Alpha Networks C2H WD TV Play User Manual WD TV Play Media Player
Alpha Networks Inc. WD TV Play WD TV Play Media Player
Contents
- 1. User Manual Part 1
- 2. User Manual Part 2
User Manual Part 1
WD TV® Play™
Media Player
User Manual
PRELIMINARY

TABLE OF CONTENTS – i
Table of Contents
1 Important User Information . . . . . . . . . . . . . . . . . . . . 1
Important Safety Instructions . . . . . . . . . . . . . . . . . . . . . . . . . . . . . . 1
WD Service and Support . . . . . . . . . . . . . . . . . . . . . . . . . . . . . . . . . 2
Recording Your WD Product Information . . . . . . . . . . . . . . . . . . . . 3
Registering Your WD Product . . . . . . . . . . . . . . . . . . . . . . . . . . . . . 3
Accessories . . . . . . . . . . . . . . . . . . . . . . . . . . . . . . . . . . . . . . . . . . 3
2 Product Overview . . . . . . . . . . . . . . . . . . . . . . . . . . . . 4
3 Features and Functions . . . . . . . . . . . . . . . . . . . . . . . 6
Features. . . . . . . . . . . . . . . . . . . . . . . . . . . . . . . . . . . . . . . . . . . . . . 6
Connections . . . . . . . . . . . . . . . . . . . . . . . . . . . . . . . . . . . . . . . . . 8
LED Indicator . . . . . . . . . . . . . . . . . . . . . . . . . . . . . . . . . . . . . . . . . . 9
Remote Control . . . . . . . . . . . . . . . . . . . . . . . . . . . . . . . . . . . . . . . 10
4 Getting Started . . . . . . . . . . . . . . . . . . . . . . . . . . . . . 11
Package Contents . . . . . . . . . . . . . . . . . . . . . . . . . . . . . . . . . . . . 11
Installation Requirements . . . . . . . . . . . . . . . . . . . . . . . . . . . . . . . 11
Operating System Compatibility . . . . . . . . . . . . . . . . . . . . . . . . . . 11
Installation Procedure. . . . . . . . . . . . . . . . . . . . . . . . . . . . . . . . . . . 12
5 Network Setup. . . . . . . . . . . . . . . . . . . . . . . . . . . . . . 21
Ethernet Network (Wired) Setup . . . . . . . . . . . . . . . . . . . . . . . . . . . 21
Wireless Network Setup. . . . . . . . . . . . . . . . . . . . . . . . . . . . . . . . . 23
Checking the Network Connection. . . . . . . . . . . . . . . . . . . . . . . . . 27
6 Finding Your Content . . . . . . . . . . . . . . . . . . . . . . . . 28
Accessing Media Content . . . . . . . . . . . . . . . . . . . . . . . . . . . . . . . 28
Transferring Files . . . . . . . . . . . . . . . . . . . . . . . . . . . . . . . . . . . . . . 33
Share a Folder on Your Computer . . . . . . . . . . . . . . . . . . . . . . . . . 37
Using the Web UI. . . . . . . . . . . . . . . . . . . . . . . . . . . . . . . . . . . . . . 45
7 Operating the Media Player . . . . . . . . . . . . . . . . . . . 49
Using the Remote Control . . . . . . . . . . . . . . . . . . . . . . . . . . . . . . . 49
Using a USB Keyboard . . . . . . . . . . . . . . . . . . . . . . . . . . . . . . . . . 50

TABLE OF CONTENTS – ii
Using the Media Player Menu. . . . . . . . . . . . . . . . . . . . . . . . . . . . . 51
Media Library Compilation . . . . . . . . . . . . . . . . . . . . . . . . . . . . . . . 55
Locating Your Contents on the Drive . . . . . . . . . . . . . . . . . . . . . . . 57
8 Watching Video . . . . . . . . . . . . . . . . . . . . . . . . . . . . . 62
Video Playback . . . . . . . . . . . . . . . . . . . . . . . . . . . . . . . . . . . . . . . 62
Videos Menu Options. . . . . . . . . . . . . . . . . . . . . . . . . . . . . . . . . . . 64
Video Playback Controls . . . . . . . . . . . . . . . . . . . . . . . . . . . . . . . . 68
Video Playback Options . . . . . . . . . . . . . . . . . . . . . . . . . . . . . . . . . 69
DVD Navigation . . . . . . . . . . . . . . . . . . . . . . . . . . . . . . . . . . . . . . . 73
9 Playing Music . . . . . . . . . . . . . . . . . . . . . . . . . . . . . . 75
Music Playback . . . . . . . . . . . . . . . . . . . . . . . . . . . . . . . . . . . . . . . 75
Music Menu Options . . . . . . . . . . . . . . . . . . . . . . . . . . . . . . . . . . . 77
Music Playback Controls . . . . . . . . . . . . . . . . . . . . . . . . . . . . . . . . 79
Music Playback Options. . . . . . . . . . . . . . . . . . . . . . . . . . . . . . . . . 80
Playing Music From Your iPod® . . . . . . . . . . . . . . . . . . . . . . . . . . 81
10 Viewing Photos . . . . . . . . . . . . . . . . . . . . . . . . . . . . . 83
Photo Display. . . . . . . . . . . . . . . . . . . . . . . . . . . . . . . . . . . . . . . . . 83
Digital Camera Support . . . . . . . . . . . . . . . . . . . . . . . . . . . . . . . . . 85
Photos Menu Options . . . . . . . . . . . . . . . . . . . . . . . . . . . . . . . . . . 86
Photo Display Options . . . . . . . . . . . . . . . . . . . . . . . . . . . . . . . . . . 88
Displaying Photo Thumbnails . . . . . . . . . . . . . . . . . . . . . . . . . . . . . 89
Displaying Photo Information . . . . . . . . . . . . . . . . . . . . . . . . . . . . . 90
Photo Slideshow . . . . . . . . . . . . . . . . . . . . . . . . . . . . . . . . . . . . . . 90
11 Files . . . . . . . . . . . . . . . . . . . . . . . . . . . . . . . . . . . . . . 92
Files Display . . . . . . . . . . . . . . . . . . . . . . . . . . . . . . . . . . . . . . . . . . 92
Files Options . . . . . . . . . . . . . . . . . . . . . . . . . . . . . . . . . . . . . . . . . 93
12 Internet Services . . . . . . . . . . . . . . . . . . . . . . . . . . . . 94
Adding a Service to Favorites. . . . . . . . . . . . . . . . . . . . . . . . . . . . . 97
AccuWeather.com . . . . . . . . . . . . . . . . . . . . . . . . . . . . . . . . . . . . 98
BBC iPlayer (UK only). . . . . . . . . . . . . . . . . . . . . . . . . . . . . . . . . . 101
CinemaNow . . . . . . . . . . . . . . . . . . . . . . . . . . . . . . . . . . . . . . . . 102
Comedy Time . . . . . . . . . . . . . . . . . . . . . . . . . . . . . . . . . . . . . . . 103
Dailymotion . . . . . . . . . . . . . . . . . . . . . . . . . . . . . . . . . . . . . . . . . 103
Deezer . . . . . . . . . . . . . . . . . . . . . . . . . . . . . . . . . . . . . . . . . . . . 104
Facebook. . . . . . . . . . . . . . . . . . . . . . . . . . . . . . . . . . . . . . . . . . . 109

TABLE OF CONTENTS – iii
Flickr . . . . . . . . . . . . . . . . . . . . . . . . . . . . . . . . . . . . . . . . . . . . . . 114
Flingo. . . . . . . . . . . . . . . . . . . . . . . . . . . . . . . . . . . . . . . . . . . . . . 121
Flixster . . . . . . . . . . . . . . . . . . . . . . . . . . . . . . . . . . . . . . . . . . . . 122
Hulu Plus (US only). . . . . . . . . . . . . . . . . . . . . . . . . . . . . . . . . . . . 123
Live365 . . . . . . . . . . . . . . . . . . . . . . . . . . . . . . . . . . . . . . . . . . . . 124
MLB.TV . . . . . . . . . . . . . . . . . . . . . . . . . . . . . . . . . . . . . . . . . . . . 131
Netflix . . . . . . . . . . . . . . . . . . . . . . . . . . . . . . . . . . . . . . . . . . . . . 135
Pandora (US only) . . . . . . . . . . . . . . . . . . . . . . . . . . . . . . . . . . . . 136
Picasa . . . . . . . . . . . . . . . . . . . . . . . . . . . . . . . . . . . . . . . . . . . . . 142
SEC Digital Network. . . . . . . . . . . . . . . . . . . . . . . . . . . . . . . . . . . 148
SHOUTcast Radio . . . . . . . . . . . . . . . . . . . . . . . . . . . . . . . . . . . 149
SnagFilms® . . . . . . . . . . . . . . . . . . . . . . . . . . . . . . . . . . . . . . . . 153
Spotify . . . . . . . . . . . . . . . . . . . . . . . . . . . . . . . . . . . . . . . . . . . . 154
TuneIn . . . . . . . . . . . . . . . . . . . . . . . . . . . . . . . . . . . . . . . . . . . . 160
Vimeo® . . . . . . . . . . . . . . . . . . . . . . . . . . . . . . . . . . . . . . . . . . . . 164
Vudu™ . . . . . . . . . . . . . . . . . . . . . . . . . . . . . . . . . . . . . . . . . . . . 165
WatchMojo . . . . . . . . . . . . . . . . . . . . . . . . . . . . . . . . . . . . . . . . . 166
XOS College Sports . . . . . . . . . . . . . . . . . . . . . . . . . . . . . . . . . . . 166
Yota Music. . . . . . . . . . . . . . . . . . . . . . . . . . . . . . . . . . . . . . . . . . 166
YouTube . . . . . . . . . . . . . . . . . . . . . . . . . . . . . . . . . . . . . . . . . . . 167
YouTube Leanback . . . . . . . . . . . . . . . . . . . . . . . . . . . . . . . . . . . 176
13 Games . . . . . . . . . . . . . . . . . . . . . . . . . . . . . . . . . . . 177
Games Display. . . . . . . . . . . . . . . . . . . . . . . . . . . . . . . . . . . . . . . 177
14 RSS . . . . . . . . . . . . . . . . . . . . . . . . . . . . . . . . . . . . . . 178
Reading RSS Feeds. . . . . . . . . . . . . . . . . . . . . . . . . . . . . . . . . . . 178
Adding RSS Feeds. . . . . . . . . . . . . . . . . . . . . . . . . . . . . . . . . . . . 178
15 Setup and Advanced Features. . . . . . . . . . . . . . . . 179
Setup Navigation Buttons . . . . . . . . . . . . . . . . . . . . . . . . . . . . . . 180
Audio/Video Output . . . . . . . . . . . . . . . . . . . . . . . . . . . . . . . . . . . 180
Appearance . . . . . . . . . . . . . . . . . . . . . . . . . . . . . . . . . . . . . . . . . 185
Video Settings . . . . . . . . . . . . . . . . . . . . . . . . . . . . . . . . . . . . . . . 188
Music Settings . . . . . . . . . . . . . . . . . . . . . . . . . . . . . . . . . . . . . . . 191
Photo Settings . . . . . . . . . . . . . . . . . . . . . . . . . . . . . . . . . . . . . . 192
Network Settings . . . . . . . . . . . . . . . . . . . . . . . . . . . . . . . . . . . . . 194
Operation. . . . . . . . . . . . . . . . . . . . . . . . . . . . . . . . . . . . . . . . . . . 199
System . . . . . . . . . . . . . . . . . . . . . . . . . . . . . . . . . . . . . . . . . . . . 201
About . . . . . . . . . . . . . . . . . . . . . . . . . . . . . . . . . . . . . . . . . . . . . 206

TABLE OF CONTENTS – iv
Media Library . . . . . . . . . . . . . . . . . . . . . . . . . . . . . . . . . . . . . . . 207
16 System Maintenance . . . . . . . . . . . . . . . . . . . . . . . 209
System Firmware Upgrade. . . . . . . . . . . . . . . . . . . . . . . . . . . . . . 209
Troubleshooting . . . . . . . . . . . . . . . . . . . . . . . . . . . . . . . . . . . . . 211
Common Error Messages . . . . . . . . . . . . . . . . . . . . . . . . . . . . . . 214
FAQs . . . . . . . . . . . . . . . . . . . . . . . . . . . . . . . . . . . . . . . . . . . . . . 215
17 Appendix . . . . . . . . . . . . . . . . . . . . . . . . . . . . . . . . . 216
Multiformat Content Playback . . . . . . . . . . . . . . . . . . . . . . . . . . . 216
Supported Formats . . . . . . . . . . . . . . . . . . . . . . . . . . . . . . . . . . . 217
Regulatory Compliance . . . . . . . . . . . . . . . . . . . . . . . . . . . . . . . . 222
Warranty Information (All Regions Except Australia/New Zealand) 226
Warranty Information (Australia/New Zealand only). . . . . . . . . . . . 226
GNU General Public License (“GPL”) . . . . . . . . . . . . . . . . . . . . . . 228
Spotify Third-Party Licenses. . . . . . . . . . . . . . . . . . . . . . . . . . . . . 229

WD TV Play Media Player
User Manual
IMPORTANT USER INFORMATION – 1
PRELIMINARY-P3
Important User Information
Important Safety Instructions
This device is designed and manufactured to assure personal safety. Improper use
can result in electric shock or fire hazard. The safeguards incorporated into this unit
will protect you if you observe the following procedures for installation, use, and
servicing.
Read these instructions.
Keep these instructions.
Heed all warnings.
Follow all instructions.
Do not use this apparatus near water.
Clean only with dry cloth.
Do not block any ventilation openings. Install in accordance with the
manufacturer’s instructions.
Do not install near any heat sources such as radiators, heat registers, stoves, or
other apparatus (including amplifiers) that produce heat.
Do not defeat the safety purpose of the polarized or grounding-type plug. A
polarized plug has two blades with one wider than the other. A grounding type
plug has two blades and a third grounding prong. The wide blade or the third
prong are provided for your safety. If the provided plug does not fit into your
outlet, consult an electrician for replacement of the obsolete outlet.
Protect the power cord from being walked on or pinched particularly at plugs,
convenience receptacles, and the point where they exit from the apparatus.
Only use attachments/accessories specified by the manufacturer.
Unplug this apparatus during lightning storms or when unused for long periods
of time.
Refer all servicing to qualified service personnel. Servicing is required when the
apparatus has been damaged in any way, such as power-supply cord or plug is
damaged, liquid has been spilled or objects have fallen into the apparatus, the
apparatus has been exposed to rain or moisture, does not operate normally, or
has been dropped.
Carefully read and follow the Quick Install Guide and User Manual.
Do not operate this device outside the temperature range of 5°C–35°C
(41°F–95°F).
Do not drop or shake the device.
Do not move the device when it is powered on.
Power supply cords should be routed so that they are not likely to be walked on
or pinched by items placed upon them or against them.
Do not overload wall outlets.
For additional safety information, refer to www.wdc.com.
1

WD TV Play Media Player
User Manual
IMPORTANT USER INFORMATION – 2
PRELIMINARY-P3
WD Service and Support
Should you encounter any problem, please give us an opportunity to address it
before returning this product. Most technical support questions can be answered
through our knowledge base or e-mail support service at http://support.wdc.com. If
the answer is not available or, if you prefer, please contact WD at the best telephone
number shown below.
Your product includes 30 days of free telephone support during the warranty period.
This 30-day period starts on the date of your first telephone contact with WD
technical support. E-mail support is free for the entire warranty period and our
extensive knowledge base is available 24/7. To help us keep you informed of new
features and services, remember to register your product online at
http://register.wdc.com.
Accessing Online Support
Visit our product support website at http://support.wdc.com and choose from these
topics:
Downloads - Download drivers, software, and updates for your WD product.
Registration - Register your WD product to get the latest updates and special
offers.
Warranty & RMA Services - Get Warranty, Product Replacement (RMA), RMA
Status, and Data Recovery Information.
Knowledge Base - Search by keyword, phrase, or answer ID.
Installation - Get online installation help for your WD product or software.
WD Community – Share your thoughts and connect with other WD users.
Contacting WD Technical Support
When contacting WD for support, have your WD product serial number, system
hardware, and system software versions available.
North America
Europe (toll free)*
00800 ASK4 WDEU
English 800.ASK.4WDC
(00800 27549338)
(800.275.4932)
Spanish 800.832.4778 Europe
+31 880062100
Middle East
+31 880062100
Mexico
001 8002754932 Africa
+31 880062100
South America
Asia Pacific
Chile 1230 020 5871 Australia 1 800 42 9861
Venezuela 0800 100 2855 China 800 820 6682/+65 62430496
Peru 0800-54003 Hong Kong +800 6008 6008
Uruguay 000 413 598 3787 India 1 800 200 5789
Argentina 0800 4440839 Indonesia +803 852 9439
Brazil 0800 7704932 Japan 0120 994 120 / 00531 65 0442
Korea 02 703 6550
Malaysia +800 6008 6008/1 800 88 1908/
+65 62430496
Philippines 1 800 1441 0159
Singapore +800 6008 6008/+800 608 6008/
+65 62430496
Taiwan +800 6008 6008/+65 62430496
* Toll free number available in the following countries: Austria, Belgium, Denmark, France, Germany, Ireland, Italy,
Netherlands, Norway, Spain, Sweden, Switzerland, United Kingdom.

WD TV Play Media Player
User Manual
IMPORTANT USER INFORMATION – 3
PRELIMINARY-P3
Recording Your WD Product Information
In the following table, write the serial and model numbers of your new WD product.
You can find this information on the label on the bottom of the device. You should
also note the date of purchase. This information may be required when requesting
technical support.
Registering Your WD Product
Your WD product includes 30 days of free technical support during the applicable
warranty period for your product. The 30-day period commences on the date of
your first telephone contact with WD technical support. Register your WD product
online at http://register.wdc.com.
If your media player has an active network connnection, you can register directly
from the device using the supplied remote control (see “Using the Remote Control”
on page 49) or a USB keyboard (see “Using a USB Keyboard” on page 50). Go to
“Device Registration” on page 204 for instructions.
Accessories
For information on optional accessories for this product, visit:
Serial Number:
Model Number:
Purchase Date:
System and Software Notes:
US www.shopwd.com or www.wdstore.com
Canada www.shopwd.ca or www.wdstore.ca
Europe www.shopwd.eu or www.wdstore.eu
All others Contact WD Technical Support in your region. For a list of Technical Support
contacts, visit http://support.wdc.com and see Knowledge Base Answer
ID 1048.

WD TV Play Media Player
User Manual
PRODUCT OVERVIEW – 4
PRELIMINARY-P3
Product Overview
Thank you for purchasing a WD TV Play media player. This user manual provides
step-by-step instructions for installing and using your new media player. For the
latest WD product information and news, visit our website at
www.westerndigital.com.
The best of the Internet on your HDTV – Stream hit movies, catch up on TV
shows, watch the latest videos, and stay connected to your social network. Don’t
settle for online entertainment on your small computer screen. With the WD TV Play
media player, you can enjoy it all on your HDTV. See “Internet Services” on page 94
for more details.
Your media collection belongs on the big screen – Enjoy your media library,
home videos, vacation slideshows, and favorite songs on your HDTV and sound
system in your living room. Sit back and enjoy the spectacular picture quality of Full-
HD 1080p.
Play virtually any media file format – The WD TV Play media player supports a
wide variety of the most popular files including MKV, MP4, XVID, AVI, WMV, and
MOV video formats. Get the freedom to enjoy your media now, in virtually any file
format.
Ready, set up, stream – So easy to set up, you’ll be up and running in minutes.
The WD TV Play connects to your high-speed Internet connection wirelessly, no PC
required. Or use the Ethernet port to connect to your wired home network.
High-performance, streaming-ready WiFi – Includes the latest wireless
technology—extended-range Wireless-N—giving you the speed you need to stream
HD.
Play media from any source – Stream videos, music, and photos from your USB
drive, network drive, and any PC or Mac computer in your home. Our media library
collects the content from all the drives, so finding the perfect video, song, or photo
to view is easier than ever.
Show photos and movies directly from your digital camera or camcorder –
Connect your camcorder or digital camera directly to the media player and instantly
view or archive HD video and photos without a PC. Works with any digital imaging
device that supports Picture Transfer Protocol.
Bring the arcade to your HDTV – Swap gems with Rockswap, try your luck with
Texas Hold’Em, or test your math skills with Sudoku. WD TV brings casual games to
your big screen TV.
Stay updated with RSS feeds – Stay posted on your favorite bloggers and
websites and stream the latest audio and video with timely RSS feeds. You can also
add specific feeds to your dashboard to be shown as tickers so you never miss a
thing.
2

WD TV Play Media Player
User Manual
PRODUCT OVERVIEW – 5
PRELIMINARY-P3
Programmable remote – Use the included programmable remote control to make
your entertainment choices using our crisp, animated navigation menus. Customize
buttons for quick and easy access to your favorite music, photos, videos or menu
choices.
Your entertainment at your fingertips – Control your WD TV experience with the
tap of a soft key or the swipe of a finger using the WD Remote™ app. Get one-touch
access to your favorite online services, easy text input and a gesture pad for faster
navigation to your favorite content. Download this free app from the Apple® App
Store or the Android™ Market.
Use your keyboard for easy searching and updating – Use the on-screen
keyboard or attach your wired or wireless USB keyboard for easy text input. Perfect
for searching videos on YouTube or updating your status on Facebook.
Advanced navigation options
Thumbnail, list, and preview modes – Browse your content by file name or by
thumbnails of photos, album covers, video preview, and movie cover art.
Media library – This unique feature lets you view all your media by media type in
one menu regardless of its location in folders or drives. You can view your
content by categories such as genre, album, artist and date.
Search – Search by genre, title, artist, filename and partial filename.
Photo viewing
View photos as a slideshow with a variety of transitions and background music
Zoom and pan
Search by filename, partial filename, most recently viewed and date
Movie viewing
Fast forward, reverse, pause, zoom, and pan
View subtitles
Search by filename, partial filename, most recently viewed and date
Music playback
Fast forward, reverse, pause, shuffle, repeat
Search by filename, partial filename, most recently viewed and date.
File Management
Copy files between USB drives and transfer files between a USB drive connected
to the media player and your computer.
HDMI and composite video output – The HDMI port lets you connect to the
highest quality HDTV or home theater. Additional composite (RCA) outputs ensure
compatibility with virtually all television sets.
S/PDIF digital output – The optical audio output sends digital signals to your AV
receiver for the best surround sound experience.
Ultra-compact design – Cool and quiet, this compact system integrates perfectly
into your entertainment center.

WD TV Play Media Player
User Manual
FEATURES AND FUNCTIONS – 6
PRELIMINARY-P3
Features and Functions
Features
The animated interface makes it easy to navigate and enjoy your media and the best
of the Internet. Make it personal and have fun.
Menus
Organized, categorized and ready to play – The WD TV Play media player finds
and categorizes all the music photos and movies on any connected USB devices
and network shares and displays them in one easy-to-view menu system.
Choose from a variety of viewing options – Select thumbnail view, list view and
even see a preview of your movies in your movie menu. You can add metadata to
your media for better identification and sort and filter the content to easily find what
you’re looking for.
Customize your media experience – Select a background from beautiful, high
resolution images provided by WD’s Creative Masters or choose one of your own
photos.
Dash to your favorites – Tag your favorites for instant playback and use the handy
dashboard to quickly access your favorite personal content and Internet services.
View your recent activity. Organize your movies, music, and photos in a queue and
play them in sequential order.
Play photo slideshows with the music you choose – View special moments
with the right music to set the mood for your next party. Select transitions and
slideshow speed.
Playing video – DVD-like navigation lets you view all the content included with your
movies, including complete menu navigation, chapter listings, special features, and
subtitles. Select and jump to a specific time-spot in a video. Browse your video
collection with its clip art in the background.
Playing music – Browse by artist, genre, and album title. Or search for your favorite
titles. Create a queue and you’ve got a virtual DJ for your party. Preset your favorite
song to a numeric key and play it with one click.
Family-ready – Share your family photos, videos, music, and files on your home
network and stream to any screen in the house.
Automatic play – Select your favorite song, movie, or photo slideshow to
automatically play when the device is turned on. Perfect for living art on your HDTV
or for digital signage.
Play your media from your computer – This media player is Windows® 7
compatible, so you can use the “Play To” feature to easily stream your Windows 7
computer’s files to your TV through your media player.*
*For more information on Play To, go to:
http://windows.microsoft.com.
3

WD TV Play Media Player
User Manual
FEATURES AND FUNCTIONS – 7
PRELIMINARY-P3
Audio/Video Interface
HDMI interface for digital audio and high-definition video.
Composite video interface (mini-jack) for analog AV connection.
S/PDIF (optical) audio for high-fidelity digital audio.
Auto source function enables the HD media player to detect and switch to a new
interface connection. For example, the media player automatically switches to
HD mode when it is connected through an HDMI cable.
Video output resolution includes 480i, 576i, 480p, 576p, 720i, 720p, 1080i,
1080p.
Stereo or multi-channel digital surround audio output (digital surround sound is
only available when using the HDMI or S/PDIF interfaces).
Wired or wireless Internet connection for access to online media content.
Plug-and-Play USB 2.0 Support*
USB storage device with a USB connector
Portable media players with USB connector
Digital cameras/camcorders with USB connector
*For a list of tested, compatible USB devices, see Article #5688 in our knowledge base at
http://support.wdc.com.
USB Storage File System Support
NTFS
FAT/FAT32
HFS+
WD TV Play Media Player
User Manual
FEATURES AND FUNCTIONS – 8
PRELIMINARY-P3
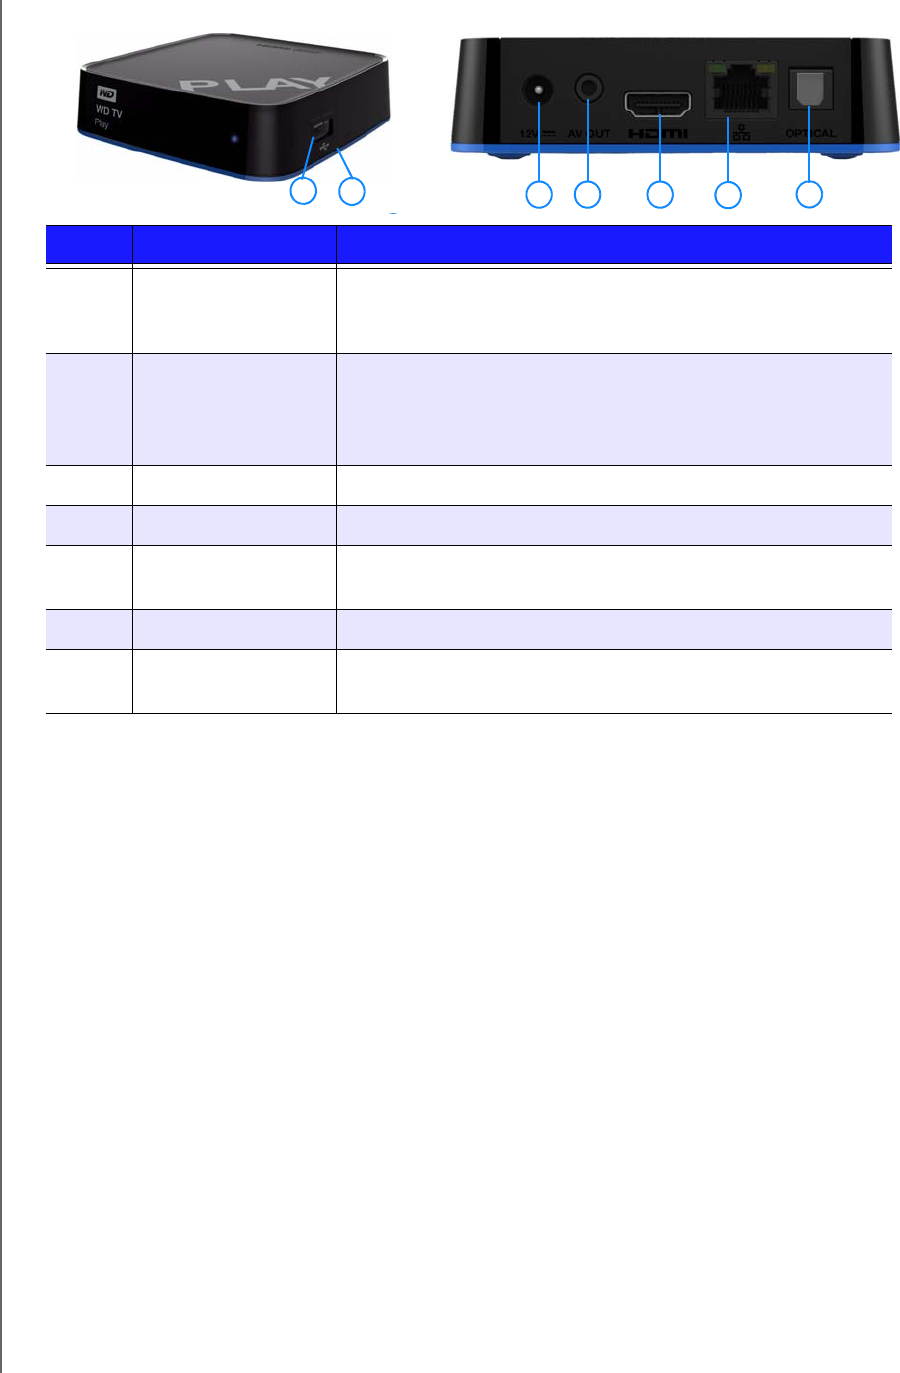
Connections
Item Component Description
1 USB port Supports connection of compatible removable storage
devices, portable media players, and digital cameras with
USB connectors.
2Reset button
(bottom of device)
Press for one second to reset to factory defaults (see “Device
Reset” on page 205). Press and hold 10 seconds to toggle
between NTSC and PAL. Use a fine-tipped stylus or the
unfolded end of a paperclip to press the reset switch.
3 Power jack Connects the power cable.
4Composite jack Connect to your TV’s analog video and audio jacks.
5 HDMI port Connects to your TV’s HDMI port (HDMI cable sold
separately).
6Ethernet port Supports LAN connection for wired Internet access.
7 S/PDIF (optical)
audio port
Connects to your AV receiver (S/PDIF cable sold separately).
1 2 3 4 5 67

WD TV Play Media Player
User Manual
FEATURES AND FUNCTIONS – 9
PRELIMINARY-P3
LED Indicator
Item Component Description
1 Infrared
receiver
• Receives signals from the remote control. Point the tip of the
remote control to the infrared receiver and ensure that the path
between the two is unobstructed.
2LED • On—The power cable is connected and the power is on.
• Off—The media player is in standby mode, turned off, or the
power cable is disconnected.
• Steady flashing— A USB device has been discovered and the
unit is being mounted in the system. If the Media Library is set
to On in the Setup options (see “Media Library Compilation” on
page 55), the LED flashes at the same steady constant rate.
• Three short flashes followed by three long flashed followed by
three short flashes—A system diagnostic failure has occurred.
See “Troubleshooting” on page 211.
12
WD TV Play Media Player
User Manual
FEATURES AND FUNCTIONS – 10
PRELIMINARY-P3
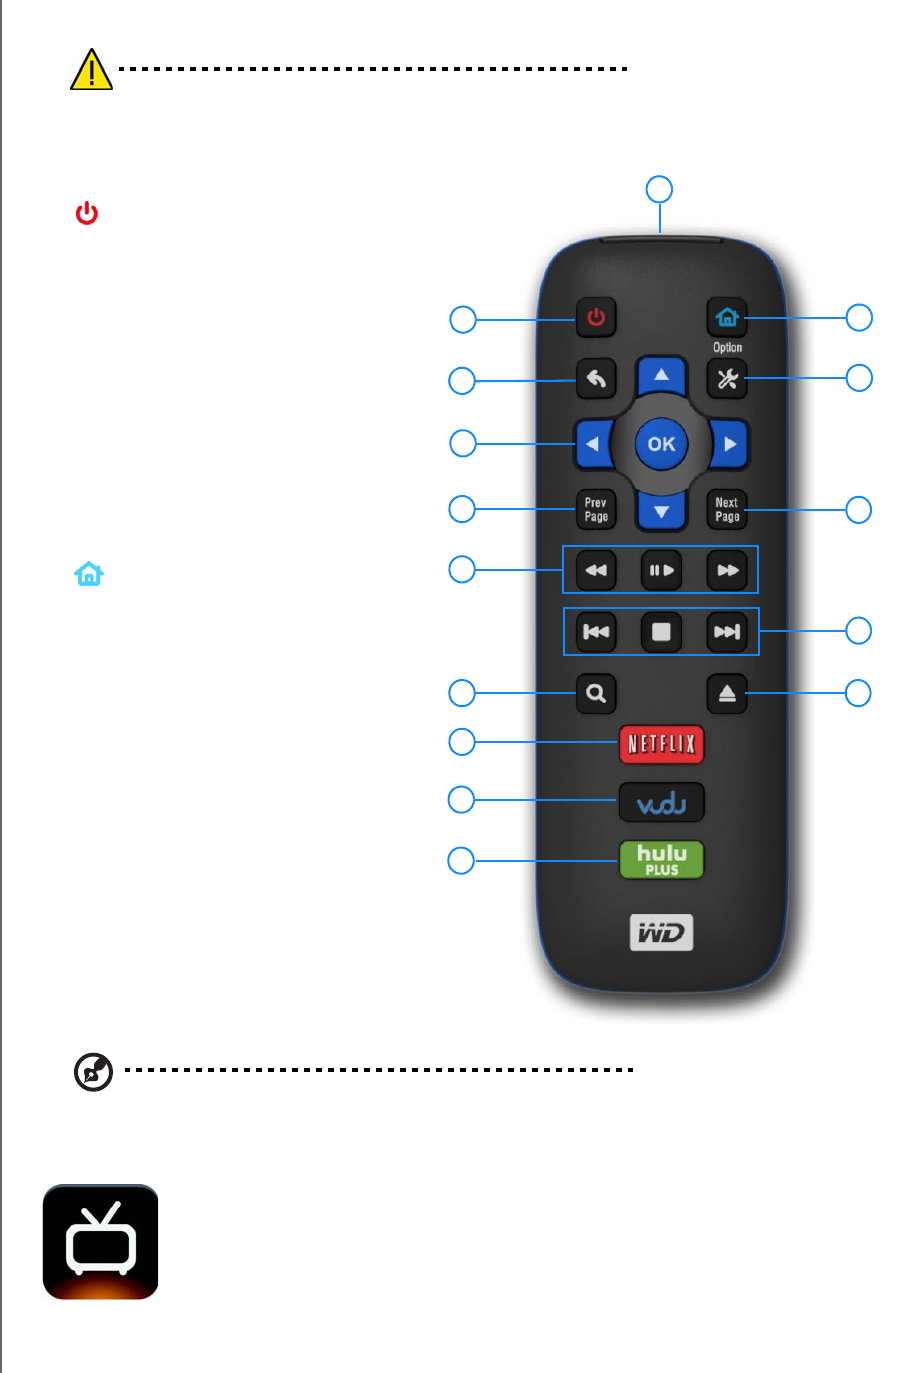
Remote Control
CAUTION: Do not expose the batteries or the remote control with batteries
installed to excessive heat (direct sunlight, fire, etc.).
1. Infrared transmitter
2. POWER
3. Back (last screen)
4. Navigation buttons, OK
5. Previous Page
6. REV, PAUSE/PLAY, FF
7. SEARCH
8. NETFLIX (starts app)
9. VUDU (starts app) or
A (shortcut/function key)
10.HULU PLUS (starts app) or
B (shortcut/function key)
11. HOME
12.Options
13.Next Page
14.PREV (track), STOP, NEXT (track)
15.EJECT (safe removal of attached
storage)
Note: For additional information, see “Using the Remote Control” on page 49.
WD TV Remote
Control your WD TV experience with the tap of a soft key or the swipe
of a finger using the WD TV Remote app. Get one-touch access to
your favorite online services, easy text input and a gesture pad for
faster navigation to your favorite content. Download this free app from
the Apple app store or get the Android app on Google Play.
1
2
3
4
5
6
7
8
9
11
12
13
14
15
10
WD TV Play Media Player
User Manual
GETTING STARTED – 11
PRELIMINARY-P3
Getting Started
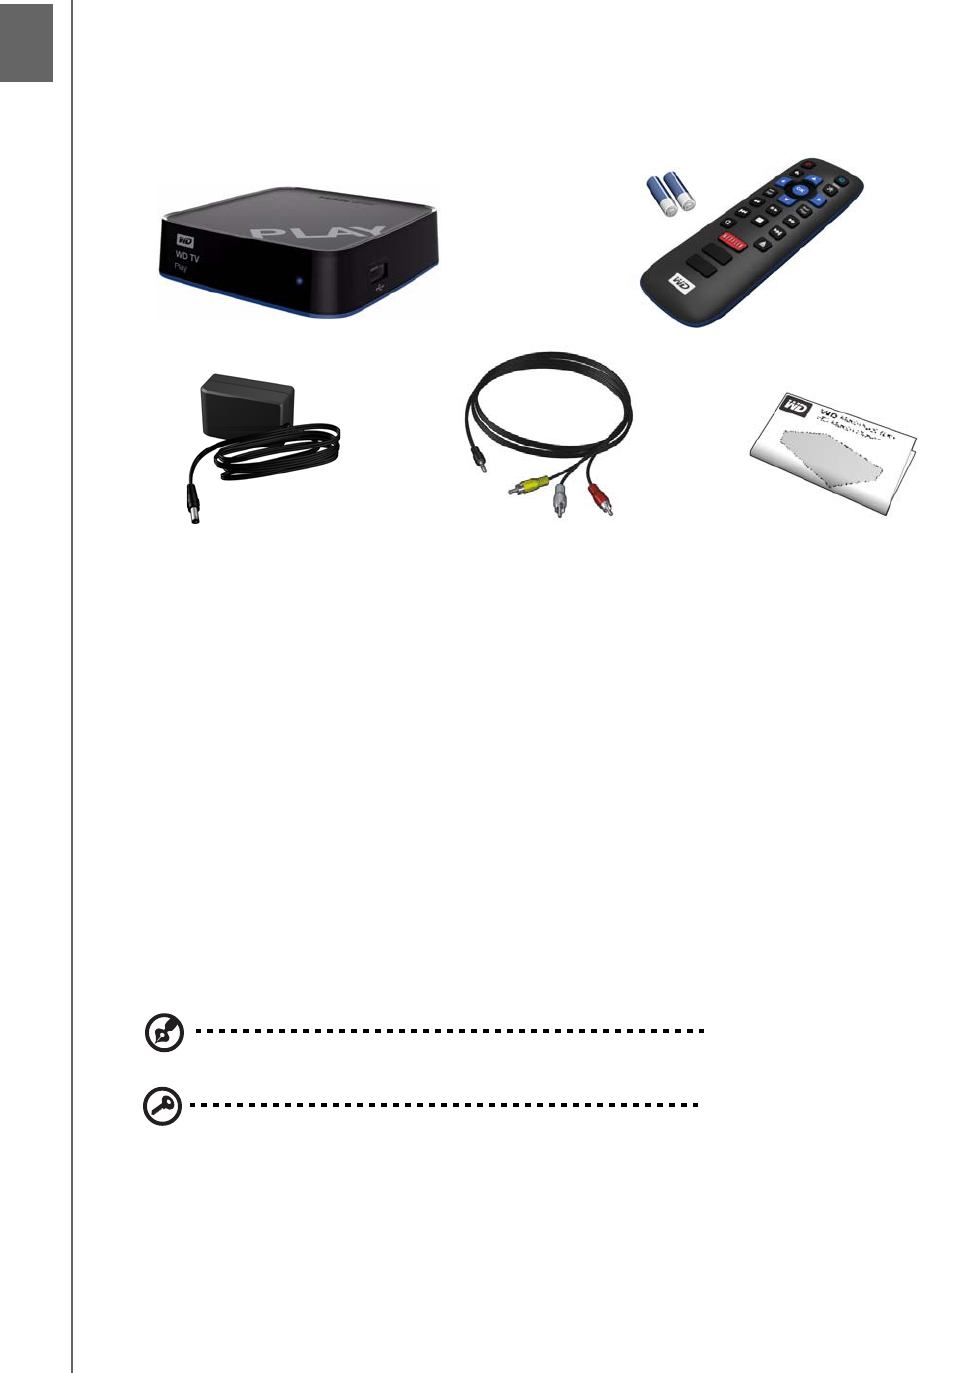
Package Contents
Installation Requirements
Standard or HDTV with a composite (standard A/V) or HDMI input
An available network connection for online content and services
Optional: TV, stereo, or AV receiver with an optical digital (S/PDIF) or stereo audio
input jack (audio playback only)
Operating System Compatibility
The media player is compatible with the following operating systems:
Note: Compatibility may vary depending on user’s hardware configuration and operating system.
Important: For highest performance and reliability, it is recommended that
you install the latest updates and service pack (SP). For Windows, go to the
Start menu and select Windows Update. For Mac, go to the Apple menu
and select Software Update.
Windows®Mac® OS X®
Windows XP
Windows Vista®
Windows 7
Leopard®
Snow Leopard®
4
WD TV Play media player Remote control and
Two AAA batteries
AC power adapter Quick Install Guide
Composite AV cable

WD TV Play Media Player
User Manual
GETTING STARTED – 12
PRELIMINARY-P3
Installation Procedure
The media player installation procedure is outlined below:
1. Connect the power cable. See “Step 1 - Connecting the Power Cable” on
page 13.
2. Connect the media player to your TV or entertainment unit. See “Step 2 -
Connecting the Media Player” on page 14. You can use HDMI (page 15), or
composite (page 16) connections.
3. Insert the batteries into the remote control.
4. Connect the USB device containing your media content (“Step 3 - Connecting a
USB Device (Optional)” on page 18) and/or establish a wired or wireless network
connection (“Step 4 - Connecting to Your Network” on page 20).
WD TV Play Media Player
User Manual
GETTING STARTED – 13
PRELIMINARY-P3
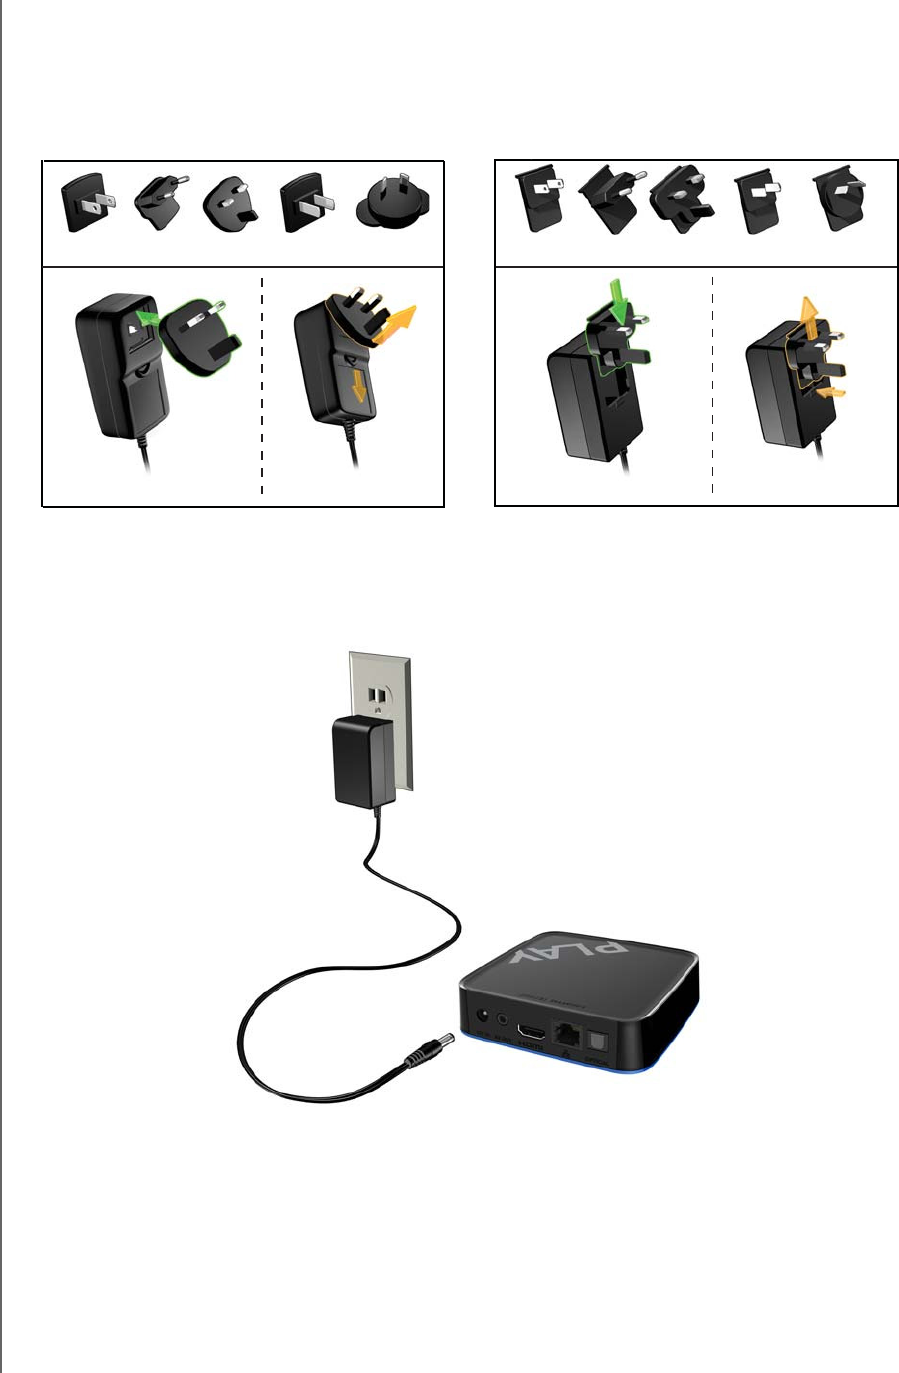
Step 1 - Connecting the Power Cable
1. If applicable, connect the power clip to the power cable plug.
The AC power adapter will vary, depending on your location. Some locations do
not require a power plug clip. Units sold in those locations will have a fixed power
plug. Refer to the illustration below.
2. Connect the power cable to the media player’s DC connector, and then plug the
opposite end into an AC power outlet. The media player powers up
automatically.
EU/KO EU/KO
US/JA/TW US/JA/TW
Installing InstallingRemoving Removing
WD TV Play Media Player
User Manual
GETTING STARTED – 14
PRELIMINARY-P3
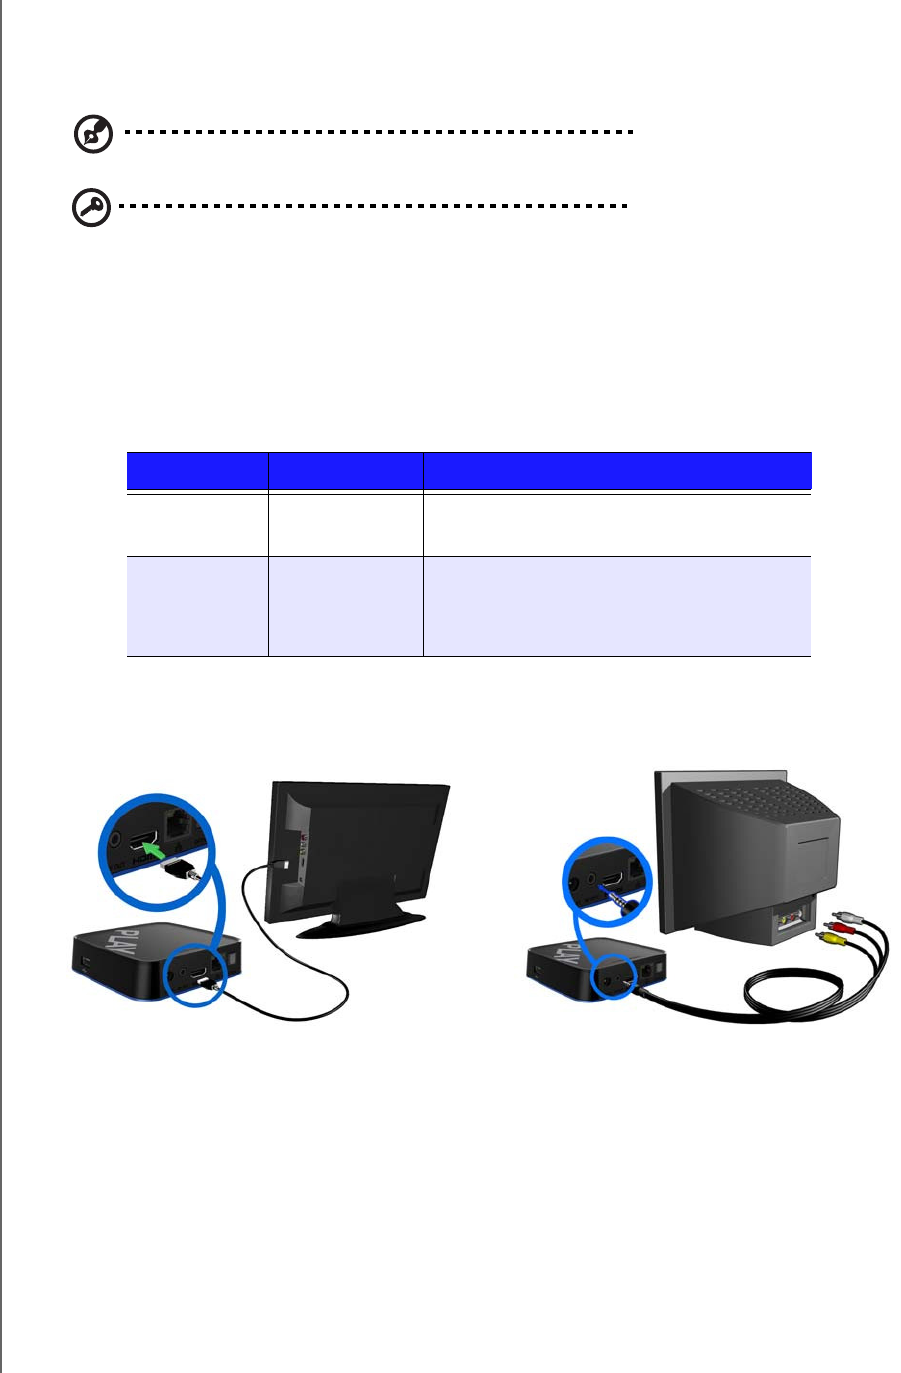
Step 2 - Connecting the Media Player
The following figures illustrate the cable connections supported by the media player.
The standard connection uses the included composite-to-mini AV cables.
Note: HDMI and S/PDIF (optical) cables are sold separately.
Important: Configure the media player’s Audio/Video settings depending on
the type of connection you choose. See “Audio/Video Output” on page 180
for more information on these settings.
Choosing the Best Connection
The quality of the picture produced by your TV depends on the quality of your TV
and its connection to the media player.
Connection Quality Connectors
HDMI Best
(up to 1080p)
Specialized, high-definition connector
Composite Good
(480i/576i)
• Yellow = video
• Red = right audio
• White = left audio
Composite (Standard Definition)
HDMI (High Definition)
WD TV Play Media Player
User Manual
GETTING STARTED – 15
PRELIMINARY-P3
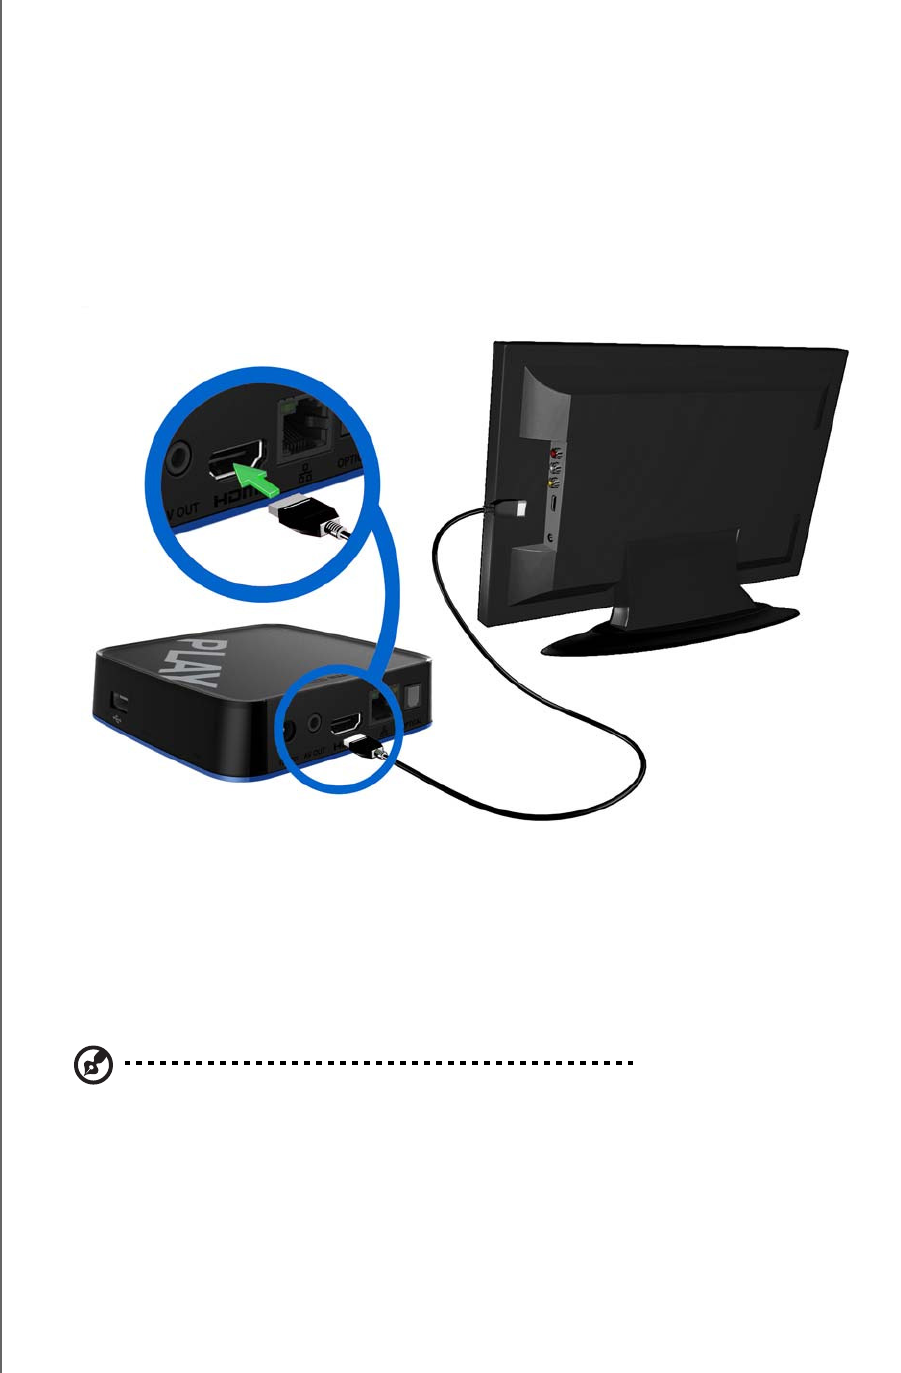
HDMI Video and Audio (High Definition)
HDMI combines high-definition video, multi-channel audio, and inter-component
control in a single digital cable. This interface provides video quality resolution of up
to 1080p.
To connect your media player using an HDMI cable:
1. Plug an HDMI cable into the HDMI connector on the media player.
2. Plug the opposite end into the HDMI port on your TV or audio/video system (if
available).
Wait a few seconds for your TV to detect the media player. If it is not detected,
you may need to change the input source on your TV to HDMI. Check the user
documentation of your TV for more information.
Once the media player is detected, the splash screen displays to indicate system
bootup, then the home screen of the user interface opens.
Note: HDMI cables are sold separately.
WD TV Play Media Player
User Manual
GETTING STARTED – 16
PRELIMINARY-P3
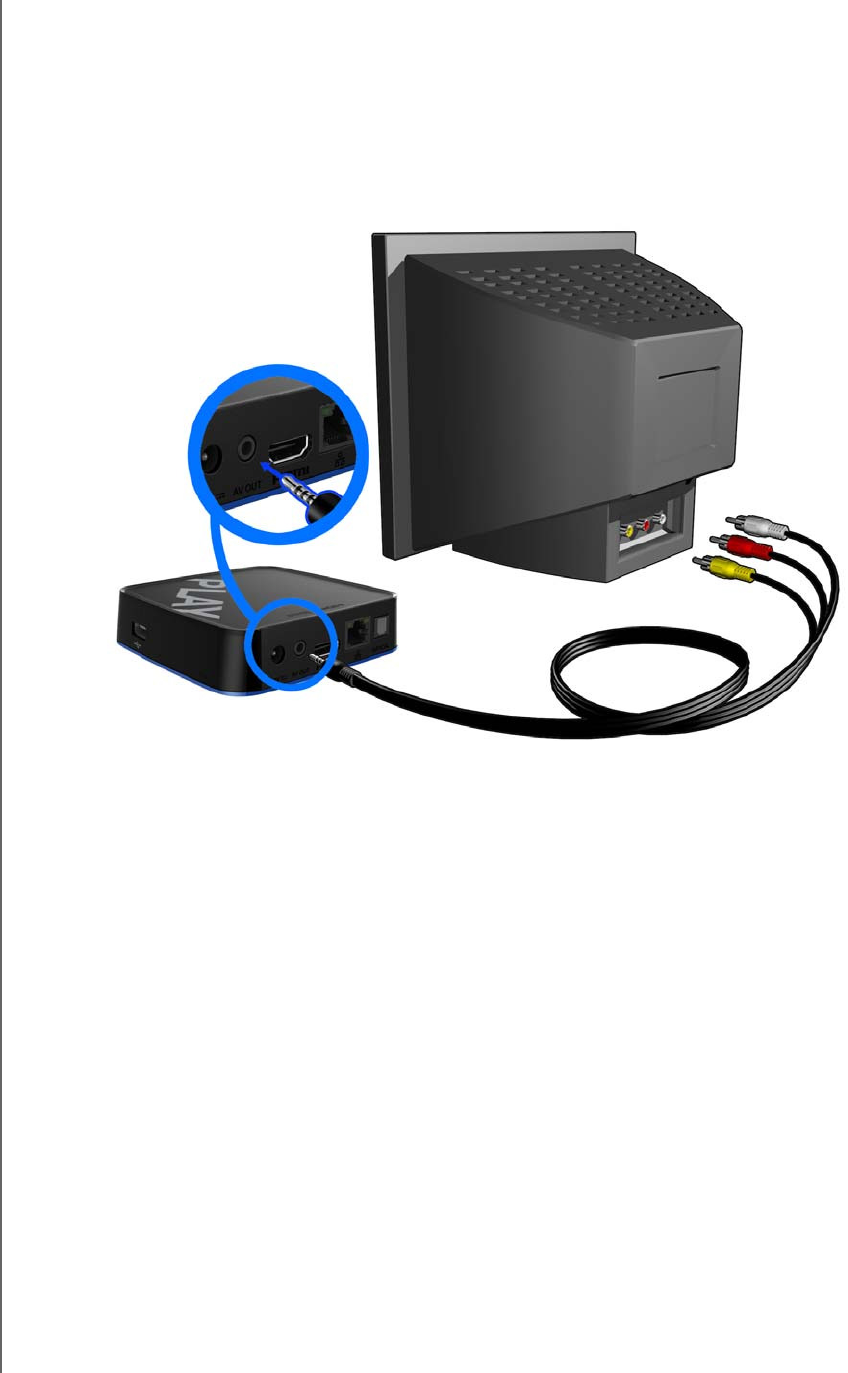
Composite AV Connection (Standard Definition)
To use a composite connection:
1. Plug the mini-connector into the composite port on the media player.
2. Plug the opposite ends into the composite input ports on your TV, yellow to
yellow, red to red, and white to white.
3. Select the appropriate TV input source.
Wait a few seconds for your TV to detect the media player. If the media player is
not detected, you may need to change the input source on your TV to
component or composite, depending on your connection. Check the user
documentation of your TV for more information.
Once the media player is detected, the splash screen displays to indicate system
bootup, then the home screen of the user interface opens.
WD TV Play Media Player
User Manual
GETTING STARTED – 17
PRELIMINARY-P3
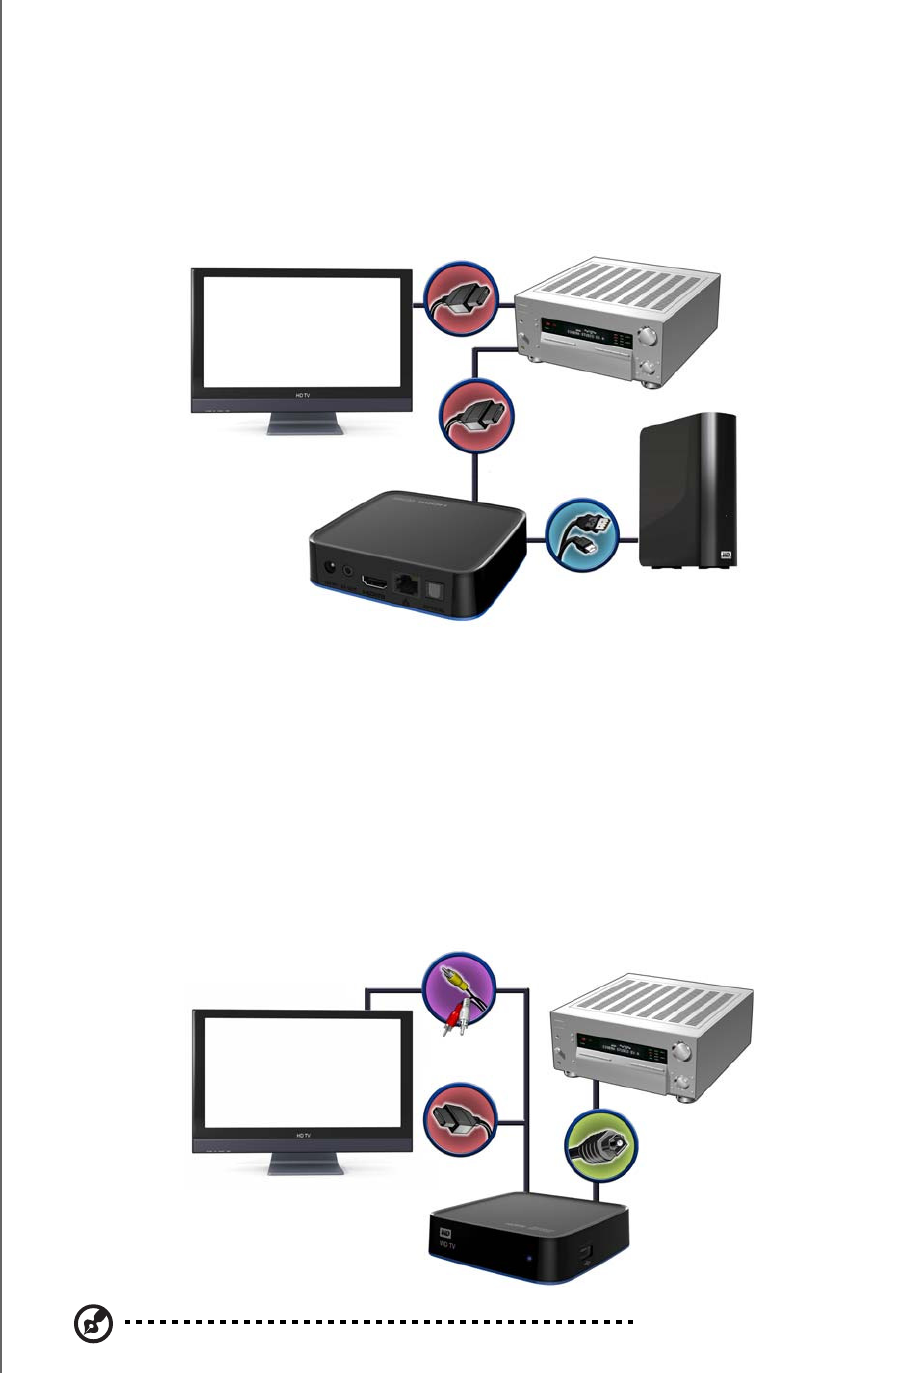
Home Theater (High Definition)
To connect a home theater system:
1. Plug an HDMI cable into the HDMI connector on the media player.
2. Plug the opposite end into the HDMI In port on your A/V receiver.
3. Plug an HDMI cable into the HDMI Out port on your A/V receiver.
4. Plug the opposite end into the HDMI port on your TV (if available).
5. Select the appropriate TV input source.
To connect a home theater system using S/PDIF:
1. Plug a S/PDIF cable into the S/PDIF connector on the media player.
2. Plug the opposite end into the S/PDIF In port on your A/V receiver.
3. Plug HDMI or composite connectors to the appropriate Out ports on the media
player.
4. Plug the opposite end(s) into the appropriate port(s) on your TV.
5. Select the appropriate TV input source.
6. Set the appropriate audio output option on the media player. See “Audio/Video
Output” on page 180.
HDMI and S/PDIF cables sold separately.
My Book® external drive
(sold separately)

WD TV Play Media Player
User Manual
GETTING STARTED – 18
PRELIMINARY-P3
Step 3 - Connecting a USB Device (Optional)
The media player has two USB ports that support playback from WD USB external
drives.*
* For a list of supported WD external drives, see article #5688 in or knowledge base at
http://support.wdc.com.
To connect the USB device:
1. Connect the USB device to the media player’s USB port.
2. Wait for a few moments while the media player scans the USB device for media
files. (Scanning is enabled by default. If you want to turn off automatic scanning,
go to “Media Library Compilation” on page 55.)
To unlock a locked WD USB device:
A USB device must be unlocked for the media player to access its contents.
1. Navigate to the Home screen, and select the menu for the media content you
wish to access. It can be Music, Videos, or Photo.
2. In the Unlock your WD Drive screen, press / to select OK, then press OK.
3. Use the navigation buttons to type in the USB drive access password in
the on-screen keyboard. Select Submit, then press OK.
If a wrong password is entered, press / to select OK, press OK, then type in
the correct password. If you enter the wrong password five consecutive times,
the USB drive is placed in a hold state. Press OK to close the error message.
Disconnect the USB drive. Power cycle and reconnect the USB drive and type in
the correct access password.
4. Once the USB drive has been unlocked, the menu bar for the selected media
type will appear. Press / to choose a filter option for displaying supported
media contents, then press OK.
Supported content for the selected media type will be displayed.
5. Use the navigation buttons to select the content you wish to access,
then press OK to start media playback.
My Book external hard
drive (sold separately)

WD TV Play Media Player
User Manual
GETTING STARTED – 19
PRELIMINARY-P3
Removing a USB Device
To prevent data loss, it is highly recommended that you first press the EJECT button
on the remote control before removing a USB device.
To remove a USB device:
1. Press the EJECT button .
2. Press / to select the USB device.
3. Press OK. With the selected, press OK again.
4. Disconnect the USB device from the media player.
WD TV Play Media Player
User Manual
GETTING STARTED – 20
PRELIMINARY-P3
Step 4 - Connecting to Your Network
The media player can be connected to your home network to access the Internet
and network storage using a wired or wireless network connection. A network
connection provides access to locally stored and online media content.
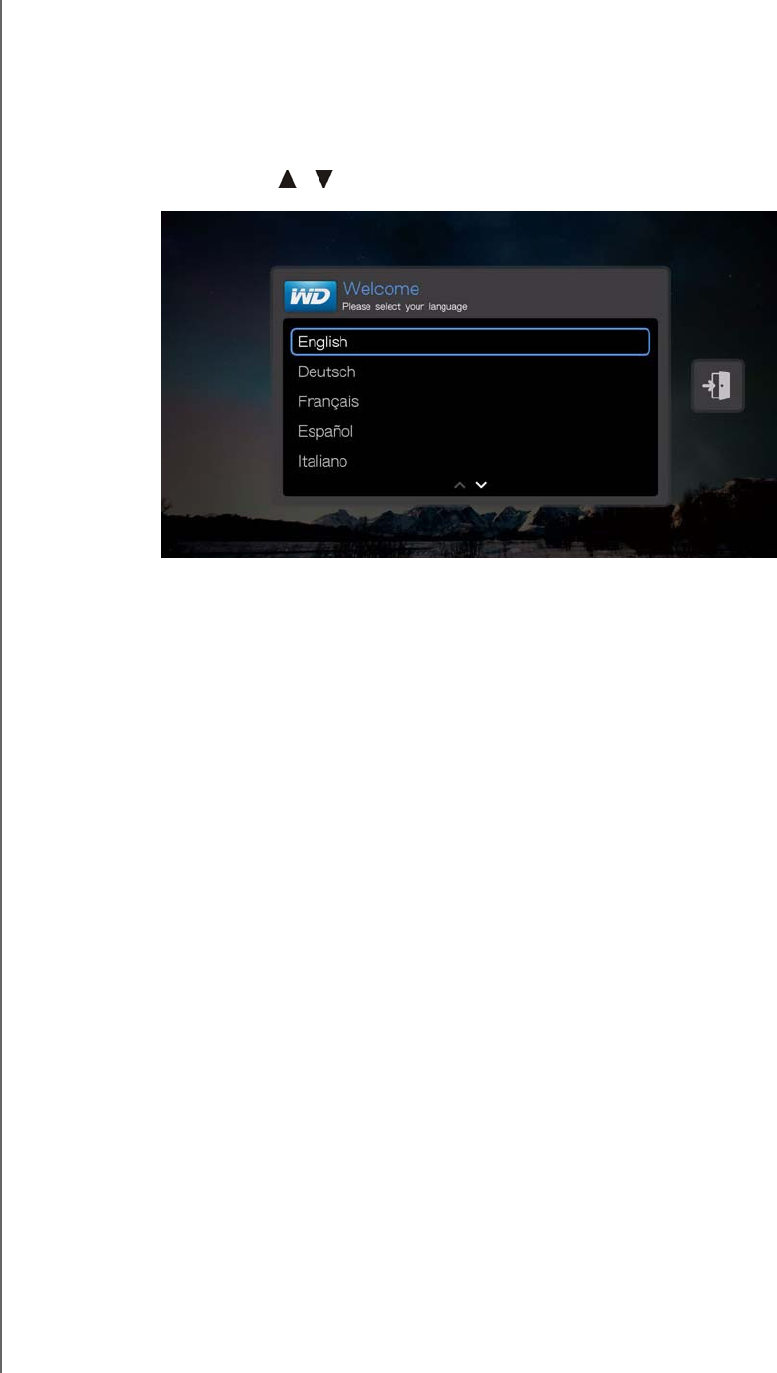
After connecting the media player to your TV and turning it on, the network setup
wizard starts up. Press / to select your language, then press OK.
For detailed instructions on wireless and wired and wireless network connections,
go to the next page (“Network Setup” on page 21).
Accessing Media Content from the Network
See “Finding Your Content” on page 28.
Accessing Online Media Content
See “Internet Services” on page 94.
WD TV Play Media Player
User Manual
NETWORK SETUP – 21
PRELIMINARY-P3
Network Setup
The media player can be connected to the local area network using a wired or
wireless network connection for access to streaming video and online and offline
media content.
Important: Streaming over Wi-Fi™ may be unstable due to various reasons
such as a weak network connection, signal strength, variable speeds, or
other environmental factors. You can create instant high-speed, wired
network connections and gain fast, reliable access to the Internet without
running wires all over your house using WD Livewire™ powerline AV network
kit (sold separately). For more information, visit
http://products.wdc.com/WDLivewire.
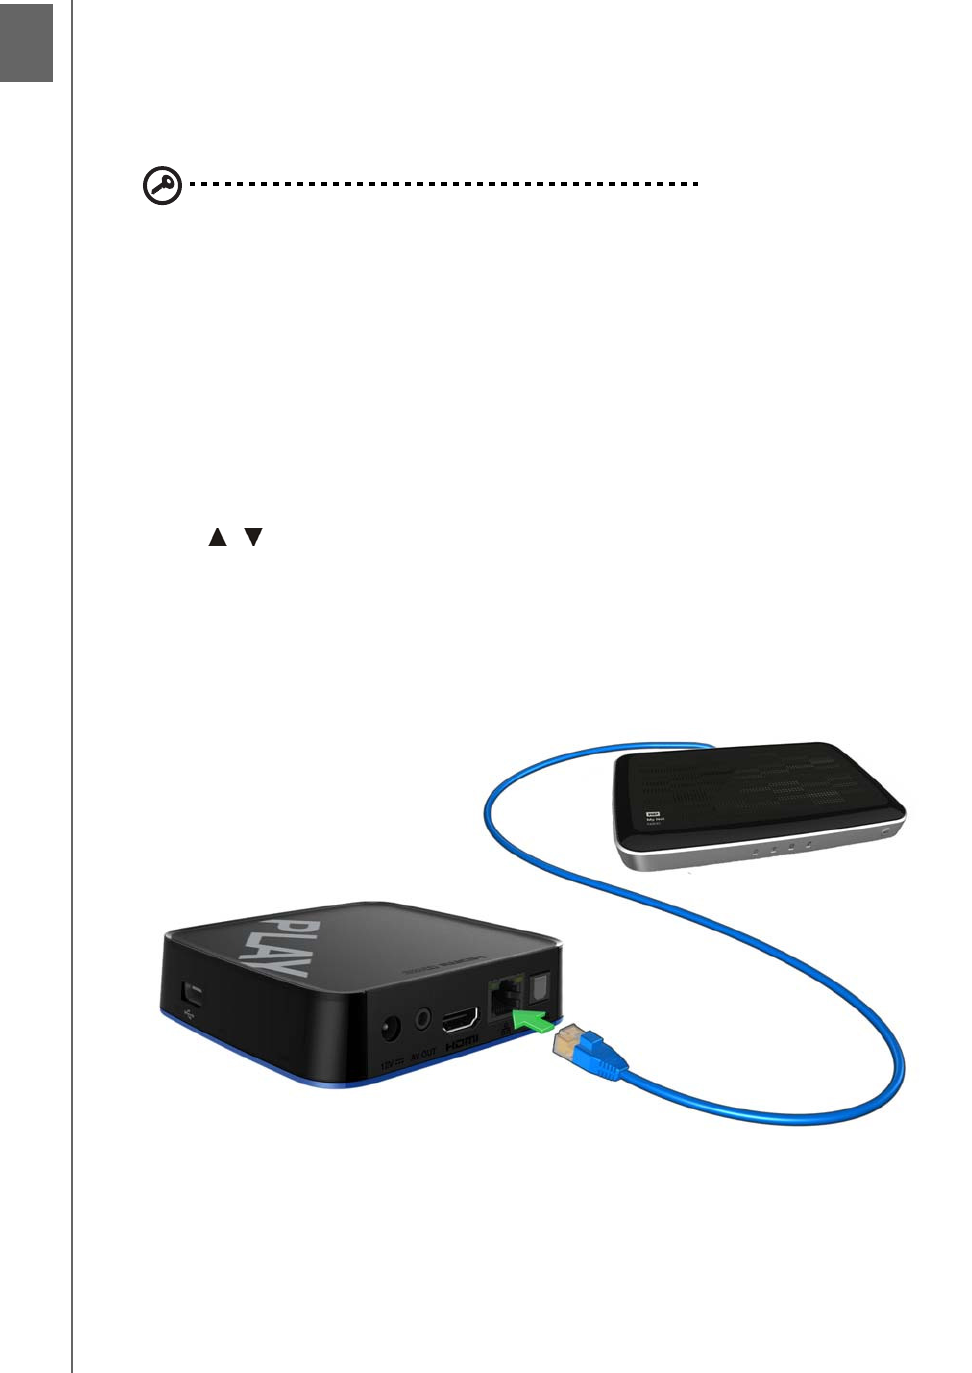
Ethernet Network (Wired) Setup
Follow these steps to automatically set up a wired network connection:
1. Press / to select your language in the setup wizard Welcome screen, then
press OK.
2. Plug an Ethernet cable into the Ethernet connector on the media player.
3. Plug the opposite end of the Ethernet cable directly into a LAN port on a router or
network switch.
5
WD TV Play Media Player
User Manual
NETWORK SETUP – 22
PRELIMINARY-P3
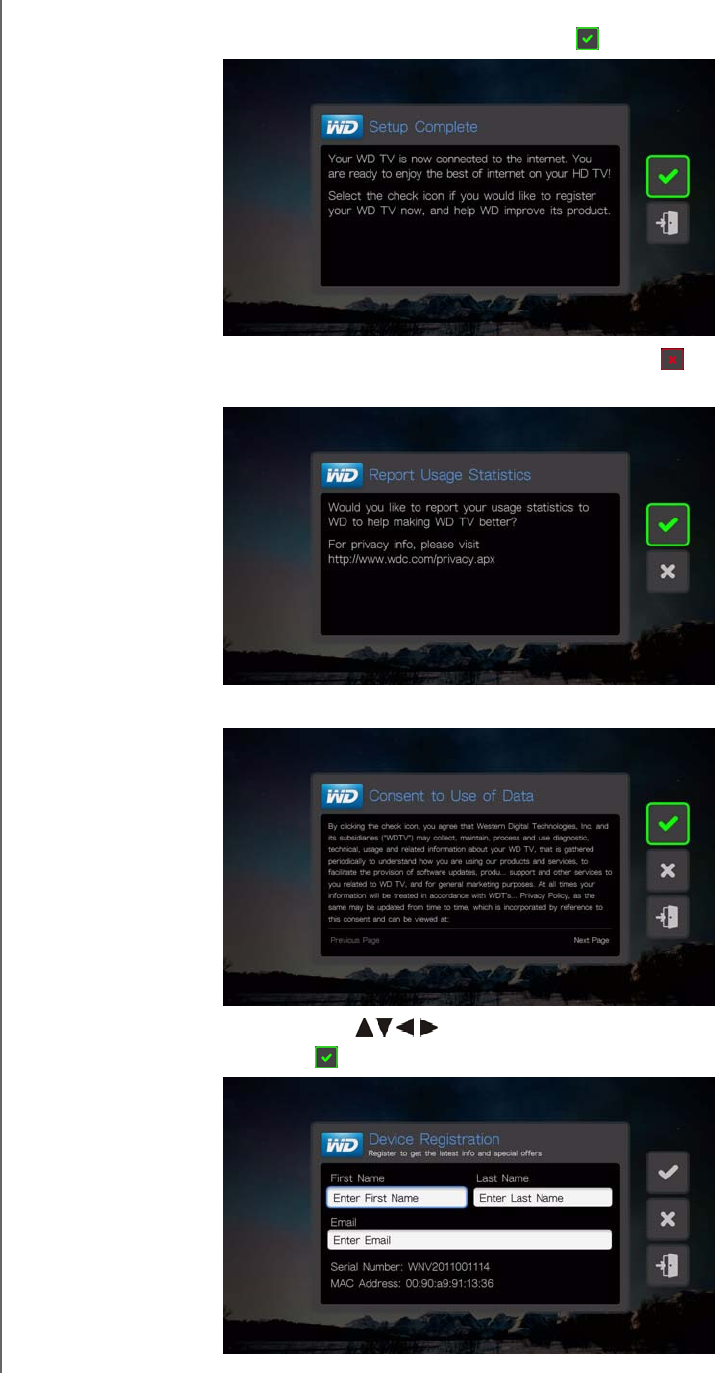
4. The wizard begins automatic network connection. When finished, the following
screen displays. Press OK to continue, or select and press OK to exit.
5. Press OK if you want to report usage statistics, or select and press OK to
decline.
6. Press OK to consent to use of data.
7. Use the navigation buttons and the OK button to type in your
registration info. Select and press OK when complete.
WD TV Play Media Player
User Manual
NETWORK SETUP – 23
PRELIMINARY-P3
To change or manually configure your wired network setup (recommended for
advanced users only), see “Network Setup” on page 194.
Wireless Network Setup
You have four options for setting up your wireless network:
Automatic – Select an available access point found by the media player.
Manually enter the wireless network name – Use the on-screen keyboard to
input the network name (SSID) manually (when SSID not set to broadcast).
Wi-Fi Proctected Setup (WPS) – Enter a PIN or push the WPS button on the
router (if available).
Windows Pairing Code – This option is only available via the Setup menu. See
“Get Windows Pairing Code (Windows 7)” on page 196
Note: The recommended setting on Wireless N routers is 802.11n-only with a channel width of 20/40
MHz. If you are using a wireless-N access point (AP) and it has been set to operate in 802.11n mode
with a security setting of anything other than WPA2-PSK+AES or None, then media player will operate
at lower 802.11g rates. Disabling wireless security is not recommended.
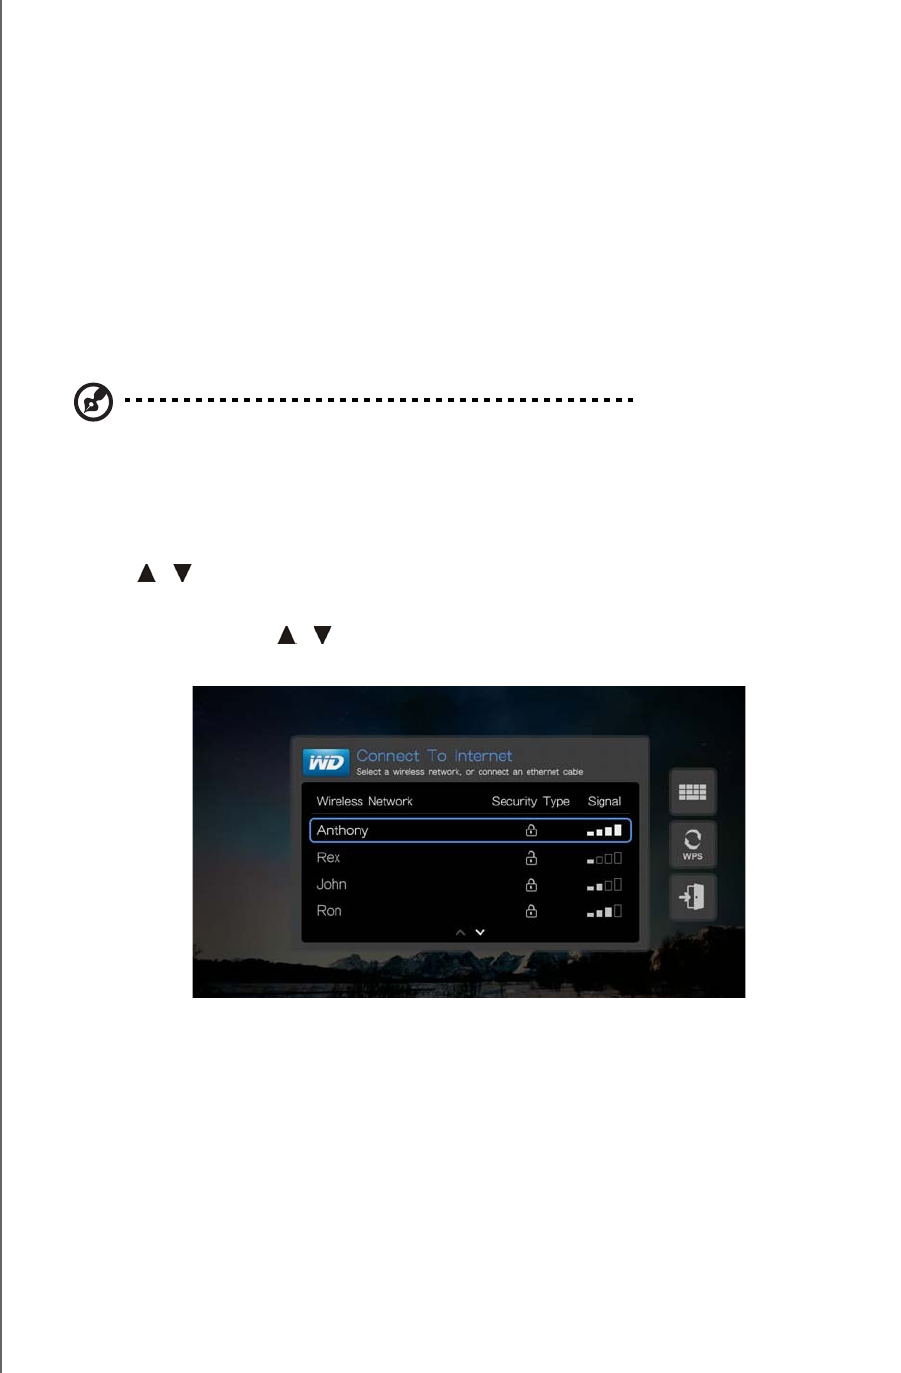
Auto Search or Manually Enter Wireless Network Name
1. Press / to select your language in the setup wizard Welcome screen, then
press OK.
2. Auto Search: Press / to select your wireless network from the list, and press
OK. Proceed to step 5.
Manual: Depending on your wireless network setup, you may want to manually
type in the name of your network. In this case, navigate to the keyboard icon on
the right side of the screen, press OK, and proceed to the next step.
WD TV Play Media Player
User Manual
NETWORK SETUP – 24
PRELIMINARY-P3
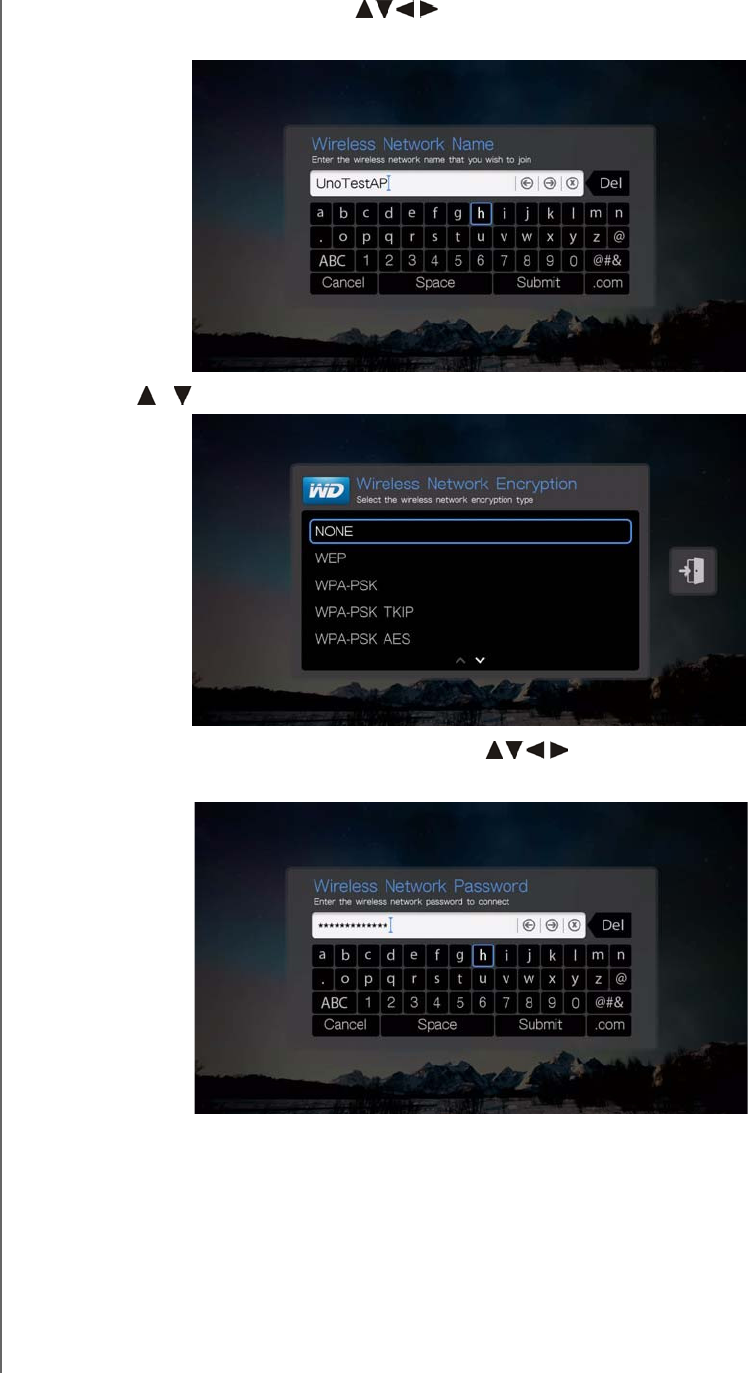
3. Use the navigation buttons to type in the SSID for the access point you
want to connect to, select Submit, then press OK.
4. Press / to select the wireless network encryption type , then press OK.
5. If necessary, use the navigation buttons to type in the passcode for the
access point, select Submit, then press OK.
6. Once the network is successfully set up, press OK to display the Home screen.
WD TV Play Media Player
User Manual
NETWORK SETUP – 25
PRELIMINARY-P3
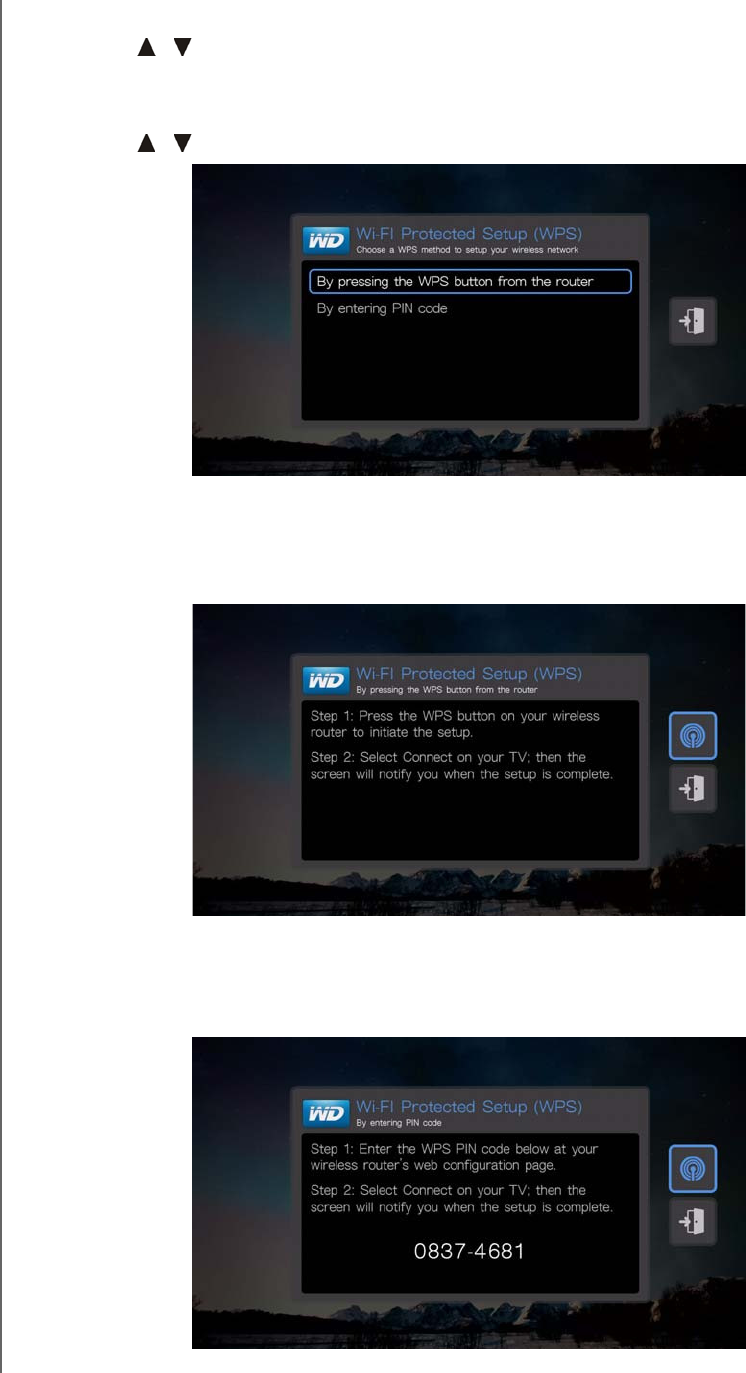
Wi-Fi Protected Setup (WPS)
1. Press / to select your language in the setup wizard Welcome screen, then
press OK.
2. Navigate to the WPS icon on the right side of the screen, and press OK.
3. Press / to select the method you want to use, then press OK.
WPS Button
1. Press the WPS button on your wireless router.
2. Press OK on the remote.
PIN Code
1. Enter the WPS PIN code shown on-screen in your wireless router’s web
configuration page.
WD TV Play Media Player
User Manual
NETWORK SETUP – 26
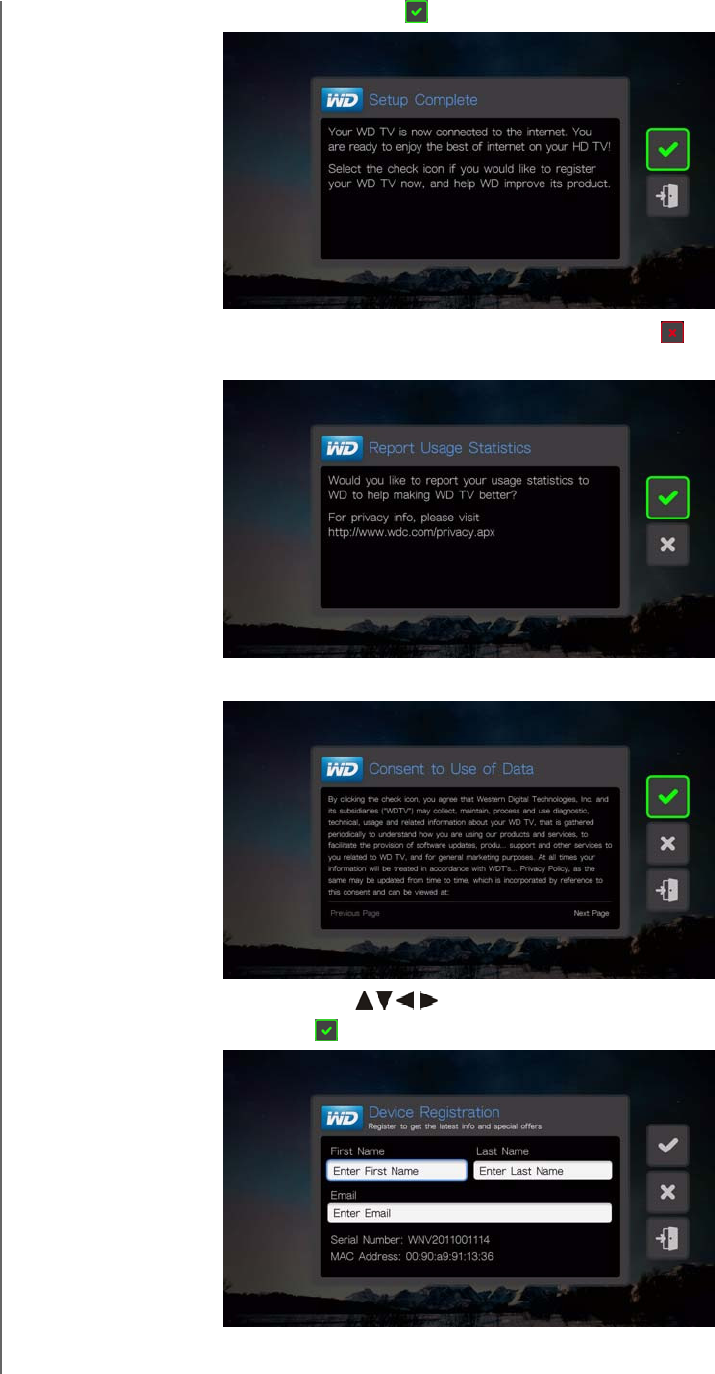
PRELIMINARY-P3
2. Press OK to continue, or select and press OK to exit.
3. Press OK if you want to report usage statistics, or select and press OK to
decline.
4. Press OK to consent to use of data.
5. Use the navigation buttons and the OK button to type in your
registration info. Select and press OK when complete.
WD TV Play Media Player
User Manual
NETWORK SETUP – 27
PRELIMINARY-P3
After establishing a network connection, you can:
Use the Internet services integrated into your media player to access
streaming media. See “Internet Services” on page 94 for more information on
these services.
Access your media files on the network. See “Finding Your Content” on
page 28.
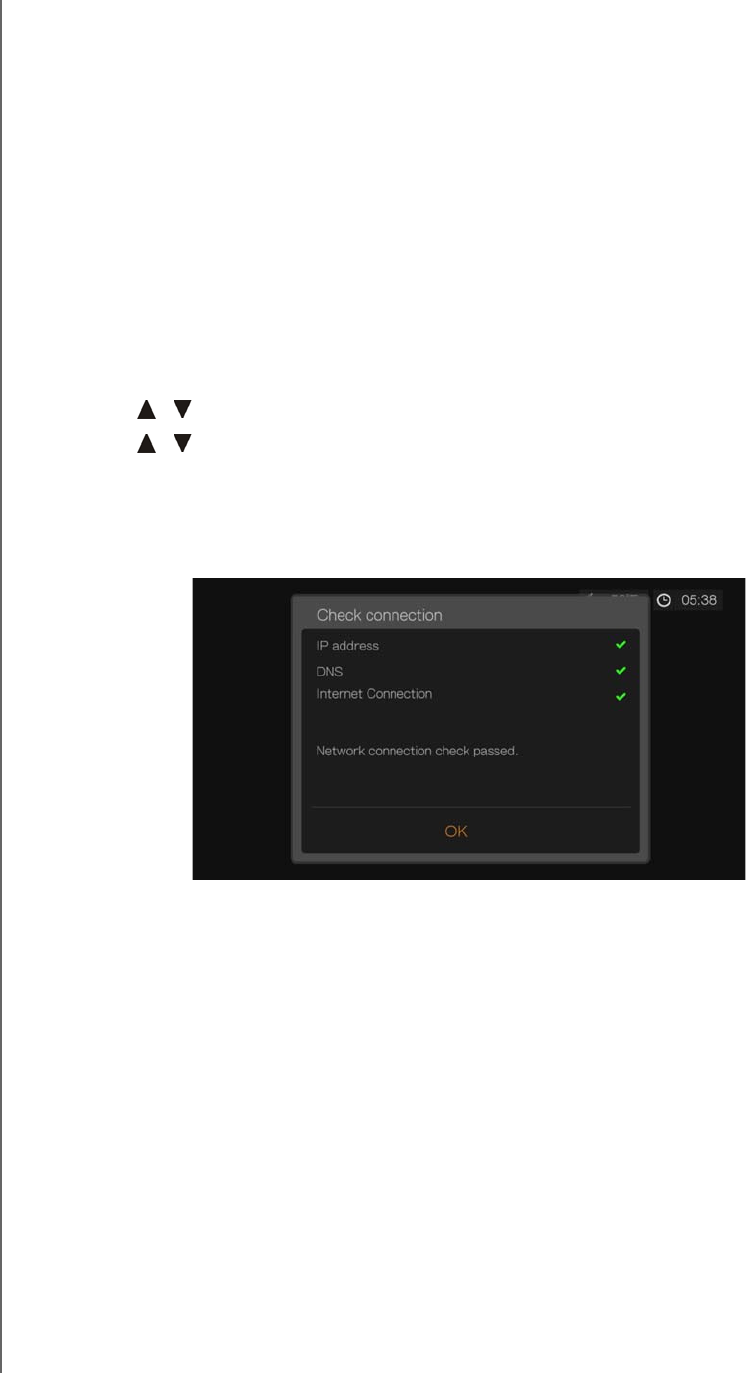
Checking the Network Connection
If you experience network problems, check the network connection to determine the
cause of the problem.
To check the network connection:
1. Press Setup or navigate to the Home | Setup menu bar.
2. Press / to select Network Settings, then press OK.
3. Press / to select Check Connection, then press OK.
The unit will automatically check the network connection. Once the check is
completed, the results display. A green check mark on these items indicate that
there is no problem with your network settings. If a problem is indicated, check
your router settings and manual for a solution.
A red cross mark indicates a problem with the network settings. It can either be
the IP address or the DNS server address. If the problem persists, check with
your Internet service provider.
WD TV Play Media Player
User Manual
FINDING YOUR CONTENT – 28
PRELIMINARY-P3
Finding Your Content
This section describes how you can use the media player to access your digital
media collection over the local network.
Access network attached storage – view and play back digital media content
stored on your network attached storage device or media server. See “Accessing
Media Content” on page 28.
Access your online media – view and play back your digital media content
stored in your Facebook or Picasa online accounts. See “Accessing Media
Content” on page 28.
Attach USB storage – attach a USB storage device to the media player and
transfer media files back and forth to it using your computer. See “Transferring
Files” on page 33.
Share a folder on your computer – view and play back digital media content
stored on your computer by sharing one or more folders containing the media.
See “Share a Folder on Your Computer” on page 37.
Accessing Media Content
Once the media player has an active network connection, you can access media
content from a Network Attached Storage (NAS) device or shared computer located
on the same network as your media player. You can also access content from USB
storage connected to the media player. The benefits and applications of each
content source type are described below.
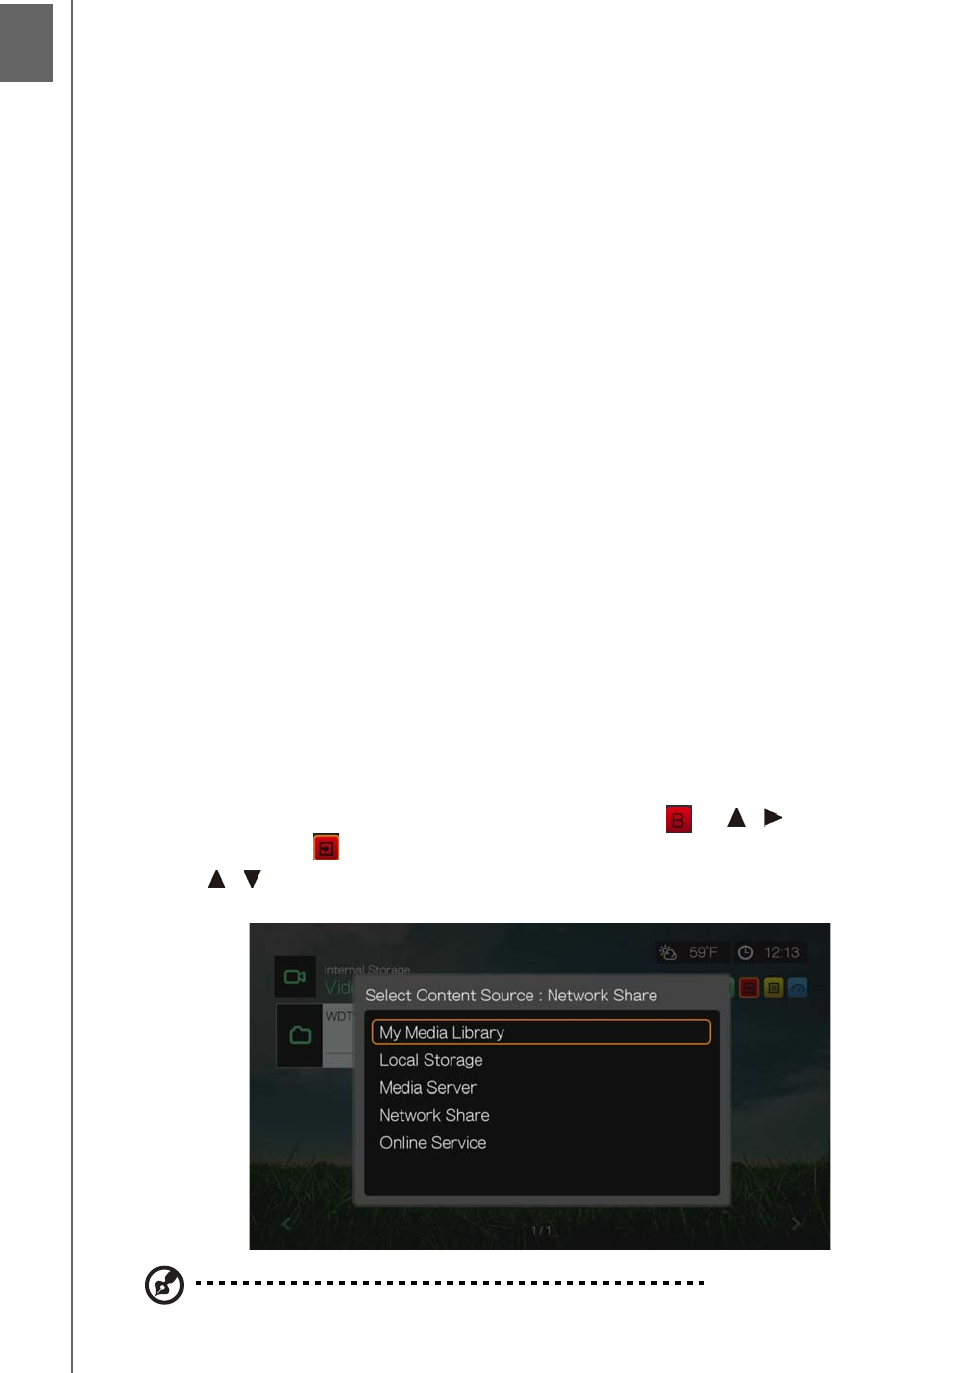
To access media content from a network share, media server, USB storage, or
online account:
1. Navigate to the Home screen, and select the menu for media content you wish to
access. It can be Music, Videos, or Photos. Press OK.
2. Press OK to select a new content source or press or / to select Select
Content Source , then press OK.
3. Press / to select the network resource where the media content you want to
access is located, then press OK.
Note: My Media Library does not appear on first use or if the media library is turned off (see “Media
Library” on page 197). It only appears if you have a USB drive attached or have added a network
attached storage drive to the Media Library list
6
WD TV Play Media Player
User Manual
FINDING YOUR CONTENT – 29
PRELIMINARY-P3
My Media Library
The benefit of selecting this option is that it shows all the aggregated content on
your network attached and USB storage together in one view. However, it does take
longer to scan all the storage content compared to selecting a more specific option
for content retrieval.
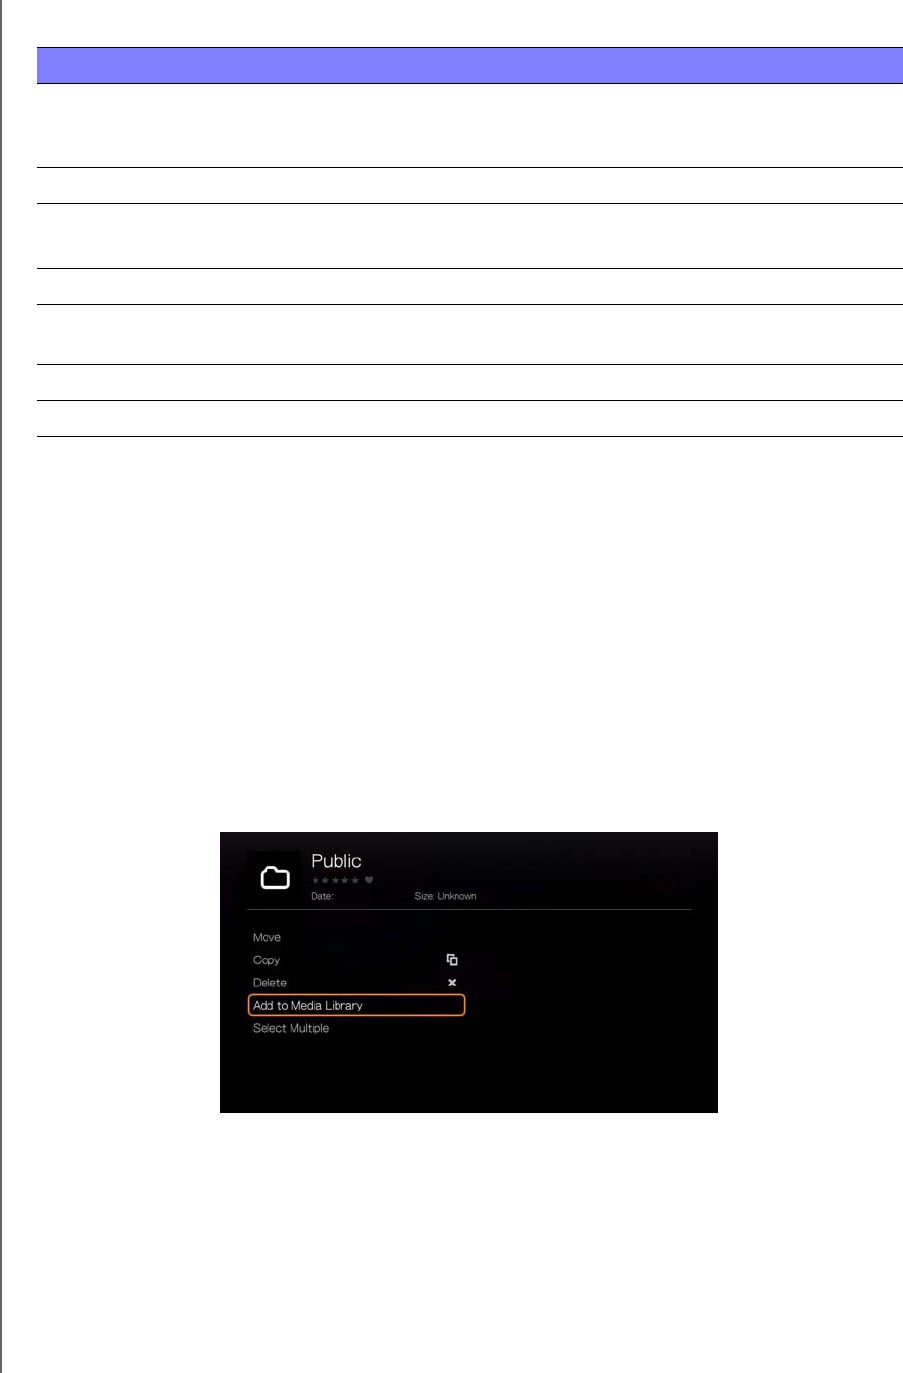
To add additional source content to My Media Library, please do one of the
following:
Attach USB storage to one of the USB ports on the media center and it is
automatically added to media library.
Connect to a Windows or Linux Share (see “Network Share” on page 31). While
browsing the content inside, press Option to add a share folder to the Media
Library.
Use the Media Library Manager for Network Share (see “Media Library Manager
for Network Share” on page 201), and select Add network share to media
library to manually add individual share folders to the media library. A maximum
of 10 shares can be added.
Content Source Best for accessing...
My Media Library All available network shares and attached USB storage (slow scan—
depending on the number of files and connection speed, the scanning time
required to compile the media library may be increased).
Local Storage Storage devices attached to USB ports 1 and/or 2.
Media Server Network-attached media server devices for ease of use (optimal for DLNA
certified server devices such as WD’s My Book® Live™ ).
Network Share
Windows Shares Windows network shares, most network attached storage drives, legacy Mac
OS before Lion, and other devices that uses SMB/CIFS protocol.
Linux Shares Linux (NFS) network shares (recommended for advanced power users).
Online Service Photos and videos posted in your Facebook and Picasa online accounts.
WD TV Play Media Player
User Manual
FINDING YOUR CONTENT – 30
PRELIMINARY-P3
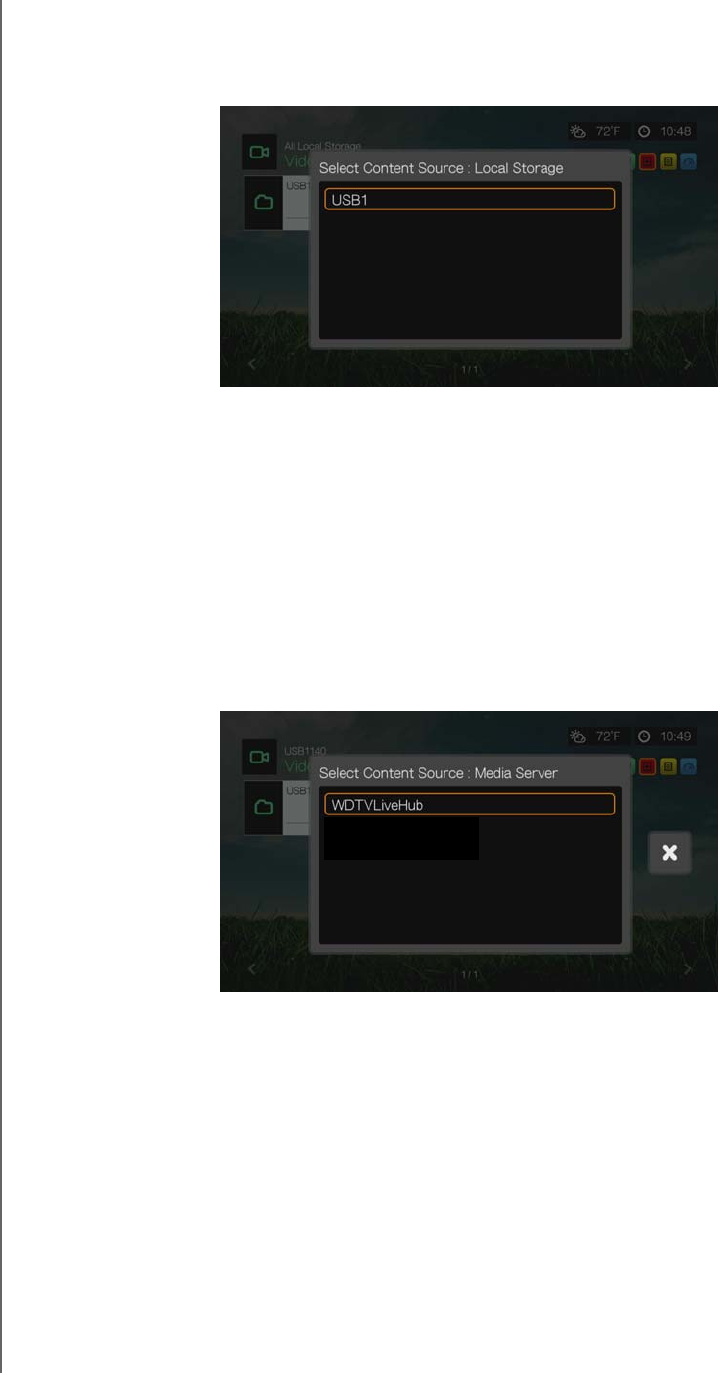
Local Storage
Select Local Storage to access media content on one or more USB storage devices
connected to the media player’s USB 1 or USB 2 ports.
After selecting USB 1 or USB 2, the media player scans the drive to build the media
library by default (if enabled).
If the media player and your computer are attached to the network, you can transfer
files back and forth between your computer and the USB storage device. See
“Transferring Files” on page 33.
Media Server
This menu displays network attached UPnP media servers connected to your
network and usage is optimized with DLNA compliant devices such as WD My Book
Live personal cloud storage and other WD TV Hub media centers.
The benefit of using a media server is that it aggregates the content together from
the device that is hosting it. The media server hosts a list of supported file formats
with metadata information that allows a client device like the media player to easily
browse and play back the content.
However, using a media server can restrict supported file types and you may not be
able to see all the files stored in the media server. When using a Network Share,
every file is presented to the media player and it does the content filtering based on
what it can support.
Follow the steps below under “Accessing a Shared Folder,” selecting the name of
your media server and referencing your media server documentation for password
setup and administration if necessary.
WD TV Play Media Player
User Manual
FINDING YOUR CONTENT – 31
PRELIMINARY-P3
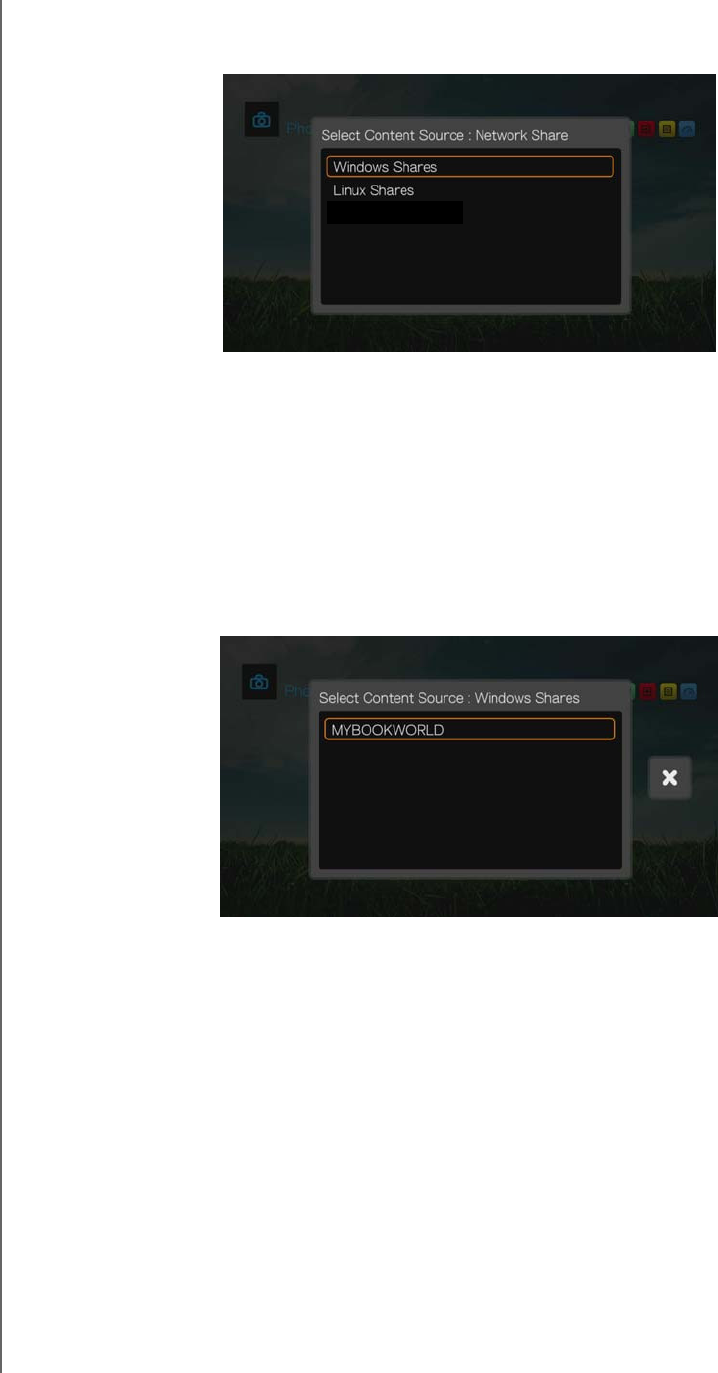
Network Share
The media player supports Windows (SMB/CIFS), and Linux (NFS) network shares.
Windows Shares
Windows Shares uses Samba (also known as SMB/CIFS), a more common protocol
among devices such as PC, NAS, and Mac (before Lion). If you want to simply
discover and/or share a folder on the network to be accessed by the media player,
Samba is a common method, especially for Windows.
Windows Shares display shared computers and network attached storage devices
(such as WD’s My Book Live personal cloud storage NAS drive) connected to your
network via the Samba protocol.
Linux Shares
Linux Shares uses NFS, which is popular with power users and Linux users because
of the increased speed and performance it can provide. NFS is better suited to Linux
since using NFS with Windows requires installation of third party applications.
Follow the steps below under “Accessing a Shared Folder,” selecting the name of
your NAS device or computer and referencing your NAS device or operating system
documentation for password setup and administration if nessesary.
Accessing a Shared Folder
To create a shared folder, follow the instructions under “Share a Folder on Your
Computer” on page 37.
To access a shared folder under Network Share:
WD TV Play Media Player
User Manual
FINDING YOUR CONTENT – 32
PRELIMINARY-P3
1. Select the name of your computer and press OK twice.
2. If necessary, enter your user name and password to access your computer, or
accept the default login. For further information regarding password setup and
administration, refer to your operating system documentation.
3. Press to select OK, then press OK. Supported content for the selected media
type displays.
4. Select the content you wish to access, then press OK to start media playback.
Accessing Network Attached Storage
Follow the steps above under “Accessing a Shared Folder,” selecting the name of
your NAS device and referencing your NAS device documentation for password
setup and administration.
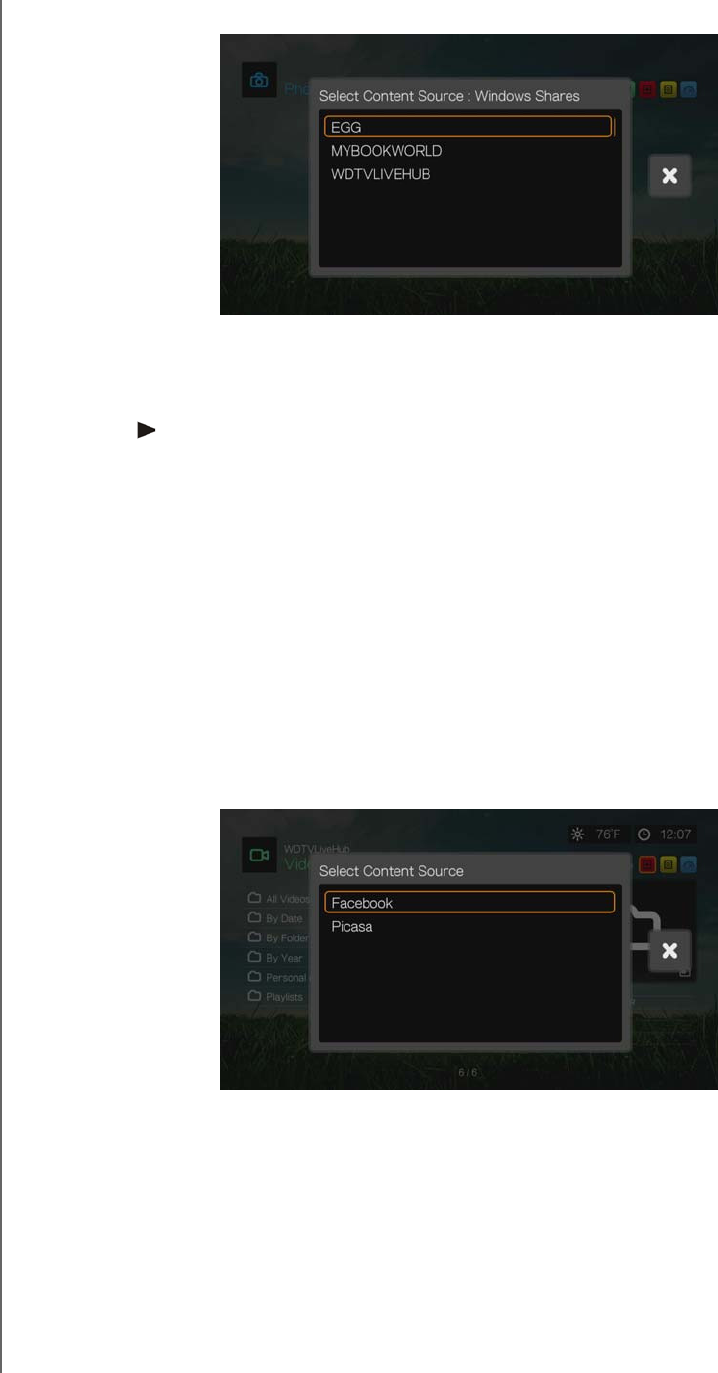
Online Service
This menu allows you to connect to media content stored in your Facebook and
Picasa online accounts. Select Facebook or Picasa and enter your user name and
password to access your media content.
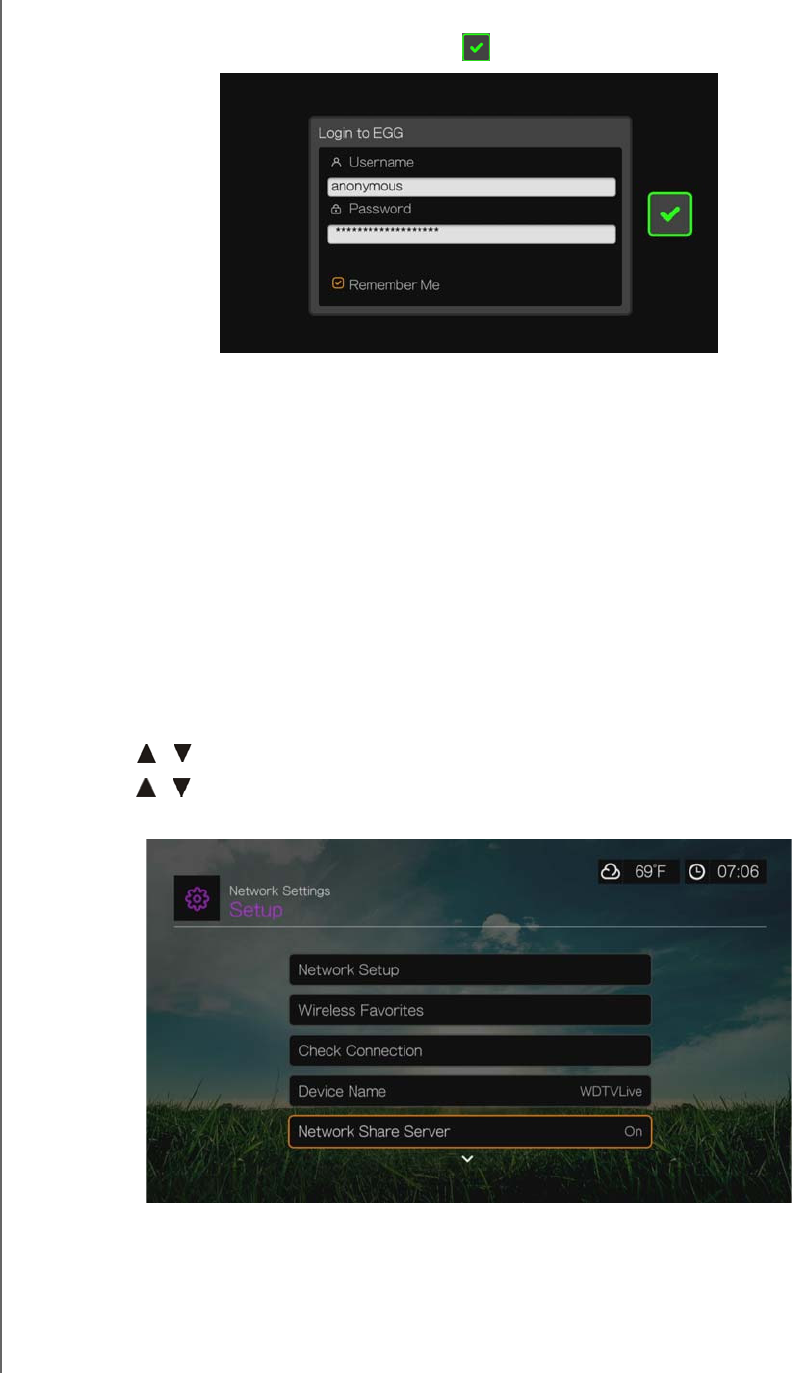
Logging in to a Network Resource or Online Account
When accessing a network resource, you need to enter in the user name and
password for the device or account using the on-screen keyboard. In some cases, a
WD TV Play Media Player
User Manual
FINDING YOUR CONTENT – 33
PRELIMINARY-P3
default anonymous login displays if no password is set for the device. When this
happens, accept the default login, select , then press OK.
Select Remember Me and press OK to have the media player remember the user
name and password for the resource.
Transferring Files
If the media player has an active network connection, any USB drive connected to it
can serve as a network drive. This allows you to transfer files between your media
player and your computer. This feature is applicable to a PC running the
Windows® XP, Windows Vista®, or Windows 7 operating systems, as well to a
Macintosh® computer running Mac® OS X® Leopard® or Snow Leopard®.
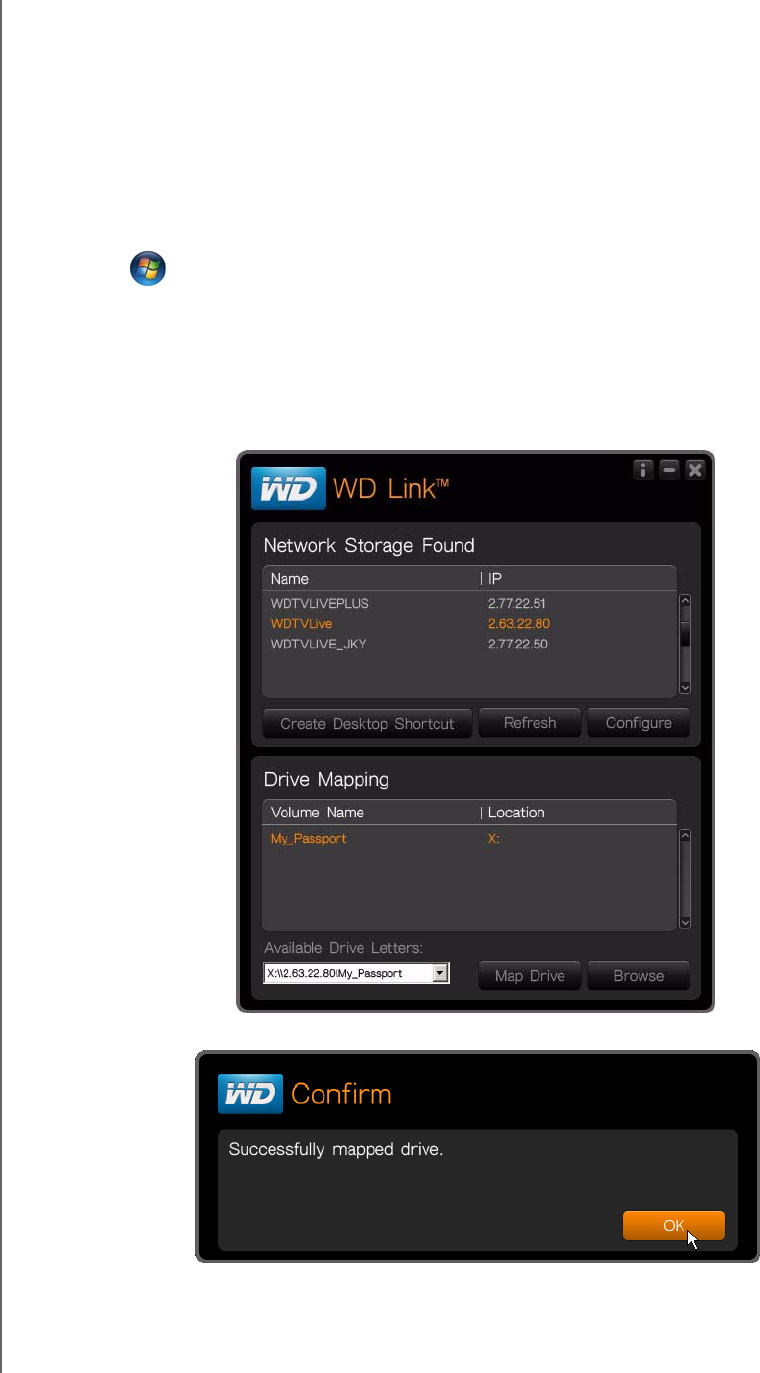
Enabling File Sharing on the Network Share (Samba Server)
1. Navigate to the Home | Setup menu bar.
2. Press / to select Network Settings, then press OK.
3. Press / to select Network Share Server and make sure the option is set to
On.
4. Note the name indicated in the Device name field. This will help you identify your
media player on the network.
WD TV Play Media Player
User Manual
FINDING YOUR CONTENT – 34
PRELIMINARY-P3
Moving Files Between the Media Player and a Windows Computer
1. Connect the USB hard drive you need for the file transfer to your media player.
2. Ensure that your computer is on the same network as your media player and that
the file sharing option is enabled. Refer to Windows Help for instructions on how
to enable file sharing on your computer.
3. Download the WD Link tool from http://products.wdc.com/WDTVLiveG3.
4. Double-click on the downloaded installer file and follow the on-screen prompts to
install WD Link.
5. Click or Start, then click Programs > WD Link > WD Link.
6. Click WD TV in the Network Storage Found list.
7. The USB drive connected to your media player displays in the Drive Mapping list.
Click the USB drive you need for the file transfer.
8. Select an available drive letter from the Available Drive Letters list.
9. Click Map Drive.
10.Click OK.
WD TV Play Media Player
User Manual
FINDING YOUR CONTENT – 35
PRELIMINARY-P3
Moving Files Between the Media Player and a Windows Vista /
Windows 7 Computer
1. Connect the USB hard drive you need for the file transfer to your media player.
2. Ensure that your computer is on the same network as your media player and that
the file sharing option is enabled. Refer to Windows Help for instructions on how
to enable file sharing on your computer.
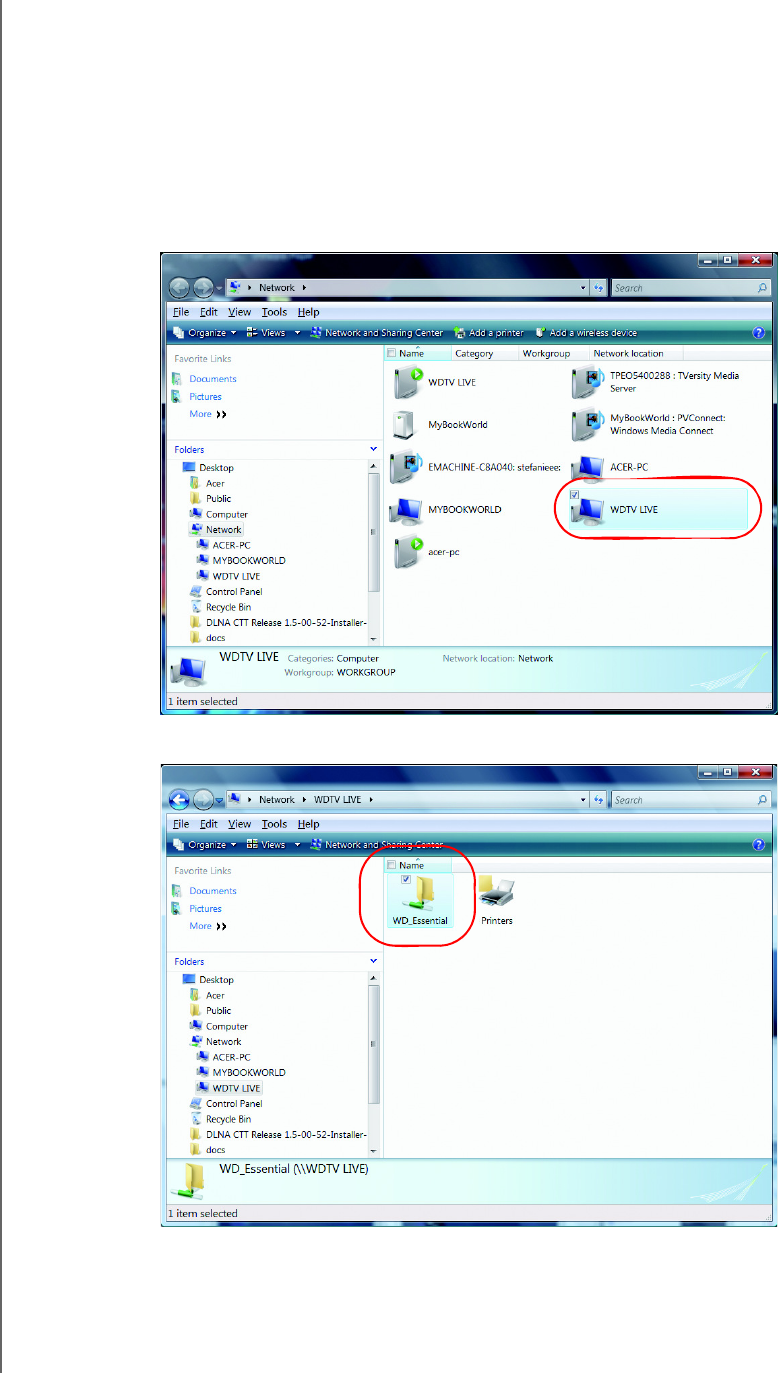
3. Open a Windows Explorer window, then click Network. Your media player is
listed on the network resources list.
4. Click the device corresponding to your media player.
WD TV Play Media Player
User Manual
FINDING YOUR CONTENT – 36
PRELIMINARY-P3
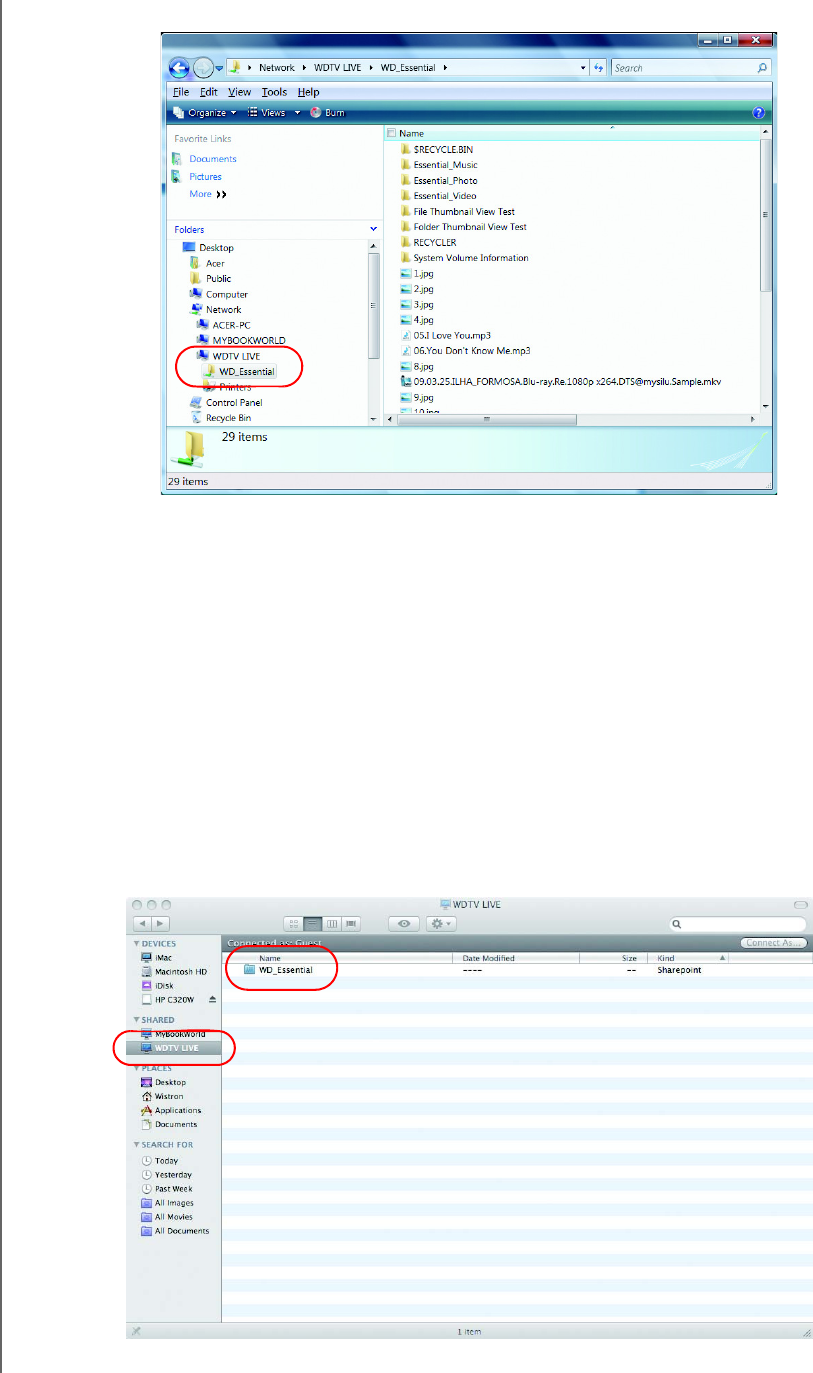
5. Click the USB drive you need for the file transfer to display its contents.
6. Locate the file(s) you intend to transfer and do a Copy/Paste, Cut/Paste, or Drag/
Drop operation.
Moving Files Between the Media Player and a Mac Computer
1. Connect the USB hard drive you need for the file transfer to your media player.
2. Ensure that your computer is on the same network as your media player and that
the file sharing option is enabled. Refer to Apple Help for instructions on how to
enable file sharing on your computer.
3. Open a Finder window.
4. On the Finder side bar, click Shared. Your media player is listed on the shared
resources list.
5. Click the device corresponding to your media player. The USB drive connected
to your media player displays.

WD TV Play Media Player
User Manual
FINDING YOUR CONTENT – 37
PRELIMINARY-P3
6. Click the USB drive you need for the file transfer to display its contents.
7. Locate the file(s) you intend to transfer and do a Copy/Paste, Cut/Paste, or Drag/
Drop operation.
Share a Folder on Your Computer
You can view and play back digital media content stored on your computer by
sharing one or more folders containing the media.
Make sure the media player and your computer are both attached to the network,
then follow the instructions below for your operating system (Windows 7/Vista/XP or
Mac).
Important: Be sure to update your operating system to the latest update or
service pack. Depending on your network's configuration you may need to
disable or adjust your Firewall settings to view your shared folder on your
network. Contact your Firewall manufacturer for assistance.
When finished following the instructions for your operating system, go to
“Accessing a Shared Folder” on page 31.
Windows 7
Change Settings to Allow Folder Sharing
The first thing you need to do to allow folders to be shared with the WD TV is to
determine how your network is configured. Follow the instructions below to
determine what kind of network you have.
1. From the Control Panel, click Network and Internet.
2. Click Network and Sharing Center.
WD TV Play Media Player
User Manual
FINDING YOUR CONTENT – 38
PRELIMINARY-P3
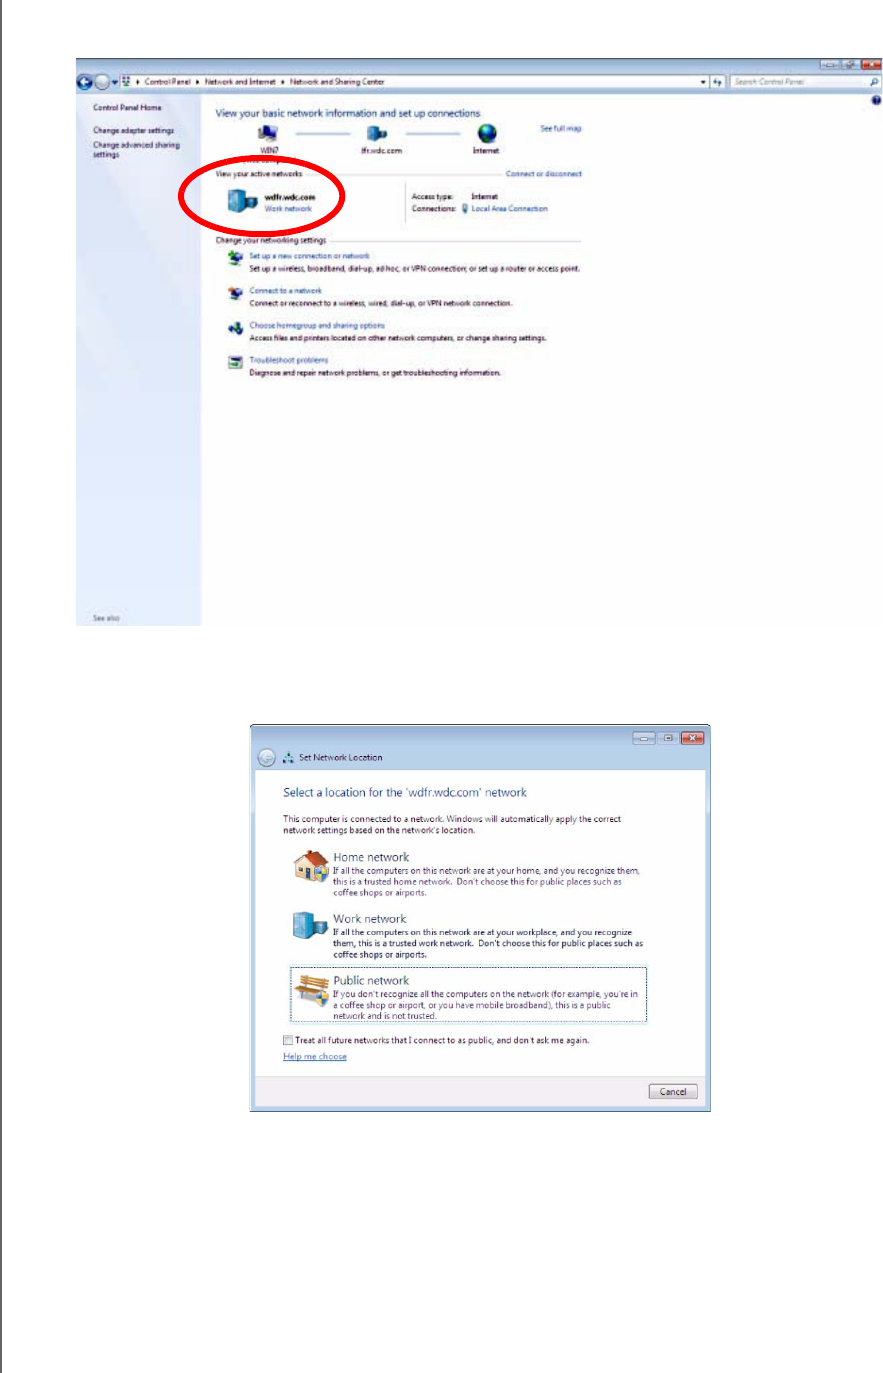
3. Look under View your active networks to determine if your network is Home,
Work, Public, or Domain.W
4. If you have a Work network, proceed to step 6. If you have a Public network,
click the Public network link.
5. Click Work network.
6. Click the Choose homegroup and sharing options link.
7. Click the Change advanced sharing settings... link.
8. Ensure that the following options are selected: Turn on network discovery,
Turn on file and printer sharing, Media streaming is off, and Allow
Windows to manage homegroup connections (recommended).
WD TV Play Media Player
User Manual
FINDING YOUR CONTENT – 39
PRELIMINARY-P3
Note: WD does not support streaming from a domain server, or a computer attached to a domain, to
the WD TV. Please contact your domain administrator or Microsoft® Support for assistance.
Share a Folder
Follow the instructions below to share a folder in Windows 7.
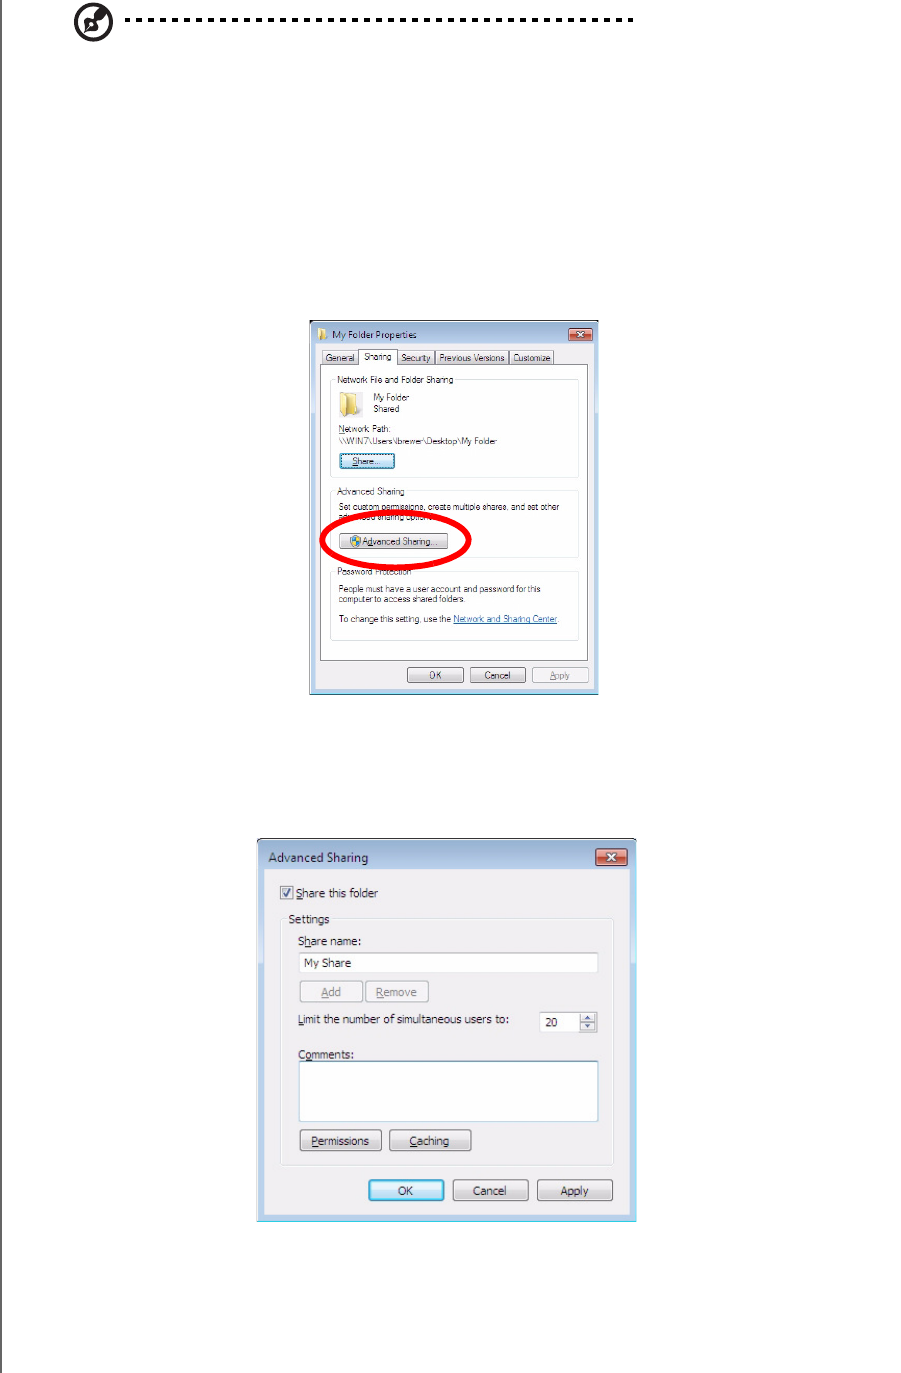
1. Navigate to the folder you want to share. Once found, right-click on the folder
and select Properties.
2. Click the Sharing tab.
3. Click the Advanced Sharing button.
4. Click the Share This Folder box.
5. Enter the name you would like this folder to appear on the network as in the
Share name box.
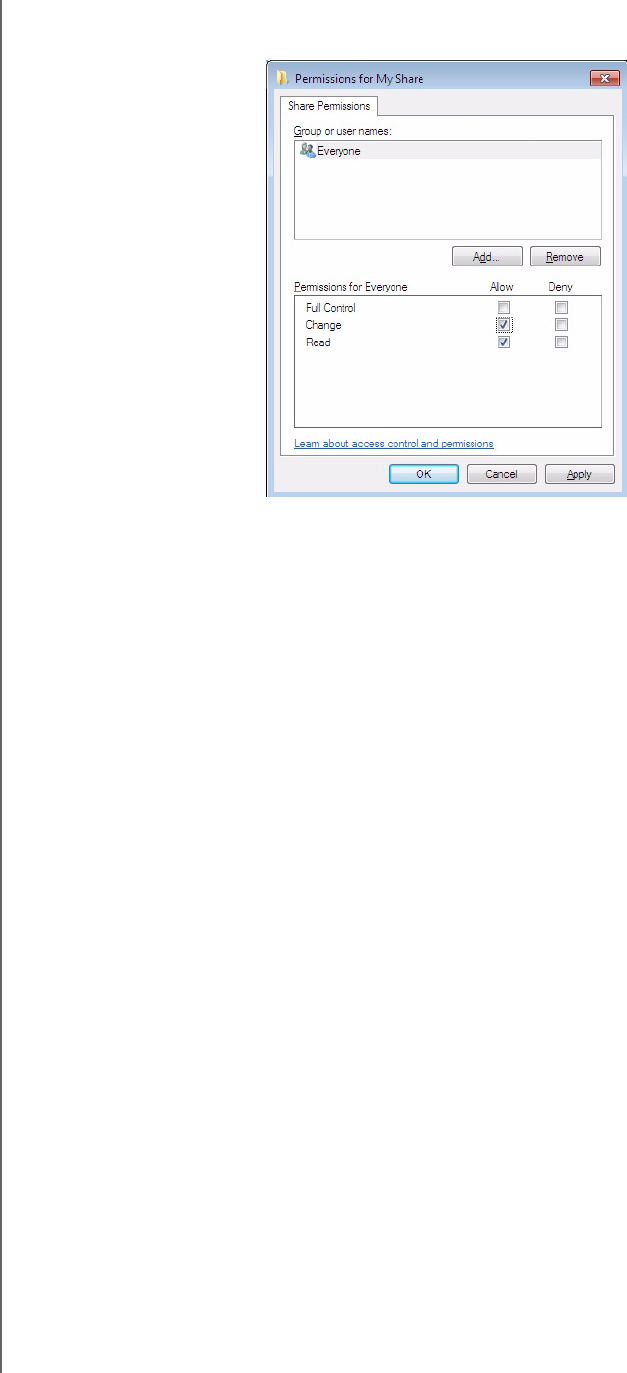
6. Click the Permissions box.
WD TV Play Media Player
User Manual
FINDING YOUR CONTENT – 40
PRELIMINARY-P3
7. Select the users you would like to give access to and the permissions you would
like to assign to that user, then click OK.
8. Click OK to close the Advanced Sharing window.
9. Finally, click on OK one more time to close the folder properties window and
save your changes.
WD TV Play Media Player
User Manual
FINDING YOUR CONTENT – 41
PRELIMINARY-P3
Windows Vista
Change Settings to Allow Folder Sharing
Follow the instructions below to configure your computer for folder sharing in
Windows Vista.
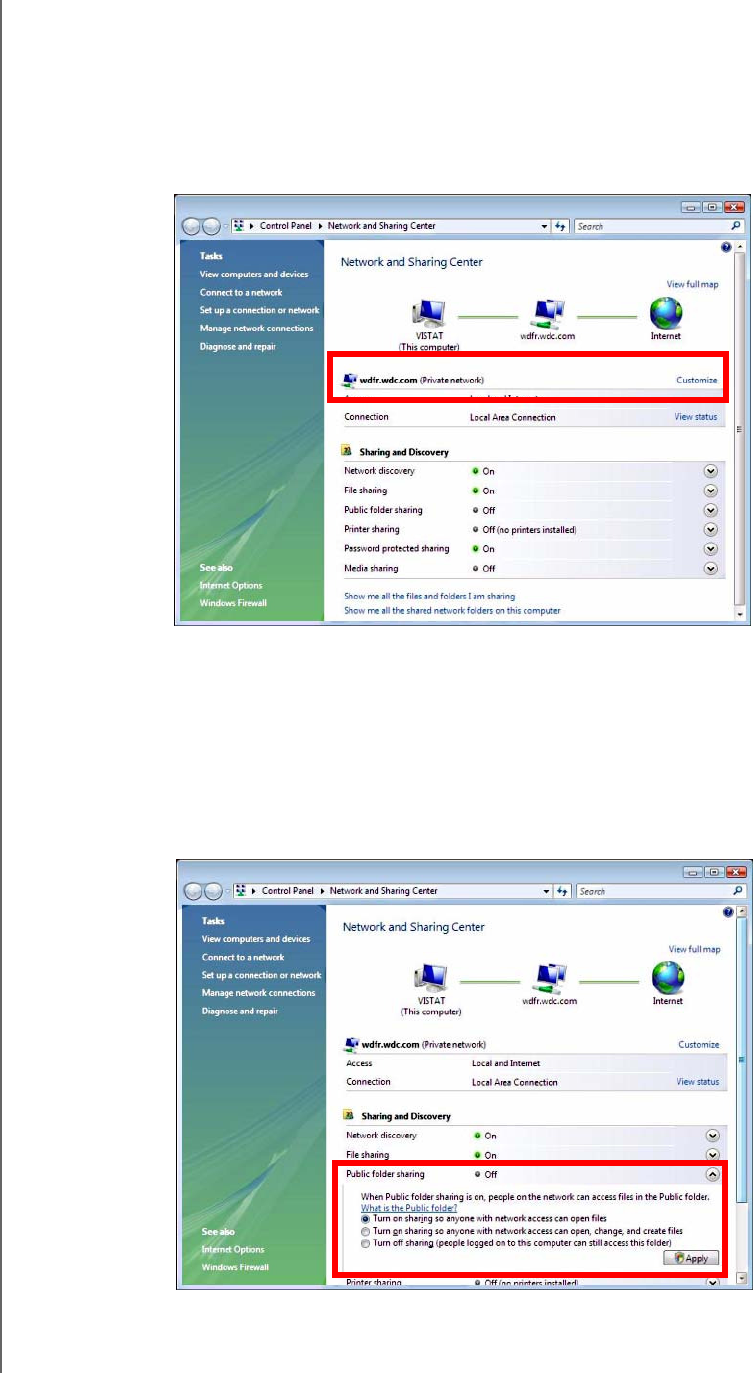
1. Open the Network And Sharing Center from the Control Panel.
2. Next to the name of the network look to see if it is a Private or Public network.
3. If your network is Private skip to step 5 below. Otherwise, click the Customize
link.
4. Click Private, then click OK.
5. If it is set to Off expand the File Sharing field and change it to On.
6. If you want to share the pre-designated Public folders in Windows, expand the
Public folder sharing field under Sharing and Discovery.
7. Select your choice of the two "Turn on sharing..." options.
8. Click Apply.
WD TV Play Media Player
User Manual
FINDING YOUR CONTENT – 42
PRELIMINARY-P3
Share a Folder
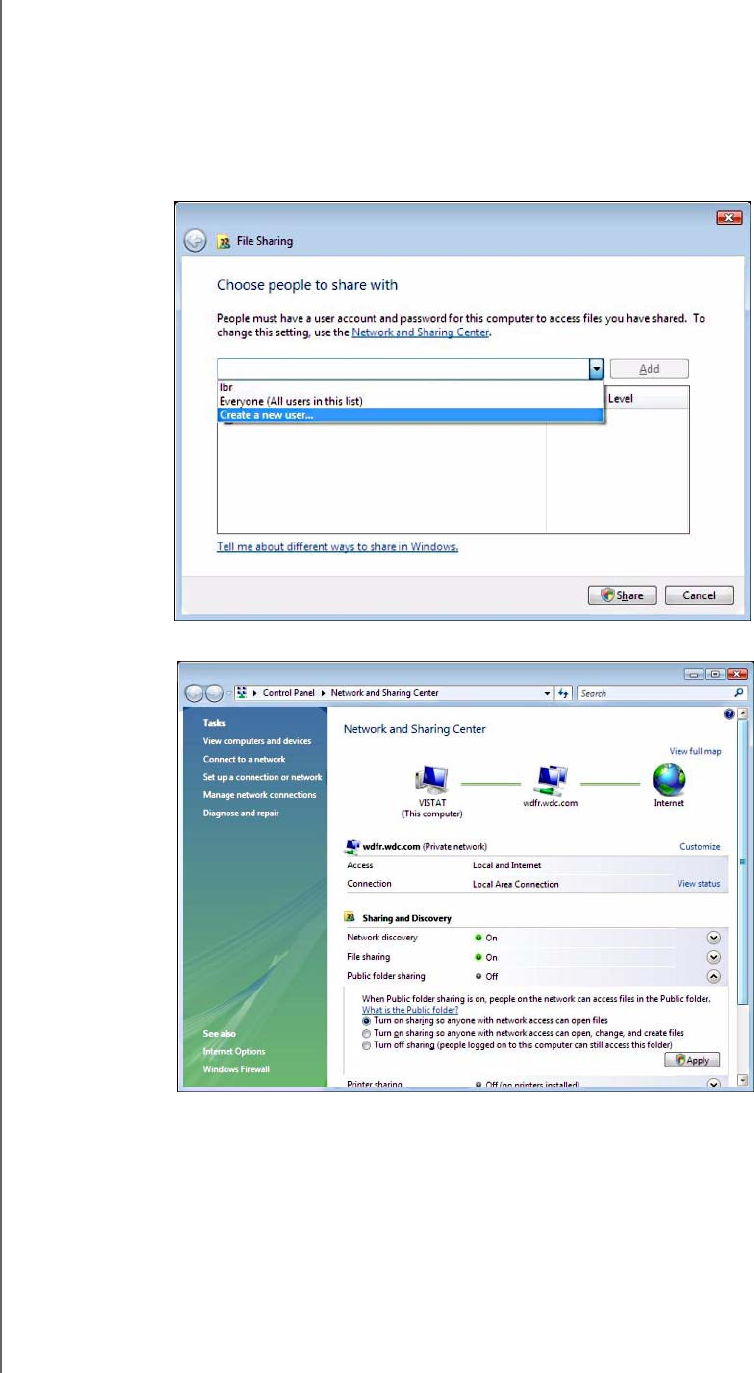
Follow the instructions below to share a folder in Windows Vista.
1. Navigate to the folder you want to share. Once found, right-click on the folder
and click Share.
2. If your system requires a login to access a shared folder, select a User account to
assign to the share, then click Share. Otherwise, simply click the Share button.
3. Under Sharing and Discovery expand the Public folder sharing field.
4. Depending on your system speed you may or may not see a progress bar while
the permissions on the folder are updated. Click Done.
WD TV Play Media Player
User Manual
FINDING YOUR CONTENT – 43
PRELIMINARY-P3
Windows XP
Follow the instructions below to share a folder in Windows XP.
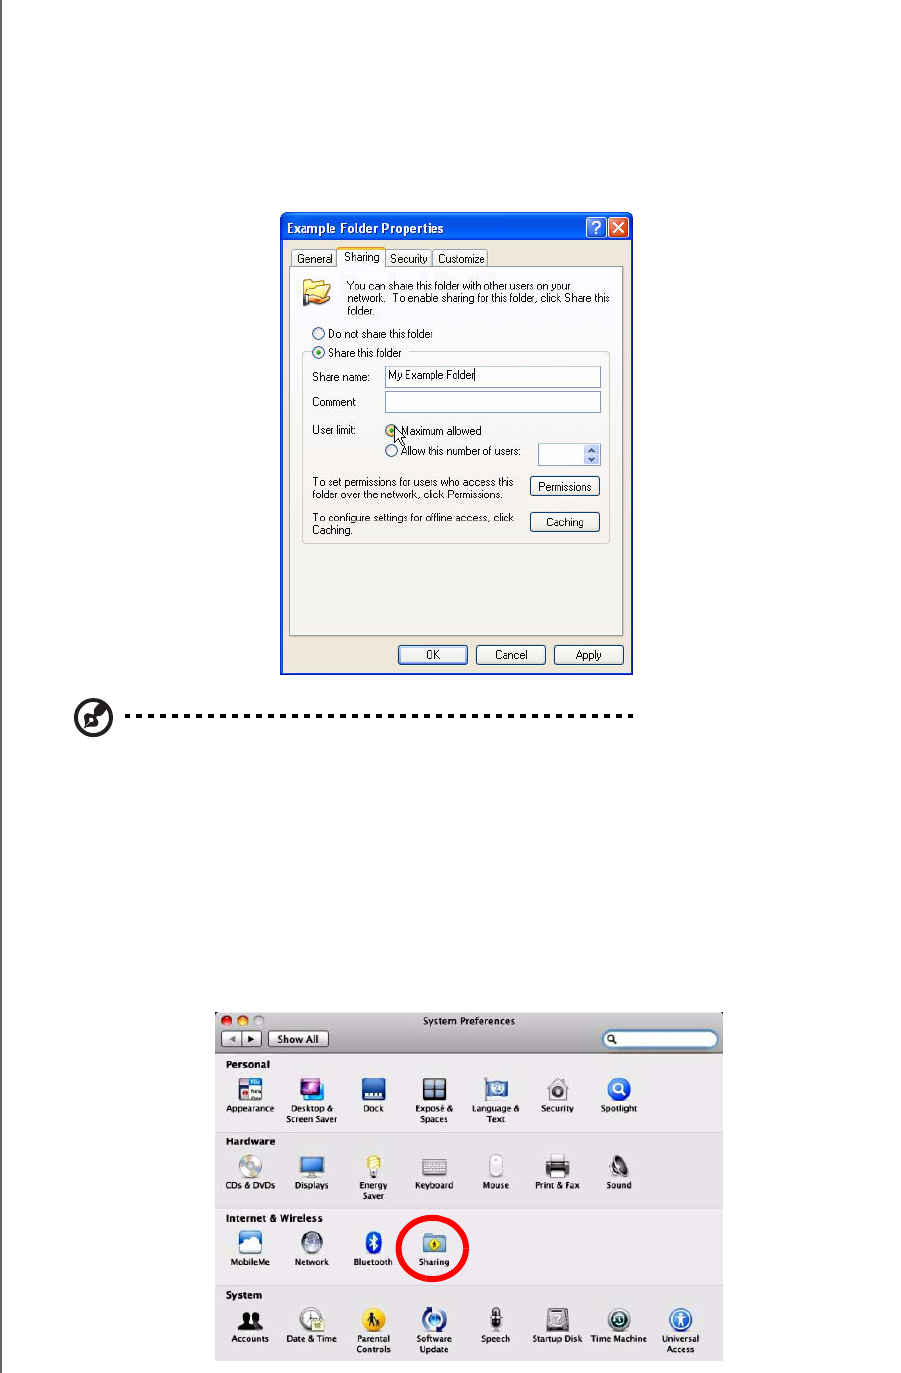
1. Right-click on the folder you want to share and select Sharing and Security.
2. Click Share this folder.
3. Choose a name you want the folder to appear as on your network and enter it in
the Share Name field.
Note: You can also set a maximum number of users able to access your drive at one time. To do this,
click "Allow this number of users: " and set the number in the field to the right.
4. Click OK.
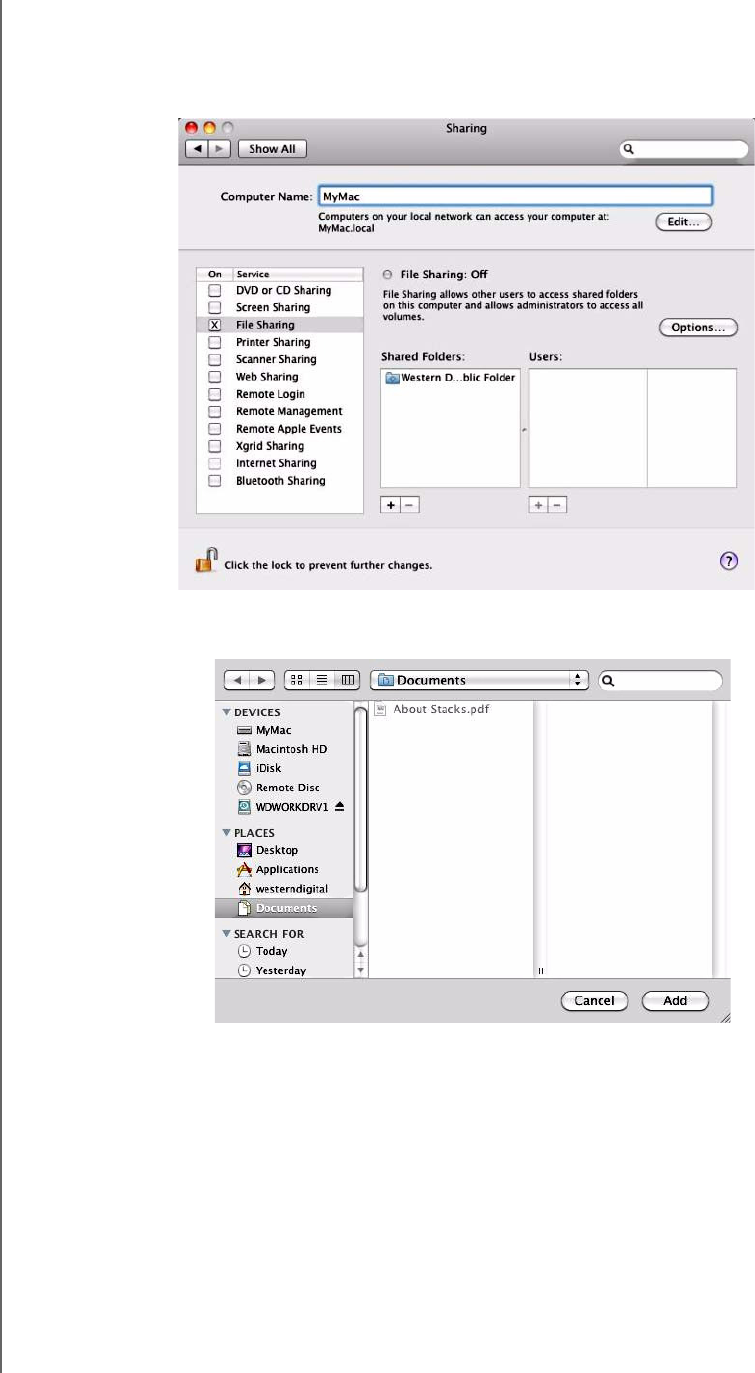
Mac
Follow the instructions below to share a folder within Mac OS 10.5 or 10.6.
1. Open the Apple menu from the upper left corner of your screen and click
System Preferences.
2. Click the Sharing button under the Internet & Wireless group.
WD TV Play Media Player
User Manual
FINDING YOUR CONTENT – 44
PRELIMINARY-P3
3. Choose a name for your computer on the network and type it in the Computer
Name field.
4. Click the box next to File Sharing to turn on the file sharing service. Then click
on the + sign button below the Shared Folders box.
5. To share additional folders beyond the default Public folder, select the folder you
would like to share and click the Add button.
6. Click on the red x in the upper left corner to close the window.
WD TV Play Media Player
User Manual
FINDING YOUR CONTENT – 45
PRELIMINARY-P3
Using the Web UI
The media player provides a Web-based user interface (UI) that can be used to
control certain functions. You must use a network-connected computer or smart
phone to use the Web UI.
Important: Your media player must be set up on the network (see “Network
Setup” on page 21 for further information) to use the Web UI.
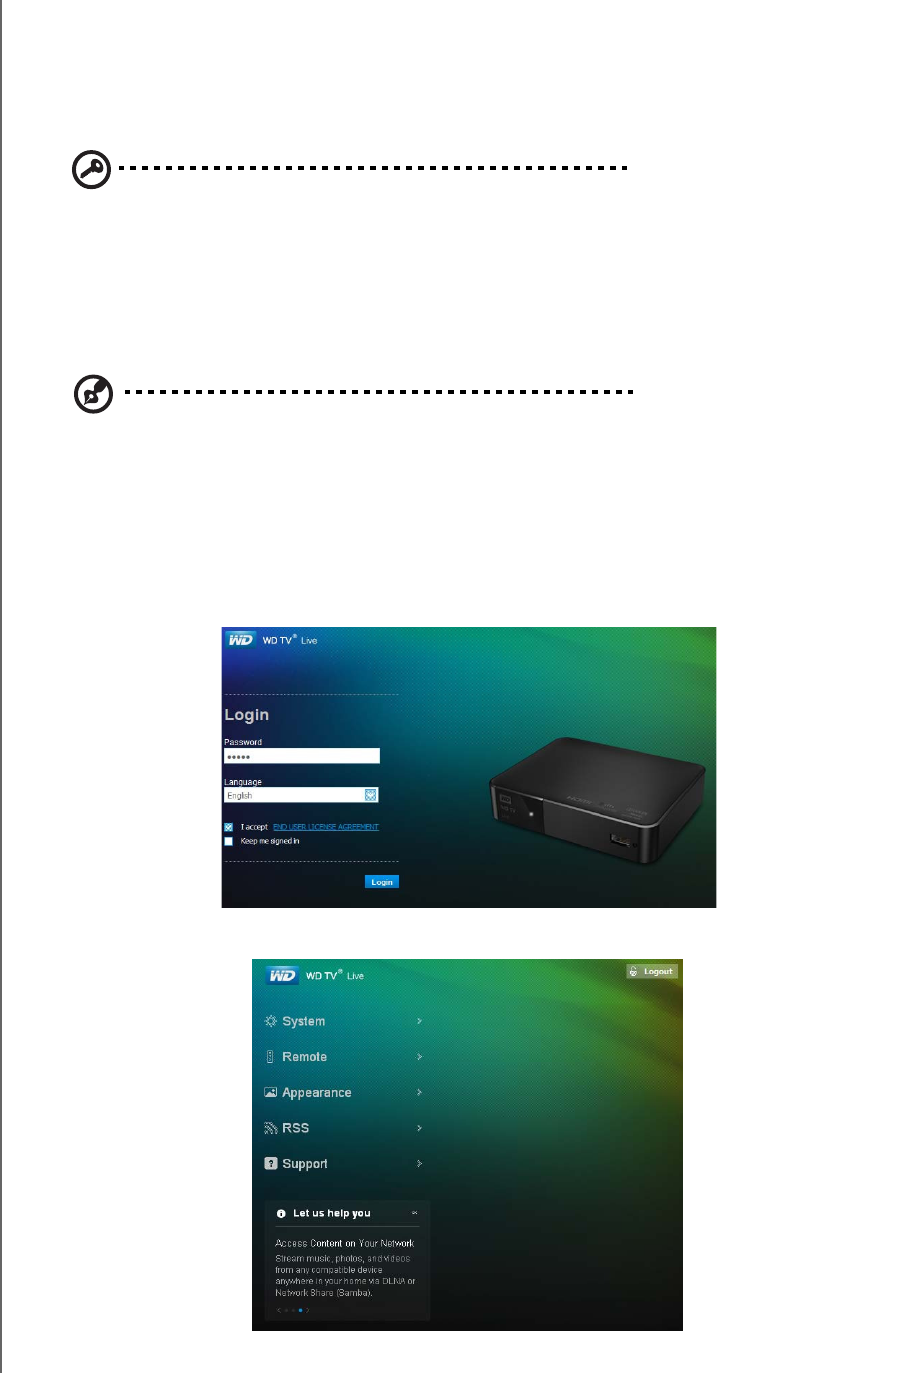
Launching the Web UI
1. Open a Web brower and type in your media’s center’s IP address in the address
field. Press ENTER on your computer keyboard.
Note: To find your media player’s IP address, press Setup on the remote controller and navigate to
Network Settings. Select Network Setup to see the media player’s IP address.
2. The Web UI launch page displays. Enter the default password (“admin”) in the
Password field.
3. Select your preferred language from the Language list.
4. Click I accept END USER LICENSE AGREEMENT, then click Login. You can
also click Keep me signed in.
5. The Web UI menu options display.
WD TV Play Media Player
User Manual
FINDING YOUR CONTENT – 46
PRELIMINARY-P3
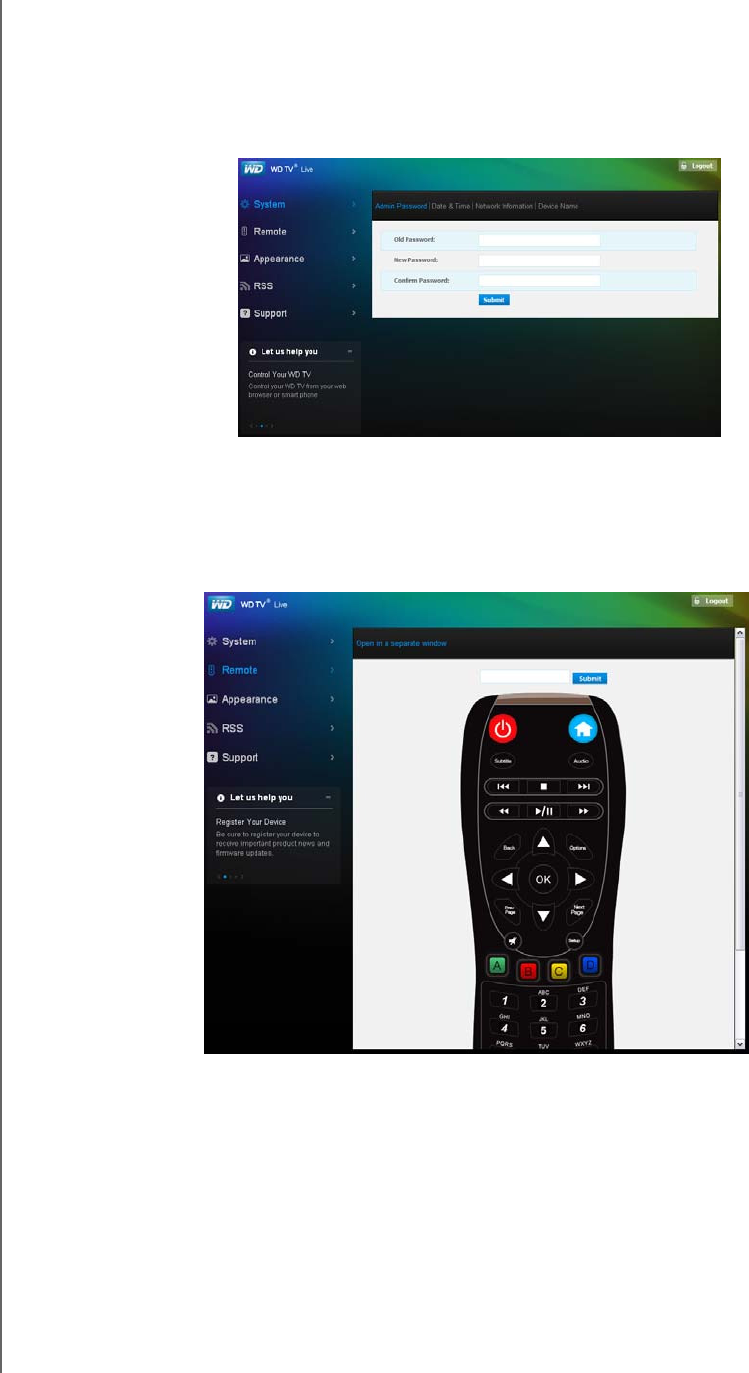
System
Click System in the Web UI home page to manage the system status of your media
player and view general network information and important messages. You can
change the password, set the device name, view network information, and choose
date and time settings using these options.
Remote
Click Remote in the Web UI home page to control the media player using your
computer. Click the buttons on the virtual remote controller to control your media
player (see “Using the Remote Control” on page 49 for further information).
Click the Open in separate window link to open the virtual remote controller in a
new browser screen. You can copy the URL from this browser screen and enter it in
a browser on your smartphone. Then, you can use your smartphone as a virtual
remote controller by touching the buttons on the screen.
WD TV Play Media Player
User Manual
FINDING YOUR CONTENT – 47
PRELIMINARY-P3
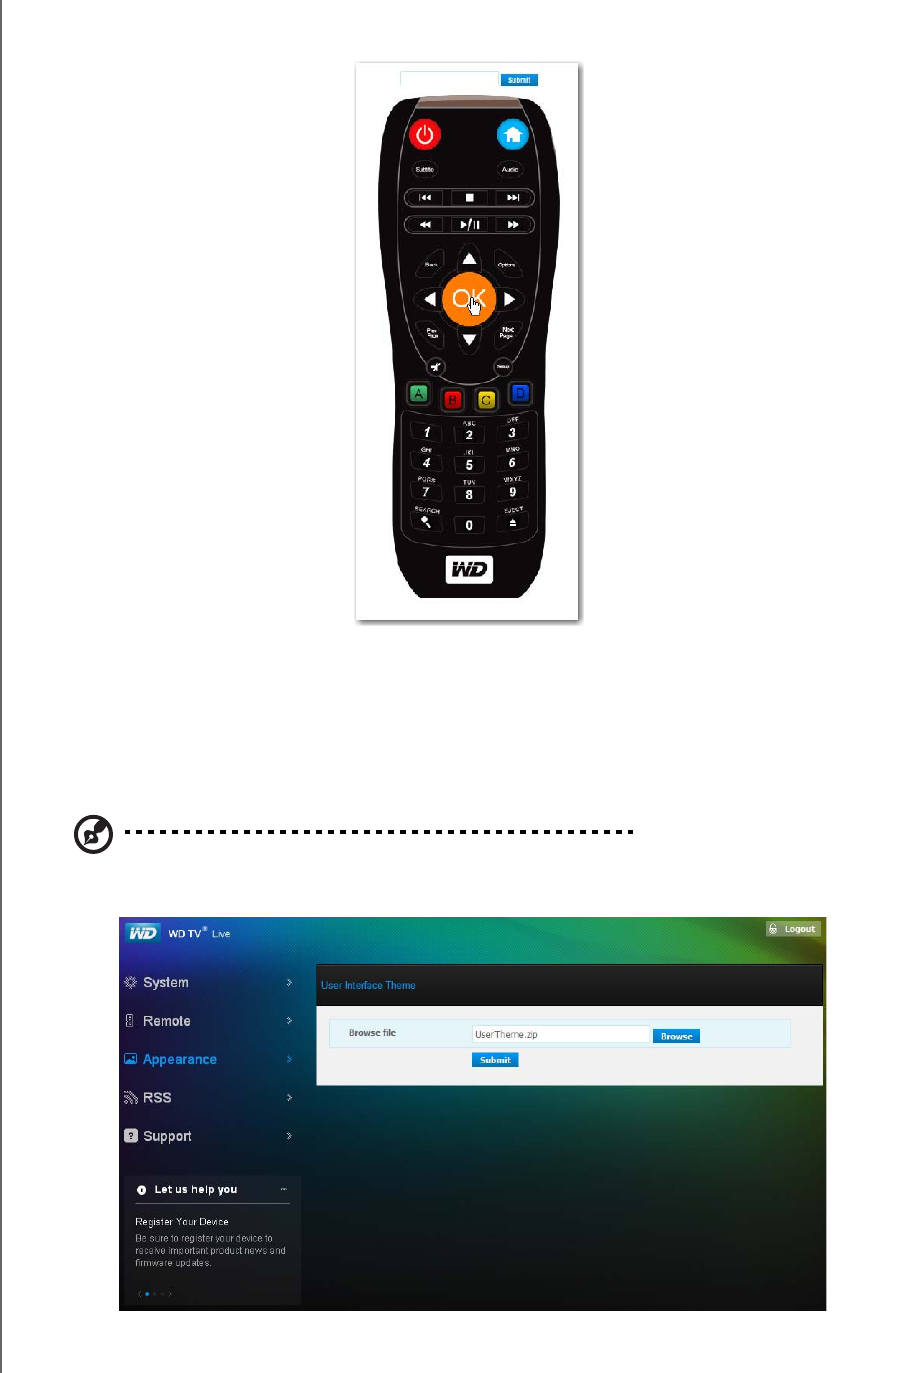
Enter on-screen keyboard commands in the Submit field using your computer or
smartphone keyboard, then click or press Submit when finished.
Appearance
The media player supports interchangeable user interfaces called themes. Themes
alter the player's visual appearance, but not its functionality. Click Appearance to
change the user interface theme. Click Browse to find the *.zip file containing all the
files for the theme you want to load. Click Submit.
Note: When applicable, make sure all the theme files have been extracted from the *.theme file then
compressed into a *.zip file.
WD TV Play Media Player
User Manual
FINDING YOUR CONTENT – 48
PRELIMINARY-P3
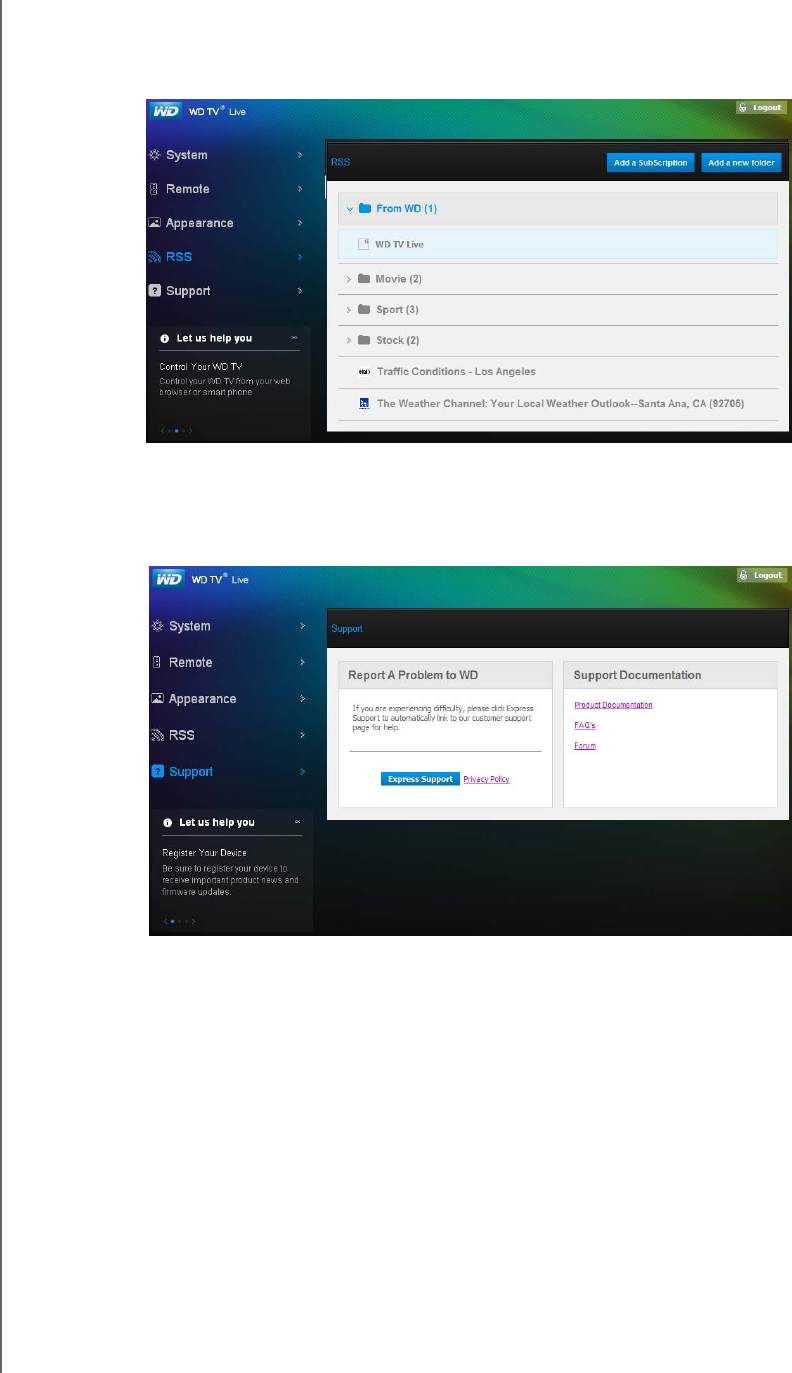
RSS
Click RSS to view your RSS subscriptions and category folders. Here, you can add
a new subscription or a new folder to categorize your subscriptions.
Support
Click Support to access Express Customer Support and Support Documentation
including product documentation, FAQ’s, and a WD TV user forum.
Logout
Click the Logout button in the main menu to log out of the Web UI.

WD TV Play Media Player
User Manual
OPERATING THE MEDIA PLAYER – 49
PRELIMINARY-P3
Operating the Media Player
Using the Remote Control
The media player’s ergonomic remote control lets you navigate the Home screen,
browse for media files, enable playback options, and customize the system settings.
The infrared sensor detects signals from the remote.
Important: Make sure there are no obstructions between the remote
control and the infrared sensor on the media player.
Button Function
HOME Displays the main menu and the various options for playback of files and
device setup.
POWER Suspends the device into sleep mode and turns off video output. Press
and hold the power button for five seconds to completely shut down the
media player.
Navigation
buttons
Navigate through Home options, menu screens, media libraries, on-screen
keyboards, and toolbars.
OK • Displays the media directories and Settings screens.
• Turns information bar ON or OFF.
• Begins playback of the selected media file.
• Enables the currently selected setting in a Settings option screen.
STOP Discontinues playback.
Back Goes back to the previous screen.
REV (reverse) Scans backward during audio/video playback. Supports the following
speeds: 2×, 4×, 8×, 16×.
PREV • Press once to jump to the start of the audio/video file.
• Press twice to jump to the previous audio/video/image file.
• Press to page up.
• During Video REV mode, press to skip back 10 minutes.
SEARCH Locates a media file in the current folder. This function is only available
when the Media Library setting is enabled. Does not search subfolder.
Option During playback, displays additional playback options. From an online
media content screen, press to display more service options.
PAUSE/PLAY Toggles between pause and playback.
FF
(fast forward)
Scans forward through the audio/video playback. Supports the
following speeds: 2×, 4×, 8×, 16×.
NEXT • Skips to the next audio, video, or image file.
• Press to page down.
• During Video FF mode, press to skip forward 10 minutes.
7

WD TV Play Media Player
User Manual
OPERATING THE MEDIA PLAYER – 50
PRELIMINARY-P3
Using a USB Keyboard
As an alternative to using the remote control, you can plug a USB keyboard into the
USB port on the media player.
EJECT Safely removes a USB device
Key or key
sequence
Function
HOME Displays the main menu and the various options for playback of files and
device setup.
CTRL + P (Power) Suspends the device into sleep mode and turns off video output.
UP, DOWN, LEFT,
& RIGHT ARROWS
Navigate through Home options, menu screens, media libraries, on-screen
keyboards, and toolbars.
ENTER • Displays the media directories and Settings screens.
• Turns information bar ON or OFF.
• Begins playback of the selected media file.
• Enables the currently selected setting in a Settings option screen.
S (Stop) Discontinues playback.
ESC (Back) Goes back to the previous screen.
- (Reverse) Scans backward during audio/video playback. Supports the following
speeds: 2×, 4×, 8×, 16×.
P (Previous) • Press once to jump to the start of the audio/video file.
• Press twice to jump to the previous audio/video/image file.
• Press to page up.
• During Video REV mode, press to skip back 10 minutes.
CTRL + F (Search) Locates a media file in the current folder. This function is only available
when the Media Library setting is enabled. Does not search subfolder.
CTRL + O (Options) During playback, displays additional playback options. From an online
media content screen, press to display more service options.
SPACE BAR
(Play/Pause)
Toggles between pause and playback.
+ (FF) Scans forward through the audio/video playback. Supports the
following speeds: 2×, 4×, 8×, 16×.
N (Next) • Skips to the next audio, video, or image file.
• Press to page down.
• During Video FF mode, press to skip forward 10 minutes.
CTRL + E (Eject) Switches to safe mode so you can safely remove a USB device.
M (Mute) Turns off the volume output
Button Function
WD TV Play Media Player
User Manual
OPERATING THE MEDIA PLAYER – 51
PRELIMINARY-P3
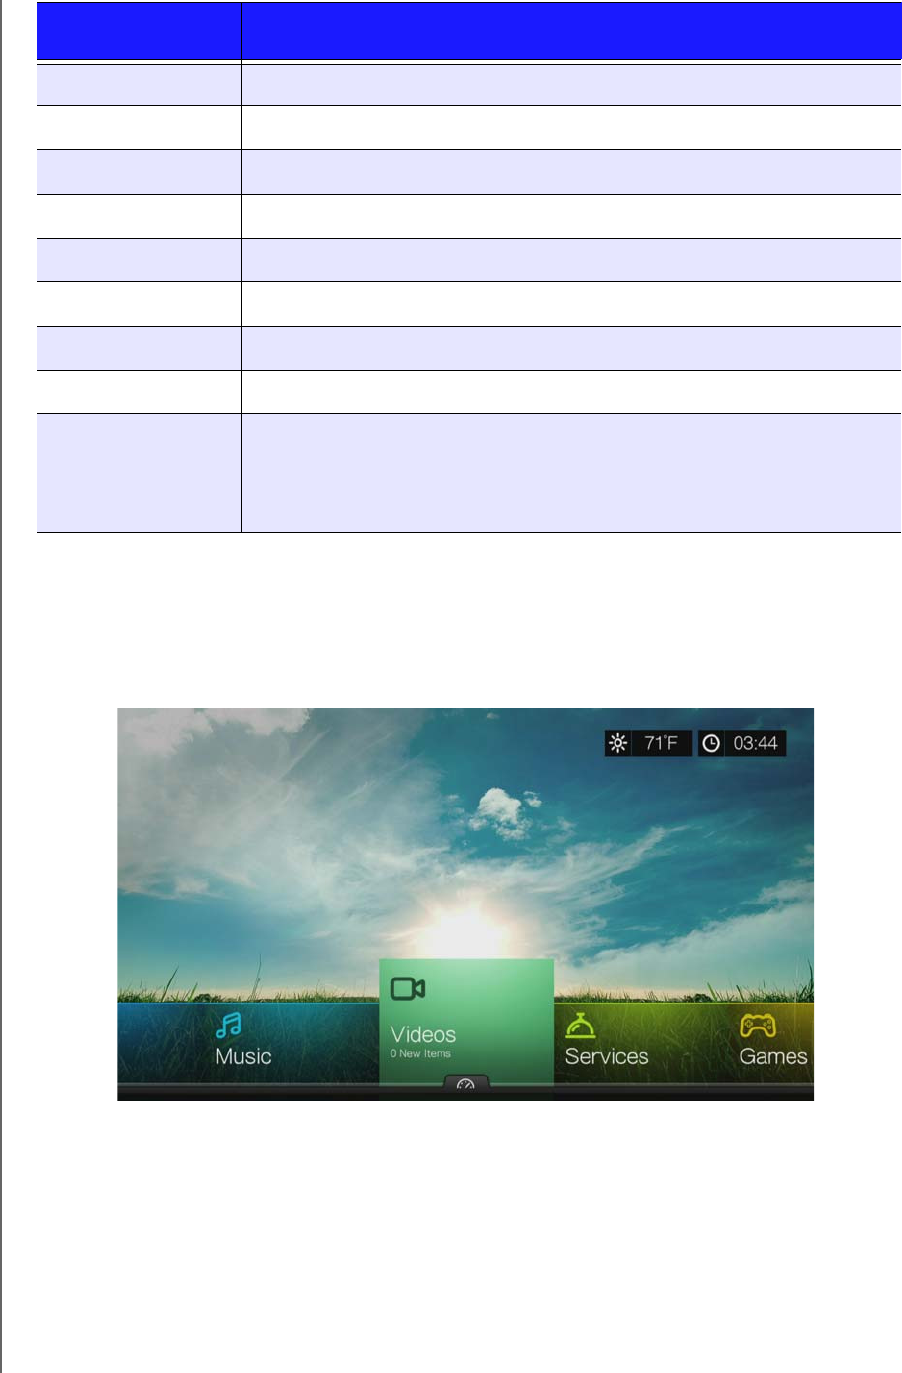
Using the Media Player Menu
The Home screen displays when turn on your media player or press HOME on the
remote control. The menu options in this screen let you browse your media library
and configure the media player’s settings.
Home Screen Options
The main Home options are:
Videos
Music
Photos
Files
V (Subtitle) Switches a video’s subtitles (if applicable)
B (Audio) Switches a video’s audio stream (if applicable)
DELETE Clears the data entry field.
Z (Zoom) Zooms in on the currently playing video file or photo.
R (Shuffle) Enables the shuffle function for Videos and Music files.
L (Repeat) Repeats the current video or music file.
BACKSPACE Deletes the currently selected file.
CTRL + S (Setup) Brings up the Setup menu
Alpha-numeric
keys
• Pressing the any of these keys once inputs the corresponding letter or
number.
• While listening to a song or music playlist, press and hold any of the
0-9 buttons to create a preset.
Key or key
sequence
Function

WD TV Play Media Player
User Manual
OPERATING THE MEDIA PLAYER – 52
PRELIMINARY-P3
Setup
Services
Games
RSS
New Firmware (automatically detects new firmware and only appears when new
firmware is available)
The Music, Videos, and Photos options represent folders for the different media
types. Media contents display either as file/file folders in the media player, network
attached storage, or a USB drive directory or as a media library compilation list
based on metadata information. For example, music files can be categorized based
on their genre or the artist’s name.
Setup lets you customize the way you use the media player and set preferences for
media playback. For more information, see “Setup and Advanced Features” on page
179.
Setting Time and Weather
To set the time in the media player screen display, see “Set Time & Country” on
page 201.
To set the temperature in the media player screen display, see
“AccuWeather.com” on page 98.
WD TV Play Media Player
User Manual
OPERATING THE MEDIA PLAYER – 53
PRELIMINARY-P3
Home Screen Navigation
Use the following keys to navigate through the menu screens.
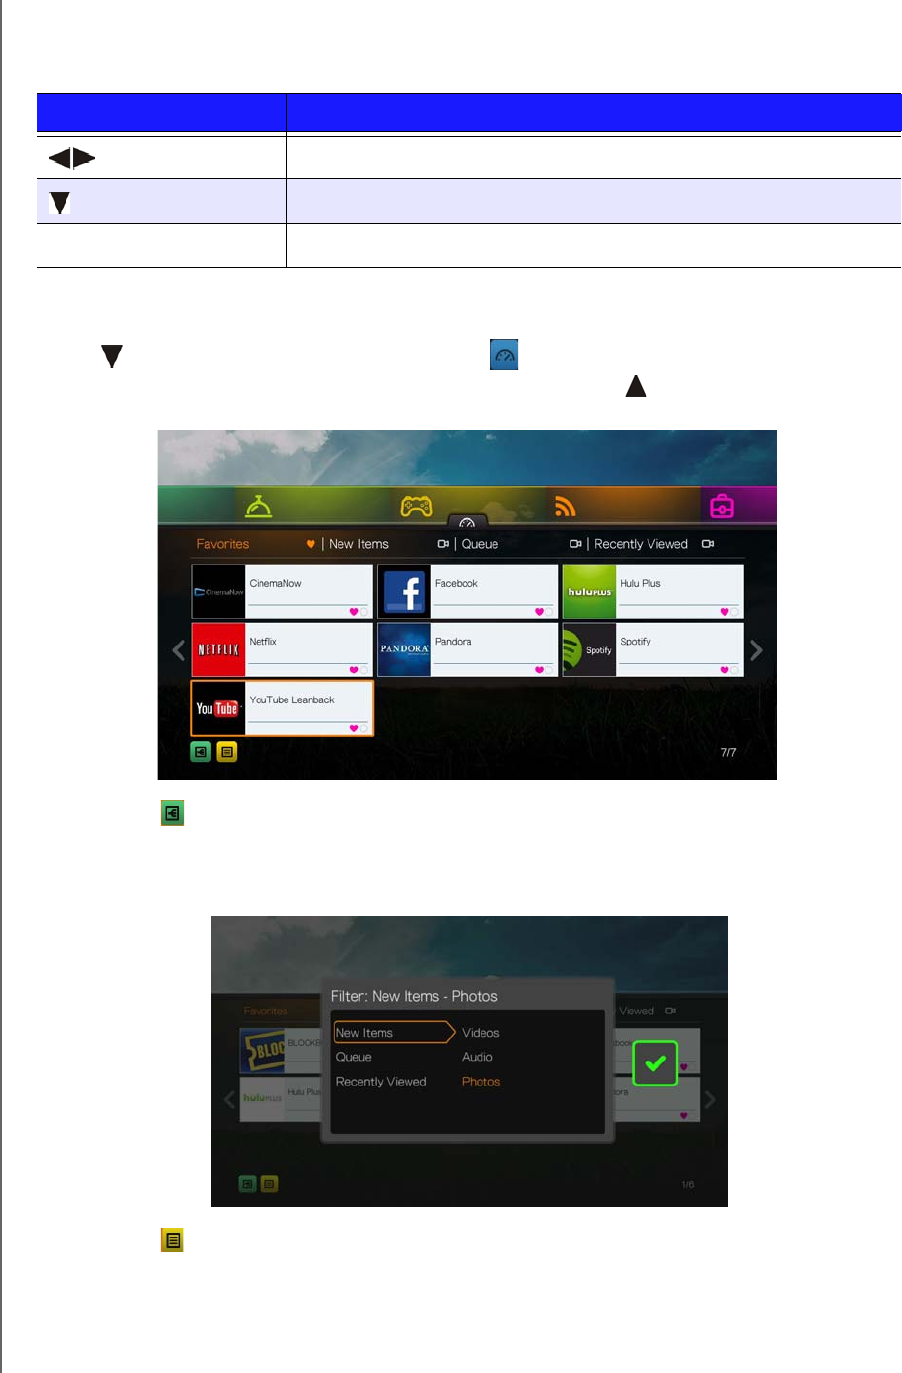
Media Player Dashboard
Press at the home screen or navigate to then press OK in the in the Videos,
Music, or Photos menus to launch the dashboard. Press or Back to exit the
dashboard. Your Favorites are shown by default.
Navigate to to filter the media files and internet service links shown on the main
dashboard page by category and media type. For example, to find photos you have
added recently, select New Items and press OK, Photos and press OK, then press
OK again.
Navigate to and press OK to toggle between list and thumbnail views.
Button Function
Left/Right arrows Move from one option to the next
Down arrow View the dashboard
OK Launches your selection

WD TV Play Media Player
User Manual
OPERATING THE MEDIA PLAYER – 54
PRELIMINARY-P3
Press , Use the / navigation buttons, then press OK in the dashboard to
display your media files by the following categories:
Favorites (see “Favorite” on page 65)
New Items (displays media files you have added within a certain date range.
See “Show New Items” on page 187 for details and instructions for adjusting the
date range)
Queue (Use the / navigation buttons then select the Videos, Music, or
Photos icon, then press OK - see “Add to Queue” on page 65)
Recently Viewed (displays media files you have viewed in the last xx days)
After selecting a category, filter the results by media type (Videos, Audio, or Photo).
Then, use the navigation buttons to select a file then press OK to begin playback.
WD TV Play Media Player
User Manual
OPERATING THE MEDIA PLAYER – 55
PRELIMINARY-P3
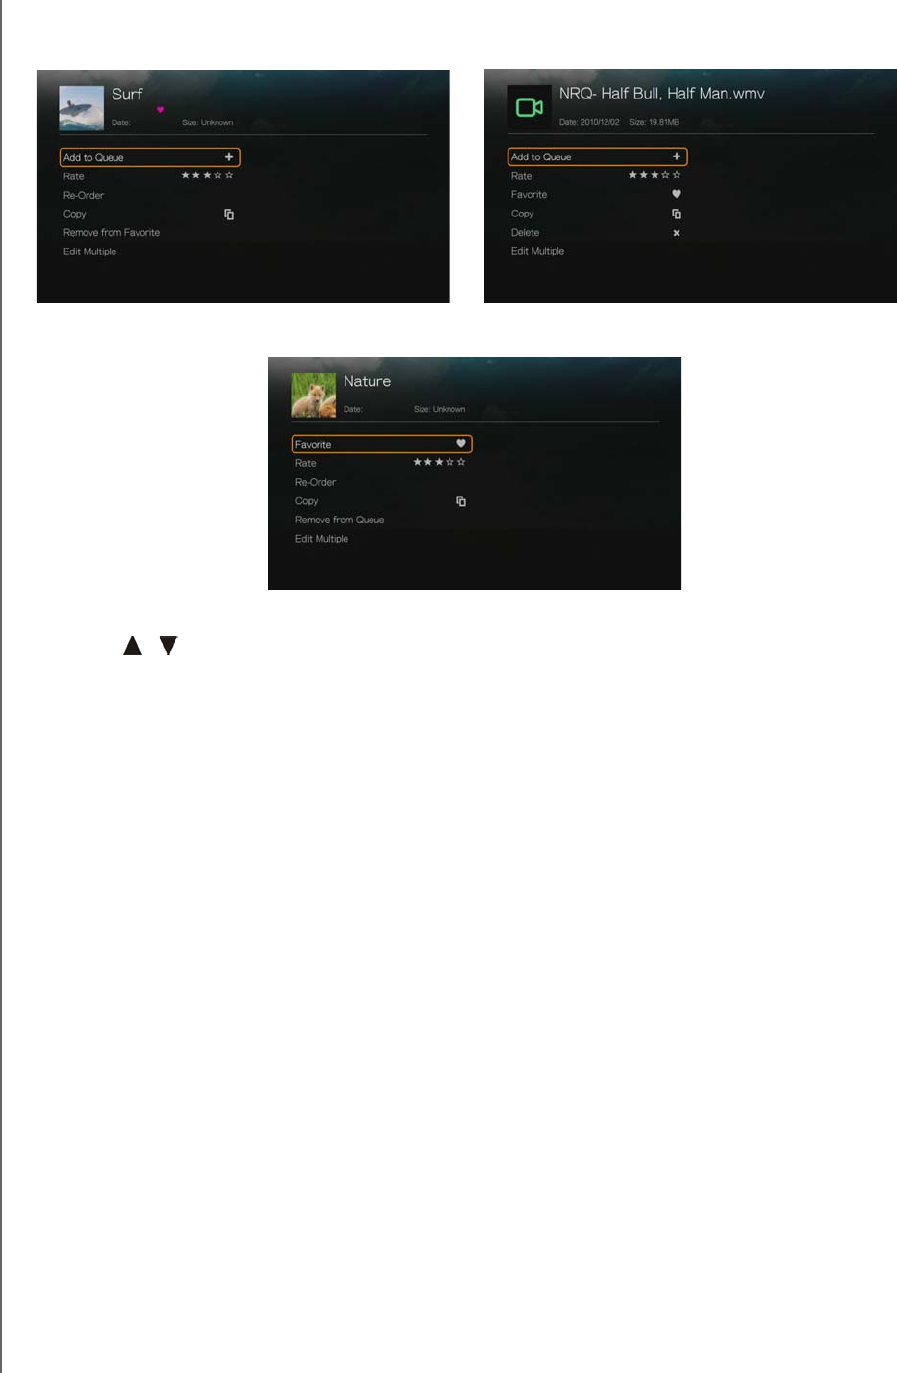
Dashboard Options
With a file selected in any of the dashboard categories, press Options.
Use the / navigation buttons to select from the following options, then press
OK.
Add to Queue (when a file in Favorites, New Items, or Recently Viewed is
selected - see “Add to Queue” on page 65).
Rate (see “Rate” on page 65).
Re-Order - use this option to move items up or down in viewing sequence in
both Favorites and Queue categories. Using the navigation buttons, place the
cursor where you want the selected file located.
Favorite (when a file in Queue, New Items, or Recently Viewed is selected - see
“Favorite” on page 65).
Copy (see “Move & Copy” on page 66).
Remove from Favorite/Remove from Queue - removes the selected file from
the Favorites or Queue categories.
Delete (see “Delete” on page 66).
Edit Multiple (see “Select Multiple” on page 67).
Media Library Compilation
Media Library Compilation refers to the process of scanning and consolidating the
media contents of the media player, network attached storage, or an attached USB
device into one comprehensive database so that you can easily browse and locate
media files based on certain metadata information (e.g., video files are categorized
based on title or release date).
Dashboard Options - Favorites Dashboard Options - New Items or
Recently Viewed
Dashboard Options - Queue

WD TV Play Media Player
User Manual
OPERATING THE MEDIA PLAYER – 56
PRELIMINARY-P3
Media Library Compilation Exemptions
The following conditions will prevent the media library compilation process.
The network share has read-only protection.
The USB device has read-only protection.
There is not enough storage space in network attached storage or an attached
USB device.
A drive is locked.
To turn off Media Library Compilation (default is On):
1. Navigate to Home | Setup | System.
2. Select Media Library, and then press OK.
3. Select OFF, then press OK.
Note: Clear Media Library clears then rebuilds the media library.
Supported Categories for Media Library Compilation
Once the media library compilation process is completed, all available media files are
organized under their respective media type directory. By default, media contents
are displayed as thumbnails (music album/movie poster art, image thumbnail). The
content categories are listed in the following table.
Media Type Category Description
Music All Tracks Displays a list of all audio files arranged in alphabetical order.
Artist Content is categorized based on the artist name.
Genre Content is categorized based on genre.
Album Content is categorized based on album names.
Date Content is organized by date modified.
Folders Contents are displayed in audio file folders.
Recent Displays a list of audio folders/files that have been accessed
recently.
Playlist Displays a list of music playlists.
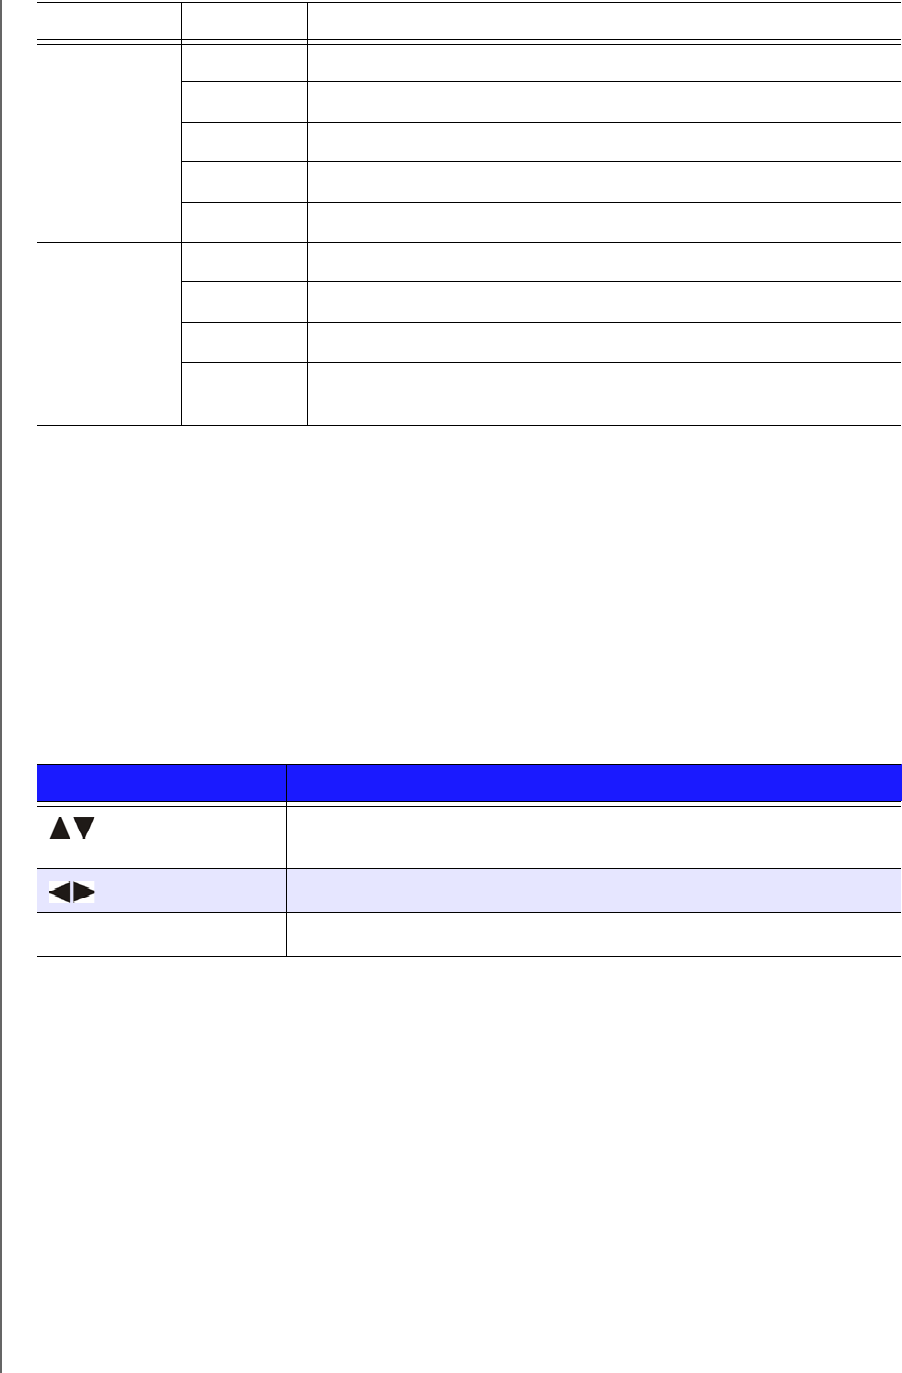
WD TV Play Media Player
User Manual
OPERATING THE MEDIA PLAYER – 57
PRELIMINARY-P3
Locating Your Contents on the Drive
There are two ways of locating a particular media file depending on whether or not
the media library compilation function is enabled.
Manual Search
You can manually search for a media file by navigating to the specific media section
and browsing through the available file folders. This method is recommended if there
are only a limited number of files to search through. Otherwise, it is better to enable
the media library compilation and use the built-in Search function.
Use the navigation buttons to move around a particular folder; press Back to move
between folders.
Thumbnail Support for Media Files
Your media player supports thumbnails in two ways - embedded or external (some
file formats do not support embedded thumbnails).
Embedded thumbnails are images that are part of the media file itself. File formats
that support embedded thumbnails:
Music - MP3 and WMA
Photo - JPEG
Video - MP4
Video All Video Displays a list of all video files arranged in alphabetical order.
Date Content is organized by date modified.
Folders Contents are displayed in video file folders.
Recent Displays a list of video folders/files that have been played recently.
Playlist Displays a list of video playlists.
Photo All Pictures Displays a list of all image files arranged in alphabetical order.
Date Content is organized by date modified.
Folders Contents are displayed in image file folders.
Recent Displays a list of image folders/files that have been accessed
recently.
Button Function
Up/Down arrows Select a media type (photos, video, or music) or settings
Select one of the option icons in an Internet service’s submenu bar
Left/Right arrows Move within a category
OK Launches your selection
Media Type Category Description

WD TV Play Media Player
User Manual
OPERATING THE MEDIA PLAYER – 58
PRELIMINARY-P3
To add an external thumbnail:
With an individual file or music album selected, press Options, then select Get
Content Info (see “Get Content Info” on page 64). As an alternative, or if the
database did not find any info:
1. Select a JPEG, GIF, or PNG image file that you want to display as a thumbnail of
the music or video file.
2. Save the file in the same location as the file it will represent, according to the
following guidelines:
Folder Thumbnail Guidelines
Music:
Display folder.jpg (the image file must be named “folder.jpg” or thumbnail will not
function)
If no folder.jpg file is found, display the first embedded album art image found in
the folder
If no album art is available, display the first .JPG in the folder
Photo:
Display thumbnail
Video:
Display embedded cover art
If no embedded cover art is available, display image file associated with the video
file to be played (for example video.mkv will be associated with video.JPG)
File Thumbnail View Functions (Defaults)
Music:
Display album art (.MP3 file with embedded .JPG)
If no album art is available, display the image file with the same name as the
audio file to be played. (for example, song.wav will be associated with song.jpg)
Photo:
Display thumbnail
Video:
Display .MP4 with embedded .JPG
Display image file associated with the video file to be played (for example
video.mkv will be associated with video.JPG)
Search Function
You must first enable the Media Library Compilation feature before using the Search
function. Go to “Media Library Compilation” on page 55 for instructions.
To perform a media search:
1. Go to the main browser screen of the type of media you want to search for
(Videos, Music, or Photos).
2. Press on the remote control.
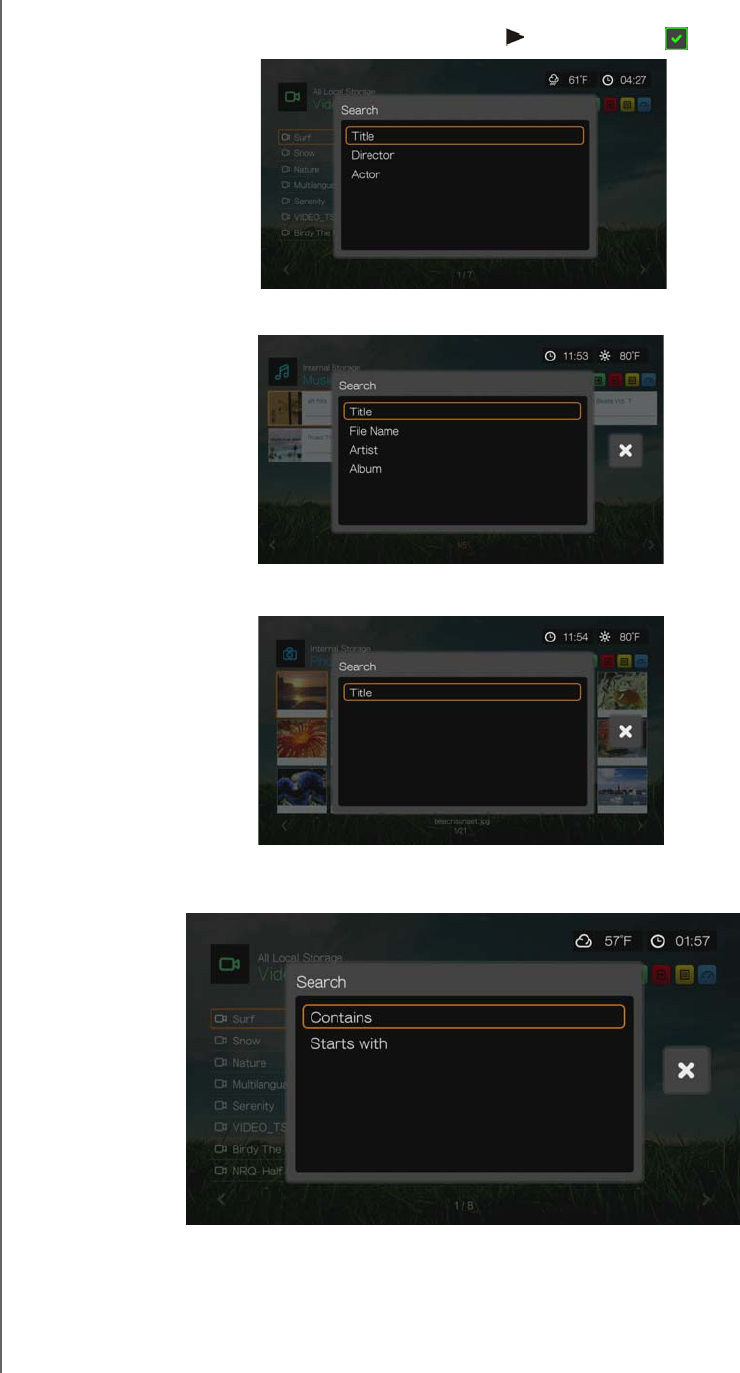
WD TV Play Media Player
User Manual
OPERATING THE MEDIA PLAYER – 59
PRELIMINARY-P3
3. Select Title, Director, or Actor (Videos); Title, File Name, Album or Artist
(Music); or Title (Photos). Press OK, then to select the . Press OK.
4. Select Contains or Starts with, then press OK twice.
Search Options - Videos
Search Options - Music
Search Options - Photos
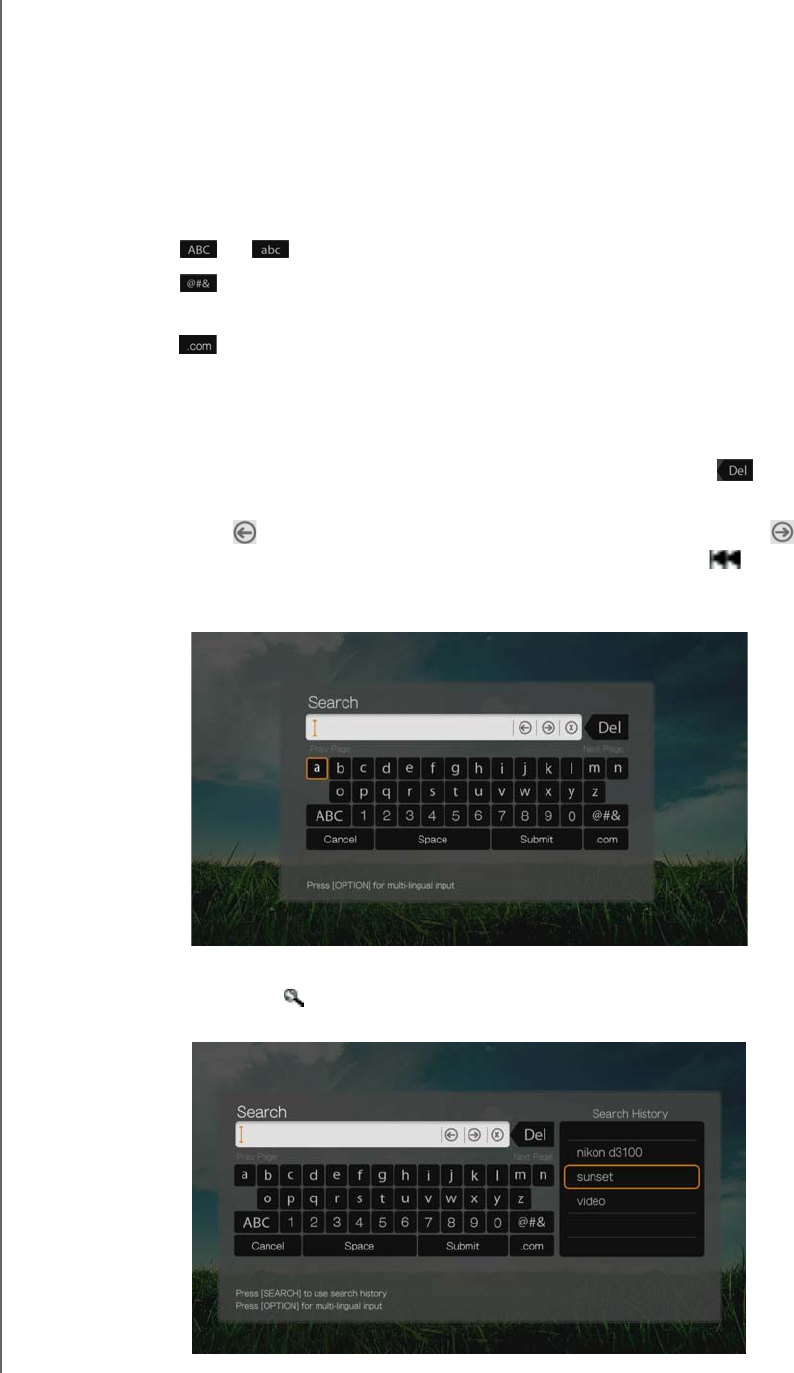
WD TV Play Media Player
User Manual
OPERATING THE MEDIA PLAYER – 60
PRELIMINARY-P3
5. Using the on-screen keyboard:
Use the navigation buttons to select a character, then press OK to input it in
the search bar. Alternatives to this method are as follows:
-Use the alpha-numeric keys on the remote control to enter search terms.
For example, press the 2 button a number of times to enter a, b, or c; press
the 3 button a number of times to enter d, e, or f, etc.
-Plug a USB keyboard into the media player as an alternative to the methods
above. See “Using a USB Keyboard” on page 50.
Select or , then press OK to input characters in a different case.
Select , then press OK to display the symbol keyboard for inputting
special keyboard characters.
Select , then press OK to display the symbols for special characters such
as .com, www., .net, .org, etc.
Press Options for multi-lingual/multi-character input (applicable to certain
letters on the keyboard).
If you want to erase the last character entered, navigate to then press
OK.
Navigate to and press OK to move the cursor backward and to move
the cursor forward in the Search field (you can also press to move the
cursor backward and Next Page to move the cursor forward in the Search
field).
To use search history:
Press the SEARCH button on the remote control. This toggles you to the
Search History list.
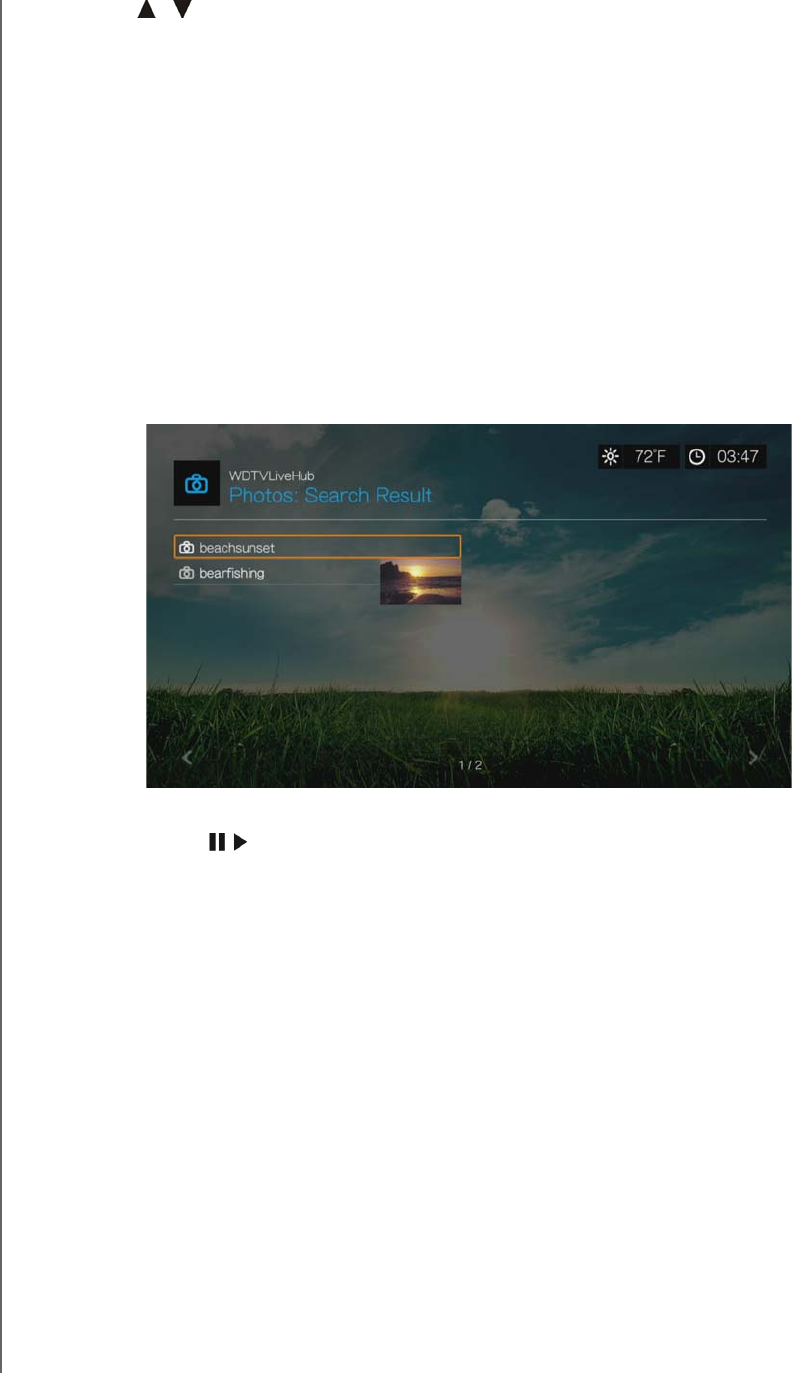
WD TV Play Media Player
User Manual
OPERATING THE MEDIA PLAYER – 61
PRELIMINARY-P3
Press / to select a search from the display.
Press OK to perform the saved search.
6. Once you define the search parameters, select Submit on the bottom of the
on-screen keyboard, then press OK.
All files with filenames that begin with the characters entered in the search field
will be included in the search results. For example, inputting ‘glo’ will result to a
search results like this:
Global party.mpeg
Glow of the Field.jpg
Gloss.mp3
7. If there are no media files matching the search parameters, press OK to display
the on-screen keyboard again and redefine the search parameters.
If media files matching the search parameters you set are found, they will be
listed as shown below (the result of entering ‘bea’ in Photos).
Use the navigation buttons to select the media file you are looking for, and then
press OK or to initiate playback.
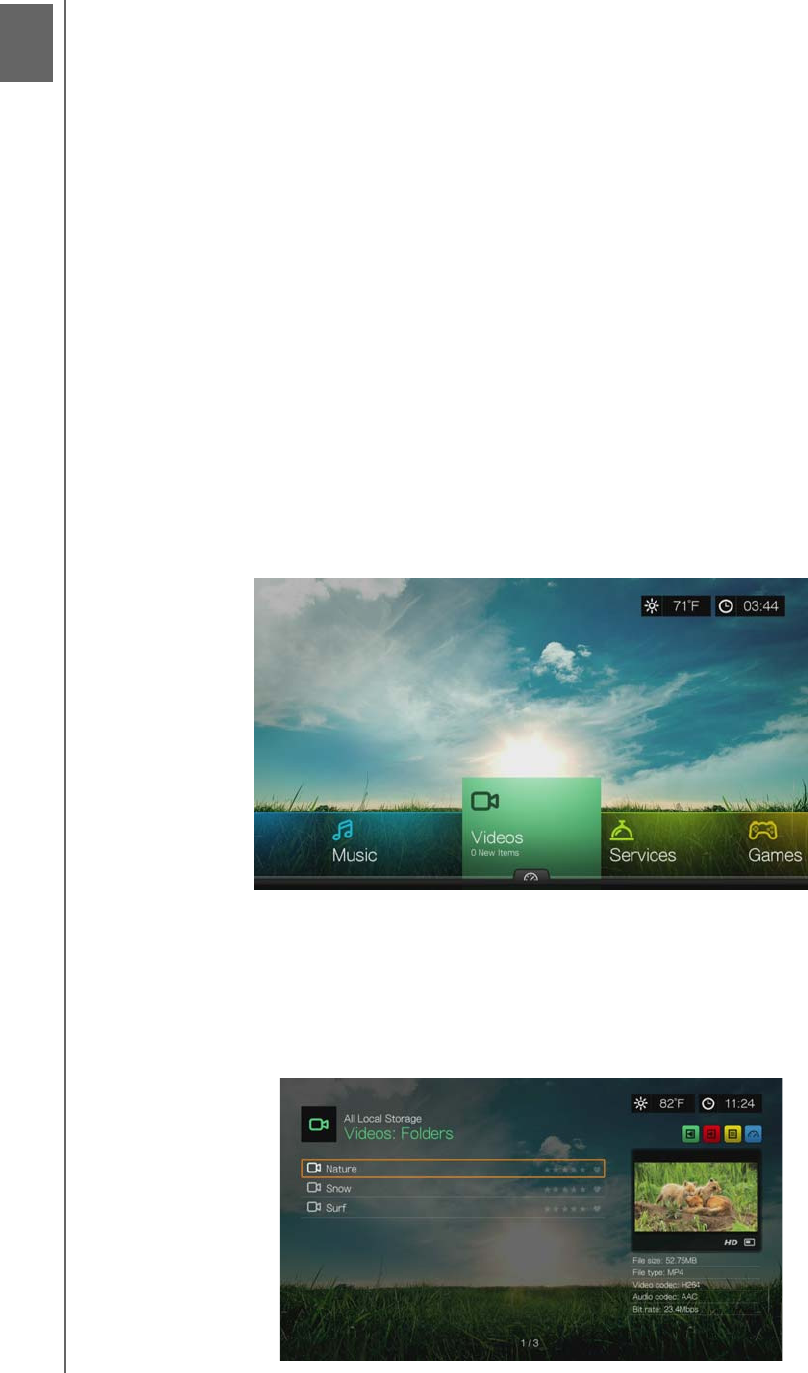
WD TV Play Media Player
User Manual
WATCHING VIDEO – 62
PRELIMINARY-P3
Watching Video
You can watch videos on your TV using the media player.
Supported Video Formats
The following video file formats are supported.
AVI (Xvid, AVC, MPEG1/2/4)
MPG/MPEG
VOB/ISO
MKV (h.264, x.264, AVC, MPEG1/2/4)
TS/TP/M2T (MPEG1/2/4, AVC, VC-1)
MP4/MOV (MPEG4, h.264)
M2TS
WMV9 (VC-1)
Video Playback
To play back video:
1. Navigate to the Home | Videos menu, then press OK.
2. The screen displays available video files and video folders in the media player’s
local drive by default. The display will either be in preview view (default), grid view,
list view, or gallery view, depending on your Browser Display setting (see “Video
Settings” on page 188 for more information on Browser Display settings).
Preview mode displays file size, and file type and genre (if available) for the
selected video.
8
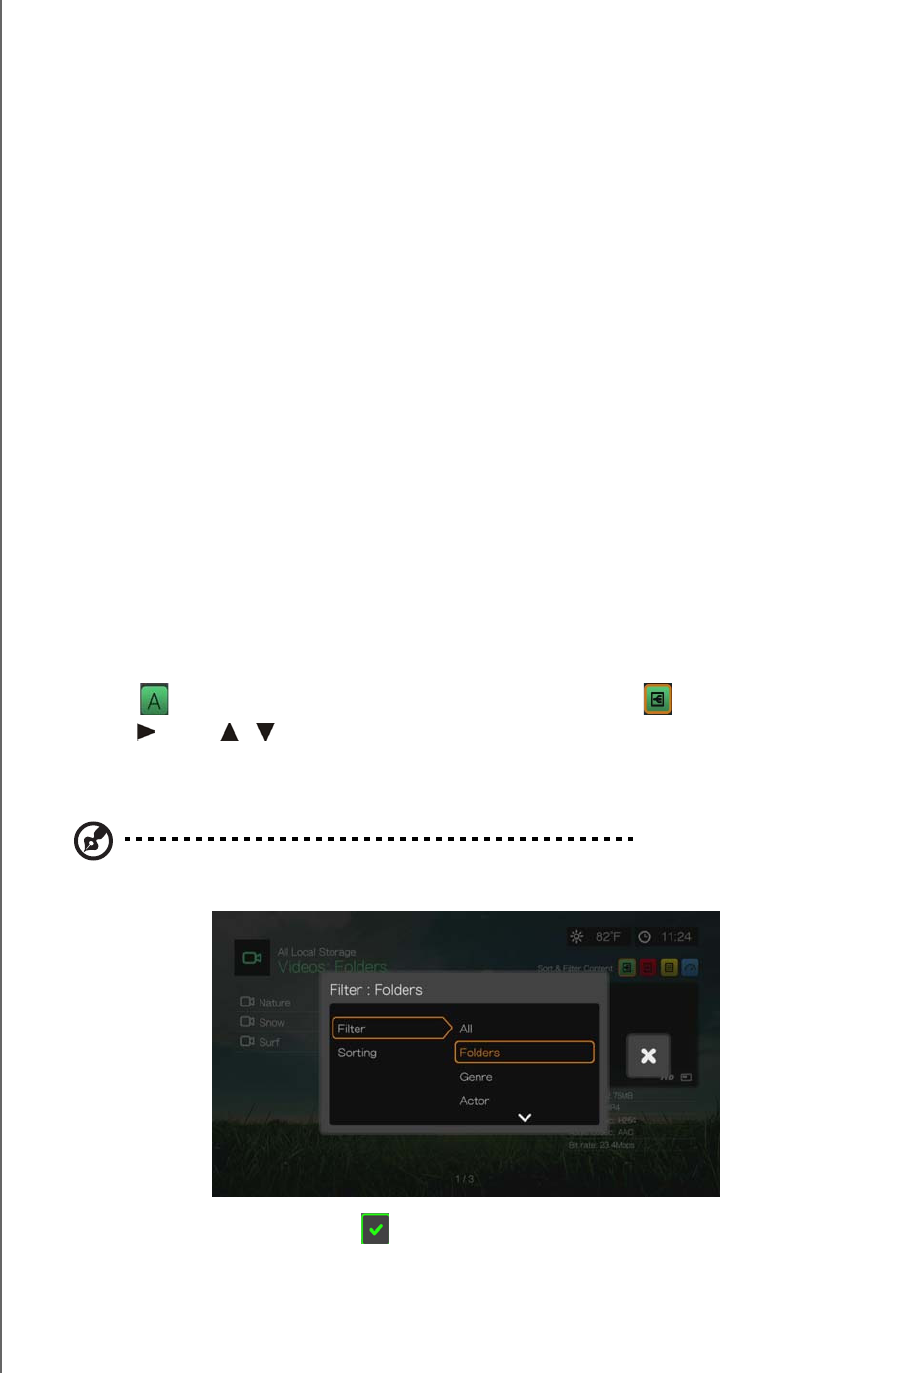
WD TV Play Media Player
User Manual
WATCHING VIDEO – 63
PRELIMINARY-P3
If Media Library is enabled, you can choose to navigate using a filter option (All
Videos, By Date, By Folders, By Year, Personal rating, or Playlists) by
selecting the Video icon and then using the left and right arrow buttons on the
remote control to scroll through the options listed. See “Supported Categories
for Media Library Compilation” on page 56 for details.
3. Locate the video file you want to play.
To begin playback of a single video file, highlight the file, and then press OK.
To begin playback of a video playlist, highlight the playlist name, then press
PAUSE/PLAY.
To begin playback of all video files in a folder, highlight a video in that folder,
then press PAUSE/PLAY.
To find a video on a network share or media player, follow the instructions in
“Accessing Media Content” on page 28.
If you try to open a video file that has been partially played before, you are
prompted to choose whether to play the file from the beginning or resume
playback from the last playback position. Select Resume to resume playback or
Restart to start playback from the beginning.
Sort & Filter Videos
You can sort and filter the videos shown in the video menu based on your
preferences using the sorting & filter option.
Filter
1. Press or navigate to the sort and filter content icon , and press OK.
2. Press , then / to select Filter by All, Folders, Genre, Actor, Director, TV
Show, Playlist, Untagged, New Items, and Favorites. Press OK to display videos
by the criteria selected.
Note: If you have your media files organized by folder, it may be easier and quicker to find your files by
using the Filter option to only show folders.
3. With the green check mark selected, press OK again.
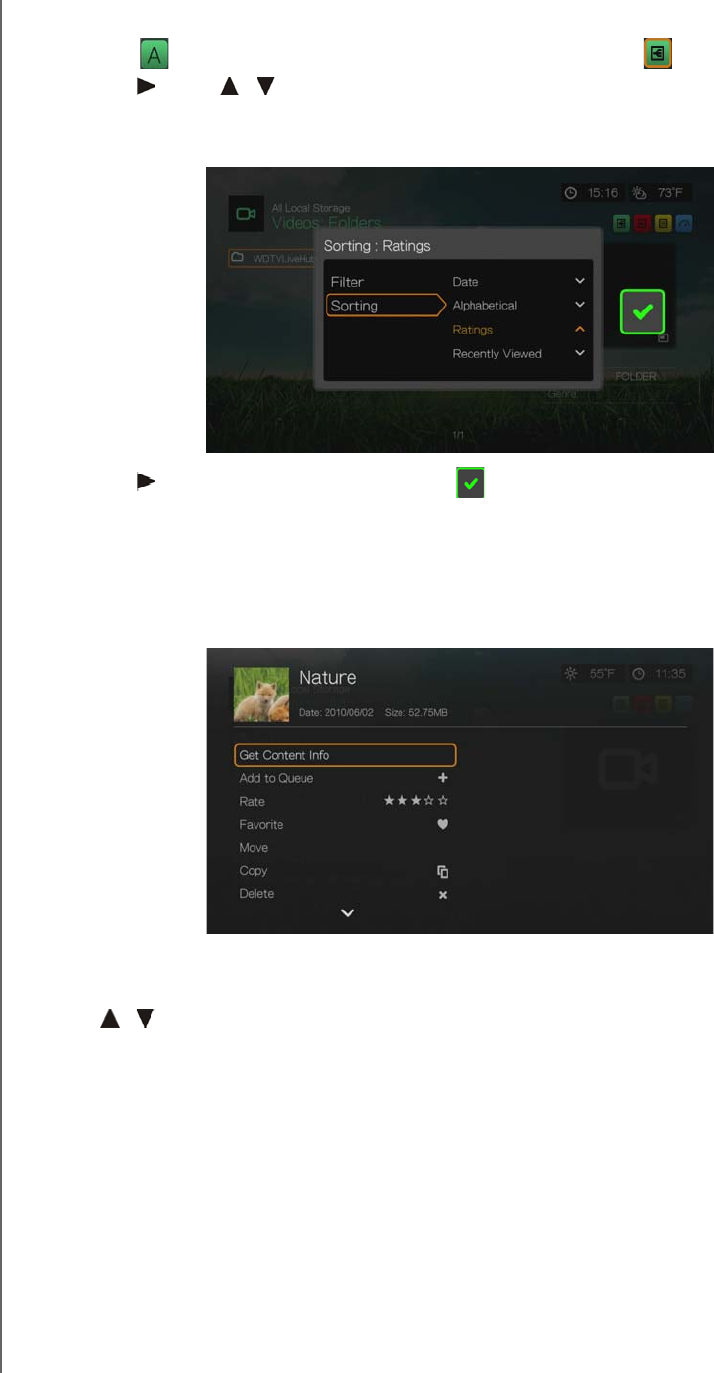
WD TV Play Media Player
User Manual
WATCHING VIDEO – 64
PRELIMINARY-P3
Sorting
1. Press or navigate to the sort and filter content icon , and press OK.
2. Press , then / to select Sorting by Date, Alphabetically, by Ratings, or by
Recently Viewed. Press OK to display videos by the criteria selected in either
ascending (arrow up) or descending (arrow down) order.
3. Press . With the green check mark selected, press OK again.
Videos Menu Options
In the main Videos screen, press Options. The Videos menu options display. Press
Back when finished to return to the main menu.
Get Content Info
Press / and select Get Content Info from the list of options prompts the media
player to connect to an online media database to gather information about the file.
For example, Get Info returns the MPAA rating, duration of the movie, genre, studio
photos, and movie trailers based on the movie’s title.
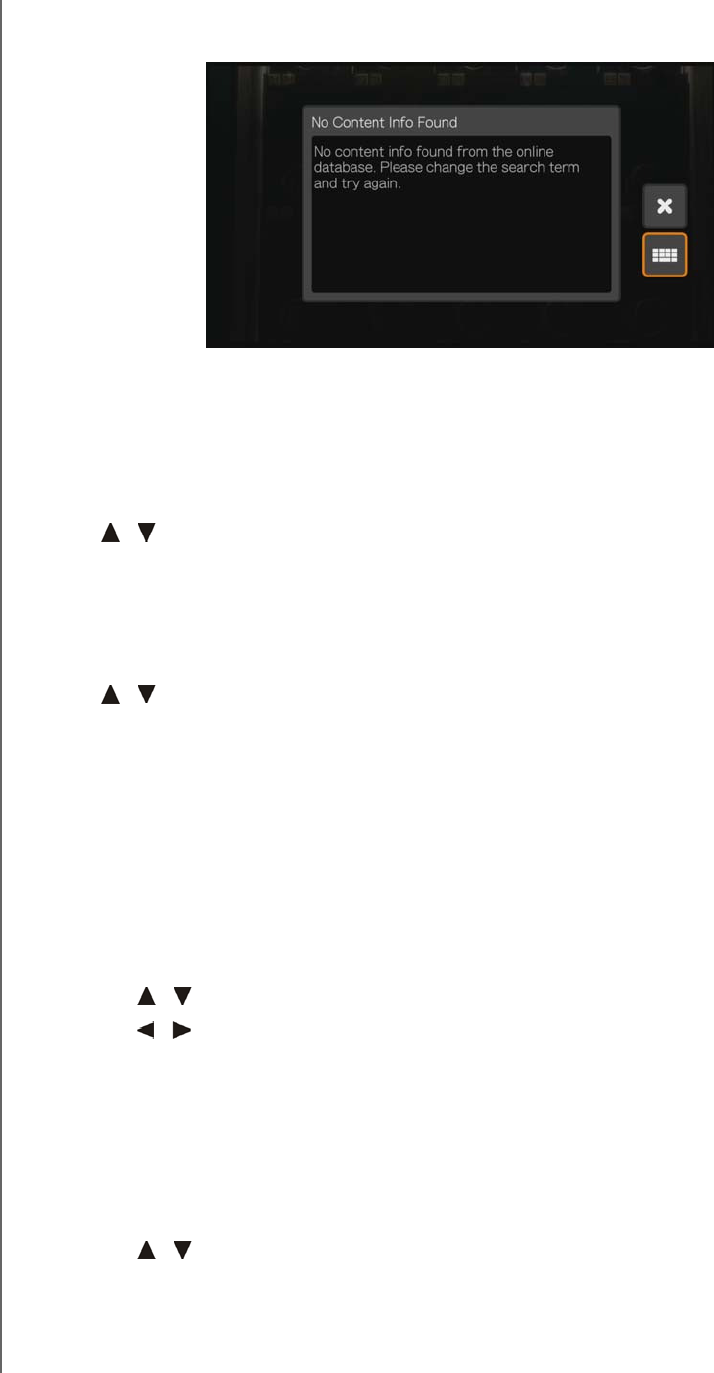
WD TV Play Media Player
User Manual
WATCHING VIDEO – 65
PRELIMINARY-P3
If a No Content Info Found message displays, navigate to the keyboard icon then
press OK.
Enter the whole title or a portion of the title using the on-screen keyboard, select
Submit, then press OK to associate info with the content. Select a title from the list,
then press OK.
Rescan Info
Press / and select Rescan Info from the list of options after you have
associated content info with a file. The rescan info option updates content info or
allows you to correct content info that was associated with the file in error.
View Info
Press / and select View Info from the list of options after you have associated
content info with a file. A synopsis/description of the title info displays.
Add to Queue
Adding videos to the queue provides quick access to these files via the dashboard
(see “Media Player Dashboard” on page 53).
Rate
Rate your videos and other media files so you can sort and filter them by ratings and
access them quickly in the dashboard.
1. Press / and select Rate Video from the list of options.
2. Press / to highlight the number of stars corresponding to your preferred
rating. Five is the highest rating, and one is the lowest.
3. Press OK to confirm your rating.
Favorite
Favorite your videos other media files so you can sort and filter them by favorite and
access them quickly in the dashboard.
1. Press / and select Favorite from the list of options.
2. Press OK.
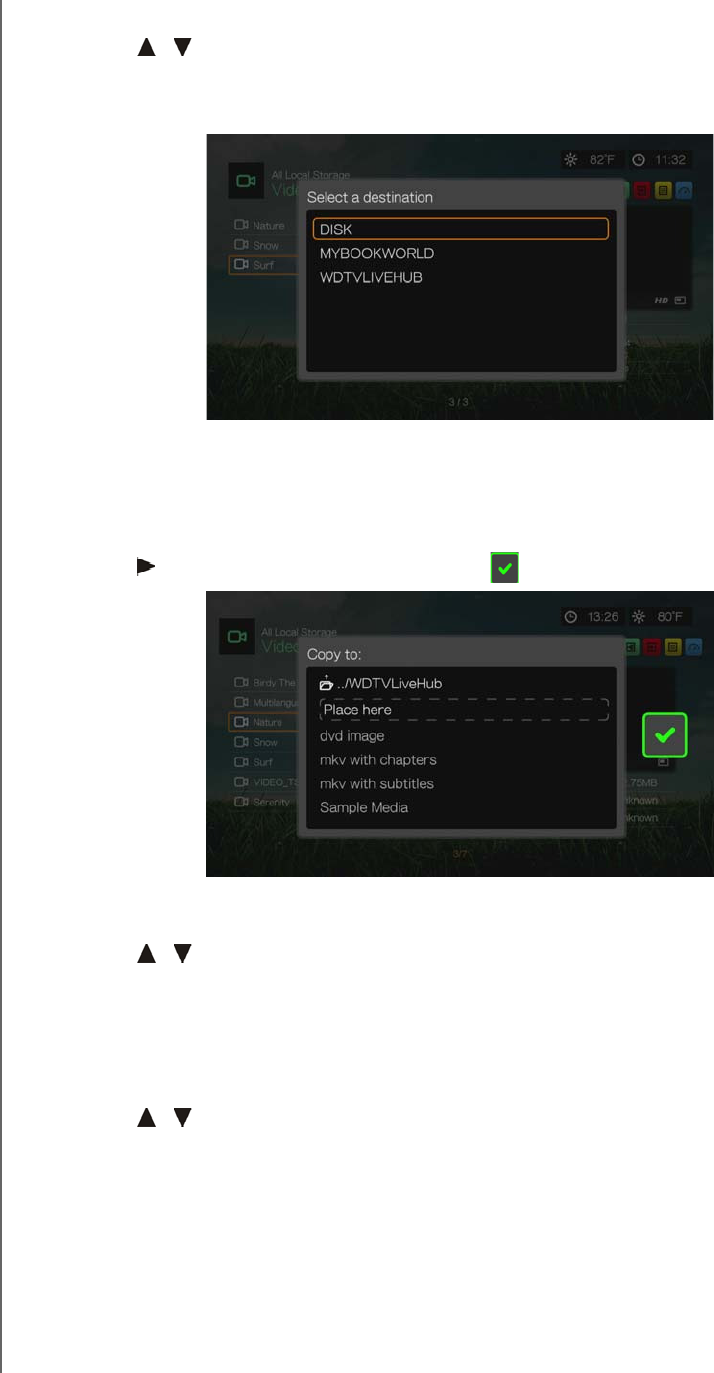
WD TV Play Media Player
User Manual
WATCHING VIDEO – 66
PRELIMINARY-P3
Move & Copy
1. Press / and select Move or Copy from the list of options, then press OK.
2. Select a storage destination for the file you want to move or copy, then press
OK.
3. Use the navigation buttons to select the location where you want to move or
copy the file. When you have selected the location, press OK to place the file
there (if selecting a network or media server location, see “Accessing Media
Content” on page 28).
4. Press to select the green check mark , then press OK.
Delete
1. Press / and select Delete from the list of options.
2. Select Yes, then press OK to confirm deletion.
Upload to Facebook
You can upload a video to Facebook by selecting this option.
1. Press / and select Upload to Facebook from the list of options.
2. Select the account you want to post the file to then press OK, or select Add
Account to add a Facebook account (see “Facebook” on page 109 for details).
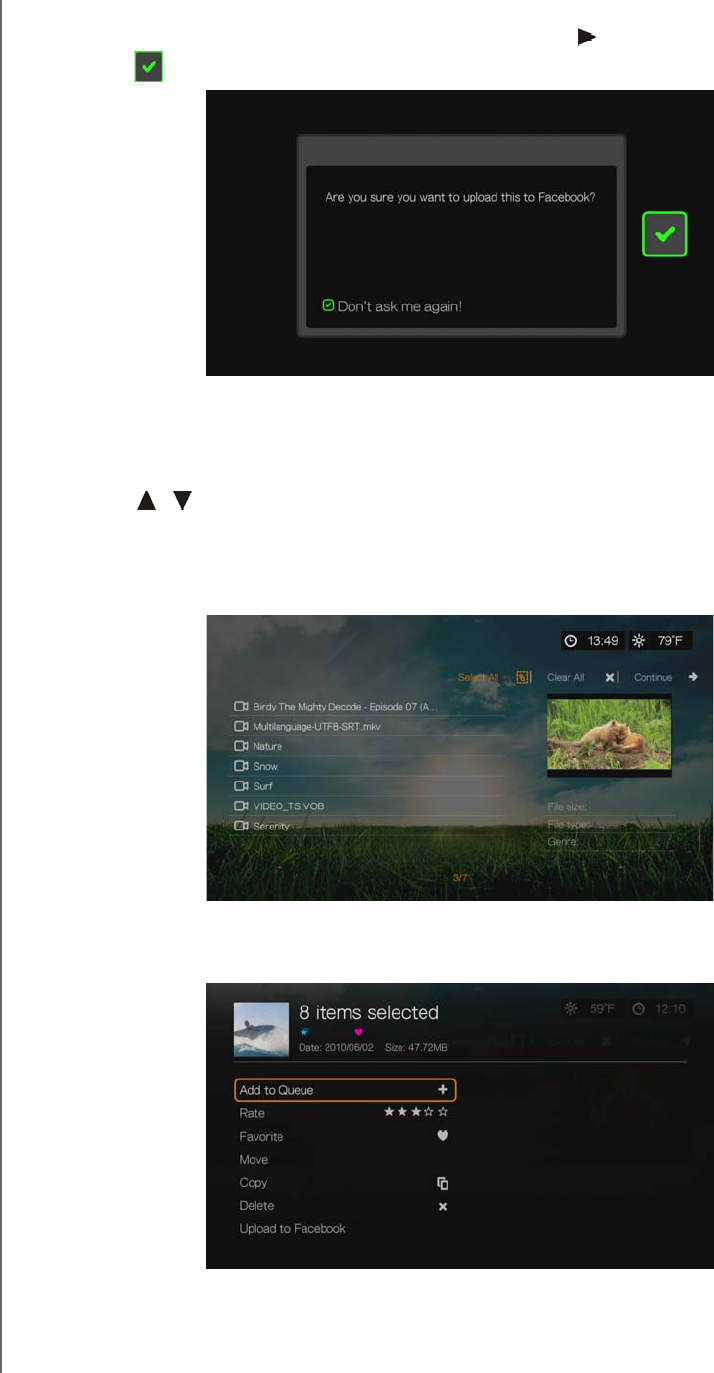
WD TV Play Media Player
User Manual
WATCHING VIDEO – 67
PRELIMINARY-P3
3. The screen below displays. Press OK to select “Don’t ask me again!” if you do
not want this screen to appear again, then press to select the green check
mark . Press OK.
Select Multiple
Select Multiple applies changes to more than file.
1. Press / and select Select Multiple from the list of options.
2. The select multiple screen displays. Use the navigation buttons to Select All,
Select Page, or Clear All files shown, or Continue to the next group of files,
then press OK.
3. With multiple files selected, press Options to apply changes to more than one
file.
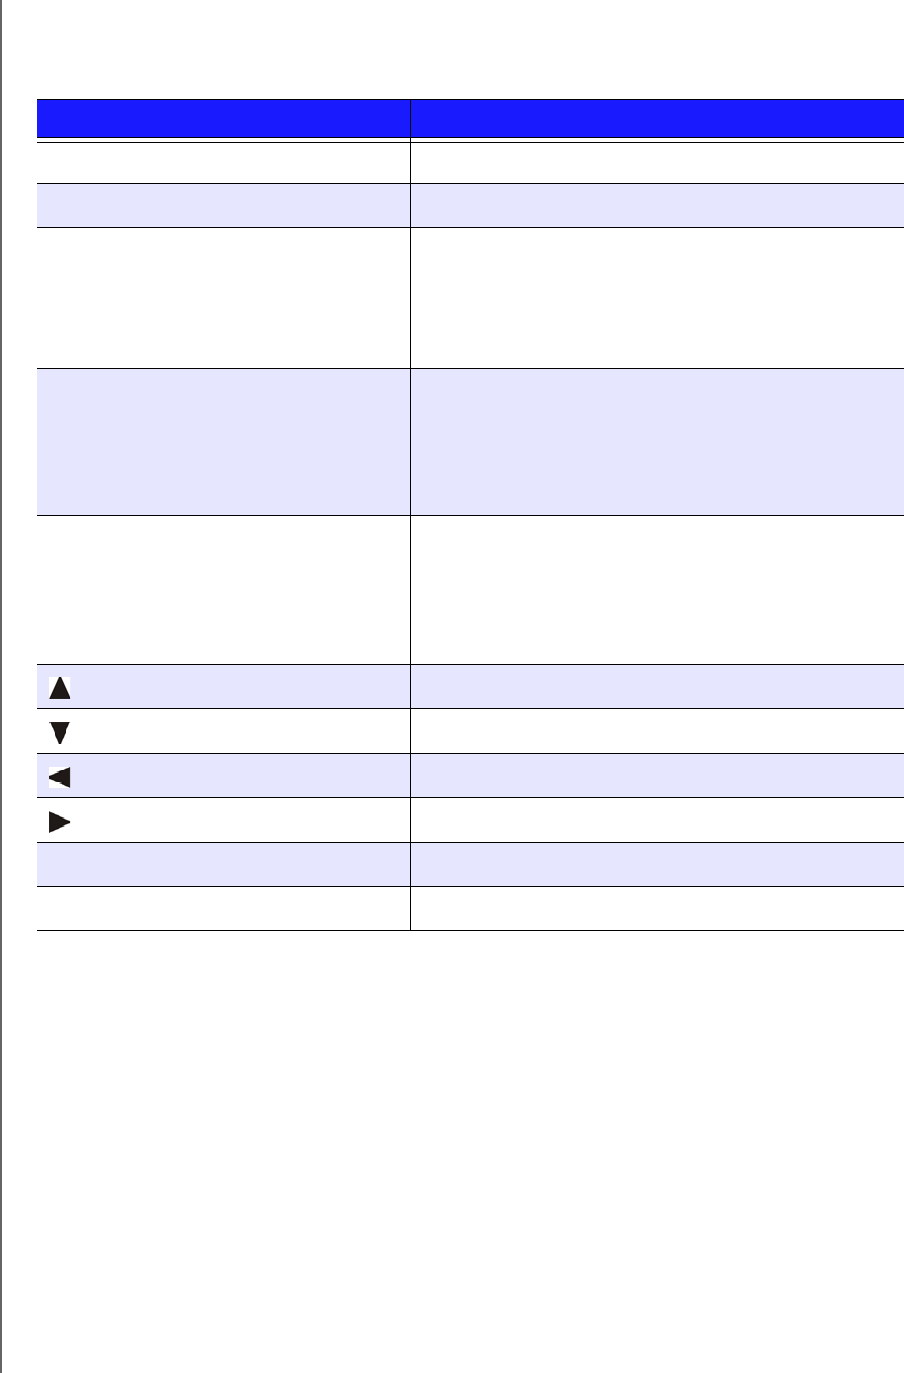
WD TV Play Media Player
User Manual
WATCHING VIDEO – 68
PRELIMINARY-P3
Video Playback Controls
Use these buttons on the remote control to control video playback:
Button Function
STOP Discontinues video playback
PAUSE/PLAY Pauses or resumes video playback
1. Press FF (fast forward) or REV
(reverse) to scan video (press
repeatedly to select the scan speed)
2. Press PAUSE/PLAY to resume
playback on the selected position
Scans the video playback forward or backward
The media player supports the following scan speeds:
2x, 4x, 8x, 16x
NEXT • Plays the next video file in the video folder/playlist
• Press during Fast Forward to skip forward 10
minutes.
•Press
NEXT to skip to the next chapter (if the
video file supports chapters).
PREV • Plays the previous video file in the video folder/
playlist
• Press during Fast Reverse to skip back 10 minutes.
• Press PREV to skip to the previous chapter (if the
video file supports chapters).
Up arrow • Move subtitles up on the screen.
Down arrow • Move subtitles down on the screen.
Left arrow • Reduce subtitle display speed.
Right arrow • Increase subtitle display speed.
Subtitle •
Audio •
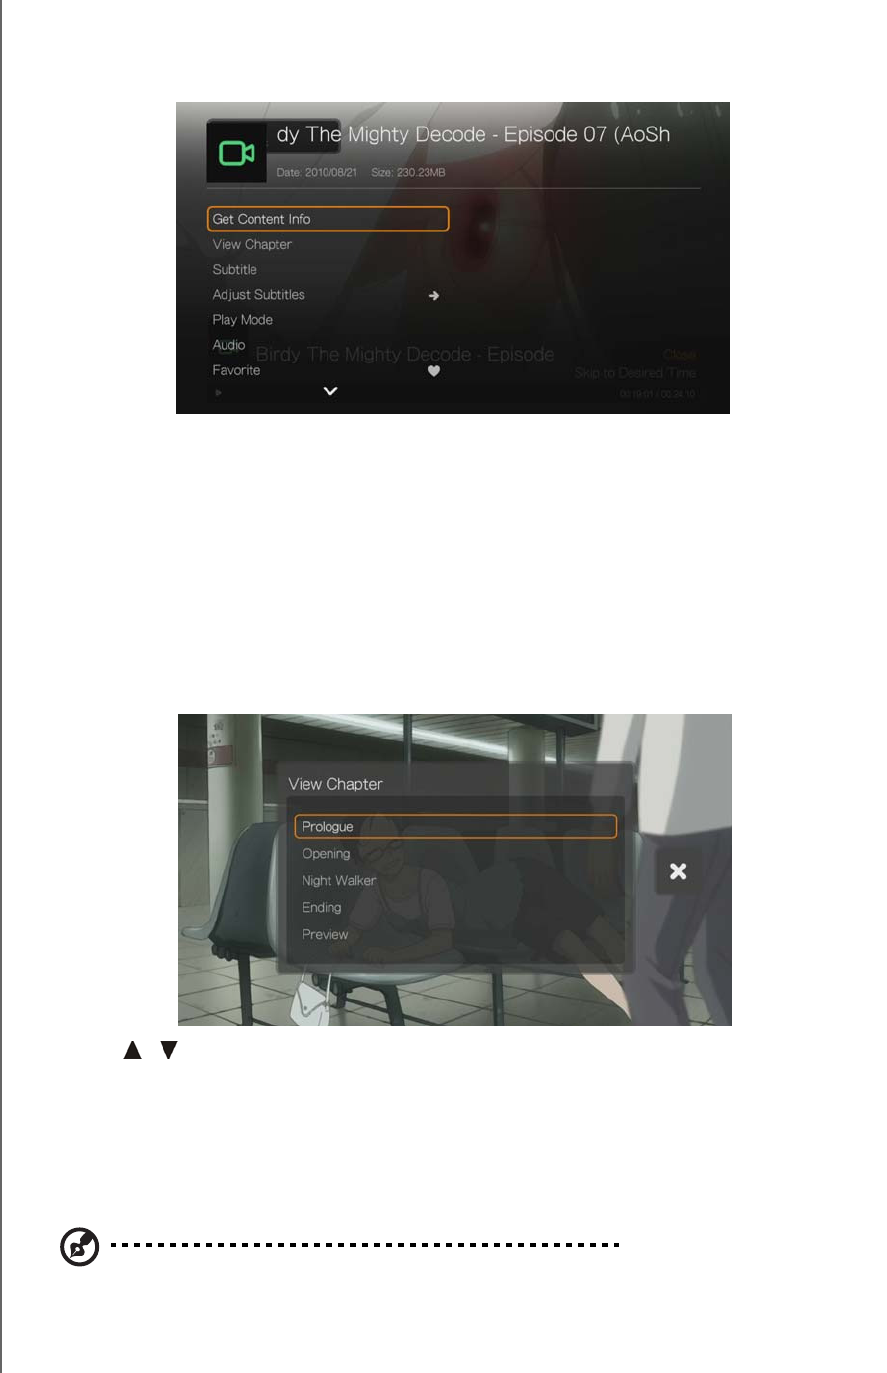
WD TV Play Media Player
User Manual
WATCHING VIDEO – 69
PRELIMINARY-P3
Video Playback Options
To display the video playback options while playing a video, press Options.
To return to the video, press Back.
Get Content Info
See “Get Content Info” on page 64.
View Chapter
If you are viewing a multichapter video file, you can select which chapter to play.
To select the video chapter:
1. Press Options.
2. Highlight View Chapter, then press OK.
3. Press / to highlight your chapter selection, then press OK twice.
Subtitle
Use this option to view subtitles during video playback. Make sure the subtitle files
are located in the same folder as the current video, and that it has the same filename
as the video file.
Note: Subtitle files (specific types that are supported) need to have the exact same file name as the
media they are playing (the extensions will be different) and need to be located in the same folder as
the video file.
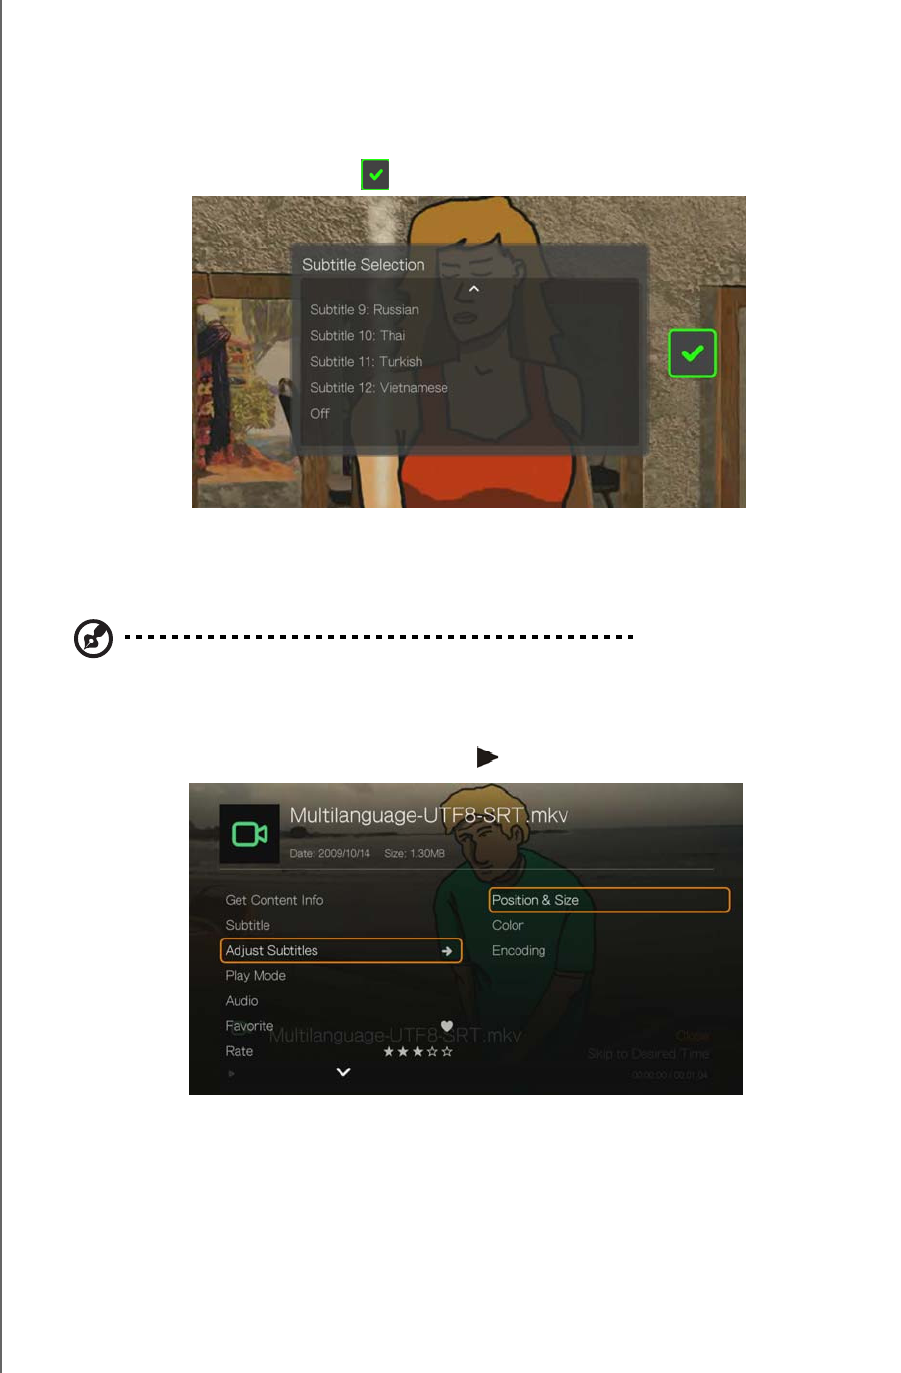
WD TV Play Media Player
User Manual
WATCHING VIDEO – 70
PRELIMINARY-P3
To view subtitles:
1. During video playback, press Subtitle repeatedly until your desired subtitles
display or “Subtitle Off” appears. Or, press Options, highlight Subtitles, then
press OK and follow the steps below.
2. Select your preferred language or Off (to disable subtitles), then press OK.
3. With the green check mark selected, press OK again.
Adjust Subtitles
After selecting subtitles, use this option to adjust subtitles during video playback.
Note: This option is only available for ASS/SRT/SSA subtitles, and is not available for PGS, SUB/IDX,
or VOBSUB subtitles.
1. During video playback, press Options.
2. Highlight Adjust Subtitles, then press .
Adjust Subtitles submenu options include:
Position & Size - use navigation buttons to adjust position and speed, press OK
repeatedly to adjust size).
Color (of subtitle text) - select fill and border color from the Subtitle Color
menu.
Encoding - see “Additional Encoding Support” on page 203.

WD TV Play Media Player
User Manual
WATCHING VIDEO – 71
PRELIMINARY-P3
Play Mode
Use the play mode option to set video repeat options. Press OK repeatedly until the
repeat icon you want is displayed. Options include:
Repeat All – All the video files in the current video folder are played in
sequence and repeatedly until you press STOP or Back.
Repeat One – The current video file is played repeatedly until you press
STOP or Back.
Audio Channel Selection
Use this option to select the audio language used in the video playback. This option
is only available if the current video has more than one audio track. Make sure the
audio tracks are located in the same folder as the current video.
To select the audio channel:
1. During video playback, press Audio (or press Options, highlight Audio, then
press OK).
2. Repeat the step above until your desired language or track plays.
Favorite
See “Favorite” on page 65.
Rate
See “Rate” on page 65.
Add to Queue
See “Add to Queue” on page 65.
Selecting Video Zoom and Pan Options
Use this option to change the viewing scale of the video playback screen and to pan
the video display.
1. During video playback, press Options.
2. Select Zoom & Pan, then press OK.
3. Press OK repeatedly to cycle through the available zoom options. Use the
navigation buttons to pan the display.
Delete
See “Delete” on page 66.
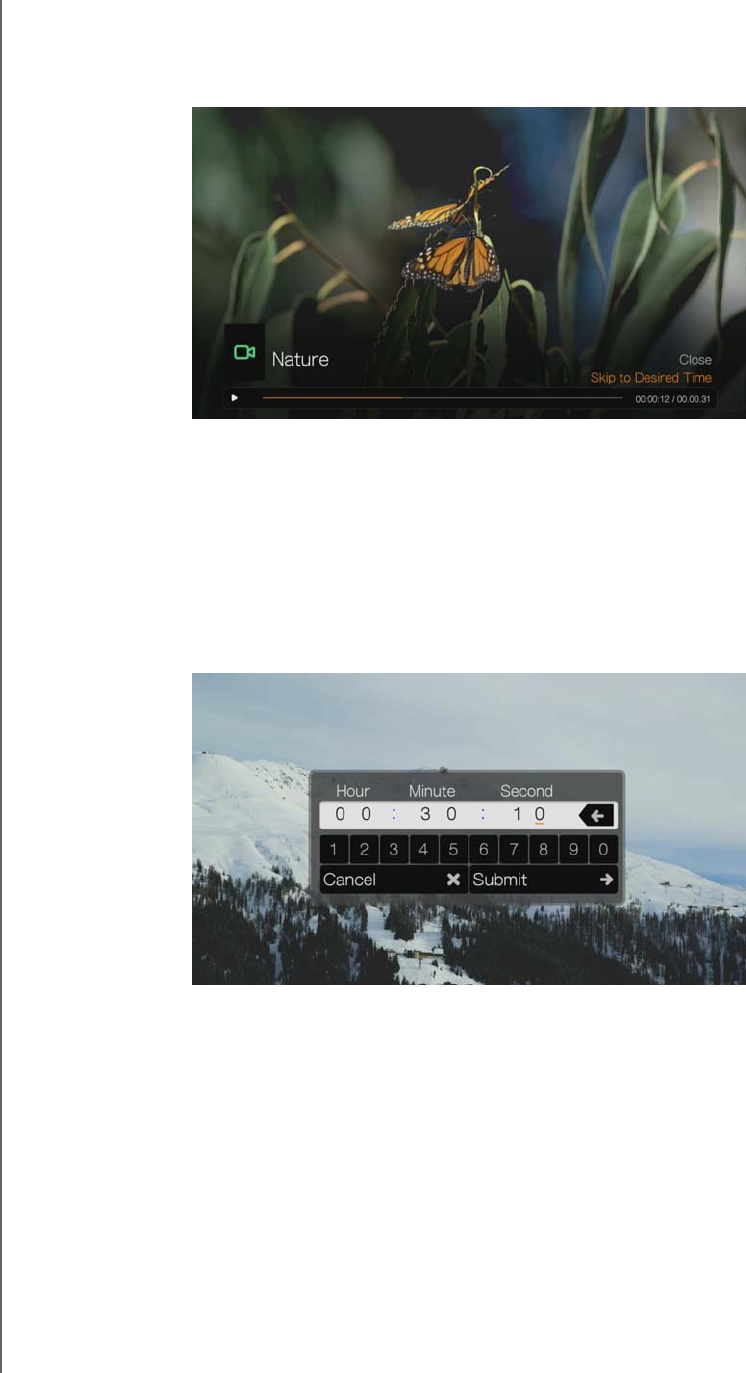
WD TV Play Media Player
User Manual
WATCHING VIDEO – 72
PRELIMINARY-P3
Displaying the Video Playback Panel
Use this option to display the Video Playback Panel on the bottom of the screen.
This panel shows the following information about the current video:
To view the Video Playback Panel:
1. During video playback, press OK. The video playback panel appears on the
bottom of the screen, showing a progress bar along with the elapsed and total
playback times.
2. Some videos allow you to advance to a specific time. Select Skip to Desired
Time, then click OK. A keyboard displays:
3. Use the navigation buttons to position the cursor under each number in the Hour,
Minute, and Second fields, then select a number from the keyboard. Select
Submit then press OK when finished to advance to the specific time.
Press OK to hide the Video Playback Panel when finished.
Video playback progress bar Elapsed and total
playback times
WD TV Play Media Player
User Manual
WATCHING VIDEO – 73
PRELIMINARY-P3
DVD Navigation
In most cases, when the contents of an entire DVD have been successfully saved
and stored on an attached USB hard drive or a networked hard drive connected to
the media player, you will experience the same DVD menu navigation functionality
using the buttons on the media player remote as you would using a DVD remote for
a DVD player connected to a television.
Important: For DVD navigation to work, the VOB files must be placed in a
folder named VIDEO_TS.
Note: Video files such as AVI, MP4, MKV, and MT2S are "single track" video files that do not provide
DVD navigation features.
DVD Navigation Controls
Use these buttons on the remote control to control DVD navigation video playback:
Button Function
STOP Discontinues video playback
PAUSE/PLAY Pauses or resumes video playback
1. Press FF (fast forward) or REV
(reverse) to scan video (press
repeatedly to select the scan speed)
2. Press PAUSE/PLAY to resume
playback on the selected position
Scans the video playback forward or backward
The media player supports the following scan speeds:
2x, 4x, 8x, 16x
NEXT • Press during Fast Forward to skip forward 10
minutes.
•Press
NEXT to skip to the next chapter.
PREV • Press during Fast Reverse to skip back 10 minutes.
• Press PREV to skip to the previous chapter.
Up arrow • At the main menu, move between selections such
as Play Movie, Scene Selection, Set Up, Special
Features, etc.
Down arrow • At the main menu, move between selections such
as Play Movie, Scene Selection, Set Up, Special
Features, etc.
Left arrow • At the main menu, move between selections such
as Play Movie, Scene Selection, Set Up, Special
Features, etc.
Right arrow • At the main menu, move between selections such
as Play Movie, Scene Selection, Set Up, Special
Features, etc.
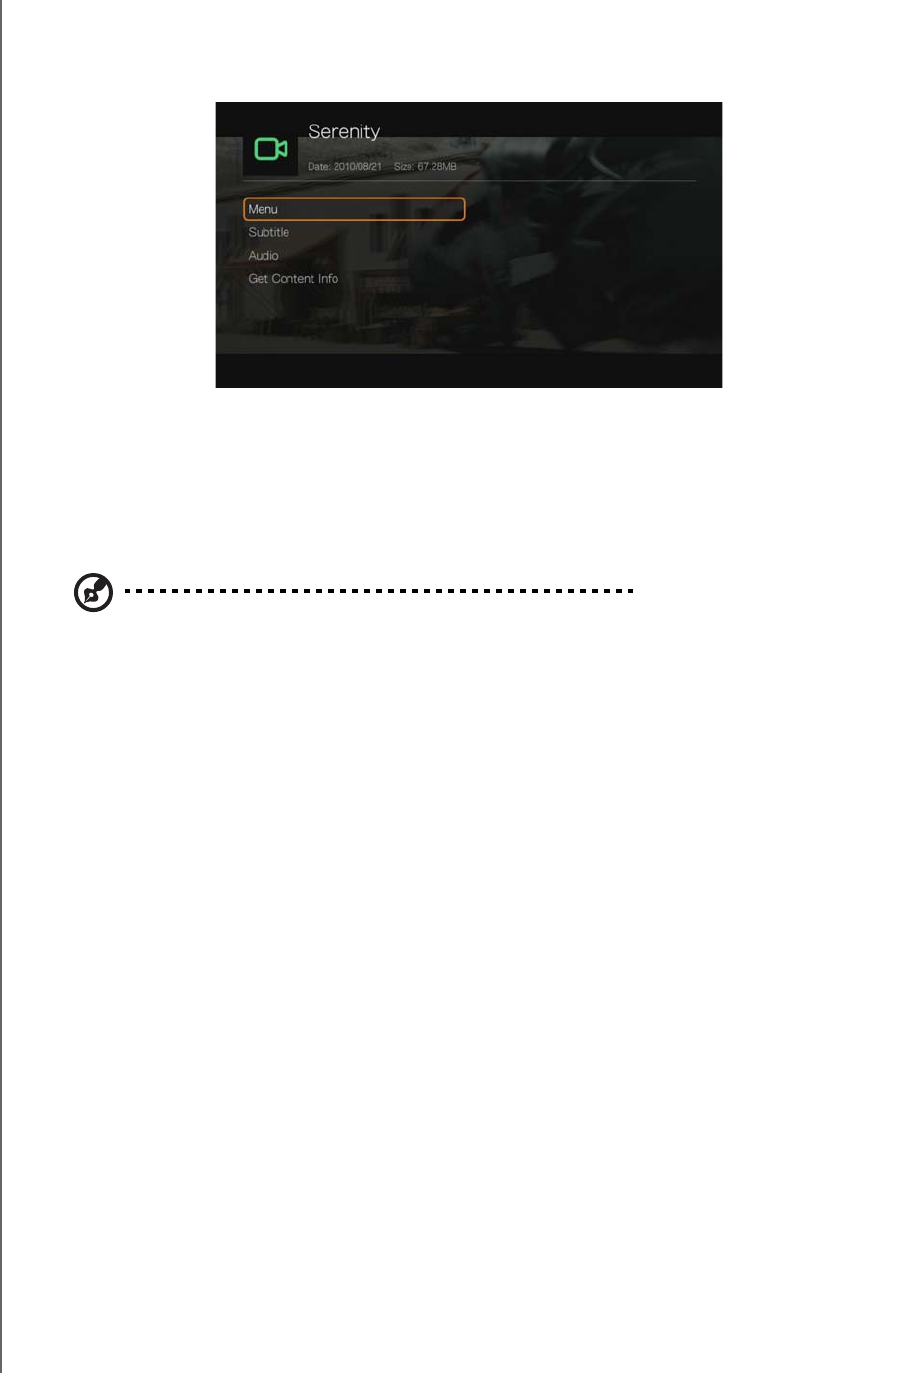
WD TV Play Media Player
User Manual
WATCHING VIDEO – 74
PRELIMINARY-P3
DVD Navigation Playback Options
To display the video playback options, press Options.
To hide the options, press Back or Options again.
Main Menu Selection
To show the main menu in DVD navigation mode:
1. Press Options.
2. Highlight Menu, then press OK. The main menu displays.
Note: Make sure the DVD menu option is set to On. See “DVD Menu” on page 188.
Selecting Subtitles
See “Subtitle” on page 69.
Audio Channel Selection
See “Audio Channel Selection” on page 71.
Get Content Info
See “Get Content Info” on page 64.
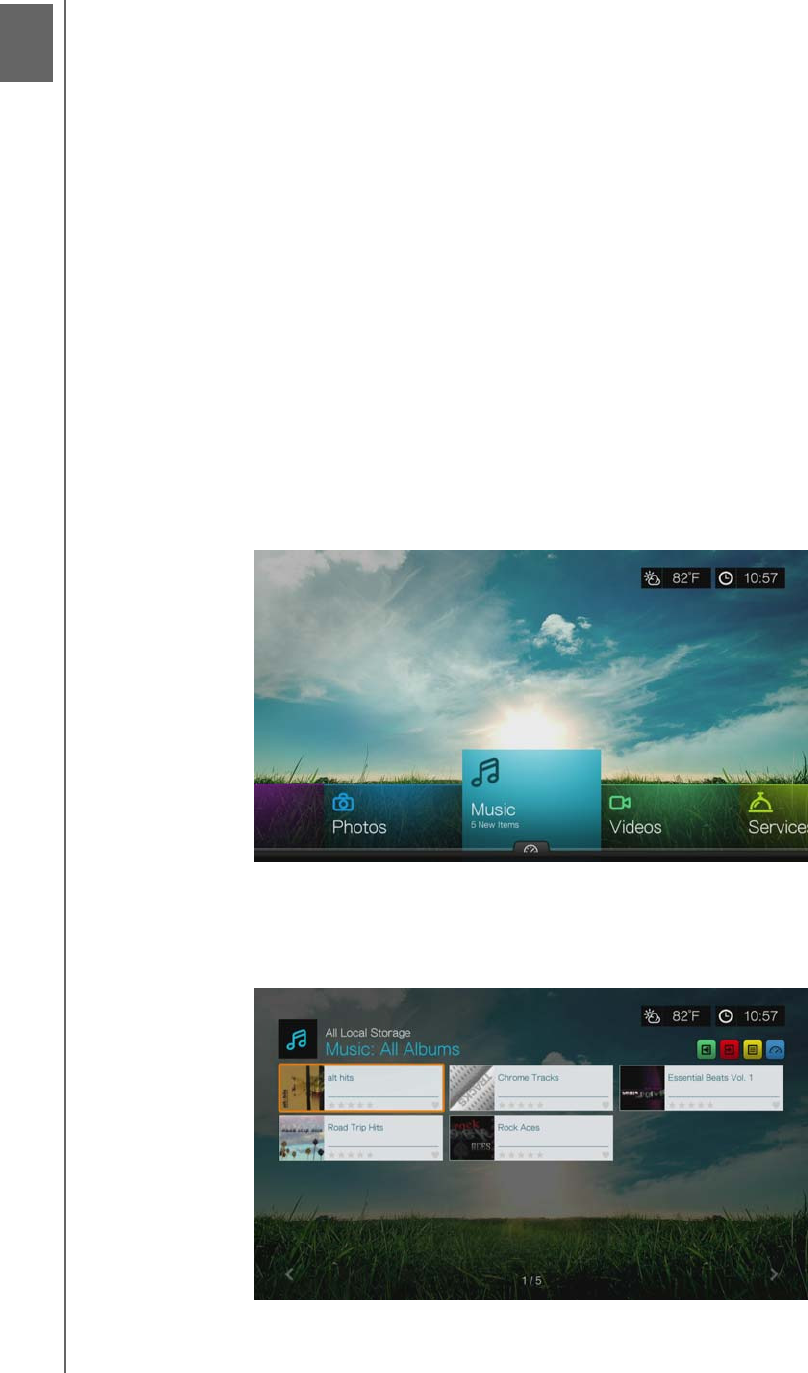
WD TV Play Media Player
User Manual
PLAYING MUSIC – 75
PRELIMINARY-P3
Playing Music
You can listen to audio files on your TV/audio system using the media player.
Supported Audio Formats
MP3
WAV/PCM/LPCM
WMA
AAC
FLAC
MKA
AIF/AIFF
OGG
Dolby Digital Plus
DTS
Music Playback
1. Navigate to the Home | Music menu, then press OK.
2. The screen displays available music files and folders in the media player’s local
drive by default. The display will either be in grid view (default) or list view,
depending on your Browser Display setting (see “Music Settings” on page 191
for more information on Browser Display settings).
If Media Library is enabled, you can choose to navigate using sorting
(Alphabetical, Date, Ratings, Recently Viewed) and filter options (All, All Tracks,
9
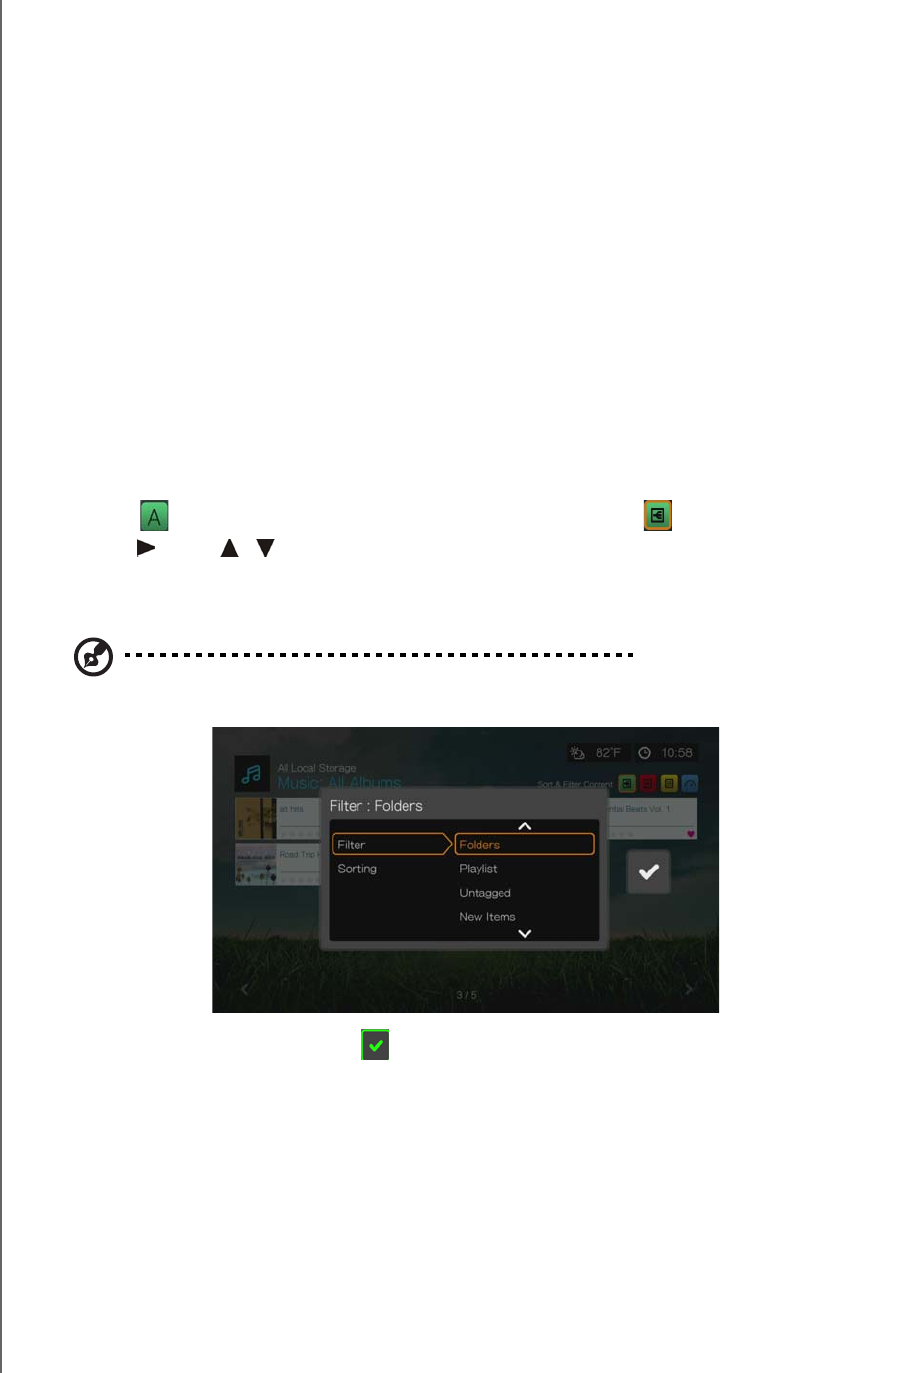
WD TV Play Media Player
User Manual
PLAYING MUSIC – 76
PRELIMINARY-P3
Genre, Artist, Album, Playlists, Favorites) See “Supported Categories for Media
Library Compilation” on page 56 for details.
3. Locate the audio file you want to play.
To begin playback of a single audio file, highlight the file, then press OK.
To begin playback of an album, highlight the album, then press OK. Press OK
again to play the album.
To begin playback of a music playlist, highlight the playlist name, and then
press PAUSE/PLAY.
To begin playback of all audio files in a folder, highlight an audio file in that
folder, and then press PAUSE/PLAY.
To find audio files on a network share or media player, follow the instructions in
“Accessing Media Content” on page 28.
Sort & Filter Music
You can sort and filter music based on your preferences using the sort & filter option.
Filter
1. Press or navigate to the sort and filter content icon , and press OK.
2. Press , then / to select Filter by All Albums, All Tracks, Genre, Artist,
Folders, Playlist, Untagged, New Items, and Favorites. Press OK to display
music by the criteria selected.
Note: If you have your media files organized by folder, it may be easier and quicker to find your files by
using the Filter option to only show folders.
3. With the green check mark selected, press OK again.
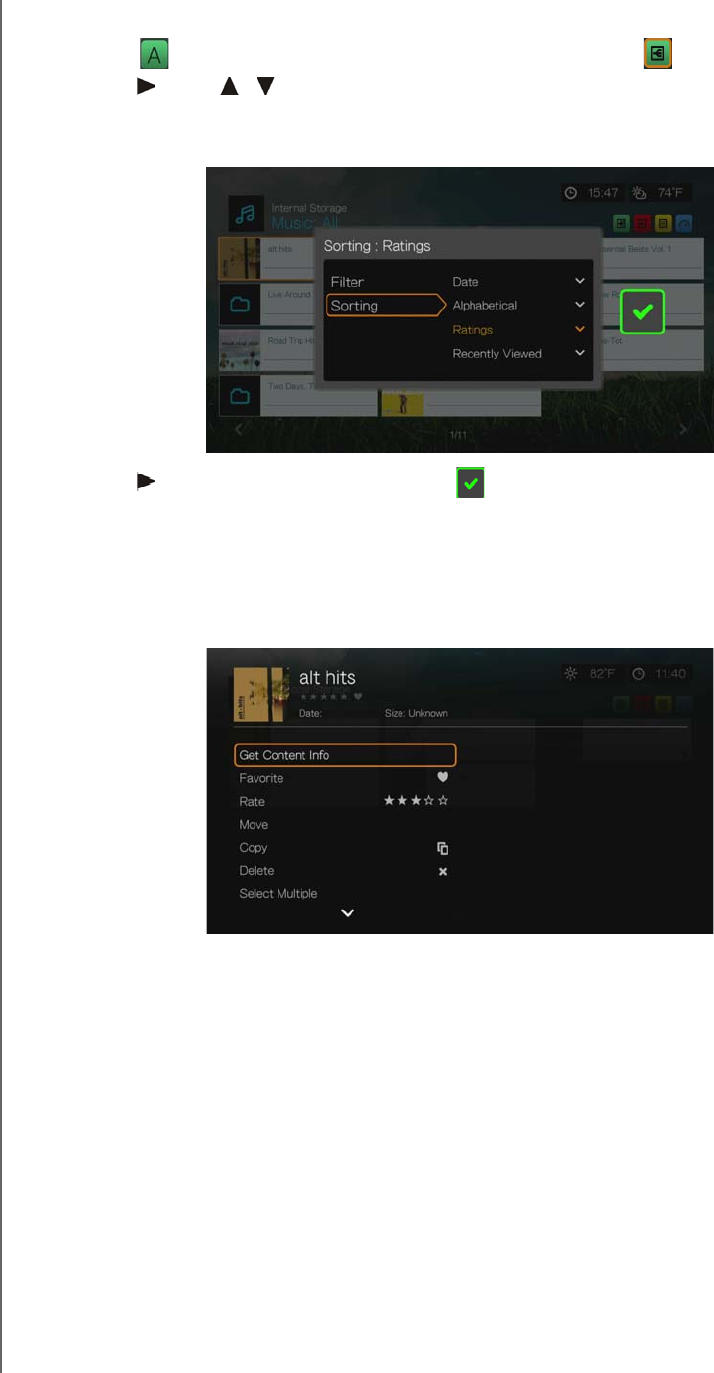
WD TV Play Media Player
User Manual
PLAYING MUSIC – 77
PRELIMINARY-P3
Sorting
1. Press or navigate to the sort and filter content icon , and press OK.
2. Press , then / to select Sorting by Date, Alphabetically, Ratings, or by
Recently Viewed. Press OK to display music by the criteria selected in either
ascending (arrow up) or descending (arrow down) order.
3. Press . With the green check mark selected, press OK again.
Music Menu Options
In the main video screen, press Options. The Music menu options display. Press
Back when complete to return to the main menu.
Get Content Info
The Music get content info function is the same as the Videos get content info
function. See “Get Content Info” on page 64.
Rescan Info
The Music rescan info function is the same as the Videos rescan info function. See
“Rescan Info” on page 65.
View Info
The Music view info function is the same as the Videos view info function. See
“Video Playback Controls” on page 68.
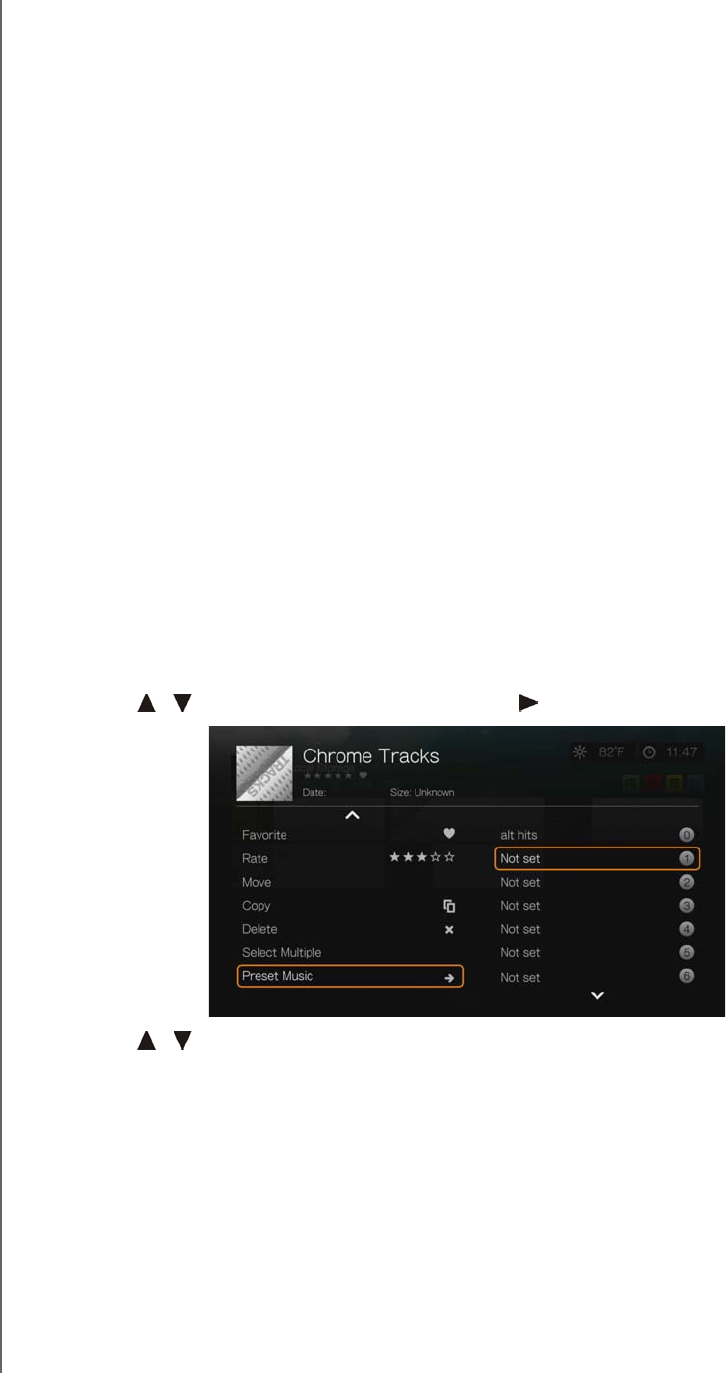
WD TV Play Media Player
User Manual
PLAYING MUSIC – 78
PRELIMINARY-P3
Favorite
The Music favorite function is the same as the Videos favorite function. See
“Favorite” on page 65.
Rate
The Music rate function is the same as the Videos rate function. See “Rate” on
page 65.
Move & Copy
The Music move and copy functions are the same as the Videos move and copy
functions. See “Move & Copy” on page 66.
Delete
The Music delete function is the same as the Videos delete function. See “Delete” on
page 66.
Select Multiple
The Music edit multiple function is the same as the Videos edit multiple function. See
“Select Multiple” on page 67.
Preset Music
The Preset Music function allows you to assign a numbered button on the remote to
a song for quick playback.
1. Press / to select Preset Music. Press .
2. Press / to select a numbered remote button, then press OK.
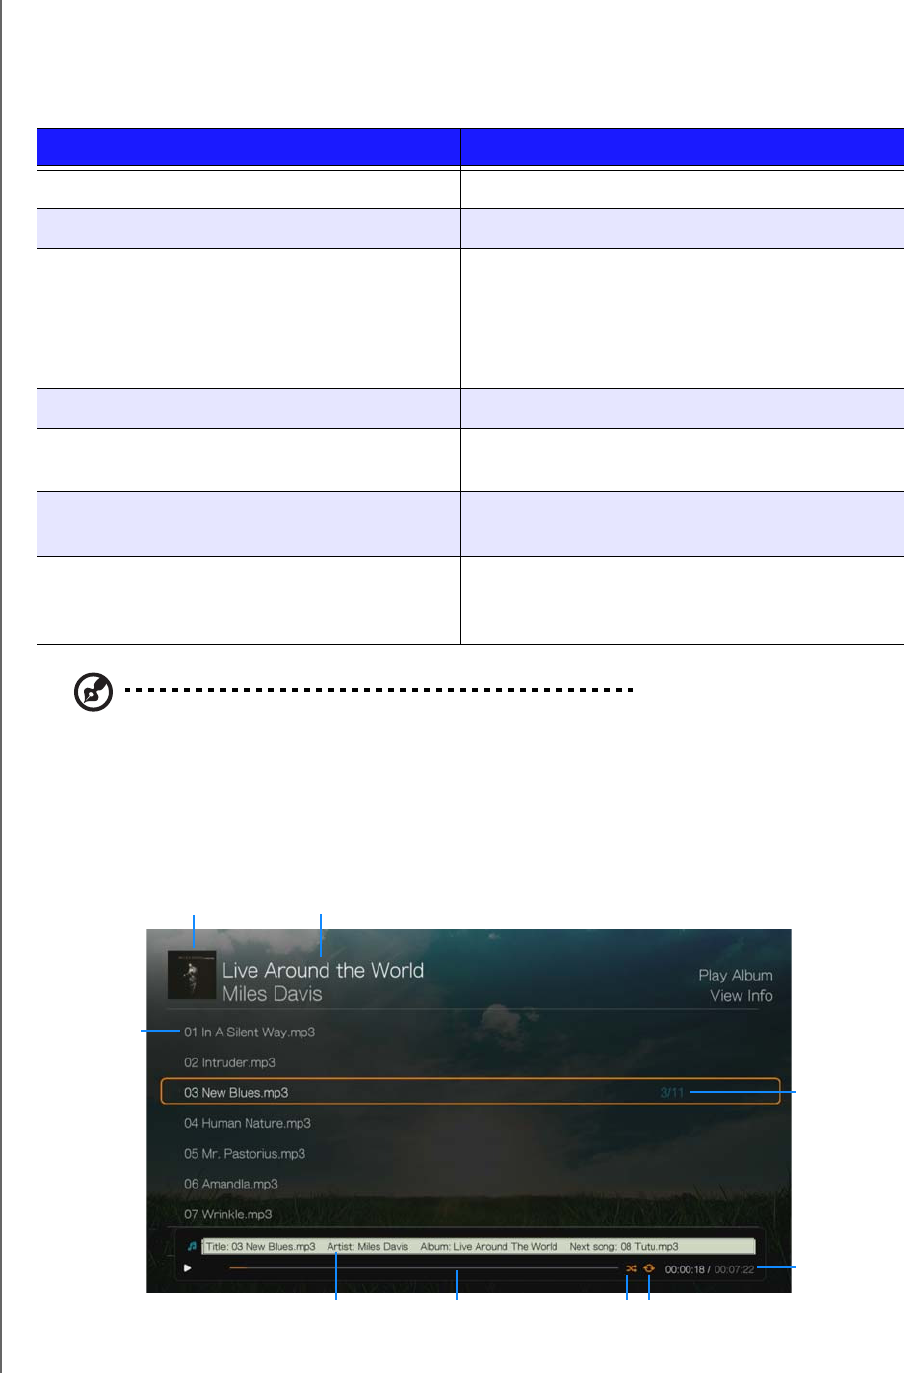
WD TV Play Media Player
User Manual
PLAYING MUSIC – 79
PRELIMINARY-P3
Music Playback Controls
Use these buttons on the remote control to control music playback when in the
music playback screen:
Note: If you leave the music playback screen, the only playback controls that work are the STOP
button (to stop music playback) and Options (during photo playback - to jump to the previous or next
track).
Music Playback Screen
The music playback screen displays the following information about the currently
playing album and/or audio file:
Button Function
STOP Stop audio playback
PAUSE/PLAY Pause or resume audio playback
1. Press FF (fast forward) or REV (reverse) to
scan the audio file (press repeatedly to
select the scan speed).
2. Press PLAY to resume playback on the
selected position.
Scan the audio playback forward or backward
The media player supports the following scan
speeds: 2×, 4×, 8×, 16×
Press PREV (previous track) once. Start playback from the beginning
Press NEXT Play the next audio track in the music folder/
playlist
Press PREV (previous track) twice. Play the previous audio track in the music folder/
playlist
0-9 While listening to a song or music playlist, press
and hold any of the 0-9 buttons to create a
preset.
Album art (if available)
Audio playback
progress bar
Elapsed time and
total playback
time
Current repeat mode
(if enabled)
Album name
Artist
Audio filename(s)
Track number/
total tracks
Shuffle mode
(if enabled)

WD TV Play Media Player
User Manual
PLAYING MUSIC – 80
PRELIMINARY-P3
Music Playback Options
To display the music playback options, press Options.
To hide the options, press Back or Options again.
Get Content Info
The Music get content info function is the same as the Videos get content info
function. See “Get Content Info” on page 64.
Rescan Info
The Music rescan info function is the same as the Videos rescan info function. See
“Rescan Info” on page 65.
View Info
The Music view info function is the same as the Videos view info function. See
“Video Playback Controls” on page 68.
Add to Queue
The Music add to queue function is the same as the Video add to queue function.
See “Add to Queue” on page 65.
Favorite
The Music favorite function is the same as the Video favorite function. See “Favorite”
on page 65.
Rate
The Music rate function is the same as the Video rate function. See “Rate” on
page 65.
Play Mode
Use the music play mode to set repeat and shuffle options.
Repeat
To set the music repeat mode:
1. During music playback, press Options.

WD TV Play Media Player
User Manual
PLAYING MUSIC – 81
PRELIMINARY-P3
2. Select Play Mode, then press OK repeatedly until the repeat icon you want is
displayed. Options include:
Repeat All – All the audio files in the current music folder/playlist is played
in sequence and repeatedly until you press STOP or Back.
Repeat One – The current audio track is played repeatedly until you press
STOP or Back.
Repeat All and Shuffle – All the audio files in the current music
folder/playlist are played repeatedly in sequence and shuffled until you press
STOP or Back.
The icon for the enabled repeat mode will appear below the playback progress
bar.
Shuffle
Use this option to set the audio tracks in the current music folder/playlist to play in
random order.
To enable music shuffle mode:
1. During music playback, press Options.
2. Select Play Mode, then press OK repeatedly until the repeat icon you want is
displayed. Options include:
Shuffle – All the audio files in the current music folder/playlist are shuffled
repeatedly until you press STOP or Back.
Repeat All and Shuffle – All the audio files in the current music
folder/playlist are played repeatedly in sequence and shuffled until you press
STOP or Back.
Delete
The Music delete function is the same as the Videos delete function. See “Delete” on
page 66.
Preset Music
See “Preset Music” on page 78.
Playing Music From Your iPod®
Apple® uses a proprietary naming scheme and because of this the media player is
unable to display the original names for the folders and files as they are in your iPod.
The media player instead reassigns new names for the folders and files, but only
while in use with the media player. The original file information is preserved in your
iPod. You can view the original file information when you play a file where the screen
will display the metadata.
Note: The media player does not support playback of protected premium content such as movies or
music from the iTunes® Store, Cinema Now, Movielink®, Amazon Unbox™, and Vongo®.

WD TV Play Media Player
User Manual
PLAYING MUSIC – 82
PRELIMINARY-P3
To use your iPod with the media player, simply plug your iPod in to the USB port and
navigate through the interface menu.
Note: The media player only supports USB mass storage mode. iPod Touch is not a USB mass
storage device and is therefore not supported.
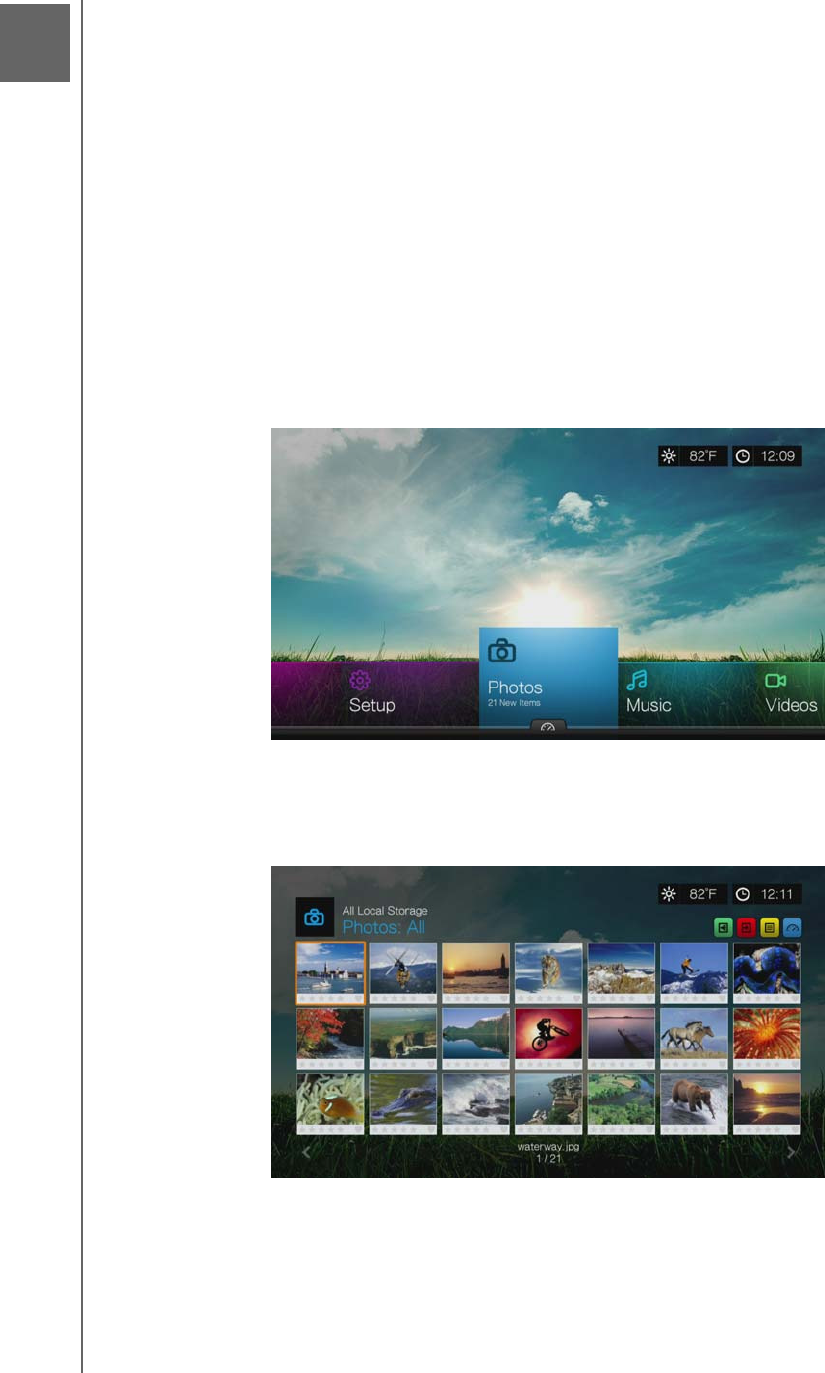
WD TV Play Media Player
User Manual
VIEWING PHOTOS – 83
PRELIMINARY-P3
Viewing Photos
You can view your digital photos both individually and in slideshow mode on your TV
using the media player.
Supported Image File Formats
GIF (Animated GIFs are not supported)
BMP (non-compressed)
JPEG (grayscale, RGB, YCbCy) (does not support CMYK or YCCK)
TIF/TIFF (RGB) (does not support CMYK, YMC, YMCK, or KCMY)
PNG (Non-alpha channel only)
Photo Display
1. Navigate to the Home | Photos menu, then press OK.
2. The screen displays available music files and folders in the media player’s local
drive by default. The display will either be in grid view (default) or list view,
depending on your Browser Display setting (see “Photo Settings” on page 192
for more information on Browser Display settings).
3. If Media Library is enabled, you can choose to navigate using sorting
(Alphabetical, Date, Ratings, Recently Viewed) and filter options (All Pictures,
10
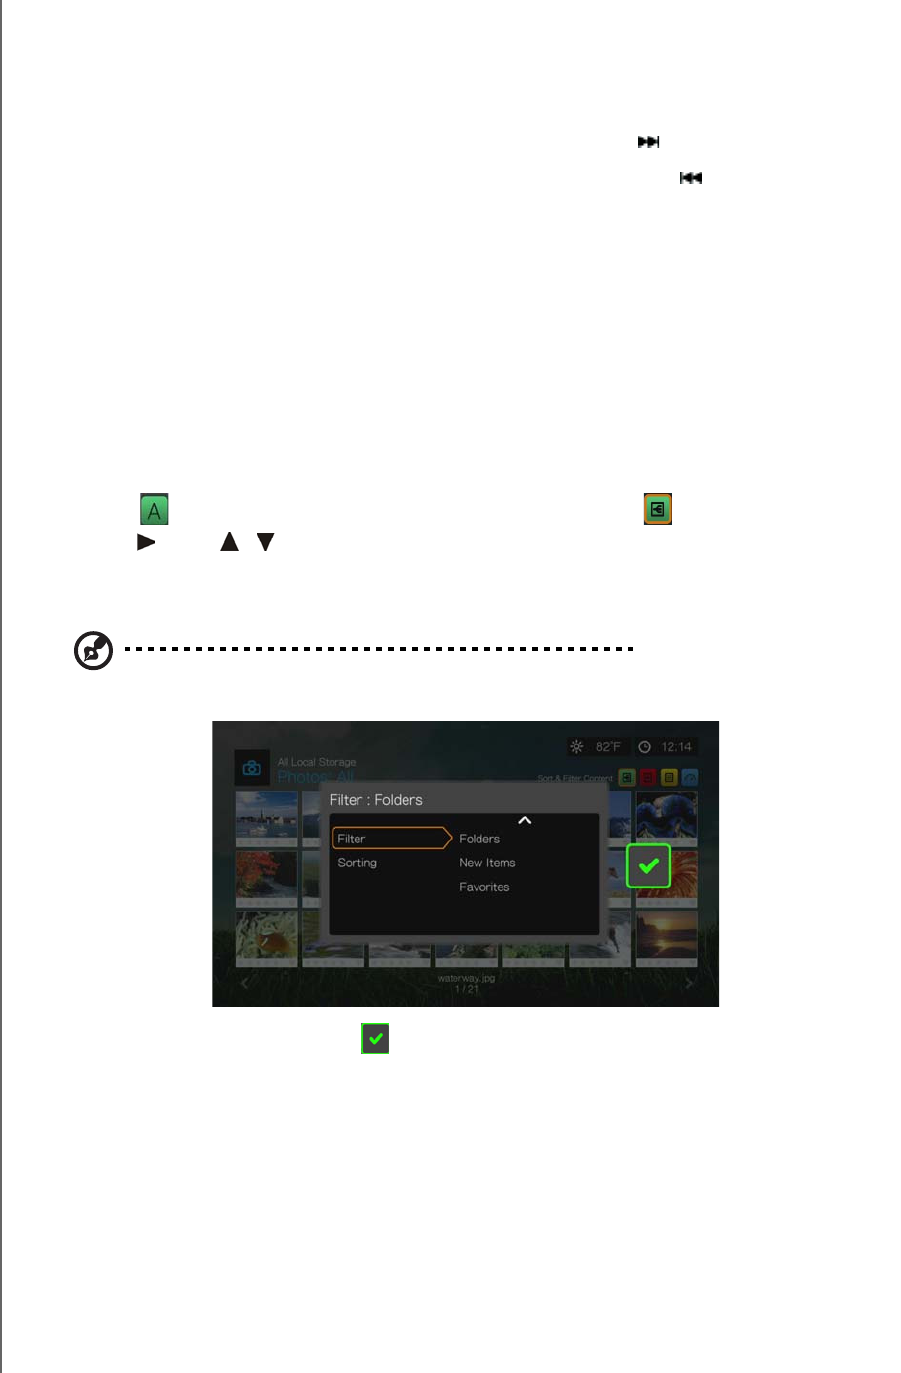
WD TV Play Media Player
User Manual
VIEWING PHOTOS – 84
PRELIMINARY-P3
Date, Folders, Recent). See “Supported Categories for Media Library
Compilation” on page 56 for details.
4. Locate the picture file you want to view.
To open a single picture file for viewing, select the file, and then press OK.
To view the next picture file in the photo folder, press (next).
To view the previous picture file in the photo folder, press (previous).
To find picture files on a network share or media player, follow the instructions in
“Accessing Media Content” on page 28.
You can also view a slideshow using all picture files in a photo folder. See “Photo
Slideshow” on page 90 for instructions.
Sort & Filter Photos
You can sort and filter photos based on your preferences using the sort & filter
option.
Filter
1. Press or navigate to the sort and filter content icon , and press OK.
2. Press , then / to select Filter by All, Date, Date (year), Date (month),
Folders, New Items, and Favorites. Press OK to display music by the criteria
selected.
Note: If you have your media files organized by folder, it may be easier and quicker to find your files by
using the Filter option to only show folders.
3. With the green check mark selected, press OK again.
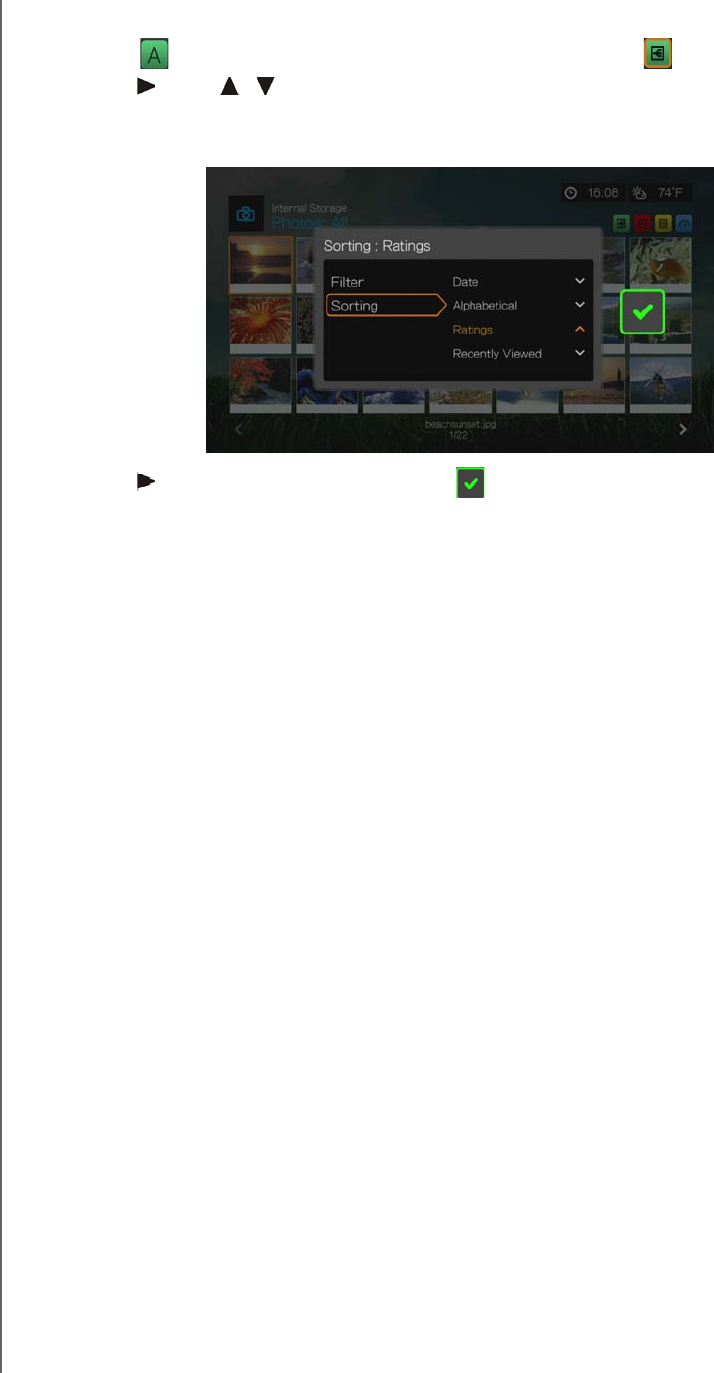
WD TV Play Media Player
User Manual
VIEWING PHOTOS – 85
PRELIMINARY-P3
Sorting
1. Press or navigate to the sort and filter content icon , and press OK.
2. Press , then / to select Sorting by Date, Alphabetically, Ratings, or by
Recently Viewed. Press OK to display photos by the criteria selected in either
ascending (arrow up) or descending (arrow down) order.
3. Press . With the green check mark selected, press OK again.
Digital Camera Support
You can attach your digital camera to the media player via a USB port and view the
supported image files stored in the camera’s memory card.
To view images from a digital camera:
1. Attach your digital camera to the media player via the USB port.
2. Press OK to close the message (the media player sees the camera’s memory
card as a read-only device).
3. Navigate to the Home | Photos menu.
4. The digital camera is considered a USB device. Use the navigation buttons to
select, then press OK.
The screen displays thumbnails of available picture files and photo folders. Only
image files supported by the media player are displayed.
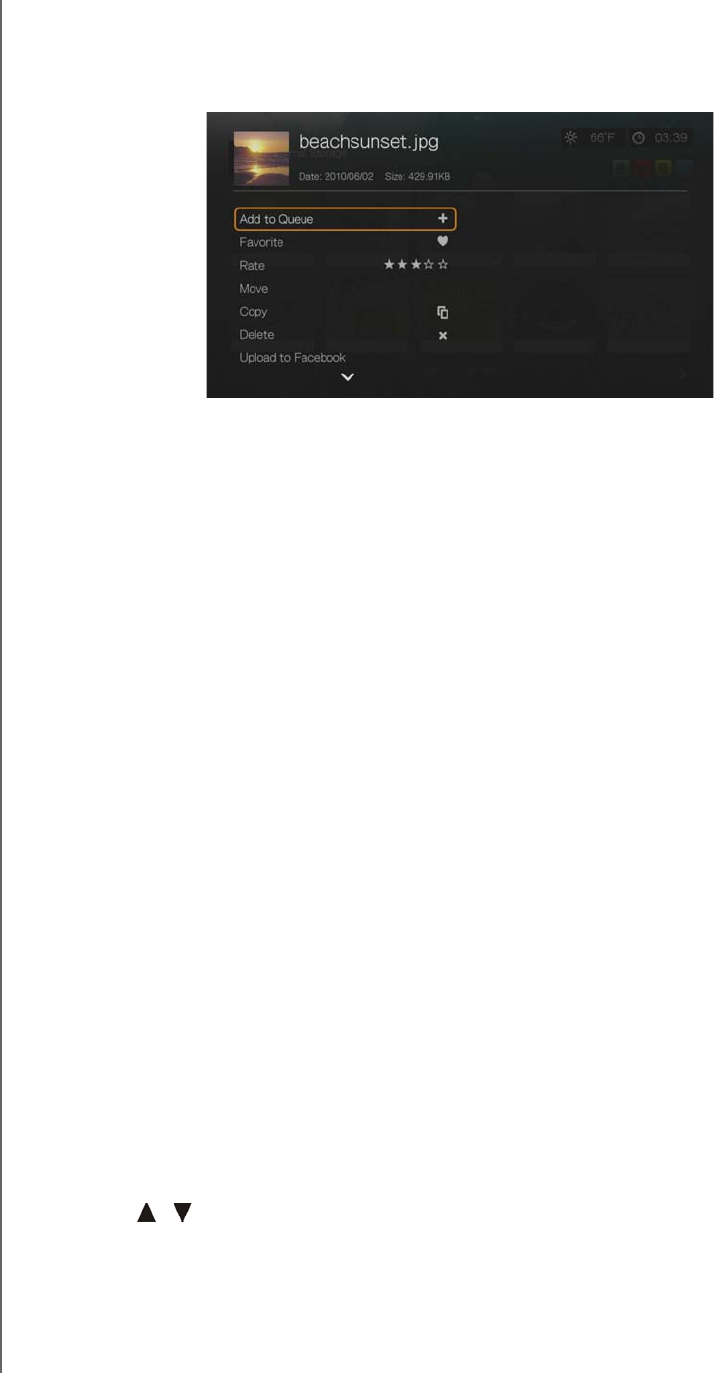
WD TV Play Media Player
User Manual
VIEWING PHOTOS – 86
PRELIMINARY-P3
Photos Menu Options
In the main photo screen, press Options. The Photos menu options display. Press
Back when complete to return to the main menu.
Add to Queue
The Photos add to queue function is the same as the Videos add to queue function.
See “Add to Queue” on page 65.
Favorite
The Photos favorite function is the same as the Videos favorite function. See
“Favorite” on page 65.
Rate
The Photos rate function is the same as the Videos rate function. See “Rate” on
page 65.
Move & Copy
The Photos move and copy functions are the same as the Videos move and copy
functions. See “Move & Copy” on page 66.
Delete
The Photos delete function is the same as the Videos delete function. See “Delete”
on page 66.
Upload to Facebook
The Photos upload to Facebook function is the same as the Videos upload to
Facebook function. See “Upload to Facebook” on page 66.
Upload to Picasa
You can upload a photo to Picasa by selecting this option.
1. Press / and select Upload to Picasa from the list of options.
2. If prompted to sign in, select Yes, then press OK, and enter your Picasa
username and password using the on-screen keyboard.

WD TV Play Media Player
User Manual
VIEWING PHOTOS – 87
PRELIMINARY-P3
3. The screen below displays. Press OK.
Set as Background
You can set any photo as the system background to replace the default grass field
and sunny sky photo or other photo you have previously selected.
1. Find and select the photo you want to use for the background in the Photos
menu, then press OK.
2. Press Options.
3. Select Set as Background, then press .
4. Select one of the photo scaling options (Keep as Original, Fit to Screen, or
Display in Full Screen), then press OK.
Select Multiple
The Photos edit multiple function is the same as the Videos edit multiple function.
See “Select Multiple” on page 67.
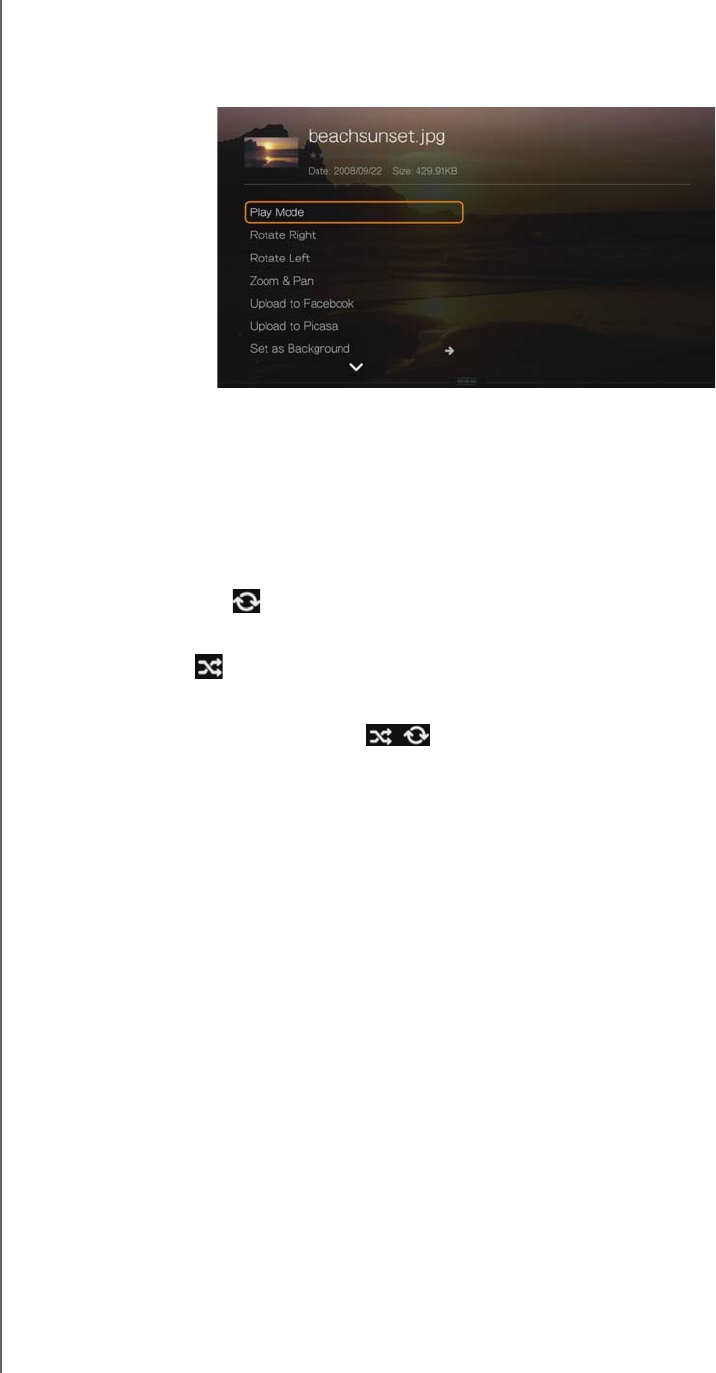
WD TV Play Media Player
User Manual
VIEWING PHOTOS – 88
PRELIMINARY-P3
Photo Display Options
To display the photo options while viewing a photo, press Options.
To return to the photo you were viewing, press Back or Options again.
Play Mode
Use the play mode option to set repeat and shuffle options.
1. During photo playback, press Options.
2. Select Play Mode, then press OK repeatedly until the repeat icon you want is
displayed. Options include:
Repeat All – All the photo files in the current photo folder are played in
sequence and repeatedly until you press STOP or Back.
Shuffle – All the photo files in the current photo folder are shuffled
repeatedly until you press STOP or Back.
Repeat All and Shuffle – All the photo files in the current photo folder
are played repeatedly in sequence and shuffled until you press STOP or
Back.
Rotate Left & Right
1. During photo viewing, press Options.
2. Select Rotate Left or Rotate Right, then press OK.
3. Press Options and select Rotate Left or Rotate Right again as needed until
the rotation you want is set for the photo.
Selecting Photo Zoom and Pan Options
See “Selecting Video Zoom and Pan Options” on page 71.
Upload to Facebook
See “Upload to Facebook” on page 66.
Upload to Picasa
See “Upload to Picasa” on page 86.
Set As Background
See “Set as Background” on page 87.
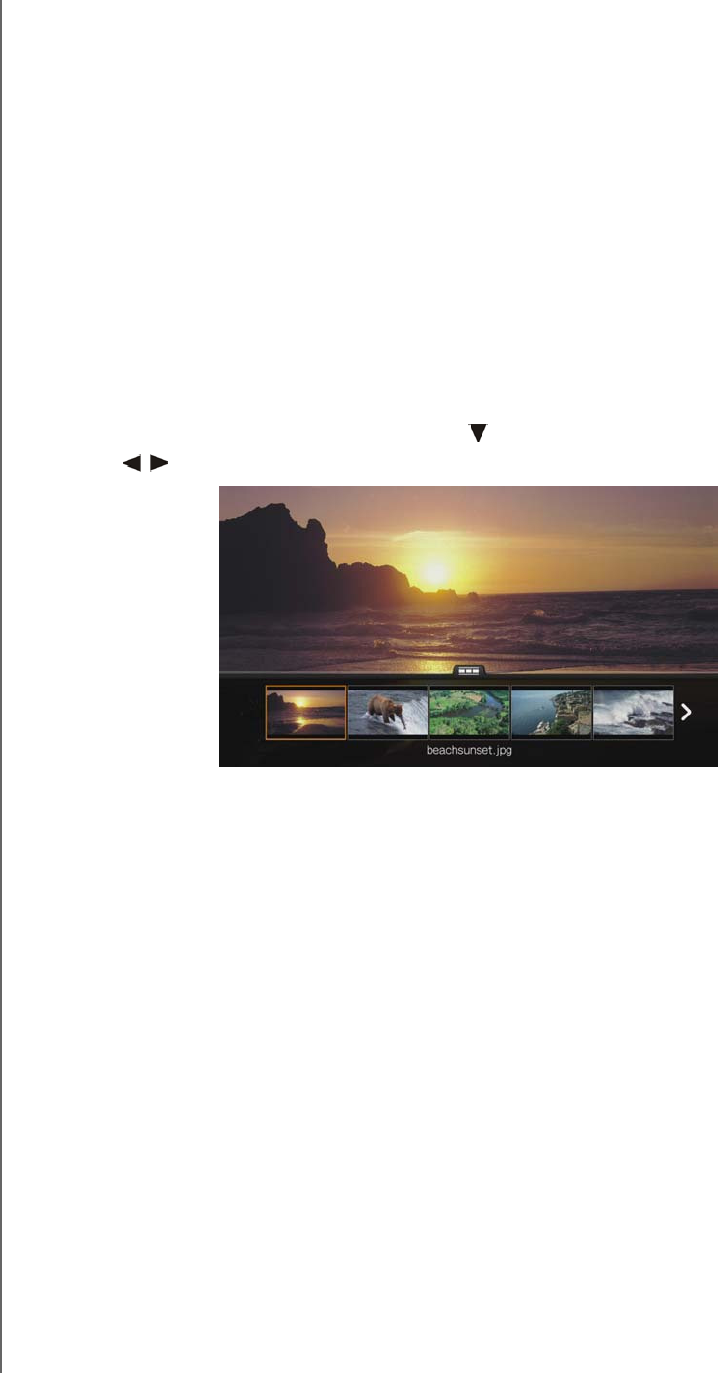
WD TV Play Media Player
User Manual
VIEWING PHOTOS – 89
PRELIMINARY-P3
Rate
See “Rate” on page 65.
Favorite
See “Favorite” on page 65.
Add to Queue
See “Add to Queue” on page 65.
Delete
See “Delete” on page 66.
Displaying Photo Thumbnails
While viewing a photo or slideshow, press to display thumbnails of all your photos.
Use the navigation buttons to select another photo to view, then press OK.

WD TV Play Media Player
User Manual
VIEWING PHOTOS – 90
PRELIMINARY-P3
Displaying Photo Information
Use this option to display the Picture Information Panel on the bottom of the screen.
This panel shows the following information about the current picture:
Image filename
Source
Image file size and resolution
Image’s sequence number and the total number of image files in the current
photo folder
To view the photo information panel:
During photo viewing, press OK. Press Back to hide photo information.
Photo Slideshow
The media player allows you to create a slideshow using the contents of a photo
folder.
To start a slideshow:
1. Locate the photo folder containing the image files you want in the slideshow.
(See “Photo Display” on page 83.)
2. Select the photo folder, then press PAUSE/PLAY to start the slideshow.
To listen to background music with a slideshow:
1. Navigate to the music folder containing the audio file/playlist you want to
accompany the slideshow. (See “Music Playback” on page 75.)
2. Select the audio file/playlist, and then press PLAY.
If you selected a single audio file, you may want to enable it to play repeatedly
so it doesn’t stop before the slideshow is done.
If you selected a music playlist, you can choose to enable the repeat or shuffle
mode.
3. Press HOME, and then start the slideshow (as described above).

WD TV Play Media Player
User Manual
VIEWING PHOTOS – 91
PRELIMINARY-P3
Slideshow Playback Controls
Use these buttons on the remote control to control slideshow playback:
Repeating and/or Shuffling a Slideshow
Access Setup > Photo settings to repeat and/or shuffle a slideshow. See “Slideshow
Sequence” on page 192.
Button Function
STOP Discontinue the slideshow
PAUSE/PLAY Pause or resume the slideshow
NEXT Display the next picture file in the slideshow
PREV Play the previous picture file in the slideshow
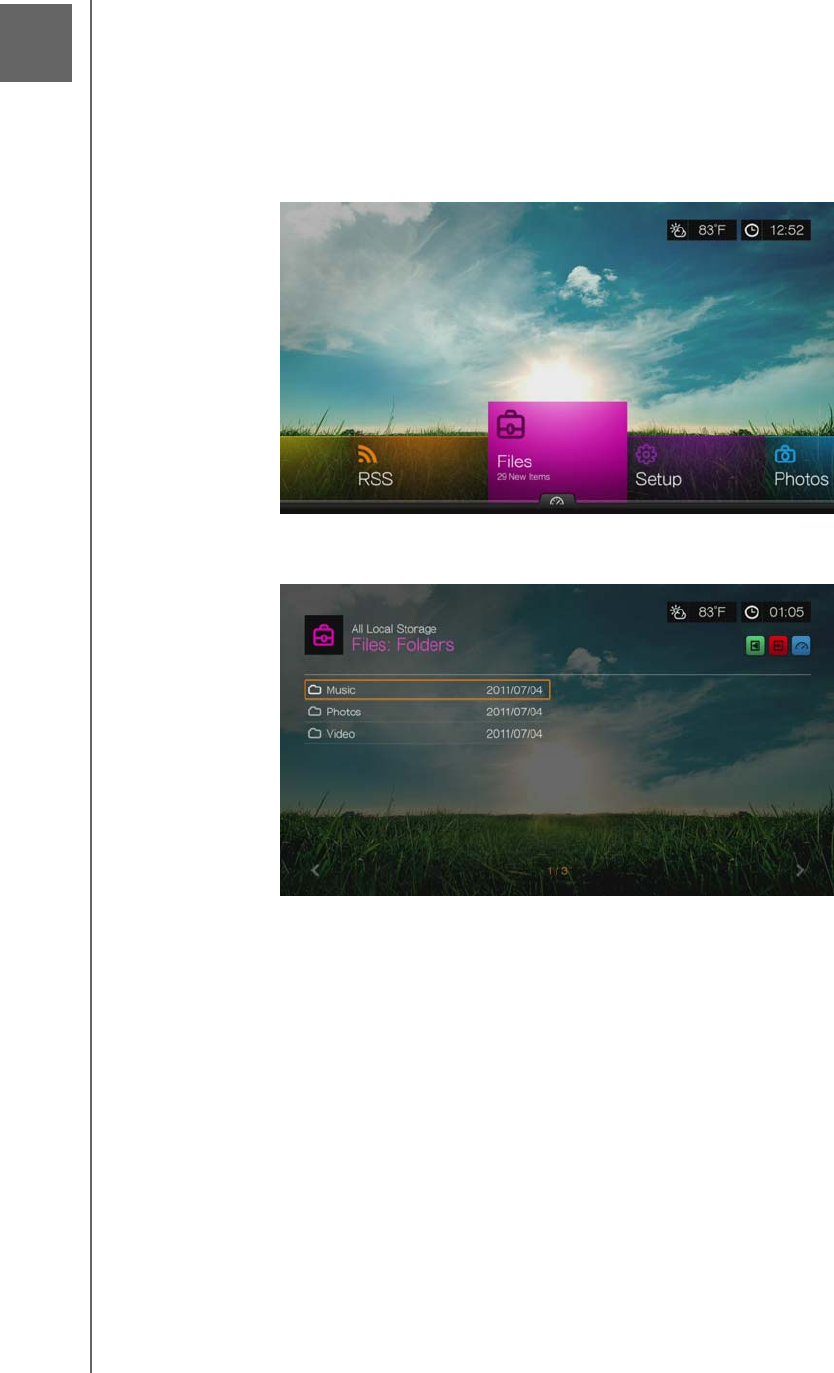
WD TV Play Media Player
User Manual
FILES – 92
PRELIMINARY-P3
Files
You can view and manage all of your media files in one place using the Files menu.
Files Display
1. Navigate to the Home | Files menu, then press OK.
2. The screen displays all available media files and folders in the media player’s local
drive by default. The display is in list view.
3. Locate a file you want to play.
To play a single file, select the file from the list or by navigating through the
folder structure, then press OK.
Follow the instructions under “Watching Video” on page 62, “Playing Music” on
page 75, or “Viewing Photos” on page 83.
To find files on a network share or media server, follow the instructions in
“Accessing Media Content” on page 28.
11

WD TV Play Media Player
User Manual
FILES – 93
PRELIMINARY-P3
Sorting Files
The Files sorting function is the same as the Videos sorting function. See
“Sorting” on page 64.
Files Options
To manage files (move, copy, delete, rename, and select), do the following:
With an individual file or folder selected, press Options.
Move & Copy
The Files move and copy functions are the same as the Videos move and copy
functions. See “Move & Copy” on page 66.
Delete
The Files delete function is the same as the Videos delete function. See “Delete” on
page 66.
Rename
To rename a folder or file, select Rename then enter in the new name using the
on-screen keyboard.
Select Multiple
The Files edit multiple function is the same as the Videos select multiple function.
See “Select Multiple” on page 67.
WD TV Play Media Player
User Manual
INTERNET SERVICES – 94
PRELIMINARY-P3
Internet Services
Important: A broadband Internet connection (e.g., DSL or cable) is required
to use Internet services. Availability varies by country. These services may be
changed, terminated, or interrupted at any time.
After connecting to a network, you can use the media player to access media
content from the following Internet services:
AccuWeather.com® – Get local and international forecasts, climate trends, and
the latest news from the world’s weather authority.
BBC iPlayer – Watch and listen to BBC programs from the past seven days live
and on demand.*
Note: *BBC iPlayer TV shows available in the UK only.
CinemaNow™– With over 11,000 titles to choose from, CinemaNow gives you
instant access to new release movies the same day they come out on DVD and
brings you TV episodes for many popular shows the day after they air.*
*CinemaNow.com account required. US only.
Comedy Time® – The Comedy Time Network launched as the comedy channel
for Sprint TV and MobiTV in July, 2004 and has since expanded on to all major
carrier decks as well as cable/satellite/IP television, broadband video and
traditional media. It is a market leader in the production and distribution of
short-form comedy programming.
Dailymotion – With over 115 million monthly unique visitors, Dailymotion
powers video sharing and discovery, presenting the hottest videos in news,
music, film, television, sports, gaming and more from across the Web.
Deezer™– A personalized on-demand music service to listen to seven million
tracks anytime, anywhere and one of the most popular Internet and mobile music
offerings in Europe.
Facebook® – Share your status, photos, videos, and your favorite links on
Facebook. Find out the latest news from your social network or the world and so
much more. Access it all on your big screen TV.
Flickr™ – Connect to Flickr using the on-screen menus. View the photos on your
Flickr account and enjoy them on your TV.
Flingo® – Flingo offers consumers free Internet Television from leading studios,
TV networks, and video websites.
Flixster™ – Watch the latest theatrical movie trailers and get critic reviews from
Rotten Tomatoes. Preview movies that are opening this week and see what’s hot
at the box office. See what’s new on DVD and Blu-ray and the top rentals.
Hulu Plus™ –Hulu Plus offers current hit TV shows and award-winning movies
anytime in HD . Watch any current season episode of top shows like Modern
Family, Glee, 30 Rock and many others, enjoy classic series, or explore
acclaimed movies from The Criterion Collection and Miramax.*
*Hulu Plus membership required. US only.
12

WD TV Play Media Player
User Manual
INTERNET SERVICES – 95
PRELIMINARY-P3
Live365®– Listen to thousands of commercial-free Internet radio stations. Easily
browse through popular genres or discover treasures in some of the less-
traveled styles.
MLB.TV – Watch every out-of-market game LIVE or on demand in HD quality.
Almost 100 games are streamed LIVE each week. Choose home or away feeds,
and use quick navigation to run scoring plays or at bats. PLUS, watch over 150
Spring Training Games with no blackout restrictions.*
* MLB.TV Premium subscription required.
Netflix® – Enjoy popular movies, classics, and TV episodes instantly. Access
your Netflix unlimited membership and instantly watch TV episodes and movies
on your big screen.*
*Netflix is available in certain countries. Unlimited membership required. More information at
www.netflix.com.
Pandora® – Free, personalized Internet radio playing only the music you love.
Enter your favorite songs or artists, and enjoy stations created just for you. Rate
songs as they play, because Pandora caters to your tastes and adapts stations
to your feedback on the spot.*
*Pandora available in US only.
Picasa – View, share and enjoy your photographs right from your television.
SEC Digital Network – The SEC Digital Network offers college sports fans
access to the largest library of multi-sport full games and original programming
from the most dominant and exciting collegiate sports conference. Watch FREE
daily programming including SEC Today, Countdown to Kickoff, Game Day
Central, and weekly coaches teleconferences, and select full games. Additional
content can be ordered at www.SECOnDemand.com.
SHOUTcast Radio – The ultimate directory of online radio stations featuring
over 45,000 music, talk, sports, and community radio stations from around the
world.
SnagFilms® – SnagFilms offers a broad collection of great independent movies
you can watch right now, on demand, for free – films that entertain and inform,
engage and inspire, and satisfy every taste. These are movies worth watching –
documentaries, comedies, dramas and thrillers, award winners and rare finds –
all free for you to enjoy.
Spotify – Enjoy on-demand access to over 15 million tracks and albums. Any
artist, any album, any genre - available instantly on your media player. Spotify is
available in: USA, UK, Sweden, Finland, Norway, France, The Netherlands,
Spain, Austria, Belgium, Switzerland and Denmark.*
*Spotify Premium account required.
TuneIn – The world’s largest Internet radio guide with access to over 30,000 free
radio stations searchable by location, genre, or format.
Vimeo® – Take your video experience to the next level with Vimeo. Get a video
experience with absolutely no pre-roll ads, unlimited video length, unlimited HD
playback and embedding, superior privacy settings and more! Vimeo is the next
step in your creative film and video experience.
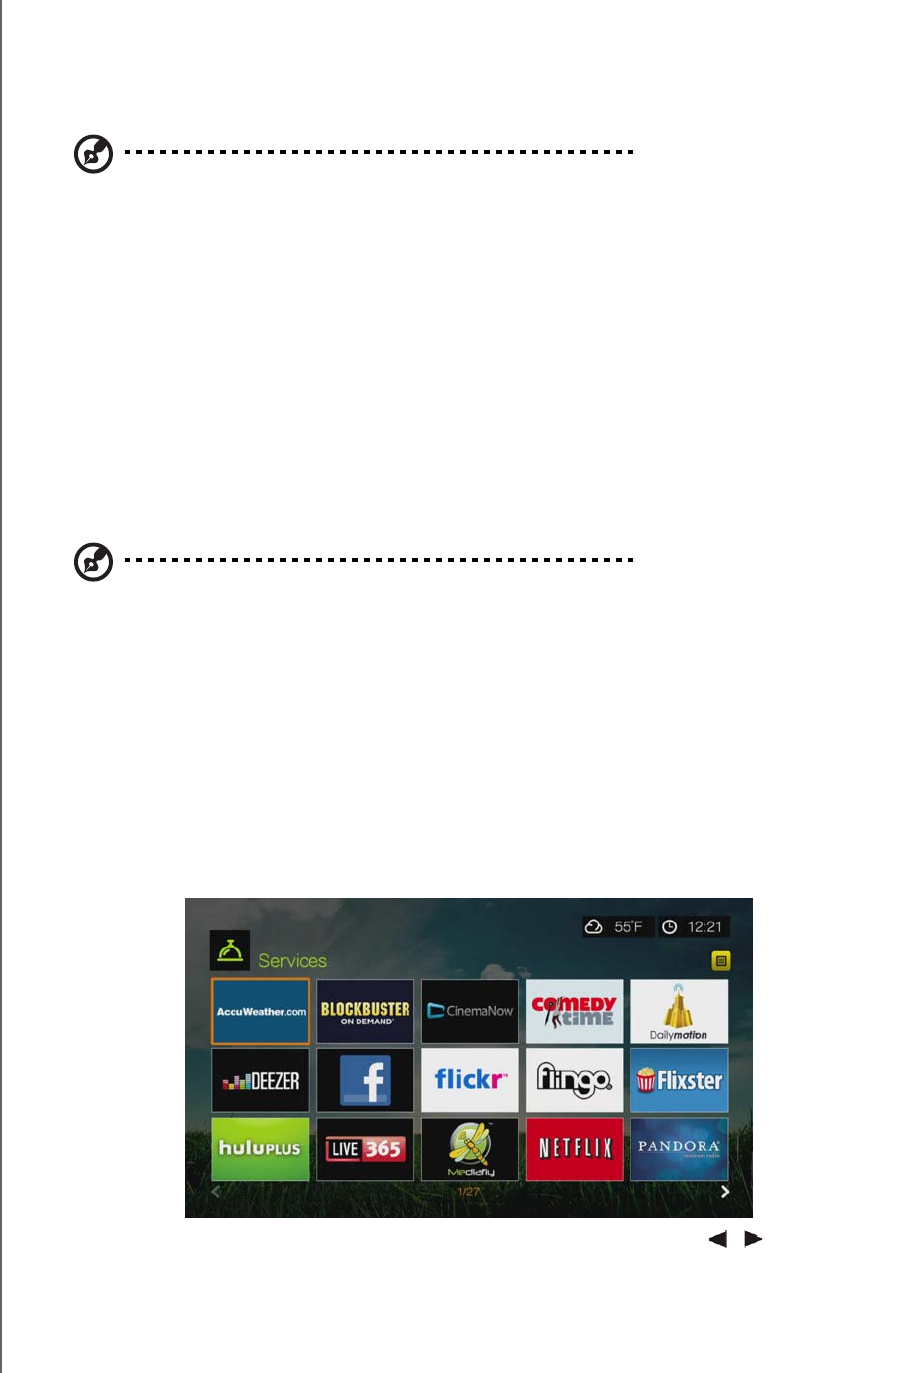
WD TV Play Media Player
User Manual
INTERNET SERVICES – 96
PRELIMINARY-P3
VUDU™ – VUDU delivers a cinema-like experience at home with the hottest new
releases and the largest HD library. There are no subscription fees or late fees,
simply pay for what you watch. Choose to rent or own from thousands of titles
available in vibrant 1080p with rich Dolby Digital 5.1 Surround Sound. Activate
your VUDU account on your media center today and receive a free* movie credit.
*New VUDU account required. Terms and conditions apply. For more information visit www.vudu.com.
WatchMojo – WatchMojo produces original video programming on the people,
places and things that people are passionate about, covering the Automotive,
Business, Education, Fashion, Film, Food, Health, Music, Parenting, Politics &
Economy, Space, Sports, Science, Technology, Travel and Video Game
categories.
XOS College Sports – XOS College Sports offers college sports fans multi-
sport, multi-conference access to full games and historic documentaries
including many of the nation’s top schools and teams. Free access to a large
collection of rare content, championship season highlights and select full games
past and present. Additional content can be ordered at www.XOSSports.com.
Yota – Yota music* is more than a million licensed tracks of the leading global
and local music labels in free access. Rock and classical, pop and jazz, global
celebrities and musical rarities, the Yota collection has it all.
Note: *WD TV media player only. Yota music service available in Russia only.
YouTube – Stream YouTube and watch your favorite videos from the world’s #1
video sharing website on your television.
The above services are fully integrated with their web-based counterparts when
accessed via the media player. If you are a registered user of any of these services,
everything you create, rate, or bookmark when using the media player shows up on
your account the next time you sign in to that service from your computer or mobile
computing device.
To access Internet Media:
1. Navigate to the Home | Services menu bar and press OK.
2. The list of Internet services display in alphabetical order. Press / and/or Next
Page to make a selection, then press OK.

WD TV Play Media Player
User Manual
INTERNET SERVICES – 97
PRELIMINARY-P3
Adding a Service to Favorites
You can add a Service to your Favorites so that it’s quickly available via the
dashboard when you are in the Home screen or other screens (when you press
or navigate to in certain screens then press OK).
1. In the Services screen, press / to select a service you want to favorite, then
press Options.
2. Press OK to list the service in the dashboard under Favorites.
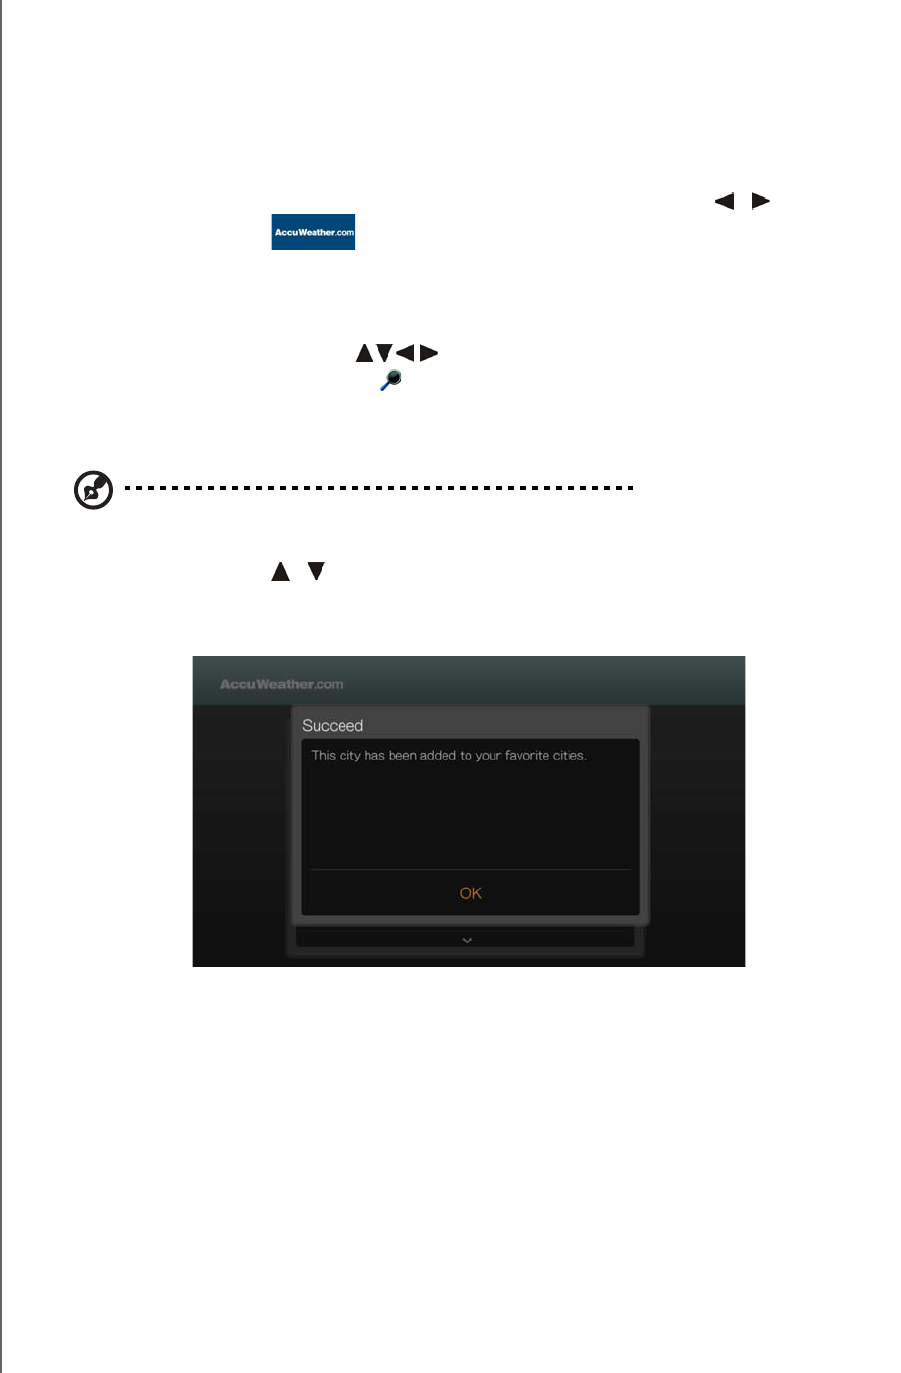
WD TV Play Media Player
User Manual
INTERNET SERVICES – 98
PRELIMINARY-P3
AccuWeather.com
The Weather service provided by AccuWeather.com provides local forecasts for
everywhere in the United States and over two million locations worldwide.
To access Weather:
1. Navigate to the Home | Services menu bar and press OK.
2. The list of Internet services display in alphabetical order. Press / to select
AccuWeather.com , then press OK to display the AccuWeather.com
home screen.
3. Select OK in the End User License Agreement screen, then press OK to display
the AccuWeather.com home screen.
4. Use the navigation buttons to type a search using the on-screen
keyboard. You can also press on the remote control to toggle to the results list
after entering several characters in the search field. Select Submit, then press
OK.
Note: The complete city name needs to be entered for locations outside of the U.S. For example, you
must type "Sydney" to find Sydney, Australia; typing "Sydn" results in Sydney, FL as the location.
5. If necessary, Press / to scroll through search results to select your city, then
press OK.
6. Press OK to complete setting your location.
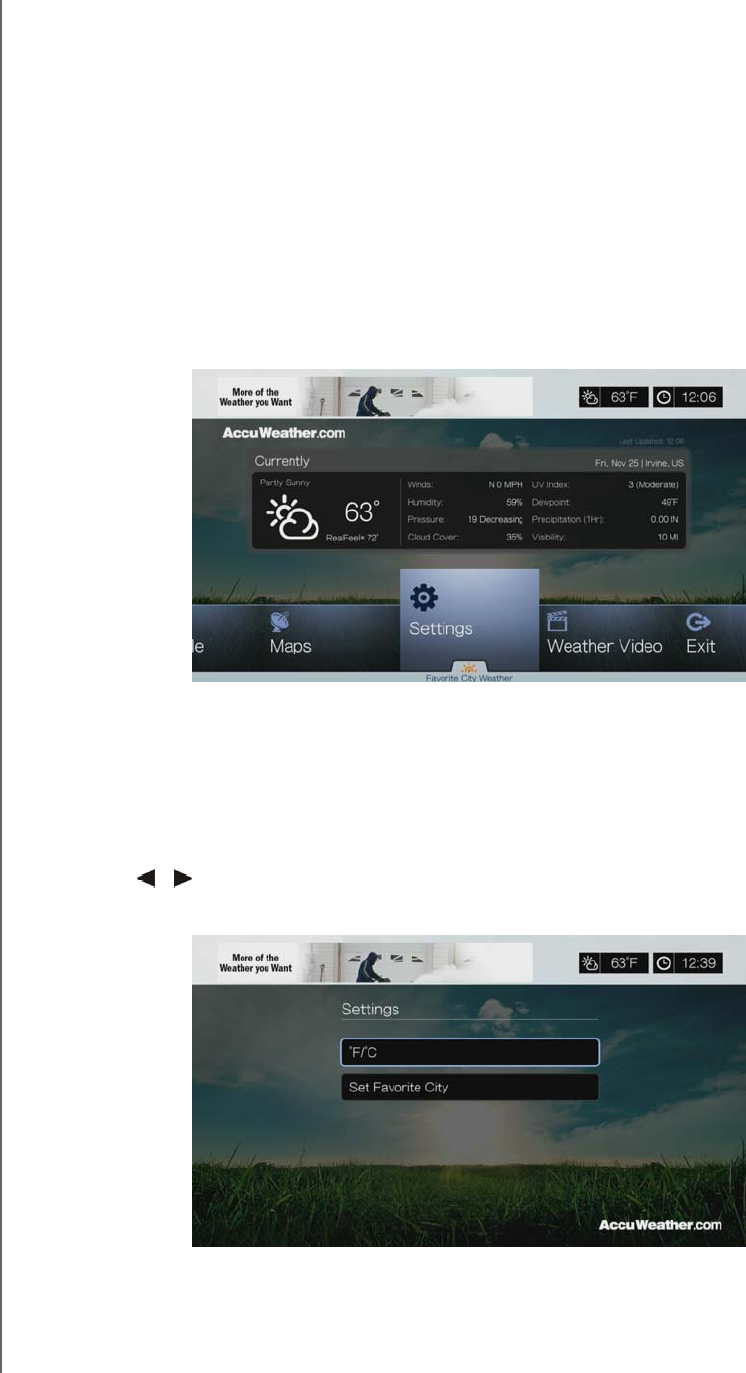
WD TV Play Media Player
User Manual
INTERNET SERVICES – 99
PRELIMINARY-P3
7. The AccuWeather.com home screen displays current temperature, conditions,
and other weather details at your location.
Options include:
Settings
Maps (press Options, then OK to zoom & pan the weather map in your area
using the navigation buttons)
Lifestyle (provides forecasts from Poor to Excellent for various health and
sporting conditions)
Forecast (select 7-Day Forecast or Weekend Forecast to view upcoming
weather)
Weather Video (select and watch popular AccuWeather.com videos)
Exit
Settings
Change Temperature Display
To change the temperature display from Celsius to Fahrenheit or vice-versa, do the
following:
1. Press / to select Settings in the AccuWeather.com home screen.
2. Select °F /°C. Press OK.
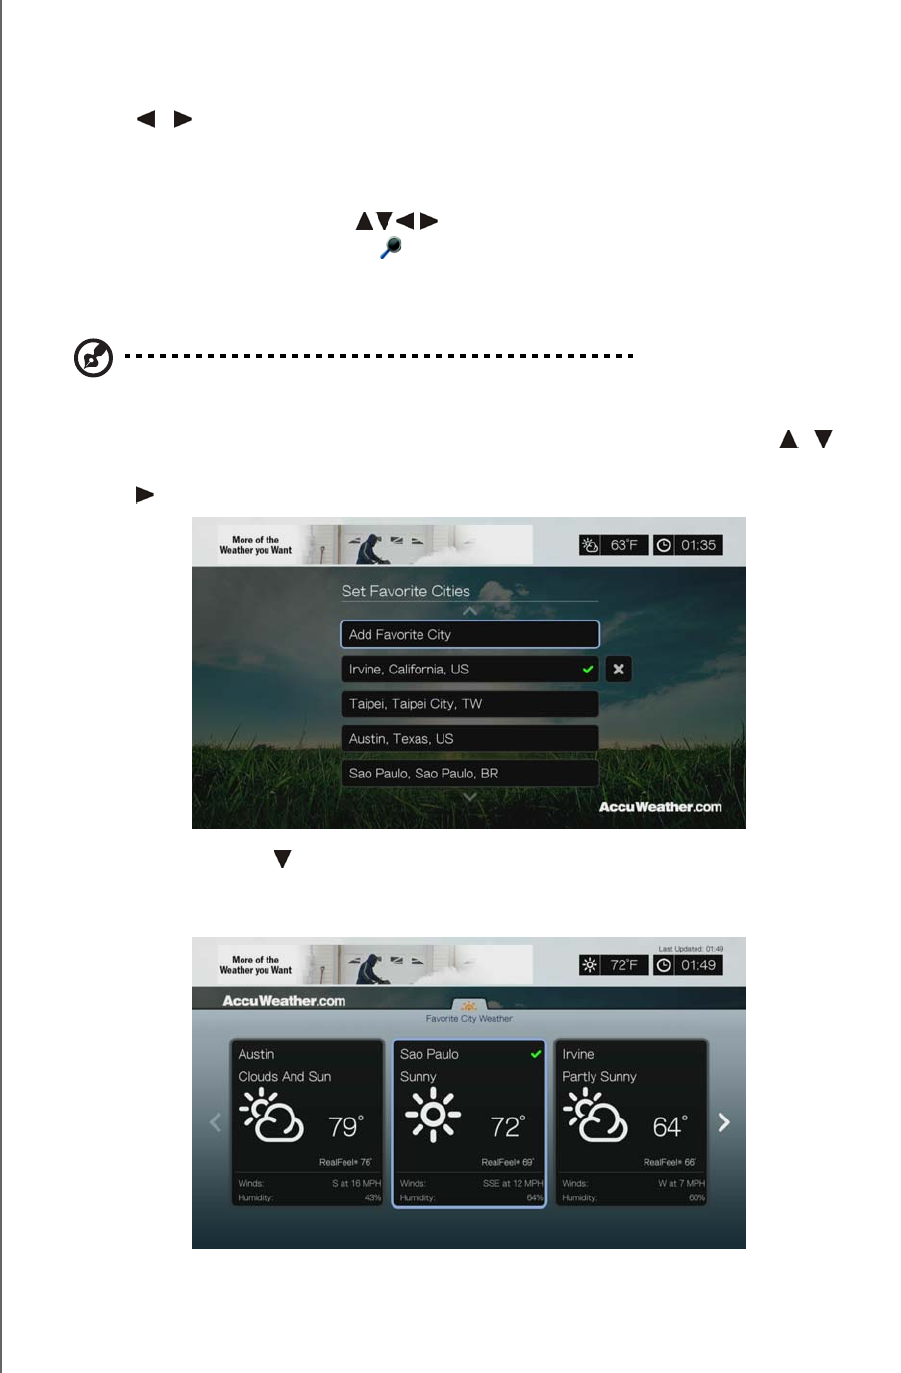
WD TV Play Media Player
User Manual
INTERNET SERVICES – 100
PRELIMINARY-P3
Set/Add Favorite City
To add one or more cities so that you can view weather information for more than
one location, do the following:
1. Press / to select Settings in the AccuWeather.com home screen.
2. Select Set Favorite City and press OK.
3. Select Add Favorite City and press OK.
4. Use the navigation buttons to type a search using the on-screen
keyboard. You can also press on the remote control to toggle to the results list
after entering several characters in the search field. Select Submit, then press
OK.
Note: The complete city name needs to be entered for locations outside of the U.S. For example, you
must type "Sydney" to find Sydney, Australia; typing "Sydn" results in Sydney, FL as the location.
5. Your new favorite city appears in the Set Favorite Cities screen. Press / to set
a new favorite city as your default location. To delete a favorite city, select it and
press , then OK.
6. You can also press in the AccuWeather.com home screen to set your favorite
city and to see the current temperature, conditions, and other weather details at
your location in all your favorite cities.
WD TV Play Media Player
User Manual
INTERNET SERVICES – 101
PRELIMINARY-P3
BBC iPlayer (UK only)
Watch and listen to BBC programs from the past seven days live and on demand.
*BBC iPlayer TV shows available in the UK only.
To access the BBC iPlayer:
1. Navigate to the Home | Services menu bar and press OK.
2. The list of Internet services display in alphabetical order. Press / to select
BBC iPlayer , then press OK. The BBC iPlayer begins loading.
3. The BBC iPlayer Home screen displays television show Highlights. Press , then
press / to choose another category (Most Popular and Last Played) from the
BBC iPlayer interface, or press again to access Help or Settings. Press OK.
4. In the home screen, you can also press , then press / to choose a media
type (TV or Radio), or Search. Press OK.
5. Use the navigation buttons to select a TV show by Channel or
Categories, or a Radio show by Stations or Categories. Press or OK to
begin playing the TV show or radio program.
6. Press the Home button to exit the BBC iPlayer.
WD TV Play Media Player
User Manual
INTERNET SERVICES – 102
PRELIMINARY-P3
CinemaNow
With over 11,000 titles to choose from, CinemaNow gives you instant access to new
release movies the same day they come out on DVD and brings you TV episodes for
many popular shows the day after they air.* No subscription required and no need to
drive to a kiosk or wait for movies in the mail!
New release movies available the same day as Blu-ray/DVD
Popular TV shows available the day after they air
No monthly subscription, pay for only what you watch
More choice – with more than 10,000 movies and TV shows
Rent or purchase with Dolby Digital Plus 5.1 surround sound
Note: *CinemaNow account required. US only.
To Get Started:
1. Go to http://www.cinemanow.com/bbactivate. Sign in or create a free
CinemaNow account. No subscription required!
2. Follow the on-screen instructions to begin activation and receive your PIN code.
3. On the media player, navigate to the Home | Internet media menu bar and press
OK.
4. The list of Services display in alphabetical order. Press / to select
CinemaNow , then press OK.
5. Select Settings from the bottom menu within the CinemaNow service, then
press OK. Press OK again to activate the device and enter the CinemaNow PIN
code.
You now have instant access to new release movies & next day TV!
How Do I Download and Watch a Movie?
Once you rent or purchase a movie, it will appear in your My Videos tab. With
progressive download, you can begin watching within minutes by selecting Play
Now as soon as it becomes available.
Your selection will continue to download while you watch. Track your download
progress in the Download Manager on the Home screen. Watch purchased
movies whenever you want, as much as you want. Rentals must be watched
within 24 hours once you start playback.
To learn more:
To learn more about CinemaNow, go to http://www.cinemanow.com.
Note: To deactivate the media player from your CinemaNow account, log in to your account at
http://www.cinemanow.com.
WD TV Play Media Player
User Manual
INTERNET SERVICES – 103
PRELIMINARY-P3
Comedy Time
The Comedy Time Network launched as the comedy channel for Sprint TV and
MobiTV in July, 2004 and has since expanded on to all major carrier decks as well as
cable/satellite/IP television, broadband video and traditional media. It is a market
leader in the production and distribution of short-form comedy programming.
To access Comedy Time:
1. Navigate to the Home | Services menu bar and and press OK.
2. The list of Internet services display in alphabetical order. Press / to select
Comedy Time , then press OK to display the Comedy Time home
screen.
3. Use the navigation buttons to browse, select, and search for videos and
the playback buttons to stop and start videos.
Dailymotion
Dailymotion is a video sharing service website.
To access Dailymotion:
1. Navigate to the Home | Services menu bar and press OK.
2. The list of Internet services display in alphabetical order. Press / to select
Dailymotion , then press OK.
3. The Dailymotion main screen displays top videos. Press to choose another
category (Channels, Favorite Members, Top Members, Search, Help, and Info)
from the Dailymotion interface. Press OK.
4. Use the navigation buttons to select a video. Press or OK to begin
playback.
5. Press the Home button to exit Dailymotion.
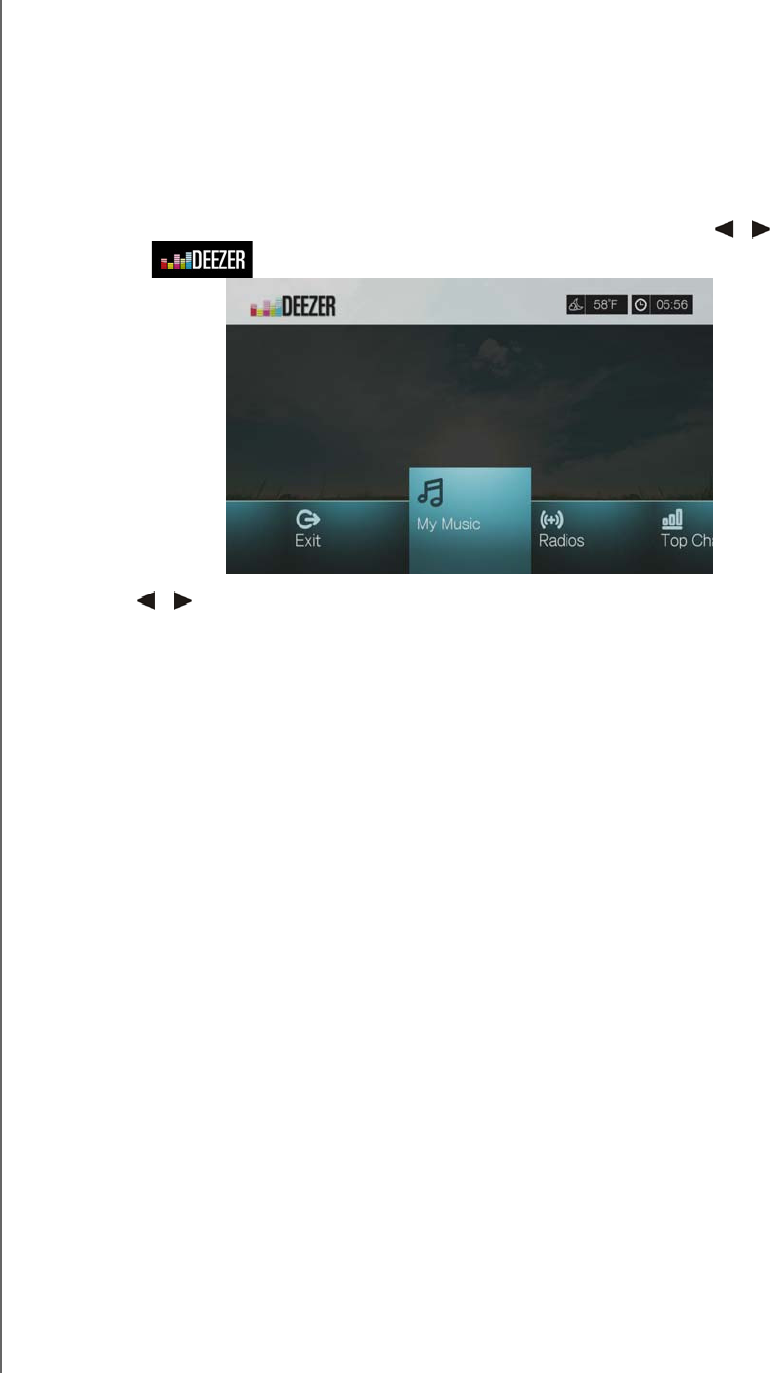
WD TV Play Media Player
User Manual
INTERNET SERVICES – 104
PRELIMINARY-P3
Deezer
Deezer is a personalized on-demand music service to listen to seven million tracks
anytime, anywhere and one of the most popular Internet and mobile music offerings
in Europe.
To access Deezer:
1. Navigate to the Home | Services menu bar and press OK.
2. The list of Internet services display in alphabetical order. Press / to select
Deezer , then press OK. The Deezer main screen displays.
3. Press / to choose an option, then press OK.
Options include:
My Music
Radios
Top Charts
Search
Sign in
Exit
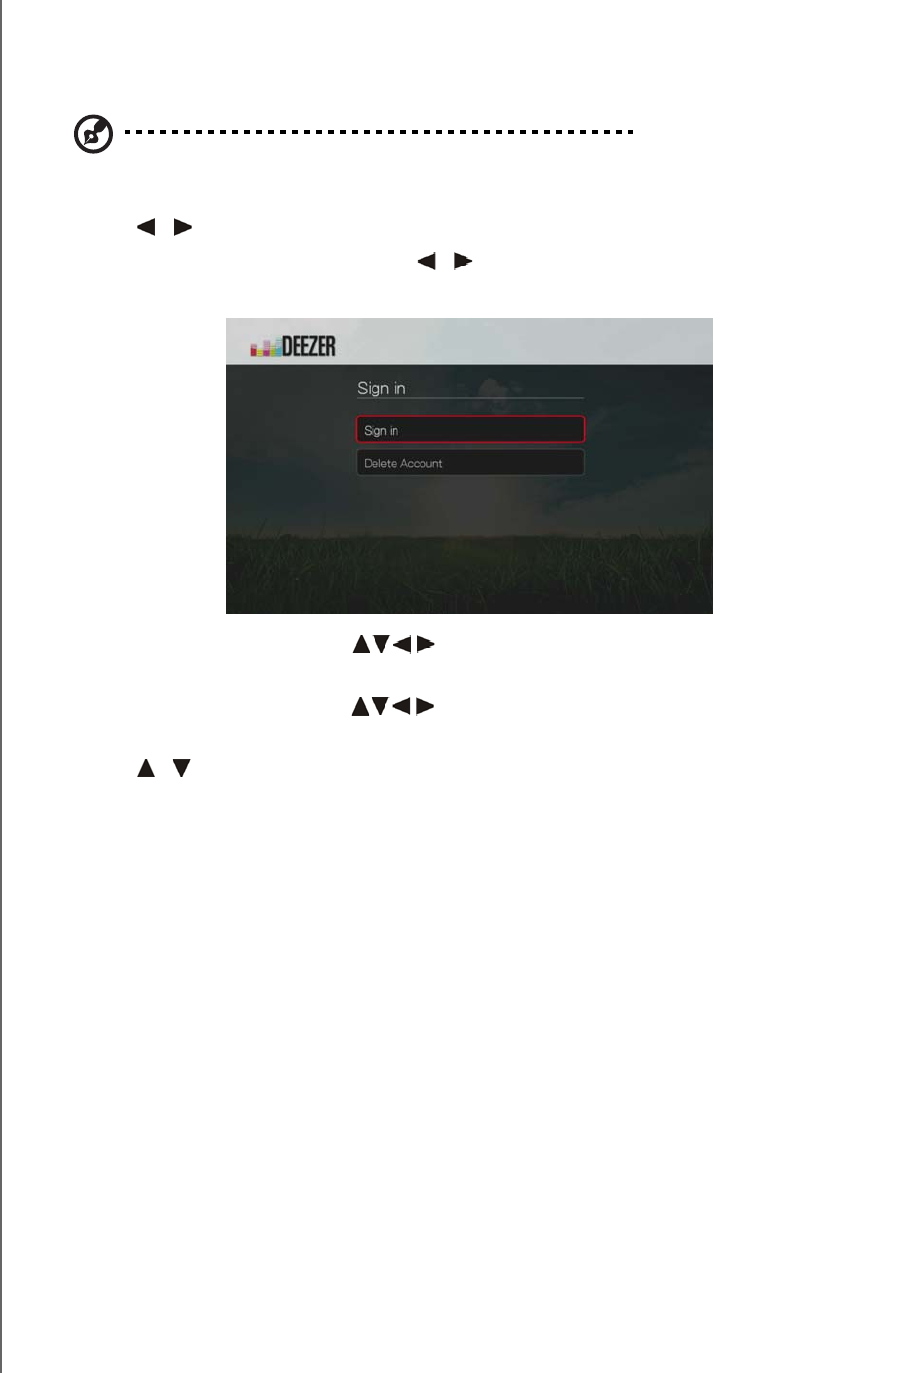
WD TV Play Media Player
User Manual
INTERNET SERVICES – 105
PRELIMINARY-P3
Signing in to Your Deezer Account
Sign in to your Deezer account to access My Music (your playlists and favorites) and
Top Charts.
Note: If you do not have a Deezer account and want to create one, go to http://www.deezer.com.
1. Navigate to the Home | Services menu bar.
2. Press / to select Deezer, then press OK.
3. In the Deezer main screen, press / to select Sign In, then press OK.
4. Select Sign in, then press OK.
5. Use the navigation buttons to type your registered Deezer email address
using the on-screen keyboard. Select Submit, then press OK.
6. Use the navigation buttons to type your Deezer account password in the
on-screen keyboard. Select Submit, then press OK.
7. Press / to select a save option.
Options include:
No – Your account details will not be saved. You need to repeat the initial
sign-in process every time you access this service using the media player.
Save username only – Your user name is saved, but you will be prompted
to type in your password every time you access this service using the media
player.
Yes – Both your user name and password are saved. You are automatically
logged in to your account every time you access this service.
8. Press OK to complete the sign-in process. The My Music screen displays.
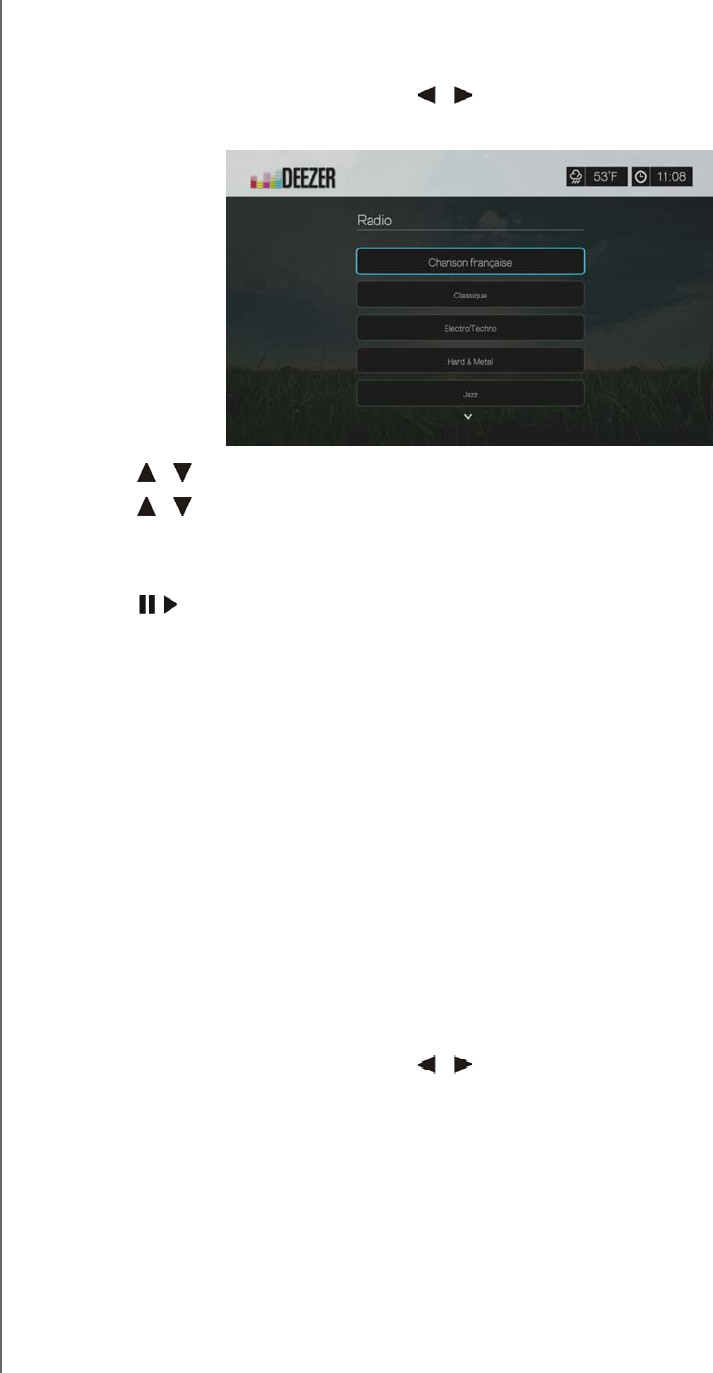
WD TV Play Media Player
User Manual
INTERNET SERVICES – 106
PRELIMINARY-P3
Radios
You can choose from a variety of radios by music genre and subgenre.
1. In the Deezer main screen, press / to select Radios, then press OK.
2. Press OK to select a radio.
3. Press / to select a radio by music genre, then press OK.
4. Press / to select a radio by music subgenre, then press OK.
5. With a radio you want to listen to selected, press Options to select Become a
Fan. This adds the radio to Favorite Radios for quick access in the future.
6. Press or OK to begin listening to the radio station.
Deezer Player
The Deezer player is similar to the regular music playback screen. It displays the
playback status bar, album, artist, and the elapsed and total playback times.
Press PLAY/PAUSE to pause and resume playback.
Press FF/REV to fast forward or rewind in 10 second increments.
Press NEXT/PREV to select the next/previous song in the station or playlist.
My Music
After signing in to Deezer, select My Music, then press OK to display playlists and
favorite radio stations.
Playlists
Adding a playlist to My Music:
1. In the Deezer main screen, press / to select My Music, then press OK.
2. Sign in to your Deezer account if not already logged in.
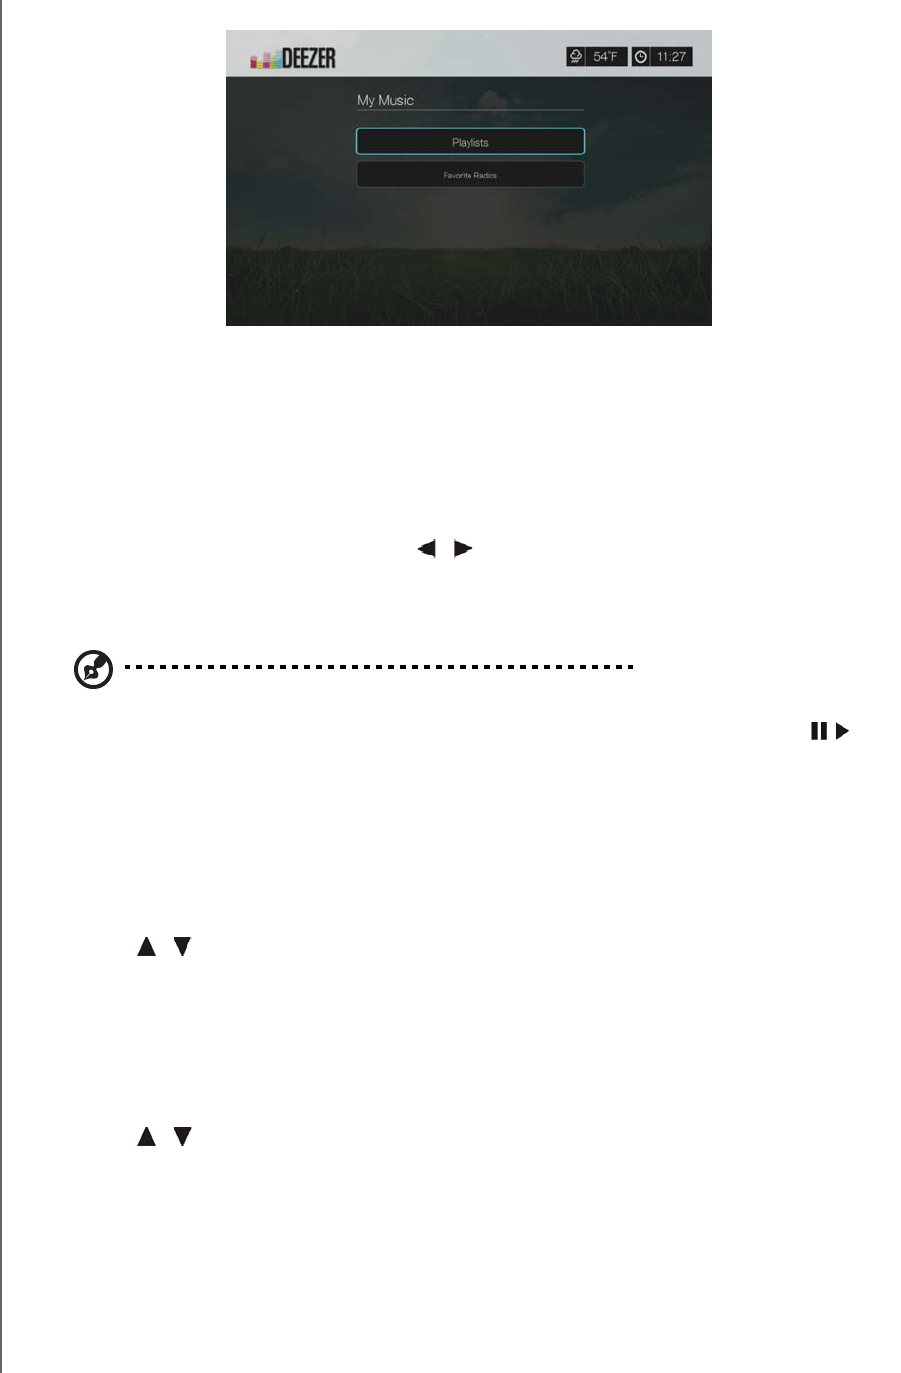
WD TV Play Media Player
User Manual
INTERNET SERVICES – 107
PRELIMINARY-P3
3. Select Playlists, then press OK.
4. Press Options, then select Create Your Playlist. Press OK.
5. Type in the name of your playlist using the on-screen keyboard, select Submit,
then press OK.
Favorite Radios
Accessing a favorite radio station in My Music:
1. In the Deezer main screen, press / to select My Music, then press OK.
2. Sign in to your Deezer account if not already logged in.
3. Select Favorite Radios, then press OK.
Note: If you have not added any stations, the screen displays "no favorite available."
4. Press the navigation buttons to select a station from the list, then press or
OK to begin listening to the radio station.
Add to Playlist
You can add songs to a playlist using the Options button on the remote.
1. With a song selected in a Radio or Top Charts screen, press Options to display
Add to Playlist. Press OK.
2. Press / to select a playlist you have created in My Music, then press OK to
add the song the selected playlist.
Delete a Playlist
You can delete a playlist using the Options button on the remote.
1. With a playlist selected in My Music > Playlists screen, press Options.
2. Press / to select Delete, then press OK.
3. Select OK, then press OK.
Delete a Radio Station
You can delete a radio station using the Options button on the remote.
1. With a radio station selected in My Music > Favorite Radios screen, press
Options.
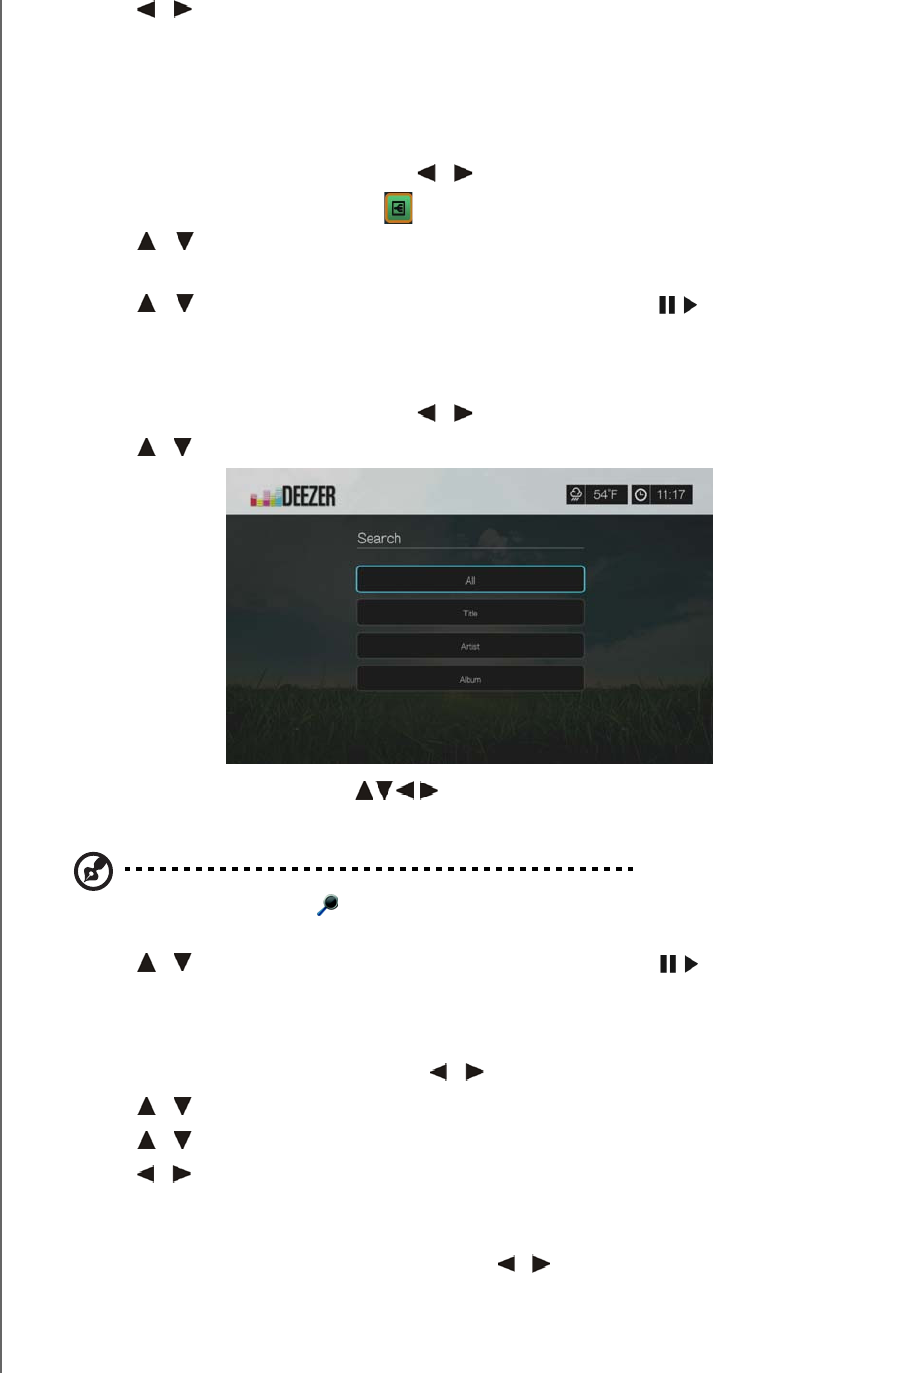
WD TV Play Media Player
User Manual
INTERNET SERVICES – 108
PRELIMINARY-P3
2. Press / to select Delete from Favorite, then press OK.
3. Select OK, then press OK.
Top Charts
These are songs deemed most popular by Deezer users by country.
1. In the Deezer main screen, press / to select Top Charts, then press OK.
2. With the filter button selected , press OK.
3. Press / to filter channel results (choose from FR, BE, UK, US), then press
OK twice.
4. Press / to select a song from the display then press or OK to start
listening to the selected song.
Search
1. In the Deezer main screen, press / to select Search, then press OK.
2. Press / to filter results (All, Title, Artist, or Album), then press OK.
3. Use the navigation buttons to type a search using the
on-screen keyboard. Select Submit, then press OK.
Note: You can also press on the remote control to toggle to the results list after entering several
characters in the search field.
4. Press / to select a song from the display, then press or OK to start
listening.
Deleting a Deezer Account
1. On the Deezer main screen, press / to select Sign in, then press OK.
2. Press / to select Delete Account, then press OK.
3. Press / to select the account you want to delete, then press OK.
4. Press / to select OK on the confirmation prompt, then press OK.
Exit Deezer
To return to the Services home screen, press / to select Exit in the Deezer home
screen, then press OK.
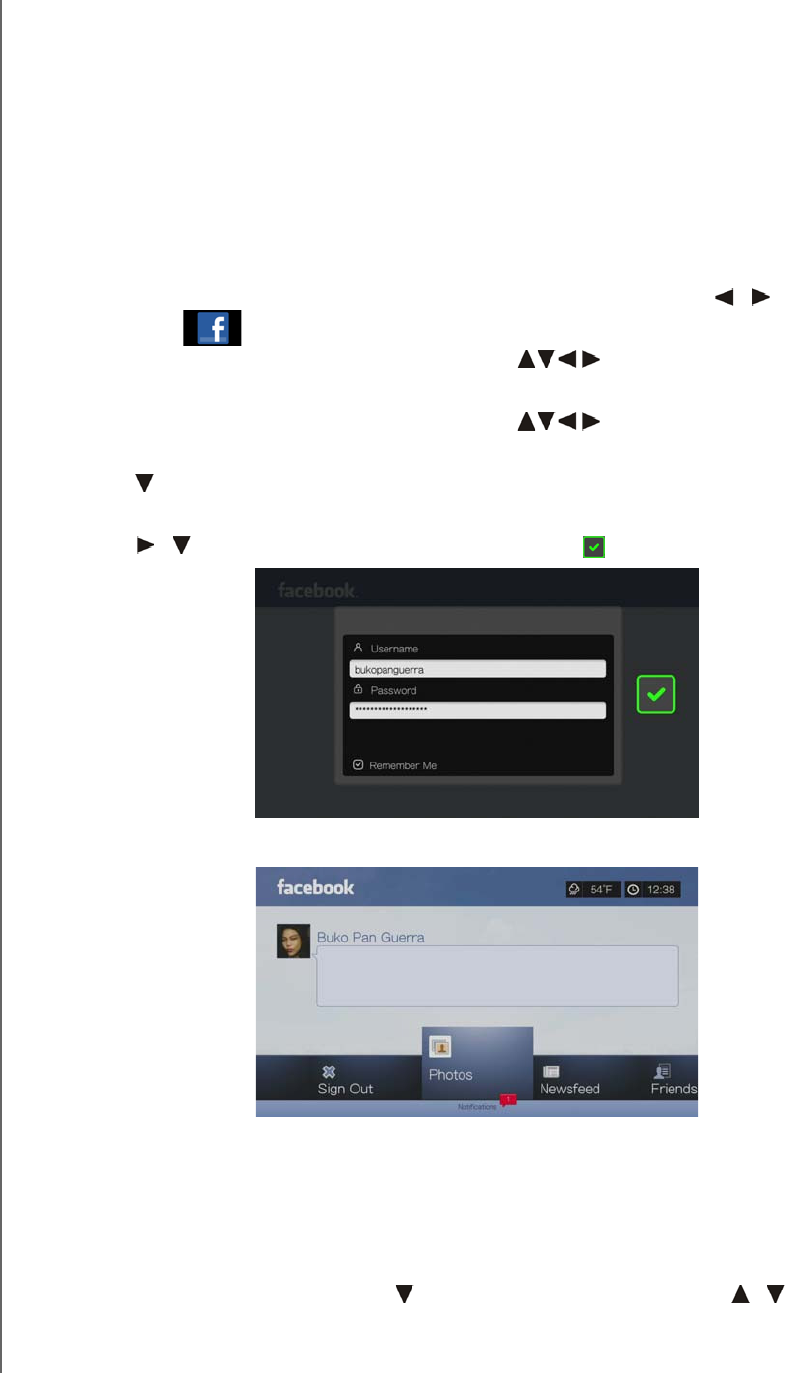
WD TV Play Media Player
User Manual
INTERNET SERVICES – 109
PRELIMINARY-P3
Facebook
Share your status, photos, videos, and your favorite links on Facebook. Find out the
latest news from your social network or the world and so much more. Access it all
on your big screen TV.
You must have have a valid Facebook account to use this service. You can create a
Facebook account at www.facebook.com.
Signing in to Facebook for the First Time
1. Navigate to the Home | Services menu bar and press OK.
2. The list of Internet services display in alphabetical order. Press / to select
Facebook , then press OK.
3. Press OK, then use the navigation buttons to type in your Facebook
user name using the on-screen keyboard. Select Submit, then press OK.
4. Press OK, then use the navigation buttons to type in your Facebook
password using the on-screen keyboard. Select Submit, then press OK.
5. Press , then OK to Remember Me if you want your Facebook account stored
in the media player for quick access.
6. Press / , then OK with the green check mark selected.
7. Press OK to complete the sign-in process. The Facebook home screen displays.
Notifications
Notifications let you know when people take actions on Facebook related to you, so
you can quickly check out a photo you've been tagged in or read a new posting on
your Wall.
In the Facebook main menu, press to select Notifications. Press / to select a
notification then press OK.

WD TV Play Media Player
User Manual
INTERNET SERVICES – 110
PRELIMINARY-P3
Photos
You can view the photos or photo albums you and others users have posted to
Facebook either individually or as a slideshow.
1. In the Facebook main menu, select Photos then press OK.
2. Navigate to a photo album, then press OK.
3. Navigate to a photo then press OK, or press (PAUSE/PLAY) to start a photo
slideshow (see “Slideshow Playback Controls” on page 91).
Photos Options
With an individual photo selected or a slideshow running, press Options.
Rotate Left & Right - See “Rotate Left & Right” on page 88.
Zoom - To change the display’s viewing scale, press OK repeatedly until the
preferred viewing scale is achieved. Press Options or Back to revert to the
default viewing scale.
Pan - To pan the display, press the navigation buttons repeatedly until
the preferred panned view displays. Press Options or Back to revert to the
default viewing scale.
Set as Background - see “Set As Background” on page 88.
Download Photo - Select this option then press OK to download the photo to
one of your local drives. Select the location you want to download your photo to
(network share or attached storage) then press OK.
Newsfeed
The Facebook news feed displays all of your friends’ comments and allows you to
“Like” or comment. The number of people who like or have commented on each
entry displays inside the corresponding icons to the right of the news feed entry.
1. In the Facebook main menu, press / to select Newsfeed, then press OK.
WD TV Play Media Player
User Manual
INTERNET SERVICES – 111
PRELIMINARY-P3
2. Press / to view your friends’ comments and posts.
3. With an entry selected, press once to select “Like,” if you like the entry ,
then press OK. Press twice to comment on a news feed entry , press OK,
then enter your comment using the on-screen keyboard.
Note: Navigating to What’s on your mind? and pressing OK allows you to add a comment to your
wall in the newsfeed screen.
Friends
You can access your friends’ pages to view their photos, videos, and Wall posts.
1. In the Facebook main menu, press / to select Friends, then press OK.
2. The page of the friend you have selected displays. The photos section of the
page displays by default. You can view photos or navigate to Videos or Wall, then
press OK to view your friend’s videos and wall comments.
Wall
The Facebook Wall displays all of your entries and your friends comments and
allows you to “Like” or comment. The number of people who like or have
commented on each entry displays inside the corresponding icons to the right of the
Wall entry.
1. In the Facebook main menu, press / to select Wall, then press OK.
2. Press / to view your friends’ comments and posts.
3. With an entry selected, press once to select “Like,” if you like the entry ,
then press OK. Press twice to comment on a wall entry , press OK, then
enter your comment using the on-screen keyboard.
Note: Navigating to What’s on your mind? and pressing OK allows you to add a comment to your
wall.
Videos
You can view the videos you and others users have posted to Facebook.
1. In the Facebook main menu, select Videos then press OK.
2. Navigate to a video, then press OK.
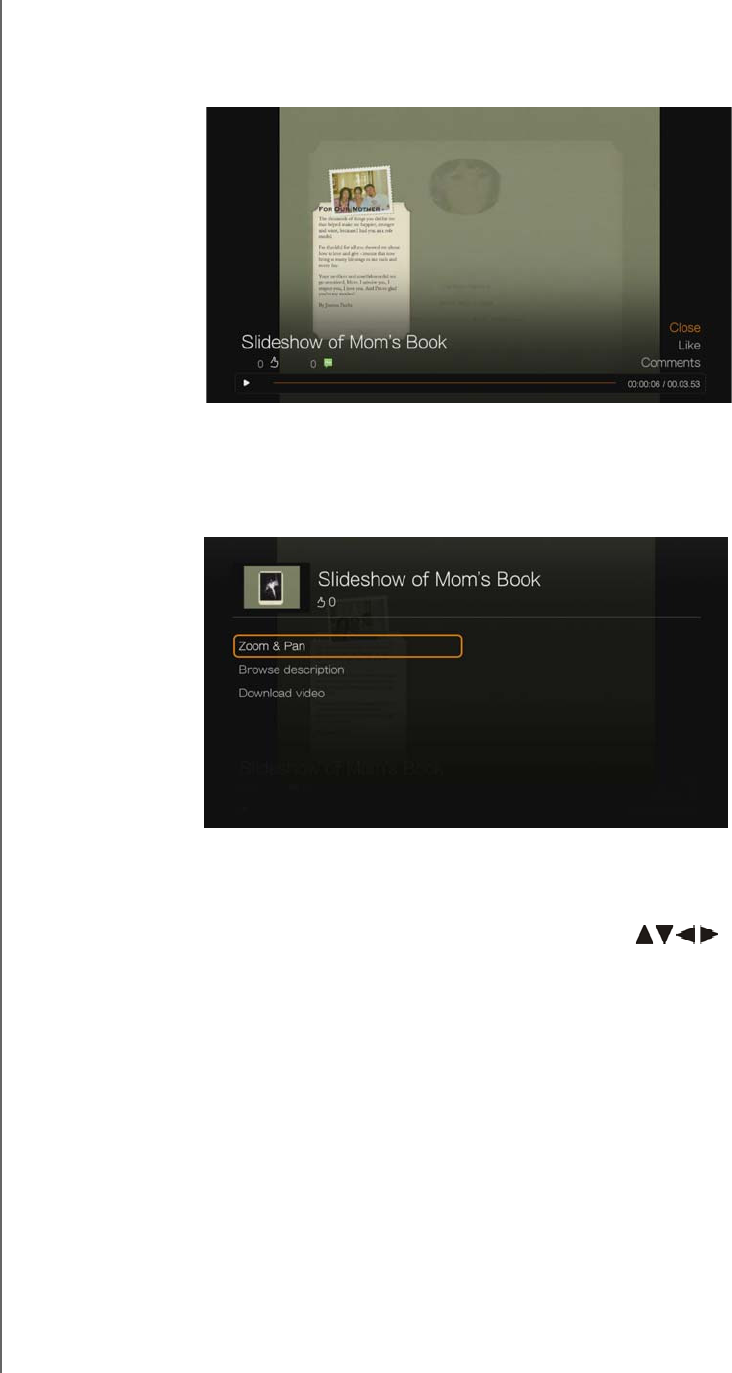
WD TV Pl ay Media Pl ayer
User Manual
INTERNET SERVICES – 112
PRELIMINARY-P3
Videos Player
With a video playing, press OK to bring up the videos player info panel. You can
choose to Like or Comment on a video in the info panel, then press OK.
Videos Options
With a video playing, press Options.
Zoom - To change the display’s viewing scale, press OK repeatedly until the
preferred viewing scale is achieved. Press Options or Back to revert to the
default viewing scale.
Pan - To pan the display, press the navigation buttons repeatedly until
the preferred panned view displays. Press Options or Back to revert to the
default viewing scale.
Browse description - Select this option then press OK to view the description
of the video.
Download video - Select this option then press OK to download the video to
one of your local drives. Select the location you want to download your video to
(network share or attached storage) then press OK.
Video playback progress bar Elapsed and total
playback times
Number of “likes”
and comments

WD TV Play Media Player
User Manual
INTERNET SERVICES – 113
PRELIMINARY-P3
Event
Event displays all events you’ve been invited to, and allows you to view more
information about or comment on events, and view your friends’ comments and
“Like” or comment on them. The number of people who like or have commented on
each entry displays inside the corresponding icons to the right of the Event entry.
1. In the Facebook main menu, press / to select Events, then press OK.
2. Select an event you’ve been invited to, then press OK.
3. Select Write a Comment... or View More Info to write a comment about or
view more info for the event.
4. Press / to view your friends’ comments and posts.
5. With an entry selected, press once to select “Like,” if you like the entry ,
then press OK. Press twice to comment on an event entry , press OK, then
enter your comment using the on-screen keyboard.
Sign Out
In the Facebook main menu, select Sign Out then press OK to log out of Facebook
and return to the Services home screen. All previously saved login data for the
Facebook account is erased.
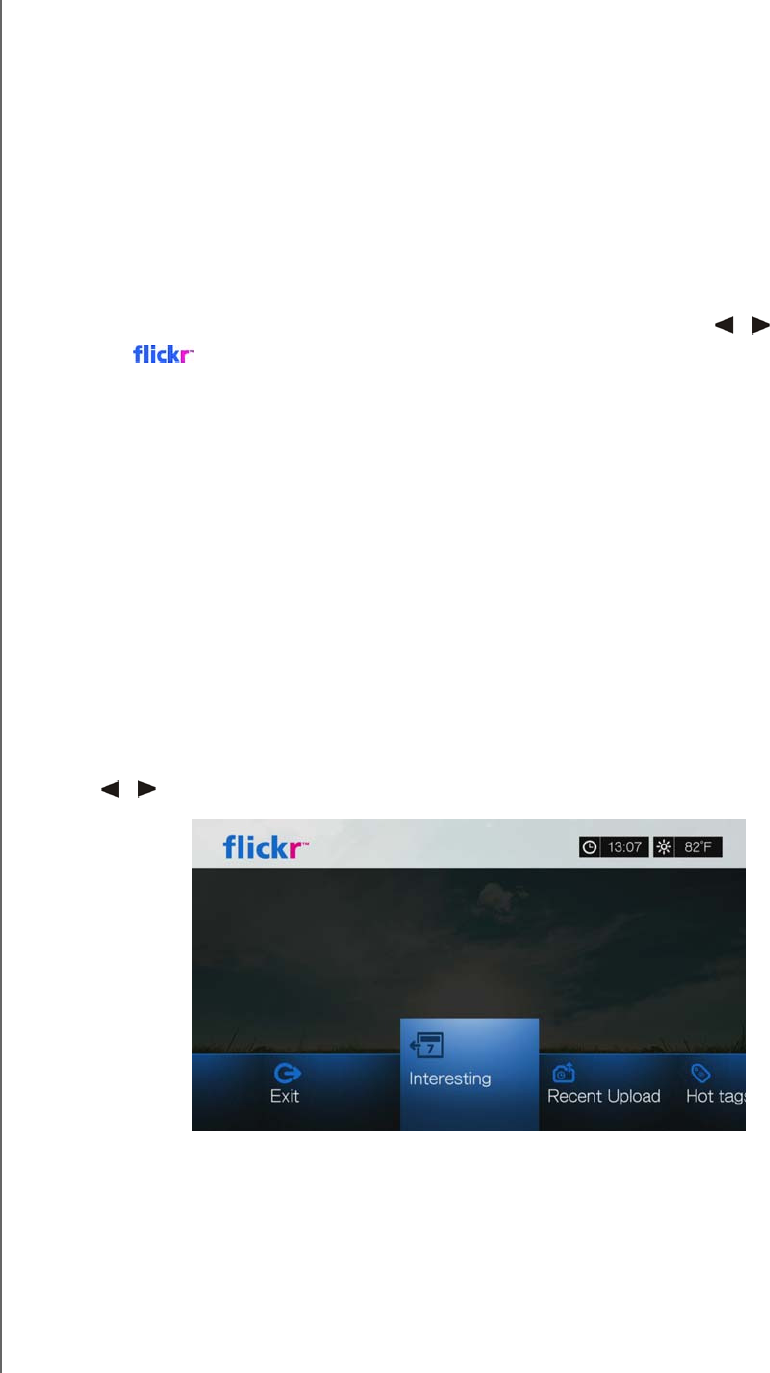
WD TV Play Media Player
User Manual
INTERNET SERVICES – 114
PRELIMINARY-P3
Flickr
Flickr is an online image and video management and sharing website. Flickr content
is organized based on tags—a keyword or category label that describes content.
Tags help users to search for contents that have something in common. Each
content file can have as many as 75 tags associated with it.
To learn more about Flickr services, and the options and limitations related to them,
go to http://www.flickr.com/tour/.
To access Flickr:
1. Navigate to the Home | Search menu bar and and press OK.
2. The list of Internet services display in alphabetical order. Press / to select
Flickr , then press OK. The Flickr home screen displays.
Options include:
Interesting (last seven days)
Recent Upload
Search
My Contacts
Hot Tags
My Tags
Exit
Exploring Contents
You can explore photostreams (Flickr’s term for content selection) available in Flickr’s
public domain.
To explore for random “interesting” media content from the past seven days:
Press / to select Interesting in the Flickr home screen, then press OK.
A photostream showing random contents rated as interesting in the past seven days
by Flickr users displays. Go to page 119 for instructions on how to navigate a
photostream.
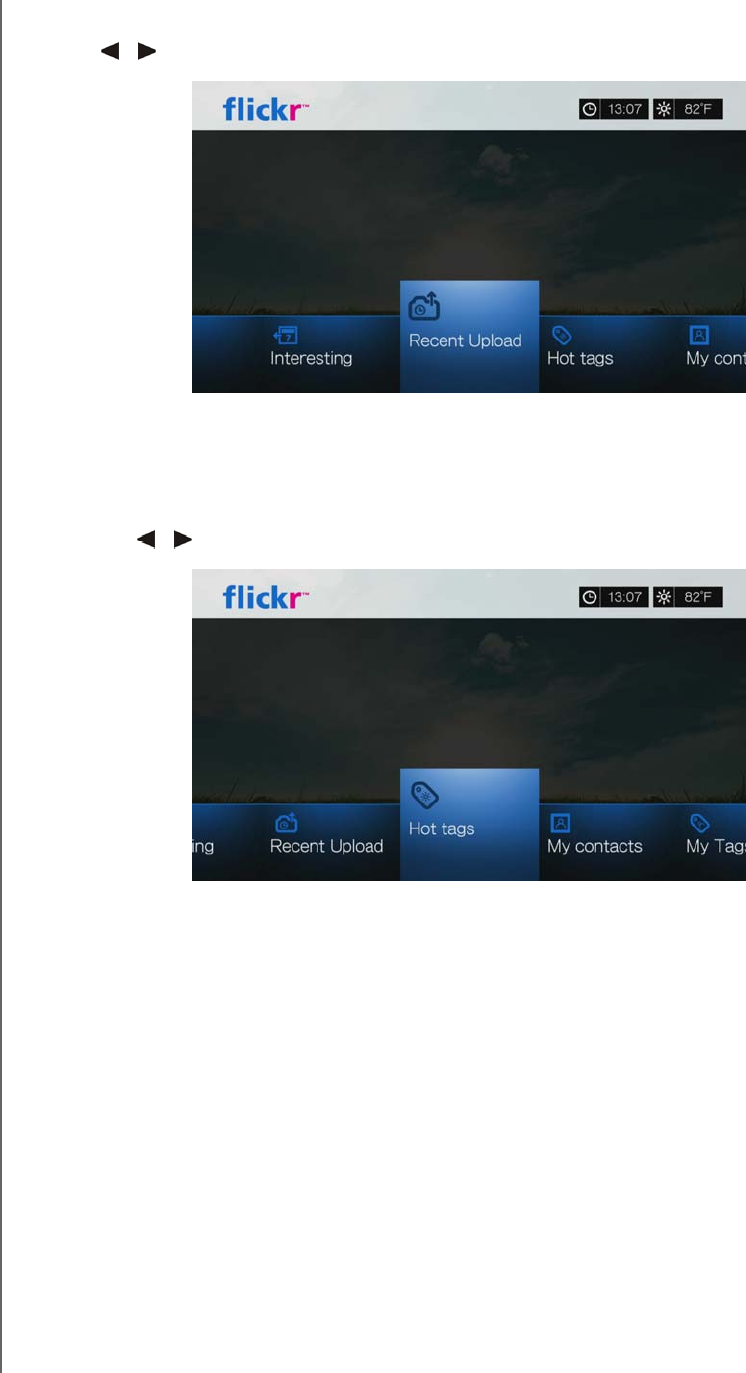
WD TV Play Media Player
User Manual
INTERNET SERVICES – 115
PRELIMINARY-P3
To explore based on the upload date:
Press / to select Recent Upload in the Flickr home screen, then press OK.
A photostream showing the most recently uploaded content displays. Go to “Flickr
Photostream” on page 119 for instructions on how to navigate a photostream.
To explore based on popular tags:
1. Press / to select Hot tags in the Flickr home screen, then press OK.
2. Press the navigation buttons to select a tag from the list, then press OK.
A photostream showing contents associated with the selected tag is displayed.
Go to “Flickr Photostream” on page 119 for instructions on how to navigate a
photostream.
Searching for Contents
To search for content based on a specific keyword:
Keywords are words or phrases associated with the type of content you’re looking
for. Keyword searches are based on information indicated on a member’s profile
page.
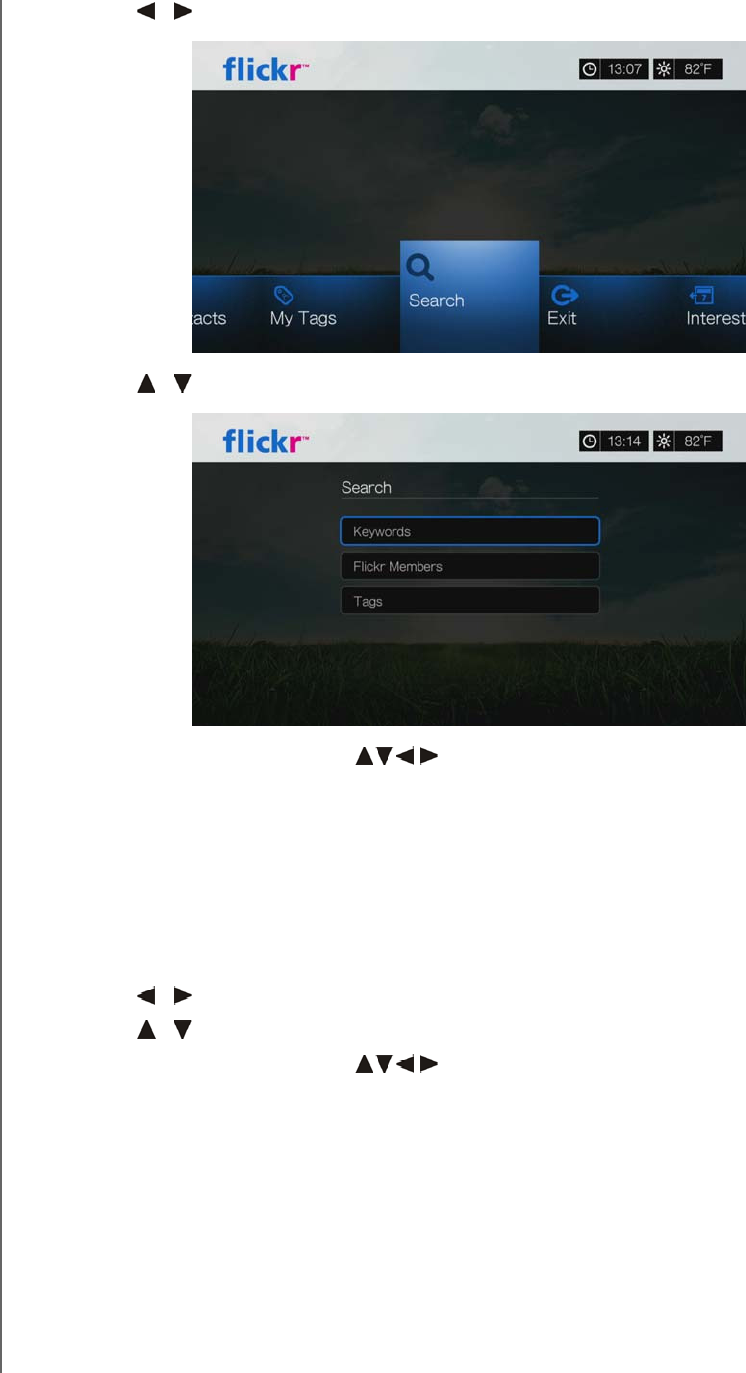
WD TV Play Media Player
User Manual
INTERNET SERVICES – 116
PRELIMINARY-P3
1. Press / to select Search in the Flickr home screen, then press OK.
2. Press / to select Keywords, then press OK.
3. Use the navigation buttons to type a search word using the on-screen
keyboard. Select Submit, then press OK.
A photostream showing contents associated with the specified keyword
displays. Go to page 119 for instructions on how to navigate a photostream.
To search for content based on tags:
Perform this type of search to find content based on information indicated in a
member’s tags list.
1. Press / to select Search in the Flickr dashboard, then press OK.
2. Press / to select Ta gs, then press OK.
3. Use the navigation buttons to type a search word using the on-screen
keyboard. Select Submit, then press OK.
A photostream showing contents associated with the specified word is
displayed. Go to “Flickr Photostream” on page 119 for instructions on how to
navigate a photostream.
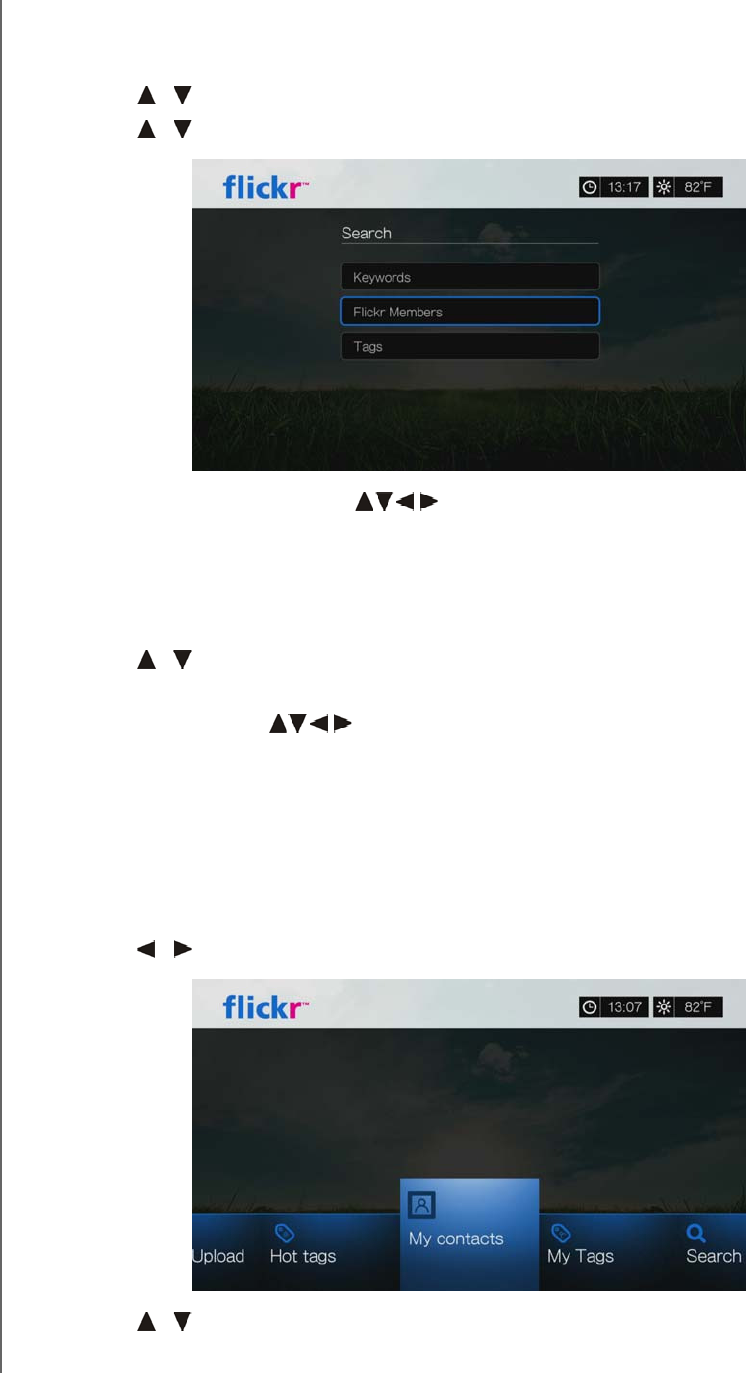
WD TV Play Media Player
User Manual
INTERNET SERVICES – 117
PRELIMINARY-P3
Searching for a Flickr Member
To search for a Flickr member:
1. Press / to select Search in the Explore screen, then press OK.
2. Press / to select Flickr member, then press OK.
3. Use the navigation buttons to type a member’s user name, email
address, or interest using the on-screen keyboard. Select Submit, then press
OK.
A browser screen listing Flickr member links matching your search criteria
displays.
4. Press / to select a link, then press OK to view that member’s profile page.
If the selected member has public photostreams, you can explore them. Use the
navigation buttons to select a content selection, then press OK to
explore it. Go to the next section for instructions on how to navigate a
photostream.
My Contacts
My Contacts shows a list of Flickr members you have searched for.
To view My Contents:
1. Press / to select My Contents in the Flickr home screen, then press OK.
2. Press / to select a Flickr member you’ve searched for previously, then press
OK to view their photos.
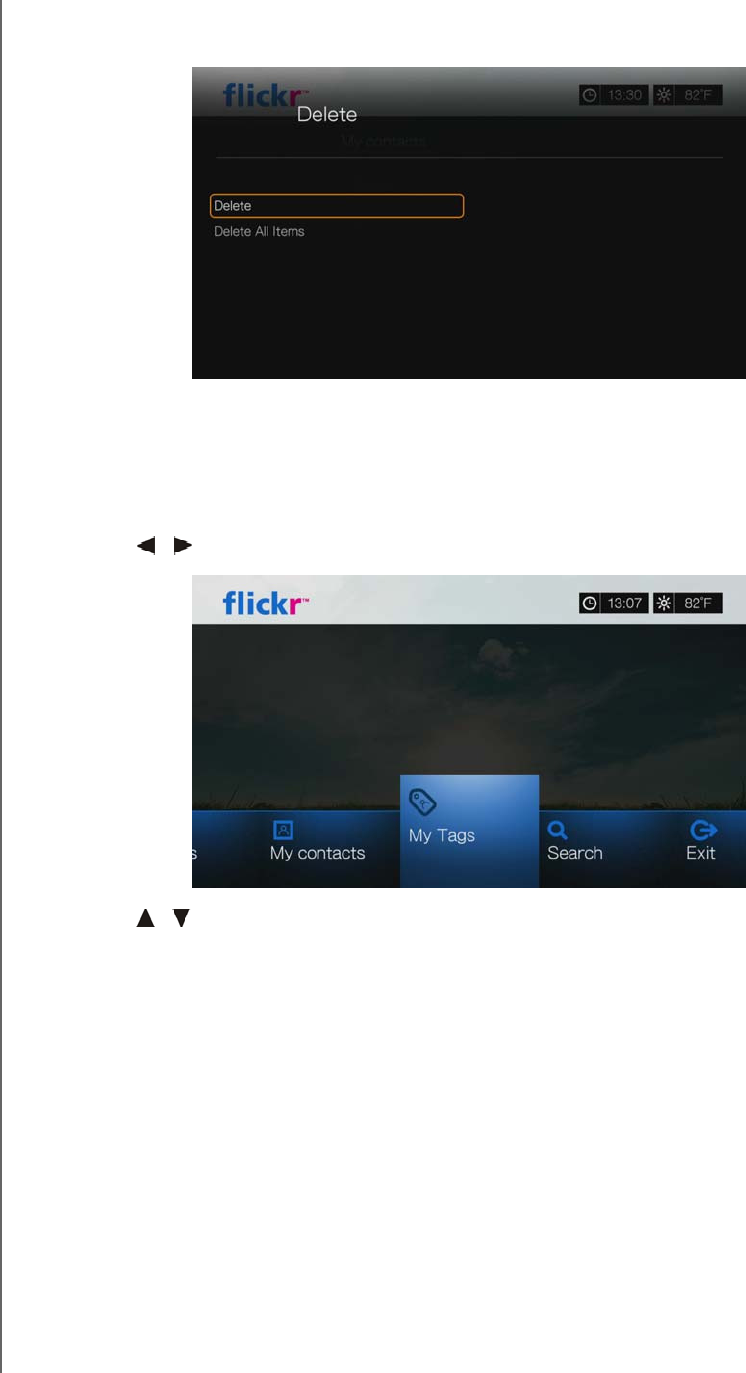
WD TV Play Media Player
User Manual
INTERNET SERVICES – 118
PRELIMINARY-P3
3. To remove a contact from the list, select the contact name and press Options.
Select Delete or Delete All Items, then press OK.
My Tags
My Tags shows a list of Flickr tags you have searched for.
To view My Tags:
1. Press / to select My Tags in the Flickr home screen, then press OK.
2. Press / to select a tag you’ve searched for previously, then press OK to view
the photos associated with the tag.
3. To remove a tag from the list, select the tag and press Options. Select Delete or
Delete All Items, then press OK.
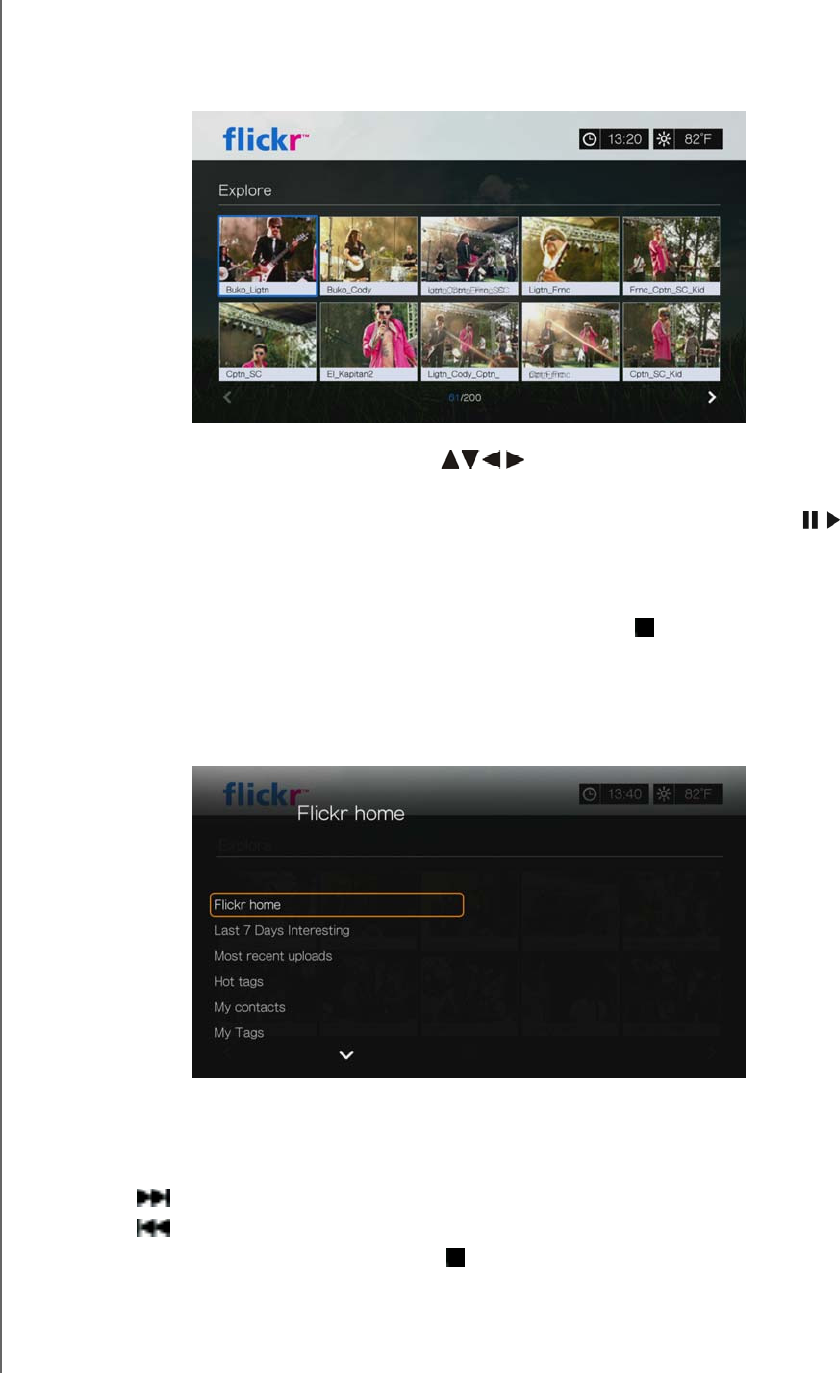
WD TV Play Media Player
User Manual
INTERNET SERVICES – 119
PRELIMINARY-P3
Flickr Photostream
The Flickr photostream layout is the same as that of a Photos directory in thumbnail
mode.
You can use the navigation buttons to select content.
To view content in fullscreen mode, select the file and press OK.
To view a slideshow using all the current photostream’s content, press or
OK. Contents display in the Flickr Player screen. Go to next section for
information.
To return to the photostream from fullscreen mode, press Back.
To return to the photostream from Player mode, press .
To view all photos in full screen, go to Photo Settings and select Fit to screen (see
“Photo Scaling” on page 193).
While in the photostream layout, press Options to jump back to the Flickr home
page or choose any of the Flickr home page menu options.
Flickr Player
The Flickr Player layout is the same as that of a photo slideshow.
Press to view the next image in the photostream.
Press to view the previous image in the photostream.
To return to the photostream, press .
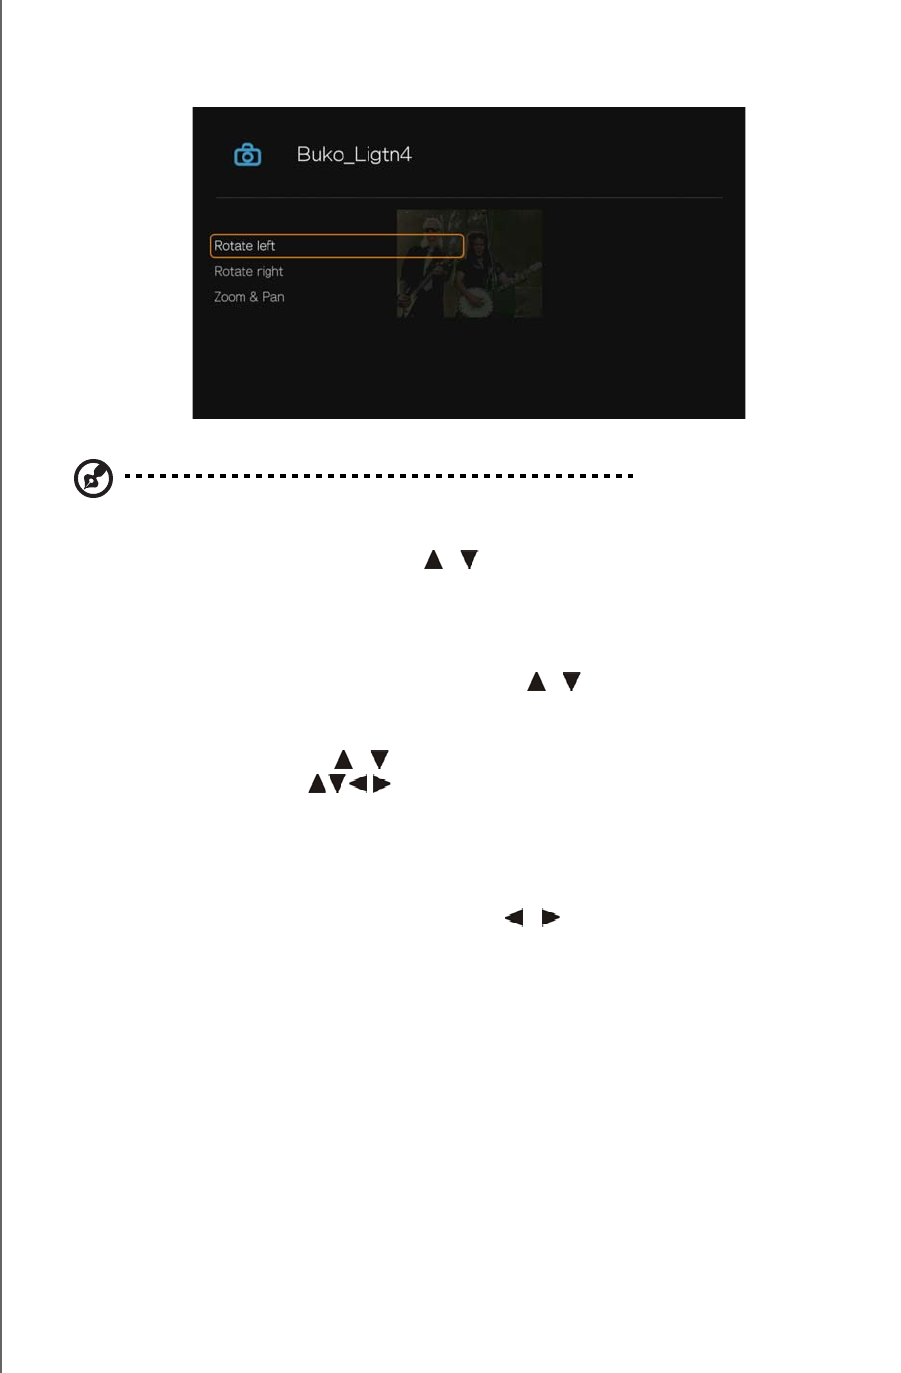
WD TV Play Media Player
User Manual
INTERNET SERVICES – 120
PRELIMINARY-P3
Player Options
As with a regular photo slideshow, you can customize the way content is displayed
in the Flickr Player. To do this, press Options.
Note: To view photos enlarged in fit to screen or full screen mode, access the Setup menu and follow
the instructions under “Photo Scaling” on page 193.
To rotate the image display, press / and select Rotate left or Rotate right,
then press OK repeatedly until the preferred display angle is achieved.
The display is rotated clockwise or counter-clockwise in 90° increments. Press
Options or Back to revert to the default display angle.
To change the display’s viewing scale, press / and select Zoom & Pan, then
press OK. Press OK repeatedly until the preferred viewing scale is achieved.
Press Options or Back to revert to the default viewing scale.
To pan the display, press / and select Zoom & Pan, then press OK. Press
the navigation buttons repeatedly until the preferred panned view
displays. Press Options or Back to revert to the default viewing scale.
Exit Flickr
To return to the Services home screen, press / to select Exit in the Flickr
dashboard, then press OK.
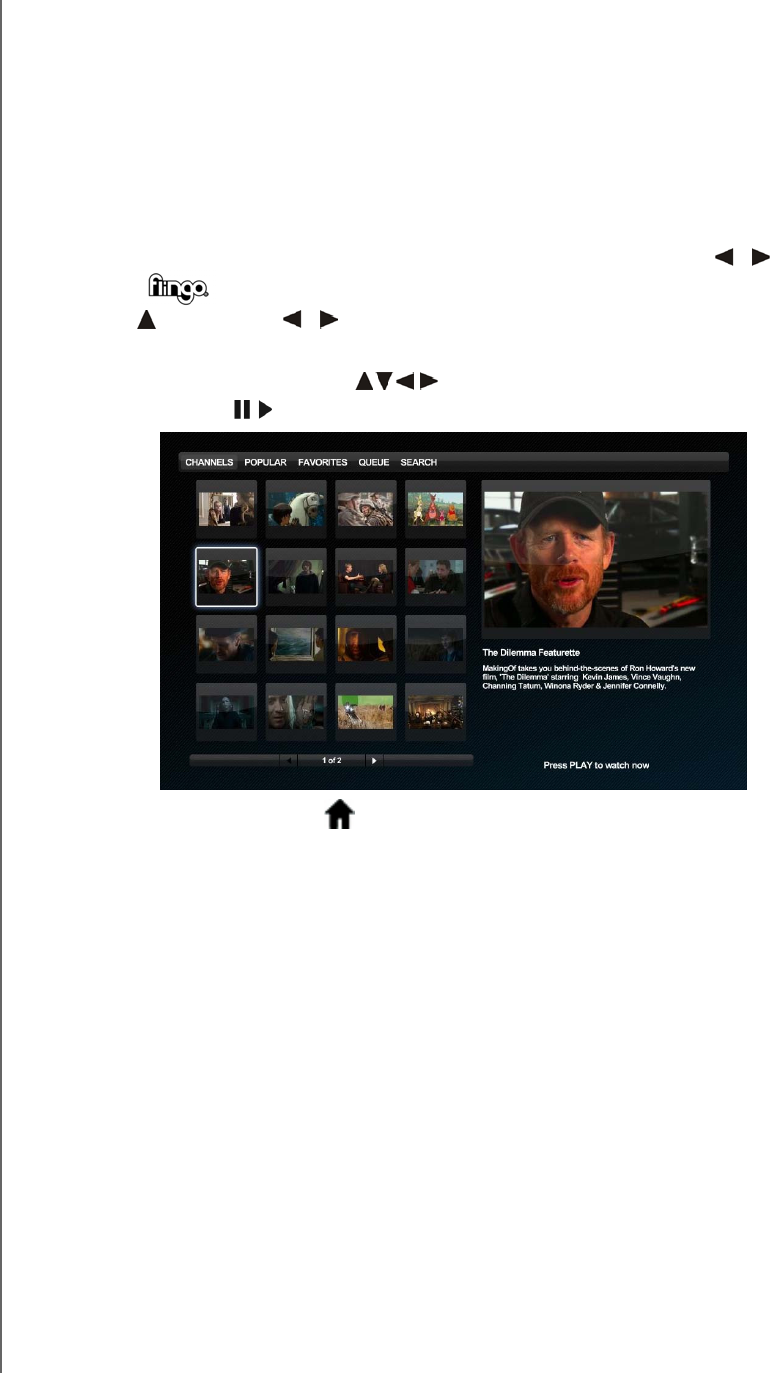
WD TV Play Media Player
User Manual
INTERNET SERVICES – 121
PRELIMINARY-P3
Flingo
Flingo offers free Internet Television from leading studios, TV networks, and video
websites. It also allows you to turn the Web into your remote control. You can simply
"fling" your favorite videos to the Queue in the Flingo application on your media
player. For more information go to www.flingo.tv.
To access Flingo:
1. Navigate to the Home | Services menu bar and press OK.
2. The list of Internet services display in alphabetical order. Press / to select
Flingo , then press OK.
3. Press , then press / to choose a category (Channels, Popular, Favorites,
Queue, and Search) from the Flingo interface. Press OK.
4. Use the navigation buttons to select a channel, then a video within the
channel. Press or OK to begin playing the video.
5. Press the Home button to exit Flingo.
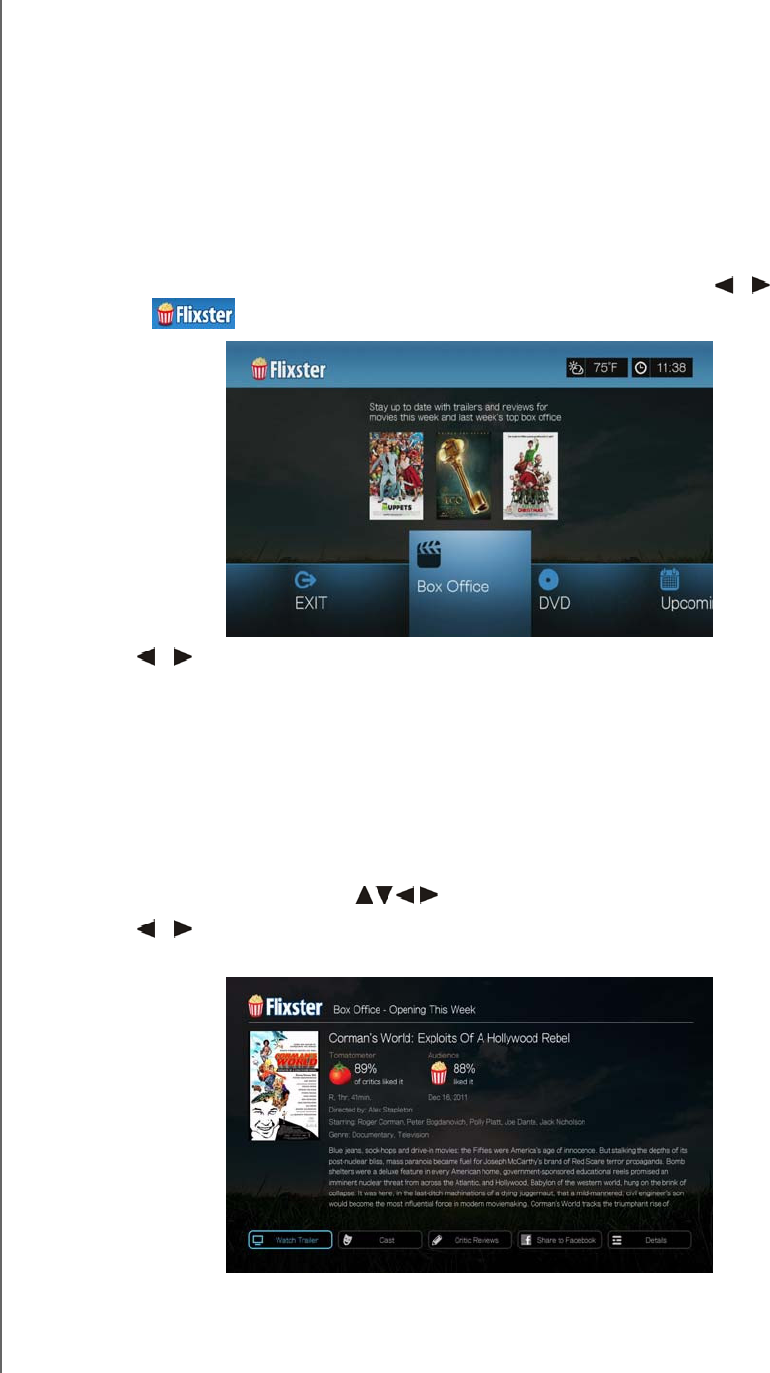
WD TV Play Media Player
User Manual
INTERNET SERVICES – 122
PRELIMINARY-P3
Flixster
Watch the latest theatrical movie trailers and get critic reviews from Rotten
Tomatoes. Preview movies that are opening this week and see what’s hot at the box
office. See what’s new on DVD and Blu-ray and the top rentals. Search a catalog of
over 40,000 films. Watch high quality trailers for over 10,000 blockbusters and indie
flicks.
To access Flixster:
1. Navigate to the Home | Services menu bar and press OK.
2. The list of Internet services display in alphabetical order. Press / to select
Flixster , then press OK. The Flixster main screen displays.
3. Press / to choose an option, then press OK.
Options include:
Box Office (stay up to date with trailers and reviews for movies this week and
last week’s top box office)
DVD (browse trailers and reviews for recently released DVDs)
Upcoming (view trailers and reviews for upcoming movies)
Search (search for trailers and reviews using the on-screen keyboard)
Exit
4. Use the navigation buttons to select a movie or DVD, then press OK.
5. Press / to select Watch Trailer, Cast, Critic Reviews, Share to
Facebook, or Details, then press OK.
6. While watching trailers, press OK to see the video progress/playback bar. Press
Option to select Zoom & Pan (see “Selecting Video Zoom and Pan Options” on
page 71).
WD TV Play Media Player
User Manual
INTERNET SERVICES – 123
PRELIMINARY-P3
Hulu Plus (US only)
Hulu Plus offers current hit TV shows and award-winning movies anytime in HD.
Watch any current season episode of top shows like Modern Family, Glee, 30 Rock
and many others, enjoy classic series, or explore acclaimed movies from The
Criterion Collection and Miramax. Visit www.hulu.com/plus for details.*
* Hulu Plus membership required. US only.
The following conditions must be satisfied before you can use the Hulu Plus service.
You must have a Hulu Plus subscription. Go to www.hulu.com/plus to create
your account.
At present, Hulu Plus is only available for users located in the United States. You
must have a US-based network connection.
To access Hulu Plus:
1. Navigate to the Home | Services menu bar and press OK.
2. The list of Internet services display in alphabetical order. Press / to select
Hulu Plus , then press OK.
3. If you are a Hulu Plus subscriber, choose Yes, then press OK. Proceed to step 4.
If you are not a Hulu Plus subscriber, choose No, then press OK. Write down the
referral code, which you will enter when you go to www.hulu.com/plus to create
your account.
Note: If you select No, you can still choose View sample videos and Learn more about Hulu Plus.
4. Write down the activation code and follow the onscreen instructions (go to
www.hulu.com/activate and enter your user name, password, and activation
code). Or, select Log in to Hulu Plus to log in to your Hulu Plus account using
the onscreen keyboard (you will need to do this each time you log out and log
back in to your Hulu Plus account).
5. The Hulu Plus Home screen displays. Press , then press / to choose
another category (Search, Browse Movies, Browse TV, Recently Added, Most
Popular, Queue/Profile, Recommended, and Help) from the Hulu Plus interface.
Press OK.
6. Press the Home button to exit Hulu Plus.
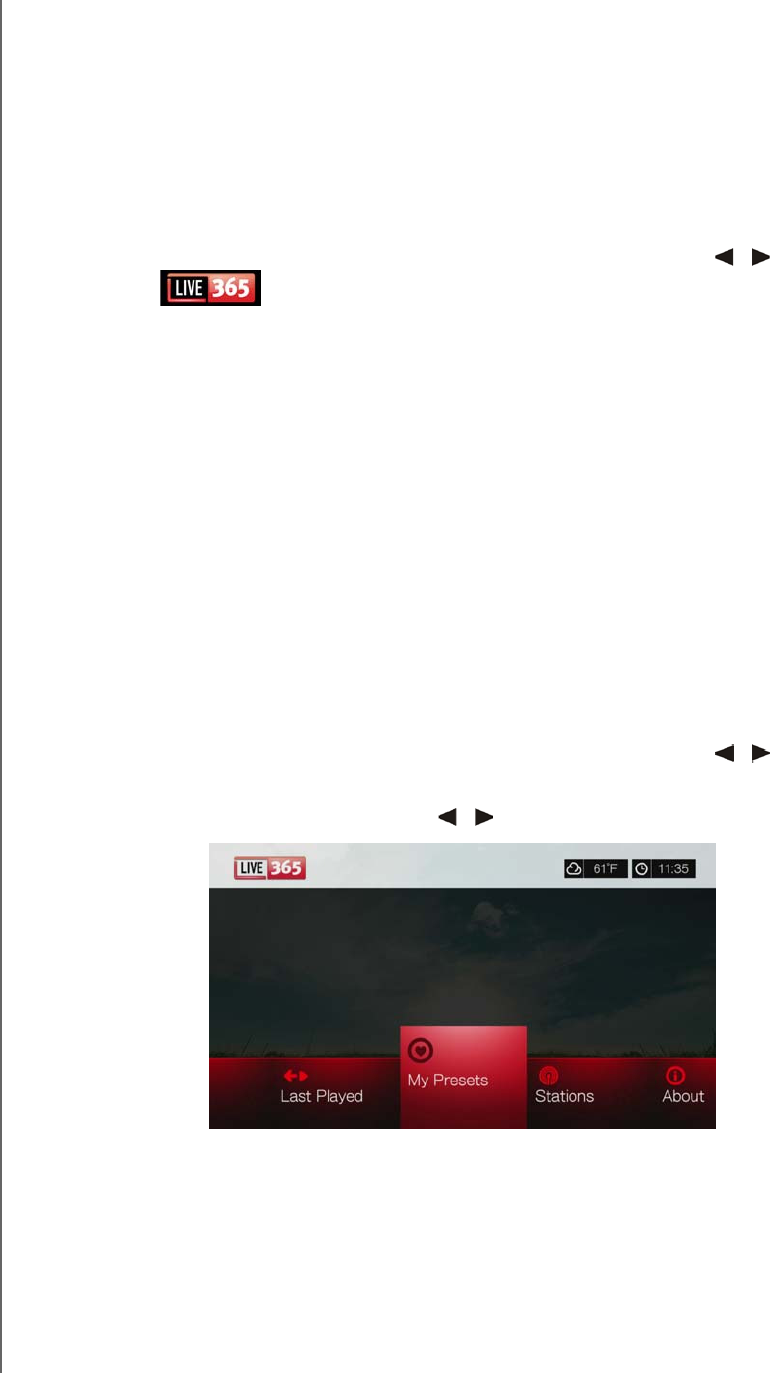
WD TV Play Media Player
User Manual
INTERNET SERVICES – 124
PRELIMINARY-P3
Live365
Use Live365 to create your own online radio station or listen to other Live365
broadcasters’ online stations. Music selections are compiled based on user ratings.
Some small AM and FM stations also utilize Live365 to stream audio over the
Internet.
To access Live365:
1. Navigate to the Home | Services menu bar and press OK.
2. The list of Internet services display in alphabetical order. Press / to select
Live365 , then press OK.
Options include:
Stations
Last Played
My Presets
About
Exit
Signing in to Live365 (Optional)
You can start listening to free Live365 stations as an unregistered user, but to enjoy
more features like access to recommended stations, saving stations to favorites,
securing track information, setting station preferences, and many others, you need
to sign up for a Live365 account.
To sign in to Live365:
1. Navigate to the Home | Services menu bar and press OK.
2. The list of Internet services display in alphabetical order. Press / to select
Live365, then press OK.
1. On the Live365 main screen, press / to select My Presets, then press OK.

WD TV Play Media Player
User Manual
INTERNET SERVICES – 125
PRELIMINARY-P3
2. Press / to select Sign In or Don’t have an account?, then press OK. If you
don’t have an account, follow the on-screen instructions to create your Live365
account online.
3. Use the navigation buttons to key in your Live365 user name on the on-
screen keyboard. Select Submit, then press OK.
4. Use the navigation buttons to key in your Live365 account password on
the on-screen keyboard. Select Submit, then press OK.
5. Press / to select a save option.
Options include:
No – Your account details are not saved. You need to repeat the initial sign-in
process every time you use the media player to access the Live365 service.
Save username only – Your user name is saved, but you will be prompted to
type in your password every time you use the media player to access the
Live365 service.
Yes – Both your user name and password are saved. You are automatically
logged in to your account every time you select Live365 from the Services menu
bar.
6. Press OK to complete the sign-in process. Once you have successfully signed
in, the Live365 Home screen appears.
From this screen you can browse for new stations, access previous stations
you’ve listened to, and define profile preferences for your Live365 account.
To sign up for a Live365 account, go to http://www.live365.com/wdtv.
For more information on the features, options, and limitations of using Live365, go to
http://www.live365.com/index.live.
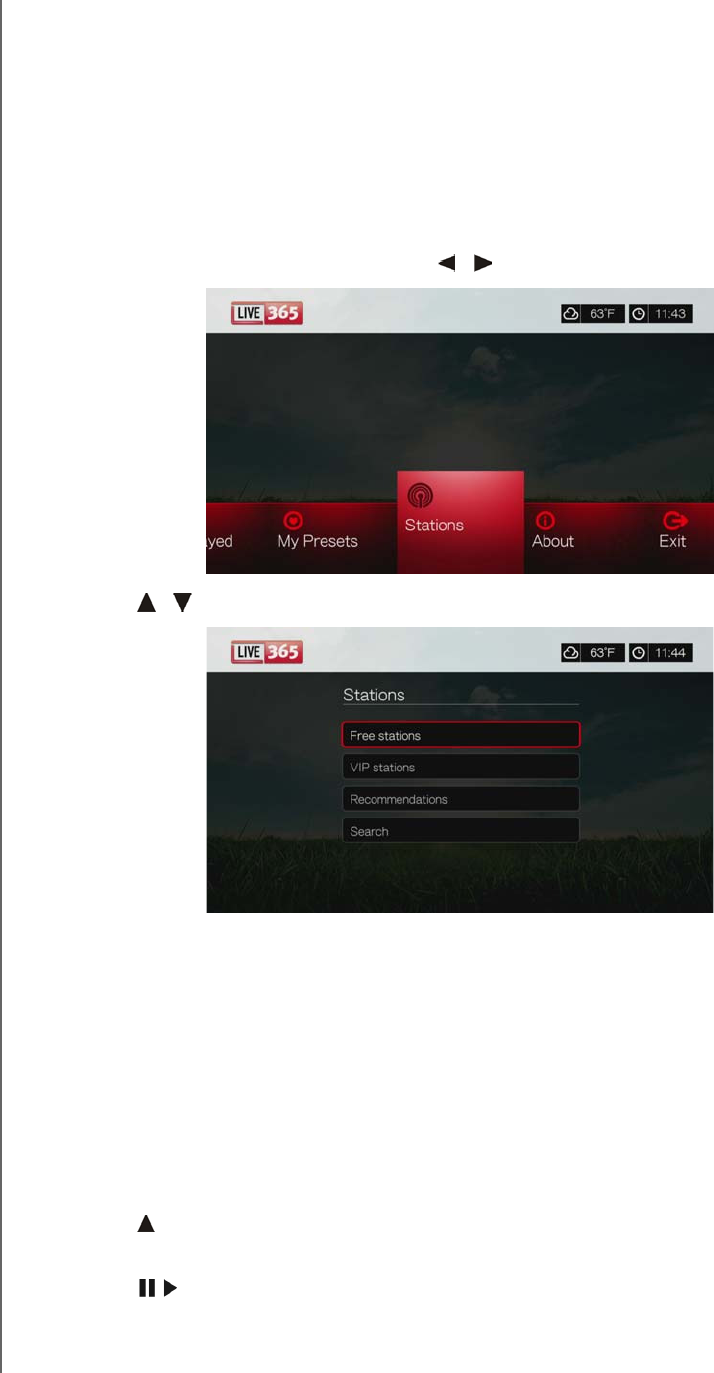
WD TV Play Media Player
User Manual
INTERNET SERVICES – 126
PRELIMINARY-P3
Listening to a Live365 Station
New Live365 users can browse for a radio station.
You can access the last station you’ve listened to if you’ve already accessed
Live365 from the media player.
Registered Live365 users can access My Preset List and listen to favorite
stations.
Live365 VIP members can listen to premium radio stations.
To browse for a radio station:
1. On the Live365 main screen, press / to select Stations, then press OK.
2. Press / to select a station category, then press OK.
Selections include:
Free Stations – Free Internet radio.
VIP Stations – Premium, uninterrupted Internet radio for registered and
paying Live365 users. You must sign in to your Live365 account and be a
valid VIP member before you can access this category. Go to page 128 for
more information.
Recommendations - Free Internet radio recommended by your other
Live365 users. You must be signed in to access these stations.
Search – Search for a Live365 station. Go to page 128 for more information.
3. Press the navigation buttons to select the station you want to listen to. Press OK.
4. Press if you want to add the station to My Presets if you have a Live365
account. Press OK.
5. Press or OK to start listening to the selected radio station.
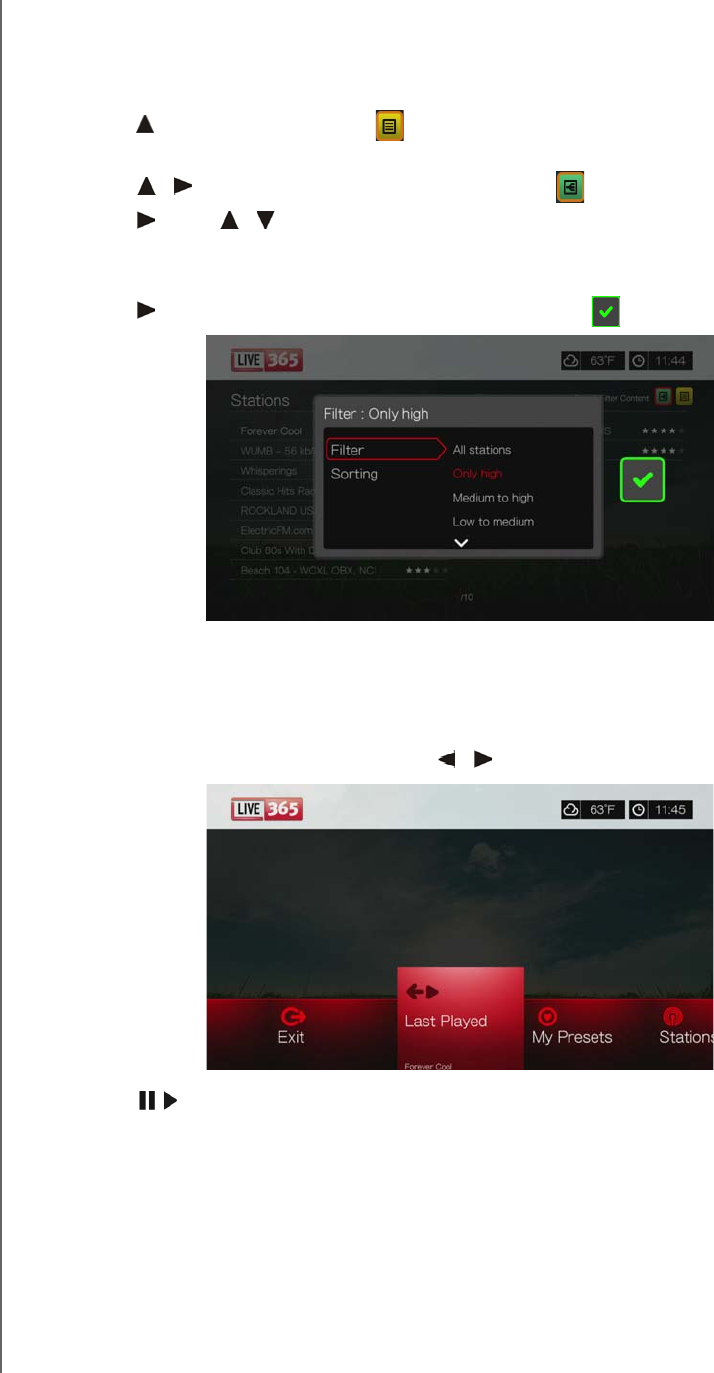
WD TV Play Media Player
User Manual
INTERNET SERVICES – 127
PRELIMINARY-P3
The Live365 Station screen:
The Live365 station screen provides view and sorting and audio quality filtering
options.
1. Press , select the view icon , and press OK to switch between Grid and List
views.
2. Press / to select the sorting and filter icon , and press OK.
3. Press , then / to select Filter by audio quality. Options include All Stations,
Only high (audio quality), Medium to high (audio quality), Low to medium (audio
quality), and Only low (audio quality). Press OK.
4. Press , then OK to select the green check mark , then press OK again.
5. Select Sorting and repeat the steps above to sort stations either Alphabetically or
By Popularity.
To access the last station listened to:
1. On the Live365 main screen, press / to select Last played.
2. Press or OK to start listening to the selected radio station.
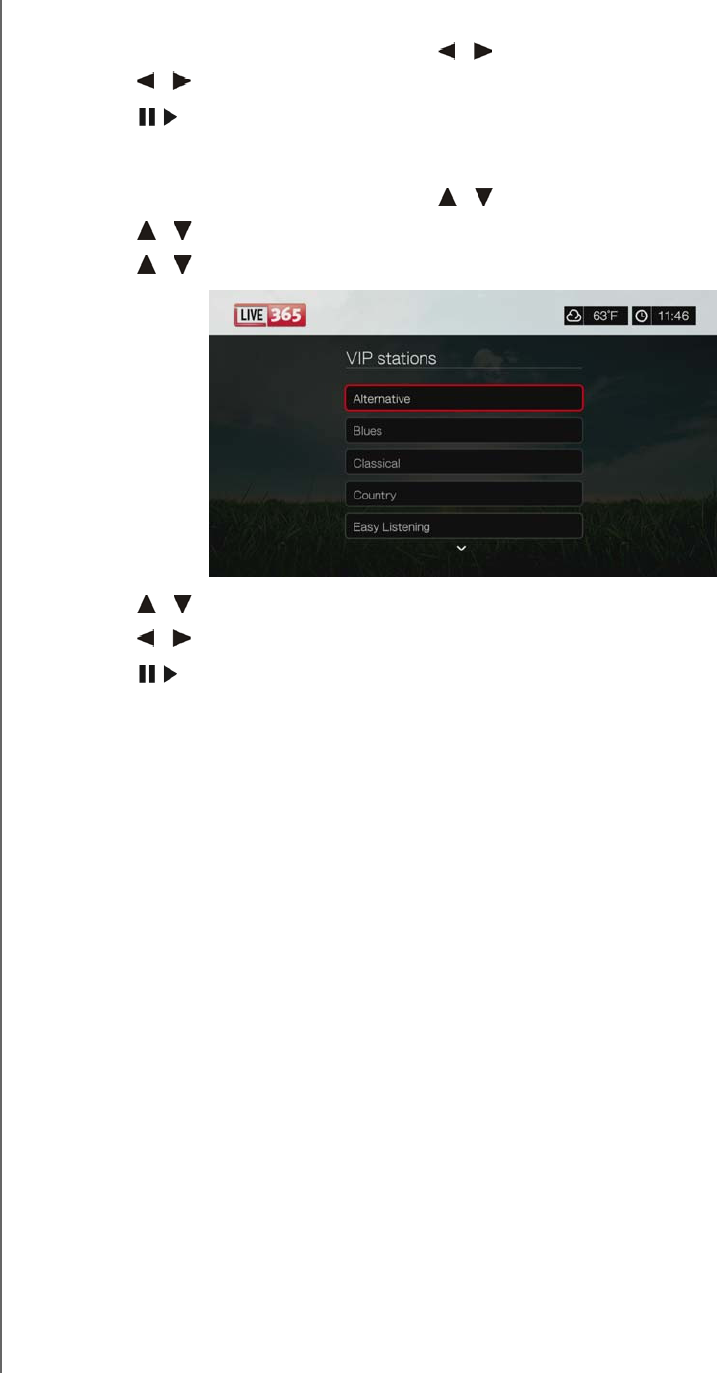
WD TV Play Media Player
User Manual
INTERNET SERVICES – 128
PRELIMINARY-P3
To listen to a favorite station:
1. On the Live365 main screen, press / to select My Presets, then press OK.
Press / to select a station from your preset list.
2. Press or OK to start listening to the selected radio station.
To listen to a VIP station:
1. On the Live365 main screen, press / to select Stations, then press OK.
2. Press / to select VIP Stations, then press OK.
3. Press / to select a music genre, then press OK.
4. Press / to select a music sub-genre, then press OK.
5. Press / to select the station you want to listen to.
6. Press or OK to start listening to the selected radio station.
Searching for a Live365 station
Perform a station search based on the following criteria:
Artist name
Track or CD title
Station information
Music genre
Station location
Audio quality.
You can limit your search based on whether a station has been rated by Live365
editors or if it is a professional, independent, or official station.
To search for a Live 365 station:
1. On the Live365 home screen, select My Presets, Stations, or Last Played,
then press Options.
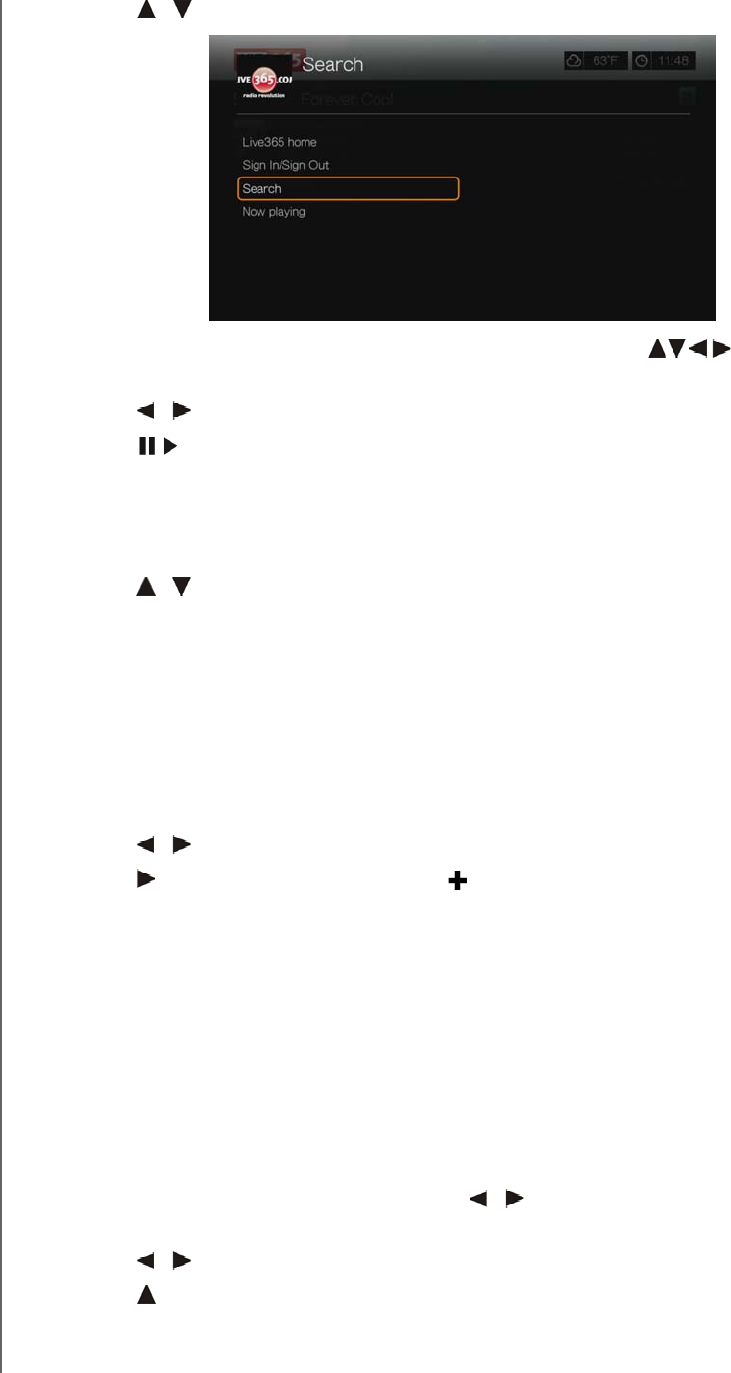
WD TV Play Media Player
User Manual
INTERNET SERVICES – 129
PRELIMINARY-P3
2. Press / to select Search, then press OK.
3. On the on-screen keyboard, use the navigation buttons to key in a
search keyword, then press OK.
4. Press / to select a station from the search result.
5. Press or OK to start listening to the selected radio station.
Displaying the Currently Playing Station
1. On the Live365 home screen, select My Presets, Stations, or Last Played,
then press Options.
2. Press / to select Now Playing, then press OK. The station currently playing
displays.
Adding a Station to Your Preset List
If you like a particular station, you can add it to your preset list for easier access in
the future.
To add a station to your preset list from the Now Playing screen list:
1. Go to the station list showing the station you want to add.
2. Press / to select the station you want to add.
3. Press several times to enable the Add to My Preset function, then press
OK.
4. A confirmation screen appears. Press OK to confirm the new preset station and
return to the Now Playing screen.
Removing a Station from Your Preset List
You can remove stations you no longer want from your preset list.
To remove a station from your preset list:
1. Sign in to your Live365 account. Go to “To sign in to Live365:” on page 124 for
instructions.
2. From the Live365 home screen, press / to select My Presets, then press
OK.
3. Press / to select the station you want to remove.
4. Press to enable the Remove Station function, then press OK.
5. A confirmation prompt appears. Press OK to go back the Now Playing screen.

WD TV Play Media Player
User Manual
INTERNET SERVICES – 130
PRELIMINARY-P3
Providing Song Feedback
Music selections in Live365 are compiled based on their user ratings. You can
participate in the selection process by giving a song the “thumbs up” or “thumbs
down” vote.
To provide song feedback:
1. While the song is playing, press / to select a feedback icon: for positive
feedback, for negative feedback. Press OK.
2. A feedback confirmation screen appears. Press OK to go back the the Now
Playing screen.
Getting Track Information
You can send the track information of the currently playing song to your email
account for later reference.
To secure track information:
1. While the song is playing, press / to select , then press OK.
2. A confirmation screen appears. Press OK to return to the Now Playing screen.
The track information will be sent to the email address you used to sign up for
your Live365 account.
Signing out from Live365
Sign out of Live365 after a listening session to ensure that nobody can make
changes to your Live365 settings and stations without your permission.
To sign out from Live365:
1. In a Stations or the Now Playing screen, press Options, then / to select
Sign In/Sign Out, then press OK.
2. Press / to select OK on the confirmation prompt, then press OK.
Exit Live365
To return to the Services home screen, press / to select Exit in the Live365
home screen, then press OK.
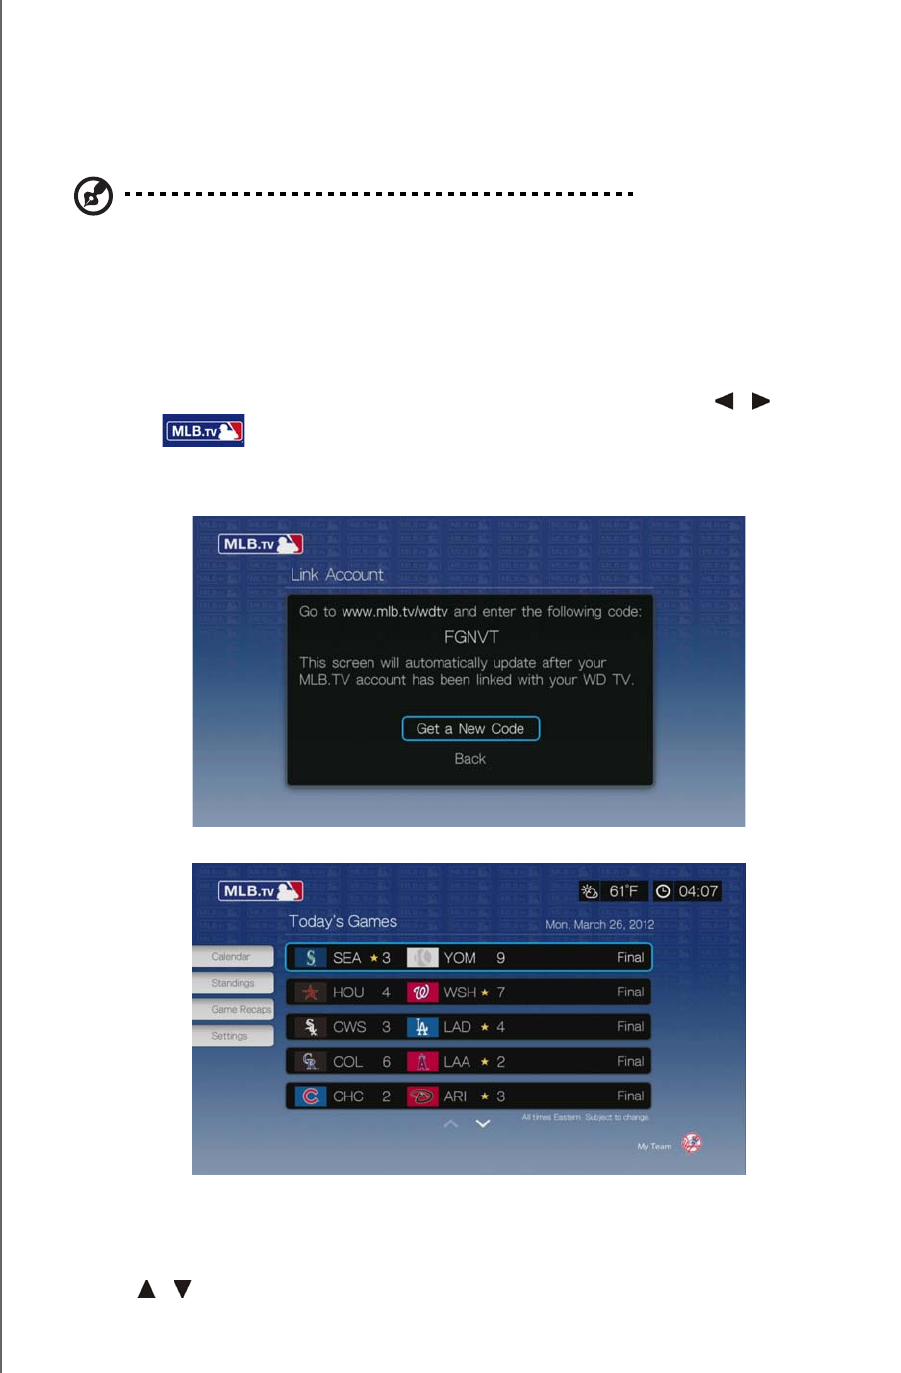
WD TV Play Media Player
User Manual
INTERNET SERVICES – 131
PRELIMINARY-P3
MLB.TV
Watch every out-of-market game LIVE or on demand in HD quality. Almost 100
games are streamed LIVE each week. Choose home or away feeds, and use quick
navigation to run scoring plays or at bats. PLUS, watch over 150 Spring Training
Games with no blackout restrictions.
Note: MLB.TV Premium subscription required. See MLBTV.COM for details.
See http://mlb.mlb.com/mlb/help/faq_subscriptions.jsp for further details and
subscription access FAQs.
To access MLB.TV:
1. Navigate to the Home | Services menu bar and press OK.
2. The list of Internet services display in alphabetical order. Press / to select
MLB.TV , then press OK.
3. Select Link Now, then press OK.
4. Go to www.mlb.tv/wdtv and enter the code shown on-screen.
5. Press OK on the remote. The MLB.TV main screen displays.
Today’s Games
To view Today’s Games:
1. Press / to select a game from the list in the main screen, then press OK.
2. Select a video feed (HOME or AWAY broadcast), then press OK.
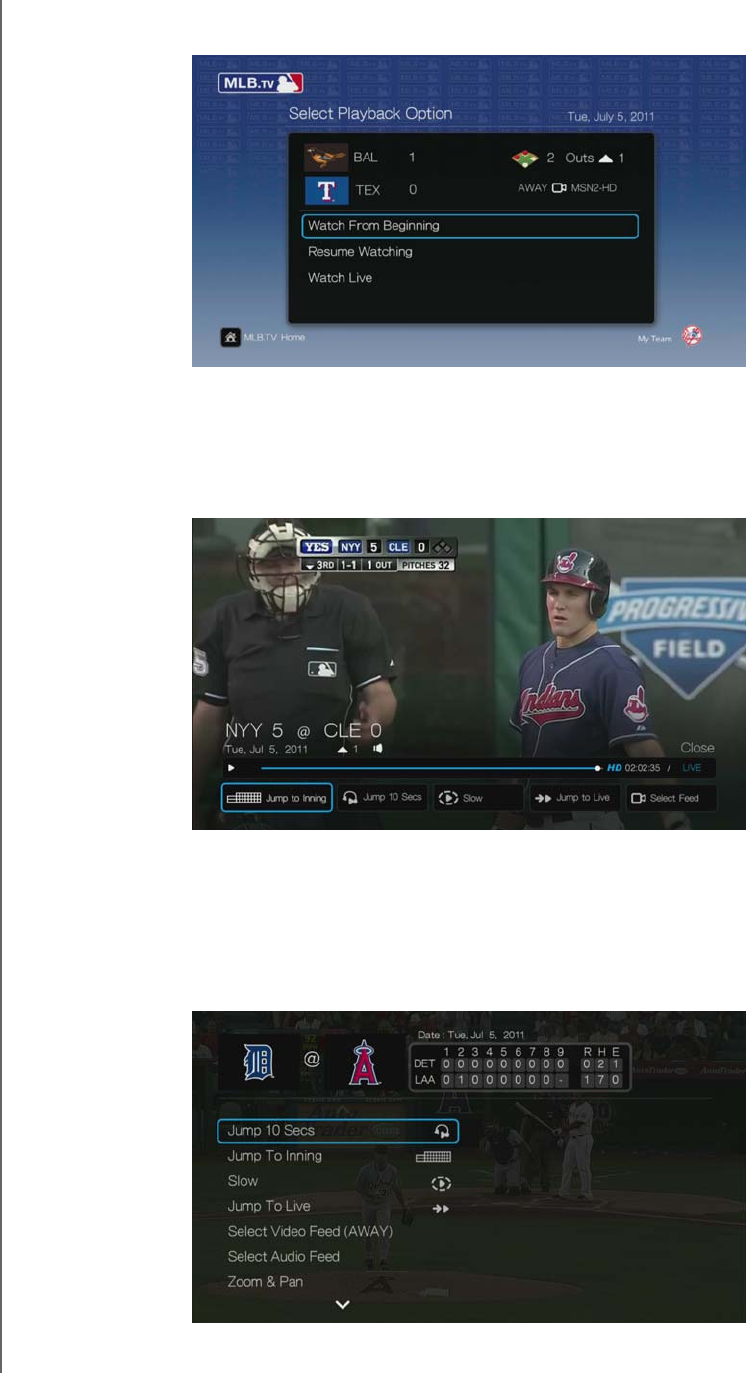
WD TV Play Media Player
User Manual
INTERNET SERVICES – 132
PRELIMINARY-P3
3. Select a playback option (Watch From Beginning, Resume Watching, Watch
Live), then press OK.
Game Playback
Press OK while watching a game to bring up the MLB.TV playback screen. Use the
navigation buttons to Jump to Inning, Jump 10 Secs, play Slow, Jump to Live,
or Select Feed. Select Close then press OK to close the playback screen.
Playback Options
Press Options during game playback to bring up the playback options screen.
Besides the same options available in the playback screen, the options screen also
includes Zoom & Pan (see “Selecting Video Zoom and Pan Options” on page 71)
and Sound Effect (TV Channel, Radio Station, or Audience Background Noise),
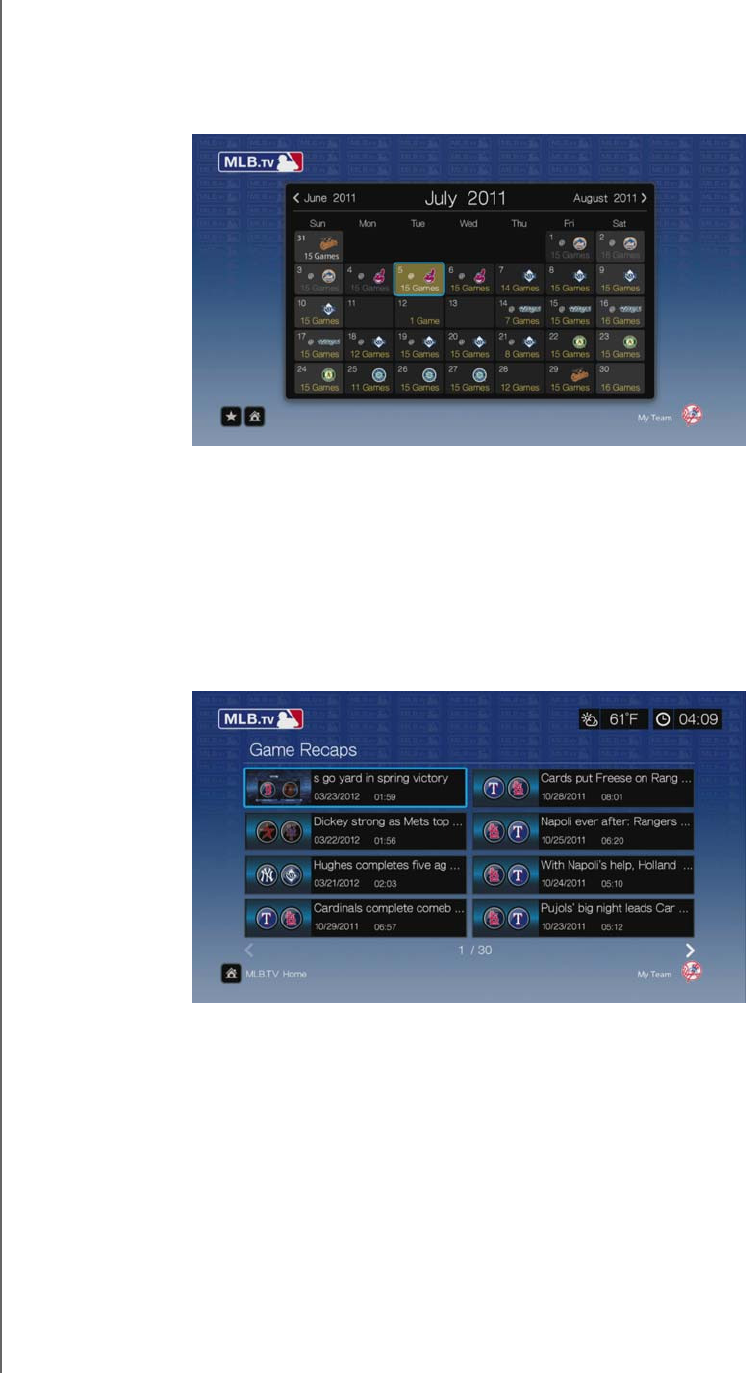
WD TV Play Media Player
User Manual
INTERNET SERVICES – 133
PRELIMINARY-P3
Calendar
In the MLB.TV main screen, navigate to Calendar then press OK. Your team’s
calendar displays. Select the current date or navigate to an earlier date and press
OK to view current or archived games.
Standings
In the MLB.TV main screen, navigate to Standings then press OK to view AL and
NL standings.
Game Recaps
In the MLB.TV main screen, navigate to Game Recaps then press OK. Use the
navigation buttons to view recaps of recent games.

WD TV Play Media Player
User Manual
INTERNET SERVICES – 134
PRELIMINARY-P3
Settings
In the MLB.TV main screen, navigate to Standings then press OK. In this screen,
you can perform such functions as setting your favorite team or teams, setting the
default team for the calendar, unlink your account, or hide or reveal scores in the
main screen.
WD TV Play Media Player
User Manual
INTERNET SERVICES – 135
PRELIMINARY-P3
Netflix
Enjoy new releases, classics, and TV episodes instantly on your WD TV Hub media
player. Don’t wait for the mailman to deliver your movies and don’t settle for
streaming to your small computer screen. Access your Netflix unlimited membership
and instantly watch TV episodes and movies on your big screen.*
*Netflix is available in certain countries. Unlimited membership required. More information at
www.netflix.com.
To access Netflix:
Important: Be sure to update your firmware to the latest version before
following the instructions below. See “System Firmware Upgrade” on
page 209 for further details.
1. Navigate to the Home | Services menu bar and press OK.
2. The list of Internet services display in alphabetical order. Press / to select
Netflix , then press OK.
Existing Netflix Members
Follow the on-screen instructions to enter your user name (in most cases, your
registered email address) and password to log in to your account using the remote
control. Go to www.netflix.com/signinhelp if you encounter any problems.
New to Netflix
Go to www.netflix.com/wdtv to sign up and start a one month free trial.
Netflix Navigation
Once you have accessed your Netflix account, navigate using the remote control to
choose from a variety of categories of movies and TV shows.
Note: To deactivate Netflix on the media player, reset the device to factory defaults. See “Device
Reset” on page 205. To deactivate the media player from your Netflix account, log in to your Netflix
account. Navigate to “Your Account & Help.” Under “Manage Netflix ready devices and computers”
locate the WD TV device and select “Deactivate.”
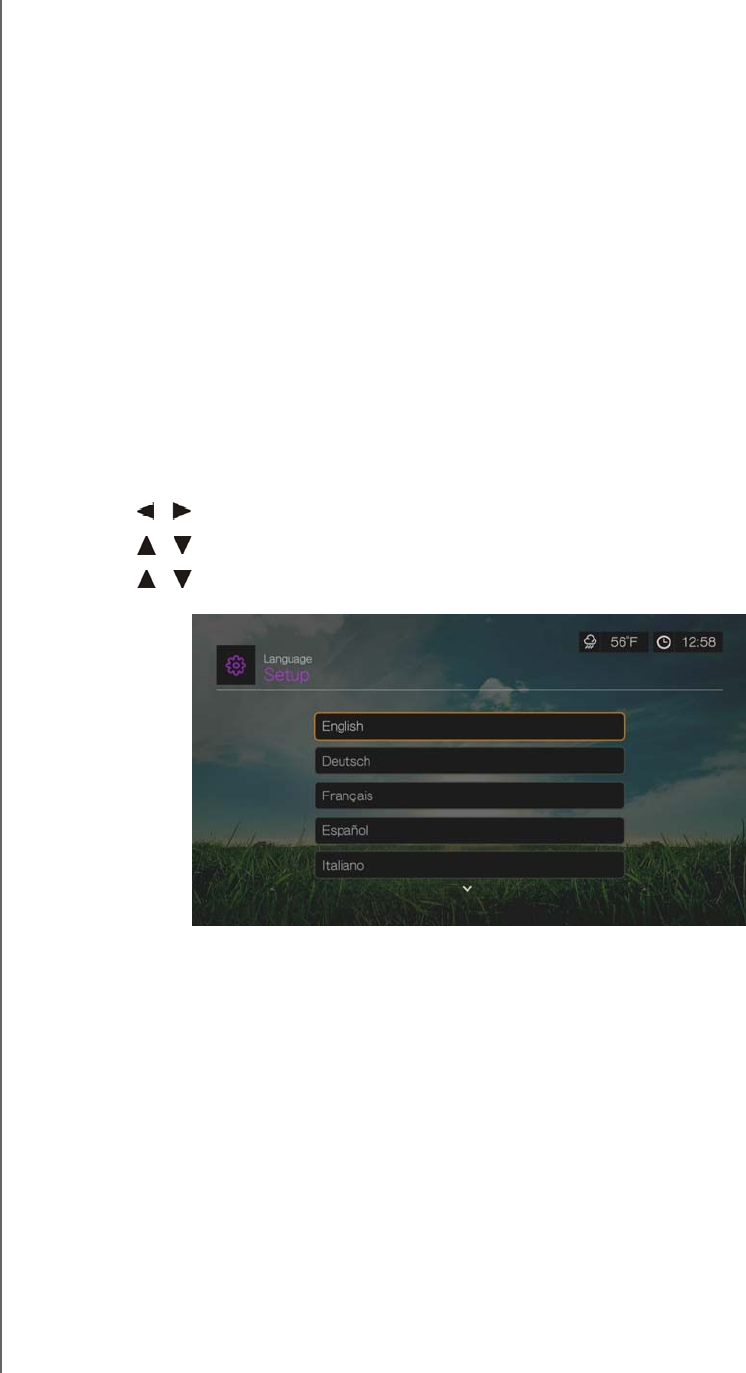
WD TV Play Media Player
User Manual
INTERNET SERVICES – 136
PRELIMINARY-P3
Pandora (US only)
Pandora is an automated music recommendation and Internet radio service. With
Pandora, you can input a song title or artist name and the service responds by
playing selections that are musically similar. You can provide feedback (approved/not
approved) on individual songs, which Pandora takes into account for future
selections.
Conditions for Using Pandora
The following conditions must be satisfied before you can use the Pandora service.
You must have a Pandora account. Go to www.pandora.com/wd to create your
account. Once you have registered, note your activation code. You will need this
code to sign in to Pandora from your media player.
At present, Pandora is only available for users located in the United States. You
must have a US-based network connection.
To set the system language to English:
1. Navigate to Home | Setup menu bar.
2. Press / to select Appearance, then press OK.
3. Press / to select Language, then press OK.
4. Press / to select English, then press OK.
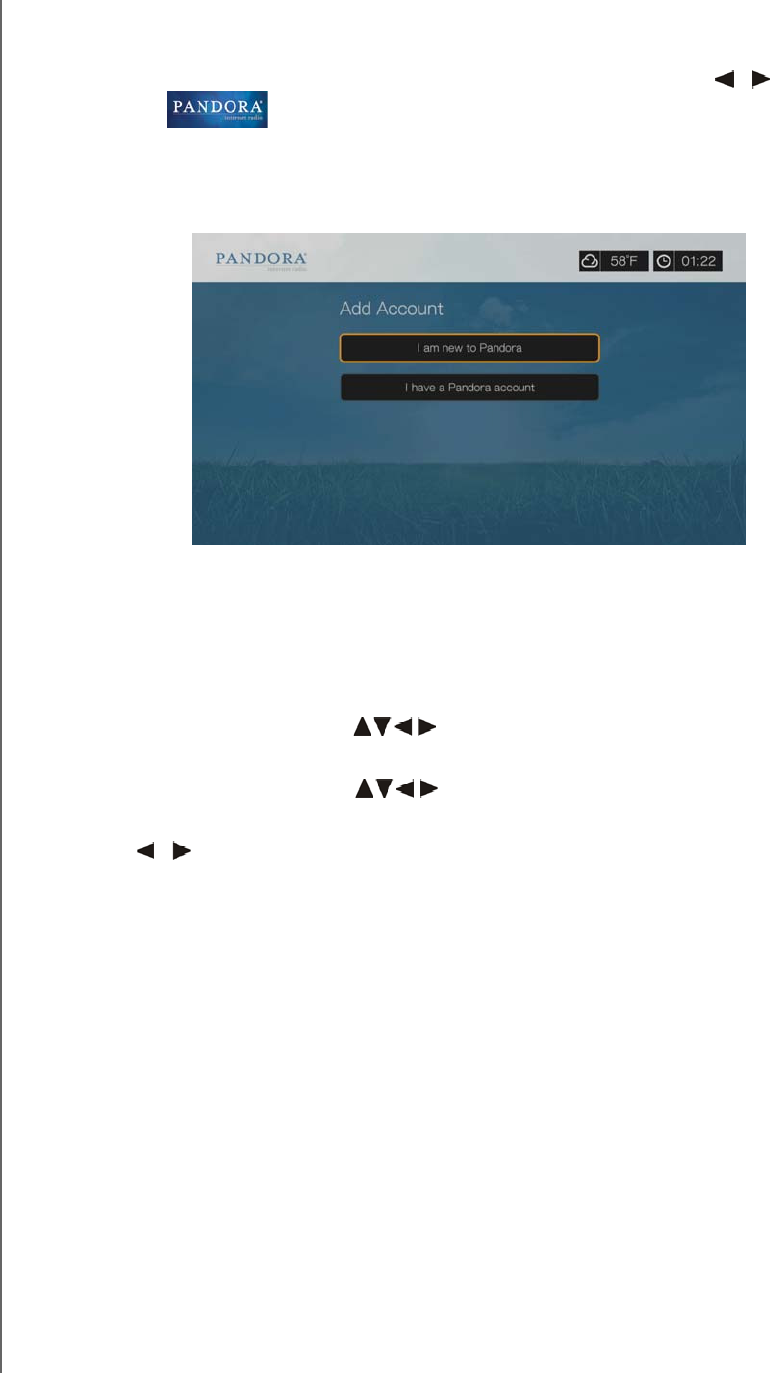
WD TV Play Media Player
User Manual
INTERNET SERVICES – 137
PRELIMINARY-P3
Signing in to Pandora for the First Time
1. Navigate to the Home | Services menu bar and press OK.
2. The list of Internet services display in alphabetical order. Press / to select
Pandora , then press OK.
3. Press OK to bring up the Add Account screen.
4. If you already have a Pandora account, choose I have a Pandora account,
then press OK to create your new Pandora account. Proceed to step 6.
5. If you do not have a Pandora account, select I am new to Pandora, then press
OK.
6. Write down the activation code and follow the onscreen instructions (go to
www.pandora.com/wd to create your new account). When finished, choose
Continue, then press OK.
7. Use the navigation buttons to type in your Pandora user name using the
on-screen keyboard, then press OK.
8. Use the navigation buttons to type in your Pandora account password
using the on-screen keyboard, then press OK.
9. Press / to select a save option.
Options include:
No – Your account details will not be saved. You need to repeat the initial
sign-in process every time you access the Pandora service using the media
player.
Save username only – Your user name is saved, but you will be prompted
to type in your password every time you access the Pandora service using
the media player.
Yes – Both your user name and password are saved. You are automatically
logged in to your account every time you access the Pandora service using
the media player.
10.Press OK to complete the sign-in process.

WD TV Play Media Player
User Manual
INTERNET SERVICES – 138
PRELIMINARY-P3
Once you have successfully signed in to Pandora, the Stations screen appears.
From this screen you can create new stations, start listening to previously
created stations and Quickmix playlist, and define profile preferences for your
account.
For more information on the features, options, and limitations of using Pandora,
go to http://www.pandora.com.
Pandora Stations
A Pandora station is a personalized stream of music, based on one or more artist
names or song titles of your choice. Once you’ve signed in to Pandora from your
media player, you can easily access your stations from the Music menu bar.
Pandora stations reminders
You can have up to 100 stations at any one time, plus one QuickMix. Once you
reach this maximum number of stations you have to delete a station before you
can add another one.
Pandora does not allow immediate or "on demand" playback of a specific song.
A Pandora station cannot play more than four songs by an artist in a three-hour
period.
After eight hours of play, Pandora prompts you to see if you’re still listening.
Streaming stops until you respond.
The music selection streamed into your Pandora station contains a mix of songs
or artists that were compiled based on:
the initial station “seed’ used in creating that station. Go to the next section
for instructions on how to create a new Pandora station.
the track feedback (thumbs up / thumbs down) you provide. Go to page 140
for more information.
the number of skips assigned to a track. Go to page 140 for more
information.
You cannot reverse or immediately replay the songs played on your Pandora
station.
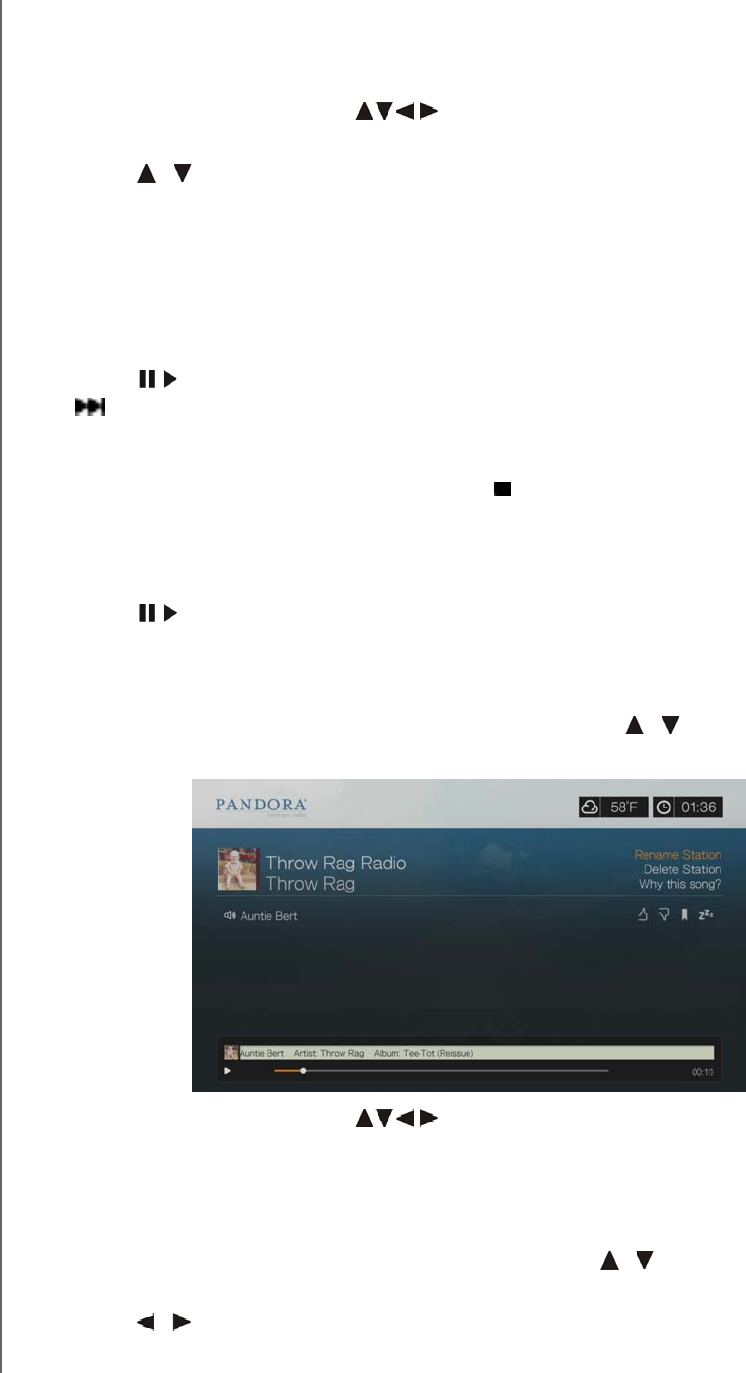
WD TV Play Media Player
User Manual
INTERNET SERVICES – 139
PRELIMINARY-P3
To create a Pandora station:
1. Navigate to Create Station or press Options to select Create station. Press
OK.
2. Use the navigation buttons to type the name of an artist or song title
using the on-screen keyboard. Select Submit, then press OK.
3. Press / to select a listing from the search results, then press OK.
The listing you selected will serve as the station ‘seed’ for Pandora to compile
and stream music similar to your station.
To listen to a Pandora station:
1. On the Stations screen, use the navigation buttons to select the name of the
station you want to listen to.
2. Press or OK to start listening to the selected Pandora station. Press NEXT
to go to the next song.
To tune in to another station:
1. While listening to a station, press STOP . You are returned to the Stations
screen.
2. Use the navigation buttons to select the name of the station you want to switch
to.
3. Press or OK to start listening to the selected station.
To rename a Pandora station:
1. Tune in to the station you want to rename.
2. Navigate to Rename Station or press Options then / to select Rename
this station. Press OK.
3. Use the navigation buttons to key in a new station name using the on-
screen keyboard. Select Submit, then press OK.
To delete a Pandora station:
1. Tune in to the station you want to delete.
2. Navigate to Delete Station or press Options then / to select Remove this
station. Press OK.
3. Press / to select OK on the confirmation prompt, then press OK.

WD TV Play Media Player
User Manual
INTERNET SERVICES – 140
PRELIMINARY-P3
QuickMix
QuickMix is a feature that allows you to listen to more than one of your stations at
once. QuickMix will play only one song based on particular musical characteristics at
a time (unlike regular Pandora stations, which play four related songs in a row), so
the mood changes more often.
Providing Song Feedback
You can influence the music selection that is streamed into your Pandora station by
providing track feedback for the song currently playing. You can give a song a
“thumbs up” or a “thumbs down” vote.
Thumbs up
If you like the currently playing song, give it a thumbs up vote. This positive feedback
means:
The very next set of songs for this station will be generated using the song you’ve
given a “thumbs up” vote to as a musical starting point.
Future sets of songs are likely to have similar musical traits. Multiple “thumbs up"
votes on this station for other similar songs will have a cumulative effect.
This song will play somewhat more often than other songs on this station's
potential playlist, and will play about as often as other songs that have received a
"thumbs up" on this station.
Thumbs down
If you don't want to hear a song on a particular station, give it a thumbs down vote.
This negative feedback means:
The song will stop playing, if there are any of the remaining "six skips per hour"
available on that particular station (this limit is per station, on a rolling per-hour
basis).
The song will be permanently removed from that particular station's playlist.
A new set of songs with a different musical emphasis will begin to play.
If you’ve given at least two “thumbs down” vote to a specific artist on that
particular station, songs from that artist will no longer be included in that station’s
playlist.
To provide song feedback:
While a song is playing, press / to select or , then press OK.
A prompt to confirm your vote appears.
Putting a Song to Sleep
When you want to stop listening to song, but not permanently remove it from a
station’s playlist, you put it to “sleep.” This prevents the song from playing on any of
your stations for 30 days.
To put a song to sleep:
While a song is playing, press / to select , then press OK.
A prompt to confirm the “sleep” action appears.

WD TV Play Media Player
User Manual
INTERNET SERVICES – 141
PRELIMINARY-P3
Bookmarking a Song or Artist
You have the option to bookmark a song or an artist for later reference. You can later
refer to this bookmark if you want buy the track when you’ve sign in to Pandora from
your computer or mobile computing device, or if you want to share your musical
preferences with other Pandora users.
To bookmark a song or artist:
1. While a song is playing, press / to select , then press OK.
2. Press / to select whether to bookmark the song title or the song artist, then
press OK.
The new bookmark is added to your listener profile page. Sign in to Pandora
from your computer or mobile computing device to view this profile page.
Why a Song is in my Station’s Playlist
You can see why Pandora included a particular song in your station’s playlist. While a
song is playing, select Why this song?, then press OK. The song analysis displays.
Deleting a Pandora Account
1. Select Pandora from the Services menu then press OK.
2. Press / to select the Pandora account you want to delete, then press to
select the and press OK.
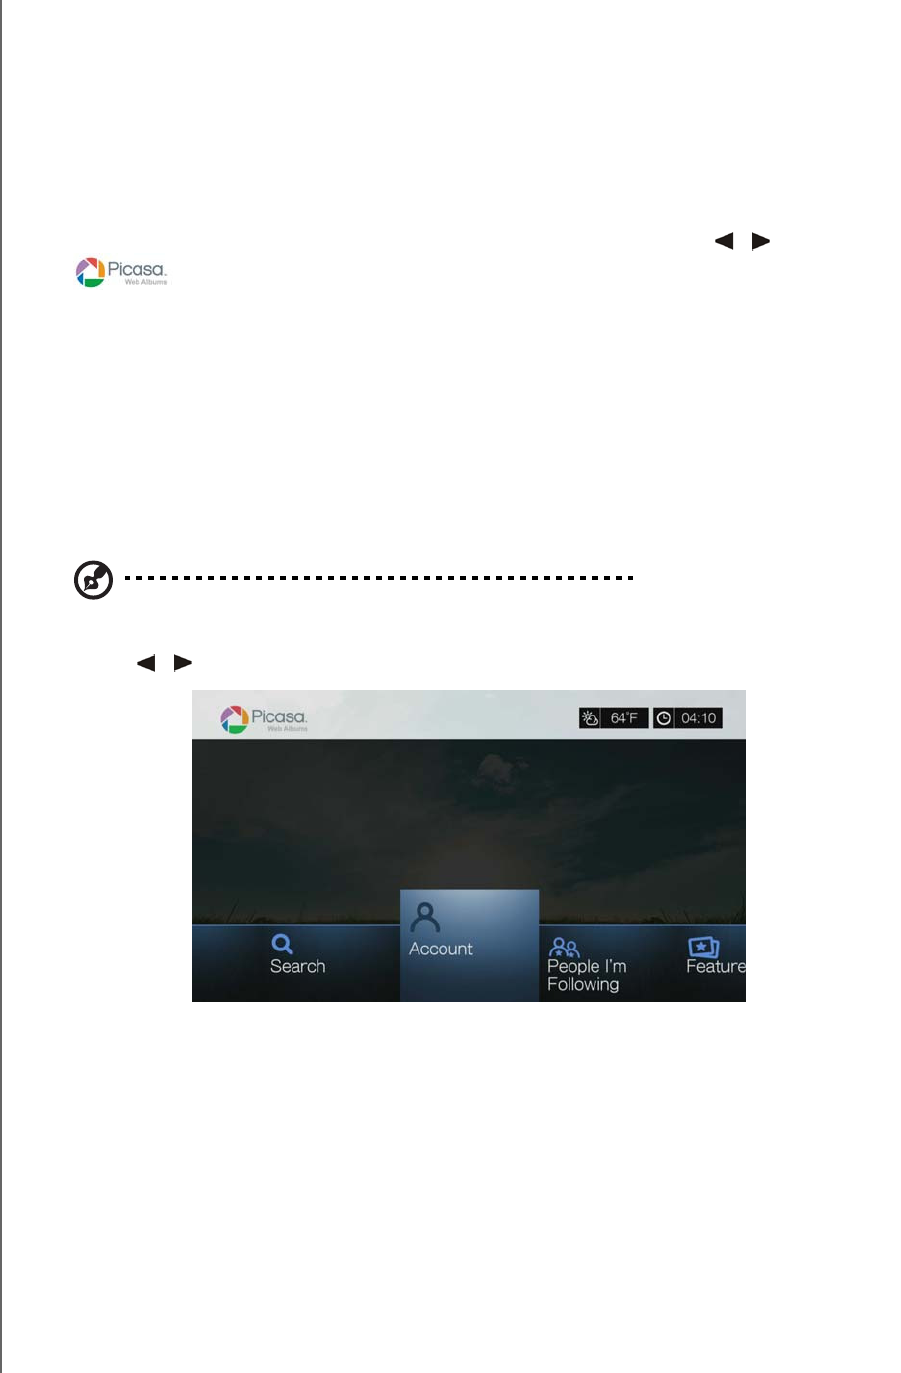
WD TV Play Media Player
User Manual
INTERNET SERVICES – 142
PRELIMINARY-P3
Picasa
View, share and enjoy your photographs right from your television.
To learn more about Picasa services, and the options and limitations related to them,
go to http://www.picasa.google.com.
To access Picasa:
1. Navigate to the Home | Services menu bar and and press OK.
2. The list of Internet services display in alphabetical order. Press / to select
, then press OK to display the Picasa home screen.
Options include:
Account
Search
My Photos
People I’m Following
Featured
Recent
Signing In To Your Picasa Account
Note: If you do not have a Picasa account and want to create one, go to
http://www.picasa.google.com.
1. Press / to select Account in the Picasa home screen, then press OK.
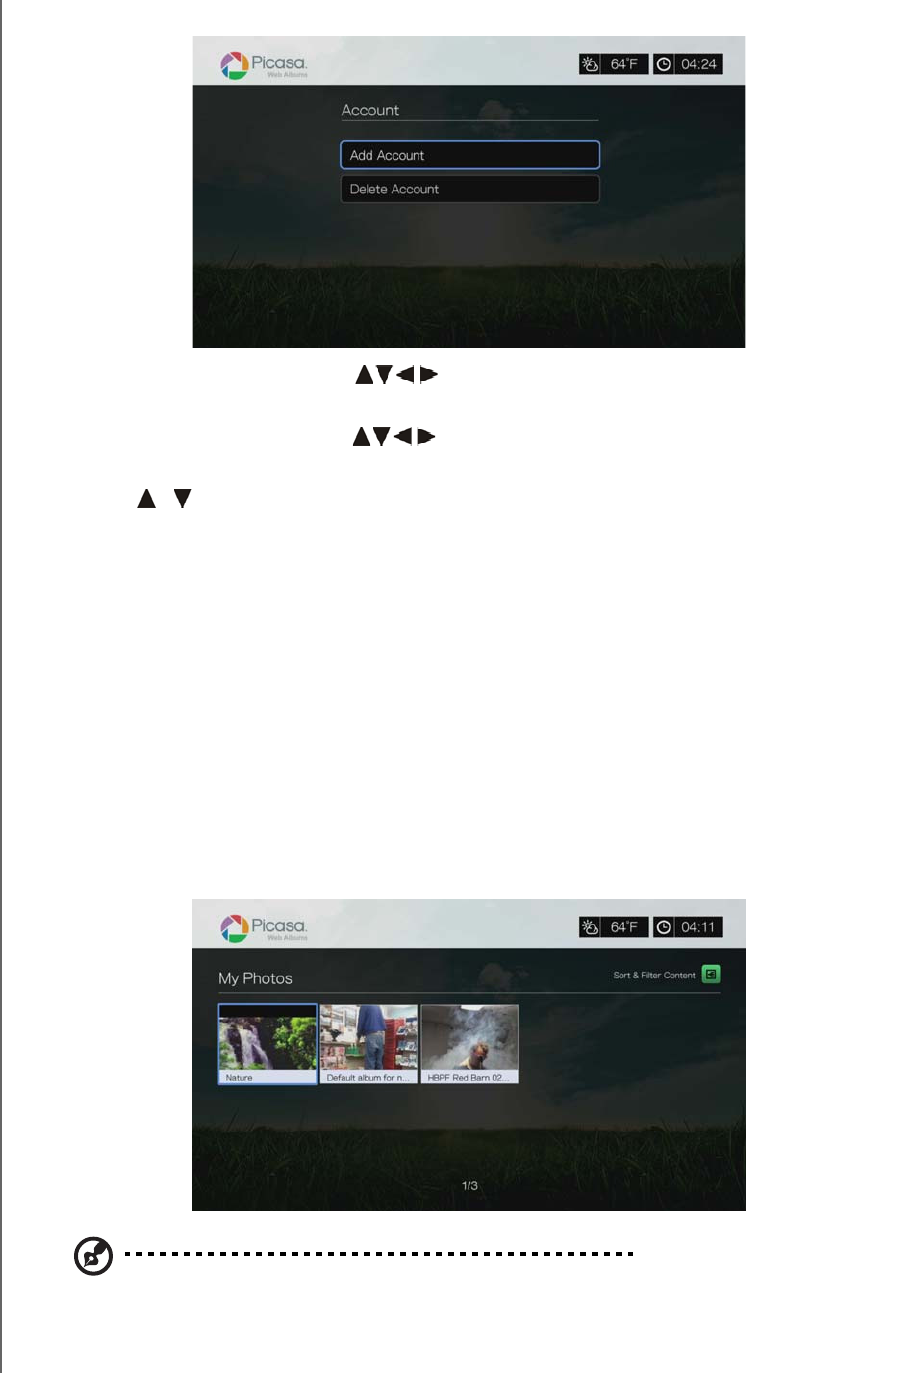
WD TV Play Media Player
User Manual
INTERNET SERVICES – 143
PRELIMINARY-P3
2. Select Add Account, then press OK.
3. Use the navigation buttons to type your Picasa user name in the
on-screen keyboard. Select Submit, then press OK.
4. Use the navigation buttons to type your Picasa account password in the
on-screen keyboard. Select Submit, then press OK.
5. Press / to select a save option. Press OK when finished.
Options include:
No – Your account details are not saved. You need to repeat the initial sign-in
process every time you access Picasa using the media player.
Save username only – Your username is saved, but you will be prompted to
input your password every time you access Picasa using the media player.
Yes – Both your user name and password are saved. You can later sign in to
your account from the Picasa Account screen.
6. The My Photos page appears. Go to the next section for more information on
this page.
Account
By default, the My Photos page displays first when you sign in to your account. This
page contains the photos and videos you have uploaded to Picasa.
Note: If you have not uploaded any photos or videos, the screen displays "there is no media in the
current folder."
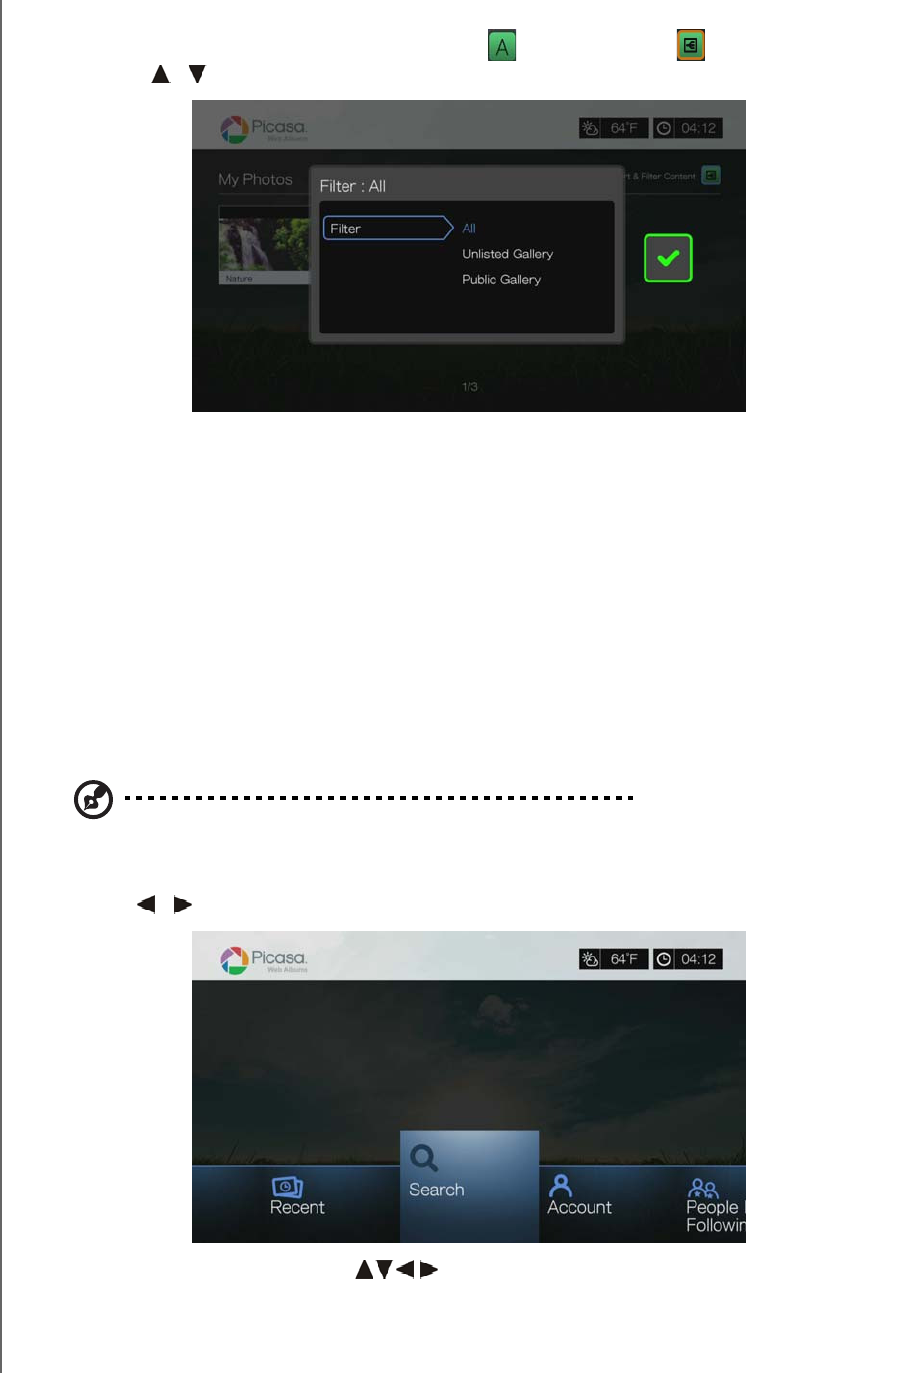
WD TV Play Media Player
User Manual
INTERNET SERVICES – 144
PRELIMINARY-P3
You can sort and filter content on this page by showing all content (All) or your
Unlisted Gallery or Public Gallery. Press or navigate to , and press OK,
then press / and OK twice to switch that selection.
Searching for Content
You can search Picasa for photos and videos of particular interest to you. The
search results are based on the following:
Filenames
Captions
Tags
Folder or album names
Camera maker
Date (i.e., 'November' or '2011')
The media player saves your searches so you can quickly recall them.
Note: Content with visibility set to “private” by users do not appear in search results.
To search for content:
1. Press / to select Search in the Picasa home screen, then press OK.
2. Use the navigation buttons to type a keyword related to the subject
matter of the content you’re looking for using the on-screen keyboard. Select
Submit, then press OK.
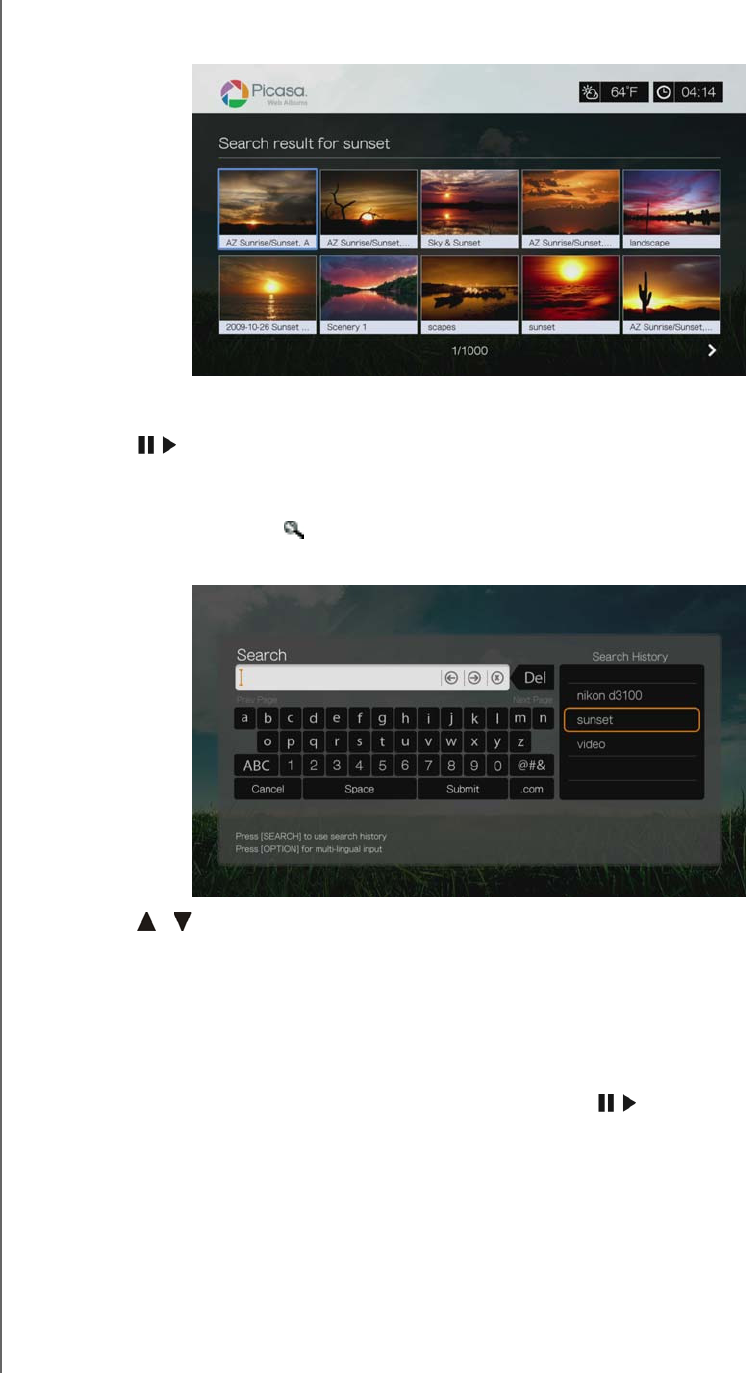
WD TV Play Media Player
User Manual
INTERNET SERVICES – 145
PRELIMINARY-P3
The content search begins (this may take a few seconds). Content matching your
search word appears in a Search result screen.
3. Use the navigation buttons to select a photo or video from the display.
4. Press or OK to view the selected photo or start watching the selected video.
To use search history:
1. Press the SEARCH button on the remote control. This toggles you to the
Search History list.
2. Press / to select a search from the display.
3. Press OK to perform the saved search.
My Photos
My Photos contains all images and videos in your Picasa Web Albums. To view
images or videos, use the navigation buttons to select a web album, then press OK.
Select an individual file and press OK to view, or press to view a slideshow of all
the photos in an album.