Alpha Networks C300BRS4 300Mbps Wireless Router & Access Point User Manual ML manual C300BRS4
Alpha Networks Inc. 300Mbps Wireless Router & Access Point ML manual C300BRS4
UserManual.wiki
>
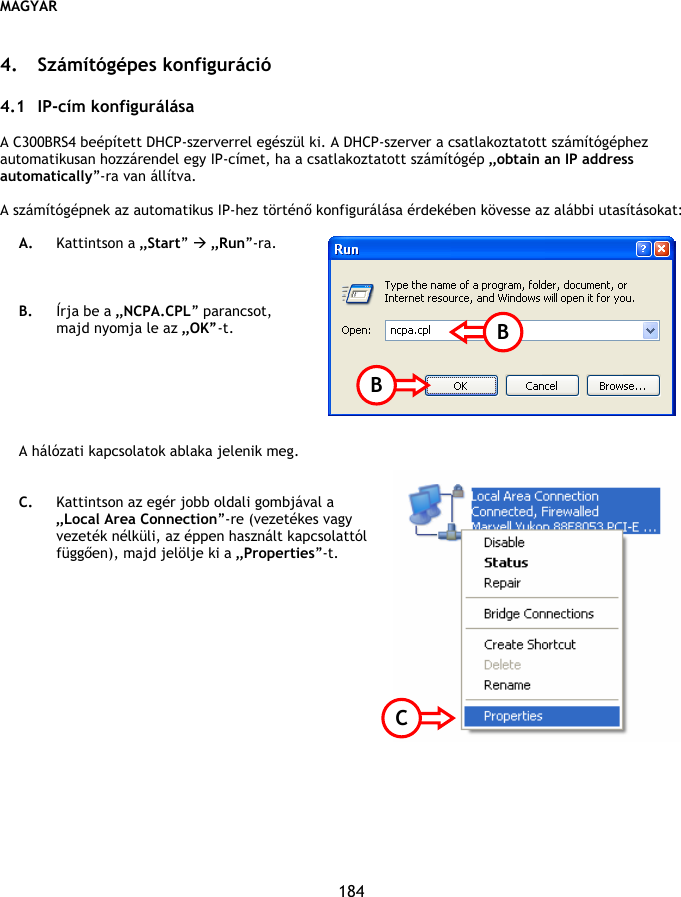
Alpha Networks
>
C300BRS4 User Manual
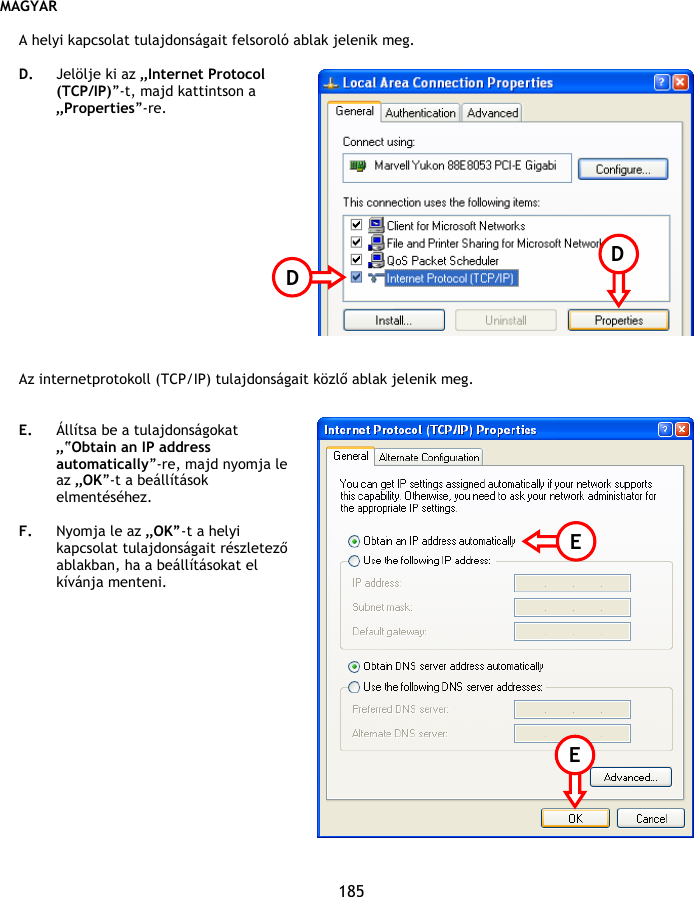
>
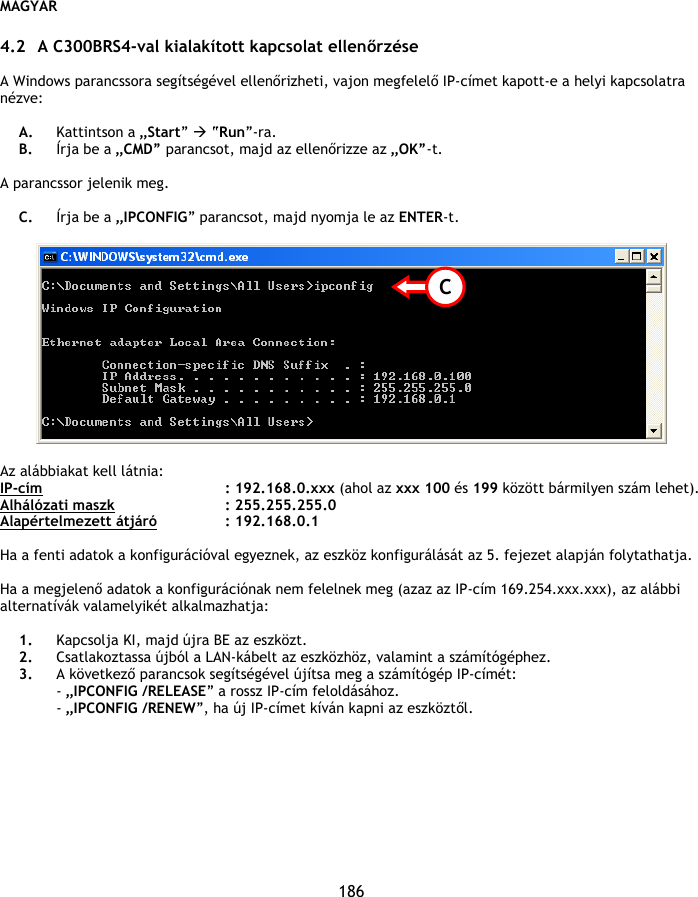
Users Manual
Contents
1.
Users Manual Cover
2.
Users Manual
Users Manual
Navigation menu
Upload a User Manual
Namespaces
Wiki Guide
HTML
PDF
Info
Views
User Manual
Discussion / Help
Navigation

![NEDERLANDS 21 De WPS Wizard zal op uw scherm getoond worden: In deze Wizard kunt u de ‘Pin Code’ optie activeren. Om te beginnen met de ‘Pin Code’ optie heeft u een Pin Code nodig die gegenereerd word door uw draadloze client. F. Selecteer de WPS ‘Pin Code’ optie in de software van uw draadloze client. De draadloze client zal een Pin Code genereren en deze tonen op het scherm. Æ [Draadloze Client Software] [C300BRS4 WPS Wizard] G. Voer de gegenereerde Pin Code in bij de WPS Wizard van de C300BRS4 en klik op “Connect”. De C300BRS4 zal het netwerk beveiligen met WPA beveiliging en de draadloze verbinding van de draadloze client met de ingevoerde Pin Code accepteren. De C300BRS4 zal de WPS authenticatie 120 seconden actief houden. Tijdens deze 120 seconden zal de WPS LED knipperen. Als er binnen deze 120 seconden geen verbinding wordt gemaakt zal de LED uitgaan en wordt de WPS authenticatie gestopt. G](https://usermanual.wiki/Alpha-Networks/C300BRS4.Users-Manual/User-Guide-891558-Page-21.png)


![ENGLISH 46 The WPS Wizard will be shown on your screen: In this Wizard, you can activate the Pin Code feature. To start with the Pin Code authentication, you need the Pin Code generated by your Wireless Client. F. Select the WPS Pin Code feature in the software of your Wireless Client. The Wireless Client will generate a Pin Code and shows it on your screen. Æ [Wireless Client Software] [C300BRS4 WPS Wizard] G. Enter the Pin Code given by your Wireless Client in the WPS Wizard of the C300BRS4 and press “Connect”. The C300BRS4 will activate WPA security on your wireless network and accepts the wireless connection of your Wireless Client with the entered Pin Code. The C300BRS4 will keep the WPS authentication active for 120 seconds. During this process, the WPS LED will blink. If there is no connection in these 120 seconds, the LED will turn off and the WPS authentication process is stopped. G](https://usermanual.wiki/Alpha-Networks/C300BRS4.Users-Manual/User-Guide-891558-Page-46.png)

![ESPAÑOL 71 A continuación aparecerá en pantalla el Asistente WPS: En este asistente podrá activar la función de Código PIN. Para empezar su autenticación, necesitará el código PIN que ha generado su cliente inalámbrico. F. Seleccione la función Código PIN WPS en el software de su cliente inalámbrico, el cual generará un código PIN que aparecerá en pantalla. Æ [Software del cliente inalámbrico] [Asistente WPS del C300BRS4] G. Introduzca el código PIN que le haya proporcionado su cliente inalámbrico en el Asistente WPS del C300BRS4 y pulse “Conectar”. El C300BRS4 activará la seguridad WPA para la red inalámbrica y aceptará la conexión inalámbrica de su cliente inalámbrico con el código PIN introducido. El C300BRS4 mantendrá activa la autenticación WPS durante 120 segundos. Durante este proceso, el LED WPS parpadeará. Si no hay conexión durante estos 120 segundos, el LED se apagará y el proceso de autenticación WPS se detendrá. G](https://usermanual.wiki/Alpha-Networks/C300BRS4.Users-Manual/User-Guide-891558-Page-71.png)

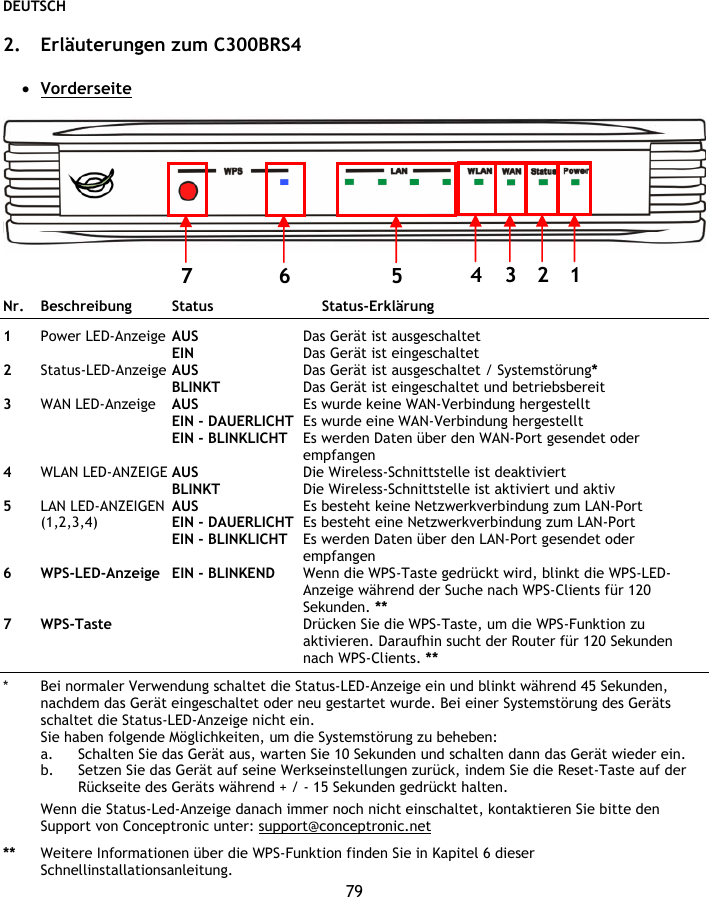
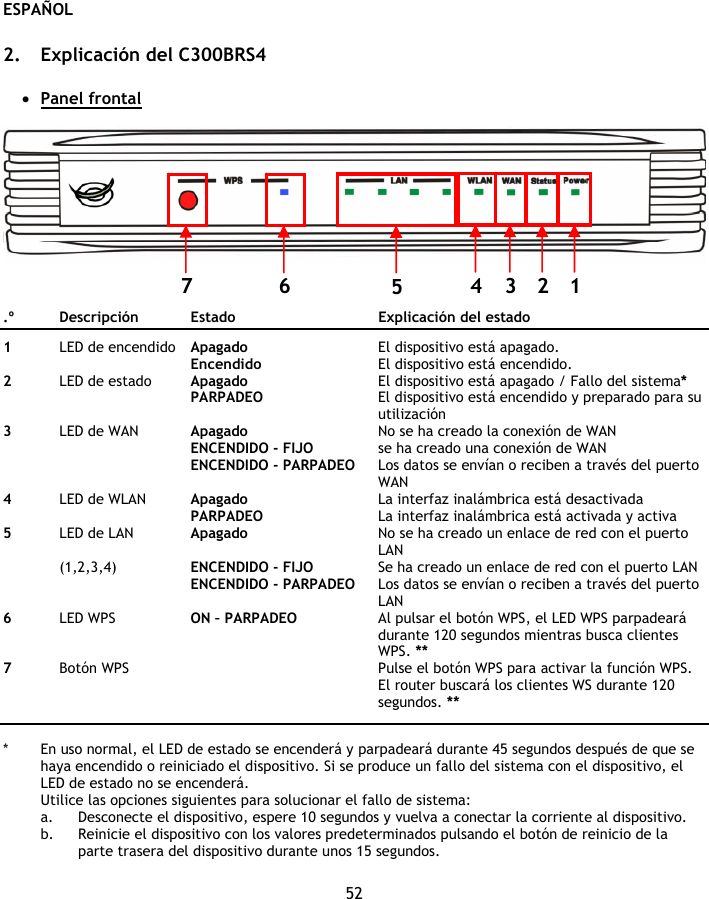
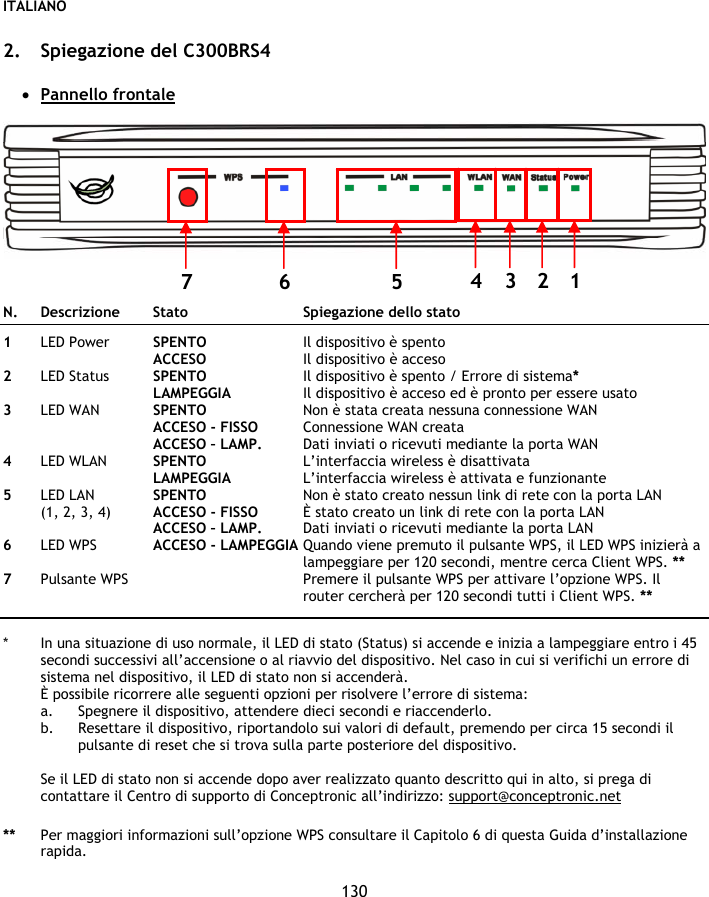
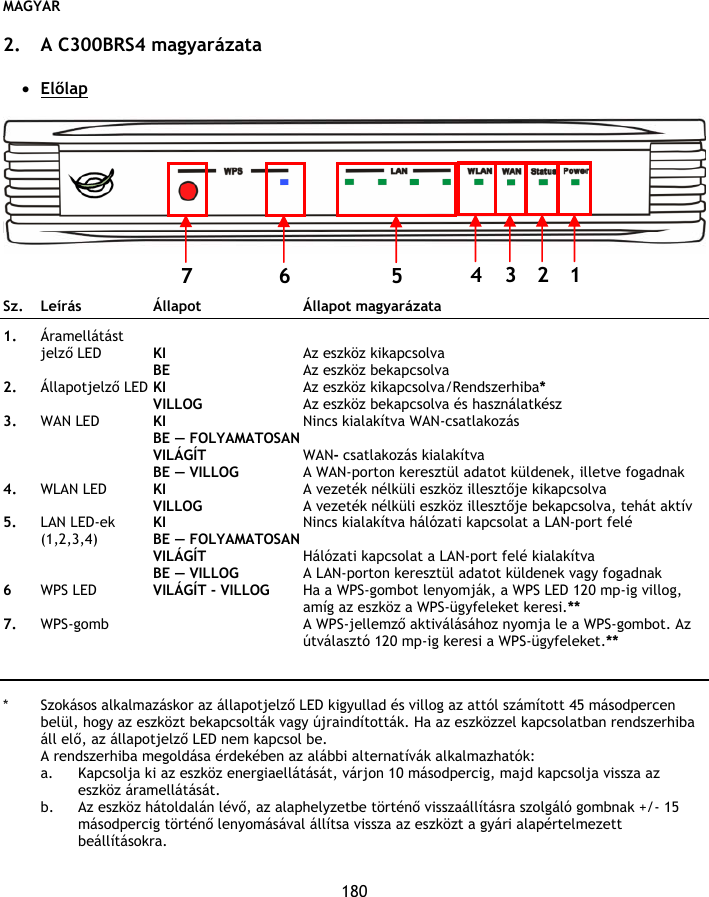
![DEUTSCH 80 • Rückseite Nr. Beschreibung Erklärung 1 Antennenanschluss Reverse-SMA-Anschluss für drahtlose Antenne 2 LAN-Anschlüsse Anschluss Ihres Computers/Ihrer Computer an den Router 3 Antennenanschluss Reverse-SMA-Anschluss für drahtlose Antenne 4 WAN-Anschluss Anschluss Ihrer Breitbandverbindung an den Router 5 Reset-Taste Zurücksetzen des Routers auf die Werkseinstellungen 6 Stromanschluss Anschluss des Routers an die Stromversorgung 7 Antennenanschluss Reverse-SMA-Anschluss für drahtlose Antenne Hinweis: Diese Schnellinstallationsanleitung erklärt lediglich die Grundschritte, die durchgeführt werden müssen, um den C300BRS4 betriebsbereit zu machen. Weitere Informationen über die verschiedenen Funktionen des C300BRS4 finden Sie im Benutzerhandbuch auf der im Lieferumfang enthaltenen CD-ROM (nur Englisch!). Wählen Sie „View User Manual [Benutzerhandbuch öffnen]” im Autorun-Menü. 2 1 4 6 5 3 7](https://usermanual.wiki/Alpha-Networks/C300BRS4.Users-Manual/User-Guide-891558-Page-80.png)
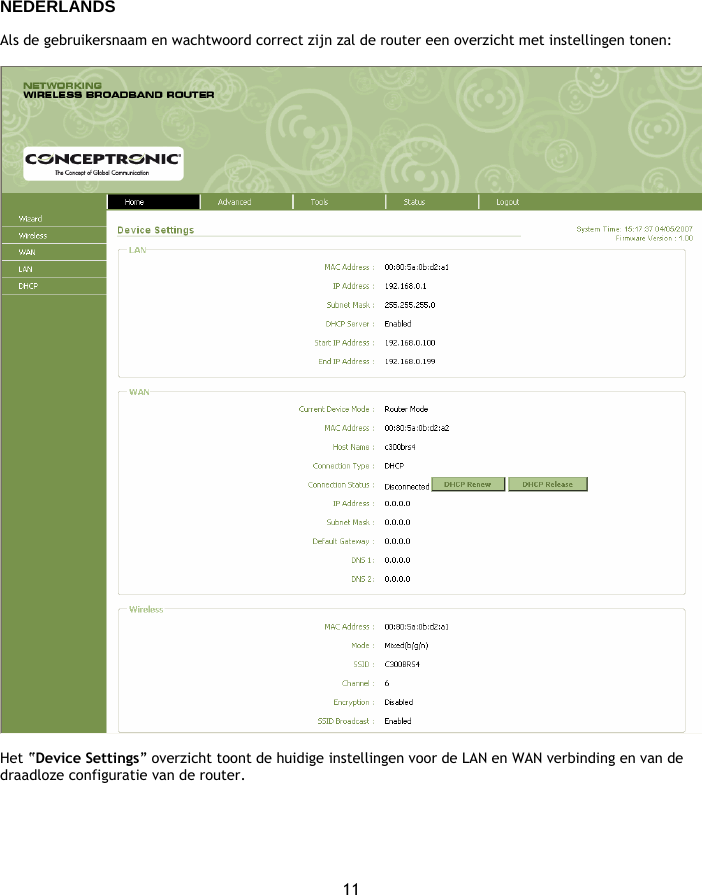
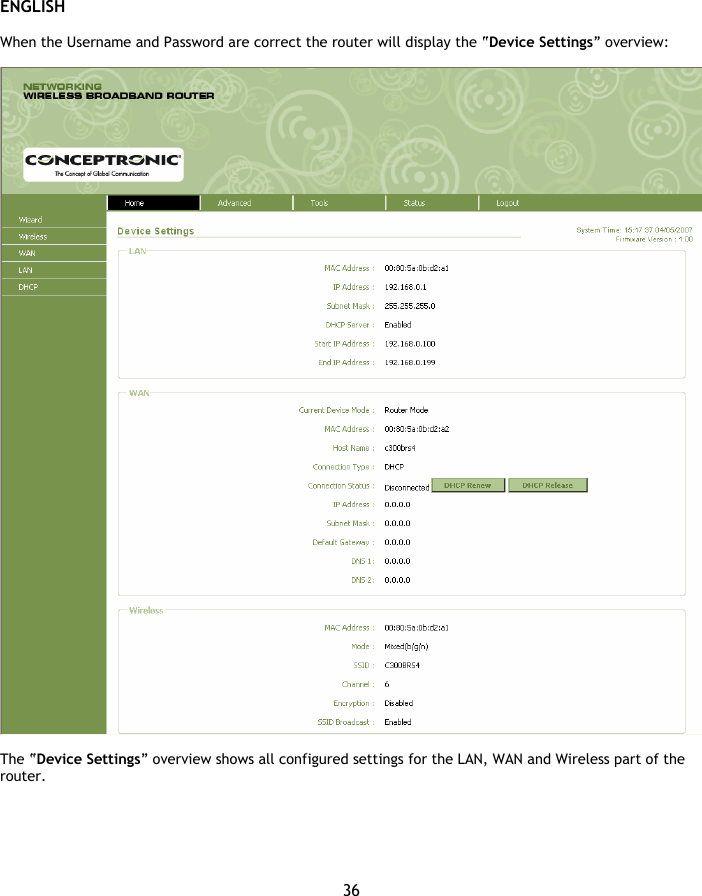
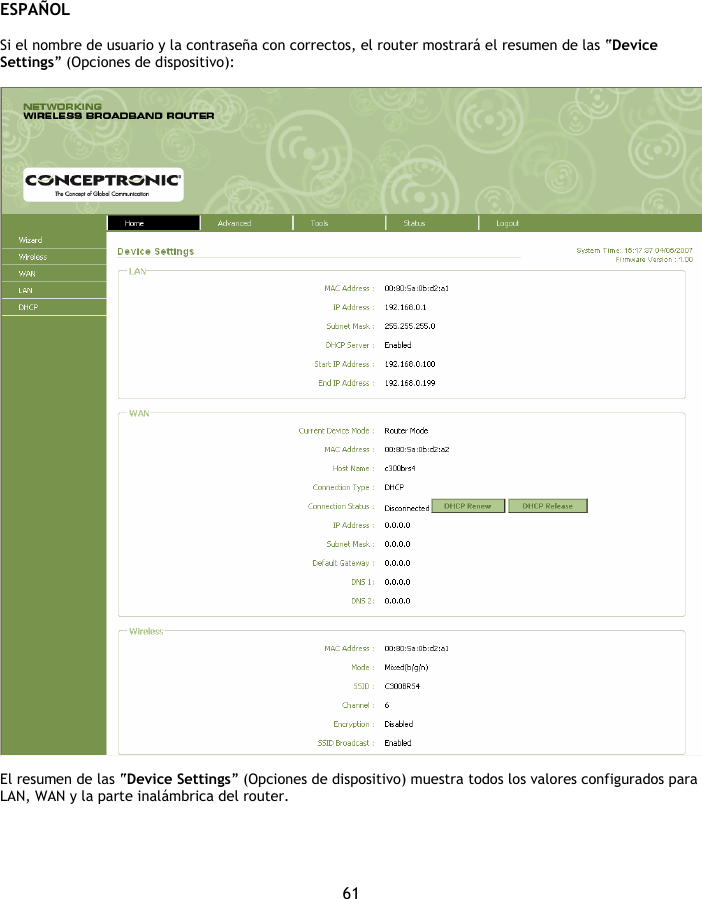
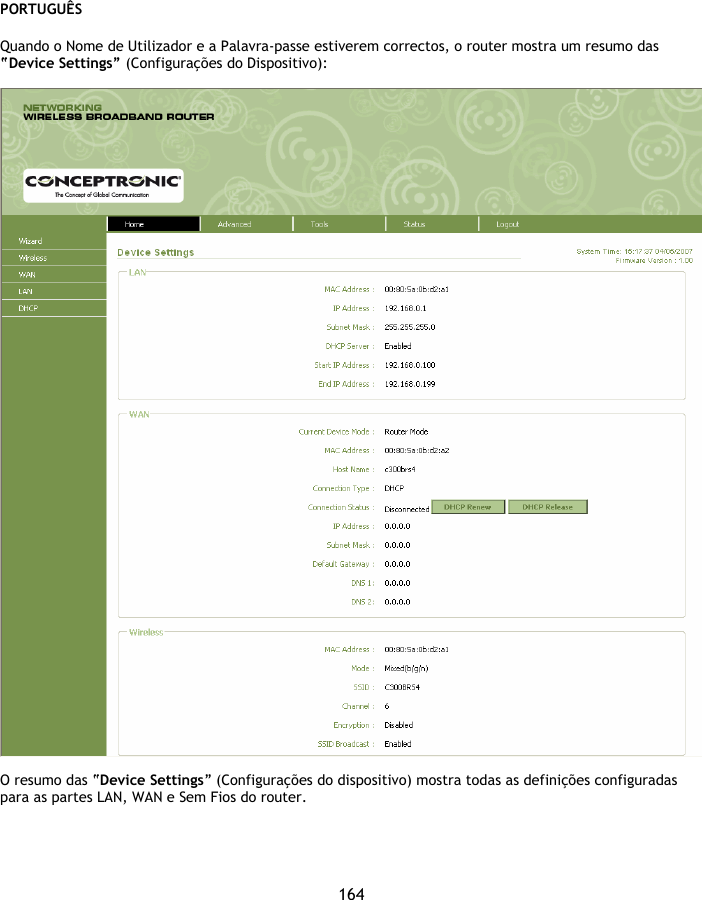
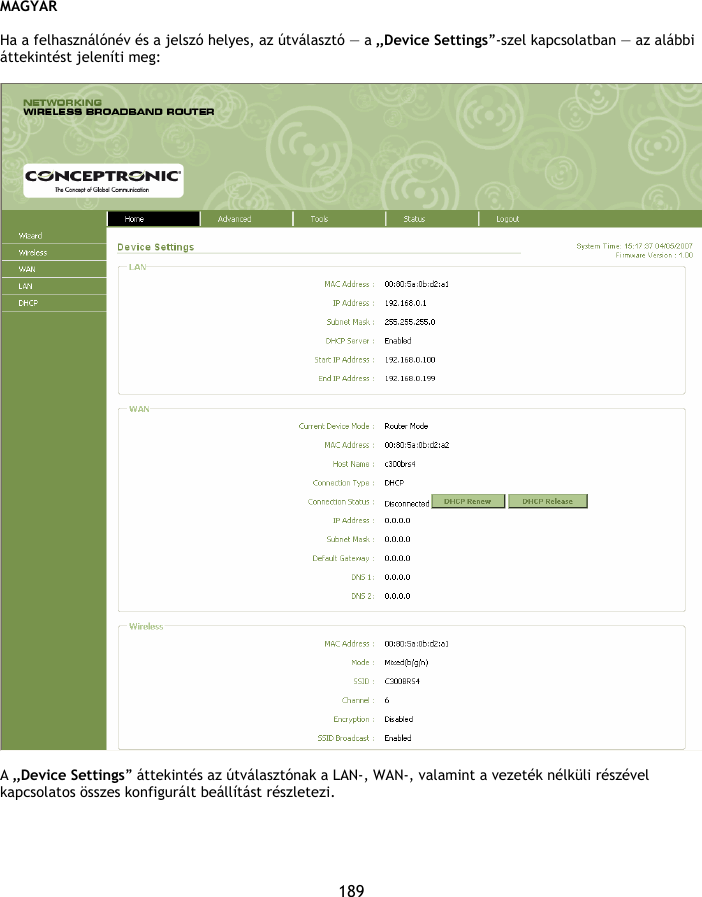
![DEUTSCH 88 Wenn Benutzername und Passwort korrekt sind, zeigt der Router einen Überblick über die „Device Settings [Geräteinstellungen]“ an. Im Überblick über die „Device Settings [Geräteinstellungen]” werden alle konfigurierten LAN-, WAN- und Wireless-Einstellungen des Routers angezeigt.](https://usermanual.wiki/Alpha-Networks/C300BRS4.Users-Manual/User-Guide-891558-Page-88.png)
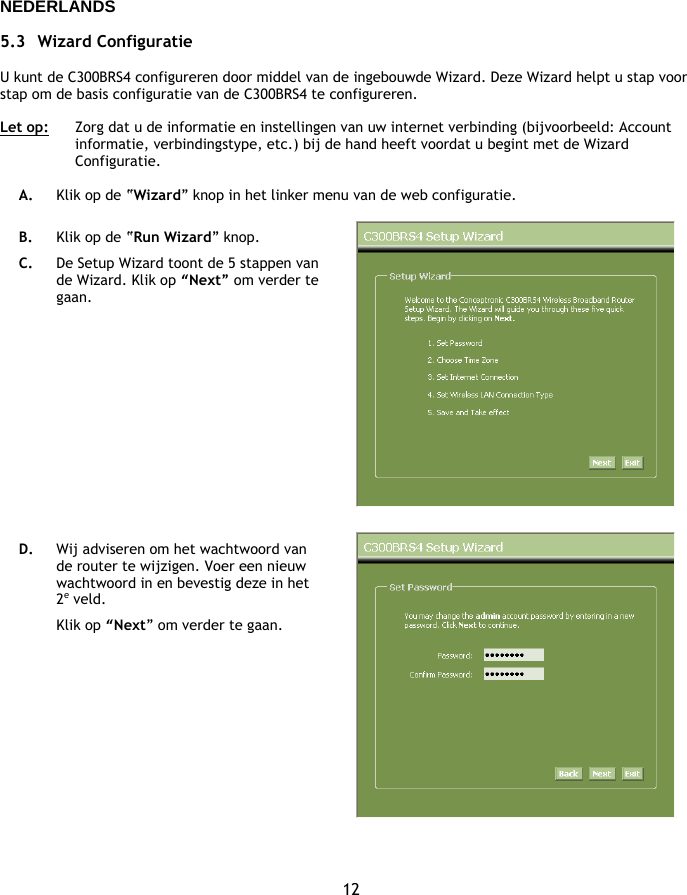
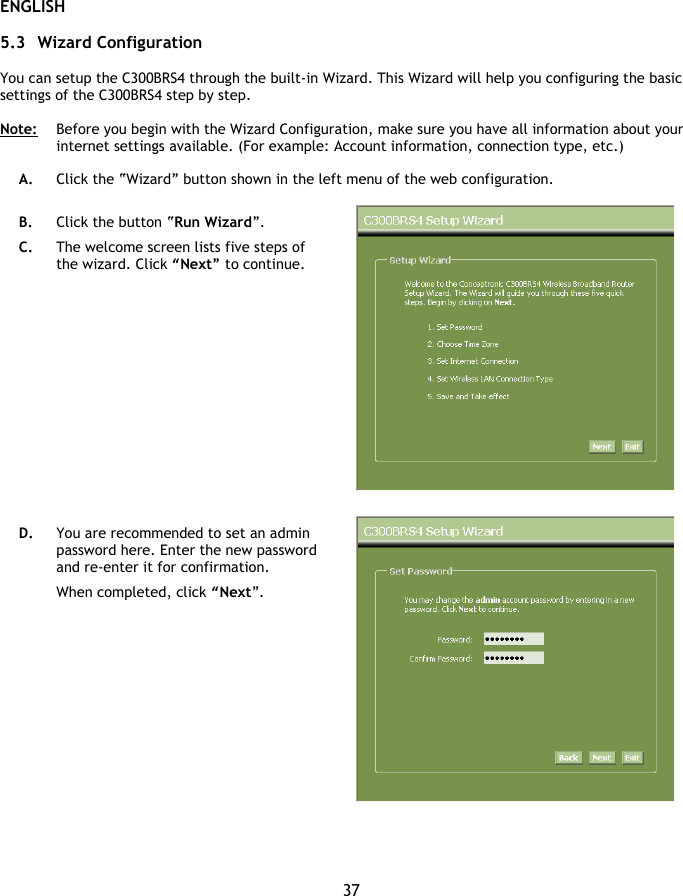
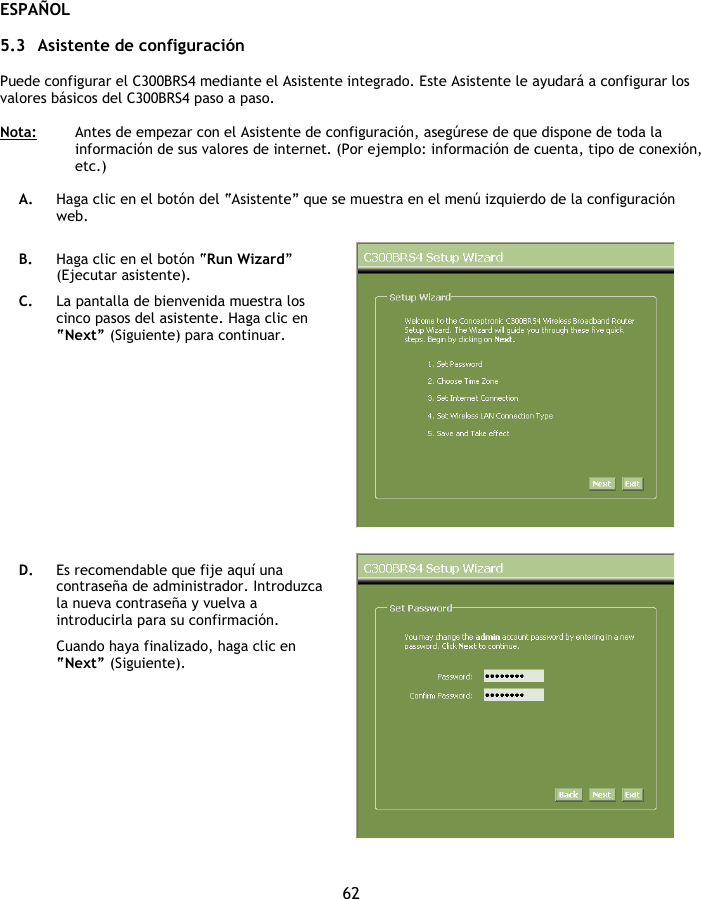
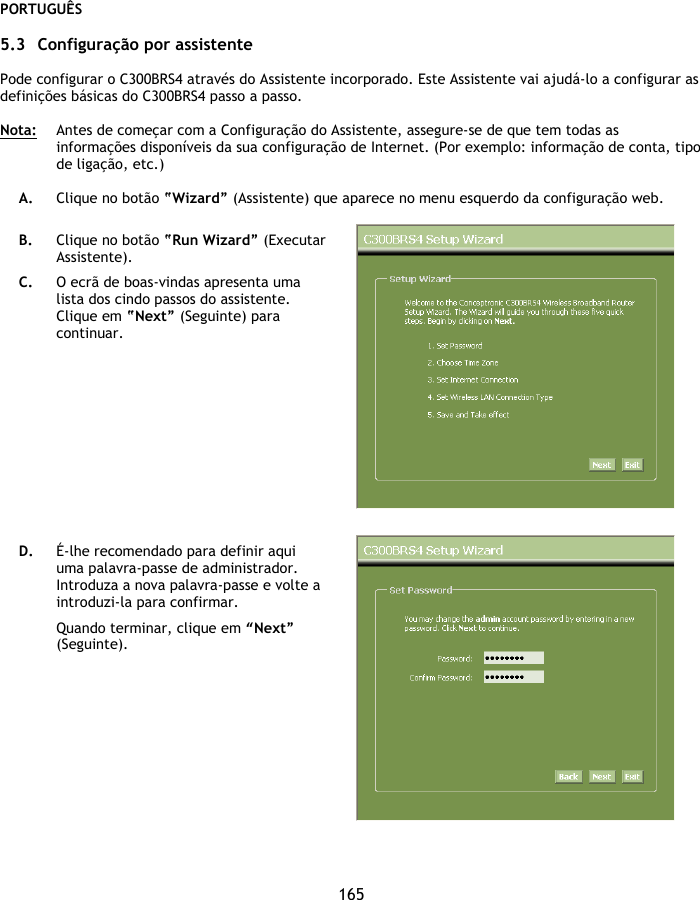
![DEUTSCH 89 5.3 Konfigurationsassistent Sie können den C300BRS4 mit dem integrierten Assistenten einrichten. Der Assistent führt Sie Schritt für Schritt durch die Konfiguration der Grundeinstellungen des C300BRS4. Hinweis: Bevor Sie die Konfiguration mithilfe des Assistenten beginnen, stellen Sie sicher, dass Sie alle Informationen über Ihre Interneteinstellungen zur Hand haben. (Zum Beispiel: Kontoinformationen, Verbindungsart usw.) A. Klicken Sie auf die Schaltfläche „Wizard [Assistent]“ im linken Menü in der Web-Konfiguration. B. Klicken Sie auf die Schaltfläche „Run Wizard [Assistent öffnen]”. C. Daraufhin werden die fünf Schritte des Assistenten angezeigt. Klicken Sie auf „Next [Weiter]“. D. Wir empfehlen Ihnen, hier ein Admin-Passwort einzurichten. Geben Sie das neue Passwort ein und bestätigen Sie es im Feld „Confirm Password [Passwort bestätigen]“. Klicken Sie danach auf „Next [Weiter]".](https://usermanual.wiki/Alpha-Networks/C300BRS4.Users-Manual/User-Guide-891558-Page-89.png)
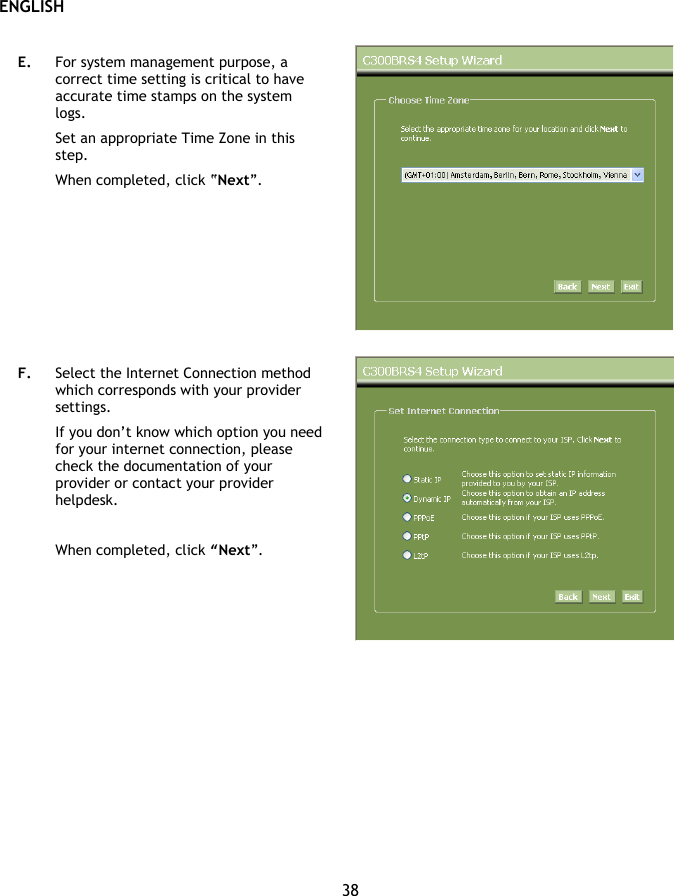
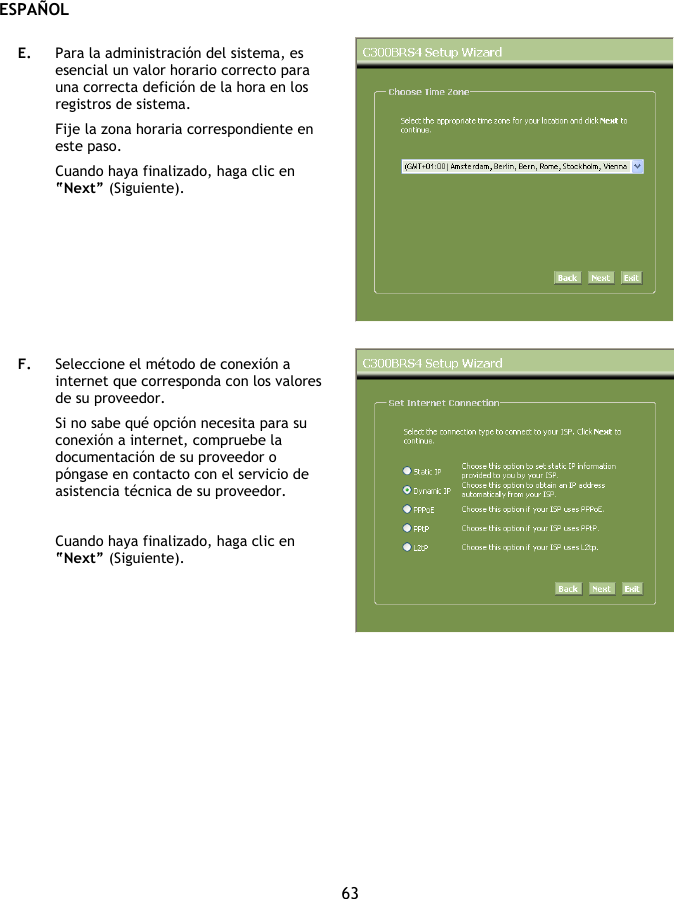
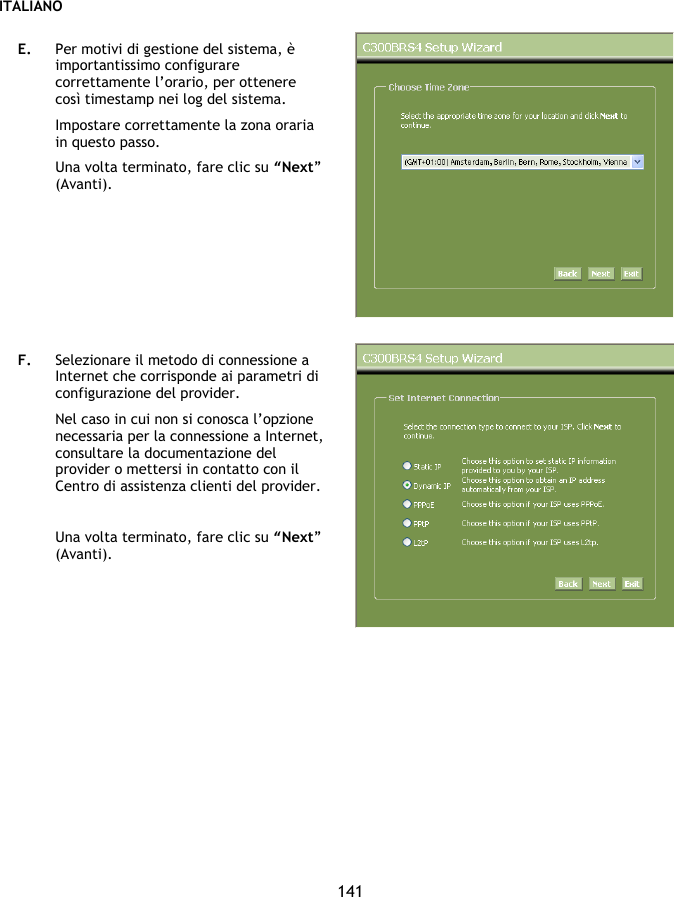
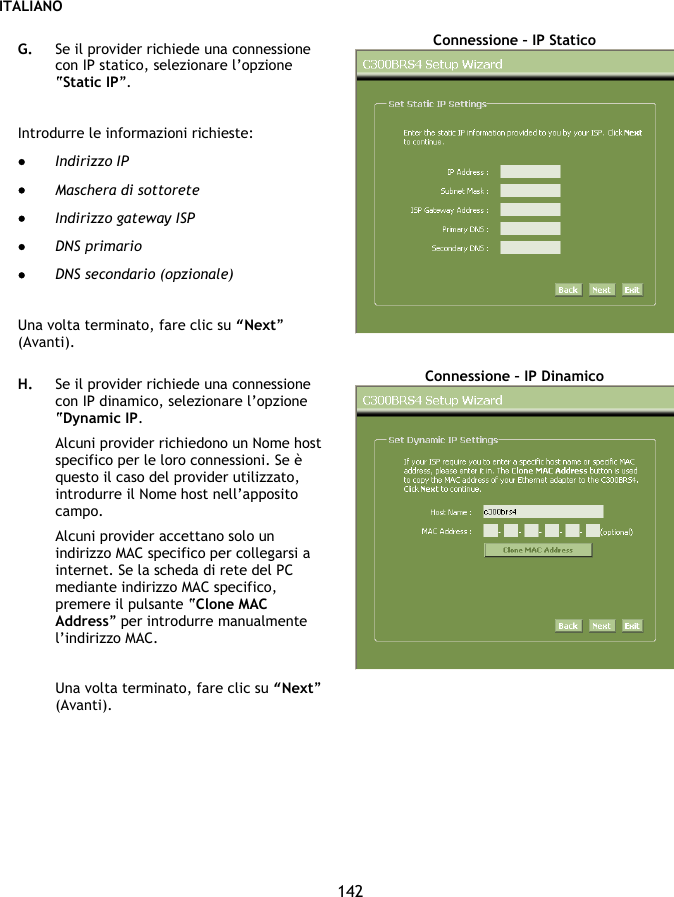
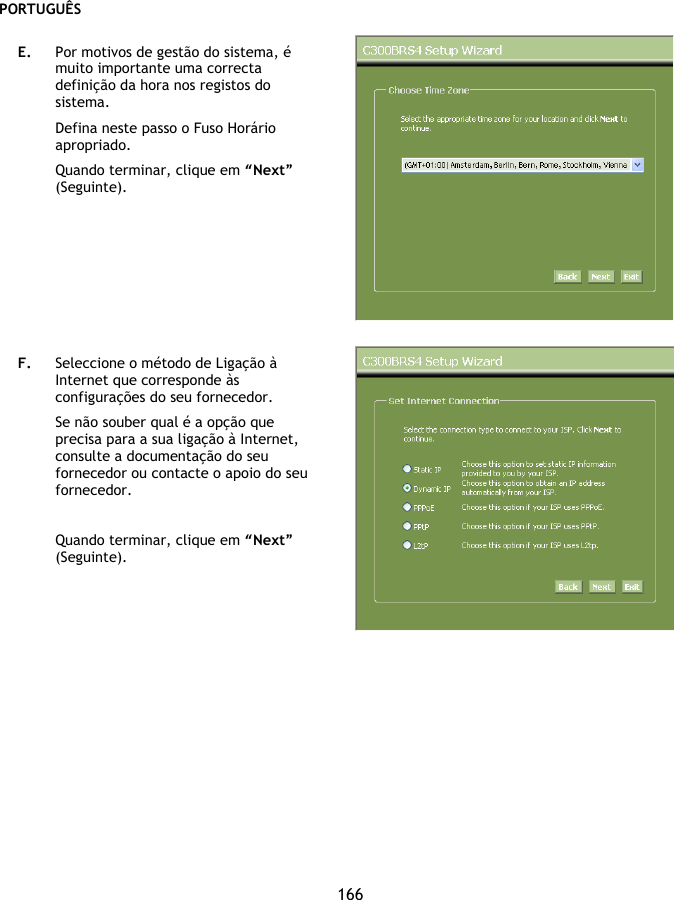
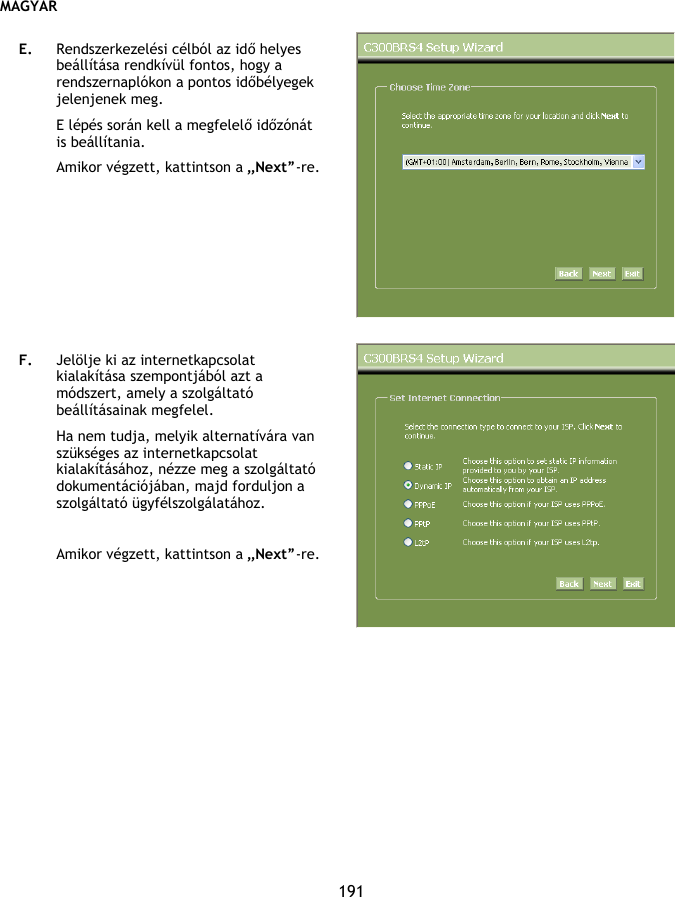
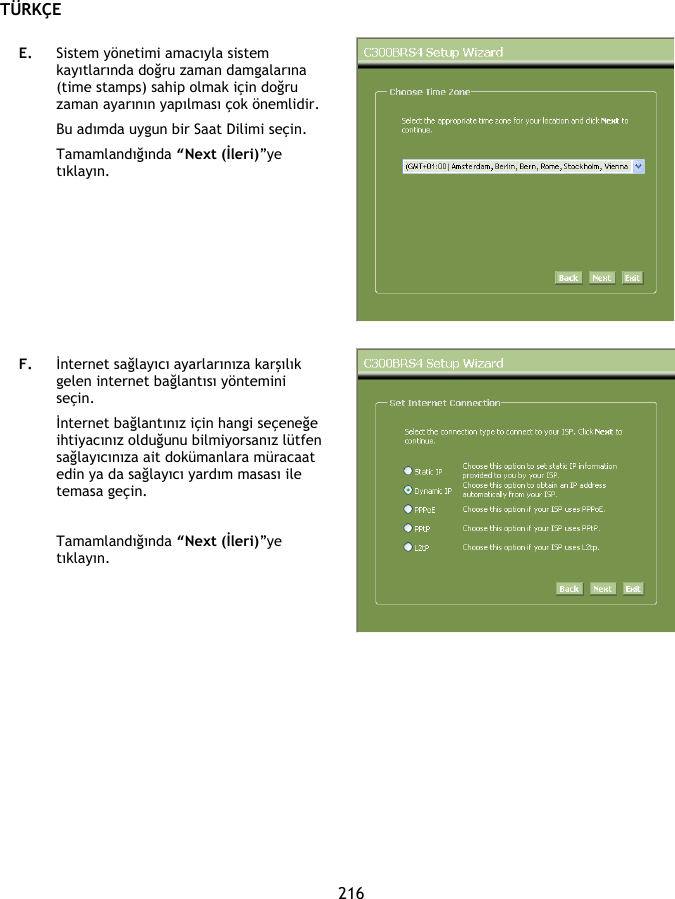
![DEUTSCH 90 E. Eine korrekte Zeiteinstellung ist aus Systemverwaltungsgründen unerlässlich, damit die Systemprotokolle die korrekten Zeitstempel enthalten. Stellen Sie die korrekte Zeitzone ein. Klicken Sie danach auf „Next [Weiter]". F. Wählen Sie die Methode der Internetverbindung, die den Einstellungen Ihres Anbieters entspricht. Wenn Sie nicht wissen, welche Option Sie für Ihre Internetverbindung benötigen, sehen Sie bitte in der Dokumentation Ihres Anbieters nach oder kontaktieren Sie das Helpdesk Ihres Anbieters. Klicken Sie danach auf „Next [Weiter]".](https://usermanual.wiki/Alpha-Networks/C300BRS4.Users-Manual/User-Guide-891558-Page-90.png)
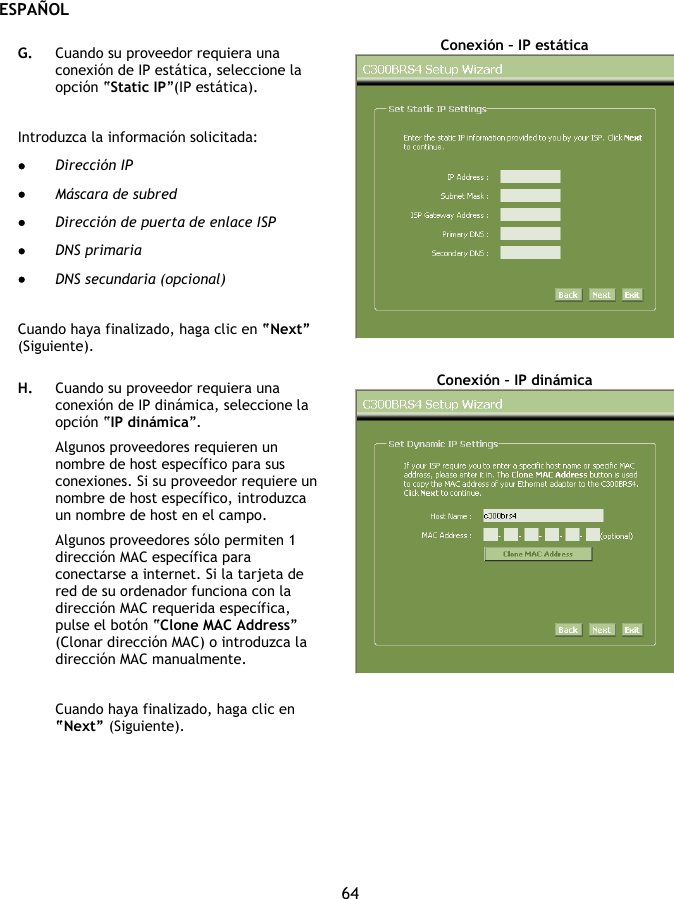
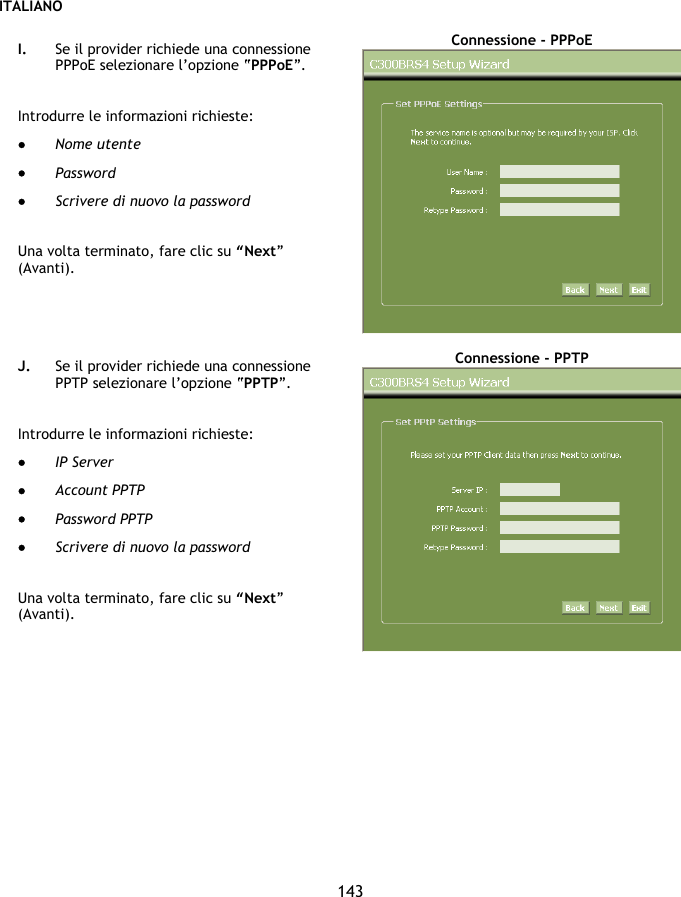
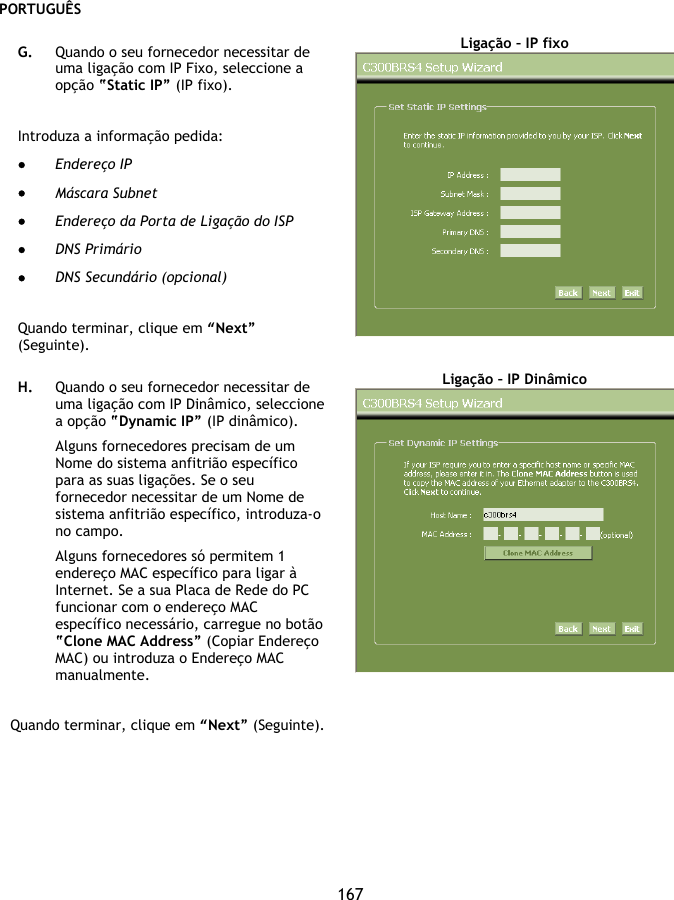
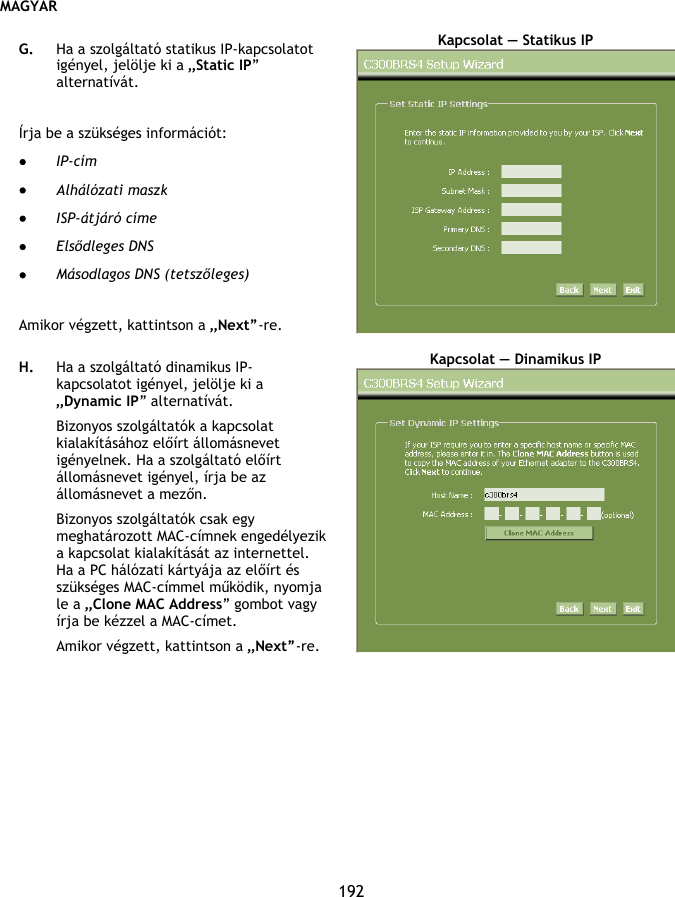
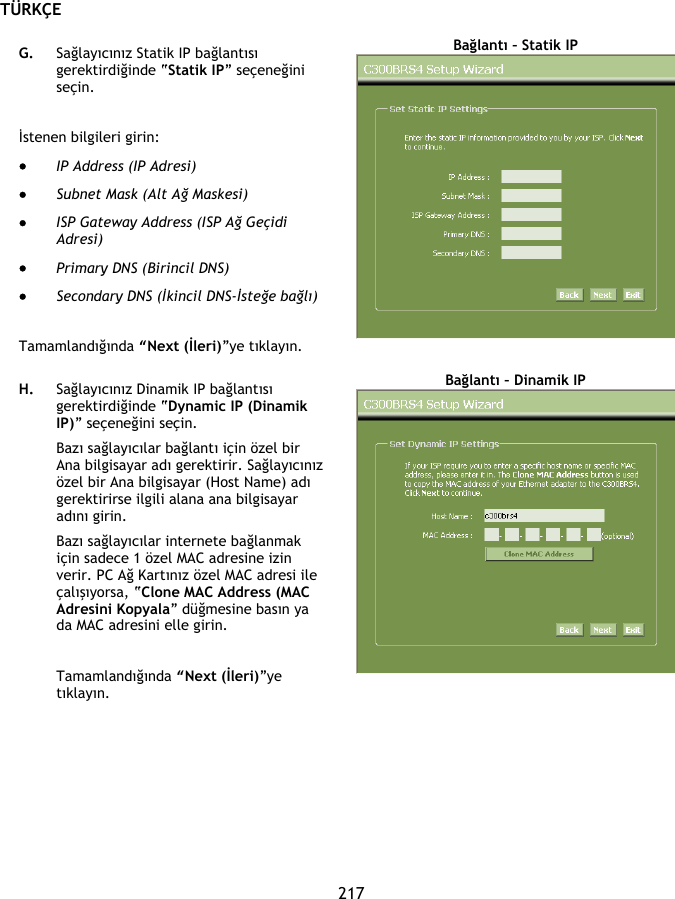
![DEUTSCH 91 G. Wenn Ihr Anbieter eine statische IP-Verbindung erfordert, wählen Sie die Option „Static IP [Statische IP]“. Geben Sie die erforderlichen Informationen ein: • IP Address [IP-Adresse] • Subnet Mask [Subnetzmaske] • ISP Gateway Address [ISP-Gateway-Adresse] • Primary DNS [Primäre DNS] • Secondary DNS [Sekundäre DNS] (optional) Klicken Sie danach auf „Next [Weiter]". Verbindung – statische IP H. Wenn Ihr Anbieter eine dynamische IP-Verbindung erfordert, wählen Sie die Option „Dynamic IP [Dynamische IP]“. Bei einigen Anbietern ist ein bestimmter Hostname für die Verbindung erforderlich. Wenn bei Ihrem Anbieter ein bestimmter Hostname erforderlich ist, geben Sie diesen in das entsprechende Feld ein. Bei einigen Anbietern darf nur eine bestimmte MAC-Adresse für die Verbindung mit dem Internet verwendet werden. Wenn Ihre PC-Netzwerkkarte mit dieser bestimmten MAC-Adresse arbeitet, klicken Sie auf die Schaltfläche „Clone MAC Address [MAC-Adresse klonen)“ oder geben Sie die MAC-Adresse im entsprechenden Feld ein. Klicken Sie danach auf „Next [Weiter]". Verbindung – dynamische IP](https://usermanual.wiki/Alpha-Networks/C300BRS4.Users-Manual/User-Guide-891558-Page-91.png)
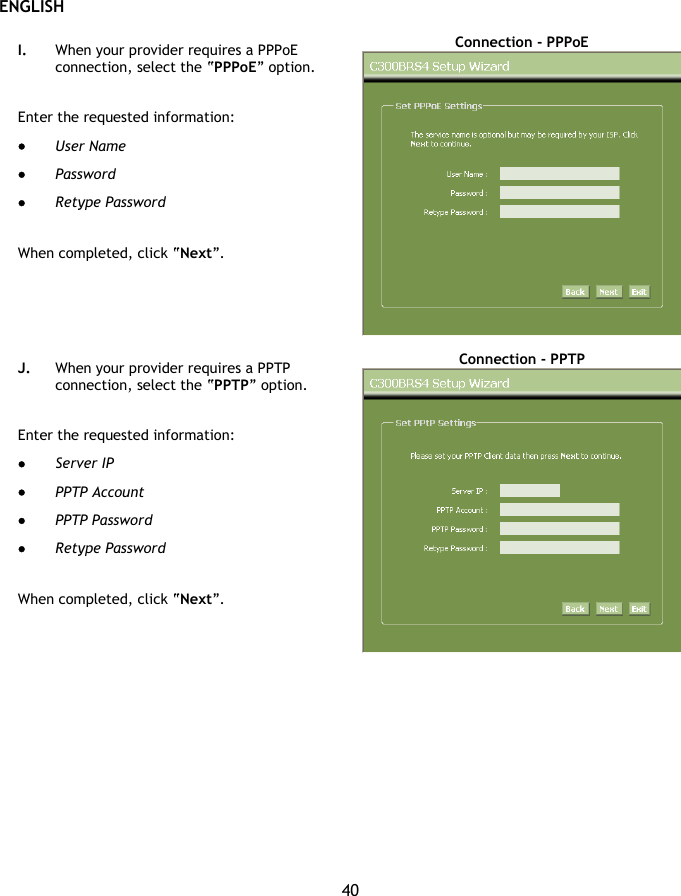
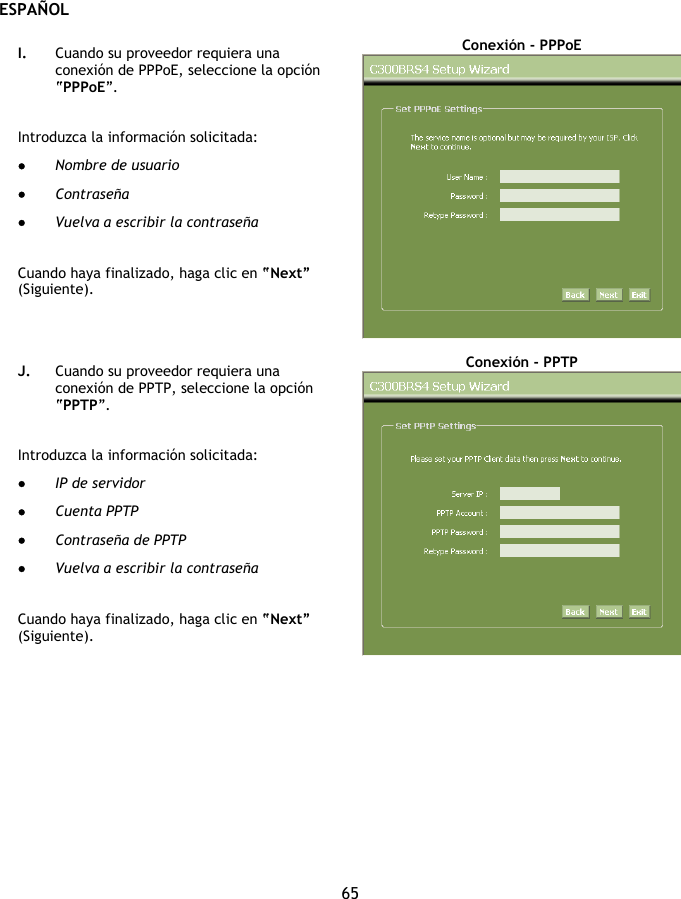
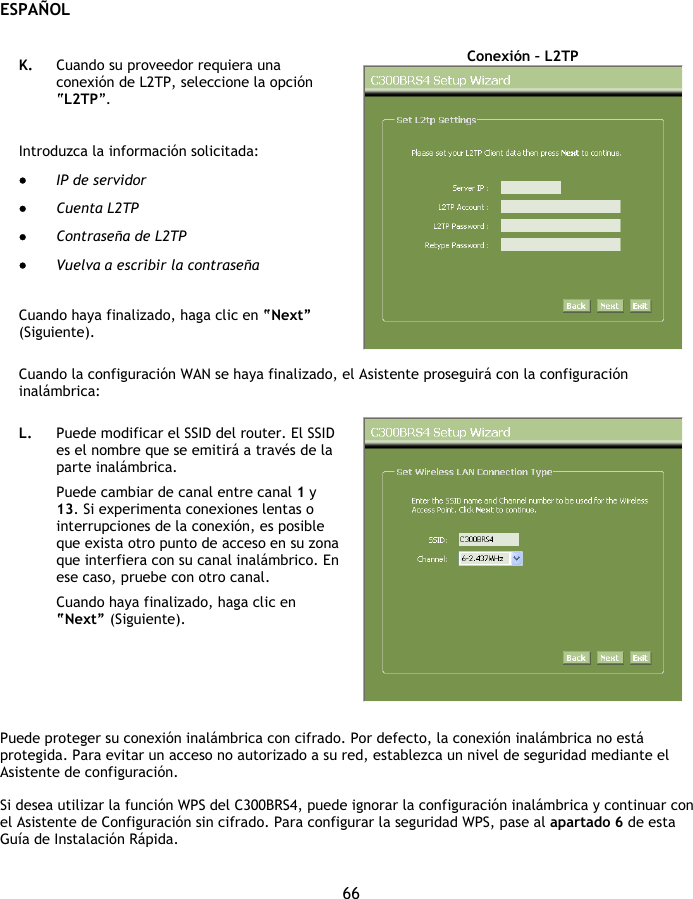
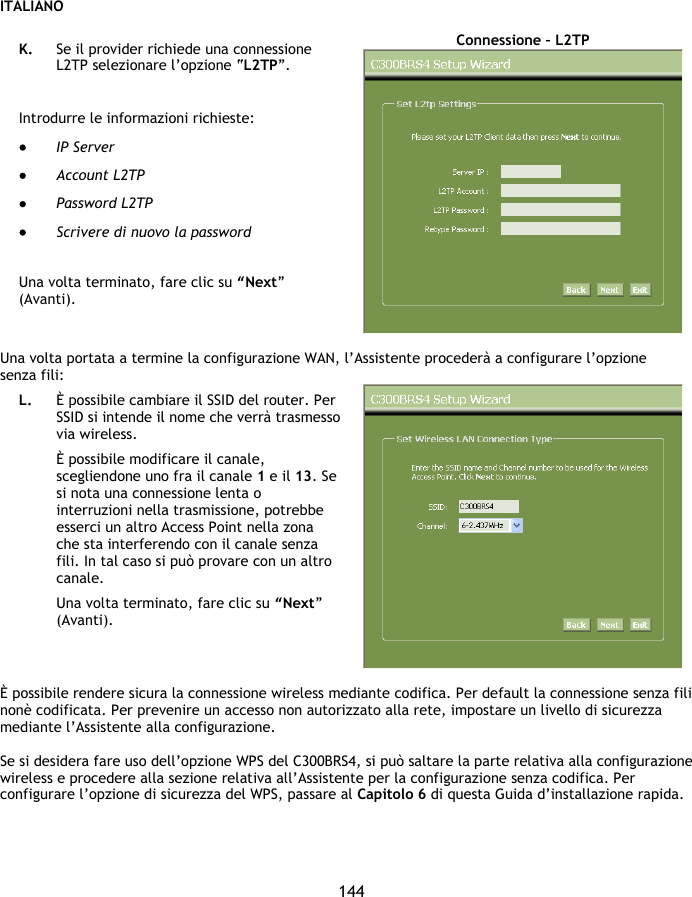
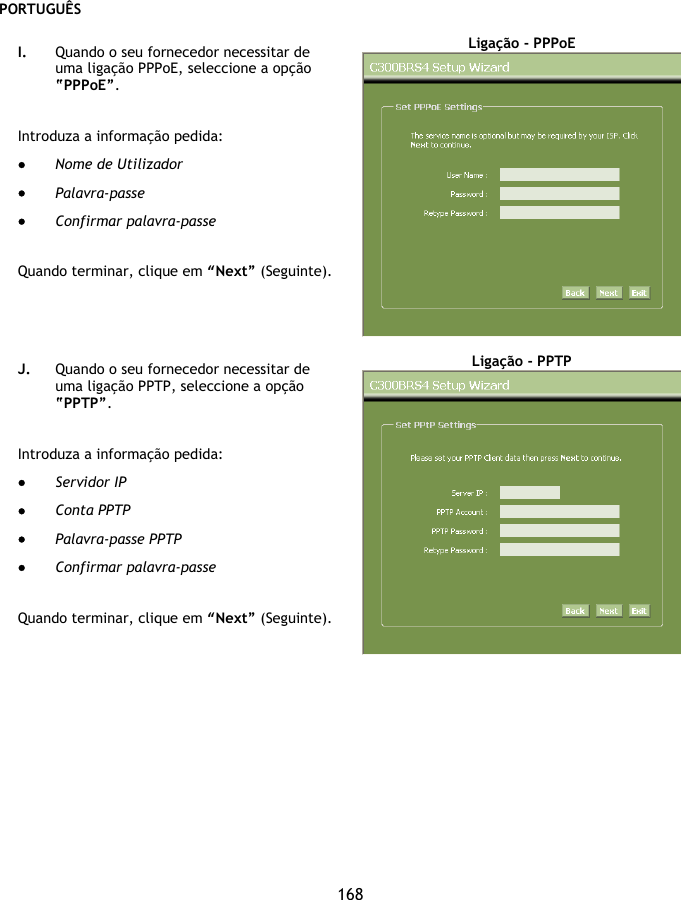
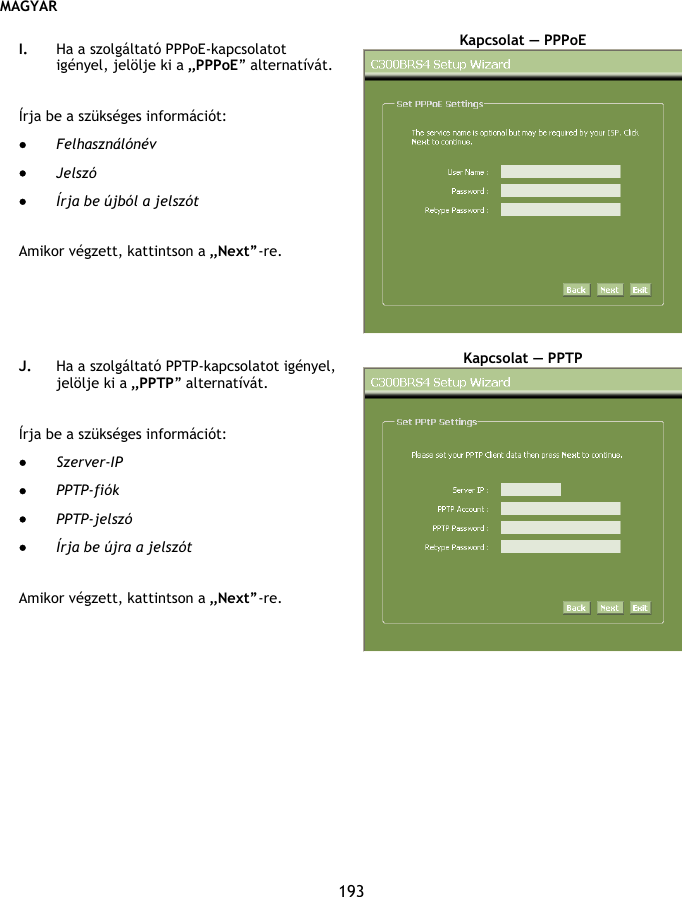
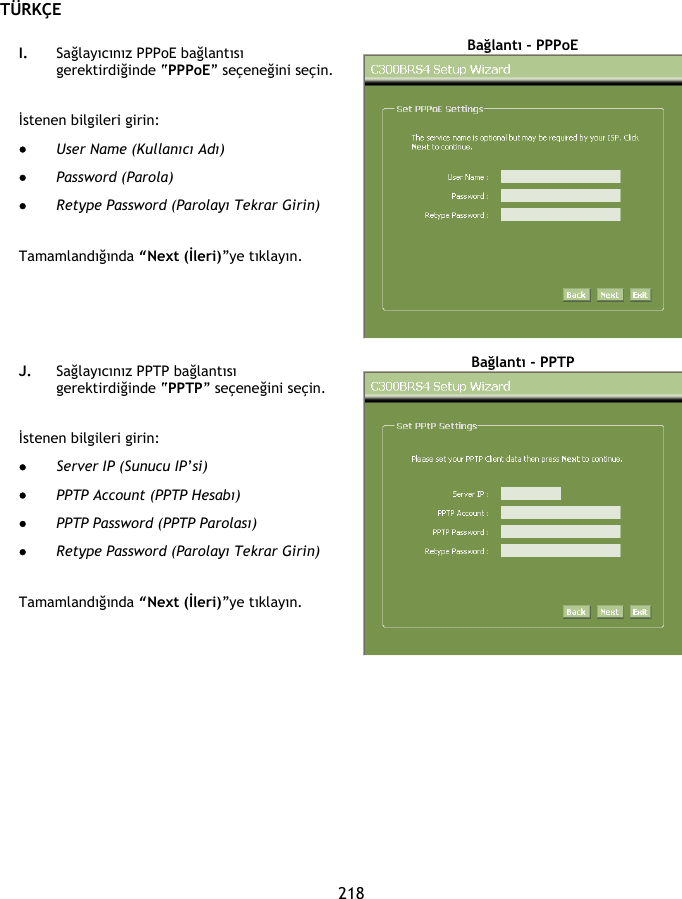
![DEUTSCH 92 I. Wenn Ihr Anbieter eine PPPoE-Verbindung erfordert, wählen Sie die Option „PPPoE“. Geben Sie die erforderlichen Informationen ein: • User Name [Benutzername] • Passwort • Retype Password [Passwort erneut eingeben] Klicken Sie danach auf „Next [Weiter]". Verbindung - PPPoE J. Wenn Ihr Anbieter eine PPTP-Verbindung erfordert, wählen Sie die Option „PPTP“. Geben Sie die erforderlichen Informationen ein: • Server IP • PPTP Account [PPTP Konto] • PPTP Password • Retype Password [Passwort erneut eingeben] Klicken Sie danach auf „Next [Weiter]". Verbindung - PPTP](https://usermanual.wiki/Alpha-Networks/C300BRS4.Users-Manual/User-Guide-891558-Page-92.png)
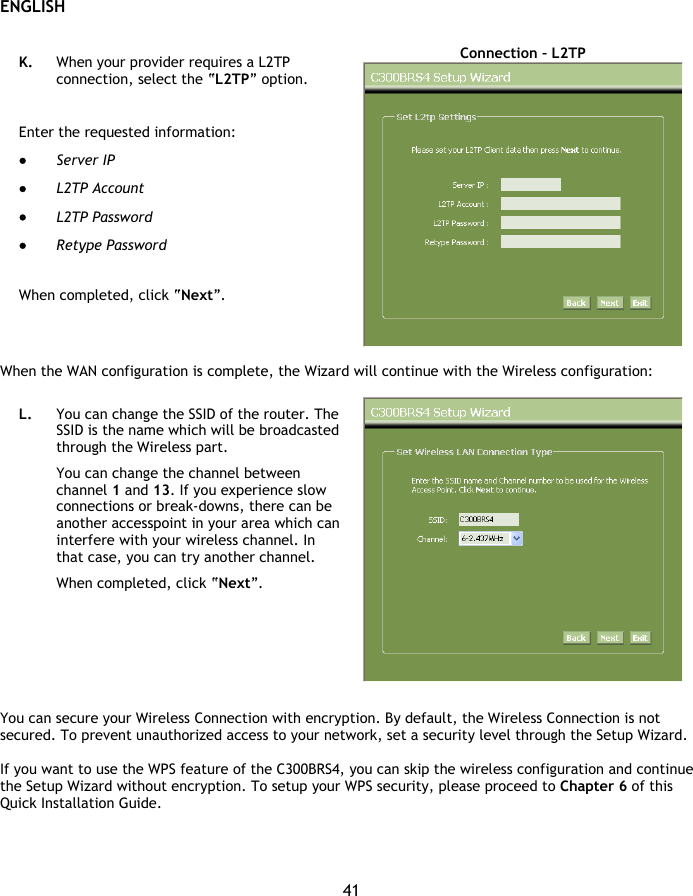
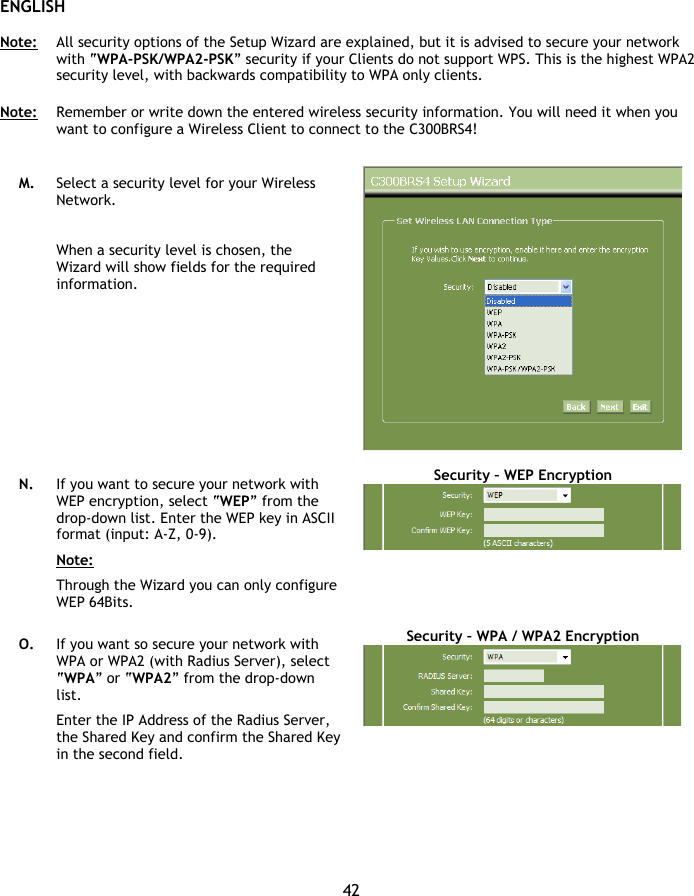
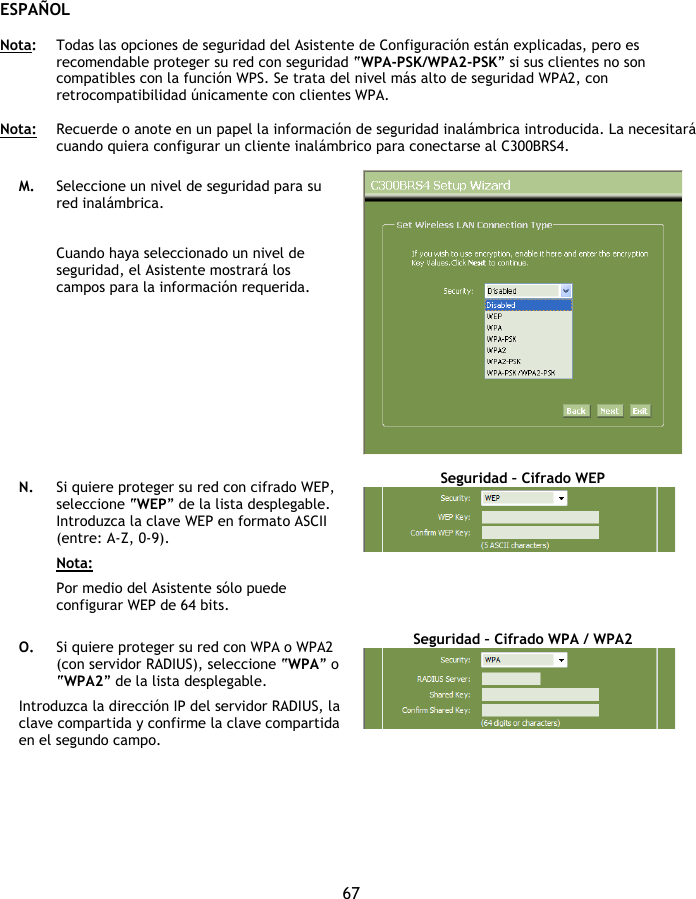
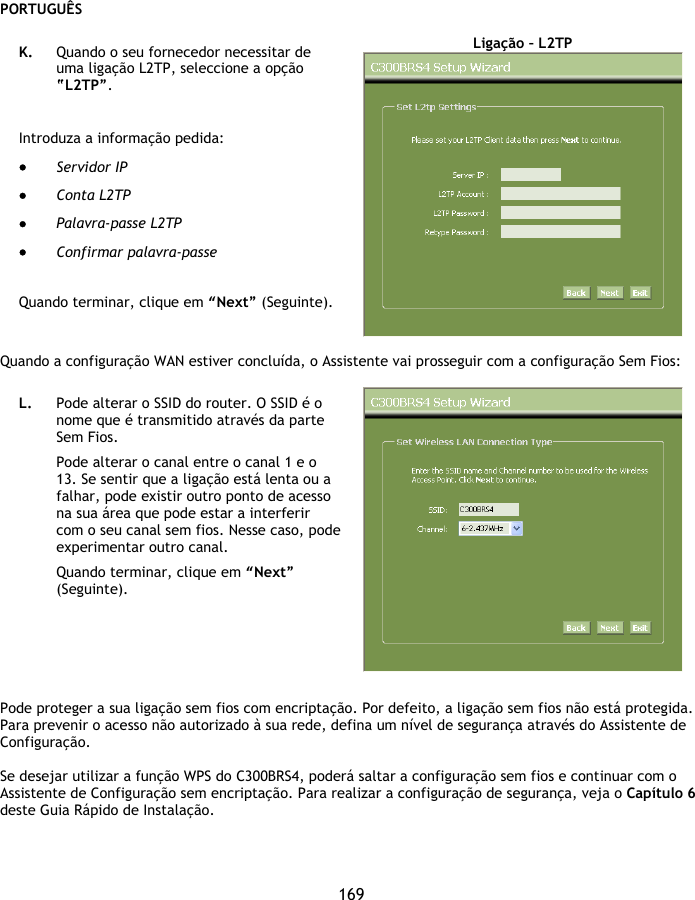
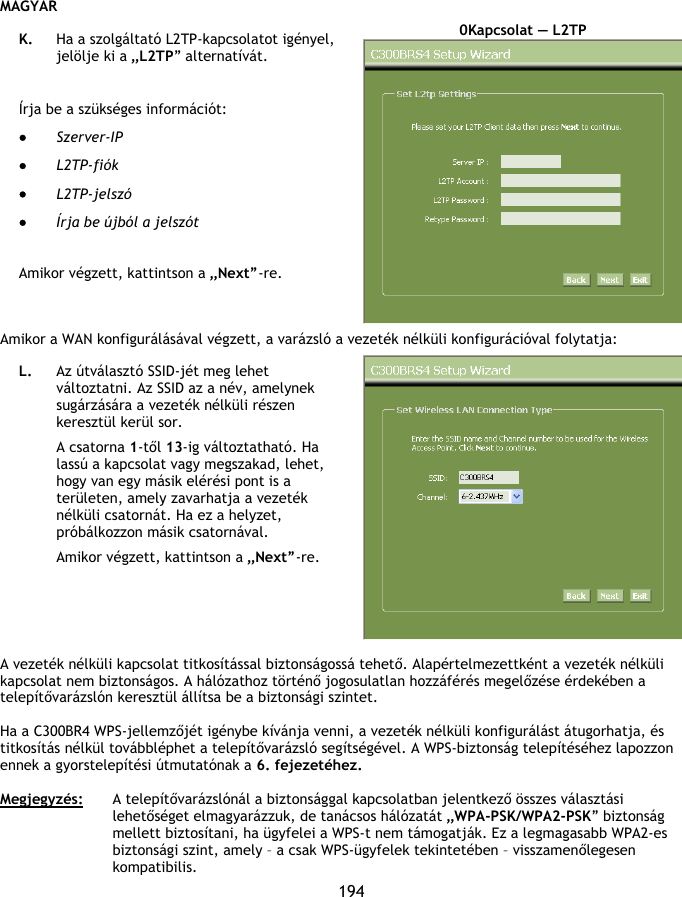
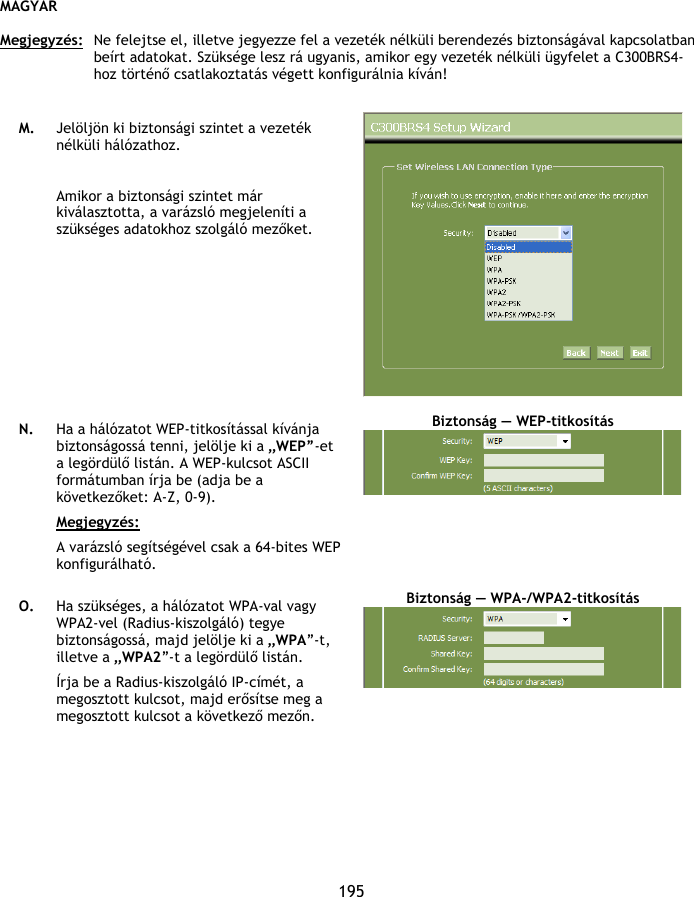
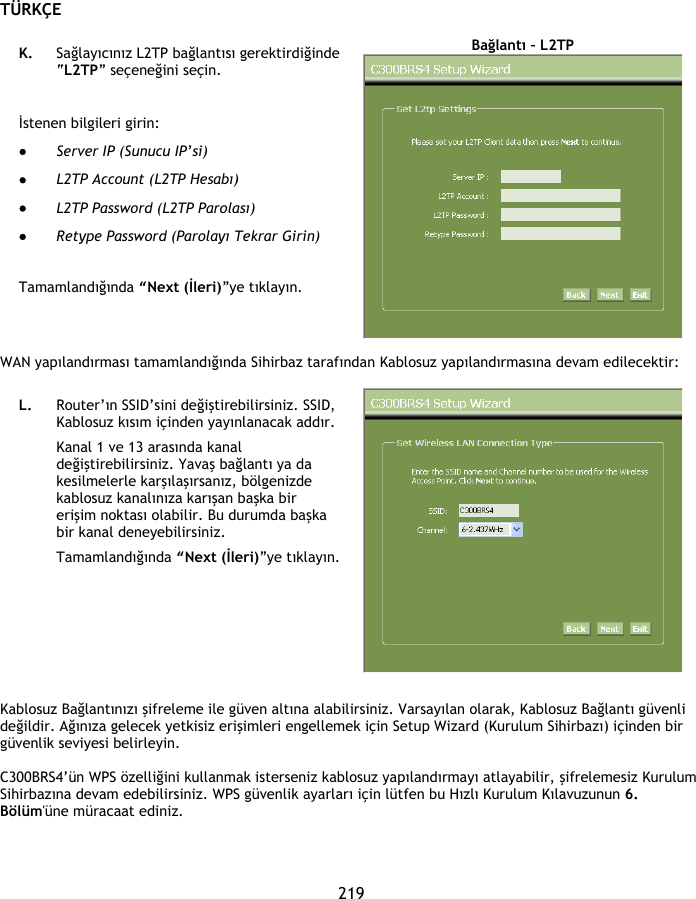
![DEUTSCH 93 K. Wenn Ihr Anbieter eine L2TP-Verbindung erfordert, wählen Sie die Option „L2TP“. Geben Sie die erforderlichen Informationen ein: • Server IP • L2TP Account [L2TP-Konto] • L2TP Password • Retype Password [Passwort erneut eingeben] Klicken Sie danach auf „Next [Weiter]". Verbindung – L2TP Sobald die WAN-Konfiguration abgeschlossen ist, setzt der Assistent die Wireless-Konfiguration fort. L. Sie können die SSID des Routers ändern. Die SSID ist der Name, der über die Wireless-Verbindung ausgestrahlt wird. Sie können den Kanal ändern (zwischen 1 und 13). Wenn die Verbindung langsam ist oder unterbrochen wird, befindet sich möglicherweise ein anderer Access Point in Ihrem Gebiet, der Störungen in Ihrem Wireless-Kanal verursacht. Versuchen Sie es in diesem Fall mit einem anderen Kanal. Klicken Sie danach auf „Next [Weiter]". Sie können Ihre Wireless-Verbindung mit Verschlüsselung sichern. Standardmäßig ist die Wireless-Verbindung nicht gesichert. Um den unberechtigten Zugriff auf Ihr Netzwerk zu verhindern, stellen Sie über den Einrichtungsassistenten eine Sicherheitsstufe ein. Wenn Sie die WPS-Funktion des C300BRS4 verwenden möchten, können Sie die Wireless-Konfiguration überspringen und mit dem Einrichtungsassistenten ohne Verschlüsselung fortfahren. Für die Einrichtung Ihrer WPS-Sicherheit gehen Sie bitte weiter zu Kapitel 6 dieser Schnellinstallationsanleitung.](https://usermanual.wiki/Alpha-Networks/C300BRS4.Users-Manual/User-Guide-891558-Page-93.png)
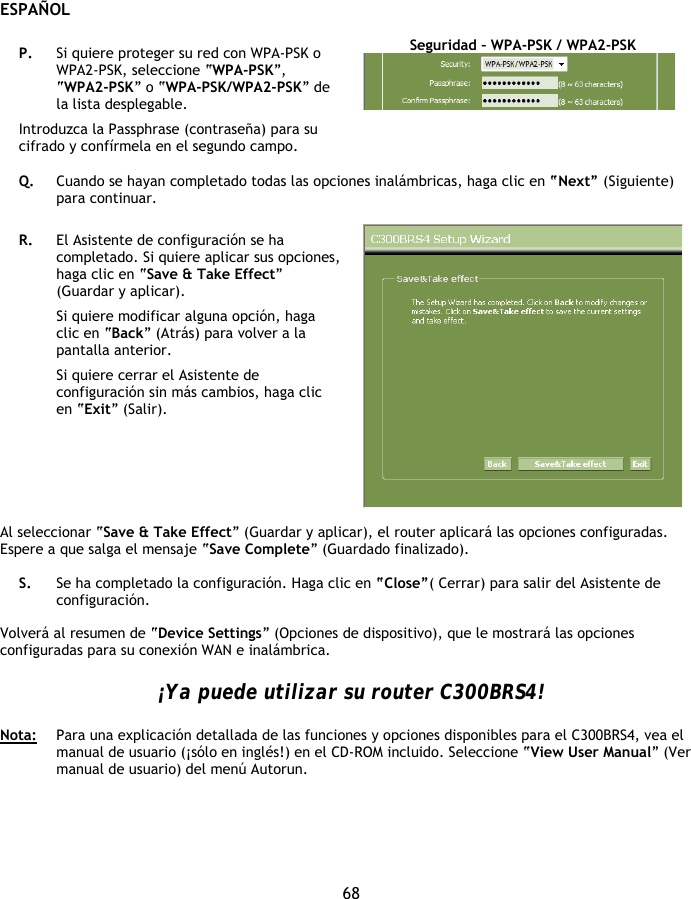
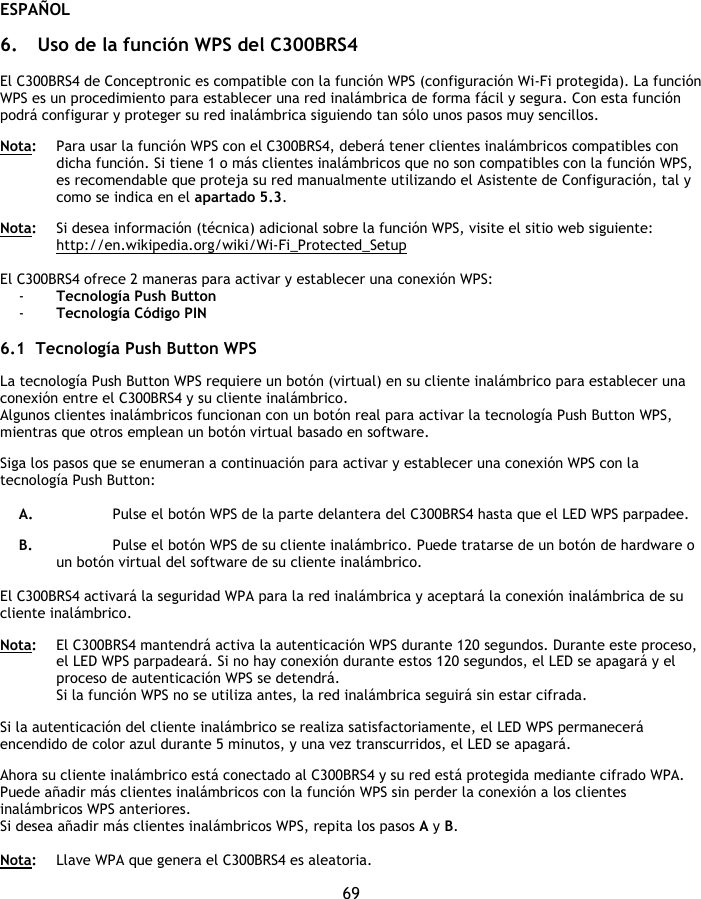
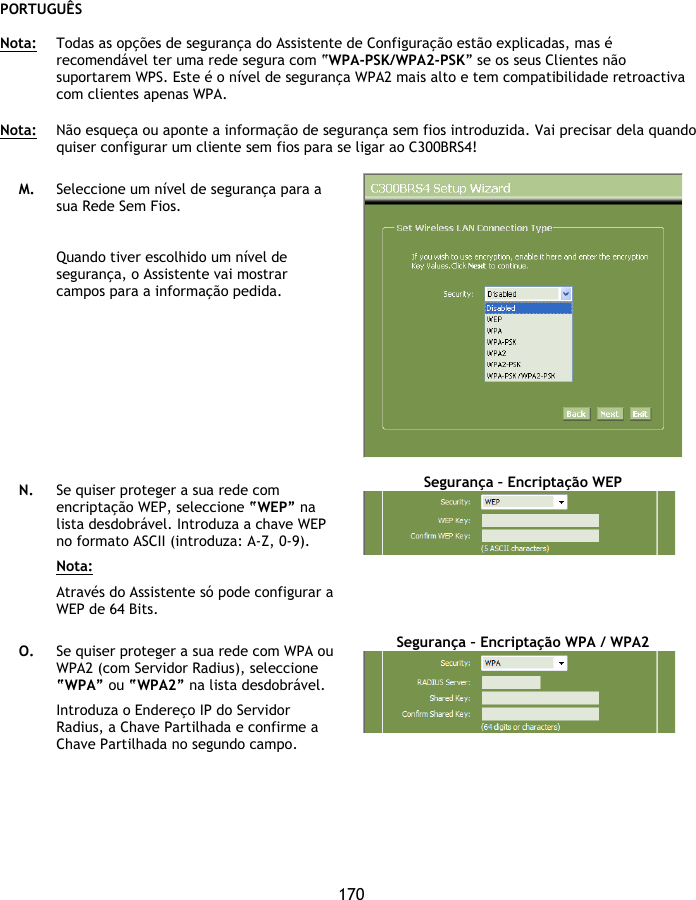
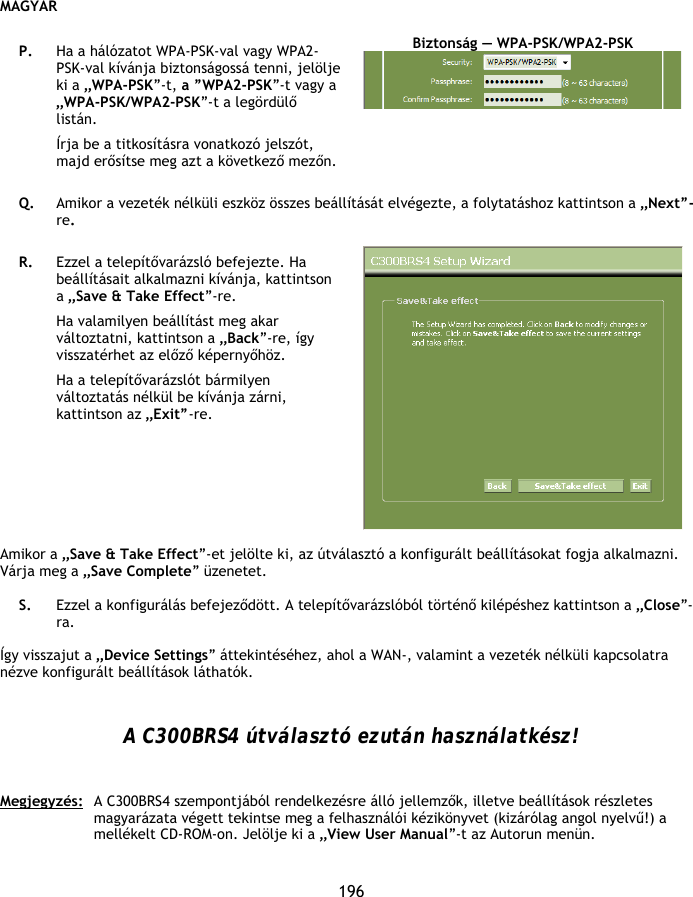
![DEUTSCH 95 P. Wenn Sie Ihr Netzwerk mit WPA-PSK oder WPA2-PSK schützen wollen, wählen Sie „WPA-PSK”, „WPA2-PSK” oder „WPA-PSK/WPA2-PSK” aus der Dropdown-Liste. Geben Sie die Passphrase für Ihre Verschlüsselung ein und bestätigen Sie die Passphrase im zweiten Feld. Sicherheit - WPA-PSK-/WPA2-PSK Q. Klicken Sie auf „Next [Weiter]“, nachdem Sie alle Wireless-Einstellungen vorgenommen haben. R. Damit ist die Konfiguration mit dem Einrichtungsassistenten abgeschlossen. Klicken Sie auf „Save & Take Effect [Speichern und Übernehmen]“, wenn Sie möchten, dass die vorgenommenen Einstellungen übernommen werden. Wenn Sie Einstellungen ändern möchten, klicken Sie auf „Back [Zurück]”, um zur vorherigen Anzeige zurückzukehren. Wenn Sie den Einrichtungsassistenten schließen möchten, ohne Änderungen vorzunehmen, klicken Sie auf „Exit [Beenden]“. Wenn Sie „Save & Take Effect [Speichern und Übernehmen]“ gewählt haben, übernimmt der Router die konfigurierten Einstellungen. Warten Sie bitte, bis die Meldung „Save Complete [Speichern abgeschlossen]“ erscheint. S. Damit ist die Konfiguration abgeschlossen. Klicken Sie auf „Close [Schließen]“, um den Einrichtungsassistenten zu schließen. Damit kehren Sie zurück zum Überblick über die „Device Settings [Geräteinstellungen]“, wo die konfigurierten Einstellungen für Ihre WAN- und Wireless-Verbindung angezeigt werden. Damit ist ihr C300BRS4 Router betriebsbereit! Hinweis: Detaillierte Erklärungen zu den für den C300BRS4 verfügbaren Funktionen und Einstellungen finden Sie im Benutzerhandbuch auf der im Lieferumfang enthaltenen CD-ROM (nur Englisch!). Wählen Sie „View User Manual [Benutzerhandbuch öffnen]” im Autorun-Menü.](https://usermanual.wiki/Alpha-Networks/C300BRS4.Users-Manual/User-Guide-891558-Page-95.png)
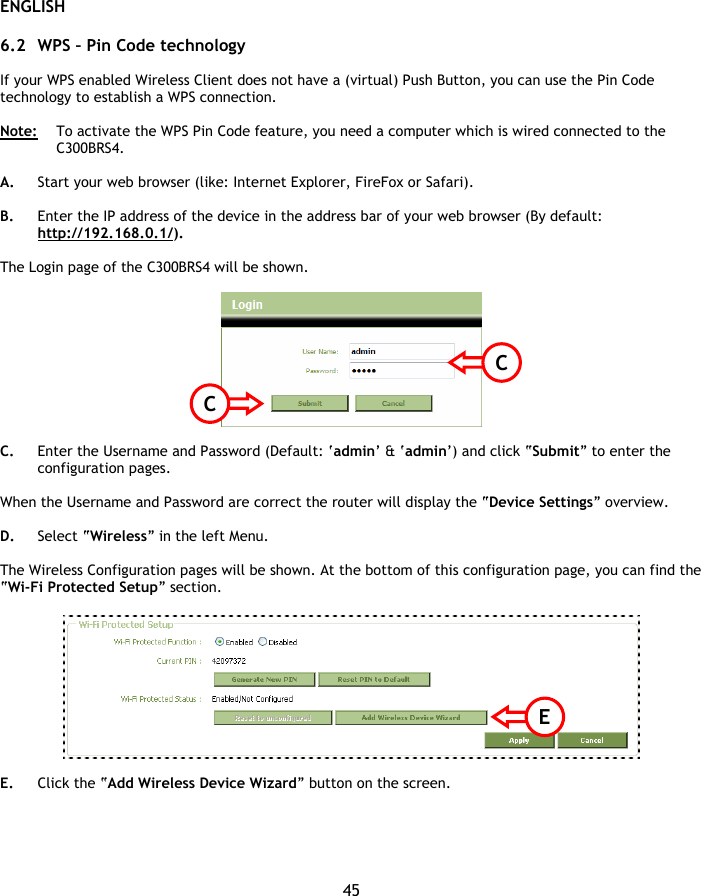
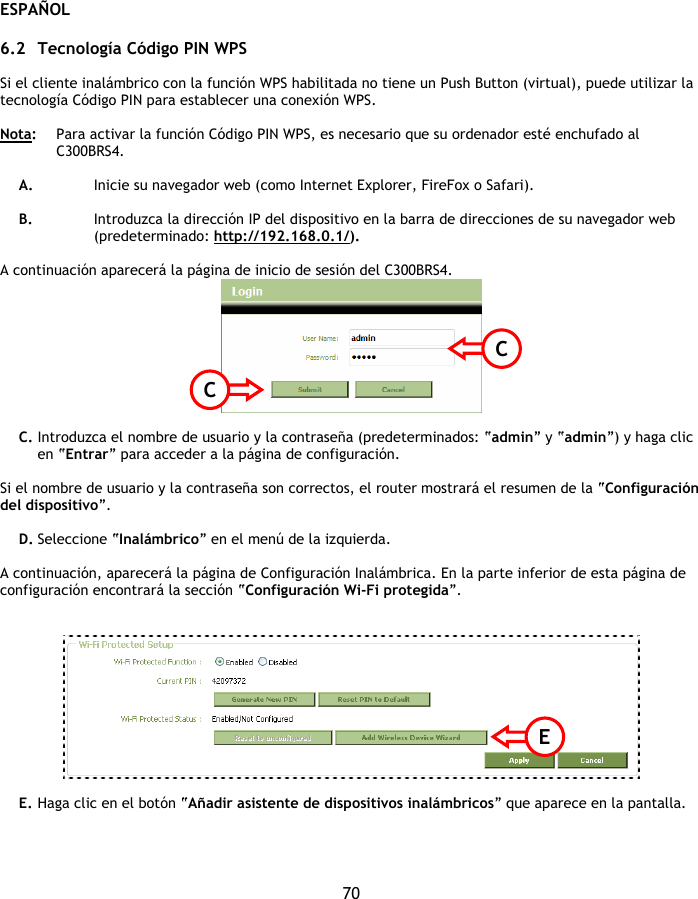
![DEUTSCH 97 Sie können weitere Wireless WPS Clients hinzufügen, wobei die Verbindung der zuvor eingerichteten Wireless WPS Clients bestehen bleibt. Wenn Sie weitere Wireless WPS Clients hinzufügen möchten, wiederholen Sie die Schritte A und B. Hinweis: Der C300BRS4 erzeugt den WPA-Schlüssel nach dem Zufallsprinzip. 6.2 WPS – Pin-Code-Methode Wenn Ihr WPS-fähiger Wireless Client keinen (virtuellen) Druckknopf hat, können Sie mithilfe der Pin-Code-Methode eine WPS-Verbindung herstellen. Hinweis: Um die WPS-Pin-Code-Funktion zu aktivieren, benötigen Sie einen Computer, der mit einem Kabel mit dem C300BRS4 verbunden ist. A. Starten Sie Ihren Webbrowser (z.B. Internet Explorer, FireFox oder Safari). B. Geben Sie die IP-Adresse des Gerätes in das Adressfeld Ihres Webbrowsers ein (standardmäßig: http://192.168.0.1/). Es erscheint die Login-Seite des C300BRS4. C. Geben Sie den Benutzernamen und das Passwort ein (standardmäßig ‚admin“ und ‚admin’) und klicken Sie auf „Submit“, um die Konfigurationsseiten zu öffnen. Wenn Benutzername und Passwort korrekt sind, zeigt der Router einen Überblick über die „Device Settings [Geräteinstellungen]“ an. D. Wählen Sie im linken Menü „Wireless [Drahtlos]“. Die Wireless-Konfigurationsseite wird angezeigt. Unten auf dieser Konfigurationsseite finden Sie das „Wi-Fi Protected Setup“. C C E](https://usermanual.wiki/Alpha-Networks/C300BRS4.Users-Manual/User-Guide-891558-Page-97.png)
![DEUTSCH 98 E. Klicken Sie auf die Schaltfläche „Add Wireless Device Wizard [Einrichtungsassistent für das Hinzufügen eines drahtlosen Geräts]”. Daraufhin öffnet sich der WPS-Einrichtungsassistent: Mithilfe dieses Assistenten können Sie die Pin-Code-Funktion aktivieren. Bevor Sie mit der Pin-Code-Authentifizierung beginnen können, muss Ihr Wireless Client den Pin-Code erzeugen. F. Wählen Sie die WPS-Pin-Code-Funktion in der Software Ihres Wireless Clients. Der Wireless Client erzeugt einen Pin-Code und zeigt diesen auf Ihrem Bildschirm an. Æ [Wireless Client-Software] [C300BRS4 WPS-Einrichtungsassistent] G. Geben Sie den Pin-Code, den Sie von Ihrem Wireless Client erhalten haben, im WPS-Einrichtungsassistenten des C300BRS4 ein und klicken Sie auf „Connect [Verbinden]”. Der C300BRS4 aktiviert die WPA-Sicherheit auf Ihrem drahtlosen Netzwerk und akzeptiert die drahtlose Verbindung mit Ihrem drahtlosen Client mit dem eingegebenen Pin-Code. Der C300BRS4 behält die WPS-Authentifizierung während 120 Sekunden aktiv. Während diesem Prozess blinkt die WPS-LED-Anzeige. Wenn in diesen 120 Sekunden keine Verbindung zustande kommt, schaltet die LED-Anzeige aus und der WPS-Authentifizierungsprozess wird abgebrochen. G](https://usermanual.wiki/Alpha-Networks/C300BRS4.Users-Manual/User-Guide-891558-Page-98.png)
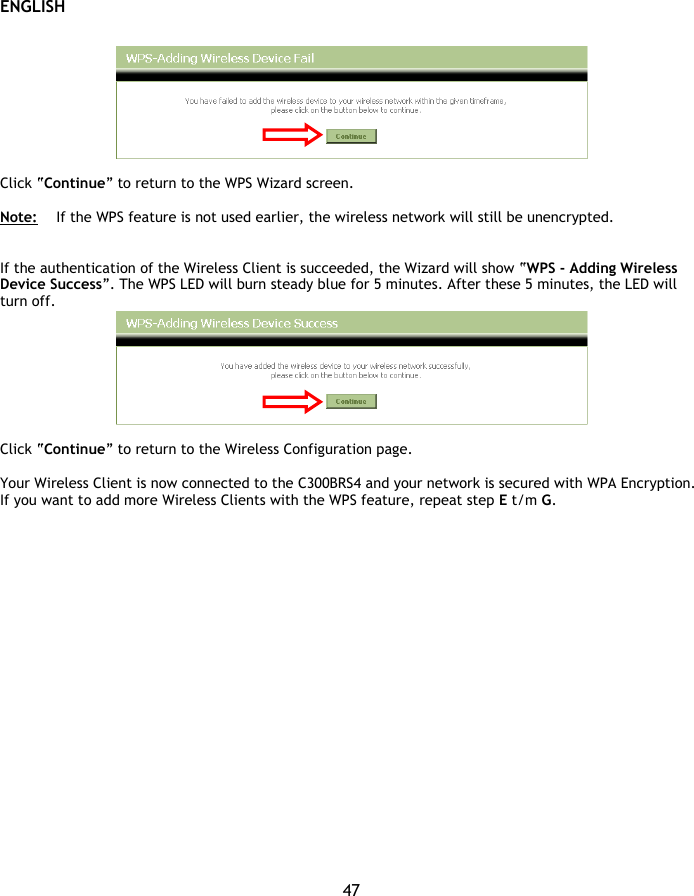
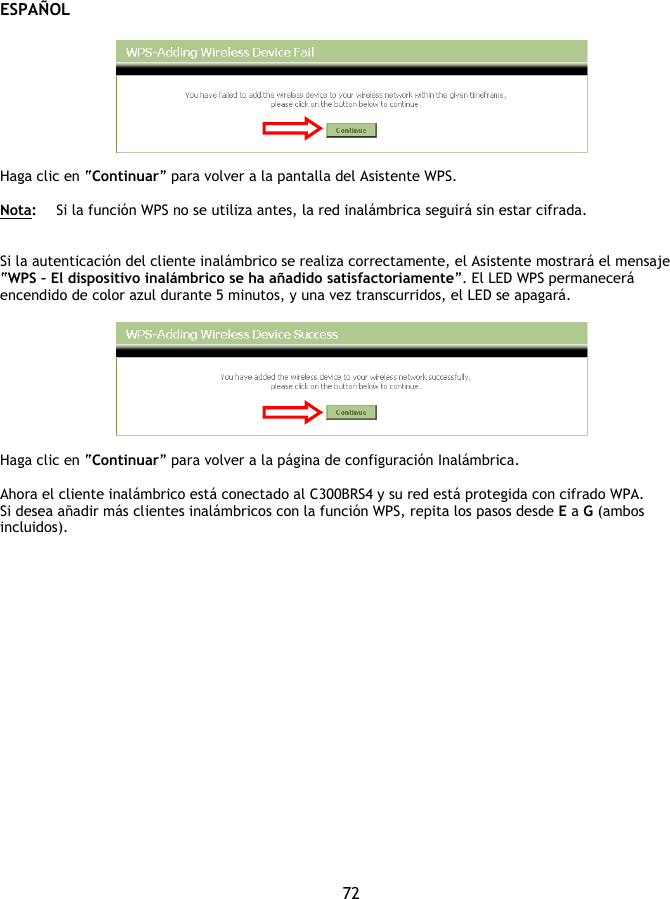
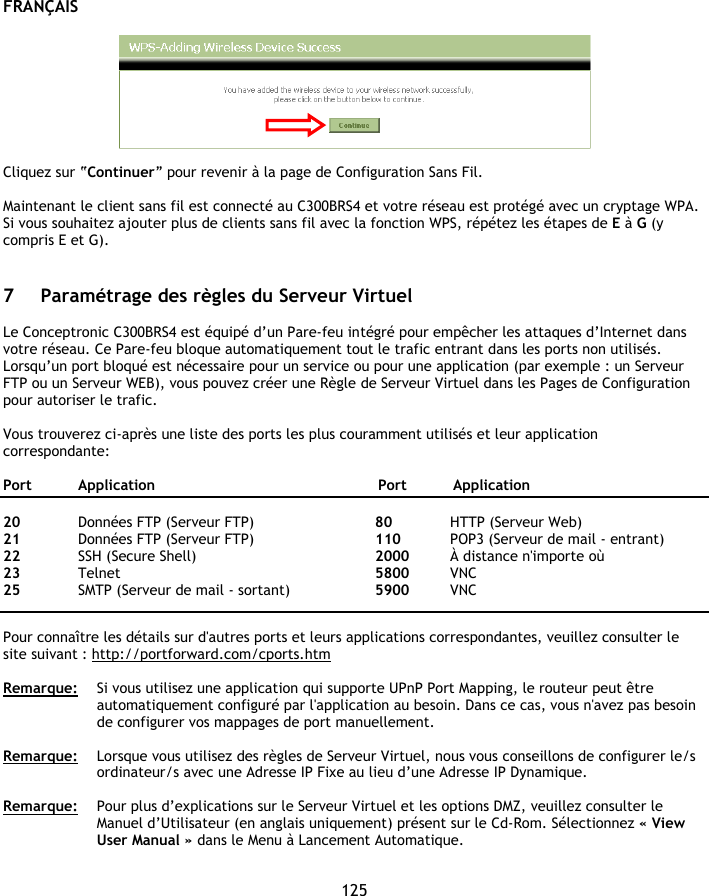
![DEUTSCH 99 Klicken Sie auf „Continue [Weiter]“, um zum WPS-Einrichtungsassistenten zurückzukehren. Hinweis: Wenn die WPS-Funktion nicht bereits früher verwendet wurde, ist das drahtlose Netzwerk nach wie vor unverschlüsselt. Wenn die Authentifizierung des Wireless Client erfolgreich war, zeigt der Assistent das Fenster „WPS - Adding Wireless Device Success [WPS – drahtloses Gerät erfolgreich hinzugefügt]” an. Die WPS-LED-Anzeige leuchtet kontinuierlich für 5 Minuten. Danach schaltet die LED-Anzeige aus. Klicken Sie auf „Continue [Weiter]“, um zur Wireless-Konfigurationsseite zurückzukehren. Damit ist Ihr Wireless Client mit dem C300BRS4 verbunden und Ihr Netzwerk ist mit WPA-Verschlüsselung gesichert. Wenn Sie weitere Wireless Clients mit der WPS-Funktion hinzufügen wollen, wiederholen Sie die Schritte E bis G.](https://usermanual.wiki/Alpha-Networks/C300BRS4.Users-Manual/User-Guide-891558-Page-99.png)
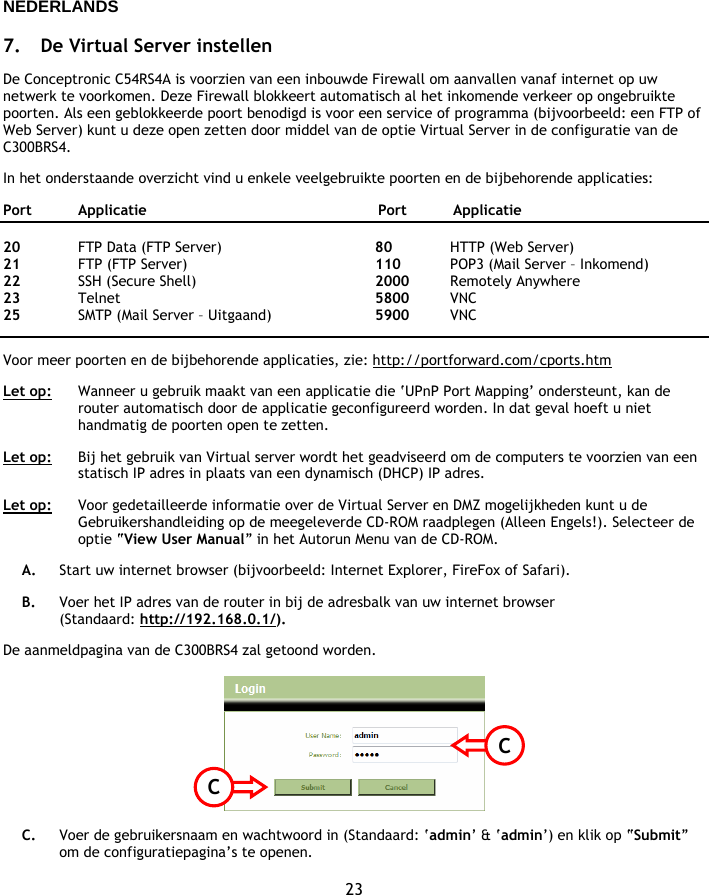
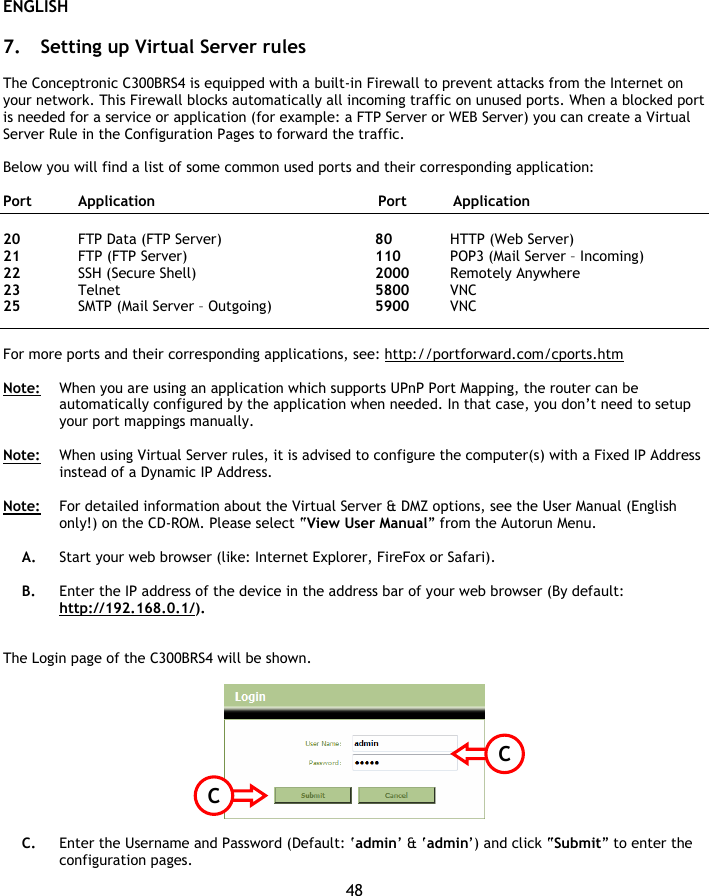
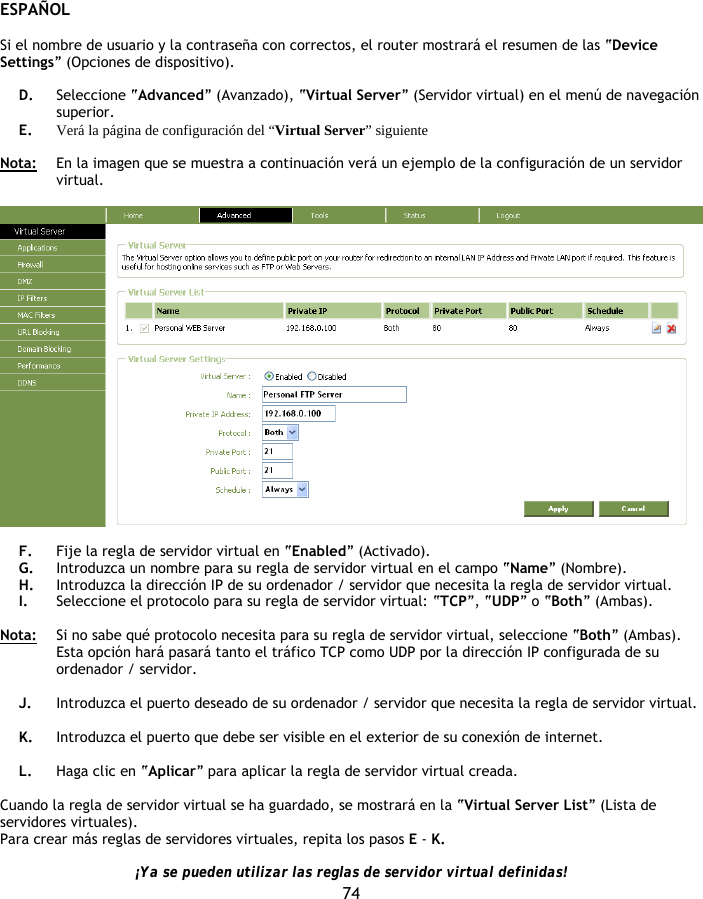
![DEUTSCH 100 7 Konfigurieren von Virtual Server-Regeln Der Conceptronic C300BRS4 ist mit einer eingebauten Firewall ausgerüstet, um Angriffe aus dem Internet auf Ihr Netzwerk zu verhindern. Diese Firewall blockiert automatisch den gesamten eingehenden Verkehr auf nicht benutzten Ports. Wenn ein blockierter Port für einen Dienst oder eine Anwendung benötigt wird (zum Beispiel: für einen FTP-Server oder WEB-Server), können Sie auf den Konfigurationsseiten eine Regel für den Virtual Server erstellen [Virtual Server Rule], um den Verkehr weiterzuleiten. Folgendes ist eine Liste einiger häufig verwendeter Ports und deren entsprechenden Anwendungen: Port Anwendung Port Anwendung 20 FTP Daten (FTP Server) 21 FTP (FTP Server) 22 SSH (Secure Shell) 23 Telnet 25 SMTP (Mail Server – Ausgang) 80 HTTP (Web Server) 110 POP3 (Mail Server – Eingang) 2000 Remotely Anywhere 5800 VNC 5900 VNC Weitere Ports und deren jeweilige Anwendung finden Sie unter: http://portforward.com/cports.htm Hinweis: Wenn Sie eine Anwendung verwenden, die UPnP Port Mapping unterstützt, können Sie den Router ggf. von der Anwendung automatisch konfigurieren lassen. In diesem Fall müssen Sie Ihre Port Mappings nicht von Hand einrichten. Hinweis: Wir empfehlen, bei der Verwendung von Virtual Server Regeln den/die Computer mit einer festen IP-Adresse statt mit einer dynamischen IP-Adresse zu konfigurieren. Hinweis: Detaillierte Erklärungen zu den Virtual Server- und DMZ-Optionen finden Sie im Benutzerhandbuch auf der im Lieferumfang enthaltenen CD-ROM (nur Englisch!). Wählen Sie dazu bitte „View User Manual [Benutzerhandbuch öffnen]” im Autorun-Menü. A. Starten Sie Ihren Webbrowser (z.B. Internet Explorer, FireFox oder Safari). B. Geben Sie die IP-Adresse des Gerätes in das Adressfeld Ihres Webbrowsers ein (standardmäßig: http://192.168.0.1/). Es erscheint die Login-Seite des C300BRS4. C. Geben Sie den Benutzernamen und das Passwort ein (standardmäßig ‚admin“ und ‚admin’) und klicken Sie auf „Submit“, um die Konfigurationsseiten zu öffnen. C C](https://usermanual.wiki/Alpha-Networks/C300BRS4.Users-Manual/User-Guide-891558-Page-100.png)
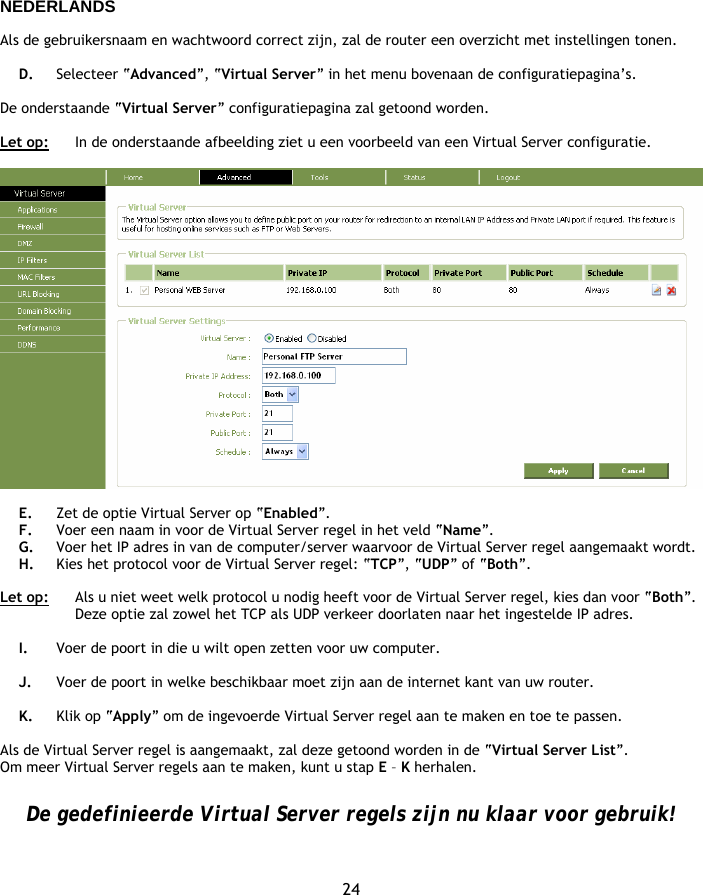
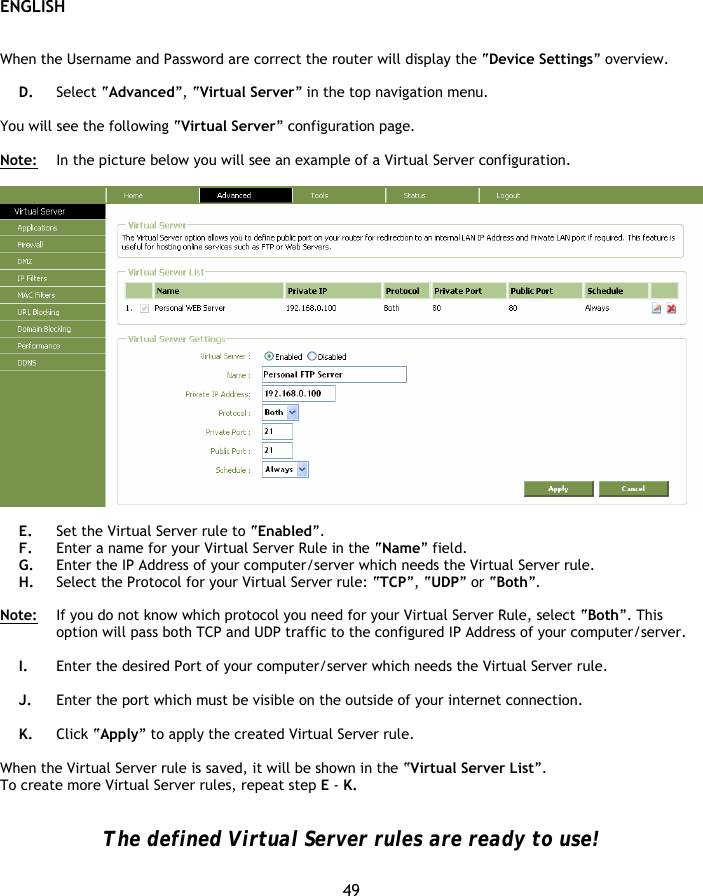
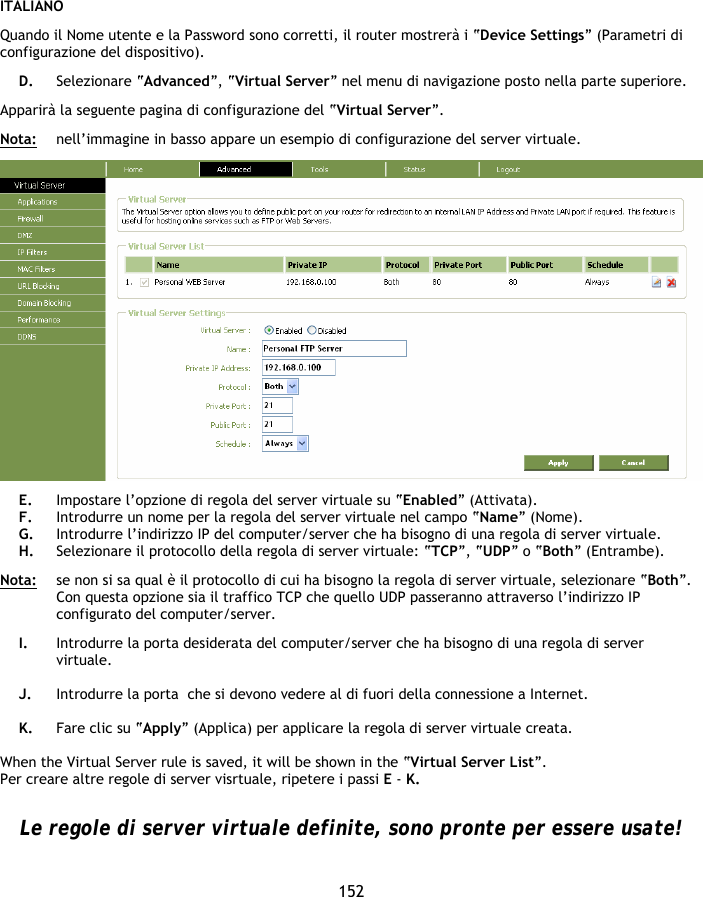
![DEUTSCH 101 Wenn Benutzername und Passwort korrekt sind, zeigt der Router einen Überblick über die „Device Settings [Geräteinstellungen]“ an. D. Wählen Sie im oberen Navigationsmenü „Advanced [Erweitert]“ und „Virtual Server“. Es erscheint die folgende Konfigurationsseite „Virtual Server”. Hinweis: Die folgende Abbildung zeigt ein Beispiel einer Virtual Server-Konfiguration. C. Stellen Sie die Virtual Server-Regel auf „Enabled [Aktiviert]”. D. Geben Sie im Feld „Name“ einen Namen für Ihre Virtual Server-Regel ein. E. Geben Sie die IP-Adresse Ihres Computers/Servers ein, für den die Virtual Server-Regel gelten soll. F. Wählen Sie das „Protocol [Protokoll]“ für Ihre Virtual Server Rule. „TCP”, „UDP” oder „Both [Beide]”. Hinweis: Wenn Sie nicht wissen, welches Protokoll Sie für Ihre Virtual Server-Regel benötigen, wählen Sie „Both [Beide]”. Mit dieser Option wird sowohl der TCP- als auch der UDP-Verkehr auf die konfigurierte IP-Adresse Ihres Computers/Servers geleitet. G. Geben Sie den gewünschten Port Ihres Computers/Servers ein, für den die Virtual Server-Regel gelten soll. H. Geben Sie den Port ein, der außerhalb Ihrer Internet-Verbindung sichtbar sein muss. I. Klicken Sie auf „Apply [Übernehmen]“, um die erstellte Virtual Server-Regel zu übernehmen. Sobald die Virtual Server-Regel gespeichert wurde, wird Sie in der „Virtual Server List” angezeigt. Um weitere Virtual Server-Regeln zu erstellen, wiederholen Sie die Schritte E - K. Die definierten Virtual Server-Regeln können jetzt verwendet werden!](https://usermanual.wiki/Alpha-Networks/C300BRS4.Users-Manual/User-Guide-891558-Page-101.png)
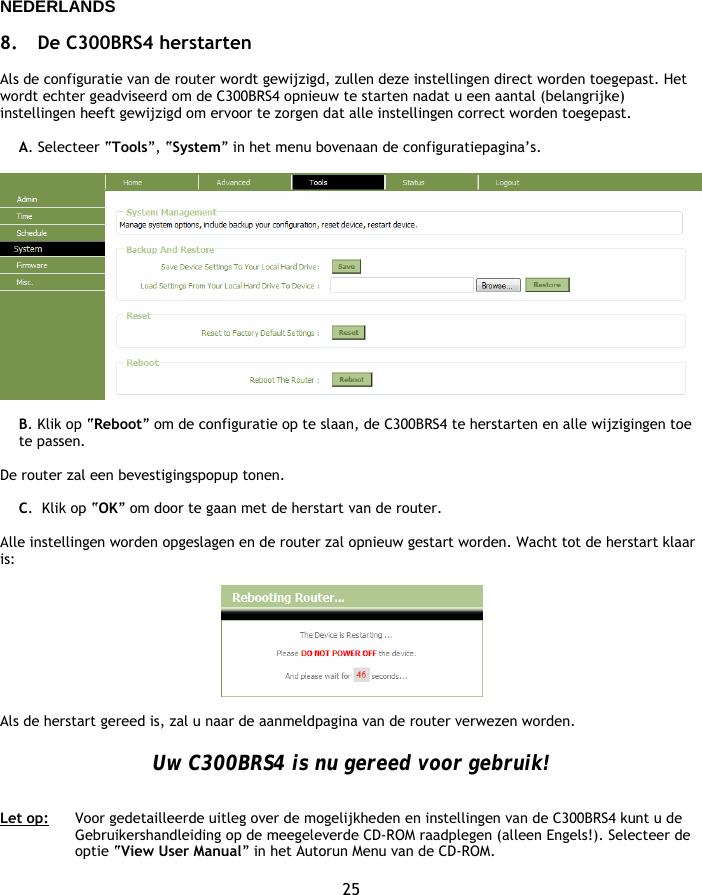
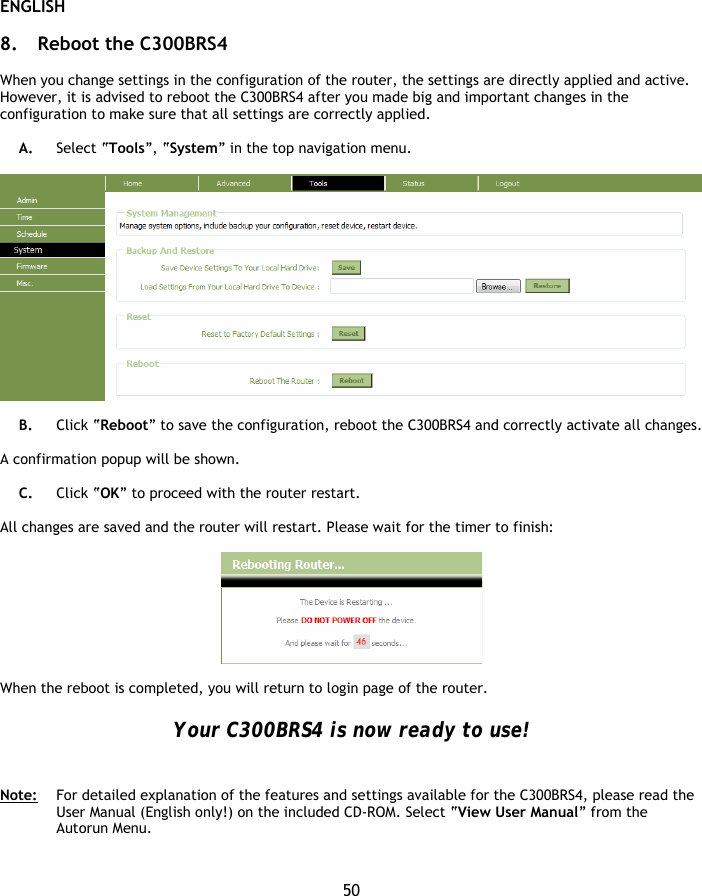
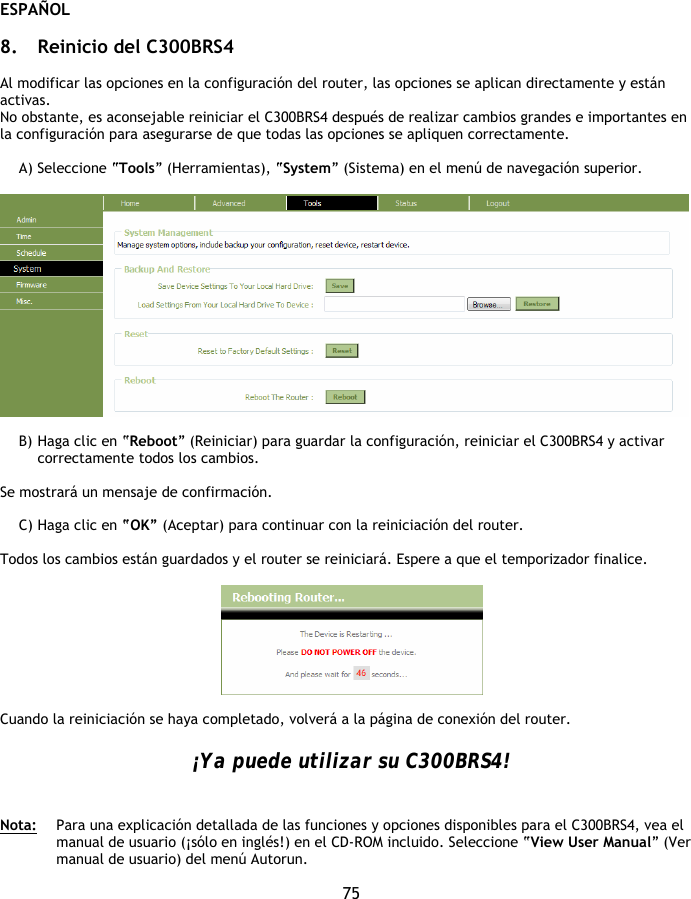
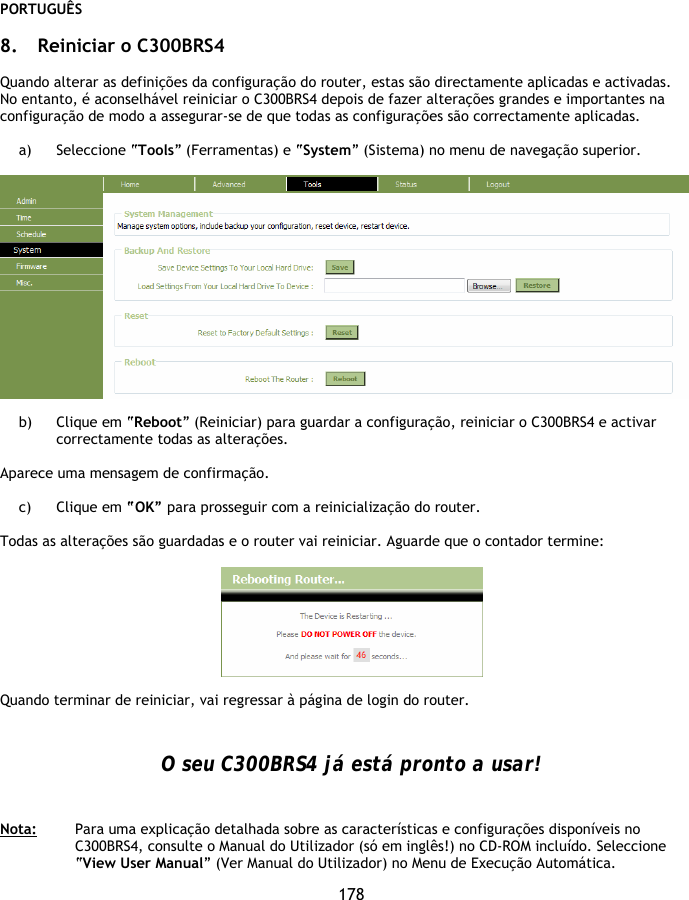
![DEUTSCH 102 8 Neustart des C300BRS4 Wenn Sie Einstellungen in der Konfiguration des Routers ändern, werden diese Einstellungen direkt übernommen und aktiv. Es ist jedoch empfehlenswert, den C300BRS4 neu zu starten, nachdem Sie große und wichtige Änderungen in der Konfiguration vorgenommen haben, um sicherzustellen, dass alle Einstellungen korrekt übernommen werden. a. Wählen Sie im oberen Navigationsmenü „Tools [Extras]“, „System“. b. Klicken Sie auf „Reboot” , um die Konfiguration zu speichern und starten Sie den C300BRS4 neu, damit alle Änderungen korrekt aktiviert werden. Danach wird eine entsprechende Bestätigung angezeigt. c. Klicken Sie auf „OK“, um den Neustart des Routers fortzusetzen. Alle Änderungen werden gespeichert und der Router wird neu gestartet. Warten Sie bitte, bis die dazu erforderliche Zeit abgelaufen ist: Sobald der Neustart abgeschlossen ist, erscheint wieder die Login-Seite des Routers. Damit ist ihr C300BRS4 betriebsbereit! Hinweis: Detaillierte Erklärungen zu den für den C300BRS4 verfügbaren Funktionen und Einstellungen finden Sie im Benutzerhandbuch auf der im Lieferumfang enthaltenen CD-ROM (nur Englisch!). Wählen Sie dazu „View User Manual [Benutzerhandbuch öffnen]” im Autorun-Menü.](https://usermanual.wiki/Alpha-Networks/C300BRS4.Users-Manual/User-Guide-891558-Page-102.png)


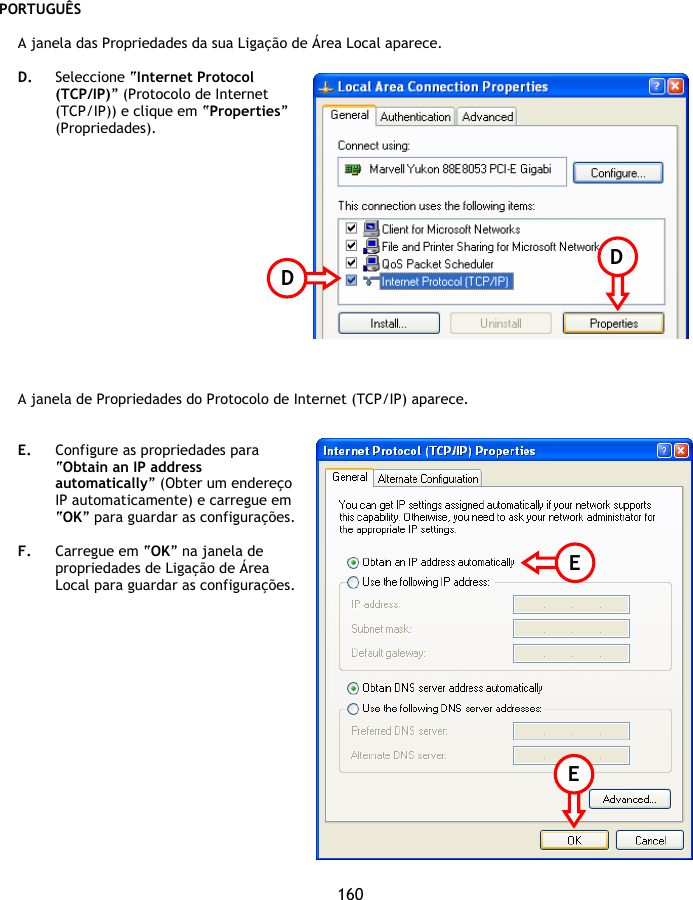
![FRANÇAIS 109 La Fenêtre Propriétés de votre Connexion de Réseau Local s’affiche. D. Sélectionnez « Internet Protocol (TCP/IP) » et cliquez sur « Properties ». La fenêtre Properties du Protocol Internet (TCP/IP) apparaît. E. Réglez les propriétés sur « Obtain an IP address automatically » [Obtenir automatiquement une adresse IP] et appuyez sur «OK » pour enregistrer les paramètres. F. Appuyez sur « OK » dans la fenêtre de propriétés de la Connexion de Réseau Local pour enregistrer les paramètres. D D E E](https://usermanual.wiki/Alpha-Networks/C300BRS4.Users-Manual/User-Guide-891558-Page-109.png)
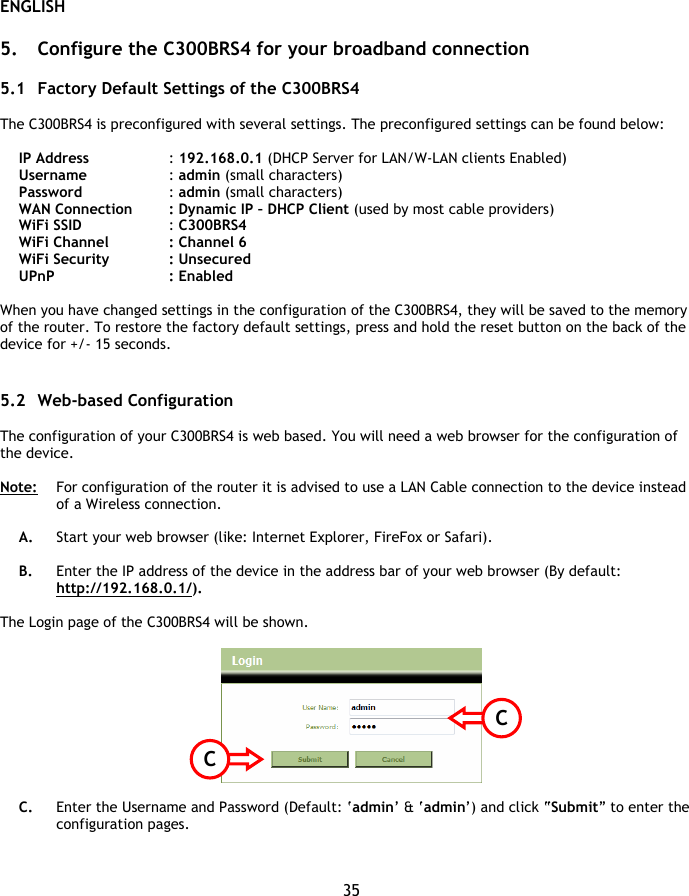
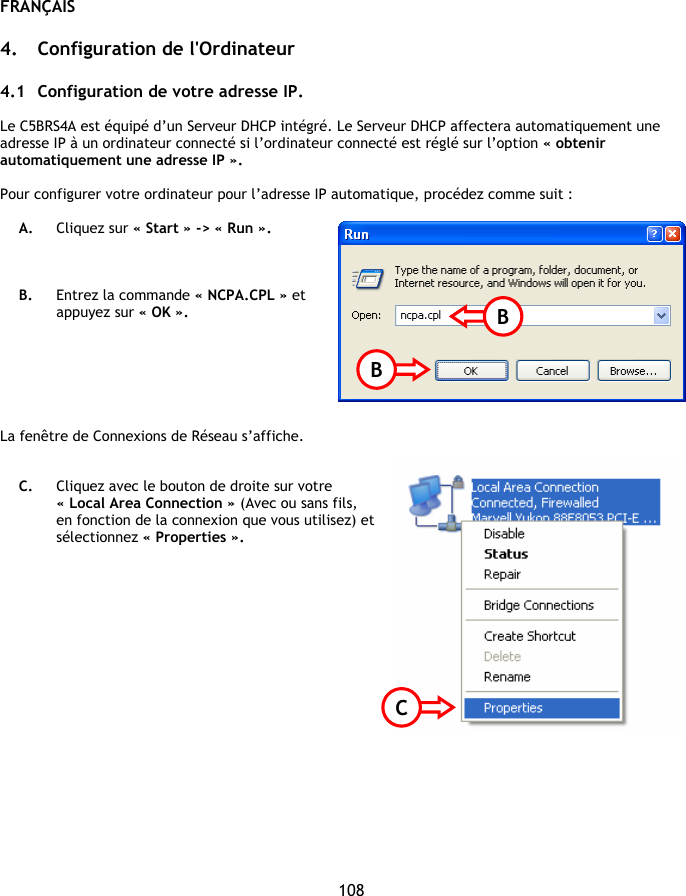
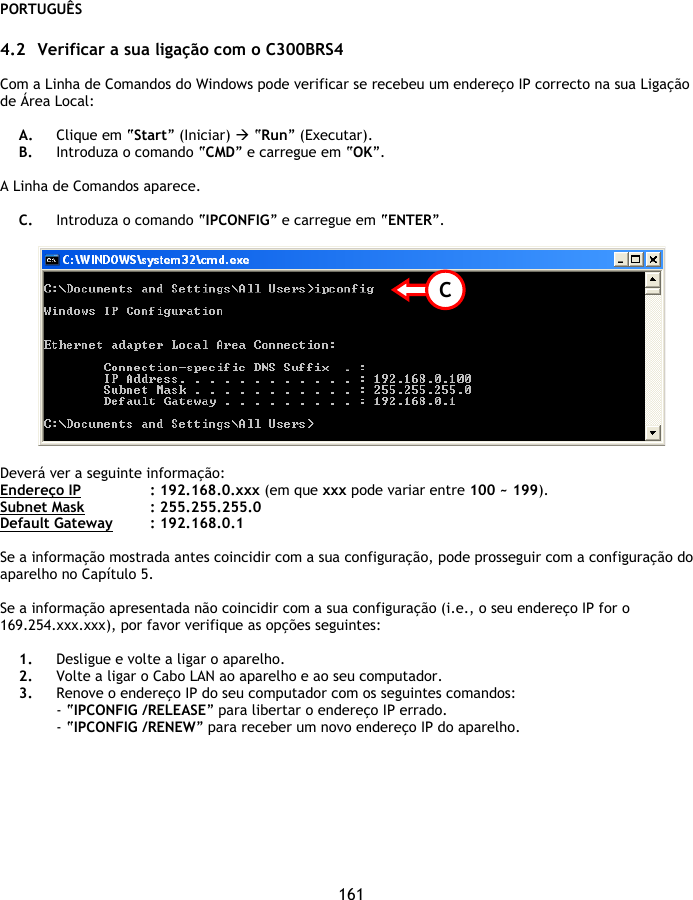
![FRANÇAIS 112 5. Comment configurer le C300BRS4 sur votre connexion bande large 5.1 Paramètres par Défaut du C300BRS4 Le C300BRS4 est préconfiguré en usine avec plusieurs paramètres. Les paramètres préconfigurés sont indiqués ci-après : Adresse IP :192.168.0.1 (serveur DHCP pour clients LAN/W-LAN activé) Nom d'utilisateur : admin (minuscules) Mot de Passe : admin (minuscules) Connexion WAN : Dynamic IP – DHCP Client (utilisé par la plupart des fournisseurs de . . connexion par câble) WiFi SSID : C300BRS4 WiFi Channel [Canal WiFi] : Channel 6 WiFi Security [Sécurité WiFi] : Non sécurisé UPnP : Activé Si vous avez modifié des paramètres dans la configuration du C300BRS4, ils seront enregistrés dans la mémoire du routeur. Pour réinitialiser l’appareil aux paramètres par défaut, appuyez sur le bouton reset à l'arrière de l’appareil pendant +/- 15 secondes. 5.2 Configuration basée sur Internet La configuration de votre C300BRS4 est basée sur Internet. Vous aurez donc besoin d’un navigateur Internet pour configurer le dispositif. Remarque: Pour configurer le routeur, nous vous conseillons d’utiliser une connexion par Câble LAN pour ce dispositif au lieu d’une Connexion Sans Fils. A. Lancez votre navigateur Internet (par ex. : Internet Explorer, FireFox ou Safari). B. Entrez l’adresse IP du dispositif dans la barre d’adresse de votre navigateur Internet (Par défaut : http://192.168.0.1/). La page de connexion du C300BRS4 s'affiche. C. Entrez le Nom d’utilisateur et le Mot de passe (par défaut : ‘admin’ & ‘admin’) et cliquez sur “Submit” [soumettre] pour entrer dans les pages de configuration. C C](https://usermanual.wiki/Alpha-Networks/C300BRS4.Users-Manual/User-Guide-891558-Page-112.png)
![FRANÇAIS 113 Lorsque le Nom d’utilisateur et le Mot de passe sont corrects, le dispositif affiche un aperçu "Device Settings" [Paramètres du Dispositif]: L'aperçu "Device Settings" vous présente tous les paramètres configurés pour la partie LAN, WAN et Sans Fils du routeur.](https://usermanual.wiki/Alpha-Networks/C300BRS4.Users-Manual/User-Guide-891558-Page-113.png)
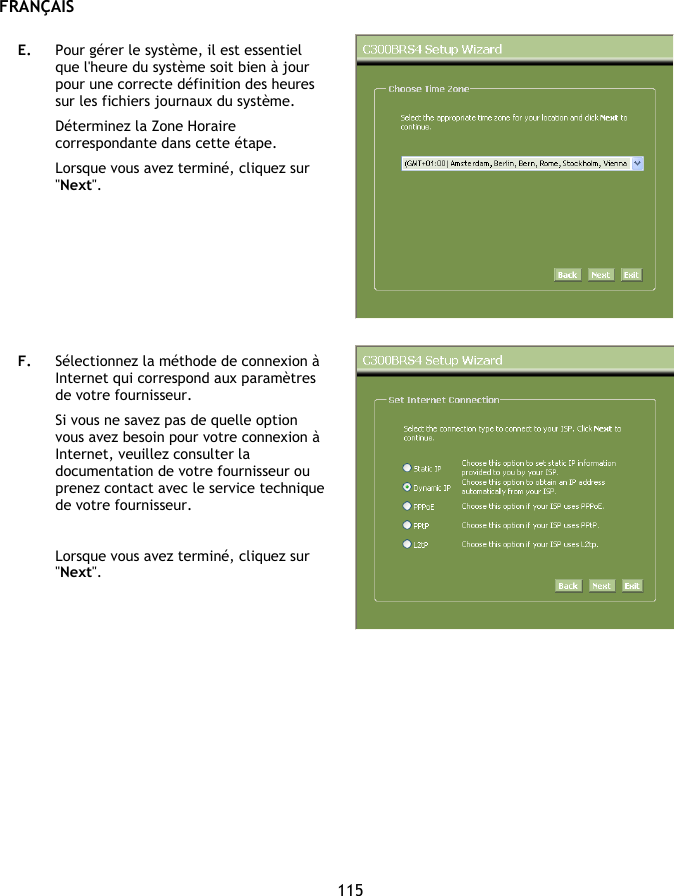
![FRANÇAIS 114 5.3 Assistant de Configuration Vous pouvez configurer le C300BRS4 grâce à l'Assistant intégré. Cet Assistant vous aidera à configurer les paramètres de base du C300BRS4 pas à pas. Remarque: Avant de commencer avec l'Assistant de Configuration, vérifiez que vous disposez bien de toutes les informations disponibles sur les paramètres Internet. (Par Exemple : Information sur le Compte, type de connexion, etc.) A. Cliquez sur la touche "Wizard" [Assistant] dans le menu de gauche de la page de Configuration. B. Cliquez sur la touche "Run Wizard". C. L'écran d'accueil indique les cinq premières étapes de l'assistant. Cliquez sur « Next » pour continuer. D. Le système vous recommande de définir ici un mot de passe d'administrateur. Entrez le nouveau mot de passe et entrez-le de nouveau pour confirmer. Lorsque vous avez terminé, cliquez sur "Next".](https://usermanual.wiki/Alpha-Networks/C300BRS4.Users-Manual/User-Guide-891558-Page-114.png)

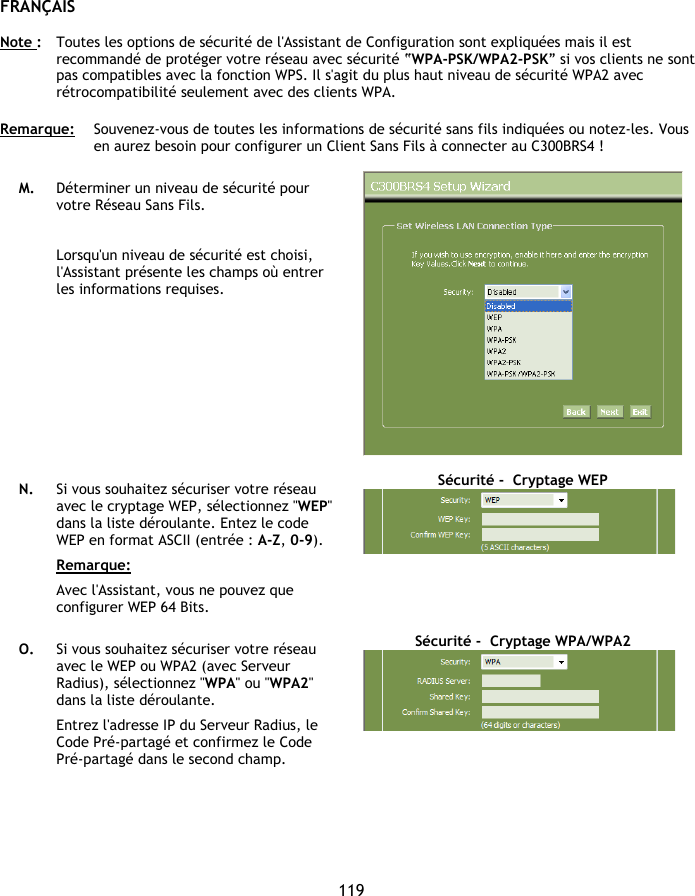
![FRANÇAIS 120 P. Si vous souhaitez sécuriser votre réseau avec le WPA-PSK ou WPA2-PSK sélectionnez "WPA-PSK", "WPA2-PSK" ou "WPA-PSK/WPA2-PSK" dans la liste déroulante. Entrez la phrase de mot de passe pour votre cryptage et confirmez la phrase de mot de passe dans le second champ. Sécurité - Cryptage WPA-PSK/WPA2-PSK Q. Lorsque tous les paramétrages sans fils sont faits, cliquez sur "Next" pour continuer. R. La configuration est à présent terminée. Si vous voulez que vos réglages s'appliquez, cliquez sur "Save & Take Effect"[Enregistrer et appliquer]. Si vous souhaitez modifier un paramètre, cliquez sur "Back" [Retour] pour revenir à l'écran précédent. Si vous voulez fermer l'Assistant de Configuration sans modification, cliquez sur "Exit". Lorsque vous sélectionnez "Save & Take Effect", le routeur applique les paramètres configurés. Attendez le message "Save Complete" [Enregistrement terminé]. S. La configuration est à présent terminée. Cliquez sur "Close" pour sortir de l'Assistant de Configuration. Vous revenez à "Device Settings" [Paramètres du dispositif] qui vous présente tous les paramètres configurés pour votre connexion WAN et Sans Fils. Vous pouvez dès à présent utiliser votre C300BRS4 ! Remarque: Pour plus d’explications concernant les fonctions et les paramètres du C300BRS4, veuillez consulter le Manuel d’Utilisateur (en anglais uniquement) présent sur le Cd-Rom. Sélectionnez « View User Manual » dans le Menu à Lancement Automatique.](https://usermanual.wiki/Alpha-Networks/C300BRS4.Users-Manual/User-Guide-891558-Page-120.png)
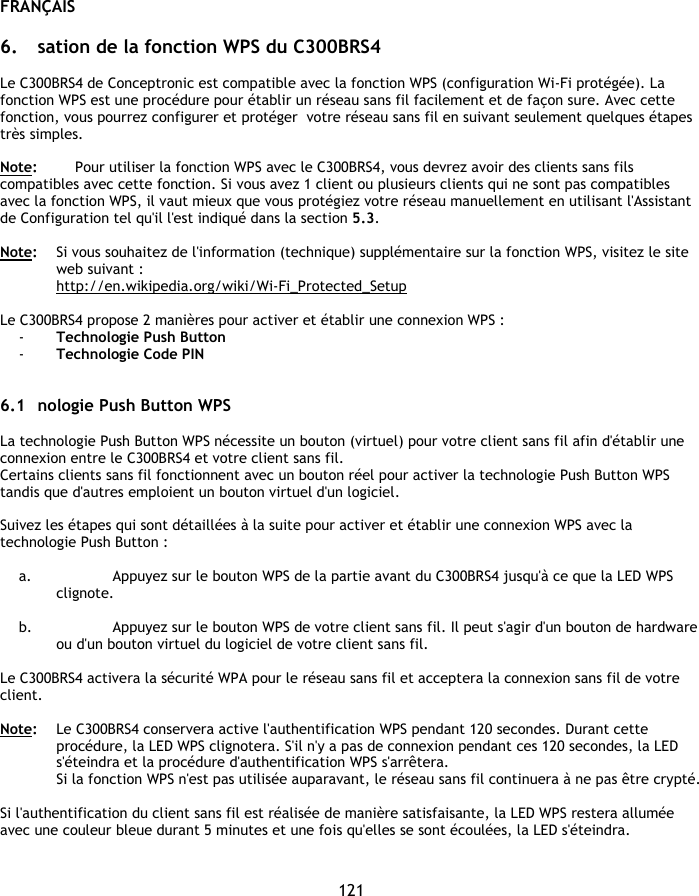

![FRANÇAIS 123 E. Cliquez sur le bouton “Ajouter assistant de dispositifs sans fil” qui apparaît sur l'écran Ensuite, l'assistant WPS apparaîtra sur l'écran : Dans cet assistant, vous pourrez activer la fonction de Code PIN. Pour débuter votre authentification, vous aurez besoin du code PIN qu'a généré votre client sans fil. F. Sélectionnez la fonction Code PIN WPS sur le logiciel de votre client sans fil, lequel génèrera un code PIN qui apparaîtra sur l'écran. Æ [Logiciel du client sans fil] [Assistant WPS du C300BRS4] G. Introduisez le code PIN que vous a fourni votre client sans fil dans l'assistant WPS du C300BRS4 et appuyez sur “Connecter”. Le C300BRS4 activera la sécurité WPA pour le réseau sans fil et acceptera la connexion sans fil de votre client sans fil avec le code PIN introduit. E G](https://usermanual.wiki/Alpha-Networks/C300BRS4.Users-Manual/User-Guide-891558-Page-123.png)
![FRANÇAIS 126 A. Lancez votre navigateur Internet (par ex. : Internet Explorer, FireFox ou Safari). B. Entrez l’adresse IP du dispositif dans la barre d’adresse de votre navigateur Internet (Par défaut : http://192.168.0.1/). La page de connexion du C300BRS4 s'affiche. C. Entrez le Nom d’utilisateur et le Mot de passe (par défaut : ‘admin’ & ‘admin’) et cliquez sur “Submit” [soumettre] pour entrer dans les pages de configuration. Lorsque le Nom d’utilisateur et le Mot de passe sont corrects, le dispositif affiche un aperçu "Device Settings" [Paramètres du Dispositif] : D. Sélectionnez « Advanced » “Virtual Server” dans le menu de navigation de la partie supérieure. Vous voyez s’afficher la page de configuration « Virtual Server ». Remarque: L'image ci-après vous présente un exemple de la configuration d'un Serveur Virtuel. C C](https://usermanual.wiki/Alpha-Networks/C300BRS4.Users-Manual/User-Guide-891558-Page-126.png)
![FRANÇAIS 127 E. Réglez le Serveur Virtuel sur « Enabled» [Activé]. F. Indiquez un nom pour votre règle de Serveur Virtuel dans le champ "Name" [Nom]. G. Entrez l'adresse IP de votre ordinateur/serveur qui a besoin de la règle de Serveur Virtuel. H. Sélectionnez le Protocole de votre Règle de Serveur Virtuel : TCP”, “UDP” ou “Both”. Remarque: Si vous ne savez pas de quel protocole vous avez besoin pour votre Règle de Serveur Virtuel, sélectionnez "Both". Cette option passera les deux trafics, TCP et UDP à l'adresse IP configurée sur votre ordinateur / serveur. I. Entrez le port de votre ordinateur/serveur qui a besoin de la règle de Serveur Virtuel. J. Entrez le port qui doit être visible à l'extérieur de votre connexion internet. K. Cliquez sur « Apply» pour appliquer la Règle de Serveur Virtuel créée. Lorsque la règle de Serveur Virtuel est enregistrée, elle s'affiche dans la "Virtual Server List" [Liste de Serveurs Virtuels]. Pour créer d'autres règles de Serveur Virtuels, répétez les étapes E - K. Les règles de Serveur Virtuel définies sont prêtes à fonctionner !](https://usermanual.wiki/Alpha-Networks/C300BRS4.Users-Manual/User-Guide-891558-Page-127.png)
![FRANÇAIS 128 8 Redémarrez le C300BRS4 Si vous modifiez les paramètres de la configuration du routeur, les paramètres sont directement appliqués et actifs. Néanmoins nous vous conseillons de redémarrer le C300BRS4 après avoir fait d'importantes modifications dans la configuration pour vous assurer que tous les paramètres sont bien appliqués. a. Sélectionnez « Tools », "System" dans le menu de navigation de la partie supérieure. b. Cliquez sur "Reboot" [Redémarrer] pour enregistrer la configuration, redémarrez le C300BRS4 et activez correctement toutes les modifications. Un écran de confirmation s'affiche. c. Appuyez sur "OK" pour poursuivre le redémarrage du routeur. Toutes les modifications sont enregistrées et le routeur redémarre. Attendez que l’opération soit terminée pour finir: Lorsque le redémarrage est terminé, vous revenez à la page de connexion du routeur. Vous pouvez dès à présent utiliser votre C300BRS4 ! Remarque: Pour plus d’explications concernant les fonctions et les paramètres du C300BRS4, veuillez consulter le Manuel d’Utilisateur (en anglais uniquement) présent sur le Cd-Rom. Sélectionnez « View User Manual » dans le Menu à Lancement Automatique.](https://usermanual.wiki/Alpha-Networks/C300BRS4.Users-Manual/User-Guide-891558-Page-128.png)

![ITALIANO 149 Nell’Assistente, è possibile attivare l’opzione di codice PIN. Per realizzare l’autenticazione mediante codice PIN, è necessario un codice PIN generato dal client wireless. F. Selezionare l’opzuione di codice PIN WPS nel software del client wireless. Il client wireless genererà un codice PIN e lo mostrerà sullo schermo. Æ [Software client wireless] [Assistente WPS C300BRS4] G. Introdurre il codice PIN fornito dal client wireless nell’Assistente WPS del C300BRS4 e premere “Connect”. Il C300BRS4 attiverà la codifica WPA per kla rete senza fili e accetterà la connessione wireless del client wireless con il codice PIN introdotto. G](https://usermanual.wiki/Alpha-Networks/C300BRS4.Users-Manual/User-Guide-891558-Page-149.png)
![ITALIANO 153 8 Riavvio del C300BRS4 Quando vengono modificati i parametri di configurazione del router, questi vengono applicati direttamente e sono funzionanti già dall’inizio. Ad ogni modo si consiglia di riavviare il C300BRS4 dopo aver realizzato un gran numero di modifiche alla configurazione, per accertarsi che tutti i parametri vengano applicati correttamente. a) Selezionare “Tools” [Strumenti], “System” [Sistema] nel menu di navigazione posto in alto. b) Fare clic su “Riavvia” per salvare la configurazione, riavviare il C300BRS4 ae attivare correttamente tutte le modifiche. Apparirà una finestra a comparsa per confermare la procedura. c) Fare clic su “OK” per procedere al riavvio del router. Verranno salvati tutti i cambiamenti e il router verrà riavviato. Aspettare fino a quando arriverà a zero il contatore. Una volta riavviato il dispositivo, apparirà di nuovo la pagina di login del router. Il C300BRS4 è pronto per essere usato! Nota: per spiegazioni maggiormente dettagliate sulle caratteristiche e sui parametri di configurazione del C300BRS4 è possibile consultare il Manuale d’uso (disponibile solo in inglese!) incluso nel CD-ROM. Selezionare “View User Manual” (Visualizza Manuale d’uso) nel menu di avvio automatico.](https://usermanual.wiki/Alpha-Networks/C300BRS4.Users-Manual/User-Guide-891558-Page-153.png)
![PORTUGUÊS 174 O Assistente WPS aparecerá no ecrã: Mediante o Assistente, poderá activar a função Código PIN. Para dar início à autenticação do Código PIN é preciso o Código PIN gerado pelo Cliente sem Fios. F. Seleccione a função WPS de Código PIN no software do Cliente sem Fios. O Cliente sem Fios irá gerar um Código PIN que aparecerá no ecrã. Æ [Software do Cliente sem Fios] [Assistente WPS do C300BRS4] G. Introduza o Código PIN fornecido pelo Cliente sem Fios no Assistente WPS do C300BRS4 e prima “Ligar”. O C300BRS4 activará a segurança WPA na sua rede sem fios e aceitará a ligação sem fios do Cliente sem Fios com o Código PIN introduzido. O C300BRS4 manterá a autenticação WPS activa durante 120 segundos. Durante este processo, o LED WPS piscará. Se não houver uma ligação durante esses 120 segundos, o LED apagar-se-á e o processo de autenticação WPS será interrompido. G](https://usermanual.wiki/Alpha-Networks/C300BRS4.Users-Manual/User-Guide-891558-Page-174.png)


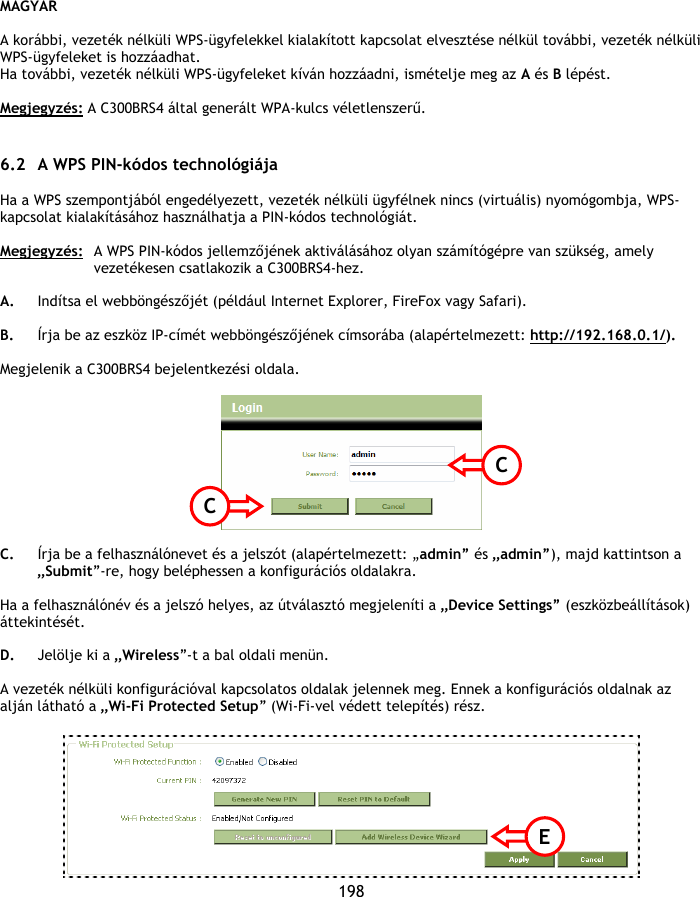
![MAGYAR 199 E. Kattintson a képernyőn a „Add Wireless Device Wizard” gombra. A WPS-varázsló jelenik meg a képernyőn: Ennél a varázslónál lehet a PIN-kódot, mint jellemzőt, aktiválnia. Ahhoz, hogy a PIN-kódos hitelesítést megkezdhesse, szüksége lesz a vezeték nélküli ügyfél által generált PIN-kódra. F. Jelölje ki a WPS PIN-kódos jellemzőjét a vezeték nélküli ügyfél szoftverje segítségével. A vezeték nélküli ügyfél PIN-kódot generál, amely megjelenik a képernyőn. Æ [Vezeték nélküli ügyfél szoftverje] [A C300BRS4 WPS-varázslója] G. Írja be a vezeték nélküli ügyfél által megadott PIN-kódot a C300BRS4 WPS-varázslójánál, majd nyomja le a „Connect”-et. A C300BRS4 a vezeték nélküli hálózaton keresztül aktiválja a WPA-biztonságot, egyszersmind a beírt PIN-kóddal elfogadja a vezeték nélküli ügyfél vezeték nélküli kapcsolatát. A C300BRS4 120 mp-ig aktívan tartja a WPS-hitelesítést. Ezalatt a WPS LED villog. Ha ez alatt a 120 mp alatt nem jött létre kapcsolat, a LED kialszik és a WPS-hitelesítési folyamat leáll. G](https://usermanual.wiki/Alpha-Networks/C300BRS4.Users-Manual/User-Guide-891558-Page-199.png)


![TÜRKÇE 224 Ekranınızda WPS Sihirbazı görüntülenecektir: Bu Sihirbazda Pin Kodu özelliğini etkinleştirebilirsiniz. Pin Kodu kimlik doğrulamasına başlamak için Kablosuz İstemciniz tarafından üretilen Pin Koduna ihtiyacınız olacaktır. F. Kablosuz İstemcinizin yazılımında bulunan WPS Pin Kodu özelliğini seçin. Kablosuz İstemci bir Pin Kodu üretecek ve bu kod ekranınızda gösterilecektir. Æ [Kablosuz İstemci Yazılımı] [C300BRS4 WPS Sihirbazı] G. C300BRS4’ün WPS Sihirbazında Kablosuz İstemciniz tarafından verilen Pin Kodunu girin ve “Connect (Bağlan)”a basın. C300BRS4, kablosuz ağınızda WPA güvenliğini etkinleştirir ve girilen Pin Kodu ile Kablosuz İstemcinizin kablosuz bağlantısını kabul eder. C300BRS4 tarafından WPS kimlik doğrulama işlemi 120 saniye boyunca aktif tutulacaktır. Bu işlem sırasında WPS LED’i yanıp sönecektir. 120 saniye içinde bağlantı olmazsa LED sönecek ve WPS kimlik doğrulama işlemi durdurulacaktır. G](https://usermanual.wiki/Alpha-Networks/C300BRS4.Users-Manual/User-Guide-891558-Page-224.png)