AlphaTheta DM40BT Active Monitor Speaker User Manual part 1
Pioneer DJ Corporation Active Monitor Speaker part 1
UserManual.wiki
>
AlphaTheta
>
DM40BT User Manual
>
User manual part 1
Contents
1.
User manual part 1
2.
User manual part 2
User manual part 1
Navigation menu
Upload a User Manual
Namespaces
Wiki Guide
HTML
PDF
Info
Views
User Manual
Discussion / Help
Navigation
![En2Thank you for buying this Pioneer DJ product.Please read through these operating instructions so you will know how to operate your model properly.After you have finished reading the instructions, put them away in a safe place for future reference.[For American Users and Canadian Users]The exclamation point within an equilateral triangle is intended to alert the user to the presence of important operating and maintenance (servicing) instructions in the literature accompanying the appliance.The lightning flash with arrowhead symbol, within an equilateral triangle, is intended to alert the user to the presence of uninsulated “dangerous voltage” within the product’s enclosure that may be of sufficient magnitude to constitute a risk of electric shock to persons.CAUTION:TO PREVENT THE RISK OF ELECTRIC SHOCK, DO NOT REMOVE COVER (OR BACK). NO USER-SERVICEABLE PARTS INSIDE. REFER SERVICING TO QUALIFIED SERVICE PERSONNEL.CAUTIONRISK OF ELECTRIC SHOCKDO NOT OPENIMPORTANTD3-4-2-1-1b_A1_EnThe Safety of Your Ears is in Your HandsGet the most out of your equipment by playing it at a safe level – a level that lets the sound come through clearly without annoying blaring or distortion and, most importantly, without affecting your sensitive hearing. Sound can be deceiving. Over time, your hearing “comfort level” adapts to higher volumes of sound, so what sounds “normal” can actually be loud and harmful to your hearing. Guard against this by setting your equipment at a safe level BEFORE your hearing adapts.ESTABLISH A SAFE LEVEL:• Set your volume control at a low setting. • Slowly increase the sound until you can hear it comfortably and clearly, without distortion. • Once you have established a comfortable sound level, set the dial and leave it there.BE SURE TO OBSERVE THE FOLLOWING GUIDELINES:• Do not turn up the volume so high that you can’t hear what’s around you.• Use caution or temporarily discontinue use in potentially hazardous situations.• Do not use headphones while operating a motorized vehicle; the use of headphones may create a traffic hazard and is illegal in many areas. S001a_A1_En[For American Users]Read these instructions.Keep these instructions.Heed all warnings.Follow all instructions.Do not use this apparatus near water.Clean only with dry cloth.Do not block any ventilation openings. Install in accordance with the manufacturer’s instructions.Do not install near any heat sources such as radiators, heat registers, stoves, or other apparatus (including amplifiers) that produce heat.Do not defeat the safety purpose of the polarized or grounding-type plug. A polarized plug has two blades with one wider than the other. A grounding type plug has two blades and a third grounding prong. The wide blade or the third prong are provided for your safety. If the provided plug does not fit into your outlet, consult an electrician for replacement of the obsolete outlet.Protect the power cord from being walked on or pinched particularly at plugs, convenience receptacles, and the point where they exit from the apparatus.1) 2) 3) 4) 5) 6) 7) 8) 9) 10)Only use attachments/accessories specified by the manufacturer.Use only with the cart, stand, tripod, bracket, or table specified by the manufacturer, or sold with the apparatus. When a cart is used, use caution when moving the cart/apparatus combination to avoid injury from tip-over.Unplug this apparatus during lightning storms or when unused for long periods of time.Refer all servicing to qualified service personnel. Servicing is required when the apparatus has been damaged in any way, such as power-supply cord or plug is damaged, liquid has been spilled or objects have fallen into the apparatus, the apparatus has been exposed to rain or moisture, does not operate normally, or has been dropped. D3-7-13-69_En11)12)13)14)](https://usermanual.wiki/AlphaTheta/DM40BT.User-manual-part-1/User-Guide-3518939-Page-2.png)
![En 3[For European Users]If you want to dispose this product, do not mix it with general household waste. There is a separate collection system for used electronic products in accordance with legislation that requires proper treatment, recovery and recycling.Private households in the member states of the EU, in Switzerland and Norway may return their used electronic products free of charge to designated collection facilities or to a retailer (if you purchase a similar new one).For countries not mentioned above, please contact your local authorities for the correct method of disposal.By doing so you will ensure that your disposed product undergoes the necessary treatment, recovery and recycling and thus prevent potential negative effects on the environment and human health.K058b_A1_EnCAUTIONTO PREVENT THE RISK OF ELECTRIC SHOCK, DO NOT REMOVE COVER (OR BACK). NO USER-SERVICEABLE PARTS INSIDE. REFER SERVICING TO QUALIFIED SERVICE PERSONNEL. D3-4-2-1-1_B1_EnIMPORTANT NOTICETHE MODEL NUMBER AND SERIAL NUMBER OF THIS EQUIPMENT ARE ON THE REAR OR BOTTOM.RECORD THESE NUMBERS ON PAGE 11 FOR FUTURE REFERENCE.D36-AP9-3*_A1_EnCautionTo prevent fire hazard, the Class 2 Wiring Cable should be used for connection with speaker, and should be routed away from hazards to avoid damage to the insulation of the cable.D3-7-13-67*_A1_EnNOTE:This equipment has been tested and found to comply with the limits for a Class B digital device, pursuant to Part 15 of the FCC Rules. These limits are designed to provide reasonable protection against harmful interference in a residential installation. This equipment generates, uses, and can radiate radio frequency energy and, if not installed and used in accordance with the instructions, may cause harmful interference to radio communications. However, there is no guarantee that interference will not occur in a particular installation. If this equipment does cause harmful interference to radio or television reception, which can be determined by turning the equipment off and on, the user is encouraged to try to correct the interference by one or more of the following measures:— Reorient or relocate the receiving antenna.— Increase the separation between the equipment and receiver.— Connect the equipment into an outlet on a circuit different from that to which the receiver is connected.— Consult the dealer or an experienced radio/TV technician for help.D8-10-1-2_A1_EnInformation to UserAlterations or modifications carried out without appropriate authorization may invalidate the user’s right to operate the equipment.D8-10-2_A1_En[For American Users and Others]The graphical symbol placed on the product means alternating current.The graphical symbol placed on the product means direct current.The graphical symbol placed on the product means Class II equipment.D3-8-2-4_A1_EnCAUTIONThis product is evaluated in moderate climate condition.D3-8-2-1-7b_A1_EnEnglish](https://usermanual.wiki/AlphaTheta/DM40BT.User-manual-part-1/User-Guide-3518939-Page-3.png)
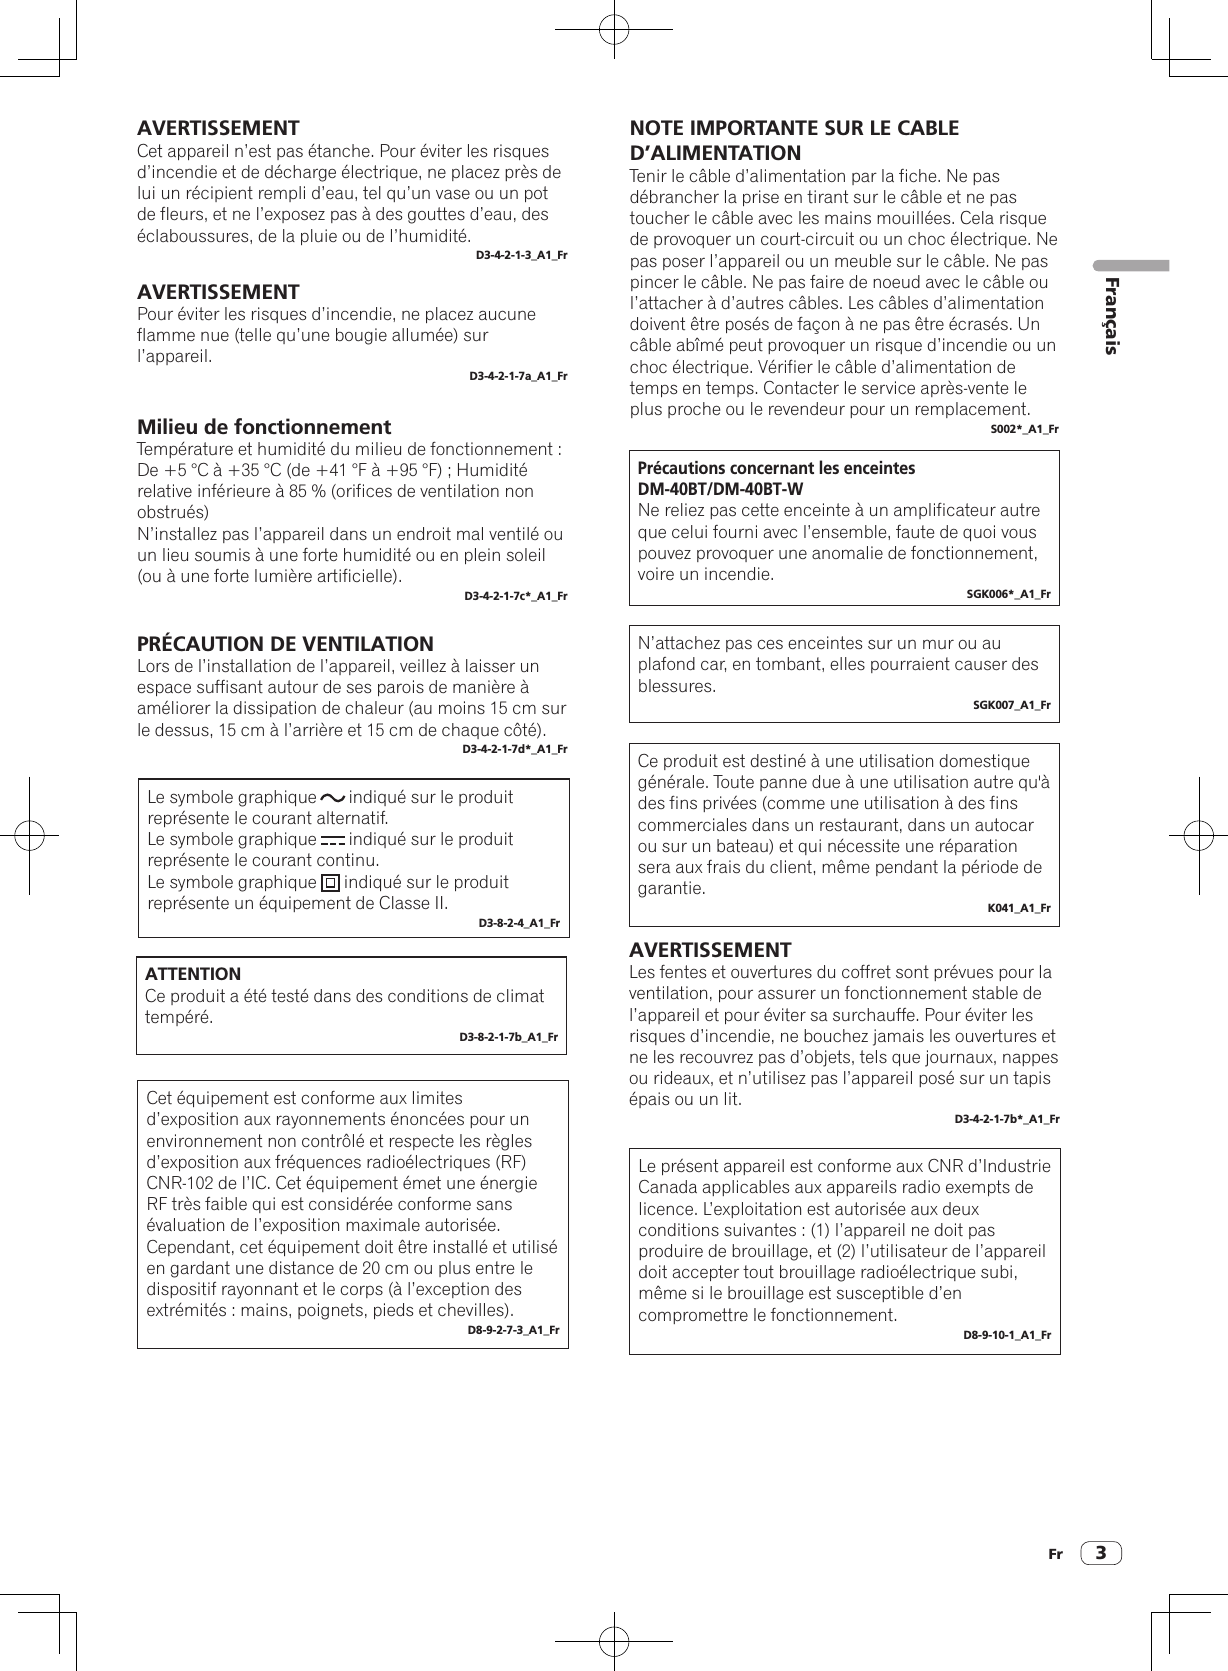
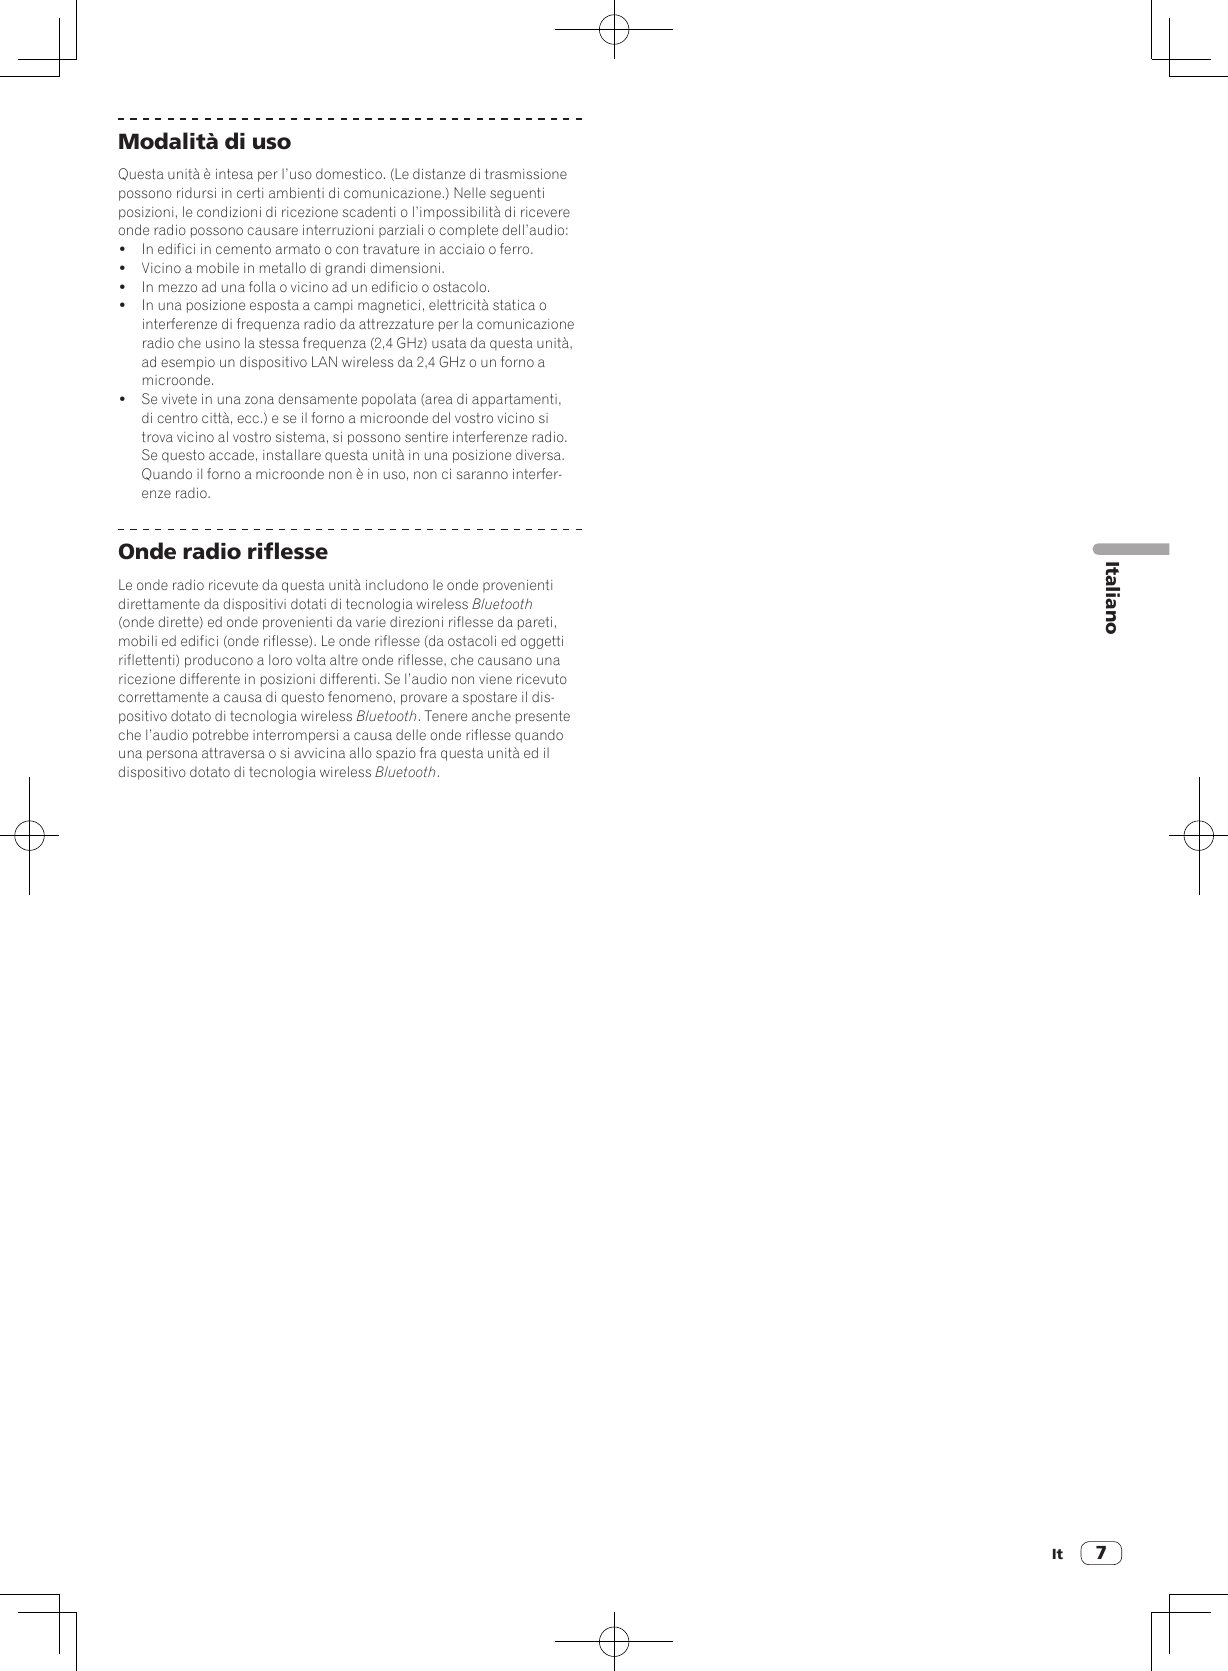
![En 7Installation and ConnectionsInstallation ProcedureA speaker’s playback sound is delicately influenced by conditions in the listening room. To produce optimum listening conditions, take due consideration of the conditions of your installation location before begin-ning actual installation.! Place the speakers at ear level.! For a natural stereo effect, the right and left speakers should be installed in symmetrical and equidistant positions from the listening position.! Affix the supplied cushions to the bottom of the unit to prevent slipping.WARNINGStore small parts out of the reach of children and infants. If accidentally swallowed, contact a doctor immediately.D41-6-4_A1_En! Install the speakers facing inward with a total angle of 60 degrees from the listening position, 30 degrees for each of the left and right speakers.50 ° to 60 ° CAUTIONTo promote proper cooling, please assure that sufficient spaceis pre-served between the speakers and nearby walls or othercomponents (minimum 15 cm or more above, behind, and toright and left sides of each speaker). Leaving insufficient spacebetween the speaker and walls or other components may lead torising interior temperatures, leading to malfunction or damage.Connections! Be sure to turn off the power and unplug the power cord from the power outlet whenever making or changing connections.! Refer to the operating instructions for the component to be connected.! Connect the power cord after all the connections between devices have been completed.! Be sure to use the included power cord.! Be careful with regard to the volume because the signals input from the [INPUT 1] terminal, [INPUT 2] terminal, and Bluetooth are mixed.Connecting cordsConnect the included speaker cord to the speakers.1 Strip about 1 cm of the head of the included speaker cord and twist and remove the exposed insulator.After removing the insulator, thoroughly twist the core wires.2 Connect the included speaker cord to the speaker terminals on the LEFT and RIGHT sides.3 Insert the core wires into the terminals while pressing the claw on the speaker terminal.Connect the speaker cord with the red line into the + terminal side (red) and the speaker cord without the red line into the – terminal side (black).Red +Black −With the red line CAUTION! After connecting to the terminals, lightly pull the speaker cord to make sure that heads of the speaker cord are securely connected to the terminals. A loose connection might cause audio output to be interrupted or noise to be output.! When connecting the speaker cord, thoroughly twist the core wires, and make sure that the core wires are not protruding out of the speaker terminals. Core wires protruding out of the speaker terminals may come into contact with the rear panel or with each other. This may cause an excessive load to be placed on the ampli-fier which results in operation stopping or a malfunction.! If a mistake is made with the polarities (+, –) on the LEFT and RIGHT sides when connecting the LEFT and RIGHT speaker cord, normal stereo effect can no longer be obtained.English](https://usermanual.wiki/AlphaTheta/DM40BT.User-manual-part-1/User-Guide-3518939-Page-7.png)
![En8Listening to the Music of a Bluetooth DeviceThese speakers allow you to wirelessly enjoy tracks saved to a Bluetooth device.When using the speakers for the first time or when connecting a new Bluetooth device to the speakers, you need to pair the speakers and Bluetooth device.Pairing (device mutual registration) is the operation required to connect a Bluetooth device and the speakers.! Microwave-based health aids! Some baby monitorsOther, less common, equipment that may operate on the same frequency:! Anti-theft systems! Amateur radio stations (HAM)! Warehouse logistic management systems! Discrimination systems for train or emergency vehicles CAUTION! In the event noise appears in your television image, there is the possibility that a Bluetooth device or this unit (including products supported by this unit) are causing signal interference with the antenna input connector of your television, video, satellite tuner, etc. In this event, increase the distance between the antenna input connector and the Bluetooth device or this unit (including prod-ucts supported by this unit).! If there is something obstructing the path between this unit (including devices supported by this unit) and the device equipped with Bluetooth wireless technology (such as a metal door, concrete wall, or insulation containing tinfoil), you may need to change the location of your system to prevent signal noise and interruptions.Scope of operationUse of this unit is limited to home use. (Transmission distances may be reduced depending on communication environment).In the following locations, poor condition or inability to receive radio waves may cause the audio to be interrupted or stopped:! In reinforced concrete buildings or steelframed or ironframed buildings.! Near large metallic furniture.! In a crowd of people or near a building or obstacle.! In a location exposed to the magnetic field, static electricity or radio wave interference from radio communication equipment using the same frequency band (2.4 GHz) as this unit, such as a 2.4 GHz wire-less LAN device or microwave oven.! If you live in a heavily populated residential area (apartment, town-house, etc.) and if your neighbor’s microwave is placed near your system, you may experience radio wave interference. If this occurs, move your unit to a different place. When the microwave is not in use, there will be no radio wave interference.Radio wave reflectionsThe radio waves received by this unit include the radio wave coming directly from the device equipped with Bluetooth wireless technology (direct wave) and waves coming from various directions due to reflec-tions by walls, furniture and building (reflected waves). The reflected waves (due to obstacles and reflecting objects) further produce a variety of reflected waves as well as variation in reception condition depending on locations. If the audio cannot be received properly due to this phe-nomenon, try moving the location of the device equipped with Bluetooth wireless technology a little. Also note that audio may be interrupted due to the reflected waves when a person crosses or approaches the space between this unit and the device equipped with Bluetooth wireless technology.Pairing and Connection Procedure1 Turn on the [POWER] switch to power on the speakers.! The Bluetooth indicator flashes for approximately 30 seconds and the speakers enter the pairing state.! If the Bluetooth indicator is off, press the pairing button for at least 2 seconds to switch to the pairing state again.2 Perform the pairing operation on the Bluetooth device.Perform the operation while the speakers are in the pairing state. For details, see the operating instructions of your Bluetooth device.3 When the Bluetooth indicator changes from the flashing to lit state, pairing (connecting) is complete.If pairing could not be performed within 30 seconds, the Bluetooth indi-cator changes from the flashing to off state.! A Bluetooth device that has already been paired can be connected by performing the connection operation on the Bluetooth device side if the speakers are powered on.PlaybackWhen you play music on a connected Bluetooth device, the music play-ing on the Bluetooth device is output from the speakers.! Pressing the pairing button during music playback on the Bluetooth device allows you to perform the pause/play operation (same func-tion as the pause/play button of the Bluetooth device). CAUTION! When pairing (connecting), move the Bluetooth device close to the speakers.! Loud sound may be output when the playback operation is per-formed for the first time after connecting completes so we recom-mend lowering the volume before playback.! The pause/play operation may not be possible with the pairing but-ton depending on the application used.! Connecting with the speakers may not be possible depending on the Bluetooth device.! If you wish to pair the speakers with a different Bluetooth device, turn off the Bluetooth function of the currently connected Bluetooth device or disconnect the connection before performing the pairing operation.! The speakers store the pairing information of up to eight Bluetooth devices, and attempt to connect to the last paired device if the pair-ing button is pressed in the state of no connection with a Bluetooth device.Radio wave cautionRadio wave cautionThis unit uses a 2.4 GHz radio wave frequency, which is a band used by other wireless systems (see list below). To prevent noise or interrupted communication, do not use this unit nearby such devices, or make sure these devices are switched off during use.! Cordless phones! Cordless facsimiles! Microwave ovens! Wireless LAN devices (IEEE802.11b/g)! Wireless AV equipment! Wireless controllers for game systems](https://usermanual.wiki/AlphaTheta/DM40BT.User-manual-part-1/User-Guide-3518939-Page-8.png)
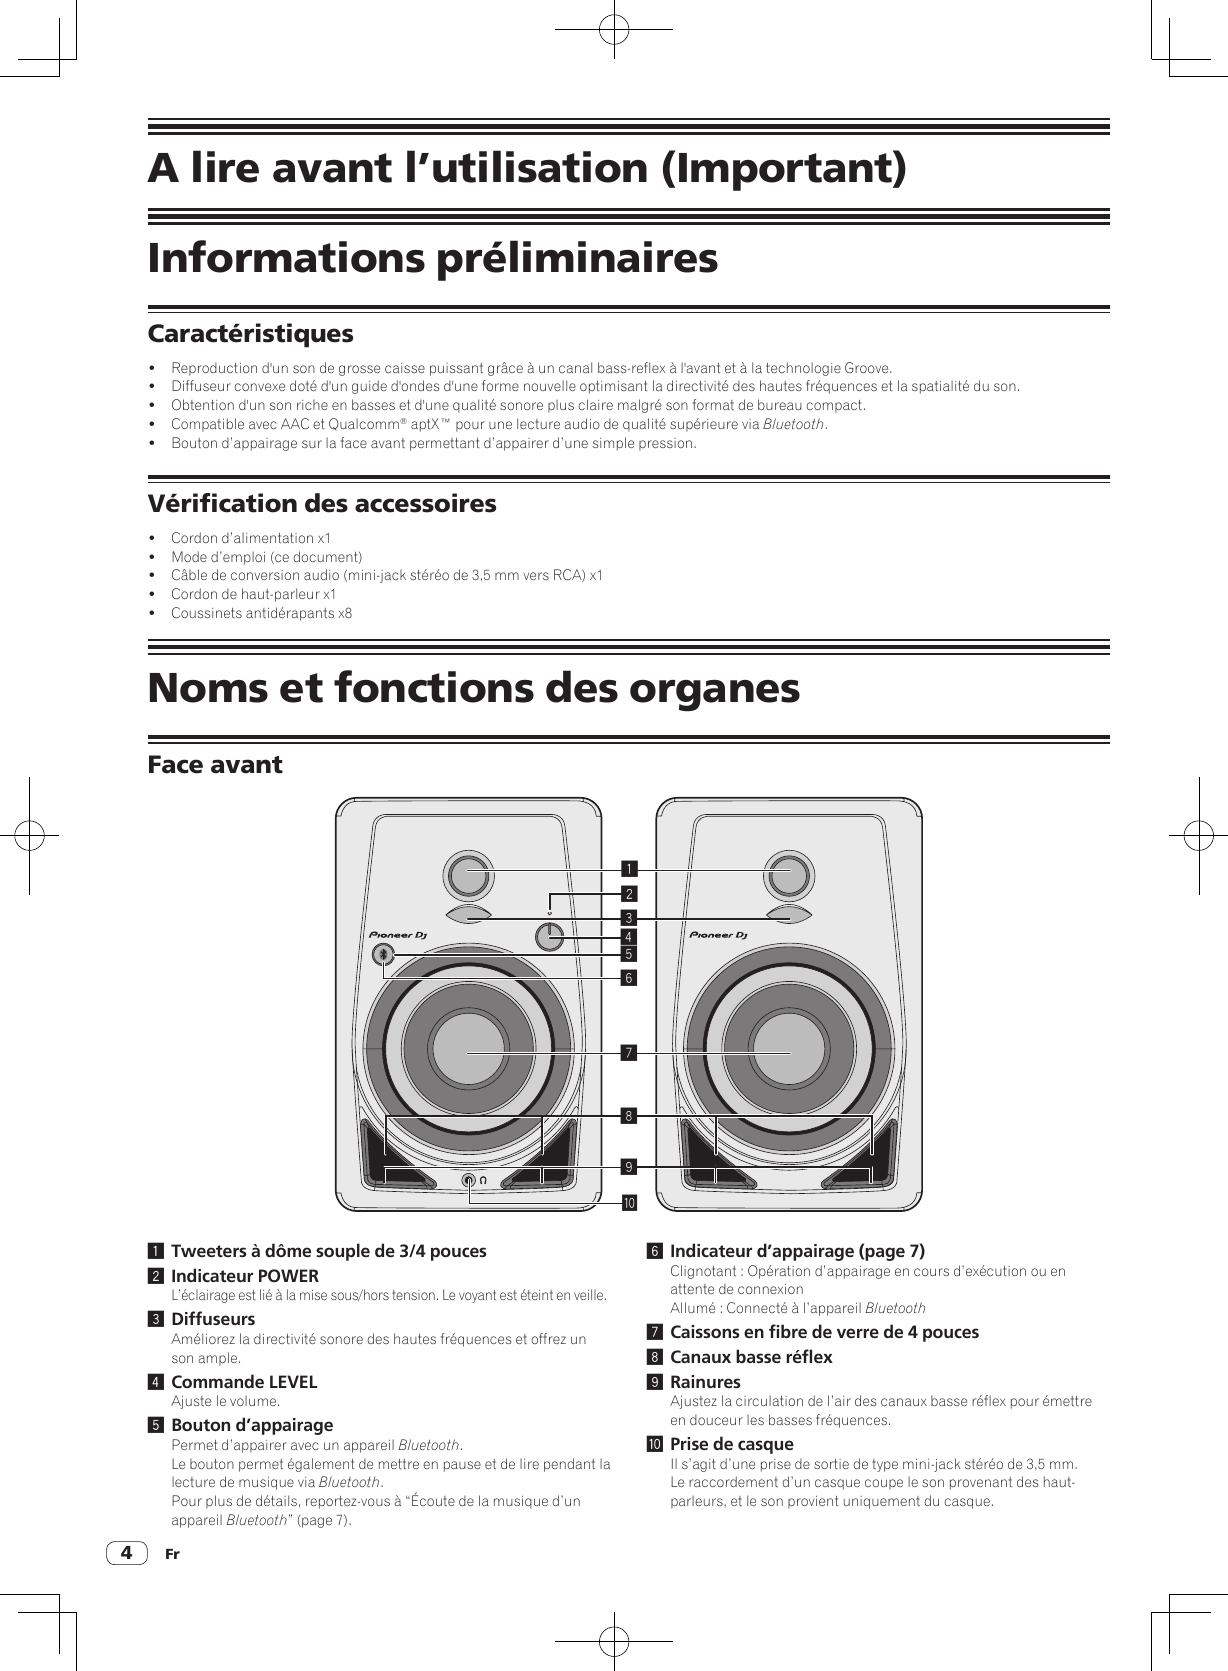
![En 9Additional informationTroubleshooting! Sometimes the problem may lie in another component. Inspect the other components and electrical appliances being used. If the problem cannot be rectified, ask your nearest Pioneer authorized service center or your dealer to carry out repair work.! This unit may not operate properly due to static electricity or other external factors. In this case, normal operation may be restored by unplugging the power cord, waiting about 5 seconds or more, then plugging the power cord back in.CommonProblem Check RemedyThe power is not turned on. Is the power cord properly connected? Plug in the power cord to an AC outlet.No sound is output from the connected device or the sound is low.Is the connected device set properly? Set the device external input and volume properly.Is the volume set to the proper position? Turn the [LEVEL] control on the front panel of this unit clockwise to increase the volume.Is the power turned on? Turn on the [POWER] switch on the rear panel of this unit.The POWER indicator (white) does not light.Is the power turned on? Turn on the [POWER] switch on the rear panel of this unit.Are the speakers in the standby state?Turn off the [POWER] switch on the rear panel of this unit once and then turn it back on after a few seconds. Or press the pairing button on the front panel of this unit.This unit does not recover (power-on) from the standby state. Is the input signal level low? Increase the input signal level.Distorted sound.Is the volume set to the proper position? Turn the [LEVEL] control on the front panel of this unit counterclockwise to reduce the volume.Is the level for input from the connected device appropriate? Adjust the output level of the connected device properly.Oscillates (loud sound is output continuously). Is the volume set to the proper position? Turn the [LEVEL] control on the front panel of this unit counterclockwise to reduce the volume.Sound is only output from the left speaker. Is the speaker cord connected properly? Connect the left and right speakers properly.The power turns off (standby state) automatically.Did a state of no sound continue for a set time (approximately 30 minutes) or longer?Input a signal from the RCA or stereo mini plug input terminal.Or press the pairing button on the front panel of this unit.Is the input signal level low? Increase the input signal level.When connected to INPUT 1 or INPUT 2 terminalsProblem Check RemedyNo sound is output from the connected device or the sound is low.Are the connection cables properly connected? Connect the connection cables properly.Are the terminals and plugs dirty? Clean the terminals and plugs before making connections.Sound is only output from one speaker. Is the device connected properly? Connect the device to both the left and right input terminals.Sound is interrupted or noise can be heard. Is there a contact problem with the connection cables? Reconnect the connection cables.When connected via BluetoothProblem Check RemedyCannot connect or sound is interrupted or noise can be heard.Is there a device producing electromagnetic waves in the 2.4 GHz band (microwave oven, wireless LAN device, other Bluetooth device, etc.) nearby?Either install the unit away from this device or stop using the other device producing electromagnetic waves.Is the distance from the Bluetooth device too far? Or is there a wall or obstacle blocking the signal in the space between?Move this unit and the connected Bluetooth device close to each other. Or change the position of the Bluetooth device or this unit.Is an application other than a music playback application running on the Bluetooth device?Exit any application on the Bluetooth device other than the music playback application.Does the Bluetooth device you wish to connect support A2DP? Use a Bluetooth device that supports A2DP.Has pairing with the Bluetooth device been per-formed properly?Turn the power of this unit and Bluetooth device off and back on, and then perform pairing again.English](https://usermanual.wiki/AlphaTheta/DM40BT.User-manual-part-1/User-Guide-3518939-Page-9.png)
![Fr2Nous vous remercions d’avoir acheté ce produit Pioneer DJ.Veuillez lire attentivement ce mode d’emploi de manière à pouvoir utiliser votre modèle correctement. Après avoir lu cesexplications, conservez-les en lieu sûr pour éventuellement les consulter plus tard.[Pour les utilisateurs en Europe][Pour les utilisateurs aux États-Unis et au Canada][Pour les utilisateurs aux États-Unis]Ce point d’exclamation, placé dans un triangle équilatéral, a pour but d’attirer l’attention de l’utilisateur sur la présence, dans les documents qui accompagnent l’appareil, d’explications importantes du point de vue de l’exploitation ou de l’entretien.Ce symbole de l’éclair, placé dans un triangle équilatéral, a pour but d’attirer l’attention de l’utilisateur sur la présence, à l’intérieur du coffret de l’appareil, de “tensions dangereuses” non isolées d’une grandeur suffisante pour représenter un risque d’électrocution pour les êtres humains.ATTENTION :POUR ÉVITER TOUT RISQUE D’ÉLECTROCUTION, NE PAS ENLEVER LE COUVERCLE (NI LE PANNEAU ARRIÈRE). AUCUNE PIÈCE RÉPARABLE PAR L’UTILISATEUR NE SE TROUVE À L’INTÉRIEUR. CONFIER TOUT ENTRETIEN À UN PERSONNEL QUALIFIÉ UNIQUEMENT.ATTENTIONDANGER D´ELECTROCUTIONNE PAS OUVRIRIMPORTANTD3-4-2-1-1b_A1_FrLa protection de votre ouïe est entre vos mainsPour assurer le rendement optimal de votre matériel et – plus important encore – la protection de votre ouïe, réglez le volume à un niveau raisonnable. Pour ne pas altérer votre sens de la perception, le son doit être clair mais ne produire aucun vacarme et être exempt de toute distorsion. Votre ouïe peut vous jouer des tours. Avec le temps, votre système auditif peut en effet s’adapter à des volumes supérieurs, et ce qui vous semble un « niveau de confort normal » pourrait au contraire être excessif et contribuer à endommager votre ouïe de façon permanente. Le réglage de votre matériel à un volume sécuritaire AVANT que votre ouïe s’adapte vous permettra de mieux vous protéger.CHOISISSEZ UN VOLUME SÉCURITAIRE:• Réglez d’abord le volume à un niveau inférieur. • Montez progressivement le volume jusqu’à un niveau d’écoute confortable ; le son doit être clair et exempt de distorsions. • Une fois que le son est à un niveau confortable, ne touchez plus au bouton du volume.N’OUBLIEZ PAS DE RESPECTER LES DIRECTIVES SUIVANTES:• Lorsque vous montez le volume, assurez-vous de pouvoir quand même entendre ce qui se passe autour de vous.• Faites très attention ou cessez temporairement l’utilisation dans les situations pouvant s’avérer dangereuses.• N’utilisez pas des écouteurs ou un casque d’écoute lorsque vous opérez un véhicule motorisé ; une telle utilisation peut créer des dangers sur la route et est illégale à de nombreux endroits. S001a_A1_FrAttentionPour éviter les risques d’incendie, des fils de câblage de Classe 2 doivent être utilisés pour le branchement de haut-parleurs et ils doivent être acheminés à l’écart de dangers potentiels afin d’éviter d’endommager leur isolant. D3-7-13-67*_A1_FrREMARQUE IMPORTANTELE NUMÉRO DE MODÈLE ET LE NUMÉRO DE SÉRIE SE TROUVENT À L’ARRIÈRE OU SUR LE FOND DE CET APPAREIL. NOTEZ CES NUMÉROS À LA PAGE 11 POUR VOUS Y RÉFÉRER ULTÉRIEUREMENT.D36-AP9-3*_A1_FrSi vous souhaitez vous débarrasser de cet appareil, ne le mettez pas à la poubelle avec vos ordures ménagères. Il existe un système de collecte séparé pour les appareils électroniques usagés, qui doivent être récupérés, traités et recyclés conformément à la législation.Les habitants des états membres de l’UE, de Suisse et de Norvège peuvent retourner gratuitement leurs appareils électroniques usagés aux centres de collecte agréés ou à un détaillant (si vous rachetez un appareil similaire neuf).Dans les pays qui ne sont pas mentionnés ci-dessus, veuillez contacter les autorités locales pour savoir comment vous pouvez vous débarrasser de vos appareils.Vous garantirez ainsi que les appareils dont vous vous débarrassez sont correctement récupérés, traités et recyclés et préviendrez de cette façon les impacts néfastes possibles sur l’environnement et la santé humaine. K058b_A1_FrATTENTIONPOUR ÉVITER TOUT RISQUE D’ÉLECTROCUTION, NE PAS ENLEVER LE COUVERCLE (NI LE PANNEAU ARRIÈRE). AUCUNE PIÈCE RÉPARABLE PAR L’UTILISATEUR NE SE TROUVE À L’INTÉRIEUR. CONFIER TOUT ENTRETIEN À UN PERSONNEL QUALIFIÉ UNIQUEMENT. D3-4-2-1-1_B1_Fr](https://usermanual.wiki/AlphaTheta/DM40BT.User-manual-part-1/User-Guide-3518939-Page-12.png)
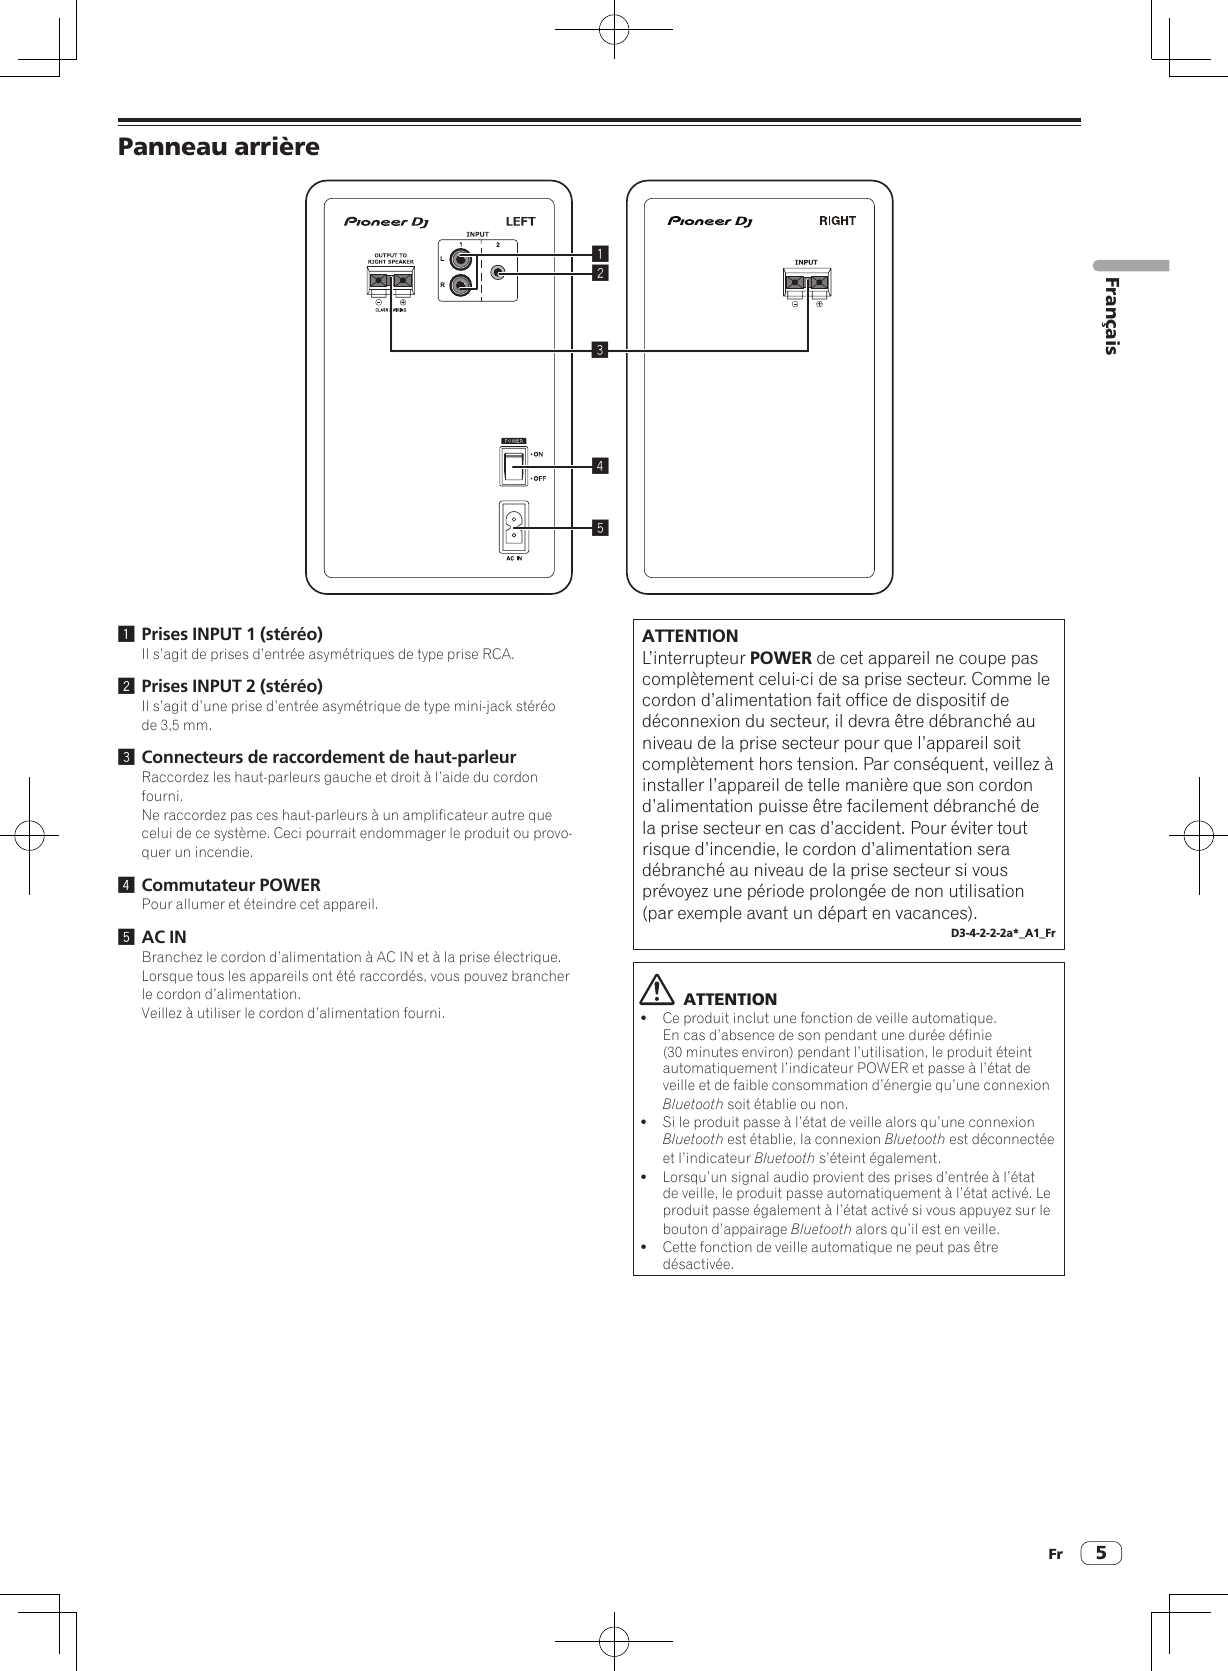
![Fr6 Installation et connexionsInstallationLes sons reproduits par les enceintes sont influencés délicatement par les conditions du local d’écoute. Pour bénéficier d’un environne-ment d’écoute optimal, réfléchissez bien aux conditions de l’emplace-ment avant de commencer l’installation proprement dite.! Installez les haut-parleurs à hauteur des oreilles.! Pour obtenir un effet stéréo naturel, les enceintes gauche et droite doivent être installées à des points symétriques et équidistants de la position d’écoute.! Fixez les coussinets fournis sur la surface inférieure de l’appareil pour éviter tout risque de glissement.AVERTISSEMENTGardez les pièces de petite taille hors de la portée des bébés et des enfants. En cas d’ingestion accidentelle, veuillez contacter immédiatement un médecin.D41-6-4_A1_Fr! Installez les haut-parleurs orientés vers l’intérieur à un angle de 60 degrés par rapport à la position d’écoute, 30 degrés pour chacun des haut-parleurs gauche et droit.50 ° à 60 ° ATTENTIONPour permettre un meilleur refroidissement, veillez à ce qu’un espace suffisant soit laissé entre les haut-parleurs et les murs ou autres composants à proximité (15 cm minimum au-dessus, derrière et sur les côtés droit et gauche de chaque haut-parleur). Le fait de ne pas laisser d’espace suffisant entre le haut-parleur et les murs ou autres composants peut entraîner une augmentation des températures inté-rieures, et provoquer un dysfonctionnement ou un endommagement.Raccordements! Veillez à toujours éteindre les appareils et à débrancher le cor-don d’alimentation de la prise secteur avant de raccorder un appareil ou de changer les liaisons.! Reportez-vous au mode d’emploi de l’appareil devant être raccordé.! Lorsque tous les appareils ont été raccordés, vous pouvez brancher le cordon d’alimentation.! Veillez à utiliser le cordon d’alimentation fourni.! Faites attention au volume car les signaux provenant de la prise [INPUT 1], de la prise [INPUT 2] et de Bluetooth sont combinés.Cordons de raccordementBranchez le cordon de haut-parleur fourni aux haut-parleurs.1 Dénudez sur 1 cm environ de la tête du cordon de haut-parleur fourni, tordez et retirez l’isolant exposé.Une fois l’isolant retiré, tordez bien les fils centraux.2 Branchez le cordon de haut-parleur fourni aux prises de haut-parleurs à GAUCHE et à DROITE.3 Introduisez les fils centraux dans les prises tout en appuyant sur la griffe de la prise de haut-parleur.Branchez le cordon de haut-parleur avec la ligne rouge sur le côté de la prise + (rouge) et le cordon de haut-parleur sans la ligne rouge sur le côté de la prise – (noire).Rouge +Noire −Avec la ligne rouge ATTENTION! Une fois les prises raccordées, tirez légèrement sur le cordon de haut-parleur pour vous assurer que les têtes de cordon de haut-parleur sont bien raccordées aux prises. Un raccordement lâche peut entraîner une interruption de la sortie audio ou l’émission de bruit.! Lors du branchement du cordon de haut-parleur, tordez bien les fils centraux, et assurez-vous que les fils centraux ne dépassent pas des prises de haut-parleur. Les fils centraux qui dépassent des prises de haut-parleur peuvent entrer en contact avec le panneau arrière ou entre eux. Ceci peut entraîner une charge excessive sur l’amplificateur, provoquant ainsi un arrêt ou un dysfonctionnement.! Si les polarités sont inversées (+, –) sur les côtés GAUCHE et DROIT lors du branchement du cordon de haut-parleur GAUCHE et DROIT, l’effet stéréo normal ne peut plus être obtenu.](https://usermanual.wiki/AlphaTheta/DM40BT.User-manual-part-1/User-Guide-3518939-Page-16.png)
![Fr 7Écoute de la musique d’un appareil BluetoothCes haut-parleurs vous permettent d’écouter des morceaux enregistrés sur un appareil Bluetooth.Lorsque vous utilisez les haut-parleurs pour la première fois ou lorsque vous connectez un nouvel appareil Bluetooth aux haut-parleurs, vous devez appairer les haut-parleurs et l’appareil Bluetooth.L’appairage (enregistrement mutuel d’appareils) est l’opération nécessaire pour connecter un appareil Bluetooth et les haut-parleurs.Procédure d’appairage et de connexion1 1 Tournez le commutateur [POWER] pour mettre les haut-parleurs sous tension.! L’indicateur Bluetooth clignote pendant 30 secondes environ et les haut-parleurs passent à l’état d’appairage.! Si l’indicateur Bluetooth est éteint, appuyez sur le bou-ton d’appairage pendant au moins 2 secondes pour revenir à l’état d’appairage.2 Effectuez l’opération d’appairage sur l’appareil Bluetooth.Effectuez l’opération lorsque les haut-parleurs sont à l’état d’appairage.Pour plus de détails, consultez le mode d’emploi de votre appareil Bluetooth.3 Lorsque l’indicateur Bluetooth passe de l’état clignotant à l’état allumé, l’appairage (la connexion) est terminé. Si l’appairage n’a pas pu être effectué dans les 30 secondes, l’indicateur Bluetooth passe de l’état clignotant à l’état éteint.! Un appareil Bluetooth déjà appairé peut être connecté en effectu-ant l’opération de connexion sur l’appareil Bluetooth si les haut-parleurs sont sous tension.LectureLorsque vous lisez de la musique sur un appareil Bluetooth connecté, la musique lue sur l’appareil Bluetooth est émise par les haut-parleurs.! Appuyez sur le bouton d’appairage pendant la lecture de musique sur l’appareil Bluetooth pour effectuer une opération de mise en pause/lecture (même fonction que le bouton de pause/lecture de l’appareil Bluetooth). ATTENTION! Pendant l’appairage (la connexion), rapprochez l’appareil Bluetooth des haut-parleurs.! Un son fort peut être émis lorsque l’opération de lecture est effec-tuée pour la première fois après l’établissement de la connexion. Nous vous recommandons donc de baisser le volume avant la lecture.! L’opération de mise en pause/lecture peut ne pas être possible avec le bouton d’appairage en fonction de l’application utilisée.! La connexion aux haut-parleurs peut ne pas être possible en fonc-tion de l’appareil Bluetooth.! Si vous souhaitez appairer les haut-parleurs à un autre appa-reil Bluetooth, désactivez la fonction Bluetooth de l’appareil Bluetooth actuellement connecté ou arrêtez la connexion avant d’effectuer l’opération d’appairage.! Les haut-parleurs stockent les informations d’appairage de huit appareils Bluetooth maximum et tentent de se con-necter au dernier appareil appairé lorsque vous appuyez sur le bouton d’appairage en l’absence de connexion à un appareil Bluetooth.Précautions relatives aux ondes radioCet appareil utilise une fréquence d’onde radioélectrique de 2,4 GHz, une bande utilisée aussi par d’autres systèmes sans fil (cf. la liste ci-dessous). Pour éviter des parasites ou une interruption des communica-tions, n’utilisez pas cet appareil près de ces dispositifs ou faites en sorteque ceux-ci soient mis hors tension pendant son utilisation.! Téléphones sans fil! Télécopieurs sans fil! Fours à micro-ondes! Périphériques LAN sans fil (IEEE802.11b/g)! Équipement audiovisuel sans fil! Commandes sans fil pour consoles de jeu! Instruments médicaux à micro-ondes! Certains interphones de surveillanceIl se peut que d’autres équipements, moins courants, fonctionnent sur la même fréquence:! Systèmes antivol! Stations de radio amateur (HAM)! Systèmes de gestion logistique d’entrepôt! Systèmes de mobilité pour trains et véhicules d’urgence ATTENTION! Si du bruit apparaît sur l’image de votre téléviseur, il est possible qu’un appareil Bluetooth® ou cette unité (y compris les produits pris en charge par cette unité) génère des interférences de signal avec le connecteur d’entrée d’antenne de votre téléviseur, lecteur vidéo, syntoniseur satellite, etc. Dans ce cas, éloignez le con-necteur d’entrée d’antenne et l’appareil Bluetooth ou cette unité (y compris les produits pris en charge par cette unité).! Si un objet fait obstacle sur le parcours entre cet appareil (y com-pris les produits supportés par cet appareil) et l’appareil adapté à la technologie sans fil Bluetooth (tel qu’une porte métallique, un mur de béton ou un isolant contenant une feuille d’étain), il se peut que vous deviez changer l’emplacement de votre système pour éviter les parasites et les interruptions.Français](https://usermanual.wiki/AlphaTheta/DM40BT.User-manual-part-1/User-Guide-3518939-Page-17.png)
![Fr 9Informations supplémentairesEn cas de panne! Parfois, le problème peut provenir d’un autre composant. Examinez les autres composants et les appareils électriques utilisés. Si le problème ne peut pas être résolu, contactez votre service après-vente agréé Pioneer ou votre revendeur pour une réparation.! De l’électricité statique ou des facteurs externes ont peut être déréglé cet appareil. Dans ce cas, le fonctionnement normal de l’appareil peut éven-tuellement être rétabli en débranchant le cordon d’alimentation, attendant 5 secondes ou plus, puis rebranchant le cordon d’alimentation.Problèmes courantsProblème Vérification SolutionL’appareil ne s’allume pas. Est-ce que le cordon d’alimentation est correcte-ment raccordé ? Branchez le cordon d’alimentation sur une prise secteur.Aucun son ne provient de l’appareil connecté ou le son est faible.L’appareil connecté est-il correctement défini ? Définissez l’entrée externe et le volume de l’appareil correctement.Le réglage du volume est-il dans la position appropriée ?Tournez la commande [LEVEL] sur le panneau avant de cette unité dans le sens horaire pour augmenter le volume.L’alimentation est-elle activée? Tournez le commutateur [POWER] sur le panneau arrière de cette unité.Le voyant POWER (blanc) ne s’allume pas.L’alimentation est-elle activée? Tournez le commutateur [POWER] sur le panneau arrière de cette unité.Les haut-parleurs sont-ils à l’état de veille ? Désactivez une fois le commutateur [POWER] sur le panneau arrière de cette unité, puis réactivez-le après quelques secondes.Cette unité ne ressort pas de l’état de veille (mise en veille). Le niveau du signal d’entrée est-il faible ? Augmentez le niveau du signal d’entrée.Distorsion du son.Le réglage du volume est-il dans la position appropriée ?Tournez la commande [LEVEL] sur le panneau avant de cette unité dans le sens antihoraire pour réduire le volume.Le niveau d’entrée de l’appareil connecté est-il approprié ? Ajustez correctement le niveau de sortie de l’appareil raccordé.Oscillations (un son faible est émis en continu).Le réglage du volume est-il dans la position appropriée ?Tournez la commande [LEVEL] sur le panneau avant de cette unité dans le sens antihoraire pour réduire le volume.Le son est restitué uniquement par le haut-parleur gauche.Le cordon de haut-parleur est-il branché correctement ? Branchez les haut-parleurs gauche et droit correctement.L’alimentation est coupée automatique-ment (état de veille).Est-ce qu’aucun son n’a été émis pendant une durée définie (30 minutes environ) ou plus ?Émettez un signal à partir d’une prise d’entrée RCA ou mini-jack stéréo.Ou appuyez sur le bouton d’appairage sur la face avant de cette unité.Le niveau du signal d’entrée est-il faible ? Augmentez le niveau du signal d’entrée.Lors de la connexion aux prises INPUT 1 ou à la prise INPUT 2Problème Vérification SolutionAucun son ne provient de l’appareil connecté ou le son est faible.Est-ce que les câbles de liaison sont correctement raccordés ? Raccordez correctement les câbles de liaison.Est-ce que les prises et fiches sont sales ? Nettoyez les prises et les fiches avant d’effectuer les raccordements.Le son est restitué uniquement par un haut-parleur. L’appareil est-il connecté correctement ? Connectez l’appareil sur les prises d’entrée gauche et droite.Le son est interrompu ou aucun bruit n’est entendu.Y-a-t-il un problème de contact avec les câbles de raccordement ? Rebranchez les câbles de raccordement.Lors de la connexion via BluetoothProblème Vérification SolutionImpossible de se connecter ou le son est interrompu ou aucun bruit n’est entendu.Un appareil produisant des ondes électromagné-tiques dans la bande 2,4 GHz (four à micro-ondes, appareil LAN sans fil, autre appareil Bluetooth, etc.) se trouve-t-il à proximité ?Éloignez l’unité de cet appareil ou cessez d’utiliser l’autre appareil produi-sant des ondes électromagnétiques.La distance de l’appareil Bluetooth est-elle trop importante ? Ou un mur ou un obstacle bloquant le signal est-il présent entre eux ?Rapprochez cette unité et l’appareil Bluetooth connecté. Ou déplacez l’appa-reil Bluetooth ou cette unité.Une application autre qu’une application de lecture de musique est-elle exécutée sur l’appareil Bluetooth ?Quittez toute application sur l’appareil Bluetooth autre que l’application de lecture de musique.L’appareil Bluetooth que vous voulez connecter prend-il en charge A2DP ? Utilisez un appareil Bluetooth prenant en charge A2DP.L’appairage à l’appareil Bluetooth a-t-il était effec-tué correctement ?Mettez cette unité et l’appareil Bluetooth hors tension puis de nouveau sous tension, puis effectuez de nouveau l’appairage.Français](https://usermanual.wiki/AlphaTheta/DM40BT.User-manual-part-1/User-Guide-3518939-Page-19.png)

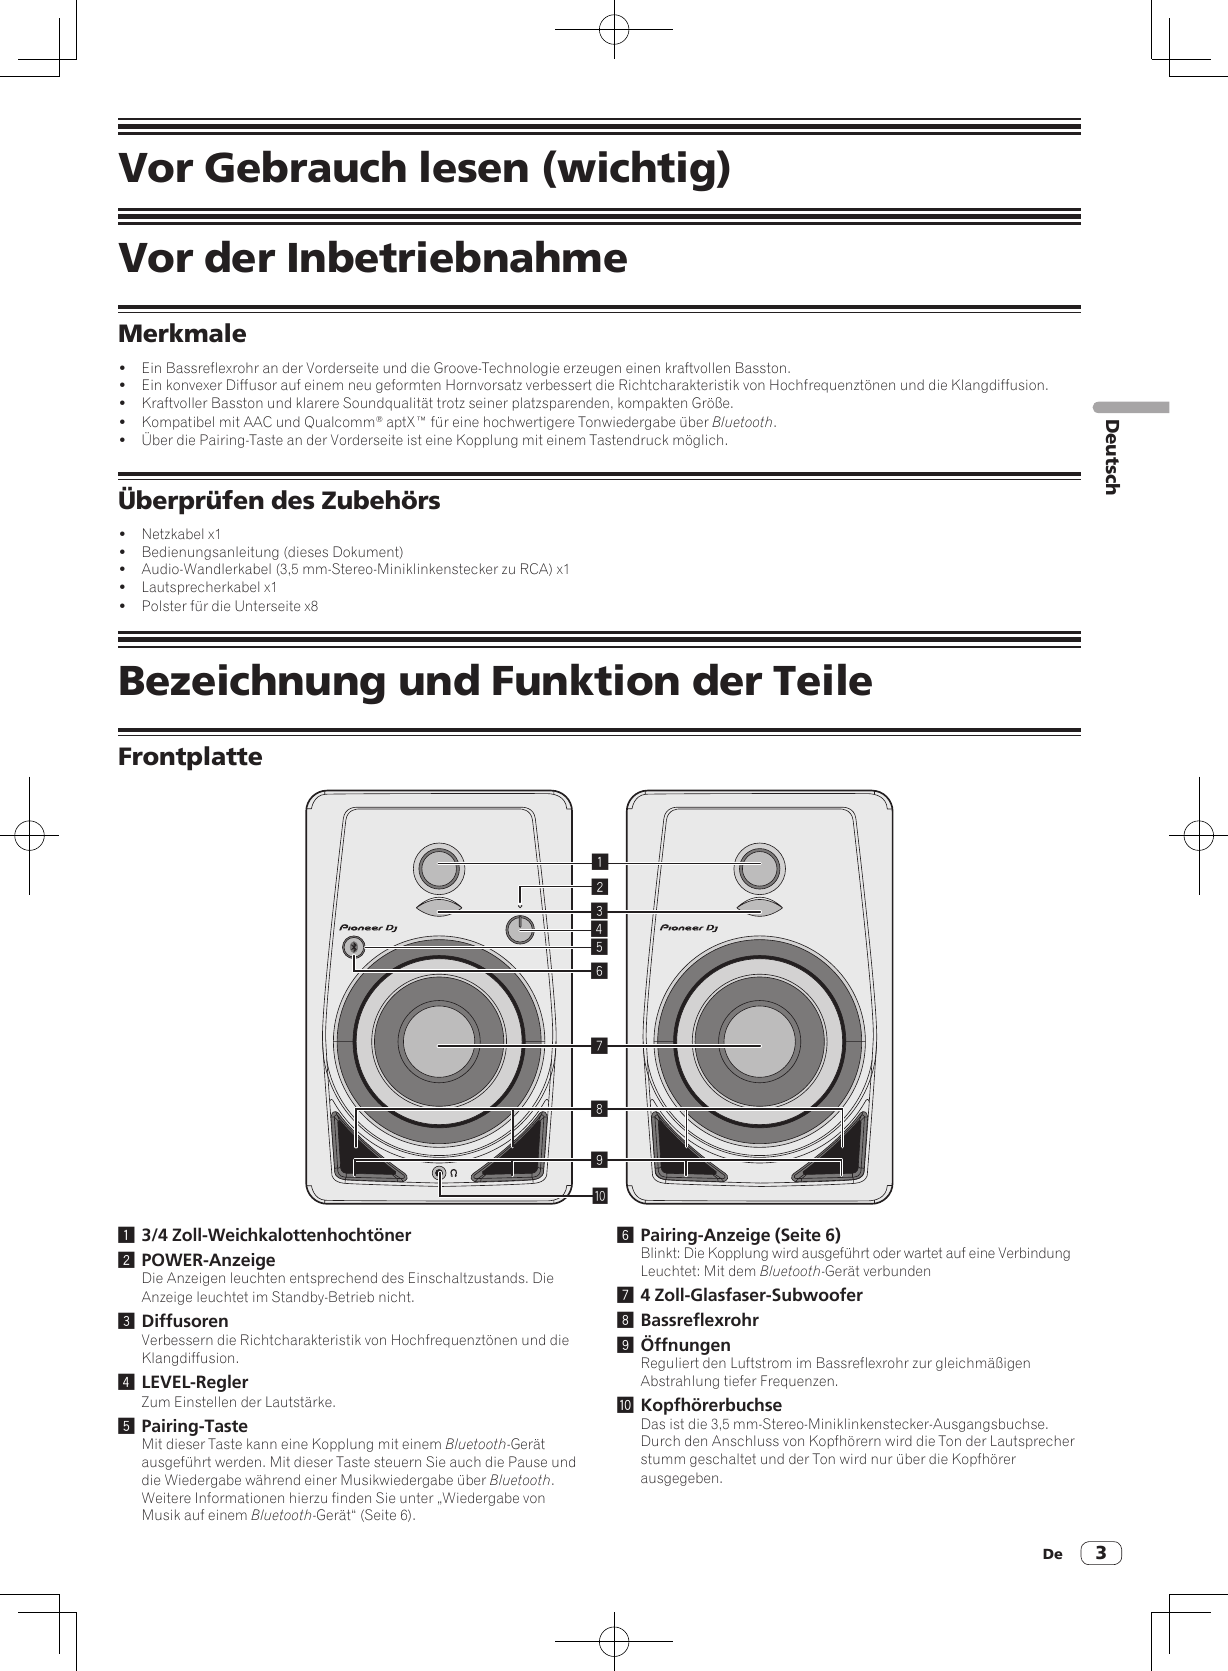
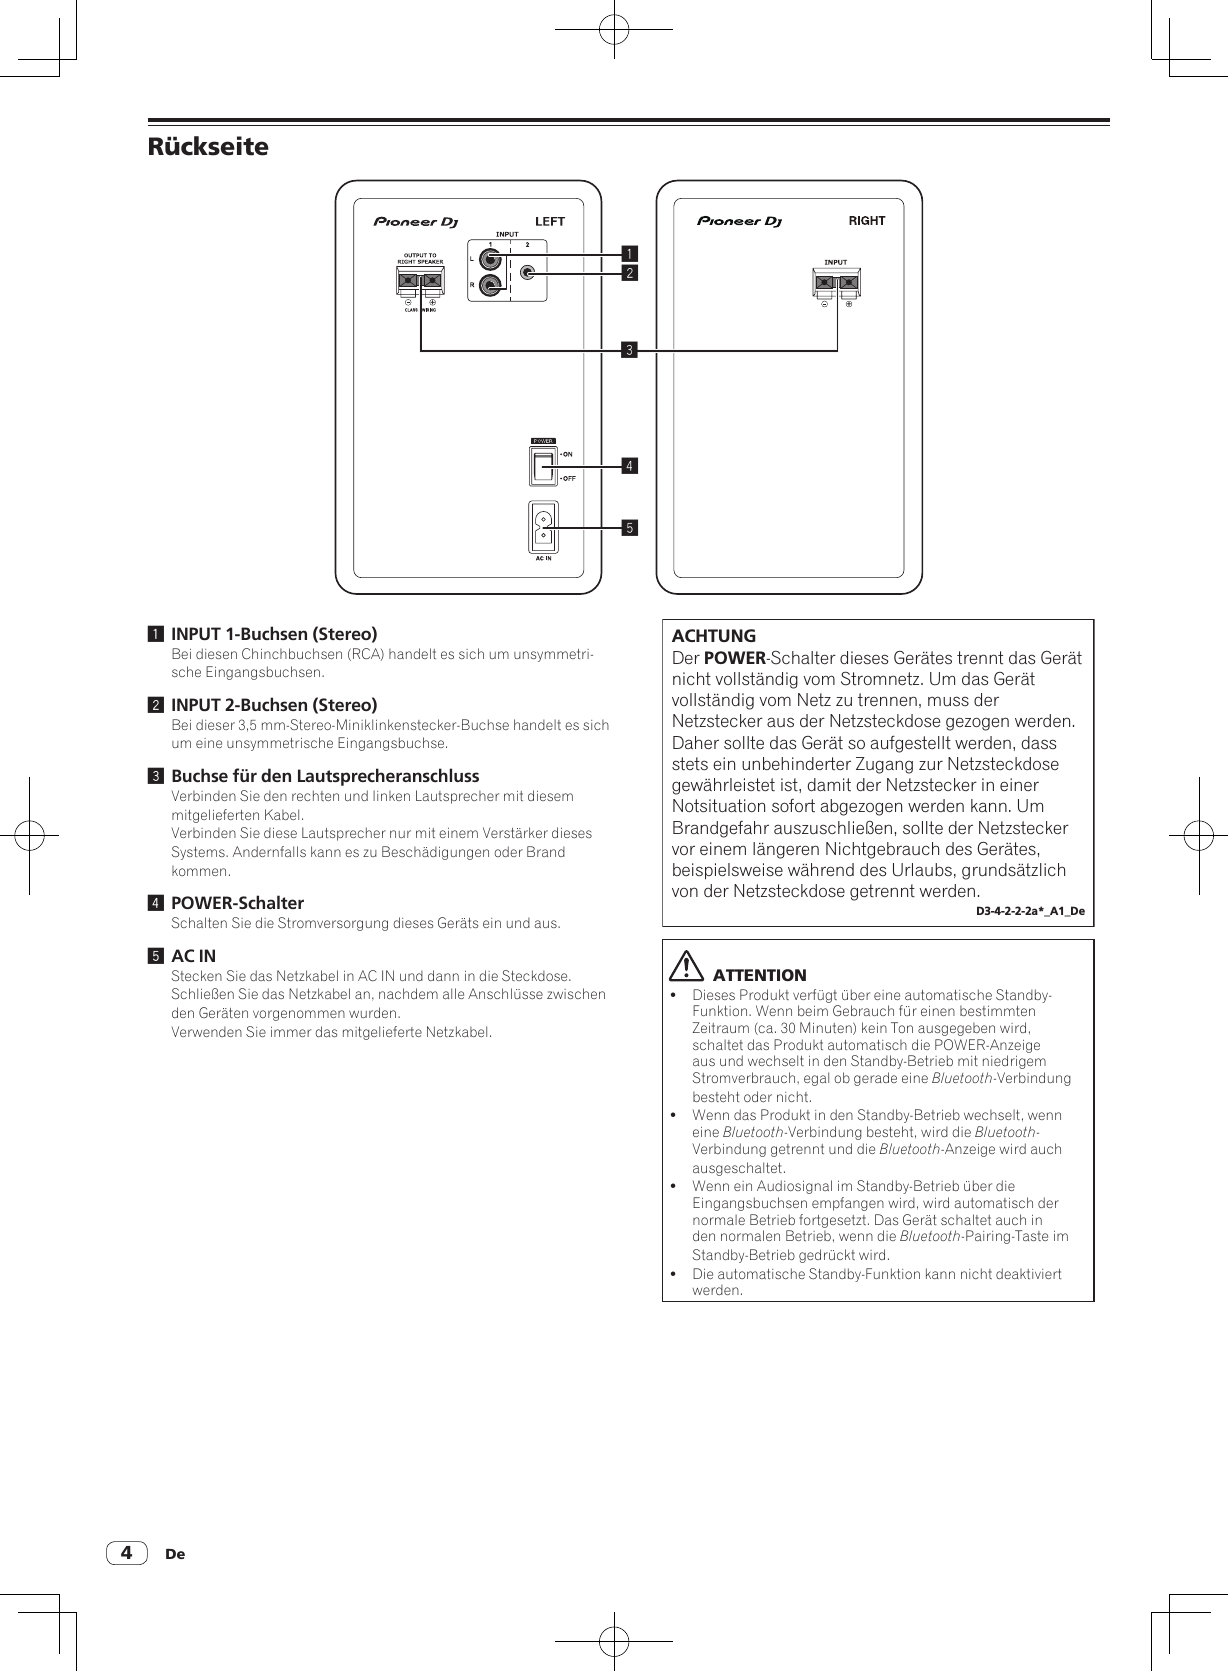
![De 5DeutschInstallation und AnschlüsseInstallationsverfahrenDer Wiedergabeklang eines Lautsprechers wird durch die akustischen Verhältnisse im Hörraum beeinflusst. Bitte berücksichtigen Sie vor Beginn der Installation sorgfältig die Bedingungen am Aufstellungsort, um eine optimale Hörumgebung zu kreieren.! Stellen Sie die Lautsprecher auf Ohrenhöhe auf. ! Um einen natürlich wirkenden Stereoeffekt zu erzielen,sollten der rechte und der linke Lautsprecher an einer symmetrischen Position jeweils im gleichen Abstand von der Hörposition aufgestellt werden.! Befestigen Sie die mitgelieferten Polster als Schutz vor Rutschen an der Unterseite des Geräts.WARNUNGKleine Teile außerhalb der Reichweite von Kleinkindern und Kindern aufbewahren. Bei unbeabsichtigtem Verschlucken ist unverzüglich ein Arzt aufzusuchen.D41-6-4_A1_De! Stellen Sie die Lautsprecher so auf, dass diese nach innen zeigen und insgesamt einen Winkel von 60 Grad von der Hörposition auf-weisen, d. h. jeweils in einem Winkel von 30 Grad für den linken und rechten Lautsprecher.50 ° bis 60 ° ACHTUNGUm eine einwandfreie Wärmeabfuhr zu gewährleisten, sollte ein ausreichender Abstand zwischen den Lautsprechern und Wänden und anderen Komponenten eingehalten werden (mindestens jeweils mindestens 15 cm oberhalb und hinter jedem Lautsprecher sowie auf beiden Seiten). Falls die Lautsprecher zu nah nebeneinander, an einer Wand oder anderen Komponenten aufgestellt werden, führt dies möglicherweise zu einem Anstieg der Innentemperatur, der eine Funktionsstörung oder Beschädigung zur Folge haben kann.Anschlüsse! Schalten Sie die Stromversorgung aus und ziehen Sie das Netzkabel aus der Netzsteckdose, bevor Sie Geräte anschließen oder die Anschlüsse ändern.! Beachten Sie die Bedienungsanleitung der angeschlossenen Komponente.! Schließen Sie das Netzkabel an, nachdem alle Anschlüsse zwischen den Geräten vorgenommen wurden.! Verwenden Sie immer das mitgelieferte Netzkabel.! Stellen Sie die Lautstärke auf einen geeigneten Pegel, da die Eingangssignale für die [INPUT 1]-Buchse, [INPUT 2]-Buchse und Bluetooth gemischt werden.Kabel anschließenVerbinden Sie das mitgelieferte Lautsprecherkabel mit den Lautsprechern.1 Sie müssen den Anfang des mitgelieferten Lautsprecherkabels auf ca. 1 cm abisolieren. Entflechten Sie die freigelegte Isolierung und entfernen Sie diese.Nachdem Sie die Isolierung entfernt haben, verdrillen Sie sorgfältig die Kerndrähte.2 Verbinden Sie das mitgelieferte Lautsprecherkabel mit den Lautsprecherbuchsen auf der LINKEN und RECHTEN Seite.3 Führen Sie die Kerndrähte in die Buchsen ein, indem Sie auf die Klemme an der Lautsprecherbuchse drücken.Verbinden Sie das Lautsprecherkabel mit der roten Linie mit der Buchse + (rot) und das Lautsprecherkabel ohne die rote Linie mit der Buchse – (schwarz).Rot +Schwarz −Mit der roten Linie ACHTUNG! Nach dem Anschluss ziehen Sie leicht am Kabel, um sicherzustel-len, dass der Anfang der Lautsprecherkabel sicher in den Buchsen befestigt ist. Eine lose Verbindung kann dazu führen, dass die Audio-Ausgabe unterbrochen wird oder Störgeräusche ausgege-ben werden.! Beim Anschluss des Lautsprecherkabels müssen Sie die Kerndrähte sorgfältig verdrillen. Achten Sie darauf, dass die Kerndrähte nicht aus den Lautsprecherbuchsen hervorragen. Kerndrähte, die aus den Lautsprecherbuchsen hervorragen, kön-nen in Kontakt mit der Rückseite kommen oder sich gegenseitig berühren. Dadurch kann es zu einer übermäßigen Last auf den Verstärker kommen, so dass der Betrieb unterbrochen wird oder es zu einer Fehlfunktion kommt.! Bei einem Fehler der Polarität (+, –) auf der LINKEN und RECHTEN Seite beim Anschluss der LINKEN und RECHTEN Lautsprecherkabel kann der normale Stereosound nicht erreicht werden.](https://usermanual.wiki/AlphaTheta/DM40BT.User-manual-part-1/User-Guide-3518939-Page-25.png)
![De6Wiedergabe von Musik auf einem Bluetooth-GerätÜber diese Lautsprecher können Sie drahtlos Tracks hören, die auf einem Bluetooth-Gerät gespeichert sind.Wenn Sie die Lautsprecher zum ersten Mal benutzen oder ein neues Bluetooth-Gerät mit den Lautsprechern verbinden, müssen Sie die Lautsprecher und das Bluetooth-Gerät koppeln.Die Kopplung (gegenseitige Geräteregistrierung) ist das Verfahren, mit dem Sie ein Bluetooth-Gerät und die Lautsprecher verbinden.Kopplungs- und Verbindungsverfahren1 Betätigen Sie den [POWER]-Schalter, um die Lautsprecher einzuschalten.! Die Bluetooth-Anzeige blinkt ca. 30 Sekunden lang und die Lautsprecher wechseln in den Kopplungsmodus.! Wenn die Bluetooth-Anzeige aus ist, drücken Sie die Pairing-Taste für mindestens 2 Sekunden, um wieder zum Kopplungsmodus zu wechseln.2 Führen Sie die Kopplung auf dem Bluetooth-Gerät aus.Führen Sie die Kopplung durch, während sich die Lautsprecher im Kopplungsmodus befinden. Einzelheiten finden Sie in der Bedienungsanleitung Ihres Bluetooth-Geräts.3 Wenn die Bluetooth-Anzeige von einem Blinken zu einem Leuchten wechselt, ist die Kopplung (die Verbindung) abgeschlossen. Wenn die Kopplung nicht innerhalb von 30 Sekunden ausgeführt werden konnte, hört die Bluetooth-Anzeige auf zu blinken und schaltet sich aus.! Ein Bluetooth-Gerät, das schon gekoppelt wurde, kann neu verbun-den werden, indem die Verbindung auf dem Bluetooth-Gerät durch-geführt wird. Dazu müssen die Lautsprecher eingeschaltet sein.WiedergabeWenn Sie Musik von einem verbundenen Bluetooth-Gerät wiederge-ben, wird die Musik, die vom Bluetooth-Gerät abgespielt wird, von den Lautsprechern ausgegeben.! Wenn Sie während der Musikwiedergabe auf dem Bluetooth-Gerät die Pairing-Taste drücken, können Sie die Pause/die Wiedergabe steuern (dieselbe Funktion wie die Pause-/Wiedergabe-Taste auf dem Bluetooth-Gerät). CAUTION! Stellen Sie beim Koppeln (beim Verbinden) das Bluetooth-Gerät in die Nähe der Lautsprecher auf.! Die Lautstärke kann sehr laut sein, wenn die Wiedergabe nach der erfolgreichen Verbindung das erste Mal gestartet wird, deshalb empfehlen wir, vor der Wiedergabe eine niedrigere Lautstärke einzustellen.! Es ist möglich, dass die Pause/Wiedergabe je nach verwendeter Anwendung mit der Pairing-Taste nicht ausgeführt werden kann.! Die Verbindung mit den Lautsprechern kann bei manchen Bluetooth-Geräten nicht hergestellt werden.! Wenn Sie eine Verbindung mit einem anderen Bluetooth-Gerät herstellen möchten, schalten Sie die Bluetooth-Funktion des derzeit verbundenen Bluetooth-Geräts aus oder trennen Sie die Verbindung, bevor Sie die Kopplung ausführen.! Die Lautsprecher speichern die Kopplungsdaten von bis zu acht Bluetooth-Lautsprechern und versuchen, sich mit dem letzten gekoppelten Gerät zu verbinden, wenn die Pairing-Taste in dem Moment gedrückt wird, in dem keine Verbindung zu einem Bluetooth-Gerät hergestellt ist.Vorsichtshinweise zu HF-WellenDieses Gerät arbeitet mit einer Rundfunkwellenfrequenz von 2,4 GHz, wobei es sich um ein von anderen drahtlosen Systemen ebenfalls verwendetes Frequenzband handelt (siehe die nachstehende Liste). Um Rauscheinstreuungen oder Unterbrechungen der Kommunikation zu vermeiden, sollte dieses Gerät nicht in der Nähe derartiger Geräte betrieben werden, oder die betreffenden Gerät sollten während des Gebrauchs dieses Gerätes ausgeschaltet werden.! Drahtlose Telefone! Drahtlose Faxgeräte! Mikrowellenherde! Drahtlose LAN-Geräte (IEEE802.11b/g)! Drahtlose AV-Geräte! Drahtlose Steuerungen für Videospielsysteme! Mit Mikrowellen arbeitende Geräte des Gesundheitswesens! Bestimmte Baby-MonitorenSonstige, weniger weit verbreitete Geräte, die möglicherweise mit der gleichen Frequenz arbeiten:! Diebstahlverhütungsanlagen! Amateur-Rundfunksender (HAM)! Logistische Verwaltungsanlagen von Lagerhäusern! Unterscheidungsanlagen für Züge und Fahrzeuge des Notdienstes ACHTUNG! Sollte es zu Rauschen auf Ihrem Fernsehbild kommen, besteht die Möglichkeit, dass ein Bluetooth®-Gerät oder dieses Gerät (auch Produkte, die von diesem Gerät unterstützt werden) eine Signalstörung mit dem Antennen-Eingangsanschluss Ihres Fernsehers, Videogeräts, Satellitentuners etc. verursacht. Vergrößern Sie in diesem Fall den Abstand zwischen dem Antennen-Eingangsanschluss und dem Bluetooth-Gerät oder diesem Gerät (auch der Produkte, die von diesem Gerät unterstützt werden).! Wenn sich ein Hindernis auf dem Übertragungsweg zwischen diesem Gerät (einschließlich von Produkten, die von diesem Gerät unterstützt werden) und dem mit Bluetooth drahtloser Technologie ausgestatteten Gerät befindet (z. B. eine Metalltür, Betonwand oder Staniolfolie enthaltendes Isolationsmaterial), muss der Aufstellungsort der Anlage möglicherweise verändert werden, um Signalrauschen und Unterbrechungen zu vermeiden.](https://usermanual.wiki/AlphaTheta/DM40BT.User-manual-part-1/User-Guide-3518939-Page-26.png)
![De8Zusätzliche InformationenStörungssuche! Manchmal wird das Problem auch durch ein externes Gerät verursacht. Überprüfen Sie die anderen verwendeten Komponenten und elektrischen Geräte. Wenn Sie das Problem nicht beheben können, wenden Sie sich an die nächste Pioneer-Kundendienststelle oder an Ihren Händler zum Ausführen der Reparaturarbeit.! Dieses Gerät kann möglicherweise aufgrund von statischer Elektrizität oder anderen externen Einflüssen nicht richtig arbeiten. In diesem Fall kann normaler Betrieb durch Abziehen des Netzsteckers, mindestens 5 Sekunden Warten und erneutes Einstecken wieder hergestellt werden.Häufige ProblemeProblem Prüfen AbhilfeDas Gerät schaltet nicht ein. Ist das Netzkabel richtig angeschlossen? Stecken Sie den Netzstecker in eine Netzsteckdose.Es wird kein Ton vom angeschlossen Gerät ausgegeben oder der Ton ist leise.Ist das angeschlossene Gerät richtig eingerichtet? Stellen Sie den externen Eingang des Geräts und die Lautstärke richtig ein.Ist die Lautstärke auf die richtige Position gestellt? Drehen Sie den [LEVEL]-Regler auf der Vorderseite dieses Geräts im Uhrzeigersinn, um die Lautstärke zu erhöhen.Ist die Stromzufuhr eingeschaltet? Drehen Sie den [POWER]-Schalter an der Rückseite des Geräts.Die POWER-Anzeige (weiß) leuchtet nicht auf.Ist die Stromzufuhr eingeschaltet? Drehen Sie den [POWER]-Schalter an der Rückseite des Geräts.Befinden sich die Lautsprecher im Standby-Betrieb?Schalten Sie den [POWER]-Schalter auf der Vorderseite dieses Geräts einmal aus und nach einigen Sekunden wieder an.Das Gerät wechselt vom Standby-Betrieb nicht in den normalen Betrieb. Ist der Eingangssignalpegel zu niedrig? Erhöhen Sie den Eingangssignalpegel.Verzerrter Ton.Ist die Lautstärke auf die richtige Position gestellt? Drehen Sie den [LEVEL]-Regler auf der Vorderseite dieses Geräts gegen den Uhrzeigersinn, um die Lautstärke zu verringern.Ist der Eingangspegel des angeschlossenen Geräts richtig eingestellt? Stellen Sie den Ausgangspegel des angeschlossenen Geräts richtig ein.Es wird ständig Ton in hoher Lautstärke ausgegeben (Oszillation). Ist die Lautstärke auf die richtige Position gestellt? Drehen Sie den [LEVEL]-Regler auf der Vorderseite dieses Geräts gegen den Uhrzeigersinn, um die Lautstärke zu verringern.Es wird nur Ton vom linken Lautsprecher ausgegeben. Ist das Lautsprecherkabel richtig angeschlossen? Schließen Sie den linken und rechten Lautsprecher richtig an.Das Gerät wird automatisch ausgeschal-tet (Standby-Betrieb).Wird für eine bestimmte Zeit (ca. 30 Minuten) oder länger kein Ton ausgegeben?Speisen Sie ein Signal von der Cinch- oder der Stereo-Miniklinkenstecker-Eingangsbuchse ein.Oder drücken Sie die Pairing-Taste an der Vorderseite des Geräts.Ist der Eingangssignalpegel zu niedrig? Erhöhen Sie den Eingangssignalpegel.Bei einer Verbindung zur INPUT 1- oder INPUT 2-BuchseProblem Prüfen AbhilfeEs wird kein Ton vom angeschlossen Gerät ausgegeben oder der Ton ist leise.Sind die Verbindungskabel richtig angeschlossen? Schließen Sie die Verbindungskabel richtig an.Sind Buchsen und Stecker verschmutzt? Reinigen Sie Buchsen und Stecker vor dem Herstellen von Verbindungen.Der Ton wird nur von einem Lautsprecher ausgegeben. Ist das Gerät richtig angeschlossen? Schließen Sie das Gerät an die linke und rechte Eingangsbuchse an.Der Ton wird unterbrochen oder Rauschen ist zu hören.Gibt es ein Verbindungsproblem mit den Verbindungskabeln? Schließen Sie die Verbindungskabel erneut an.Bei der Verbindung über BluetoothProblem Prüfen AbhilfeEs kann keine Verbindung hergestellt werden, der Ton wird unterbrochen oder ein Rauschen ist zu hören.Befindet sich ein Gerät in der Nähe, das elektro-magnetische Wellen im 2,4-GHz-Bereich pro-duziert (Mikrowellenherd, WLAN-Gerät oder ein anderes Bluetooth-Gerät etc.)?Stellen Sie entweder das Gerät, das elektromagnetische Wellen erzeugt, weiter weg von diesem Gerät auf oder beenden Sie dessen Verwendung.Ist die Entfernung zum Bluetooth-Gerät zu weit? Oder gibt es eine Wand oder ein Hindernis, durch das das Signal in dem Bereich dazwischen blockiert wird?Stellen Sie dieses Gerät und das verbundene Bluetooth-Gerät näher zuei-nander auf. Oder ändern Sie die Position des Bluetooth-Geräts oder dieses Geräts.Läuft eine andere Anwendung als eine Anwendung zur Musikwiedergabe auf dem Bluetooth-Gerät?Schließen Sie alle Anwendungen außer der Anwendung zur Musikwiedergabe auf dem Bluetooth-Gerät.Unterstützt das Bluetooth-Gerät, das Sie verbinden möchten, A2DP? Benutzen Sie ein Bluetooth-Gerät, das A2DP unterstützt.Wurde das Pairing mit dem Bluetooth-Gerät richtig ausgeführt?Schalten Sie dieses Gerät und das Bluetooth-Gerät aus und wieder ein, und führen Sie danach die Kopplung erneut aus.](https://usermanual.wiki/AlphaTheta/DM40BT.User-manual-part-1/User-Guide-3518939-Page-28.png)

![It 5ItalianoInstallazione e collegamentiProcedura di installazioneLa riproduzione di un diffusore viene influenzata dalle condizioni pre-senti nella stanza di ascolto. Per ottenere condizioni di ascolto ottimali, tenere in considerazione le caratteristiche di ambiente prima di ini-ziare l’installazione.! Posizionare i diffusori a livello degli orecchi. ! Per ottenere un effetto stereo naturale, installare i diffusori di sinistra e destra in posizioni simmetriche ed equidistanti dalla posizione di ascolto.! Applicare i cuscinetti in dotazione nella parte inferiore dell’unità per prevenire gli scivolamenti.ATTENZIONEConservare i piccoli ricambi fuori dalla portata dei bambini e dei bebé. Se inghiottiti accidentalmente, recarsi immediatemente dal medico.D41-6-4_A1_It! Installare i diffusori rivolti verso l’interno, con un’angolazione totale di 60 gradi rispetto alla posizione di ascolto, ottenuta angolando di 30 gradi i diffusori destro e sinistro.50 ° a 60 ° ATTENZIONEPer agevolare il corretto raffreddamento, assicurarsi di riservare spa-zio sufficiente tra i diffusori e le pareti circostanti o gli altri componenti (minimo 15 cm in alto, indietro, e sul lato destro e sinistro di ciascun diffusore). Se non si lascia spazio insufficiente tra i diffusori e le pareti o gli altri componenti, le temperature interne potrebbero salire ecces-sivamente, provocando malfunzionamenti o danni.Collegamenti! Prima di fare o modificare collegamenti, non mancare di spe-gnere l’apparecchio e di scollegare il cavo di alimentazione.! Consultare le istruzioni per l’uso del componente da collegare.! Collegare il cavo di alimentazione dopo che tutti i collegamenti fra dispositivi sono stati fatti.! Usare solo il cavo di alimentazione accluso.! Fare attenzione al volume perché i segnali ricevuti dai terminali [INPUT 1] e [INPUT 2] e dall’interfaccia Bluetooth vengono missati.Cavi di collegamentoCollegare i cavi di collegamento dei diffusori acclusi ai diffusori.1 Incidere leggermente per circa 1 cm l’estremità dei cavi per diffusori, ruotare e rimuovere il rivestimento isolante.Dopo aver rimosso il rivestimento isolante, attorcigliare con cura i fili conduttori.2 Collegare i cavi di collegamento dei diffusori acclusi ai terminali dei diffusori sui lati SINISTRO e DESTRO.3 Inserire i fili conduttori nei terminali mentre si tiene premuto il fermo sui terminali dei diffusori.Collegare il cavo del diffusore rigato di rosso al lato del terminale + (rosso) e il cavo del diffusore non rigato di rosso al lato del terminale – (nero).Rosso +Nero−Rigato di rosso ATTENZIONE! Dopo aver collegato i terminali, tirare delicatamente i cavi dei diffusori per accertarsi che le estremità dei cavi dei diffusori siano saldamente collegate ai terminali. Un collegamento non saldo potrebbe provocare interruzioni della trasmissione dell’audio o emissione di rumore.! Quando si collegano i cavi dei diffusori, attorcigliare con cura i fili conduttori e accertarsi che i fili conduttori non sporgano dai terminali dei diffusori. Se i fili conduttori sporgono dai terminali dei diffusori, potrebbero entrare in contatto tra di loro o con il pannello posteriore. Ciò potrebbe sottoporre l’amplificatore a carico ecces-sivo, con possibili malfunzionamenti o interruzioni dell’audio.! Se si provocano errori relativi alla polarità (+, –) sui lati SINISTRO e DESTRO quando si collegano i cavi dei diffusori SINISTRO e DESTRO, potrebbe non essere possibile ottenere il normale effetto stereo.](https://usermanual.wiki/AlphaTheta/DM40BT.User-manual-part-1/User-Guide-3518939-Page-33.png)
![It6Ascolto della musica trasmessa da un dispositivo BluetoothQuesti diffusori consentono di ascoltare in wireless i brani salvati su un dispositivo Bluetooth.Quando si utilizzano i diffusori per la prima volta o quando si collega un nuovo dispositivo Bluetooth ai diffusori, è necessario accoppiare i diffusori e il dispositivo Bluetooth.L’accoppiamento (la registrazione reciproca dei diffusori) è l’operazione necessaria per collegare il dispositivo Bluetooth ai diffusori.Procedura di accoppiamento e collegamento1 Accendere l’interruttore [POWER] per collegare l’alimentazione ai diffusori.! L’indicatore Bluetooth lampeggia per circa 30 secondi e i diffusori passano in stato di accoppiamento.! Se l’indicatore Bluetooth è spento, premere il pulsante di accop-piamento per almeno 2 secondi per passare nuovamente in stato di accoppiamento.2 Eseguire l’operazione di accoppiamento sul dispositivo Bluetooth.Eseguire l’operazione mentre i diffusori sono in stato di accoppiamento.Per dettagli, vedere le istruzioni per l’uso del dispositivo Bluetooth.3 Quando l’indicatore Bluetooth smette di lampeggiare e rimane acceso costantemente, l’accoppiamento (il collegamento) è completato. Se non è possibile eseguire l’accoppiamento entro 30 secondi, l’indicatore Bluetooth smette di lampeggiare e si spegne.! È possibile collegare un dispositivo Bluetooth già accoppiato in precedenza eseguendo l’operazione dal lato del dispositivo Bluetooth, se i diffusori sono accesi.RiproduzioneSe si riproduce musica sul dispositivo Bluetooth collegato, la musica viene trasmessa dai diffusori.! Premendo il pulsante di accoppiamento sul dispositivo Bluetooth durante la riproduzione della musica è possibile ese-guire l’operazione di pausa/riproduzione (la stessa funzione eseguita dal pulsante pausa/riproduzione del dispositivo Bluetooth). ATTENZIONE! Durante l’accoppiamento (collegamento), spostare il dispositivo Bluetooth vicino ai diffusori.! Al completamento del primo collegamento, l’audio potrebbe essere emesso a volume eccessivo, pertanto si consiglia di abbassare il volume prima della riproduzione.! A seconda dell’applicazione utilizzata, l’operazione di pausa/ripro-duzione potrebbe non essere possibile.! A seconda del dispositivo Bluetooth, il collegamento dei diffusori potrebbe non essere possibile.! Se si desiderano accoppiare i diffusori a un dispositivo Bluetooth diverso, disattivare la funzione Bluetooth del dispositivo Bluetooth correntemente collegato o interrompere il collegamento prima di eseguire l’operazione di accoppiamento.! I diffusori memorizzano le informazioni sull’accoppiamento per un massimo di otto dispositivi Bluetooth e cercano di collegarsi all’ultimo dispositivo accoppiato se si preme il pulsante di accoppi-amento quando i diffusori non sono collegati a nessun dispositivo Bluetooth.Avvertenza sulle onde radioQuesta unità impiega frequenze radio da 2,4 GHz, una banda di fre-quenza usata da altri sistemi wireless (vedi la lista più oltre). Per pre-venire i rumori o l’interruzione della comunicazione, non usare questa unità vicino a simili dispositivi, oppure accertarsi che questi siano spenti durante l’uso.! Telefoni cordless! Telefax cordless! Forni a microonde! Dispositivi LAN wireless (IEEE802.11b/g)! Dispositivi AV wireless! Controller wireless per sistemi per il gioco! Attrezzature sanitarie a base di microonde! Alcuni monitor piccoliAltre attrezzature, meno comuni, che possono funzionare sulla stessa frequenza:! Sistemi antifurto! Stazioni per radioamatori (HAM)! Sistemi di gestione logistica per magazzini! Sistemi di discriminazione per treni e veicoli di emergenza ATTENZIONE! Se l’immagine del televisore è disturbata, è possibile che un dispo-sitivo Bluetooth® o questa unità (inclusi i prodotti supportati da questa unità) causino interferenze di segnale col connettore d’in-gresso dell’antenna del televisore, impianto video, sintonizzatore satellitare, ecc. In tal caso, aumentare la distanza tra il connet-tore d’ingresso dell’antenna e il dispositivo Bluetooth o questa unità (inclusi i prodotti supportati da questa unità).! Se un oggetto (ad esempio una porta in metallo, un muro in cemento, o dell’isolamento contenente un foglio fra questa unità in stagnola) dovesse ostacolare la trasmissione di segnale da questa unità (compresi i dispositivi che essa supporta) ed il dis-positivo dotato di tecnologia wireless Bluetooth, potrebbe essere necessario cambiare la posizione del sistema per evitare i rumori e le interruzioni.](https://usermanual.wiki/AlphaTheta/DM40BT.User-manual-part-1/User-Guide-3518939-Page-34.png)
![It8Informazioni aggiuntiveDiagnostica! A volte il problema risiede in un altro componente. Controllare tutti i componenti ed apparecchi elettronici usati. Se il problema non può venire eliminato, chiedere assistenza tecnica al più vicino centro assistenza o rivenditore autorizzato Pioneer.! Questa unità può non funzionare a causa di elettricità statica o altre influenze esterne. In tal caso, essa torna alla normalità scollegando il cavo di alimentazione, attendendo 5 secondi o più, quindi ricollegando il cavo.Problemi comuniProblema Controllare RimedioL’apparecchio non è acceso. Il cavo di alimentazione è collegato correttamente? Collegare il cavo di alimentazione ad una presa di c.a.Non viene emesso alcun suono dai dispo-sitivi collegati o il volume è basso.Il dispositivo collegato è configurato correttamente? Configurare correttamente l’ingresso per il dispositivo esterno e il volume.Il volume è in posizione corretta? Girare in senso orario il comando [LEVEL] sul pannello anteriore di questa unità per aumentare il volume.L’alimentazione è collegata? Premere l’interruttore [POWER] sul pannello posteriore del diffusore.L’indicatore POWER (bianco) non si accende.L’alimentazione è collegata? Premere l’interruttore [POWER] sul pannello posteriore del diffusore.I diffusori sono in stato di standby? Spegnere l’interruttore [POWER] sul pannello posteriore di questa unità e quindi riaccenderlo dopo alcuni secondi.L’unità non si riprende dallo stato di standby (non si riaccende). Il livello del segnale in ingresso è troppo basso? Aumentare il livello del segnale in ingresso.Audio distorto.Il volume è in posizione corretta? Girare in senso antiorario il comando [LEVEL] sul pannello anteriore di questa unità per ridurre il volume.Il livello del segnale in ingresso dal dispositivo collegato è corretto? Regolare il livello di uscita del dispositivo collegato.Oscillazioni (viene emesso continua-mente suono rumoroso). Il volume è in posizione corretta? Girare in senso antiorario il comando [LEVEL] sul pannello anteriore di questa unità per ridurre il volume.Il suono viene emesso solo dal diffusore sinistro. I cavi dei diffusori sono collegati correttamente? Collegare correttamente i diffusori destro e sinistro.I diffusori si spengono (passano in stato di standby) automaticamente.Non è stato emesso alcun suono continuamente per il periodo predefinito (circa 30 minuti) o più?Inviare segnale ai terminali di ingresso RCA o spina mini stereo.Oppure premere il pulsante di accoppiamento sul pannello anteriore di questa unità.Il livello del segnale in ingresso è basso? Aumentare il livello del segnale in ingresso.Quando i diffusori sono collegati tramite i terminali INPUT 1 o INPUT 2Problema Controllare RimedioNon viene emesso alcun suono dai dispo-sitivi collegati o il volume è basso.I cavi di collegamento sono collegati correttamente? Collegare correttamente i cavi di collegamento.I terminali o gli spinotti sono sporchi? Pulire i terminali e gli spinotti prima di procedere con i collegamenti.Il suono viene emesso solo da un diffusore. Il dispositivo è collegato correttamente? Collegare il dispositivo ai terminali di ingresso sia destro che sinistro.Il suono viene interrotto o si avverte rumore.Vi è un problema di contatto dei cavi di collegamento? Ricollegare i cavi di collegamento.Quando i diffusori sono collegati tramite interfaccia BluetoothProblema Controllare RimedioNon è possibile stabilire il collegamento oppure il suono viene interrotto o si avverte rumore.Nelle vicinanze vi è un dispositivo che produce onde elettromagnetiche nella banda di 2,4 GHz (forno a microonde, dispositivo LAN wireless, altro dispositivo Bluetooth, ecc.)?Installare l’unità più lontano dal dispositivo o interrompere l’uso del disposi-tivo che produce onde elettromagnetiche.La distanza dal dispositivo Bluetooth è eccessiva? Oppure tra il prodotto e il dispositivo si frappone un muro o un ostacolo che blocca il segnale?Avvicinare il dispositivo Bluetooth collegato e l’unità. Oppure modificare la posizione del dispositivo Bluetooth rispetto all’unità.Sul dispositivo Bluetooth è in esecuzione un’ap-plicazione diversa da quella di riproduzione musicale?Sul dispositivo Bluetooth chiudere tutte le applicazioni tranne quella di riproduzione musicale.Il dispositivo Bluetooth che si desidera collegare supporta i profili A2DP? Utilizzare un dispositivo Bluetooth che supporti i profili A2DP.L’accoppiamento col dispositivo Bluetooth è stato eseguito correttamente?Spegnere e riaccendere questa unità e il dispositivo Bluetooth, quindi ese-guire nuovamente l’accoppiamento.](https://usermanual.wiki/AlphaTheta/DM40BT.User-manual-part-1/User-Guide-3518939-Page-36.png)
![Nl 5NederlandsInstallatie en aansluitingenInstallatieprocedureHet weergavegeluid van luidsprekers wordt beïnvloed door de omstan-digheden in de luisterruimte. Om een optimale luisteromgeving te creëren, moet u terdege rekening houden met de omstandigheden op de installatieplaats voordat u met de feitelijke installatie begint.! Plaats de luidsprekers op oorniveau. ! Voor een natuurlijk stereo-effect moeten de linker en de rechter luidspreker symmetrisch en op gelijke afstand van de luisterplaats worden opgesteld.! Bevestig de meegeleverde kussens aan de onderkant van het toestel om glijden te voorkomen.WAARSCHUWINGBerg kleine onderdelen op buiten het bereik van kinderen en peuters. Raadpleeg onmiddellijk een arts indien kleine onderdelen per ongeluk worden ingeslikt.D41-6-4_A1_Nl! Installeer de luidsprekers naar binnen gericht zodat de hoek op de luisterpositie in totaal 60 graden bedraagt, 30 graden elk voor de linker en de rechter luidspreker.50 ° tot 60 ° WAARSCHUWINGVoor een goede koeling moet u ervoor zorgen dat er voldoende ruimte is tussen de luidsprekers en eventuele muren of andere componenten in de buurt (minimaal 15 cm vrije ruimte boven, achter, en rechts en links van elke luidspreker). Wanneer er onvoldoende ruimte is tussen de luidspreker en de muur of andere componenten, kan de interne temperatuur te hoog oplopen met een defect of beschadiging tot gevolg.Aansluitingen! Schakel altijd eerst de stroom uit en trek de stekker uit het stopcon-tact alvorens u enige aansluiting maakt of verbreekt.! Zie tevens de gebruiksaanwijzingen van de aan te sluiten apparatuur.! Sluit het netnoer pas aan nadat alle aansluitingen tussen de appara-tuur volledig zijn gemaakt.! Gebruik alleen het bijgeleverde netsnoer.! Wees voorzichtig wat het volume betreft omdat de ingangssignalen van de aansluitingen [INPUT 1], [INPUT 2] en Bluetooth gemengd worden.De kabels aansluitenSluit de meegeleverde luidsprekerdraad op de luidsprekers aan.1 Strip ongeveer 1 cm van het uiteinde van de meegeleverde luidsprekerdraad, en draai en verwijder de isolatie.Draai of vlecht de kerndraden goed nadat u de isolatie hebt verwijderd.2 Sluit de meegeleverde luidsprekerdraad aan op de luidsprekeraansluitingen aan de LINKER en de RECHTER kant.3 Duw de klem van de luidsprekeraansluiting naar beneden en steek de kerndraad in de aansluiting.Sluit de luidsprekerdraad met de rode lijn aan op de + aansluiting (rood), en de luidsprekerdraad zonder de rode lijn op de – aansluiting (zwart).Rood +Zwart −Met de rode lijn WAARSCHUWING! Trek na het aansluiten lichtjes aan de luidsprekerdraad om te controleren of deze met het uiteinde stevig in de aansluitingen vastzit. Een losse aansluiting kan leiden tot onderbrekingen in de geluidsweergave of ruis.! Draai de kerndraden goed in elkaar bij het aansluiten van de luidsprekerdraad, en zorg ervoor dat de kerndraden niet uit de luidsprekeraansluitingen naar buiten steken. Als de kerndraden uit de luidsprekeraansluiting naar buiten steken, kunnen ze het ach-terpaneel of elkaar raken. Daardoor kan de versterker bovenmatig belast worden en stoppen of defect raken.! Als de polariteit (+, –) van de LINKER en RECHTER kant verkeerd is bij het aansluiten van de LINKER en RECHTER luidsprekerdraad, kan geen normaal stereo-effect meer worden verkregen.](https://usermanual.wiki/AlphaTheta/DM40BT.User-manual-part-1/User-Guide-3518939-Page-41.png)
![Nl6Naar de muziek van een Bluetooth-apparaat luisterenMet deze luidsprekers kunt u draadloos naar muziekstukken luisteren die op een Bluetooth-apparaat zijn opgeslagen.Wanneer u de luidsprekers voor het eerst gebruikt of een nieuw Bluetooth-apparaat op de luidsprekers aansluit, dient u de luidsprekers en het Bluetooth-apparaat te koppelen.Koppelen (wederzijdse registratie van de apparaten) is een vereiste handeling om een Bluetooth-apparaat en de luidsprekers te verbinden.Waarschuwing betreffende radiogolvenDit apparaat maakt gebruik van een radiogolffrequentie van 2,4 GHz, wat een band is die ook wordt gebruikt door andere draadloze systemen (zie de onderstaande lijst). Om ruis of onderbrekingen in de communicatie te voorkomen, dient u dit apparaat niet in de buurt van dergelijke appa-ratuur te gebruiken, of u dient ervoor te zorgen dat die apparatuur tijdens het gebruik van dit apparaat uitgeschakeld is.! Draadloze telefoons! Draadloze faxmachines! Magnetrons! Draadloze LAN-apparaten (IEEE802.11b/g)! Draadloze AV-apparatuur! Draadloze regelaars voor spelsystemen! Gezondheidsapparaten op basis van microgolven! Bepaalde babyphonesAndere, minder bekende apparatuur die op dezelfde frequentie werkzaam kan zijn:! Antidiefstalsystemen! Amateurradiostations (HAM)! Logistieke beheersystemen in magazijnen! Discriminatiesystemen voor trein- of noodhulpvoertuigen WAARSCHUWING! Als er ruis verschijnt in het televisiebeeld, is het mogelijk dat een Bluetooth®-apparaat of dit toestel (met inbegrip van producten die door dit toestel worden ondersteund) signaalinterferentie veroorzaakt met de antenne-ingangsaansluiting van uw televisie, videospeler, satellietontvanger, e.d. Vergroot in dat geval de afstand tussen de antenne-ingangsaansluiting en het Bluetooth-apparaat of dit toestel (met inbegrip van producten die door dit toestel worden ondersteund).! Als er iets is dat de baan blokkeert tussen dit apparaat (inclusief de apparatuur die door dit apparaat wordt ondersteund) en de appa-ratuur uitgerust met Bluetooth draadloze technologie (zoals een metalen deur, een betonwand of isolatie waarin aluminiumfolie is verwerkt), kan het zijn dat u de plaats van uw systeem moet veran-deren om signaalruis en andere onderbrekingen te voorkomen.Procedure voor koppelen en verbinden1 Zet de [POWER]-schakelaar aan om de luidsprekers aan te zetten.! De Bluetooth-indicator knippert ongeveer 30 seconden en de luid-sprekers schakelen over naar de koppelstand.! Als de Bluetooth-indicator uitgaat, druk dan minstens 2 seconden op de koppeltoets om weer over te schakelen naar de koppelstand.2 Voer het koppelen uit op het Bluetooth-apparaat. Doe dit terwijl de luidsprekers in de koppelstand staan.Zie voor details de handleiding van uw Bluetooth-apparaat.3 Als de Bluetooth-indicator stopt met knipperen en blijft branden, is het koppelen (verbinden) voltooid. Als het koppelen niet binnen 30 seconden wordt uitgevoerd, stopt de Bluetooth-indicator met knipperen en gaat de indicator uit.! Een Bluetooth-apparaat dat al gekoppeld is, kan verbonden worden door het verbinden op het Bluetooth-apparaat uit te voeren als de luidsprekers zijn ingeschakeld.WeergevenAls u muziek op een verbonden Bluetooth-apparaat afspeelt, wordt de op het Bluetooth-apparaat afgespeelde muziek via de luidsprekers weergegeven.! Als u tijdens de muziekweergave op het Bluetooth-apparaat op de koppeltoets drukt, kunt u pauzeren/afspelen (zelfde functie als de knop voor pauzeren/afspelen van het Bluetooth-apparaat). ATTENTION! Verplaats het Bluetooth-apparaat tijdens het koppelen (verbinden) dicht bij de luidsprekers.! Er kan luid geluid worden weergegeven wanneer voor de eerste keer wordt afgespeeld na het verbinden; daarom raden we aan om vóór het afspelen het volume te verlagen.! Afhankelijk van de gebruikte applicatie is het mogelijk dat pau-zeren/afspelen met de koppeltoets niet werkt.! Afhankelijk van het Bluetooth-apparaat kan mogelijk geen verbind-ing worden gemaakt met de luidsprekers.! Als u de luidsprekers met een ander Bluetooth-apparaat wilt kop-pelen, zet dan de Bluetooth-functie van het momenteel verbonden Bluetooth-apparaat uit of verbreek de verbinding voordat u het koppelen uitvoert.! De luidsprekers bewaren de koppelgegevens van maximaal acht Bluetooth-apparaten, en proberen verbinding te maken met het laatst gekoppelde apparaat als de koppeltoets wordt ingedrukt wanneer er geen verbinding is met een Bluetooth-apparaat.](https://usermanual.wiki/AlphaTheta/DM40BT.User-manual-part-1/User-Guide-3518939-Page-42.png)
![Nl8Aanvullende informatieVerhelpen van storingen! Soms ligt de oorzaak van het probleem bij een ander apparaat. Controleer daarom ook de andere componenten en elektrische apparatuur die gebruikt wordt. Als u het probleem niet kunt verhelpen, verzoekt u dan uw dichtstbijzijnde officiële Pioneer onderhoudsdienst of uw vakhandelaar om het apparaat te laten repareren.! Dit apparaat kan soms niet goed werken vanwege statische elektriciteit of andere externe invloeden. In dat geval kunt u de normale werking herstel-len door de stekker uit het stopcontact te trekken en die na ongeveer 5 seconden of langer weer aan te sluiten.AlgemeenProbleem Controle OplossingDe stroom wordt niet ingeschakeld. Is het netsnoer naar behoren aangesloten? Steek de netsnoerstekker in het stopcontact.Er wordt geen geluid uit het aangesloten apparaat weergegeven of het geluid is zwak.Is het aangesloten apparaat juist ingesteld? Stel de externe ingang van het apparaat en het volume juist in.Staat het volume in de juiste stand? Draai de regelaar [LEVEL] op het voorpaneel van dit toestel met de wijzers van de klok mee om het volume te verhogen.Is de stroom ingeschakeld? Zet de schakelaar [POWER] op het achterpaneel van dit toestel aan.De indicator POWER (wit) licht niet op.Is de stroom ingeschakeld? Zet de schakelaar [POWER] op het achterpaneel van dit toestel aan.Staan de luidsprekers in de stand-bystand? Zet de schakelaar [POWER] op het achterpaneel van dit toestel een keer uit en na een paar seconden weer aan.Het toestel komt niet uit de stand-bystand (gaat niet aan). Is het ingangssignaalniveau laag? Verhoog het ingangssignaalniveau.Vervorming in het geluid.Staat het volume in de juiste stand? Draai de regelaar [LEVEL] op het voorpaneel van dit toestel tegen de wijzers van de klok in om het volume te verlagen.Is het niveau voor de ingang van het aangesloten apparaat juist ingesteld? Stel het uitgangsniveau van het aangesloten apparaat juist in.Er is oscillatie (er wordt voortdurend luid geluid uitgevoerd). Staat het volume in de juiste stand? Draai de regelaar [LEVEL] op het voorpaneel van dit toestel tegen de wijzers van de klok in om het volume te verlagen.Er klinkt alleen geluid uit de linker luidspreker. Is de luidsprekerdraad juist aangesloten? Sluit de linker en rechter luidspreker juist aan.De stroom wordt automatisch uitgescha-keld (stand-bystand).Is er gedurende een bepaalde tijd (ongeveer 30 minuten) of langer geen geluid geweest?Voer een signaal in via de RCA- of stereoministekker-ingangsaansluiting.Of druk op de koppeltoets op het voorpaneel van dit toestel.Is het ingangssignaalniveau laag? Verhoog het ingangssignaalniveau.Indien verbonden met de aansluiting INPUT 1 of INPUT 2Probleem Controle OplossingEr wordt geen geluid uit het aangesloten apparaat weergegeven of het geluid is zwak.Zijn de aansluitsnoeren goed aangesloten? Zorg dat de aansluitsnoeren juist zijn aangesloten.Zijn de aansluitbussen en de stekkers vuil? Maak de aansluitbussen en de stekkers schoon voordat u aasluitingen gaat maken.Er klinkt alleen geluid uit één luidspreker. Is het apparaat juist aangesloten? Sluit het apparaat aan op zowel de linker als de rechter ingangsaansluiting.Het geluid wordt onderbroken of er is ruis hoorbaar.Is er een contactprobleem met de verbindingskabels? Sluit de verbindingskabels weer aan.Indien verbonden via BluetoothProblème Vérification SolutionKan geen verbinding maken of het geluid wordt onderbroken of er is ruis hoorbaar.Is er in de buurt apparatuur die elektromagne-tische golven in de 2,4 GHz-band produceert (magnetron, draadloos LAN-apparaat, ander Bluetooth-apparaat, e.d.)?Installeer dit toestel uit de buurt van die apparatuur of stop de andere appa-ratuur die elektromagnetische golven afgeeft.Is de afstand vanaf het Bluetooth-apparaat te groot? Of wordt het signaal geblokkeerd door een muur of ander obstakel in de tussenruimte?Plaats dit toestel en het verbonden Bluetooth-apparaat dichter bij elkaar. Of wijzig de positie van het Bluetooth-apparaat of dit toestel.Wordt op het Bluetooth-apparaat een andere applicatie dan de applicatie voor muziekweergave uitgevoerd?Sluit andere applicaties dan de applicatie voor muziekweergave op het Bluetooth-apparaat.Ondersteunt het Bluetooth-apparaat dat u wilt verbinden A2DP? Gebruik een Bluetooth-apparaat dat A2DP ondersteunt.Is het koppelen met het Bluetooth-apparaat cor-rect uitgevoerd?Zet de stroom van dit toestel en het Bluetooth-apparaat uit en weer aan, en voer het koppelen opnieuw uit.](https://usermanual.wiki/AlphaTheta/DM40BT.User-manual-part-1/User-Guide-3518939-Page-44.png)
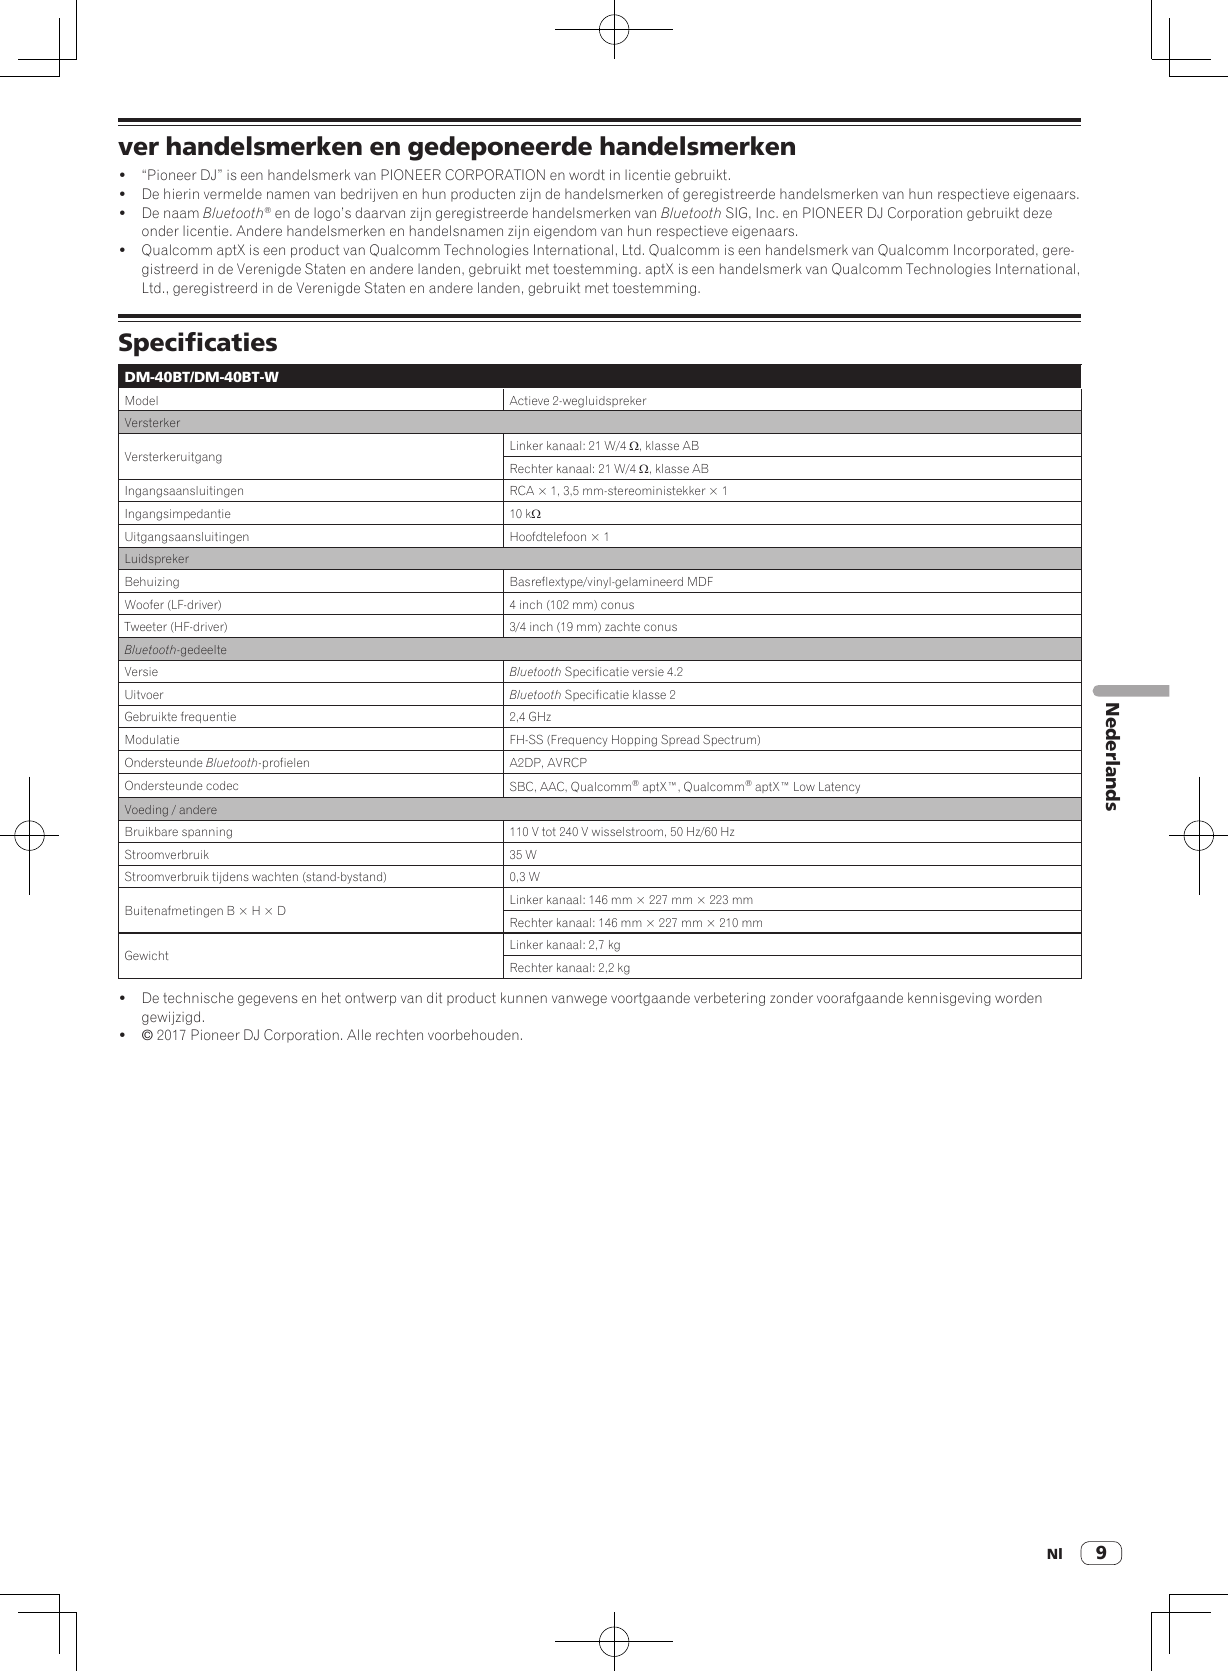
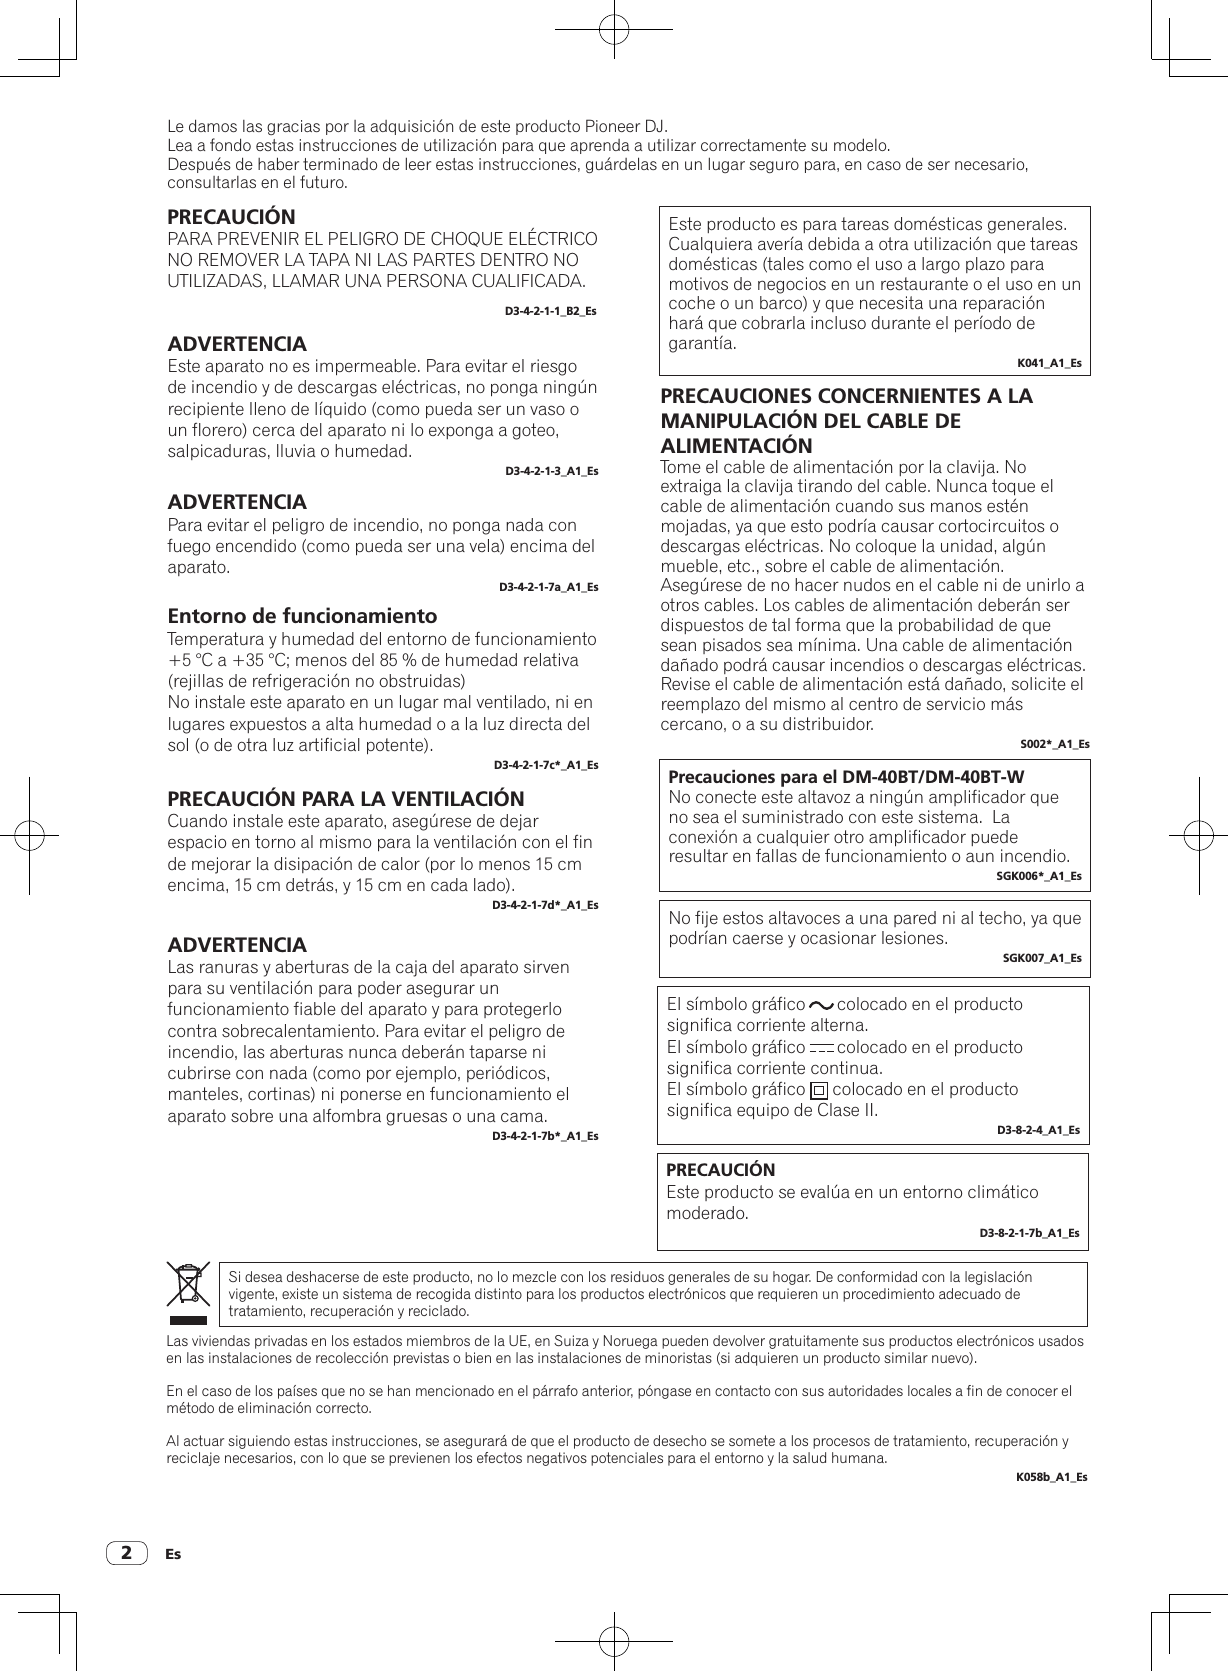

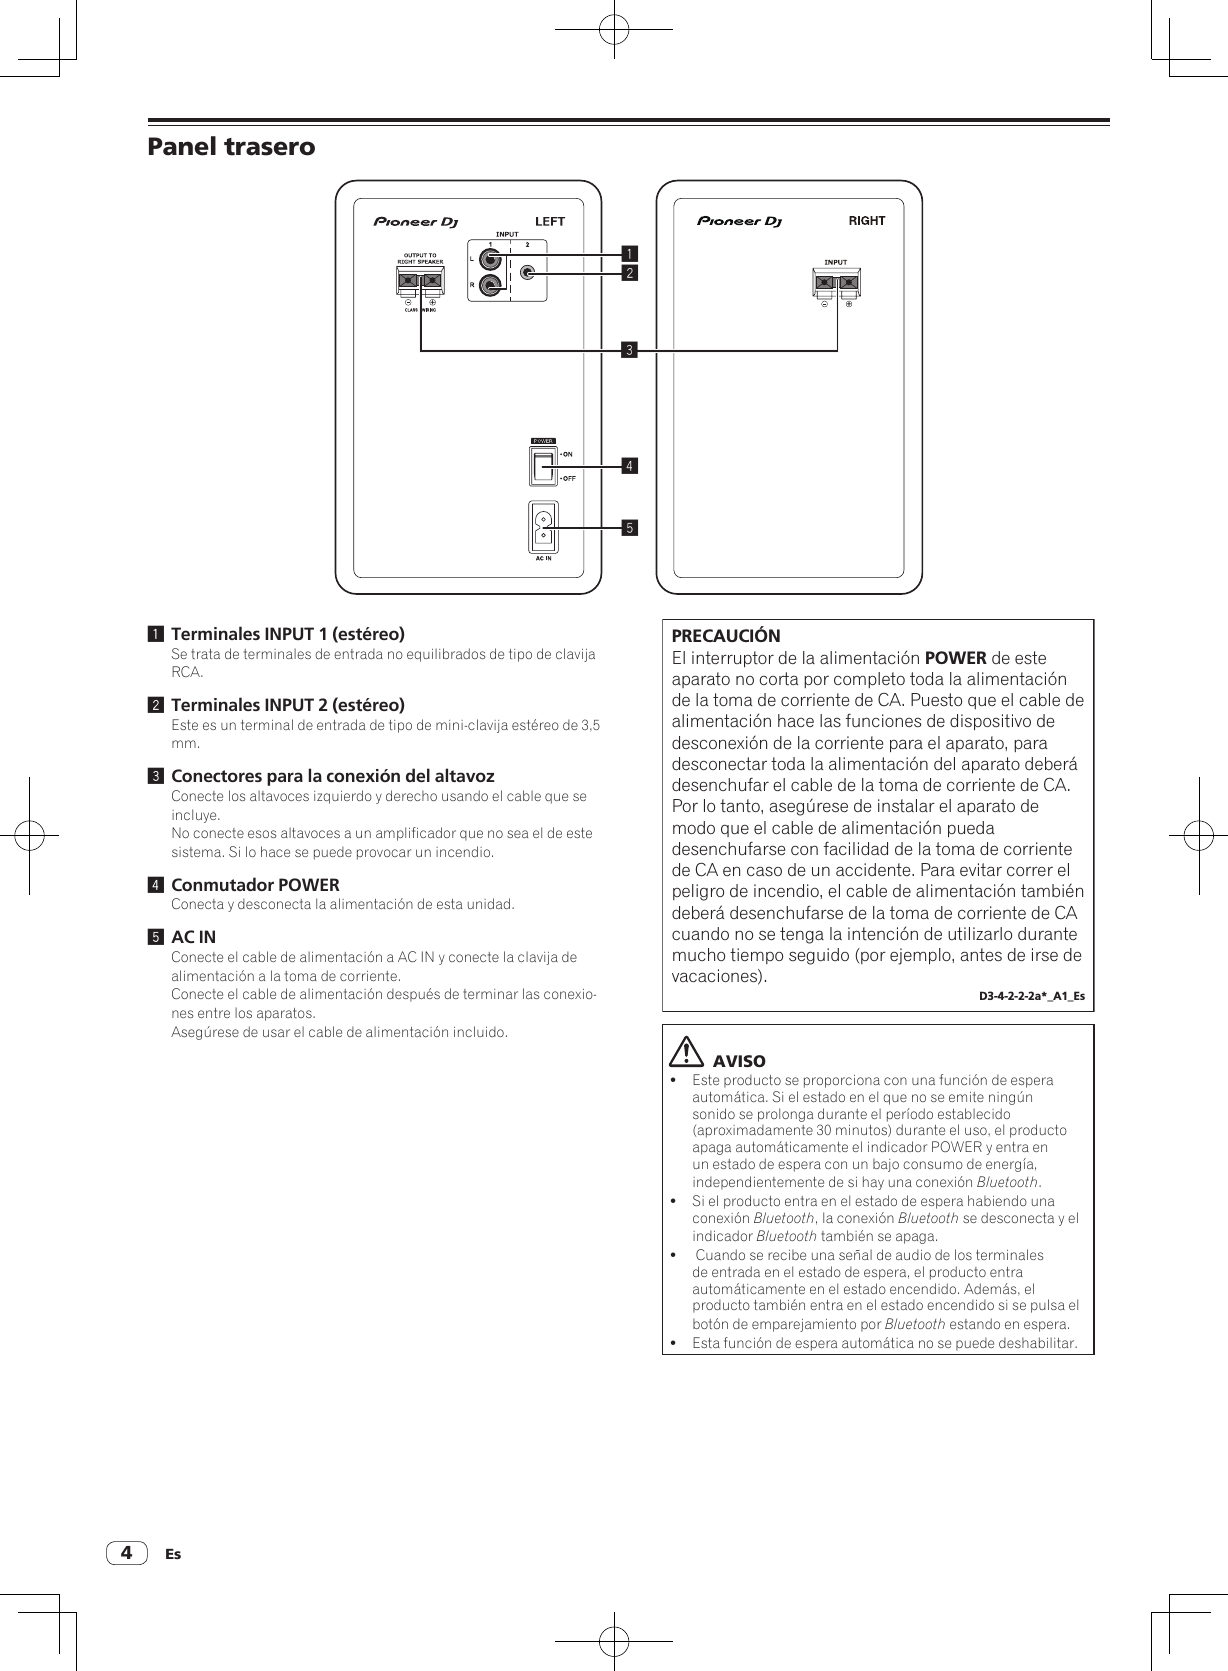
![Es 5EspañolInstalación y conexionesProcedimiento de instalaciónEl sonido de reproducción de un altavoz queda ligeramente afectado por las condiciones de la sala de audición. Para producir las mejores condi-ciones para la audición, tenga debidamente en cuenta las condiciones del lugar de instalación antes de comenzar la instalación.! Coloque los altavoces al nivel de los oídos.! Para obtener un efecto estéreo natural, los altavoces derecho e izquierdo deben instalarse simétricamente y en posiciones equidis-tantes de la posición de audición.! Fije las almohadillas suministradas en la parte inferior de la unidad para evitar que resbale.ADVERTENCIAGuarde las piezas pequeñas fuera del alcance de los niños. Si las ingirieran accidentalmente, póngase de inmediato en contacto con un médico.D41-6-4_A1_Es! Instale los altavoces orientados hacia dentro con un ángulo total de 60 grados desde la posición de escucha, 30 grados para cada uno de los altavoces, izquierdo y derecho.50 ° a 60 ° AVISOPara favorecer una refrigeración adecuada asegúrese de que haya suficiente espacio entre los altavoces, las paredes cercanas y otros componentes (mínimo de 15 cm o más por encima, detrás, a la dere-cha y a la izquierda de cada altavoz). Si deja un espacio insuficiente entre el altavoz y las paredes u otros componentes, puede provocar que aumente la temperatura interior, lo que puede provocar un mal funcionamiento o daños.Conexiones! Asegúrese de desconectar la alimentación y desenchufar el cable de alimentación de la toma de corriente siempre que haga o cambie conexiones.! Consulte el manual de instrucciones del componente que va a ser conectado.! Conecte el cable de alimentación después de terminar las conexio-nes entre los aparatos.! Asegúrese de usar el cable de alimentación incluido.! Tenga cuidado con el volumen porque las señales de entrada del ter-minal [INPUT 1], del terminal [INPUT 2] y del Bluetooth se mezclan.Conexión de los cablesConecte a los altavoces el cable de altavoces que se incluye.1 Pele 1 cm de la punta del cable que se incluye y retuerza y retire el aislante expuesto.Tras retirar el aislante, retuerza los cables.2 Conecte el cable del altavoz que se incluye con los terminales del altavoz de los lados IZQUIERDO y DERECHO.3 Inserte los cables en los terminales mientras presiona la pinza del terminal del altavoz.Conecte el cable del altavoz con la línea roja en el lado del terminal + (rojo) y el cable del altavoz sin la línea roja en el lado del terminal – (negro).Rojo +Negro −Con la línea roja AVISO! Tras conectar los terminales, tire ligeramente del cable del altavoz para asegurarse de que las puntas del cable del altavoz se hayan conectado de forma segura con los terminales. Una conexión floja puede hacer que la salida de audio se interrumpa o se emita ruido.! Cuando conecte el cable del altavoz, retuerza a fondo los cables y asegúrese de que no sobresalgan de los terminales del altavoz. Los cables que sobresalgan de los terminales del altavoz pueden entrar en contacto con el panel trasero o entre ellos. Esto puede provocar una carga excesiva en el amplificador, lo que puede hacer que no funcione o puede provocar una avería.! Si se comete una equivocación con las polaridades (+, –) en los lados IZQUIERDO y DERECHO cuando se conecta el cable del altavoz IZQUIERDO y DERECHO, es posible que ya no se obtenga el efecto de estéreo normal.](https://usermanual.wiki/AlphaTheta/DM40BT.User-manual-part-1/User-Guide-3518939-Page-49.png)
![Es6Cómo escuchar música de un dispositivo BluetoothEstos altavoces permiten disfrutar inalámbricamente de las pistas guardadas en un dispositivo Bluetooth.Al utilizar los altavoces por primera vez o al conectar un nuevo dispositivo Bluetooth a los altavoces, hay que emparejar los altavoces y el dispositivo Bluetooth.El emparejamiento (registro mutuo de dispositivos) es la operación necesaria para conectar un dispositivo Bluetooth y los altavoces.Procedimiento de emparejamiento y conexión1 Encienda el interruptor [POWER] para encender los altavoces.! El indicador Bluetooth parpadeará durante aproximadamente 30 segundos y los altavoces entrarán en estado de emparejamiento.! Si el indicador Bluetooth está apagado, pulse el botón de empareja-miento durante al menos 2 segundos para volver a cambiar al estado de emparejamiento.2 Realice la operación de emparejamiento en el dispositivo Bluetooth.Realice la operación mientras los altavoces estén en estado de emparejamiento.Para más información, consulte el manual de instrucciones del disposi-tivo Bluetooth.3 Cuando el indicador Bluetooth cambie de estar parpadeando a estar encendido, se habrá completado el emparejamiento (o conexión).Si no se ha podido realizar el emparejamiento en 30 segundos, el indica-dor Bluetooth pasará de parpadear a apagarse.! Un dispositivo Bluetooth que ya se ha emparejado se puede conec-tar realizando la operación de conexión en el lado del dispositivo Bluetooth si los altavoces están encendidos.ReproducciónAl reproducir música en un dispositivo Bluetooth conectado, la música reproducida en el dispositivo Bluetooth se emite por los altavoces.! Si pulsa el botón de emparejamiento durante la reproducción de música en el dispositivo Bluetooth, podrá ejecutar la operación de pausa/reproducción (la misma función que la del botón de pausa/reproducción del dispositivo Bluetooth). ATTENTION! Al realizar el emparejamiento (conexión), acerque el dispositivo Bluetooth a los altavoces.! El sonido puede emitirse a un volumen alto al reproducir por prim-era vez tras realizar la conexión, por lo que recomendamos bajar el volumen antes de reproducir sonido.! Según la aplicación que se utilice, puede que no funcione la oper-ación de pausa/reproducción con el botón de emparejamiento.! Puede que no sea posible establecer una conexión con los altavo-ces según cuál sea el dispositivo Bluetooth.! Si desea emparejar los altavoces con otro dispositivo Bluetooth, desactive la función Bluetooth del dispositivo Bluetooth que esté ahora conectado o desconecte la conexión antes de realizar el emparejamiento.! Los altavoces guardan la información de emparejamiento de hasta ocho dispositivos Bluetooth, e intentan conectarse al último dispositivo emparejado si se pulsa el botón de emparejamiento sin conexión con un dispositivo Bluetooth.Precauciones con las ondas de radioEsta unidad emplea una frecuencia de onda de radio de 2,4 GHz, que es una banda utilizada por otros sistemas inalámbricos (consulte la lista siguiente). Para evitar ruidos o interrupciones de la comunicación, no emplee esta unidad cerca de estos dispositivos, o compruebe que tales dispositivos estén apagados durante la utilización.! Teléfonos inalámbricos! Facsímiles inalámbricos! Hornos de microondas! Dispositivos LAN inalámbricos (IEEE802.11b/g)! Equipos audiovisuales inalámbricos! Controladores inalámbricos para sistemas de juegos! Equipos médicos por microondas! Algunos monitores para niñosOtros equipos menos comunes que puedan utilizar la misma frecuencia:! Sistemas antirrobo! Emisoras de radioaficionados (HAM)! Sistemas de gestión logística de almacenes! Sistemas de discriminación para trenes o vehículos de emergencia CAUTION! En caso de que aparezca ruido en la imagen de su televisor, es posible que un dispositivo Bluetooth® o esta unidad (incluidos productos compatibles con esta unidad) causen interferencias en las señales con el conector de entrada de la antena del televisor, vídeo, sintonizador de satélite, etc. En tal caso, aumente la distan-cia entre el conector de la entrada de la antena y el dispositivo Bluetooth o esta unidad (incluyendo productos compatibles con esta unidad).! Si hay algo que obstruya el paso entre esta unidad (incluyendo los productos compatibles con esta unidad) y el dispositivo habilitado con tecnología inalámbrica Bluetooth (como pueda ser una puerta metálica, un muro de hormigón o papel de aluminio aislante), es posible que tenga que cambiar la ubicación del sistema para evitar ruidos en la señal e interrupciones.Para los usuarios de MéxicoLa operación de este equipo está sujeta a las siguientes dos condicio-nes: (1) es posible que este equipo o dispositivo no cause interferencia perjudicial y (2) este equipo o dispositivo debe aceptar cualquier interfer-encia, incluyendo la que pueda causar su operación no deseada.](https://usermanual.wiki/AlphaTheta/DM40BT.User-manual-part-1/User-Guide-3518939-Page-50.png)