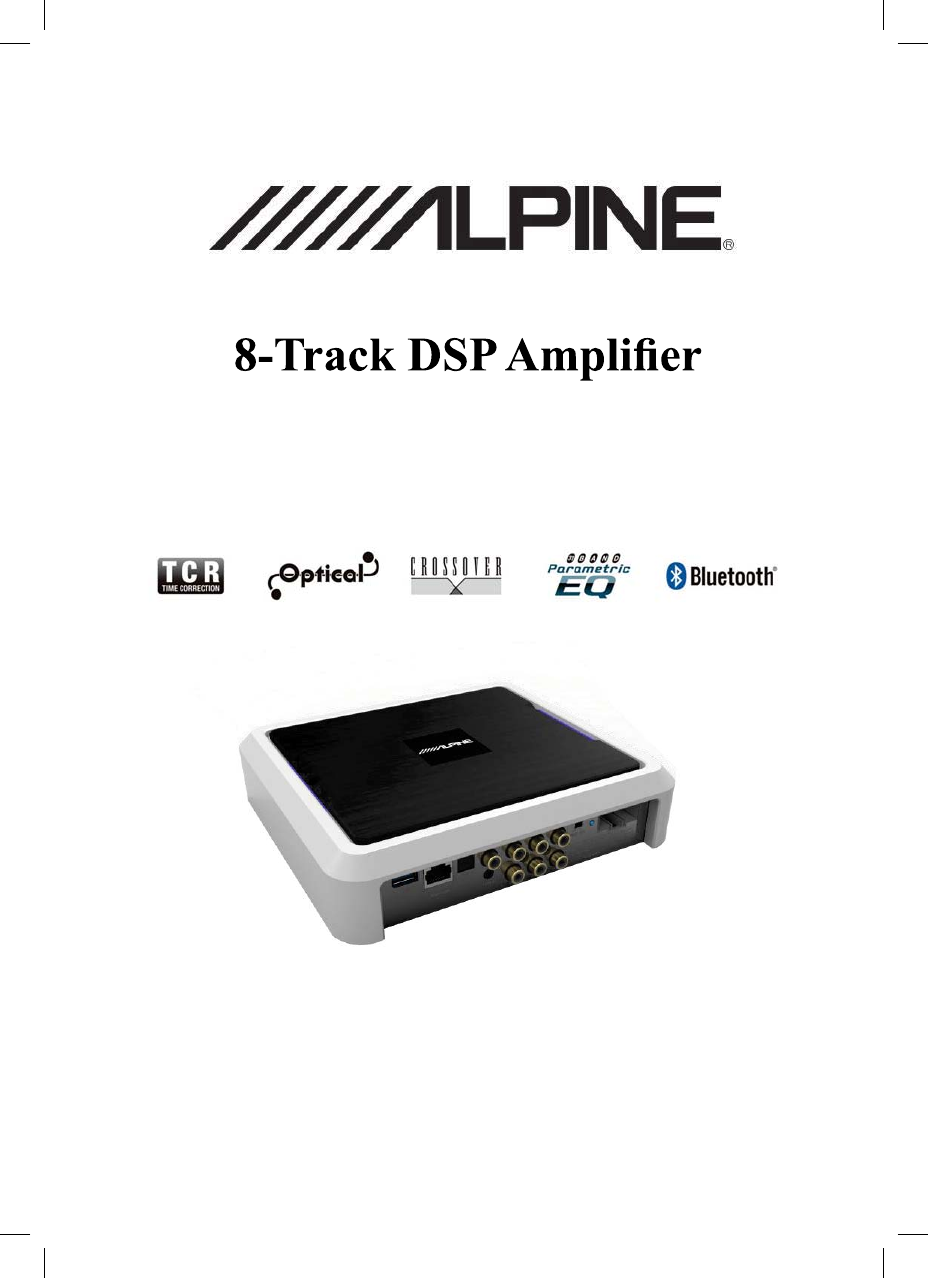
Alpine Electronics of America PXE-0850S External Bluetooth Interface for Alpine Car Audio DSP Amplifier User Manual Owner manual PXE 0850P P1
Alpine Electronics of America Inc External Bluetooth Interface for Alpine Car Audio DSP Amplifier Owner manual PXE 0850P P1
Users Manual
3;(6
UserManual
Pleasereadthismanualcarefully
beforeusingtheproduct.
1
English
Contents
Software for PC
Software Instructions ...............................10
Important Instructions for Software
Installation..........................................10
Introduction to Software Main
Interface.............................................10
Control Interface .........................10
Operating Instructions for Software .........11
EQ Interface................................11
Machine Connections .............11
Set Preset Sound Effect..........12
Data Encryption ......................12
Switch Audio Input Source ......12
Adjust the Master Volume .......12
Switch Output Channel ...........12
Set Output Channel EQ ..........13
Set Equalizer...........................13
Set Frequency Divider ............13
Set Sound Volume and Phase
Position of Output Channel .....14
Select Type of Output
Channel...................................14
Function ..................................14
Set Delay ................................14
Audio & Video Mixing Interface...15
Set Audio & Video Mixing........15
Wired Controller
..........17
Machine Connections .................17
Control Interface .........................17
Adjust the Master Volume...........17
Switch Audio Input Source..........17
Set Preset Sound Effect..............17
Machine Introduction
Diagram of Machine Connections......18
Introduction to Machine Interface ......19
Operating Instructions
Warning
Warning........................................................... 3
Attention.......................................................... 3
Important Instructions ..................................... 3
Preparatory Works
How to read this manual ................................. 4
Function List ................................................... 4
Accessory List................................................. 4
Mobile Phone App
Mobile Phone App Instructions ....................... 5
Home Page............................................... 5
Control Interface ................................ 5
Machine Connections ........................ 5
Switch Audio Input Source................. 5
Set Preset Sound Effect..................... 5
Data Encryption ................................. 6
Adjust the Master Volume.................. 6
EQ Interface.............................................. 6
Switch Output Channel ...................... 6
Set Output Channel EQ ..................... 6
Set Equalizer ..................................... 7
Channel Interface ..................................... 7
Set Frequency Divider ....................... 7
Set Sound Volume and Phase
Position of Output Channel................ 7
Select Type of Output Channel.......... 7
...... 8
Delay Interface.......................................... 8
Set Delay ........................................... 8
Audio Mixing Interface .............................. 8
Set Audio & Video Mixing................... 9
Wired Controller Operating
Instructions .................
..........
...

2
Technical Parameter Indicators
.....................20
Functional Parameter ........................20
Information
Harmful Substances ..........................21
3
This symbol is intended to alert you. It may cause
serious injury or death if neglected by you.
Warning
Product Cleaning
Please clean the product by a dry soft cloth
regularly. Clean the product only with a soft cloth
dampened with water, if the dirt is not easily
removed. Other solvents may be soluble.
Temperature
Please ensure the in-vehicle temperature
between +60°C and -20°C before use.
Maintenance
Should you meet any problems, please do not
attempt to undertake repairs yourself. Please
send the product to Alpine dealers or nearby
Alpine service centers for repairing.
Installation Location
Do not install PXE-0850S in the following places:
Under the direct sunshine or near heating
sources
A very humid place or near water source
Dusty place
A place of violent vibration
Warning
Alpine is not liable for any documents loss,
including lost documents when using this
product.
Attention
This symbol is intended to alert you. It may
cause injury or damage devices if you don’t
pay attention.
Attention
Operating Instructions Important Instructions
Please immediately stop using the
product if any problem occurs.
Please send the product to the designated Alpine
dealers or nearby Alpine service centers for
repairing.
Do not use any functions that may divert
your attention when driving.
Only use such functions that distract you when
the car stops. Make sure that you park your car
in a safe place before using such functions.
Otherwise, it may cause accidents.
Keep the audio volume to a level that will
It’s dangerous or may cause accidents, if the
audio volume is too loud to hear the sirens of
emergency vehicles or road sirens (e.g. at the
intersection of railway line). In addition, loud
sound may hurt your hearing.
Do not disassemble or modify the product.
shock.
Keep children away from small parts,
such as bolts and screws.
Swallowing them may result in serious injury. In
case of swallow, please consult a physician
immediately.
This product only applies to 12V -type
vehicles.
other injury.
BLUETOOTH® word mark and logos are
registered trademarks owned by Bluetooth SIG,
Inc.
Alpine Electronics, Inc. has been authorized to
use them.
4
Preparatory Works
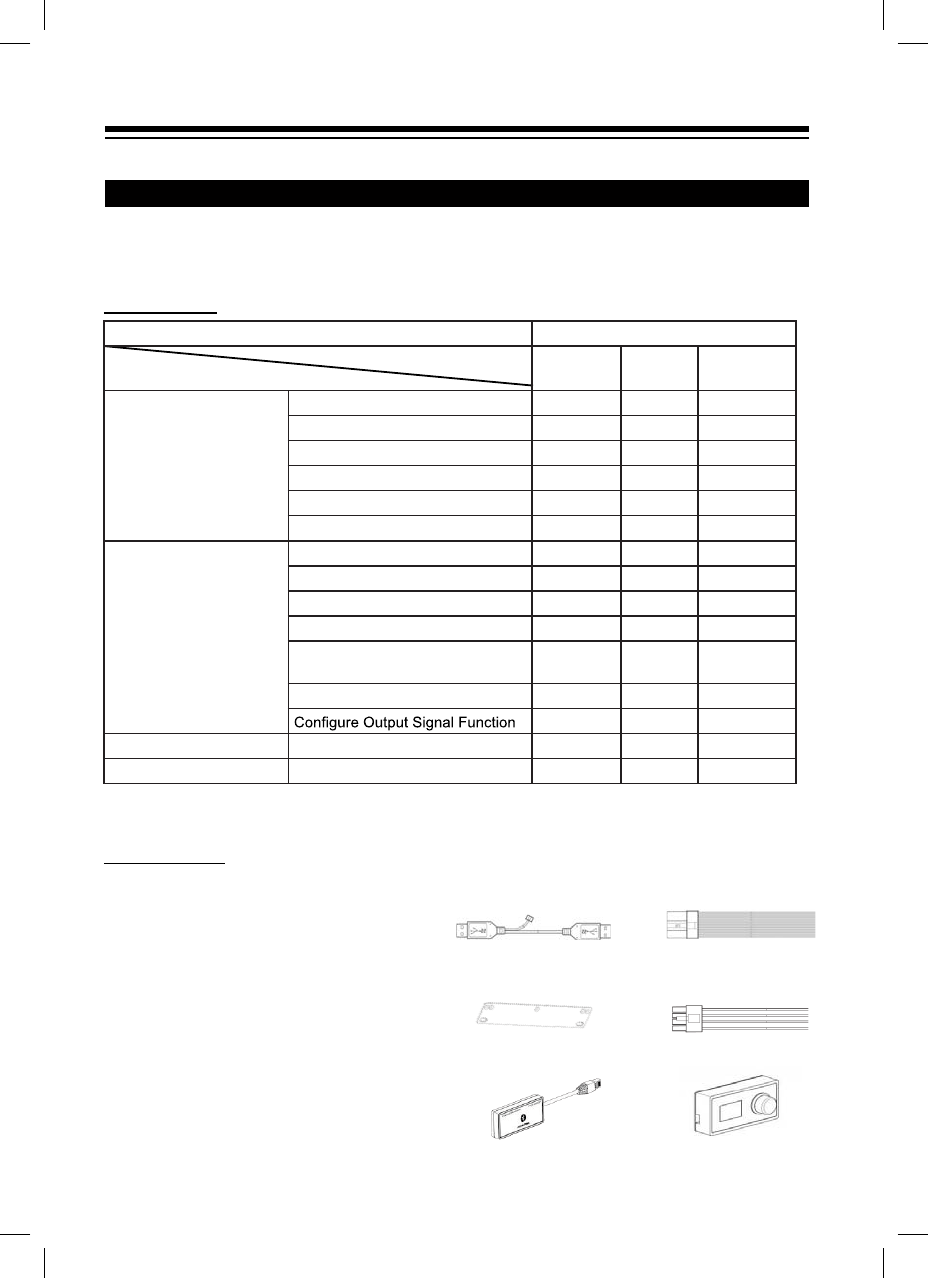
Function List
Note: Priority: Music Play: Bluetooth>High Level, Low Level, Digital;
Data Connections: Mobile Phone App, Software for PC > Wired Controller.
Accessory List
For the model you purchased, the packing box should contain the following accessories.
If any items are missing, please immediately contact retailers or manufacturers.
USB3.0 extension cable ×1 High level input connector and
input & output cords ×1
Stand mount ×4 Speaker cable ×2
External Bluetooth ×1 Wired controller ×1
How to read this manual
PXE-0850S machine is supplied with the wired controller. Using the wired controller could easily
control PXE-0850S machine, or use PXE-0850S app or software to adjust or set the audio effect of
PXE-0850S machine. These three control methods are varied and thus they will be described individually
in the following chapters. Functions are listed as follows:
Accessory Quantity
Stand mount 4 (pieces)
USB3.0 extension cable 1 (piece)
High level input connector
and input & output cords 1 (piece)
Speaker cable 2 (pieces)
Wired controller 1 (set)
External Bluetooth 1 (set)
Manual 1 (booklet)
Item Page
Mobile
Phone PC Wired
Controller
Basic Operation
Control Interface 5 10 17
Machine Connections 5 11 17
Set Preset Sound Effect 5 12 17
Data Encryption 6 12 -
Switch Audio Input Source 6 12 17
Adjust the Master Volume 6 12 17
Channel Operation
Switch Output Channel 6 12 -
Set Output Channel EQ 6 13 -
Set Equalizer 7 13 -
Set Frequency Divider 7 13 -
Set Sound Volume and Phase
Position of Output Channel 714 -
Select Type of Output Channel 7 14 -
814 -
Delay Operation Set Delay 8 14 -
Audio Mixing Operation Set Audio & Video Mixing 9 15 -
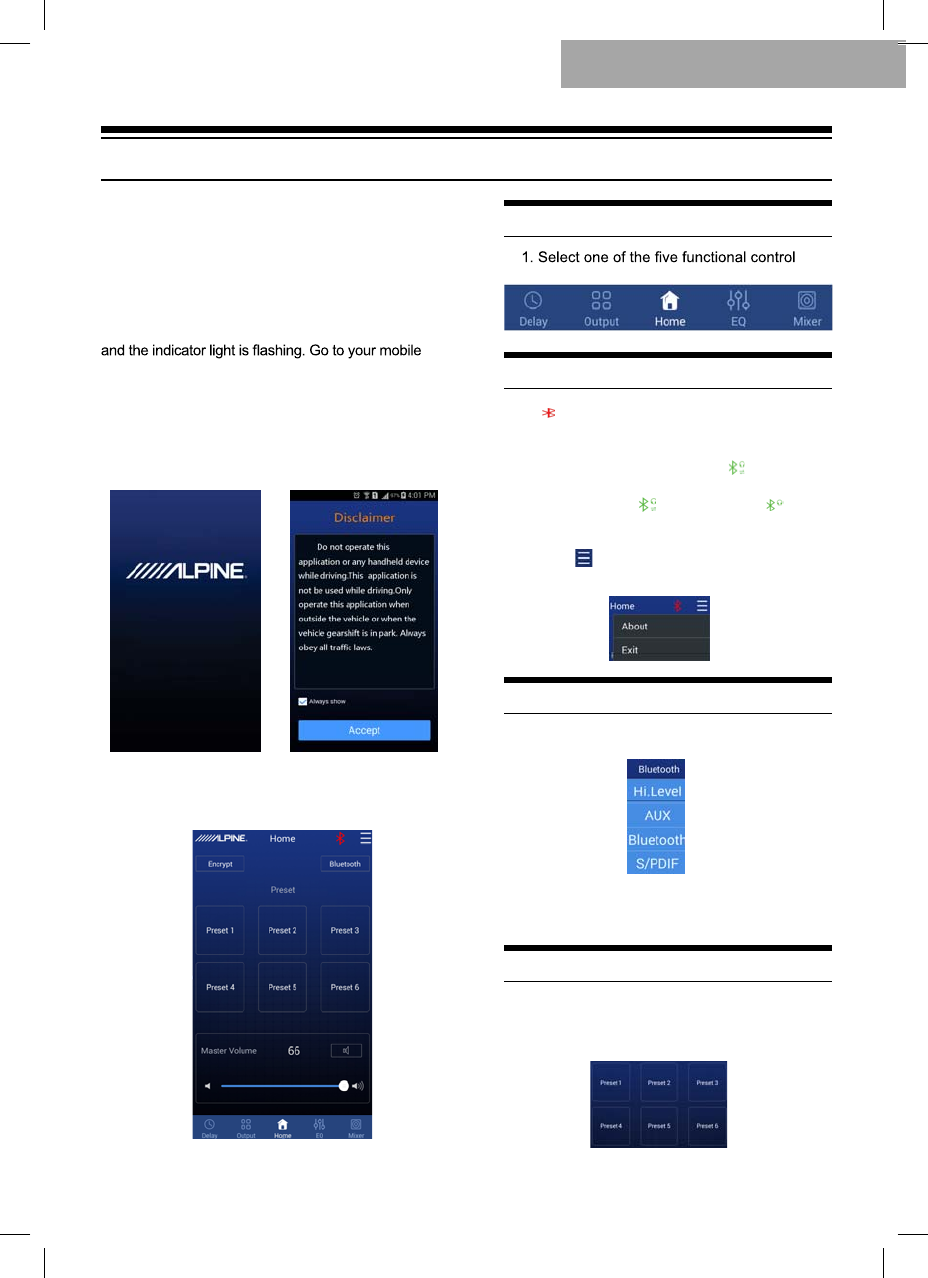
1. [ ] represents that Bluetooth is not connected.
If mobile phone has connected to Bluetooth,
start app and it will be automatically connected.
Bluetooth icon will become green [ ] represents
that app could control main machine to play music
and set data. If click [ ] and switch to [ ],
mobile phone could play music but app couldn’t
control the machine.
2. Click [ ] and go to [About] to view the version
of the machine. Click [Exit] to close the app.
5
Mobile Phone App
Android users could download PXE-0850S app
from Alpine Electronics website or scan QR code
printed on the packing box.
iPhone users could search and download Alpine
PXE-0850S app from iPhone App Store.
After your phone has been successfully installed
PXE-0850S app, start PXE-0850S machine. Now, the
machine doesn’t connect to the external Bluetooth yet
phone “Setting”ĺ“Turn on Bluetooth”ĺ“Search
device”ĺ“DSP-HD-......”, click connection and the
Bluetooth indicator light will be on now.
Now, start PXE-0850S app that will automatically
connect to the machine. Go to $OSLQHSDJHĺ
Read the Disclaimer carefully and click
“Accept” to go to the homepage.
I. Homepage Interface
Control Interface
interfaces.
Machine Connections
Switch Audio Input Source
1. You could select any type of sound sources.
For example: if the main machine inputs high
level, the type of sound source will select “high
level”.
Set Preset Sound Effect
1. The machine has six preset sound effect
spaces, which could store and call sound effect
data.
Mobile Phone App Instructions
6
1. For called sound effect data, you could click
[Data Encryption] to set a six-digit password to
encrypt 31-band EQ frequency, Q-value and gain
data. Meanwhile, tuning data could be encrypted,
such as delay, channel, phase position and
equalizer. Only current sound effect is encrypted,
rather than the whole machine data. Encrypted
sound effect data could be saved as preset sound
don’t compromise encryption protection. For
encrypted data, click [Decryption] and enter the
password to decrypt.
Warning! Please make sure to remember the
password. If you forget your password, you
couldn’t decrypt.
Data Encryption
Adjust the Master Volume
1. Display the master sound volume, control
master sound volume tuning and mute button.
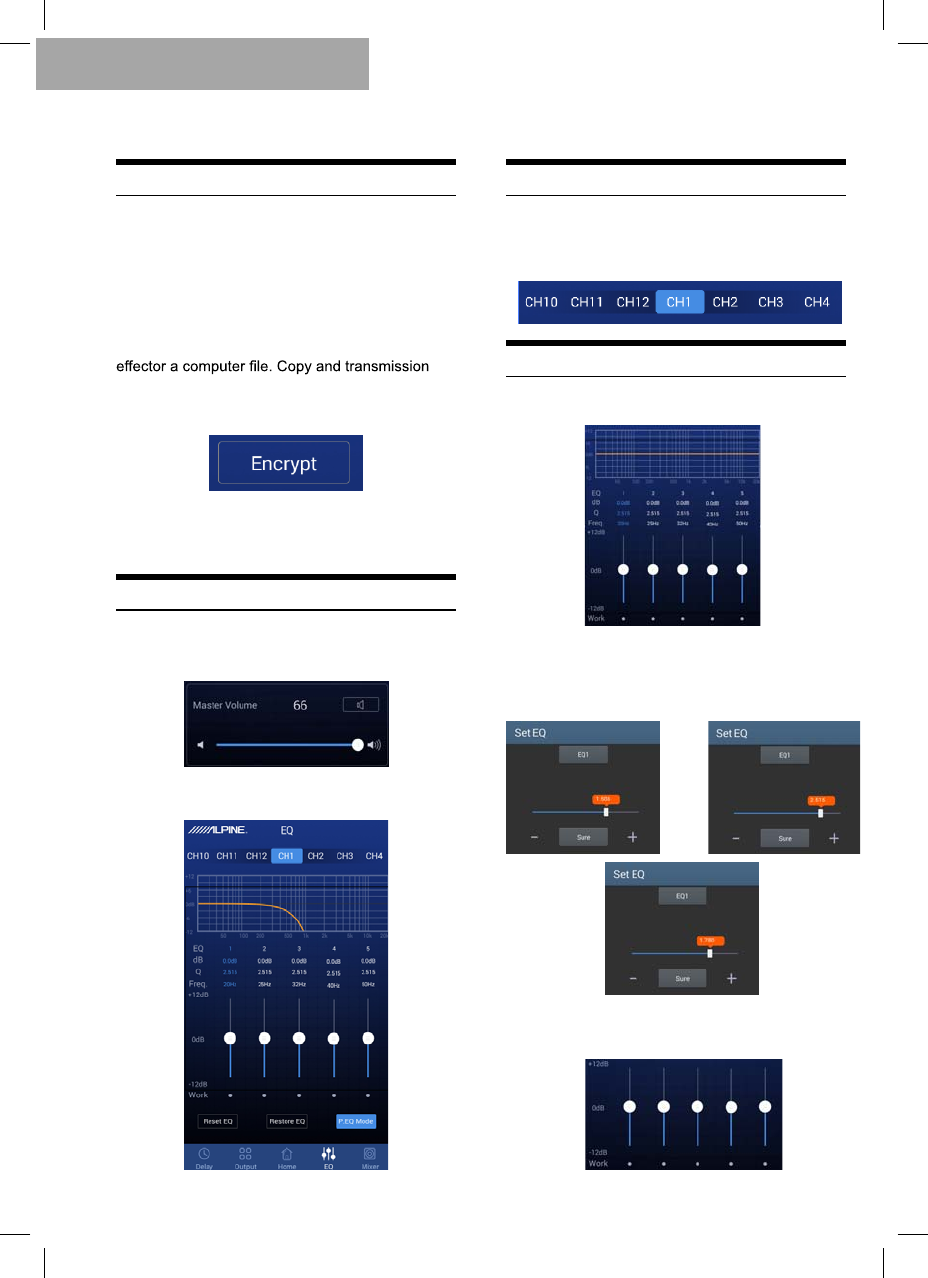
II. Click [EQ] to enter EQ interface.
Switch Output Channel
1. Select output channel. There are 12 output
channels and you could select the output channel
by sliding left or right.
Set Output Channel EQ
1. EQ curve, gain, Q value and frequency tuning
interface.
2. In [Pararmetric EQ], click related values to set
gain, Q value and frequency of related EQ channel.
In [Graphic EQ], you couldn’t change Q value and
frequency and only EQ’s gain is adjustable.
3. Adjust gain by the following icons. The range
of gain is -12dB~+12dB.
Mobile Phone App
7
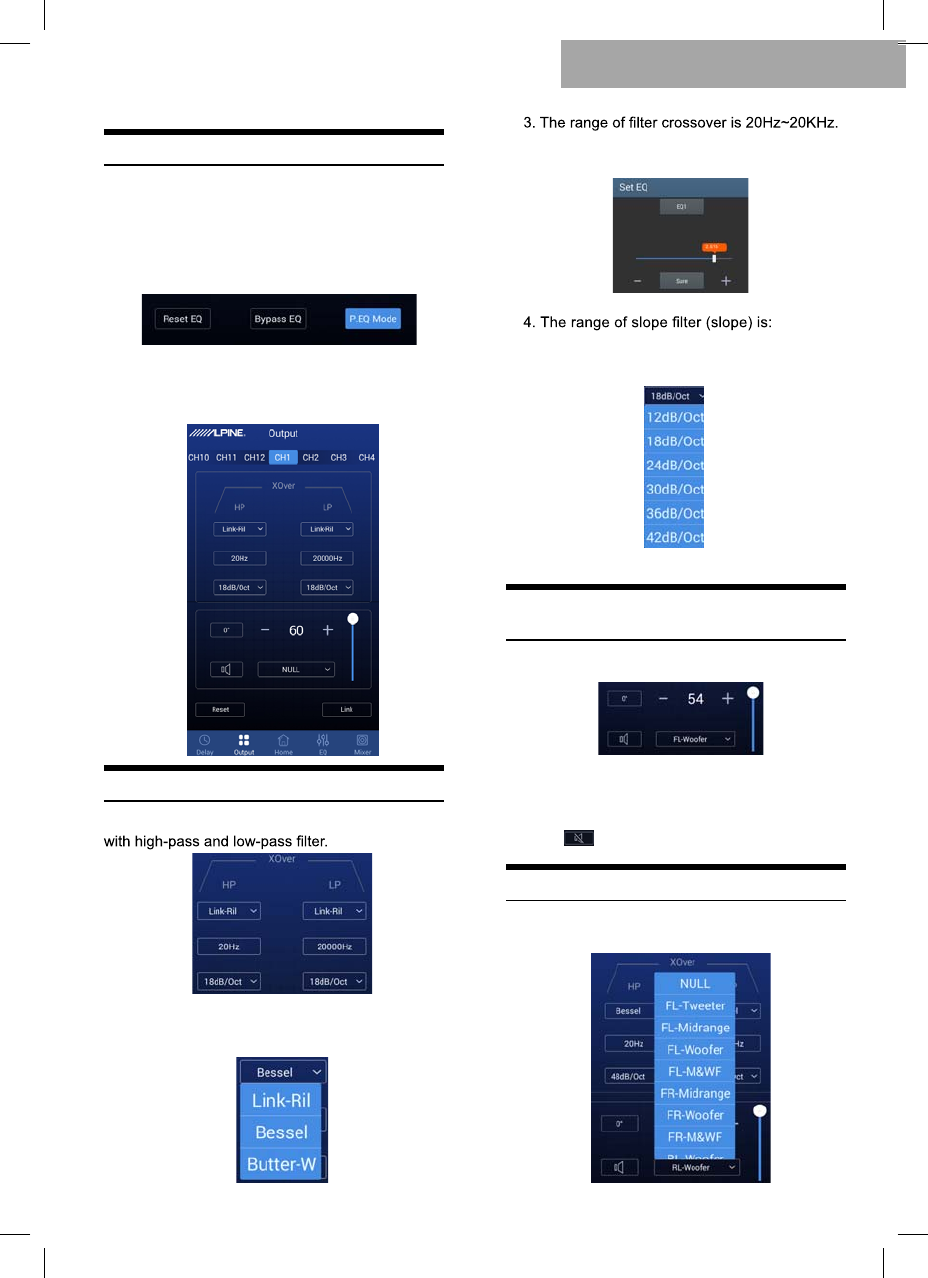
Set Equalizer
1. Click [Reset EQ] to reset all EQ parameters to
their default values and the preset values couldn’t be
restored. Click [Direct EQ] to set all EQ gains to zero.
Click [Restore EQ] to restore values before zero.
III. Click [Channel] to enter the channel
interface.
Set Frequency Divider
1. Frequency divider: Each channel is equipped
2. Filter types: Linkwitz-Riley, Bessel and
Butterworth.
Click related value to set the frequency. The
resolution is set at 1Hz.
12dB/Oct ~ 48dB/Oct and the resolution is
6dB/Oct.
Set Sound Volume and Phase
Position of Output Channel
1. Set channel output sound volume:
Select Type of Output Channel
1. Click the window to select channel type:
Click [Positive] or [Inverted] to change phase
position of this output channel: positive or inverted
phase.
Click [ ] to set the channel mute or not.
Mobile Phone App
8
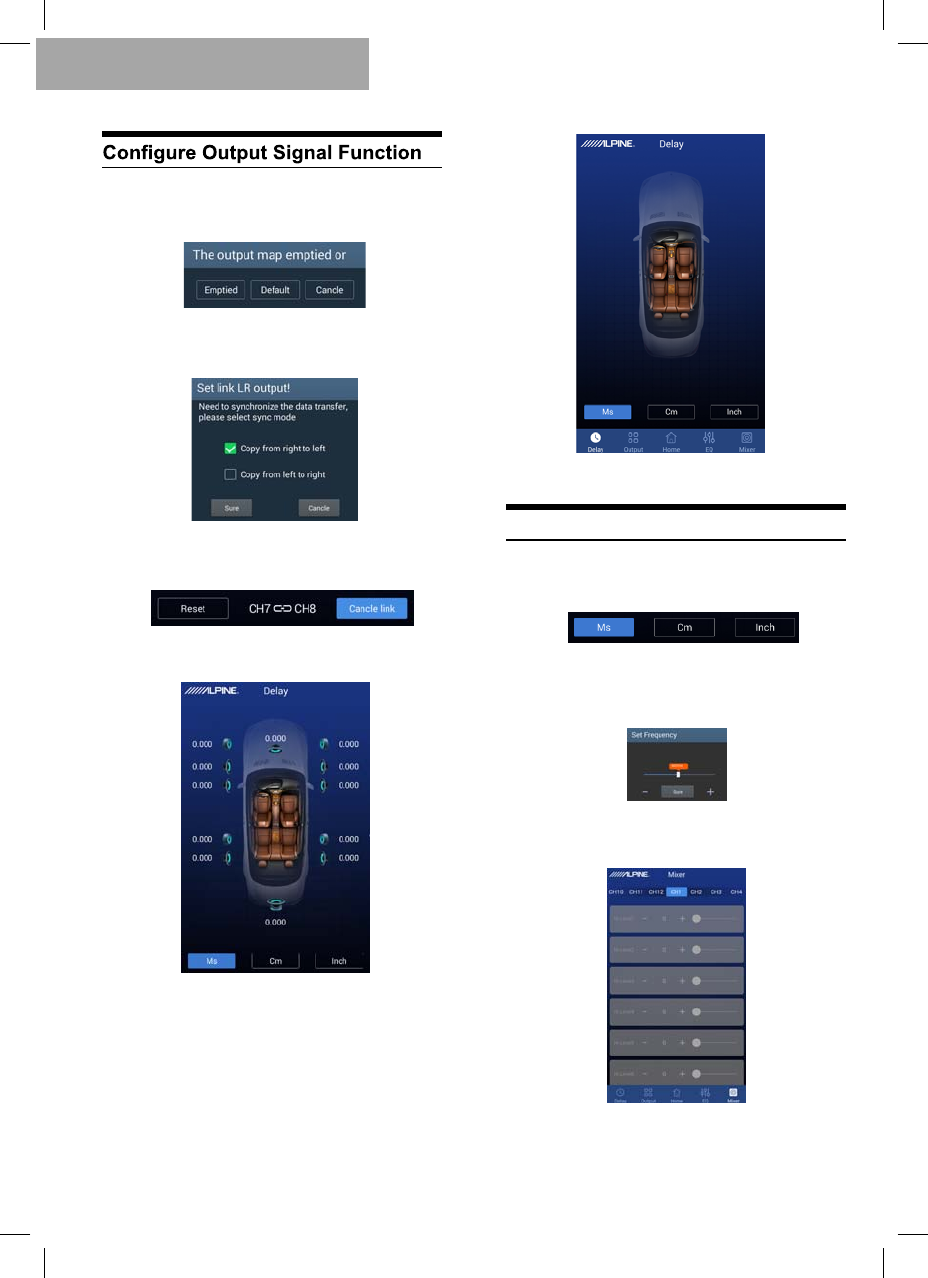
1. Click [Reset] to clear all output settings or
return to default values.
2. Click [Combined Tuning] to tune the left and
right channel. You need to select the method for
data synchronization before combined tuning.
3. Channel interface will show related value for
combined tuning.
IV. Click [Delay] to enter the delay interface.
Default of channel type
Channel type is cleared
Set Delay
1. The default unit of delay is [Millisecond] and
either [cm] or [inch] is also available for selection.
2. Click the loudspeaker of related channels to
set delay.
V. Click [Audio Mixing] to enter the
audio mixing interface.
Mobile Phone App

9
Set Audio & Video Mixing
1. PXE-0850S machine allows to set the sound
volume allocated to each output channel after the
sound source is input into the DSP, adjust the
sound volume of each source to mix audio and
video effects.
Note: Please refer to software instructions for
operating audio & video mixing.
10
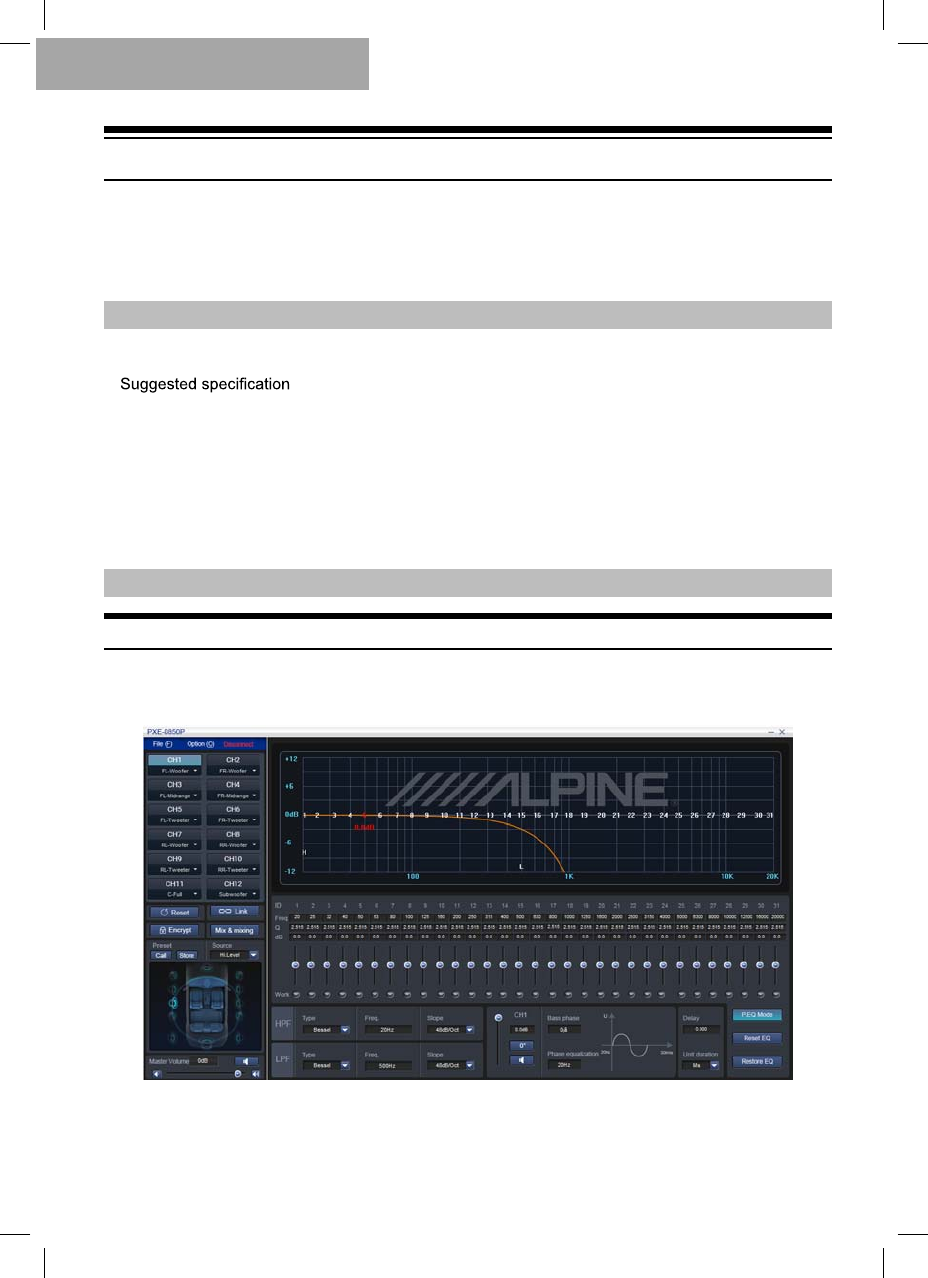
EQ interface
Software Instructions
Download PXE-0850S software for PC from AlpineElectronics website or by scanning QR code
printed on the packing box. After PXE-0850S software is installed, tune PXE-0850S machine via the PC.
Note: The functions of app are the same as software. So, please refer to the instructions for
software for mobile devices.
Software is run in Microsoft®Windows® system.
Operating system: WindowsXP, WindowsVista, Windows7, Windows8, Windows10
CPU: 1.6GHz or higher
Memory card: 1GB or higher
Hard disk: 512MB or more space
PC resolution: 1280*768 or higher
Before connecting PXE-0850S main machine to PC, please install PXE-0850S software properly.
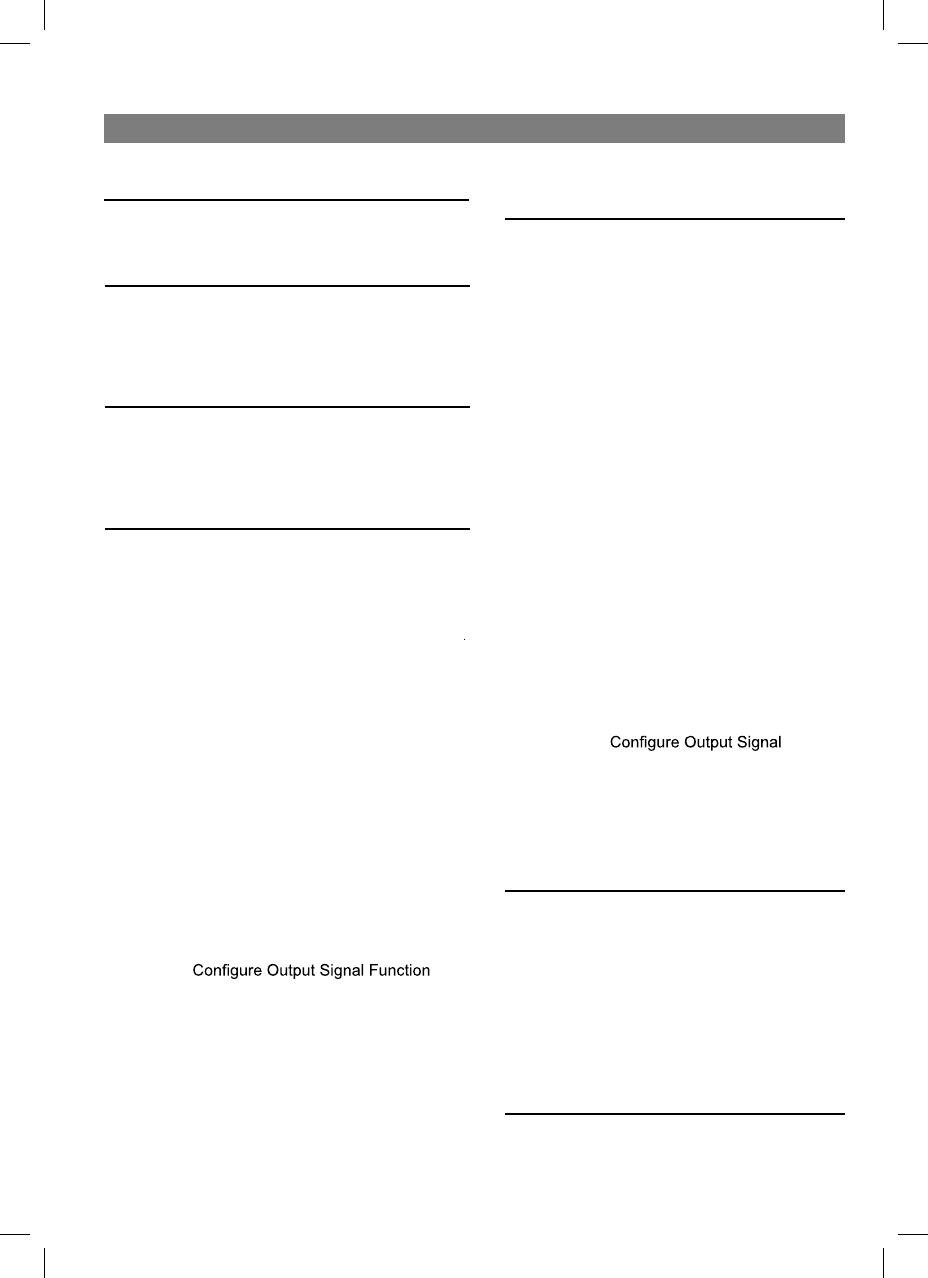
Control Interface
PXE-0850S PC software has two interfaces for controlling master tuning: EQ and audio & video
mixing. Click [Audio & Video Mixing] button to enter audio & video mixing interface.
Software for PC
1. Important Instructions for Software Installation
2. Introduction to Software Main Interface
11
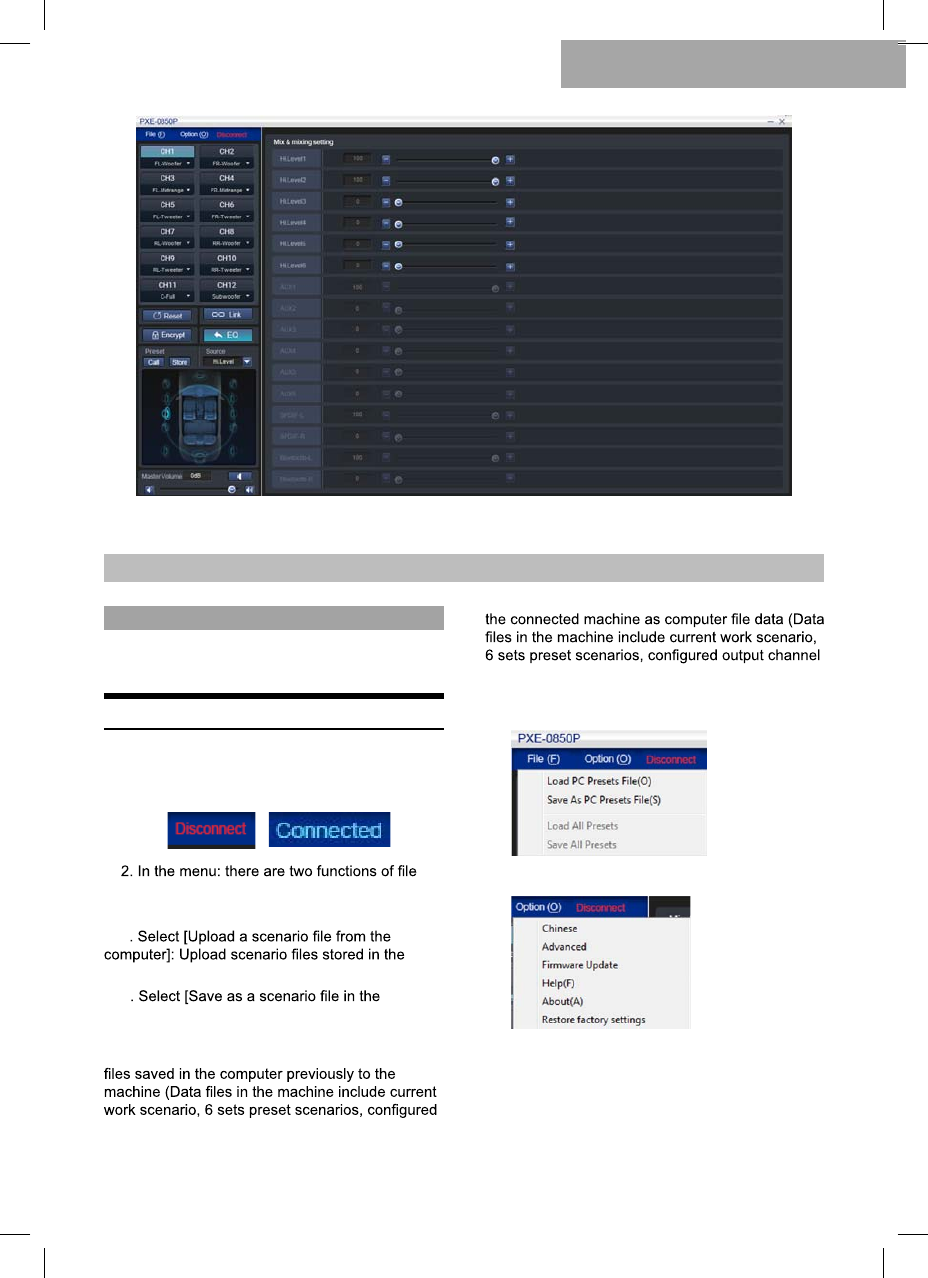
Audio & Video Mixing Interface
When start PXE-0850S software, you will enter
the EQ interface by default.
Machine Connections
1. The interface will show [Not Connected] before
connecting to the machine and show [Connected] if
the software has been successfully connected.
and option.
Click [File]:
a
computer as current machine’s scenario.
b
computer]: Save current scenario in the computer
for the future use.
c. Select [Upload all scenarios]: Upload all data
output channel data and data in the advanced
setting). Namely, copy all tested data to the
connected machine.
d. Select [Save all scenarios]: Save all data in
data and data in the advanced setting) for the
future use. This operation won’t change any data in
the connected machine.
Click [Option]:
a. Switch between Chinese and English. Show
[English] in Chinese and show [ѣᮽ] in English.
b. Click [Advanced] to set input noise gate.
Software for PC
3. Operating Instructions for Software
EQ Interface
a. Adjust master sound volume: adjust the
master volume by directly dragging the volume
fader, or entering the value or scrolling mouse
wheel. The adjustment range: Close -59dB~6dB.
b. Mute button: Click the panel of setting
master sound volume [ ] to mute master
sound volume and click again to cancel the mute
(mute will be automatically canceled when
adjusting the master sound volume).
12
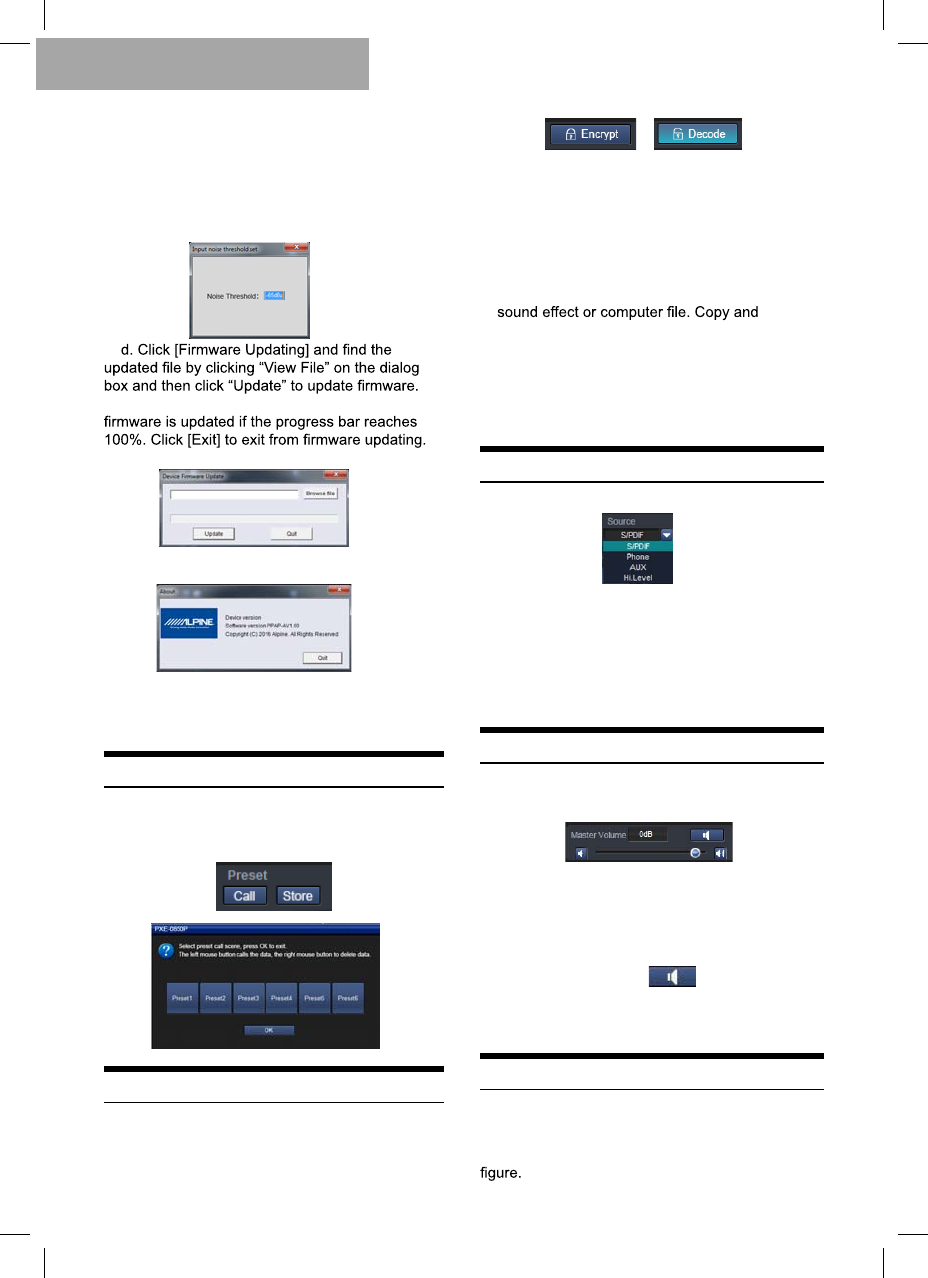
c. Set a signal threshold. If the input signal is
higher than the threshold, it could be entered
normally. Otherwise, it will be blocked. If the
threshold is set reasonably, the machine will be
automatically muted when the system has no
signal input, so as to make system output quieter.
Adjustment range: Close and -99.0dB~-40dB.
The progress bar starts to change color and
After updated, the machine will be rebooted.
e. Click [About] to view the device version.
f. Click [Restore Factory Settings] to restore to
the default settings.
Set Preset Sound Effect
1. Call and store preset sound effect. Click [Call]
or [Save] to set six sets preset sound effects.
Data Encryption
1. Data encryption and decryption.
For adjusted sound effect data, click
[Encryption] to set a six-digit password to encrypt
31-band EQ frequency, Q-value and gain data.
Meanwhile, tuning data could be encrypted, such
as delay, channel, phase position and equalizer.
Only current sound effect is encrypted, rather
than the whole machine data. After encrypted,
the sound effect data could be saved as preset
transmission won’t affect the encryption status.
Encrypted data could be decrypted by clicking
[Decryption] and entering the correct password.
Warning! Please make sure to remember the
password. If you forget your password, you
couldn’t decrypt.
Switch Audio Input Source
1. Select type of sound source from the
drop-down list.
Four types of sound sources are available for
selection: Digital, Bluetooth, AUX and high-level
input. Among them, Bluetooth has the highest
priority. If the machine detects Bluetooth when
playing music, the machine will switch to
Bluetooth compulsorily and return to previous
sound source when the music ends.
Adjust the Master Volume
1. Edit, adjust and display master sound volume
of output signals.
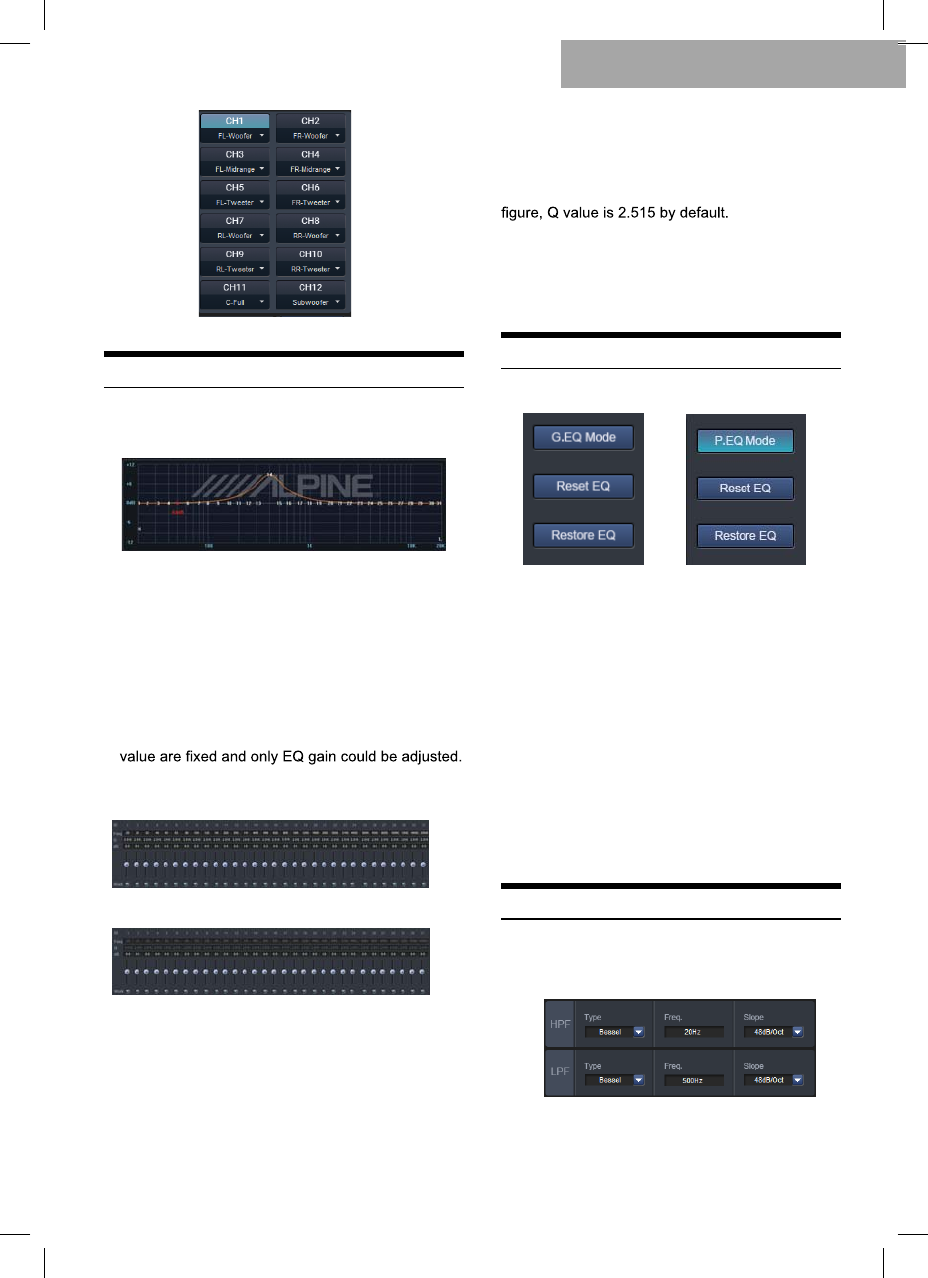
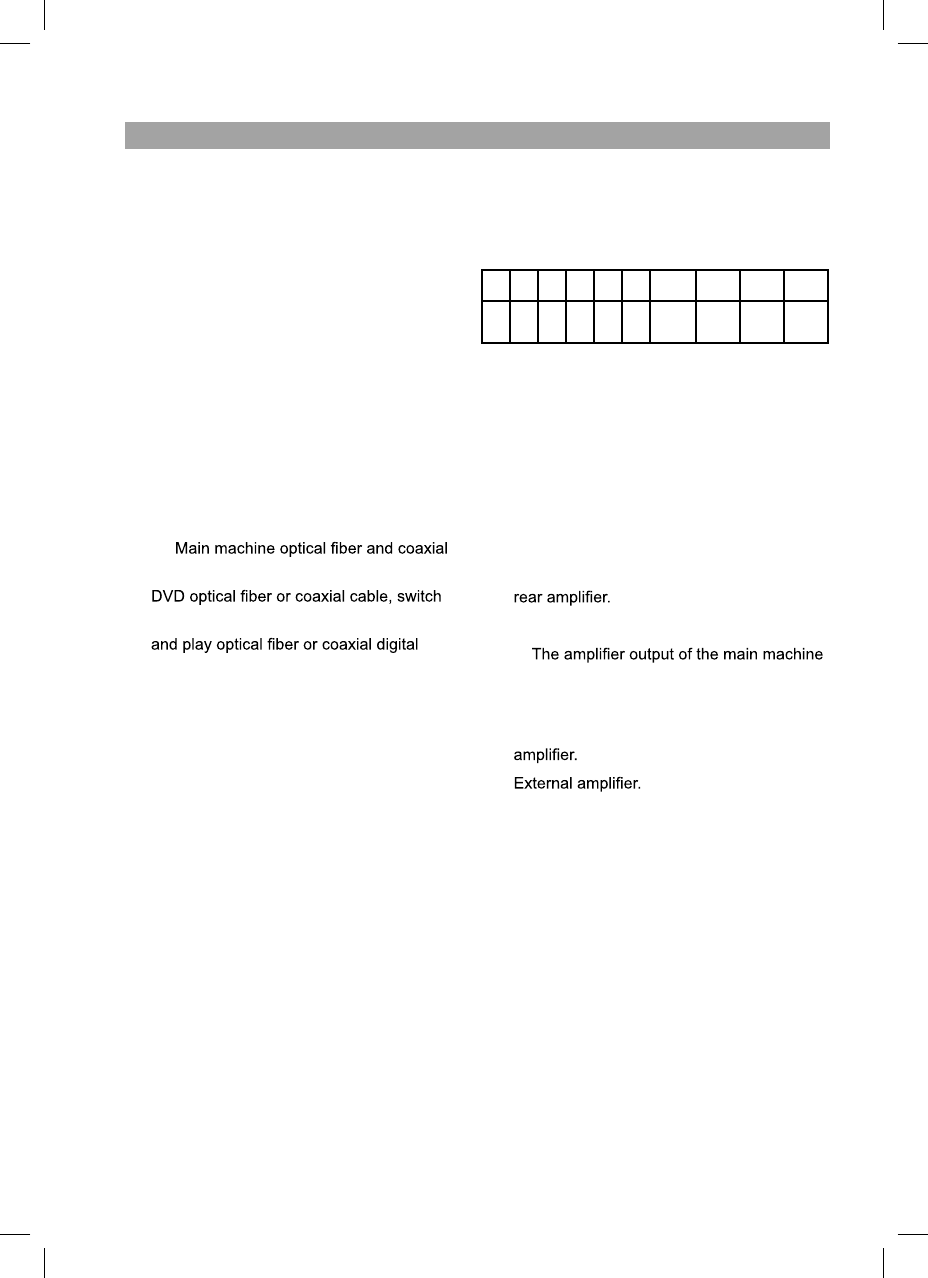
Switch Output Channel
1. Channel edit and switch: totally 12 output
channels could be edited or switched. The default
settings of 12 output channels are illustrated in the
Software for PC
13
Set Output Channel EQ
1. Frequency response curve and frequency
dividing & EQ editing panel for output signal channel.
31 bands EQ are available for tuning. Move your
mouse over the sequence number and hold. Move up
and down to adjust the gain of EQ and move left and
right to adjust EQ frequency. Move the mouse on the
red box and adjust Q value of EQ by moving left and
right. When making the adjustment, the parameter of
EQ will show under the sequence number in real time
and the value of EQ parameter editing panel will be
updated.
Note: In the Graphic EQ model, frequency and
Q
2. The parameter display and editing panel for
output signal channel.
The Parametric EQ model
Frequency: In the Parametric EQ model, in the
editing panel, adjust the frequency by directly entering
the value, scrolling mouse wheel or pressing up/down
arrow keys (The range of adjustment: 20Hz~20KHz);
In the Graphic EQ model, the frequency is 1/3 times
of sound interval by default.
The Graphic EQ model,
Q value: In the parametric EQ model, in the
editing panel, you could adjust Q value through
directly entering the value, scrolling mouse wheel
or pressing up/down arrow keys (The range of
adjustment: 0.404~28.85); In the EQ model in the
Gain: In the editing panel, adjust the gain by
directly entering the value, scrolling the mouse
wheel or pressing up/down arrow keys or directly
dragging the fader (the range of adjustment:
-12.0dB~12.0dB).
Set Equalizer
1. Output signal EQ model.
a. Click [Graphic EQ] and [Parametric EQ] to
change the EQ model.
b. Click [Reset EQ]: All parameter EQs of
current channel restore to the initial status:
frequency is distributed evenly, Q value is 2.515
and gain is 0dB.
c. Direct EQ: When current channel EQ starts,
this button will be shown and click [Direct EQ] to
turn off all EQ on the current channel (Direct). Click
the button and button will return to [Recovery EQ]
status. Then, click [Recovery EQ]and all EQs on
the current channel will return to the status
activated last time.
Note: This operation could only change gain of
EQ.
Set Frequency Divider
1. The editing panel of frequency divider for
output signals.
Software for PC
14
Linkwitz-Riley, Bessel and Butterworth options.
Frequency setting: Adjust low-pass or high-pass
frequency by directly entering the value, scrolling
mouse wheel or pressing up/down arrow keys. Range
of adjustment: 20Hz~20KHz.
Frequency slope (Slop) setting: Drop-down menu
has 8 options: 12dB/Oct, 18dB/Oct, 24dB/Oct, 30dB/
Oct, 36dB/Oct, 42dB/Oct, 48dB/Oct and close.
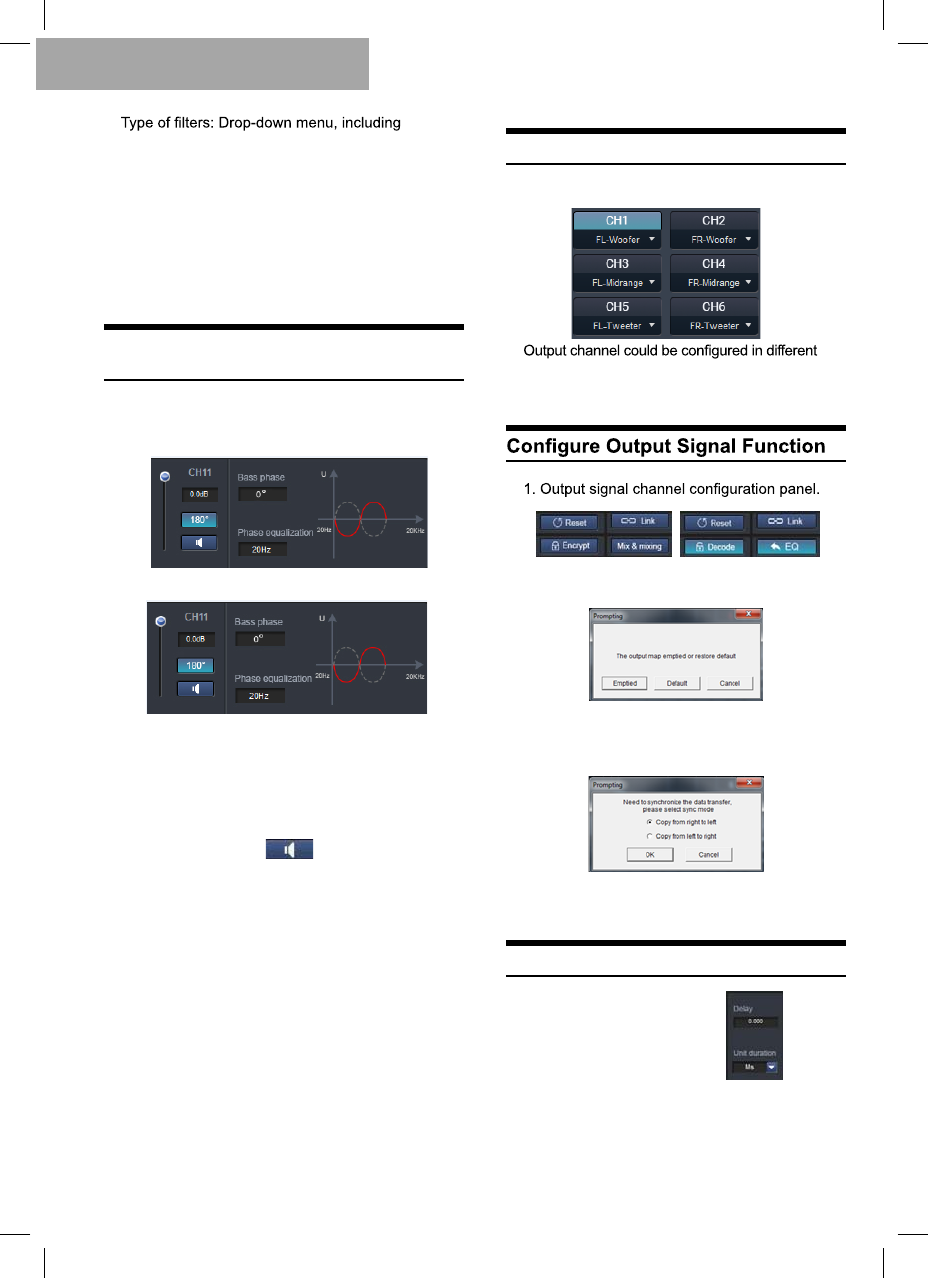
Set Sound Volume and Phase
Position of Output Channel
1. The editing and display panel for output channel
sound volume, low-pitched phase position, phase EQ,
phase position editing and displaying panel.
In the positive phase position,
a. Channel sound volume: Adjust the channel
volume by directly scrolling the volume fader, or
entering the value or scrolling mouse wheel. The
range of adjustment: Close -59dB ~ 0dB.
b. Mute button: Click [ ] to mute the channel
sound volume and click again to cancel the mute
(mute will be automatically canceled when adjusting
the channel sound volume).
c. Click [Positive Phase] to change output phase
position: positive or inverted.
d. Low-pitched phase position and phase EQ:
Adjust the phase by directly entering the value,
scrolling mouse wheel or pressing up/down arrow
keys. The range of low-pitched phase: 0° ~ 360°. The
range of phase position EQ: 20Hz~20KHz.
Low-pitched phase position could set 20Hz-200Hz
frequency bands adjustable at 0-360°, with a
resolution of 2°. Phase position EQ could rotate 180°
of nearby frequency point’s signal phase position.
Select Type of Output Channel
1. Select output signal channel types.
types. Such as pre-three-modulus crossover and
post-dual-crossover; 5.1 System; 7.1 System etc.
a. Click [Reset]: Clear or restore default output
setting.
b. Click [Combined Tuning] to tune the left and
right channel. You need to select the method for
data synchronization before combined tuning.
c. Click [EQ] or [Sound Source Mixing] to enter
the tuning interface.
Set Delay
1. Output signal delay panel.
a. Delay: Adjust by directly entering the value,
scrolling mouse wheel or pressing up/down arrow
keys.
b. Delay unit: Drop-down menu, the default unit
of delay is [Millisecond] and either [cm] or [inch] is
also available for selection.
In the inverted phase position
Software for PC
15
Audio & Video Mixing Interface
Original car
owner
high-level
three-modulus
crossover
output
Pre-left
Pre-right
High Frequency
Intermediate
Frequency
Low Frequency
High Frequency
Intermediate
Frequency
Low Frequency
CH2 right
full-frequency
output
CH1 left
full-frequency
output L
R
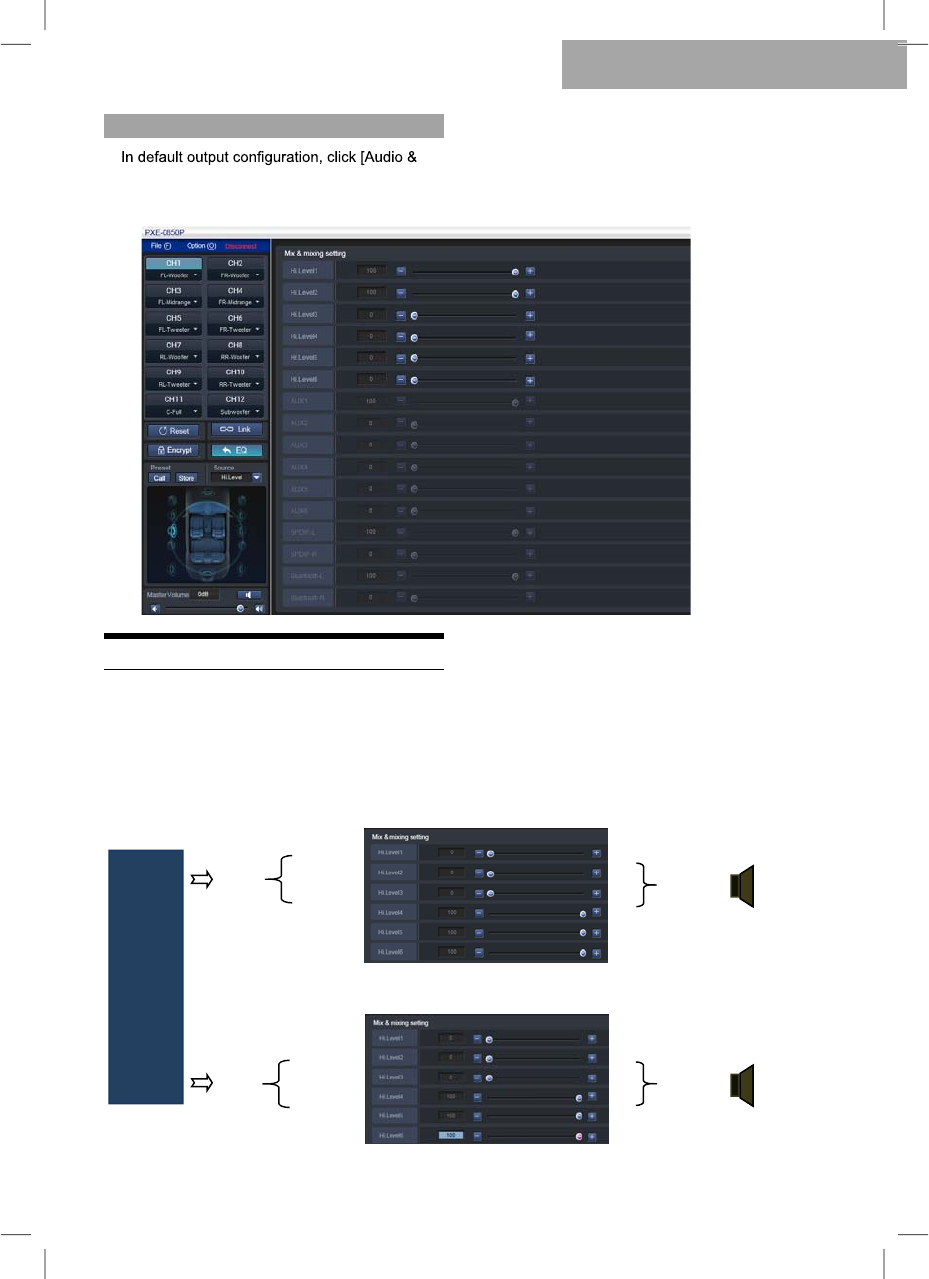
Video Mixing] to enter the audio & video mixing
interface. Click CH1~CH12 to view the interface of
each default channel.
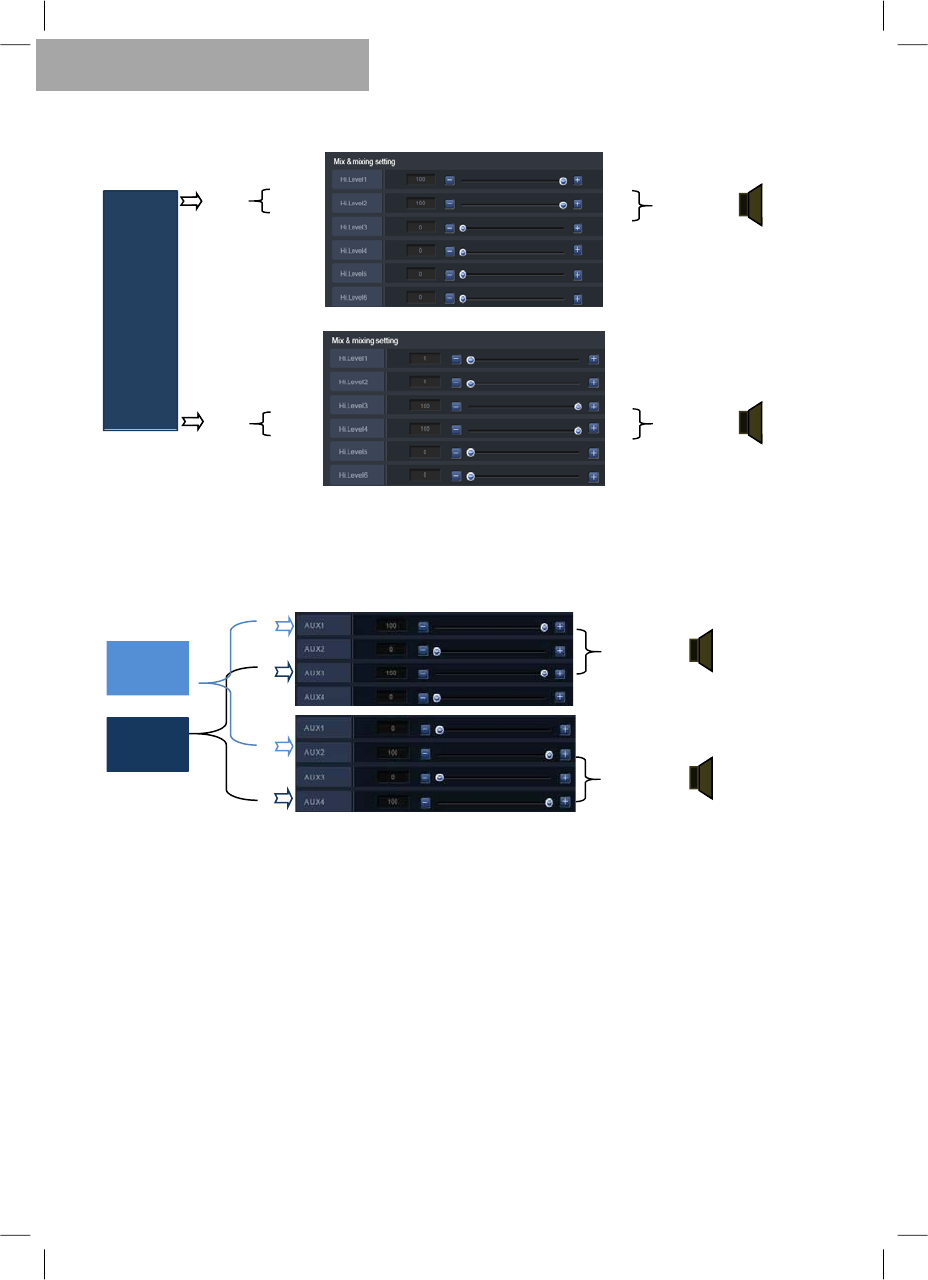
Set Audio & Video Mixing
PXE-0850S machine allows to set the sound volume
allocated to each output channel after the sound
source is input into the DSP, adjust the sound volume
of each source to achieve audio and video mixing.
Example 1: Illustration of original car main machine’s high-level three-modulus active crossover and stereoscopic
full-frequency output
Software for PC
16
L
R
L
R
R
L
Original car main
machine’s main
machine AUX
output
Connected to CD
device AUX
output
CH1 left
full-frequency
output L
R
Original car
main
machines’s
high-level
dual-modulus
crossover
output
Pre-left
Pre-right
High
frequency
Medium
and low
frequency
High
frequency
Medium
and low
frequency
Example 2: Illustration of original car main machine’s high-level dual-modulus active crossover and
stereoscopic full-frequency output
CH2 right
full-frequency
output
Example 3: Illustration of original car main machine’s AUX connected to CD device, AUX mixing input and
stereoscopic full-frequency output
CH1 left
full-frequency
output
CH2 right
full-frequency
output
Software for PC
17
Wired Controller Operating Instructions
PXE-0850S wired controller machine is only
suitable for PXE-0850S machine. Before using wired
controller, connect the wired controller to the main
machine and ensure that software or app isn’t
connected. Connect PXE-0850S wired controller to
PXE-0850S machine and power on properly.
Machine Connections
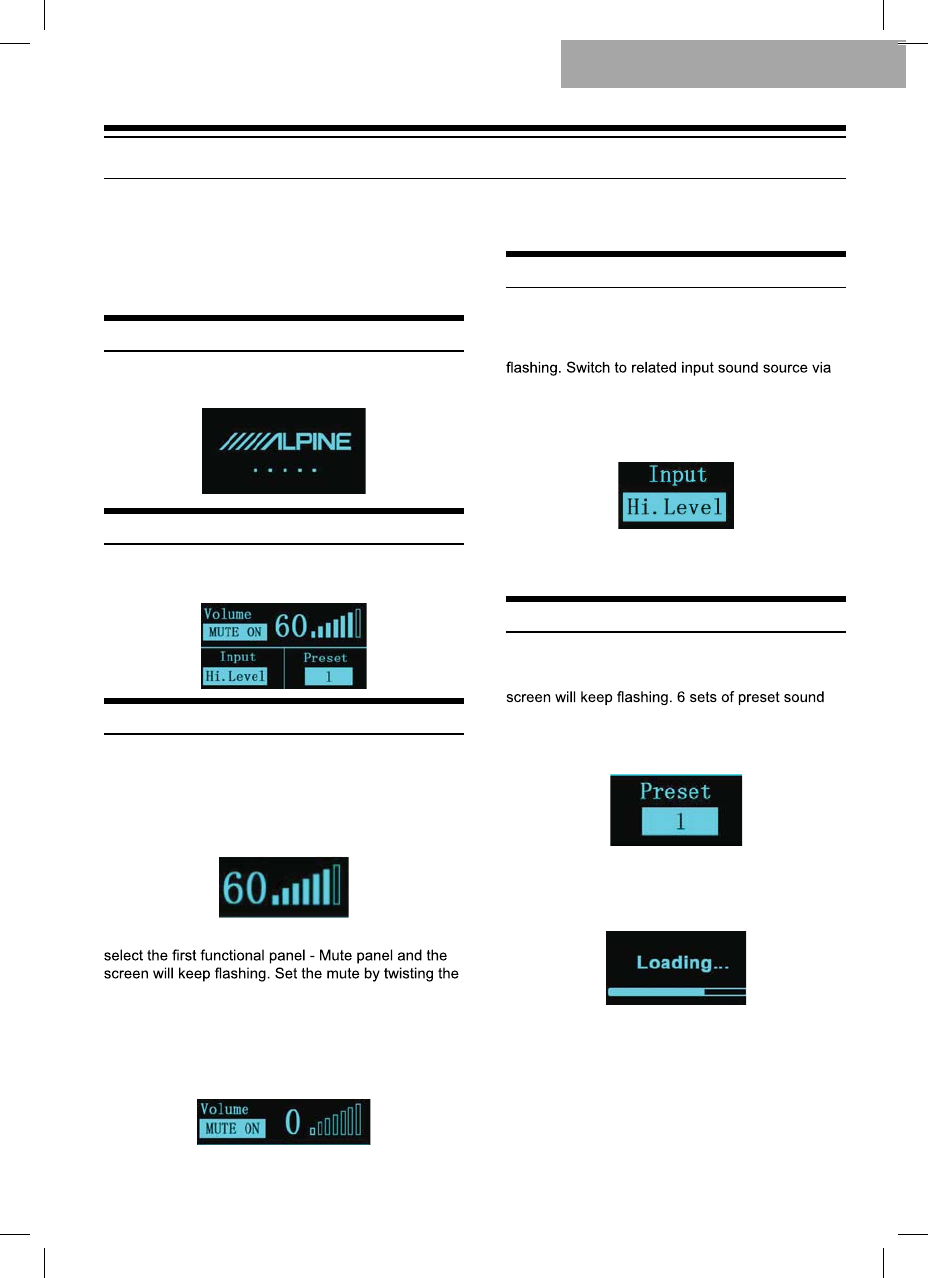
1. After the machine is connected, the following
interface will show:
Control Interface
1. PXE-0850S machine’s wired controller has the
following control interface:
Adjust the Master Volume
1. Adjust the master sound volume of machine by
twisting the knob of wired controller. Increase the
sound volume by twisting the knob in a clockwise
direction and decrease the sound volume in an
anticlockwise direction. The wired controller interface
will show the sound volume in real time.
2. Press the knob of the wired controller shortly to
knob. Activate the mute by twisting the knob in a
clockwise direction and the sound volume 0 will be
displayed. If twisting the knob in an anticlockwise
direction, the mute will turn off and the original sound
volume will be restored. Long press the knob to exit
from the functional panel.
Note: The session will automatically time out if
left idle for 20s.
Switch Audio Input Source
1. Short press the knob again to select the
second functional panel - Switch to input sound
source functional panel and the screen will keep
knob. In the clockwise direction, options are: S/
PDIF (digital), Hi.Level (high-level), Phone
(Bluetooth), AUX (low-level). Long press the knob
to exit from the functional panel.
Note: The session will automatically time out if
left idle for 20s.
Set Preset Sound Effect
1. Press the knob shortly to select the third
functional panel - Call preset sound effect and the
effects are available for selecting via the knob. In
the clockwise direction, there are 6 sets of preset
sound effects available for selection.
Select the intended sound effect and press the
knob shortly to call this sound effect. Long press
the knob to exit from the functional panel.
Note: The session will automatically time out if
left idle for 20s.
Wired Controller
18
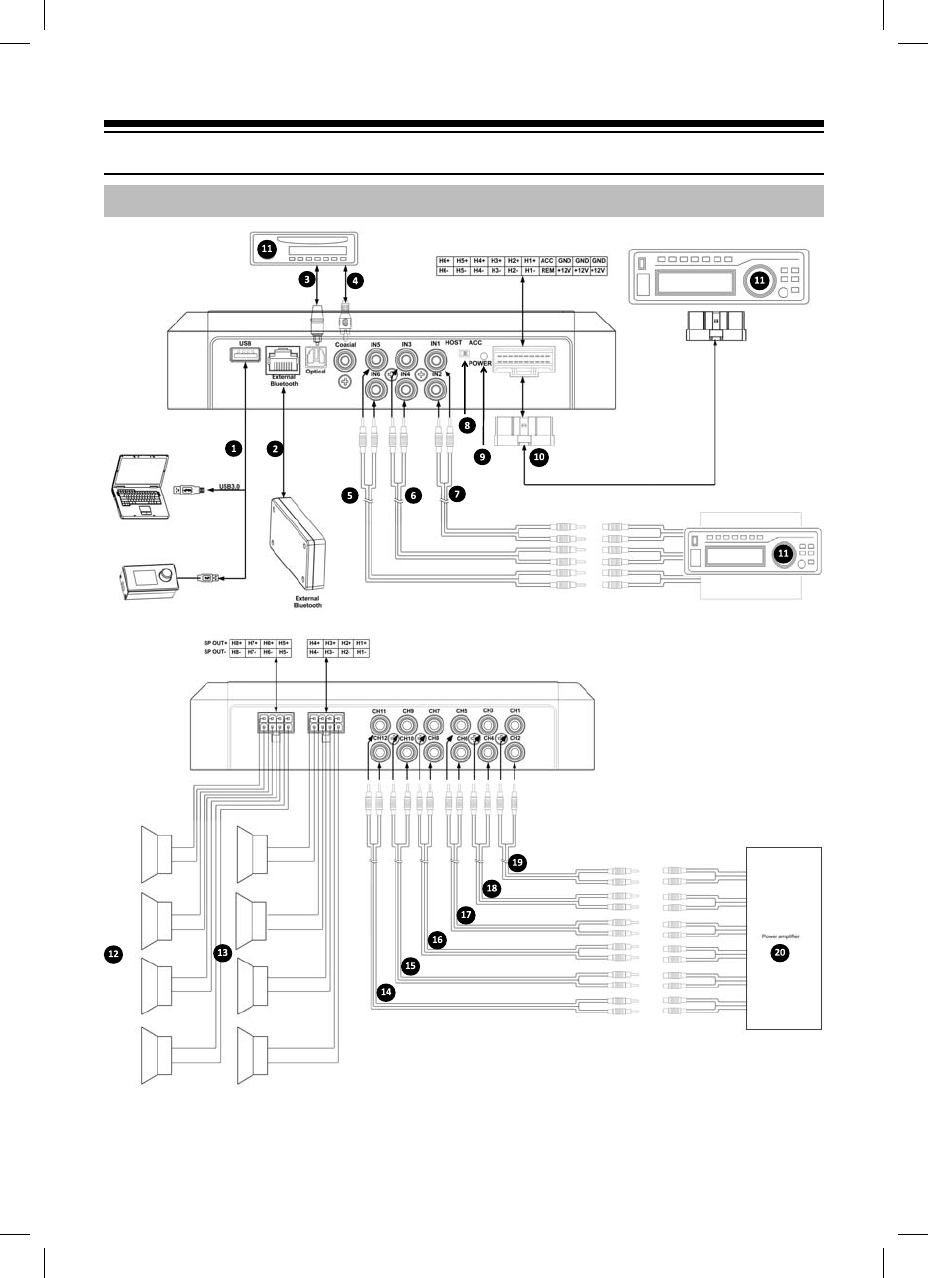
Machine Introduction
1. Diagram of Machine Connections
H6
+
H5
+
H4
+
H3
+
H2
+
H1
+ACC GND GND GND
H6
-
H5
-
H4
-
H3
-
H2
-
H1
-
REM
OUT
+12
V
+12
V
+12
V
19
༃Main machine USB port connects to the
computer via USB3.0 cord. Start
PXE-0850S software to switch sound
sources of main machine and perform
such functions as data storage, calling
and EQ. USB port connects to the wired
controller via USB3.0 cord and perform
functions including switching sound
source, data calling and adjusting master
sound volume via the wired controller.
༄The main machine is equipped with
Bluetooth interface to play lossless music
via Bluetooth and connect to PXE-0850S
app. After the Bluetooth is connected, the
indicator light will be on.
༅༆
interface connect to in-vehicle CD or
the machine sound source to digital input,
signals.
༇༈༉ AUX input interface connects to
in-vehicle CD or DVD low-level output,
switches the machine sound source to
AUX input and plays low-level signals.
༊REM input switch. When the switch is
placed on the “ACC”-end, ACC will start.
If the switch is placed on the “HOST”-
end, high-level signal will start the
machine.
་Power indicator light.
༌High-level input and power input interface
connects to in-vehicle CD or DVD. If the
sound source switches to high-level, the
machine will play high-level signals.
Notes:
A. Original cables for designated vehicles only
or customer’s customized external cables.
B. High-level REM input (HOST): for these two
high-level input cables of H1+/H1- .
C. REM output, this machine has one
REMOUT output, to control machine
on-and-off by connecting to REM input of
། In-vehicle CD or DVD main machine.
༎༏
connects to the speaker.
༐༑༒༓༔༕6 sets of RCA low-level
output of main machine connects to external
༖
2. Introduction to Machine Interface
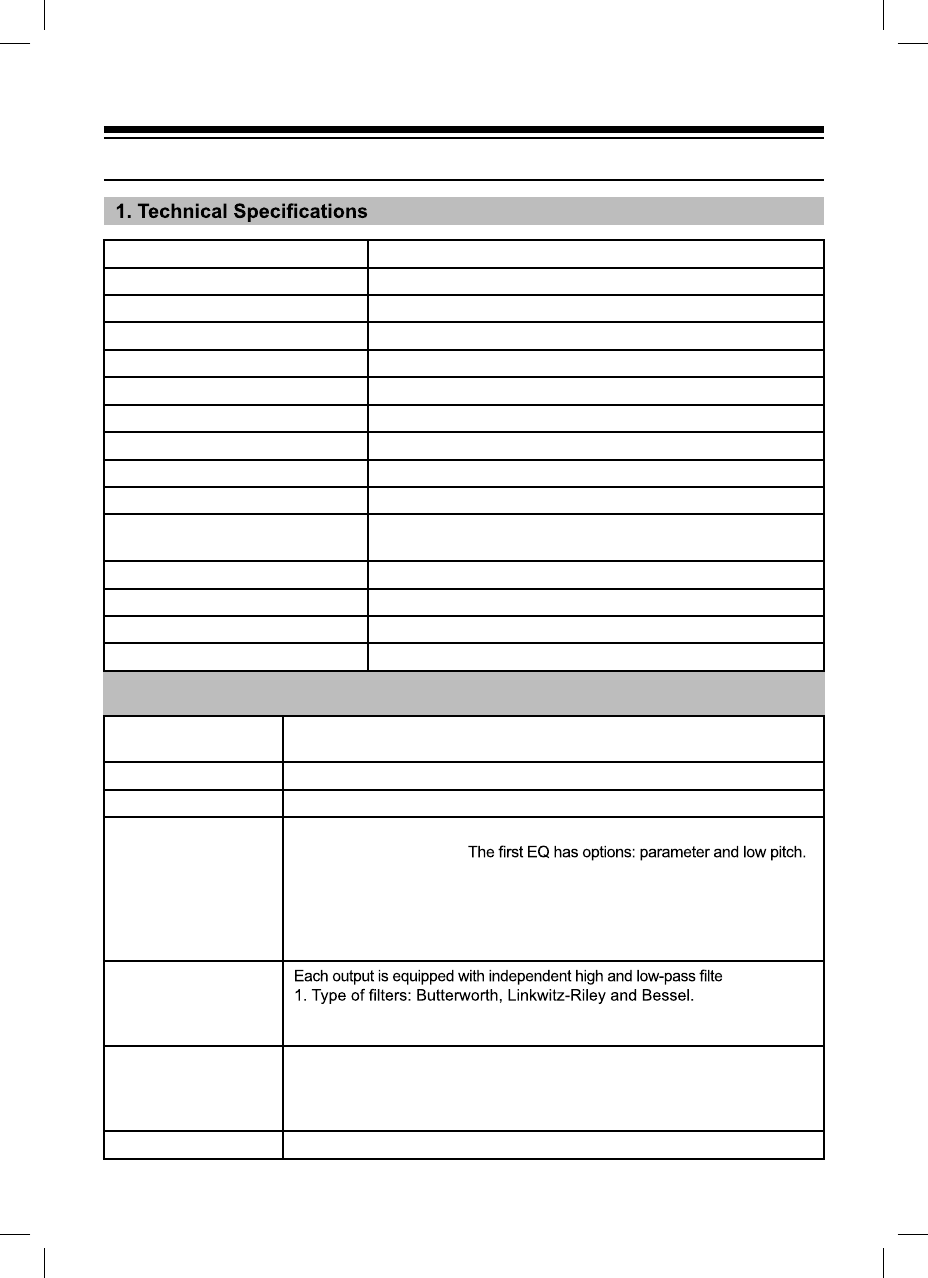
Dynamic range 110dB
Signal-to-noise ratio G%
Total harmonic distortion
Frequency response 20Hz~20KHz
Input impedance /RZOHYHOLQSXW.ȍKLJKOHYHOLQSXWȍ
Low-level output impedance ȍ
Scope of signal input and output RCALQSXW9SS+LJKOHYHO9SS5&ARXWSXW9SS
Ambient temperature -20~60°C
Storage temperature a&
Power source '&9~9
Activate REM input Options of high-level activation (H1+/H1-) and ACC activation
for selection
Activate REM output 9DFWLYDWLRQYROWDJHRXWSXW$
Stand-by power consumption :
Gross weight NJ
9olume PPORQJPPZLGHPPKLJK
2. Functional Parameter
Type of input signals 2SWLRQVFKDQQHOKLJKOHYHOFKDQQHOVWHUHRSKRQLFORZOHYHORSWLFDO
FRD[LDO%OXHWRRWK
Output position 12-Channel RCARXWSXWFLUFXLW506SRZHUî:
Output signal gain 5DQJHRIJDLQPXWHG%G%
Output signal EQ
EQ engine for each output channel:
Type of EQ:
The second EQ has options: parameter and high pitch
2WKHUVDUHSDUDPHWULF(4
5DQJHRIIUHTXHQF\ 20Hz~.+]UHVROXWLRQ+]
4YDOXHVORSH ~UHVROXWLRQ
*DLQ G%~G%UHVROXWLRQG%
Output signal
frequency divider
r up to 2-order
)LOWHUFURVVRYHUSRLQWV+].+]5HVROXWLRQ+]
)LOWHUVORSH6ORSHVHWWLQJG%2FWG%2FW
Output phase position
and delay
Each output channel could adjust phase position and delay
The scope of parameter:
3KDVHSRVLWLRQSRVLWLYHDQGLQYHUWHG
'HOD\PLOOLVHFRQGVFPLQFKHV
Scenario operation 7KHPDFKLQHFRXOGVDYHVL[SUHVHWWLQJPXVLFVFHQDULRV
20
Technical Parameter Indicators
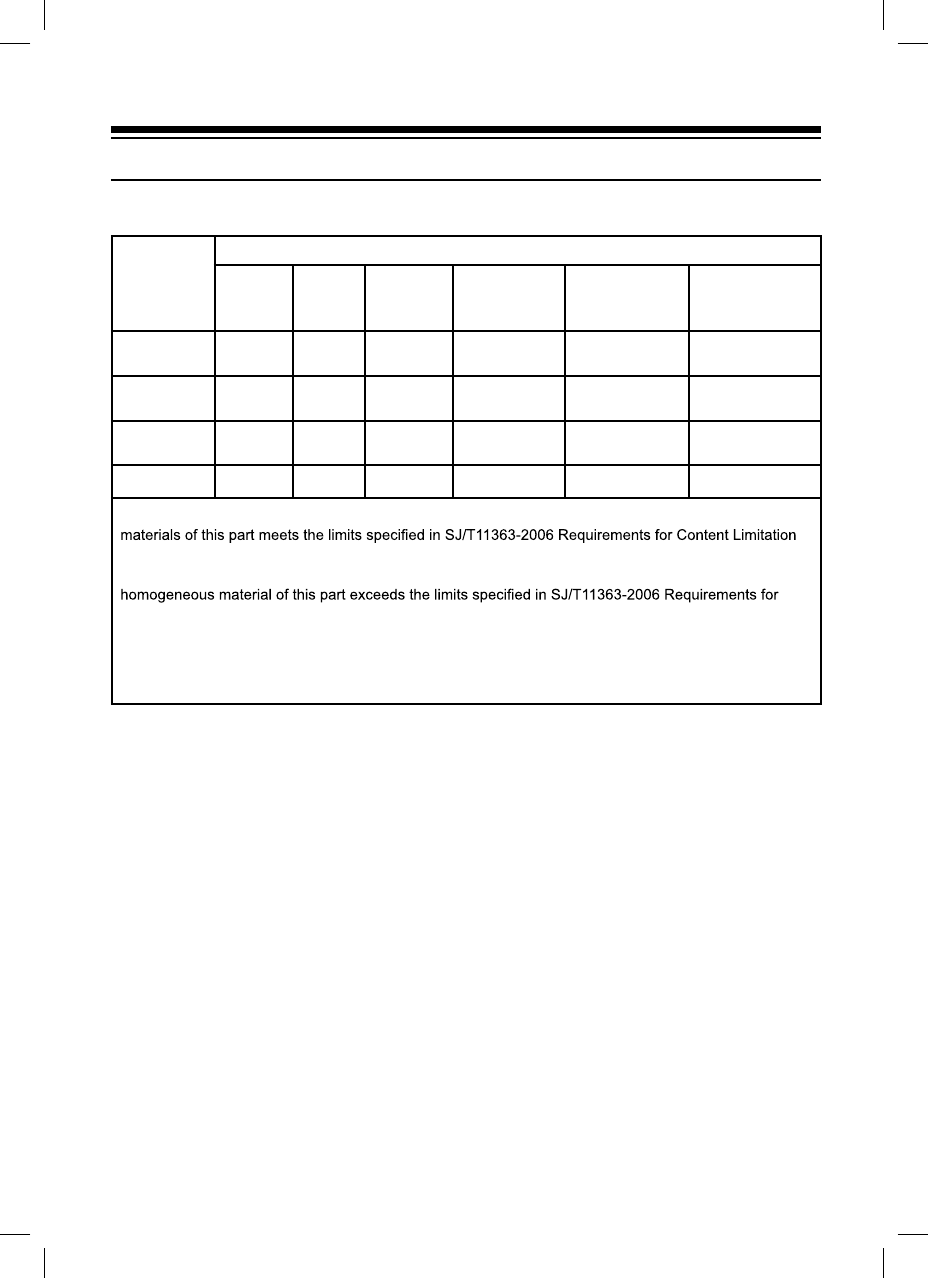
Name of
Accessories
Poisonous and harmful substances or elements
Lead
(Pb)
Mercury
(Hg)
Cadmium
(Cd)
Hexavalent
chromium
(Cr(VI))
Polybrominated
biphenyls
(PBB)
Polybrominated
diphenyl ethers
(PBDE)
Circuit board
components ɈɈ Ɉ Ɉ Ɉ Ɉ
Shell
components ɈɈ Ɉ Ɉ Ɉ Ɉ
Display
components ɈɈ Ɉ Ɉ Ɉ Ɉ
Accessories ɈɈ Ɉ Ɉ Ɉ Ɉ
Ɉ: represents that the content of poisonous and harmful substance contained in all homogeneous
for Certain Hazardous Substances in Electronic Information Products.
×: represents that the content of poisonous and harmful substance contained at least in a certain
Content Limitation for Certain Hazardous Substances in Electronic Information Products; however,
the content of items marked “×” in above table exceeds the limits due to nonavailability of mature
alternative technology in the sector.
Wherein, the components of circuit board include printing circuit board and its components such as
resistance, capacitance, electrolysis and chip.
21
Name and contents of poisonous and harmful substances or elements contained in
PXE-0850S machine
Harmful Substances