Altacogni MDH3-1620 Presence Mini(MDH3-1620) User Manual
Yanzi Networks AB Presence Mini(MDH3-1620)
User manual

Doc No: 890-03084 Date: 2017-11-21 Rev 24pa3
Yanzi Networks Installation Manual – Smart Office 1 of 42
Installation Manual – Smart Office
This installation manual describes how to install Yanzi IoT infrastructure and sensors
in offices.
IMPORTANT:
This manual contains important safety, usage, and service information.
We strongly urge you to read this manual in its entirety before using the products.

Doc No: 890-03084 Date: 2017-11-21 Rev 24pa3
Yanzi Networks Installation Manual – Smart Office 2 of 42
Table of Contents
Disclaimer .......................................................................................................................................................... 4
1. Introduction ............................................................................................................................................... 5
1.1 Best Technology .............................................................................................................................. 5
1.2 Easiest to install ............................................................................................................................... 5
1.3 Enterprise security ........................................................................................................................... 5
1.4 Cirrus Software as a Service ......................................................................................................... 5
2. Installation Planning ................................................................................................................................ 6
2.1 Infrastructure .................................................................................................................................... 6
2.1.1 Connecting the Gateway to Internet .................................................................................... 6
2.1.2 Building the IoT Network ........................................................................................................ 6
2.1.3 Infrastructure Examples......................................................................................................... 6
2.2 Use Cases ......................................................................................................................................... 9
2.2.1 Space Utilization ...................................................................................................................... 9
2.2.2 Comfortability .......................................................................................................................... 9
2.3 Installation Tool ............................................................................................................................. 10
2.4 Privacy ............................................................................................................................................. 10
3. Installation of Infrastructure ................................................................................................................ 11
3.1 Yanzi IoT Gateway overview and installation ........................................................................... 12
3.2 Gateway Functions ........................................................................................................................ 13
3.3 Gateway LED Behavior ................................................................................................................. 14
4. Teams and Equipment .......................................................................................................................... 15
5. Sensor Handling Tips ............................................................................................................................ 16
5.1 Battery lid ........................................................................................................................................ 16
5.2 Sensor element .............................................................................................................................. 16
5.3 Battery insertion ............................................................................................................................. 16
5.4 External power input ..................................................................................................................... 16
5.5 Sensor buttons and switches ...................................................................................................... 17
6. Placement of Sensors ........................................................................................................................... 18
7. Installation of Sensors .......................................................................................................................... 19
7.1 Start Yanzi Installation tool .......................................................................................................... 19
7.2 Installation Procedure ................................................................................................................... 19
7.3 Yanzi Footfall Camera Overview and Installation .................................................................... 20
8. Wireless Communication ..................................................................................................................... 22
9. SIM card management ......................................................................................................................... 23
9.1 SIM card requirements for Yanzi IoT Gateway 3G .................................................................. 23
9.1.1 SIM requirements .................................................................................................................. 23

Doc No: 890-03084 Date: 2017-11-21 Rev 24pa3
Yanzi Networks Installation Manual – Smart Office 3 of 42
9.1.2 Operator requirements ......................................................................................................... 23
9.2 Mobile Broadband Coverage ....................................................................................................... 23
9.3 Replacing SIM card in IoT Gateway 3G ..................................................................................... 25
9.4 IoT Gateway 3G SIM card configuration ................................................................................... 27
10. Working with Sensors ........................................................................................................................... 28
10.1 LED Behavior .................................................................................................................................. 28
10.2 Resetting a device ......................................................................................................................... 28
11. Battery Requirements ........................................................................................................................... 29
11.1 Battery Consumption .................................................................................................................... 30
11.2 Note on Lithium Batteries ............................................................................................................ 30
12. Troubleshooting ..................................................................................................................................... 31
13. Security .................................................................................................................................................... 32
13.1 Secure from Node to Cloud ......................................................................................................... 32
13.2 High Security Cloud Model .......................................................................................................... 33
14. IEEE 802.15.4 Overview ........................................................................................................................ 34
15. Privacy Note Examples ......................................................................................................................... 35
15.1 E-Mail Example ............................................................................................................................... 36
15.2 Desk Note Example ....................................................................................................................... 36
16. Disposal and Recycling Information .................................................................................................. 37
17. General Product Information ............................................................................................................... 38
18. Regulatory Information ......................................................................................................................... 40
18.1 Yanzi Motion+ ................................................................................................................................ 40
18.2 Yanzi Comfort ................................................................................................................................ 40
18.3 Yanzi IoT Gateway 2 ..................................................................................................................... 41
18.4 Yanzi Presence Mini ...................................................................................................................... 41
18.5 Yanzi IoT Hybrid Mesh .................................................................................................................. 42
Doc No: 890-03084 Date: 2017-11-21 Rev 24pa3
Yanzi Networks Installation Manual – Smart Office 4 of 42
Disclaimer
Information in this document is provided in connection with Yanzi products. No license, express
or implied, by estoppel or otherwise, to any intellectual property rights is granted by this
document. Except as provided in Yanzi’s Terms of Service and other sales conditions for such
products, Yanzi assumes no liability whatsoever, and Yanzi disclaims any express or implied
warranty, relating to sale and/or use of the Yanzi products including liability or warranties relating
to fitness for a particular purpose, merchantability, or infringement of any patent, copyright or
other intellectual property right. Products from Yanzi must be used only for smart office
applications as recommended by Yanzi and are not designed, intended or authorized for use for
critical applications, including, but not limited to, life support, health and safety, aviation, nuclear,
and security applications or for any other application in which the failure of the Yanzi product
could create a situation where personal injury or death may occur. Yanzi may make changes to
product(s) and/or the service described in this manual, specifications and product descriptions at
any time, without notice.
Using your Yanzi products safely
• Follow the battery requirements in section 11 before installing any batteries.
• Never force a connector into a port. If the connector and port don’t join with reasonable ease,
they probably don’t match. Make sure that the connector matches the port and that you have
positioned the connector correctly in relation to the port.
• Protect your Yanzi products from direct sunlight
• Keep away the Yanzi products from sources of liquid, e.g. drinks, bathtubs, washbasins,
shower stalls and so on.
• Use Yanzi products in environments according to specification. Most products are targeted
for indoor office use only.
• Only use Yanzi provided power supplies for products requiring external power.
• There are no user-serviceable parts inside Yanzi products. For service personnel: Always
unplug external power supply, remove batteries, and turn off UPS battery before service
operation.
About handling
Your Yanzi products may be damaged by improper storage or handling. Take caution not to drop
them during transport and installation. The passive infrared sensor elements (PIR) (used in e.g.
Yanzi Motion, Yanzi Motion+, Yanzi Presence, and Yanzi Presence Mini) are particularly sensitive
to external force, so handle them with extra care.
WARNING: Do not attempt to open or disassemble any Yanzi products. You run the risk of
electric shock and voiding the limited warranty. No user-serviceable parts are inside.

Doc No: 890-03084 Date: 2017-11-21 Rev 24pa3
Yanzi Networks Installation Manual – Smart Office 5 of 42
1. Introduction
Yanzi Networks delivers an end-to-end, horizontal, and all-IP software Internet of Things platform.
We offer sensors, gateways, and Cirrus, a cloud platform solution packaged into a Software as a
Service solution (SaaS) for Smart Building applications. The horizontal and all-IP approach
provides a solution that is fast, robust, and transformative.
1.1 Best Technology
All IP technology, all the way to the sensor, ensures powerful scaling to thousands of sensors and
excellent cost efficiency. Yanzi Networks focus on open standards and leverage the widely
deployed protocols such as 4G/LTE, Ethernet, Wi-Fi, and the low power "brother" to Wi-Fi, IEEE
802.15.4, which enables battery operated sensors to last for 10+ years.
1.2 Easiest to install
Automatic security provisioning provides best-in-class installation provided by the patent pending
zero-touch configuration. Sensor installation do not need professional installers but can leverage
the employees on site. The optimized power management deliver very long battery life which
secure a minimum of maintenance required once installed.
1.3 Enterprise security
Yanzi Networks combines ease of installation and maintenance with enterprise security. It is a
highly secure solution with all links in Cloud and to Gateway being authenticated with client and
server certificates and all communication is made using SSL encryption. All local communication,
between the sensors and the Gateway, is encrypted for both wired and wireless solutions. Each
sensor has an individual key and can be revoked remotely.
1.4 Cirrus Software as a Service
The Yanzi Cirrus Software as a Service provides Device and Gateway management at a new level.
The Cirrus data model allow access to any data originating from any location with a uniform
interface without the need to understand the sensor details. A secure Gateway-to-Cloud
connector to multiple redundant link servers provides reliable remote access to Gateway.
The Cirrus open API is a JSON over web socket API where all operations are authenticated. The
API support both subscriptions models as well as request/response.

Doc No: 890-03084 Date: 2017-11-21 Rev 24pa3
Yanzi Networks Installation Manual – Smart Office 6 of 42
2. Installation Planning
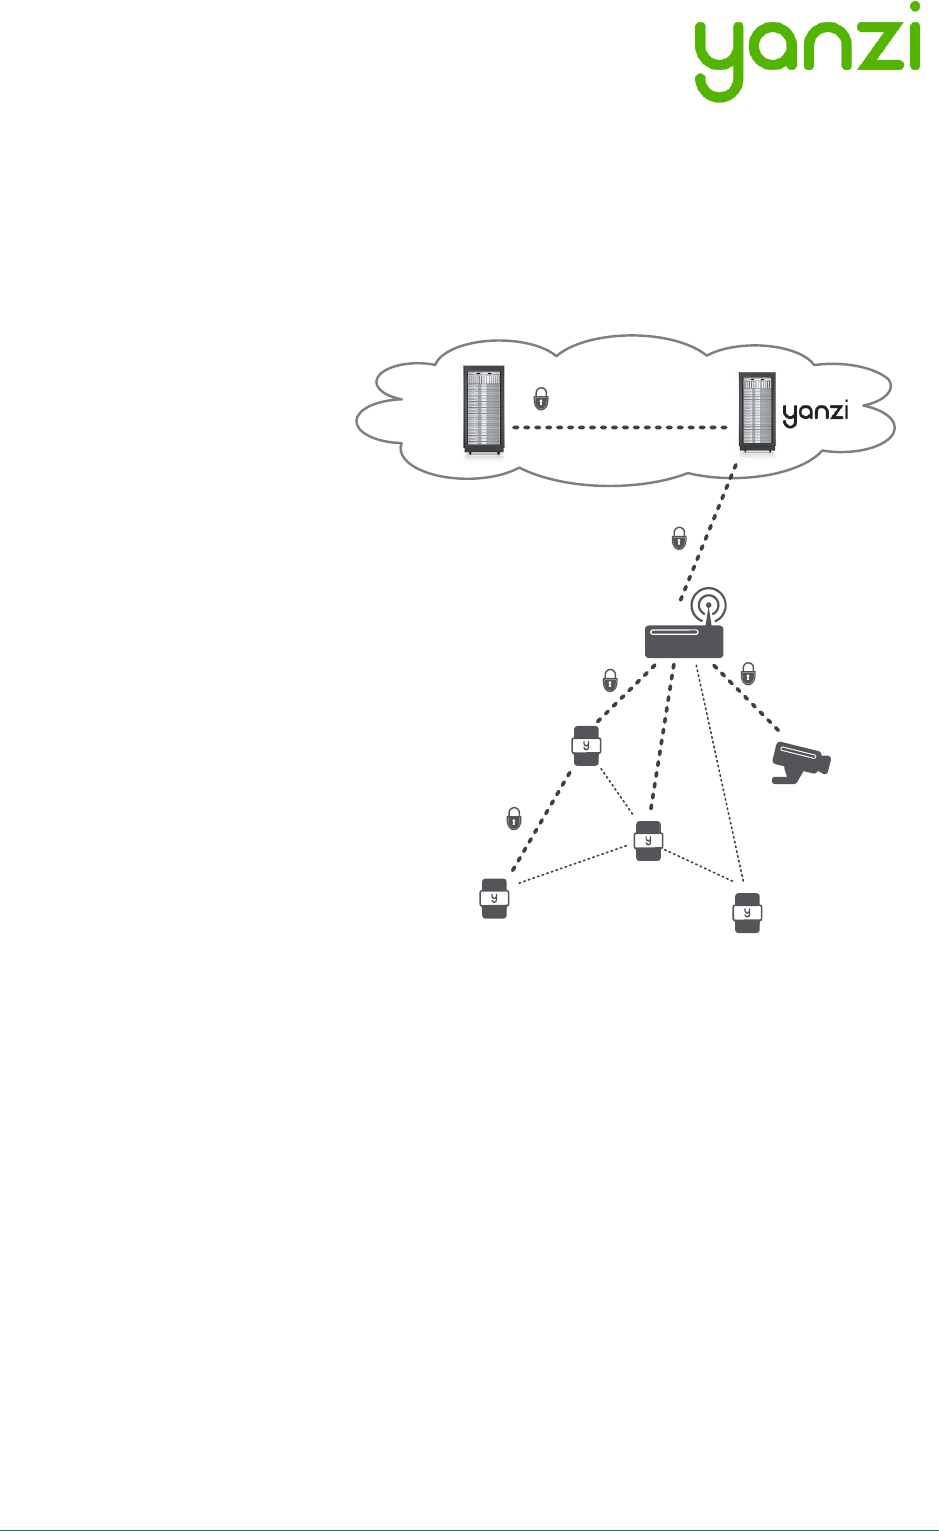
2.1 Infrastructure
The infrastructure has two parts: The Gateway and the IoT network. The Gateway is the brains of
the system and manages all sensors, collects all data, and keeps a communication channel open
to the Cloud. The IoT network is required to enable sensors to communicate with the Gateway.
The IoT network is completely built on IP communication, same as on the Internet. The IoT
network is built using one or more Access Points, just like a WiFi network is built. The Access
Points communicate with the Gateway using standard Ethernet connectivity. For more
information on networks and wireless technologies, please see support sections below.
Before ordering any infrastructure products, the first step is to decide type of Internet connection
and way to build the IoT network according to the following sections.
2.1.1 Connecting the Gateway to Internet
Gateways can be connected to the Internet in two ways:
1) Sharing the Internet connection already available in the building or
2) Using a mobile broadband uplink
Sharing the Internet connection does not mean the IoT network must run on the corporate
network. It means using a separate port on the customer’ firewall to create a separate network
that only provides Internet access.
2.1.2 Building the IoT Network
The IoT Network can be built in two ways.
1) If there are Ethernet cabling available in the building, it may be possible to use a single
Gateway and connect that to one or more Access Points using those Ethernet cables.
2) If there are no Ethernet cabling available and it is not possible to pull new cables, the IoT
network is built using one or more Gateways connecting to the cloud over mobile
broadband. Most of the Gateways have access points capabilities already built-in so a
small IoT network can be created around each Gateway. These Gateways all
communicate separately with the Cloud.
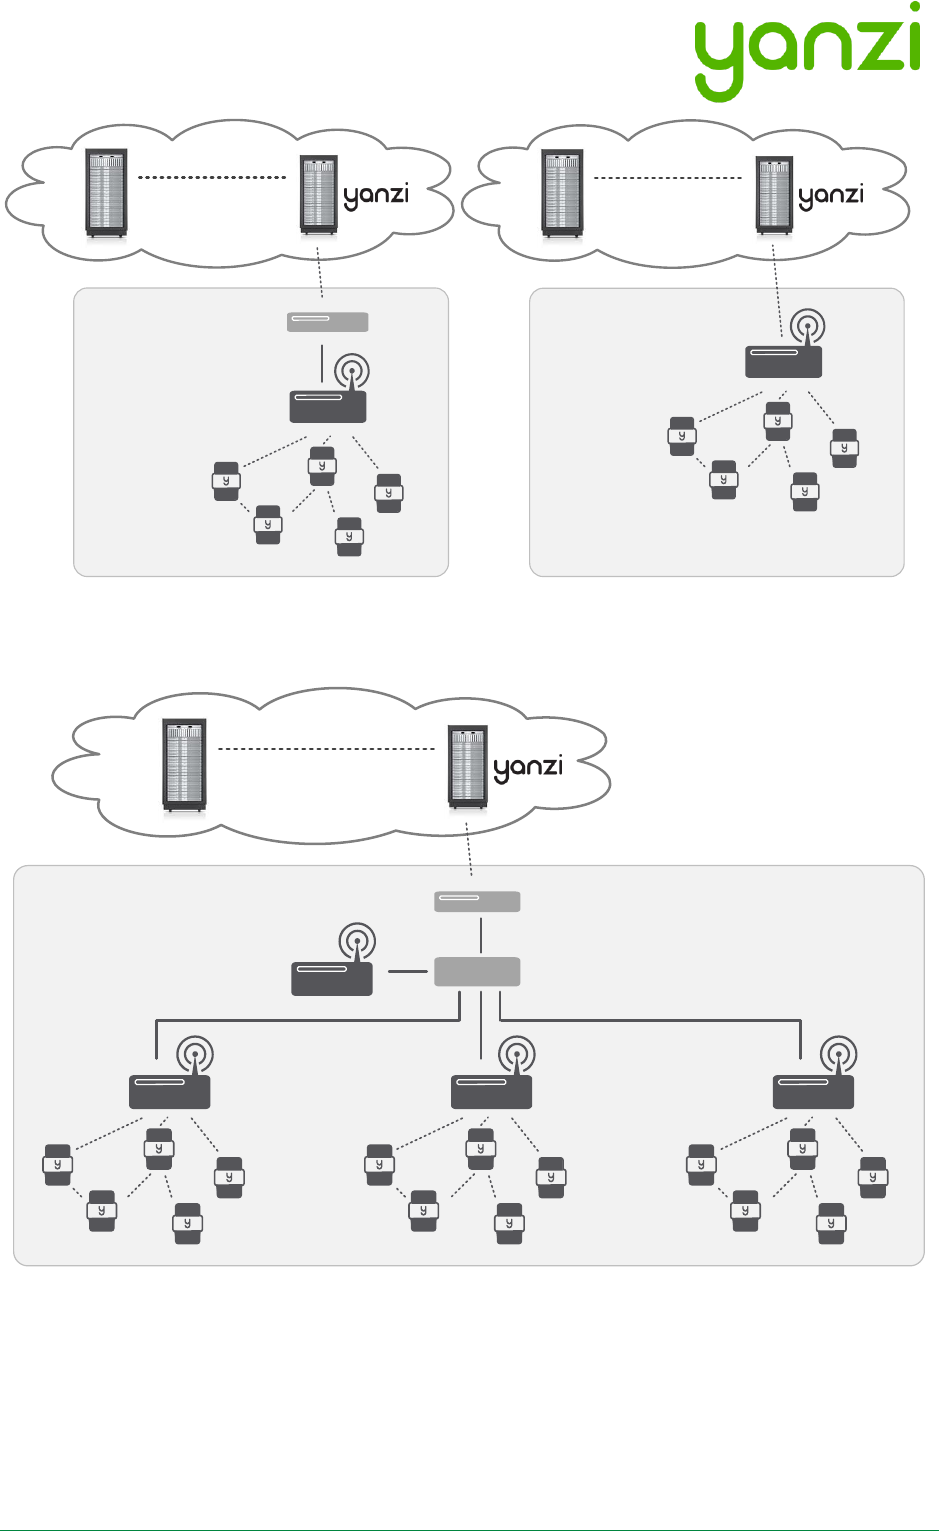
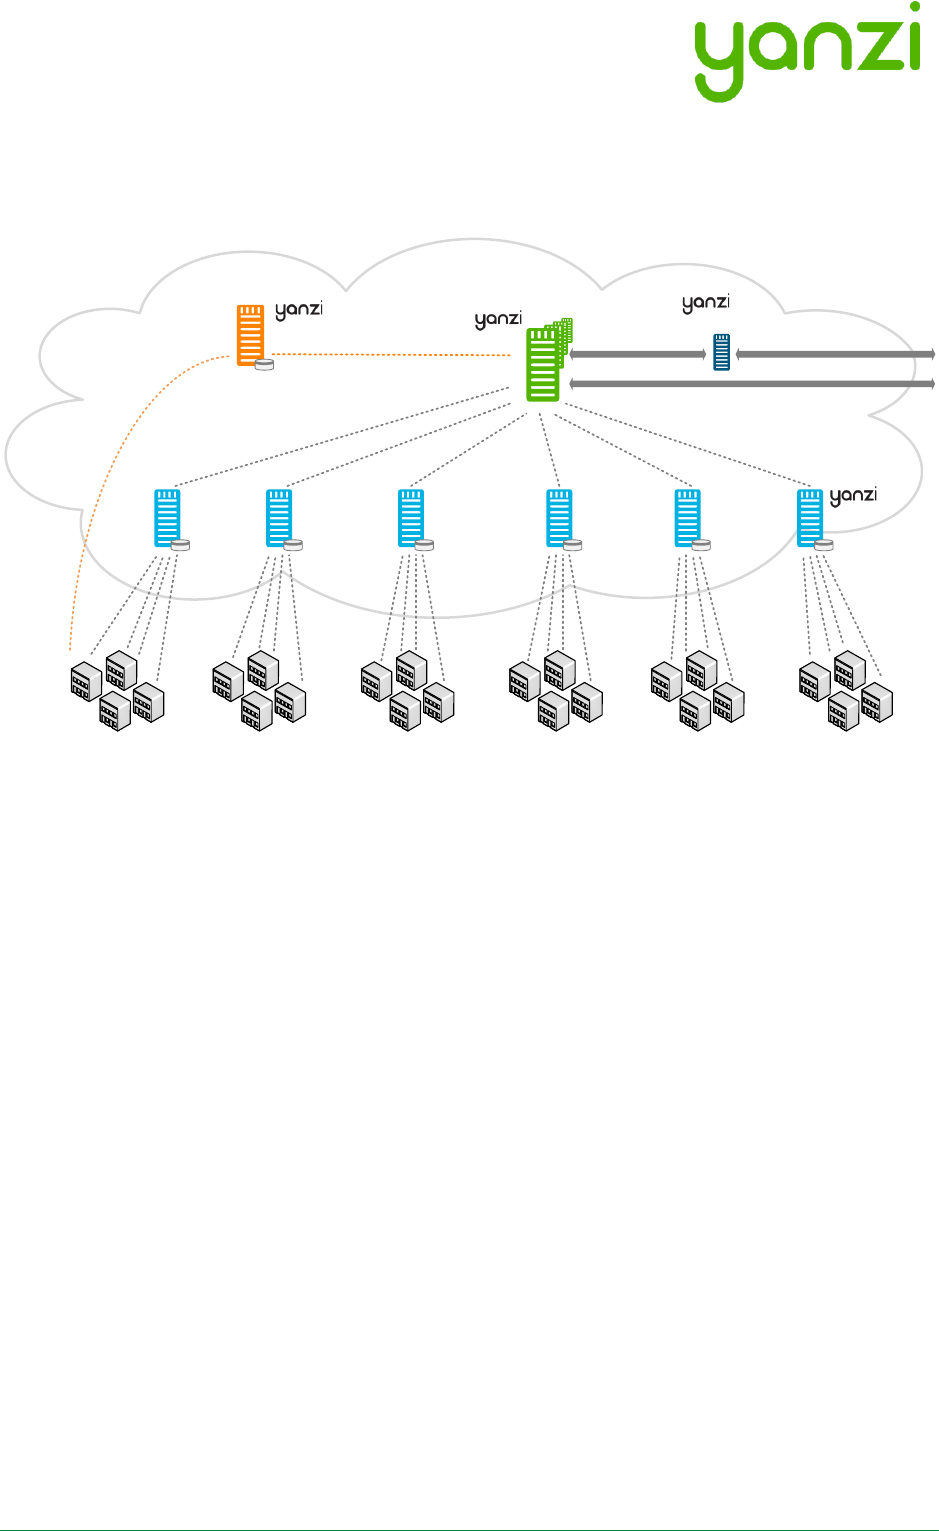
2.1.3 Infrastructure Examples
Small system where only one Gateway is enough to create the wireless IoT network. Internet
connectivity can be provided using Ethernet (on the left) or using built-in mobile broadband in the
Gateway (on the right).
Doc No: 890-03084 Date: 2017-11-21 Rev 24pa3
Yanzi Networks Installation Manual – Smart Office 7 of 42
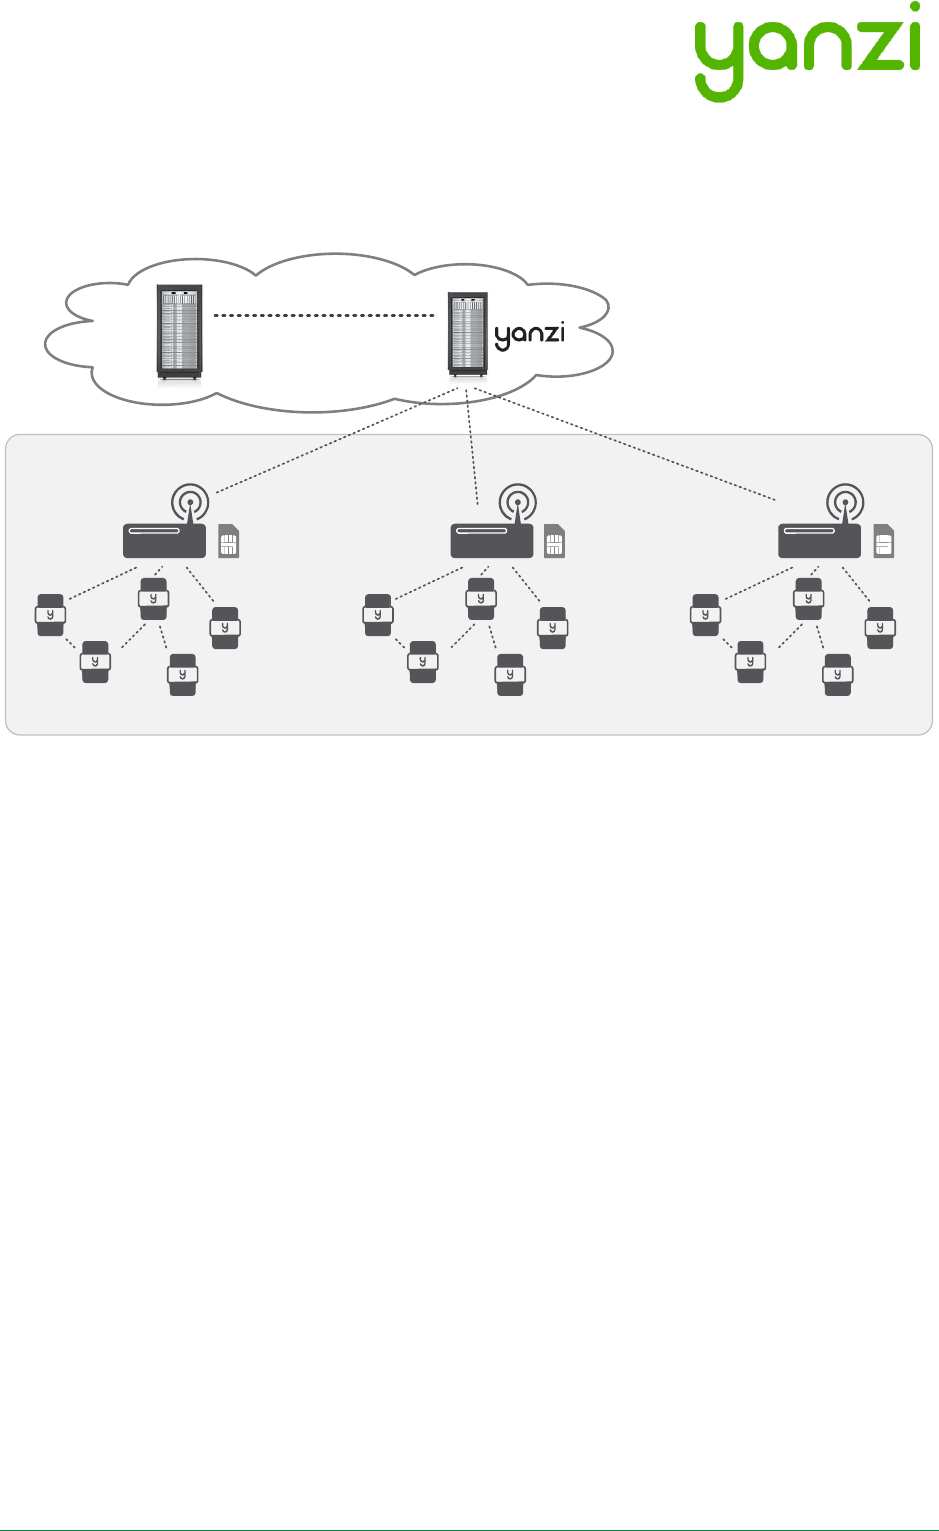
Large system reusing Ethernet infrastructure in building and where Internet connectivity can be
provided by sharing a port on the existing firewall or using an external mobile broadband router.
• Gateway and Access Points needs a network with a DHCP server to get IP addresses
assigned.
• The Gateway communicates with the Access Points using UPnP and SSL over Ethernet
• Internet connection only requires outgoing port 443 and 4445. No inwards connection
required. Gateway connects automatically to the Yanzi server.
• All communication links are encrypted
Yanzi IoT Gateway
Customer Firewall or
Mobile Broadband Router
3G/4G/LTE
Partner
Cloud Servers
Yanzi Sensors
Yanzi IoT Gateway 4G
3G/4G/LTE
Partner
Cloud Servers
Yanzi Sensors
Yanzi IoT Gateway
Cloud Servers
Secure Cirrus API
IPv6 over IEEE 802.15.4
handled by the Gateway
Customer Firewall or
Mobile Broadband Router
Yanzi IoT Access Points
Yanzi Sensors
Fiber/DSL or
3G/4G/LTE
Ethernet
Switch
Partner
Cloud Servers
Doc No: 890-03084 Date: 2017-11-21 Rev 24pa3
Yanzi Networks Installation Manual – Smart Office 8 of 42
• PoE switch connects and powers all IoT Access Points (when AP has PoE support)
• Optional UPS on PoE switch and Gateway to enable operation when power is lost
Large system completely stand-alone without using any existing infrastructure.
Cloud Servers
Secure Cirrus API
IPv6 over IEEE 802.15.4
handled by the Gateway
Yanzi IoT Gateway 3G/4G
Yanzi Sensors
3G/4G/LTE
Partner
Cloud Servers
Doc No: 890-03084 Date: 2017-11-21 Rev 24pa3
Yanzi Networks Installation Manual – Smart Office 9 of 42
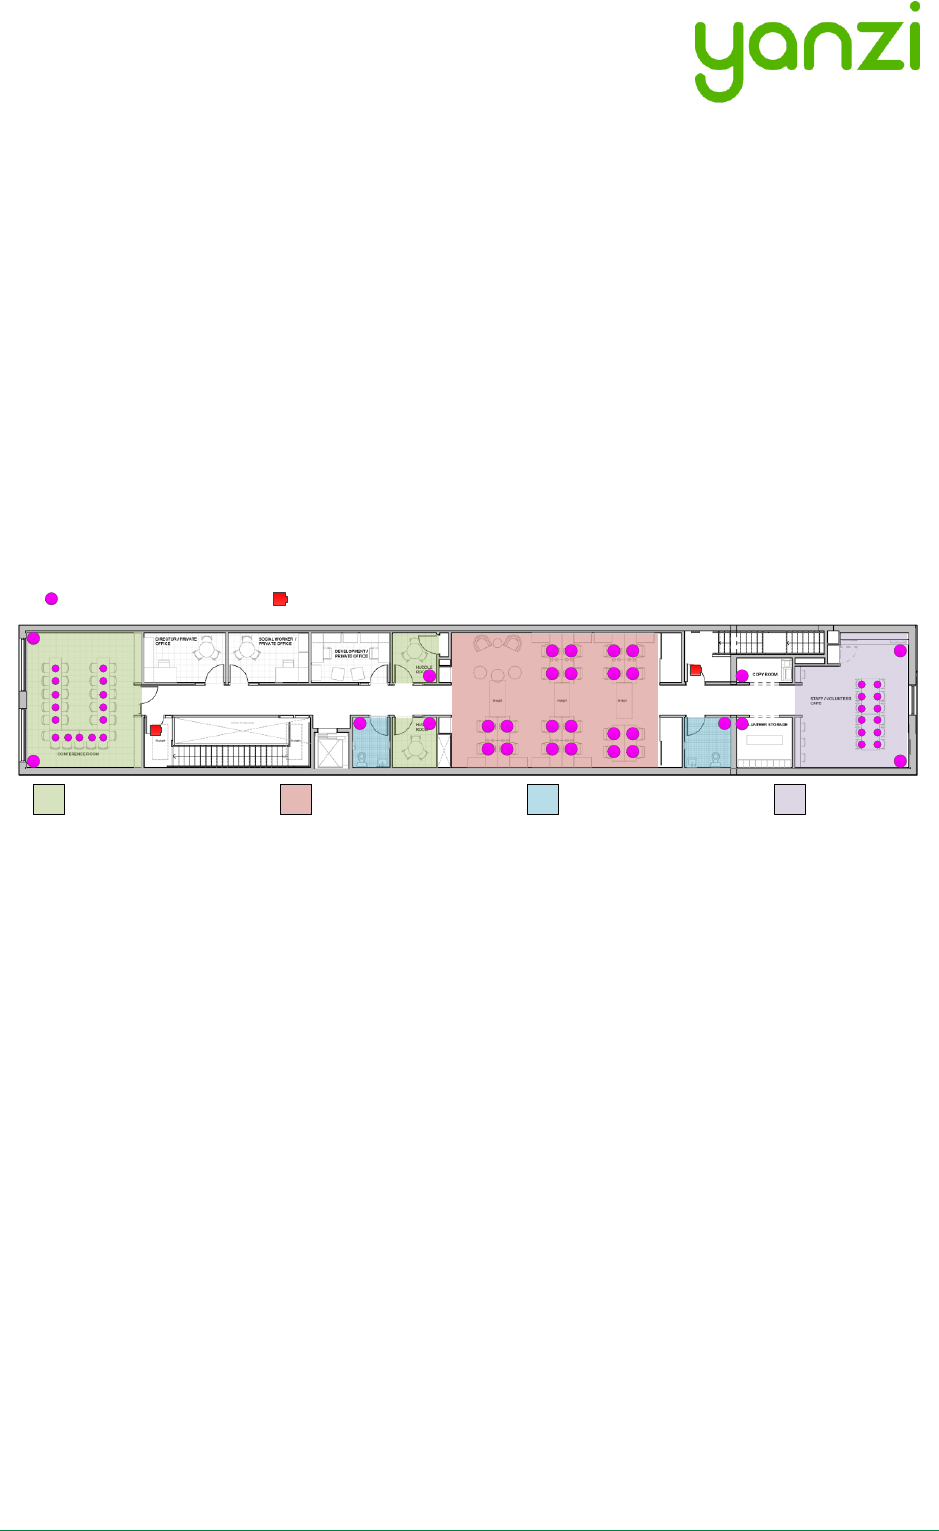
2.2 Use Cases
Depending on which use case to cover, the type and position of sensors may vary. Two typical
use cases are shown below for space utilization and comfortability.
2.2.1 Space Utilization
For space utilization, Yanzi Motion/Presence sensors are added under the table at each work
desk chair and at each chair of larger conference rooms (typically rooms with 6 chairs or more)
to detect usage. For room usage, Yanzi Motion/Presence or Yanzi Motion+ is placed on the wall
(rooms larger than 20m2 are recommended to use two sensors to make sure the whole room is
covered). Selection between Motion/Presence sensor and Motion+ sensor depends on if
comfortability use case also should be covered as the Motion+ sensor monitors more things than
the Motion/Presence sensor.
Motion/Presence sensors may also be used for restroom utilization to monitor each stall as well
as the washroom.
Footfall cameras may be placed in the ceiling of each entrance to the building and can as well be
placed at the entrance to any area where specific information is wanted. The footfall cameras are
connected to the Gateway using Ethernet/PoE. This proposal do not focus on footfall cameras.
2.2.2 Comfortability
For comfortability, the work environment is monitored using for example CO2, temperature,
humidity, barometric pressure, volatile organic compounds (VOC), ambient light and ambient
noise sensors. Yanzi Comfort sensors are placed in each room (conference room, phone booths,
locker room, etc.) where people are present for longer periods of time as well spread out in open
work spaces. In open work spaces, recommendation is to use one Yanzi Comfort for each 15-25
work desks.
Yanzi Motion+ are used to monitor occupancy and light at work desks (preferably placed in the
ceiling where it covers about 6-8 work desks depending on height of ceiling). It is also used to
monitor utilization of smaller rooms such as conference rooms, phone booths, locker rooms,
storage rooms, kitchens, restrooms, etc.
P
FC
P
P
P
P
P
P
P
P
P
P
P
P
P
P
P
P
P
P
P
P
P
P
P
FC
P P
P
P
P
P
Work Desks/Hot Desks
Conference/Phone Rooms Restrooms Dining Area
FC Ceiling mount camera for footfall applications
Yanzi Footfall Camera
POptimized for space Utilization. PIR motion.
Yanzi Motion/Presence
Doc No: 890-03084 Date: 2017-11-21 Rev 24pa3
Yanzi Networks Installation Manual – Smart Office 10 of 42
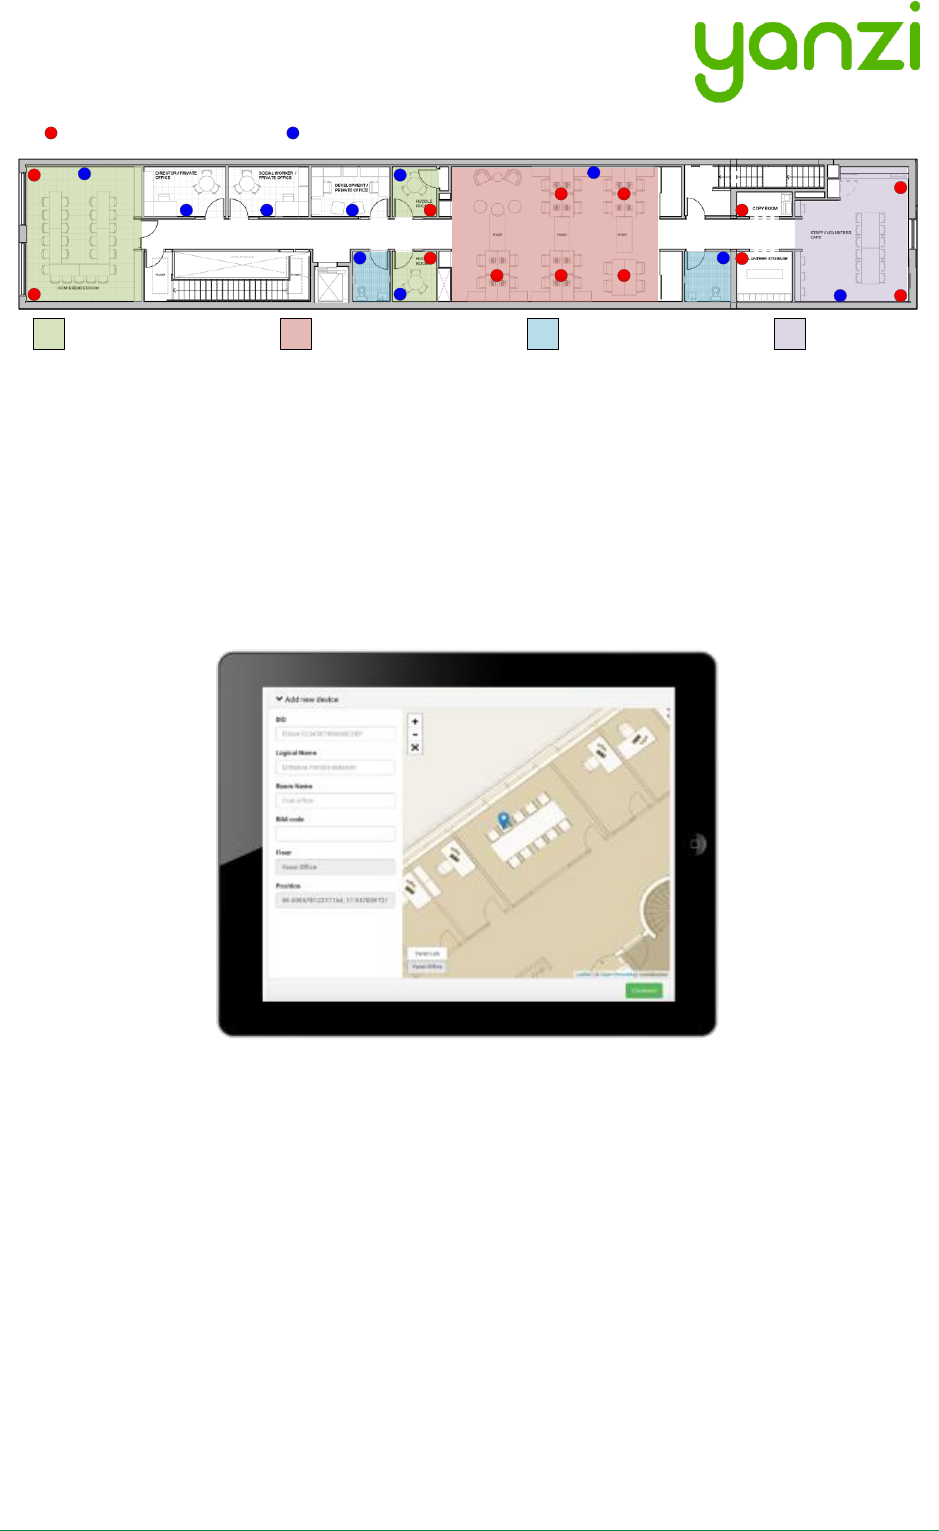
2.3 Installation Tool
One of the important parts after the installation is to know where sensors have been placed. The
mapping between the sensor unique ID and the physical location is done at time of installation
using the Yanzi installation tool in Yanzi Live. This is a browser based installation tool that allows
for quick installation of many sensors.
Prior to installation, make sure the floor map(s) has been provided to Yanzi and added to your
account.
2.4 Privacy
It is strongly recommended to inform personnel of the reasons for the installation, that their
privacy is respected and maintained at all times, and clarify that no images, video, or sound is
ever recorded.
The correct process for this is up to each company to decide but Yanzi recommends the
following as a basis:
1. Send an email with information two weeks prior to installation
2. Leave a note on each person’s desk at the time of installation
3. Send an email again after installation is done reminding why this is done
See section 15 for examples of wording.
A
M
M
M
A A A
A
M
A
M M
MMM
A
A A
A
M
M
M
M
MMotion, Temperature, Humidity, Ambient Light, Ambient Noise (Sampled)
Yanzi Motion+
Work Desks/Hot Desks
Conference/Phone Rooms Restrooms Dining Area
CO2, VOC, Temperature, Humidity, Air Pressure, Ambient Noise (Continuous)
AYanzi Comfort
Doc No: 890-03084 Date: 2017-11-21 Rev 24pa3
Yanzi Networks Installation Manual – Smart Office 11 of 42
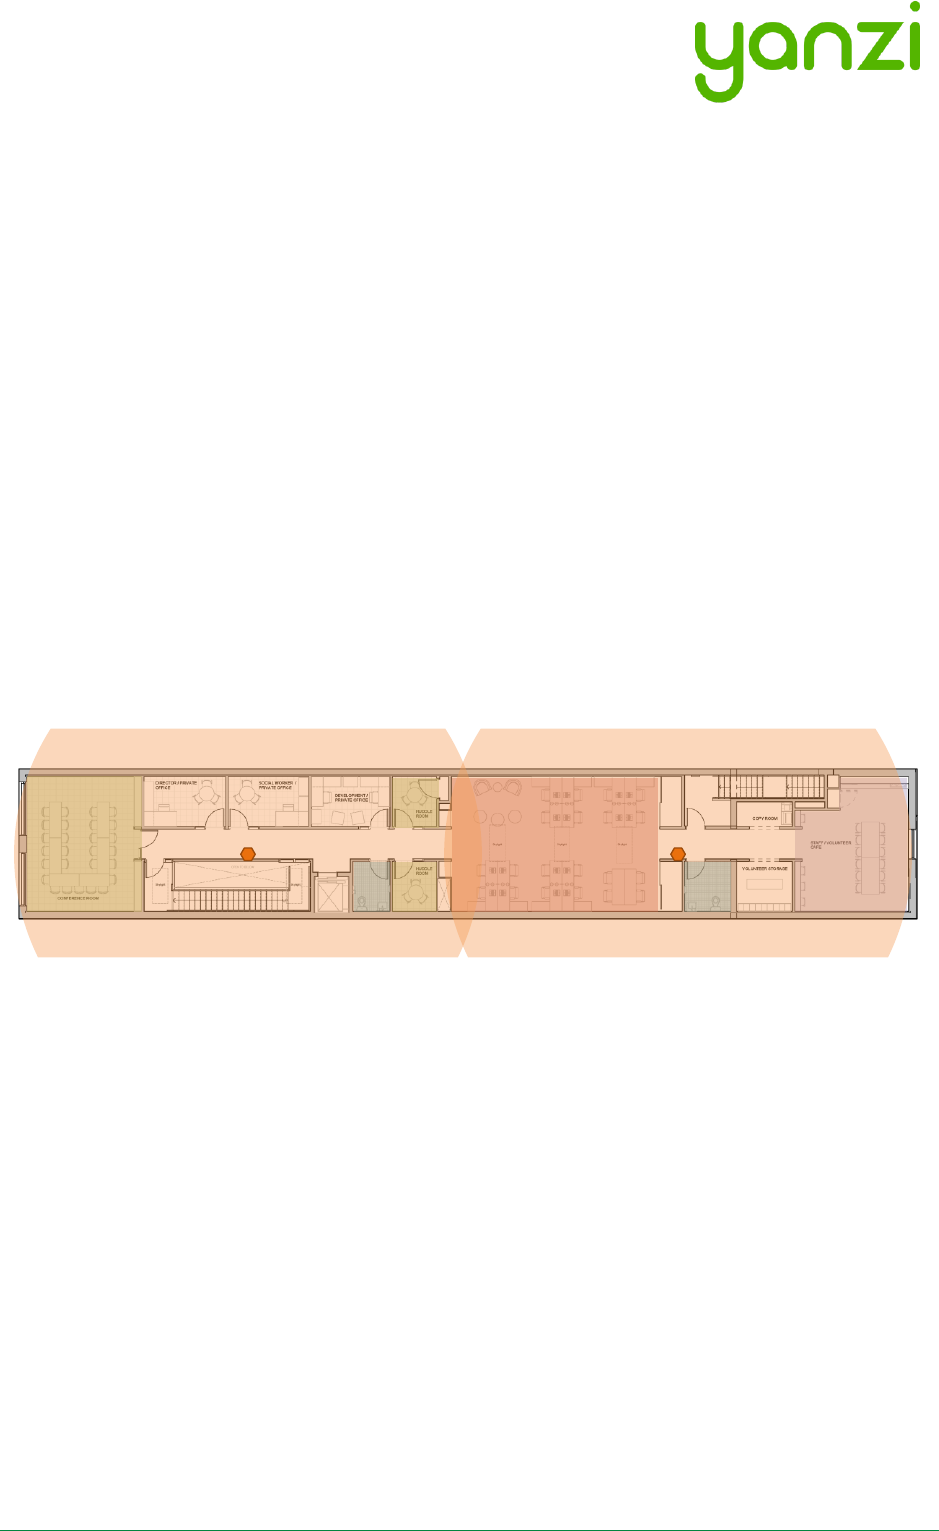
3. Installation of Infrastructure
Gateways are recommended to be registered prior to installation. Register means connecting the
Gateway to a specific account. Users can then be added or removed from this account to control
access. Registration is done using the installation tool or provided as remote support by Yanzi.
Yanzi needs the Gateway ID (printed on the Gateway label), the location name it should have, as
well as a user with administrative rights for this account.
Make sure the infrastructure is always built prior to installing any sensors. Install the Gateway
and connect it to Internet. Install the Access Points and connect them to the same network as
the Gateway according to the pictures above.
The wireless IoT network created around Access Points have a range of about 500-1,500 m2 (~
5,000-15,000ft2). The actual range depends heavily on walls, obstacles, materials, and number of
potential mesh nodes (This is very similar to WiFi access points). Wireless coverage is affected
for example by elevator shafts (lots of metal), bathrooms (water and thick walls), and other radio
disturbances such as WiFi access points and microwave ovens.
IoT Access Points (or Gateways with mobile broadband) is shown below with an approximated
wireless coverage shown as orange circles. In this specific building, two Access Points per floor
is enough.
AP AP

Doc No: 890-03084 Date: 2017-11-21 Rev 24pa3
Yanzi Networks Installation Manual – Smart Office 12 of 42
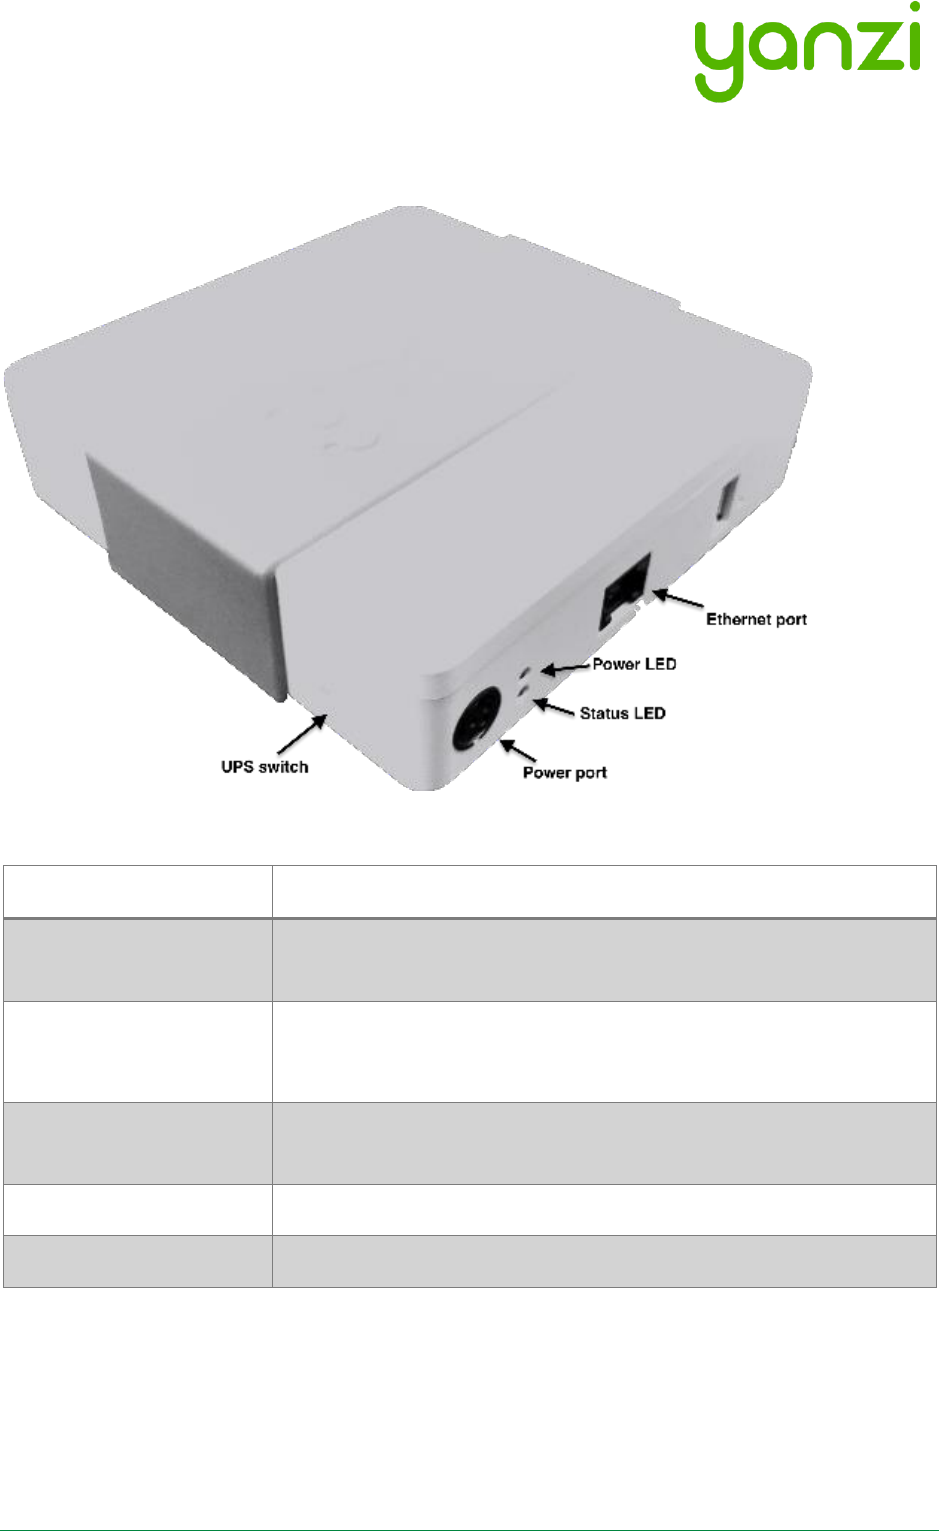
3.1 Yanzi IoT Gateway overview and installation
The following applies to all variants of Yanzi IoT Gateway (DR2-88xx) and Yanzi IoT Gateway Plus
(DR2-89xx). For more details on gateway LED behavior, see section 3.3.
Installing and registering a gateway
1. Insert the included power adapter to a power outlet and plug in the cable to the gateway.
The power LED should now turn solid green.
2. Optional: Enable the gateways built in UPS by pushing the switch located on the left side of
the gateway towards the grey sleeve (Applies to Yanzi Gateway and Yanzi Gateway Plus).
3. Connect the gateway to internet
a. For Ethernet based gateway: Connect an Ethernet cable to the gateways Ethernet
port. Connect the cables other end to an available switch/router port with internet
access.
b. For 3G based gateways: Once the gateway has booted, it will search for a cellular
network, please allow up to 10 minutes for this to complete.
4. Once step 3 is complete and the gateway has established a connection to the Yanzi
cloud, the status LED should blink green.
5. Register the gateway – follow the below steps;
a. Use Googles Chrome browser, go to the link specified by Yanzi, typically
something like https://cirrus.yanzi.se
b. Sign in using the credentials provided by Yanzi, email and password
c. In the upper right hand corner (below the search field) you will find a “+Install
Gateway” button. Click this and enter the details in the ‘Connect New Gateway’
field
i. Gateway ID: Fill in your gateways ID, located on the silver label on the
gateway
ii. Location Name: Fill in the name of your Location, e.g. “Yanzi HQ”.
iii. Account: Select an account to link this Location to and click register
6. Once the registration process is complete, the status LED will turn solid green.
Doc No: 890-03084 Date: 2017-11-21 Rev 24pa3
Yanzi Networks Installation Manual – Smart Office 13 of 42
3.2 Gateway Functions
Port
Desription
Power Port
Only use Yanzi Wall Adapter according to Gateway datasheet,
typically 12V/2A.
Ethernet Port
1x 10/100 Ethernet port (DR2-88xx)
2x 10/100 Ethernet ports (DR2-89xx)
UPS Switch
Enables/disables built-in battery backup. Push to front to disable.
Push towards rear to enable.
Power/Status LED
Indicates power status according to section 3.3.
USB Port
Reserved. Do not use.

Doc No: 890-03084 Date: 2017-11-21 Rev 24pa3
Yanzi Networks Installation Manual – Smart Office 14 of 42
3.3 Gateway LED Behavior
Yanzi IoT Gateway and IoT Gateway Plus both have a dual color LED that can indicate green or
orange. The typical LED behaviors are shown in the table below.
Gateway LED State
Yanzi IoT Gateway
Yanzi IoT Gateway Plus
Top LED (Power)
Off
Power is off
Power is off
Steady green
Power applied and gateway is
turned on
Power applied and gateway is
turned on
Steady orange
N/A
External power failure, the
gateway is operating on the built-
in battery
Bottom LED (Status)
Off
Status LED is off whenever the
gateway is off and during boot
Status LED is off whenever the
gateway is off and during boot
Blinking green
Gateway is ready to be registered
in the portal
Gateway is ready to be registered
in the portal
Steady green
Gateway is connected to portal
Gateway is connected to portal
Steady orange
Gateway has local access but is
not connected to the portal
Gateway has local access but is
not connected to the portal
Blinking orange*
*Applies to 4G/3G gateways
Mobile broadband connection
error
This could for example indicate that
all the monthly data has been used
Mobile broadband connection
error
This could for example indicate that
all the monthly data has been used

Doc No: 890-03084 Date: 2017-11-21 Rev 24pa3
Yanzi Networks Installation Manual – Smart Office 15 of 42
4. Teams and Equipment
Most efficient is usually to have installer teams of 2-3 persons. Multiple teams can work in
parallel for quicker sensor installations. 1 person places the sensor on the floor map and scans
the QR code. 1-2 persons place the sensor on the correct spot in the building.
Each installation team needs
• Laptop with Chrome browser
o Internet access is required for the laptop as installation tool is web based
• QR code scanner
o Such as the Motorola, Symbol, or Zebra DS6708
• Plastic bins for carrying sensors
• Access to all rooms in building where sensors are to be placed

Doc No: 890-03084 Date: 2017-11-21 Rev 24pa3
Yanzi Networks Installation Manual – Smart Office 16 of 42
5. Sensor Handling Tips
5.1 Battery lid
To open and close the battery lid, gently push the back side label close to the battery lid with your
thumb and slide the battery lid downwards with your other hand.
5.2 Sensor element
The sensor elements must be handled with care as these are sensitive parts.
5.3 Battery insertion
The battery powered sensors operate with 2 or 4 batteries. Two batteries makes the product run
for half the time which is usually 5 years. When using two batteries, please use the bottom two
battery slots as shown in section 11. Note the polarity when inserting the batteries. Polarity is
always shown in the sensors battery compartment as well as on the battery itself.
It is very important to follow the battery requirements when inserting batteries, see section 11 for
more details.
Verify that the front panel LED is turned on within 5 seconds after inserting batteries. Note that it
may only be turned on for a very short while to save battery. If you do not see the LED come on
even for a short while, please remove the batteries and re-insert them again. If it still doesn’t work,
please see the Troubleshooting section.
5.4 External power input
For sensor requiring an external power supply, insert the USB-C connector on the bottom side of
the sensor carefully until a “click” is detected. See each product manual for more details.
Verify that the front panel LED is turned on within 5 seconds after inserting power.

Doc No: 890-03084 Date: 2017-11-21 Rev 24pa3
Yanzi Networks Installation Manual – Smart Office 17 of 42
5.5 Sensor buttons and switches
All Yanzi sensors have a status button, a short press on the
status button will indicate the status using the LED, see 9.1 for
LED behavior.
Some sensors ship with batteries already inserted and therefore
have a power switch. Carefully push the switch to its upper
position to turn on the sensor. Should you want to turn off the
sensor, carefully push the switch to its downward position. Use
a sharp tool such as a paper clip or mobile phone SIM card
ejector to flip the switch.
Yanzi Motion+ shown as example above

Doc No: 890-03084 Date: 2017-11-21 Rev 24pa3
Yanzi Networks Installation Manual – Smart Office 18 of 42
6. Placement of Sensors
General tips on placement
• Try to place the sensors in discrete locations
• Place sensors along walls at about
150-170 cm (60-70 inches) from floor
• Sensors are attached using adhesive tape
• Target wood, plastic, or metal surfaces that are flat
• Avoid wall papers as they may break if sensor must be removed
• Avoid painted walls when using adhesive tape as modern paint is efficient in repelling
adhesive tape
• Dry target surface with a cloth to remove dust, dirt, and grease
• Remove tape cover and press firmly ON THE SLEEVE for 10 seconds. After 10 seconds,
the adhesive tape is strong enough to hold the sensor. Full adhesiveness is reached after
72 hours.
Yanzi Motion+
• Place on wall of smaller rooms such as conference rooms and phone booths
• Place in ceiling above groups of 4-8 work desks
Yanzi Comfort
• Place on wall not close to work desk
• Place vertically with the power connecter facing downwards
• Avoid placement near any air ventilation inlets or outlets as this may cause inaccurate
readings
• Requires a power outlet within 0.5 meters (longer cables available as accessory)
Yanzi Presence for work desks
• Place under work desk about an arm’s length from edge
Yanzi Presence for conference room chairs
• Place under conference room table at each chair about an arms length from edge
Yanzi Presence for conference room corner
• Place in corner of smaller rooms and along walls in larger rooms
• Face away from windows to avoid direct sunlight
• Face away from door to avoid detecting people walking outside the room
• Use multiple sensors for large rooms (>20m2)

Doc No: 890-03084 Date: 2017-11-21 Rev 24pa3
Yanzi Networks Installation Manual – Smart Office 19 of 42
7. Installation of Sensors
Sensors are installed using the Yanzi installation tool. Make sure you get login credentials from
Yanzi prior to installation and that the floorplan of the building has been added to the account.
7.1 Start Yanzi Installation tool
1) Using a Chrome browser, go to the link specified by Yanzi, typically something like
https://cirrus.yanzi.se
2) Sign in using the credentials provided by Yanzi, email and password
3) When logged in, click “Locations” in the left column
4) In the list of locations, click on the location where installation should take place.
5) Click “Installer” to the right of the top bar
6) The floor plan will now open and you are ready to install sensors
The Yanzi installation tool is a cloud based tool so make sure Internet connection is available
throughout the building.
7.2 Installation Procedure
1) Select floor in the bottom left corner of the map
2) Zoom into area on the floorplan where the sensor should be installed
3) Click on the exact location where the sensor will be installed
4) Add the following properties in the “Add new device” list
DID. Scan the sensor QR code using the hand scanner.
Example: EUI64-0090DAFFFE00526A
Optional: Logical Name
Example: Entrance motion detector
Optional: Room name
Example: Oval office
5) Click “Connect” in bottom right corner
6) Turn on the sensor
• For battery powered sensors: Push power switch to ON (see section 5.5) or insert
batteries.
• For USB powered sensors: Insert the USB cable and plug in the power adapter to a
wall socket.
7) Verify the LED on the front panel is lit within 10 seconds. If the LED has not made any
indication within 10 seconds, check batteries or external power.
8) Dry target surface with a cloth to remove dust, dirt, and grease
9) Place sensor by removing the non-stick film on the back of the sensors sleeve and place it
into position by pressing FIRMLY on the gray sleeve for 10 seconds (if adhesive tape is used)
10) Restart at point 3 for next sensor
When done, leave the Installer and go to the List view to verify that all your added sensors are
connected.
Sensors are assigned a radio channel, encryption key, and configuration settings automatically
and data should be available in the Cloud within a few minutes after installation.
Doc No: 890-03084 Date: 2017-11-21 Rev 24pa3
Yanzi Networks Installation Manual – Smart Office 20 of 42
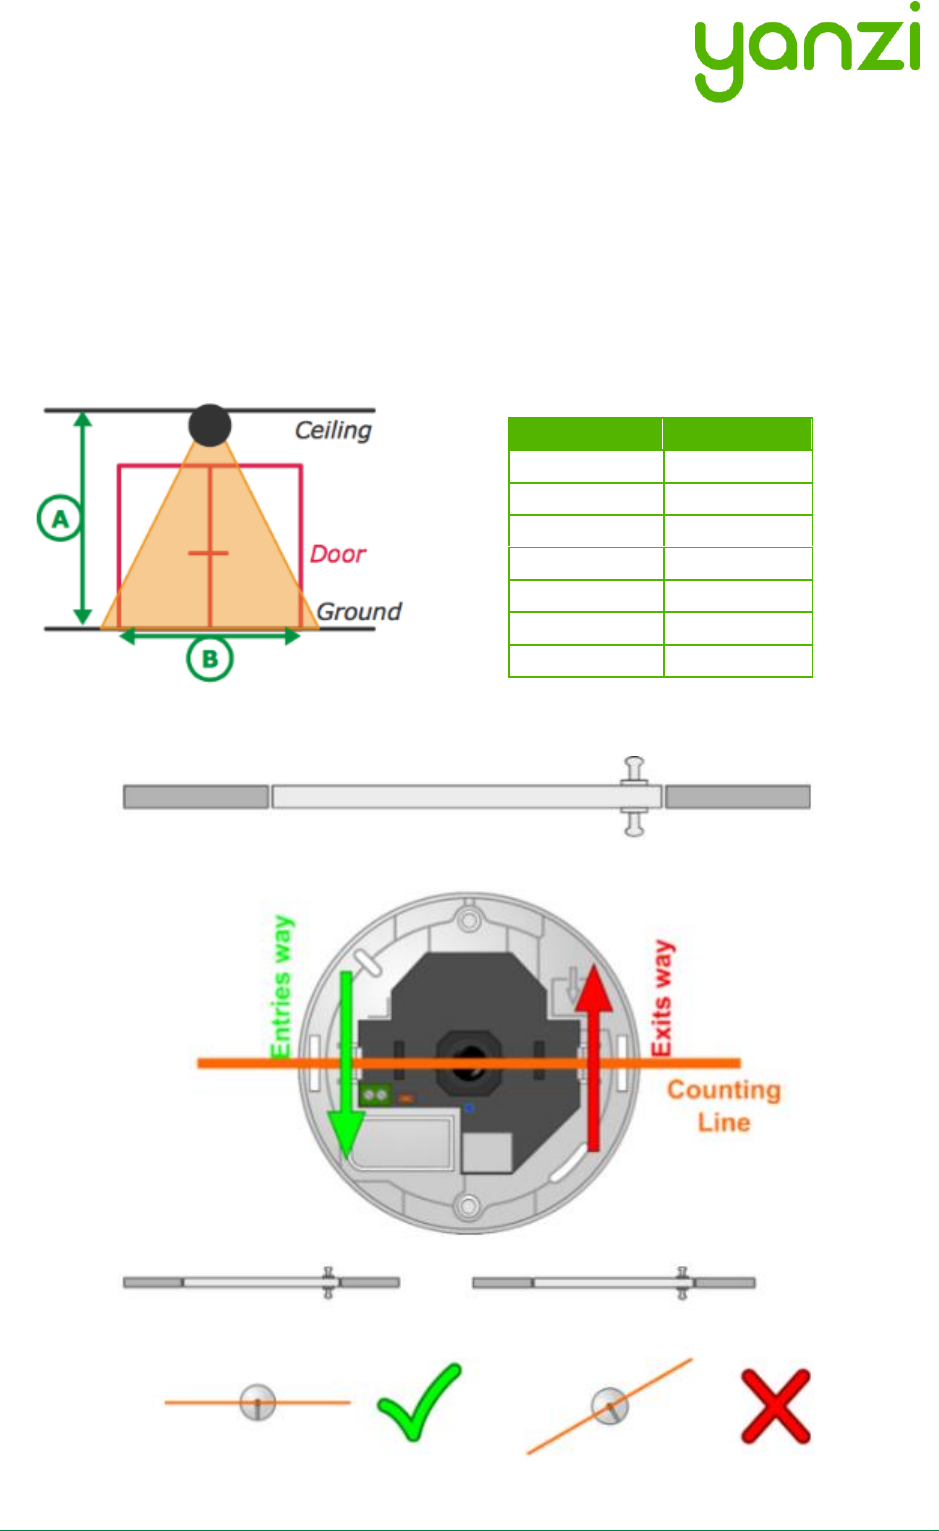
7.3 Yanzi Footfall Camera Overview and Installation
General requirements
The Yanzi footfall camera must:
• Be mounted with the correct orientation
• Be in an area where, preferably, people do not stagnate
• Be in a place with adequate illumination
• Be outside of the door opening area
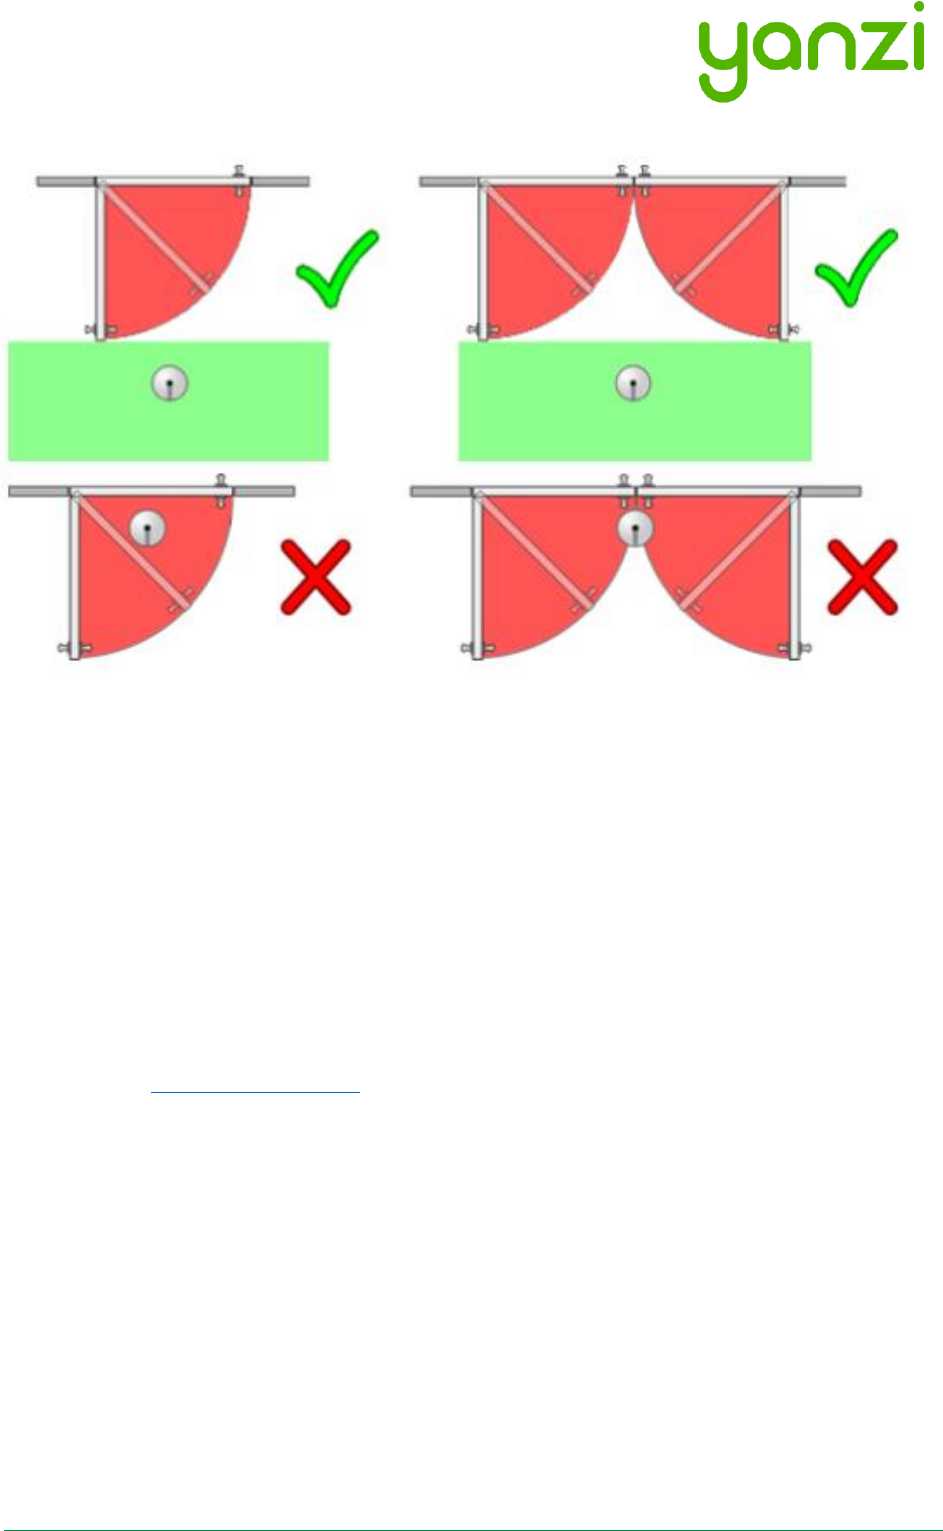
Depending on the ceiling height, the width the camera will be able to count varies as shown in the
illustration and in the chart below.
The footfall
camera must be
correctly aligned
and oriented
as shown below.
Height (A)
Width (B)
2.5m
2.5m
3.0m
3.5m
4.0m
5.5m
5.0m
7.0m
6.0m
9.0m
7.0m
11m
8.0m
12m
Doc No: 890-03084 Date: 2017-11-21 Rev 24pa3
Yanzi Networks Installation Manual – Smart Office 21 of 42
Ensure that the door won’t open directly under the cameras counting line.
Installation and configuration
1. Mount the camera in the ceiling, having considered the requirements listed above. Make
sure you connect the camera using an PoE switch as it gets power over Ethernet. Please
note that the footfall camera must be connected to the same network as the Yanzi
Gateway
2. Log in to the footfall camera by typing in its assigned IP-address in your internet browser
of choice. The default login credentials - username: admin and password: admin
3. When logged in, click Wizard and follow the steps to configure the footfall camera.
4. Once the footfall camera is mounted and configured you need to connect the footfall
camera to you Yanzi Location, to do this:
a. Go to the Cirrus link specified by Yanzi, typically something like
https://cirrus.yanzi.se
b. Sign in using the credentials provided by Yanzi, email and password
c. In the list of Locations, select the Location where you mounted the footfall camera
and click Installer
d. In the dropdown menu called ‘Discovered Things’ you will now be able to see your
recently installed footfall camera. Click Quick Connect
e. Your Yanzi Footfall Camera is now connected and will start pushing data to the
cloud

Doc No: 890-03084 Date: 2017-11-21 Rev 24pa3
Yanzi Networks Installation Manual – Smart Office 22 of 42
8. Wireless Communication
Yanzi sensors operate on world-wide standard physical medias only such as IEEE 802.3
(Ethernet) and IEEE 802.11 (WiFi) for high performance sensors, and IEEE 802.15.4 for very low
power sensors. The wireless protocols are all designed by IEEE to operate simultaneously with
minimum interference. Yanzi uses very low power for IEEE 802.15.4 sensors in order to be
friendly with WiFi. An advanced back-off/retransmission scheme ensures good coexistence with
Wifi networks as well as providing minimal impact from unwanted interference.
IEEE 802.15.4 has similar range to WiFi and normally operates on the same ISM band, 2.4GHz.
There are Sub-GHz solutions for IEEE 802.15.4 as well but for normal high density installations, it
is not required for reach.
For more details on IEEE 802.15.4, please see section 14.
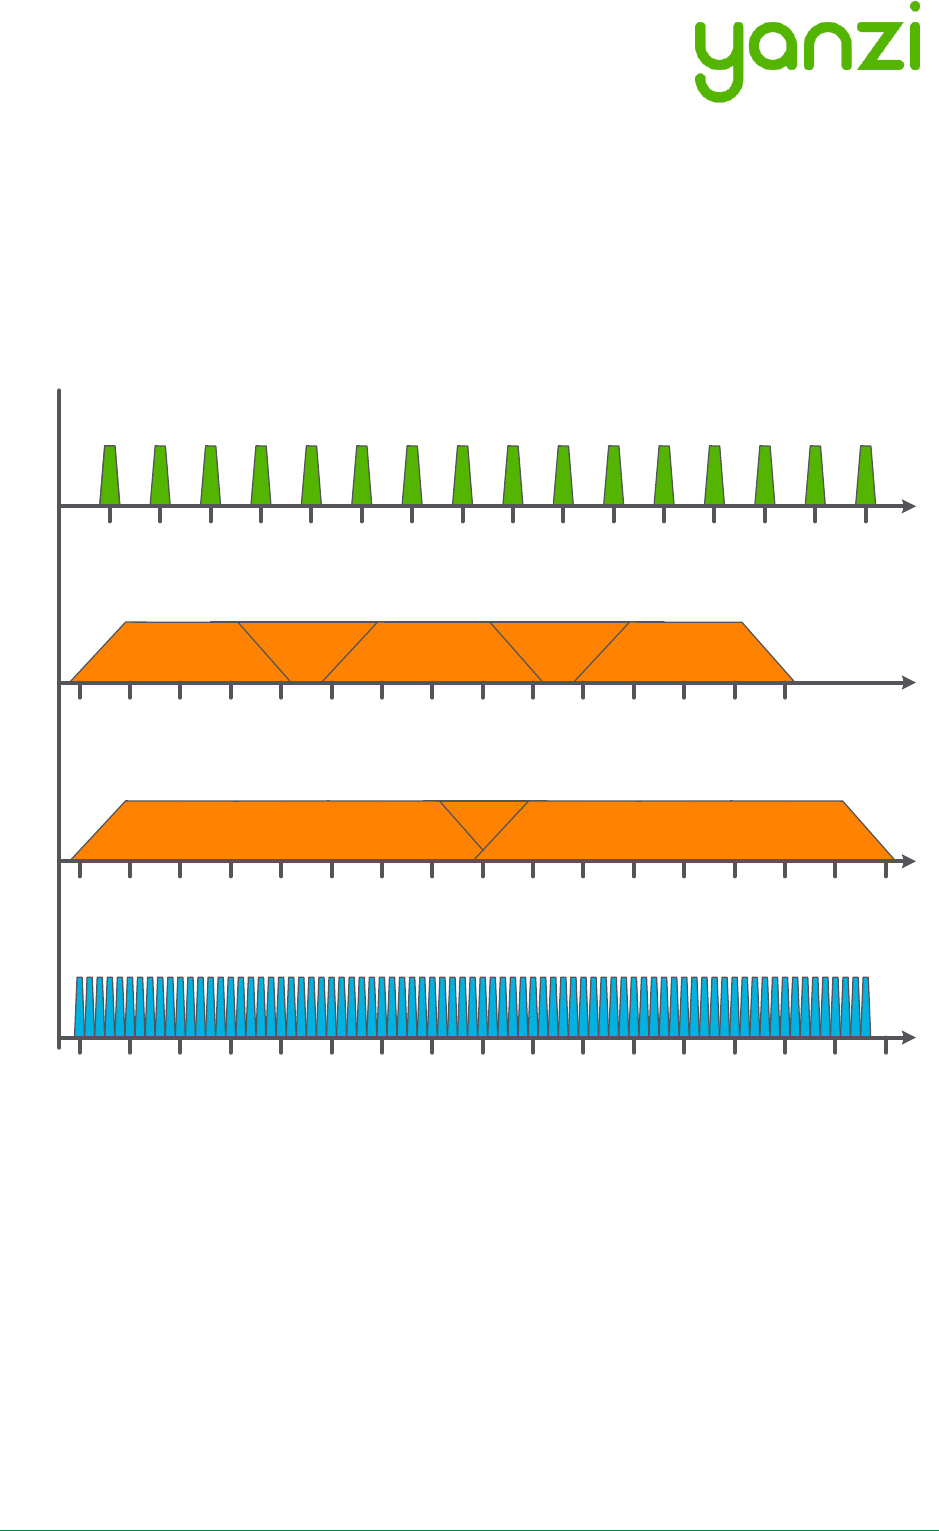
Sensors communicate periodically (typically every minute but depends on type of sensor) with
the Gateway. Events are communicated immediately (and not periodically) for fast notifications.
All communication is full duplex ensuring that all packets are received properly.

Doc No: 890-03084 Date: 2017-11-21 Rev 24pa3
Yanzi Networks Installation Manual – Smart Office 23 of 42
9. SIM card management
Yanzi Gateways with mobile broadband are shipped without SIM card inserted. This section
describes the requirement for the SIM card as well as instructions on how to add a SIM card and
configure the Gateway accordingly. For details on pre-supported operators and countries, please
see section 15.
9.1 SIM card requirements for Yanzi IoT Gateway 3G
9.1.1 SIM requirements
Item
Requirement
Note
Bandwidth
Minimum HSPA
HSPA is up to 5.76 Mbit/s
Data amount
5 – 20 GB/month
Data usage heavily depends on the
implementation of the analytics, front end,
and end usage. For many installations,
5GB/month works well but Yanzi strongly
recommends 20GB/month.
Over-usage of data
-
Strongly recommended that operator does
not incur extra charges for over-usage of
data. Customer will be responsible for any
extra charges.
PIN
No
Pin code must be disabled
APN
Standard APN and
APN authentication
(username/password)
APN and APN authentication must be made
available to Yanzi at the time of order if
Gateway is to ship pre-configured.
Size
Micro-SIM
Management
-
Web interface with over-usage warning
recommended
Roaming
Sweden
Roaming for Sweden must be enabled
(without requiring confirmation by the user)
with at least 100 MB of data in order to
verify APN configuration.
9.1.2 Operator requirements
Network frequency: 850/900/1900/2100MHz
Network speed: Minimum HSPA
9.2 Mobile Broadband Coverage
Good radio coverage is required for the service to work well. Verify prior to installation that the
chosen operator has 3G and 4G access in the building where Gateways are to be installed. Note
that even if the operator says the area has coverage, it doesn’t mean coverage is available inside
the building.

Doc No: 890-03084 Date: 2017-11-21 Rev 24pa3
Yanzi Networks Installation Manual – Smart Office 24 of 42
Doc No: 890-03084 Date: 2017-11-21 Rev 24pa3
Yanzi Networks Installation Manual – Smart Office 25 of 42
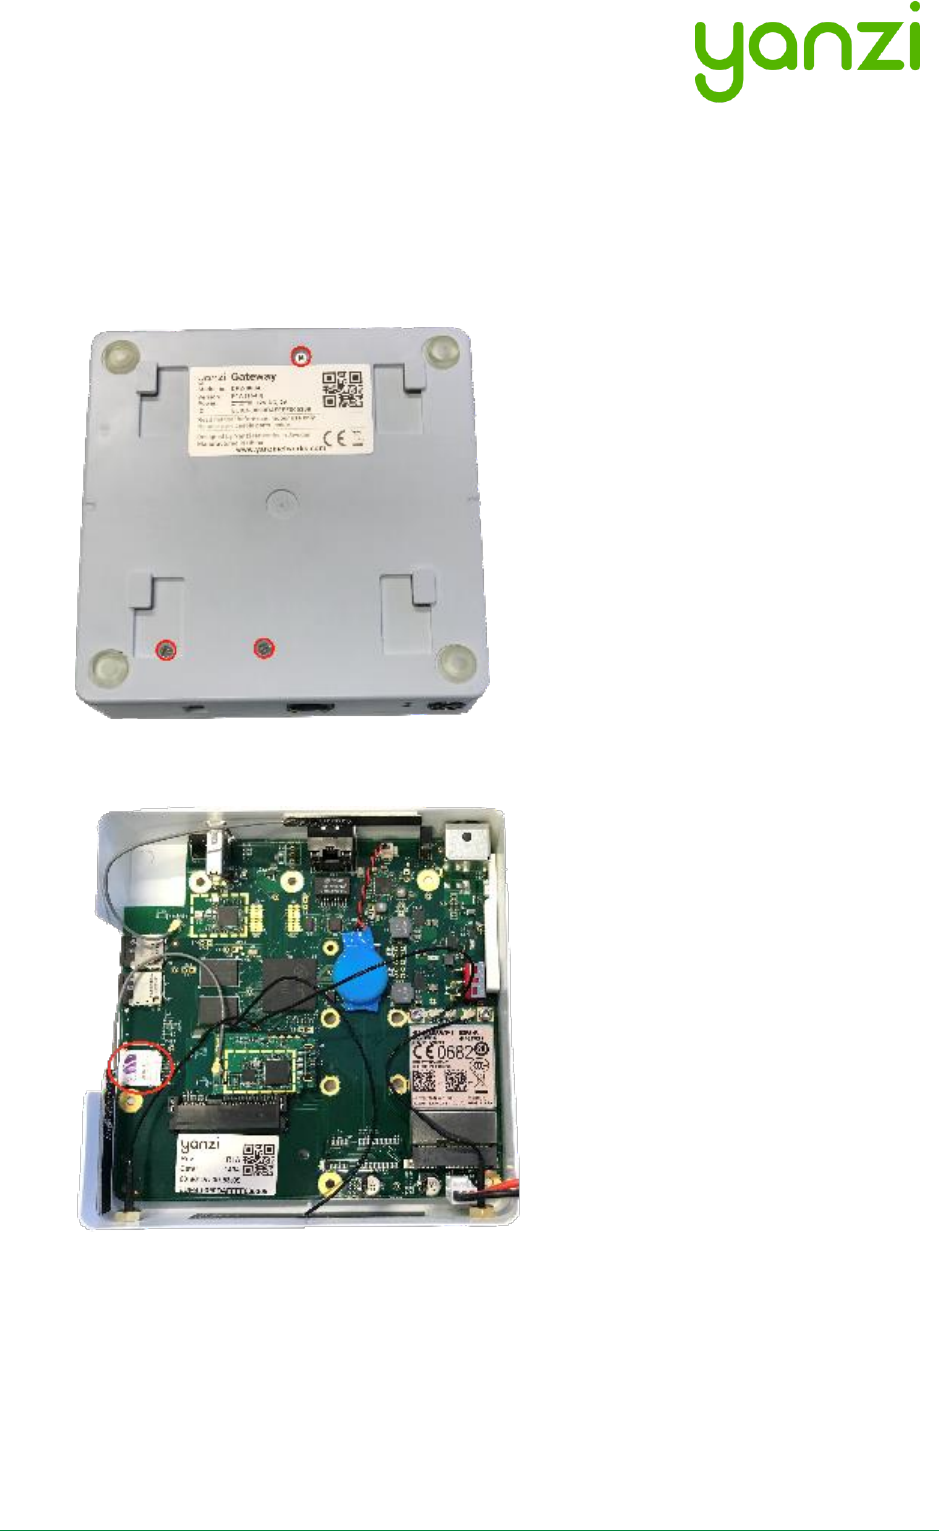
9.3 Replacing SIM card in IoT Gateway 3G
Always take extra caution when working with exposed electronics, never touch the internal
components or the logic board.
1. Remove the grey Yanzi sleeve
2. Using a Philips screwdriver, unscrew the three screws on the back of the gateway
3. Carefully open the gateway as the top lid holds the battery and is connected to the logic
board
4. Carefully push the micro-SIM card out of its holder

Doc No: 890-03084 Date: 2017-11-21 Rev 24pa3
Yanzi Networks Installation Manual – Smart Office 26 of 42
5. Insert the new micro-SIM card, take note of the SIM card orientation shown below
Yanzi IoT Gateway Yanzi IoT Gateway Plus
6. Re-assemble the gateway
Please note that you will have to update the gateways SIM card configuration after changing
operator. See section 9.4.

Doc No: 890-03084 Date: 2017-11-21 Rev 24pa3
Yanzi Networks Installation Manual – Smart Office 27 of 42
9.4 IoT Gateway 3G SIM card configuration
Put files in a folder named yanzi-upgrades on a USB stick and add the three following files as
shown in the table below. Please note that the three files must not include a file extension.
Filename
Description
File content
Comment
wwan
Wireless WAN (3G)
on/off
When the wwan file contains “on”
3G will be enabled and when
containing “off” the gateway will
be configured for Ethernet use.
apn
APN config
3g.telia.com
Telia APN show as an example,
ask your SIM card provider for the
correct APN.
apn.auth
APN Authentication
username:password
Note that not all operators require
an APN authentication, if yours
doesn’t, don’t include this file.
Once you have put these files on a USB stick, follow the steps below:
1. Ensure gateway is off
2. Insert the USB stick
3. Turn the gateway ON (USB still inserted, let the gateway run for at least 15 mins)
4. Turn the gateway OFF (USB still inserted, make sure gateway is switched off at least 10
seconds)
5. Turn the gateway ON (USB still inserted, let the gateway run until the lower LED turns solid
or blinking green)
6. Remove the USB stick
7. Reboot the gateway: Verify the lower LED still turns green (or blinking green)

Doc No: 890-03084 Date: 2017-11-21 Rev 24pa3
Yanzi Networks Installation Manual – Smart Office 28 of 42
10. Working with Sensors
10.1 LED Behavior
All sensors have a dual color LED that can indicate green or orange. The typical LED behaviors
are shown in the table below.
Sensor LED State
Description
Note
Off
Power is off or sensor is in sleep
All sensors turn the LED off a short
while after power has been applied
to avoid light pollution. A short
press on the button turns the LED
on to display status if sensor has
power (see section 5.5)
Short orange or
green blink
Power has just been applied and
sensor is booting up
Wait a few seconds for actual
status
Blinking green (slow)
Sensor is ready to be peered with
a location
Use the installation tool to peer the
sensor with a Gateway (Location)
Steady green
Sensor is peered with a location
and working
Blinking green (fast)
Sensor is about to be reset
See details on resetting a device in
section below
Blinking
orange/green (fast)
Sensor has been reset to factory
default
See details on resetting a device in
section below
10.2 Resetting a device
If a device should be removed from an installation, please hold the status button (see section 5.5)
on the sensor pressed for about 20 seconds. After 15 seconds the LED will start flashing green
quickly to warn that if you keep the button pressed, it will reset. After another 5 seconds it will
start flashing orange/green which means it will now reset when the button is released. Release
the button and the sensor will reboot as factory default.
Doc No: 890-03084 Date: 2017-11-21 Rev 24pa3
Yanzi Networks Installation Manual – Smart Office 29 of 42
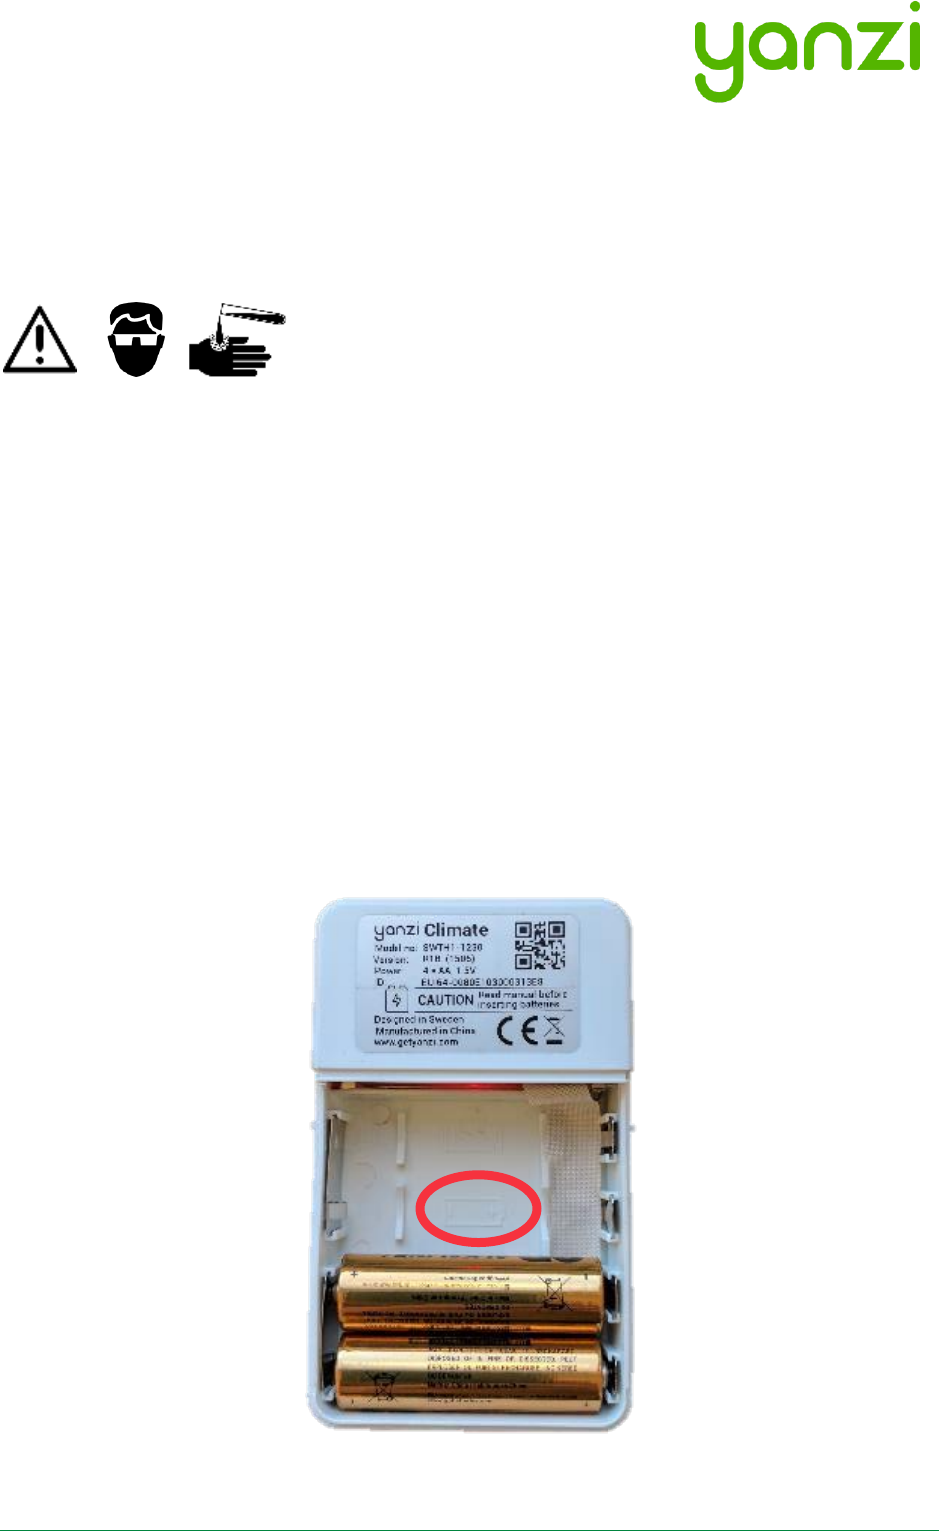
11. Battery Requirements
It is very important to follow these guidelines to avoid serious injuries. Bad handling of batteries
may cause them to leak, potentially rapidly, creating a risk of injury as the internals of batteries
are very corrosive. It is recommended to use Alkaline batteries in most use cases and Lithium
(LiFeS2) for cold use cases.
• NOTE THE POLARITY OF THE BATTERIES WHEN INSERTING THEM. Polarity is always
shown in the battery compartment as well as on the battery itself. The plus side is marked
on the picture below.
• NOTE THE VOLTAGE OF THE BATTERIES. There are several voltages available for the
same size of batteries. See the product manual for details on which battery to use.
• ONLY USE NEW BATTERIES. Batteries older than 1 year should be avoided as they may
have aged differently and therefore cause harm when used together.
• NEVER MIX TYPE OF BATTERIES. Only use the same type of chemical compound in all
batteries.
• NEVER MIX OLD AND NEW BATTERIES. Make sure all batteries used are from the same
package.
• IF BATTERIES GET WARM WITHIN 5 SECONDS AFTER INSERTION, REMOVE THE
BATTERIES IMMEDIATELY.
• IT IS RECOMMENDED TO USE PROTECTIVE GLASSES WHEN WORKING WITH
BATTERIES.
Note polarity symbols in the battery compartment

Doc No: 890-03084 Date: 2017-11-21 Rev 24pa3
Yanzi Networks Installation Manual – Smart Office 30 of 42
11.1 Battery Consumption
Yanzi sensors are very power efficient. Most battery driven Yanzi sensors consume less than 5uA
during sleep which is class leading. Sensors wake up periodically to communicate with the
Gateway with a configurable frequency. Sensors detecting motion communicates with the
Gateway immediately upon motion for fast response times and goes to sleep for a certain time
following a motion, called black-out period, to save battery. Things that affect the battery life is
shown below. Battery life time cannot be guaranteed if used outside of below recommendation.
Note that default sensor settings may differ from below requirements.
Item
Required for 5-year battery life
Yanzi Presence and Yanzi Climate
Battery
Type of battery
AA, 1.5V
Battery chemistry
Alkaline or LiFe
Number of batteries
4 (Inserted/replaced according to Yanzi battery requirements)
Battery capacity
Minimum 2,700mAh
Usage
Radio usage
Minimum 70% of 2.4GHz radio channel
Maximum background noise floor of -100dBm
Radio coverage
Minimum RSSI of -80dBm
Communication interval
2 minutes or more with 50% blackout period
Environment
16-25°C
20%-80% relative humidity
PIR usage
Maximum 8h per day
Peering process
Peered within 4 hours
Gateway availability
>99%
11.2 Note on Lithium Batteries
There are several types of Lithium batteries on the market in the standard size called AA. First,
care must be taken to make sure the voltage is correct according to the datasheet; 1.5V, 3.0V, or
3.6V.
Yanzi has identified that several suppliers of 1.5V Lithium batteries of type LiFeS2 often produce a
voltage higher than 1.8V. Voltages above 1.8V may harm products targeted for 1.5V batteries so
please verify that the battery you use follows the recommendations in the product datasheet.

Doc No: 890-03084 Date: 2017-11-21 Rev 24pa3
Yanzi Networks Installation Manual – Smart Office 31 of 42
12. Troubleshooting
Behavior
Solution
Note
Gateway
won't
connect
Ethernet-based gateways
Yanzi IoT Gateway:
1. Ensure Ethernet cable is plugged in
2. Verify gateway is receiving power and is turned
on
Yanzi IoT Gateway Plus:
1. Ensure Ethernet cable is plugged in to the right-
hand port
2. Verify gateway is receiving power and is turned
on. If using PoE, double-check your switch is
providing power over Ethernet.
Yanzi IoT Gateway Rack:
1. Ensure Ethernet cable is plugged into the right-
hand port (the one next to the VGA port)
2. Verify the gateway is receiving power and is
turned on
3G/4G-based gateways
Yanzi IoT Gateway 3G:
1. Verify gateway is receiving power and is turned
on
2. Ensure sim card is inserted
Yanzi IoT Gateway Plus 3G:
1. Verify gateway is receiving power and is turned
on
2. Ensure sim card is inserted
Sensor won’t
connect
Battery powered sensors
1. Ensure batteries are inserted
2. Some battery powered sensors have a power
switch, verify this is set to ON
USB powered sensors
1. Ensure cable is plugged in
2. Verify the power adapter is plugged in to a
working outlet
It is always possible
to check any
sensors status by
pushing the button.
The LED will then
indicate the current
state of the sensor,
see section 10.1 for
LED behavior.
Doc No: 890-03084 Date: 2017-11-21 Rev 24pa3
Yanzi Networks Installation Manual – Smart Office 32 of 42
13. Security
Security is one of the most important pillars as distributed IoT devices require high security on all
links. This section gives a quick overview of the security models on Gateway to cloud and sensor
to Gateway.
13.1 Secure from Node to Cloud
SSL encrypted channels from
Open Cloud API to Cloud to
Gateway authentication by
certificate.
Automatic security provisioning
of devices provides quick
installation:
• Automatic key management
with ECC (Vendor, Owner, and
Location keys)
• Application layer encryption
for user data and
management data including
firmware updates
• Layer 2 key distribution when
applicable (Wi-Fi and IEEE
802.15.4)
• Individual security keys per
device with revoke capability
SSL – Client and
Server Certificates
HTTPS –
Ethernet and WiFi
ECC – Security setup
AES – Application
layer encryption
Cloud Servers
Partner
Cloud Servers
SSL – Client and
Server Certificates
Doc No: 890-03084 Date: 2017-11-21 Rev 24pa3
Yanzi Networks Installation Manual – Smart Office 33 of 42
13.2 High Security Cloud Model
All access to IoT data is authenticated in the API. All links are authenticated with client and server
certificates and all communication is made using SSL encryption.
Data model
• Authentication server (Orange) signs all certificates as well as redirects the Gateways to
the correct Link server
• Link servers (Light Blue) manage Gateways and pass data to Microsoft IoT Hub via API
Server.
• API servers (Green) provides a secure interface to analytics partner and acts as an
aggregator for multiple link servers.
• Prototocl Translators (Dark Blue) translates Yanzi Cirrus API to other APIs such as MQTT.
• Local Gateway (Gray) stores all sensor data temporarily to support autonomous operation
when Internet connection is down
Two Cloud Server models:
• Shared: Servers are shared between customers
• Dedicated: All data is kept within a specific cloud provider
Link Servers
Authentication Server API Servers
Protocol Translators
Cirrus API
Customer Sites
MQTT
MS IoT Hub
IBM MessageSight
IBM IoT Foundation
Doc No: 890-03084 Date: 2017-11-21 Rev 24pa3
Yanzi Networks Installation Manual – Smart Office 34 of 42
14. IEEE 802.15.4 Overview
IEEE 802.15.4 is a low power wireless network optimized for battery driven devices. On the world-
wide approved 2.4GHz spectrum, it supports 16 channels with 250kbps per channel where each
channel has a bandwidth of 2MHz.
A comparison with WiFi, IEEE 802.11b/g/n, and Bluetooth can be seen on the below picture. IEEE
802.11b uses 11 channels in US and 13 channels in Europe with a bandwidth of 22MHz per
channel.
Yanzi Gateways automatically select channels for IEEE 802.15.4 that sensors attach to.
2412 2417 2422 2427 2432 2437 2442 2447 2452 2457 2462 2467 2472
2412 2417 2422 2427 2432 2437 2442 2447 2452 2457 2462 2467 2472
3
1 6 11
IEEE 802.11n
40MHz
IEEE 802.11b/g/n
20/22MHz
11 12 13 14 15 16 17 18 19 20 21 22 23 24 25 26
2405 2410 2415 2420 2425 2430 2435 2440 2445 2450 2455 2460 2465 2470 2475 2480
IEEE 802.15.4
World-Wide
[MHz]
[MHz]
[MHz]
24072402
24072402 2477 2482
11
2412 2417 2422 2427 2432 2437 2442 2447 2452 2457 2462 2467 2472
1
Bluetooth
[MHz]
24072402 2477 2482
79

Doc No: 890-03084 Date: 2017-11-21 Rev 24pa3
Yanzi Networks Installation Manual – Smart Office 35 of 42
15. APN
The table below shows the pre-configured APN (Access Point Name) settings in the latest
Gateway software release. Any SIM/APN settings outside this table must be manually configured
according to section 9. If a manual configuration of APN results in a failed connection, the pre-
configured APNs will be automatically tested by the Gateway.
Below APN settings are applied based on the SIM card IMSI (International Mobile Subscriber
Identity) number according to longest prefix match. This list will be updated as more operators
are qualified.
Country
Operator
APN
Username /
Password
Network ID
Sweden
Telia
online.telia.se
- / -
24001
Tre
bredband.tre.se
- / -
24002
Tele 2
Internet.tele2.se
- / -
24007
Telenor
internet.telenor.se
- / -
24008
Denmark
Telia M2M
internet.ts.m2m
- / -
23820

Doc No: 890-03084 Date: 2017-11-21 Rev 24pa3
Yanzi Networks Installation Manual – Smart Office 36 of 42
16. Privacy Note Examples
The privacy notes below are only examples and should be modified to work with your company’s
privacy policy.
16.1 E-Mail Example
16.2 Desk Note Example
This desk is part of our efforts to
improve the office experience and
increase your comfort.
A sensor has been placed under
this desk. Note that this sensor
only gathers anonymous data and
never pictures, video, or sound.
For more detailed information,
please contact facility
management.
The following contains some information about the smart sensors we will install
throughout the office to help enhance the comfort of our teams.
Installing sensors is a step towards our continuous work to improve the office
environment experience for all team members. By using these sensors, we can learn
more about our office building and work environment, and begin to utilize it fully.
The sensors measure parameters such as temperature, humidity, CO2 levels, light
levels, motion, and ambient noise.
Being aware and able to track and analyze these factors in turn enables us to ensure
a great working experience. Your workplace privacy is maintained and no video or
sound is recorded at any time
If you have any questions regarding this, please do not hesitate to contact the project
manager:

Doc No: 890-03084 Date: 2017-11-21 Rev 24pa3
Yanzi Networks Installation Manual – Smart Office 37 of 42
17. Disposal and Recycling Information
This symbol indicates that your product must be disposed of properly according to local laws
and regulations. When your product reaches its end of life, contact Yanzi or your local authorities
to learn about recycling options.

Doc No: 890-03084 Date: 2017-11-21 Rev 24pa3
Yanzi Networks Installation Manual – Smart Office 38 of 42
18. General Product Information
The information below relates to the following products
- Yanzi IoT Gateway DR2-8830
- Yanzi IoT Gateway Plus DR2-8910
- Yanzi IoT Gateway 2 DR3-314x
- Yanzi Climate SWTH1-1230
- Yanzi Motion MDW1-0201
- Yanzi Presence MDW3-0180
- Yanzi Presence Mini MDH3-1620
- Yanzi Motion+ MDW3-0231
- Yanzi Comfort SWAQ3-0372
These devices comply with part 15 of the FCC Rules / Industry Canada license-exempt RSS
standard(s). Operation is subject to the following two conditions: (1) This device may not cause
harmful interference, and (2) this device must accept any interference received, including
interference that may cause undesired operation.
Changes or modifications not expressly approved by the party responsible for compliance could
void the user's authority to operate the equipment.
This equipment has been tested and found to comply with the limits for a Class B digital device,
pursuant to part 15 of the FCC Rules. These limits are designed to provide reasonable protection
against harmful interference in a residential installation. This equipment generates uses and can
radiate radio frequency energy and, if not installed and used in accordance with the instructions,
may cause harmful interference to radio communications. However, there is no guarantee that
interference will not occur in a particular installation. If this equipment does cause harmful
interference to radio or television reception, which can be determined by turning the equipment
off and on, the user is encouraged to try to correct the interference by one or more of the
following measures:
- Reorient or relocate the receiving antenna.
- Increase the separation between the equipment and receiver.
- Connect the equipment into an outlet on a circuit different from that to which the receiver is
connected.
- Consult the dealer or an experienced radio/TV technician for help.
Le présent appareil est conforme aux CNR d'Industrie Canada applicables aux appareils radio
exempts de licence. L'exploitation est autorisée aux deux conditions suivantes : (1) l'appareil ne
doit pas produire de brouillage, et (2) l'utilisateur de l'appareil doit accepter tout brouillage
radioélectrique subi, même si le brouillage est susceptible d'en compromettre le fonctionnement.
Les antennes installées doivent être situées de facon à ce que la population ne puisse y être
exposée à une distance de moin de 20 cm. Installer les antennes de facon à ce que le personnel
ne puisse approcher à 20 cm ou moins de la position centrale de l’ antenne. La FCC des éltats-
unis stipule que cet appareil doit être en tout temps éloigné d’au moins 20 cm des personnes
pendant son functionnement.

Doc No: 890-03084 Date: 2017-11-21 Rev 24pa3
Yanzi Networks Installation Manual – Smart Office 39 of 42
The information below relates to the following product
- Yanzi IoT Gateway Plus DR2-8910
For your own safety, and in terms of the RF exposure requirements of the FCC, always observe
these precautions:
- Always maintain a minimum separation distance of 20 cm (7.8 inches) between yourself and
the radiating antenna.
- Do not co-locate the antenna with any other transmitting device.

Doc No: 890-03084 Date: 2017-11-21 Rev 24pa3
Yanzi Networks Installation Manual – Smart Office 40 of 42
19. Regulatory Information
This section shows the regulatory information for each product and country that is not available
on the product label.
19.1 Yanzi Motion+
The below information relates to Yanzi Motion+, MDW3-0231.
Country
Standard
Regulatory Information
China
SRRC
CMIIT ID: xxxxxxxxxx
Japan
MIC
XXX-ABCDEF
Mexico
IFETEL
IFT: xxxxxxxxxx
Singapore
iDA
19.2 Yanzi Comfort
The below information relates to Yanzi Comfort, SWAQ3-0372.
Country
Standard
Regulatory Information
China
SRRC
CMIIT ID: xxxxxxxxxx
Japan
MIC
XXX-ABCDEF
Mexico
IFETEL
IFT: xxxxxxxxxx
Singapore
iDA
Complies with
IMDA Standards
DBxxxxxx
Complies with
IMDA Standards
DBxxxxxx

Doc No: 890-03084 Date: 2017-11-21 Rev 24pa3
Yanzi Networks Installation Manual – Smart Office 41 of 42
19.3 Yanzi IoT Gateway 2
The below information relates to Yanzi IoT Gateway 2, DR3-314x.
Country
Standard
Regulatory Information
China
SRRC
CMIIT ID: xxxxxxxxxx
Japan
MIC
XXX-ABCDEF
Mexico
IFETEL
IFT: xxxxxxxxxx
Singapore
iDA
19.4 Yanzi Presence Mini
The below information relates to Yanzi Presence Mini, MDH3-1620.
Country
Standard
Regulatory Information
China
SRRC
CMIIT ID: xxxxxxxxxx
Japan
MIC
XXX-ABCDEF
Mexico
IFETEL
IFT: xxxxxxxxxx
Singapore
iDA
Complies with
IMDA Standards
DBxxxxxx
Complies with
IMDA Standards
DBxxxxxx

Doc No: 890-03084 Date: 2017-11-21 Rev 24pa3
Yanzi Networks Installation Manual – Smart Office 42 of 42
19.5 Yanzi IoT Hybrid Mesh
The below information relates to Yanzi IoT Hybrid Mesh, IoT-U42.
Country
Standard
Regulatory Information
China
SRRC
CMIIT ID: xxxxxxxxxx
Japan
MIC
XXX-ABCDEF
Mexico
IFETEL
IFT: xxxxxxxxxx
Singapore
iDA
Complies with
IMDA Standards
DBxxxxxx