Altacogni MDW3-0231 Motion+ User Manual
Yanzi Networks AB Motion+
User manual

Doc No: 890-03084 Date: 2017-02-13 Rev 02pa1
Yanzi Networks Installation Manual – Smart Office 1 of 19
Installation Manual – Smart Office
This installation manual describes how to install Yanzi IoT infrastructure and sensors in smart offices.

Doc No: 890-03084 Date: 2017-02-13 Rev 02pa1
Yanzi Networks Installation Manual – Smart Office 2 of 19
Table of Contents
1. Introduction ........................................................................................................................................... 3
1.1 Best Technology ........................................................................................................................... 3
1.2 Easiest to install ............................................................................................................................ 3
1.3 Enterprise security ........................................................................................................................ 3
1.4 Cirrus Software as a Service ......................................................................................................... 3
2. Installation Planning ............................................................................................................................. 4
2.1 Infrastructure ................................................................................................................................. 4
2.1.1 Connecting the Gateway to Internet ..................................................................................... 4
2.1.2 Building the IoT Network ..................................................................................................... 4
2.1.3 Infrastructure Examples ........................................................................................................ 4
2.2 Use Cases ...................................................................................................................................... 7
2.2.1 Space Utilization ................................................................................................................... 7
2.2.2 Comfortability ....................................................................................................................... 7
2.3 Installation Tool ............................................................................................................................ 8
3. Installation of Infrastructure ................................................................................................................. 9
4. Teams and Equipment ......................................................................................................................... 10
5. Sensor Handling Tips .......................................................................................................................... 11
5.1 Battery lid .................................................................................................................................... 11
5.2 Sensor element ............................................................................................................................ 11
5.3 Battery insertion .......................................................................................................................... 11
5.4 External power input ................................................................................................................... 11
6. Placement of Sensors .......................................................................................................................... 12
7. Installation of Sensors ......................................................................................................................... 13
7.1 Start Yanzi Installation tool ........................................................................................................ 13
7.2 Installation Procedure ................................................................................................................. 13
8. Wireless ............................................................................................................................................... 14
9. Working with Sensors ......................................................................................................................... 15
9.1 LED Behavior ............................................................................................................................. 15
9.2 Resetting a device ....................................................................................................................... 15
10. Battery Requirements .......................................................................................................................... 16
11. Post Installation ................................................................................................................................... 17
12. Troubleshooting .................................................................................................................................. 18
13. General Product Information .............................................................................................................. 19

Doc No: 890-03084 Date: 2017-02-13 Rev 02pa1
Yanzi Networks Installation Manual – Smart Office 3 of 19
1.Introduction
Yanzi Networks delivers an end-to-end, horizontal, and all-IP software Internet of Things platform. We
offer sensors, gateways, and Cirrus, a cloud platform solution packaged into a Software as a Service
solution (SaaS) for Smart Building applications. The horizontal and all-IP approach provides a solution
that is fast, robust, and transformative.
1.1 Best Technology
All IP technology, all the way to the sensor, ensures powerful scaling to thousands of sensors and
excellent cost efficiency. Yanzi Networks focus on open standards and leverage the widely deployed
protocols such as 4G/LTE, Ethernet, Wi-Fi, and the low power "brother" to Wi-Fi, IEEE 802.15.4, which
enables battery operated sensors to last for 10+ years.
1.2 Easiest to install
Automatic security provisioning provides best-in-class installation provided by the patent pending zero-
touch configuration. Sensor installation do not need trained installers but can leverage the employees on
site. The optimized power management deliver very long battery life which secure a minimum of
maintenance required once installed.
1.3 Enterprise security
Yanzi Networks combines ease of installation and maintenance with enterprise security. It is a highly
secure solution with all links in Cloud and to Gateway being authenticated with client and server
certificates and all communication is made using SSL encryption. All local communication, between the
sensors and the Gateway, is encrypted for both wired and wireless solutions. Each sensor has an
individual key and can be revoked remotely.
1.4 Cirrus Software as a Service
The Yanzi Cirrus Software as a Service provides Device and Gateway management at a new level. The
Cirrus data model allow access to any data originating from any location with a uniform interface without
the need to understand the sensor details. A secure Gateway-to-Cloud connector to multiple redundant
link servers provides reliable remote access to Gateway.
The Cirrus open API is a JSON over web socket API where all operations are authenticated. The API
supports both hot and cold data paths.

Doc No: 890-03084 Date: 2017-02-13 Rev 02pa1
Yanzi Networks Installation Manual – Smart Office 4 of 19
2.Installation Planning
2.1 Infrastructure
The infrastructure has two parts: The Gateway and the IoT network. The Gateway is the brains of the
system and manage all sensors, collects all data, and keeps a communication channel open to the Cloud.
The IoT network is required to enable sensors to communicate with the Gateway. The IoT network is
completely built on IP communication, same as on the Internet. The IoT network is built using one or
more Access Points, just like a WiFi network is built. The Access Points communicate with the Gateway
using standard Ethernet connectivity. For more information on networks and wireless technologies,
please see support sections below.
Before ordering any infrastructure products, the first step is to decide type of Internet connection and way
to build the IoT network according to the following sections.
2.1.1Connecting the Gateway to Internet
Gateways can be connected to the Internet in two ways:
1)Sharing the Internet connection already available in the building or
2)Using a mobile broadband uplink
Sharing the Internet connection does not mean the IoT network must run on the corporate network. It
means using a separate port on the customer’ firewall to create a separate network that only provides
Internet access.
2.1.2Building the IoT Network
The IoT Network can be built in two ways.
1)If there are Ethernet cabling available in the building, it may be possible to use a single Gateway
and connect that to one or more Access Points using those Ethernet cables.
2)If there are no Ethernet cabling available and it is not possible to pull new cables, the IoT
network is built using one or more Gateways. Most of the Gateways have access points
capabilities already built-in so a small IoT network can be created around each Gateway. These
Gateways all communicate separately with the Cloud and can be made into a single virtual
location in the Cloud.
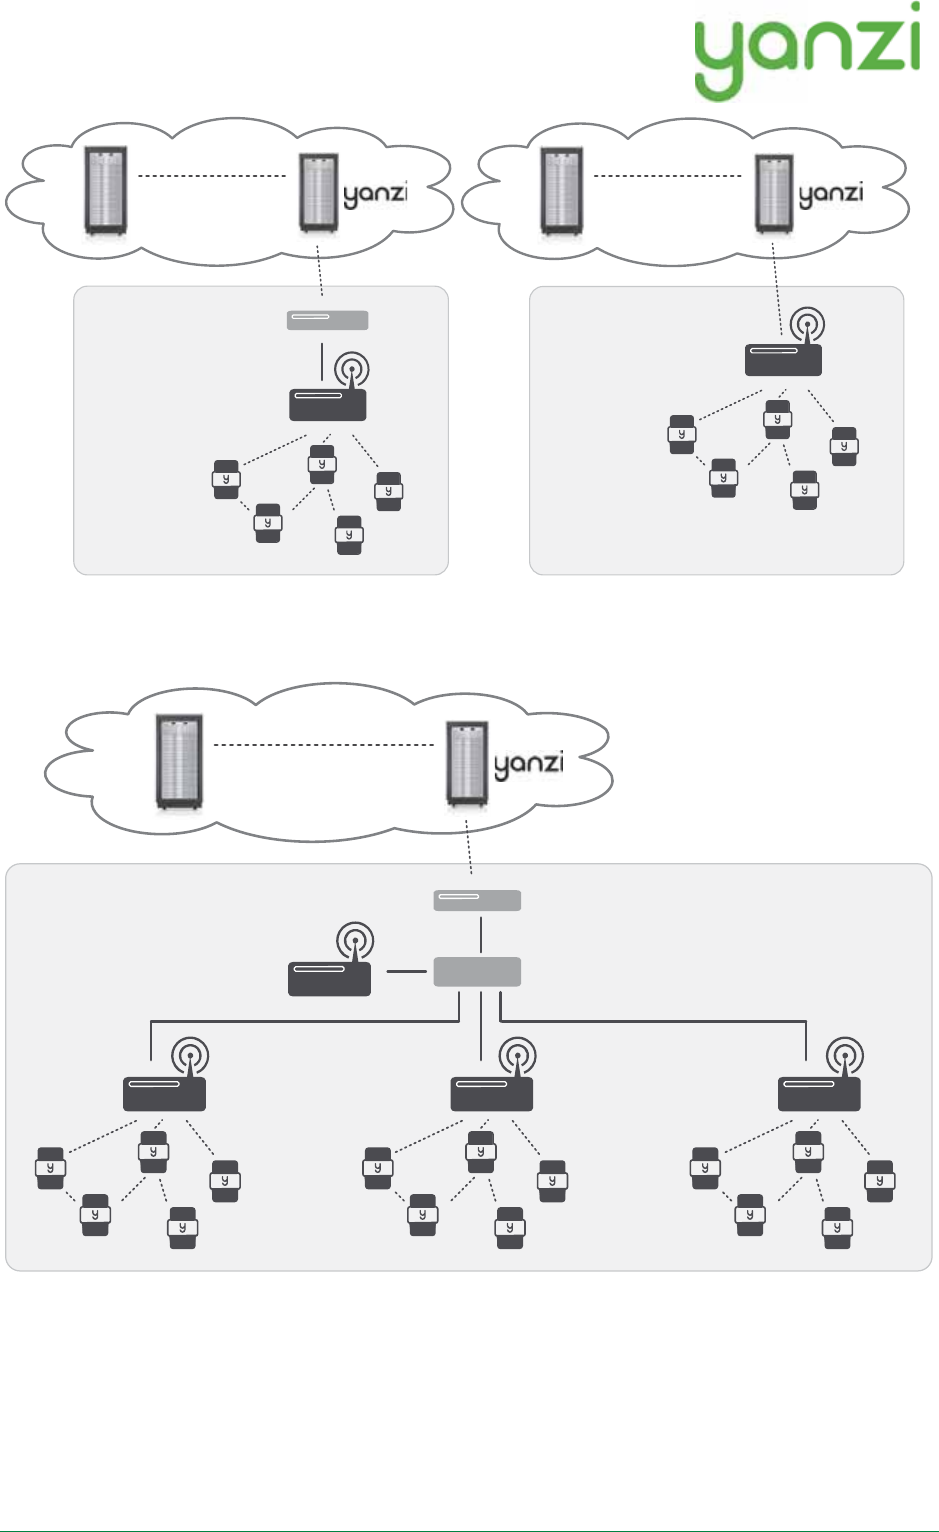
2.1.3Infrastructure Examples
Small system where only one Gateway is enough to create the wireless IoT network. Internet connectivity
can be provided using Ethernet (on the left) or using built-in mobile broadband in the Gateway (on the
right).
Doc No: 890-03084 Date: 2017-02-13 Rev 02pa1
Yanzi Networks Installation Manual – Smart Office 5 of 19
Large system reusing Ethernet infrastructure in building and where Internet connectivity can be provided
by sharing a port on the existing firewall or using an external mobile broadband router.
•DHCP addresses are required for the Gateway and the Access Points
•The Gateway communicates with the Access Points using UPnP and SSL over Ethernet
•Internet connection only requires outgoing port 443 and 4445. No inwards connection required.
Gateway connects automatically to the Yanzi server.
•All communication links are encrypted
•PoE switch connects and powers all IoT Access Points (when AP has PoE support)
Yanzi IoT Gateway
Customer Firewall or
Mobile Broadband Router
3G/4G/LTE
Partner
Cloud Servers
Yanzi Sensors
Yanzi IoT Gateway 4G
3G/4G/LTE
Partner
Cloud Servers
Yanzi Sensors
Yanzi IoT Gateway
Cloud Servers
Secure Cirrus API
IPv6 over IEEE 802.15.4
handled by the Gateway
Customer Firewall or
Mobile Broadband Router
Yanzi IoT Access Points
Yanzi Sensors
Fiber/ DSL or
3G/4G/ LTE
Ethernet
Switch
Partner
Cloud Servers

Doc No: 890-03084 Date: 2017-02-13 Rev 02pa1
Yanzi Networks Installation Manual – Smart Office 6 of 19
•Optional UPS on PoE switch and Gateway to enable operation when power is lost
Large system completely stand-alone without using any existing infrastructure.
Cloud Servers
Secure Cirrus API
IPv6 over IEEE 802.15.4
handled by the Gateway
Yanzi IoT Gateway 3G/ 4G
Yanzi Sensors
3G/4G/ LTE
Partner
Cloud Servers
Doc No: 890-03084 Date: 2017-02-13 Rev 02pa1
Yanzi Networks Installation Manual – Smart Office 7 of 19
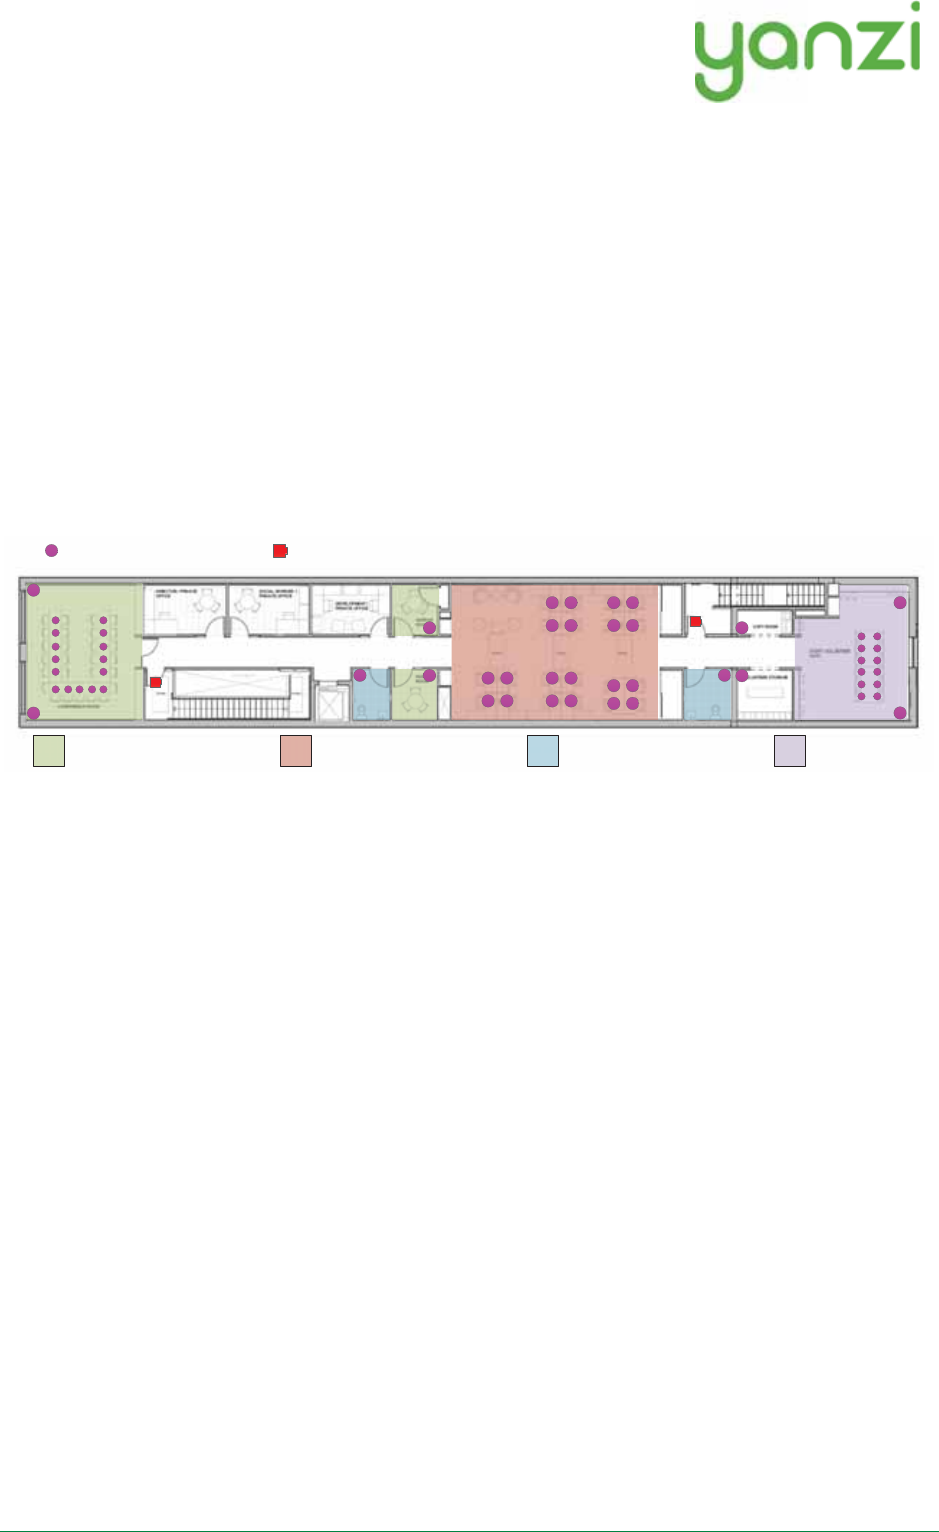
2.2 Use Cases
Depending on which use case to cover, the type and position of sensors may vary. Two typical use cases
are shown below for space utilization and comfortability.
2.2.1Space Utilization
For space utilization, Yanzi Motion/Presence sensors are added under the table at each work desk chair
and at each chair of larger conference rooms (typically rooms with 6 chairs or more) to detect usage. For
room usage, Yanzi Motion/Presence or Yanzi Motion+ is placed on the wall (rooms larger than 20m2 are
recommended to use two sensors to make sure the whole room is covered). Selection between
Motion/Presence sensor and Motion+ sensor depends on if comfortability use case also should be covered
as the Motion+ sensor monitors more things than the Motion/Presence sensor.
Motion/Presence sensors may also be used for restroom utilization to monitor each stall as well as the
washroom.
Footfall cameras may be placed in the ceiling of each entrance to the building and can as well be placed
at the entrance to any area where specific information is wanted. The footfall cameras are connected to
the Gateway using Ethernet/PoE. This proposal do not focus on footfall cameras.
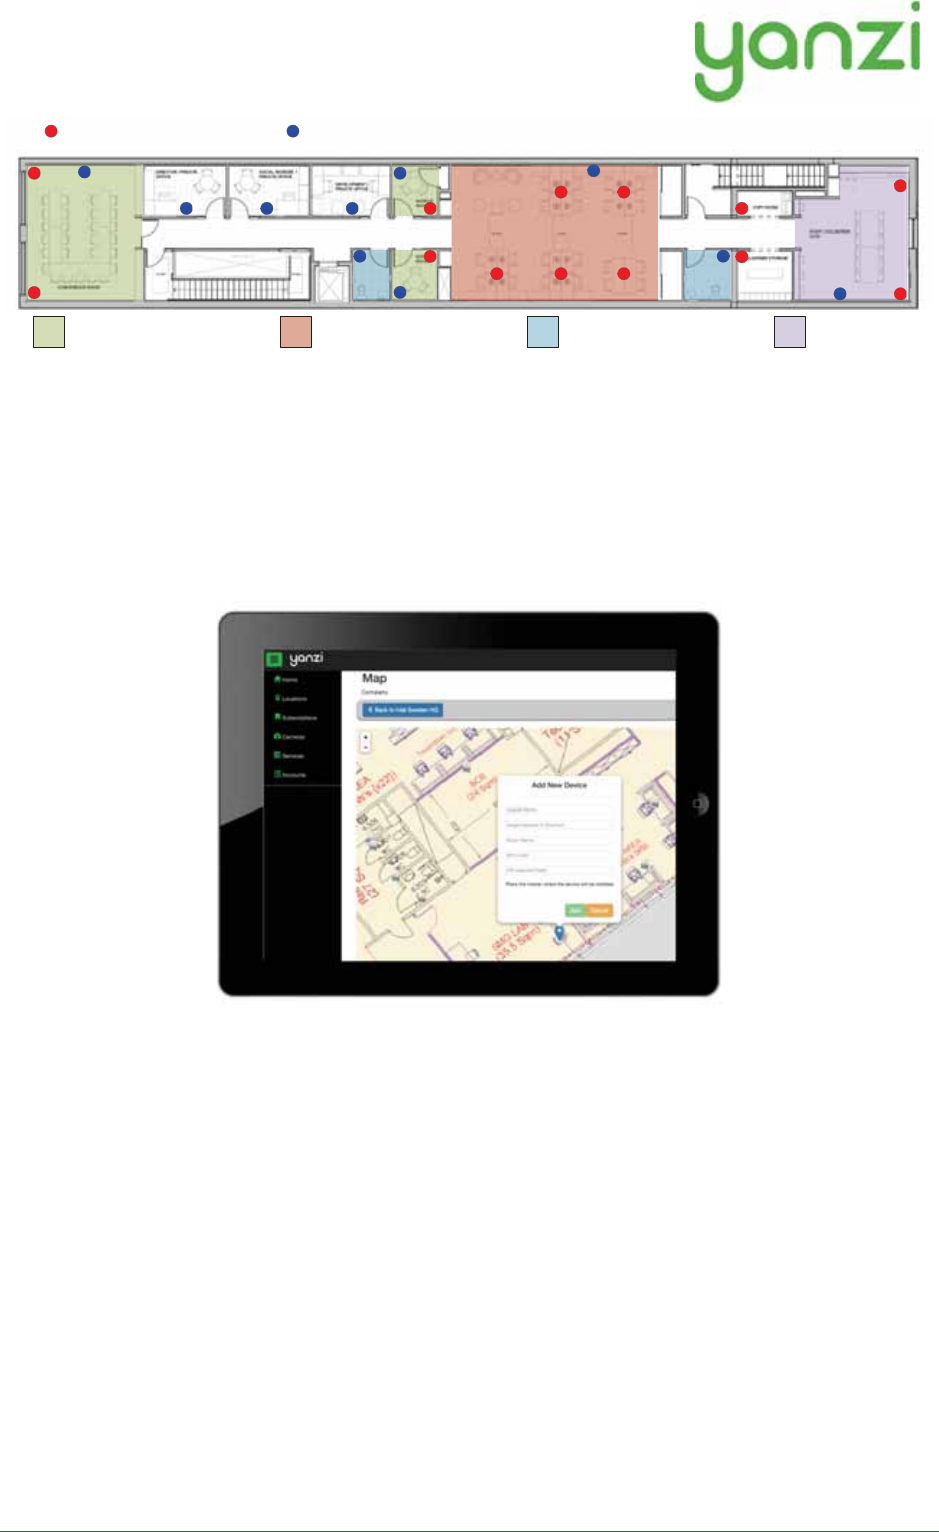
2.2.2Comfortability
For comfortability, the work environment is monitored using for example CO2, temperature, humidity,
barometric pressure, volatile organic compounds (VOC), ambient light and ambient noise sensors. Yanzi
Comfort sensors are placed in each room (conference room, phone booths, locker room, etc.) where
people are present for longer periods of time as well spread out in open work spaces. In open work
spaces, recommendation is to use one Yanzi Comfort for each 15-25 work desks.
Yanzi Motion+ are used to monitor occupancy and light at work desks (preferably placed in the ceiling
where it covers about 6-8 work desks depending on height of ceiling). It is also used to monitor
utilization of smaller rooms such as conference rooms, phone booths, locker rooms, storage rooms,
kitchens, restrooms, etc.
!
!
Doc No: 890-03084 Date: 2017-02-13 Rev 02pa1
Yanzi Networks Installation Manual – Smart Office 8 of 19
2.3 Installation Tool
One of the important parts after the installation is to know where sensors have been placed. The mapping
between the sensor unique ID and the physical location is done at time of installation using the Yanzi
installation tool in Yanzi Live. This is a browser based installation tool that allows for quick installation
of many sensors.
Prior to installation, make sure the floor map(s) has been provided to Yanzi and added to your account.
"& "# &#"$&""&"!()
%
!!'"!!
'! !" !
*
&& "# &#"$& !!# &"!("##!)
%
Doc No: 890-03084 Date: 2017-02-13 Rev 02pa1
Yanzi Networks Installation Manual – Smart Office 9 of 19
3.Installation of Infrastructure
Gateways are recommended to be peered prior to installation. Peering means connecting the Gateway to a
specific account. Users can then be added or removed from this account to control access. Peering is done
using the installation tool or provided as remote support by Yanzi. Yanzi needs the Gateway ID (printed
on the Gateway label), the location name it should have, as well as a user with administrative rights for
this account.
Make sure the infrastructure is always built prior to installing any sensors. Install the Gateway and
connect it to Internet. Install the Access Points and connect them to the same network as the Gateway
according to the pictures above.
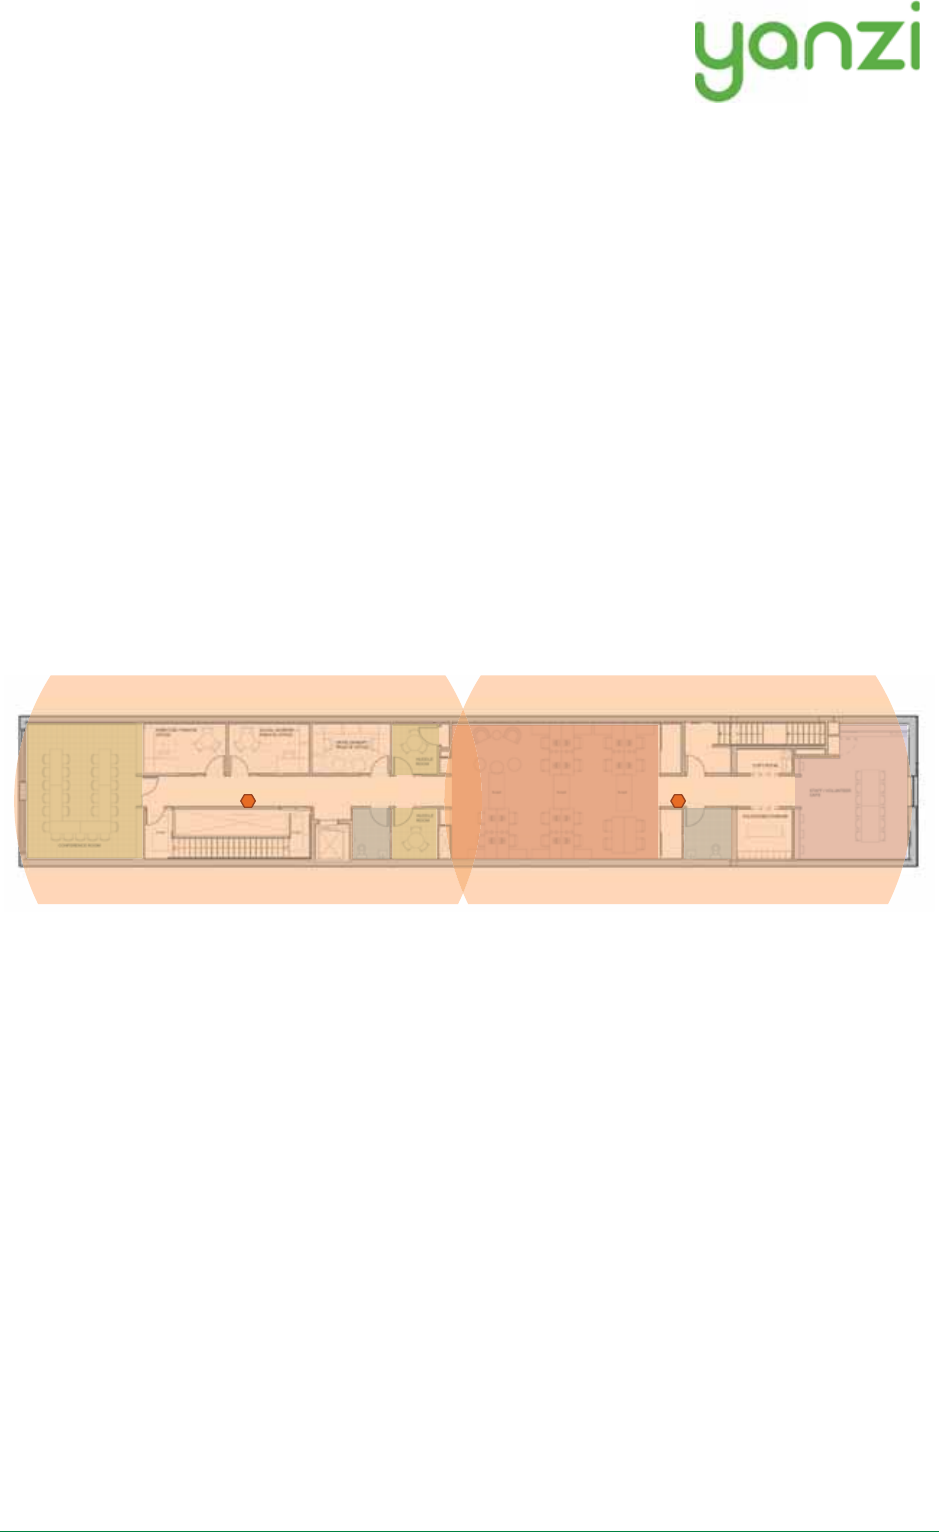
The wireless IoT network created around Access Points have a range of about 500-1,500 m2 (~ 5,000-
15,000ft2). The actual range depends heavily on walls, obstacles, materials, and number of potential mesh
nodes (This is very similar to WiFi access points). Wireless coverage is affected for example by elevator
shafts (lots of metal), bathrooms (water and thick walls), and other radio disturbances such as WiFi
access points and microwave ovens.
IoT Access Points (or Gateways with mobile broadband) is shown below with an approximated wireless
coverage shown as orange circles. In this specific building, two Access Points per floor is enough.

Doc No: 890-03084 Date: 2017-02-13 Rev 02pa1
Yanzi Networks Installation Manual – Smart Office 10 of 19
4.Teams and Equipment
Most efficient is usually to have installer teams of 2-3 persons. Multiple teams can work in parallel for
quicker sensor installations. 1 person places the sensor on the floor map and scans the QR code. 1-2
persons place the sensor on the correct spot in the building.
Each installation team needs
•Laptop with Chrome browser
oInternet access is required for the laptop as installation tool is web based
•QR code scanner
oSuch as the Motorola, Symbol, or Zebra DS6708
•Plastic bins for carrying sensors
•Access to all rooms in building where sensors are to be placed

Doc No: 890-03084 Date: 2017-02-13 Rev 02pa1
Yanzi Networks Installation Manual – Smart Office 11 of 19
5.Sensor Handling Tips
5.1 Battery lid
To open and close the battery lid, gently push the back side label close to the battery lid with your thumb
and slide the battery lid downwards with your other hand.
5.2 Sensor element
The sensor elements must be handled with care as these are sensitive parts.
5.3 Battery insertion
The battery powered sensors operate with 4 batteries, note the polarity when inserting the batteries.
Polarity is always shown in the sensors battery compartment as well as on the battery itself.
It is very important to follow the battery requirements when inserting batteries, see page 16.
Verify that the front panel LED is turned on within 5 seconds after inserting batteries. Note that it may
only be turned on for a very short while to save battery. If you do not see the LED come on even for a
short while, please remove the batteries and re-insert them again. If it still doesn’t work, please see the
Troubleshooting section.
5.4 External power input
For sensor requiring an external power supply, insert the USB-C connector on the bottom side of the
sensor carefully until a “click” is detected. See each product manual for more details.
Verify that the front panel LED is turned on within 5 seconds after inserting power.

Doc No: 890-03084 Date: 2017-02-13 Rev 02pa1
Yanzi Networks Installation Manual – Smart Office 12 of 19
6.Placement of Sensors
General tips on placement
•Try to place the sensors in discrete locations
•Place sensors along walls at about
150-170 cm (60-70 inches) from floor
•Sensors are attached using screws or adhesive tape
•Target wood, plastic, or metal surfaces that are flat
•Avoid wall papers as they may break if sensor must be removed
•Avoid painted walls when using adhesive tape as modern paint is efficient in repelling adhesive
tape
•Remove tape cover and press firmly ON THE SLEEVE for 10 seconds. After 10 seconds, the
adhesive tape is strong enough to hold the sensor. Full adhesiveness is reached after 72 hours.
Yanzi Motion+
•Place on wall of smaller rooms such as conference rooms and phone booths
•Place in ceiling above groups of 4-8 work desks
Yanzi Comfort
•Place on wall not close to work desk
•Requires a power outlet within 0.5 meters (longer cables available as accessory)
Yanzi Presence for work desks
•Place under work desk about an arm’s length from edge
Yanzi Presence for conference room chairs
•Place under conference room table at each chair about an arms length from edge
Yanzi Presence for conference room corner
•Place in corner of smaller rooms and along walls in larger rooms
•Face away from windows to avoid direct sunlight
•Face away from door to avoid detecting people walking outside the room
•Use multiple sensors for large rooms (>20m2)

Doc No: 890-03084 Date: 2017-02-13 Rev 02pa1
Yanzi Networks Installation Manual – Smart Office 13 of 19
7.Installation of Sensors
Sensors are installed using the Yanzi installation tool. Make sure you get login credentials from Yanzi
prior to installation and that the floorplan of the building has been added to the account.
7.1 Start Yanzi Installation tool
1)Using a Chrome browser, go to the link specified by Yanzi, typically something like
https://cirrus5.yanzi.se
2)Sign in using the credentials provided by Yanzi, email and password
3)When logged in, click “Locations” in the left column
4)In the list of locations, click on the location where installation should take place.
5)Click Map to the right of the top bar
6)The floor plan will now open and you are ready to install sensors
The Yanzi installation tool is a cloud based tool so make sure Internet connection is available throughout
the building.
7.2 Installation Procedure
1)Click ”Start Installation” in the top right corner
2)Select floor in the bottom right corner
3)Zoom into area on the floorplan where the sensor should be installed
4)Click on the exact sensor location where the sensor will be installed
5)Add the following properties in the pop-up that is displayed
Device ID. Scan the sensor QR code using the hand scanner.
Example: EUI64-0090DAFFFE00526A
Optional: Height from the floor in [mm]
Example: 1500
Optional: Room name
Example: G51
6)Turn on the sensor
•For battery powered sensors: Pull power switch to ON.
•For USB powered sensor: Insert the USB cable and plug in the power adapter to a wall
socket.
7)Place sensor by removing the non-stick film on the back of the sensors sleeve and place it into
position by pressing FIRMLY on the gray sleeve for 10 seconds (if adhesive tape is used)
8)Restart at point 4 for next sensor
When done, click “Stop Installation” in the top right corner.
Sensors are assigned a radio channel, encryption key, and configuration settings automatically and data
should be available in the Cloud within a few minutes after installation.

Doc No: 890-03084 Date: 2017-02-13 Rev 02pa1
Yanzi Networks Installation Manual – Smart Office 14 of 19
8.Wireless
For high speed devices, Ethernet and WiFi is the typical communication mediums used. For very low
power devices such as battery driven devices, a sister protocol to WiFi is used that is called the IEEE
802.15.4.
IEEE 802.15.4 has about the same range as WiFi and normally operates on the same ISM band, 2.4GHz.
There are Sub-GHz solutions for IEEE 802.15.4 as well but for normal high density installations, it is not
required for reach.

Doc No: 890-03084 Date: 2017-02-13 Rev 02pa1
Yanzi Networks Installation Manual – Smart Office 15 of 19
9.Working with Sensors
9.1 LED Behavior
All sensors have a dual color LED that can indicate green or orange. The typical LED behaviors are
shown in the table below.
Sensor LED State Description Note
Off Power is off or sensor is in sleep All sensor turn the LED off a short
while after power has been applied to
avoid light pollution. A short press on
the button turns the LED on to display
status if sensor has power.
Short orange or
green blink
Power has just been applied and
sensor is booting up
Wait a few seconds for actual status
Blinking green (slow) Sensor is ready to be peered with a
location
Use the installation tool to peer the
sensor with a Gateway (Location)
Steady green Sensor is peered with a location and
working
Blinking green (fast) Sensor is about to be reset See details on resetting a device in
section below
Blinking
orange/green (fast)
Sensor has been reset to factory
default
See details on resetting a device in
section below
9.2 Resetting a device
If a device should be removed from an installation, please hold the button on the sensor pressed for about
20 seconds. After 15 seconds the LED will start flashing green quickly to warn that if you keep the button
pressed, it will reset. After another 5 seconds it will start flashing orange/green which means it is now
reset. Release the button and the sensor will reboot as factory default.

Doc No: 890-03084 Date: 2017-02-13 Rev 02pa1
Yanzi Networks Installation Manual – Smart Office 16 of 19
10.Battery Requirements
It is very important to follow these guidelines to avoid serious injuries. Bad handling of batteries may
cause them to leak, potentially rapidly, creating a risk of injury as the internals of batteries are very
corrosive. It is recommended to use Alkaline batteries in most use cases and Lithium (LiFeS2) for cold
use cases.
•Note the polarity of the batteries when inserting them. Polarity is always shown in the battery
compartment as well as on the battery itself.
•Note the voltage of the batteries. There are several voltages available for the same size of
batteries. See the product manual for details on which battery to use.
•Never mix type of batteries. Only use the same type of chemical compound in all batteries.
•Never mix old and new batteries. Make sure all batteries used are from the same package.
•Do not use old batteries. Batteries older than 2 years should be avoided as they may have aged
differently and therefore have different voltages.
•If batteries get warm within 5 seconds after insertion, remove the batteries immediately.
•It is recommended to use protective glasses when working with batteries.

Doc No: 890-03084 Date: 2017-02-13 Rev 02pa1
Yanzi Networks Installation Manual – Smart Office 17 of 19
11.Post Installation
Following the successful completion of the Yanzi smart building installation, we recommend you to send
an internal email to all company team members informing them of the reasons for the installation. It is
important is to explain the purpose of the installation and to clarify that no images, video, or sound is ever
recorded and that their privacy is respected and maintained at all time. We then advise you to focus on all
the benefits the installation will bring, e.g. a constant monitoring of CO2 and temperature that will allow
continuous improvements of the climate environment at the office.

Doc No: 890-03084 Date: 2017-02-13 Rev 02pa1
Yanzi Networks Installation Manual – Smart Office 18 of 19
12.Troubleshooting
Behavior Solution Note
Gateway won't
connect
Ethernet-based gateways
Yanzi IoT Gateway:
1.Ensure Ethernet cable is plugged in
2.Verify gateway is receiving power and is turned on
Yanzi IoT Gateway Plus:
1.Ensure Ethernet cable is plugged in to the right-
hand port
2.Verify gateway is receiving power and is turned on.
If using PoE, double-check your switch is providing
power over Ethernet.
Yanzi IoT Gateway Rack:
1.Ensure Ethernet cable is plugged into the right-hand
port (the one next to the VGA port)
2.Verify the gateway is receiving power and is turned
on
4G-based gateways
Yanzi IoT Gateway 4G:
1.Verify gateway is receiving power and is turned on
2.Ensure sim card is inserted
Yanzi IoT Gateway Plus 4G:
1.Verify gateway is receiving power and is turned on
2.Ensure sim card is inserted
Sensor won’t
connect
Battery powered sensors
1.Ensure batteries are inserted
2.Some battery powered sensors have a power switch,
verify this is set to ON
USB powered sensors
1.Ensure cable is plugged in
2.Verify the power adapter is plugged in to a working
outlet
It is always possible to
check any sensors
status by pushing the
button. The LED will
then indicate the
current state of the
sensor, see page 15 for
LED behavior.

Doc No: 890-03084 Date: 2017-02-13 Rev 02pa1
Yanzi Networks Installation Manual – Smart Office 19 of 19
13.General Product Information
The information below relates to the following products
- Yanzi Climate, SWTH1-1230
- Yanzi Motion, MDW1-0201
- Yanzi Presence, MDW3-0180
- Yanzi Motion+, MDW3-0231
- Yanzi Comfort, SWAQ3-0372
These devices complies with part 15 of the FCC Rules. Operation is subject to the following two
conditions: (1) This device may not cause harmful interference, and (2) this device must accept any
interference received, including interference that may cause undesired operation.
Changes or modifications not expressly approved by the party responsible for compliance could void the
user's authority to operate the equipment.
This equipment has been tested and found to comply with the limits for a Class B digital device, pursuant
to part 15 of the FCC Rules. These limits are designed to provide reasonable protection against harmful
interference in a residential installation. This equipment generates uses and can radiate radio frequency
energy and, if not installed and used in accordance with the instructions, may cause harmful interference
to radio communications. However, there is no guarantee that interference will not occur in a particular
installation. If this equipment does cause harmful interference to radio or television reception, which can
be determined by turning the equipment off and on, the user is encouraged to try to correct the
interference by one or more of the following measures:
- Reorient or relocate the receiving antenna.
- Increase the separation between the equipment and receiver.
- Connect the equipment into an outlet on a circuit different from that to which the receiver is connected.
- Consult the dealer or an experienced radio/TV technician for help.