Altis Technology DXFHJJ Walkie Talkie Two-way Radio User Manual DXFRS800 MANL EN KEM ML42600 01 lr 072418

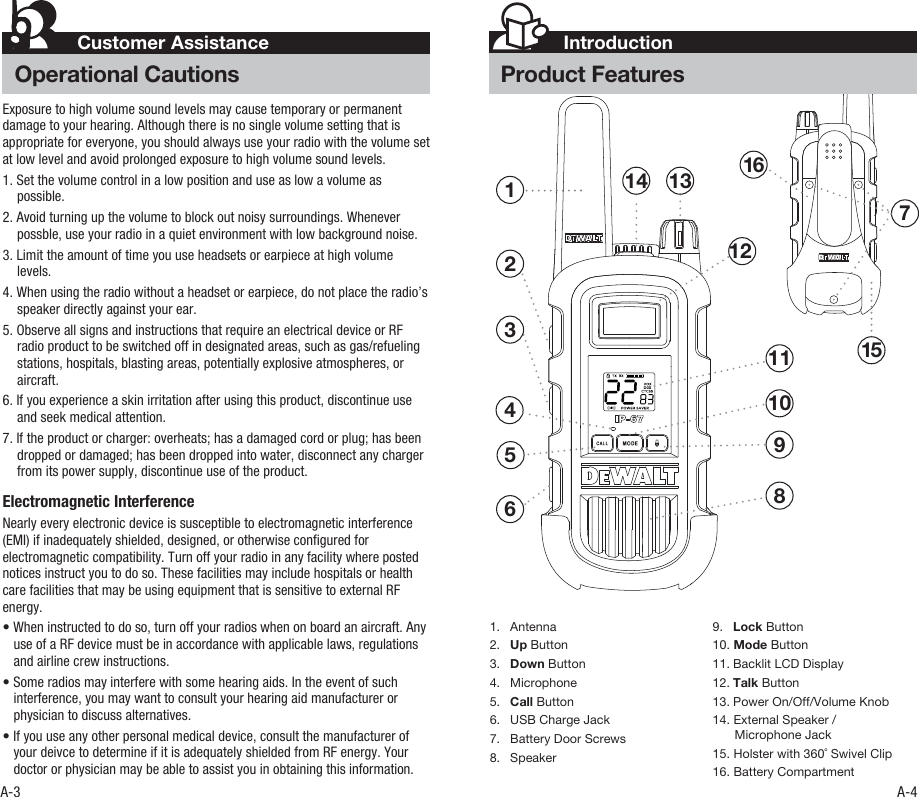
Altis Technology (Hong Kong) Ltd. Walkie Talkie Two-way Radio DXFRS800 MANL EN KEM ML42600 01 lr 072418

User Manual

Owner’s Manual Printed in ChinaPart No. KEM-ML42600-01EnglishTWO-WAY RADIO MODELDXFRS800Owner’s ManualDXFRS800
Staying in touch is convenient and easy when using your radio. Some of the many uses you will discover include:Communicating with others while hiking, biking, and working; keeping track of family and friends at a crowded public event; checking with travel companions; connecting with neighbors; arranging meeting spots with others while shopping at the mall, talking with your colleagues in warehouse or jobsite.Secure your radio while on the go.Carrying your radio with you is easy when using the holster.The holster easily attaches to your belt, purse, or backpack.IntroductionMaking Life Easier and SaferCustomer AssistanceProduct Service & SupportFor any questions about operating this new DEWALT branded product, PLEASE CONTACT US FIRST… do not return this product to the retail store. The contact information for support will vary depending on the country in which you purchased and utilize the product. To obtain warranty service or other information for products purchased from Altis itself or through its authorized reseller or agent and utilized in the U.S.A., please call our consumer support line at (866) 208-1654, or email us at DEWALT.COM. You will receive instructions on how to ship the products at your expense to an our Authorized Service Center. To obtain service, you must include: (a) a copy of your receipt, bill of sale or other comparable proof of purchase; (b) a written description of the problem; and, most importantly; (c) your address and telephone number.For further information needed on its features, please visit DEWALT.COM for frequently asked questions and the electronic manual.©2018 Altis Global Limited, Atlanta, GA USA.A-1 A-2        WARNING: Important Safety Instructions for BatteryRead All Instructions • Do not incinerate the battery even if it is severely damaged or is completely worn out.• Do not discard battery in a re. The battery pack can explode in a re. • Do not replace battery in any area labeled “Hazardous Atmosphere”. Any sparks created in a potentially explosive atmosphere can cause an explosion or re.• Do not disassemble, crush, puncture, shred, or otherwise attempt to change the form of your battery.• Do not dry a wet or damp battery with an appliance or heat source, such as a hair dryer or microwave oven.• A small leakage of liquid from the battery cells may occur under extreme usage or temperature conditions. This does not indicate a failure.  Do not open, deform or mutilate the battery as there may be corrosive materials which can cause damage to eyes or skin and may be toxic if swallowed.However, if the outer seal is broken and this leakage gets on your skin: a. Wash quickly with soap and water. b. Neutralize with a mild acid such as lemon juice or vinegar. c. If battery liquid gets into your eyes, ush them with clean water for a minimum of 10 minutes and seek immediate medical attention.This product uses Lithium Polymer Battery. Do not transport package if damaged, a re hazard could exist.For more information, please call our customer support line at (866) 208-1654, or email us at DEWALT.COM.Recycle Battery Local, state or federal laws may prohibit disposal of batteries in ordinary trash. Consult your local waste authority for information regarding available recycling and/or disposal options.   1.  Only accessories included in this package or specied by the manufacturer should be used with the radio. The 5V micro-USB charging input is compatible with most high quality micro-USB chargers that fully conform to the USB standards.2.  Do not use cleaners or solvents to clean the exterior of the radio. Use only a damp or dry cloth.3.  Do not attempt to service the radio yourself. Removing the cover will void the warranty. Changes or modications not expressly approved by DEWALT may void the user’s authority granted by the FCC to operate this device and should not be made.4.  Do not plug the wall adaptor into the power outlet if the outlet is wet.5.  Do not use any portable radio that has a damaged antenna. If a damaged antenna comes into contact with your skin, a minor burn can result.WARNING: Important Safety InstructionsBefore operating the radio, please read all safety and operating instructions. Save all instructions in a safe place for future reference.Holster
1615IntroductionProduct FeaturesCustomer AssistanceOperational CautionsExposure to high volume sound levels may cause temporary or permanent damage to your hearing. Although there is no single volume setting that is appropriate for everyone, you should always use your radio with the volume set at low level and avoid prolonged exposure to high volume sound levels.1. Set the volume control in a low position and use as low a volume as possible.2. Avoid turning up the volume to block out noisy surroundings. Whenever possble, use your radio in a quiet environment with low background noise.3. Limit the amount of time you use headsets or earpiece at high volume levels.4. When using the radio without a headset or earpiece, do not place the radio’s speaker directly against your ear.5. Observe all signs and instructions that require an electrical device or RF radio product to be switched off in designated areas, such as gas/refueling stations, hospitals, blasting areas, potentially explosive atmospheres, or aircraft.6. If you experience a skin irritation after using this product, discontinue use and seek medical attention.7. If the product or charger: overheats; has a damaged cord or plug; has been dropped or damaged; has been dropped into water, disconnect any charger from its power supply, discontinue use of the product.Electromagnetic InterferenceNearly every electronic device is susceptible to electromagnetic interference (EMI) if inadequately shielded, designed, or otherwise congured for electromagnetic compatibility. Turn off your radio in any facility where posted notices instruct you to do so. These facilities may include hospitals or health care facilities that may be using equipment that is sensitive to external RF energy.• When instructed to do so, turn off your radios when on board an aircraft. Any use of a RF device must be in accordance with applicable laws, regulations and airline crew instructions.• Some radios may interfere with some hearing aids. In the event of such interference, you may want to consult your hearing aid manufacturer or physician to discuss alternatives.• If you use any other personal medical device, consult the manufacturer of your deivce to determine if it is adequately shielded from RF energy. Your doctor or physician may be able to assist you in obtaining this information.A-3 A-413141986523114127101. Antenna2.  Up Button3.  Down Button4. Microphone5.  Call Button6.  USB Charge Jack7.  Battery Door Screws8. Speaker9.  Lock Button10. Mode Button11. Backlit LCD Display12. Talk Button13. Power On/Off/Volume Knob14. External Speaker /  Microphone Jack15. Holster with 360˚ Swivel Clip16. Battery Compartment
Wires alignmentBattery connector12Remove HolsterBacklit LCD DisplayFeatures•  22 Channels•  121 Privacy Codes    (38 CTCSS codes/   83 DCS codes)•  IP67 Water Proof and    Dust Proof Rating•  Hands-Free Operation   (VOX)•  Backlit LCD Display•  Call Alert •  Button Lock•  Speaker/ Microphone/   Charge Jack•  Roger Beep  •  Battery/Power Saver •  Keystroke Tones•  Battery Level   Indicator•  Low Battery    Audible Alert•  Auto Squelch•  Holster1 212345101197861.  Lock Icon2.  Transmit Icon3.  Receive Icon4.  Battery Level Indicator5.  VOX Icon6.  DCS Icon7.  CTCSS Icon8.  DCS / CTCSS Privacy Code Numbers9.  Power Saver Icon10. Vibra Alert Icon11. Channel NumbersBattery Door ScrewsO-ringCaring for Your Radio   Your radio will give you years of trouble-free service if cared for properly. Handle the radio gently. Keep the radio away from dust. Never put the radio in water or in a damp place. Avoid exposure to extreme temperatures. Installing Batteries 1. Remove Holster by releasing the belt clip latch and slide the holster downward.2. Unscrew 3 screws at battery door with a proper screwdriver, then open the battery compartment cover. Connect the battery connector in proper polarity.3. Place the battery inside battery compartment and align the wires as shown.   Ensure the battery connector with cables are tucked into the hole located at bottom.  (Note: Wires are required to be tucked into the battery compartment completely and carefully. If any object interfere the O-ring, its sealing performance will be affected.)4. Place the battery compartment cover, screw down the screws mildly.  (Screw nuts may be damaged if overtighten)5. Re-attach the holsterTo charge batteries in radio:1. Check to see that the batteries have been inserted properly. 2. Insert the cable into the charge jack located atthe left side of the radio. 3. Plug the cable into USB-compatible power port. Only use the supplied rechargeable batteries and desktop charger for recharging your DEWALT radio.DEWALT recommends your radio is turned off while being charged.
3 4Battery Low     When battery power is low, the nal bar in the Battery Low icon will blink and an audible tone will sound twice before the radio shuts off. Your batteries need to be recharged.Auto Battery Save     If there are no transmissions within 10 seconds, the    radio will automatically switch to Battery Save mode    and the Power Saver icon will ash in the display.   This will not affect the radio’s ability to receive    incoming transmissions.Battery LowThe radio will display ashing battery iconwhile charging if the radio is on.Battery Save ModeOperationUsing Your RadioTurning on Your Radio Turn         clockwise to turn the radio on and counterclockwise to turn the radio off.1.  In the ON position, the radio chirps and briey shows all feature icons available on the radio.2.  The display screen then shows the current channel, code and all features that are enabled.Quick Start1. Turn On/Off VOL Knob clockwise to turn the radio on and counter clockwise to turn the radio off.2. Select a desired channel.3. Press and hold the Talk button while speaking into the microphone.4. When nished talking, release the Talk button and listen for a response.Both radios must be tuned to the samechannel/privacy code to communicate.For charging radio(s) in desktop charger:1. Insert radio(s) into desktop charger as shown. 2. Insert the micro-USB cable into jack on back of charger.3. Plug the cable into USB compatible power port. For pluggable equipment, the socket-outlet shall be installed near the equipment and shall be easily   accessible.If charging light is not on, check position of radio. Radio should be upright. The charge indicator light will stay on as long as the radio is in the charging mode, and the light will go off when the charging is complete.Note: To charge a single radio, you can bypass the desktop charger and simply insert the micro-USB’s connector directly into the charge jack located on the left side of the radio.The radio will display ashing battery icon while charging.DEWALT recommends your radio be turned off while being charged.
Call Button  Press and release the Call button.   The other person will hear a three second call     tone. This tone is used only to establish voice    communications.Lock Function The Lock function locks the Up, Down and Mode buttons to prevent accidental operation.   To turn the lock on or off:  – Press and hold the Lock button for    two  seconds.  A double beep sound is used to conrm your lock enabled. When in Lock mode, the Lock icon will be displayed also.Range  Your range will vary depending on terrain and conditions.  In at, open country your radio will operate at maximum range.  Buildings and foliage in the path of the signal can reduce the range of the radio.  Dense foliage and hilly terrain will further reduce the range of the radio.  On Channels 8 through 14, your radio automatically switches to low power, which will limit the range the radio can communicate.Auto SquelchYour radio will automatically shut off weak transmissions and unwanted noise due to terrain, conditions limit.Communicating with Another Person  1. Press and hold the Talk button. 2. Position the microphone about two inches (5 cm) from your mouth, speak in a normal voice. 3. Release the Talk button when you are nished talking and listen for a response.  You cannot receive incoming calls while pressing the Talk button.To Select a Channel Press Mode button once, then press Up button or Down button.5 6Both radios must be tuned to the same channel to communicate.See page 13 for frequencyallocations charts.Listening for a Response  Release the Talk button to receive incoming transmissions. Your radio is always in Standby mode while the Talk or Call buttons are not pressed.To Adjust Volume1.  Rotate         clockwise to increase the volume.2.  Rotate         counterclockwise to decrease the volume.Do not hold the radio close to your ear. If the volume is set to an uncomfortable level, it can hurt your ear.Call ButtonLock ButtonChannel NumberLock IconBoth radios must be tuned to the same channel and privacy code to communicate.Two Inchesfrom MouthUp & Down ButtonTalk ButtonListeningThis radio is equipped with default Privacy Code on each channel for minimizing unwanted signals from others. See page 9 to 10 for procedures changing your radio from default Privacy Code to a different Privacy Code or disabling Privacy Code.
7 8 Mode ButtonOperationMode FunctionsChannel  22 channels with default privacy codeVOX on/off  On or off shown on LCDVOX sensitivity  5 levels Vibra Alert selection  0:Off, 1:EnableCTCSS code setting   38 codes for settingDCS code setting   83 codes for settingPrivacy CodesYour radio incorporates two advanced coded squelch systems that can help to reduce interference from other users on any given channel. CTCSS (Continuous Tone Coded Squelch System) provides 38 privacy codes and DCS (Digitally Coded Squelch) provides 83 privacy codes. This provides a total of 121 Privacy Codes. Either system can be used on all channels, but both systems cannot be used on the same channel at the same time.For ease of use and to reduce interference from other users, the 22 channels of your radio have been customized, see Channel and Default Privacy Code Table.You can change your radio Privacy Codes in order to work with other radios with different privacy codes or radio without privacy codes. See page 9 and 10 for procedures.Scrolling Through the Mode FunctionBy scrolling through the Mode function, you will be able to select or turn on preferred features of your radio. When scrolling through the Mode function, your radio features will be displayed in the same predetermined order:Channel and Default Privacy Code Table  Channel  Privacy Code    Type   Number 1  CTCSS  1 2  CTCSS  11 3  CTCSS  22 4  CTCSS  33 5  DCS  1 6  DCS  11 7  DCS  22 8  DCS  33 9  DCS  44 10  DCS  55 11  DCS  66 Channel  Privacy Code    Type   Number 12  DCS  77 13  CTCSS  1 14  CTCSS  11 15  CTCSS  22 16  CTCSS  33 17  DCS  1 18  DCS  11 19  DCS  22 20  DCS  33 21  DCS  44 22  DCS  55
Set DCS Privacy Codes To select a DCS privacy code: 1. After selecting a channel, press the Mode button until the DCS icon appears and the small numbers ash on the display (00 through 83).    2. Press the Up or Down button to select a DCS privacy code. You can hold the Up or Down button for fast advance.3. When DCS privacy code is displayed, choose one of the following: a. Press the Mode button to enter the new setting and proceed to other functions. b. Press the Talk button to return to Standby mode. c. Do not press any buttons for 6 seconds to enter the new settings and to return to Standby mode.Set CTCSS Privacy Codes To select a CTCSS privacy code: 1. After selecting a channel, press the Mode button until the CTCSS icon appears and the small numbers next to the channel number ash on the display. 2. Press the Up or Down button to select a privacy code. You can hold the Up or Down button for fast advance.3. When your desired CTCSS privacy code is displayed, choose one of the following:a. Press the Mode button to enter the new setting and proceed to other functions.b. Press the Talk button to return to Standby mode.c. Do not press any buttons for 6 seconds to return to Standby mode.  To successfully communicate using a privacy code, both the sending and receiving radios must be tuned to the samechannel and to the same privacy code system (CTCSS or DCS)and privacy code number. Each channel will remember thelast privacy code system and number you select.The privacy code 00 is not a privacy code, but allows allsignals to be heard on a channel that is set to 00 on boththe CTCSS and DCS systems.Privacy Code DCS Privacy CodeUp/Down Button Up/Down Button9 10If DCS is turned on at the channel selected, the display will ash the CTCSS icon and “OFF.” To switch from DCS to CTCSS, press the Up or Down button while the display is ashing “OFF.” The display will then show the small numbers ashing and you will then be able to proceed to step 2.If CTCSS is turned on at the channel selected, the display will ash the DCS icon and “OFF.” To switch from CTCSS to DCS, press the Up or Down button while the display is ashing “OFF.” The display will then show the small numbers ashing and you will then be able to proceed to step 2.Mode Button Mode Button
Vibra Alert and Call AlertYour radio can alert you to incoming signals by sounding an audible call tone or an audible tone with Vibra Alert.  To change call settings: 1. Press the Mode button until the Call Setting icon is shown on the display. The current setting (“0” ring only, “1” vibrate + ring) is displayed. 2. Press the Up or Down button to change the call setting. 3. Choose one of the following:  a. Press the Mode button to enter the new setting and proceed to other functions.  b. Press Talk button to return to Standby mode.   c. Do not press any buttons for 6 seconds to return to Standby mode.Note: Vibra Alert will be suspended during chargingRoger Beep Confirmation ToneYour listener will hear an audible tone when you release the Talk button. This alerts the other party that you have nished talking and it is OK for them to speak.Key Tone Key Tone is an audible tone which will sound each time a button is pressed.Up/Down ButtonUp/Down Button11 12The current VOX sensitivity level isdisplayed with letters “L” and a Number 1through 5, with Number 5 being the mostsensitive level and Number 1 being theleast sensitive level.Call Tone On/Vibration OffCall Tone On/Vibration OnVOX  IconVOX Sensitivity LevelMode ButtonMode ButtonVoice Activated Transmit (VOX)In VOX mode, your radio can be used “hands-free,” automatically transmitting when you speak. You can set the VOX sensitivity level to t the volume of your voice and avoid transmissions triggered by background noise.  To turn VOX mode on or off: 1. Press the Mode button until the VOX icon shown on the display. The current On or Off setting is displayed. 2. Press the Up or Down button to turn VOX On or Off. 3. Choose one of the following:  a. Press the Mode button to enter the new setting and proceed to other functions.    b. Press the Talk button to return to Standby mode. To set VOX sensitivity:1. Press the Mode button until the VOX icon ashes and the current sensitivity level is displayed.2. Press the Up or Down button to change the setting.3. Choose one of the following: a. Press the Mode button to enter the new setting and proceed to other functions. b. Press the Talk button to return to Standby mode. c.  Do not press any buttons for 6 seconds to return to Standby mode.
OperationGeneral Specications13 14Frequency Allocation and Compatibility A = Channel No. for 22 Channel ModelsB = Frequency in MHzC = Power OutputA B  C1   462.5625  High2  462.5875  High3   462.6125  High4   462.6375  High5   462.6625  High6   462.6875  High7    462.7125  High8   467.5625  Low9    467.5875  Low10 467.6125  Low11   467.6375  Low12   467.6625  Low13   467.6875  Low14   467.7125  Low15   462.5500  High16   462.5750  High17   462.6000  High18   462.6250  High19   462.6500  High20   462.6750  High21   462.7000  High22   462.7250  HighIMPORTANT NOTICE: WARNING: Changes or modications to this unit not expressly approved by the party responsible for compliance could void the user’s authority to operate the equipment.This device complies with Part 15 of the FCC Rules. Operation is subject to the following two conditions: 1) This device may not cause harmful interference, and 2) this device must accept any interference received,including interference that may cause undesired operation.NOTE: This equipment has been tested and found to comply with the limits for a Class B digital device, pursuant to Part 15 of the FCC Rules.  These limits are designed to provide reasonable protection against harmful interference in a residential installation.  This equipment generates, uses and can radiate radio frequency energy and, if not installed and used in accordance with the instructions, may cause harmful interference to radio communications.However, there is no guarantee that interference will not occur in a particular installation.  If this equipment does cause harmful interference to radio or television reception, which can be determined by turning the equipment off and on, the user is encouraged to try to correct the interference by one or more of the following measures:• Reorient or relocate the receiving antenna.• Increase the separation between the equipment and receiver.• Connect the equipment into an outlet on a circuit different from that to which the receiver is connected.• Consult the dealer or an experienced radio/TV technician for help. Safety Information for RadiosYour wireless handheld portable transceiver contains a low power transmitter. When the talk button is pushed, it sends out radio frequency (RF) signals. The device is authorized to operate at a duty factor not to exceed 50%. In August 1996, the Federal Communications Commissions (FCC) adopted RF exposure guidelines with safety levels for handheld wireless devicesImportantFCC/ISEDC RF Exposure Requirements: For body-worn operation, this radio has been tested and meetsthe FCC/ISEDC RF exposure guidelines when used with DEWALT accessories supplied or designated forthis product. Use of other accessories may not ensure compliance with FCC/ISEDC RF exposure guidelines.Use only the supplied antenna. Unauthorized antennas, modifcations or attachments could damage the transmitter and may violate FCC/ISEDC regulations. Normal PositionHold the transmitter approximately 25 mm from your face and  speak in a normal voice, with the antenna pointed up and away.ISEDC WARNINGThis device complies with ISEDC license-exempt RSS standard(s). Operation is subject to the following two conditions: (1) this device may not cause interference, and (2) this device must accept any interference, including interference that may cause undesired operation of the device. Under ISEDC regulations, this radio transmitter may only operate using an antenna of a type and maximum (or lesser) gain approved for the transmitter by ISEDC. To reduce potential radio interference to other users, the antenna type and its gain should be so chosen that the equivalent isotropically radiated power (e.i.r.p.) is not more than that necessary for successful communication.The applicant is responsible for providing proper instructions to the user of the radio device, and any usage restrictions, including limits of exposure durations. The user manual shall provide installation and operation instructions, as well as any special usage conditions, to ensure compliance with SAR and/or RF eld strength limits. For instance, compliance distance shall be clearly stated in the user manual.CetappareilestconformeauxnormesRSSexemptesdelicenceISEDC.Sonfonctionnementestsoumisauxdeuxconditionssuivantes:(1)cetappareilnedoitpasprovoquerd'interférenceset(2)cetappareildoitacceptertouteinterférence,ycomprislesinterférencespouvantentraînerunfonctionnementindésirabledel'appareil.EnvertudesréglementationsISEDC,cetémetteurradionepeutfonctionnerqu'avecuneantenned'untypeetungainmaximal(ouinférieur)approuvépourl'émetteurparl'ISEDC.Pourréduirelesinterférencesradiopotentiellesavecd’autresutilisateurs,letyped’antenneetsongaindoiventêtrechoisisdemanièreàcequelapuissanceisotroperayonnéeéquivalente(e.i.r.p.)nesoitpassupérieureàcellenécessaireàunecommunicationréussie.Ledemandeurestresponsabledefournirdesinstructionsappropriéesàl'utilisateurdudispositifradioetdetouterestrictiond'utilisation,ycomprisleslimitesdeladuréed'exposition.Lemanueldel'utilisateurdoitfournirdesinstructionsd'installationetd'utilisation,ainsiquedesconditionsd'utilisationspéciales,pourassurerlaconformitéavecleslimitesdechampdeSARet/ouRF.Parexemple,ladistancedeconformitédoitêtreclairementindiquéedanslemanueld'utilisation.Important:Exigences de la FCC/ISEDC concernant l’exposition aux champs électro-magnétiques RF (radiofréquences): En ce qui concerne le fonctionnement de l’appareil porté sur le corps de l’utilisateur, les tests effectués ont permis de vérier que cet émetteur-récepteur satisfait aux directives FCC/ISEDC limitant l’exposition aux champs électro-magnétiques RF lorsqu’il est utilisé avec les accessoires Cobra fournis ou conçus pour ce produit; l’utilisation d’autres accessoires peut ne pas garantir le respect des critères des directives FCC/ISEDC limitant l’exposition aux champs électro-magnétiques RF. Utiliser l’appareil uniquement avec l’antenne fournie. L’emploi d’une antenne non homologuée ou modiée, ou d’accessoires non autorisés, pourrait faire subir des dommages à l’appareil, et peut violer les prescriptions de la réglementation FCC/ISEDC.Position normale:Tenir l'émetteur à environ 25 mm de la bouche et parler normalement, l'antenne étant éloignée et dirigée vers le haut.
Warranty & Trademark Acknowledgment Limited Lifetime Warranty on RadioAltis Global Limited warrants to the original consumer purchaser only that this product and the component parts thereof, will be free from defects in workmanship and materials. Altis will, repair or replace, at its sole option and discretion, this product or any defective parts.  Altis’ liability hereunder shall be limited to repair or replacement of the defective part or parts, and such correction shall constitute a fulllment of all of Altis’ warranties hereunder.  This limited lifetime warranty is only valid for the original consumer purchaser in limited jurisdictions and is not transferrable.  This limited lifetime warranty will automatically terminate if this product is sold or otherwise transferred to another party.  The product must be purchased from Altis or an authorized dealer or the warranty is void.  This limited lifetime warranty is valid only for products purchased and utilized in specic jurisdictions.  Please visit our website at DEWALT.COM for a list of jurisdictions wherein this lifetime limited warranty is valid.      This limited lifetime warranty does not apply to accessories and consumables and does not cover damage due to misuse, abuse, negligence, acts of God, accident, commercial use or modication of, or to any part of this product.  This warranty does not cover damage due to improper operation, maintenance or installation; ordinary wear and tear; or attempted alterations or repairs by anyone other than Altis or someone authorized by Altis to do warranty work.  Any unauthorized alterations or repairs will void this warranty.  This limited lifetime warranty does not cover product sold AS IS or WITH ALL FAULTS.  This limited lifetime warranty is invalid if the factory applied serial number or date stamp has been altered, defaced or removed from this product.  This limited lifetime warranty does not cover product purchased or utilized in a jurisdiction not covered.  The procedure for obtaining service and support, and the applicability of this warranty, will vary depending on the country or jurisdiction in which you purchase and utilize the product. For details on obtaining product service, support and other warranty information please visit DEWALT.COM.This warranty gives you specic legal rights, and you may also have other rights which vary from state to state and country to country.EXCEPT AS EXPRESSLY SET FORTH IN THIS WARRANTY, ALTIS MAKES NO OTHER WARRANTIES, EXPRESSED OR IMPLIED, INCLUDING ANY IMPLIED WARRANTIES OF MERCHANTABILITY AND FITNESS FOR A PARTICULAR PURPOSE.  ALTIS EXPRESSLY DISCLAIMS ALL WARRANTIES NOT STATED IN THIS LIMITED WARRANTY.  ANY IMPLIED WARRANTIES THAT MAY BE IMPOSED BY LAW ARE LIMITED TO THE TERMS OF THIS EXPRESSED WARRANTY.  LIMITATION OF REMEDIES AND DAMAGES.  REPAIR OR REPLACEMENT AS PROVIDED UNDER THIS WARRANTY IS THE EXCLUSIVE REMEDY OF THE CONSUMER.  ALTIS SHALL NOT BE LIABLE FOR ANY INCIDENTAL OR CONSEQUENTIAL DAMAGES, INCLUDING BUT NOT LIMITED TO ATTORNEYS’ FEES AND/OR COSTS OF LITIGATION, FOR BREACH OF ANY EXPRESS OR IMPLIED WARRANTY ON THIS PRODUCT.  ALTIS IS NOT LIABLE FOR ANY DAMAGES CAUSED BY THE PRODUCT OR BY THE PRODUCT TO PERFORM, INCLUDING ANY LOST PROFITS, LOST SAVINGS, INCIDENTAL DAMAGES, OR CONSEQUENTIAL DAMAGES.  ALTIS IS NOT LIABLE FOR ANY CLAIM MADE BY A THIRD PARTY OR MADE BY YOU FOR A THIRD PARTY.  THIS LIMITATION APPLIES WHETHER DAMAGES ARE SOUGHT, OR A CLAIM MADE, UNDER THIS WARRANTY OR AS A TORT CLAIM (INCLUDING NEGLIGENCE OR STRICT PRODUCT LIABILITY), A CONTRACT CLAIM, OR ANY OTHER CLAIM.  THIS LIMITATION CANNOT BE WAIVED OR AMENDED BY ANY PERSON.  THIS LIMITATION OF LIABILITY WILL BE EFFECTIVE EVEN IF ALTIS OR AN AUTHORIZED REPRESENTATIVE OF ALTIS HAS BEEN ADVISED BY YOU OF THE POSSIBILITY OF ANY SUCH DAMAGES.   Some states and countries do not allow limitations on how long an implied warranty lasts and do not allow the exclusion or limitation of incidental or consequential damages, so the above limitations may not apply to you. This warranty gives you specic legal rights, and you may also have other rights which vary from state to state and country to country.Provided that the product was purchased from Altis itself or through its authorized reseller or agent and utilized in the U.S.A., Altis will, without charge, repair or replace, at its option, defective products, products or component parts upon delivery to the authorized Altis Global Limited Authorized Service Center, accompanied by proof of the date of rst customer purchase, such as a duplicated copy of a sales receipt.You must pay any initial shipping charges required to ship the product for warranty service, but the return charges, to an address in the U.S.A, will be at Altis’ expense, if the product is under warranty.For Products Purchased Outside the U.S.A.Please contact your authorized local reseller or agent for warranty information.Trademark AcknowledgmentDEWALT® and the DEWALT Logo are trademarks of the DEWALT Industrial Tool Co., or an afliate thereof and are used under license.The yellow/black color scheme is a trademark for DEWALT power tools & accessories.© 2018 DEWALTU.S. & Canada Only  Made in CHINAProduct Manufactured by:Altis Global Limited, Atlanta, GA USA.For product, service or warranty information contact us at:DEWALT.COM  (866)208-165415 16
Notes17 18

Navigation menu