Alula RE215 Carbon Monoxide Detector User Manual
Resolution Products, Inc. Carbon Monoxide Detector
Alula >
User Manual
I
N
S
T
A
L
L
G
U
I
D
E
I
CO Alarm is a life-safety device that
alarms when it detects carbon
monoxide.
Features
• UL2034 and CSA 6.19-01 listings
• Detects carbon monoxide
• 5 year warranty
Key Instructions
1. Review sections 1 and 2 for
information regarding the CO alarm.
2. Determine where to place the CO
alarms per Section 3.
3. Install per Section 4.
Cryptix Enrolment:
4. Enroll the CO alarm into the panel:
• Place panel in enrollment mode
• Press and hold TEST button until you
hear the sounder beep
• The panel will learn the CO alarm
• Press and hold TEST button until
sounder is done sounding beeps
• Panel will indicate a CO Test by
sounding temporal 4 siren one time
Interlogix Compatible Enrollment
• Place panel in enrollment mode
• Press and hold TEST button until
sounder is done sounding beeps
• Panel will learn the CO alarm-
recommended group 34
• Test that the CO alarm is enrolled in
the panel:
• Put panel into test mode
• Press and hold TEST button until
sounder is done sounding beeps
• Panel will indicate a CO sensor has
tripped
Attention
This manual should be read prior to use and retained for further information.
Use the Helix installation guide to verify proper system setup.
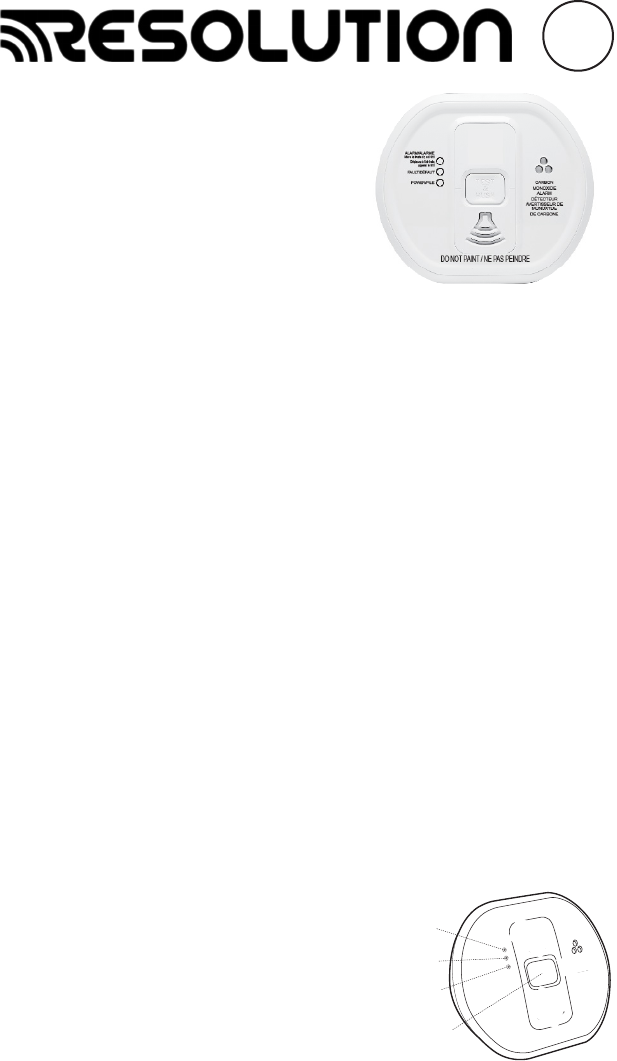
CO Alarm
CARBON
MONOXIDE
ALARM
ALARM
FAULT
POWER
Red
Light
Amber
Light
Green
Light
Test
Button

• Panel will learn the CO alarm
• Recommended group is 81
• Test that the CO alarm is
enrolled in the panel
• Put panel into test mode
• Press and hold TEST button until
sounder is done sounding beeps
• Panel will indicate a CO sensor
has tripped
5. Test that the CO alarm is enrolled
in the panel.
6. Review Section 5 for CO alarm
testing and maintenance.
• Test the functionality of the CO
alarm weekly.
7. Review Sections 6 and 7 for
information regarding what to
do when the alarm sounds and
information regarding how to
protect your family.
8. Review how to have your alarm
serviced per Section 8.
9. For troubleshooting information,
refer to Section 9.
1. Read This First
Congratulations on becoming the owner
of a carbon monoxide alarm. This will
help protect you and your household
from the dangerous effects of carbon
monoxide - the silent killer.
• Wait 15 seconds after connecting
the power before button testing. We
recommend you:
• Install a CO alarm in every room that
contains a fuel burning appliance,
particularly rooms where people spend
a lot of time, such as bedrooms,
kitchens, etc.
• In rooms with an appliance, install
(preferably) on the ceiling (300mm
from walls) and between 1.5m to 3m
horizontally away from the appliance.
In rooms remote from the appliance,
install at ‘head height’, where the light
indicators can be seen.
Honeywell Compatible Enrollment
• Place panel in enrollment mode
• Zone type= Carbon Monoxide
• Input type= Supervised RF
Transmitter
• When asked for a serial number:
trip tamper twice
• To tamper, turn base counter-
clockwise. Wait for two seconds
and restore the base. Wait for
three seconds and repeat steps.
• Select Loop 1 for CO
• Put panel into test mode
• Press and hold TEST button until
sounder is done sounding beeps
• Panel will indicate a CO sensor
has tripped
2GIG Compatible Enrollment
• Place panel in enrollment mode
• Q1: Select RF sensor number
(01-48) zone number of your
choice
• Select RF sensor type [14] 24
hour carbon monoxide (see
control panel installation manual)
• Select RF sensor equip type [1]
• Select RF sensor equip code
[0860] CO1-345 CO detector
• Select RF sensor serial number
and press shift, press learn trip
sensor
• Select RF sensor age [1] New
• Select RF sensor Loop number
[1]
• Put panel into test mode
• Press and hold TEST button until
sounder is done sounding beeps
• Panel will indicate a CO sensor
has tripped
DSC Compatible Enrollment
• Place panel in enrollment mode
• Press and hold TEST button until
sounder is done sounding beeps
2
• Test the alarm weekly by pressing the
test/hush button. The horn will sound at
a diminished sound output level initially
and then quickly reach maximum sound
output level.
• Replace alarm after approximately 10
years operation (see ‘replace by’ date
on label).
• Do not install alarm until all building work
is completed to avoid contamination.
• Individuals with medical problems may
consider warning devices which provide
audible and visual signals for carbon
monoxide concentrations under 30ppm.
2. Carbon Monoxide - The
Silent Killer
2.1 What is carbon monoxide?
Many people are killed each year, and
many more suffer ill health from carbon
monoxide (CO) poisoning. CO is an
invisible, odorless, tasteless and extremely
toxic gas. It is produced by appliances and
vehicles burning fuels, such as coal, oil,
natural/bottled gas, paraffin, wood, petrol,
diesel, charcoal, etc. CO is absorbed by
red blood cells in the lungs in preference
to oxygen - this results in rapid damage
to the heart and brain from oxygen
starvation.
High levels of CO in a house can be
caused by:
• Incorrectly or poorly installed fuel-burning
appliances
• Blocked or cracked chimneys/flues
• Blocked vents or draft-proofing
which makes areas with fuel-burning
appliances or fireplaces airtight
• Engines of cars, lawnmowers, etc. left
running in confined spaces
• Portable paraffin or gas heaters in badly
ventilated rooms
2.2 What happens when your CO Alarm
detects Carbon Monoxide?
When the Alarm detects potentially
dangerous levels of CO, it flashes the red
alarm light immediately and then sounds
a loud alarm if the CO persists. Table
B shows how the CO Alarm reacts to
different levels of CO gas and exposure
time. At higher levels of CO the alarm
turns on sooner. The rate of flashing of
the red light indicates the level of CO.
If your CO Alarm sounds, follow the
instructions in Section 6. NEVER IGNORE
THE ALARM!
3
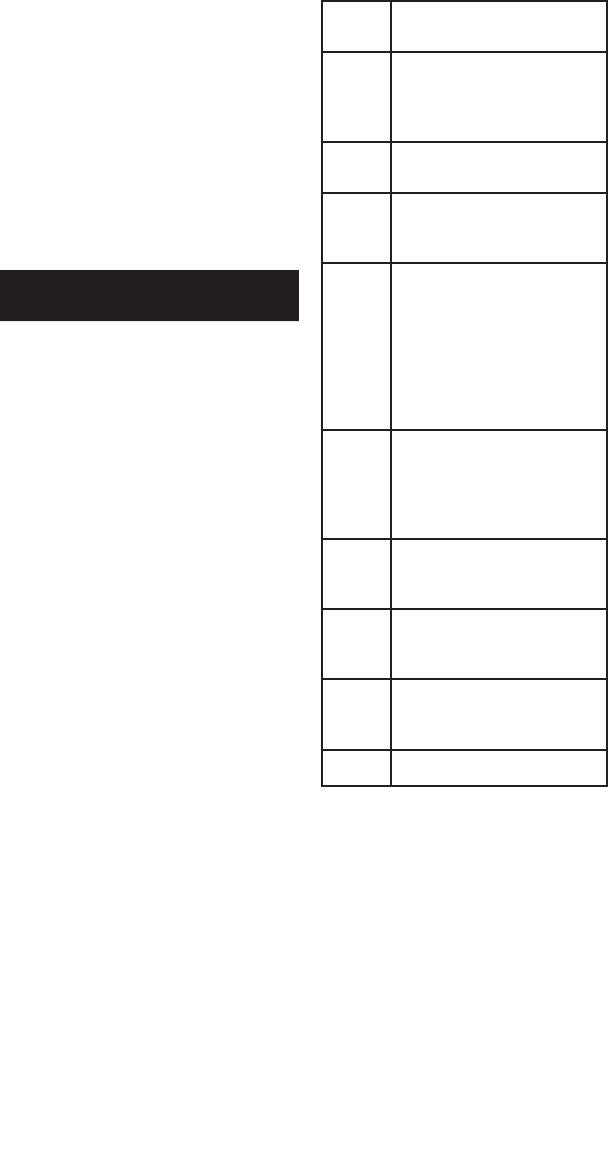
2.3 Symptoms of CO Poisoning
CO in
PPM
Symptoms
35 The maximum allowable
concentration exposure
in any 8 hour period
according to OSHA
150 Slight headache after 1.5
hours
200 Slight headache, fatigue,
dizziness, nausea after 2-3
hours
400 Frontal headaches
within 1-2 hours, life
threatening after 3 hours,
also maximum parts per
million in ue gas (on an
air free basis) according
to US Environmental
Protection Agency.
800 Dizziness, nausea and
convulsions within 45
minutes. Unconsciousness
within 2 hours. Death within
2-3 hours.
1600 Headache, dizziness, and
nausea within 20 minutes.
Death within 1 hour.
3200 Headache, dizziness and
nausea within 5-10 minutes.
Death within 25-30 minutes.
6400 Headache, dizziness and
nausea within 1-2 minutes.
Death within 10-15 minutes.
12800 Death within 1-3 minutes
The following symptoms may be related
to Carbon Monoxide Poisoning and
should be discussed with all members of
the household:
Mild exposure: Headaches, running
nose, sore eyes, often described as “flu
like symptoms”
Medium Exposure: Dizziness,
drowsiness, vomiting
Extreme Exposure: Unconsciousness,
brain damage, death
Many cases of reported carbon
monoxide poisoning indicate that while
victims are aware they are not well, they
become so disoriented they are unable
to save themselves by either exiting the
building or calling for assistance.

Pre-Alarm (before horn sounds): When
the Alarm detects over 50 ppm CO, the
red light flashes in accordance with Table
B. This helps locate CO leaks as the unit
gives an indication straight away.(Without
this feature the CO level would need to
be at 50 ppm CO for typically 72 minutes
for an alarm sound to be given). Note: the
pre-alarm signal may be triggered by CO
coming for example, from cooking with
gas, from car engines, or from nearby
barbecues. This is usually not a concern,
unless the pre-alarm signal persists until
the alarm sounds and the CO source is
unknown.
NOTE: The CO Alarm may sound if
cigarette smoke is blown into it, or
aerosols are released nearby.
CO ALARM MEMORY
The CO Alarm memory is an important
feature of the CO Alarm where even if
the house is unoccupied during an alarm
condition, it warns the homeowner that
the unit has previously detected CO gas
and been in alarm. The memory feature
has two operation modes:
- memory indication for 24 hour period
after alarm
- memory recall on demand
24 hour memory indicators: After
alarm, the RED light will flash at different
rates every 50 seconds depending on
the level of CO detected - see the CO
Response Table.
Memory recall on demand: To review
the memory status after initial 24 hours,
press and hold the test button. The red
*OSHA Occupational Safety and
Health Association
4
Table B: CO Alarm Response
CO
Gas
Level
Red Light Horn/
Sounder
0 - 30
ppm
Off (unless
it has
alarmed
previously)
Off
>50
ppm
1 flash
every 3
seconds
On within
60-240
minutes
(typically 90
minutes)
>110
ppm
2 flashes
every 3
seconds
On within
10-50
minutes
(typically 30
minutes)
>250
ppm
3 flashes
every 3
seconds
On within
4-15 minutes
(typically 9
minutes)
Condition Indicator
Pre Alarm Red LED flash only
CO Alarm Red LED flash + sounder
Faults Yellow LED flash + beeps
Alarm Indicators
people sleep, place a CO Alarm in this
room
- Locate a CO Alarm in a room containing
a flueless or open-flued appliance, and
- Locate an Alarm in a room where the
occupant(s) spend most of their time
(e.g. sitting room)
- In a single room dwelling, the CO Alarm
should be placed as far away from the
cooking appliance as possible, but near
to where the person sleeps
- If the appliance is in a room not normally
used, such as a boiler room, the CO
Alarm should be placed just outside the
room so that the alarm will be heard
more easily.
LED will flash in accordance to the CO
Response Table. Display models will
show the peak level of CO measured.
Reset Memory: Hold down the test
button until the red light stops and the
green light starts flashing. Cover the horn
with a cloth to muffle the alarm during this
time. Please note that the memory will
also be reset when the unit is switched
off.
3. Where to Place CO Alarms
NATIONAL FIRE PROTECTION
ASSOCIATION REQUIRED
PROTECTION
For your information, the National Fire
Protection Association’s Standard 720
advises as follows:
Carbon Monoxide Alarms shall be
installed as follows:
1. Outside of each separate dwelling unit
sleeping area in the immediate vicinity of
the bedroom.
2. On every occupiable level of a dwelling
unit, including basements but excluding
attics and crawl spaces.
3. Other locations where required by
applicable laws, codes or standards.
The equipment should be installed using
wiring methods in accordance with the
National Fire Protection Association’s
Standard 72, 720. (National Fire
Protection Association, Batterymarch
Park, Quincy, MA 02269)
IMPORTANT!
Specific requirements for Carbon
Monoxide Alarm installation vary from
state to state and from region to region.
Check with your local Fire Department for
current requirements in your area.
3.1 Ideally a Carbon Monoxide Alarm
should be installed in:
- Every room containing a fuel burning
appliance
- Remote rooms where occupants spend
a considerable amount of time
- Every bedroom
However, if the number of Carbon
Monoxide Alarms to be fitted is limited,
the following points should be considered
when deciding where best to fit the
Alarm(s):
- If there is an appliance in a room where
5
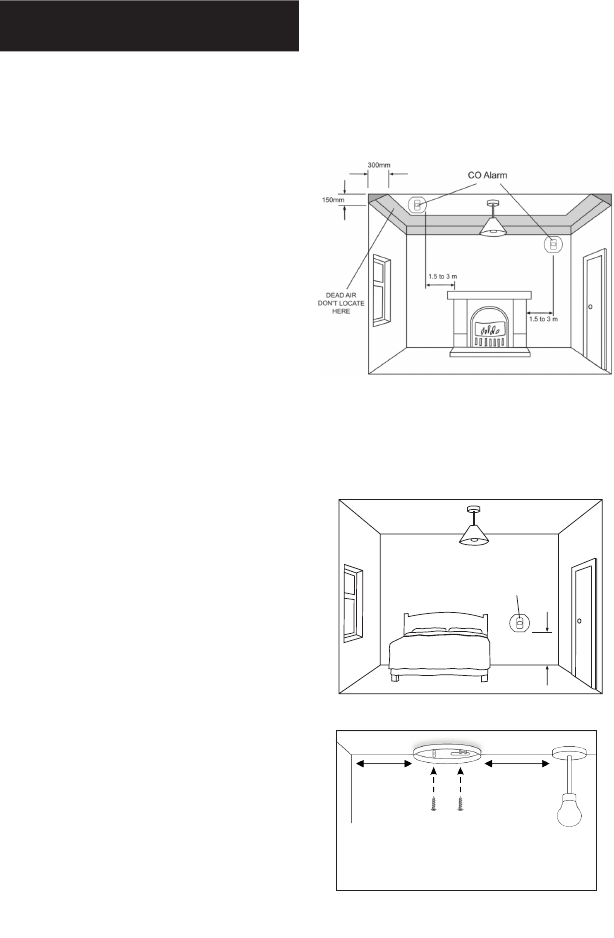
Figure 2
Location in room with sloped
ceilings, the CO Alarm should be
located at the high side of the room
CO Alarm
about
1 to 2m
Figure 1
Location in room with a
fuel burning appliance
Figure 3 Position CO Alarm
12 inches
minimum
12 inches
minimum

3.2 Unsuitable Locations
Do not place the CO Alarm in any of the
following areas:
1. In the immediate vicinity of a cooking
appliance (keep it at least 1 meter
horizontally from it).
2. Outside the building.
3. In an enclosed space (e.g. in or below
a cupboard).
4. In a damp or humid area.
5. Directly above a sink or kitchen
appliance.
6. Next to a door, window, air vent or
anywhere that it would be affected by
drafts.
7. Next to an extractor fan.
8. Over heat sources such as radiators or
hot air vents.
9. Where it would be obstructed, e.g. by
curtains or furniture.
10. In an area where the temperature
could drop below 40°F (4.4°C) or rise
above 100°F (37.8°C).
11. Where dirt or dust could block the
sensor.
12. Where it could be easily knocked or
damaged, or where it could be
accidentally turned off or removed.
13. In a bathroom or other areas where
the CO Alarm may be exposed to water
splashes, dripping or condensation (e.g.
above an electric kettle).
14. Near paint, thinners, solvent fumes or
air fresheners.
3.31 If locating the CO Alarm in a room
with a fuel burning appliance
(See Figure 1)
• If it is mounted on a wall, it should be
located at a height greater than the
height of any door or window but still be
at least 150mm from the ceiling.
• If it is mounted on the ceiling it should
be at least 300mm from any wall or light
fitting.
• The CO Alarm should be a horizontal
distance of between 1.5m and 3m from
the potential CO source.
• If there is a partition in the room, the CO
Alarm should be located on the same
side of the partition as the potential
source.
• In rooms with sloped ceilings, the CO
Alarm should be located at the high
side of the room (see figure 2).
3.32 If locating the CO Alarm in a
bedroom or in rooms remote from a
fuel burning appliance (see figure 3)
Mount the CO Alarm relatively close to
the breathing zone of the occupants.
Whatever position is chosen make sure
it is possible to view the three light
indicators, when in the vicinity of the
Alarm.
WARNING: A CO Alarm should not
be used as a substitute for proper
installation, use and maintenance
of fuel-burning appliances, including
appropriate ventilation and exhaust
systems.
WARNING: Your CO Alarm is intended
for use in ordinary indoor locations of
family units. It is not designed to measure
compliance with OSHA commercial or
industrial standards.
4. Installation
4.1 Installation Procedure
1. Select a location complying with the
advice in Section 3.
2. Remove the mounting plate from the
packaging/Alarm.
3. Place the mounting plate on the
ceiling/wall exactly where you want to
mount the Alarm. With a pencil, mark the
location of the two screw holes.
4. Taking care to avoid any electrical
wiring in the ceiling, drill holes using a
5.0mm drill bit through the center of the
marked locations. Push the plastic screw
anchors provided into the drilled holes.
Screw the mounting plate to the ceiling/
wall.
5. Alternatively, if desired, the CO Alarm
will also free stand on a flat surface with
6
300mm
CO Alarm
Figure 4
Location in bedrooms & other rooms
remote from the appliance
(at breathing level)
If necessary it is possible to further secure
or tamper proof the Alarm by using a No.2
or No.4 (2 to 3mm diameter - not supplied)
self tapping screw 6 to 8mm long to firmly
lock the Alarm and its mounting plate
together (see figure 6C).
5. Testing and Maintenance
Testing
Frequent testing of the system is a
requirement to ensure its continued and
safe operation. To test the Alarm press
and hold the test button. The Green LED
will flash and the horn will ramp up to full
sound to indicate the Alarm is operating
correctly. Guidelines and best practices
for testing are as follows:
1. After the system is installed
2. Once weekly thereafter
3. After prolonged absence from the
dwelling (e.g. after a holiday period)
4. After repair or servicing of any of the
systems elements or household electrical
works
Silencing (Hush)
When the Alarm sounds after sensing
CO, pressing the test/hush button will
immediately stop the horn (the red
light will continue to flash). If CO is still
present, the red light and the horn will
turn on again after about 4 minutes. The
unit can only be silenced once during a
CO incident. At levels > 300ppm CO, the
unit cannot be silenced.
Monitoring
The CO alarm will self check (monitor)
itself and give a status update every 50
seconds if there are any problems. The
status of the Alarm can also be checked
on demand by using the test button. If the
Alarms are indicating a fault, pressing the
test button will silence the beeps for a 24
hour period. This is for your convenience
and can only be done once.
the mounting plate attached.
6. Ensure the RF module is fitted
correctly into the base of the Alarm.
7. Remove the battery door and gently
pull the battery tab and replace the
battery door.
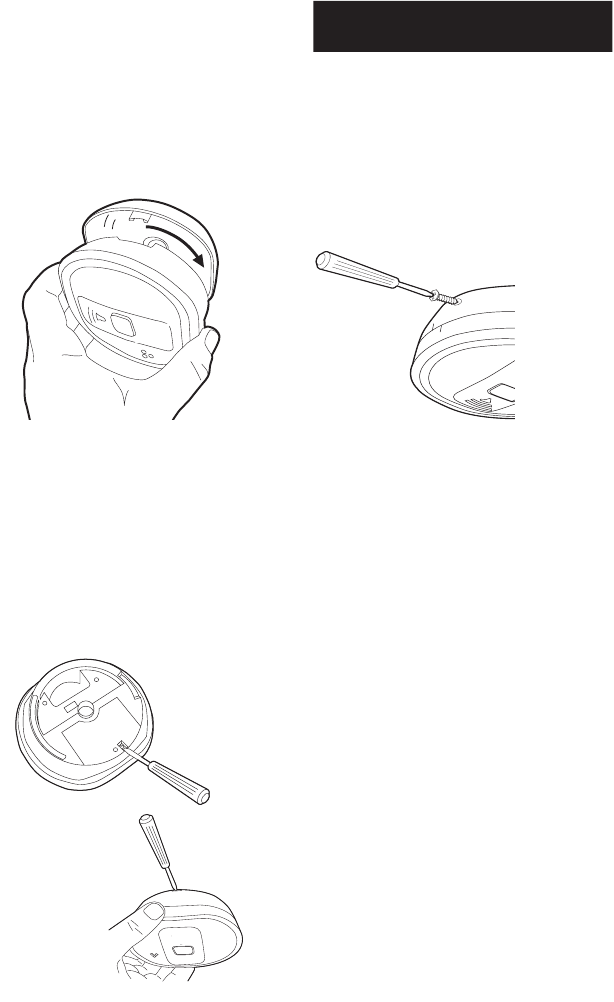
8. Carefully line up the Alarm on the
base, gently press home & twist on – see
figure 4. (This connects the batteries).
The red, amber & green lights will
immediately flash in sequence to show
they are working.
9. Press the Test button (after 15
seconds) to ensure that the Alarm works
(see figure 5).
10. Install all the other Alarms similarly.
Figure 5
4.2 How to Tamperproof the Alarm
The Alarm can be made resistant to
unauthorized removal. Break off the small
pillar on the base as shown in figure 6A.
To remove the Alarm from the ceiling it is
necessary to use a small screwdriver to
release the catch (push catch towards the
ceiling) and then twist off the alarm (see
figure 6B).
7
Figure 6C
Figure 6A
Figure 6B
Maintenance
Clean the outside case by occasionally
wiping with a clean damp cloth. Do not
use any cleaning agents, bleaches,
detergents or polishes, including those
in aerosol cans. Avoid spraying air
fresheners, hair spray, paint or other
aerosols near the CO Alarm. Do not
place air fresheners near the unit. Use
the narrow nozzle of a vacuum cleaner to
remove fluff and other contamination
from the cover slots and gas entry holes.
Caution: Do not paint the CO Alarm.
Remove the CO Alarm when decorating.
Do not allow water or dust to contaminate
the Alarm.
Warning: Do not open or tamper with the
CO Alarm. There are no user serviceable
parts inside and this can damage the
Alarm.
Battery Replacement
Check the ‘Replace by’ label on the side
wall - if it has been exceeded replace
the entire unit. If the Replace by label
on the side wall has not been exceeded,
remove the Alarm from the mounting
plate, remove the battery cover (see
figure 7) and replace the batteries. Use
only Duracell Alkaline MN2400BK AAA
size batteries (obtainable from local
retailers). Insert the new batteries with the
orientation shown on the base. Replace
the battery cover and replace the Alarm
back on its mounting plate (this action
automatically switches on the batteries).
Button test the Alarm (after 15 seconds) to
check the batteries are installed correctly
and that they are not depleted.
Warning!
Constant exposures to high or low
temperatures or high humidity may reduce
battery life. Use only batteries specified
in marking. Use of a different battery
may have a detrimental effect on alarm
operation. For environmentally sound
disposal, remove the Alarm from its
mounting plate
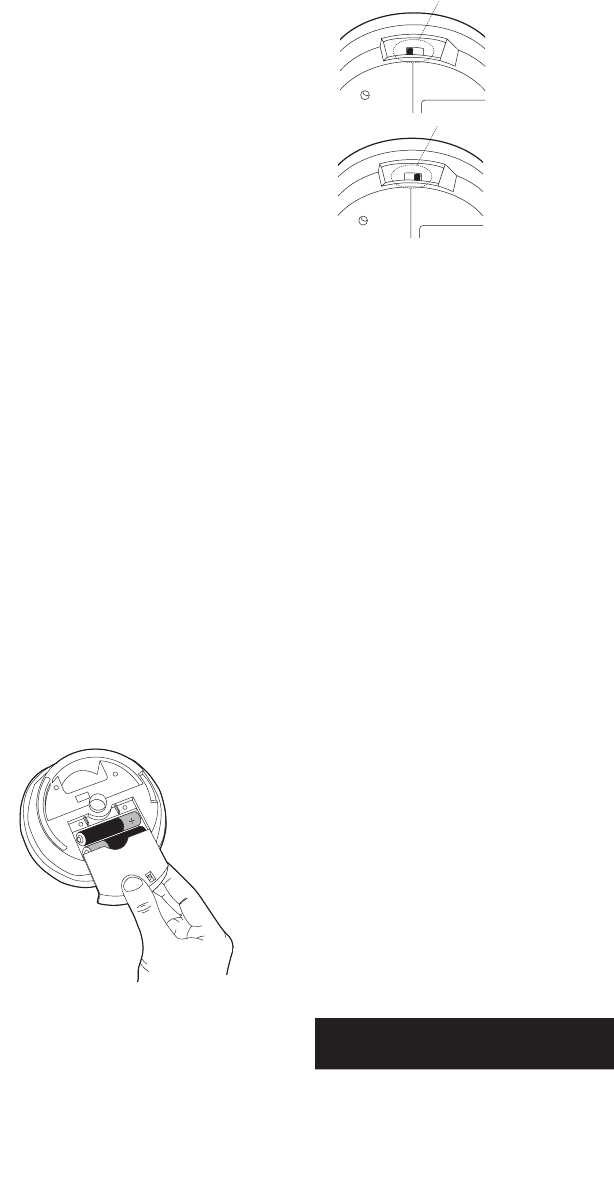
Quick Test with Carbon Monoxide
The Carbon Monoxide Alarm checks
for CO gas every 4 seconds and when
exposed to the CO gas, the red light will
flash (as per Table B) to confirm that it
is detecting the CO gas. The Alarm can
be tested with carbon monoxide gas by
using one of the kits that comes with the
gas either in a glass phial or aerosol can.
Follow the instructions on the kit.
If a test gas kit is not readily available, it is
also possible to gas test the Alarm using
a joss stick or cigarette smoke. To do this,
remove the Alarm from its base and slide
the power switch to the ON position (see
fig 8). Fill a suitable size plastic bag with
smoke from the joss stick or cigarette.
Insert the Alarm into the smoke filled bag
and seal it closed. Within seconds, the red
light will begin to flash (as per Table B) to
confirm that the Alarm has detected the
CO gas in the bag. To check the Alarm
sound, momentarily press the test button
and within seconds the horn will sound
briefly. Slide the power switch to the OFF
position and replace the Alarm on its
mounting plate.
6. What to do when the alar
6. What to Do When the
Alarm Sounds
Warning! Actuation of your CO Alarm
indicates the presence of carbon
monoxide (CO) which can KILL YOU. If
an alarm signal sounds:
8
Figure 7
OFF
Position
ON
Position
Figure 8

these signs are present get the appliance
checked out by an expert before further
use. If family members are ill get medical
help.
2. Choose all appliances and vehicles
which burn fossil fuels such as coal,
oil, natural/bottled gas, paraffin, wood,
petrol, diesel, charcoal, etc. with care and
have them professionally installed and
regularly maintained.
3. These appliances must “breathe in”
air to burn the fuel properly. Know where
the air comes from and ensure vents/
air bricks, etc. remain unobstructed
(particularly after building work).
4. The appliances must also “breathe
out” the waste gases (including the CO) –
usually through a flue or chimney. Ensure
chimneys and flues are not blocked or
leaking, and get them checked every
year. Check for excessive rust or cracks
on appliances and pipe work.
5. Never leave your car, motor bike or
lawnmower engine running in the garage
with the garage door closed. Never leave
the door from the house to the garage
open if the car is running.
6. Never adjust your own gas pilot lights.
7. Never use a gas cooker or a barbecue
for home heating.
8. Children should be warned of the
dangers of CO poisoning and instructed
never to touch, or interfere with the CO
Alarm. Do not allow small children to
press the test/hush button as they could
be subjected to excessive noise when the
unit alarms.
9. Leaving windows or doors slightly
open (even a few inches) will
significantly reduce the risk of high
levels of CO occurring. The high levels
of draught-proofing in modern houses
reduces ventilation and can allow
dangerous gases to build up.
10. Install CO Alarms in all the areas
recommended in this booklet.
11. Recognize that CO poisoning may be
the cause when family members suffer
from “flu-like” symptoms when at home
but feel better when they are away for
extended periods.
8. Getting Your Alarm
Serviced
If your CO Alarm fails to work after you
have carefully read all the instructions,
check that the unit has been installed
correctly, and ensured that it has good
1. Operate reset/ Silence button.
2. Call your emergency services Fire
Department or 911.
3. Immediately move to fresh air –
outdoors or by an open door/ window. Do
a head count to check that all persons
are accounted for. DO NOT re-enter the
premises until the emergency services
responders have arrived, the premises
have been aired out and your Alarm
remains in its normal condition.
4. After following steps 1-3, if your Alarm
reactivates within a 24 hour period,
repeat steps 1-3 and call a qualified
appliance technician to investigate
for sources of CO from fuel burning
equipment and appliances, and inspect
for proper operation of this equipment.
If problems are identified during this
inspection have the equipment serviced
immediately. Note any combustion
equipment not inspected by the
technician and consult the manufacturers’
instructions, or contact the manufacturer
directly, for more information about CO
safety and this equipment. Make sure
that motor vehicles are not, and have not
been, operating in an attached garage or
adjacent to the residence.
Note: When ventilation is provided by
leaving the window and doors open, the
CO build up may have dissipated by
the time help arrives and the Alarm may
have stopped sounding. Although your
problem may appear temporarily solved,
it is crucial that the source of the CO
is determined and appropriate repairs
made. 7
7. How to Protect Your
Family
Follow these guidelines to reduce the risk
of Carbon Monoxide poisoning:
1. Know and look out for tell-tale signs
that Carbon Monoxide may be present.
These include:
-The CO Alarm warning of abnormal
levels.
-Staining, sooting or discoloration on or
around appliances.
-A pilot light frequently going out.
-A strange smell when an appliance is
operating.
-A naked gas flame which is yellow or
orange, instead of the normal blue.
- Family members (including pets)
exhibiting the “flu-like” symptoms of CO
poisoning described above. If any of
9

batteries connected.
1. The CO Alarm will not work without
good batteries. If the batteries have
been drained, the Alarm will not give
protection. Button test the Alarm weekly
and on return from holidays and other
long absences.
2. Carbon Monoxide must enter the
unit for it to be detected. There may be
Carbon Monoxide in other areas of the
house but not in the vicinity of the CO
Alarm. Doors, air drafts and obstructions
can prevent the CO reaching the Alarm.
For these reasons we recommend
CO Alarms are fitted both near and in
bedrooms, particularly if bedroom doors
are closed at night. Additionally, install in
rooms where members of the household
spend much of their time, with potential
sources of CO gas.
3. The CO Alarm may not be heard. The
sound output is loud but it may not be
heard behind a closed door or if it is too
far away. RF interconnecting CO Alarms
greatly improves the probability that they
will be heard. The Alarm may not wake
up somebody who has taken alcohol or
drugs. The alarm sound may be masked
by other sounds such as T.V., stereo,
traffic noise, etc. Fitting CO Alarms on
either side of closed doors will improve
their chance of being heard. This CO
Alarm is not designed for people with
impaired hearing.
4. CO Alarms don’t last indefinitely.
CO Alarms are sophisticated electronic
devices with many parts. Although the
Alarm and its component parts have
undergone stringent tests, and are
designed to be very reliable, it is possible
that parts can fail. Therefore, you should
test your CO Alarm weekly. The CO
Alarm must be replaced after 10 years of
operation.
5. CO Alarms are not a substitute for life
insurance. Homeowners are responsible
for their own insurance. The CO Alarm
warns of increasing CO levels, but we
do not guarantee that this will protect
everyone from CO poisoning.
6. CO Alarms are not suitable as early
warning Smoke Alarms. Some fires
produce Carbon Monoxide, but the
response characteristics of these CO
Alarms are such that they would not give
sufficient warning of fire. Smoke Alarms
must be fitted to give early warning of
fire.
7. The CO Alarm does not detect the
presence of natural gas (methane),
bottled gas (propane, butane) or other
combustible gases. Fit combustion Gas
Alarms to detect these. Note: Carbon
Monoxide Alarms with electrochemical
sensors have a cross sensitivity to
hydrogen. This means that they can
alarm due to sensing hydrogen being
produced by batteries being incorrectly
charged such as on boats or with battery
back-up systems such as those used with
alternative energy systems. The unit will
alarm with 500 ppm H2 after between 10
and 40 minutes exposure.
This CO Alarm is intended for residential
use. It is not intended for use in industrial
applications where Occupational Safety
and Health Administration (OSHA)
requirements for carbon monoxide
detectors must be met.
This carbon monoxide alarming device
is designed to detect carbon monoxide
gas from ANY source of combustion. It is
NOT designed to detect smoke, fire, or
any other gases.
WARNING: THIS CO ALARM IS
DESIGNED TO PROTECT INDIVIDUALS
FROM THE ACUTE EFFECTS OF
CARBON MONOXIDE EXPOSURE.
IT WILL NOT FULLY SAFEGUARD
INDIVIDUALS WITH SPECIFIC
MEDICAL CONDITIONS. IF IN DOUBT,
CONSULT A MEDICAL PRACTITIONER.
9. Troubleshooting
ALARM DOES NOT WORK WITH THE
TEST BUTTON:
1. Wait 15 seconds after connecting the
power before button testing.
2. Hold button down firmly for at least 5
seconds.
3. Check that the Alarm is secured
correctly on the mounting plate.
4. Replace batteries.
ALARM SOUNDS FOR NO APPARENT
REASON:
Follow the detailed instructions in Section
Entitled “What to do when the alarm
sounds” If there are still problems:
1. Ensure there are no fuel burning
appliances in the vicinity which could
be leaking CO gas (e.g. even from next
door).
2. Ensure there are no fumes in the
area (e.g. paint, thinners, hair spray,
10

11
chemical cleaners, aerosol sprays, damp
proofing done with an aqueous emulsion
such as Aminofunctional Siloxane, and
Alkylalkoxysilane.
3. Ensure there is no outdoor source of
CO in the vicinity such as a car with the
engine running, heavy traffic, or heavy air
pollution.
4. Ensure there is no source of hydrogen
such as batteries being charged (e.g.
on boats or in Uninterruptable Power
Supplies (UPS)).
5. Ensure there is not excessive smoke
or fumes from smoking devices.
6. Ensure that there are no problems with
the other RF interconnected Alarms and
that all Alarms are housecoded correctly.
7. Press the test/hush button to silence
the alarm.
If the unit continues to sound, it is
possibly defective and should be replaced
(see section 8 “Getting the CO Alarm
Serviced”).

Specications
Physical
Housing Dimensions
Weight with Batteries
Mounting Fastener
4.7 x 4.1 x 1.6 inches
(12.0 x 10.4 x 4.1 centimeters)
6.53 ounces (185 grams)
#6 screws and anchors (provided)
Environmental
Operating Temperature
Maximum Humidity
32°F to 104°F (0°C to 40°C)
15% to 95% non-condensing relative humidity
Sensor Specications
Frequencies
Replacement Batteries
Sensor Indications
Audible Alarm
Humidity Range
433.92 MHz,
Two Alkaline AAA Batteries
Low Battery, Supervision, Removal Tamper
85 dBA at 10 feet (3m) minimum
15% to 95% R.H. (Non-Condensing)
Certication
RE115, RE215, RE215T,
RE315, RE615
FCC, IC, UL2034, CSA 6.19-01
Specications subject to change without notice.
IC NOTICE
This device complies with Industry Canada license-
exempt RSS standard(s). Operation is subject to the
following two conditions:
(1) This device may not cause interference, and
(2) This device must accept any interference, including
interference that may cause undesired operation of
the device.
Le présent appareil est conforme aux cnr d’Industrie
Canada applicables aux appareils radio exempts de
licence. L’exploitation est autorisée aux deux conditions
suivantes:
(1) L’appareil ne doit pas produire de brouillage, et
(2) L’utilisateur de l’appareil doit accepter tout
brouillage radioélectrique subi, même si le
brouillage est susceptible d’en compromettre le
fonctionnement.
IC: 8310A-RE115, 8310A-RE215, 8310A-RE315
WARRANTY
Resolution Products, Inc. will replace non-portable
products that are defective in their rst ve (5) years
and all defective portable products in their rst two
(2) years.
47-0024-00• RevA • 2018-02-01
Tech Support Line (877) 260-5578
www.ResolutionProducts.com
FCC NOTICE
This device complies with Part 15 of the FCC rules.
Operation is subject to the following two conditions:
(1) This device may not cause harmful interference.
(2) This device must accept any interference that
may be received, including interference that may
cause undesired operation.
Changes or modications not expressly approved
by Resolution Products, Inc. could void the user’s
authority to operate this equipment.
FCC ID: U5X-RE115, U5X-RE215, U5X-RE315
TRADEMARKS
INTERLOGIX, HONEYWELL, DSC, AND 2GIG
ARE TRADEMARKS OWNED BY UNITED
TECHNOLOGIES ELECTRONIC CONTROLS INC.,
HONEYWELL INTERNATIONAL INC., TYCO SAFETY
PRODUCTS CANADA LTD, AND NORTEK SECURITY
& CONTROL LLC, RESPECTIVELY. RESOLUTION
PRODUCTS, INC. PRODUCTS WILL FUNCTION
WITH ONE OF EITHER INTERLOGIX (FORMERLY
GE), HONEYWELL, DSC, OR 2GIG SYSTEMS.
HOWEVER, NO RESOLUTION PRODUCT IS
PRODUCED BY, ENDORSED BY, NOR IS OFFICIALLY
ASSOCIATED WITH INTERLOGIX (FORMERLY
GE), HONEYWELL, DSC OR 2GIG. RESOLUTION
RECOMMENDS VERIFYING PROPER ENROLLMENT
AND OPERATION, PER CONTROL PANEL
INSTALLATION INSTRUCTIONS, AT INSTALLATION.