Alvarion Technologies SUR-24 Mobile spread spectrum radio system User Manual Su M3
Alvarion Ltd. Mobile spread spectrum radio system Su M3
Contents
user manual

BreezeACCESS
SU-M
Installation
Guide
Cat. No. 213288
© 2002 by Alvarion Ltd. All rights reserved.
No part of this publication may be reproduced in any material form without the written permission
of the copyright owner.
Trade Names
BreezeCONFIG, BreezeWIZARD, BreezeACCESS, BreezeNET, BreezeLINK, BreezeVIEW and
BreezeMANAGE are trade names of Alvarion Ltd. Other brand and product names are registered
trademarks or trademarks of their respective companies.
Statement of Conditions
The information contained in this manual is subject to change without notice. Alvarion Ltd. shall
not be liable for errors contained herein or for incidental or consequential damages in connection
with the furnishing, performance, or use of this manual or equipment supplied with it.
Warranty
In the following warranty text, “the Company” shall mean:
Alvarion Ltd., for products located outside the USA.
Alvarion Inc., for products located in the USA.
This BreezeACCESS product is warranted against defects in material and workmanship for a period
of one year from date of purchase. During this warranty period the Company will, at its option,
either repair or replace products that prove to be defective.
For warranty service or repair, the product must be returned to a service facility designated by the
Company. Authorization to return products must be obtained prior to shipment. The buyer shall pay
all shipping charges to the Company and the Company shall pay shipping charges to return the
product to the buyer.
The Company warrants that the firmware designed by it for use with the unit will execute its
programming instructions when properly installed on the unit. The Company does not warrant that
the operation of the unit or firmware will be uninterrupted or error-free.
Limitations of Warranty
The foregoing warranty shall not apply to defects resulting from improper or inadequate
maintenance by the buyer, buyer supplied interfacing, unauthorized modification or misuse,
operation outside of the environmental specifications for the product, or improper site preparation or
maintenance. No other warranty is expressed or implied. The Company specifically disclaims the
implied warranties of merchantability and fitness for any particular purpose.
Alvarion shall not be liable to any person for any special or indirect damages, including, but not
limited to, loss of profits or revenues, loss of use or damage to any associated equipment, cost of
capital, cost of substitute products, facilities or services, downtime costs or claims resulting from any
cause whatsoever arising from or in any way connected with the manufacture, sale, handling,
service, repair, maintenance or use of the products. In no event shall the company’s liability exceed
the purchase price denoted on the invoice.
Electronic Emission Notice
This device complies with Part 15 of the FCC rules. Operation is subject to the following two
conditions:
This device may not cause harmful interference.

BreezeACCESS SU-M Installation Guide
ii
This device must accept any interference received, including interference that may cause undesired
operation.
FCC Radio Frequency Interference Statement
This equipment has been tested and found to comply with the limits for a class B digital device,
pursuant to Part 15 of the FCC rules. These limits are designed to provide reasonable protection
against harmful interference when the equipment is operated in a residential environment
notwithstanding use in commercial, business and industrial environments. This equipment generates,
uses, and can radiate radio frequency energy and, if not installed and used in accordance with the
instruction manual, may cause harmful interference to radio communications.
FCC Radiation Hazard Warning
To comply with FCC RF exposure requirements in section 1.1307, a minimum separation distance
of 20cm (8 inches) is required between the antenna and all persons:
R&TTE Compliance Statement
This equipment complies with the appropriate essential requirements of Article 3 of the R&TTE
Directive 1999/5/EC.
Information to User
Any changes or modifications of equipment not expressly approved by the manufacturer could void
the user’s authority to operate the equipment.
Safety Considerations
For the following safety considerations, “Instrument” means the BreezeACCESS units’ components
and their cables.
Caution
To avoid electrical shock, do not perform any servicing unless you are qualified to do so.
DC Line Voltage
Before connecting this instrument to the power line, make sure that the voltage of the power source
matches the requirements of the instrument.
Power Cord
Use only the power cord supplied with the unit.
Radio
The instrument transmits radio energy during normal operation. To avoid possible harmful exposure
to this energy, do not stand or work for extended periods of time in front of its antenna. The long-
term characteristics or the possible physiological effects of Radio Frequency Electromagnetic fields
have not been yet fully investigated.
Antenna Installation and Grounding
Be sure that the antenna and the supporting structure are properly installed to eliminate any physical
hazard to either people or property. Make sure that the installation of the antenna and cables is
performed in accordance with all relevant national and local safety codes.

iii
Important Notice
This Installation Guide is applicable to BreezeACCESS version 4.0 and
is delivered subject to the following conditions and restrictions:
! This manual contains proprietary information belonging to Alvarion
Ltd. Such information is supplied solely for the purpose of assisting
explicitly and properly authorized users of BreezeACCESS.
! No part of its contents may be used for any other purpose,
disclosed to any person or firm or reproduced by any means,
electronic and mechanical, without the express prior written
permission of Alvarion Ltd.
! The text and graphics are for the purpose of illustration and
reference only. The specifications on which they are based are
subject to change without notice.
! The software described in this document is furnished under a
license. The software may be used or copied only in accordance
with the terms of that agreement.
! Information in this document is subject to change without notice.
! Corporate and individual names and data used in examples herein
are fictitious unless otherwise noted.
! Alvarion Ltd. reserves the right to alter the product specifications
and descriptions in this publication without prior notice. No part of
this publication shall be deemed to be part of any contract or
warranty unless specifically incorporated by reference into such
contract or warranty.
! The information contained herein is merely descriptive in nature,
and does not constitute a binding offer for the sale of the product
described herein.

BreezeACCESS SU-M Installation Guide
iv
Table of Contents
System Description ...................................................1-1
The BreezeACCESS SU-M..................................................................1-2
SU-M Specifications..........................................................................1-3
Radio and Modem.................................................................................1-3
Data Communications..........................................................................1-4
Environmental......................................................................................1-4
Connectors...........................................................................................1-4
Power Supply Requirements .................................................................1-4
Mechanical...........................................................................................1-4
Installation................................................................ 2-1
Packing List .....................................................................................2-2
Other Items Required for Installation....................................................2-2
Installing the SU-M Unit ...................................................................2-2
Installing the Antenna......................................................................2-3
Connecting the Unit .........................................................................2-3
Preliminary Configuration .........................................3-1
Introduction.....................................................................................3-2
To access the Monitor Program using Telnet:........................................3-2
To configure parameters using BreezeCONFIG ACCESS: ......................3-2
Configuring Basic Parameters ...........................................................3-2
Verifying Proper Operation ...............................................................3-3
Wireless Status Monitor............................................. 4-1
Introduction.....................................................................................4-2
Installation.......................................................................................4-2
Using the Wireless Status Monitor ....................................................4-3
Parameter Tabs ....................................................................................4-4

Chapter 1
System
Description
About This Chapter
This chapter introduces the BreezeNET SU-M system. It includes the
following section:
! The BreezeACCESS SU-M, page 1-2, introduces the SU-M and its
functions.
! System Specifications, page 1-3, lists the technical and physical
specifications of the SU-M.
BreezeACCESS SU-M Installation Guide
1-2
The BreezeACCESS SU-M
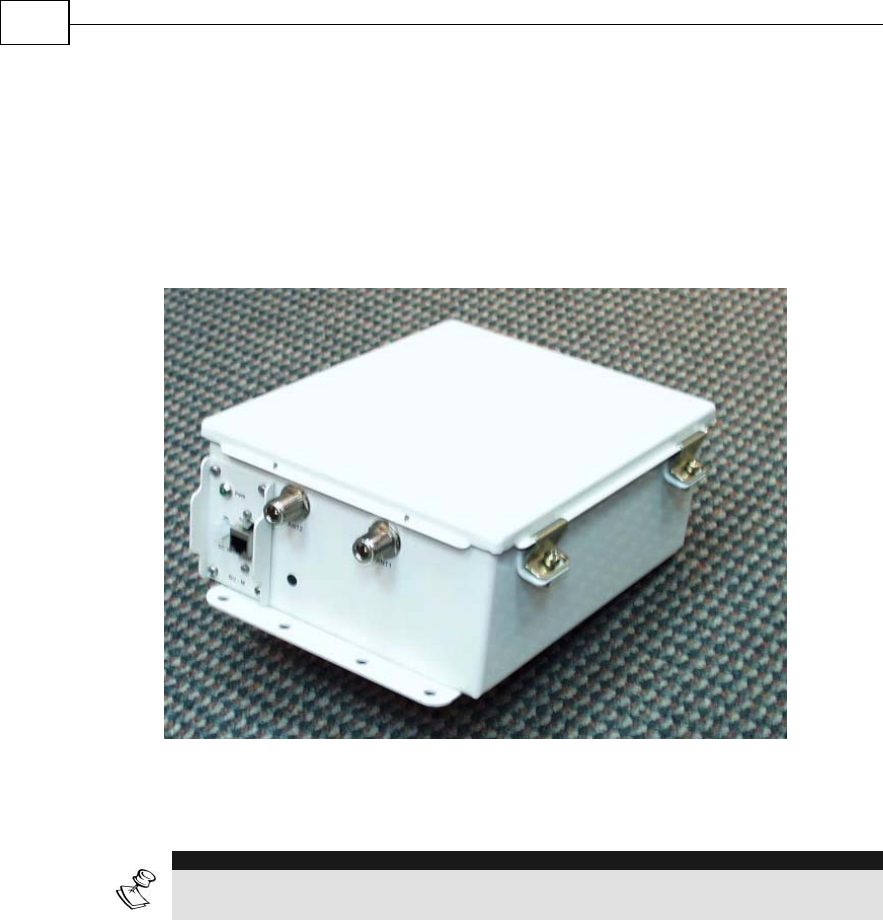
The BreezeACCESS SU-M is a small, high-power unit designed for
mobile use. It is enclosed in a hardened, field-tested container and is
specially designed to provide a constant network connection for law
enforcement and emergency services personnel.
Figure 1-1: SU-M Unit
NOTE:
The SU-M’s case may only be opened by an authorized technician. If the case is opened
by anyone other then an authorized technician it may void the warranty.

System Description
CHAPTER 1
1-3
SU-M Specifications
Radio and Modem
Frequency 2.400-2.500 GHz (according to country standard)
Operation Mode Time Division Duplex
Radio Access
Method FH-CDMA
Standard
Compliance FCC Part 15.247, ETS 300 328
Channel Bandwidth 1 MHz
Central Frequency
Resolution 1 MHz
Output Power (at
antenna port) 27 dBm
Maximum Input
Power (at antenna
port)
-20 dBm
Gross Bit Rate 1, 2, 3 Mbps
Receive Nominal
Sensitivity (at
antenna port, BER
10E-6)
1 Mbps 2 Mbps 3 Mbps
-84 dBm -77 dBm -68 dBm
Modulation GFSK modulation, with 2, 4, 8 modulation states (1, 2,
3 bits / symbol).
Symbol rate 1 Msymbol/sec.

BreezeACCESS SU-M Installation Guide
1-4
Data Communications
Standard Compliance IEEE 802.3 CSMA/CD
VLAN support Based on IEEE 802.1Q
Layer-2 Traffic
Prioritization Based on IEEE 802.1p
Layer-3 Traffic
Prioritization ToS according to RFC791
MIR (Maximum
Information Rate) and
CIR (Committed
Information Rate)
Programmable for each user, separately for
uplink and downlink. Range: 0 2200 Kbps, 1
Kbps resolution.
Environmental
Operating
Temperature -25C to 60C
Operating
Humidity 5%-95% non-condensing, weather protected
Connectors
Connector Description
Antenna 2 N Type female connectors
ETH 10BaseT Ethernet (RJ 45)
DC IN 2 wire 11 ft fused cable with Molex
connector
Power Supply Requirements
Unit Details
SU-M unit External power supply 12 VDC or
Battery
Mechanical
Unit Structure Dimensions Weight
SU-M (excluding
antennas and
connectors)
Metal box,
vehicle
mountable
30 x 20 x 12 cm 4.5 kg

Chapter 2
Installation
About This Chapter
The BreezeACCESS SU-M system is comprised of three main
components, the SU-M unit, the PC onboard the vehicle and the
Antenna. This chapter describes the physical installation procedure for
the system. It includes the following sections:
! Packing List, 2-2, lists the items that are included with the SU-M.
! Installing the SU-M Unit, page 2-2, describes how to physically
install the SU-M unit inside the vehicle.
! Installing the Antenna, page 2-3, describes how to install the SU-
M’s antenna on the vehicle.
! Connecting the SU-M Unit, page 2-3, describes how to connect the
SU-M to other components in the system.
NOTE:
This unit is to be installed by a professional installer only.

BreezeACCESS SU-M Installation Guide
2-2
Packing List
SU-M units are shipped with the following units and accessories.
The exact packing list varies depending on system configuration and
ordered equipment.
! The SU-M unit
! An omni antenna with mounting kit and cable
! A 12 VDC power cable with fuse
! Mounting hardware for the SU-M unit
Other Items Required for
Installation
! A PC in the vehicle with Ethernet capability
! Installation tools and materials
Installing the SU-M Unit
The SU-M unit must be installed securely in the vehicle. Four screws
are provided to mount the SU-M to either wood or sheet metal.
The position of the SU-M unit must allow it to be easily connected to
the PC, the omni antenna and the power supply. See the connection
diagram for guidance concerning relative placement and how best to
connect the units.
Install the SU-M as follows:
1 Place the unit against the surface where you wish to mount it.
Mark the screw placement using four of the mounting holes in the
unit as guides.
2 Drill four holes in the surface using the marks you made.
3 Clear all paint, dirt and oil away from the immediate area around
the holes.
4 Screw the unit firmly in place using the mounting kit provided.

Installation
CHAPTER 2
2-3
Installing the Antenna
The SU-M Antenna consists of two parts: an external base & whip
combination, and an NMO mounting assembly. The Antenna is
installed on the roof or body of a vehicle as follows
1 Drill a ¾” (19 mm) hole in the roof or body of the vehicle.
2 Clear all paint, dirt and oil away from the immediate area around
the hole. It is important that there be a clean metal-to-metal
contact point between the antenna mount and the car.
3 Feed the Mounting Assembly through the hole starting from the
exterior of the car. (Note: the Locking Nut should already be turned
down onto the base about one and a half turns.) Continue feeding
the Mounting Assembly through until the serrated portion is also
on the interior of the hole.
4 Gently pull on the Locking Nut to pull the Mounting Assembly into
proper alignment.
5 Continue to pull on the Locking Nut and, at the same time, tighten
the Locking Nut until it is finger tight.
6 Hold the Mounting Assembly firmly with a wrench or long nose
pliers and, at the same time, hold the Locking Nut with an
adjustable or open ending wrench. Tighten firmly but do not over
tighten.
7 A red capsule containing Silicone Grease is enclosed in the small
bag with the O-ring. Break the capsule open and spread the
Silicone Grease around the O-ring before installing it in the
Antenna base.
8 Add the O-ring to the base of the exterior Base/Whip Assembly by
sliding it into the grove in the walls of the base.
9 Place the Antenna Base onto the Locking Nut and screw down until
it is tightened securely. Hand pressure should be sufficient for a
secure connection.
Connecting the Unit
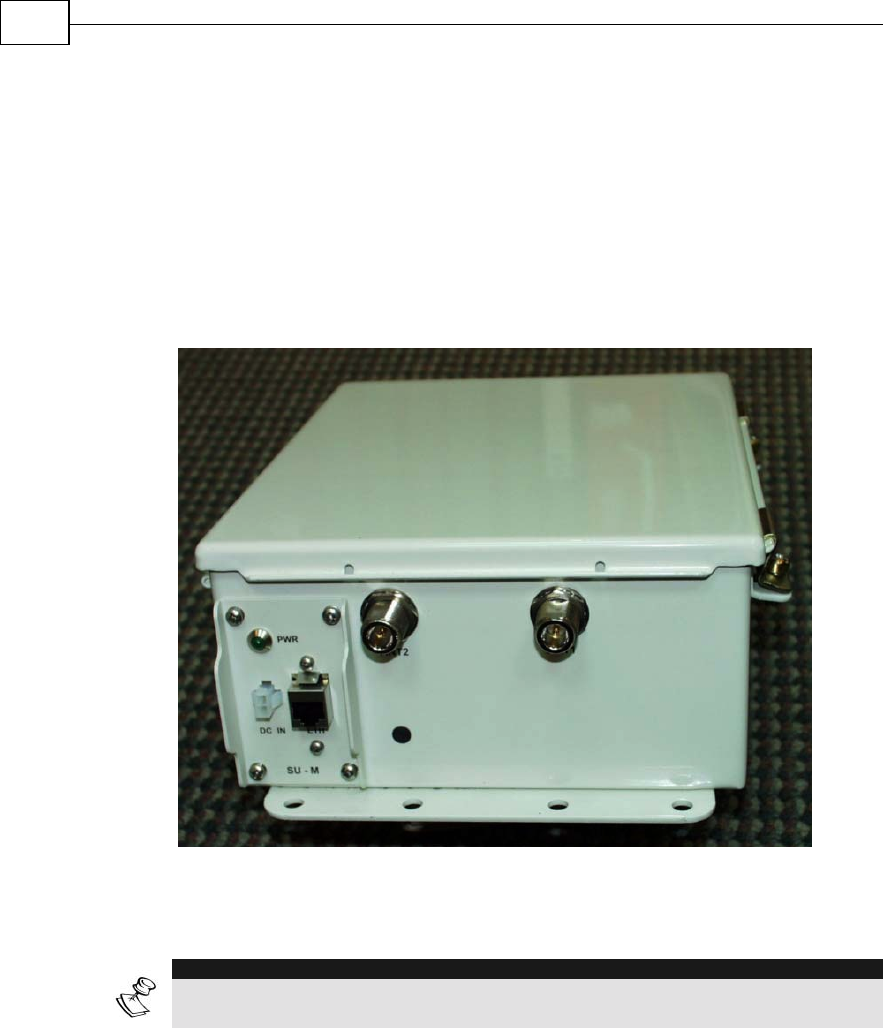
1 Once the SU-M unit is installed in the vehicle, connect the 12 VDC
power cable to the unit’s DC IN port.
Wire the other end of the cable to the power source, making sure
that the cable is secure and out of the way.
BreezeACCESS SU-M Installation Guide
2-4
2 Connect the Ethernet cable to the Ethernet ports on the PC and the
ETH port on the SU-M.
3 Connect the Antenna cables to the omni antenna and then to the
ANT ports on the SU-M.
If only one antenna is being used, connect it to the ANT 1 port. If
two antennas are being used, connect them to both the ANT 1 and
ANT 2 ports.
Figure 2-1: SU-M Connectors
NOTE:
The SU-M’s case may be opened by an authorized technician ONLY. If the case is
opened by anyone other then an authorized technician it may void the warranty.

Chapter 3
Preliminary
Configuration
About This Chapter
This chapter describes how to set the basic parameters of the
BreezeACCESS SU-M. It includes the following sections:
! Introduction, page 3-2, gives an overview of how to change
parameter settings.
! Configuring Basic Parameters, page 3-2, lists the basic
parameters and their defaults.
! Verifying Proper Operation, page 3-3, describes how to confirm
that the SU-M unit is fully operational.

BreezeACCESS SU-M Installation Guide
3-2
Introduction
After completing the installation process, as described in the preceding
chapter, the basic parameters must be configured to ensure that the
SU-M operates correctly. Once the basic parameters have been
configured, additional parameters can be remotely configured via either
the Ethernet port or the wireless link using Telnet, TFTP or SNMP
management.
Parameters can be configured using either of the following alternatives:
To access the Monitor Program
using Telnet:
Connect a PC to the Ethernet port, using a straight Ethernet cable.
Before running the Telnet program, configure the PC’s IP parameters to
enable connectivity with the unit. The default IP address is 10.0.0.1.
To configure parameters using
BreezeCONFIG ACCESS:
Connect a PC to the Ethernet port, using a straight Ethernet cable.
Run the BreezeCONFIG program. You can use the Set IP tool of
BreezeCONFIG to configure the IP parameters (IP Address, Subnet
Mask and Default Gateway Address) based on the unit’s MAC Address
which is marked on the front panel of the unit.
Refer to BreezeACCESS II System Manual for more information on
accessing and using the Monitor program and on configurable
parameters. Refer to the BreezeCONFIG ACCESS User’s Manual for
more information on using BreezeCONFIG for configuring parameters.
Configuring Basic Parameters
The Basic Configuration menu in the Monitor program includes all the
parameters necessary for the initial operation of BreezeACCESS SU-M.
In many installations, most of these parameters should not be changed
from their default values. The following list includes the basic
parameters and their default values:

Preliminary Configuration
CHAPTER 3
3-3
Parameter Default Value Comment
IP Address 10.0.0.1
Subnet Mask 255.255.255.0
Default Gateway
Address
0.0.0.0
DHCP Option Disable
Access to DHCP From Wlan Only
ESSID ESSID1 Must be the same as
ESSID the Base
Station AU.
Transmit Antenna Antenna 1
VLAN Link Type Hybrid Link
VLAN ID –
Management
65535
Best AU Support Disable
Preferred AU MAC
Address
00-00-00-00-00-00
(none)
Applicable only when
Best AU Support is
enabled
Authentication
Algorithm
Open System Can be changed to
Shared Key only after
configuring the WEP
Key and the Default
Key ID
Default Key ID 1
WEP Key 1-4 0000000000 (none)
Once the basic parameters are configured, the unit must be reset in
order to activate the new configuration.
Verifying Proper Operation
1 Verify that the PWR LED on the SU-M unit is on.
2 Confirm that the PC is operational.
3 Send and receive a test message from the vehicle in order to
confirm the wireless link.

Chapter 4
Wireless Status
Monitor
About This Chapter
This chapter describes the Wireless Status Monitor application
includes the following sections:
! Introduction, page 4-2, introduces and describes the Wireless
Status Monitor.
! Installation, page 4-2, describes how to install the Wireless Status
Monitor
! Using the Wireless Status Monitor, page 4-3, describes how to
use the application and interpret the data it provides.

BreezeACCESS SU-M Installation Guide
4-2
Introduction
The Wireless Status Monitor allows you to check the performance of
the SU-M and it’s wireless link during operation. The application runs
on any PC.
Installation
1 Place the Applications CD in the CD-ROM drive of the target
computer.
2 Open the WSM folder on the CD.
3 Run the .exe file found in the folder.
4 Follow the instructions in the installation wizard.
5 Select Wireless Status Monitor from the Program folder in the
Start menu.
6 When prompted, enter the IP address of the target unit.
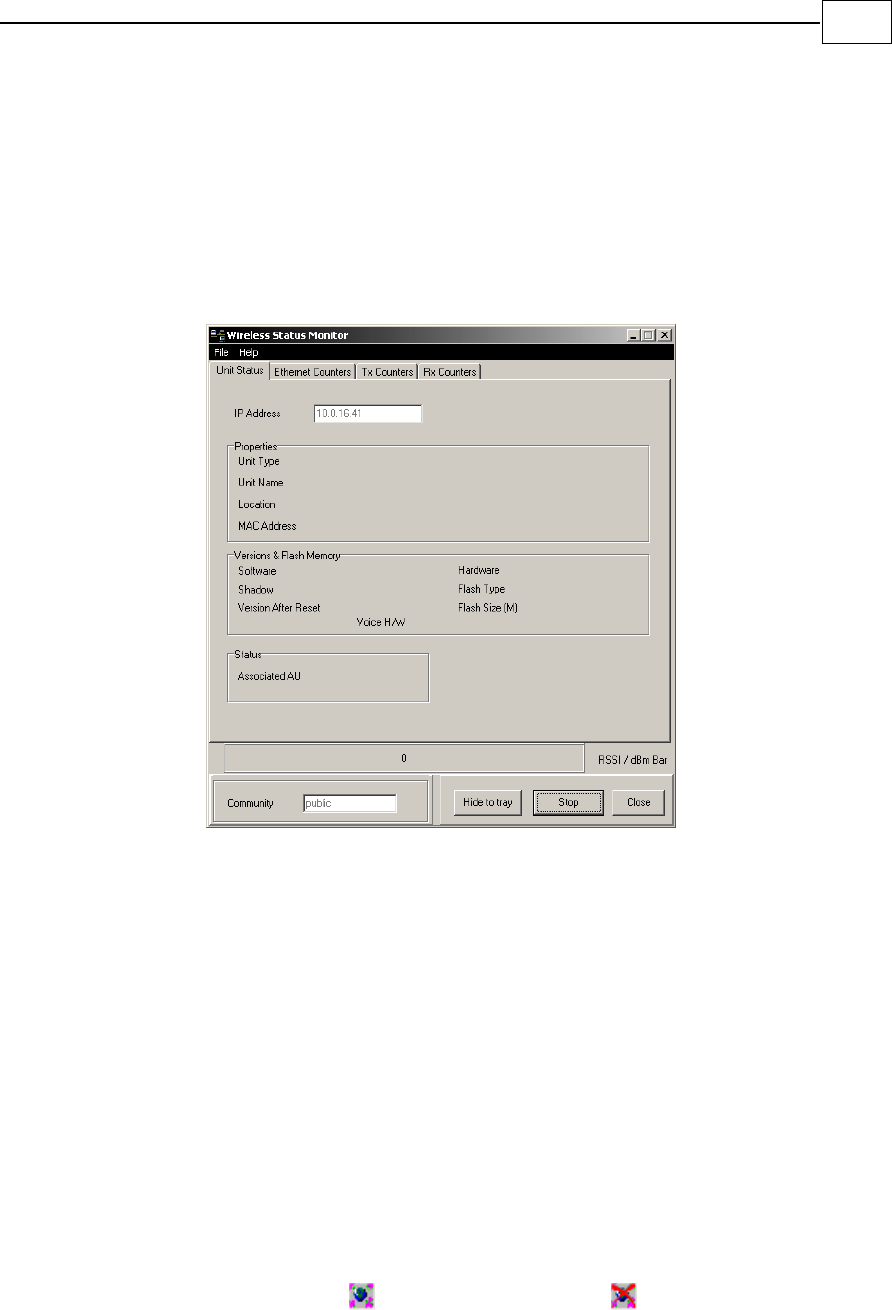
Wireless Status Monitor
CHAPTER 4
4-3
Using the Wireless Status
Monitor
The Wireless Status Monitor starts automatically when the computer is
booted up. If it fails to start automatically or must be started at a later
point it may be selected from the Programs folder in the Start menu.
Figure 4-1: Wireless Status Monitor, Main Screen
The Wireless Status Monitor appears.
The main screen of the Wireless Status Monitor features the four
parameter babs in addition to the following user-defineable
components:
! RSSI/dBm Bar: The bar shows the strength of the wireless signal.
The longer the bar, the stronger the signal. You may set the units
displayed in the bars, RSSI or dBm from the Unit Status parameter
tab.
! Community: Sets the SNMP community for the unit.
The default is Public.
! Hide to tray: Minimizes the Wireless Status Monitor to a tray icon.
The icon appears as when a link is present, when no link is
established. When the link status changes, a sound alert is heard.
! Start/Stop: Click to begin or to stop monitoring the wireless link.
! Close: Click to exit the program.
BreezeACCESS SU-M Installation Guide
4-4
Parameter Tabs
The parameter tabs display data concerning the unit and the link
status. All fields in the parameter tabs are read-only, save for the IP
Address field in the Unit Status tab.
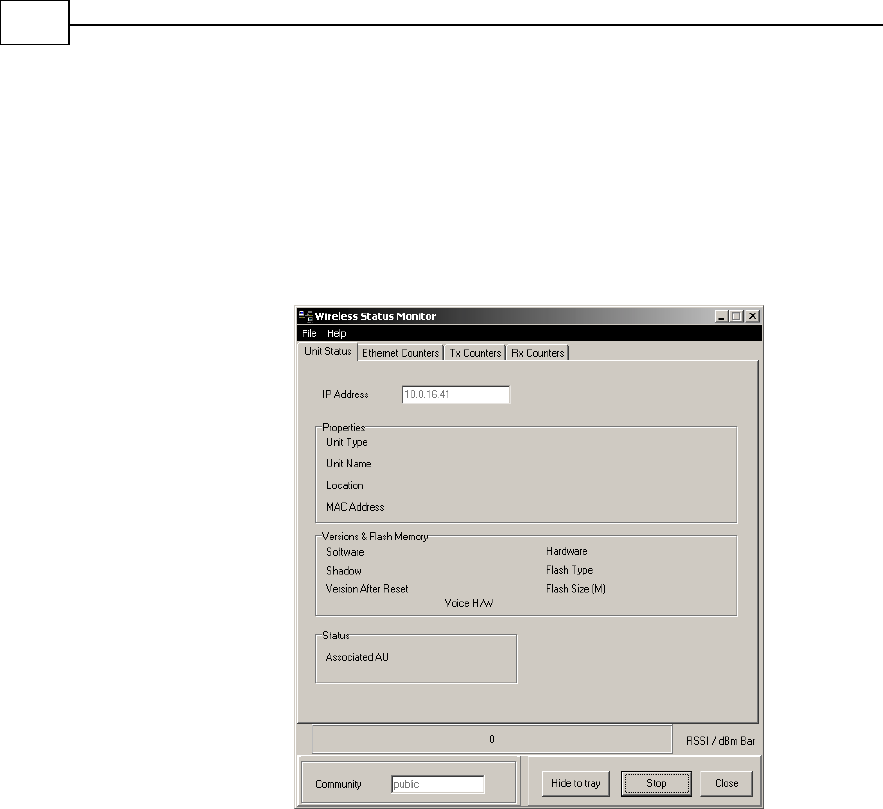
Unit Status
Figure 4-2: Wireless Status Monitor, Unit Status Tab
The Unit Status tab enables you to view the name, IP Address, location
and other information about the unit. In addition, the Unit Status tab
displays details regarding the unit's firmware and hardware versions
and it’s AU.
The Unit Status tab is comprised of the following components:
! IP Address: Displays the IP address of the unit.
This field may be changed, but only when the Wireless System
Monitor is disabled. Click the Stop button to disable the program.
! Unit Type: Identifies the unit's function.
! Unit Name: Displays the name for the selected unit.
! Location: Displays descriptive geographical or site location for the
selected unit.
! MAC Address: Displays the unit's MAC address.
Wireless Status Monitor
CHAPTER 4
4-5
! Versions and Flash Memory
! Software: Displays the version number of the unit's current
active software.
! Shadow: Displays the version number of the unit's backup
software.
! Version After Reset: Displays the version number of the
software that is defined to be active following the next reset.
! Hardware: Displays the model identification of the unit
hardware
! Flash Type: Displays the type of Flash memory installed in the
unit, either STRATA FLASH Type S or Type F.
! Flash Size (M): Displays the size of the unit's Flash memory in
Megabytes.
! Voice H/W (SU with voice only): Displays the model
identification of the unit's voice-enabling hardware.
! Associated AU: Displays the MAC address of the Access Unit with
which the Subscriber Unit is currently associated.
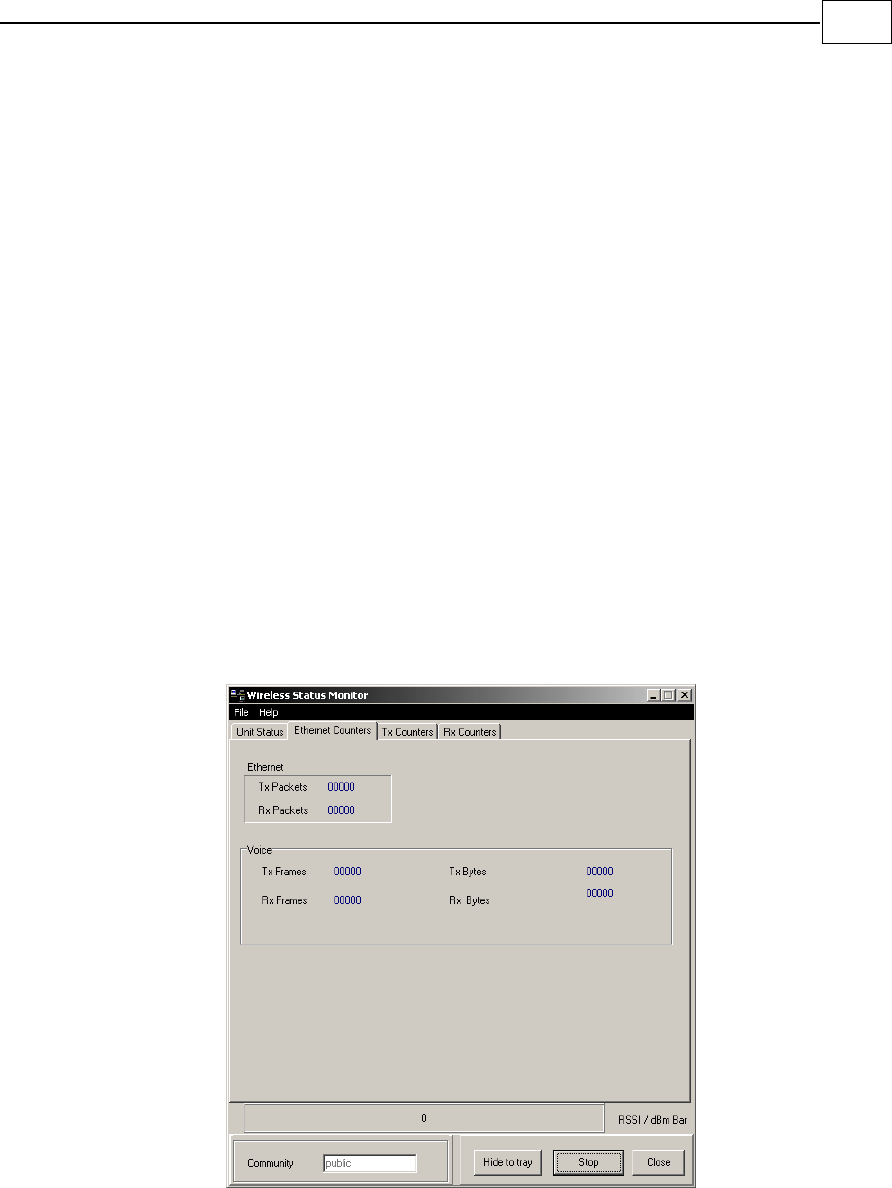
Ethernet Counters
Figure 4-3: Wireless Stastus Monitor, Ethernet Counters Tab
The Ethernet Counters tab displays general traffic statistics for the unit
and is comprised of the following components:
! Ethernet
! Tx Packets: Displays the total number of packets received from
the Ethernet port.
BreezeACCESS SU-M Installation Guide
4-6
! Rx Packets: Displays the number of packets transmitted by the
unit to the Ethernet port. These include packets received from
the wireless media and packets generated by the unit itself.
Tx Counters
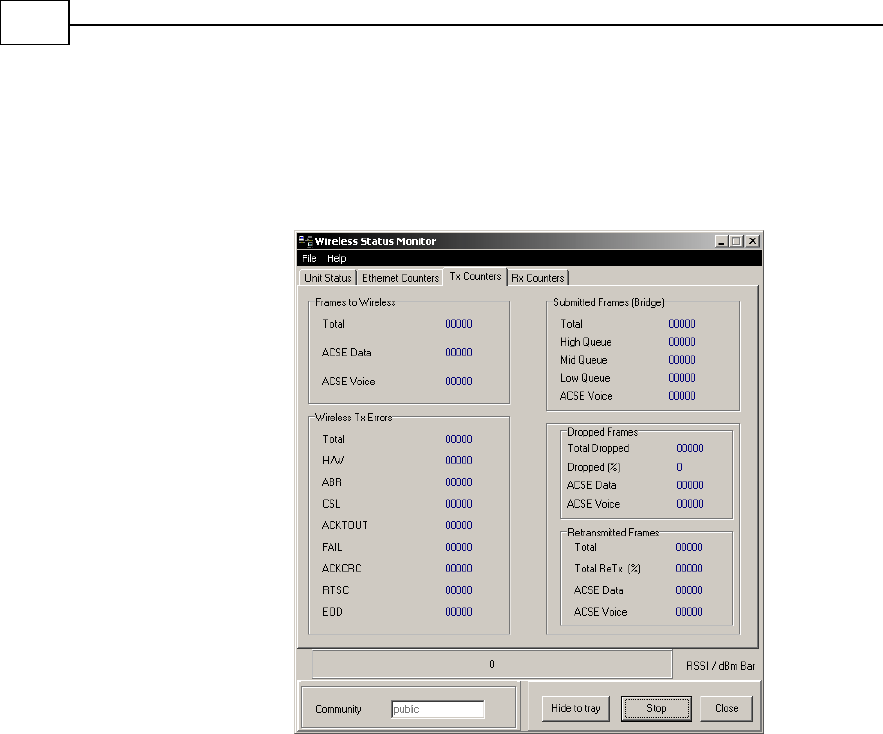
Figure 4-4: Wireless Status Monitor, Tx Counters Tab
The Tx Counters tab displays information regarding data transmitted
from the unit and is comprised of the following components:
! Frames to Wireless
! Total: Displays the total number of frames transmitted to the
wireless media. This includes data, RTP, control and wireless
management frames and beacons. This total excludes
retransmissions.
! ACSE Data: Displays the total number of data frames
transmitted by the unit to the wireless media. This excludes
retransmissions. This statistic is only applicable if the ACSE
Option is set at Enable.
! ACSE Voice: Displays the total number of ACSE voice frames
transmitted by the unit to the wireless media. This statistic is
only applicable if the ACSE Option is set at Enable.
! ACSE Beacons: Displays the total number of beacons
transmitted by the unit to the wireless media. This statistic is
only applicable if the ACSE Option is set at Enable.

Wireless Status Monitor
CHAPTER 4
4-7
! Wireless Tx Errors
! Total: Displays the total number of errors that occurred
whereby frames were discarded or transmissions where aborted
or unacknowledged for various reasons. Additional fields display
counters for the number of errors due to specific reasons.
! H/W: The number of errors due to internal hardware problems
in the modem.
! ABR: The number of errors due to aborting the transmission
before completion because of internal problems in the DSP.
! CSL: The number of errors due to canceling the transmission
because the modem was occupied receiving data.
! ACKTOUT: The number of errors due to an acknowledge
timeout, where a frame remained unacknowledged past the time
defined in the Acknowledge Delay Limit parameter.
! FAIL: The number of errors due to internal timeouts in the
modem.
! ACKCRC: The number of errors due to a CRC error in the ACK
message.
! RTSC: The number of errors due to an RTS collision where the
RTS was sent, and the CTS was not received.
! EOD: The number of errors due to an End of Dwell, where not
enough time is left to transmit the message
! Submitted Frames (Bridge)
! Total: Displays the total number of data and RTP frames
submitted to the bridge for transmission to the wireless media.
This statistic does not include internally generated control or
wireless management frames or retransmissions.
! High Queue: Displays the number of frames sent to the bridge
and routed to the highest priority queue.
! Mid Queue: Displays the number of frames sent to the bridge
and routed to the medium priority queue.
! Low Queue: Displays the number of frames sent to the bridge
and routed to the lowest priority queue.
! ACSE Voice: Displays the number of ACSE voice frames sent to
the bridge for transmission to the wireless media. This statistic
is only applicable if the ACSE Option is set to Enable.
! Dropped Frames
! Total Dropped: Displays the total number of frames that were
dropped after being retransmitted to the extent of the maximum
permitted number of retransmissions.
! Dropped %: Displays the number of dropped frames as a
percentage of the total transmitted frames.
BreezeACCESS SU-M Installation Guide
4-8
! ACSE Data: Displays the number of dropped data frames and is
only applicable if the ACSE Option is enabled.
! ACSE Voice: Displays the number of dropped voice frames and
is only applicable if the ACSE Option is enabled.
! Retransmitted Frames
! Total: Displays the total number of retransmitted frames. A
separate count is submitted for each retransmission attempt.
! Retransmissions (%): Displays the number of retransmitted
frames as a percentage of the total transmitted frames.
! ACSE Data: Displays the number of retransmitted data frames
and is only applicable if the ACSE Option is enabled.
! ACSE Voice: Displays the number of retransmitted voice frames
and is only applicable if the ACSE Option is enabled.
Rx Counters
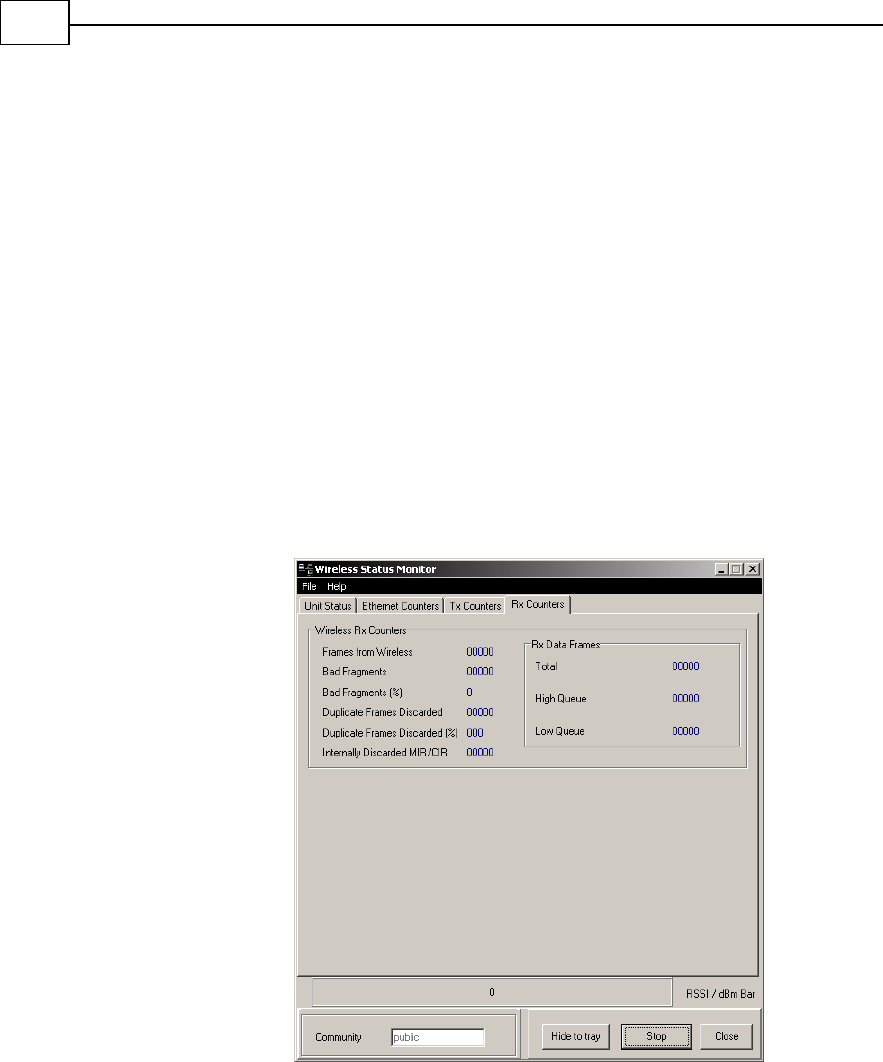
Figure 4-5: Wireless Status Monitor, Rx Counters Tab
The Rx Counters tab displays statistics regarding the traffic received by
the selected unit and is comprised of the following components:
! Wireless Rx Counters
! Frames from Wireless: Displays the total number of frames
received from the wireless media, including data, control and
wireless management frames and beacons received from the AU.
The count does not include frames discarded internally, bad
frames and duplicate frames.

Wireless Status Monitor
CHAPTER 4
4-9
! Bad Fragments: Displays the total number of frames received
from the wireless media that contain CRC errors.
! Bad Fragments (%): Displays the number of bad fragments as a
percentage of the total received frames.
! Duplicate Frames Discarded: Displays the number of frames
discarded because multiple copies are received.
! Duplicate Frames Discarded (%): Displays the number of
discarded duplicate frames as a percentage of the total received
frames.
! Internally Discarded MIC/CIR: Displays the number of frames
received from the Ethernet port that are discarded to avoid
exceeding the maximum permitted information rate.
! Rx Data Frames
! Total: Displays the total number of data frames received by the
selected unit.
! High Queue: Displays the number of data frames received by
the selected unit routed from the highest priority queue.
! Low Queue: Displays the number of data frames received by the
selected unit routed from the lowest priority queue.

BreezeACCESS SU-M Installation Guide
4-10