Amano Time Guardian Fingerprint Installation And Users Guide Plus User's
2015-04-28
: Amano Amano-Time-Guardian-Fingerprint-Installation-And-Users-Guide-715768 amano-time-guardian-fingerprint-installation-and-users-guide-715768 amano pdf
Open the PDF directly: View PDF ![]() .
.
Page Count: 414 [warning: Documents this large are best viewed by clicking the View PDF Link!]
- Chapter 1: Introduction
- Chapter 2: Installation
- Chapter 3: Setup Wizard
- Using Time & Attendance Software
- Using the Setup Wizard
- Step 1: General Setup Wizard [Optional Wizard Setup Step]
- Step 2: Department Setup Wizard [Optional Wizard Setup Step]
- Step 3: Pay Code Setup Wizard [Optional Wizard Setup Step]
- Step 4: Schedule Setup Wizard [Optional Wizard Setup Step]
- Step 5: Pay Class Setup Wizard [Required Wizard Setup Step]
- Overtime Rules
- Rounding Rules
- Meal Rules
- Holidays
- Step 6: Exception Setup Wizard [Optional Wizard Setup Step]
- Step 7: Employee Setup Wizard [Required Wizard Setup Step]
- Employees General
- Employees Personal
- Employees Contact
- Employees Assignments
- Employees Schedule
- Employees Labor Level
- Employees Certification
- Employees Benefit
- Employees Web Access
- Employees Wages
- Employees Nexus220
- Employees AmanoNet
- Step 8: Clock Setup Wizard [Optional]
- Step 9: Login Setup Wizard [Required]
- Chapter 4: Daily Use
- Chapter 5: Employee Administration
- Chapter 6: Timecard Administration
- Chapter 7: Communications
- Chapter 8: Recalculate
- Chapter 9: Output Group
- Chapter 10: Advanced Pay Class Module
- Chapter 11: Advanced Overtime Module
- Chapter 12: Advanced Schedule Module
- Chapter 13: Advanced Meal Module
- Chapter 14: Advanced Rounding Module
- Chapter 15: Advanced Labor/Rate Module
- Chapter 16: Access Control Module
- Chapter 17: Web Interface Module
- Web Interface Module Introduction
- Using the Web Interface Module
- Login (Web)
- Supervisor Web Access
- Schedule (Web)
- Template Schedules (Web)
- Auto Schedules (Web)
- Creating A Schedule (Web)
- Schedule Rotation (Web)
- Timecard Grid (Web)
- Punches Tab (Web)
- Information Indicators (Web)
- Individual Schedule (Web)
- Adjustments Tab (Web)
- Overrides Tab (Web)
- Employee Timecard Navigation (Web)
- Totals (Web)
- Icons/Commands (Web)
- Preferences (Web)
- Punches Columns Menu Selection (Web)
- Adjustment & Overrides Columns Menu Selection (Web)
- Exception Colors Menu Selection (Web)
- Miscellaneous Colors Menu Selection (Web)
- Adding, Editing and Deleting Employee Punches
- Adding, Editing and Deleting Employee Tips
- Schedule Override
- Overtime Authorization
- Authorizing Payroll Export
- Chapter 18: Zone Differential Module
- Chapter 19: Payroll Interface Module
- Chapter 20: Events Notification Module
- Chapter 21: Benefit Time Module
- Chapter 22: User/Group Module
- Chapter 23: Nexus Lite Module
- Nexus Lite Management (NLM) Software Installation
- NLM Setup Wizard
- Using Nexus Lite Management (NLM) Software
- Using the NLM Setup Wizard
- Step 1: General Setup (NLM) [Optional Step]
- Step 2: Employee Setup (NLM) [Required Step]
- Employees General
- Employees Personal
- Employees Contact
- Employees Assignments
- Employees Access
- Step 3: Terminal Setup NLM [Optional]
- Step 4: Login Setup NLM [Required]
- Network Module (NLM)
- Communications Module (NLM)
- Reports Module (NLM)
- Creating a Access Transaction Report (NLM) Profile
- Creating a Employee Report (NLM) Profile
- Running a Report Profile (NLM)
- Upgrading to Time Attendance
- Glossary
Time Guardian
Series
Installation and User Guide

Thank you…
For purchasing another fine product from
Amano Cincinnati, Inc.
This User Guide covers the following Amano Time Guardian Series software;
• Time Guardian v5.2 and higher
• Time Guardian Plus v2.2 and higher
• Time Guardian Pro v4.2 and higher
• Nexus Lite Management (NLM) v1.1
Proprietary Notice
This document contains proprietary information and such information may not be reproduced in
whole or in part without written permission from:
Amano Cincinnati, Inc.
140 Harrison Avenue
Roseland, New Jersey, 07068-1239
Amano Cincinnati Inc. reserves the right to make equipment changes and improvements that
may not be reflected in this document. Portions of this document may have been updated to
include the latest software, hardware, or firmware version, if applicable.
We recommend that this document be read in its entirety before any attempt is made to operate
the equipment.
For more information about Amano’s complete line of products, visit our web site at:
www.amano.com/time
Licenses and Trademarks
Amano and Time Guardian are registered trademarks of Amano Cincinnati, Inc.
Adobe Acrobat and Acrobat Reader are registered trademarks of Adobe Systems Incorporated.
InstallAnywhere and InstallShield are registered trademarks of Acresso Software.
Microsoft® SQL Server®, Windows Vista®, Windows NT, Windows XP, Windows 2000, Windows 7 are
trademarks or registered trademarks of Microsoft Corporation in the United States and/or other countries.
Peachtree is a registered trademark of Sage.
Paychex Paylink and Paychex Preview are registered trademarks of Paychex, Inc.
QuickBooks® Pro® are trademarks and service marks of Intuit Inc., registered in the United States and
other countries.
Other product names used herein are for identification purposes only and might be trademarks of their
respective companies. We disclaim any and all rights in those marks.

Time Guardian Series – Table of Contents i
Table of Contents
Table of Contents ....................................................................................................................... i
Chapter 1: Introduction .........................................................................................................1-1
Welcome to Amano Time & Attendance Software Suite ...................................................... 1-1
Amano Customer Support ................................................................................................... 1-4
Chapter 2: Installation ...........................................................................................................2-1
Time & Attendance Software Installation ............................................................................. 2-2
Chapter 3: Setup Wizard ........................................................................................................3-1
Using Time & Attendance Software ..................................................................................... 3-1
Using the Setup Wizard ....................................................................................................... 3-3
Chapter 4: Daily Use ..............................................................................................................4-1
Initial Startup ....................................................................................................................... 4-1
Layout Appearance ............................................................................................................. 4-2
Holiday Formulas ................................................................................................................. 4-7
Chapter 5: Employee Administration ...................................................................................5-1
Adding Employees ............................................................................................................... 5-1
Chapter 6: Timecard Administration ....................................................................................6-1
Timecard Module ................................................................................................................. 6-1
Hot Keys ......................................................................................................................................... 6-10
Adding, Editing and Deleting Employee Punches .............................................................. 6-10
Adding, Editing and Deleting Employee Tips ..................................................................... 6-11
Overtime Authorization ...................................................................................................... 6-11
Authorizing Payroll Export ................................................................................................. 6-12
Global Timecard Edit ......................................................................................................... 6-12
Chapter 7: Communications .................................................................................................7-1
Communications Module ..................................................................................................... 7-1
Chapter 8: Recalculate ..........................................................................................................8-1
Recalculate Module ............................................................................................................. 8-1
Chapter 9: Output Group .......................................................................................................9-1
Reports Module ................................................................................................................... 9-1
Payrolls Module ................................................................................................................. 9-16
Generating the Payroll File .......................................................................................................... 9-32
QuickBooks Manual Integration .................................................................................................. 9-33
QuickBooks Auto Integration ....................................................................................................... 9-39
Import Module ................................................................................................................... 9-45

ii Time Guardian Series – Table of Contents
Table of Contents
Export Module ................................................................................................................... 9-48
Auto Process Module ........................................................................................................ 9-50
Chapter 10: Advanced Pay Class Module .......................................................................... 10-1
Introduction to Advanced Pay Class Module ...................................................................... 10-1
Using the Advanced Pay Class Module ............................................................................. 10-2
Holidays ........................................................................................................................................... 10-2
Chapter 11: Advanced Overtime Module ............................................................................ 11-1
Advanced Overtime Module Introduction ........................................................................... 11-1
Using the Advanced Overtime Module ............................................................................... 11-2
Daily Rules ...................................................................................................................... 11-11
Pay Class ........................................................................................................................ 11-16
Chapter 12: Advanced Schedule Module ........................................................................... 12-1
Advanced Schedule Module Introduction ........................................................................... 12-1
Using the Advanced Schedule Module .............................................................................. 12-2
Chapter 13: Advanced Meal Module ................................................................................... 13-1
Advanced Meal Module Introduction .................................................................................. 13-1
Using the Advanced Meal Module ..................................................................................... 13-2
Chapter 14: Advanced Rounding Module .......................................................................... 14-1
Advanced Rounding Module Introduction .......................................................................... 14-1
Using the Advanced Rounding Module .............................................................................. 14-2
Chapter 15: Advanced Labor/Rate Module......................................................................... 15-1
Advanced Labor/Rate Module Introduction ........................................................................ 15-1
Using the Advanced Labor/Rate Module ........................................................................... 15-1
Chapter 16: Access Control Module ................................................................................... 16-1
Access Control Module Introduction .................................................................................. 16-1
Using Access Control Module ............................................................................................ 16-2
Chapter 17: Web Interface Module ...................................................................................... 17-1
Web Interface Module Introduction .................................................................................... 17-1
Using the Web Interface Module ........................................................................................ 17-3
Chapter 18: Zone Differential Module ................................................................................. 18-1
Zone Differential (Premium Rules) Module Introduction ..................................................... 18-1
Using the Zone Differential (Premium Rules) Module ........................................................ 18-1
Chapter 19: Payroll Interface Module ................................................................................. 19-1
Payroll Interface Module Introduction ................................................................................. 19-1

Time Guardian Series – Table of Contents iii
Table of Contents
Chapter 20: Events Notification Module ............................................................................. 20-1
Events Notification Module Introduction ............................................................................. 20-1
Using Events Notification Module ...................................................................................... 20-3
Chapter 21: Benefit Time Module ........................................................................................ 21-1
Benefit Time Module Introduction ...................................................................................... 21-1
Using the Benefit Time Module .......................................................................................... 21-1
Chapter 22: User/Group Module ......................................................................................... 22-1
User/Group Module Introduction ........................................................................................ 22-1
Using the User/Group Module ........................................................................................... 22-2
Chapter 23: Nexus Lite Module ........................................................................................... 23-1
Nexus Lite Management (NLM) Software Installation ........................................................ 23-2
NLM Setup Wizard ............................................................................................................ 23-7
Using Nexus Lite Management (NLM) Software ................................................................ 23-7
Upgrading to Time and Attendance ................................................................................... 23-7
Glossary ................................................................................................................................ G-1

iv Time Guardian Series – Table of Contents
Table of Contents
This page intentionally left blank.
Time Guardian Series – Introduction 1-1
Chapter 1: Introduction
Welcome to Amano Time & Attendance Software Suite
Welcome to Time Guardian, Time Guardian Plus, and Time Guardian Pro
Should you have any comments on
the all in one, easy-
to-use Time and Attendance software. Amano’s Time and Attendance software allows you to
track and manage your employees’ time and attendance directly from your PC, which makes
the collecting, reporting and the transferring of employees’ hours to payroll companies easier
and quicker than ever before.
If this is your first time working with a time and attendance package, there may be terms that
are new to you such as Salary, Hourly, Pay Policy, Pay Code, Wages, Unit and Point. A
detailed Glossary, located in the back of this User Guide, has been provided to assist you as
you navigate through Amano’s Time & Attendance software.
Time Guardian, Time Guardian Plus, Time Guardian Pro
and the materials provided we ask that you e-mail them to TimeGuardian@amano.com. All
feedback is welcome and greatly appreciated, and will help us provide a better product to you,
our customer.
We thank you for selecting Time Guardian, Time Guardian Plus, or Time Guardian Pro
Feature/Module
and
welcome you to the Amano Cincinnati family of Time Solution and Access Control products. The
following table lists the standard and optional features for all Amano Time & Attendance
software.
Time Guardian Time Guardian Plus Time Guardian Pro
Time & Attendance
software with 100
employee capacity with
13 standard Payroll
Interfaces
Standard
Version 5.X Standard
Version 2.X Standard
Version 4.X
Employee Capacity
Upgrade
Optional 25, 50, 100,
250, 500, 1000, and
unlimited
Optional 25, 50, 100, 250,
500, 1000, and unlimited Optional 25, 50, 100, 250,
500, 1000, and unlimited
Number of concurrent
users 1 5 1
Concurrent User
Upgrade Optional 1, 5, 10, 25,
and unlimited Optional 1, 5, 10, 25, and
unlimited Optional 1, 5, 10, 25, and
unlimited
Advanced Overtime Optional Optional Standard
Advanced Scheduling Optional Optional Standard
Advanced Meal Optional Optional Standard
Advanced Rounding Optional Optional Standard
Advanced Labor/Rate Optional Optional Standard
Advanced Pay Class Optional Optional Standard
Access Control Optional Optional Standard
Web Interface Optional Optional Standard
Zone Differential Optional Optional Standard
Event Notification Optional Optional Standard
Benefit Time Optional Optional Standard
Payroll Interface
(additional interfaces) Optional Optional Optional

1-2 Time Guardian Series – Introduction
Features for Base Time Guardian Software (Expandable)
• Multi-user with standard support of 1 concurrent user for Time Guardian and 5 concurrent
users for Time Guardian Plus and Time Guardian Pro [Optional support for additional
concurrent users is available for all packages with the User Module activation – see
previous table].
• Standard one hundred (100) Employee Capacity (not including inactive employees), with
available upgrade from 25 additional employee capacity to unlimited maximum (see
previous table).
• Thirteen (13) Built-In Payroll Interfaces [Optional Payroll Module activation can supply
additional Payroll Interfaces from 1 to 46 additional – see Payroll Module section for
additional information].
• Fixed Template Schedule (one schedule per day). [Optional Advanced Schedule Module
activation unlimited number of schedules with auto schedules, Template Schedules with
Auto Schedule, Individual/Advanced Schedules, Schedule Rotation, and Employee
Schedule Override].
• One Labor level (fixed to department). [Optional Advanced Labor/Rate Module activation
can supply additional 5 labor levels – see Advanced Labor/Rate Module section for
additional information]
• Unlimited Number of Departments.
• Time Rounding Capability Based on Company-Defined Pay Class (Customizable
Rounding). [Optional Advanced Rounding Module activation can supply additional
advanced Pay Class and/or Daily Rules rounding schemes – see Advanced Rounding
Module section for additional information]
• Nine (9) Predefined Pay Codes for Hours Allocation with Pay Code Multipliers.
• Rates for Wages calculation.
• Two (2) Pay Codes for Tips and Bonuses. [Optional Advanced Overtime Module
activation adds TT (triple time pay code) and custom pay codes.
• Nine (9) Predefined Exception Flags for Employee Punch Tracking.
• Nine (9) On Demand Reports. [Optional Advanced Pay Class Module activation adds 2
reports (Unauthorized Hours report and Time Card Report).Optional Advanced Schedule
Module activation adds 2 reports (Schedule Posting and Schedule vs. Actual Reports).
Optional Benefit Time Module activation adds 2 reports (DeAccrual Balance and
DeAccrual History Reports)]. Optional Advanced Labor Rate Module activation adds up to
6 labor levels to reports and show billable rates on reports).
• Optional Access Control integration with Amano Nexus 220 and AmanoNet systems. See
Access Control Module section for additional information. Employee and department
synchronization with auto sync on login.
• Automatic Polling of Data Collection Terminal.
• Bell Schedule Capabilities.
• Firebird or MS SQL Database.
• Several Built-In Utilities for Maintenance of the System.
• On-Line Help.
Time Guardian Series – Introduction 1-3
Requirements
• Windows 2000/XP/VISTA/Server 2000, 2003 and 2008, and Mac OS (support for MTX-15
terminal communication)
• CD-ROM Drive
• 1 GB of Memory for Server, and 512 MB of Memory for Client
• 700 MB of Free Hard Disk Space for Server/100 MB for Client
• Broadband Internet Access (for Remote Support)
• Screen Display 800 x 600 Small Font
• Optional Microsoft® SQL Server® 2000, 2005, and 2008
• Firebird 2.0.
Setup Wizard
The Time & Attendance software Setup Wizard provides a seamless setup when used with the
appropriate Wizard on-line help. The Setup Wizard is designed as a 9-step rapid installation
and configuration for an easy-to-use time and attendance system with access integration.
The nine (9) steps of the Setup Wizard are:
STEP 1: General Setup [Optional Wizard Step]
• Access System Integration
• Company Profile
• Payroll Interface
STEP 2: Department Setup [Optional Wizard Step]
STEP 3: Pay Code Setup [Optional Wizard Step]
• Pay Code Types
• Overtime and Absence Rules
• Wages Rules
1-4 Time Guardian Series – Introduction
STEP 4: Schedule Setup [Optional Wizard Step]
STEP 5: Pay Class Setup [Required
• Overtime Authorization
– minimum of 1 Pay Class]
• Pay period Type
• Overtime Rules
• Rounding Rules
• Meal Rules
• Holiday Assignment
• Hours Authorization requirement (requires schedules)
• Advanced Overtime
• Day Change Rules
STEP 6: Exception Setup [Optional Wizard Step]
STEP 7: Employee Setup [Required Wizard Step – minimum of 1 employee needed]
STEP 8: Clock Setup
STEP 9: Login Setup [Required Wizard Step – minimum of 1 administrator profile created]
After the completion of Step 9: Login Setup, click on the Wizard Complete button to end
the Setup Wizard. Once the initial setup is complete, the Setup Wizard can be accessed and
used at any time to make setup modifications. For instructions on how to do this, please refer to
the section about “Setup Wizard”.
Registration
Please perform on-line registration after successful initial Time & Attendance software
activation or return the enclosed warranty registration card.
Amano Customer Support
On-Line Help
Can be accessed through the main menu in the software or most windows by clicking on the
button.
E-Mail Support
Support is provided via e-mail at TGSupport@amano.com. A zip file with your settings should
be sent to Amano support for diagnostic troubleshooting.

Time Guardian Series – Introduction 1-5
Amano One-on-One Technical Support Options
Toll Free support number is: 1(800) 253-9836.
• The first 30 days of support is provided free of charge, however this only applies to
installation and set up questions, and requires the user to complete the warranty registration
card.
• After 30 days, users requiring phone support will be charged a fee per incident or the user
can purchase a support contract.
• A Support Contract (contact support for fee) includes software support for one year and also
includes free software updates. Also, a hardware Support Contract (contact support for fee)
is available for terminals, etc.
Software Upgrades
Module activation allows you can expand the Time & Attendance capabilities/capacity via the
Toll Free support number to:
• Purchase and conveniently activate any combination of available
• Expand the employee capacity from the standard 100 employees incrementally from 125
employees and higher to unlimited.
optional advanced
modules through a simple activation process.
• Expand the number of concurrent users.
• Purchase extended support to setup Advanced Modules, i.e., Zone Differentials.
Time and Attendance Software Installation and User Guide
This Installation and User Guide was designed to assist you with the installation and daily
operation of your Time and Attendance software by providing a comprehensive understanding
of the software. This document covers the Time Guardian, Time Guardian Plus, and Time
Guardian Pro software with screen shots from mainly from Time Guardian and Time Guardian
Plus, but includes descriptions of Time Guardian Pro features. This Guide has a Table of
Contents to locate specific areas of interest.

1-6 Time Guardian Series – Introduction
This page intentionally left blank.
Time Guardian Series – Installation 2-1
Chapter 2: Installation
There are five documents available to assist you in the setup and use of your Amano Time &
Attendance software: This Installation & User Guide, the FPT-40 Terminal/Time Guardian
Quick-Start Guide, the MTX-15 Terminal/Time Guardian Quick-Start Guide, the MTX-15
Installation & Operation Guide, and the FPT-40 Installation & Operation Guide. All these
documents can be accessed and printed from the Time & Attendance software CD. An
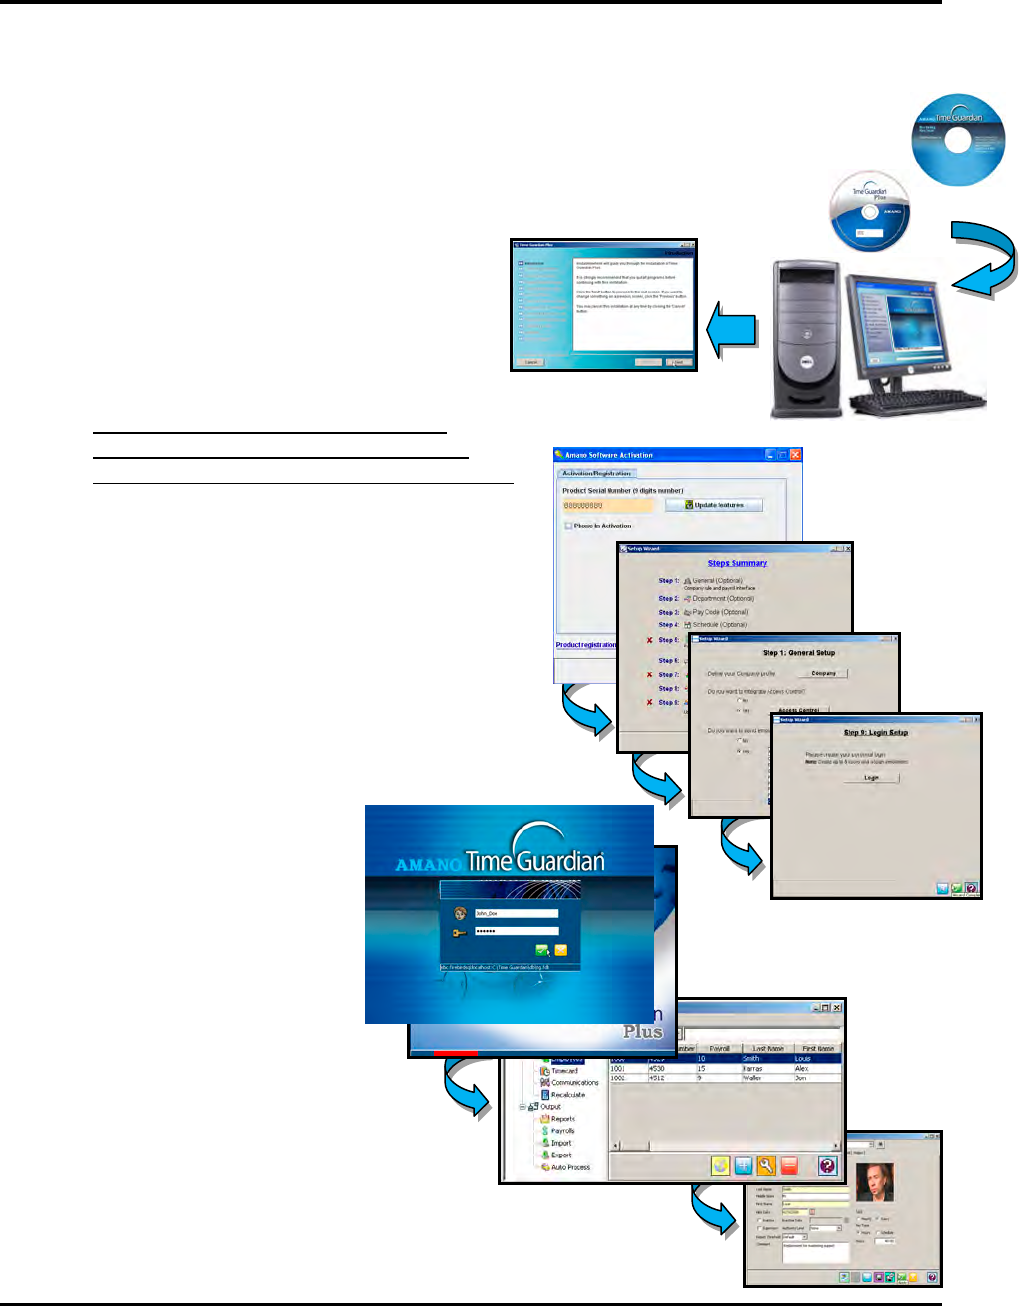
overview of the software installation steps is as follows:
Step 1. Insert the Time & Attendance CD
into your CD-ROM drive, and the
CD Menu will automatically launch.
Click on “Install” button to launch
InstallShield Wizard. If the installation
stalls, browse on CD to
\Disk1\InstData\Windows\VM\install.exe
Full integration with QuickBooks Pro
can require QuickBooks to be installed
on the host PC and open during installation
.
Step 2. After the initial software installation, the
Amano Software Activation screen will
appear. Enter the 9-digit serial number
and click the Activate button. Upon
successful activation perform on-line
registration. Next the user will be prompted
to proceed through the 9-Step
Setup Wizard.
Step 3. Login to the Time &
Attendance software, and
perform daily activities
such as Timecard
Administration and
Payroll, etc. The software
by default will support 100
employees. If you have
more than 100
employees, contact
Amano Support to obtain
an incremental upgrade
from 125 to an unlimited
number of employees.
2-2 Time Guardian Series – Installation
Time & Attendance Software Installation
The following discussion utilizes Time Guardian for screen illustrations. The installation of the
Amano Time & Attendance software is as follows:
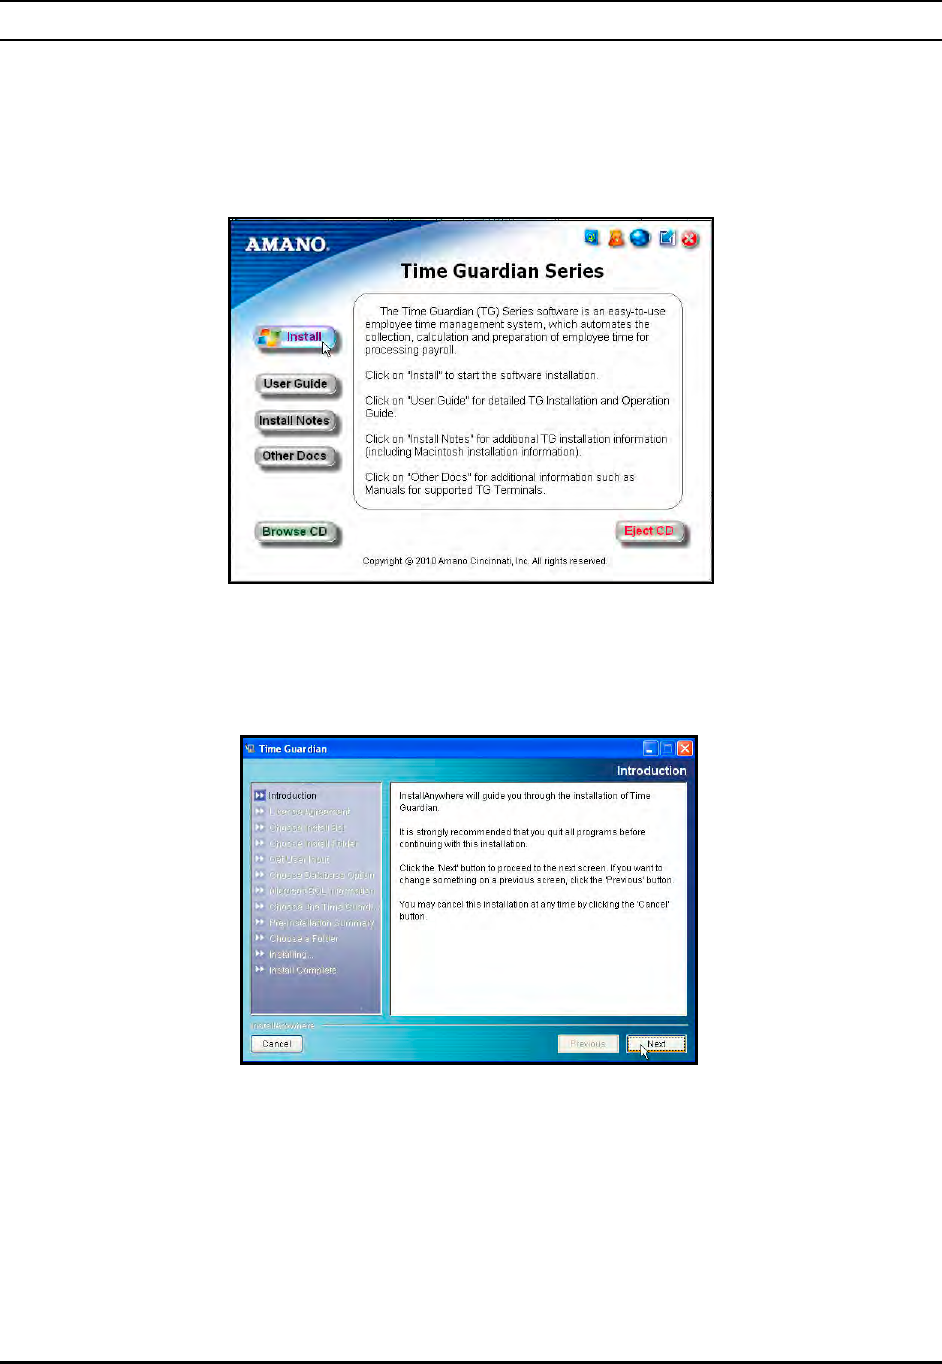
1. Insert the Amano CD into your CD-ROM drive. The software program should automatically
launch the Time Guardian Series CD Menu (see figure).
2. Click the Install button and the software program should automatically launch the
InstallAnywhere® Wizard (see figure).
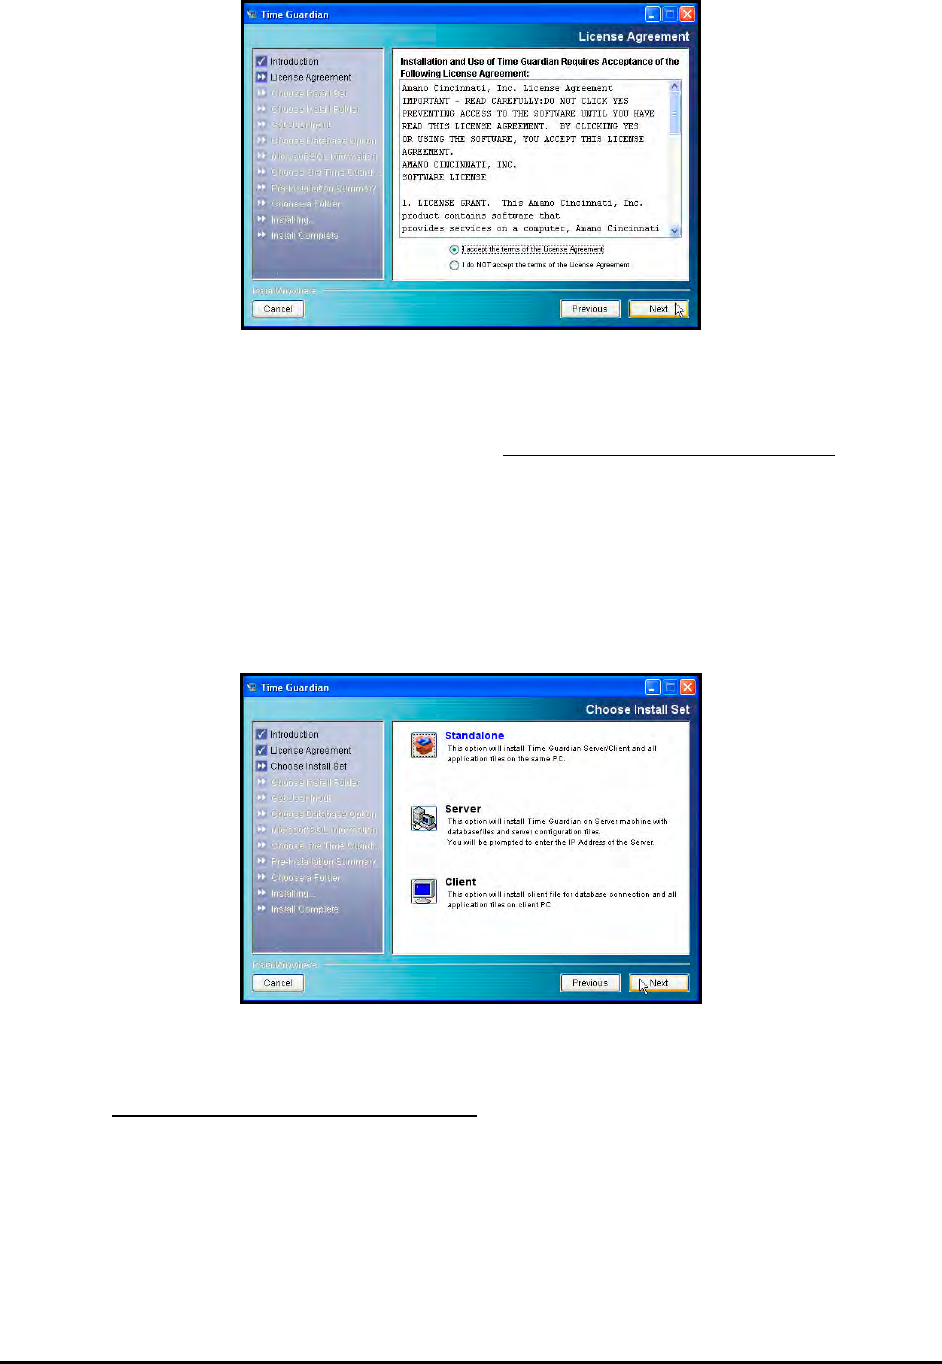
3. When the Introduction screen appears click on the Next button to continue.
4. The License Agreement screen will appear. Check the selection to accept the terms of the
License Agreement and click on the Next button. Clicking on “I do NOT accept…..” stops
the installation process.
Time Guardian Series – Installation 2-3
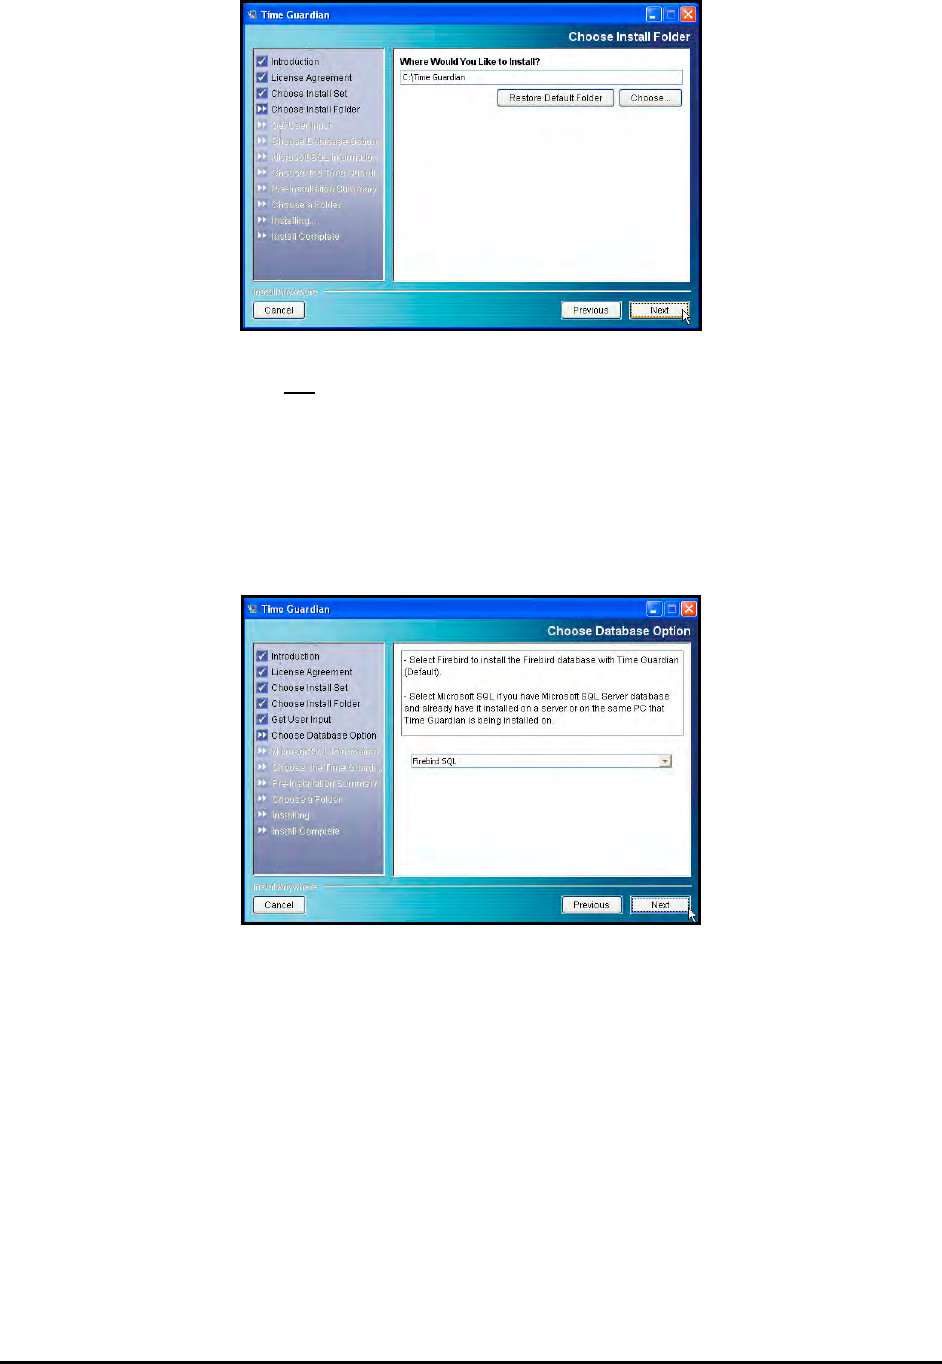
5. The Choose Install Set screen will appear. Select one of the following options:
• Standalone: Installs both the Time & Attendance Software Server (database) and Client
portion on the same PC. This is the default. Press next to accept and continue
• Server: Installs the Time & Attendance Software database on a server machine. You will
be prompted to enter the IP Address of the server.
.
• Client: Installs the Time & Attendance Software on a client PC to connect to the server
database.
After you have made your selection, click on the Next button.
6. If Server was selected as an installation option, you will be prompted to enter the IP Address
of the Time & Attendance Software Server. Enter the IP Address and click on the Next
button. If you did not select server in Step #4
7. The Choose Install Folder screen will appear. The default installation folder will be
displayed. If you would like to install the Time & Attendance Software in another folder, click
on the Choose button. To reset this field, click on the Restore Default Folder button. After
you have made your selection, click on the Next button.
, just click on the Next button to proceed to
Step #6. However, if Client was selected as an installation option, you will be prompted to
choose Time Guardian Server Folder.
2-4 Time Guardian Series – Installation
Note: Amano recommends not
8. The Choose Database Option screen will appear. Select either Firebird SQL or Microsoft
SQL and click on the Next button. If you chose Microsoft SQL, the Firebird Database
Service does not have to be installed.
installing the Time & Attendance software inside the “Program
Files” folder.
Note: You must purchase Microsoft SQL separately, have it already installed and properly
configured.
9. If Microsoft SQL was selected as a database option, you will be prompted to enter the SQL
Server Name, Administrator's User Name, and Administrator's Password in the Microsoft
SQL Information screen. When you have finished entering the required information, click
on the Next button.
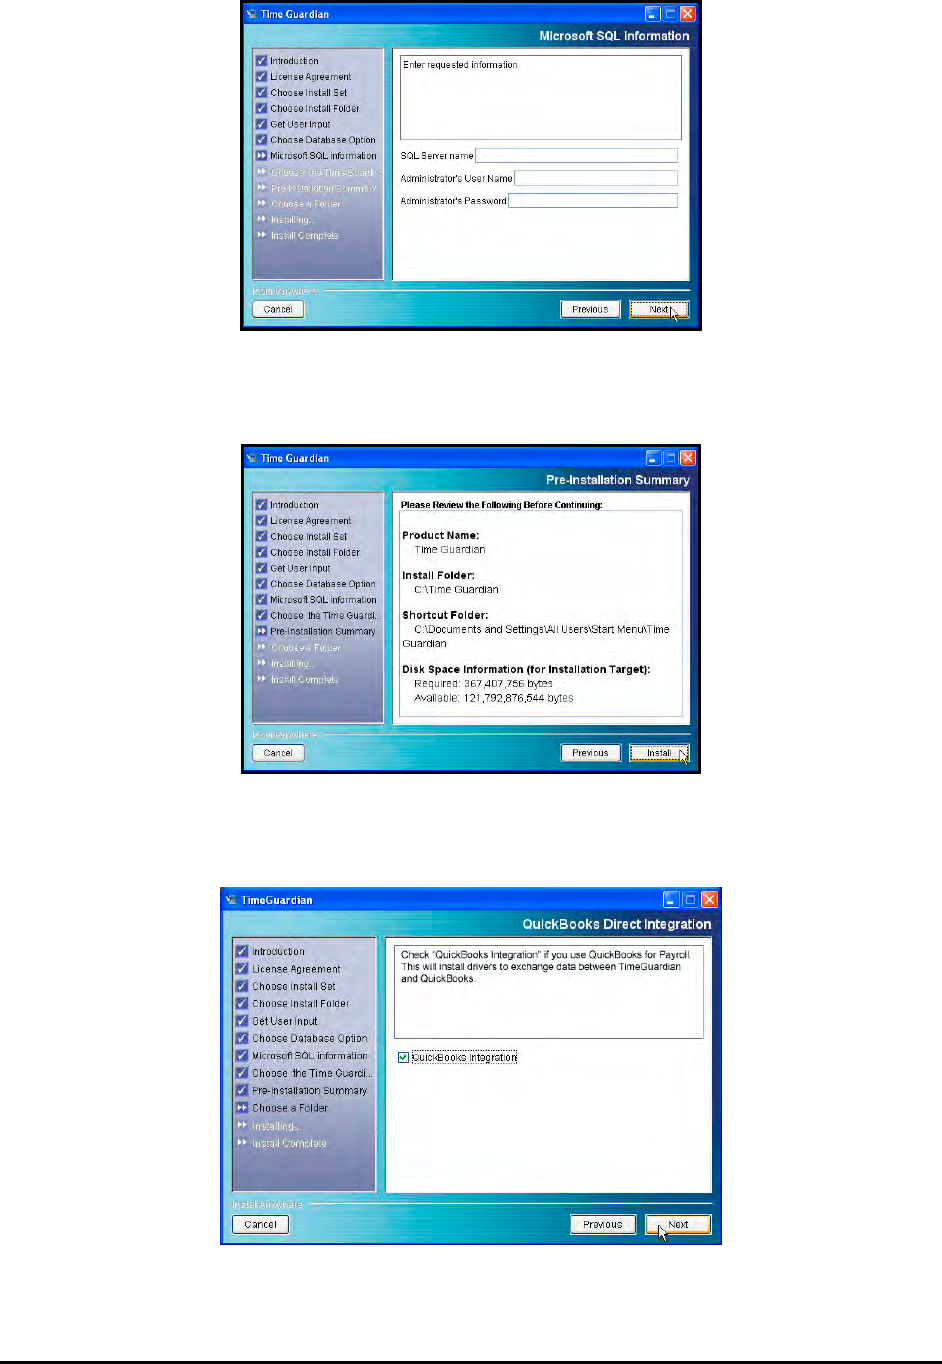
Time Guardian Series – Installation 2-5
10. The Pre-Installation Summary screen will appear. Please review the displayed information
on the screen and click on the Next button to proceed.
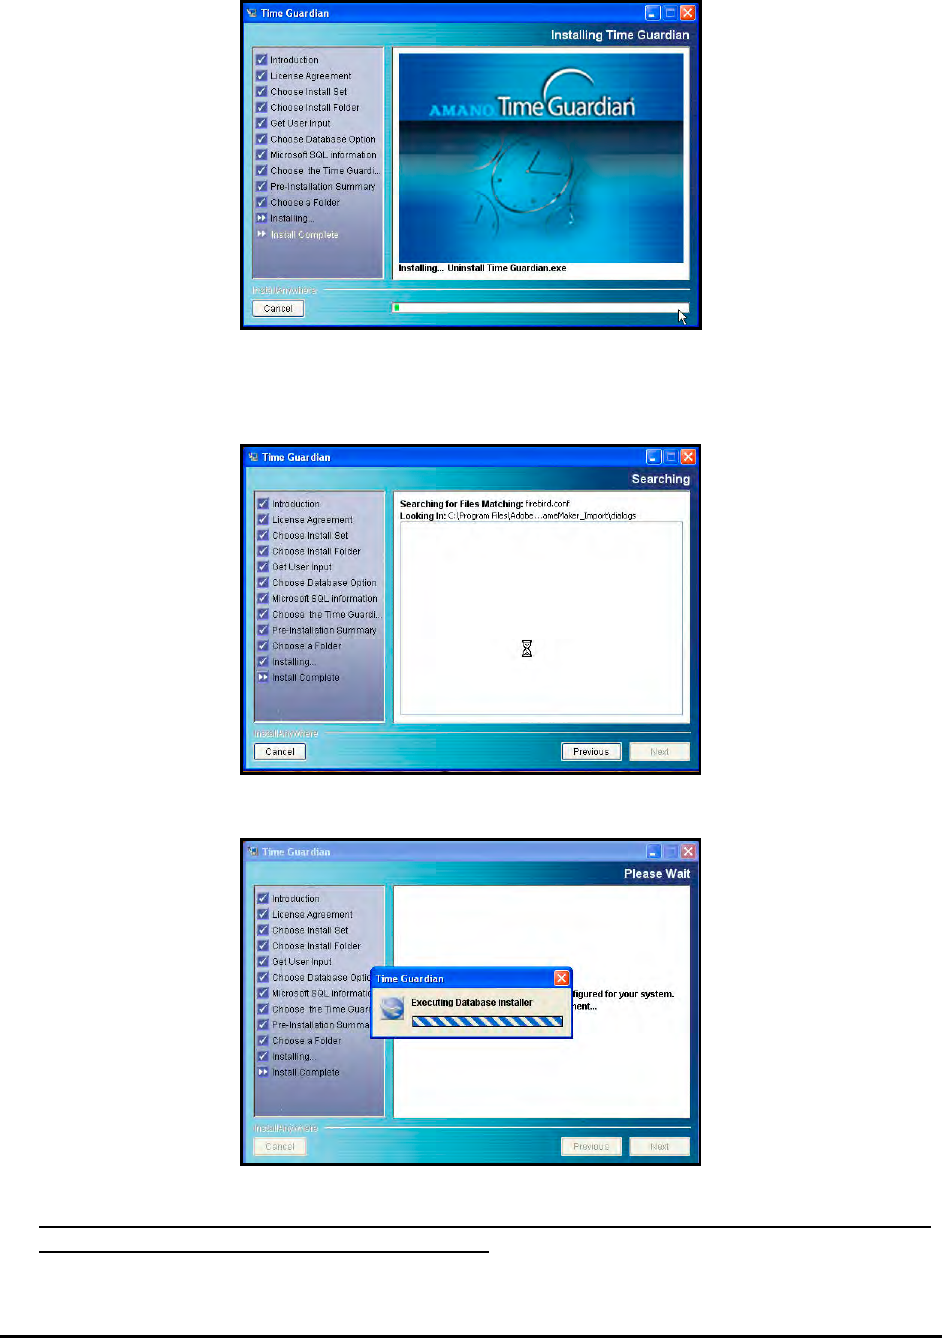
11. The QuickBooks Direct Integration screen will appear. Please review the displayed
information on the screen and click on the Next button to proceed.
12. The Installing screen will appear. The status bar on the bottom of the screen will display the
installation status.
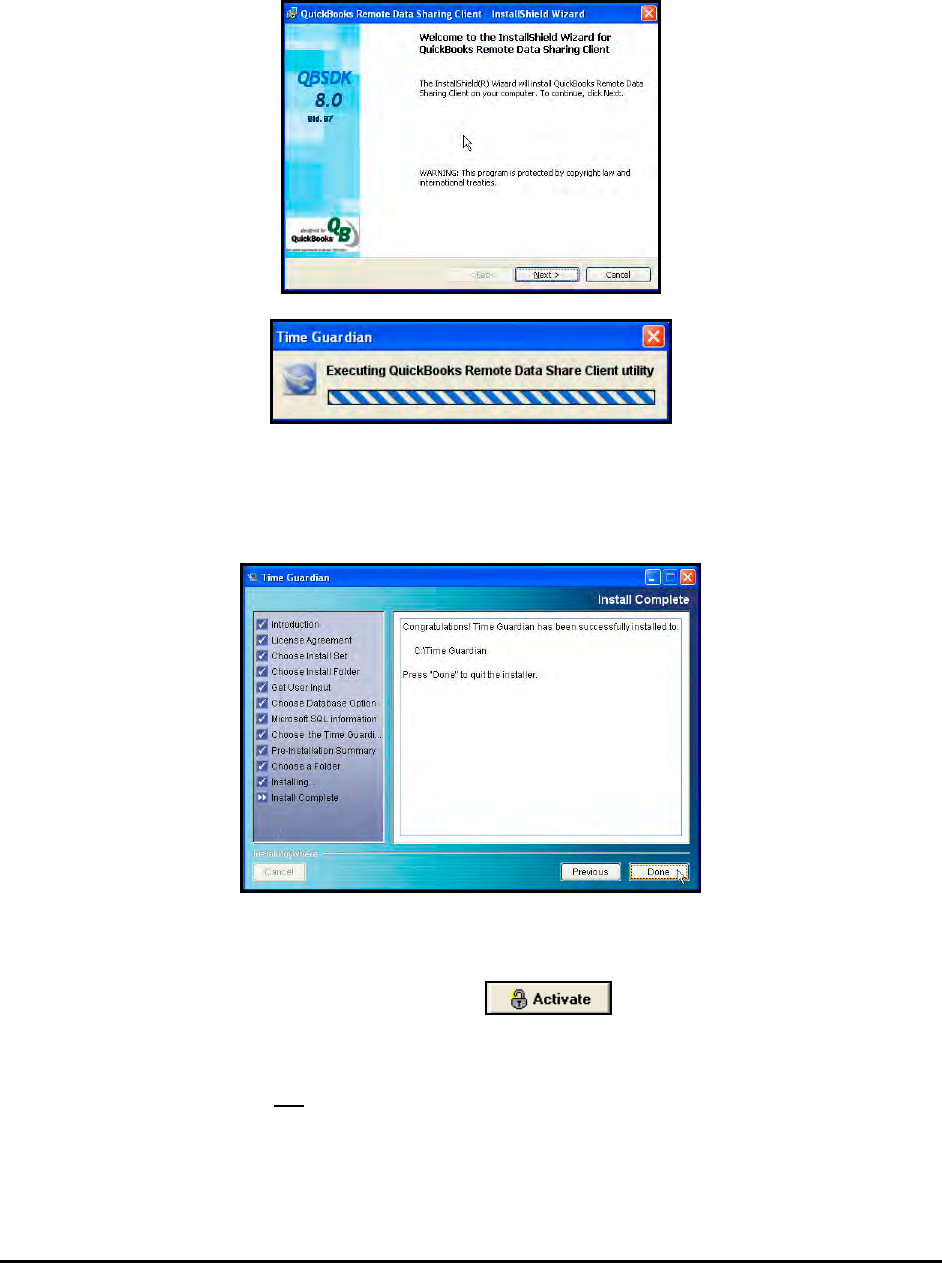
2-6 Time Guardian Series – Installation
13. At this point, the general install is complete and the installation utility will scan your PC for
Adobe Acrobat Reader®. If it is not installed, the installation utility will install it.
14. The Firebird Database Server will be installed.
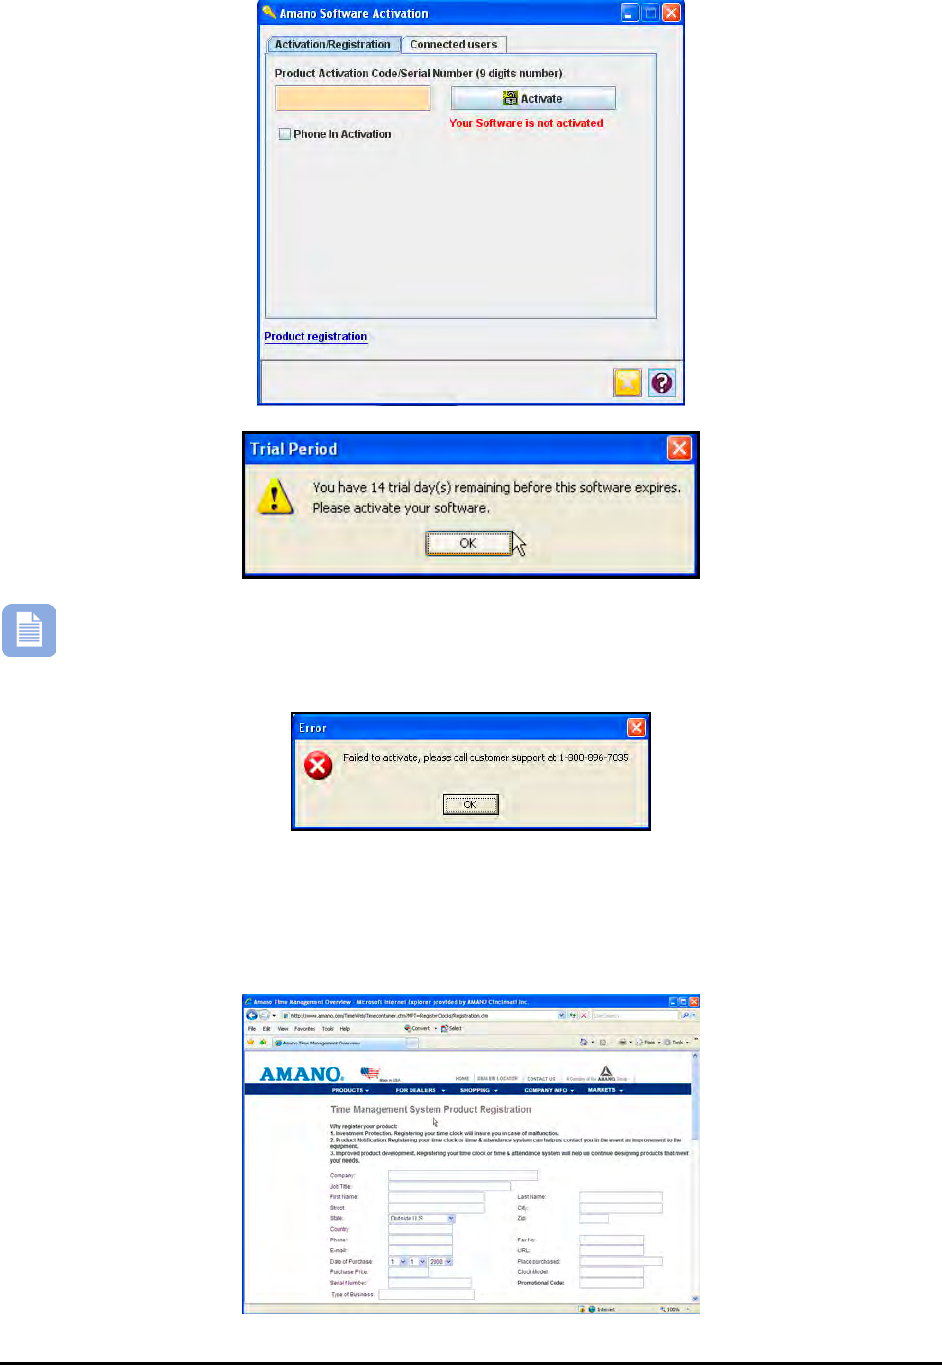
15. If QuickBooks Integration was selected the QuickBooks drivers will be installed to exchange
data between Time Guardian and QuickBooks
. Next QuickBooks utility will execute and the
QuickBooks InstallShield Wizard for QBFC will appear.

Time Guardian Series – Installation 2-7
16. Click on the Next button to start the InstallShield for QuickBooks FC or Cancel if you are not
using QuickBooks payroll software.
17. Click on the Finish button to complete installing the QuickBooks InstallShield Wizard for
QBFC.
18. Next, click on the Install button to begin installing the QuickBooks Remote Data Sharing
Client or Cancel if you are not using QuickBooks payroll software.
2-8 Time Guardian Series – Installation
19. Click on the Next button to start the InstallShield Wizard for QuickBooks Remote Data
Sharing Client and execute the Data Share Client utility, or Cancel if you are not using
QuickBooks payroll software.
20. Click on the Done button to finish the initial Time & Attendance software installation. The
system will briefly prompt; “Please wait Time Guardian is being configured for your
system….”
21. The Amano Software Activation (ASA) screen will appear after the initial software installation
(see Figure). Enter the Activation Code/Serial Number (9-digit number) supplied on the
Amano software CD and click on the Activate button. Upon successful
activation the dialog "Your Software has been activated. Proceed to product
registration" dialog will appear (skip to register).
However, if you choose not to activate the software by canceling the ASA procedure the
following error message will appear. At this point you have a trial period of up to 14-days to
use the software. Click the OK button to launch the software and continue using the Time &
Attendance software under the trial period.
Time Guardian Series – Installation 2-9
Note
– If the Activation error dialog appears, e.g., the Activation Code/Serial Number
is incorrect, or the same Activation Code/Serial Number was previously installed. At
this point contact Amano customer support at 1-800-896-7035.
22. Upon successful activation the registration screen will appear (see figure). Perform on-line
registration by entering the appropriate information in the Product Registration fields [red
error messages will appear alongside incomplete fields]. Amano recommends you
complete the registration to ensure notification of all important software updates, etc.
2-10 Time Guardian Series – Installation
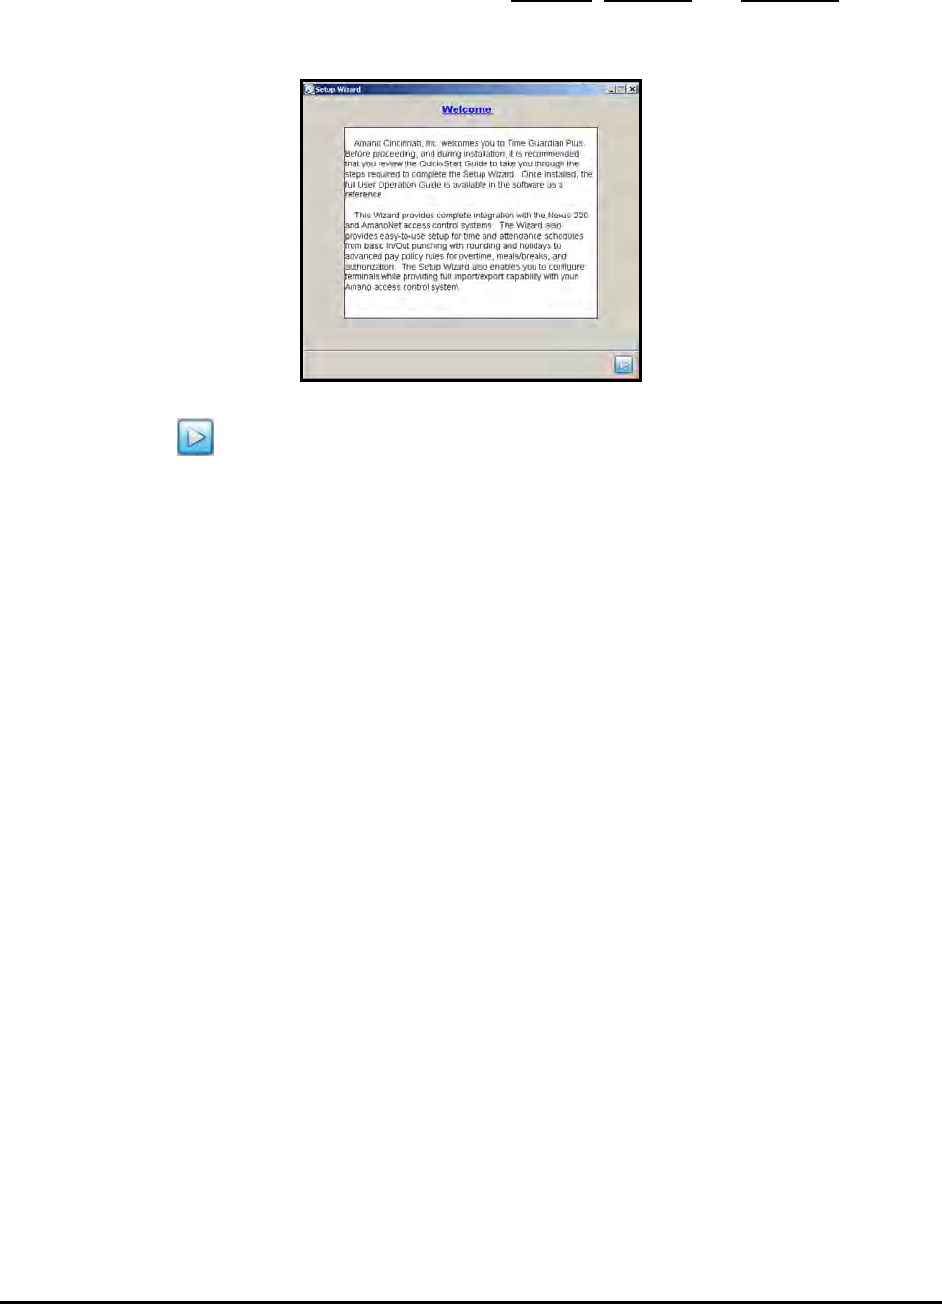
23. After the Time & Attendance Software has been installed, activated and registered
, the
Setup Wizard Welcome screen will appear (see figure for example). See Setup Wizard for
detailed setup instructions.
Click on the Next button to begin the Setup Wizard to configure the Time & Attendance
Software and the Setup Wizard Steps Summary screen will appear (see Using the Setup
Wizard).
Time Guardian Series – Setup Wizard 3-1
Chapter 3: Setup Wizard
It is recommended that you utilize the Quick-Start Guide and/or reference this Installation &
Operation Guide as you proceed through the Setup Wizard.
The Setup Wizard will help guide the user through a seamless step-by-step initial configuration
of the Time & Attendance software. As data is entered in each step the Setup Wizard can be
sequentially advanced to complete the next step. Once initial Setup Wizard is complete and the
Time & Attendance software is logged into, the Setup Wizard can be accessed from the Edit
menu at any time
Using Time & Attendance Software
to modify the software configuration, i.e., add terminals and employees.
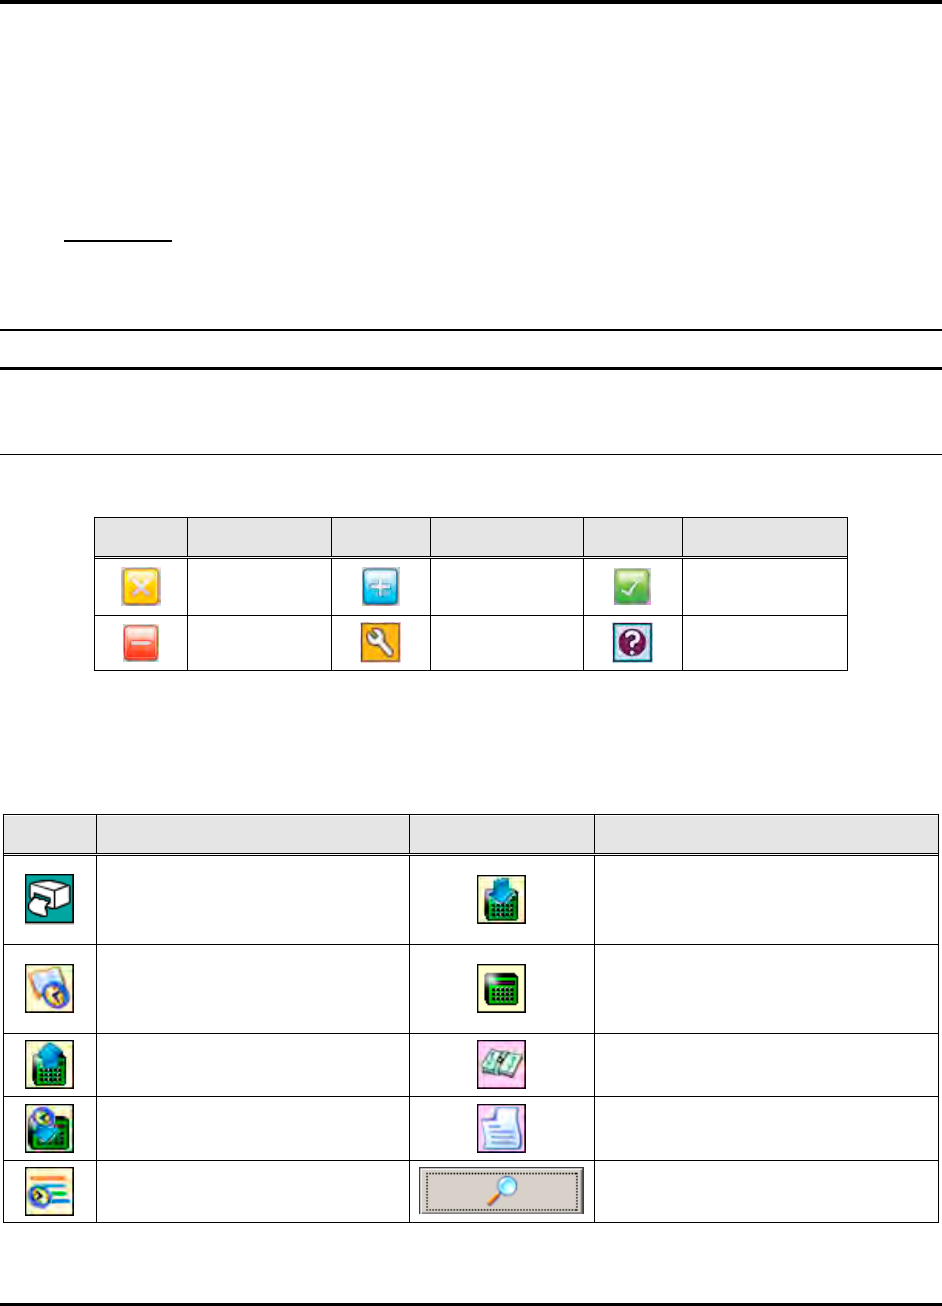
Buttons
The following buttons are common to all the modules in the Time & Attendance software:
Button Description Button Description Button Description
Close Add Save and exit
Delete Edit On-line Help
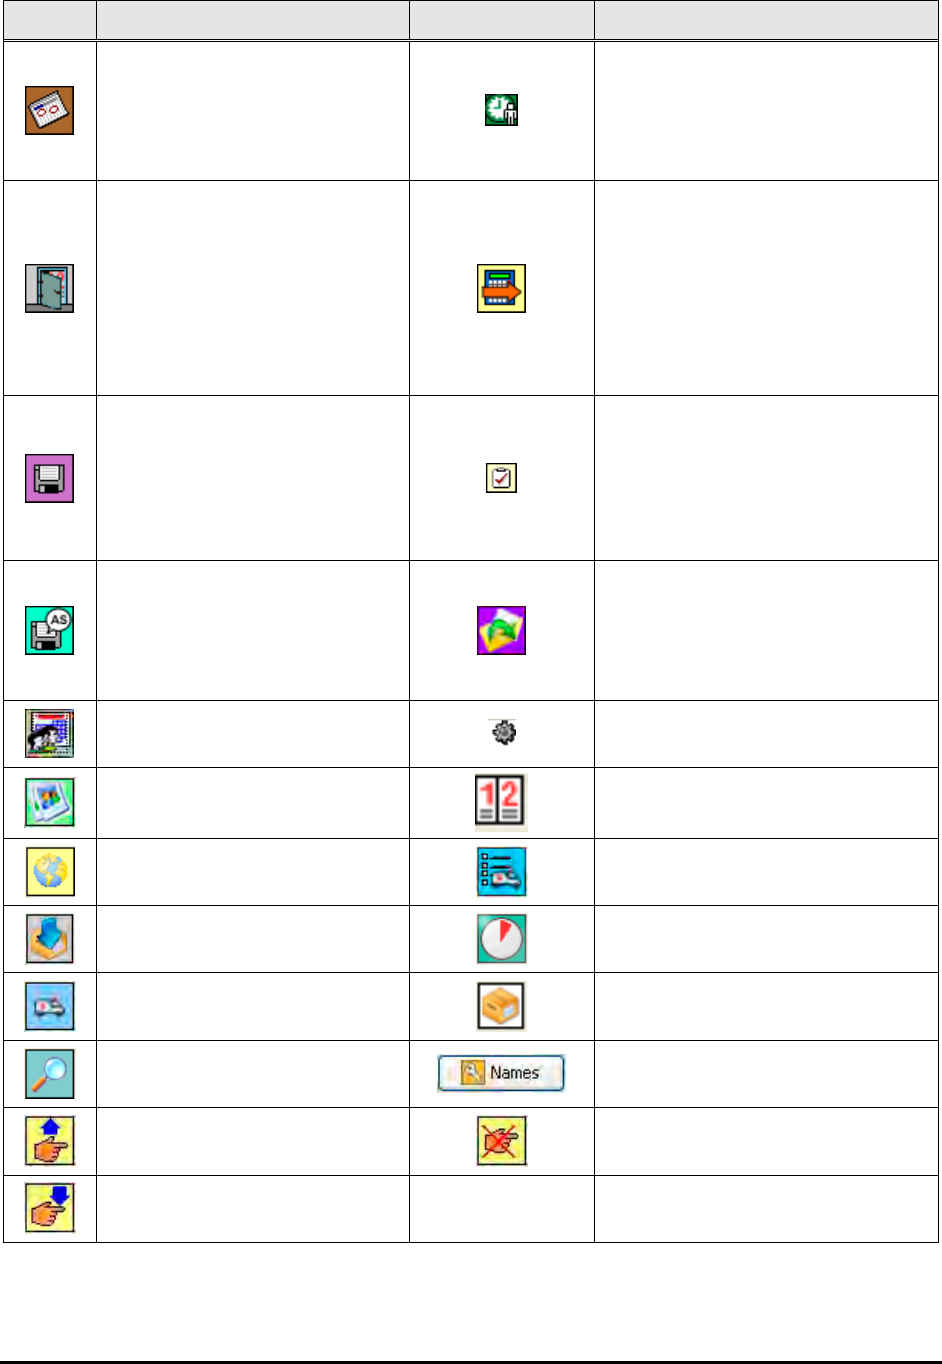
The following buttons are module specific and as such some buttons for Time Guardian and
Time Guardian Plus may not be active unless that module has been activated. However,
Time Guardian Pro comes standard with all modules.
Button Description Button Description
Run report.
Download validations and
settings to all terminals at the
selected locations.
Timecard.
View and communicate with
specific terminals of a specific
location.
Poll all terminals of the
selected locations. Run payroll file.
Set the time for all terminals
at the selected locations. Add employee certification.
Show schedule timeline. Filter employee records.
3-2 Time Guardian Series – Setup Wizard
Button Description Button Description
Run Schedule Coverage
report in the Schedule
module or view assigned
holiday calendar in the Pay
class module.
Define breaks in the Meal
Template option of the Schedule
module.
Allows the user to access the
selection window in the
Payperiods module to set
lock and close payperiods
properties. Note: Close
Payperiods must be selected
in the Company module for
this to be active.
Allows the user to access the
selection window to choose the
payperiod for Recalculation.
Perform Save.
Selects or de-selects (Check
and Uncheck) all Pay codes in
the Weekly and Consecutive
windows in the Pay class
module and the various
Overtime modules.
Save As. Allows you to copy
the properties of one record
into another by saving under
the record under a different
name. Copy report to another using.
Run the Individual Schedule
module. Run the selected Import Profile.
Click to add employee image. Select date.
Global Apply or Edit. Exception list filter preferences.
Run Import/Run Export. Rounding Demo.
Open timecard with exception
list filter. Labor references.
Find terminals. Edit labor names.
Send map templates for FPT-
40 terminal only Clear map templates for FPT-40
terminal only.
Receive map templates for
FPT-40 terminal only.
Time Guardian Series – Setup Wizard 3-3
Highlighted Fields
Yellow: Indicates that the field is required (data must be entered).
Red: Indicates an error or data not entered for a required field.
Icon Toolbar
The following icons are used in most Amano Time & Attendance modules, and if they are
present they will have the same universal function, which is:
• To create a new item (for example user) click on the Add button, and enter the
appropriate information.
Note: However, if you desire to save the item (i.e., User) without closing the open window,
simply click on the Save button.
• Use the navigation arrow buttons to move between the First, Previous,
Next, or Last item (i.e., User) in the list which appears on the top right of the open screen.
• To delete an item (i.e., Bell User), navigate to the desired item (i.e., User) and click on the
Delete button. Click on the Yes button when the warning dialogue appears.
• Click on the Apply button to save the selected item (i.e., User) and close the open
window, or click on the Close button close the open window without saving.
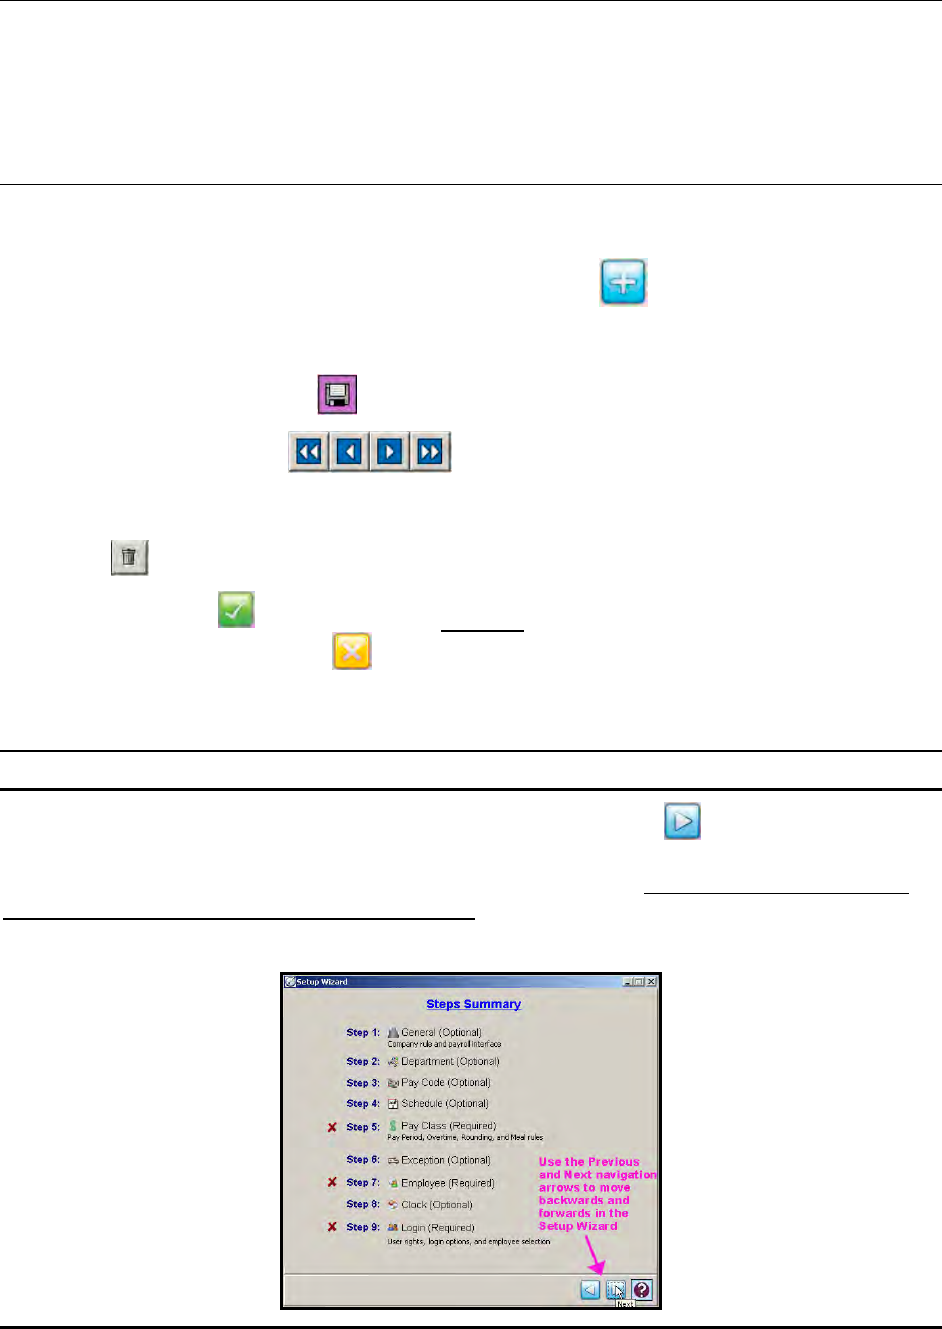
Using the Setup Wizard
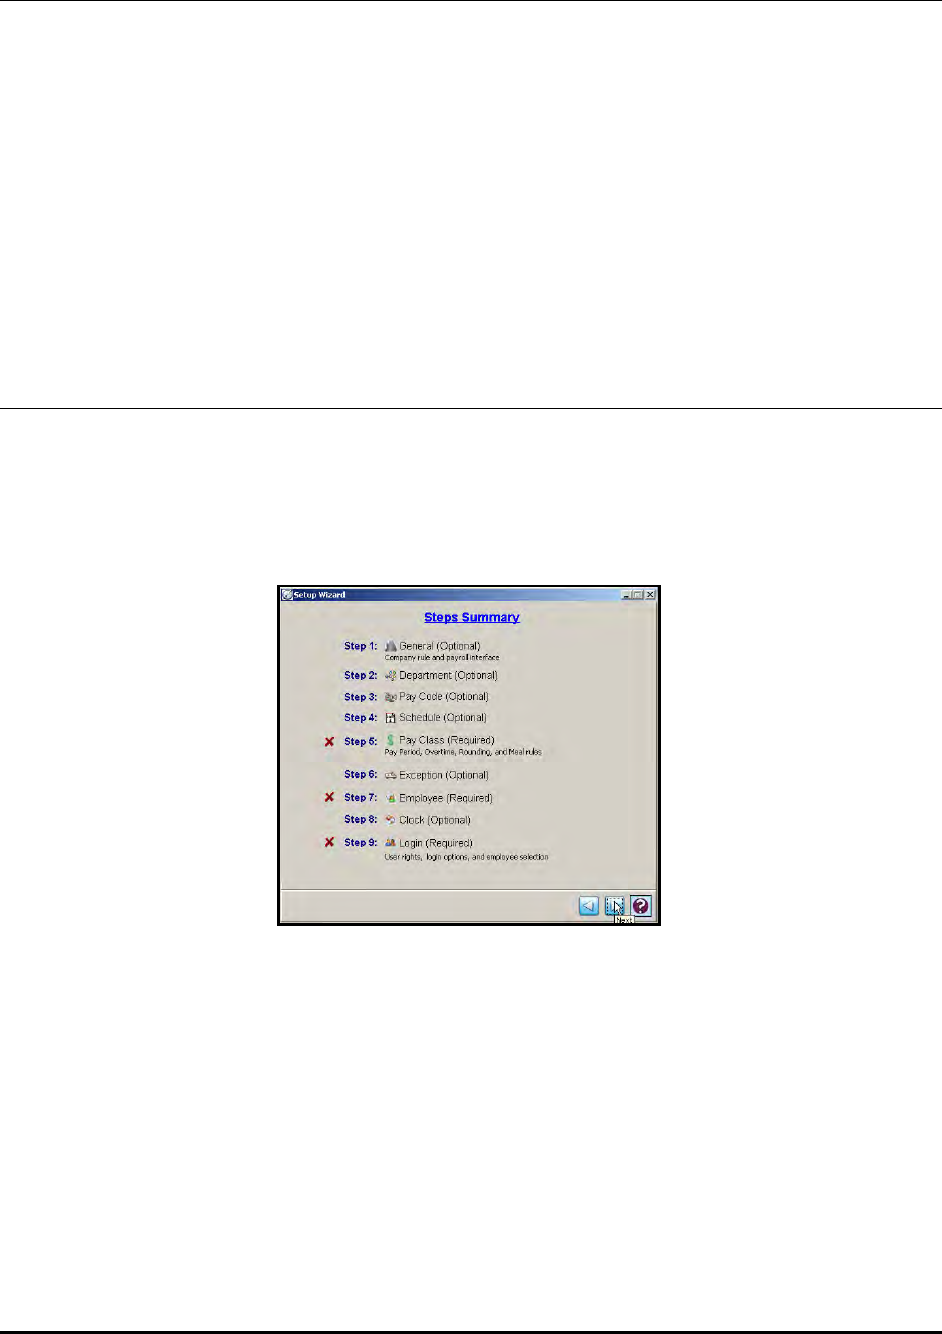
From the Setup Wizard “Steps Summary” screen click on the Next button to continue with
Step1. The Wizard Help will guide you through the Wizard Steps. The Setup Wizard has 9
Steps (see figure), however, as a minimum only Steps 4, 7 and 9 are required with at least; 1
Pay Class, 1 employee, and 1 user login defined. These steps will have Red X’s alongside
them until they are completed, at which point Green checkmarks will appear.
3-4 Time Guardian Series – Setup Wizard
Amano recommends that you have the appropriate information before you begin the Setup
Wizard. Should you need to exit the Setup Wizard before completion, your settings will be
saved.
Once the Setup Wizard is finished, the Wizard Complete button will become active. At this
point, all settings will be applied, including the time synchronization between the Time &
Attendance software PC and the connected terminals. Integration with Nexus220, and
AmanoNet 7.6 for Access control systems may require the activation of Access Control module
which is standard in Time Guardian Pro.
If the Wizard Complete button is not active, you must review your setup, verifying that all
mandatory fields (in red) have been completed. When all required fields are complete, the
Wizard Complete button will then be displayed.
Should you have any questions or require additional information, please email
TGSupport@Amano.com.
The following information will sequentially guide the user through the Setup Wizard data entry.
See the remaining sections of this Time & Attendance software Installation & User Guide for
more additional functional descriptions especially sections describing the functionality of the
Advanced Modules.
Note: Time Guardian screens are used for illustrative purposes in the Setup Wizard. Some
advanced modules may have been activated to illustrate their setup features.
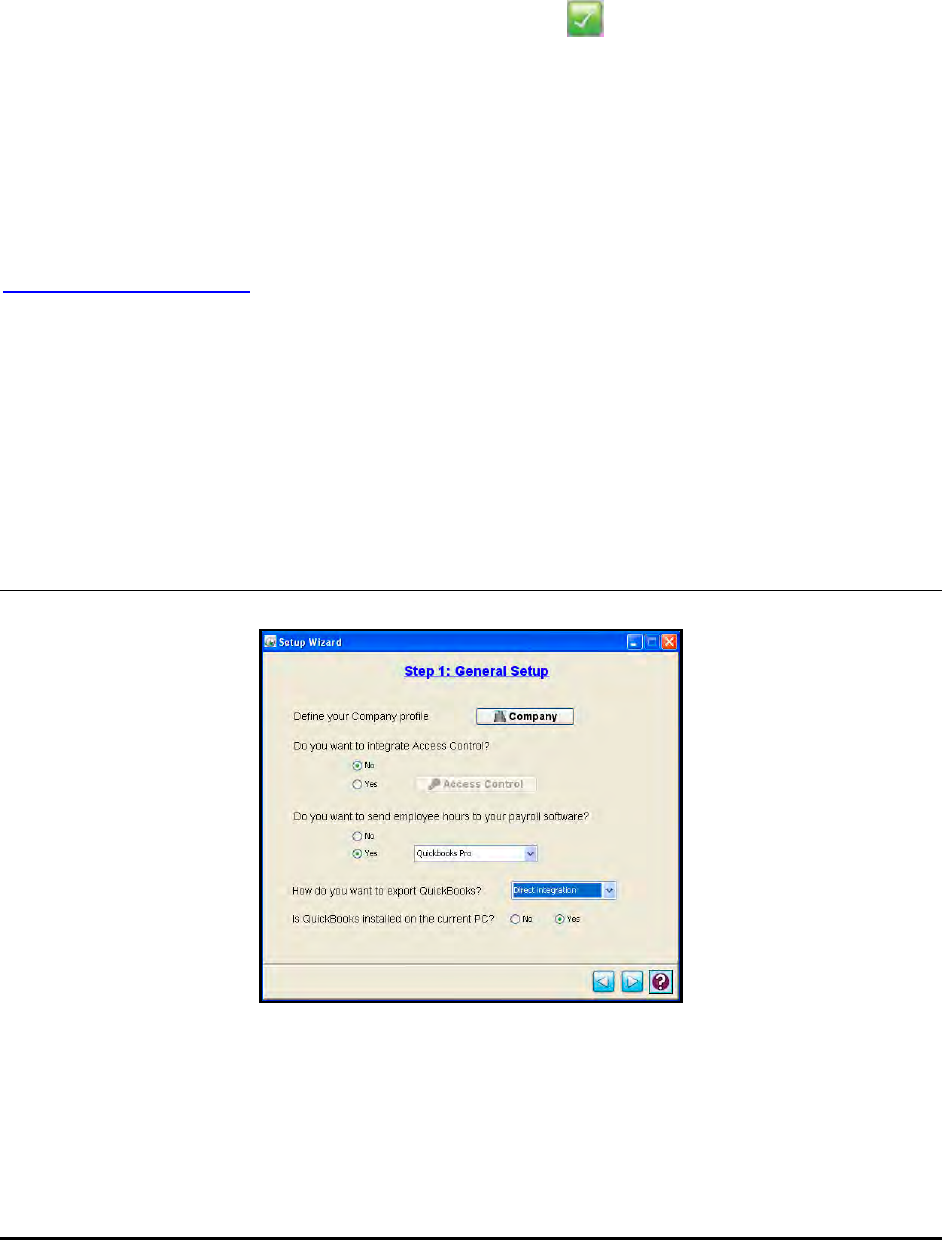
Step 1: General Setup Wizard [Optional Wizard Setup Step]
Define your Company profile:
From Step 1: General Setup press the Company button to define the company's profile and
the Company screen will appear. The Company profile consists of two tabs, General and
Settings. The General tab is used for the Company profile information, while the Settings tab is
used for the hours/time format and auto-poll on login.
Time Guardian Series – Setup Wizard 3-5
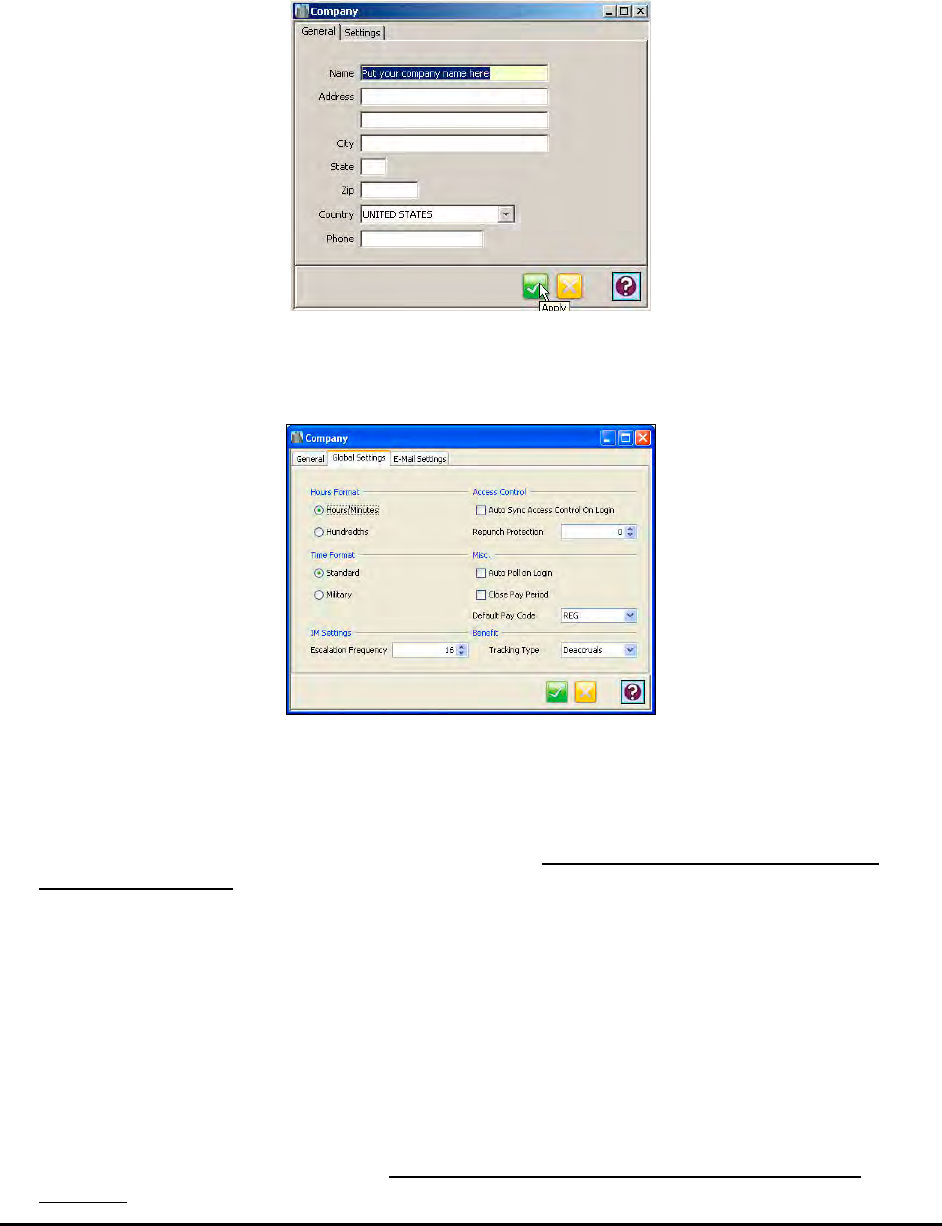
Note: The Company Name is the minimum requirement in this step to complete this portion of
the Setup Wizard. All required fields will be highlighted in yellow.
1. From the General tab on the Company Setup window enter the Name, Address, City, State,
Zip Code, Country, and Telephone Number of the company.
2. From the Company screen, press the Global Settings tab and the following screen will
appear:
3. Select the appropriate Hours Format [for Timecard and Reports]. This selection determines
how employees' hour totals will be displayed. Select Hours Format: Hours/Minutes (60th’s: 8
hours, 30 minutes = 8:30), or Hundredths (100th’s: 8 hours, 30 minutes = 8.50).
4. Access Control Auto Sync and Repunch Protection
5. Select the Time Format [for Timecard and Reports]. This selection determines the time
display format in Time Guardian. Select either Standard AM/PM (12-hour: i.e., 3:00 PM =
3:00 PM), or Military (24-hour: i.e., 3:00 PM = 15:00) format.
only enabled when Access Control
module is activated.
6. Click the box to select Auto Poll on Login if desired. Upon start up, the Time & Attendance
software will automatically poll all connected terminals such as MTX’s, FPT-40’s, and/or
HP’s for the punch information.
7. The function to Close Pay Period is on automatically active when activated.
8. Select Default Pay Code to use from the drop down list.
9. IM Settings Escalation Frequency only enabled when Events Notification module is
activated. Select the desired escalation frequency in minutes.
3-6 Time Guardian Series – Setup Wizard
10. Benefit Tracking Type only enabled when the Benefit Time module is activated
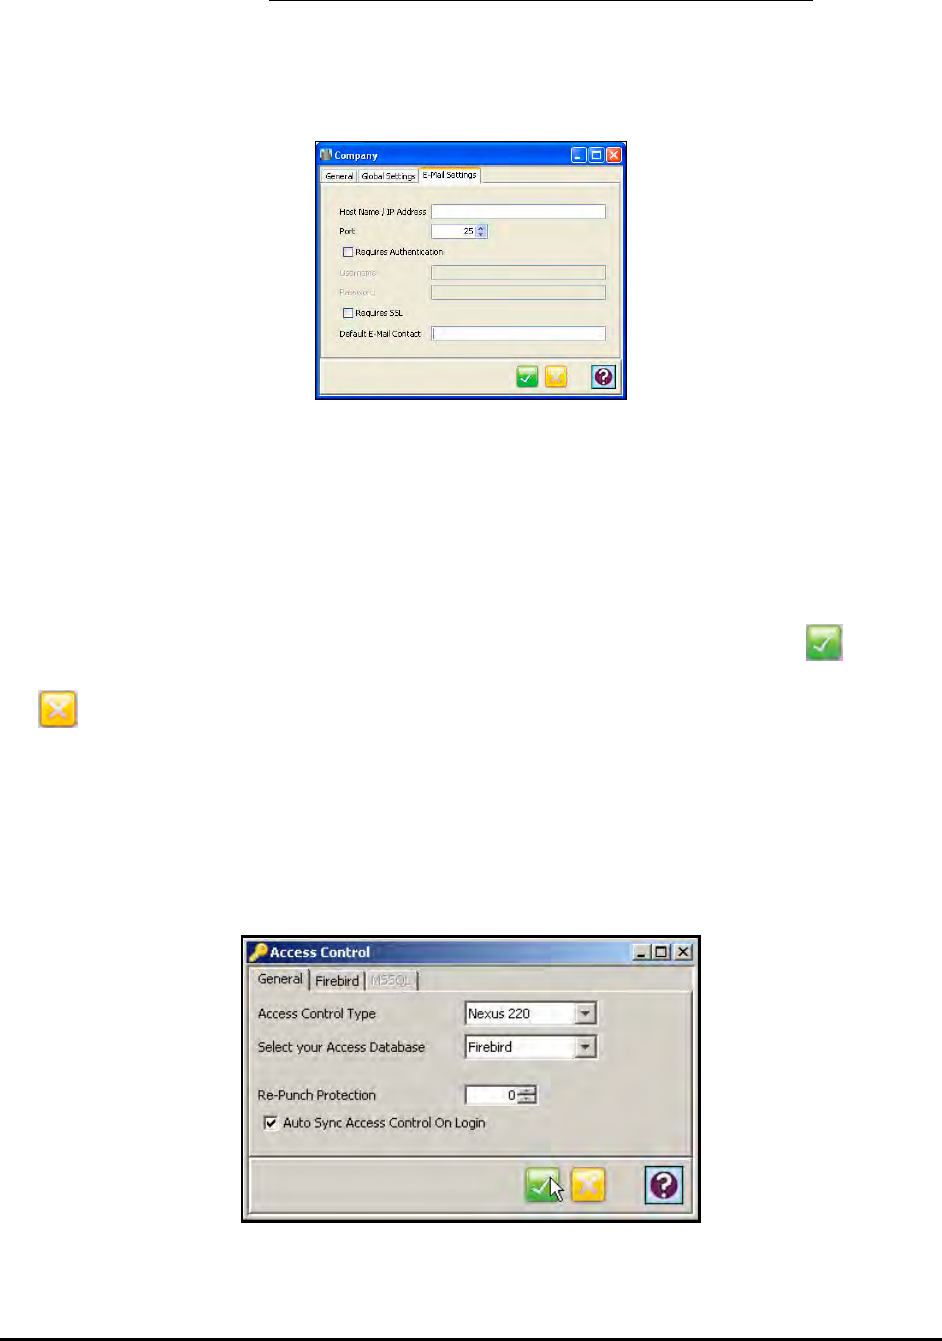
11. From the Company screen, press the E-Mail Settings tab and the following screen will
appear:
. Select the
benefit type from the choices of none, Deaccruals, or Import Balances. Deaccruals or Import
Balances must be selected for the Benefit tab on the Employees screen to be active.
12. Configure the E-mail settings by; entering the SMTP Host Name/IP Address [may have to
consult network administrator]. Select the Port to use for e-mail. Default setting = 25.
13. Click the box to select Requires Authentication if desired, and enter Username and
Password to be required. For added security click the box to select Requires SSL.
14. Enter the Default E-mail Contact which is the E-mail address to be used if none is setup in
the IM profile.
15. After completing the entry/selection of company information click on the Apply button to
save the company information and return to the Step 1: General Setup. Click on the Close
button to close the Company window without saving.
Note: The Apply and Close button function is universal for all Setup Wizard steps.
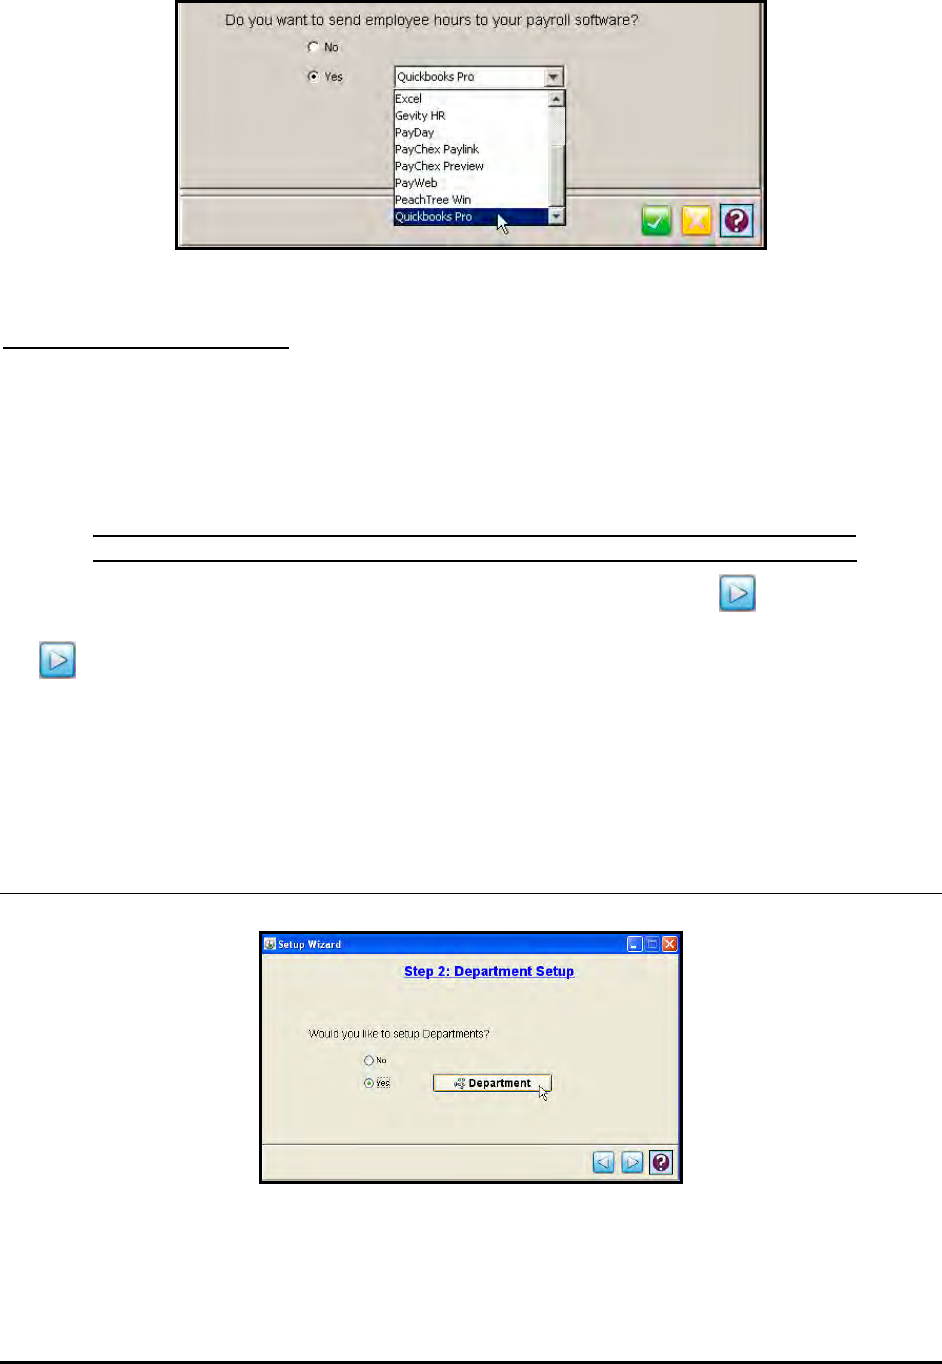
Do you want to integrate access control? [Module – requires activation to use]
From Step 1: General Setup press the Access Control button to define the company's access
control profile and the Access Control screen will appear (see figure).

Time Guardian Series – Setup Wizard 3-7
From the General tab on the Access Control window:
1. Select the Access Control Type from the drop down menu of; Nexus 220, AmanoNet 7.6, or
None.
2. Select the Access Database Type of either Firebird or MSSQL.
3. Browse to and select the actual Database location [path].
4. Set Re-Punch Protection.
5. Select if you want Auto Sync Access Control on Login to be active by checking the box.
Answering Yes is recommended if you connect your terminal directly to the PC. If you
selected Access Control option during this Setup Wizard step, you will also be asked to
synchronize with the Access Control (Nexus 220 or AmanoNet 7.6) at login.
6. After completing the entry/selection of company information click on the Apply button to
save the company information and return to the Step 1: General Setup. Click on the Close
button close the Access Control window without saving.
Do you want to send employee hours to your payroll software?
From Step 1: General Setup, select Yes if you want employees' hours to be transferred to your
payroll software. You must then select the Payroll Software that you are using. The following 13
payroll software options are available (see figure):
• ADP for DOS
• ADP PC Payroll for Windows®
• CBS Payroll
• Ceridian Power Pay
• EasyPay
• Excel
• Gevity HR
• PayDay
• PayChex Paylink®
• PayChex Preview®
• PayWeb
• PeachTree® Win
• QuickBooks Pro®
3-8 Time Guardian Series – Setup Wizard
Note: The Apply and Close button function is universal for all Setup Wizard steps.
1. Select Yes to send employee hours to payroll software and select QuickBooks from the
dropdown menu.
QuickBooks Pro Procedure
2. Select Yes if QuickBooks is installed on the same PC with the Time & Attendance software,
or No to connect across network to QuickBooks. See Step 7: Employee Setup for
integration/synchronization with QuickBooks.
Note: 40 plus additional payroll interfaces are available with Payroll Interface module
upgrade activation. See Payroll Interface Module for a list of Payroll Interfaces.
After saving the information for Step 1: General Setup, click on the Next button to advance
to Step 2: Department Setup. If no General Setup is desired, skip all of Step 1 and just click on
the button to advance to Step2.
Note: You can close at any time to end the Setup Wizard, but you must complete the Setup
Wizard before you can Log into the Amano Time & Attendance system. The Wizard will
automatically open up to the Welcome screen until it is completed.
Step 2: Department Setup Wizard [Optional Wizard Setup Step]
Would you like to setup Departments?
All employees are assigned to No Department as the default setting. If you wish to create
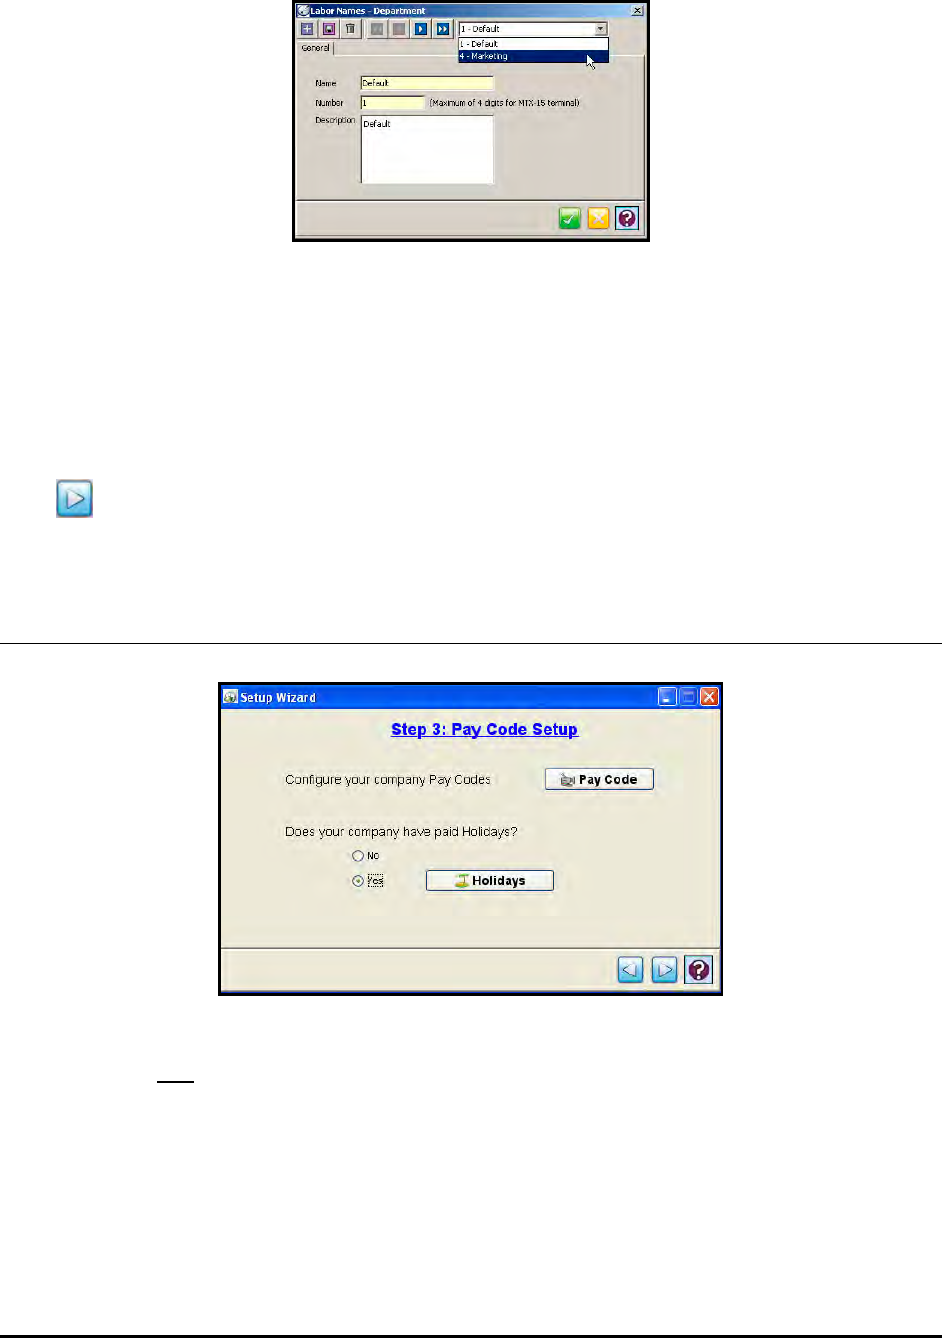
Departments, select Yes and click on the Department button. The Labor Names-Department
screen (see figure) will appear.
Time Guardian Series – Setup Wizard 3-9
Create a new Department and enter the required unique number [yellow field] and Department
name [yellow field]. You can also enter a description if desired.
Although departments are not used in the calculation of hours, they can be used to filter the
employees displayed in the Employee List Box on the Main View. This information will also be
displayed in the Department Report. If no departments are created, this report will be disabled.
After completing the Department information entry for Step 2: Department Setup, click on the
Next button to advance to Step 3: Pay Code Setup.
Step 3: Pay Code Setup Wizard [Optional Wizard Setup Step]
Press the Pay Code button to configure the Pay Codes that your company will be using (see
figure). At least one Pay Code must be selected for the Time and Attendance software to
calculate hours.
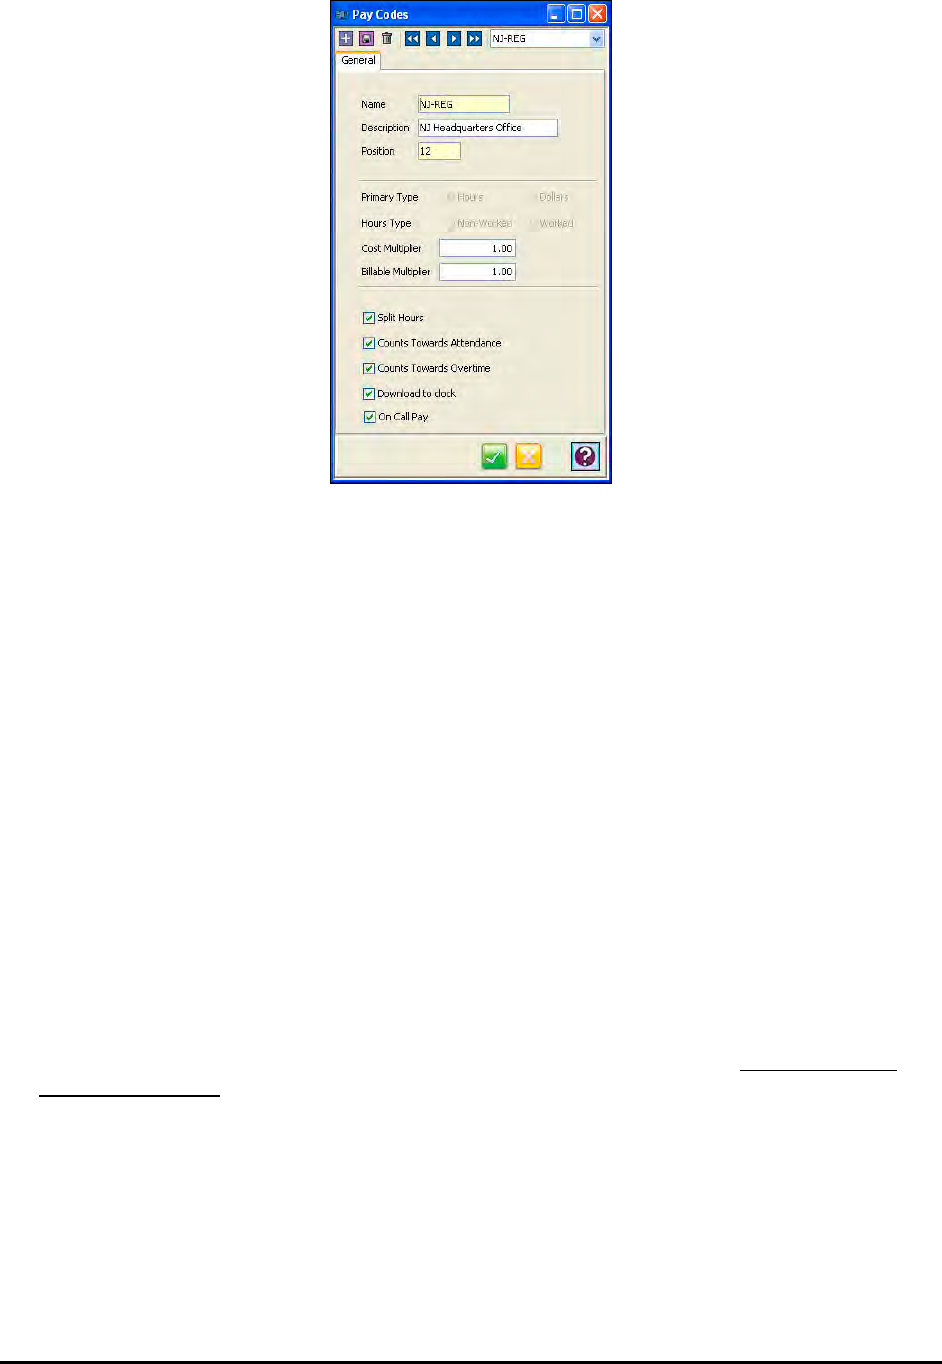
3-10 Time Guardian Series – Setup Wizard
1. The Name field is pre-defined for the Pay Code and can be changed (6 character maximum
allowed). However, duplicate names are not allowed.
2. In the Description field, enter in a brief description of the Pay Code.
3. A Position number is assigned automatically and can be changed (5-digit maximum allowed
with no duplicate position numbers). This position number is used for display order on
reports and the Timecard grid, and also used to select the 4 pay codes downloaded to the
MTX-15 and/or FPT-40 Terminal(s).
4. See the pre-defined Primary Type (how the hours awarded to a specific Pay Code). Hours
corresponds to work hours (REG, OT) and non-worked hours (SCK, VAC). Dollars
corresponds to monetary amounts given to an employee (Bonus, Tip).
5. See the pre-defined Hours Type: Non-worked (SCK, VAC, etc.) or Worked (REG, OT).
6. In the Cost Multiplier field, enter in the cost multiplier for the Pay Code if the default value
is not acceptable.
7. In the Billable Multiplier field, enter in the cost multiplier for the Pay Code rate if the default
value is not acceptable.
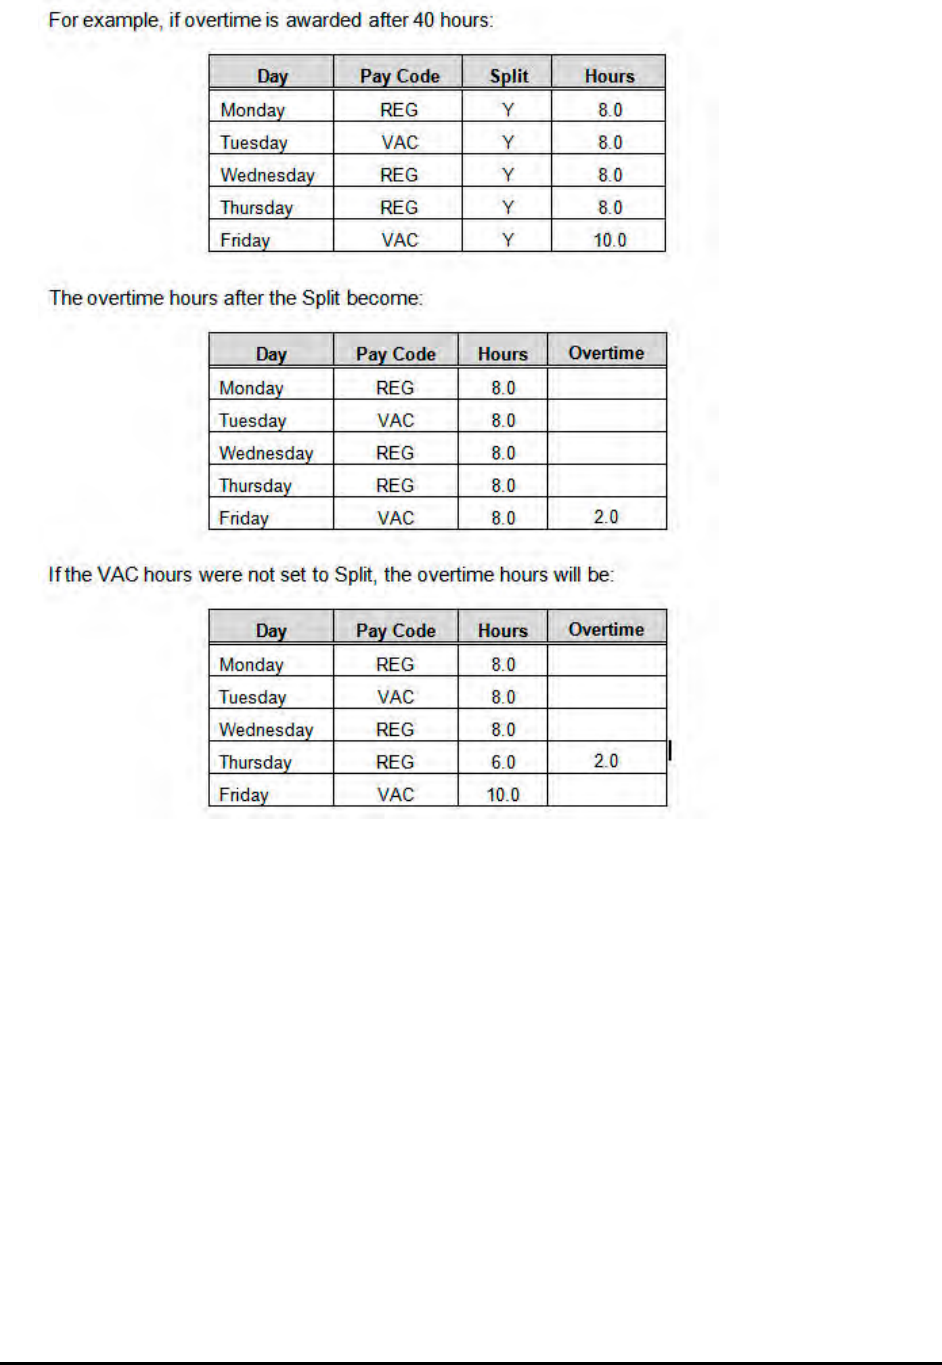
8. Check Split Hours if you want the Pay Code to be used for Split Hours. Split hours allow the
system to move hours from one Pay Code to another. Not allowed for BONUS Pay Code.
9. Check On Call Pay if you want to this type of pay to be added to hours. Only allowed for
BONUS Pay Code.
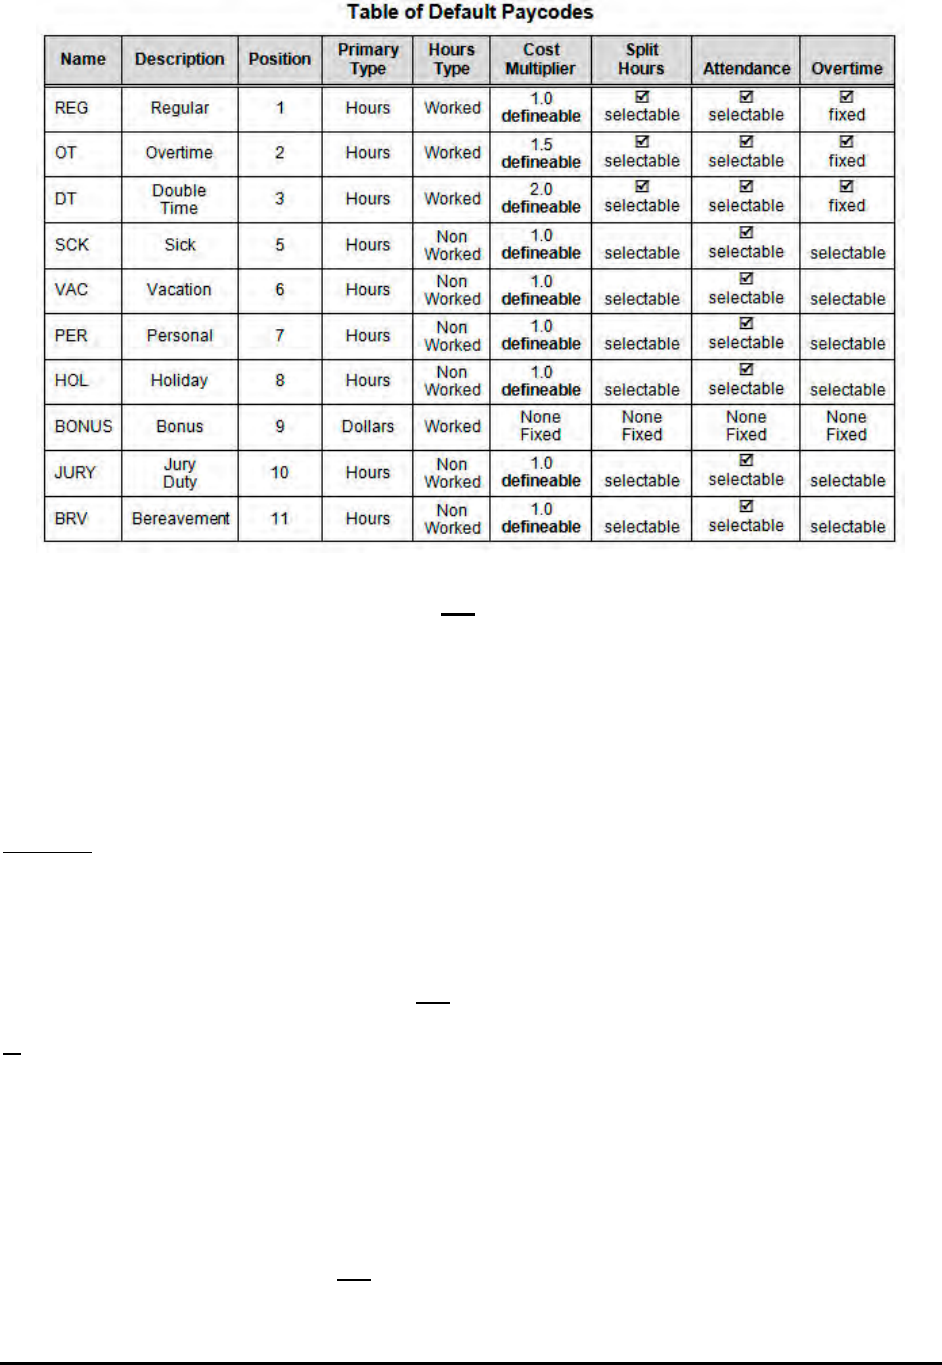
Time Guardian Series – Setup Wizard 3-11
The following table lists all of the Pay Codes with their predefined fixed and selectable
parameters. If the Cost Multiplier parameter is marked as “defineable” that means the default
value in the field can be changed by entering a new value and saving it. If the Split Hours,
Counts Towards Attendance, and Counts Towards Overtime parameters are selectable that’s
indicates that this action can be turned On or Off. A checkmark () in this column indicates the
default setting.
3-12 Time Guardian Series – Setup Wizard
If the “Counts Towards Attendance” box is not selected, the Absence flag will not be removed
even though hours have been added for that day. The Pay Codes you select during this setup
will be displayed in the Hours Grid of the Main View.
You must also decide whether hours assigned to a Pay Code will count towards daily
attendance by checking the box. This is important if you choose to track the Absences or
Exceptions, which will be set up in Step 6.
Note: The “BONUS” Pay Code for Hours type cannot count towards Split Hours, Attendance,
and Overtime.
Overtime
Overtime is the time an employee works that extends beyond a certain level of time set by the
company policy. Daily overtime is based on hours worked and is a way of rewarding the
employee for working more hours than a set hour value in one day. The hours that exceed the
set hour value are normally paid at a higher wage or rate.
If the “Counts Towards Overtime” box is not selected, then hours assigned to that Pay Code
will not be counted towards the Overtime qualification. If the “Counts Towards Overtime” box
is selected, then those hours will be included when processing an employee’s Overtime
qualification by checking the box. Overtime setup is defined during Step 4: Pay Class Setup.
Also, the Pay Codes you select during Step 4: Pay Class Setup will be displayed in the
Timecard Grid.
Note: The “SCK, VAC, PER, HOL, JURY, and/or BRV” Pay Codes for Hours type can count
towards attendance and/or overtime if they are selected (see table). The BONUS Pay
Code is for dollars and cannot count towards overtime, whereas the REG, OT, and DT
Pay Codes are for hours count towards overtime (see table).
If the “Download to clock” box is not selected, then Pay Codes will not be sent to the MTX-15
and/or FPT-40 terminal(s) to be used for labor transfer. A maximum of 4 Pay Codes based on
position number can be downloaded to the terminal(s).

Time Guardian Series – Setup Wizard 3-13
10. After completing the entry/selection of Pay Code information return to the Step 3: Pay Code
Setup.
Does your company have paid holidays?
Answering Yes to this question and pressing the Holidays button will give you access to the
Holiday General & Setting setup screens (see figures). Each Holiday requires a unique Name,
Date, Number of Hours and Pay Code. Comments can also be entered if desired in the
Description field. The Name and Hours fields are highlighted in yellow = must be filled.
1. Enter a name for the Holiday in the Name field [yellow required field].
2. Enter a description of the Holiday in the Description field.
3. Using the Pay Code dropdown list, assign the Pay Code that will be awarded for that
holiday.
4. Select the Type for the Holiday. The choices are Schedule or Hours. If Hours is selected,
proceed to Step 5. If Schedule is selected, proceed to Step 6.
5. Enter in the number of hours that will be awarded for the holiday [yellow required field].
6. Click on the Setting tab. The Setting tab is used to enter the date and condition definition for
the holiday.
3-14 Time Guardian Series – Setup Wizard
A formula is entered in the Date Definition and Condition tables to generate the holiday (see
next chapter for Date Definition and Condition tables).
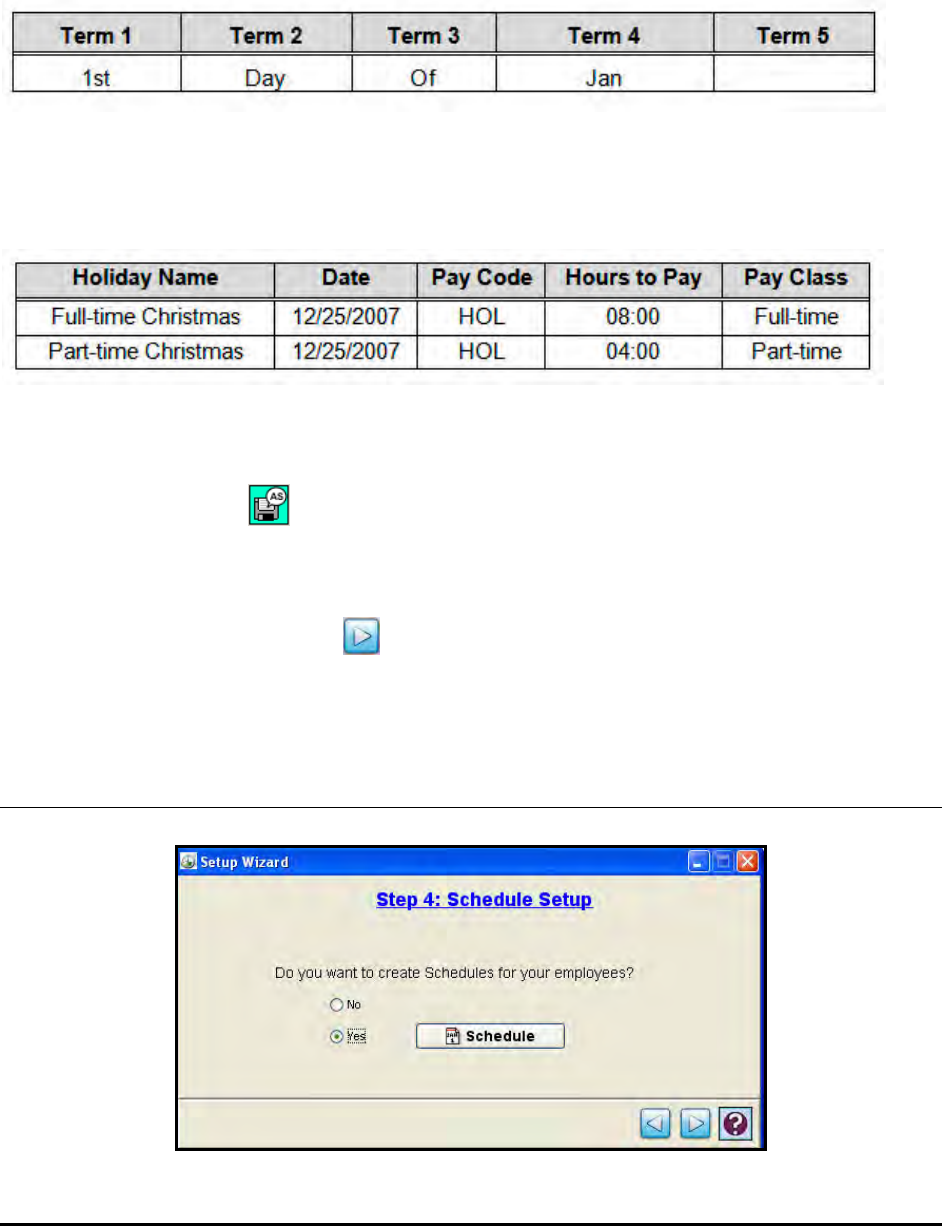
Use of a formula can eliminate the need to enter a specific date. For example, to define New
Year’s Day, select the following terms in the Date Definition table:
Once saved, the holiday must then be assigned to a Pay Class. The table below gives an
example of a holiday that occurs on the same date but assigns different hours based on the Pay
Class.
An unlimited number of holidays can be added, and the custom holiday rule-based setting (see
figure) provides for holiday changes each year, so they do not have to be updated annually.
Note: Use the Save As button to make a copy of an existing holiday with a different
name.
7. After completing the Pay Code and Holiday entry/selection of information for Step 3: Pay
Code Setup, click on the Next button to advance to Step 4: Schedule Setup.
Step 4: Schedule Setup Wizard [Optional Wizard Setup Step]

Time Guardian Series – Setup Wizard 3-15
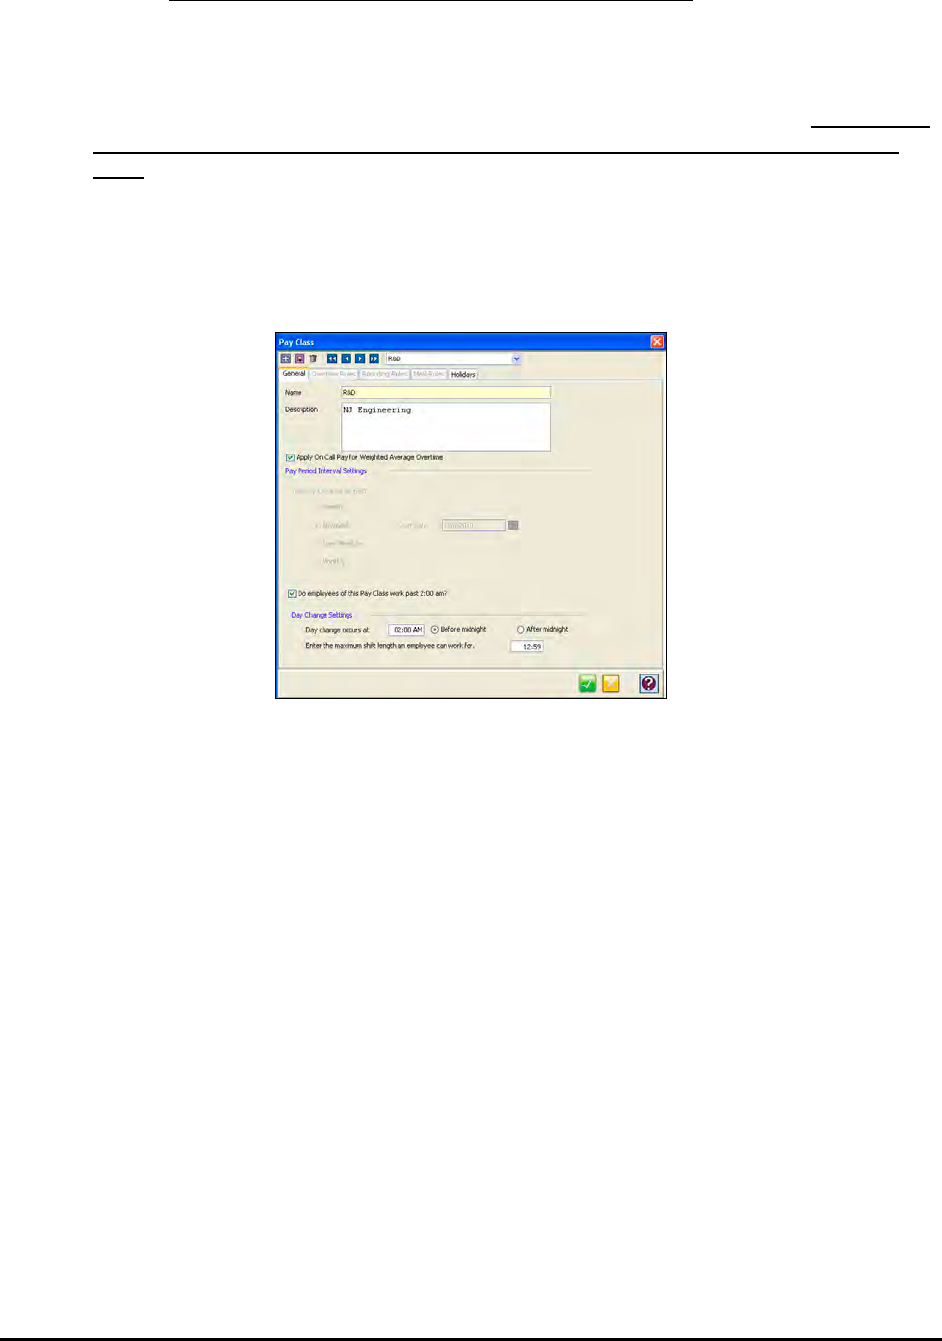
Do you want to create schedules for your employees?
Click Yes and press the Schedule button to define at least 1 Schedule if you are scheduling
employees. The default is No Schedule, which is automatically assigned to all employees when
the company schedules employees. When you press the Schedule button the following screen
will appear:
Note: Employees can only be assigned to 1 schedule/day and schedules cannot overlap.
1. Create a new Schedule. You will be required to enter a Name.
2. Click on the Add button and a row will appear to define the new schedule. Select the Start
Day from the dropdown choices of Current Day, 1 days before, or 1 days after. Click in the
End Day field and select from the End Day choices of; Current Day, 1 day after, 2 days
after, or 3 days after. The Start and End Days define when a schedule will run (start) to
(end).
3. Enter a Start Time and End Time in the appropriate fields of the Week for the Start and End
times of the schedule. If a schedule crosses midnight, you will also be required to indicate
what day you want the punches to be applied to. This is done by selecting Previous, Next,
or Current for the Start or End times.
4. Schedules with different Start and/or End times can also be created. This is done by first
creating a basic schedule and entering the days with common Start and/or End times.
Select the Add button to add another row for the schedule. For example, the standard 8am-
5pm shift Mon – Fri might have a different start and end time on Sat and Sun.
5. After completing the entry/selection of information for Step 4: Schedules Setup, click on the
Next button to advance to Step 5: Pay Class Setup.
Step 5: Pay Class Setup Wizard [Required Wizard Setup Step]
3-16 Time Guardian Series – Setup Wizard
Note: Step 5: Pay Class Setup only performs basic Pay Class setup. If you are configuring
Amano Time & Attendance software with the Advanced Pay Class module activated,
i.e., Time Guardian Pro you must continue configuring Pay Class rules from the Pay
Class module in the tree view (see Advanced Pay Class, Advanced Overtime,
Advanced meal, and Advanced Rounding sections) as the Overtime Rules tab,
Rounding Rules and Meal Rules tabs will be grayed out [non-accessible]. There is NO
Custom selection in the Pay Period Interval Settings (see Pay Class module in tree
view).
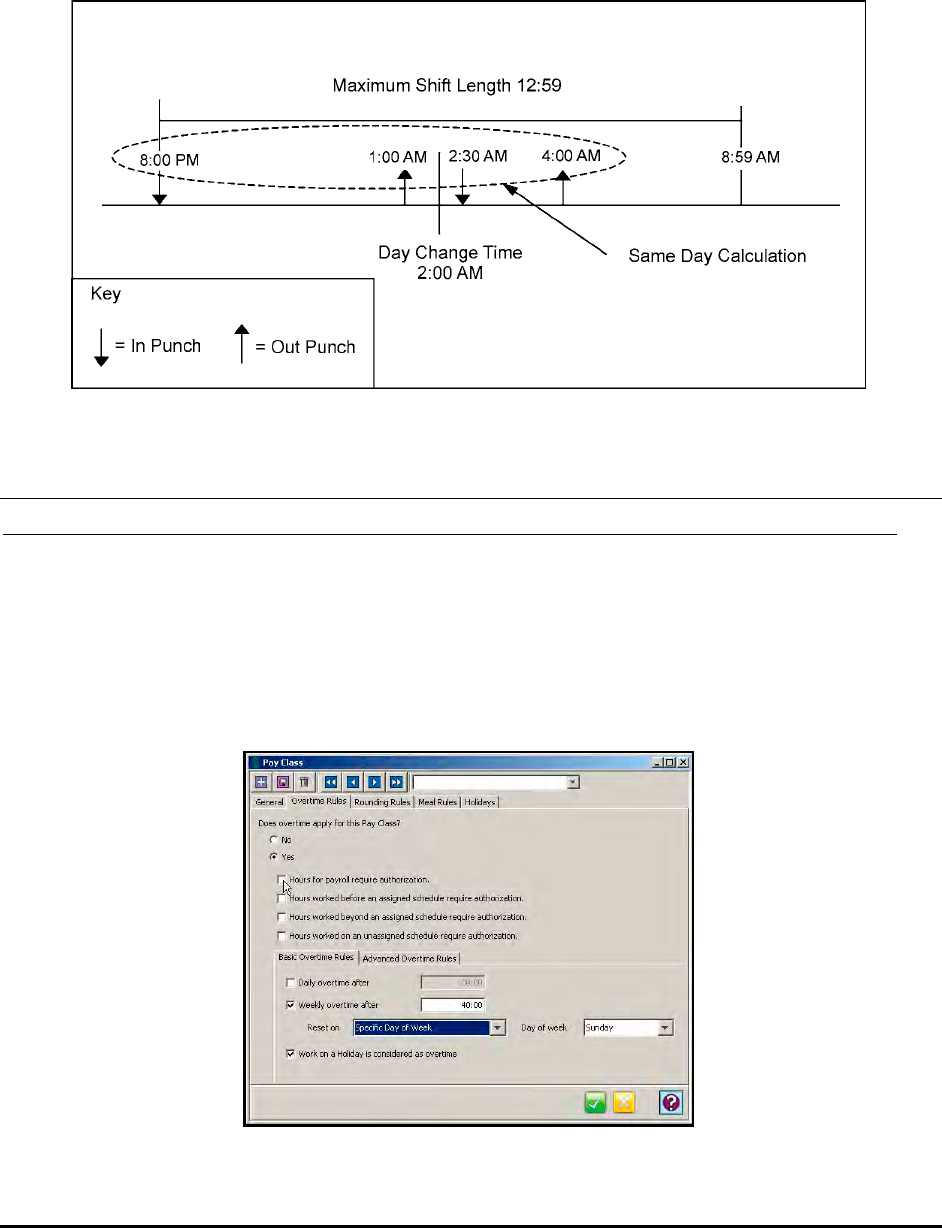
Configure your Pay Class rules
Press the Pay Class button to define the employees pay rules. The system will allow unlimited
pay policy templates. When you press the Pay Class button the following screen will appear:
1. To create a new Pay Class, you will be required to enter a Name.
2. Enter a brief description of the Pay Class in the Description field.
3. Select Apply On Call Pay for Weighted Average Overtime if On Call Pay is desired (see
Advanced Labor/Rate Module for more detailed description of Weighted Average Rate of
Pay.
4. Select the desired Pay Period Interval Setting from the following choices:
• Weekly: Employees are paid every week.
• Bi-Weekly: Employees are paid every two weeks.
• Semi-Monthly: Employees are paid twice a month.
• Monthly: Employees are paid once a month.
5. For Weekly select Day of the Week from the dropdown list. For Bi-Weekly click the down
arrow to display the calendar, and double click on the desired date to populate the field. For
semi-monthly, enter the 1st and 2nd day of the month selection (default 1st = 1, 2nd = 15). For
monthly enter the day of the month from 1 to 31.
6. Select if employees of this Pay Class work past 2:00 AM?
7. Enter the desired Day Change Settings by entering the hour when the day change occurs
and selecting “Before midnight” or “After midnight”.

Time Guardian Series – Setup Wizard 3-17
Day Change Settings should only be changed if employees are scheduled to start work
after 02:00 AM and you want those hours applied to the current day.
Midnight (00:00) marks the start of a new day. However, there are times when an employee
is scheduled to start on one day and end on another (i.e., start work at 10:00 PM Sunday
and leave work at 6:00 AM Monday).
Day Change Settings allow the Time & Attendance software to account for a midnight day-
change time and calculate the number of hours correctly, placing the punches on the
current day.
For example, using the following settings, there are two scenarios where the hours can
either be applied to Sunday or Monday.
Scenario #1
If you want the hours applied to Sunday, then Sunday becomes the Current day and the
hours from Monday are shifted backwards to Sunday.
• The following timeline example illustrates an employee punching in at 8:00 PM and
punching out at 4:00 AM.
Scenario #2
If you want the hours applied to Monday, then Sunday becomes the Previous day and the
hours from Sunday are shifted forwards to Monday.
In either scenario, the Day Change Time must be configured. The exception to this rule is
when a punch occurs after the day change time, but falls within the Maximum shift length.
The Maximum shift length (window) is the period of time that punches will be calculated for
a schedule that crosses day change time: 12 –13 hours is a recommended number for this
field. This allows all lunch or break punches to be applied to the correct schedule.
In the examples below, 2:00 AM will be used for the Day Change Time. Once defined, you
must determine if this time is to start Before or After midnight. When Before midnight is
selected, all hours from 00:00 – 2:00 AM will be recognized by the Time & Attendance
software as part of the Previous day. Anything after 2:00 AM will be applied to the Current
or New Day.
When After midnight is selected, all hours from 00:00 – 2:00 AM will be seen by the Time &
Attendance software as part of the Current day and anything beyond 2:00 AM will be
applied to the Next day.
Examples of “Before” and “After” midnight settings:
2:00 AM Before Midnight means that all punches up to 2:00 AM will be applied to the
Previous day and any punch after 2:00 AM will be applied to the Current day.
2:00 AM After Midnight means that all punches up to 2:00 AM will be applied to the
Current day and any punch after 2:00 AM will be applied to the Next day.
10:00 PM Before Midnight means that all punches up to 10:00 PM will be applied to the
Previous day and any punch after 10:00 PM will be applied to the Current day.
10:00 PM After Midnight means that all punches up to 10:00 PM will be applied to the
Current day and any punch after 10:00 PM will be applied to the Next day.
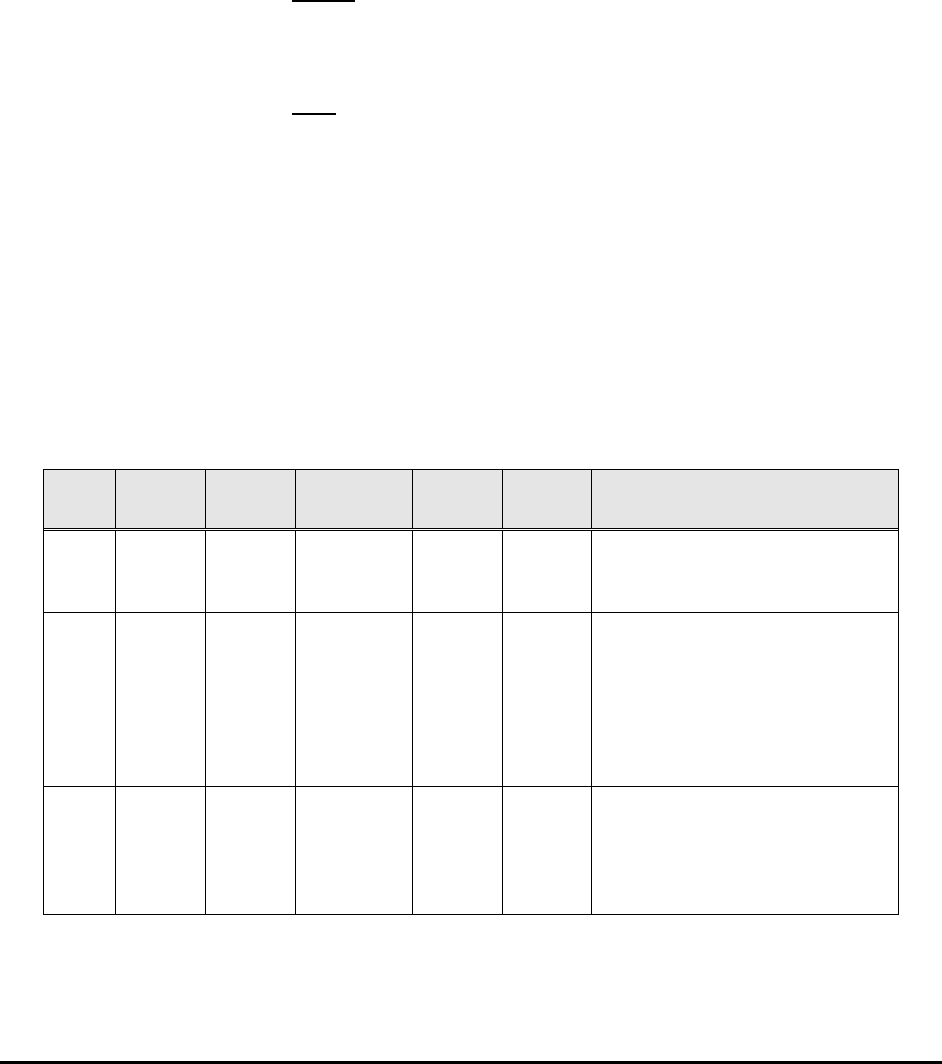
• The day change time is set to 2:00 AM.
• The Day Change is configured to Before Midnight, with a maximum shift length of 12
hours and 59 minutes.
3-18 Time Guardian Series – Setup Wizard
In the example, even though two of the punches (2:30 AM and 4:00 AM) occur after day
change time, they are within the maximum shift length and are calculated on the same day
(the day the IN punch occurs).
8. Enter the maximum shift length an employee can work for.
Overtime Rules
1. Click on the Overtime Rules tab and the Overtime Rules screen will appear (see figure).
This tab is used to define the basic daily and weekly overtime rules for this Pay Class. The
Time & Attendance software was designed to accommodate a wide variety of overtime rules
[activation of the Advanced Overtime module adds additional capability such as Overtime
Execution order, Daily Overtime template, Consecutive and non-consecutive template, etc.].
You can cancel all authorized overtime by clicking No to the question; Do you want to
authorize your employee's hours?
Note: If the Advanced modules are activated the Overtime Rules tab will be non-accessible.
2. Select Yes if overtime applies to this Pay Class.
Time Guardian Series – Setup Wizard 3-19
3. Select authorization if the company schedules the employees. By default the following
options are unchecked;
Hours for payroll require authorization – when checked a user with Admin or Payroll
privileges (see Step 9: Login) needs to approve employees hours in the timecard before
they can be passed to the payroll. However, the hours will still be calculated. (see example
timecard and table).
Note: The following three schedule authorizations will not be enabled if no schedule created.
Hours worked before an assigned schedule require authorization – when checked a
user with Admin or Payroll privileges (see Step 9: Login) needs to approve employees hours
in the timecard that occur before a schedule before they can be calculated (see example
table).
Hours worked beyond an assigned schedule require authorization – when checked a
user with Admin or Payroll privileges (see Step 9: Login) needs to approve employees hours
in the timecard that occur after
Day
a schedule before they can be calculated (see example
table).
Hours worked on an unassigned schedule require authorization – when checked a user
with Admin or Payroll privileges (see Step 9: Login) needs to approve employees hours in
the timecard that occur during non scheduled time before they can be calculated (see
example table).
For example, employee Bill Jackson is an engineer who is assigned to a schedule to work
Monday to Friday from the hours of 08:00 (8:00 AM) to 17:00 (5:00 PM) with an hour for lunch
(does not punch for lunch) and there is no punch rounding. The following table for employee Bill
Jackson utilizes a few options to illustrate how time calculations would be affected by
authorization. Option 1 = No authorization for before, after, or unassigned hours is checked
(enabled); Option 2 = Authorization is required for before and after; and Option 3 =
Authorization required for unassigned hours.
In
Punch OUT
Punch Assigned
Schedule Option Total
Hrs. Timecard Punches
Mon 07:30 17:30 08:00
–
17:00
Option
1 9 hours All hours in timecard.
Depending on Overtime rules
potentially 1 hr OT
Tues 07:00 18:30 08:00
–
17:00
Option
2 8 hours
8 Scheduled hours reported
and authorization required for
B-Sch & A-Sch for punches to
calculated. Without
authorization, only 8 hrs paid.
With authorization, potentially
2.5 hrs OT?
Sat 10:00 14:00 No
Schedule Option
3 0 hours
No hours in timecard.
Unscheduled hours must be
authorized. With authorization 4
hours, with potential for
counting towards OT?
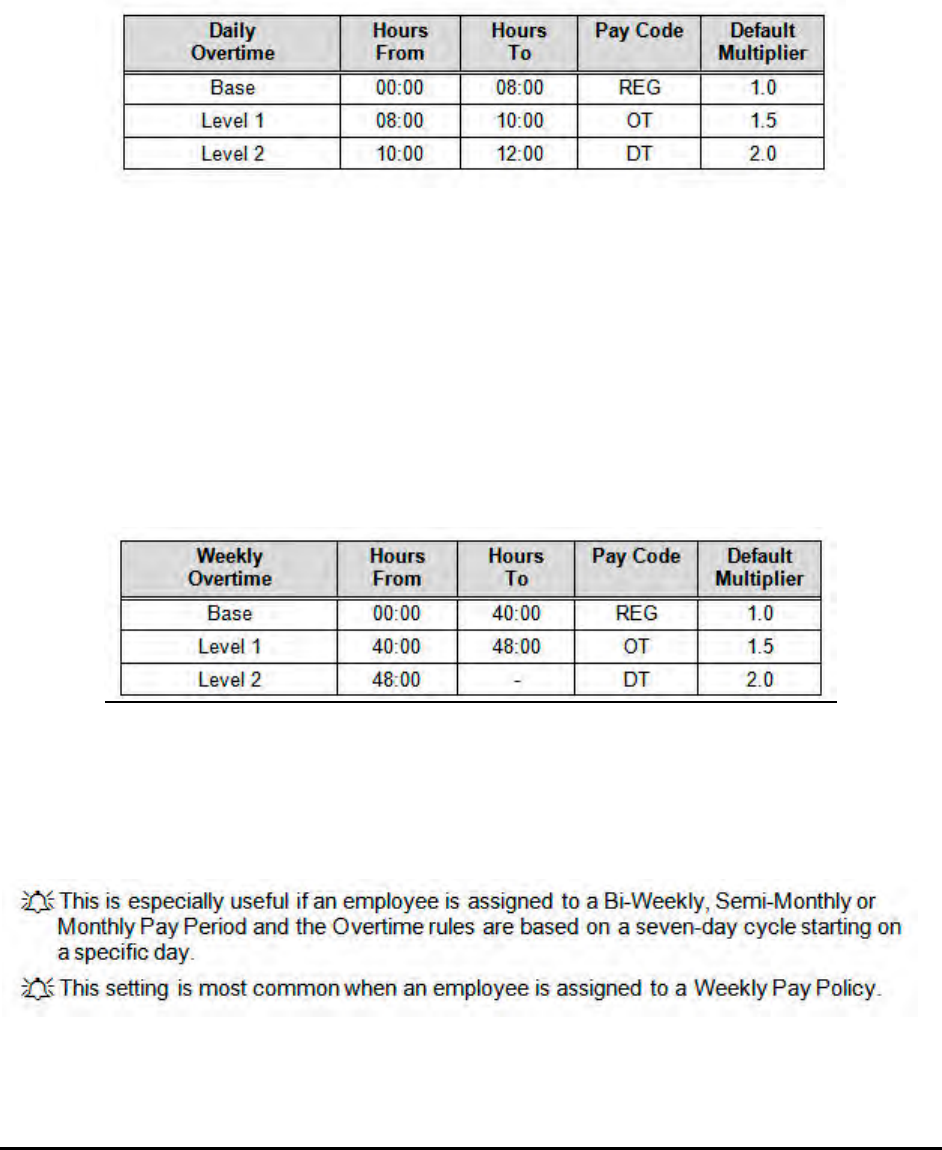
4. Select the Daily overtime after and enter the hours to award overtime after the assigned
number of hours have been worked in a day.
3-20 Time Guardian Series – Setup Wizard
Daily Overtime is the time an employee works that extends beyond a certain level of time set
by the company’s policies. Daily overtime is based on hours worked and is a way of
rewarding the employee for working more hours than a set hour value in one day. The hours
that exceed the set hour value are normally paid at a higher wage or rate.
Up to (2) levels of Daily Overtime can be used. Each level can be assigned its own
threshold limit that move the hours from one Pay Code to another. The following table
shows an example.
5. Select the Weekly overtime after and enter the hours to award overtime after the assigned
number of hours have been worked in a week.
Weekly Overtime rewards employee’s overtime hours for working more hours than a set
hour value for that particular week or pay period. The hours that exceed the set hour value
are normally paid at a higher wage than regular (REG) Pay Code hours. Weekly Overtime is
set in the Weekly Overtime window, which is accessed by selecting the Weekly Overtime
within the Setup Wizard Pay Class step.
Up to (2) levels of Weekly Overtime can be used. Each level can be assigned its own
threshold limit that move the hours from one Pay Code to another. See the following table
for an example.
6. Select the Reset Options for Weekly overtime after for; Specific Day of Week by selecting
the day of the week from the dropdown, select Pay Period Day of Week Start to auto reset
on every week on the pay period start day, or select Pay Period to auto reset every pay on
start date.
7. Select if Worked on Holiday is considered as overtime, else any holiday dates will not be
counted towards overtime based on the other overtime rules.
Time Guardian Series – Setup Wizard 3-21
Note: This selection will be disabled if you selected that your company does not pay for
Holidays (see Step 3: Pay Code)
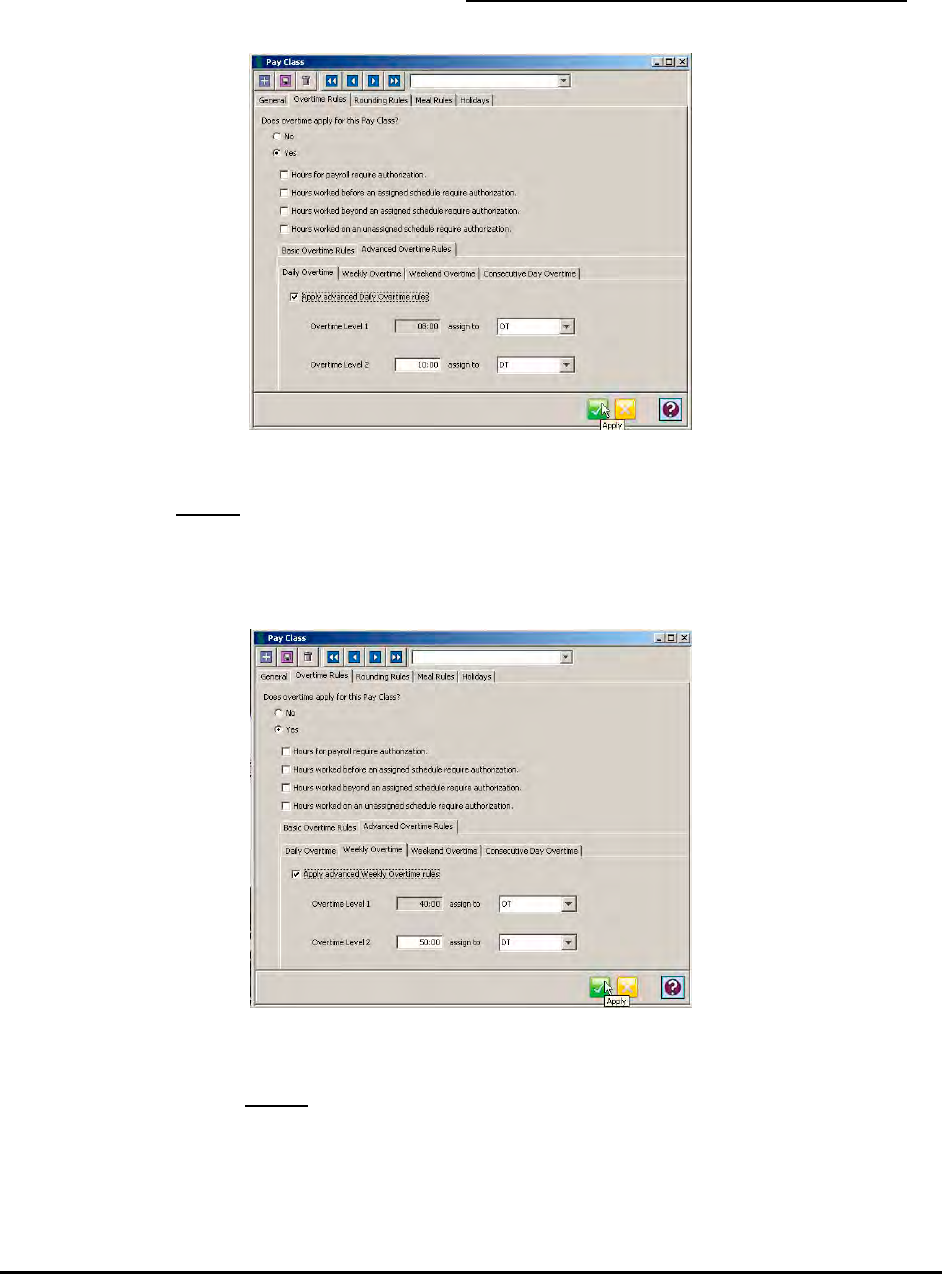
8. Select the Advanced Overtime Rules tab (only active if Basic Daily Overtime is checked) to
select advanced daily overtime rules (see figure).
9. Click the Apply advanced Daily Overtime rules box, enter the hour amount to work before
applying, and assign to a Pay Code of OT or DT. If DT is selected for Overtime Level 1, OT
Level 2 will be disabled.
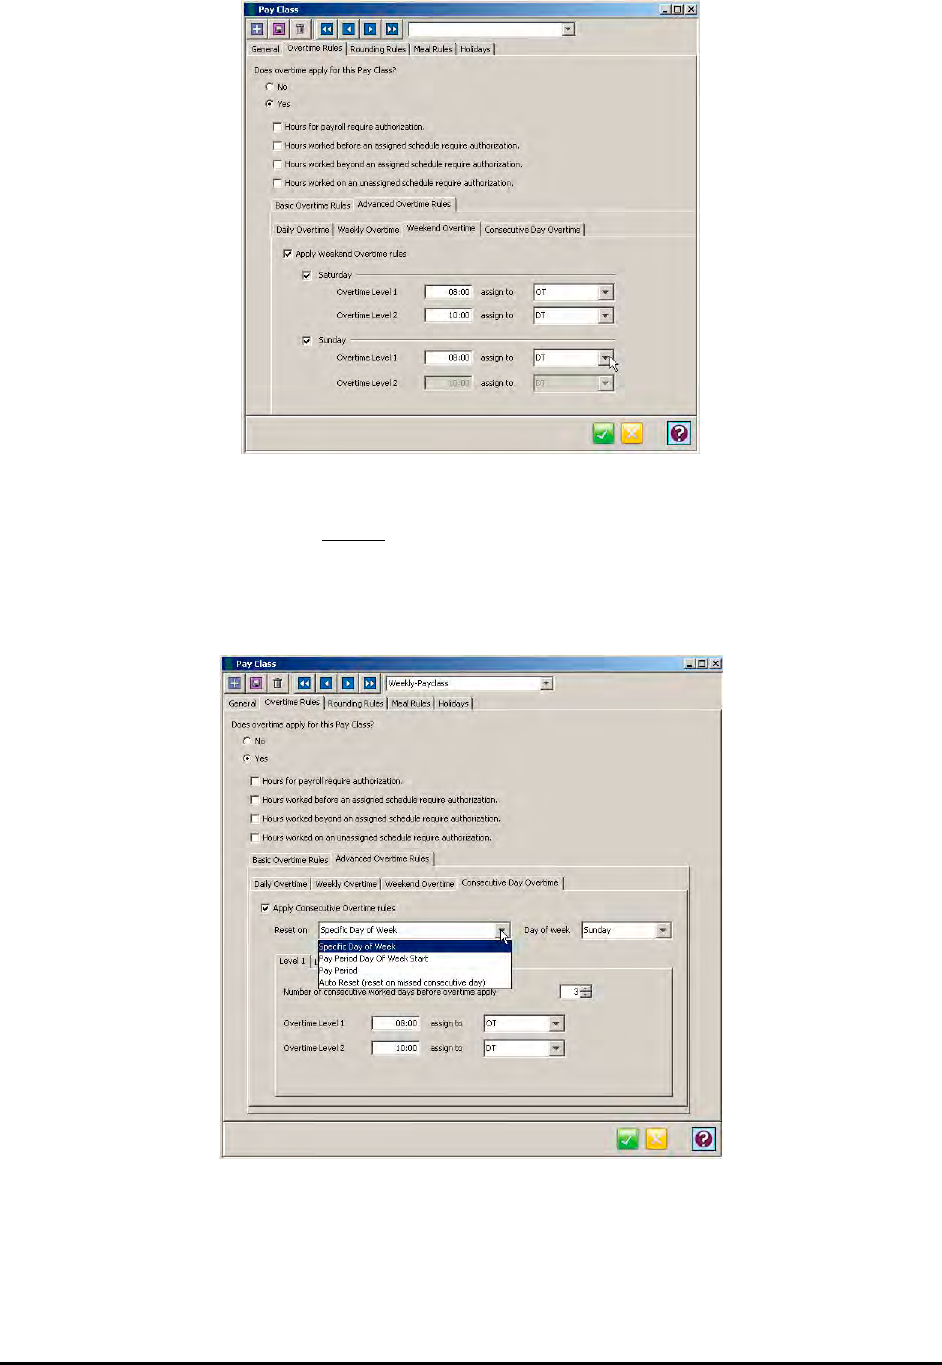
10. From the Pay Class Advanced Overtime Rules, click on the Weekly Overtime tab to define
the Weekly Overtime (see figure).
11. Click the Apply advanced Weekly Overtime rules box, enter the hour amount to work
before applying, and assign to a Pay Code of OT or DT. If DT is selected for Overtime Level
1, OT Level 2 will be disabled.
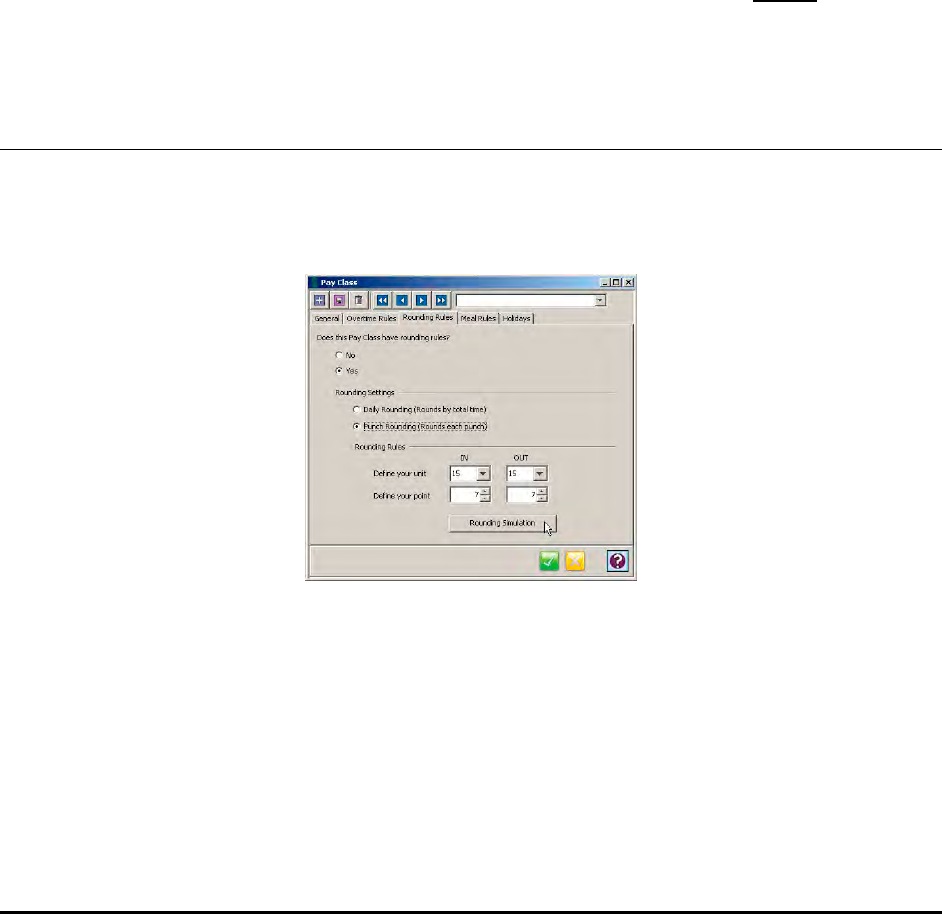
12. From the Pay Class Advanced Overtime Rules, click on the Weekend Overtime tab to
define the Weekend Overtime (see figure).
3-22 Time Guardian Series – Setup Wizard
13. Click the Apply Weekend Overtime rules box, enter the Saturday & Sunday hour amount
to work before applying, and assign to a Pay Code of OT or DT. If DT is selected for
Overtime Level 1, OT Level 2 will be disabled.
14. From the Pay Class Advanced Overtime Rules, click on the Consecutive Day Overtime tab
to define the Consecutive Day Weekend Overtime (see figure).
Consecutive Day Overtime awards overtime based on the qualifying number of consecutive
days worked. If an employee fails to work the number of consecutive days needed to
qualify, no overtime is awarded.
Time Guardian Series – Setup Wizard 3-23
Up to two levels of overtime can be set for Consecutive Day Overtime calculations. Each
level consists of two settings, Consecutive Day Overtime 1 and 2. To enable this option,
click on the Consecutive Day Overtime checkbox.
For Level 1, select the number of consecutive days (up to 7), then enter the number of
hours that must be worked and assign the pay code to be awarded for each setting
(Consecutive Day Overtime 1 and 2). If Consecutive Day Overtime 1 is to be used for all
hours worked, 00:00 must be entered in the hour’s field for the corresponding day and the
overtime hours awarded must be assigned to the OT or OT2 pay code.
For Level 2, select the number of consecutive days (up to 7), then enter the number of
hours that must be worked and assign the pay code to be awarded for each setting
(Consecutive Day Overtime 1 and 2). If Consecutive Day Overtime 1 is to be used for all
hours worked, 00:00 must be entered in the hour’s field for the corresponding day and the
overtime hours awarded must be assigned to the OT or OT2 pay code.
15. Select Yes to Apply Consecutive Overtime rules to enable rules. Then select when to reset
Weekly Overtime.
16. Enter the Saturday & Sunday hour amount to work before applying, and assign to a Pay
Code of OT or DT. If DT is selected for Overtime Level 1, OT Level 2 will be disabled.
Rounding Rules
Note: If the Advanced modules are activated the Rounding Rules tab will be non-accessible.
1. Click on the Rounding Rules tab and the Rounding Rules screen will appear (see figure).
This tab is used to define the basic rounding rules for this Pay Class.
2. Select Yes to enable rounding rules for this Pay Class, and select rounding settings for
either Daily Rounding or Punch Rounding. For Daily Rounding all IN and OUT punches
for a day will be rounded with Unit/Point. For Punch Rounding, all punch pair hours will be
rounded with Unit/Point.
Rounding was created so that employers could define rules that would allow employees’
punched time to be rounded to a defined unit. The time that the employees’ punches move
forward or backward is based on a defined point. This allows all of the hours to be better
managed for payroll purposes because rounding moves an employee’s punches [IN/OUT]
or daily [hours] to an even amount to make it easier for calculations.
3-24 Time Guardian Series – Setup Wizard
The Time & Attendance software allows you to apply the defined Unit and Point to individual
punches (Punch Rounding) or the daily total of hours worked by an employee (Daily
Rounding). For Punch Rounding, you must specify the Unit and Point individually for both
the IN and OUT punches (a punch pair). For Daily Rounding just the total amount of time for
the day is rounded.
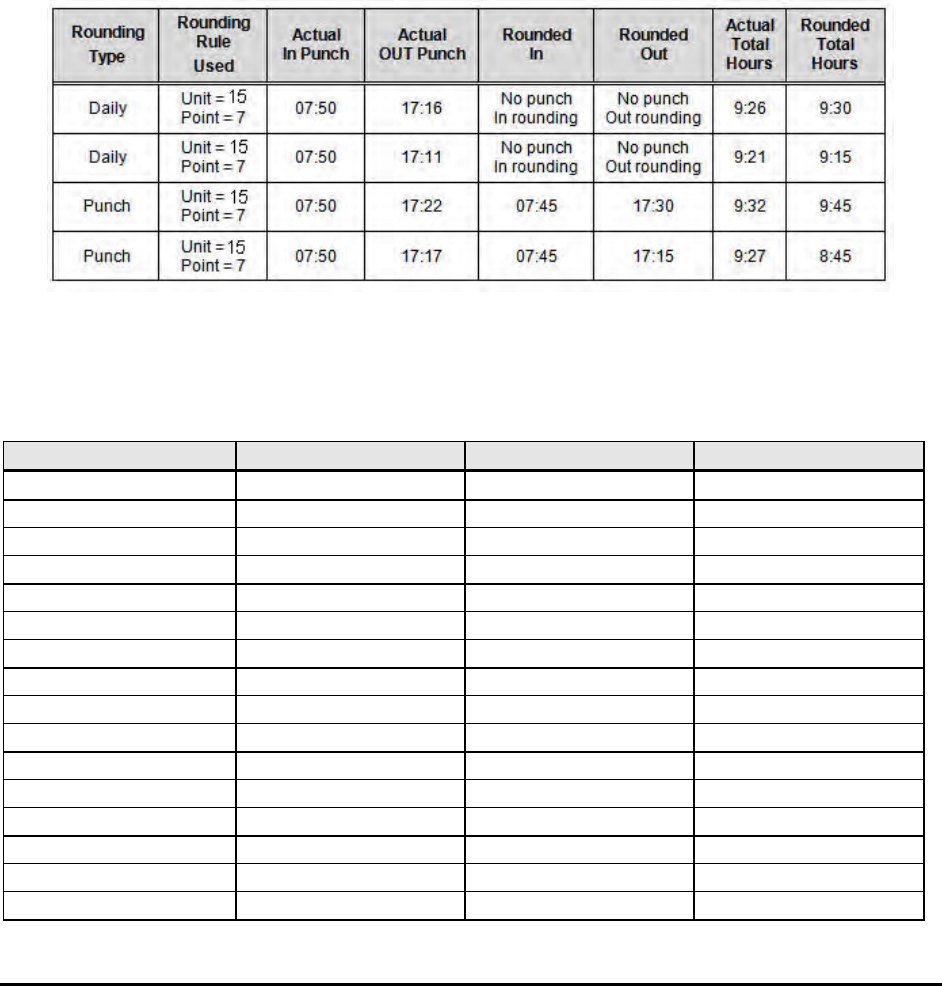
A Time Simulation tool has been included on the Overtime Rules screen to test your
settings. For example, employee Bill Jackson is displayed in the following table using the
same rounding formula of Unit = 15 and Point = 7 for 2 different scenarios (Daily and
Punch Rounding) with 2 different times for punching put.
The following example illustrates the difference for an employee who normally works from
08:00 to 17:00 with no time off for lunch each day having his time being calculated with Daily
Rounding (which rounds by total time) versus Punch Rounding (which rounds by each punch –
punch pairs).
The following example table is provided to give you a visual example (similar to the Rounding
Simulator) of where a defined Unit starts and ends. The Time & Attendance software only
allows the Unit to be one of the following numbers: 1, 3, 6, 15 or 30. Selecting 1 would be
minute to minute, thus no example is shown.
3 Unit 6 Unit 15 Unit 30 Unit
00:00 (First Unit Start) 00:00 (First Unit Start) 00:00 (First Unit Start) 00:00 (First Unit Start)
00:01 00:01 00:01 00:01
00:02 00:02 00:02 00:02
00:03 (Next Unit Start) 00:03 00:03 00:03
00:04 00:04 00:04 00:04
00:05 00:05 00:05 00:05
00:06 (Next Unit Start) 00:06 (Next Unit Start) 00:06 00:06
00:07 00:07 00:07 00:07
00:08 00:08 00:08 00:08
00:09 (Next Unit Start) 00:09 00:09 00:09
00:10 00:10 00:10 00:10
00:11 00:11 00:11 00:11
00:12 (Next Unit Start) 00:12 (Next Unit Start 00:12 00:12
00:13 00:13 00:13 00:13
00:14 00:14 00:14 00:14
00:15 (Next Unit Start) 00:15 00:15 (Next Unit Start) 00:15
Time Guardian Series – Setup Wizard 3-25
3 Unit 6 Unit 15 Unit 30 Unit
00:16 00:16 00:16 00:16
00:17 00:17 00:17 00:17
00:18 (Next Unit Start) 00:18 (Next Unit Start) 00:18 00:18
00:19 00:19 00:19 00:19
00:20 00:20 00:20 00:20
00:21 (Next Unit Start) 00:21 00:21 00:21
00:22 00:22 00:22 00:22
00:23 00:23 00:23 00:23
00:24 (Next Unit Start) 00:24 (Next Unit Start) 00:24 00:24
00:25 00:25 00:25 00:25
00:26 00:26 00:26 00:26
00:27 (Next Unit Start) 00:27 00:27 00:27
00:28 00:28 00:28 00:28
00:29 00:29 00:29 00:29
00:30 (Next Unit Start) 00:30 (Next Unit Start) 00:30 (Next Unit Start) 00:30 (Next Unit Start)
This pattern will repeat itself throughout the entire day.
Meal Rules
Note: If the Advanced modules are activated the Meal Rules tab will be non-accessible.
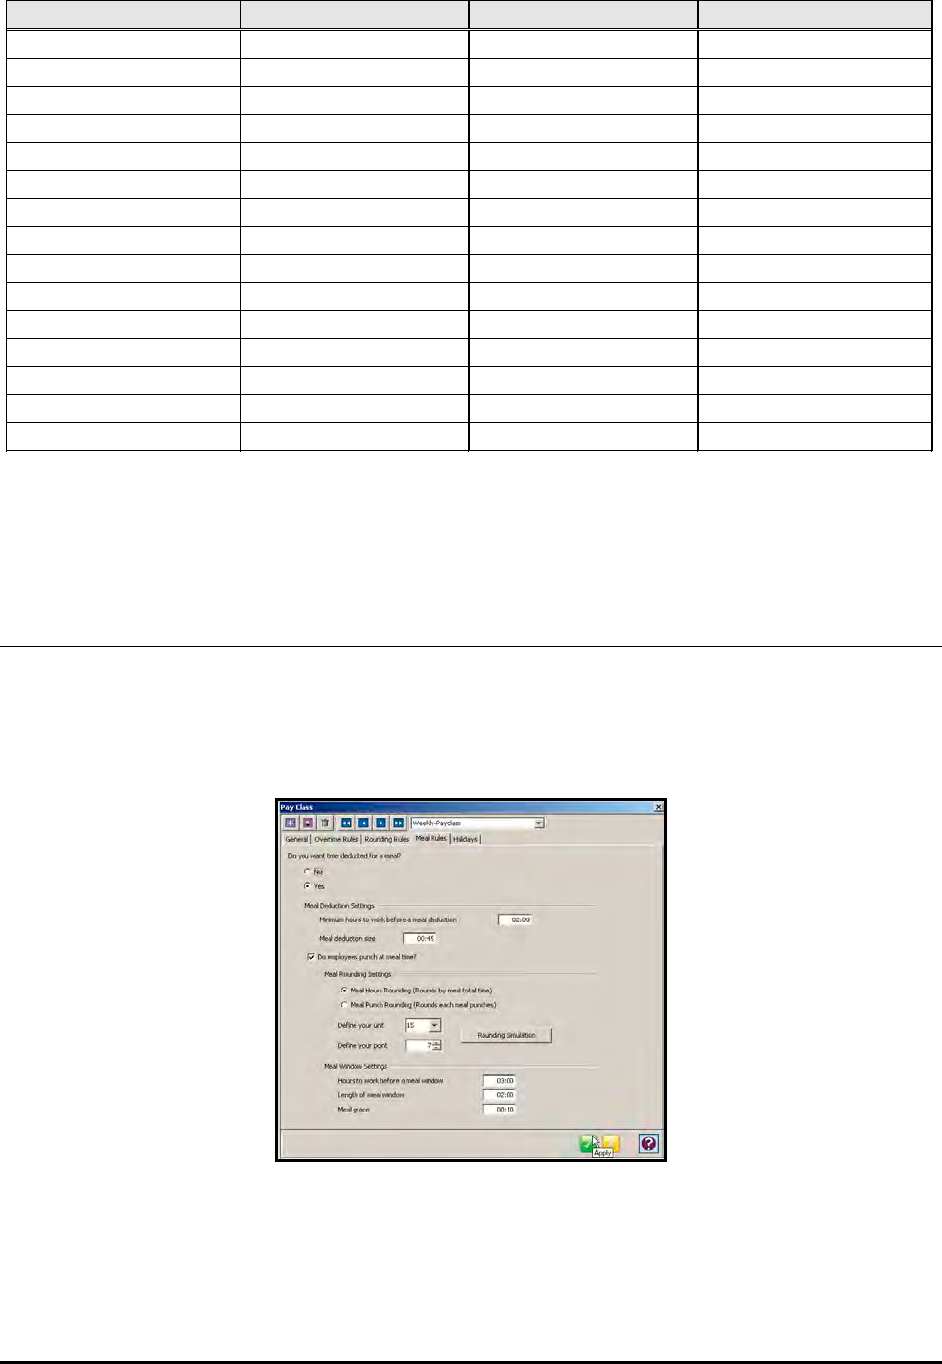
1. Click on the Meal Rules tab and the Meal Rules screen will appear (see figure). This tab is
used to define the basic meal rules for this Pay Class.
The Meal Rules tab will allow you to define the Meal rules for a Pay Class of employees.
Start by selecting Yes to the question "Do you want time deducted for a meal?" Next enter
the Minimum hours that an employee must work before the Meal rule will be applied,
followed by the length of the Meal deduction.
3-26 Time Guardian Series – Setup Wizard
Once a meal deduction is defined, you have the option of whether the employee will punch
out during the meal period. If so, you must define whether rounding will apply to these meal
period punches. When an employee punches IN and OUT for their meal, the window that
these punches occur in must be defined so that the meal will not be deducted twice. To
prevent meal punches from being deducted twice, check the box next to the question “Do
employees punch at meal time?”
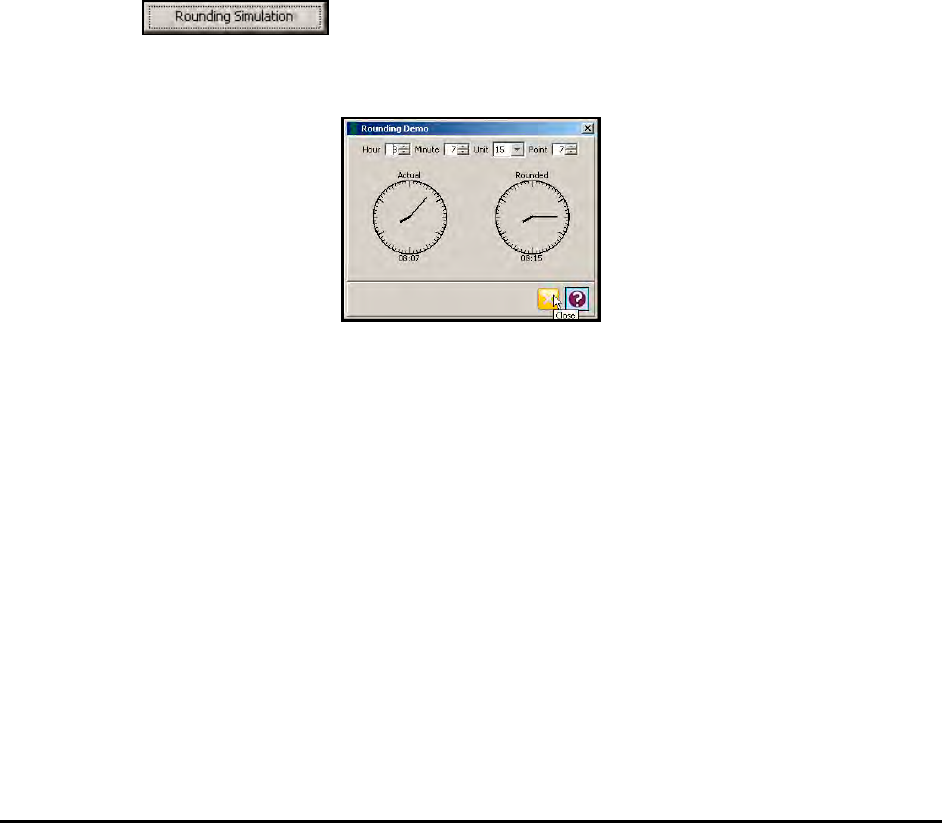
The concepts for meal rounding are the same as those used in the Rounding Rules tab. If
rounding is to be used for meal punches, enter the desired Unit and Point. You must also
enter the number of hours an employee must work before the meal period in the “Hours to
work before start of meal window” field.
For example, if the scheduled start time is 9:00 AM, and the Hours to work is set to 3:00,
then the meal window for this employee would start at 12:00 PM. If the scheduled start time
is 7:00 AM, and the hours to work is set to 3:00, then the meal window for this employee
would start at 10:00 AM.
Enter the Length of Meal window. This is the length of time between an employee's meal
punches that will be applied toward the meal rule.
Enter in the Meal Grace. This is the number of minutes that an employee can return late
from a meal before additional time is deducted.
Note: If you wish to visualize the properties of Rounding, view the Rounding Demo by clicking
on the button on the Pay Class Rounding Rules and Meal Rules
screens from Setup Wizard for Pay Class. The following Rounding Demo view will
appear:
Clicking in the dropdown boxes for Hour and Minute will set the actual time clock display,
while clicking in the dropdown boxes in Unit and Point will enter the rounding rules. This
presents a real time visual display of actual time versus rounded time.
The following example illustrates how the Meal Rules tab from Pay Class can provide control of
time utilized for meals by providing such items as;
• Auto meal deduction
• Normal meal time
• Meal rounding settings
• Meal punching with grace time
A Time Simulation tool has been included on the Meal Rules screen to test your settings. For
example, hourly employee Bill Jackson is displayed in the following table using the same
rounding formula of Unit = 15 and Point = 7 with various scenarios for meal rules. For this
example a normal meal time = 45 minutes.
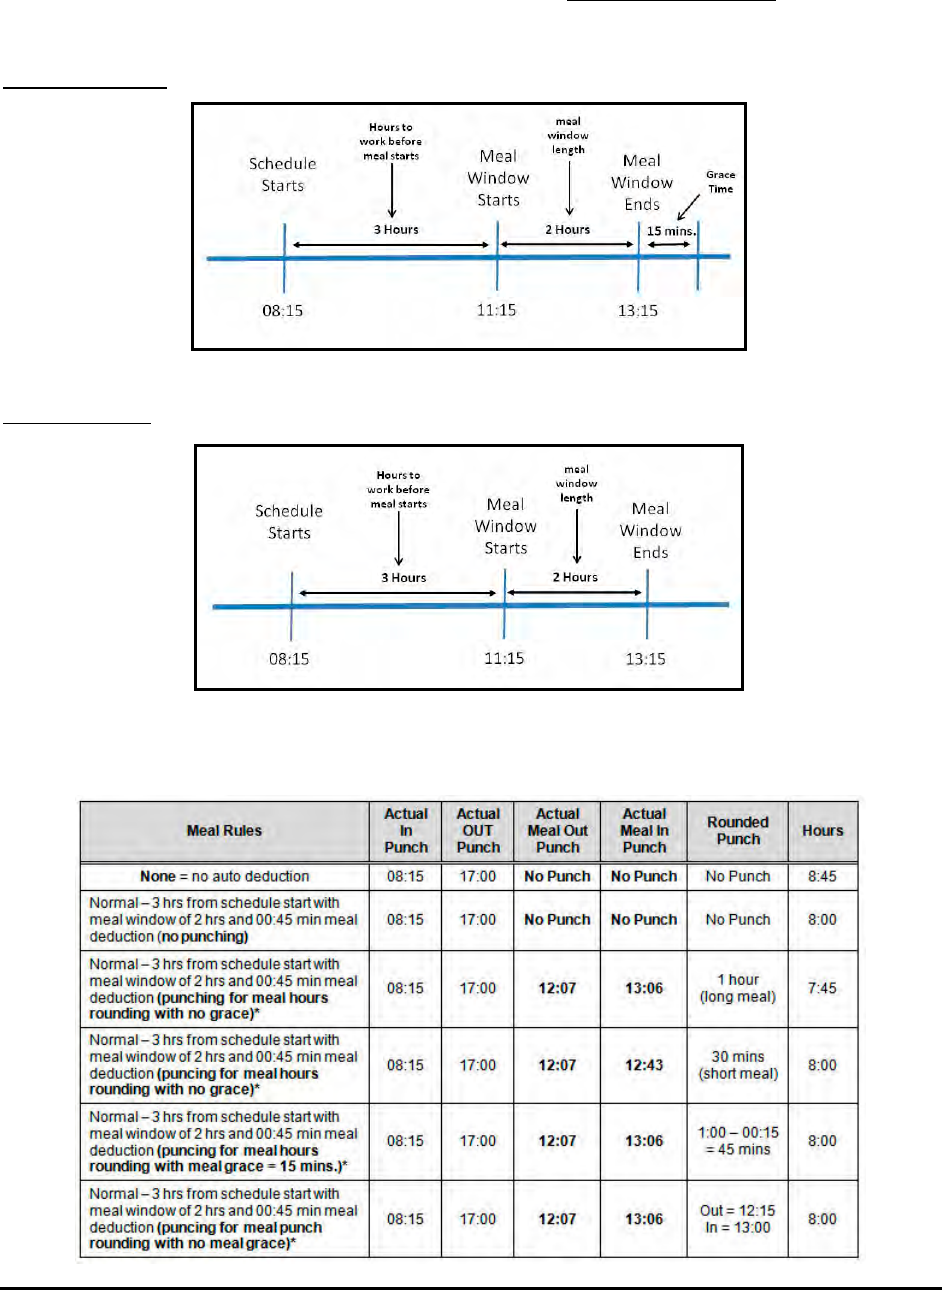
Time Guardian Series – Setup Wizard 3-27
* Note: In the following example, the Hours to work before a meal = 3:00 hours, and the meal
window length is set to 2:00 hours with a schedule of 08:15 to 17:00 with 45 minutes
for lunch. So employee Bill Jackson has met the window requirements for punching
Out and In for lunch of 11:15 to 13:15. This will prevent meal punches from being
deducted twice because he was within the meal window/.
With Meal Grace
No Meal Grace
For the following example the employee has a regular schedule of working from 08:15
to 17:00.
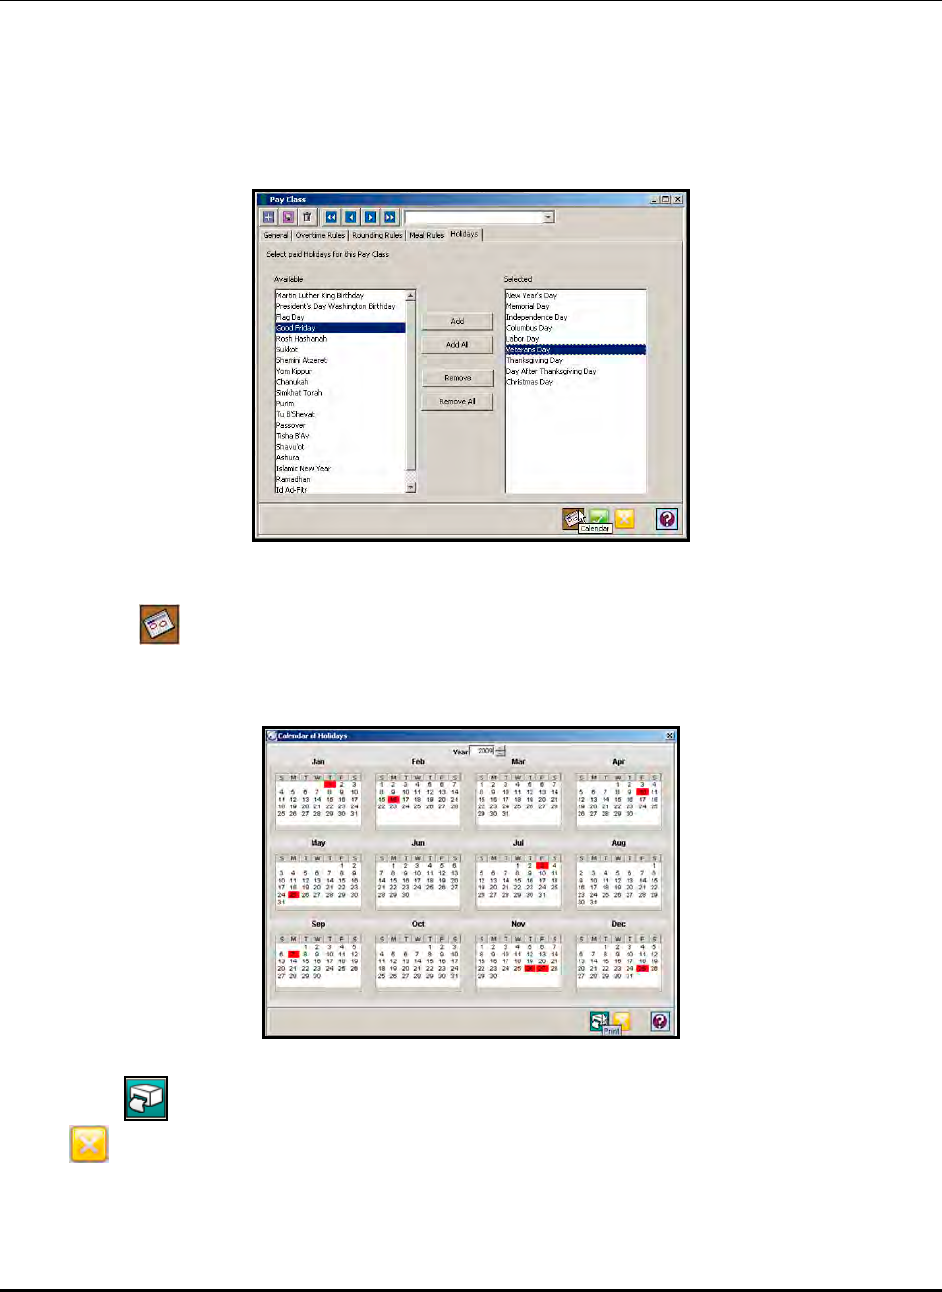
3-28 Time Guardian Series – Setup Wizard
Holidays
1. From the Pay Class screen, click on the Holidays tab and the Pay Class Holidays screen
will appear (see figure). This tab is used to assign pre-defined Holidays to a Pay Class.
Note: The tab will not be enabled if you selected No in Step 3: Pay Code Setup for “Does your
company have paid Holidays?”
The Holidays assigned to a Pay Class can be displayed in calendar format by clicking on the
Calendar button. This button is activated when at least one Holiday is assigned to the
Pay Class. The Year view (see figure) is used to see the current, previous, or following
year’s scheduled holidays.
Click on the icon too print the displayed Holiday calendar, and to close the calendar, click
on the button.
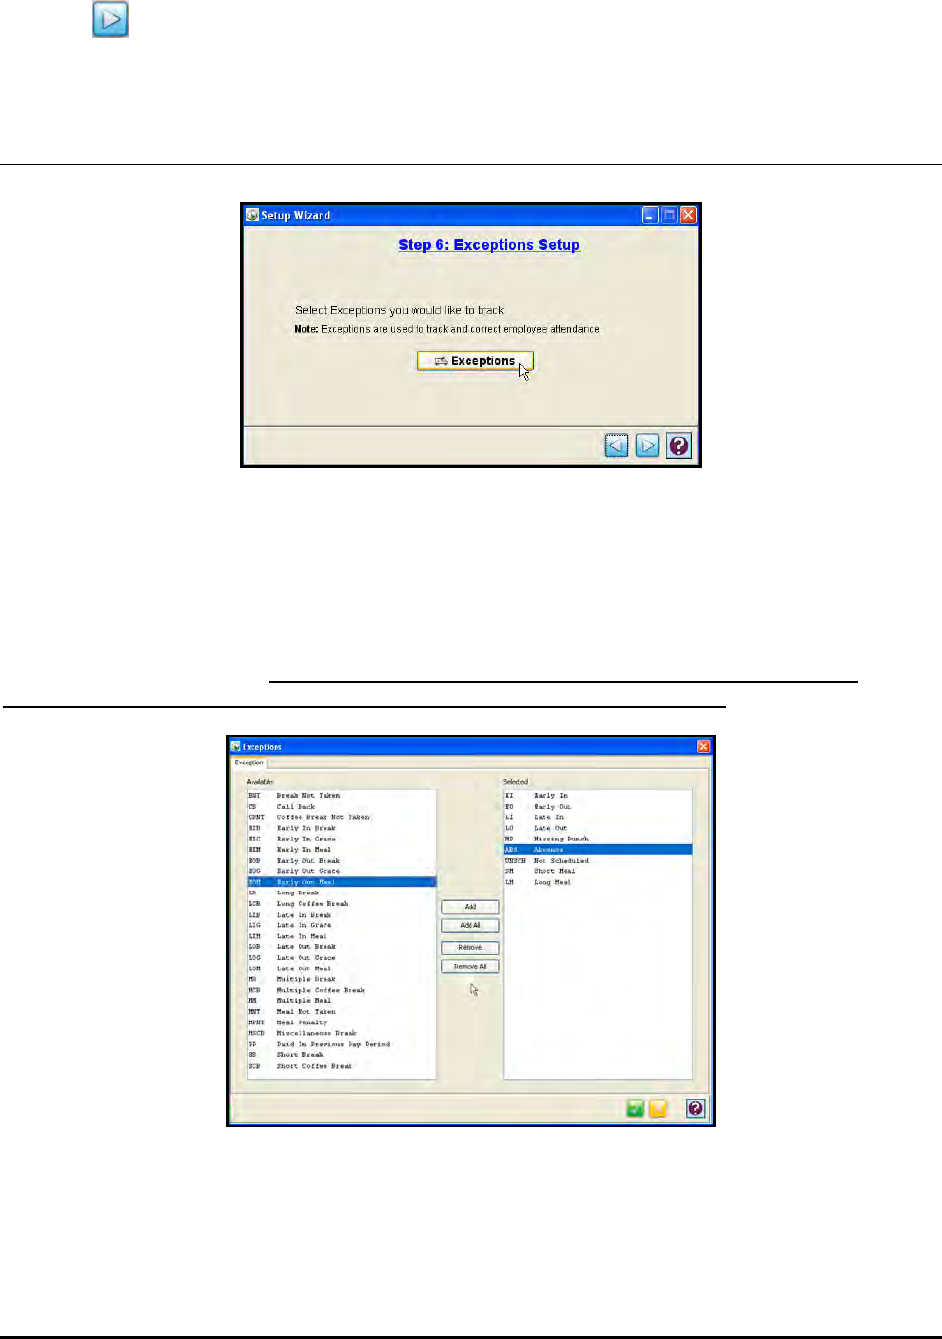
Time Guardian Series – Setup Wizard 3-29
2. After completing the entry/selection of information for Step 5: Pay Class Setup, click on the
Next button to advance to Step 6: Exception Setup.
Step 6: Exception Setup Wizard [Optional Wizard Setup Step]
Select Exceptions you would like to track
Press the Exceptions button to select from 9 predefined exceptions.
Exception Setup allows you to select whether or not to track differences in the time that an
employee was scheduled and the actual time worked. The Time & Attendance software has
nine (9) standard Exceptions which are located in the “Selected” list that can be moved to the
“Available” list (see figure). The default is all exceptions selected. However, activation of
advanced modules can add up to an additional 26 Exceptions (see figure).
1. To add an Exception, highlight the desired Exception in the Available list and click on the
Add button. To select all the listed Exceptions, click on the Add All button. To remove an
Exception from an employee’s record, highlight the desired Exception in the Selected list
and click on the Remove button. To remove all the listed Exceptions, click on the Remove
All button.
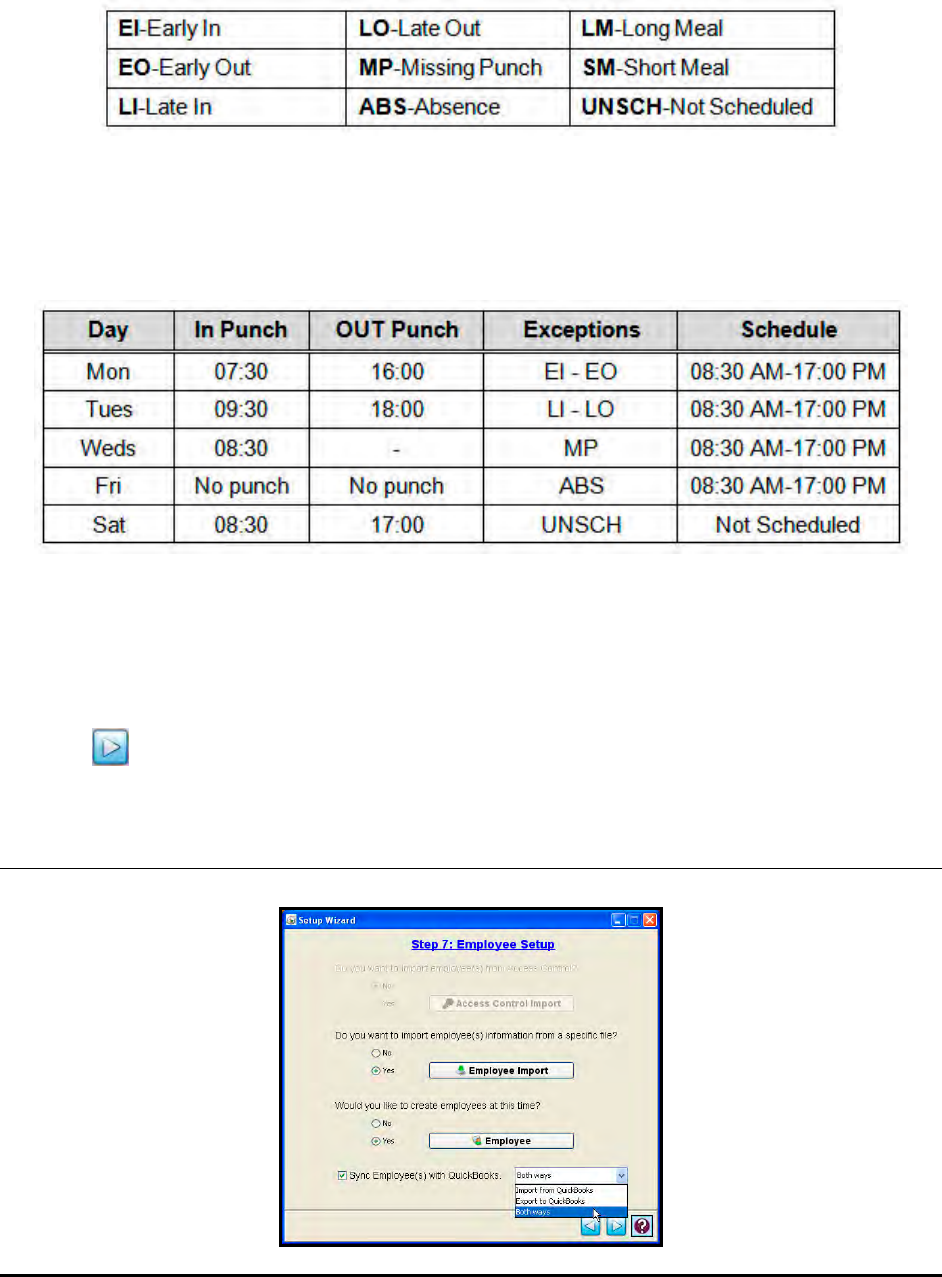
3-30 Time Guardian Series – Setup Wizard
These 9 standard exceptions are:
You may choose to track all, some, or none of these exceptions. The table below gives an
example of the exceptions that would be displayed for an employee who was assigned to an
08:30 AM to 17:00 PM schedule. These Exceptions are based on the recorded IN and OUT
punches.
In the example above an employee has a schedule for Monday through Friday, and worked on
Saturday, so the UNSCH exception would be displayed indicating that no schedule was found
for that day.
2. After completing the entry/selection of information for Step 6: Exception Setup, click on the
Next button to advance to Step 7: Employee Setup.
Step 7: Employee Setup Wizard [Required Wizard Setup Step]
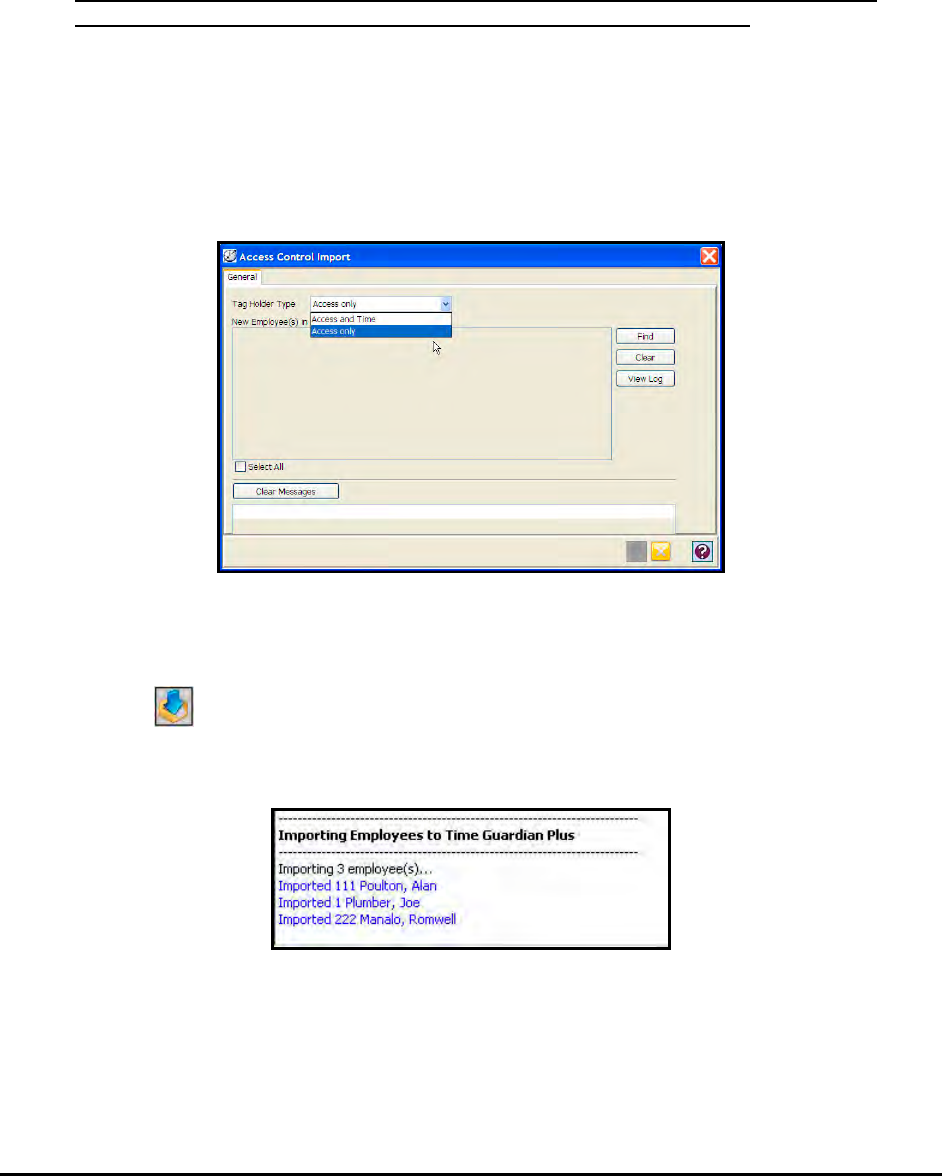
Time Guardian Series – Setup Wizard 3-31
Do you want to import employees from Access Control?
Answer Yes to this question if you want to use this built-in import feature. This feature allows
you to import Time and Attendance employee information from the Access Control database
directly into the Time & Attendance software.
Note: This feature is only active if you selected in Step 1: General Setup Yes to integrate
Access Control. Also, the Access Control module has to be activated.
1. To use this feature, select the Tag Holder Type from the dropdown menu choices of Access
and Time or Access only.
Note: Employees imported with the Tag Holder Type of Access only will be marked in the
Access Control database as Access and Time.
2. Press the Find button (see figure) to search for the Access Control database, you will need
to know the name and location of the import file.
Employees who cannot be imported will appear in the information message box indicated in red
with a description of why they failed to meet import criteria. Select the employees you desire
from the list of found employees by clicking in the “Select” column or check “Select All”. Press
the Run Import button and the employees will be imported into the Time Guardian database
with confirmation information appearing in the message box in blue (see figure for TG Plus
example).
Once complete, field’s specific to Time Guardian such as Schedule, Department, Wages and
Employee Type will have to be updated for the newly imported employees from Access
Control. These items can also be globally assigned.
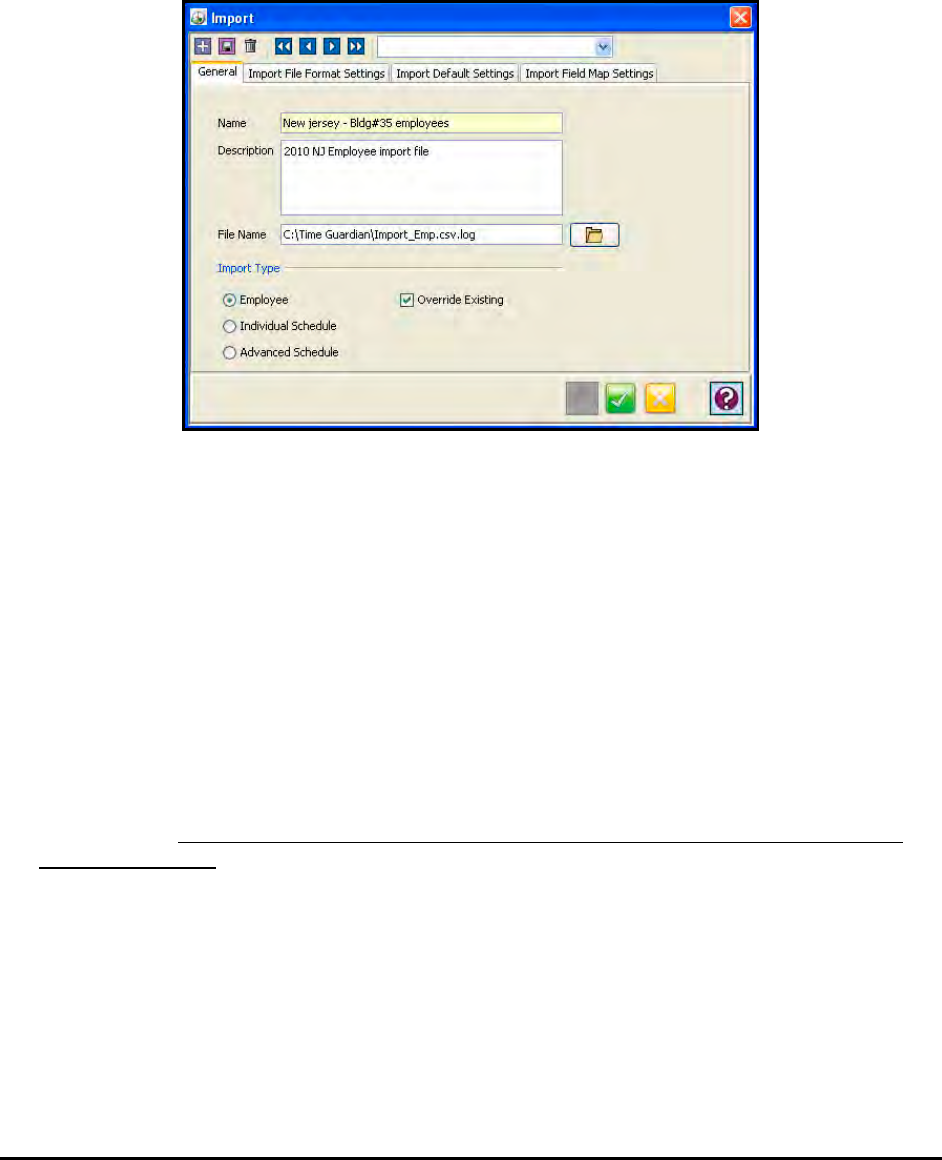
3-32 Time Guardian Series – Setup Wizard
Do you want to import employee information from specific file?
Answer Yes to this question if you want to use this built-in import feature. This feature allows
you to import employee information from a text file directly into the Time Guardian database. To
use this feature, you will need to know the name and location of the file to be imported.
Click on the Employee Import button and the Import window (see figure) will appear on the
General tab.
Note: Default import fields are provided to be used and defaults will be used if the imported file
does not contain data for those fields.
1. Create a new Employee Import file. You will be required to enter a Name.
2. In the Name field, enter a name for the Import profile.
3. Enter a brief description of the Import profile in the Description field.
4. Enter the name and path of the import file in the File Name field, or click on the browse
button to the right of the field to browse for the file you wish to import.
5. Select the Import Type from; Employee, Individual Schedule, or Advanced Schedule. Select
whether or not you want to Override Existing employee data.
6. Click on the Import File Format Settings tab. This tab helps to define the format of your
import profile. If these parameters are not set to properly match the import file, the import
process might fail. The file contents window on the Import Field Map Settings tab screen will
help to indicate the file format. Pay attention when you select the following for an example:
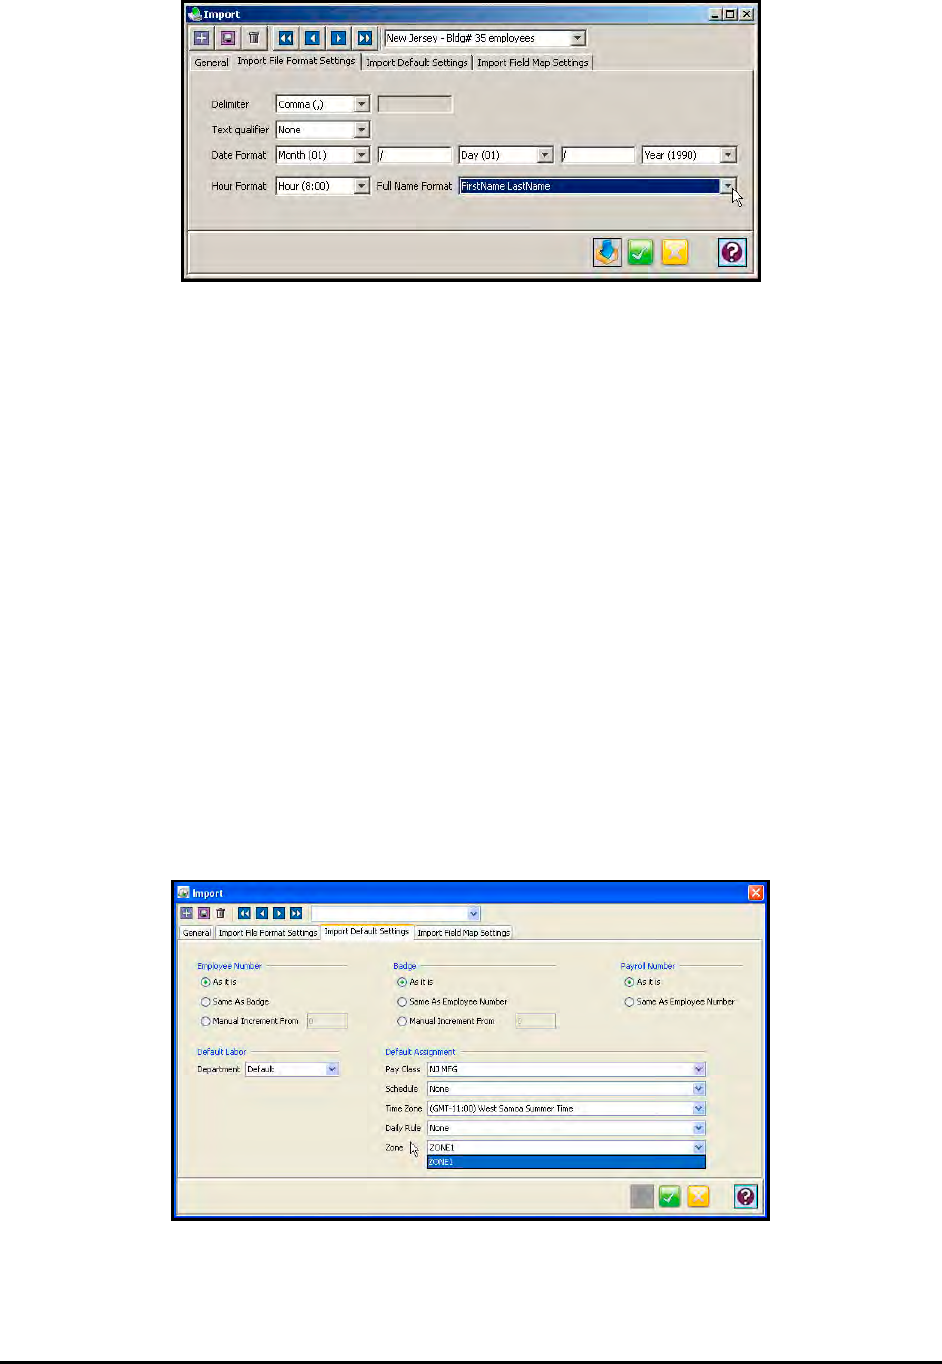
Time Guardian Series – Setup Wizard 3-33
• Delimiter: Select a Delimiter from the dropdown list. The Delimiter is the character,
which separates the data elements from one another. The choices are: Tab, Comma,
Pipe, Semicolon, Backslash, Forward slash, or User Defined. If User Defined is
selected, you must enter the character in the field provided.
• Text Qualifier: Select a Text Qualifier from the dropdown list. The choices are: None,
Single Quote, or Double Quote. The Text Qualifier is the character, which encapsulates
a data element (i.e., “California”).
• Date Format: Select the date format from the dropdown lists. The choices are: Month
(1), Month (01), Month (Jan), Month (January), Year (90), Year (1990), Day (1), Day
(01), and Day (Mon).
• Hour Format: Select the hour format. The choices are; Hour (8:00), Hour (08:00), Hour
(08.00), or Minutes (480).
• Full Name Format: Select the Full Name Format from the dropdown list. The choices
are; FirstName LastName; FirstName Middle LastName; FirstName,Middle,LastName;
LastName FirstName; LastName,FirstName; and LastName,FirstName Middle
Note: This field will be available for assignment in the Import Field Map Settings tab.
7. Click on the Import Default Settings tab. This tab allows you set the defaults for data being
imported. Select the following:
• Employee Number: Select how the Employee Number will be defined. The choices are:
As it is, Same as Badge, or Manual Increment From. If Manual Increment From is
selected, you must enter the starting number in the field provided.

3-34 Time Guardian Series – Setup Wizard
• Badge Number: Select how the Badge Number will be defined. The choices are: As it is,
Same as Employee Number, or Manual Increment From. If Manual Increment From is
selected, you must enter the starting number in the field provided.
• Payroll Number: Select how the Payroll Number will be defined. The choices are: As it
is, or Same as Employee Number.
• Default Labor: Assign a default category for each Labor Level using the dropdown lists.
• Default Assignment: Assign a default Pay Class, Time Zone, and Schedule, using the
dropdown lists. Also, when Advanced Overtime Module is activated you can assign from
a “Daily Rule” and when Zone Differential Module is active you can assign a “Zone”.
Note: The defaults will be used if the import file does not contain data for these fields.
8. Click on the Import Field Map Settings tab. This tab allows you to manually define the
elements of the import file you are using.
Note: The data elements in the selected list should match the data fields of the import file. The
selected data elements should also be in the same order as they appear in the import
file (use the Move UP & Down buttons if necessary).
The contents of your import file will be displayed line by line in the File Contents window
(see figure for example). This area allows you to assign fields to data elements in each line.
You can select to import a single line, a selected group of lines or all lines.
To set the row number of the import file that the import operation will begin at, enter a
number in the Start Import At Row field.
Each data element in the import file must be defined in the order that it appears. Data
elements can be separated by commas, tabs, and semicolons. To assign a field, select a
data element in the Available list and click on the Add button. To select all the fields, click
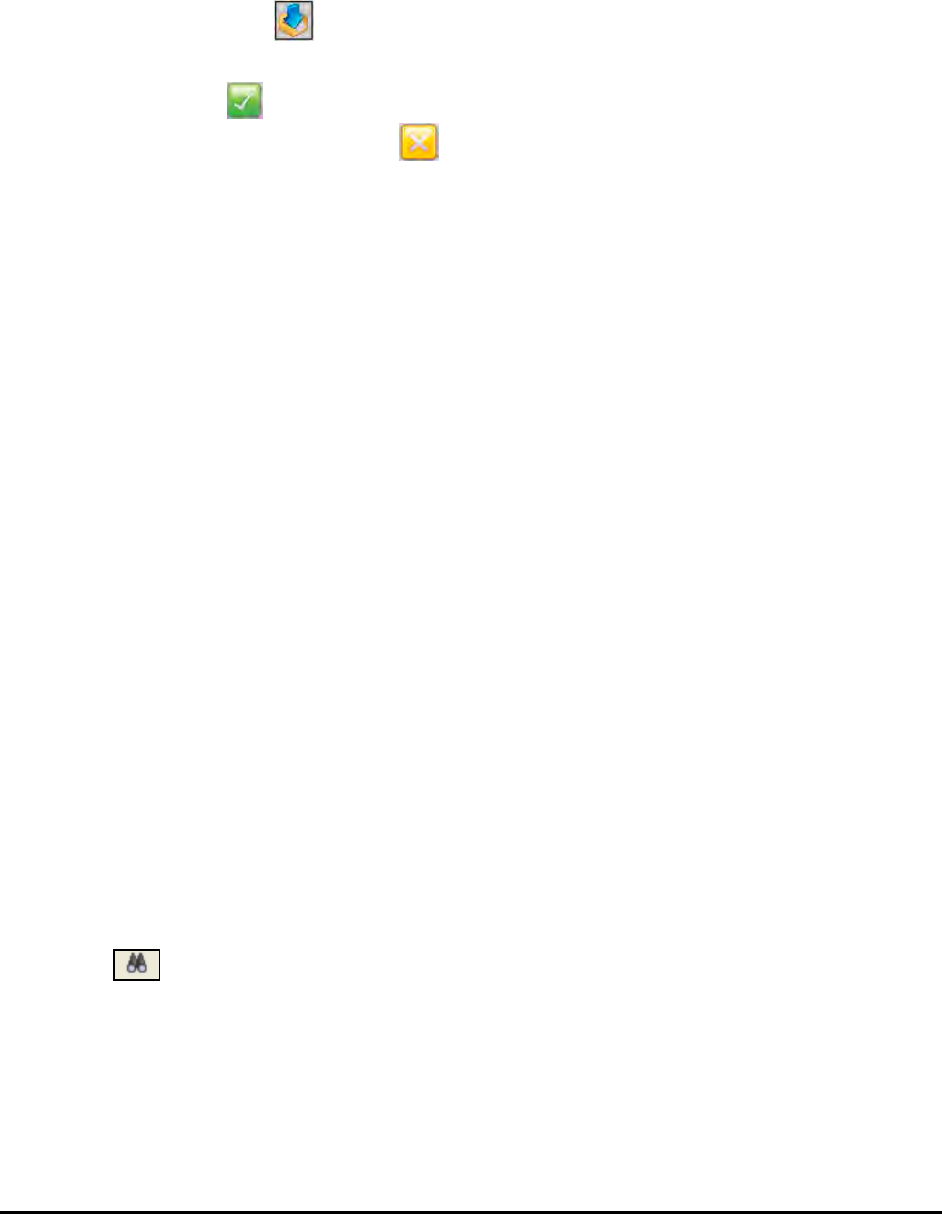
Time Guardian Series – Setup Wizard 3-35
on the Add All button. The field(s) will then be displayed in the Selected list. Add additional
fields until all data elements have been properly defined. Use the Remove Fields button to
un-assign fields. To skip a data element, click on the ][ button. A “][“ character will appear in
the Selected list to indicate that a data element was skipped.
To re-order fields in the Selected Window, use the Move Up and Move Down buttons.
9. Click on the Run Import button, to Import an employee file into the Time & Attendance
software.
10. Click on the Apply button to save the Import information and return to the Step 7:
Employee Setup. Click on the Close button close the Import window without saving.
Would you like to create employees at this time?
Click Yes for this question and press the Employee button if you want to enter employees. The
Employees module (see figure) of the Time & Attendance software allows you to have up to one
hundred (100) active employees and assign them a schedule with Pay Class and wages.
Note: Optional additional active employee amounts are available upon activation for
incremental increase all the way up to an unlimited number of employees.
Each employee record requires a unique Employee and Badge number, both of which are
entered in the Employee module on the General tab (see figure). The standard Employees
module for Time Guardian consists of seven (7) tabs: General, Personal, Contact,
Assignments, Schedule, Labor Level, and Wages. Activation of the Access Control module
can add Nexus 220 or AmanoNet [for access control] when selected in Wizard Setup Step1.
Activation of the Benefit Time module will add the Certification and Benefit tabs. Activation of
the Web Access module will add the Web Access tab.
The Pay Type will only be active when Salary has been selected for the Type of Employee. The
Time & Attendance software has two Employee Types:
• Hourly employees – These employees are required to punch at the clock in order for hours
to be calculated and awarded.
• Salary employees – These employees must have an assigned schedule and are paid
automatically either By Hour or By Schedule.
Note: Remember when creating a Salary Employee you must have a schedule before hours
will be calculated. A salaried employee with Pay by Hour can punch for exception
tracking, while a salaried employee with Pay by Schedule cannot punch.
You can lookup employees from any of the Employee screens by clicking on the Filter
Employee icon on the top of each Employees screen to filter employees with using Pay
Class, department, and/or employee criteria. The following is an example of the screen that will
appear when you click on the Employee tab from the Employee Filter screen:
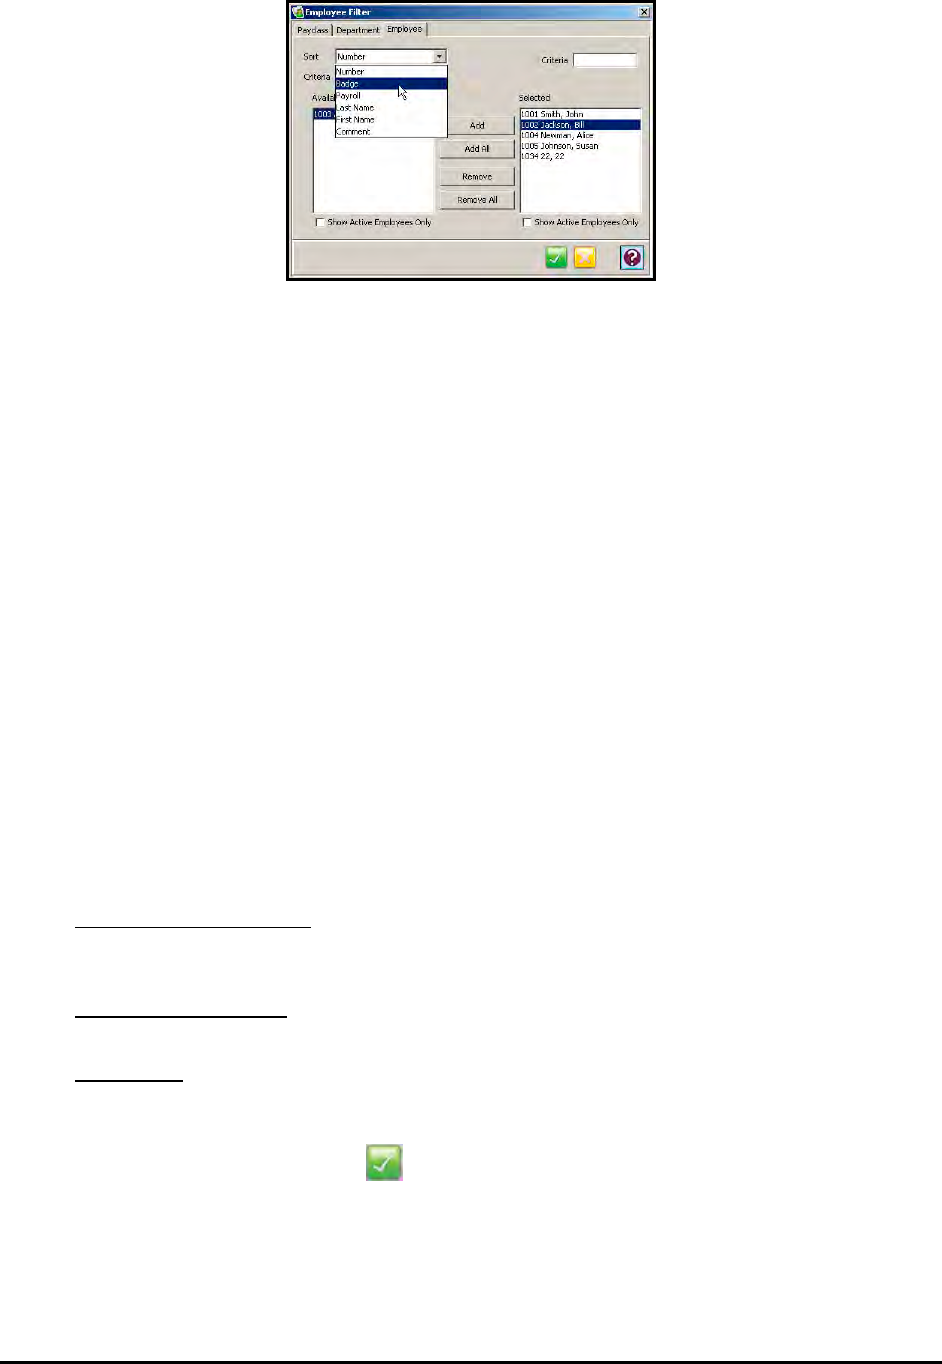
3-36 Time Guardian Series – Setup Wizard
By default, all employees are selected. You can filter out employees by selecting:
• To add an employee to the list, highlight the desired employee in the Available list and
click on the Add button. To add all employees to the list, click on the Add All button.
• To remove an employee from the list, highlight the desired employee in the Selected list
and click on the Remove button. To remove all selected employees, click on the
Remove All button.
• Select the desired sort criteria from the dropdown list. Both the Available and Selected
lists of employees can be sorted by typing in the “Criteria” fields above each list.
• Click on the Pay Class tab to utilize available Pay Classes as a filter for employee
reports and follow the same preceding procedure.
• Click on a Department tab to utilize available departments as a filter for employee
reports and follow the same preceding procedure.
From Setup Wizard in Step7: Employee Setup, check the box to Sync Employee(s) with
QuickBooks and select the method of synchronization from the dropdown choices of; Import
from QuickBooks, Export to QuickBooks, or Both ways [bi-directional].
The synchronization will be performed depending on what was selected for the method of
synchronization in the Wizard Employee Setup for how to Sync Employee(s) with
QuickBooks with the choices of;
• Import from QuickBooks – QuickBooks acts as the master. Suggested for scenario
where you already have the QuickBooks as the payroll software and the Time &
Attendance software is being added.
• Export to QuickBooks - Suggested for scenario where you already have the Time &
Attendance software and QuickBooks is being added as the payroll software.
• Both ways – Employee information will bi-directional transfer, but QuickBooks remains
as the master. If employee is changed in the Time & Attendance software, the employee
change must be updated in QuickBooks to maintain good synchronization.
When you have finished, click on the button to save your settings.
Note: This function can also be done with Global Apply command from the main employee list.
Create a new Employee and you will be required to enter a Name, etc. Click on the necessary
tabs to complete the entry of employee information. See the following paragraphs for
description. Also, see the Employee Administration chapter.
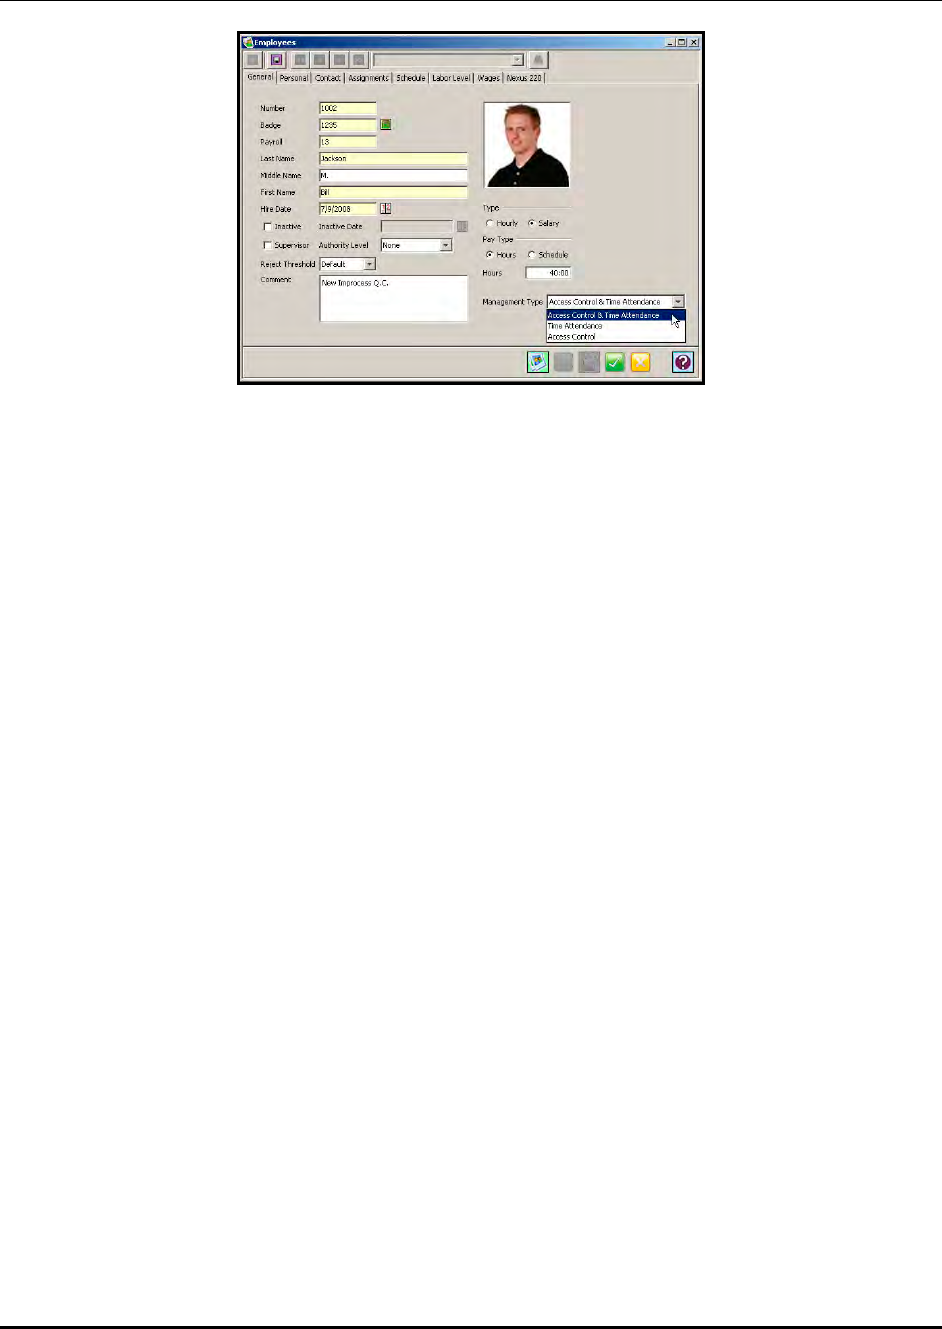
Time Guardian Series – Setup Wizard 3-37
Employees General
When using an MTX-15 terminal, the Time & Attendance software provides you with two options
to punch: with a badge or with a specific PIN number. The FPT-40 terminal provides you with
two options to punch: with a specific ID number, or biometric template [fingerprint].
• Badges: When Badges are used, the Badge/PIN Number section of the Employee Setup
needs to be the same number as on the badge. Should an employee forget their badge, the
PIN to be entered is the same as the employee’s badge number.
• PIN Only: If Badges are NOT used in the system, then ANY number may be entered in the
Badge/PIN section of the Employee Setup. (The MTX-15 terminal can use up to 12 digits).
Note: Please keep a record of the employee PIN Number, as the software automatically masks
this information when entered. This number must be unique.
Enter the employee Pay Type. Examples of both are described below:
• By Hour: When selected, a Salary employee will be awarded the number of hours entered
here on each day scheduled. For example, if the number entered is 8, and the employee is
scheduled to work from Monday through Friday, then they will be awarded 8 hours for each
of those days. The total amount will be 40 hours for the week.
• By Schedule: When selected, a Salary employee will be awarded the number of hours
defined for each scheduled day minus their mealtime. For example, if the employee is
assigned to work from 8:00 AM to 5:00 PM with no mealtime, the employee will be given 9
hours for each of those days, for a total of 45 hours for the week. If a 30-minute mealtime is
included, then the time awarded for each day would change to 8 hours and 30 minutes. The
total amount will be 42:30 hours for the week.
Information contained in the General tab can be printed out for each employee when the
Employee Report is selected from the Report List. The information in the Personal and Contact
Tabs (see the following figures) is for reference purpose only. Employees can be added to the
system at any time by accessing the Setup Wizard from the Edit menu.
Note: Use the inactive field to remove an employee from being calculated, but still leave the
employee information in the system for historical records, and/or in case you want to reactive
the employee at a later date, i.e., may be a seasonal employee?
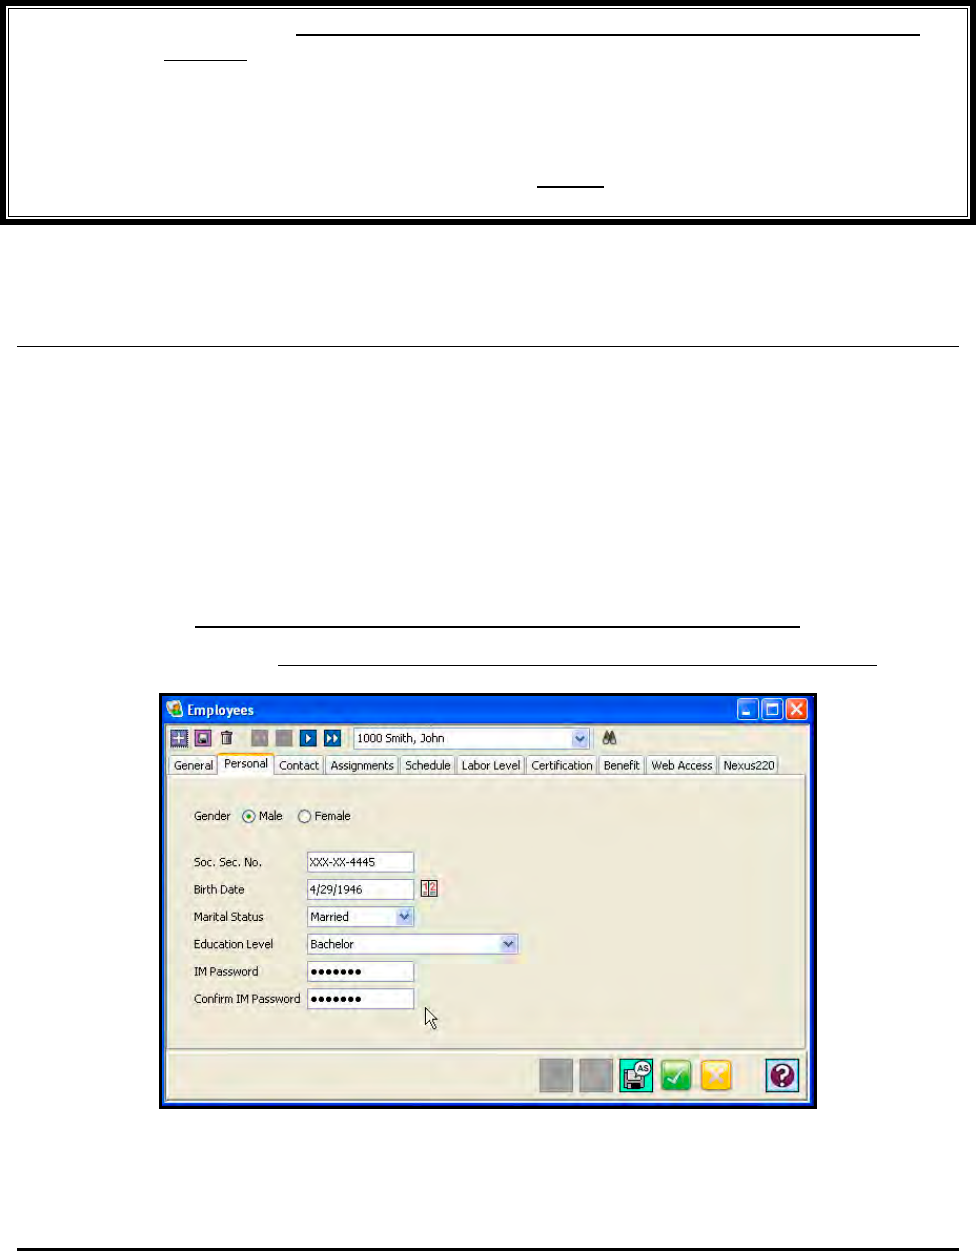
3-38 Time Guardian Series – Setup Wizard
Select from the dropdown the Management Type of; Access Control & Time Attendance, Time
Attendance, or Access Control. The following Special Note only applies if the Access Control
module is active.
Special Note: Must change employee and department information in the Time & Attendance
software for changes to be reflected in both the Time & Attendance software and
the Nexus or AmanoNet databases.
When a Time Attendance & Access Control employee is deleted in the Time &
Attendance software, that employee will be marked Access only in the Access
Control database. This type of person will not have their transactions transferred
to the Time & Attendance software.
Employees Personal
Use this tab as Human Resources function to record the following employee personal
information:
• Gender; Male or Female.
• Birth Date; use calendar to select.
• Marital Status;
• Education Level; None specified, Elementary, High School, Some College, No Degree,
Bachelor, Masters, Doctorate.
• IM Password; This field active only if Events Notification module is activated.
• Confirm IM Password; This field active only if Events Notification module is activated.
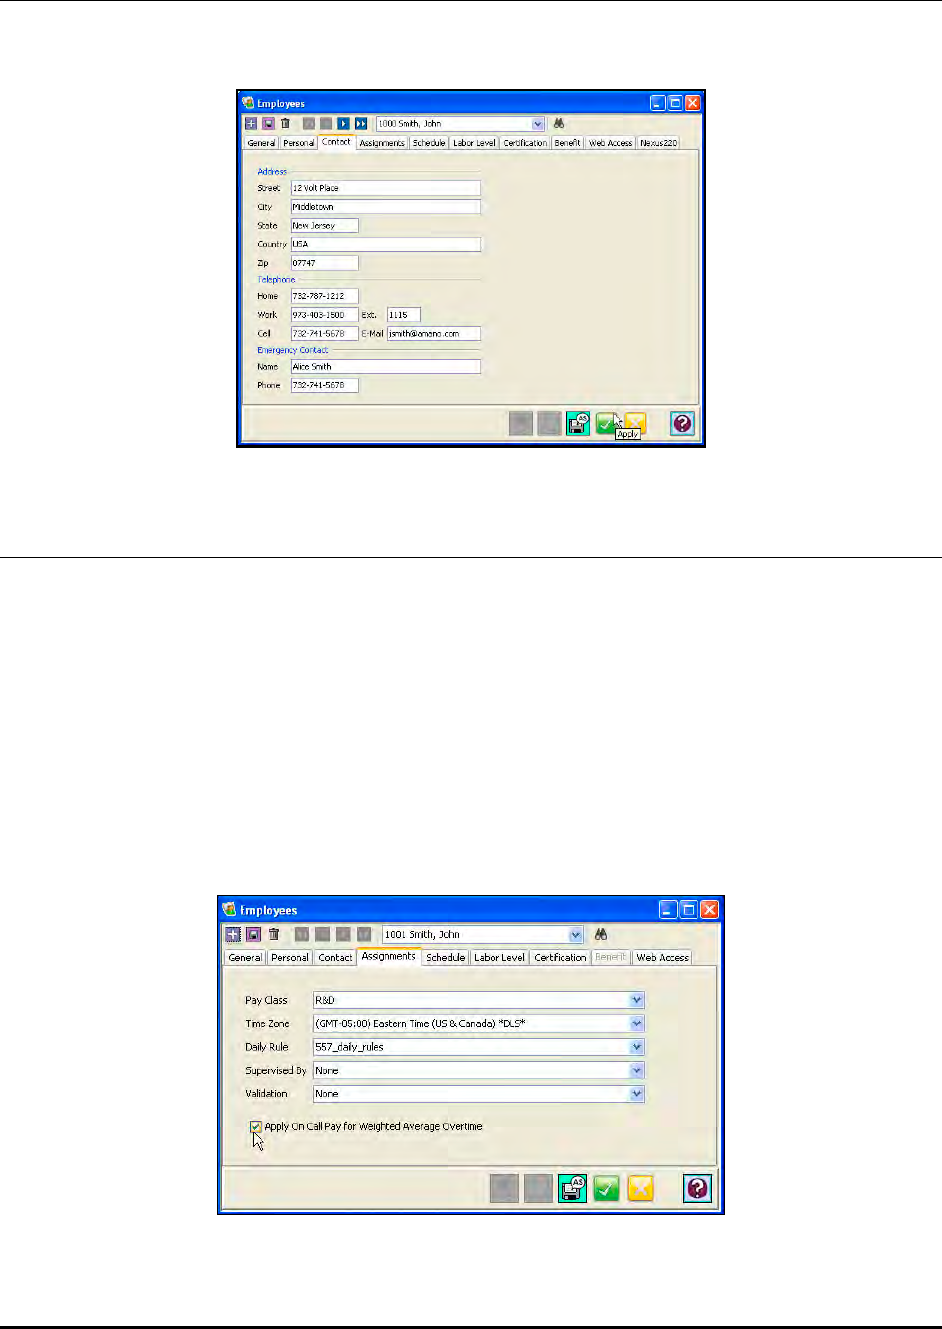
Time Guardian Series – Setup Wizard 3-39
Employees Contact
Use this tab as a Human Resources function to record employee contact information (see figure
for example).
Employees Assignments
Use this tab to Assign each employee to:
Pay Class: Assigns a Pay Class to an employee. Pay Classes can be created in the Setup
Wizard.
Time Zone: Assigns the time zone of the location that the employee works in.
Daily Rule: Assigns a daily rule to the employee if the Advanced Overtime module is active.
Supervised by: Assigns a supervisor field to employee. Can be used to filter employees.
Validation: Assigns employee(s) to terminal(s). Can be used to filter employees.
Apply on Call Pay for Weighted Average overtime: Adds On Call Pay [Bonus Pay Code] to
weighted average overtime pay. Can be used to filter employees.
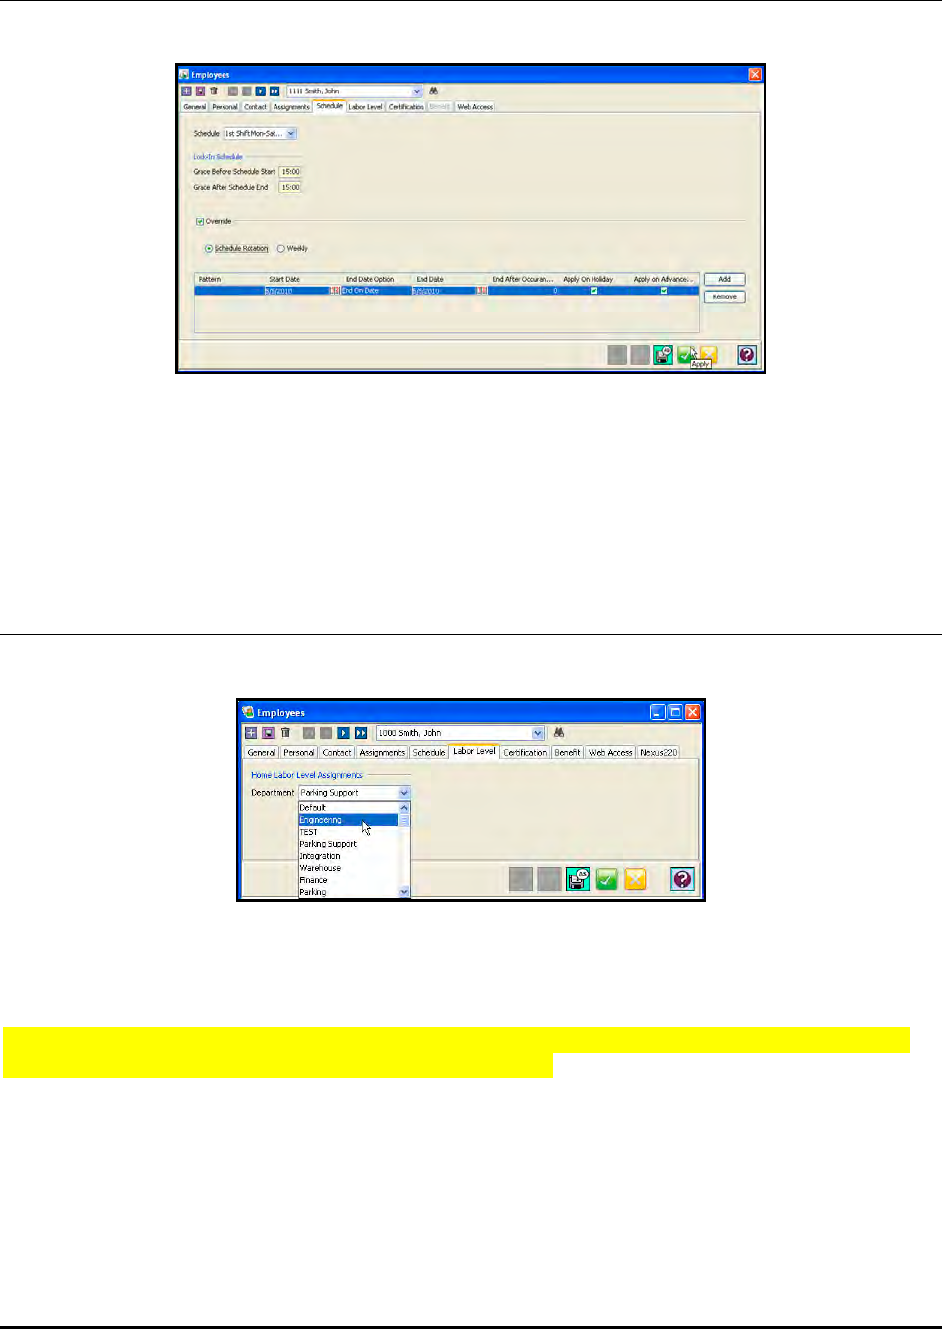
3-40 Time Guardian Series – Setup Wizard
Employees Schedule
Use this tab to schedule employees.
Assign employees to:
Schedule: Assigns a Schedule to an employee. Schedules can be created in the Setup Wizard.
Define a Grace period for before and after time for Lock-in Schedule at the terminal.
Select to use and define an override with Schedule Rotation or Weekly template.
Employees Labor Level
Use this tab as to assign Labor Levels/Home Department to employees (see figure).
This tab allows you to assign default Home Labor Level Assignments for Departments to each
employee from the user defined dropdown lists. Only predefined Departments will appear under
“Home Labor Level Assignments”.
Note: See Advanced Labor/Rate Module, Example of Multiple Labor Levels for details about
Labor Level Association links (Parent/Child relationship).
Note: This function can also be done with Global Assign from the main employee list.
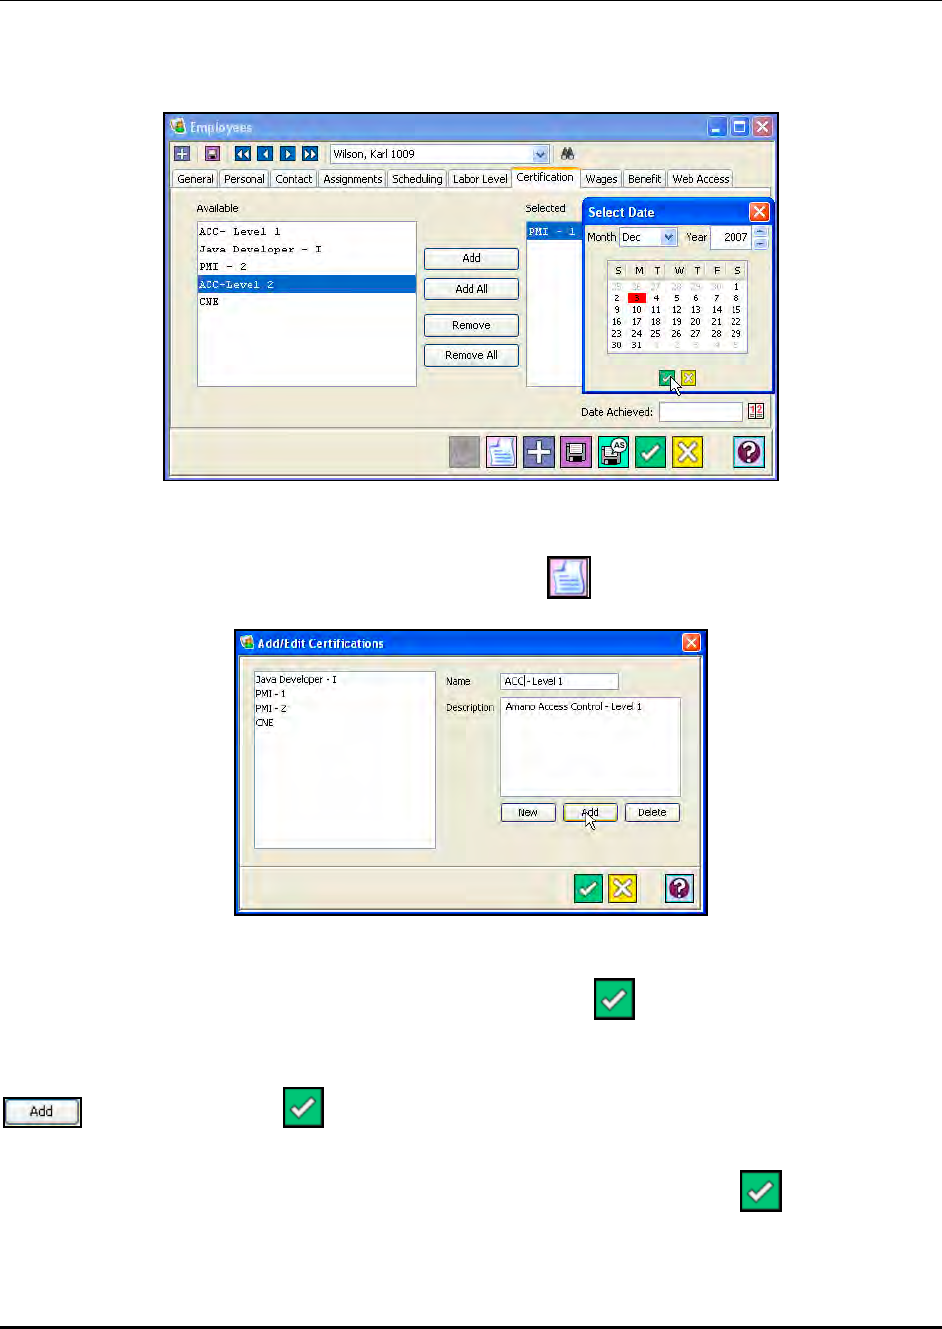
Time Guardian Series – Setup Wizard 3-41
Employees Certification
From the Employees screen, click on the Certification tab and the following type of screen will
appear:
This tab allows you to track the employee’s training, education, achievements, or certifications.
To add a certification, click on the Add/Edit Certification button.
To add a Certification, click on the New button. Enter in a name and description for the
Certification in the Name and Description fields. Click on the button when finished.
To add a Certification when first entering the Add/Edit Certifications screen, enter in a name
and description for the Certification in the Name and Description fields, and then click on the
button. Click on the button when finished.
To edit a Certification, highlight the desired item in the list. The selected Certification will appear
in the Name and Description fields. After making your changes, click on the button when
finished.
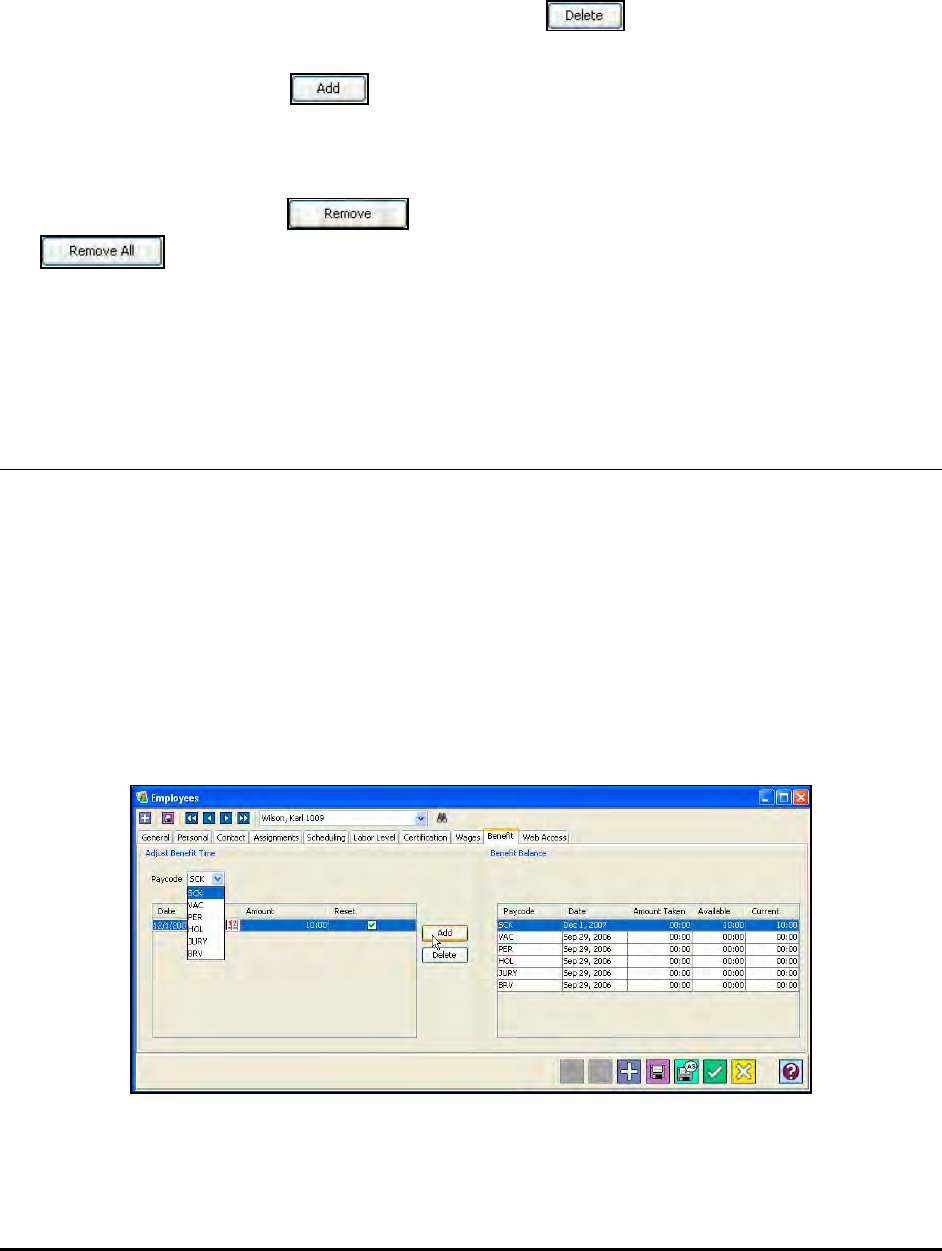
3-42 Time Guardian Series – Setup Wizard
To update a Certification, highlight the desired item in the list. The selected Certification will
appear in the Name and Description fields. After making your changes, click on the update
button when finished.
To delete a Certification, highlight the desired item in the list. The selected Certification will
appear in the Name and Description fields. Click on the button.
To add a Certification to an employee’s record, highlight the desired Certification in the
Available list and click on the button. To select all the listed Certifications, click on the
Add All button. To document the date the Certification was achieved, enter the date in the Date
Achieved field or use the Calendar icon provided.
To remove a Certification from an employee’s record, highlight the desired Certification in the
Selected list and click on the button. To remove all the listed Certifications, click on
the button.
Note: This function can also be done with Global Assign from the main employee list.
Employees Benefit
This tab allows you to adjust Benefit time for an employee. It also allows you to view Benefit
balances. This tab will only be visible if the Tracking Type on the Company module is select as
“Deaccrual” or “Import Balances”. If None was selected in this field, no Benefit tab will appear on
the Employees screen.
Note: If Import Balances has been selected from Setup > Company > Settings for Benefit
Tracking Type then the Add and Delete buttons to Adjust Benefit Time will be grayed out
because cannot adjust benefit time. When you import benefit balances you can only
keep track of how the imported amounts are used by showing Benefit Balance.
From the Employees screen, click on the Benefit tab and the following type of screen will
appear:
Select a Pay code from the dropdown list. The choices are all non-work hours type pay codes;
SCK, VAC, PER, HOL, JURY, and BRV.
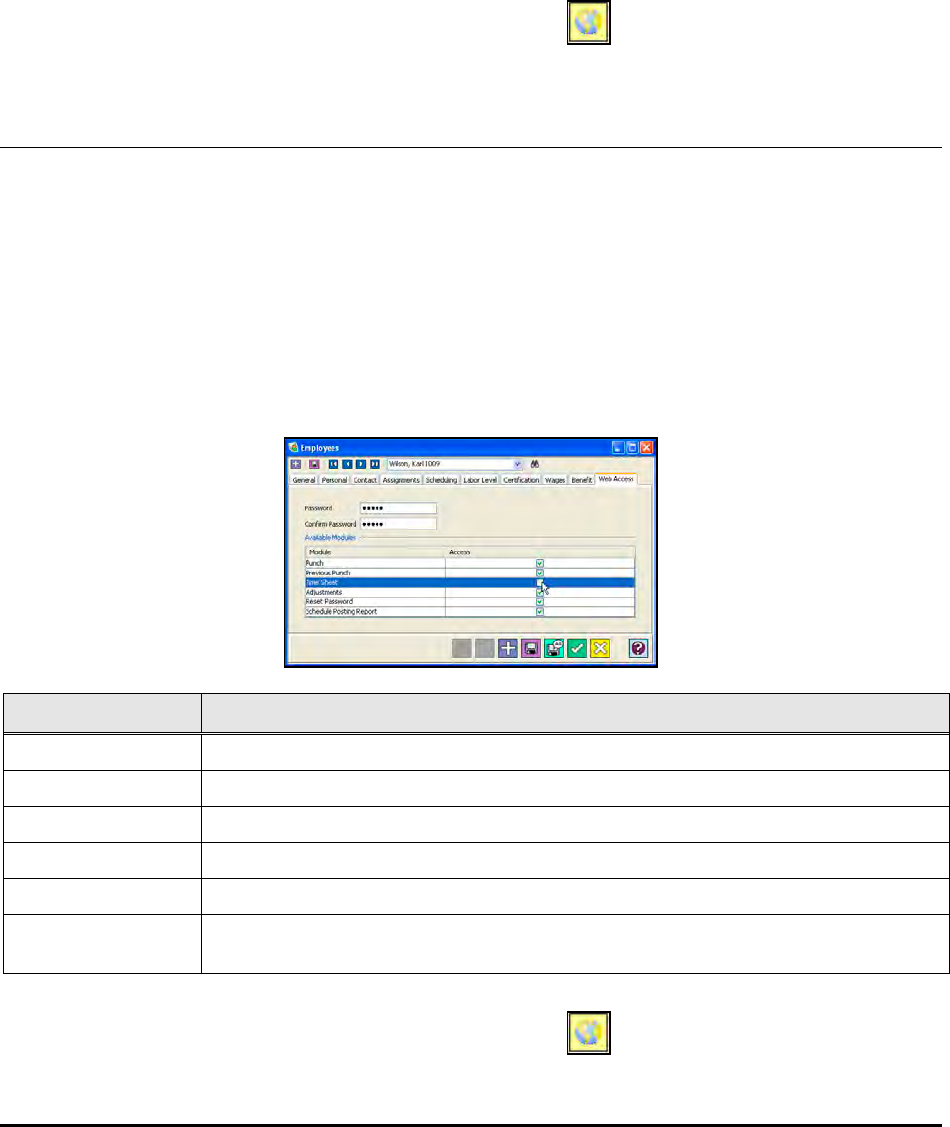
Time Guardian Series – Setup Wizard 3-43
To adjust the benefit time for an employee, click on the Add button (Setup > Company >
Settings Tracking Type must be set to Deaccruals for Add to be enabled).
Click on the calendar icon to enter the date.
Click in the Amount field and enter the amount.
To reset the available amount to the entered value, check the Reset box
The benefit balance for an employee will appear under the Benefit Balance column if the
Tracking Type has been previously set to Deaccruals or Import Balance.
Note: This function can also be done with Global Assign from the main employee list.
Employees Web Access
This tab allows the supervisor/administrator when signed into the Time Guardian Pro system to
set the web access rights for an employee. From this screen the supervisor can assign the
employee a password to use for initial login to the web module. Retype this password in the
confirm password.
Next, select the modules below from the web client that you wish this employee to have access
to. Modules that are not checked off will not appear as menu selections when the employee logs
in.
From the Employees screen, click on the Web Access tab and the following type of screen will
appear:
Module Description
Punch Allows the employee to punch IN/OUT.
Previous Punch Allows the employee to view previos punches record on the system.
Time Sheet Allows the employee to view his or her timecard in read-only screen.
Adjustments Allows the employee to allocate hours he or she worked for the Payperiod.
Reset Password Allows the employee to change his or her password.
Schedule Posting
Report Allows the employee to schedule posting his or her timecard.
Note: This function can also be done with Global Assign from the main employee list (see
Global A).
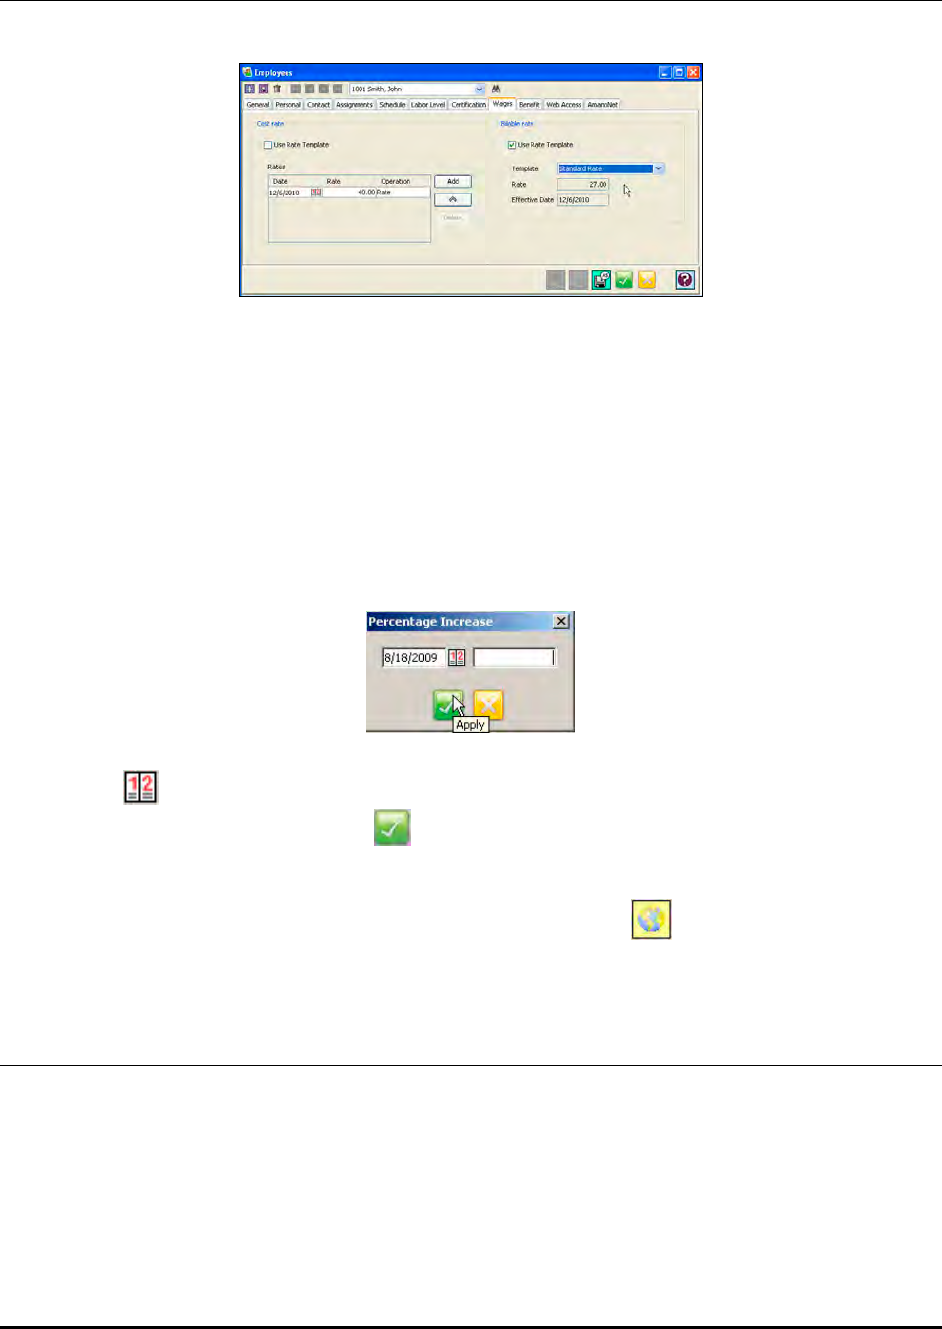
3-44 Time Guardian Series – Setup Wizard
Employees Wages
Use this tab as to create, increase (%), and/or delete wage rates (cost) for employees.
This tab allows you to assign wages to employees. The Cost Rate and/or Billable Rate box(s)
will only be enabled if a Cost and/or Billable is configured in the Rate Setup module for
Standard Rate.
Click on the Add button and a row will appear in the Rates box. Enter a rate for the employee in
the Rate field. In the Operation field, select Rate, Add to, or Percentage. Rate is the employee's
actual rate. Add to will add to the existing rate (as defined in Rate Setup). Percentage will
increase the existing rate for the employee by the percentage as defined in Rate Setup.
Rates can be increased using the Operation field or by clicking on the Percent Increase button
and the following window will appear:
Click on the button to enter an effective date for the increase and enter the percentage you
wish to increase the rate. Click on the button when finished.
To delete a rate or rate operation, select the desired row, and click on the Delete button.
Note: Creating Cost rates can also be done with Global Assign from the main employee
list.
Employees Nexus220
This is part of an optional Access Control Module which requires activation to utilize. Use to
setup access control integration with PIN numbers and/or tags for each employee. See the
Access Control Integration section for additional configuration information.
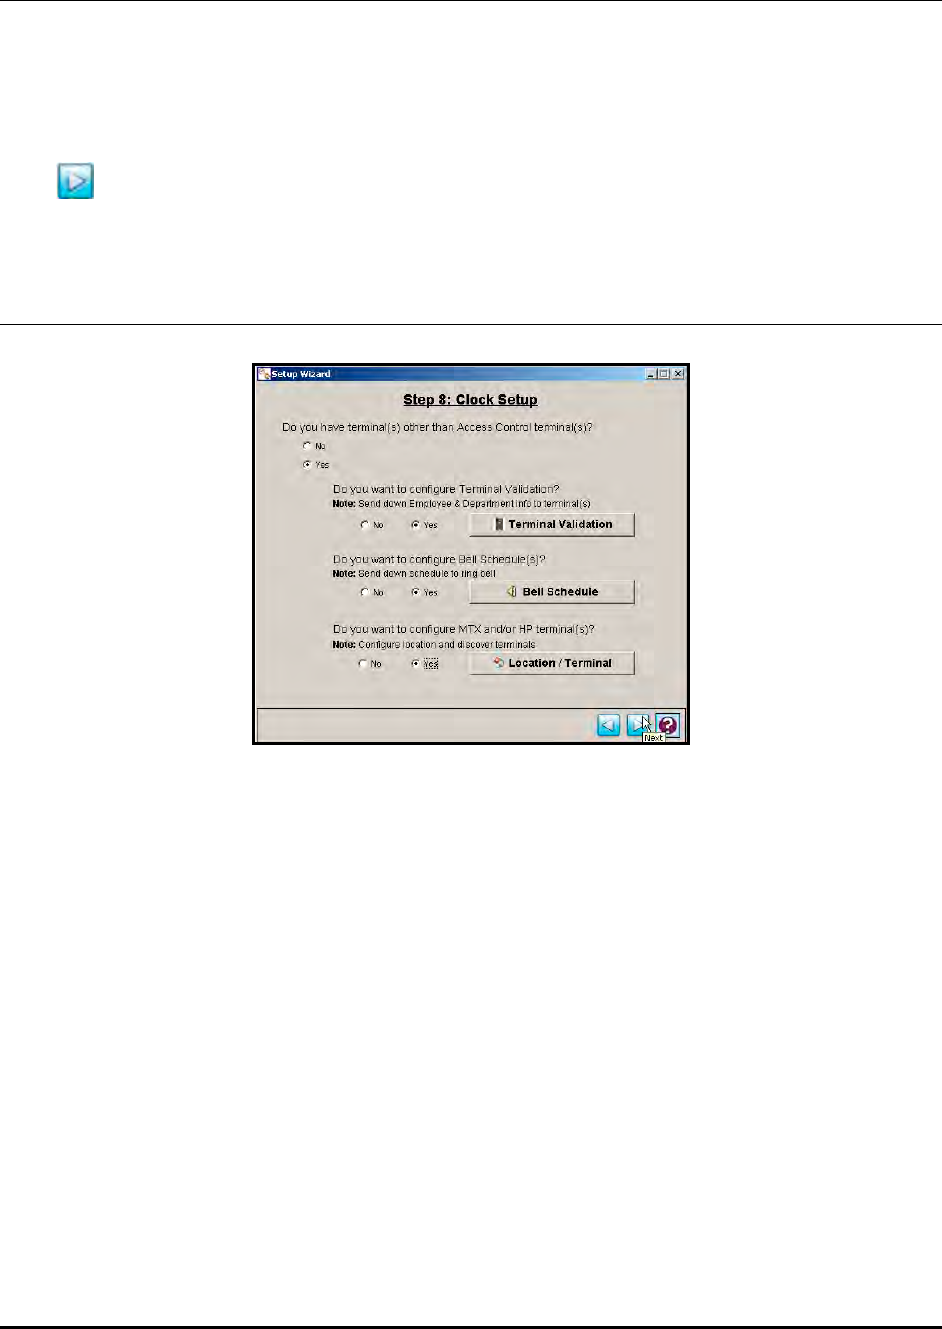
Time Guardian Series – Setup Wizard 3-45
Employees AmanoNet
This is part of an optional Access Control Module which requires activation to utilize. Use to
setup access control integration with PIN numbers and/or tags for each employee. See the
Access Control Integration section for additional configuration information.
After completing the entry/selection of information for Step 7: Employee Setup, click on the
Next button to continue to Step 8: Terminal Setup.
Step 8: Clock Setup Wizard [Optional]
Note: Prior to commencing this step, it is recommended you install your terminal, using the
appropriate terminal installation guide. The terminal is installed to communicate with the
host PC. The installation guide will provide the necessary steps to install the terminal.
You may need to obtain the IP address for each Ethernet terminal(s) connected to the
system.
Step 8: Clock Setup is optional; use this step only if:
• The company doesn’t have access system
• The company doesn’t want the Time Attendance System to be integrated with Access
Control System.
• The company has an access system, but wants to use a different device(s) for Time
Attendance.
Do you have Terminal(s) other than Access Control Terminal(s)?
If Yes, the Time & Attendance software will automatically poll and upload punches from
connected terminals each time the software is opened.

3-46 Time Guardian Series – Setup Wizard
If No, the connected terminals will have to be polled manually using the Communications menu
in the Time & Attendance software.
Answer No to this question if only Access Control terminal(s) are directly connected to the PC in
which the Time & Attendance software is installed.
Do you want to configure Terminal Validation?
If Yes is selected for Terminal Validation, click the Terminal Validation button and the Terminal
Validation screen will appear (see figure). Terminal validation provides employee filtering from
the setup configured in the General, Department, Labor Levels, and Employee tabs (see the
figures).
Terminal Validation is used to assign employees and Labor Levels to selected terminals in the
system. When validation is used, only employees assigned to a particular terminal with the
selected Labor Levels can use the terminal. Labor transfers at the terminal can only occur within
the Labor Levels selected. Terminal Validations are downloaded to the selected terminals by
location in the Communications module. To do so, perform the following:
1. Create a new Terminal Validation and you will be required to enter a Name for the Terminal
Validation setting [yellow required field].
2. In the Description field, enter in a brief description of the Terminal Validation setting.
3. Click on the Department tab to select the Labor Level to be included in the Terminal
Validation from the Department screen (see figure). The Department category has
precedent over the Employees filter. For example, if employee numbers 1 - 20 where
assigned to the “Engineering” Department, and the Engineering Department was
deselected, the Employees tab would not list employees 1 – 20.
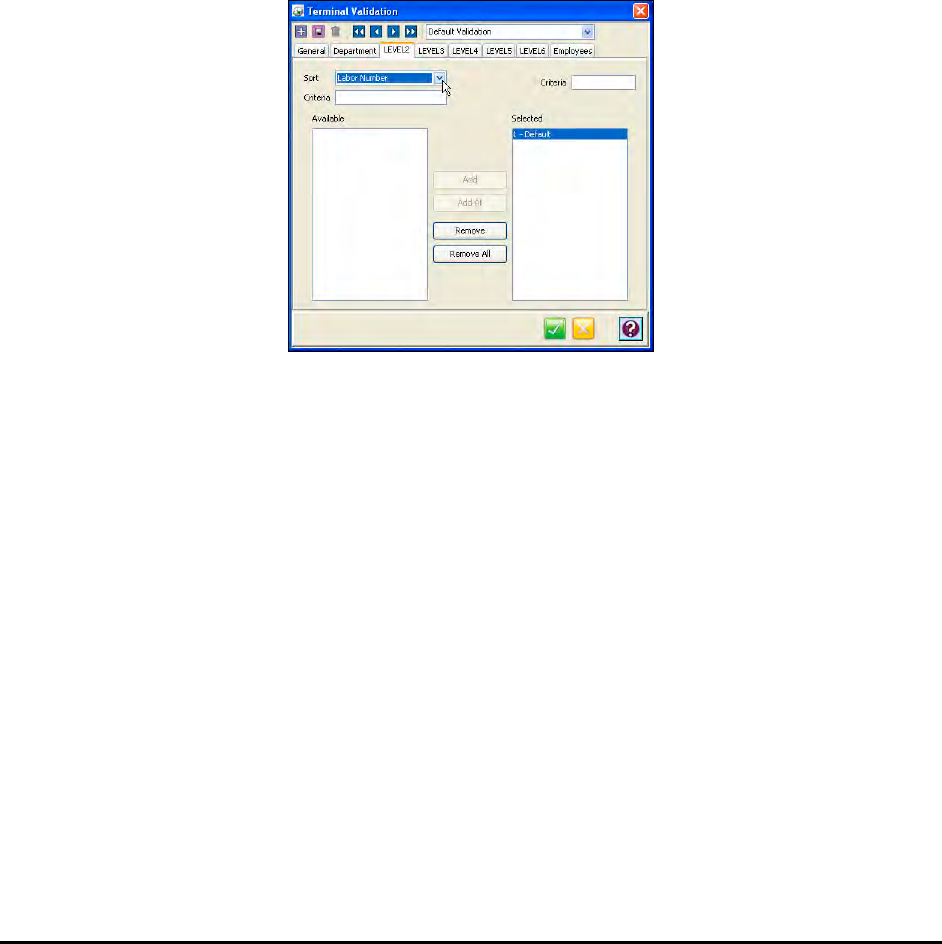
Time Guardian Series – Setup Wizard 3-47
• To add a Labor Level (department) category to the filter for Terminal Validation, highlight
the desired item in the Available list and click on the Add button. To select all the listed
items, click on the Add All button.
• To remove a Labor Level (department) category from filter for Terminal Validation,
highlight the desired item in the Selected list and click on the Remove button. To
remove all the listed items, click on the Remove All button.
• Select the desired sort criteria from the dropdown list (the choices are; Labor Number
and Name). Both the Available and Selected lists for terminal validations can be sorted
by typing in the “Criteria” fields above each list.
4. Click on another Labor Level tab and so forth to select that Labor Level to be included in
the Terminal Validation from the Labor Level screen (see figure). The Labor Level category
has precedent over the Employees filter. For example, if employee numbers 1 - 20 where
assigned to the “1-Engineering” Department, and the Engineering Department was
deselected, the Employees tab would not list employees 1 – 20.
• To add a Labor Level category to the filter for Terminal Validation, highlight the desired
item in the Available list and click on the Add button. To select all the listed items, click
on the Add All button.
• To remove a Labor Level category from filter for Terminal Validation, highlight the
desired item in the Selected list and click on the Remove button. To remove all the listed
items, click on the Remove All button.
• Select the desired sort criteria from the dropdown list (the choices are; Labor Number
and Name). Both the Available and Selected lists for terminal validations can be sorted
by typing in the “Criteria” fields above each list.
5. Click on the Employees tab to filter employees.
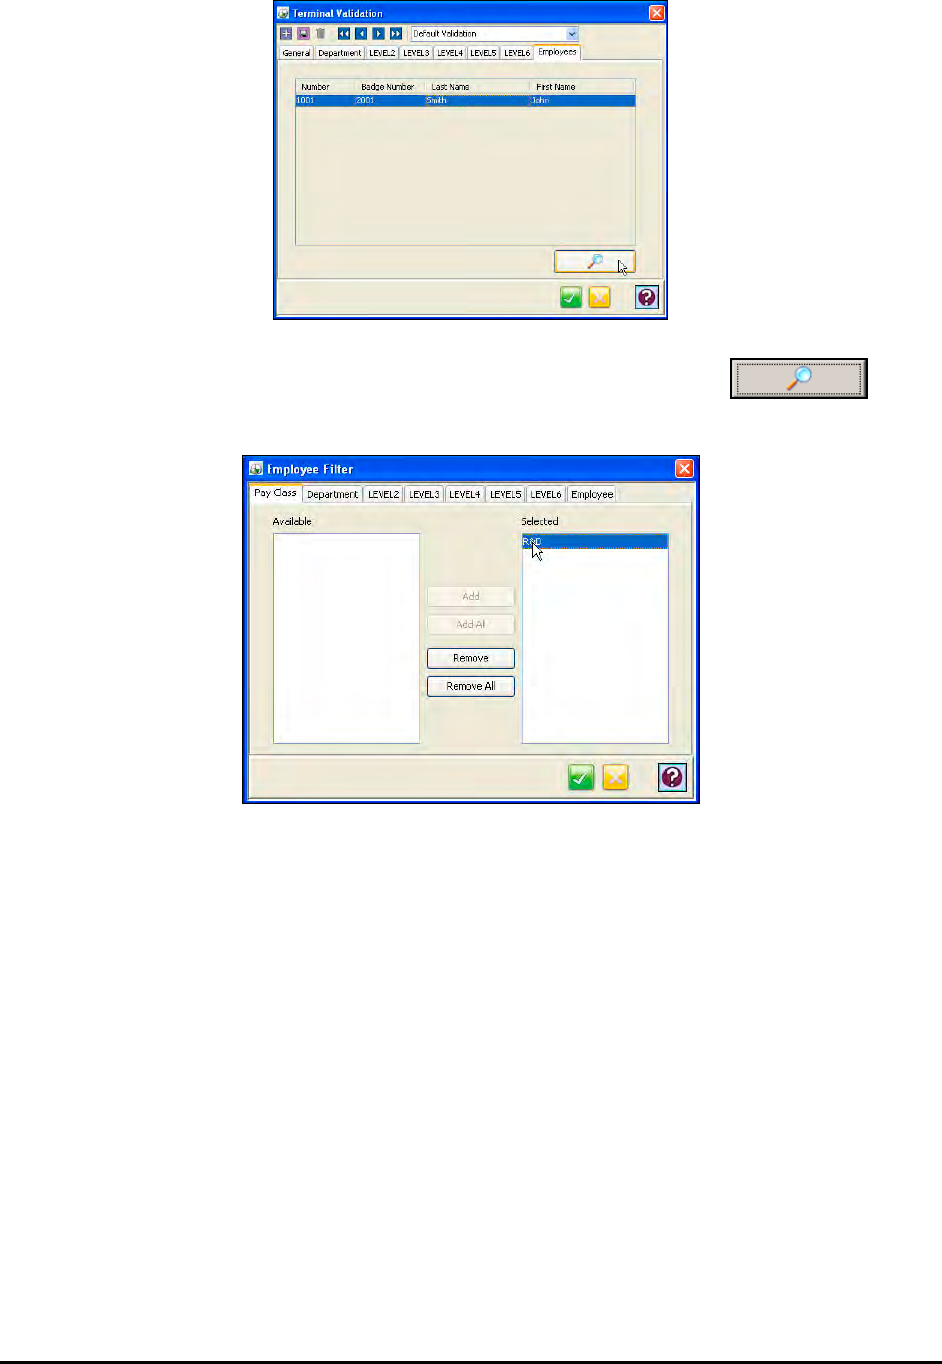
3-48 Time Guardian Series – Setup Wizard
6. To filter/add employees for the Terminal Validation setting, click on the
button. The Employee Filter window will appear:
This filter is deeper as it acts upon the previous filter from the Department tab to filter out
employees by selecting the Pay Class and Department/Labor Level tabs. Employees that
are assigned to the selected Pay Class and/or Department/Labor Level will appear in the
Available list. Also, you can use the Employee tab to sort the employee list using; Number,
Badge, Payroll, Last Name, First Name, and Comment, and then apply the criteria.
To add an employee to the Terminal Validation, highlight the desired item in the Available
list and click on the Add button. To select all, click on the Add All button.
To remove an employee from the Terminal Validation, highlight the desired item in the
Selected list and click on the Remove button. To remove all, click on the Remove All
button.
Do you want to configure Bell Schedules?
If Yes is selected for Bell Schedules, click the Bell Schedule button and the Bell Schedules
screen will appear (see figure).
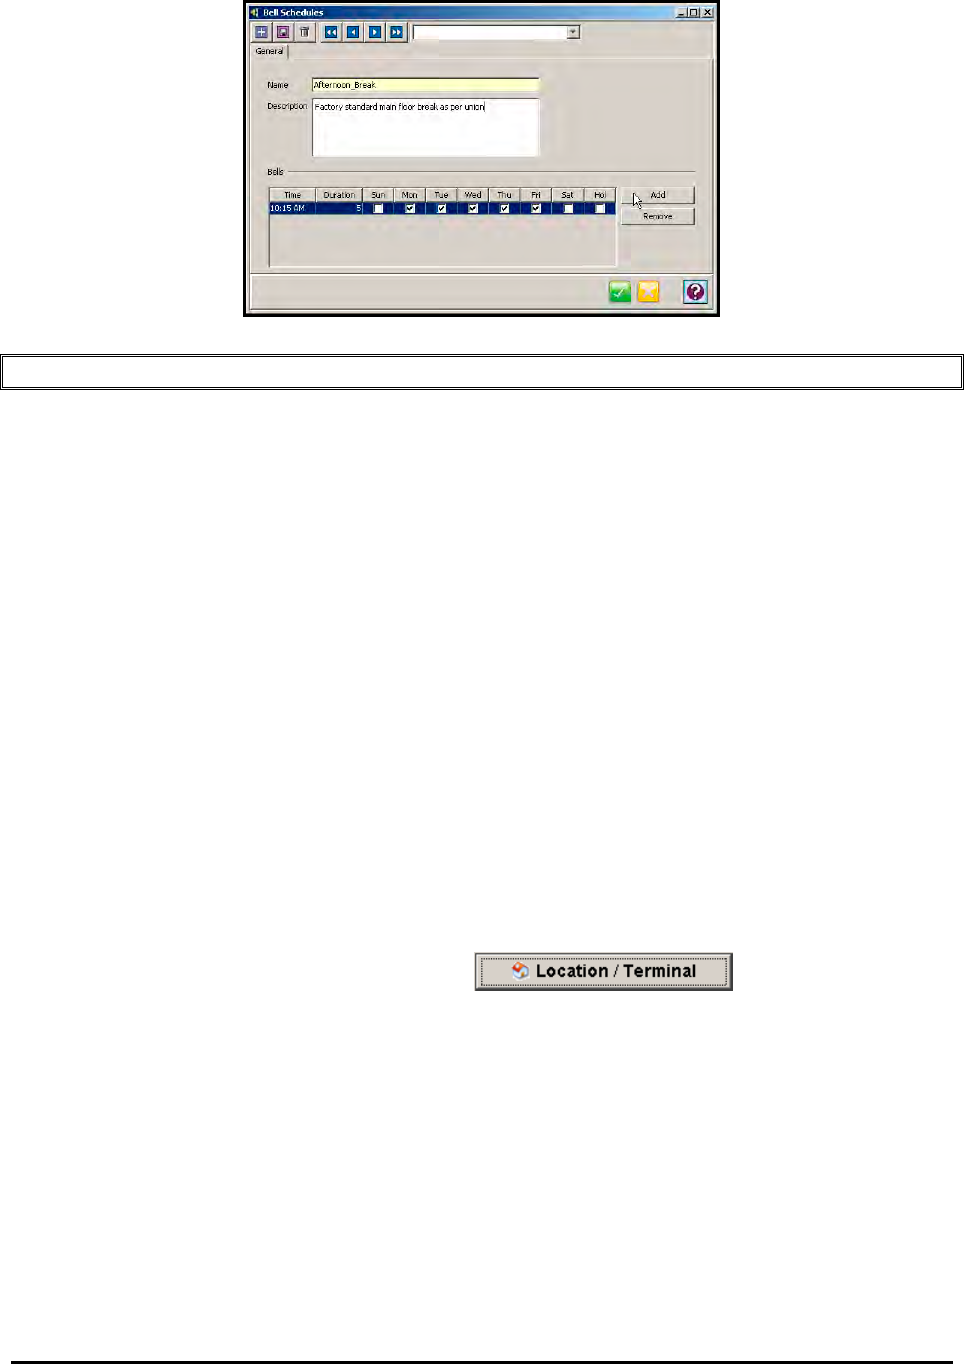
Time Guardian Series – Setup Wizard 3-49
Special Note: Selecting Holidays will only work with HandPunches (all HandPunch models).
A Bell schedule requires you to enter the Duration for the bell to ring, the time of day for the bell
to ring and the days of the week. Multiple entries can be made for Bell Schedules with different
duration and day assignments. Bell Schedules are downloaded to the selected terminals by
location in the Communications module. To do so, perform the following:
1. Create a new Bell Schedule and you will be required to enter a name for the Bell Schedule
[yellow required field].
2. In the Description field, enter in a brief description of the Bell Schedule.
3. Click on the Add button. A blank row will appear in the Bells grid.
4. Enter a time (in 24 hour format) of the day in the Time column that the desired bell signal will
be activated.
5. Enter the duration (in seconds) in the Duration column that the bell circuit will be activated
for.
6. Check the appropriate day(s) of the week and/or Holiday (Holidays only work with
HandPunch terminals) that the bell circuit will be activated.
Do you want to configure your terminals?
If Yes is selected, click the Location/Terminal button and the
Locations screen will appear (see figure). Answer Yes to this question if you are using
terminals such as a Hand Punch, FPT-40 (Fingerprint), and/or MTX-15 terminal via a serial,
Ethernet, or modem connection.
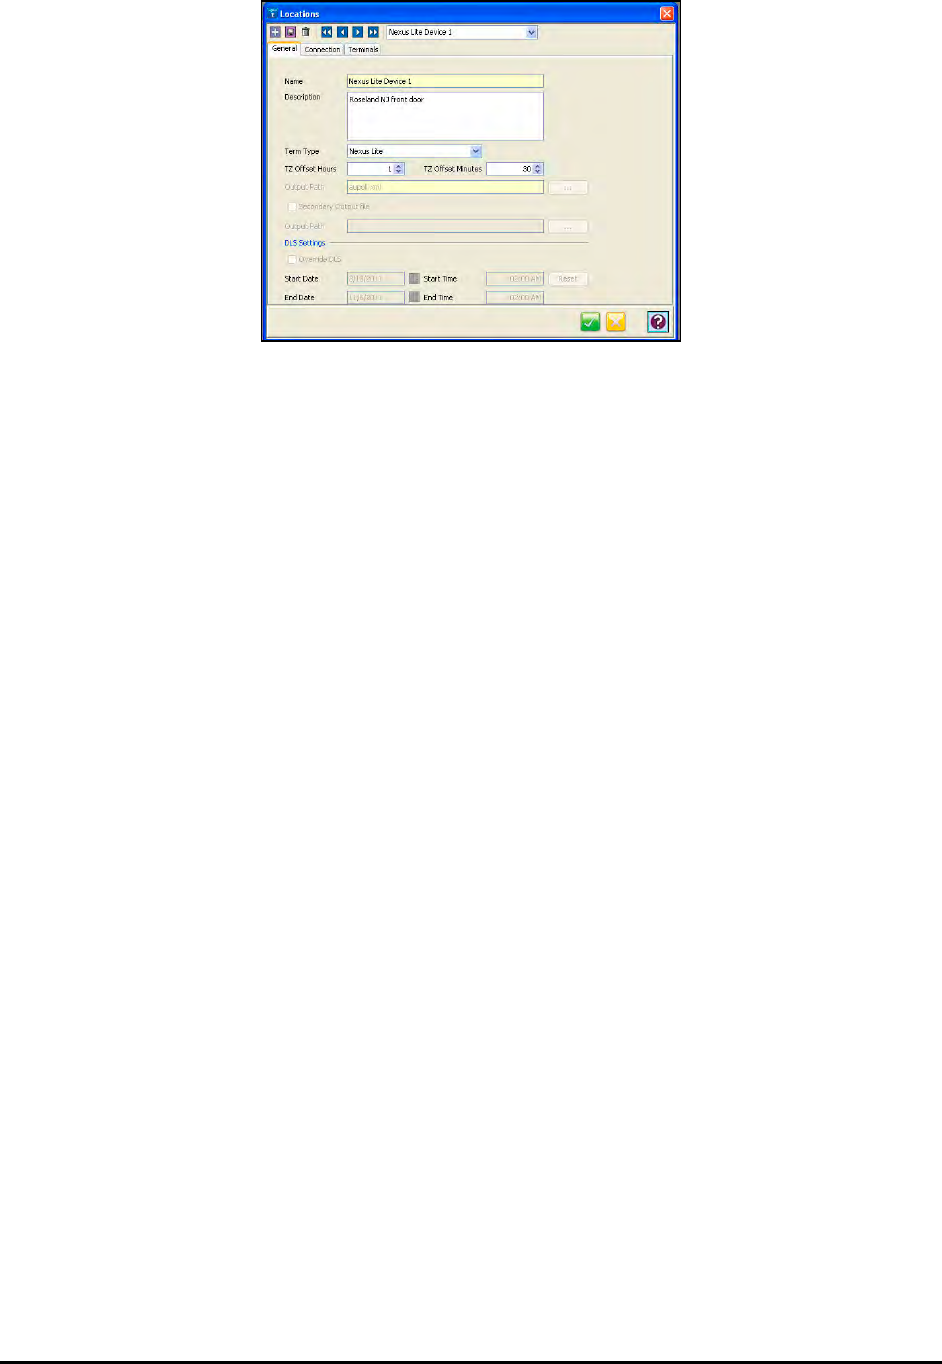
3-50 Time Guardian Series – Setup Wizard
Before a Location can be created, a Bell Schedule and Terminal Validation must be set.
You must create a Location to communicate with your terminals. A Location enables the Time &
Attendance software to distinguish and interact with the desired terminal(s). Only one terminal
type can be used per Location. If you have more than one terminal type, you must have multiple
Locations.
The window will open on the General Tab with a Location Name. It is recommended to use the
default names for an MTX-15, FPT-40, or Nexus Lite terminal.
Note: Three default terminal locations have been setup and they are called “MTX-15 Default”,
“FPT-40 Default” and “Nexus Lite Default”. Direct connection (serial) for either terminal
does not require any additional setup, while Ethernet does require the IP Address for
each terminal.
To create a new Location:
1. Create a new Location and you will be required to enter a unique Name [yellow required
field] that will be used to describe the area or site where a terminal or group of terminals is
located.
2. In the Description field, enter in a brief description of the Location.
3. In the Term Type field; select the type of terminal you are using at this location. The choices
are MTX-5, MTX-10, MTX-15, MTX-20, FPT-40, HandPunch 1000, 2000, 3000, 4000, or
Nexus Lite.
4. In the TZ (Time Zone) Offset field, select the time zone difference in Hours and Minutes (if
applicable) between the physical location of your PC and the terminals.
5. In the Output Path field, enter the path of the output XML file. If necessary, press the
Browse button to navigate to the location of the XML output file.
6. If necessary, check the “Secondary Output File” box, and In the Output Path field, enter the
path of the secondary output file. Press the Browse button to navigate to the location of the
secondary output file.
7. For DLS (Daylight Savings Time ) Settings, enter the following:
• Start Date: The date that the DLS period will begin.
• Start Time: The time of the day of the Start Date that the DLS period will begin.
• End Date: The date that the DLS period will end.
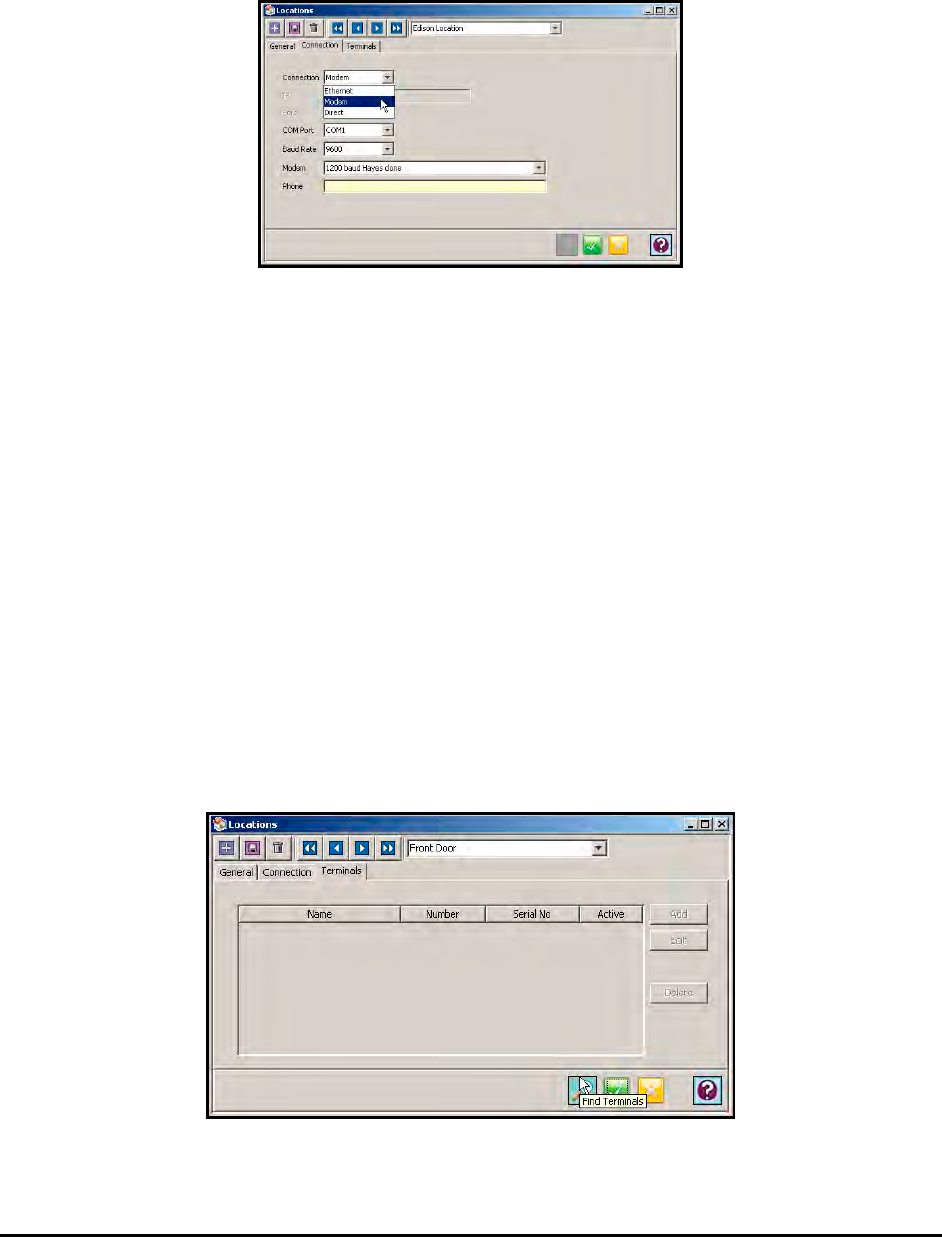
Time Guardian Series – Setup Wizard 3-51
• End Time: The time of the day of the End Date that the DLS period will end.
Press the Reset button to Reset the DLS at the Terminal.
8. Click on the Connection tab.
9. In the Connection field, select the type of connection you are using to communicate with the
terminal(s). The required information in the Connection Info will depend on your connection.
• Ethernet: The terminals communicate to the Host PC via Ethernet connection. If
selected, you must enter the IP Address and Port. [Obtain the correct IP address from
your network administrator, or alternatively, please consult the appropriate terminal
manual (i.e., MTX-15 Installation Guide, FPT-40 Fingerprint Installation Guide, Nexus
Lite documents, Hand Punch 50e Manual, etc.) to perform terminal diagnostics,
hardware configuration, and identify the IP address].
• Modem: A modem is used at the Com Port of the Host PC to communicate to the
terminal(s). If selected, you must select the Com Port, Baud Rate, Modem Type, and
enter the Phone Number. If your modem is not available from the list, select a
compatible model. This information should be provided in the modem’s documentation.
The telephone number entered must be the terminal’s modem. (Include 1 + (Area Code)
+ 7-digit phone number, when applicable)
• Direct: The terminal(s) are directly connected to the Host PC via Com Port. If selected,
you must select the Com Port and Baud Rate.
10. Click on the Terminals tab to add, edit, delete, or find terminals.
11. To find terminals, click on the Find Terminals button to search for terminals (see figure).
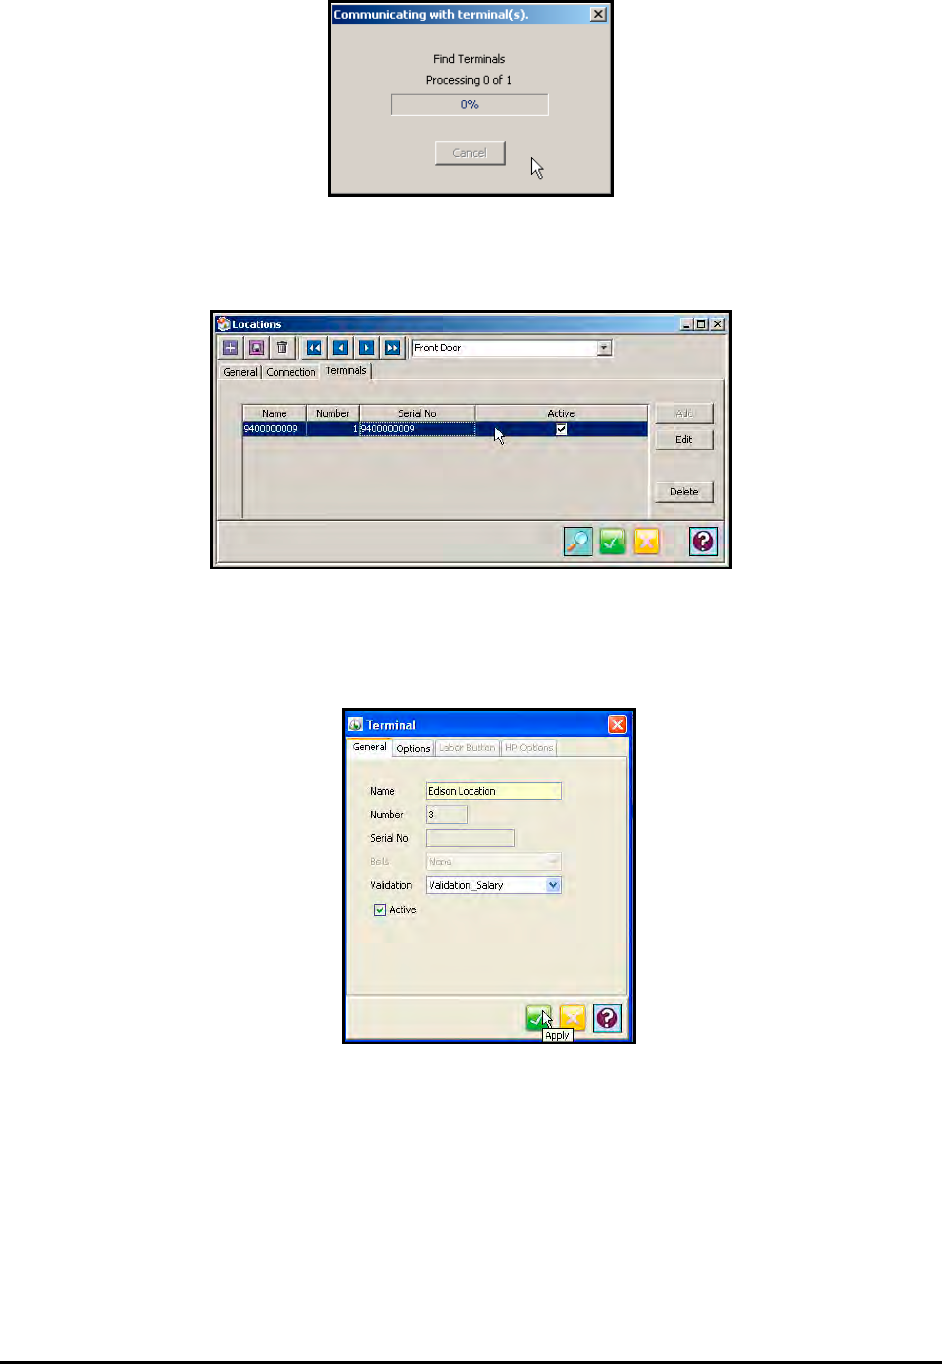
3-52 Time Guardian Series – Setup Wizard
The Ethernet and directly connected terminals in this location will appear in the Terminals
list (see figure).
12. Double-click on the found terminal or highlight the terminal and click on the Add button to
add a new HandPunch Terminal to the Location and the Terminal window will appear for
setup. If adding a new FPT-40 or MTX Terminal you must first search for the Terminal.
13. In the Name field, enter in a unique name [required field] that will be used to describe the
terminal. This field will be automatically populated with the MAC address when the eyeglass
button is used.
14. In the Number field, enter in a unique number for the terminal if allowed.
15. In the Serial No. field, a unique number will appear for a found MTX-15 terminal.
16. If you wish to assign a Bell Schedule to the terminal, select one from the dropdown list in the
Bells field.
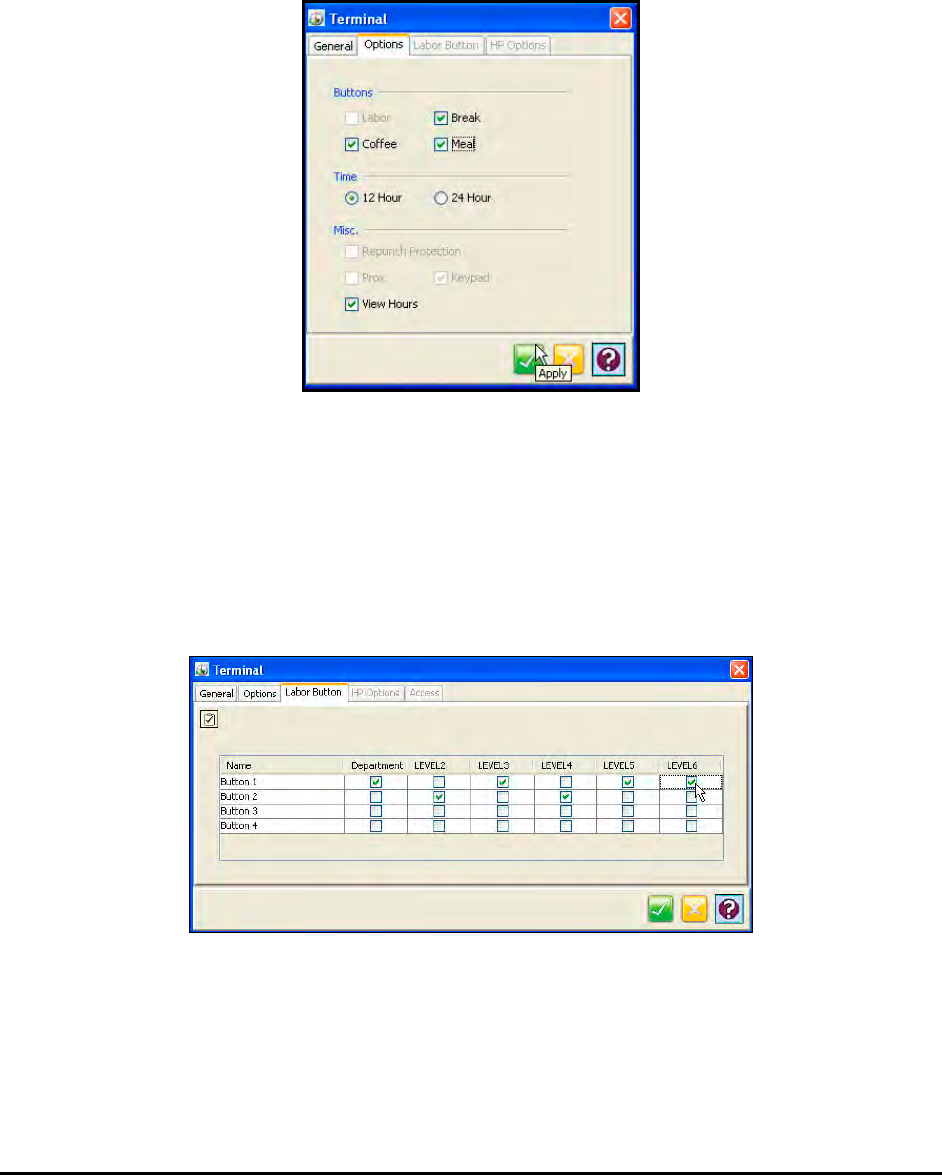
Time Guardian Series – Setup Wizard 3-53
17. If you wish to assign a Terminal Validation setting to the terminal, select one from the
dropdown list in the Validation field.
18. Click on the Options tab. In the Buttons boxes, place a check in the Labor box to activate
the Labor button for a MTX-15 terminal. This box will be grayed out for FPT-40 terminal
because this function is not available at the terminal. Click in the Coffee, Break, and/or Meal
boxes to activate those functions at the terminals.
19. In the Time Format box, select the time format (12-hour or 24-hour) for the terminal (FPT-40,
MTX-15 and Hand Punches).
20. In the Misc boxes, select whether to enable the RR, Keypad, Repunch Protection, and/or
view hours for the MTX-15 terminal. The only function available at the FPT-40 is to View
Hours.
21. If you checked the Labor button click on the Labor Button tab and the following screen will
appear to setup labor transfer buttons with departments at the MTX-15 terminal:
22. If you set the Term Type to Hand Punch 1000, 2000, 3000, or 4000 in the General tab, the
HP Options tab will also be enabled. This allows you to reassign configuration parameters
for Hand Punch terminals. Click on the HP Options tab and the following screen will appear:
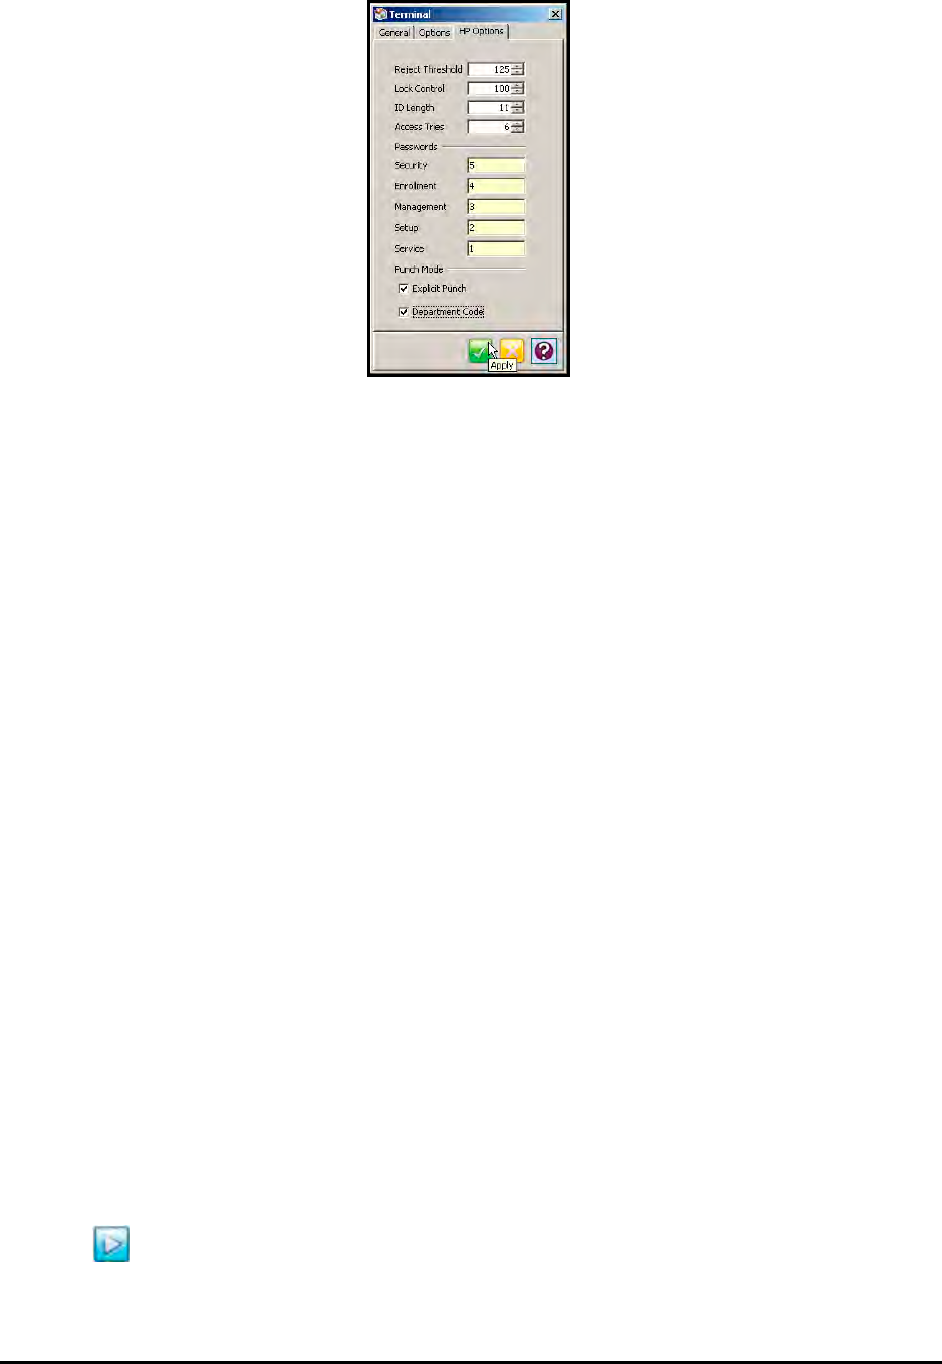
3-54 Time Guardian Series – Setup Wizard
To configure for an HP 1000, 2000, 3000, or 4000 Terminal set the following:
Reject Threshold: The sensitivity of the terminal to the user’s hand geometry. Permitted values
are 40 [strictest setting] through 200 [least strict setting-almost off], with a default of 125.
Lock Control: The duration, in seconds, that the Lock Control output of the terminal will be
activated. The default is 10 seconds
ID Length: The User ID number length. Permitted values are 1 through 11, with the default
being 11. 10 digits are the maximum in any case, but if 11 are specified, the Enter key (#) must
be pressed after the 10th digit is entered.
Access Tries: The number of hand reading attempts a user is permitted to try hand readings
before being refused. The default is 6.
Passwords: The following fields are used to assign the Command Mode Group passwords for
the selected terminal. Each password may be up to 10 digits long
a. Security: Disable the hand reading checks in the terminal [required field].
b. Enrollment: Enroll and remove users [required field].
c. Management: General system management operations [required field].
d. Setup: Set the baud rate and number of the terminal [required field].
e. Service: Access to service and diagnostic functions [required field].
Punch Mode: Select one or both of the following data entry modes:
a. Explicit Punch: If checked, the Explicit Punch Menu will be enabled at the terminal.
b. Department Code: If checked, a Department Code will be requested each time a user
punches; otherwise the user must press the # key once before entering their ID number to
display the Department Code prompt.
23. To update the terminal settings, click on the Update button. This will download the current
settings in this window to the terminal.
24. After completing the entry/selection of information for Step 8: Terminal Setup, click on the
Next button to advance to Step 9: Login Setup.
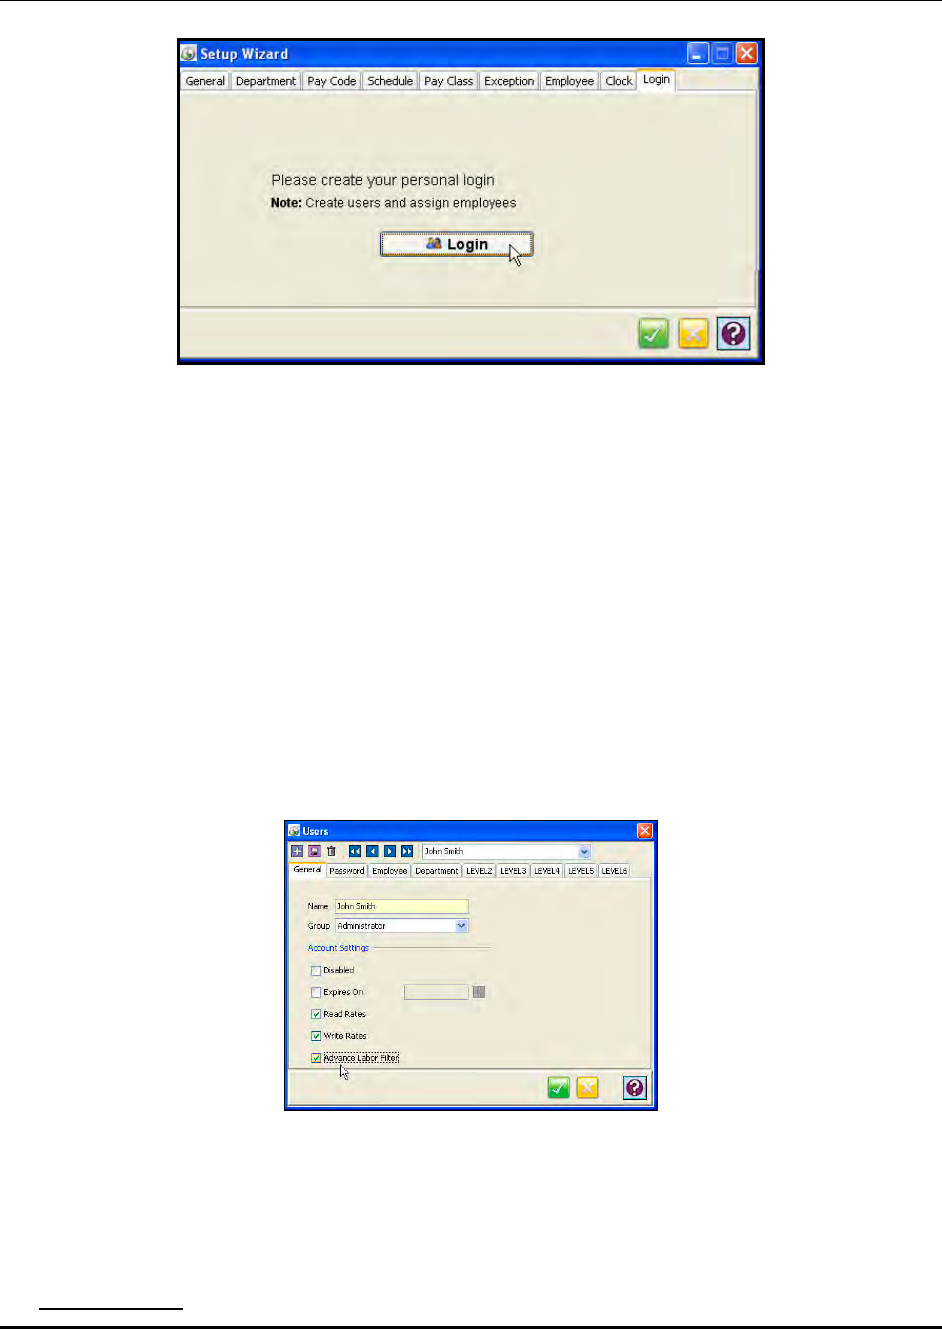
Time Guardian Series – Setup Wizard 3-55
Step 9: Login Setup Wizard [Required]
Please create your personal login
The Login Setup allows you to create User profiles/accounts and assign access privileges to the
accounts in Time Guardian.
• When you add a profile, the option for the Administrator or Read Only access is provided.
Once an Administrator has been given access, they will have the ability to add, modify and
edit any data contained in the system.
Note: At least one administrator profile must be created in this step. Each profile consists of a
Name, Password and Language selection.
• Selecting Default User will cause this Login to be displayed each time the Time Guardian is
opened.
Press the Login button and the following Users screen will appear to enter general info for
account settings. The User’s window consists of (5) tabs: General, Password, Pay Class,
Department and Employee (see figure).
To create a User account:
1. In the General tab, enter the name of the individual or account you are adding in the Name
field.
2. Select the type of group you want the user to belong to from the dropdown choices of;
Administrator – will have full access to all functions (all modules).
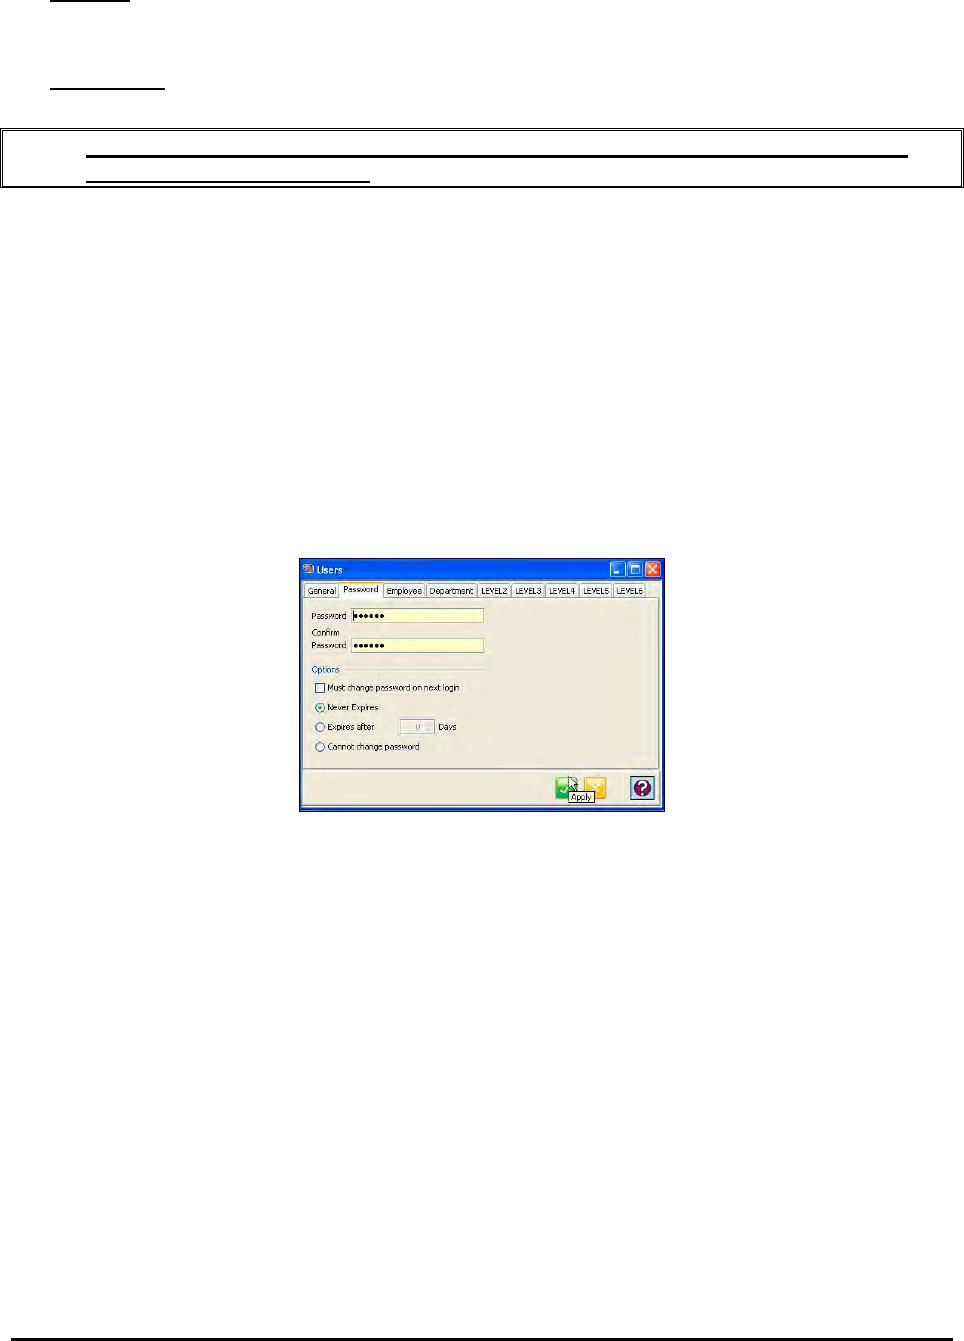
3-56 Time Guardian Series – Setup Wizard
Payroll – No access to Setup Wizard from the Edit menu. Only access to Employee,
Timecard, Communications, and Recalculate modules. Also access to Reports and Payroll
modules. However, no access to Global assign and apply functions.
Supervisor – No access to Setup Wizard from the Edit menu. Only access to Employees,
Timecard, and Reports modules. However, no access to Global assign and apply functions.
Note: Only Users created during the initial Setup Wizard will have default Report and
Payroll (if created) profiles.
3. In the Account Settings section, select the following:
• Disabled: If checked, the user will be disabled. (Enabled is default)
• Expires On: When checked, the password will expire on a given date. When the date
arrives, a check will automatically be placed in the disabled option.
• Read Rates: When checked, the user will have read-only access to the Rates’ modules.
• Write Rates: When checked, the user will have write access to the Rates’ modules.
• Advanced Labor Filter: When checked, the user will have the ability to filter employee
with another labor filter (advanced) working independent of the employee labor level
filter.
4. Click on the Password tab.
5. Enter a user password and confirm the password.
Note: The minimum required password length is (6) characters with a maximum of 20
characters. The password can be any combination of letters and numbers and is case-
sensitive. However, no spaces and/or symbols are allowed.
Please make a note of your name (administrator/user) and password and keep in a safe
place:
6. Set the password expiration options. The choices are:
• Must change password on next login: The user will be prompted to enter a new
password for this account at login.
• Never expires: The password created will never expire.
• Expires after: This allows you to set a specific date for the password to expire. After this
date the user will be prompted to enter a new password.
• Cannot change password: The users will not be able to change their password.
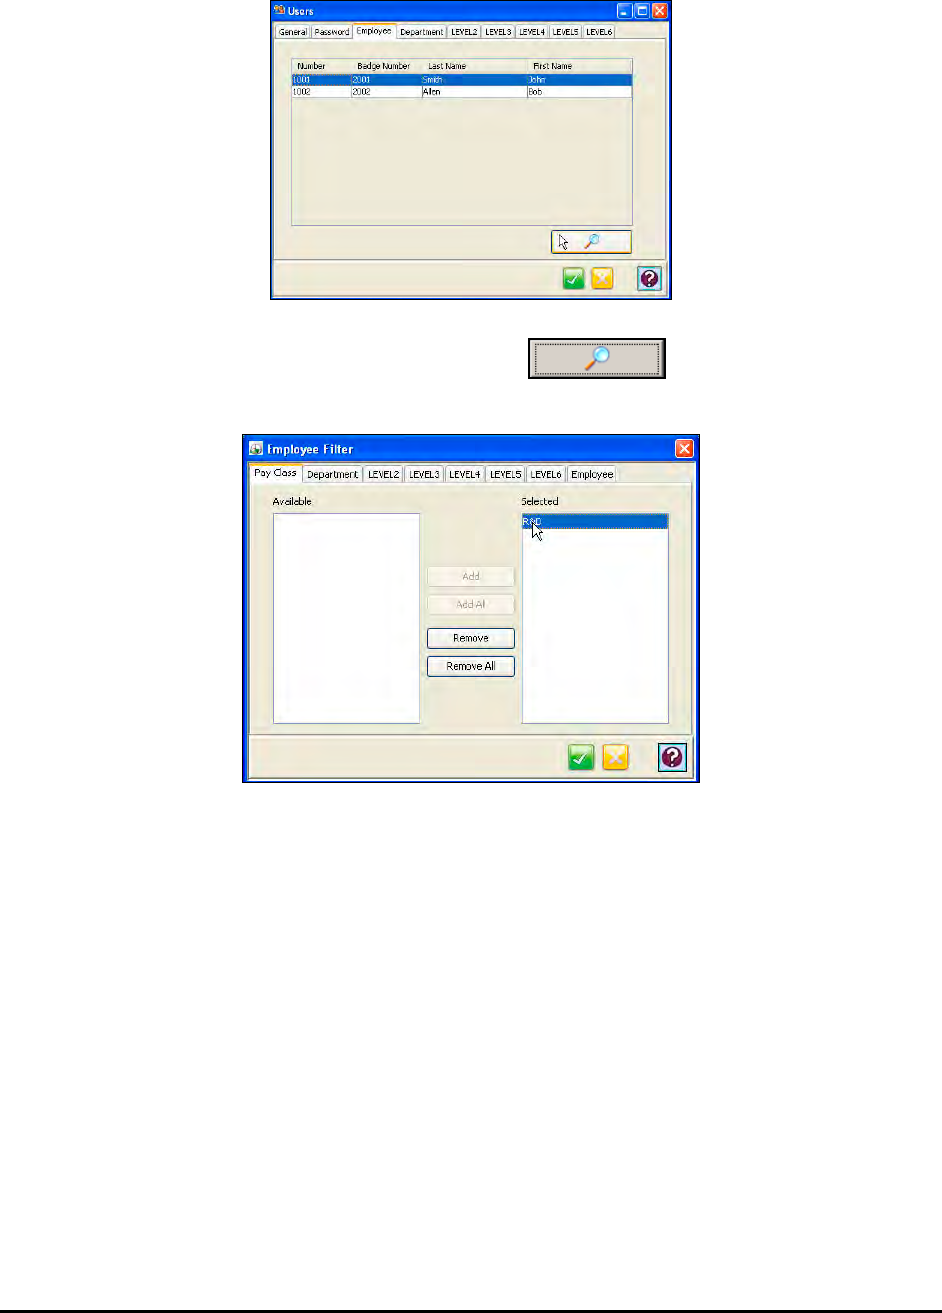
Time Guardian Series – Setup Wizard 3-57
7. Click on the Employees tab to filter employees.
8. To filter/add employees for the Users, click on the button. The Employee
Filter window will appear:
By default, all employees are selected. This filter is deeper as it acts upon the previous filter
from the Department/Labor Level tab to filter out employees by selecting the Pay Class and
Department/Labor Level tabs. Employees that are assigned to the selected Pay Class
and/or Department/Labor Level will appear in the Available list. Also, you can use the
Employee tab to sort the employee list using; Number, Badge, Payroll, Last Name, First
Name, and Comment, and then apply the criteria.
To add an employee to the Users, highlight the desired item in the Available list and click on
the Add button. To select all, click on the Add All button.
To remove an employee from the Users, highlight the desired item in the Selected list and
click on the Remove button. To remove all, click on the Remove All button.
Note: By unselecting Pay Classes/Departments/ Labor Levels/Employees, it will reduce the
Employees that the user has access to.
Note: The Administrator cannot be deleted.
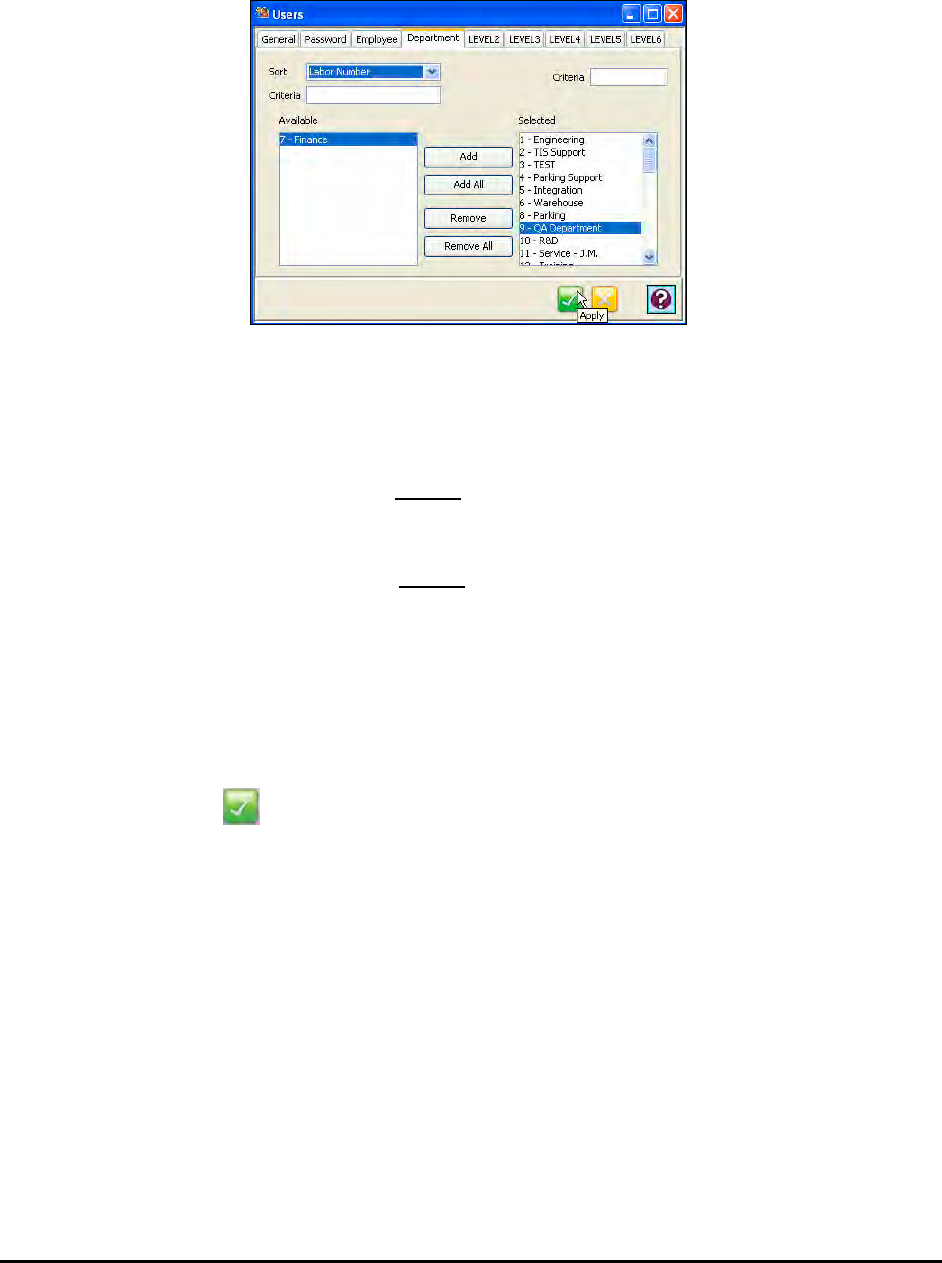
3-58 Time Guardian Series – Setup Wizard
9. Click on the Department and/or Labor Level tab(s) [only active if “Advanced Labor Filter” is
selected]. These tabs can be used to set the labor categories within each department that
the user has access to. Note: If a labor level is marked red it has expired.
10. By default, all departments are selected and will appear in the Selected list. Departments
can be removed from the Group by selecting them in the Selected list and clicking on the
Remove button. All the labor categories can be removed from the Selected list by clicking
on the Remove All button.
Departments can be simultaneously filtered in both the “Available” and Selected” lists in
ascending order by using the Sort field dropdown list. The choices in this list are; labor
number, or name.
Additionally, labor categories can be filtered in the “Available” or “Selected” lists by entering
additional case sensitive characters in dedicated Criteria fields (see illustration). The Criteria
field located above the “Available” list filters only that list, while the Criteria field above the
“Selected” list filters that list. Each list is filtered independently in ascending order.
Note: By unselecting Departments, it can reduce the Employees that the user can have access
to.
11. After completing the entry/selection of information for Step 9: Login Setup, click on the
Wizard Complete button at the bottom of the wizard to complete the setup of Time
Guardian and display Time Guardian login screen. The Time settings and other
configuration data will now be populated in the software, including the time setting on the
terminal(s). Time Guardian will poll for any connected terminals.
Note: Employees can be entered during the initial setup process, or any time later. Employees
can also be imported.
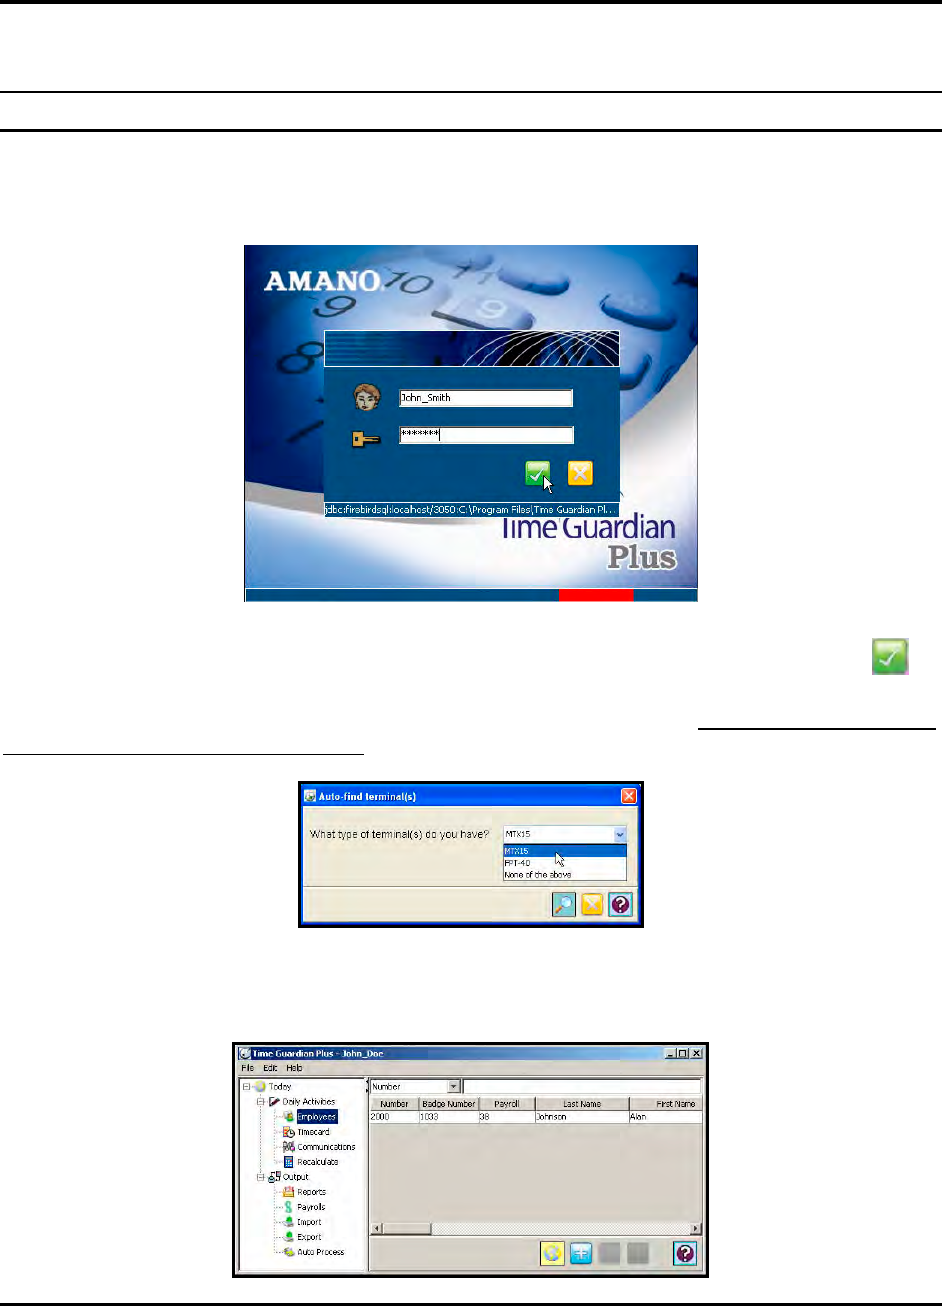
Time Guardian Series – How To Use 4-1
Chapter 4: Daily Use
Initial Startup
When the installation, software activation/registration, and Setup Wizard are complete, the
Login screen will appear. The following figures may use Time Guardian, Time Guardian Plus,
and Time Guardian Pro from the Time Guardian Series as examples.
Enter the Username and Password you defined in Step 9: Login Setup, and click on the
button and the Auto Find dialog will appear to select the type of terminal to be auto detected on
initial startup. The choices are MTX-15, FPT-40, or None of the Above. This dialog only appears
the first time the software is installed.
After terminal selection, the software will open with the Tree View (see Time Guardian Plus
example figure).
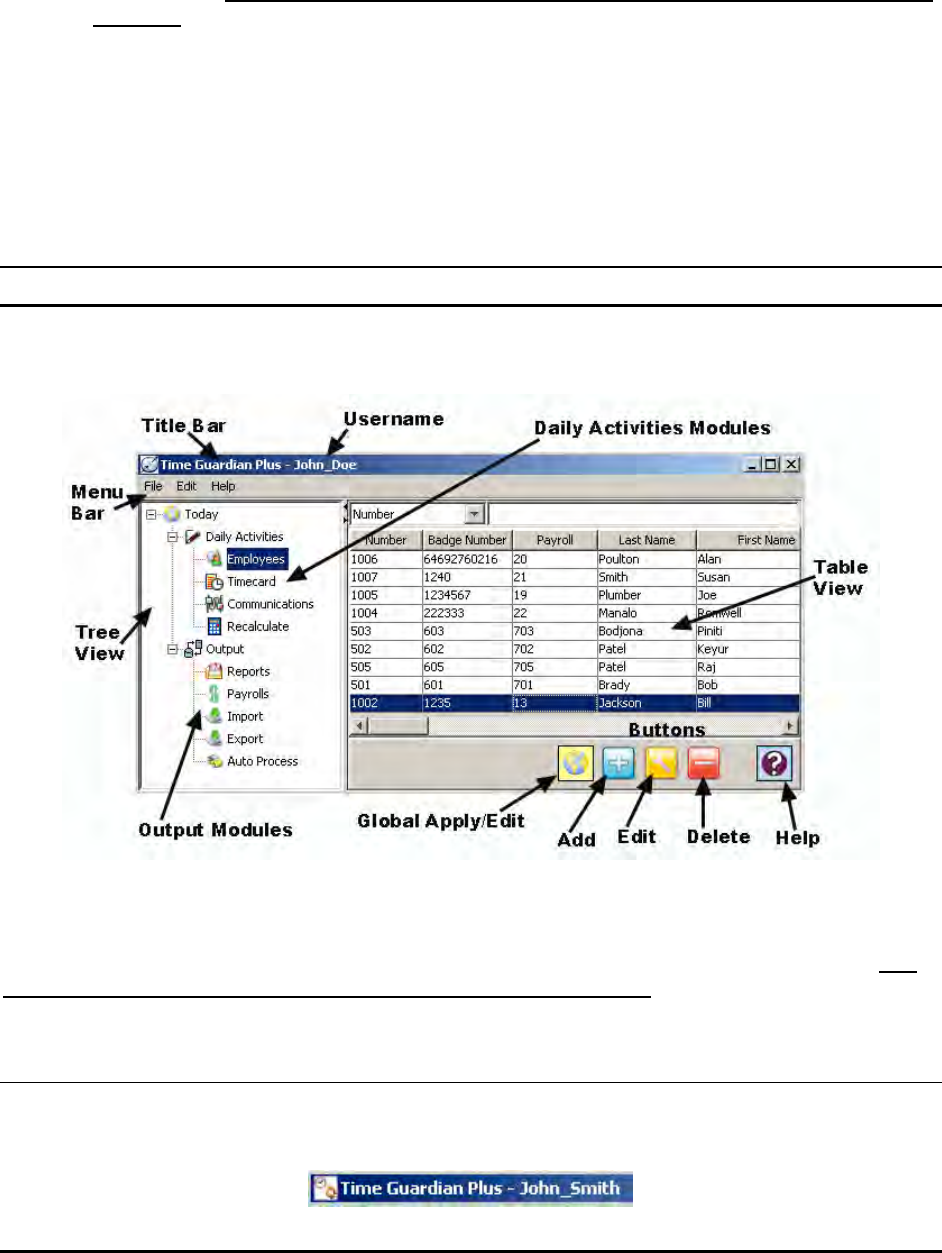
4-2 Time Guardian Series – How To Use
Note: The software will always open to the tree view in the last module opened. If necessary,
simply click on the “+” signs to expand the Daily Activities and/or Output Group to view
the modules [Setup with subordinate modules will be present if Advanced modules are
activated]. Some modules may not be active depending upon what selections were
made using the Setup Wizard (i.e., selecting No on Step 8: Clock for terminals other
than Access Control). Also, the User type (login) will control which modules are active
(i.e., a “Payroll” user logged in will not be able to see the Import, Export, and Auto
Process modules). Several modules such as Pay Class and Shift Rules will not be
visible unless the Advanced Pay Class and Advanced Meal modules are activated.
Note: Time Guardian Pro contains all modules.
Layout Appearance
The following is an overview of the screens for standard Time Guardian Plus with no activated
optional Advanced modules, menus, and buttons used throughout the system.
The above screenshot displays the Table View of Time Guardian Plus and identifies its various
sections. The item windows contained in the main screen can be resized by dragging the double
arrow pointer to the right or left, up or down, depending on the section you are working in. The
tree view for Time Guardian Pro would contain additional modules.
Title Bar
Located across the top of the screen, the Title Bar contains the software name, username, and
the Windows screen buttons that will allow you to minimize, resize or close the software.
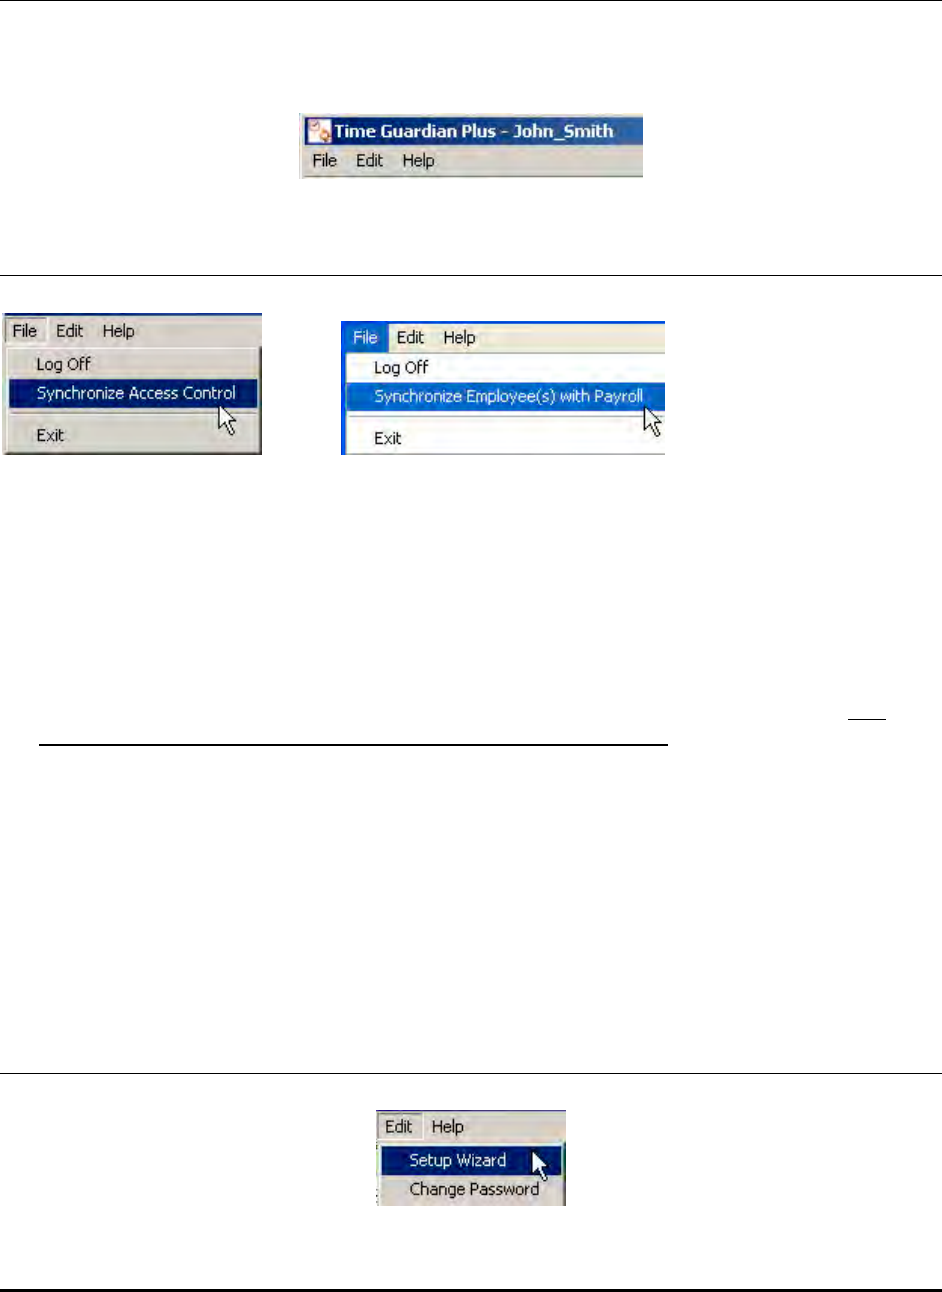
Time Guardian Series – How To Use 4-3
Menu Bar
The Menu Bar contains three (3) drop-down menus [File, Edit, and Help], each with submenus
to provide additional options that will assist you in the administration and use of Time &
Attendance software.
File Menu
The features of the File Menu are:
• Log Off: Log off current user.
• Synchronize Access Control: Provides the ability to synchronize both the Amano Time &
Attendance software database with the AmanoNet 7.6 or Nexus 220 databases. This
submenu item will only appear after Access Control integration has been selected by
selecting Yes in the Setup Wizard Step 1: General Setup, pressing the Access Control
button, and configuring Access Control. When the Synchronize Access Control submenu
is selected all new transactions are transferred to the Time & Attendance software. The
Access Control module must be activated for this feature to work. See Access Control
section for more details.
• Synchronize Employee(s) with Payroll: Provides the ability to synchronize both the
Amano Time & Attendance employees with QuickBooks employees. This submenu item will
only appear after Sync Employee(s) with QuickBooks by selecting in the Setup Wizard Step
7: Employee Setup. When the Synchronize Employee(s) with Payroll submenu is
selected employee data are export to QuickBooks, Imported from QuickBooks, or Both
depending on the selection on the Wizard Employee Setup.
• Exit: Exit the application.
Edit Menu
The features of the Edit Menu are:
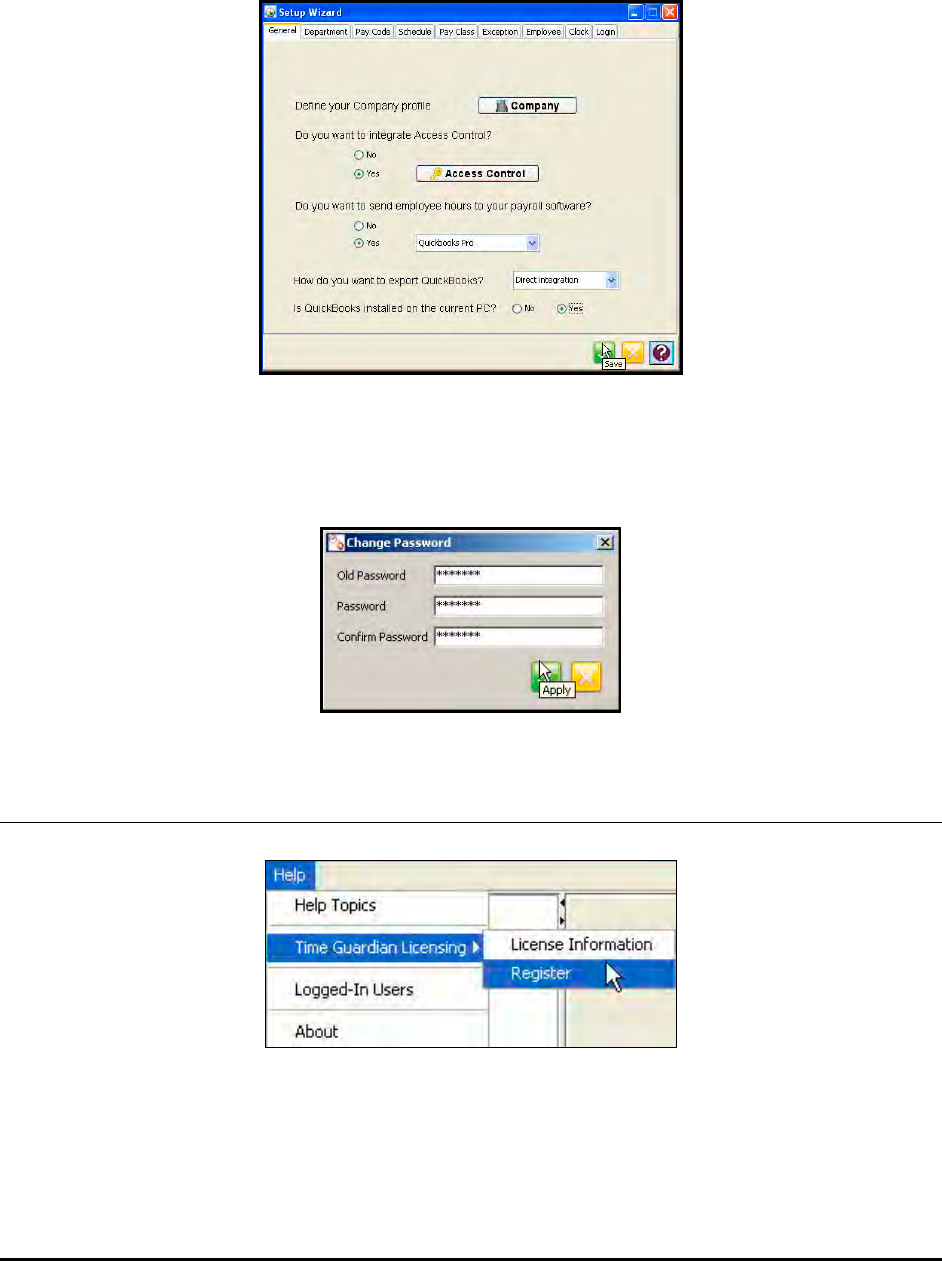
4-4 Time Guardian Series – How To Use
• Setup Wizard: Provides the ability to edit setup of the software such as adding additional
employees and changing current users (administrators). When this submenu is selected the
Setup Wizard will appear (see figure).
• Change Password: Provides the ability to change the password for the current user
(administrator) if it has expired, or is set to change password on Login. When this submenu
is selected the Change Password screen will appear (see figure).
Help Menu
The features of the Help Menu are:
• Help Topics: Provides access to the on-line Help.
• Time Guardian Licensing: Provides access to License Information and a connection for
software registration. Select License Information to see employee and concurrent user
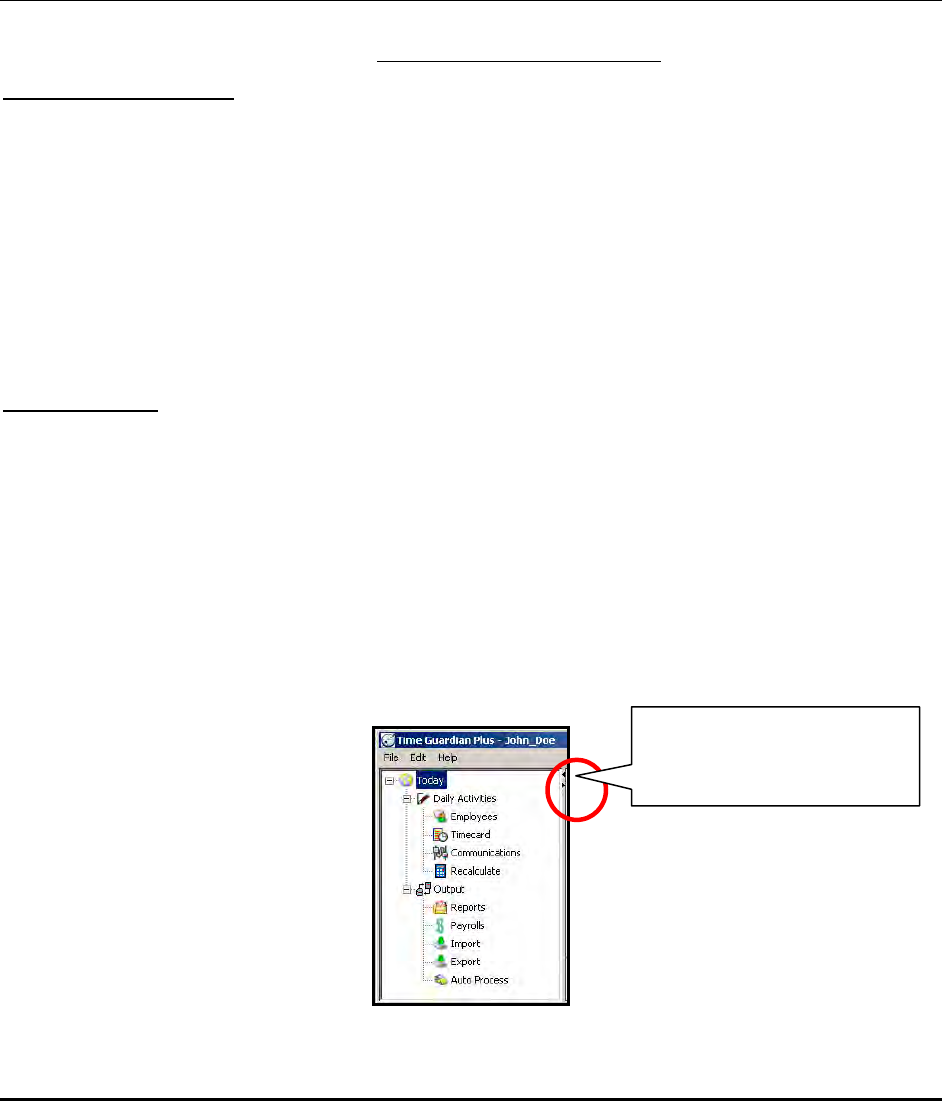
Time Guardian Series – How To Use 4-5
capacities. This will also display what Time & Attendance modules are activated with a
green checkmark.
• Logged-In Users: Provides a screen showing all users currently logged into the TG Series
software. This feature only active for registered users.
• About: Provides the version of the software that you are using, which is required when
placing a support call.
Tree View
The Tree View (see the following figure) lists the desktop module components for using
standard Time & Attendance software without any optional modules. They are:
Daily Activities Modules
• Employees: Click on this module in the tree view to; Add, edit, and/or delete employees.
• Timecard: Click on this module in the tree view to; Add and/or modify employee punches.
• Communications: Click on this module [enabled if using Access Terminals] to remotely
transfer functions on active terminals from the Host PC such as; poll locations, set locations
time, download validation and settings, and view & communicate with specific
terminals/location.
• Recalculate: Click on this module in the tree view to recalculate employee hours for
selected Pay periods within a given Pay Class.
Output Modules
• Reports: Click on this module in the tree view to configure, generate, and print reports
based on employee time and attendance data.
• Payrolls: Click on this module in the tree view to add, configure, or edit payroll company
settings for file export.
• Import: Click on this module to create and/or edit employee import data transfer.
• Export: Click on this module in the tree view to define file format and export employee data.
• Auto Process: Click on this module in the tree view to name and set up recurrence of auto
process for report, terminal communications, import, export, and/or synchronize Access
Control.
See the next section for a more detailed description of Tree View activity.
Use these arrows to
expand or collapse the
tree view panel.
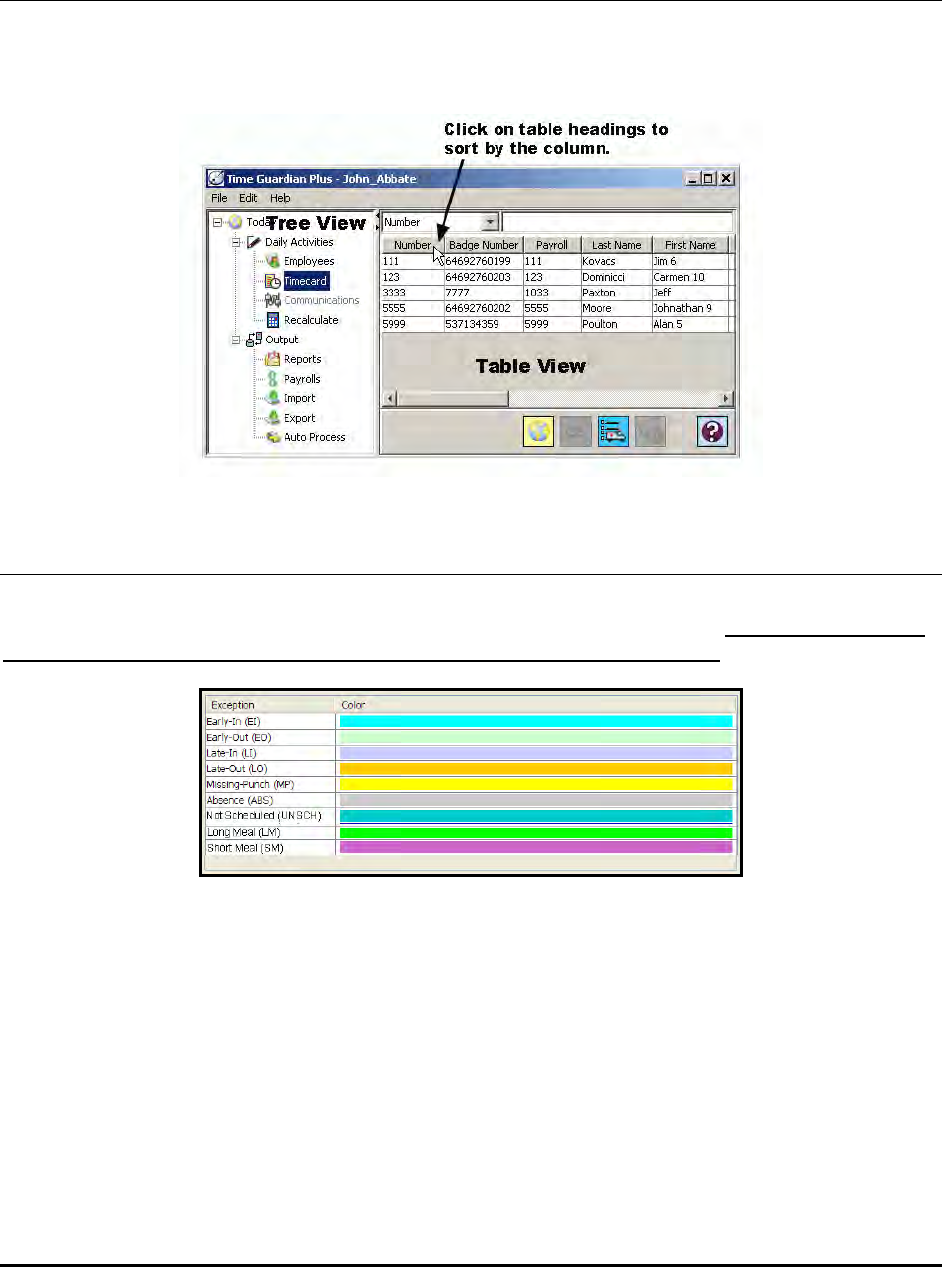
4-6 Time Guardian Series – How To Use
Table View
The Table View displays the currently selected (highlighted) module in the Tree View. The items
listed in the Table View can be sorted by double-clicking on the table header for that column
(see example figure).
Timecard Colors
The following figure shows the colors displayed in the timecard to indicate various employee
exceptions that have occurred if they have been configured to be tracked. Note: The amount of
exceptions that can be tracked may vary depending on module activation.
The following figure shows the colors displayed in the timecard to indicate various actions
performed. These timecard actions may differ depending on the modules activated.
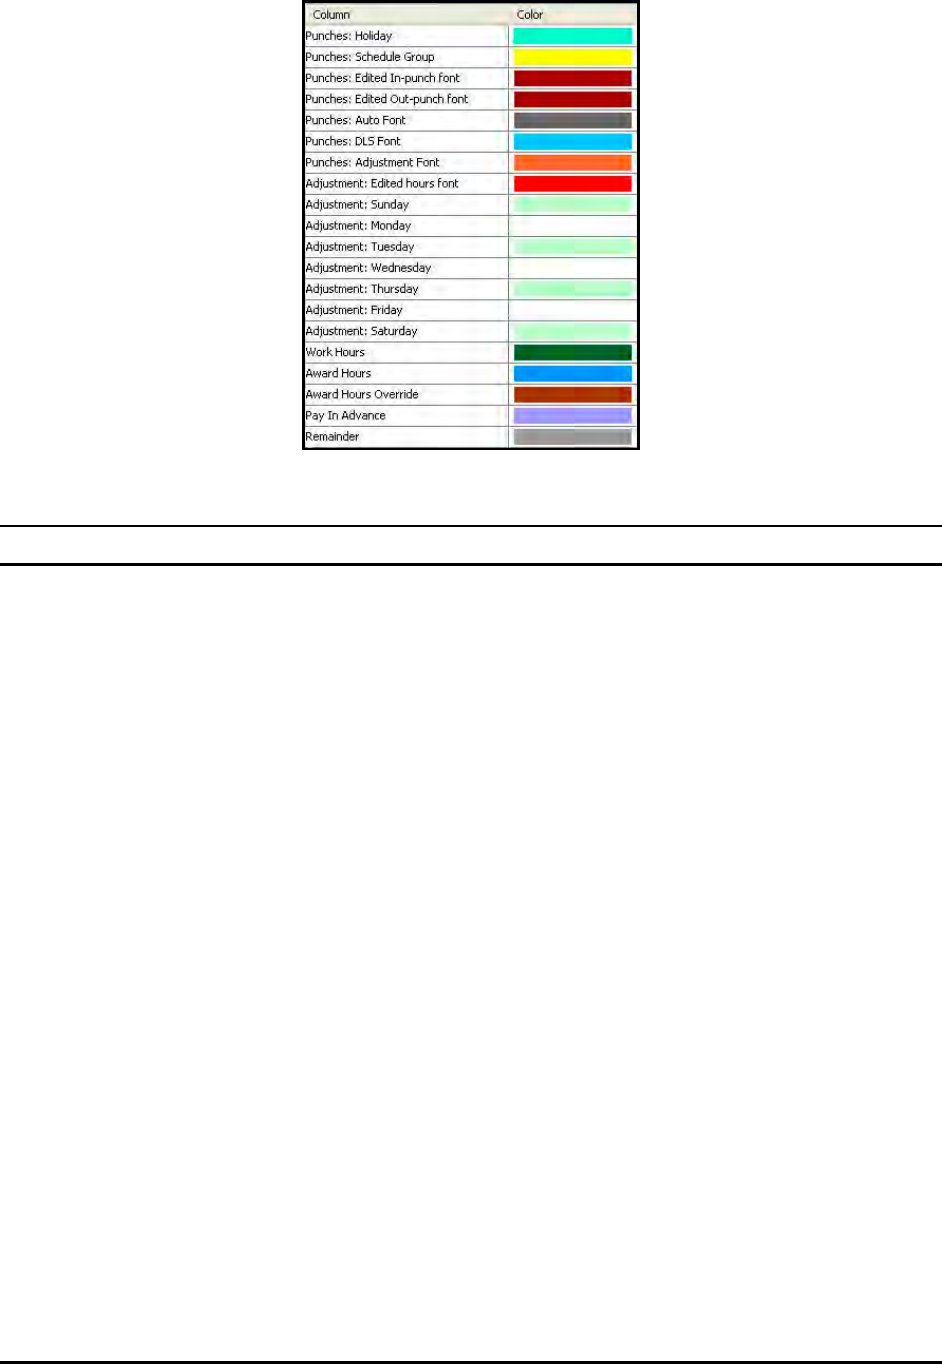
Time Guardian Series – How To Use 4-7
Holiday Formulas
Individual Holidays can be created in the Holiday window by selecting the Setup Wizard from
the Edit menu, clicking on the Pay Code tab and pressing the Holiday button. A formula is
used in the Date Definition and Condition tables to generate the holiday.
Note: If the Advanced Pay Class Module is activated see this module for additional
information on the Holiday Group and formulas.

4-8 Time Guardian Series – How To Use
This page intentionally left blank.
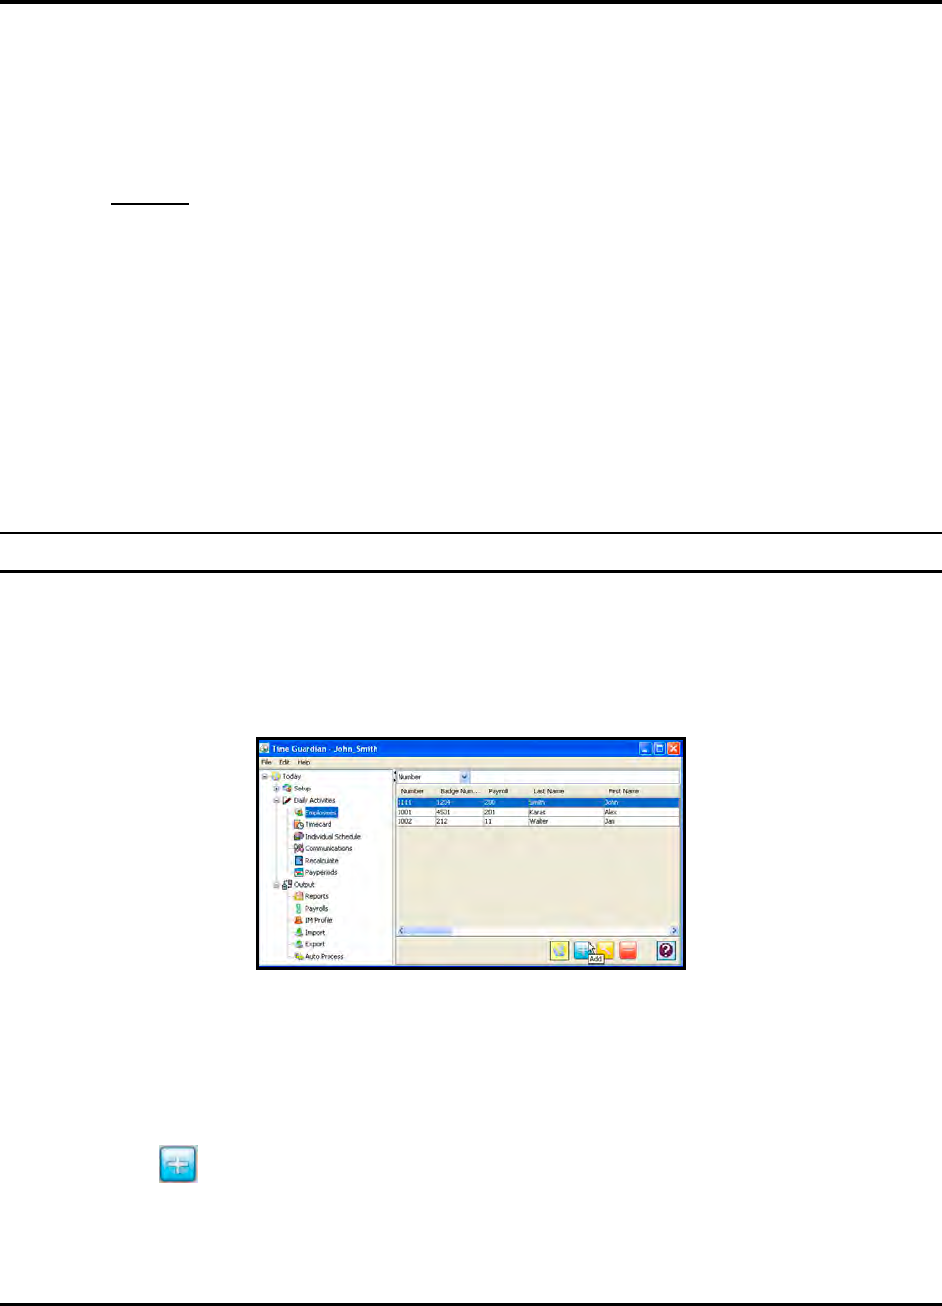
Time Guardian Series – Employee Administration 5-1
Chapter 5: Employee Administration
Employees can be administered by selecting the Employees module in the Daily Activities group
within the Tree View. The Employees module can consist of the following tabs: General,
Personal, Contact, Assignments, Scheduling, Labor Level, Wages. The following tabs may be
present if these modules have been activated; Access Control AmanoNet or Nexus220 Tabs,
Advanced Schedule Certification Tab, Benefit Time Benefit Tab, and Web Interface
Web Access Tab.
Note: If optional Access Module is installed to integrate with Amano Access Control
(AmanoNet 7.6 or Nexus 220) from 4 to 8 tags could be present. The amount of tags
depends upon the controller the AmanoNet system is connected to; connection to AC
or EC controller will have 4 tags, while connection to EC2 controller will have 8 or 10
tags.
The Amano Time & Attendance software can easily accommodate employees with the same
first or last name, however the Employee Number must be unique since it is the primary sorting
key. Badge Numbers can be changed or reused should an employee lose the badge or become
inactive. Each tab also has an Employee List; double-clicking a selected employee on this list
will cause their information to become active in all fields.
Adding Employees
To add Employees:
• In the Tree View, select the Employees module within the Daily Activities group, and the
Employees list will appear in the Table View (see the following figure).
Note: Employees can be added to the Amano Time & Attendance database by selecting to;
Sync Employees with QuickBooks and import from QuickBooks database from Setup
Wizard Employee (Step 7 of initial Wizard), or using the Import module to import
employee data. The employee module can also be used to add/create new employees
and/or edit existing employee(s).
• Click on the button, and the Employees window will appear (see the following figure).
The Employees window can consist of the following tabs: General, Personal, Contact,
Assignments, Schedule, Labor Level, Wages, Nexus 220 or AmanoNet, Certification,
Benefit, and Web Access depending on what modules are activated. May also depend on
setup configuration.
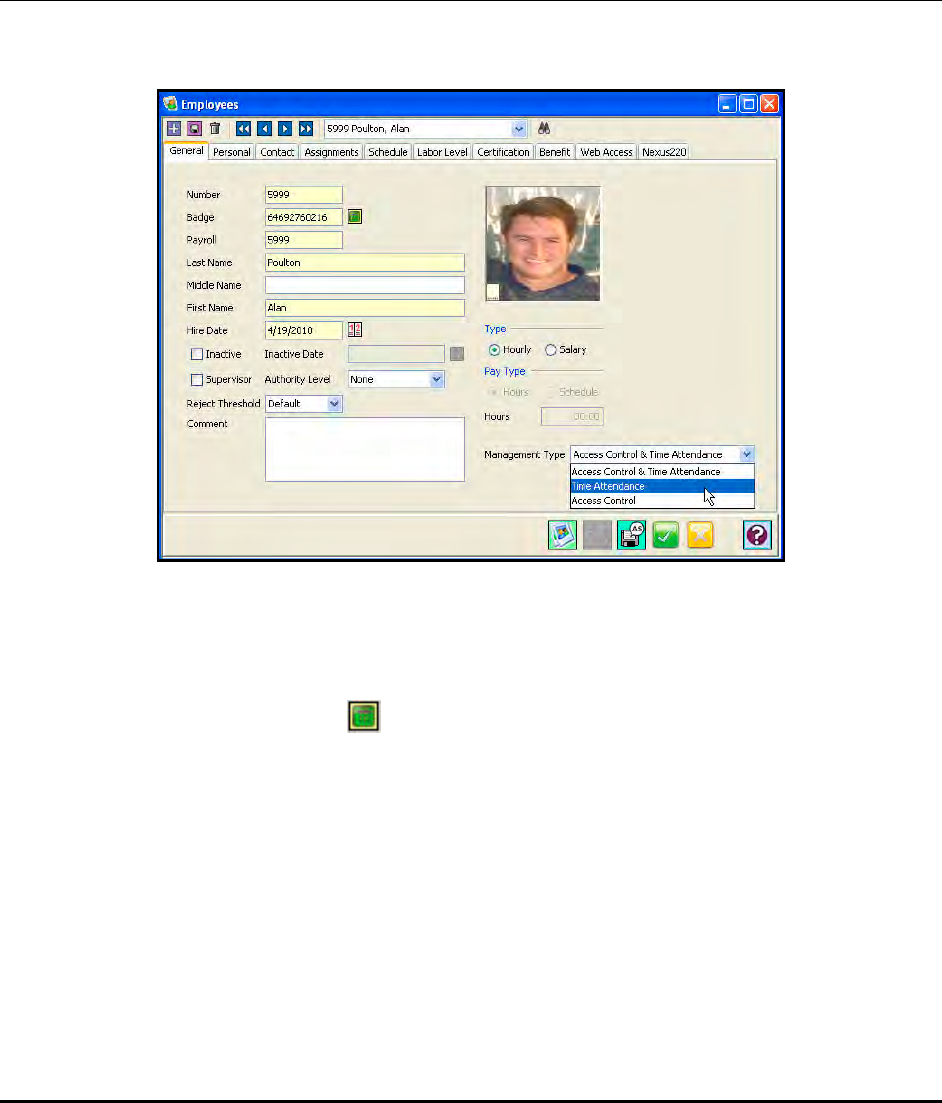
5-2 Time Guardian Series – Employee Administration
• Enter the employee information in the fields of each tab. Fields highlighted in yellow are
required and no record can be saved without the proper information being entered. The
following is an overview of each of these tabs including field names and definitions:
Note: The employee badge number and employee number must be unique. Also, see Access
Control about employee number requirements.
General Tab
From the Employees screen, click on the General tab and the following type of screen will
appear:
Number: Employee Number (required field), this must be unique since it is the primary sorting
key.
Badge: The employee badge number (required field).
Note: If you are using Access Control (Nexus 220 or AmanoNet 7.6), use the Registration
Reader(RR) Badge Reader icon to the right of the Badge field to enter the Badge
number from the Registration Reader.
Payroll: The Payroll ID Number of the employee (required field).
Last Name: A mandatory field for each employee containing his or her last name.
Middle Name: An optional field containing the employee’s middle name.
First Name: A required field for each employee containing his or her first name.
Hire Date: The date that the employee was hired, and can be set by clicking on the calendar
icon. Double-click on the desired date to close the box and populate the required field.
Inactive: When checked, the employee will be considered inactive and will no longer be
displayed on reports or count toward your employee total.
Inactive Date: The date that the employee was put on Inactive status.
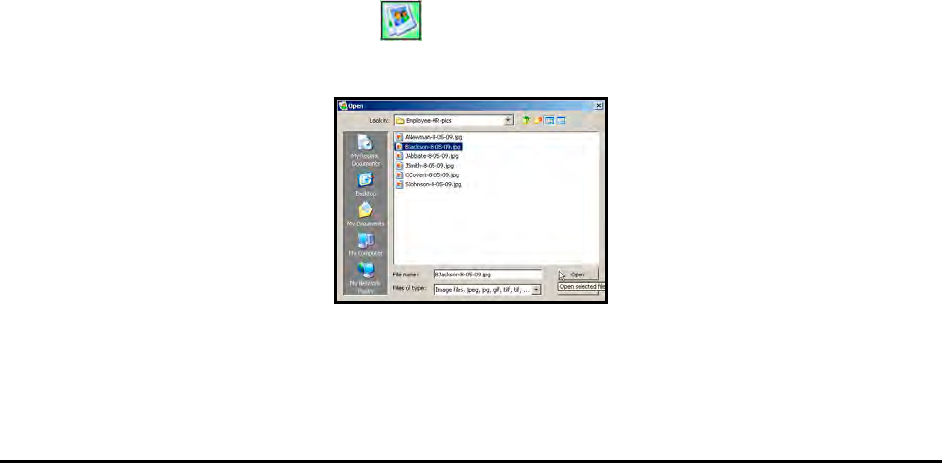
Time Guardian Series – Employee Administration 5-3
Supervisor: Check this box if this employee manages any other employee. This will allow the
employee to show up in the supervisor list box on the assignment tab.
Authority Level: The choices are: None, Service, Setup, Management, Enrollment, and Special.
These choices are only utilized for Hand Punch Terminals.
Reject Threshold: The choices are: Default, and 30 [strictest setting] – 250 [least strict].
Management Type: Available when using Access Control. The choices are:
a. Access Control and Time Attendance: The employee will be written to both the
access system and the Time Guardian databases.
b. Time Attendance: The employee will be written to the Time Guardian database only.
c. Access Control: The employee will be written to the access system database only.
Employee Type: Available when using Access Control and the management Type is set to
Access Control and Time Attendance or Access Control. The choices are Employee or Visitor.
Different access rights can be given to employees and visitors.
Type: There are two options to identify your employees: Select either Salary or Hourly.
Pay Type: Select either Hours or Schedule.
Note: A salaried employee can be paid by hours, or by schedule. An employee does not have
to punch to get credit for hours. A salaried employee can either be paid by:
- Hours: fixed hours to pay for each schedule(s), and all un-scheduled punches will be
grouped and not count as hours (no hours). Exceptions will be generated when
employees punch.
or
- Schedule: total of hours for each schedule(s) with all punches ignored. An employee
cannot punch for a schedule, and hours will be paid for only scheduled days. A
schedule is a day that has an Individual Schedule or Template Schedule defined for
it.
Comment: The place to enter specific comments about an employee.
Note: This function can also be done with Global Apply from the main employee list.
Load Image: Click on the Load Image icon to load an employee’s image into the screen
and database. The following Open dialog type screen will appear:
Valid image formats are; JPEG, JPG, GIF, TIFF, TIF, and PNG. The employee image
will be saved into the Time Guardian database and displayed on the General tab.
Note: Cannot be retained when converting from Firebird to MS SQL and vice versa.
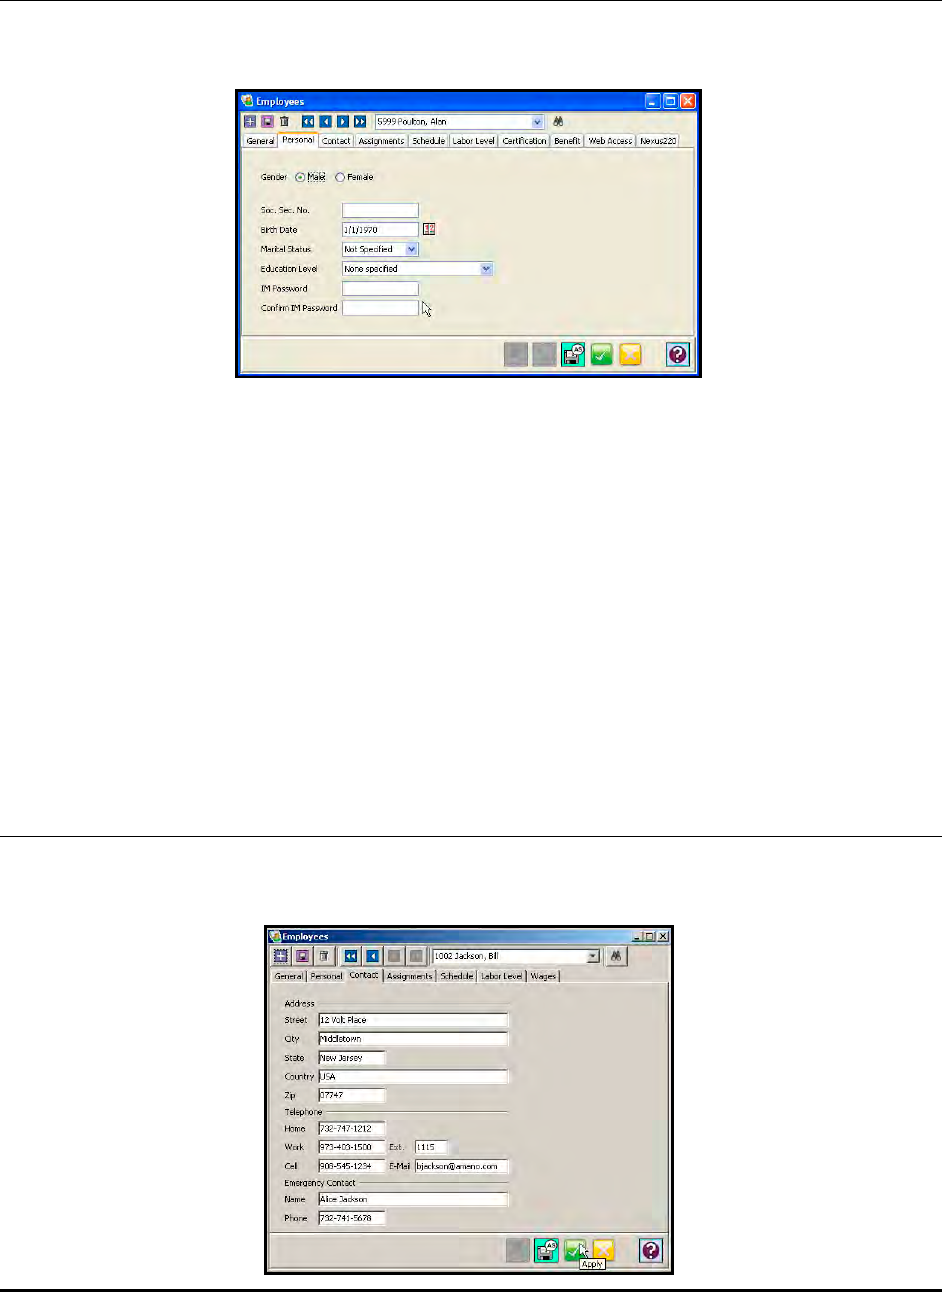
5-4 Time Guardian Series – Employee Administration
Personal Tab
From the Employees screen, click on the Personal tab and the following type of screen will
appear:
Gender: Male or Female.
Soc. Sec. No.: The employee’s 9-digit social security number (first 5 digits masked).
Birth Date: The employee’s birth date (MMDDYYYY).
Marital Status: The employee’s marital status (Single, Married, Divorce, or Widowed). Default is
Not Specified.
Educational Level: The employee’s education level (Elementary, High School, Some College
(No Degree), Associate, Bachelor, Masters, or Doctorate). Default is None Specified.
IM Password: Only available if Events Notification module is activated.
Confirm IM Password: Only available if Events Notification module is activated.
Contact Tab
From the Employees screen, click on the Contact tab and the following type of screen will
appear to enter employee contact information (see figure).

Time Guardian Series – Employee Administration 5-5
Assignments Tab
From the Employees screen, click on the Assignments tab and the following type of screen will
appear:
Pay Class: Assigns a Pay Class to an employee. Pay Classes are created in the Pay Class tab
in the Setup Wizard. Select a Pay Class from the dropdown list.
Time Zone: Assigns the time zone of the location that the employee works in. Select the
appropriate time zone from the dropdown list.
Daily Rule, only appears if Advanced Rounding module is activated. Assigns a Daily Rule to an
employee which can supersede a schedule.
Supervised By: Assigns a supervisor to a employee for filtering and timecard processing.
Validation: Assigns employee to a validation template which defines specific location/terminal.
Apply On Call Pay for Weighted Average Overtime: Check this function to calculate overtime
rate based on all hours worked plus hours (bonus) awarded for being on-call. See “Creating a
Pay Class” for weighted average overtime execution sequence.
Note: To lookup employees, click on the Filter Employee icon on the top of the
Employees screen and an Employee Filter screen will appear similar to the following
example:
By default, all employees are selected. You can filter employees by selecting the Pay
Classes and Departments/Labor Levels they are assigned to in each of the available Pay
Class and Department/Labor Level tabs. Employees that are assigned to the selected Pay
Classes and/or Departments/Labor Levels will appear in the Available list.
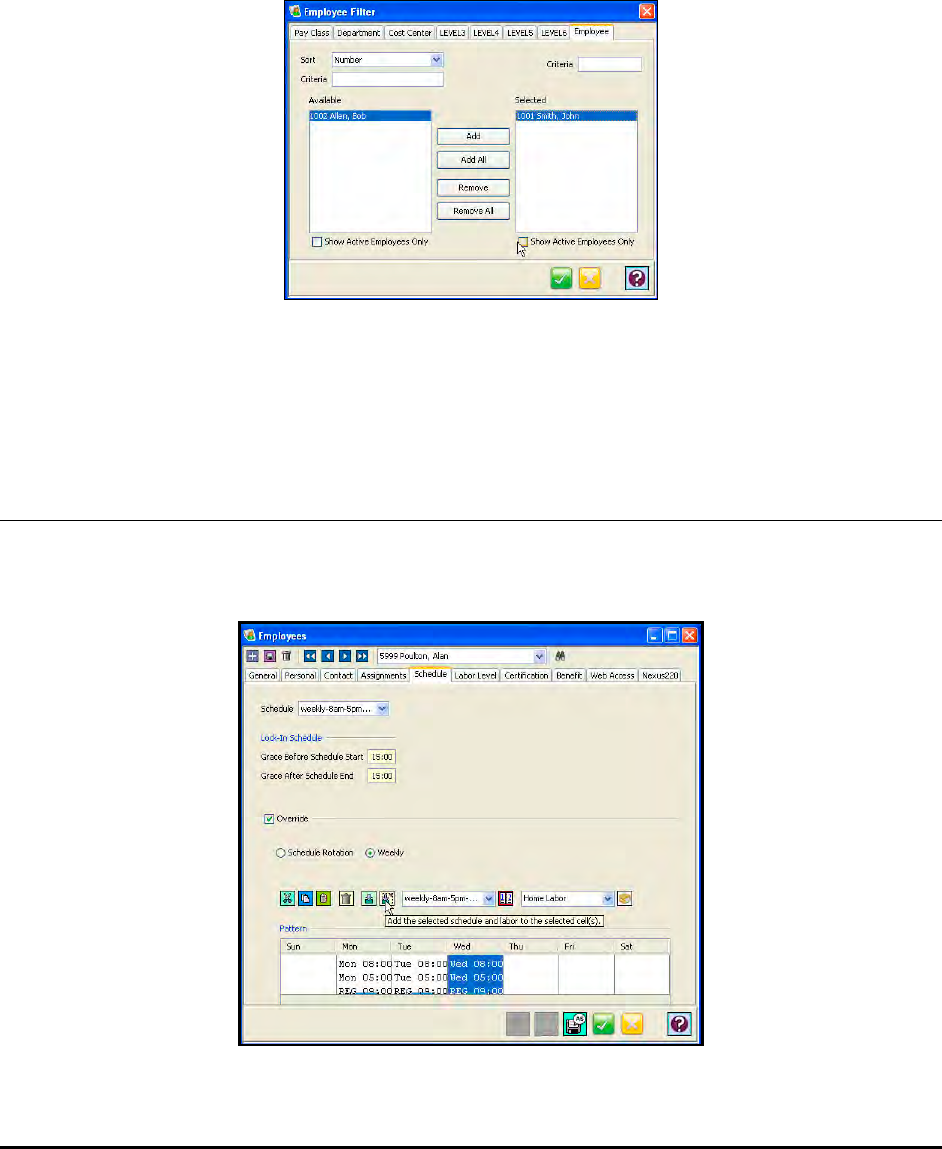
5-6 Time Guardian Series – Employee Administration
From the Employee Filter screen, click on the Employee tab to show Available and Selected
lists of employees. Both the Available and Selected lists of employees can be sorted by
typing in the “Criteria” fields above each list. To add an employee, highlight the desired
employee in the Available list and click on the Add button. To select all the listed Available
employees, click on the Add All button. To remove an employee from the Selected list,
highlight the desired employee in the Selected list and click on the Remove button. To
remove all the listed employees, click on the Remove All button.
Note: This function can also be done with Global Assign from the main employee list (see
Global Assign).
Schedule Tab
From the Employees screen, click on the Schedule tab and the following type of screen will
appear:
This tab is used to assign a Schedule to an employee. Schedules can be created in the Setup
Wizard from the Schedule tab. Select a Schedule by clicking on the dropdown list of Schedules.
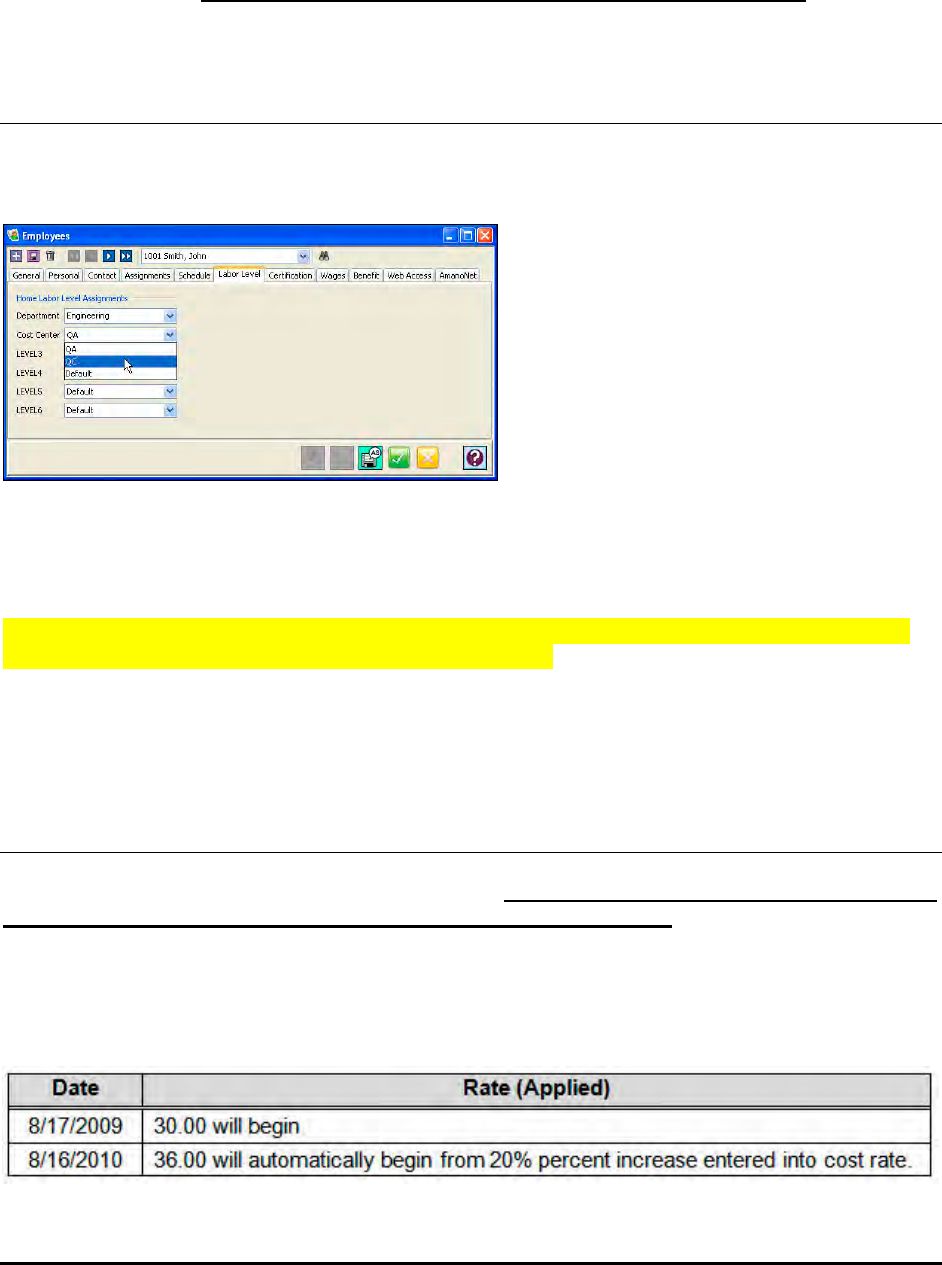
Time Guardian Series – Employee Administration 5-7
When using a Lock-in Schedule at the terminal you can define the grace time allowed before
schedule start time and after schedule end time.
When selecting to override a schedule you can select to use a template from; Schedule
Rotation or Weekly. Advanced Schedule module must be activated for this feature.
Labor Level Tab
From the Employees screen, click on the Labor Level tab and the following type of screen will
appear:
This tab allows you to assign default Home Labor Level Assignments for Departments to each
employee from the user defined dropdown lists. Only predefined Departments will appear under
“Home Labor Level Assignments”.
Note: See Advanced Labor/Rate Module, Example of Multiple Labor Levels for details about
Labor Level Association links (Parent/Child relationship).
This function can also be done with Global Assign from the main employee list (see Global
Assign).
Wages Tab
This tab allows you to assign wages to employees. The Wages tab will only be enabled if you
are logged into Time & Attendance software as an administrator. (See the Users Module
for more detailed description about read/write privileges). From the Employees screen, click on
the Wages tab and the following type of screen will appear:
For example, as illustrated in the following table and figures, the Cost Rate for employee #
1002, Bill Jackson is:
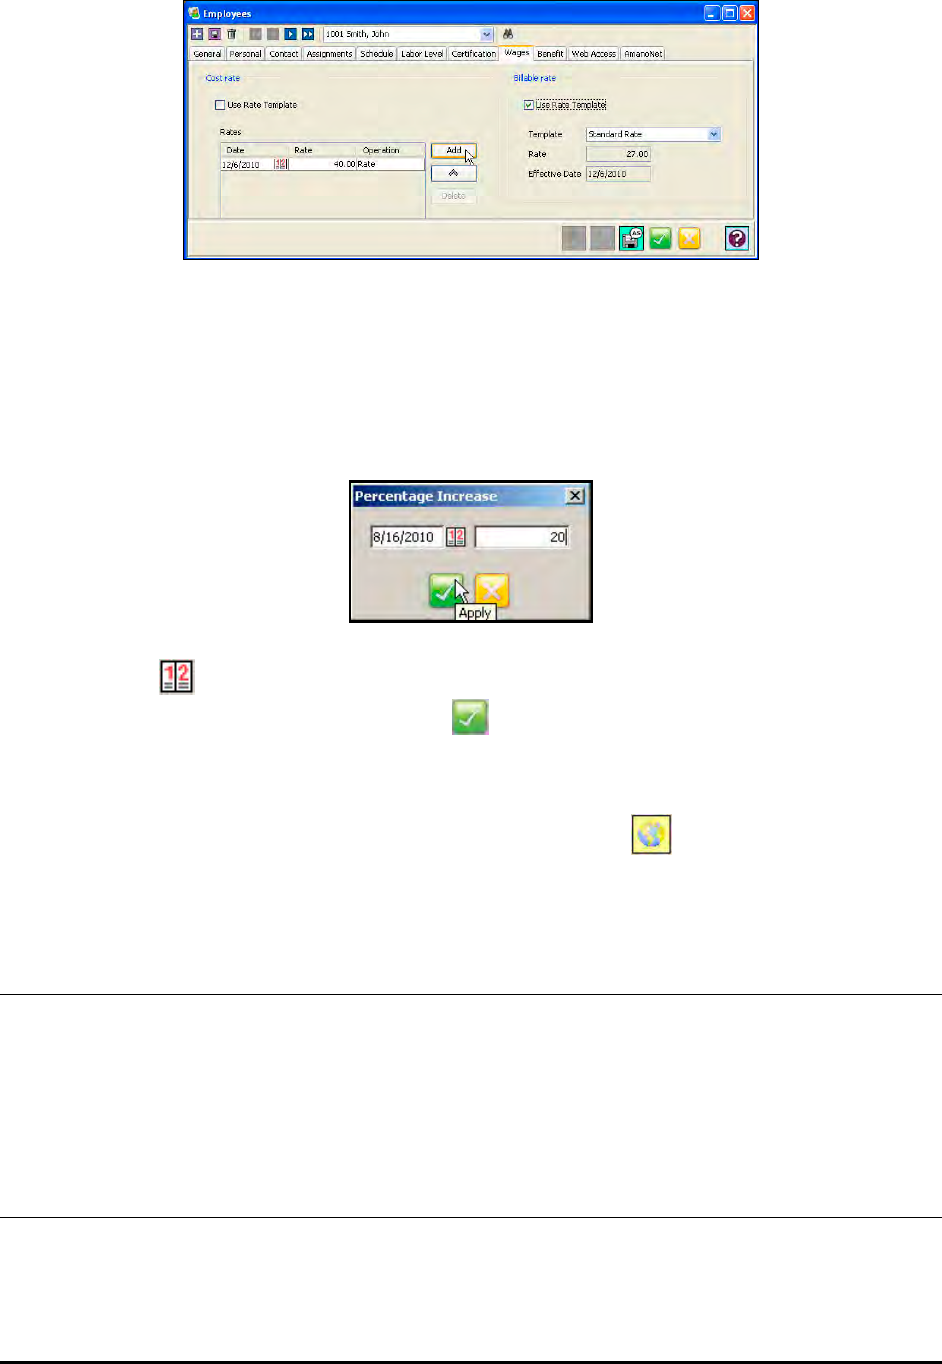
5-8 Time Guardian Series – Employee Administration
To assign a Cost and/or Billable Rate, click on the Add button and a row will appear in the
Rates box. In the Date field, enter a date when the rate for the employee will be in effect. Enter
a rate for the employee in the Rate field. Rate is the employee's actual rate. Percentage will
increase the existing rate for the employee by the percentage on the date as defined in Rate
Setup. Rates can be increased using the Operation field or by clicking on the Percent Increase
button and the following window will appear:
Click on the button to enter an effective date for the increase and enter the percentage
you wish to increase the rate. Click on the button when finished and a new row will be
created in the Rates box.
To delete a rate or rate operation, select the desired row, and click on the Delete button.
Note: Creating Cost rates can also be done with Global Assign from the main employee
list (see Global Apply).
Nexus 220 Tab
Access Control module must be activated for this feature. Use to setup access control
integration with PIN numbers and/or tags for each employee. See Access Control Integration
Module for details on the setup/configuration and use of the
Nexus 220 system with the Amano Time & Attendance software.
AmanoNet Tab
Access Control module must be activated for this feature. Use to setup access control
integration with PIN numbers and/or tags for each employee. See Access Control Integration
Module for details on the setup/configuration and use of the AmanoNet system with the Amano
Time & Attendance software.
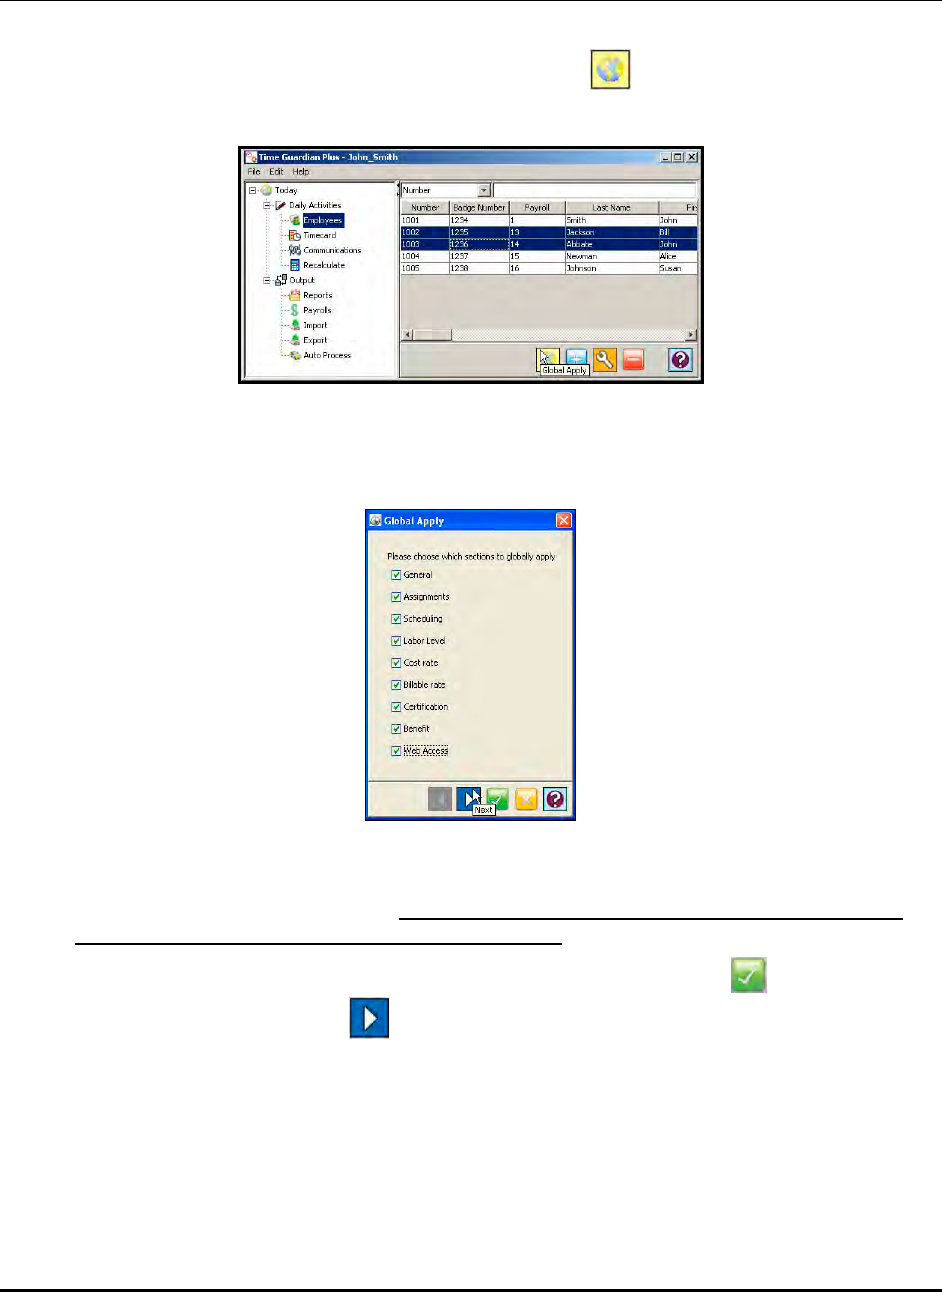
Time Guardian Series – Employee Administration 5-9
Global Apply
1. To globally assign settings to a group of employees, highlight the desired employees from
the list in the Table View, and click on the Global Apply button (see the following
figure).
2. The Global Apply window will appear (see the following figure) to choose which sections
(parameters) to globally apply to the employees.
Note: This Global Apply Wizard essentially corresponds to the tabs found on the Employees
screen (see Adding Employees). However, Certification, Benefit and Web Access will
only appear if the appropriate module is activated.
3. After choosing the sections by clicking in the boxes, click on the Apply button to apply
your choices. Click on the Next button and the first selection will appear (sections will
appear in order).
General – Global Apply
If selected, the General window for the Global Apply Wizard (see the following figure) will be the
1st to appear. This corresponds to the General tab found on the Employees screen (see General
Tab).
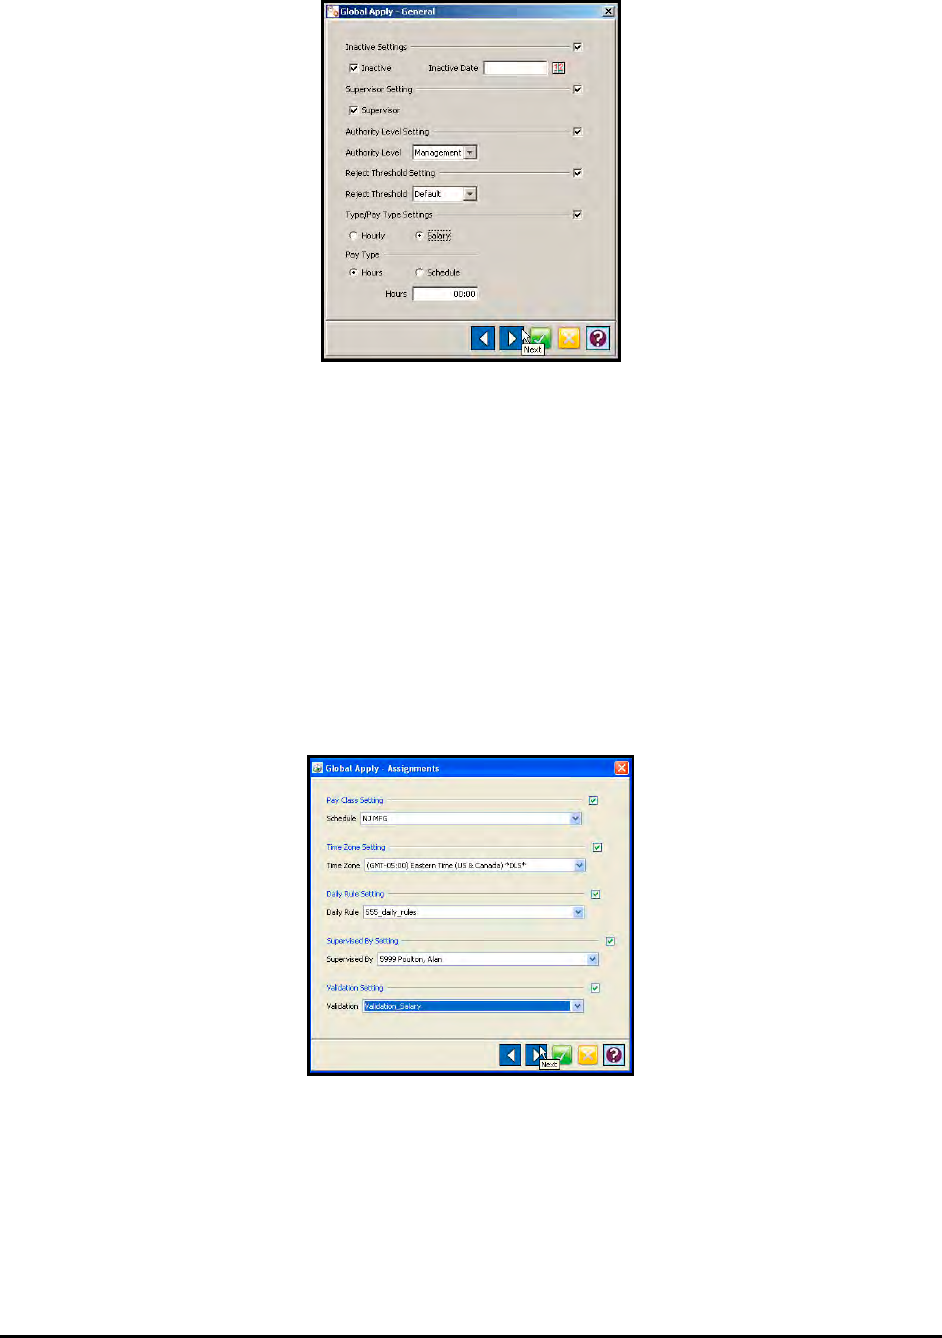
5-10 Time Guardian Series – Employee Administration
From this window, the user can choose to apply a specific setting by clicking on the box next to
the selection. If no checkmark is placed in the box, then the selection will not be applied to the
employee(s). In the example (figure above), the user choose to apply all the selections to the
employee(s). When the Global Apply Wizard is completed, all these settings will be applied to all
the employees selected on the list.
Assignments – Global Apply
If selected, the Assignments window for the Global Apply Wizard (see the following figure) will
be the 2nd to appear. This corresponds to the Assignments tab found on the Employees screen
(see Assignments tab).
From this window, the user can choose to apply a specific setting by clicking on the box next to
the selection. If no checkmark is placed in the box, then the selection will not be applied to the
employee(s). In the example (figure above), the user choose to apply all the selections to the
employee(s). When the Global Apply Wizard is completed, all these settings will be applied to all
the employees selected on the list.
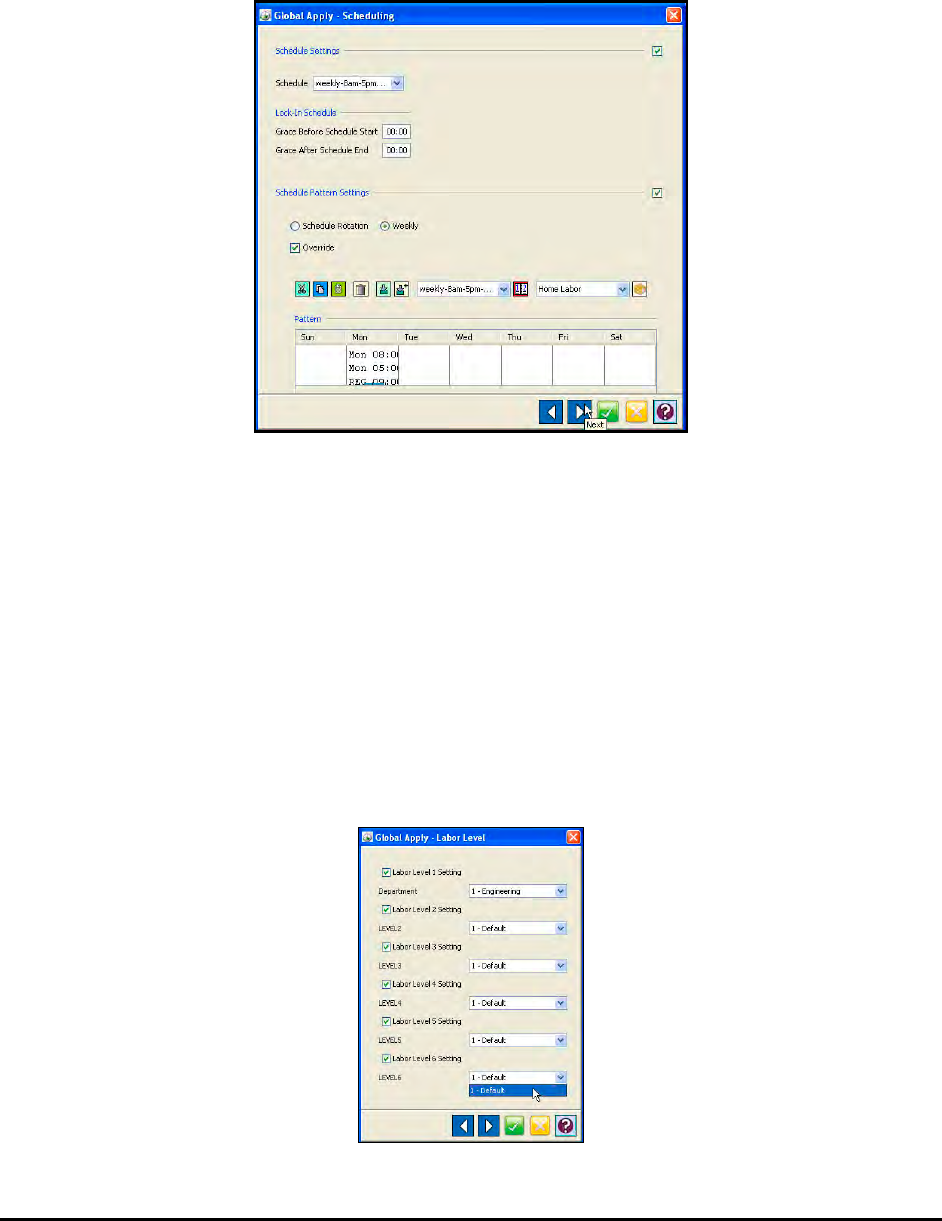
Time Guardian Series – Employee Administration 5-11
Scheduling – Global Apply
If selected, the Scheduling window for the Global Apply Wizard (see the following figure) will be
the 3rd to appear. This corresponds to the Schedule tab found on the Employees screen (see
Schedule Tab).
From this window, the user can change the employee’s schedule. They can choose to change
the employee's selected schedule by clicking on the box next to Schedule Settings. If no
checkmark is placed in this box, then the Schedule selections will not be applied to the
employee(s).
When the Global Apply Wizard is completed, all these settings will be applied to all the
employees selected on the list.
Labor Level – Global Apply
If selected, the Labor Level window for the Global Apply Wizard (see the following figure) will be
the 4th to appear. This corresponds to the Labor Level tab found on the Employees screen (see
Labor Level Tab).

5-12 Time Guardian Series – Employee Administration
Note: See Advanced Labor/Rate Module, Example of Multiple Labor Levels for details about
Labor Level Association links (Parent/Child relationship).
From this window, the user can choose to apply a specific setting by clicking on any of the
“Labor Level Settings and choosing a department from the dropdown list. If no checkmark is
placed in the box, then the selection will not be applied to the employee(s). In the example
(figure above), the user choose to change the selected employee(s) home labor levels 1. When
the Global Apply Wizard is completed, all these settings will be applied to all the employee(s)
selected on the list.
Certification – Global Apply
If selected, the Certification window for the Global Apply Wizard (see the following figure) will be
the 5th to appear. This corresponds to the Certification tab found on the Employees screen
Note: This global apply function will only be available when Advanced Schedule module is
activated.
From this window, the user can choose to add or replace an employee's certifications. In the
example (figure above), the user choose to add the CNE certification to the selected
employee(s) with an Achievement date of 12/13/2007. In the example the Override check box is
not selected. If the Override checkbox is selected, then the selected employee's existing
certifications would be replaced with the new selections. When the Global Apply Wizard is
completed, all these settings will be applied to all the employee(s) selected on the list.
Cost Rate – Global Apply
If selected, the Cost Rate window for the Global Apply Wizard (see the following figure) will be
the 6th to appear. This corresponds to the Wages tab found on the Employees screen (see
Wages Tab).
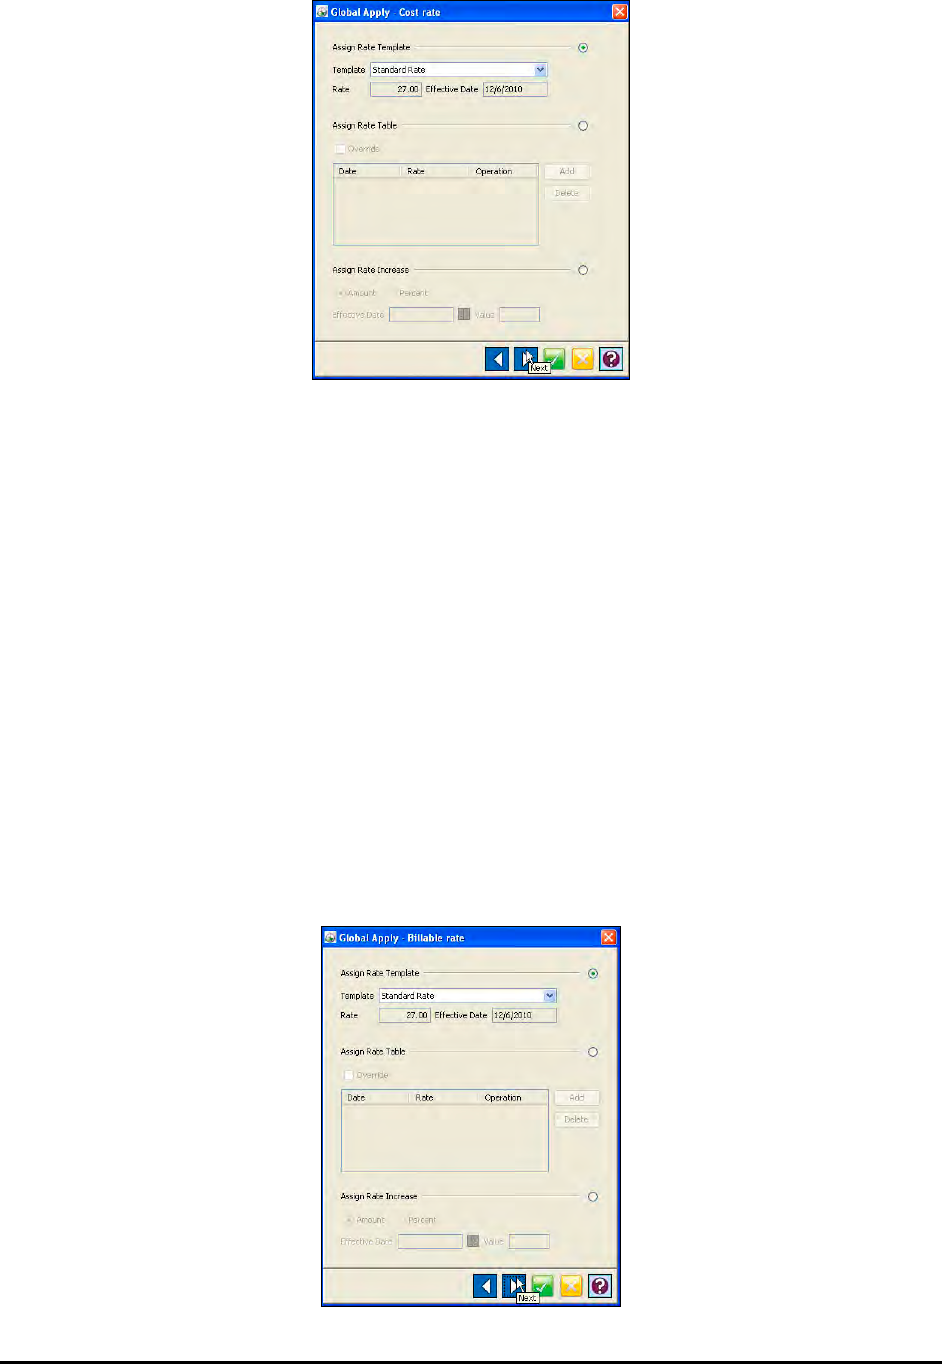
Time Guardian Series – Employee Administration 5-13
The Cost Rate window allows the user to specify and apply rate settings by clicking on the radio
button next to the selection. If the radio button is not selected, then the selection will not be
applied to the employee(s). The user can choose to Assign Rate Table, or Assign Rate
Increase. Note – the first option would replace the existing settings with the new settings, while
the 2nd option is only applied to employees with a Rate Table. Additionally, if assigning a Rate
Table, the user can choose to Override the employee's existing Rate Table with the new
settings by clicking on the Override checkbox. In this example, all selected employees (from
employee list) will be assigned a Rate Table. If they already have a Rate Table, the specified
rate would be added to it.
When the Global Apply Wizard is completed, all these settings will be applied to all the
employee(s) selected on the list.
Billable Rate – Global Apply
If selected, the Billable Rate window for the Global Apply Wizard (see the following figure) will
be the 8th to appear. This corresponds to the Wages tab found on the Employees screen (see
Wages Tab).
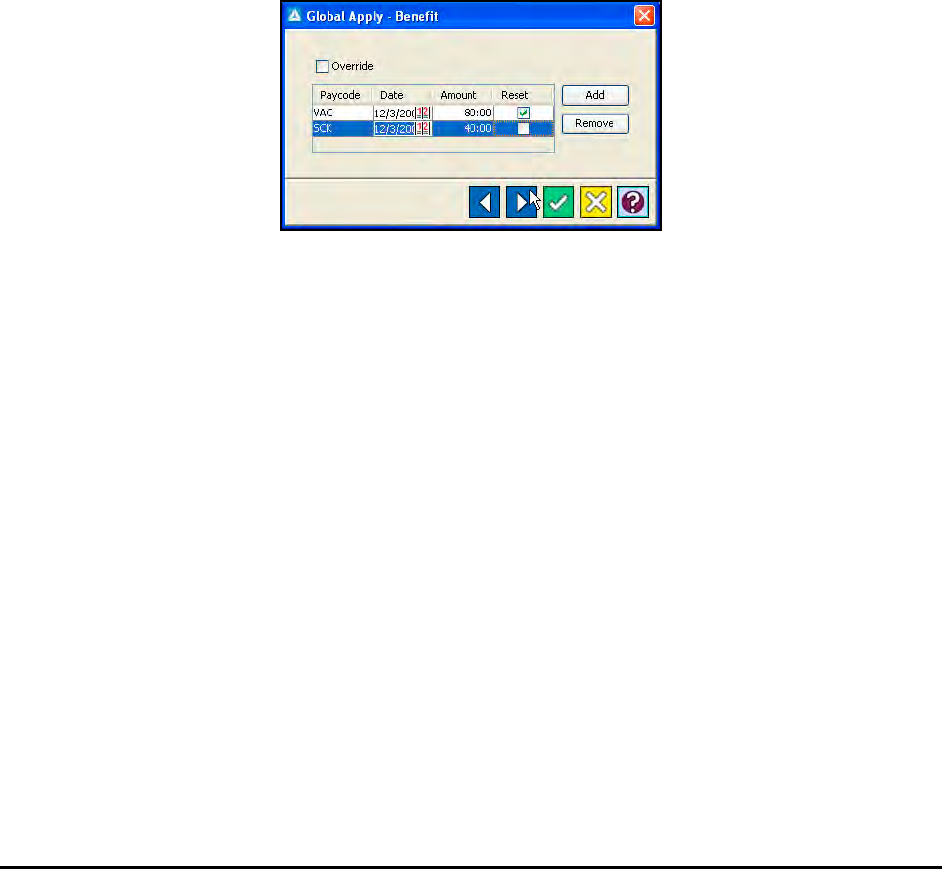
5-14 Time Guardian Series – Employee Administration
The Billable Rate window allows the user to specify and apply rate settings by clicking on the
radio button next to the selection. If the radio button is not selected, then the selection will not
be applied to the employee(s). The user can choose to Assign Rate Table, or Assign Rate
Increase. Note – the first option would replace the existing settings with the new settings, while
the 2nd option is only applied to employees with a Rate Table. Additionally, if assigning a Rate
Table, the user can choose to Override the employee's existing Rate Table with the new
settings by clicking on the Override checkbox. In this example, all selected employees (from
employee list) will be assigned a Rate Table. If they already have a Rate Table, the specified
rate would be added to it.
When the Global Apply Wizard is completed, all these settings will be applied to all the
employee(s) selected on the list.
Benefit – Global Apply
If selected, the Benefit window for the Global Apply Wizard (see the following figure) will be the
8th to appear. This corresponds to the Benefit tab found on the Employees screen.
Note: This global apply function will only be available when Benefit Time module is activated.
From this window, the user can choose to apply a benefit setting to the selected employee(s). In
this example, the user wanted to add Vacation and Sick benefit time to the employee(s). The
user wanted not to Override the existing settings, but add instead. When the Global Apply
Wizard is completed, all these settings will be applied to all the employee(s) selected on the list.
Web Access – Global Apply
If selected, the Web Access window for the Global Apply Wizard (see the following figure) will
be the 9th to appear. This corresponds to the Web Access tab found on the Employees screen.
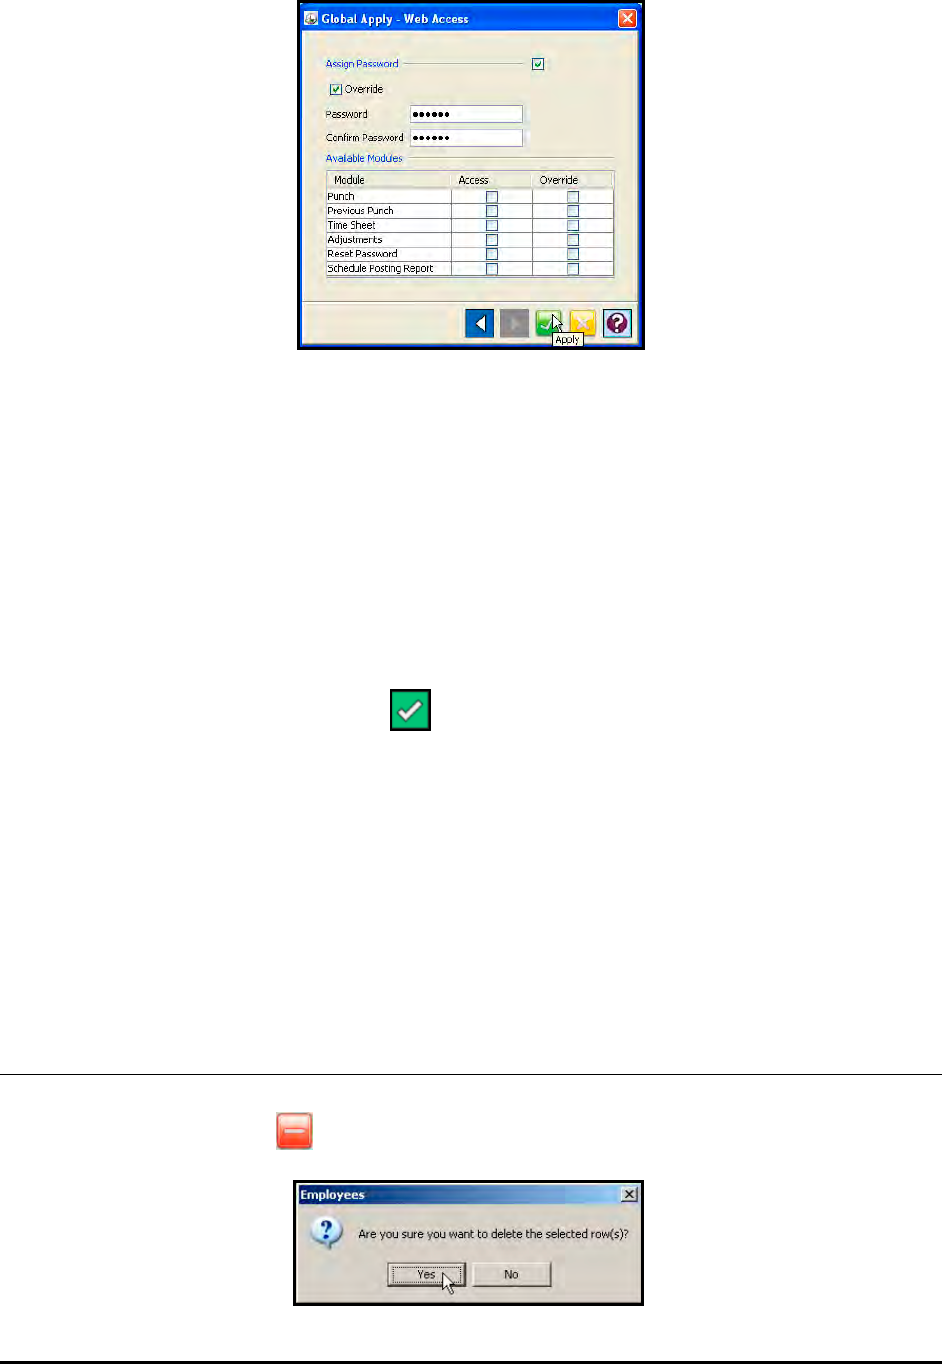
Time Guardian Series – Employee Administration 5-15
Note: This global apply function will only be available when Web Interface module is activated.
From this window, the user can choose to apply Web Access settings by clicking on the box
next to the selection. If no checkmark is placed in the box, then the selection will not be applied
to the employee(s). In the example (figure above), the user is choosing to override the
employee's password with the specified setting and to grant the Punch, Previous Punch, and
Reset Password privilege to the employee(s). The Override setting for the password determines
if employees that already have a password are affected. If selected, then the password is
changed, but if not selected, then only the employees that do not have passwords are affected.
When the Global Apply Wizard is completed, all these settings will be applied to all the
employee(s) selected on the list.
Make the desired edits and click on the button when finished.
Note: IMPORTANT!! Global Apply (assign) will only effect [override] the modules (i.e.,
Previous Punch) that have a checkmark in the "Access" column. Therefore, any module
where the Access column is not checked will not be changed (updated by Global Apply).
Finishing Global Apply
The final screen shows a list of the employee's that would be affected by the Global Apply
operation/selections and provides the user with the chance to Cancel the operation. Click on
the OK button perform the operation.
Deleting Employees
To delete an employee, highlight the desired employee record from the employee list in the
Table View and click on the button. You will be prompted to confirm your deletion.
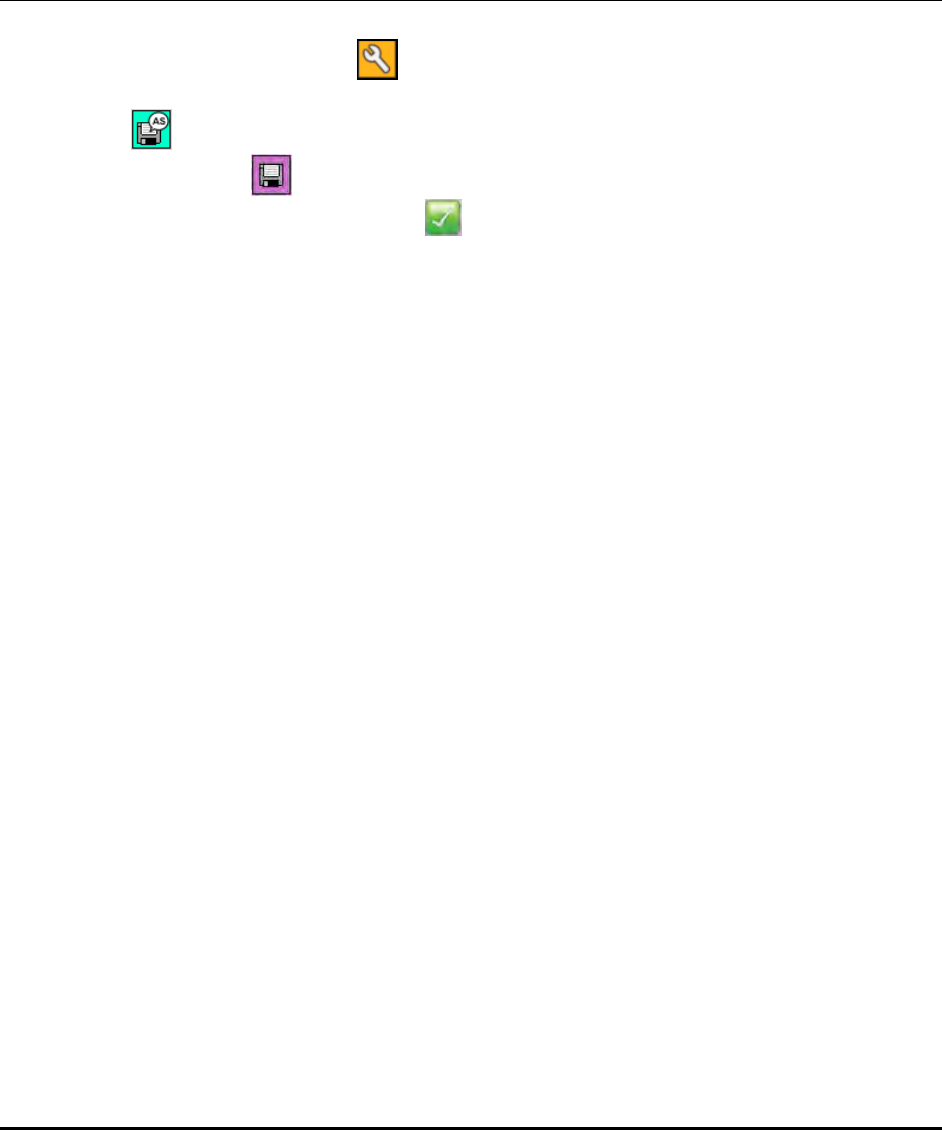
5-16 Time Guardian Series – Employee Administration
Click on Yes to delete. The employee record will be removed from the list, including all historical
data.
Note: It is recommended that you make the employee inactive instead of deleting the
employee in case you would want to reactivate the employee at a later date.
Editing Employees
To edit an employee record, double-click on the desired employee record, or highlight the
employee in the list and click on the button. The Employees window will appear with the
fields populated with the information of the selected employee. Make the desired edits and use
the Save As button to make a copy of an existing employee with different information, i.e.,
name, etc. Use the Save button to save the current employee information and not exit to
the Employee tree view list. Use the Apply button to save and exit to the Employee tree
view list. These functions are present on all of the Employees tab screens.
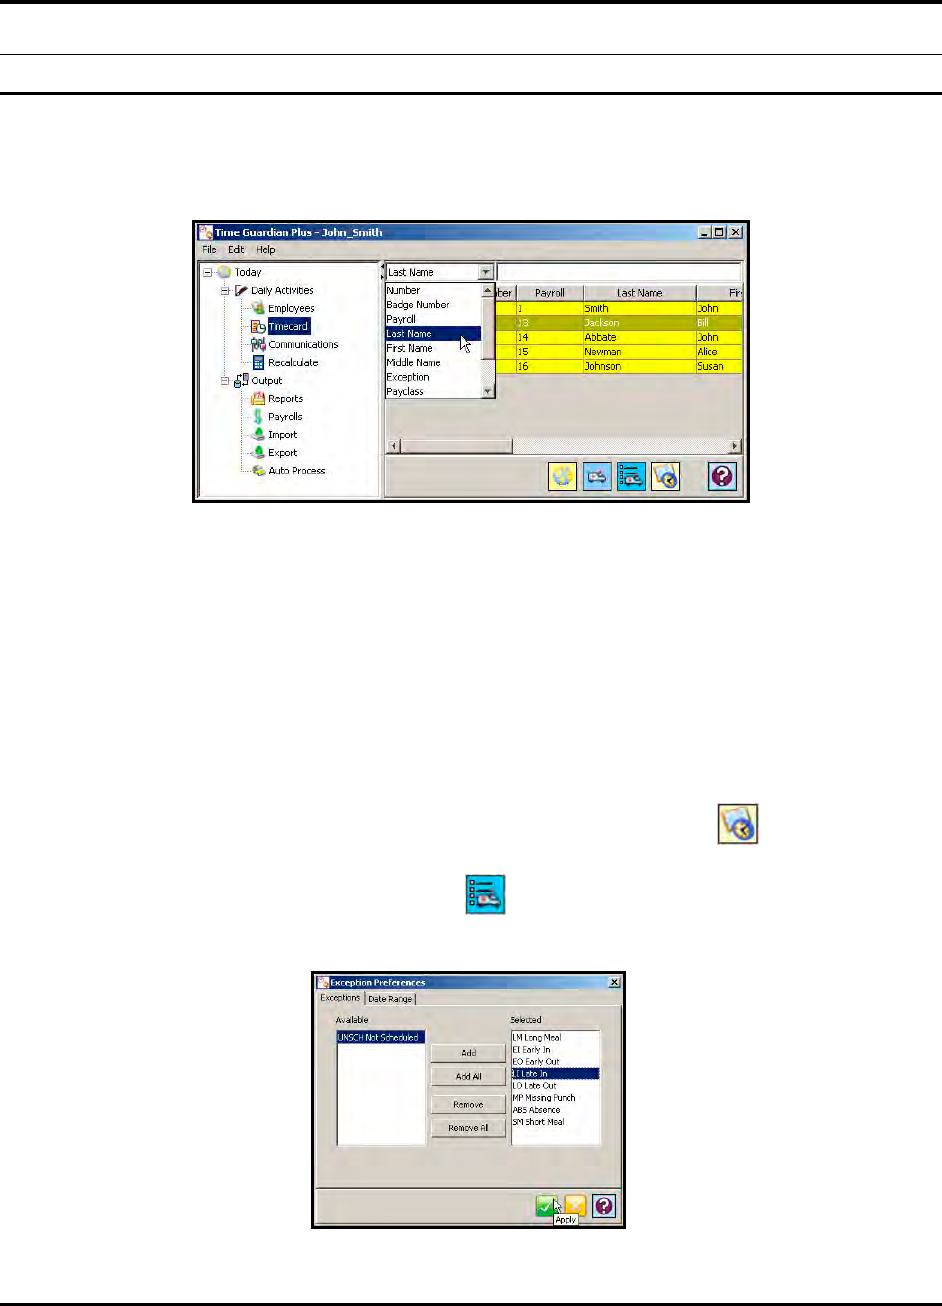
Time Guardian Series – Timecard Administration 6-1
Chapter 6: Timecard Administration
Timecard Module
Employee punches can be viewed, added, edited, and deleted in the Timecard module. The
Timecard module is accessed by selecting the Timecard module within the Daily Activities group
in the Tree View.
Employees can be initially filtered in ascending order by using a field with a dropdown list
located on the top of the Timecard window (see above figure). The choices in this list are;
Number, Badge Number, Payroll, Last Name, First Name, Middle Name, Exception, Pay
Class, Schedule, Department Number, Department, Labor Level (name), or labor level
(number).
Additional filtering in ascending order can be accomplished by entering characters in a case
sensitive field located to the right of the dropdown list (see above illustration).
Click in the column headings anywhere to further sort both columns. Each click toggles between
ascending and descending order.
To view employees’ punches in the Timecard grid, click on the Timecard button, or
double-click on the desired employee record. To filter those employees with certain Exceptions
click on the Exceptions list filter preferences button, and the following window will
appear:
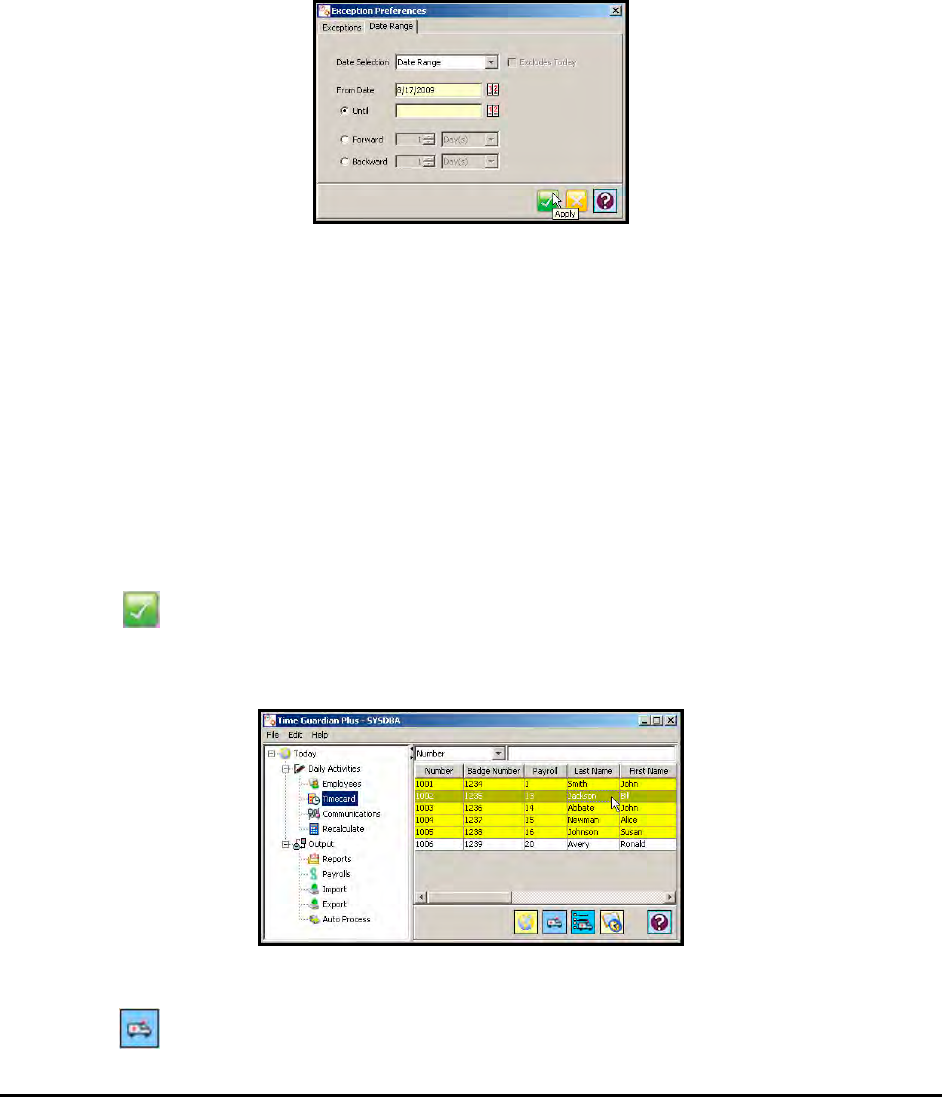
6-2 Time Guardian Series – Timecard Administration
• To select Exceptions, highlight the desired Exceptions in the Available list and click on the
Add button. To select multiple Exceptions hold down the “Shift” key and/or “Ctrl” keys.
• To select all Exceptions, click on the Add All button.
• To remove Exceptions, highlight the desired Exceptions in the Selected list and click on the
Remove button. (see above procedure for selecting multiples).
• To remove all selected Exceptions, click on the Remove All button.
• Click on the Date Range tab, to select date range for the exceptions filter. The following is
an example of the screen that will appear:
• In the Date Selection field, select the date range for the report. The choices are; Today,
Yesterday, Last Open Period, Previous Open Period, Current Week, Previous Week,
Current Month, Previous Month, Last 2 Weeks, Date Range, Current Pay period, and
Previous Pay period.
Note: When Current Pay period and Previous Pay period are selected, the first Pay Class in
the Selected List on the Pay Class tab will be used as the date range for the report.
• If Date Range was chosen as the Date Selection, you must enter the From Date and Until
Date using the Calendar icon. You also have the option of going forward or backward as
many days, weeks, months, or years from the From Date using the Forward and Backward
options.
• Click in the “Excludes Today” box to exclude today from preference marking.
Click on the button when finished. Employees that have the Exceptions selected in the Date
Range selected will be highlighted in yellow. The following is an example of an employee
timecard with exceptions flagged in yellow:
To view those employees’ punches with the selected Exceptions in the Date Range selected,
click on the button to open the employee’s timecard with the current exceptions list filter.
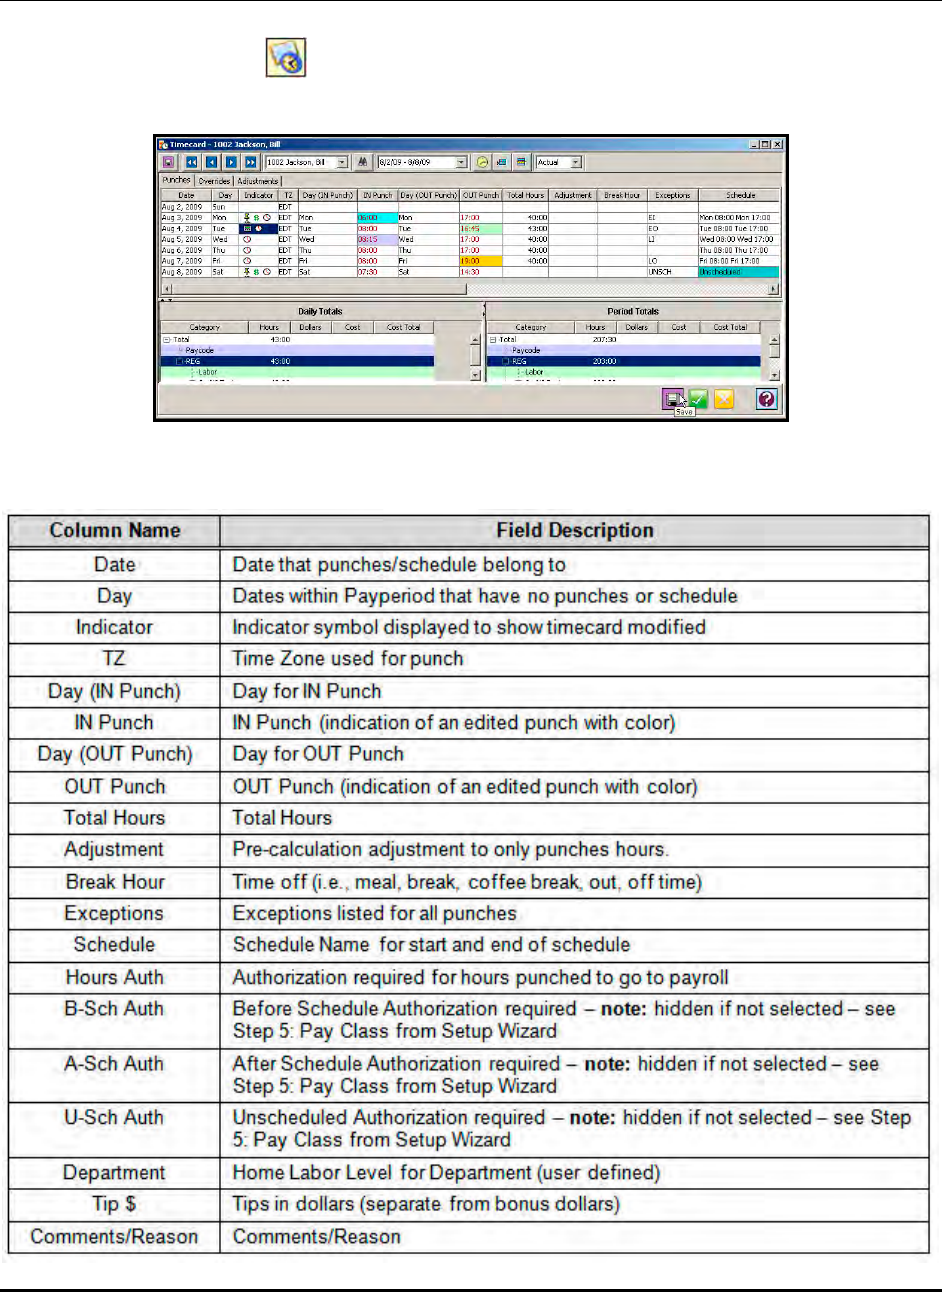
Time Guardian Series – Timecard Administration 6-3
Punches Tab
From the Timecard module double-click on an employee or highlight an employee on the list
and click on the Timecard icon to view the Timecard grid screen with the Punches tab as
shown:
The Punches Tab in the Timecard grid consists of the following displayed columns:
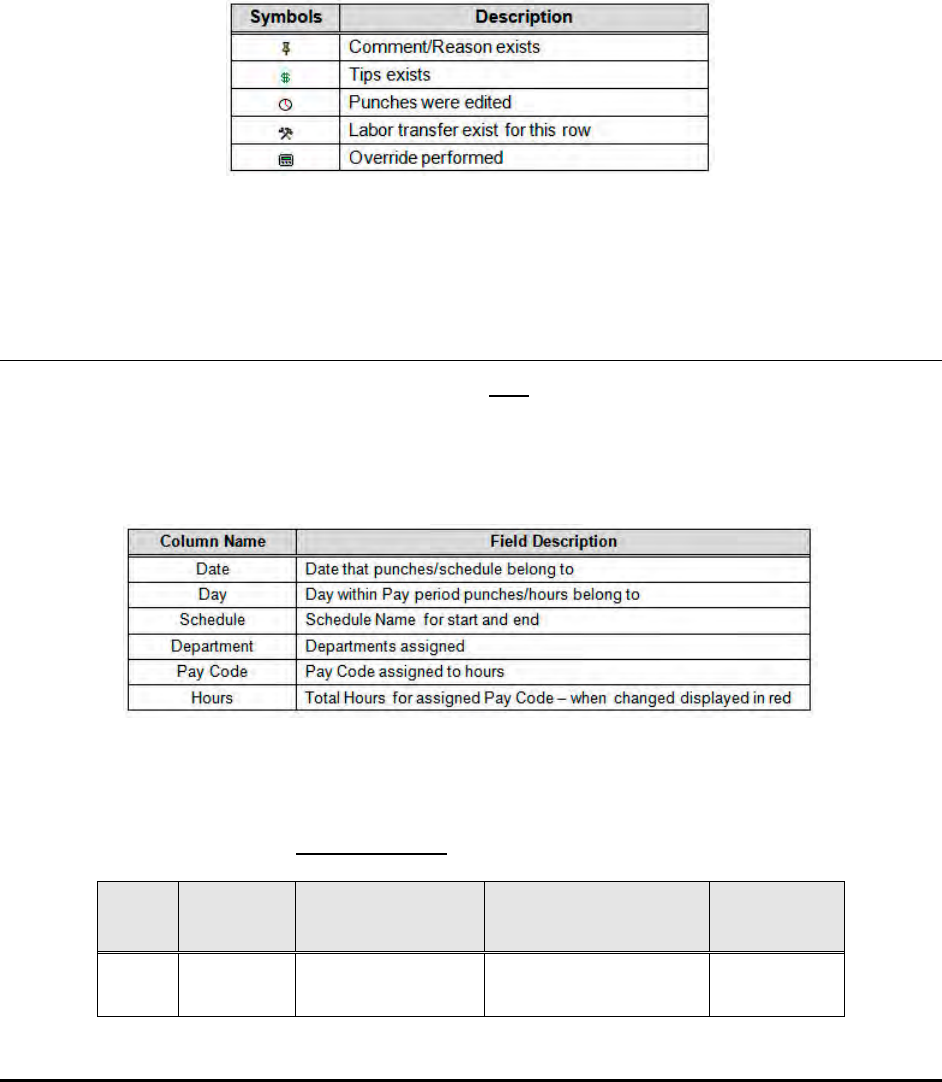
6-4 Time Guardian Series – Timecard Administration
Note: If the Advanced Labor/Rate module is activated, the Timecard can show the Billable
Rates depending upon the User privileges.
Information Indicators
The Indicator field in the Punches tab displays symbols to indicate that certain data in the
Timecard grid was entered or modified. The indicator symbols are as follows:
Note: By putting the mouse over the icon you can see the information that the icon represents.
Overrides Tab
This function allows post-calculation overrides for only the existing employee hours for an
employee assigned to a schedule. For all other Timecard modifications see Punches and
Adjustments tabs. To perform an employee Timecard override, click on the Overrides tab, then
click on the Hours cell in the grid for the hours that you wish to override. The Overrides Tab
consists of the following displayed columns:
For example, Bill Jackson worked 10 hours on Monday. His Pay Class awards Daily Overtime
after he has worked 8 hours and his boss scheduled him to work 10 hours on Monday to finish a
rush project. He used the override feature to change his REG hours from 8 to 10 and give him a
total of 10 hours of REG for a post calculation after override of REG = 10 and OT = 2.
Day Hours
Worked Daily Overtime
After 8 Hours Overrides
Hours After
Override
Mon 10 Hours REG = 8
OT = 2 Change Reg = 8
to Reg = 10 REG = 10
OT = 2
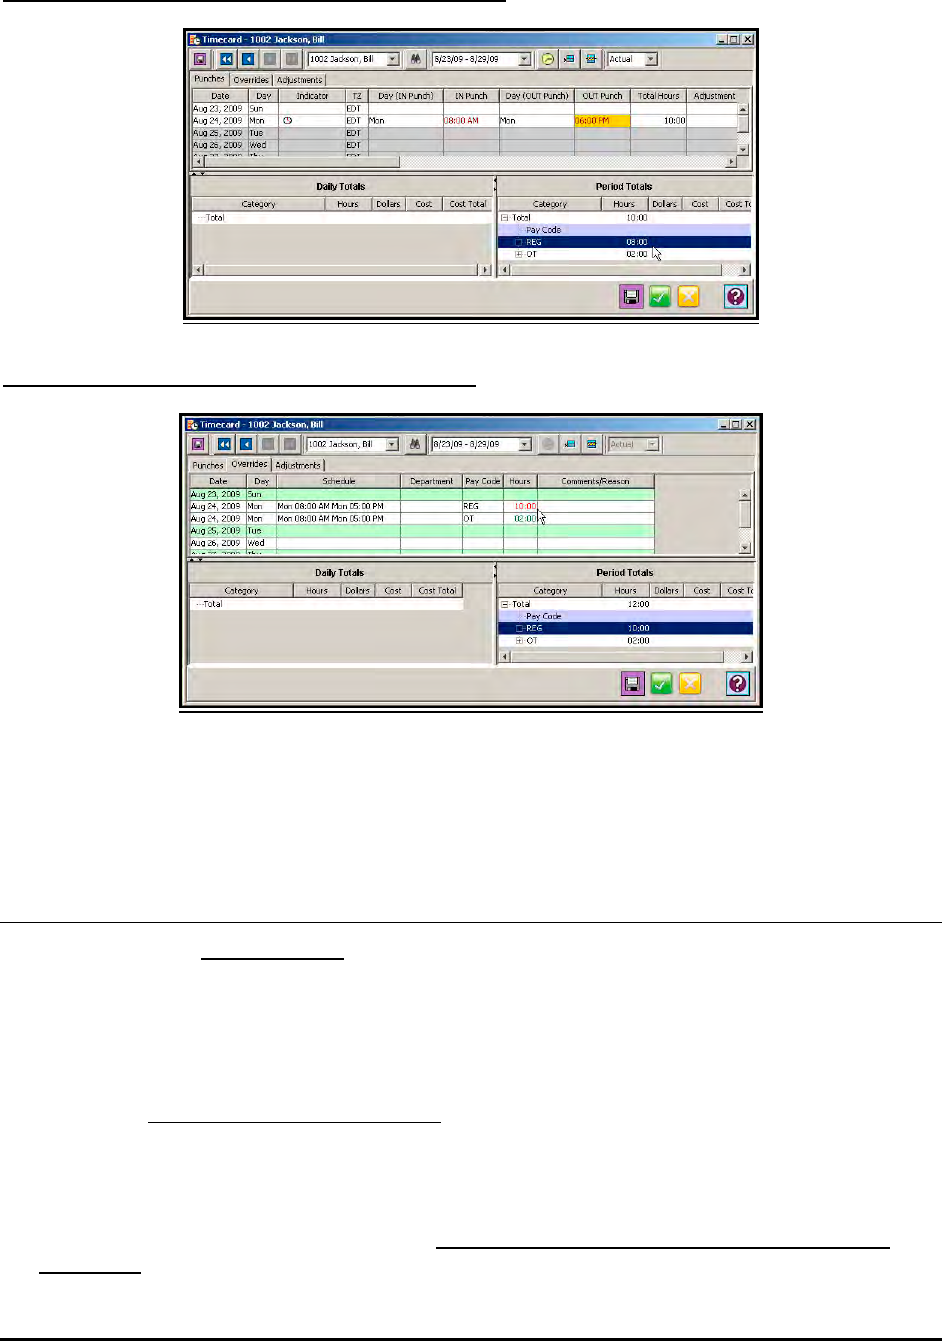
Time Guardian Series – Timecard Administration 6-5
Illustration of Bill Jackson timecard before overrides
Illustration of Bill Jackson timecard after override
Note: The Period Totals on the bottom of the timecard show the before and after amount of
hours.
Adjustments Tab
This function allows pre-calculation Timecard adjustments to be made to Labor Levels, Pay
Codes, Hours (not for BONUS Pay Code), and Dollars (only for BONUS Pay Code). A
Comments/Reasons column is provided to make notes (i.e., reason for the adjustment). For all
other Timecard modifications see Punches and Overrides tabs.
1. To perform an employee Timecard adjustment, click on the Adjustments tab, then click in
Pay Code column in the date row you wish to edit. From the dropdown list select the desired
Pay Code. This action must be done first.
2. Click in the Department column to select the desired labor level from the dropdown list. This
action is optional.
3. Click in the hour’s column to enter the value for Hours, or click in the Dollars column to enter
value for dollars [Bonus Pay Code only]. This action must be done before you can enter
comments.

6-6 Time Guardian Series – Timecard Administration
4. If desired, enter a information in the Comments/Reason field. Step 3 must be completed for
this field to be open for entry.
Note: Use the Add Row button to insert a row in the Timecard grid at the appropriate
location for an adjustment such as using more than one Pay Code; i.e., OT for overtime
hours. Press the Delete Row button to remove a row.
For example, Bill Jackson worked 10 hours on Monday. His Pay Class awards Daily Overtime
after he has worked 8 hours and his boss scheduled him to work 10 hours on Monday to finish a
rush project. He used the adjustments feature to add 2 REG hours and give him a total of 12
hours for a pre-calculation after adjustment of REG = 8 and OT = 4. Note – the Daily Overtime
rule is utilized because adjustments are made to precalculated hours.
Day Hours
Worked Daily Overtime
After 8 Hours Overrides
Hours After
Adjustment
Mon 10 Hours REG = 8
OT = 2 Add 2 hours regular REG = 8
OT = 4
Illustration of Bill Jackson timecard before adjustment
Illustration of Bill Jackson timecard after adjustment
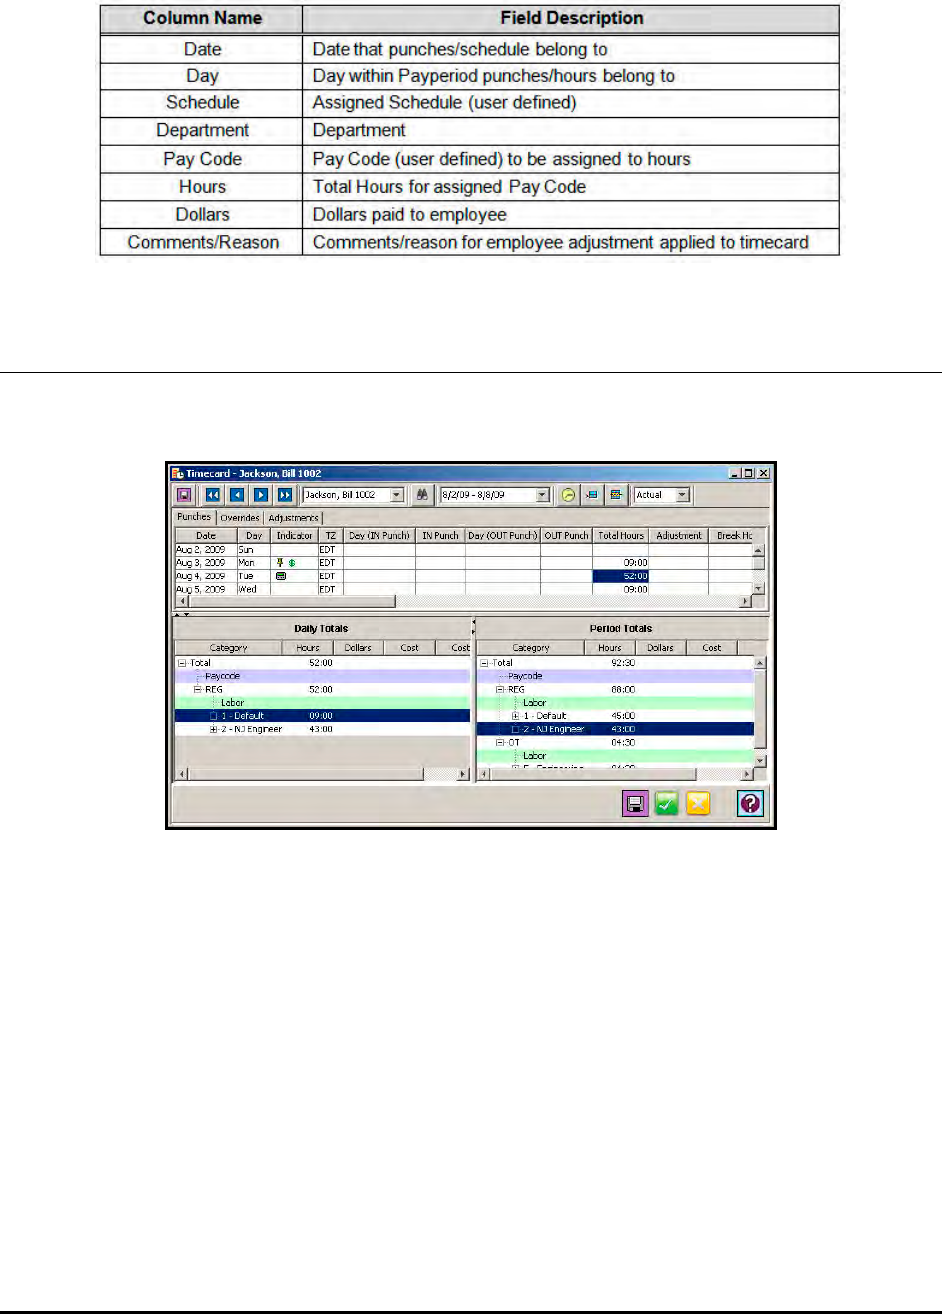
Time Guardian Series – Timecard Administration 6-7
The Adjustments Tab in the Timecard grid consists of the following displayed columns:
Totals
The Daily and Pay period Totals for the employee are shown in the Timecard grid at the bottom
of the screen to provide a quick view for the employee’s Daily and Pay period totals (see figure).
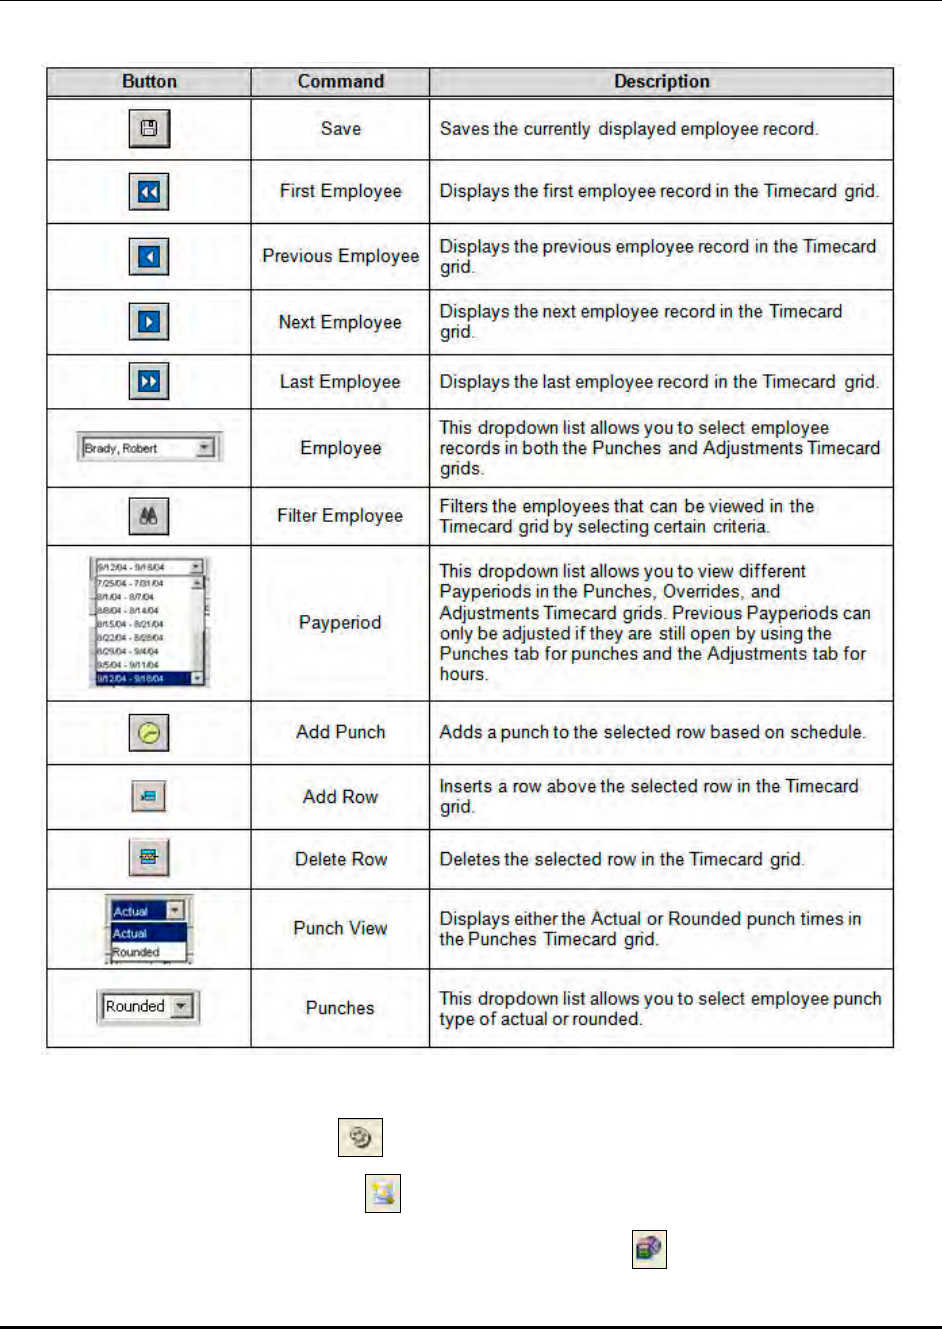
6-8 Time Guardian Series – Timecard Administration
Icons/Commands
The toolbar of the Timecard grid consists of the following:
Activation of the following modules will add these associated icons;
User Module will add Preferences icon on the timecard toolbar.
Benefit Time Module will add Benefit icon on the timecard toolbar.
Advanced Schedule Module will add Create Individual Schedule icon on the timecard
toolbar.
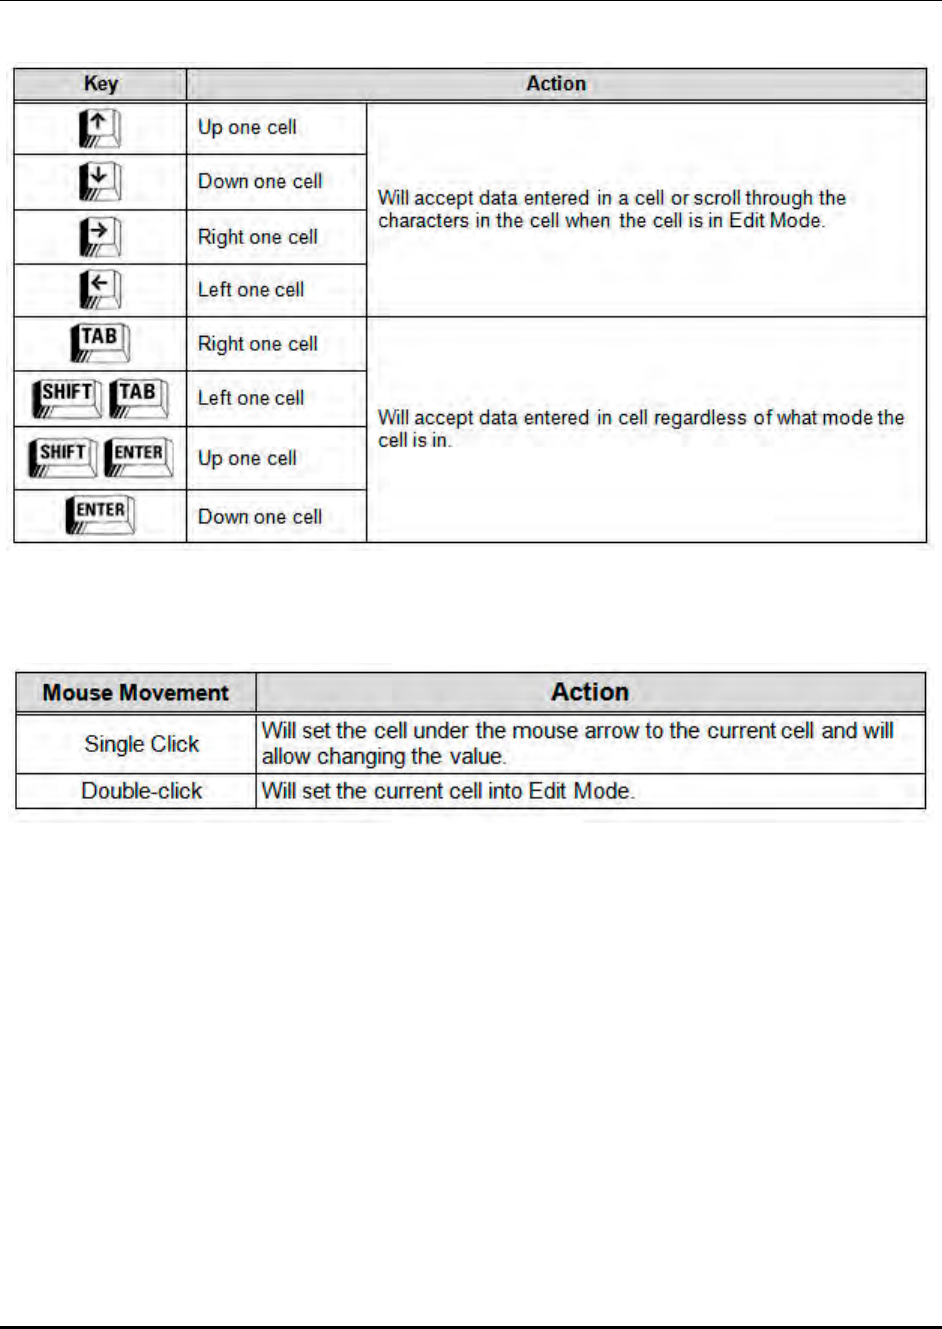
Time Guardian Series – Timecard Administration 6-9
Grid Navigation
Timecard grid navigation can be accomplished through the following keys and mouse clicks:
Note: Holding down any of the above keys will cause the cursor to move rapidly in the
designated direction.
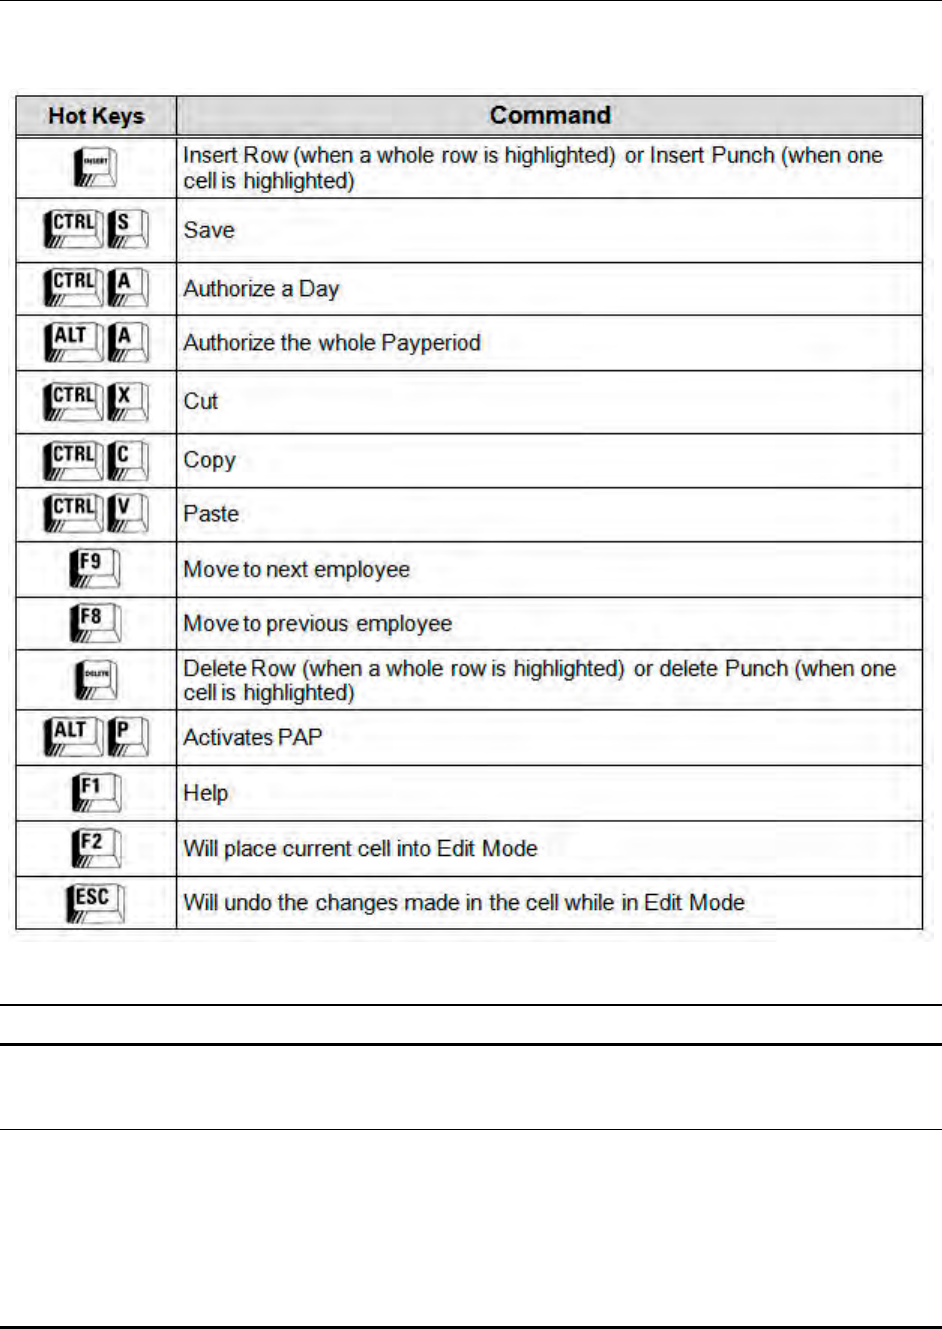
6-10 Time Guardian Series – Timecard Administration
Hot Keys
The table below lists hot keys for commands for the Timecard grid. Some may also used
throughout the Amano Time & Attendance software family.
Adding, Editing and Deleting Employee Punches
Adding Punches
Punches are added by clicking on the desired IN or OUT punch field and or by clicking the Add
Punch button in the toolbar and entering the time in the field. Punches can be entered in either
military or AM/PM format. For example, 5 o’clock PM can be entered as 500p (AM/PM) or 1700
(Military). When entering in AM/PM format AM is the default. When 8 is entered, it will be taken
as 8:00 AM. If 8 o’clock PM is intended, the 8 must be followed by a P or 8P. When you have
finished, click on the Save button in the toolbar to save your changes.

Time Guardian Series – Timecard Administration 6-11
Editing Punches
To edit punches, double-click on the desired IN or OUT Punch field and enter the desired time.
When you have finished, click on the Save button in the toolbar to save your changes.
Deleting Punches
To delete a punch, click on the desired IN or OUT Punch field and press the Delete button.
When you have finished, click on the Save button in the toolbar to save your changes.
Adding, Editing and Deleting Employee Tips
Adding Employee Tips
To add an employee tip, click on the desired Tip field and enter in the desired dollar amount.
When you have finished, click on the Save button in the toolbar to save your changes.
Editing Tips
To edit an employee tip, double-click on the desired Tip field and enter the desired dollar
amount. When you have finished, click on the Save button in the toolbar to save your changes.
Deleting Tips
To delete an employee tip, click on the desired Tip field and press the Delete button. When you
have finished, click on the Save button in the toolbar to save your changes.
Overtime Authorization
If overtime authorization was selected in the Overtime Rules tab from the Pay Class step in the
Setup Wizard for;
• Hours worked before an assigned schedule = B-Sch Auth
• Hours worked beyond an assigned schedule = A-Sch Auth
• Hours worked on an unassigned schedule = U-Sch Auth
you must place a check in the corresponding overtime column (B-Sch, A-Sch, or U-Sch) on the
timecard on the Punches tab for the employee to be awarded overtime hours (see figure).
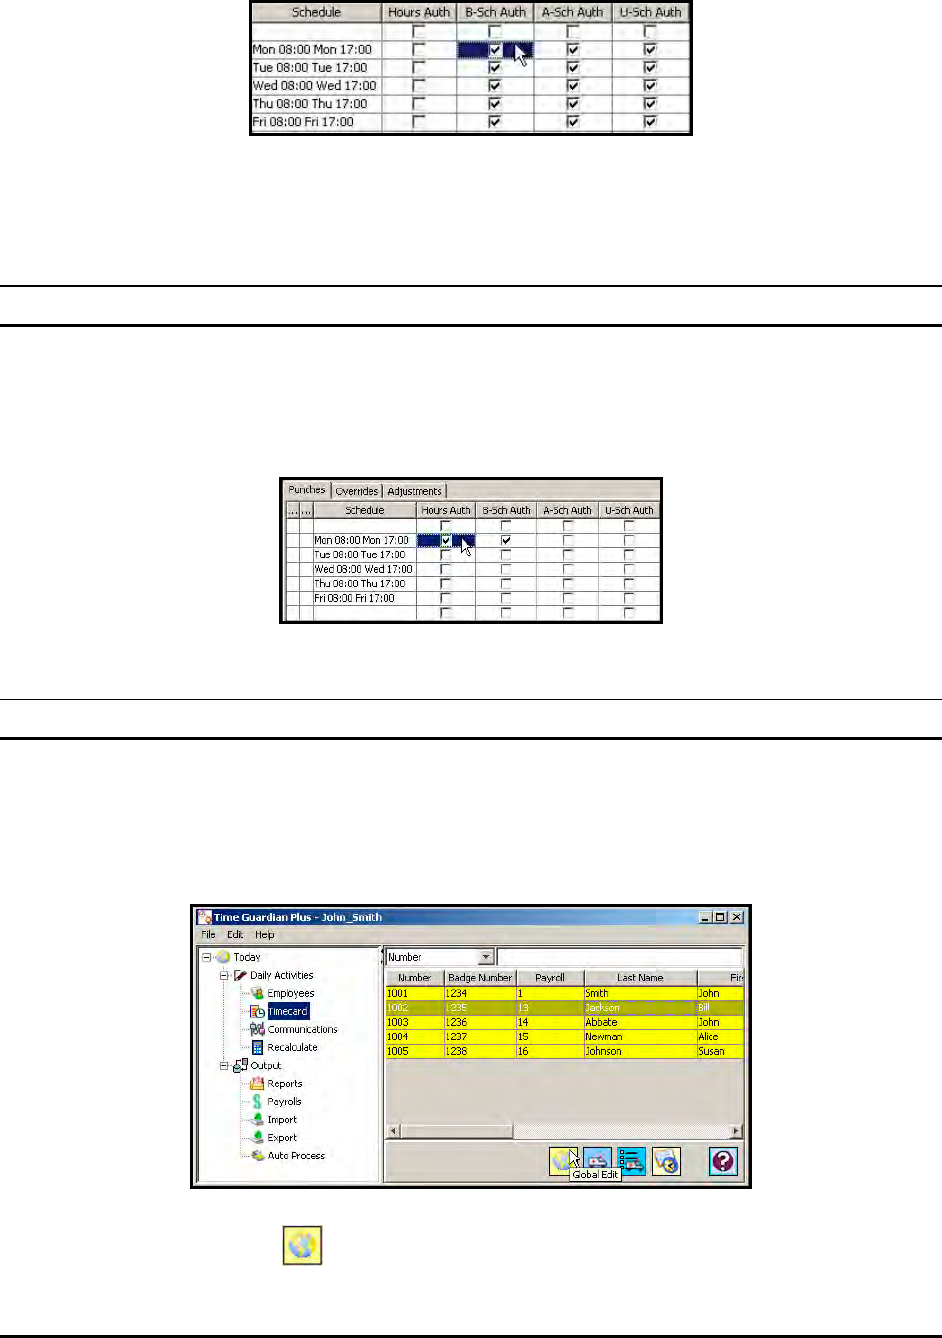
6-12 Time Guardian Series – Timecard Administration
Note: The Sch Auth columns will not appear on the timecard if there is no schedule.
Authorizing Payroll Export
To authorize hours for an employee to be included in the payroll export file, place a check in the
corresponding Hours column in the timecard on the Punches tab (see figure). This is required if
“Hours for payroll require authorization” was checked in the Overtime Rules tab from the Pay
Class step in the Setup Wizard.
Global Timecard Edit
To globally edit employee timecards:
• In the Tree View, select the Timecard module within the Daily Activities group and the
following is an example of the screen that will appear:
• Click on the Global Edit button, and the General Global Edit window will open.
• Select Edit Type from the choices of; Add Punch, Add Hours, or Add Dollars.
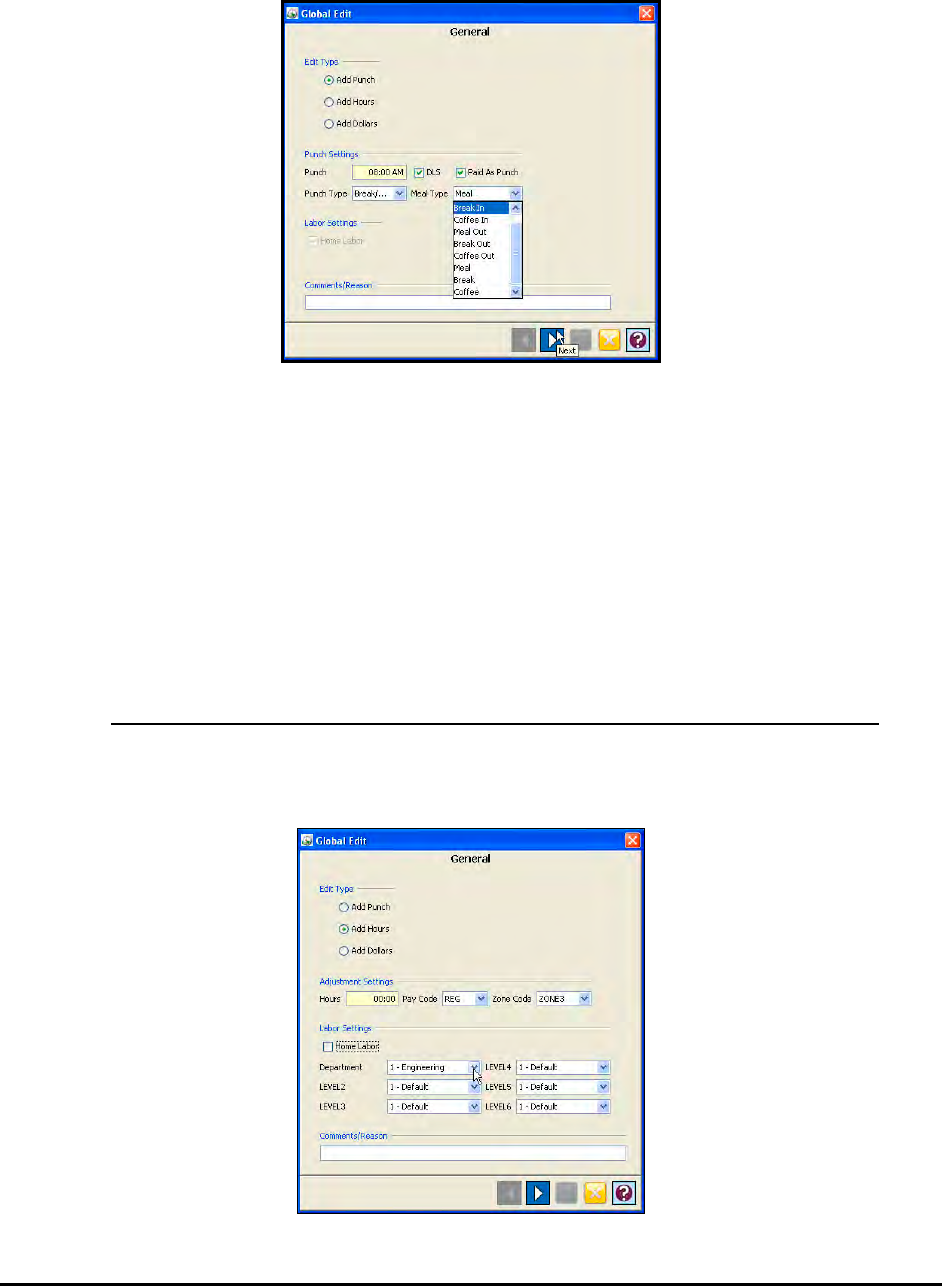
Time Guardian Series – Timecard Administration 6-13
• When Add Punch is selected, the following is an example of the General Global Edit
window:
• Enter Punch Settings for;
− Punch: enter punch time (i.e., 16:00 [4:00 PM]).
− DLS: check box if you want punch entered under DLS.
− Paid As Punch: check box if you want punch to be paid as punch.
− Select Punch Type: the choices are; Standard, or Transfer.
− If Standard for Punch Type selected, no other choices available.
− If Transfer for Punch Type selected, check “Home Labor” box to bypass
departments, or select desired departments for transfer.
− If Break/Meal for Punch Type selected, select Meal Type from the dropdown menu.
Note: Advanced Meal module must be activated for this feature to be available.
• If desired, enter text in the Comments/reason field.
• When Add Hours is selected, the following is an example of the General Global Edit window:
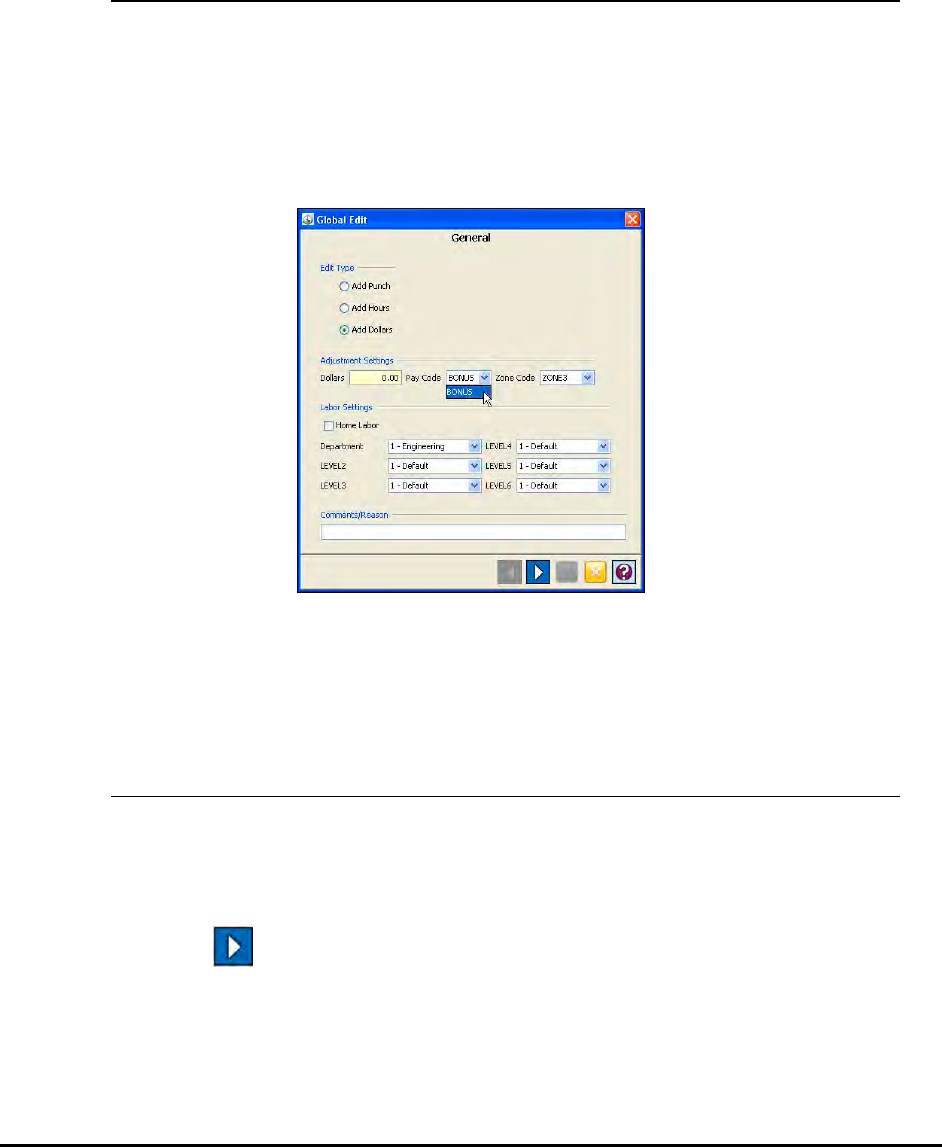
6-14 Time Guardian Series – Timecard Administration
• Enter Adjustment Settings for;
− Hours: enter amount of time (i.e., 08:00).
− Pay Code: select the Pay Code to credit punch hours to from the dropdown list. The
default choices are; REG, OT, DT, SCK, VAC, PER, HOL, BONUS, JURY, BRV, or
user named ones.
− Zone Code: select the Zone Code to credit punch hours to from the dropdown list.
Note: Zone Differentials module must be activated for this feature to be available.
• Enter Labor Settings for;
− Check “Home Labor” box to bypass departments, or select desired departments.
• If desired, enter text in the Comments/reason field.
• When Add Dollars is selected, the following is an example of the General Global Edit
window:
• Enter Adjustment Settings for;
− Dollars: enter dollar amount (i.e., 1000.00).
− Pay Code: select the Pay Code to credit dollars to from the dropdown list.
− Zone Code: select the Zone Code to credit punch dollars to from the dropdown list.
Note: Zone Differentials module must be activated for this feature to be available.
• Enter Labor Settings for;
− Check “Home Labor” box to bypass departments, or select desired departments.
• If desired, enter text in the Comments/reason field.
• Click on the Next button, and the following is an example of the Global Edit Exceptions
window that will appear:
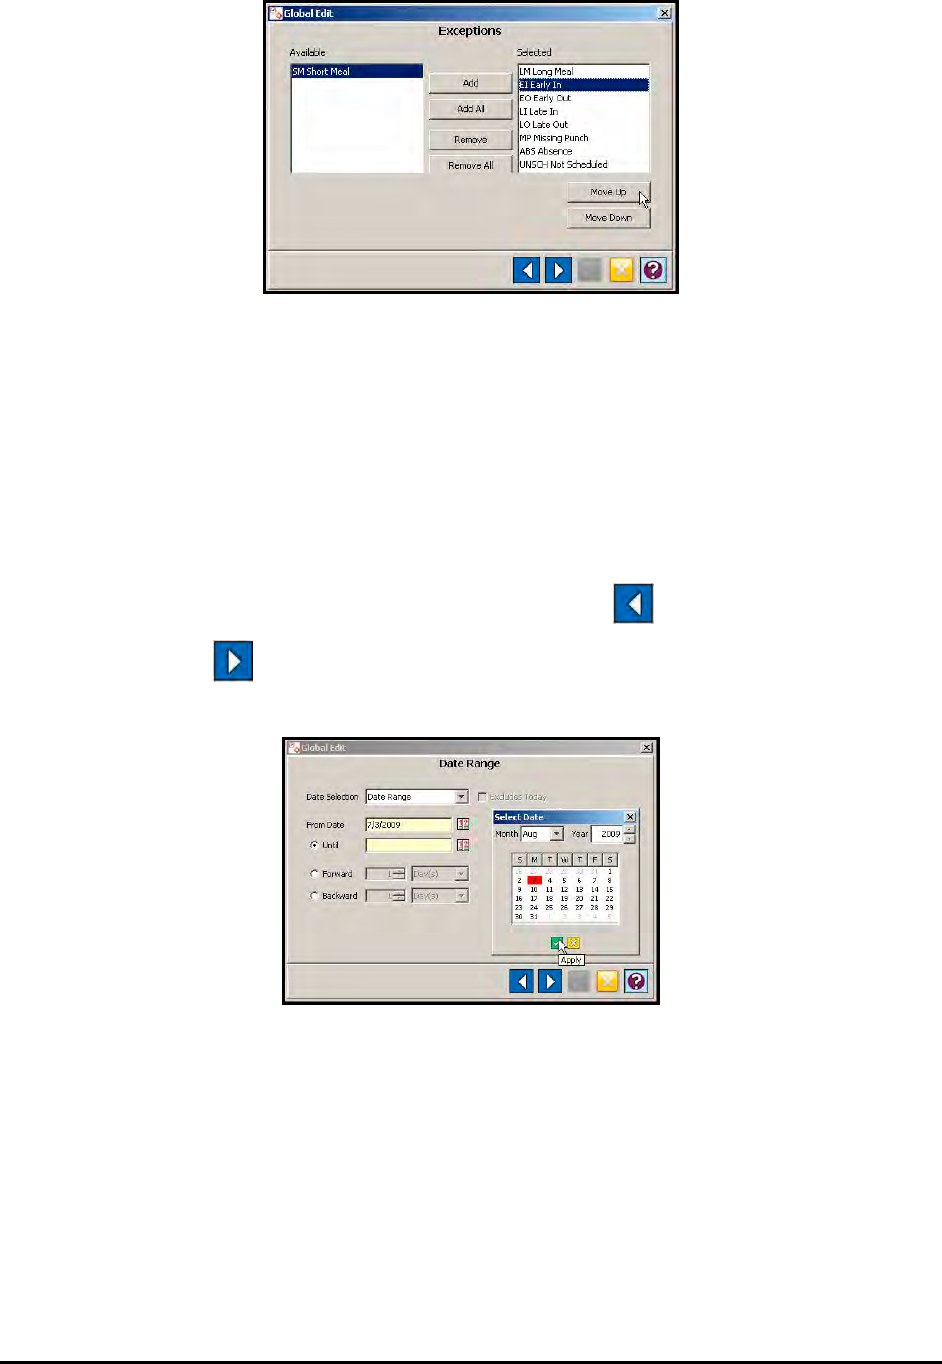
Time Guardian Series – Timecard Administration 6-15
• To add an exception, highlight the desired exception in the Available list and click on the
Add button.
• To add all exceptions from the Available list, click on the Add All button.
• To remove an exception, highlight the desired exception in the Selected list and click on
the Remove button.
• To remove all selected exceptions, click on the Remove All button.
1. Click on the Move Up or Move Down buttons to move an exception up or down in the
Selected column to change the priority.
Note: To move backwards at any time, click on the Previous button.
• Click on the Next button, and the following is an example of the Date Range Global Edit
window that will appear:
• Date Selection: select from the dropdown list. The choices are; Today, Yesterday, Last
Open Period, Previous Open Period, Current Week, Previous Week, Current Month,
Previous Month, Last 2 weeks, Date Range, Current Pay period, or Previous Pay period.
• Check “Excludes Today” box to bypass editing today’s Timecard with user configured
global edits.
• If Date Range is selected, enter the From Date using the calendar dialog screen. Also,
select either Until and enter the date using the calendar dialog screen, or select Forward
or Backward. If using Forward or Backward, pick an amount of time and type a fixed time
from the dropdown lists. The choices for time segments are; Day(s), Week(s), Month(s),
or Year(s).
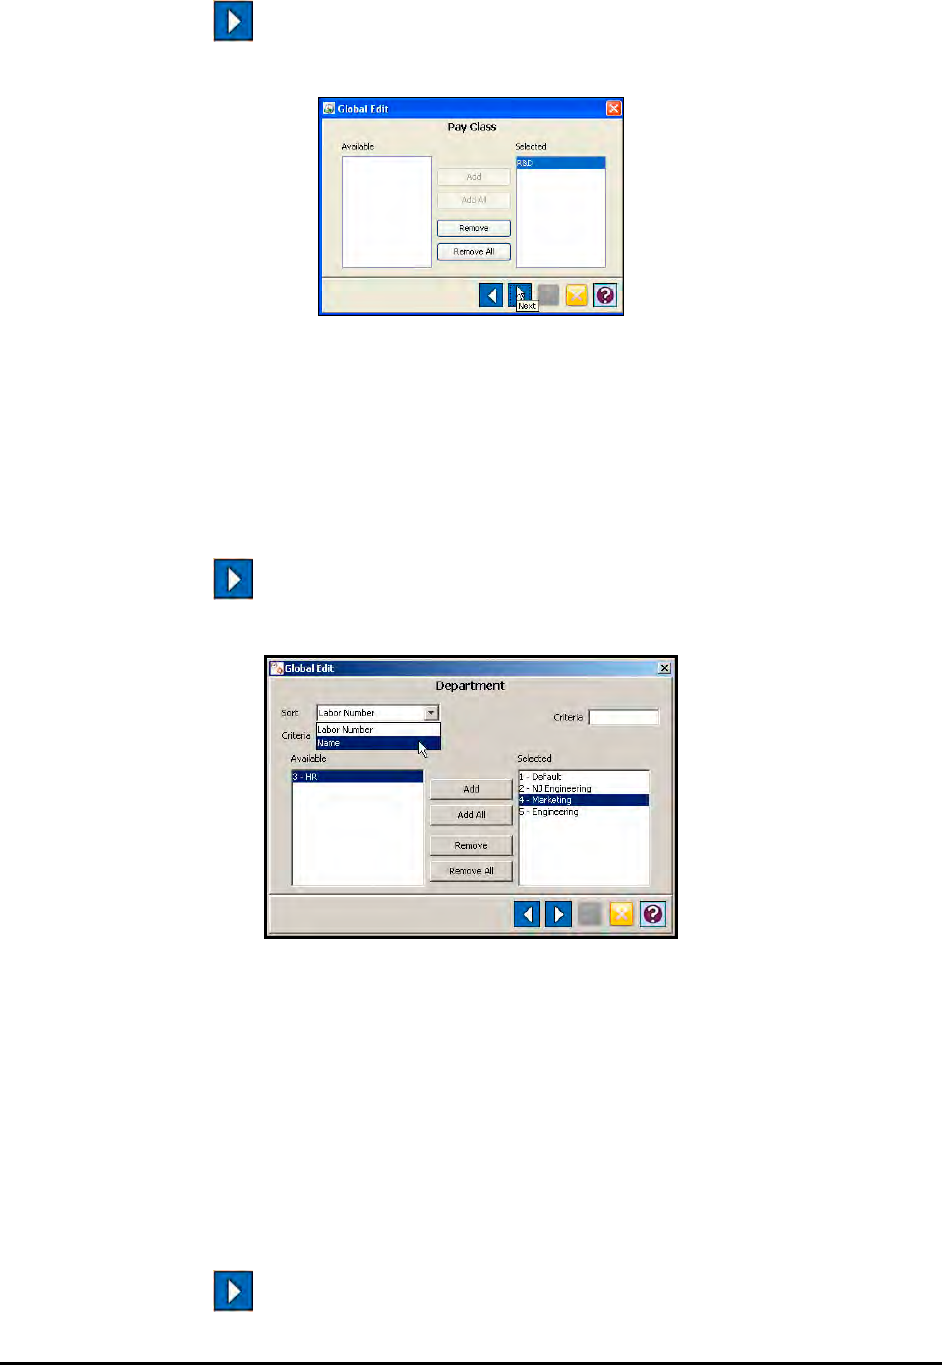
6-16 Time Guardian Series – Timecard Administration
• Click on the Next button, and the following is an example of the Pay Class Global Edit
window that will appear:
• To add a Pay Class, highlight the desired Pay Class in the Available list and click on the
Add button.
• To add all Pay Classes from the Available list, click on the Add All button.
• To remove a Pay Class, highlight the desired Pay Class in the Selected list and click on
the Remove button.
• To remove all selected Pay Classes, click on the Remove All button.
• Click on the Next button, and the following is an example of the Global Edit Department
window that will appear:
• To add a department, highlight the department in the Available list and click on the Add
button.
• To add all departments from the Available list, click on the Add All button.
• To remove a department, highlight the desired department in the Selected list and click
on the Remove button.
• To remove all selected departments, click on the Remove All button.
• Use the Criteria field above the Available and Selected lists to filter/sort departments in
the respective list. The choices are; Number, Badge, Payroll, Last Name, First Name, or
Comment.
• Click on the Next button for each Labor Level and complete same as Department.
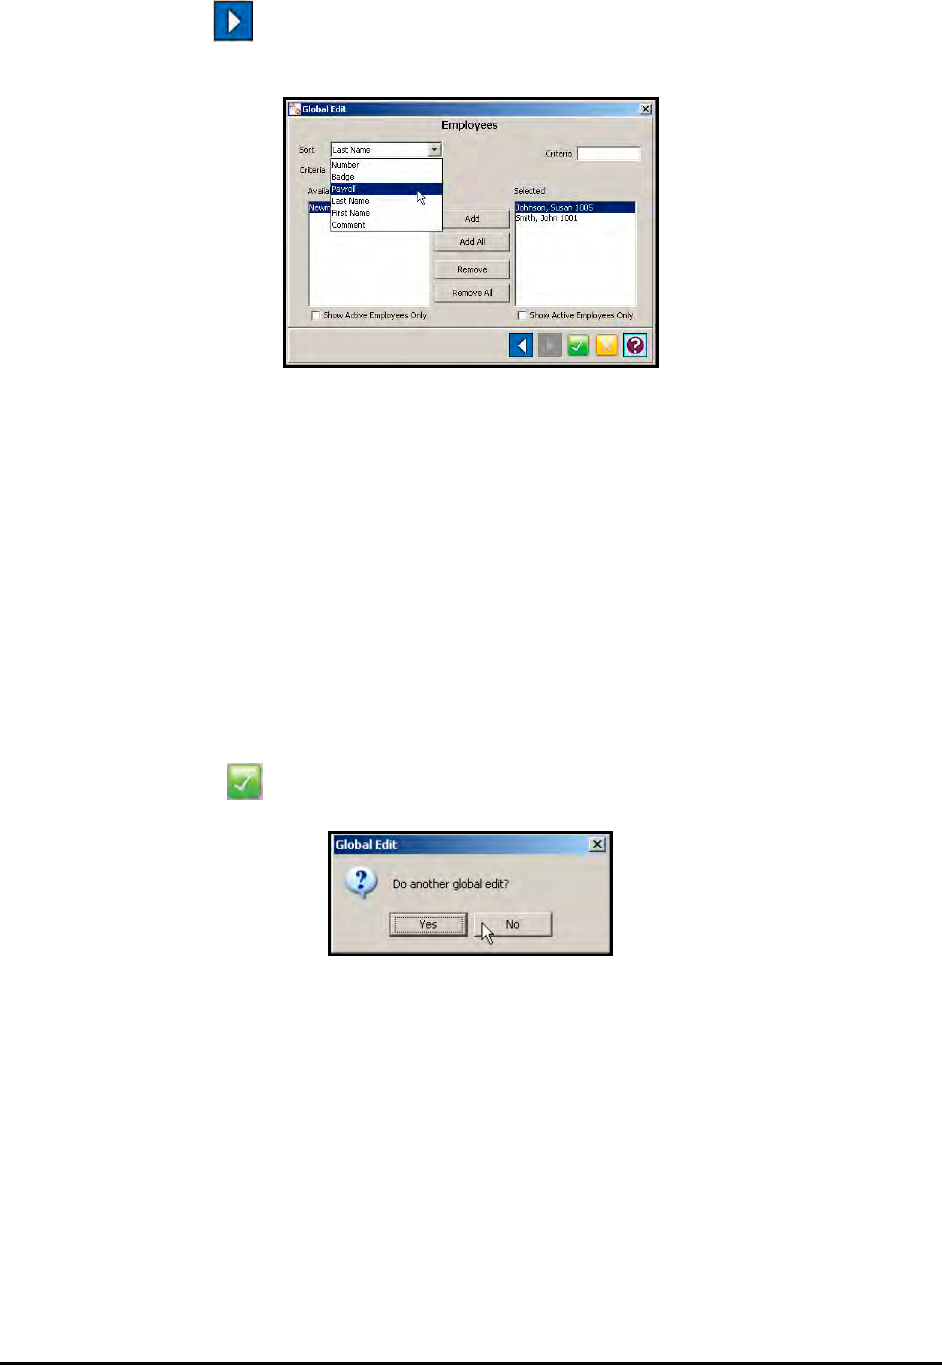
Time Guardian Series – Timecard Administration 6-17
• Click on the Next button, and the following is an example of the Employees Global Edit
window that will appear:
• To add an employee, highlight the desired employee in the Available list and click on the
Add button.
• To add all employees from the Available list, click on the Add All button.
• To remove an employee, highlight the desired employee in the Selected list and click on
the Remove button.
• To remove all selected employees, click on the Remove All button.
• Use the Sort field dropdown list to sort employees. The choices are; Number, Badge,
Payroll, Last Name, First Name, or Comment.
• Use the Criteria field above the Available and Selected lists to filter/sort employees in the
respective list. The choices are; Number, Badge, Payroll, Last Name, First Name, or
Comment.
• Click on the Apply button, and the following Global Edit dialog box will appear:
• Click on the Yes button to configure another global edit, or No to exit global editing of
timecards.

6-18 Time Guardian Series – Timecard Administration
This page intentionally left blank.
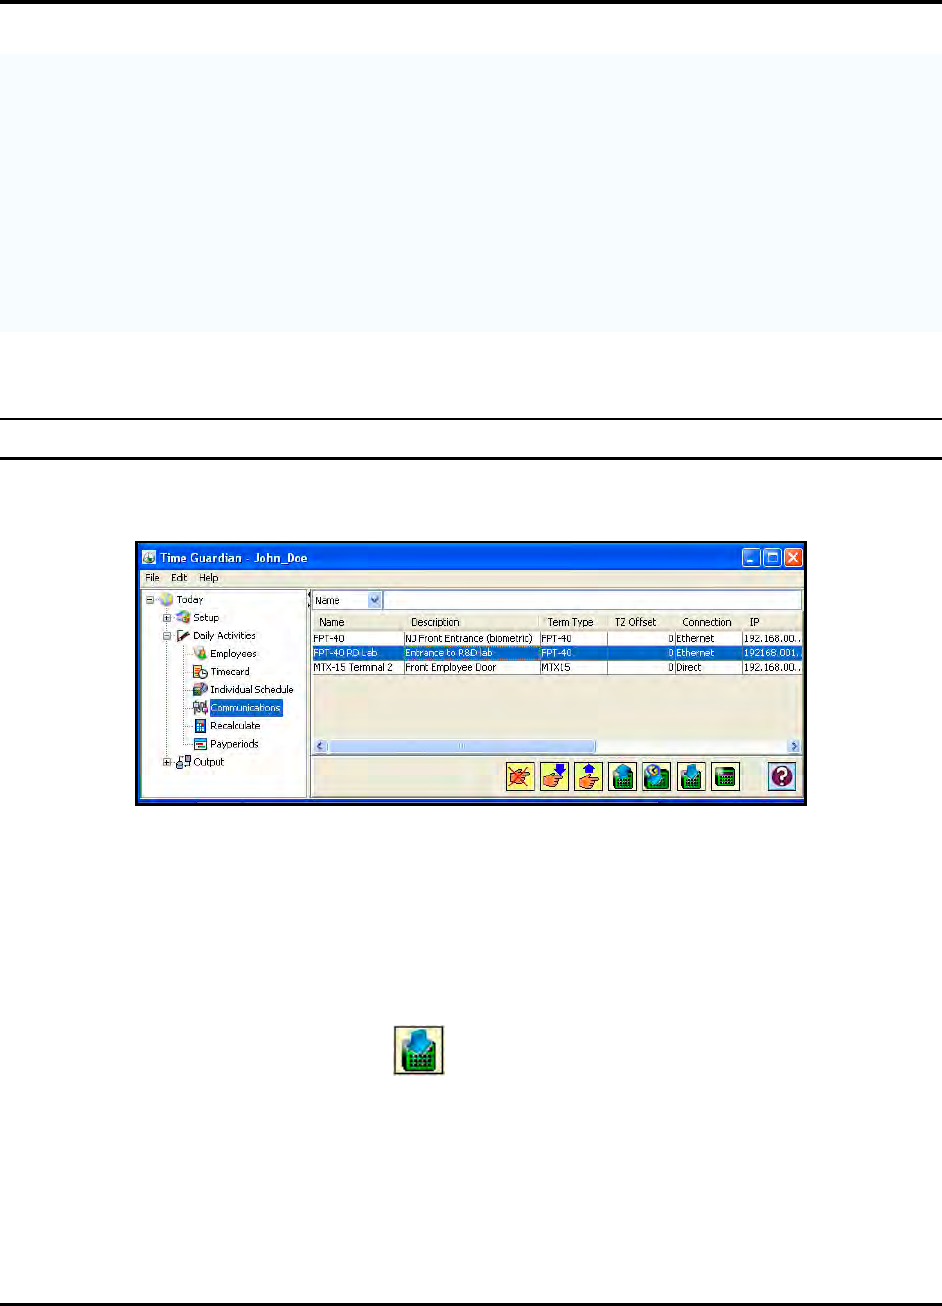
Time Guardian Series – Communications 7-1
Chapter 7: Communications
The Communications module is used to remotely communicate with terminals in setup
locations. Locations and Terminals can be configured during the Setup Wizard Step 8: Terminal
Setup. Operations include polling, downloading, setting the time, and viewing specific terminal
settings in a location. Polling, or polled operation, refers to actively sampling the status of the
external terminals by the client program Time & Attendance software. Downloading is utilized
to send data to the remote terminals from the Time & Attendance software such as the Lock-in
schedule at the MTX-15 terminal which is derived from the employee schedule and/or Pay
Class schedule. The MTX-15 lock-in schedule can restrict an employee from punching outside
the authorized time range without supervisor help. Also, the function buttons activation on the
MTX-15 display are controlled by the communication download with the Time & Attendance
software.
Communications Module
From the tree view, click on the Communications module within the Daily Activities group and
the following type of screen should appear:
Locations are selected by clicking on the desired row. You can select multiple locations by
holding down the Ctrl key and clicking on other locations. Also, you can sort the displayed
Locations list by clicking on the dropdown list in the upper left-hand corner and selecting on;
Name, Description, Term Type, TZ Offset, Connection, IP, Port, COM Port, Baud Rate, Modem,
and Phone. Once the location is selected use the following commands found at the bottom of
the screen to communicate with the terminal(s) at that location:
Based on the options (terminal, etc) the download command will for;
• MTX-15 Terminal – send the employee names, employee hours, time display format, lock-in
schedule, DLS settings, and previous punches. This will be finished by setting the time.
• FPT-40 Terminal - send the employee names, employee hours, time display format, and
DLS settings. This will be finished by setting the time.
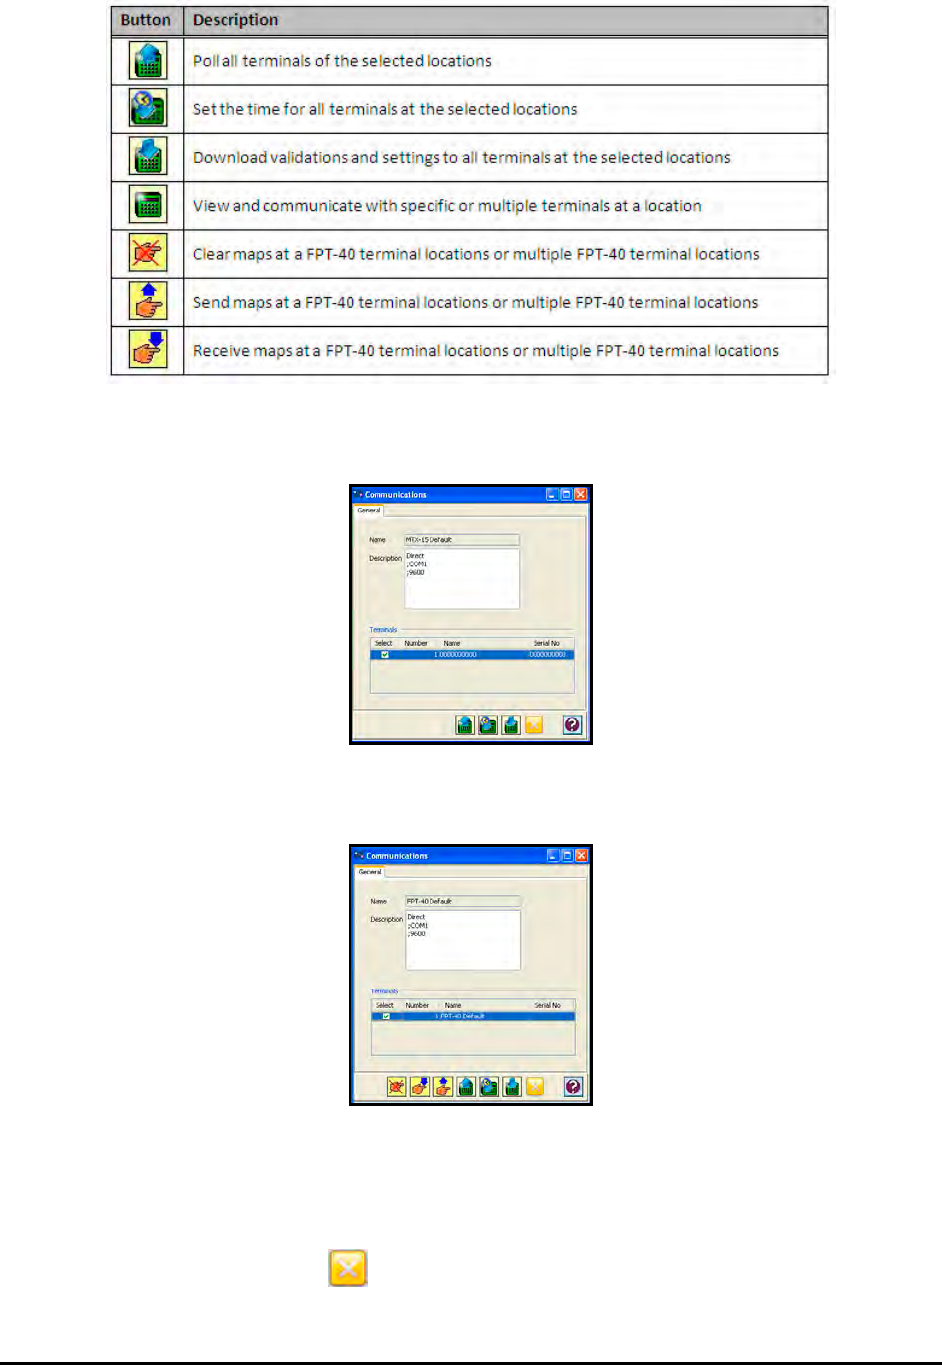
7-2 Time Guardian Series – Communications
To select specific MTX terminals within a location, double-click on the desired location row, and
the following Communications dialog will appear for MTX terminals:
To select specific FPT-40 terminals within a location, double-click on the desired location row,
and the following Communications dialog will appear for FPT-40 terminals:
The Send Maps, Receive Maps, and Clear Maps commands are only used for FPT-40
terminals.
Select terminals in the Terminals list by placing a check in the Select box of each terminal.
When you have finished making your selections, use one the commands to communicate with
the terminals. Click on the Close button to close this dialog.
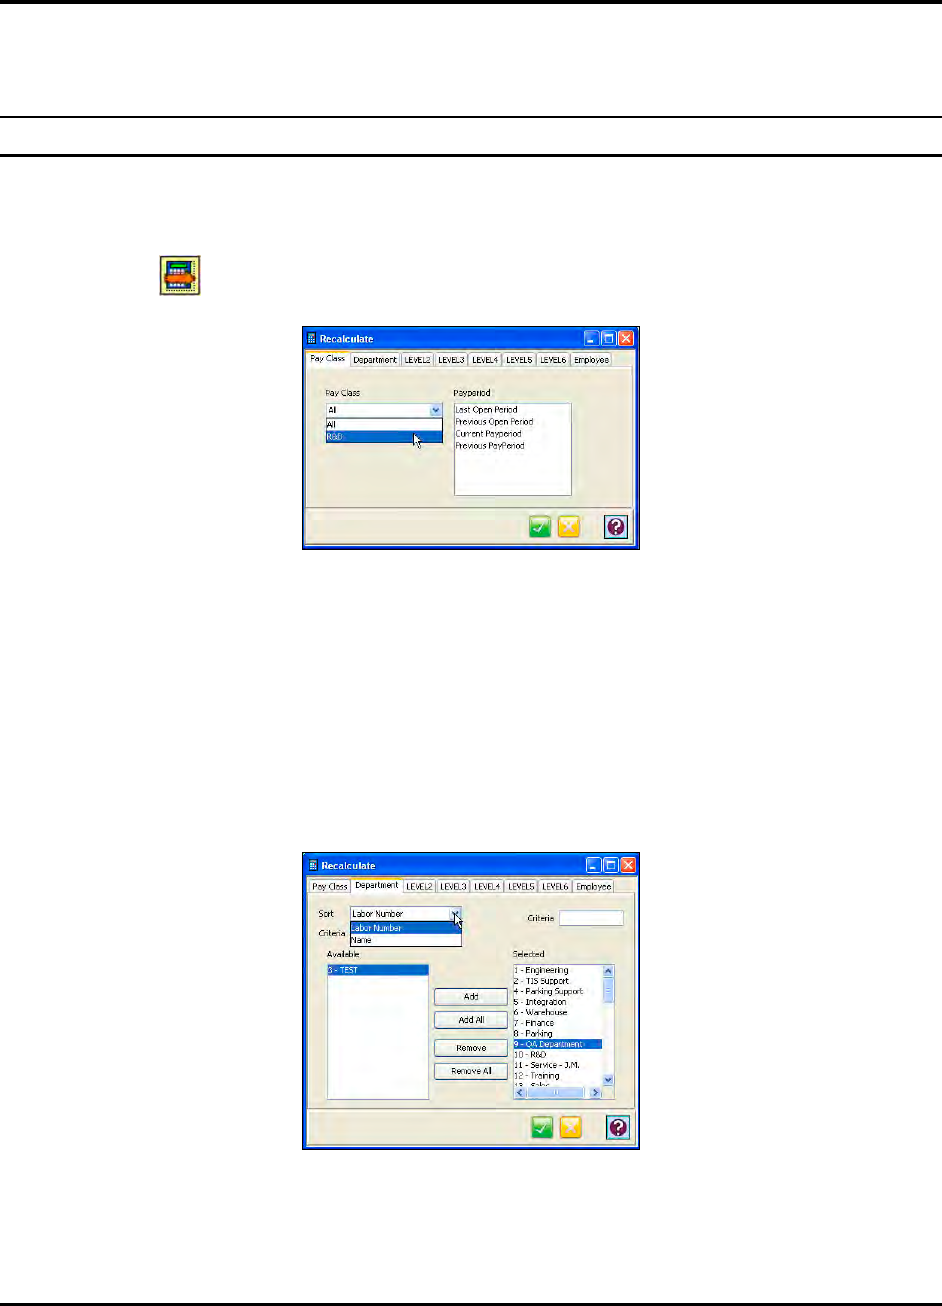
Time Guardian Series – Recalculate 8-1
Chapter 8: Recalculate
The Recalculate module is used to recalculate employee hours for the selected Pay periods
within a given Pay Class. The Pay period must be open for hours to be recalculated.
Recalculate Module
To Recalculate employee hours:
1. Click on the Recalculate module within the Daily Activities group in the Tree View.
2. Click on the button, and the Recalculate window will open with the Pay Class tab.
3. In the Pay Class tab, select the Pay Class for the employee(s) hours you are going to
recalculate and select the Pay period that the hours belong to from the Pay period list.
or
In the Pay Class tab, select “All” for Pay Class and select the Pay period that the hours
belong to from the Pay period list. This list consists of; Last Open Period, Previous Open
Period, Current Pay period, and Previous Pay period.
4. Click the Department or any other Labor Level tab to sort or filter employees.
To recalculate the hours of employees that belong to a particular Department/Labor Level,
highlight the desired Department/Labor Level in the Available list and click on the Add button.
To select all Departments/Labor Levels listed, click on the Add All button.
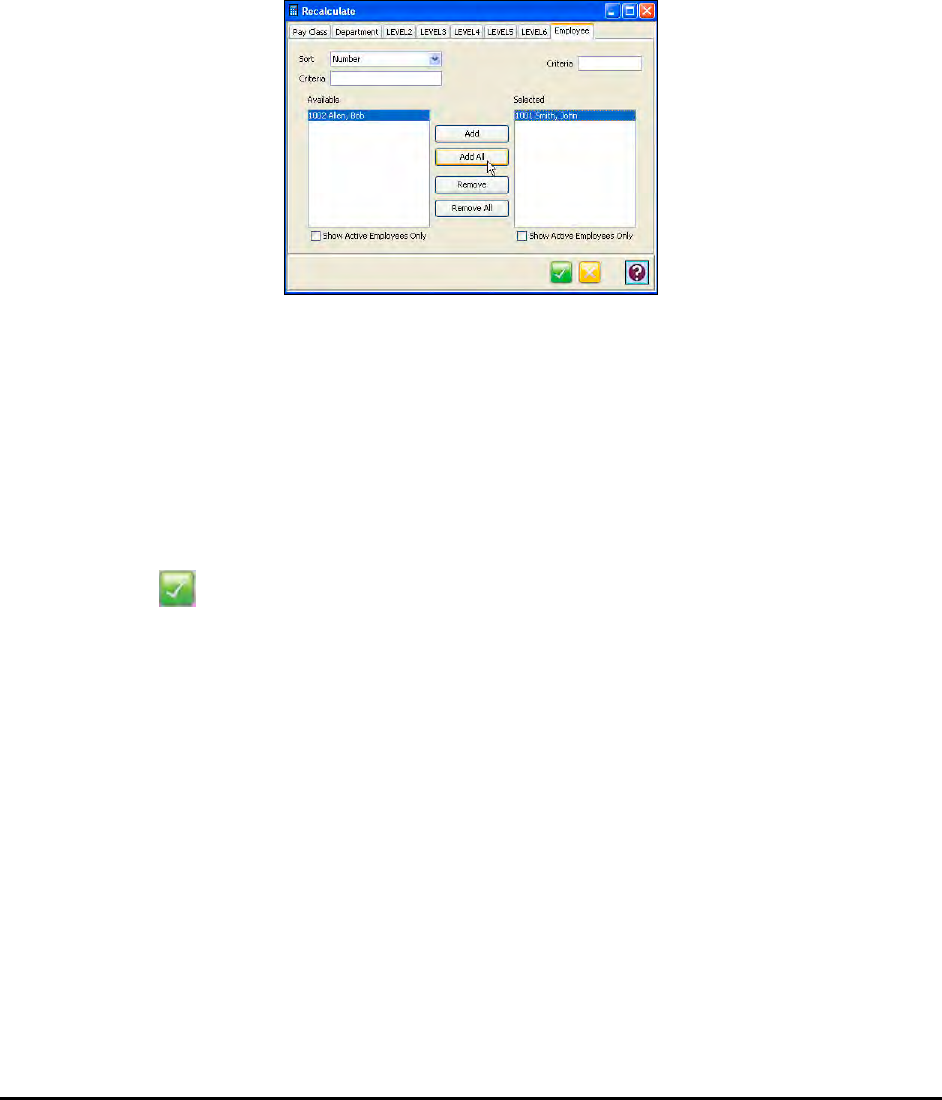
8-2 Time Guardian Series – Recalculate
To remove employees that belong to a particular Department/Labor Level, highlight the desired
Department/Labor Level in the Selected list and click on the Remove button. To remove all,
click on the Remove All button.
Departments can be filtered in both the Available and Selected lists by selecting a sort category
in the dropdown list in the sort field. Then enter secondary filter data into the Criteria fields
above each list. Only Departments matching the data entered will appear in both lists.
5. Repeat the previous Step to further filter employees.
6. Click on the Employee tab.
Employees can be filtered in both the Available and Selected lists by selecting a sort
category in the dropdown list in the sort field. Then enter secondary filter data into the
Criteria fields above each list. Only employees matching the data entered will appear in both
lists.
To select an employee, highlight the desired employee in the Available list and click on the
Add button. To select all employees listed, click on the Add All button.
To remove employees, highlight the desired employee in the Selected list and click on the
Remove button. To remove all selected employees, click on the Remove All button.
7. Click on the button to recalculate the selected employees hours and exit. Verify the
selected employee hours using the Timecard or Reports module.

Time Guardian Series – Output 9-1
Chapter 9: Output Group
Reports Module
Reports are the largest and most important output from the system. Below is a list of the reports
available from Time Guardian. The general format of each report type is fixed, but some content
can be hidden. Reports will be resized to fit large data fields such as Badge Number, Employee
Number, Employee Name, and Labor Names.
Report Name Description
Audit Report Lists by user and date parameter changes made to the system
with old and new values shown.
Employee Report Portrait format list of employees showing employee
information such as address, phone numbers, hire date,
E-mail, schedule, type, pay class, pay type, SS, etc.
Exceptions Report Lists all employees’ exceptions by day with IN/OUT punches.
Used to make corrections, and show comments.
Historical Hours Report Landscape calendar-like view of selected exceptions
generated by an employee and the hours worked by day. Also
listed, are exception number with minutes for exceptions.
Hours Summary Report Lists employee total minutes/hours worked by pay code with
total dollars, and signature lines.
Labor Analysis Report Grouping of hours worked by employees in labor categories
from each labor level showing wages, and billable rates.
Presence Report Shows by day all employees who were present and absent,
and at what time they punched in and out.
Time Card Detail Report Lists daily employee punches, hours, exceptions, breaks,
adjustments, absent days, and schedules in a landscape style
format.
Tips Report A report by employee showing all paid tips for a period of time.
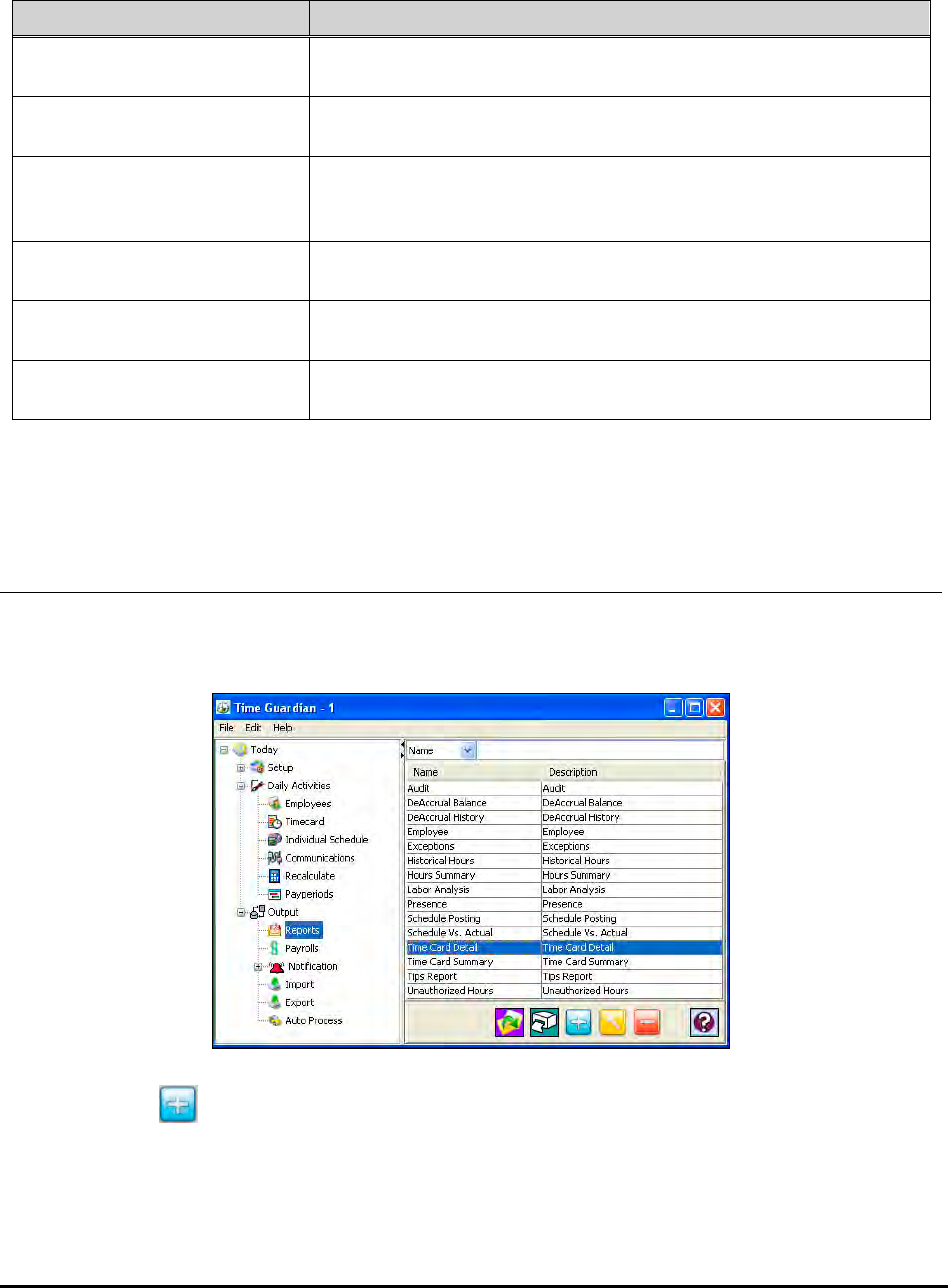
9-2 Time Guardian Series – Output
The following is a list of the additional reports available when optional modules are activated
(equivalent to Time Guardian Pro).
Report Name Description
Unauthorized Hours Report
(from Advanced Pay Class) Lists by employee and date hours that are not authorized to
go to the payroll export file.
Timecard Summary Report
(from Advanced Pay Class) Lists daily employee punches, hours, exceptions, and
schedules in a portrait style report format.
Schedule Posting Report
(From Advanced Schedule) A landscape type calendar-like grid report that can be
grouped by one of the labor levels to post for the employees
to see when they are scheduled to work.
Schedule vs. Actual Report
(From Advanced Schedule) A landscape format analysis report of scheduled time with
wages versus actual hours with variance.
DeAccrual Balance Report
(From Benefit Time) Employee list showing balance of remaining yearly benefits
(i.e., vacation, sick time, holidays, etc.).
DeAccrual History Report
(From Benefit Time) Employee list showing history of benefit use (i.e., vacation,
sick time, holidays, etc.).
Reports are generated from Report Profiles, which are created in the Reports module of the
Output group. Report format can be either PDF or Excel.
Creating a Report Profile
1. Click on the Reports module of the Output group in the Tree View (see figure).
2. Click on the button, and the following type of a Reports window General tab will appear:
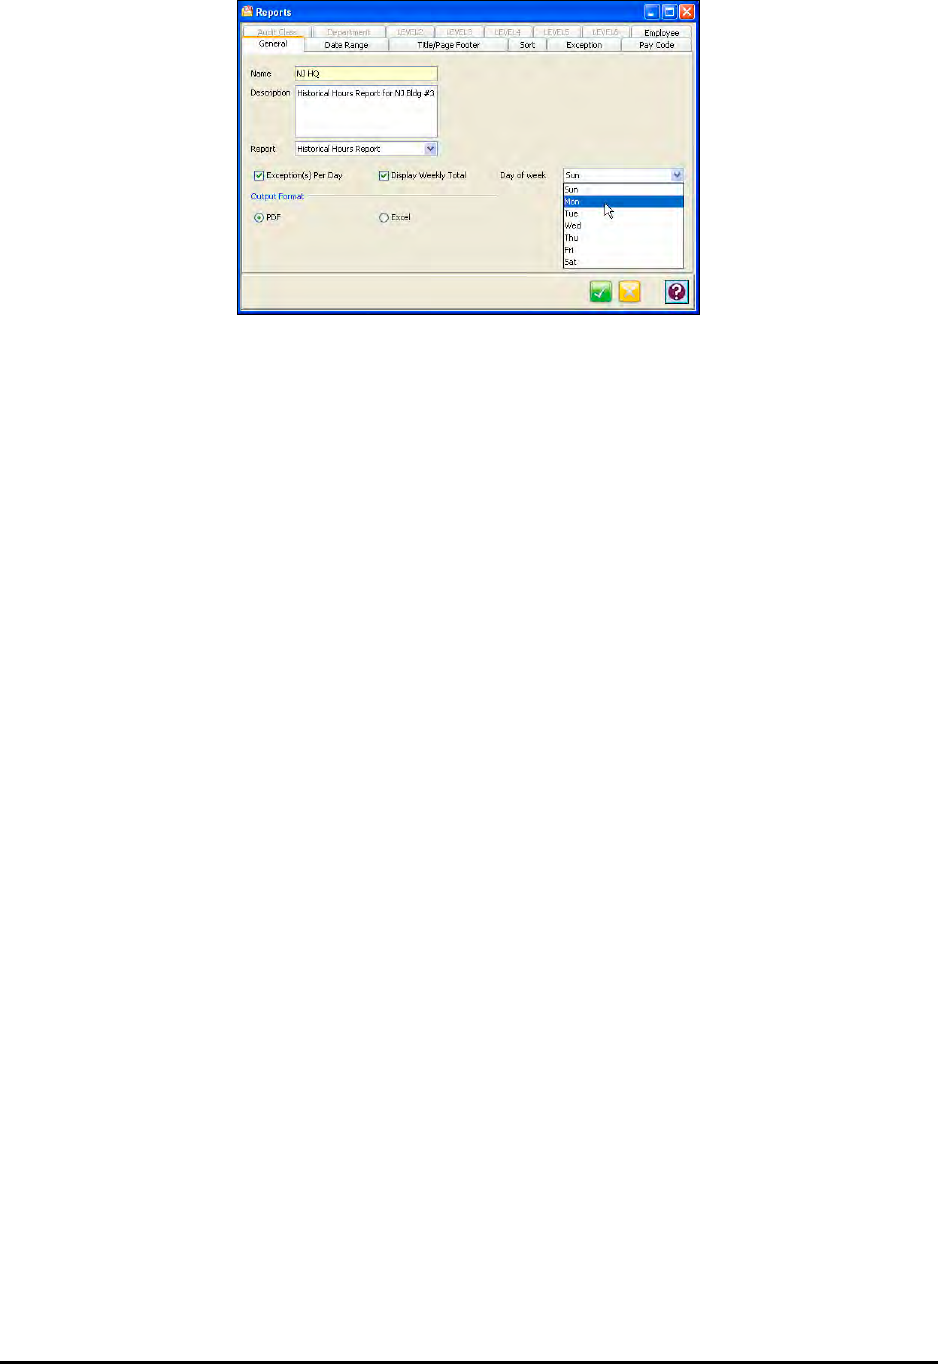
Time Guardian Series – Output 9-3
3. In the Name field, enter a name for the report [required field].
4. Enter in a brief description of the report in the Description field.
5. In the Report field, select the type of report you want to create. The choices are; Hours
Summary Report, Employee Report, Labor Analysis Report, Presence Report, Historical
Hours Report, Exceptions Report, Time Card Detail, Audit Report, and Tips Report.
Note: Advanced modules can add the following choices; Unauthorized Hours Report,
Timecard Report, Schedule Posting Report, Schedule vs. Actual Report, DeAccrual
Balance Report, and DeAccrual History Report.
6. For Hours Summary Report: Check the following options to include them on the report:
• Employee signature line
• Supervisor signature line
7. For Time Card Summary and Time Card Detail Report: Check the following options to
include them on the report:
• Enter No. of Punch in a Row
• Enter No. of Pay Code in a Row
• Show terminal number
• Employee signature line
• Show Comments
• Supervisor signature line
• Show Break-Hour Adjustment
• Show Absence
• Show Exceptions
• Check Actual Punches or Rounded Punches
Advanced Modules can add the following;
• Cost Rate
• Billable Rate
• Show Zone Number
8. For Labor Analysis Report: Only Check the output formats for the report.
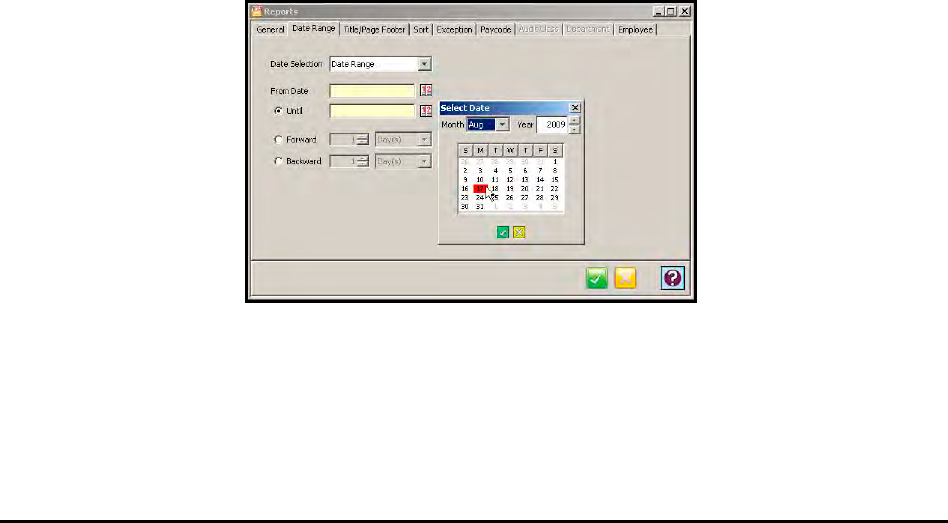
9-4 Time Guardian Series – Output
9. For Presence Report: Check the following options to include them on the report:
• On Premise
• Out
• Absent
10. For Historical Hours Report: Check the following options to include them on the report:
• Exception(s) Per Day
• Display Weekly Total
• Select Day of Week
11. For Exceptions Report: Check the following option to include it on the report:
• Show comments
12. For Audit Report: Check the following option to include it on the report:
• Show full Audit history
13. For Schedule Posting Report: Check the following options to include them on the report:
• Print advance schedules
• Advance schedules override regular schedules
• Print employee phone number
14. For Schedule vs. Actual Report: Check the following options to include them on the report:
• Report type of Summary or Detail
• Punch time of Actual Punches and Rounded Punches
15. In the Output Format section for all report types, click on either PDF to generate the report in
Adobe Acrobat® PDF format or Excel to generate the report in an Excel worksheet.
16. Click on the Date Range tab. See the following illustration for an example:
17. In the Date Selection field, select the date range for the report. The choices are; Today,
Yesterday, Last Open Period, Previous Open Period, Current Week, Previous Week,
Current Month, Previous Month, Last 2 Weeks, Date Range., Current Pay period, and
Previous Pay period.
Note: When Current Pay period and Previous Pay period are selected, the first Pay Class in
the Selected List on the Pay Class tab will be used as the date range for the report.
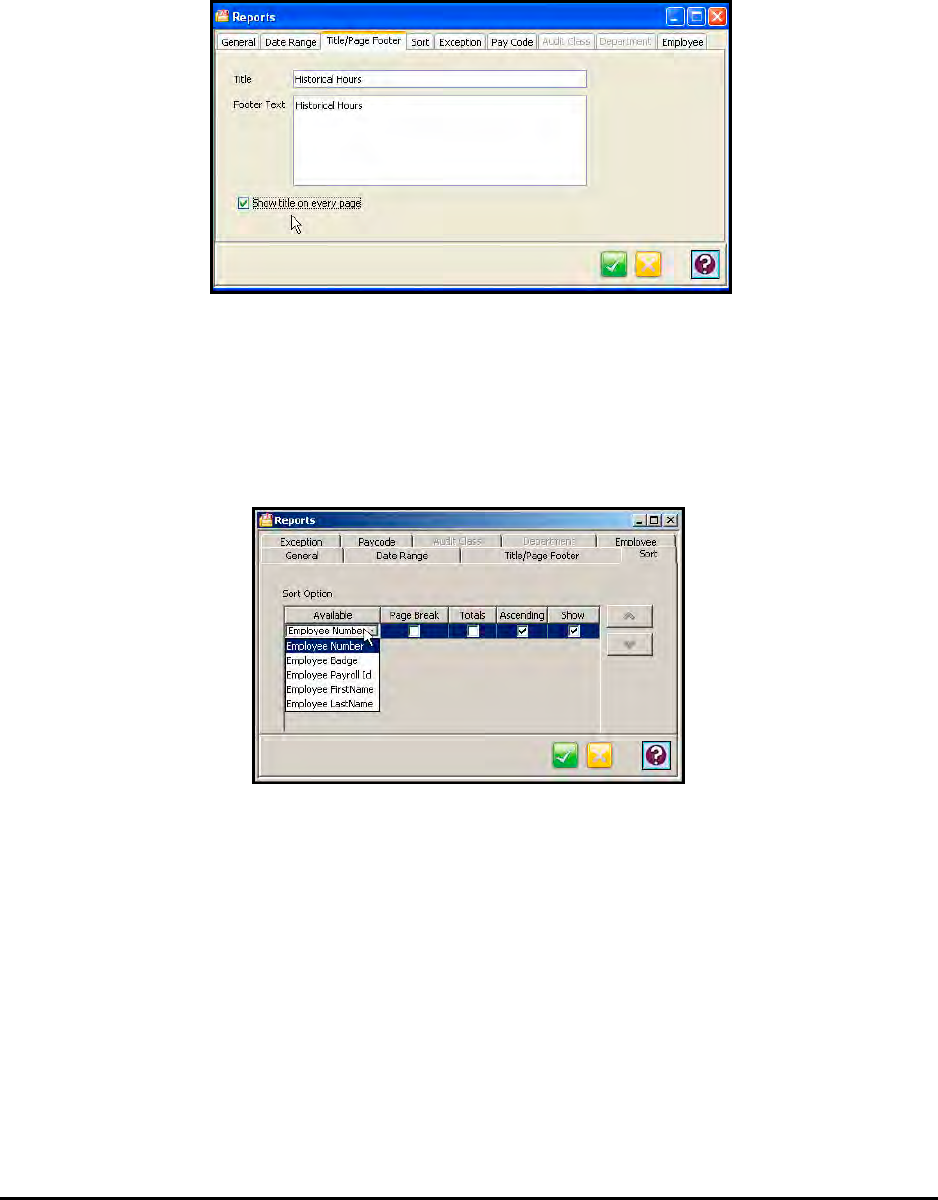
Time Guardian Series – Output 9-5
18. If Date Range was chosen as the Date Selection, you must enter the From Date and Until
Date using the Calendar icon. You also have the option of going forward or backward as
many days, weeks, months, or years from the From Date using the Forward and Backward
options.
19. Click on the Title/Page Footer tab. See the following illustration for an example:
20. In the Title field, enter the title that you want to appear on the report. If no title is entered, the
report name (type) will appear as the title of the report. Click to show title on every page if
desired.
21. In the Footer Text field, enter the text that you want to appear on the footer of the report.
22. Click on the Sort tab. See the following illustration for an example:
2. The Available column lists the sorting criteria reports. They are: Employee Number,
Employee Badge Number, Employee Payroll Number, Employee First and Last
Name. Employee Numbers are selected by using the dropdown list in each of the
corresponding sort fields.
3. Click on the up or down arrows to move an item up or down in the sort Available
column to change the sorting priority.
4. Also, sort in the Available column by Date, Department, Department No. and/or Pay
Code.
Note: Sorting options may vary depending upon the report selected.
5. Placing a check in the Page Break column will place a page break after each of the
sorting criteria selected.

9-6 Time Guardian Series – Output
6. Placing a check in the Totals column will total each of the sorting criteria selected.
7. Placing a check in the Ascending column will list each of sorting criteria selected in
ascending order on the report. No check will list them in descending order.
8. Placing a check in the Show column will allow the selected sort criteria to appear in
the report.
9. The placement of the sort criteria in the report is accomplished by selecting a row
and using the up or down arrow buttons to move the row to the desired position.
23. Click on the Exception tab. See the following illustration for an example:
• To add an Exception to the report, highlight the desired Exception in the Available list
and click on the Add button.
• To add all Exceptions to the report, click on the Add All button.
• To remove an Exception from the report, highlight the desired Exception in the Selected
list and click on the Remove button.
• To remove all selected Exceptions, click on the Remove All button.
• To define a Minute Requirement for a selected Exception, click on the Minute
Requirement field and enter a time in HH:MM format.
24. Click on the Pay Code tab. The Pay Code TT for triple time will appear if advanced module
is activated. See the following illustration for an example:
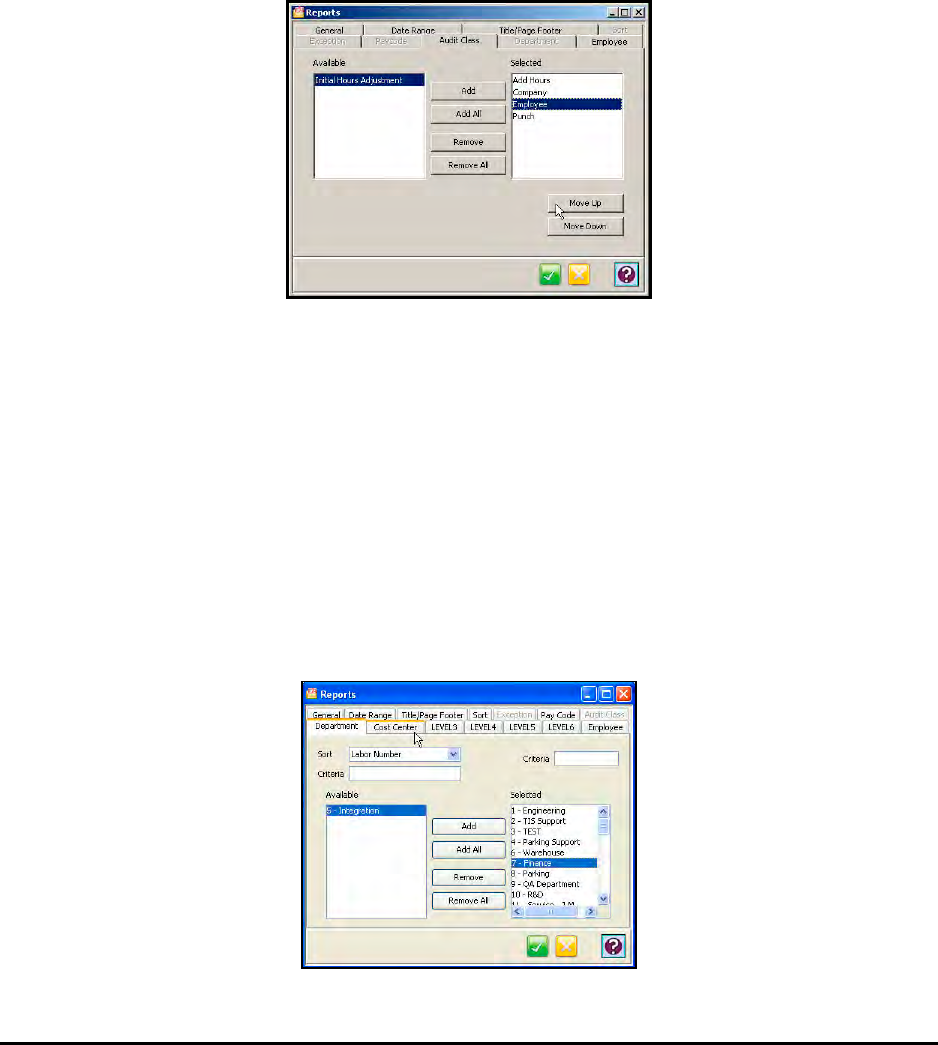
Time Guardian Series – Output 9-7
• To add a Pay Code to the report, highlight the desired Pay Code in the Available list and
click on the Add button.
• To add all Pay Codes to the report, click on the Add All button.
• To remove a Pay Code from the report, highlight the desired Pay Code in the Selected
list and click on the Remove button.
• To remove all selected Pay Codes, click on the Remove All button.
10. Click on the Move Up or Move Down buttons to move an item up or down in the sort
Selected column to change the priority.
25. Click on the Audit Class tab. See the following illustration for an example:
• To add an Audit Class [activity type] to the report, highlight the desired Audit Class in the
Available list and click on the Add button.
• To add all Audit Classes to the report, click on the Add All button.
• To remove an Audit Class from the report, highlight the desired Audit Class in the
Selected list and click on the Remove button.
• To remove all selected Audit Classes, click on the Remove All button.
11. Click on the Move Up or Move Down buttons to move an item up or down in the sort
Selected column to change the priority.
26. Click on the Department and/or labor Level tabs. See the following illustration for an
example:
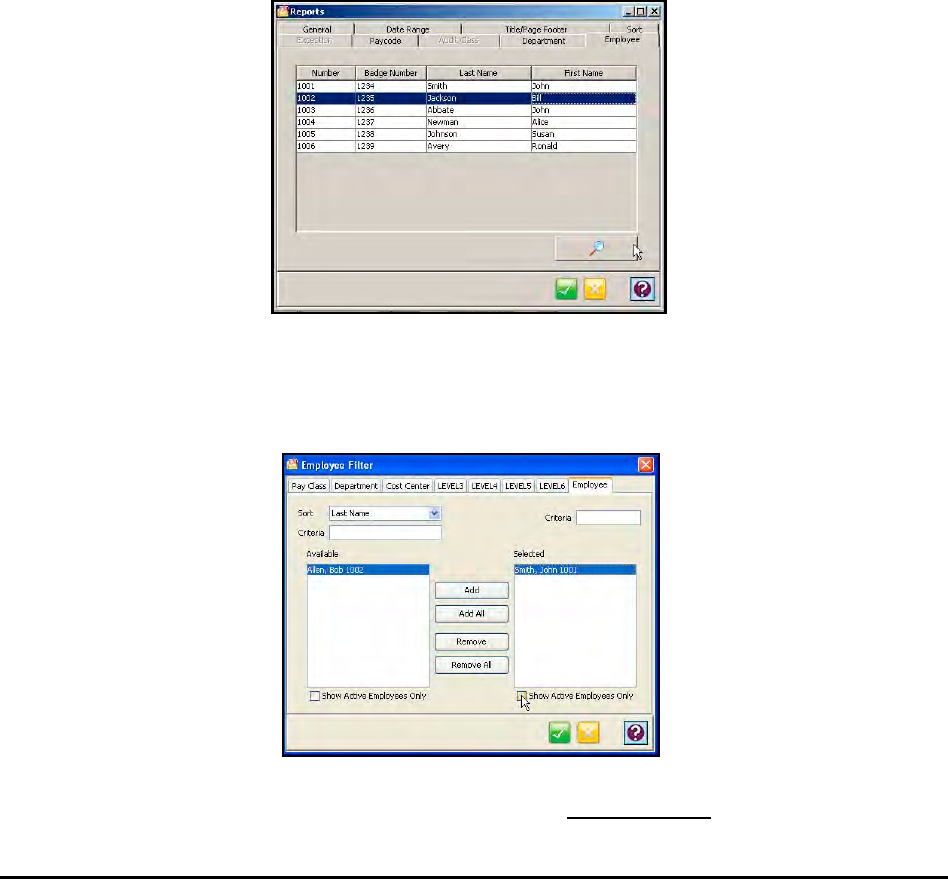
9-8 Time Guardian Series – Output
• To add a department/labor level to the report, highlight the desired department/labor
level in the Available list and click on the Add button.
• To add all available departments/labor levels to the report, click on the Add All button.
• To remove a selected department/labor level from the report, highlight the desired
department/labor level in the Selected list and click on the Remove button.
• To remove all selected departments/labor levels, click on the Remove All button.
• Filter categories of the Departments/labor levels shown in the “Available” and “Selected”
lists by selecting a sort item in the dropdown list in the Sort field. Then enter data in the
Criteria field(s) above either or both lists. Only departments/labor levels matching the
data entered will appear in both lists.
Note: Filtering by department/labor level does not exclude employees from that
department/labor level, but it does exclude the hours worked in that department/labor
level.
27. When you have finished selecting the departments/labor levels for the report, click on the
Employee tab. See the following illustration for an example:
Click on the Magnifying Eyeglass icon to further (more deep) filter employees using Pay Class,
Department/labor Level, and/or Employee criteria. The following is an example of the screen
that will appear when you click on the Employee tab from the Employee Filter screen:
Note: Clicking in the box “Show Active Employees Only” does not apply for new employees
added after the filter profile was set.
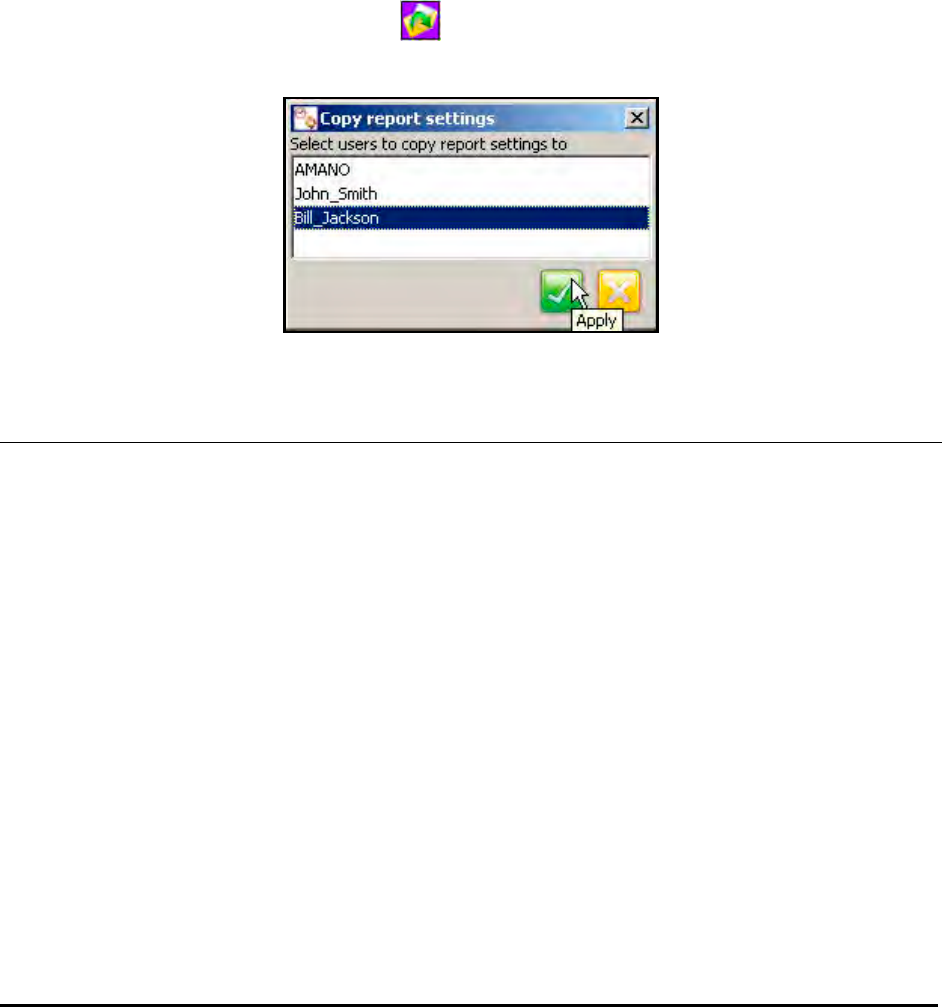
Time Guardian Series – Output 9-9
• To add an employee to the report, highlight the desired employee in the Available list
and click on the Add button. To add all employees to the report, click on the Add All
button.
• To remove an employee from the report, highlight the desired employee in the Selected
list and click on the Remove button. To remove all selected employees, click on the
Remove All button.
• Click on the Pay Class tab to utilize available Pay Classes as a filter for employee
reports and follow the same preceding procedure.
• Click on a Department/Labor Level tabs to utilize available departments as a filter for
employee reports and follow the same preceding procedure.
Note: Report profile settings are associated with the user that was logged into the Time
Guardian Series software when the report profiles where created. However, a user with
Admin privileges can click on the button to transfer the report profiles to the
selected users (see figure).
Report Functions & Examples
Audit Report
As seen in the following example, the Audit Report records every change made in Time
Guardian. This includes changes made to an employee’s punch, and the addition or deletion of
a Department, or any other modifications made to the program. This invaluable report also
provides the date, day and time the modification was made, including the Login name of the
user who made the change. Events will be listed in chronological order, starting with the first
edit and continuing through to the last, with a line separating activities for each date. This report
will record all punch transaction records and warnings of undefined data.
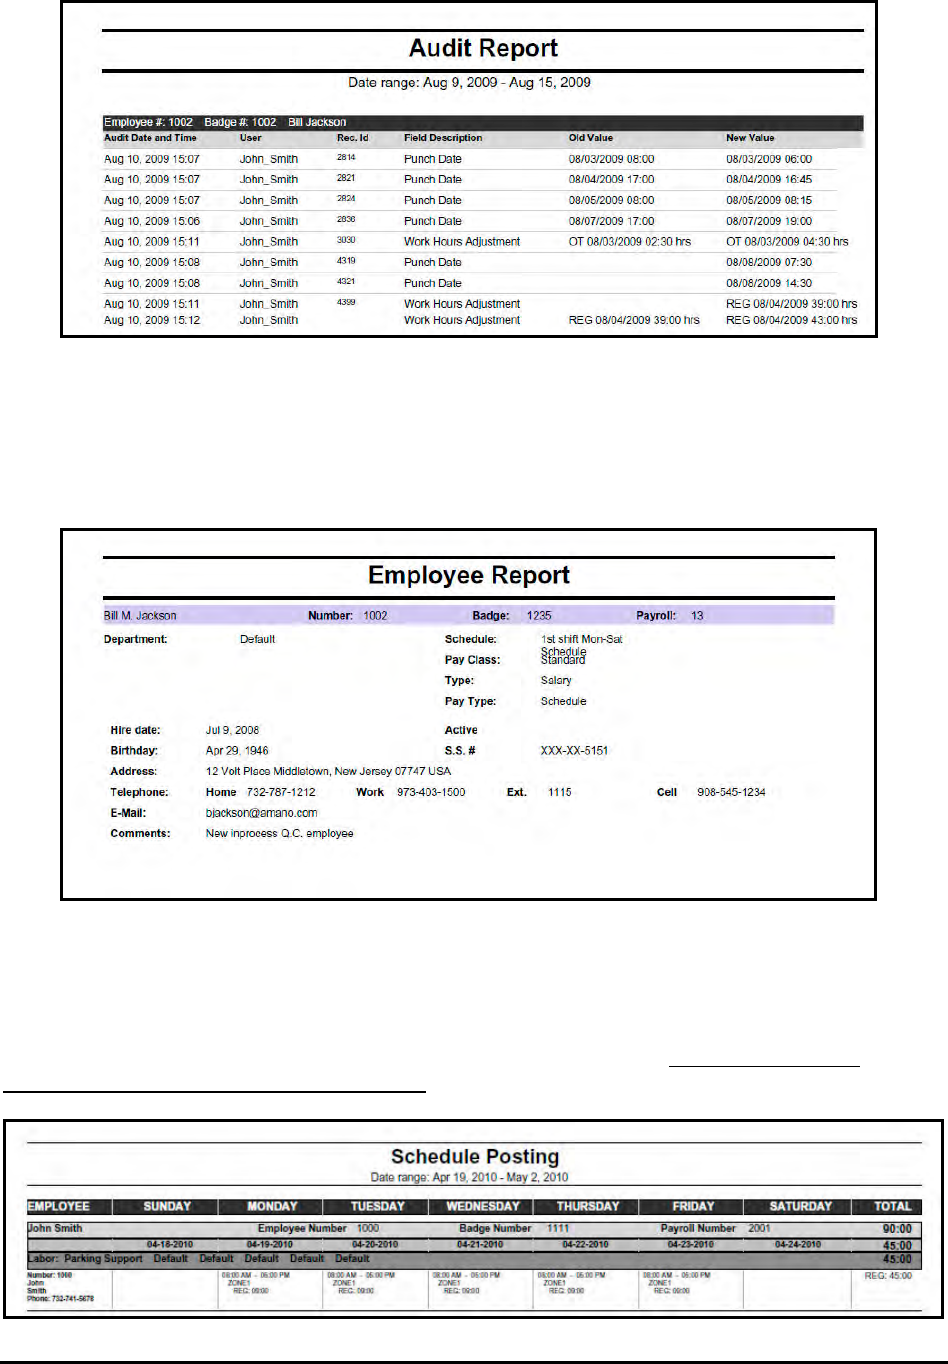
9-10 Time Guardian Series – Output
Employee Report
As seen in the following example, the Employee Report provides a list of employees, including
all of the information contained in the General tab of the Employee Setup Wizard.
Schedule Posting Report
As seen in the following example, the Schedule Posting Report provides a list of employees,
including the information showing when they are scheduled to work. Requires Advanced
Schedule module activation to be available.
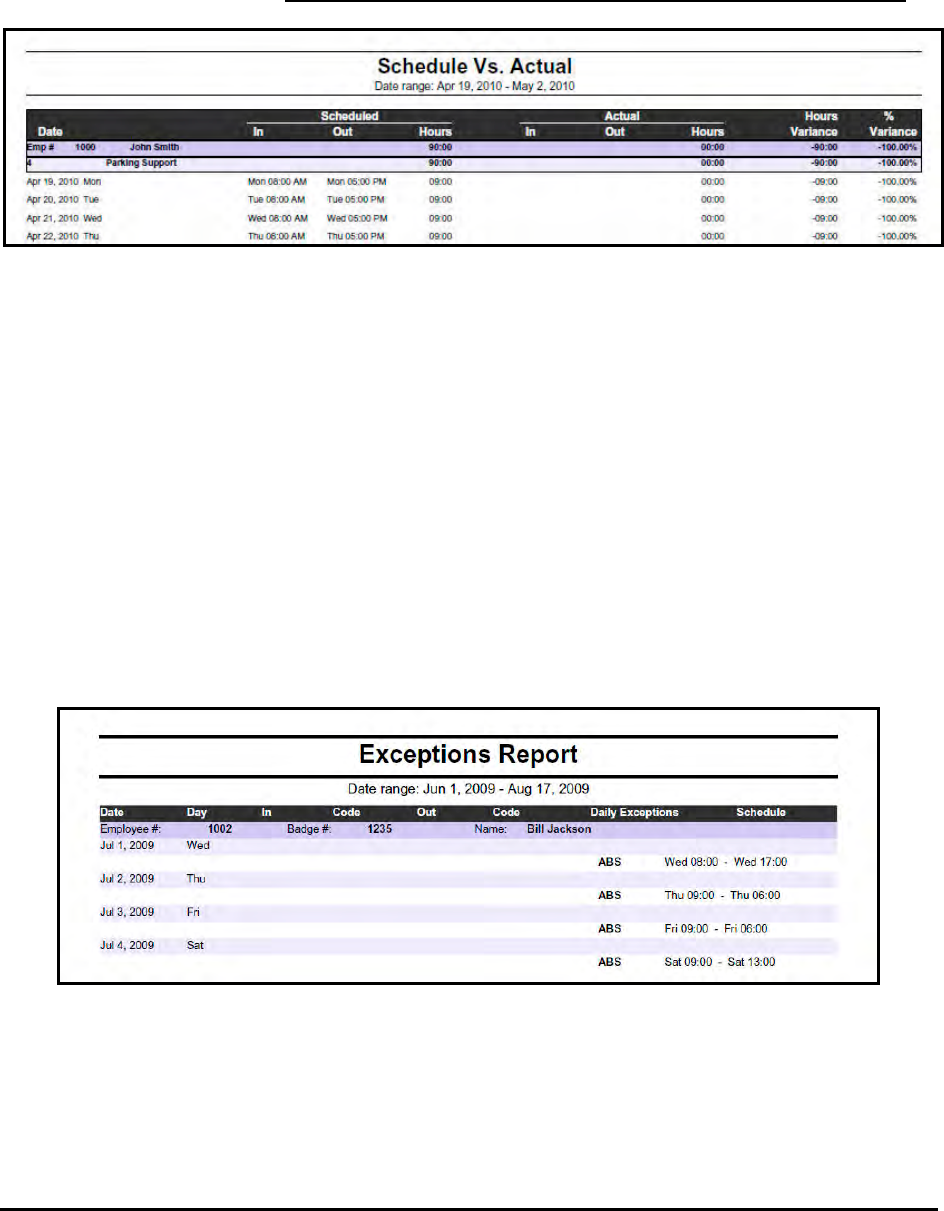
Time Guardian Series – Output 9-11
Schedule vs. Actual Report
As seen in the following example, the Schedule vs. Actual Report provides a list of
employees, showing when they were scheduled to work versus the actual hours they worked
plus the variance in percent. Requires Advanced Schedule module activation to be available.
Exceptions Report
The flagging of Exceptions is a valuable piece of information that can be provided by Time
Guardian. These flags provide managers with a key piece of feedback as to when, how, and if
an employee is punching properly. If you did not choose to use Exceptions during the initial
installation, they can be modified at any time by opening the Setup Wizard from the Edit menu
and selecting the “Exceptions” tab. Select the exceptions you wish to track [see below for
additional method].
As seen in the following example, the Exceptions Report includes the Name, Employee
Number, and Badge Number. Check “Show comments” to add comments to this report. It
provides a list of the Exceptions that were generated based on the settings selected in the
Exceptions section of the Wizard. The report also includes reasons provided in the Main
operations window. Employees may have multiple Exceptions for the same day, depending on
the settings provided. If no exceptions were selected during the Setup Wizard, then this report
will be blank.
By default, all Exception codes are selected during the Setup Wizard and are included in the
report.
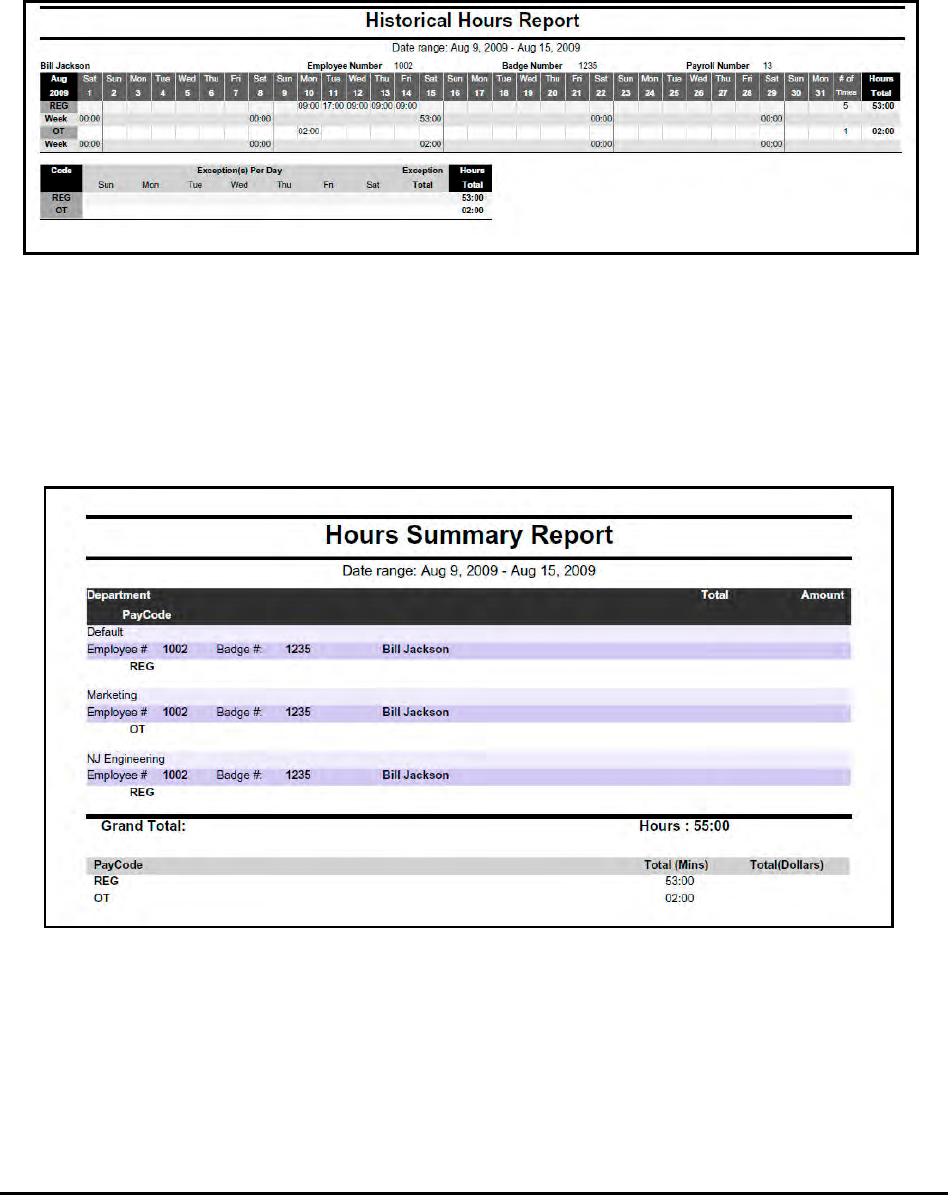
9-12 Time Guardian Series – Output
Historical Hours Report
This report displays all of the historical data of an employee for a defined length of time,
including exceptions, absences, and Pay Code information. Exceptions (must have at least one
exception selected) to be included in the report. To include a tabulated summary of Exceptions
for each day of the week, select to, “Exceptions Per Day”.
Hours Summary Report
This report provides a one line total for each employee, displaying pay codes, wages, and total
hours. This can also provide totals by department, when the selected employee is sorted by
department.
Note: When Zone Differential module is activated the report will include Zone information.

Time Guardian Series – Output 9-13
Unauthorized Hours Report
This report displays employee list with date and hors that are not authorized to go to payroll
export file.
Labor Analysis Report
As seen in the following example, the Labor Analysis Report provides a complete and
detailed account of employees’ labor for a specified period of time. Information will vary based
on your company’s Setup Wizard selections.
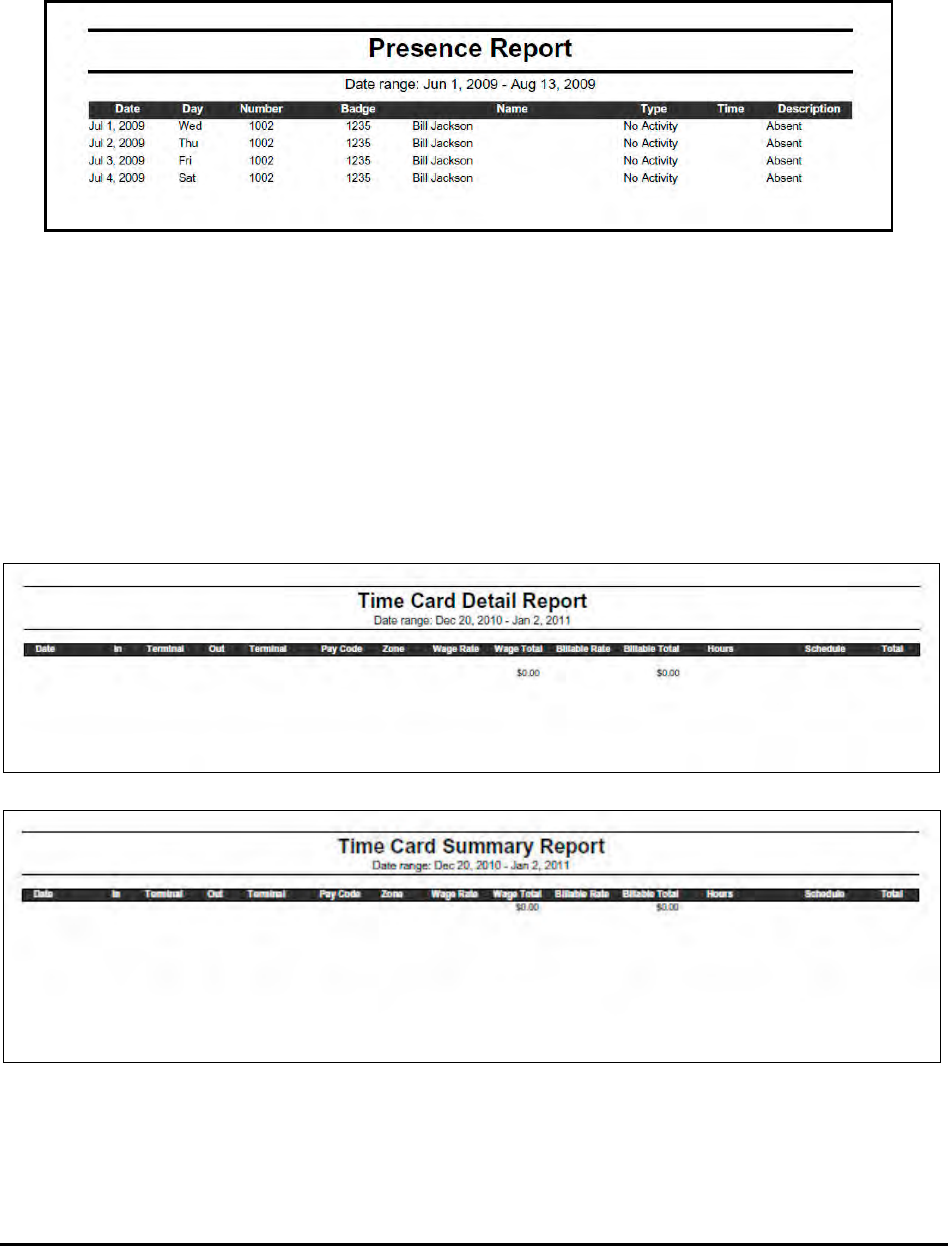
9-14 Time Guardian Series – Output
Presence Report
As seen in the following example, the Presence Report provides a list of employees currently
punched IN at the terminal. This report will only be accurate if the terminal is polled regularly.
Time Card Summary and Time Card Detail Reports
As seen in the following examples, the Time Card Detail Report and Time Card Summary
Report provide a complete and detailed account of employees’ punch times, totals, wages, and
exceptions for a specified period of time. Information will vary based on your company’s Setup
selections. Wages will only be displayed if enabled to be displayed on reports on the Pay Code
tab within the Setup Wizard.
When the Zone Differentials module is activated, the Zone information will be shown on these
reports.
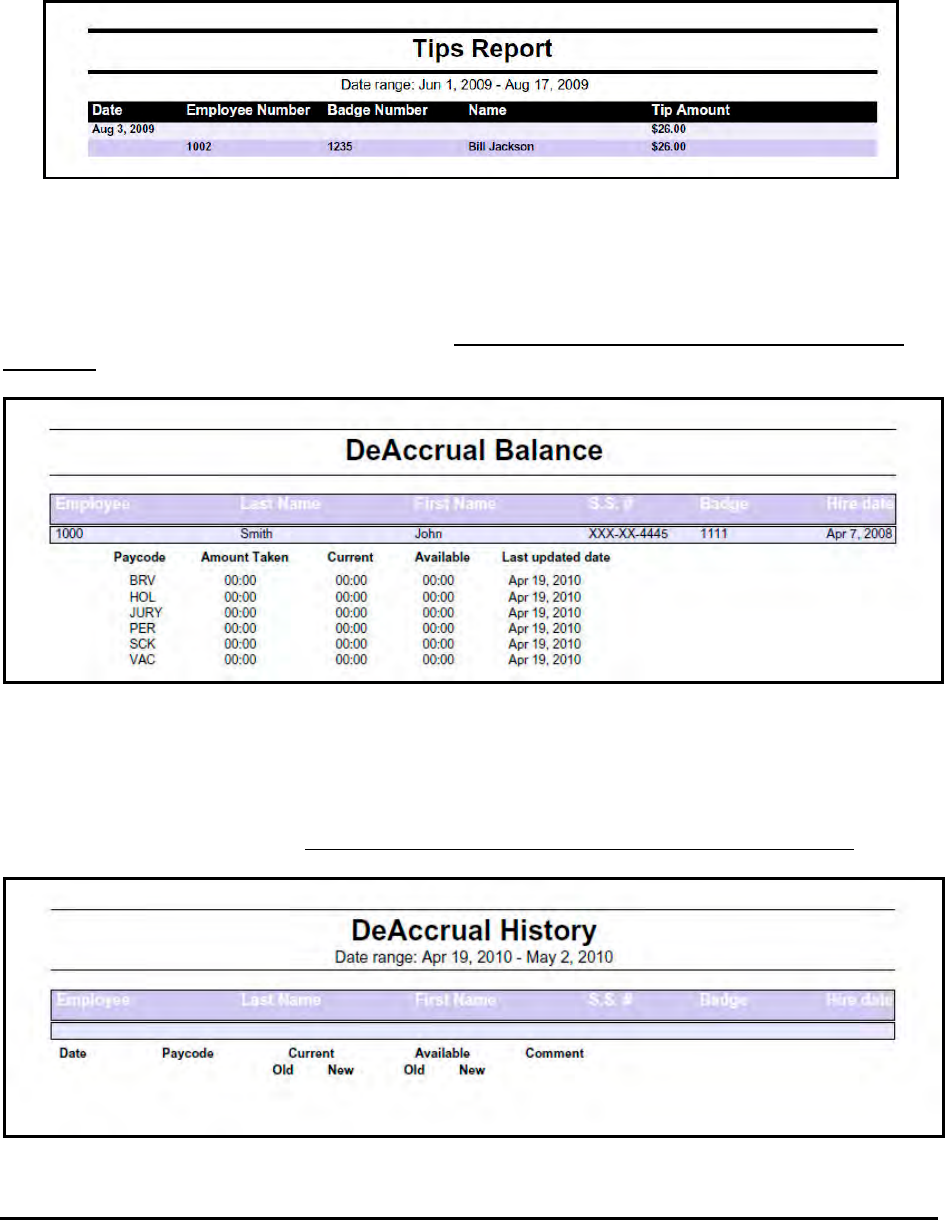
Time Guardian Series – Output 9-15
Tips Report
As seen in the following example, the Tips Report provides a complete and detailed account of
employees’ punch tips with totals for a specified period of time. Information will vary based on
your company’s Setup Wizard selections.
DeAccrual Balance Report
As seen in the following example, the DeAccrual Balance Report provides a list of employees,
showing balance of remaining yearly benefits. Requires Benefit Time module activation to be
available.
DeAccrual History Report
As seen in the following example, the DeAccrual History Report provides a list of employees,
showing history of benefit use. Requires Benefit Time module activation to be available.
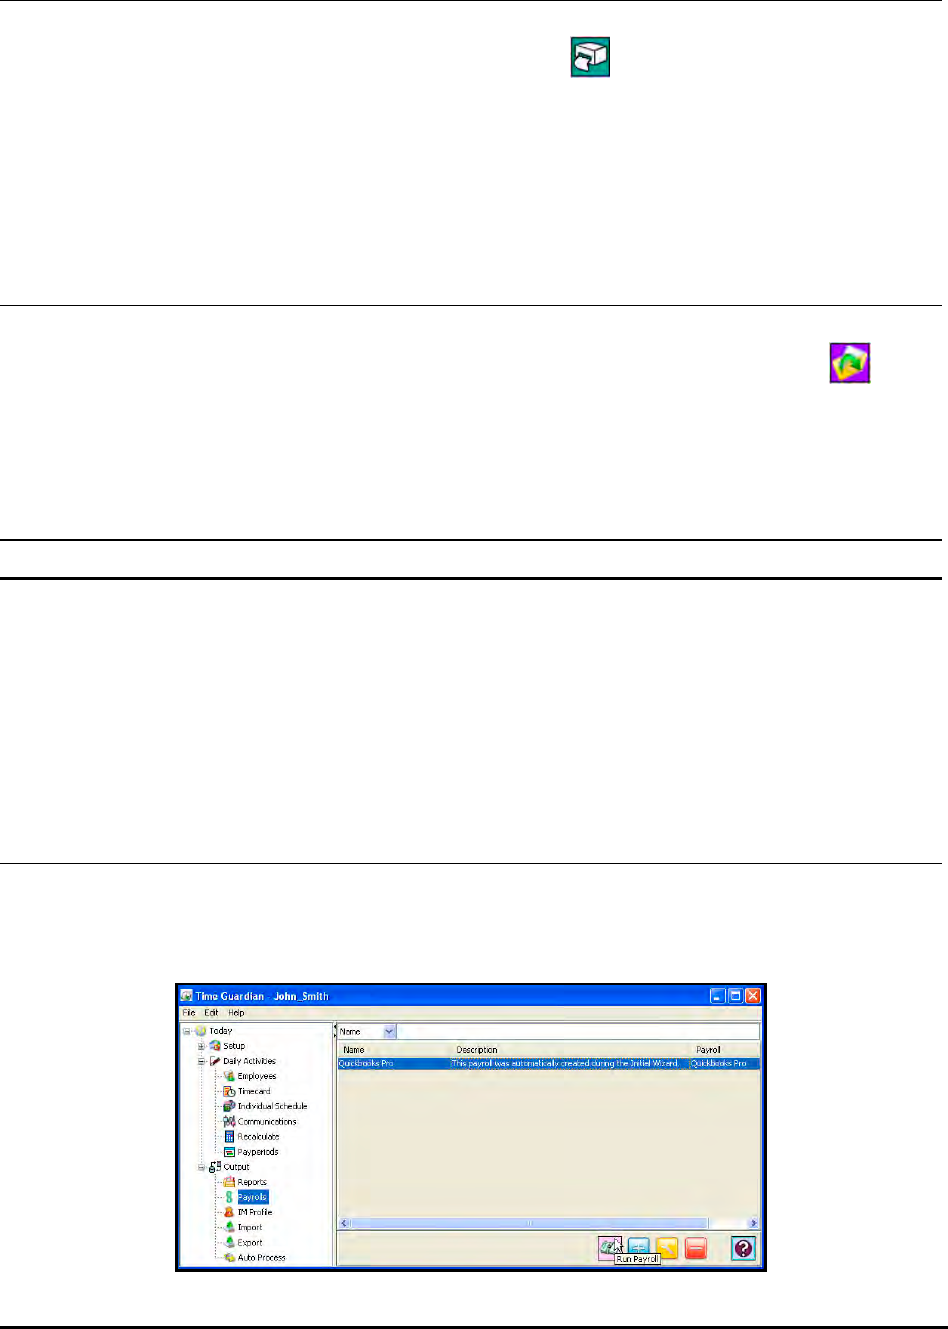
9-16 Time Guardian Series – Output
Running a Report Profile
To run a report from a Report Profile, select the desired Report Profile from the list in the Table
View of the Reports module, and click on the Run Report button. The report will be
generated, and displayed on screen if Adobe Acrobat PDF Output format was selected. If Excel
Output was selected, the report will be generated and an Excel worksheet created and saved in
the Amano Time & Attendance software directory [i.e., Time Guardian] in the "Reports" folder
[C:\Program Files\Time Guardian\reports].
Copying a Report Profile to Alternate Users
To copy a report from a Report Profile to other users, select the desired Report Profile from the
list in the Table View of the Reports module, and click on the Copy Report Settings
button. The report profile settings will be copied to the selected Users. Since report profiles
when created are directly linked to the logged in User, the function of being able to transfer
[copy] report profile to another user(s) is very useful. This function quickly creates the same
report profile for alternate users.
Payrolls Module
The Payrolls module provides a way of transferring data in the system to payroll software. The
data is usually transferred by means of a text file formatted to the payroll company’s
specifications or directly into the payroll company database.
Note: Activation of the Payroll Interface module can provide up to an additional 46 plus payroll
interfaces. See Payroll Interface module section for additional information.
Creating a Payroll Profile
1. Click on the Payrolls module within the Output group in the Tree View (see the following
figure).
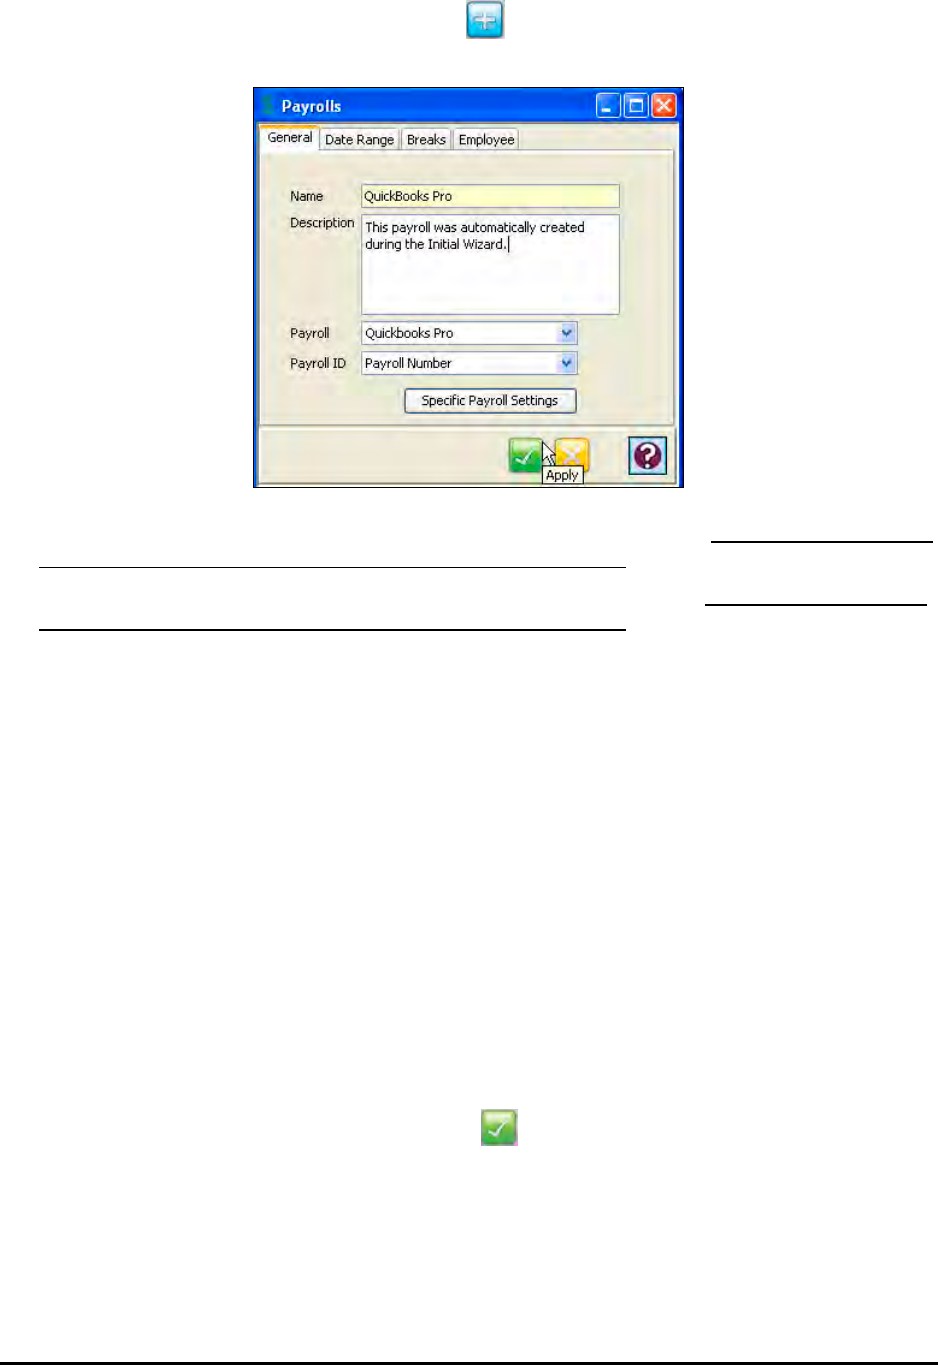
Time Guardian Series – Output 9-17
2. To create a new Payroll Profile, click on the button, and the following Payrolls Profile
window will appear:
3. In the Name field, enter a name for the payroll profile [required field]. This field automatically
filled out during setup wizard with QuickBooks Pro selection.
4. Enter a brief description of the payroll profile in the Description field. This field automatically
filled out during setup wizard with QuickBooks Pro selection.
5. In the Payroll field, select the type of Payroll Export file you want to create. The choices are:
ADP DOS, ADP PC Payroll for Windows, CBS Payroll, Ceridian Power Pay, EasyPay,
Excel, Gevity HR, PayChex Paylink, PayChex Preview, PayDay, PayWeb, PeachTree Win,
and QuickBooks Pro.
Note: The Payroll profile with name, description, payroll selection, payroll number, and output
path will be created automatically during the initial Setup Wizard when QuickBooks Pro
is selected to auto sync.
6. In the Payroll ID field, select: Payroll Number, Employee Number, Social Security Number,
or Badge Number.
7. In the Output Path field, enter in the directory path of the payroll file or click on the Browse
button to set the path. An Open dialog will appear. Select the path and directory and enter in
the filename. The filename of the payroll file is usually set by the payroll company you are
using.
8. Click on the Specific Payroll Settings button to see the Payroll Settings window, which are
payroll company specific. Configure the General and Pay Codes settings tabs as per the
desired payroll requirements and click on the button.
QuickBooks Compatibility
Note: The Amano Time & Attendance software is compatible with the following versions of
QuickBooks Pro for manual export:
• The current QuickBooks 2011 and two years back

9-18 Time Guardian Series – Output
See the following matrix tables for additional information on Specific Payroll Settings:
QuickBooks Pro
Examples of export iif file fields for QuickBooks Pro are shown in the following matrix table:
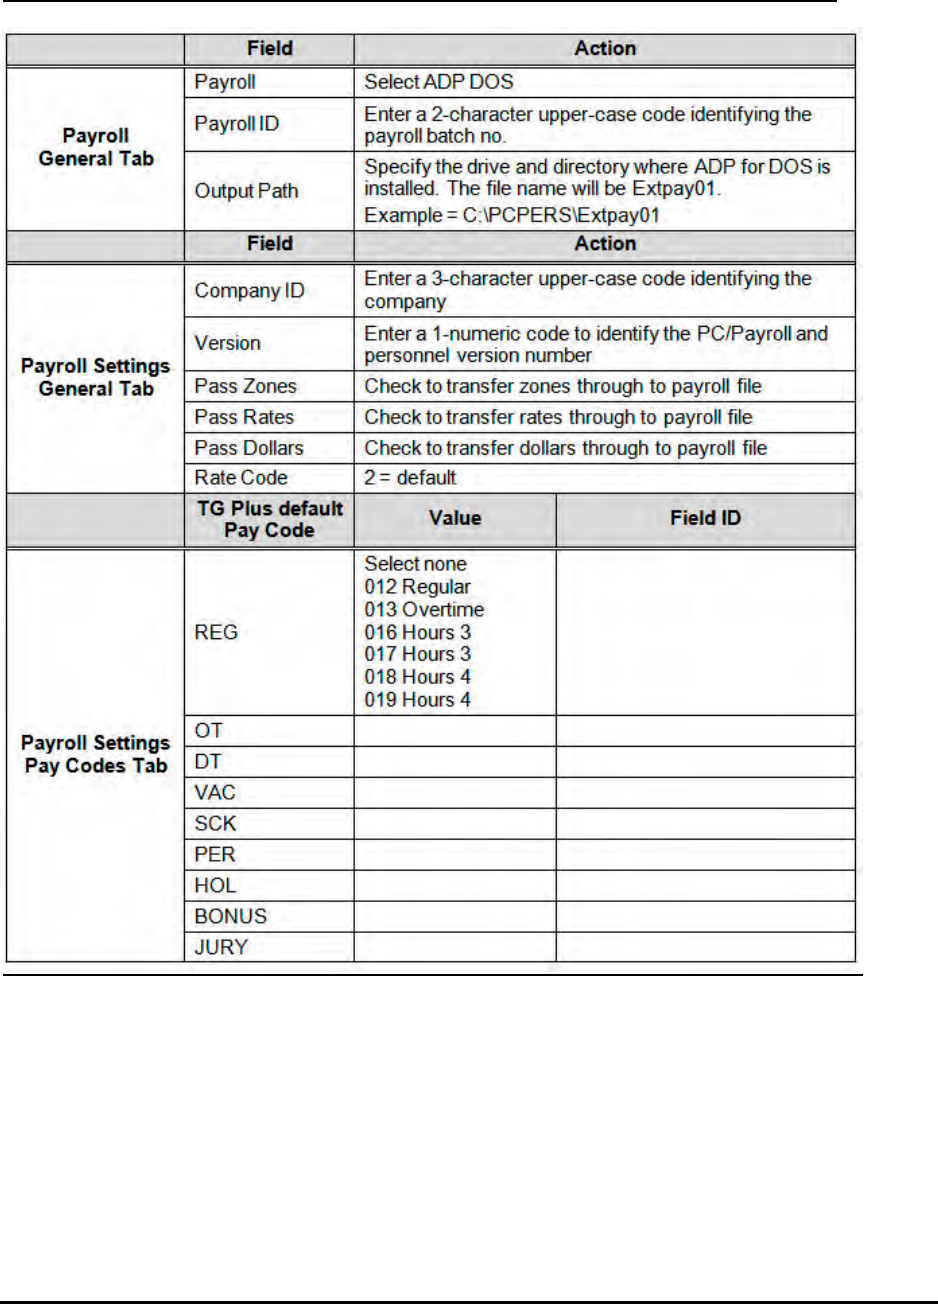
Time Guardian Series – Output 9-19
ADP For DOS
Examples of export file fields for ADP for DOS are shown in the following matrix table:
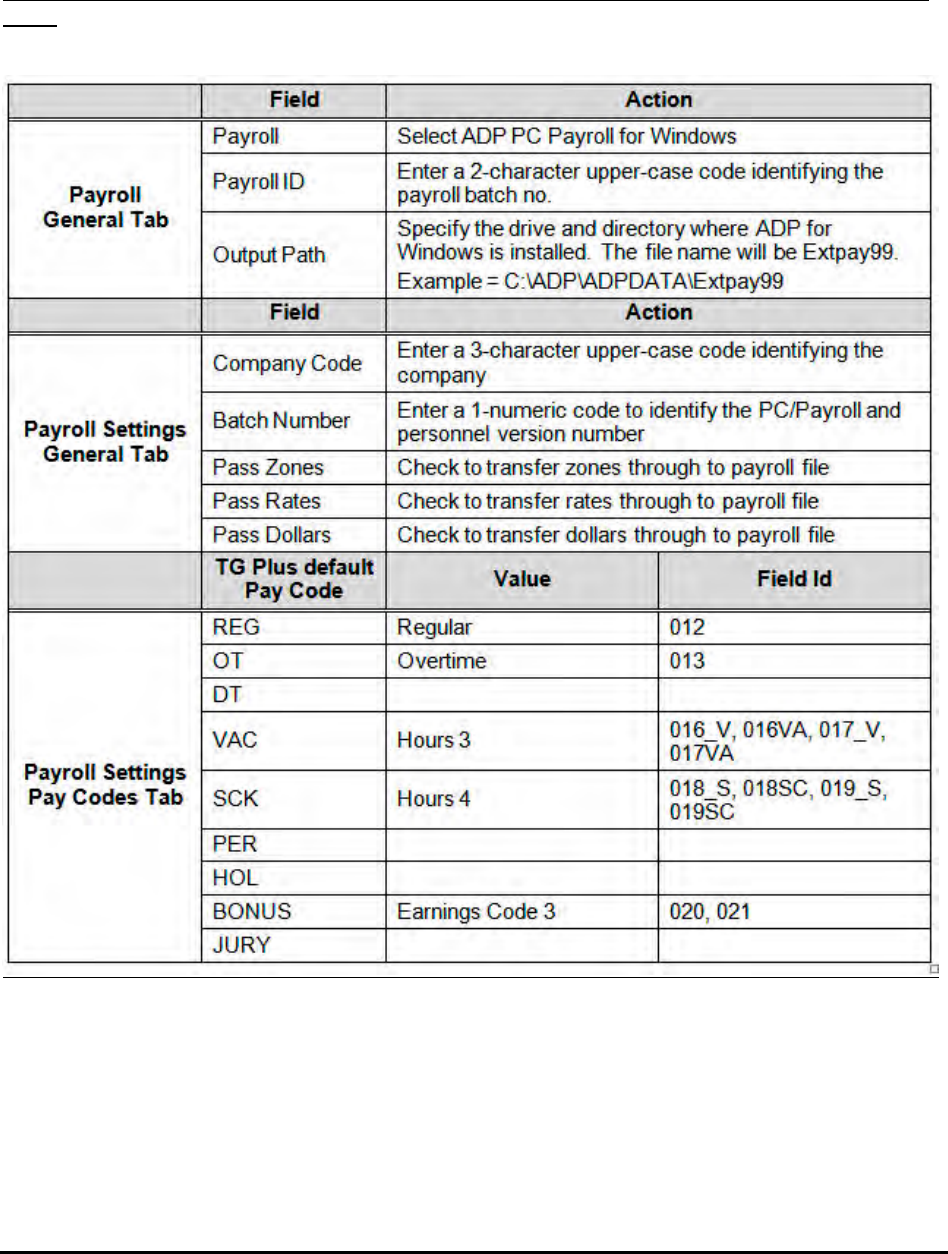
9-20 Time Guardian Series – Output
ADP PC Payroll For Windows
Examples of export file fields for ADP PC Payroll for Windows are shown in the following matrix
table:
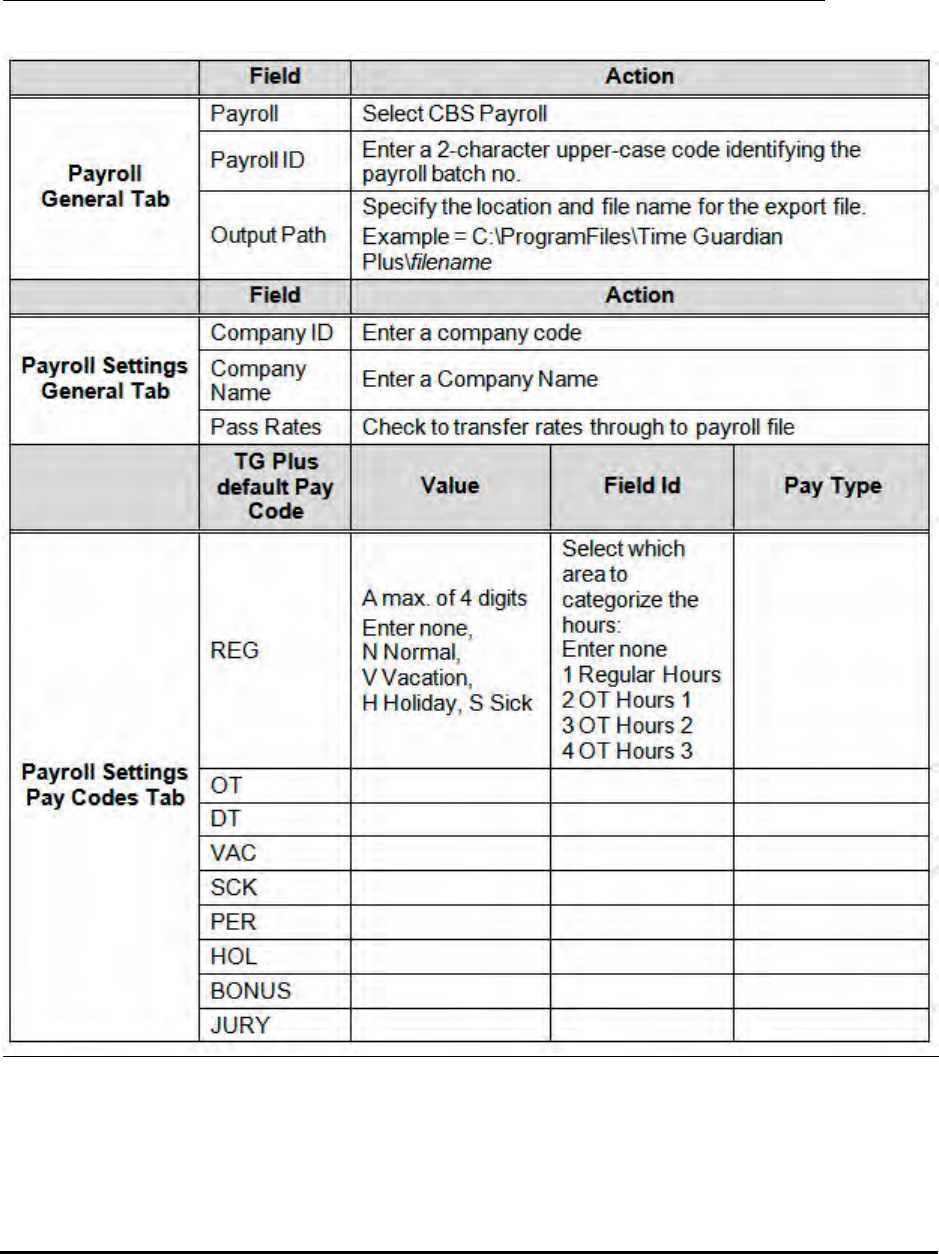
Time Guardian Series – Output 9-21
CBS Payroll
Examples of export file fields for CBS Payroll are shown in the following matrix table:
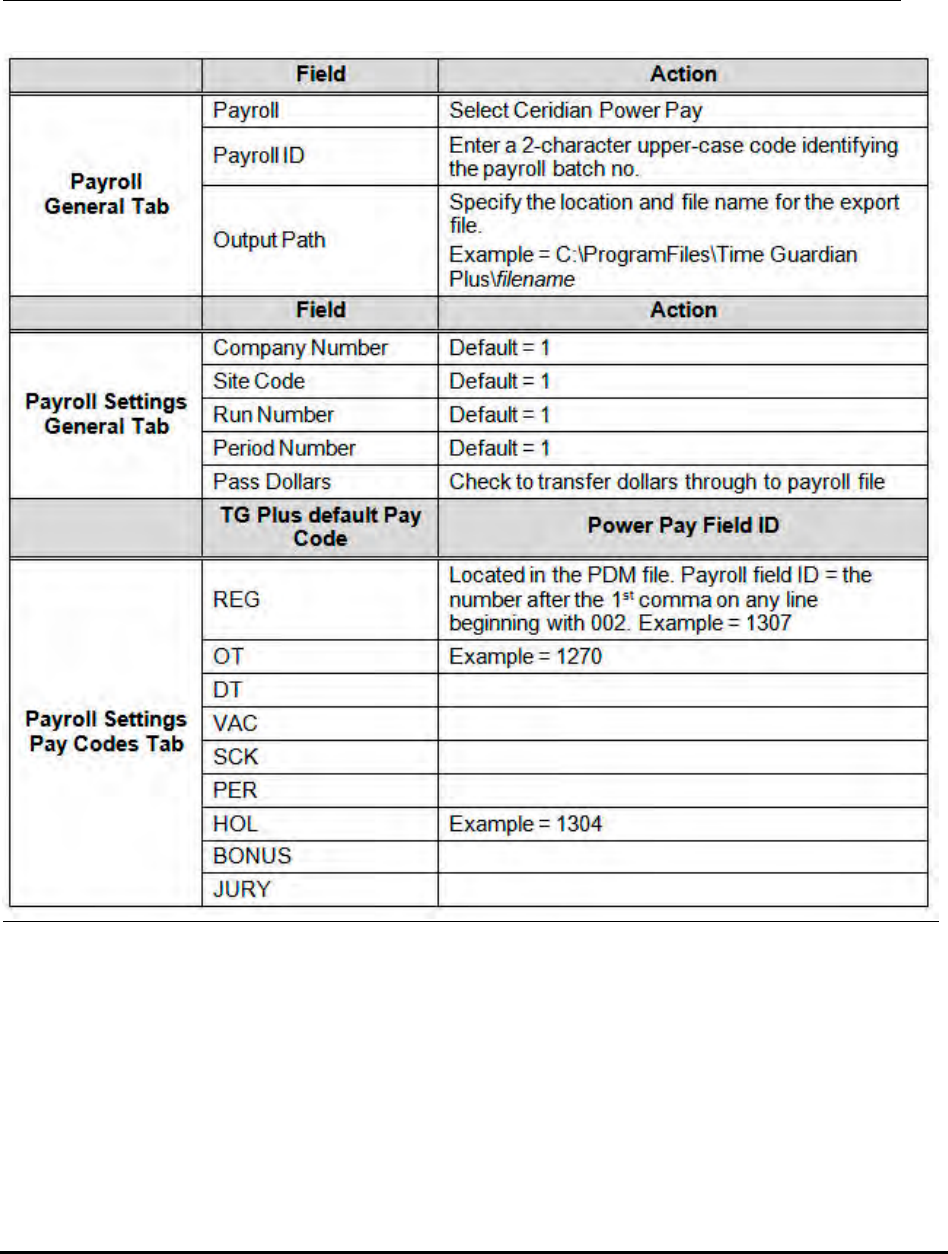
9-22 Time Guardian Series – Output
Ceridian Power Pay
Examples of export file fields for Ceridian Power Pay are shown in the following matrix table:
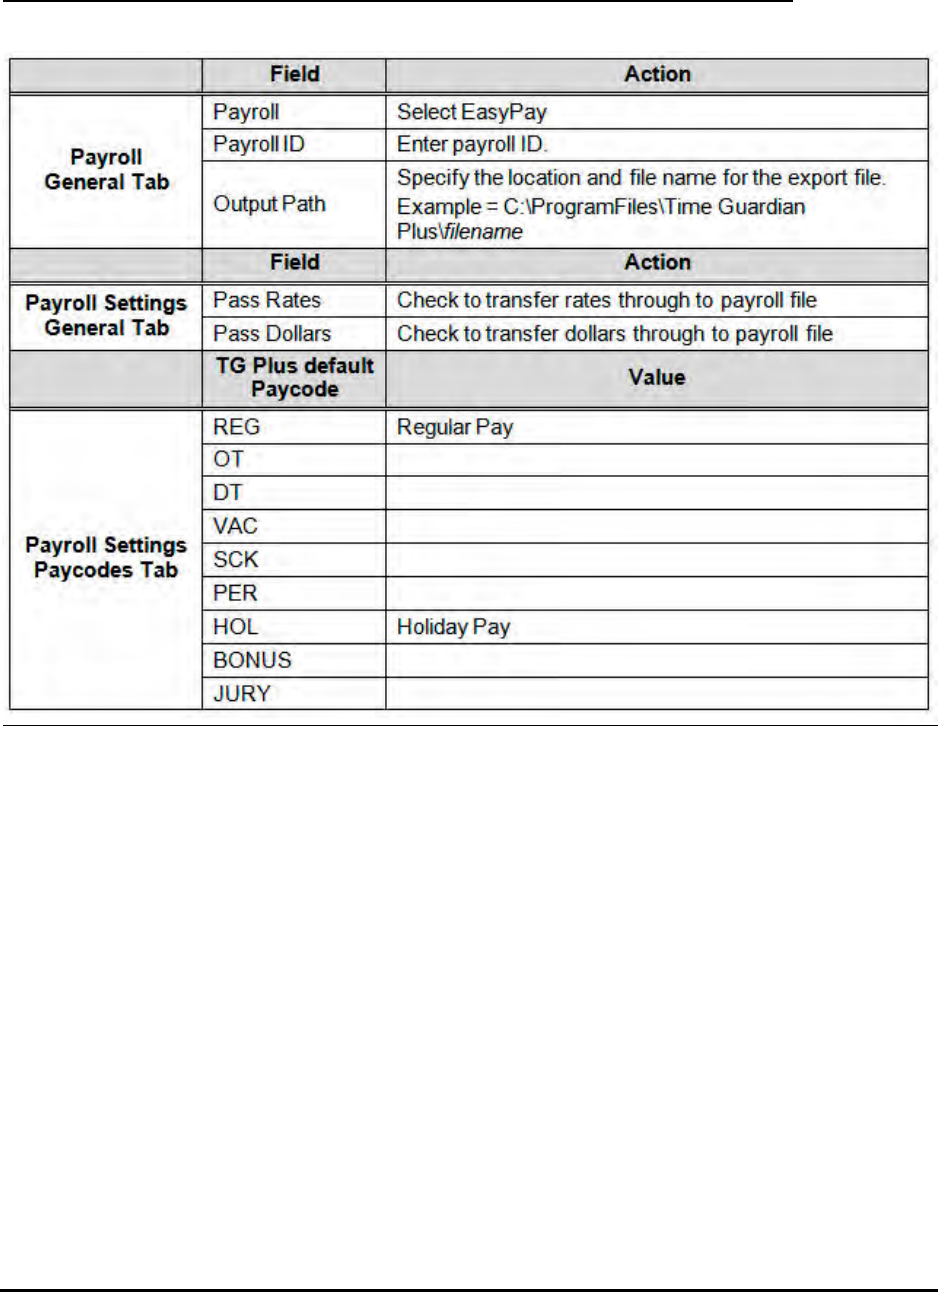
Time Guardian Series – Output 9-23
EasyPay
Examples of export file fields for EasyPay are shown in the following matrix table:
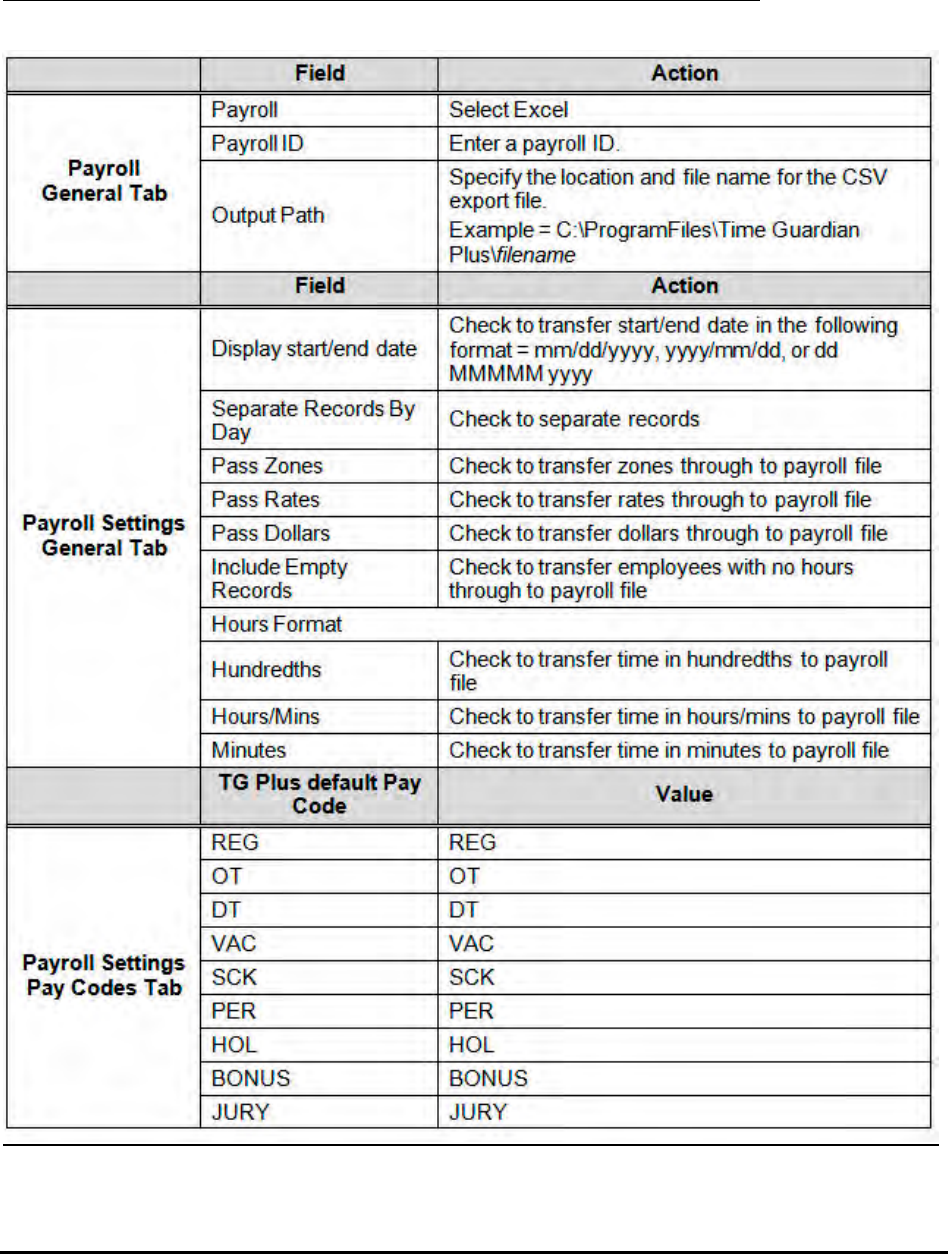
9-24 Time Guardian Series – Output
Excel
Examples of export file fields for Excel are shown in the following matrix table:
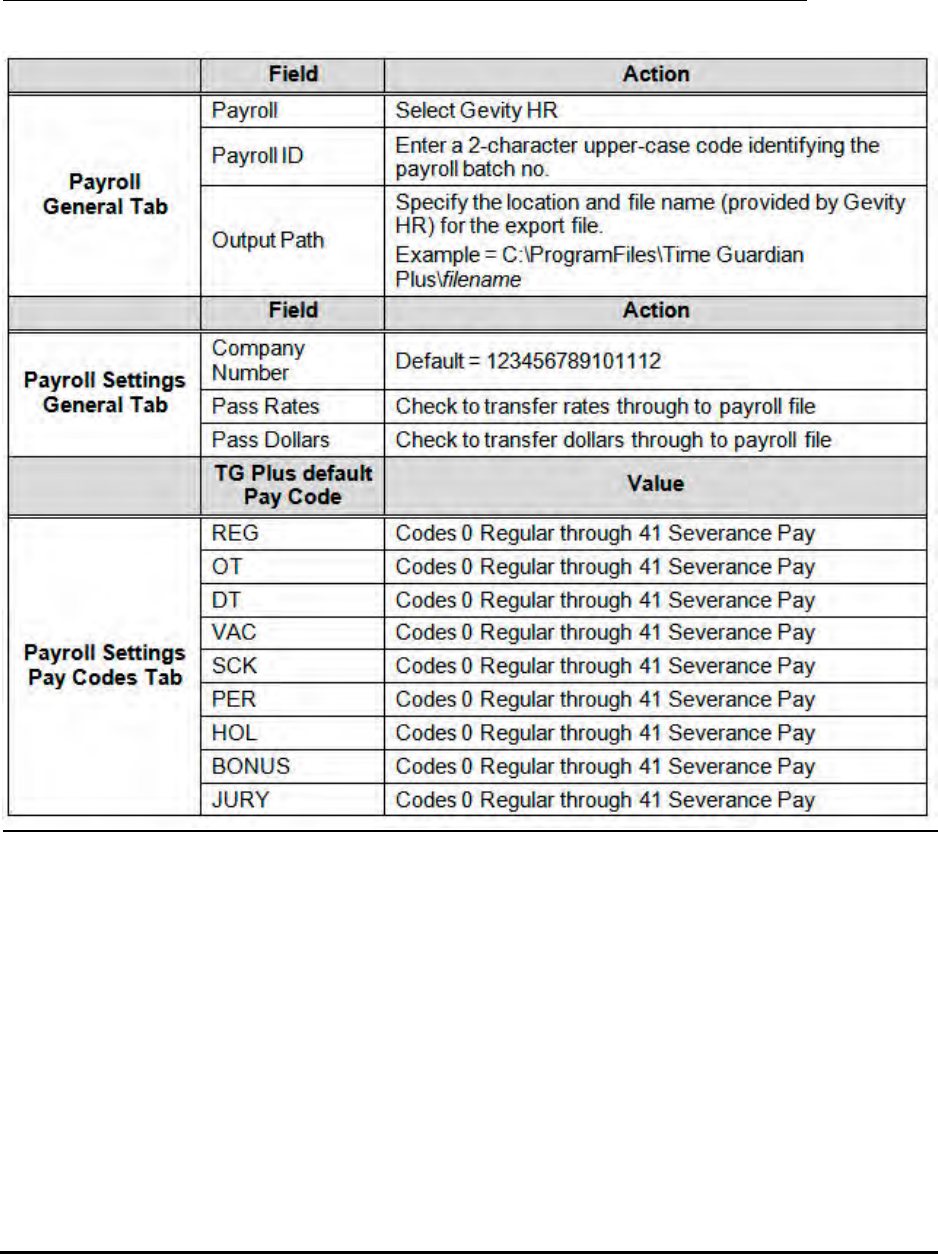
Time Guardian Series – Output 9-25
Gevity HR
Examples of export file fields for Gevity HR are shown in the following matrix table:
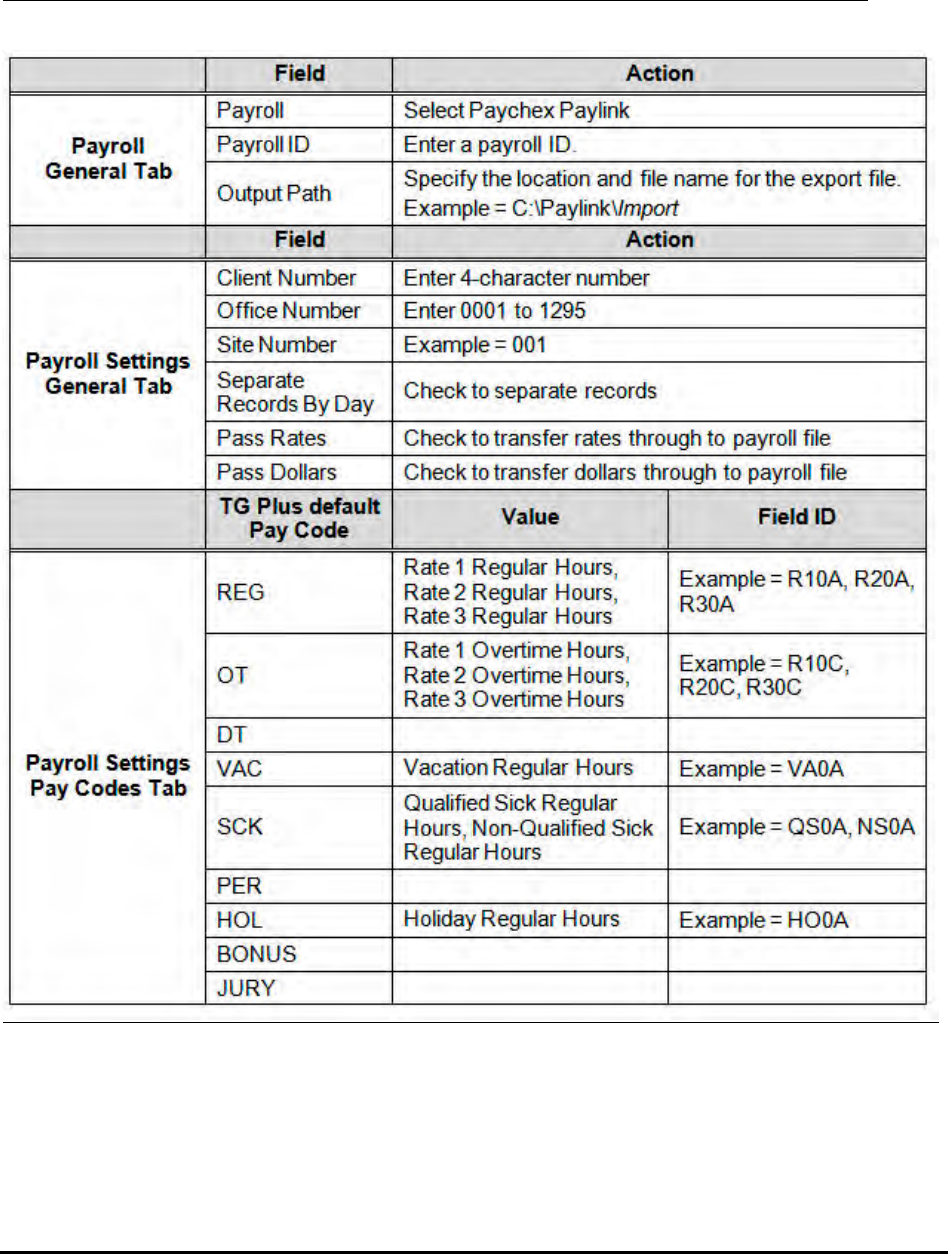
9-26 Time Guardian Series – Output
Paychex Paylink
Examples of export file fields for Paychex Paylink are shown in the following matrix table:
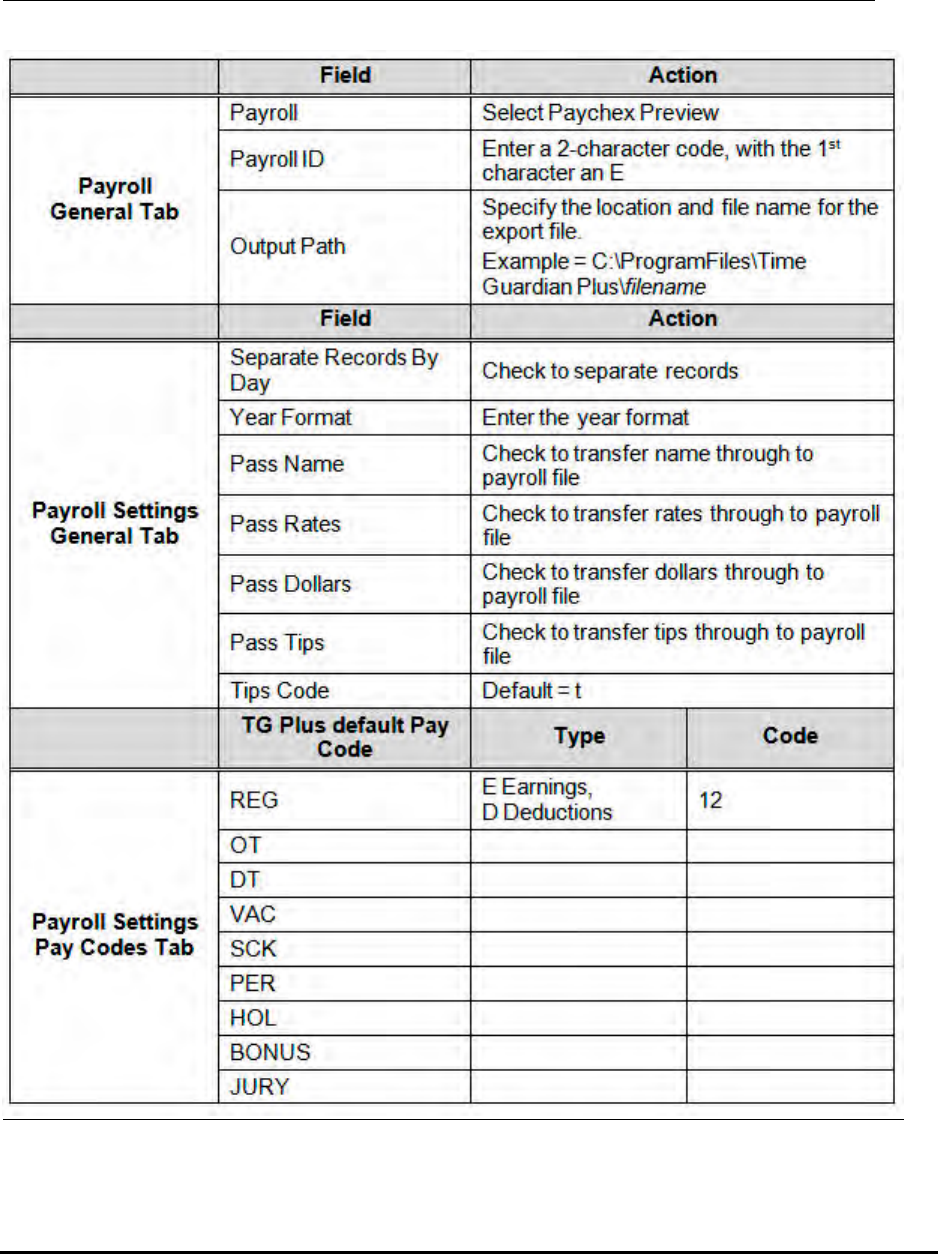
Time Guardian Series – Output 9-27
Paychex Preview
Examples of export file fields for Paychex Preview are shown in the following matrix table:
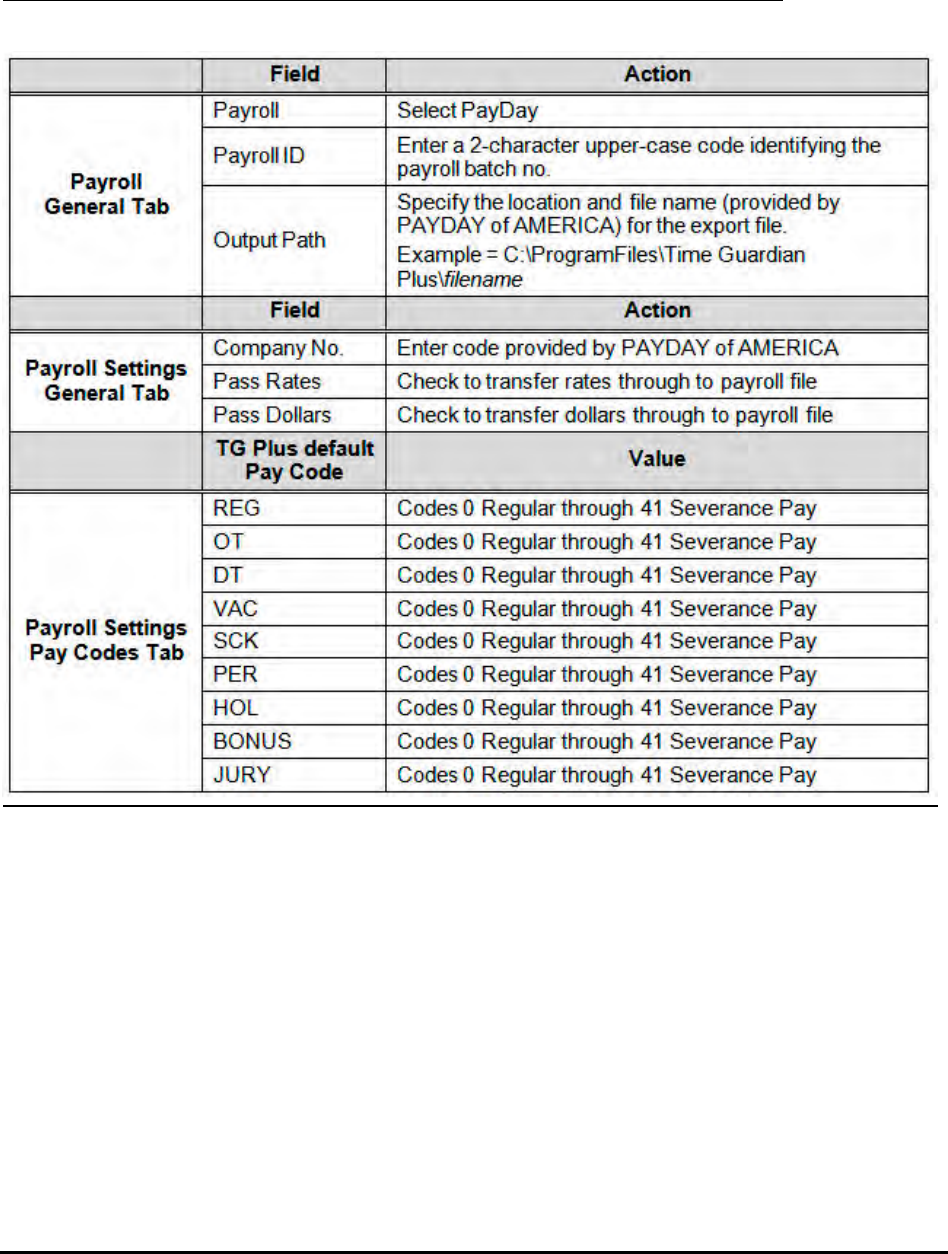
9-28 Time Guardian Series – Output
PayDay
Examples of export file fields for PayDay are shown in the following matrix table:
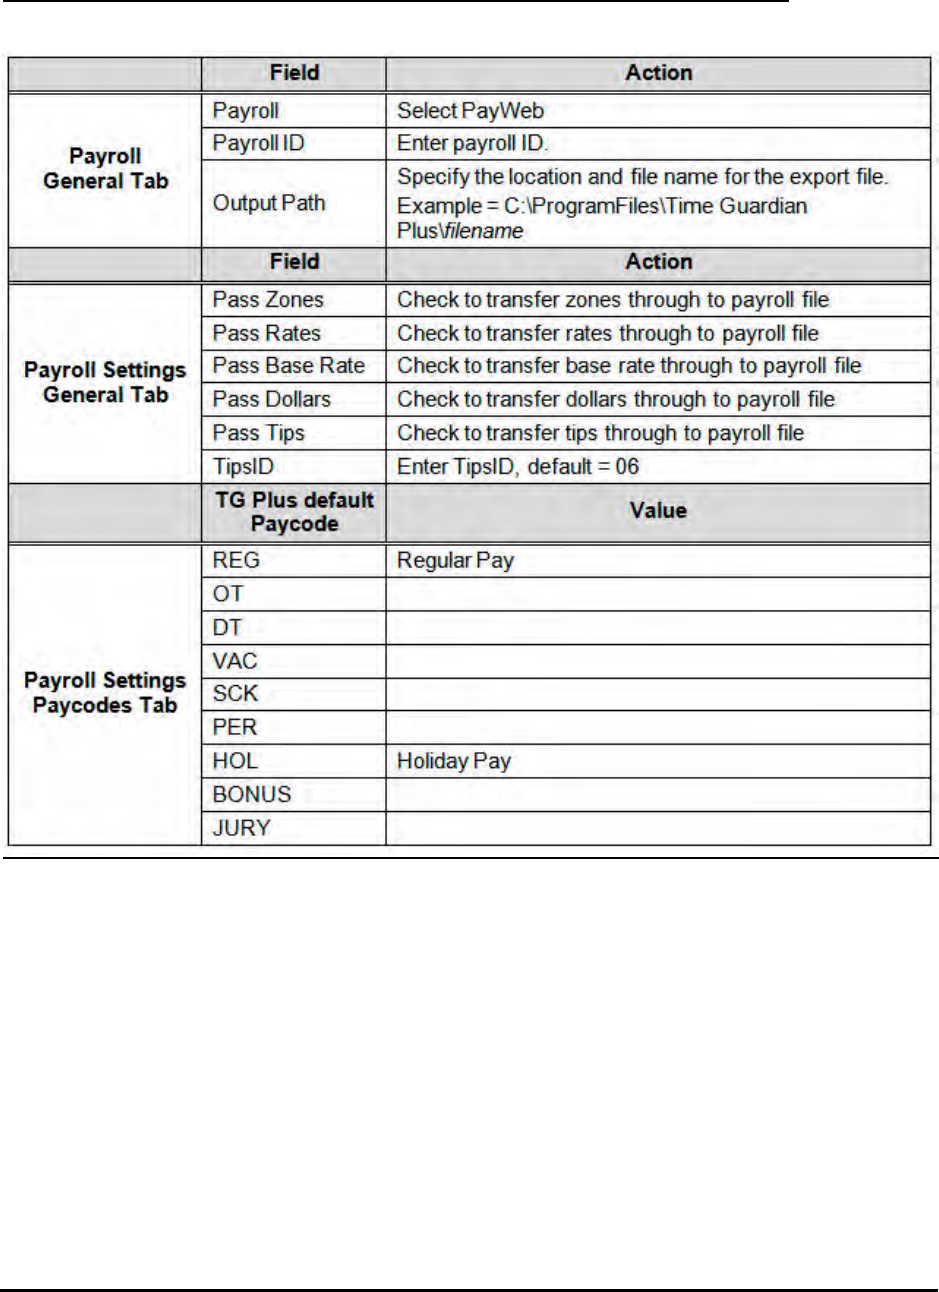
Time Guardian Series – Output 9-29
PayWeb
Examples of export file fields for PayWeb are shown in the following matrix table:
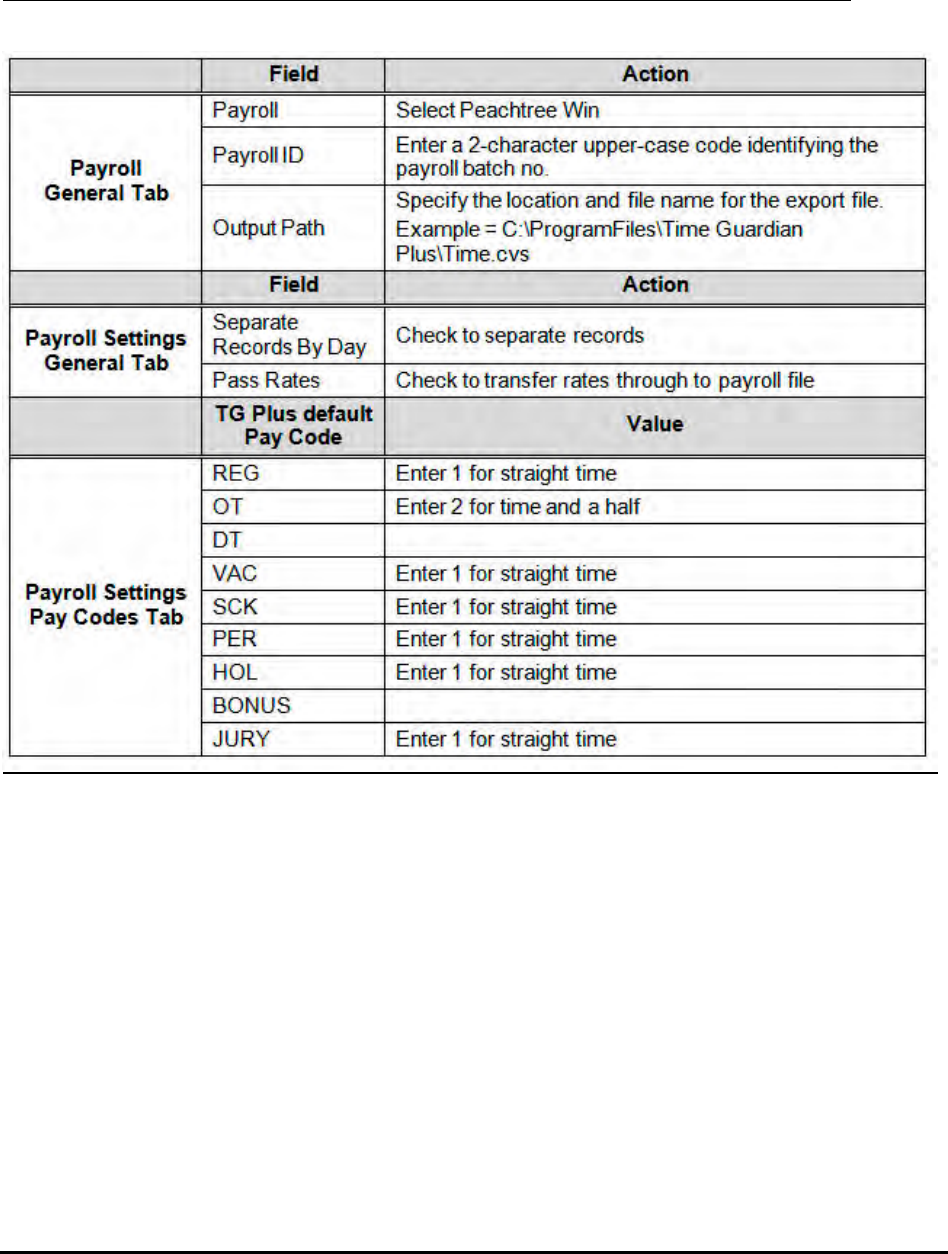
9-30 Time Guardian Series – Output
Peachtree Win
Examples of export file fields for Peachtree Win are shown in the following matrix table:
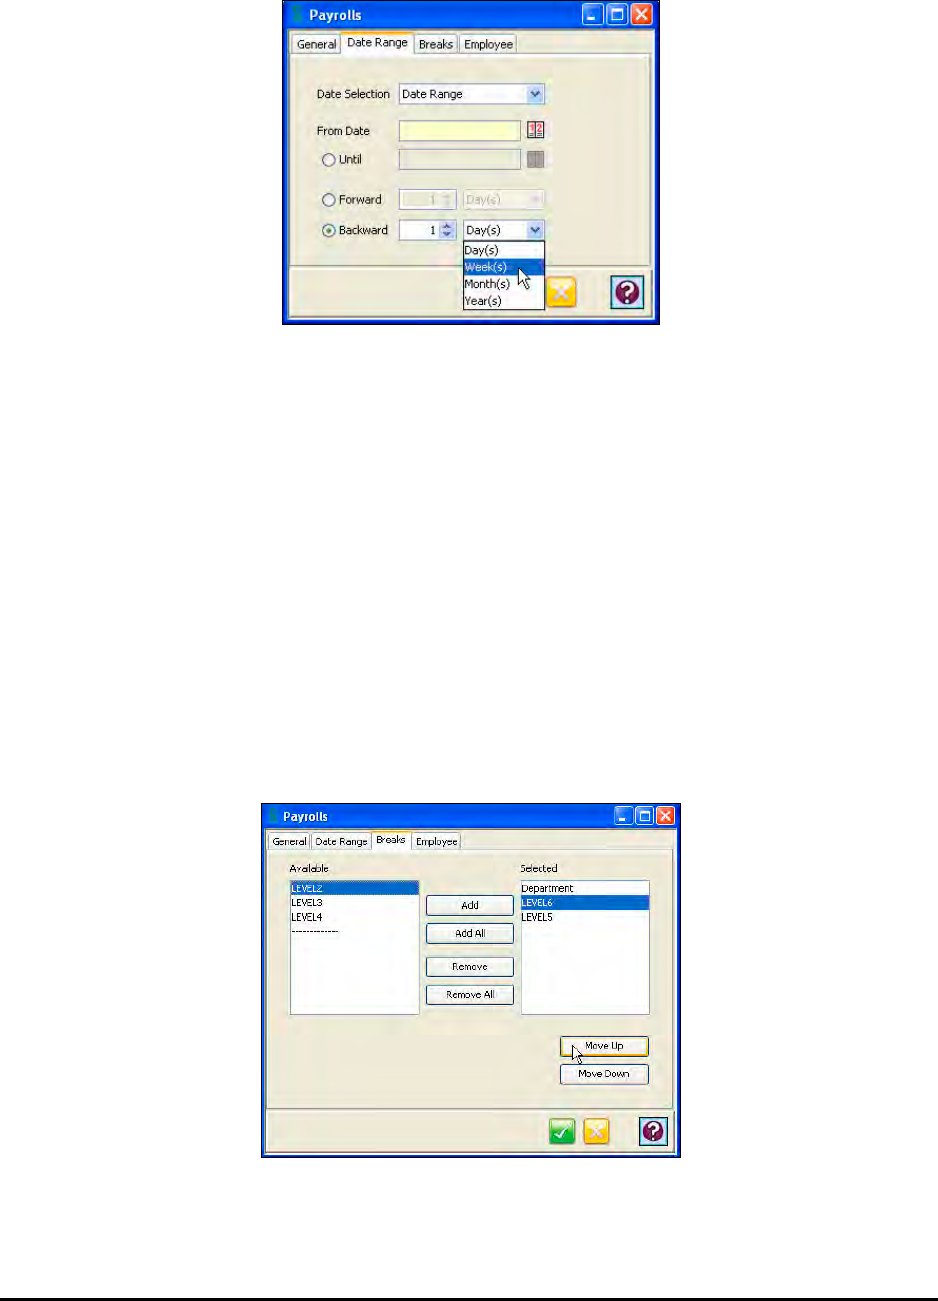
Time Guardian Series – Output 9-31
9. Click on the Date Range tab. The following is an example of the Date Range tab window:
10. In the Date Selection field, select the date range for the report. The choices are; Today,
Yesterday, Last Open Period, Previous Open Period, Current Week, Previous Week,
Current Month, Previous Month, Last 2 Weeks, Date Range, Current Pay period, and
Previous Pay period.
Note: When Current Pay period and Previous Pay period are selected, the first Pay Class in
the Selected List on the Pay Class tab will be used as the date range for the file.
11. If Date Range was chosen as the Date Selection, you must enter the From Date and Until
Date using the Calendar icon. You also have the option of going forward or backward as
many days, weeks, months, or years from the From Date using the Forward and Backward
options.
12. Click on the Breaks tab. The Breaks tab determines which departments in the Amano Time
& Attendance software that will be passed to the Payroll Export file. The number of
departments to be passed on is dependent upon the payroll company you are using. The “- -
- - - - - - - - - -“ selection will leave that particular department field blank in the payroll file.
The following is an example of the Breaks tab window:
• To add a department to the payroll file, highlight the desired Labor Level in the Available
list and click on the Add button.
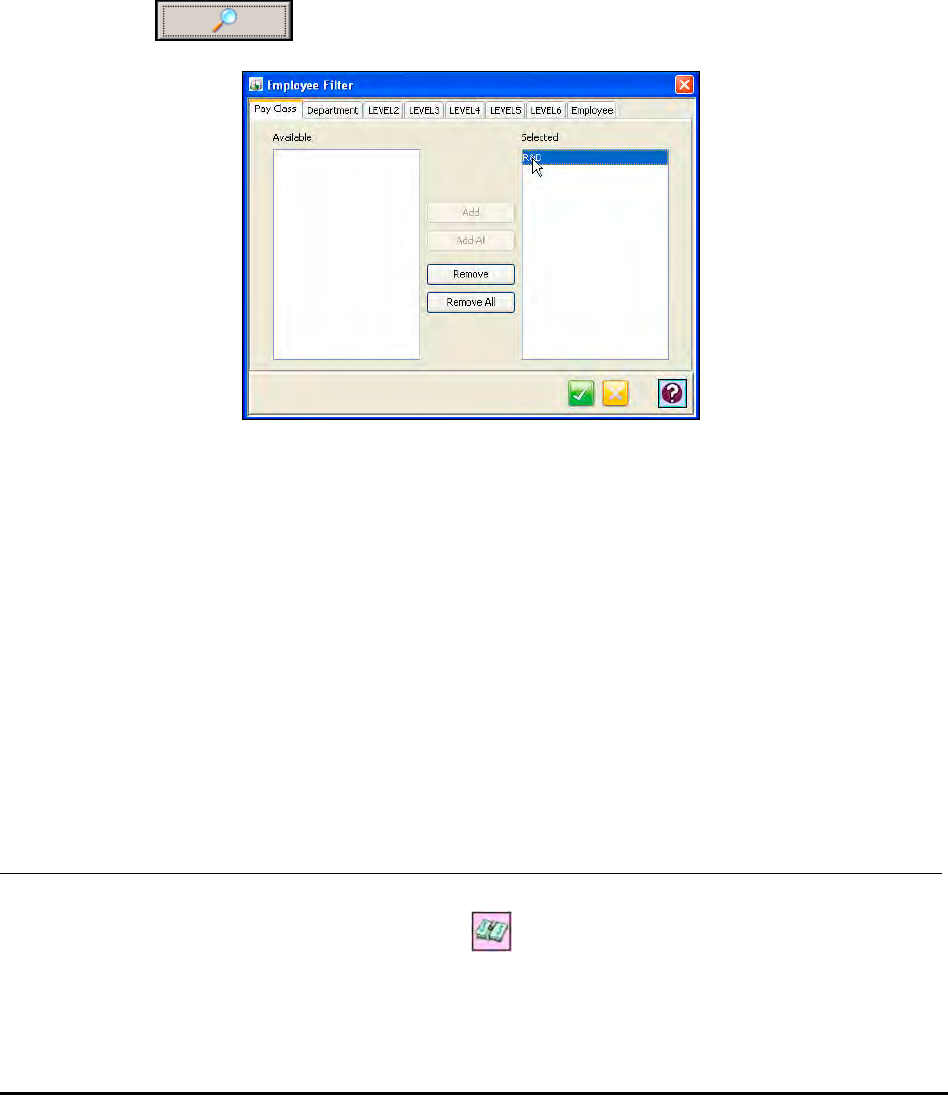
9-32 Time Guardian Series – Output
• To add all departments to the payroll file, click on the Add All button.
• The departments in the payroll file will be separated in the order that they appear in the
Selected list. To change the order of the departments in the Selected list, select the
desired department, and click on the Move Up and Move Down button.
• To remove a department from the payroll file, highlight the desired department in the
Selected list and click on the Remove button. To remove all selected departments, click
on the Remove All button.
13. To filter/add employees for Payroll, click on the Employee tab, select the employee, and
click on the button. The Employee Filter window will appear:
The Employee filter is deeper as it acts upon the previous filter from the Date Range and
Breaks tab to sort out employees by selecting the Pay Class, Department, Labor Levels,
and Employee tabs. Employees that are assigned to the selected Pay Class and/or
Department/Labor Level will appear in the Available list. Also, you can use the Employee tab
to sort the employee list using; Number, Badge, Payroll, Last Name, First Name, and
Comment, and then apply the criteria.
To add an employee to the Payroll, highlight the desired employee in the Available list and
click on the Add button. To select all the listed employees, click on the Add All button.
To remove an employee from the Payroll, highlight the desired employee in the Selected list
and click on the Remove button. To remove all the listed employees, click on the Remove
All button.
Generating the Payroll File
To generate a payroll file from the Payroll Profile, select the desired Payroll Profile from the list
in the Table View, and click on the Run Payroll button and the following message will
appear:
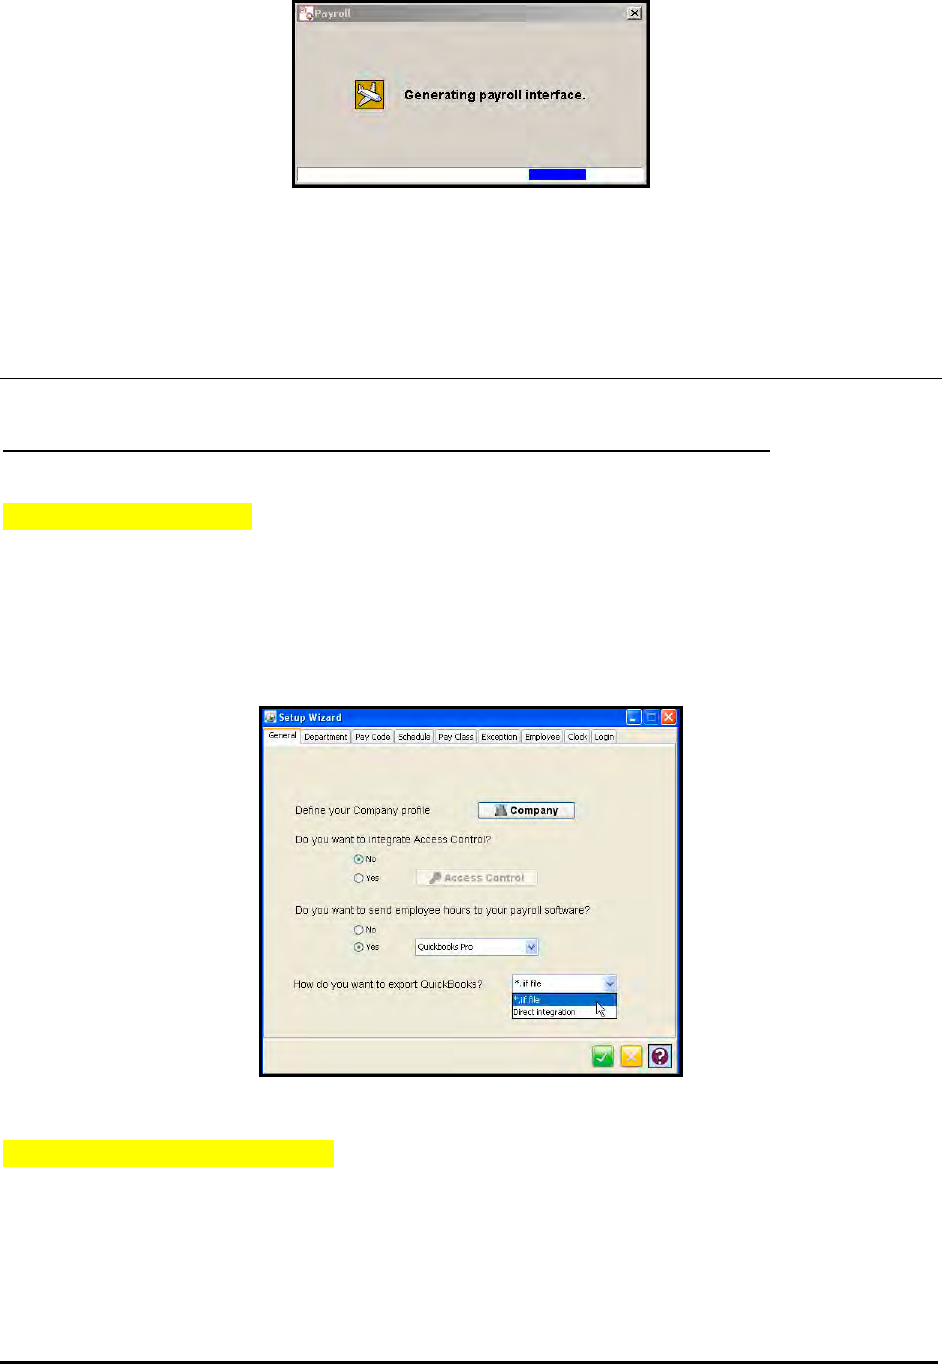
Time Guardian Series – Output 9-33
Note: An error message may appear if the Payroll interface cannot be created. Please check
the Payroll Settings and/or consult Amano support if necessary.
QuickBooks Manual Integration
The setup process to create a QuickBooks export iif file manually is as follows:
Part A - Configuration
Step 1. During installation of the Amano Time & Attendance software the Setup Wizard in
Step 1: General Setup will ask; Do you want to send employee hours to your
payroll software? Select Yes.
Step 2. Select *.iif file from the dropdown menu for How do you want to export
QuickBooks?
Part B – Employee Exchange
Step 1. From the main menu of QuickBooks select File (see figure).
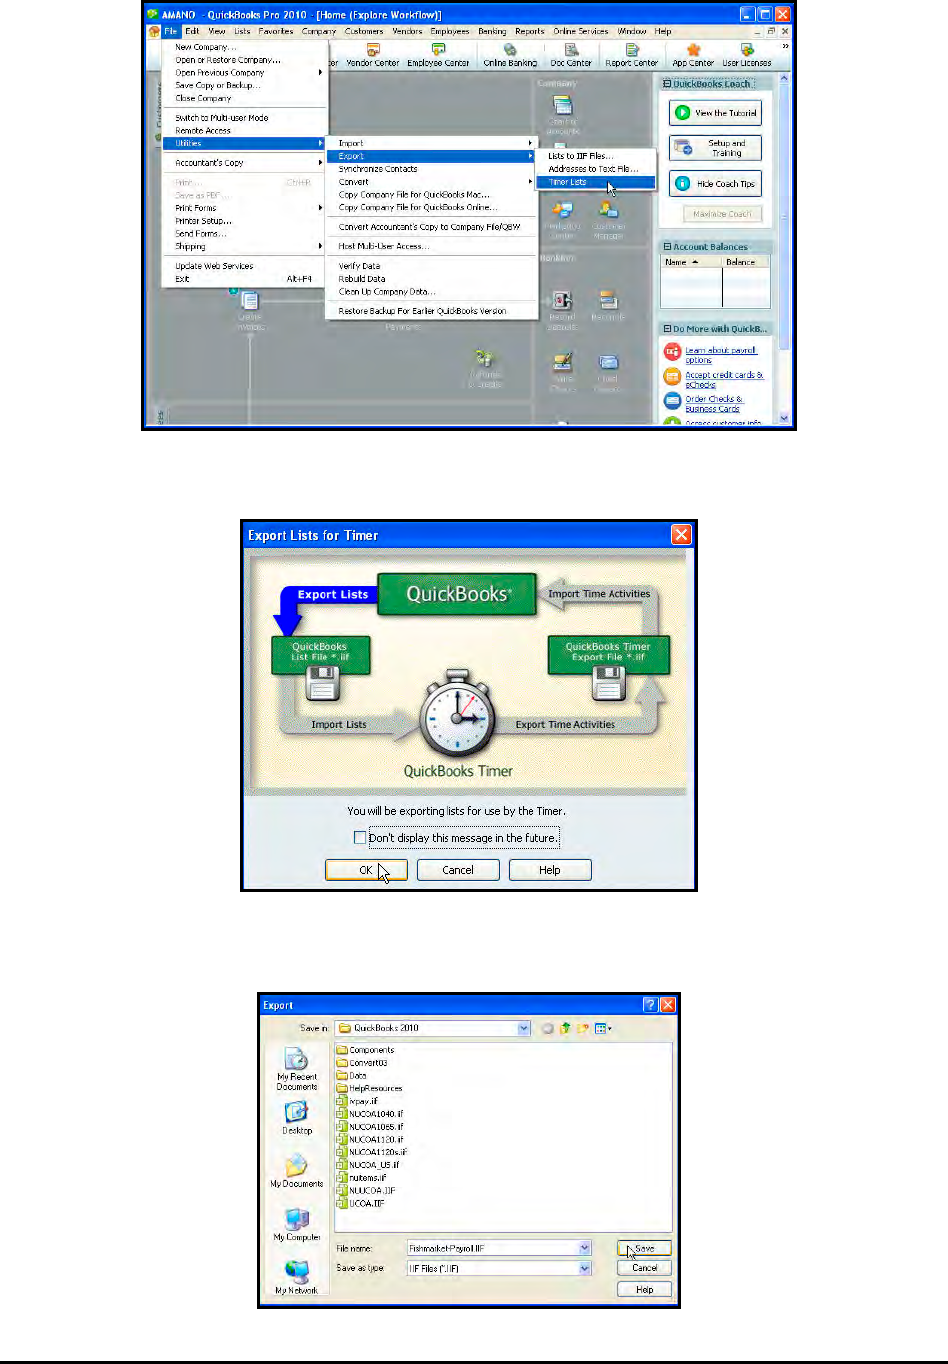
9-34 Time Guardian Series – Output
Step 2. Select Utilities Export Timer Lists and the following screen will appear:
Step 3. Enter the name for the payroll file in the File name field (see figure). It is recommended
to use an .iif file extension.
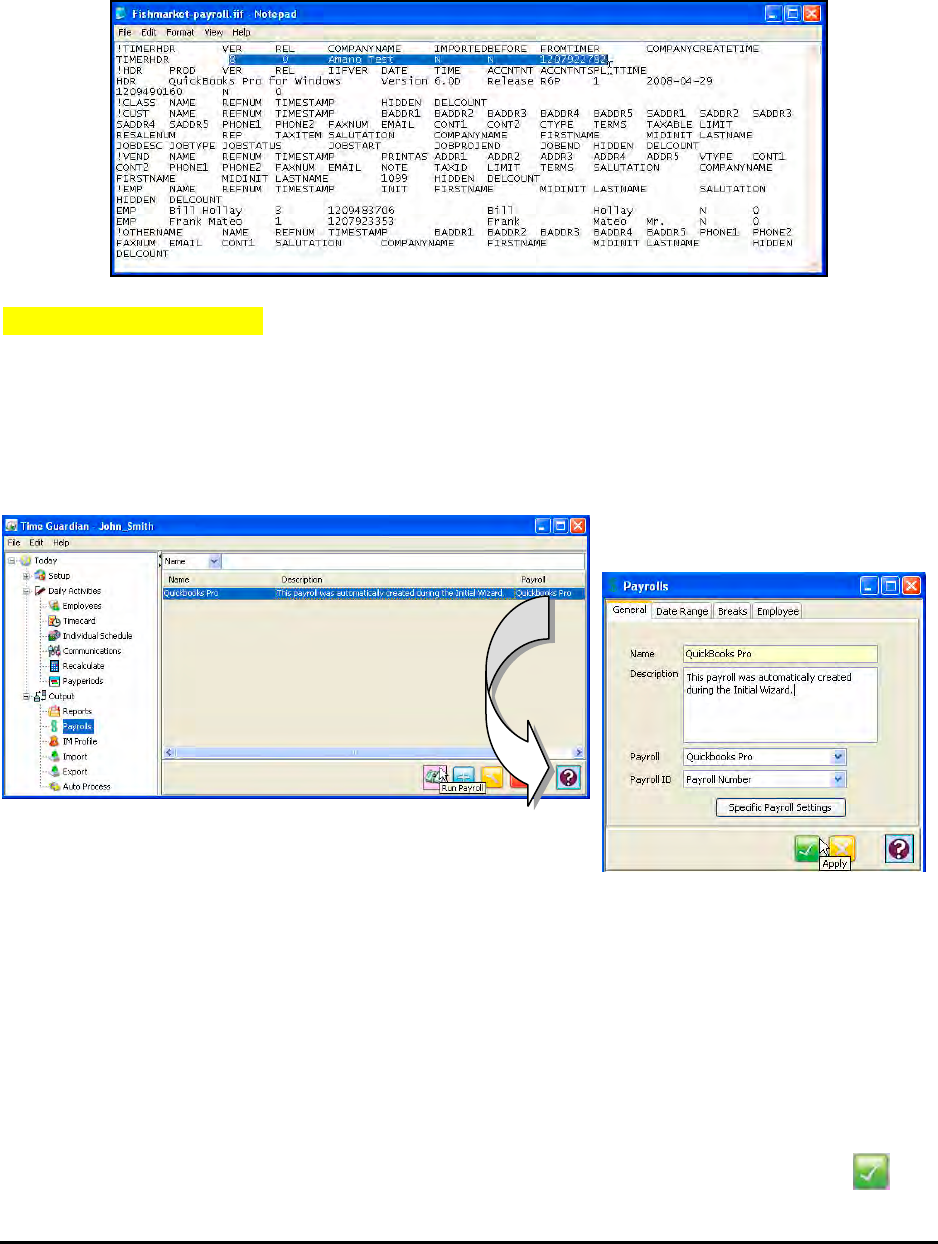
Time Guardian Series – Output 9-35
Step 4. Click Save button and if successful a message will appear; “Your data has been
exported successfully”. After the file has been saved, open the file using Notepad
(see figure). Information from this file will be used to create the export file from the
Amano Time & Attendance software.
Part C – Payroll Export
Step 1. From the tree view in the Time & Attendance software select the Payrolls module and
double-click on the created QuickBooks Pro payroll profile to define the Name,
Description, Payroll, and/or Payroll ID fields or just use the default QuickBooks entries.
If necessary browse to define the Output Path for the iif file.
Step 2. In the Payroll ID field, select: Payroll Number, Employee Number, Social Security
Number, or Badge Number.
Step 3. In the Output Path field, enter in the directory path of the payroll file or click on the
Browse button to set the path. An Open dialog will appear. Select the path and
directory and enter in the filename. The filename of the payroll file is usually set by the
payroll company you are using.
Step 4. Click on the Specific Payroll Settings button to see the Payroll Settings window,
which are payroll company specific. The following are examples for QuickBooks Pro
Payroll Settings General and Pay Codes tab screens. Configure the General and Pay
Codes settings tabs as per the QuickBooks Pro requirements and click on the
button.

9-36 Time Guardian Series – Output
Step 5. Enter the version number of the QuickBooks package you are using. This information
can be obtained from QuickBooks iif file opened with Notepad (see figure).
Step 6. Enter the release number of the QuickBooks package you are using. This information
can be obtained from QuickBooks iif file opened with Notepad in (see figure).
Step 7. Enter the Company Name from QuickBooks. This information can be obtained from
QuickBooks iif file opened with Notepad (see figure).
Step 8. Enter the Create Time number from the QuickBooks package you are using. This
information can be obtained from QuickBooks iif file opened with Notepad (see figure).
The Time & Attendance software will enter a default value in the Export To field.
Choose the location and file name for the export file. This information is entered in the
select path field.
Step 9. Once all the fields for the General Payroll Settings have been entered, click on the Pay
Codes tab (see figure) and select the Pay Codes that you want transferred from the
Time & Attendance software to QuickBooks. Assigning a payroll ID to the desired pay
codes will do this. A complete list of payroll Ids can be found in QuickBooks payroll
items. The “Item Name” in QuickBooks = Pay Code in the Time & Attendance
software.
Example of Amano Time & Attendance Pay Codes vs. QuickBooks Payroll Field IDs:
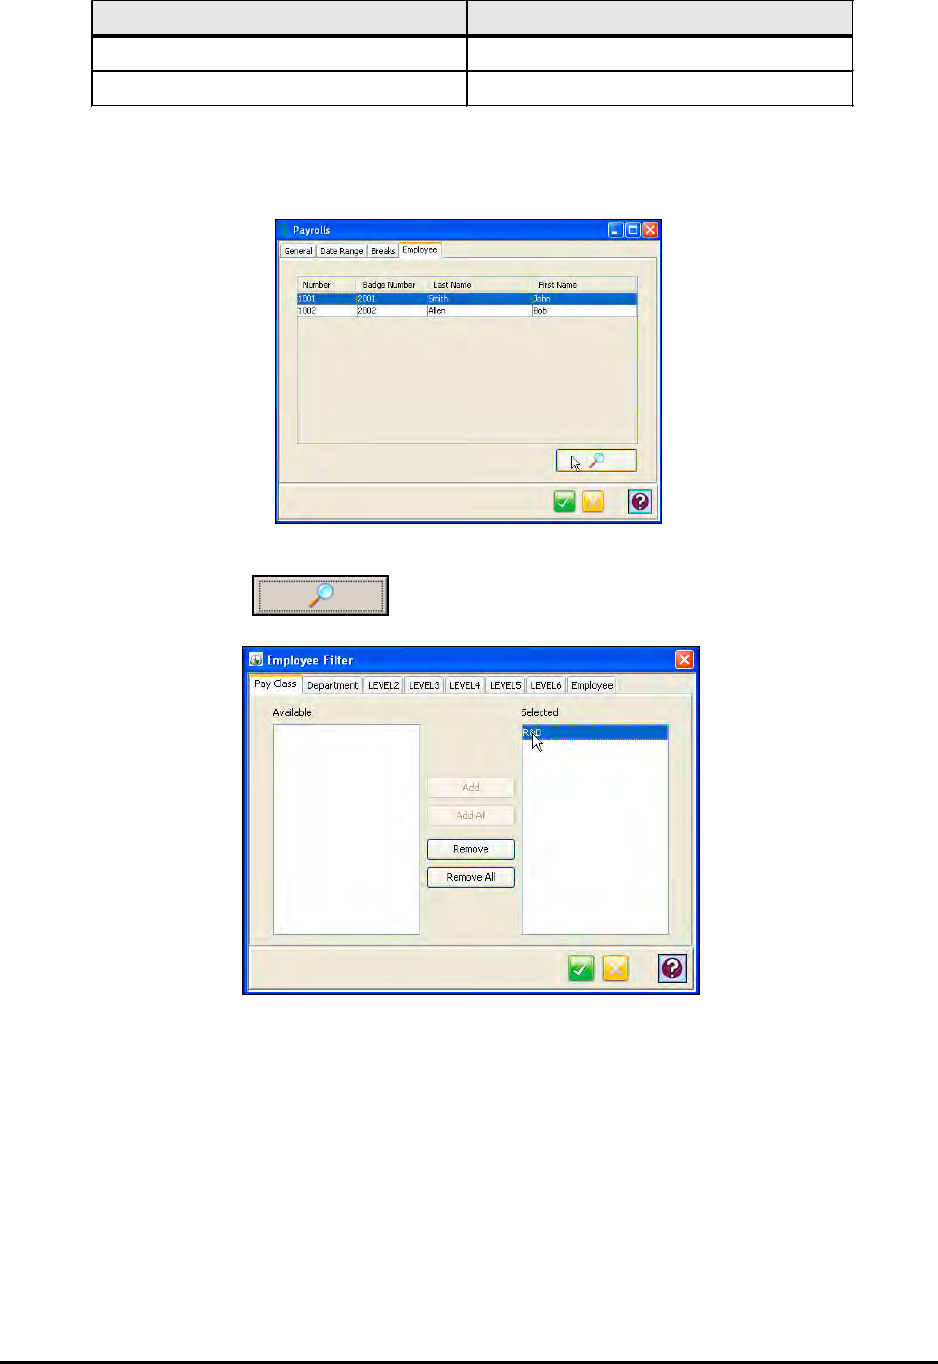
Time Guardian Series – Output 9-37
Time Guardian Pay Codes
QuickBooks Payroll Field ID
REG
Regular Pay
HOL
Holiday Pay
Step 10. From the Time & Attendance software Payrolls screen, click on the Employee tab (see
figure), and select the employee.
Step 11. To filter/add employees for Payroll, click on the Employee tab, select the employee,
and click on the button. The Employee Filter window will appear:
The Employee filter is deeper as it acts upon the previous filter from the Date Range and
Breaks tab to sort out employees by selecting the Pay Class, Department, Labor Levels,
and Employee tabs. Employees that are assigned to the selected Pay Class and/or
Department/Labor Level will appear in the Available list. Also, you can use the Employee tab
to sort the employee list using; Number, Badge, Payroll, Last Name, First Name, and
Comment, and then apply the criteria.
To add an employee to the Payroll, highlight the desired employee in the Available list and
click on the Add button. To select all the listed employees, click on the Add All button.
To remove an employee from the Payroll, highlight the desired employee in the Selected list
and click on the Remove button. To remove all the listed employees, click on the Remove
All button.
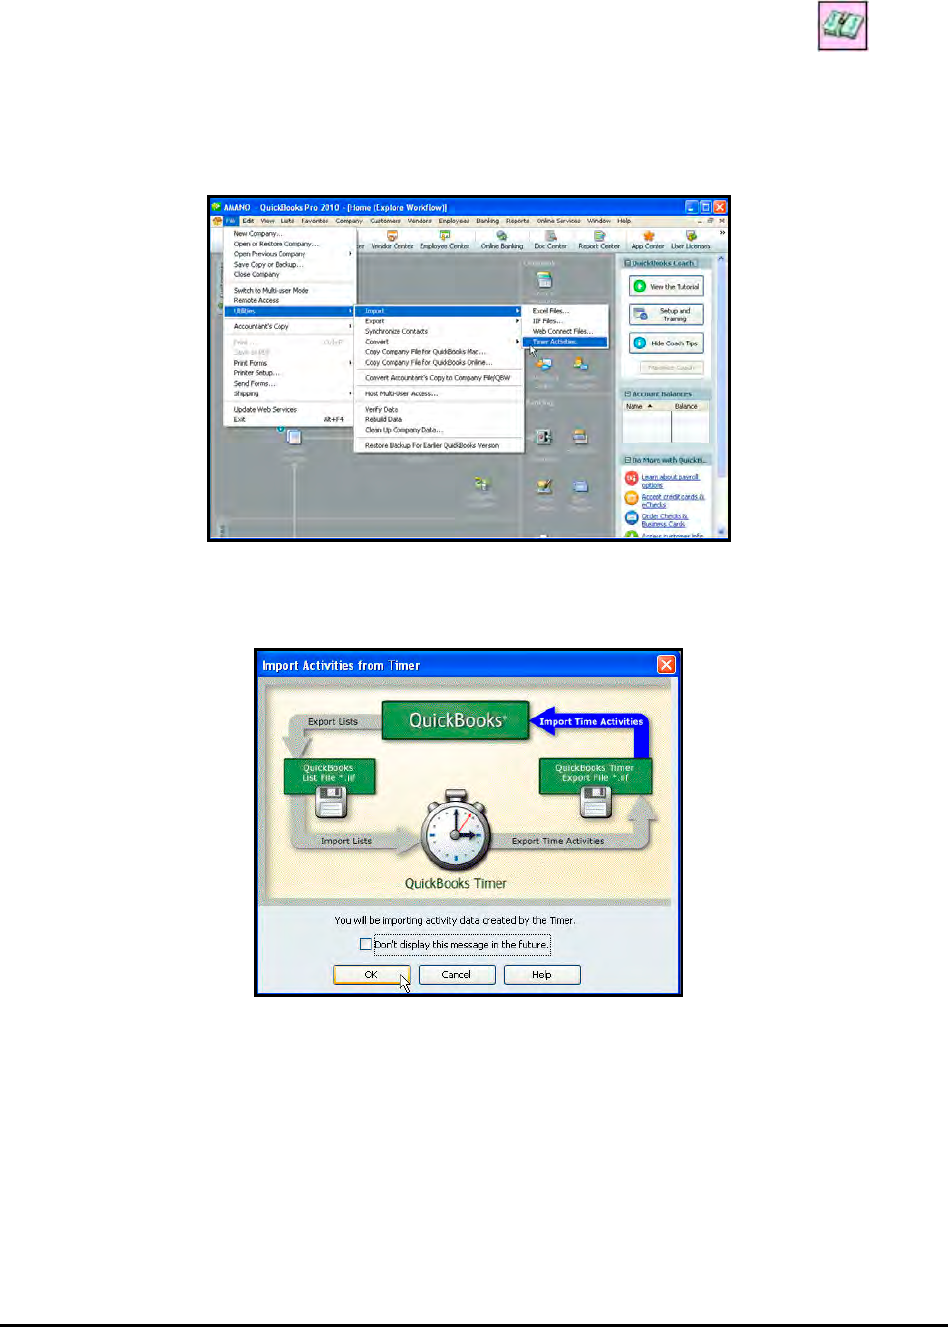
9-38 Time Guardian Series – Output
Step 11. Save the Payroll Settings you just created and then select the Run Payroll icon
to generate the payroll export file from the Time & Attendance software.
Step 12. Once the export file has been created from the Amano Time & Attendance software it
can now be imported by QuickBooks. From QuickBooks select File from the main
menu (see figure).
Step 13. From QuickBooks Pro, select Utilities =>Import => Timer Activities and the following
QuickBooks screen will appear:
Step 14. Select OK to continue and select the file to be imported (see figure). This is the file
name that was defined in Time Guardian. Highlight the file as illustrated in the example
figure and select open.
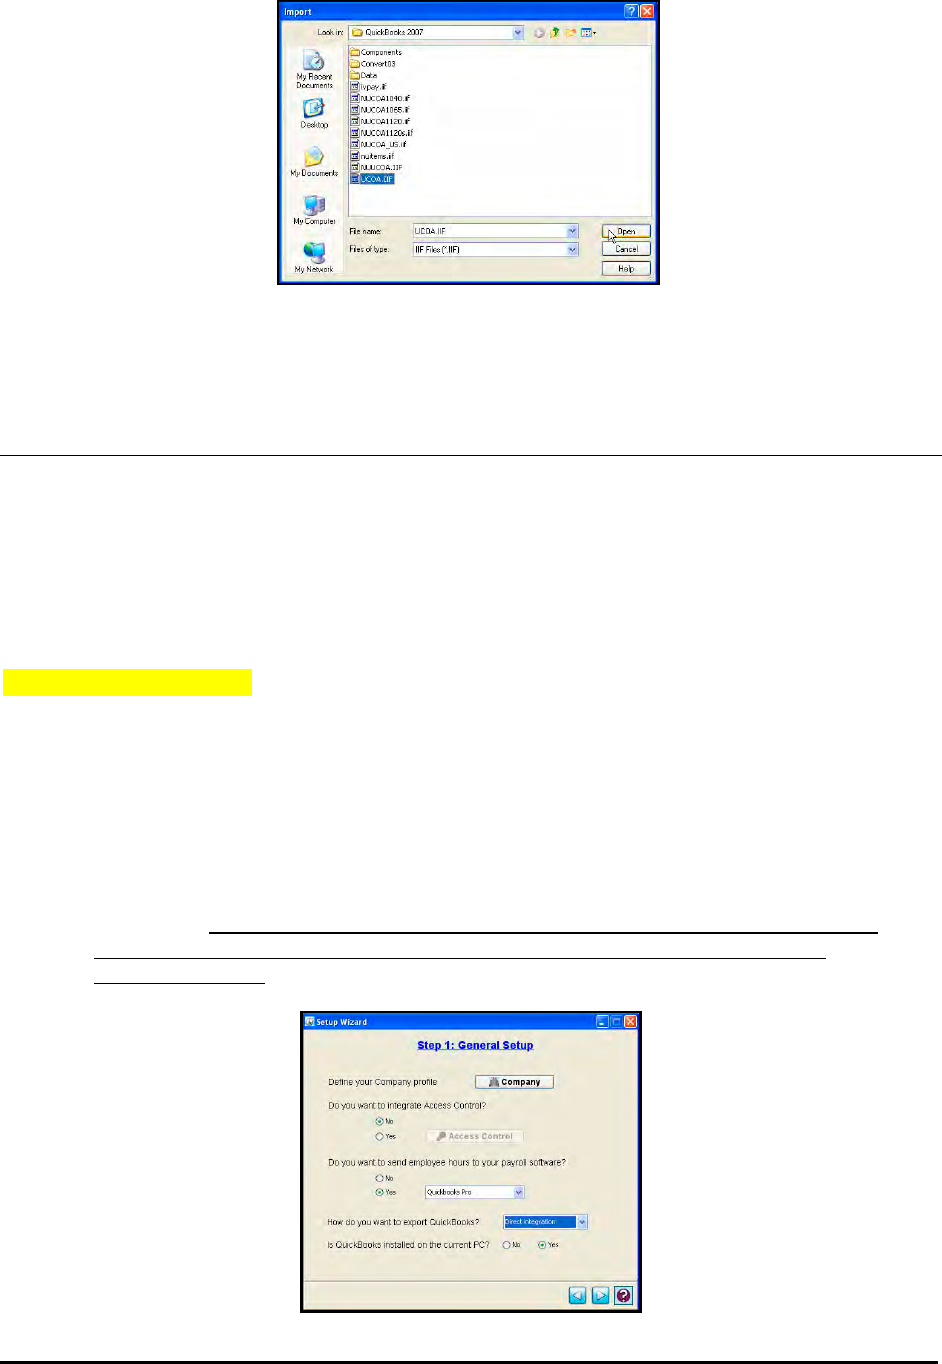
Time Guardian Series – Output 9-39
Step 15. From QuickBooks view the imported employee information, create paychecks if
desired, and/or submit for payroll.
QuickBooks Auto Integration
Note: For auto synchronization to work: QuickBooks 2011 or no older than 2 years (2009)
must be installed. Also, QuickBooks Pro must be started up first and running before
starting up the Amano Time & Attendance software.
The following procedure describes how to setup the Amano Time & Attendance software for
QuickBooks Pro auto integration/synchronization.
Part A - Configuration
Step 1. During installation of the Amano Time & Attendance software the Setup Wizard in
Step 1: General Setup will ask; Do you want to send employee hours to your
payroll software? Select Yes.
Step 2. Select Direct integration from the dropdown menu for How do you want to export
QuickBooks?
Step 3. Select Yes for Is QuickBooks installed on the current PC? It is recommended to
have QuickBooks installed on the current PC and open for successful direct
integration. Note – You can select No and integrate with QuickBooks on a server
[remotely] but the QuickBooks still has to be open for successful integration
[synchronization].
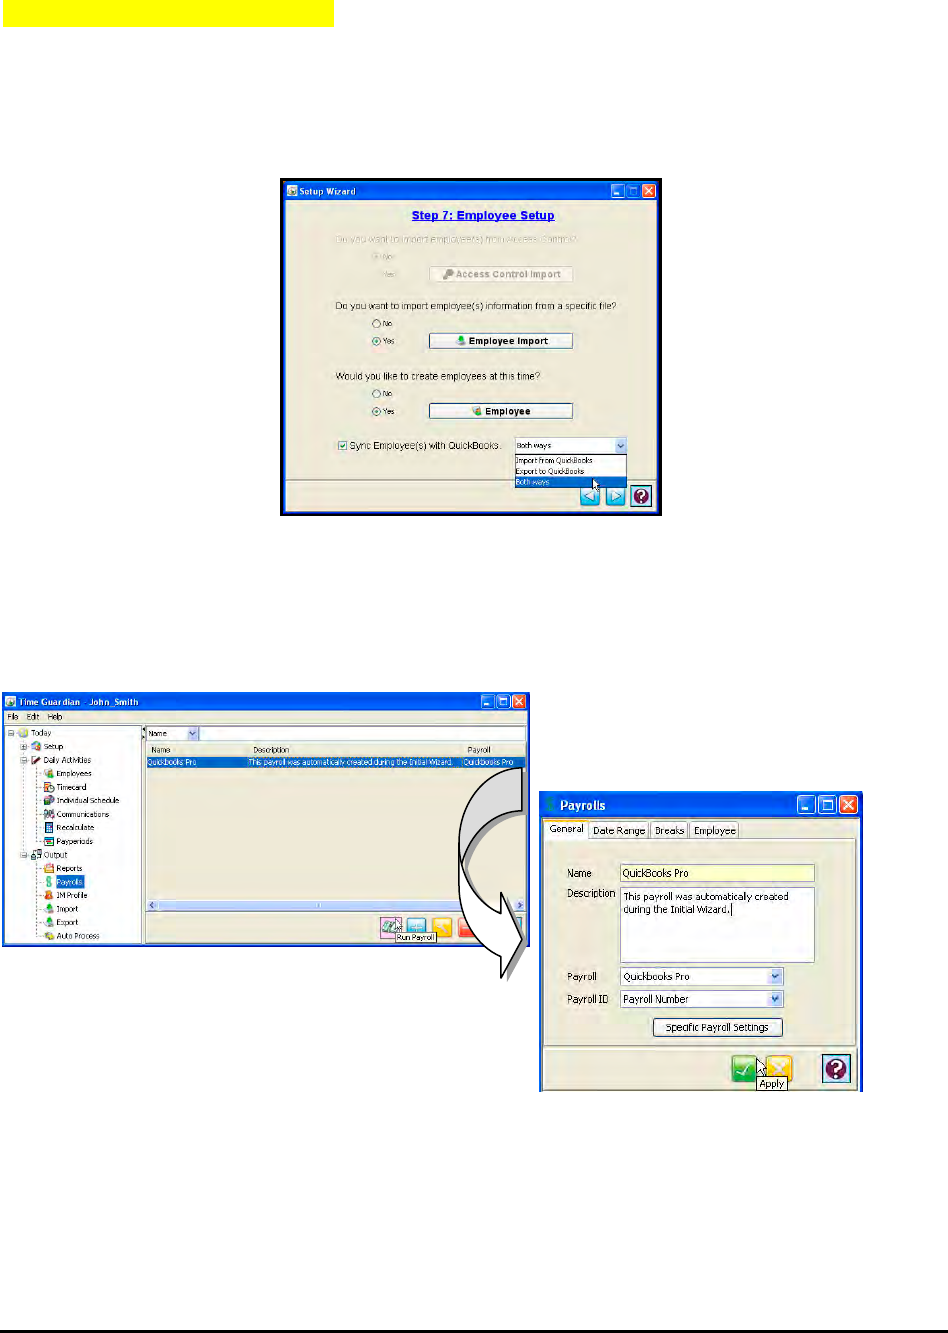
9-40 Time Guardian Series – Output
Part B – Employee Exchange
Step 1. From Setup Wizard in Step7: Employee Setup, check the box to Sync Employee(s)
with QuickBooks and select the method of synchronization from the dropdown
choices of; Import from QuickBooks, Export to QuickBooks, or Both ways [bi-
directional].
Step 2. The selection of Direct Integration for QuickBooks will auto create the QuickBooks Pro
payroll template. From the tree view select the Payrolls module and double-click on the
created QuickBooks Pro payroll template to define the Name, Description, Payroll,
and/or Payroll ID fields or just use the default entries.
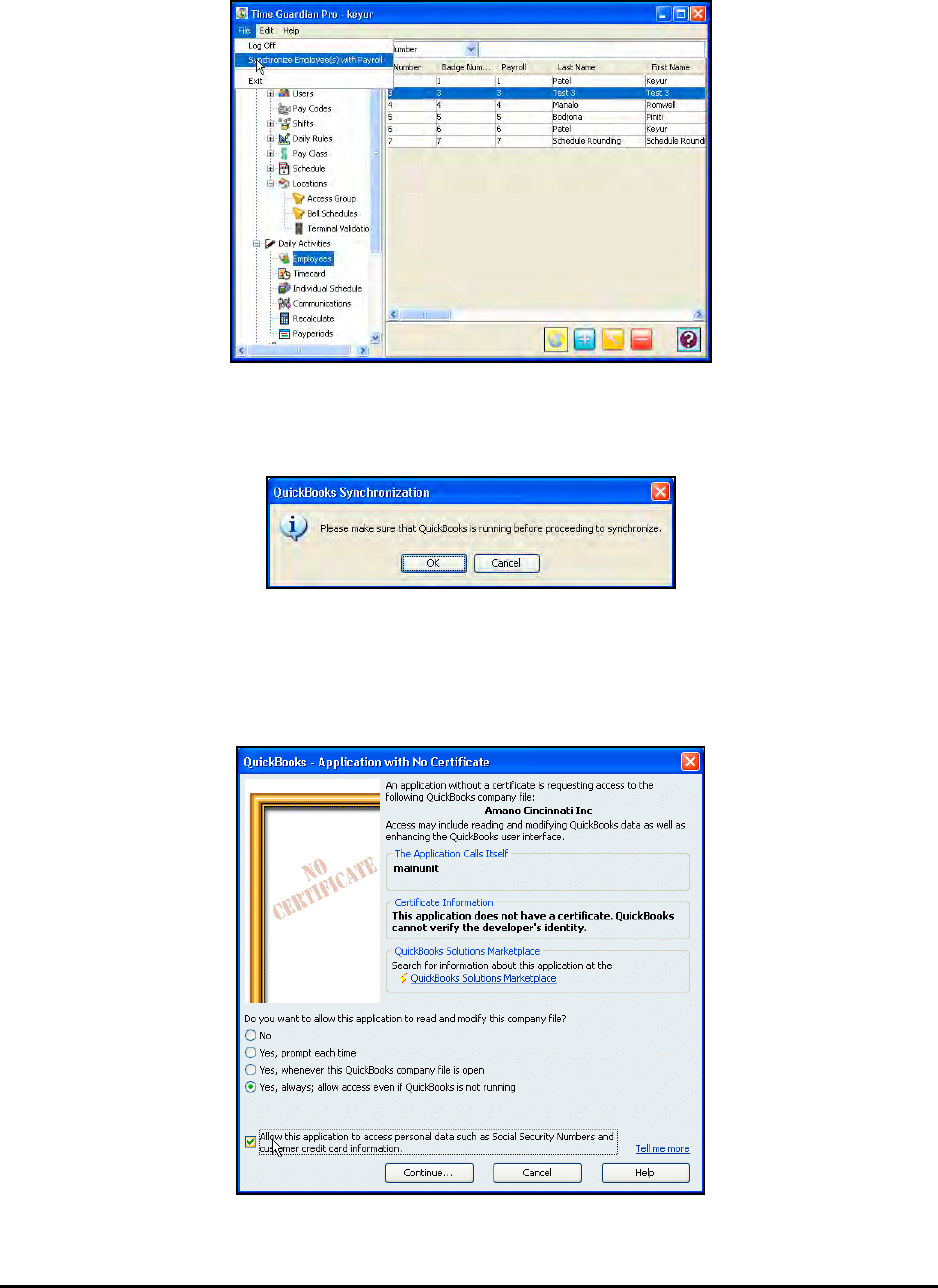
Time Guardian Series – Output 9-41
Step 3. From the File menu in the Time & Attendance software, select “Synchronize
Employee(s) with Payroll”.
Step 4. The “Please make sure that QuickBooks is running before proceeding to
synchronize” message will appear click OK to proceed.
Step 5. When the NO CERTIFICATE message appears; select “Yes, always allow access
even if QuickBooks is not running” and “Allow this application to access
personal data such as Social Security Numbers and customer credit card
information” click Continue.
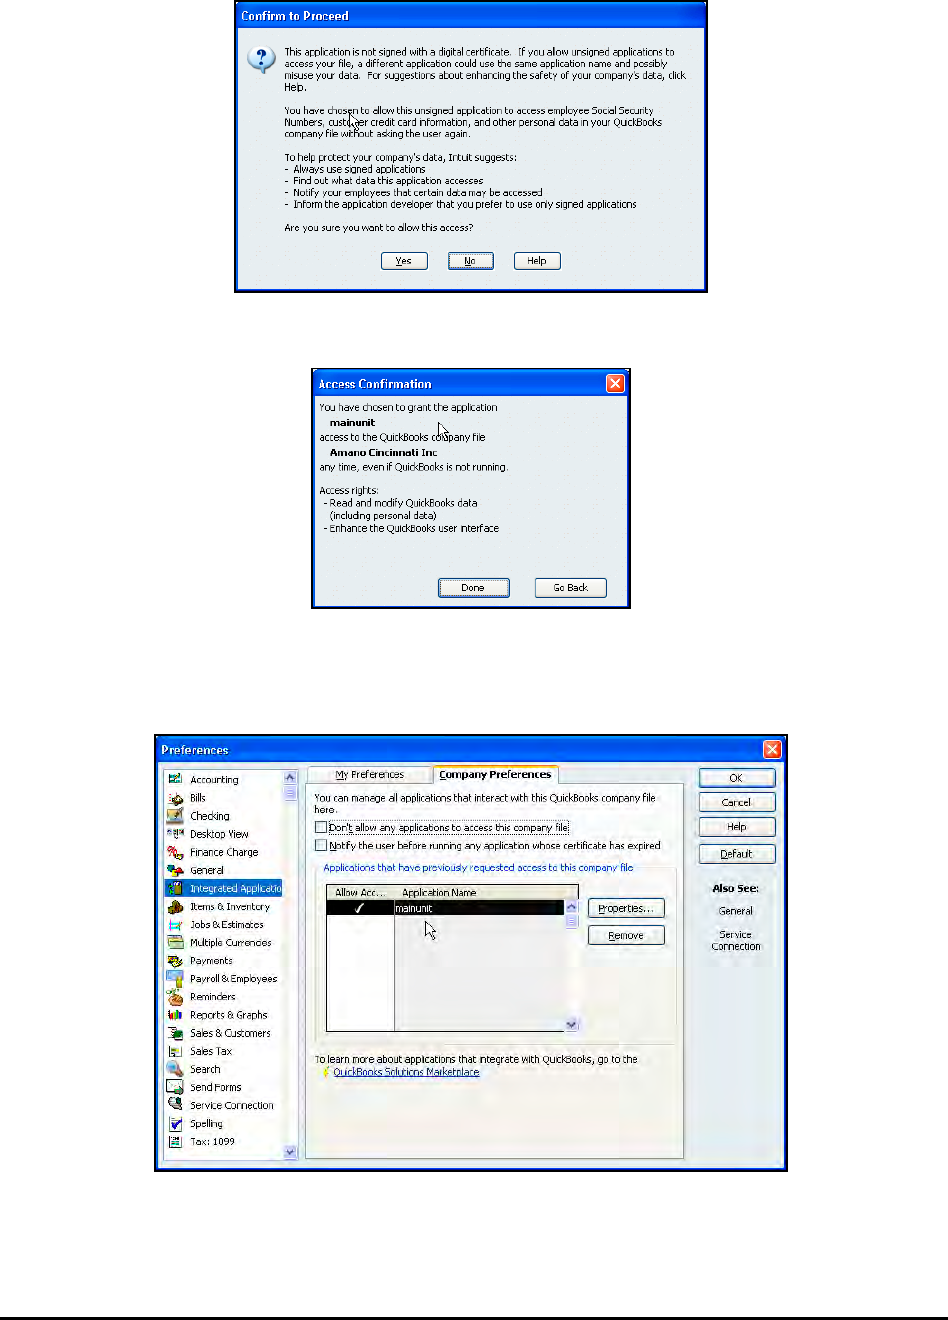
9-42 Time Guardian Series – Output
Step 6. When the Confirm to Proceed message appears; click Yes.
Step 7. When the Access Confirmation message appears; click Done.
Step 8. In QuickBooks, click Edit and select the Preferences Option. When the Preferences
screen appears, click on the Company Preferences tab to verify access to
QuickBooks; click OK.
Step 9. The “Synchronizing Payrolls” message will appear followed by the message
“Successfully synchronized employees with QuickBooks” click OK to finish.
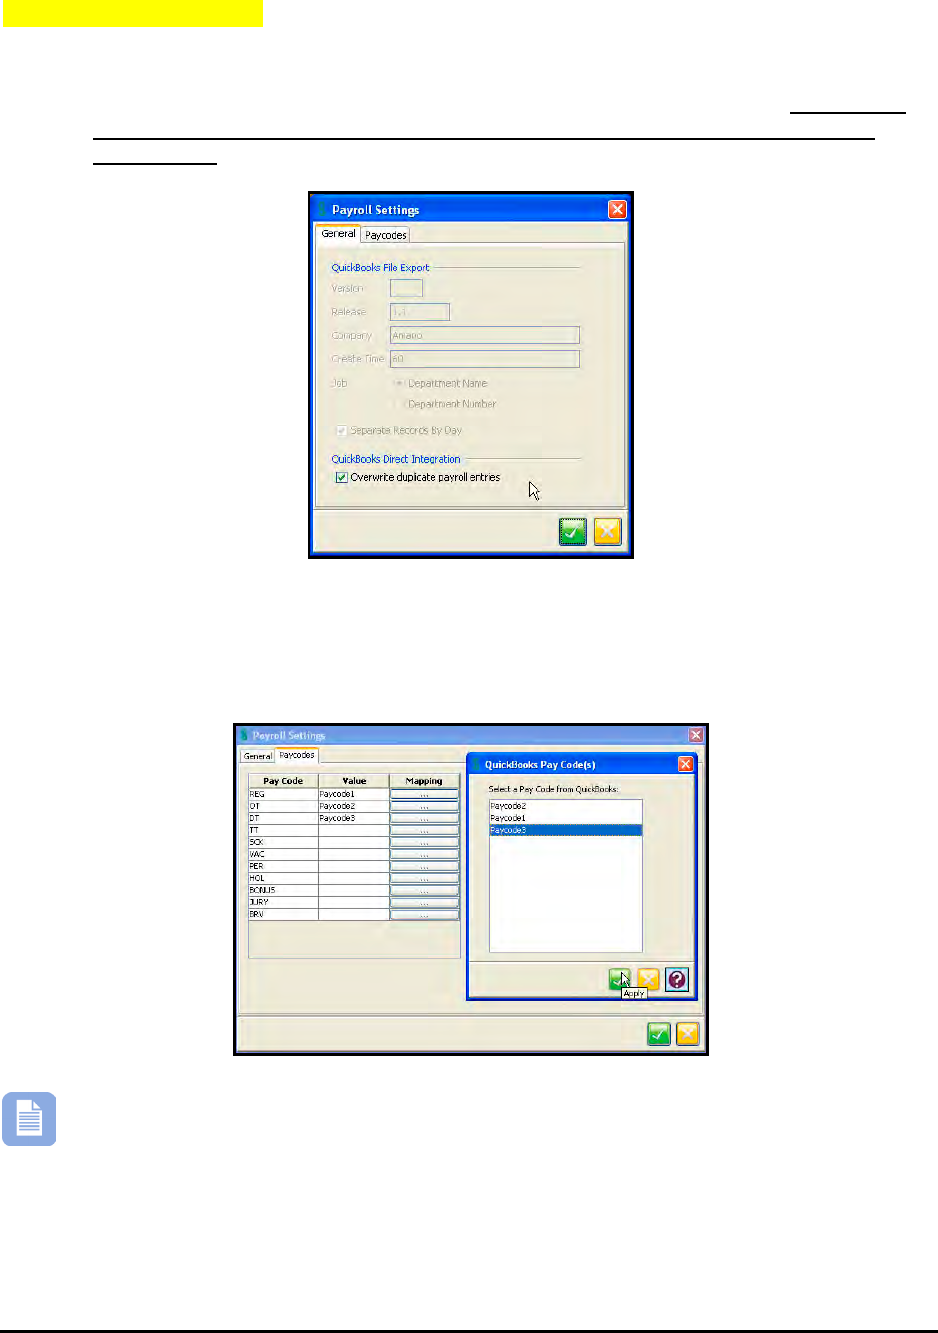
Time Guardian Series – Output 9-43
Part C – Payroll Export
Step 1. Click on the Specific Payroll Settings button to perform Pay Code mapping.
QuickBooks should be configured for your company. From the General tab select if
you want to Overwrite duplicate payroll entries for Direct Integration. If this box is
not checked, the hours sent will be duplicated each time hours are transferred to
QuickBooks.
Step 2. Click on the Pay codes tab to perform Pay codes mapping with QuickBooks from the
QuickBooks Pay Code(s) screen. Select the “Mapping” browse button alongside the
Time & Attendance Pay Code listed on the left side to map the QuickBooks Pay Code.
The QuickBooks Pay Code will appear in the “Value” column.
Note – Failure to perform and/or correctly map Pay Codes could result in non-
synchronization. The “Item Name” in QuickBooks = Pay Code in the Time &
Attendance software.
Step 3. From the Time & Attendance software Payrolls screen, click on the Employee tab, and
select the employee (see figure).
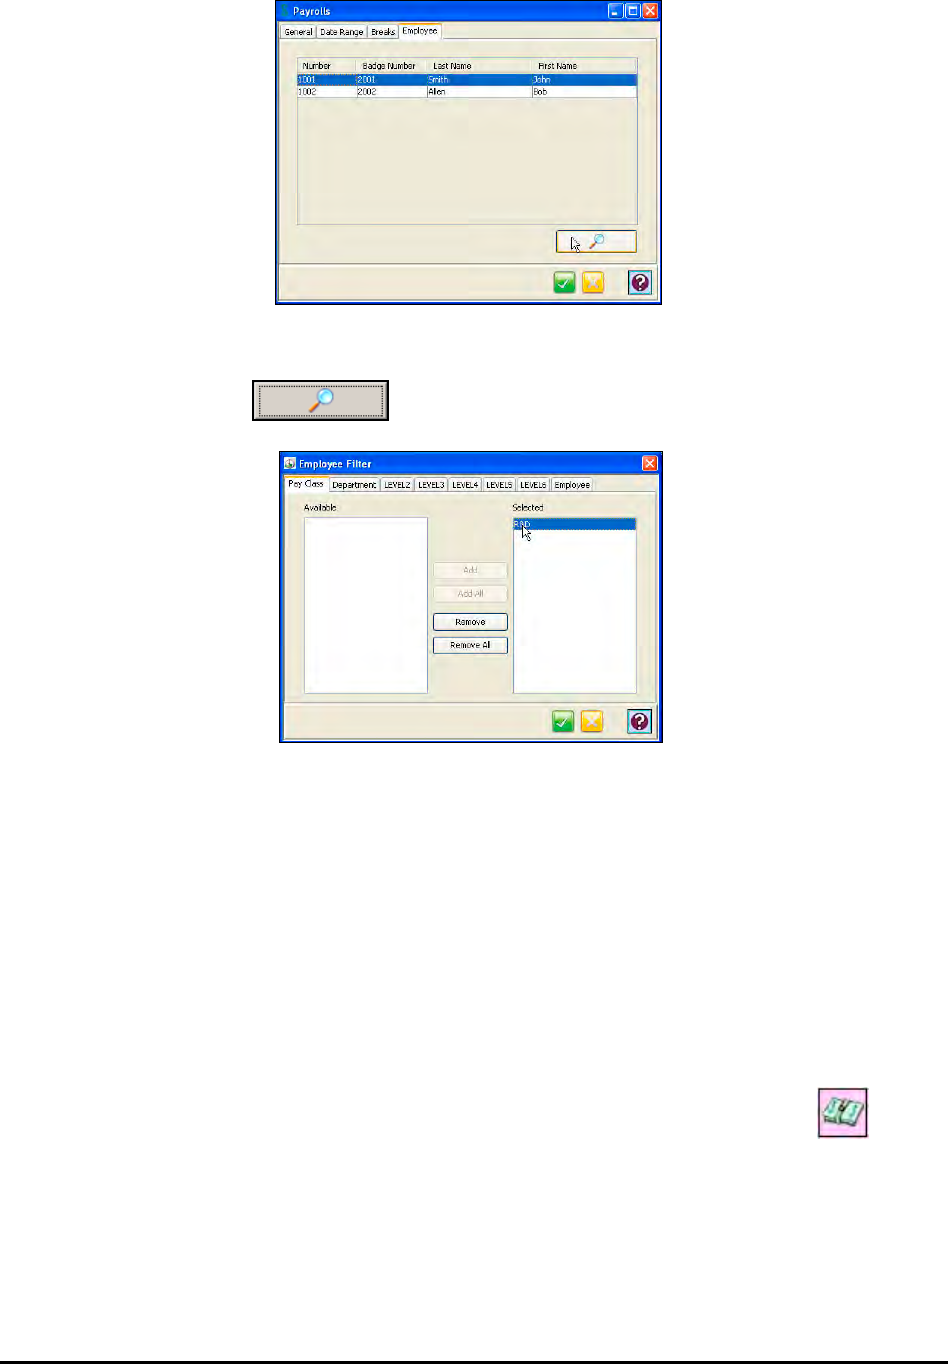
9-44 Time Guardian Series – Output
Step 4. To filter/add employees for Payroll, click on the Employee tab, select the employee,
and click on the button. The Employee Filter window will appear:
The Employee filter is deeper as it acts upon the previous filter from the Date Range and
Breaks tab to sort out employees by selecting the Pay Class, Department, Labor Levels,
and Employee tabs. Employees that are assigned to the selected Pay Class and/or
Department/Labor Level will appear in the Available list. Also, you can use the Employee tab
to sort the employee list using; Number, Badge, Payroll, Last Name, First Name, and
Comment, and then apply the criteria.
To add an employee to the Payroll, highlight the desired employee in the Available list and
click on the Add button. To select all the listed employees, click on the Add All button.
To remove an employee from the Payroll, highlight the desired employee in the Selected list
and click on the Remove button. To remove all the selected employees, click on the
Remove All button.
Step 5. Save the Payroll Settings you just created and then select the Run Payroll icon
to generate the payroll export file from the Time & Attendance software.
Step 6. From the File menu in the Time & Attendance software, select “Synchronize
Employee(s) with Payroll”. The “Please make sure that QuickBooks is running
before proceeding to synchronize” message will appear click OK to proceed. The
“Synchronizing Payrolls” message will appear followed by the message
“Successfully synchronized employees with QuickBooks” click OK to finish.
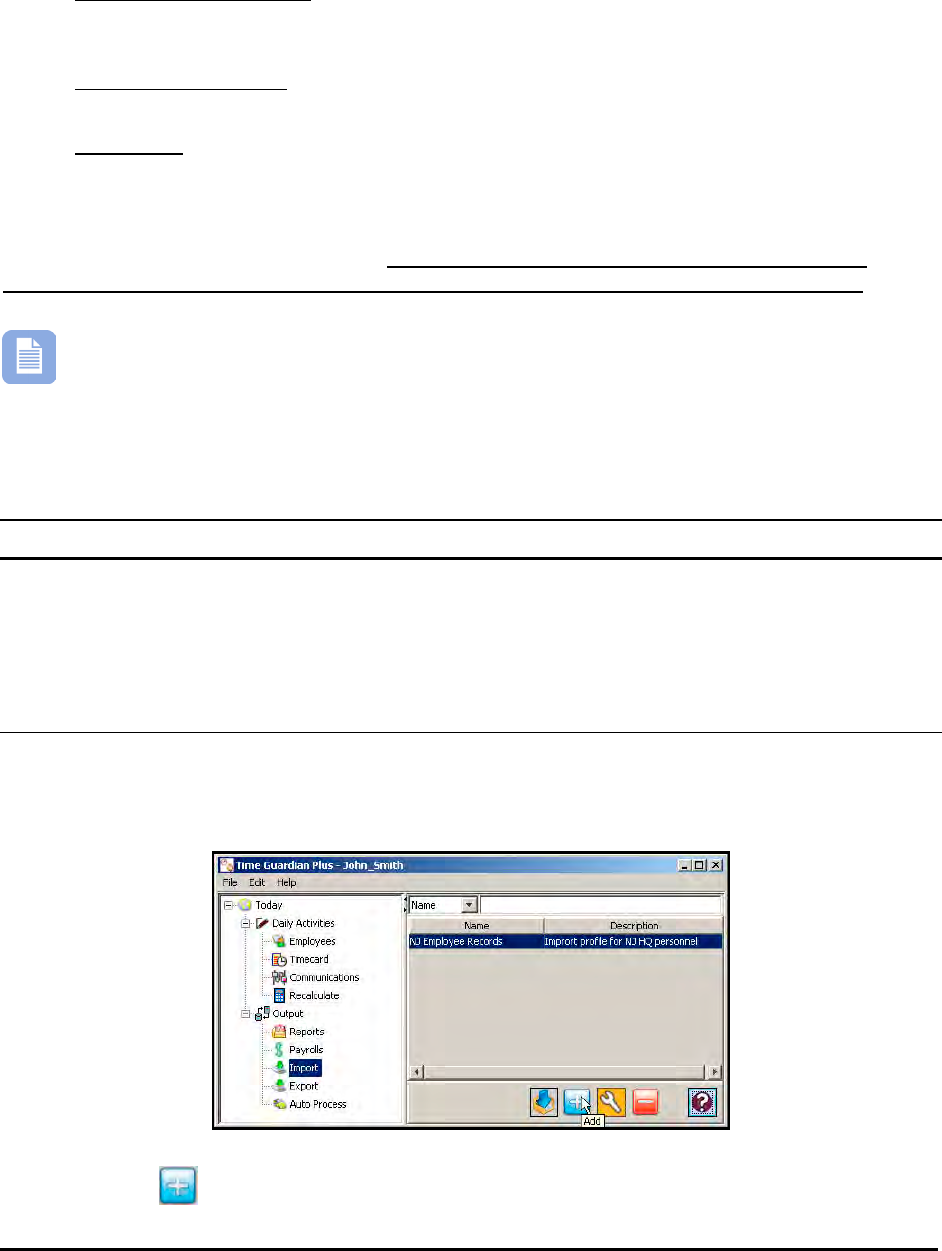
Time Guardian Series – Output 9-45
The synchronization will be performed depending on what was selected for the method of
synchronization in the Wizard Employee Setup for how to Sync Employee(s) with
QuickBooks with the choices of;
• Import from QuickBooks – QuickBooks acts as the master. Suggested for scenario
where you already have the QuickBooks as the payroll software and the Time &
Attendance software is being added.
• Export to QuickBooks - Suggested for scenario where you already have the Time &
Attendance software and QuickBooks is being added as the payroll software.
• Both ways – Employee information will bi-directional transfer, but QuickBooks remains
as the master. If employee is changed in the Time & Attendance software, the employee
change must be updated in QuickBooks to maintain good synchronization.
The Time & Attendance software can accept the QuickBooks payperiod settings of; Weekly, Bi-
Weekly, Semi-Monthly, and Monthly. Any different payperiod setting in QuickBooks will
automatically be defined as Weekly when transferred to the Time & Attendance software.
Note – QuickBooks Payroll integration can also be setup by selecting the Setup Wizard
from the File Menu in the Time & Attendance software. Click on General & Employee
tabs to configure. Select Payrolls module from the tree view and create the QuickBooks
payroll profile.
Import Module
The Import module provides a way to import employee and schedule data from delimiter files
into Time Guardian.
Creating an Import Profile
1. Click on the Import module within the Output group in the Tree View (see the following
figure).
2. Click on the button to create a new import profile and the following Import window will
appear:
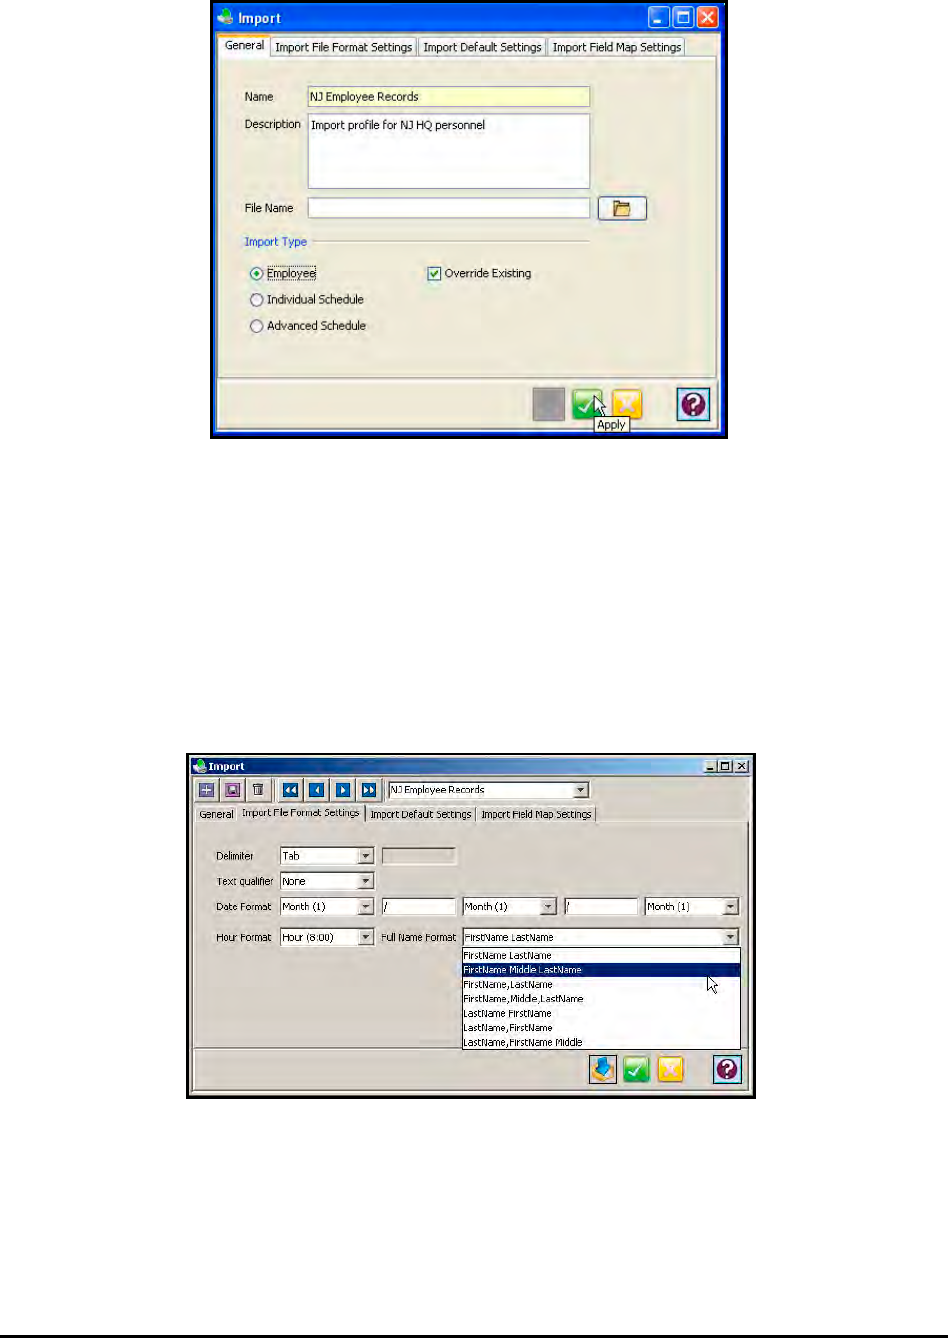
9-46 Time Guardian Series – Output
3. In the Name field, enter a name for the Import profile.
4. Enter a brief description of the Import profile in the Description field.
5. Enter the name and path of the import file in the File Name field, or click on the browse
button to the right of the field to browse for the file you wish to import.
6. Select the Import Type from; Employee, Individual Schedule [requires Advanced Schedule
module], Advanced Schedule [requires Advanced Schedule module], and Override Existing.
7. Click on the Import File Format Settings tab. This tab defines the format of your import file.
Select the following:
a. Delimiter: Select a Delimiter from the dropdown list. The Delimiter is the character,
which separates the data elements from one another. The choices are: Tab, Comma,
Pipe, Semicolon, Backslash, Forward slash, or User Defined. If User Defined is
selected, you must enter the character in the field provided.
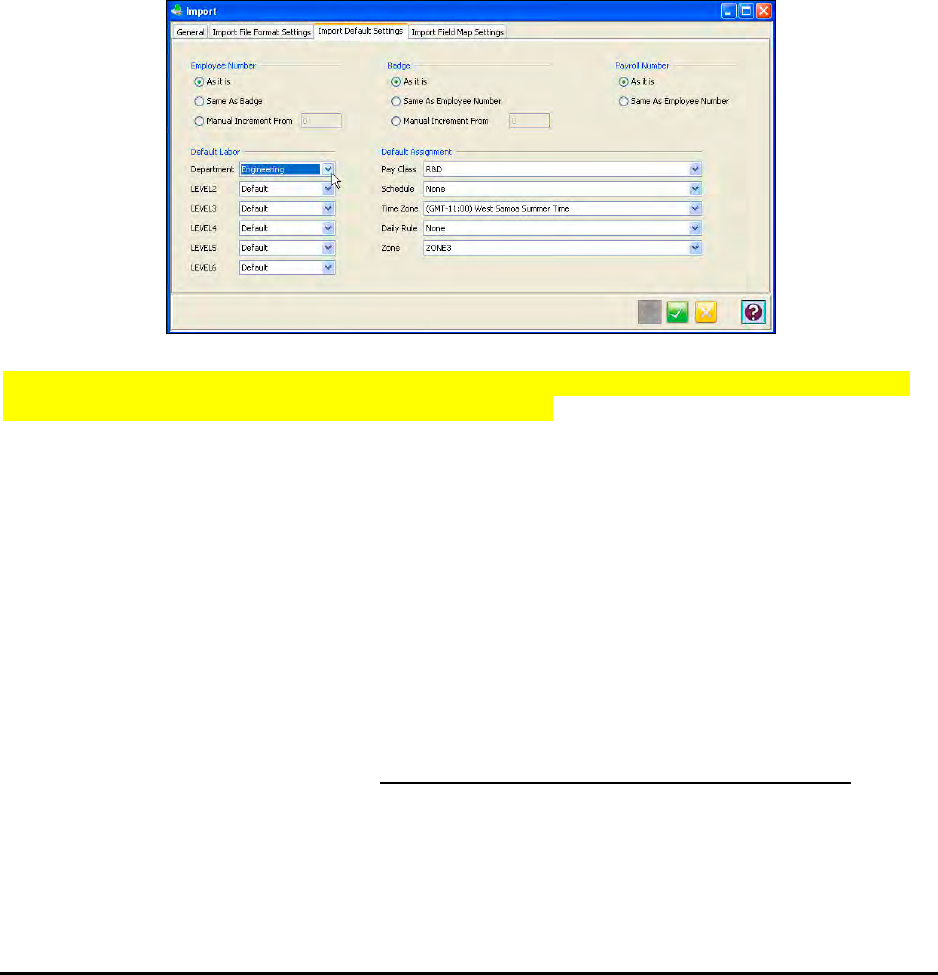
Time Guardian Series – Output 9-47
b. Text Qualifier: Select a Text Qualifier from the dropdown list. The choices are: None,
Single Quote, or Double Quote. The Text Qualifier is the character, which encapsulates
a data element (i.e. “California”).
c. Date Format: Select the date format from the dropdown lists. The choices are: Month
(1), Month (01), Month (Jan), Month (January), Year (90), Year (1990), Day (1), Day
(01), and Day (Mon).
d. Hour Format: Select the hour format. The choices are; Hour (8:00), Hour (08:00), Hour
(08.00), or Minutes (480).
e. Full Name Format: Select the Full Name Format from the dropdown list.
Note: This field will be available for assignment in the Import Field Map Settings tab.
8. Click on the Import Default Settings tab. This tab allows you set the defaults for data being
imported. Select the following:
Note: See Advanced Labor/Rate Module, Example of Multiple Labor Levels for details about
Labor Level Association links (Parent/Child relationship).
a. Employee Number: Select how the Employee Number will be defined. The choices are:
As it is, Same as Badge, or Manual Increment From. If Manual Increment From is
selected, you must enter the starting number in the field provided.
b. Badge Number: Select how the Badge Number will be defined. The choices are: As it is,
Same as Employee Number, or Manual Increment From. If Manual Increment From is
selected, you must enter the starting number in the field provided.
c. Payroll Number: Select how the Payroll Number will be defined. The choices are: As it
is, or Same as Employee Number.
d. Default Labor: Assign a default category for each Department/Labor Level using the
dropdown list(s).
e. Default Assignment: Assign a default Pay Class, Daily Rule, Time Zone, Schedule, and
Zone using the dropdown lists. Daily Rule and Zone require advanced modules.
Note: The defaults will be used if the import file does not contain data for these fields.
9. Click on the Import Field Map Settings tab. This tab allows you to manually define the
elements of the import file you are using (see figure for example).
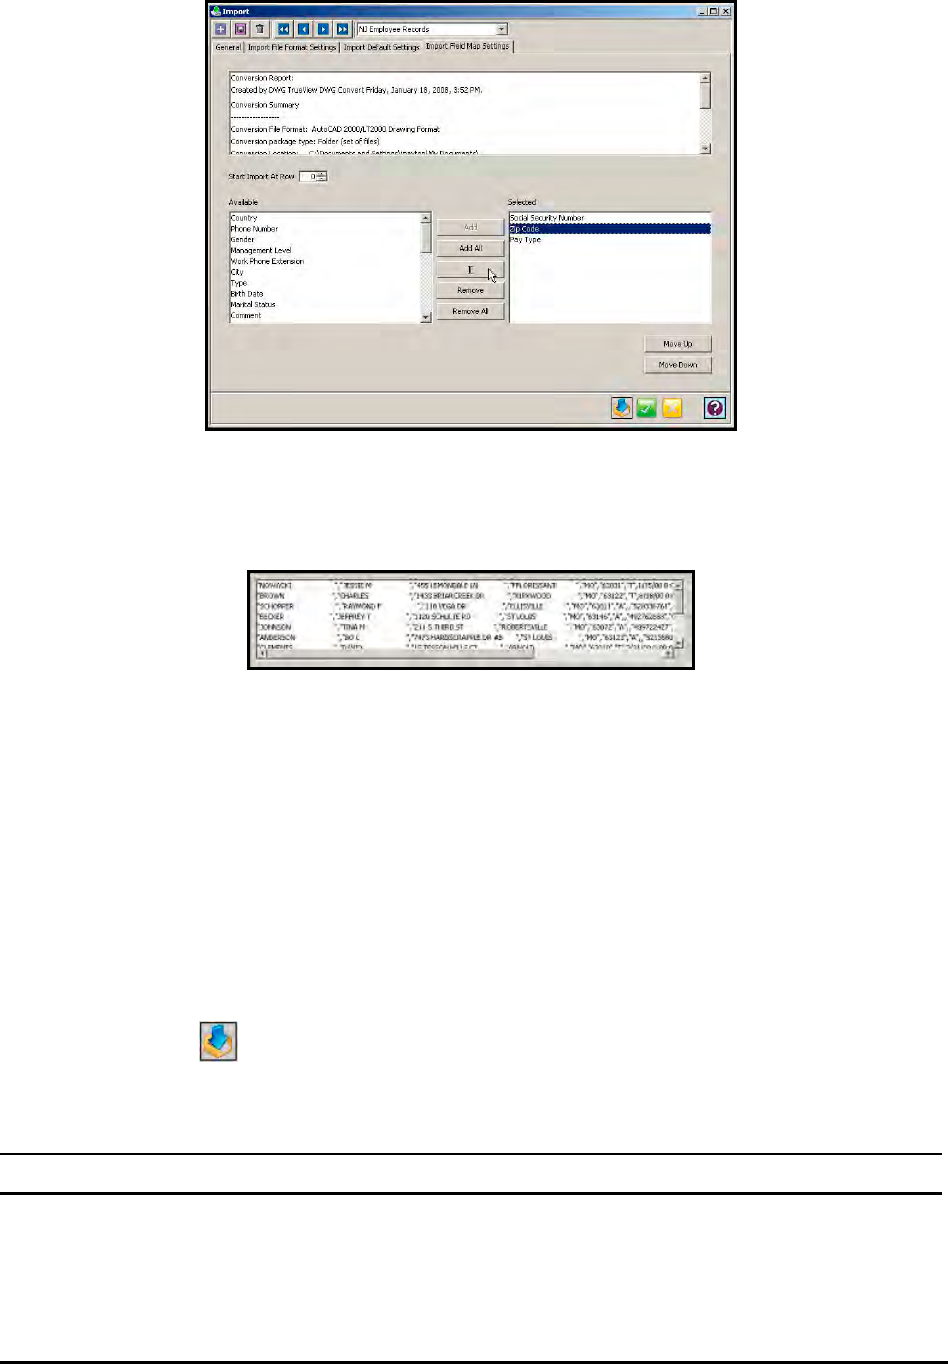
9-48 Time Guardian Series – Output
The contents of your import file will be displayed line by line in the File Contents window.
This area allows you to assign fields to data elements in each line. You can select to import
a single line, a selected group of lines or all lines.
To set the row number of the import file that the import operation will begin at, enter a
number in the Start Import At Row field.
Each data element in the import file must be defined in the order that it appears. Data
elements can be separated by commas, tabs, and semicolons. To assign a field, select a
data element in the Available list and click on the Add button. To select all the fields, click on
the Add All button. The field(s) will then be displayed in the Selected list. Add additional
fields until all data elements have been properly defined. Use the Remove Fields button to
un-assign fields. To skip a data element, click on the ][ button. A “][“ character will appear in
the Selected list to indicate that a data element was skipped.
To re-order fields in the Assignments Window, use the Move Up and Down buttons.
10. To Import a file, select the import profile for the file from the import profile list and click on
the Run Import button.
Export Module
The Export module provides a way to create a profile for the export of employee and schedule
data from the Amano Time & Attendance software.
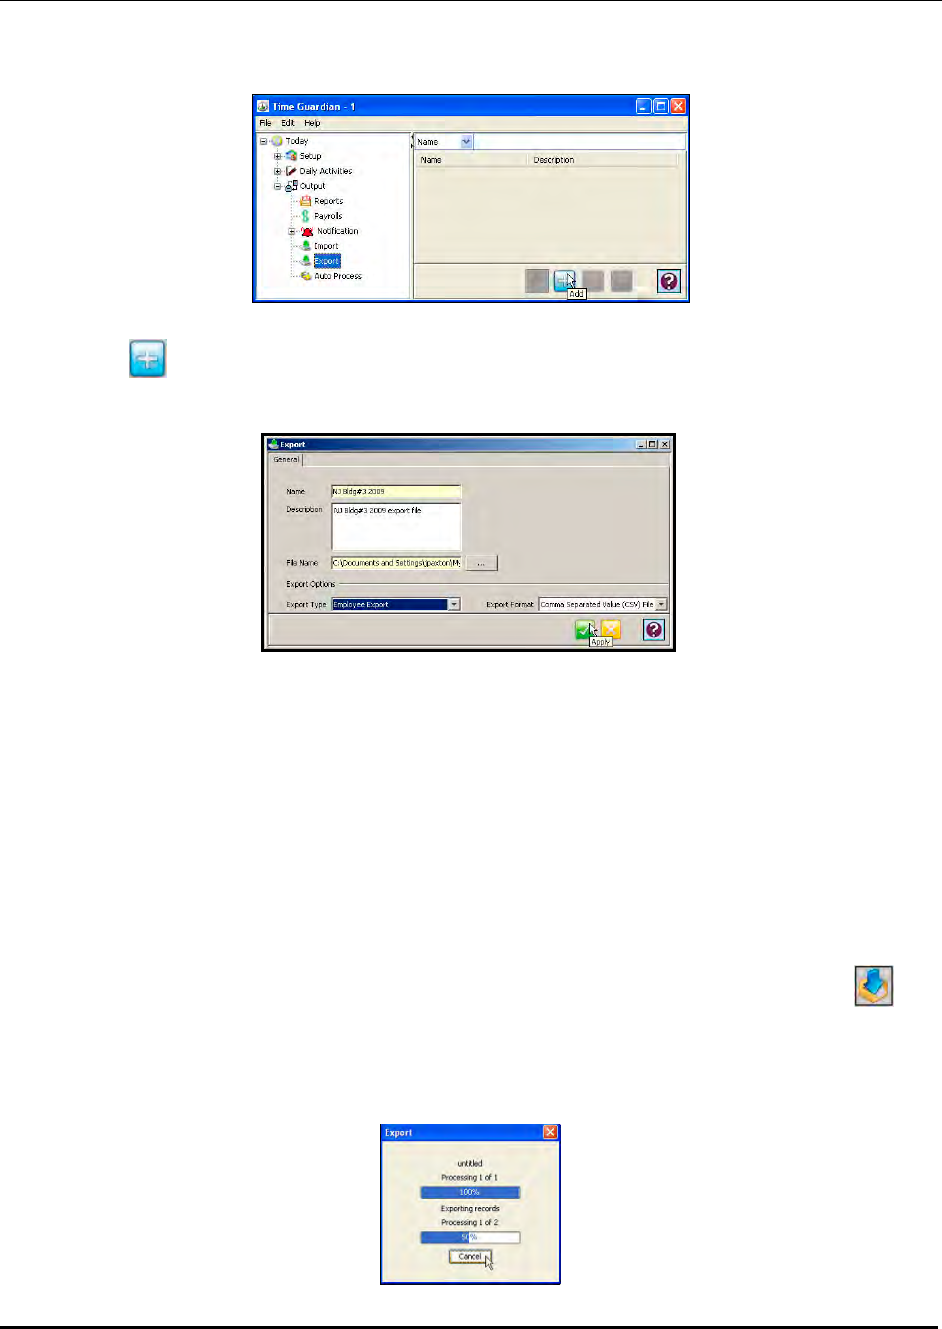
Time Guardian Series – Output 9-49
Creating an Export Profile
1. Click on the Export module within the Output group in the Tree View.
2. Click the button to create a new Export profile and the following Export window will
appear:
3. In the Name field, enter a name for the Export report profile [required field].
4. Enter a brief description of the Export report profile in the Description field.
5. Enter a file name in the File Name field and press the browse button to establish a path of
where the file will be placed.
6. Select the Export Options by selecting the desired:
• Export Type: select from the dropdown list.
• Export Format: the choices are: Comma Separated Value (CSV) File, Tab Separated
Value (TAB) File, Quoted (“”) Comma Separated, and Quoted (“”) Tab Separated.
7. To Export the file, select the export profile from the list and click on the Run Export
icon.
8. An export dialog box will appear as the Amano Time & Attendance database records are
exported and the export file is created (see figure). Click Ok to complete.
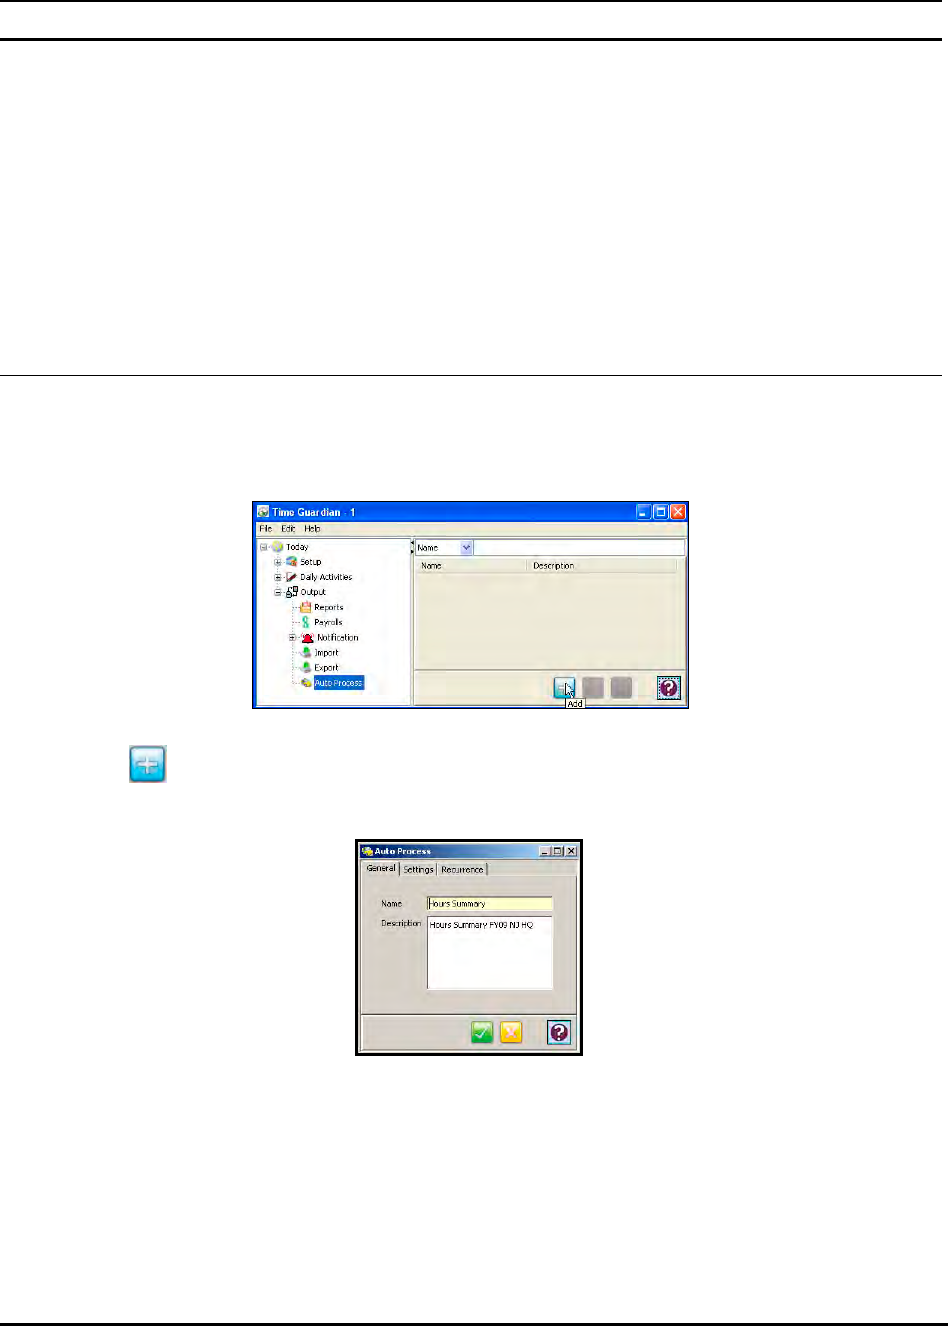
9-50 Time Guardian Series – Output
Auto Process Module
The Auto Process module provides a way to schedule time and attendance processes such as
reports (printed, archived, and e-mailed), communications with terminals, data import, data
export, and synchronization with Amano Nexus 220/AmanoNet access control systems from the
Amano Time & Attendance software. The Auto Process will run as a service in the background
based upon the selections and the “Recurrence” settings that you have defined.
Note: For client server setup, the Auto Process will be executed on the server side.
Creating an Auto Process Profile
1. Click on the Auto Process module within the Output group in the Tree View (see the
following figure).
2. Click the button to create a new Auto Process profile and the following Auto Process
window will appear:
3. In the Name field, enter a name for the Auto Process profile.
4. Enter a brief description of the Auto Process profile in the Description field.
5. Click on the Settings tab. The following is an example of the Settings tab window that will
appear:
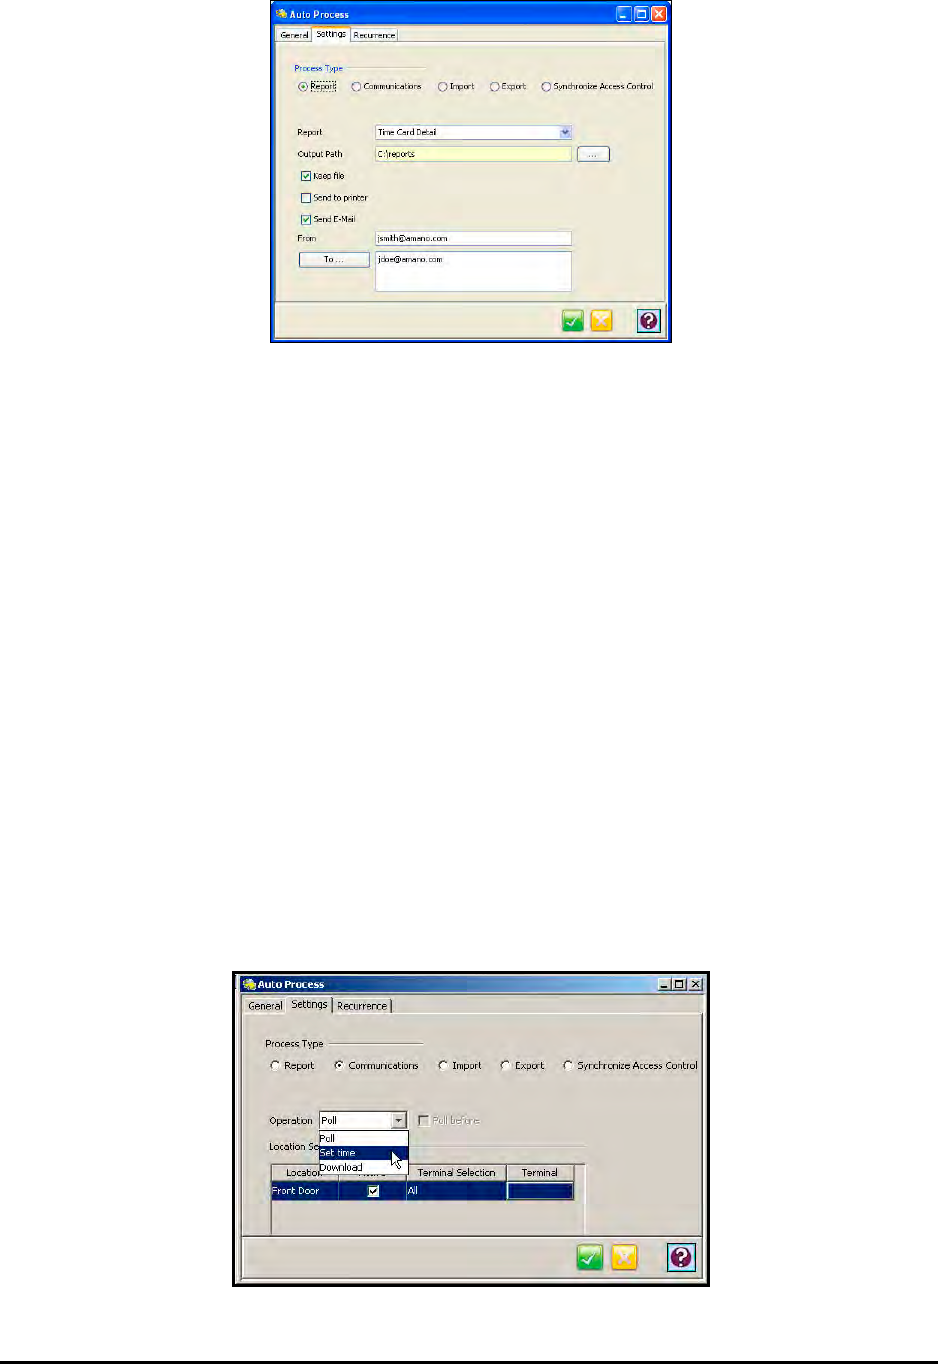
Time Guardian Series – Output 9-51
6. For Process Type choose from; Report, Communications, Import, Export, or Synchronize
Access Control.
Note: The Auto Process for Report, Import and Export, which runs as a service, will run the
selected Report, Import, and Export profiles with a frequency based upon the
“Recurrence” settings. The Auto Process for Communications will either Poll, Set Time,
or Download the selected terminals based on “Recurrence” settings. While the Auto
Process for Synchronize Access Control will synchronize employee and department
data in the background as a service with a frequency level based upon “Recurrence”
settings.
7. When Report is selected for the Process Type, select:
Report profile from the dropdown list in the Report field.
Check Keep file if desired and enter the Output Path (use the browse button).
Check Send to printer to print report and the enter the printer in the Printer field.
Check Send E-Mail to send e-mail to the specified e-mail address. Press To button to use
the address book (employee or Outlook addresses). This E-mail notification via the Auto
Process Module operates even if the Events Notification Module is not activated. It uses the
E-mail parameters defined in the Company Module under E-Mail Settings screen.
8. When Communications is selected for the Process Type, you must select the operation to
be performed and the Location for the Operation. See the following figure for an example.
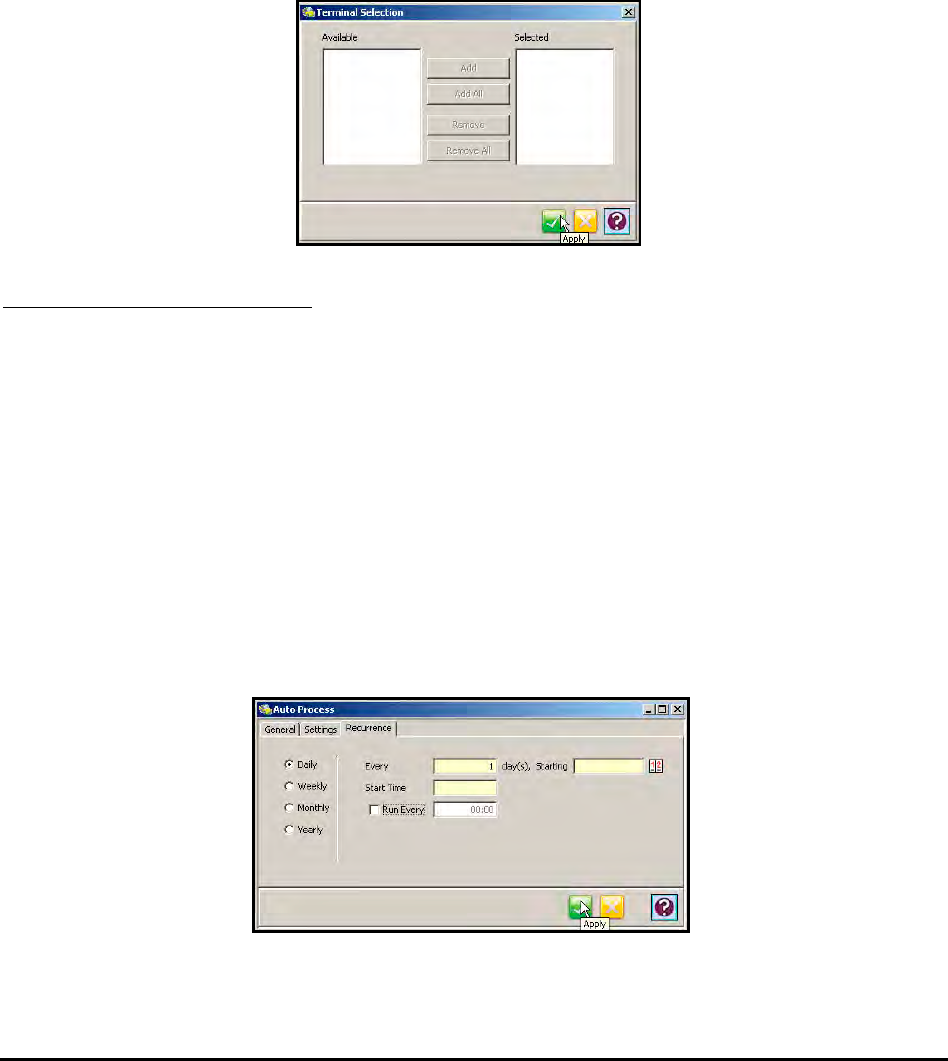
9-52 Time Guardian Series – Output
a. Operation: Select Poll, Set Time, or Download, When Download is selected, the Poll
before option will be enabled. Check this option if you want to poll the selected terminals
before downloading.
b. Location Setting: The Location Setting lists all Locations that are configured in the Time
& Attendance software. To enable the use of a Location for Auto Process, check the
Active box. To use all the terminals in the Location, select All from the dropdown
Terminal Selection column and the browse indicator will be displayed. Click on the
Browse button in the Terminal column to you choose terminals from the terminal
selection screen.
Note: Setup terminals from Setup Wizard Terminals Setup.
Terminal selection is as follows:
a. To select a terminal, highlight the desired terminal in the Available list and click on the
Add button.
b. To select all terminals from the Available list, click on the Add All button.
c. To remove a terminal from the Selected list, highlight the desired terminal in the
Selected list and click on the Remove button.
d. To remove all selected terminals, click on the Remove All button.
9. If Import or Export is selected for the process type, select the name from the dropdown list.
10. Select “Synchronize Access Control” to run auto process of synchronization upon startup
and/or settings defined on the Recurrence tab.
11. Click on the Recurrence tab. The following is an example of the Recurrence tab window
that will appear:
Daily: The service for the auto process can be run every day or every number of days, or
every number of hours.
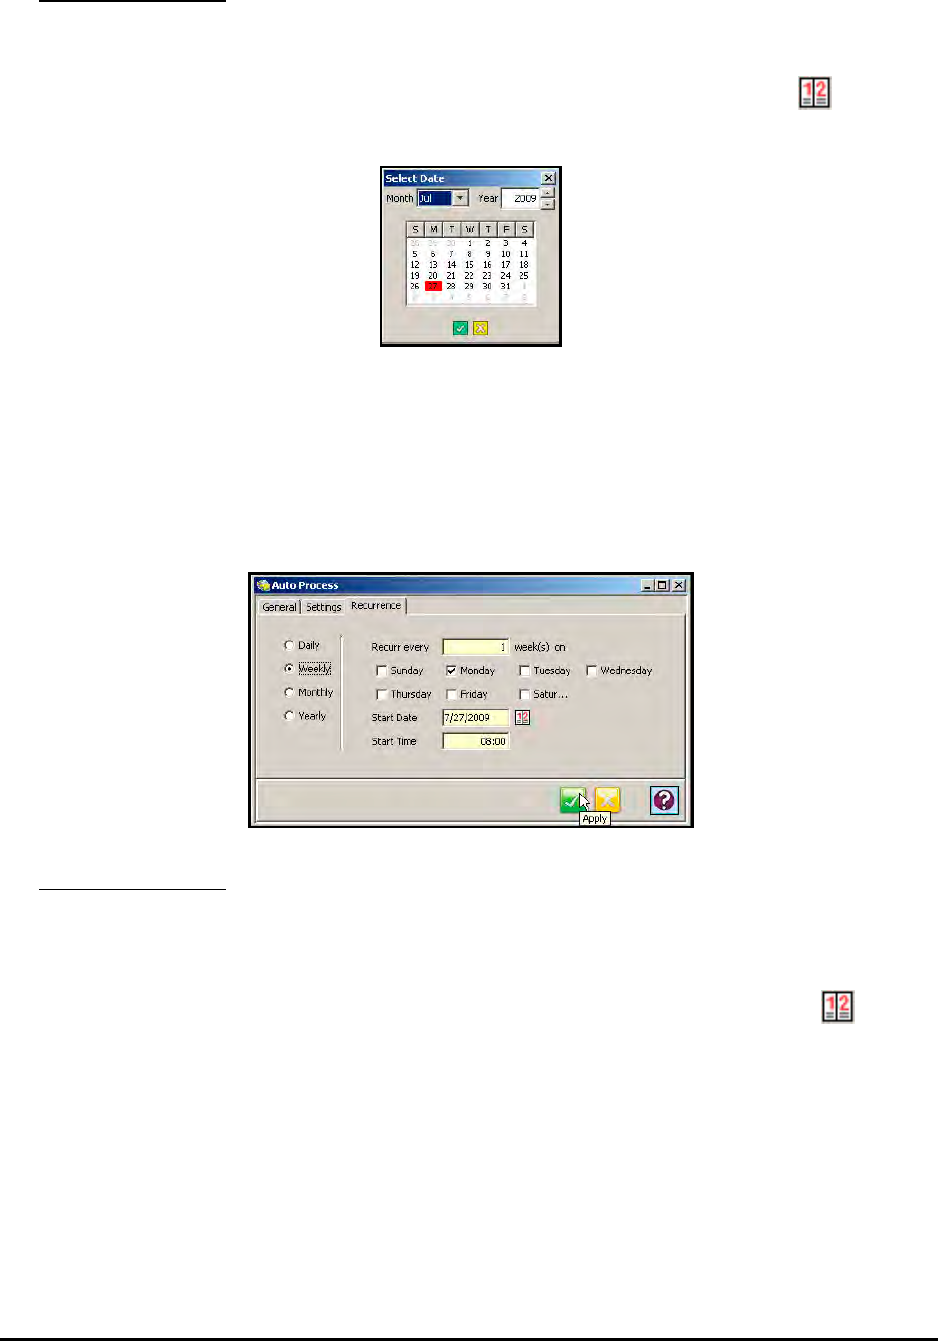
Time Guardian Series – Output 9-53
Enter the following:
a. Every: Enter the number of days that the process will run. For example, if you want to
run the process every 2 days, enter 2.
b. Starting: Enter a start date manually in MMDDYYYY format or click on the button.
The Select Date dialog box will appear:
c. Start Time: Enter the time of day (HH:MM) that you want the process to run.
d. Run Every: Check this option if you wish to run the process, on an hourly basis. You
must enter the number of hours (HH:MM) that you want the process to repeat.
Weekly: The service for the auto process can be run every set number of weeks on specific
days of the week. See the following example:
Enter the following:
a. Recur Every: Enter the number of recurring weeks that the process will run. For
example to run the process every week, enter 1. Place a check next to the day(s) of the
week that you want the process to run on.
b. Start Date: Enter a start date manually in MMDDYYYY format or click on the button.
c. Start Time: Enter the time of day (HH:MM) that you want the process to run.
Monthly: The service for the auto process can be set to run on a specific day of each
month, for a set number of months. See the following example:
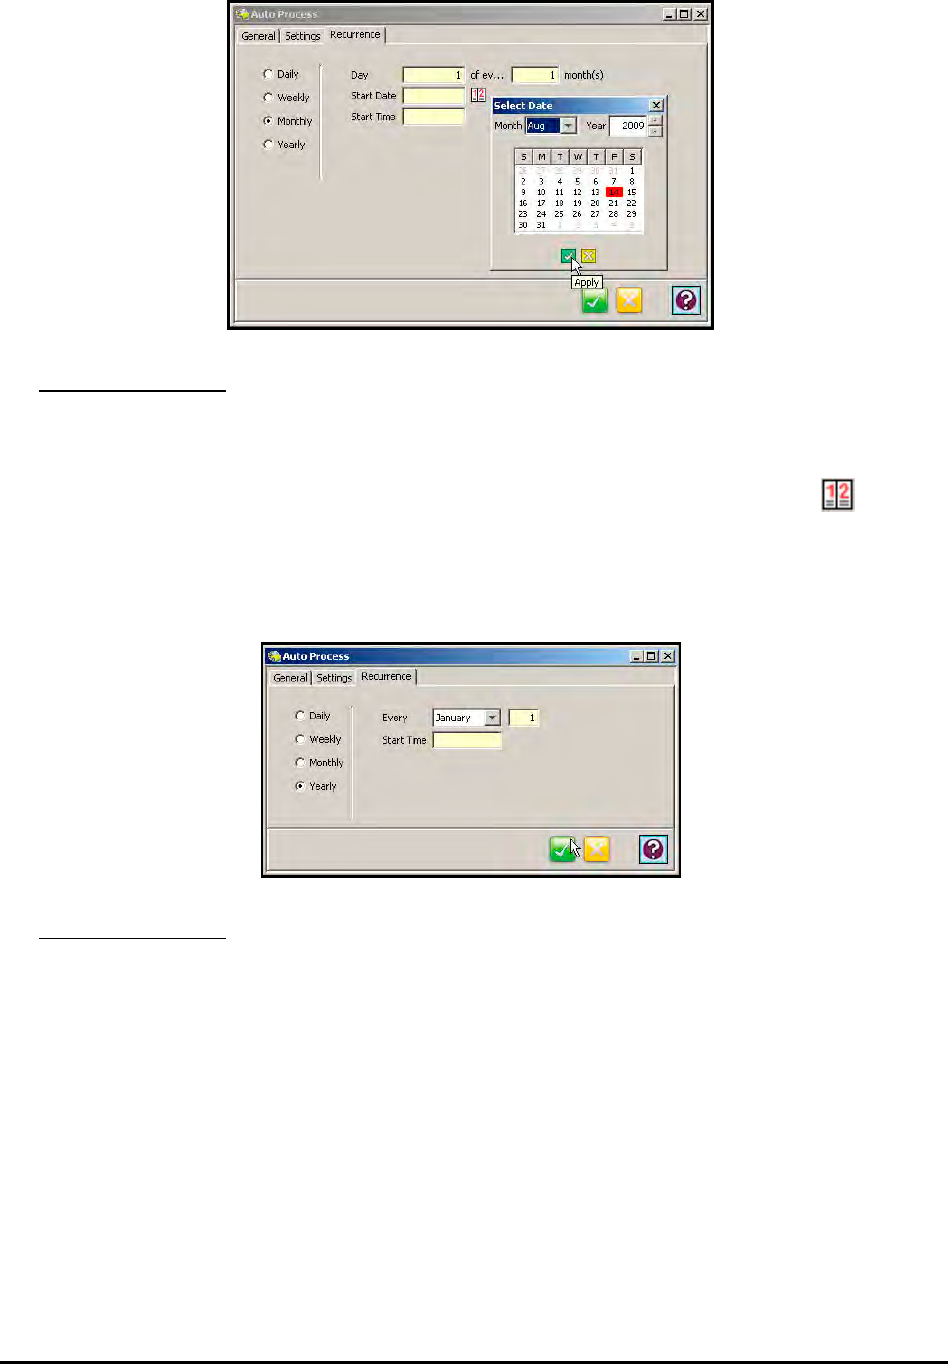
9-54 Time Guardian Series – Output
Enter the following:
a. Day: Enter the day of the month.
b. Month(s): Enter the number of months that the process will repeat.
c. Start Date: Enter a start date manually in MMDDYYYY format or click on the button.
The Select Date dialog box will appear.
d. Start Time: Enter the time of day (HH:MM) that you want the process to run.
Yearly: The process can be set to run once every year on the date specified.
Enter the following:
a. Every: Select the desired Month from the dropdown list and enter in the day of the
month in the field provided.
b. Start Time: Enter the time of day (HH:MM) that you want the process to run
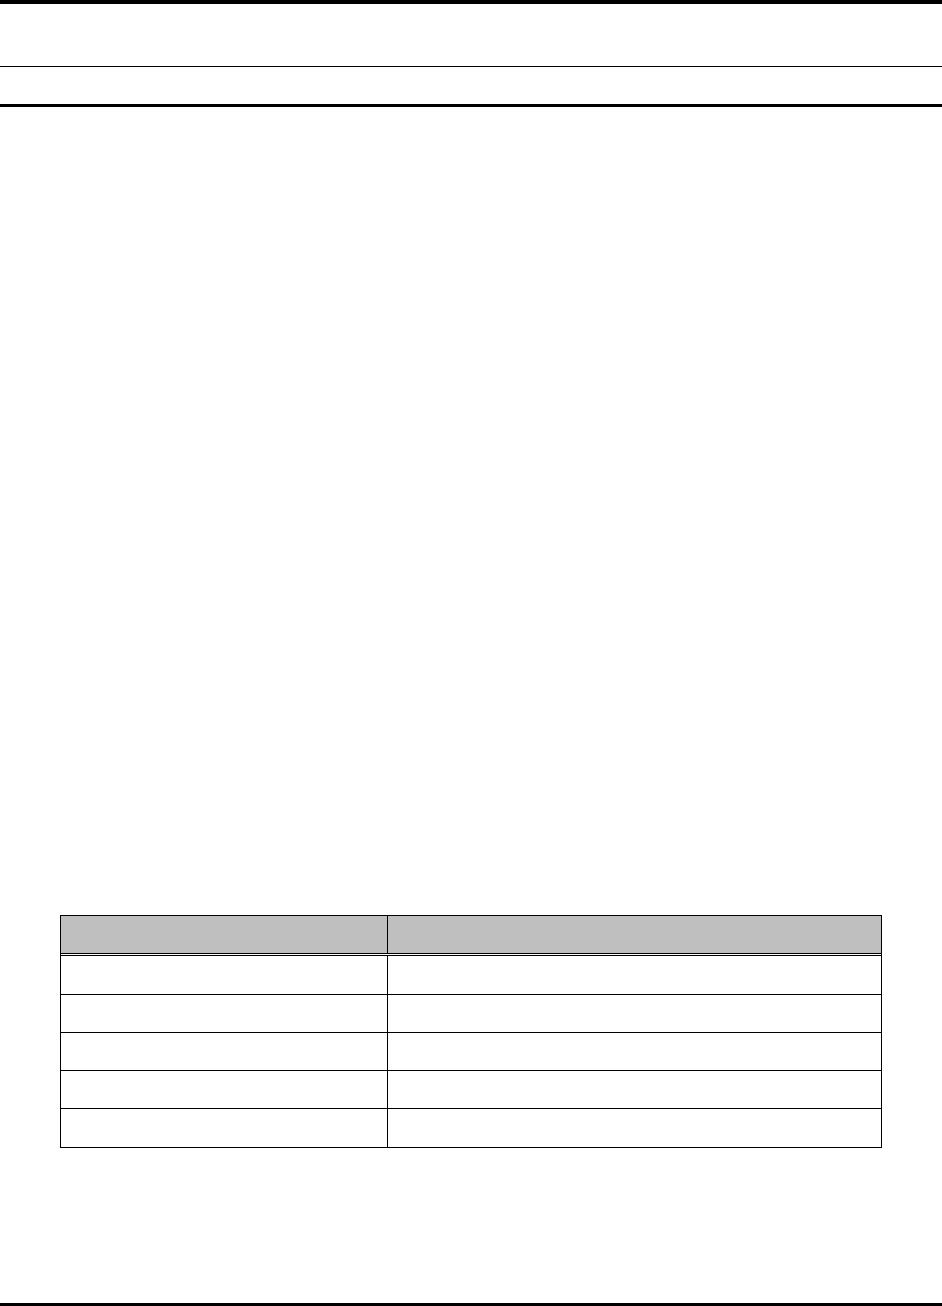
Time Guardian Series – Advanced Pay Class Module 10-1
Chapter 10: Advanced Pay Class Module
Introduction to Advanced Pay Class Module
Pay Class contains rules that affect more than one day of the week. The activation of the
Advanced Pay Class Module provides the user with additional uncommon rules.
The sections of the Time & Attendance Software affected and/or features added from the
activation of this module include:
• Pay Class tree view general tab show
− Custom Pay Period
− Shift Auto Punch Out
− Day Change Override (Shift Length and/or Maximum Number of punches)
• Company setup show
− Close Pay period option
− Default Pay Code selection for un-scheduled hours
• Pay period Option in Daily Activities
− Provides the ability to Lock Pay Periods
− Provides the ability to Close Pay Periods
• Holiday Group (Holiday Eligibility)
− Provides the ability to award holiday pay based on Seniority Eligibility
− Provides the ability to award holiday pay based on Schedule Eligibility
− Provides the ability to work on holiday and get paid based on Work on Holiday Eligibility
• Pay code Template in Setup
− Provides the ability to create custom Pay Codes Template rather than just use standard
Pay Code Template
Software Setup & Feature Software Configuration Location
Pay Class General Main Application Tree View
Company Setup Wizard, Main Application Tree view
Pay Period Setup Wizard, Main Application Tree view
Holiday Group Main Application Tree view
Pay Code Template Main Application Tree view

10-2 Time Guardian Series – Advanced Pay Class Module
Using the Advanced Pay Class Module
Holidays
The Holiday Group of the Pay Class Module allows you to add, edit or delete company holidays,
and create Holiday Groups. Individual Holidays are created in the Holiday window, and a group
of Holidays or rules are created in the Holiday Group. A Holiday Pay Code should be created
prior to adding your holidays. If it has not been selected you will be unable to assign holiday
hours to a Pay Code until one has been created.
How to Create a Holiday
1. Click on the Holiday node within the Holiday Group in the Pay Class module from the tree
view (see the following figure).
2. Click on the button, and the Holiday window will appear:
3. Enter a name for the Holiday in the Name field [required field].
4. Enter a description of the Holiday in the Description field.
5. Using the dropdown list, select the Holiday Group that this holiday belongs to.
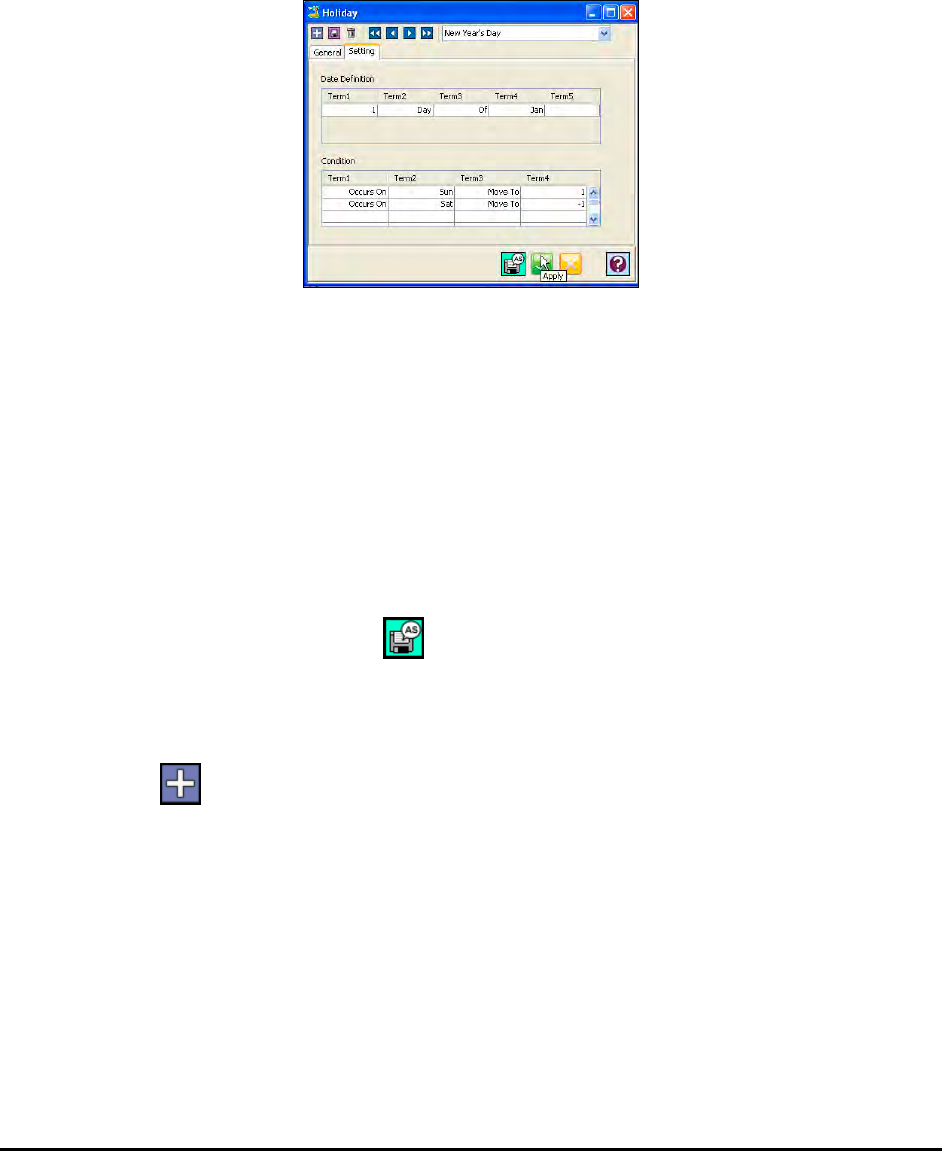
Time Guardian Series – Advanced Pay Class Module 10-3
6. Using the Pay Code dropdown list, assign the Pay Code that will be awarded for that
holiday.
7. Select the Type for the Holiday. The choices are Schedule or Hours. If Hours is selected,
proceed to Step 8. If Schedule is selected, proceed to Step 9.
8. Enter in the number of hours that will be awarded for the holiday.
9. Click on the Setting tab. The Setting tab is used to enter the date that the holiday occurs on.
A formula is entered in the Date Definition and Condition tables to generate the holiday. The
Date Definition table consists of the following:
Creating a Holiday Group
The Holiday Group is used to setup the requirements that an employee must meet in order to
receive holiday pay.
Note: If you wish to duplicate the properties of an existing Holiday Group for another Holiday
Group, select the desired Holiday Group from the Holiday Group window, open it, enter
in a new name and click on the button. The new Holiday Group will appear in the
Holiday Group window.
1. Click on the Holiday Group node within the Pay Class module in the Tree View.
2. Click on the button, and the Holiday Group window will appear:
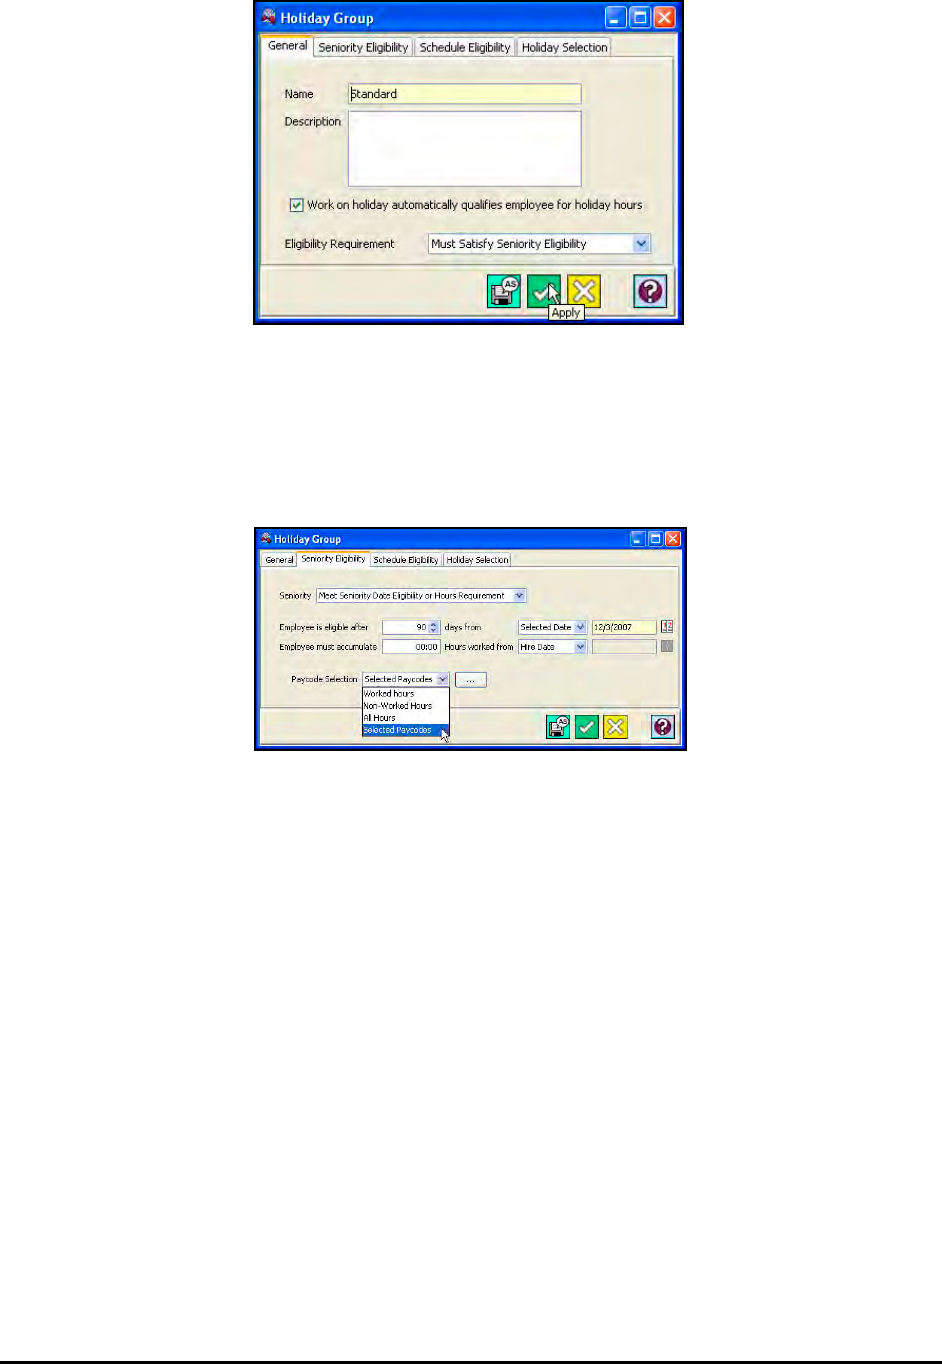
10-4 Time Guardian Series – Advanced Pay Class Module
3. If you want the employee to be awarded holiday hours for working on a Holiday, place a
check in the checkbox. If a check is placed in the checkbox, you must meet the Eligibility
Requirement. The choices are Always or Must Satisfy Seniority Eligibility. The Eligibility
Requirement is set in the Seniority and Schedule Eligibility tabs.
4. Click on the Seniority Eligibility tab.
5. In the Seniority field, select the requirement from the dropdown list for the employee to be
awarded Holiday hours:
• None: No requirement
• Meet Seniority Date Eligibility: The employee must work the required amount of days
from the date set (Hire or Selected Date) to be awarded holiday hours.
• Meet Hours Requirement: The employee must work a required amount of hours from the
date set (Hire or selected date) to be awarded holiday hours.
• Meet Seniority Date Eligibility and Hours Requirement: The employee must work the
required amount of days and hours from the date set (Hire or selected date) to be
awarded holiday hours.
• Meet Seniority Date Eligibility or Hours Requirement: The employee must work the
required amount of days or hours (which-ever comes first) from the date set (Hire or
selected date) to be awarded holiday hours.
6. If the eligibility requirement chosen requires a date, enter the number of days in the Days
field and select the desired “From Date” (Hire Date or Selected). For Selected, use the
Calendar icon to select the “From Date”.
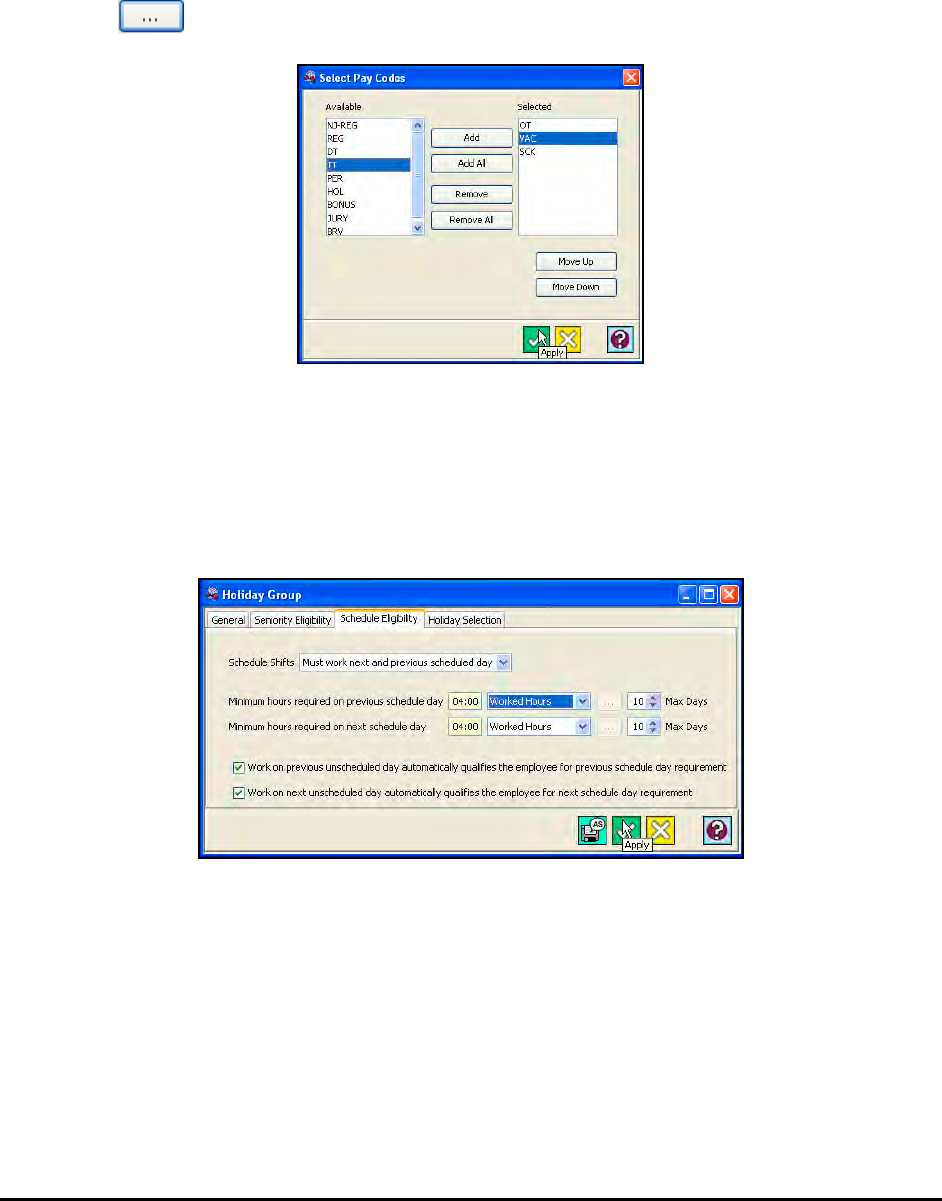
Time Guardian Series – Advanced Pay Class Module 10-5
7. If the eligibility requirement chosen requires hours, enter the number of hours in the Hours
field and select the desired “From Date” (Hire Date or Selected). For Selected, use the
Calendar icon to select the “From Date”.
8. If the eligibility requirement chosen requires hours, you also must specify the Pay Code(s)
for the hours worked. In the Pay Code Selection field. The choices are: Worked Hours, Non-
Worked Hours, All Hours, or Selected Pay Codes. For Selected Pay Codes, click on the
Browse button, and the Select Pay Codes window will appear:
To add a Pay Code, highlight the desired Pay Code in the Available list and click on the Add
button. To select all Pay Codes, click on the Add All button.
To remove a Pay Code, highlight the desired Pay Code in the Selected list and click on the
Remove button. To remove all the listed Pay Codes, click on the Remove All button.
9. Click on the Schedule Eligibility tab:
10. In the Schedule Shifts field, select the requirement from the dropdown list for the employee
to be awarded Holiday hours:
• None: No requirement
• Must work previous scheduled day: To be awarded holiday hours, the employee must
work a required minimum amount of hours in the designated Pay Code(s) on the
previously scheduled day before the holiday.
• Must work next scheduled day: To be awarded holiday hours, the employee must work a
required minimum amount of hours in the designated Pay Code(s) on the next
scheduled day after the holiday.
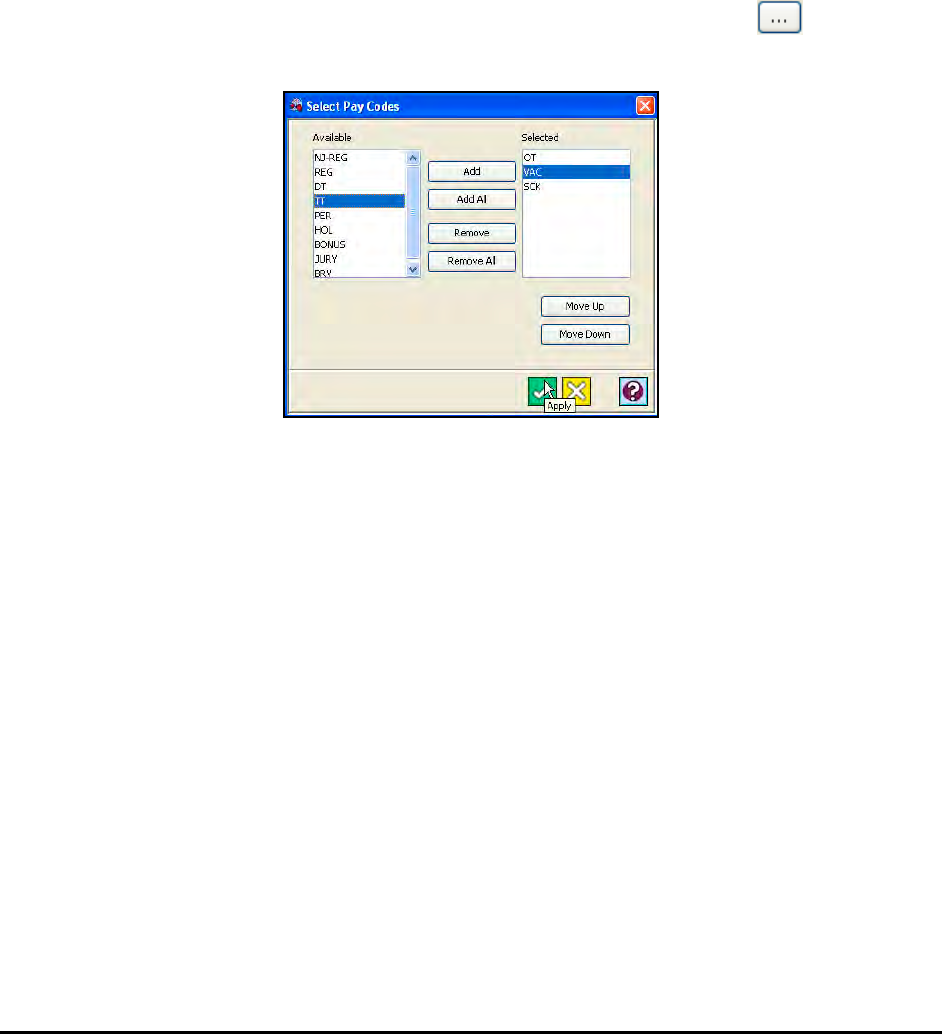
10-6 Time Guardian Series – Advanced Pay Class Module
• Must work next and previous scheduled day: To be awarded holiday hours, the
employee must work a required minimum amount of hours in the designated Pay
Code(s) on the previously scheduled day before and the next scheduled day after the
holiday.
• Must work next or previous scheduled day: To be awarded holiday hours, the employee
must work a required minimum amount of hours in the designated Pay Code(s) on the
previously scheduled day before or the next scheduled day after the holiday.
11. For each eligibility requirement, you must select the minimum number of hours to be worked
in a specific Pay Code and the maximum number of days that Time Guardian Pro will look
back or forward [1 – 20] to see if the Pay Code requirement was met. After entering the
minimum number of hours to be worked, you must specify the Pay Code for the hours
worked. The choices are: Worked Hours, Non-Worked Hours, All Hours, Selected Pay
Codes, or Within Schedule. For Selected Pay Codes, click on the Browse button. The
Select Pay Codes window will appear:
To add a Pay Code, highlight the desired Pay Code in the Available list and click on the Add
button. To select all Pay Codes, click on the Add All button.
To remove a Pay Code, highlight the desired Pay Code in the Selected list and click on the
Remove button. To remove all the listed Pay Codes, click on the Remove All button.
12. If the employee works on an unscheduled day before the holiday, you have the option of
using that day for the previous day requirement. To do so, place a check in the checkbox.
13. If the employee works on an unscheduled day after the holiday, you have the option of using
that day for the next day requirement. To do so, place a check in the checkbox.
14. Click on the Holiday Selection tab. By default, all Holidays will be selected.
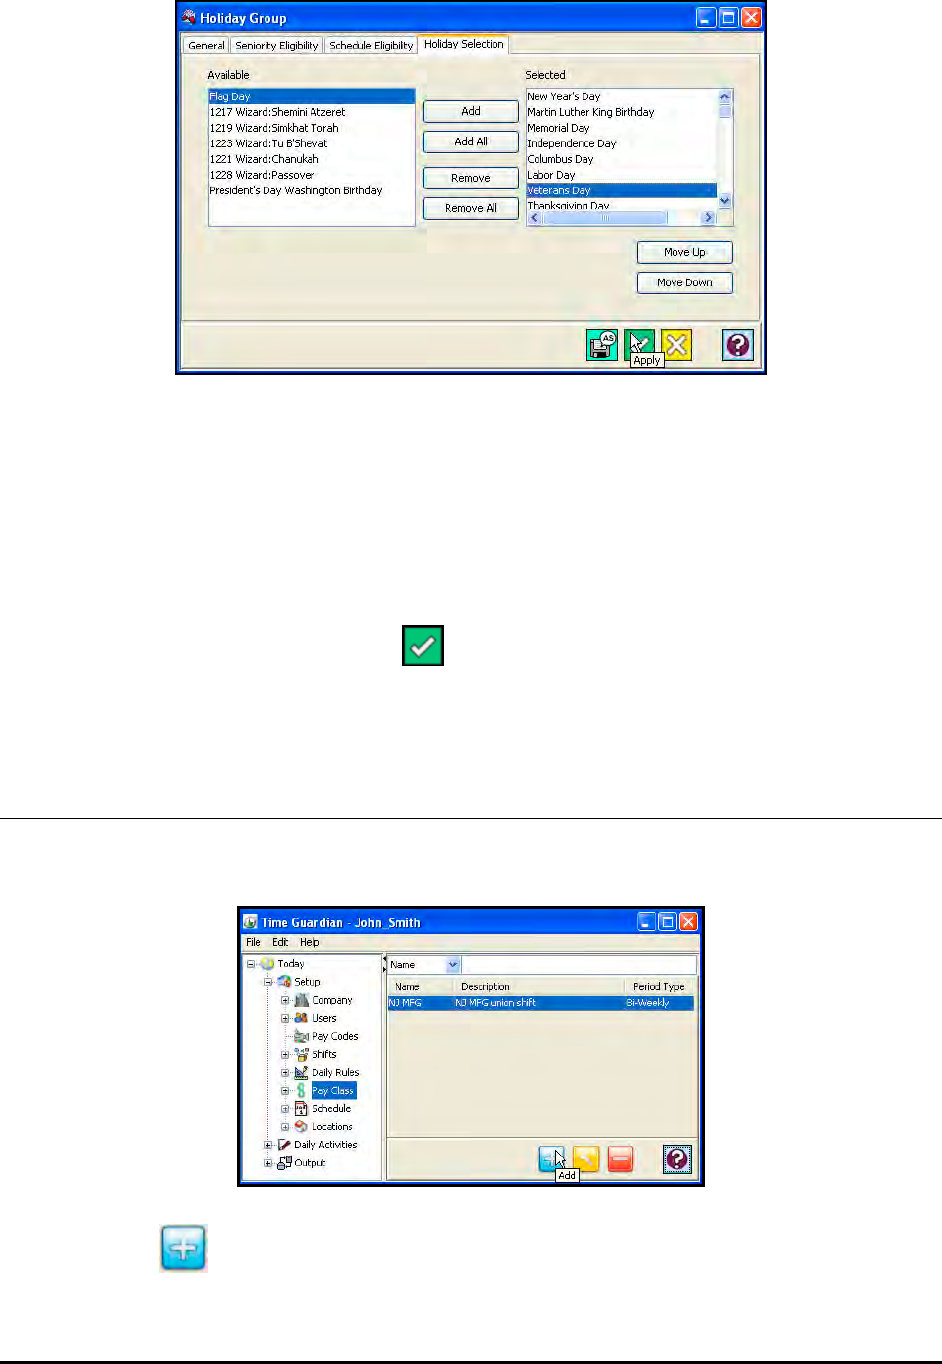
Time Guardian Series – Advanced Pay Class Module 10-7
To add a Holiday to the group, highlight the desired Holiday in the Available list and click on
the Add button. To select all Holidays to the group, click on the Add All button.
To remove a Holiday from the group, highlight the desired Holiday in the Selected list and
click on the Remove button. To remove all selected Holidays, click on the Remove All
button.
12. Click on the Move Up or Move Down buttons to move a holiday up or down in the
Selected column to change the priority.
15. When you have finished, click on the button to save your settings. The Holiday Group
will appear as a row in the Table View.
Creating a Pay Class
1. Click on Pay Class module within the Setup group in the Tree View (see the following
figure).
2. Click on the button, and the Pay Class window will appear:
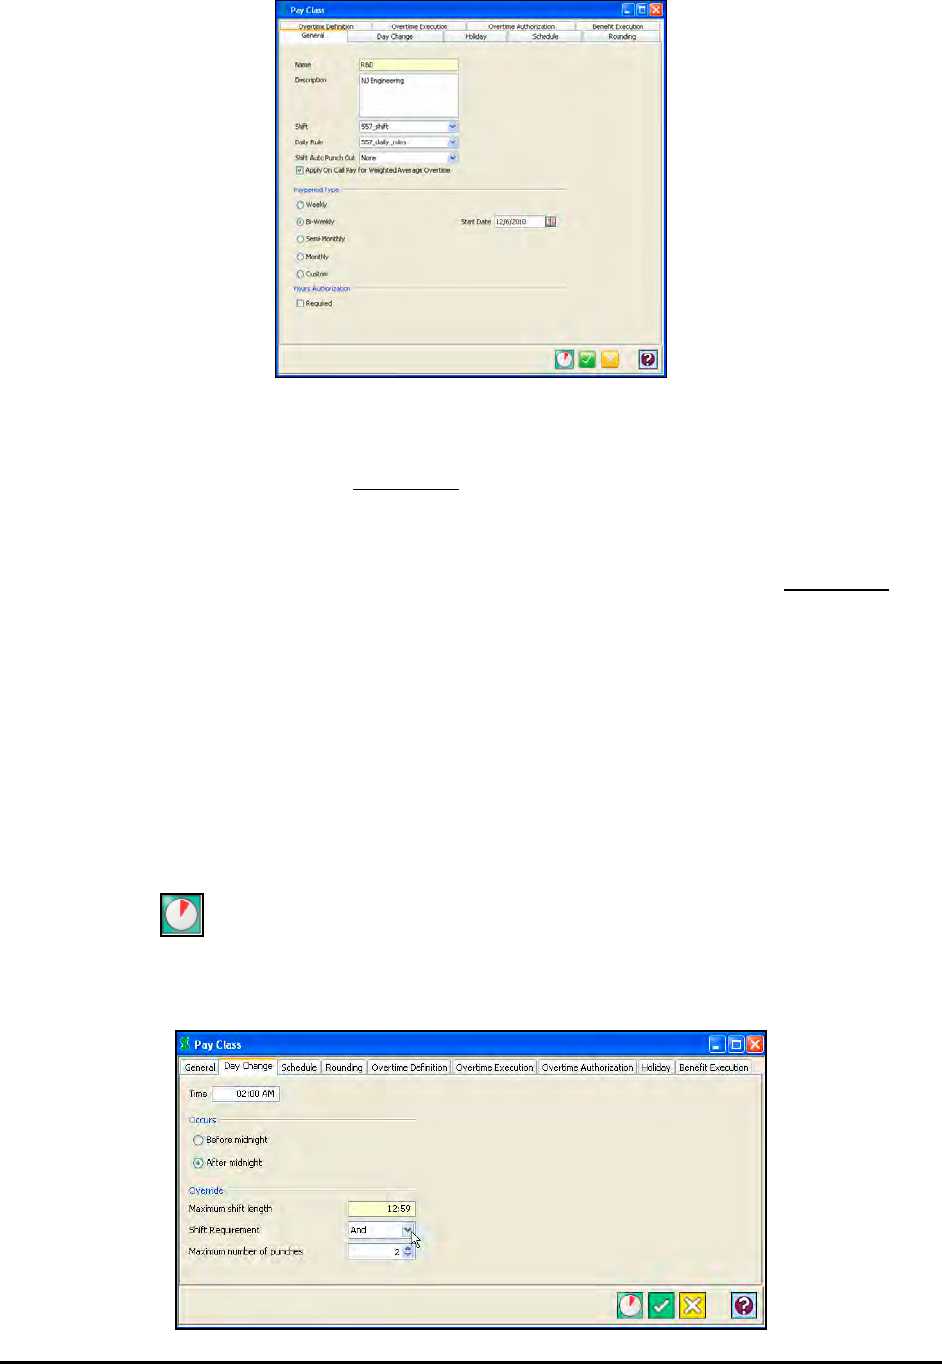
10-8 Time Guardian Series – Advanced Pay Class Module
3. Using the drop down list, select for the Shift Auto Punch Out based on; none, Schedule End,
or Last In-Punch. The following two scenarios can be used to understand how this selection
affects punching in and out. For Scenario 1 - if Schedule End is selected for an employee
that has a schedule = 8:00am - 5:00pm. If the actual last In-Punch was 8:20 and the minutes
from was set for 120 minutes. [2 hours], then the employee would be automatically punched
out at 7:00pm. Note - the employee must have a Template Schedule or Individual
Schedule already defined for this to work, or else it will be ignored. For Scenario 2 - if
Last In-Punch is selected for an employee that has a schedule = 8:00am - 5:00pm. If the
Last In-Punch was 08:20am, and minutes from was set for 60 minutes. [1 hour], then the
employee would be punched out at 09:20am.
Note: The sequence of overtime is first check employee and if Yes then apply rules. Second
check Pay Class and if Yes apply all selected and if No apply nothing. Third apply On Call
for Weighted Average if selected.
4. Select Apply On Call Pay for Weighted Average Overtime to calculate weighted average
with On Call Pay included. See Advanced Labor/Rate Module for weighted average.
5. Select the Pay period type choice of Custom and Select the start date for the Pay period
with the number of days.
6. Click on the icon to display the Rounding Demo view to help understand rounding
rules.
7. Click on the Day Change tab.
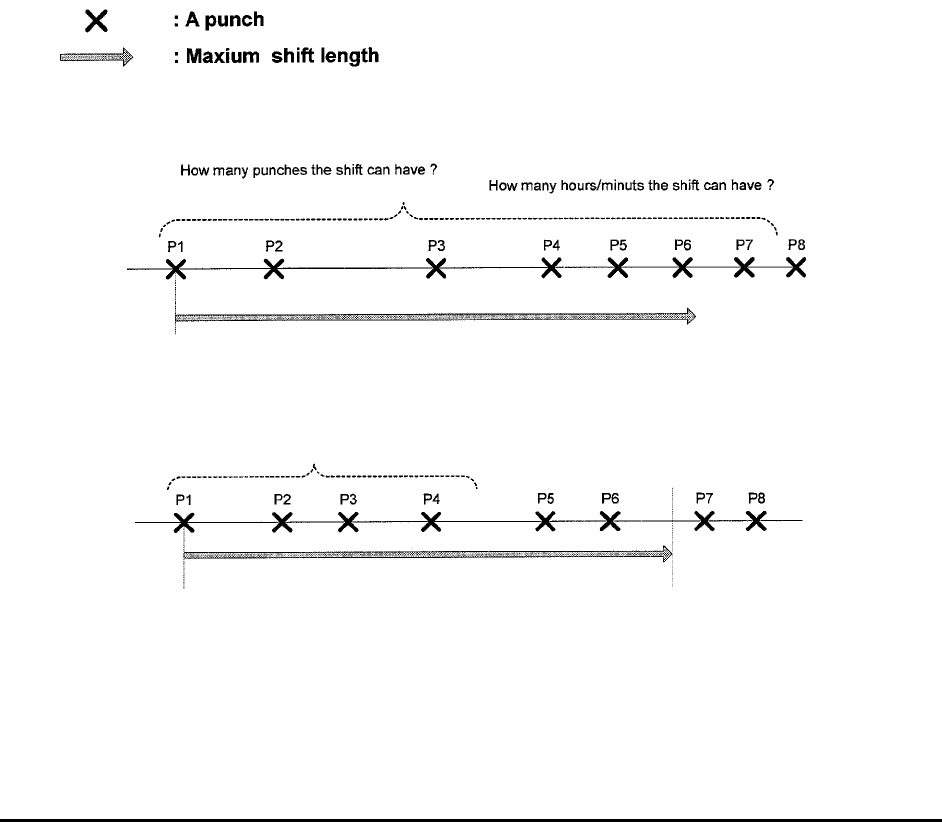
Time Guardian Series – Advanced Pay Class Module 10-9
8. Enter the time (in 24 hour format) that your business day ends in the Time field.
9. Enter the Maximum shift length or window of time (HH:MM) that will enable punches to be
grouped together for one shift. 12 to 13 hours is a recommended number for this field thus
allowing all lunch or break punches to be applied to the correct schedule.
10. Enter the number of punches allowed that cross the day change time to be calculated for the
schedule in the Maximum number of punches field. If 0 is entered, the Maximum shift length
will be used to override the Day Change Time.
11. If you are using both Maximum shift length and number of punches to override the Day
Change Time, you must select how punches will be applied to the schedule in the Shift
Requirement field. The choices are:
• AND: The punches are brought back to the same shift until both the maximum number of
punches and maximum shift length conditions are satisfied.
• OR: The punches are brought back to the same shift until either the maximum number of
punches or maximum shift length conditions are satisfied.
Example: Max Number of Punches/Max Shift Length relation with Shift Requirement
Max Shift Length is as follows:
Max Number of Punches = 4
Max Shift Length = Shown below.
If Shift Requirement is:
AND: Punches P1 through P6 qualify.
OR: Punches P1 through P4 qualify.
Max Number of Punches = 6
Max Shift Length = Shown below.
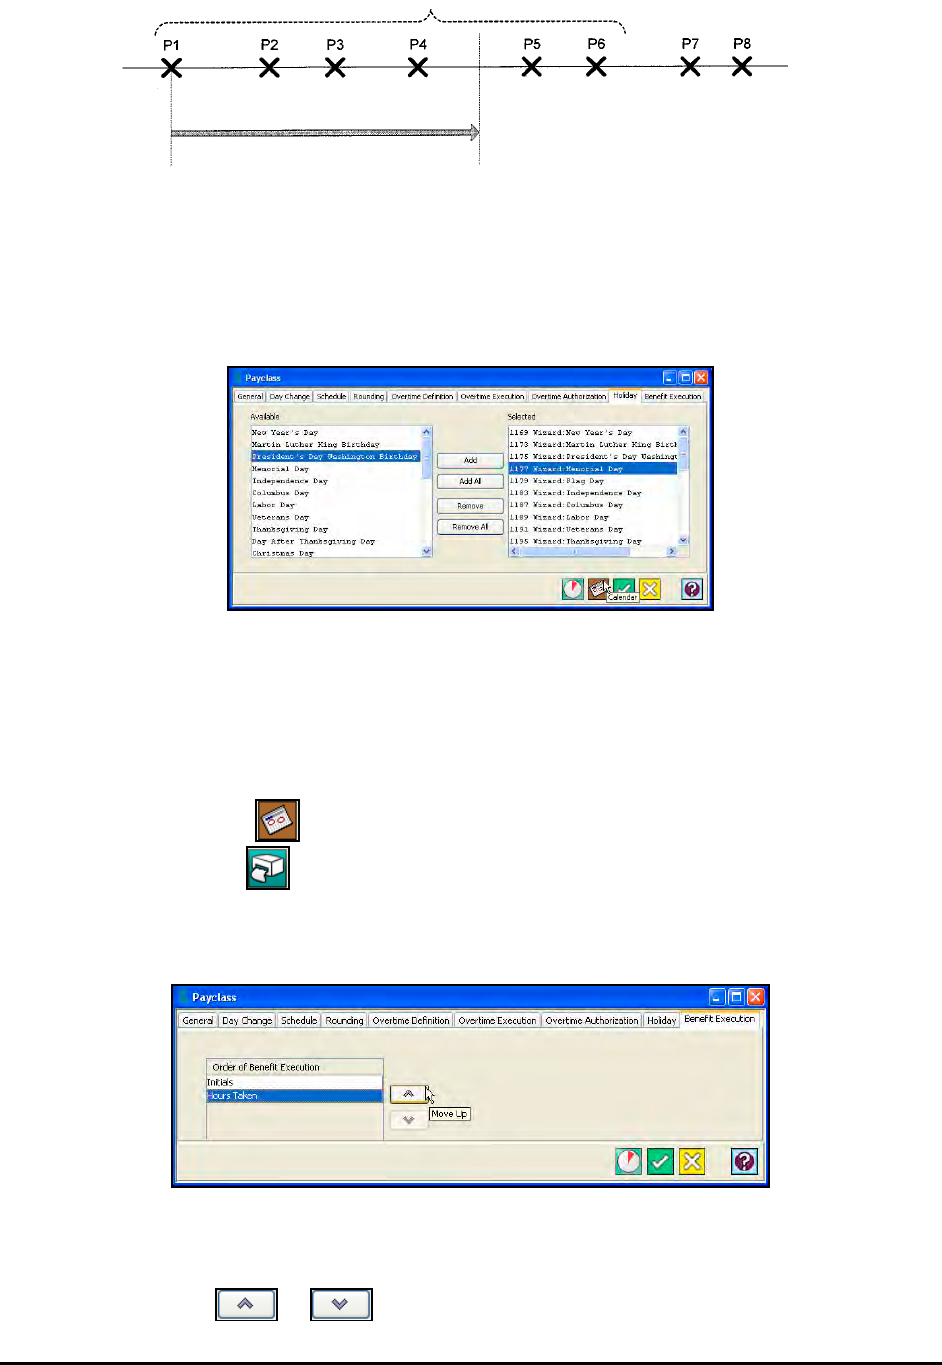
10-10 Time Guardian Series – Advanced Pay Class Module
If Shift Requirement is:
AND: Punches P1 through P6 qualify.
OR: Punches P1 through P4 qualify because of shift length.
12. Click on the Holiday tab.
To add a Holiday to the Pay Class, highlight the desired Holiday in the Available list and
click on the Add button. To add all Holidays to the Pay Class, click on the Add All button.
To remove a Holiday from the Pay Class, highlight the desired Holiday in the Selected list
and click on the Remove button. To remove all selected Holidays, click on the Remove All
button.
Click on the Calendar icon to display a Calendar of Holidays. From the Calendar of
Holidays click on the icon too print a Holiday calendar.
13. Click on Benefit Execution tab. This tab determines the order in which benefits will be
calculated.
Order (Priority) of Benefits:
The execution order (Priority) of benefits can be set by selecting the benefit category and
clicking on the up or down arrows to move the benefit up or down the list.
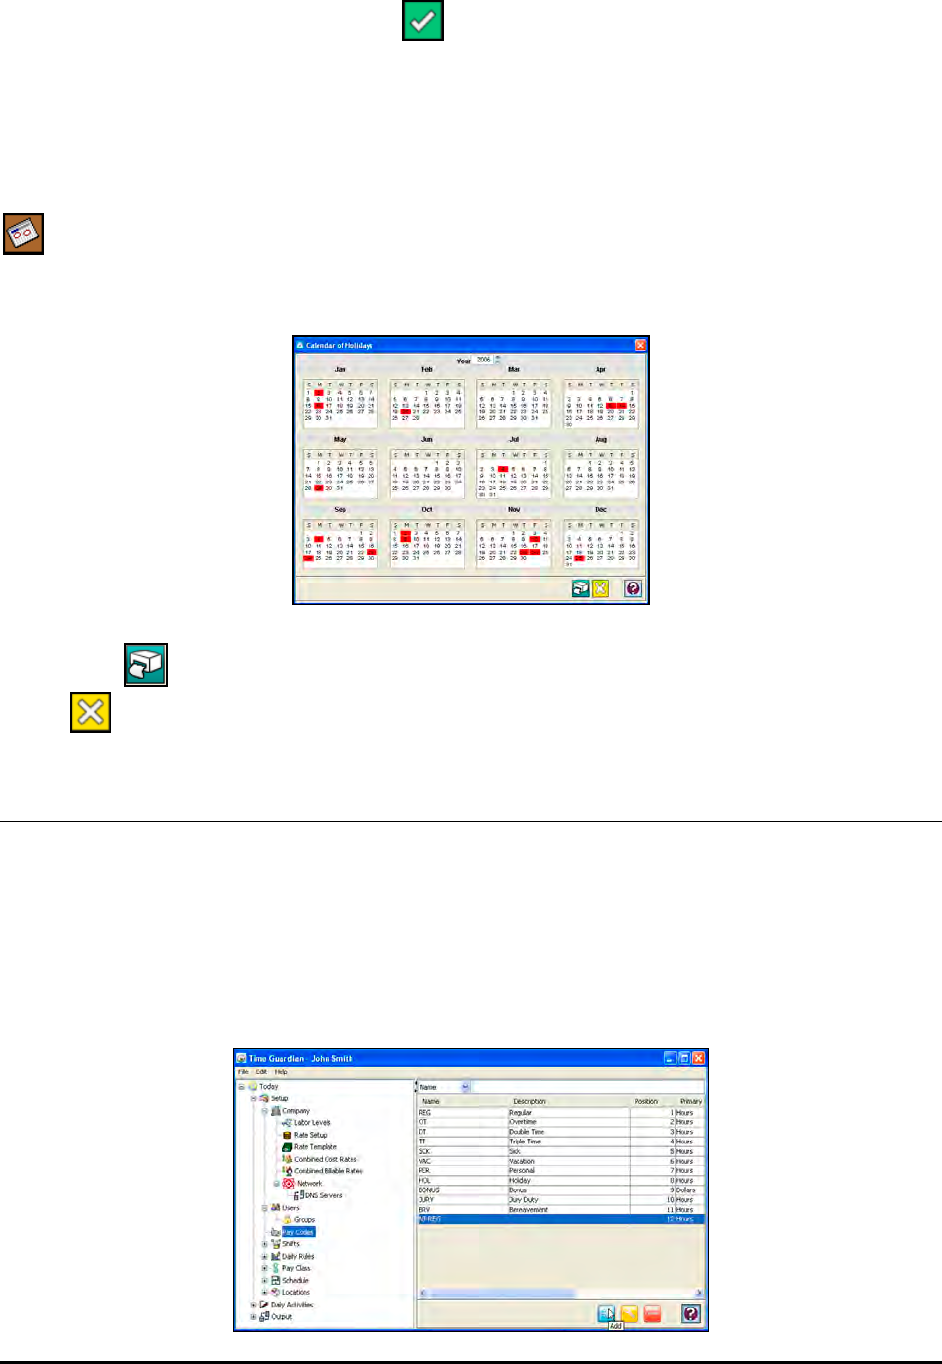
Time Guardian Series – Advanced Pay Class Module 10-11
14. When you have finished, click on the button to save your settings. The Pay Class will
appear as a row in the Table View.
Viewing Holidays in a Pay Class
The Holidays assigned to a Pay Class can be displayed in calendar format by clicking on the
button. This button is activated when at least one Holiday Group is assigned to the Pay
Class. The Year field is used to view the current, previous, or following year’s scheduled
holidays.
Click on the icon too print the displayed Holiday calendar, and to close the calendar, click
on the button.
Pay Codes
Pay codes determine how an employee’s hours will be categorized and displayed throughout
the system. The Pay codes module will be visible in the tree view when the optional Advanced
Pay Class Module is activated.
To create a Pay code:
1. Click on the Pay codes module within the Setup group in the Tree View (see the figure).
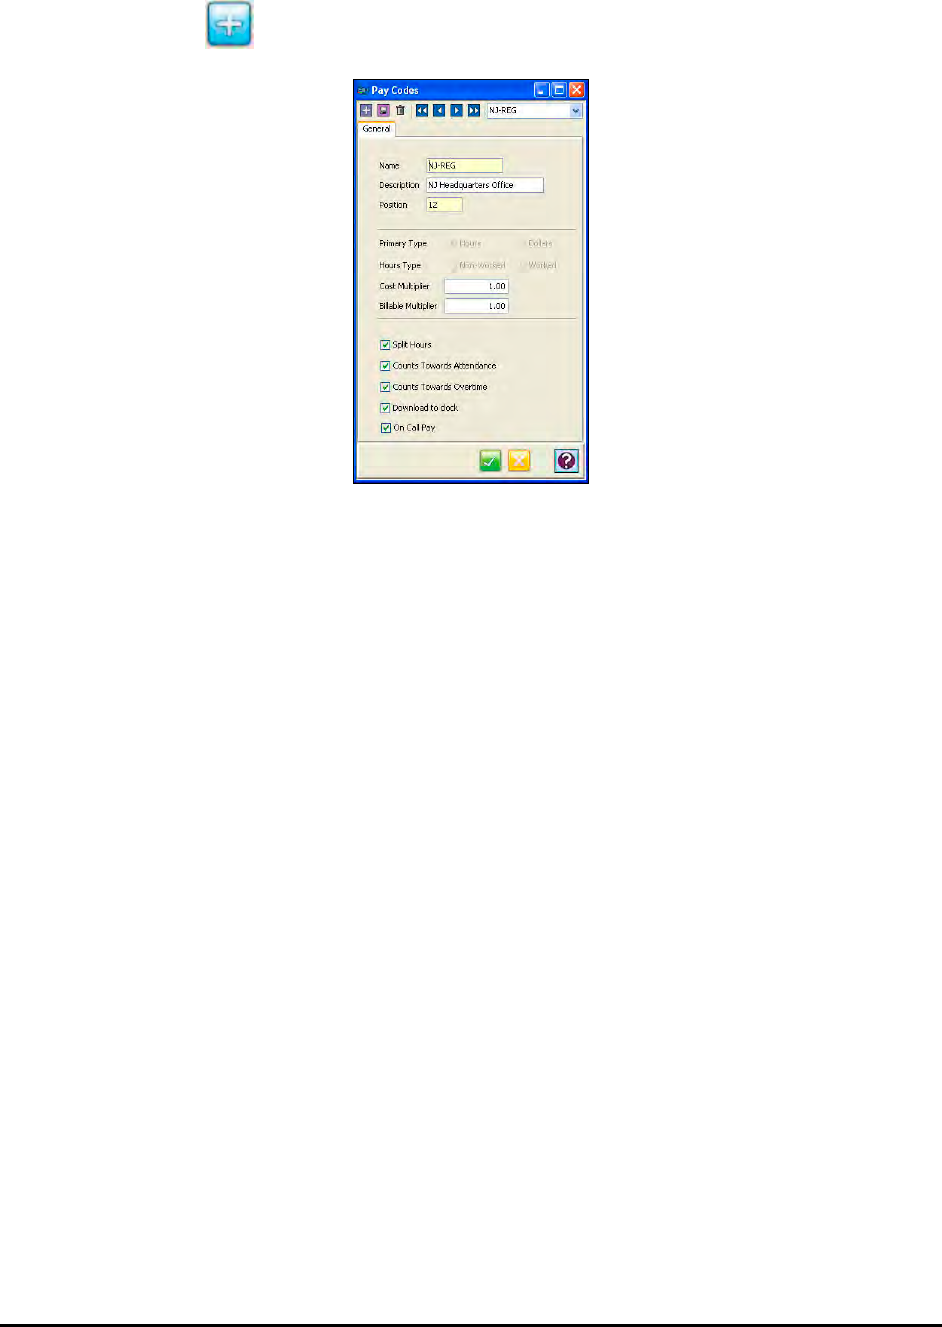
10-12 Time Guardian Series – Advanced Pay Class Module
2. Click on the Add button, and the Pay Codes window will appear.
3. In the Name field, enter in a name for the Pay Code. Duplicate names are not allowed.
4. In the Description field, enter in a brief description of the Pay Code.
5. Enter the Position number. A Position number is assigned automatically but can be
changed. This number is used for display order on reports and the Timecard grid.
6. Select the Primary Type (how the hours awarded to a specific Pay Code will be classified).
Hours corresponds to worked hours (REG, OT) and non-worked hours (SIC, VAC). Dollars
corresponds to monetary amounts given to an employee (Bonus, Tip).
7. Select the Hours Type: Non-worked (SIC, VAC, etc.) or Worked (REG, OT).
11. In the Cost Multiplier field, enter in the cost multiplier for the Pay Code. For example, TT =
3.0 in the example shown above.
12. In the Billable Multiplier field, enter in the billable multiplier for the Pay Code. For example,
TT = 1.0 in the example shown above. For example, this field could be used to markup the
cost of labor charges that are billable for rendered services.
13. Check Split Hours if you want the Pay Code to be used for Split Hours. Split hours allow the
system to move hours from one Pay Code to another.
14. Check Counts Towards Attendance if you want the Pay Code to override the Absence
exception or not.
15. Check Counts Towards Overtime if you want the Pay Code to count towards OT.
16. Check “Download to clock” if you want the Pay Code to be sent to the terminal (clock).
17. Check “On Call Pay” if you want the Pay Code to count for On Call Pay [only for Bonus] to
be used in Weighted Average OT calculation.
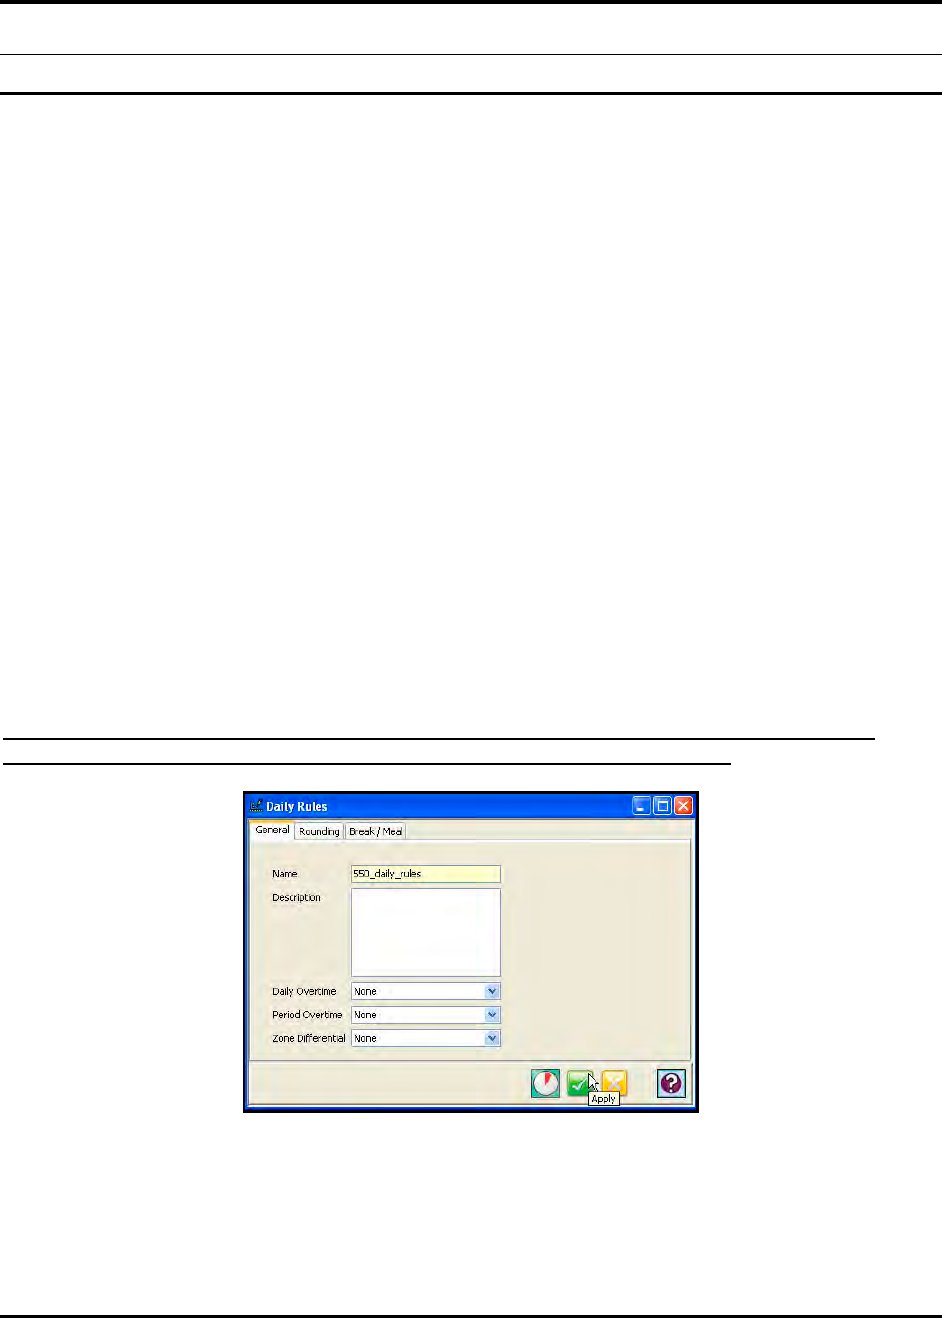
Time Guardian Series – Advanced Overtime Module 11-1
Chapter 11: Advanced Overtime Module
Advanced Overtime Module Introduction
Overtime is the time an employee works that extends beyond a certain amount of time that is
set by the Administrator of the Time & Attendance software. Daily overtime is based on hours
worked and is a way of awarding the employee for working more hours than a set hour value in
a day. The hours that exceed the set hour value are paid at a high wage.
The sections of the Time & Attendance Software affected and/or features added from the
activation of this module include:
• Advanced Pay Class
− Overtime Definition (Custom overtime level and pay codes selection for specific day of
week or holiday)
Weekly Overtime Template
Consecutive and Non-Consecutive Overtime Template
Range Overtime Template
− Overtime Execution (Order of execution for multiple Overtimes)
• Daily Rules
− Daily Overtime Template (Custom overtime level and pay codes selection for specific
day of week or holiday)
− Period Overtime Template
User Interface: From Daily Rules link in tree view only Daily overtime templates and
Period overtime can be created and assigned to a Daily Rule template
Note: If the advanced overtime module is not active, daily overtime and period overtime will
be grayed theses nodes will not be accessible from the tree view.
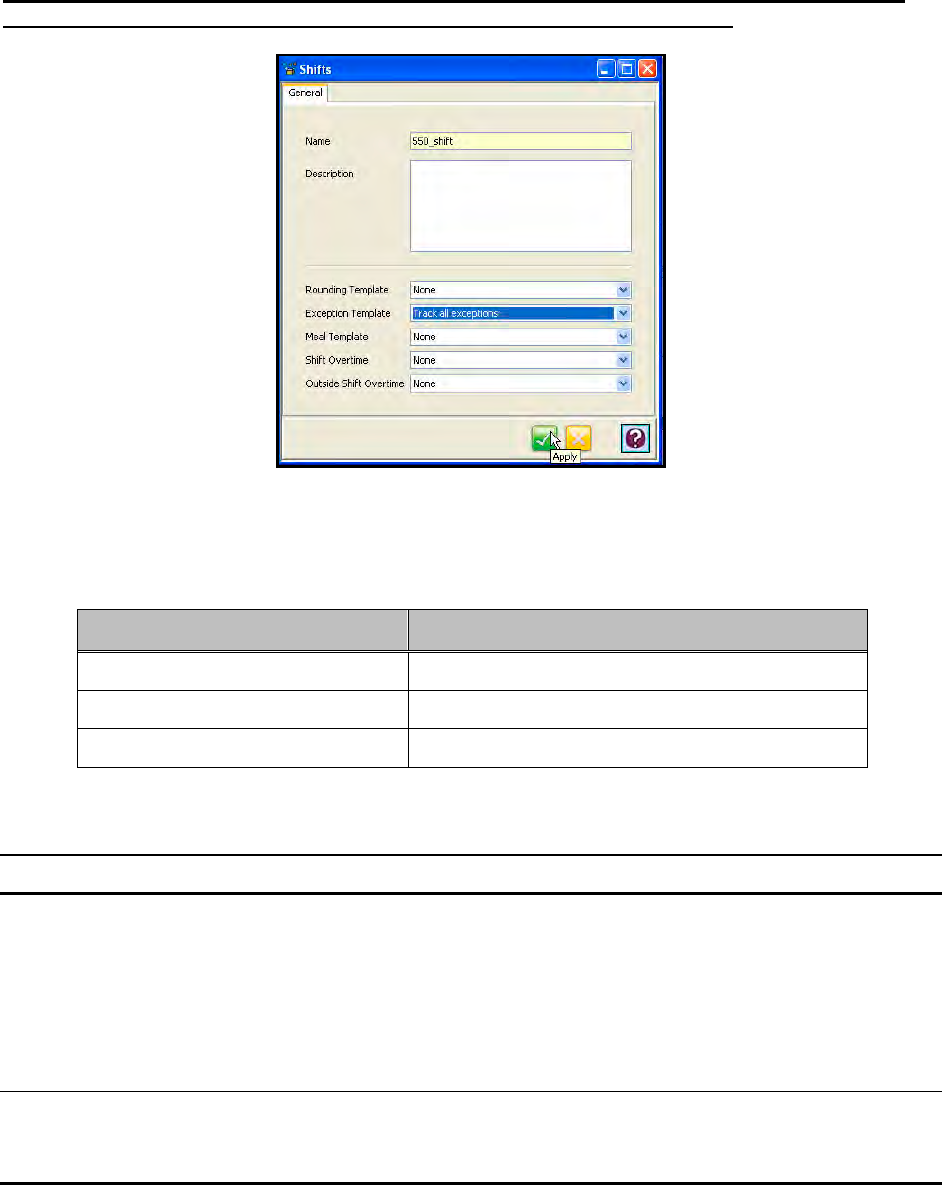
11-2 Time Guardian Series – Advanced Overtime Module
• Shift Rules
− Exception Template
− Shift Overtime Template
− Outside Shift Overtime Template
User Interface: From shift link in tree view only exception templates shift overtime and
outside shift overtime can be created and assigned to a shift template
Note: If the advanced overtime module is not active, the shift overtime and outside shift
overtime nodes will be grayed out but the exception template will stay selectable and
theses nodes will not be accessible from the tree view.
Software Setup & Feature Software Configuration Location
Advanced Pay Class Main Application Tree View
Daily Rules Main Application Tree View
Shift Rules Main Application Tree View
Using the Advanced Overtime Module
The activation of the Advanced Overtime Module affects the Pay Class, Shifts, and Daily Rules
Modules.
Overtime Definition in Pay Class Module
1. Click on Overtime Definition tab.
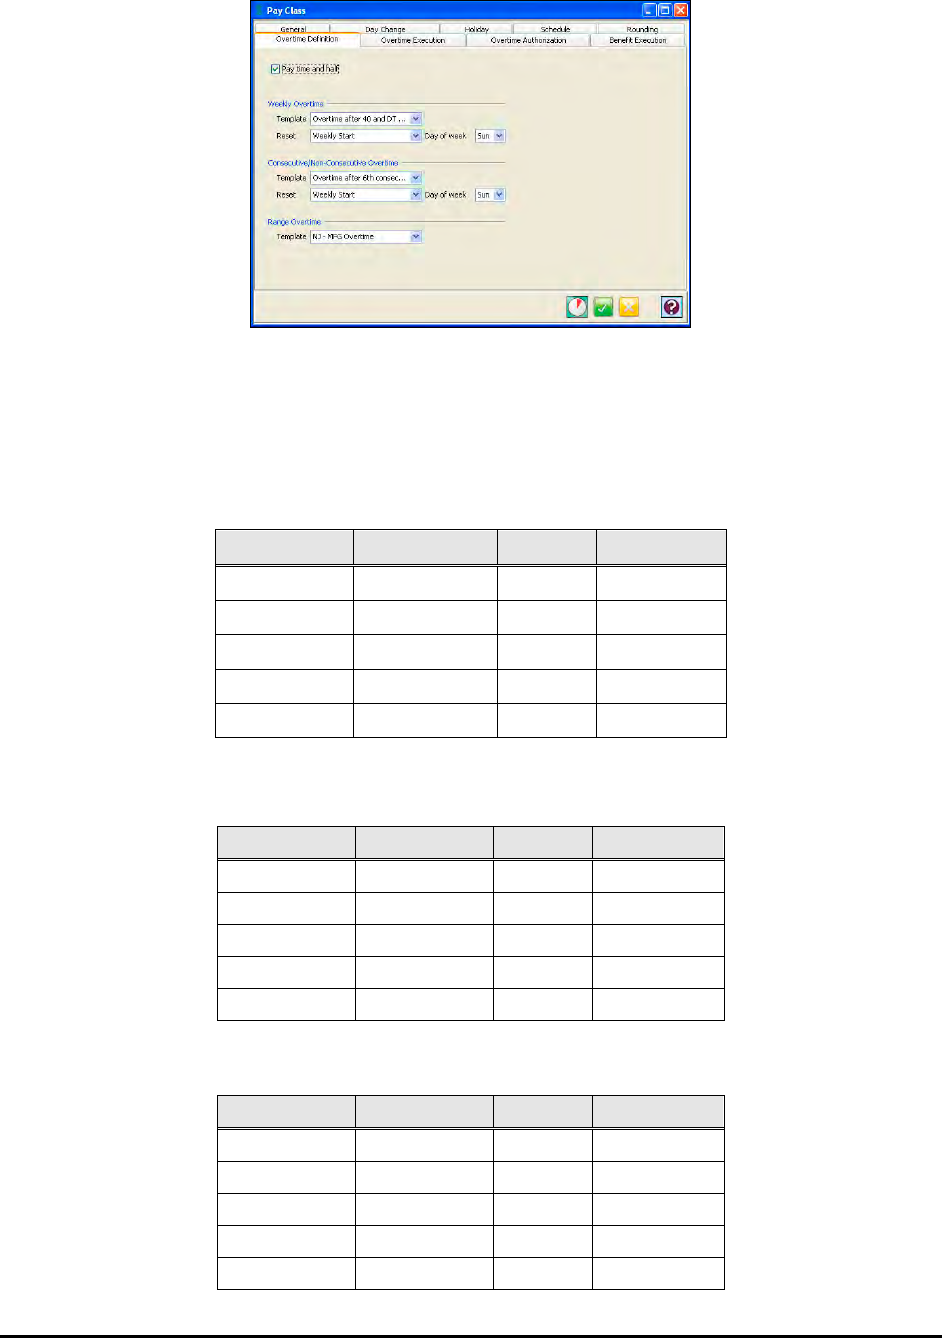
Time Guardian Series – Advanced Overtime Module 11-3
2. If you want the Pay Rate to be time and a half for overtime, check the Pay Time and a half
option, otherwise the Pay Rate will default to the multiplier in the Pay Codes. Check “Apply
On Call for Weighted Average Overtime” if you want to calculate overtime plus pay On call
bonus.
For example, if overtime is awarded after 40 hours:
Day Pay Code Split Hours
Monday REG Y 8.0
Tuesday REG Y 8.0
Wednesday REG Y 8.0
Thursday REG Y 8.0
Friday REG Y 10.0
The overtime hours Pay time and half checked:
Day Pay Code Hours Overtime
Monday REG 8.0
Tuesday REG 8.0
Wednesday REG 8.0
Thursday REG 8.0
Friday REG 8.0 2.0
The overtime hours Pay time and half unchecked:
Day Pay Code Hours Overtime
Monday REG 8.0
Tuesday REG 8.0
Wednesday REG 8.0
Thursday REG 8.0
Friday REG 10.0 2.0
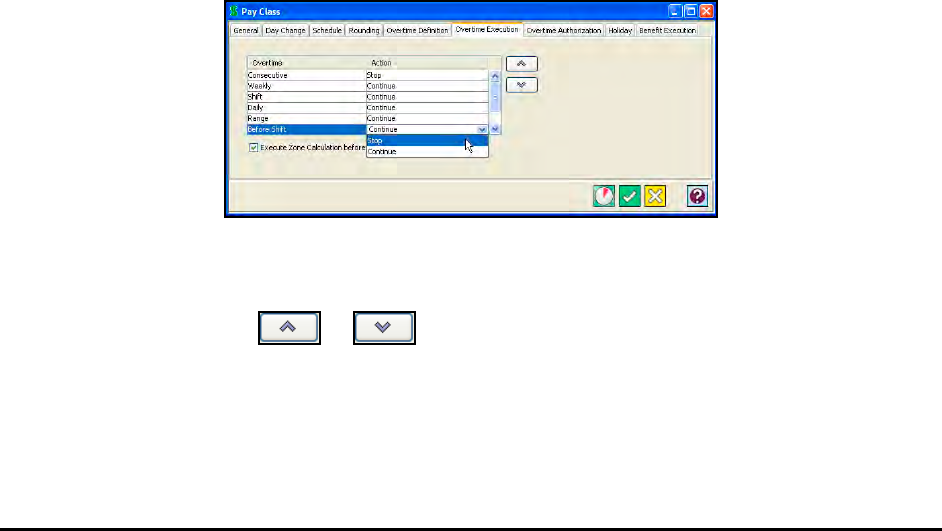
11-4 Time Guardian Series – Advanced Overtime Module
3. For Weekly Overtime, select the Weekly Overtime template and the Reset date in the fields
provided. The setup for this overtime allows you to select whether the hours counted will
occur in a "Weekly Start", "Pay Period Day of Week Start", or "Pay Period". This is called
the overtime reset date.
• If Weekly Start is selected, then you must select the day of the week the reset
begins on (Sunday, Monday, Tuesday, Wednesday, Thursday, Friday, and
Saturday).
• If the user chooses Pay Period Day of Week Start, then the overtime resets at
the day of the week that the pay period actually stated on. Note - the overtime
reset date is configured in the Overtime Definition tab of the Pay Class.
• If the user chooses Pay Period then the start date of each Pay Period is the start
date for the overtime and the overtime will continue for the entire pay period.
4. For Consecutive Day Overtime, select the Consecutive Day template and the Reset date in
the fields provided. The setup for the Consecutive Overtime requires overtime reset date,
which determines if the hours and days worked to qualify must occur in a "Weekly Start",
"Pay Period Day of Week Start", or by "Pay Period".
• If Weekly Start is selected, then you must select the day of the week the reset begins
on (Sunday, Monday, Tuesday, Wednesday, Thursday, Friday, and Saturday).
• If the user chooses Pay Period Day of Week Start, then the overtime starts on the day
of the week that the pay period actually stated on. Note - the overtime reset date is
configured in the Overtime Definition tab of the Pay Class.
• If the user chooses Pay Period then the start date of each Pay Period is the start date
for the overtime and the overtime will continue for the entire pay period. The overtime
reset date is configured in the Overtime Definition tab of the Pay Class.
5. For Range Overtime, select the range template created previously.
6. Click on Overtime Execution tab. This tab determines the order in which overtime will be
calculated.
Order (Priority) of Overtime:
The execution order (Priority) of overtime can be set by selecting the desired overtime type
and clicking on the up or down arrows to move the overtime up or down the
list.
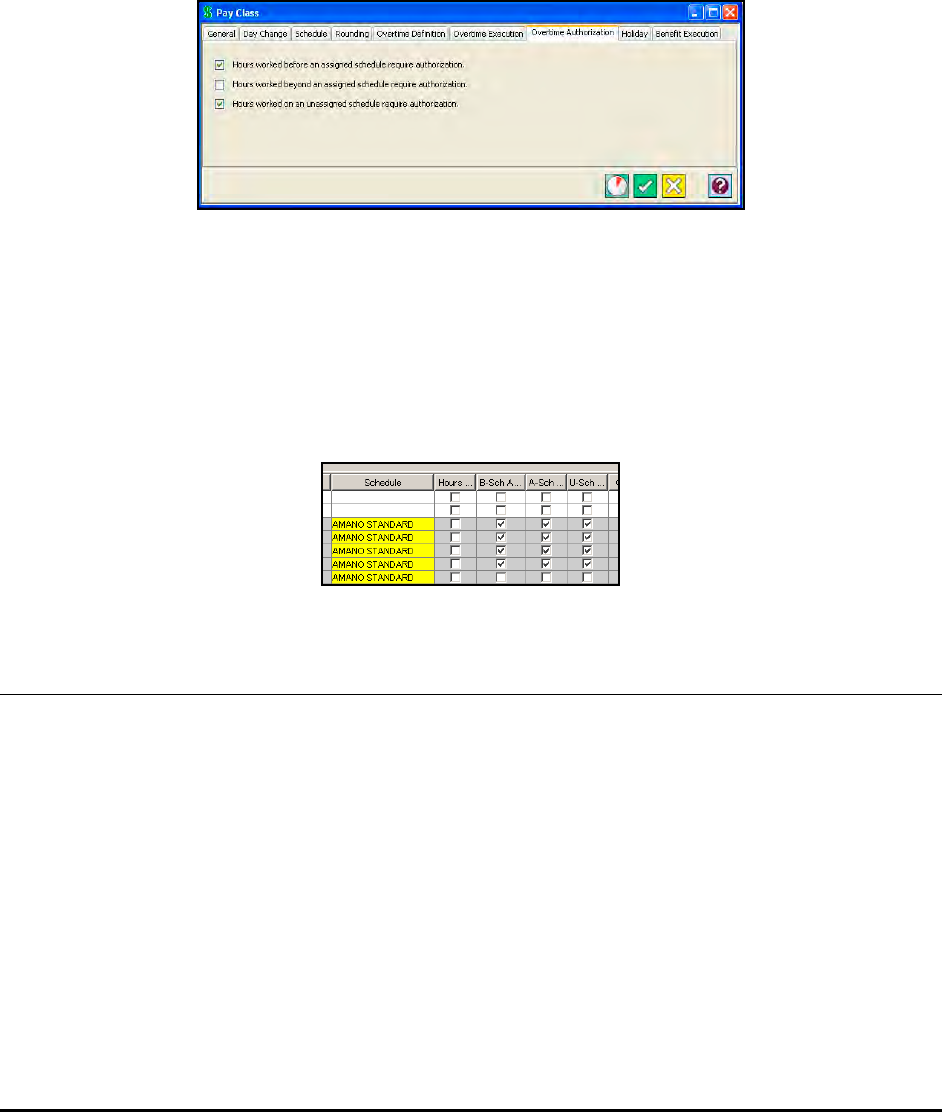
Time Guardian Series – Advanced Overtime Module 11-5
Execution of Priority
The list is calculated in order as they occur provided that the word “Continue” is in the Action
field of each overtime type. When the Action field is set to “Stop”, any overtime types that
are listed in the table where this occurs will not be executed, if employee qualifies for that
overtime. To proceed, you must change the Action field from Continue to Stop in the
selected overtime type. To do so, click on the Action field for the desired overtime type and
select the Action from the dropdown list. See the previous illustration for an example.
7. Click on the Overtime Authorization tab.
If your company’s policy requires overtime authorization, check any one of the (3) possible
scenarios where employees may work overtime. The scenarios are:
Hours worked before an assigned schedule start.
Hours worked after an assigned schedule.
Hours worked on an unassigned schedule.
When checked, the employee will only be awarded overtime for each of the above if a check
is placed in the corresponding column of the Timecard grid.
Shifts
All setup rules will fall into (3) categories: shift rules, daily rules, or multiple day rules. Shift rules
apply to a given shift or schedule. A Shift is the set of rules for a given shift or schedule. A Shift
consists of the following elements:
• Rounding Template: Determines how an employee’s punches will be rounded.
• Exceptions: Codes used to track employee’s time deviations from assigned schedules.
(Note: Meal Penalty has been added to provide feature to penalize a company when an
employee does not take lunch break or takes the lunch break late. In this instance penalty
hours are generated in the Pay Code plus the MPNT exception code will be generated).
• Meal Templates: Defines employee breaks and meal breaks.
• Shift Overtime: Defines the overtime rules for the schedule.
• Outside Shift Overtime: Defines a finite set of overtime rules for employees that work before
or after their scheduled Shift or Schedule.
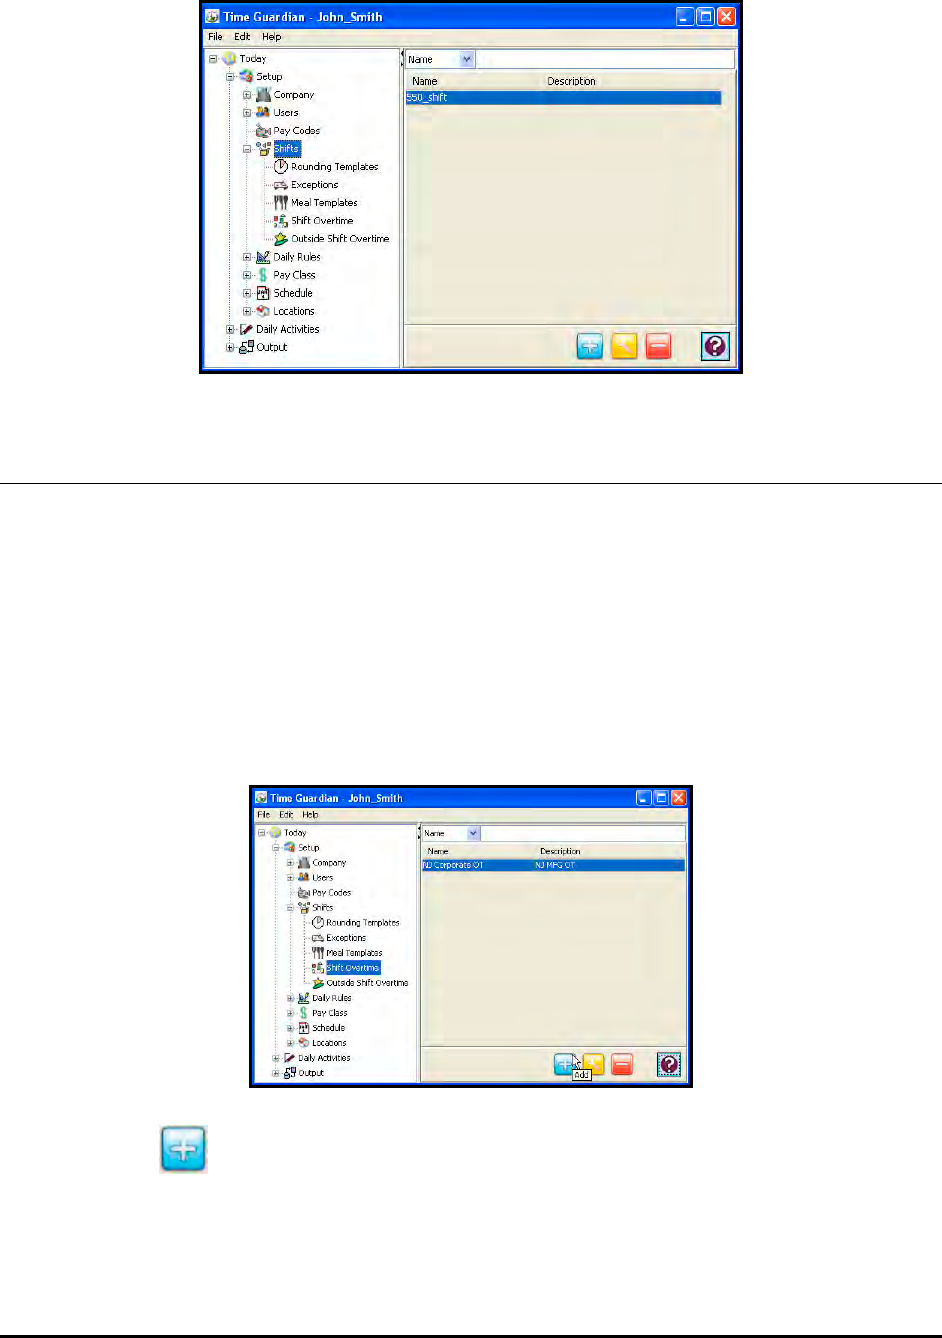
11-6 Time Guardian Series – Advanced Overtime Module
Shift Overtime
Overtime is the time an employee works that extends beyond a certain level of time set by the
company’s policies. Shift overtime is based on hours worked and is a way of rewarding the
employee for working more hours than a set hour value in one shift (Schedule). The hours that
exceed the set hour value are normally paid at a high wage or rate.
Up to (4) levels of Shift Overtime can be used. Each level can be assigned its own threshold
limit. The hours worked beyond the threshold will be moved to the specified OT Pay Code.
To create a Shift Overtime template:
1. Click on the Shift Overtime node in the Shifts module in the Tree View (see the figure).
2. Click on the button, and the Shift Overtime window will appear.
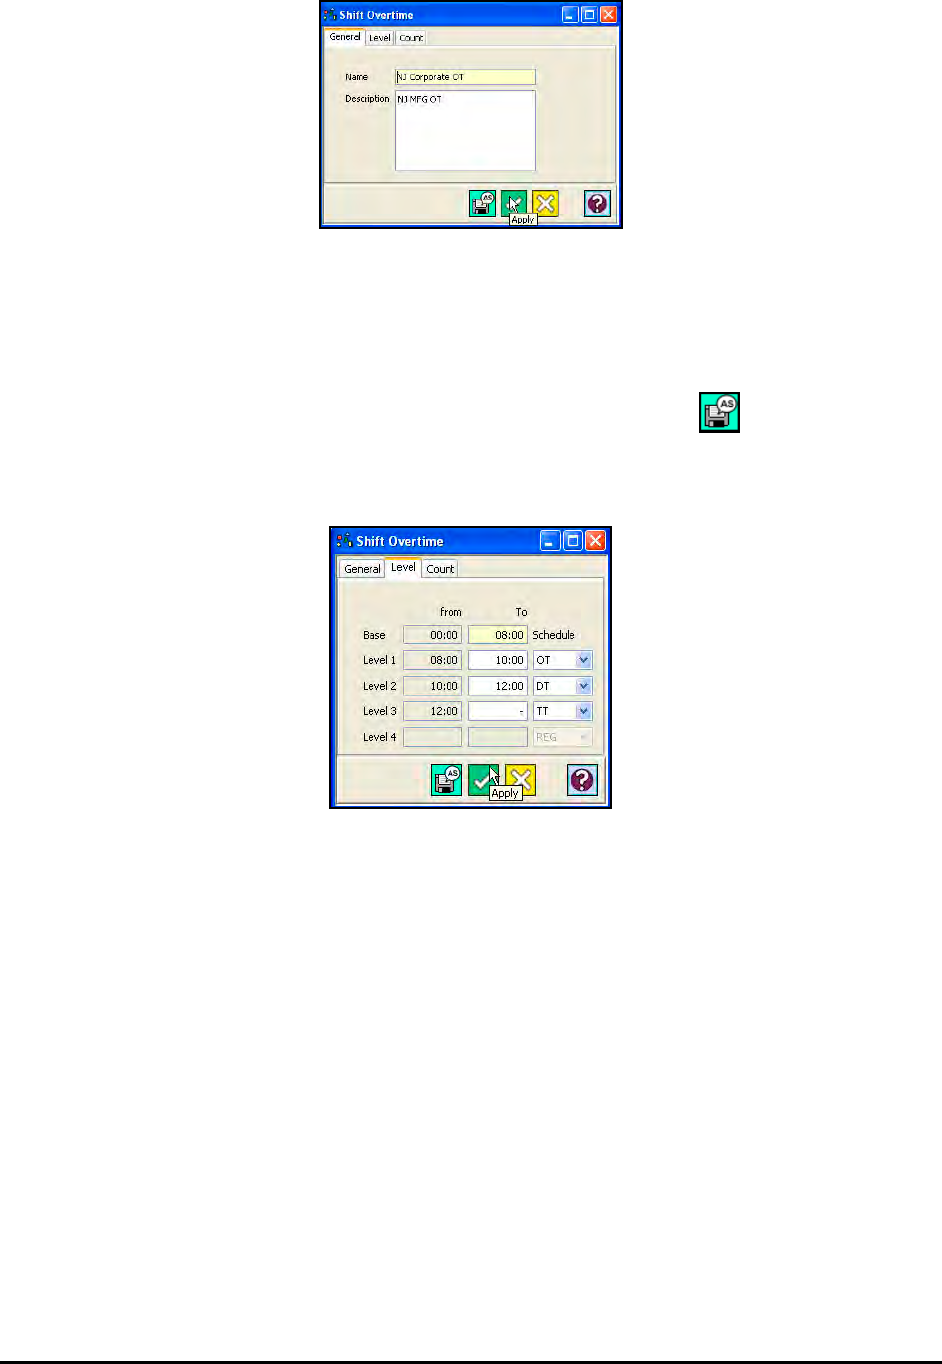
Time Guardian Series – Advanced Overtime Module 11-7
3. Enter a name for the Shift Overtime rule in the name field.
4. Enter a description of the Shift Overtime rule in the Description field.
Note: If you wish to duplicate the properties of an existing Shift Overtime template for another
Shift Overtime template, select the desired Shift Overtime template from the Shift
Overtime window, open it, enter in a new name and click on the button. The new
Shift Overtime template will appear in the Shift Overtime window.
5. Click on the Level tab.
6. In the Level table, enter the threshold limits (from and To times) and assign a reasonable
Pay Code to each level of shift overtime. For example, in the example shown in the previous
figure, an employee will be paid based upon the schedule for a regular 8 hour day. From the
8th hour to the 10th hour the employ will be paid for an OT (overtime rate). While from the
10th to 12th hours the employee will be paid at a DT (double-time rate), and from the 12th
hour till the end of the day, the employee will be paid at a TT (triple time rate).
7. Click on the Count tab.
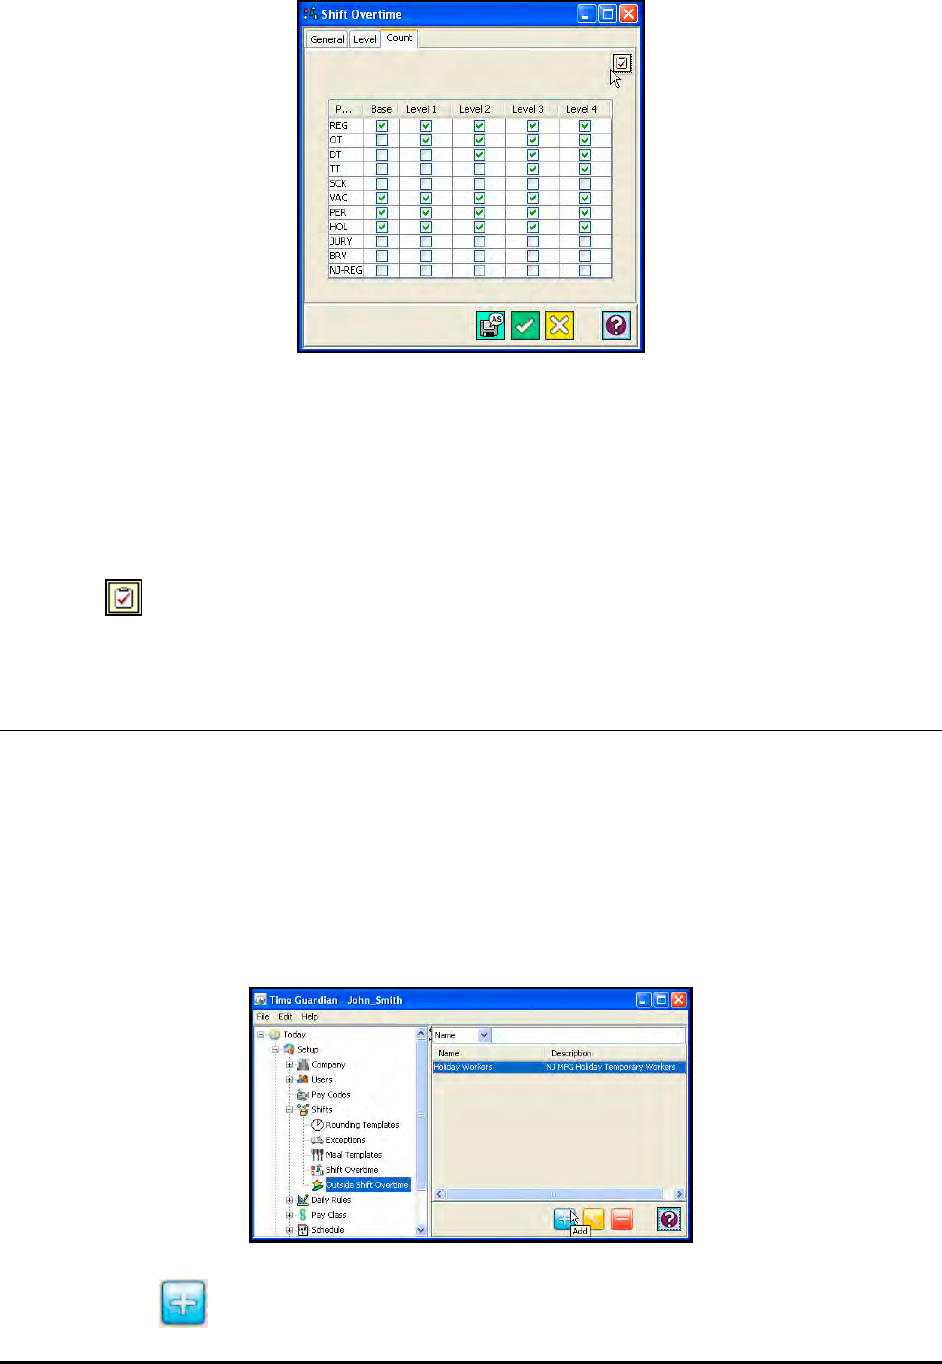
11-8 Time Guardian Series – Advanced Overtime Module
8. In the Count table, check the Pay codes in each column that you want to be combined to
achieve each level’s threshold. For example, if you checked REG and HOL in the Level1
column, then the hours for REG and HOL Pay codes will be combined to reach Level1’s
threshold value.
Note: You can select all the Pay codes in a given column by clicking on the column heading.
You can also deselect any checked Pay codes in a column by clicking on the column
heading. Also, you can select/unselect all pay codes by clicking on the Check/Uncheck
All icon.
Outside Shift Overtime
Outside Shift overtime allows you to create a finite set of overtime rules for employees that work
before or after their scheduled Shift or Schedule.
Up to (4) levels of Outside Shift Overtime can be used. Each level can be assigned its own
threshold limit. Hours worked beyond the threshold will be moved to the specified OT pay code.
To create an Outside Shift Overtime template:
1. Click on the Outside Shift Overtime node in the Shifts module in the Tree View (see figure).
2. Click on the button, and the Outside Shift Overtime window will appear.
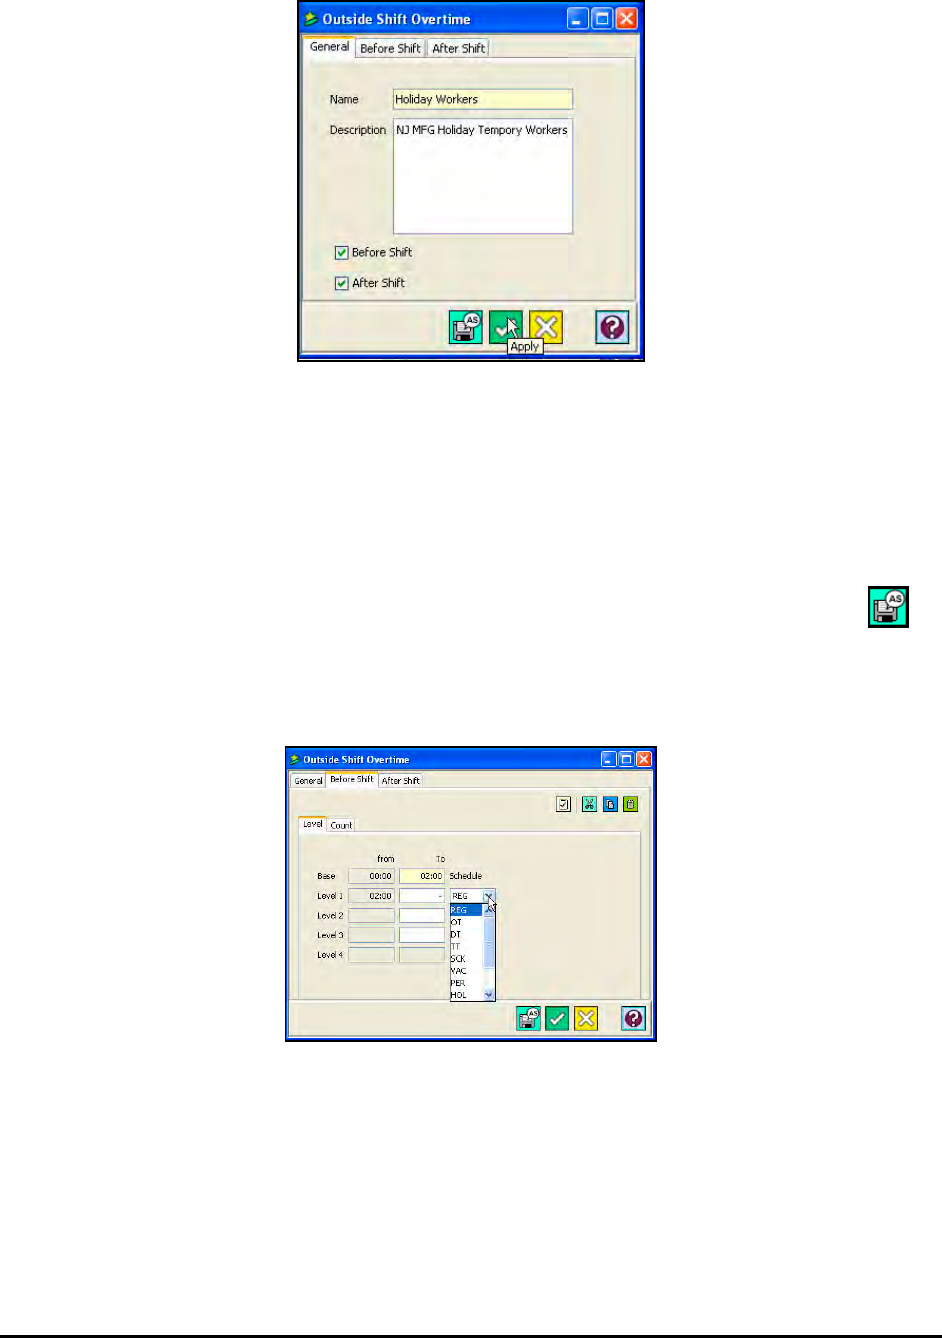
Time Guardian Series – Advanced Overtime Module 11-9
3. Enter a name for the Outside Shift Overtime rule in the name field [required field].
4. Enter a description of the Outside Shift Overtime rule in the Description field.
5. Select either Before Shift, After Shift, or both. The Before and After tabs will be active only if
they are checked.
Note: If you wish to duplicate the properties of an existing Outside Shift Overtime template for
another Shift Overtime template, select the desired Outside Shift Overtime template from
the Outside Shift Overtime window, open it, enter in a new name and click on the
button. The new Outside Shift Overtime template will appear in the Outside Shift
Overtime.
6. Click on the Before Shift tab.
7. In the Level table, enter the threshold limits and assign a Pay Code to each level of
overtime.
8. Click on the Count tab.
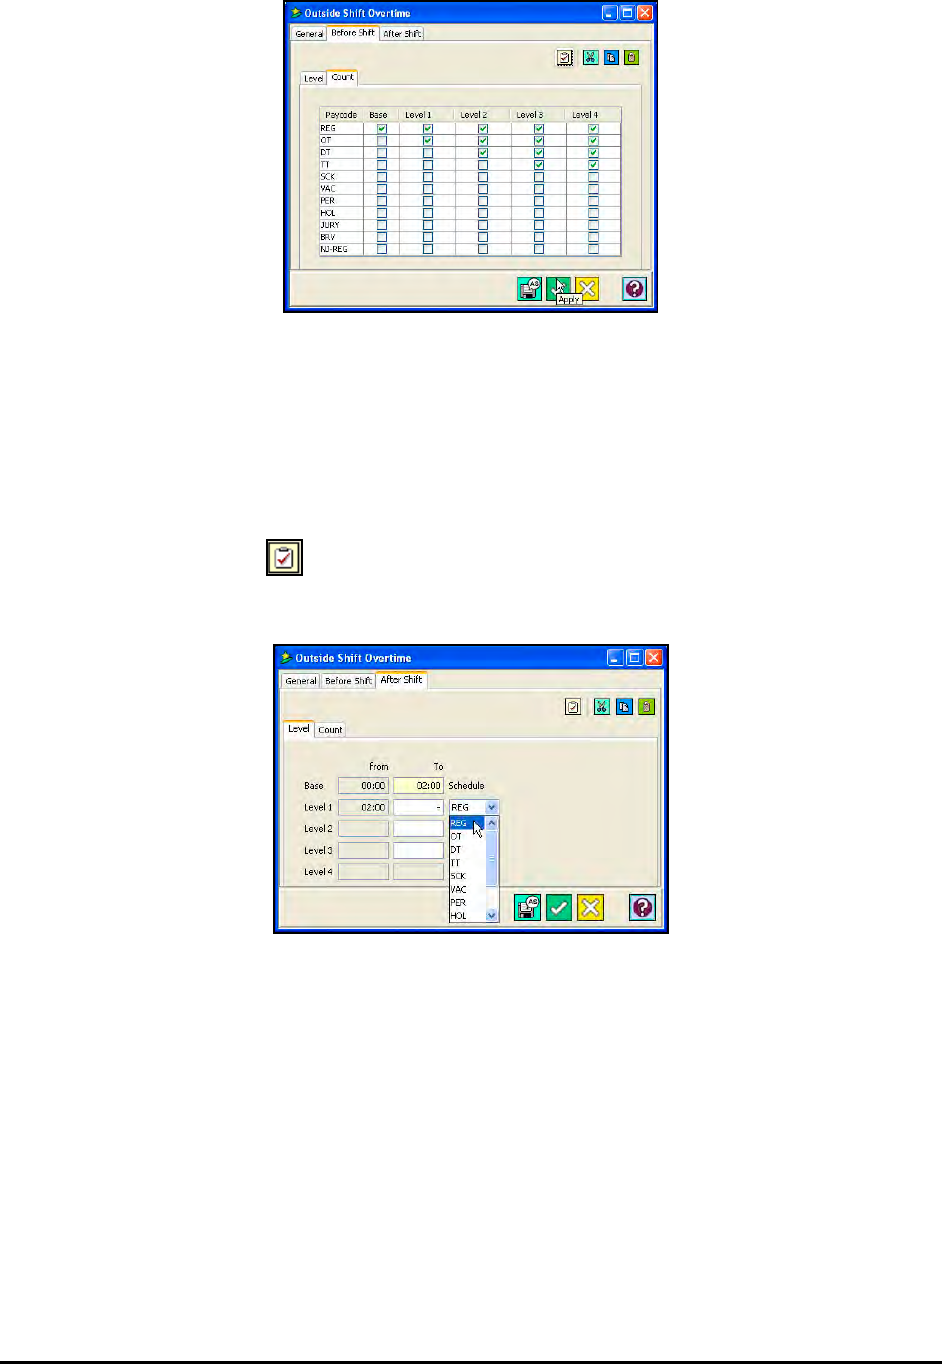
11-10 Time Guardian Series – Advanced Overtime Module
9. In the Count table, check the Pay Codes in each column that you want to be combined to
achieve each level’s threshold. For example, if you checked REG and HOL in the Level 1
column, then the hours for REG and HOL Pay Codes will be combined to reach Level 1’s
threshold value.
Note: You can select all the Pay Codes in a given column by clicking on the column heading.
You can also deselect any checked Pay Codes in a column by clicking on the column
heading. Also, you can select/unselect all the Pay Codes by clicking on the
Check/Uncheck All icon.
10. Click on the After Shift tab.
11. In the Level table, enter the threshold limits and assign a Pay Code to each level of
overtime.
12. Click on the Count tab.
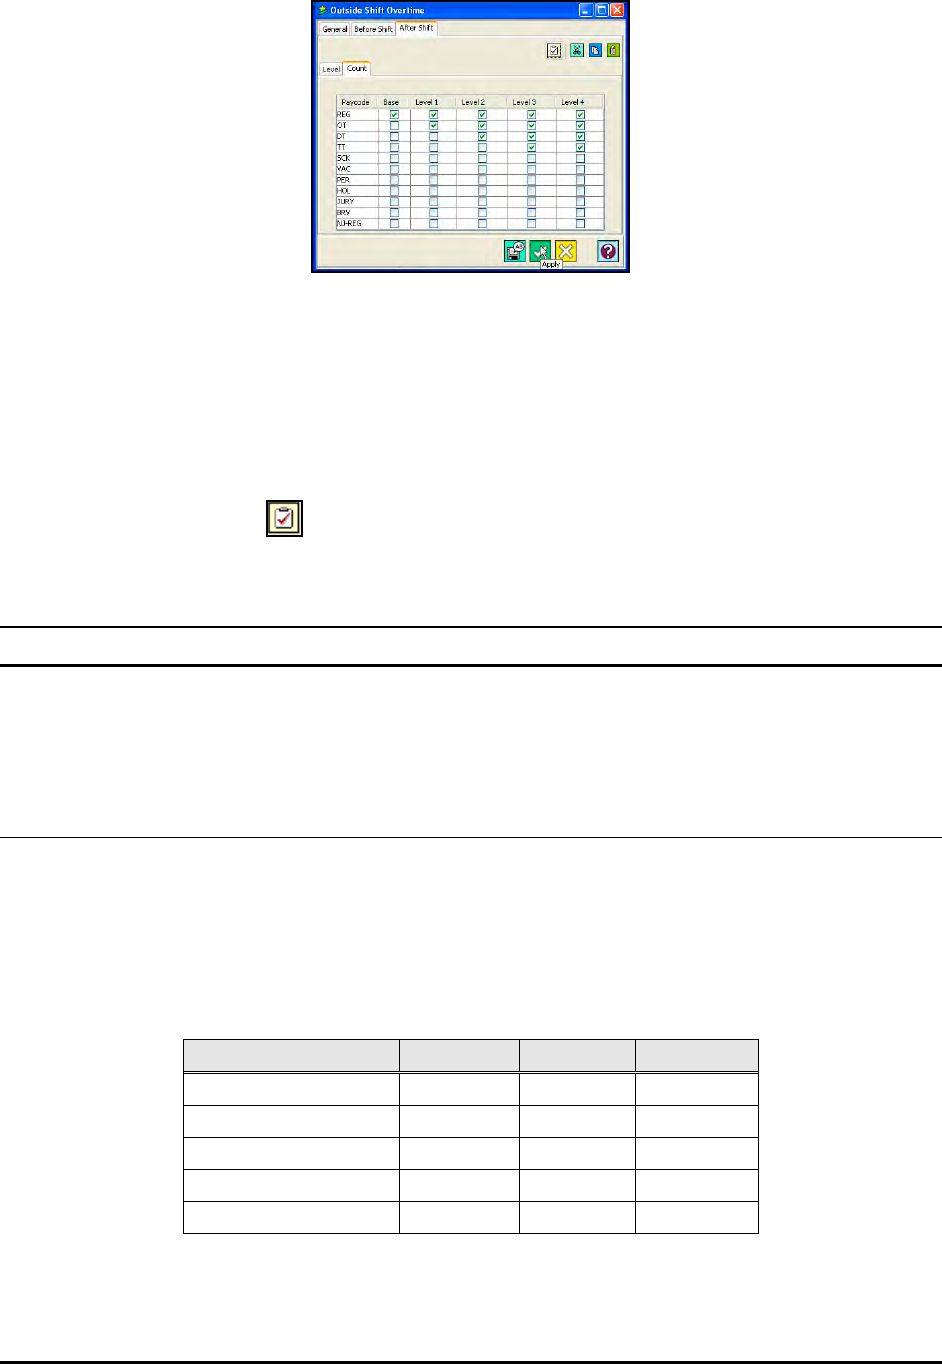
Time Guardian Series – Advanced Overtime Module 11-11
13. In the Count table, check the Pay Codes in each column that you want to be combined to
achieve each level’s threshold. For example, if you checked REG and HOL in the Level1
column, then the hours for REG and HOL Pay Codes will be combined to reach Level1’s
threshold value.
Note: You can select all the Pay Codes in a given column by clicking on the column heading.
You can also deselect any checked Pay Codes in a column by clicking on the column
heading. Also, you can select/unselect all the Pay Codes by clicking on the
Check/Uncheck All icon.
Daily Rules
The Daily Rules module is used to set the rules which govern daily punches, such as Rounding,
Break/Lunch Rounding, and Daily Overtime.
Daily Overtime
Overtime is the time an employee works that extends beyond a certain level of time set by the
company’s policies. Daily overtime is based on hours worked and is a way of rewarding the
employee for working more hours than a set hour value in one day. The hours that exceed the
set hour value are normally paid at a higher wage or rate.
Up to (4) levels of Weekly Overtime can be used. Each level can be assigned its own threshold
limit that move the hours from one Pay Code to another. The following table shows an example.
Daily Overtime From To Pay Code
Base 00:00 08:00 REG
Level 1 08:00 10:00 OT
Level 2 10:00 12:00 DT
Level 3 12:00 - TT
Level 4
Additionally, you can set the Pay Codes that will count toward daily overtime level.

11-12 Time Guardian Series – Advanced Overtime Module
To create a Daily Overtime template:
1. Click on the Daily Overtime node within the Daily Rules module in the Tree View (see
figure).
2. Click on the button, and the following Daily Overtime window will appear:
3. Enter a name for the Daily Overtime template in the name field [required field].
4. Enter a description of the Daily Overtime template in the Description field.
5. Click on the Settings tab and the following window will appear:

Time Guardian Series – Advanced Overtime Module 11-13
6. In the Level tab, select the day of the week that this overtime rule will apply to, using the
Day of the Week/Holiday(s) field. The choices are Sunday through Saturday, Default, or
Holiday Group. The Default setting will be used for any day(s) or Holiday(s) not defined
explicitly. Enter the threshold limits and assign a Pay Code to each level of overtime.
7. Click on the Count tab and the following window will appear:
8. On the Count table, check the Pay Codes in each column that you want to be combined to
achieve each level’s threshold. For example, if you checked REG and HOL in the Level1
column, then the hours for REG and HOL Pay Codes will be combined to reach Level1’s
threshold value.
Note: The (4) buttons at the top right of the Level tab allow you to Select (or De-select) all,
copy, cut, and paste the (Overtime) Pay Codes into different days or holidays. The
Period Overtime
Period Overtime is a method of awarding an employee for working more hours than a set hour
value in a given period of time. Multiple periods can be set in a given day. Each period begins
with an IN punch and expires the number of hours set from that punch.
The setup for this overtime is similar to that of Daily Overtime. The levels and counts can be
setup for each day of the week, Default (any day not explicitly set), and Holidays. The day for
which levels and count will be used is based on the calculation day and the IN punch that
begins the period. Up to (4) levels of Period Overtime can be used. Each level can be assigned
its own threshold limit that move the hours from one Pay Code to another.
For example, (2) 24-hour periods:
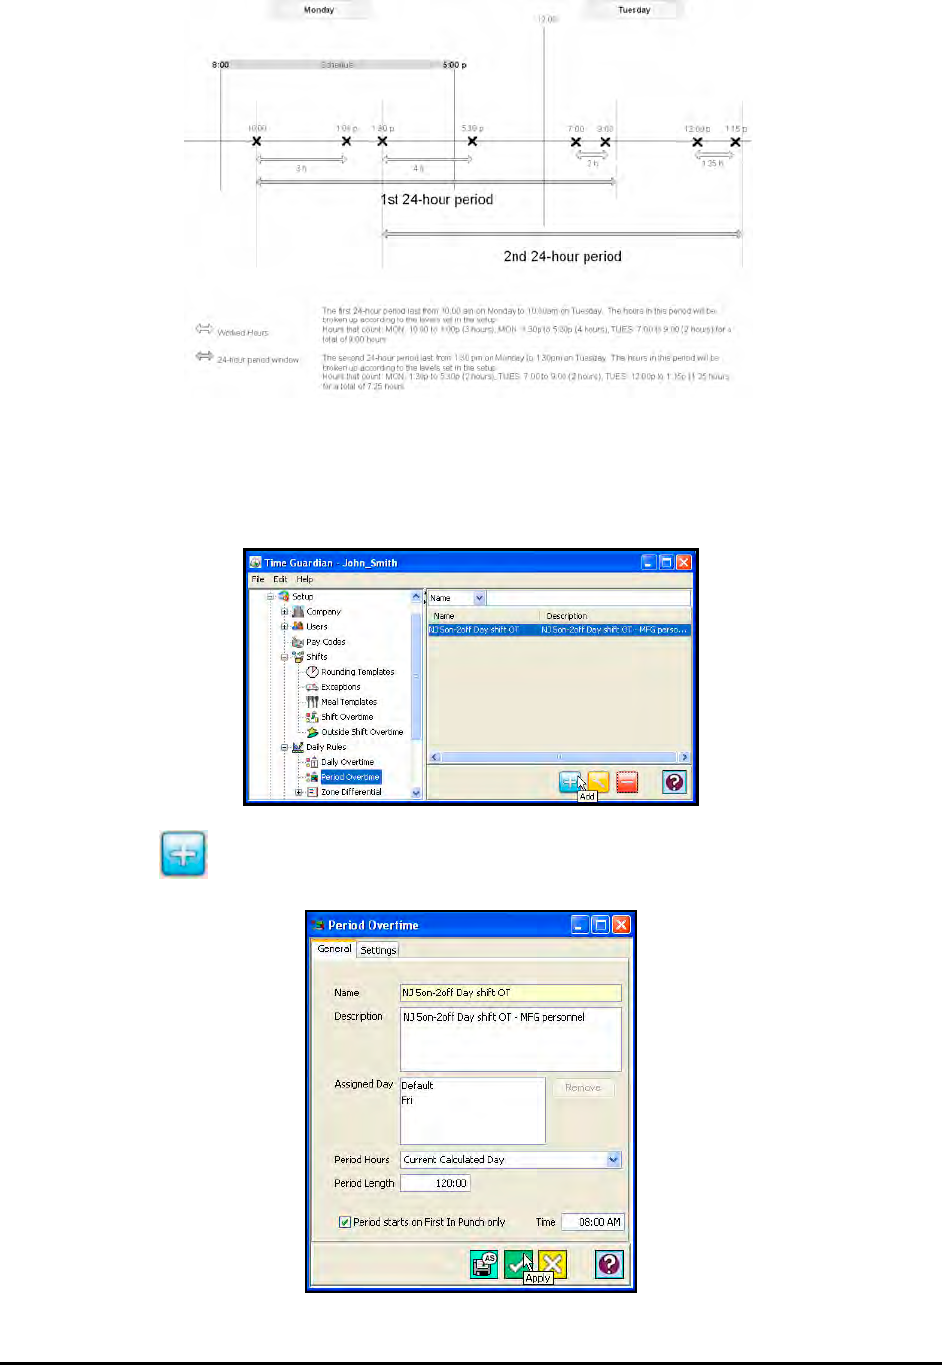
11-14 Time Guardian Series – Advanced Overtime Module
To create a Period Overtime template:
1. Click on the Period Overtime node within the Shifts Module in the Tree View, and the
following type of screen will appear.
2. Click on the button, and the Period Overtime window will appear (see figure).
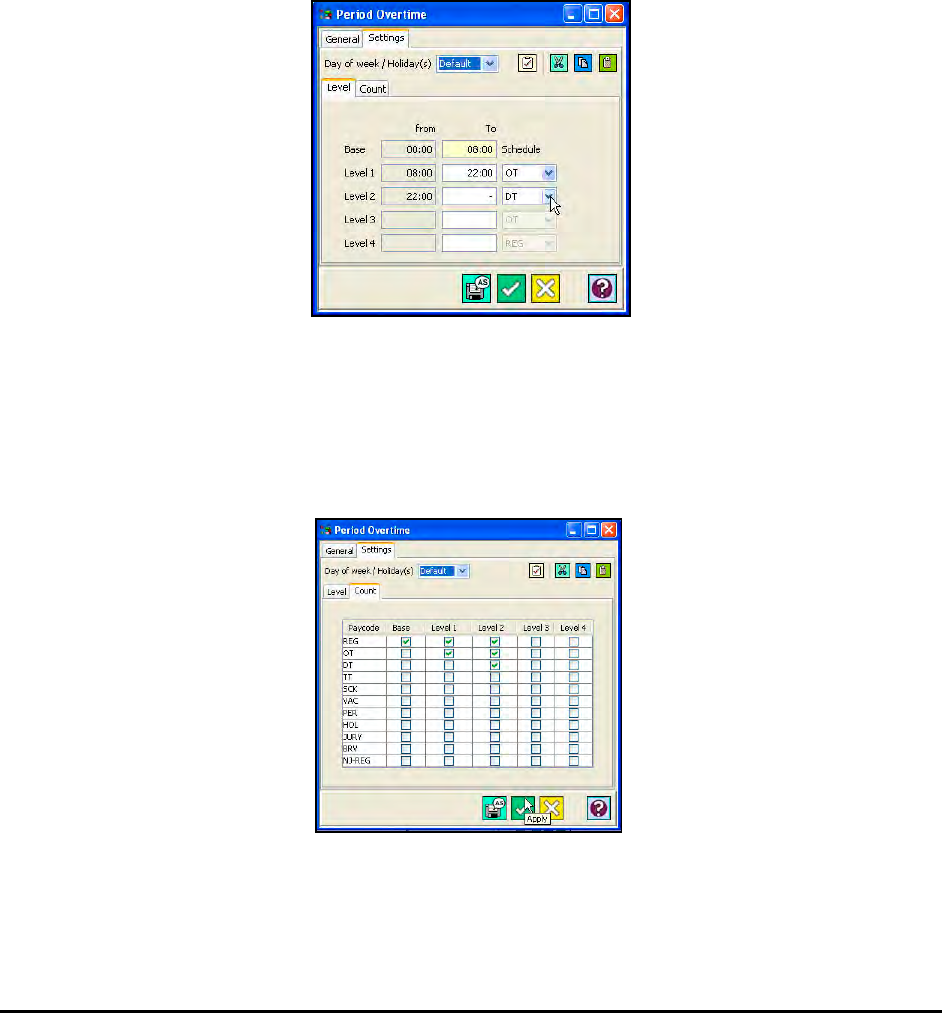
Time Guardian Series – Advanced Overtime Module 11-15
3. Enter a name for the Period Overtime template in the name field [required field].
4. Enter a description of the Period Overtime template in the Description field.
5. Select Period Hours. The choices are; Current Calculated Day, or Previous Calculated Day
of the 1st In-Punch.
6. Enter the Period Length in HH:MM.
7. Enter the Time in HH:MM for period overtime.
8. Click on the check box if you wish the Period to start on the first In Punch only. If this setting
is not checked, a new period will be created for every IN punch. When multiple periods are
in effect, an employee can receive overtime for each period.
9. Click on the Settings tab, and the following type of screen will appear.
10. In the Level tab, select the day of the week that this overtime rule will apply to, using the
Day of the Week/Holiday(s) field. The choices are Sunday through Saturday, Default, or
Holiday Group. The Default setting will be used for any day(s) or Holiday(s) not defined
explicitly. Enter the threshold limits and assign a Pay Code to each level of overtime.
11. Click on the Count tab and the following window will appear:
12. On the Count table, check the Pay Codes in each column that you want to be combined to
achieve each level’s threshold. For example, if you checked REG and HOL in the Level1
column, then the hours for REG and HOL Pay Codes will be combined to reach Level1’s
threshold value.
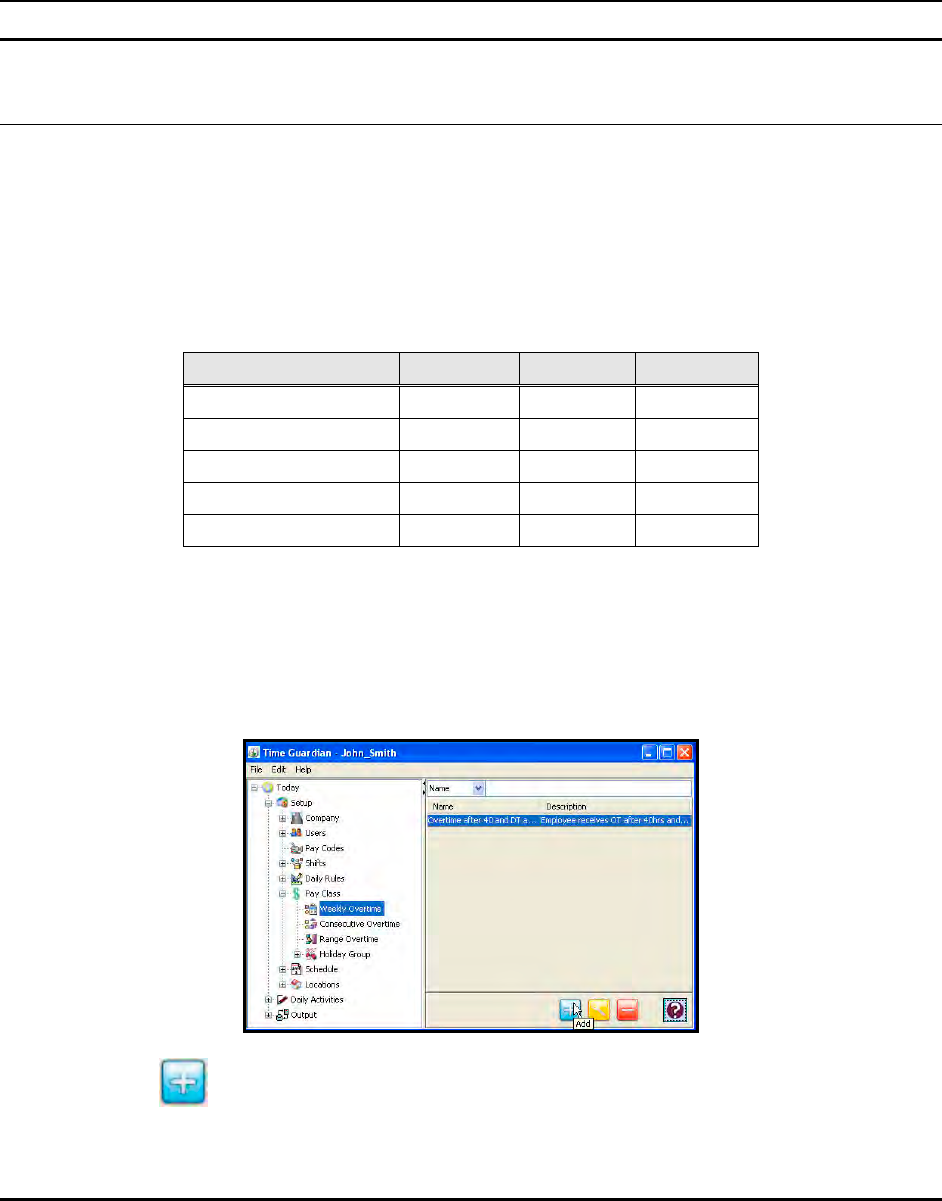
11-16 Time Guardian Series – Advanced Overtime Module
Note: The (4) buttons at the top right of the Level tab allow you to Select (or De-select) all,
copy, cut, and paste the (Overtime) Pay Codes into different days or holidays. The
buttons are as follows:
Pay Class
Weekly Overtime
Weekly Overtime rewards employees overtime hours for working more hours than a set hour
value for that particular week or Pay period. The hours that exceed the set hour value are
normally paid at a higher wage than regular (REG) Pay Code hours. Weekly Overtime is set in
the Weekly Overtime window, which is accessed by selecting the Weekly Overtime node within
the Pay Class module in the Tree View.
Up to (4) levels of Weekly Overtime can be used. Each level can be assigned its own threshold
limit that move the hours from one Pay Code to another. See the following table for an example.
Weekly Overtime From To Pay Code
Base 00:00 40:00 REG
Level 1 40:00 48:00 OT
Level 2 48:00 - DT
Level 3
Level 4
Additionally, you can set the Pay Codes that will count toward weekly overtime level.
Creating a Weekly Overtime Template
1. Click on the Weekly Overtime node within the Pay Class module in the Tree View.
2. Click on the button, and the Weekly Overtime window will appear.
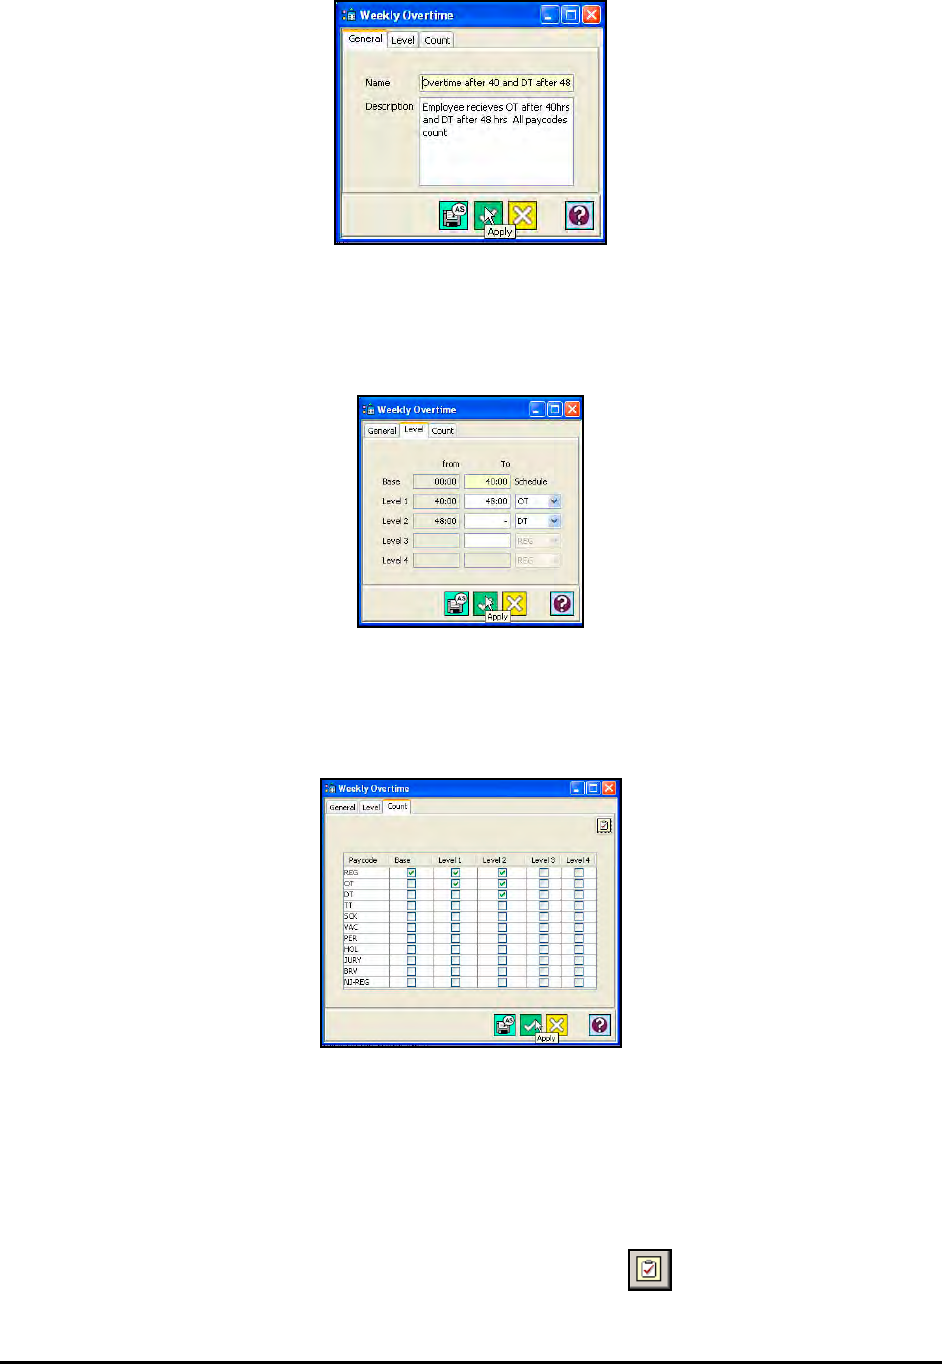
Time Guardian Series – Advanced Overtime Module 11-17
3. Enter a name for the weekly OT template in the name field [required field].
4. Enter a description of the weekly OT template in the Description field.
5. Click on the Level tab.
6. Enter the threshold limits for each level of weekly overtime and assign a Pay Code to each
level of weekly overtime.
7. Click on the Count tab.
8. In the Count table, check the Pay Codes in each column that you want to be combined to
achieve each level’s threshold. For example if you checked REG and HOL in the Level 1
column, then the hours for REG and HOL Pay Codes will be combined to reach Level 1’s
threshold value.
Note: You can select all the Pay Codes in a given column by clicking on the column heading.
You can also deselect any checked Pay Codes in a column by clicking on the column
heading. To select all Pay Codes in the grid, click on the button. This button will
also deselect all the Pay Codes in the grid, if all were selected.
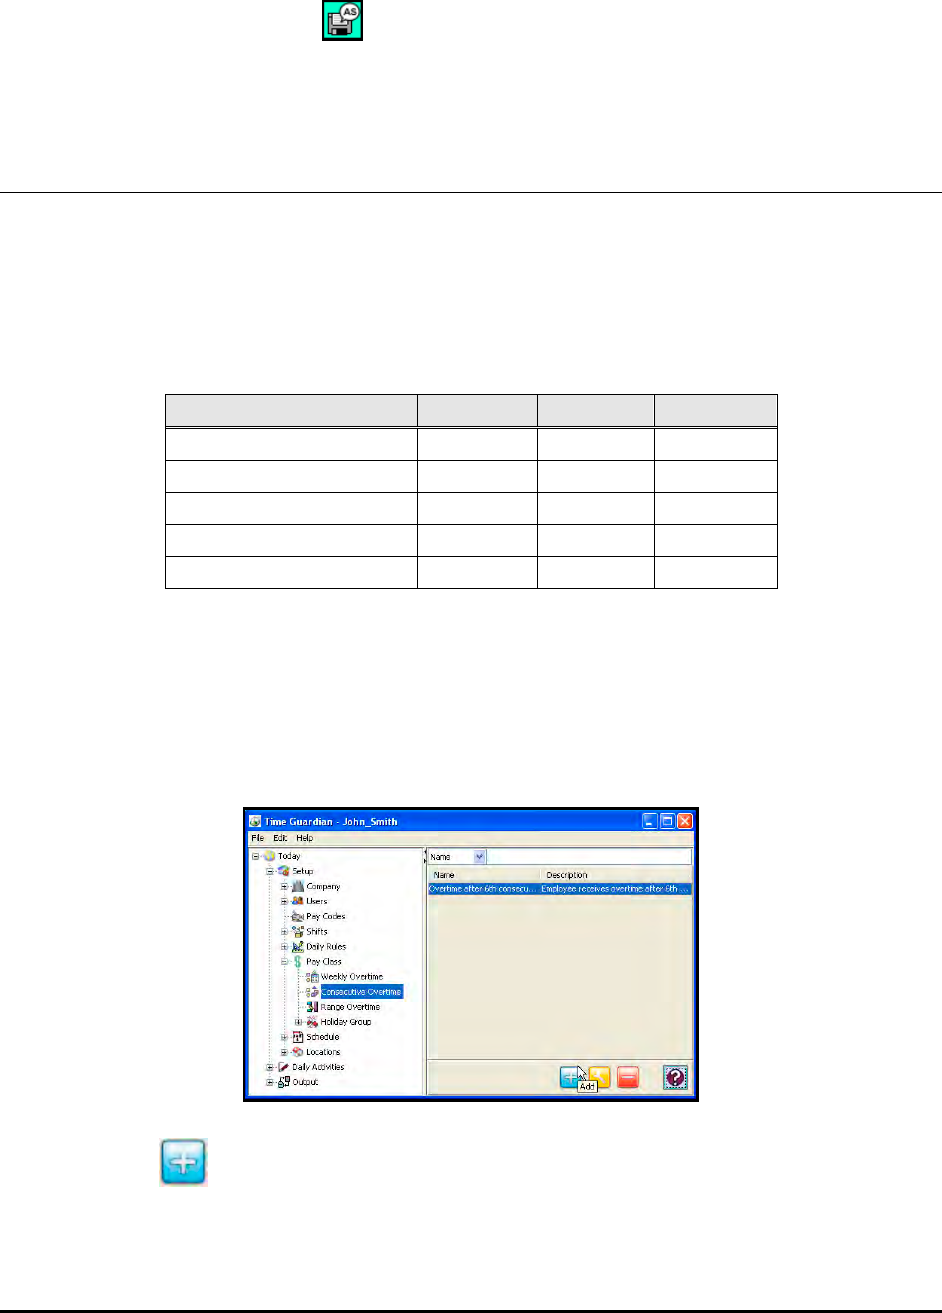
11-18 Time Guardian Series – Advanced Overtime Module
Note: If you wish to duplicate the Weekly Overtime properties from the General, Level, and/or
Count tabs, select the desired Weekly Overtime template, open it, enter in a new name
and click on the Save As button. The new Weekly Overtime template will appear in
the Main View.
Consecutive Overtime
Consecutive Overtime awards overtime based on the qualifying number of consecutive or non-
consecutive days within a week or Pay period and number of hours worked per day.
Consecutive days are days that are worked one right after another with no days off in between.
Up to (4) levels of Consecutive Overtime days can be created with each level assigned its own
threshold limit to move the hours from one Pay Code to another. See the following table for an
settings example.
Consecutive Overtime From To Pay Code
Base 00:00 08:00 REG
Level 1 08:00 10:00 OT
Level 2 10:00 12:00 DT
Level 3 12:00 - TT
Level 4
Additionally, you can set the Pay Codes that will count toward consecutive overtime level.
Creating a Consecutive Overtime Template
1. Click on the Consecutive Overtime node within the Pay Class module in the tree view (see
the following figure).
2. Click on the button, and the Consecutive Overtime window will appear:
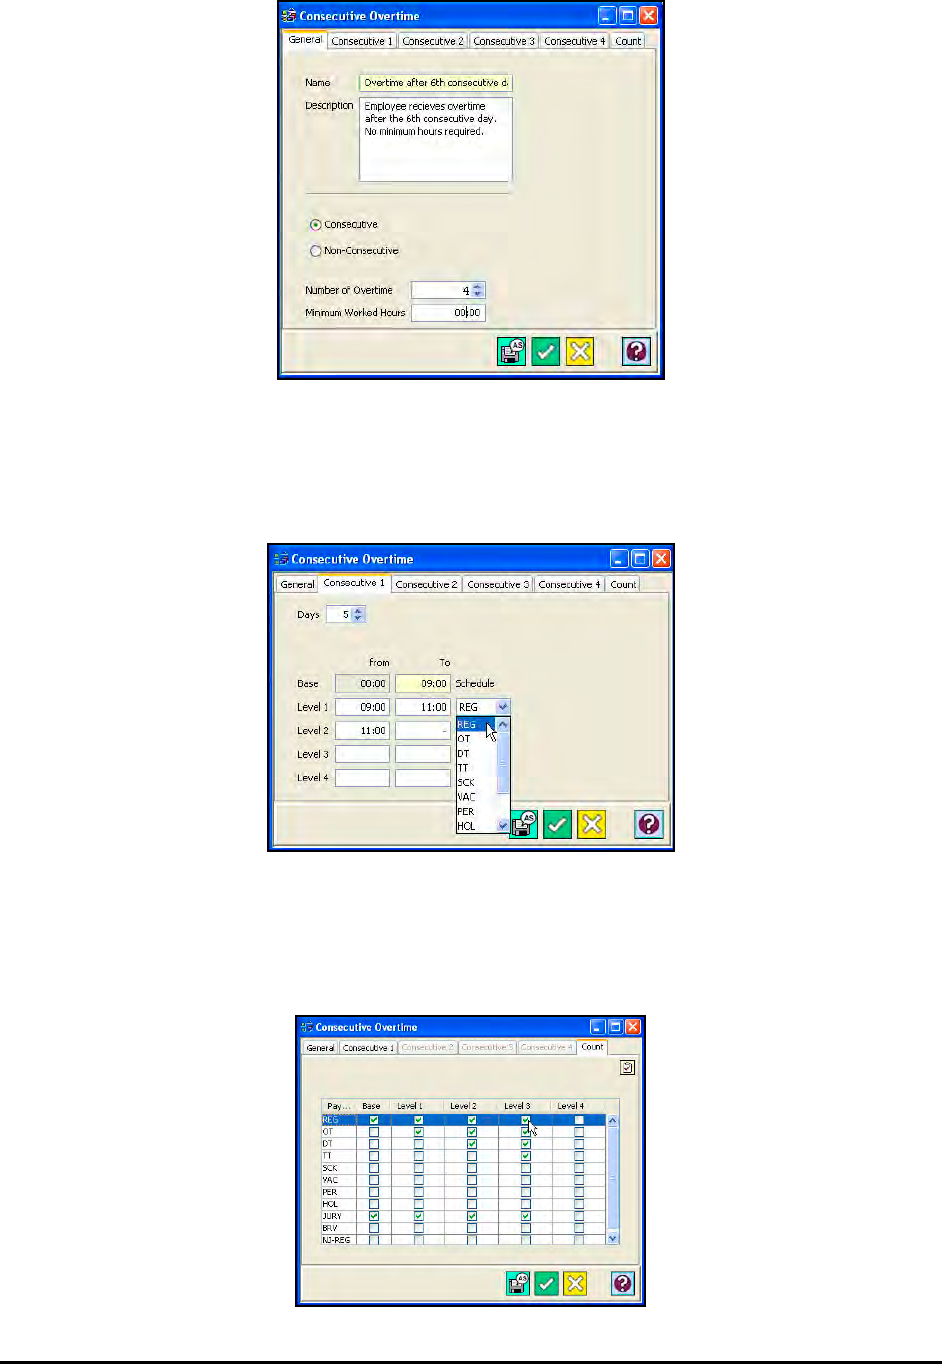
Time Guardian Series – Advanced Overtime Module 11-19
2. Enter a name for the overtime template in the name field [required field].
3. Enter a description of the overtime template in the Description field.
4. Click on the Consecutive 1 tab.
5. Enter the threshold limits and assign a Pay Code to each level.
6. Repeat Steps 5 and 6 for Consecutive 2 thru 4 (If applicable).
7. Click on the Count tab.
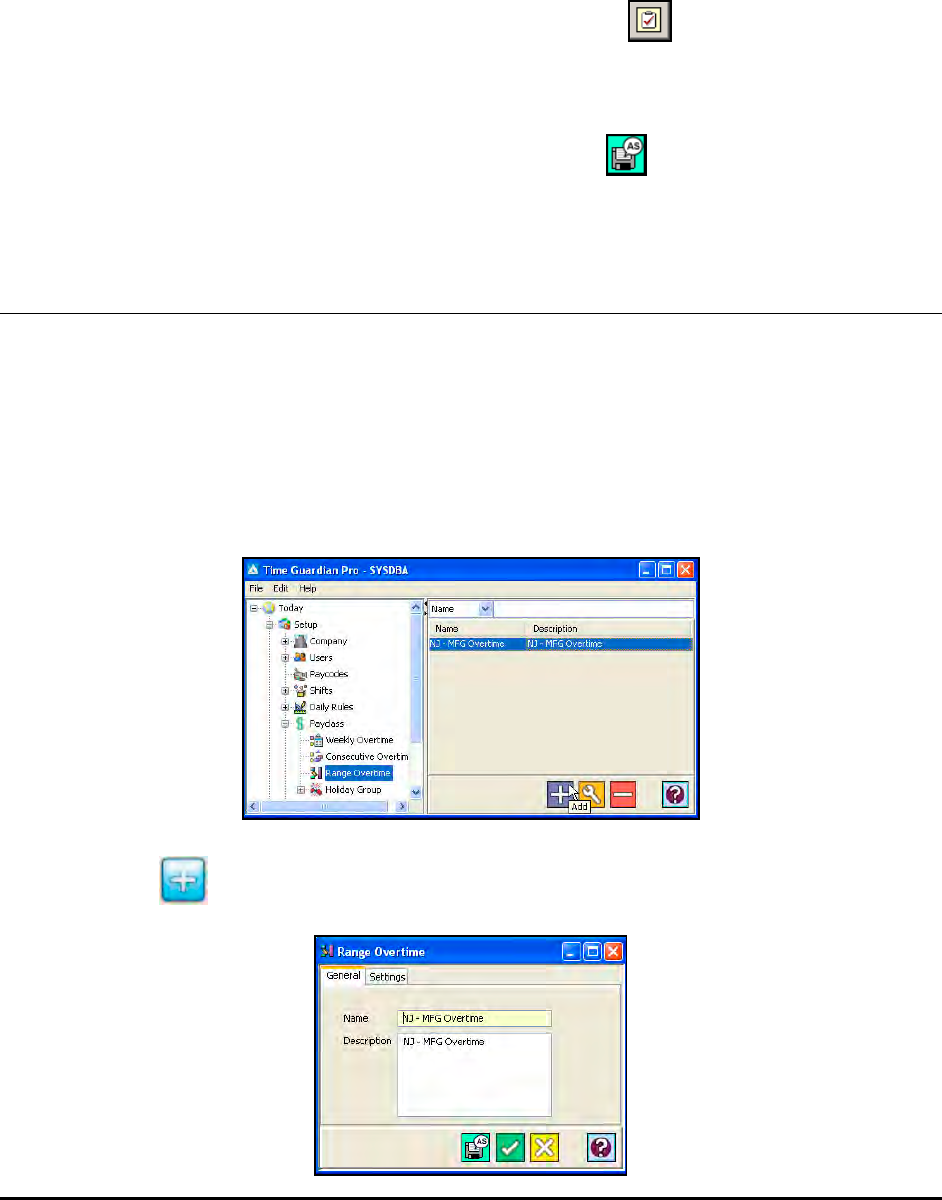
11-20 Time Guardian Series – Advanced Overtime Module
8. In the Count table, check the Pay Codes in each column that you want to be combined to
achieve each level’s threshold. For example if you checked REG and HOL in the Level1
column, then the hours for REG and HOL Pay Codes will be combined to reach Level1’s
threshold value.
Note: You can select all the Pay Codes in a given column by clicking on the column heading.
You can also deselect any checked Pay Codes in a column by clicking on the column
heading. To select all Pay Codes in the grid, click on the button. This button will
also deselect all the Pay Codes in the grid, if all were selected.
Note: If you wish to duplicate the Consecutive Overtime properties from the General,
Consecutive, and/or Count tabs, select the desired Consecutive Overtime template,
open it, enter in a new name and click on the Save As button. The new Consecutive
Overtime template will appear in the Main View.
Range Overtime
Range Overtime awards overtime based on the qualifying number of hours in a given period (or
date range). A start and end date are required for each period. An unlimited number of “Ranges”
or periods can be setup in a given Range Overtime template, but they cannot overlap.
Creating a Range Overtime Template
1. Click on the Range Overtime node within the Pay Class module in the tree view (see the
following figure).
2. Click on the button, and the Range Overtime window will appear:
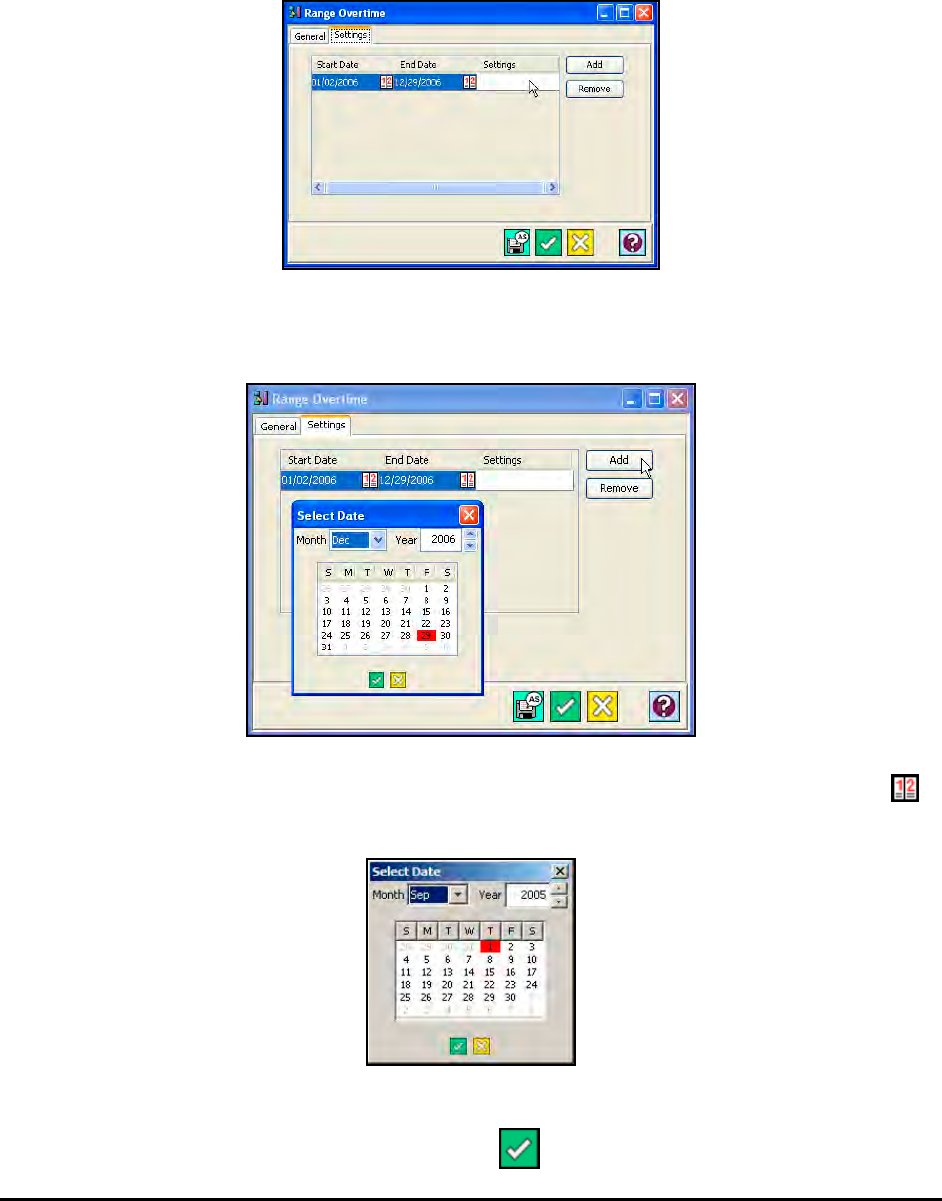
Time Guardian Series – Advanced Overtime Module 11-21
3. Enter a name for the Range Overtime template in the Name field.
4. Enter a description of the Range Overtime template in the Description field.
5. Click on the Settings tab.
6. Click on the Add button to create a date range or period. A row will appear with the Start and
End Date fields enabled.
7. In the Start Date field, enter a start date manually in MMDDYYYY format or click on the
button. The Select Date dialog box will appear:
Using the dropdown lists, select the Month and Year. Click on the desired day in the
calendar. When you have finished, click on the button on the Select Date screen to
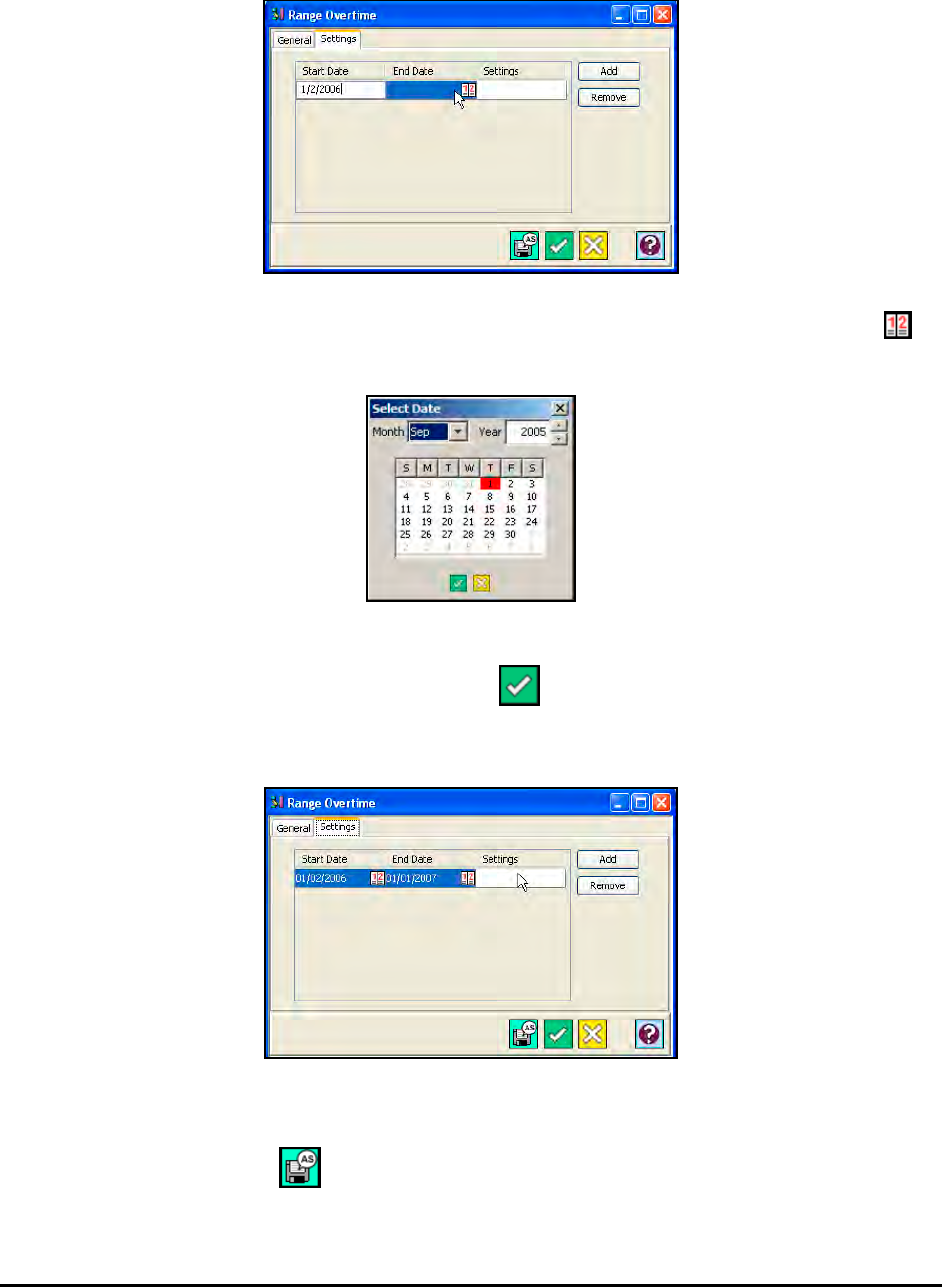
11-22 Time Guardian Series – Advanced Overtime Module
save your setting and close the dialog box and return to the Settings tab of the Range
Overtime window.
8. In the End Date field, enter a start date manually in MMDDYYYY format or click on the
button. The Select Date dialog box will appear:
Using the dropdown lists, select the Month and Year. Click on the desired day in the
calendar. When you have finished, click on the button in the Select Date screen to save
your setting and close the dialog box and return to the Settings tab of the Range Overtime
window.
Note: If you wish to duplicate the Range Overtime properties from the General, and/or Settings
tabs, select the desired Range Overtime template, open it, enter in a new name and
click on the Save As button. The new Range Overtime template will appear in the
Main View.
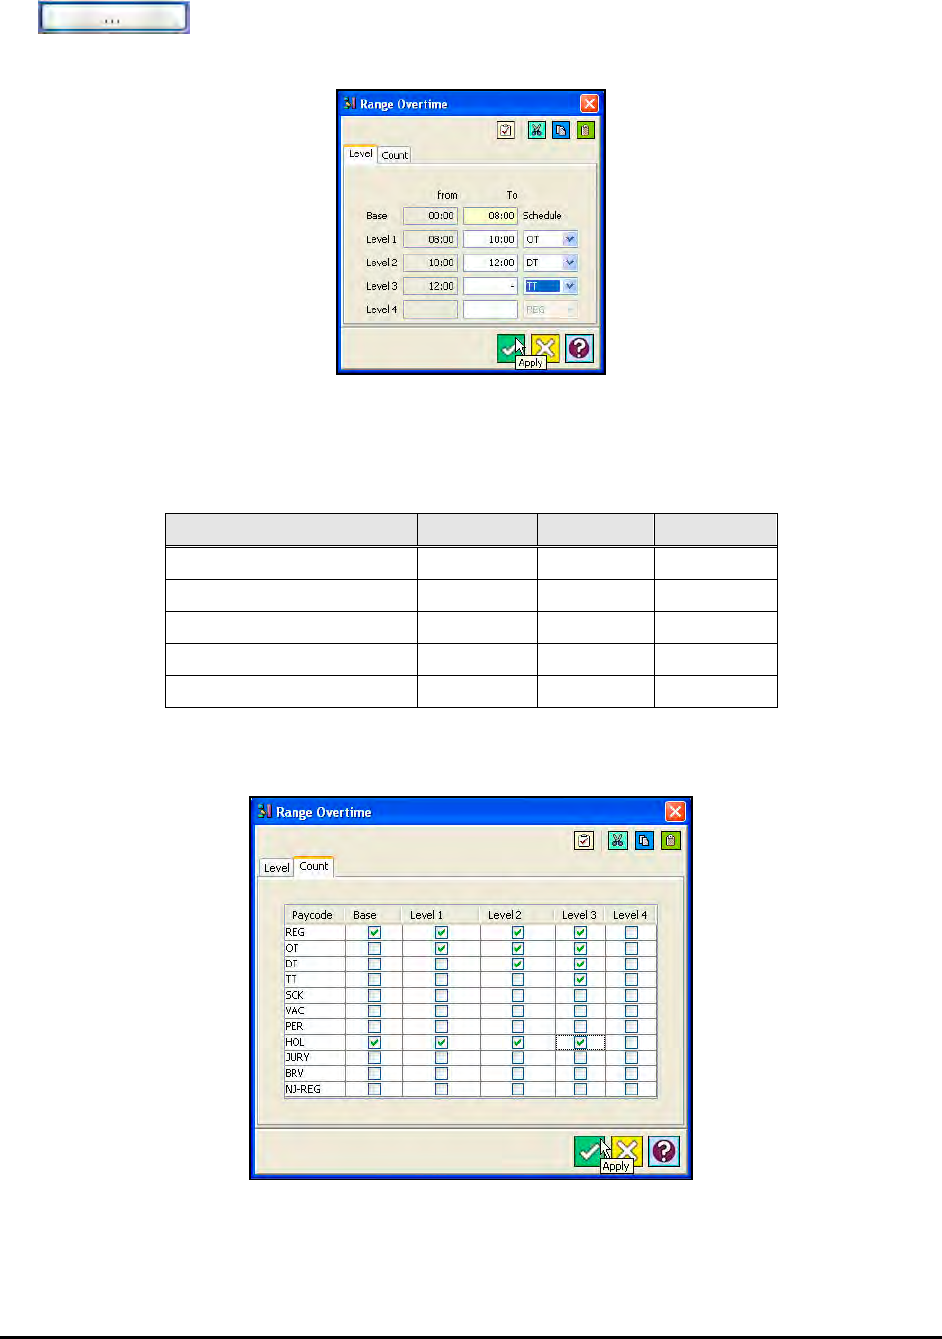
Time Guardian Series – Advanced Overtime Module 11-23
9. From the Settings tab within Range Overtime module screen, click on the Browse
button within the Settings column and the following type of screen will
appear:
10. From the Level tab, up to (4) levels of Range Overtime can be created with each level
assigned its own threshold limit to move the hours from one Pay Code to another. See the
following table for a settings example.
Range Overtime From To Pay Code
Base 00:00 08:00 REG
Level 1 08:00 10:00 OT
Level 2 10:00 12:00 DT
Level 3 12:00 - TT
Level 4
11. Click on the Count tab, and the following type of screen will appear:
12. On the Count table, check the Pay Codes in each column that you want to be combined to
achieve each level’s threshold. For example, if you checked REG and HOL in the Level 1
column, then the hours for REG and HOL Pay Codes will be combined to reach Level 1’s
threshold value.

11-24 Time Guardian Series – Advanced Overtime Module
Note: You can select all the Pay Codes in a given column by clicking on the column heading.
You can also deselect any checked Pay Codes in a column by clicking on the column
heading. To select all Pay Codes in the grid, click on the button. This button will
also deselect all the Pay Codes in the grid, if all were selected.
Note: The (4) buttons at the top right of the Level tab allow you to Select (or De-select) all,
copy, cut, and paste the (Overtime) Pay Codes into different days or holidays. The
buttons are as follows:
Time Guardian Series – Advanced Schedule Module 12-1
Chapter 12: Advanced Schedule Module
Advanced Schedule Module Introduction
This module is used to define when an employee should work. Schedules consist of Template
Schedule (fixed schedule for day of week), Auto Schedule (a set of template schedules to pick
from based on an employee’s punches and for a multiple shift), Individual Schedule (a fixed
schedule for a specific date) and Schedule Rotation (a schedule based on a pattern).
The sections of the Time & Attendance Software affected and/or features added from the
activation of this module include:
• Schedule
− Auto Schedules
− Template Schedule with Auto Schedule
− Individual/Advanced Schedules
− Schedules Rotation
− Employee Schedule Override (Employee Configuration)
• Advanced Pay Class
− Template Schedule assignment based on (schedule start time, schedule overlaps)
• Shift Rules (Exception Template)
• Reports
− Schedule Posting Report
− Schedule vs. Actual Report (Meal Hours will be included if schedule time allowed) [now
includes meal hours]
• Import
− Individual Schedule Import
− Advanced Schedule Import
• Time card
− Schedule Override
• Web Schedules (Template, Auto, Schedule Rotation, Individual Schedule)
Software Setup & Feature Software Configuration Location
Schedule Main Application Tree View
Advanced Pay Class Main Application Tree View
Shift Rules Main Application Tree View
Reports Main Application Tree View
Import Main Application Tree View
Web Schedules Applicable if web Module is enabled
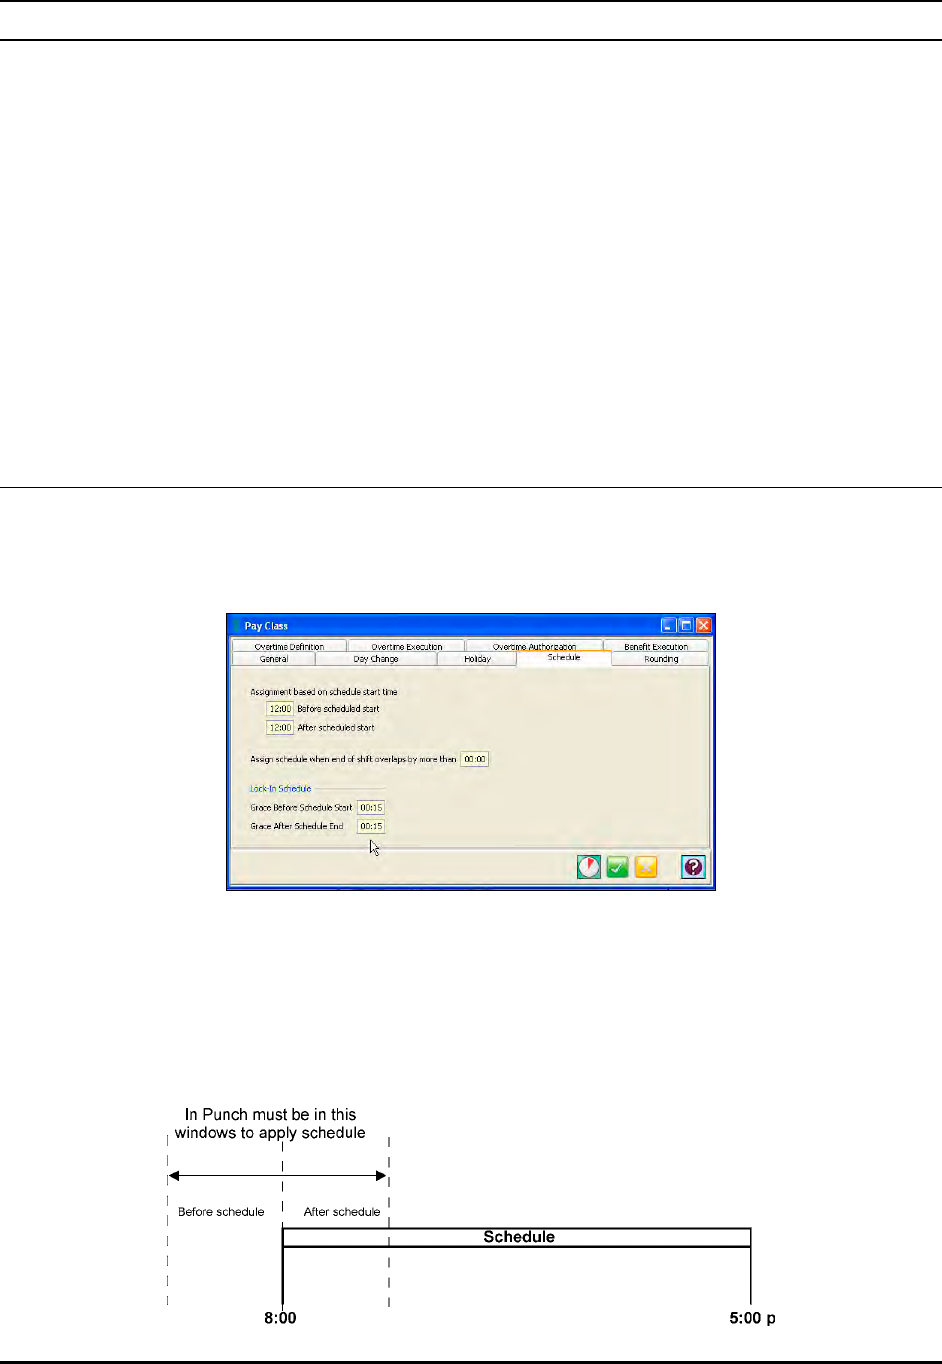
12-2 Time Guardian Series – Advanced Schedule Module
Using the Advanced Schedule Module
An employee’s schedule is made up of template schedules and auto schedules. Together these
schedules form the weekly work pattern that can be applied to an employee.
Note: You must have activated the Advanced Schedule Module to see Schedule and the four
(4) nodes; Templates Schedules, Auto Schedules, Schedule Coverage, and Schedule
Rotation in the tree view.
Note: If the Web Interface Module is activated you can perform Templates Schedules, Auto
Schedules, Schedule Coverage, and Schedule Rotation utilizing the Web. See the Web
Interface Module for procedural steps.
Note: See Timecard Administration for procedural steps for Schedule Overrides utilizing the
Overrides Tab from an employee Timecard.
Pay Class Schedule
1. Click on the Schedule tab. This tab will assign an employee to a schedule based on their
start and end times.
Schedule Assignment Based on IN punch:
1. In the Before scheduled start field, enter the amount of time before schedule that an
employee’s IN punch must occur in to be assigned to a schedule.
2. In the After scheduled start field, enter the amount of time after schedule that an employee’s
IN punch must occur in to be assigned to a schedule.
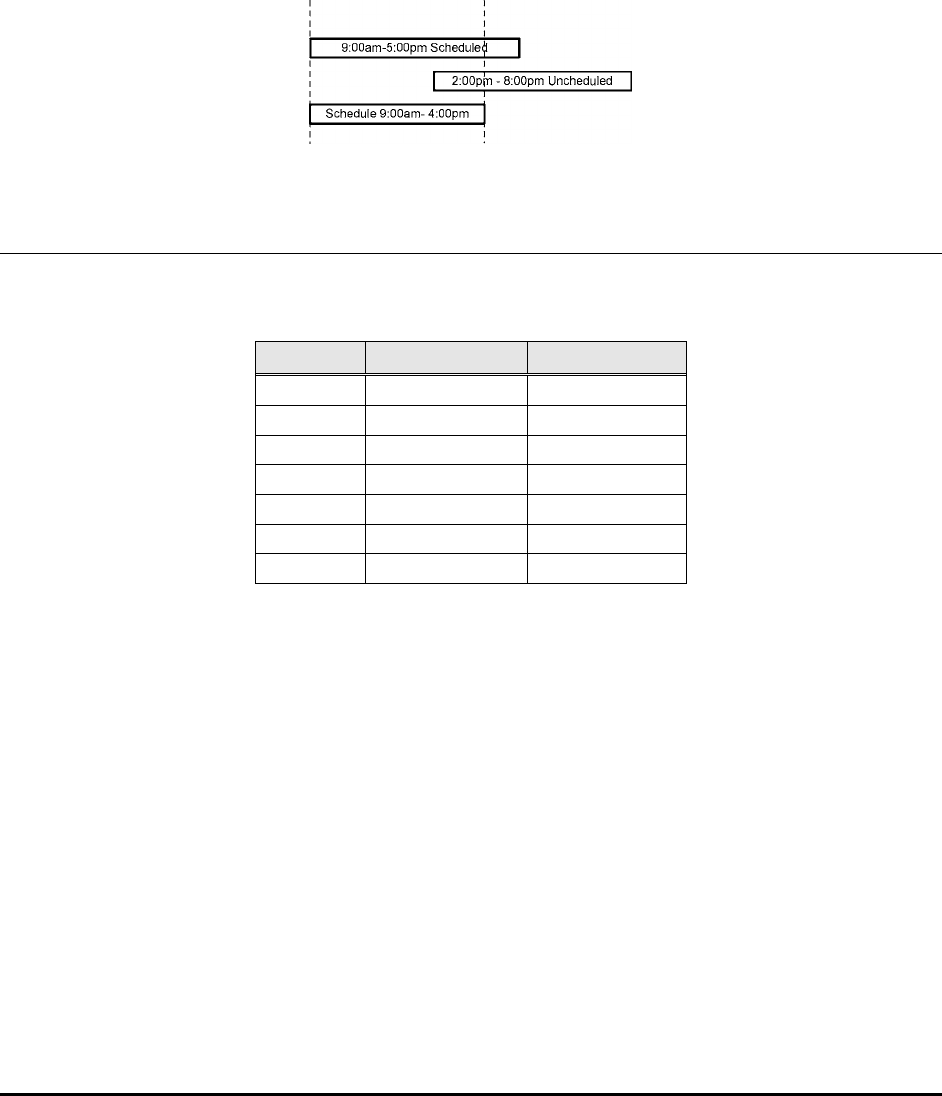
Time Guardian Series – Advanced Schedule Module 12-3
3. In the Grace Before schedule start field, enter the amount of time before a schedule that an
employee’s has to punch IN before being locked out and requiring supervisor approval.
4. In the Grace After schedule end field, enter the amount of time after a schedule that an
employee’s has to punch OUT before being locked out and requiring supervisor approval.
Schedule Assignment Based on Overlap:
Enter the amount of time that an employee’s shift must overlap the schedule for a schedule
to be assigned to the employee.
Template Schedules
A template schedule is a schedule that an employee has for a particular day (Sun., Mon. Tues.,
Wed., Thurs., Fri. or Sat.). For example, Employee 1 will have a schedule setup as follows:
Day Start Time End Time
Sun.
Mon. 8:00 AM 5:00 PM
Tues. 9:00 AM 6:00 PM
Wed. 8:00 AM 5:15 PM
Thurs. 10:00 AM 8:30 PM
Fri. 8:00 AM 2:00 PM
Sat.
The template schedule consists of start and end times (Fixed type only), which may span across
multiple days (limited by maximum shift length), Pay Code, shift rules, and the days to apply the
schedule so open schedules do not generate any exceptions on the punches for the day.
To create Template Schedules:
1. Click on the Template Schedules node within the Schedule module in the Tree View (see
the following figure).
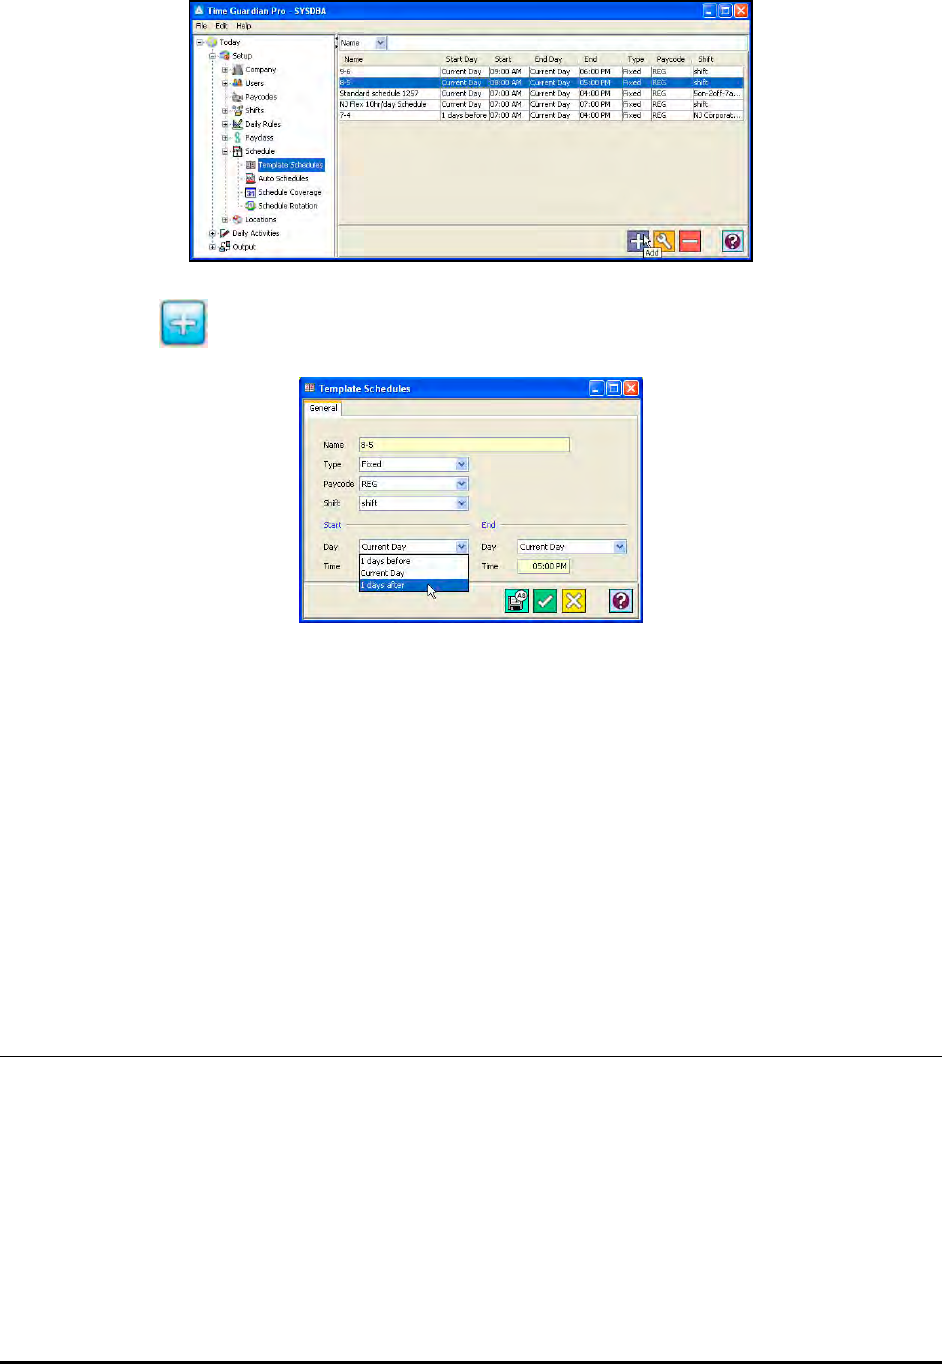
12-4 Time Guardian Series – Advanced Schedule Module
2. Click on the button, and the Template Schedules window will appear.
3. Enter a name for the template schedule in the Name field [required field].
4. In the Type field, select either Fixed, Off, or Open. If Open is selected, Start and End Times
will be disabled.
5. Assign a Pay Code to the schedule using the dropdown list in the Pay Code field.
6. Assign a Shift to the schedule using the dropdown list in the Shift field.
7. In the Start box, select the Day that the schedule will start and the time of the day that the
schedule is to begin. The choices are; 1 days before, Current Day, or 1 days after.
8. In the End box, select the Day that the schedule will end and the time of the day that the
schedule is to end. The choices are Current Day, 1 days after, 2 days after, or 3 days after.
Auto Schedules
Auto schedules are used when an employee can work any one of many different schedules.
The schedule that is used for the employee can be based upon the employee’s IN punch, OUT
punch, or both. The auto schedule uses the template schedules. A template schedule is
assigned to an auto schedule with its own start before and after setting, and end before and
after setting. The following is an example of the Auto Schedules screen.
To create Auto Schedules:
1. Click on the Auto Schedules node within the Schedule module in the Tree View (see the
following figure).
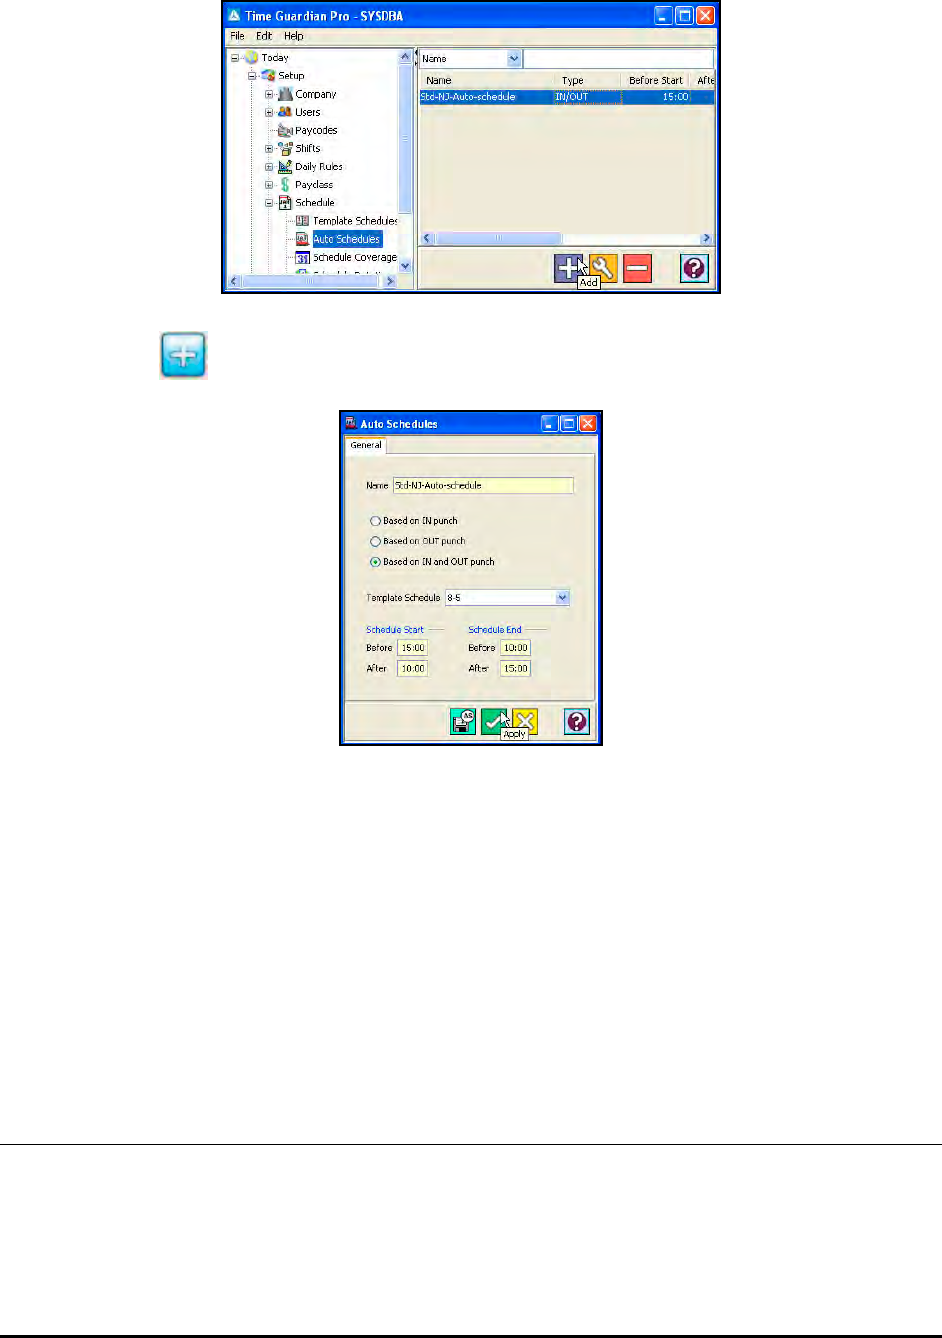
Time Guardian Series – Advanced Schedule Module 12-5
2. Click on the button, and the Auto Schedules window will appear.
3. Enter a name for the auto schedule in the Name field [required field].
4. Select the punch that the schedule will be based on:
• IN Punch: If selected, only the Schedule Start Before and After times need to be
entered.
OUT Punch: If selected, only the Schedule End Before and After times need to be entered.
IN and OUT Punch: If selected, both the Schedule Start/End Before and After times need to be
entered.
5. Assign a template schedule using the dropdown list in the Template Schedule field.
Template Schedule
In creating a schedule the user defines schedules that are made up of template schedules and
auto schedules. Together these schedules form the weekly work pattern that can be applied to
an employee. The screen below shows an example of the template schedule and auto schedule
assignments into a schedule.
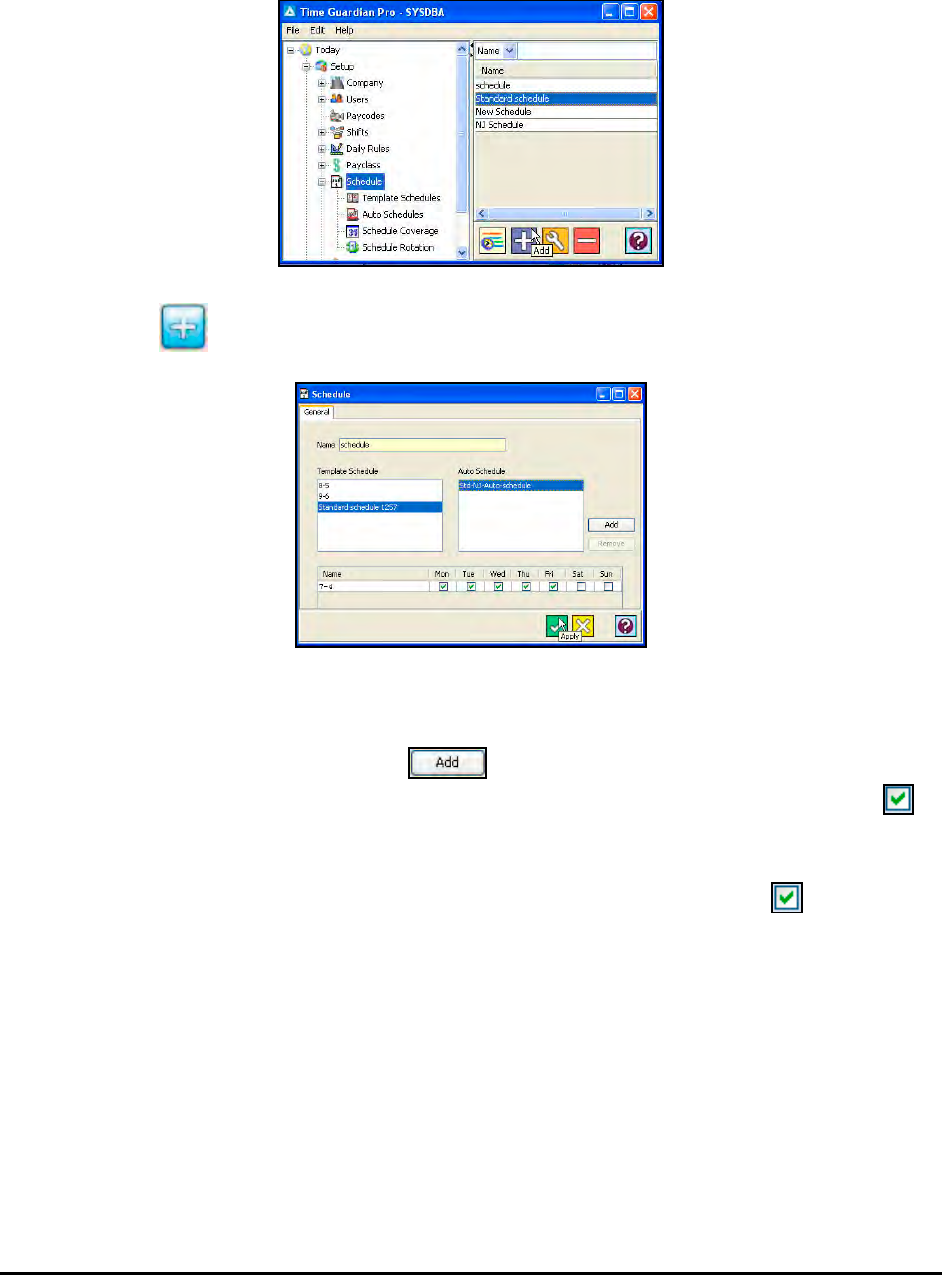
12-6 Time Guardian Series – Advanced Schedule Module
To Create a Schedule:
1. Click on the Schedule module within the Setup group in the Tree View (see the figure).
2. Click on the button, and the Schedule window will appear:
3. Enter a name for the schedule in the Name field.
4. To assign a template or auto schedule to a particular day, highlight the desired template or
auto schedule in the lists, click on the button, and check the desired day of the
week. The assigned Template or Auto Schedule will appear in the schedule list with a “ ”
under the chosen day.
To remove a Template or Auto Schedule from a particular day, highlight the schedule in the
Schedule list and click on the day you want the schedule unassigned. The “ ” will be
removed from that particular day in the Schedule list.
To remove a Template or Auto Schedule from the Schedule list, highlight the desired
schedule and click on the remove button.
Note: Time Guardian Pro checks for a schedule in the following order:
1. Schedule Override
2. Template Schedule
3. Auto Schedule
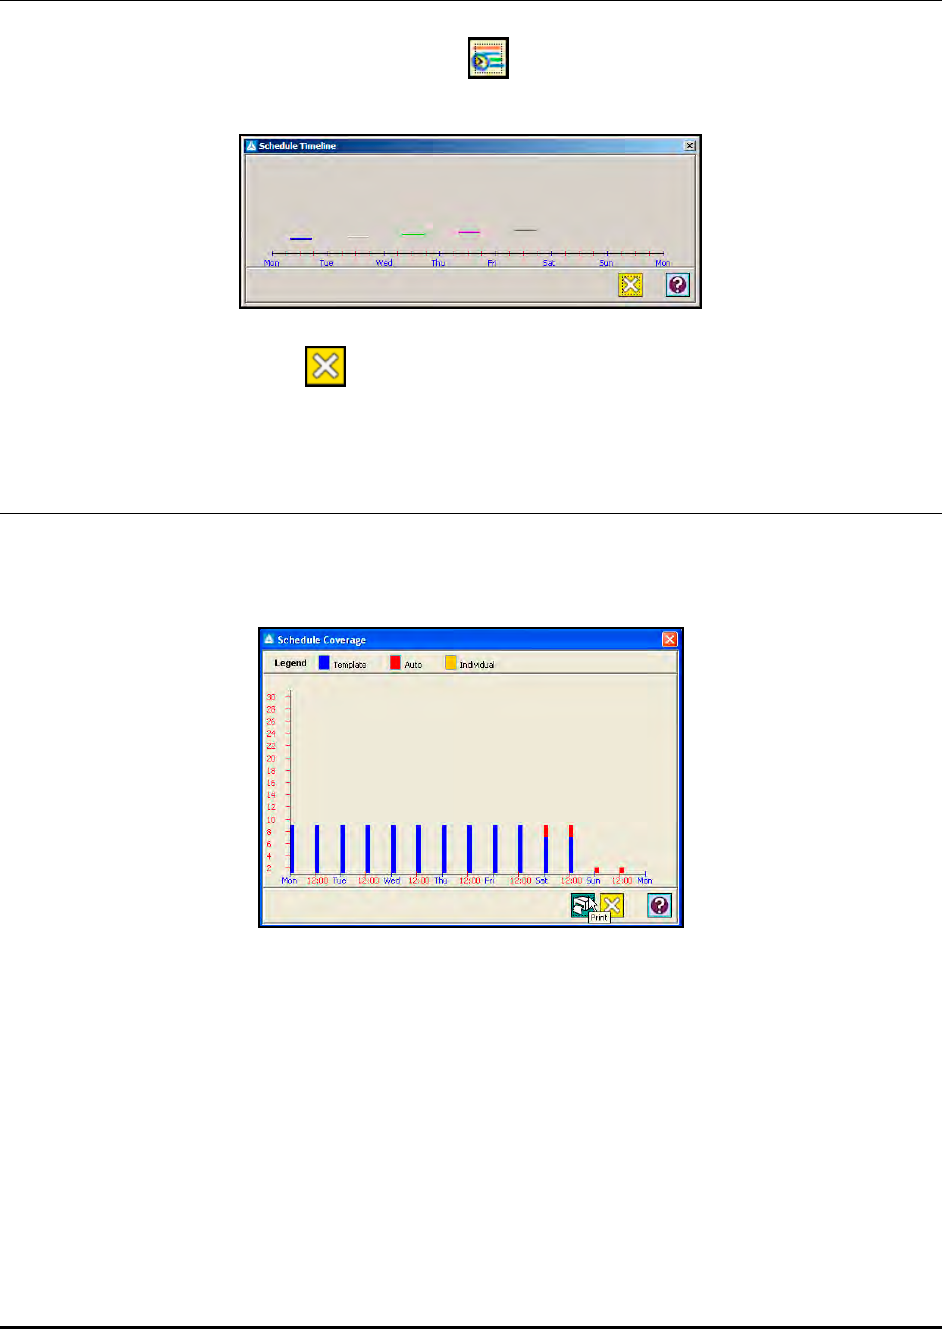
Time Guardian Series – Advanced Schedule Module 12-7
Schedule Timeline
A schedule timeline can be displayed by selecting a schedule from the schedule list in the
Schedule module tree view, and clicking on the button. This button is enabled when at
least one schedule has been created.
To close this view, click on the button.
Schedule Coverage
The Schedule Coverage feature (illustrated below) allows you to view a report or image of the
schedule hours and verify that you have adequate coverage for peak times during the day. This
feature can only be used after you assigned Schedules to employees in the Employee Module.
To create a Schedule Coverage Report:
1. Click on the Schedule Coverage node within the Schedule module in the Tree View (see the
following figure).
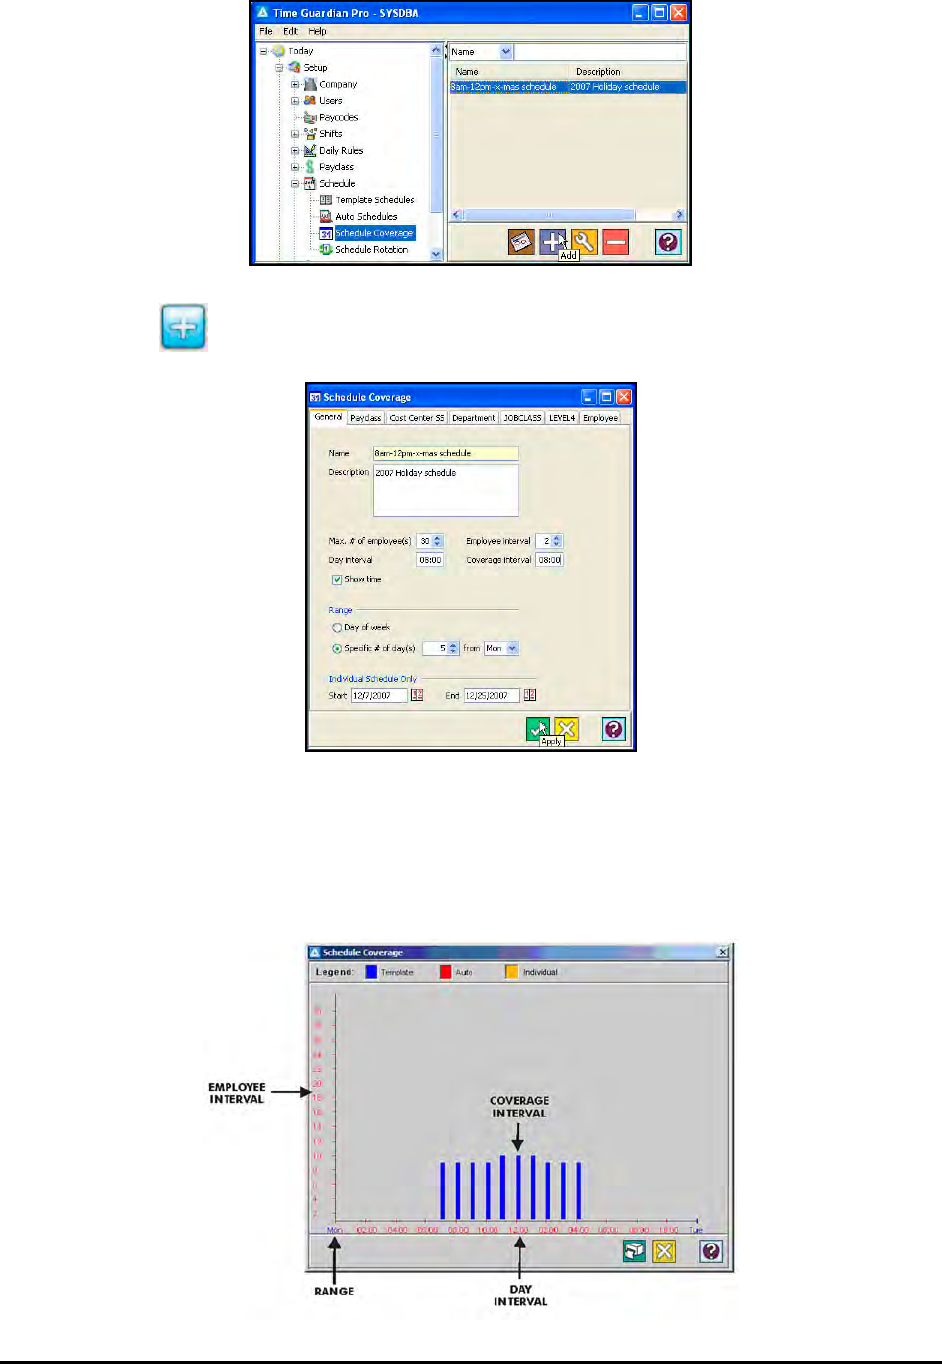
12-8 Time Guardian Series – Advanced Schedule Module
2. Click on the button, and the Schedule Coverage window will appear.
3. Enter a name for the Coverage Schedule report in the Name field and a brief description of
the report in the Description field.
4. Select the Maximum # of employee(s) to be included in the report.
5. Select the Employee Interval (y-axis of the report, see the following example).
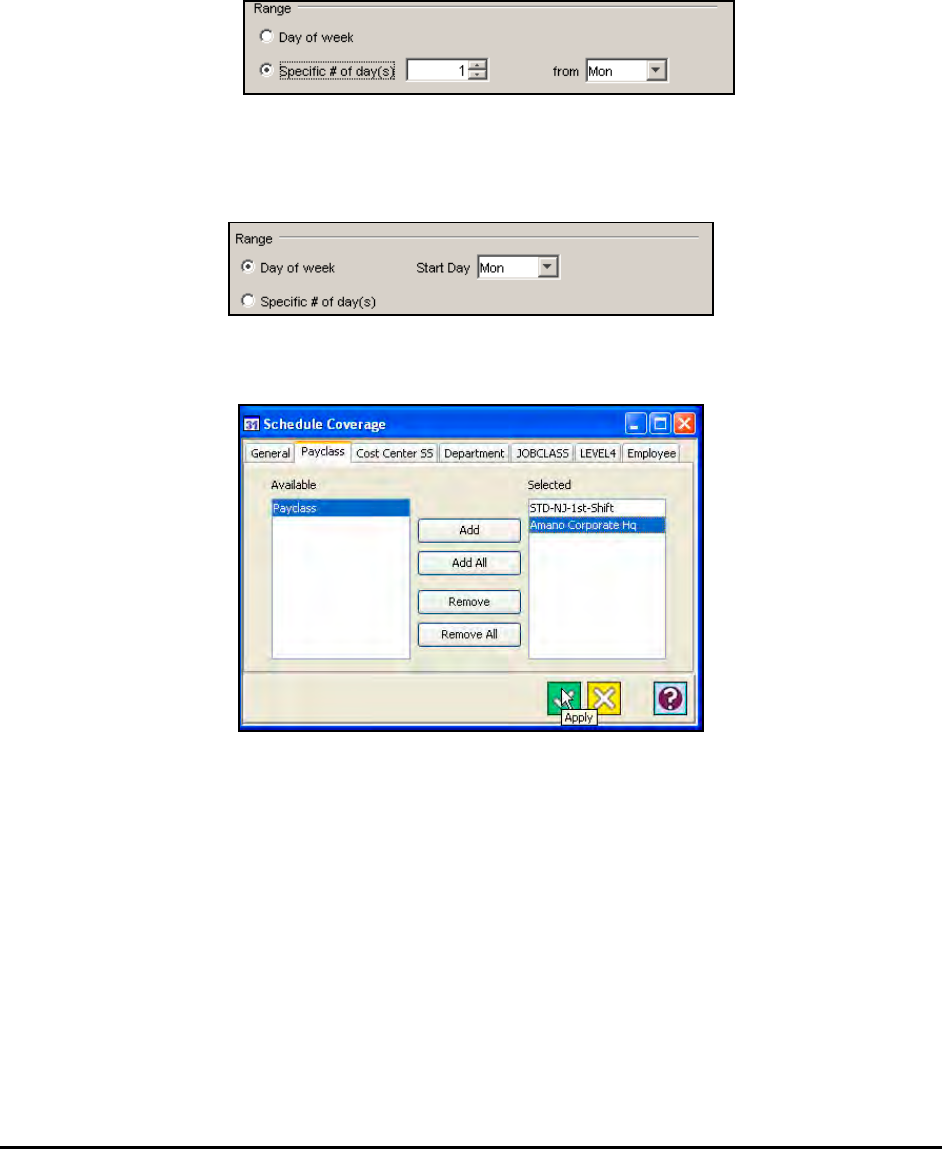
Time Guardian Series – Advanced Schedule Module 12-9
6. Enter the Day Interval (hours of the day interval) in HH:MM format.
7. Enter the Coverage Interval (hours of the day that will have schedule coverage) in HH:MM
format.
8. Select the Range of the report:
• For Single Day: Select Specific # of day(s) and enter 1 and then select the desired day
in the “from” field.
Range of Days: Select Specific # of day(s) and enter the desired amount and then select the
desired day in the From field.
Weekly Range: Select Day of the Week and select the desired Day in the Start Day field.
9. Click on the Pay Class tab.
To include schedule coverage for a given Pay Class in the report, highlight the desired item
in the Available list and click on the Add button. To select all items in all Pay Classes, click
on the Add All button. To remove the schedule coverage from a given Pay Class from the
report, highlight the desired schedule in the Selected list and click on the Remove button. To
remove all selected schedules, click on the Remove All button.
10. Click on any of the Labor Level tabs.
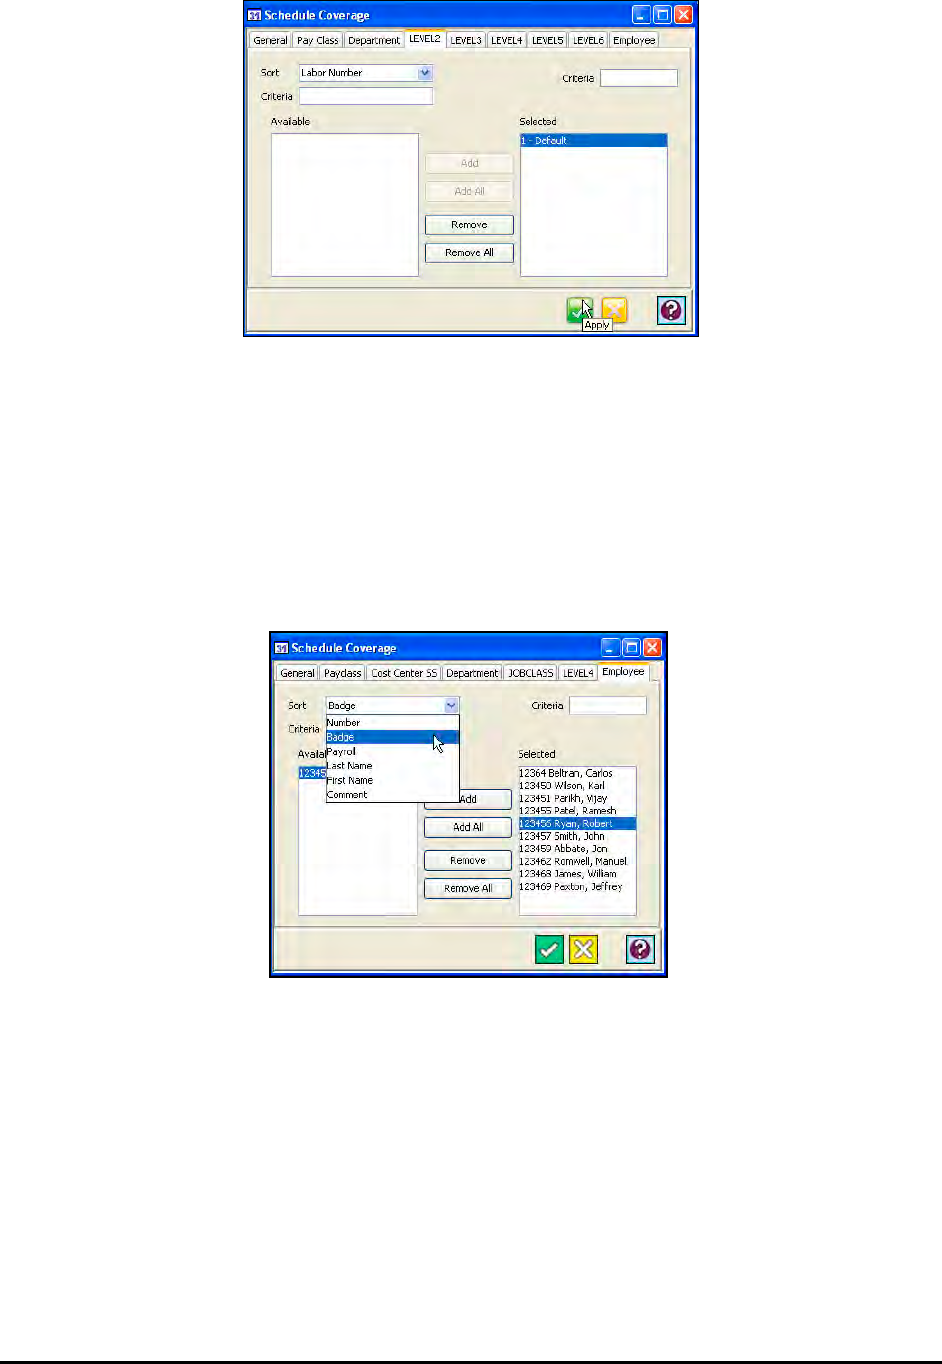
12-10 Time Guardian Series – Advanced Schedule Module
• To include employees from a given Labor Level in the report, highlight the desired Labor
Level in the Available list and click on the Add button.
• To select all employees in all Labor Levels, click on the Add All button.
• To remove the employees from a given Labor Level from the report, highlight the desired
Labor Level in the Selected list and click on the Remove button.
• To remove all selected Labor Levels, click on the Remove All button.
11. Click on the Employee tab.
• To add an employee to the report, highlight the desired employee in the Available list
and click on the Add button.
• To select all employees to the report, click on the Add All button.
• To remove an employee from the report, highlight the desired employee in the
Selected list and click on the Remove button.
• To remove all selected employees, click on the Remove All button.
• To sort both Available and Selected employee lists select a category from the
dropdown list in the Sort field. Also, enter filter characters in the Criteria field above
the Selected list to show employees filtered based upon that information. Do the
same thing above the Selected list to filter those employees.
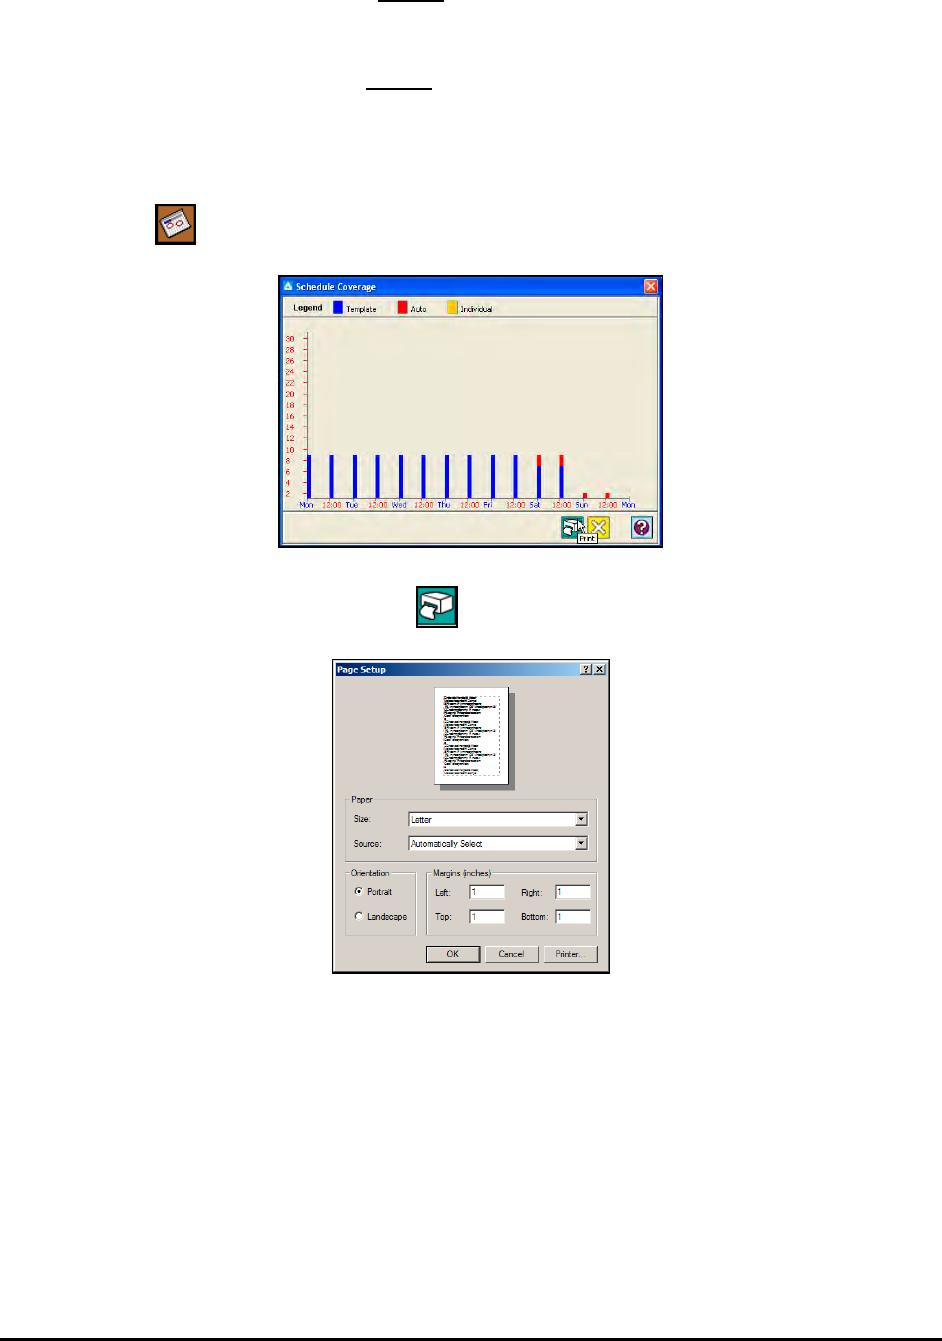
Time Guardian Series – Advanced Schedule Module 12-11
Employees can be simultaneously filtered in both the “Available” and Selected” lists in
ascending order by using the Sort field dropdown list. The choices in this list are; employee
number, badge number, payroll number, last name, first name, or comment field.
Additionally, Employee(s) can be filtered in the “Available” or “Selected” lists by entering
additional case sensitive characters in dedicated Criteria fields (see above illustration). The
Criteria field located above the “Available” list filters only that list, while the Criteria field
above the “Selected” list filters that list. Each list is filtered independently in ascending order.
12. To generate a Schedule Coverage report, select a profile from the list in the Table View and
click on the button. The report will be generated on screen.
To print the Coverage Report, click on the button, and a Page Setup window will appear:
The Coverage Report will print to your system’s default printer. To change the printer, click on
the Printer button. A print dialog similar to the following will appear:
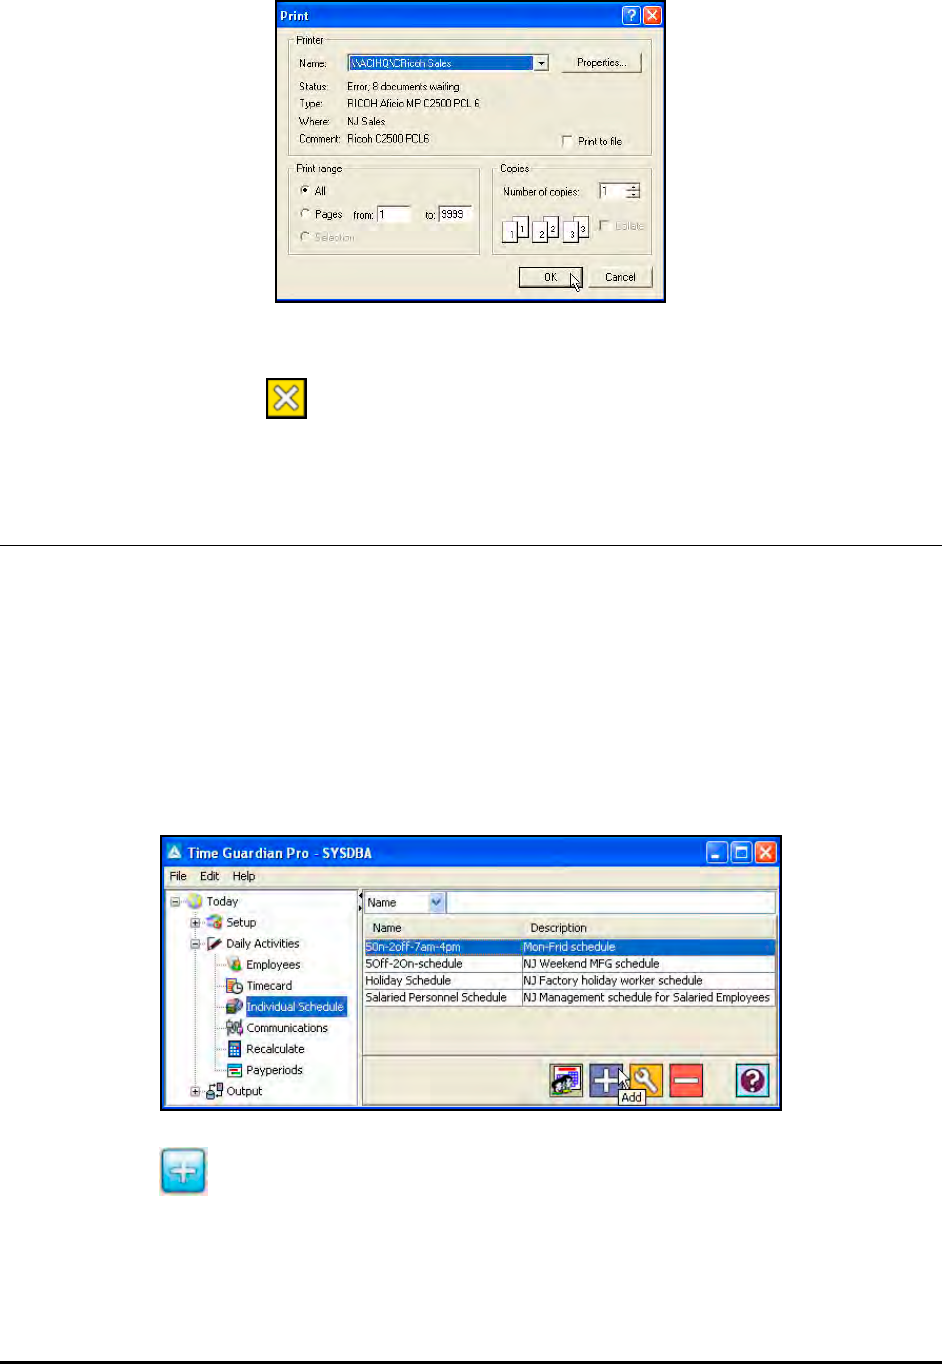
12-12 Time Guardian Series – Advanced Schedule Module
Make your selection and click OK to print the Coverage Report.
To close the report, on the button.
Individual Schedule
The individual schedule is a schedule that an employee has for a particular date. For example,
employee number 1 will have schedule setup for 08:00 am to 05:00 pm on 06/25/06. This
employee may have a different schedule on another date. The schedule might be from 09:00
am to 6:00 pm on 6/26/03. The individual schedule is applied to employee when it qualifies
based on the rules setup in Pay Class for schedule assignment.
To add employees to an Individual Schedule profile:
1. In the Tree View, select the Individual Schedule node within the Daily Activities module (see
the following figure).
2. Click on the button, and the Individual Schedule window will appear.
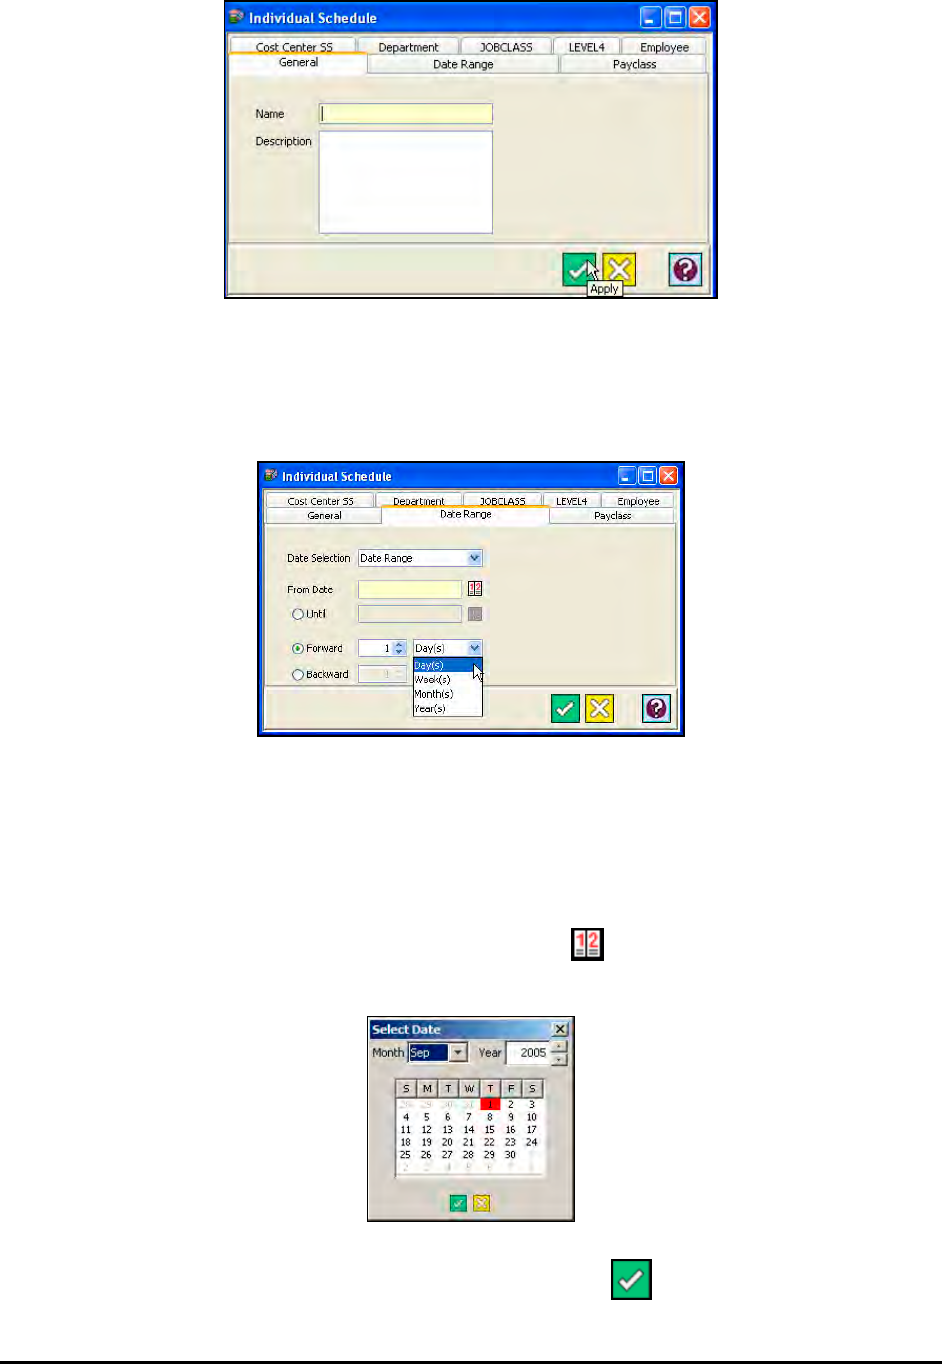
Time Guardian Series – Advanced Schedule Module 12-13
3. Enter a name for the schedule profile in the Name field [required field].
4. Enter a brief description of the schedule profile in the Description field.
5. Click on the Date Range tab.
From the Date Range screen select the following:
• Date Selection: Select one of the following choices: Today, Yesterday, Last Open
Period, Previous Open Period, Current Week, Previous Week, Current Month, Previous
Month, Last 2 Weeks, Date Range, Current Pay period, or Previous Pay period.
• From Date: Enabled when Date Range is selected as the Date Selection. Enter the
date that the Date Range will begin, or click on the button to select a date. The
Select Date dialog box will appear as shown in the following:
When you have finished, click on the click on the Save button to enter the date.
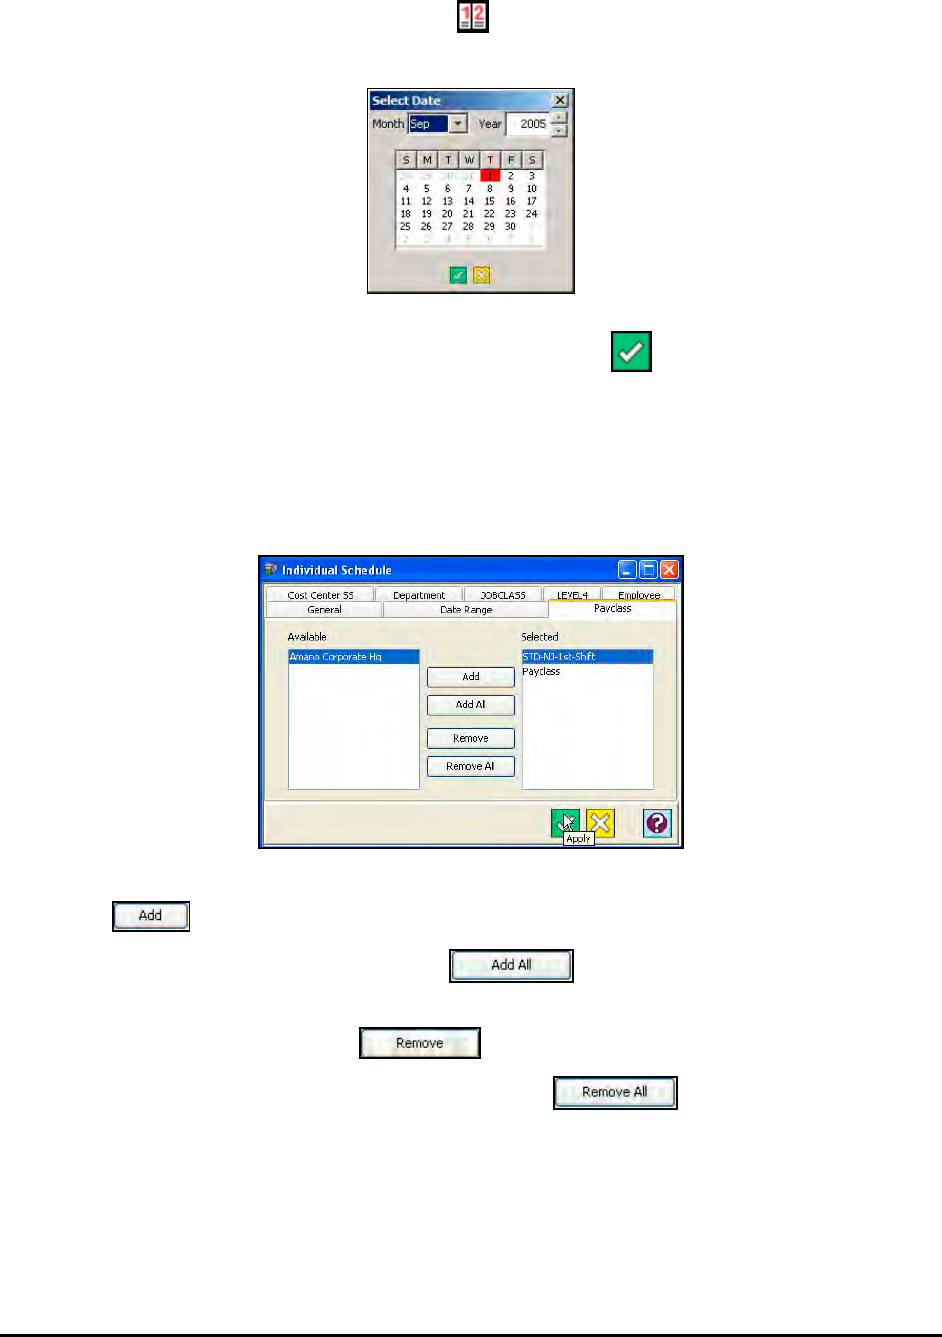
12-14 Time Guardian Series – Advanced Schedule Module
• Until: Enabled when Date Range is selected as the Date Selection. Enter the date that
the Date Range will end or click on the button to select a date. The Select Date
dialog box will appear as shown in the following:
When you have finished, click on the click on the Save button to enter the date.
• Forward and Backward: Enabled when Date Range is selected as the Date Selection.
Allows the option of going forward or backward as many days, weeks, months, or years
from the From Date.
6. Click on the Pay Class tab. This tab allows you to select those employees that belong to
particular Pay Classes. By default, all Pay Classes are selected.
• To select a Pay Class, highlight the desired Pay Class in the Available list and click on
the button.
• To select all Pay Classes, click on the button.
• To remove a Pay Class from the Selected list, highlight the desired Pay Class in the
Selected list and click on the button.
• To remove all selected Pay Classes, click on the button.
7. Click on any of the Labor Level tabs. These tabs allow you to select those employees that
belong to particular category of a Labor Level. By default, all categories are selected.
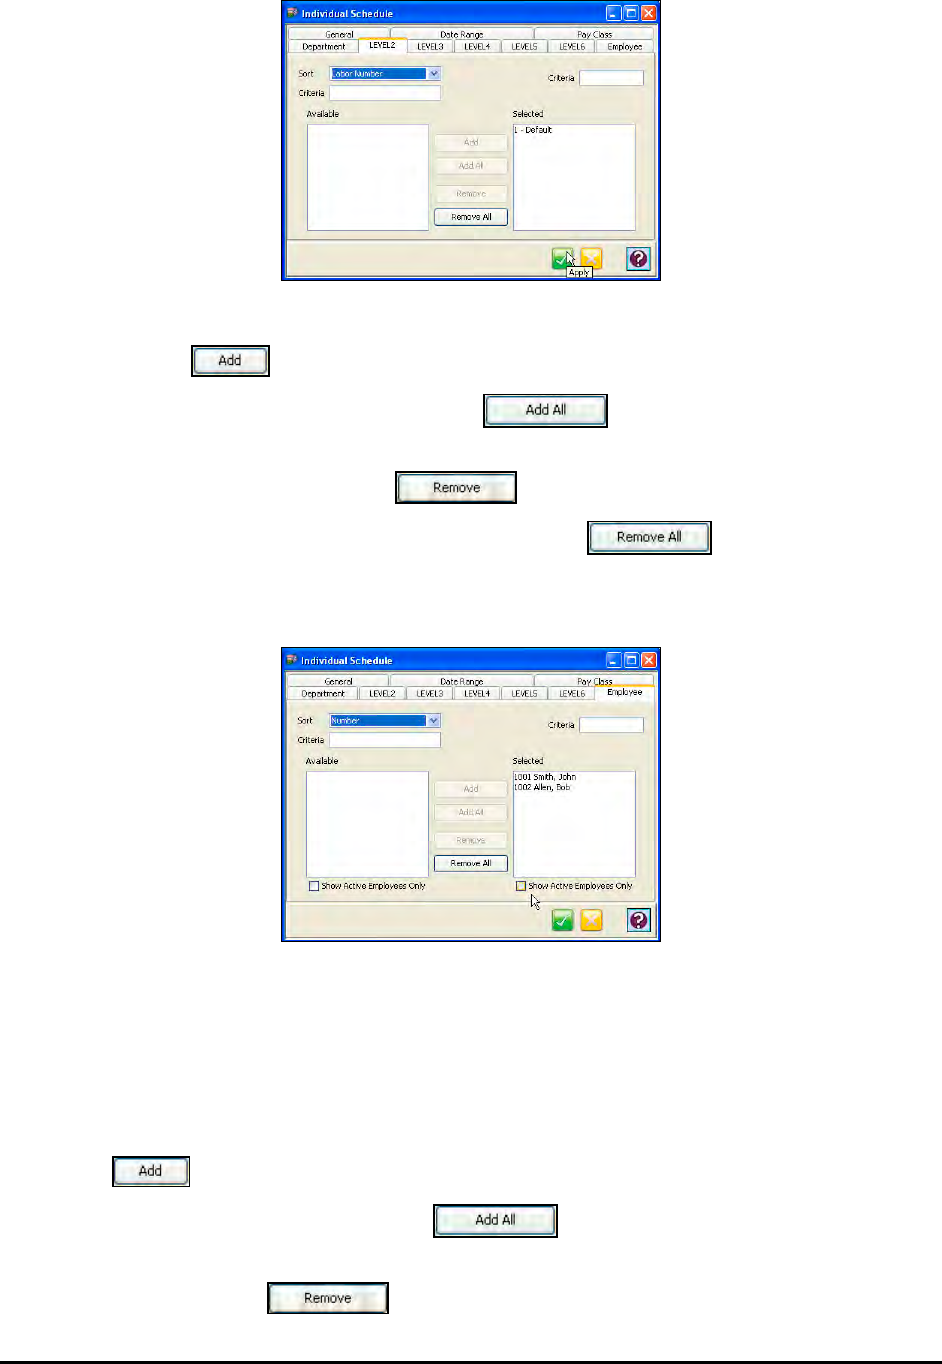
Time Guardian Series – Advanced Schedule Module 12-15
• To select a labor category, highlight the desired labor category in the Available list and
click on the button.
• To select all labor categories, click on the button.
• To remove a labor category from the Selected list, highlight the desired labor category in
the Selected list and click on the button.
• To remove all selected labor categories, click on the button.
8. Click on the Employee tab. This tab allows you to select employees. By default, all
employees are selected.
Employees can be sorted by (Employee) Number, Badge (Number), Payroll (ID), Last
Name, First Name, or Comment using the Sort field.
Employees can be filtered in both the Available and Selected lists by entering data into the
Criteria field above each list. Only employees matching the data entered will appear in both
lists.
• To select an employee, highlight the desired employee in the Available list and click on
the button.
• To select all employees, click on the button.
• To remove an employee from the Selected list, highlight the employee in the Selected
list and click on the button.
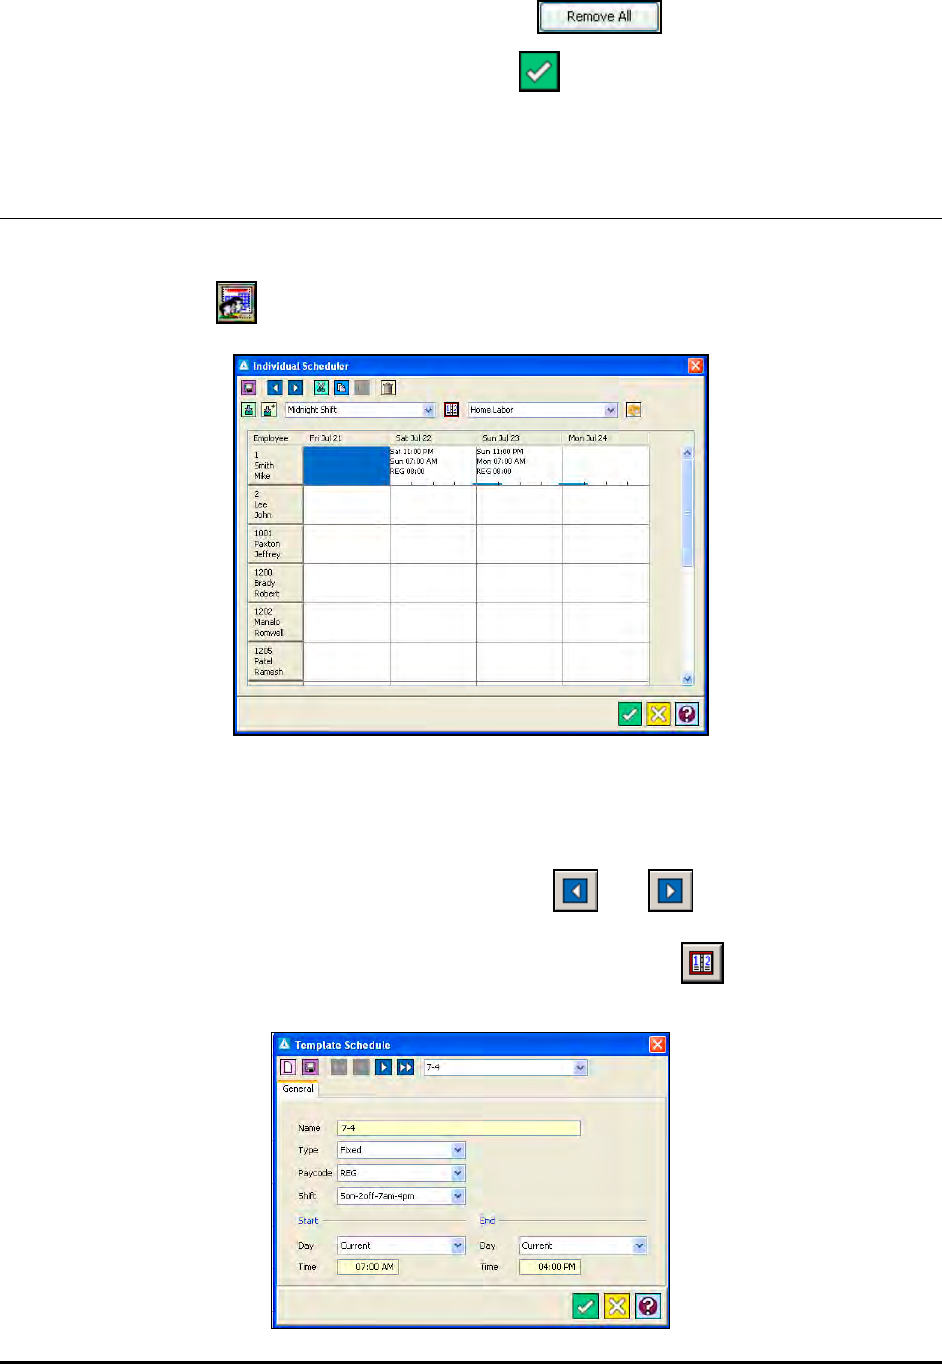
12-16 Time Guardian Series – Advanced Schedule Module
• To remove all selected employees, click on the l button.
9. When you have finished, click on the click on the button.
Assigning Individual Schedules
Individual Schedules are template schedules assigned to employees in the Individual
Scheduler. To launch the Individual Scheduler, select an Individual Schedule Profile in the Main
View and click on the button.
The Individual Scheduler consists of the following components:
• Grid: One row for each selected employee(s) and a column for each day in the profile.
• Template Schedule: This dropdown list is used to assign existing Template Schedules to an
employee for a particular day. You may also use the and buttons to move the
Date Range of the Individual Schedule Grid. Custom schedules based on Template
Schedules can be created by clicking on the Template Schedules button and the
following screen will appear:
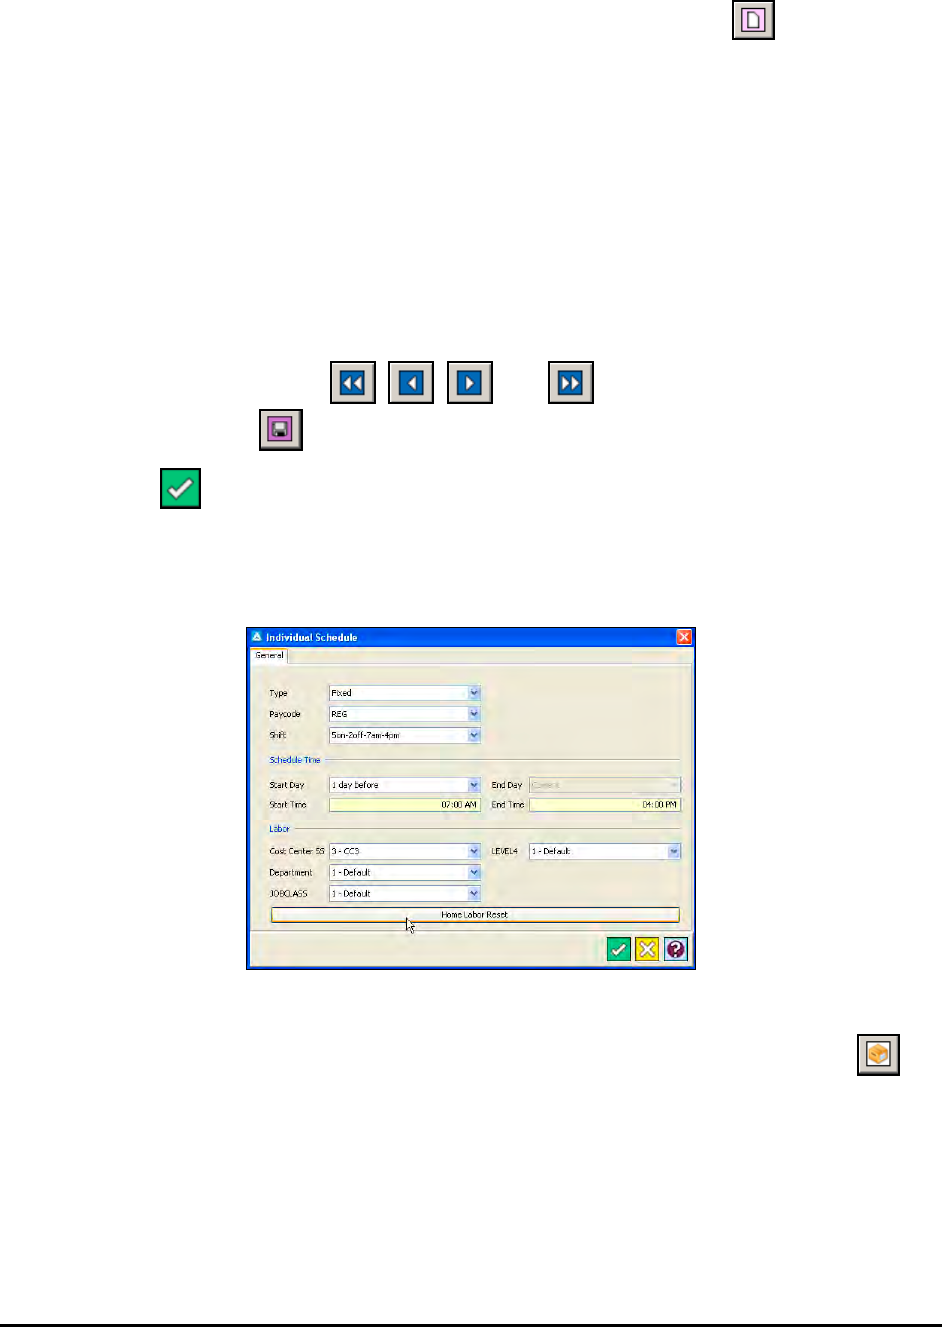
Time Guardian Series – Advanced Schedule Module 12-17
To create a custom schedule from the Template Schedule, click on the button and
select the following:
a. Name: Enter a name for the schedule.
b. Type: Select Fixed, Open, or Off from the dropdown list.
c. Pay Code: Select the Pay Code for the schedule from the dropdown list.
d. Shift: Select the Shift for the schedule from the dropdown list.
e. Start: Select Current Day, 1 days before, or 1 days after for the Start Day, and enter the
Start Time in the Time field.
f. End: Select Current Day, 1 days after, 2 days after, or 3 days after for the End Day, and
enter the End Time in the Time field.
To copy an already existing schedule, select the desired Template Schedule using the
Template Schedule list or the , , , and buttons. Enter a new schedule
name and click on the button.
Click on the button to apply your settings and return to the Individual Scheduler
window. The schedule you just created will appear in the Template Schedule list.
Note: Double-clicking on any cell within the Individual Scheduler grid will launch the following
Individual Schedule screen:
• Labor Reference: This field represents the labor categories that will be used in the Individual
Schedule. You can select the labor categories from the dropdown list or click on the
button from the Individual Scheduler screen to create a custom labor reference. The
following window will appear:
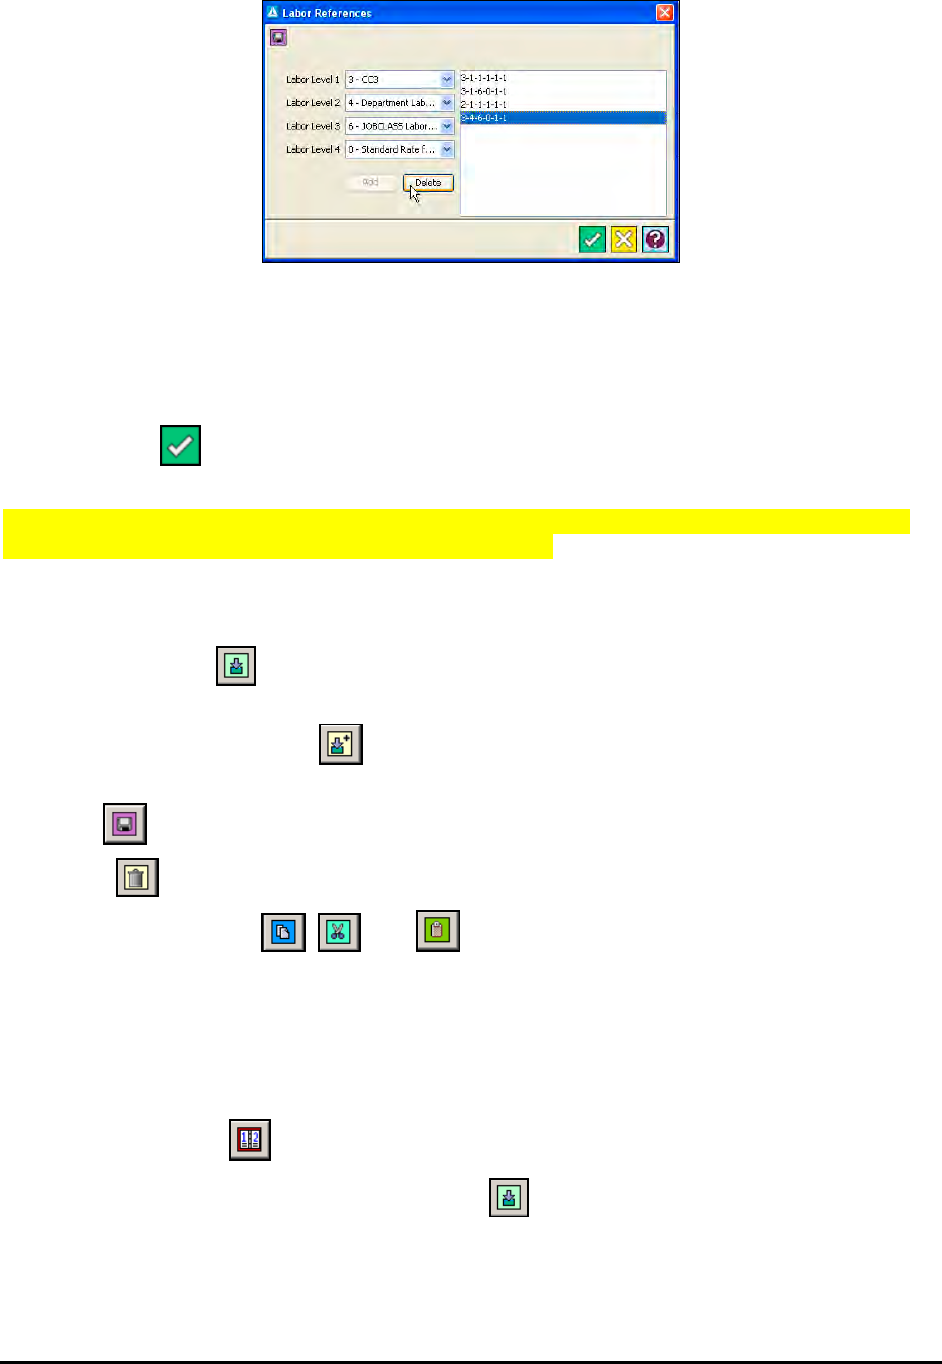
12-18 Time Guardian Series – Advanced Schedule Module
To add a labor category, select the desired categories from any one of the Labor Level fields
and click on the Add button.
To delete a labor category, select the desired categories from any one of the Labor Level
fields and click on the Delete button.
Click on the button to save your settings return to the Individual Scheduler window. The
schedule you just created will appear in the Template Schedule list.
Note: See Advanced Labor/Rate Module, Example of Multiple Labor Levels for details about
Labor Level Association links (Parent/Child relationship).
From the Individual Scheduler:
• Assign Schedule ( ): Assigns the currently displayed template schedule in the Template
Schedule list to the employee for the particular day.
• Assign Additional Schedule ( ): Assigns an additional template schedule in the Template
Schedule list to the employee for the particular day.
• Save ( ): Saves the template schedule assignments.
• Delete ( ): Deletes an assigned template schedule from the selected cell.
• Copy, Cut, and Paste ( , , and ): Allows you to cut, copy, and paste schedule
assignments to different days and employees.
To assign an Individual Schedule to an employee:
1. Select the desired cell in the grid.
2. Select the desired template schedule using the dropdown list or create a custom template
schedule using the button.
3. Select the desired labor category, click on the button, and the schedule will appear in
the cell.
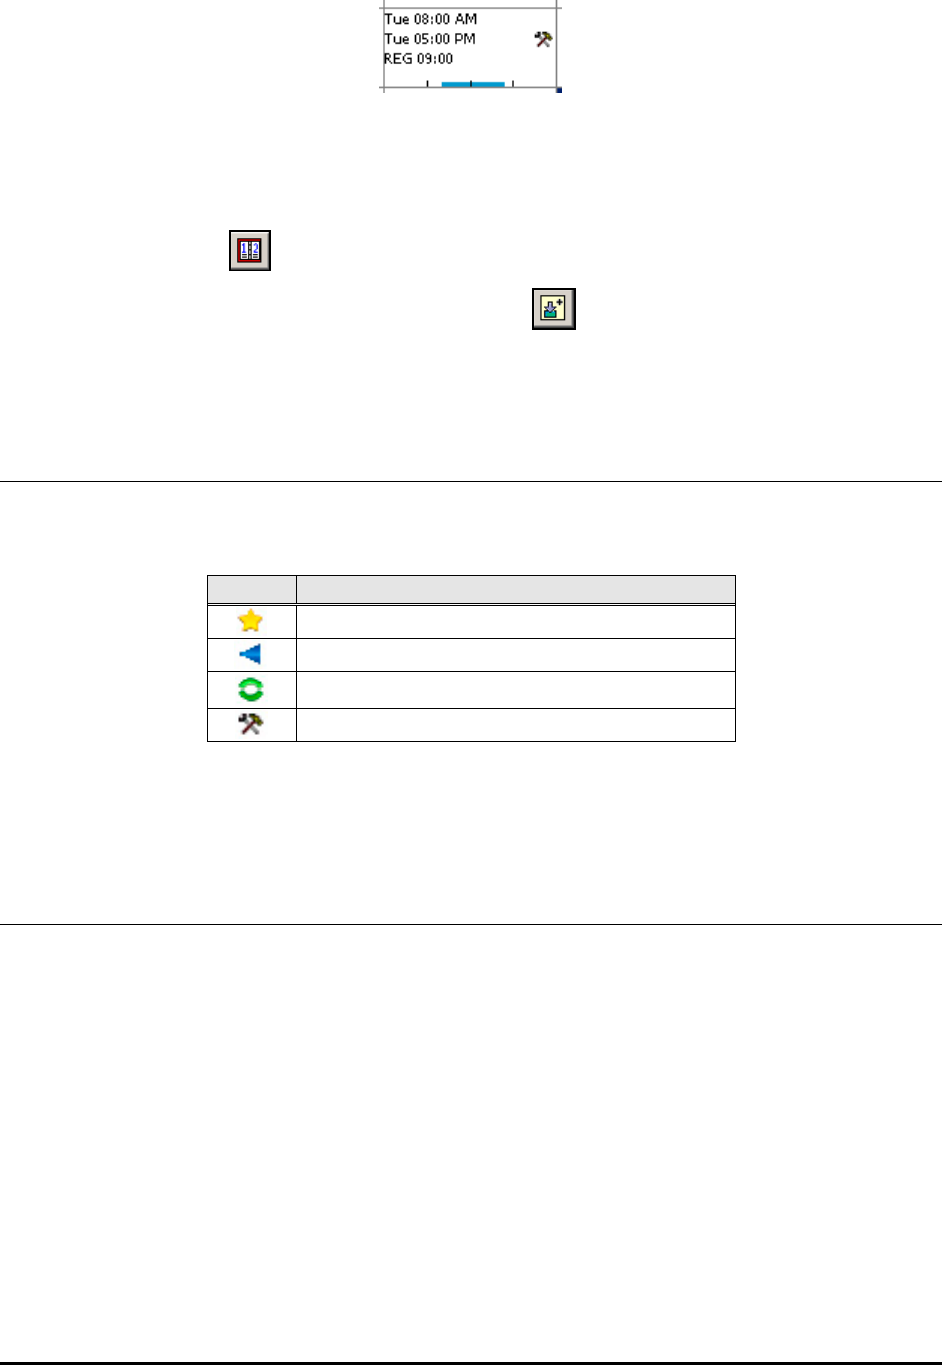
Time Guardian Series – Advanced Schedule Module 12-19
To add an additional Individual Schedule to particular day:
1. Select the desired cell in the grid that already has a schedule assigned to it.
2. Select the desired template schedule using the dropdown list or create a custom template
schedule using the button.
3. Select the desired labor category, and click on the button, and the schedule will appear
in the cell.
Schedule Icons
When an Individual Schedule is applied to an employee, an indicator will appear alongside the
scheduled hours in the cell. Below is a list of the indicators that may appear in the cell.
Icon Meaning
Advance Schedule
Advance Schedule with Pay in Advance.
Schedule Rotation
Labor transfer exist for this row
Note: By putting the mouse over the icon you can see the information that the icon represents.
Assigning Advanced Schedules
Advanced Schedules allow you to schedule an employee for the time off in the future. To assign
a Advanced Schedule to an individual, click on the desired cell in the grid and right click once. A
menu will appear. Scroll down the menu to Advanced Schedule. A submenu will appear. Select
either New or Edit User Defined.
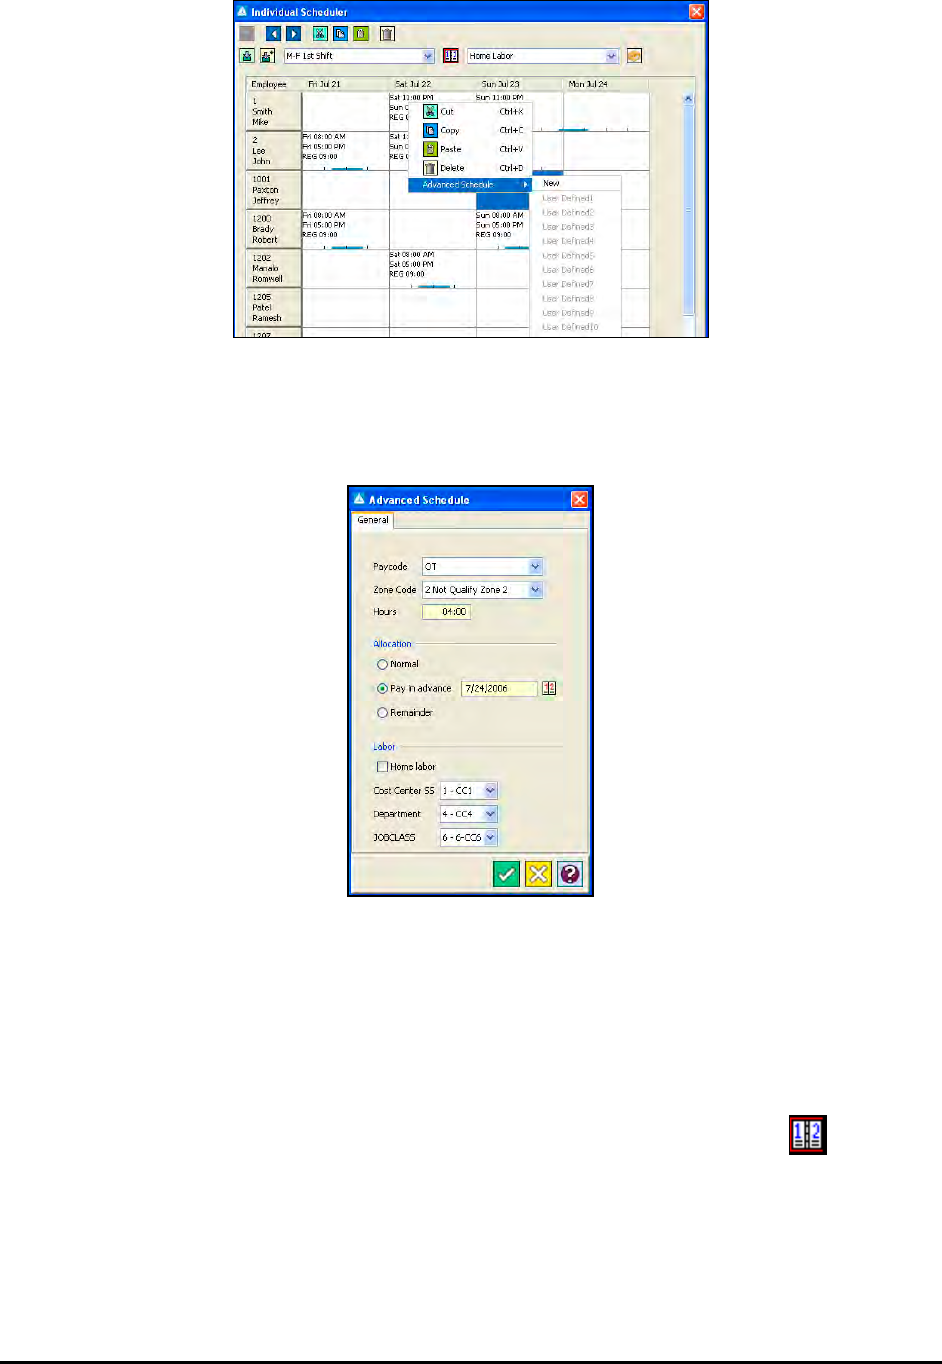
12-20 Time Guardian Series – Advanced Schedule Module
New
The New command from the submenu enables you to create a custom Advanced Schedule.
Select the following:
• Pay Code: Select the Pay Code that the schedule will be in.
• Zone Code: Select the Zone Code that the schedule will be in.
• Hours: Enter the amount of hours for the day.
• Allocation: Select Normal, Pay in advance, or Remainder. If Pay in Advance is selected, you
must enter the date that the employee will be paid for the schedule using the button.
The Select Date window will appear:
Note: The Hours for the Pay in Advance will be put into the Payroll Export file on the Pay in
Advance date. The hours on the Timecard will indicate the date they occur.
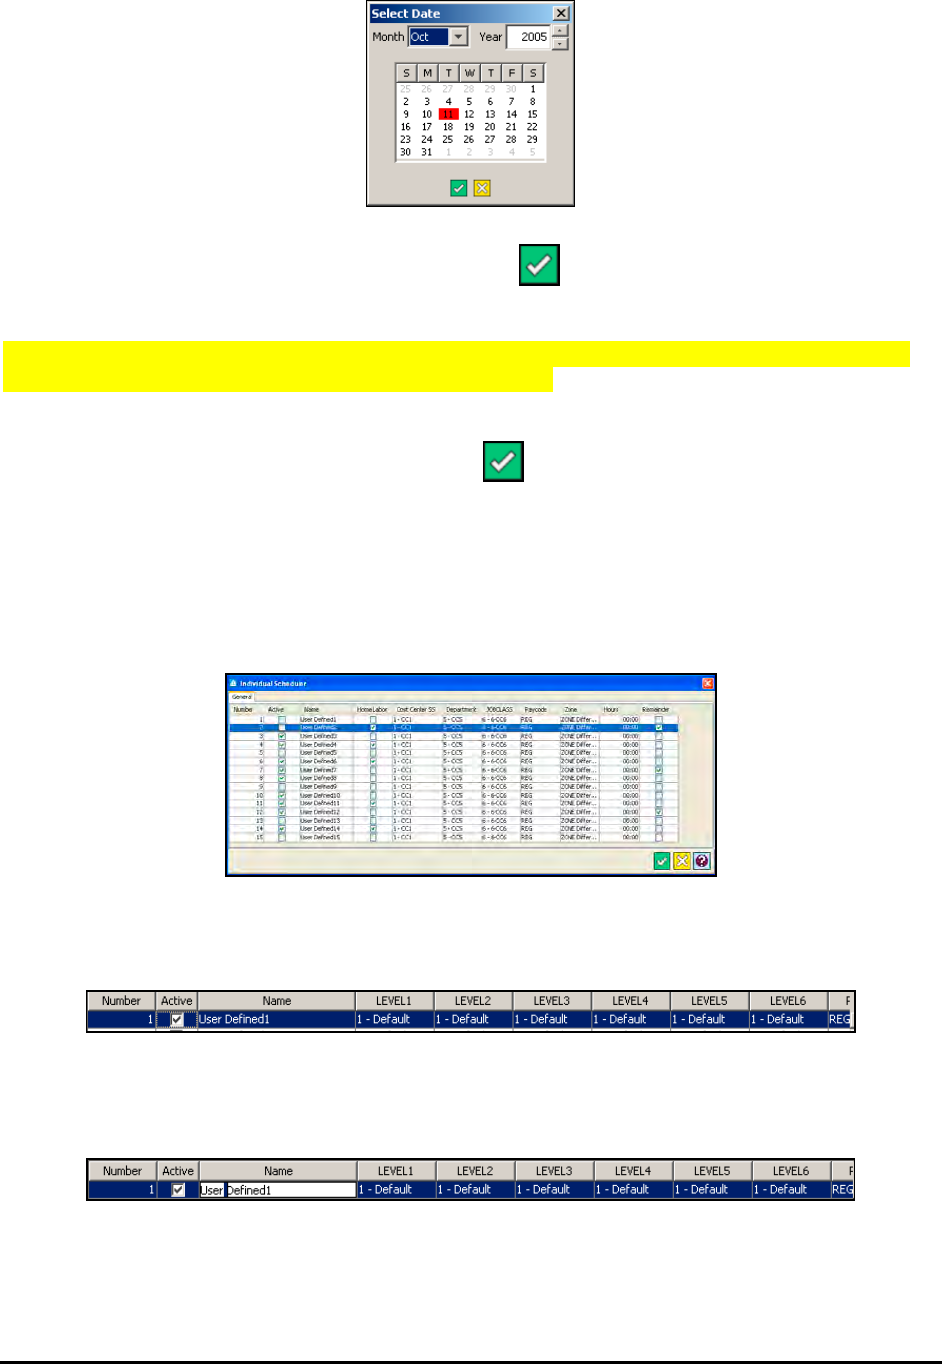
Time Guardian Series – Advanced Schedule Module 12-21
When you have finished, click on the click on the button.
• Labor: Select the labor category or categories that the Schedule will use.
Note: See Advanced Labor/Rate Module, Example of Multiple Labor Levels for details about
Labor Level Association links (Parent/Child relationship).
When you have finished, click on the click on the button. The Advanced Schedule you just
created will appear in the selected cell.
Edit User Defined
The Edit User Defined command from the submenu enables you to create a custom Advanced
Schedule. There are (15) User Defined Advanced Schedules to choose from.
User Defined Advanced Schedules must be enabled before use. To do so, select the row of the
desired schedule and check the Active column.
To change the Name of a schedule, double click on the name field and type in the desired
name. When finished, you must press the Enter key to save the name, otherwise the name you
just entered will not appear in the Advanced Schedule pop-up menu.
The Labor Level, Pay Code, and Zone fields can be modified by double clicking on them and
using the dropdown lists to make a selection.
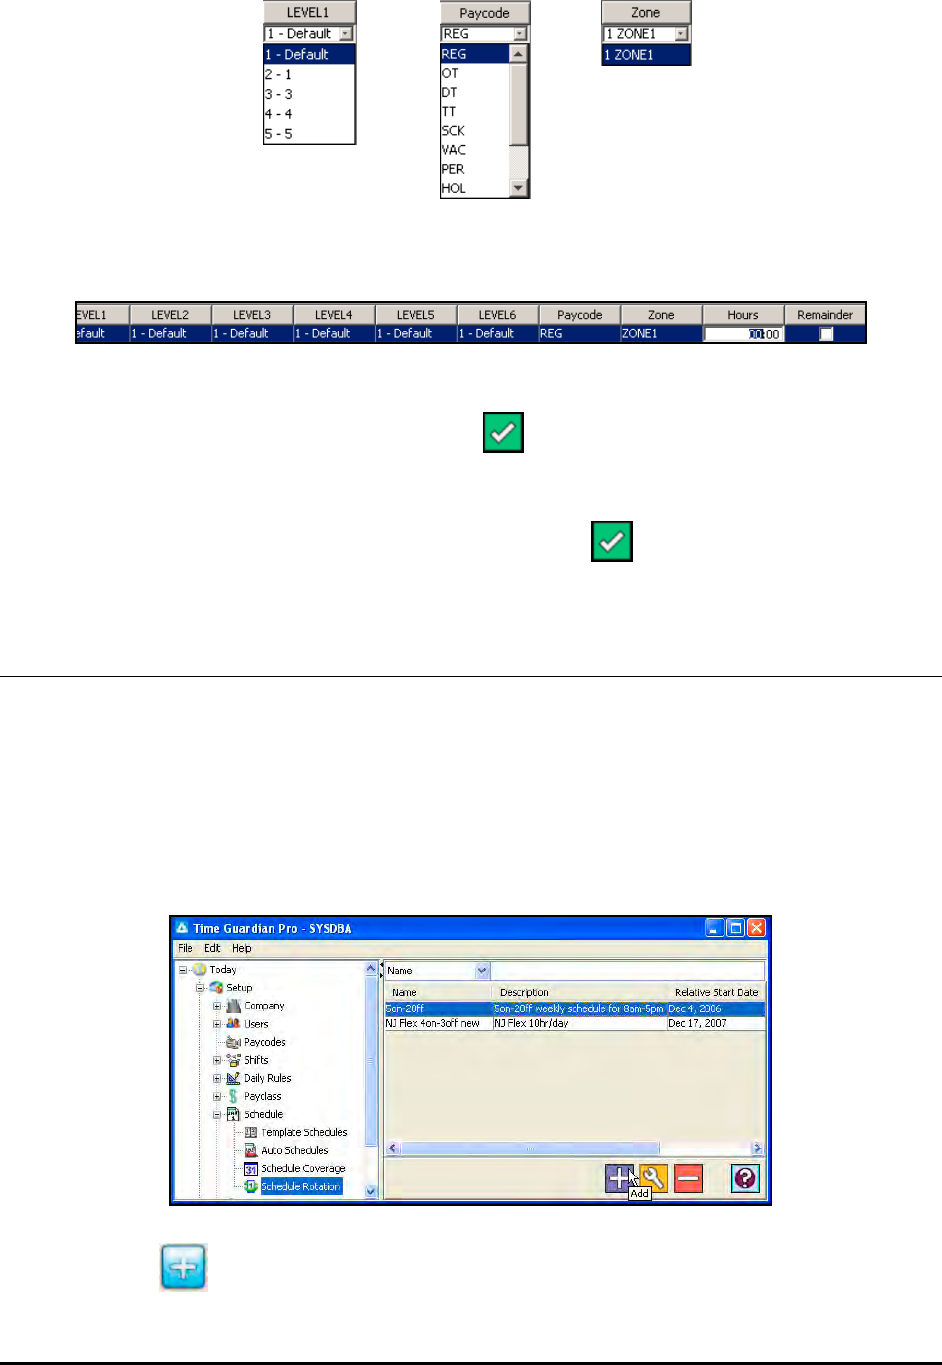
12-22 Time Guardian Series – Advanced Schedule Module
To enter the hours for the schedule, double click on the Hours field and enter the desired
amount of hours.
Check Remainder if you want the hours to be part of the Remainder calculation.
When you have finished, click on the click on the button.
To assign a User Defined Individual Schedule, select a cell in the grid and select the desired
schedule name from the Advanced Schedule pop-up menu. The selected schedule will appear
in the grid. When you have finished, click on the click on the button to save your settings
and exit the Individual Scheduler window.
Schedule Rotation
Schedule Rotation is used to setup repeating schedule patterns. For example, some workers
work at (7) day rotation of (4) days on and (3) days off schedule. Rotating schedules are
assigned to employees in the Assignments tab of the Employees module.
To create a Rotating Schedule Template:
1. Click on the Schedule Rotation node within the Schedule module in the Tree View (see the
following figure).
2. Click on the button, and the Schedule Rotation window will appear:

Time Guardian Series – Advanced Schedule Module 12-23
3. Enter a name for the Schedule Rotation Template in the Name field [required field].
4. In the Description field, enter a brief description of the template.
5. In the Relative Start Date field, enter in the start date of the pattern in DDMMYYYY format or
click on the button. The Select Date dialog box will appear:
Using the dropdown lists, select the Month and Year. Click on the desired day in the
calendar. When you have finished, click on the button to save your setting and close
the dialog box and return to the Settings tab of the Schedule Rotation window.
6. In the Length In Days field, select the number of days that this template will span. A blank
schedule grid will appear in the Pattern box. The days included in the template are indicated
by white cells.
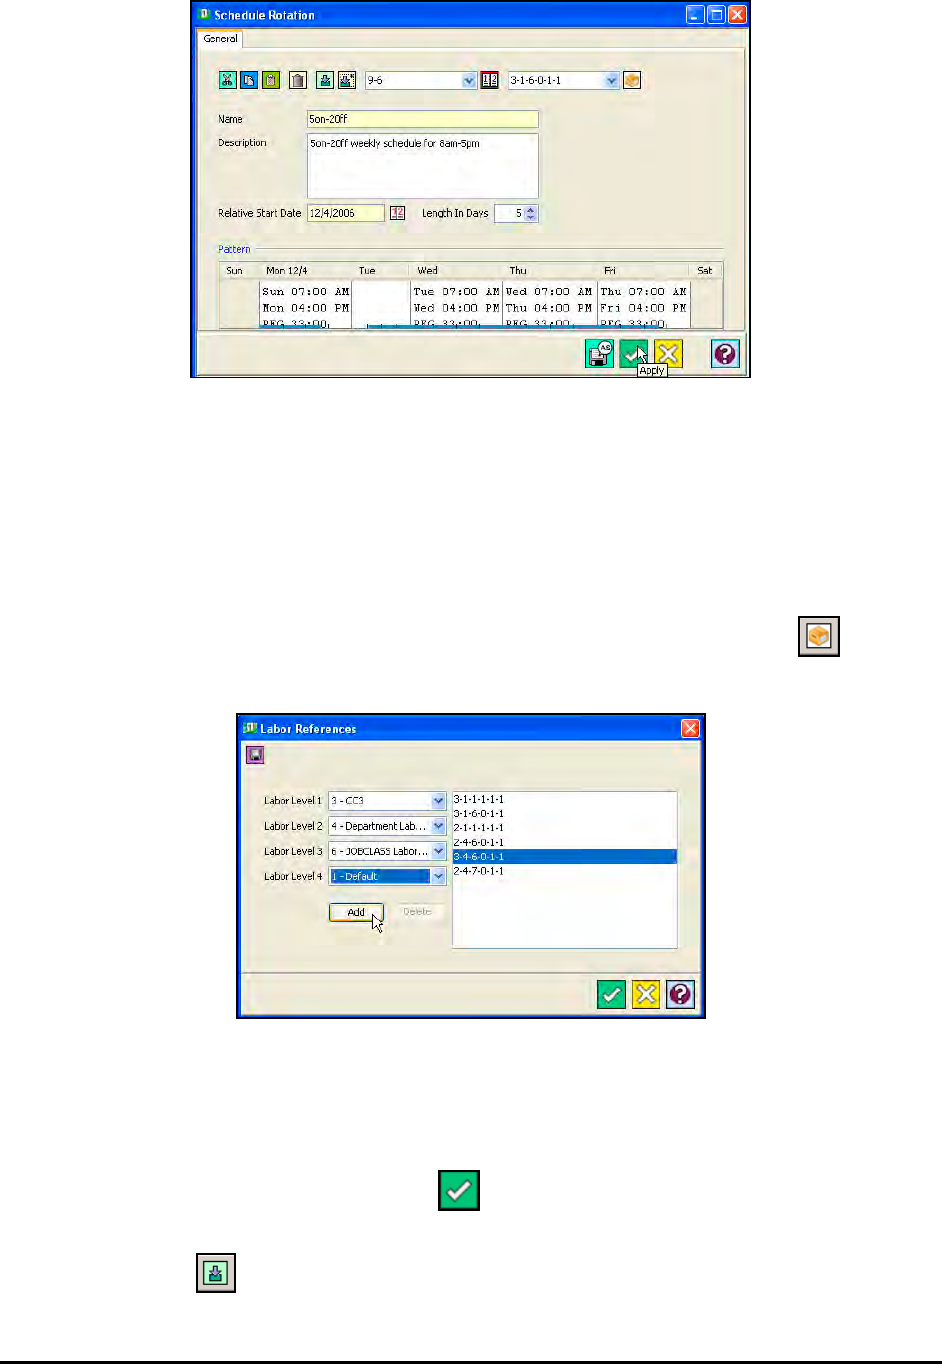
12-24 Time Guardian Series – Advanced Schedule Module
7. Schedules and Labor Levels are assigned to each day of the rotation by any one of the
following methods:
Existing Template Schedule and Labor Reference: To add a template or auto schedule
and labor category to a particular day:
a. Select the desired day in the Pattern box.
b. Select desired schedule from the Schedule list.
c. Select desired Labor Level subcategory from the Labor list, or click on the button.
The Labor References window will appear:
d. To add a labor category, select a subcategory from each of the dropdown lists and click
on the Add button. The selected labor category will appear in the Selected window. To
remove a labor category, select the desired category in the Selected window and click
on the Delete button. See above example screen.
e. When you have finished, click on the button to save your settings and return to the
Schedule Rotation window.
f. Click on the button. The displayed schedule in the Schedule list and labor category
in the Labor Reference list will be applied to the cell.
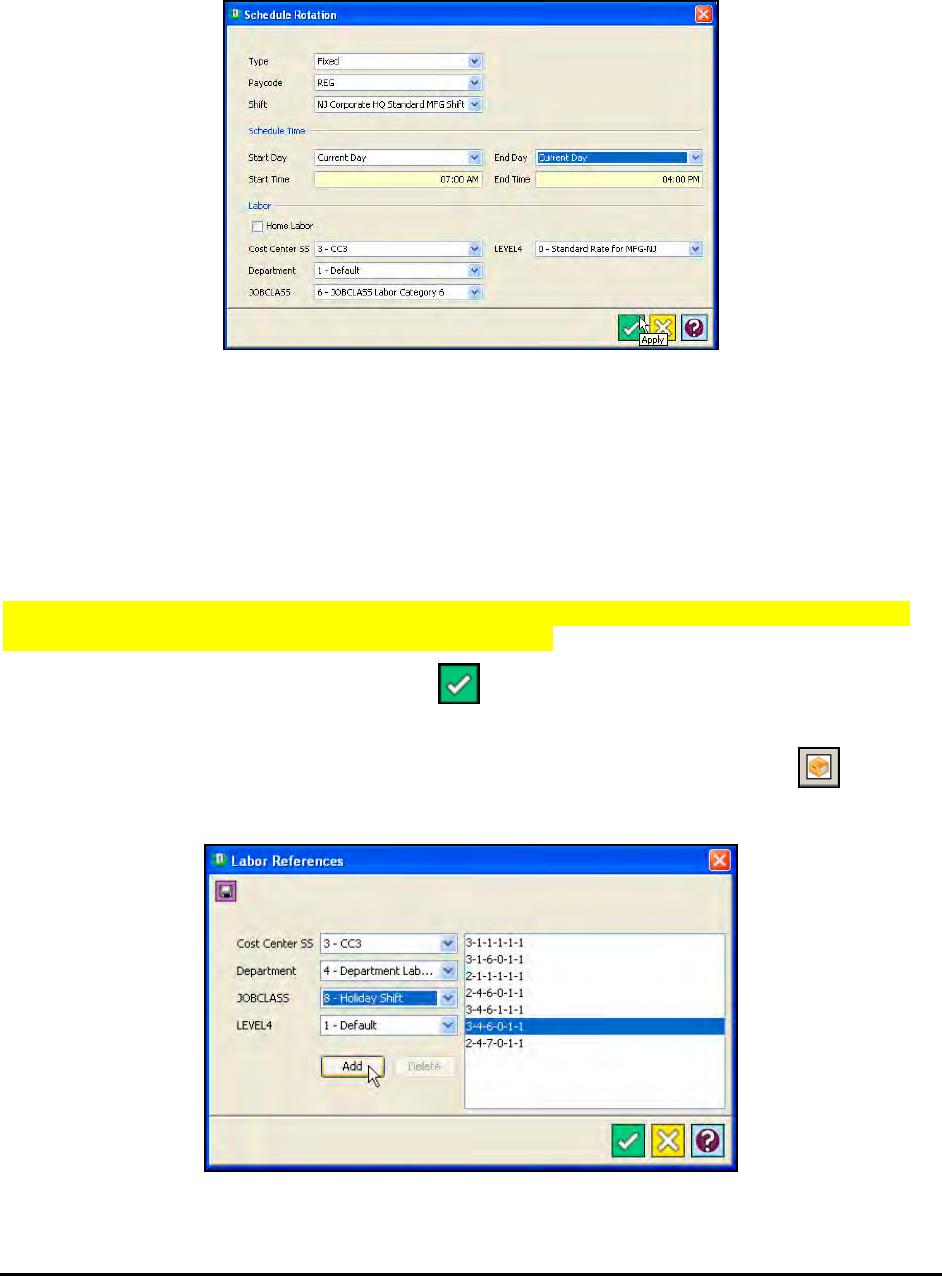
Time Guardian Series – Advanced Schedule Module 12-25
Manual: To add a schedule manually:
a. Double click on the desired cell in the rotation, and the following window will appear:
b. Select the Type, Pay Code, and Shift from the fields provided.
c. In the Schedule Time boxes, enter the Start and End Times, and the day that this
particular schedule will end. The choices for Start Day are; 1 days before, Current Day,
or 1 day after. The choices for End Day are; Current Day, 1 days after, 2 days after, or 3
days after.
d. In the Labor box, check the “Home Labor” box to default all labor levels to Home Labor,
or select the sub categories of each Labor Level you wish to include in the schedule.
Note: See Advanced Labor/Rate Module, Example of Multiple Labor Levels for details about
Labor Level Association links (Parent/Child relationship).
e. When you have finished, click on the button to save your settings and close the
dialog box.
f. Select desired Labor Level subcategory from the Labor list, or click on the button.
The Labor References window will appear:
g. To add a labor category, select a subcategory from each of the dropdown lists and click
on the Add button. The selected labor category will appear in the Selected window. To

12-26 Time Guardian Series – Advanced Schedule Module
remove a labor category, select the desired category in the Selected window and click
on the Delete button.
Note: See Advanced Labor/Rate Module, Example of Multiple Labor Levels for details about
Labor Level Association links (Parent/Child relationship).
h. When you have finished, click on the button to save your settings and return to the
Schedule Rotation window.
i. Click on the button. The displayed schedule in the Schedule list and labor category
in the Labor Reference list will be applied to the cell.
Copy, Cut and Paste: Schedules can be assigned to other days in the rotation pattern by
using the , , and (Copy, Cut, and Paste) buttons once there is at least one
schedule assigned to a day in the rotation pattern.
8. To add an additional Schedule and Labor Reference to particular day:
a. Select the desired day in the rotation.
b. Select the desired schedule from the Schedule list.
c. Select the desired labor category from the Labor Reference list.
d. Click on the button.
Import
The Import Module provides a way to import employee and schedule data from delimiter files
into Time & Attendance software. If the Advanced Schedule Module is activated the Import
Module screen will allow the Import Type selection for Individual Schedule and/or Advanced
Schedule. The selection of Benefit will be possible if the Benefit Module is Activated.
Creating a Import Profile
1. Click on the Import node within the Output module in the Tree View.
2. Click on the button, and the following Import window will appear:
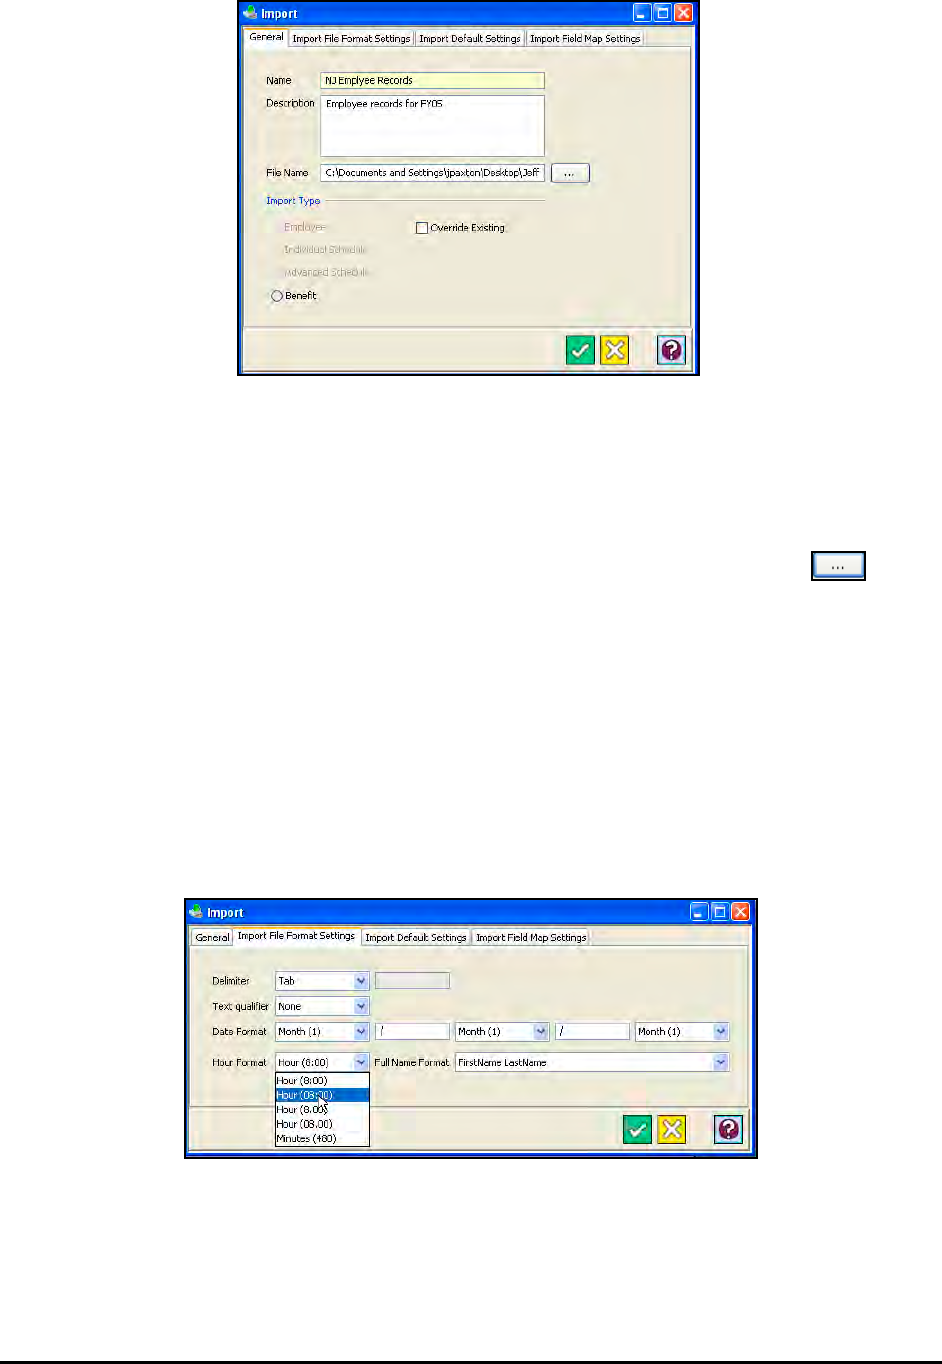
Time Guardian Series – Advanced Schedule Module 12-27
Note: In Setup . Company . Settings the Tracking Type must be set to Import Balances for
Benefit to appear on the Import General screen.
3. In the Name field, enter a name for the Import profile.
4. Enter a brief description of the Import profile in the Description field.
5. Enter the name and path of the import file in the File Name field, or click on the button
to the right of the field to browse for the file you wish to import.
6. In the Import Type area, select the type of import you wish to perform. The choices are;
Employee, Individual Schedule, or Advanced Schedule.
7. Check Benefit if you want to import employee benefits from another database.
Note: Benefit will only appear when Tracking Type in Company module is set to Import
Balances.
11. Check Override Existing if you want to replace existing database with imported information.
12. Click on the Import File Format Settings tab. This tab defines the format of your import file.
Select the following:
• Delimiter: Select a Delimiter from the dropdown list. The Delimiter is the character,
which separates the data elements from one another. The choices are: Tab, Comma,
Pipe, Semicolon, Backslash, Forward slash, or User Defined. If User Defined is
selected, you must enter the character in the field provided.
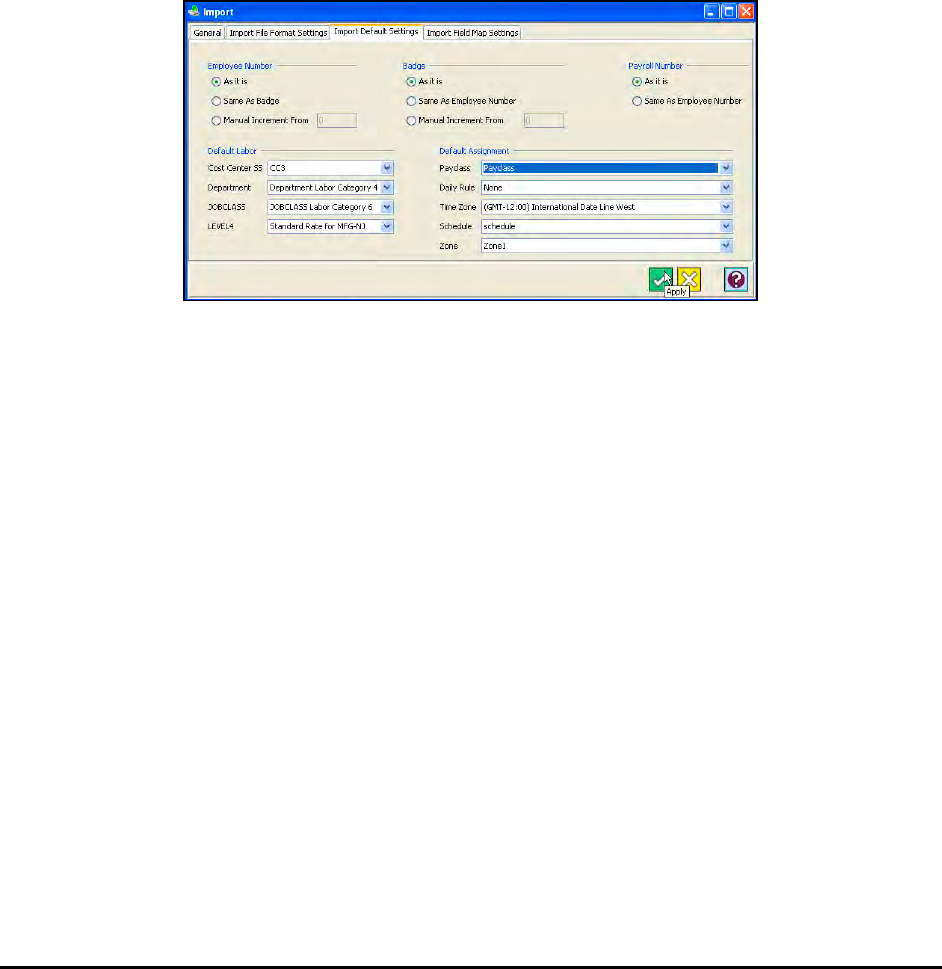
12-28 Time Guardian Series – Advanced Schedule Module
• Text Qualifier: Select a Text Qualifier from the dropdown list. The choices are: None,
Single Quote, or Double Quote. The Text Qualifier is the character, which encapsulates
a data element (i.e. “California”).
• Date Format: Select the date format from the dropdown lists. The choices are: Month
(1), Month (01), Month (Jan), Month (January), Year (90), Year (1990), Day (1), Day
(01), and Day (Mon).
• Hour Format: Select the hour format. The choices are; Hour (8:00), Hour (08:00), Hour
(08.00), or Minutes (480).
• Full Name Format: Select the Full Name Format from the dropdown list.
Note: This field will be available for assignment in the Import Field Map Settings tab.
13. Click on the Import Default Settings tab. This tab allows you set the defaults for data being
imported. Select the following:
• Employee Number: Select how the Employee Number will be defined. The choices are:
As it is, Same as Badge, or Manual Increment From. If Manual Increment From is
selected, you must enter the starting number in the field provided.
• Badge Number: Select how the Badge Number will be defined. The choices are: As it is,
Same as Employee Number, or Manual Increment From. If Manual Increment From is
selected, you must enter the starting number in the field provided.
• Payroll Number: Select how the Payroll Number will be defined. The choices are: As it
is, or Same as Employee Number.
• Default Labor: Assign a default category for each Labor Level using the dropdown lists.
• Default Assignment: Assign a default Pay Class, Daily Rule, Time Zone, Schedule, and
Zone using the dropdown lists.
Note: The defaults will be used if the import file does not contain data for these fields.
14. Click on the Import Field Map Settings tab. This tab allows you to manually define the
elements of the import file you are using.
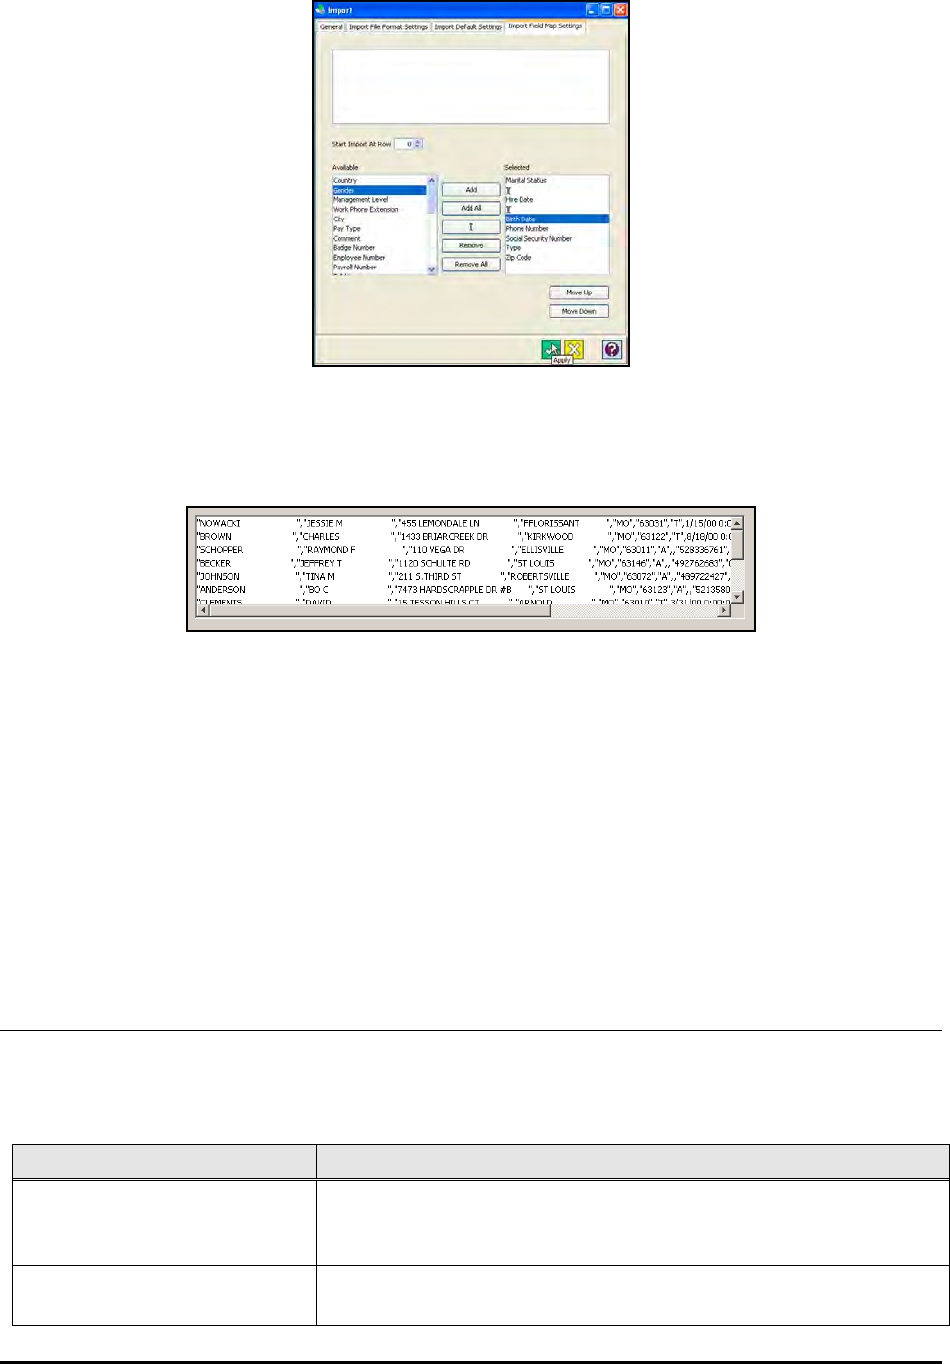
Time Guardian Series – Advanced Schedule Module 12-29
The contents of your import file will be displayed line by line in the File Contents window.
This area allows you to assign fields to data elements in each line. You can select to import
a single line, a selected group of lines or all lines.
To set the row number of the import file that the import operation will begin at, enter a
number in the Start Import At Row field.
Each data element in the import file must be defined in the order that it appears. Data
elements can be separated by commas, tabs, and semicolons. To assign a field, select a
data element in the Available list and click on the Add button. To select all the fields, click on
the Add All button. The field(s) will then be displayed in the Selected list. Add additional
fields until all data elements have been properly defined. Use the Remove Fields button to
un-assign fields. To skip a data element, click on the ][ button. A “][“ character will appear in
the Selected list to indicate that a data element was skipped.
To re-order fields in the Assignments Window, use the Move Up and Down buttons.
Reports About Scheduling
The Schedule Posting and Schedule vs. Actual Reports are available if the Advanced Schedule
Module is activated. The general format of each report type is fixed, but some content can be
hidden.
Report Name Description
Schedule Posting Report A landscape type calendar-like grid report that can be grouped
by one of the labor levels to post for the employees to see
when they are scheduled to work.
Schedule vs. Actual A landscape format analysis report of scheduled time with
wages versus actual hours with variance.

12-30 Time Guardian Series – Advanced Schedule Module
Reports are generated from Report Profiles, which are created in the Reports module of the
Output group. The Report format can be PDF or Excel.
Creating a Report Profile
1. Click on the Reports node of the Output module in the Tree View.
2. Click on the button, and the Reports window General tab will appear:
3. In the Name field, enter a name for the report [required field].
4. Enter in a brief description of the report in the Description field.
5. In the Report field, select the type of report you want to create. The choices will have added
Schedule Posting Report, and Schedule vs. Actual Report.
6. For Schedule Posting Report: Check the following options to include them on the report:
• Print advance schedules
• Advance schedules override regular schedules
• Print employee phone number
7. For Schedule vs. Actual Report: Check the following options to include them on the report:
• Report type of Summary or Detail
• Punch time of Actual Punches and Rounded Punches
8. Continue to follow the procedure as outlined in Reports in the output section.
Shifts
All setup rules will fall into (3) categories: shift rules, daily rules, or multiple day rules. Shift rules
apply to a given shift or schedule. They include punch rounding; shift rounding, punch pair
rounding, meals, exceptions, etc. These rules are assigned to the shift in the Shifts module (see
the following figure). Daily rules apply to a day and may cover multiple shifts and schedules.
Daily rules are created in the Daily Rules module. Multiple day rules apply to a period that
extends greater than one day. They include weekly overtime, weekly rounding, Pay period
rounding, etc. Multiple day rules are created in the Pay Class module.
A Shift is the set of rules for a given shift or schedule. A Shift consists of the following elements:
• Rounding Template: Determines how an employee’s punches will be rounded.
• Exceptions: Codes used to track employee’s time deviations from assigned
schedules. (Note: Meal Penalty has been added to provide feature to penalize a
company when an employee does not take lunch break or takes the lunch break late.
In this instance penalty hours are generated in the Pay Code plus the MPNT exception
code will be generated).
• Meal Templates: Defines employee breaks and meal breaks.
• Shift Overtime: Defines the overtime rules for the schedule.
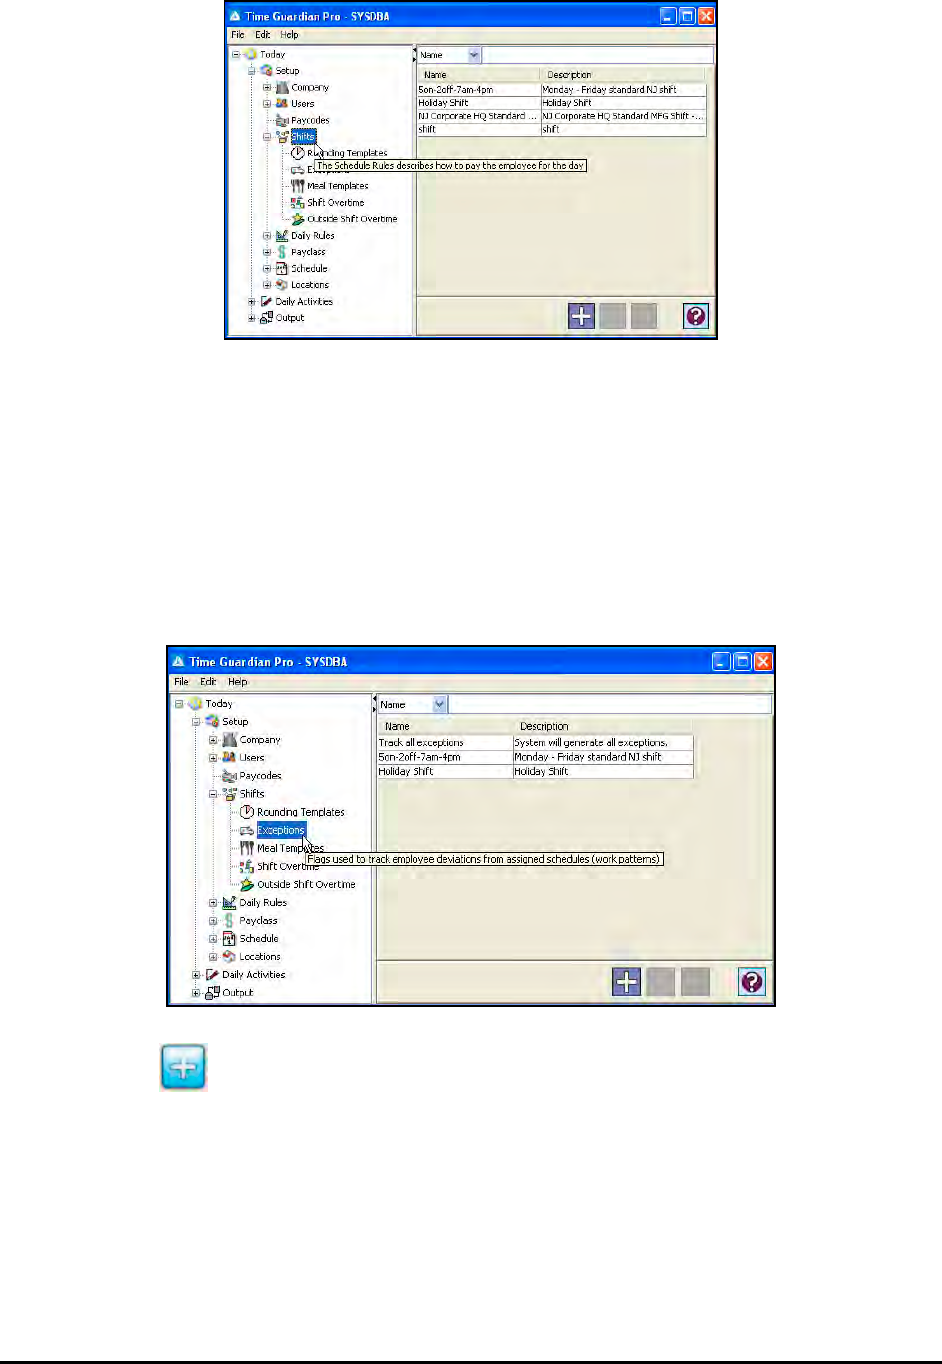
Time Guardian Series – Advanced Schedule Module 12-31
Exceptions
Exceptions are used to track deviations in an employee’s time and attendance from assigned
schedules. Exceptions in Time Guardian Pro are defined by a group or set and then assigned to
a Shift.
To create a group or set of Exceptions template:
1. Click on the Exception module within the Shifts module in the Tree View, and the list of
defined exceptions will appear:
2. Click on the button, and the Exception window will appear.
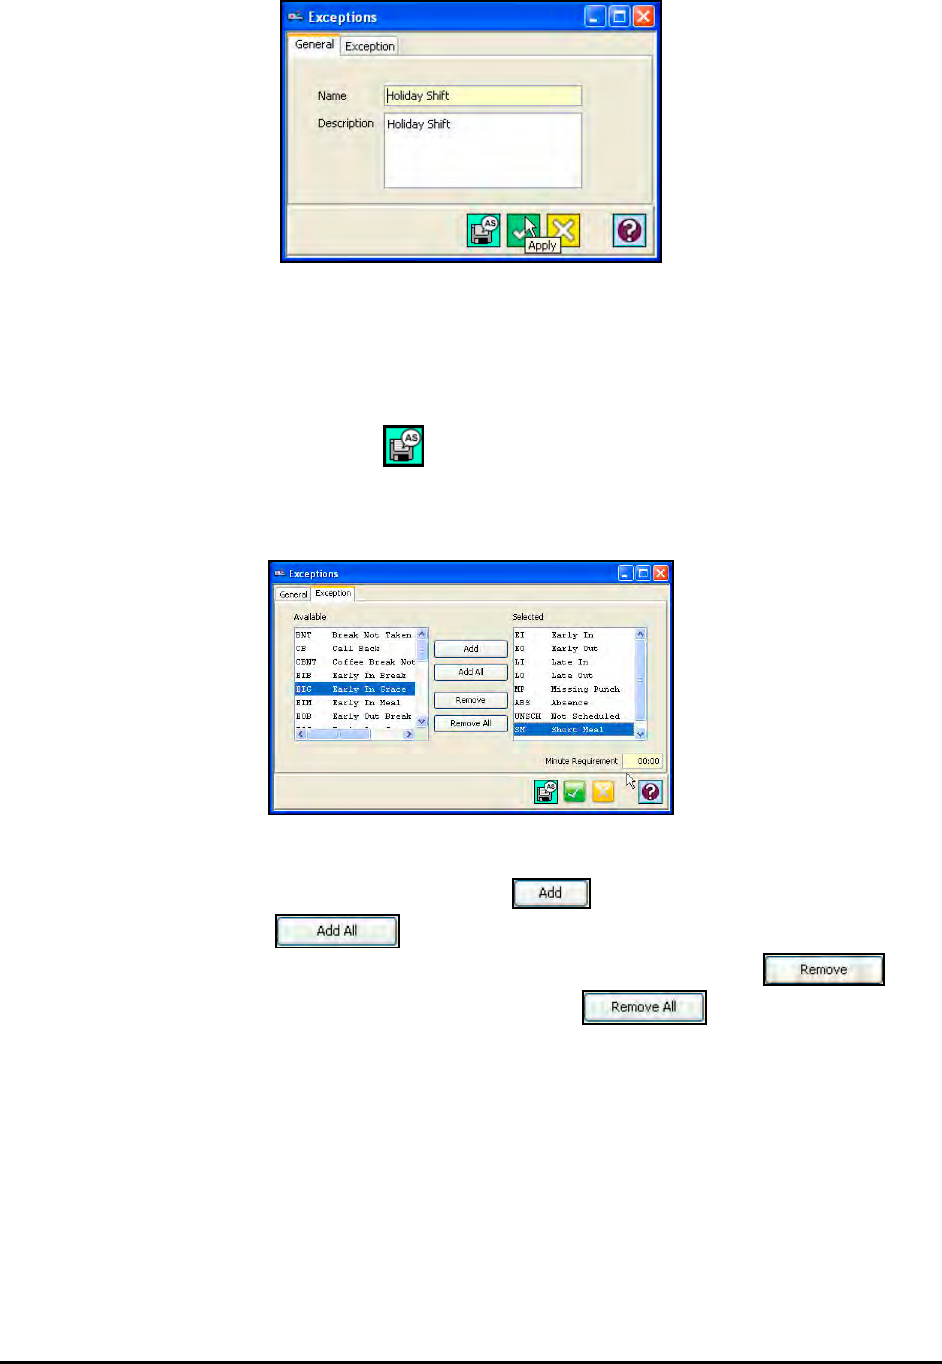
12-32 Time Guardian Series – Advanced Schedule Module
3. Enter a name for the Exception set in the name field.
4. Enter a description of the Exception set in the Description field.
Note: If you wish to duplicate the properties of an existing Exceptions template for another
Exceptions template, select the desired Exceptions template, open it, enter in a new
name and click on the Save As button. The new Exceptions template will appear in
the Main View.
5. Click on the Exception tab.
6. To add an Exception, highlight the desired Exception (note: Meal Penalty = MPNT can now
be selected) in the Available list and click on the button. To select all the listed
Exceptions, click on the button. To remove an Exception from an employee’s
record, highlight the desired Exception in the Selected list and click on the
button. To remove all the listed Exceptions, click on the button.
7. For some Exceptions in the Selected list, you can enter in the Minute Requirement (HH:MM)
which will determine if the Exception will be reported once the Minute Requirement has
been reached. For example, Time Guardian Pro can be configured to not generate a LI
(Late In Exception) if the employee is late by less than 5 minutes.
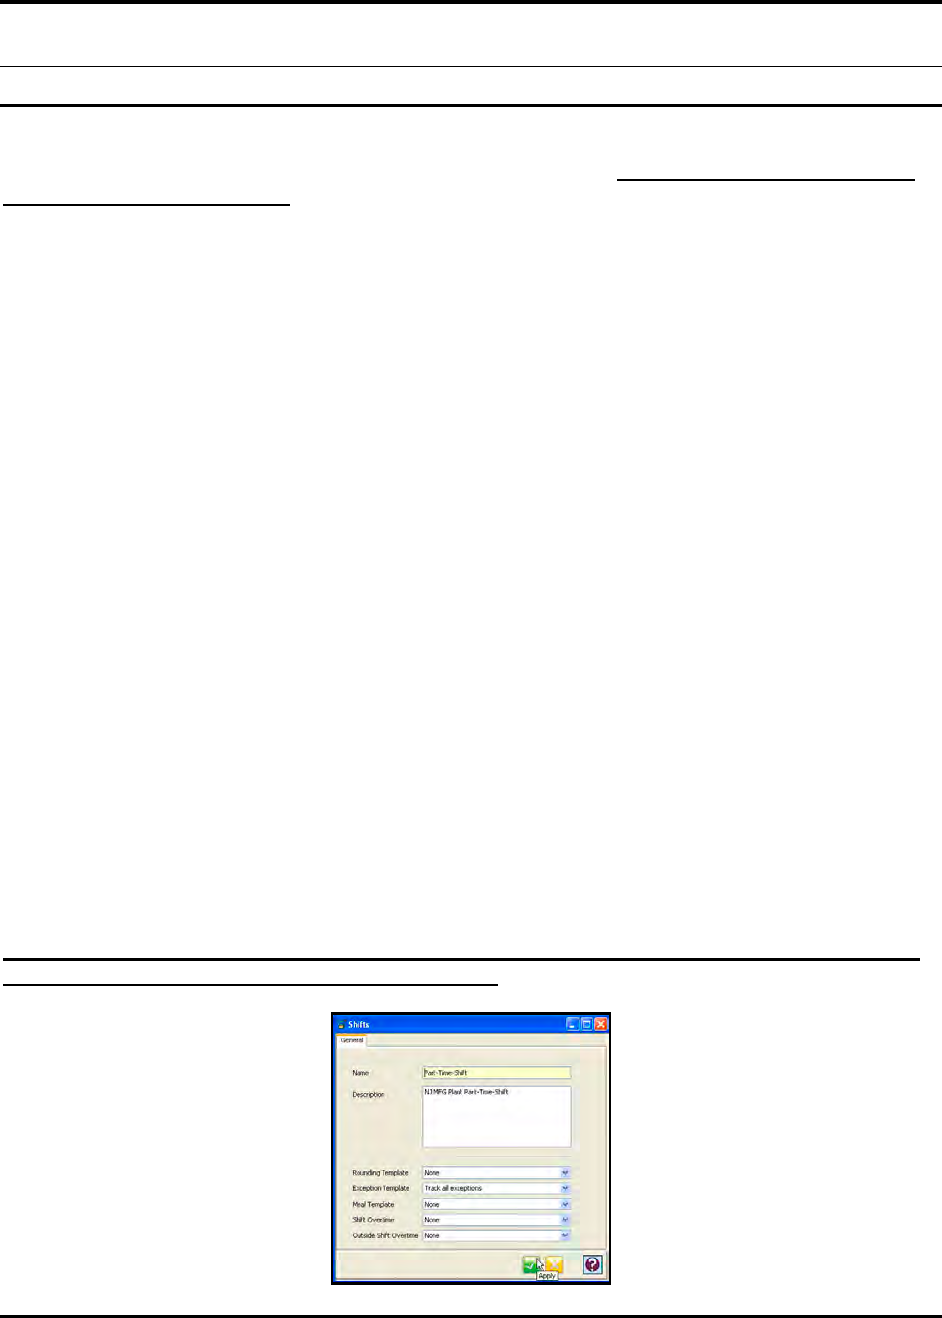
Time Guardian Series – Advanced Meal Module 13-1
Chapter 13: Advanced Meal Module
Advanced Meal Module Introduction
The activation of the Advanced Meal Module provides the ability to setup complex scenarios for
meal and/or break deductions on an automatic or punch basis. When this module is activated,
the shift module is also active.
Meals are the deduction of hours taken from an employee or hours given to employee for meal
and breaks. The meals will be broken up into 3 categories meals, breaks, and coffee breaks.
There are two ways in which the deduction can take place either by the fixed or automatic
method. In fixed method the times when the meal occurs is set and the difference between the
start and end is deducted. In the automatic method different time windows are setup to see if
employees punch for the meal. If the employee punches then amount setup for the automatic
deduction taken away from the employee works hours. If the employee does punch in the
windows then no time is deducted, but there is setup feature that allows the user to deduct the
automatic time even though the employee did not punch for it.
The sections of the Time & Attendance Software affected and/or features added from the
activation of this module include:
• Shift Rules
− Exception Template
− Meal Template
Fixed Meal
Flex Meal (Interval, Window, Sequence, Terminal)
Meal Credit
Meal Penalty
• Location/Terminal
− MTX-15 Terminal (Break, Coffee break Meal options sent to the terminal)
• Global Edit
− Punch Type
− Meal Type
User Interface: From shift link in tree view only exception templates and meal templates
can be created and assigned to a shift template
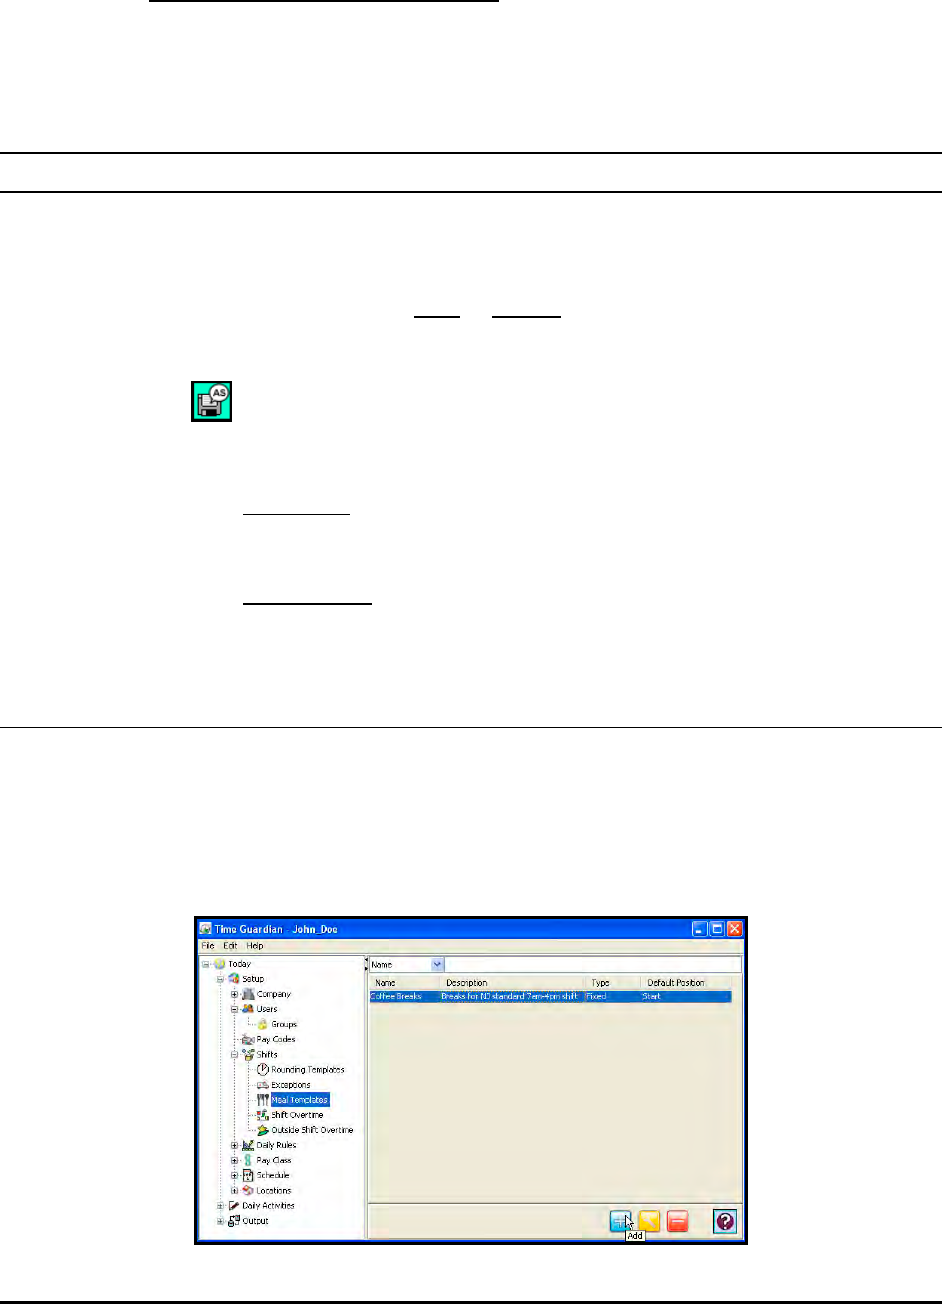
13-2 Time Guardian Series – Advanced Meal Module
Note: If the advanced meal module is not active, the meal template will be grayed out but the
exception template will stay selectable and meal template will not be accessible from
the tree view.
Using the Advanced Meal Module
Meals are the deduction of hours taken from an employee or hours given to the employee for
meals and breaks. The meals are broken up into (3) categories; meals, breaks, and coffee
breaks. There are two types of deduction: fixed or flexible.
Note: If you wish to duplicate the properties of an existing Meal template for another Meal
Overtime template, select the desired Meal template, open it, enter in a new name and
click on the button. The new Meal template will appear in the Main View.
• A fixed meal or break has to be taken at a set time of the day – see Fixed Meal
Template topic for details of Break, Coffee Breaks, Meals, Assignments, and Break
Credit tabs for a Fixed Meal.
• A flexible meal is a meal that can be taken at any time of the day – see Flexible Meal
Template topic for details of Break, Coffee Breaks, Meals, Assignments, and Break
Credit tabs for a Flexible Meal.
Fixed Meal Template
A fixed meal or break has to be taken at a set time of the day.
To create a fixed Meal Template:
1. Click on the Meal Templates node within the Shifts module in the Tree View, and the list of
meal templates will appear:
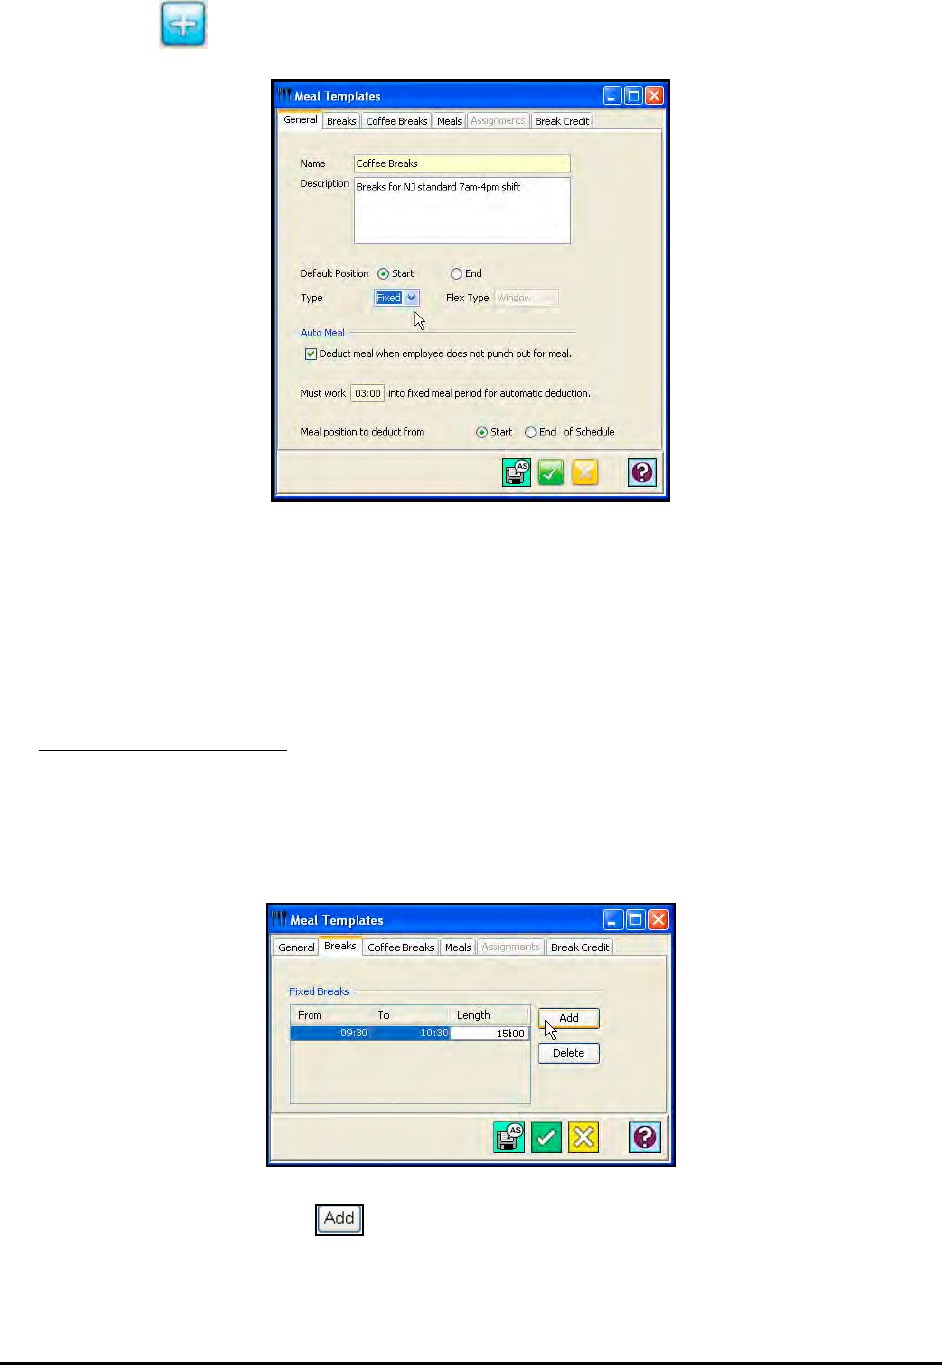
Time Guardian Series – Advanced Meal Module 13-3
2. Click on the button, and the Meal Templates window will appear.
3. Enter a name for the Meal Template in the name field.
4. Enter a description of the Meal Template in the Description field.
5. Select the Default (Punch) Position that the meal would be deducted from should the
employee take less time than the allotted time. If Start is chosen, the time will be deducted
starting from the start of the break or meal, and moving forward. For End, the time will be
deducted starting from the end time of the break or meal, and moving forward.
6. Select Fixed as the Type.
7. Place a check in the Auto Meal check box if you wish to have an automatic break deduction.
Enter in the required number of hours to work in Fixed Position before for the deduction is
applied. Select the (Punch) Position of the shift to deduct from.
8. Click on the Breaks tab.
9. To add a break, click on the button. A row will appear in the Fixed Breaks box. Must
double-click on From, To, and/or Length fields to enter data.
10. Enter From and To times for the break (in 24-hour format) and Break Length (in HH:MM
format).
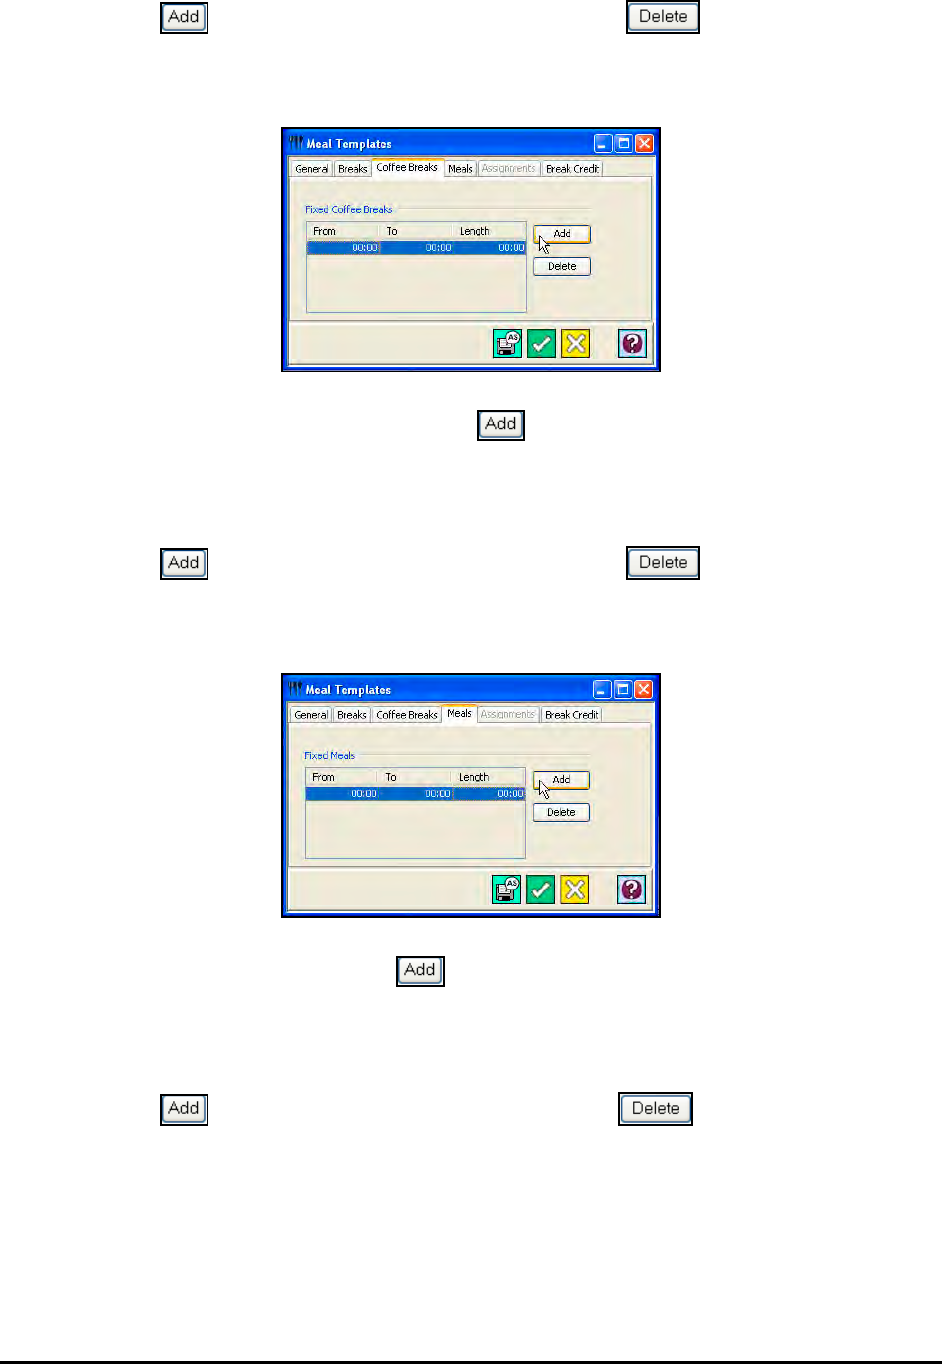
13-4 Time Guardian Series – Advanced Meal Module
11. Click on the button to add more breaks, or click on the button to remove a
break.
12. Click on the Coffee Breaks tab.
13. To add a Coffee Breaks interval, click on the button. A row will appear in the Fixed
Coffee Breaks box. Must double-click on From, To, and/or Length fields to enter data.
14. Enter From and To times for the break (in 24-hour format) and Break Length (in HH:MM
format).
15. Click on the button to add more breaks, or click on the button to remove a
break.
16. Click on the Meals tab.
17. To add a meals interval, click on the button. A row will appear in the Fixed Meals box.
Must double-click on From, To, and/or Length fields to enter data.
18. Enter From and To times for the interval (in 24-hour format) and Meal Length (in HH:MM
format).
19. Click on the button to add more meals, or click on the button to remove a
meal.
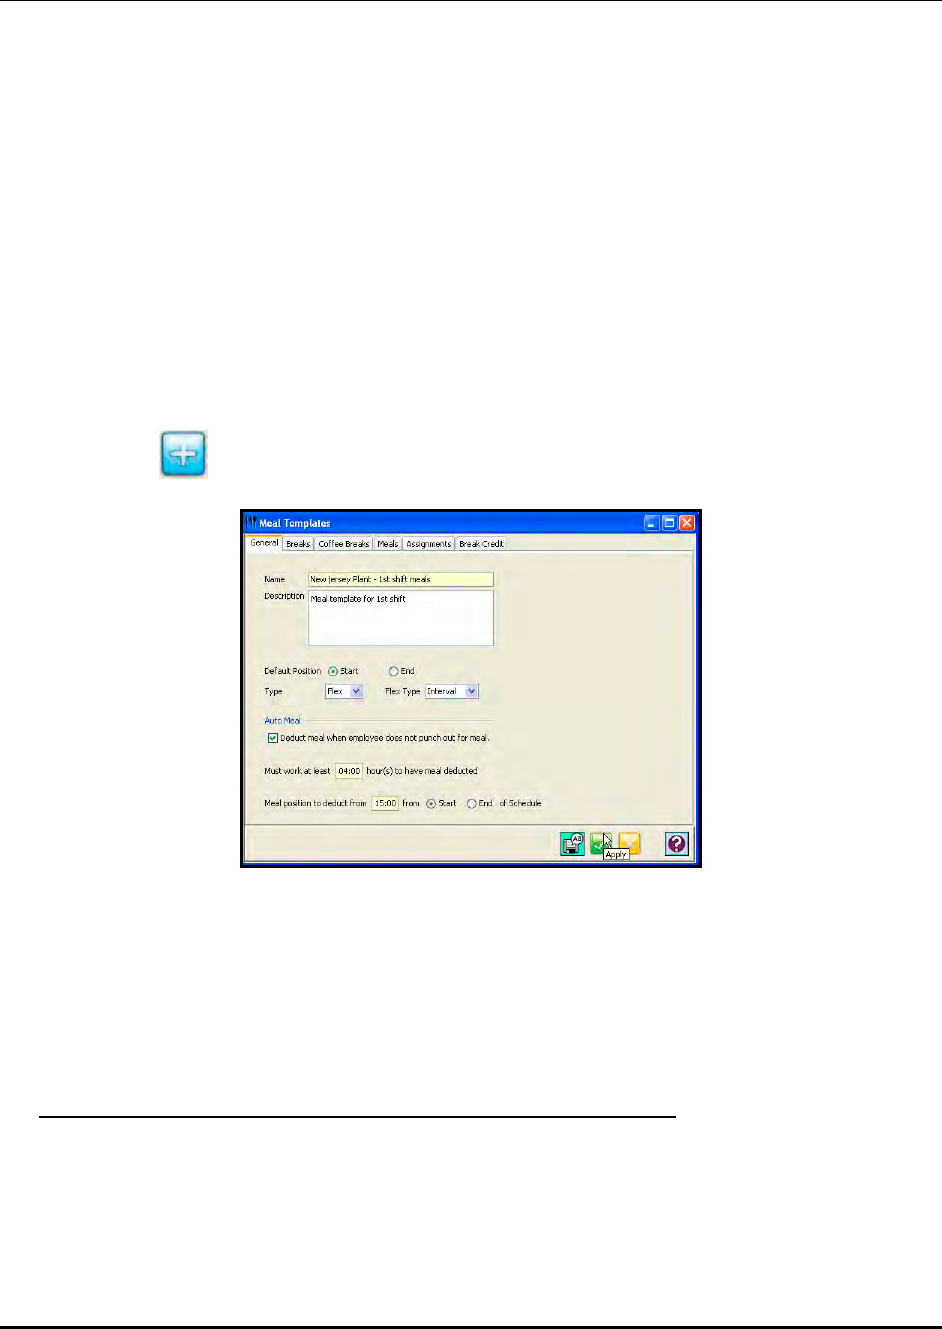
Time Guardian Series – Advanced Meal Module 13-5
Flexible Meal Template
A flexible meal is a meal that can be taken at any time of the day. There are (4) types:
• Terminal: Employees must press a button on the clock before punching IN and OUT for
breaks. Only works with MTX-15 terminal (function buttons can be used on the MTX-15).
• Interval: Punches that occur within certain preset intervals are assigned to breaks or meals.
This takes a look at the amount of time an employee punches out for.
• Sequence: Breaks or meals are assigned in sequential order, and each punch pair is
assigned to a break or meal in the order that they occur. This setting requires an employee
to take a break and meal in the proper sequence.
• Window: Punches that occur within certain preset windows of time are assigned to breaks or
meals.
To create a Flexible Interval or Terminal Meal Template:
1. Click on the Meal Templates node within the Shifts module in the Tree View.
2. Click on the button, and the Meal Templates window will appear.
3. Enter a name for the Meal Template in the name field [required field].
4. Enter a description of the Meal Template in the Description field.
5. Select the Default (Punch) Position that the meal would be deducted from should the
employee take less than the allotted time. If Start is chosen, the time will be deducted
starting from the start of the break or meal, and moving forward. For End, the time will be
deducted starting from the end time of the break or meal, and moving forward.
6. Select Flex as the Type and Interval or Terminal as the Flex Type.
7. Place a check in the Auto Meal check box if you wish to have an automatic break deduction.
Enter in the required number of hours to work before the deduction is applied and select the
(Punch) Position [amount of time to deduct start or end] of the shift to deduct from.
8. Click on the Breaks tab.
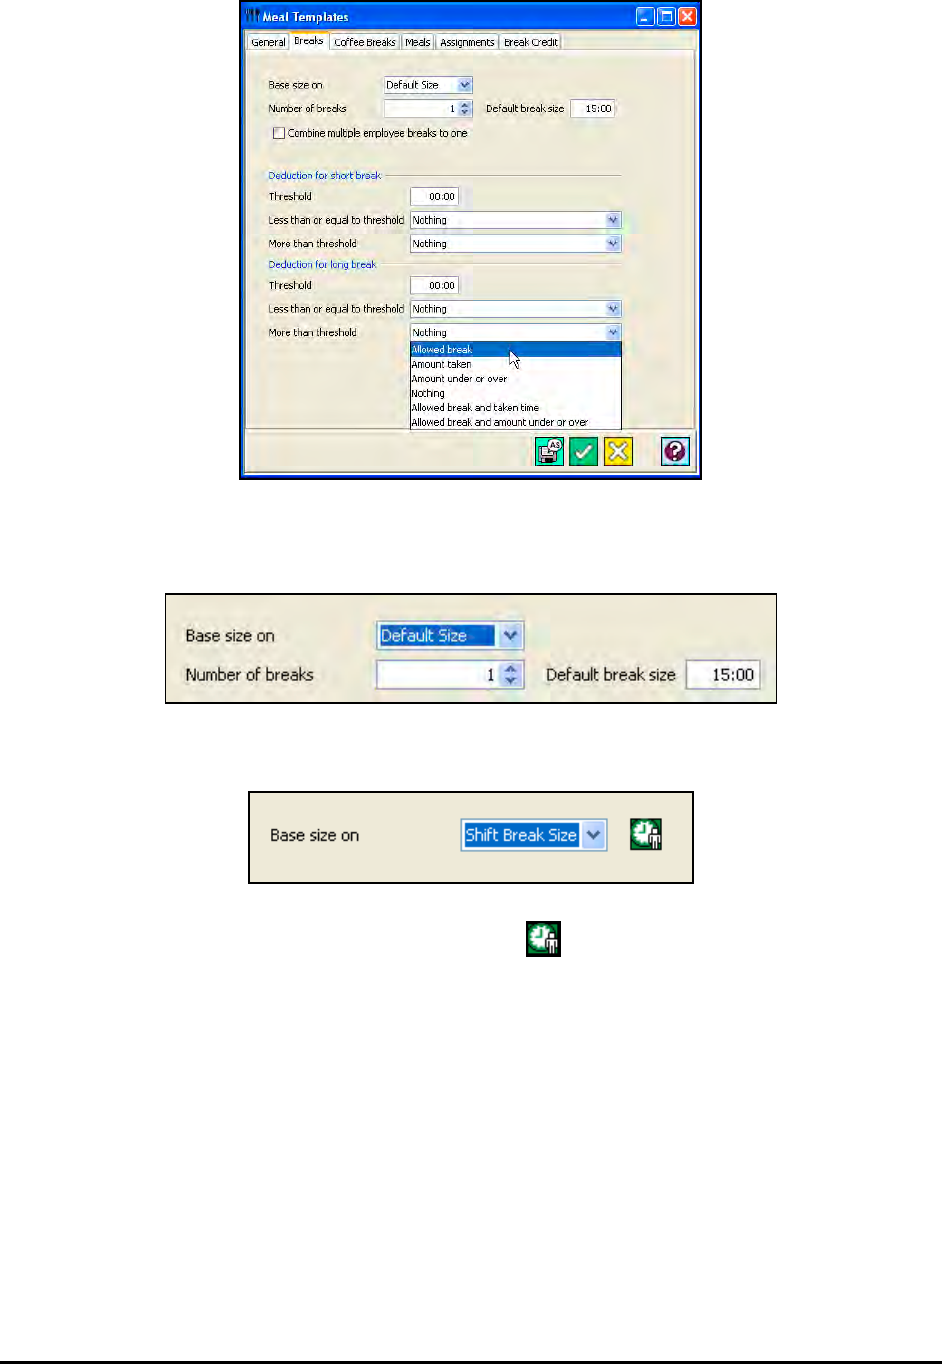
13-6 Time Guardian Series – Advanced Meal Module
9. Select the Break size based on Default Size or Shift Break Size. For breaks based on
default size, enter the number of breaks and the default break size in the fields provided.
For breaks based on Shift break size, the following selection will appear:
For breaks based on Shift break size, click on the button, and the following Define
Breaks window will appear:
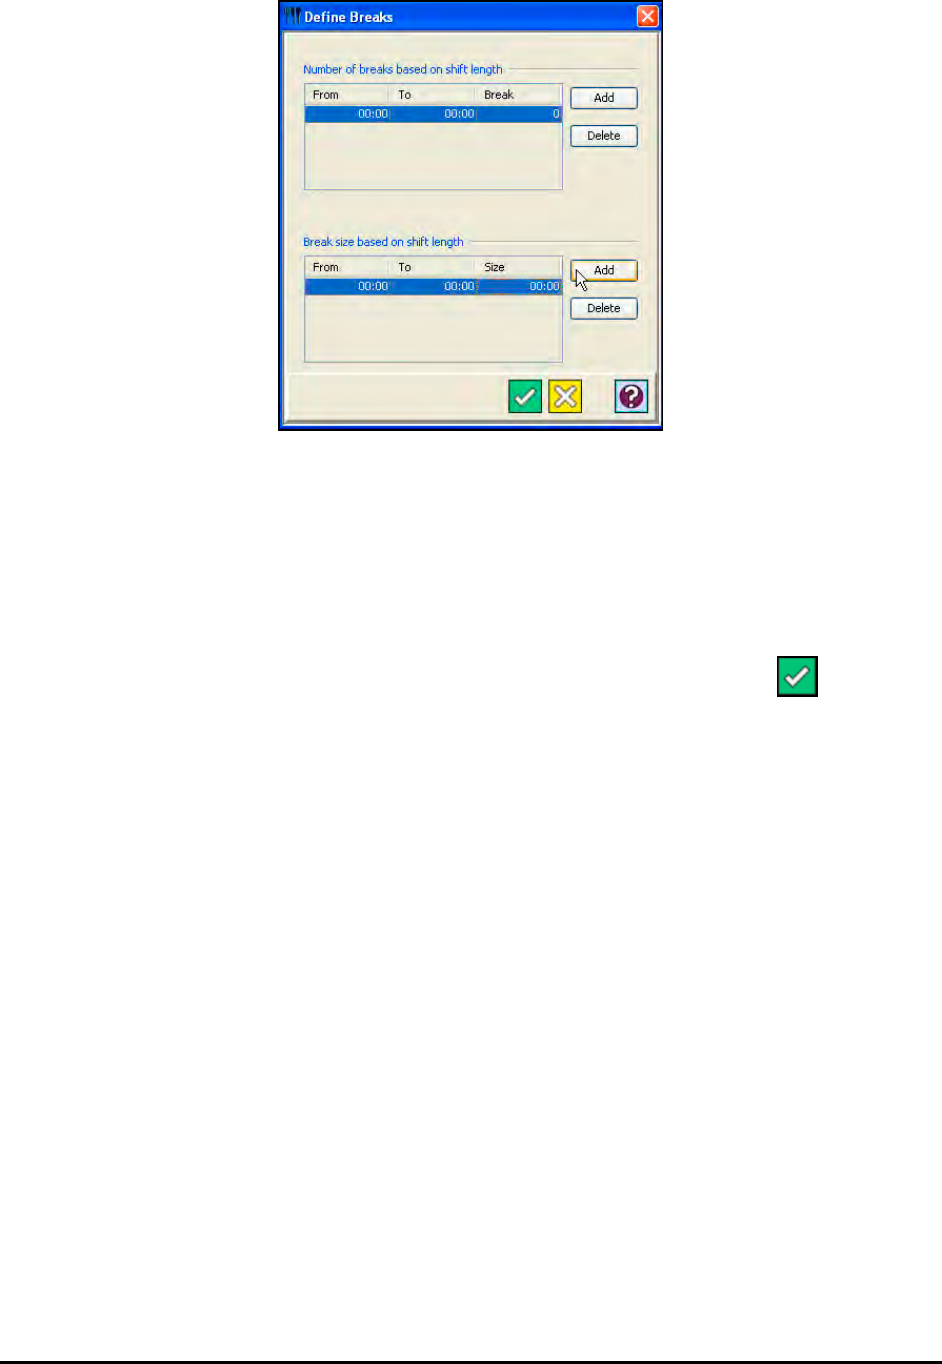
Time Guardian Series – Advanced Meal Module 13-7
To enter the Number of breaks based on shift length click on the Add button. A row will
appear. Enter the From and To times of the shift and the number of breaks for that shift.
To enter the Break size based on shift length click on the Add button. A row will appear.
Enter the From and To times of the shift and the size of each break for that shift.
Click on the Combine multiple employee breaks to one check box if you wish to have all
employee breaks combined together as one break.
When you have finished the number of breaks and break sizes, click on the button to
save your settings.
10. In the Deduction for Short Break box, set how the break will be deducted if the employee
uses a shorter period of time than allocated for the break.
a. In the Threshold field, enter the amount of time (HH:MM) that will be used in the
determination.
b. In the Less and More Than Threshold fields, set the conditions if the time taken for the
break is either less or more than the threshold in the fields provided. They choices are:
• Allowed break: Which is the amount of time the employee is allocated for the Regular
break or Coffee break
• Amount taken: Which is the amount of time the employee actual punched out for the
Regular break or Coffee break.
• Amount under or over: Equals the amount of time that exceeds or is under the time
allocated for the Regular break or Coffee break.
• Nothing: Means to deduct no time from the employee.
• Allowed break and taken time: Which will deduct the time allocated for Regular break
or Coffee break plus the time taken for Regular break or Coffee break.
• Allowed break and amount under or over: Which is the amount of time the employee
is allocated for the Regular break or Coffee break and which is the amount of time
that exceeds or is under the time allocated for the Regular break or Coffee break.
11. In the Deduction for Long Break box, set how the break will be deducted if the employee
uses a longer period of time than allocated for the break.
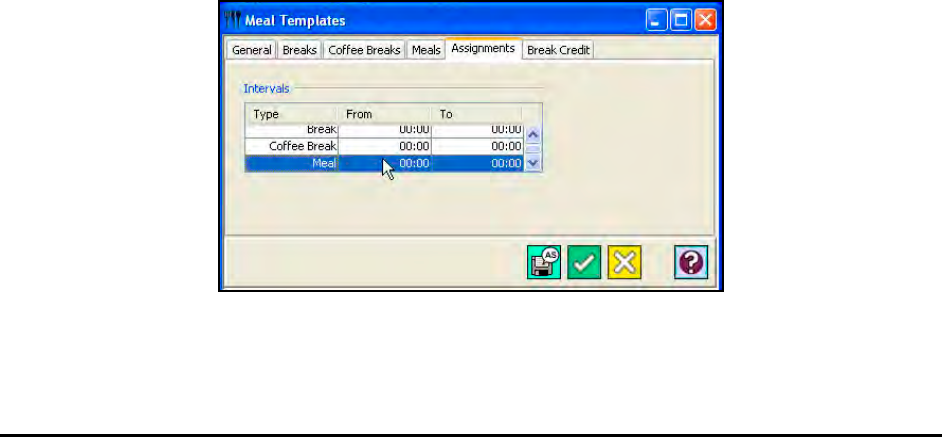
13-8 Time Guardian Series – Advanced Meal Module
a. In the Threshold field, enter the amount of time (HH:MM) that will be used in the
determination.
b. In the Less and More Than Threshold fields, set the conditions if the time taken for the
break is either less or more than the threshold in the fields provided. They choices are:
• Allowed break: Which is the amount of time the employee is allocated for the Regular
break or Coffee break
• Amount taken: Which is the amount of time the employee actual punched out for the
Regular break or Coffee break.
• Amount under or over: Equals the amount of time that exceeds or is under the time
allocated for the Regular break or Coffee break.
• Nothing: Means to deduct no time from the employee.
• Allowed break and taken time: Which will deduct the time allocated for Regular break
or Coffee break plus the time taken for Regular break or Coffee break.
• Allowed break and amount under or over: Which is the amount of time the employee
is allocated for the Regular break or Coffee break and which is the amount of time
that exceeds or is under the time allocated for the Regular break or Coffee break.
c. Click on the Coffee Breaks tab. Repeat steps 10 through 12 for the Coffee Breaks.
d. Click on the Meals tab. Repeat steps 10 through 12 for the Meals.
An example of how this would be used is to look at an employee who is assigned a 1:00
hour meal size to be taken during the day. When the employee actually takes his or her
meal, if he or she takes less than 1:00 hour the software will denote this as a Short Meal
and if he or she takes more than 1:00 hour the software will denote this as a Long Meal.
Using the example above as the setup a short meal example would be, if employee takes
00:45 minutes for meal the software will denote this as a Short Meal. The employee will
have a short meal of 00:15 minutes (01:00 – 00:45). Therefore, the short meal of 00:15
minutes is less than the threshold and then the software will deduct the Allowed Meal of
1:00 hour. If the employee takes 00:20 minutes for meal the software will denote this as a
Short Meal. The employee will have a short meal of 00:40 minutes (01:00 – 00:20).
Therefore, the short meal of 00:40 minutes is more than the threshold and then the software
will deduct the Amount Taken of 00:20 minutes.
e. If you have selected Interval as the Flex Type, Click on the Assignments tab.
f. Enter the From and To (interval) times for each break. The employee punch times will be
assigned to one of the Meal Template types (Break, Meal, or Coffee Break) based on
the time between the OUT and IN punches.
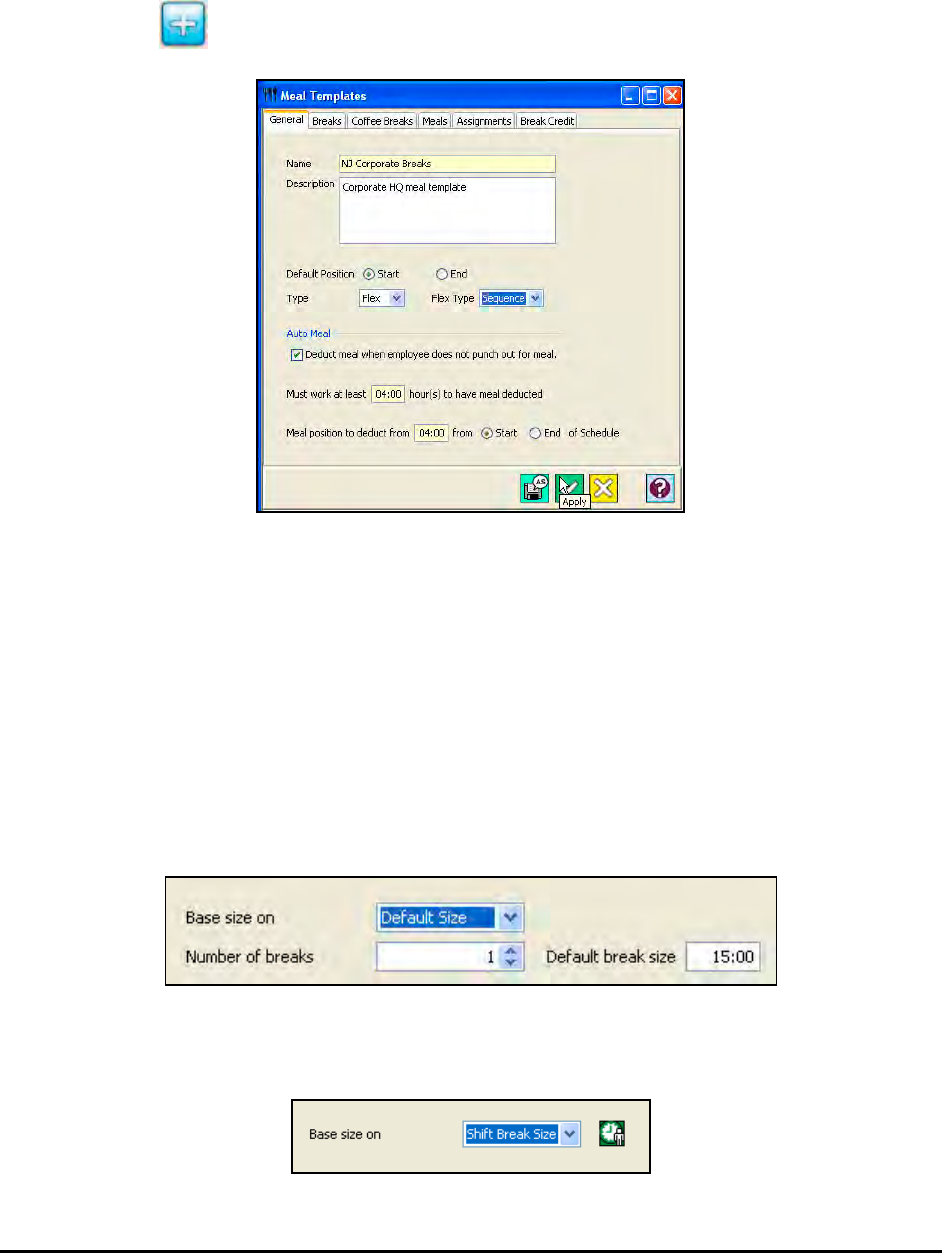
Time Guardian Series – Advanced Meal Module 13-9
To create a Flexible Sequence Meal Template:
1. Click on the Meal Templates node within the Shifts module in the Tree View.
2. Click on the button, and the Meal Templates window will appear.
3. Enter a name for the Meal Template in the name field.
4. Enter a description of the Meal Template in the Description field.
5. Select the Default (Punch) Position, Start or End, that the break or meal will be based on.
6. Select Flex as the Type and Sequence as the Flex Type.
7. Place a check in the Auto Meal check box if you wish to have an automatic break deduction.
Enter in the required number of hours to work before for the deduction is applied and select
the (Punch) Position of the shift to deduct from.
8. Click on the Breaks tab.
9. Select the Break size based on Default Size or Shift Break Size.
For breaks based on default size, enter the number of breaks and the default break size in
the fields provided.
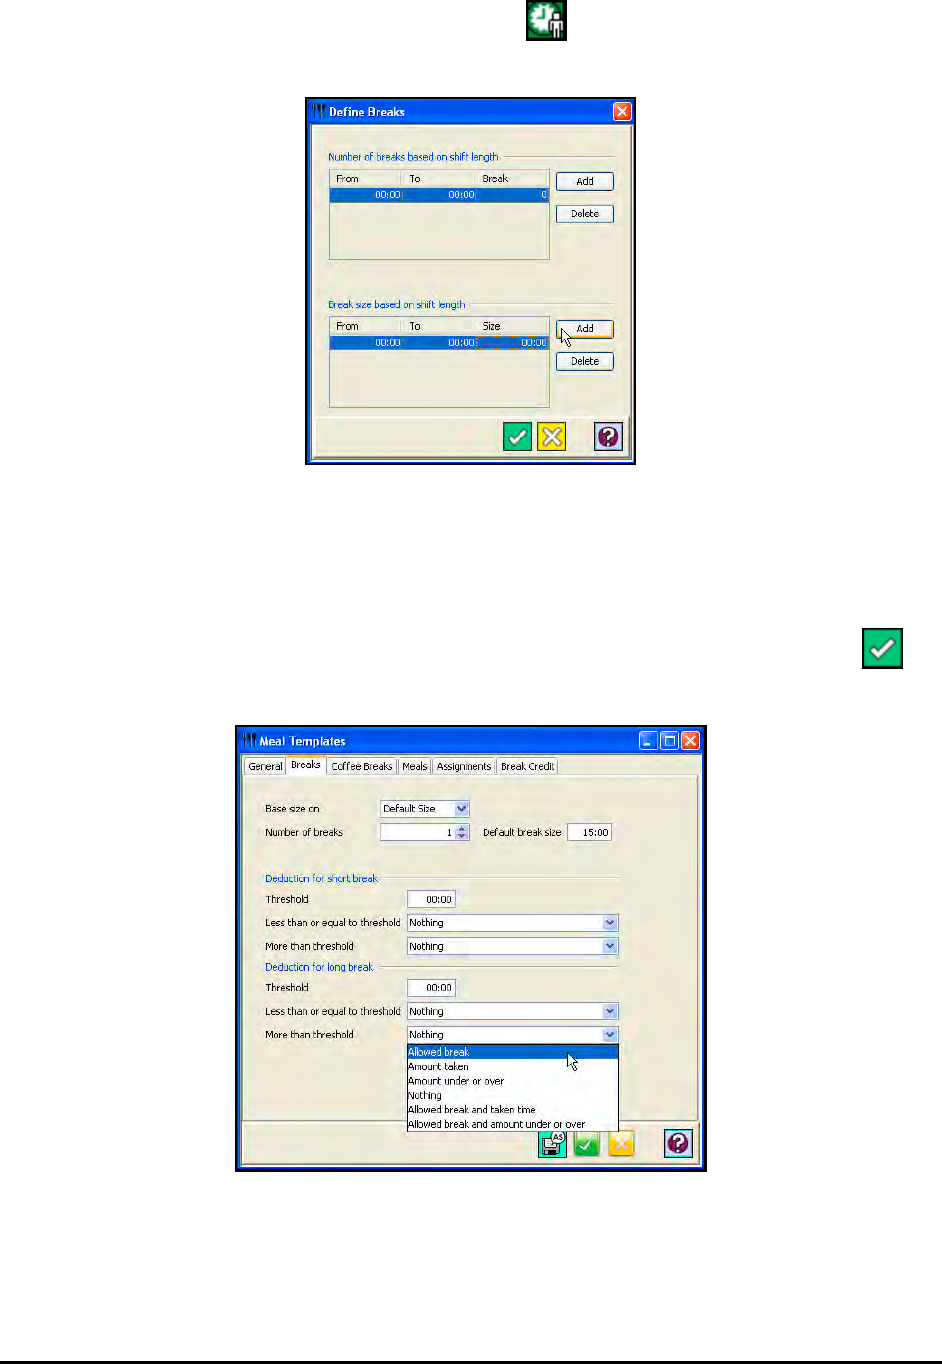
13-10 Time Guardian Series – Advanced Meal Module
For breaks based on Shift break size, click on the button, and the following Define
Breaks window will appear:
To enter the Number of breaks based on shift length click on the Add button. A row will
appear. Enter the From and To times of the shift and the number of breaks for that shift.
To enter the Break size based on shift length click on the Add button. A row will appear.
Enter the From and To times of the shift and the size of each break for that shift.
When you have finished entering the number of breaks and break sizes, click on the
button to save your settings.
10. In the Deduction for Short Break box, configure how much time will be deducted from the
employee when an employee punches out for a shorter period of time than they were
allocated for in the break:
a. Enter in the amount of time (HH:MM) that the action is to be taken.

Time Guardian Series – Advanced Meal Module 13-11
b. Set the conditions if the time taken for the break is either less or more than the threshold
in the fields provided. The choices are:
Allowed break: Which is the amount of time the employee is allocated for the Regular break or
Coffee break.
Amount taken: Which is the amount of time the employee actually punched out for the Regular
break or Coffee break.
Amount under or over: This is the amount of time that exceeds or is under the time allocated for
the Regular break or Coffee break.
Nothing: This is to deduct no time from the employee.
Allowed and taken time: Which will deduct the time allocated for Regular break or Coffee break
plus the time taken for Regular break or Coffee break.
Allowed break and amount under or over: Which is the amount of time the employee is allocated
for the Regular break or Coffee break and which is the amount of time that exceeds or is under
the time allocated for the Regular break or Coffee break.
11. In the Deduction for Long Break box, configure how much time will be deducted from the
employee when an employee takes a longer period of time than they were allocated for in
the break:
a. Enter in the amount of time (HH:MM) that the action is to be taken.
b. Set the conditions if the time taken for the break is either less or more than the threshold
in the fields provided. The choices are:
Allowed break: Which is the amount of time the employee is allocated for the Regular break or
Coffee break.
Amount taken: Which is the amount of time the employee actually punched out for the Regular
break or Coffee break.
Amount under or over: This is the amount of time that exceeds or is under the time allocated for
the Regular break or Coffee break.
Nothing: This is to deduct no time from the employee.
Allowed and taken time: Which will deduct the time allocated for Regular break or Coffee break
plus the time taken for Regular break or Coffee break.
Allowed break and amount under or over: Which is the amount of time the employee is allocated
for the Regular break or Coffee break and which is the amount of time that exceeds or is under
the time allocated for the Regular break or Coffee break.
12. Click on the Coffee Breaks tab. Repeat steps 10 through 12 for the Coffee Breaks.
13. Click on the Meals tab. Repeat steps 10 through 12 for the Meals.
14. Click on the Assignments tab.
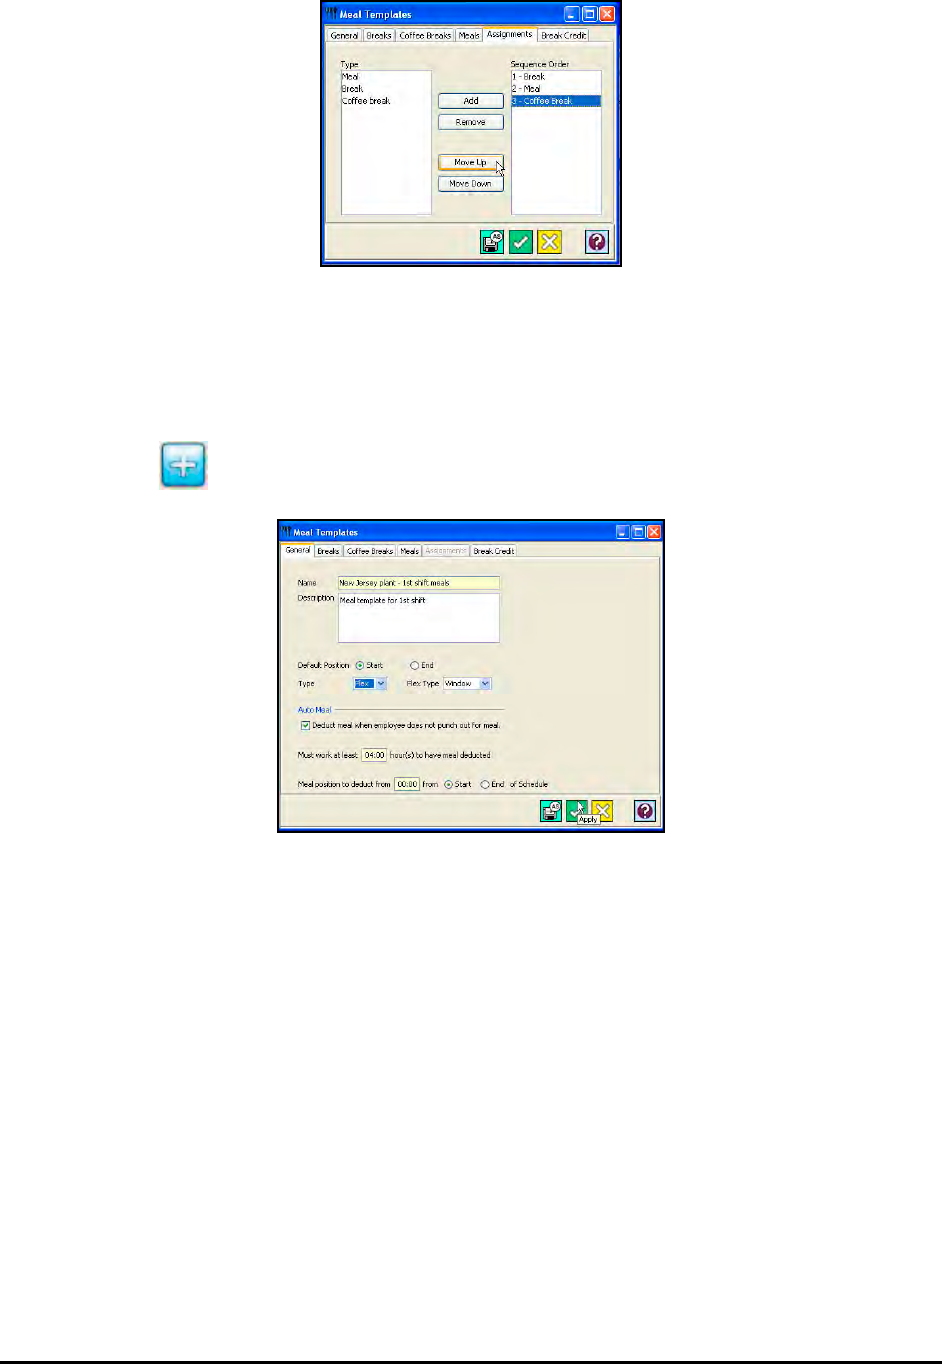
13-12 Time Guardian Series – Advanced Meal Module
15. Assign sequence of Meal Template types.
To create a Flexible Window Meal Template:
1. Click on the Meal Templates node within the Shifts module in the Tree View.
2. Click on the button, and the Meal Templates window will appear.
3. Enter a name for the Meal Template in the name field.
4. Select the Default (Punch) Position, Start or End, that the break or meal will be based upon.
5. Select Flex as the Type and Window as the Flex Type.
6. Place a check in the Auto Meal check box if you wish to have an automatic break deduction.
Enter in the required number of hours to work before the deduction is applied and select the
Meal Position of the shift to deduct from. The Meal Position is used to determine where in
the employee’s worked hours the system will deduct the time for the flexible meal if the
employee does not take it. You have the choice of deducting the meal length from the Start
or End of the employee’s shift. If Start is selected, then the length of the meal will be
deducted starting at the employee’s first IN punch and working forward. If End is selected
then the length of the meal will be deducted starting at the employee’s last OUT punch and
working backwards.
7. Click on the Breaks tab.
8. Select the Break size based on Default Size or Shift Break Size.
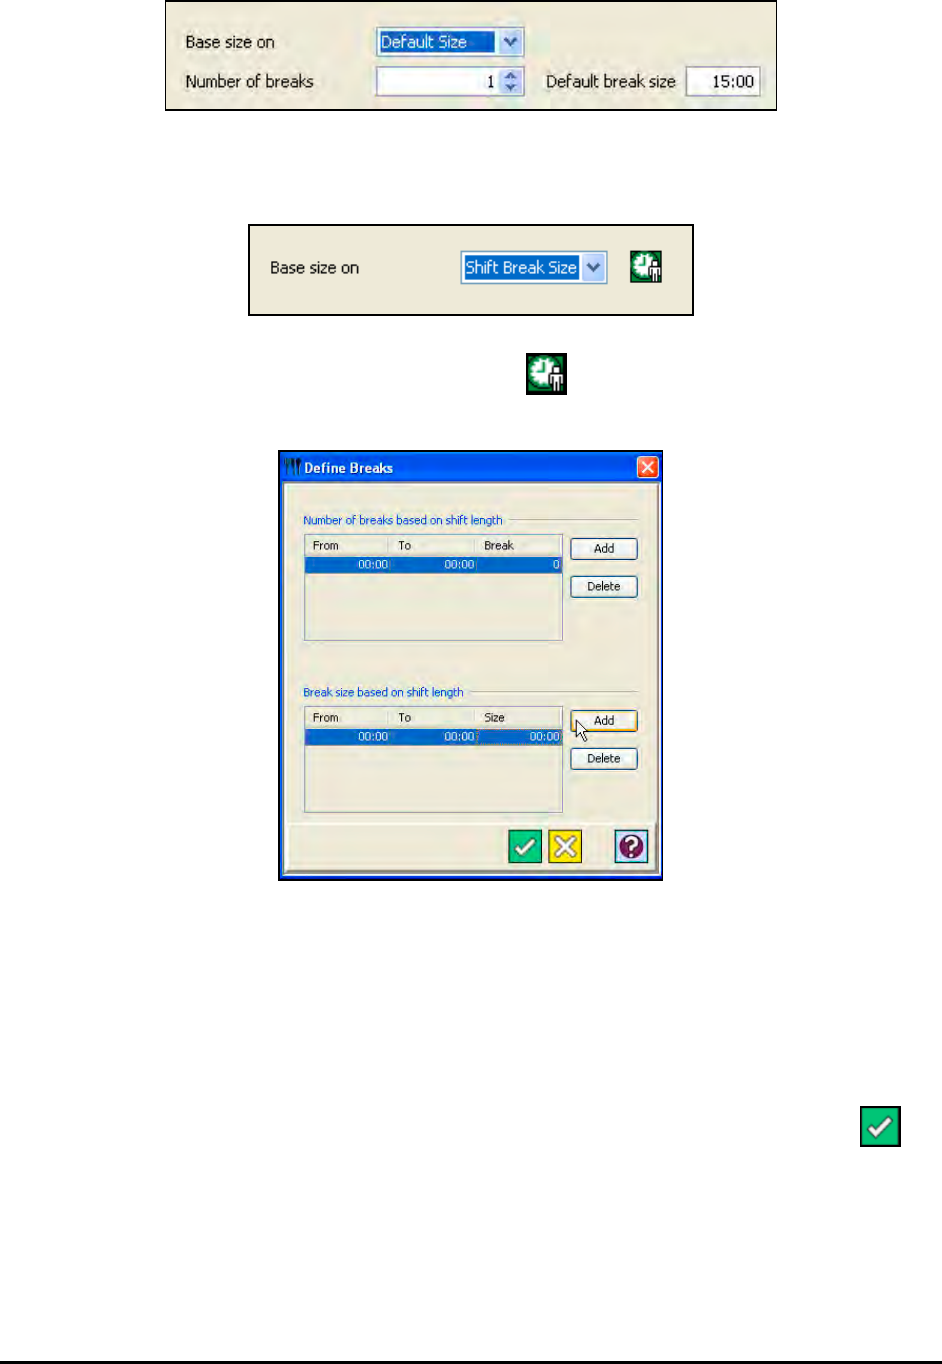
Time Guardian Series – Advanced Meal Module 13-13
For breaks based on default size, enter the number of breaks and the default break size in
the fields provided.
For breaks based on Shift break size, click on the button. The following Define Breaks
window will appear:
To enter the Number of breaks based on shift length click on the Add button. A row will
appear. Enter the From and To times of the shift and the number of breaks for that shift.
To enter the Break size based on shift length click on the Add button. A row will appear.
Enter the From and To times of the shift and the size of each breaks for that shift.
Click on the Combine multiple employee breaks to one check box if you wish to have all
employee breaks combined together as one break.
When you have finished defining the number of breaks and break sizes, click on the
button to save your settings.
9. In the “Deduction for short break” box, configure how much time will be deducted from the
employee when an employee punches out for a shorter period of time than they were
allocated in the break:
a. Enter in the amount of Threshold time (HH:MM) before the action is to be taken.
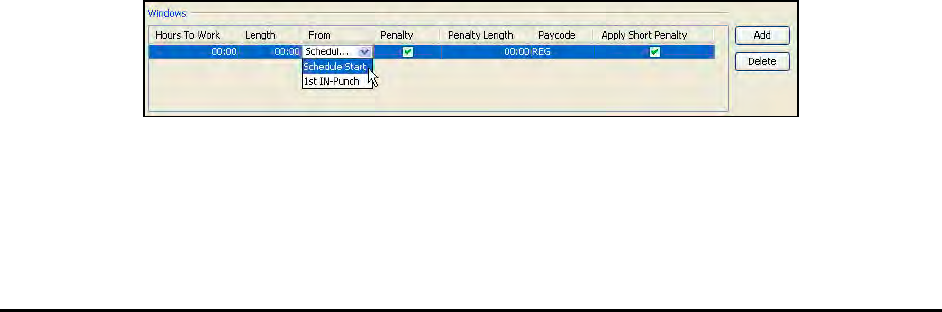
13-14 Time Guardian Series – Advanced Meal Module
b. Set the conditions if the time taken for the break is either less or more than the threshold
in the fields provided. The choices are:
Allowed break: Which is the amount of time the employee is allocated for the Regular break or
Coffee break.
Amount taken: Which is the amount of time the employee actually punched out for the Regular
break or Coffee break.
Amount under or over: This is the amount of time that exceeds or is under the time allocated for
the Regular break or Coffee break.
Nothing: This is to deduct no time from the employee.
Allowed break and taken time: Which will deduct the time allocated for Regular break or Coffee
break plus the time taken for Regular break or Coffee break.
Allowed break and amount under or over: Which is the amount of time the employee is allocated
for the Regular break or Coffee break and which is the amount of time that exceeds or is under
the time allocated for the Regular break or Coffee break.
10. In the “Deduction for long break” box, configure how much time will be deducted from the
employee when an employee takes a longer period of time than they were allocated in the
break:
a. Enter in the amount of Threshold time (HH:MM) before the action is to be taken.
b. Set the conditions if the time taken for the break is both less and more than the threshold
in the fields provided. The choices are:
Allowed break: Which is the amount of time the employee is allocated for the Regular break or
Coffee break.
Amount taken: Which is the amount of time the employee actually punched out for the Regular
break or Coffee break.
Amount under or over: This is the amount of time that exceeds or is under the time allocated for
the Regular break or Coffee break.
Nothing: This is to deduct no time from the employee.
Allowed and taken time: Which will deduct the time allocated for Regular break or Coffee break
plus the time taken for Regular break or Coffee break.
Allowed break and amount under or over: Which is the amount of time the employee is allocated
for the Regular break or Coffee break and which is the amount of time that exceeds or is under
the time allocated for the Regular break or Coffee break.
11. Click on the Add button to create a Break window and enter the following:
• Hours to Work: The starting point of the break window. The number of hours the
employee must work after the From field setting before the break window begins.
• Length: Length of window in which the employee must punch to be awarded the break.
• From: Select the Schedule Start or 1st IN Punch.
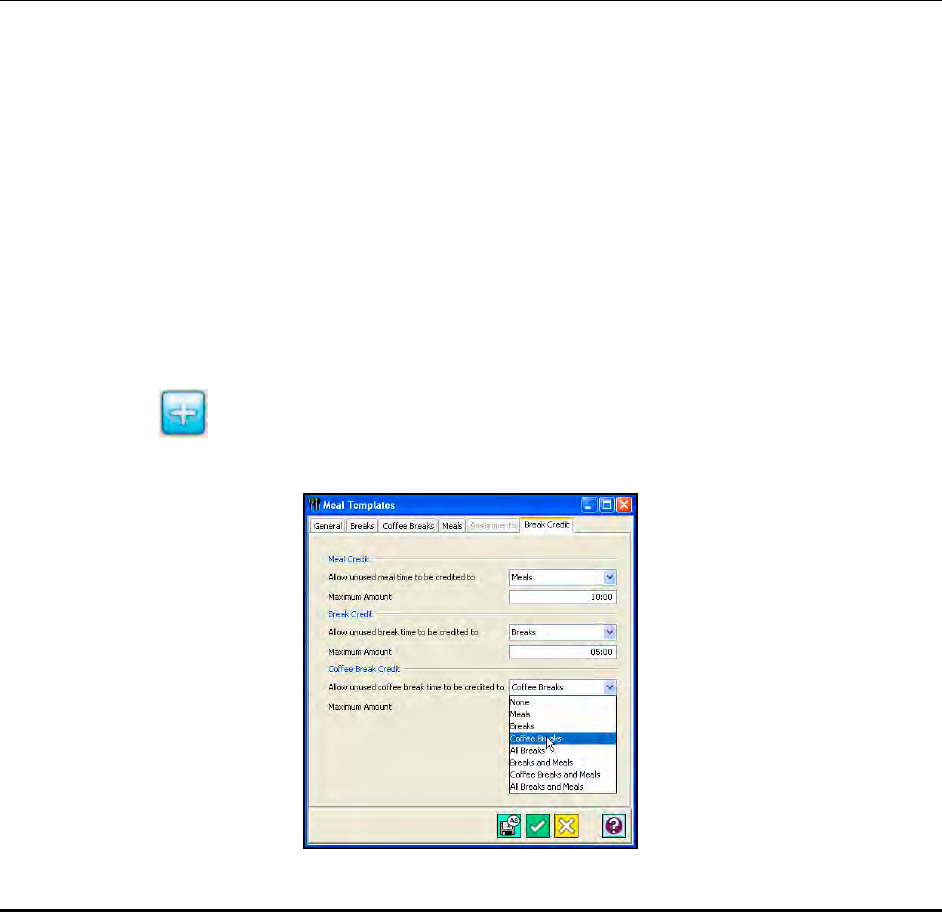
Time Guardian Series – Advanced Meal Module 13-15
• Penalty: Select this box to apply the penalty. This applies when an employee is not able
to take their assigned break for the day. The employer is penalized.
• Penalty Length: Enter the penalty window length. If an employee takes their break during
this window, the penalty is the amount of time assigned the penalty window, minus the
lunch taken at the penalty Pay Code.
• Pay Code: Select appropriate Pay Code from the dropdown list.
• Apply Short Penalty: Select this box to apply the short penalty.
To delete a break window, select the desired row and click on the Delete button.
12. Click on the Coffee Breaks tab. Repeat steps 10 through 12 for the Coffee Breaks.
13. Click on the Meals tab. Repeat steps 10 through 12 for the Meals.
Break Credit
Break Credit is used to apply the left over or remaining time that an employee has from a meal
or break to other meals or breaks where the employee exceeded the time allowed.
For example, the Break Credit is setup to allow break time to be credited to meals for the
Maximum Amount of 15 minutes. The break time allocated for the employee is 20 minutes and
the meal time allocated is 45 minutes. The employee takes a 10-minute break and 55-minute
meal. The 10 minutes that employee did not take for the break will be applied to the 10 minutes
the employee went over on the meal. No extra time will be deducted from the employee for
taking a longer meal than allowed. The total time taken from the employee is 65 minutes. If the
Break Credit is not used (set to None), then 75 minutes would deducted from the employee (20
minutes for breaks and 55 minutes for meal).
To configure the Break Credit:
1. Click on the Meal Templates node within the Shifts module in the Tree View.
2. Click on the button, and the Meal Templates window will appear. Click on the Break
Credit tab.

13-16 Time Guardian Series – Advanced Meal Module
3. In the Meal Credit box, select how the unused meal time will be credited to using the
dropdown list. The choices are; None, Meals, Breaks, Coffee Breaks, All Breaks, Breaks
and Meals, Coffee Breaks and Meals, or All Breaks and Meals.
4. In the Maximum Amount field, enter the maximum amount of time (HH:MM) that will be
credited.
5. In the Break Credit box, select how the unused Break time will be credited to using the
dropdown list. The choices are; None, Meals, Breaks, Coffee Breaks, All Breaks, Breaks
and Meals, Coffee Breaks and Meals, or All Breaks and Meals.
6. In the Maximum Amount field, enter the maximum amount of time (HH:MM) that will be
credited.
7. In the Coffee Break Credit box, select how the unused Coffee Break time will be credited to
using the dropdown list. The choices are; None, Meals, Breaks, Coffee Breaks, All Breaks,
Breaks and Meals, Coffee Breaks and Meals, or All Breaks and Meals.
8. In the Maximum Amount field, enter the maximum amount of time (HH:MM) that will be
credited.
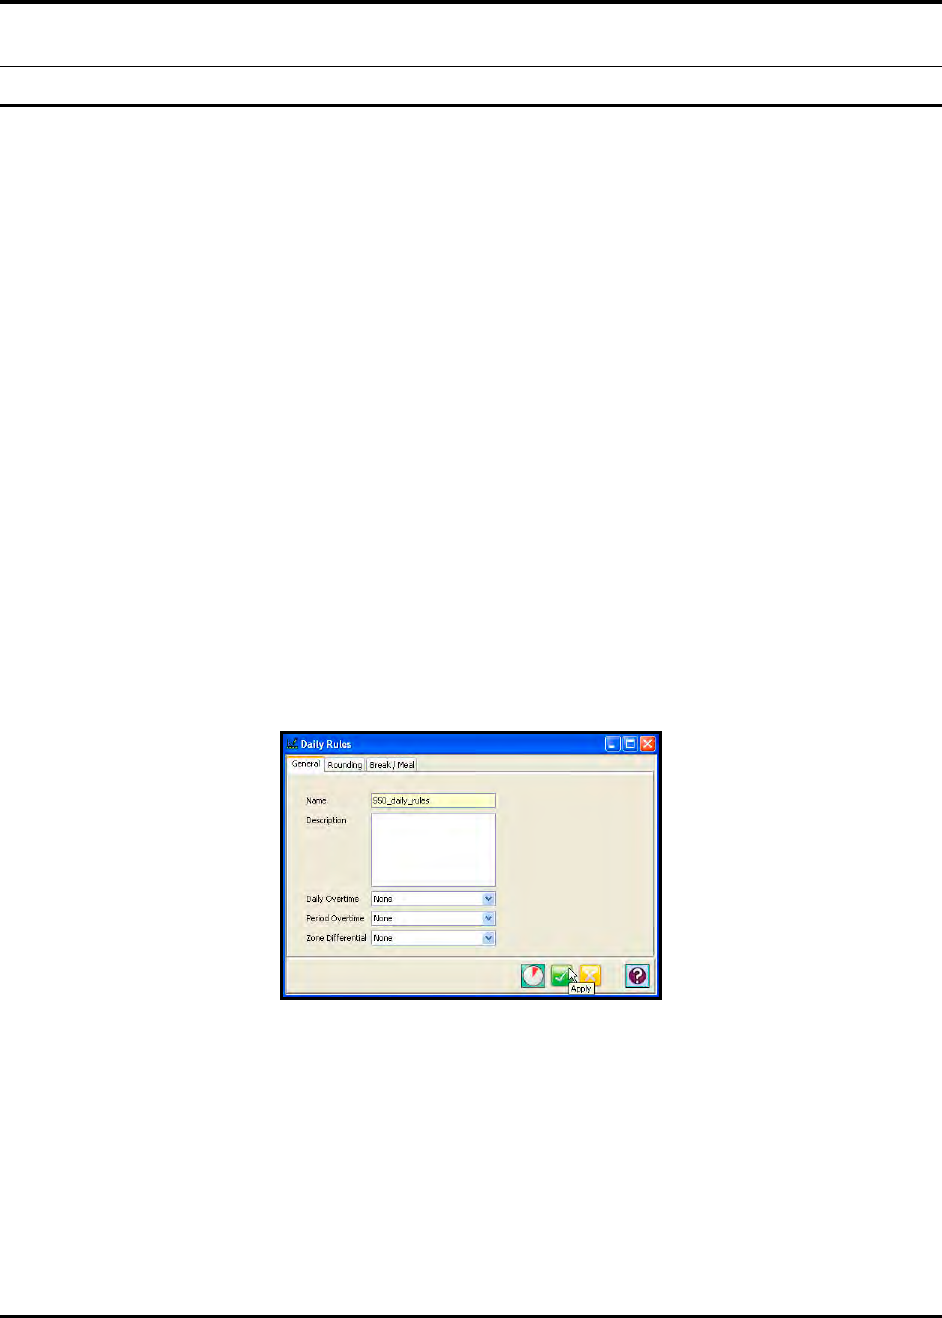
Time Guardian Series – Advanced Rounding Module 14-1
Chapter 14: Advanced Rounding Module
Advanced Rounding Module Introduction
Rounding is the act of moving the employee’s punches or hours to an even amount that will
make it easier for end-user calculations. Rounding is done in two ways. The first type of
rounding is rounding individual punches, while the second type, is rounding the hours that the
punches make up.
Note: Hours rounding cannot be done in conjunction with punching rounding. The user has a
choice of either using punch rounding or hour rounding parts.
The sections of the Time & Attendance Software affected and/or features added from the
activation of this module include:
• Advanced Pay Class
− Weekly Rounding with day of week reset
− Pay Period Rounding
− Meal/Break Rounding (Hours Rounding or Punch Rounding)
• Daily Rules
− Rounding Template
− Daily Rounding
− Meal/Break Rounding (Hours Rounding or Punch Rounding)
− Specific Day of Week / Holiday Rounding
• Shift Rules (Exception Template)
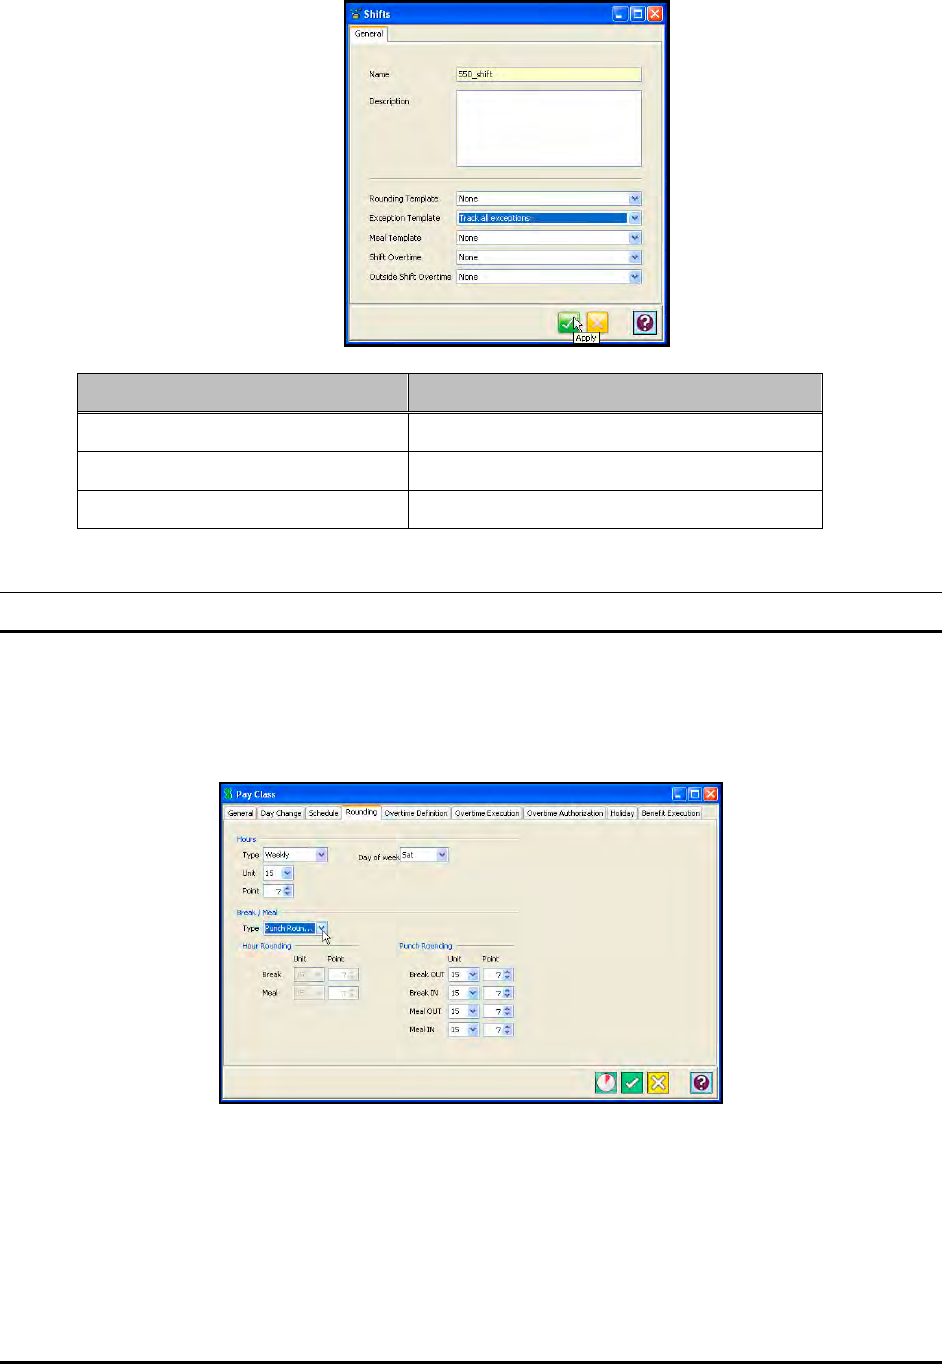
14-2 Time Guardian Series – Advanced Rounding Module
Software Feature Software Configuration Location
Advanced Pay Class Main Application Tree View
Daily Rules Main Application Tree View
Shift Rules Main Application Tree View
Using the Advanced Rounding Module
1. Click on the Pay Class module in the tree view.
2. Click on the Rounding tab. This tab is used to set the rounding rules for the Pay Class.
Hours: Enter the following to set the Hours rounding rules for the Pay Class:
• Type: Select the period in which the hours will be rounded. The choices are; None,
Weekly, or Pay period. If None is selected, Time Guardian Pro checks the Daily Rules
and then the Shift rules for rounding. If Weekly is selected, you must specify the Day of
the Week that the workweek begins in the Day of week field.
• Unit: The numeric value used to adjust an employee punch time to a consistent
measurement of time. Common Units are 1, 3, 6, 15, and 30. A Point divides each Unit.
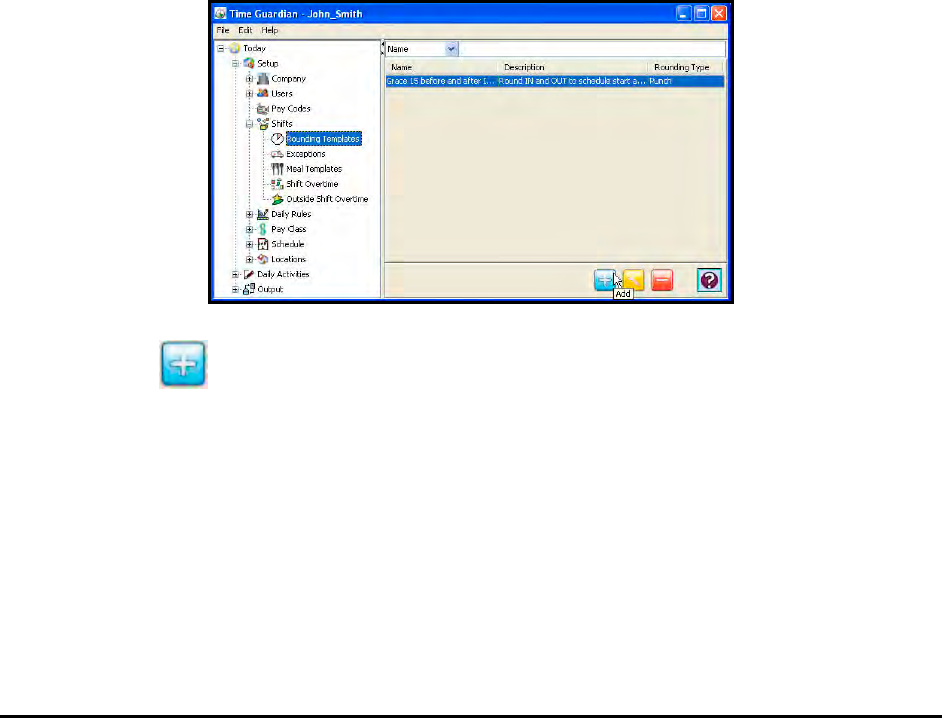
Time Guardian Series – Advanced Rounding Module 14-3
• Point: The numeric value used to determine when an employee’s punch would be
moved forward to the next Unit. The rule for rounding is that the Point always moves
forward.
Break/Meal: Enter the following to set the Break/Meal rounding rules for the Pay Class:
Note: This section of the screen will be disabled if the Hours Rounding Type field is set to
None.
• Type: Select None, Hour Rounding, or Punch Rounding.
• Hour Rounding: If Hour Rounding was selected, set the Unit and Point for both the Break
and Meal.
• Punch Rounding: If Hour Rounding was selected, set the Unit and Point for IN and OUT
punches for both the Break and Meal.
Rounding moves an employee’s punches or hours to an even amount to make it easier for
calculations. There are (2) methods available, either by rounding individual punches (Punch) or
by rounding the total hours (Hours). Only one method can be selected.
A Rounding Template is used to set a particular rounding rule. The template can then be
assigned to a Shift. Additional rounding can be found in the Daily Rules (Daily Rounding) and
Pay Class (Weekly/Pay period Rounding) modules. Refer to these modules for more detail.
To create a Rounding Template:
1. Click on the Rounding Template node within the Shifts module in the Tree View.
2. Click on the button, and the following Rounding Templates window will appear:
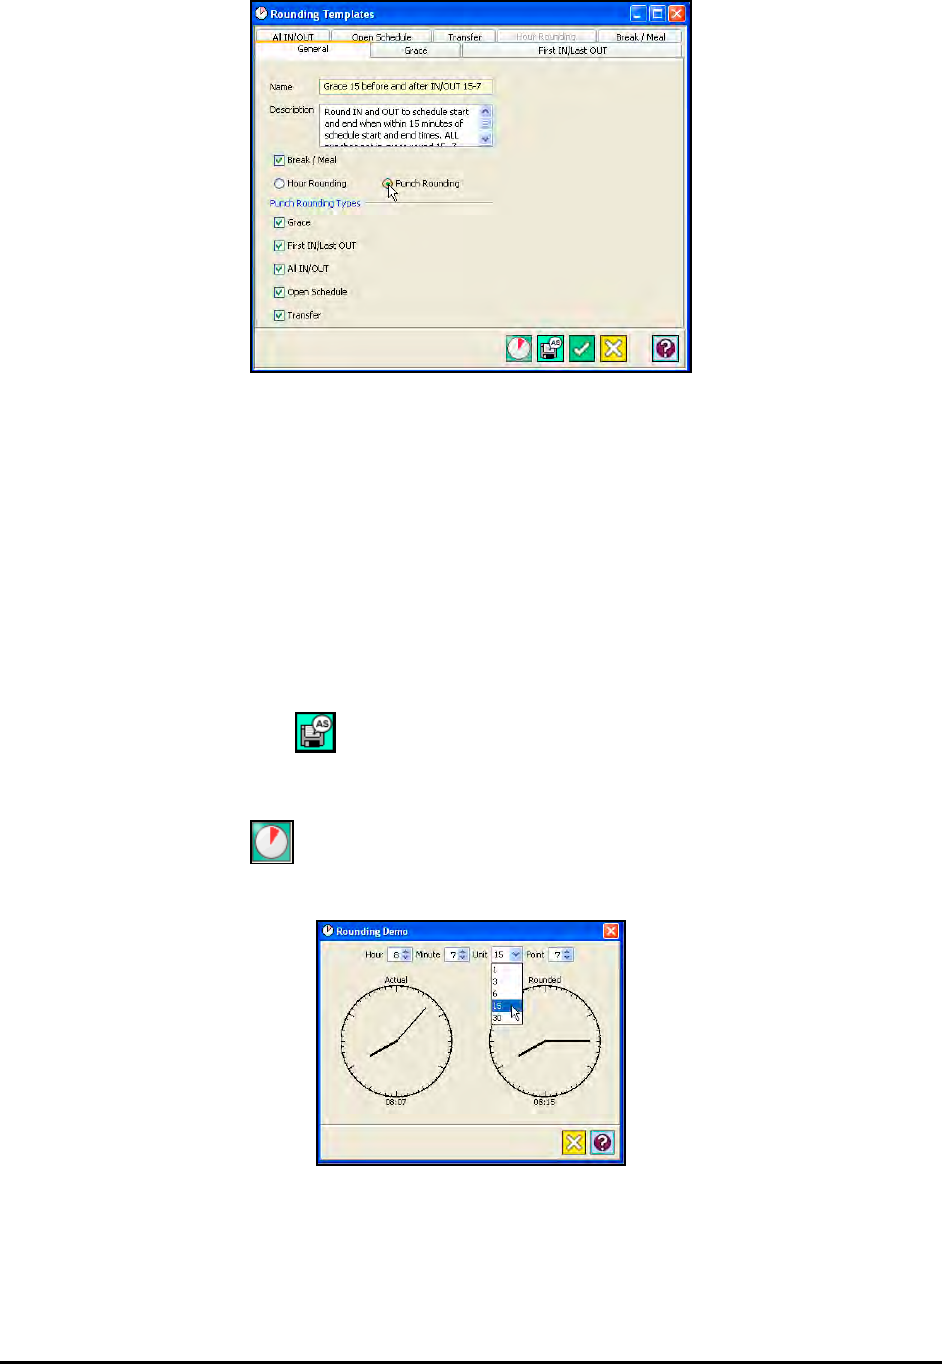
14-4 Time Guardian Series – Advanced Rounding Module
3. Enter a name for the Rounding Template in the name field [required field].
4. Enter a description of the Rounding Template in the Description field.
5. Click on Break/Meal if rounding template is to be applied.
6. Select the desired rounding type and options: hour rounding or punch rounding. If selecting
Punch Rounding the boxes alongside Grace, First IN/Last OUT, All IN/OUT, Open
Schedule, and Transfer will become selectable. The corresponding tab on the Rounding
Templates screen will become configurable depending upon the type(s) of Punch Rounding
selected.
Note: If you wish to duplicate the properties of an existing Rounding Template for another
Rounding Template, select the desired Rounding Template, open it, enter in a new
name and click on the button. The new Rounding Template will appear in the Main
View.
Note: If you wish to visualize the properties of a Rounding Template, view the Rounding Demo
by clicking on the button on the bottom of the Rounding Templates screen. The
following Rounding Demo view will appear:
Clicking in the dropdown boxes for Hour and Minute will set the actual time clock display, while
clicking in the dropdown boxes in Unit and Point will enter the rounding rules. This presents a
real time visual display of actual time versus rounded time.
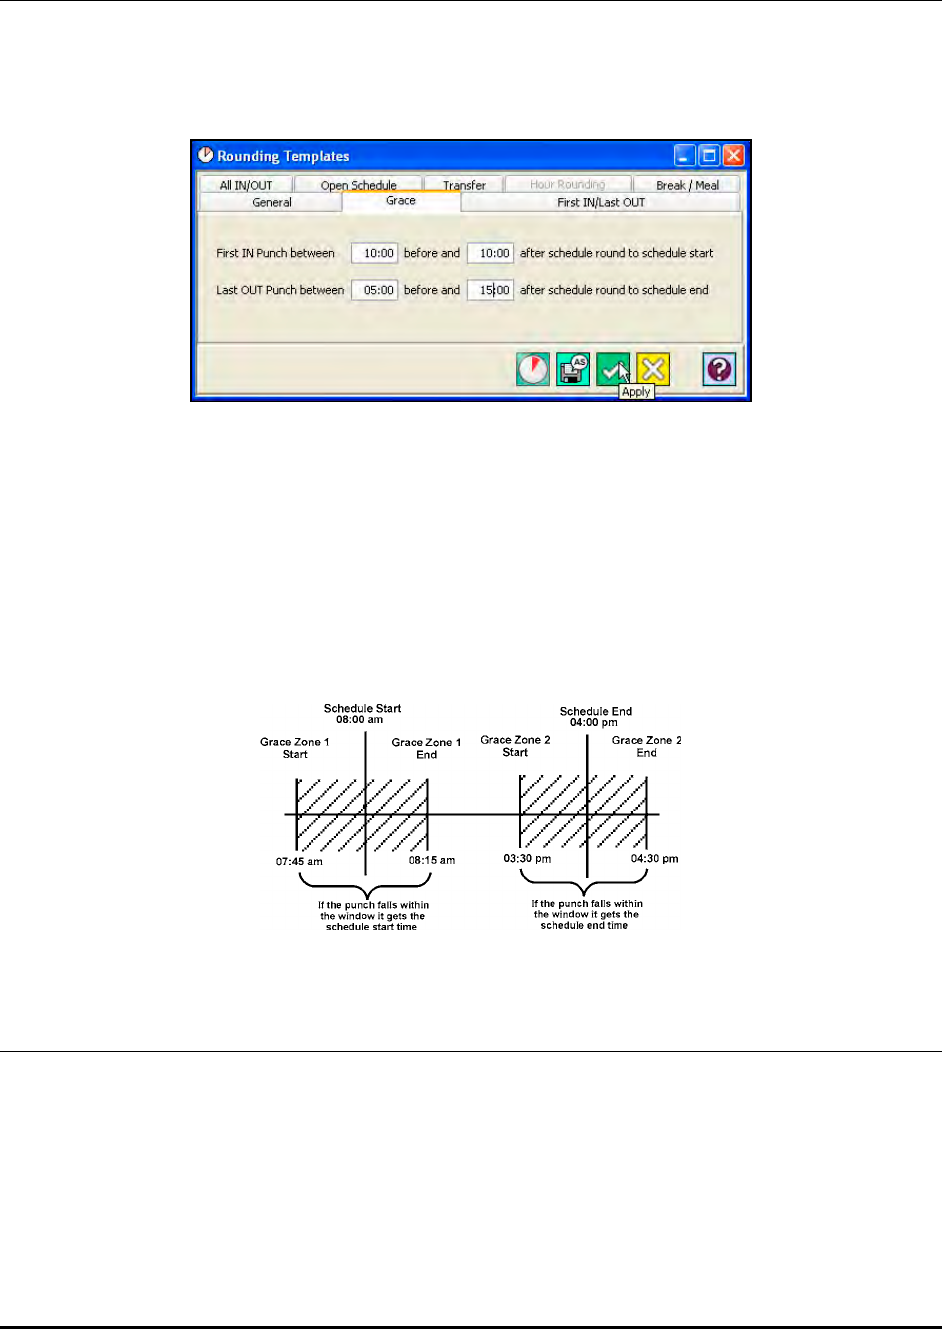
Time Guardian Series – Advanced Rounding Module 14-5
Grace Rounding
In grace rounding, a window of time is setup around the start and end times of a schedule. If the
IN punch falls within the window for the scheduled start time, it is rounded (changed for
calculation) to the start of the schedule. If the OUT punch falls within window for the scheduled
end time, it is rounded (changed for calculation) to the end of the schedule.
To create a grace zone, enter the desired number of hours and minutes (HH:MM) before and
after the scheduled start time. Repeat for the scheduled end time.
For example, the schedule for the employee is 8:00 AM to 4:00 PM. The grace window for the
start of schedule is set for 15 minutes before (7:45 AM) and 15 minutes after (8:15 AM) the
scheduled start time. If the first IN punch for the day occurs between these two times it will be
rounded to the scheduled start time of 8:00 AM. The grace window for the end of the schedule
is 30 minutes before (3:30 PM) and 30 minutes after (4:30 PM) the scheduled end time. If the
last OUT punch for the day occurs between these two times it will be rounded to the schedule
start time of 4:00 PM.
First IN/Last OUT
This rounding occurs outside of the grace rounding windows and when an employee has a
schedule with start and end times.
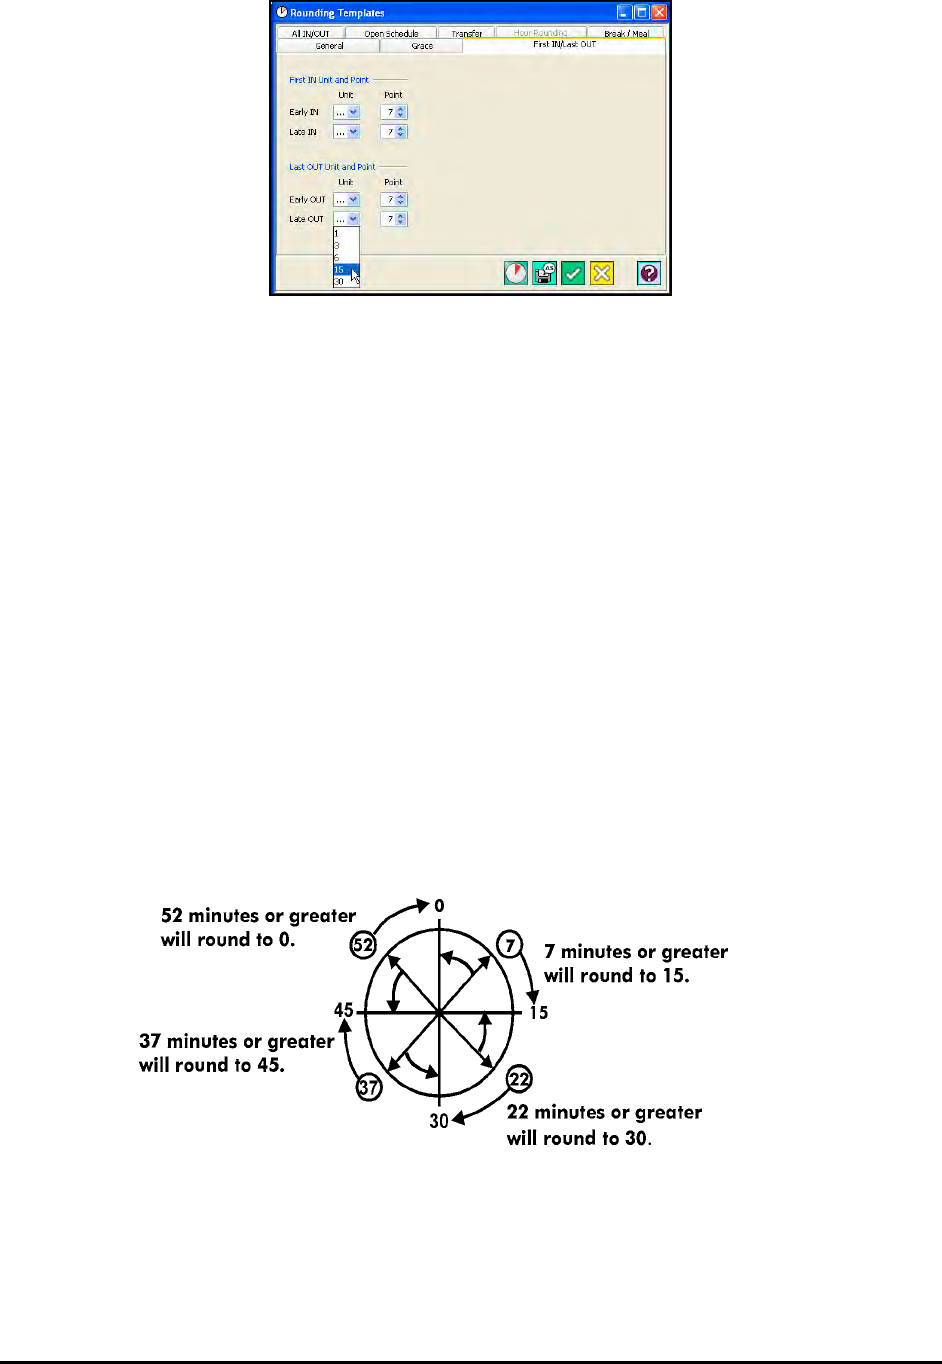
14-6 Time Guardian Series – Advanced Rounding Module
In the First In/Last Out tab, there are (4) Units and (4) Points used to determine rounding. A Unit
is a numeric value used to adjust employee punch time to a consistent measurement of time.
Common units are: 1, 3, 6, 15, and 30 minutes. The Unit is used in conjunction with the Point. A
Point determines if the punch will be rounded backward or forward.
The Units and Points to be set are:
• Early IN: The first punch of the day before the start of the schedule and not inside the
grace window.
• Late IN: The first punch of the day after the start of the schedule and not inside the grace
window.
• Early OUT: The last punch of the day before the end of the schedule and not inside the
grace window.
• Late OUT: The last punch of the day before the end of the schedule and not inside the
grace window.
Example:
Unit = 15 minutes
Point = 7 minutes
The example above shows how the rounding occurs for the punches. This same rounding
procedure is done for the rest of the rounding discussed in this section. For example, it shows
that if a punch occurs between 0 and 6 minutes it will be rounded to 0, so that a 9:06 AM will be
rounded to 9:00 AM. It then shows that if a punch occurs between 7 and 15 minutes, it will be
rounded to 15, so that 9:07 AM will be rounded to 9:15 AM.
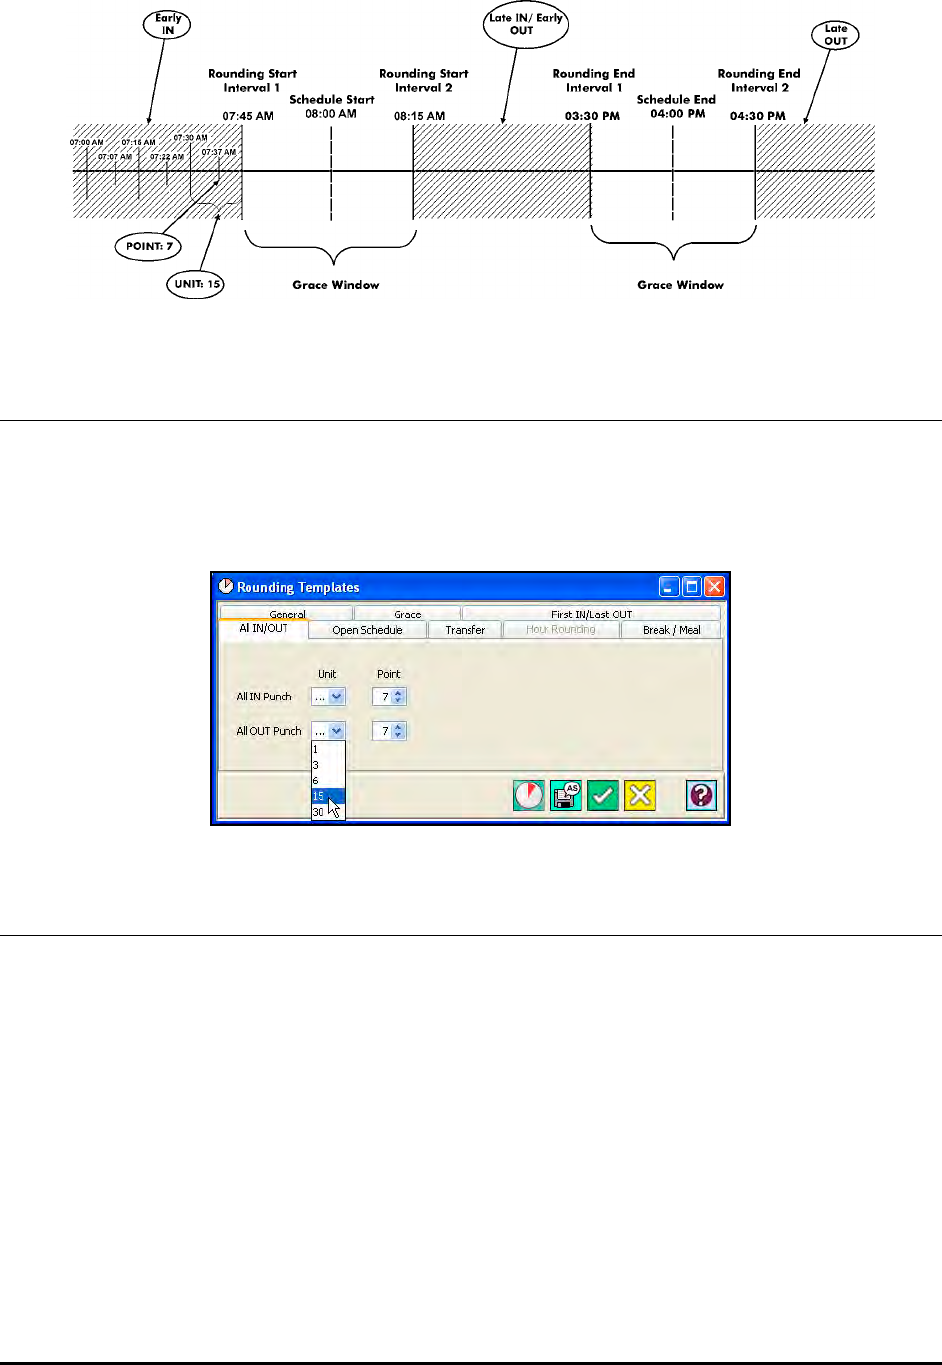
Time Guardian Series – Advanced Rounding Module 14-7
All IN/OUT
If First IN/Last OUT is selected in the General tab, all punches that occur between the first IN
and OUT punches will be rounded using the Units and Point set in this tab. If First IN/Last OUT
is not selected, this rounding will be used for all punches including the first IN and last OUT
punches. A Unit and Point must be assigned to both the IN and OUT punches.
Open Schedule
Open Schedule rounding is used when a schedule for the day has no start or end time defined.
There are four types of rounding performed for the open schedule. A Unit and Point must be
entered for each type. They are:
• First IN punch of the day
• All OUT punches
• All IN punches
• Last OUT punch of the day
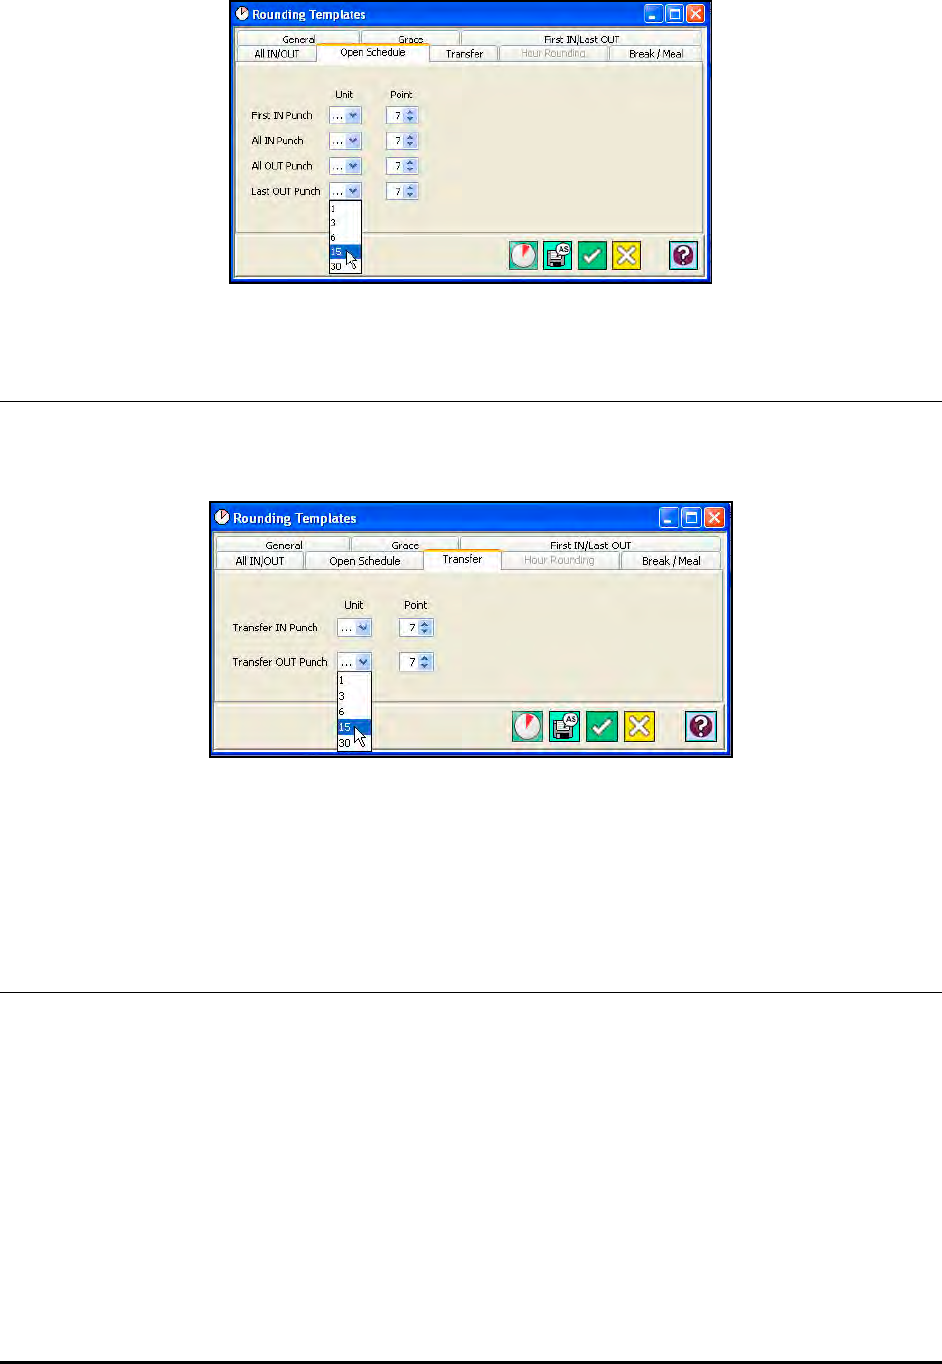
14-8 Time Guardian Series – Advanced Rounding Module
Transfer Rounding
Transfer rounding is used on punches that are designated as transfer punches by an employee
pressing the transfer button on the terminal.
Transfer rounding works the same way as Break/Meal rounding. When a punch is designated
as a transfer punch it will use transfer rounding if it is activated. If it is not activated, then
IN/OUT rounding will be used.
Hour Rounding
Hour Rounding is enabled in the General Rounding tab. You must select either Punch Pair or
Schedule as the Rounding Type. Punch Pair rounds the amount of time worked between two
punches after the automatic break/meal deductions are taken out. Schedule rounds the total
amount of time worked for a schedule after the automatic break/meal deductions are taken out.
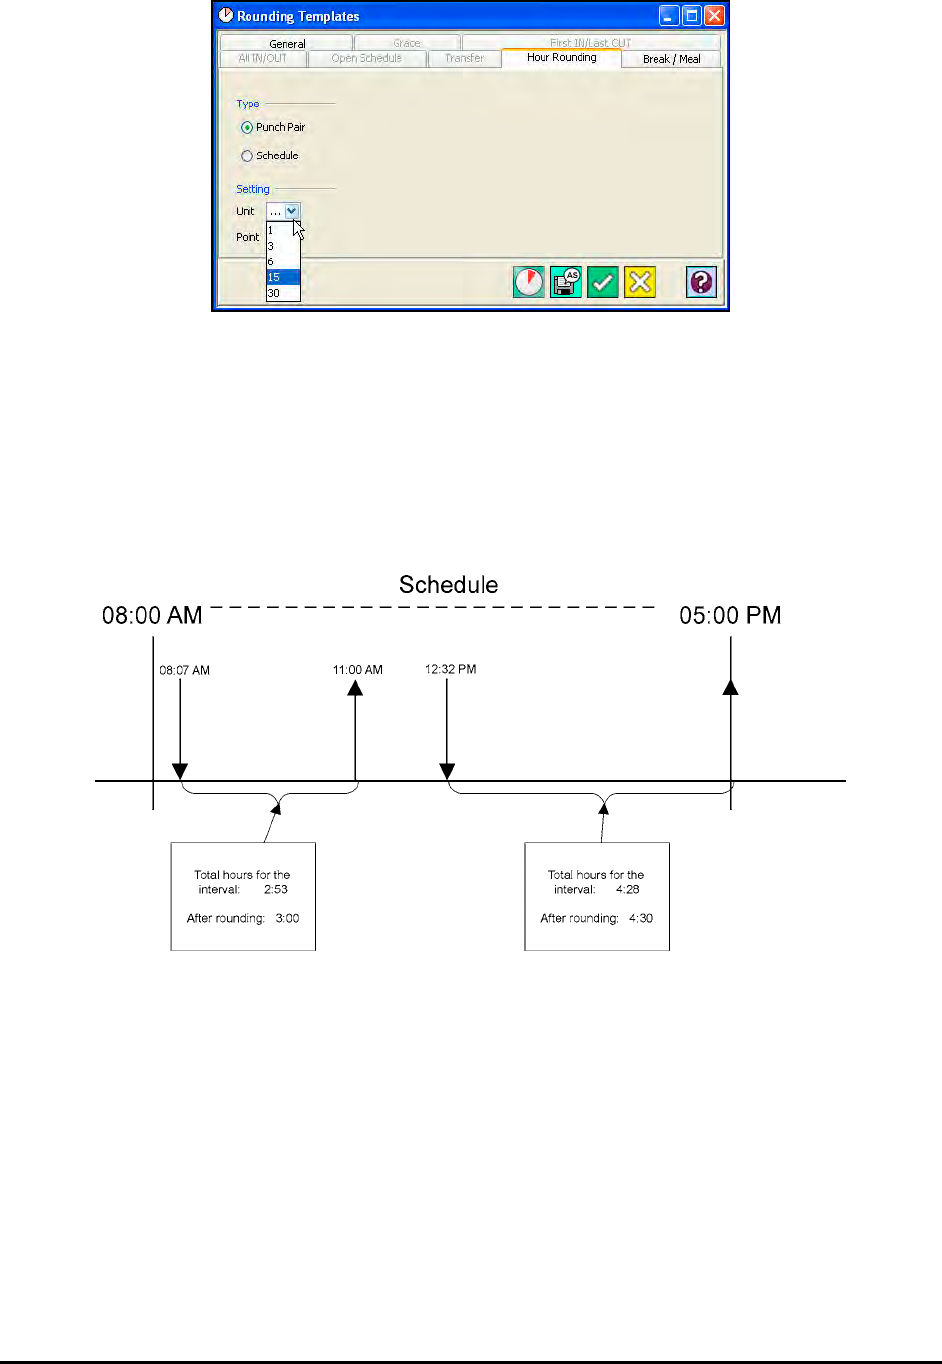
Time Guardian Series – Advanced Rounding Module 14-9
Example: Interval/punch pair rounding occurs on multiple punches in a day.
The first interval or punch pair is 8:07 AM and 11:00 AM. These punches calculate to 2 hours
and 53 minutes of time. If a Unit of 15 and Point of 7 is used, then this time would be rounded to
3 hours and 0 minutes.
The second interval or punch pair is 12:32 PM and 5:00 PM. These punches calculate to 4
hours and 28 minutes of time. This time is rounded to 4 hours and 30 minutes. This would give
the employee a daily total of 7 hours and 30 minutes.
Example: Schedule Rounding
The first schedule is from 8:00 AM to 12:00 PM. The four punches within the schedule calculate
to 3 hours and 21 minutes of time. If the Unit is set to 15 and the Point is 7, this time would be
rounded to 3 hours and 15 minutes.
Note: The minus 6 minutes will be taken away from the last interval hours in Schedule 1.
The second schedule is from 1:00 PM to 5:00 PM. The four punches within the schedule
calculate to 3 hours and 20 minutes of time. This time would be rounded to 3 hours and 15
minutes.
Note: The minus 5 minutes will be taken away from the last interval hours in Schedule 2.
This would give the employee a daily total of 6 hours and 30 minutes.
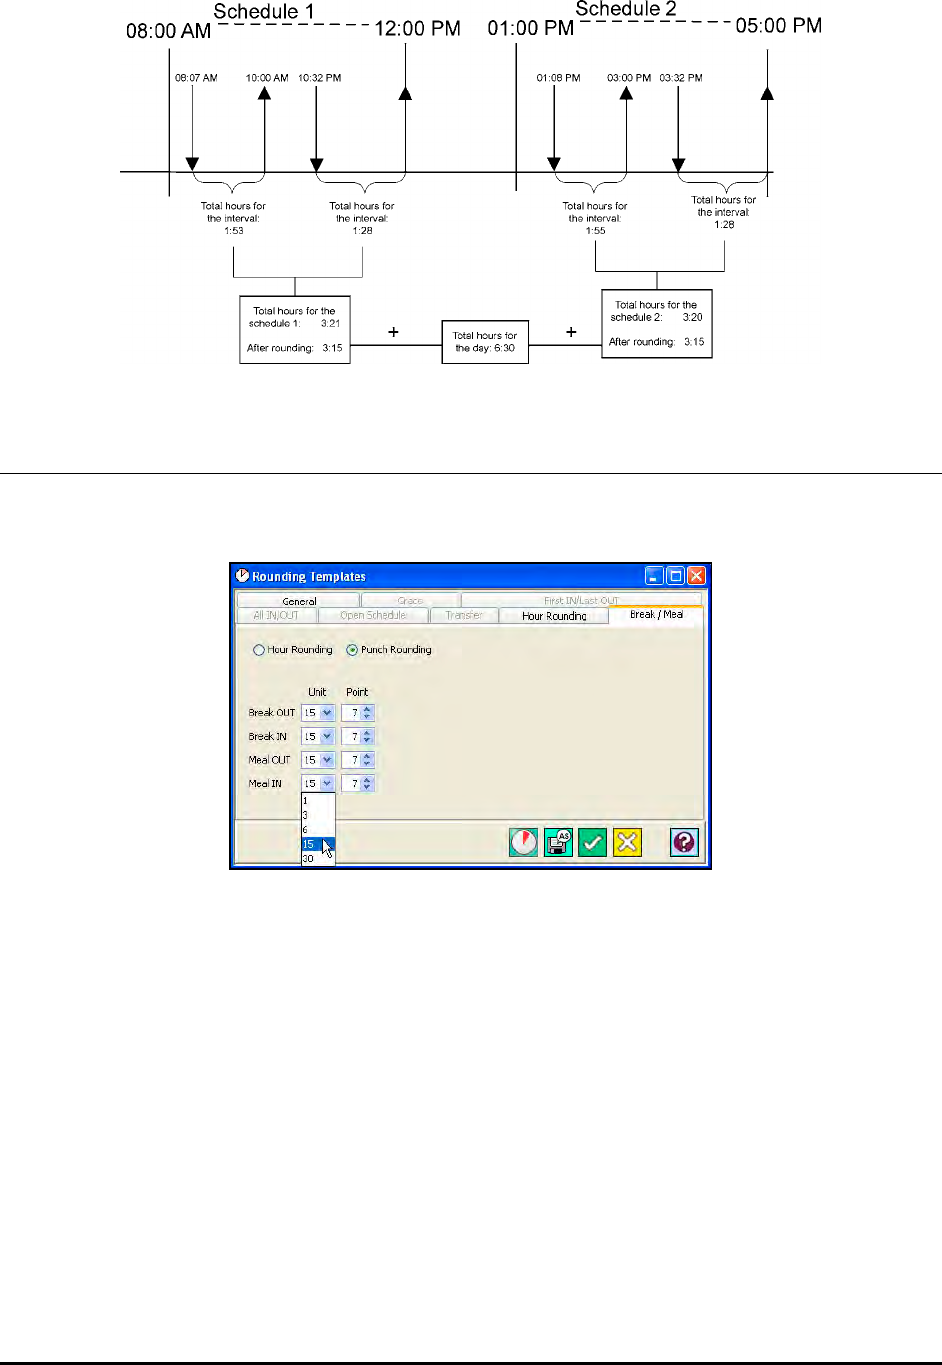
14-10 Time Guardian Series – Advanced Rounding Module
Break/Meal Rounding
Break/Meal is used on punches that are designated as break or meal punches as in the Meal
Templates module within the Shift module.
You must select either Hour or Punch Rounding for the break or meal. Hour Rounding will round
the total time taken and Punch Rounding will round the punches to the unit.
If Hour Rounding is selected, you must set the Unit and Point for the entire Break and Lunch
(Meal). If Punch Rounding is selected you must set the Unit and Point for the Break OUT, Break
IN, Lunch (Meal) OUT, and Lunch (Meal) IN punches.
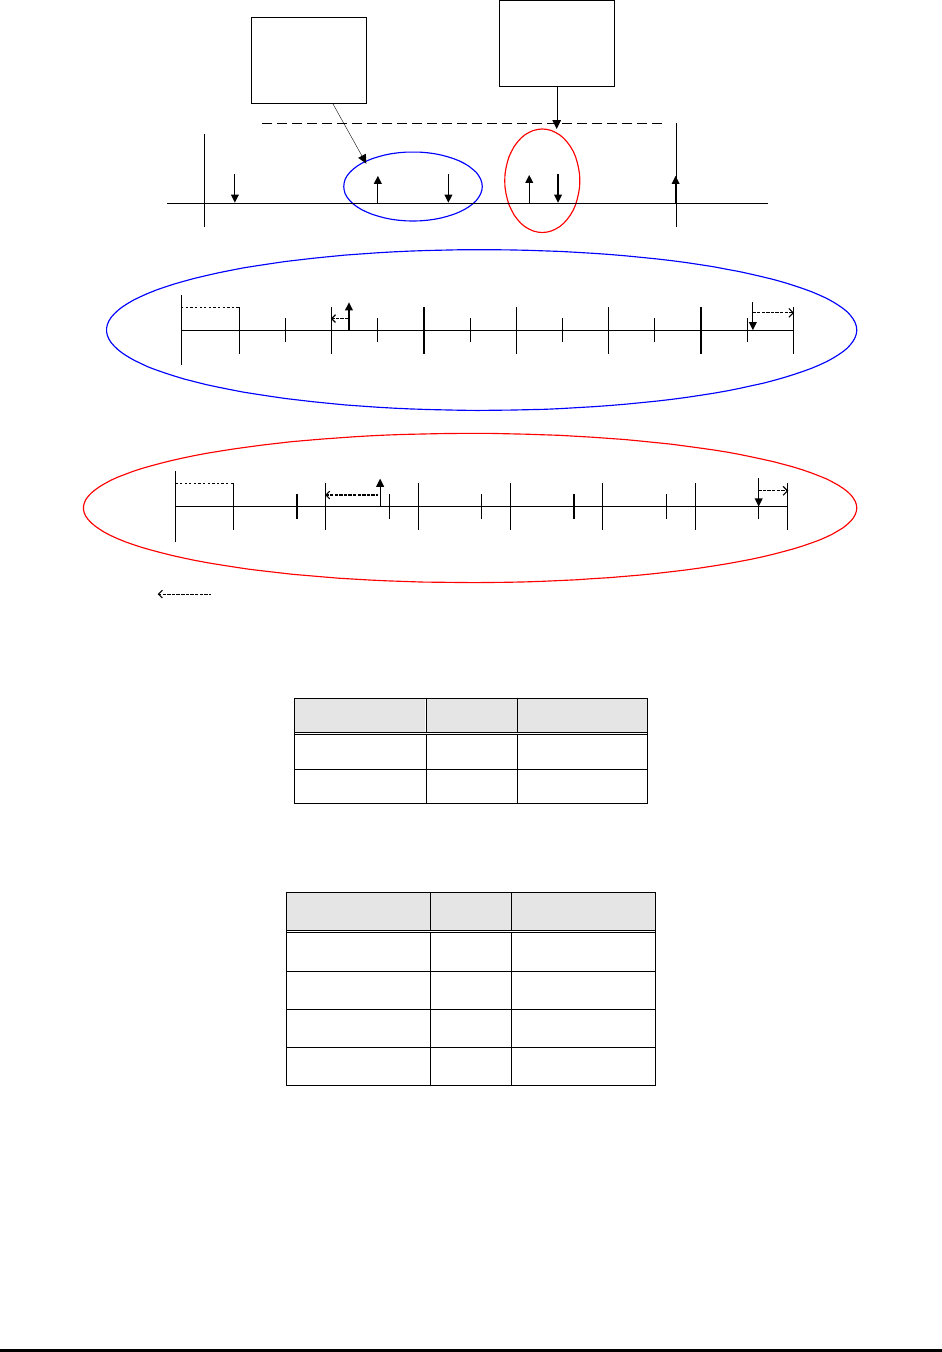
Time Guardian Series – Advanced Rounding Module 14-11
08:00 AM
05:00 PM
Schedule
08:10 AM 11:02 AM 12:08 PM
03:09 PM 04:10 PM
These punches are
consider break
punches by the
software.
These punches are not
assigned to either a
break or lunch.
Therefore are consider
just IN/OUT punches.
08:00 AM
10:45 AM 11:00 AM 11:15 AM 11:30 AM 11:45 AM 12:00 PM 12:15 PM
11:02 AM 12:08 PM
10:52 AM 11:07 AM 11:22 AM 11:37 AM 11:52 AM 12:07 PM
08:00 AM
02:45 PM 03:00 PM 03:15 PM 03:30 PM 03:45 PM 04:00 PM 04:15 PM
03:09 PM 04:10 PM
02:55 PM 03:10 PM 03:25 PM 03:40 PM 03:55 PM 04:10 PM
Indicates what Unit the punch rounds to
In the example shown above the configuration for the IN/OUT rounding is as follows:
Type Unit Point
IN 15 10
OUT 15 10
The configuration for the Break/Meal rounding is as follows:
Type Unit Point
Break OUT 15 7
Break IN 15 7
Meal OUT 15 7
Meal IN 15 7
The 11:02 AM and 12:08 PM punches are assigned by the system to a break. The 03:09 PM
and 04:10 PM are not assigned to any break or meal.

14-12 Time Guardian Series – Advanced Rounding Module
This page intentionally left blank.
Time Guardian Series – Advanced Labor/Rate Module 15-1
Chapter 15: Advanced Labor/Rate Module
Advanced Labor/Rate Module Introduction
The Advanced Labor/Rate Module, when activated, allows the user to define the rate of pay
an employee receives for the hours worked to be set up in two ways. Standard which applies
the rate based on the order the user configures. They can configure the system to look for the
rate to apply. The employee and 6 labor levels are available for the user to select. This function
allows the user to set up a combination of items that the employee’s hours must be in order to
receive that rate. Below are sample screens of the setup and entry of the wage/rate. The
employee wages will be used for both the employee standard rate setup and the labor rate
setup. This screen will be seen the same way in the labor levels module.
The sections of the Time & Attendance Software affected and/or features added from the
activation of this module include:
• Labor Levels up to 6 levels
• Rate Setup
• Rate Template
• Combined Cost Rates
• Combined Billable Rates
• Time card Show Billable Rates
• Report Show Billable Rates
• Report show up to 6 labor levels
Software Setup & Feature Software Configuration Location
Labor/Rate Main Application Tree View
Using the Advanced Labor/Rate Module
Labor levels are used to determine where an employee worked and what an employee worked
on. When the Advanced Labor/Rate Module is activated, up to (6) main Labor Level categories
can be created with an unlimited number of entries per category. These multiple levels can be
used simultaneously for where an employee worked and what an employee worked on.
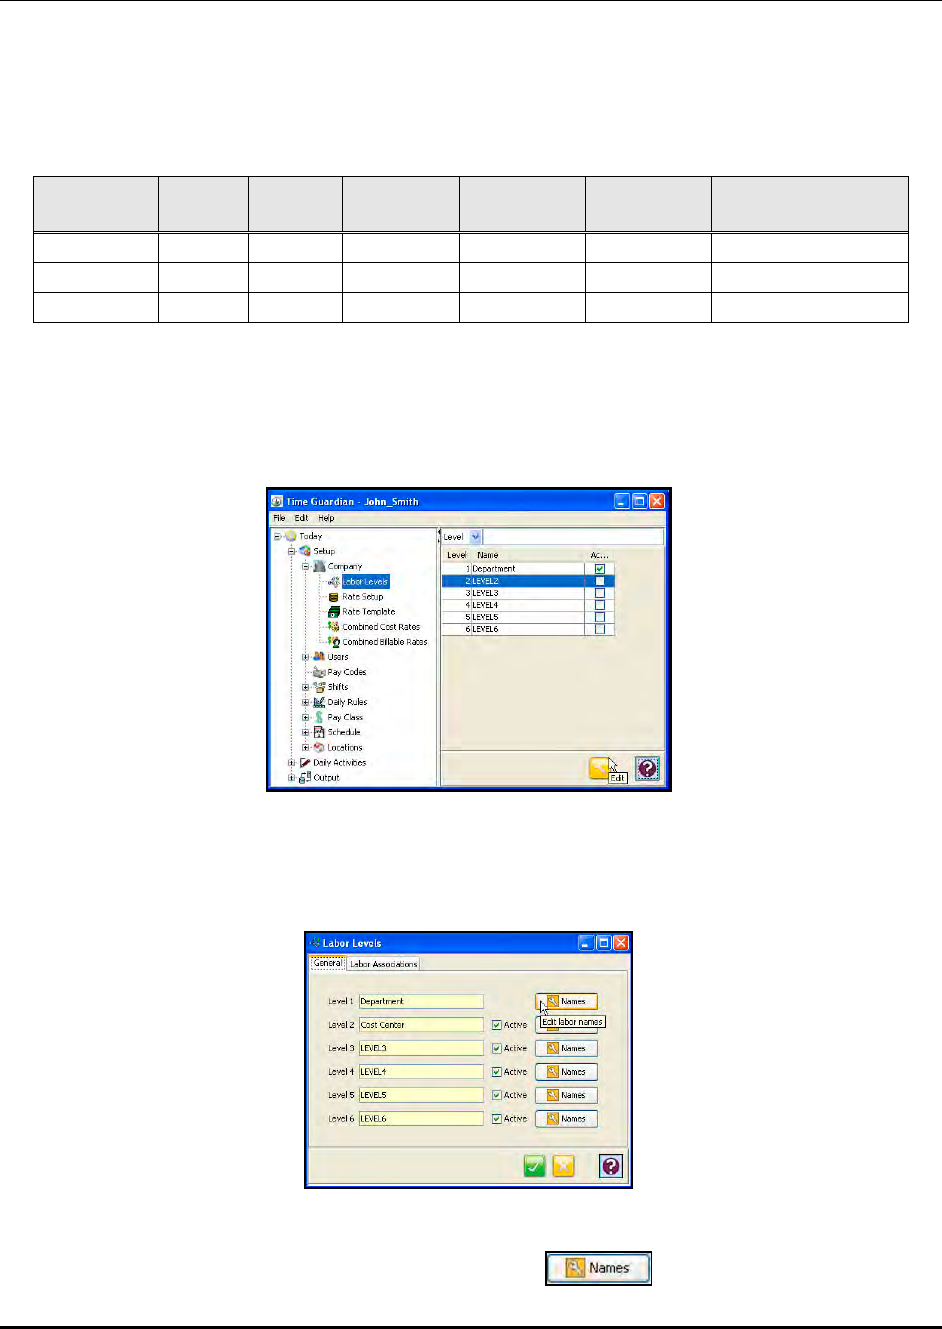
15-2 Time Guardian Series – Advanced Labor/Rate Module
Example of Multiple Labor Levels:
An employee is scheduled to work from 9:00 AM to 6:00 PM. From 9:00AM to 11:00AM, they
work in Building A and in the Production Department. While working in Production, the
employee performed the job of welding parts that were needed for Work Order # 100200, and
then from 11:00 AM to 6:00 PM, the employee switched to the job of Assembly of parts needed
for Work order # 100300. The assignment of labor for the day would look like this:
Time of Day Hours
Worked Pay
Code Labor
Level 1 Labor Level
2 Labor Level
3 Labor Level 4
9:00-11:00 2:00 Regular Building A Production Welding Work Order# 100200
11:00-5:00 6:00 Regular Building A Production Assembly Work Order# 100300
5:00 - 6:00 1:00 Overtime Building A Production Assembly Work Order# 100300
How many labor levels the employee’s hours are assigned to simultaneously vary from
company to company and is therefore part of the software configuration. Labor Levels can be
created through the Setup Wizard or by selecting the Labor Levels module within the Company
module.
To create Labor Levels, you must specify how many of them you wish to use, then enter a name
for each in the desired level in the General Tab and check Active for each Labor Level used. By
default, Level 1 is always active.
Once entered, the main Labor Level name will appear in the desired field number. To add
levels within each Labor Level, click on the Edit Names button in the desired row.

Time Guardian Series – Advanced Labor/Rate Module 15-3
The Labor Names window for the selected Labor Level will appear as shown in the following
example:
To add a Labor Name, click on the button. All the fields in the window will go blank. In the
Name field, enter a name for the Labor Name. In the number field, enter a number that will be
associated with the Labor Name. Enter a brief description of the Labor Name in the Description
field.
If the Labor Name is to expire on a specified date, click on the button and select an
expiration date from the calendar. When you have finished, click on the button to save your
settings and return to the Labor Names window.
Note: When the labor expires, the labor name will be flagged in Red (see User Accounts) and
the EXPIRED LABOR WILL NOT BE DOWNLOADED TO THE CLOCK!!
Note: There is a 4 digit maximum for a labor number that can be downloaded to the MTX-15
terminal (clock).
To modify a Labor Name, select the desired Name from the active list and click on the
button to view the Labor Names General tab window for that labor name, change
current labor name to new name and save your changes. To add a new Labor Name make an
inactive level active by clicking on the box alongside “Active” .
To create Labor Levels Associations, click on the Labor Associations tab. Click on each Labor
Level dropdown to select the Level you want to link to.
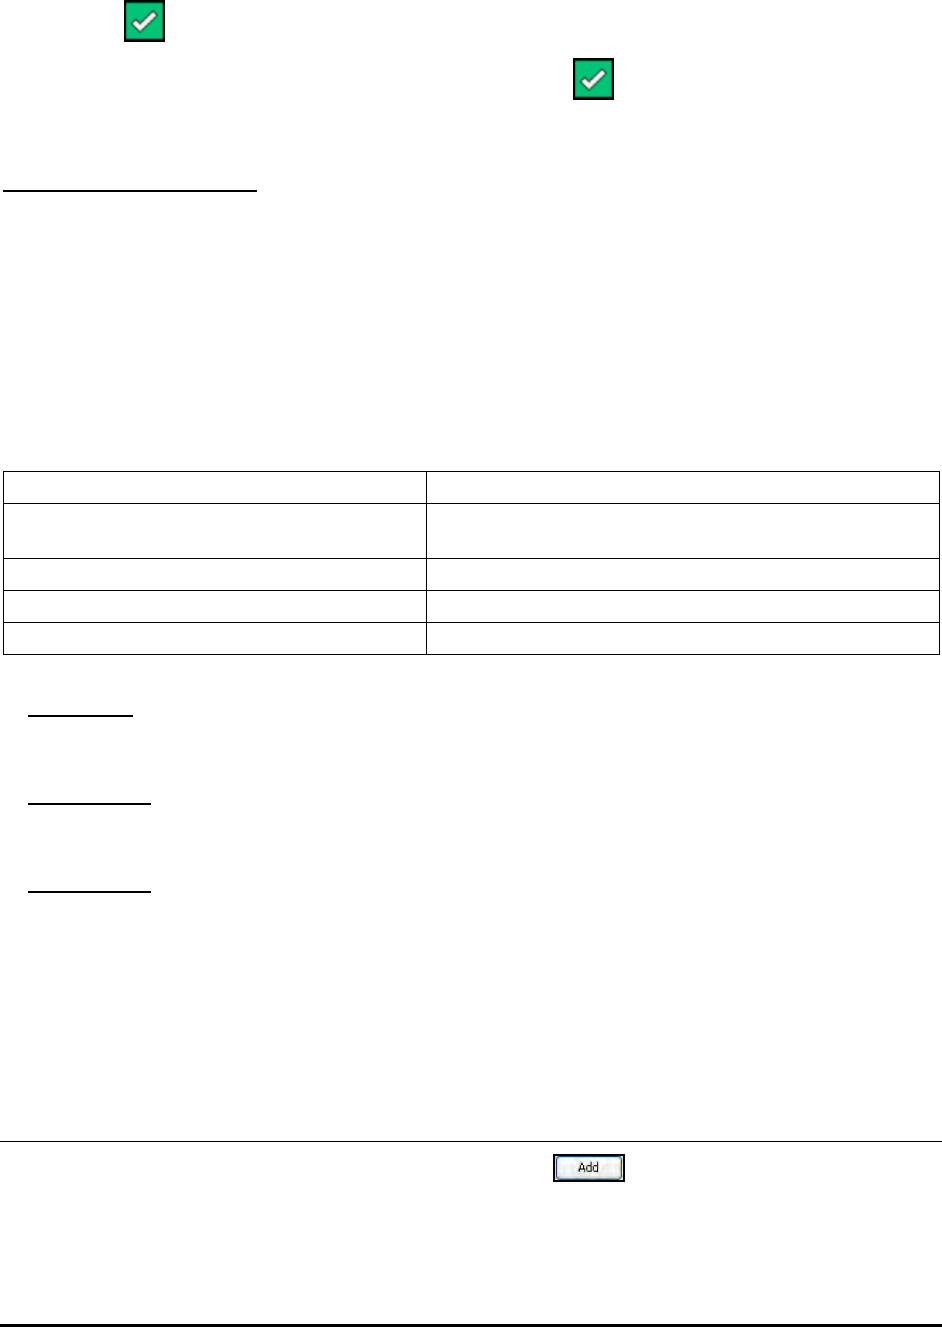
15-4 Time Guardian Series – Advanced Labor/Rate Module
Click on the button to save your settings and return to the Labor Levels window.
After you have finished entering Labor Levels, click on the button in the Labor Levels
window to save your settings and return to the main tree view.
Labor Level Association
The labor level association is important because it allows the user to link labor levels (see Labor
Levels module under the Company module in the tree view for links setup) and associate level
name by;
• Specifying labor level links
• Defining parent/child relationship for labor name
Labor level association can affect employee labor levels, client and Web timecards, Individual
Schedules, employee Web punches, and all related labor views. See the following table and
Scenarios for examples:
Labor Level 1: Department [user defined] Labor Level 2: Cost Center [user defined]
R&D [user defined labor name] Electrical, Mechanical, QA, Software, Firmware [user
defined labor names]
Finance [user defined labor name] Audit, Forecasting [user defined labor names]
Sale [user defined labor name] TS-3000i, PIX-55, TG [user defined labor names]
Marketing [user defined labor name] Show all labor [no association]
In Scenario 1 - using the table, if Labor Level 1 (“Department”) and Labor Level 2 (“Cost
Center”) are not linked, selection of any Department in Labor Level 1 will show all Cost Center
associated labor in Labor Level 2 dropdown list.
In Scenario 2.1 - if Level 1 and Level 2 are linked and associated such as Department is linked
with Cost Center, then the selection of Finance in Level 1 will only show Audit and Forecasting
in the dropdown for Level 2 (see table).
In Scenario 2.2 - if Level 1 and Level 2 are linked and associated such as Department is linked
with Cost Center, but Marketing has no association then the selection of Marketing in Level 1
will show all labor in the dropdown for Level 2 (see table).
Note: Only active levels will be shown, and only one level can be associated with one level.
Level association occurs from the top down. This function can also be done with Global
Assign from the main employee list (see Global A).
Wages
To assign a Cost or Billable Rate for wages, click on the button or check the Use Rate
Template for Cost or Billable rate.
Note: You must be an Administrator to have access to Wages, or this tab will not appear.
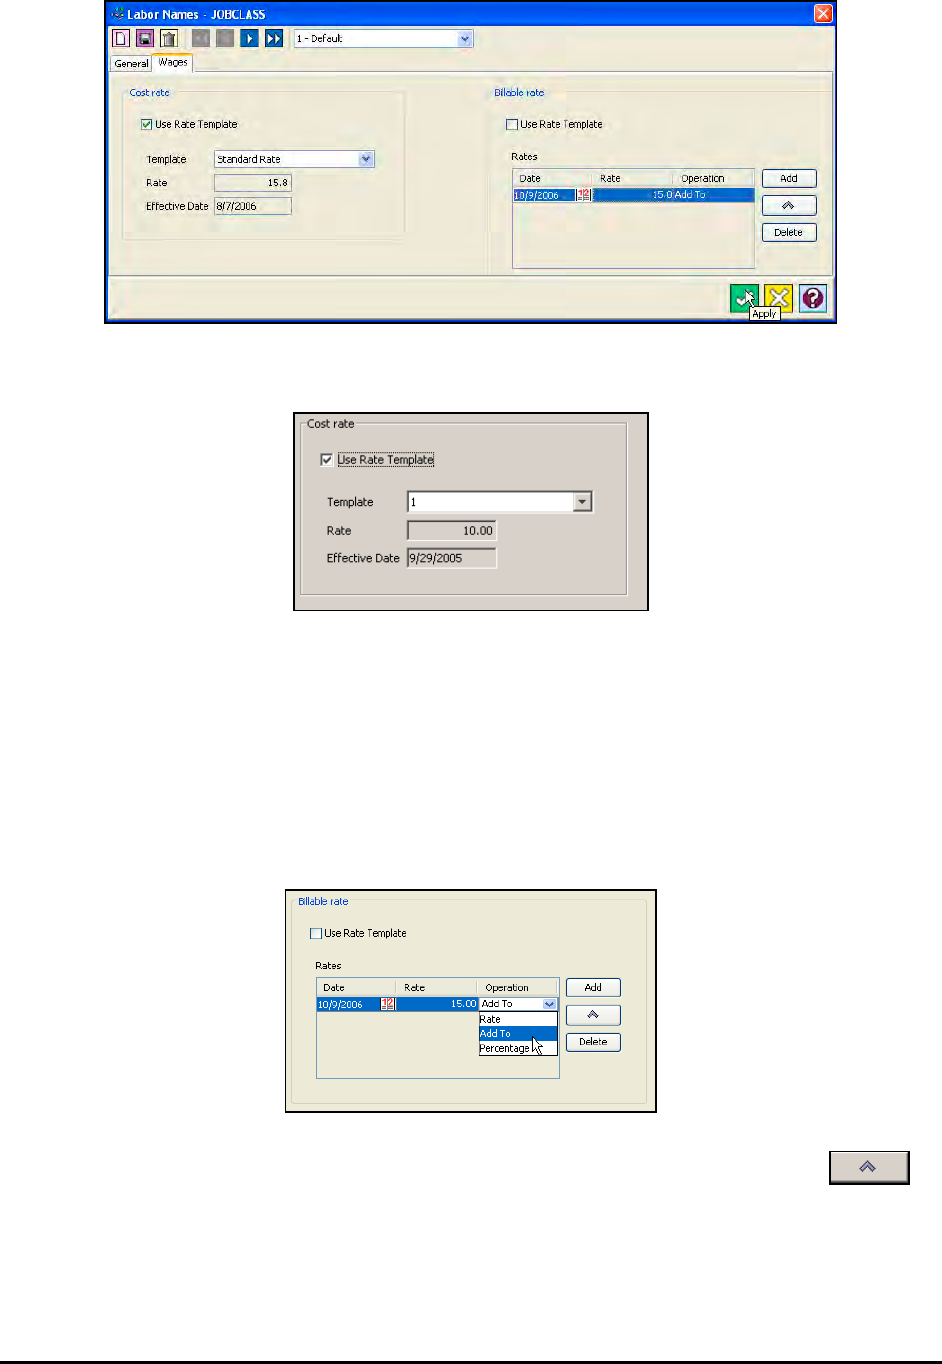
Time Guardian Series – Advanced Labor/Rate Module 15-5
For Use Rate Template check the box:
Select the desired Rate Template from the list in the Template field.
To Add a rate:
Click on the Add button and a row will appear in the Rates box. In the Date field, enter a date
when the rate for the labor level will be in effect. Enter a rate for the labor level in the Rate field.
In the Operation field, select Rate, Add to, Percentage. Rate is the labor level's actual rate. Add
to will add to the existing rate (as defined in Rate Setup). Percentage will increase the existing
rate for the labor level by the percentage as defined in Rate Setup.
Rates can be increased using the Operation field or clicking on the Percent Increase
button. The following window will appear for percent increase:

15-6 Time Guardian Series – Advanced Labor/Rate Module
Click on the button to enter an effective date for the increase and enter in a percentage of
the rate you wish to increase the rate by. Click on the button when finished.
To delete a rate or rate operation, select the desired row, and click on the Delete button.
Rate Setup
The Rate Setup module allows you to classify employee wages or rates in terms of cost or
billable rates per employee or Labor Level(s). There are (2) types for each; Standard or
Combined. Standard applies the rate based on the order set, and Combined applies the rate
based on the combination of items (Employee and Labor Levels) selected. For multiple
employees, a Rate Setup template must be configured for each individual employee.
To define the criteria for Rate Setup templates:
1. Select the Rate Setup module within the Company group in the Tree View.
2. The top line can be used as a filter to select the desired row. Also, clicking on any column
heading in the list will sort the list in ascending/descending order based upon the column
that was clicked on. Select a row and click on the button to edit a Rate Setup.
3. In the General tab, select the number of decimal places (0 thru 5) that will be used for the
rates.
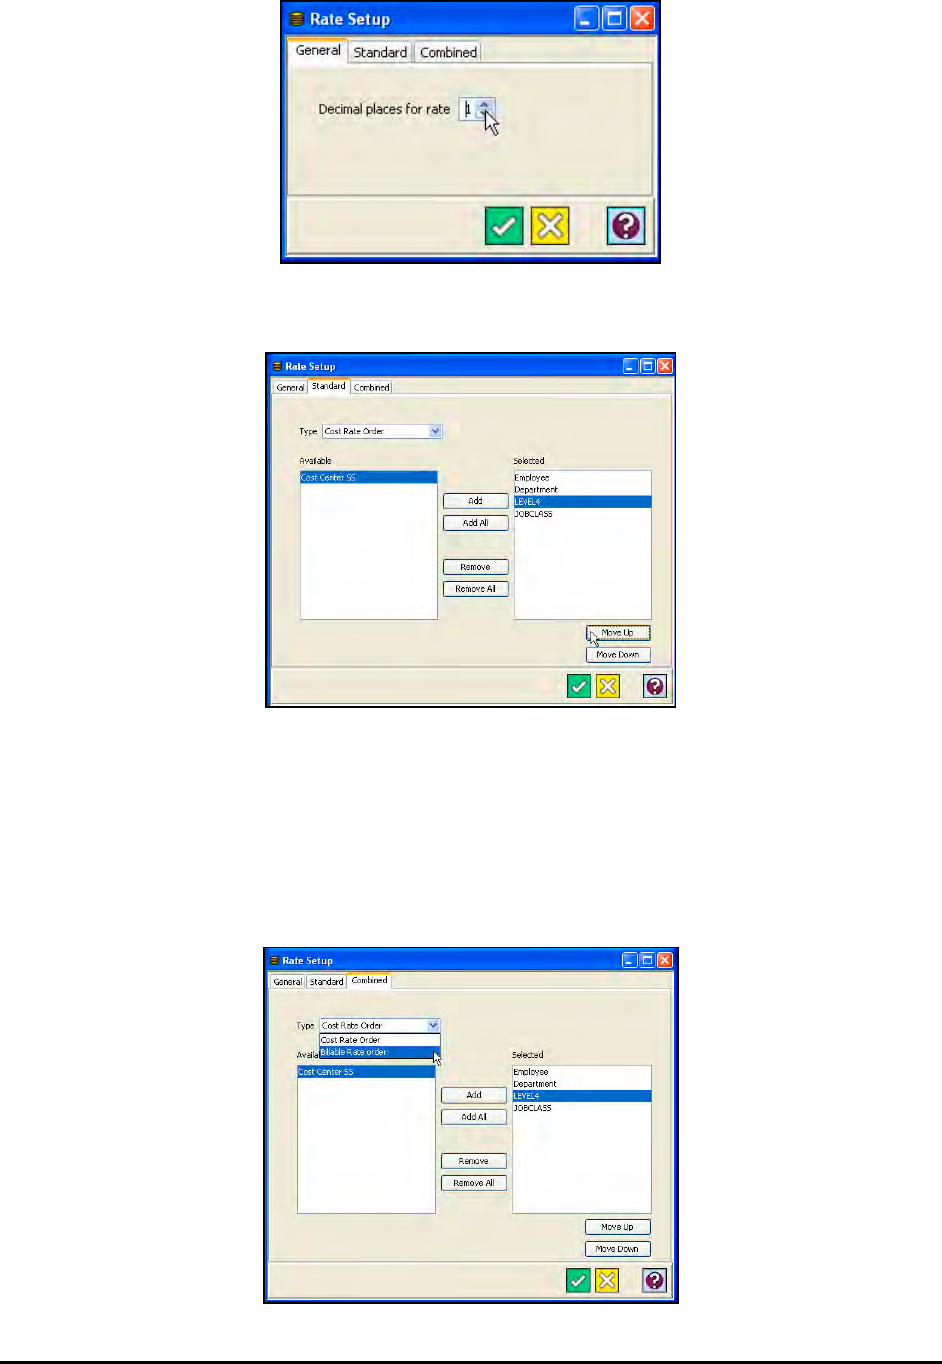
Time Guardian Series – Advanced Labor/Rate Module 15-7
4. Click on the Standard tab.
5. Select either Cost Rate or Billable Rate Order in the Type field.
6. To add a selection, highlight the desired item in the Available list and click on the Add
button. To select all the listed items, click on the Add All button. To remove an item, highlight
the desired item in the Selected list and click on the Remove button. To remove all the listed
items, click on the Remove All button.
7. Click on the Combined tab.
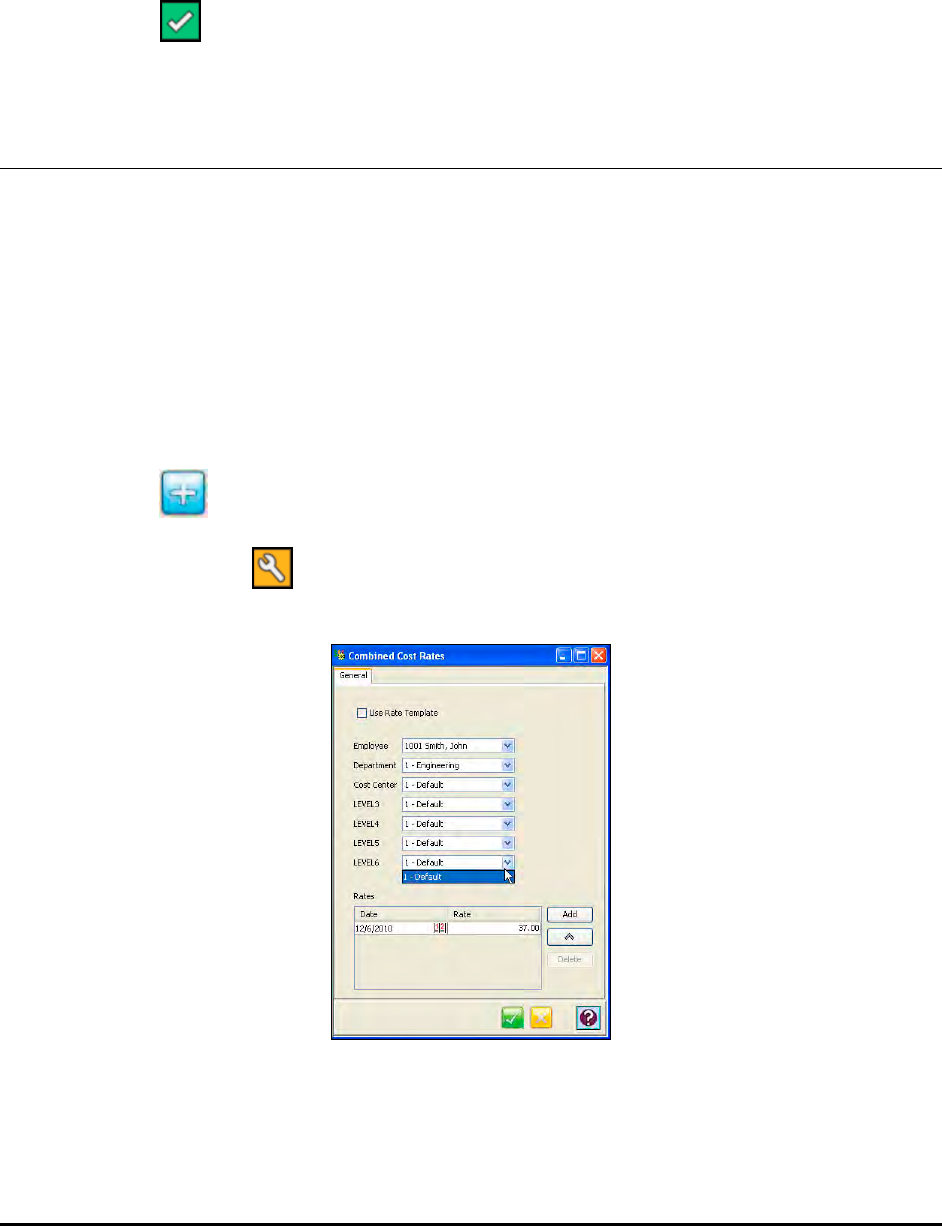
15-8 Time Guardian Series – Advanced Labor/Rate Module
8. Select either Cost Rate or Billable Rate Order in the Type field.
9. To add a selection, highlight the desired item in the Available list and click on the Add
button. To select all the listed items, click on the Add All button. To remove an item, highlight
the desired item in the Selected list and click on the Remove button. To remove all the listed
items, click on the Remove All button.
10. Click on the button to save your settings.
Combined Cost Rates
This module enables you to create Combined Cost Rates, and is enabled when at least one
item is assigned to the Cost Rate Order in the Combined tab of the Rate Setup window, and at
least one employee has been added in the Employees module. The rate templates created here
are assigned to employees in the Wage tab of the Employees module.
Note: There must first be combined cost rates setup in the Rate Setup module under Company
before using this module.
To create a Combined Cost Rate:
1. Select the Combined Cost Rates module within the Company group in the Tree View.
2. Click on the button to create a new Cost Rate. To edit a Combined Cost Rates
template, select the desired template within the Combined Cost Rates module in the Tree
View and click on the button, or double-click on the template row and the following type
of screen will appear.
The items assigned to the Cost Rate Order in the General tab of the Rate Setup window will
appear in the Combined Cost Rates window.
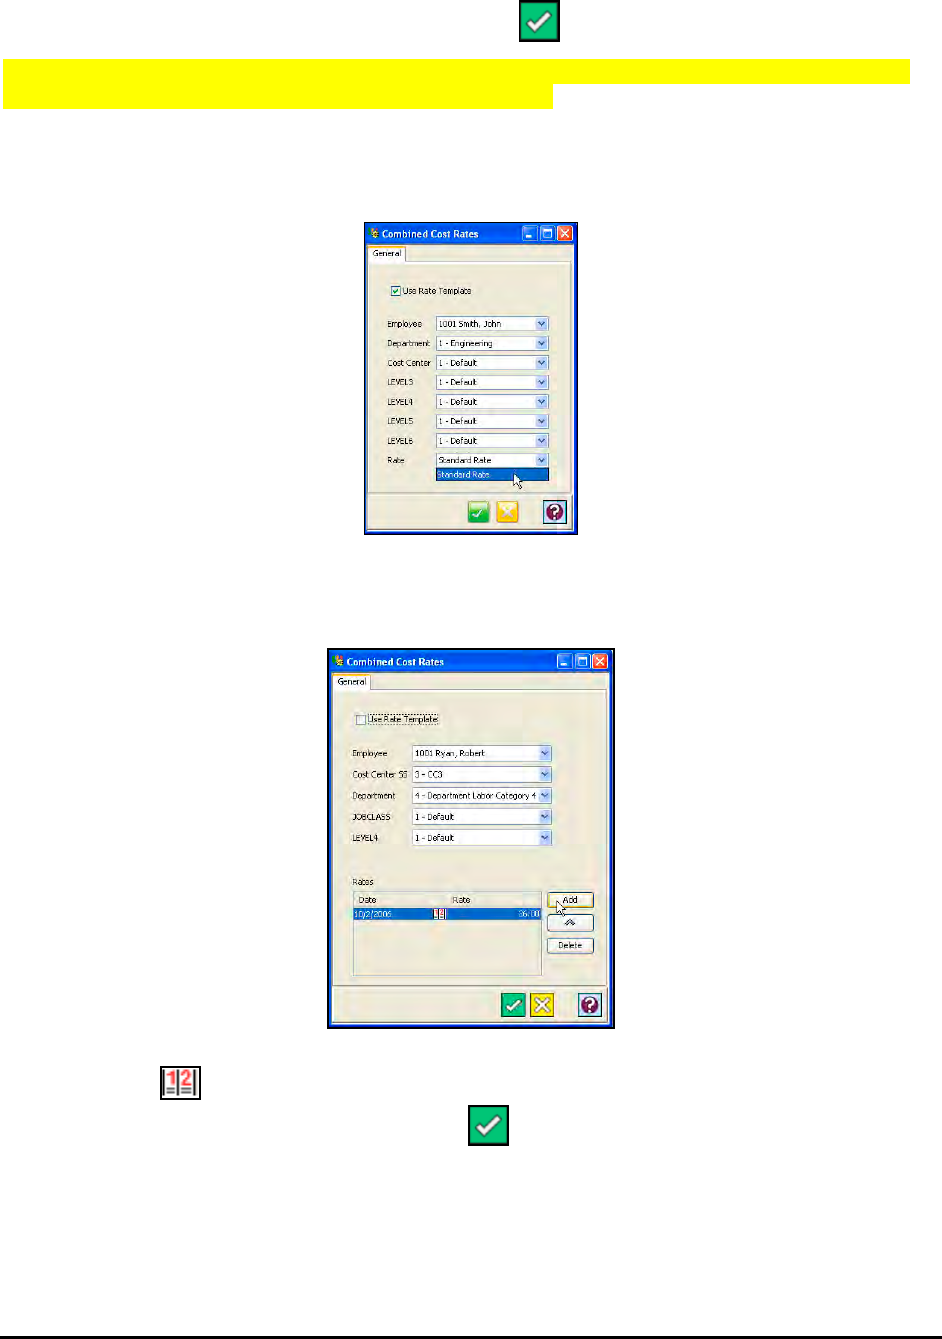
Time Guardian Series – Advanced Labor/Rate Module 15-9
3. Using the dropdown lists provided, select the employee or the Labor Level subcategory you
wish to track. To save your changes, click on the button.
Note: See Advanced Labor/Rate Module, Example of Multiple Labor Levels for details about
Labor Level Association links (Parent/Child relationship).
4. To add a rate based on a Rate Template, check the Use Rate Template option and select a
Rate Template using the dropdown list in the Rate field as illustrated in the following
example.
If you do not wish to use a Rate Template, deselect “Use Rate Template”, and click on the
Add button. A row will appear in the Rates box as shown in the following example.
5. Click on the button in the Date field to enter the effective date for the rate will be in
effect. When you have finished, click on the button to save your settings and return to
the Rate Template window.
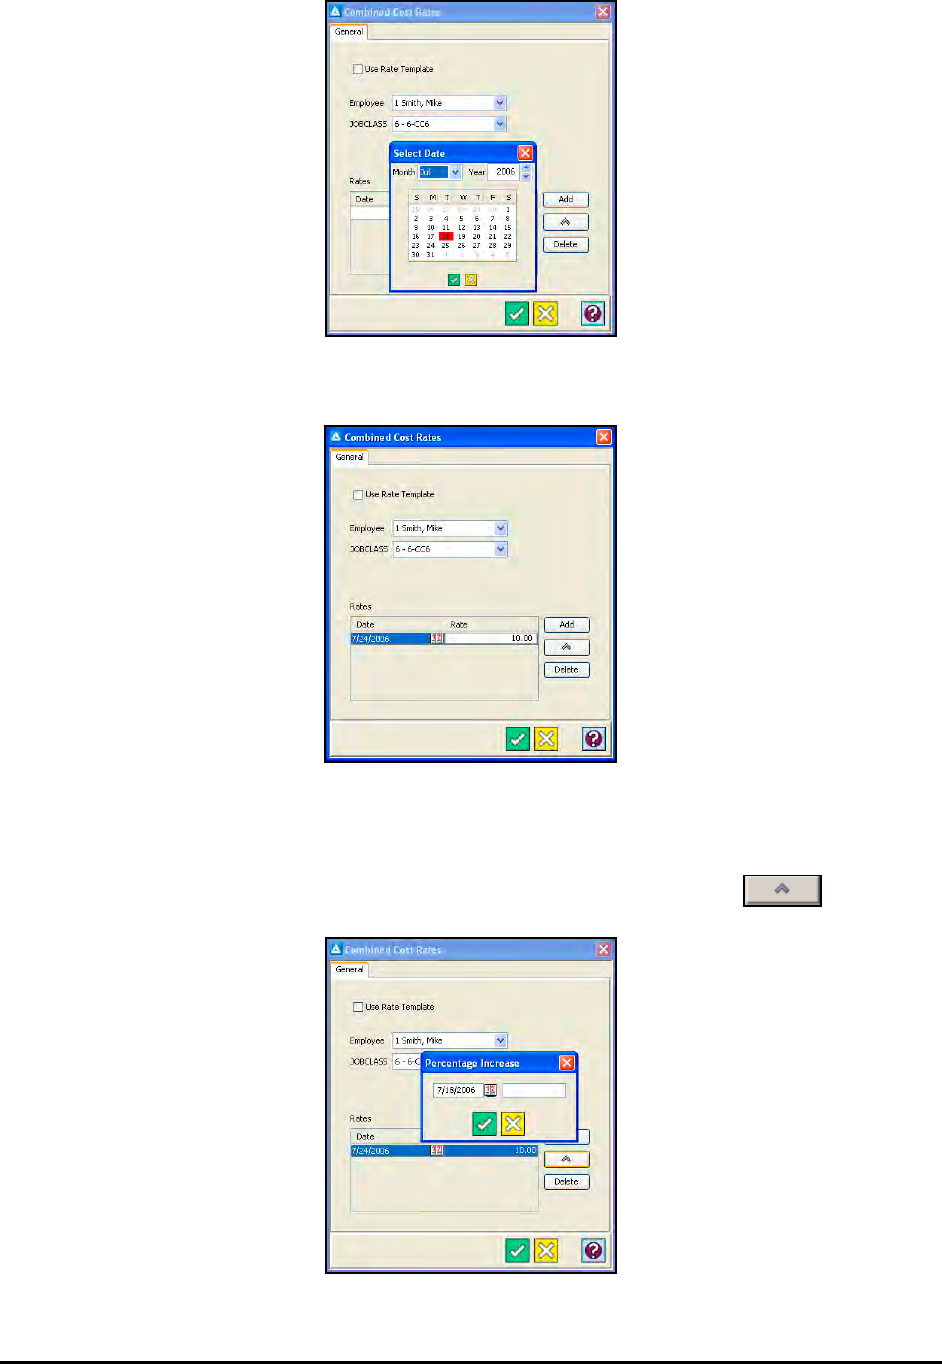
15-10 Time Guardian Series – Advanced Labor/Rate Module
6. Enter a rate in the Rate field.
7. Repeat Steps #3 thru #6 to add additional Rates to this template.
8. To delete a rate select the desired row and click on the Delete button.
9. To automatically increase the rate by a %, click on the Percent Increase button.
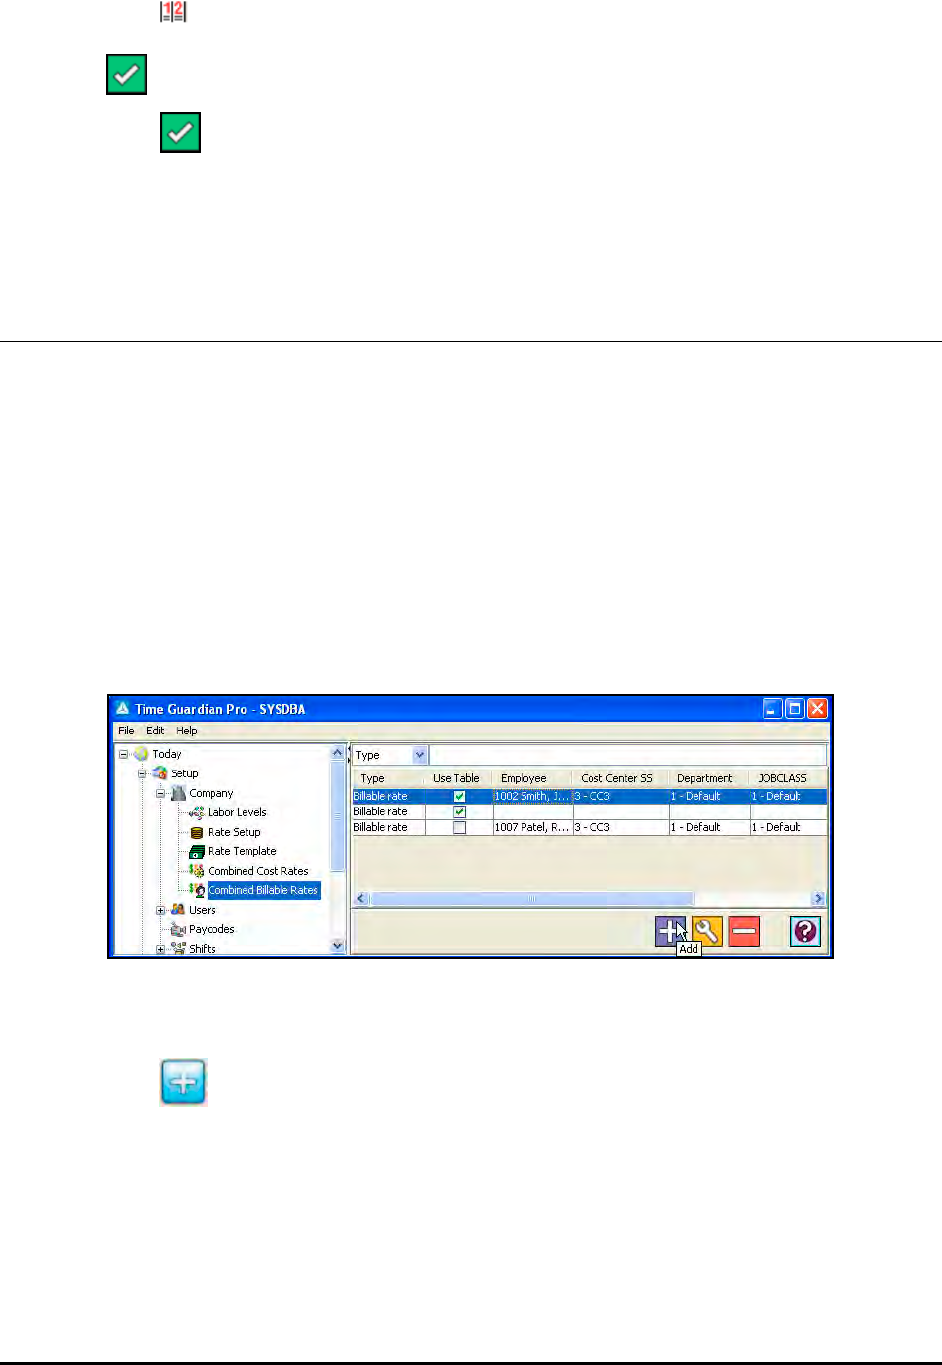
Time Guardian Series – Advanced Labor/Rate Module 15-11
10. Click on the button in the Date field to enter the effective date for the rate increase and
enter the percentage increase of the rate in the Increase field. When you have finished, click
on the button to save your settings and return to the Combined Cost Rates window.
11. Click on the button to save your settings. The Combined Cost Rate will be added to the
Main View.
Combined Billable Rates
This module enables you to create Combined Billable Rates, and is enabled when at least one
item is assigned to the Billable Rate Order in the Combined tab of the Rate Setup window, and
at least one employee has been added in the Employees module. The rate templates created
here are assigned to employees in the Wage tab of the Employees module.
Note: There must first be combined billable rates setup in the Rate Setup module under
Company before using this module.
To create a Billable Cost Rate:
1. Select Combined Billable Rates module within the Company group in the Tree View (see the
following figure).
The items assigned to the Billable Rate Order in the Combined tab of the Rate Setup
window will appear in the Combined Cost Rates window.
2. Click on the button, and the following is an example of the Combined Billable Rates
window that will appear:

15-12 Time Guardian Series – Advanced Labor/Rate Module
3. Using the dropdown lists, provided, select the employee or the Labor Level subcategory you
wish to track.
Note: See “Example of Multiple Labor Levels” for details on setting up Labor Levels, names,
and association links (Parent/Child relationship).
4. To add a rate based on a Rate Template, check the Use Rate Template option and select a
Rate Template from the dropdown list in the Rate field.
If you do not wish to use a Rate Template, click on the Add button, and a row will appear in
the Rates box (see the following figure).

Time Guardian Series – Advanced Labor/Rate Module 15-13
5. Click on the button in the Date field to enter the date that the rate will be in effect. When
you have finished, click on the button to save the date and return to the Rate Template
window.
6. Enter a rate in the Rate field (see previous figure).
7. Repeat Steps #3 thru #6 to add additional Rates to this template.
8. To delete a rate select the desired row and click on the button.
9. To automatically increase the rate by %, click on the Percent Increase button.
10. Click on the button in the Date field to enter the date that the rate increase will be in
effect and enter the percentage increase of the rate in the Increase field. When you have
finished, click on the button to save your settings and return to the Combined Billable
Rates window.
11. Click on the button to save your settings. The Combined Billable Rate will be added to
the Main View.
Rate Templates
A Rate Template allows you to create a rate to assign to employees or labor levels. Rate
Templates are assigned to employees in the Wages tab of the Employee window.
To create a Rate Template:
1. Select the Rate Template module within the Company module in the Setup group in the
Tree View.
2. Click on the button, and the Rate Template window will appear:
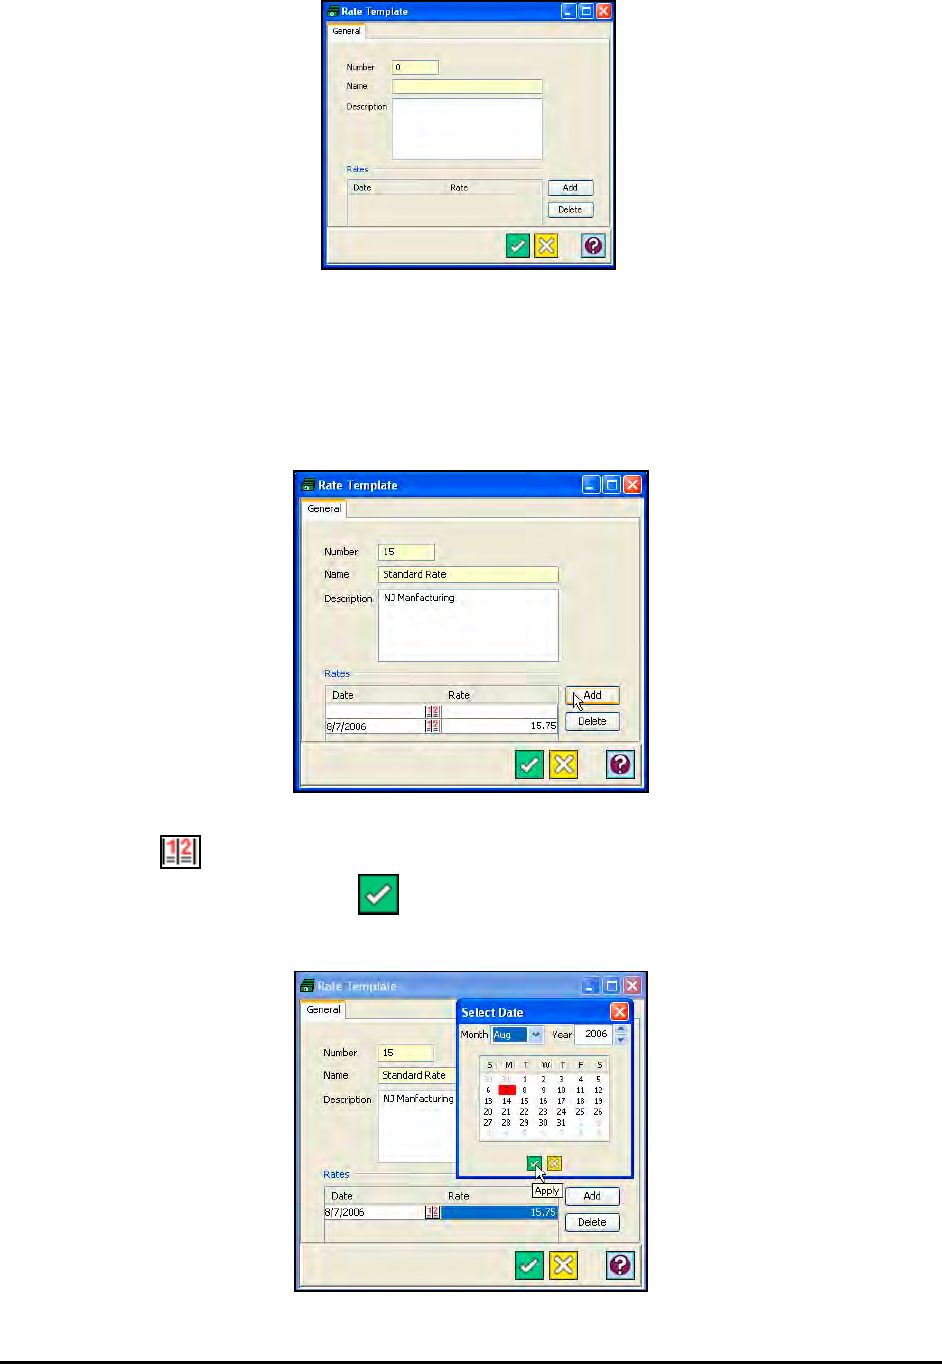
15-14 Time Guardian Series – Advanced Labor/Rate Module
3. Enter a number for the Rate Template in the Number field [required field].
4. Enter a name for the Rate Template in the Name field [required field].
5. In the Description field, enter a brief description of the Rate Template.
6. To add a rate, click on the Add button, and a row will appear on the Rates box.
7. Click on the button in the Date field to enter the effective date for the rate. When you
have finished, click on the Apply button to save your settings and return to the Rate
Template window.
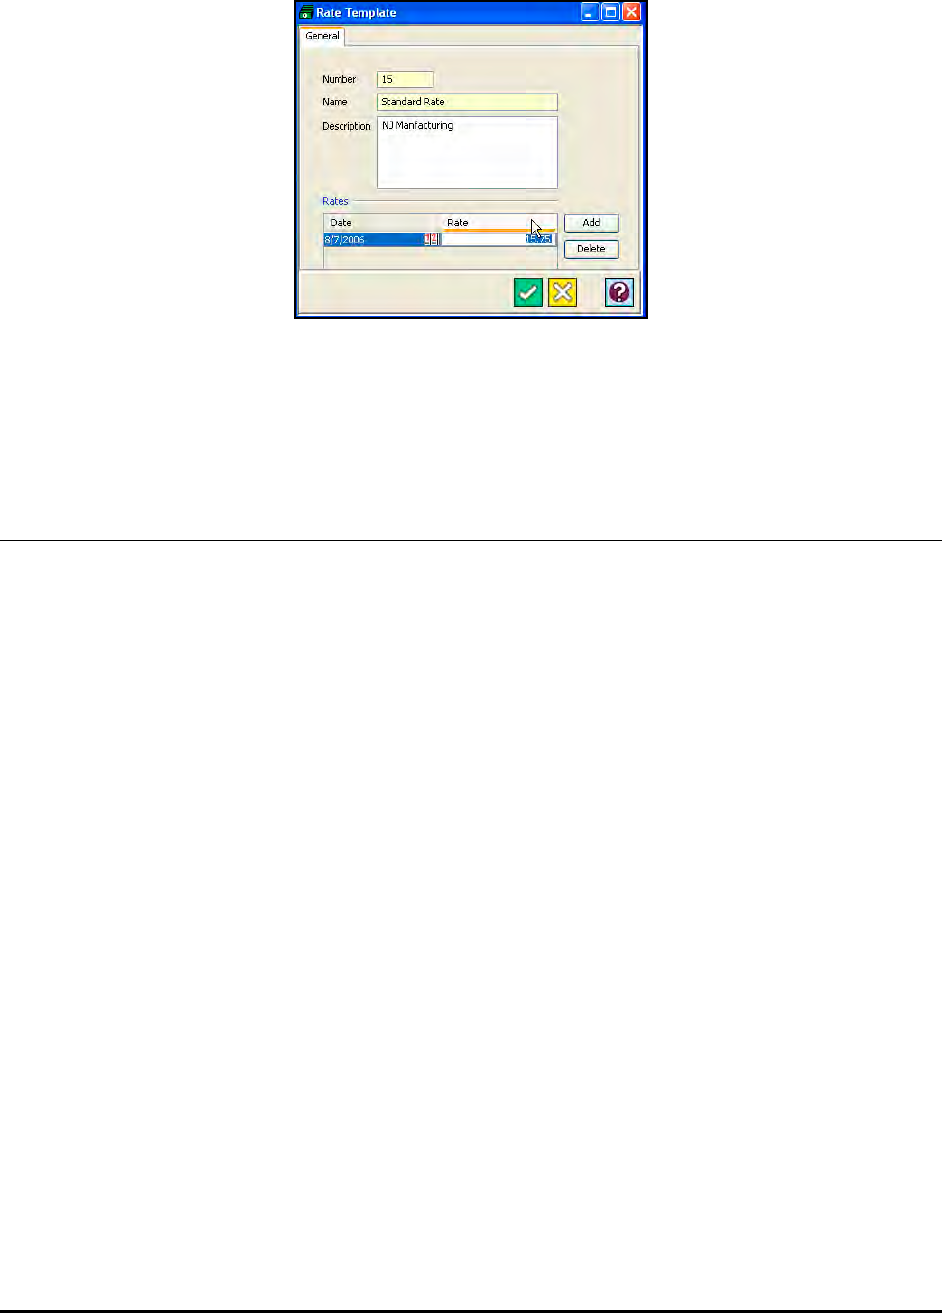
Time Guardian Series – Advanced Labor/Rate Module 15-15
8. Enter a rate in the Rate field.
9. Repeat Steps #5 thru #7 to add additional Rates to this template.
Weighted Average Rate of Pay
This function is available when the Advanced Rounding Module is activated. It is used to
calculate the overtime rate based on all hours worked plus hours awarded from being on call.
The following should be setup to perform this function:
• Employee weighted average (use for single employee settings).
• Pay Class weighted average (all employee settings).
• On call bonus for weighted average (defined in Pay Code).
This function can be used to calculate overtime rate of pay for daily, weekly, period and range
overtime.
This function can be used to calculate overtime cost and/or billable rate of pay depending on the
setup. The calculation of floating precision will follow rate precision setting. The following are
examples of weighted average overtime rate calculations:
Note: The sequence of overtime is first check employee and if Yes then apply rules. Second
check Pay Class and if Yes apply all selected and if No apply nothing. Third apply On Call for
Weighted Average if selected.
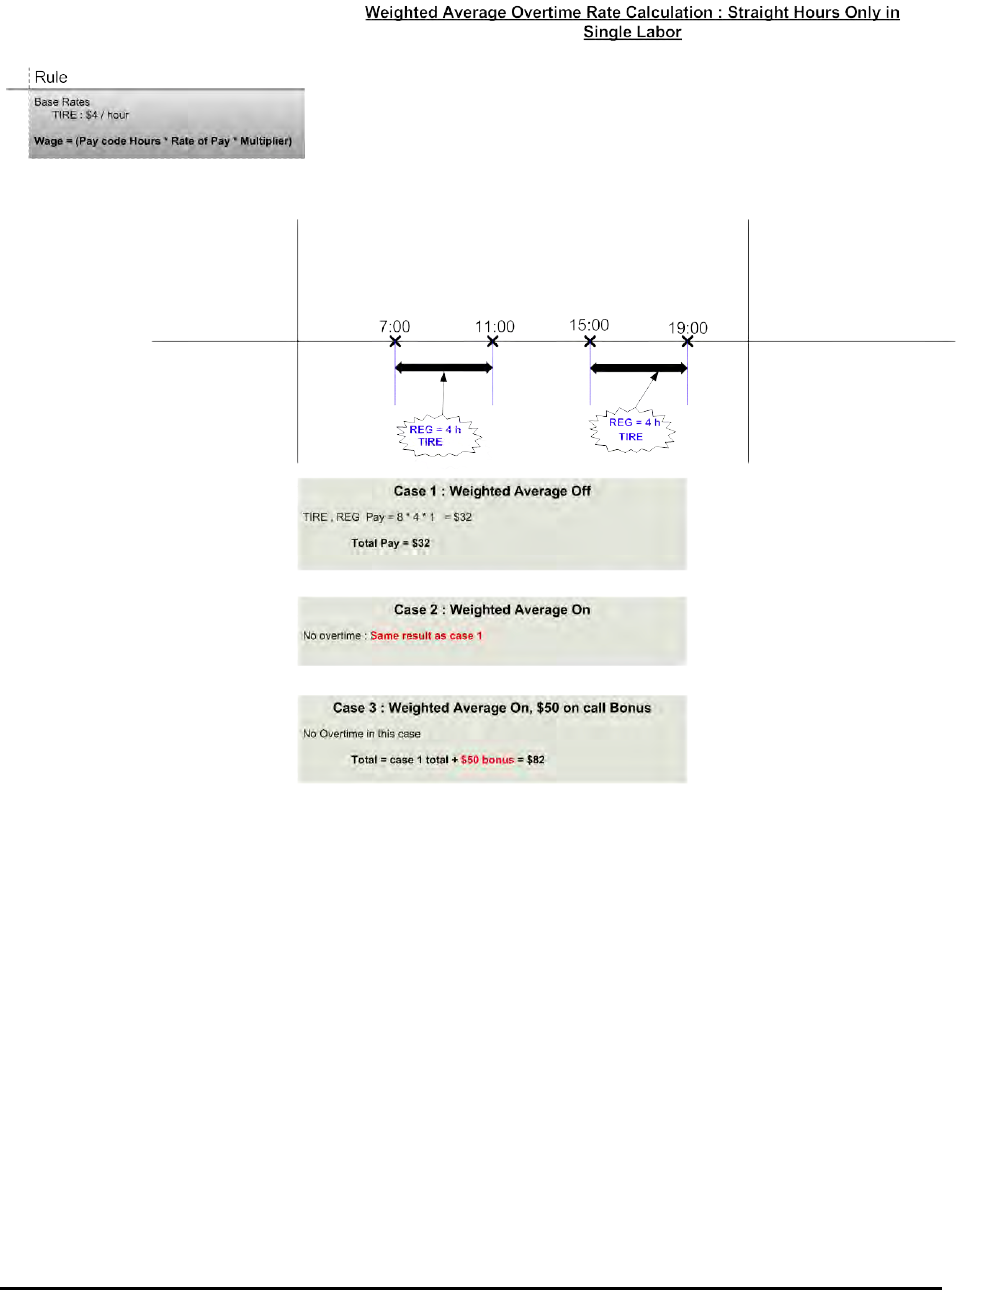
15-16 Time Guardian Series – Advanced Labor/Rate Module
Example Showing:
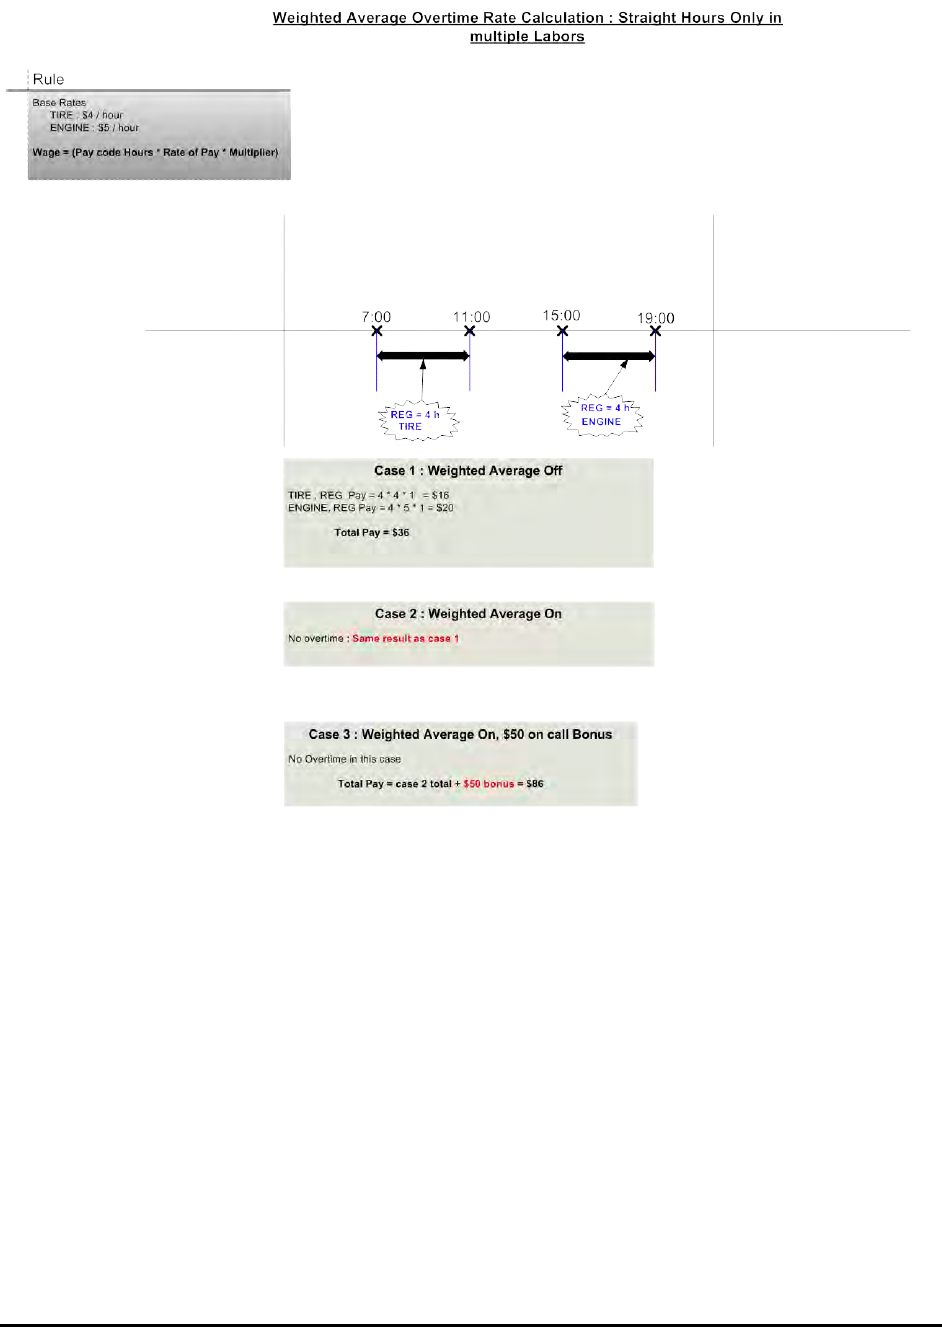
Time Guardian Series – Advanced Labor/Rate Module 15-17
Example Showing:
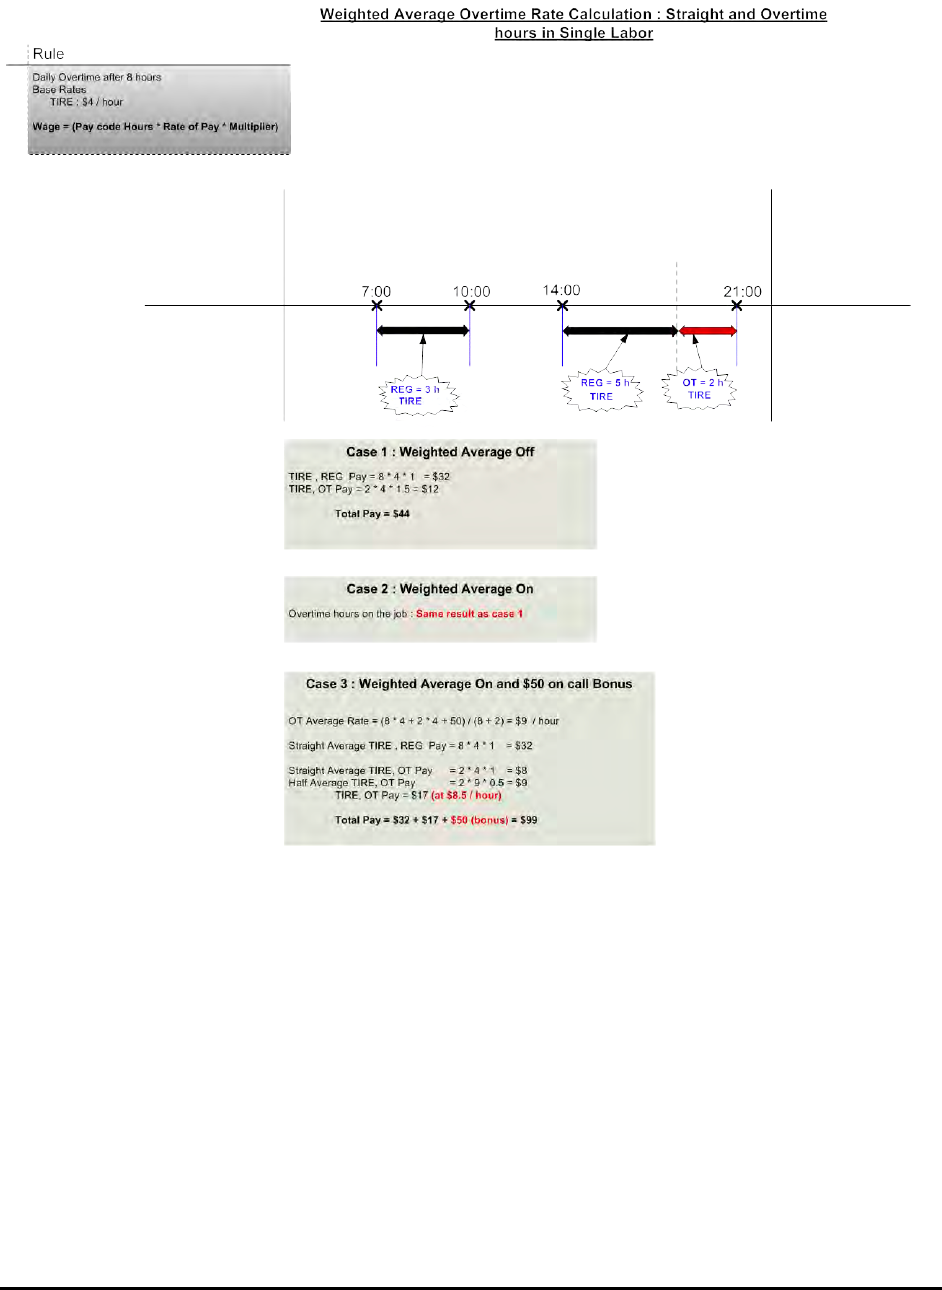
15-18 Time Guardian Series – Advanced Labor/Rate Module
Example Showing:
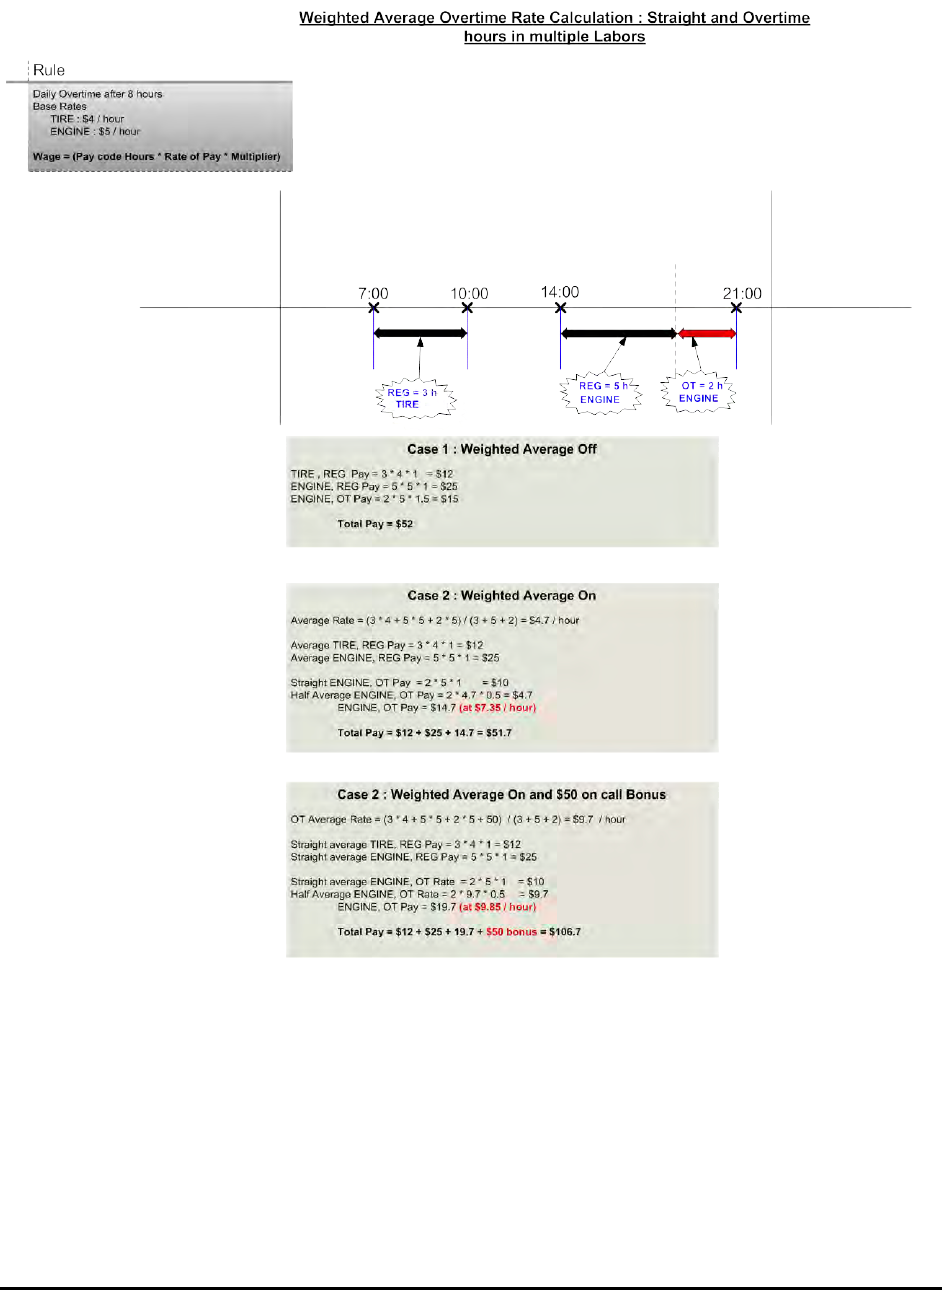
Time Guardian Series – Advanced Labor/Rate Module 15-19
Example Showing:
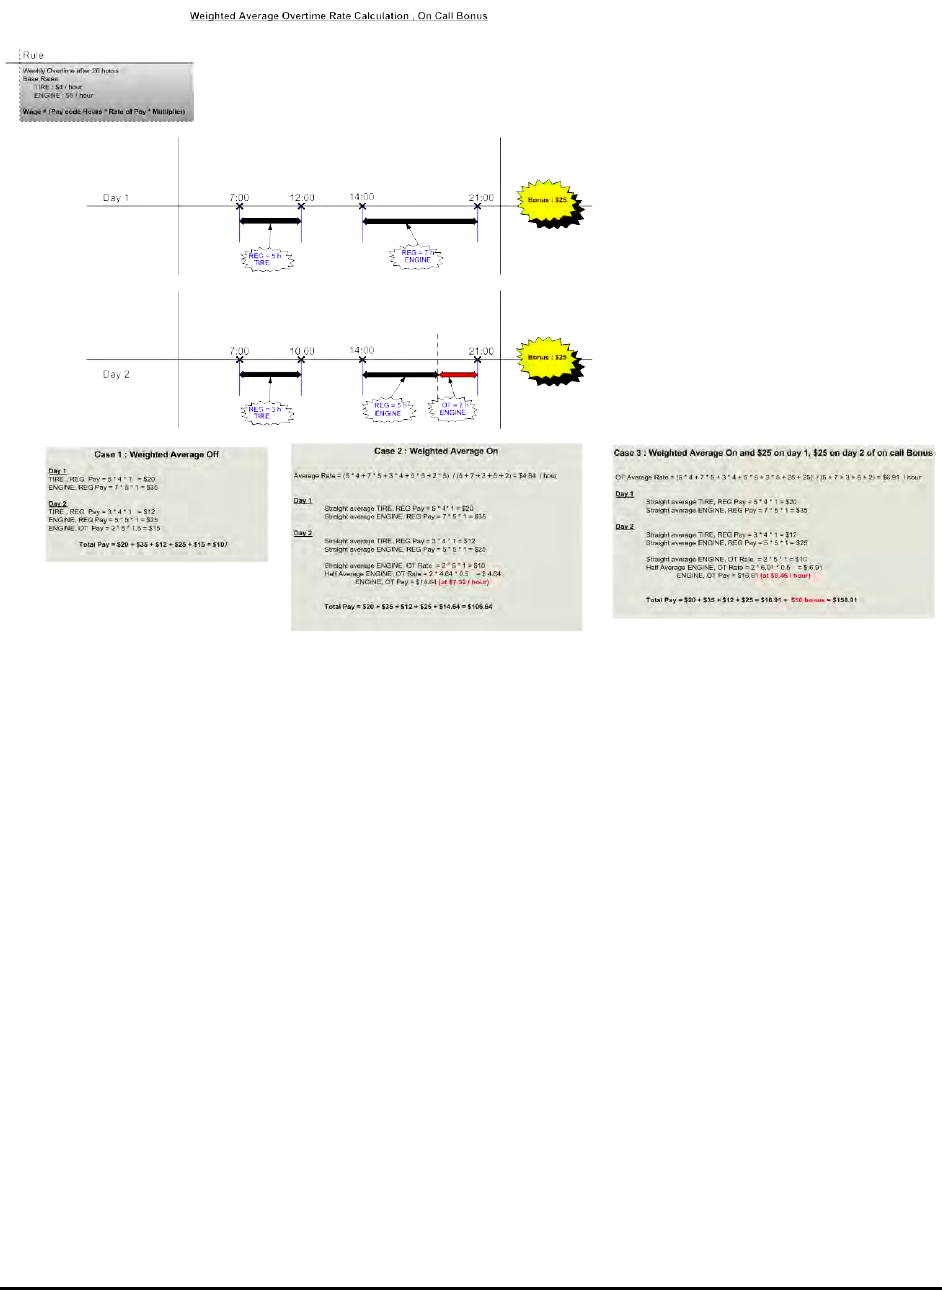
15-20 Time Guardian Series – Advanced Labor/Rate Module
Example Showing:
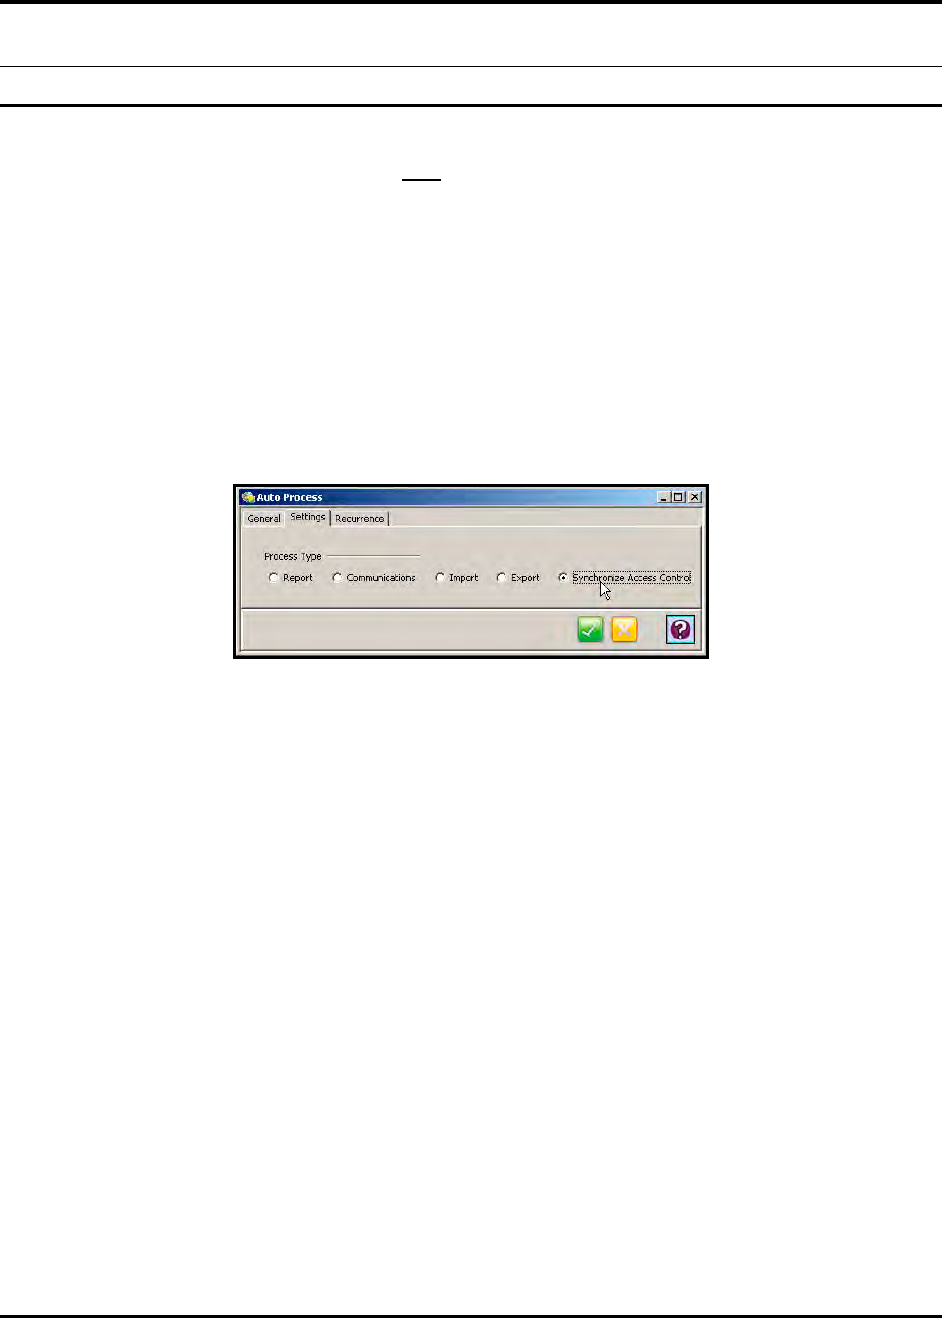
Time Guardian Series – Access Control Module 16-1
Chapter 16: Access Control Module
Access Control Module Introduction
When the Amano Nexus 220 or AmanoNet 7.6 software is installed on your system coupled with
the Amano Time & Attendance Software with the optional Access Control Module active; you
can load employees from the Access Control system into the Time & Attendance System using
the Synchronize Access Control command (see Auto Process – Settings tab).
Also, any new employee entered into the Time & Attendance software will be automatically
added to the Access Control system using the same command.
Once the Access Control Module is activated, the Time & Attendance software can be
configured to use the punches stored in the Nexus220 and AmanoNet 7.6 database for time and
attendance. This can be accomplished automatically when polling is performed or manually
when the Synchronize Access Control command is selected from the Settings tab in the Auto
Process module (see figure). The Auto Process will run as a service in the background based
upon the “Recurrence” settings that you have defined.
Note: The terminals must be set up for Time and Attendance in Nexus220 or AmanoNet 7.6.
The sections of the Time & Attendance Software affected and/or features added from the
activation of this module include:
• Access Control Integration provided for:
− Nexus220
− AmanoNet 7.6
• Employee synchronization provided for:
− On application startup
− Manual synchronization
− New employee synchronization between the Time & Attendance software & Access
• Department synchronization
− New Department synchronization between the Time & Attendance software & Access
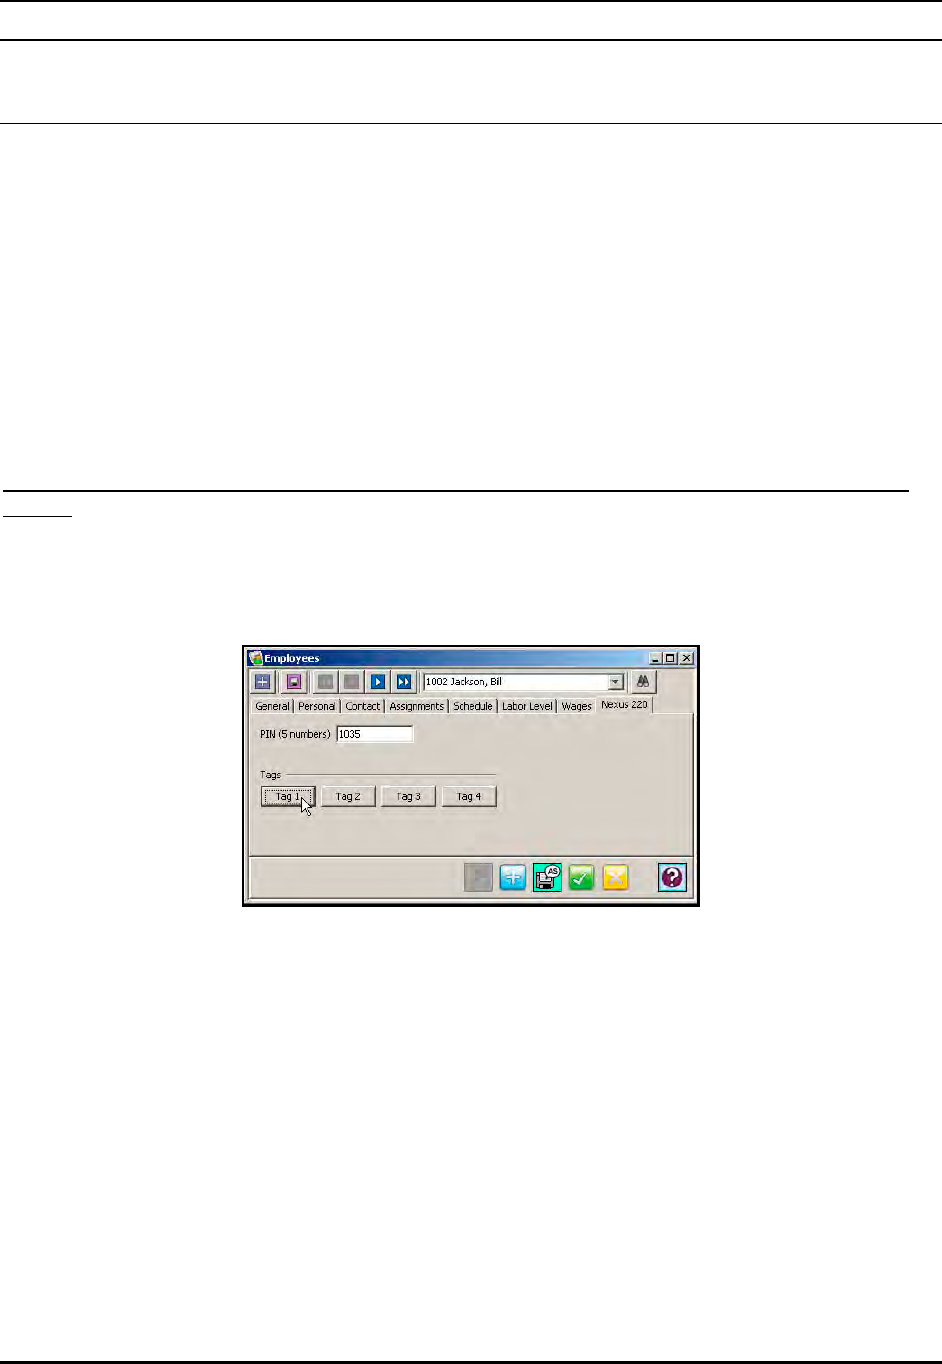
16-2 Time Guardian Series – Access Control Module
Using Access Control Module
Nexus 220 Integration
Wizard Setup for Nexus 220
The following paragraphs detail the steps involved in setting up the Nexus 220 Access Control
System during Employee Setup with the Setup Wizard (see Step 7: Employee Setup Wizard for
additional Wizard information).
Employees Setup for Nexus220
The Access Control Module must be activated for the Nexus 220 tab not to be grayed out. Once
this module is activated, Nexus 220 tab will be active during employees Step 7 Wizard Setup if
you selected to integrate the Nexus 220 for Access Control from the General tab of the Setup
Wizard. When Nexus 220 Access Control software is connected to an AC or EC controller 4
tags are available (see the following figure for an example with 4 Tags). Tag1 can be used to
assign access levels, sites, and tag options to the badge or tag number entered in the General
tab. Tag2, thru Tag4 can be used to add and configure additional tag(s) or badge(s) for the
employee to use. Click on the Nexus 220 tab and the following type of screen will appear:
For Nexus 220 Access Control use:
Enter PIN: The 5-digit number that an employee may have to enter at an access control device.
Click on Tag 1 through Tag 4 and the following type of screen will appear:
Note: For Tag 1 the Badge number (Tag Code) is disabled as it is Read only, but it is enabled
in the other tags. It will be Read only and the same as the Badge number.
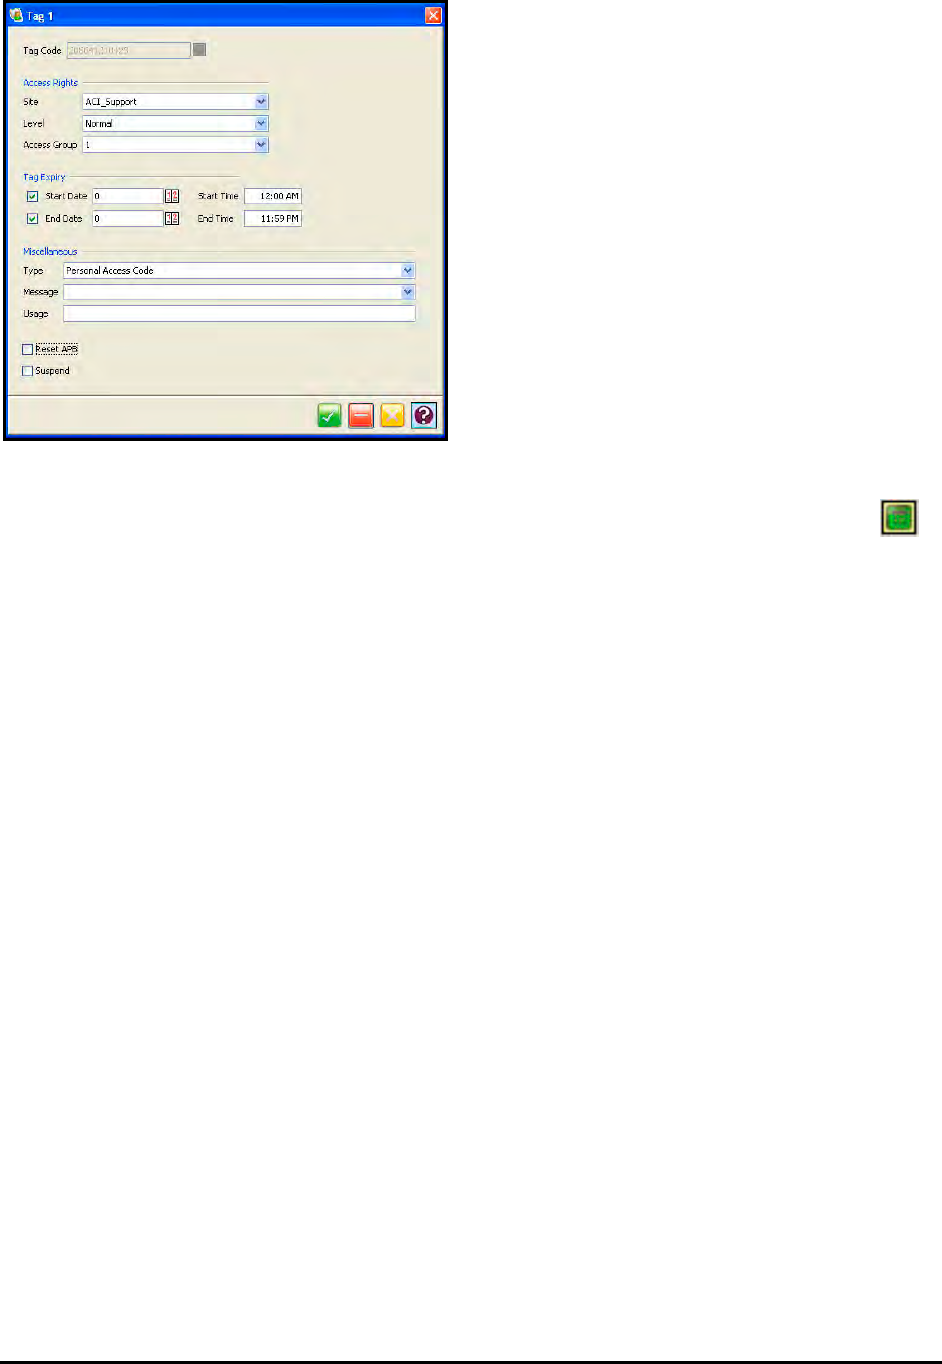
Time Guardian Series – Access Control Module 16-3
Enter the following for Tag(s):
• TAG Code: The number of the tag or badge you wish to use. Use the Read Badge
icon to the right of the TAG Code field to enter the number from the Registration Reader
(RR).
• Site: Select the site from the dropdown list to assign relevant site number that the
employee will have access to.
• Level: (Tag Options) Assigns one of the following functions to the badge or tag:
a. Normal: Normal employee
b. Suspend: All access for a particular tag is suspended
c. Blacklist: The tag holder will be denied access to the site
d. Special Events, 1 and 2 Button: Tag holders are admitted for specific events, such as
a meeting or demonstration
• Access Group: for Access groups that will be assigned to the tag.
• Start Date: The date when the tag will be activated (YYYYMMDD).
• End Date: Displays the date when the tag will expire (YYYYMMDD). (If left blank, the tag
will never expire).
• Start Time: The actual hour (1 – 23) on the date when the tag will start (HH).
• End Time: The actual hour (1 – 23) on the date when the tag will expire (HH).
• Miscellaneous – Type select from dropdown.
• Miscellaneous – Message select from dropdown.
• Miscellaneous – Usage enter.
• Reset APB: Resets the tag holder to the APB constraint condition on the doors to which
they have access.
• Suspend: Enables the tag holder to override the APB constraint condition on the doors
to which they have access by suspending it.
If you wish to assign another tag for the employee, click on the Tag 2, thru Tag 4 (Tag 8)
buttons and follow a similar procedure performed for Tag 1.
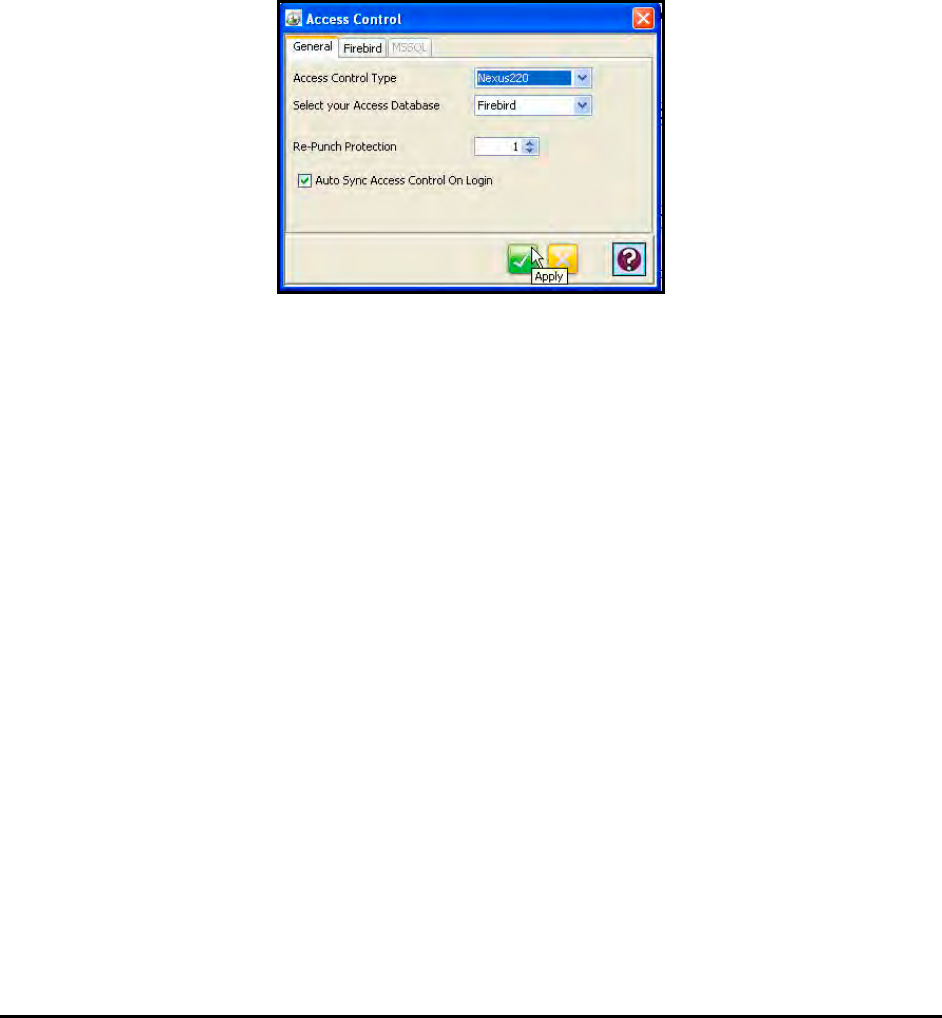
16-4 Time Guardian Series – Access Control Module
Configuring Nexus 220
The following paragraphs detail the steps involved in integrating data between the Time &
Attendance software and the Nexus 220 system.
Step A. Configure the Nexus 220 settings with the following procedure:
1. Login to the Time & Attendance software, select the Setup Wizard from the Edit menu and
the Setup Wizard screen will appear.
2. From the General Tab of the Setup Wizard, select Yes to integrate Access Control, then
click on the Access Control button and the Access Control screen will appear.
3. From the General tab on the Access Control screen;
• Select Nexus 220 as the Access Control type.
• Select Firebird (Nexus 220 version 1.0 only works with Firebird) as the Database type.
• If you want to process all valid Transactions during synchronization, leave the default
value = 0 for the Reason Code. Otherwise, set the Reason Code to a value that is
specific (to filter) for those transactions that you want to process.
4. Click on the Firebird tab to enable the Firebird database.
• Select Yes if the Nexus 220 database is on the same PC as Time & Attendance
software.
• If not, select No and enter the appropriate IP Address for the PC which contains the
Nexus 220 database.
• Enter the location or use the file chooser button to select the location for the Nexus 220
database file. For example: C:\Program Files\Nexus 220\Database\DB220.FDB
Step B. Synchronize the Time & Attendance software and Nexus 220 with the following
procedure:
After the Nexus 220 configuration is complete, the Synchronize Access Control menu will
appear under the Time & Attendance software File menu. Use this menu selection to
synchronize Time & Attendance software with the Nexus 220 system. The procedure for this
synchronization is as follows:

Time Guardian Series – Access Control Module 16-5
1. Synchronize Departments on Time & Attendance software with Nexus 220. In this process,
Departments from the Nexus 220 that do not exist in the Time & Attendance software Labor
Names for the Department Labor Level will be brought into the Time & Attendance software.
The same will be done for Nexus 220, whereas Labor Names for the Department Labor
Level in the Time & Attendance software that do not exist in Nexus 220 Department will be
brought into Nexus 220. The link between the two is the Labor Name Number in the Time
& Attendance software and the Department No in Nexus 220.
2. Synchronize Employees/Tag holders in the Time & Attendance software and Nexus 220. In
this process, the Nexus 220 Tag holders and the Time & Attendance employees will be
created in both systems.
Synchronize Time & Attendance Employee to Nexus 220 Tag holder:
The following criteria must be met to import a Time & Attendance employee into the Nexus
220:
• The Time & Attendance employee cannot have the same Employee Number as the
|Nexus 220’s Tag holder Id No.
• The Time & Attendance employee must be an Active employee.
• The Time & Attendance employee’s Management Type must be Access Control or
Access Control and Time Attendance.
Synchronize Nexus 220 Tag holder to Time & Attendance Employee:
The following criteria must be met to import a Nexus 220 Tag holder into Time &
Attendance:
• The Nexus 220 Tag holder’s Master Type should be Access and Time.
• The Nexus 220 Tag holder must have the Id No defined.
• The Nexus 220 Tag holder’s Id No cannot be the same value as any Employee
Number in Time & Attendance software.
• The number of employees cannot exceed the maximum # of active employees allowed
by the Time & Attendance software [100 standard, 250 to unlimited optional expansion].
• The Nexus 220 Tag holder must be assigned to a Department.
• The Department that the Nexus 220 Tag holder is assigned to, should exist as one of
the Labor Names for the Department Labor Level in Time & Attendance software.
• The Nexus 220 Tag holder must have a Tag with a Tag Number that does not equal a
Time & Attendance employee’s Badge Number.
3. Synchronize Transactions from Nexus 220 to the Time & Attendance software. This is the
last step in the synchronization process. This process brings in transactions from the Nexus
220 into the Time & Attendance software as punches. The following criteria must be
successfully met to import the transactions:
• The transactions have not been processed.
• Under the Access Control Settings module, when the Reason Code is set to the default
value = 0, then all valid transactions will be processed. Otherwise, only transactions
with the set Reason Code value will be processed.
• The Nexus 220 Tag holder that has a transaction must have an Id No defined.
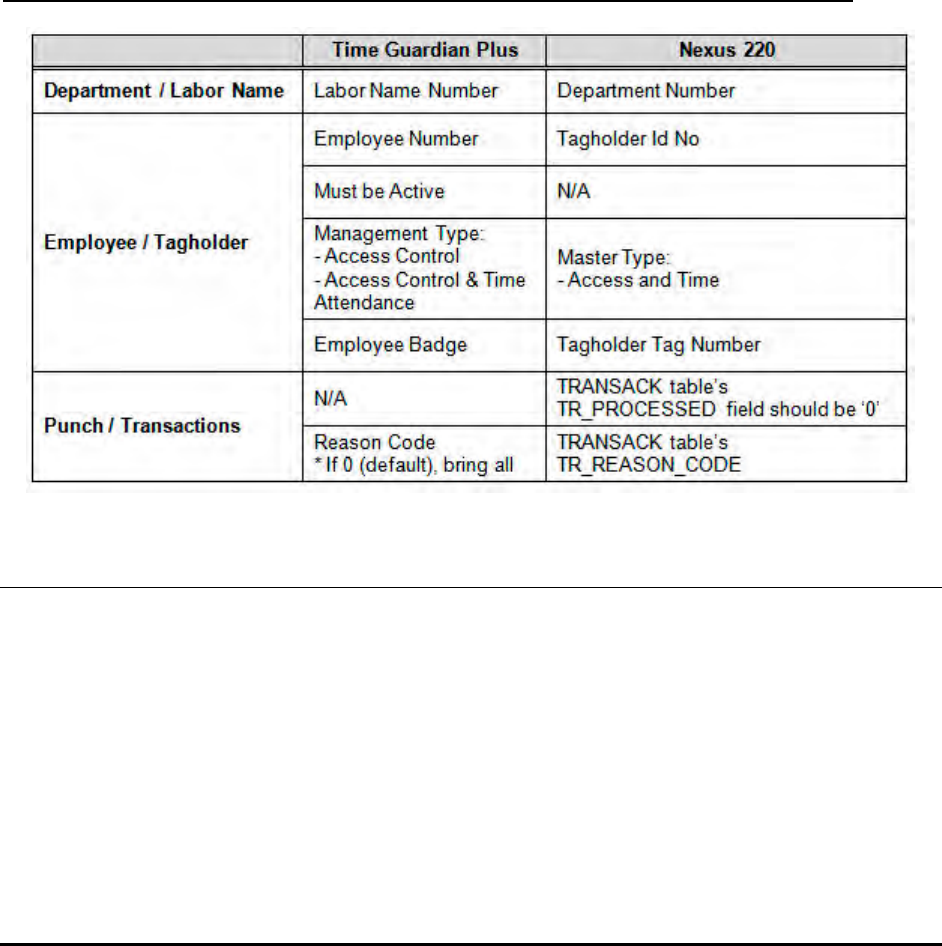
16-6 Time Guardian Series – Access Control Module
• The Nexus 220 Tag holder that has a transaction must have a corresponding Time &
Attendance employee where the Tag holder’s Id No is equal to the Time & Attendance
Employee Number.
• If there is an Employee match, then a Punch record will be created in the Time &
Attendance software assigned to that employee.
• If No employee is found, then an Undefined Punch record will be created in the Time &
Attendance software.
• Eventually, the Nexus 220 Transaction record would be marked as “processed” in the
Nexus 220 database to prevent re-processing the same transaction again.
Note: This process only imports NEW Departments, Employees/Tag holders, and Nexus 220
Transactions. It does NOT update any existing Departments, Employees/Tag holders,
and Nexus 220 Transactions.
Requirements / Relationship Matrix for Time & Attendance software & Nexus 220:
AmanoNet
Wizard Setup for AmanoNet
The following paragraphs detail the steps involved in setting up the AmanoNet Access Control
Systems during Employee Setup with the Setup Wizard if the Access Control Module has been
activated (see Step 7: Employee Setup Wizard for additional Wizard information).
Employees Setup for AmanoNet
Use to setup access control integration with PIN numbers and/or tags for each employee.
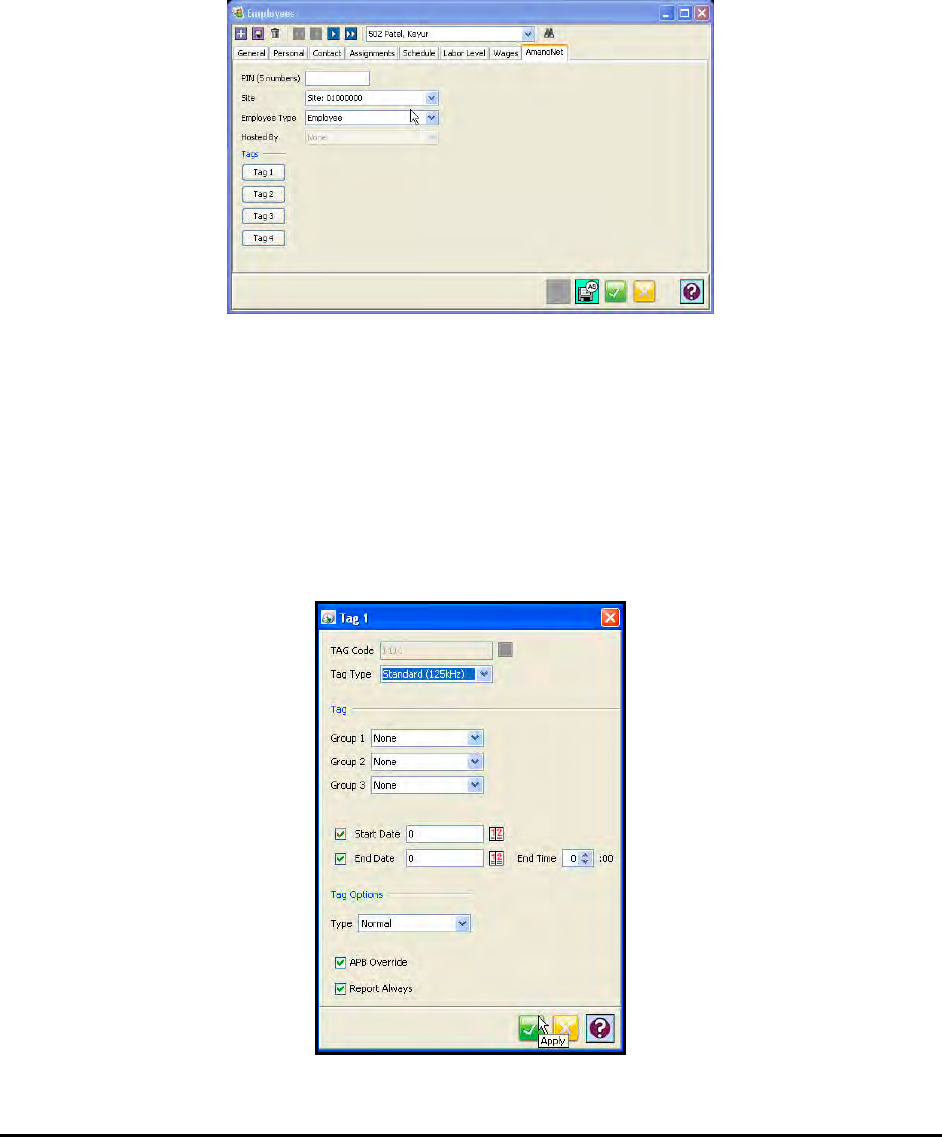
Time Guardian Series – Access Control Module 16-7
The AmanoNet tab will be active if you selected to integrate Access Control and selected
AmanoNet during the setup on the General tab from the Setup Wizard. When AmanoNet
Access Control software is connected to an AC or EC controller 4 tags are available, while 8
tags or 10 tags will appear when AmanoNet is connected to an EC2 controller (see the following
figure for an example with 4 Tags). Tag1 can be used to assign access levels, sites, and tag
options to the badge or tag number entered in the General tab. Tag2, thru Tag8 can be used to
add and configure additional tag(s) or badge(s) for the employee to use. Click on the
AmanoNet tab and the following type of screen will appear:
For AmanoNet Access Control use:
1. Enter PIN: The 5-digit number that an employee may have to enter at an access control
device.
2. Select the site from the dropdown list to assign relevant site number that the employee will
have access to.
3. Select employee type from the dropdown list choices of; Employee or Visitor.
4. Click on Tag 1 through Tag 4 and the following type of screen will appear:

16-8 Time Guardian Series – Access Control Module
Note: For Tag 1 the Badge number (Tag Code) is disabled as it is Read only, but it is enabled
in the other tags. It will be Read only and the same as the Badge number.
Enter the following for Tag(s):
• TAG Code: The number of the tag or badge you wish to use. Use the Read Badge
icon to the right of the TAG Code field to enter the number from the Registration Reader
(RR).
• TAG Type: The choices from the dropdown menu are: Slim Tag (5 bytes), ISO Animal,
WriTag 2048, WriTag 128, ASCII, Barcode, Magstripe, Sagem Biometric, Personal
Access Code, RF/InfraRed Tag, Mifare Tag, HID Tag, Felicia Tag, General 13.56 MHz
Tag, and Any Tag Type. (For AmanoNet only)
• Group 1 to 3 [for 4 Tag systems] and 1 to 6 [for 8 Tag systems]: Access groups that will
be assigned to the tag.
• Start Date: The date when the tag will be activated (YYYYMMDD).
• End Date: Displays the date when the tag will expire (YYYYMMDD). (If left blank, the tag
will never expire).
• End Time: The actual hour (1 – 23) on the date when the tag will expire (HH).
• Type: (Tag Options) Assigns one of the following functions to the badge or tag:
a. Normal: Normal employee
b. Suspend: All access for a particular tag is suspended
c. Blacklist: The tag holder will be denied access to the site
d. Special Events, 1 and 2 Button: Tag holders are admitted for specific events, such as
a meeting or demonstration
• APB Override: Enables the tag holder to override the APB constraint condition on the
doors to which they have access.
• Report Always: When checked all transactions with this will be reported.
If you wish to assign another tag for the employee, click on the Tag 2, thru Tag 4 (Tag 8)
buttons and follow a similar procedure performed for Tag 1.
Configuring AmanoNet 7.6
The following paragraphs detail the steps involved in integrating data between the Time &
Attendance software and the AmanoNet 7.6 system.
Step A. Configure AmanoNet 7.6 Settings with the following procedure:
1. Login to the Time & Attendance software, select the Setup Wizard from the Edit menu and
the Setup Wizard screen will appear.
2. From the General Tab of the Setup Wizard, select Yes to integrate Access Control, then
click on the Access Control button and the Access Control screen will appear.
3. From the General tab on the Access Control screen;

Time Guardian Series – Access Control Module 16-9
• Select AmanoNet 7.6 for the Access Control type.
• Select Firebird or MSSQL as the Database type.
• If you want to process all valid Transactions during synchronization, leave the default
value = 0 in the Reason Code. Otherwise, set the Reason Code to a value (to filter) that
is specific for those transactions that you want to process.
4. If Firebird was selected as the database click on the enabled Firebird tab.
• Select Yes if the AmanoNet 7.6 database is on the same PC as the Time & Attendance
software.
• If not, select No and enter the IP Address for the PC with the AmanoNet 7.6 database.
• Type in or use the file chooser button to select the location for the AmanoNet 7.6
database file. For example: C:\Program Files\AmanoNet\Database\AMANONET.FDB
5. If MSSQL was selected as the database click on the enabled MSSQL tab.
• Select Yes if the Nexus 220 database is on the same PC as the Time & Attendance
software.
• If not, select No and enter the IP Address for the PC with the Nexus 220 database.
• Enter the MSSQL database name for AmanoNet.
Step B. Synchronize the Time & Attendance software and AmanoNet 7.6
After the AmanoNet 7.6 configuration is complete, the Synchronize Access Control menu will
appear under the Time & Attendance software File menu. Use this menu selection to
synchronize both the Time & Attendance software and the AmanoNet 7.6 system. The
procedure for this synchronization is as follows:
1. Synchronize Departments on both Time Guardian and AmanoNet 7.6. In this process,
Departments from AmanoNet that does not exist in the Time 7 Attendance’s Labor Names
for the Department Labor Level will be brought into the Time & Attendance software. The
same will be done for AmanoNet, whereas Labor Names for the Department Labor Level in
the Time & Attendance software that does not exist in AmanoNet Department will be
brought into AmanoNet. The link between the two is the Labor Name Number in the Time
& Attendance software and the Department No in AmanoNet.
2. Synchronize Employees/Tag holders on both the Time & Attendance software and
AmanoNet. In this process, AmanoNet Tag holders and TGP Employees will be created in
both systems.
Time & Attendance Employee to AmanoNet Tag holder:
The following criteria that must be met to import a Time & Attendance employee into
AmanoNet.
• The Time & Attendance employee cannot have the same Employee Number value as
the AmanoNet’s Tag holder Id.
• The Time & Attendance employee must be an Active employee.
• The Time & Attendance employee’s Management Type must be Access Control or
Access Control and Time Attendance.

16-10 Time Guardian Series – Access Control Module
AmanoNet Tag holder to Time & Attendance Employee:
The following criteria must be met to import an AmanoNet Tag holder into the Time &
Attendance software:
• The AmanoNet’s Tag holder Type should be “Access and Time”.
• The AmanoNet Tag holder must have a defined Id.
• The AmanoNet Tag holder’s Id cannot have the same value as any Employee Number
in the Time & Attendance software.
• Cannot exceed the maximum # of active employees allowed (activated) for Time &
Attendance software [100 standard, with optional expansion from 250 up to unlimited].
• The AmanoNet Tag holder must be assigned to a Department.
• The Department where the AmanoNet Tag holder is assigned, should exist as one of
the Labor Names for the Department Labor Level in the Time & Attendance software.
• The AmanoNet Tag holder must have a Tag where the Tag Code does not equal a Time
& Attendance employee’s Badge.
3. Synchronize Transactions from AmanoNet to the Time & Attendance software.
This is the last step in the synchronization process. This process brings in transactions from
AmanoNet 7.6 into the Time & Attendance software as punches. There following criteria must
be met for the transactions to come in:
1. The transactions have not been processed.
2. Under the Access Control Settings module, if the Reason Code is set to the default value =
0, then all valid transactions will be processed. Otherwise, only transactions that have the
Reason Code value will be processed.
3. The AmanoNet Tag holder that has a transaction must have an Id defined.
4. The AmanoNet Tag holder that has the transaction must have a corresponding Time &
Attendance software employee where the Tag holder’s Id is equal to the Time & Attendance
software Employee Number.
5. If there is an Employee match, then a Punch record will be created in Time & Attendance
software assigned to that employee.
6. If No employee is found, then an Undefined Punch record will be created in the Time &
Attendance software.
7. Eventually, the AmanoNet Transaction record would be marked as “processed” in the
AmanoNet database to prevent re-processing the same transaction again.
Note: These processes only bring in NEW Departments, Employees/Tag holders, and
AmanoNet Transactions. It does NOT update any existing Departments, Employees/Tag
holders, and AmanoNet Transactions.
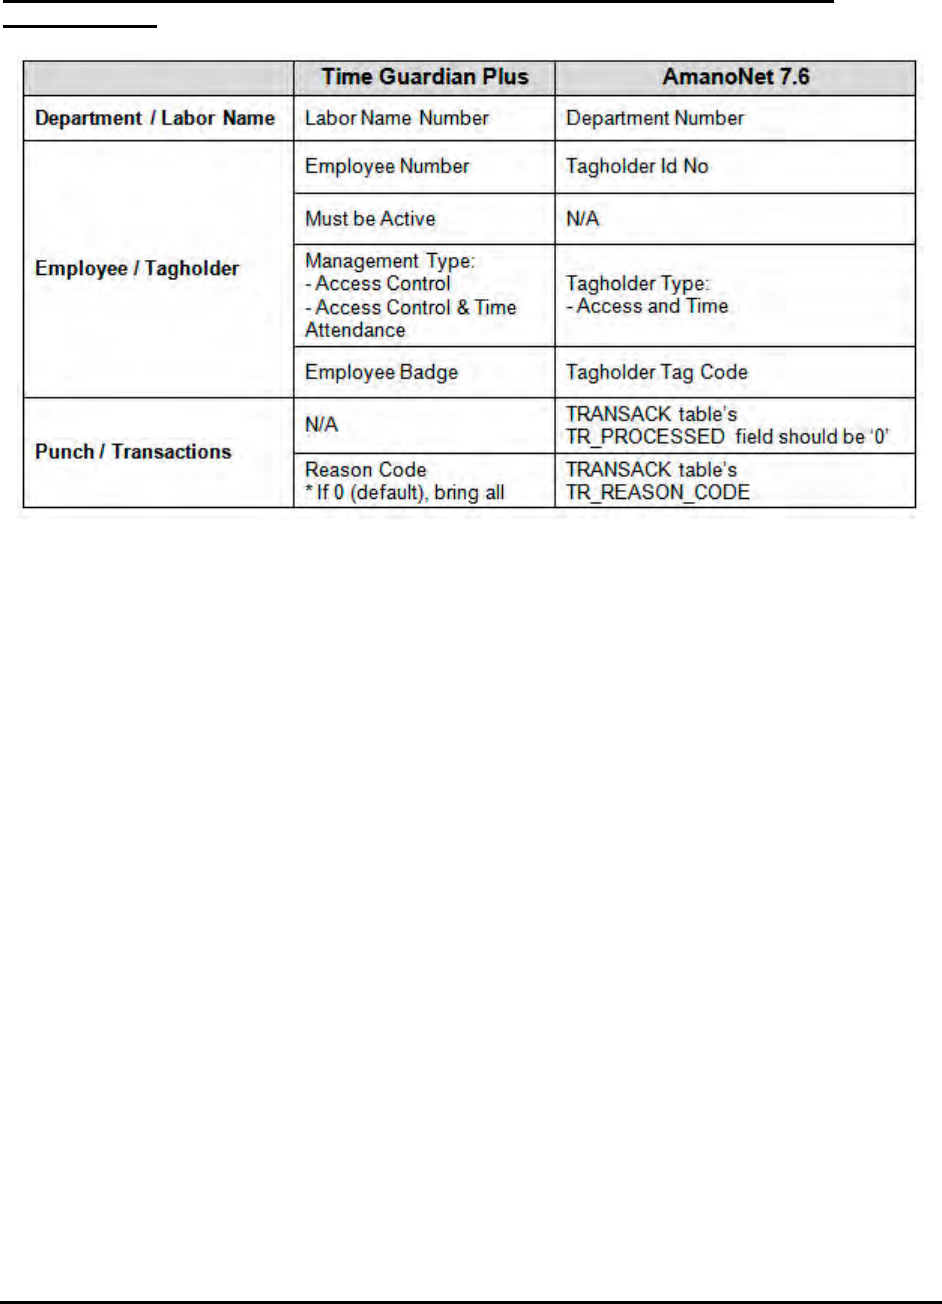
Time Guardian Series – Access Control Module 16-11
Requirements / Relationship Matrix for Amano Time & Attendance software and
AmanoNet 7.6:

16-12 Time Guardian Series – Access Control Module
This page intentionally left blank.
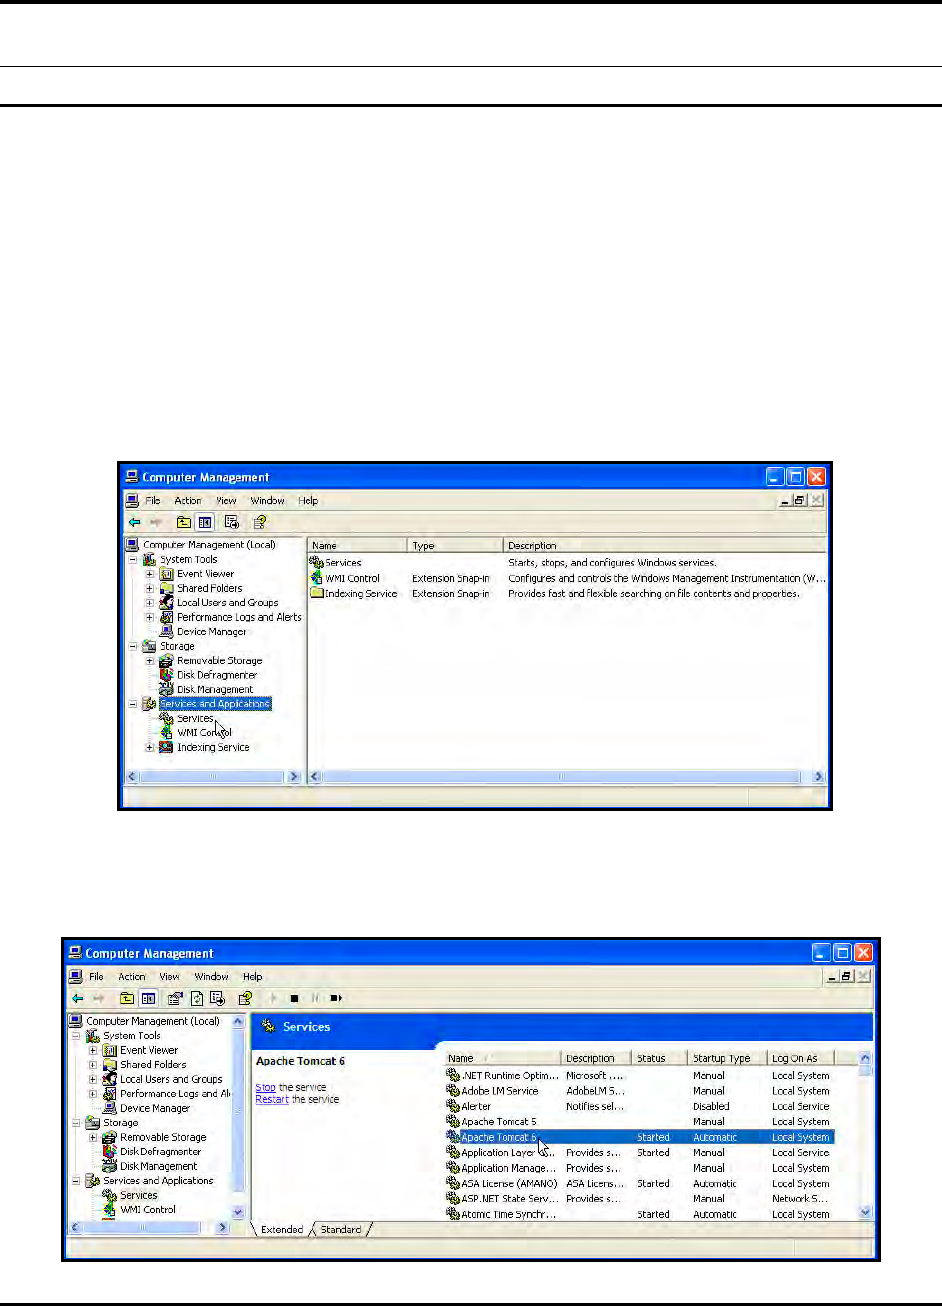
Time Guardian Series – Web Interface Module 17-1
Chapter 17: Web Interface Module
Web Interface Module Introduction
Time Guardian Pro comes standard with the Web Interface module, while Time Guardian and
Time Guardian Plus require it to be activated as an optional module.
Note: Time Guardian and Time Guardian Plus require the “Apache Tomcat 6” service to be
started and configured to automatically start when the Time & Attendance software is
opened. This service was installed during the initial installation but not started for Time
Guardian and Time Guardian Plus. Time Guardian Pro automatically has this service
configured to start.
To configure and/or start the Apache Tomcat 6 service;
Step 1. Open “Computer Management” and select “Services and Applications”.
Step 2. Click on “Services” and the following type of “Service” screen which lists currently
installed services will appear:
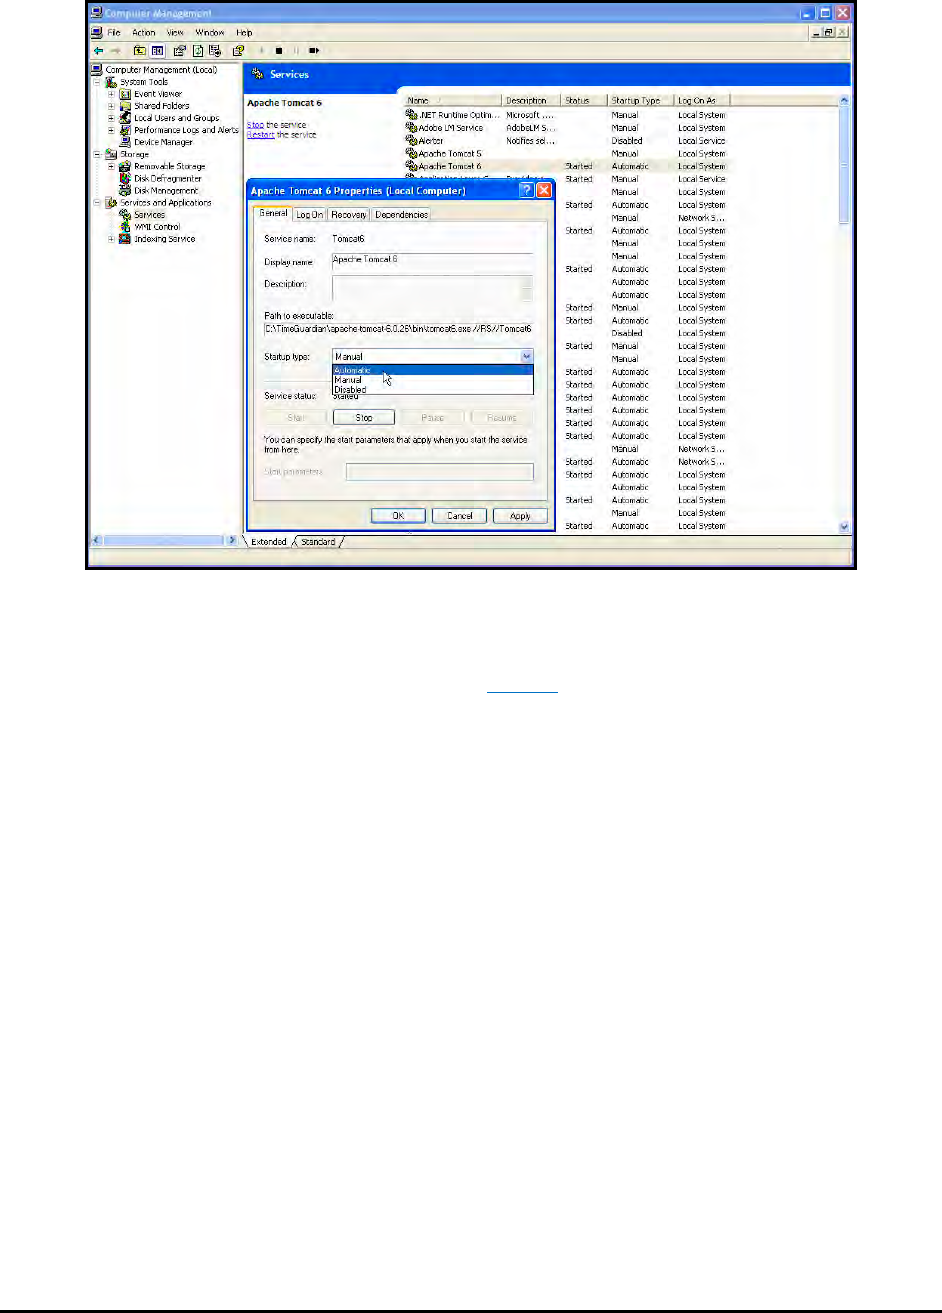
17-2 Time Guardian Series – Web Interface Module
Step 3. Find “Apache Tomcat 6” and select it. Then double-click on it to display properties.
Step 4. On the Properties screen, under “Startup type:” select “Automatic” from the dropdown
menu and click on the Apply” button.
Step 5. With “Apache Tomcat 6” selected, click “Restart” to immediately start the service.
Step 6. Close “Computer Management” screen as you are finished configuring and starting the
required “Apache Tomcat 6” service. From now on the service will start automatically.
The description of this module will utilize Time Guardian Pro screens for illustrative purposes.
The activation of the Web Interface Module provides a punch web view that allows the
employee to punch IN or OUT. This operates with same functionality as the Amano MTX-15
and/or FPT-40 clock provides. The employee may be capable of doing labor transfers from the
punch submission screen. Also, the employee will be able to denote whether the punch is for a
coffee break, break, or meal.
However, the Web Interface Module will provide two (2) distinct parts/capabilities; 1 part will be
for employee access, and the 2nd part will be for supervisor only access.
The sections of the Time & Attendance Software affected and/or features added from the
activation of this module include:
• Employee Configuration (Web Access)
• Employee Global Assign (Web Access)
• Employee Portal
− Web Punch In
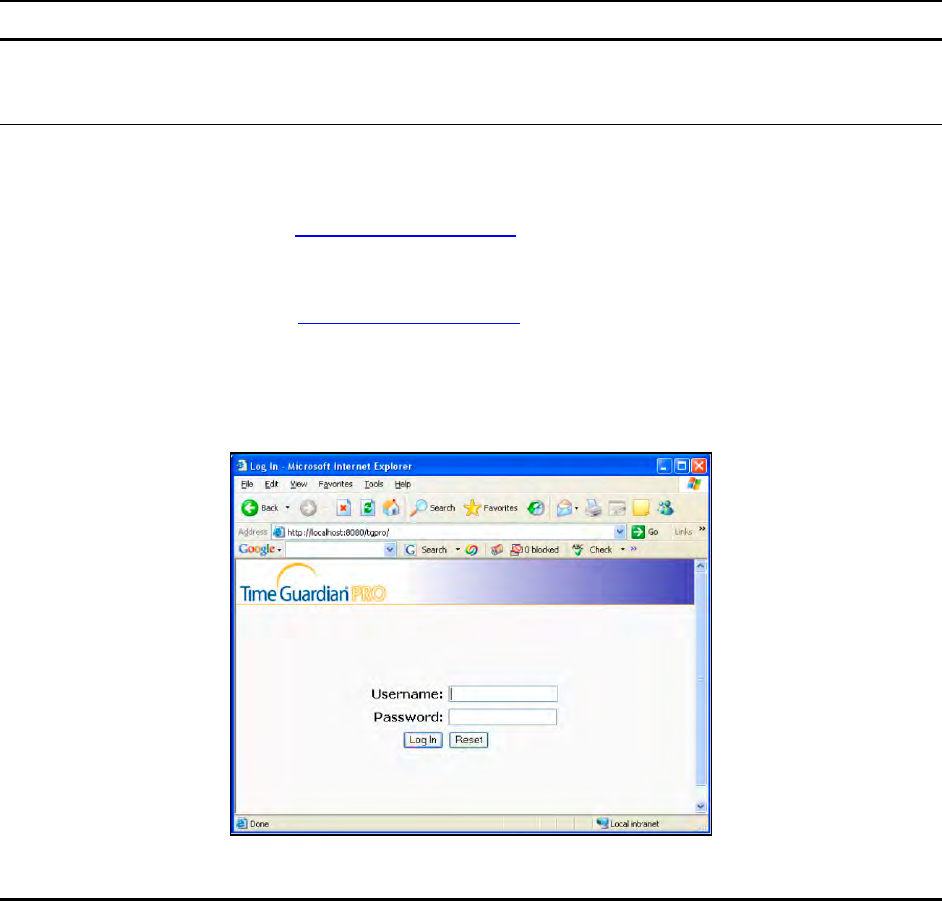
Time Guardian Series – Web Interface Module 17-3
− View Previous Punches
− View Time Sheet
− Make Adjustments
− Reset Password
− Run Schedule Posting Report
• Supervisor Portal
− Access list of supervise Employees
− Add/Edit/Delete Employees if granted
− View/Edit Employees Time Card if granted
− Run Reports
Using the Web Interface Module
Login (Web)
To login to the Time & Attendance software Web Interface there are two paths:
1. Open any Web browser.
2. For non-secure login type http://localhost:8080/tg . Replace localhost with the IP address of
the Time & Attendance software server. The standard port is 8080. [May need to obtain the
IP address from the network administrator].
For secure SSL login type http://localhost:8443/tg . Replace localhost with the IP address of
the Time & Attendance software server. The standard port for SSL is 8443. [May need to
obtain the IP address from the network administrator].
Note: All SSL certificates are the responsibility of the customer network.
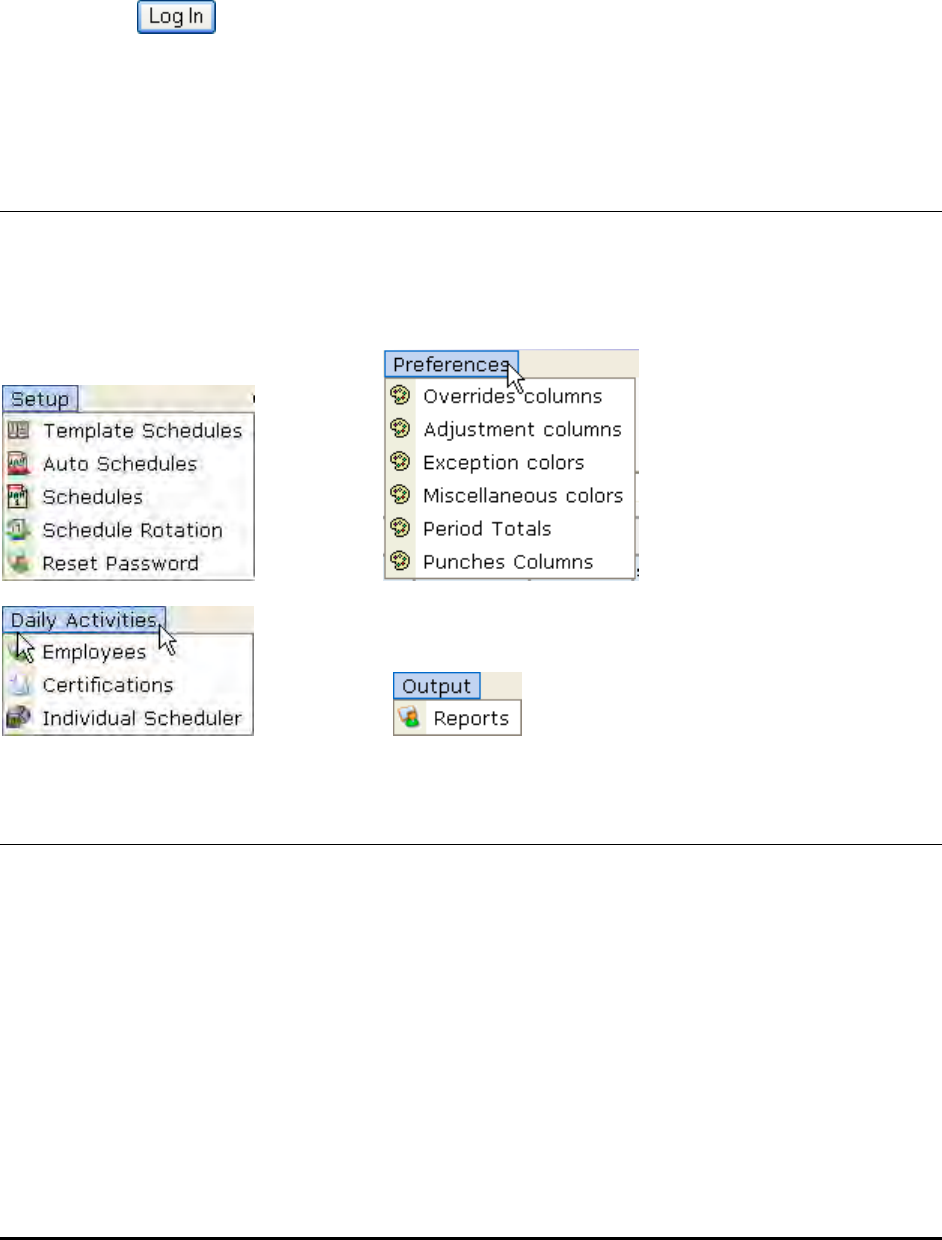
17-4 Time Guardian Series – Web Interface Module
3. Enter Username. For employees this is his or her badge number. For supervisors this is the
user login name.
4. Enter password. For employees it is the password setup in the web access of the employee
module. For supervisors this is the user password for the username.
5. Press the button. Note – when logged in on the Web this counts as one
concurrent user. Therefore, to simultaneously login on a PC would require anther
concurrent user.
Supervisor Web Access
The Setup, Daily Activities, Output, and Preferences menus from the Time & Attendance
software allow a supervisor to schedule, edit time sheets, run reports, edit/add employees, and
reset passwords. The supervisor allowed menu items provide this user group with access to the
following features:
Schedule (Web)
An employee’s schedule is made up of template schedules and auto schedules. Together these
schedules form the weekly work pattern that can be applied to an employee.
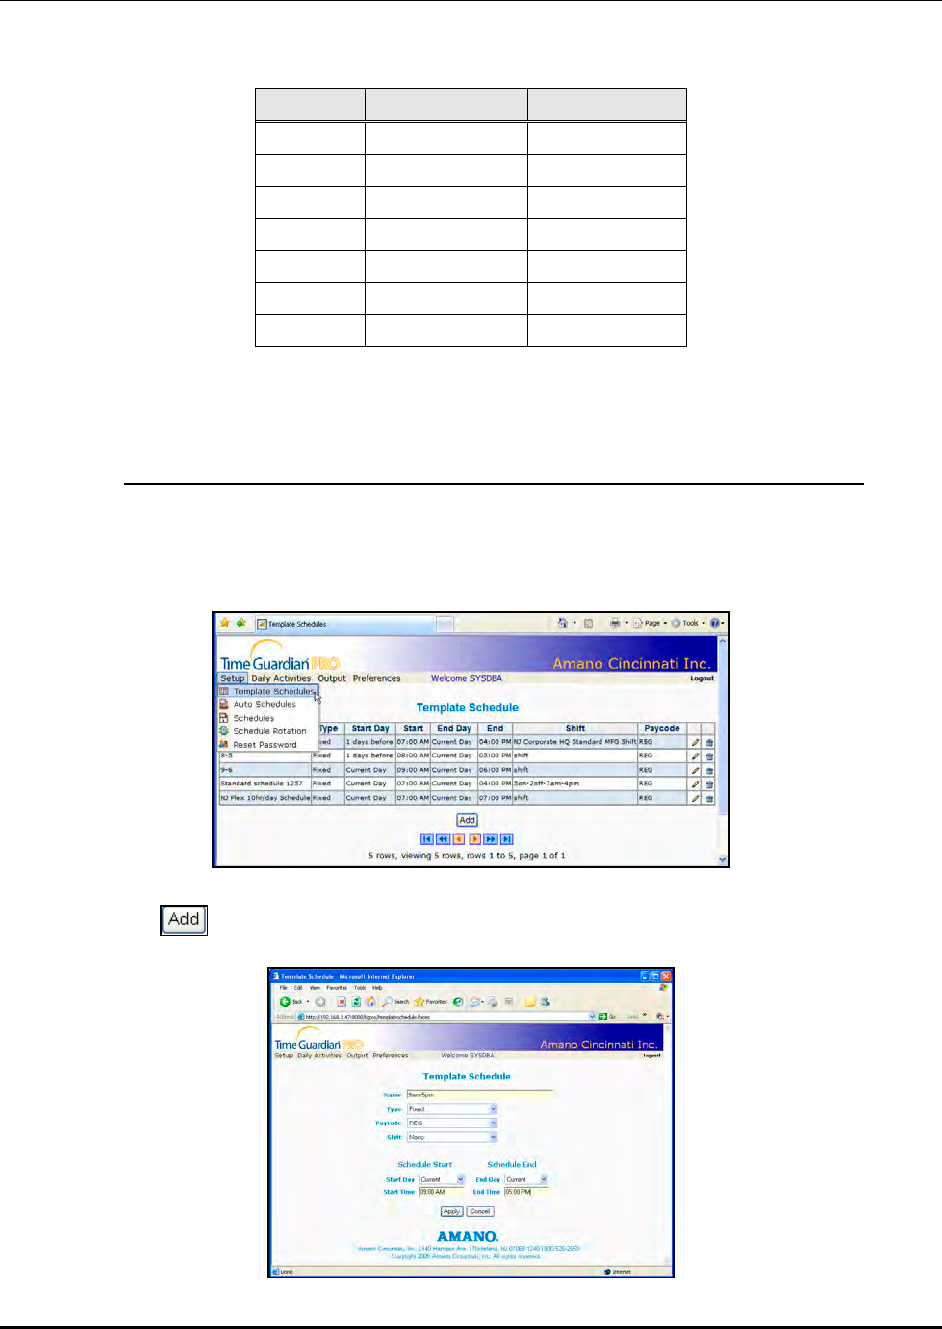
Time Guardian Series – Web Interface Module 17-5
Template Schedules (Web)
A template schedule is a schedule that an employee has for a particular day (Sun., Mon. Tues.,
Wed., Thurs., Fri. or Sat.). For example, Employee 1 will have a schedule setup as follows:
Day Start Time End Time
Sun.
Mon. 8:00 AM 5:00 PM
Tues. 9:00 AM 6:00 PM
Wed. 8:00 AM 5:15 PM
Thurs. 10:00 AM 8:30 PM
Fri. 8:00 AM 2:00 PM
Sat.
The template schedule consists of start and end times (Fixed type only), which may span across
multiple days (this is limited by maximum shift length), Pay Code, shift rules, and the days to
apply the schedule. Open schedules do not generate any exceptions on the punches for the
day. Note – this function is only available when Advanced Schedule Module is activated.
To create a Template Schedule:
1. Click on the Template Schedules menu selection from the Setup menu (see figure).
2. Click on the button, and the following Template Schedule window will appear.
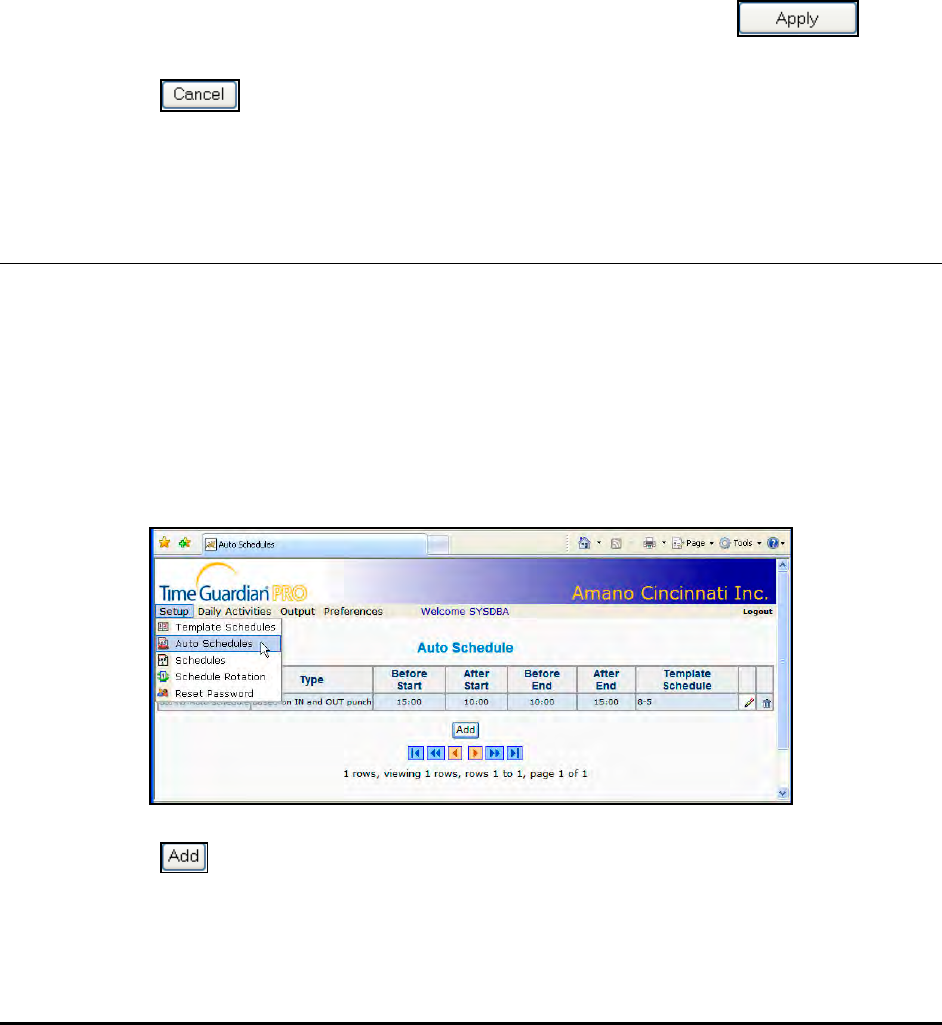
17-6 Time Guardian Series – Web Interface Module
3. Enter a name for the template schedule in the Name field.
4. In the Type field, select either Fixed, Open, or Off. If Open is selected, Start and End Times
will be disabled.
5. Assign a Pay Code to the schedule using the dropdown list in the Pay Code field.
6. Assign a Shift to the schedule using the dropdown list in the Shift field.
7. In the Start box, select the Day that the schedule will start and the time of the day that the
schedule is to begin. The choices for Start Day are; Current Day, 1 days before, or 1 days
after. AM is default for Start Time field.
8. In the End box, select the Day that the schedule will end and the time of the day that the
schedule is to end. The choices for End Day are; Current Day, 1 days after, 2 days after, or
3 days after.
9. When you have finished configuring the template schedule, click on the button
to save your settings.
10. Click on the button to exit without saving your settings, and return to the main
Individual Template screen.
Auto Schedules (Web)
The Auto schedule is used when an employee can work any one of many different schedules.
The schedule that is used for the employee can be based upon the employee’s IN punch, OUT
punch, or both. The auto schedule uses the template schedules. A template schedule is
assigned to an auto schedule with its own start before and after setting, and end before and
after setting.
To create an Auto Schedule:
1. Click on the Auto Schedules menu selection from the Setup menu (see figure).
2. Click on the button, and the Auto Schedule window will appear (see figure).
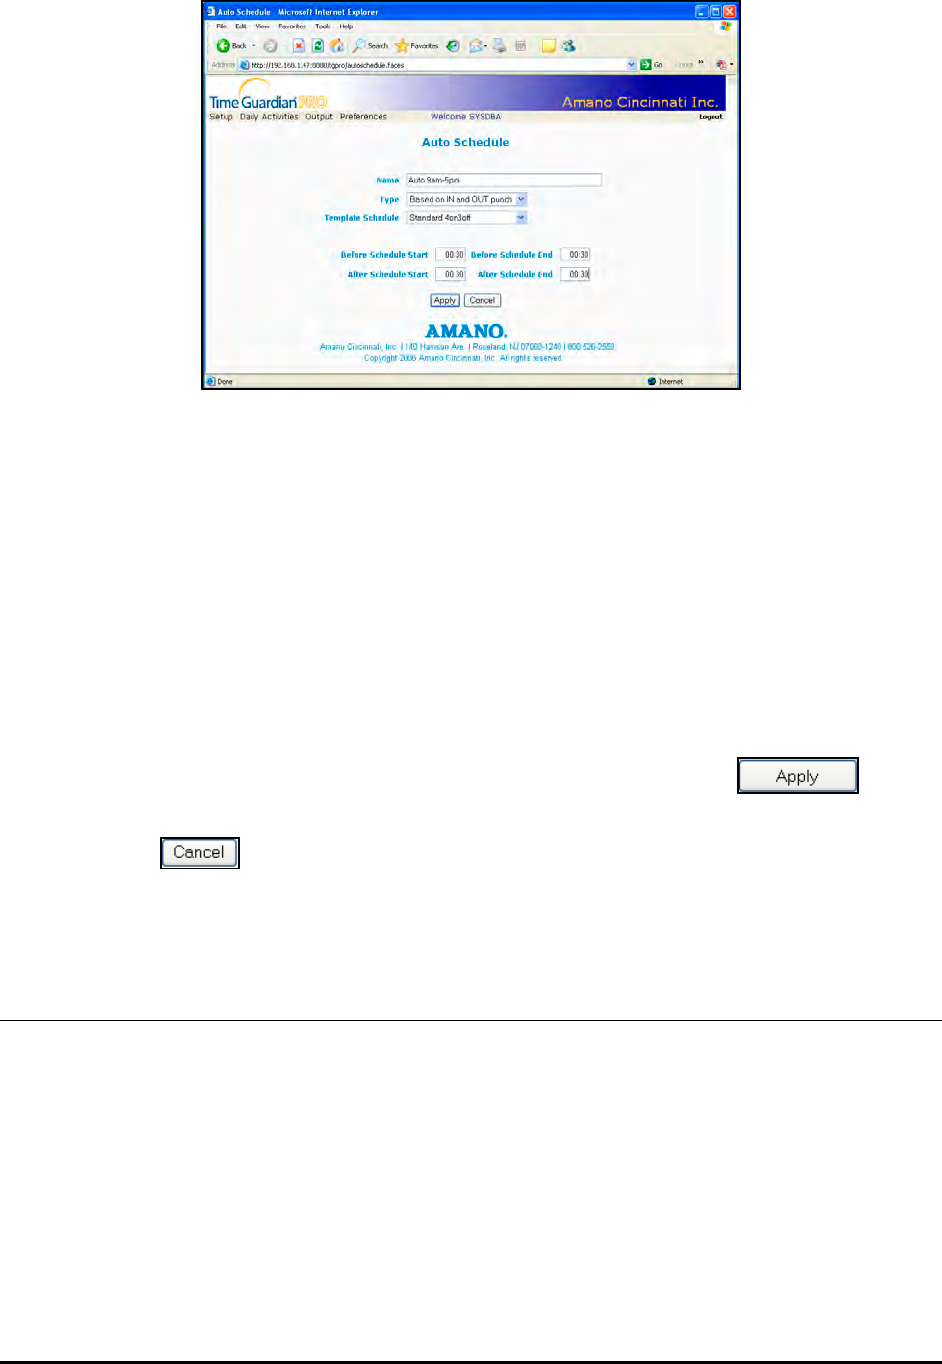
Time Guardian Series – Web Interface Module 17-7
3. Enter a name for the auto schedule in the Name field (suggest typing auto in the beginning
of the name to indicate that it is an auto schedule.
4. Select the punch that the schedule will be based on:
• Based on IN Punch: If selected, only the Schedule Start Before and After times need to
be entered.
• Based on OUT Punch: If selected, only the Schedule End Before and After times need to
be entered.
• Based on IN and OUT Punch: If selected, both the Before and After Schedule Start and
End times have to be assigned.
5. Assign a template schedule using the dropdown list in the Template Schedule field.
6. When you have finished configuring the template schedule, click on the button
to save your settings.
7. Click on the button to exit without saving your settings, and return to the main Auto
Schedule screen.
Creating A Schedule (Web)
When creating a schedule the user defines schedules that are made up of template schedules
and auto schedules. Together these schedules form the weekly work pattern that can be applied
to an employee. The screen below shows an example of the template schedule and auto
schedule assignments into a schedule.
To create a Schedule:
1. Click on the Schedules menu selection from the Setup menu (see figure).
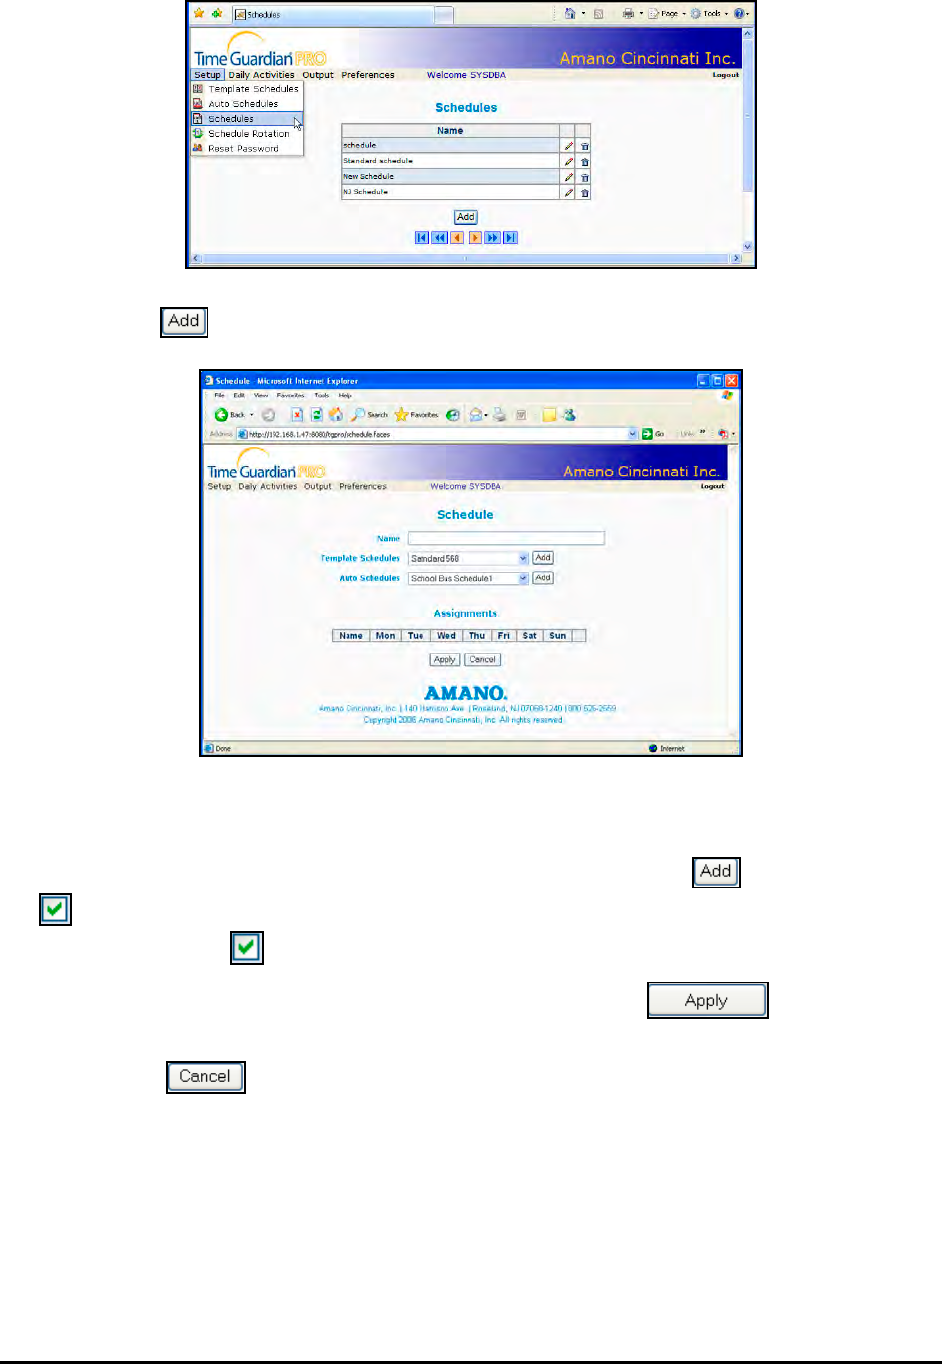
17-8 Time Guardian Series – Web Interface Module
2. Click on the button, and the following Schedule window will appear:
3. Enter a name for the schedule in the Name field [required field].
4. To assign a template or auto schedule to a particular day, select the desired template or
auto schedule from the dropdown lists and click on the appropriate button. Next check
the desired day of the week. The assigned template or auto schedule will appear in the
schedule list with a under the chosen day.
5. When you have finished configuring the schedule, click on the button to save
your settings and return back to the main Schedules view.
6. Click on the button to exit without saving your settings, and return to the main
Schedules screen showing a list of created schedules.
Note: The Time & Attendance software checks for a schedule in the following order:
1. Schedule Override
2. Template Schedule
3. Auto Schedule
Note: If a schedule does not meet the schedule assignment rules set in the Pay Class of the
employee, the employee will be unscheduled for this shift.
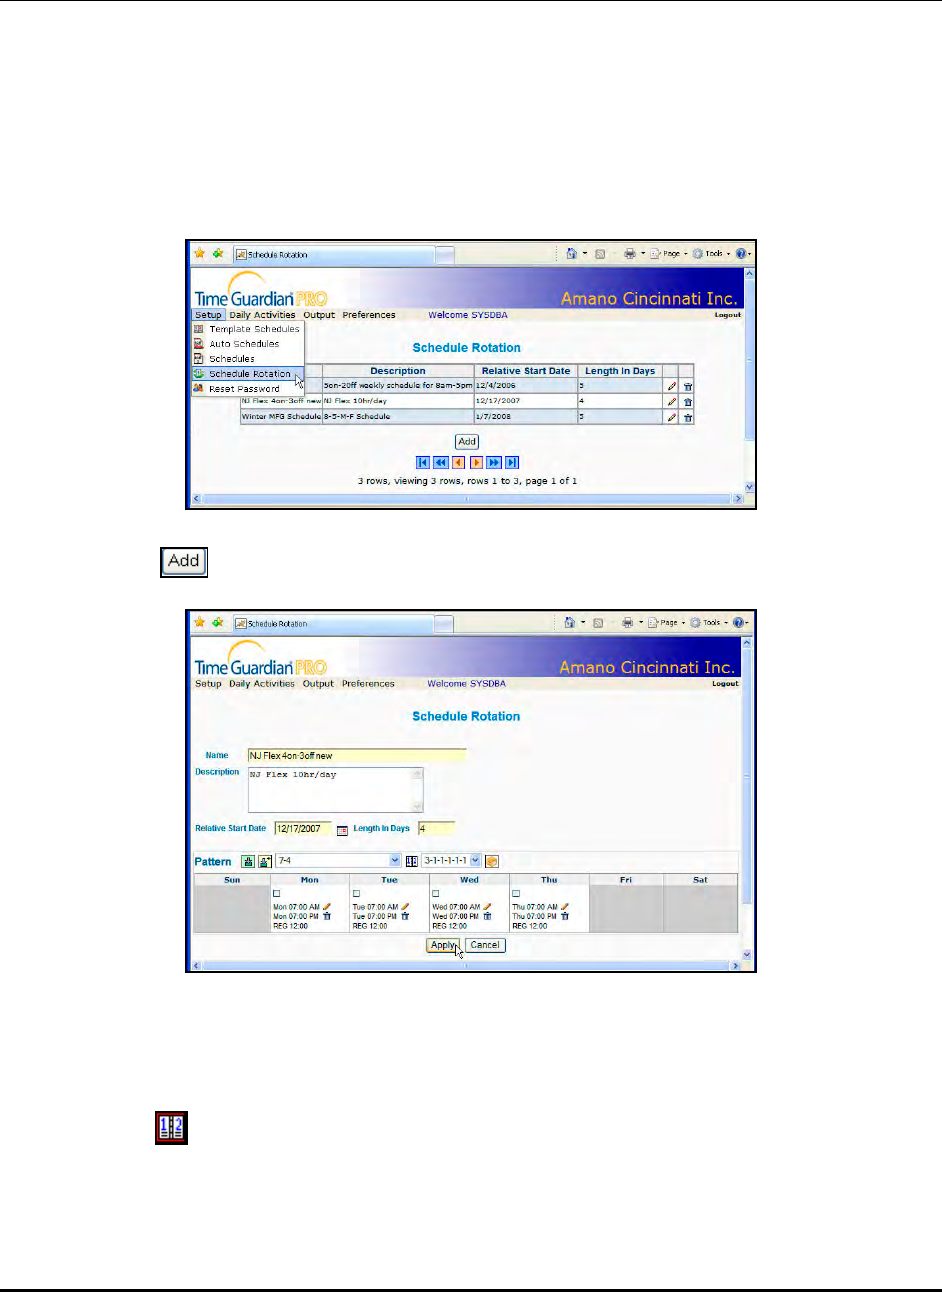
Time Guardian Series – Web Interface Module 17-9
Schedule Rotation (Web)
A Schedule Rotation is used to setup repeating schedule patterns. For example, some
employees work a schedule with a (7) day rotation which consists of (4) days on and (3) days
off. Rotating schedules are assigned to employees in the Assignments tab of the Employees
module.
To create a Rotating Schedule Template:
1. Click on the Schedule Rotation menu selection from the Setup menu (see figure).
2. Click on the button, and the following Schedule Rotation window will appear:
3. Enter a name for the Schedule Rotation template in the Name field [required field].
4. In the Description field, enter a brief description of the template.
5. In the Relative Start Date field, enter in the start date of the pattern in DDMMYYYY format or
click on the button, and the following Select Date dialog box will appear:
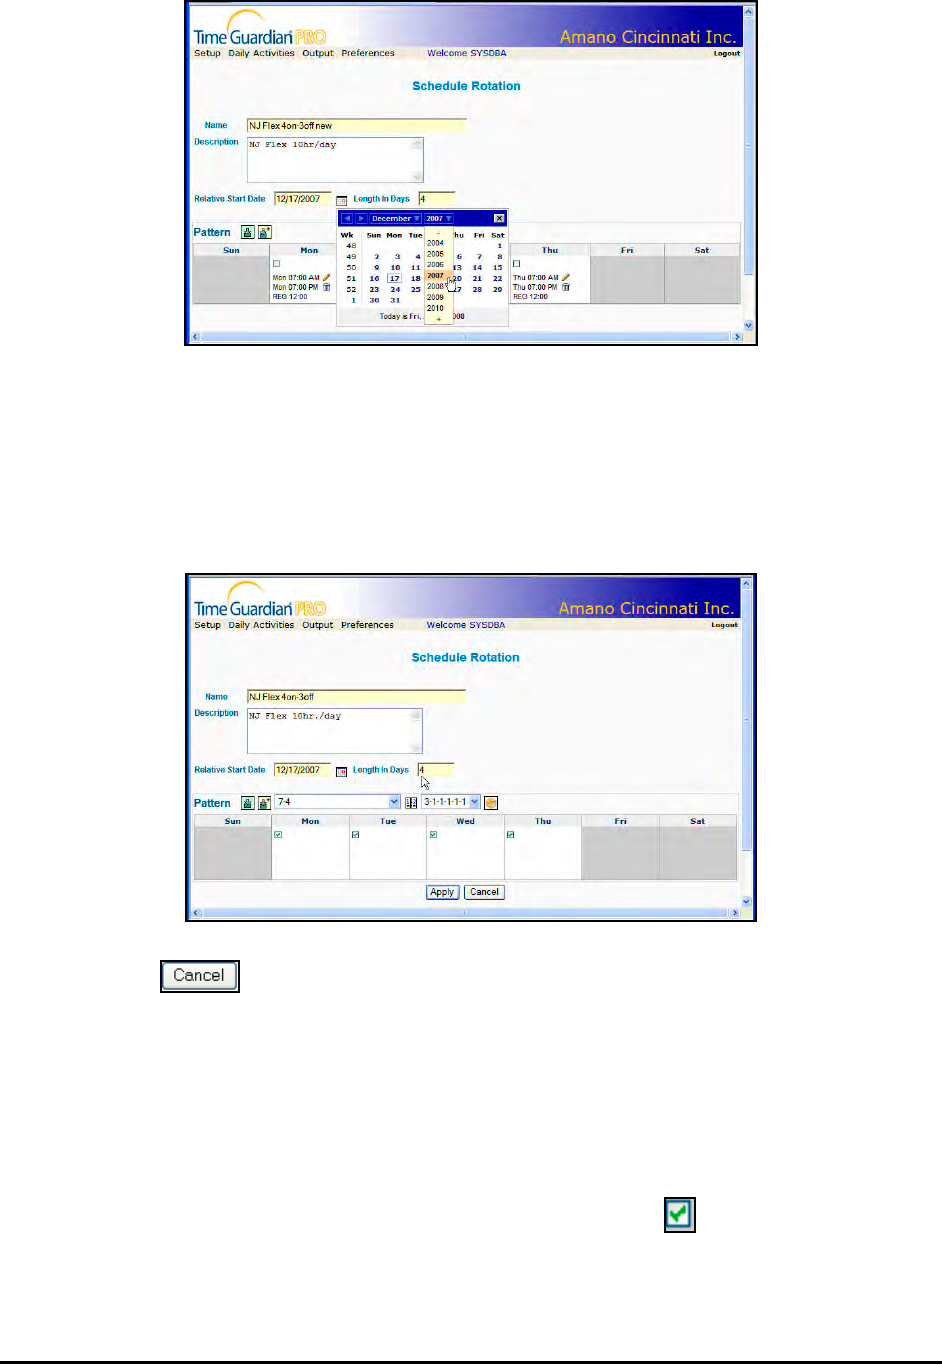
17-10 Time Guardian Series – Web Interface Module
Using the dropdown lists, select the Month and Year. Click on the desired day in the pop-up
calendar. When you have finished, close the calendar, and return to the Schedule Rotation
window.
6. In the Length In Days field, select the number of days that this template will span. Click on
the Pattern to display a schedule grid in the Pattern box. The days to be included in the
template are indicated by cells (see the following figure).
7. Click on the button to exit without saving your settings, and return to the main
Schedule Rotation screen showing a list of already created schedule rotations.
Note: To complete you must have at least one schedule assigned to a day.
8. Schedules and Labor Levels are assigned to each day of the rotation by any one of the
following methods:
Existing Template Schedule and Labor Reference: To add a template or auto schedule
and labor category to a particular day:
a. Select the desired day in the Pattern box with the check box .
b. Select desired Template Schedule from the Template Schedules dropdown list.
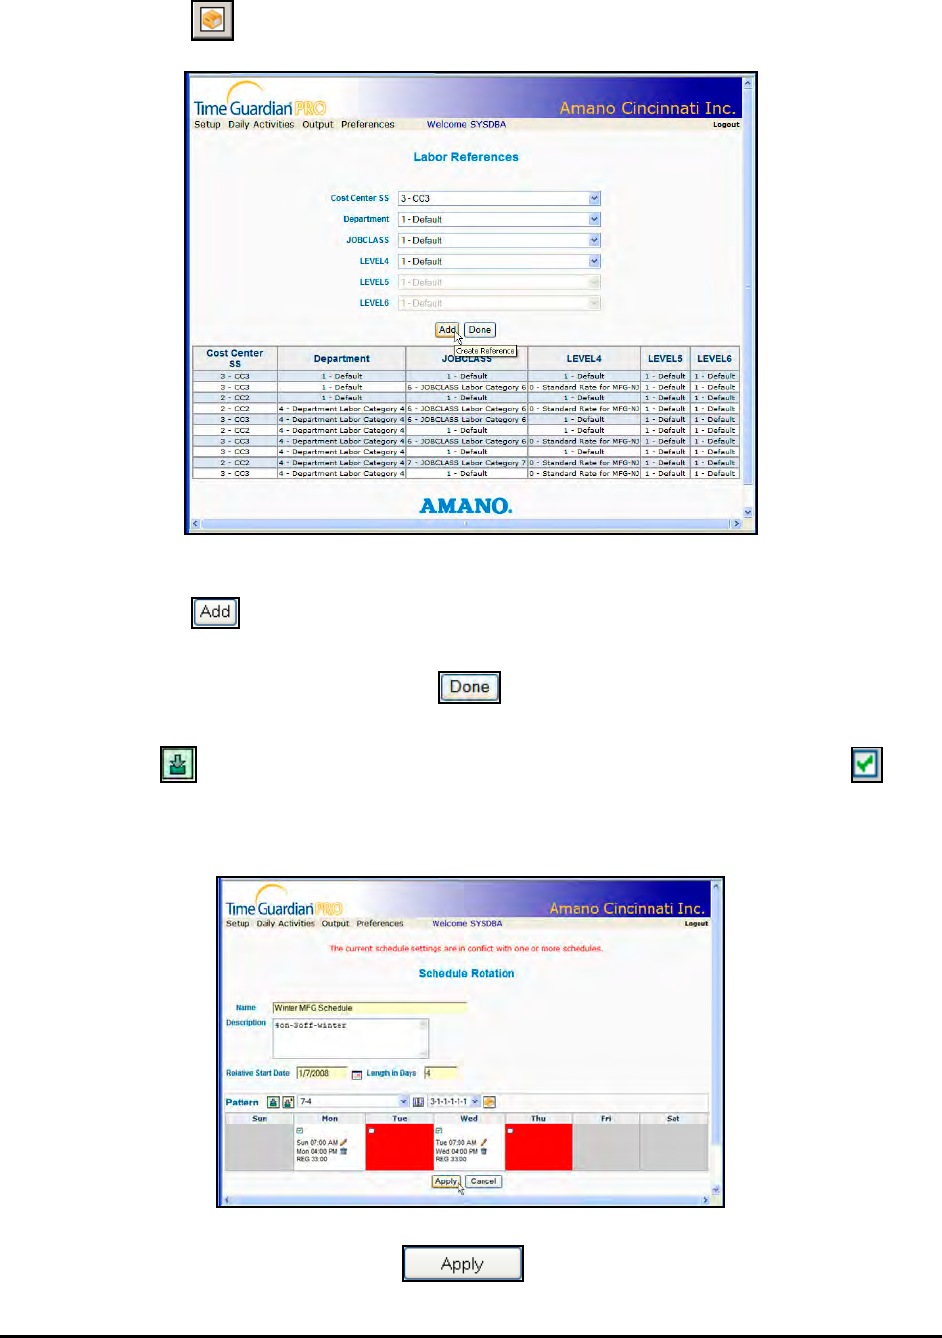
Time Guardian Series – Web Interface Module 17-11
c. Select desired Labor Level subcategory from the Labor References dropdown list, or
click on the button, and the following Labor References window will appear:
d. To define a labor category, select a subcategory from each of the dropdown lists and
click on the button. The defined labor category will appear in the Labor References
window.
e. When you have finished, click on the button to finish and return to the Schedule
Rotation window.
9. Click on the button to apply selected schedules and labor to the selected cells ( ).
Note: Any schedule conflicts will be flagged with error message and marked with a red cell at
this time (see figure).
10. When you have finished, click on the button to finish and return to the Schedule
Rotation main window, which lists all defined schedule rotations.
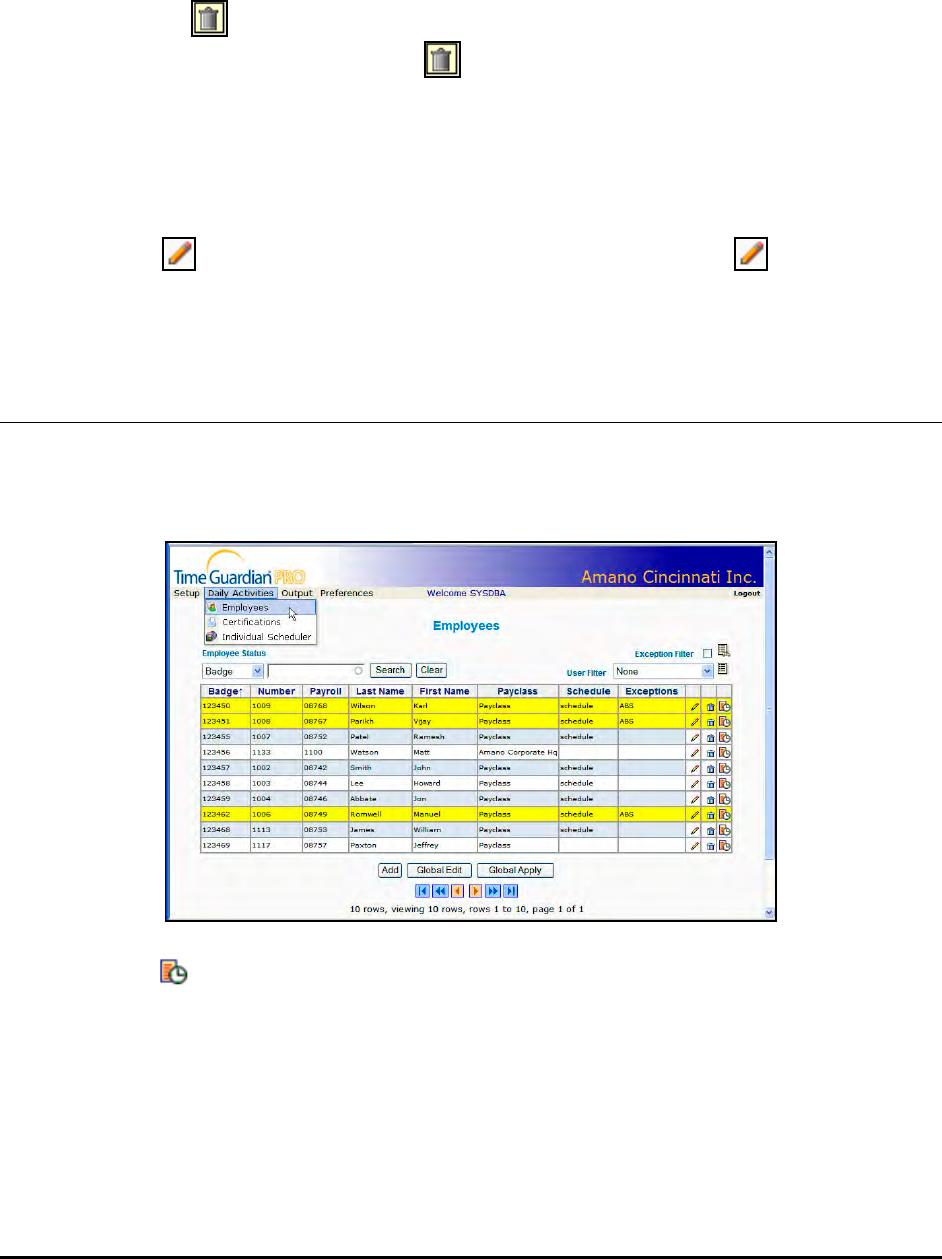
17-12 Time Guardian Series – Web Interface Module
Removing an Assigned Schedule
Assigned schedules are removed from days in the rotation pattern by selecting the desired day,
and clicking on the button in the cell. To delete a Schedule Rotation, select a Schedule
Rotation from the main list and click on the icon.
Editing a Schedule Rotation Template
To edit a Schedule Rotation template, select the desired Schedule Rotation from the main list
and click on the icon. To edit a specific schedule for a day, click on the icon within that
cell.
Timecard Grid (Web)
1. To view an employee’s Timecard grid, click on the Employees menu selection from the Daily
Activities menu (see the following figure).
2. Click on the button alongside the selected employee to view/edit the employee's
Timecard grid. The appropriate Timecard window will appear showing punches, overrides,
and adjustments (see the following figure).
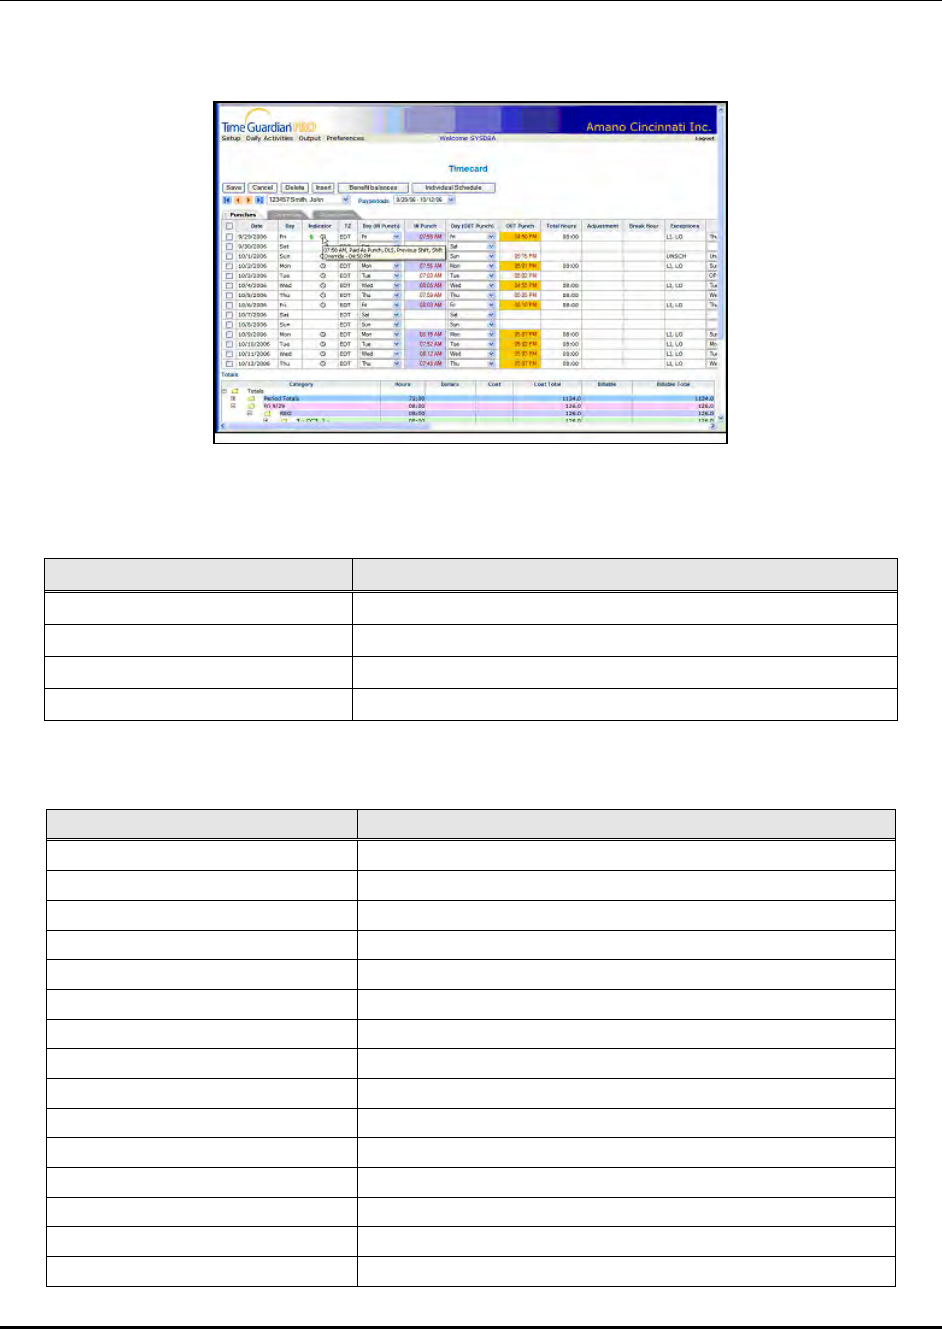
Time Guardian Series – Web Interface Module 17-13
Punches Tab (Web)
1. Click on the Punches tab to view and/or edit an employee’s punches in the Timecard grid.
The Punches Tab in the Timecard grid consists of the following columns that have to be
displayed:
Column Name Field Description
Date Date that punches/schedule belong to
IN Punch IN Punch (indication of an edited punch with color)
OUT Punch OUT Punch (indication of an edited punch with color)
Total Hours Total Hours
And the following additional user selectable columns that can be displayed:
Column Name Field Description
Day Dates within Pay period that have no punches or schedule
Indicator Indicator symbol displayed to show timecard modified
TZ Time Zone used for punch
Day (IN Punch) Day for IN Punch
PAP (IN Punch) Paid As Punch for IN Punch)
DLS (IN Punch) Daylight Saving Time used for IN time
Previous Shift (IN Punch) Previous IN Punch
Shift Override (IN Punch) IN Punch for Shift Override
Location (IN Punch) Location name for IN Punch
Terminal (IN Punch) Terminal name for IN Punch
Day (OUT Punch) Day for OUT Punch
PAP (OUT Punch) Paid As Punch for OUT Punch
DLS (OUT Punch) Daylight Saving Time used for OUT time
Previous Shift (OUT Punch) Previous OUT Punch
Shift Override (OUT Punch) OUT Punch for Shift Override
17-14 Time Guardian Series – Web Interface Module
Column Name Field Description
Location (OUT Punch) Location name for OUT Punch
Terminal (OUT Punch) Terminal name for OUT Punch
Adjustment Initial hours adjustment
Break Hour Time off (i.e., meal, break, coffee break, out, off time)
Exceptions Exceptions listed for all punches
Schedule Schedule Name for start and end or auto schedule
Hours Auth Authorization required for hours punched
B-Sch Auth Before Schedule Authorization required
A-Sch Auth After Schedule Authorization required
U-Sch Auth Unscheduled Authorization required
LEVEL1 Labor Level 1 (user defined)
LEVEL2 Labor Level 2 (user defined)
LEVEL3 Labor Level 3 (user defined)
LEVEL4 Labor Level 4 (user defined)
LEVEL5 Labor Level 5 (user defined)
LEVEL6 Labor Level 6 (user defined)
Tip $ Tips in dollars (separate from bonus dollars)
Comments/Reason Comments/Reason
Information Indicators (Web)
The Indicator field in the Punches tab displays symbols to indicate that certain data in the
Timecard grid was entered or modified. The indicator symbols are as follows:
Symbols Description
Comment/Reason exists
Tips exists
Punches were edited
Labor transfer exist for this row
Override hours applied
Note: By putting the mouse over the icon you to see the information that the icon represents.
Individual Schedule (Web)
To modify an Individual Schedule for an employee, select a date from the Timecard Grid on the
Punches tab, and click on the Individual Schedule button (only active on this screen). The
Individual Schedule will allow you to create and/or modify the schedule for that date (see figure).
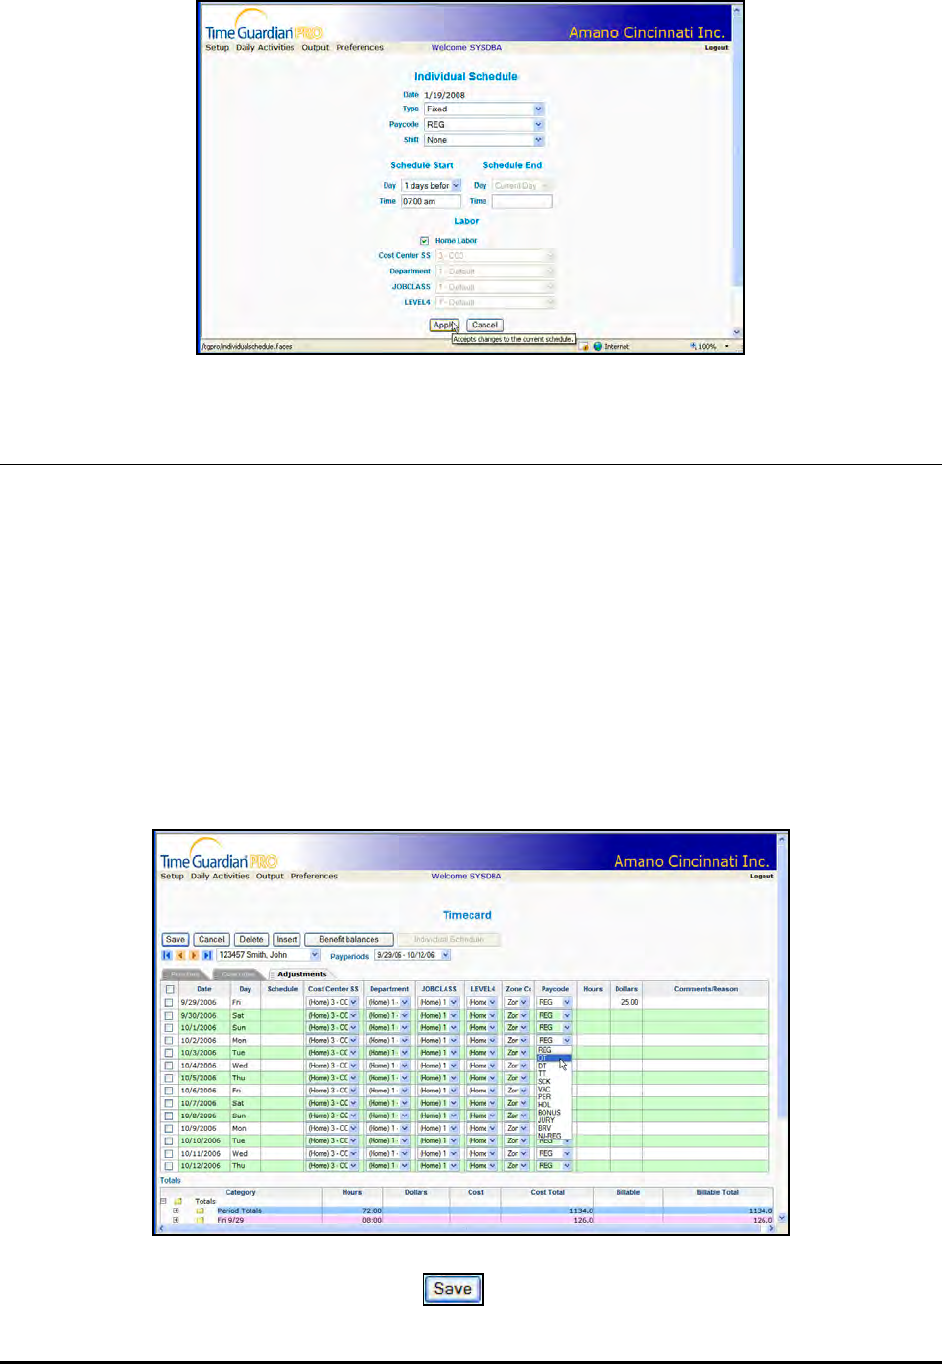
Time Guardian Series – Web Interface Module 17-15
Adjustments Tab (Web)
This function allows Timecard adjustments to be made to Labor Levels, Zone Codes, Pay
Codes, Hours, and Dollars. A Comments/Reasons column is provided to make notes. For all
other Timecard modifications see Punches and Overrides tabs.
To perform an employee Timecard adjustment, click on the Adjustments tab, then select the
desired column in the date row you wish to edit. Click to enter the value for Hours, Dollars
[Bonus Pay Code only], and Comments/Reason. Use the dropdown lists for Labor Levels, Zone
Codes, and Pay Codes.
Note: Use the Insert button to insert a row in the Timecard grid at the appropriate location for
an adjustment such using more than one Pay Code; i.e. hours defined as overtime.
When you have finished performing a Timecard adjustment, click on the Save button to save
your changes.
When you have finished, click on the Save button to save your changes.
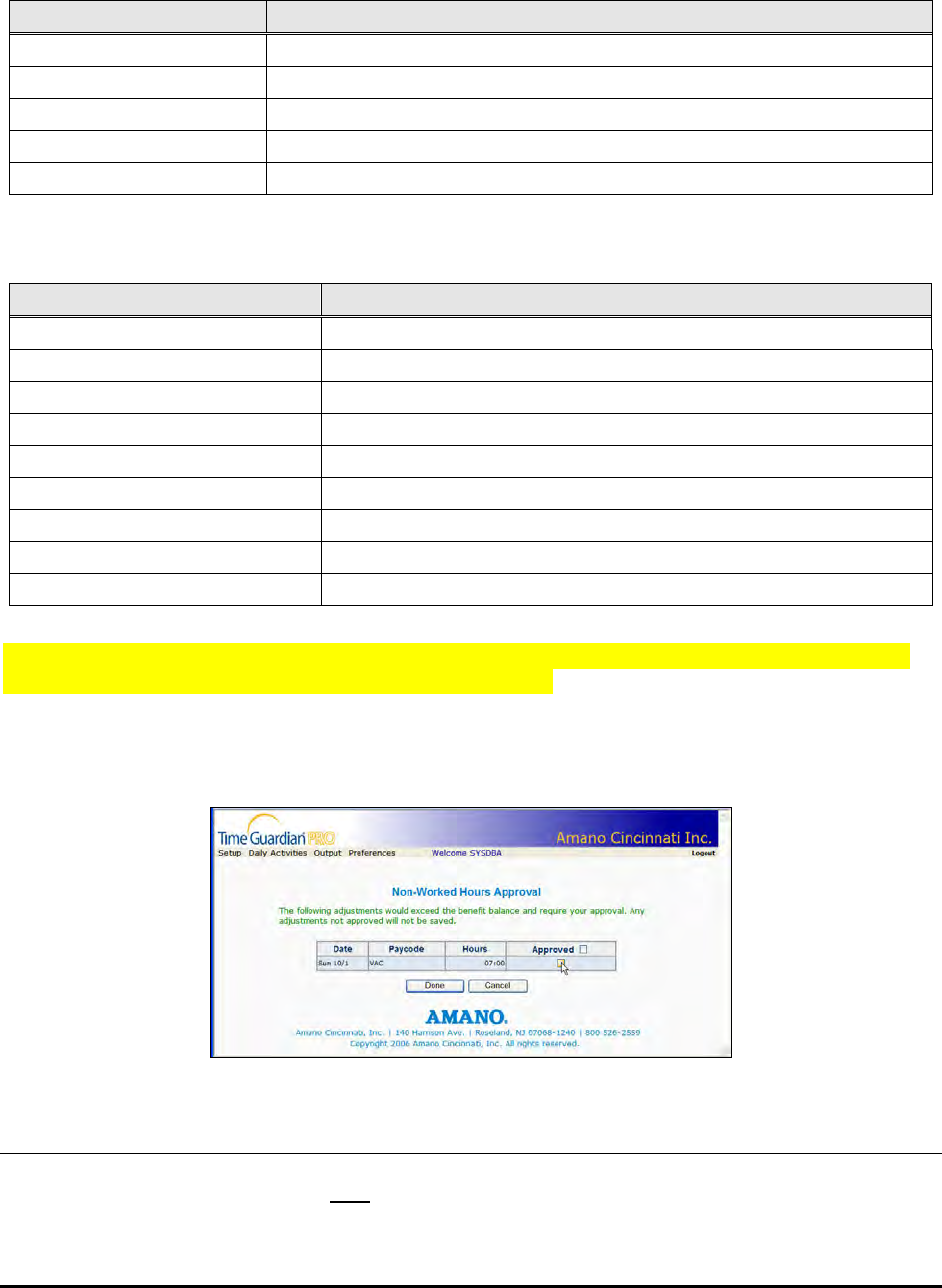
17-16 Time Guardian Series – Web Interface Module
The Adjustments Tab in the Timecard grid consists of the following columns that have to be
displayed:
Column Name Field Description
Date Date that punches/schedule belong to
Zone Zone Code assigned (user defined) for zone differentials
Pay Code Pay Code (user defined) to be assigned to hours
Hours Total Hours for assigned Pay Code
Dollars Dollars paid to employee
And the following additional user selectable columns that can be displayed:
Column Name Field Description
Day Day within Pay period punches/hours belong to
Schedule Assigned Schedule (user defined)
LEVEL1 Labor Level 1 (user defined)
LEVEL2 Labor Level 2 (user defined)
LEVEL3 Labor Level 3 (user defined)
LEVEL4 Labor Level 4 (user defined)
LEVEL5 Labor Level 5 (user defined)
LEVEL6 Labor Level 6 (user defined)
Comments/Reason Comments/Reason for adjustment
Note: See Advanced Labor/Rate Module, Example of Multiple Labor Levels for details about
Labor Level Association links (Parent/Child relationship).
Note: When making an hour adjustment for an employee for type of hours which require
approval, the following type of screen will appear.
Overrides Tab (Web)
This function allows overrides for only the existing employee hours and associated Pay Code.
For all other Timecard modifications see Punches and Adjustments tabs. To perform an
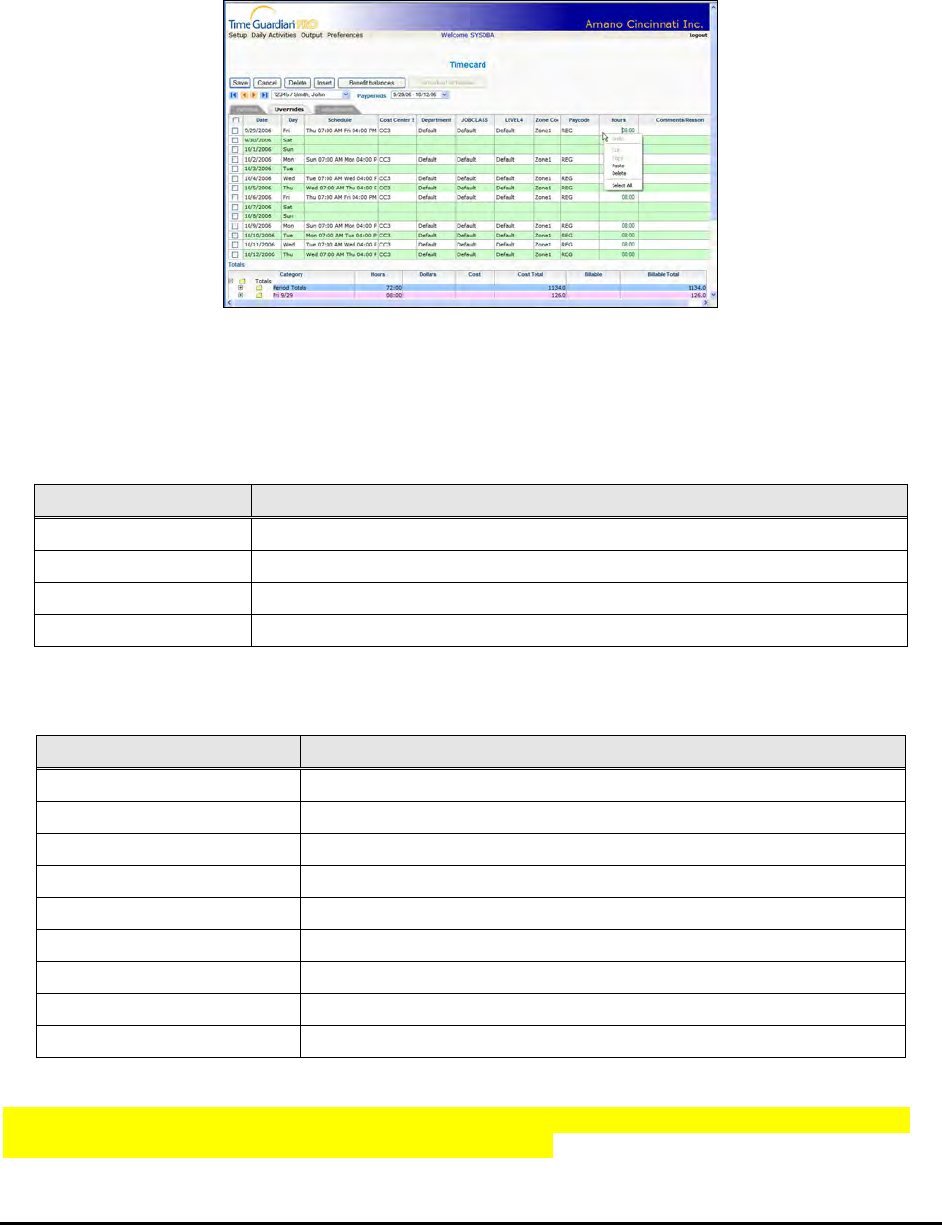
Time Guardian Series – Web Interface Module 17-17
employee Timecard override, click on the Overrides tab, then click on the Hours cell in the grid
for the hours that you wish to override (see figure).
When you have finished performing a Timecard override, click on the Save button to save your
changes.
When you have finished, click on the Save button to save your changes.
The Overrides Tab in the Timecard grid consists of the following columns that have to be
displayed:
Column Name Field Description
Date Date that punches/schedule belong to
Zone Zone Code assigned (user defined) for zone differentials
Pay Code Pay Code (user defined) assigned to hours
Hours Total Hours for assigned Pay Code
And the following additional user selectable columns that can be displayed:
Column Name Field Description
Day Day within Pay period punches/hours belong to
Schedule Schedule Name for start and end or auto schedule
LEVEL1 Labor Level 1 (user defined)
LEVEL2 Labor Level 2 (user defined)
LEVEL3 Labor Level 3 (user defined)
LEVEL4 Labor Level 4 (user defined)
LEVEL5 Labor Level 5 (user defined)
LEVEL6 Labor Level 6 (user defined)
Comments/Reason Comments/Reason
Note: See Advanced Labor/Rate Module, Example of Multiple Labor Levels for details about
Labor Level Association links (Parent/Child relationship).
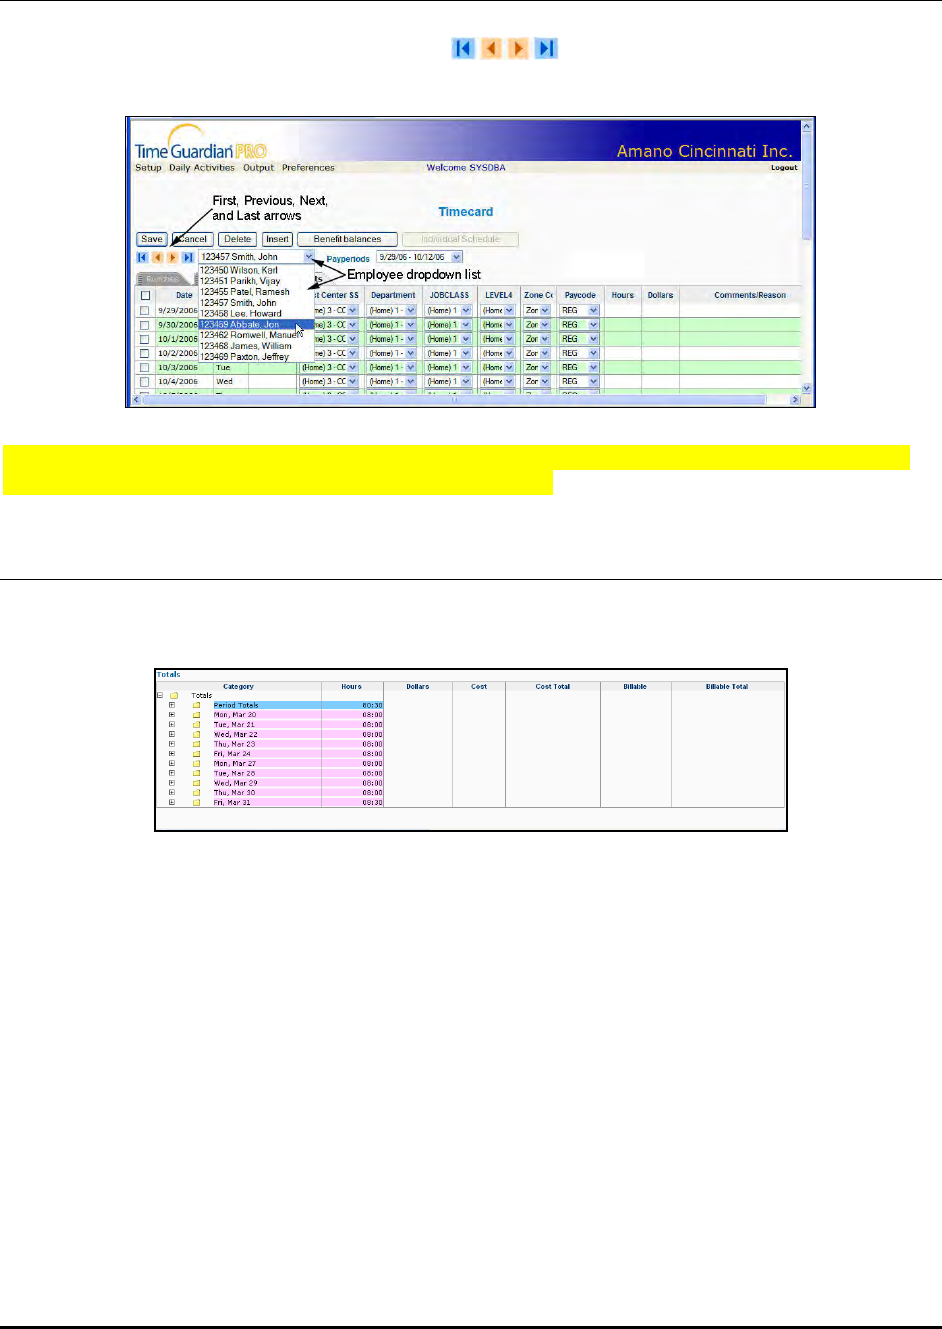
17-18 Time Guardian Series – Web Interface Module
Employee Timecard Navigation (Web)
Use the employee dropdown list to quickly navigate between employees from any employee
Timecard. The First, Previous, Next, and Last arrows can also be used. See the
following figure.
Note: See Advanced Labor/Rate Module, Example of Multiple Labor Levels for details about
Labor Level Association links (Parent/Child relationship).
Totals (Web)
The Daily and Pay period Totals for the employee are shown in the Timecard grid at the bottom
of the screen to provide a quick view of the employee’s daily and Pay period totals (see figure).
The timecard total rows can be expanded to show more detail about the hours for the Pay
period or a given day by clicking on the left-hand side on the + node (see illustration below –
notice the hand pointer and + and - signs).
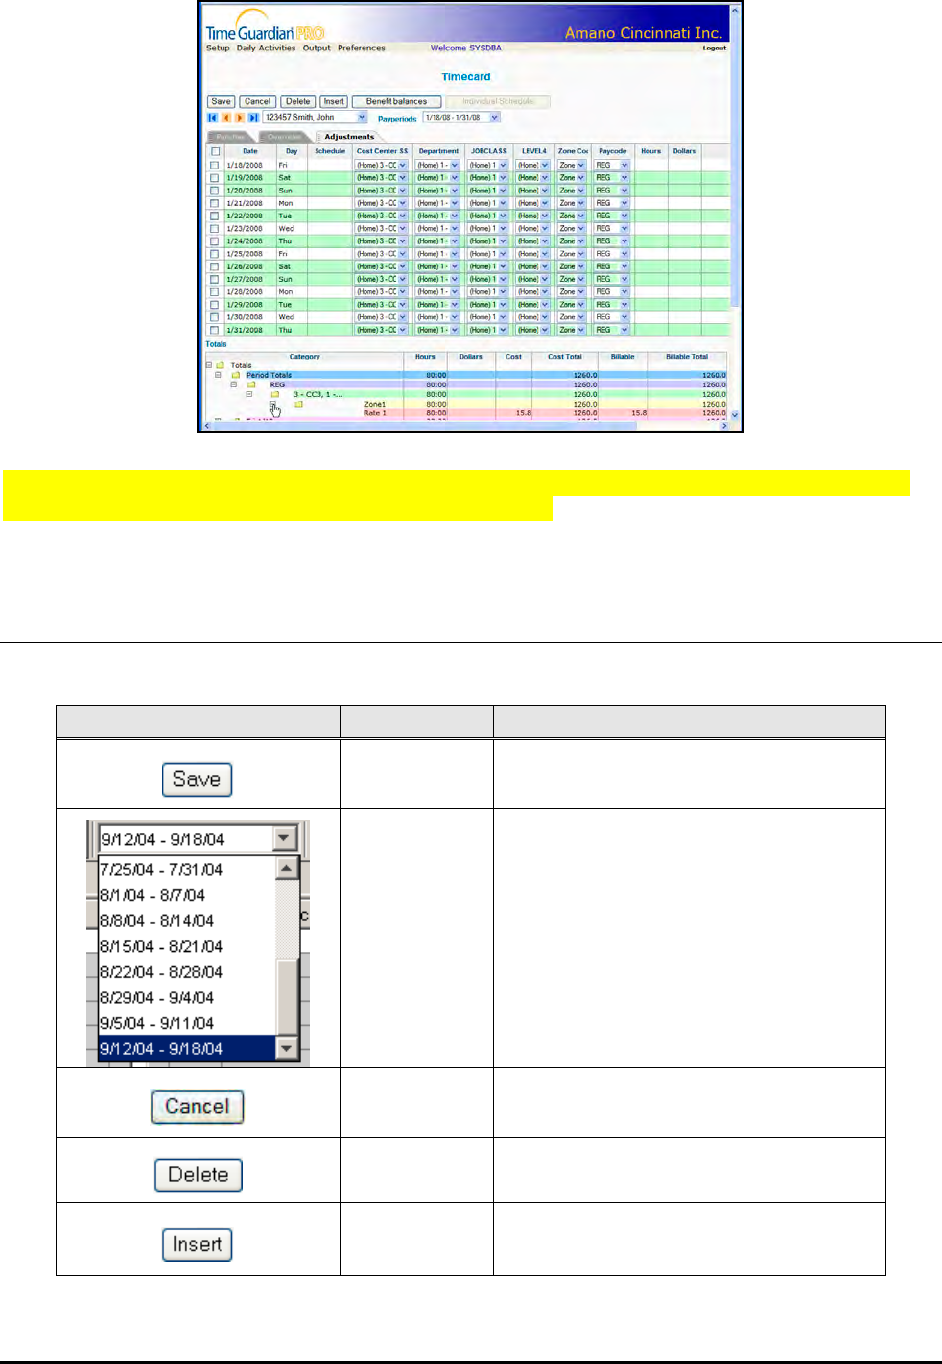
Time Guardian Series – Web Interface Module 17-19
Note: See Advanced Labor/Rate Module, Example of Multiple Labor Levels for details about
Labor Level Association links (Parent/Child relationship).
Icons/Commands (Web)
The toolbar of the Timecard grid consists of the following:
Button Command Description
Save Saves the currently displayed employee
record.
Pay periods
This dropdown list allows you to view
different Pay periods in the Punch,
Overrides, or Adjustments Timecard
grids. Previous Pay periods can only be
adjusted if they are still open by using the
Punches tab for punches and the
Adjustments tab for hours.
Cancel Cancel any Timecard adjustments and
return to the Employees screen.
Delete Row Deletes the selected row(s) in the grid.
Insert Row Inserts a row below the selected row in
the grid.
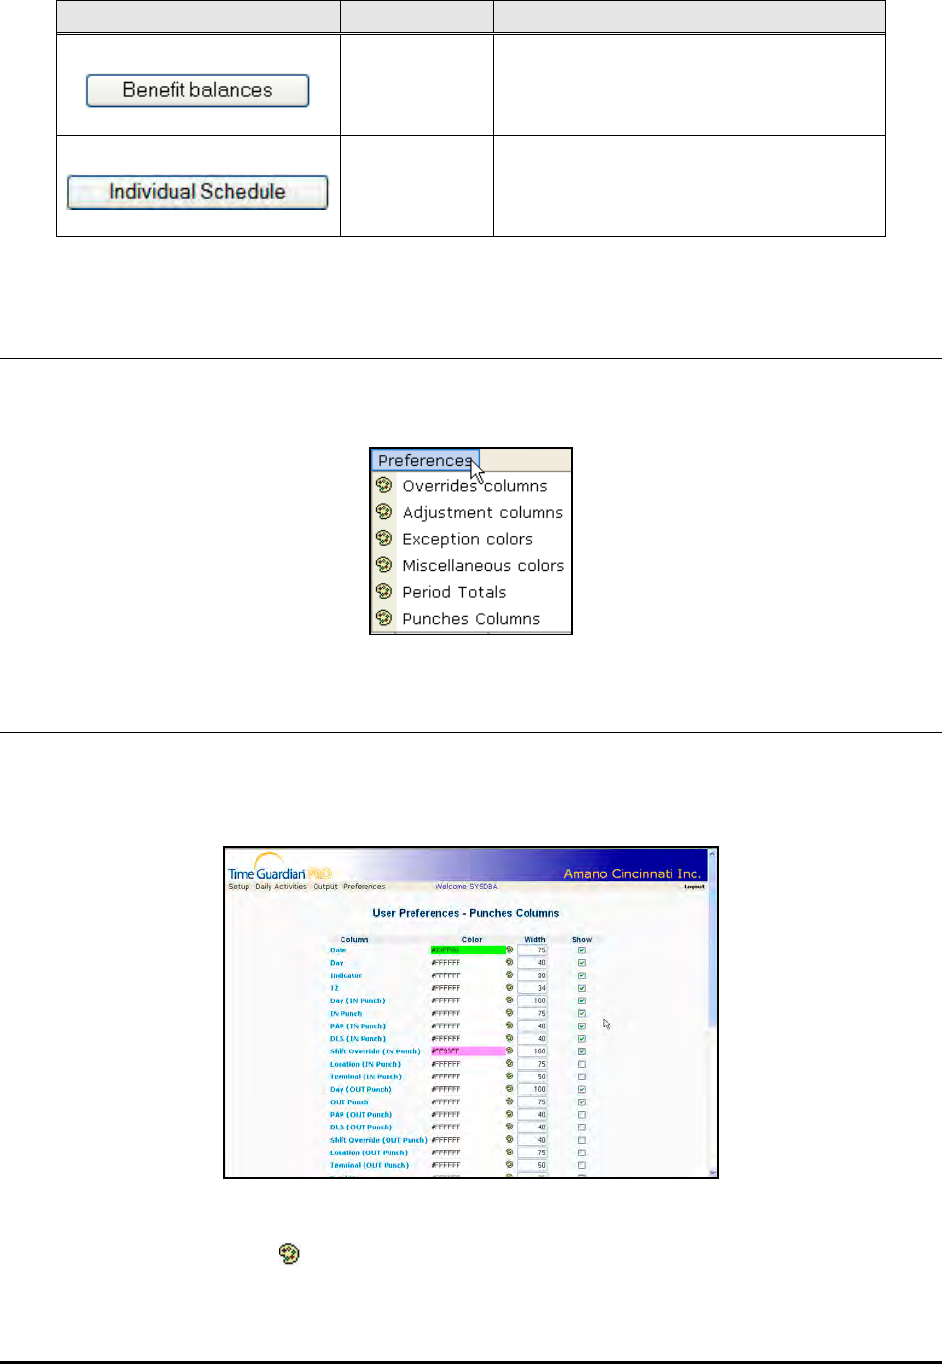
17-20 Time Guardian Series – Web Interface Module
Button Command Description
Benefit
Balances
Will display the benefit balances for the
selected employee and show the amount
taken, available, and current balance (up
to the Pay period shown).
Individual
Schedule
Will display the Individual Schedule for
the selected employee and date to allow
schedule modification. At least one row
must be selected to display.
Preferences (Web)
The display preferences for the Timecard grid are set by clicking on the appropriate Preferences
submenu selections from the Preferences menu.
Punches Columns Menu Selection (Web)
The Punches Columns selection is used to set the properties of each of the columns in the
Punch tab view of the Timecard grid. Select the Punches Columns and the following User
Preferences – Punches Columns window will appear:
• Color: Color of the Column. The default is white. The color can be changed by clicking on
the desired color palette icon alongside the desired column field, and selecting a color
from the Pick A Color palette from a palette of 3 choices. The choices are; Windows Safe
Palette, Web Safe Palette, or Grey Scale Palette.
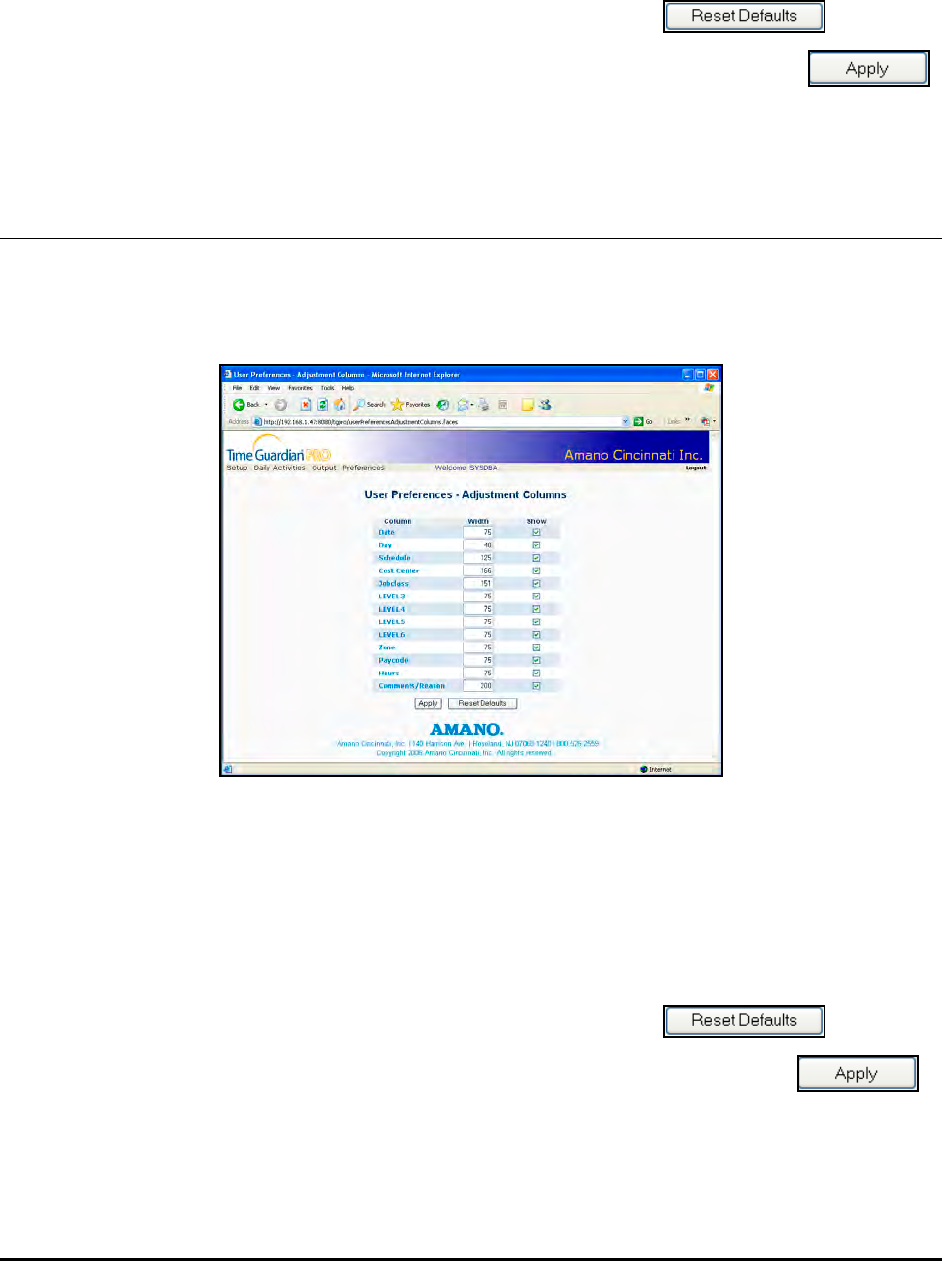
Time Guardian Series – Web Interface Module 17-21
• Width: Width of the Column. To change the width of the desired Column, enter in a number.
• Show: The Column will be displayed in the grid if this field is checked. Columns that are
fixed cannot be deselected.
To restore the default settings of the Punches columns, click on the button.
To save/apply new settings for the Adjustments & Overrides Columns, click on the
button.
Adjustment & Overrides Columns Menu Selection (Web)
Select the Adjustment Columns or Overrides Columns submenus from the Preferences menu
and the following User Preferences – Adjustment Columns or Overrides Columns windows will
appear:
The Adjustment & Overrides Columns selections are used to set the user preferences
properties of each of the columns in the Adjustments and Overrides tab view of the Timecard
grid.
• Width: Width of the Column. To change the width of the desired Column, enter in a number.
• Show: The Column will be displayed in the grid if this field is checked. Columns that are
fixed cannot be deselected.
To restore the default settings of the Punches columns, click on the button.
To save/apply new settings for the Adjustment & Overrides Columns, click on the
button.
The following is an example of the Overrides Columns, which is set the same way as the
Adjustment Columns.
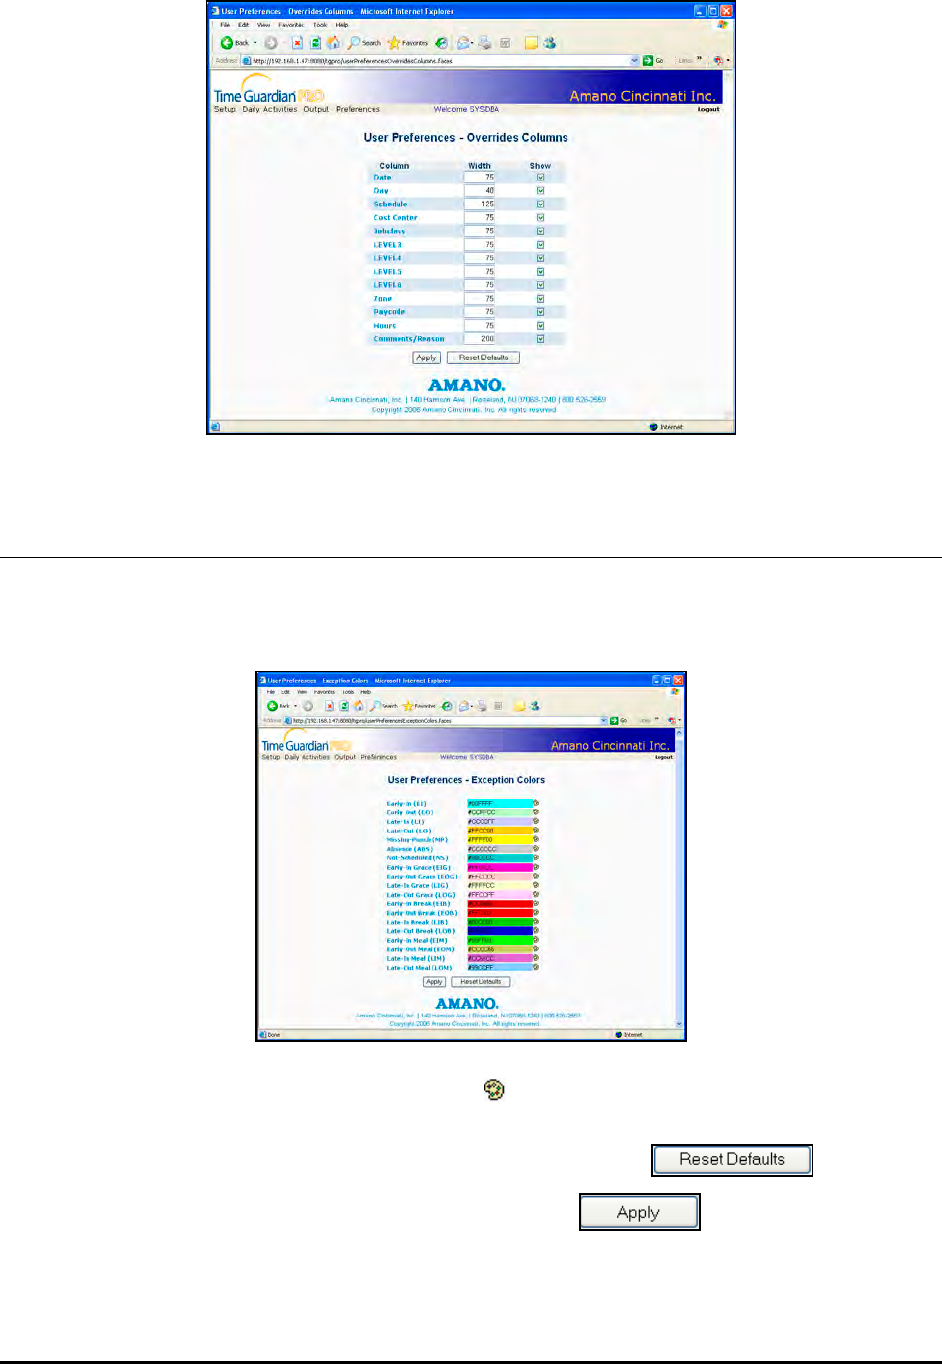
17-22 Time Guardian Series – Web Interface Module
Exception Colors Menu Selection (Web)
The Exception Colors submenu is used to change the colors for Exceptions in the Timecard grid
(MPNT for Meal Penalty now exists). Select the Exception Colors and the following User
Preferences – Exception Colors window will appear:
To define colors for exception colors, click on the button on the desired color column and
select a color from the Pick A Color palette.
To restore the default color settings of the Exceptions, click on the button.
To save new settings for the Exception Colors, click on the button.
The desktop side of Time Guardian Pro has one set of colors, while the Web side has a different
set of colors.

Time Guardian Series – Web Interface Module 17-23
Note: Web safe selection in the Color Palette, means these colors are guaranteed to be the
same in all browsers.
The following is an example of the Timecard grid using colors:
Black punches on the Timecard grid means the punches are from the employee while red
indicates the punches have been performed by a supervisor.
Miscellaneous Colors Menu Selection (Web)
The Miscellaneous Colors submenu is used to change the colors for items listed on the
Timecard grid. Select the Miscellaneous Colors and the following User Preferences –
Miscellaneous Colors window will appear:
To define colors for miscellaneous columns, click on the button on the desired color column
and select a color from the Pick A Color palette.
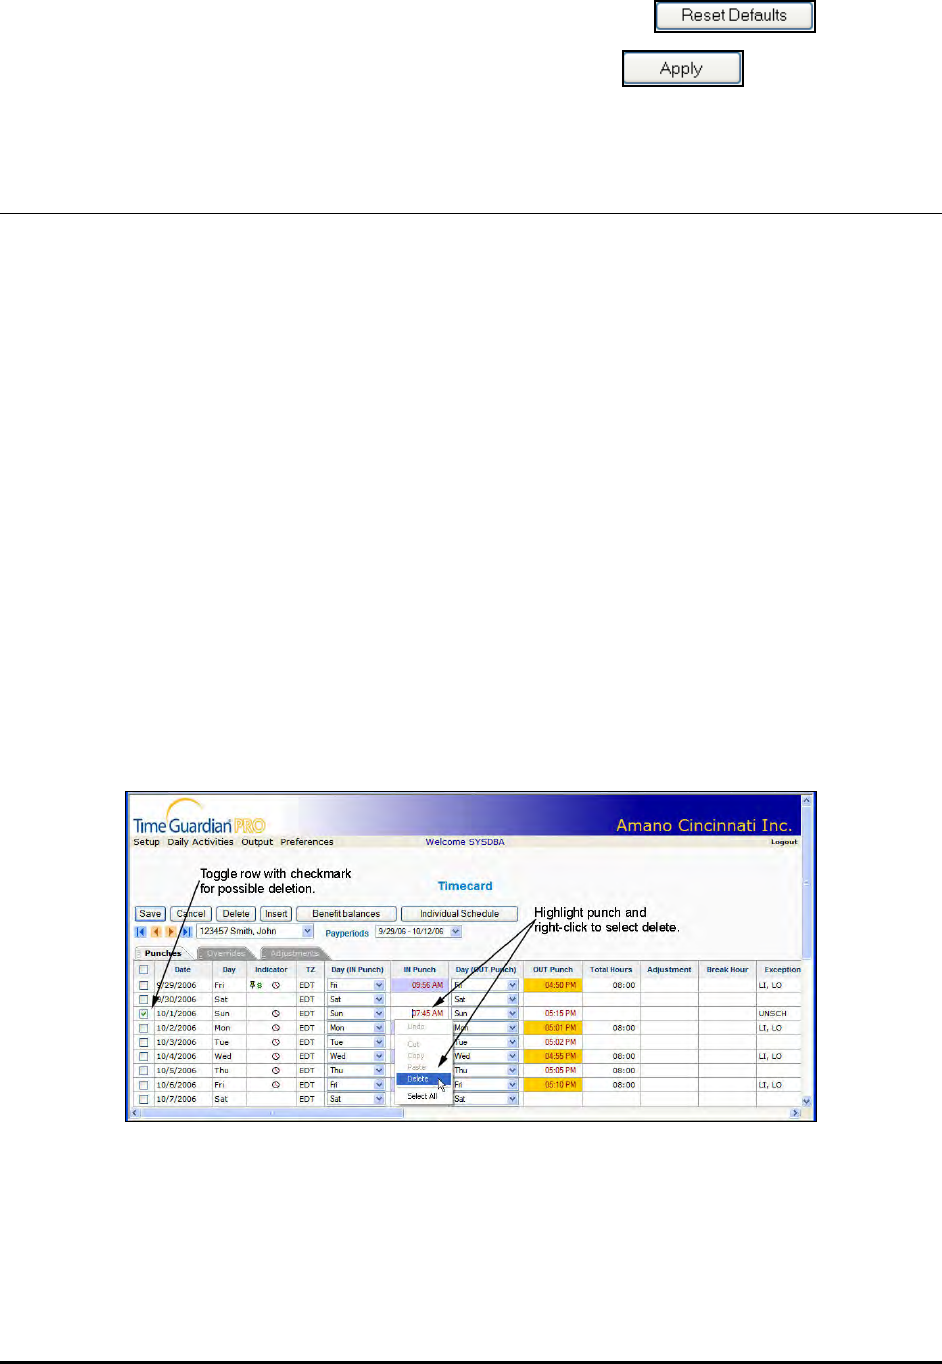
17-24 Time Guardian Series – Web Interface Module
To restore the default color settings of the listed items, click on the button.
To save new settings for the Miscellaneous Colors, click on the button.
Adding, Editing and Deleting Employee Punches
Adding Punches (Web)
Punches are added by clicking on the desired IN or OUT punch field in the Timecard grid and
entering the time in the field. Punches can be entered in either military or AM/PM format. For
example, 5 o’clock PM can be entered as 500p (AM/PM) or 1700 (Military). When entering in
AM/PM format AM is the default. When 8 is entered, it will be taken as 8:00 AM. If 8 o’clock PM
is intended, the 8 must be followed by a P or 8P. When you have finished, click on the Save
button in the toolbar to save your changes, and update the Timecard grid screen view.
Editing Punches (Web)
To edit punches, click on the desired IN or OUT Punch field, and enter the desired time. When
you have finished, click on the Save button in the toolbar to save your changes.
Deleting Punches (Web)
To delete a punch, click on the desired IN or OUT Punch field, highlight the punch, right-click,
and select Delete. Also, you can click to toggle row selection and press the Delete button (see
figure). When you have finished, click on the Save button in the toolbar to save your changes.
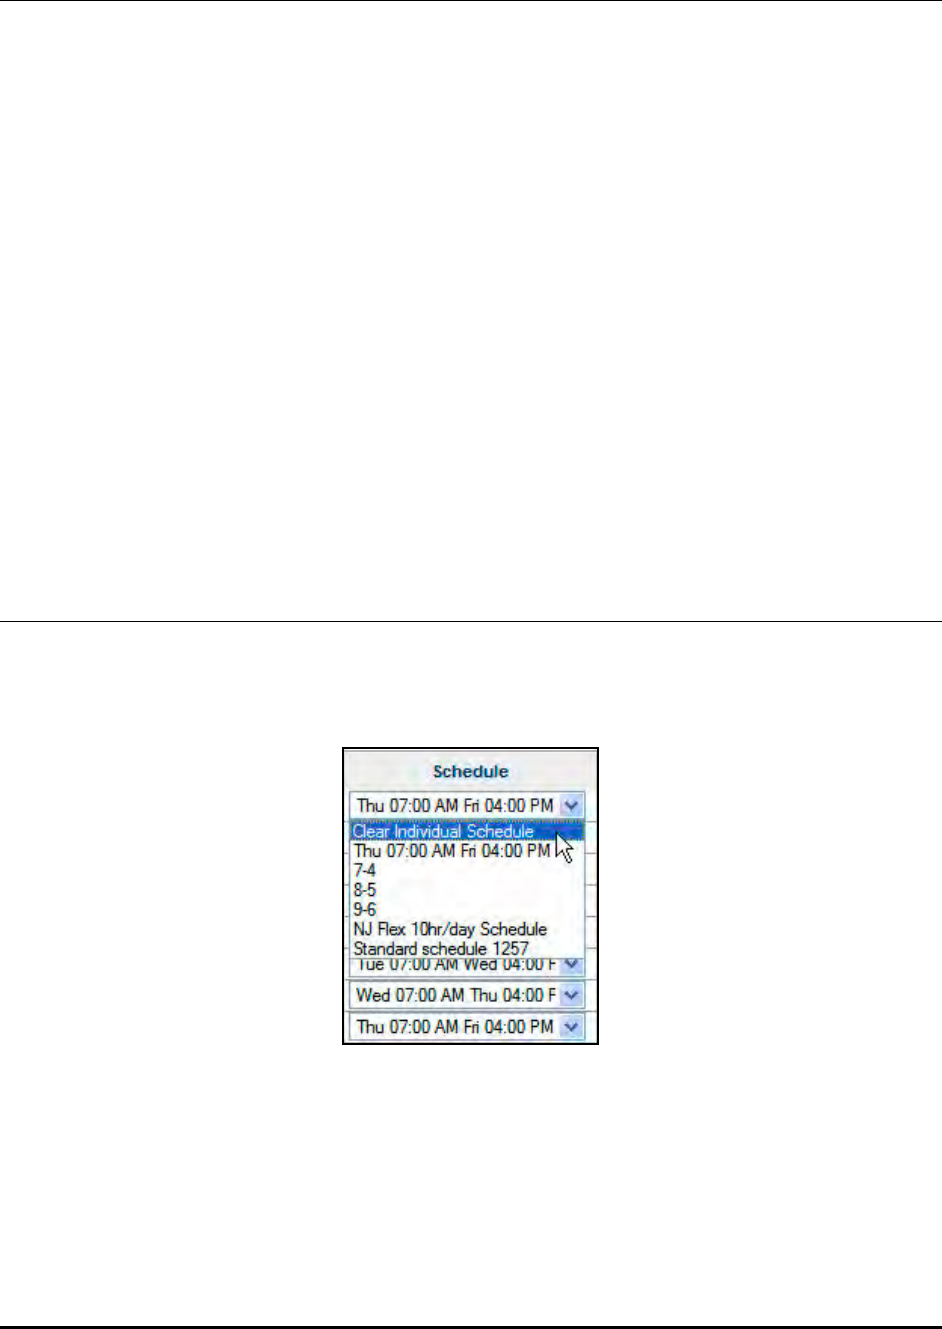
Time Guardian Series – Web Interface Module 17-25
Adding, Editing and Deleting Employee Tips
Adding Employee Tips (Web)
To add an employee tip, click on the desired Tip field and enter in the desired dollar amount.
When you have finished, click on the Save button in the toolbar to save your changes.
Editing Tips (Web)
To edit an employee tip, click on the desired Tip field and enter the desired dollar amount. When
you have finished, click on the Save button in the toolbar to save your changes.
Deleting Tips (Web)
To delete an employee tip, click on the desired Tip field, highlight the tip, right-click, and select
delete. When you have finished, click on the Save button in the toolbar to save your changes.
Schedule Override
Overriding a schedule consists of changing an employee’s schedule for a given day within
another existing schedule. To do so, click on the schedule cell in the employee Timecard grid
for the day that you wish to change. A dropdown list will appear with existing schedules.
Click on the desired template schedule you wish to use as a replacement. The selected
schedule will appear in the Schedule cell. When you have finished, click on the Save button in
the toolbar to save your changes.
Note: If this schedule does not meet the schedule assignment rules set in the Pay Class of the
employee, the employee will be unscheduled for this shift.
Note: You can also select to "Clear Individual Schedule" to switch the employee to
unscheduled status.
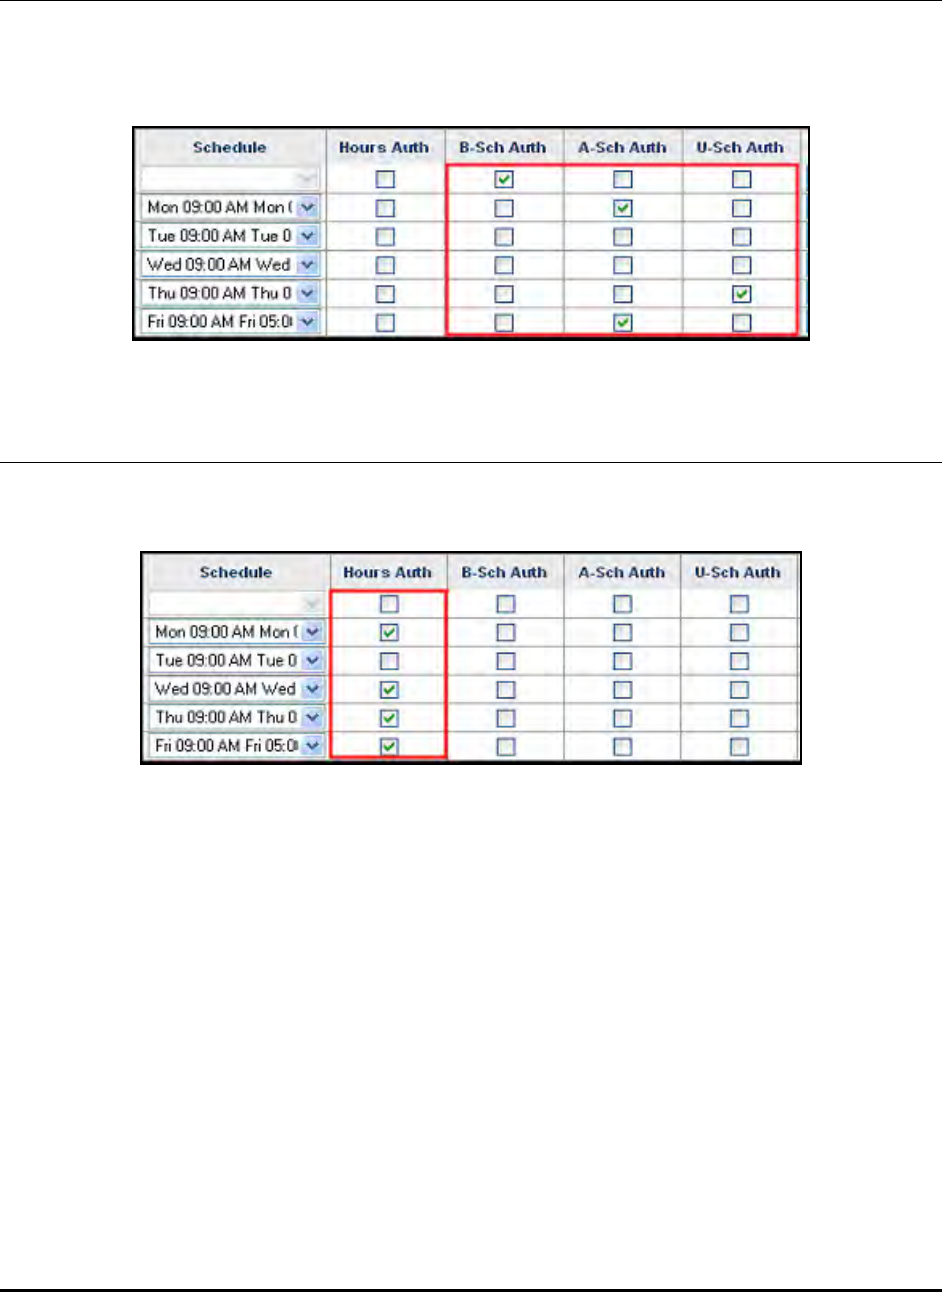
17-26 Time Guardian Series – Web Interface Module
Overtime Authorization
If overtime authorization was selected in the Overtime Authorization tab of the Pay Class
module, you must place a check in the corresponding overtime column (B-Sch, A-Sch, or U-
Sch) for the employee to be awarded overtime hours (see the figure).
Authorizing Payroll Export
To authorize hours for an employee to be included in the payroll export file, place a check in the
corresponding Hours Auth column (see the figure).
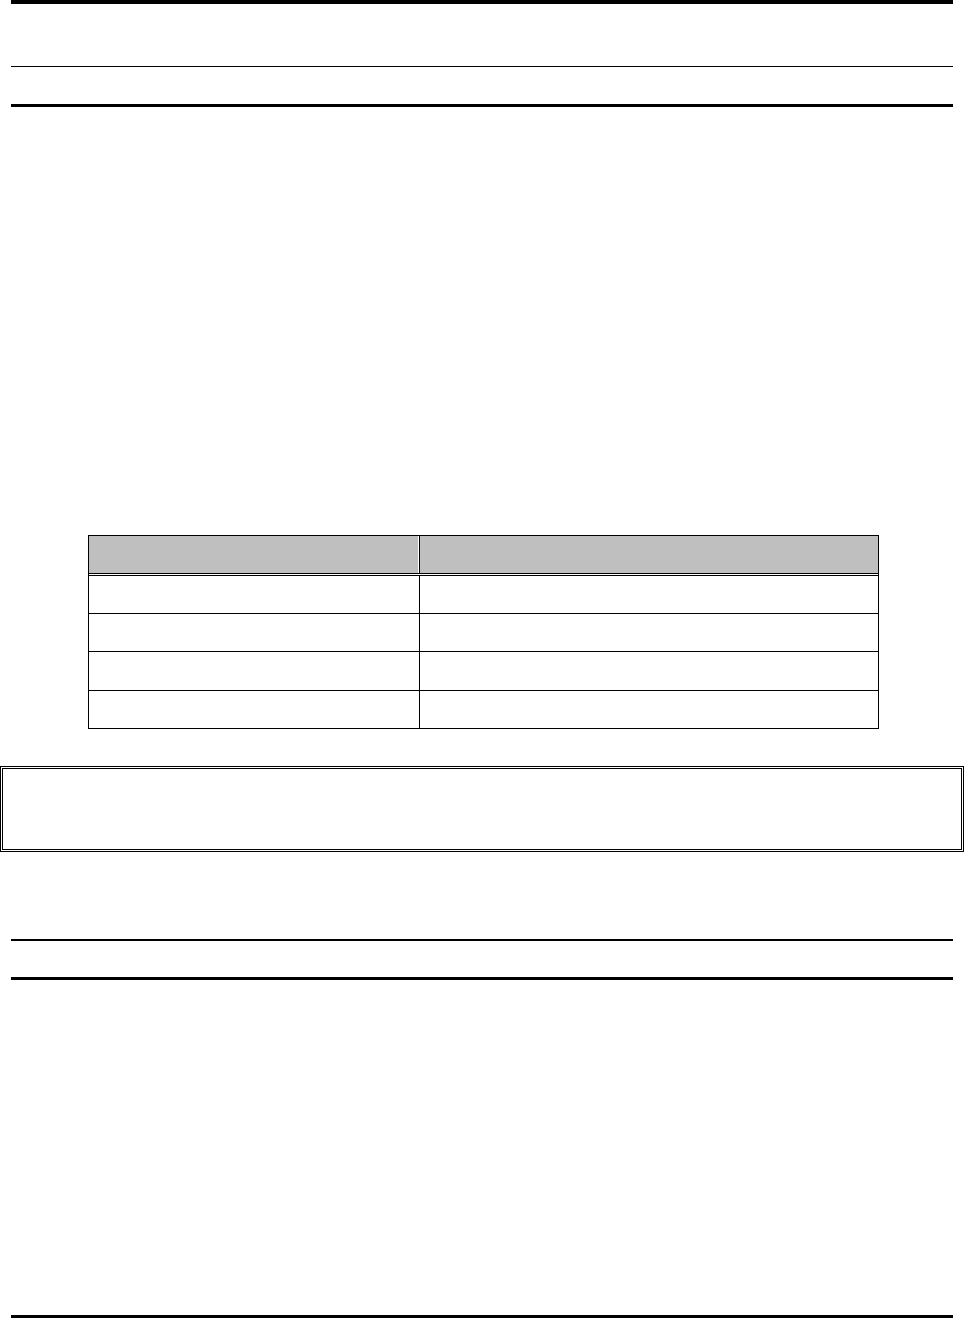
Time Guardian Series – Zone Differential Module 18-1
Chapter 18: Zone Differential Module
Zone Differential (Premium Rules) Module Introduction
The activation of the Zone Differential Module provides a way to increase an employee’s pay for
working during certain times of the day. Premiums are broken into three sections of zone
window, qualifications, and awards. The Premiums module falls under the daily rules section of
the tree view. Premiums will be assigned to a daily rule. Then the daily rule can be applied to
either an employee or Pay Class. Below is a sample of the new daily rule module.
The sections of Time & Attendance Software affected and/or features added from the activation
of this module include:
• Daily Rules
− Zone Differential Template
Zone Codes definition
Zone Qualification definition
Zone Award definition
Software Setup & Feature Configuration Location in Software
Zone Differential Template Main Application Tree view
Zone Codes definition Main Application Tree view
Zone Qualification definition Main Application Tree view
Zone Award definition Main Application Tree view
Note: Due to the complexity of the Zone Differential rules Amano recommends using Support
to assist in defining your Zone Differentials. See also the Zone Windows examples
document.
Using the Zone Differential (Premium Rules) Module
Note: The Zone Differentials Module with Zone Codes node, Qualification Rules node and
Zone Award node will not be visible in the tree view (located under Daily Rules) until the
optional Zone Differentials Module is activated.
Zone Differentials are a way to increase an employee’s pay for working during certain times or
“Zones” of the day. Zone Differentials consist of Zone Codes, Qualification Rules, and Zone
Awards. The Zone Differential module is located within the Daily Rules module in the Tree View.
Zone Differentials are assigned to a Daily Rule.
Zone Differentials can be initially filtered in ascending order by using a field with a dropdown list
located on the top of the zone differential window (see the following figure). The choices in this
list are; Name or Description.
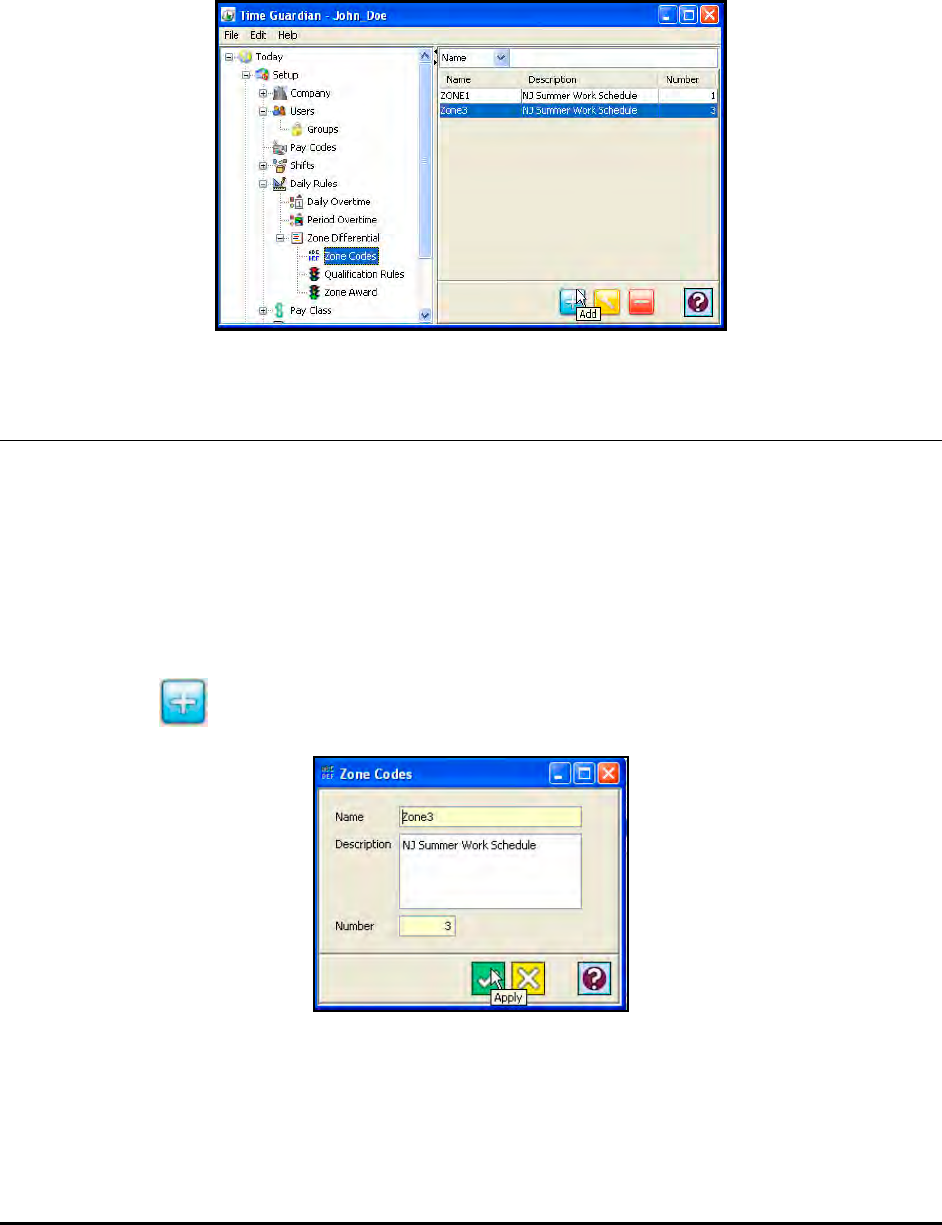
18-2 Time Guardian Series – Zone Differential Module
Additional filtering in ascending order can be accomplished by entering characters in a case
sensitive field located to the right of the dropdown list (see above illustration).
Click in the column headings anywhere to further sort both columns. Each click toggles between
ascending and descending order.
Zone Codes
The Zone Code is used to name or reference the window of time in a day that an employee can
work to receive premium pay. Zone Codes are assigned to Zone Differentials. To create a Zone
Code, perform the following:
To create Zone Codes:
1. Click on the Zone Differential node within the Daily Rules module in the Tree View.
2. Expand the view of the Zone Differential node and click on Zone Codes.
3. Click on the button, and the Zone Codes window will appear.
4. Enter a name for the Zone Code in the name field [required field].
5. Enter a description of the Zone Code in the Description field.
6. Assign a Number to the Zone Code in the Number field [required field]. Duplicate numbers
are not allowed.
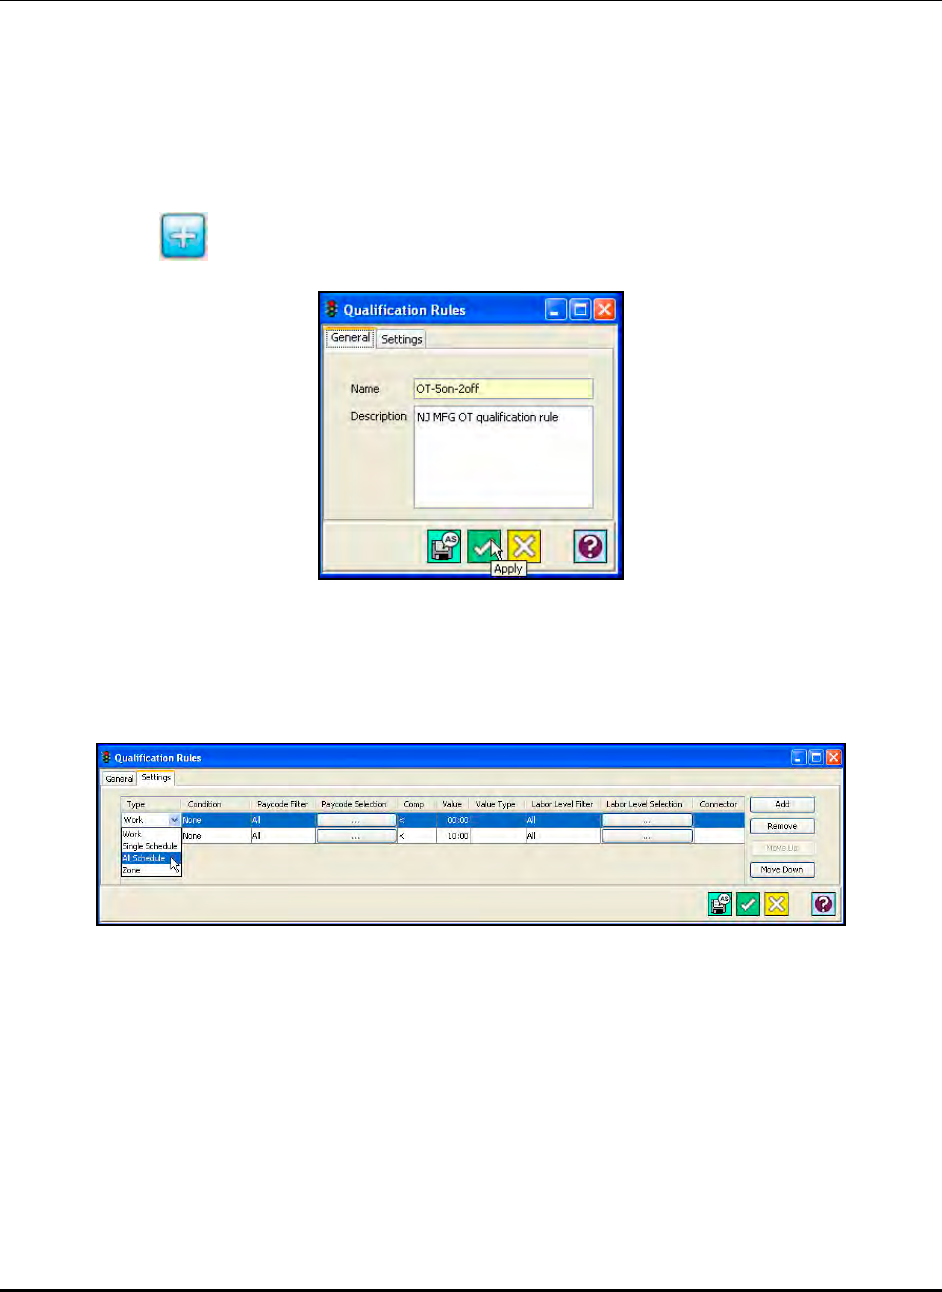
Time Guardian Series – Zone Differential Module 18-3
Qualification Rules
Qualification Rules are rules that govern whether an employee can be awarded hours (Zone
Award) in a particular Zone Code for working inside the eligibility windows.
To create Qualification Rules:
1. Click on the Zone Differential node within the Daily Rules module in the Tree View.
2. Expand the view of the Zone Differential node and click on Qualification Rules.
3. Click on the button, and the following Qualification Rules window will appear:
4. Enter a name for the rule in the name field [required field].
5. Enter a description of the rule in the Description field.
6. Click on the Settings tab and the following settings view will appear:
7. Click on the Add button to add a Qualification Rule and enter the following information:
Type: Select one of the following options:
• Work: Looks at all work hours for the day.
• All Schedule: The hours worked by the employee will be compared to all shifts, and the
employee must qualify on all shifts to get the Zone Award.
• Single Schedule: The hours worked by the employee will be compared to a particular
shift, and the employee must qualify on any of these shifts to get the Zone Award. Each
single schedule has to pass the rule to get this.
• Zone: Looks at the time in the window.

18-4 Time Guardian Series – Zone Differential Module
Condition: Select one of the following options:
For Type set to All Schedule, Single Schedule and Zone the options are:
• Work before
• Work within
• Work after
• Work before %
• Work within %
• Work after %
• Punch before
• Punch after
• Punch before %
• Punch after %
• Schedule type
For Type set to Zone, the options include all the above and:
• Schedule within
• Schedule within %
• Schedule start before
• Schedule start before %
• Schedule start after
• Schedule start after %
• Schedule end before
• Schedule end before %
• Schedule end after
• Schedule end after %
• First In punch after zone start
• Last Out punch before zone end
Pay Code Filter: Select either All or Selected. If selected is chosen, use the
button in the Pay Code Selection column to select the Pay Code hours to count towards the
Zone Award.
Comp: This field will compare the value in the Value column to the Condition. The options
are:
• < (Less than)
• <= (Less than or equal to)
• = (Equal to)
• > (Greater than)
• >= (Greater than or equal to)
• <> (Not equal to)

Time Guardian Series – Zone Differential Module 18-5
Value and Value Type: Enter in the amount of hours or dollars in the Value column and
select Hours or Dollars in the Value Type column.
Labor Level Filter: Select either All or Selected. If selected, use the button in
the Labor Level Selection column to select the Labor Levels to count towards the Zone
Award.
Connector: This field is used to connect the next line or rule to the condition. The options
are;
− AND
− OR.
8. To add another Qualification Rule, click on the Add button. A new Qualification Rule line will
appear beneath the line just created.
To delete a Qualification Rule, click on the Remove button. To move a Qualification Rule up
in the sequence, select the desired line and click on the Move Up button. To move a
Qualification Rule down in the sequence, select the desired line and click on the Move Down
button.
Zone Award
The Zone Award allows you to transfer the hours to another Pay Code, duplicate hours to
another Pay Code, or award hours or dollars after the employee has met the Zone Qualification
Rules. Multiple rules can be award for each zone window and qualification.
To create Zone Award Rules:
1. Click on the Zone Differential node within the Daily Rules module in the Tree View.
2. Expand the view of the Zone Differential node and click on Zone Award.
3. Click on the button, and the Zone Award window will appear.
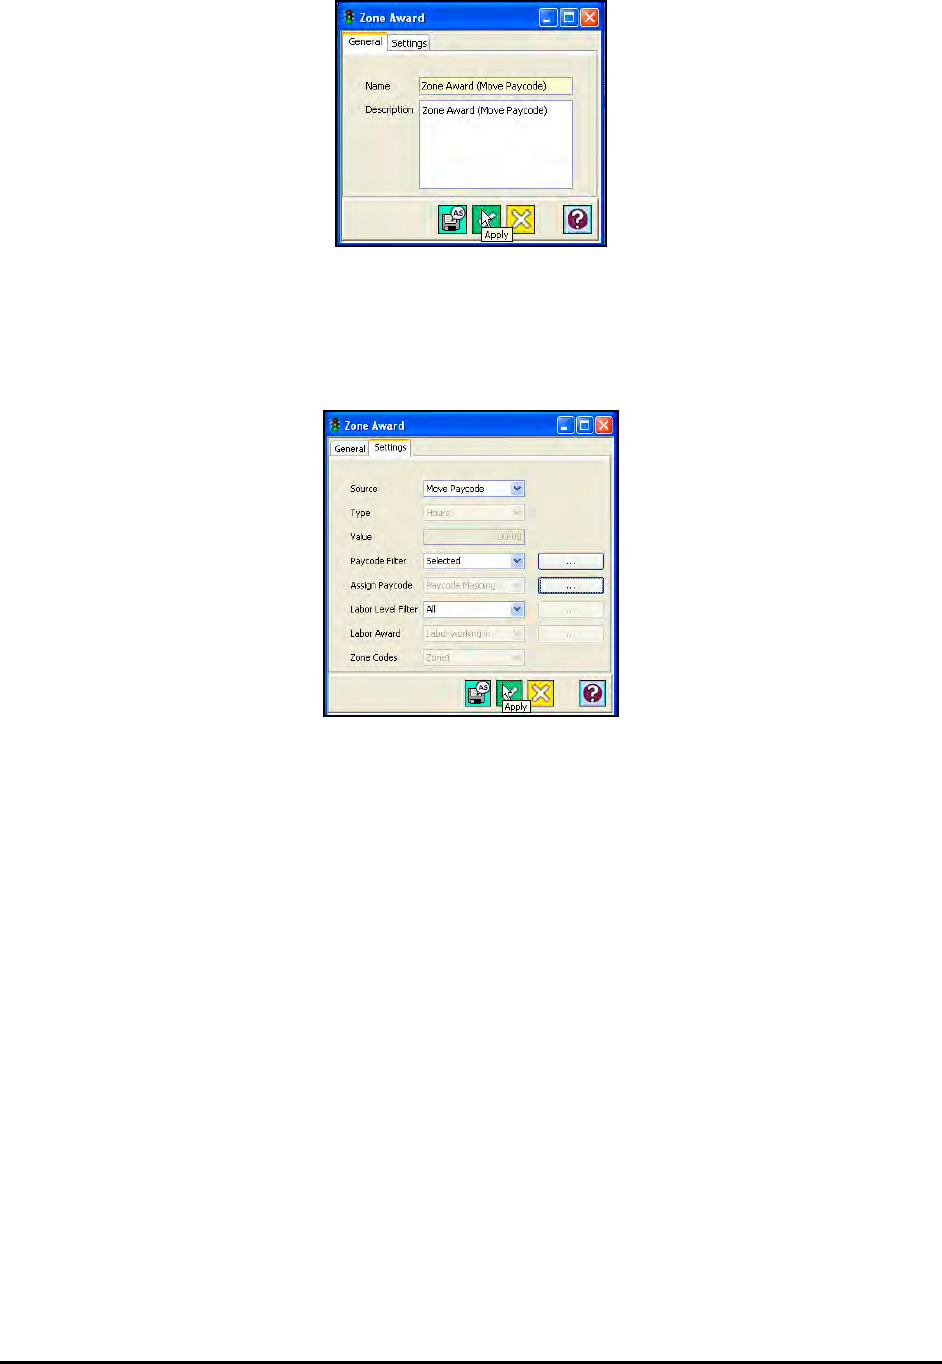
18-6 Time Guardian Series – Zone Differential Module
4. Enter a name for the rule in the Name field.
5. Enter a description of the rule in the Description field.
6. Click on the Settings tab.
7. Enter the following information:
Source: Select one of the following options:
• Move Pay Code: Use to filter out Pay Codes you do not want to use.
• Work Hours: Awards all work hours in addition.
• Before Schedule: Hours worked before scheduled.
• Within Schedule: Hours worked in schedule.
• After Schedule: Hours worked after schedule.
• Schedule: Use this to setup award for schedule.
• Zone: Use zone window to award hours.
• Value: Used to award hours, or dollars.
• Hour Multiplier: Get all hours within zone X multiplier.
• Change Rate: Used to change rate of pay for both cost & billable rates.
• Change Billable Rate: Change only billable rate.
• Change Cost Rate: Change only cost rate.
• Set Zone Number: Used to select zones.
• Guaranteed Hours: System gives you guaranteed amount across all schedules or single
schedule.

Time Guardian Series – Zone Differential Module 18-7
Type: Select one of the following options when source is set to:
• Value and Hour Multiplier: select either Hours, or Dollars.
• Change Rate: select Fix Value, Add To, or Percentage + Base.
• Set Zone Number: select either Set All, or Set in Window.
• Schedule: select either In Zone or All.
• Guaranteed Hours: select either Single Schedule or All Schedule.
Value: Enter in the amount of hours or dollars.
Pay Code Filter: Select either All or Selected. If selected is chosen, use the
button in the Pay Code Selection column to select the Pay Code hours to count towards the
Zone Award.
Assign Pay Code: Select either Single Pay Code, or Pay Code Mapping.
Labor Level Filter: Select either All or Selected. If selected is chosen, use the
button in the Labor Level Selection column to select the labor categories to count towards
the Zone Award.
Labor Award: Select either Labor working in, Home labor, or Fixed labor. If Fixed labor is
selected, use the button in the Labor Award Selection column to select the
Labor Level that will be included in the Zone Award.
Zone Codes: Select the zone code to set the awarded hours to.
The following table displays the options for the Zone Award based on the Source selected:
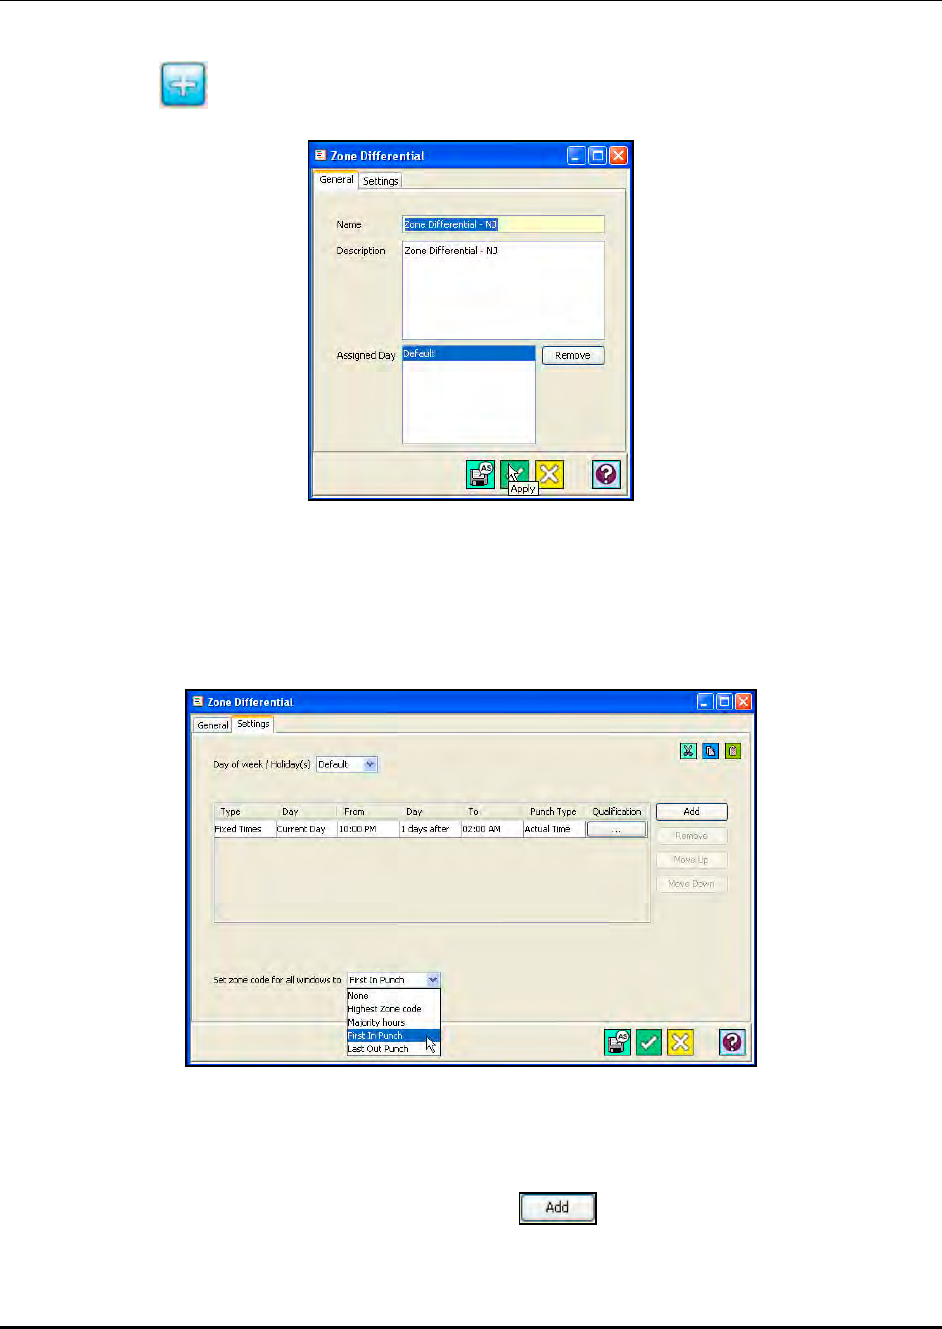
18-8 Time Guardian Series – Zone Differential Module
Creating a Zone Differential
1. Click on the Zone Differential node within the Daily Rules module in the Tree View.
2. Click on the button, and the Zone Differential window will appear.
3. Enter a name for the Zone Differential in the Name field [required field].
4. Enter a description for the Zone Differential in the Description field.
5. The Assigned Day field is read-only and set in the Day(s) of the Week/Holiday field of the
Settings tab. To do so, click on the Settings tab and the following type of screen will appear.
6. In the Day of the Week/Holiday(s) field, select the Day of the Week or Holiday(s) that the
Zone Differential will be in effect. The choices are: Default, Sun, Mon, Tue, Wed, Thu, Fri,
Sat, or Standard.
7. To add a Zone Differential Rule, click on the Add button and enter the following:
• Type: Select Fixed Times, Schedule Start, or First IN Punch.
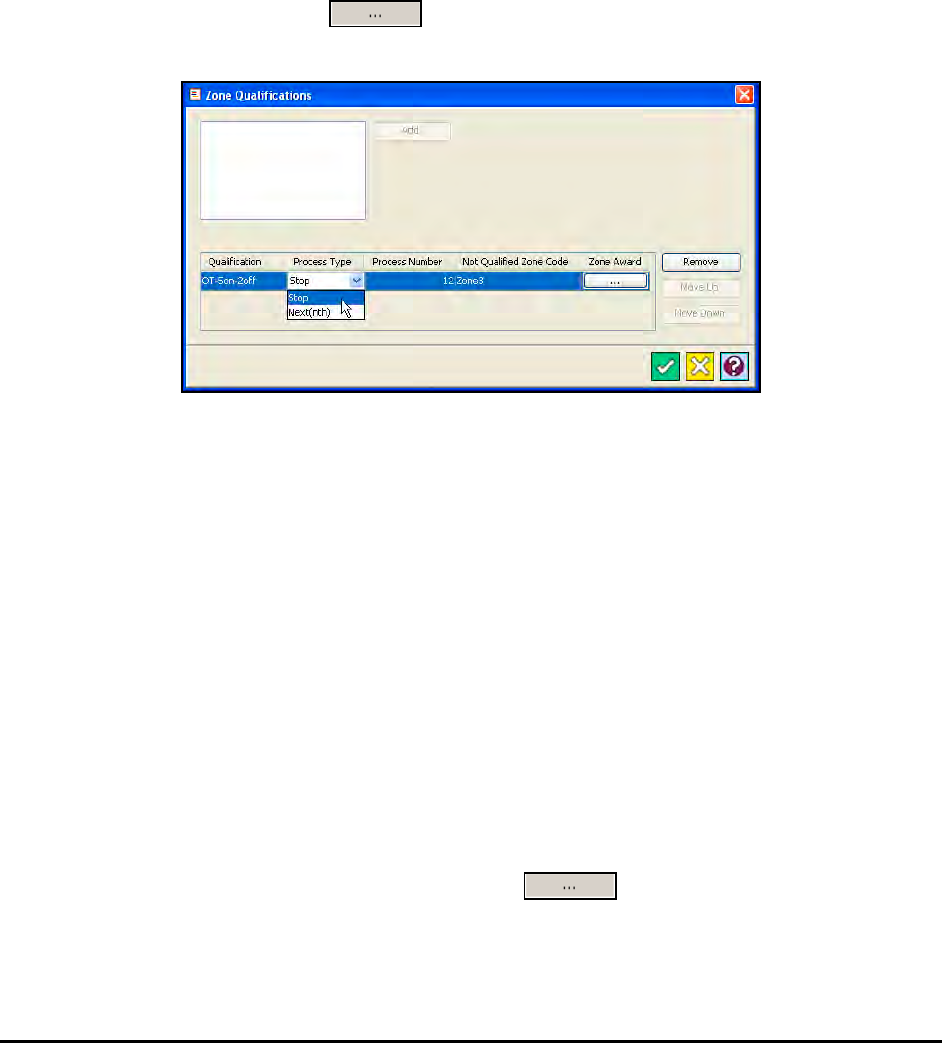
Time Guardian Series – Zone Differential Module 18-9
• Day: The day that the Zone Differential will begin. For Schedule Start and First IN Punch
this field is set to Current. For Fixed Time, select 1 days before, Current Day, 1 days
after, 2 days after, or 3 days after.
• From: Enter the time (HH:MM) that the Zone Differential will begin.
• Day: The day that the Zone Differential will end. For Schedule Start and First IN Punch
this field is set to Current. For Fixed Time, select 1 days before, Current Day, 1 days
after, 2 days after, or 3 days after.
• To: Enter the time (HH:MM) that the Zone Differential will end.
• Punch Type: For Fixed Time and Schedule Start this field is set to Actual Time. For First
IN Punch, select either Actual or Rounded Time.
• Qualification: Click on the button to set the Qualification, and the Zone
Qualifications window will appear:
a. Select a Qualification from the Qualification list and click on the Add button. The
choices are; Work Hour, Before Schedule, Within Schedule, After Schedule,
Schedule, and Zone. A row will appear in the Qualification Rule box.
b. Enter the following:
• Process Type: Select either Stop or Next(nth). Stop will process the qualification
rule if the qualification is met, and “Stop”, disregarding any subsequent rules.
Next(nth) will process the qualification rule if the qualification is met, and move to
the Next or nth Qualification Rule.
• Process Number: Required when Next(nth) is set as the Process Type. It
designates which Qualification Rule will be processed when the qualification is
met in the current rule. If the qualification is met, then the “Next” or “nth number”
rule is processed in relation to the current rule’s position and not order of
appearance.
• Not Qualified Zone Code: Select the Zone Code from the list that will be applied
to the qualification.
• Zone Award: Click on the Zone Award button, and the following
window will appear:
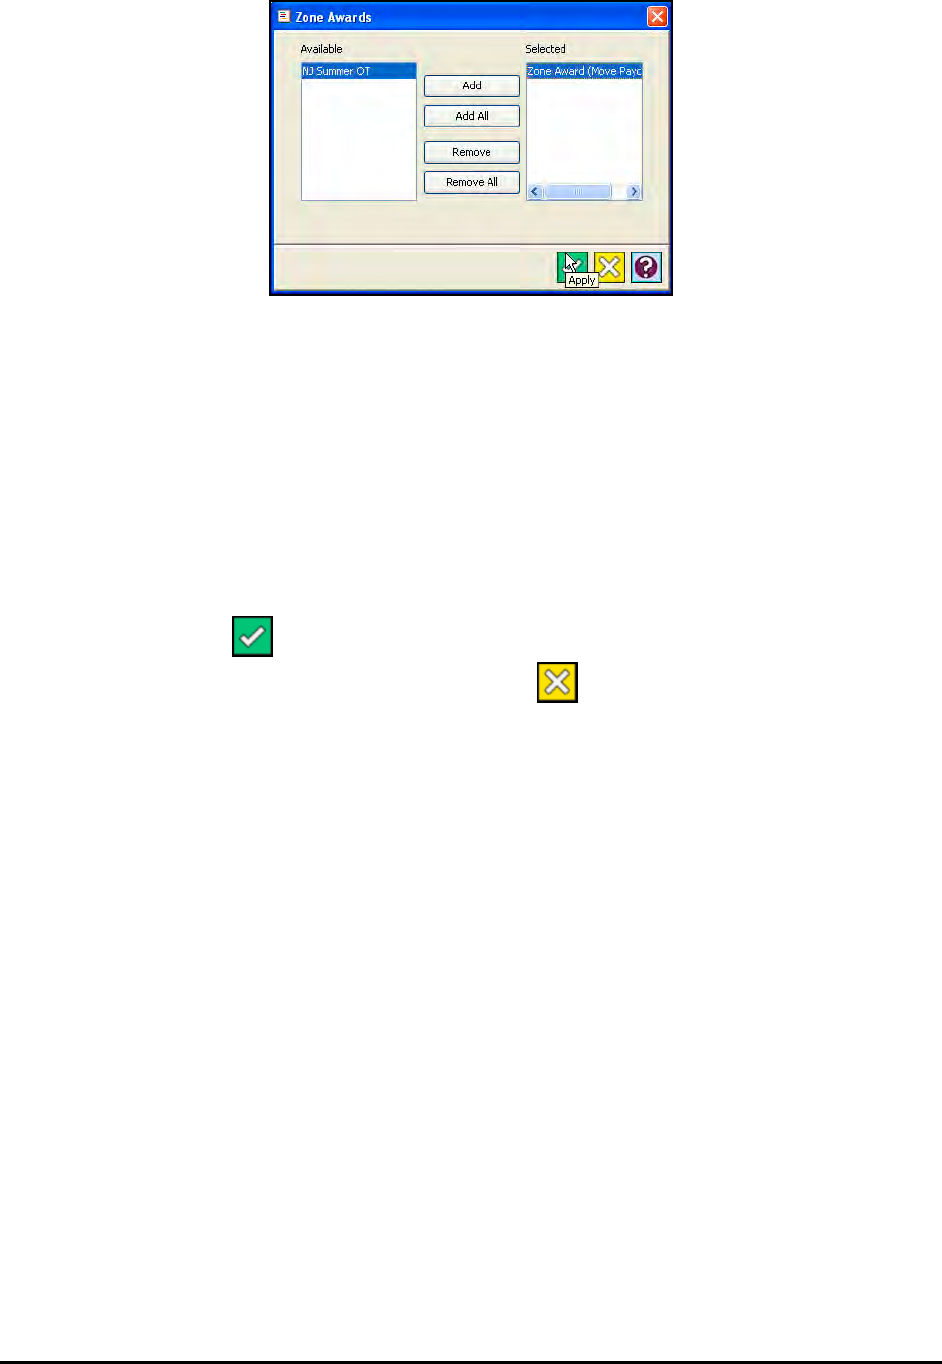
18-10 Time Guardian Series – Zone Differential Module
To add a Zone Award to the Qualification, select the desired Zone Award from
the Available list and click on the Add button. To add all the Zone Awards, click
on the Add All button.
To remove a Zone Award from a Qualification, select the desired Zone Award
from the Selected list and click on the Remove button. To remove all the Zone
Awards, click on the Remove All button.
c. To add more Qualification Rules, repeat the previous steps. To change the order of
the Qualification Rules, select the desired rule in the list and click on the Move Up or
Move Down buttons. To remove a Qualification Rule, select the desired rule from the
list and click on the Remove button.
d. Click on the button to save your settings and return to the Zone Qualifications
window. To exit without saving, click on the button.
8. To “Set zone code for all windows to”, click on the dropdown box and select one of the
following choices; None, Highest Zone Code, Majority hours, First In Punch, or Last Out
Punch.
9. To add more Zone Differential Rules click on the Add button and repeat Steps #4 thru #6.
To change the order of the rules, select the desired rule in the list and click on the Move Up
or Move Down buttons. To remove a Zone Differential Rule, select the desired rule from the
list and click on the Remove button.
10. In the Set Zone code for all Windows field, choose one of the following; None, Highest Zone
Code, Majority Hours, First In Punch, and Last Out Punch
Time Guardian Series – Payroll Interface Module 19-1
Chapter 19: Payroll Interface Module
Payroll Interface Module Introduction
The Amano Time & Attendance Software comes standard with a default 13 common payroll
interfaces. The activation of the Payroll Interface Module can supply up to 46 additional payroll
interfaces.
Default Payroll Interfaces Optional Payroll Interfaces
1. ADP DOS
2. ADP PC Payroll for Windows
3. CBS
4. Excel
5. GevityHR
6. Paycheck Paylink
7. Paycheck Preview
8. Payday
9. Peachtree
10. Ceridian Power Pay
11. EasyPay
12. PayWeb
13. QuickBooks file export/Integration
1. ABRA
2. ACCPAC for Windows
3. Ahola
4. Amano
5. Americanhealthtech
6. Ameripay
7. Ceridian Encore
8. Ceridian Esource
9. Ceridian Insync
10. Ceridian Source 500
11. Ceridian Web
12. CompuPay
13. CYBORG
14. DacEasy
15. DELTEK
16. DM Payroll
17. EVOLUTION
18. Fidelity
19. Great Plains Dynamics
20. HRPS/ScorPEO
21. JD Edwards
22. Lawson 8.1
23. MAS 90
24. Millenium
25. Pay Choice
26. PayAmerica
27. Paycom
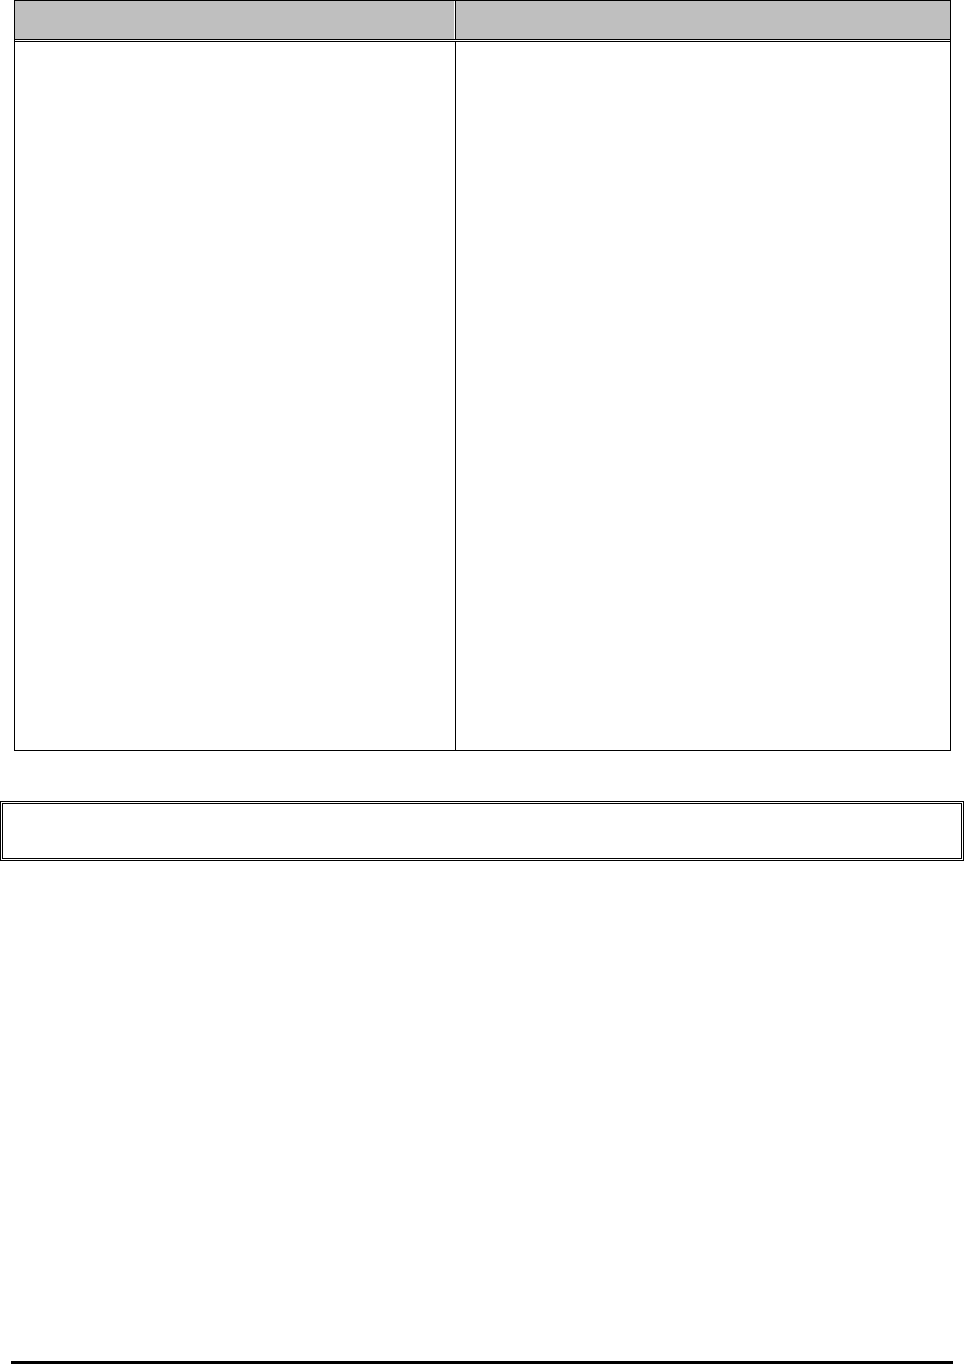
19-2 Time Guardian Series – Payroll Interface Module
Default Payroll Interfaces Optional Payroll Interfaces
28. Paycor
29. PayMaxx
30. PayPlus
31. Payroll 1
32. PayTime
33. PeopleSoft
34. Real World
35. SAGE
36. SageAccPacERP
37. SBT VisionPoint 10
38. Solomon
39. Specialized Data Systems
40. SunGuard Pentamation
41. Timberline
42. Ultipro
43. Paymate Platinum
44. Creative Solutions
45. MAS 90 v4.1.0
46. Paragon
Note: Due to the complexity of the Payroll Interface Profile creation, Amano recommends
using Support to assist in defining your Payroll Interface parameters.
The Payroll Interface Module provides a way of transferring data in the system to payroll
software. The data is usually transferred by means of a text file formatted to the payroll
company’s specifications or directly into the payroll company database. See Creating a Payroll
Profile in the output section.
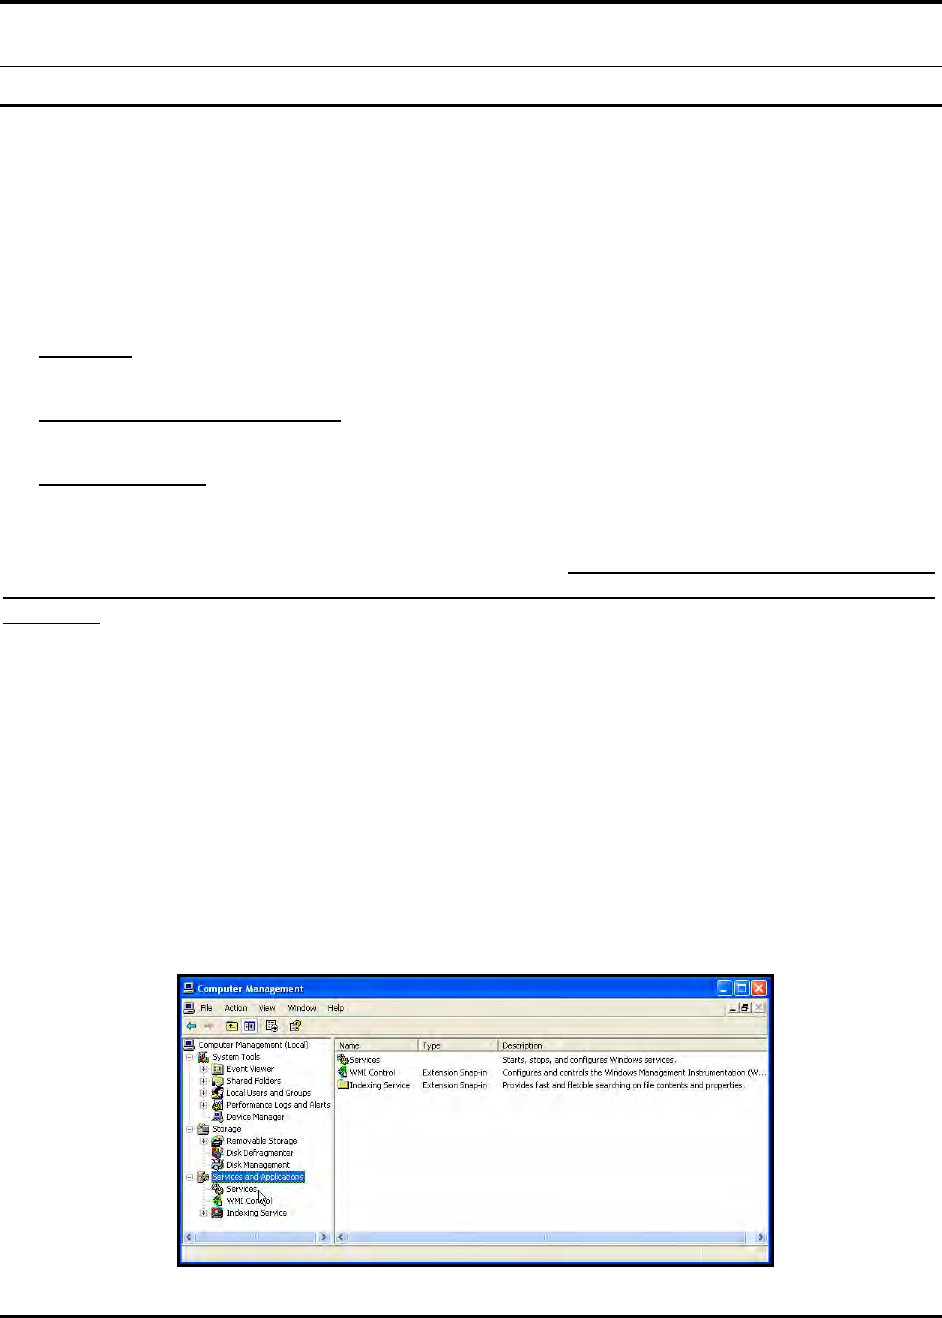
Time Guardian Series – Events Notification Module 20-1
Chapter 20: Events Notification Module
Events Notification Module Introduction
Traditionally, time and attendance systems have always been after-the-fact reporting systems.
Warnings, errors, notifications, etc. have always been reported by reports or log files. The
problem with this approach is that the end user finds about these events after they have
occurred, many times after it is too late or too costly to address them.
The Instant Messaging (IM) that this module provides when activated runs as a service in the
background to allow real-time notifications and immediate response to events. Instant
messaging provides the following three (3) crucial aspects of real-time response:
• Presence – It will be easy to know in real-time if a service, resource, or device is available
and its current status.
• Two-way device independence – As long as both devices talk the same protocol they will be
able to communicate regardless of location and system.
• Standards based – The IM system uses an open standards based protocol to communicate
allowing easy integration into existing environment and systems.
This module, when activated, requires the installation of an Escalation server using Jabber
Server, which can run as an Application or as a Service. This service is not necessary for just e-
mail notification as the Auto Process Module can be used with the Report Type Process to send
an e-mail.
Note: Time Guardian requires the “Escalation Server (TG)” service and Time Guardian Plus
requires the “Escalation Server (TG Plus)” service to be started and configured to
automatically start when the Time & Attendance software is opened. These services
were installed during the initial installation but not started for Time Guardian and Time
Guardian Plus. Time Guardian Pro automatically has this service configured to start.
Also, the Time Guardian Series software can now provide even notification via e-mail if set on
the IM Profile module.
To configure and/or start the Escalation Server service;
Step 1. Open “Computer Management” and select “Services and Applications”.
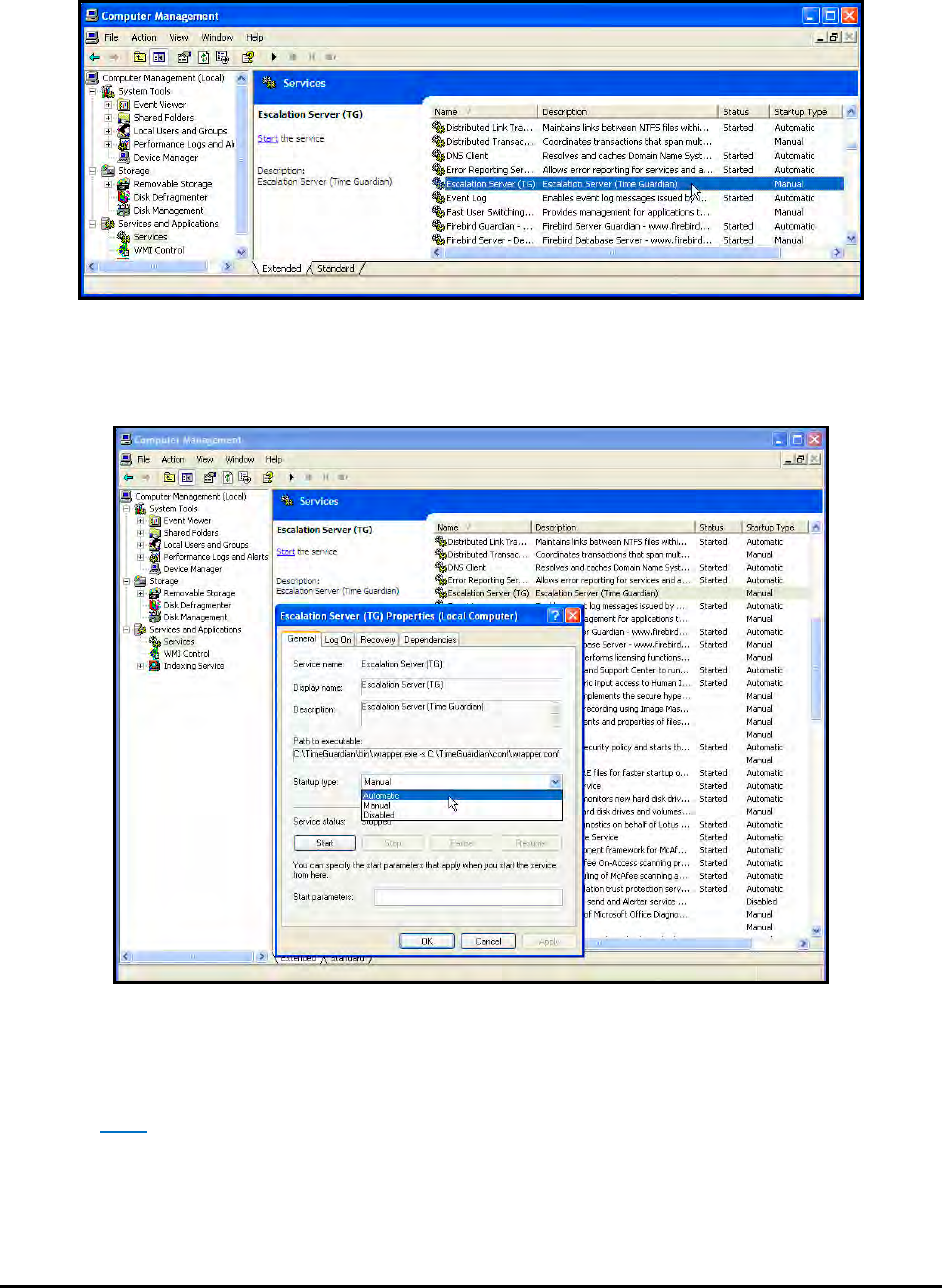
20-2 Time Guardian Series – Events Notification Module
Step 2. Click on “Services” and the following type of “Service” screen which lists currently
installed services will appear:
Step 3. Find “Escalation Services (TG)” or “Escalation Service TG Plus)” and select it. Then
double-click on it to display properties.
Step 4. On the Properties screen, under “Startup type:” select “Automatic” from the dropdown
menu and click on the Apply” button.
Step 5. With “Escalation Services (TG)” or “Escalation Services (TG Plus)” selected, click
“Start” to immediately start the service.
Step 6. Close “Computer Management” screen as you are finished configuring and starting the
required “Apache Tomcat 6” service. From now on the service will start automatically.
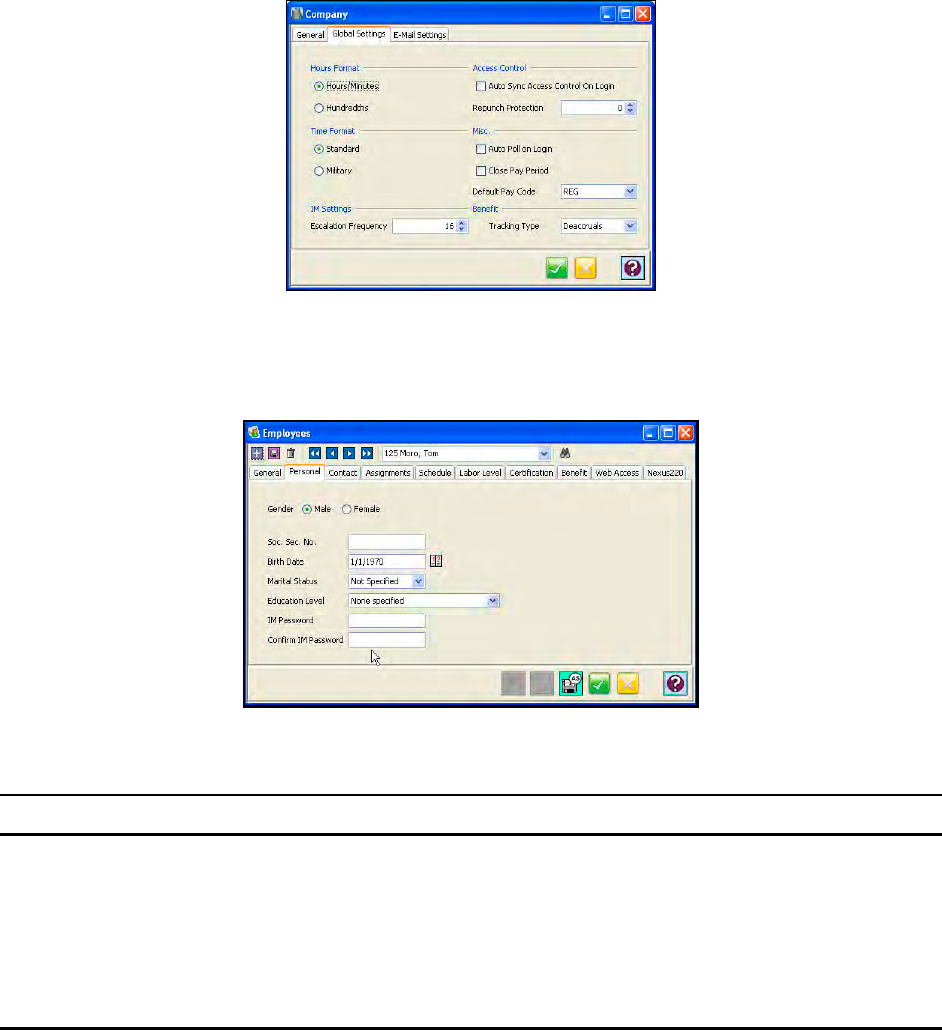
Time Guardian Series – Events Notification Module 20-3
The Time Guardian Series software sections affected and/or features added from the activation
of this module include:
• Instant Messaging Profile (IM/E-mail [event] notification)
− Notification base on Pay Code Threshold
− Notification Exception selection
− Absence notification by Threshold
• Company
− Escalation frequency in minutes is set on the Company Global Settings Tab screen for
event notification (see figure).
• Employee
− IM password is set on the Employees Personal Tab screen (see figure).
Using Events Notification Module
The IM Profile module is used to configure profiles for the Instant Messaging (Jive Messenger)
system. Profiles are created to inform the supervisor of exceptions, absences, warnings, etc., in
real-time, when they occur instead of after-the-fact.
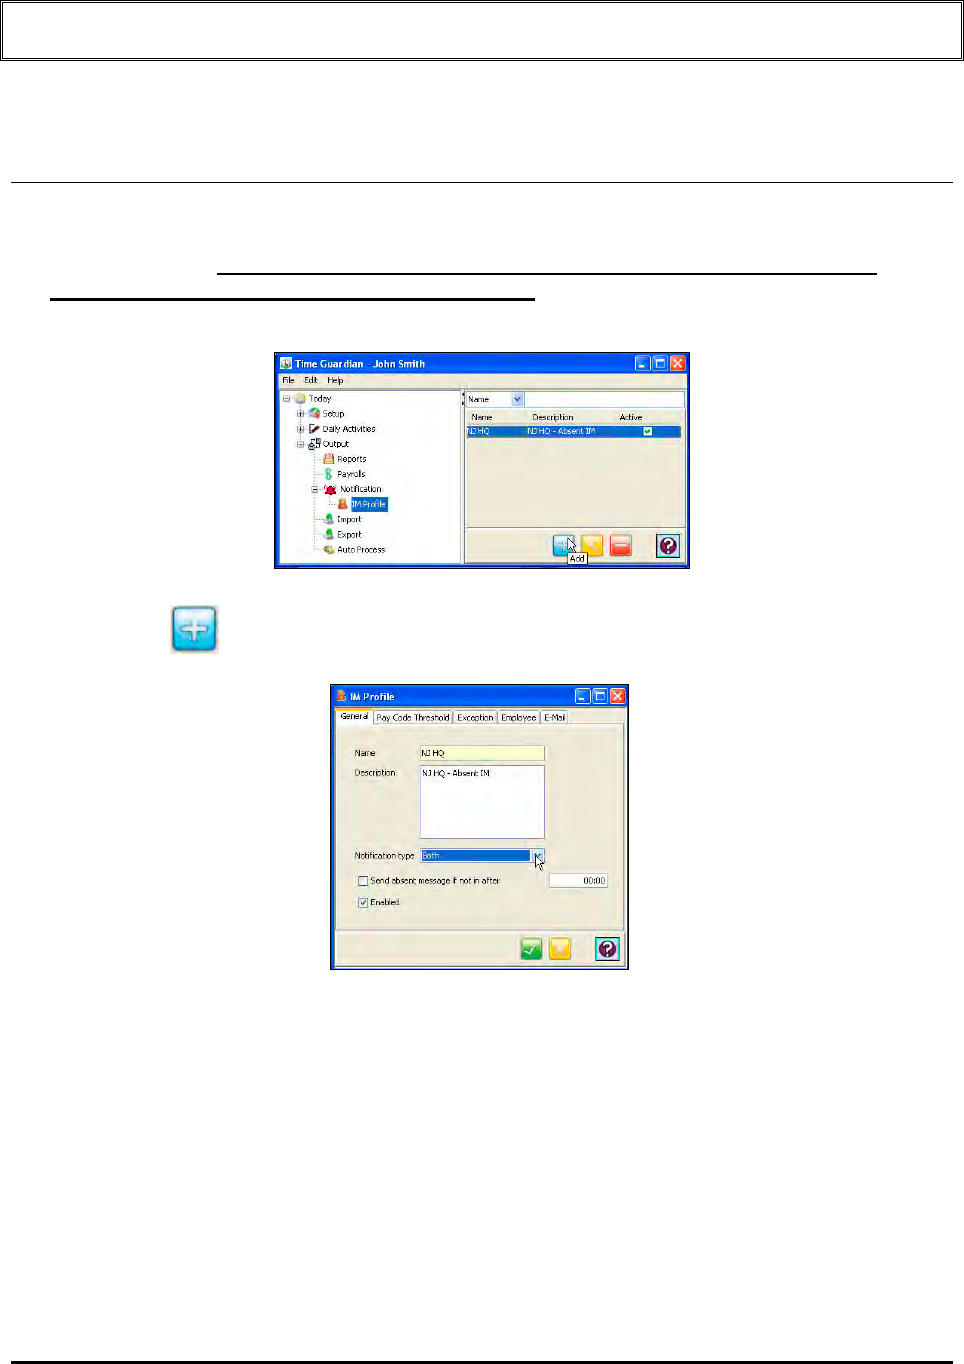
20-4 Time Guardian Series – Events Notification Module
Note: Due to the complexity of the configuration of the Events Notification Module, Amano
recommends using Support to assist in setting up your Instant Messenger (IM) service.
Creating an IM Profile
1. Click on the IM Profile node within the Output/Notification modules in the Tree View (see the
following figure). The IM Profile node will only be visible in the tree view after the
Events Notification Module has been activated. See “Software Activation Guide” for
software activation procedure.
2. Click on the button, and the following IM Profile window will appear:
3. In the Name field, enter a name for the IM Profile [required field].
4. Enter a brief description of the IM Profile in the Description field.
5. In the Notification type field, select either; Both, Jive Messenger, or E-Mail.
6. The Send absent message if not in after option is used to send am IM/E-mail (event)
notification to a supervisor if employees are absent or late beyond a specified time after their
start time. To enable this option, place a check in the checkbox, and enter the amount of
time (HH:MM) that will trigger the notification in the field provided.
7. Check Enabled to activate the IM Profile. For example, no e-mail will be sent by the system
if this box is not checked.
8. Click on the Pay Code Threshold tab. This tab enables you to set an IM/E-mail (event)
notification based on certain Pay Code conditions.
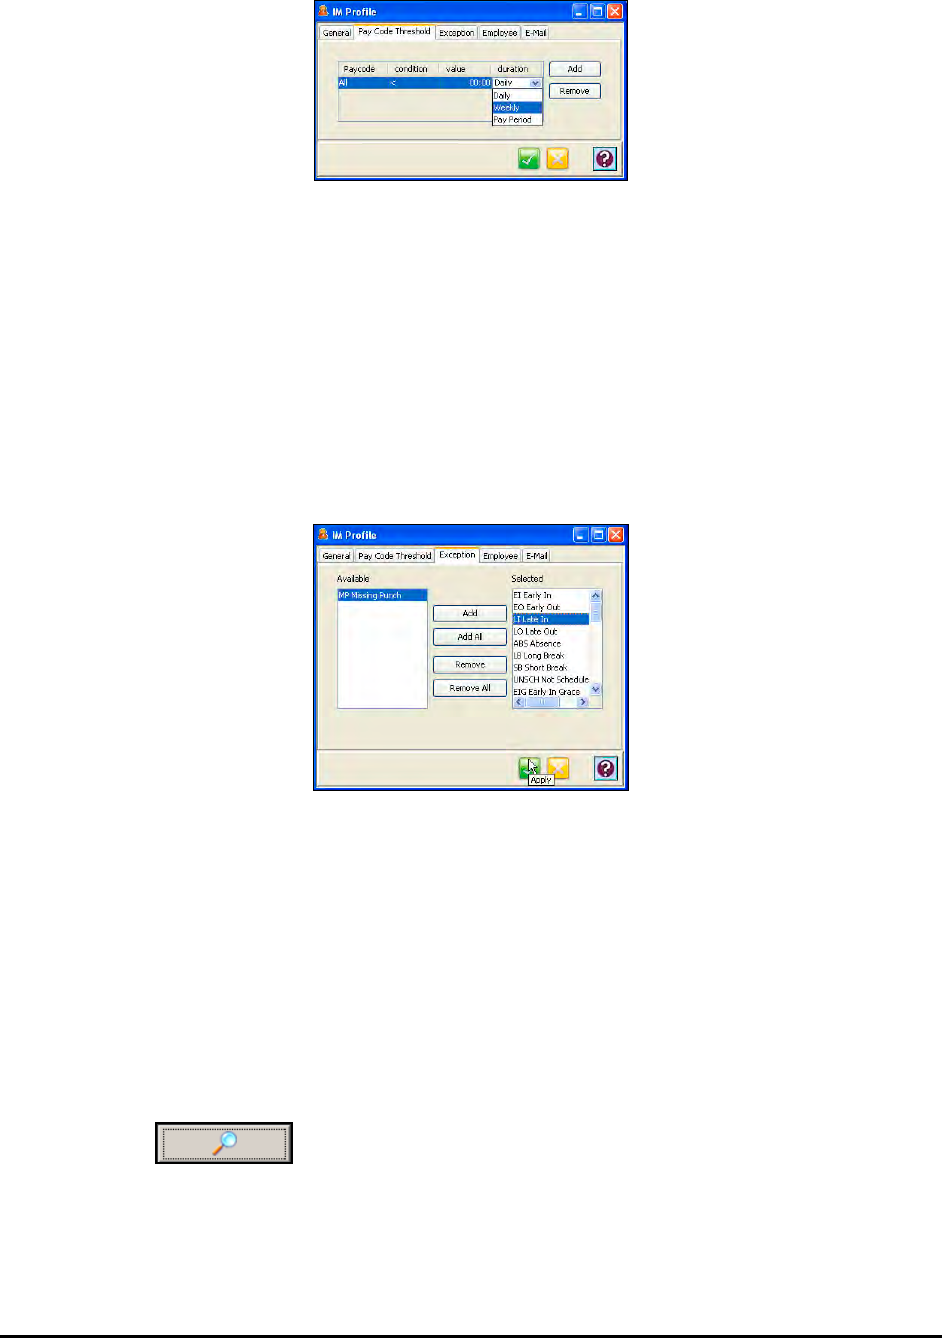
Time Guardian Series – Events Notification Module 20-5
To add a condition, click on the Add button and enter the following:
• Pay Code: Select All or individual Pay Codes.
• Condition: Select <, <=, =, >, or >=.
• Value: Enter a time threshold (HH:MM) for the selected Pay Codes.
• Duration: Select Daily, Weekly, or Pay period.
To remove a condition, select a row and click on the Remove button.
9. Click on the Exception tab. This tab enables you to receive an IM/E-mail (event) notification
when the selected Exceptions are generated.
• To select an Exception, highlight the desired Exception in the Available list and click on
the Add button.
• To select all Exceptions from the Available list, click on the Add All button.
• To remove an Exception from the Selected list, highlight the desired Exception in the
Selected list and click on the Remove button.
• To remove all selected Exceptions, click on the Remove All button.
10. Click on the Employee tab. This tab enables you to select employee for IM/E-mail (event)
notification.
11. To filter/add employees for IM Profile, click on the Employee tab, select the employee, and
click on the button. The Employee Filter window will appear:
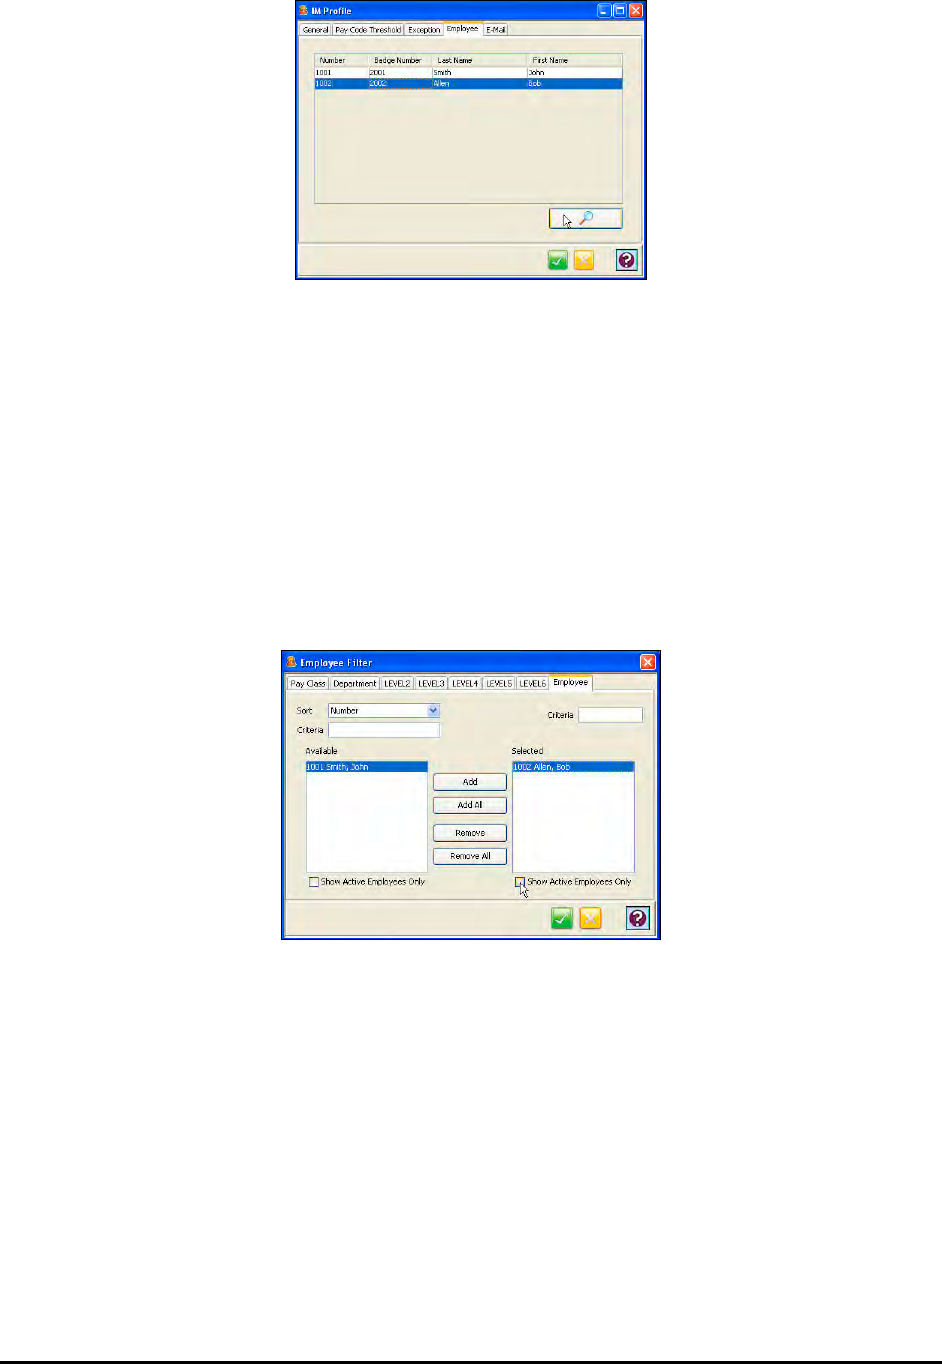
20-6 Time Guardian Series – Events Notification Module
The Employee filter is deeper as it acts upon the previous filter from the Pay Code
Threshold and Exception tab to sort out employees by selecting the Pay Class, Department,
Labor Levels, and Employee tabs. Employees that are assigned to the selected Pay Class
and/or Department/Labor Level will appear in the Available list. Also, you can use the
Employee tab to sort the employee list using; Number, Badge, Payroll, Last Name, First
Name, and Comment, and then apply the criteria.
To add an employee to the IM Profile, highlight the desired employee in the Available list
and click on the Add button. To select all the listed employees, click on the Add All button.
To remove an employee from the IM Profile, highlight the desired employee in the Selected
list and click on the Remove button. To remove all the listed employees, click on the
Remove All button.
Employees can be sorted by (Employee) Number, Badge (Number), Payroll (ID), Last
Name, First Name, or Comment using the Sort field.
Employees can be filtered in both the Available and Selected lists by entering data into the
Criteria field above each list. Only employees matching the data entered will appear in both
lists. Also, employees can be filtered by clicking alongside “Show Active Employees Only.”
• To select an employee, highlight the desired employee in the Available list and click on
the Add button.
• To select all employees from the Available list, click on the Add All button.
• To remove an employee from the Selected list, highlight the employee in the Selected
list and click on the Remove button.
• To remove all selected employees, click on the Remove All button.

Time Guardian Series – Events Notification Module 20-7
12. From the IM profile screen, click on the E-Mail tab. This tab enables you to define e-mail
notification parameters.
On this screen define the From, To, Subject, and Message fields for system generated e-mail
(see Auto Process Module and Company Module – Global and Notification Settings).
13. From the IM profile screen, click on the To button to use the Address Book and select
recipients from the dropdown choices of Employees (employees in the system with e-mail
addresses), or select Contacts from Outlook (e-mail addresses from Microsoft Outlook
address book).
Configuring the IM Server
1. Right click on the in the system tray in the lower right hand corner and click Launch
Admin.

20-8 Time Guardian Series – Events Notification Module
2. Select English, then click continue.
3. Change the Domain to the server's IP Address (as seen below), then click Continue.
4. In the Data source Settings screen, select Embedded Database and click Continue.
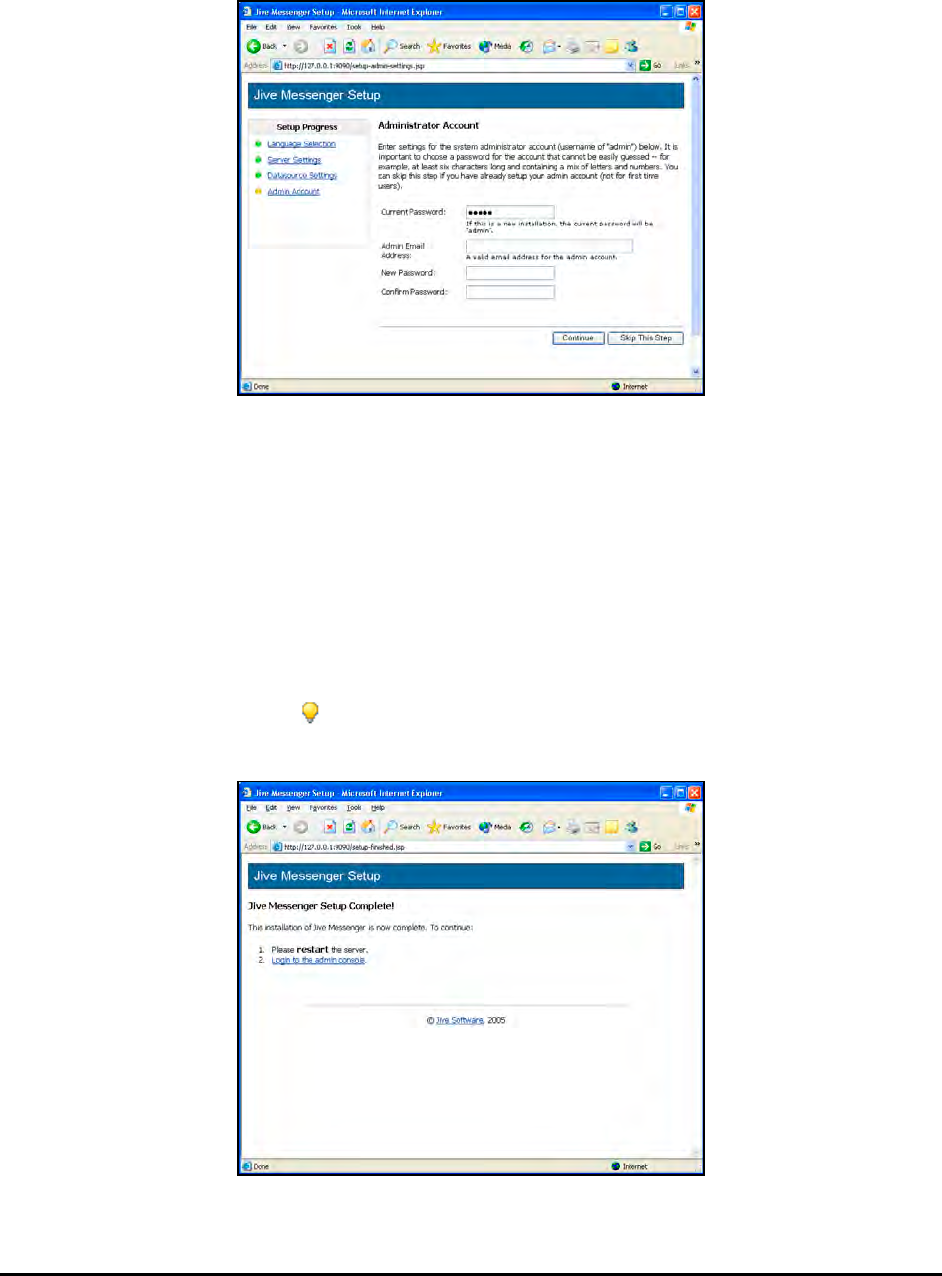
Time Guardian Series – Events Notification Module 20-9
5. The Administrator Account screen will appear.
Enter the following:
• Current Password: For new installations, the default current password is admin.
• Admim Email Address: Enter the e-mail address of the Admin or computer that the Jive
Messenger Server is installed on.
• New Password: Enter a new password for admin account. If you do not want to change
the password for the admin user, click Skip This Step button.
• Confirm Password: Enter the same password as above.
6. The Jive Messenger Setup Complete screen will appear. The IM Server must be restarted.
To do so, right click on the in the system tray on the lower right hand corner and click
Launch Admin.

20-10 Time Guardian Series – Events Notification Module
7. The Jive Messenger Screen will appear. Click on Stop and the Start to restart the Jive
server.
Configuring the IM Client
First Time Setup
1. Select IM Client from the Start Menu or your Desktop from the Time Guardian folder, and
the following screen will appear:
2. Enter in the Username and Password you wish to login as. Click Save Password if you want
to save the Password on the computer.
3. In the Server field, enter the IP Address of the IM Server.
4. Click Save.
5. Restart the IM Client and login.
Editing an IM Profile
1. Select IM Client from the Start Menu or your Desktop.

Time Guardian Series – Events Notification Module 20-11
2. Click on the button in the lower left hand corner, and select Profile| Edit Account from
the menu.
3. The Profile Editor screen will appear.
4. Enter the changes to the Profile and click Save.
5. Restart the IM Client and login.
6. Change the Domain to the server's IP Address, then click Continue.
20-12 Time Guardian Series – Events Notification Module
7. In the Data source Settings screen, select Embedded Database and click Continue.

Time Guardian Series – Benefit Time Module 21-1
Chapter 21: Benefit Time Module
Benefit Time Module Introduction
The benefit time Module provides de-accrual which allows the user to track benefit time an
employee has accumulated and used. The de-accrual is a manual process by which the user
manually tells the system how much benefit time the employee has. The system will deduct any
time the employee takes from the benefit Pay Code selected. It consist of:
1. Supervisor Time Card will check balance before authorization.
2. Supervisor Advanced scheduling check balance before authorization.
3. Employee balance.
The Time & Attendance software sections affected and/or features added from the activation of
this module include:
• Company
− Benefit tracking Type (De-Accrual or Import Balances)
• Employee configuration
− Employee Manual Balance Adjustment
− Employee Balance display
• Employee Time Card
− Display employee Benefit Balances for non-worked hours type Pay Codes
• Advanced Pay Class
− Benefit execution order
• Reports
− De-Accrual Balance Report
− De-Accrual History Report
Using the Benefit Time Module
Benefit Tab
Note: This feature will only be visible/allowed in the following instances when the Benefit Time
Module has been activated.
This tab allows you to adjust Benefit time for an employee. It also allows you to view Benefit
balances. This tab will only be visible if the Tracking Type on the Company module is select as
“DeAccrual” or “Import Balances”. If None was selected in this field, the Benefit tab will be
grayed out on the Employees screen.
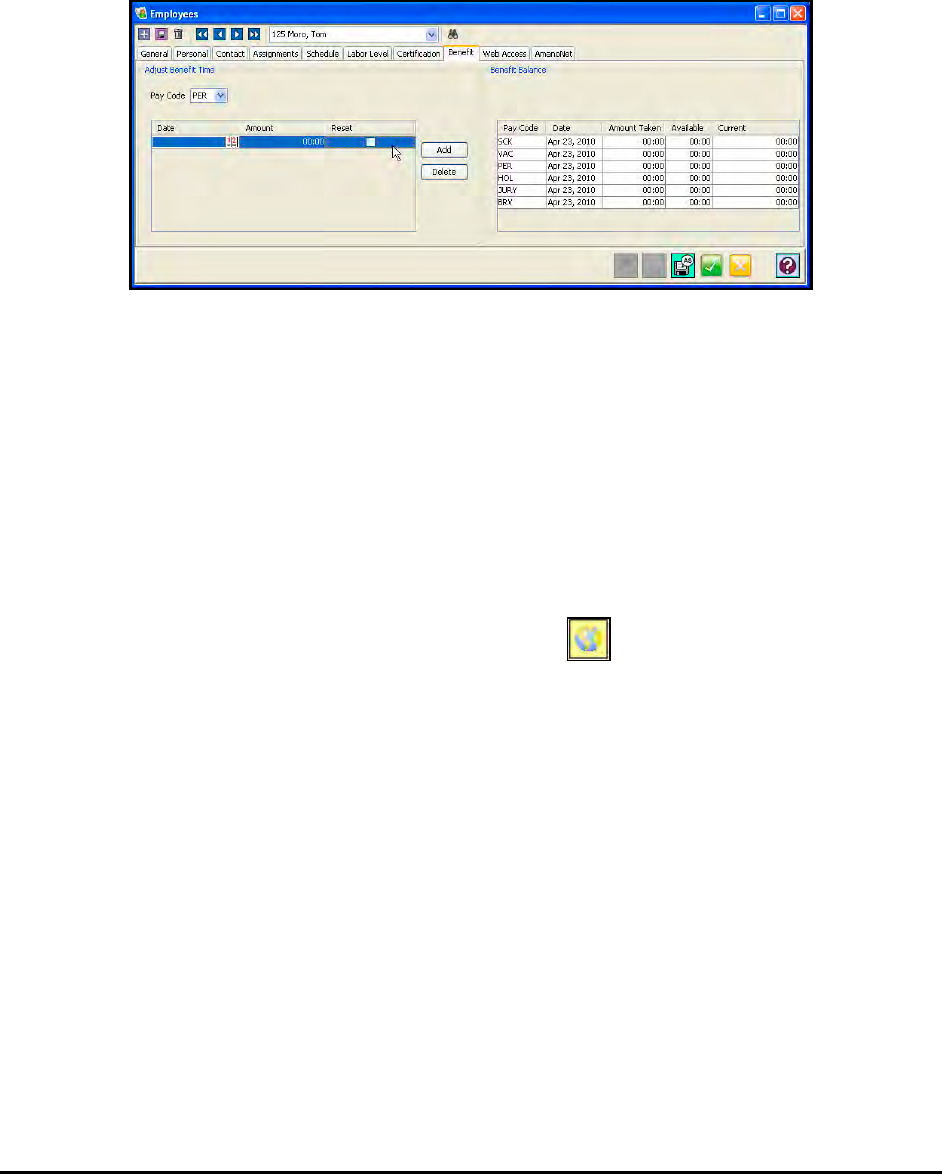
21-2 Time Guardian Series – Benefit Time Module
Note: If Import Balances has been selected from Setup Company Settings for Benefit
Tracking Type then the Add and Delete buttons to Adjust Benefit Time will be grayed out
because cannot adjust benefit time. When you import benefit balances you can only
keep track of how the imported amounts are used by showing Benefit Balance.
From the Employees screen, click on the Benefit tab and the following type of screen will
appear:
Select a Pay Code from the dropdown list. The choices are all non-work hours type Pay Codes;
SCK, VAC, PER, HOL, JURY, and BRV.
To adjust the benefit time for an employee, click on the Add button (Setup Company
Settings Tracking Type must be set to DeAccruals for Add to be enabled).
Click on the calendar icon to enter the date.
Click in the Amount field and enter the amount.
To reset the available amount to the entered value, check the Reset box.
The benefit balance for an employee will appear under the Benefit Balance column if the
Tracking Type has been previously set to DeAccruals or Import Balance.
Note: This function can also be done with Global Assign from the main employee list.
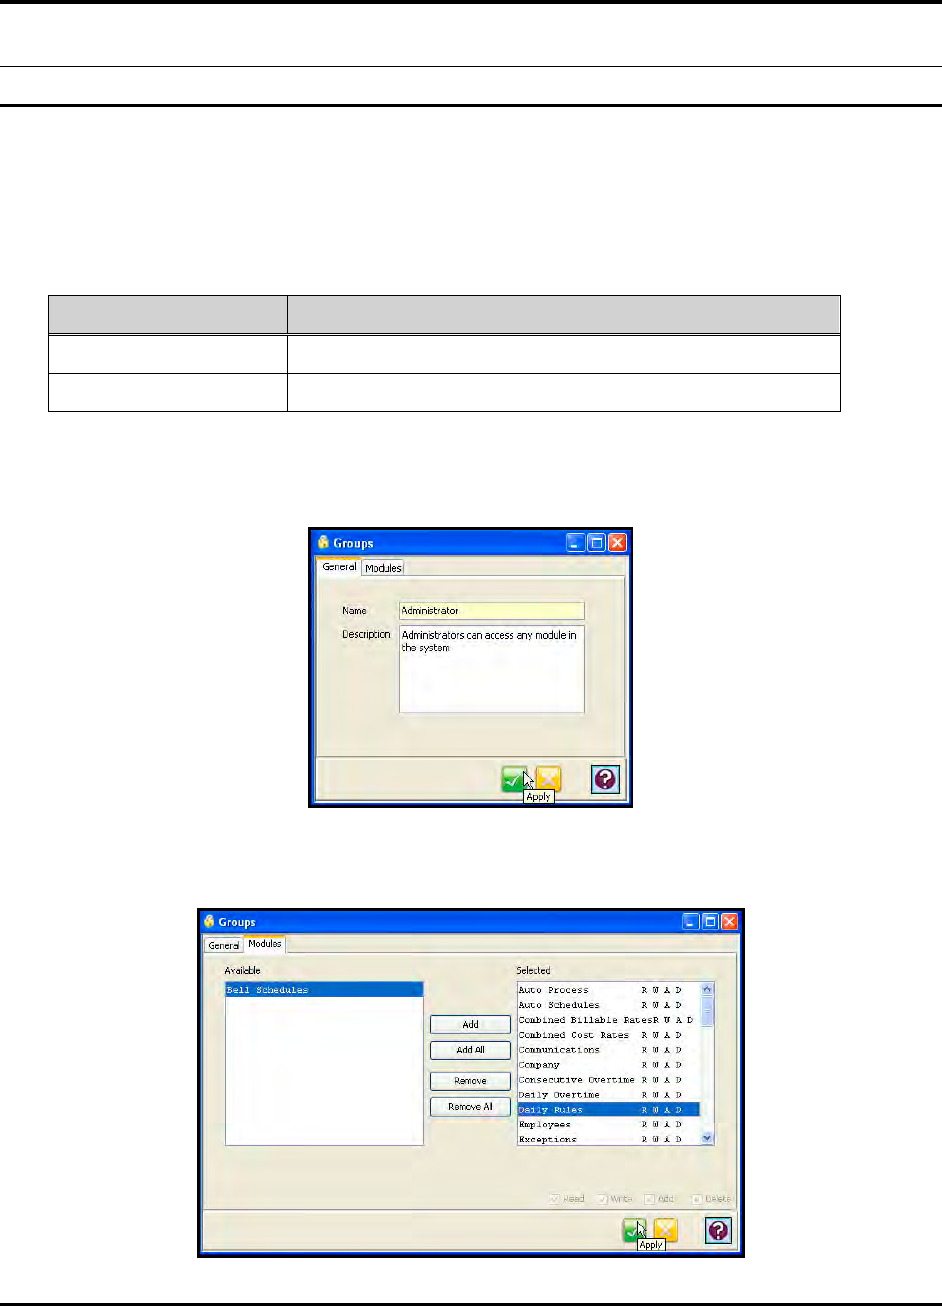
Time Guardian Series – User/Group Module 22-1
Chapter 22: User/Group Module
User/Group Module Introduction
This optional module allows the creation of user groups that can define rights (Read, Write, Add,
and Delete) for user selected Modules. For example, a Payroll Supervisor Group could be the
only group allowed to see Wages.
The Time & Attendance software sections affected and/or features added from the activation of
this module include:
Software Feature Software Configuration Location
User Setup Wizard, Main Application Tree view
Group Main Application Tree View
− User creation View
− Group creation view
Note: This module will be included with any optional module. It is not be available in the basic
software package.
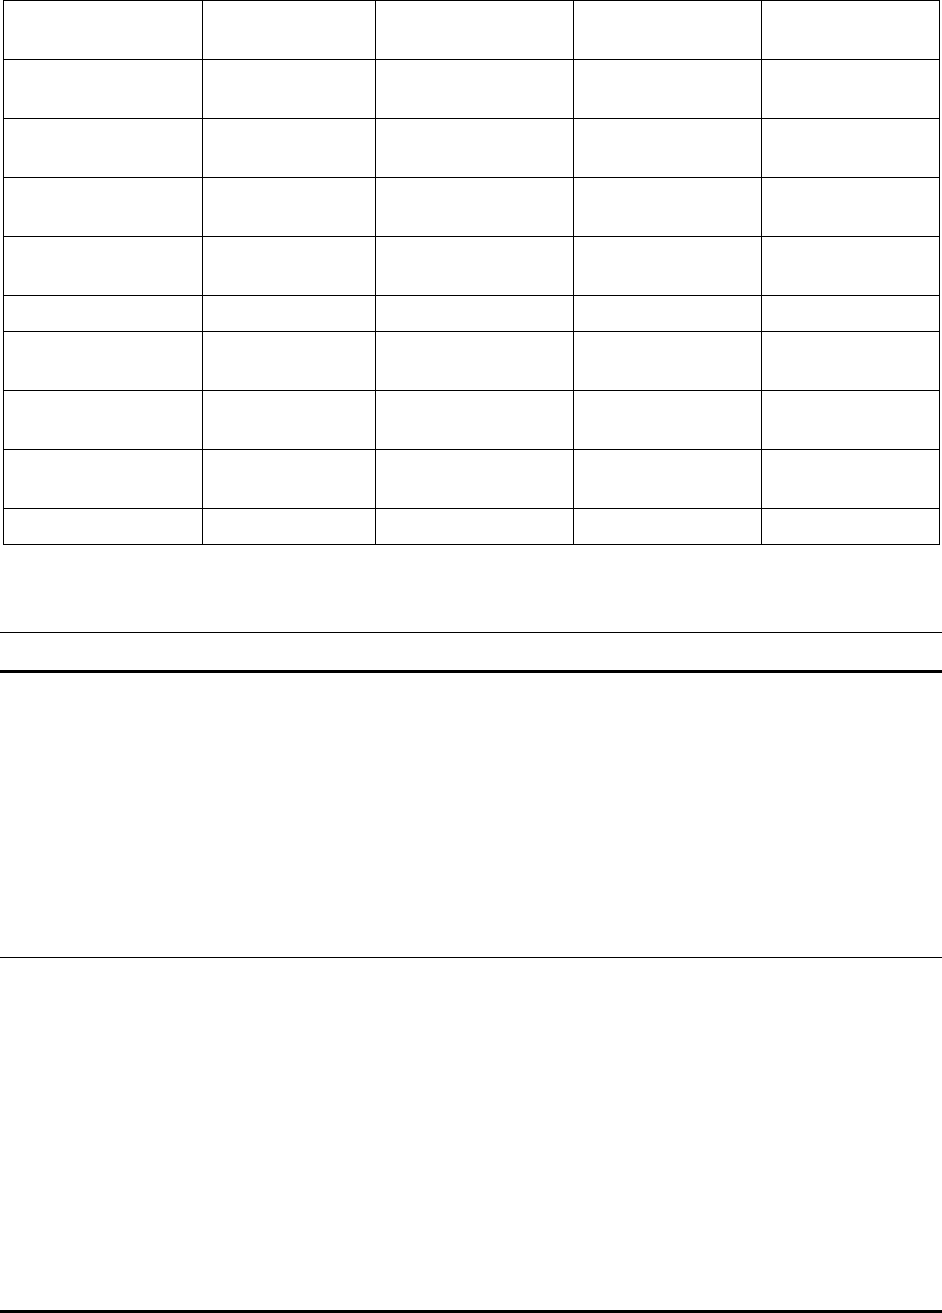
22-2 Time Guardian Series – User/Group Module
The following table is a list of Time and Attendance Modules controlled by User/Group Access
Auto Process Employees Locations Rate Setup Template
Schedules
Auto Schedule Exceptions Meal Template Rate Template Terminal
validation
Bell Schedules Export Outside Shift
Overtime Recalculate Timecards
Combined Billable
Rate Group Pay Class Reports Users
Combined Cost
Rates Holiday Pay Codes Rounding
Templates Weekly Overtime
Communication Holiday Group Pay Periods Schedule Zone Award
Company IM Profile Payrolls Schedule
Coverage Zone Codes
Consecutive
Overtime Import Period Overtime Schedule Rotation Zone Differential
Daily Overtime Individual
Schedule Qualification Rules Shift Overtime
Daily Rules Labor Levels Range Overtime Shifts
Using the User/Group Module
The User/Group module in the Setup group is used to create user profiles/accounts and assign
access privileges to these accounts. This is accomplished through the use of User ID’s,
Passwords, and Groups (access levels). Groups are specific levels of rights and accessibility
privileges. These levels are custom to your company’s needs and are created in the Groups
module, which is beneath the Users module in the Tree View. Groups must be created before
Users can be assigned.
Groups
Access privileges are defined in the Groups selection from the optional User/Group Module in
the Tree View. This module is only visible after it has been activated.
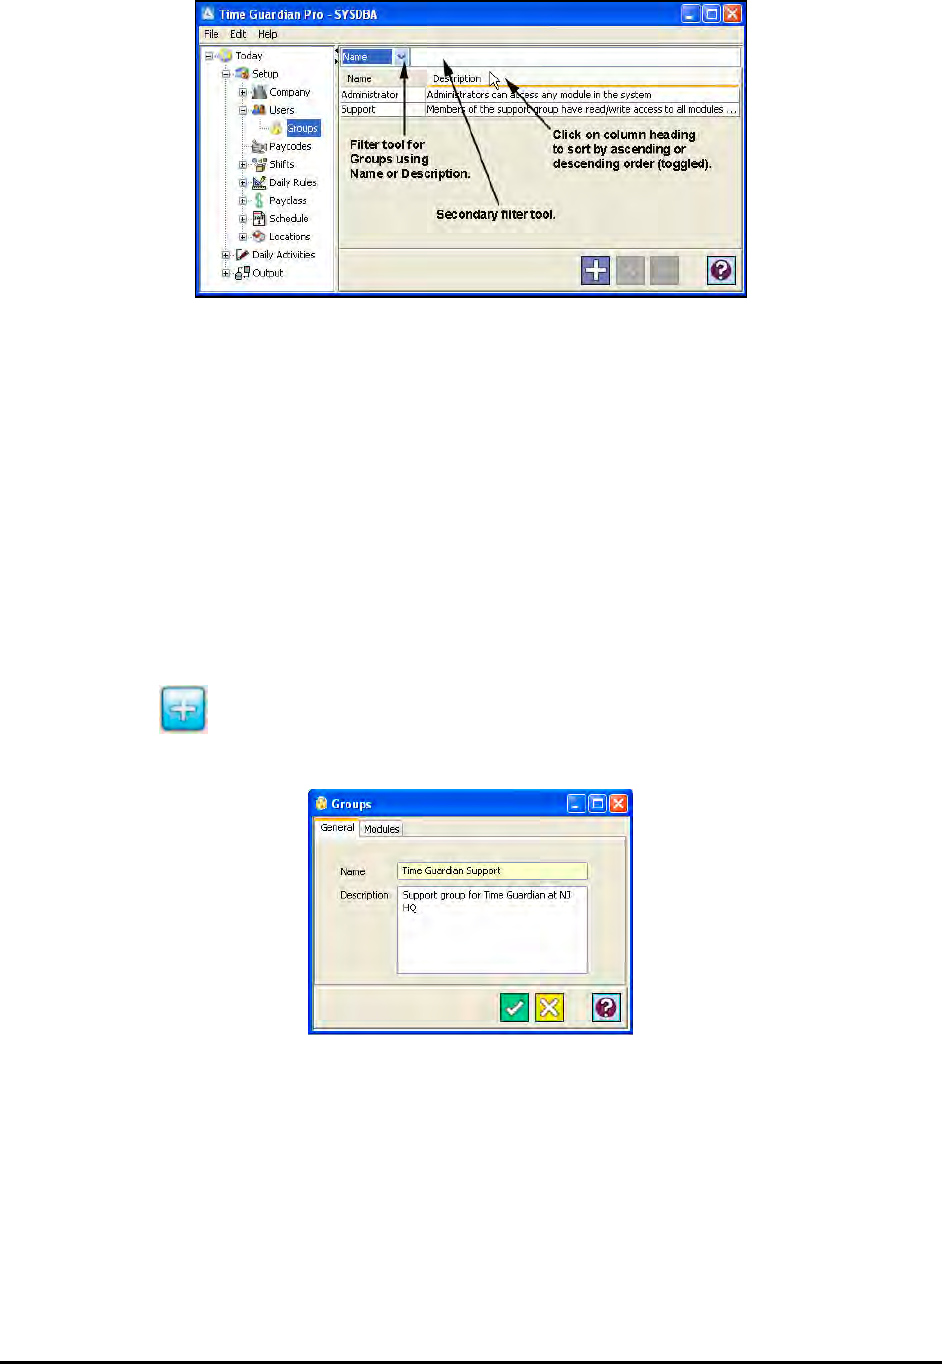
Time Guardian Series – User/Group Module 22-3
Note: The Administrator and Support Groups are default groups and cannot be deleted.
User Groups can be initially filtered in ascending order by using a field with a dropdown list
located on the top of the groups window (see above illustration). The choices in this list are;
Name or Description.
Additional filtering in ascending order can be accomplished by entering characters in a case
sensitive field located to the right of the dropdown list (see above illustration).
Click in the column headings anywhere to further sort both columns. Each click toggles between
ascending, or descending order.
To create Groups:
1. Click on the Groups module in the tree view.
2. Click on the button, and the following is an example of the Groups window that will
appear:
3. In the General Tab, enter a name and a description for the Group in the fields provided.
4. Click on the Modules tab, and the following type of window will appear:
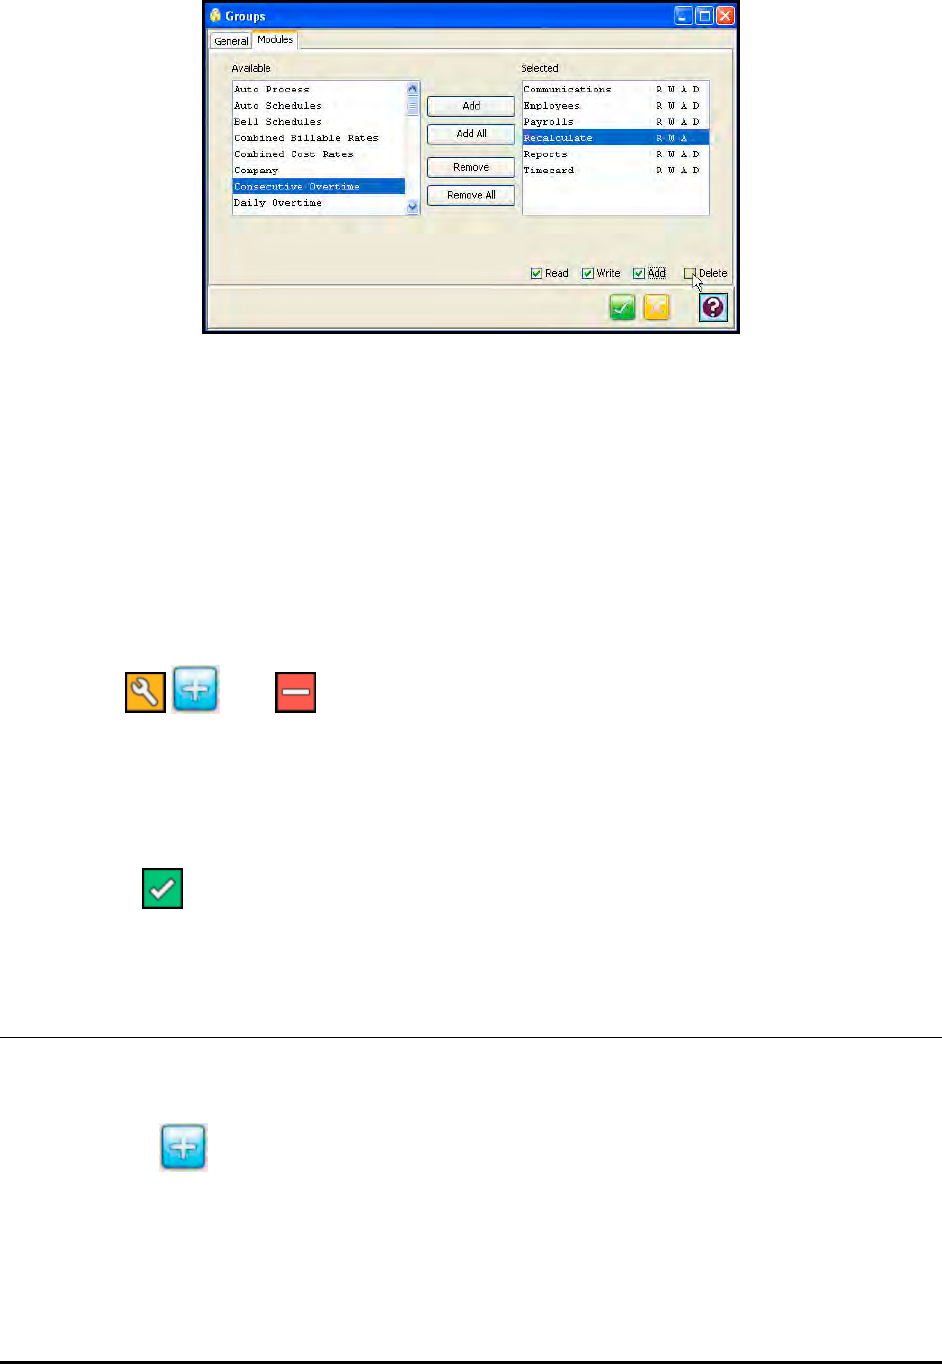
22-4 Time Guardian Series – User/Group Module
By default, all modules are selected for each new group and will appear in the Selected List.
When a module is highlighted or selected from within this list, the privileges or rights options
for that module will be enabled in the checkboxes below the Selected list. They are:
• Read: Read-only
• Write: Modify records in the module.
• Add: Add records in the module.
• Delete: Delete records in the module.
Placing or removing a check in each checkbox can modify the privileges or rights options. If
you disable the Write (Edit), Add, or Delete functions for the Group, the corresponding
buttons ( ,, and ) will be disabled when a user assigned to the Group is using
the software.
Modules can be removed from the Group by selecting them in the Selected list and clicking
on the Remove button. All the modules can be removed from the Selected list by clicking on
the Remove All button.
Note: For example, if you move Pay periods from the "Selected" list to the "Available" list, click
on the button to save, when someone from that Group logs in they will not be able
to access the Pay periods module.
User Accounts
To create a User account:
1. Click on the button with the Users module selected in the tree view, and the User’s
window will appear. The User’s window can consist of up to (9) tabs: General, Password,
Employee, and Department/Labor Levels (5).
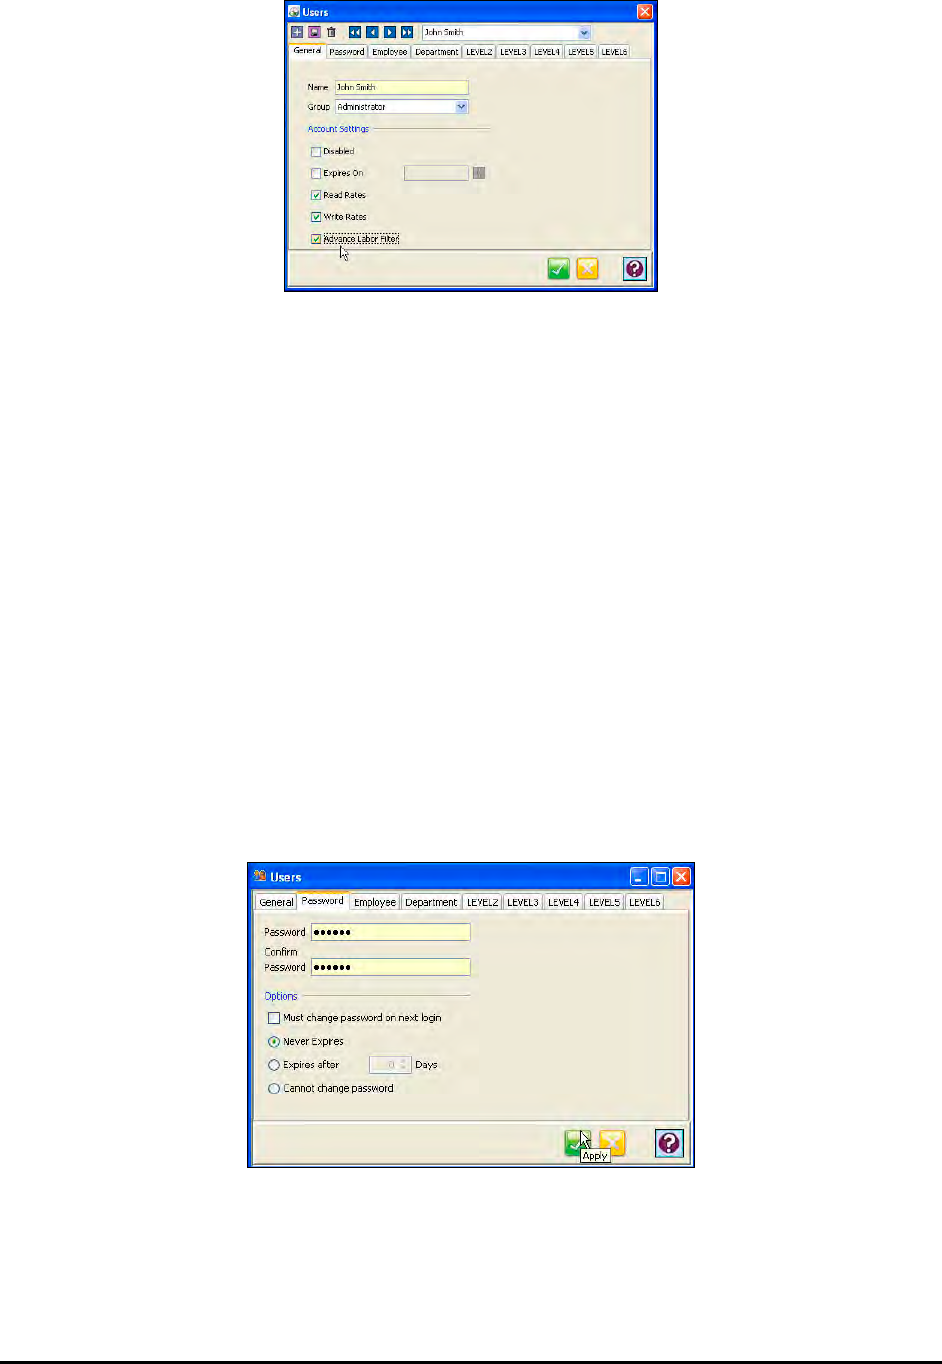
Time Guardian Series – User/Group Module 22-5
2. In the General tab, enter the name of the individual or account you are adding in the Name
field.
3. Select the Group that this user will belong to.
4. In the Account Settings section, select the following:
• Disabled: If checked, the user will be disabled. (Enabled is default)
• Expires: When checked, the password will expire on a given date. When the date
arrives, a check will automatically be placed in the disabled option.
• Read Rates: When checked, the user will have read-only access to the Rates’ modules.
THIS MUST BE CHECKED to have access to the Wages tab in Employees Module.
• Write Rates: When checked, the user will have write access to the Rates’ modules. THIS
MUST BE CHECKED to have access to the Wages tab in Employees Module.
• Advanced Labor Filter: When checked, the user will have access to the Advanced Labor
Filter which provides the function to primary filter employee labor (labor transfer)
independent of secondary employee filter. THIS MUST BE CHECKED to have access
to the Labor Level tab in Employees Module.
5. Click on the Password tab.
6. Enter in a password for the user. The password must then be confirmed.
Note: The minimum required password length is (6) characters, and can be any combination of
letters and numbers and is case-sensitive.
7. Set the password expiration options. The choices are:

22-6 Time Guardian Series – User/Group Module
• Must change password on next login: The user will be prompted to enter a new
password for this account at login.
• Never expires: The password created will never expire.
• Expires after: This allows you to set a specific date for the password to expire. After this
date the user will be prompted to enter a new password.
• Cannot change password: The users will not be able to change their password.
8. Click on the Employee tab. This tab is used to set user access to employee records.
9. To filter/add employees for Users Group, click on the Employee tab, select the employee,
and click on the button. The Employee Filter window will appear:
The Employee filter is deeper as it acts upon the other filter from the Department/Labor
Level tabs to sort out employees by selecting the Pay Class, Department, Labor Levels, and
Employee tabs. Employees that are assigned to the selected Pay Class and/or
Department/Labor Level will appear in the Available list. Also, you can use the Employee tab
to sort the employee list using; Number, Badge, Payroll, Last Name, First Name, and
Comment, and then apply the criteria.
To add an employee to the Users Group, highlight the desired employee in the Available list
and click on the Add button. To select all the listed employees, click on the Add All button.
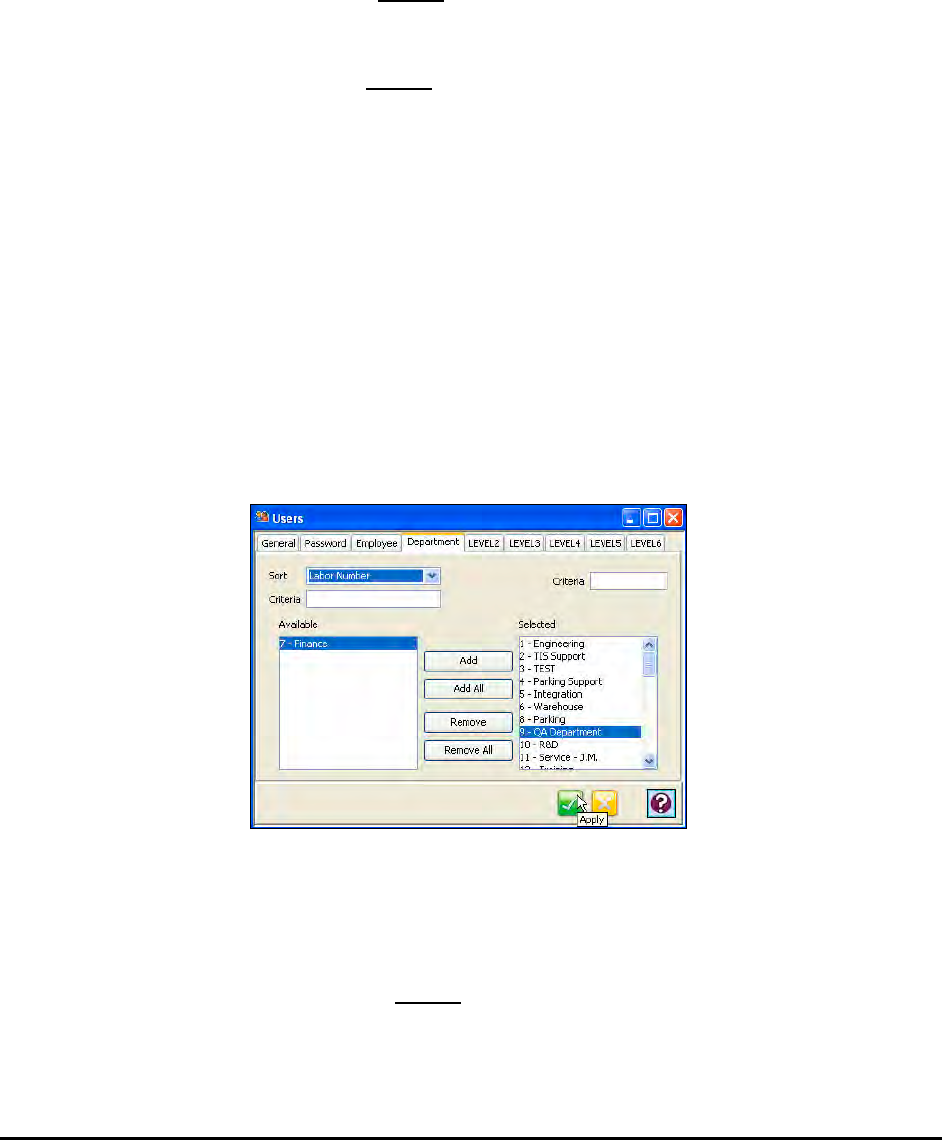
Time Guardian Series – User/Group Module 22-7
To remove an employee from the Payroll, highlight the desired employee in the Selected list
and click on the Remove button. To remove all the listed employees, click on the Remove
All button.
10. By default, all employee records are selected and will appear in the Selected list. Employees
can be removed from the Group by selecting them in the Selected list and clicking on the
Remove button. All the employees can be removed from the Selected list by clicking on the
Remove All button.
Employees can be simultaneously filtered in both the “Available” and Selected” lists in
ascending order by using the Sort field dropdown list. The choices in this list are; employee
number, badge number, payroll number, last name, first name, or comment field.
Additionally, Employee(s) can be filtered in the “Available” or “Selected” lists by entering
additional case sensitive characters in dedicated Criteria fields (see above illustration). The
Criteria field located above the “Available” list filters only that list, while the Criteria field
above the “Selected” list filters that list. Each list is filtered independently in ascending order.
Also, employees can be filtered by checking the “Show Active Employees Only” box for
each list independently.
Note: By unselecting Pay Classes, it will reduce the Employees that the user can have access
to.
Note: The Administrator and Support accounts cannot be deleted.
Note: By unselecting labor categories, it can reduce the Employees that the user can have
access to.
12. Click on the Department and/or Labor Level tab(s) [only active if “Advanced Labor Filter” is
selected]. These tabs can be used to set the labor categories within each department that
the user has access to. Note: If a labor level is marked red it has expired.
13. By default, all departments are selected and will appear in the Selected list. Departments
can be removed from the Group by selecting them in the Selected list and clicking on the
Remove button. All the labor categories can be removed from the Selected list by clicking
on the Remove All button.
Departments can be simultaneously filtered in both the “Available” and Selected” lists in
ascending order by using the Sort field dropdown list. The choices in this list are; labor
number, or name.

22-8 Time Guardian Series – User/Group Module
Additionally, labor categories can be filtered in the “Available” or “Selected” lists by entering
additional case sensitive characters in dedicated Criteria fields (see illustration). The Criteria
field located above the “Available” list filters only that list, while the Criteria field above the
“Selected” list filters that list. Each list is filtered independently in ascending order.
Note: By unselecting Departments, it can reduce the Employees that the user can have access
to.
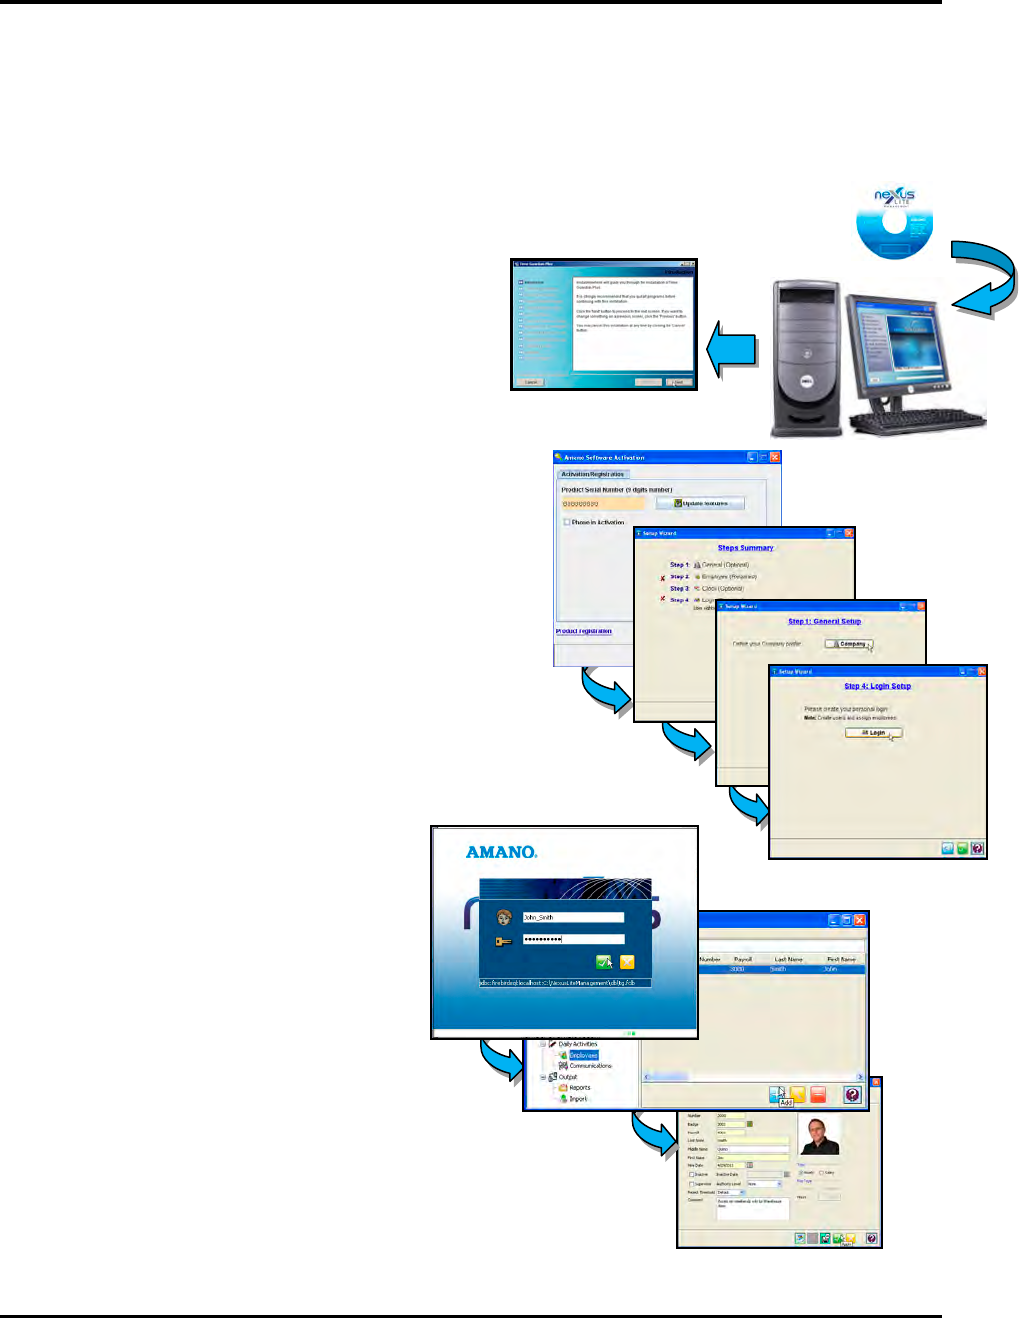
Time Guardian Series – Nexus Lite Module 23-1
Chapter 23: Nexus Lite Module
There are five documents available to assist you in the setup and use of your Amano Nexus
Lite Management (NLM) software: This Chapter of the Installation & User Guide, the Nexus Lite
Management Quick-Start Guide, the Nexus Lite Touch Screen Quick-Start Guide, the Nexus
Lite Web Interface Quick-Start Guide, and the Nexus Lite Controller Installation Manual. All of
these documents can be accessed and printed from the Nexus Lite Management (NLM)
software CD menu. An overview of the NLM software installation steps is as follows:
Step 1. Insert the Nexus Lite Management CD
into your CD-ROM drive, and the
CD Menu will automatically launch.
If the installation stalls, browse on CD to
\Disk1\InstData\Windows\VM\install.exe.
Step 2. After the initial software installation, the
Amano Software Activation screen will
appear. Enter the 9-digit serial number
and click the Activate button. Upon
successful activation perform on-line
registration. Next the user will be
prompted to proceed through the
4-Step Setup Wizard.
Step 3. Login to the Nexus Lite
Management (NLM) software,
and perform daily activities such
as create Access Groups and
employees, etc. The software
by default will support 100
employees. If you have more
than 100 employees, contact
Amano Support to obtain an
incremental upgrade from 125
to an unlimited number of
employees.
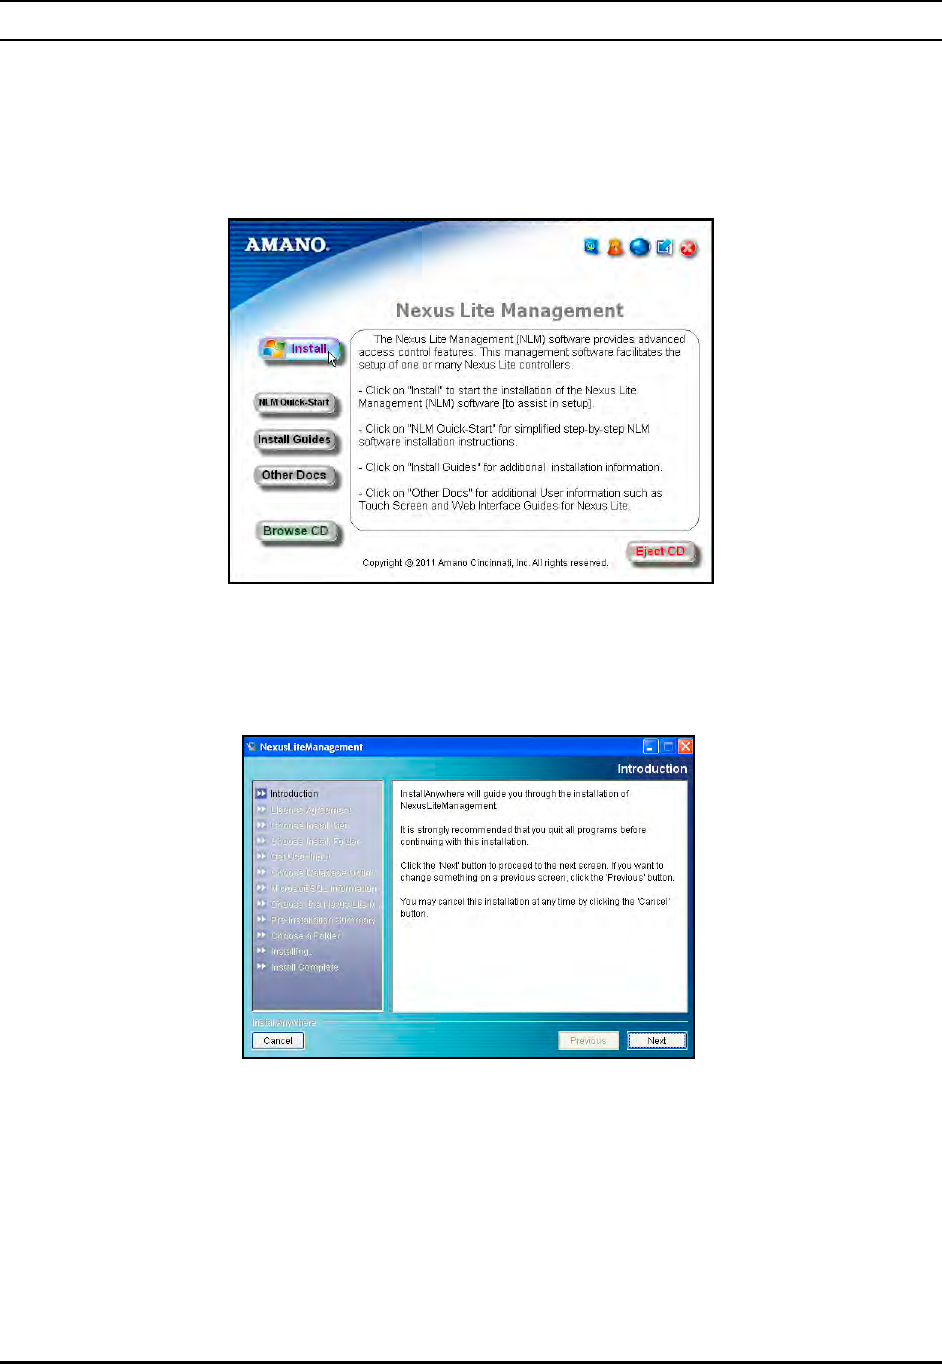
23-2 Time Guardian Series – Nexus Lite Module
Nexus Lite Management (NLM) Software Installation
The following discussion utilizes the Nexus Lite Management screens for illustrations. The
installation of the Amano Nexus Lite Management (NLM) software is as follows:
1. Insert the Amano CD into your CD-ROM drive. The software program should automatically
launch the Nexus Lite Management CD Menu (see figure)
2. Click the Install button and the software program should automatically launch the
InstallAnywhere® Wizard (see figure).
3. When the Introduction screen appears click on the Next button to continue.
4. The License Agreement screen will appear. Check the selection to accept the terms of the
License Agreement and click on the Next button. Clicking on “I do NOT accept…..” stops
the installation process.
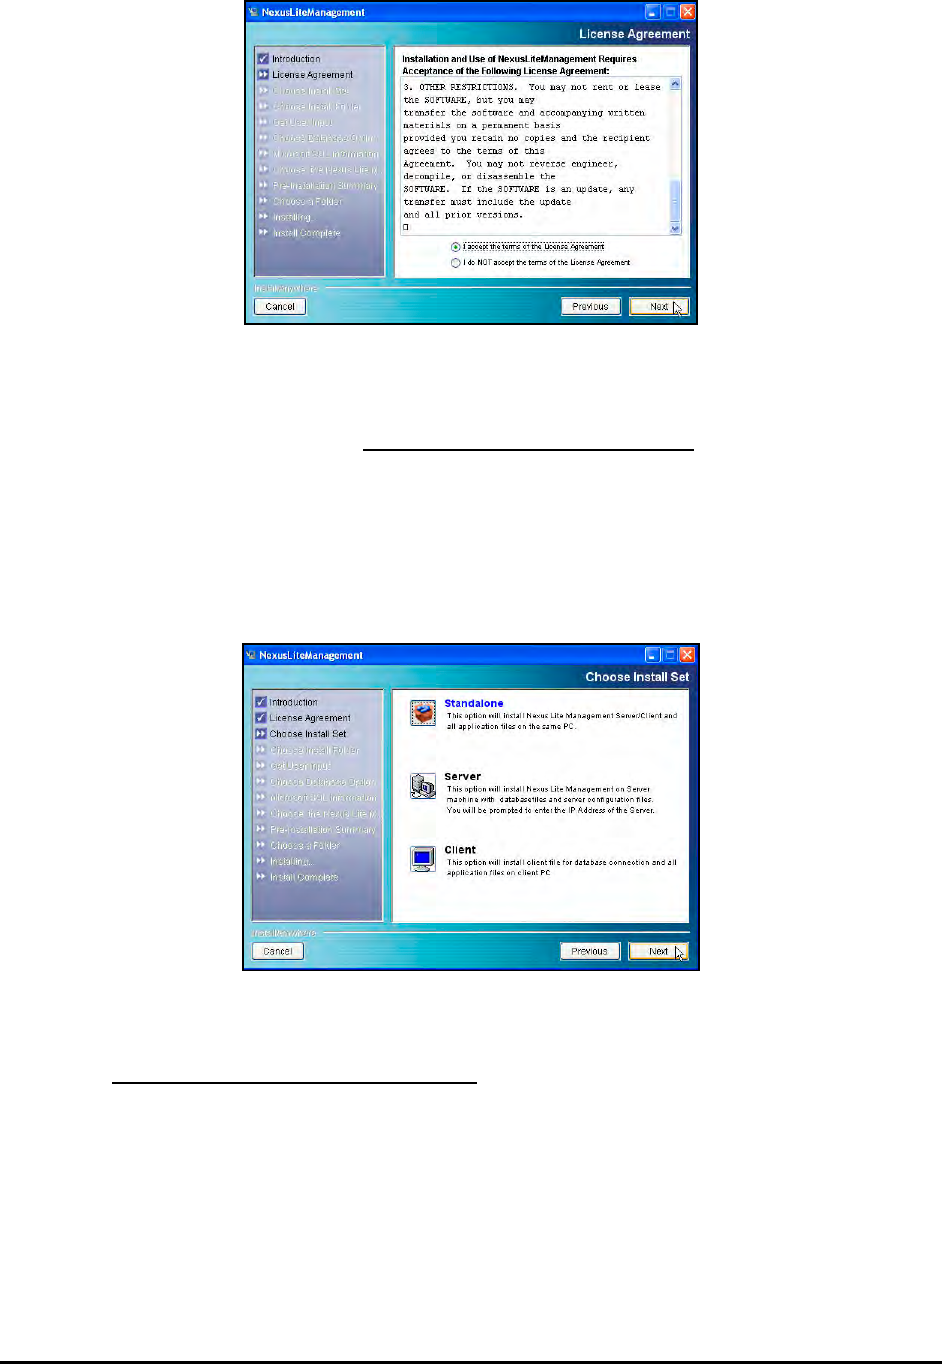
Time Guardian Series – Nexus Lite Module 23-3
5. The Choose Install Set screen will appear. Select one of the following options:
• Standalone: Installs both the NLM Software Server (database) and Client portion on the
same PC. This is the default. Press next to accept and continue.
• Server: Installs the NLM Software database on a server machine. You will be prompted
to enter the IP Address of the server.
• Client: Installs the NLM Software on a client PC to connect to the server database.
After you have made your selection, click on the Next button.
6. If Server was selected as an installation option, you will be prompted to enter the IP Address
of the Nexus Lite Management Software Server. Enter the IP Address and click on the Next
button. If you did not select server in Step #4, just click on the Next button to proceed to
Step #6. However, if Client was selected as an installation option, you will be prompted to
choose Nexus Lite Management Server Folder.
7. The Choose Install Folder screen will appear. The default installation folder will be
displayed. If you would like to install the Nexus Lite Management (NLM) Software in another
folder, click on the Choose button. To reset this field, click on the Restore Default Folder
button. After you have made your selection, click on the Next button.
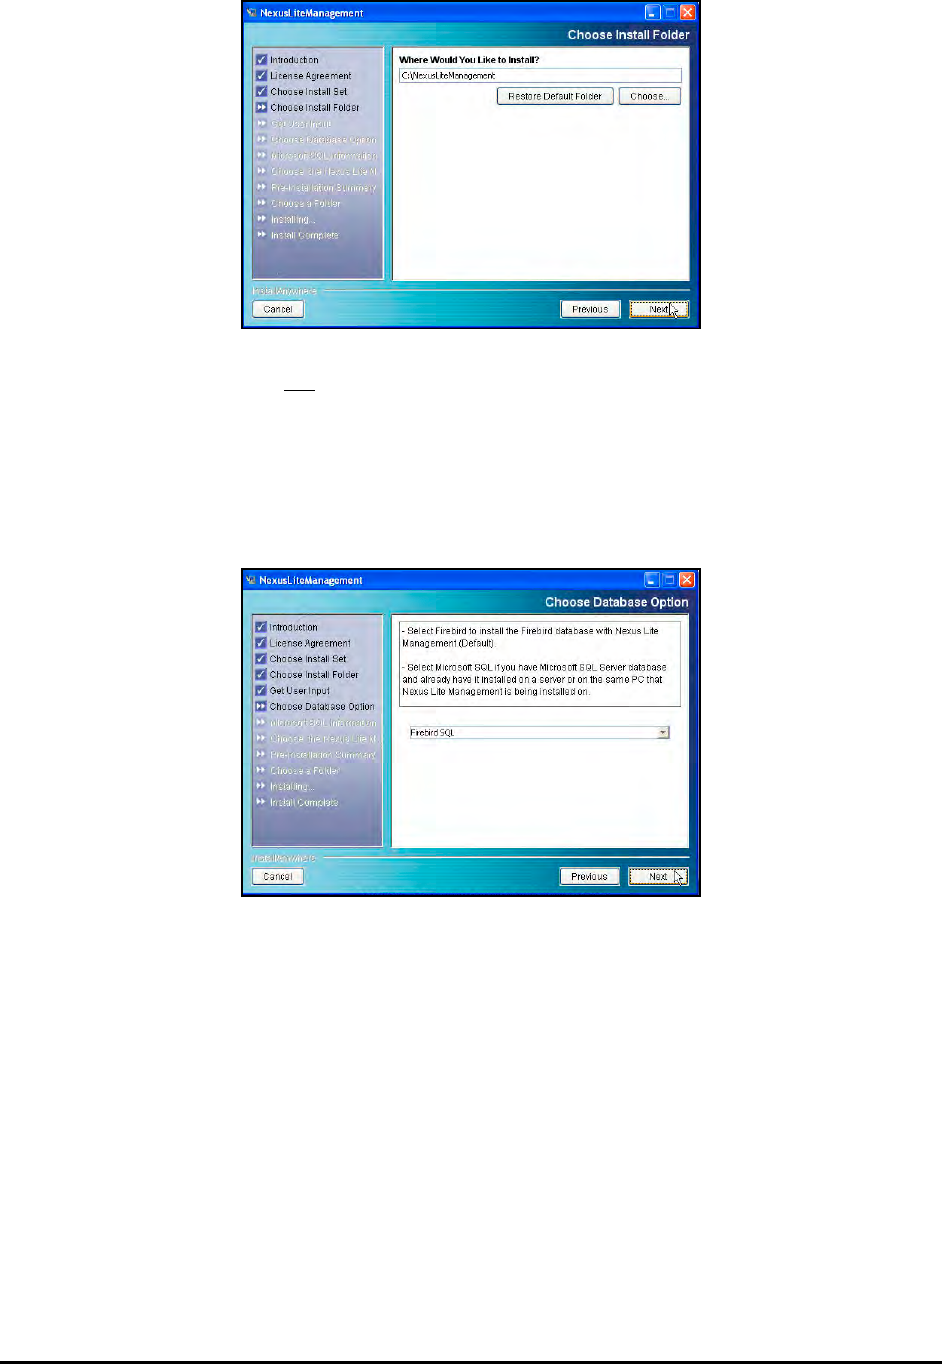
23-4 Time Guardian Series – Nexus Lite Module
Note: Amano recommends not installing the NLM software inside the “Program Files” folder.
8. The Choose Database Option screen will appear. Select either Firebird SQL or Microsoft
SQL and click on the Next button. If you chose Microsoft SQL, the Firebird Database
Service does not have to be installed.
Note: You must purchase Microsoft SQL separately, have it already installed and properly
configured.
9. If Microsoft SQL was selected as a database option, you will be prompted to enter the SQL
Server Name, Administrator's User Name, and Administrator's Password in the Microsoft
SQL Information screen. When you have finished entering the required information, click
on the Next button.
10. The Pre-Installation Summary screen will appear. Please review the displayed information
on the screen and click on the Next button to proceed.
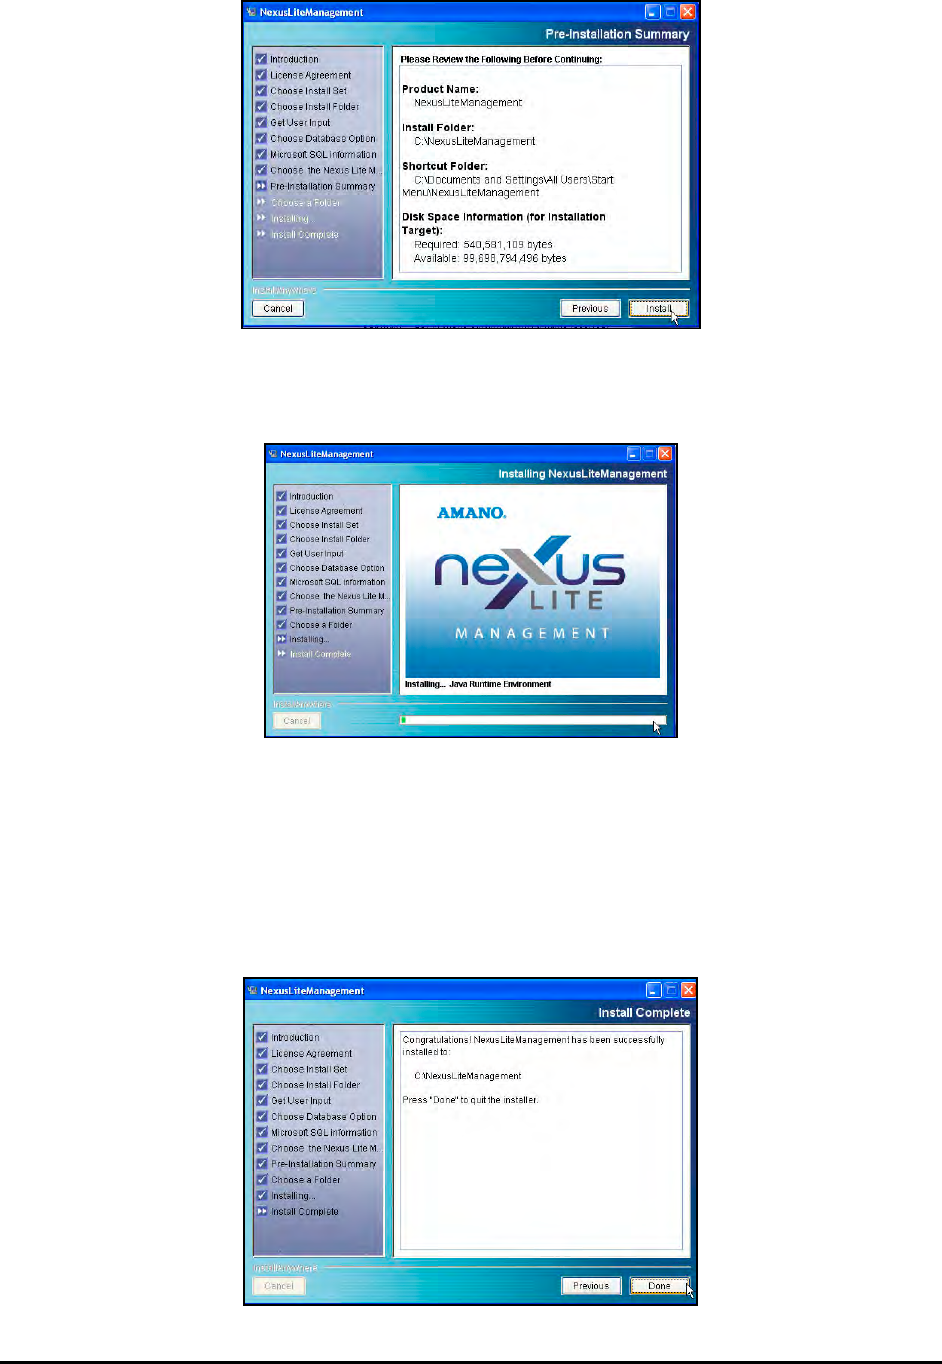
Time Guardian Series – Nexus Lite Module 23-5
11. The Installing screen will appear. The status bar on the bottom of the screen will display the
installation status.
12. At this point, the general install is complete and the installation utility will scan your PC for
Adobe Acrobat Reader®. If it is not installed, the installation utility will install it.
13. The Firebird Database Server will be installed.
14. Click on the Done button to finish the initial Nexus Lite Management (NLM) software
installation. The system will briefly prompt; “Please wait Nexus Lite Management is being
configured for your system….”
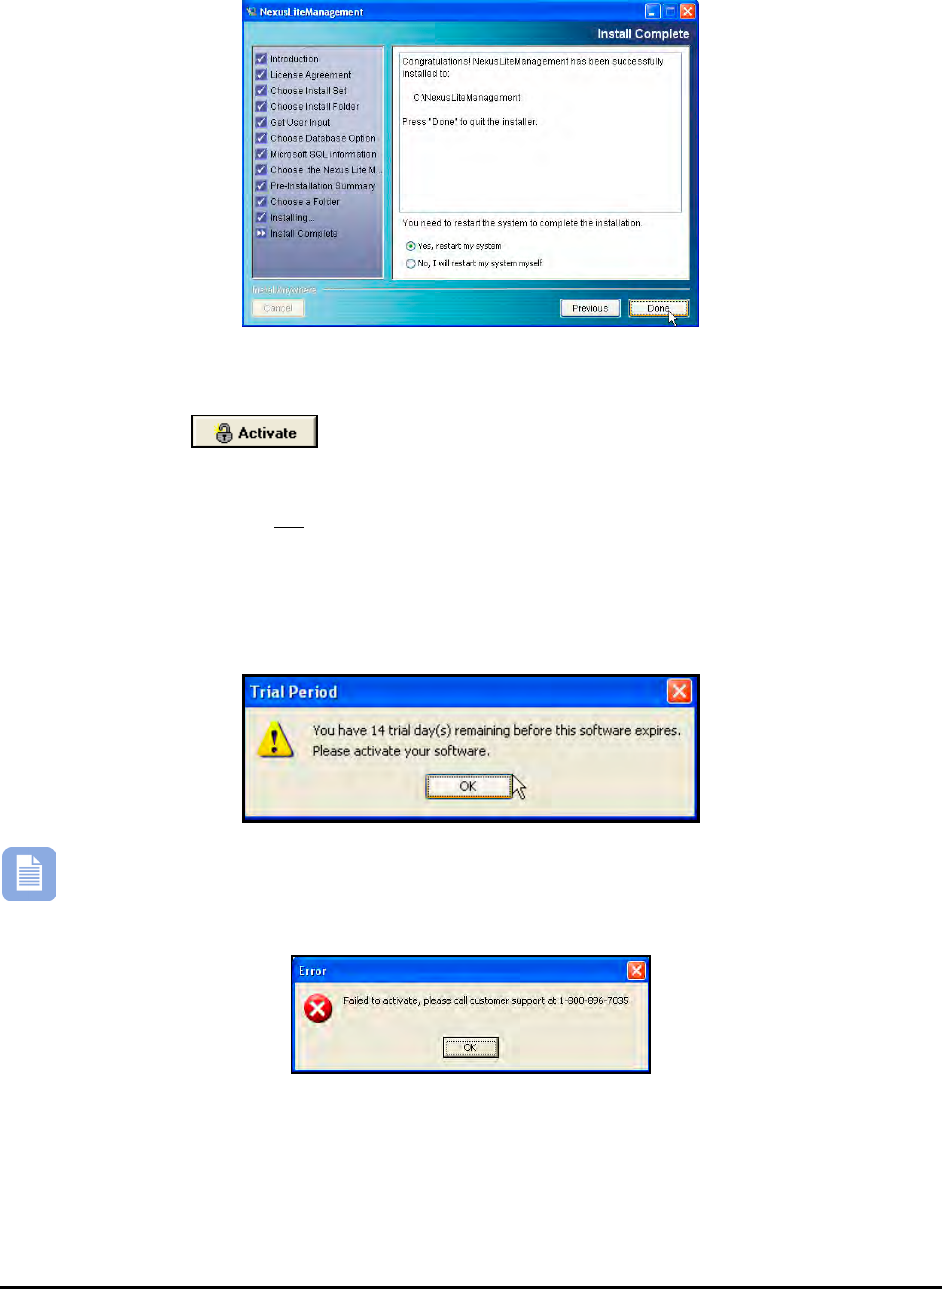
23-6 Time Guardian Series – Nexus Lite Module
15. Click on the Done button to finish the initial Nexus Lite Management (NLM) software
installation and restart your system.
16. The Amano Software Activation (ASA) screen will appear after the initial software installation
(see Figure). Enter the 9-digit Serial Number supplied on the Amano software CD and click
on the Activate button. Upon successful activation the dialog "Your Software
has been activated. Proceed to product registration" dialog will appear (skipping to
register).
However, if you choose not to activate the software by canceling the ASA procedure the
following error message will appear. At this point you have a trial period of up to 14-days to
use the software. Click the OK button to launch the software and continue using the Nexus
Lite Management (NLM) software under the trial period.
Note
– If the Activation error dialog appears, e.g., the serial number is incorrect, or the
same serial number was previously installed. At this point contact Amano customer
support at 1-800-896-7035.
17. Upon successful activation the registration screen will appear. Perform on-line registration
by entering the appropriate information in the Product Registration fields [red error
messages will appear alongside incomplete fields]. Amano recommends you complete
the registration to ensure notification of all important software updates, etc.
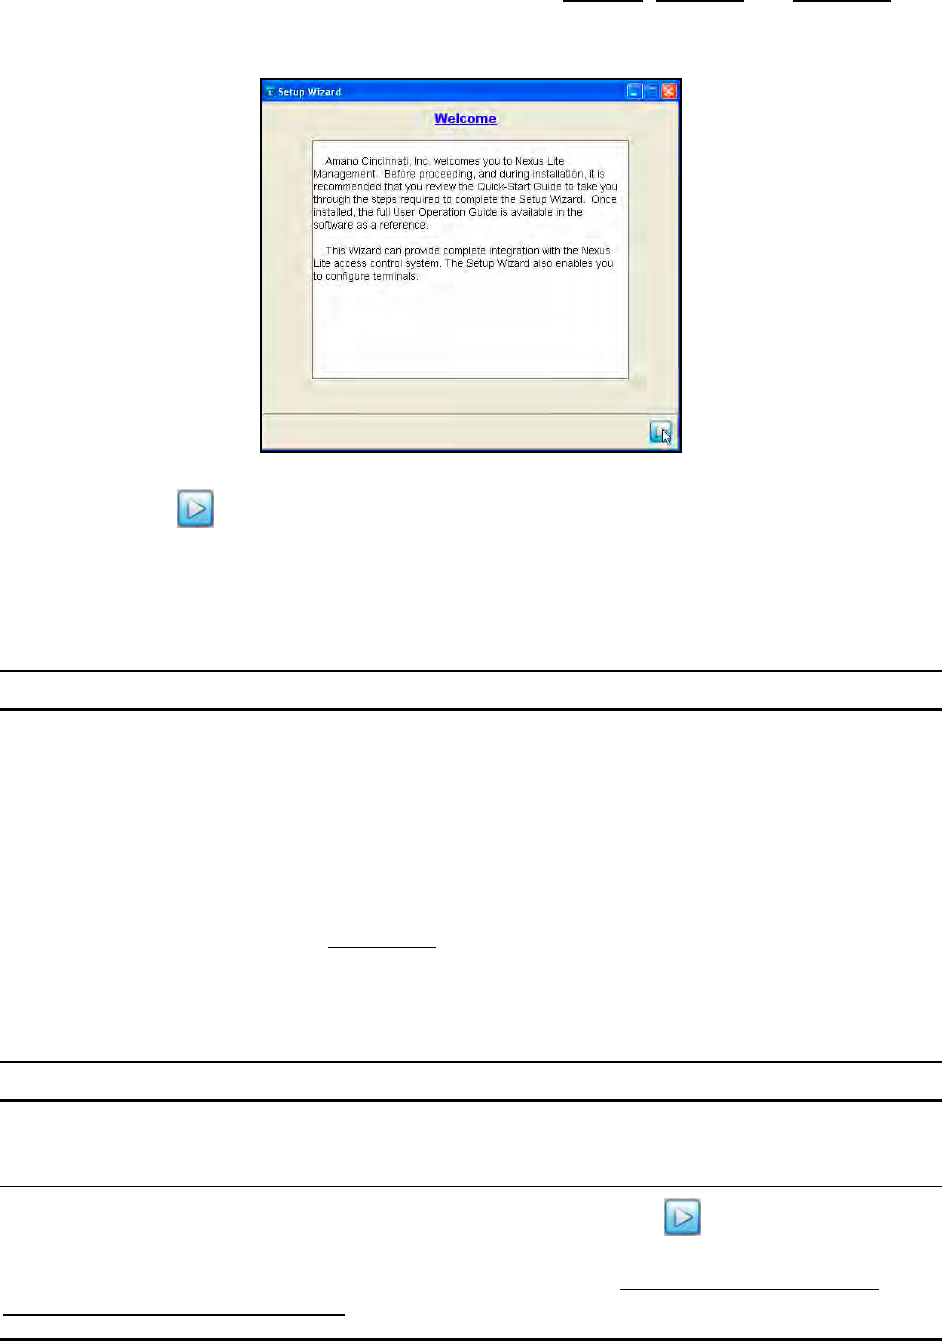
Time Guardian Series – Nexus Lite Module 23-7
18. After the Nexus Lite Management Software has been installed, activated and registered, the
Setup Wizard Welcome screen will appear (see figure for example). See Setup Wizard for
detailed setup instructions.
Click on the Next button to begin the Setup Wizard to configure the Nexus Lite
Management (NLM) Software and the Setup Wizard Steps Summary screen will appear (see
Using the Setup Wizard).
NLM Setup Wizard
It is recommended that you utilize the NLM Quick-Start Guide and/or reference this Installation
& Operation section as you proceed through the Setup Wizard.
The Setup Wizard will help guide the user through a seamless step-by-step initial configuration
of the Nexus Lite Management (NLM) software. As data is entered in each step the Setup
Wizard can be sequentially advanced to complete the next step. Once initial Setup Wizard is
complete and the Nexus Lite Management (NLM) software is logged into, the Setup Wizard can
be accessed from the Edit menu at any time to modify the software configuration, i.e., add
terminals and employees.
Using Nexus Lite Management (NLM) Software
Using the NLM Setup Wizard
From the Setup Wizard “Steps Summary” screen click on the Next button to continue with
Step 1. The Wizard Help will guide you through the Wizard Steps. The Setup Wizard has 4
Steps (see figure), however, as a minimum only Steps 2 and 4 are required with at least 1
employee, and 1 user login defined. These steps will have Red X’s alongside them.
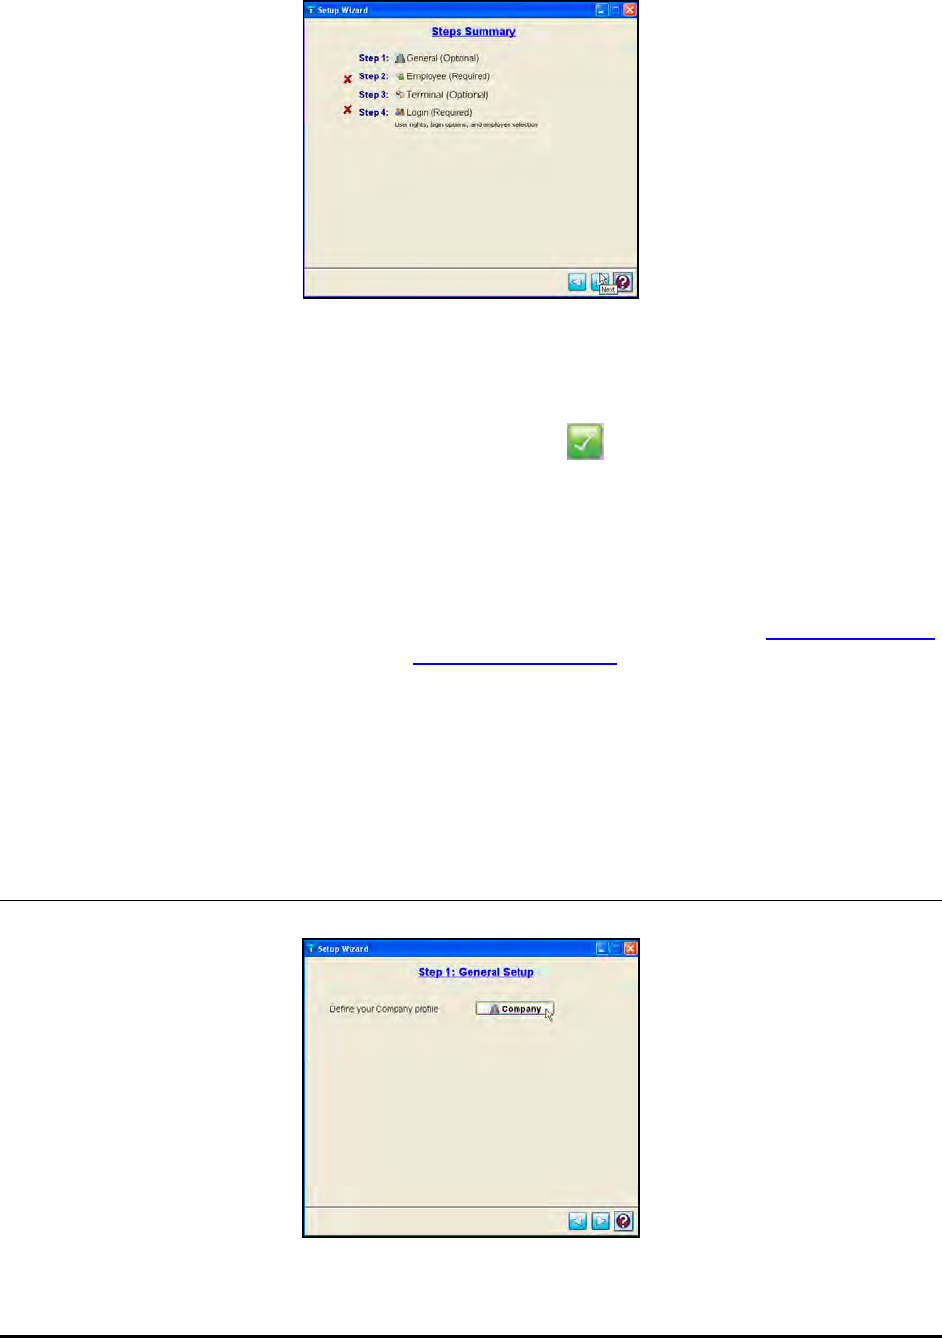
23-8 Time Guardian Series – Nexus Lite Module
Amano recommends that you have the appropriate information before you begin the Setup
Wizard. Should you need to exit the Setup Wizard before completion, your settings will be
saved.
Once the Setup Wizard is finished, the Wizard Complete button will become active. At this
point, all settings will be applied, including the time synchronization between the NLM software
PC and the connected terminals.
If the Wizard Complete button is not active, you must review your setup, verifying that all
mandatory fields (in red) have been completed. When all required fields are complete, the
Wizard Complete button will then be displayed.
Should you have any questions or require additional information, please email tkb@Amano.com
or check the Amano Knowledge Base at www.amano.com/tkb
The following information will sequentially guide the user through the Setup Wizard data entry.
See the remaining paragraphs of this Chapter for Access Module for more additional functional
descriptions especially paragraphs describing the Setup Wizard and the functionality of the
Nexus Lite Management (NLM) software.
Step 1: General Setup (NLM) [Optional Step]
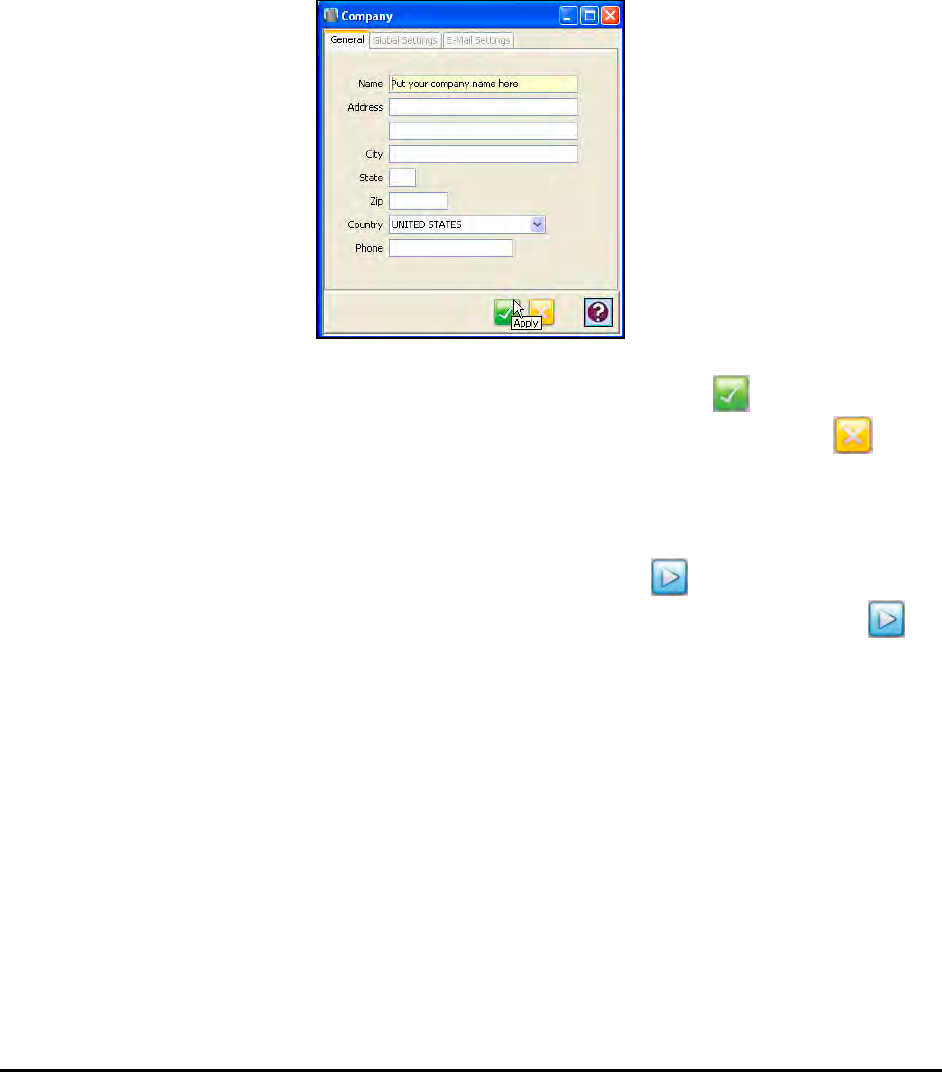
Time Guardian Series – Nexus Lite Module 23-9
Define your Company profile:
From Step 1: General Setup press the Company button to define the company's profile and
the Company screen will appear. The Company profile consists of one tab, General, which is
used for the Company profile information. The Global and E-Mail Settings tabs are grayed out
and not used for NLM.
Note: The Company Name is the minimum requirement in this step to complete this portion of
the Setup Wizard. All required fields will be highlighted in yellow.
1. From the General tab on the Company Setup window enter the Name, Address, City, State,
Zip Code, Country, and Telephone Number of the company.
2. After completing the entry of company information click on the Apply button to save the
company information and return to the Step 1: General Setup. Click on the Close
button to close the Company window without saving.
Note: The Apply and Close button function is universal for all Setup Wizard steps.
After saving the information for Step 1: General, click on the Next button to advance to
Step 2: Employee. If no General Setup is desired, skip all of Step 1 and just click on the
button to advance to Step2.
Note: You can close at any time to end the Setup Wizard, but you must complete the Setup
Wizard before you can Log into the Amano Nexus Lite Management (NLM) software.
The Wizard will automatically open up to the Welcome screen until it is completed.
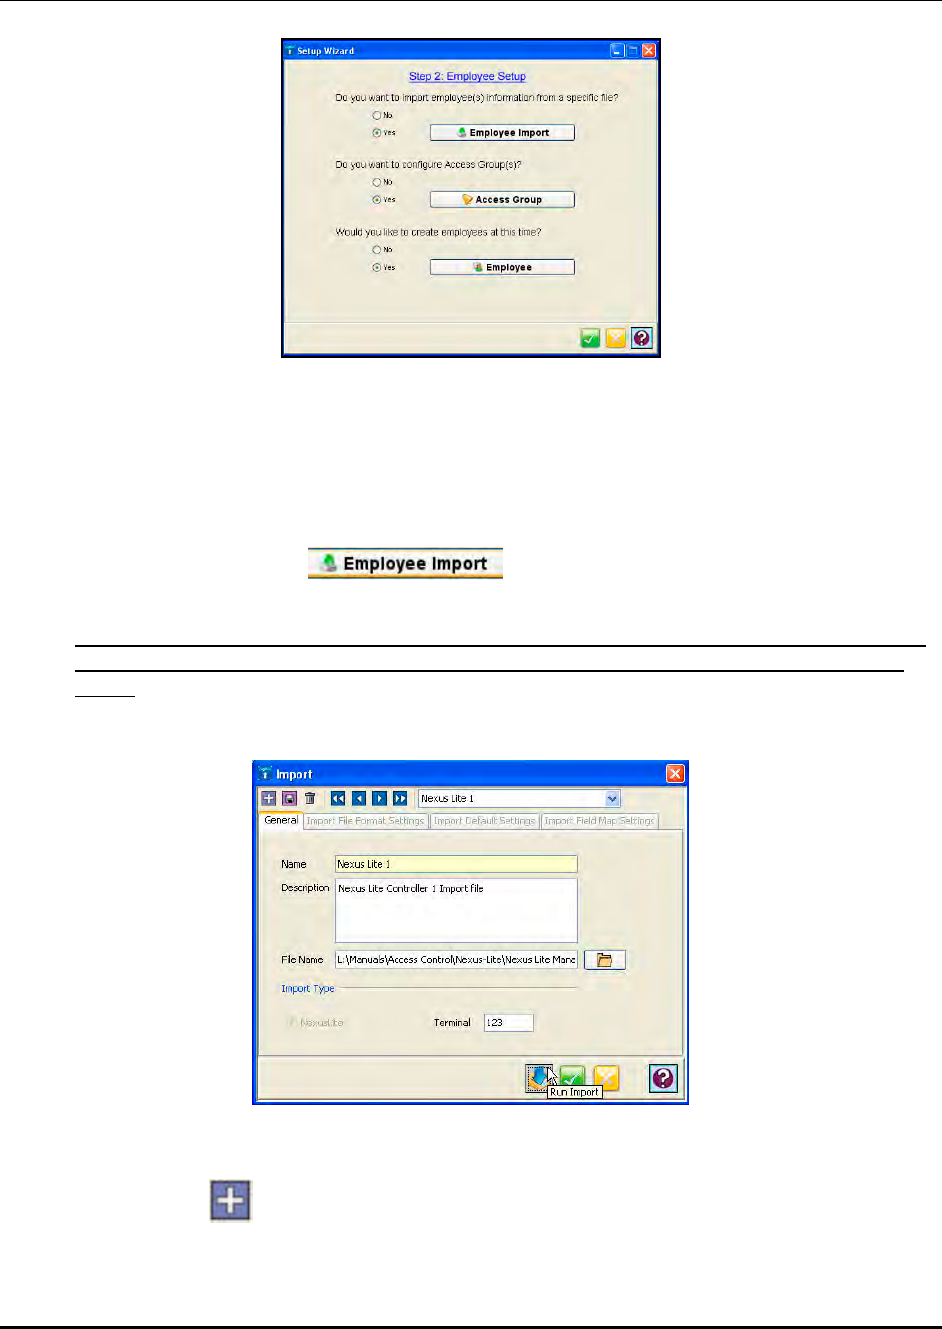
23-10 Time Guardian Series – Nexus Lite Module
Step 2: Employee Setup (NLM) [Required Step]
Do you want to import employee(s) information from a specific file?
Answer Yes to this question if you want to use this built-in import feature. This feature allows
you to import employee information from a Nexus Lite backup file directly into the Nexus Lite
Management (NLM) database. To use this feature, you will need to know the name and location
of the Nexus Lite backup [.bak] file to be imported.
Click on the Employee Import button and the Import window (see figure)
will appear on the General tab.
Note: This feature is capable of importing Access Groups created at the Nexus Lite controller.
It is recommended to use this feature only if Nexus Lite(s) is/are already installed and
setup.
Note: Only the General tab will be active to create the Employee Import file template.
Note: Default import fields are used.
1. Click on the New button to create a new Employee Import file you will be required to
enter a Name for the Import profile.
2. Enter a brief description of the Import profile in the Description field.
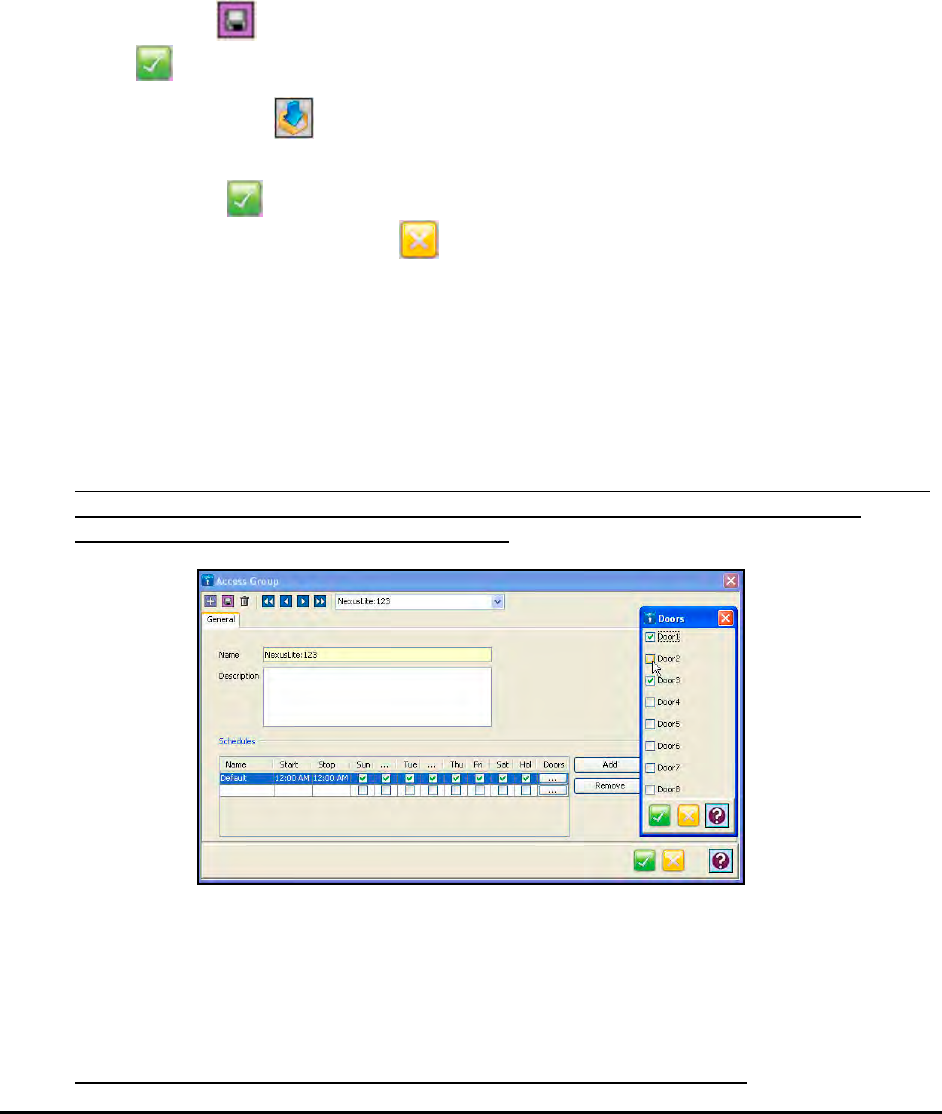
Time Guardian Series – Nexus Lite Module 23-11
3. Enter the name and path of the Nexus Lite backup import file in the File Name field, or click
on the browse button to the right of the field to browse for the file you wish to import.
4. The Import Type will be fixed as Nexus Lite.
5. Enter the terminal number which will be automatically appended to the employee ID. This
feature allows the same employee to have unique setup at multiple Nexus Lite access
controllers.
6. The Import File Format Settings, Import Default Settings, and the Import Field Map
Settings tabs will be grayed out as they are not used in NLM.
7. Click on the Save button to save the Import profile before running import and/or clicking
the Apply button. Failure to do so could result in the import profile being lost.
8. Click on the Run Import button, to Import an employee file into the Nexus Lite
Management (NLM) software database.
9. Click on the Apply button to save the Import information and return to the Step 2:
Employee Setup. Click on the Close button close the Import window without saving.
Do you want to configure Access Group(s)?
Answer Yes to this question if you want to create Access Groups for the Nexus Lite(s). This
feature allows you to setup Access Groups to limit access for doors/times at the Nexus Lite(s).
For example, you could create a group for the Warehouse that did not have access to the
door(s) on the weekends in the front office.
Note: You DO NOT have to create Access Groups if you have already performed the previous
Import Employees function. Access Groups are automatically created in the NLM
database with the Employee Import function.
1. To create a new Access Group you will be required to enter a Name for the Access Group.
2. Enter a brief description for the Access Group in the Description field.
3. Create a Schedule for the Access Group by entering a Name, i.e., “Weekday”. Enter the
Start and Stop time, select the desired days for the Schedule. Finish the Schedule by
clicking on the “Doors” button.
Note: You can create a maximum of eight (8) schedules per Access Group.
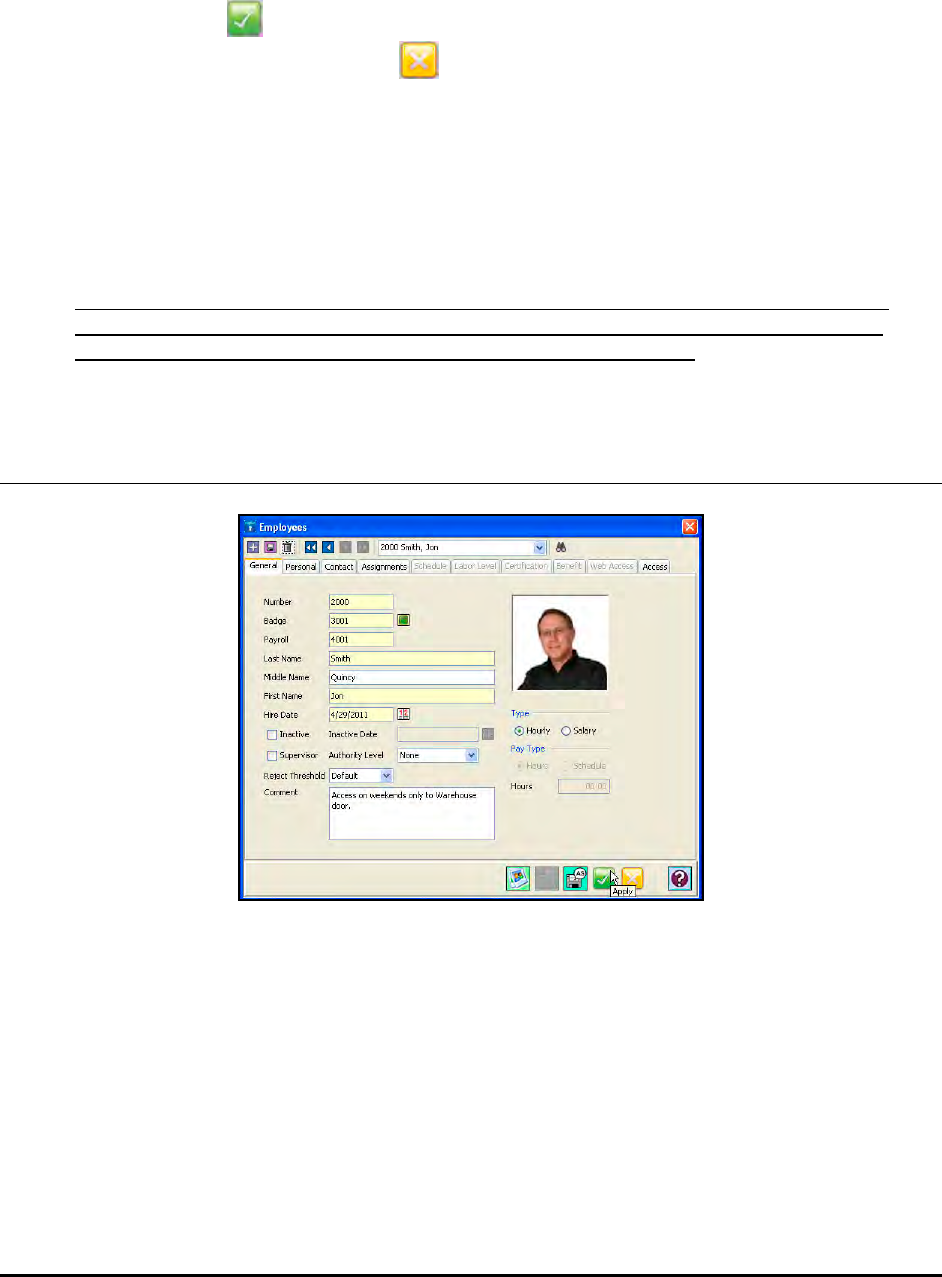
23-12 Time Guardian Series – Nexus Lite Module
4. When the Doors screen pops up select the doors you want to assign to this Schedule.
Nexus Lite controllers can support up to 8 doors, but you have to know which doors are
actually connected to Multi-discipline Readers.
5. Click on the Apply button to save the Import information and return to the Step 2:
Employee Setup. Click on the Close button close the Import window without saving.
Would you like to create employees at this time?
Click Yes for this question and press the Employee button if you want to enter employees. The
Employees module (see figure) of the Nexus Lite Management (NLM) software allows you to
have up to one hundred (100) active employees and assign them Access Groups and
validation.
Note: You DO NOT have to create Employees if you have already performed the previous
Import Employees function. Employees are automatically assigned to doors/access
groups in the NLM database with the Employee Import function.
Employees General
Employees can be added to the system at any time by accessing the Setup Wizard from the
Edit menu or clicking on the Employees module from the Tree View (see Figure for example).

Time Guardian Series – Nexus Lite Module 23-13
Note: Use the inactive field to remove an employee from having access, but still leave the
employee information in the system for historical records, and/or in case you want to
reactive the employee at a later date, i.e., may be a seasonal employee?
Employees Personal
Use Personal tab as Human Resources function to record the following employee personal
information:
• Gender; Male or Female.
• Birth Date; use calendar to select.
• Marital Status; select from dropdown.
• Education Level; None specified, Elementary, High School, Some College, No Degree,
Bachelor, Masters, Doctorate.
• IM Password; This field is grayed out and not used.
• Confirm IM Password; This field is grayed out and not used.
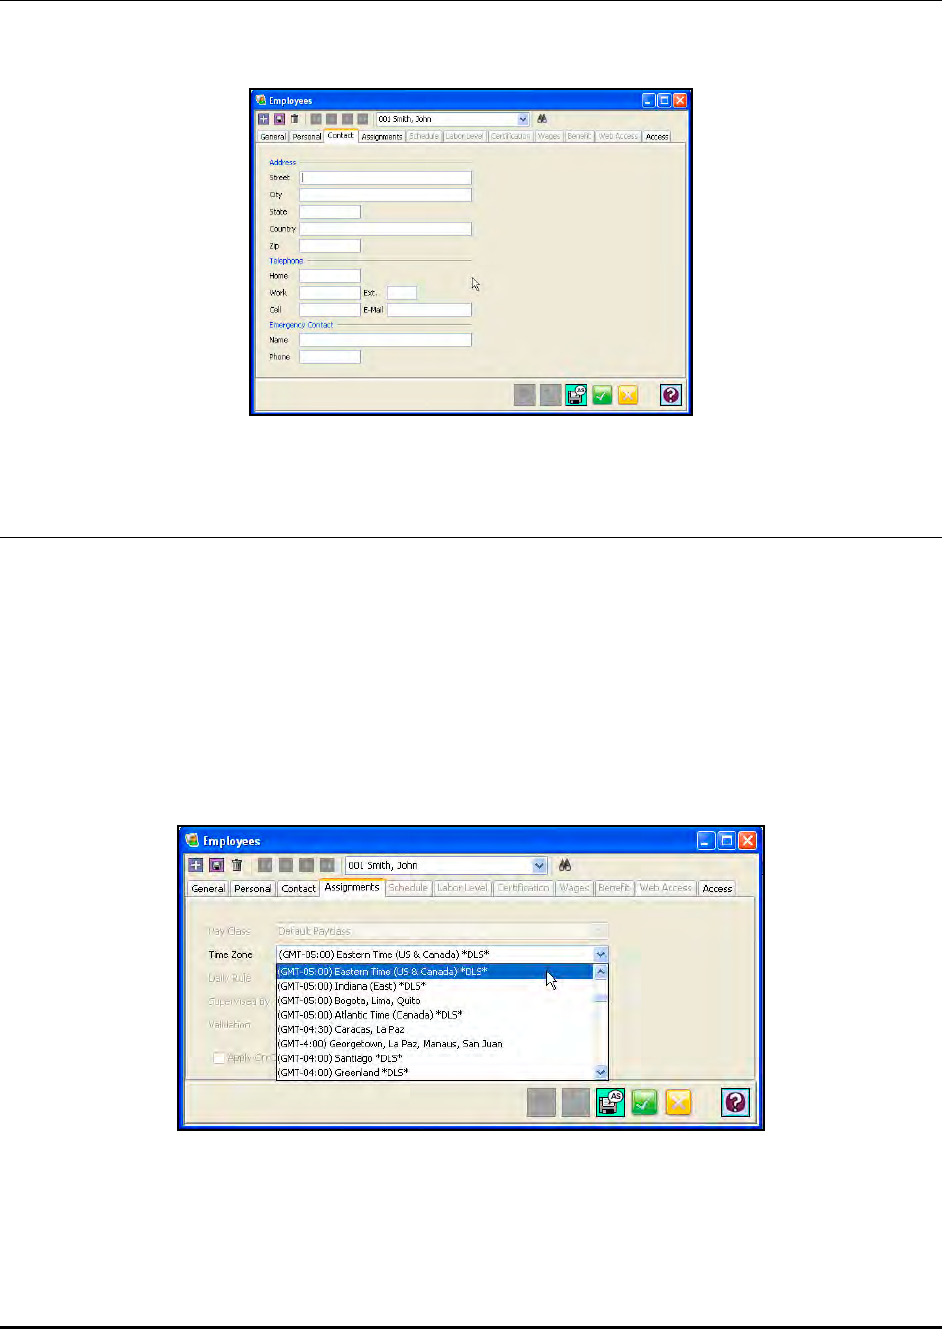
23-14 Time Guardian Series – Nexus Lite Module
Employees Contact
Use Contact tab as a Human Resources function to record employee contact information (see
figure for example).
Employees Assignments
Use Assignments tab to Assign each employee to:
Time Zone: Assigns the time zone of the location that the employee works in.
Pay Class: Grayed out and not used.
Daily Rule: Grayed out and not used.
Supervised by: Grayed out and not used
Validation: Grayed out and not used.
Apply on Call Pay for Weighted Average overtime: Grayed out and not used.
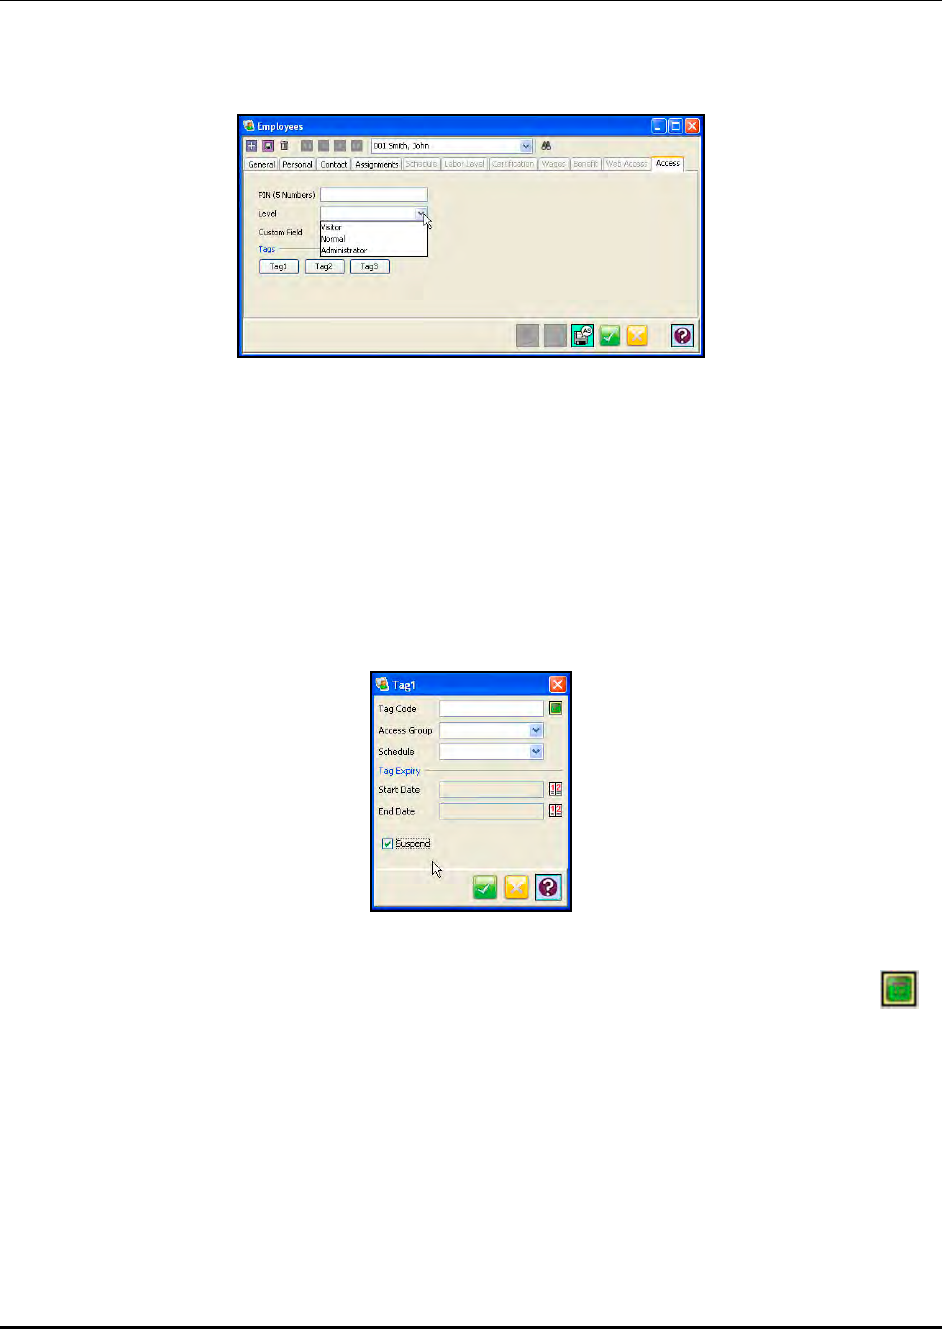
Time Guardian Series – Nexus Lite Module 23-15
Employees Access
The Access tab allows the user when signed into the Nexus Lite Management (NLM) software
to set the PIN number and access level for an employee. From the Employees screen, click on
the Access tab and the following type of screen will appear:
When using a Nexus Lite terminal, the Nexus Lite Management (NLM) software provides you
with two options to obtain access: with a tag or with a specific PIN number.
Enter PIN: The 5-digit number that an employee may use to enter at an access control device.
Select the desired Level for the access from the dropdown menu choices of Visitor, Normal, or
Administrator. For example, all visitors could have an Expiry Date of only one day.
Enter a unique description, if desired, for the “Custom Field”.
Each employee could have up to 3 tags assigned to them. Click on Tag 1 through Tag 3 and the
following type of screen will appear:
Enter the following for Tag(s):
• TAG Code: The number of the tag or badge you wish to use. Use the Read Badge
icon to the right of the TAG Code field to enter the number from the Registration Reader
(RR).
• Access Group: for Access groups that will be assigned to the tag.
• Schedule: Assigns a schedule of valid access to the badge or tag
• Start Date: The date when the tag will be activated (YYYYMMDD).
• End Date: Displays the date when the tag will expire (YYYYMMDD). (If left blank, the tag
will never expire).
• Suspend: Enables the tag holder to override the APB constraint condition on the doors
to which they have access by suspending it.
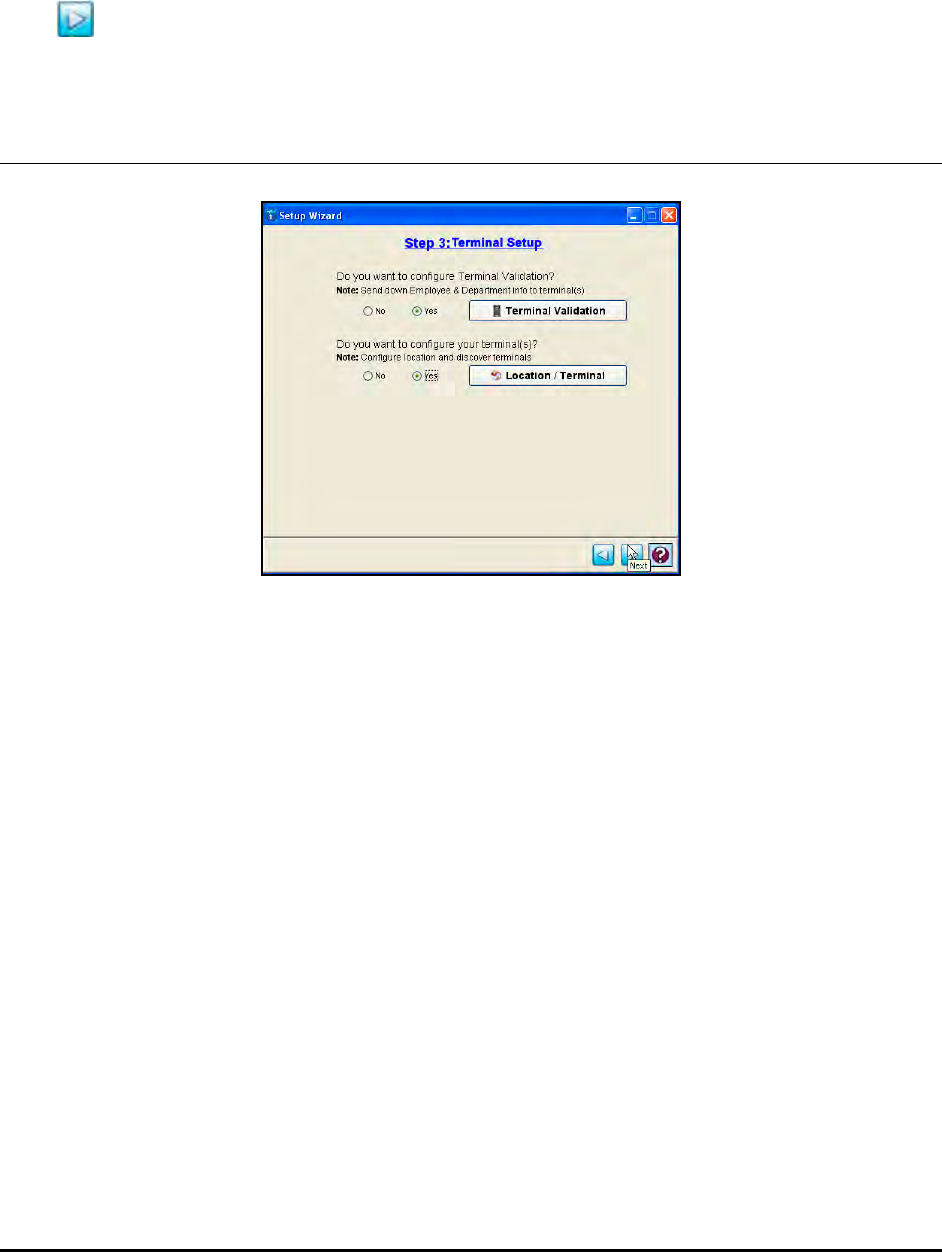
23-16 Time Guardian Series – Nexus Lite Module
If you wish to assign another tag for the employee, click on the Tag 2, thru Tag 3 buttons and
follow a similar procedure performed for Tag 1.
After completing the entry/selection of information for Step 2: Employee Setup, click on the
Next button to continue to Step 3: Terminal Setup.
Step 3: Terminal Setup NLM [Optional]
Note: Prior to commencing this step, it is recommended you install your Nexus Lite access
controller terminal, using the appropriate Nexus Lite installation guide. The Nexus Lite is
installed to communicate with the host PC. The appropriate documentation will provide
the necessary steps to install the Nexus Lite controller(s) and reader(s). You may need
to obtain the IP address for each Ethernet Nexus Lite connected to the system.
Step 3: Terminal Setup is optional; use this step only if:
• The company wants to use Nexus Lite(s) for access control.
Do you want to configure Terminal Validation?
If Yes is selected for Terminal Validation, click the Terminal Validation button and the Terminal
Validation screen will appear (see figure). Terminal validation provides employee filtering from
the setup configured in the General and Employee tabs (see the figures).
Terminal Validation is used to assign employees to selected terminals (Nexus Lite’s). When
validation is used, only employees assigned to a particular terminal can use the terminal.
Validations are downloaded to the selected terminals by location in the Communications
module. To create validation, perform the following:
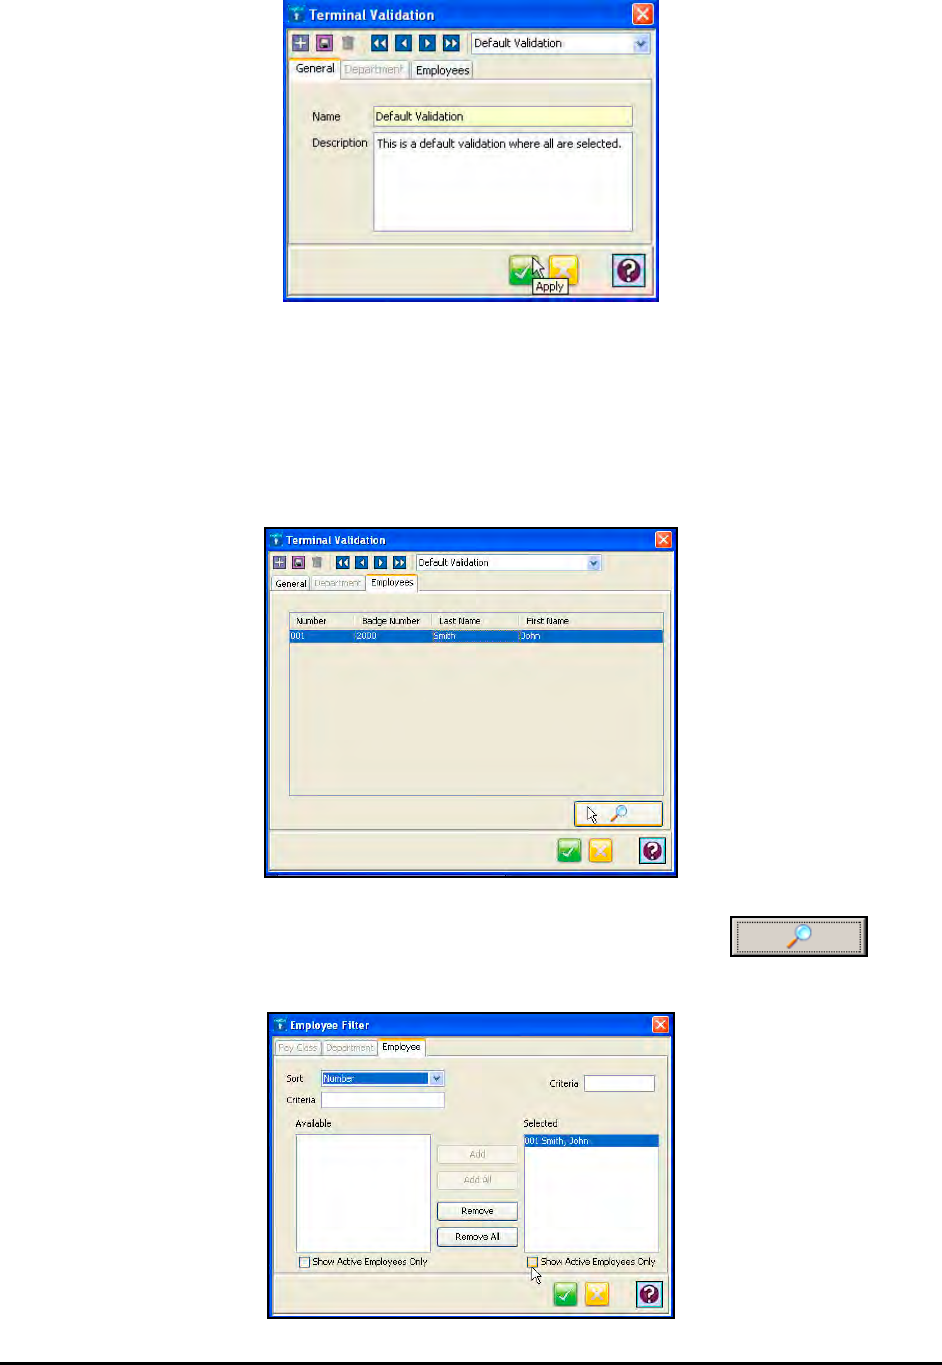
Time Guardian Series – Nexus Lite Module 23-17
1. Create a new Terminal Validation and enter a Name for the Terminal Validation setting
[yellow required field].
2. In the Description field, enter in a brief description for the Terminal Validation.
3. The Department tab is not used and grayed out.
4. Click on the Employees tab to filter employees.
5. To filter/add employees for the Terminal Validation setting, click on the button
and the Employee Filter window will appear:
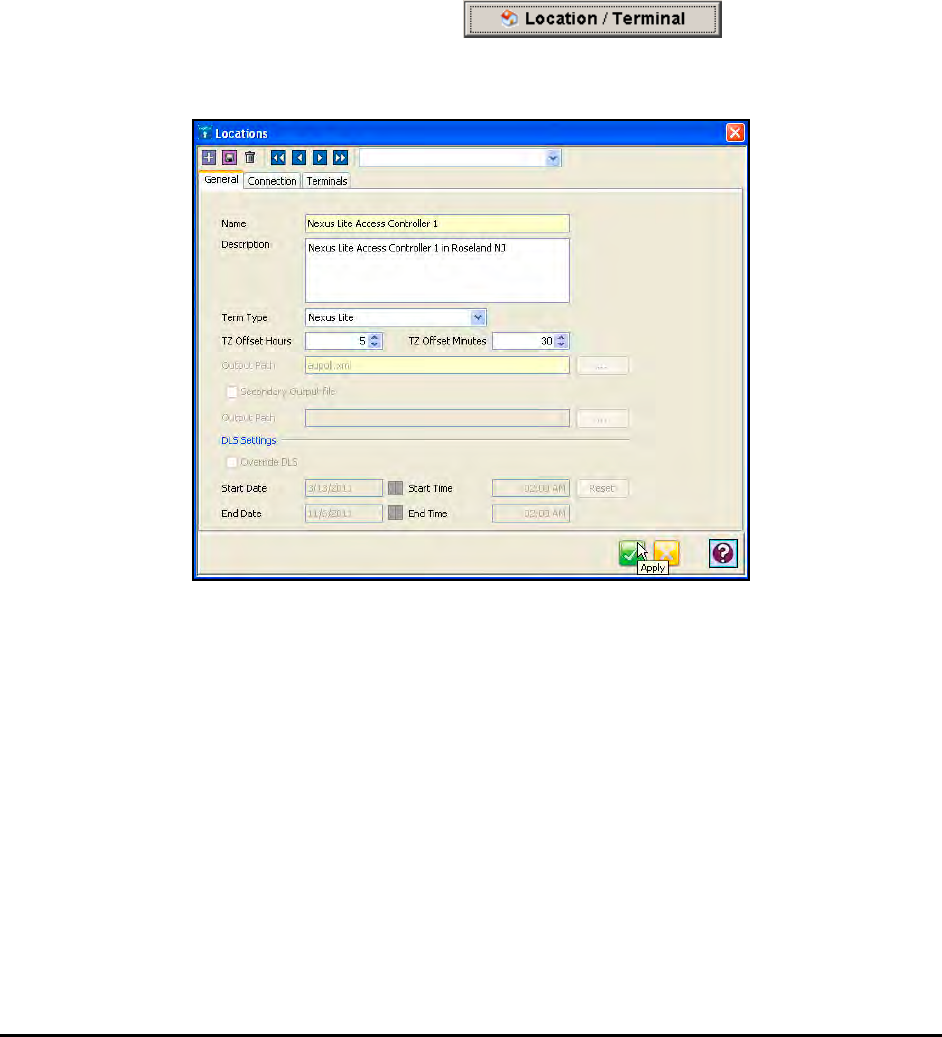
23-18 Time Guardian Series – Nexus Lite Module
This filter is deeper as you can use the Employee tab to sort the employee list using;
Number, Badge, Payroll, Last Name, First Name, and Comment, and then apply the criteria.
To add an employee to the Terminal Validation, highlight the desired employee in the
Available list and click on the Add button. To select all, click on the Add All button.
To remove an employee from the Terminal Validation, highlight the desired employee in the
Selected list and click on the Remove button. To remove all, click on the Remove All
button.
Do you want to configure your terminals?
If Yes is selected, click the Location/Terminal button and the
Locations screen will appear (see figure). Answer Yes to this question if you are using Nexus
Lite terminals (Ethernet connection).
Before a Location can be created, a Terminal Validation must be set.
You must create a Location to communicate with your Nexus Lite terminals. A Location enables
the Nexus Lite Management (NLM) software to distinguish and interact with the desired
terminal(s). Only one terminal type can be used per Location. If you have more than one
terminal type, you must have multiple Locations.
The window will open on the General tab with a blank Location Name.
To create a new Location:
1. Create a new Location and enter a unique Name [yellow required field] that will be used to
describe the area or site where a terminal or group of terminals is located.
2. In the Description field, enter in a brief description of the Location.
3. The Term Type field is fixed as Nexus Lite for the type of terminal.
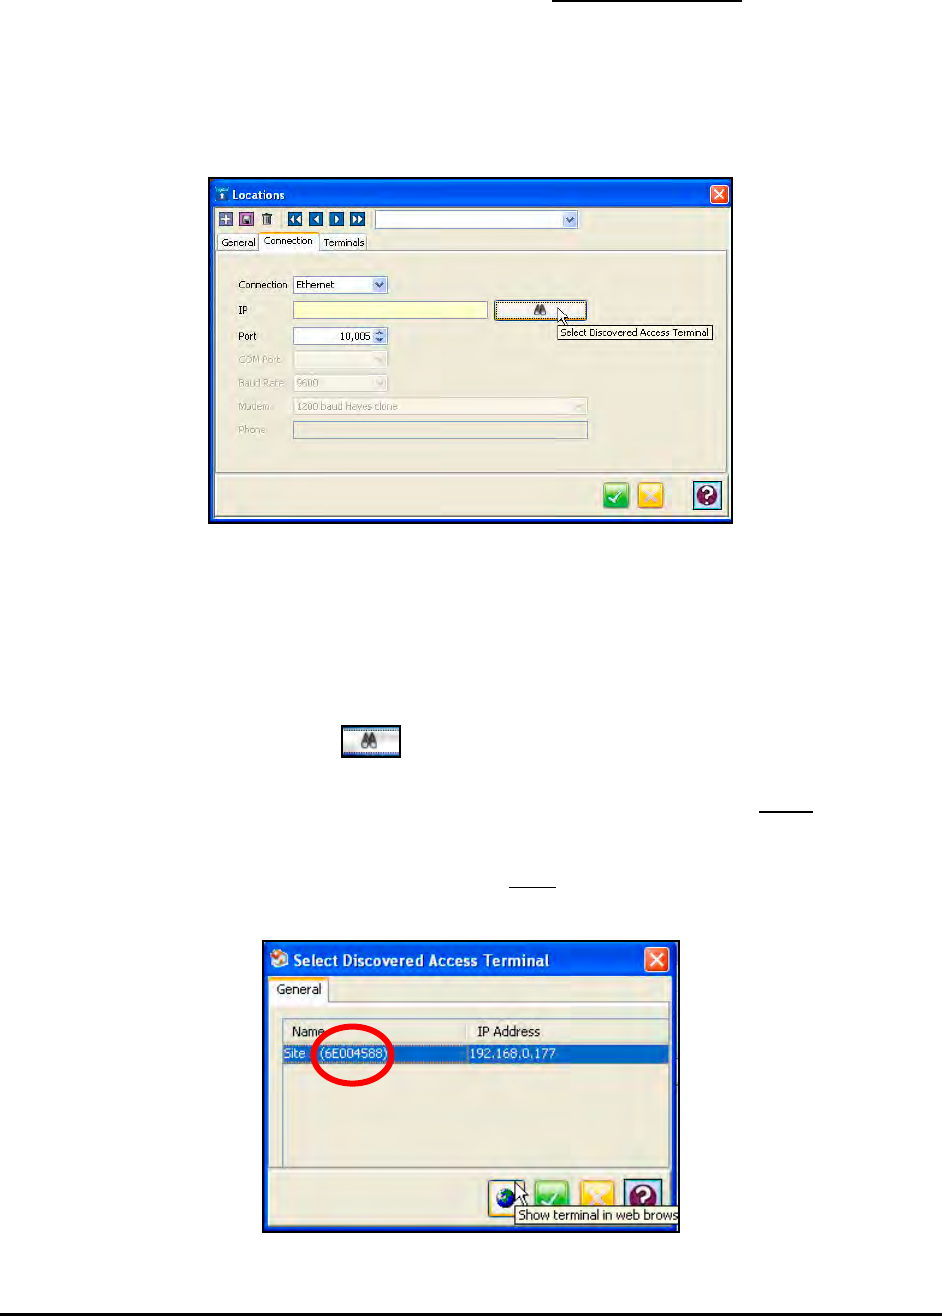
Time Guardian Series – Nexus Lite Module 23-19
4. In the TZ (Time Zone) Offset fields, select the time zone difference (if applicable) between
the physical location of your PC and the terminals in Hours and Minutes.
5. The Output Path field is not used and grayed out.
6. The “Secondary Output File” box is not used and grayed out.
7. The DLS (Daylight Savings Time) Settings are not used and grayed out.
8. Click on the Connection tab.
9. In the Connection field, Ethernet is fixed for the type of connection you are using to
communicate with the terminal(s). The terminals communicate to the Host PC via Ethernet
connection. You must enter the IP Address and Port (default port = 10,005). [Obtain the
correct IP address from your network administrator, or alternatively, please consult the
appropriate terminal manual to perform terminal diagnostics, hardware configuration, and
identify the IP address].
10. Click on the Select Terminals button to see a list of discovered terminals (see
figure). The Ethernet connected terminals in this location should appear in the Terminals list
(see figure). The User Datagram Protocol (UDP) Output of the Nexus Lite must be set to the
IP Address of the NLM client PC. Also, NLM utilizes a UDP Service which runs in the
background on the NLM client. The UDP Service must be running for this communication.
The “Receiving Port Number” on the Nexus Lite must be set to the same as the NLM client
which has a default = 4445. (See Network Module).
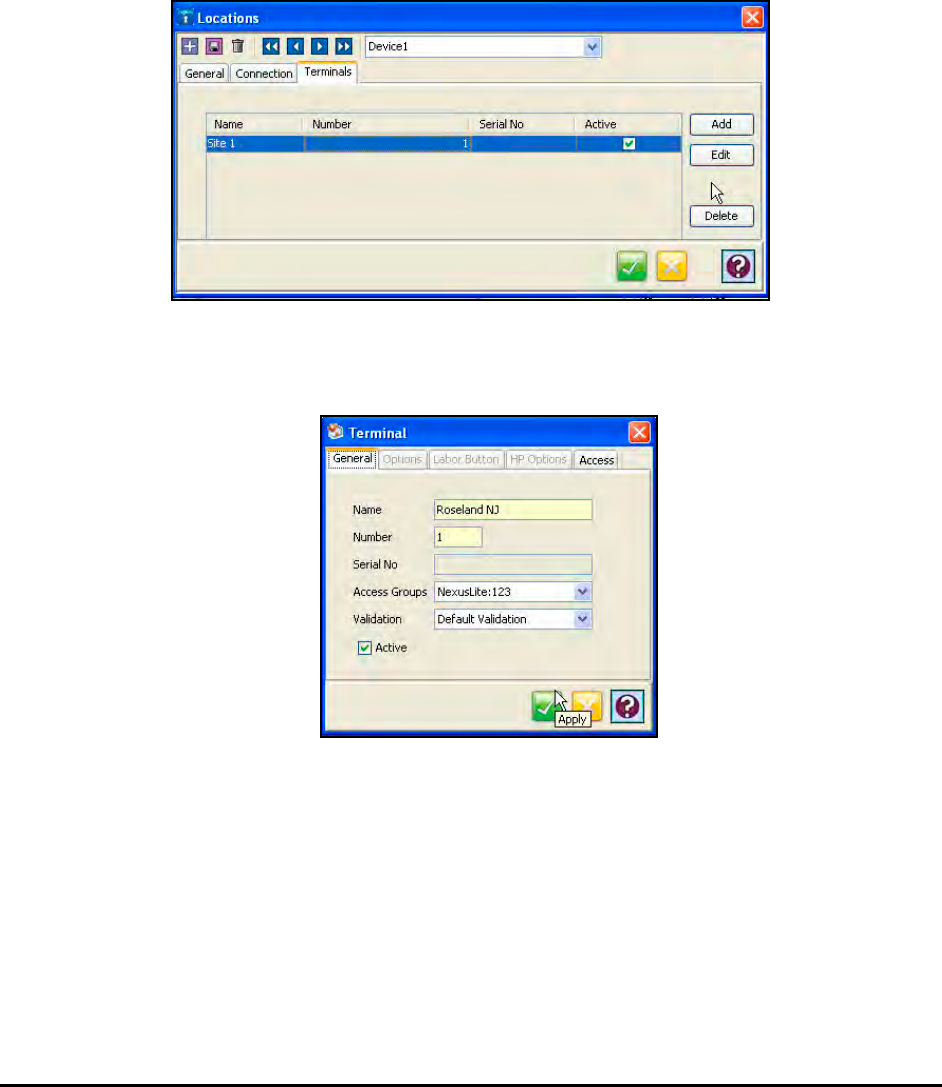
23-20 Time Guardian Series – Nexus Lite Module
Note: Using the “Select Terminals” button is important because it also captures the last 8
letters of the MAC address from the Nexus Lite terminal [i.e., the MAC address in the
figure above = 6E004588]. Should the IP address at the Nexus Lite change, the NLM
software could still maintain its connection by using the unique MAC of the Nexus Lite
terminal.
11. Click on the Globe button to access the selected (highlighted) Nexus Lite terminal via a Web
browser. The Nexus Lite settings can be controlled via this Web access. See the Web
Interface Quick Start Guide for more details.
12. Click on the Terminals tab to add, edit, or delete terminals.
13. Click on the Add button to add the Nexus Lite Terminal to the Location and the Terminal
window will appear for setup.
14. In the Name field, enter in a unique name [required field] that will be used to describe the
terminal.
15. In the Number field, enter in a unique number for the terminal.
16. The Serial No. field is not used.
17. If you wish to assign an Access Group to the terminal, select one from the dropdown list in
the field.
18. If you wish to assign a Terminal Validation setting to the terminal, select one from the
dropdown list in the Validation field.
19. Click the “Active” box to enable the terminal in this location.
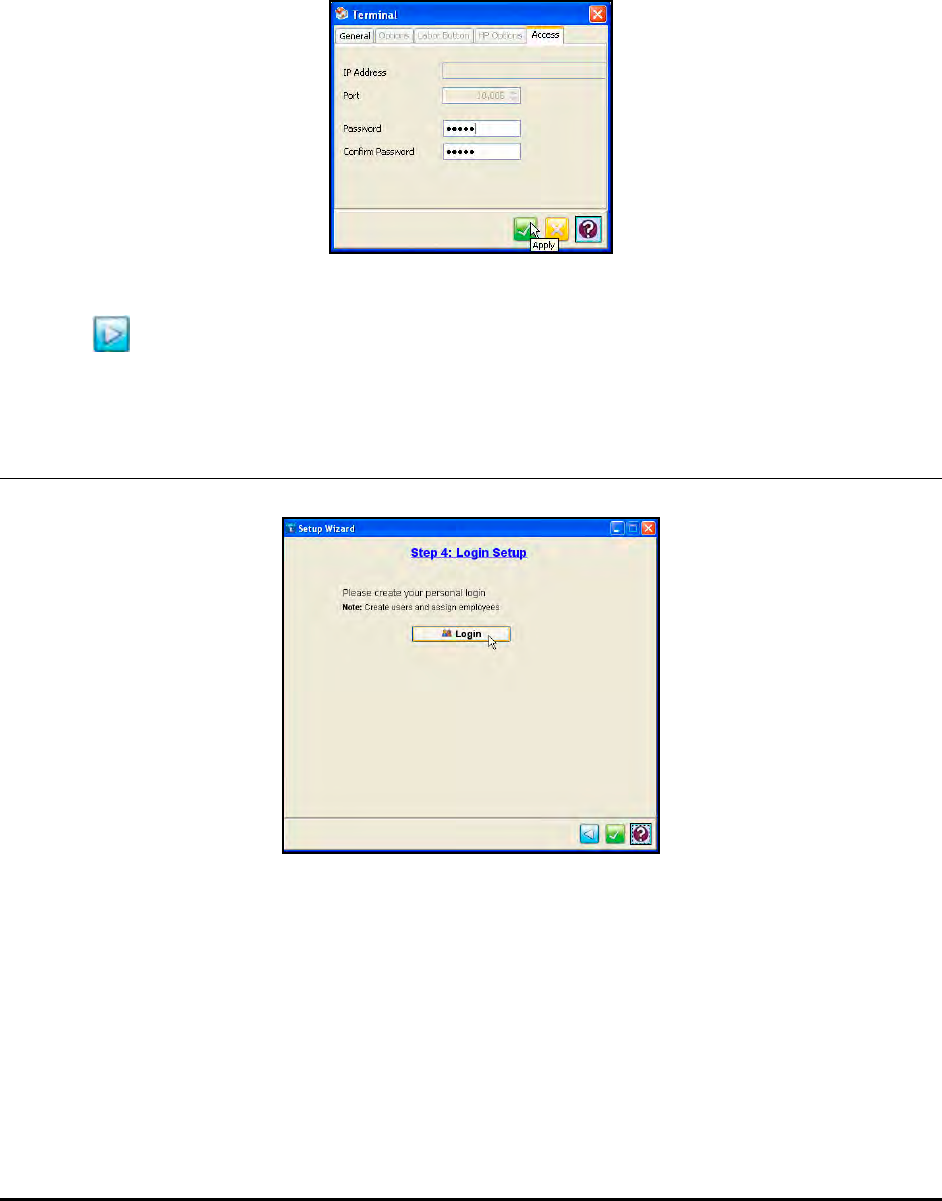
Time Guardian Series – Nexus Lite Module 23-21
20. The Options tab is grayed out and not used.
21. The Labor Button tab is grayed out and not used.
22. The HP Options tab is grayed out and not used.
23. Click on the Access tab to enter the Password for the terminal at that location.
24. After completing the entry/selection of information for Step 3: Terminal Setup, click on the
Next button to advance to Step 4: Login Setup.
Step 4: Login Setup NLM [Required]
Please create your personal login
The Login Setup allows you to create User profiles/accounts and assign access privileges to the
accounts in Nexus Lite Management (NLM).
Press the Login button and the following Users screen will appear to enter general info for
account settings. The User’s window consists of (3) tabs: General, Password, and Employee
(see figure).
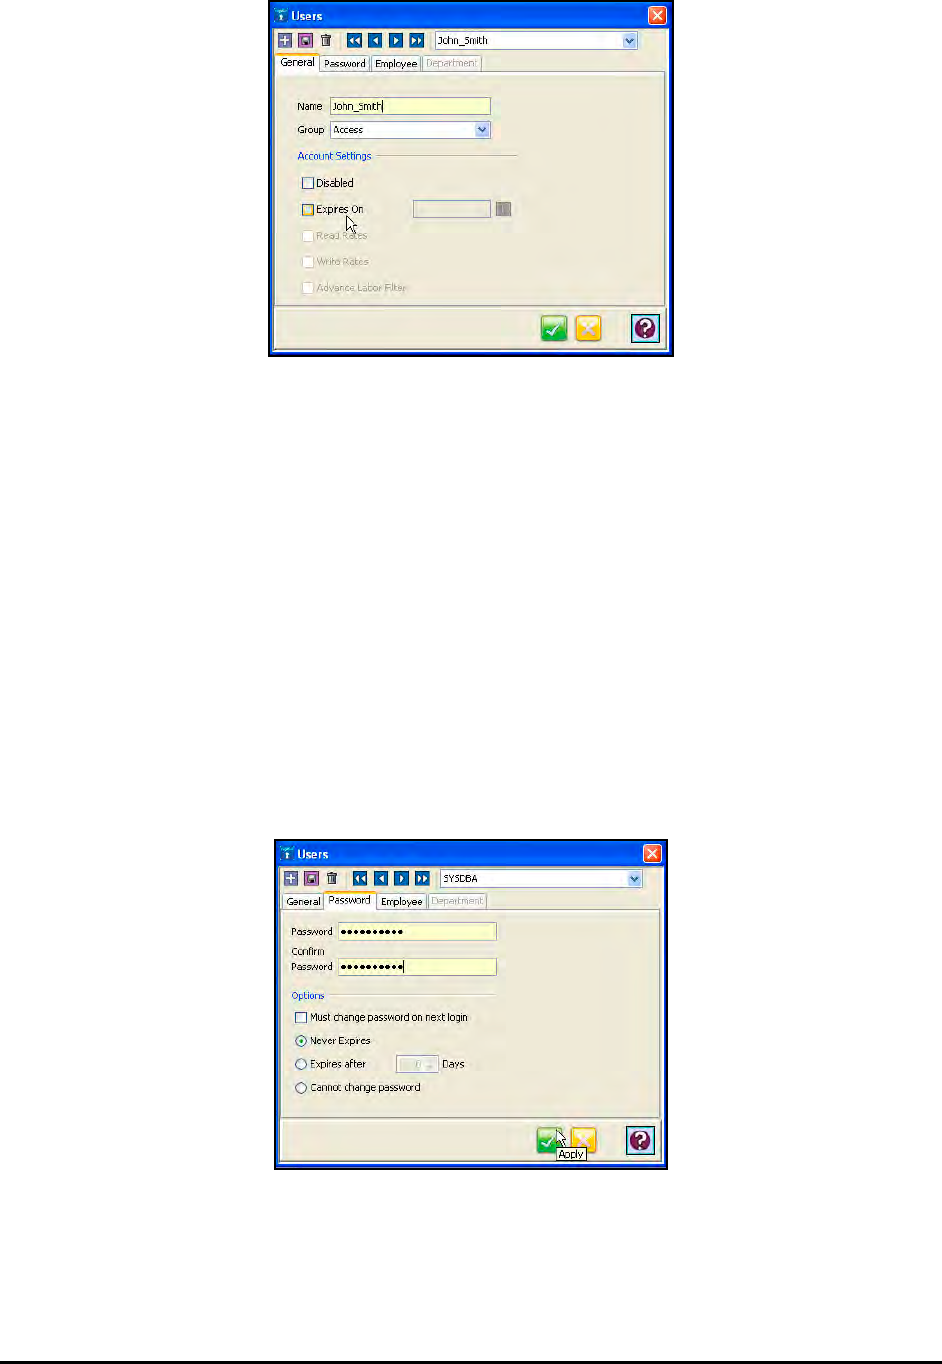
23-22 Time Guardian Series – Nexus Lite Module
To create a User account:
1. In the General tab, enter the name of the individual or account you are adding in the Name
field.
2. The type of group is fixed as Access.
3. In the Account Settings section, select the following:
• Disabled: If checked, the user will be disabled. (Enabled is default)
• Expires On: When checked, the password will expire on a given date. When the date
arrives, a check will automatically be placed in the disabled option.
• Read Rates: Not used in NLM.
• Write Rates: Not used in NLM.
• Advanced Labor Filter: Not used in NLM.
4. Click on the Password tab.
5. Enter a user password for NLM and confirm the password.
Note: The minimum required password length is (6) characters with a maximum of 20
characters. The password can be any combination of letters and numbers and is case-
sensitive. However, no spaces and/or symbols are allowed.
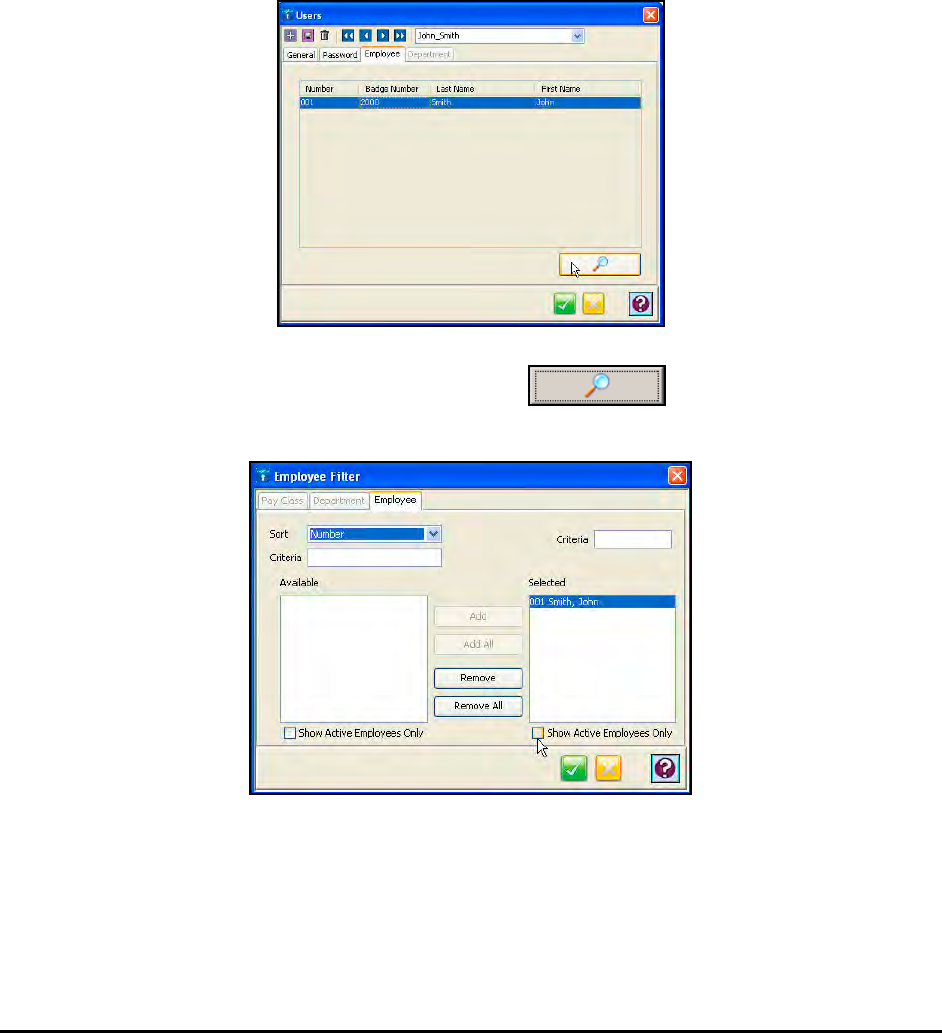
Time Guardian Series – Nexus Lite Module 23-23
Please make a note of your name (user) and password and keep in a safe place:
6. Set the password expiration options. The choices are:
• Must change password on next login: The user will be prompted to enter a new
password for this account at login.
• Never expires: The password created will never expire.
• Expires after: This allows you to set a specific date for the password to expire. After this
date the user will be prompted to enter a new password.
• Cannot change password: The users will not be able to change their password.
7. Click on the Employees tab to filter employees.
8. To filter/add employees for the Users, click on the button. The Employee
Filter window will appear:
By default, all employees are selected. This filter is deeper as you can sort the employee list
using; Number, Badge, Payroll, Last Name, First Name, and Comment, and then apply the
criteria.
To add an employee to the Users, highlight the desired employee in the Available list and
click on the Add button. To select all, click on the Add All button.
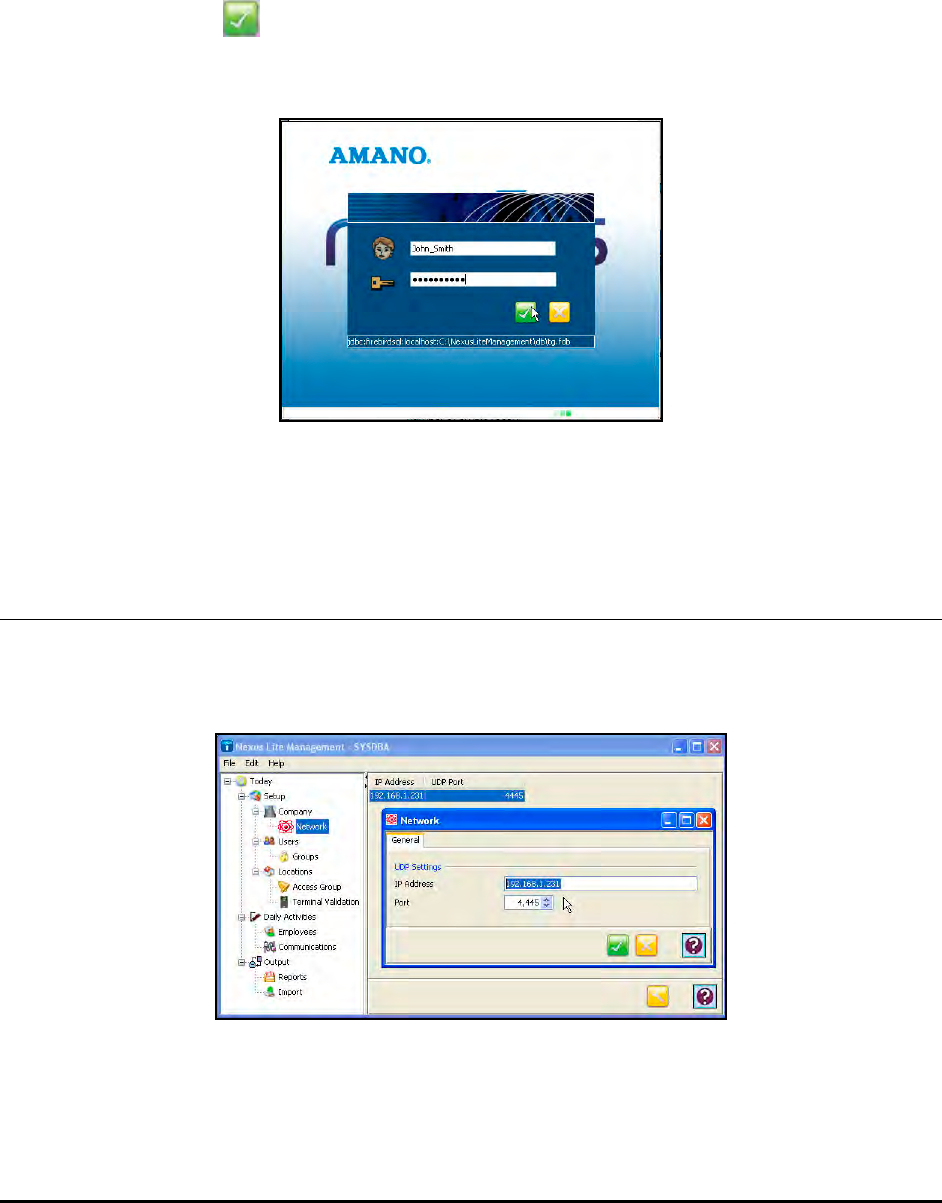
23-24 Time Guardian Series – Nexus Lite Module
To remove an employee from the Users, highlight the desired employee in the Selected list
and click on the Remove button. To remove all, click on the Remove All button.
Note: By unselecting, it will reduce the Employees that the user has access to.
Note: The Administrator cannot be deleted.
9. After completing the entry/selection of information for Step 4: Login Setup, click on the
Wizard Complete button at the bottom of the wizard to complete the setup of Nexus
Lite Management (NLM) and display the Nexus Lite Management (NLM) login screen. The
Time settings and other configuration data will now be populated in the software.
Note: Employees can be entered during the initial setup process, or any time later. Employees
can also be imported.
Network Module (NLM)
From the NLM Tree View, click on “Network” within the Setup/Company group to view the
current IP Address and UDP Port setting in NLM for the network client and the following type of
screen will appear:
Double click on the IP Address shown and the Network screen will appear:
From the “Network” screen click in the IP Address field to change the IP Address (only if not
communicating with the desired Nexus Lite. The “Port” field can also be changed if necessary,
but the default = 4,445.
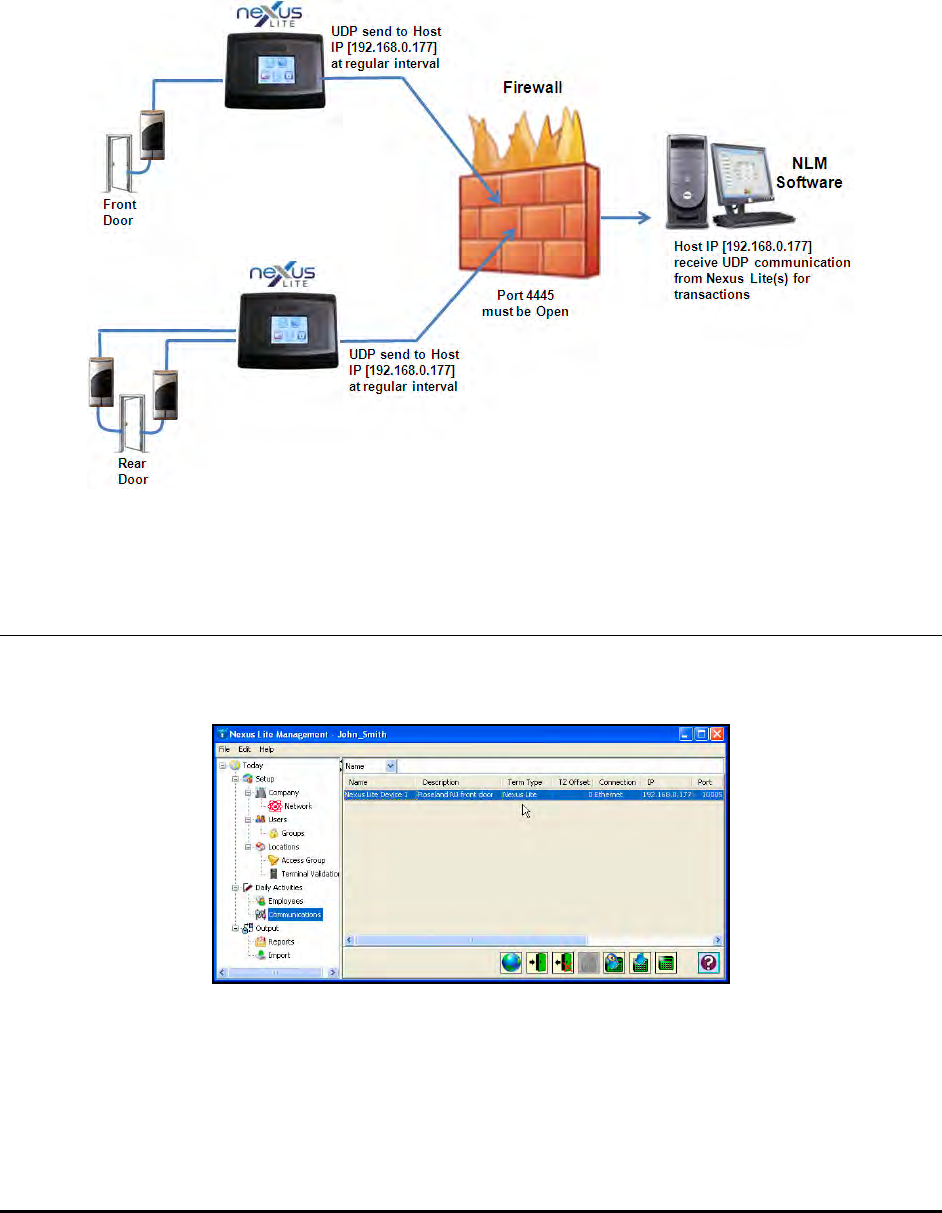
Time Guardian Series – Nexus Lite Module 23-25
Nexus Lite devices have a feature where it broadcasts transactions (door access) via User
Datagram Protocol (UDP). While performing a download (see Communications Module), the
IP/Port defined in the Network Module will be sent to the Nexus Lite(s). The IP/Port values are
equal to the IP/Port of the host PC with NLM which is listening to transactions from the Nexus
Lite(s).
Note: The transactions are used by NLM to populate the Access Transaction Report.
Communications Module (NLM)
From the NLM Tree View, click on “Communications” module within the Daily Activities group
and the following type of screen will appear:
Locations are selected by clicking on the desired row. You can select multiple locations by
holding down the Ctrl key and clicking on other locations. Also, you can sort the displayed
Locations list by clicking on the dropdown list in the upper left-hand corner and selecting on;
Name, Description, Term Type, TZ Offset, Connection, IP, Port, COM Port, Baud Rate, Modem,
and Phone. Once the location is selected use the following commands found at the bottom of
the screen to communicate with the terminal(s) at that location:
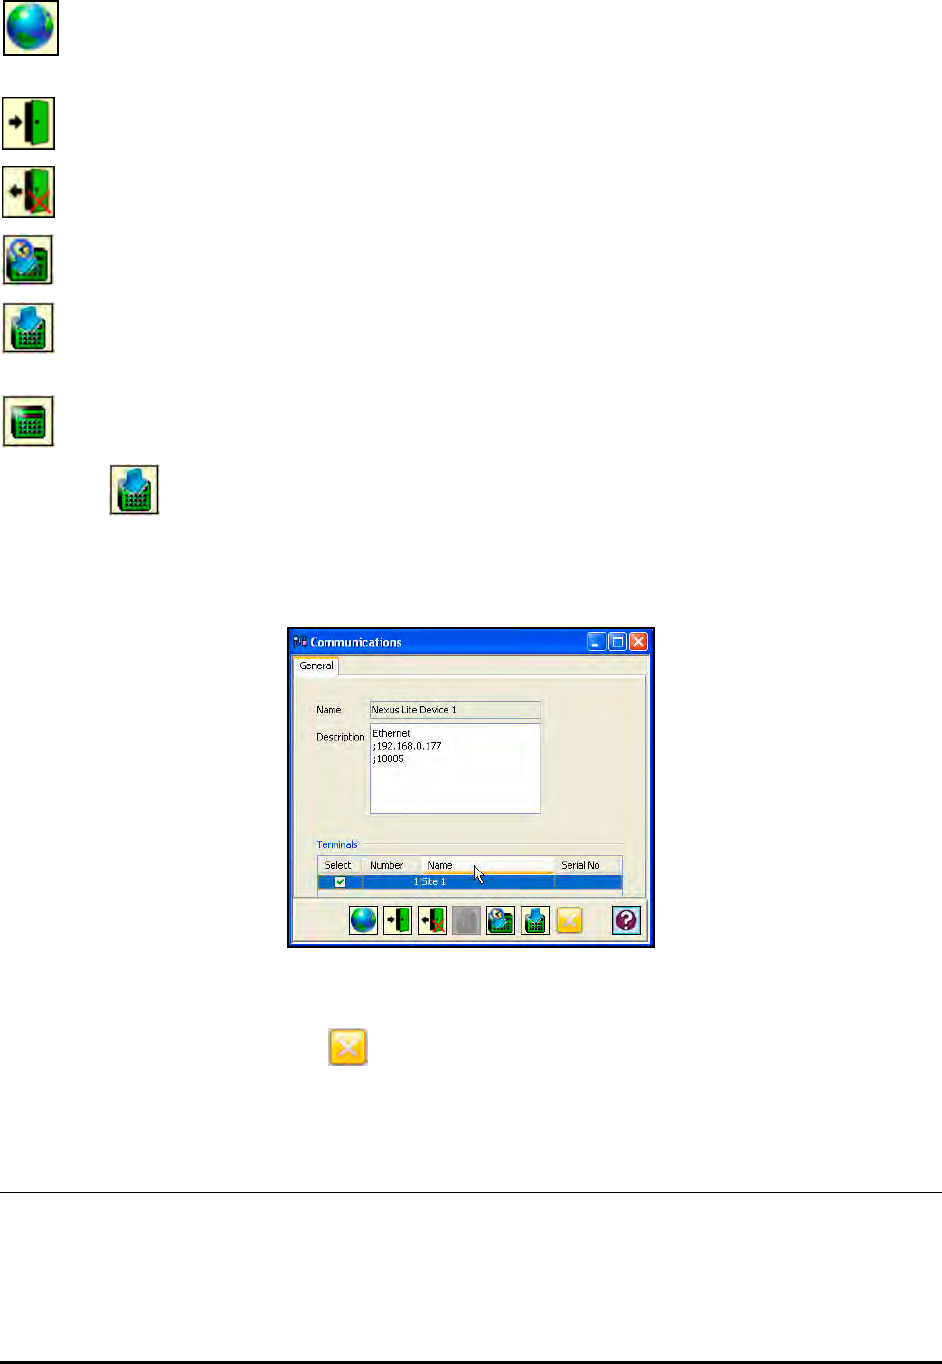
23-26 Time Guardian Series – Nexus Lite Module
Connect to Nexus Lite using a Web browser. The Nexus Lite must not be already logged
into.
To read Access Groups/Employees from a Nexus Lite.
To clear [delete] Access Groups/Employees from a Nexus Lite.
To set time on the Nexus Lite from the client PC.
To send selected employees (terminal validations), Access Groups, Time and settings to
a Nexus Lite.
To view Nexus Lite communications information such as IP Address and Port.
Note: The command is not used and will be grayed out.
To select a specific Nexus Lite terminal within a location, double-click on the desired location
row, and the following Communications dialog will appear for Nexus Lite terminals:
Select terminals in the Terminals list by placing a check in the Select box of each terminal.
When you have finished making your selections, use one the commands to communicate with
the terminals. Click on the Close button to close this dialog.
Reports Module (NLM)
From the NLM Tree View, click on “Reports” module within the Output group and the following
type of screen will appear:
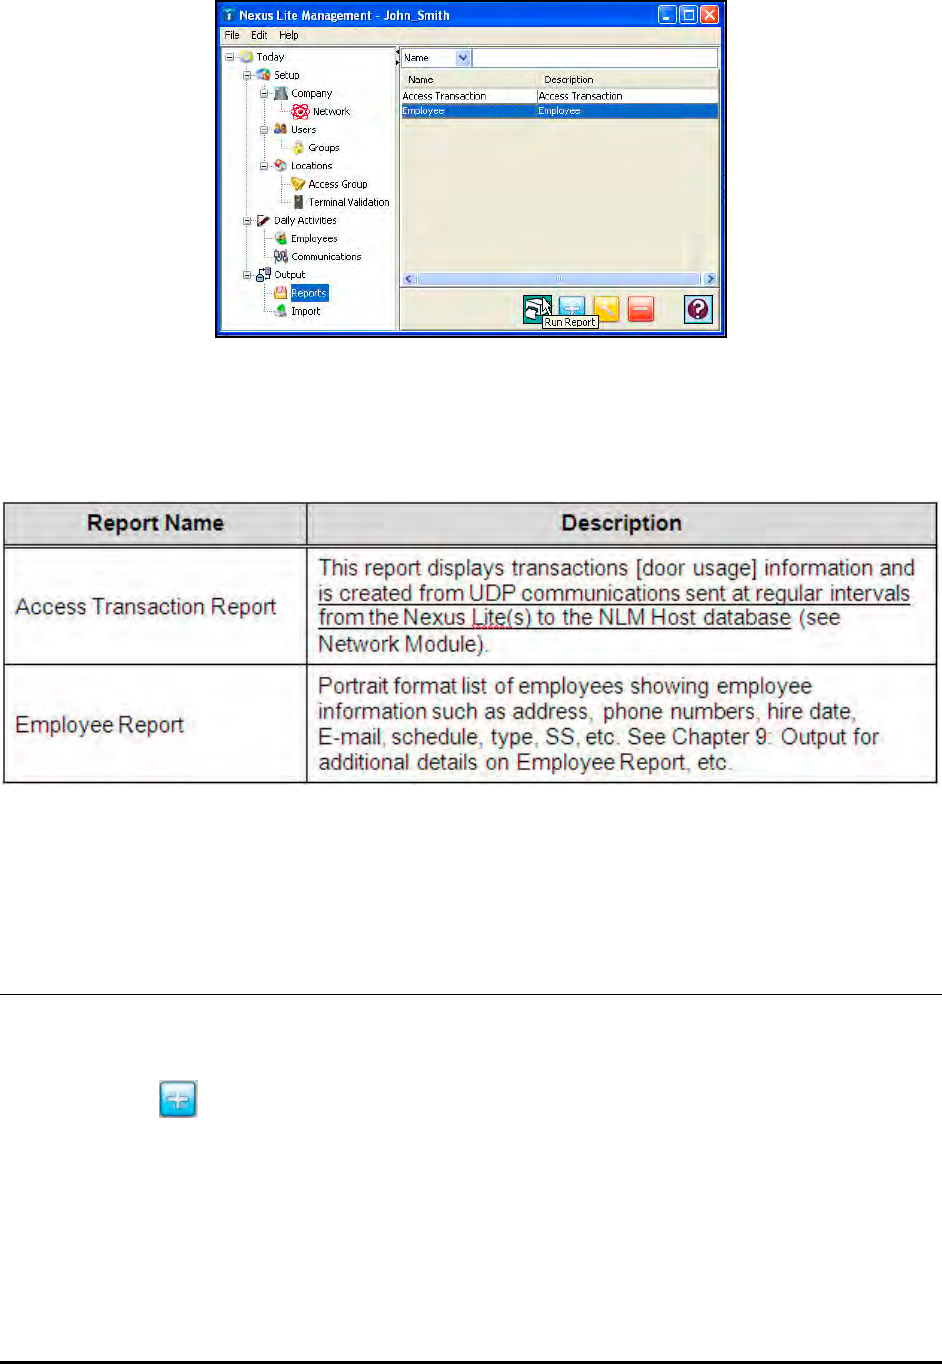
Time Guardian Series – Nexus Lite Module 23-27
Reports are the largest and most important output from the NLM software and the following is a
list of the reports available from NLM. The general format of each report type is fixed, but some
content can be hidden. Reports will be resized to fit large data fields such as Badge Number,
Employee Number, Employee Name, and Labor Names.
Reports are generated from Report Profiles, which are created in the Reports module of the
Output group. Report format can be either PDF or Excel.
Creating a Access Transaction Report (NLM) Profile
1. Click on the Reports module of the Output group in the Tree View.
2. Click on the button, and the Reports window General tab will appear:
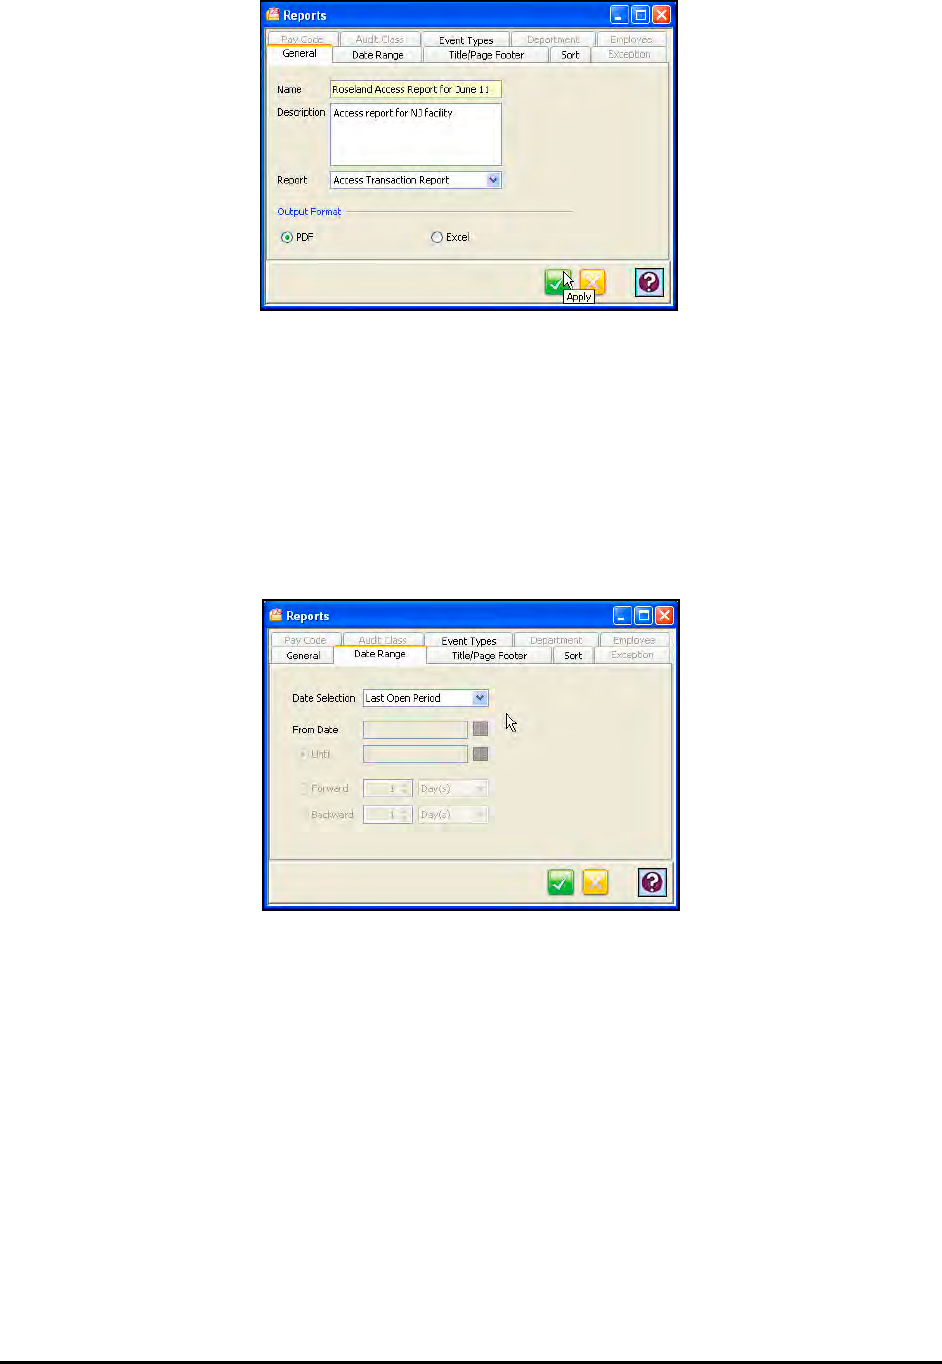
23-28 Time Guardian Series – Nexus Lite Module
3. In the Name field, enter a name for the report [required field].
4. Enter in a brief description of the report in the Description field.
5. In the Report field, select the type of report you want to create. The choices are; Access
Transaction and Employee Report.
6. In the Output Format section for all report types, click on either PDF to generate the report in
Adobe Acrobat® PDF format or Excel to generate the report in an Excel worksheet.
7. Click on the Date Range tab. See the following illustration for an example:
8. In the Date Selection field, select the date range for the report. The choices are; Today,
Yesterday, Current Week, Previous Week, Current Month, Previous Month, Last 2 Weeks,
and Date Range.
9. If Date Range was chosen as the Date Selection, you must enter the From Date and Until
Date using the Calendar icon. You also have the option of going forward or backward as
many days, weeks, months, or years from the From Date using the Forward and Backward
options.
10. Click on the Title/Page Footer tab. See the following illustration for an example:
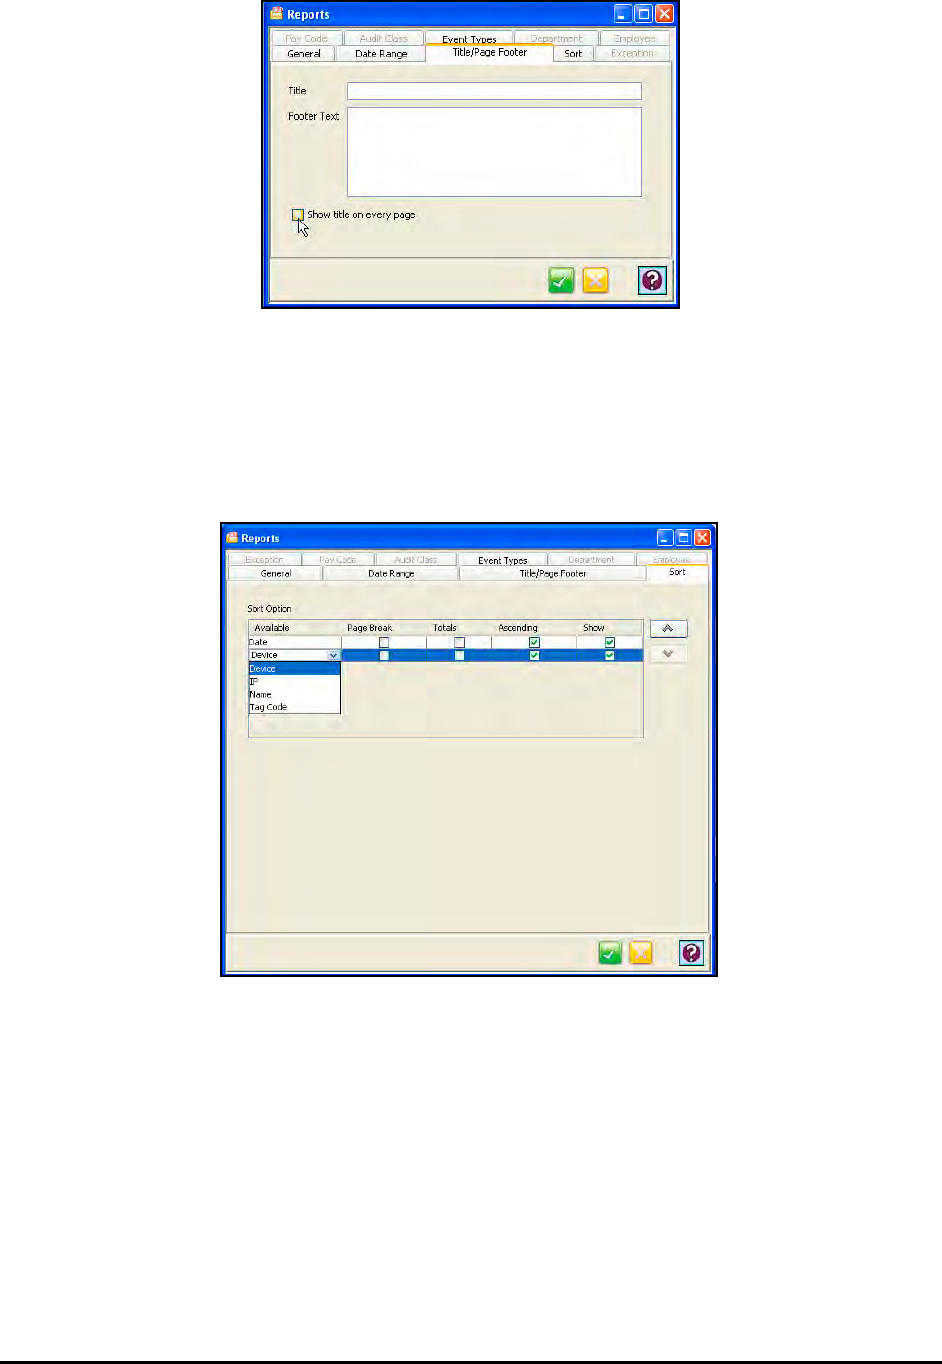
Time Guardian Series – Nexus Lite Module 23-29
11. In the Title field, enter the title that you want to appear on the report. If no title is entered, the
report name (type) will appear as the title of the report. Click to show title on every page if
desired.
12. In the Footer Text field, enter the text that you want to appear on the footer of the report.
13. Click on the Sort tab. See the following illustration for an example:
14. The Available column lists the sorting criteria reports. They are: Date, Device, IP, Name, and
Tag Code. Employees are selected by using the dropdown list in each of the corresponding
sort fields.
15. Click on the up or down arrows to move an item up or down in the sort Available column to
change the sorting priority.
Note: Sorting options may vary depending upon the report selected.
16. Placing a check in the Page Break column will place a page break after each of the sorting
criteria selected.
17. Placing a check in the Totals column will total each of the sorting criteria selected.
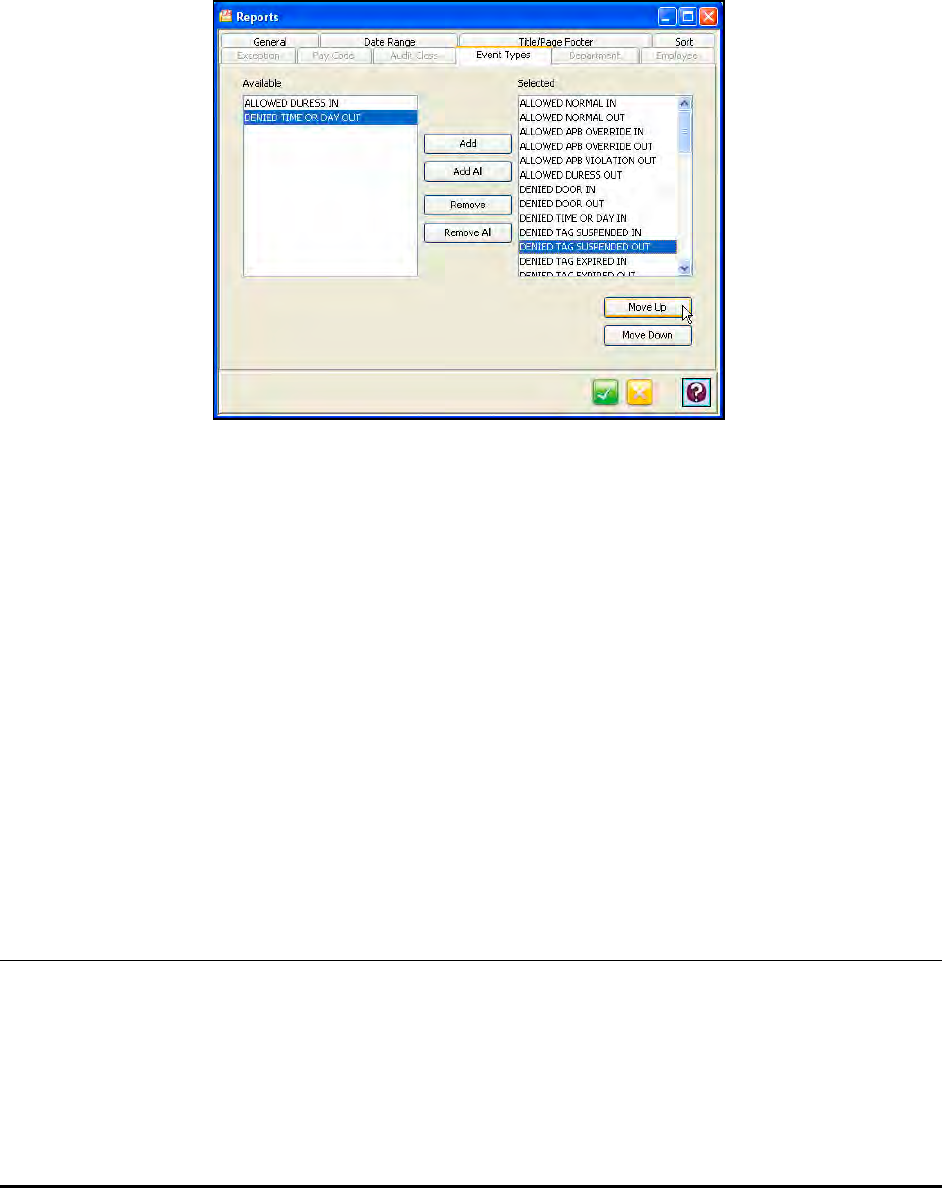
23-30 Time Guardian Series – Nexus Lite Module
18. Placing a check in the Ascending column will list each of sorting criteria selected in
ascending order on the report. No check will list them in descending order.
19. Placing a check in the Show column will allow the selected sort criteria to appear in the
report.
20. Click on the Event Types tab. See the following illustration for an example:
Note: Event Types is only used for Transactions Report.
• To add an Event Type to the report, highlight the desired Event Type in the Available list
and click on the Add button.
• To add all Event Types to the report, click on the Add All button.
• To remove an Event Type from the report, highlight the desired Event Type in the
Selected list and click on the Remove button.
• To remove all selected Event Types, click on the Remove All button.
21. Click on the Move Up or Move Down buttons to move an item up or down in the sort
Selected column to change the priority.
Note: Report profile settings are associated with the user that was logged into the Nexus Lite
Management (NLM) software when the report profiles where created.
Creating a Employee Report (NLM) Profile
Note: Please see “Creating a Report Profile” and “Report Functions & Examples”.

Time Guardian Series – Nexus Lite Module 23-31
Running a Report Profile (NLM)
To run a report from a Report Profile, select the desired Report Profile from the list in the Table
View of the Reports module, and click on the Run Report button.
The report will be generated, and displayed on screen if Adobe Acrobat PDF Output format was
selected (see Figure below). If Excel Output was selected, the report will be generated and an
Excel worksheet created and saved in the Amano Nexus Lite Management software directory
[i.e., Nexus Lite Management] in the "Reports" folder [C:\Program Files\Nexus Lite
Management\reports].

23-32 Time Guardian Series – Nexus Lite Module
Upgrading to Time Attendance
The Nexus Lite Management setup wizard creates a user with the Access privilege. This user,
by default, does not have access to the Time Attendance modules. Since, you are logged in
with Access privilege, you are not able to see the Time Attendance related modules.
Follow the steps below to create a new user with an Administrator privilege.
1. Login into Nexus Lite Management (NLM) using your username/password.
2. Click on Users in Tree View (Setup -> Users).
3. Click on the New button to create a new user - A new dialog will open.
4. Type in a username in the name field.
5. Select Administrator in the Group field.
6. Click on the Password tab.
7. Type in a password and confirm the password.
8. Click on the apply button and the dialog will close with a new user being created.
9. Go to: File->Log off.
10. Login as the new user you have just created.
11. If you see Timecard under Daily Activities on the Tree View the procedure has
succeeded.

Time Guardian Series – Glossary G-1
Glossary
100 of hours
Displays hours in the software in decimal format. Example: 8 hours, 15 minutes will be
displayed as 8.25 hours.
About
Displays the version of the software and the Serial Number of the package.
ABS Absence
When an employee is scheduled to work on a day and does not appear.
Add Employee
Adds new employees to the Time and Attendance software.
Advanced Settings
Allows the user to set a specific Day Change Time and Override.
After Midnight
The Day Change Time set in the software occurs on or after midnight. Example: a Day Change
Time of 1:00 a.m. occurs after midnight.
AM/PM
Used to indicate day or night when using a 12 hour format for displaying time.
Audit Report
A report that displays all changes made in the Time and Attendance software, which is listed by
user, date, time, and the change made.
Auto Update
Automatically locates the terminal and sets the time.
Badge Number
The number of the card assigned to each employee.

G-2 Time Guardian Series – Glossary
Before Midnight
The Day Change Time set in the software occurs on or before midnight. Example: a Day
Change Time of 10:00 p.m. occurs before midnight.
Bell
One of two types of relay schedules, a bell is a device used to produce a tone at an assigned
time and day.
Bereavement
The Pay Code used for grievance.
Bonus
Used to give an employee a monetary award for a given day.
By Actual Time
Displays actual punch times in the editing screen.
By Rounded Time
Displays Rounded punches (configured by the pay policy) in the editing screen.
Clear Transaction
Will clear all punches recorded in the terminal.
Comments
Used to add text to describe certain areas (for reference only).
Current
Indicates the “Current” day.
Custom Toolbar
Allows the user to add, edit or delete buttons from the toolbar located on the Main screen.
Daily Overtime
The time at which hours worked are applied to the Overtime Pay Code.

Time Guardian Series – Glossary G-3
Daily Rounding
Used to round an employee’s recorded punches based on a defined Unit and Point in the Pay
Policy.
Day Change Time
The time at which the next work day begins. By default, this setting is 2:00 a.m.
Department Report
Provides data based on the Department that the employee is assigned to.
Departments
Used to group employees for reporting purposes only.
DOB
Abbreviation used for Date of Birth.
Dollar Pay Codes
Used to assign Tips and Bonuses in the system.
Door
One of two types of relay schedules, Door is used to assign the duration of time when access is
permitted.
Duration
Used to specify the amount of time for a Relay Schedule.
EI Early IN
An exception used to identify early IN punches for an employee.
Employee Number
The unique number assigned to each employee.
Employee Report
Provides a list of all employees in the system.
Employee Setup
An option located on the Main menu that allows the administration of employees in the system.

G-4 Time Guardian Series – Glossary
Early Out (EO)
An exception used to identify early OUT punches for an employee.
Example Simulation
A tool that tests the results of certain rounding rules.
Exception Codes
Flags used to track employee schedule deviations.
Exception Report
A report used to track deviations.
Grid View
Allows you to select the way in which you would like to view the employee data.
Hire Date
The first date that an employee begins working for an employer.
Historical Report
This report displays all historical data for an employee for a given length of time, including
absence, exception, and pay code information.
Holiday
An assigned day off.
Holidays
Located under the Pay Codes setup, this menu allows holidays to be assigned a pay code and
the number of hours to be paid.
Hourly
One of two types of employee designations used by the Time and Attendance software when
calculating time.
Hours Display
Determines how hours are displayed throughout the system. There are two options: Minutes
and 100 of hours.

Time Guardian Series – Glossary G-5
Hours Grid
Displays a complete history of employee activity for a given date range.
Hours Worked Report
Displays a complete history of hours worked by date and employee range.
Import
Extracting data from third party software and adding it to the Time and Attendance software.
Inactive Date
The date on which an employee’s hours are no longer calculated by the system.
Initialize
Used in conjunction with the terminal to establish communication.
Late In (LI)
An exception used to identify late IN punches for an employee.
Long Meal (LM)
An exception used to identify a long meal by an employee.
Late Out (LO)
An exception used to identify late OUT punches for an employee.
Login Profile
Used to indicate an assigned Username and Password to provide access to the software.
Meal
A designated period of break time for an employee.
Maximum Shift Length
Determines the period of time that all punches occurring after Day Change Time will be
associated with the last IN Punch before the Day Change Time.
Meal Grace
A "Free" period of time that is allocated to an employee who returns late from a meal.

G-6 Time Guardian Series – Glossary
Memory Dump
A command sent to the terminal that will erase all data currently stored in its memory.
Military Time
Based on a 24-hour clock, military time is one of two standard forms of recording time.
Miscellaneous
Used to denote information that falls into no specific category.
Missing Punch (MP)
An exception used to identify missing punches for an employee.
Next
Indicating that the punch occurred after midnight and is applied to the “Next” day.
No Schedule
Indicates that no specific schedule has been assigned to an employee.
Not Scheduled (NS)
An exception used to identify an employee who works on a day where they have no assigned
schedule.
On-Line
Used in the Help menu, on-line indicates that the information is contained within the software.
Overtime
Hours worked that extend beyond an assigned schedule.
Overtime Authorization
Requires manager approval before overtime hours are awarded.
Overtime Reset Day
The day or date on which overtime calculations are reset.

Time Guardian Series – Glossary G-7
Pay Policy
The rules used to calculate employee hours.
Pay Codes
Used to allocate employees’ worked and non-worked hours. There are nine (9) predefined Pay
Codes.
Pay Code Multiplier
Used to provide a multiplier for employees’ worked hours from a specific date. There are nine
(9) predefined Pay Codes. The multiplier can also be increased by a percentage from a specific
date.
Pay Period
The interval by which an employee is paid. Industry standards are weekly, bi-weekly, semi-
monthly and monthly.
Payroll Interface
Payroll software packages that the Time and Attendance software can automatically interact
with.
Personal
Part of the employee profile. This section is used to record information such as address, phone,
DOB and more.
Point
Used in rounding calculations, the point is the place at which the punched time will be moved
forward to the next “Unit.”
Poll
A term used to describe the retrieving of information from the terminal by the software.
Presence Report
A report that displays employees currently punched IN at the terminal.
Previous
Indicates that the punch originates from the “Previous” day.

G-8 Time Guardian Series – Glossary
Profile
Used throughout the software to indicate a summary of information.
Refresh Data
Located under the “File” section of the Main menu, this option is used to update the software
with the most recent information available.
Regular
The most common Pay Code used to identify hours worked by an employee.
Relay
A circuit located on the terminal that will allow for controlled door access or the ringing of bells
at assigned times and days.
Relay Name List
A list of available schedules that may be assigned to a terminal, and only one schedule can be
assigned per terminal.
Report
A format for presenting employee and system information to the user in a predefined format.
Rounding
A formula used to adjust employees’ punched time based on a defined Unit and Point.
Rounding Rules
The specific Unit and Point that determines how employee’s punches will be rounded.
Salary
One of two types of employee designations used by the Time and Attendance software.
Employees who are salaried do not to have to punch in, but they must have an assigned
schedule. If a salaried employee works on a holiday, they will only receive holiday pay.
Save
Used to store updates made to the system.
Schedules
Work patterns with fixed start and end times that can then be assigned to employees to track IN
and OUT punches.

Time Guardian Series – Glossary G-9
Sick
The Pay Code used for employee illness.
Short Meal (SM)
An exception used to identify a short meal.
SS#
The abbreviation used for the Social Security Number.
TG
An abbreviation for the words "Time Guardian" (part of the TG Series).
TG Pro
An abbreviation for the words "Time Guardian Pro" (part of the TG Series).
TG Plus
An abbreviation for the words "Time Guardian Plus" (part of the TG Series).
Terminal Number List
A listing of all terminals currently available in the Time and Attendance software. Used to assign
Relay Schedules.
Time Display
The format used to display time, either AM/PM or Military Time.
Time from Start of Schedule
A setting used when employees are punching IN and OUT for meals. This number defines the
window of time before a meal can be taken.
Tips
Used to record tip earnings. Also, one of two pay codes used to assign dollar amounts.
Tools
Located under the Help section of the Main menu, Tools are internal utilities used to assist in
the understanding of the Time and Attendance software calculations.

G-10 Time Guardian Series – Glossary
Type of Employee
Used to indicate how employee hours will be displayed in the Time and Attendance software.
The options are: Hourly or Salary.
Undefined Data
Data that cannot be processed by the Time and Attendance software will be noted in the Audit
Trail Report. Undefined data is usually caused when an employee is punching prior to being
entered in the software. The Time and Attendance software will automatically process
undefined data.
Unit
Identifies how an hour will be divided into smaller pieces for rounding purposes.
Vacation
The Pay Code used for scheduled time off.
Wages
An assigned dollar amount per hour which is applied to the hours worked plus any authorized
overtime (with pay code multiplier), tips and/or bonuses to create an employee’s calculated
earnings.
Weekly Overtime
An assigned number of hours that, when exceeded, will cause an employee’s hours to be
calculated as overtime.
Wizard
The installation program created specifically for the Time and Attendance software, which can
also be accessed from the Setup menu.