Amazon com Services 1210 Communications Device User Manual Users manual
Joyous LLC Communications Device Users manual
Contents
Users manual
The Device
User Guide
4 Buttons
8
IConnect Product To Your Computer
10 Browsing the Web... ...5
11 Airplane Mode.......... ...........5
12 Compliance Statement 6-7
The Device User Guide
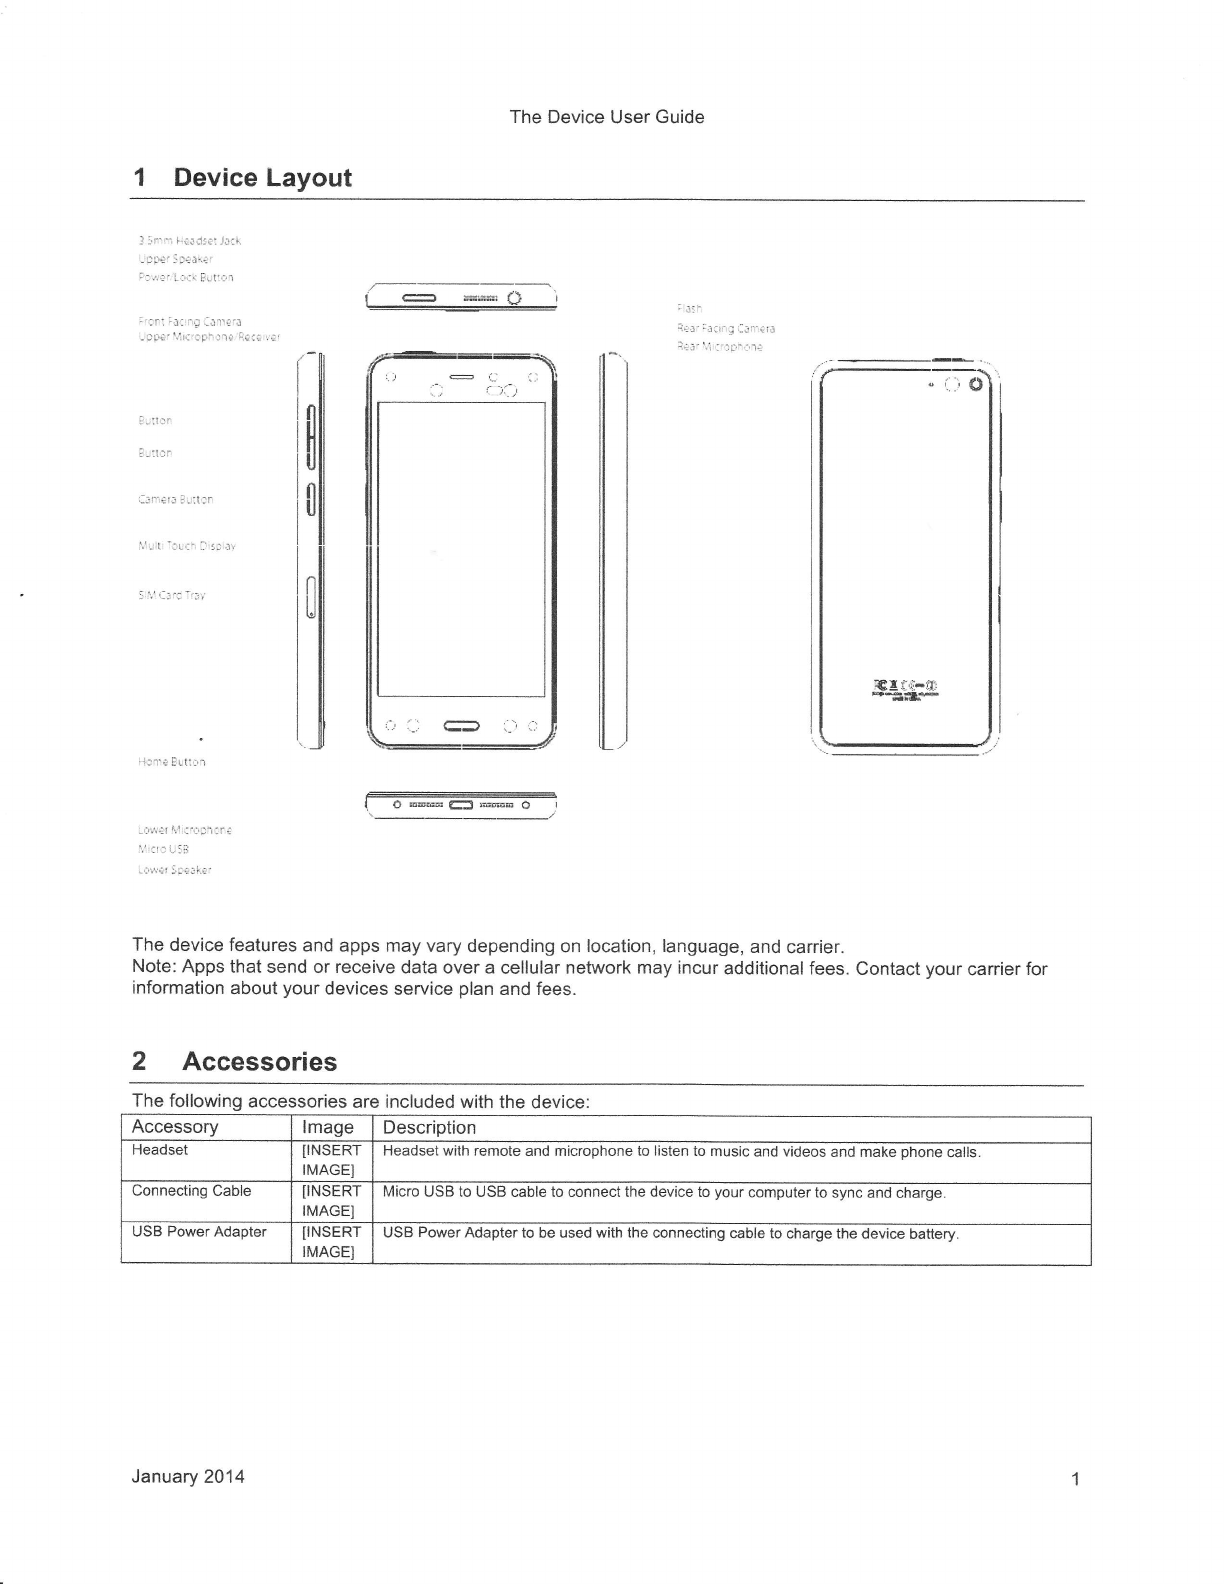
1 Device Layout
I :r'.', i-i;iJ::: l:r!.
-'si-i:.::rrnl;'
,': +:' liii Fnl:,lt
:,:r. ;J: irt.::-jl1efn
, tri: li1i.:tri l.r* i€:: r; 11;':3;rr r- 1-;1.r13
-j,i: '.i .: :!:-;,-r:
-|()
:Erl:'iFffi
835il#
! -r: l:l a
lr:i.r
r:rrlarn .!ittr
:,1t.:t ::L,:. :.,ij i\.
'i:r'; P!ti!il
r,;,,.rt rr!::l!;ilr;
i;',it: L!i
.a'yr!! i:;Jia"
I OffiClffiO r
The device features and apps may vary depending on location, language, and carrier.
Note: Apps that send or receive data over a cellular network may incur additional fees. Contact your carrier for
information about your devices service plan and fees.
2 Accessories
The following accessories are included with the device:
Accessory lmage Description
Headset IINSERT
IMAGEI
Headset with remote and microphone to listen to music and videos and make phone calls.
Connecting Cable IINSERT
TMAGEI
Micro USB to USB cable to connect the device to your computer to sync and charge.
USB Power Adaoter IINSERT
IMAGEI
USB Power Adapter to be used with the connecting cable to charge the device battery.
January 2014
The Device User Guide
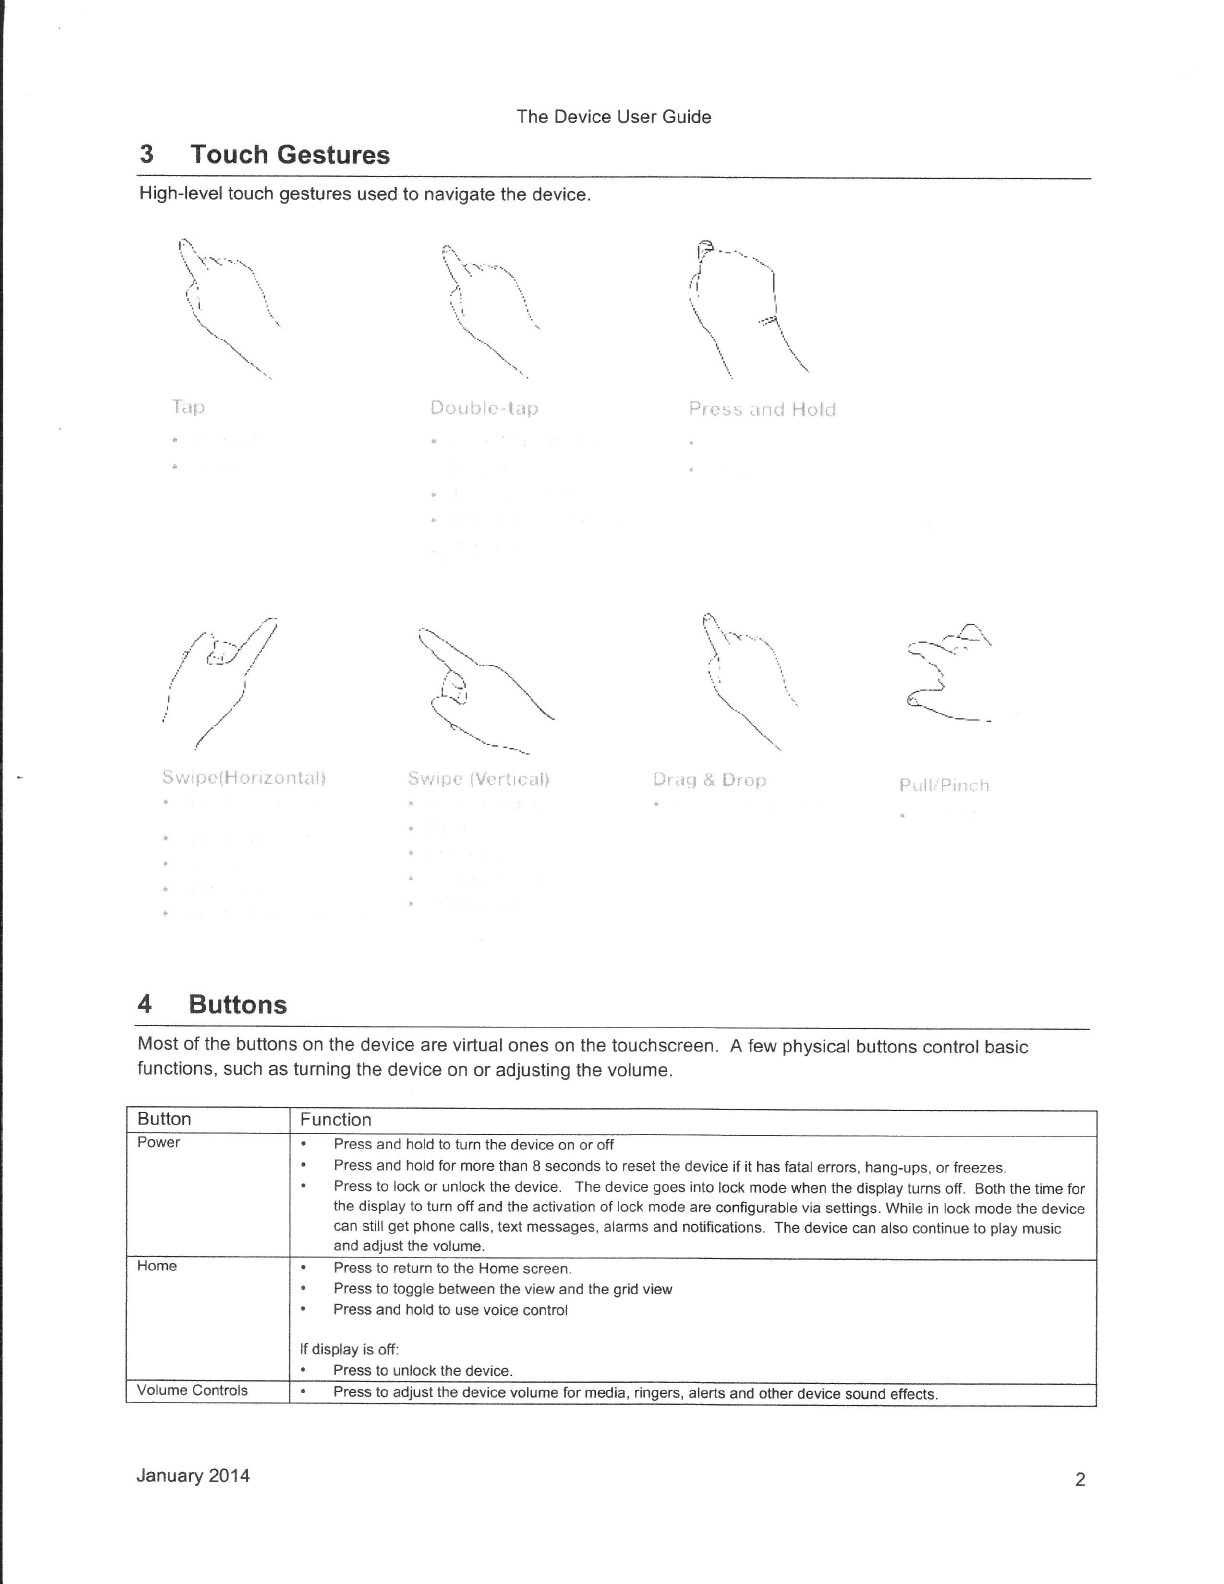
3 Touch Gestures
High-level touch gestures used to navigate the device.
l;r --
i
,1
n
), -..
ii i
t\. "\
l--... ,:, iii..rr!, ,i1
I
II
I
.irtr-i i-.ii-.iri
1,r1,, Ft i::.:
".'r..tri j:l Lll;-:i:
-+_\
.--\ .- -.
.}
L-r
f\
.t '.
ir r
\'.
\',
\.
;t)
/. /'./
./ f--r i
! {:iJ i
ji
ir
!/
i:! ii ijr:r. it
4 Buttons
Most of the buttons on the device are virtual ones on the touchscreen. A few physical buttons control basic
functions, such as turning the device on or adjusting the volume.
Button Function
Power Press and hold to turn the device on or off
Press and hold for more than 8 seconds to reset the device if it has faial errors, hang-ups, or freezes.
Press to lock or unlock the device. The device goes into lock mode when the display tums off. Both the time for
the display to turn off and the activation of lock mode are configurable via settings. While in lock mode the device
can still get phone calls, text messages, alarms and notifications. The device can also continue to play music
and adjust the volume.
Home Press to return to the Home screen.
Press to toggle between the view and the grid view
Press and hold to use voice control
lf display is off:
. Press to unlock the device
Volume Controls Press to adjust the device volume for media, ringers, alerts and other device sound effects.
January 2014
The Device User Guide
Button Function
Other Button . Press to launch the camera.
In the camera application:
. Press to take afl image
lf display is off:
. Press to unlock the device.
5 Status lcon
The icons in the status bar at the top of the screen given information about the device:
[insert image of status bar]
Constant lndicators Description
,| Time Displa!'s the current time preseni
2Signal Displays the signal strength and carrier name. The device is in range of the cellular network and
can make and receive calls. ll there's no signal, "No service" icon appears. Present unless
disabled by special state.
3Network Displays wireless network. Present unless disabled by special state.
Network lcons:
LTE
UMTS
UMTS/EV.DO
EDGE
GPRS
WIFI
4Battery Represents the amount of battery life left. Always present.
Transient lndicators Description
5 Bluetooth Active Only shows when the device is connected to another device via Bluetooth.
6.:pa Only shows when a GPS satellite is actively engaging. Will mostly appear in Maps application and
when using Tum-by-Turn directions.
7Alarm Only shows when one or more alarms have been set to go off in the future-
ICall Forwarding Only shows when the device has been set to forward calls to another number.
9 TTY Only shows when the device is connected to a TTY device.
SpecialStates Description
10 Airplane Mode Indicates when the device is in airplane mode. You can not make phone calls. Also initially disable
Wi-Fi, Bluetooth and GPS- These can be turned back on while still in Airplane Mode. Replaces the
Signal Strength, Carrier Network and WAN Data Network Type icons.
1',1 No Service Indicates when the device is not connected to a voice network. Replaces the Signal Strength, Carrier
Network, and WAN Data Network Type icon.
12 No SIM Indicates when the device does not have a SIM card. Replaces the Signal Strength, Canier Network,
and WAN Data Network Type icon.
13 Emergency Calling Only Indicates when the device is disabled, except for emergency calling. Replaces the Signal Strength,
Canier Network, and WAN Data Network Type icon.
14 Searching Indicates when the device is actively trying to acquire a network indicator. Replaces the Signal
Strength, Carrier Network, and WAN Data Network Type icon.
January 2014
The Device User Guide
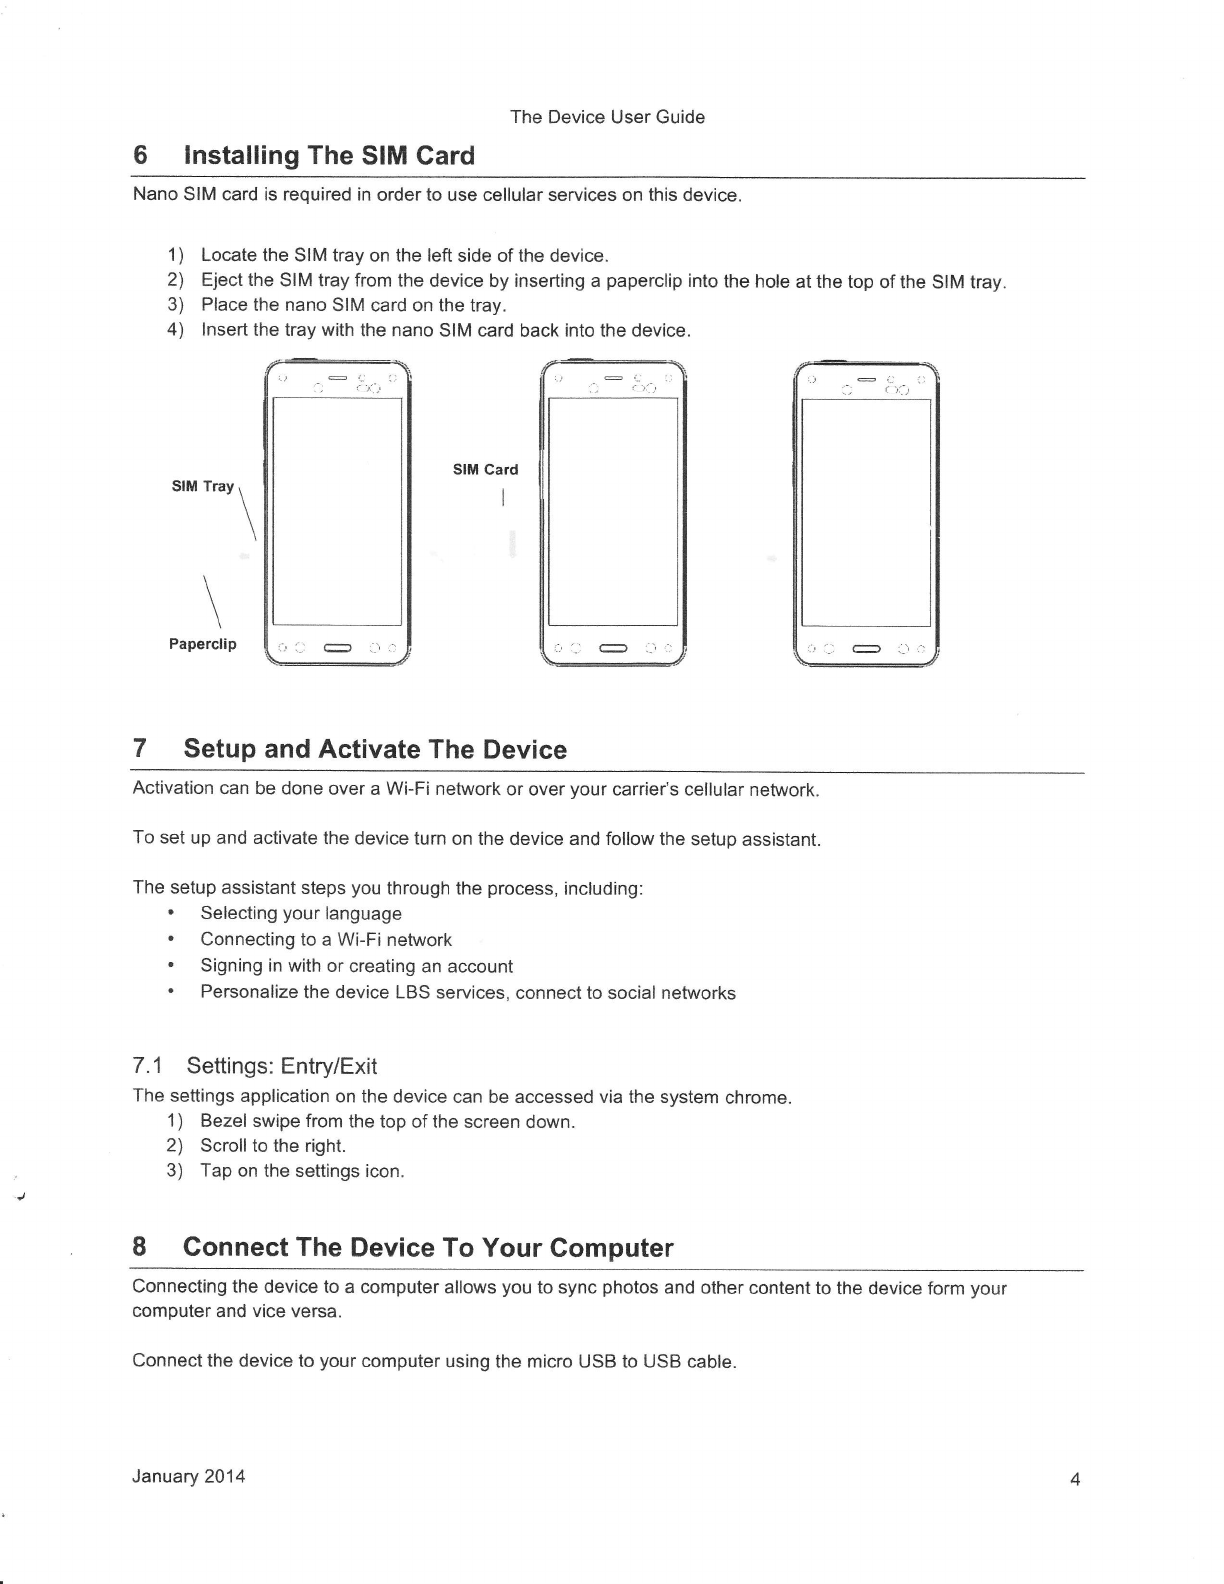
6 Installing The SIM Card
Nano SIM card is required in order to use cellular services on this device.
1) Locate the SIM tray on the left side of the device.
2) Eject the SIM tray from the device by inserting a paperclip into the hole at the top of the SIM tray.
3) Place the nano SIM card on the tray.
4) Insert the tray with the nano SIM card back into the device.
tt* t*r\
Paperclip
SIM Card
I
7 Setup and Activate The Device
Activation can be done over a Wi-Fi network or over vour carrier's cellular network.
To set up and activate the device turn on the device and follow the setup assistant.
The setup assistant steps you through the process, including:
. Selecting your language
. Connecting to a Wi-Fi network
. Signing in with or creating an account
. Personalize the device LBS services. connect to social networks
7.1 Settings: EntrylExit
The settings application on the device can be accessed via the system chrome.
1) Bezel swipe from the top of the screen down.
2) Scroll to the right.
3) Tap on the settings icon.
I Gonnect The Device To Your Computer
Connecting the device to a computer allows you to sync photos and other content to the device form your
computer and vice versa.
Connect the device to your computer using the micro USB to USB cable.
January 2014
The Device User Guide
9 Gonnect To Wi-Fi
The device automatically detects nearby Wi-Fi networks and wireless hotspots that broadcast their network name.
Some networks are open for everyone to join, while others require a password to connect. You can connect the
device to your home Wi-Fi network, public Wi-Fi networks, and some enterprise private networks. The device will
reconnect to previously added networks automatically when the network is within range.
9.1 Joining Wi-Fi networks
To connect to a Wi-Fi network open the settings application as defined in section 7.1.
1) Scroll down to Wi-Fi settings.
1) Tap on "Connect to a Wi-Fi network"
2) Tap a network to connect to it. lf you see a lock icon, a network password is required. Enter the Wi-Fi
network password, and then tap OK.
a. To adjust the settings for a Wi-Fi network a tap Show Advanced Options. You can set an HTTP
proxy and define static network settings.
Note: lf you don't know the passwor4, check with the person who set up the network. This password is not your
account password.
9.2 Adding Wi-Fi Networks
To add a Wi-Fi network open the seftings application as defined in section 7.1.
1) Scroll down to Wi-Fi settings.
2) Tap on "Connect to a Wi-Fi network"
3) Tap Add Network located at the bottom of the network list.
4) Enter the Network SSID, select the security type and enter the password if it is not an open network, and
then tap OK.
b. To adjust the settings for a Wi-Fi network a tap Show Advanced Options. You can set an HTTP
proxy and define static network settings.
9.3 Forgetting Wi-Fi Networks
Any network that has ever been used, including the current network, can be forgotten so the device will not
automatically connect to it. To forget a Wi-Fi network open the setting application as defined in section 7.1
1) Scroll down to Wi-Fi settings.
2) Tap on "Connect to a Wi-Fi network"
3) Tap on the network from the network list.
4) Tap on Forget this Network
10 Browsing the Web
To browse the internet use the device browser application.
To open the browser, tap the browser icon from the home screen or from home grid.
Note: An Internet connection either over Wi-Fi or Cellular is required to browse the web.
',1 Airplane Mode
To switch to Airplane Mode:
1) Bezel swipe from the top of the screen down.
2) Scroll to the right.
3) Tap on the Airplane Mode icon.
January 2014
The Device User Guide
I 2 Compliance Statements
FCC Regulations:
This device complies with part 15 of the FCC Rules. Operation is subject to the following two conditions: (1) This
device may not cause harmful interference, and (2) this device must accept any interference received, including
interference that may cause undesired operation.
Changes or modifications not expressly approved by the party responsible for eompliance could void the user's
authority to operate the equipment.
This equipment has been tested and found to comply with the limits for a Class B digital device, pursuant to part 15
of the FCC Rules. These limits are designed to provide reasonable protection against harmful interference in a
residential installation. This equipment generates, uses and can radiate radio freguency energy and, if not installed
and used in accordance with the instructions, may cause harmful interference to radio communications. However,
there is no guarantee that interference will not occur in a particular installation. lf this equipment does cause harmful
interference to radio or television reception, which can be determined by turning the equipment off and on, the user is
encouraged to try to correct the interference by one or more of the following measures:
-Reorient or relocate the receiving antenna.
-lncrease the separation between the equipment and receiver.
-Connect the equipment into an outlet on a circuit different from that to which the receiver is connected.
-Consult the dealer or an experienced radiolTV technician for help.
Operation on the 5.15-5.25 GHz frequency band is restricted to indoor use only.
RF Exposure Information (SAR)
This device has been tested and meets applicable limits for Radio Frequency (RF) exposure.
Specific Absorption Rate (SAR) refers to the rate at which the body absorbs RF energy. SAR limits are 1.6 Watts per
kilogram (over a volume containing a mass of 1 gram of tissue) in countries that follow the United States FCC limit
and 2.0 Wkg (averaged over 10 grams of tissue) in countries that foltow the Council of the European Union limit.
Tests for SAR are conducted using standard operating positions with the device transmitting at its highest certified
power level in all tested frequency bands.
To reduce exposure to RF energy, use a hands-free accessory or other similar option to keep this device away from
your head and body. Carry this device at least 15 mm away from your body to ensure exposure levels remain at or
below the as-tested levels. Choose the belt clips, holsters, or other similar body-worn accessories which do not
contain metallic components to support operation in this manner. Cases with metal parts may change the RF
performance of the device, including its compliance with RF exposure guidelines, in a manner that has not been
tested or certified, and use such accessories should be avoided.
Hearing Aid Compatibility Information (HAC)
Your phone is compliant with the FCC Hearing Aid Compatibility requirements.
The Device User Guide
The FcC has adopted HAC rules for digital wireless phones. These rules require certain phone to be tested and
rated under the American National Standard Institute (ANSI) C63.19-2011 hearing aid compatibility standards. The
ANSI standard for hearing aid compatibility contains two types of ratings:
M-Ratings: Rating for less radio frequency interference to enable acoustic coupling with hearing aids.
T-Ratings: Rating for inductive coupling with hearing aids in telecoil mode.
Not all phones have been rated, a phone is considered hearing aid compatible under FCC rules if it is rated M3 or
M4 for acoustic coupling and T3 or T4 for inductive coupling. These ratings are given on a scale from one to four,
where four is the most compatible. Your phone meets the M4n4level rating.
However, hearing aid compatibility ratings don't guarantee that interference to your hearing aids won't happen"
Results will vary, depending on the level of immunity of your hearing device and the degree of your hearing loss. lf
your hearing device happens to be vulnerable to interference, you may not be able to use a rated phone
successfully. Trying out the phone with your hearing device is the best way to evaluate it for your personal needs.
This phone has been tested and rated for use with hearing aids for some of the wireless technologies that it uses.
However, there may be some newer wireless technologies used in this phone that have not been tested yet for use
with hearing aids. lt is important to try the different features of this phone thoroughly and in different locations, using
your hearing aid or cochlear implant, to determine if you hear any interfering noise. Consult your service provider or
the manufacturer of this phone for information on hearing aid compatibility. lf you have questions about return or
exchange policies, consult your service provider or phone retailer.
Hearing devices may also be rated. Your hearing device manufacturer or hearing health professional may help you
find this rating. For more information about FCC Hearing Aid Compatibility, please go to hftp://www.fcc.gov/cgb/dro.