AmbiCom 2000USB Air2Net Bluetooth Wireless USB Dongle User Manual User s Guide For Windows 2000
AmbiCom Holdings, Inc. Air2Net Bluetooth Wireless USB Dongle User s Guide For Windows 2000
AmbiCom >
block diagram

AmbiCom Bluetooth Solutions
User Manual for Win98SE
June 25, 2002

Air2Net Bluetooth Wireless Solutions
User Manual for Windows 98SE Working at the speed of thought
AmbiCom, Inc Page 1 of 26 6/25/2002
1. Introduction
This user manual covers the product features, release notes, installation procedures, and
operating procedures for AmbiCom’s Bluetooth applications.
Bluetooth wireless technology is a global standard for low-cost and low-power small form factors
to connect multiple devices such as computers, mobile phones, PDAs, printers, LAN and WANs to
each other. It provides fast and reliable digital transmission of both voice and data over 2.4GHz
ISM open band. AmbiCom’s Bluetooth wireless technology offers the following features:
• Cable Replacement
Establishes a wireless Personal Area Network with other Bluetooth devices within the
operating range, without the hassles of wiring and configuration.
• Ad-hoc Networking
Supports both data and voice between two or more devices wirelessly.
• Secure Wireless Connections
Built-in authentication, encryption and authorization applications ensure secure
information access and transmission.
• LAN and WAN Access Points
LAN and WAN access such as Web, email, E-commerce, and VPN.
2. Product Features
With AmbiCom’s Bluetooth CompactFalsh Card with PCMCIA adapter, USB Adapter or UART
Adapter and Bluetooth software, you can establish wireless connections between your computer
and other Bluetooth wireless devices. The features include:
• Device Discovery
• Name Discovery
• Service Discovery
• File Transfer
• Object Push for files, objects and business cards
• Blue Chat that allows users to instantly send and receive text messages
• Internet Access through Dial-Up Networking
• Connection to LAN through LAN Access Point
AmbiCom provides Bluetooth Neighborhood software application that integrates all of the above
features into one single application.
3. Release Notes
• We support Windows 98SE on this release
• This release supports the AmbiCom Bluetooth CompactFlash, USB Dongle, USB
module, and UART Adapter.
• SIG 1.1 compliant Bluetooth protocol stack.
Air2Net Bluetooth Wireless Solutions
User Manual for Windows 98SE Working at the speed of thought
AmbiCom, Inc Page 2 of 26 6/25/2002
• We support Device Discovery, Name Discovery, Service Discovery, Pairing, Object
Push, File Transfer, Dial-Up and LAN access Networking in this release.
• Audio is not supported in this release.
• When two devices are performing Device Discovery at the same time, they will not
discover each other. Please do not run Bluetooth Neighborhood at the same time.
4. Installation Procedures for Windows 98SE
Important Notes: Make sure you have installed the Dcom 98.exe from Microsoft on your
Win98SE system before you install the AmbiCom Bluetooth software.
1. Insert the AmbiCom Bluetooth Installation CD into your laptop CD-ROM drive.
2. Run AmbiCom Bluetooth Setup.exe and follow the on-screen instruction to install the
application program.
3. The following window will appear at the start of the installation process:
4. Choose the device you have and click “Next” to continue. Simply follow the on-screen
instructions. At the end of the installation, the system will pop up several windows to install
some devices. This is because the system is installing some virtual devices for the software to
use. Please be patient and wait until the system finishes.
Air2Net Bluetooth Wireless Solutions
User Manual for Windows 98SE Working at the speed of thought
AmbiCom, Inc Page 3 of 26 6/25/2002
5. After the system is finished installing the virtual devices, please click Finish to reboot your
system.
6. After you have restarted your laptop, please connect your AmbiCom Bluetooth
CompactFlash, USB or UART Adapter to your laptop. The system will automatically install
the driver for you. After the system installed the driver you need reboot your system. Now you
are ready to execute Object Push, File Transfer and Blue Chat by using Bluetooth
Neighborhood. Please see the section “How to Run Bluetooth Neighborhood” and skip the
following steps. If you want to use the Dial-up Networking and LAN Access, please observe
the following steps.
Air2Net Bluetooth Wireless Solutions
User Manual for Windows 98SE Working at the speed of thought
AmbiCom, Inc Page 4 of 26 6/25/2002
Installation Procedures for Dial-Up Networking
If you have a Bluetooth phone/modem, we recommend that you continue installing the
corresponding components.
Note:
During the software installation, you will see several modems installed in your system. You
can go to Device Manager, click Modem to view all the modems. For Dial-Up and LAN
Access networking, we will use those modems to set up.
1. From Control Panel, go to Dial-up Networking and create a New Connection for
Bluetooth Dial-Up Networking. Following the on-screen instructions to set up a connection
for the Bluetooth Dial-up Networking. During the setup, the system will ask you to select a
modem for dial-up, please select the modem Bluetooth DUN Client. Click Next.
Air2Net Bluetooth Wireless Solutions
User Manual for Windows 98SE Working at the speed of thought
AmbiCom, Inc Page 5 of 26 6/25/2002
2. Click Next.
3. Click Next.
Air2Net Bluetooth Wireless Solutions
User Manual for Windows 98SE Working at the speed of thought
AmbiCom, Inc Page 6 of 26 6/25/2002
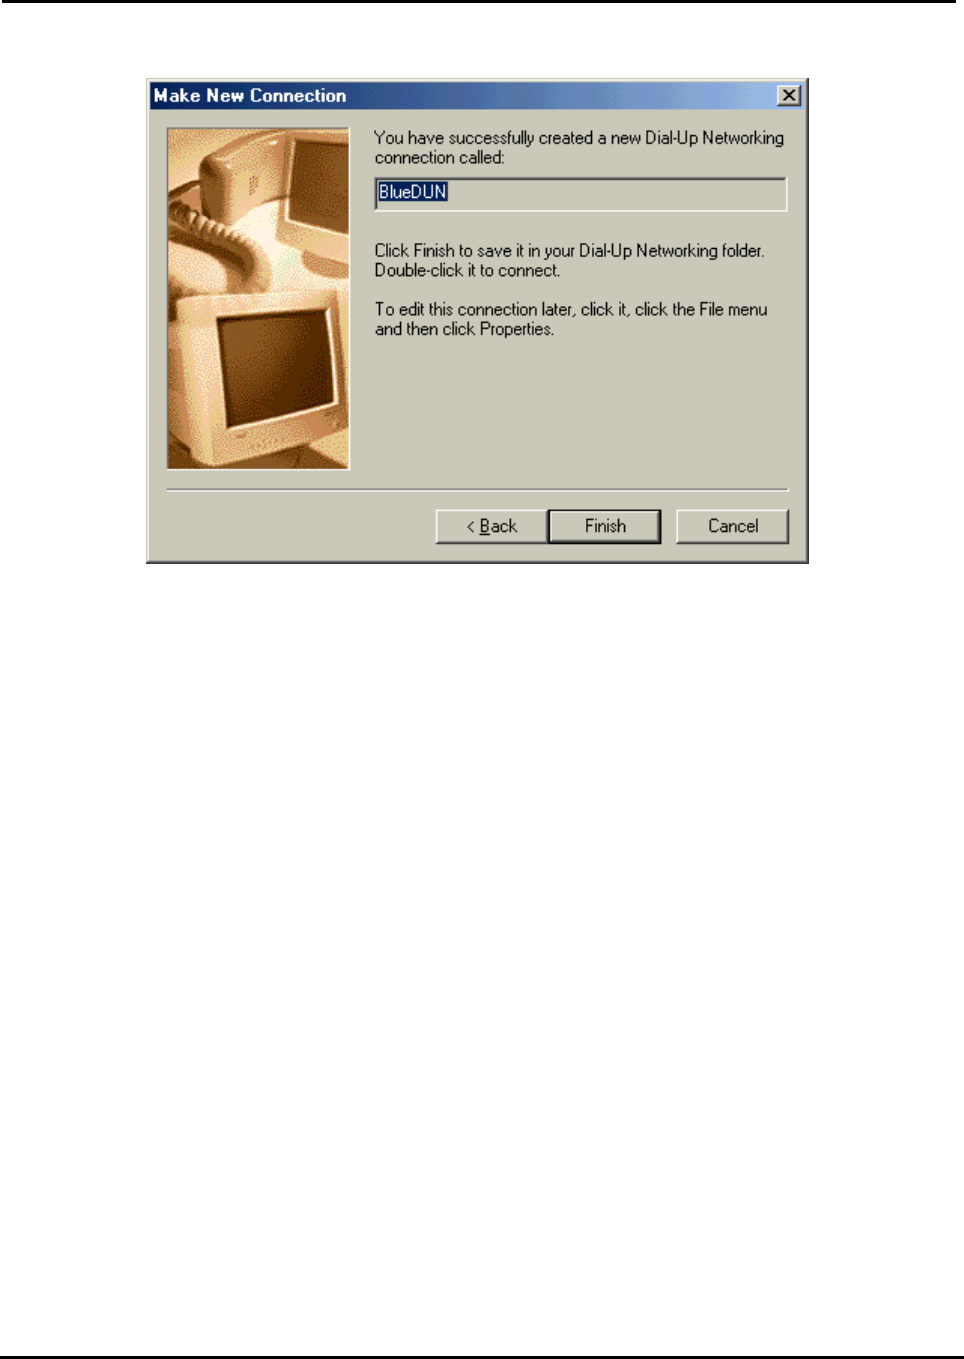
4. Click Finish.
Follow the on-screen instructions to complete the setup.
Air2Net Bluetooth Wireless Solutions
User Manual for Windows 98SE Working at the speed of thought
AmbiCom, Inc Page 7 of 26 6/25/2002
Installation Procedures for LAN Access
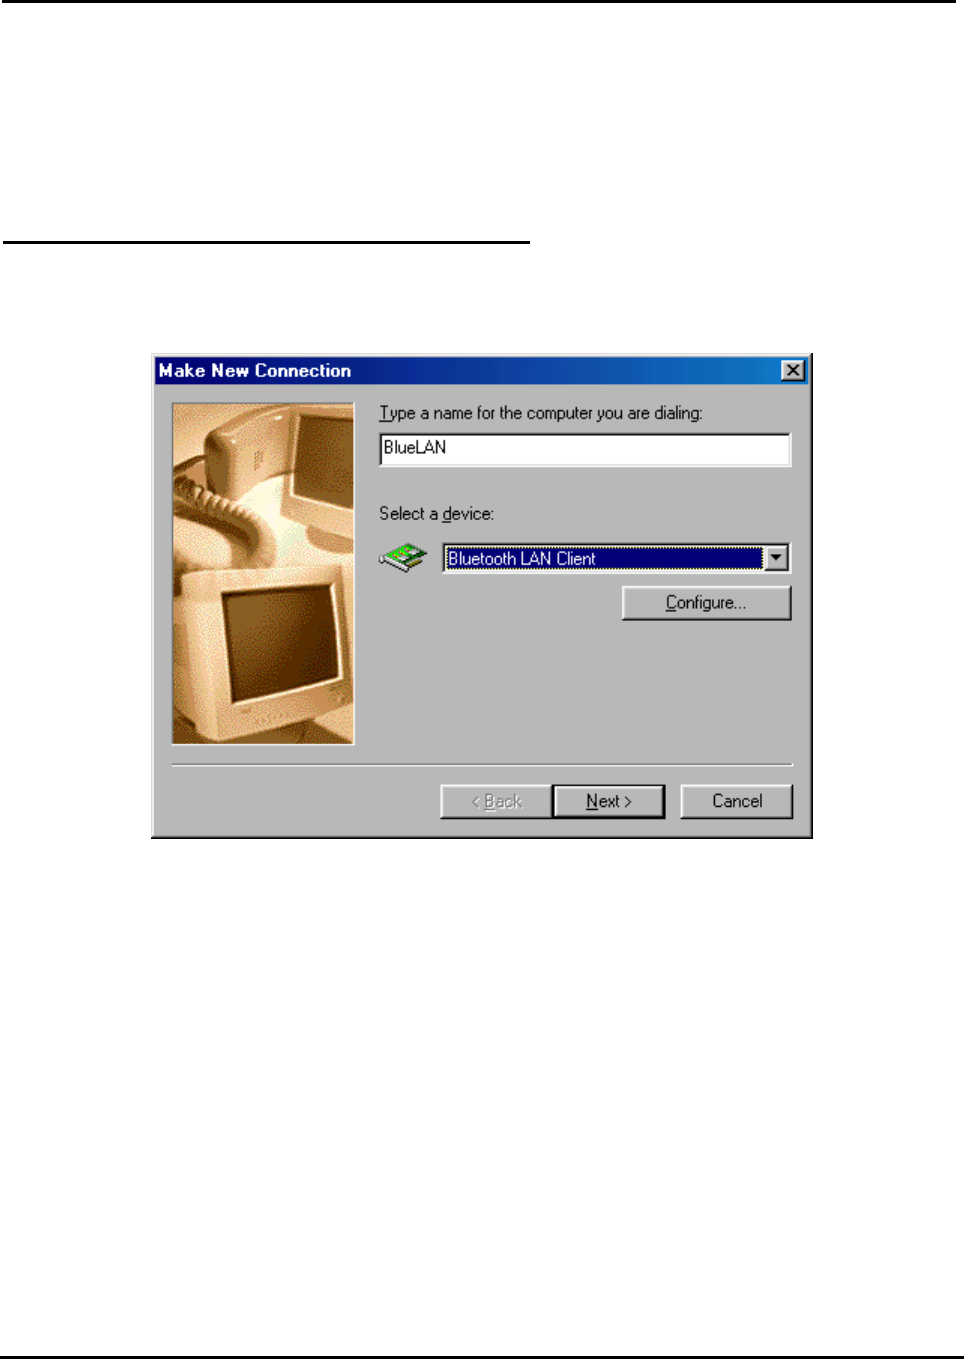
1. For LAN Access, the installation procedure is almost identical to dial-up networking. The only
difference is under “Make New Connection”, choose “Bluetooth LAN Client” instead.
Click “Next” to continue the installation.
Air2Net Bluetooth Wireless Solutions
User Manual for Windows 98SE Working at the speed of thought
AmbiCom, Inc Page 8 of 26 6/25/2002
5. How to Run Bluetooth Neighborhood
1. You will find a Bluetooth Neighborhood shortcut on your Desktop.
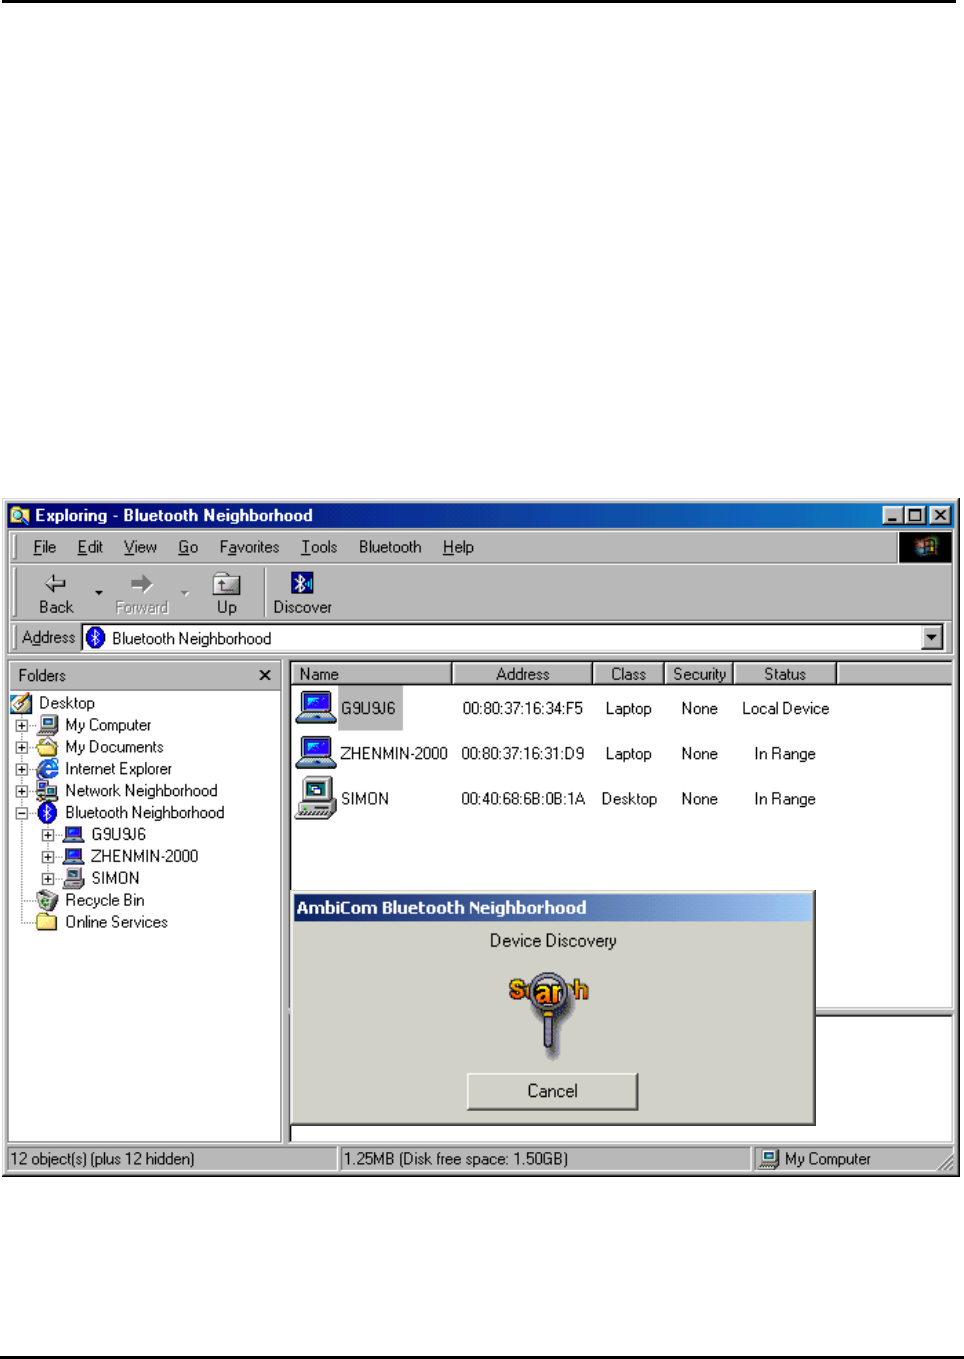
2. Upon opening Windows Explorer, you will find the "Bluetooth Neighborhood" icon. Double-click
on it and Bluetooth Neighborhood will start to run. You can see a Bluetooth Neighborhood GUI
at the right-hand side of Windows Explorer, and the window "Device Discovery" will appear.
When it finds all the Bluetooth devices within the operating range, the "Device Discovery"
window will disappear. The discovery process includes device discovery and name discovery.
Air2Net Bluetooth Wireless Solutions
User Manual for Windows 98SE Working at the speed of thought
AmbiCom, Inc Page 9 of 26 6/25/2002
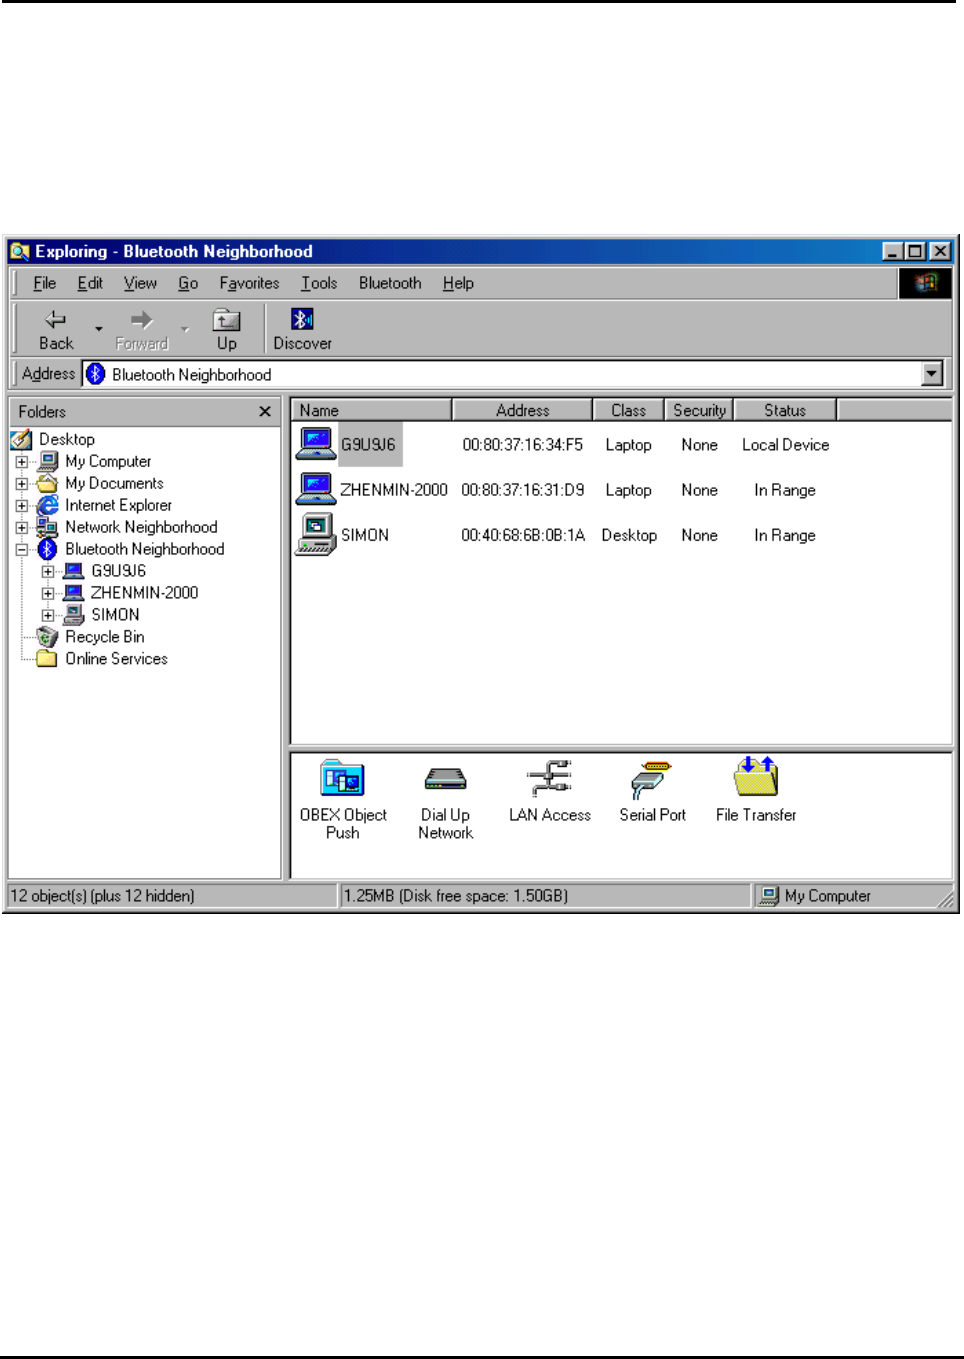
3. After finding the devices, you can click on one of the devices and its services and capabilities
will be listed. In the Device List Window (at the right of Windows Explorer), the first device is
always the local device.
Air2Net Bluetooth Wireless Solutions
User Manual for Windows 98SE Working at the speed of thought
AmbiCom, Inc Page 10 of 26 6/25/2002
Security Mode
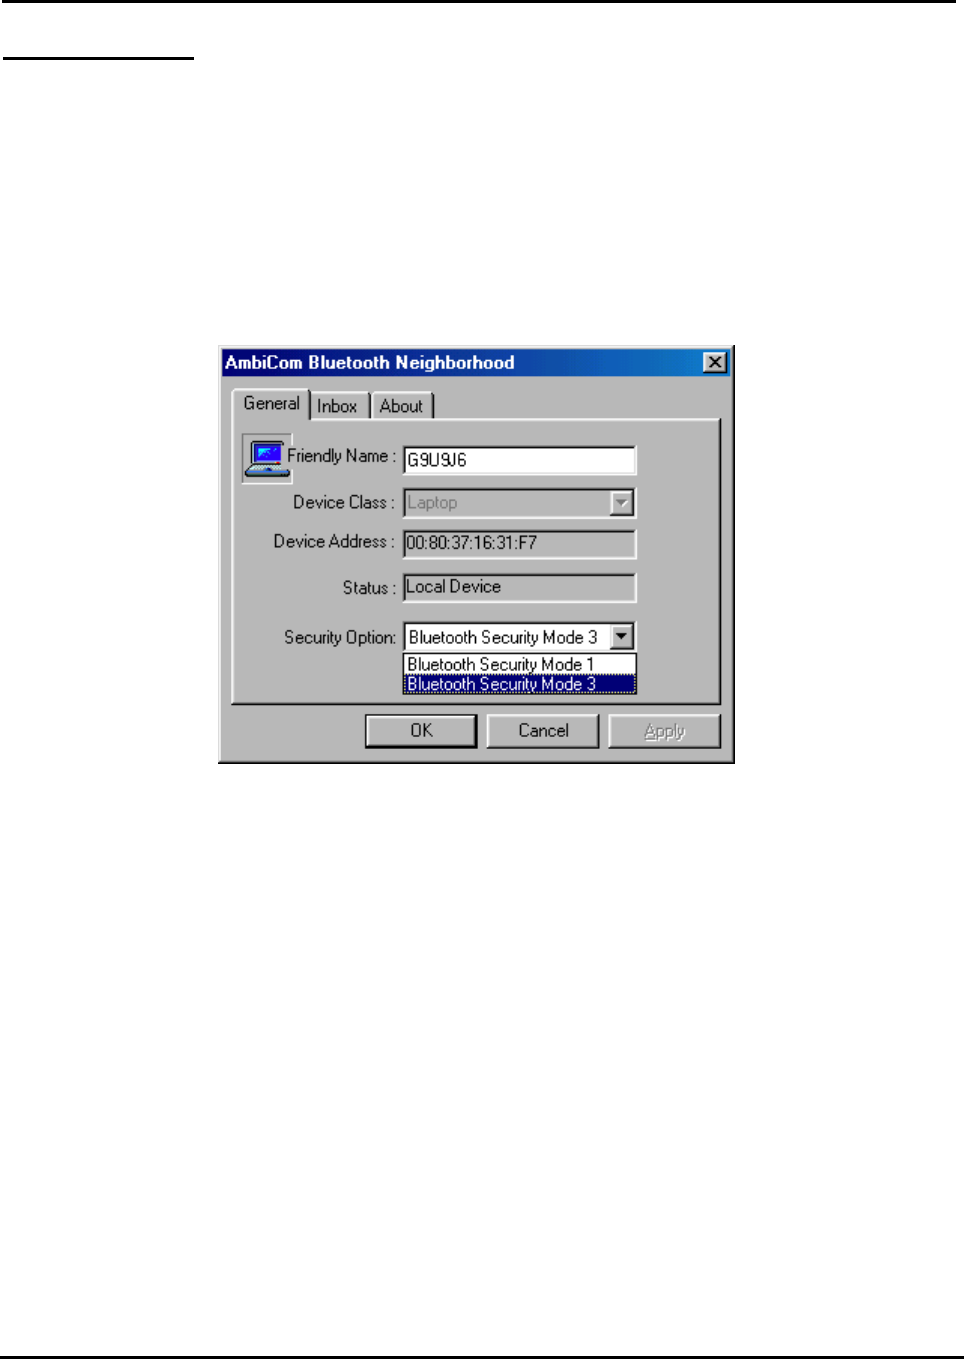
1. Our software provides two levels of security mode: security level 1 and security level 3. At
security level 3, a PIN code will be required when other Bluetooth enabled devices try to
connect with you. The PIN code entered needs to be the exact same one entered on both
machines. This will give you more security. If you set your PC in security level 1, then there is
no PIN code needed.
2. You can go to Bluetooth Neighborhood to set the security level. Choose “Local Device”, click
the right button of your mouse, and then select “Property”. You will see the following window.
Air2Net Bluetooth Wireless Solutions
User Manual for Windows 98SE Working at the speed of thought
AmbiCom, Inc Page 11 of 26 6/25/2002
Access Mode
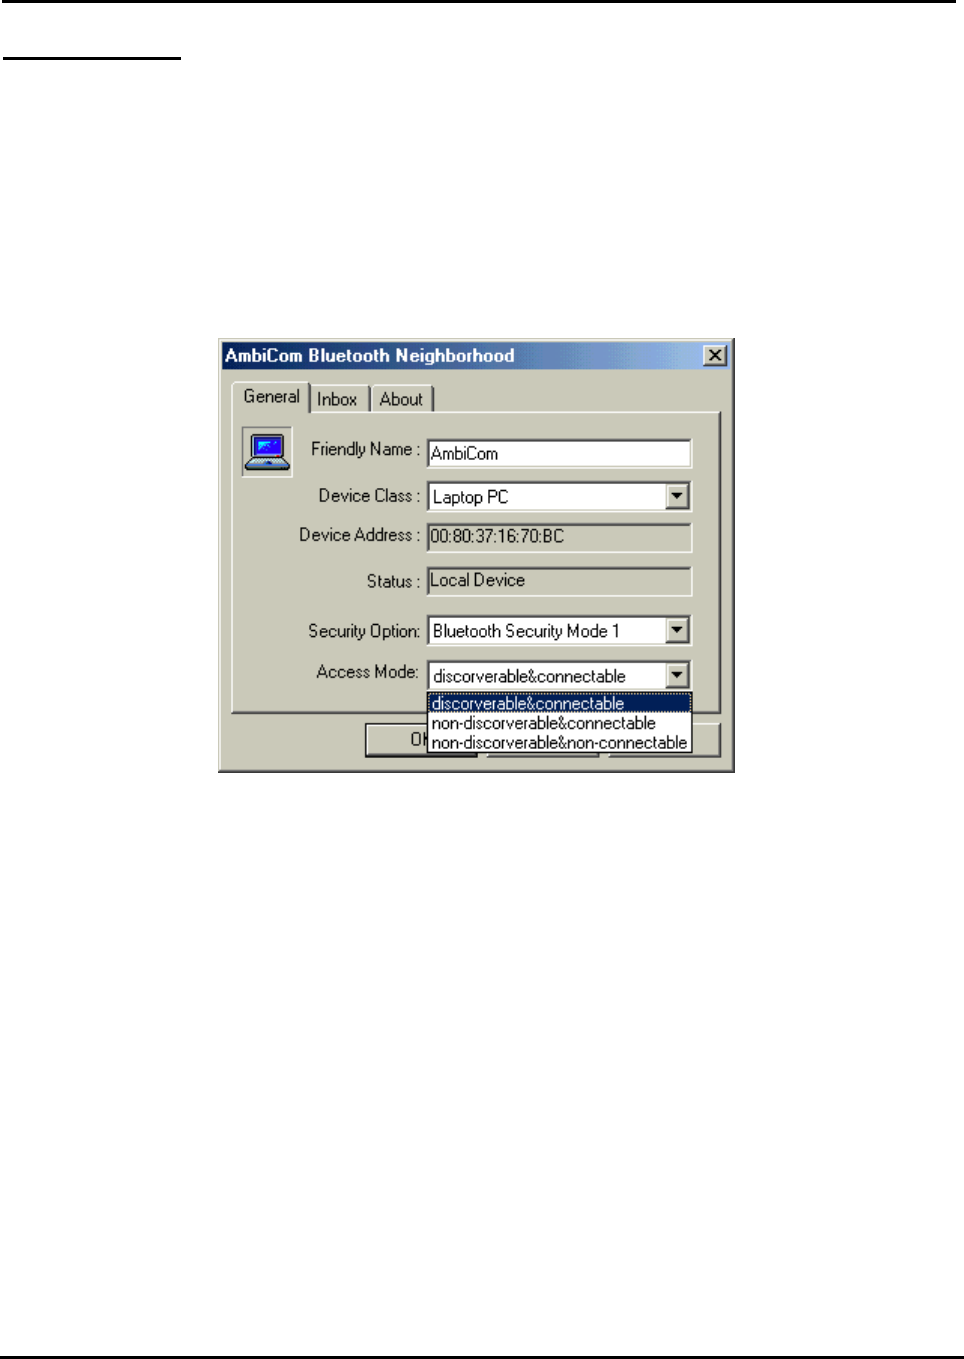
1. Our software provides three options of access mode: discoverable&connectable, non-
discoverable&connectable and non-discoverable&non-connectable. At the discoverable&
connectable mode, you will allow the other Bluetooth enabled devices to find and connect to
you. At other two options, you will allow them to find you, but cannot connect to you. Or they
cannot find you nor connect to you.
2. You can go to Bluetooth Neighborhood to set the Access mode. Select Local Device, click the
right button of your mouse and select “Property”. You will see the following window.
Air2Net Bluetooth Wireless Solutions
User Manual for Windows 98SE Working at the speed of thought
AmbiCom, Inc Page 12 of 26 6/25/2002
Exchange vCards
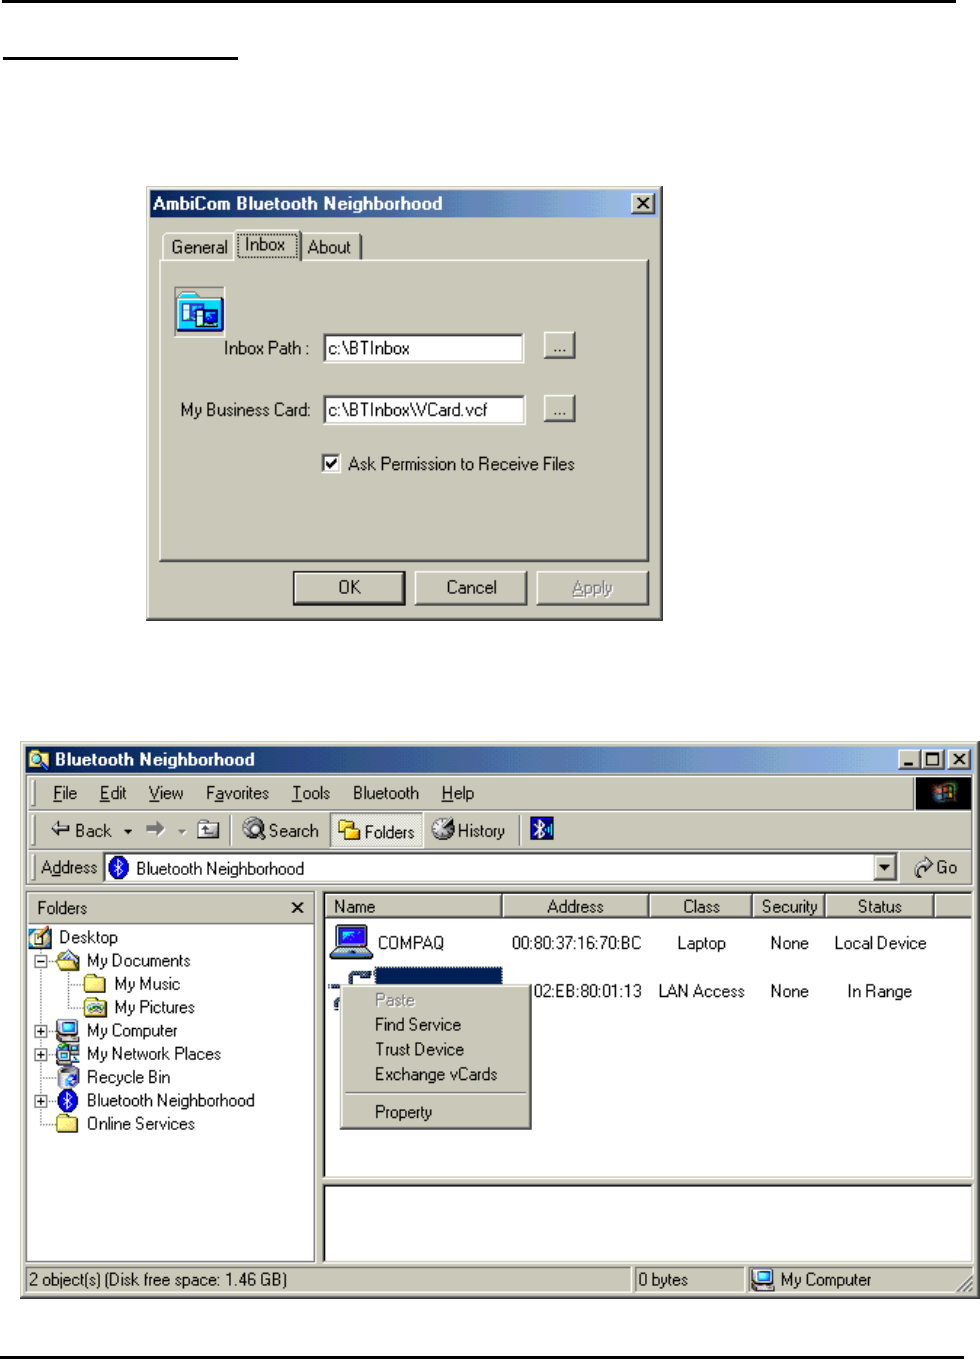
1. When you perform Exchange vCard, you need to go to the local device‘s property to set up
“My Business Card” path first, as shown in the following window. The default path is
“C:\BTInbox”.
2. Then you click the device that you want to exchange vCard with. You will see the following
window. Click on “Exchange vCards”, and you will send your business card to this device,
also you will get his business card to your device.
Air2Net Bluetooth Wireless Solutions
User Manual for Windows 98SE Working at the speed of thought
AmbiCom, Inc Page 13 of 26 6/25/2002
Object Push
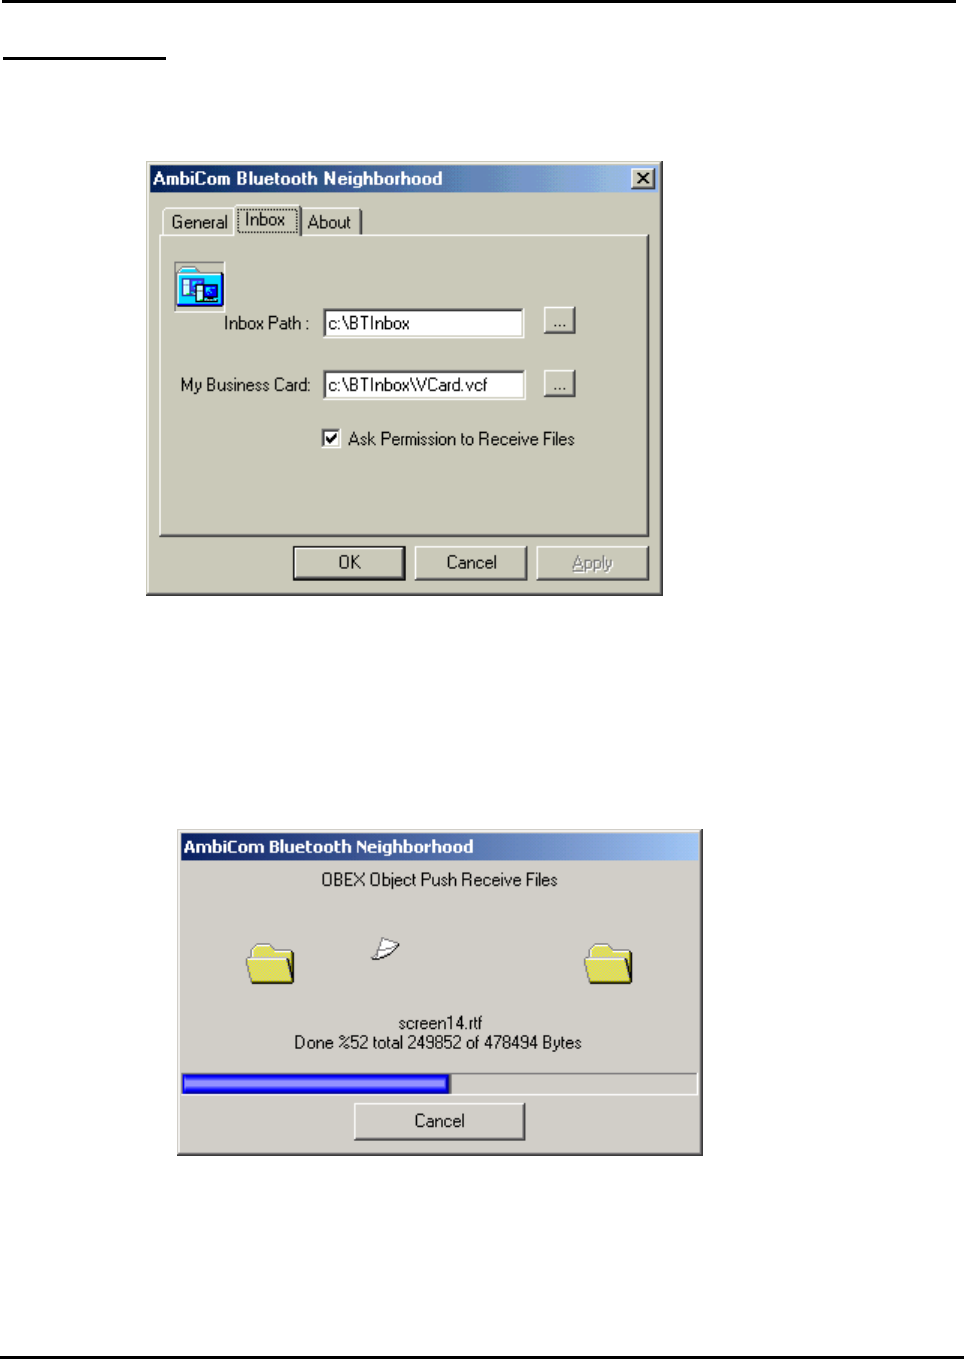
1. Before you perform Object Push, Please set up your Inbox path first. This directory will save
files that you receive. The default path is “C:\BTInbox”.
2. When you perform Object Push, simply Drag the file that you want to send, and Drop it to the
Bluetooth Device that you want to receive on the left hand side in Windows Explorer. You also
can use Copy and Paste to do the object transfer between two Bluetooth devices. When you
perform Object Push, you will see a dialog box indicating the status like the window below.
Air2Net Bluetooth Wireless Solutions
User Manual for Windows 98SE Working at the speed of thought
AmbiCom, Inc Page 14 of 26 6/25/2002
File Transfer
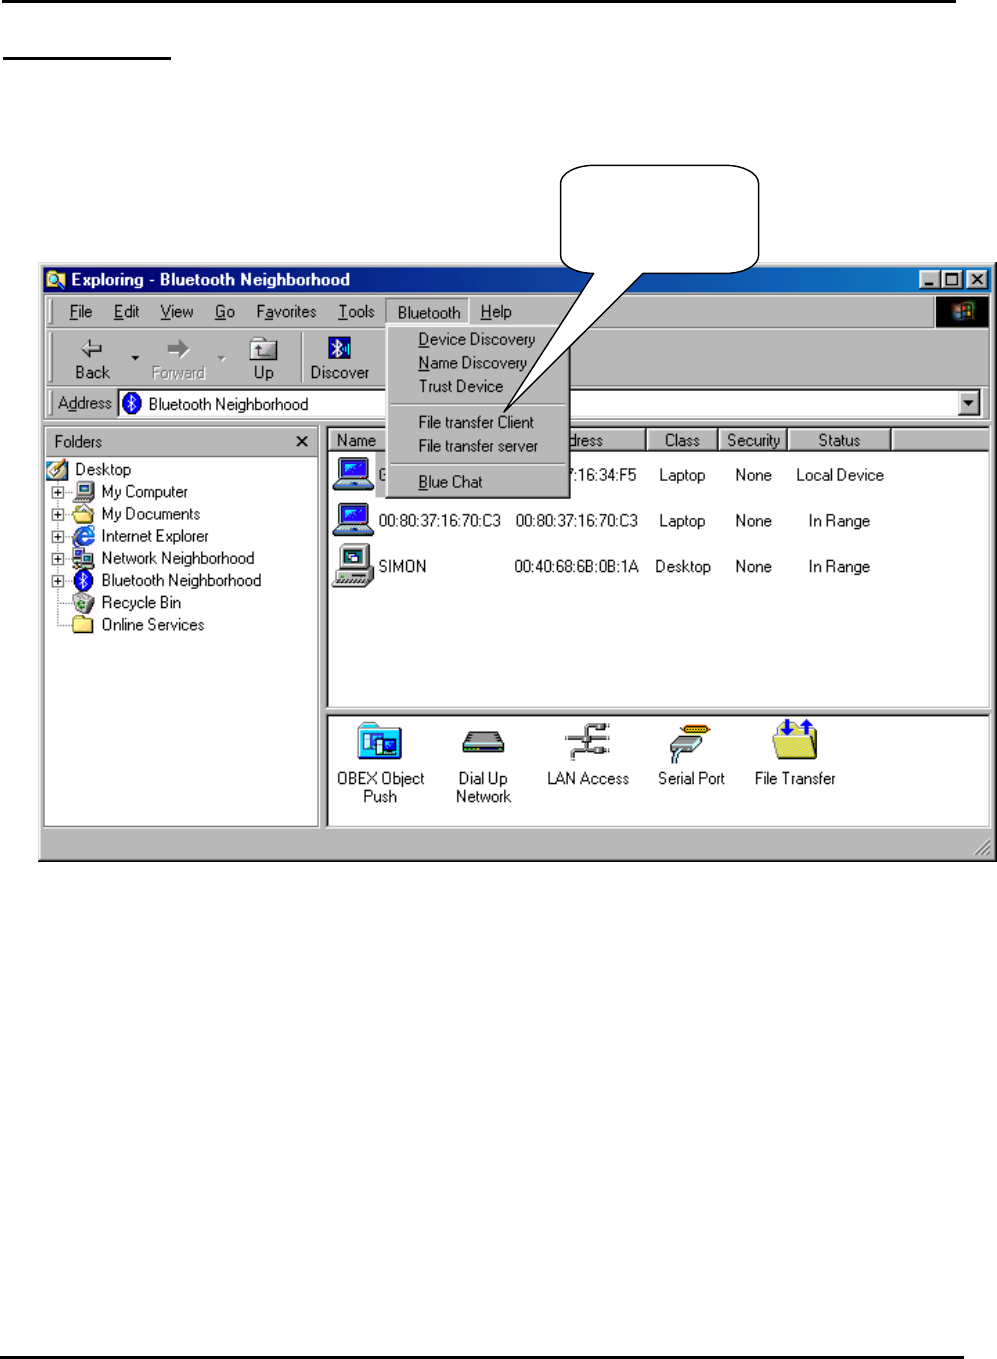
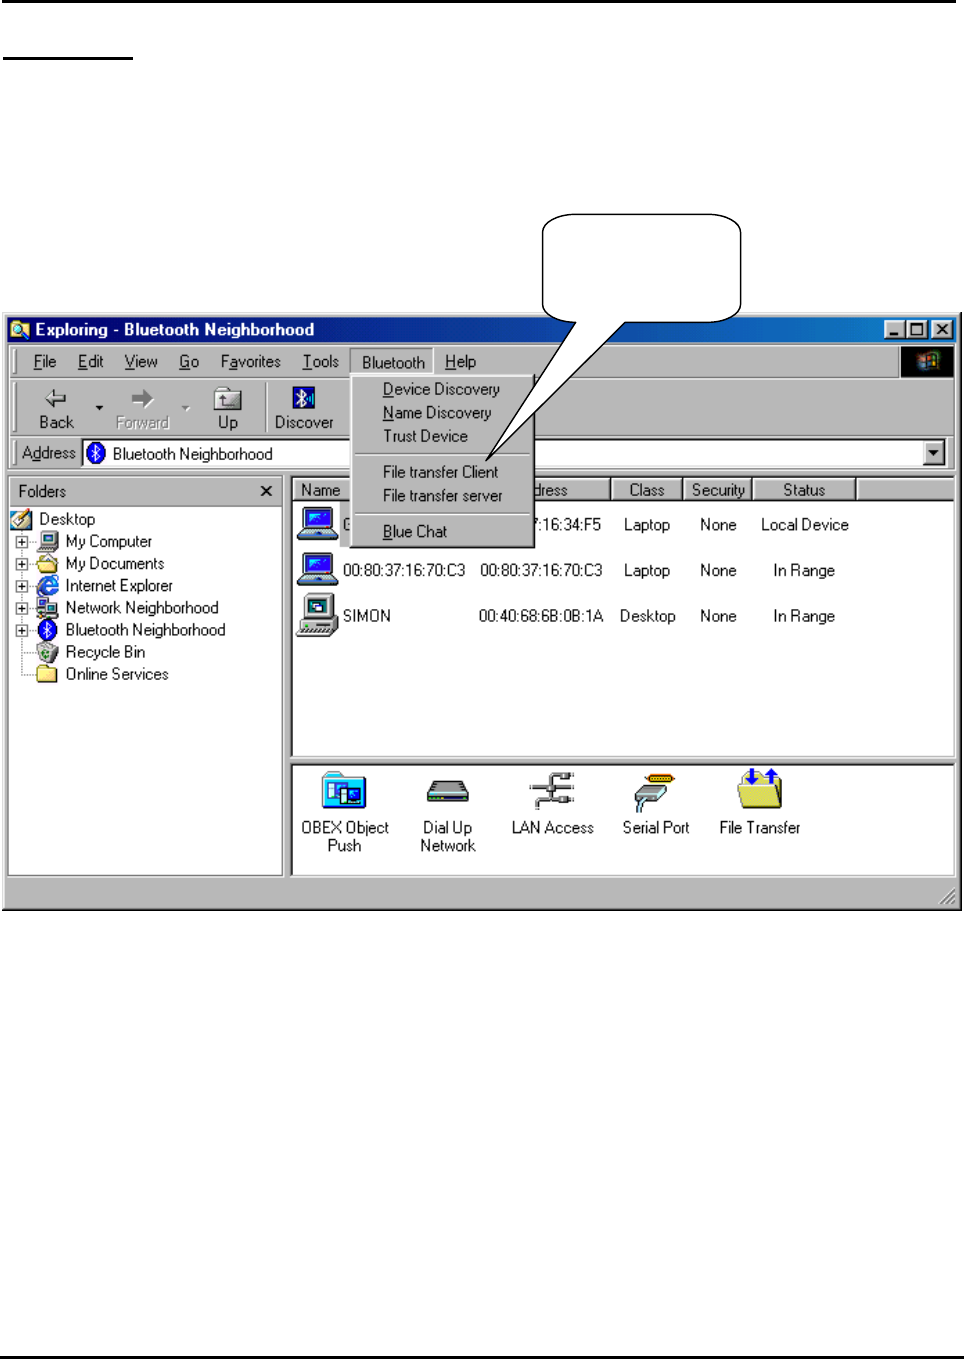
1. To execute File Transfer, open Windows Explorer, select “Bluetooth” on the menu bar and
click on “File Transfer Client ” or “File Transfer Server”. To activate File Transfer on both ends,
the application on the remote computer also needs to run File Transfer at the same time.
Click it to run
File Transfer
Client or Server
Air2Net Bluetooth Wireless Solutions
User Manual for Windows 98SE Working at the speed of thought
AmbiCom, Inc Page 15 of 26 6/25/2002
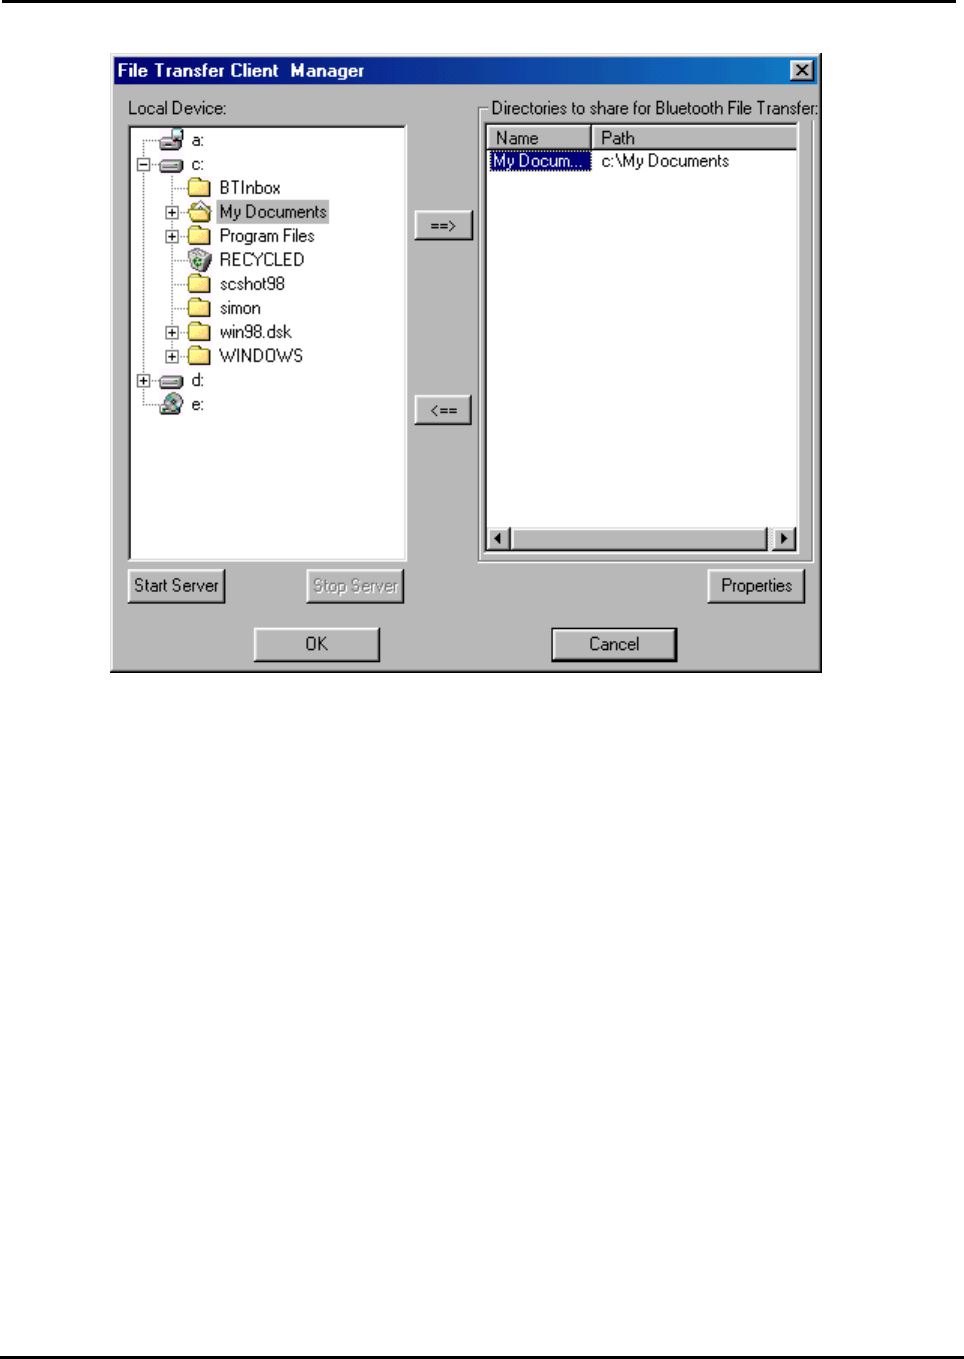
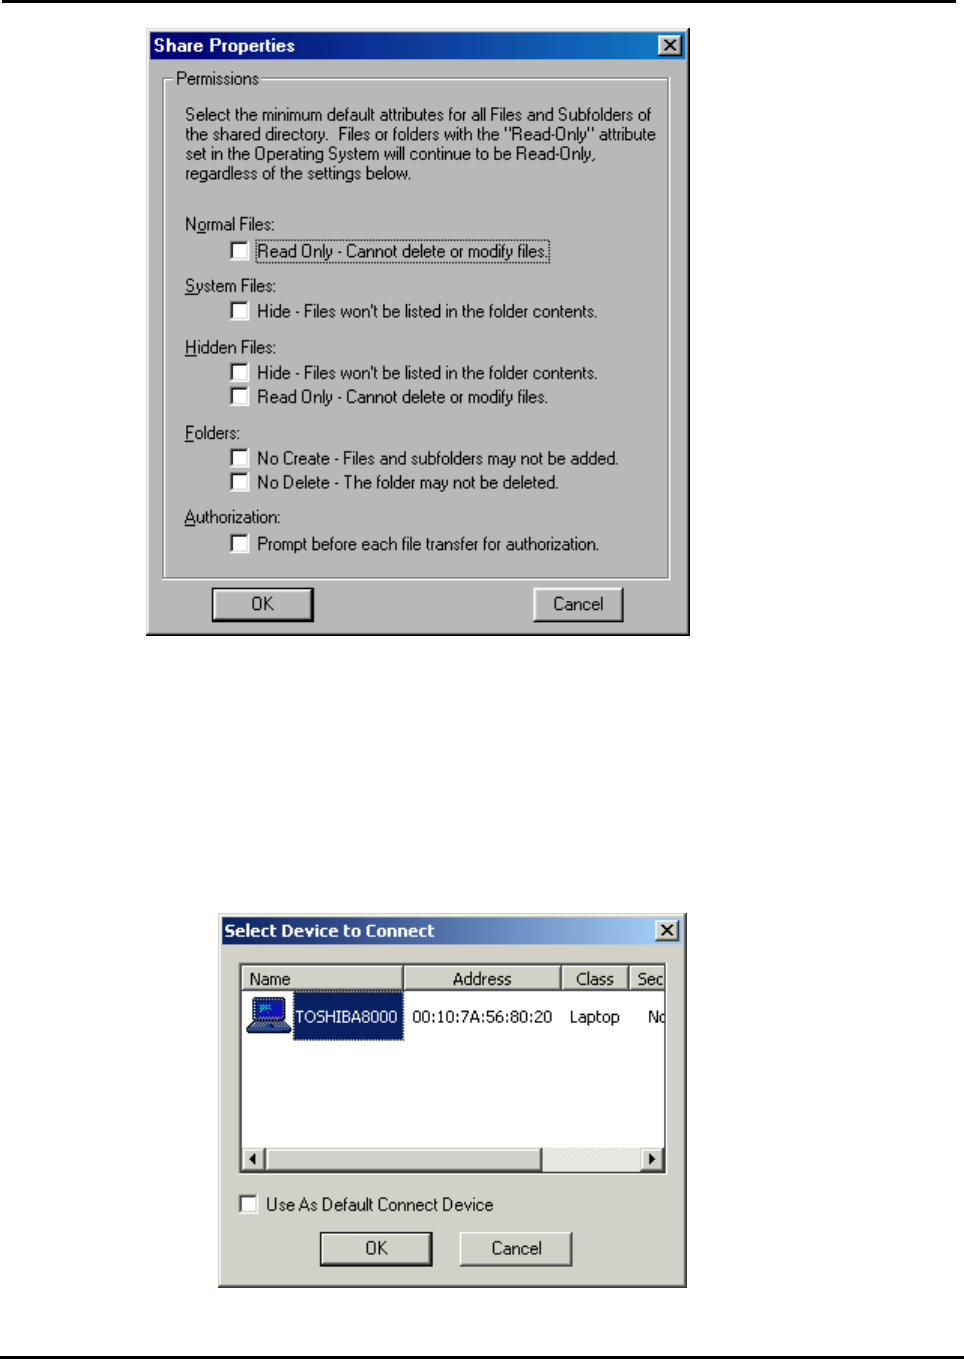
2. After you share the directory and files, you can select them and click the “Properties” button to
configure those directory or files.
Air2Net Bluetooth Wireless Solutions
User Manual for Windows 98SE Working at the speed of thought
AmbiCom, Inc Page 16 of 26 6/25/2002
In this window, you can define the attribute of the Directory or file that you shared, give the
permission for the “File Transfer Client “ to use.
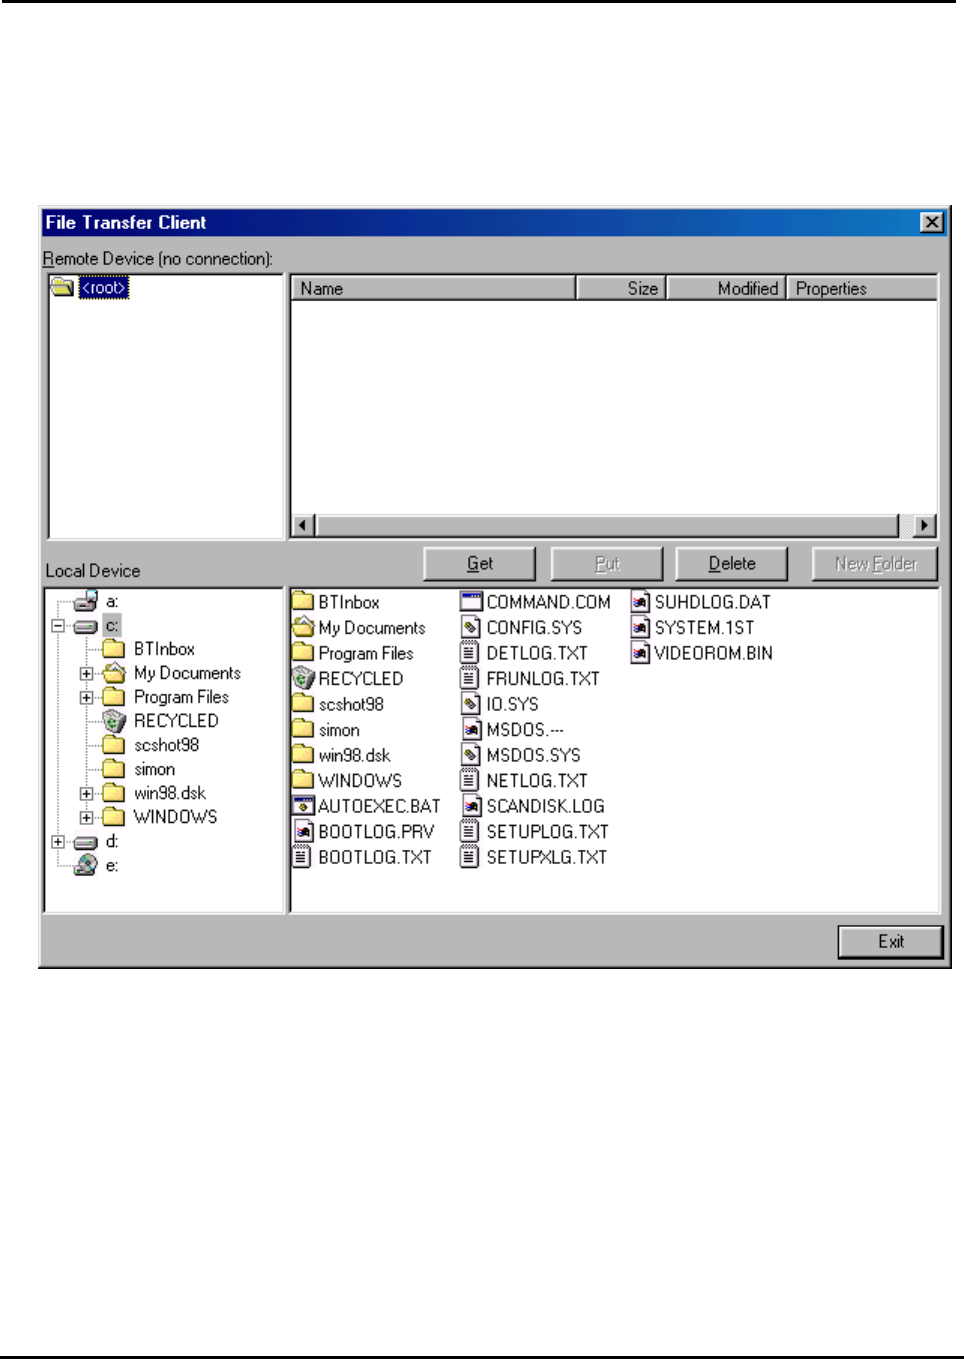
3. When you click on the “File Transfer Client” menu to run it, the system will show a “Select
Device to Connect” window for you to choose which device you want to connect.
Air2Net Bluetooth Wireless Solutions
User Manual for Windows 98SE Working at the speed of thought
AmbiCom, Inc Page 17 of 26 6/25/2002
4. After you select the remote device that runs the File Transfer Server, the following window will
appear. You will see the directory and file shared by the File Transfer Server. You can get file
or directory from the File Transfer Server or place file or directory to the File Transfer Server.
Also, you can create new folder in the Shared Directory from File Transfer Server.
Air2Net Bluetooth Wireless Solutions
User Manual for Windows 98SE Working at the speed of thought
AmbiCom, Inc Page 18 of 26 6/25/2002
Blue Chat
1. To execute Blue Chat, open Windows Explorer, select “Bluetooth” on the menu bar and click
on “Blue Chat.” To have Blue Chat working on both ends, the application on the remote
computer also needs to run Blue Chat at the same time.
Click it to run
Blue Chat
Air2Net Bluetooth Wireless Solutions
User Manual for Windows 98SE Working at the speed of thought
AmbiCom, Inc Page 19 of 26 6/25/2002
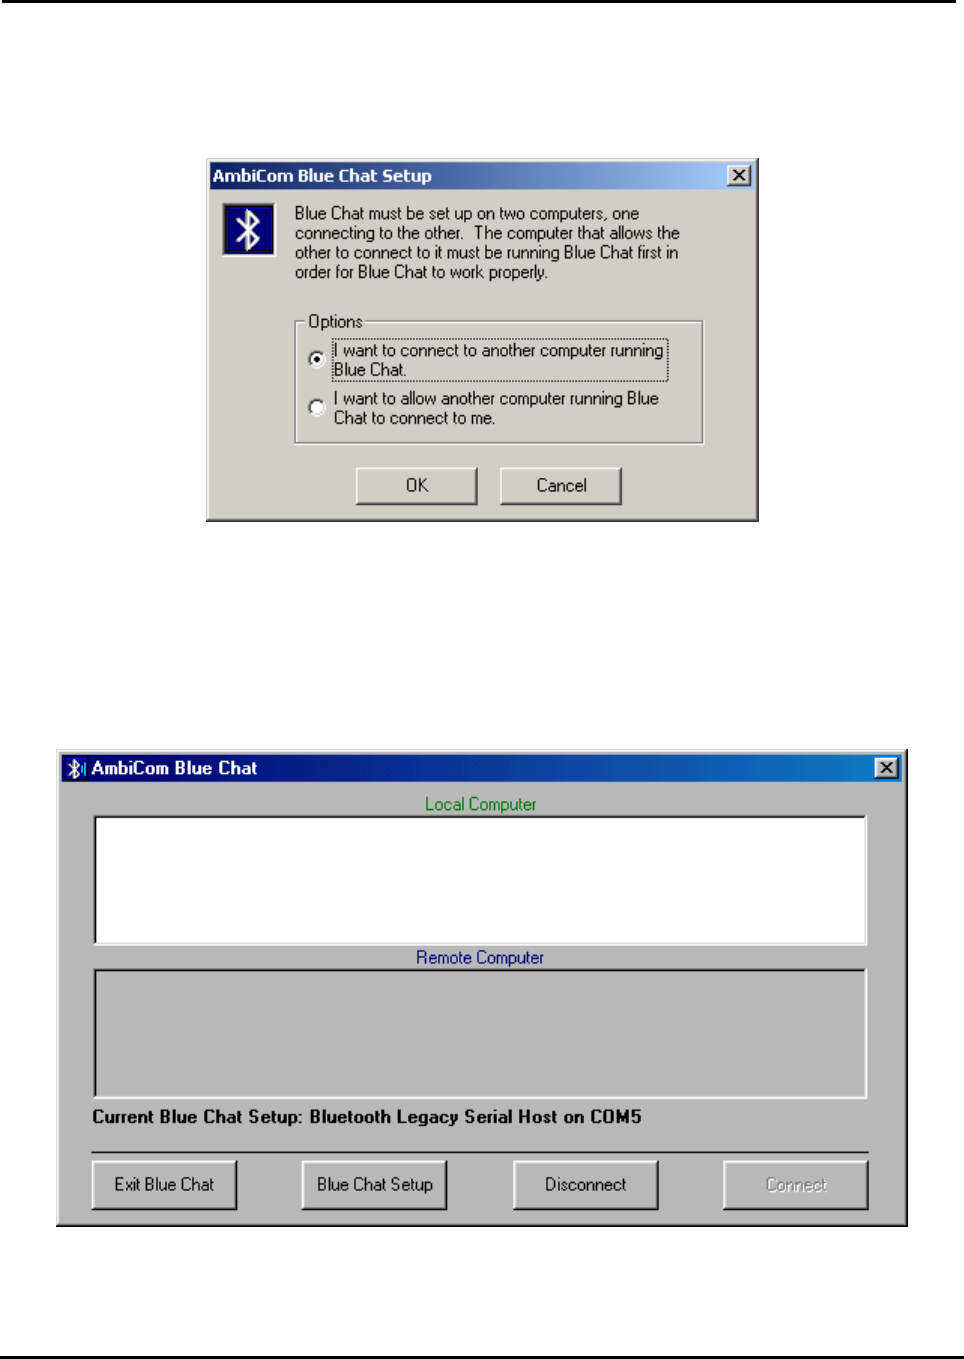
2. After selecting “Blue Chat”, the following window will appear, prompting you to choose the
direction of the connection setup.
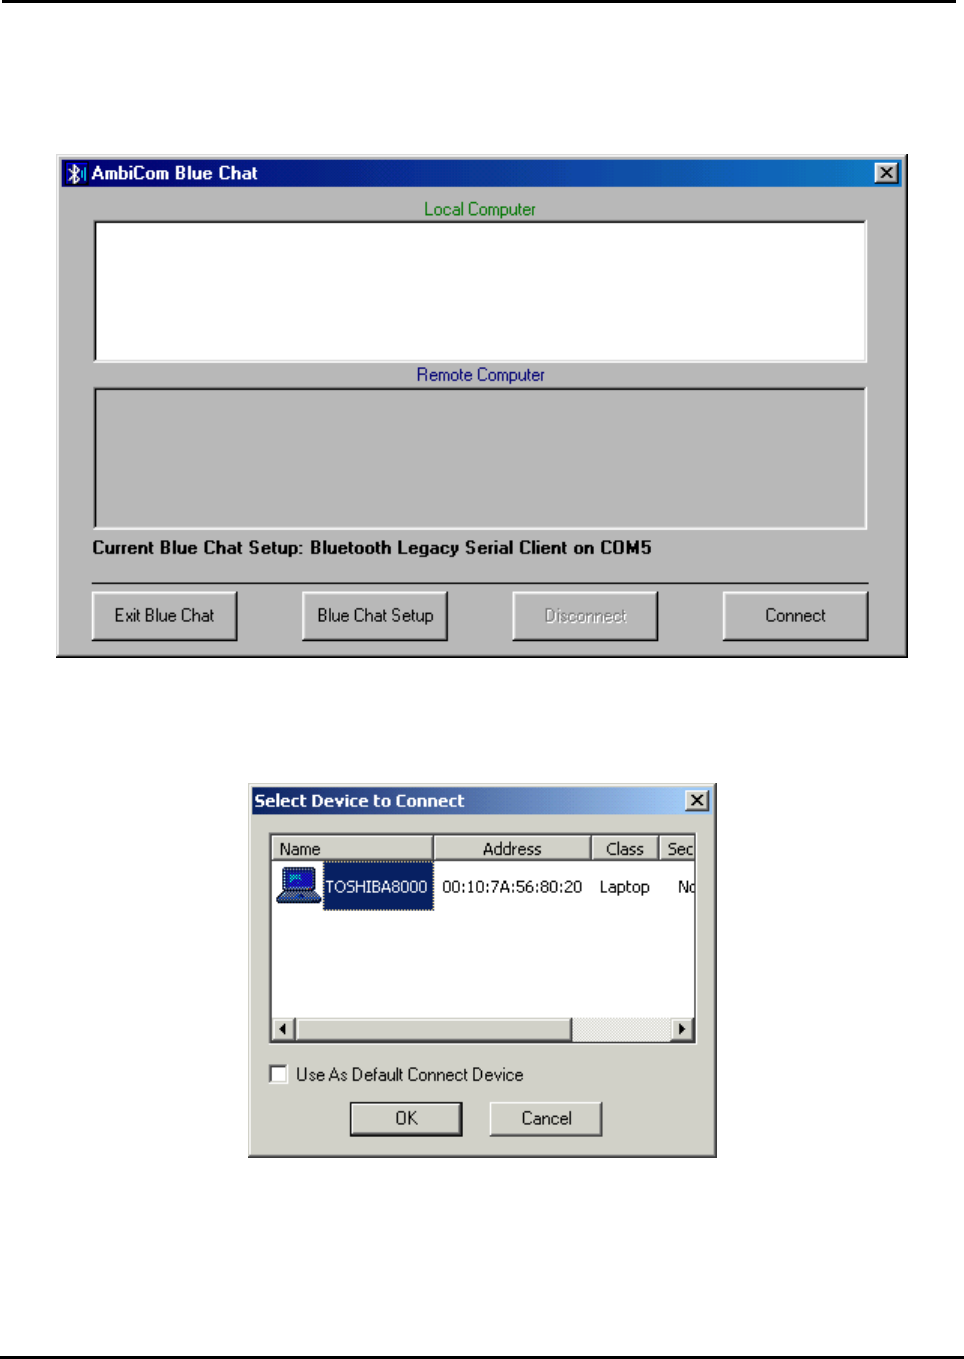
3. In the above window, two options are shown. You can either choose to connect to someone or
wait for connection. If you want other people to communicate with you, simply select the lower
checkbox and click “OK” and the following window will appear.
Air2Net Bluetooth Wireless Solutions
User Manual for Windows 98SE Working at the speed of thought
AmbiCom, Inc Page 20 of 26 6/25/2002
4. If you want to connect to a remote device, select the first option, “I want to connect to another
computer running Blue Chat,” and click “OK” to see the following window. Click “Connect” to
continue.
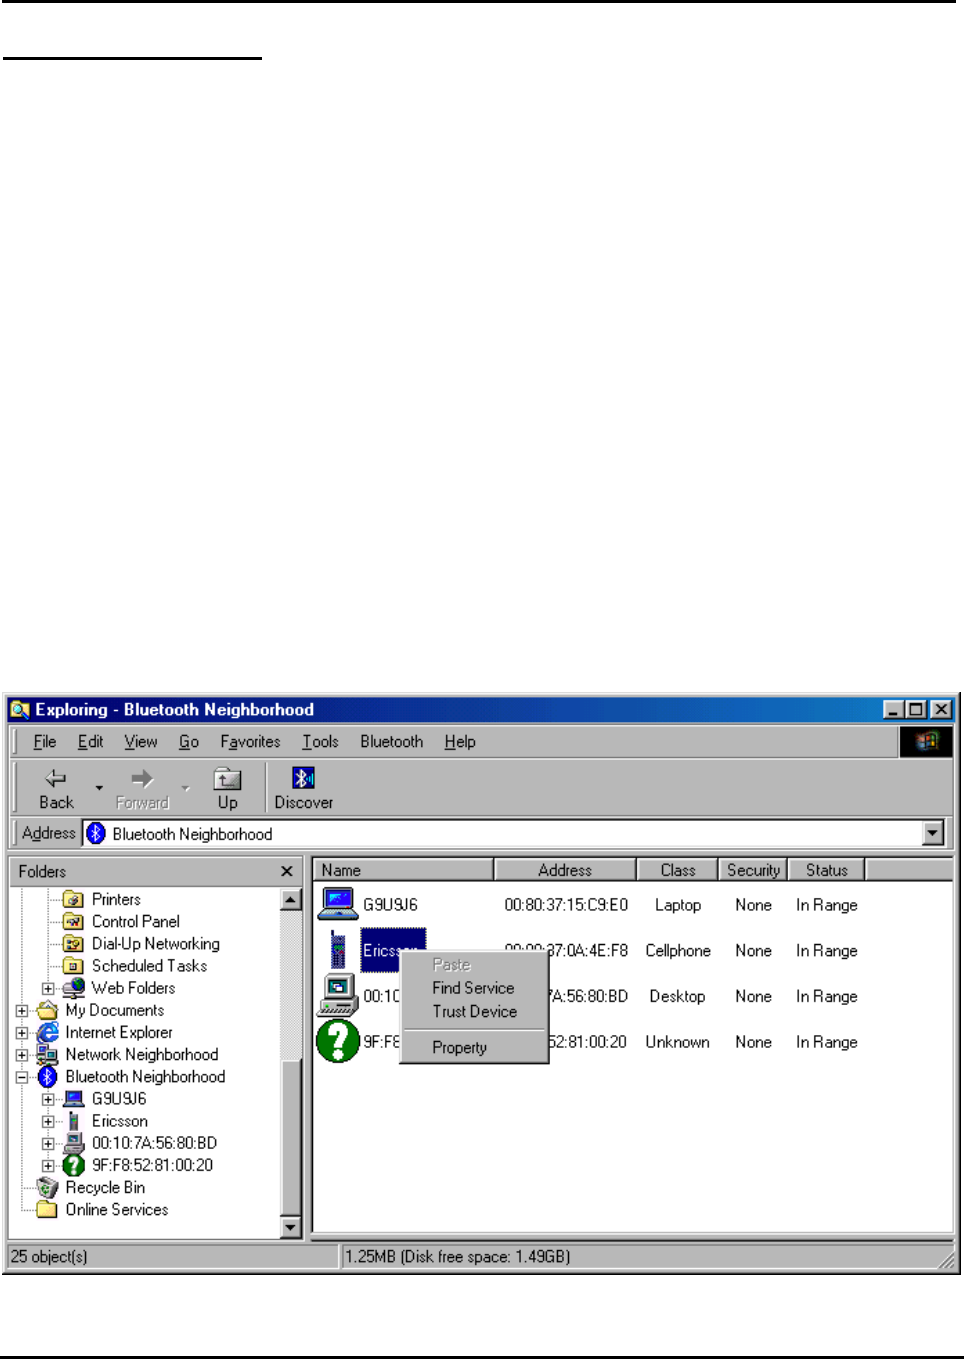
5. The system will show the following window in which you can select which device you wish to
connect. Upon selecting the desired device, click “OK” to establish the connection.
6. Now the two Bluetooth devices can connect to each other. You can type any text message in
the Local Computer dialogue window and see the corresponding message from the Remote
Computer as well.
Air2Net Bluetooth Wireless Solutions
User Manual for Windows 98SE Working at the speed of thought
AmbiCom, Inc Page 21 of 26 6/25/2002
Dial-Up Networking
Note:
The requirement to set up Dial-up Networking is to provide the Internet Service Provider
information (ISP); user name, password, and the phone number.
For some Bluetooth enabled devices such as Cellular Phones, before you perform Dial-up,
you need to execute Trust Device first. The following window shows you how to do so. For
phone configuration, you need set it to the Ready to pair mode. You can refer the phone
manual. After you paired your phone with the Bluetooth device, the software will remember the
trust profile. You don’t need to do this every time when you execute the Dial-up networking.
On Nokia Cell Phone
You have to set the security level 3 in the Bluetooth Neighborhood. Choose “Local Device”,
click the right button of your mouse, and then select “Property”. Select under security option
“Bluetooth Security Mode 3” and then follow the wizard manual.
On Ericsson Cell Phone
Select menu Extra > Bluetooth> Paired devices > Add devices > Phone Accepts
Click Yes to assign the phone name and will show Ready to pair mode
On the computer
After discover the phone, right click on the mouse and choose Trust Device.
Insert the password.

Air2Net Bluetooth Wireless Solutions
User Manual for Windows 98SE Working at the speed of thought
AmbiCom, Inc Page 22 of 26 6/25/2002
On Ericsson Phone
• Click Yes on the phone to Add to paired devices > insert the Password click yes
On Computer
• Insert the PIN number in the computer (the same that you inserted the password on the
phone)
On Phone
• Show Pairing successful
On Computer
Change the status to Trusted in the Bluetooth Neighborhood
Air2Net Bluetooth Wireless Solutions
User Manual for Windows 98SE Working at the speed of thought
AmbiCom, Inc Page 23 of 26 6/25/2002
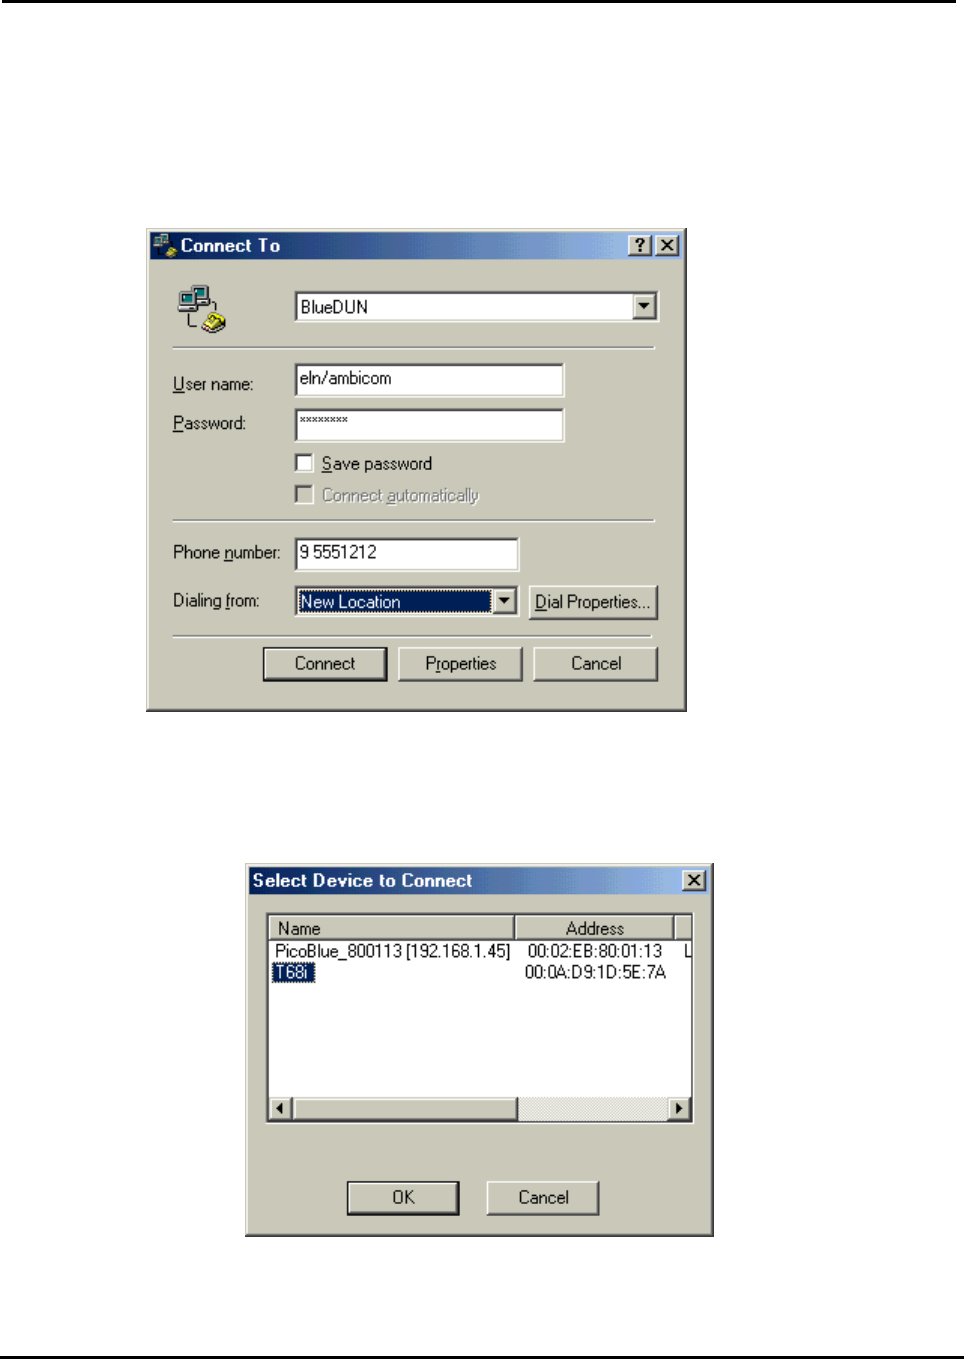
1. After you have created a new connection, run AmbiCom Bluetooth Neighborhood application
first. It will find all the Bluetooth devices within the range. If you find devices such as Bluetooth
phone/modem or Dial-Up Networking Access Point, you can proceed to establish the
connection you just created. The system will show the following window. Fill in the necessary
information and click Dial.
2. The system will now show the following window in which you can select the Bluetooth device
you would like to connect. Click OK to establish an Internet connection to an ISP.
3. In the above window, select T68 (The Phone name) and click OK to dial to ISP.

Air2Net Bluetooth Wireless Solutions
User Manual for Windows 98SE Working at the speed of thought
AmbiCom, Inc Page 24 of 26 6/25/2002
LAN Access
The setup procedures for LAN Access are almost identical to Dial-Up Networking. Please go to
“Dial-up Networking” to establish a new connection. It is not necessary to provide the phone
number, user name and password to establish the connection.

Air2Net Bluetooth Wireless Solutions
User Manual for Windows 98SE Working at the speed of thought
AmbiCom, Inc Page 25 of 26 6/25/2002
6. Uninstalling AmbiCom’s Bluetooth Neighborhood
1. Please click “Start”, go to “Programs”, click “AmbiCom Bluetooth Neighborhood”, and select
“Uninstall Bluetooth Neighborhood”, follow the screen instruction.
2. After rebooting your system, please go to “Device Manager” to find “BtEsi”, and remove
“AmbiCom Bluetooth Kernel”.

Air2Net Bluetooth Wireless Solutions
User Manual for Windows 98SE Working at the speed of thought
AmbiCom, Inc Page 26 of 26 6/25/2002
7. Technical Support
Please visit AmbiCom Web site http://www.ambicom.com for online technical support. If you wish
to speak to our support staff, please call 1-408-562-0168.

AmbiCom Bluetooth Solutions
User Manual for Win2000
June 25, 2002

Air2Net Bluetooth Wireless Solutions
User Manual for Windows 2000 Working at the speed of thought
AmbiCom, Inc Page 1 of 34 12/2/2002
1. Introduction
This user manual covers the product features, release notes, installation procedures, and
operating procedures for AmbiCom’s Bluetooth applications.
Bluetooth wireless technology is a global standard for low-cost and low-power small form factors
to connect multiple devices such as computers, mobile phones, PDAs, printers, LAN and WANs to
each other. It provides fast and reliable digital transmission of both voice and data over 2.4GHz
ISM open band. AmbiCom’s Bluetooth wireless technology offers the following features:
• Cable Replacement
Establishes a wireless Personal Area Network with other Bluetooth devices within the
operating range, without the hassles of wiring and configuration.
• Ad-hoc Networking
Supports both data and voice between two or more devices wirelessly.
• Secure Wireless Connections
Built-in authentication, encryption and authorization applications ensure secure
information access and transmission.
• LAN and WAN Access Points
LAN and WAN access such as Web, email, E-commerce, and VPN.
2. Product Features
With AmbiCom’s Bluetooth CompactFlash with PCMCIA adapter, USB Adapter or UART Adapter
and Bluetooth software, you can establish wireless connections between your computer and other
Bluetooth wireless devices. The features include:
• Device Discovery
• Name Discovery
• Service Discovery
• File Transfer
• Object Push for files, objects and business cards
• Blue Chat that allows users to instantly send and receive text messages
• Internet Access through Dial-Up Networking
• Connection to LAN through LAN Access Point
AmbiCom provides Bluetooth Neighborhood software application that integrates all of the above
features into one single application.
3. Release Notes
• We support Windows 2000 on this release
• This release supports the AmbiCom Bluetooth CompactFlash, USB Dongle, USB
Adapter, and UART Adapter.
• SIG 1.1 compliant Bluetooth protocol stack.
Air2Net Bluetooth Wireless Solutions
User Manual for Windows 2000 Working at the speed of thought
AmbiCom, Inc Page 2 of 34 12/2/2002
• We support Device Discovery, Name Discovery, Service Discovery, Pairing, Object
Push, File Transfer, Dial Up and LAN access Networking in this release.
• Audio is not supported in this release.
• When two devices are performing Device Discovery at the same time, they will not
discover each other. Please do not run Bluetooth Neighborhood at the same time.
4. Installation Procedures for Windows 2000
1. Insert the AmbiCom Bluetooth Installation CD into your laptop CD-ROM drive.
2. Run AmbiCom Bluetooth Setup.exe and follow the on-screen instruction to install the
application program.
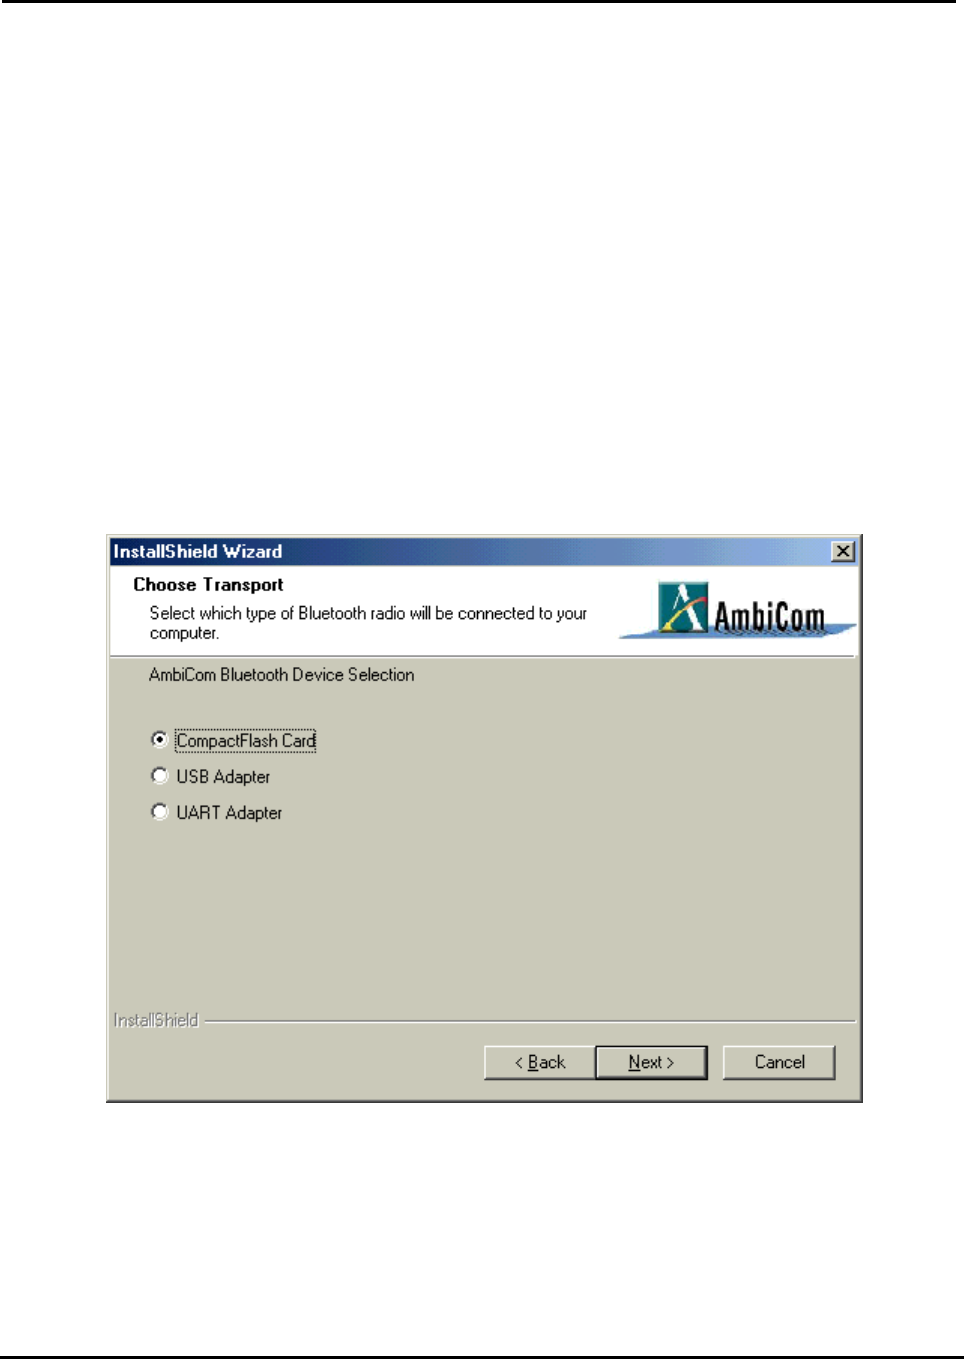
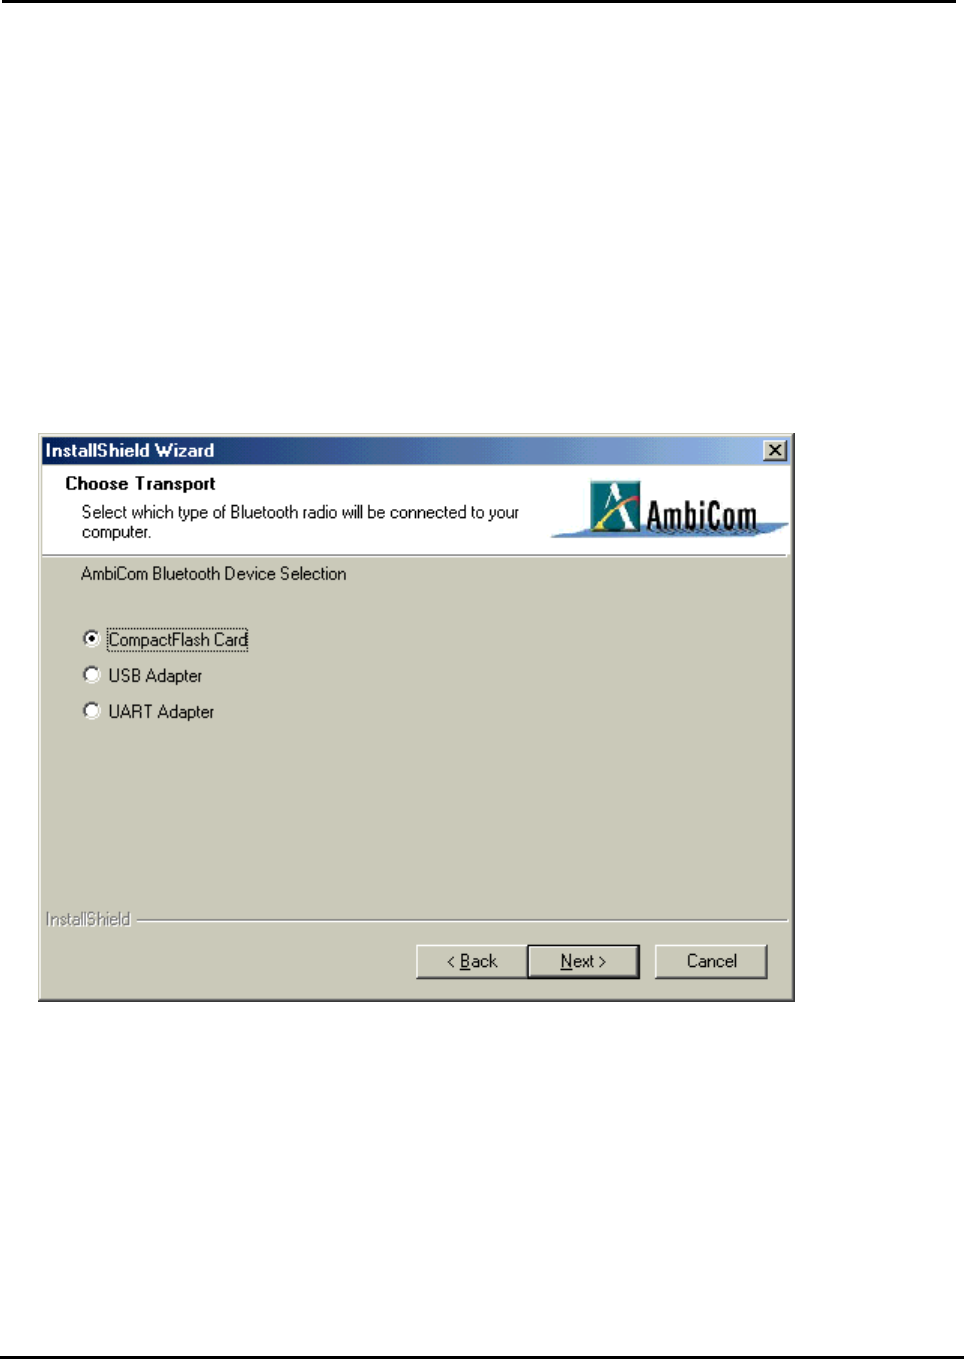
3. The following window will appear at the start of the installation process:
4. Choose the device you have and click Next to continue. Simply follow the on-screen
instructions.
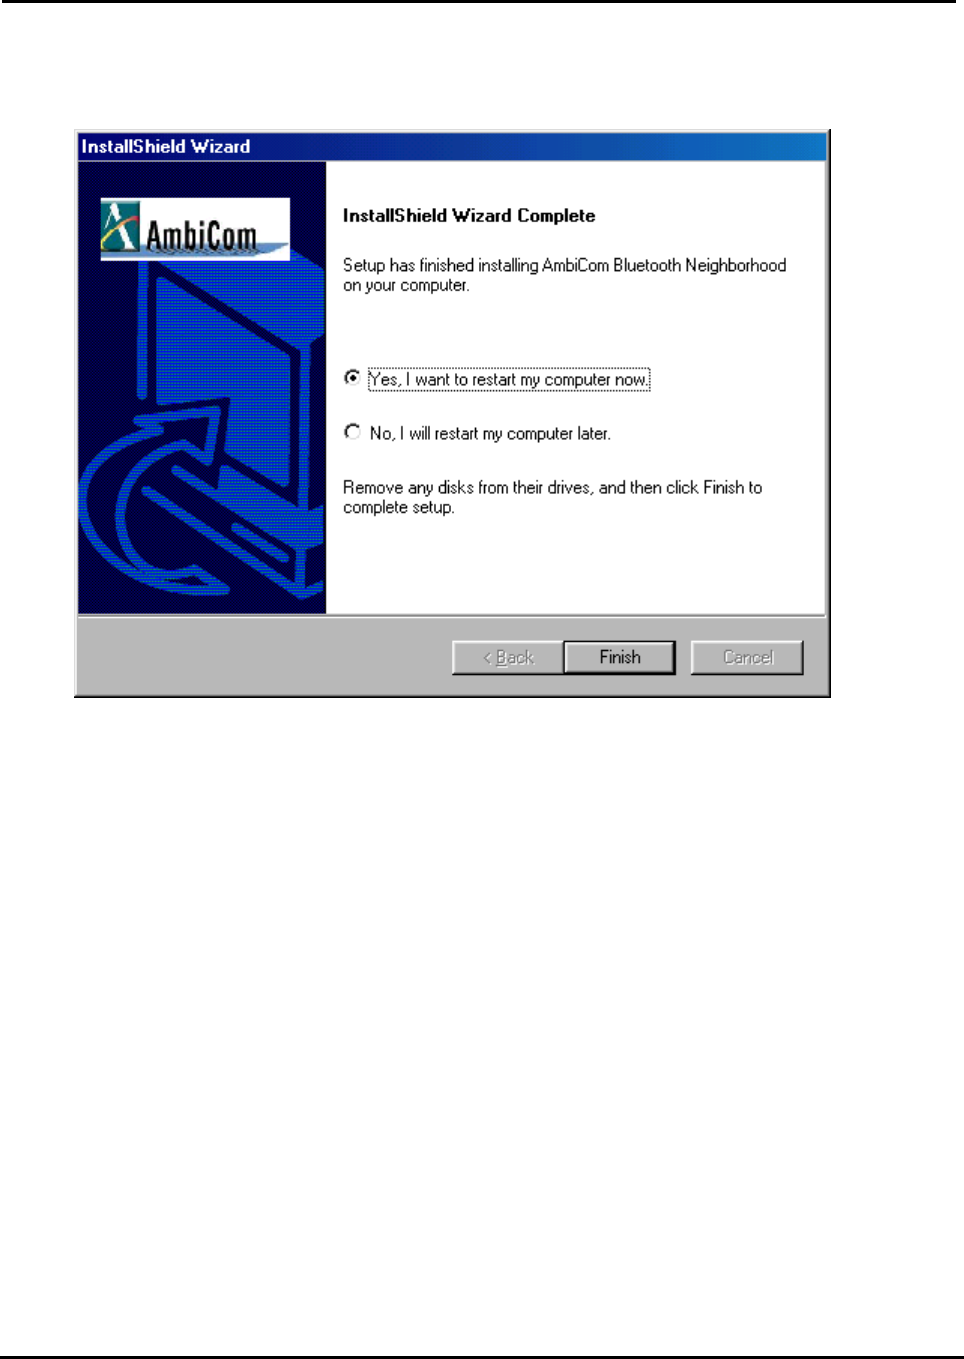
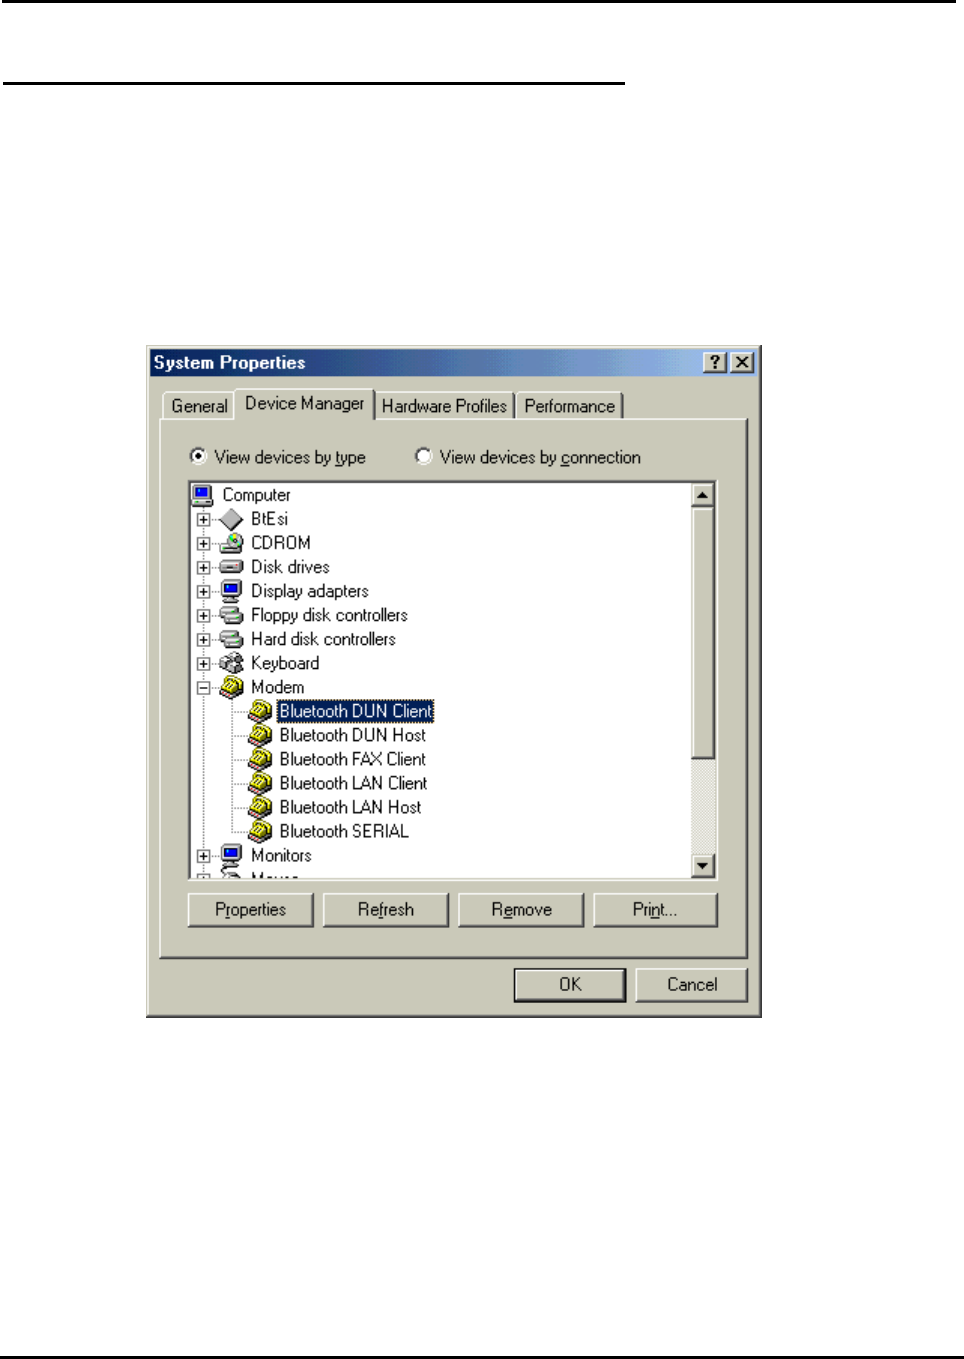
5. After you finished the installation, in the “Device Manager”, you will see the following window.

Air2Net Bluetooth Wireless Solutions
User Manual for Windows 2000 Working at the speed of thought
AmbiCom, Inc Page 3 of 34 12/2/2002
In this window, you can see the AmbiCom Bluetooth COM Bridge has a question mark. This
is OK because it is a special device and was designed to appear as such.
6. After you have restarted your laptop, please connect your AmbiCom Bluetooth
CompactFlash, USB or UART Adapter to your laptop. The system will automatically install
the driver for you. After the system installed the driver you need reboot your system. Now you
are ready to execute Object Push, File Transfer and Blue Chat by using Bluetooth
Neighborhood. Please see the section How to Run Bluetooth Neighborhood and skip the
following steps. If you want to use the Dial-up Networking and LAN Access, please observe
the following steps.
Air2Net Bluetooth Wireless Solutions
User Manual for Windows 2000 Working at the speed of thought
AmbiCom, Inc Page 4 of 34 12/2/2002
Installation Procedures for Dial-up Networking
If you have Bluetooth phone/modem, then you should continue to install the corresponding
components.
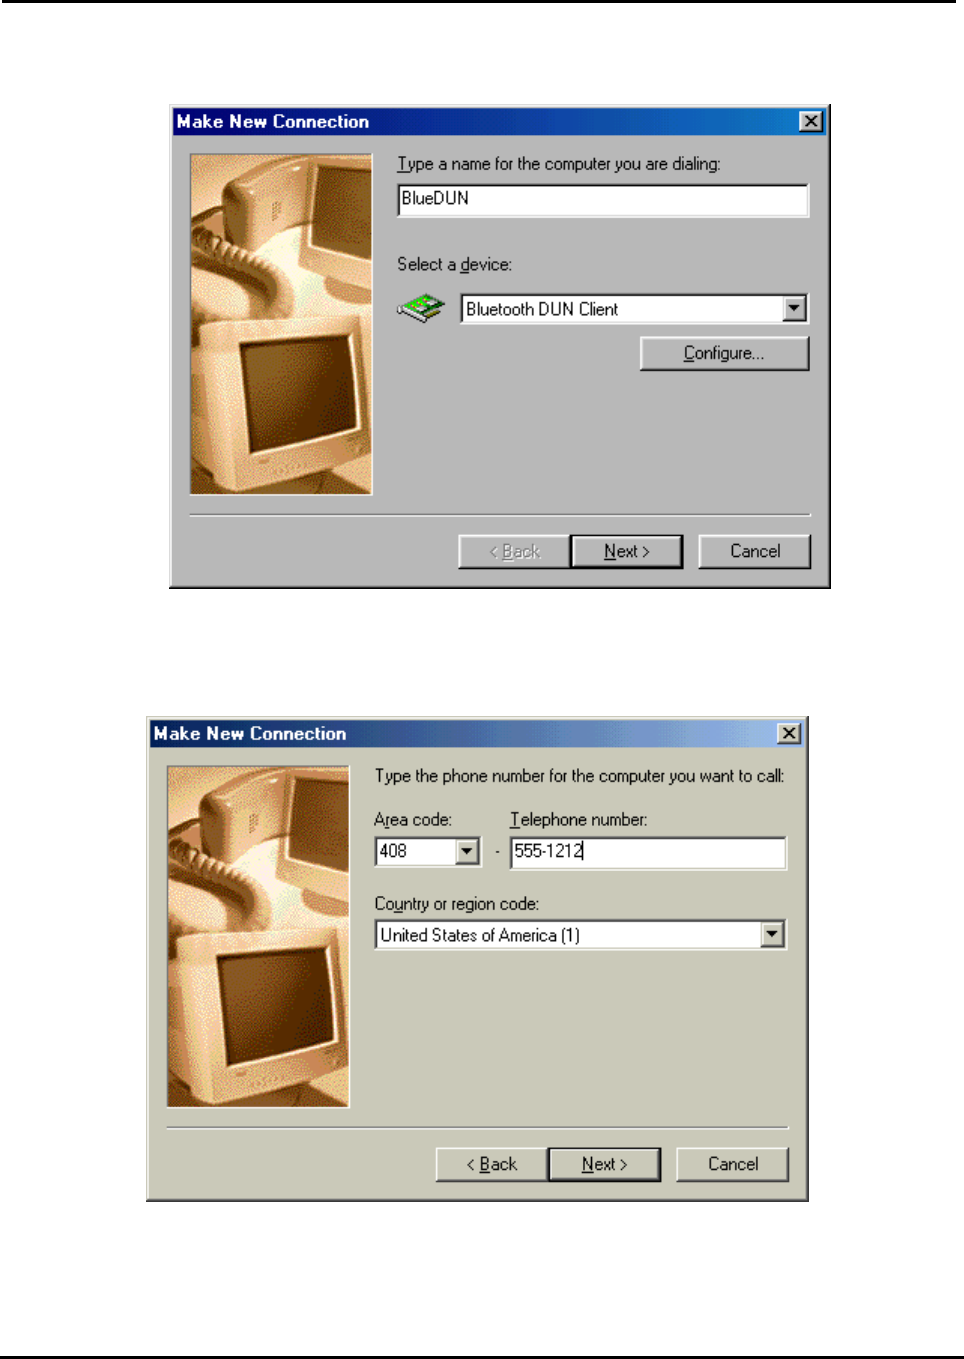
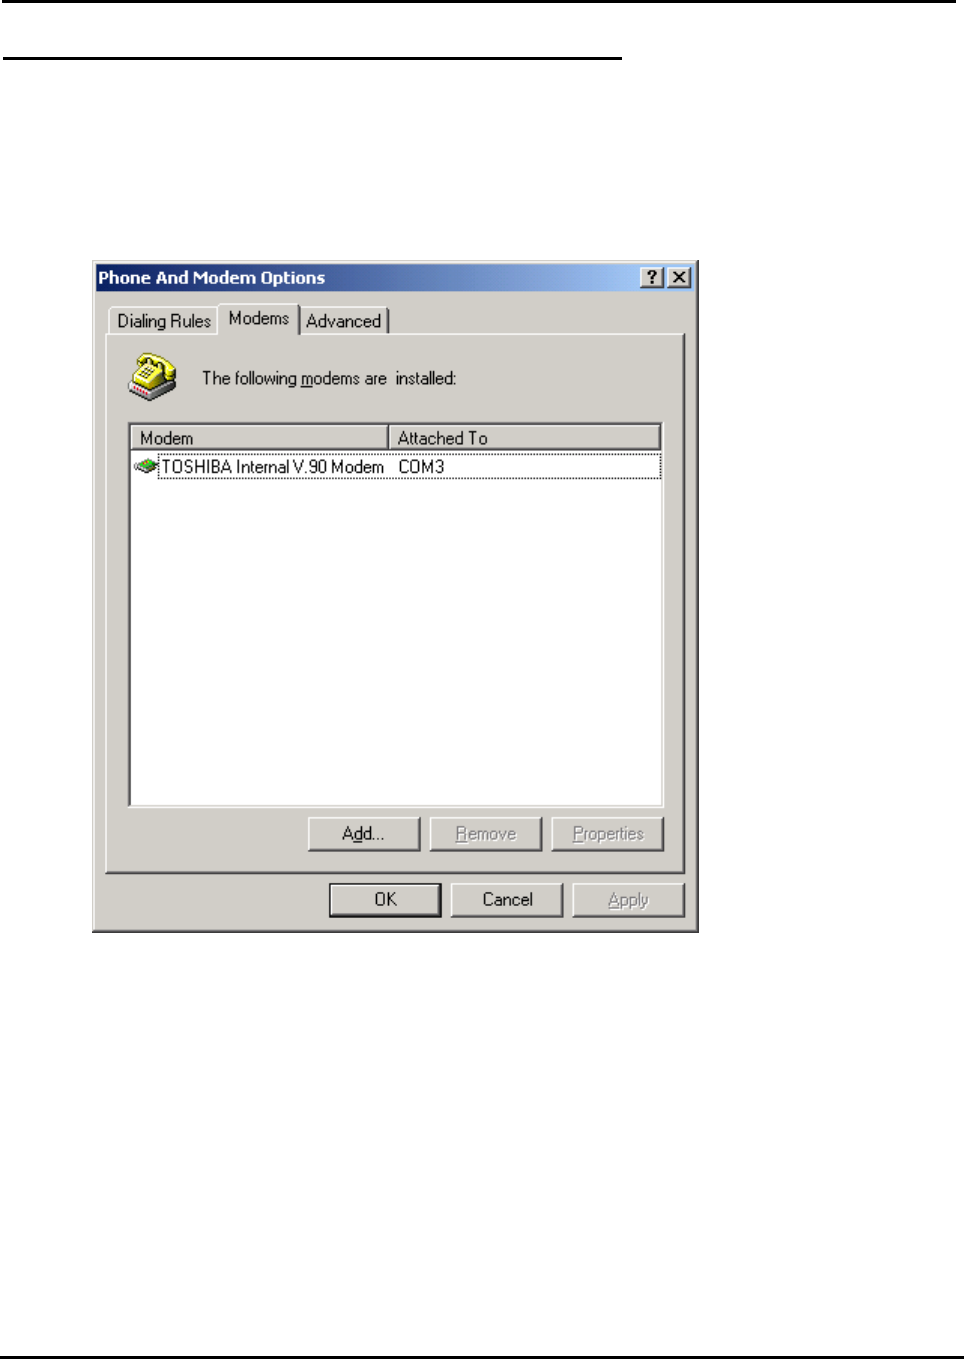
1. Go to Control Panel, click on Phone and Modem Options to add a new mode for Bluetooth
Dial-Up Networking.
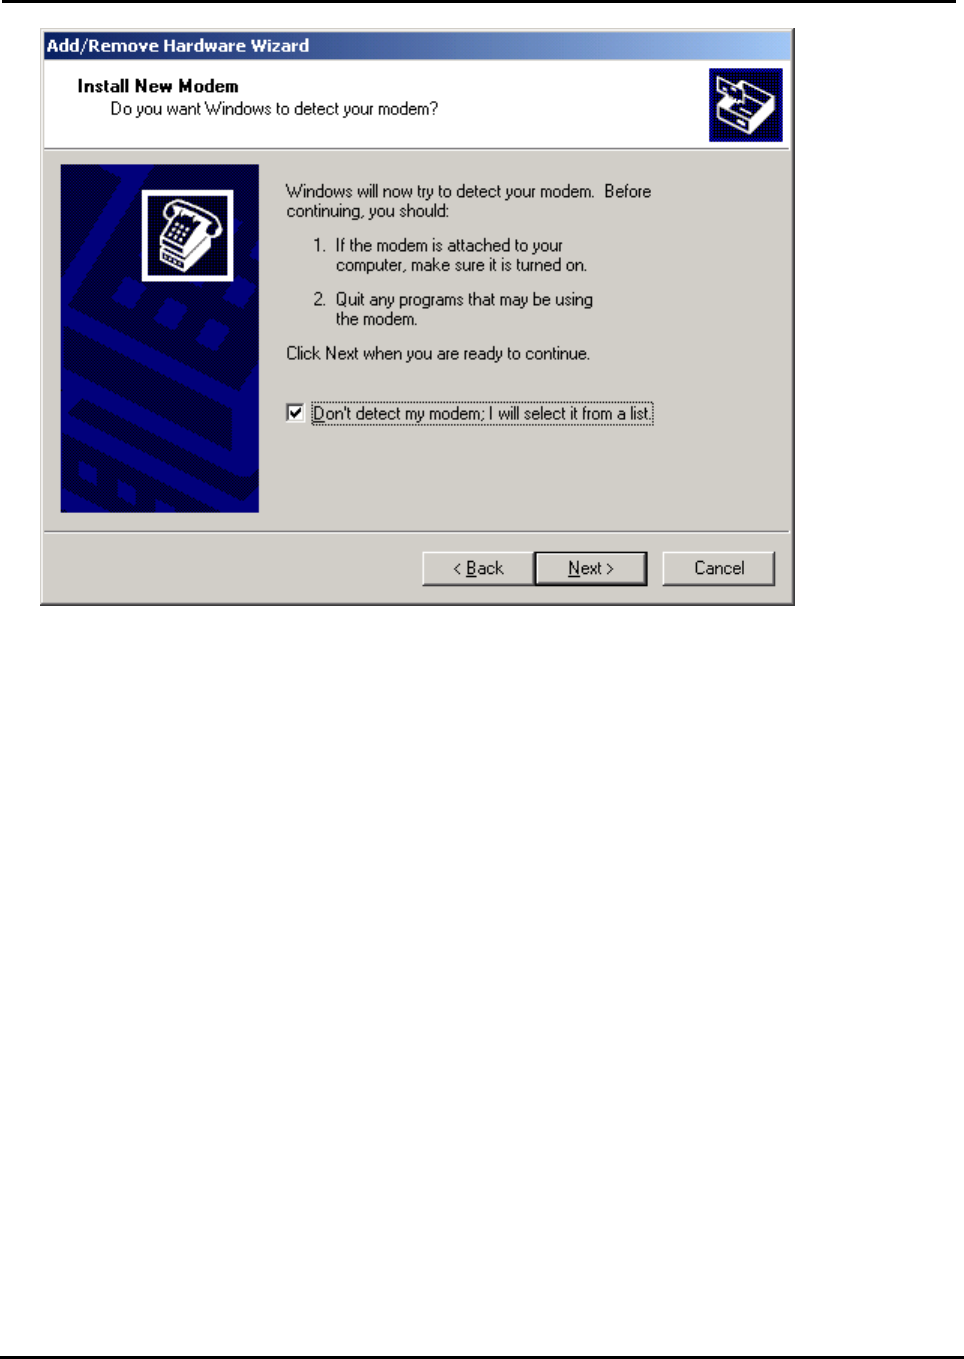
2. Click Add and you will see Add/Remove Hardware Wizard, Check the checkbox Don’t detect
my modem I will select it from a list. and click Next.
Air2Net Bluetooth Wireless Solutions
User Manual for Windows 2000 Working at the speed of thought
AmbiCom, Inc Page 5 of 34 12/2/2002
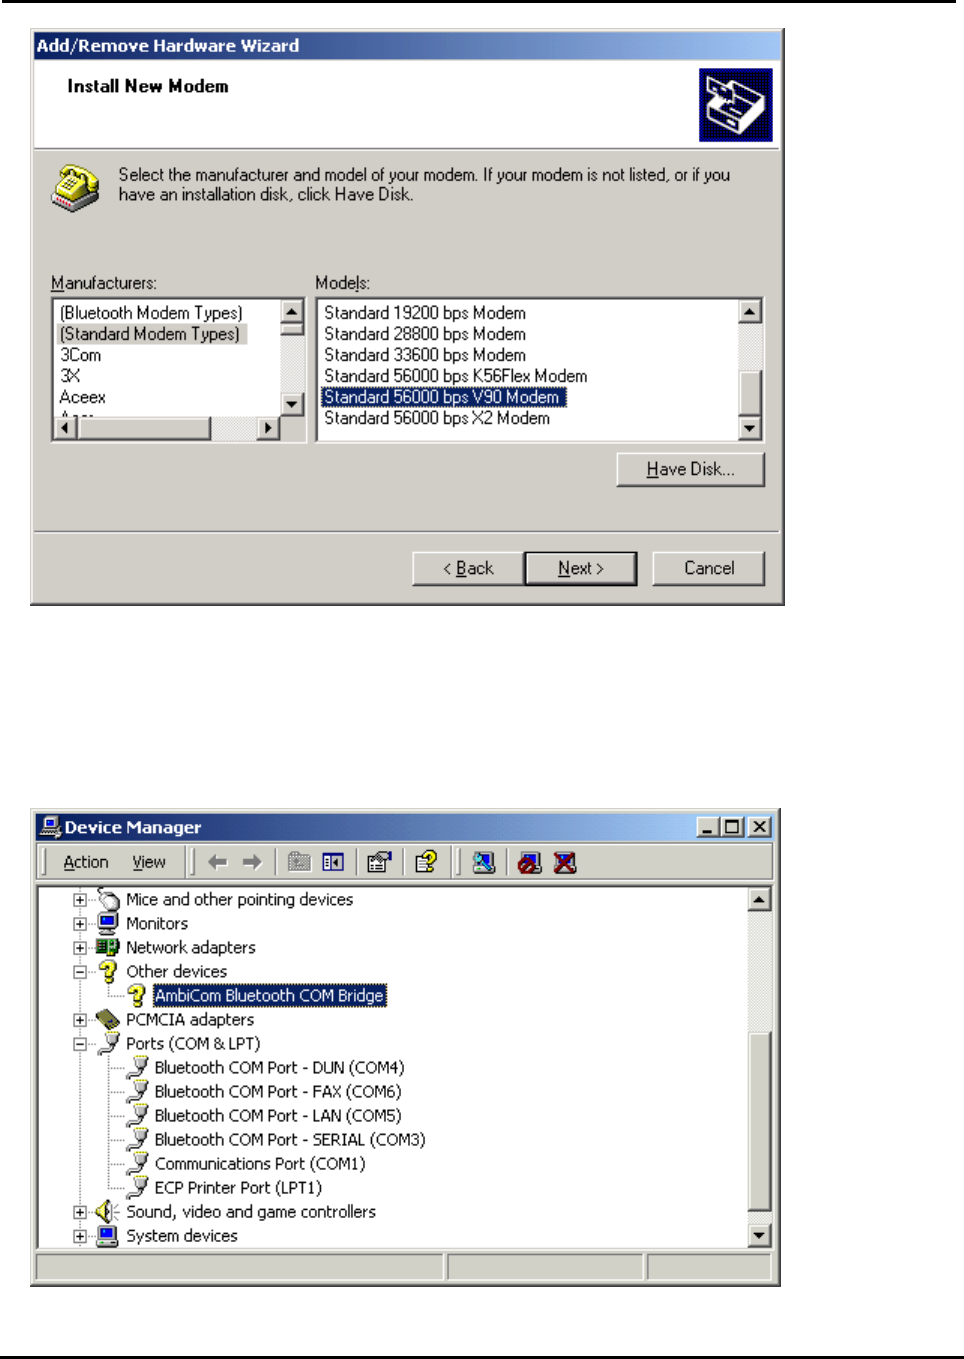
3. After you click Next, the following window will appear. Select Standard 56000bps V90
Modem as the Bluetooth modem. Click Next to continue.
Air2Net Bluetooth Wireless Solutions
User Manual for Windows 2000 Working at the speed of thought
AmbiCom, Inc Page 6 of 34 12/2/2002
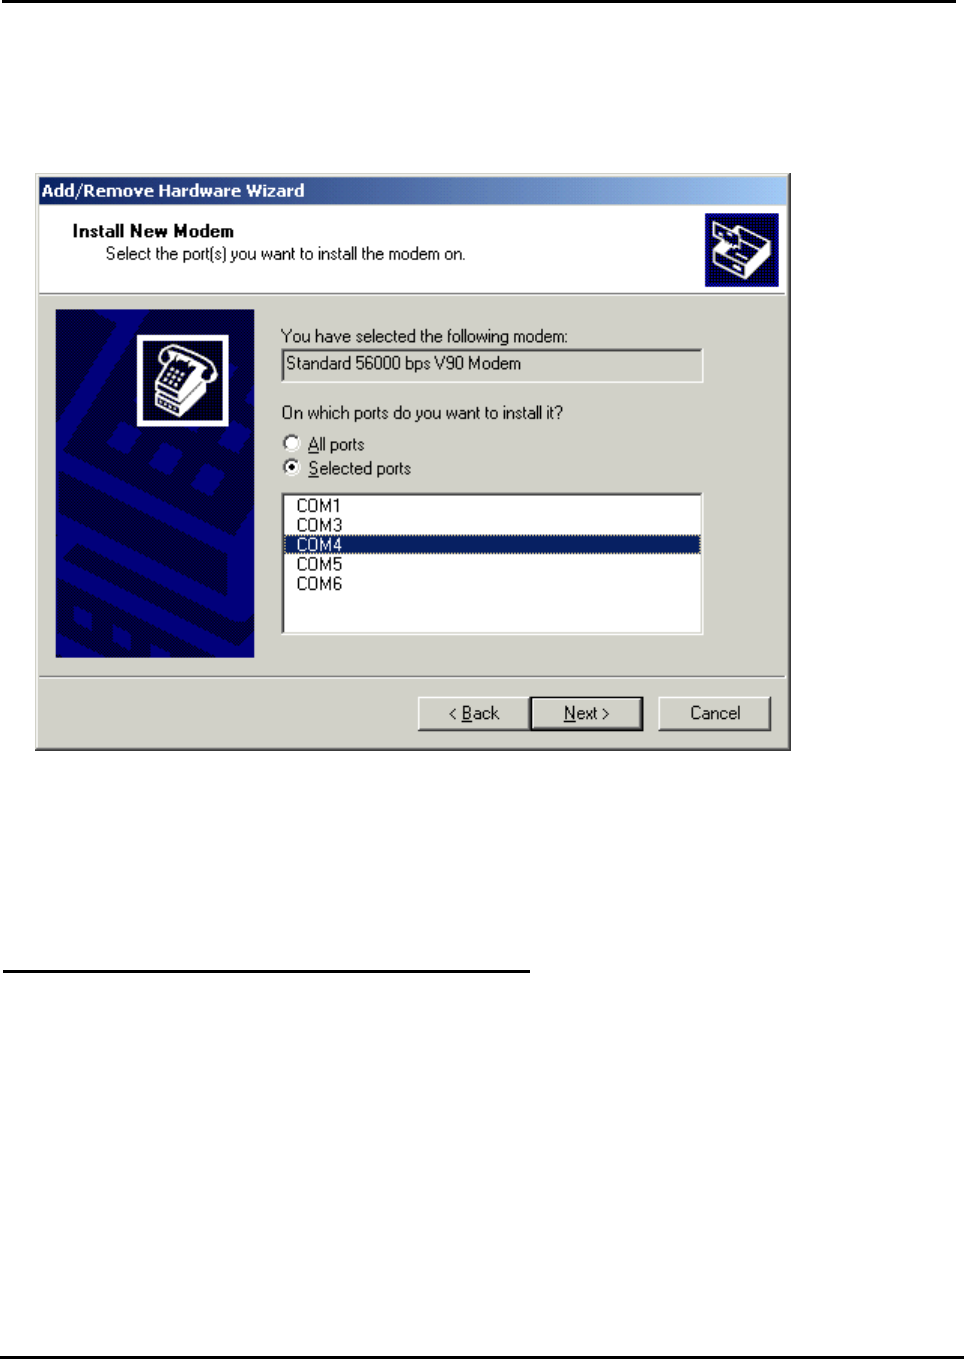
4. After you click Next, the following window will appear asking you which COM Port you will use.
Before selecting, you should go to Device Manager > Ports (COM & LPT) to find out which
COM port is associated with “Bluetooth COM Port - DUN” (assume Com 4 for DUN).
Air2Net Bluetooth Wireless Solutions
User Manual for Windows 2000 Working at the speed of thought
AmbiCom, Inc Page 7 of 34 12/2/2002
Refer to the above window to select the correct COM Port for your Bluetooth DUN modem
(assume COM 4 for DUN).
5. Click Next to finish the modem installation. After you installed the Bluetooth Modem, Standard
56000bps V90 Modem, you can treat it as a normal modem. Now, you are ready to create a
Dial-up networking connection through the Bluetooth Phone/Modem.
Installation Procedures for LAN Access
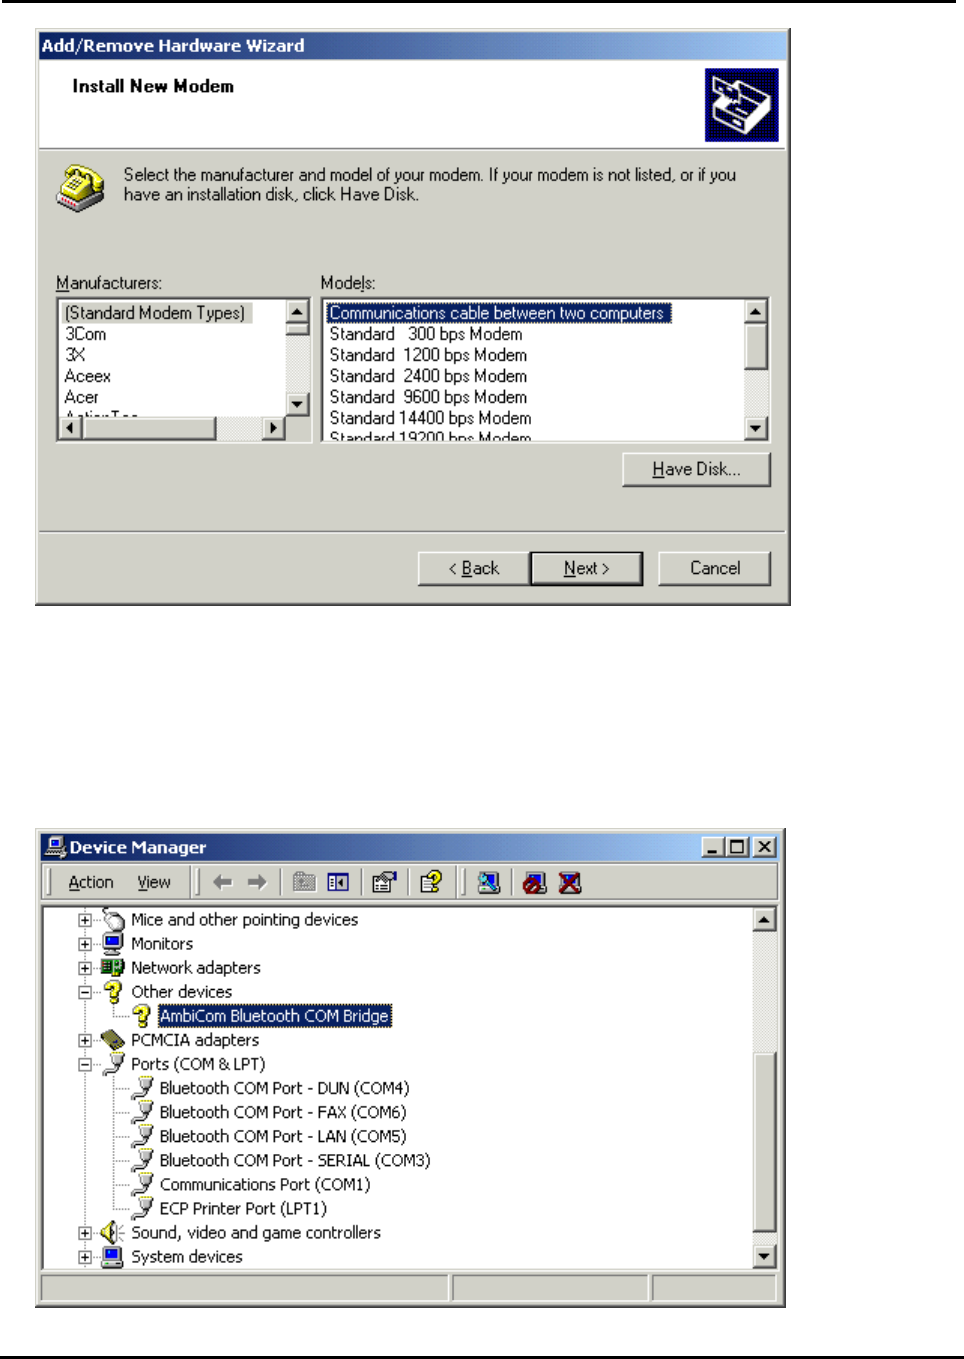
1. For the LAN Access, the installation procedure for modem is almost the same as Dial-up
networking. The only difference is under installing new modem where you should select
Communications Cable between two computers.
Air2Net Bluetooth Wireless Solutions
User Manual for Windows 2000 Working at the speed of thought
AmbiCom, Inc Page 8 of 34 12/2/2002
2. Click Next to continue the installation.
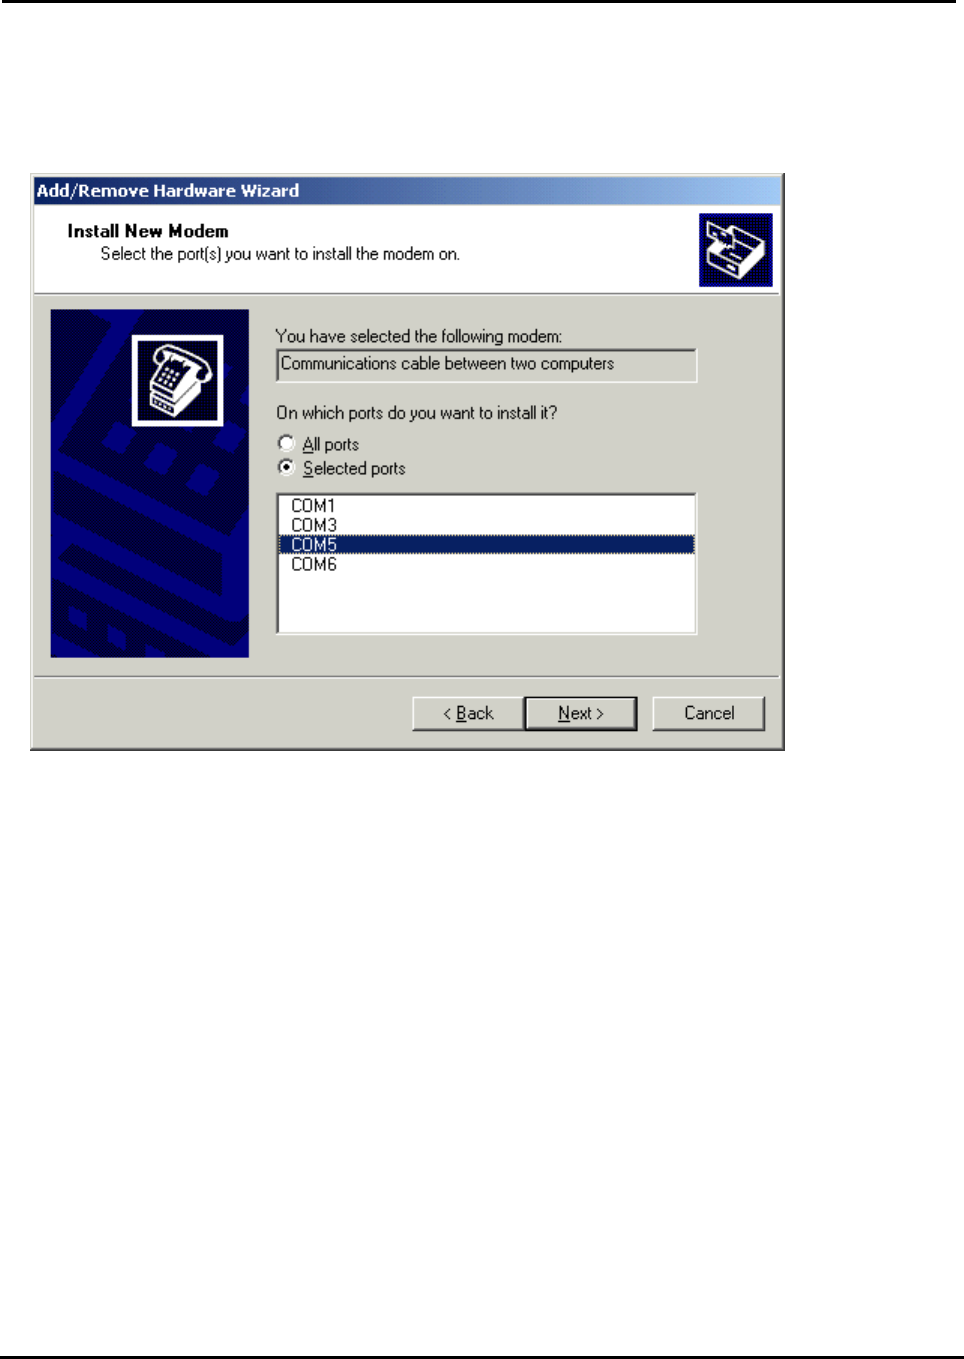
3. After you click Next, the following window will appear asking you which COM Port you will use.
Before selecting, you should go to Device Manager to find out which COM port is associated
with “Bluetooth COM Port - LAN”.
Air2Net Bluetooth Wireless Solutions
User Manual for Windows 2000 Working at the speed of thought
AmbiCom, Inc Page 9 of 34 12/2/2002
Refer to the above window to select the correct COM Port for your Bluetooth LAN modem.
4. After you install the Communication cable between two computers, you are ready to create
a new network connection through LAN Access Point.
Air2Net Bluetooth Wireless Solutions
User Manual for Windows 2000 Working at the speed of thought
AmbiCom, Inc Page 10 of 34 12/2/2002
5. How to Run Bluetooth Neighborhood
1. You can find a shortcut on the Desktop - Bluetooth Neighborhood.
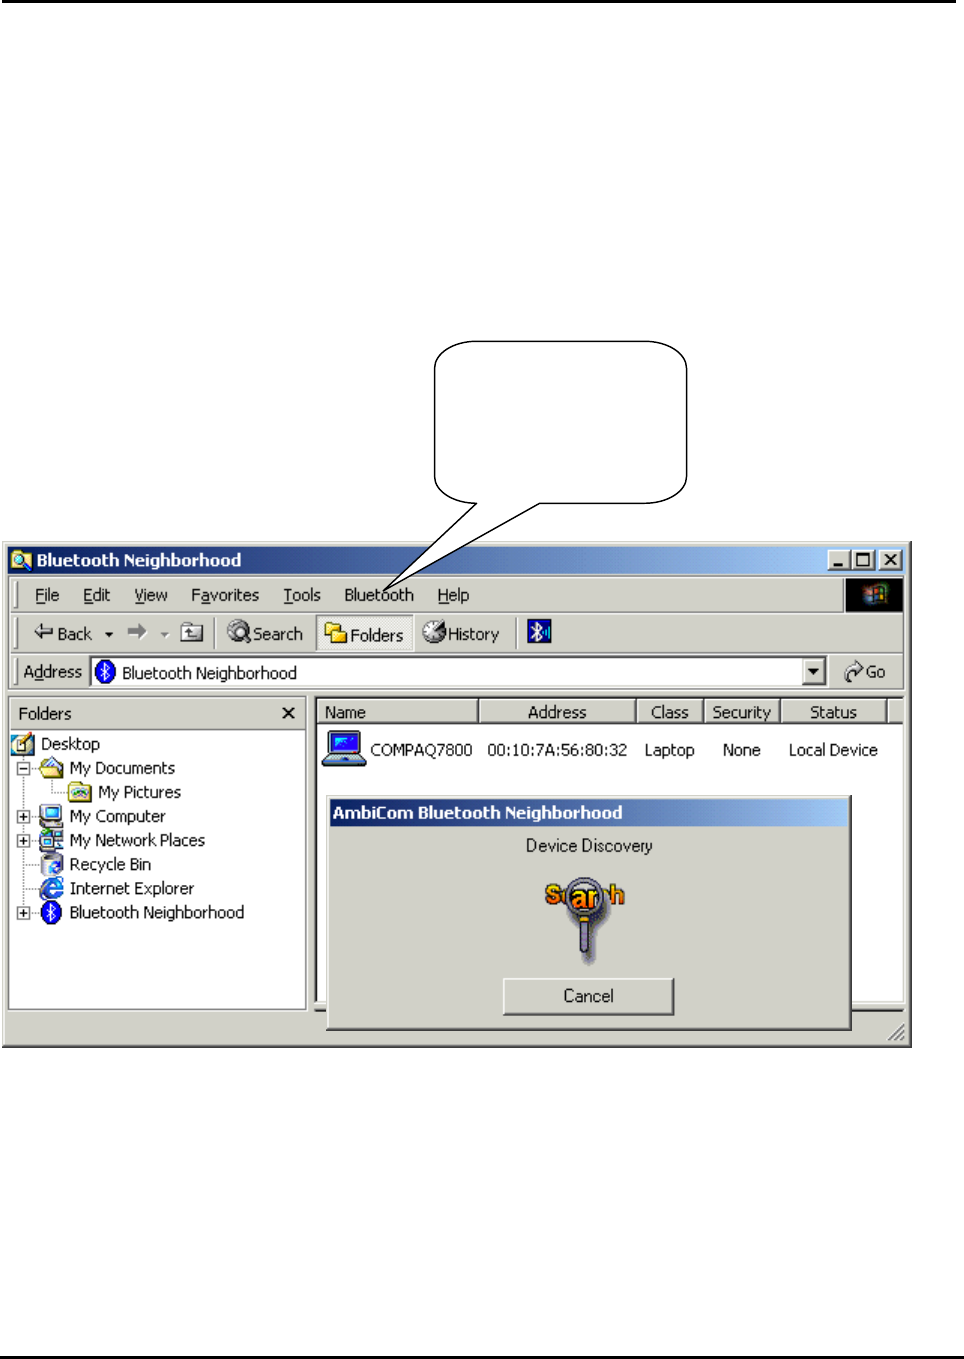
2. Go to Windows Explorer and find the icon Bluetooth Neighborhood. Double-click on it to
start the program. You can see a Bluetooth Neighborhood GUI at the right-hand side of
Windows Explorer, and the window Device Discovery will appear. When it finds all the
Bluetooth devices within the range, the Device Discovery window will disappear. The discovery
process includes device discovery and name discovery.
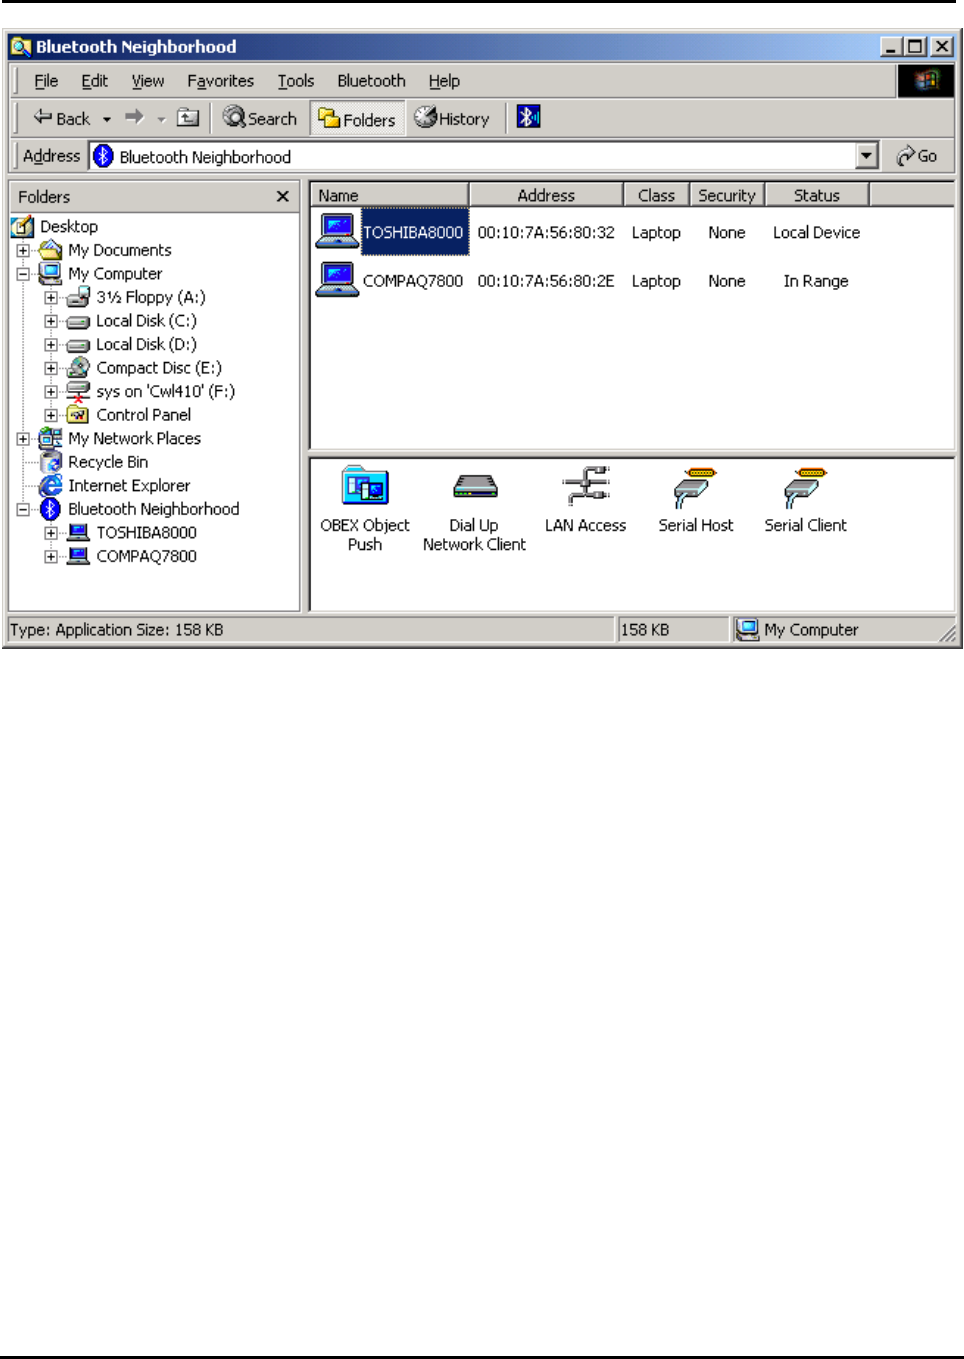
3. After finding the devices, you can click one of the devices and see what services that device
can provide. In the Device List Window (at the right-hand side of Windows Explorer), the first
device is always the local device.
This menu will give you
some action option about
Bluetooth, such as
“Service Discovery”,
”Device Discovery”,
“BlueChat” and etc.
Air2Net Bluetooth Wireless Solutions
User Manual for Windows 2000 Working at the speed of thought
AmbiCom, Inc Page 11 of 34 12/2/2002
Air2Net Bluetooth Wireless Solutions
User Manual for Windows 2000 Working at the speed of thought
AmbiCom, Inc Page 12 of 34 12/2/2002
Security Mode
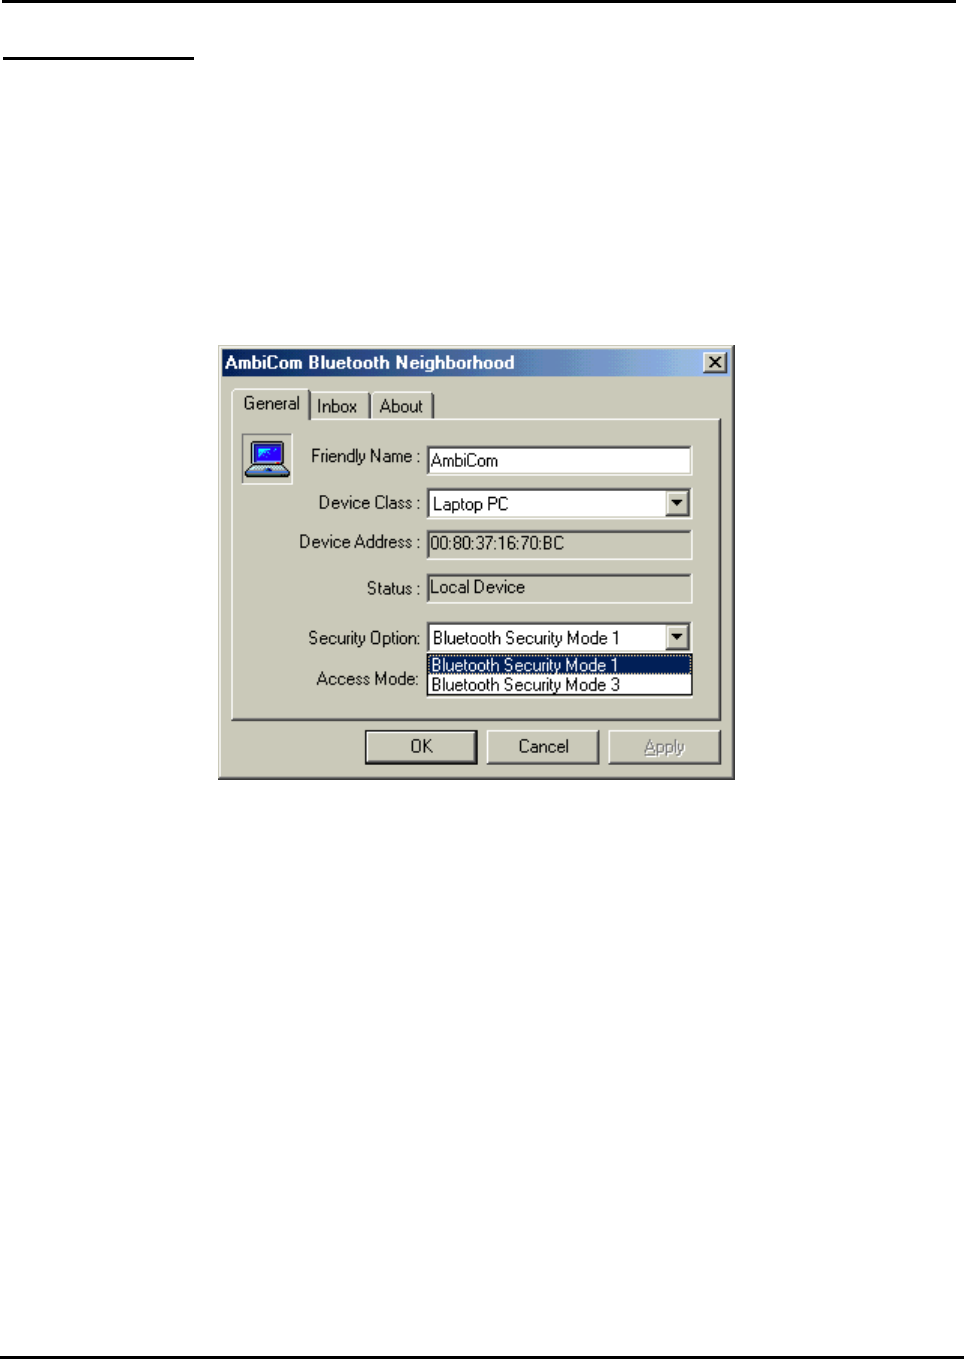
1. Our software provides two levels of security mode: security level 1 and security level 3. At
security level 3, a PIN code will be required when other Bluetooth enabled devices try to
connect with you. The PIN code entered needs to be the exact same one entered on both
machines. This will give you more security. If you set your PC in security level 1, PIN codes
will not be needed.
2. You can go to Bluetooth Neighborhood to set the security level. Choose the local device, right-
click it and select Property. You will see the following window.
Air2Net Bluetooth Wireless Solutions
User Manual for Windows 2000 Working at the speed of thought
AmbiCom, Inc Page 13 of 34 12/2/2002
Access Mode
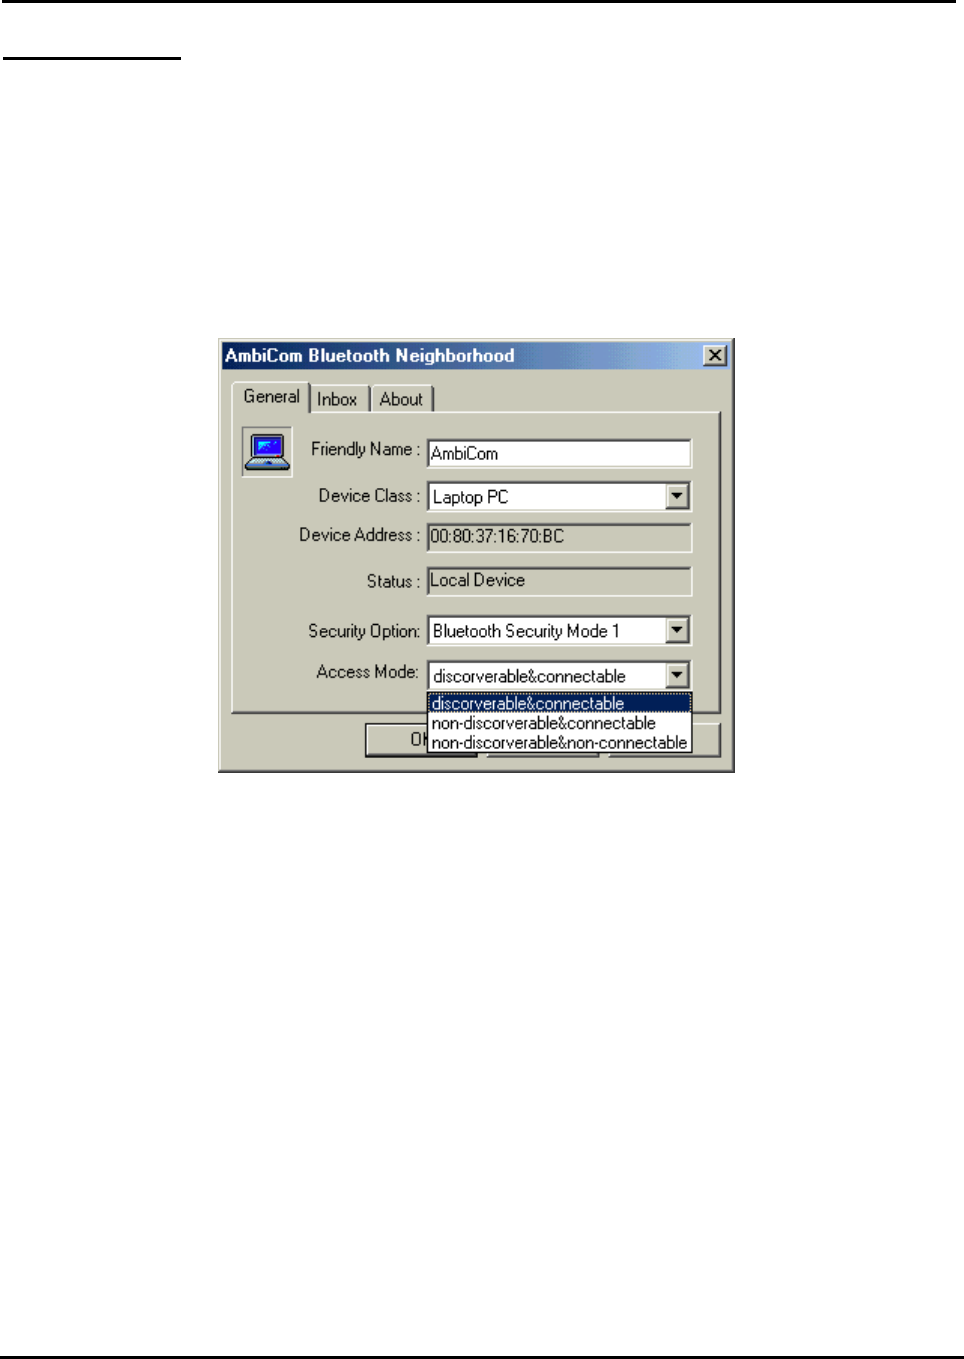
1. Our software provides three options of access mode: discoverable&connectable, non-
discoverable&connectable and non-discoverable&non-connectable. At the discoverable&
connectable mode, you will allow other Bluetooth enabled devices to find and connect to you.
At other two options, you will allow them to find you, but cannot connect to you. Or they cannot
find you nor connect to you.
2. You can go to Bluetooth Neighborhood to set the Access mode. Choose the local device, right-
click on it and choose Property. You will see the following window.
Air2Net Bluetooth Wireless Solutions
User Manual for Windows 2000 Working at the speed of thought
AmbiCom, Inc Page 14 of 34 12/2/2002
Exchange vCards
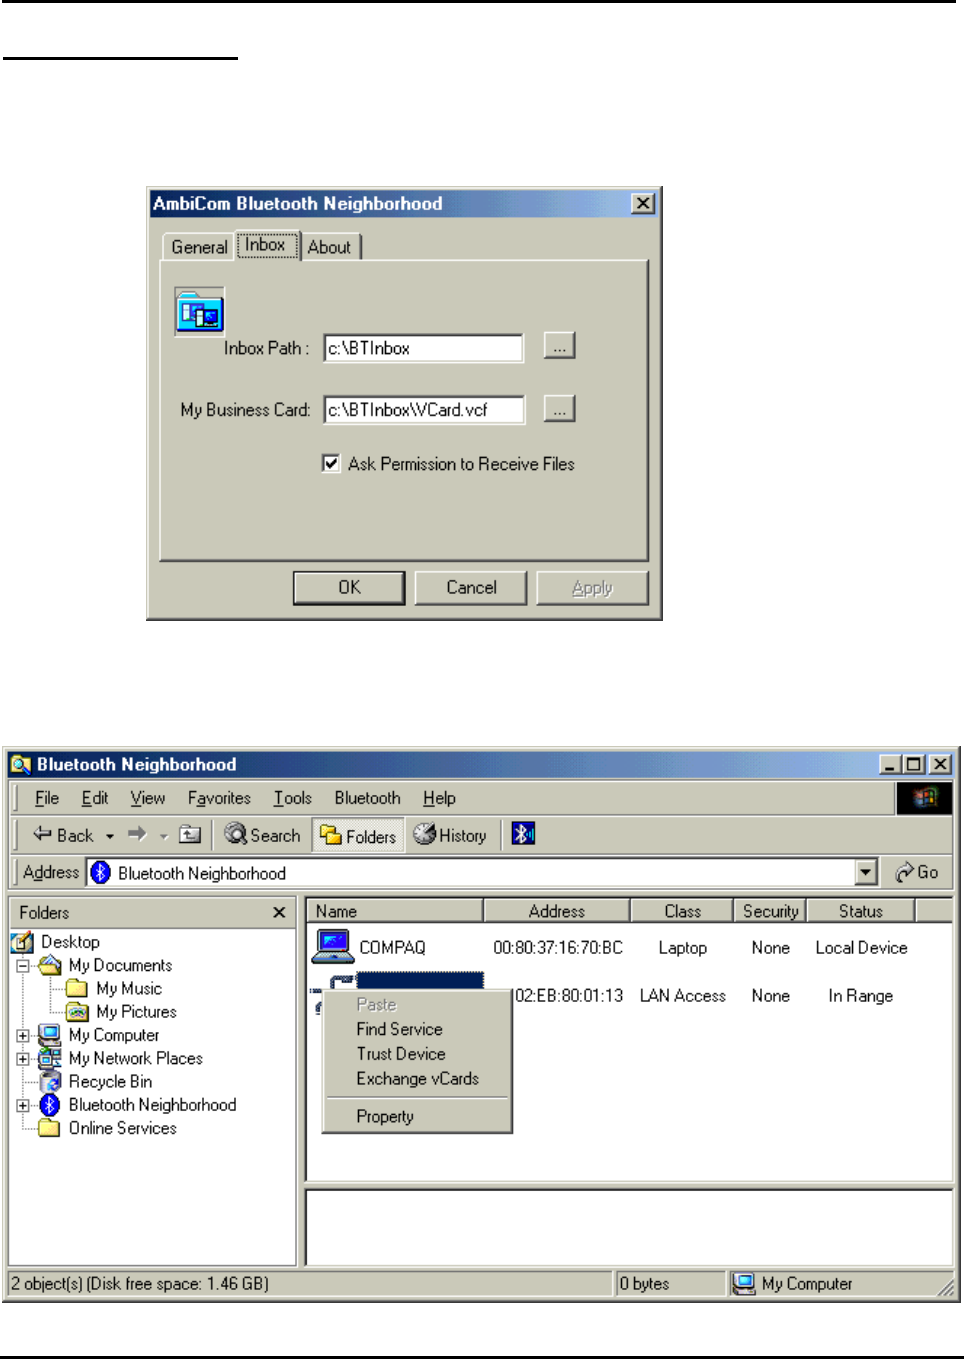
1. When you perform Exchange vCard, you need to go to the local device‘s property to set up
“My Business Card” path first, as shown in the following window. The default path is
“C:\BTInbox”.
2. Now you click the device that you want to exchange vCard with. You will see the following
window. Click “Exchange vCards” and you will send your business card to this device and vice
versa.
Air2Net Bluetooth Wireless Solutions
User Manual for Windows 2000 Working at the speed of thought
AmbiCom, Inc Page 15 of 34 12/2/2002
Object Push
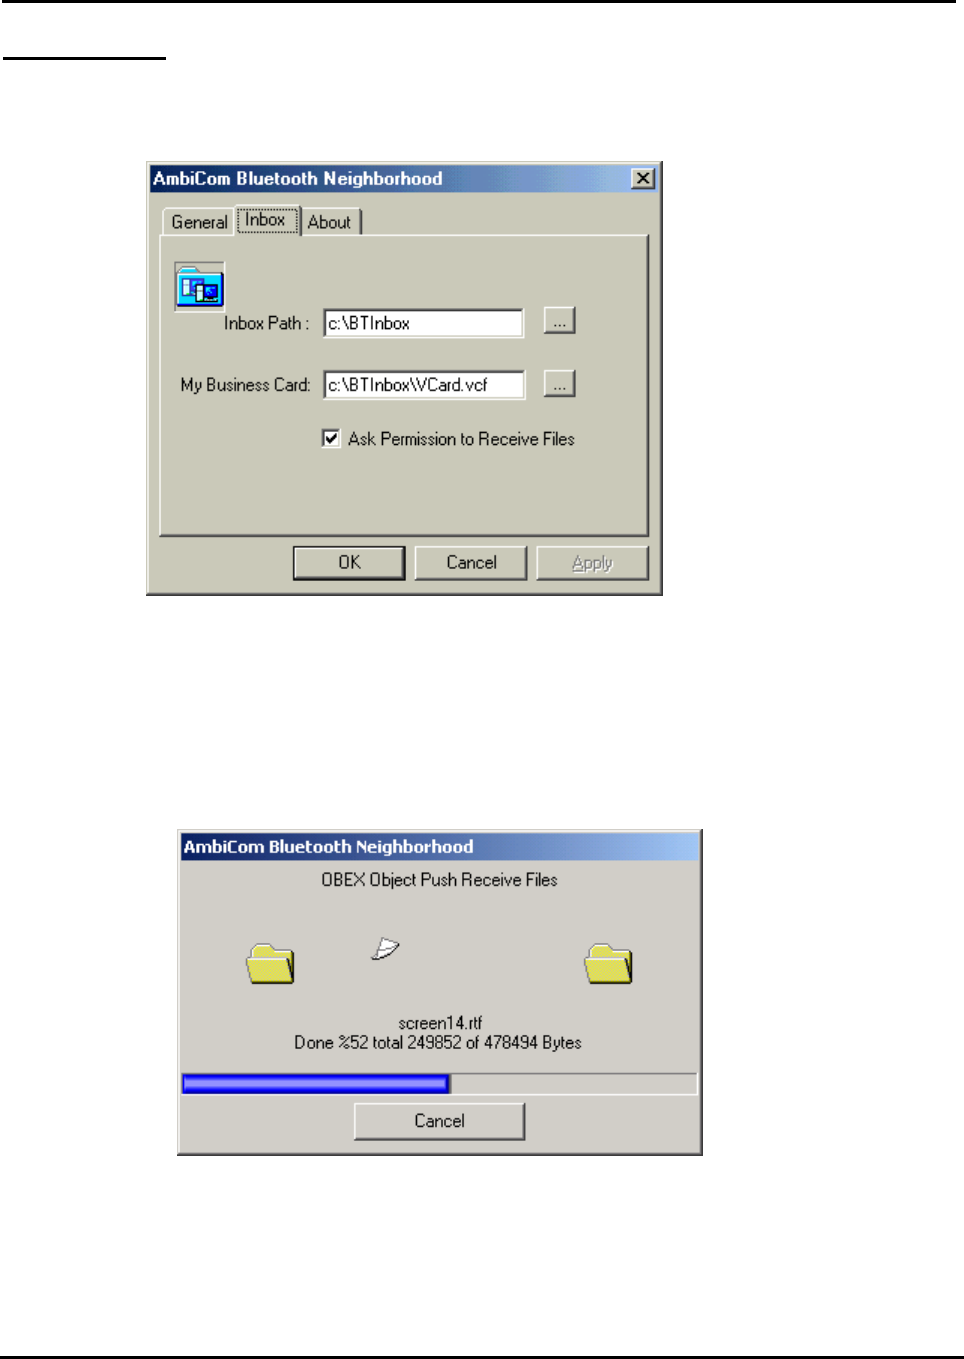
1. Before you perform Object Push, please set up your inbox path first. This directory will save
files that you receive. The default path is “C:\BTInbox”.
2. When you perform Object Push, simply Drag the file that you want to send and Drop it to the
Bluetooth Device that you want to receive on the left side of Windows Explorer. You also can
use Copy and Paste to do the object transfer between two Bluetooth devices. When you
perform Object Push, the status will be shown on the following window.
Air2Net Bluetooth Wireless Solutions
User Manual for Windows 2000 Working at the speed of thought
AmbiCom, Inc Page 16 of 34 12/2/2002
File Transfer
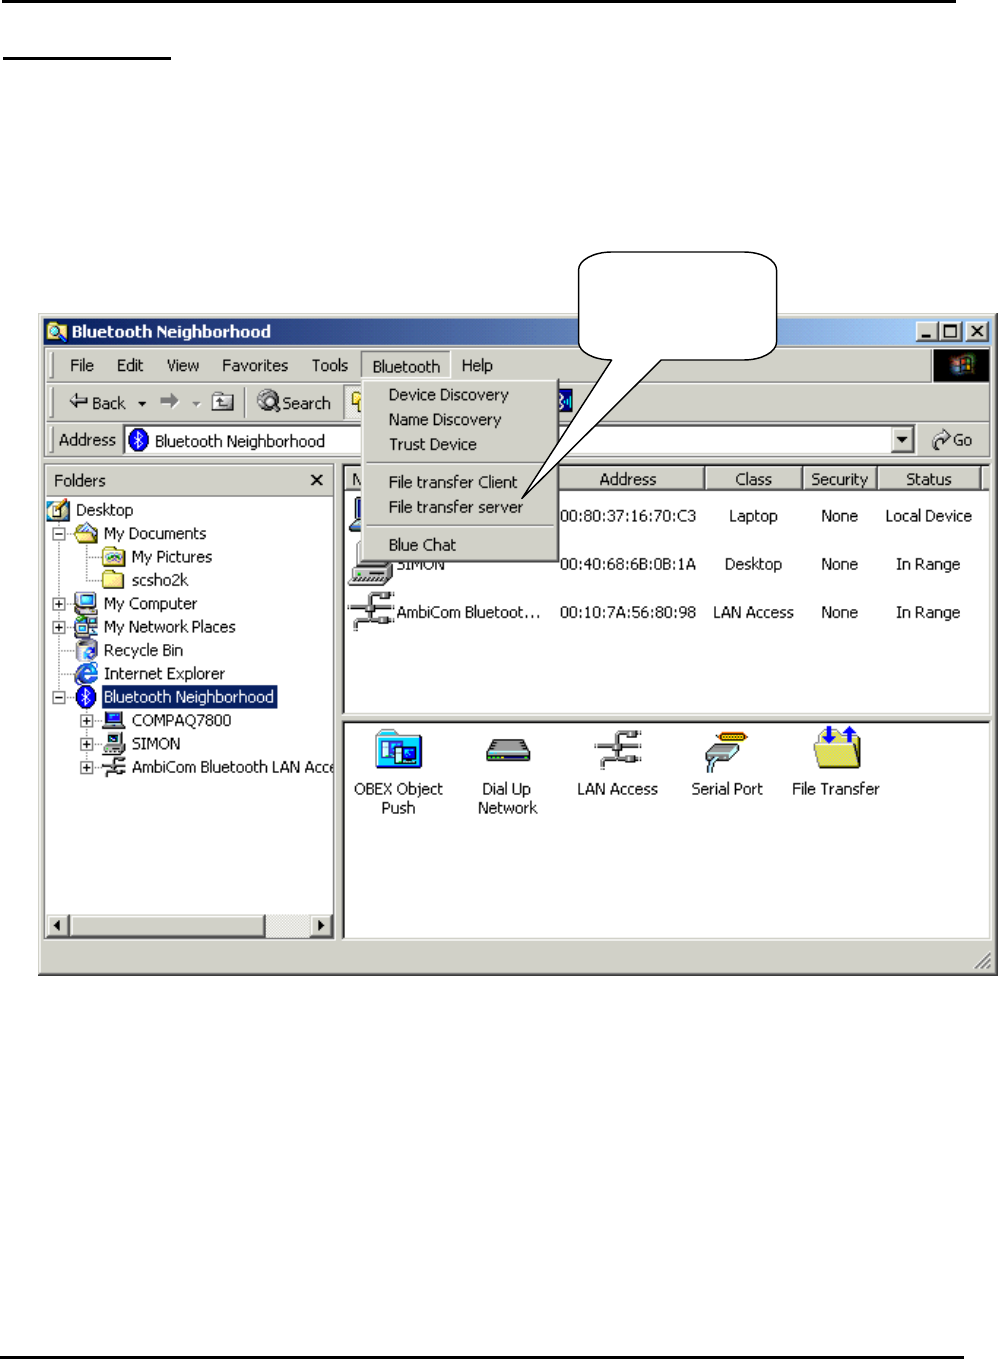
1. To execute File Transfer, open Windows Explorer, select Bluetooth on the menu bar and click
on File Transfer Client or File Transfer Server. To activate File Transfer on both ends, the
application on the remote computer also needs to run File Transfer at the same time.
Click it to run
File Transfer
Client or Server
Air2Net Bluetooth Wireless Solutions
User Manual for Windows 2000 Working at the speed of thought
AmbiCom, Inc Page 17 of 34 12/2/2002
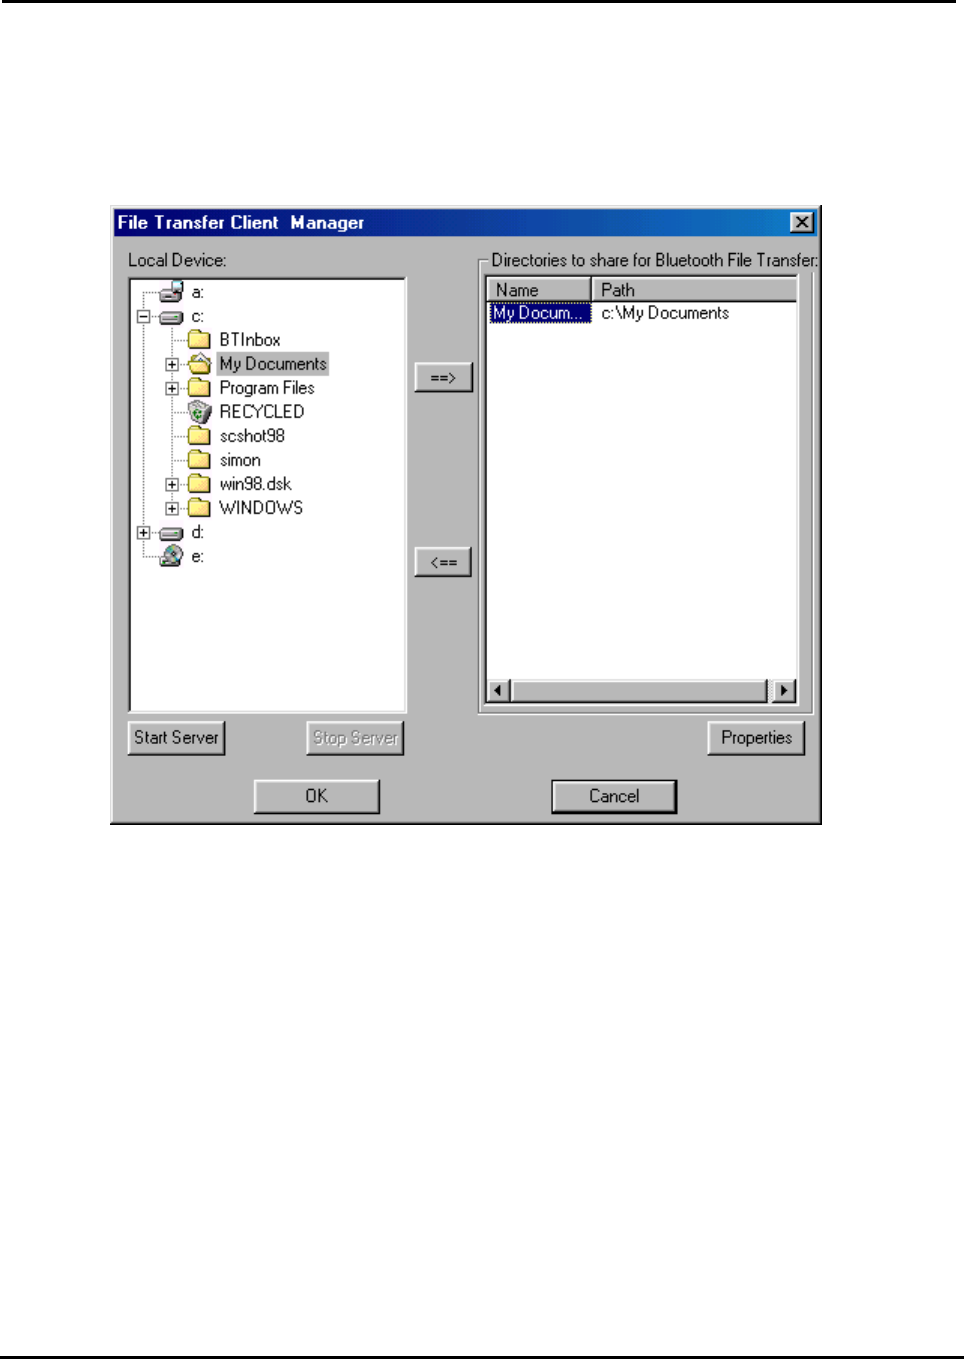
2. The following window shows the File Transfer Server. In the File Transfer Server, you can
select the directory or file on the left-hand side of the window and share it by using the arrow
button to transfer it to the right-hand side of window. The directory or files in the right-hand
side of the window are those that have been shared for the File Transfer Client to use.
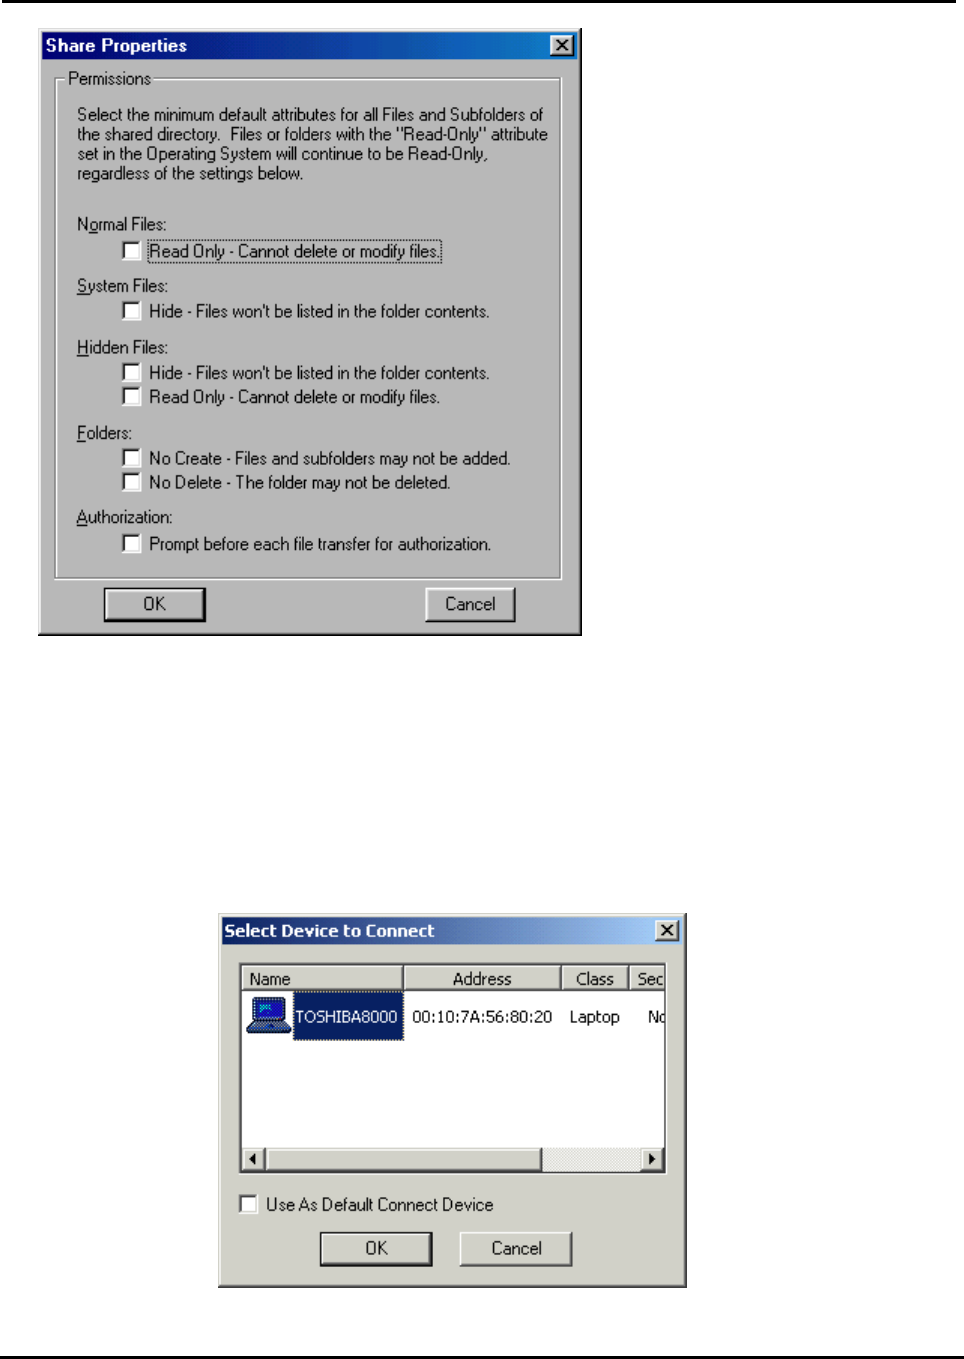
3. After you share the directory and files, you can configure them by clicking on the Properties
button.
Air2Net Bluetooth Wireless Solutions
User Manual for Windows 2000 Working at the speed of thought
AmbiCom, Inc Page 18 of 34 12/2/2002
In this window, you can define the attribute of the directory or file that you shared, give the
permission for the File Transfer Client to use.
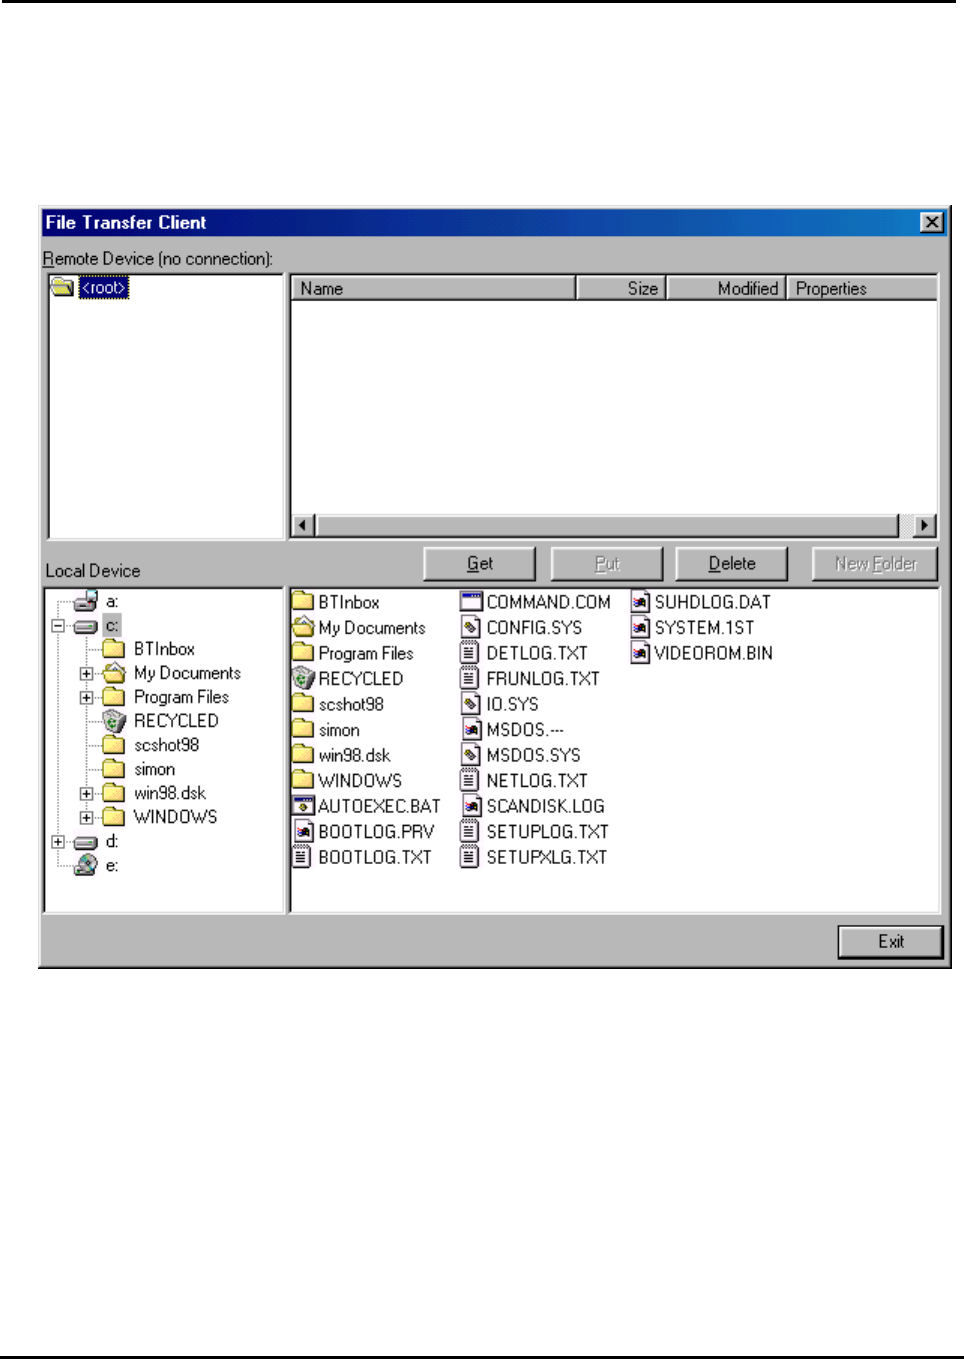
4. When you click the File Transfer Client menu to run it, the system will show a Select Device to
Connect window for you to choose which device you want to connect.
Air2Net Bluetooth Wireless Solutions
User Manual for Windows 2000 Working at the speed of thought
AmbiCom, Inc Page 19 of 34 12/2/2002
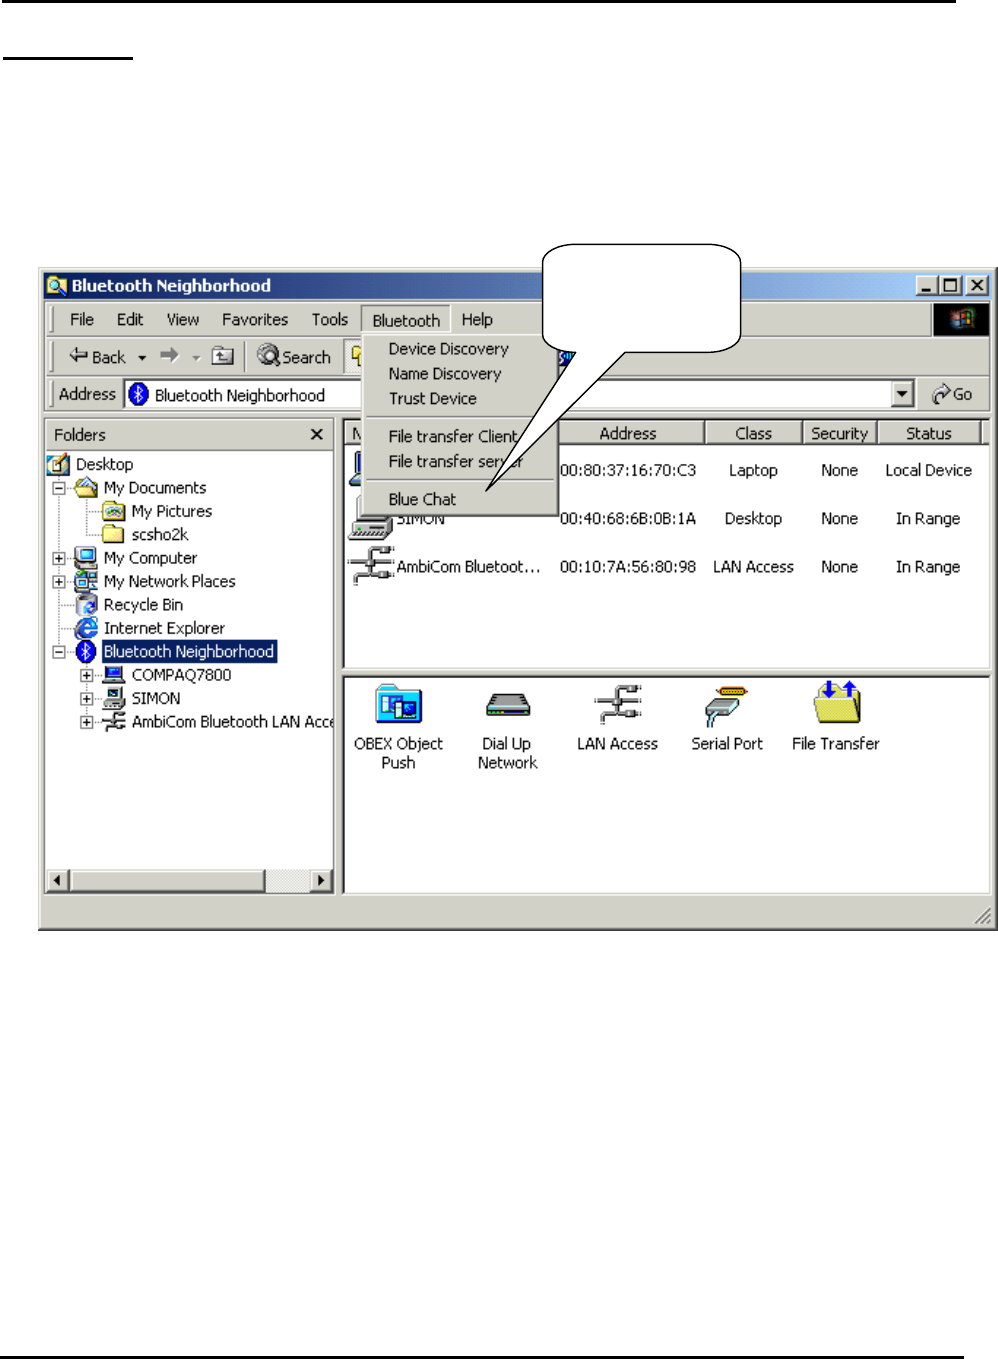
5. After you select the remote device that runs the File Transfer Server, the following window will
appear. You will see the directory and file shared by the File Transfer Server. You can get file
or directory from the File Transfer server or place file or directory to the File Transfer Server.
Also you can create new folder in the Shared Directory from File Transfer Server.
Air2Net Bluetooth Wireless Solutions
User Manual for Windows 2000 Working at the speed of thought
AmbiCom, Inc Page 20 of 34 12/2/2002
Blue Chat
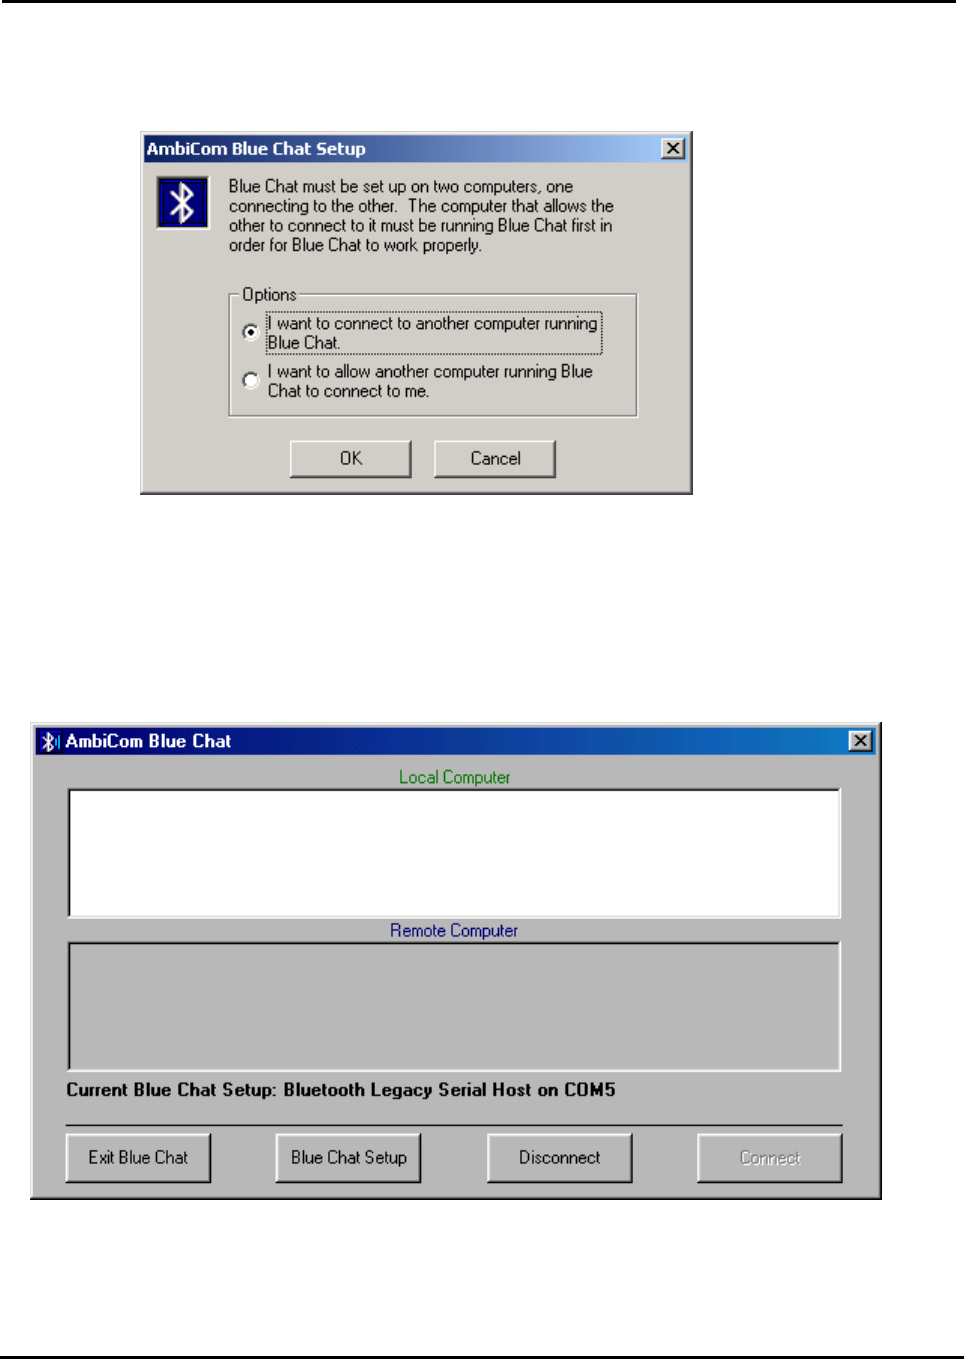
1. For Blue Chat, click Blue Chat on Bluetooth Menu on Windows Explorer Menu bar. To have
Blue Chat working on both ends, the application on the remote computer also needs to run at
the same time.
Click it to run
Blue Chat
Air2Net Bluetooth Wireless Solutions
User Manual for Windows 2000 Working at the speed of thought
AmbiCom, Inc Page 21 of 34 12/2/2002
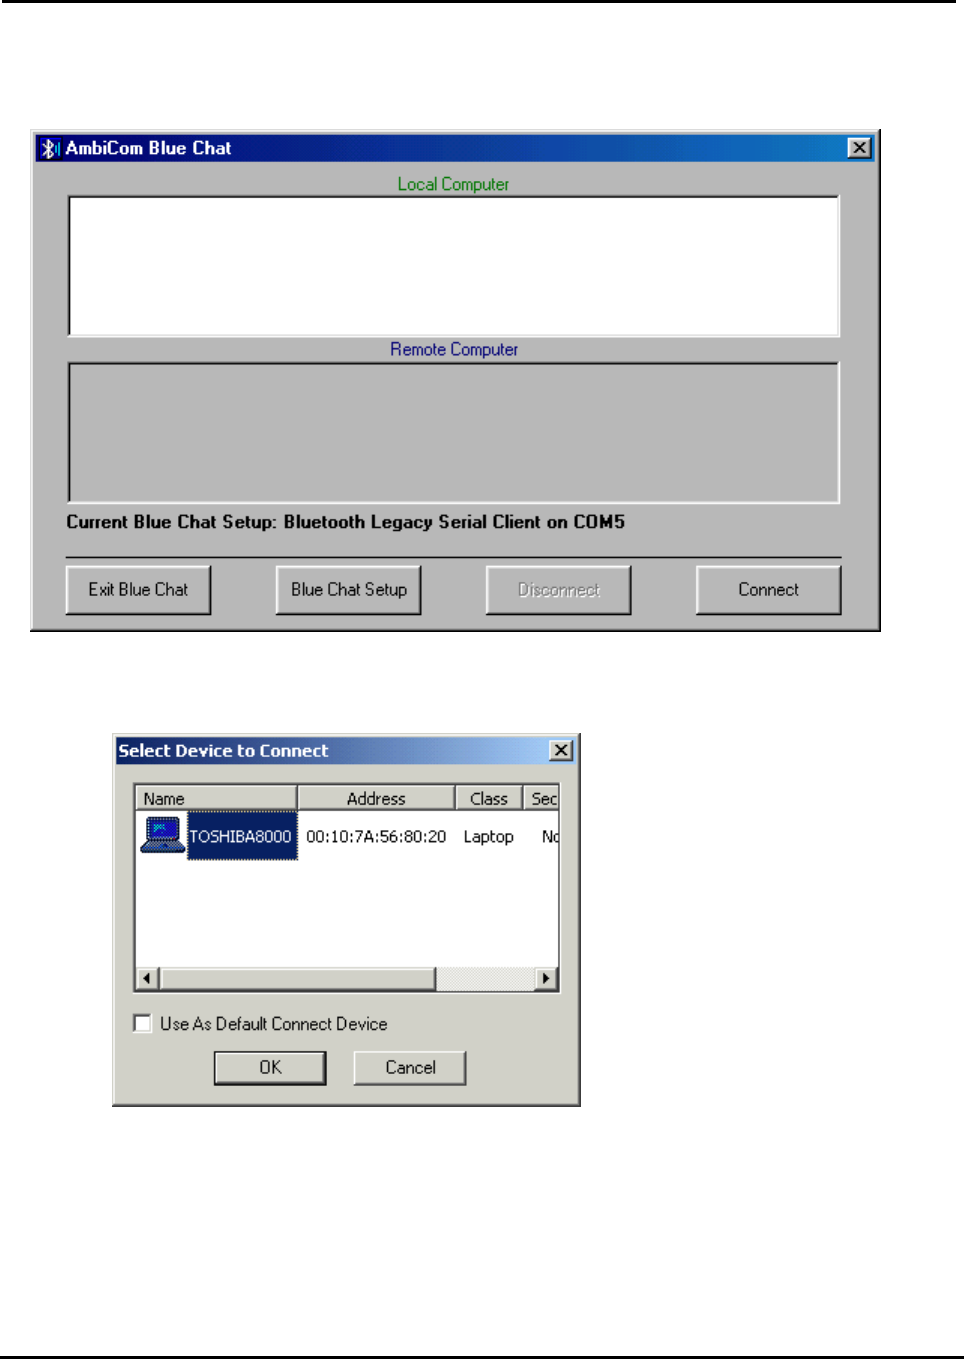
2. After you click Blue Chat, the following window will appear.
3. In the above window, two options are shown. You can choose to either connect to someone or
wait for connection. If you want other people to communicate with you, simply check the lower
checkbox and click OK and the following window will appear.
Air2Net Bluetooth Wireless Solutions
User Manual for Windows 2000 Working at the speed of thought
AmbiCom, Inc Page 22 of 34 12/2/2002
4. If you want to connect to a remote device, check the first option. Click OK and the following
window will appear.
5. Now click Connect, the system will prompt you with the following window and you can select
which device you want to connect.
6. Select the Bluetooth Device you want to connect and then click OK. The two Bluetooth devices
now can connect to each other. You can type any text messages within the Local Computer
window and you can see the messages from Remote Computer as well.
Air2Net Bluetooth Wireless Solutions
User Manual for Windows 2000 Working at the speed of thought
AmbiCom, Inc Page 23 of 34 12/2/2002
Dial-Up Networking
Note:
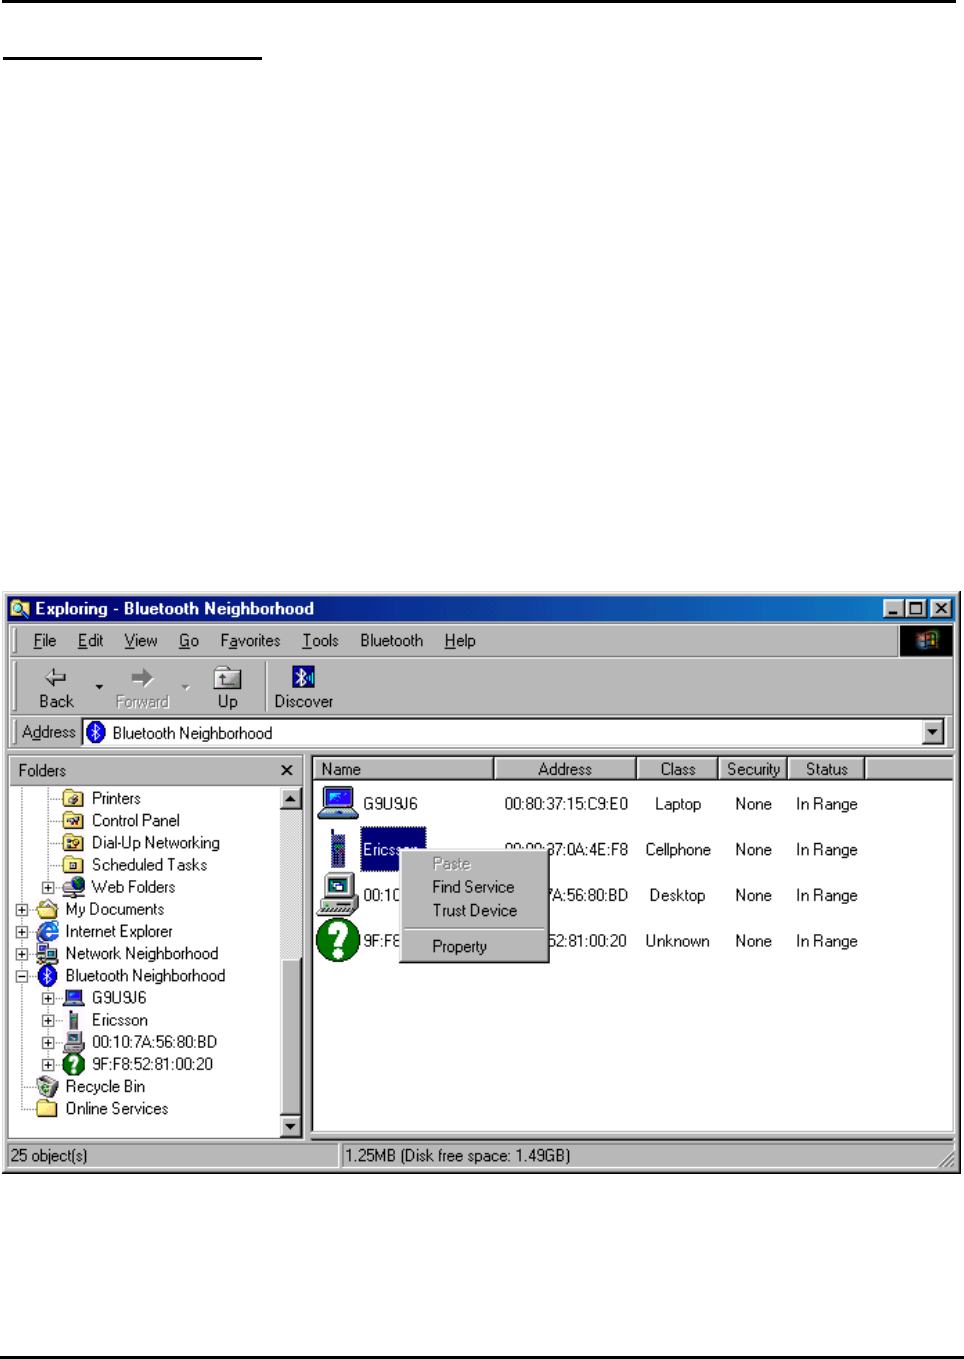
For some Bluetooth enabled devices such as Cellular Phones, before you perform Dial-up,
you need to execute Trust Device first. The following window shows you how to do so. For
phone configuration, you need set it to the Ready to pair mode. You can refer the phone
manual. After you paired your phone with the Bluetooth device, the software will remember the
trust profile. You don’t need to do this every time when you execute the Dial-up networking.
On Nokia Cell Phone
You have to set the security level 3 in the Bluetooth Neighborhood. Choose “Local Device”,
click the right button of your mouse, and then select “Property”. Select under security option
“Bluetooth Security Mode 3” and then follow the wizard manual.
On Ericsson Cell Phone
Select menu Extra > Bluetooth> Paired devices > Add devices > Phone Accepts
Click Yes to assign the phone name and will show Ready to pair mode
On the computer
After discover the phone, right click on the mouse and choose Trust Device.
Insert the password.
On Ericsson Phone
• Click Yes on the phone to Add to paired devices > insert the Password click yes

Air2Net Bluetooth Wireless Solutions
User Manual for Windows 2000 Working at the speed of thought
AmbiCom, Inc Page 24 of 34 12/2/2002
On Computer
• Insert the PIN number in the computer (the same that you inserted the password on the
phone)
On Phone
• Show Pairing successful
On Computer
• Change the status to Trusted in the Bluetooth Neighborhood
Air2Net Bluetooth Wireless Solutions
User Manual for Windows 2000 Working at the speed of thought
AmbiCom, Inc Page 25 of 34 12/2/2002
The requirement to set up Dial-up Networking is to provide the Internet Service Provider
information (ISP); user name, password, and the phone number.
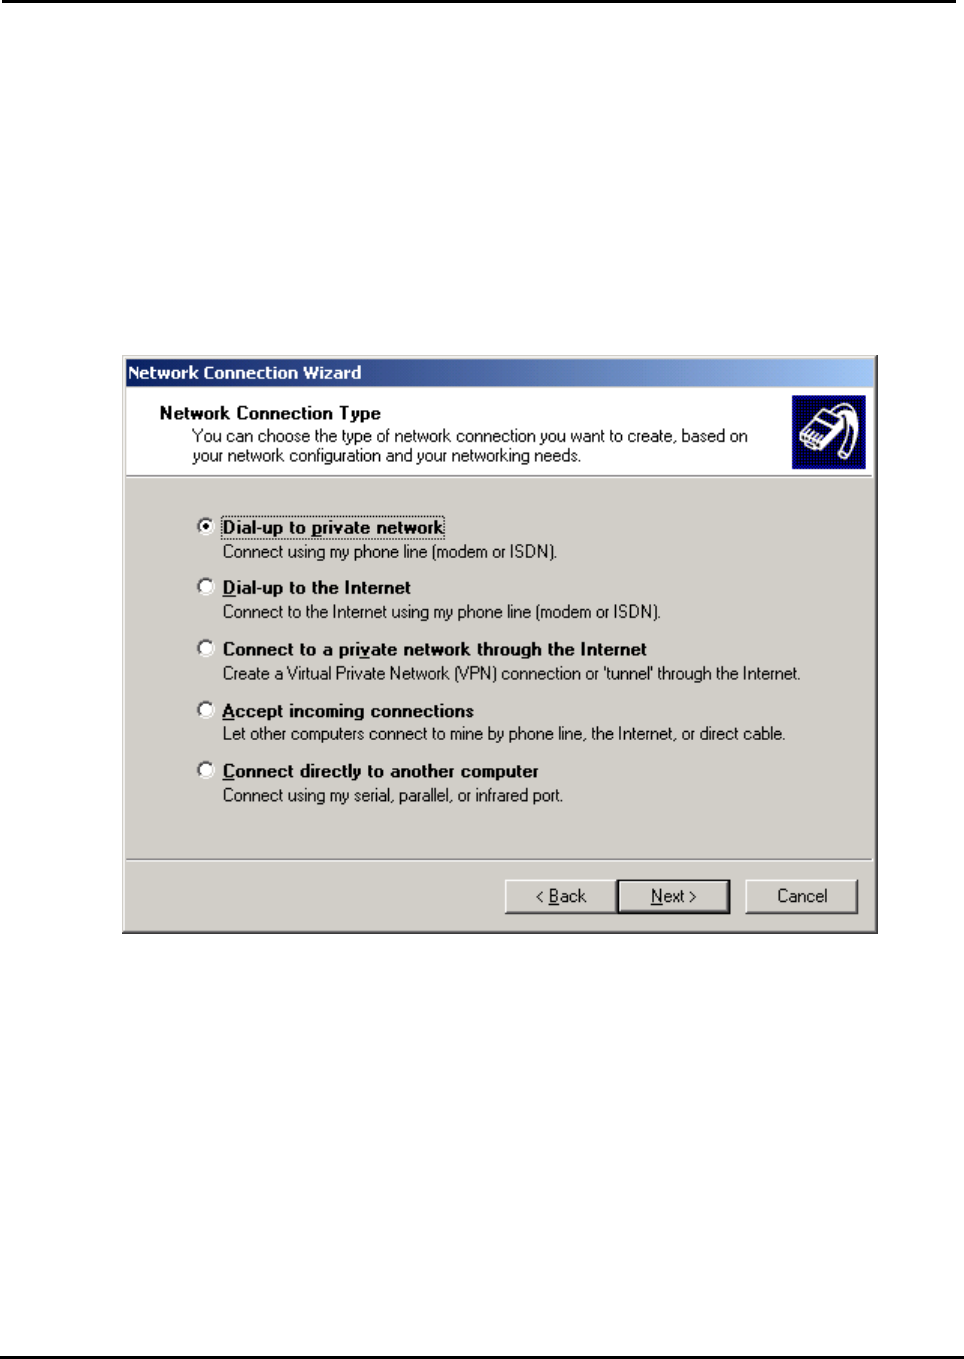
1. For Dial-Up Networking, please go to the Control Panel and find Network and Dial-up
Connections to create a new connection. When you create the connection for the Dial-Up
networking, please use the “Standard 56000bps V90 Modem” that you installed before. If you
haven’t installed that modem, please refer to the Installation section.
2. Choose “Dial up to private network”, click Next
Air2Net Bluetooth Wireless Solutions
User Manual for Windows 2000 Working at the speed of thought
AmbiCom, Inc Page 26 of 34 12/2/2002
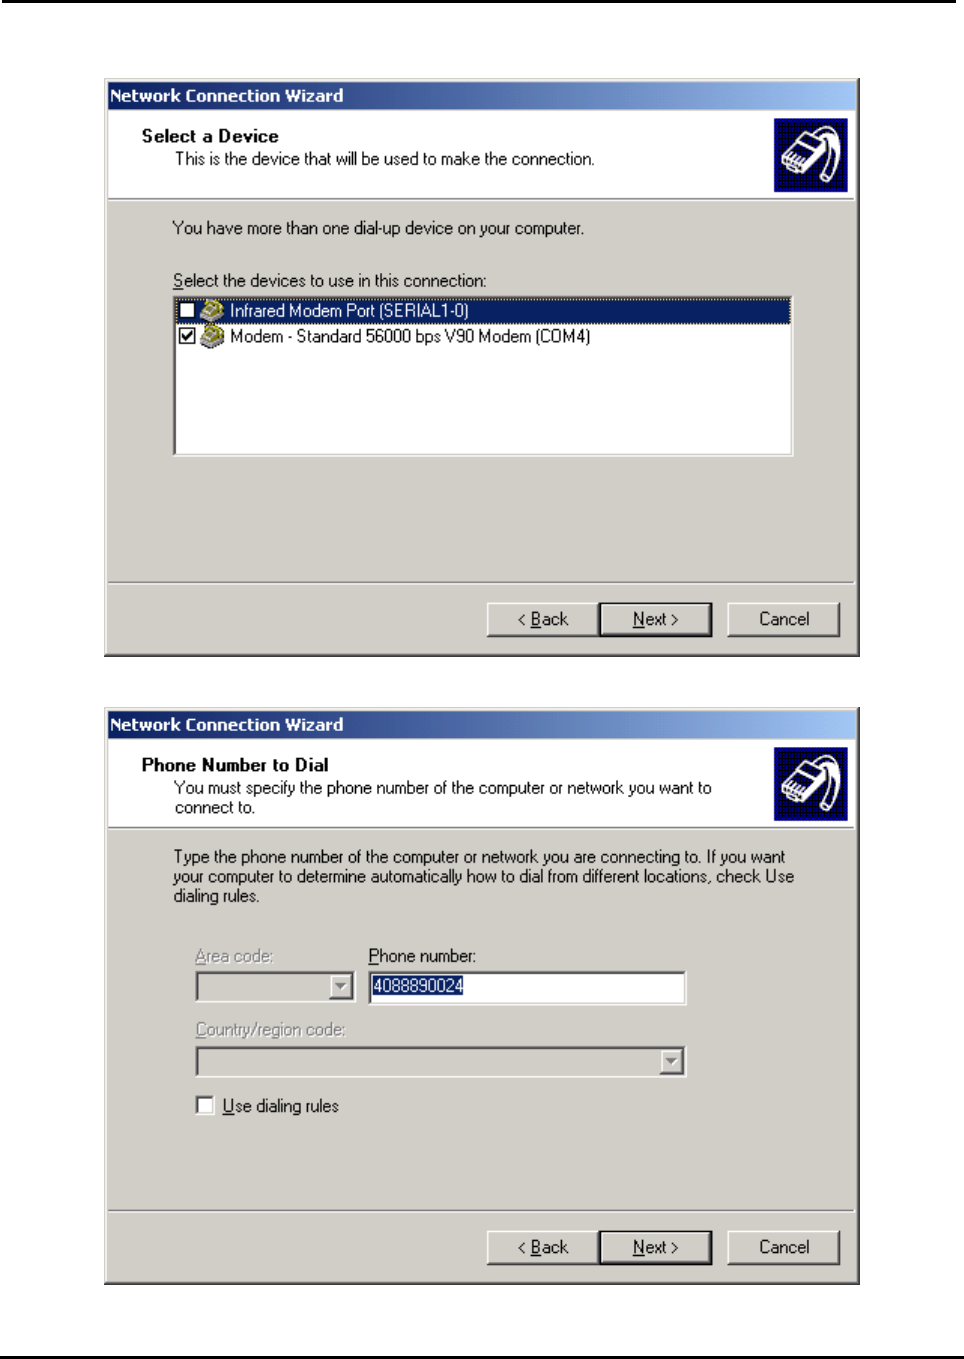
3. Check the Modem - Standard 56000bps V90 Modem (assume COM4 for DUN) and click
Next.
4. Insert the ISP phone number click next
Air2Net Bluetooth Wireless Solutions
User Manual for Windows 2000 Working at the speed of thought
AmbiCom, Inc Page 27 of 34 12/2/2002
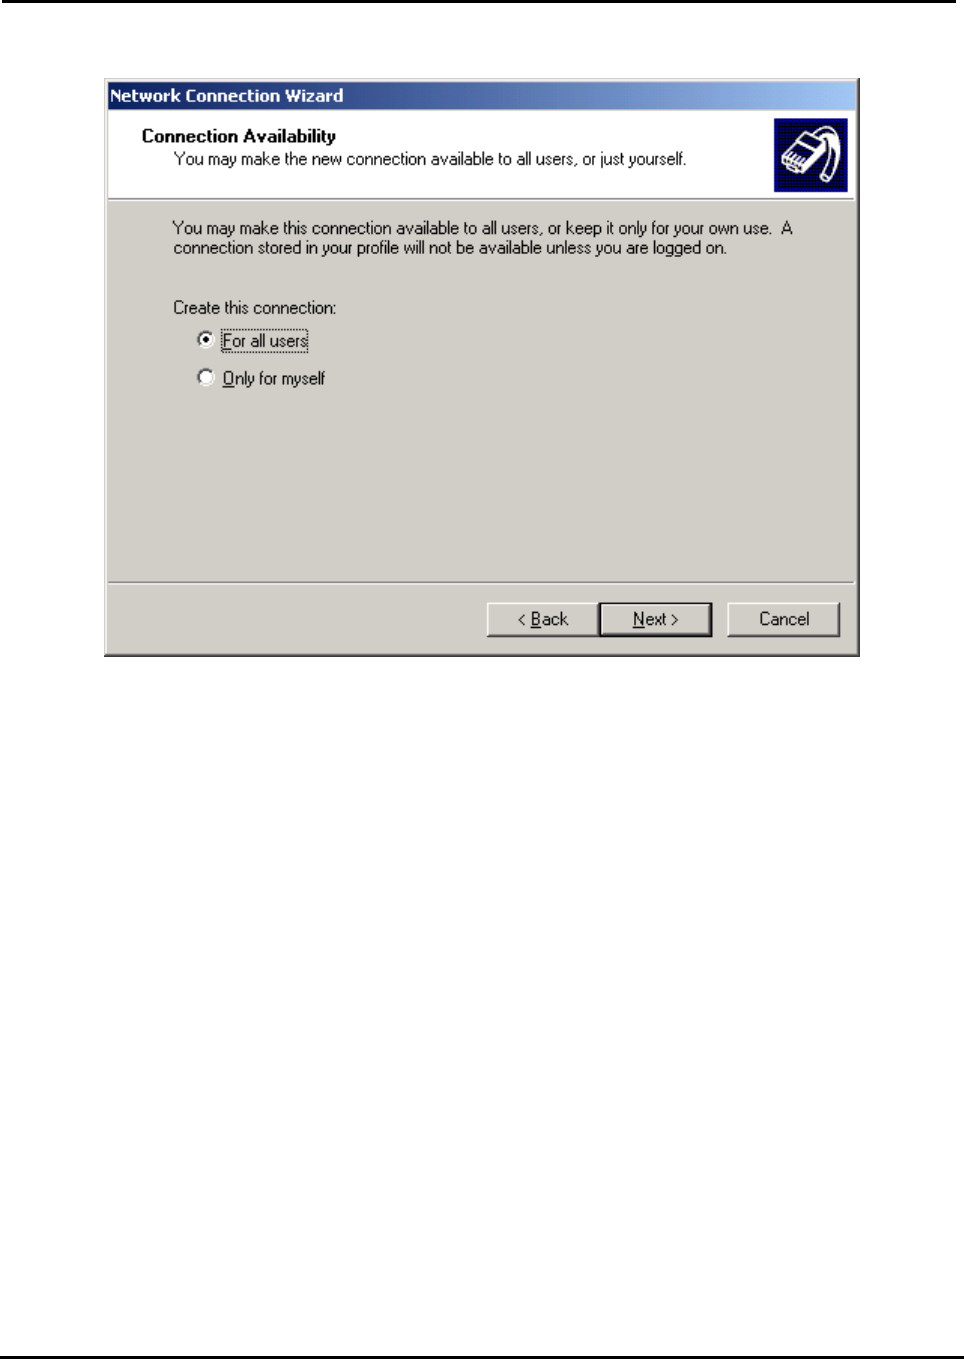
5. Check for all users (recommended) and click Next
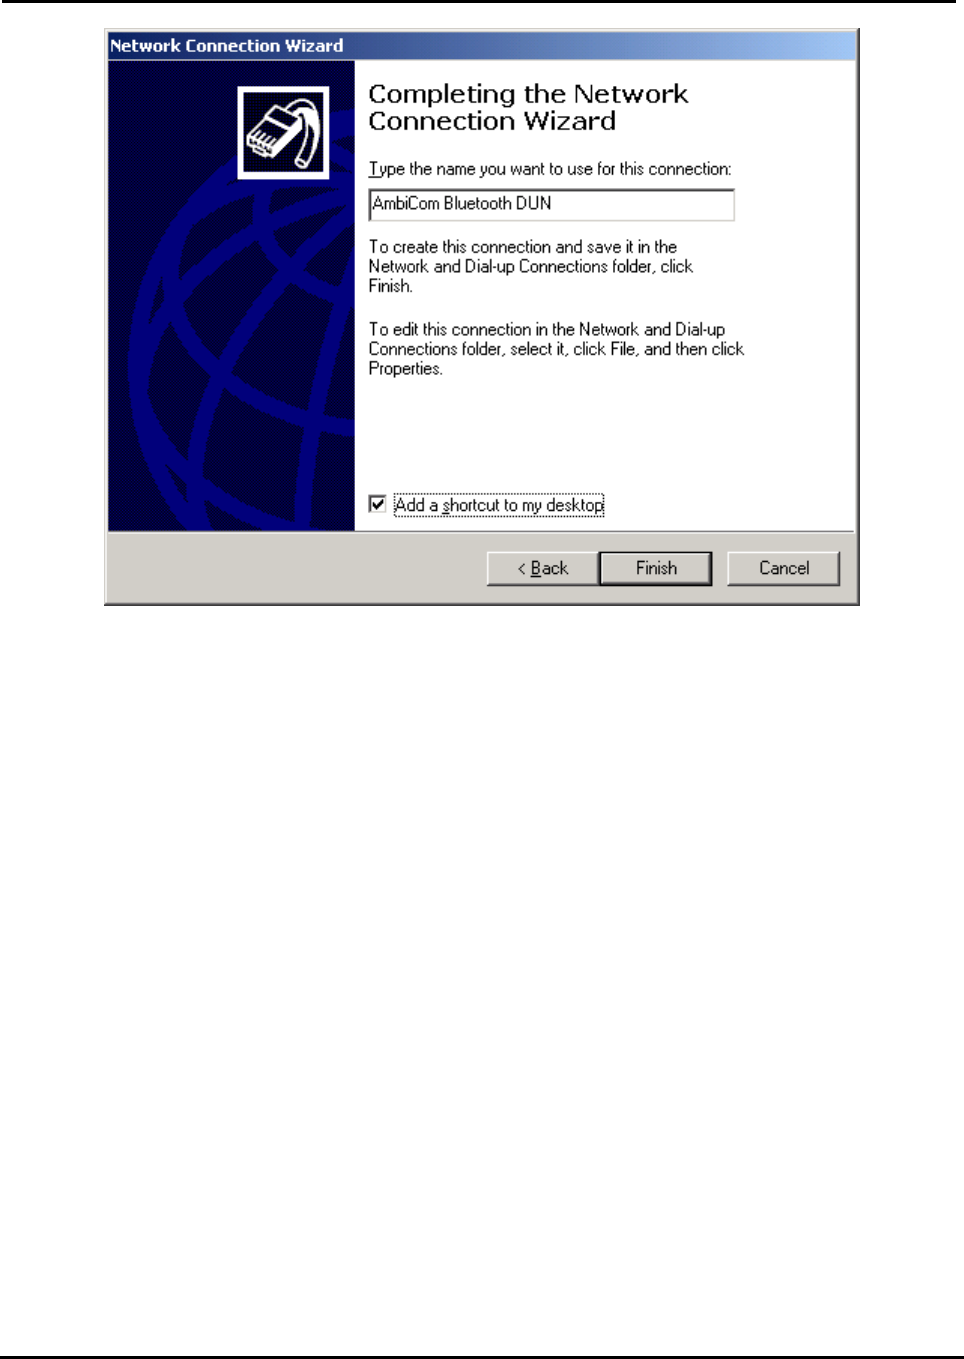
6. Create the name of the DUN Connection and check to add a shortcut to your desktop
(Recommended)
Air2Net Bluetooth Wireless Solutions
User Manual for Windows 2000 Working at the speed of thought
AmbiCom, Inc Page 28 of 34 12/2/2002
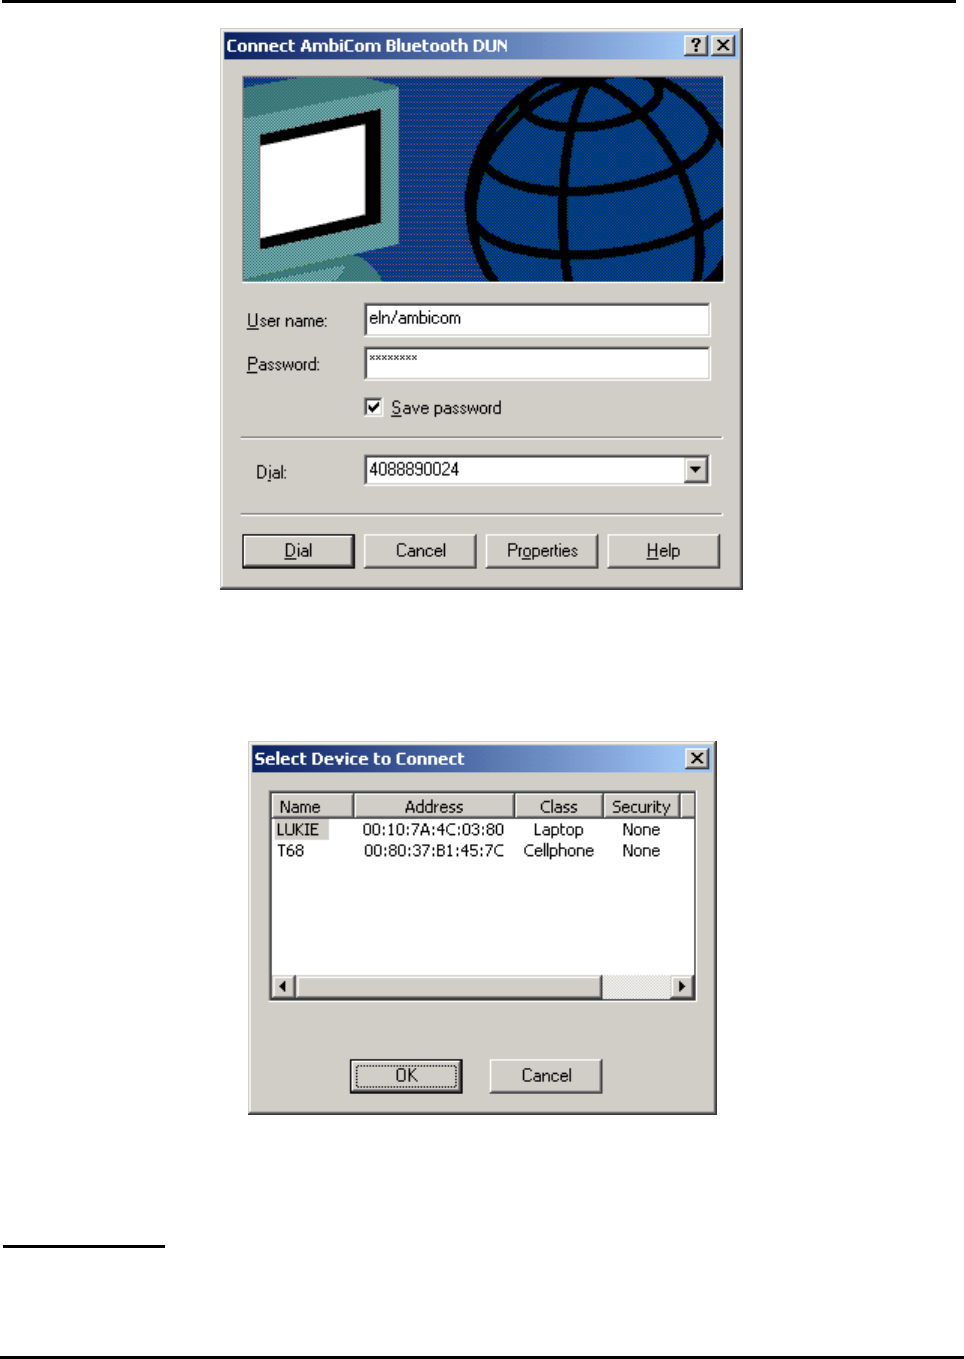
6. After you have created a new connection, you should run AmbiCom Bluetooth Neighborhood
application first. It will find the Bluetooth devices within the range. If you find devices such as
Bluetooth phone/modem or Dial-Up Networking Access point, you can start the connection you
just created by click the AmbiCom Bluetooth DUN icon in your desktop, the system will show
the following window.
Air2Net Bluetooth Wireless Solutions
User Manual for Windows 2000 Working at the speed of thought
AmbiCom, Inc Page 29 of 34 12/2/2002
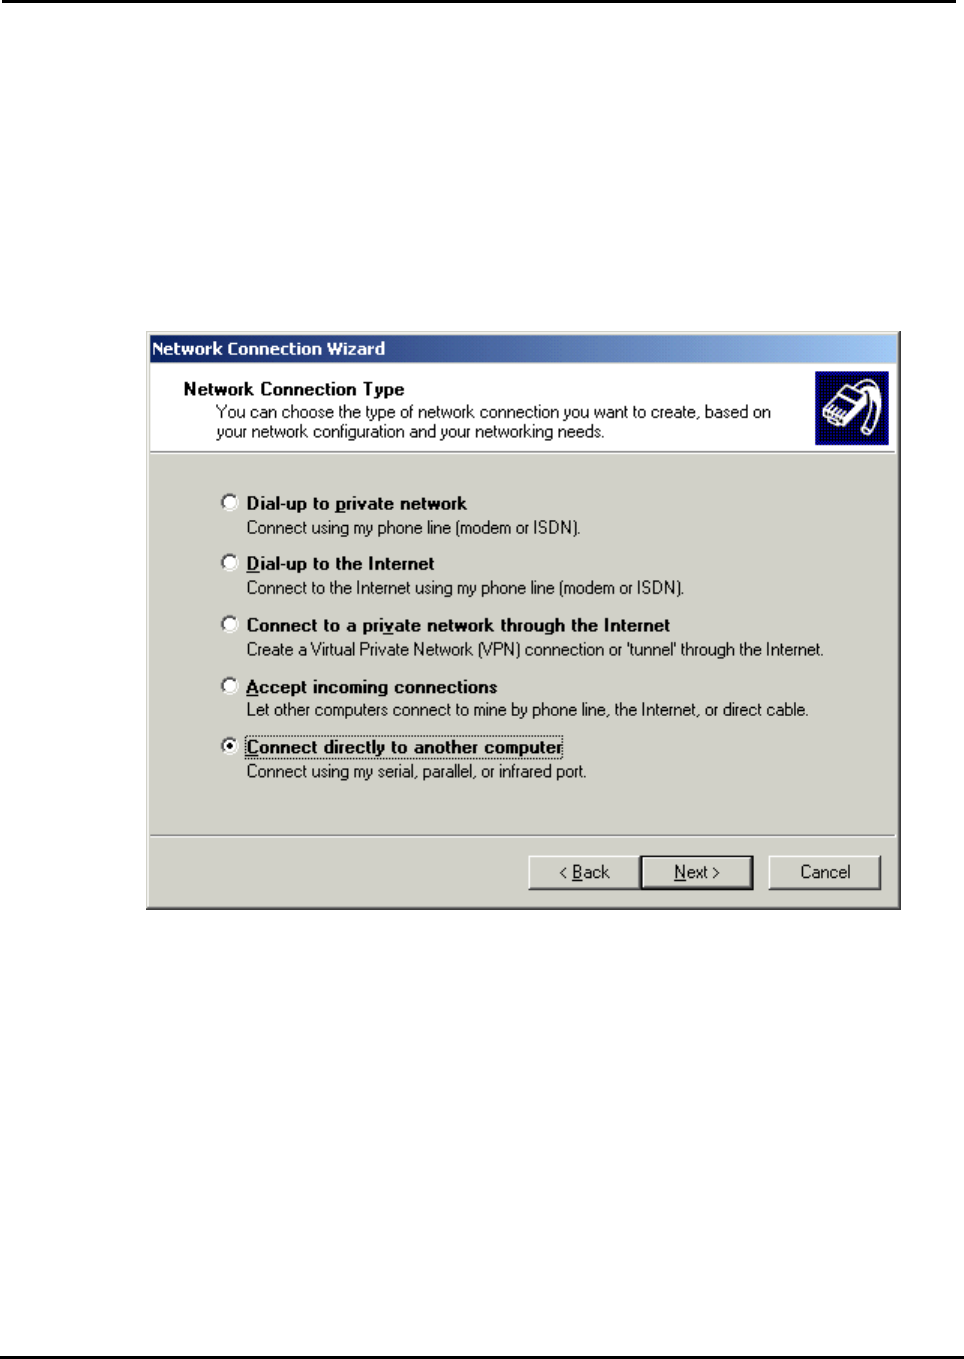
7. Click Dial and a window will appear for you to select the Phone, which Bluetooth device you
want to connect.
8. In the above window, select T68 (The Phone name) and click OK to dial to ISP.
LAN Access
Air2Net Bluetooth Wireless Solutions
User Manual for Windows 2000 Working at the speed of thought
AmbiCom, Inc Page 30 of 34 12/2/2002
For LAN Access, the setup is almost identical to Dial-Up Networking. You need to create a
Communications cable between two computers modem in your system. For details on how to
install this modem, please refer to the Installation Section. When you have the Communications
cable between two computers modem set up, please go to Network Connections to create a
new connection. It is not necessary to provide phone number, user name and password to make
the connection.
1. Go to Control Panel -> Network and Dial-up Connections, click Make new Connection, a New
Connection Wizard window will appear. Click Next and you will see the following window.
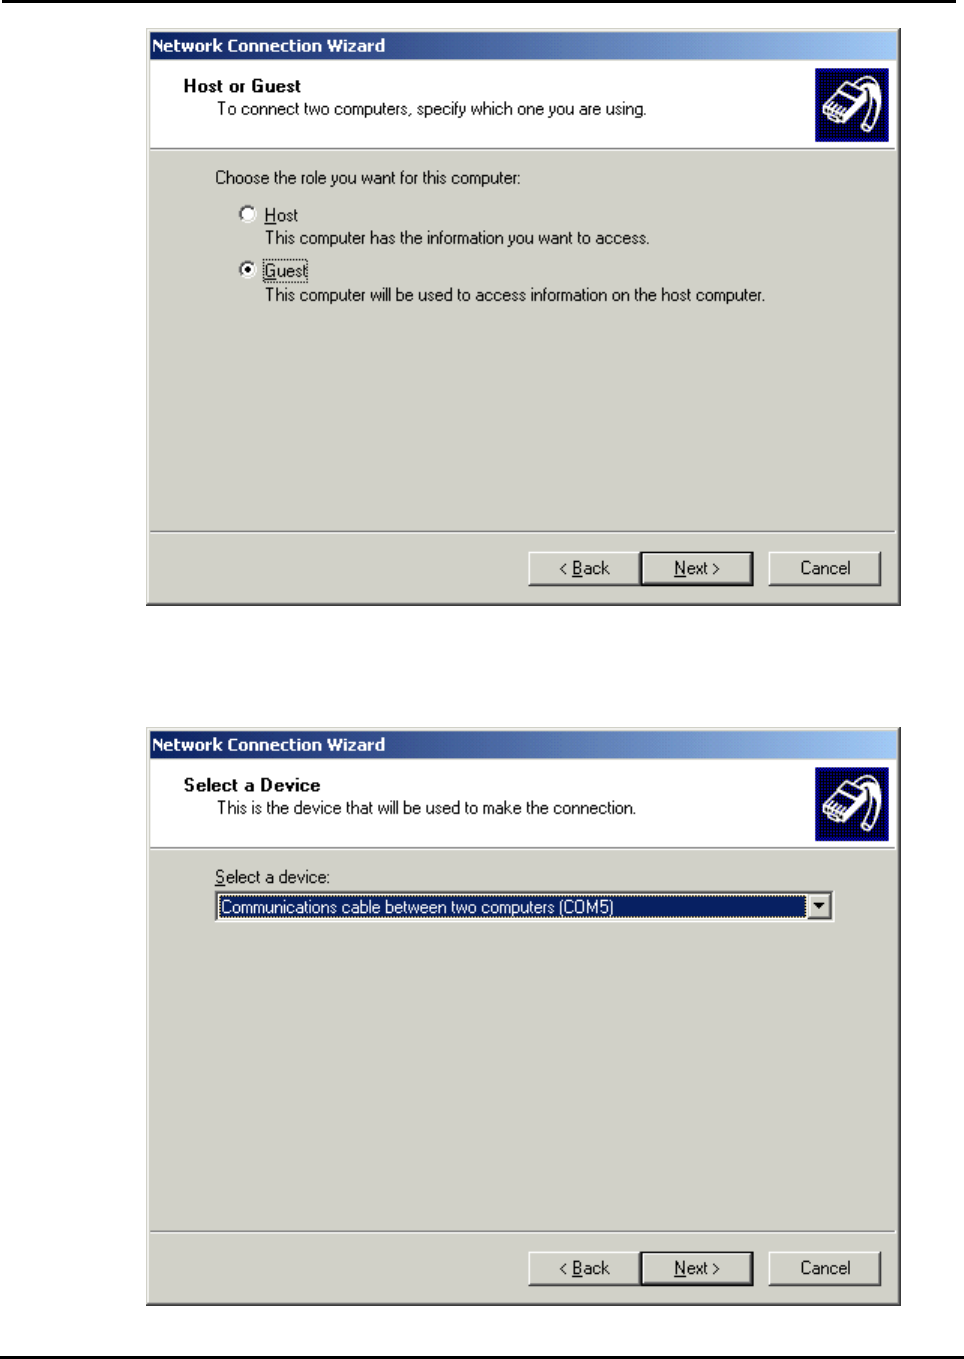
2. Select the Connect directly to another computer option and click Next to continue the
installation.
Air2Net Bluetooth Wireless Solutions
User Manual for Windows 2000 Working at the speed of thought
AmbiCom, Inc Page 31 of 34 12/2/2002
3. Select the Guest option and click Next to continue.
Air2Net Bluetooth Wireless Solutions
User Manual for Windows 2000 Working at the speed of thought
AmbiCom, Inc Page 32 of 34 12/2/2002
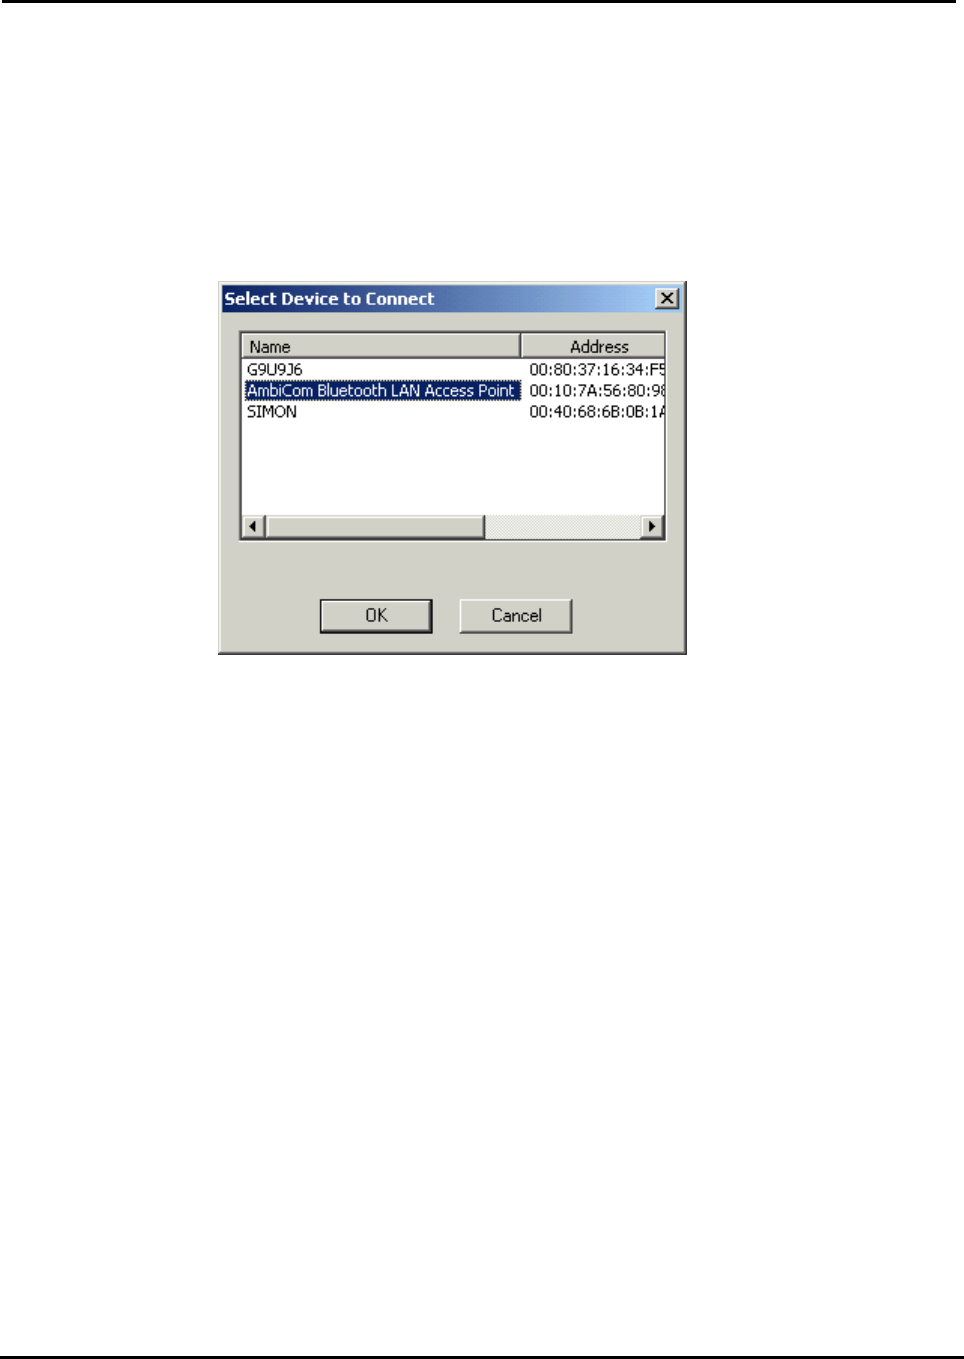
4. Select the Communications cable between two computers modem that you installed
earlier. If you haven’t installed that modem, please refer to the Installation section and follow
the on-screen instructions to complete the installation.
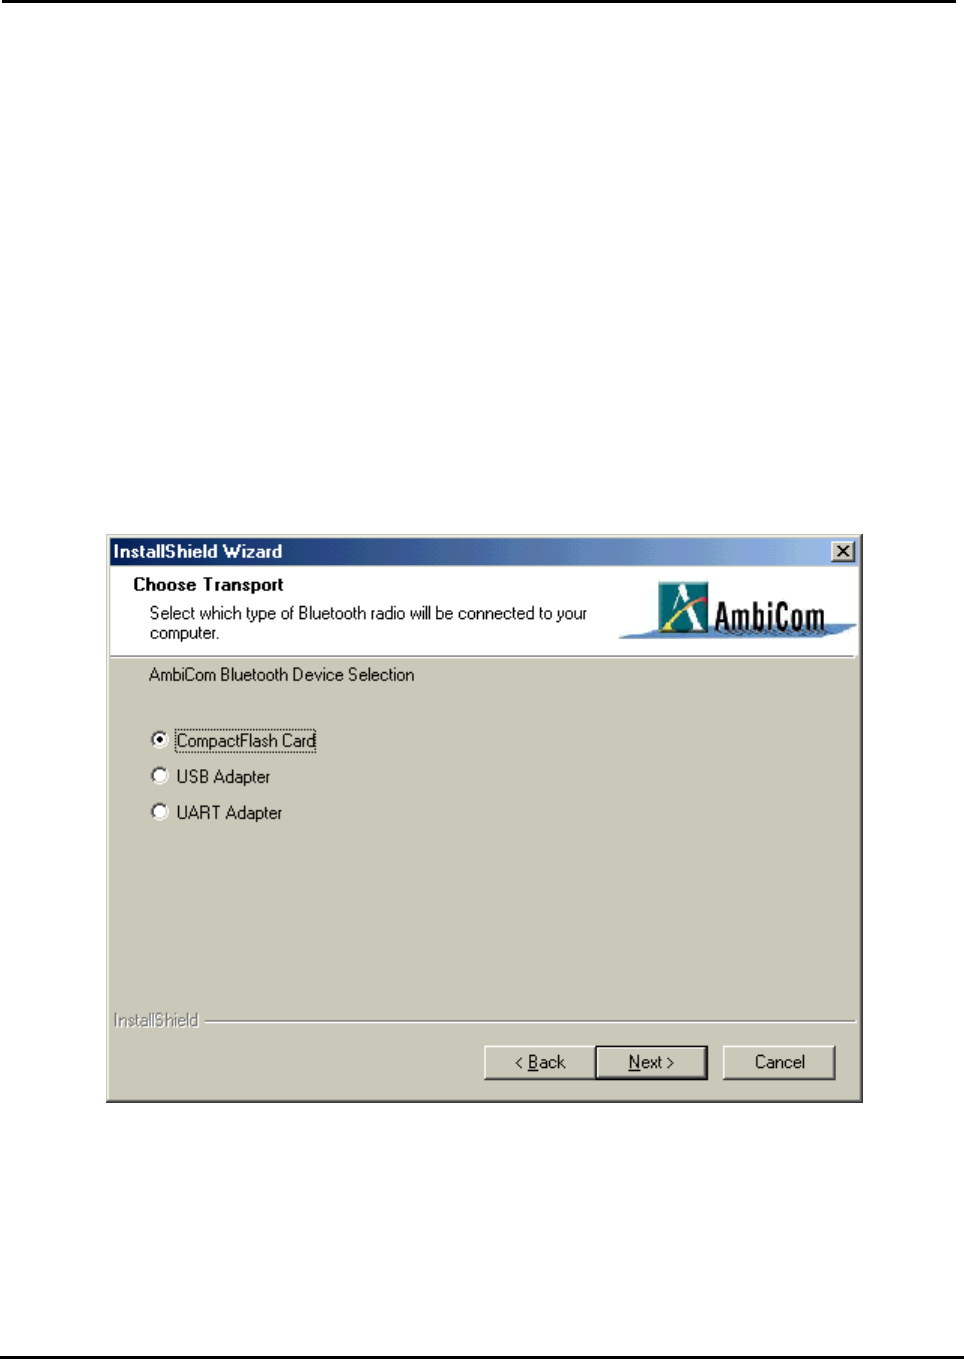
5. After you create a new connection, you should run AmbiCom Bluetooth Neighborhood
application first. It will find the Bluetooth devices within the range. If you find a device such as
the Bluetooth LAN Access point, you can start the connection you just created and the system
will show the following window.
6. In the above window, select AmbiCom Bluetooth LAN Access Point and click OK to
make an Internet connection.

Air2Net Bluetooth Wireless Solutions
User Manual for Windows 2000 Working at the speed of thought
AmbiCom, Inc Page 33 of 34 12/2/2002
Uninstall The AmbiCom Bluetooth Neighborhood
Please click Start, go to Programs, find AmbiCom Bluetooth Neighborhood and select
Uninstall Bluetooth Neighborhood. Follow the on-screen instructions to complete the
uninstallation.

Air2Net Bluetooth Wireless Solutions
User Manual for Windows 2000 Working at the speed of thought
AmbiCom, Inc Page 34 of 34 12/2/2002
7. Technical Support
Please visit AmbiCom Web site http://www.ambicom.com for online technical support. If you wish
to speak to our support staff, please call 1-408-562-0168.

AmbiCom Bluetooth Solutions
User Manual for WinME
June 25, 2002

Air2Net Bluetooth Wireless Solutions
User Manual for Windows ME Working at the speed of thought
AmbiCom, Inc Page 1 of 26 6/25/2002
1. Introduction
This user manual covers the product features, release notes, installation procedures, and
operating procedures for AmbiCom’s Bluetooth applications.
Bluetooth wireless technology is a global standard for low-cost and low-power small form factors
to connect multiple devices such as computers, mobile phones, PDAs, printers, LAN and WANs to
each other. It provides fast and reliable digital transmission of both voice and data over 2.4GHz
ISM open band. AmbiCom’s Bluetooth wireless technology offers the following features:
• Cable Replacement
Establishes a wireless Personal Area Network with other Bluetooth devices within the
operating range, without the hassles of wiring and configuration.
• Ad-hoc Networking
Supports both data and voice between two or more devices wirelessly.
• Secure Wireless Connections
Built-in authentication, encryption and authorization applications ensure secure
information access and transmission.
• LAN and WAN Access Points
LAN and WAN access such as Web, email, E-commerce, and VPN.
2. Product Features
With AmbiCom’s Bluetooth CompactFalsh Card with PCMCIA adapter, USB Adapter or UART
Adapter and Bluetooth software, you can establish wireless connections between your computer
and other Bluetooth wireless devices. The features include:
• Device Discovery
• Name Discovery
• Service Discovery
• File Transfer
• Object Push for files, objects and business cards
• Blue Chat that allows users to instantly send and receive text messages
• Internet Access through Dial-Up Networking
• Connection to LAN through LAN Access Point
AmbiCom provides Bluetooth Neighborhood software application that integrates all of the above
features into one single application.
3. Release Notes
• We support Windows ME on this release
• This release supports the AmbiCom Bluetooth CompactFlash, USB Dongle, USB
Adapter, and UART Adapter.
• SIG 1.1 compliant Bluetooth protocol stack.
Air2Net Bluetooth Wireless Solutions
User Manual for Windows ME Working at the speed of thought
AmbiCom, Inc Page 2 of 26 6/25/2002
• We support Device Discovery, Name Discovery, Service Discovery, Pairing, Object
Push, File Transfer, Dial-Up and LAN access Networking in this release.
• Audio is not supported in this release.
• When two devices are performing Device Discovery at the same time, they will not
discover each other. Please do not run Bluetooth Neighborhood at the same time.
4. Installation Procedures for Windows ME
Important Notes: Make sure you have installed the Dcom 98.exe from Microsoft on your
WinME system before you install AmbiCom Bluetooth software.
1. Insert the AmbiCom Bluetooth Installation CD into your laptop CD-ROM drive.
2. Run AmbiCom Bluetooth Setup.exe and follow the on-screen instruction to install the
application program.
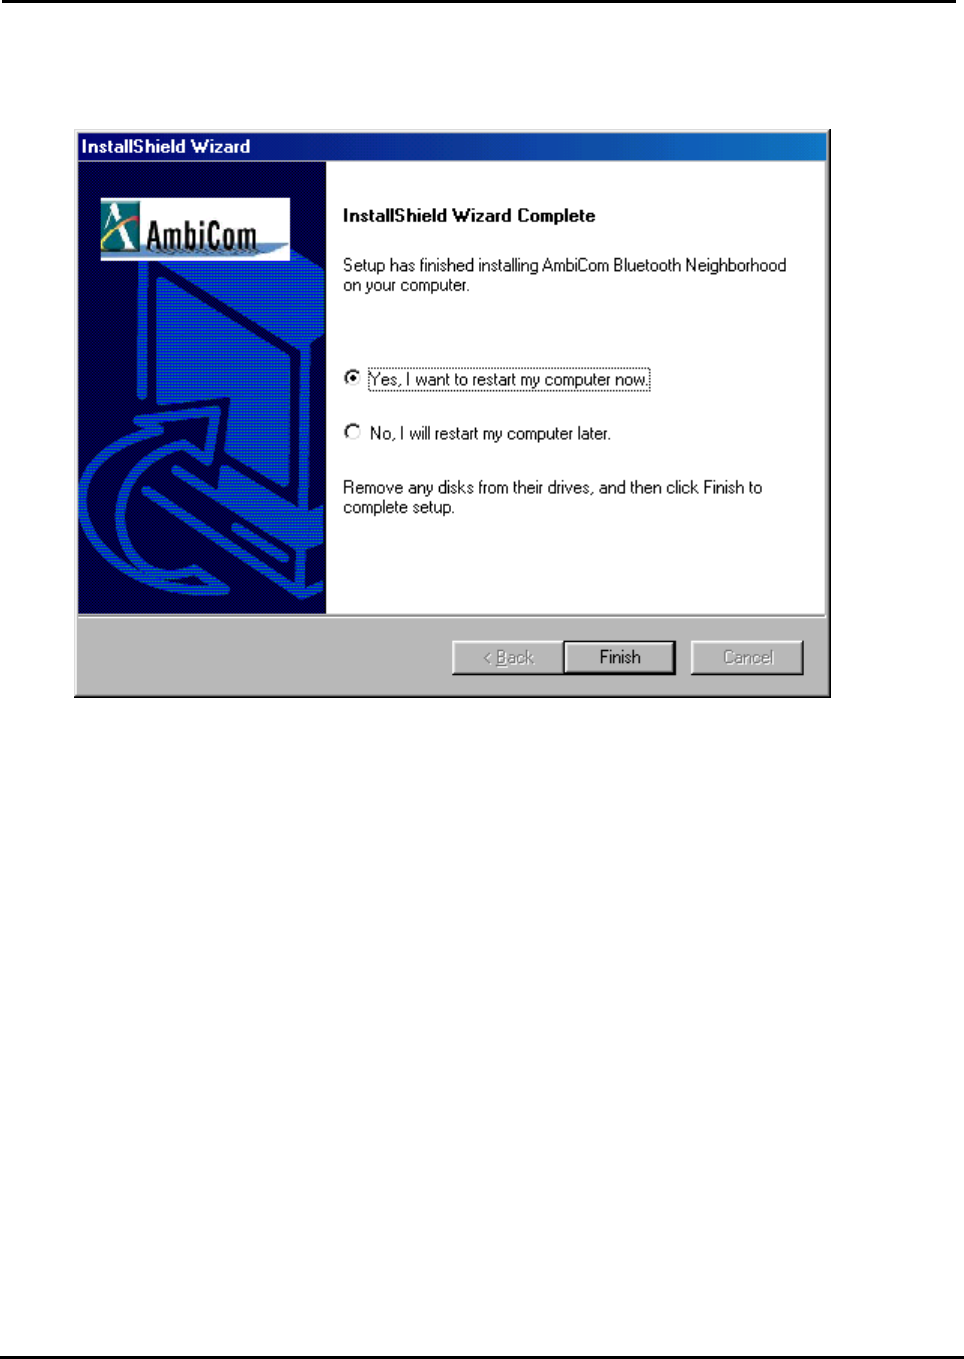
3. The following window will appear at the start of the installation process:
4. Choose the device you have and click Next to continue. Simply follow the on-screen
instructions. At the end of the installation, the system will show several windows to install some
devices. This is because the system is installing some virtual devices for the software to use.
Please be patient and wait until the system finishes.
Air2Net Bluetooth Wireless Solutions
User Manual for Windows ME Working at the speed of thought
AmbiCom, Inc Page 3 of 26 6/25/2002
5. After the system is finished installing the virtual devices, please click Finish to reboot your
system.
6. After you have restarted your laptop, please connect your AmbiCom Bluetooth
CompactFlash, USB or UART Adapter to your laptop. The system will automatically install
the driver for you. After the system installed the driver you need reboot your system. Now you
are ready to execute Object Push, File Transfer and Blue Chat by using Bluetooth
Neighborhood. Please see the section How to Run Bluetooth Neighborhood and skip the
following steps. If you want to use the Dial-up Networking and LAN Access, please observe
the following steps.
Air2Net Bluetooth Wireless Solutions
User Manual for Windows ME Working at the speed of thought
AmbiCom, Inc Page 4 of 26 6/25/2002
Installation Procedures for Dial-Up Networking
If you have a Bluetooth phone/modem, we recommend that you continue installing the
corresponding components.
Note:
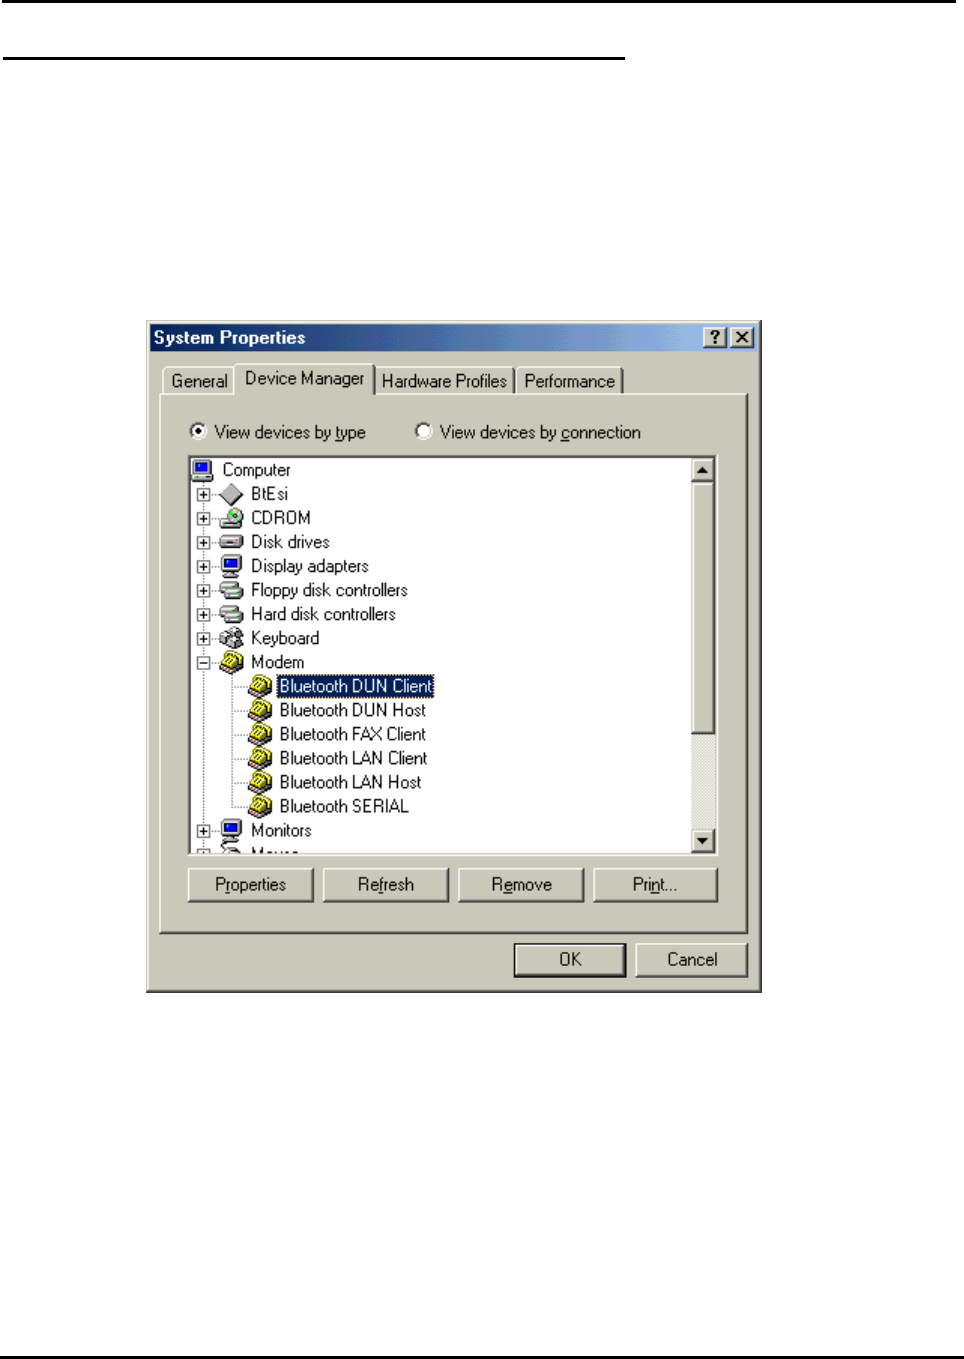
During the software installation, you will see several modems installed in your system. You
can go to Device Manager, click Modem to view all the modems. For Dial-Up and LAN
Access networking, we will use those modems to set up.
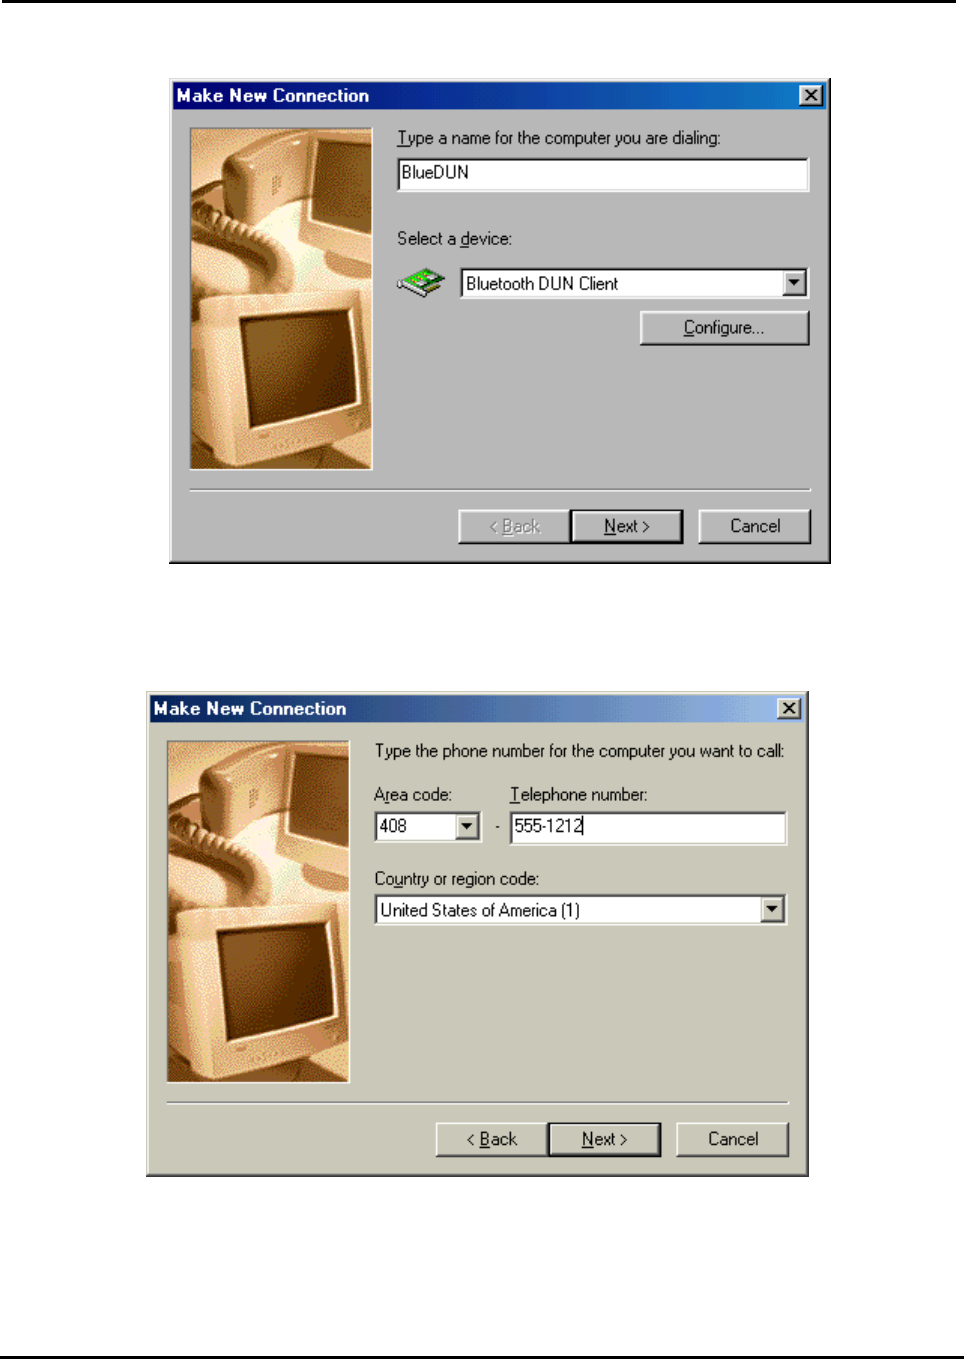
1. From Control Panel, go to Dial-up Networking and create a New Connection for Bluetooth
Dial-Up Networking. Following the on-screen instructions to set up a connection for the
Bluetooth Dial-up Networking. During the setup, the system will ask you to select a modem for
dial-up, please select the modem Bluetooth DUN Client. Click Next.
Air2Net Bluetooth Wireless Solutions
User Manual for Windows ME Working at the speed of thought
AmbiCom, Inc Page 5 of 26 6/25/2002
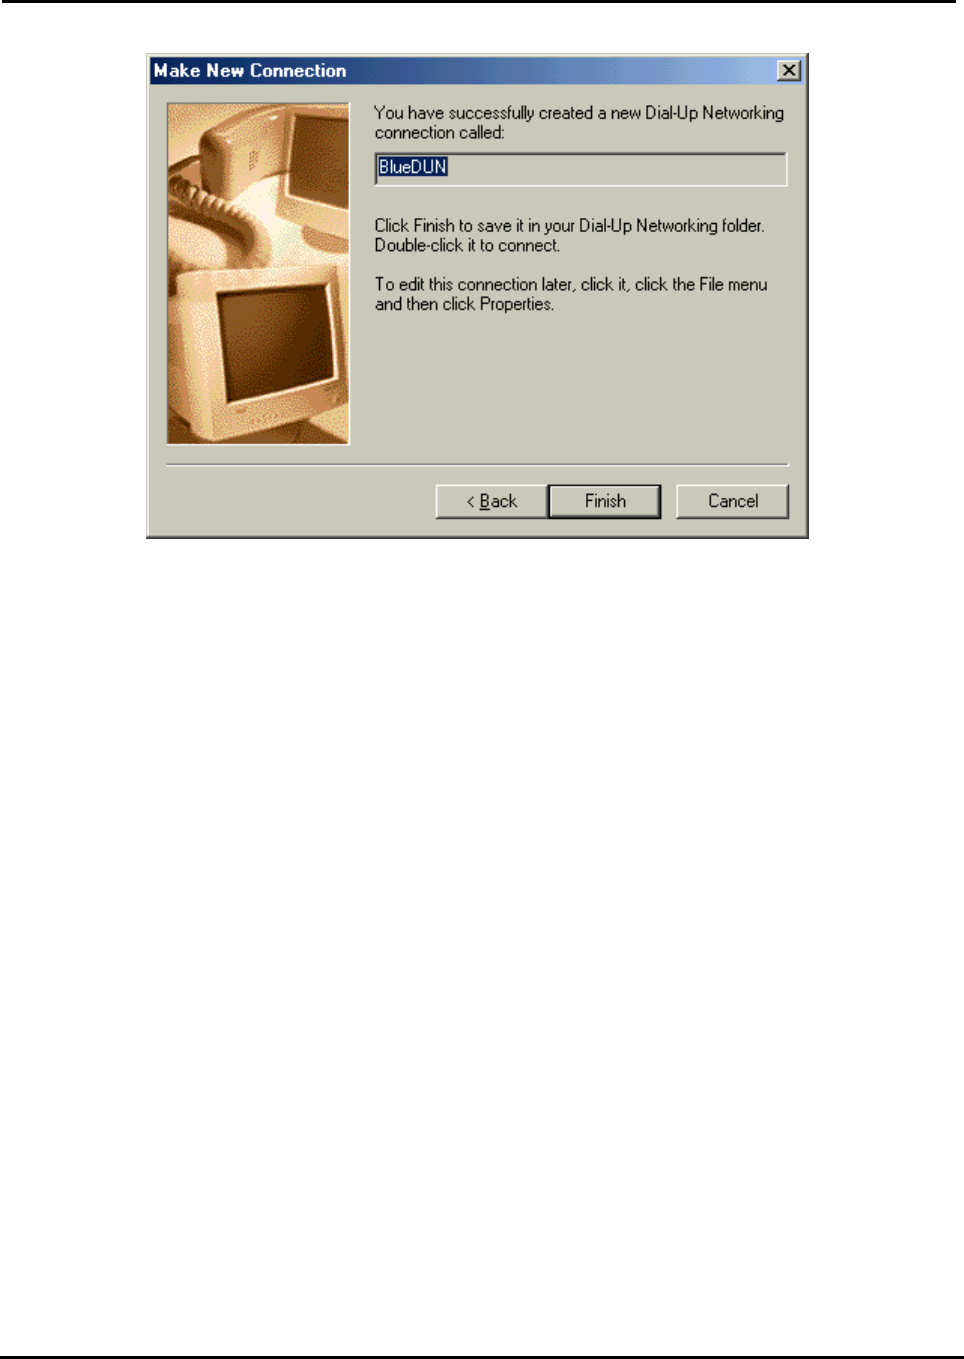
2. Click Next.
3. Click Next.
4. Click Finish.
Air2Net Bluetooth Wireless Solutions
User Manual for Windows ME Working at the speed of thought
AmbiCom, Inc Page 6 of 26 6/25/2002
Follow the on-screen instructions to complete the setup.
Air2Net Bluetooth Wireless Solutions
User Manual for Windows ME Working at the speed of thought
AmbiCom, Inc Page 7 of 26 6/25/2002
Installation Procedures for LAN Access
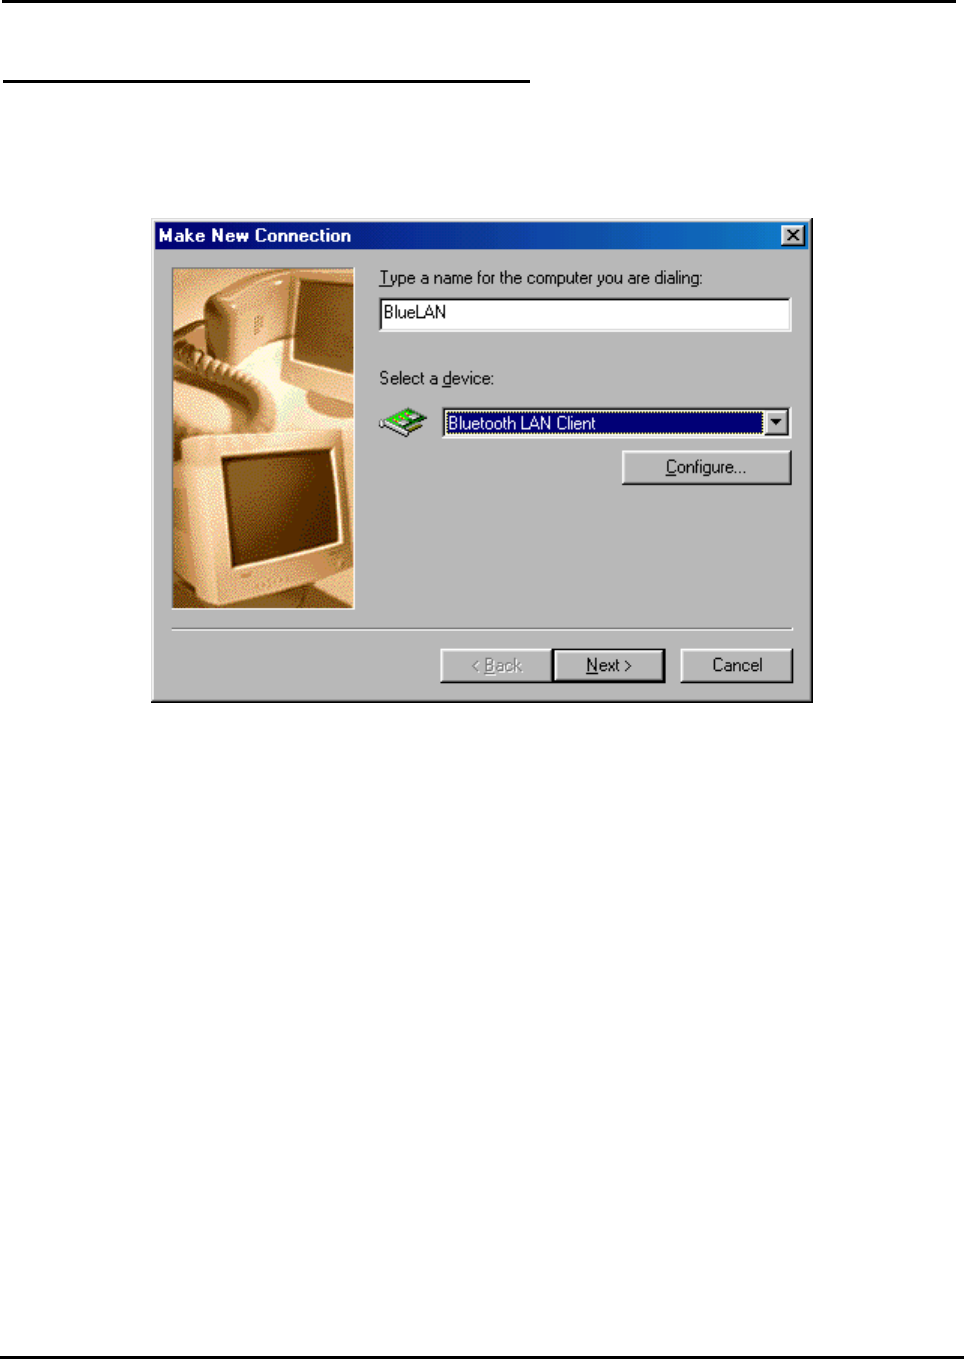
1. For LAN Access, the installation procedure is almost identical to Dial-Up networking. The
only difference is under Make New Connection where you should select Bluetooth LAN
Client.
Click Next to continue the installation.
Air2Net Bluetooth Wireless Solutions
User Manual for Windows ME Working at the speed of thought
AmbiCom, Inc Page 8 of 26 6/25/2002
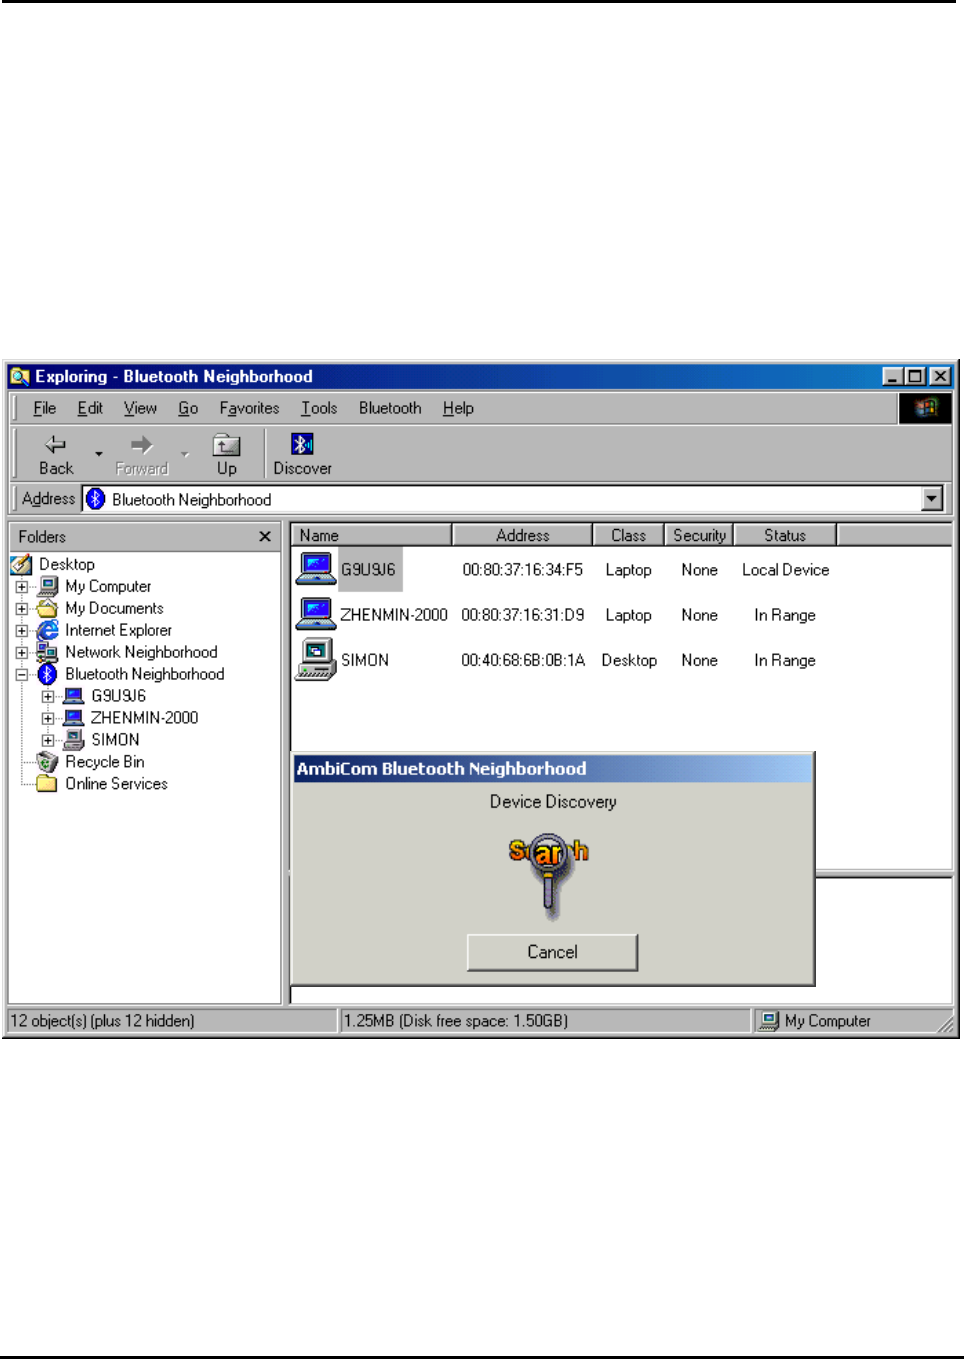
5. How to Run Bluetooth Neighborhood
1. You will find a Bluetooth Neighborhood shortcut on your Desktop.
2. Upon opening Windows Explorer, you will find the Bluetooth Neighborhood icon. Double-
click on it and Bluetooth Neighborhood will start to run. You can see a Bluetooth Neighborhood
GUI at the right-hand side of Windows Explorer. The Device Discovery window will appear
when it finds all the Bluetooth devices within the operating range. The discovery process
includes device discovery and name discovery.
Air2Net Bluetooth Wireless Solutions
User Manual for Windows ME Working at the speed of thought
AmbiCom, Inc Page 9 of 26 6/25/2002
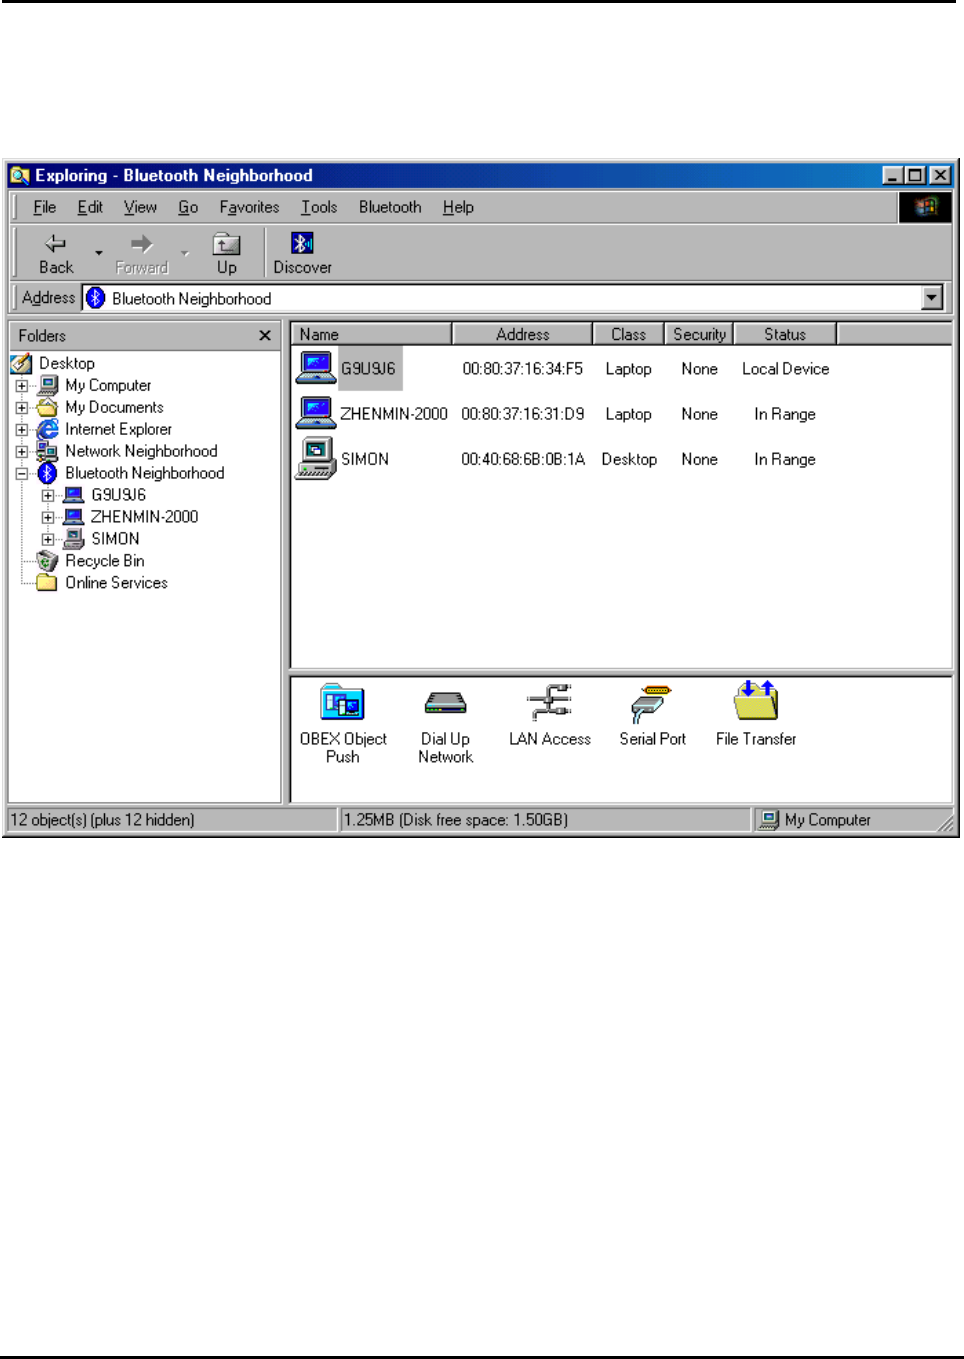
3. After finding the devices, you can click on one of the devices and its services and capabilities
will be listed. In the Device List Window (at the right of Windows Explorer), the first device is
always the local device.
Air2Net Bluetooth Wireless Solutions
User Manual for Windows ME Working at the speed of thought
AmbiCom, Inc Page 10 of 26 6/25/2002
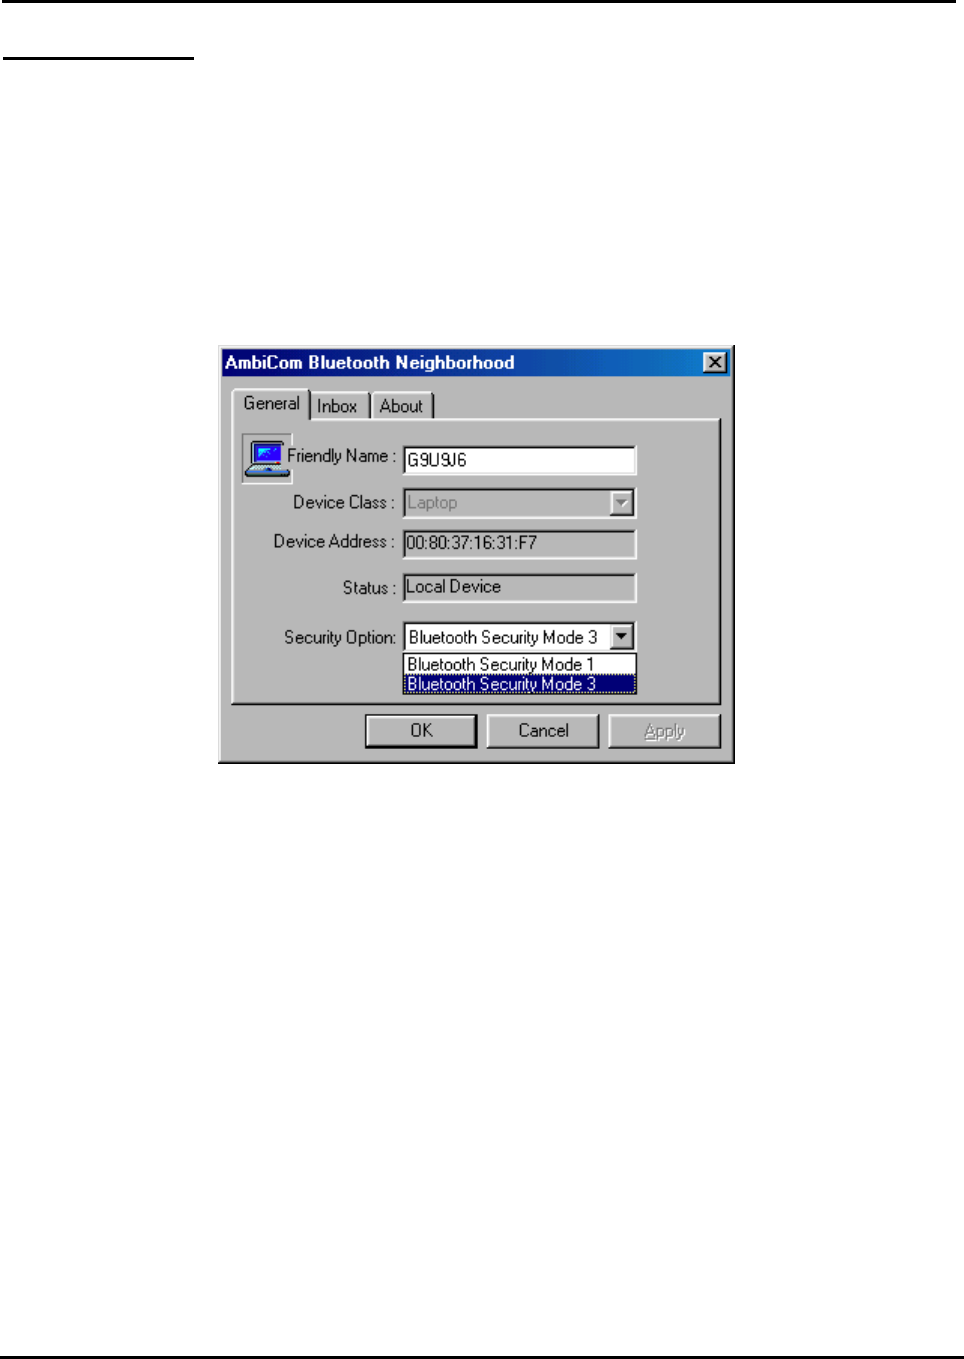
Security Mode
1. Our software provides two levels of security mode: security level 1 and security level 3. At
security level 3, a PIN code will be required when other Bluetooth enabled devices try to
connect with you. The PIN code entered needs to be the exact same one entered on both
machines. This will give you more security. If you set your PC in security level 1, PIN codes
will not be needed.
2. You can go to the Bluetooth Neighborhood to set the security level. Select the local device,
right-click on it and select Property. You will see the following window.
Air2Net Bluetooth Wireless Solutions
User Manual for Windows ME Working at the speed of thought
AmbiCom, Inc Page 11 of 26 6/25/2002
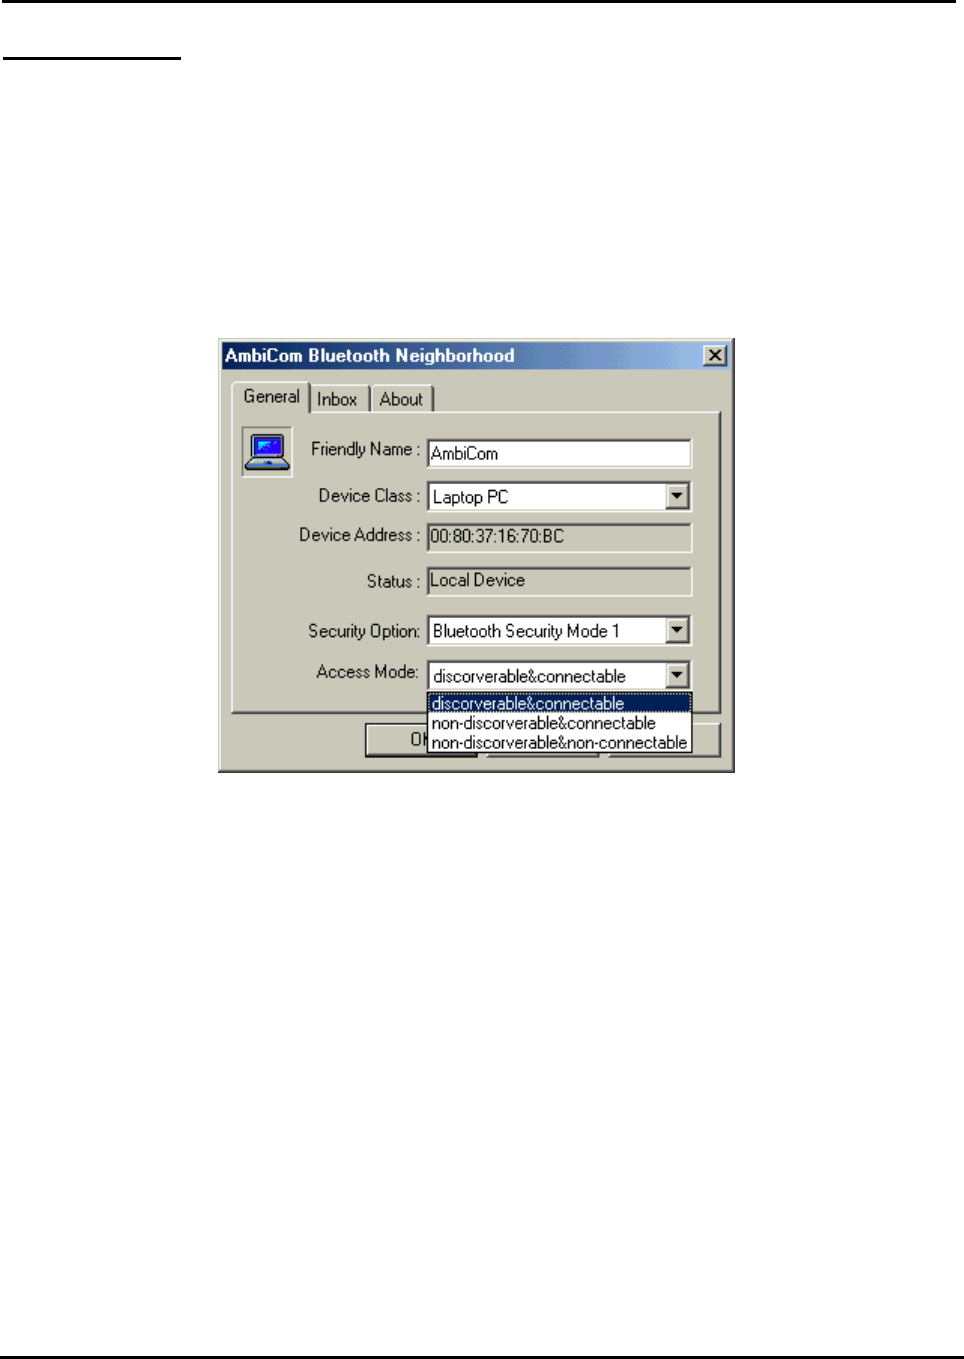
Access Mode
1. Our software provides three options of access mode: discoverable&connectable, non-
discoverable&connectable and non-discoverable&non-connectable. At the discoverable&
connectable mode, you will allow other Bluetooth enabled devices to find and connect to you.
At other two options, you will allow them to find you, but cannot connect to you. Or they cannot
find you nor connect to you.
2. You can go to the Bluetooth Neighborhood to set the Access mode. Select the local device,
right-click on it and select Property. You will see the following window.
Air2Net Bluetooth Wireless Solutions
User Manual for Windows ME Working at the speed of thought
AmbiCom, Inc Page 12 of 26 6/25/2002
Exchange vCards
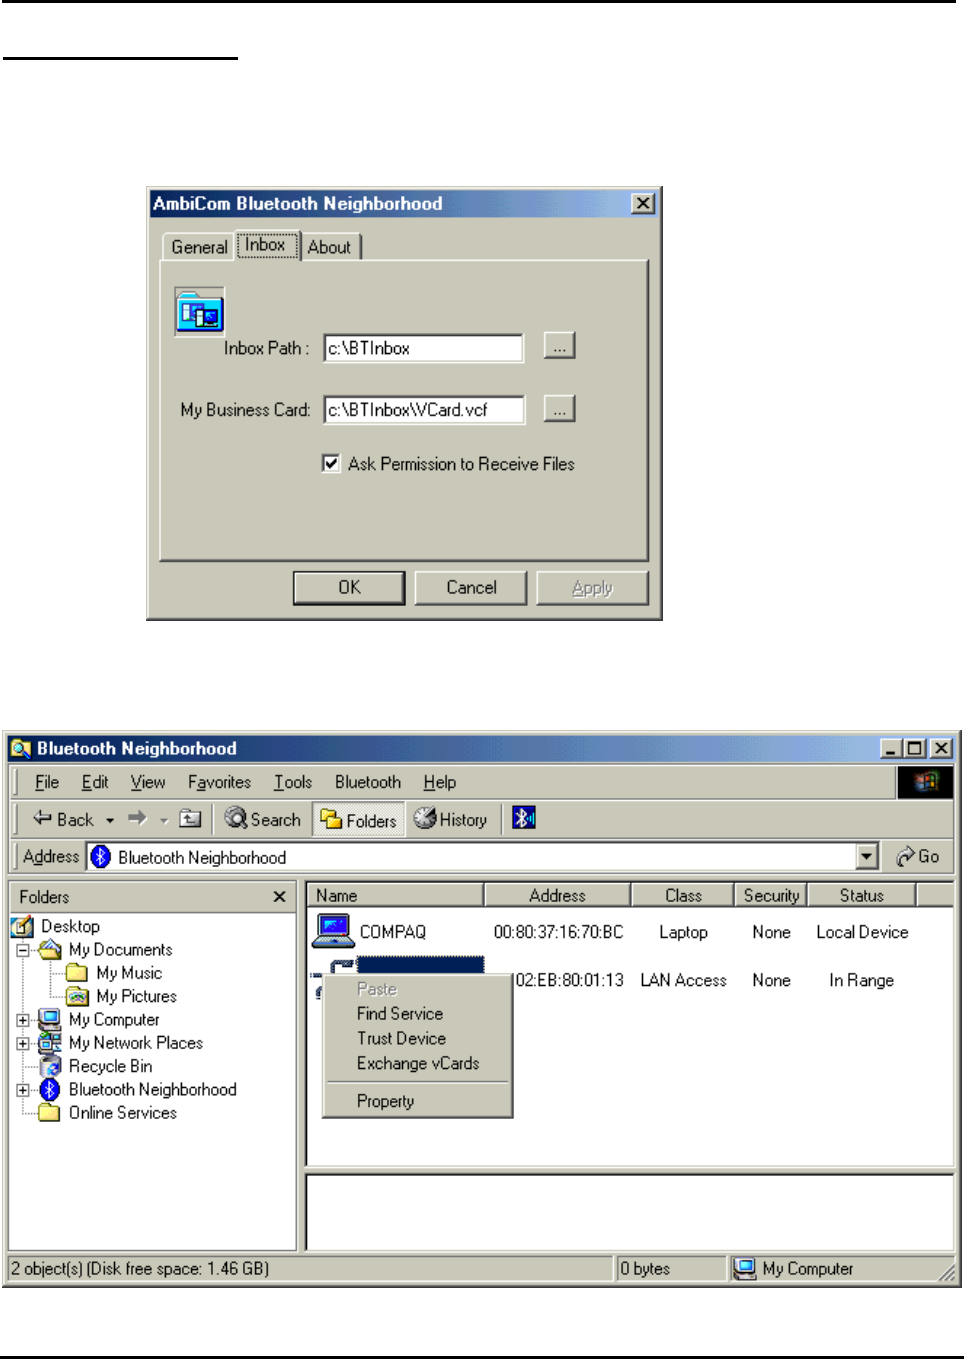
1. When you perform Exchange vCard, you need to go to the local device‘s Property to set up My
Business Card path first, as shown in the following window. The default path is
“C:\BTInbox”.
2. Now click the device that you want to exchange vCard with. You will see the following window.
Click Exchange vCards and you will send your business card to the device and vice versa.
Object Push
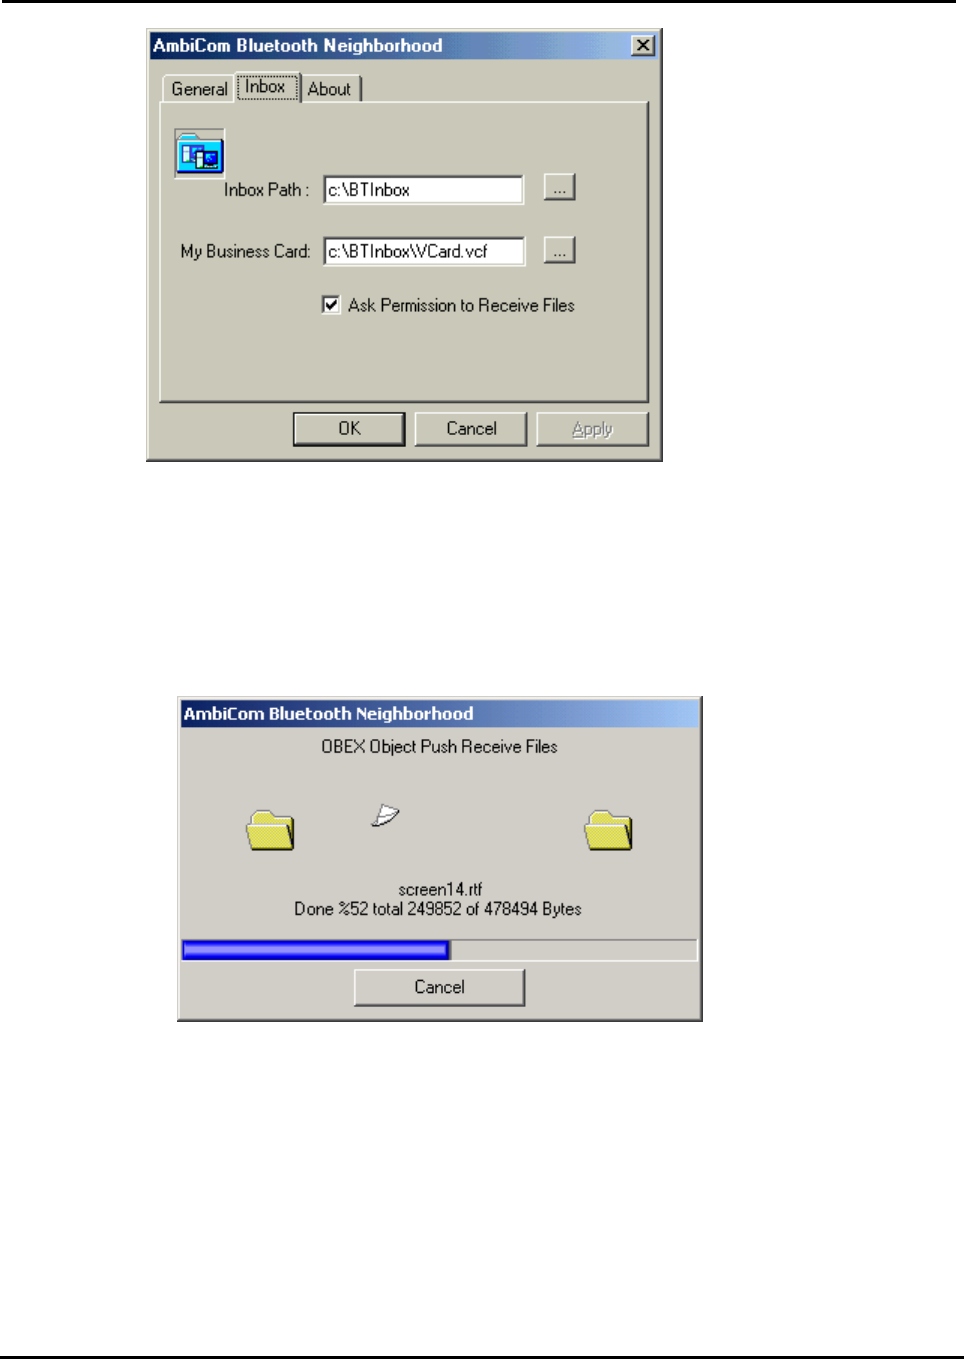
1. Before you perform Object push, Please set up your inbox path first. This directory will
save files that you receive. The default path is “C:\BTInbox”.
Air2Net Bluetooth Wireless Solutions
User Manual for Windows ME Working at the speed of thought
AmbiCom, Inc Page 13 of 26 6/25/2002
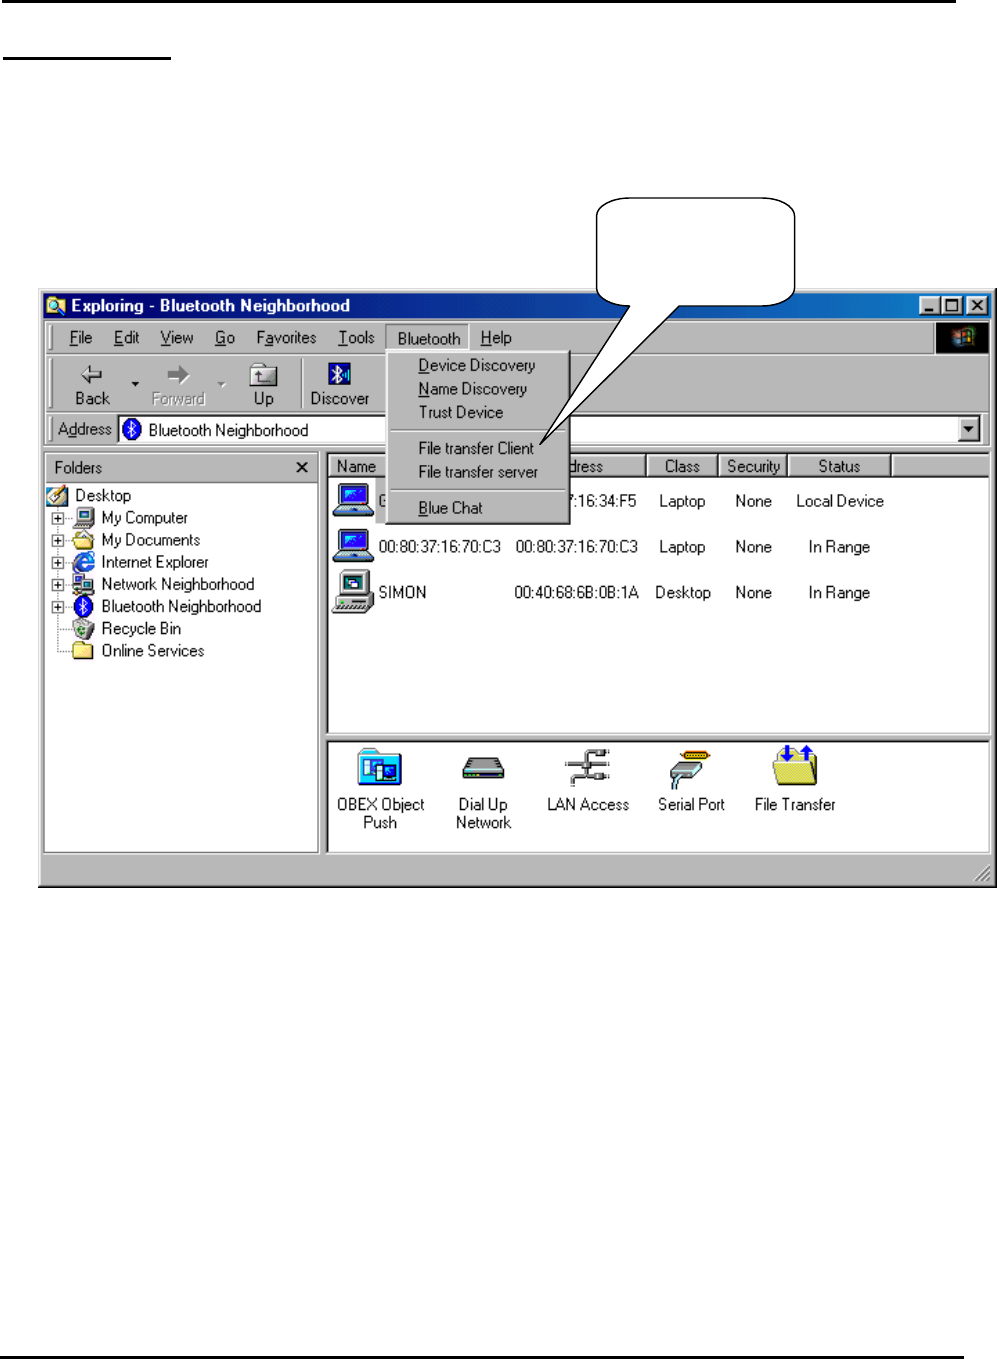
2. When you perform Object Push, simply Drag the file that you want to send, and Drop it to the
Bluetooth Device that you want to receive on the left-hand side in Windows Explorer. You also
can use Copy and Paste to do the object transfer between two Bluetooth devices. When you
perform Object Push, the dialog box will show you the status.
Air2Net Bluetooth Wireless Solutions
User Manual for Windows ME Working at the speed of thought
AmbiCom, Inc Page 14 of 26 6/25/2002
File Transfer
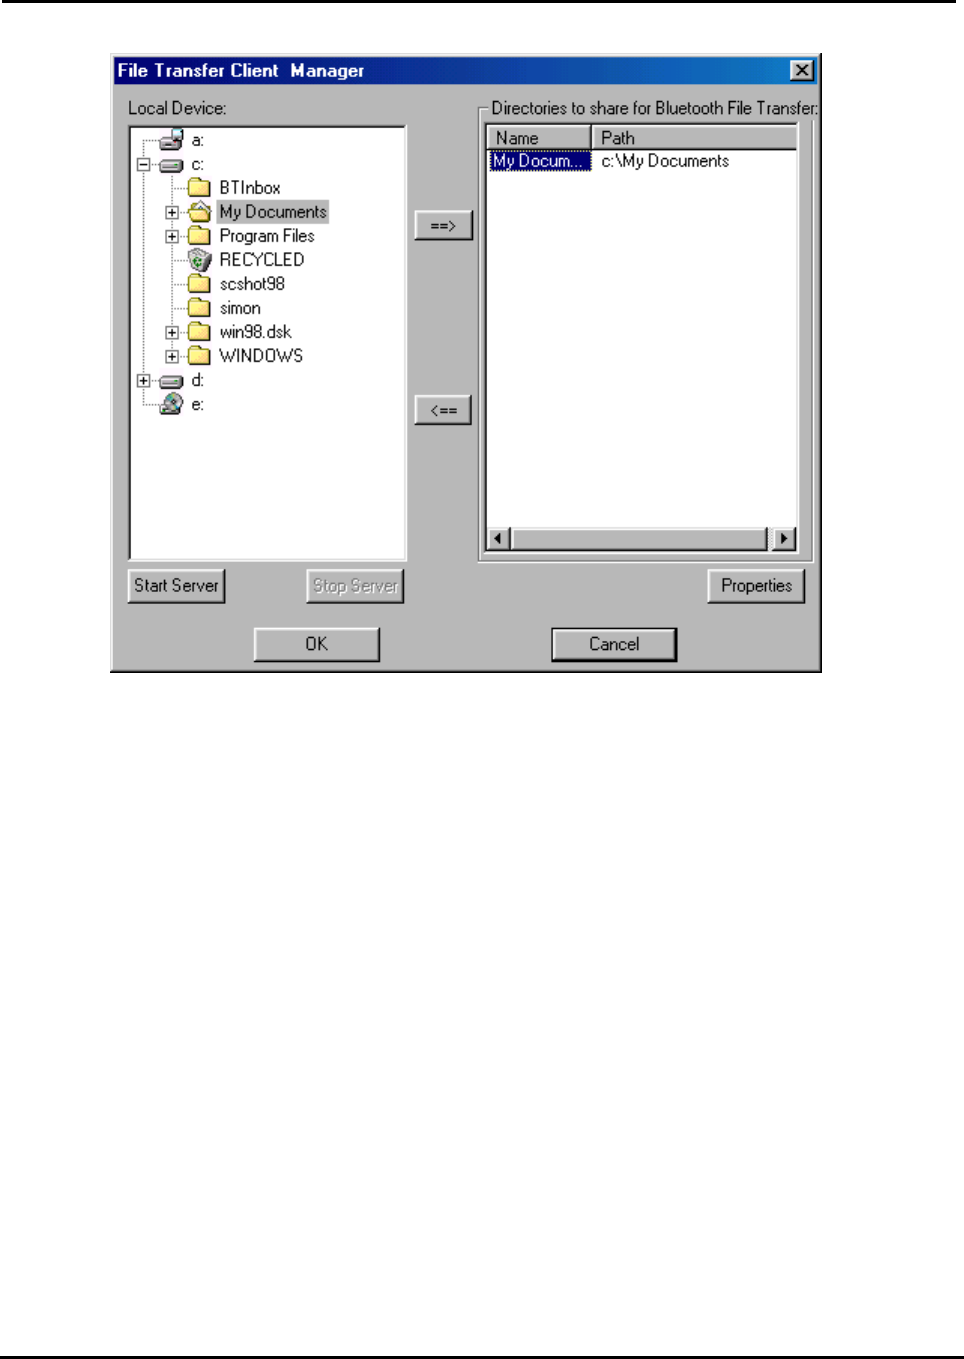
1. To execute File Transfer, open Windows Explorer, select “Bluetooth” on the menu bar and
click on File Transfer Client or File Transfer Server. To have File transfer working on both
ends, the application on the remote computer also needs to run File Transfer at the same time.
Click it to run
File Transfer
Client or Server
Air2Net Bluetooth Wireless Solutions
User Manual for Windows ME Working at the speed of thought
AmbiCom, Inc Page 15 of 26 6/25/2002
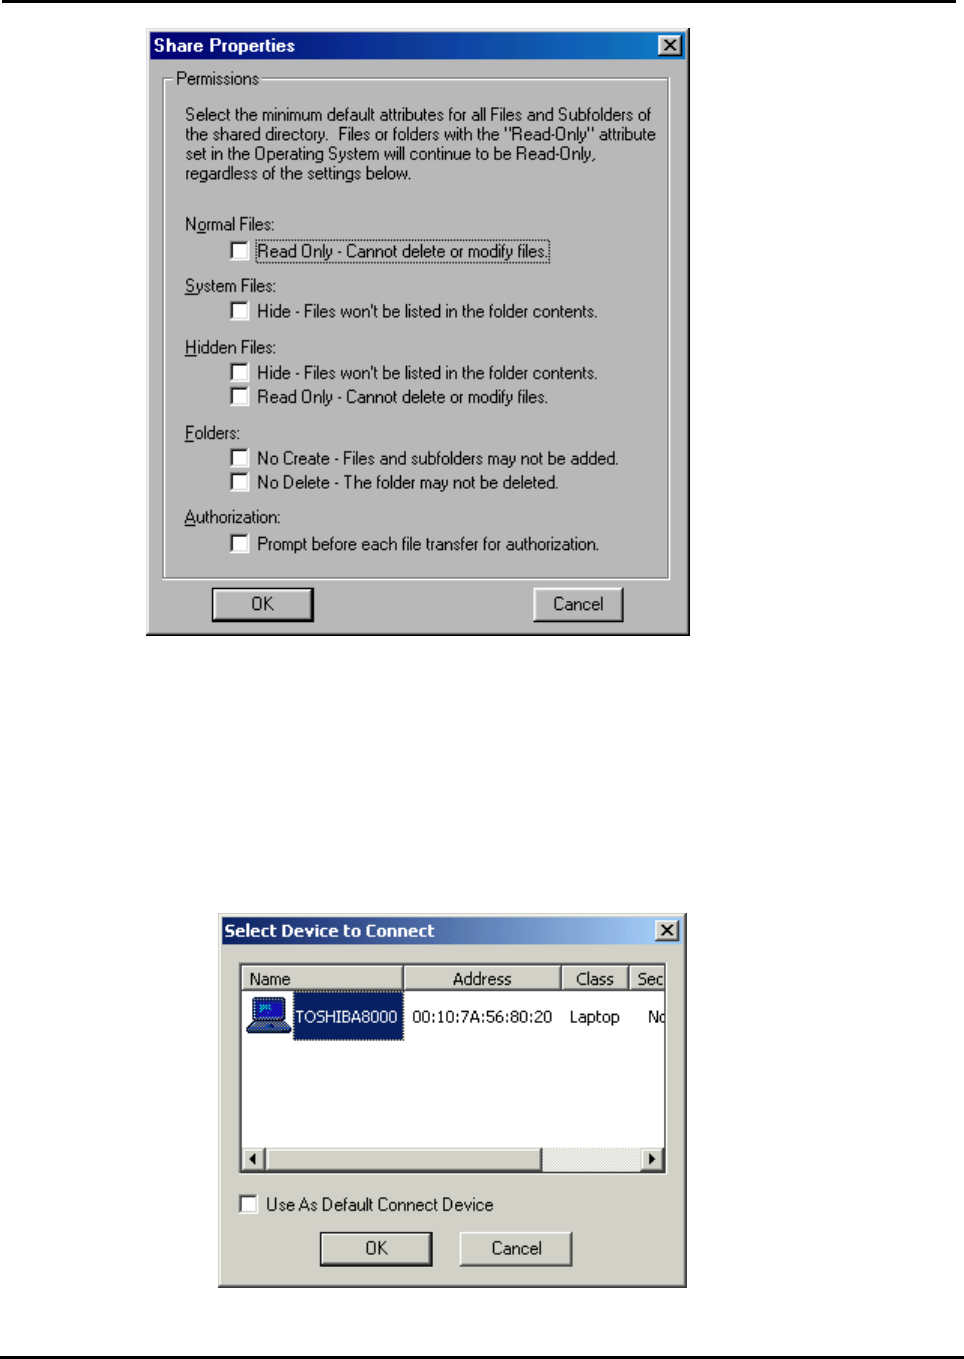
2. After you share the directory and files, you can select them and click the Properties button to
configure those directory or files.
Air2Net Bluetooth Wireless Solutions
User Manual for Windows ME Working at the speed of thought
AmbiCom, Inc Page 16 of 26 6/25/2002
In this window, you can define the attribute of the Directory or file that you shared, give the
permission for the File Transfer Client to use.
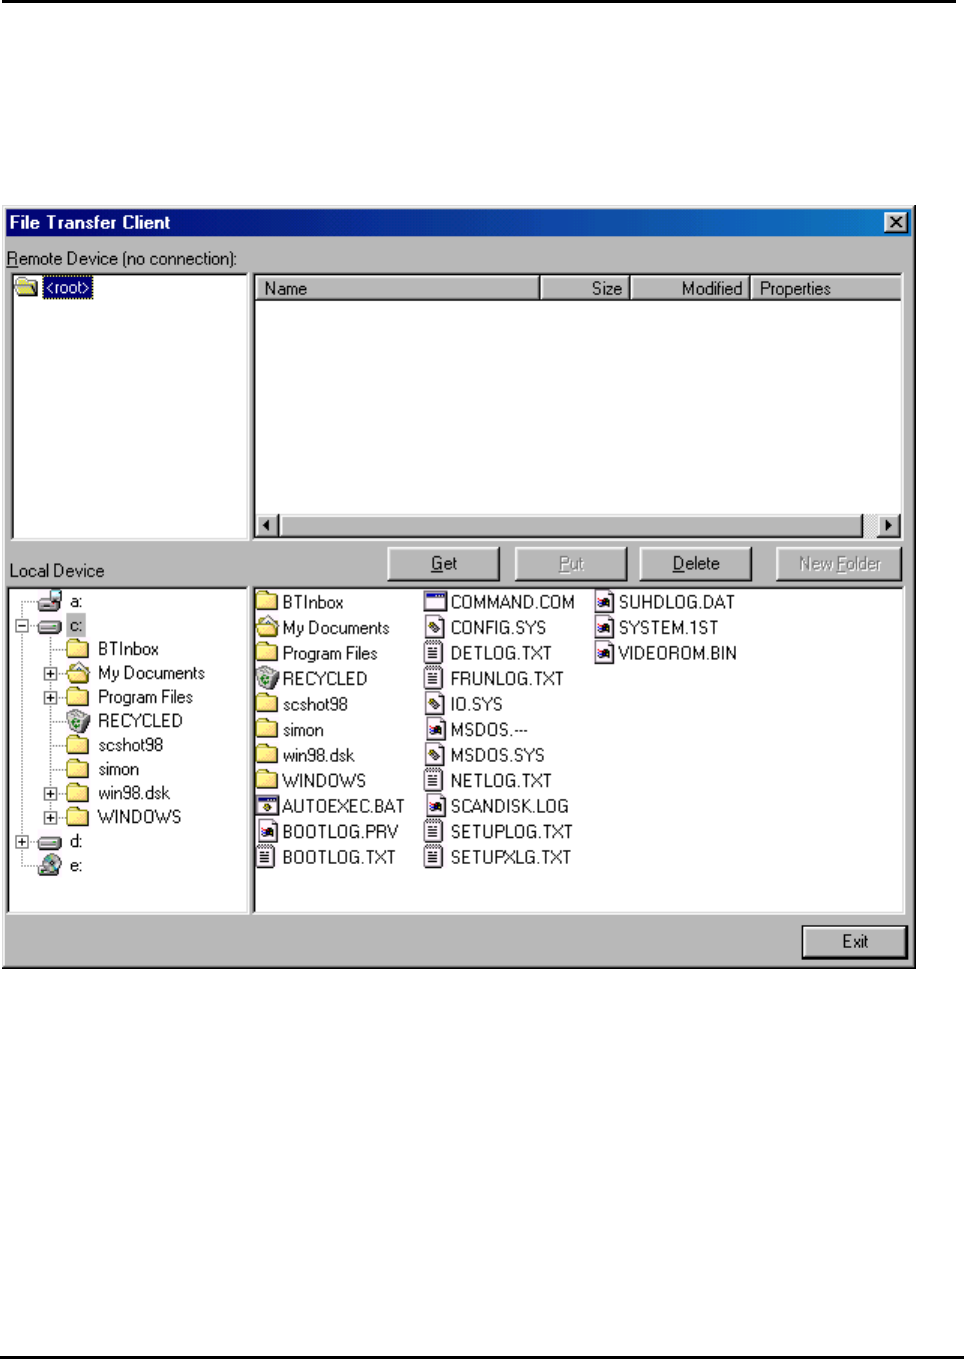
3. When you click on the File Transfer Client menu to run it, the system will show a Select
Device to Connect window for to chose which device you want to connect.
Air2Net Bluetooth Wireless Solutions
User Manual for Windows ME Working at the speed of thought
AmbiCom, Inc Page 17 of 26 6/25/2002
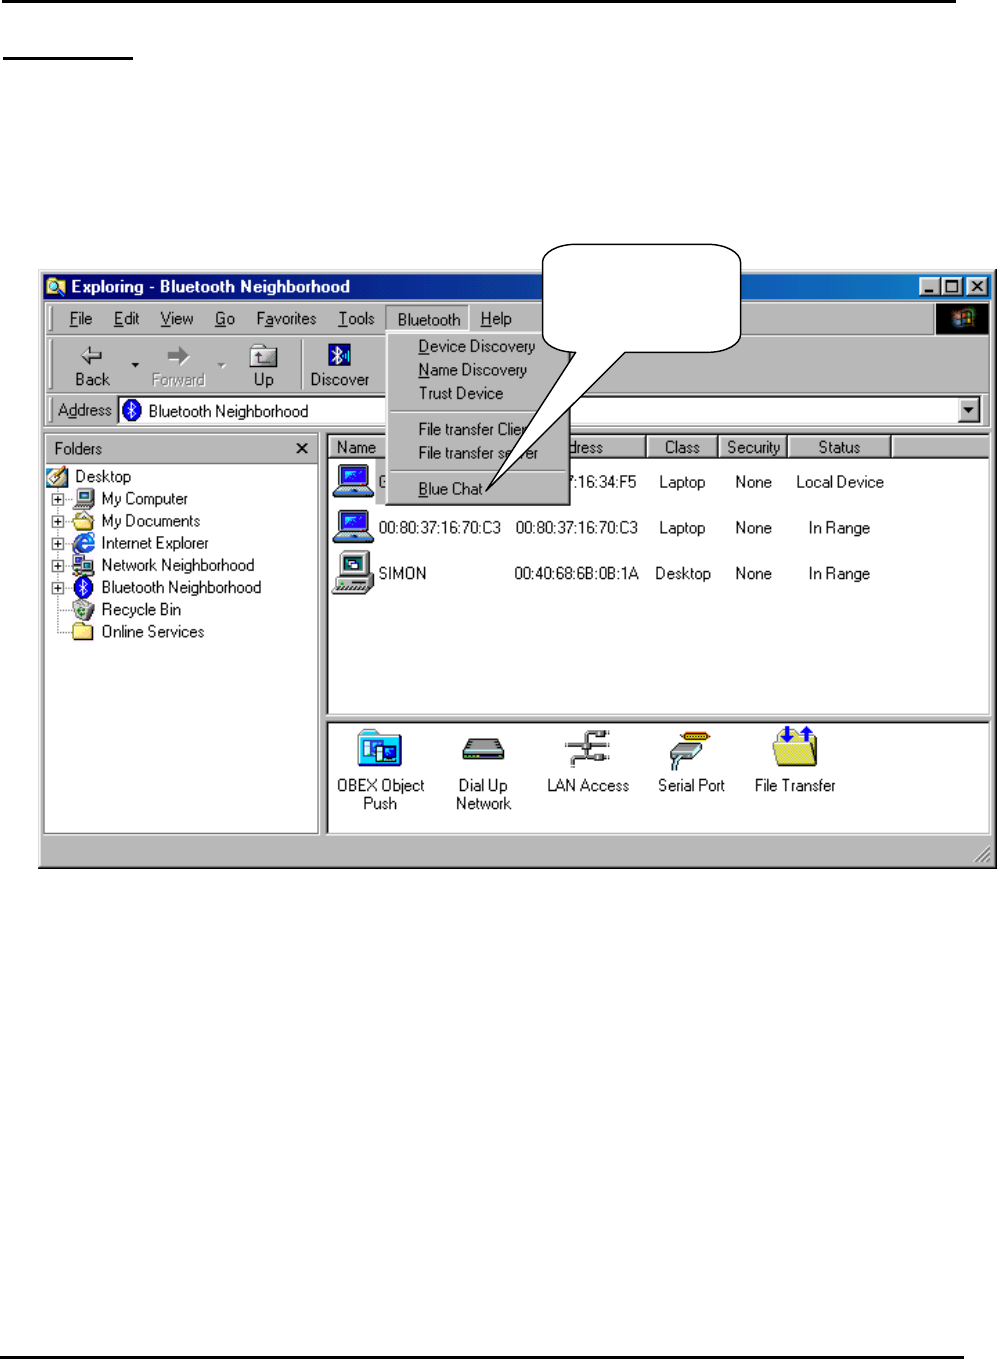
4. After you select the remote device that runs the File Transfer Server, the following window will
appear. You will see the directory and file shared by the File Transfer Server. You can get file
or directory from the File Transfer Server or place file or directory to the File Transfer Server.
Also, you can create new folder in the Shared Directory from File Transfer Server.
Air2Net Bluetooth Wireless Solutions
User Manual for Windows ME Working at the speed of thought
AmbiCom, Inc Page 18 of 26 6/25/2002
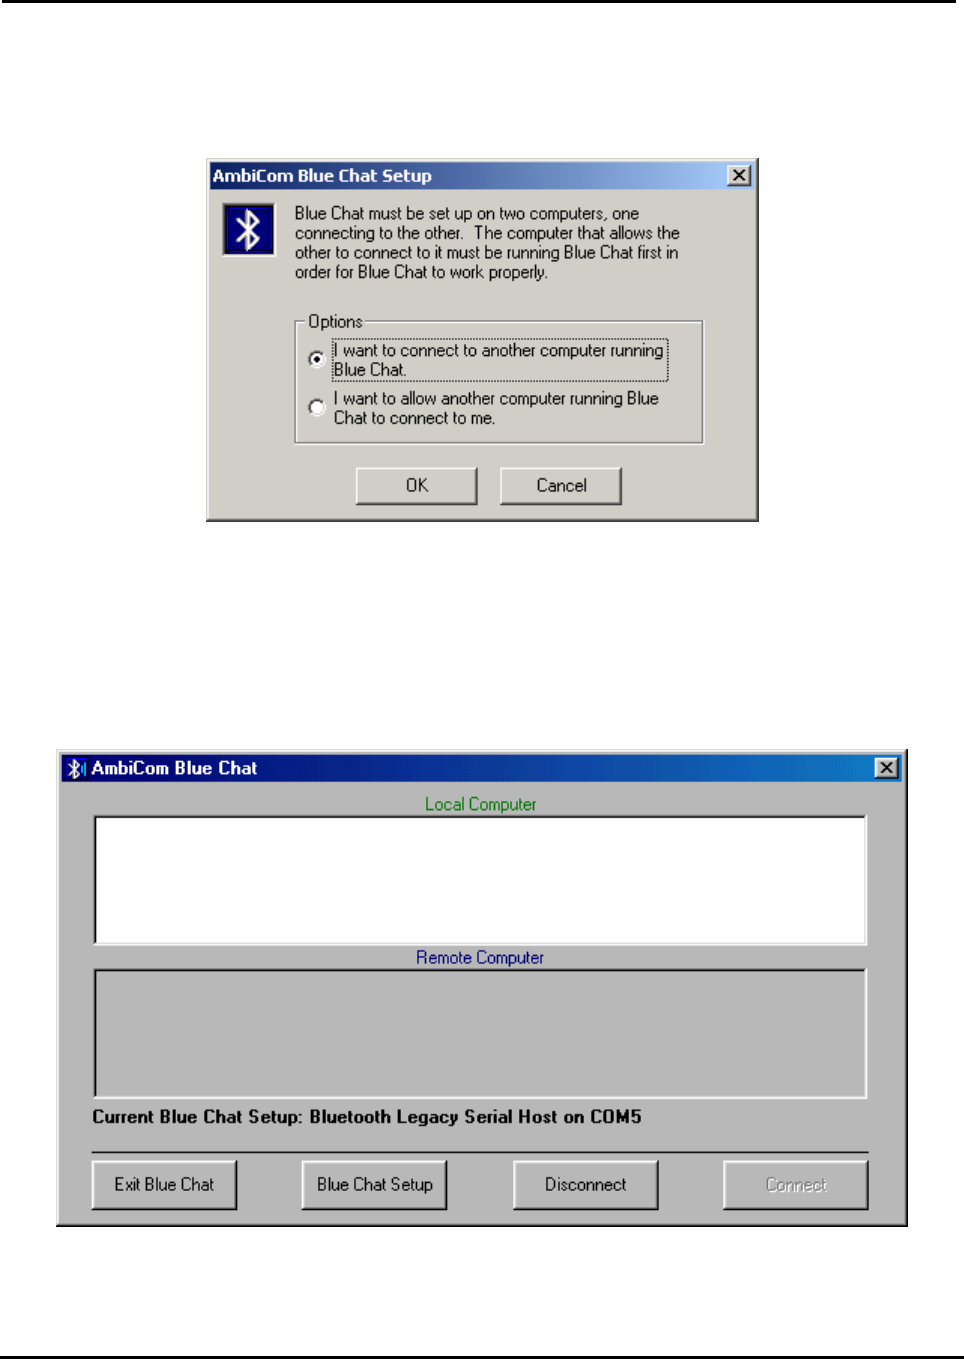
Blue Chat
1. To execute Blue Chat, open Windows Explorer, select “Bluetooth” on the menu bar and click
on “Blue Chat.” To have Blue Chat working on both ends, the application on the remote
computer also needs to run Blue Chat at the same time.
Click it to run
Blue Chat
Air2Net Bluetooth Wireless Solutions
User Manual for Windows ME Working at the speed of thought
AmbiCom, Inc Page 19 of 26 6/25/2002
2. After selecting Blue Chat, the following window will appear, prompting you to choose the
direction of the connection setup.
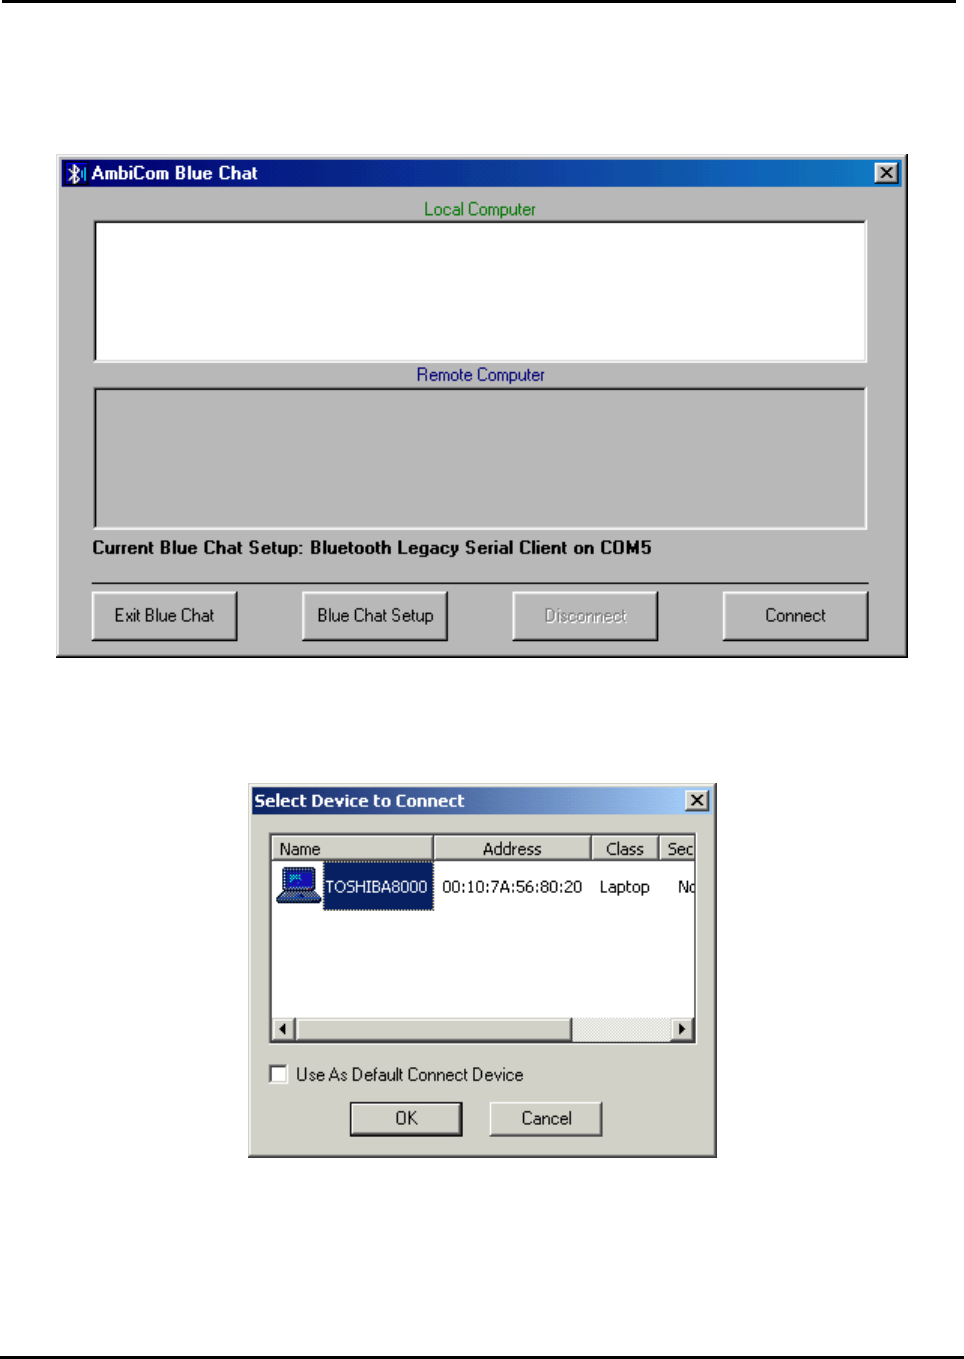
3. In the above window, two options are shown. You can either choose you want to connect to
someone or wait for connection. If you want other people to communicate with you, simply
select the lower checkbox, click OK and the following window will appear.
Air2Net Bluetooth Wireless Solutions
User Manual for Windows ME Working at the speed of thought
AmbiCom, Inc Page 20 of 26 6/25/2002
4. If you want to connect to a remote device, select the first option, I want to connect to another
computer running Blue Chat and click OK to see the following window. Click Connect to
continue.
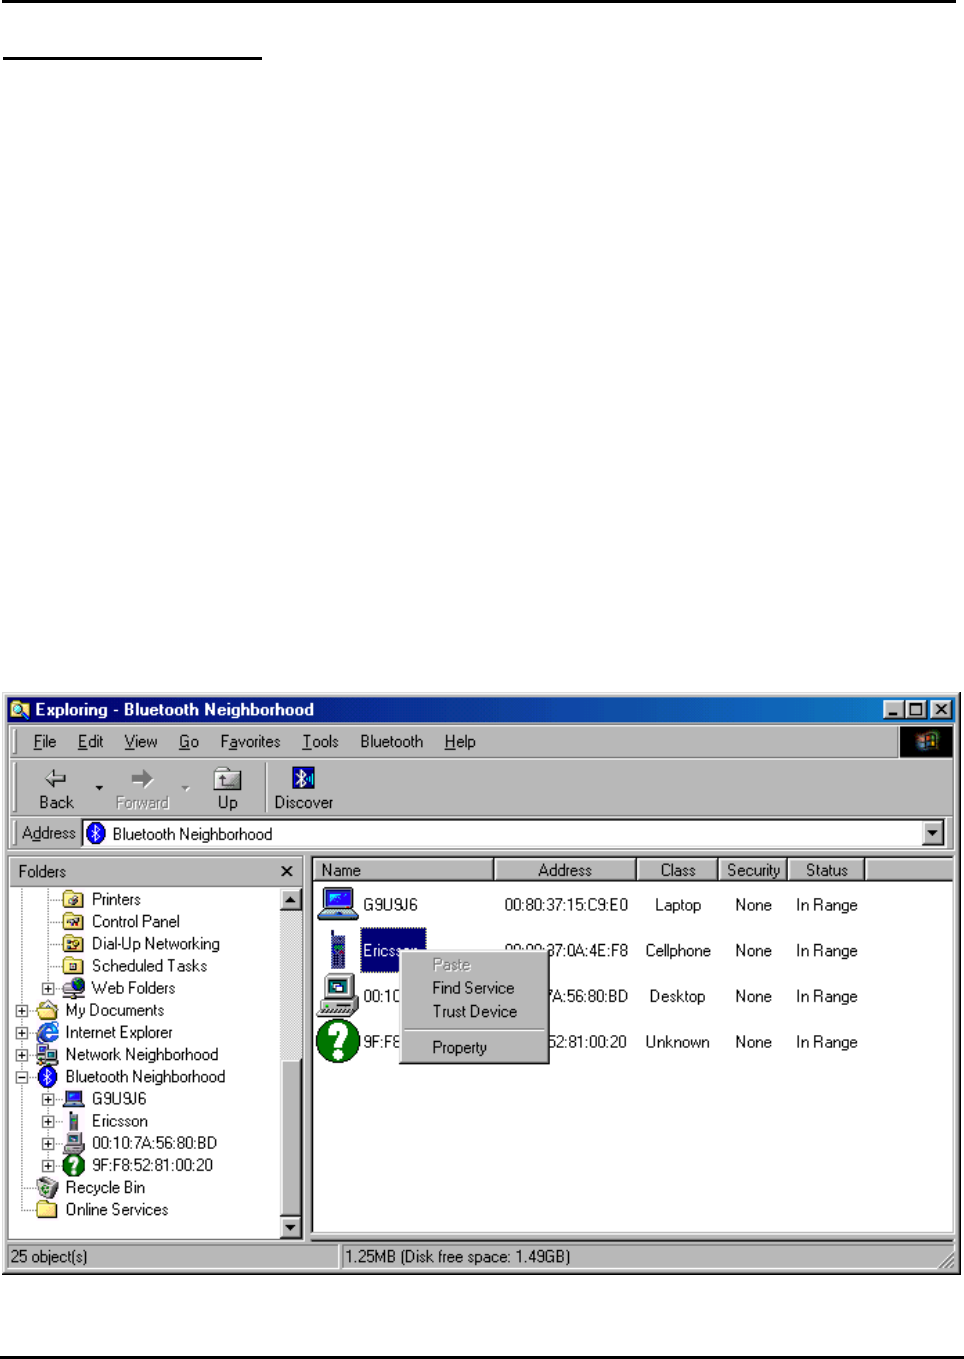
5. The system will show the following window in which you can select which device you wish to
connect. Upon selecting the desired device, click OK to establish the connection.
6. Now the two Bluetooth devices can connect to each other. You can type any text message in
the Local Computer dialogue window and see the corresponding message from the Remote
Computer as well.
Air2Net Bluetooth Wireless Solutions
User Manual for Windows ME Working at the speed of thought
AmbiCom, Inc Page 21 of 26 6/25/2002
Dial-Up Networking
Note:
The requirement to set up Dial-up Networking is to provide the Internet Service Provider
information (ISP); user name, password, and the phone number.
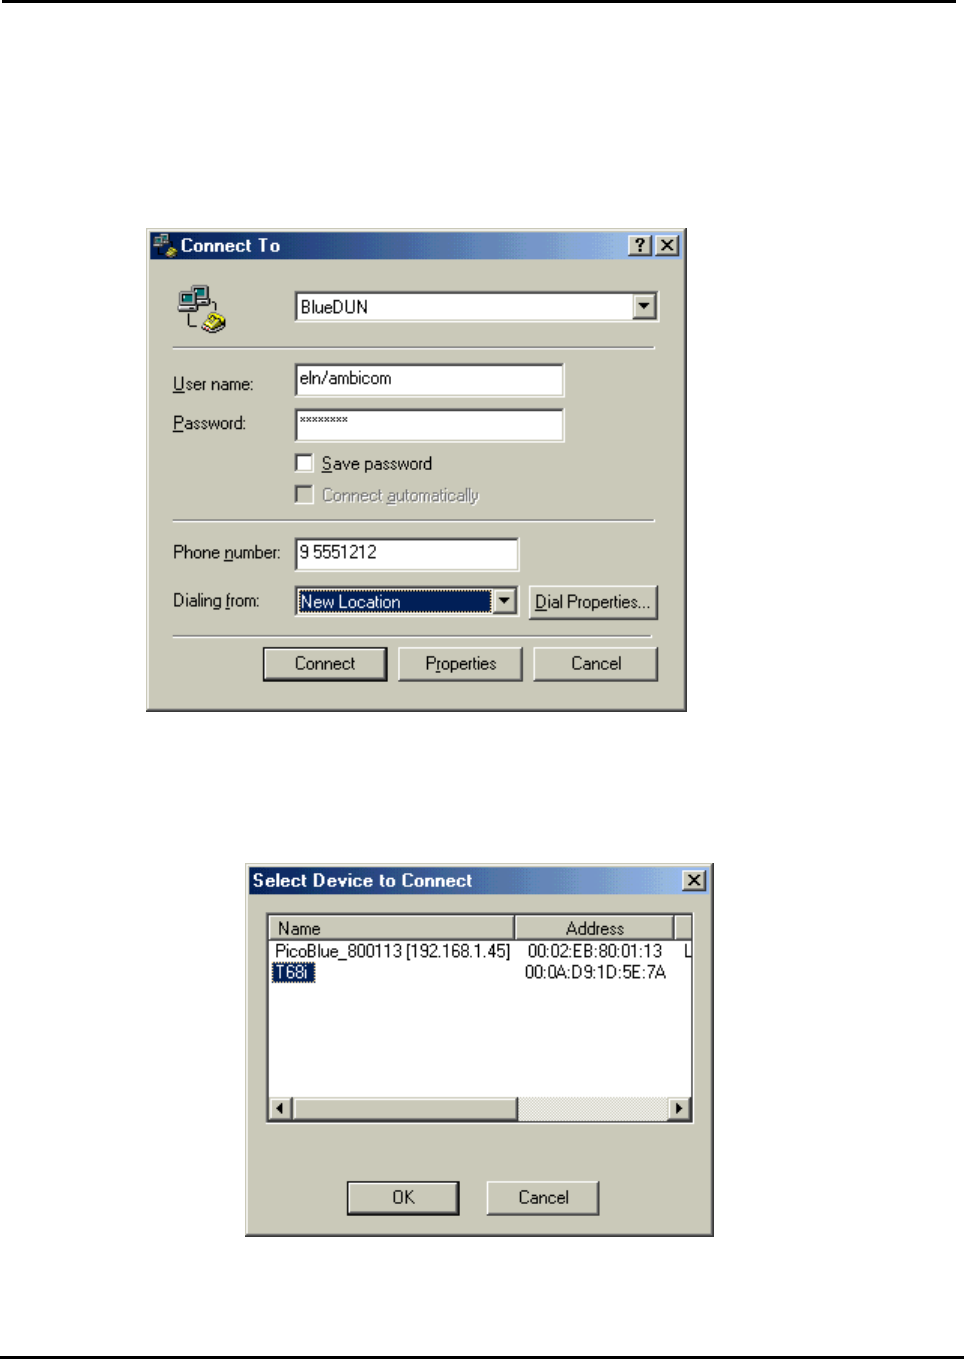
For some Bluetooth enabled devices such as Cellular Phones, before you perform Dial-up,
you need to execute Trust Device first. The following window shows you how to do so. For
phone configuration, you need set it to the Ready to pair mode. You can refer the phone
manual. After you paired your phone with the Bluetooth device, the software will remember the
trust profile. You don’t need to do this every time when you execute the Dial-up networking.
On Nokia Cell Phone
You have to set the security level 3 in the Bluetooth Neighborhood. Choose “Local Device”,
click the right button of your mouse, and then select “Property”. Select under security option
“Bluetooth Security Mode 3” and then follow the wizard manual.
On Ericsson Cell Phone
Select menu Extra > Bluetooth> Paired devices > Add devices > Phone Accepts
Click Yes to assign the phone name and will show Ready to pair mode
On the computer
After discover the phone, right click on the mouse and choose Trust Device.
Insert the password.

Air2Net Bluetooth Wireless Solutions
User Manual for Windows ME Working at the speed of thought
AmbiCom, Inc Page 22 of 26 6/25/2002
On Ericsson Phone
• Click Yes on the phone to Add to paired devices > insert the Password click yes
On Computer
• Insert the PIN number in the computer (the same that you inserted the password on the
phone)
On Phone
• Show Pairing successful
On Computer
Change the status to Trusted in the Bluetooth Neighborhood
Air2Net Bluetooth Wireless Solutions
User Manual for Windows ME Working at the speed of thought
AmbiCom, Inc Page 23 of 26 6/25/2002
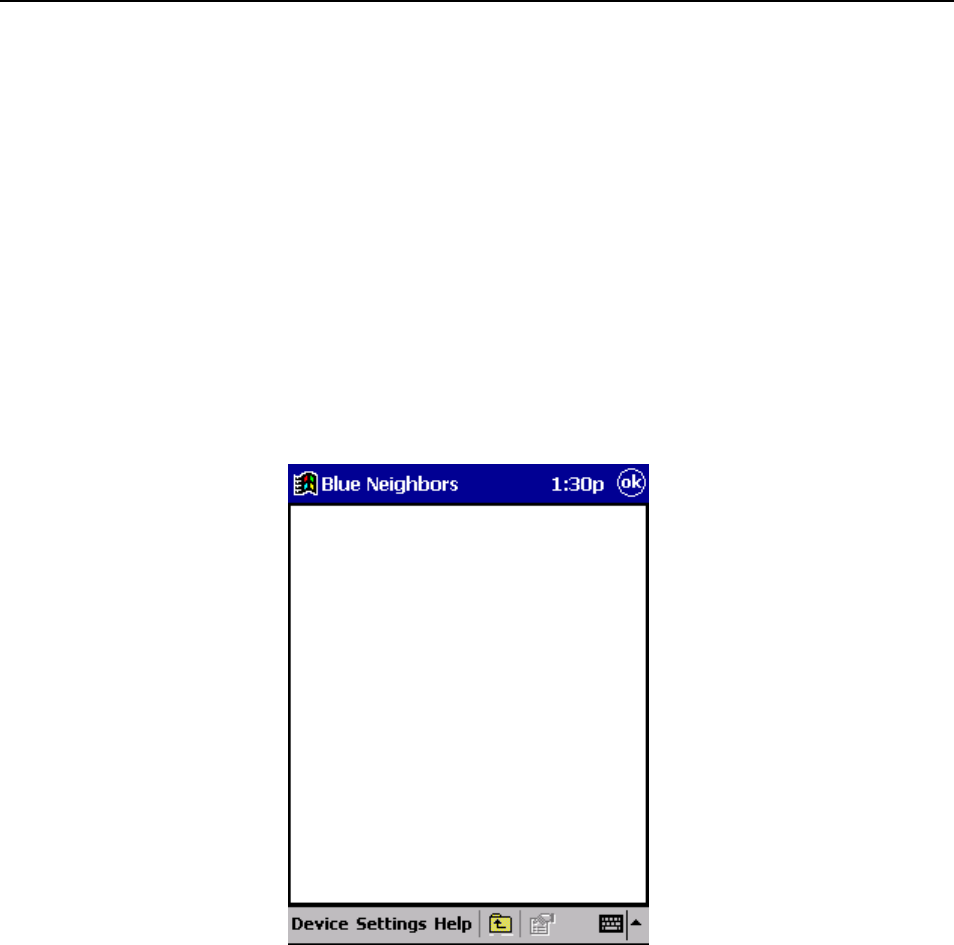
1. After you have created a new connection, run AmbiCom Bluetooth Neighborhood application
first. It will find all the Bluetooth devices within the range. If you find devices such as Bluetooth
phone/modem or Dial-Up Networking Access Point, you can proceed to establish the
connection you just created. The system will show the following window. Fill in the necessary
information and click Dial.
2. The system will now show the following window in which you can select the Bluetooth device
you would like to connect. Click OK to establish an Internet connection to an ISP.
3. In the above window, select T68 (The Phone name) and click OK to dial to ISP.

Air2Net Bluetooth Wireless Solutions
User Manual for Windows ME Working at the speed of thought
AmbiCom, Inc Page 24 of 26 6/25/2002
LAN Access
The setup procedures for LAN Access are almost identical to Dial-Up Networking. Please go to
Dial-up Networking to establish a new connection. It is not necessary to provide phone number,
user name and password to establish the connection.

Air2Net Bluetooth Wireless Solutions
User Manual for Windows ME Working at the speed of thought
AmbiCom, Inc Page 25 of 26 6/25/2002
6. Uninstalling AmbiCom’s Bluetooth Neighborhood
1. Please click Start, go to Programs, click AmbiCom Bluetooth Neighborhood, select
Uninstall Bluetooth Neighborhood and follow the on-screen instructions.
2. After rebooting your system, please go to Device Manager to find BtEsi and remove
AmbiCom Bluetooth Kernel.

Air2Net Bluetooth Wireless Solutions
User Manual for Windows ME Working at the speed of thought
AmbiCom, Inc Page 26 of 26 6/25/2002
7. Technical Support
Please visit AmbiCom Web site http://www.ambicom.com for online technical support. If you wish
to speak to our support staff, please call 1-408-562-0168.

AmbiCom Bluetooth CompactFlash Card
BT2000-CF
User Manual for Pocket PC
Dec 02, 2002

AmbiCom Bluetooth CompactFlash Card BT2000-CF User Manual
AmbiCom, Inc - 1 - 12/2/2002
1.0 Product Description
With the AmbiCom Bluetooth CompactFlash Card and Bluetooth software, you can
establish wireless links between your Pocket PC and other Bluetooth wireless devices.
Currently, we provide the following services through the Blue Neighbors and Phone
Manager:
• Device Discovery
• Service Discovery
• Name Discovery
• Object Push (Transfer file between two Bluetooth enabled devices)
• Dial-Up Networking
• LAN Access Networking
• Phone Manager
This product can work with Compaq iPAQ, HP Jornada and CASIO CASSIOPEIA running
on Windows CE 3.0.

AmbiCom Bluetooth CompactFlash Card BT2000-CF User Manual
AmbiCom, Inc - 2 - 12/2/2002
2.0 Installation Procedure
1. You should first install Microsoft ActiveSync software on your Host PC.
2. Establish a partnership between your PDA and host PC through a serial or USB
connection.
3. Run “AmbiCom Blue Neighbors for Windows CE.exe” from AmbiCom Bluetooth
software CD and install all the Bluetooth components on to your PDA.
4. After you installed the software, reset your PDA.
2.1 Add the AmbiCom Blue Neighbors to your “Today” list.
After installing the software click Start->Today. Verify whether a banner is added for
AmbiCom Bluetooth. If not, click on “Today” to get a setting page. From there,
make a check to AmbiCom Blue Neighbors. An “AmbiCom Bluetooth” banner will
be added to your “Today” list.
2.2 Hot Swapping feature
AmbiCom Bluetooth CF Card supports hot swapping feature. However, it is
recommended to exit the Blue Neighbor program before removing the CF card from
the slot.
AmbiCom Bluetooth CompactFlash Card BT2000-CF User Manual
AmbiCom, Inc - 3 - 12/2/2002
3.0 How to use Blue Neighbors
3.1 Open Blue Neighbors
1. After you install the software, insert your AmbiCom Bluetooth CF Card into the
PCMCIA slot. Double click or click and hold “AmbiCom Bluetooth” banner in
“Today” list. You should get a pop up window. Select “Blue Neighbors”.
2. Using Blue Neighbors, you can perform ObjectPush, Device Discovery, Service
Discovery, Name Discovery and Pairing.
3. For the Dial-Up and LAN Access functions, see “Using Dial Up Networking” and
“Using LAN Access Networking” for further information.
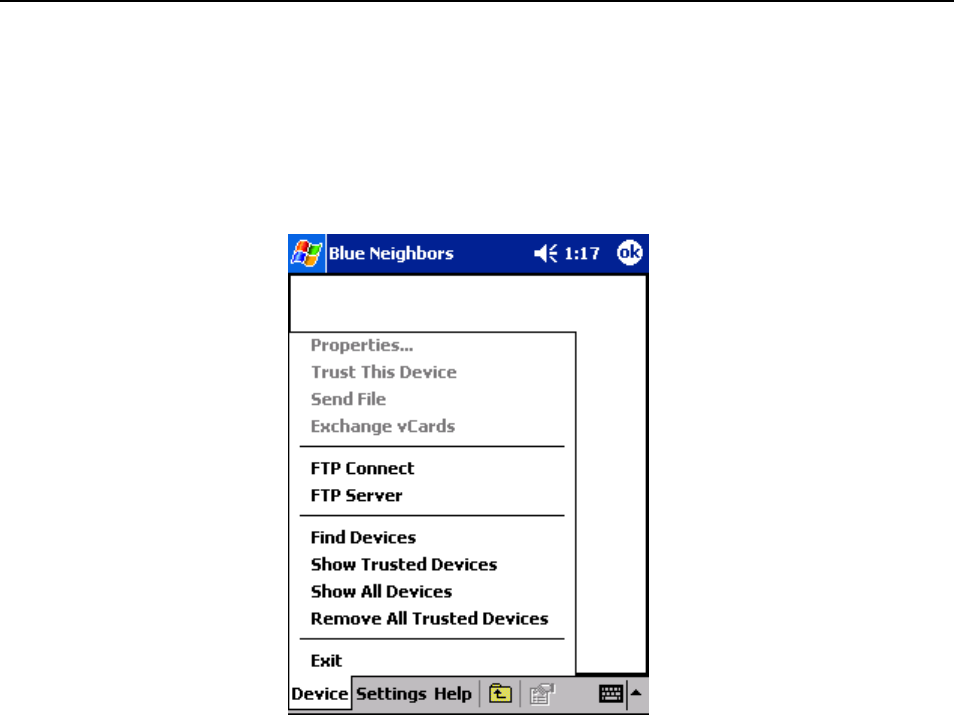
When you open the Blue Neighbors, you will see the following window.
Select “Device” option to get more options or select “Settings” to set the Blue
Neighbors. How to set the various features is explained on Section 3.2.
AmbiCom Bluetooth CompactFlash Card BT2000-CF User Manual
AmbiCom, Inc - 4 - 12/2/2002
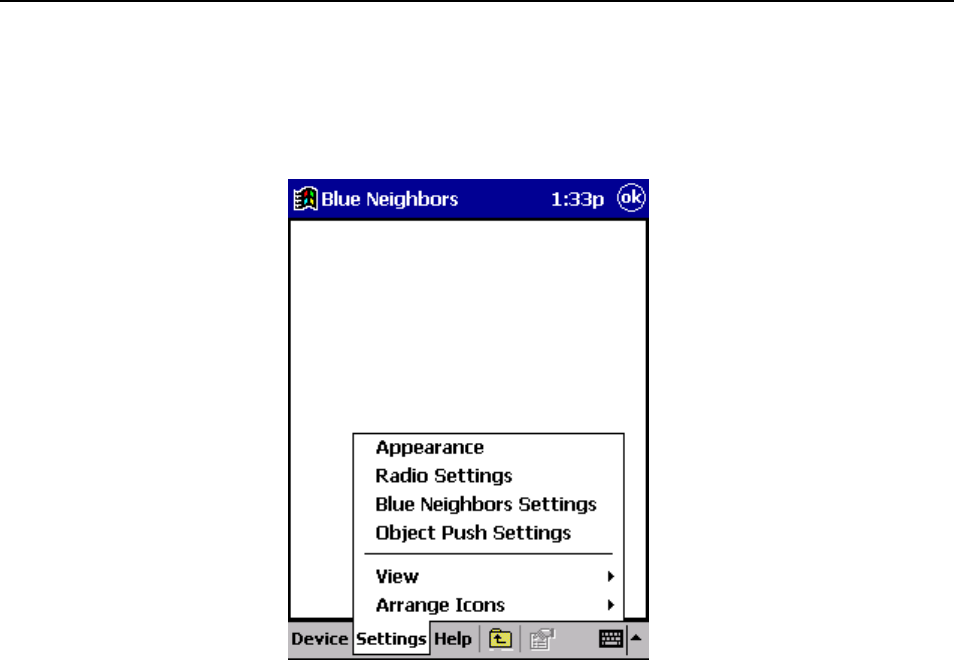
3.2 Discovering and Pairing Devices
When you select “Device” option in the tool bar, you will get a pop up menu as
shown in the picture
Click “Find Devices” to discover all the other devices around you. After discovering
devices, you can do pairing as follows:
• Double click a device that you want to pair with.
• Click “Trust This Device” for pairing. If you are pairing with Ericsson cell phone,
make sure that the phone you are trying to pair with is in pairing mode (See
“How to use Dial-up Networking” in the following section for how to set Ericsson
phone in pairing mode).
• When asked, enter the PIN key.
• You can click on “Device->Show Trusted Devices” to get the devices that are
already paired and trusted earlier.
• If you want to see all the devices, which are discovered, click “Show All
Devices”. If you want to see only trusted devices click “Device->Show Trusted
Devices”.
AmbiCom Bluetooth CompactFlash Card BT2000-CF User Manual
AmbiCom, Inc - 5 - 12/2/2002
3.3 Change default settings
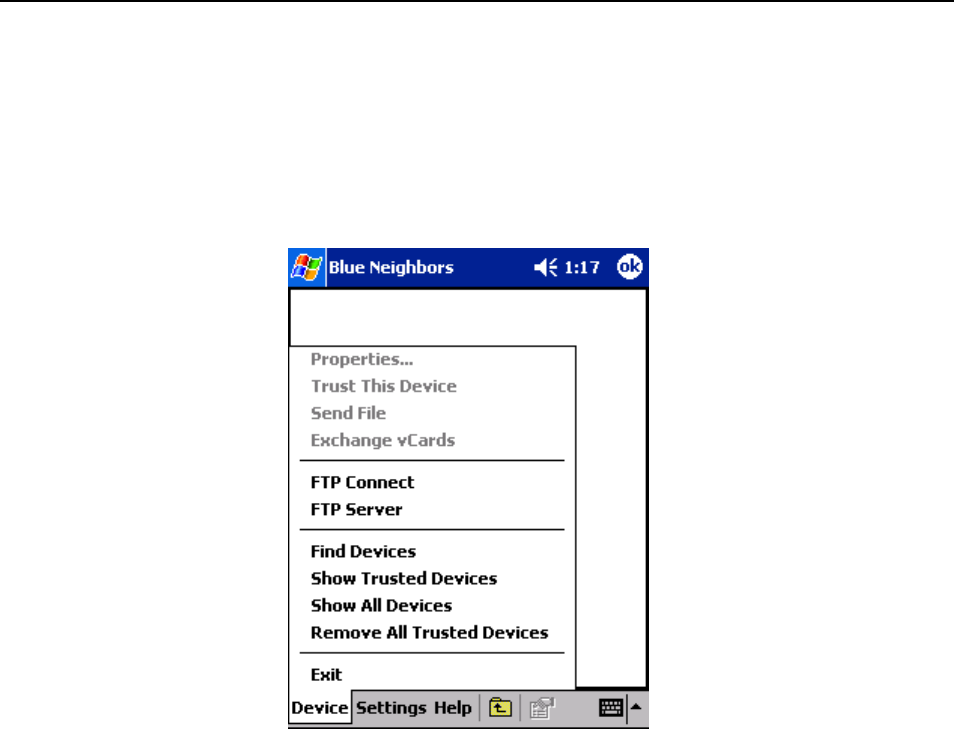
Select “Setting” option in the tool bar to get a following pop up menu.
3.3.1 Appearance
This option allows you to set your device name and device type.
3.3.2 Radio Settings
This option allows you to set the security mode. You can set either security level 1
or security level 3. Security level 1 means no security. It is in-secure connection.
Devices will not do any security procedures while connecting each other. Security
level 3 means link level security. User will be authenticated during the connection.
While establishing connection, device will ask the passkey (PIN key). If a same
number is entered in both devices then authentication will complete successfully
and connection continues or else connection will not establish.
3.3.3 Blue Neighbors Setting
If you want to retrieve the name of the device in range enable “Automatically
retrieve name of devices in range” by checking the check box.
3.3.4 Object Push Setting
This option allows you to set the Inbox path and name of the default vCard. Inbox
path is the path to directory where received object will be stored. VCard is the
name of the object, which will send to selected device when you select “Device-
>Exchange vCard”.

AmbiCom Bluetooth CompactFlash Card BT2000-CF User Manual
AmbiCom, Inc - 6 - 12/2/2002
3.3.5 View
This option allows you to set the icon type.
3.3.6 Arrange icons
This option allows you to arrange the icons depending on name, address or by
type.
3.4 Send an object
After discovering the devices, select a device for which you want to send an object.
Now click Device->Send file. It will open a window in which you can select a file to
send.
AmbiCom Bluetooth CompactFlash Card BT2000-CF User Manual
AmbiCom, Inc - 7 - 12/2/2002
4.0 Using File Transfer
When you select “Device” option in the tool bar, you will get a pop up menu as
shown in the picture
4.1 File Transfer Sever
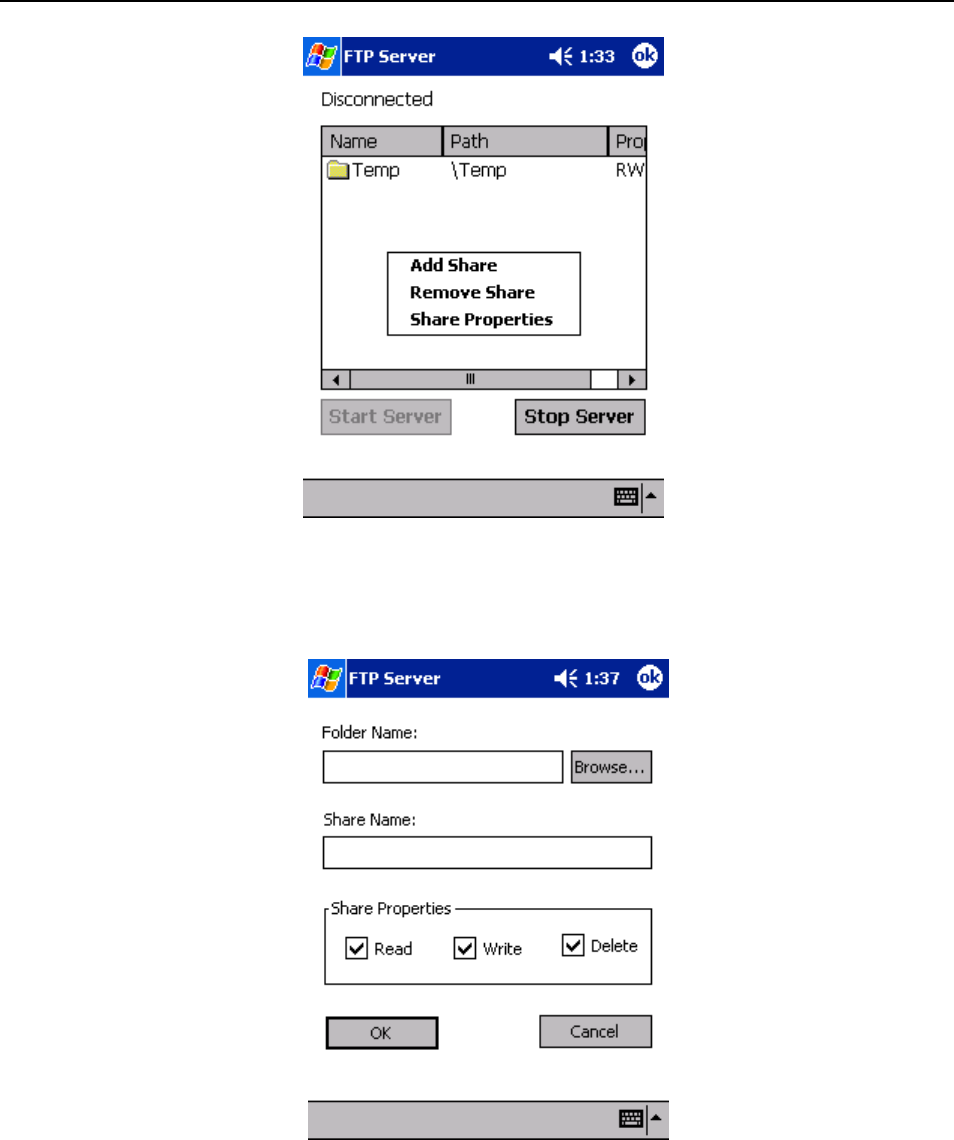
When you click the FTP Server on the above window, the following window will
show up. Use your pen click and hold the screen, the menu will pop up. You can
add the new share directory or remove it. you also can configure the shared
directory. After you done it, you just simply click the “Start Server” button, the FTP
server will start running.
AmbiCom Bluetooth CompactFlash Card BT2000-CF User Manual
AmbiCom, Inc - 8 - 12/2/2002
When you click the “Add Share”, the following window will pop up to let you add the
new share directory. You can give the different permission, also you can give the
different name for your shared directory.
AmbiCom Bluetooth CompactFlash Card BT2000-CF User Manual
AmbiCom, Inc - 9 - 12/2/2002
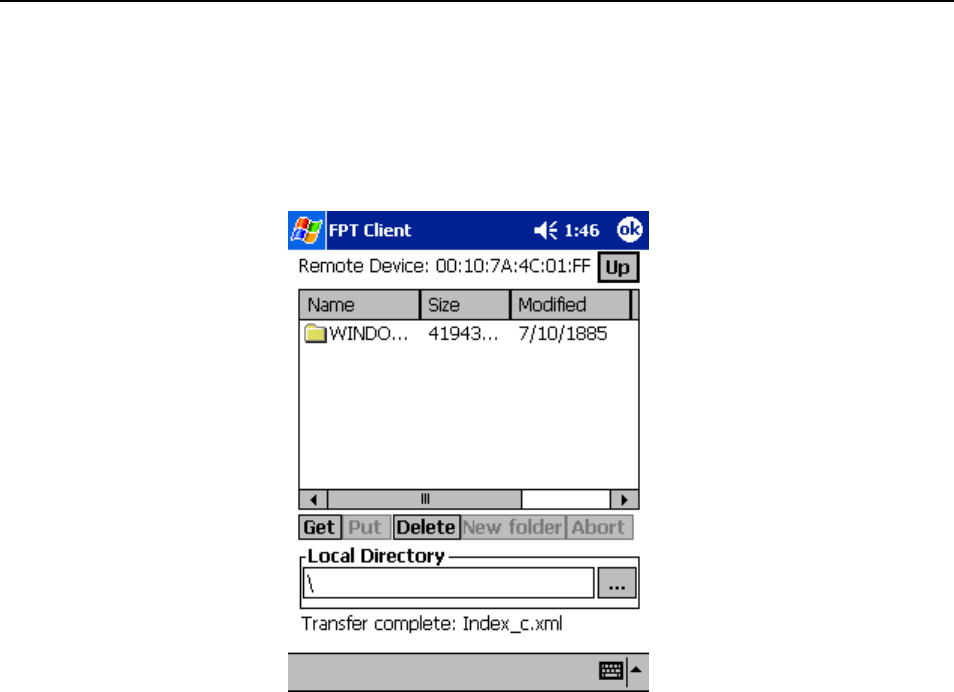
4.2 File Transfer Client
Double click on the Bluetooth device that is displayed after the discovery. A pop up
menu will show up. you click the FTP Connect on the screen, the following
window will show up.
You will see the shared directory from the FTP server. You also can configure the
directory that you send or receive file by setting the “Local Directory”.

AmbiCom Bluetooth CompactFlash Card BT2000-CF User Manual
AmbiCom, Inc - 10 - 12/2/2002
5.0 Using Dial-up Networking
Double click on any Bluetooth device that is displayed after the discovery. A pop
up menu will show all the services support by that device. If the device supports
dial-up networking, choose that service.
5.1 Device Configuration
1. Insert AmbiCom CF Card into PDA.
2. Create a new modem connection in your Windows CE device
• Find the prompt "To create a new modem connection, go to Modem
Settings." in the connection group, and Click the "Modem".
• Select "New Connection..."
• Enter a name for your connection.
• Select " AmbiCom Bluetooth Modem " for your dialup modem. (***DO
NOT select AmbiCom_inc-BT2000E***)
• Use the default baud rate in your system.
• Click "Next"
• Enter "Country code", "Area code" and "Phone number".
• Click "Next"
• Uncheck the box "Wait for dial tone before dialing".
• Click "Finish" to complete your configuration.
5.2 Device Pairing with Ericsson Cell Phone
1. On Phone
• Select menu "Extras"
• Select "Bluetooth"
• Select "Paired devices"
• Select "Add Device"
• Select "Phone accepts"
2. On PDA
If you are pairing with any device other than Ericsson cell phone, refer to
section “How to discover other devices and pairing with them?” If you are
pairing with the Ericsson cell phone then you can either use the wizard, which
is easier or follow the below explained guidelines. Usage of the wizard is
explained later.
• Double click AmbiCom Bluetooth panel in “Today” window. Click
“Blue Neighbors".
• Find the Bluetooth devices around it
• Double click Ericsson cell phone with which you want to do pairing.
• Select "Trust this Device" in pop-up Menu.
AmbiCom Bluetooth CompactFlash Card BT2000-CF User Manual
AmbiCom, Inc - 11 - 12/2/2002
3. Enter passkey on the phone first and then enter the same passkey on the PDA
after the dialog window pops up.
4. Follow instruction on the phone to save the paired device.
5. After you finish the pairing, the Blue Neighbors will remember the paired Device
(i.e. the cell phone), so it is not necessary to do pairing again when you use the
same phone next time.
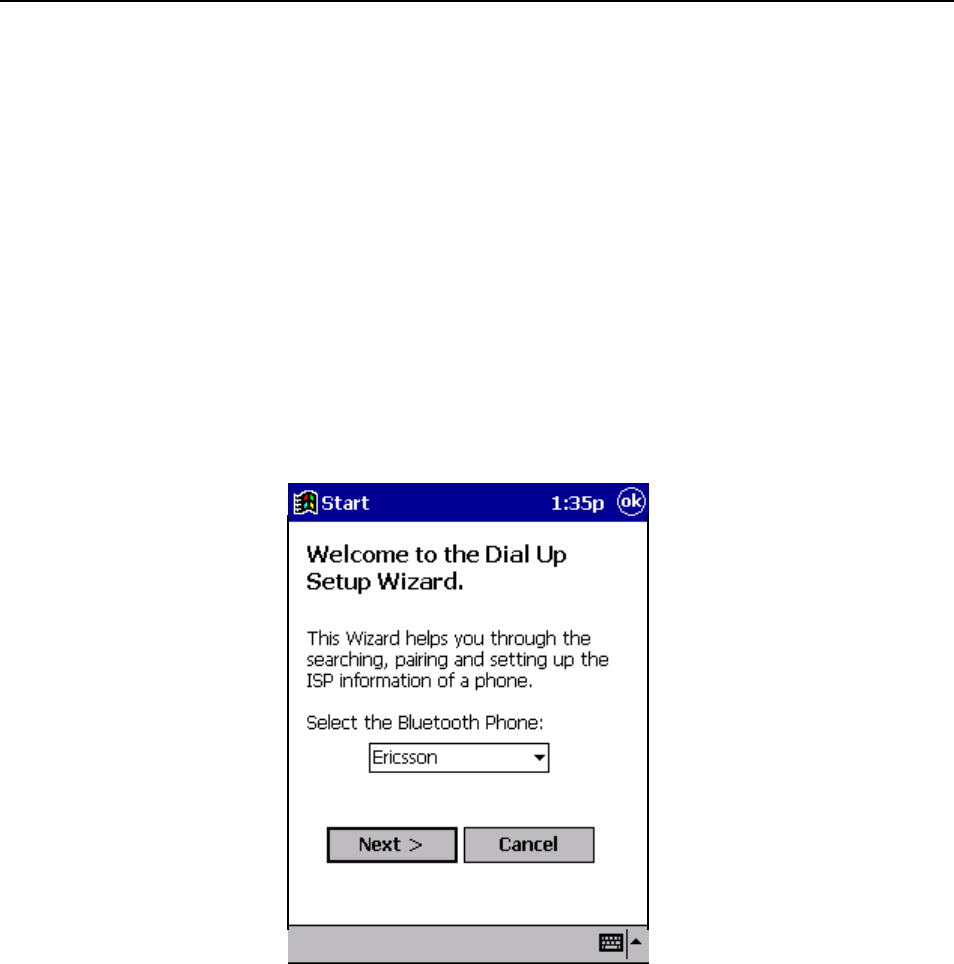
5.3 Using Wizard
1. Double click or click and hold the “AmbiCom Bluetooth” banner in the “Today”
list. You will get a popup menu. Select “Dial Up Setup Wizard”. You will get the
window shown below.
2. Select a phone type and then click “Next”. Currently you can use this wizard
only for Ericsson cell phone.
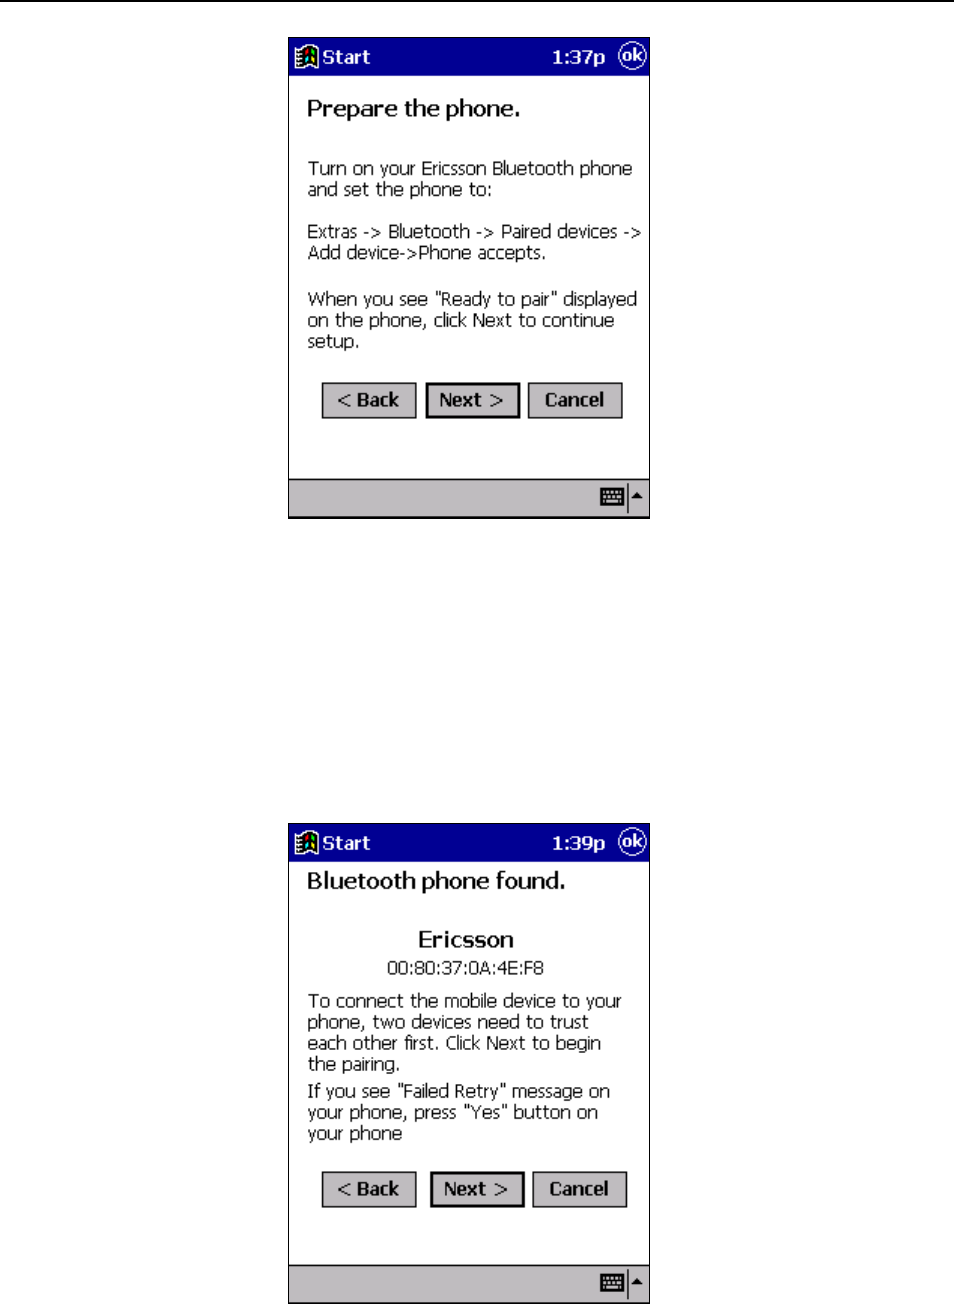
3. After this, you will get a window shown on the following page. Read the
message in the window and have your phone ready for pairing. After this, click
“Next” to continue.
AmbiCom Bluetooth CompactFlash Card BT2000-CF User Manual
AmbiCom, Inc - 12 - 12/2/2002
Note: If you have paired the PDA with Ericsson phone previously,
delete that paired device name from your phone first. On your phone,
set to “Extras -> Bluetooth -> Paired devices” and select the paired
device name you want to pair again. Press ‘Yes’ button and select
‘delete’.
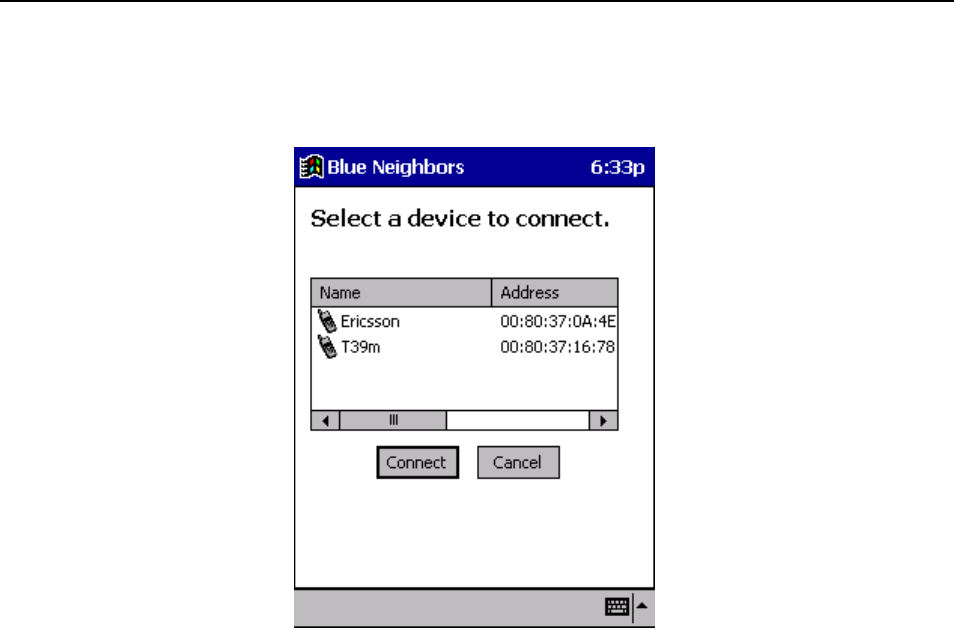
4. Your PDA will search the phone for pairing. You will get the window shown
below as a result of successful search of a phone. Click “Next” to continue.
AmbiCom Bluetooth CompactFlash Card BT2000-CF User Manual
AmbiCom, Inc - 13 - 12/2/2002
However, if the wizard gets more than one phone, it will display the following dialog
box with all the nearby Bluetooth phones that are in discoverable/pairing mode.
Click on the phone you want to use and click “Connect”.
5. Your phone will ask you to enter a PIN number. Enter your PIN number there.
Enter the same PIN number on your PDA. If the pairing is successful, the wizard
will continue for the dial up setup procedure.
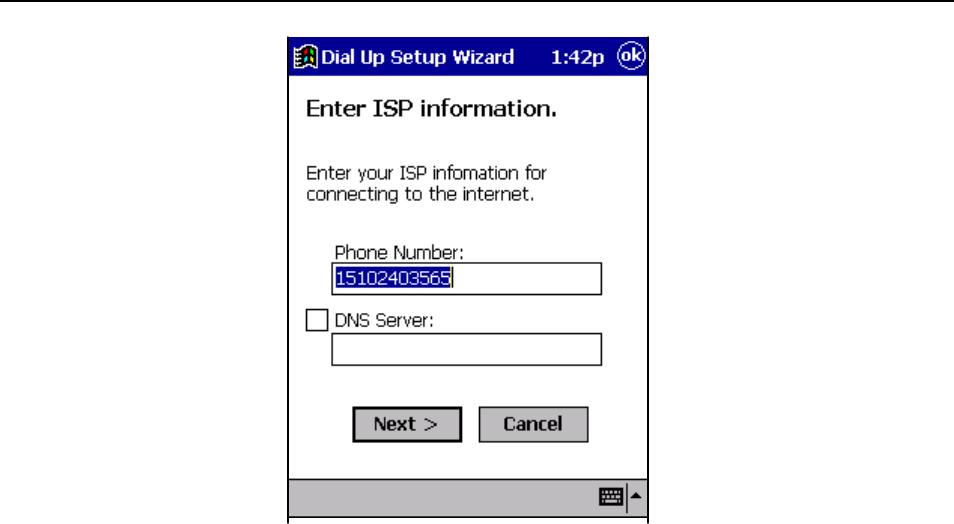
6. Enter the phone number and DNS server name (if applicable) in the window
when prompt shown on the following page.
AmbiCom Bluetooth CompactFlash Card BT2000-CF User Manual
AmbiCom, Inc - 14 - 12/2/2002
7. Click Next to get another window and complete the process.
5.4 Dial-up to ISP
Select the cell phone icon in the AmbiCom Bluetooth banner. It will connect you to
the cell phone with which you have done pairing. After that, it will connect you to an
ISP using that cell phone. If you have more than one paired phone, the last
selected phone will be used.
Note: If you have more than one paired phone on your PDA and want to
select different phone, go to “Blue Neighbors” and double click on the phone
you want to use and select “Dial Up”.
5.5 Disconnect from the Dial Up Server
If you want to disconnect, click “Today” and then click the network connection icon,
which is located in the lower right corner of the screen. It will display a dialog box
where you can select “Disconnect” to disconnect from the network.

AmbiCom Bluetooth CompactFlash Card BT2000-CF User Manual
AmbiCom, Inc - 15 - 12/2/2002
6.0 Using LAN Access Networking
When you install the AmbiCom Blue Neighbors software, a new connection is made
for the use of LAN Access point. If you want to connect to LAN Access point,
select Start->Programs->Connections. You will find an icon called “AmbiCom
BTLAN”. Double click this icon, it will show you the lists of devices found. Select the
LAN Access Point device and then click “Connect” to connect with the LAN Access
point.
Another way is to double click on any Bluetooth device that is displayed after the
discovery. A pop up menu will show all the services supported by that device. If
the device supports LAN Access networking, choose that service, and when you
click the “Dial up” option, the system will bring up the “Connections” window. In this
window, you will find an icon called “AmbiCom BTLAN”. Double click this icon, and
then click “Connect” to connect to the LAN Access point.
If you are using the Pocket PC 2002, if the device supports LAN Access
networking, choose that service, and when you click the “Dial up” option, the
system will bring up a dialog window. You can click the “Connect” to connect to the
LAN Access point.
6.1 Disconnect from the LAN Access Point
If you want to disconnect click “Today” first and then click the network connection
icon that is located in the lower right corner of the screen. It will display a dialog
box where you can select “Disconnect” to disconnect from the network.

AmbiCom Bluetooth CompactFlash Card BT2000-CF User Manual
AmbiCom, Inc - 16 - 12/2/2002
7.0 Using Phone Manager
The major function of phone manager is to manage the Phone Book and SMS (Short
Message Service) through PDA instead of the phone. A Bluetooth link will be established
between the phone and the PDA.
From Blue Neighbors
1. Double click or click and hold “AmbiCom Bluetooth” banner in “Today” list.
2. Click Blue Neighbors
3. Click the “Device” option in the tool bar. Select “Find Devices” option in the pop
up menu, which will discover devices in the surrounding area.
4. After discovering devices, select a particular cell phone and double click it to
open a pop up menu. Make sure that the cell phone you select is already paired
up with your device. Otherwise, you need to do pairing first before proceeding
this section.
5. Select “Phone Manager” option to open the phone manager.
From AmbiCom Bluetooth banner
1. Double click or click and hold “AmbiCom Bluetooth” banner in “Today” list.
2. Select “Phone Manager” in the pop up window.
Note: If you have more than one paired phone on your PDA, you need to
select which phone you want to use first. Go to “Blue Neighbors” and double
click on the phone you want to use and select “Phone Manager”.
7.1 Phone Books
7.1.1 Get Contact Information from Cell Phone
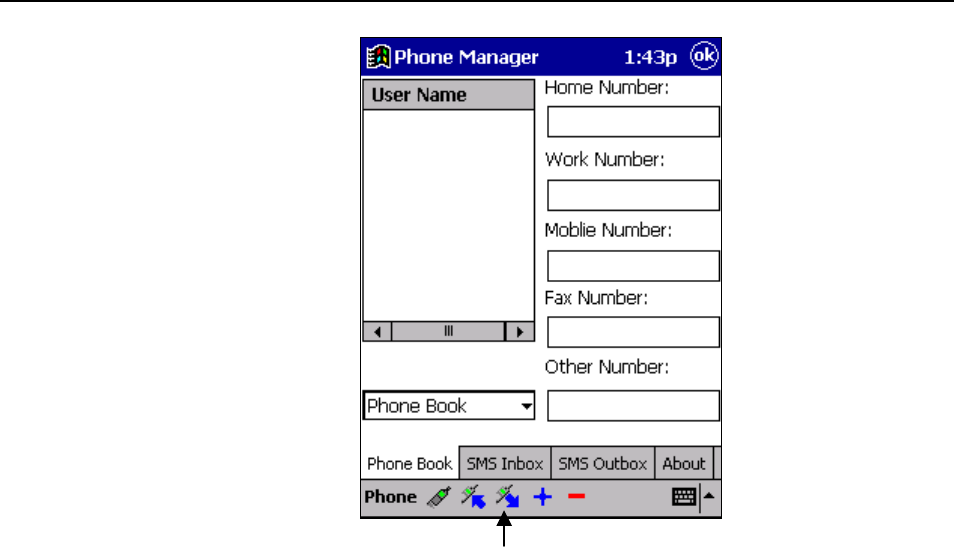
You can get all the contact information from your cell phone by clicking the cell
phone icon with outward directing arrow icon. You can also select “Phone Book” or
“SIM Book” option to get contact information.
AmbiCom Bluetooth CompactFlash Card BT2000-CF User Manual
AmbiCom, Inc - 17 - 12/2/2002
7.1.2 Modify and Save Information
After getting the information, you can modify any information. To save the
modification, click the cell phone with inward directing arrow icon.
7.1.3 Delete Information
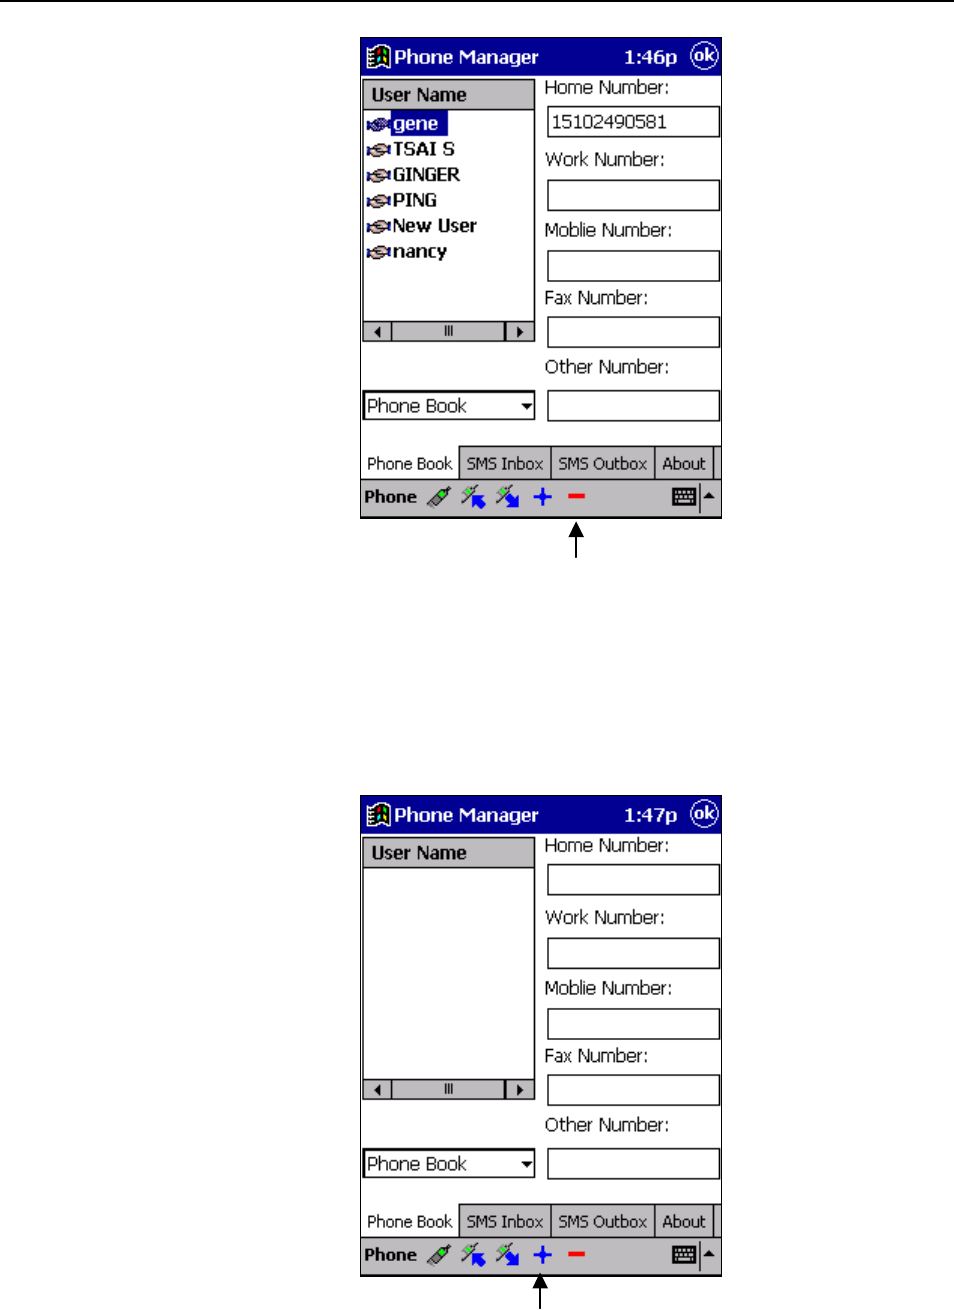
To delete any user contact, select user name and then click the red colored bar
icon.
AmbiCom Bluetooth CompactFlash Card BT2000-CF User Manual
AmbiCom, Inc - 18 - 12/2/2002
7.1.4 Add New User
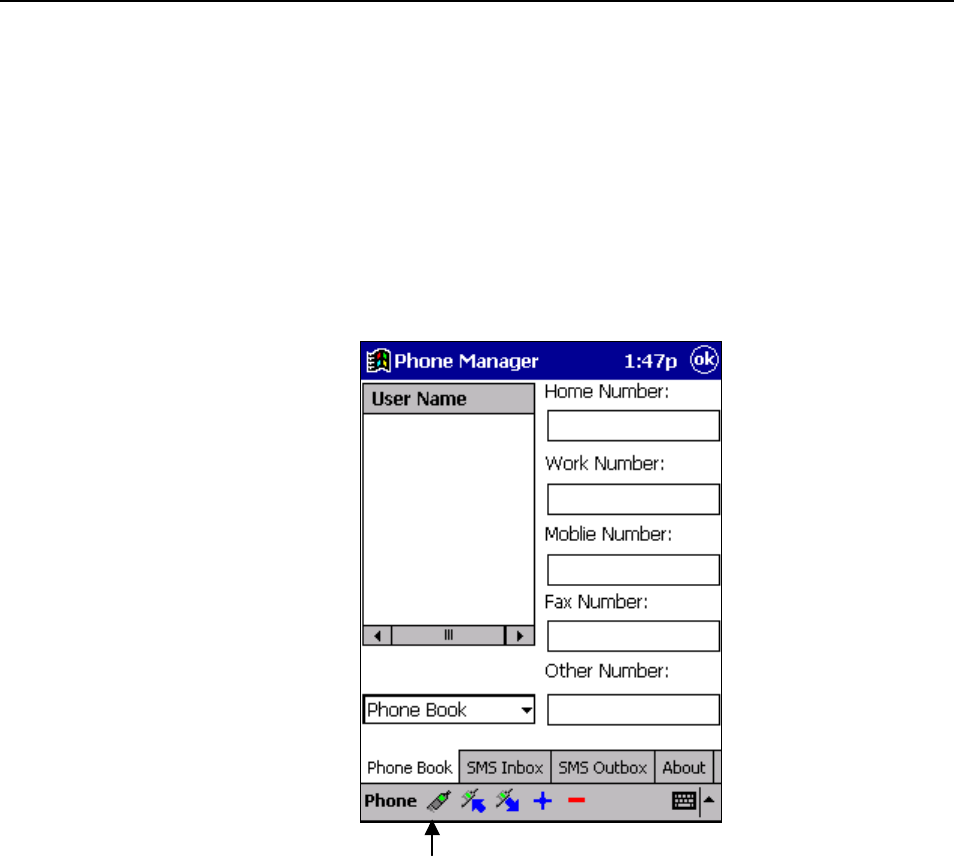
To add new contacts, choose the blue plus sign icon or select “Phone” option in
menu and click “Add User”. Fill user name and all other related information and
click phone with inward direction arrow icon to save in the cell phone.
AmbiCom Bluetooth CompactFlash Card BT2000-CF User Manual
AmbiCom, Inc - 19 - 12/2/2002
7.1.5 Change the User Name
First select the user name that you want to rename and then click once on that user
name. This will then allow you to edit the name. Make appropriate changes and
save it.
7.1.6 Disconnect from Phone
To disconnect, click the cell phone icon or select “Phone->Disconnect” option.
7.2 SMS Messages
7.2.1 Get Messages from Inbox of the Cell Phone through SMS
Select SMS Inbox page in menu bar displayed at the bottom. Click outward
direction arrow to get all the messages in the SMS Inbox of the cell phone. To open
a particular message, double click the message.
7.2.2 Delete a SMS Message
Select a message and click delete icon (icon with red colored bar).
7.2.3 Send a SMS Message

AmbiCom Bluetooth CompactFlash Card BT2000-CF User Manual
AmbiCom, Inc - 20 - 12/2/2002
Select SMS Outbox page. You have the following three options to open outbox
message:
1. Click the blue colored plus sign icon to open a new window. Type your
message and phone number to whom you want to send the message and
click the send button.
2. Click “Phone” option in the lower left corner of the device and then click
Send message.
3. Or you can simply double click the white screen.

AmbiCom Bluetooth CompactFlash Card BT2000-CF User Manual
AmbiCom, Inc - 21 - 12/2/2002
8.0 Un-installation Procedures
1. Make sure you remove the AmbiCom Bluetooth CF Card from the PCMCIA slot.
2. Click the “Start” on the upper left corner of the screen and then select “Settings”.
3. On the lower left corner of the screen, you will see “System”. Click it.
4. Click the “Remove Programs”.
5. Select “AmbiCom Blue Neighbors for Windows CE” then click “Remove”.

AmbiCom Bluetooth Solutions
User Manual for WinXP
June 25, 2002

Air2Net Bluetooth Wireless Solutions
User Manual for Windows XP Working at the speed of thought.
AmbiCom, Inc Page 1 of 35 6/25/2002
1. Introduction
This user manual covers the product features, release notes, installation procedures, and
operating procedures for AmbiCom’s Bluetooth applications.
Bluetooth wireless technology is a global standard for low-cost and low-power small form factors
to connect multiple devices such as computers, mobile phones, PDAs, printers, LAN and WANs to
each other. It provides fast and reliable digital transmission of both voice and data over 2.4GHz
ISM open band. AmbiCom’s Bluetooth wireless technology offers the following features:
• Cable Replacement
Establishes a wireless Personal Area Network with other Bluetooth devices within the
operating range, without the hassles of wiring and configuration.
• Ad-hoc Networking
Supports both data and voice between two or more devices wirelessly.
• Secure Wireless Connections
Built-in authentication, encryption and authorization applications ensure secure
information access and transmission.
• LAN and WAN Access Points
LAN and WAN access such as Web, email, E-commerce, and VPN.
2. Product Features
With AmbiCom’s Bluetooth CompactFlash with PCMCIA, USB Adapter or UART Adapter and
Bluetooth software, you can establish wireless connections between your computer and other
Bluetooth wireless devices. The features include:
• Device Discovery
• Name Discovery
• Service Discovery
• File Transfer
• Object Push for files, objects and business cards
• Blue Chat that allows users to instantly send and receive text messages
• Internet Access through Dial-Up Networking
• Connection to LAN through LAN Access Point
AmbiCom provides Bluetooth Neighborhood software application that integrates all of the above
features into one single application.
3. Release Notes
• We support Windows XP on this release
• This release supports the AmbiCom Bluetooth CompactFlash, USB Dongle, USB
Adapter, and UART Adapter.
• SIG 1.1 compliant Bluetooth protocol stack.
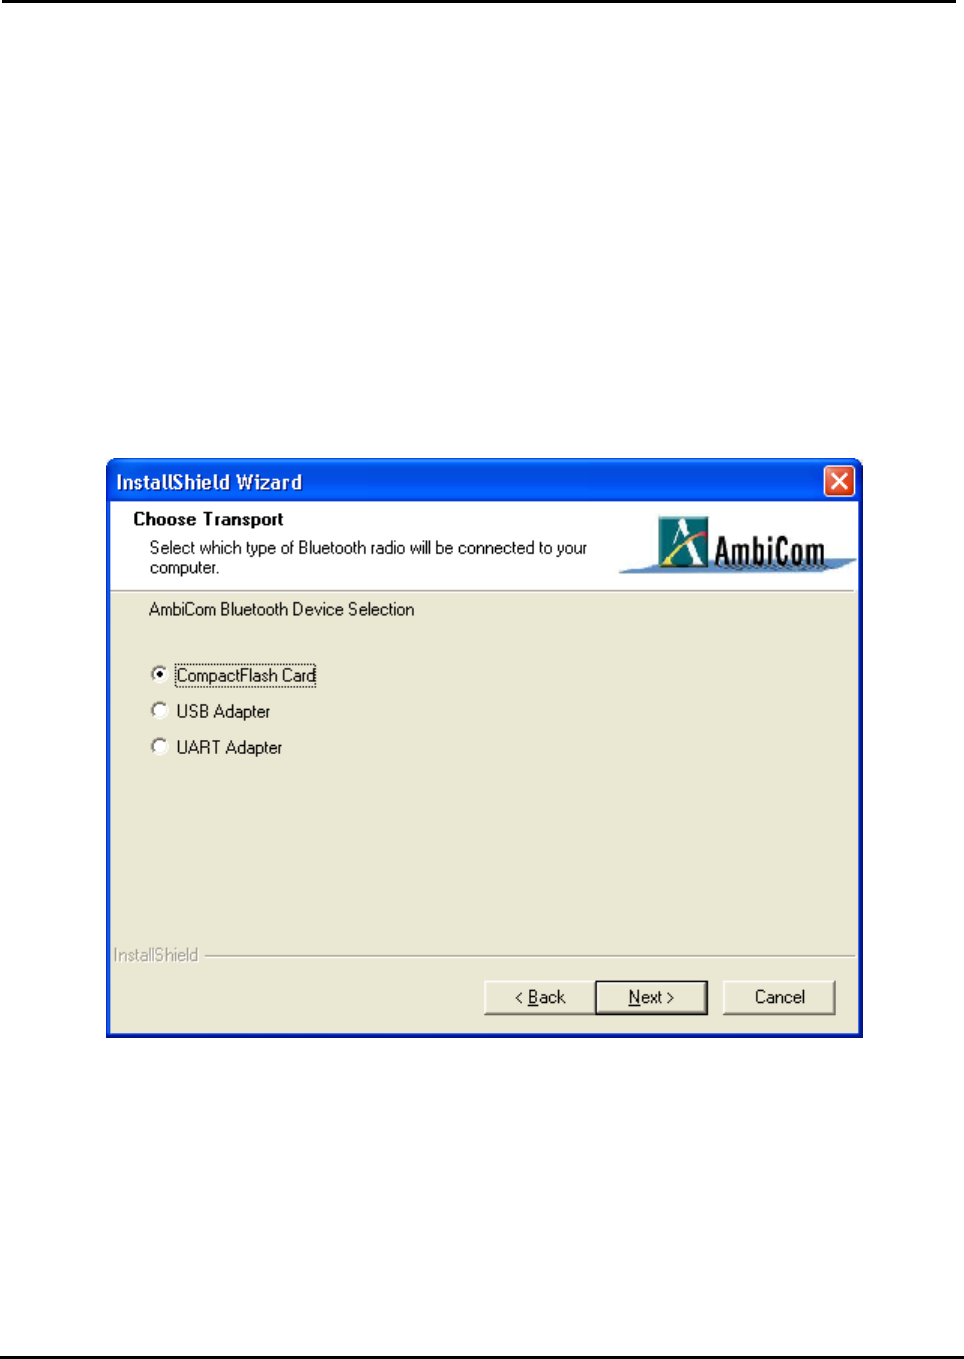
Air2Net Bluetooth Wireless Solutions
User Manual for Windows XP Working at the speed of thought.
AmbiCom, Inc Page 2 of 35 6/25/2002
• We support the Device Discovery, Name Discovery, Service Discovery, Pairing, Object
Push, File Transfer, Dial-Up Networking and LAN Access Networking in this release.
• Audio is not supported in this release.
• When two devices are performing Device Discovery at the same time, they will not
discover each other. Please do not run Bluetooth Neighborhood on both devices at the
same time.
4. Installation Procedures for Windows XP
1. Insert the AmbiCom Bluetooth Installation CD into your laptop CD-ROM drive.
2. Run AmbiCom Bluetooth Setup.exe and follow the on-screen instruction to install the
application program.
3. The following window will appear at the start of the installation process:
Select the device you have and click Next to continue. During the installation, the following
windows will appear indicating additional new devices are being installed.
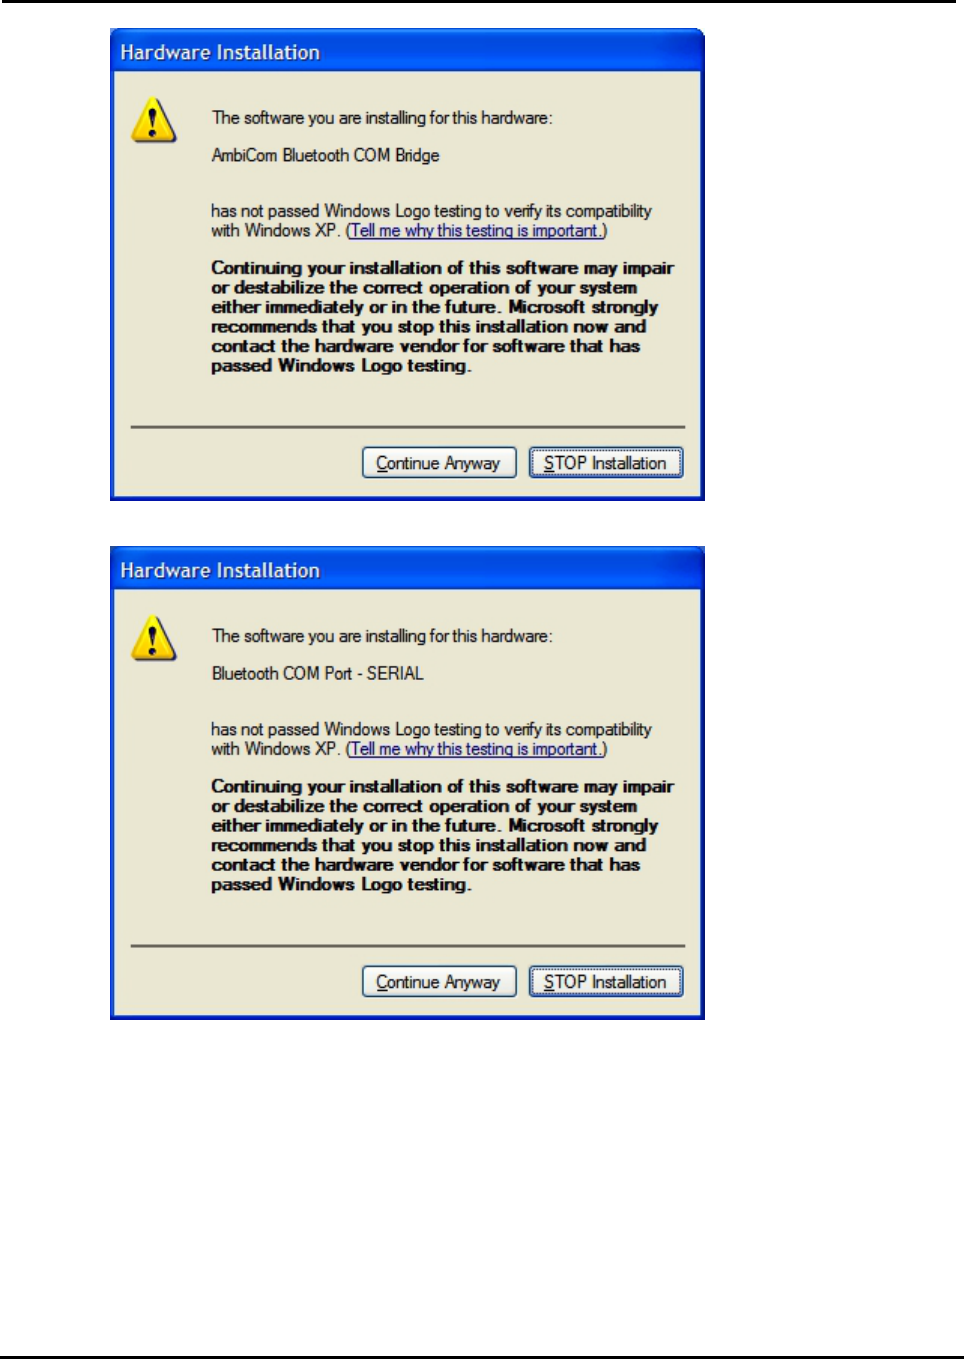
Air2Net Bluetooth Wireless Solutions
User Manual for Windows XP Working at the speed of thought.
AmbiCom, Inc Page 3 of 35 6/25/2002
Click Continue Anyway to complete the installation. After this installation, you can go to
Device Manager and find those devices under Other devices and Ports (COM & LPT)
shown in the following window.
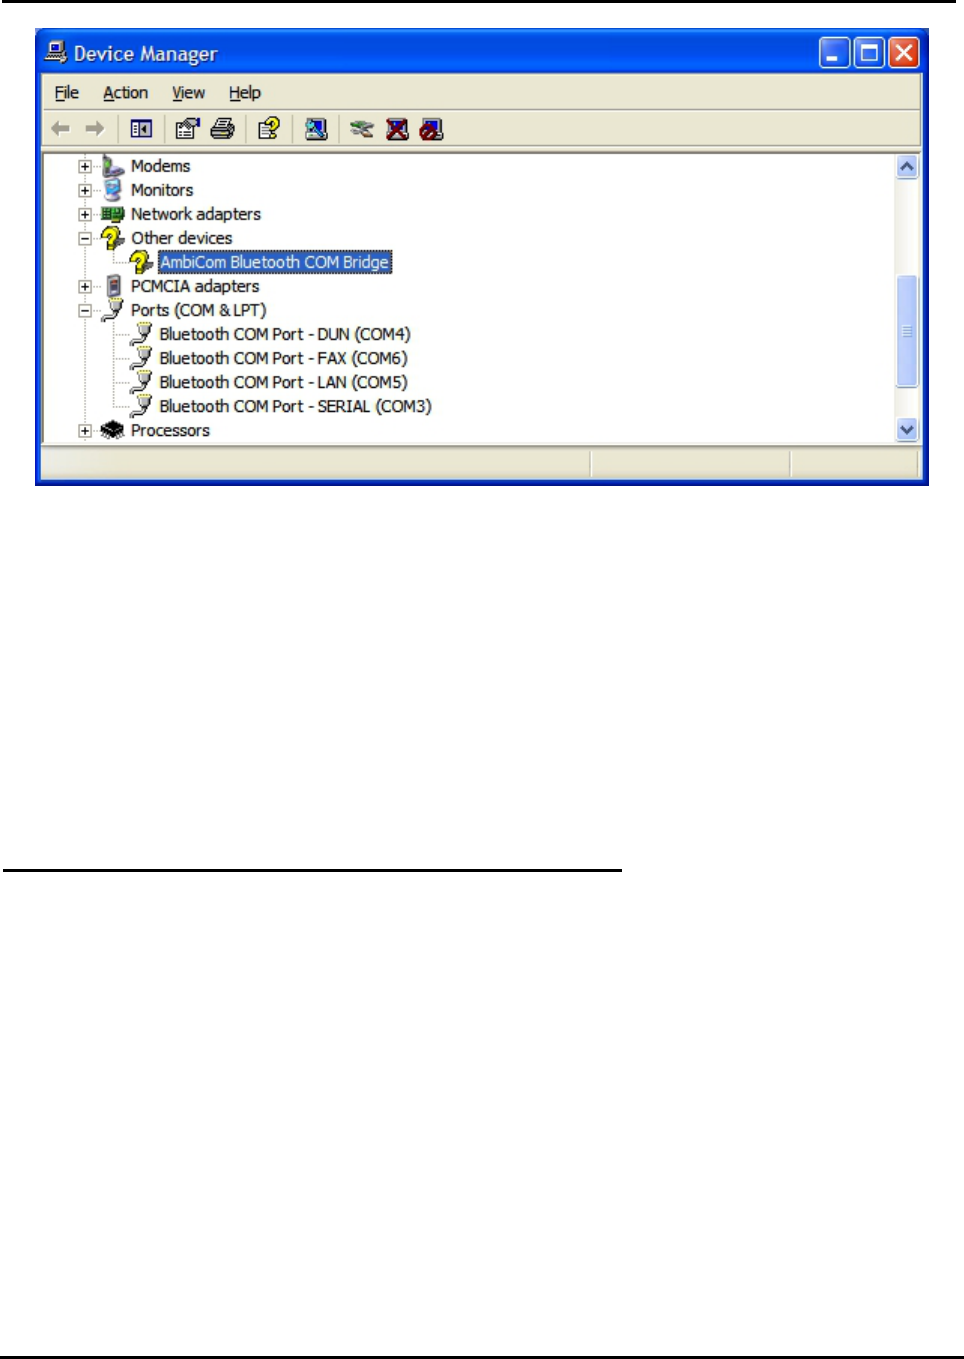
Air2Net Bluetooth Wireless Solutions
User Manual for Windows XP Working at the speed of thought.
AmbiCom, Inc Page 4 of 35 6/25/2002
In this window, you can see that AmbiCom Bluetooth COM Bridge has a question mark. This
is OK because it is a special device and was designed to appear as such.
4. After you have restarted your laptop, please connect your AmbiCom Bluetooth
CompactFlash, USB or UART Adapter to your laptop. The system will automatically install
the driver for you. After the system installed the driver you need reboot your system. Now you
are ready to execute Object Push, File Transfer and Blue Chat by using Bluetooth
Neighborhood. Please see the section “How to Run Bluetooth Neighborhood” and skip the
following steps. If you want to use the Dial-up Networking and LAN Access, please observe
the following steps.
Installation Procedures for Dial-up Networking
If you have Bluetooth phone/modem, then you should continue to install the corresponding
components.
1. Go to Control Panel, click on Phone and Modem Options to add a new mode for Bluetooth
Dial-Up Networking.
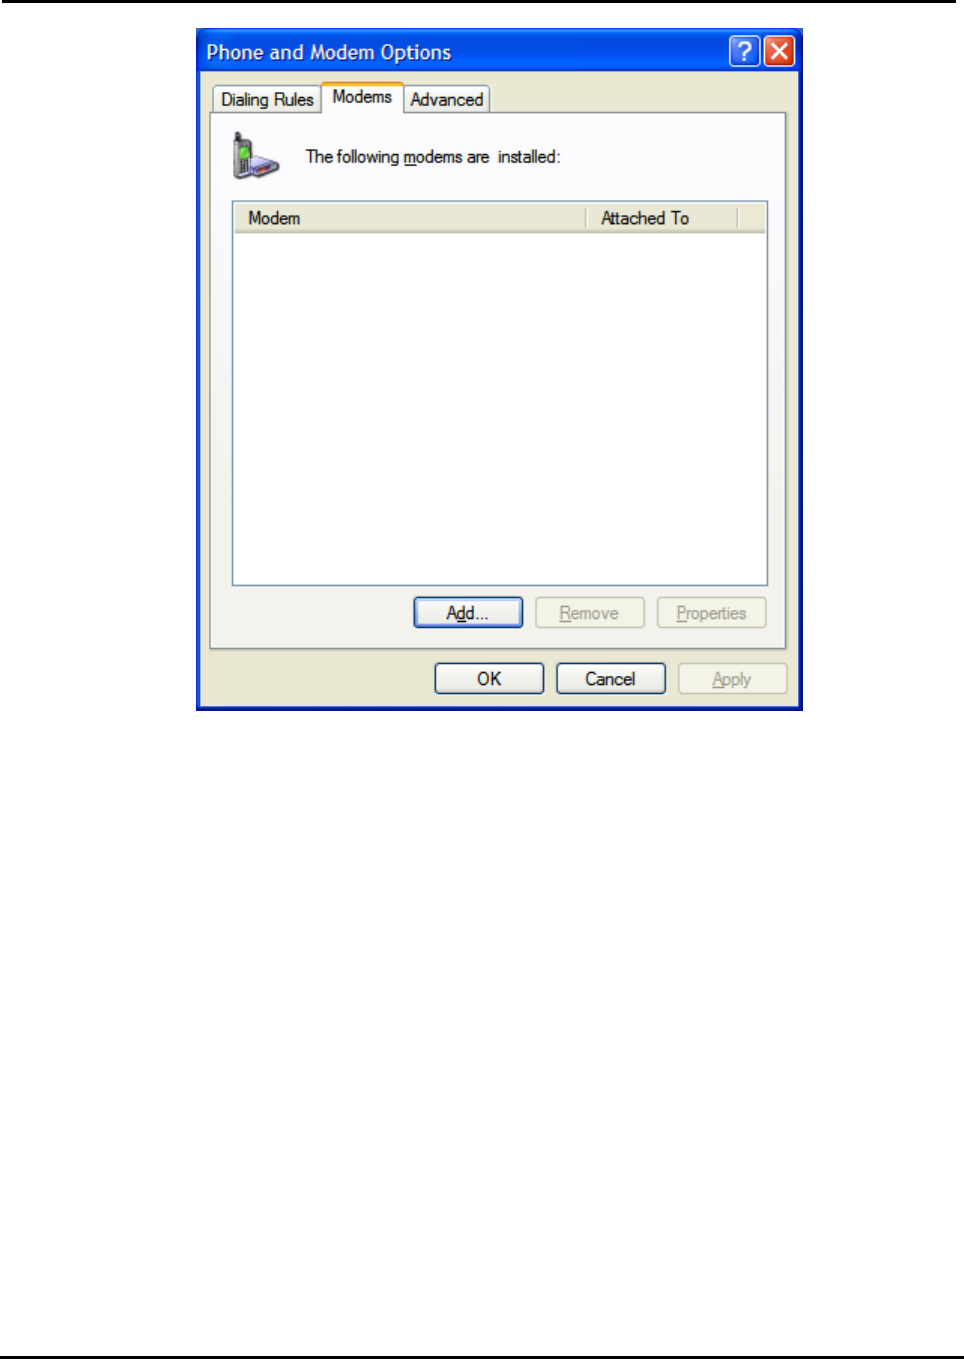
Air2Net Bluetooth Wireless Solutions
User Manual for Windows XP Working at the speed of thought.
AmbiCom, Inc Page 5 of 35 6/25/2002
2. Click Add to see Add/Remove Hardware Wizard, Check the checkbox Don’t detect my
modem I will select it from a list and click Next.
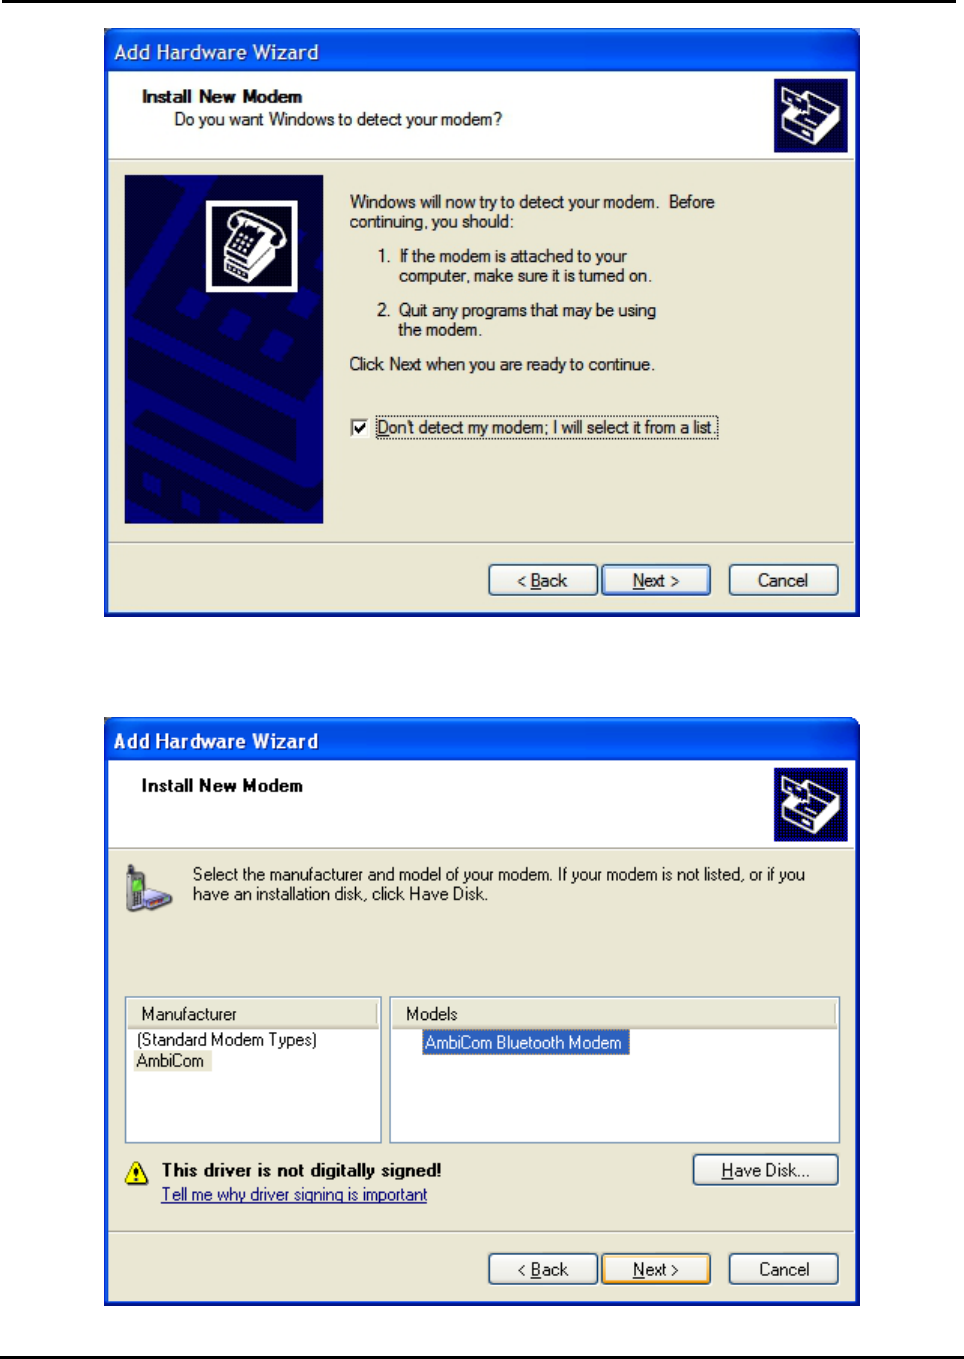
Air2Net Bluetooth Wireless Solutions
User Manual for Windows XP Working at the speed of thought.
AmbiCom, Inc Page 6 of 35 6/25/2002
3. After you click Next, the following window will appear. Select the AmbiCom as the Bluetooth
modem and click Next to continue.
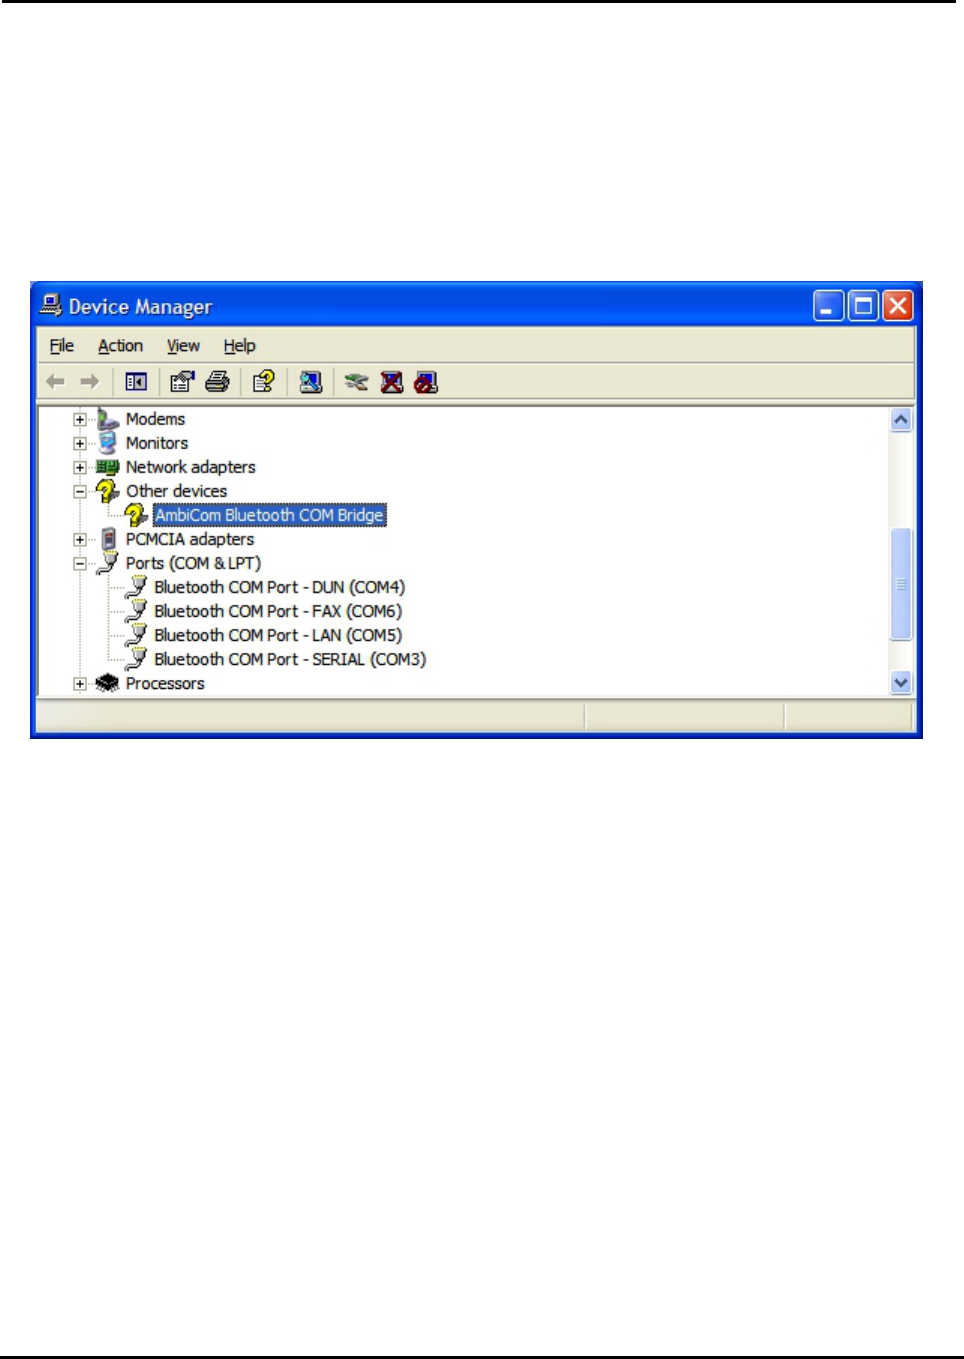
Air2Net Bluetooth Wireless Solutions
User Manual for Windows XP Working at the speed of thought.
AmbiCom, Inc Page 7 of 35 6/25/2002
Note: If you want to use this modem to perform Dial-Up networking with your Bluetooth cellular
phone, it’s possible some phones may not work properly. If it doesn’t work, you should contact
your cellular phone vendor for special modem driver.
4. After you click Next, the system will ask you which COM Port you will use. Before selecting,
you should go to Device Manager > Ports (COM & LPT) to find out which COM port is
associated with Bluetooth COM Port – DUN (assume COM 4 for DUN).
Refer to the above window to select the correct COM Port for your Bluetooth DUN modem.
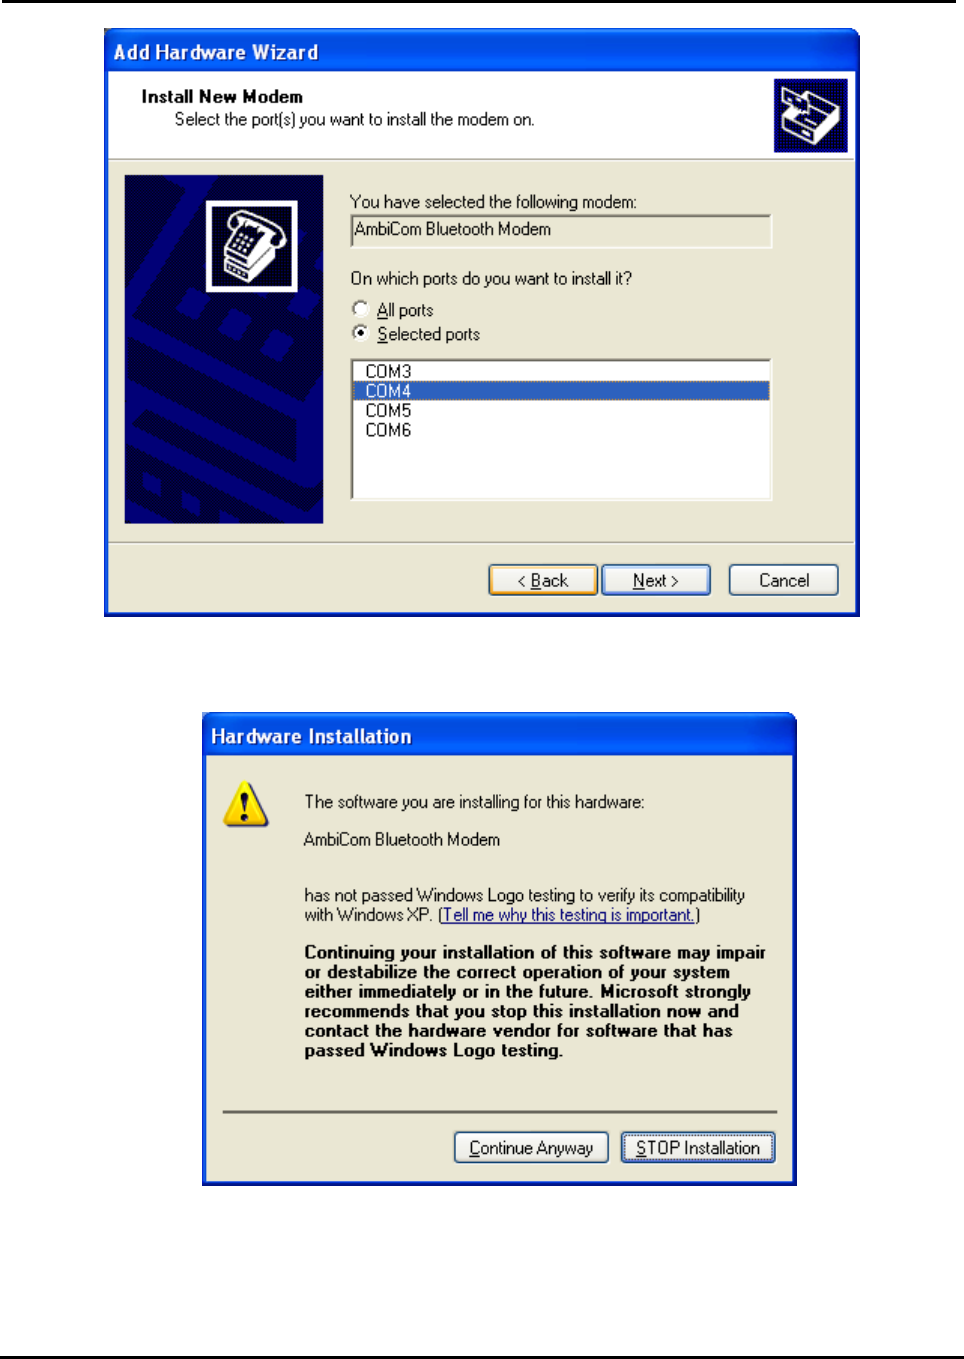
Air2Net Bluetooth Wireless Solutions
User Manual for Windows XP Working at the speed of thought.
AmbiCom, Inc Page 8 of 35 6/25/2002
After you click Next, the following window will appear.
5. Click Continue Anyway to complete the modem installation. After you installed the Bluetooth
Modem Ambicom Bluetooth Modem, you can treat it as a normal modem. Now, you are
ready to create a Dial-Up networking connection through the Bluetooth Phone/Modem.
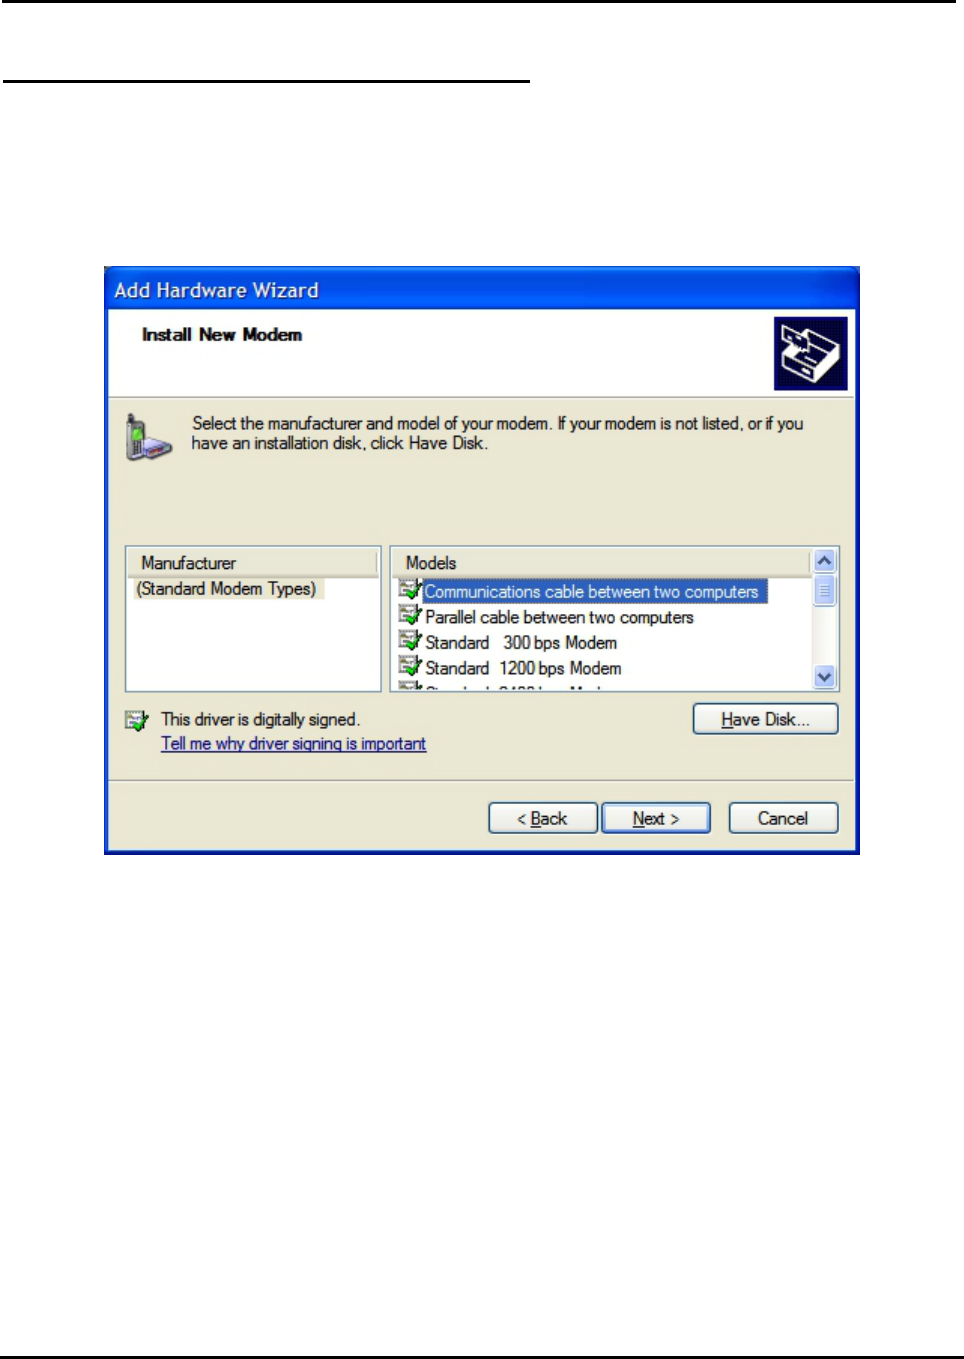
Air2Net Bluetooth Wireless Solutions
User Manual for Windows XP Working at the speed of thought.
AmbiCom, Inc Page 9 of 35 6/25/2002
Installation Procedures for LAN Access
6. For LAN Access, the installation procedure for modem is almost the same as Dial-Up
networking. The only difference is under Installing New Modem where you should select
Communications Cable between two computers instead.
7. Click Next to continue the installation.
8. After you click Next, the system will show a window asking you which COM Port you will use.
Before performing the selection, you should go to Device Manager to find out which COM port
is associated with Bluetooth COM Port - LAN.

Air2Net Bluetooth Wireless Solutions
User Manual for Windows XP Working at the speed of thought.
AmbiCom, Inc Page 10 of 35 6/25/2002
Refer to the above window to select the correct COM Port for your Bluetooth LAN modem.
9. After you install Communications cable between two computers, you are ready to create a
new network connection through LAN Access Point.
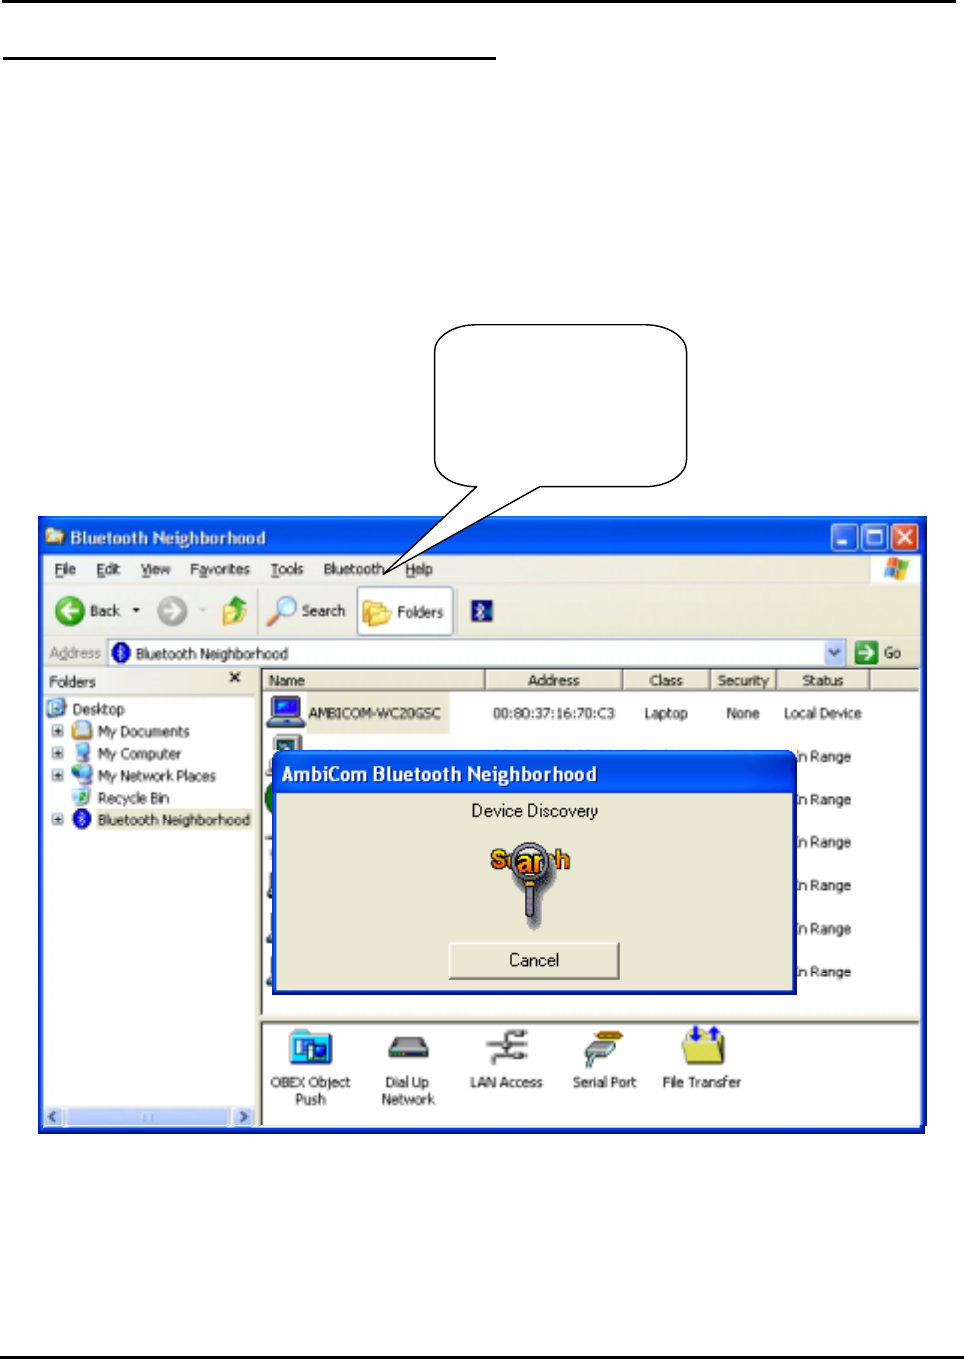
Air2Net Bluetooth Wireless Solutions
User Manual for Windows XP Working at the speed of thought.
AmbiCom, Inc Page 11 of 35 6/25/2002
How to Run Bluetooth Neighborhood
1. You can find a shortcut on the Desktop - Bluetooth Neighborhood.
2. Please go to the Windows Explorer, you will find an icon labeled Bluetooth Neighborhood.
Double-click on it to run Bluetooth Neighborhood. You can see a Bluetooth Neighborhood GUI
at the right-hand side of Windows Explorer, and the window Device Discovery will appear.
When all the Bluetooth devices within the range are found, the Device Discovery window will
disappear. The discovery process includes device discovery and name discovery.
3. After finding the devices, you can click on one of the devices and see what services that
device can provide. In the Device List Window (at the right-hand side of Windows Explorer),
the first device is always the local device.
This menu will give you
some action option about
Bluetooth, such as
“Service Discovery”,
”Device Discovery”,
“BlueChat” and etc.
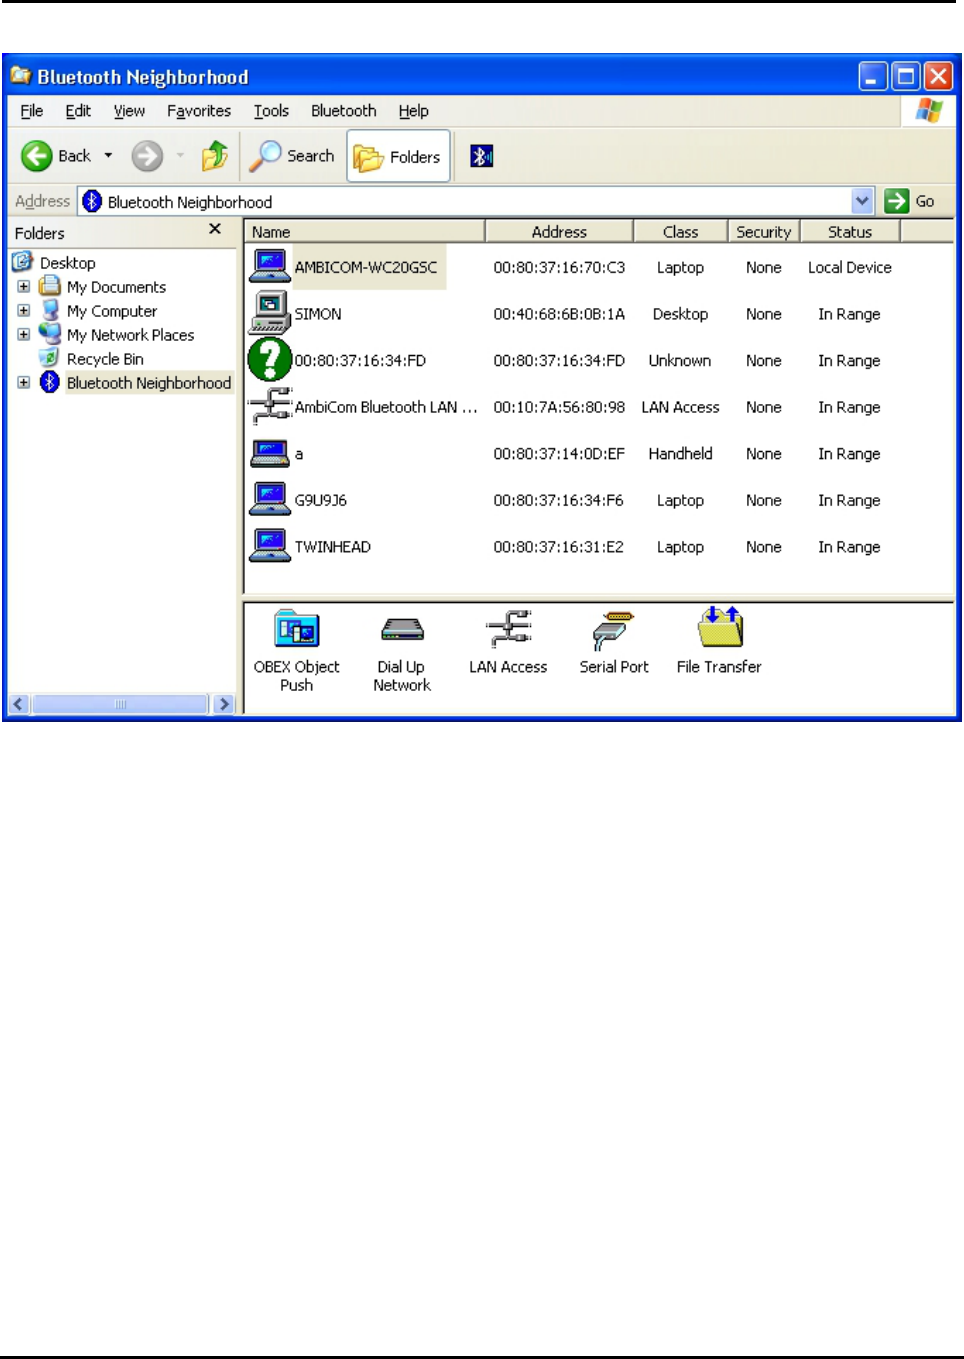
Air2Net Bluetooth Wireless Solutions
User Manual for Windows XP Working at the speed of thought.
AmbiCom, Inc Page 12 of 35 6/25/2002
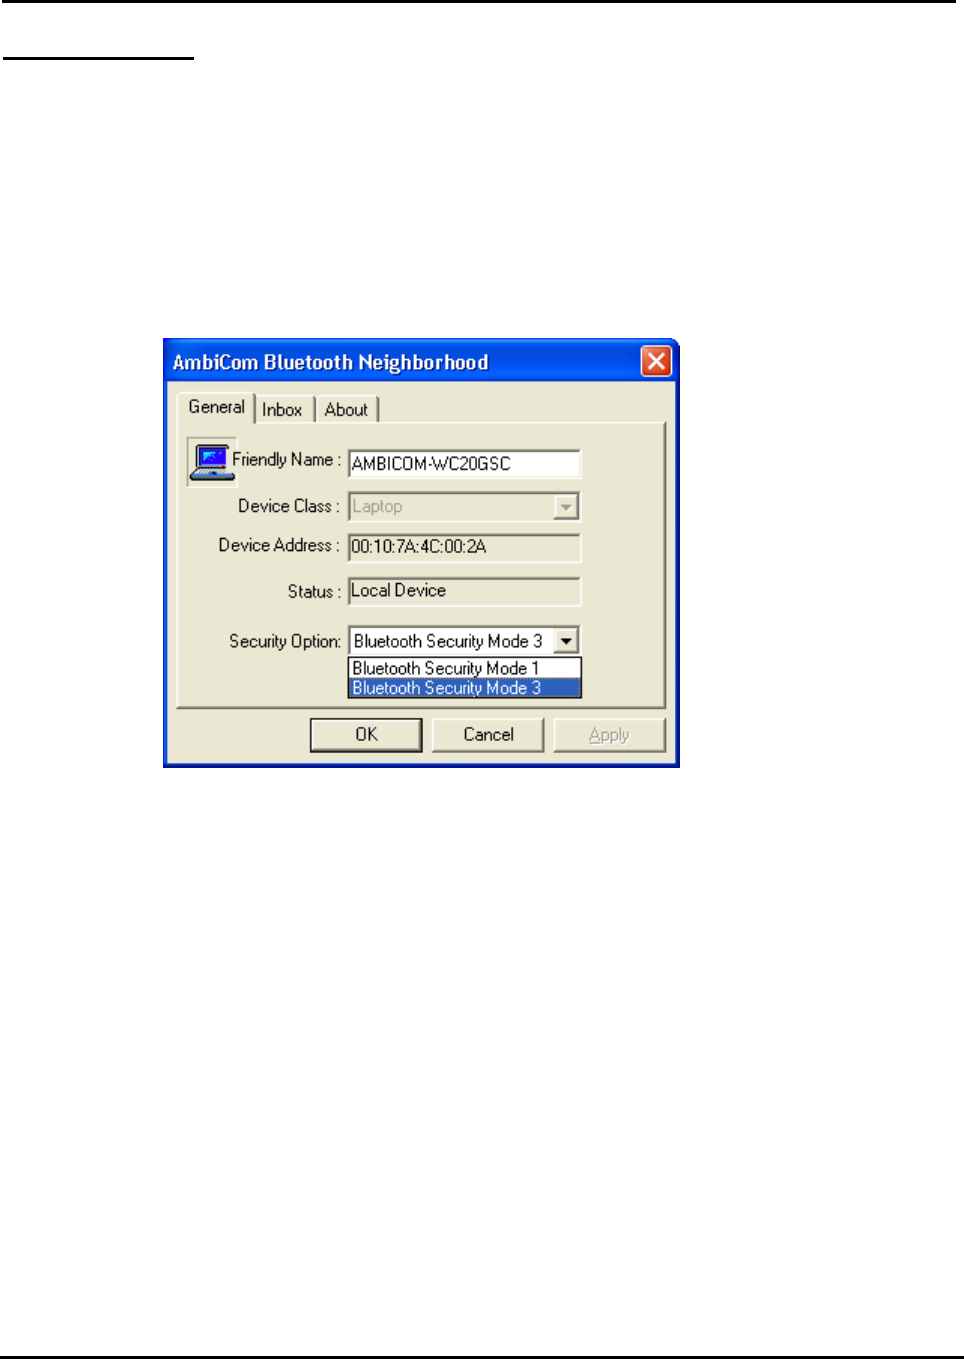
Air2Net Bluetooth Wireless Solutions
User Manual for Windows XP Working at the speed of thought.
AmbiCom, Inc Page 13 of 35 6/25/2002
Security Mode
1. Our software provides two levels of security mode: security level 1 and security level 3. At
security level 3, a PIN code will be required when other Bluetooth enabled devices try to
connect with you. The PIN code entered needs to be the exact same one entered on both
machines. This will give you more security. If you set your PC in security level 1, PIN codes
will not be needed.
2. Security levels can be set in Bluetooth Neighborhood. Select the local device, right-click it,
select Property and you will see the following window.
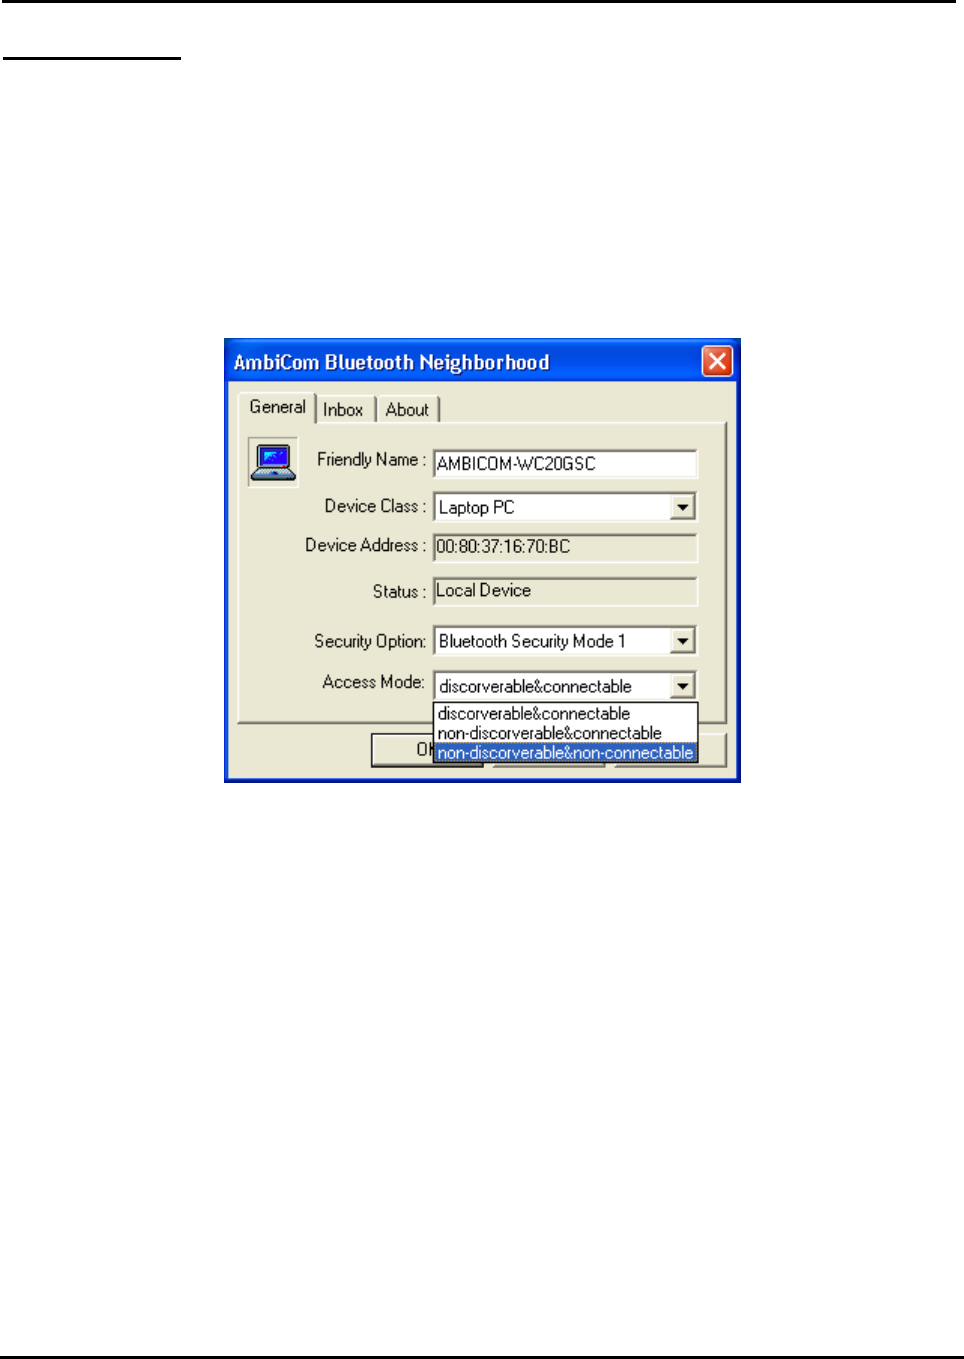
Air2Net Bluetooth Wireless Solutions
User Manual for Windows XP Working at the speed of thought.
AmbiCom, Inc Page 14 of 35 6/25/2002
Access Mode
1. Our software provides three options of access mode: discoverable&connectable, non-
discoverable&connectable and non-discoverable&non-connectable. At the discoverable&
connectable mode, you will allow other Bluetooth enabled devices to find and connect to you.
To run the other two options, you will allow them to find you, but cannot connect to you. Or
they cannot find you nor connect to you.
2. You can go to Bluetooth Neighborhood to set the Access mode. Choose the local device, right-
click it, select Property and you will see the following window.
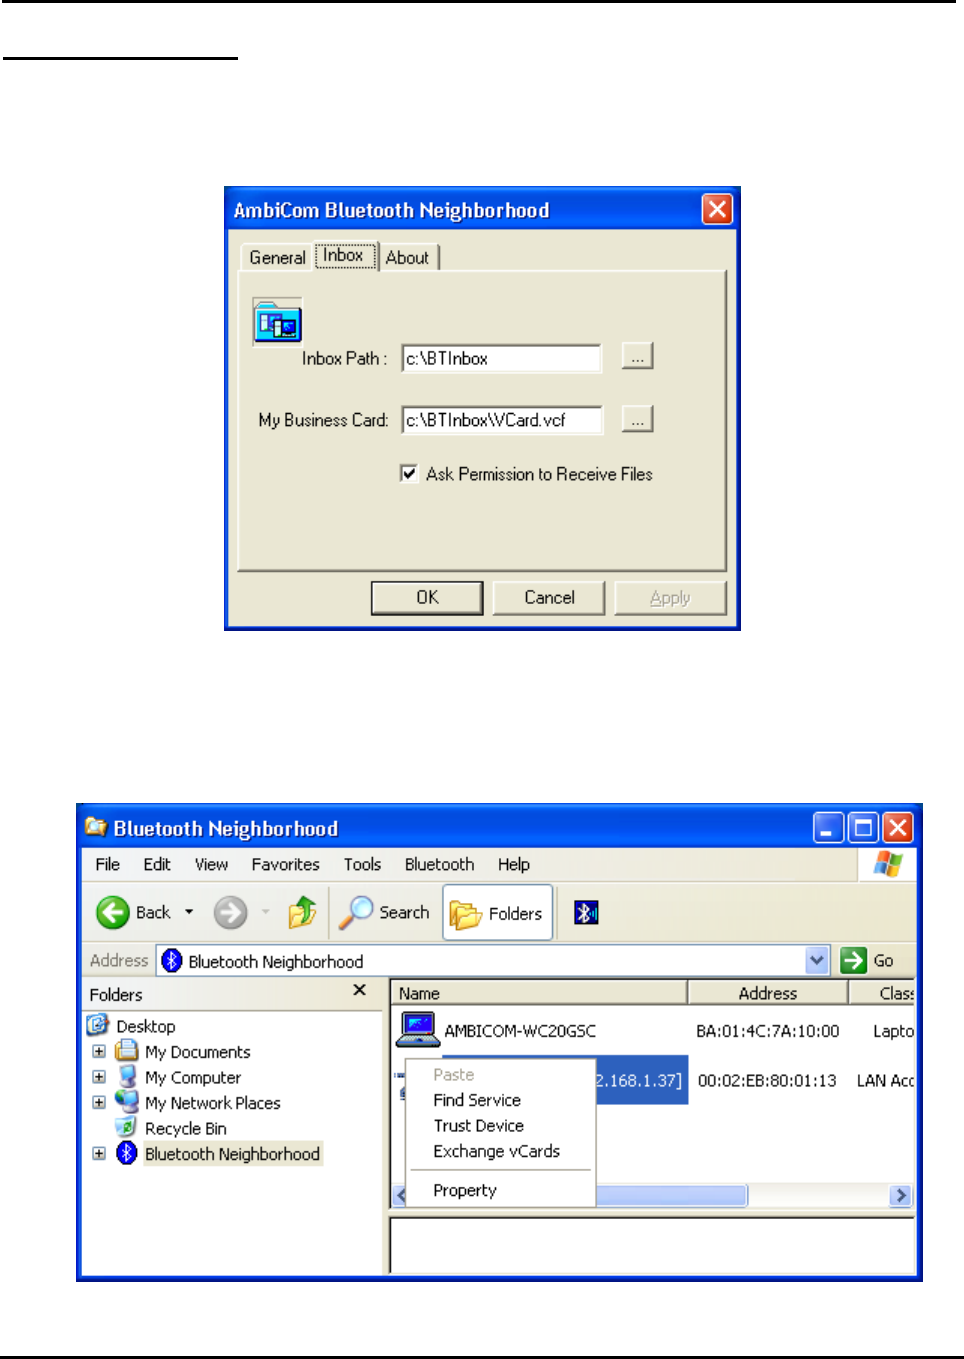
Air2Net Bluetooth Wireless Solutions
User Manual for Windows XP Working at the speed of thought.
AmbiCom, Inc Page 15 of 35 6/25/2002
Exchange vCards
1. When you perform Exchange vCard, you need go to the local device ‘s property to set up My
Business Card” path first, as shown in the following window. The default path is
“C:\BTInbox”.
2. Now you click the device that you want to exchange vCard with. You will see the following
window. Click Exchange vCards and you will send your business card to this device and vice
versa.
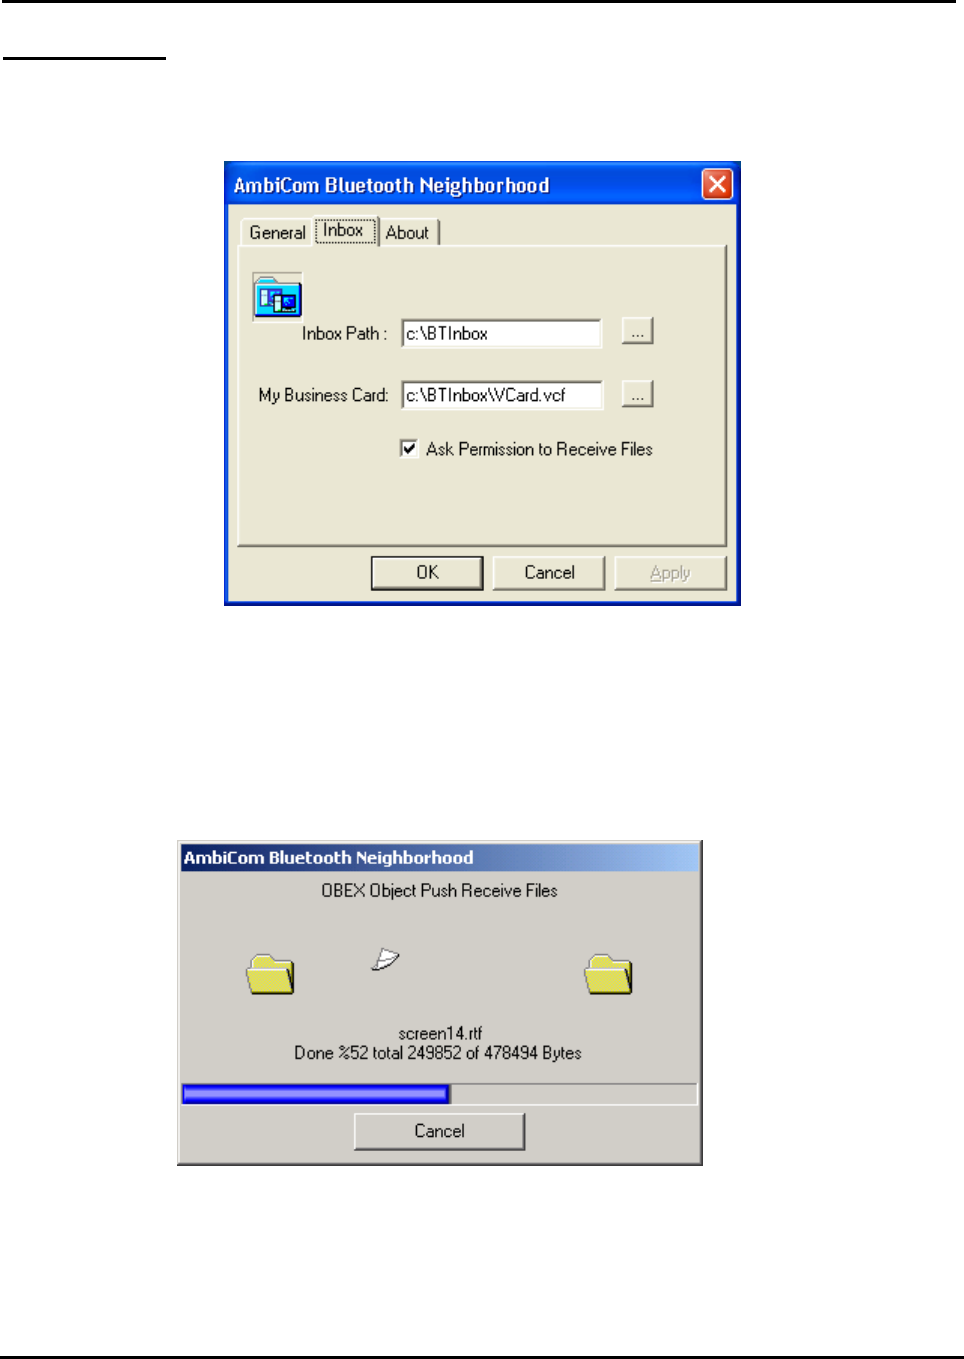
Air2Net Bluetooth Wireless Solutions
User Manual for Windows XP Working at the speed of thought.
AmbiCom, Inc Page 16 of 35 6/25/2002
Object Push
1. Before you execute Object Push, please set up your inbox path first. This directory will save
files that you receive. The default path is “C:\BTInbox”.
2. When you execute Object Push, simply Drag the file that you want to send, and Drop it to the
Bluetooth Device that you want to receive on the left-hand side in Windows Explorer. You also
can use Copy and Paste to do the object transfer between two Bluetooth devices. When you
perform Object Push, you will see a dialog box like the one below indicating the status.
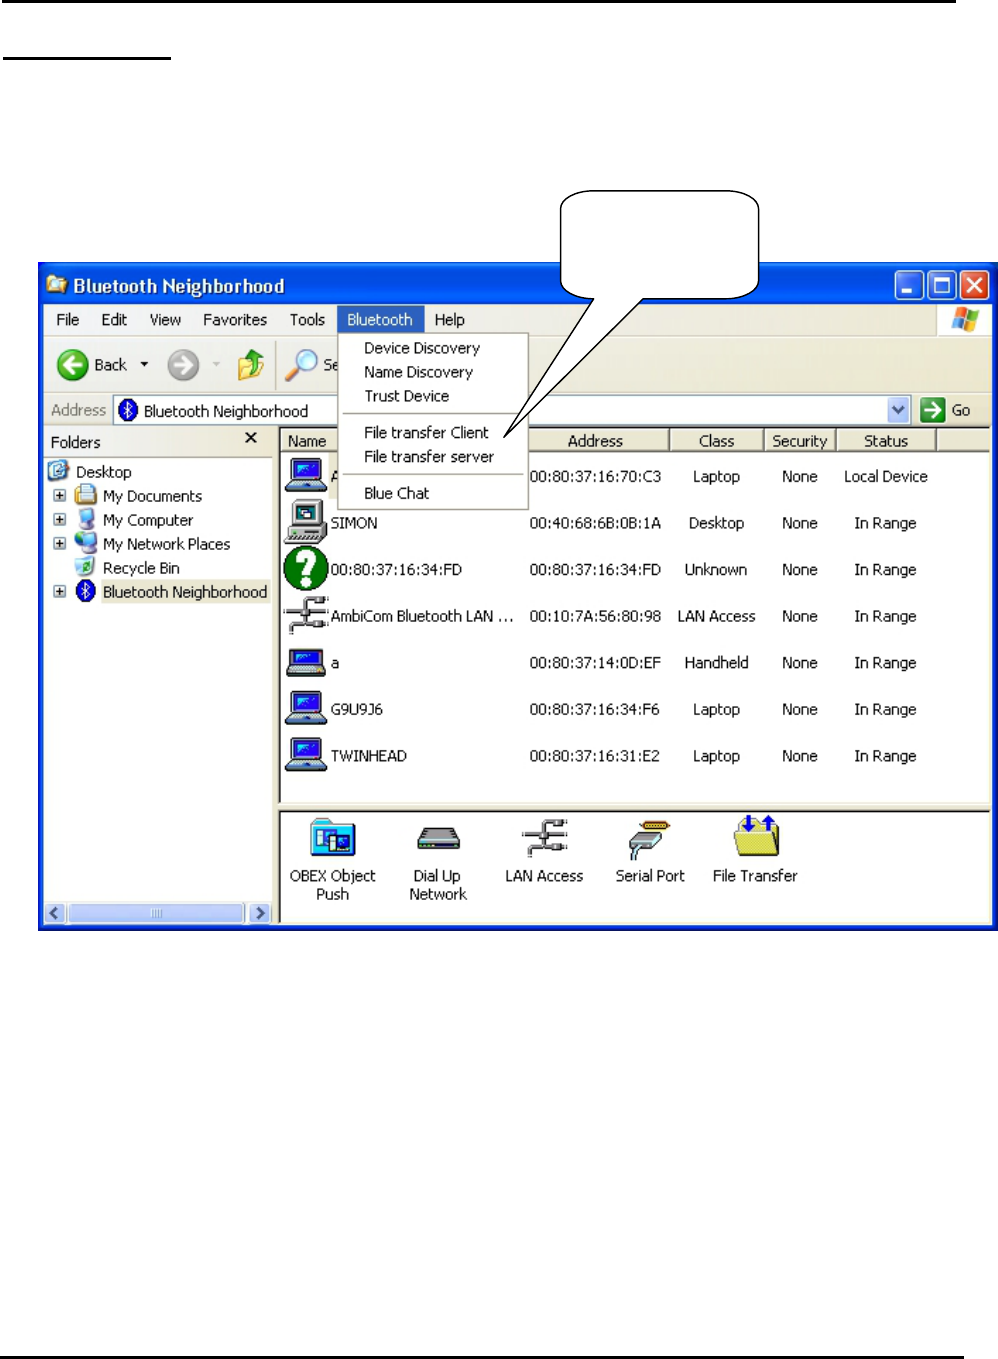
Air2Net Bluetooth Wireless Solutions
User Manual for Windows XP Working at the speed of thought.
AmbiCom, Inc Page 17 of 35 6/25/2002
File Transfer
1. To execute File Transfer, open Windows Explorer, select Bluetooth on the menu bar and click
on File Transfer Client or File Transfer Server. To have File transfer working on both ends,
the application on the remote computer also needs to run File transfer at the same time.
Click it to run
File Transfer
Client or Server
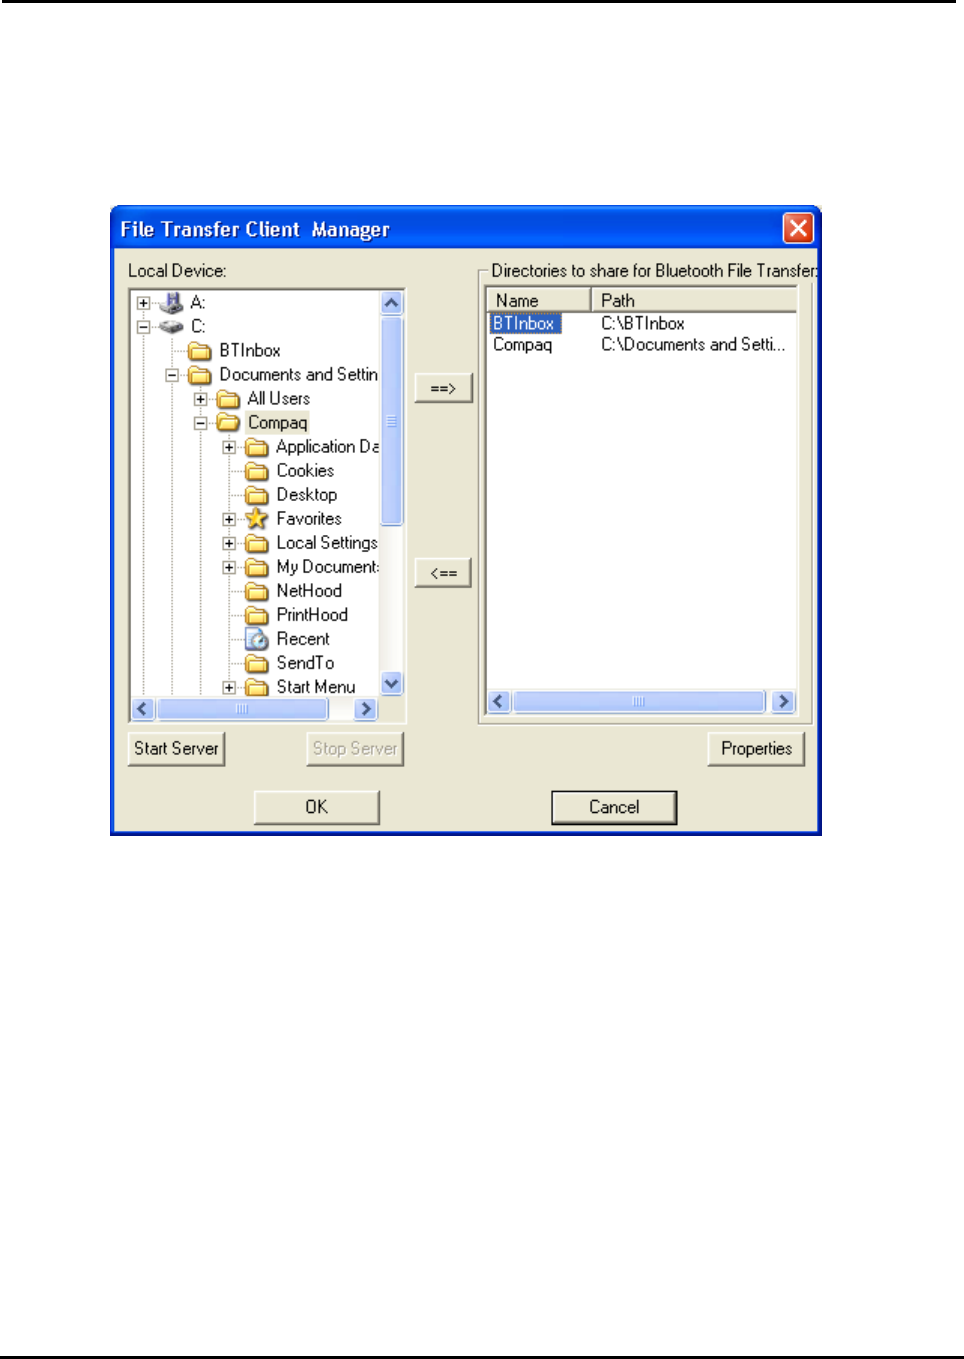
Air2Net Bluetooth Wireless Solutions
User Manual for Windows XP Working at the speed of thought.
AmbiCom, Inc Page 18 of 35 6/25/2002
2. The following window shows the File Transfer Server. In the File Transfer Server, you can
select the directory or file on the left-hand side of the window, and share it by using the arrow
button to transfer it to the right side of window. The directory or files in the right-hand side of
the window are those that have been shared for the File Transfer Client to use.
3. After you share the directory and files, you can select them and click the Properties button to
configure those directory or files.
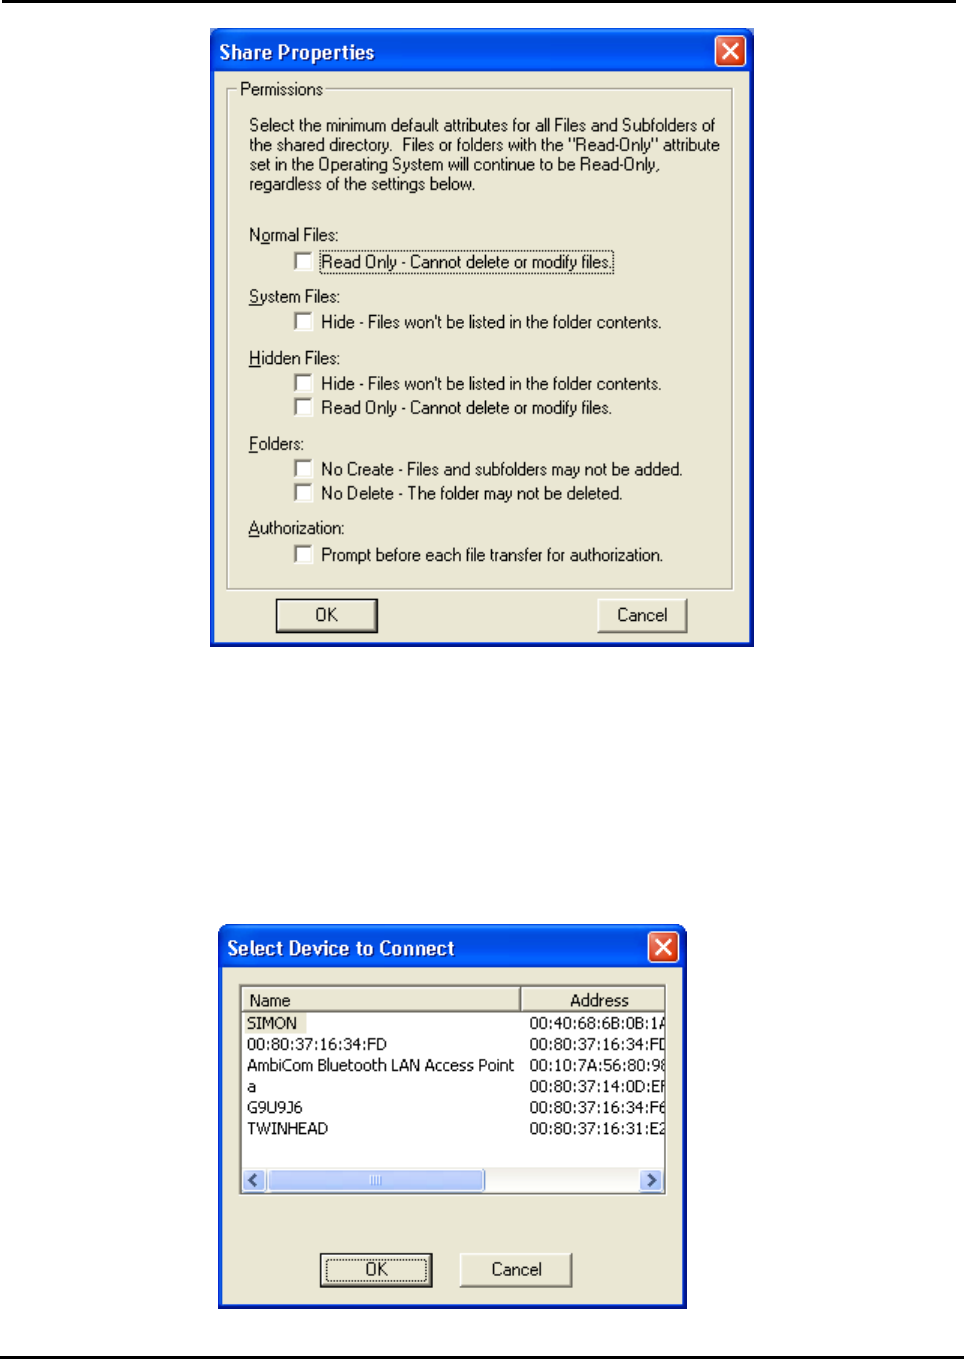
Air2Net Bluetooth Wireless Solutions
User Manual for Windows XP Working at the speed of thought.
AmbiCom, Inc Page 19 of 35 6/25/2002
In this window, you can define the attribute of the directory or file that you shared, give the
permission for the “File Transfer Client “ to use.
4. When you click on the File Transfer Client menu to run it, the system will show a Select
Device to Connect window for you to choose which device you want to connect.
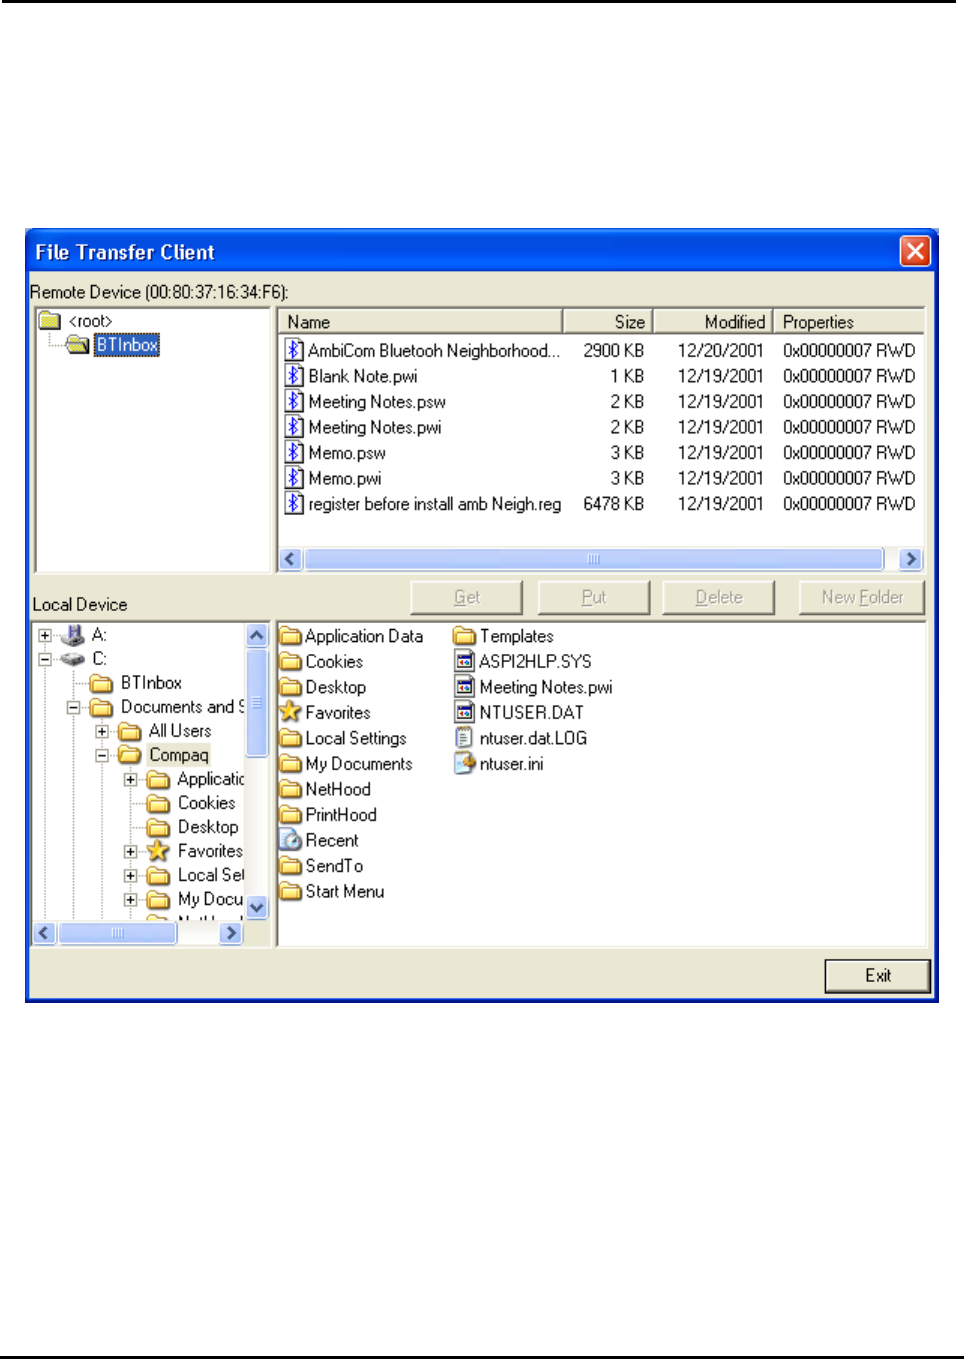
Air2Net Bluetooth Wireless Solutions
User Manual for Windows XP Working at the speed of thought.
AmbiCom, Inc Page 20 of 35 6/25/2002
5. After you select the remote device that runs the File Transfer Server, the following window will
appear. You will see the directory and file shared by the File Transfer Server. You can get file
or directory from the File Transfer Server or place file or directory to the File Transfer Server.
Also, you can create new folder in the Shared Directory from File Transfer Server.
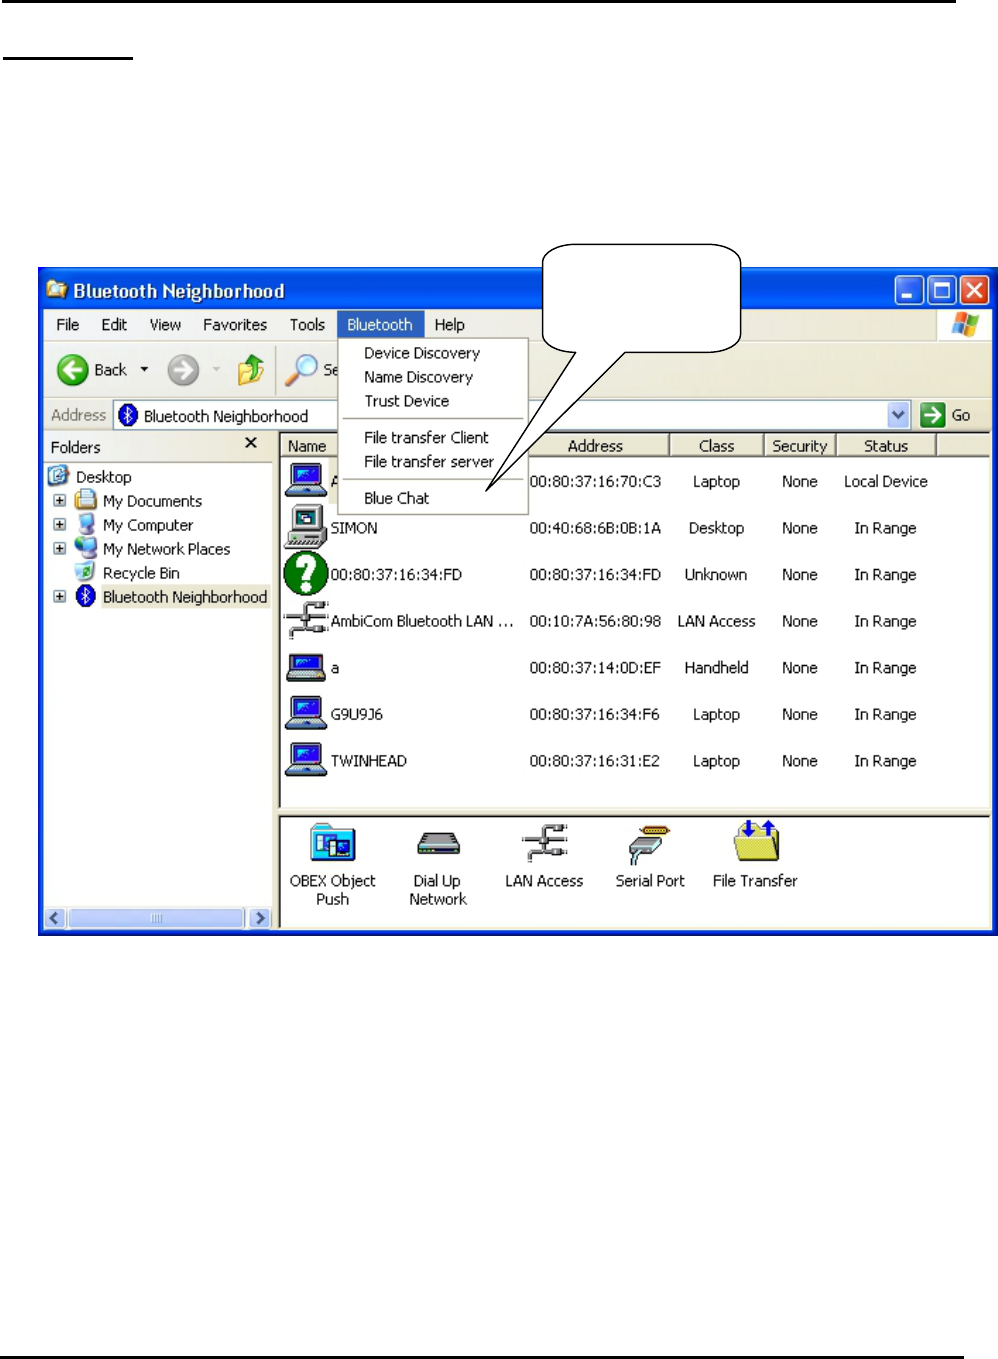
Air2Net Bluetooth Wireless Solutions
User Manual for Windows XP Working at the speed of thought.
AmbiCom, Inc Page 21 of 35 6/25/2002
Blue Chat
1. To execute Blue Chat, click Blue Chat on the Bluetooth Menu on Windows Explore Menu
bar. To have Blue Chat working on both ends, the application on remote computer also needs
to run Blue Chat at the same time.
Click it to run
Blue Chat
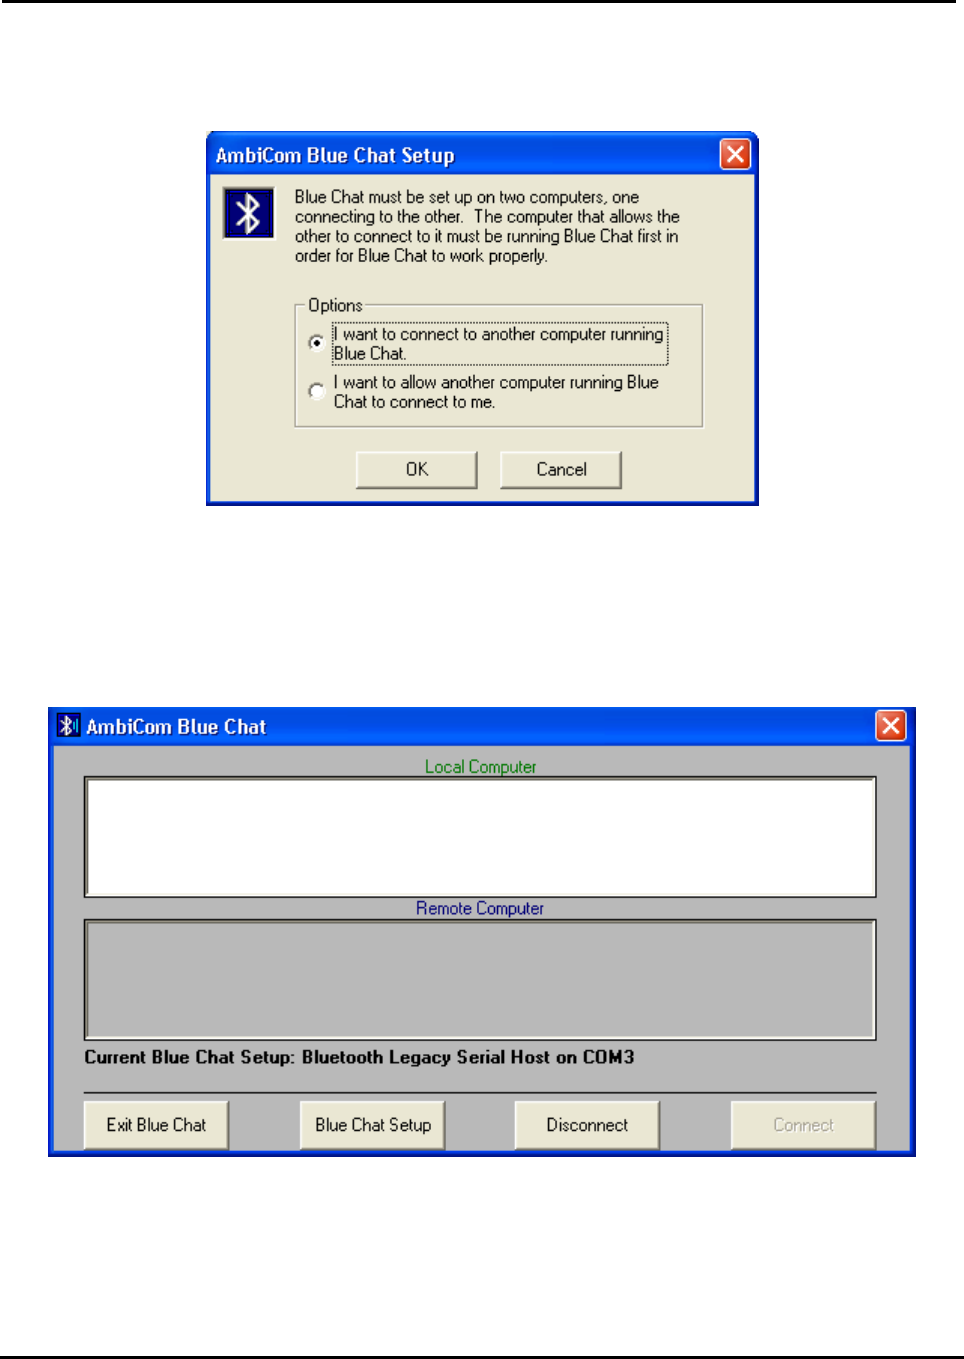
Air2Net Bluetooth Wireless Solutions
User Manual for Windows XP Working at the speed of thought.
AmbiCom, Inc Page 22 of 35 6/25/2002
2. After you click on Blue Chat, the following window will appear.
3. In the above window, two options are shown. You can either choose to connect to someone or
wait for connection. If you want other people to communicate with you, simply check the lower
checkbox, click OK and the following window will appear.
4. If you want to connect to a remote device, check the upper checkbox. Click OK, the following
window will appear.
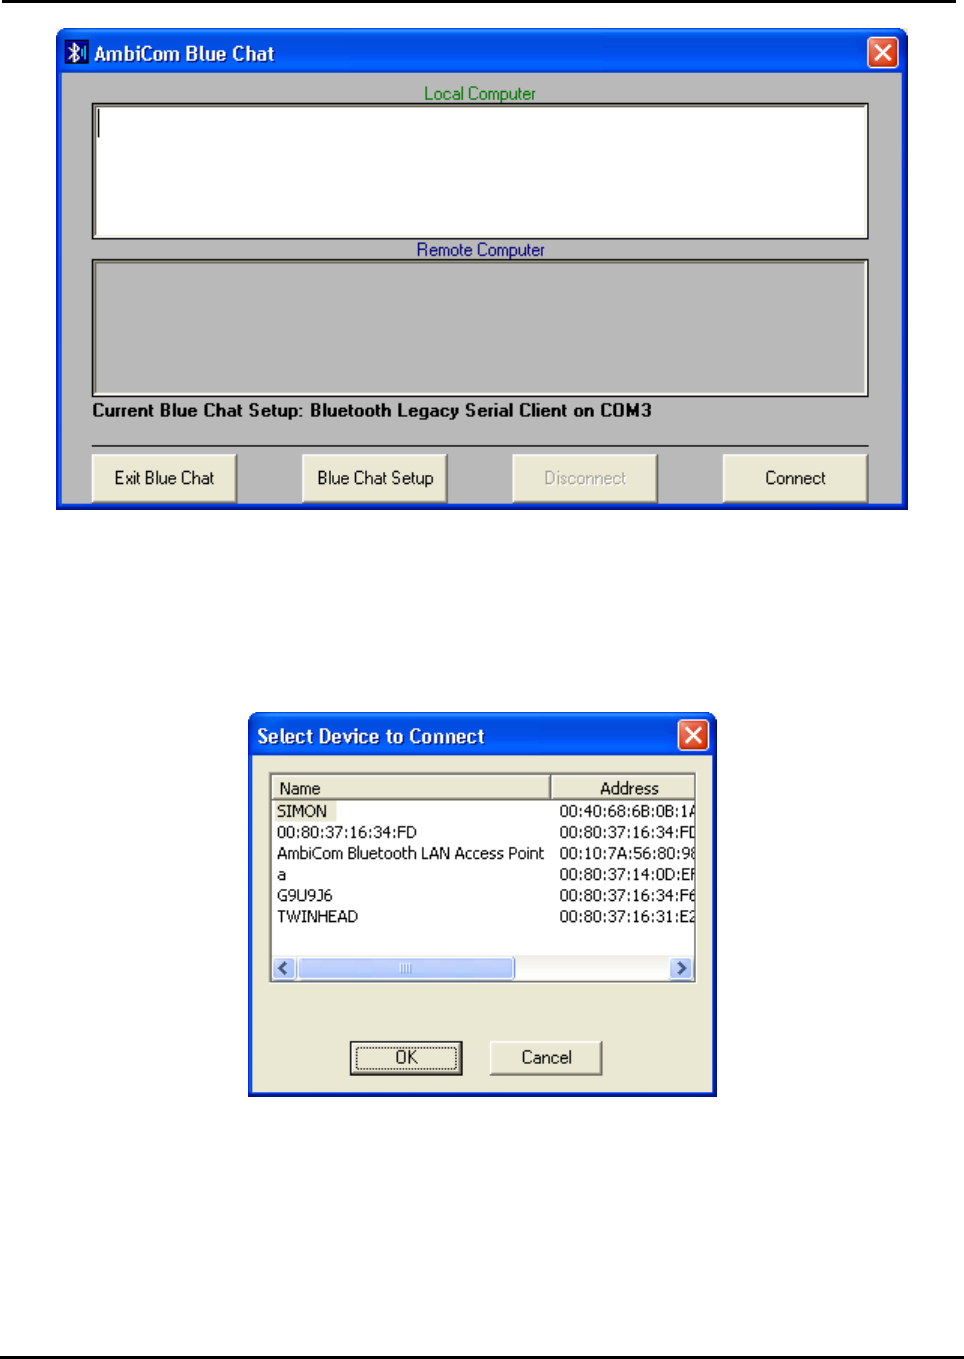
Air2Net Bluetooth Wireless Solutions
User Manual for Windows XP Working at the speed of thought.
AmbiCom, Inc Page 23 of 35 6/25/2002
5. Click Connect, you will see the following window from which you can select the device you
wish to connect.
6. Select a Bluetooth Device you wish to connect, and click OK. The two Bluetooth devices now
can connect to each other. You can type any text messages within Local Computer window
and you can see the messages from the Remote Computer as well.
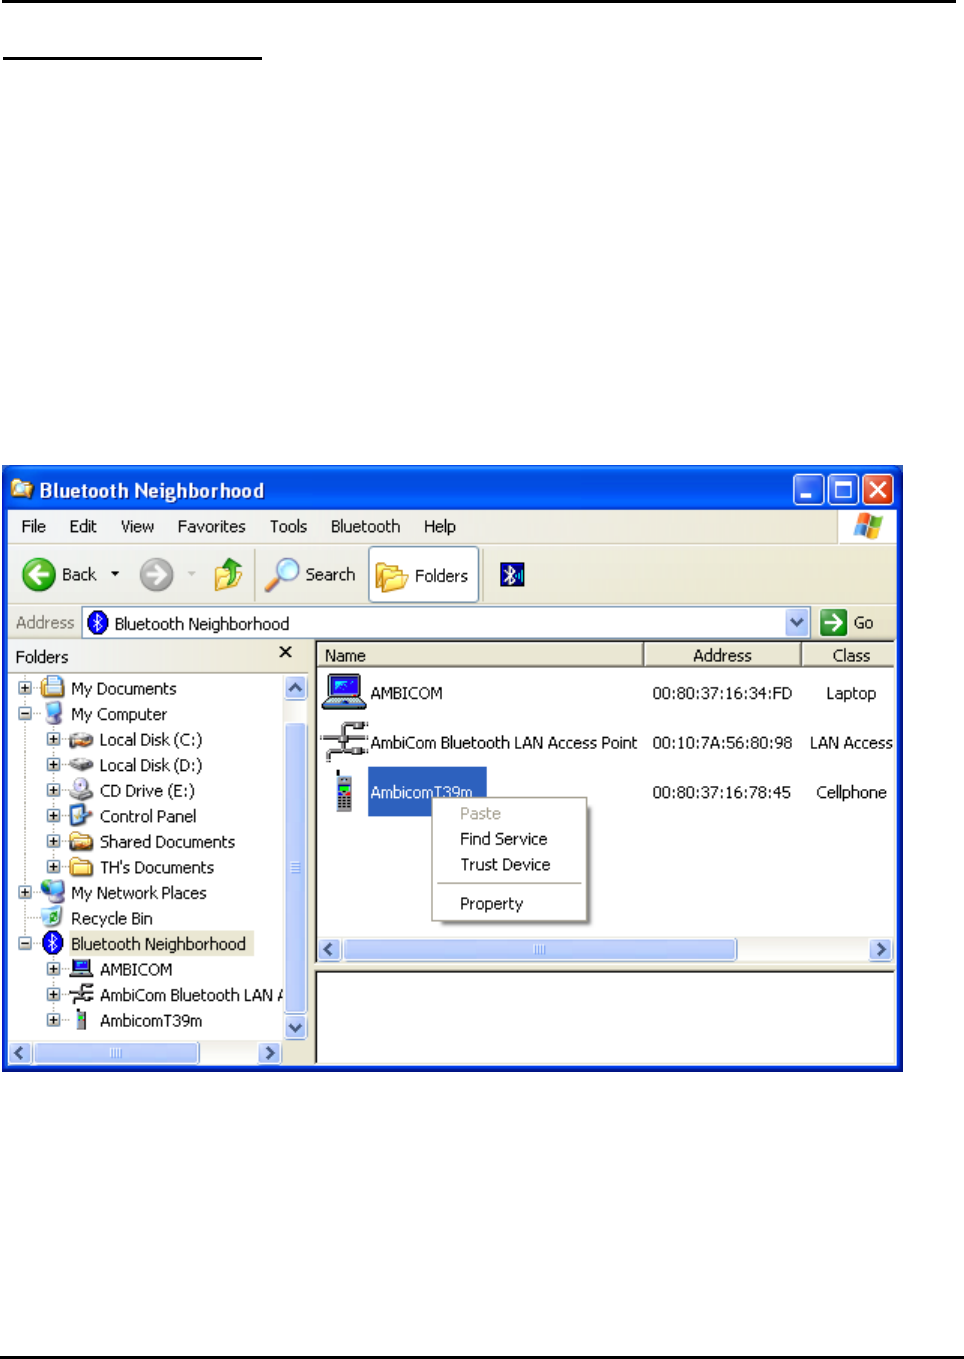
Air2Net Bluetooth Wireless Solutions
User Manual for Windows XP Working at the speed of thought.
AmbiCom, Inc Page 24 of 35 6/25/2002
Dial-Up Networking
Note:
For some Bluetooth enabled devices such as Cellular Phones, before you perform Dial-up,
you need to execute Trust Device first. The following window shows you how to do so. For
phone configuration, you need set it to the Ready to pair mode. You can refer the phone
manual. After you paired your phone with the Bluetooth device, the software will remember the
trust profile. You don’t need to do this every time when you execute the Dial-up networking.
On Ericsson Cell Phone
Select menu Extra > Bluetooth> Paired devices > Add devices > Phone Accepts
Click Yes to assign the phone name and will show Ready to pair mode
On the computer
After discover the phone, right click on the mouse and choose Trust Device.
Insert the password.
On Ericsson Phone
• Click Yes on the phone to Add to paired devices > insert the Password click yes
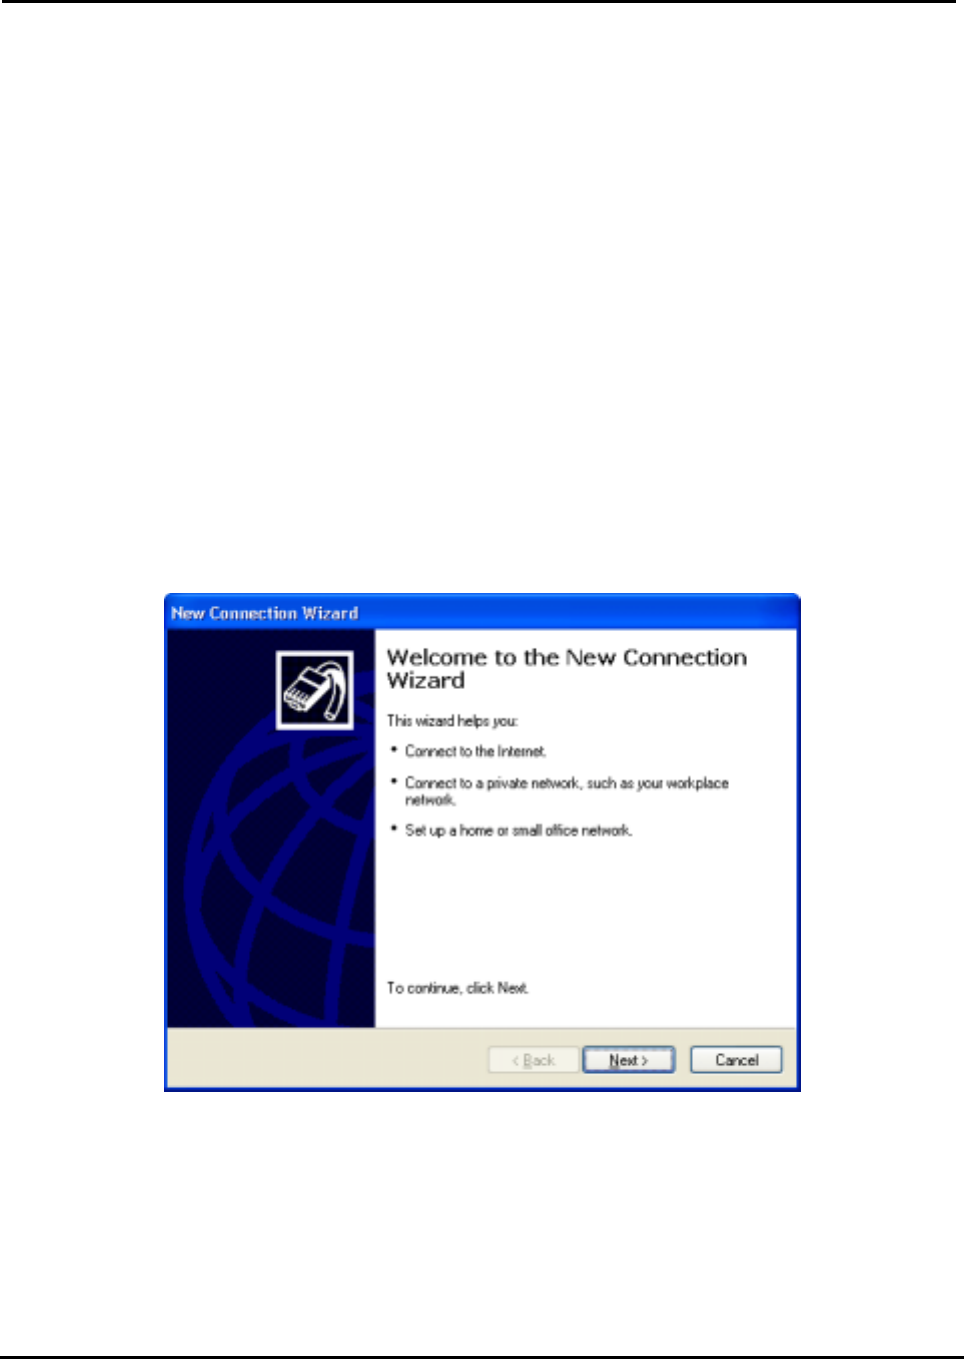
Air2Net Bluetooth Wireless Solutions
User Manual for Windows XP Working at the speed of thought.
AmbiCom, Inc Page 25 of 35 6/25/2002
On Computer
• Insert the PIN number in the computer (the same that you inserted the password on the
phone)
On Phone
• Show Pairing successful
On Computer
• Change the status to Trusted in the Bluetooth Neighborhood
The requirement to set up Dial-up Networking is to provide the Internet Service Provider
information (ISP); user name, password, and the phone number.
1. For Dial-Up Networking, please go to Control Panel and find Network Connections to create
a new connection. When you create the new connection for the Dial-Up networking, please
use the AmbiCom Bluetooth Modem that you installed earlier. If you haven’t installed that
modem, please refer to the Installation section. Continue the process by click Next.
2. Choose the option “Connect to the network at my workplace”. Click Next.
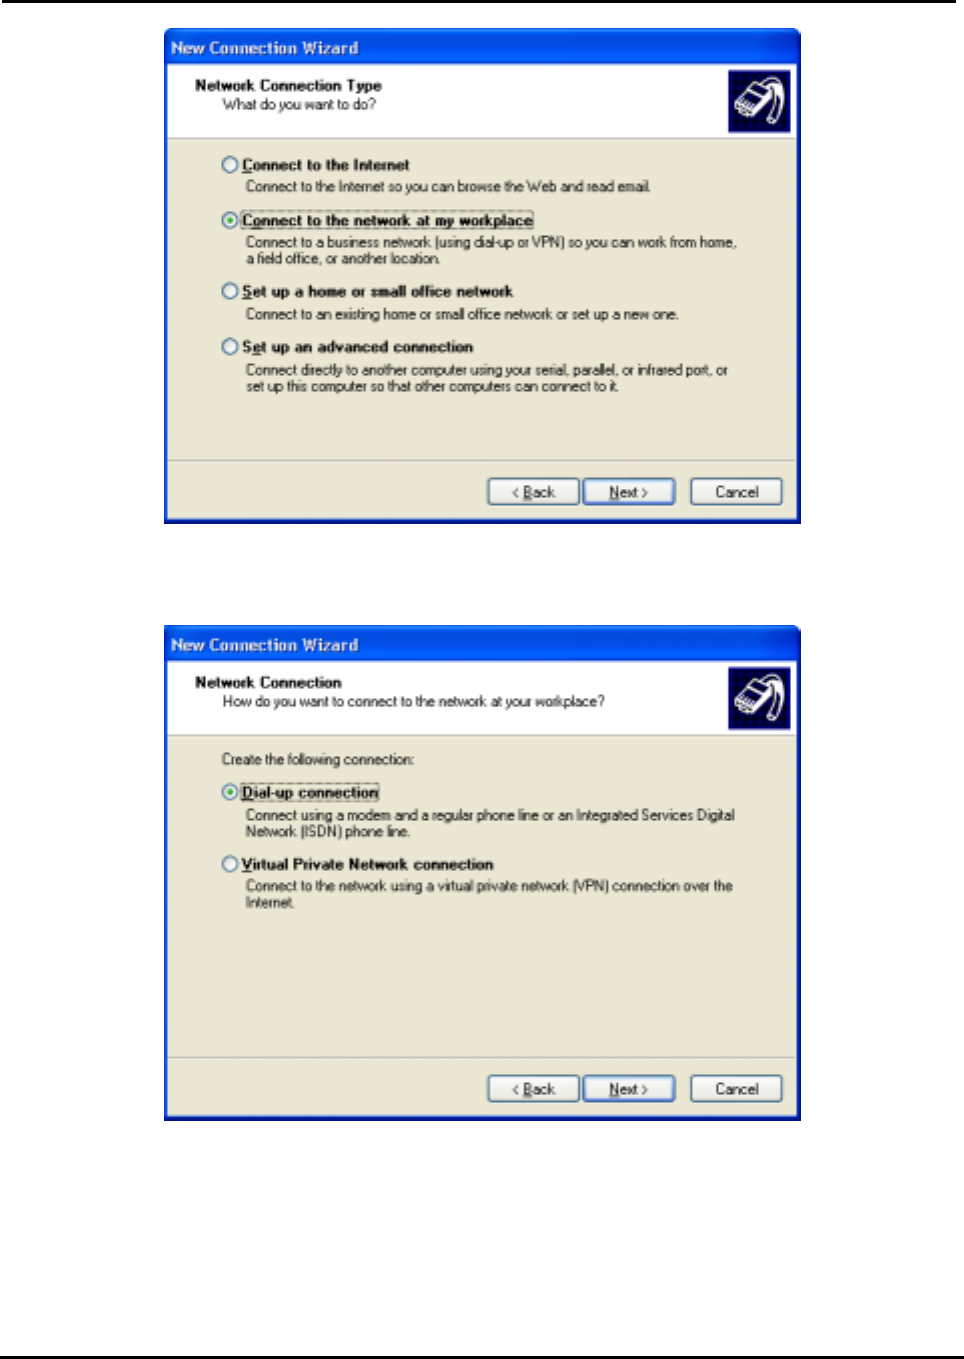
Air2Net Bluetooth Wireless Solutions
User Manual for Windows XP Working at the speed of thought.
AmbiCom, Inc Page 26 of 35 6/25/2002
3. Choose “Dial-up connection” option and then click Next.
4. Ensure that Modem Ambicom Bluetooth Modem (Assume Com4 is checked mark). Click Next.
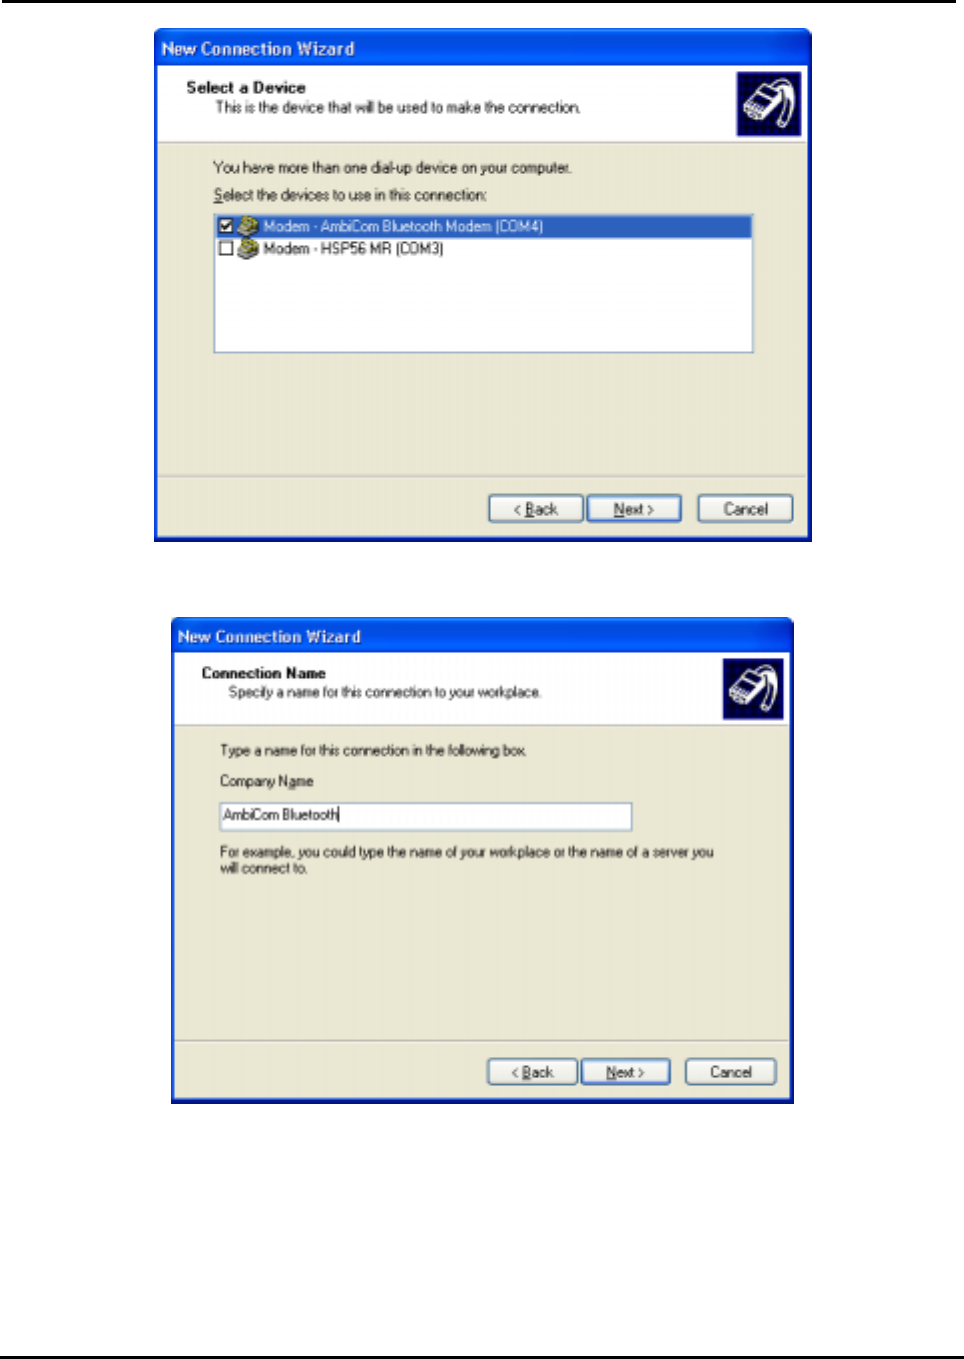
Air2Net Bluetooth Wireless Solutions
User Manual for Windows XP Working at the speed of thought.
AmbiCom, Inc Page 27 of 35 6/25/2002
5. Specify the name of Application. Click Next.
6. Insert the Internet Service Provider (ISP)’s phone number. Click Next.
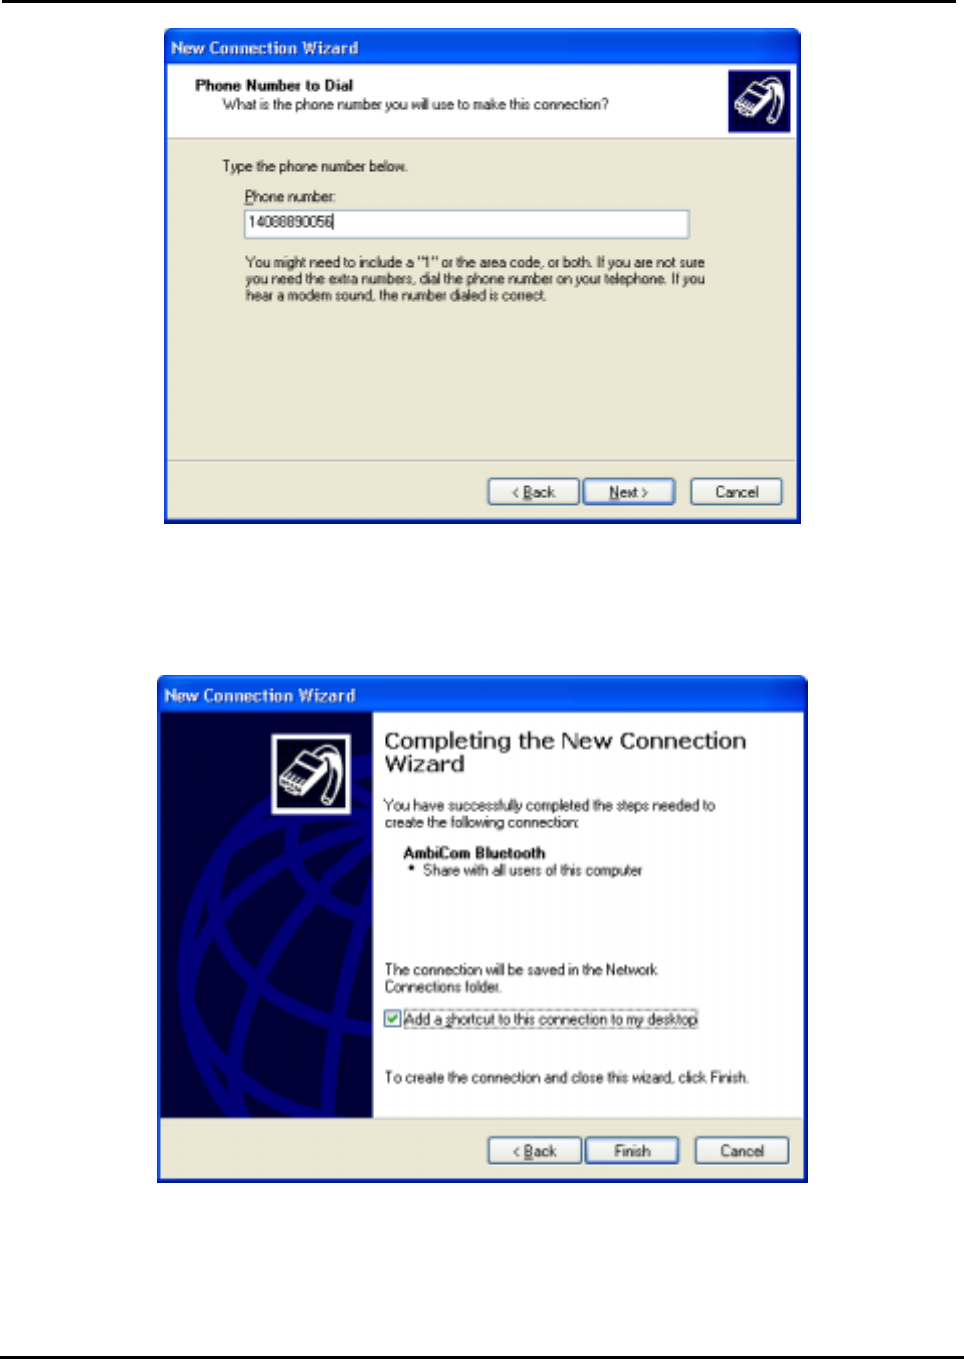
Air2Net Bluetooth Wireless Solutions
User Manual for Windows XP Working at the speed of thought.
AmbiCom, Inc Page 28 of 35 6/25/2002
7. Check if the column box (recommended) if you want to add this connection to the desktop.
Click Finish.
8. After you have created a new connection, you should run AmbiCom Bluetooth Neighborhood
application first. It will find the Bluetooth devices within the range. If you find devices such as
Bluetooth phone/modem or Dial-Up Networking Access point, you can start the connection you
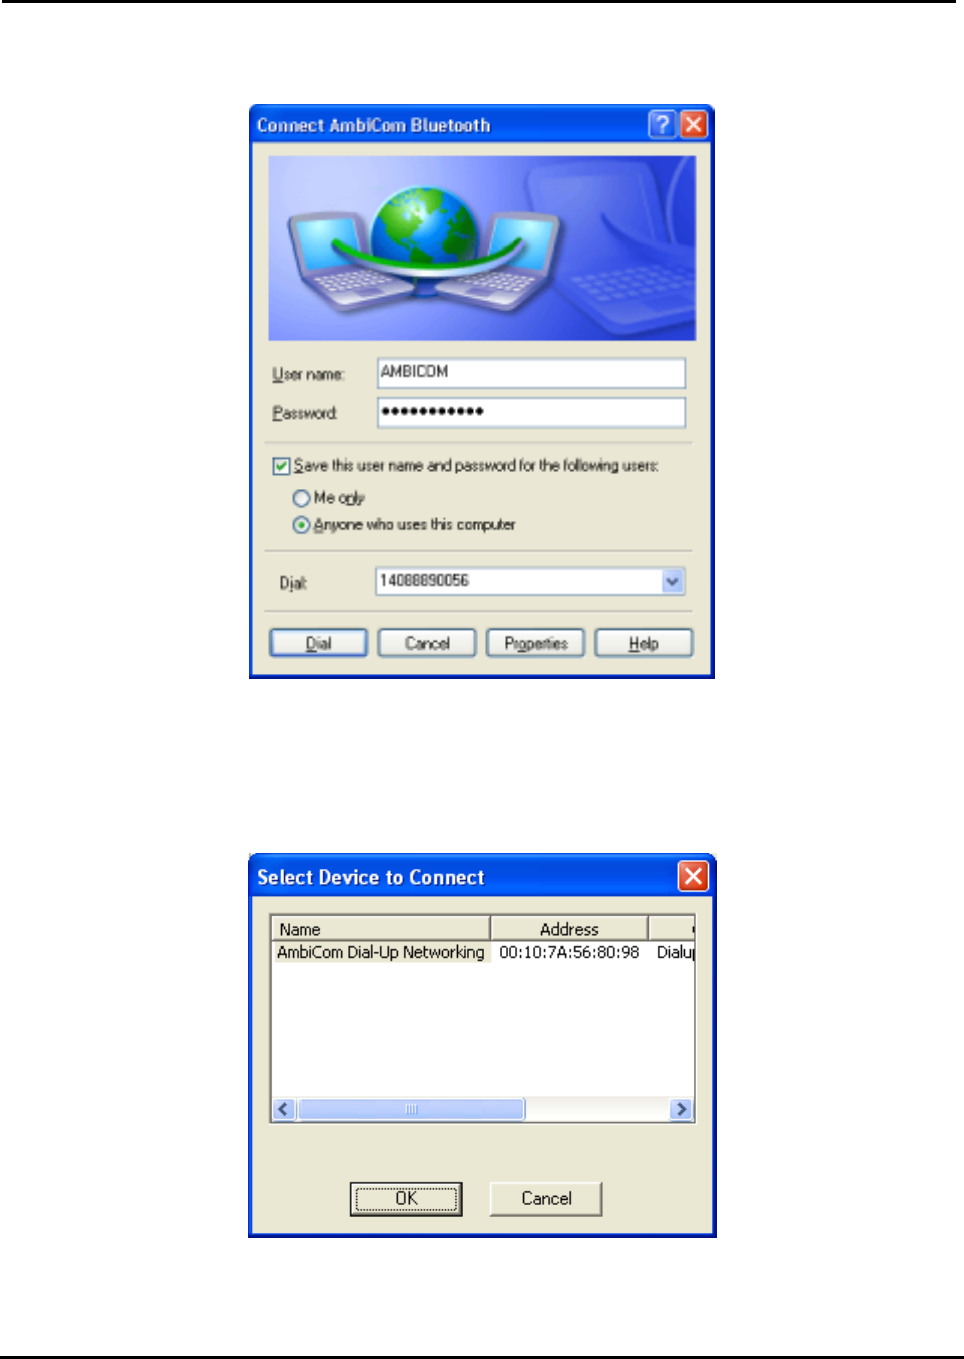
Air2Net Bluetooth Wireless Solutions
User Manual for Windows XP Working at the speed of thought.
AmbiCom, Inc Page 29 of 35 6/25/2002
just created by clicking the AmbiCom Bluetooth in your desktop, the system will show the
following window.
9. Click Dial, a window will appear for you to select the Phone, which Bluetooth device you want
to connect.
10. In the above window, select AmbiCom Bluetooth Dial-Up Networking (the phone name) and
click OK to make an Internet connection to ISP.
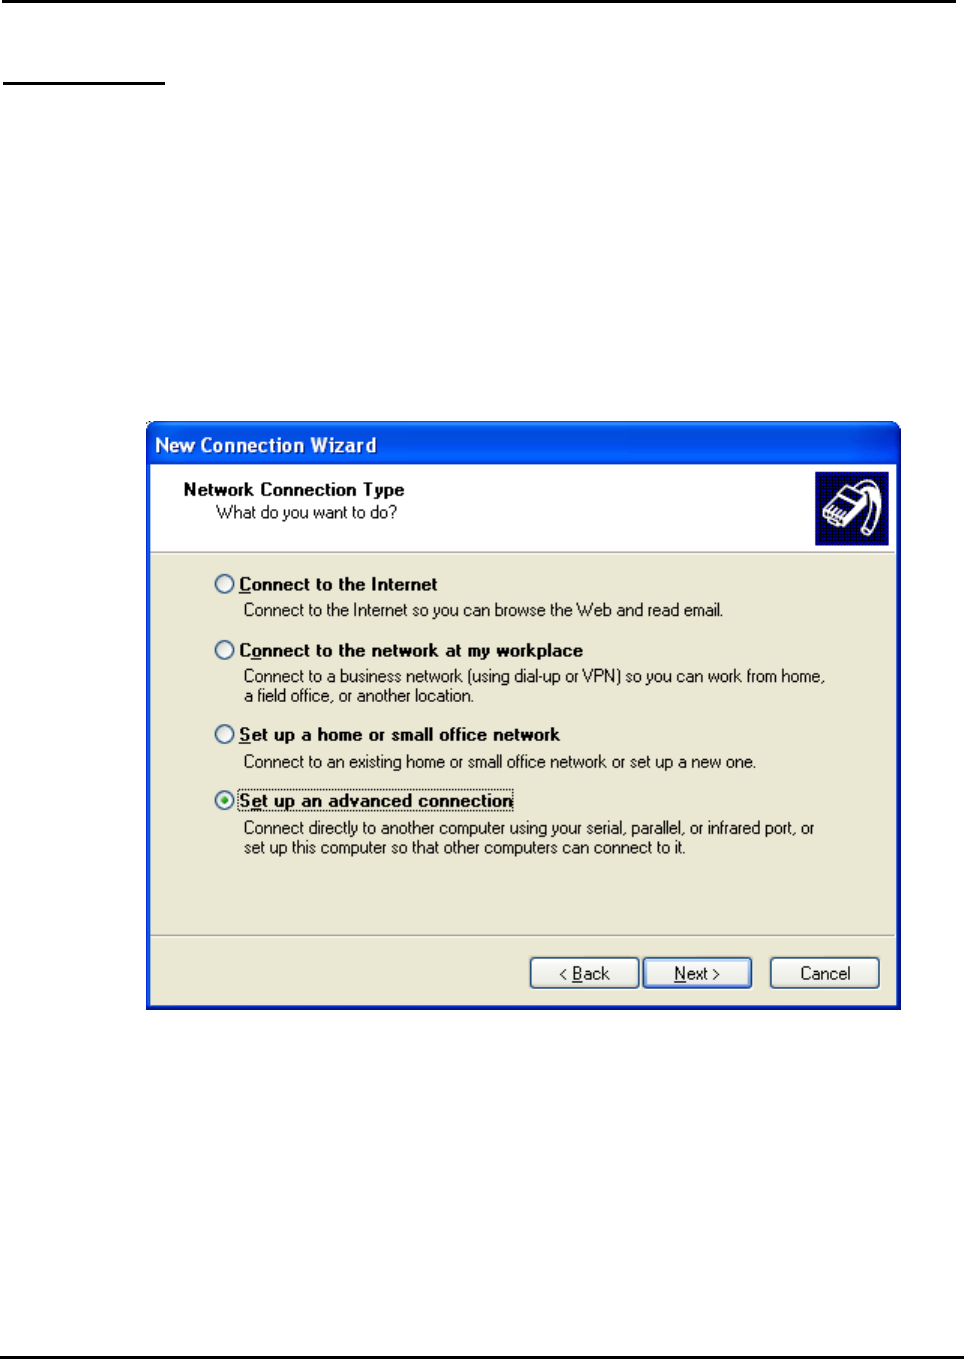
Air2Net Bluetooth Wireless Solutions
User Manual for Windows XP Working at the speed of thought.
AmbiCom, Inc Page 30 of 35 6/25/2002
LAN Access
For LAN Access, the setup is almost identical to Dial-Up Networking. You need to create a
Communications cable between two computers modem in your system. For details on how to
install this modem, please refer to the Installation Section. When you have the Communications
cable between two computers modem set up, please go to the Network Connections to create
a new connection. It is not necessary to provide phone number, user name and password to make
the connection.
1. Go to Control Panel -> Network Connections, click Create a new Connection, and a New
Connection Wizard window will appear. Click Next and you will see the following window.
2. Select the Set up an advanced connection option, and click Next to continue the installation.
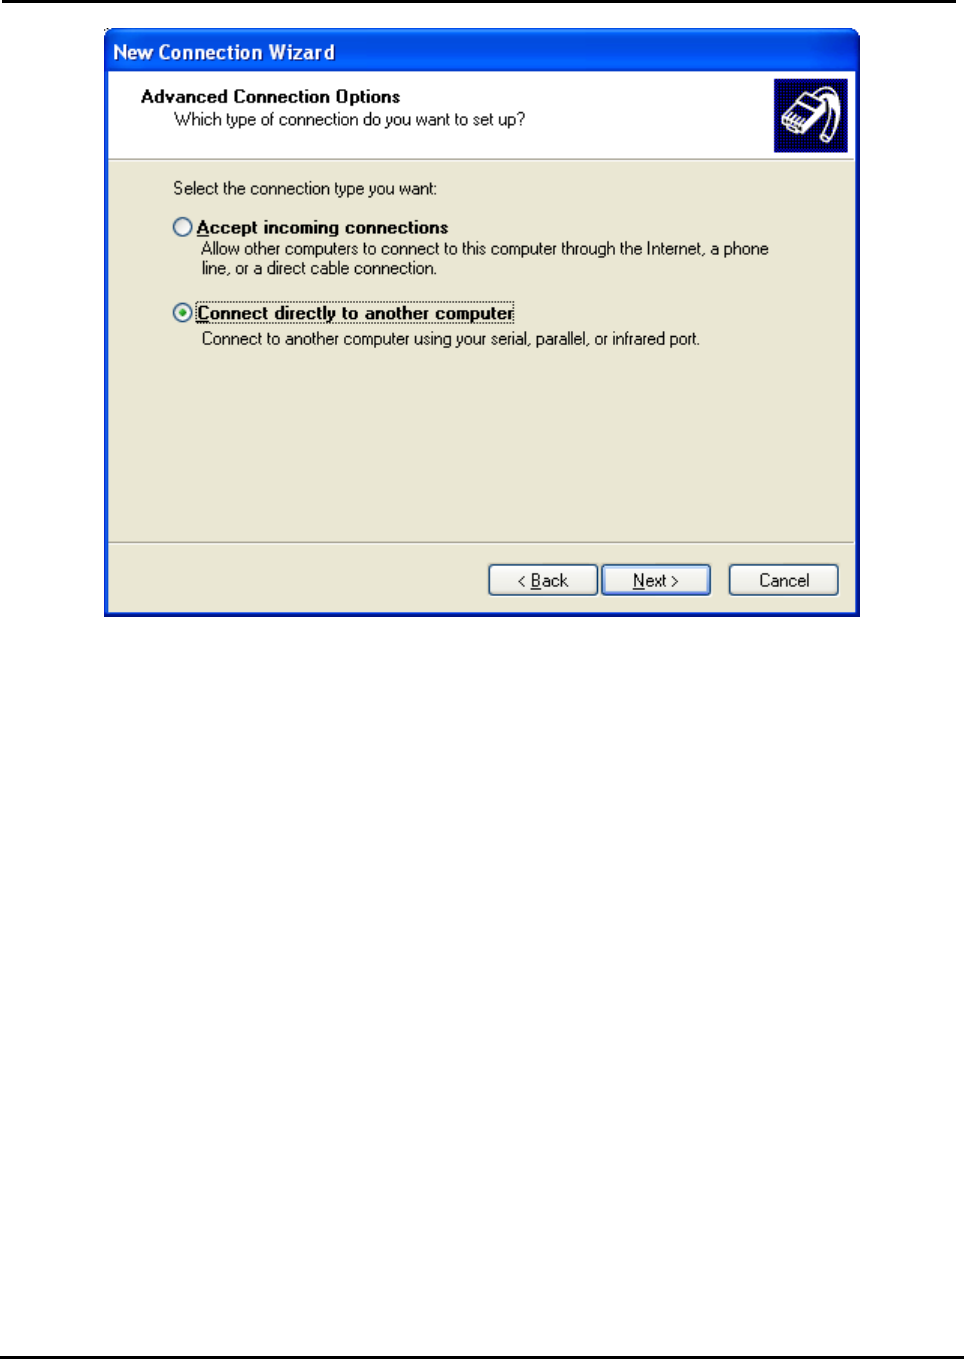
Air2Net Bluetooth Wireless Solutions
User Manual for Windows XP Working at the speed of thought.
AmbiCom, Inc Page 31 of 35 6/25/2002
3. Select the Connect directly to another computer option and click Next to continue.
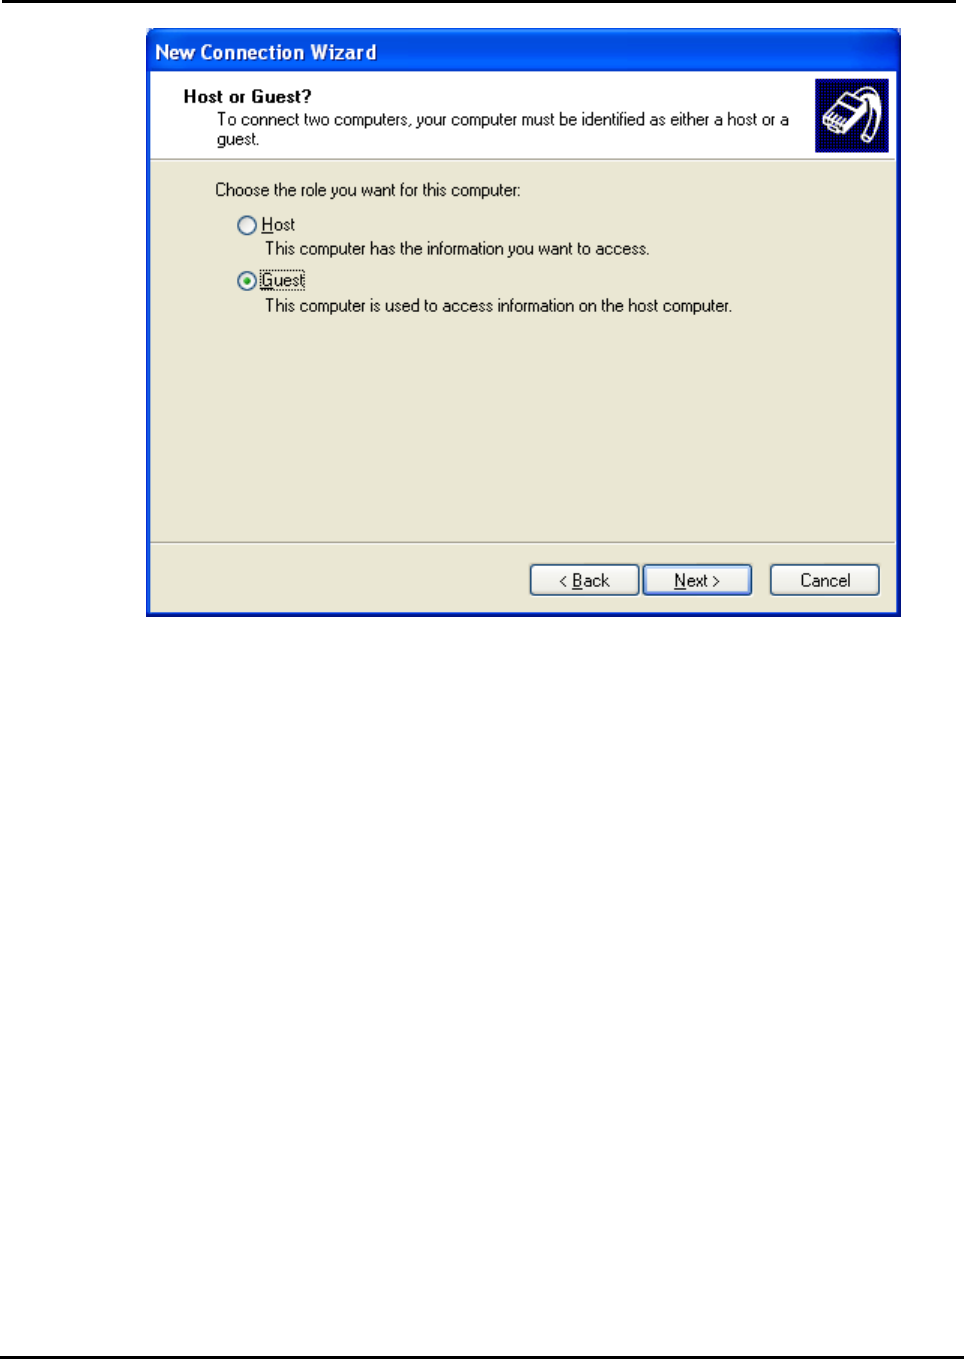
Air2Net Bluetooth Wireless Solutions
User Manual for Windows XP Working at the speed of thought.
AmbiCom, Inc Page 32 of 35 6/25/2002
4. Select the Guest option and click Next to continue.
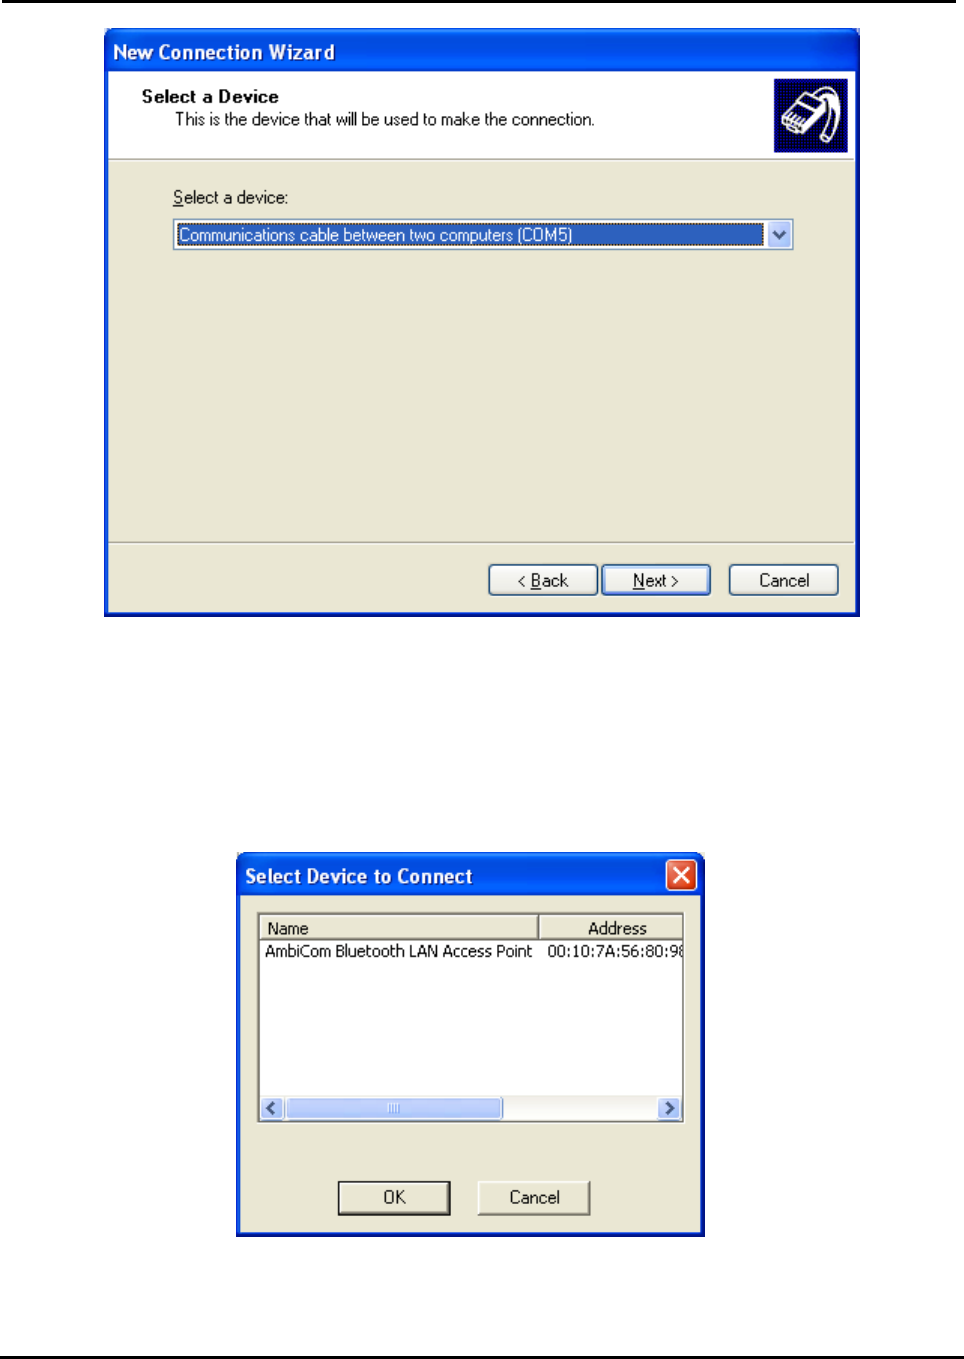
Air2Net Bluetooth Wireless Solutions
User Manual for Windows XP Working at the speed of thought.
AmbiCom, Inc Page 33 of 35 6/25/2002
11. Select the Communications cable between two computers modem that you installed
before. If you haven’t installed that modem, please refer to the Installation Section. Then follow
the on-screen instructions to complete the installation.
12. After you create a new connection, you should run AmbiCom Bluetooth Neighborhood
application first. It will find the Bluetooth devices within the range. If you find a device such as
the Bluetooth LAN Access point, you can start the connection you just created and the system
will show the following window.
13. In above window, you selected AmbiCom Bluetooth LAN Access Point. Click OK to make an
Internet connection.

Air2Net Bluetooth Wireless Solutions
User Manual for Windows XP Working at the speed of thought.
AmbiCom, Inc Page 34 of 35 6/25/2002
6. Uninstall the AmbiCom Bluetooth Neighborhood
Please click Start, go to Programs, find AmbiCom Bluetooth Neighborhood, and select the
Uninstall Bluetooth Neighborhood. Follow the on-screen instructions to finish the uninstallation.

Air2Net Bluetooth Wireless Solutions
User Manual for Windows XP Working at the speed of thought.
AmbiCom, Inc Page 35 of 35 6/25/2002
7. Technical Support
Please visit AmbiCom Web site http://www.ambicom.com for online technical support. If you wish
to speak to our support staff, please call 1-408-562-0168.
FCC COMPLIANCE STATEMENT:
This device complies with part 15 of the FCC Rules. Operation is subject to the following two conditions:
(1) This device may not cause harmful interference, and (2) this device must accept any interference
received, including interference that may cause undesired operation.
INFORMATION TO USER:
This equipment has been tested and found to comply with the limits of a Class B digital device, pursuant
to Part 15 of the FCC Rules. These limits are designed to provide reasonable protection against harmful
interference in a residential installation. This equipment generates, uses and can radiate radio frequency
energy and, if not installed and used in accordance with the instructions, may cause harmful interference
to radio communications. However, there is no guarantee that interference will not occur in a particular
installation; if this equipment does cause harmful interference to radio or television reception, which can
be determined by turning the equipment off and on, the user is encouraged to try to correct the
interference by one or more of the following measures:
1.Reorient / Relocate the receiving antenna.
2.Increase the separation between the equipment and receiver.
3.Connect the equipment into an outlet on a circuit difference from that to which the receiver is connected.
4.Consult the dealer or an experienced radio/TV technician for help.
CAUTION: Changes or modifications not expressly approved by the manufacturer responsible for
compliance could void the user’s authority to operate the equipment
RF Exposure Statement :
This device and its antenna must not be co-located or operating in conjunction with any other antenna or
transmitter.