AmbiCom BTHS Wireless Skype Headset User Manual BT HS V1 0
AmbiCom Holdings, Inc. Wireless Skype Headset BT HS V1 0
AmbiCom >
User manual
Quick Installation Guide
Wireless Bluetooth Headset

2
Please charged at least 6 hours
before proceeding to the next step
The red charging light will be turned off
when it is fully charged
Warning
• To prevent fire or electrical shock hazard, do not dismantle unit or expose to rain or moisture.
• No user serviceable parts inside.
• To avoid damage to your hearing, do not operate this unit with the volume turned up too loud for an
extended period of time. Take off the unit immediately if you experience discomfort.
• Do not operate this headset while driving, operating machinery or outdoors activities.
Always obey the laws and use common sense.
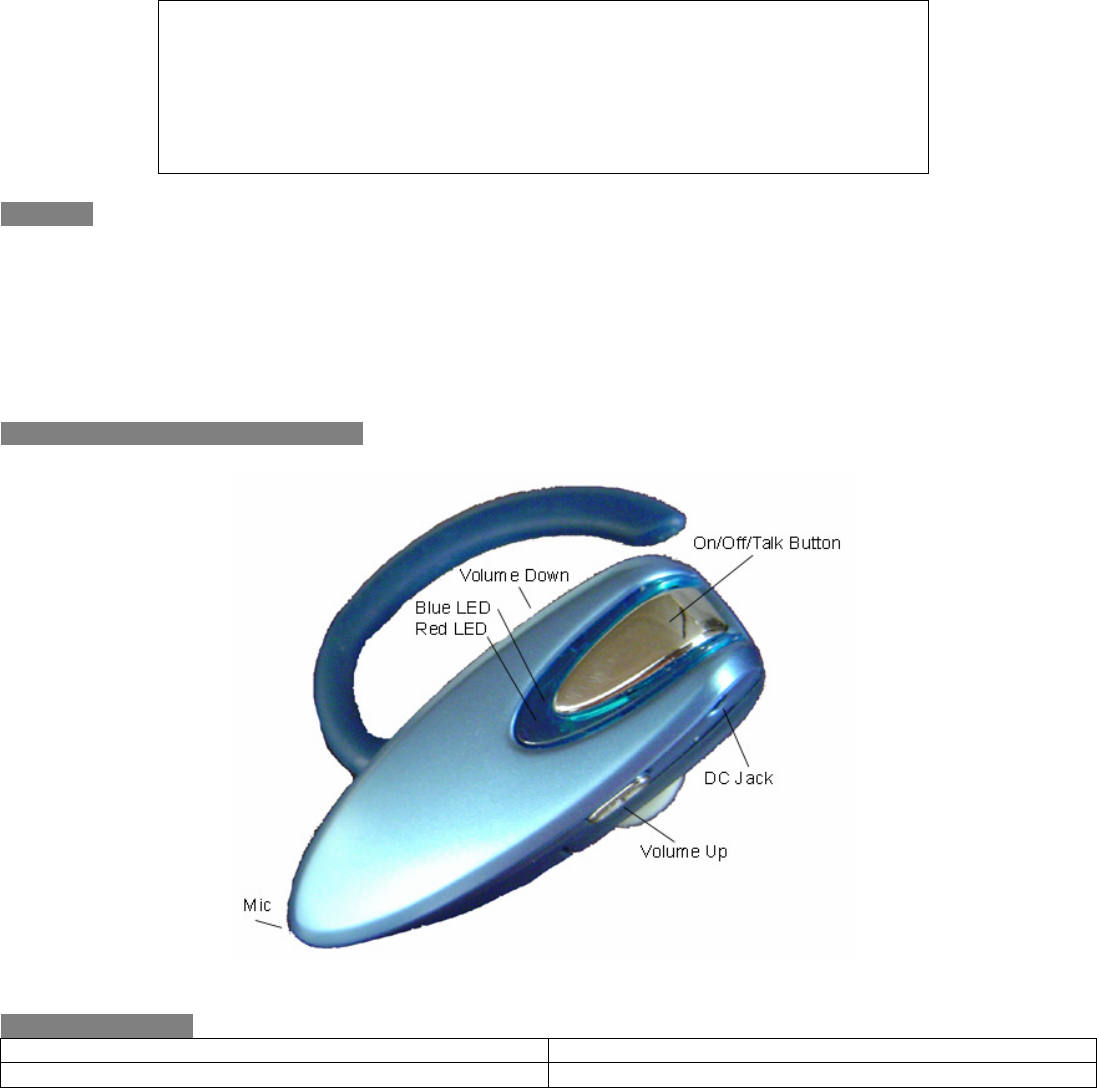
Function Button / LED Indicators
Application Setup
Setup With A Computer Setup With A Mobile Phone
Page 3 Page 5

3
Setup With A Computer
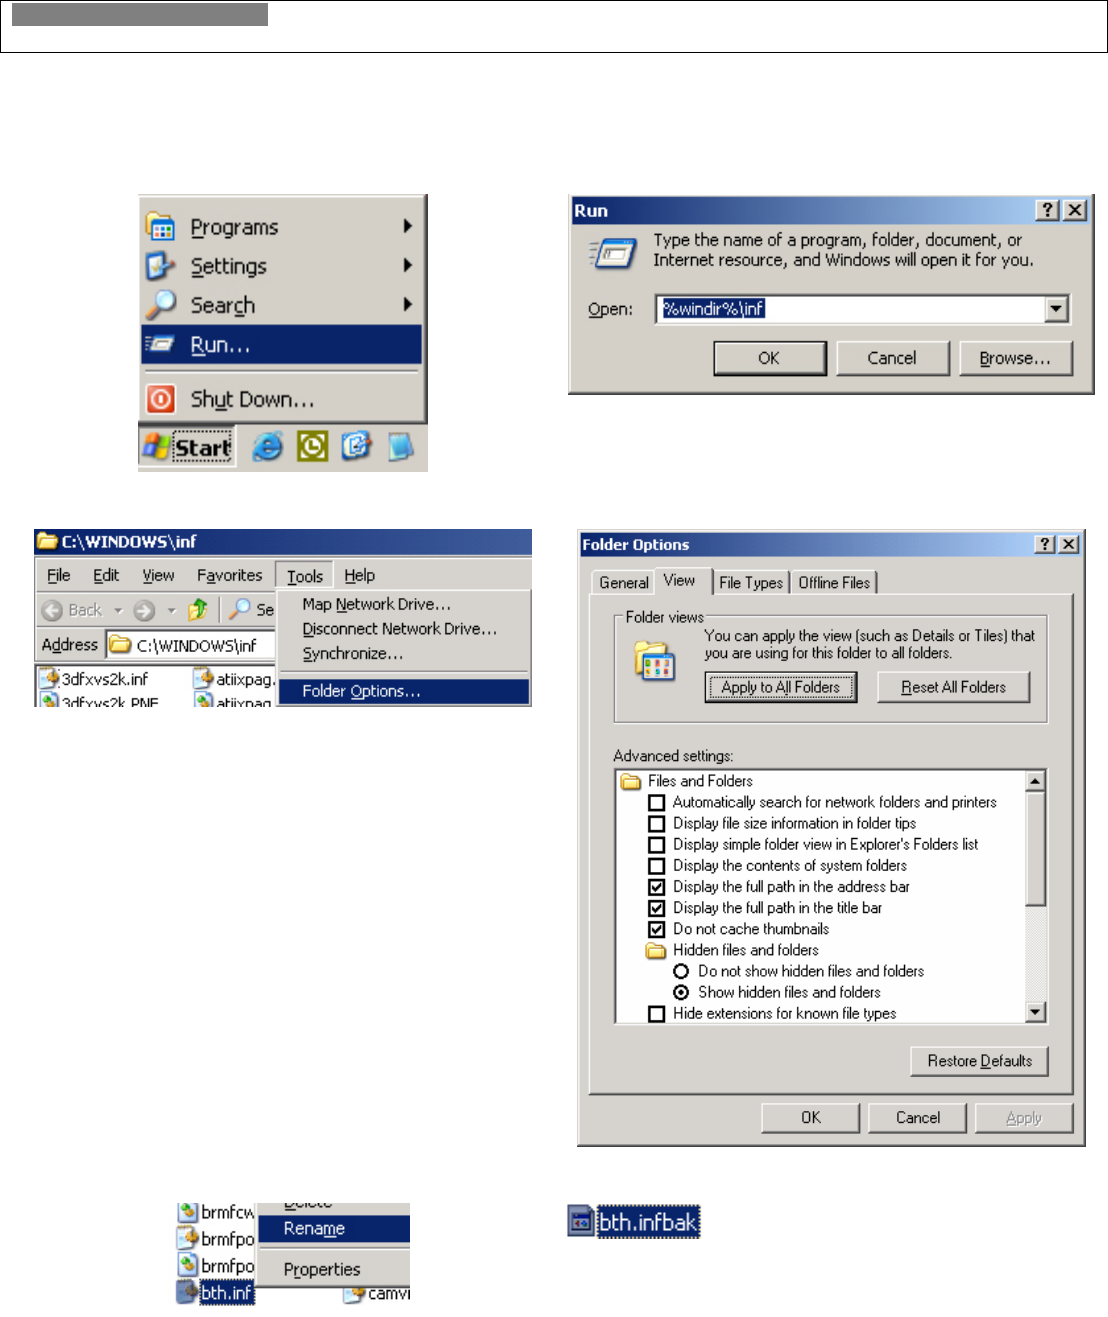
Step 1 - Renaming The Microsoft XP Service Pack 2 Generic Bluetooth Driver
Note:
• Do not insert the USB Adapter into your computer.
• Skip directly to Step 2 if you are not using Windows XP Service Pack 2.
To determine your Windows XP service pack version, right click on My Computer and select
Properties. You will see “Service Pack 2” under the General tab.
• Click the Run function on the Start button.
• Then type %windir%\inf and click OK.
• Select Folder Options from the Tools menu.
• Click on the View tab.
• In the Advanced settings, change the
Hidden files and folders setting to Show
hidden files and folders. (Remember to
return here to change the setting back to it
original default setting)
• Uncheck Hide extensions for known file
types.
• Click OK twice to return to the inf Windows.
• Search for the Bth.inf file. Right-click and
rename it to Bth.infbak.
• Reboot your computer

4
Step 2 - Installing Bluetooth Software
Do NOT Insert The USB Bluetooth Adapter Yet
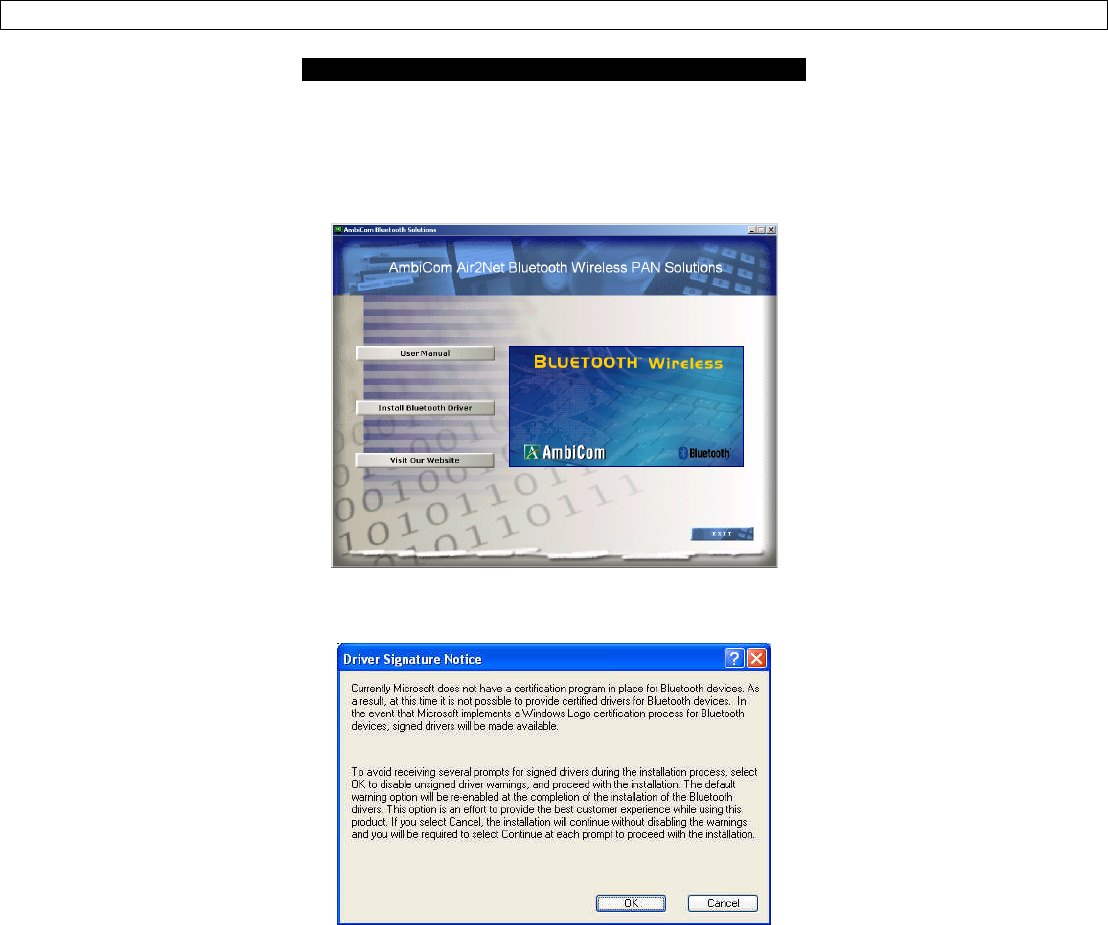
1. Place the Setup CD into your CD-ROM drive. Setup should start automatically. If the setup does not start
please go to Windows Explorer, locate the CD-ROM and double-click “Setup.exe”.
2. Click “Install Bluetooth Driver”, and then click “Next”.
3. Click “OK” if the “Driver Signature Notice” appears.
4. When the “Bluetooth device not found” window appears. Insert the USB Bluetooth adapter into a USB
port on your computer and click “OK”. Click “Finish” to complete the installation. Do NOT insert the
Bluetooth USB Adapter into an USB hub station.
5. Congratulation! Bluetooth USB Adapter is ready.
6. Continue on next page to setup the Wireless Bluetooth Headset.

5
Step 3 - Pairing The Bluetooth Headset With A Computer
1. Make sure the Bluetooth Headset is turned off. Press and hold the On/Off button for at least 3 seconds
until 2 beeps are heard. Then press and hold the On/Off button for at least 10 seconds until the blue/red
LED flashes.
2. Double-click “My Bluetooth Places” icon from the Desktop.
3. Click “View devices in range” in Category View or double-click “Find Bluetooth Devices” in Classic
View.
4. Wait until the search is completed. The device name for the headset should now appear on the screen.
5. Right-click on the headset icon and select “Pair Device”. A Bluetooth Security Code Request windows will
appear on your screen.
6. Enter 0000 in the Bluetooth security code field. Then click OK.
7. Double-click on the headset icon to connect.
• To check if you have setup the Bluetooth Headset correctly, open the Control Panel windows. Click on
“Sounds, Speech, and Audio Devices” then click “Sounds and Audio Devices” in Category View
or double-click “Sounds and Audio Devices” in Classic View.
• Click on the “Audio” tab. Change both the “Sound playback” and “Sound recording” default
device to “Bluetooth Hands-free Audio”. Then click OK.
8. Your headset is now ready to use.
9. Simply run your Instant Messenger (IM) software and select a person to call from your IM contact list and
enjoy wireless instant messenger chat. To receive or hang up a call, press the on/off button once.
Note:
• It is highly recommended to run the IM’s voice/audio setup wizard again to obtain the optimum audio
quality.
*IM: Skype, Yahoo Messenger, MSN Messenger, Google Talk and more.
Setup With A Mobile Phone
1. Turn on your mobile phone’s Bluetooth function. (Refer to your mobile phone’s operating manual)
2. Turn off the headset by press and hold the On/Off button for 3 seconds until 2 beeps are heard. Then
press and hold the On/Off button for at least 10 seconds until the blue/red LED flashes.
3. From your mobile phone, press the search function.
4. Select and accept the headset when the name appears on the screen.
5. When the mobile phone asks for a Passcode, enter 0000.
6. Your headset is now paired to the mobile phone and ready to use. Depend on your mobile phone; you
might be required to press Connect to initial the handset.
7. To receive a call or hang up, press the On/Off button once.
Note: Do not operate this headset while driving, operating machinery or outdoors activities.
Always obey the laws and use common sense.

6
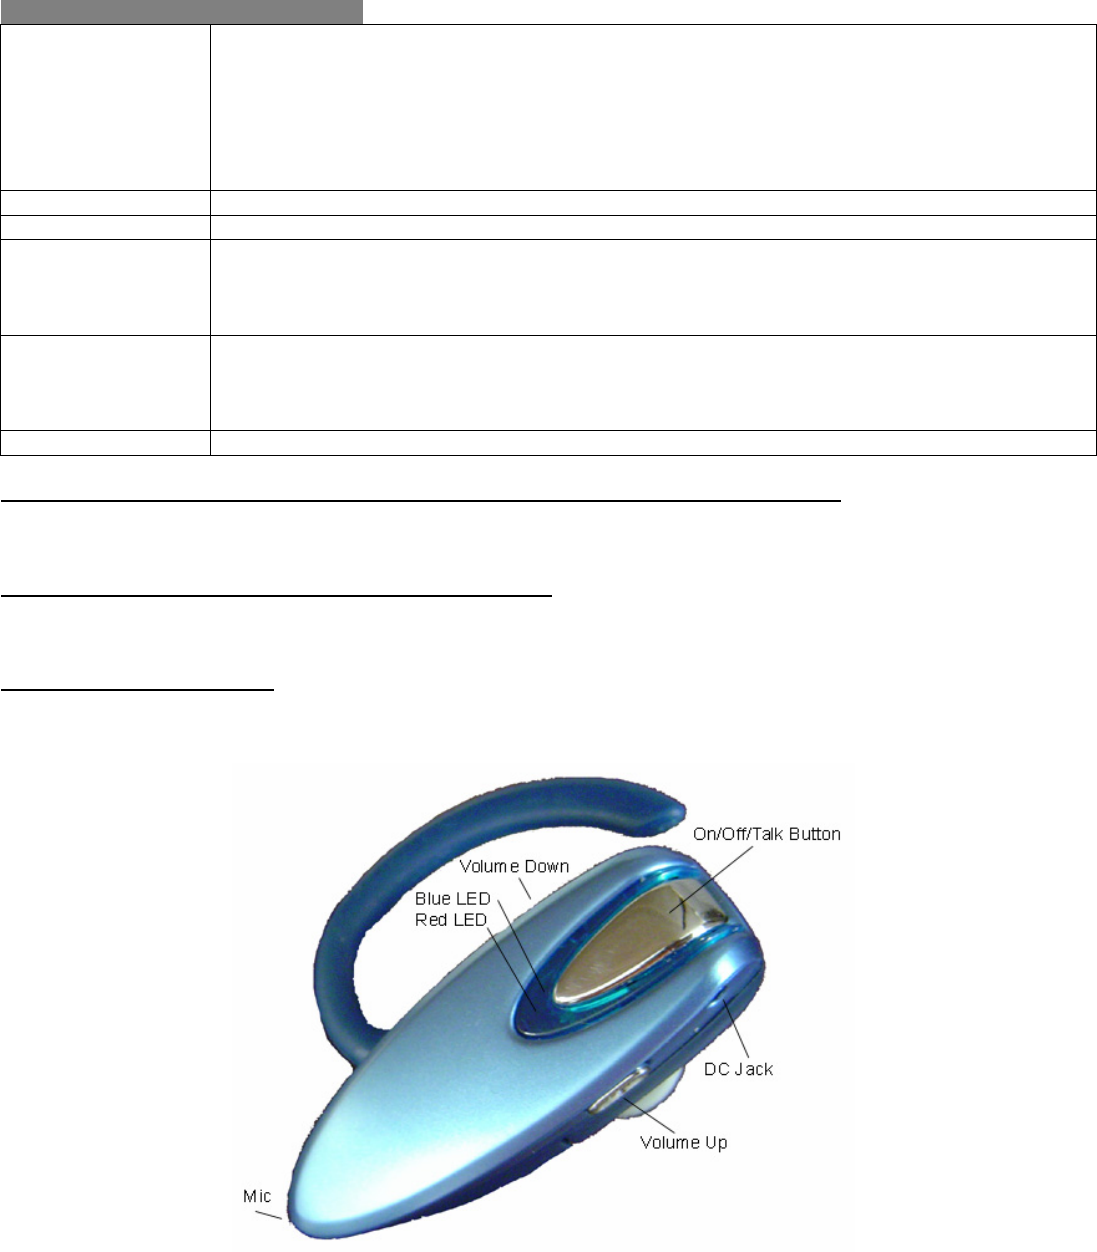
Function Button / LED Indicators
Talk Button Power On: press for 6 seconds.
Power Off: press for 3 seconds.
Answer Call: press once briefly.
Hang Up: press once briefly.
Reject Call: press and hold until a beep is heard.
Pairing Mode: Turn off, and then press for 10 seconds. Blue and Red LED flashes
alternatively.
Volume Up (+) Volume up, mute, transfer call. See below.
Volume Down (-) Volume down, mute, last number redial. See Below.
Blue LED Standby Mode: Flash once every 3 seconds.
Incoming-call Mode: Flashes twice every 3 seconds.
Connected Mode: Flashes 3 times every 3 seconds.
Pairing Mode: Blue and Red LED flashes alternatively.
Red LED Turn Off: Flashes 5 times.
Battery Low: Flashes every 20 seconds.
Charging Mode: Red LED will be ON until the battery is fully charge.
Pairing Mode: Blue and Red LED flashes alternatively.
DC Jack (2.3mm) For charging.
Transfer a call between Headset or Cell phone (connect in Handsfree profile)
During conversation, press and hold the Volume Up (+) button until hearing a beep sound and then release
the button. Press and hold again to transfer back to the initial device.
Last Number Redial (connect in Handsfree profile)
During standby mode, press and hold the Volume Down (-) button until hearing a beep sound and then
release the button.
Mute or Un-mute the mic
During conversation, press and hold both the Volume Up (+) and Volume Down (-) buttons until hearing a
beep sound and then release the button to mute. To un-mute, press and hold the same buttons again.

7
Technical Support
Visit ambicom.com online for latest tips, troubleshooting and updates.
Weekdays: 9:00a.m - 6:00p.m. (Monday – Friday. Except holidays)
Phone: (408) 321 - 0822 Email: support@ambicom.com
Website: www.ambicom.com
Disclaimer
This product is design for indoor use only.
AmbiCom Inc., is not liable for the personal injury and property damage cause by misuse of this product. By
using this product, users agree to obey their local regulations, public safety laws, and maintaining safety
environment to other user.
Warranty
1 Year Limited Warranty
AmbiCom, Inc. warrants its product to be free from defects in materials and workmanship, under normal use
and service, for 1 year from the date of purchase from its Authorized Reseller with proof of purchase.
This warranty gives you specific legal rights. You may also have other rights that vary from state to state.
RMA number and Proof of Purchase are required for all warranty service.
USA/Canada
During the warranty period, AmbiCom, Inc. will, at its option, either repair or replace defective products with
similar parts and products. Should the product be identified as defective, the end user is responsible for
returning the product to the place of purchase1 / manufacturer2 and the cost of shipping and handling. Any
replaced or repaired product has a ninety-day (90-day) warranty or the remainder of the initial warranty
period, whichever is longer.
Outside USA/Canada
During the warranty period, AmbiCom, Inc. will, at its option, either repair or replace defective products with
similar parts and products. Should the product be identified as defective, the end user is responsible for
returning the product to the place of purchase1 / manufacturer2 and the cost of shipping and handling for
sending and returning the product. Any replaced or repaired product has a ninety-day (90-day) warranty
or the remainder of the initial warranty period, whichever is longer. AmbiCom, Inc. shall not be responsible
for any software, firmware, information or memory data of customer contained in, stored on, or integrated
with any products returned to AmbiCom, Inc. pursuant to any warranty.
1if within store return policy period. Check with the store policy.
2iif store return policy has expired or requesting for a warranty service.
Exclusion: The warranty on your products shall not apply to defect or damages resulting from:
• Improper or inadequate handling or installation of the product operation outside the environmental
specification for the products.
• Incidental, contingent, or consequential charges.
• Power spikes or other power related damage.
• Compatibility problems with any other software of hardware products.
• Installation of any other software of hardware products.
• Physical damage causes by misuse, misapplication or negligence.

8
Warranty Limitations
The warranty set forth above is exclusive and no other warranty, whether written or oral is expressed or
implied. AmbiCom, Inc. specifically disclaims the implied warranties of merchantability and fitness for a
particular purpose.
AmbiCom, Inc. also specifically disclaims any responsibility for any incidental or consequential damages that
its products may cause. A buyer’s recourse shall be strictly limited to those contained in this warranty. Some
states do not allow these limitations on the length of an implied warranty, so the above limitations or
exclusions may not apply to you. However, any implied warranty or merchantability of fitness for a particular
purpose is for a period of 1 year on this written warranty. AmbiCom, Inc. reserves the right to change its
warranty policy without prior notice. Information provided in this manual is subject to change without prior
notice.
For last minute warranty changes that is not printed as time of publishing, please contact
support@ambicom.com.
Federal Communications Commission (FCC) Statement
15.21
You are cautioned that changes or modifications not expressly approved by the part responsible for
compliance could void the user’s authority to operate the equipment.
15.105(b)
This equipment has been tested and found to comply with the limits for a Class B digital device, pursuant to
part 15 of the FCC rules. These limits are designed to provide reasonable protection against harmful
interference in a residential installation. This equipment generates uses and can radiate radio frequency
energy and, if not installed and used in accordance with the instructions, may cause harmful interference to
radio communications. However, there is no guarantee that interference will not occur in a particular
installation. If this equipment does cause harmful interference to radio or television reception, which can be
determined by turning the equipment off and on, the user is encouraged to try to correct the interference by
one or more of the following measures:
-Reorient or relocate the receiving antenna.
-Increase the separation between the equipment and receiver.
-Connect the equipment into an outlet on a circuit different from that to which the receiver is connected.
-Consult the dealer or an experienced radio/TV technician for help.
Operation is subject to the following two conditions:
1) This device may not cause interference and
2) This device must accept any interference, including interference that may cause undesired operation of the
device.
FCC RF Radiation Exposure Statement:
This equipment complies with FCC radiation exposure limits set forth for an uncontrolled environment. End
users must follow the specific operating instructions for satisfying RF exposure compliance. This transmitter
must not be co-located or operating in conjunction with any other antenna or transmitter.
Rev 1.0