Amcrest Technologies AGASIO-A8 AGASION DROPAD A8 User Manual User s Guide
Amcrest Technologies LLC AGASION DROPAD A8 User s Guide
Users Manual
Droipad manul
User's Guide
Dropad A8
Thanks:
Dear User
Thank you for purchasing our product. These operational guidelines for
the user, to ensure you a quick and convenient to use,read the instructions
carefully before use.
Any question please browse our company URL: www.saayi.com
1
Droipad manul
Contents
Contents............................................................................................ 2
Product details................................................................................... 3
Using guide....................................................................................... 4
1. Startup and shutdown............................................................ 4
2. Desktop.................................................................................. 4
3. Button..................................................................................... 5
4. Main menu operation............................................................. 6
5. System settings........................................................................ 7
6. Install\Uninstall\Run the application...................................... 12
7. Net work.................................................................................. 13
8. Music....................................................................................... 14
9. Video........................................................................................ 15
10. Photo Browse......................................................................... 15
11. Wall paper.............................................................................. 16
12. Recording.............................................................................. 17
13. E-mail client.......................................................................... 17
14. External devices.................................................................... 18
15. Firmware upgrade................................................................. 19
16. Frequently asked question treatment.................................... 20
Note............................................................................................. 20
FCC STATEMENT....................................................................... 22
2

Droipad manul
Product Details
Product Name Dropad Tablet PC
Product Model Dropad A8
CPU High-performance A8 processor Frequency1000MHz
Support for hardware 3D graphics acceleration
Chipset Samsung S5PV210 Cortex A8 1GHZ
Screen Size 7 inch; Resolution WVGA 800*480; Color 16 million
colors;
Touch Screen Capacitive Multi-Touch
Memory DDR2 512Mb cache
Storage Built-in flash memory 4GB/8GB/16GB/32/GB
Support external TF card, maximum capacity of 32GB
Graphics card Intergration
Camera 0.3MP Front Camera for Video Conference
Speaker Hi-fi stereo speakers
Battery Built-in 3000mAh High Polymer Li-ion Rechargeable Battery
Power adapter DC 9V/1.5A
Ports * USB 2.0 Host 1*USB2.0 UTG 1*Headphone 1*AC power
1*TF Card
OS Google Android 2.1
Network IEEE802.11b/g wireless network; 3G
Video resolution Max support 1920*1080
Video AVI RM\RMVB FLV DAT VOB WMV MPG MPEG-1
MPEG-2 MPEG-11 MP4 M4V VC-1 etc.
Audio MP3 WMA AAC FLAC WAV OGG APE etc.
GPS Selectable
Included in Box Droipad host; Power adapter; Mini USB Cable; HDMI
Cable; Earphone; Manual; warranty card
Weight 510g
Size 193*118*13.3mm
Color Silvery grey
Application
Web Browsing; Email; QQ MSN SKPE; Games;
E-book; Text processing; Video player; Music player;
Others supporting Android 2.1 OS Programs; Built-in
Google map etc.
3
Droipad manul
Using guide
1. Startup and Shutdown
*Boot: Press and hold the power button, the system will enter the startup
process
Boot Logo startup...,System has been started, are entering the Android
system:
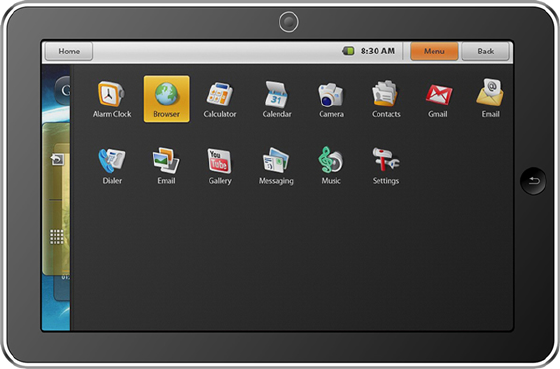
The system enters the default home interface.
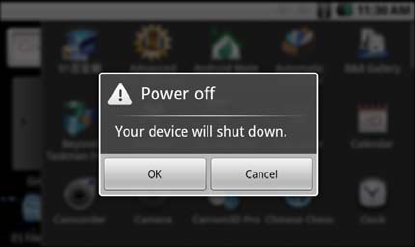
*Shutdown: Press the power button, pop-up device options, select Power
off
Click OK, you can safely shut down.
*Sleep: the machine under normal operating conditions, short press the
power button, into hibernation, now, screen will close. Short press the
power button again, be able to resume normal mode. When the time being
use this MID can enable this feature when, to reduce power consumption.
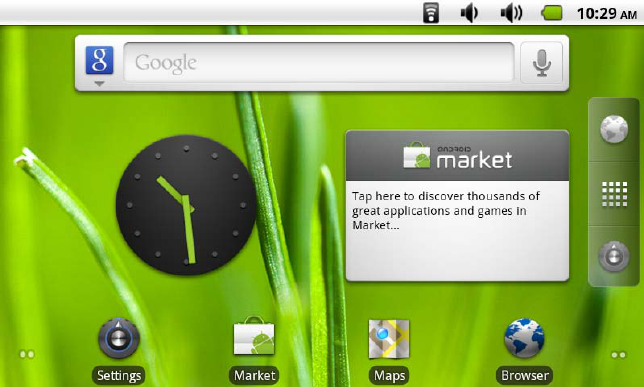
2. Desktop
System after the completion of normal start, desktop can see Android 2.1
The default desktop by the: Status Bar; Quick Search Bar; Main menu
4
Droipad manul
labels and a number of shortcut icons form.
The status bar to display the current system of network status; battery;
time information. Quick search box for web search by typing key words.
Middle right of the screen the main menu tab stop, click or drag to the
main menu bar to start the default. Bottom of the screen displaying the
browser shortcut icon.
Optimization of the status bar results, increase the volume of two icons
volume+/volume-. Click to adjust the volume.
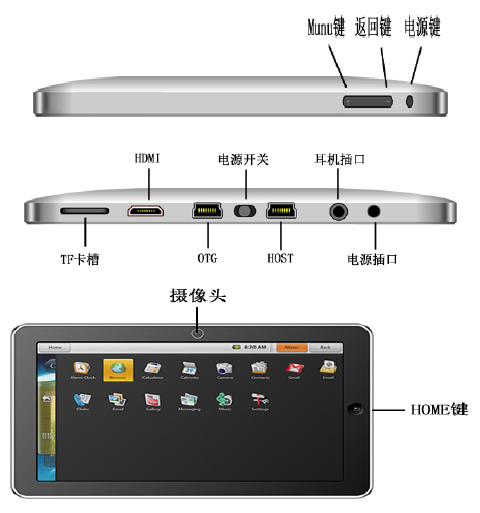
3. Button
Android system uses in the course of the keys:(As follows)
Volume keys: the task bar volume+; volume- achieve changes in the
volume.
Power key: Press and switch machines. Short press to enter or leave the
hibernation.
Menu button: Displays the current form of the menu items (if any).
Home button: Back to the main interface or choose.
5
Droipad manul
Return: Return on an interface.
Power switch: Power supply/Interrupt power supply.
4. Main Menu Operation
Click or drag the main interface of the main menu tab, the main menu
will be from right to left(or bottom-first; last), and is as follows:
6

Droipad manul
In the main menu, the system can be set to run existing applications,
install a new application, start the touch calibration, music player, video
player, web browsing, games and other operations.
5. System Settings
Click the main menu interface in the "Settings" icon, you can open the
system settings interface, as shown below:
Select the appropriate operation of the relevant items, such as:
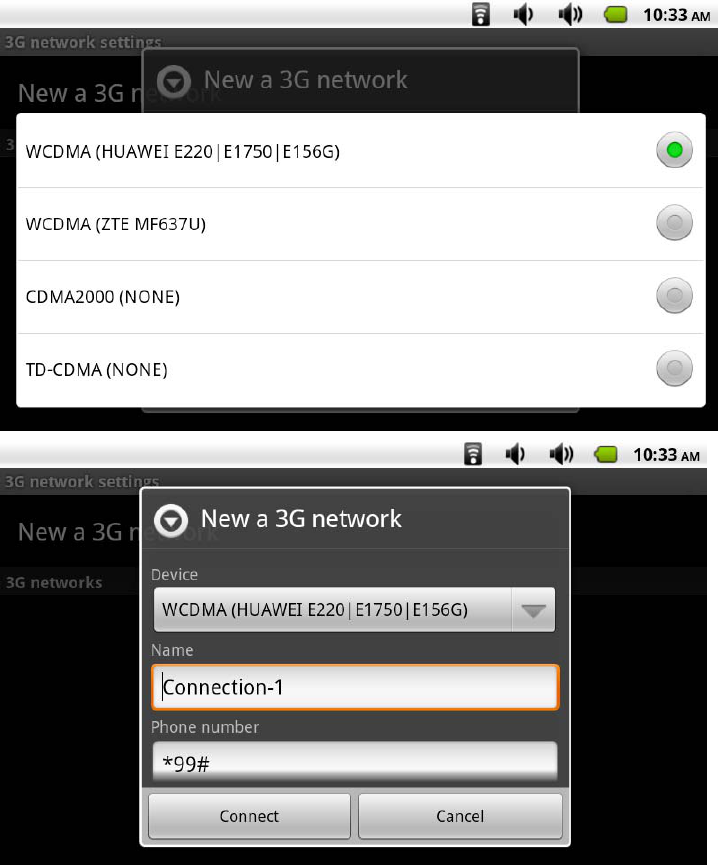
*Wireless and network
3G network setup
7
Droipad manul
*Sound and displayvl
*Date and time settings
*About Equipment
Etc.
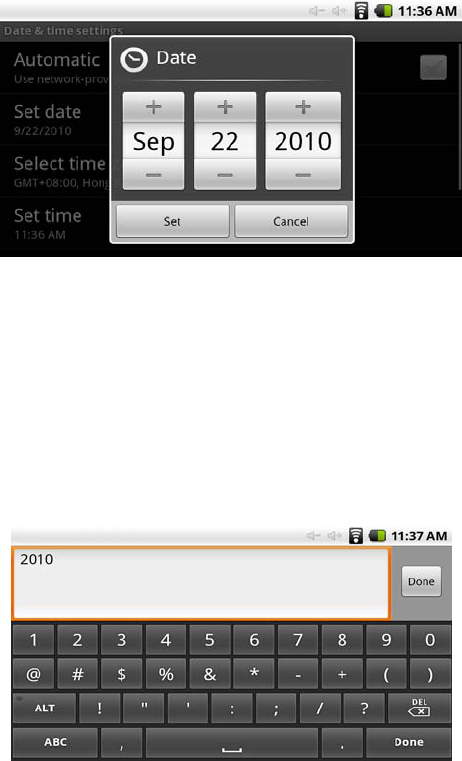
1) Date and Time settings:
Set interface options "time and date settings options" to enter the date and
time settings interface:
Can choose to automatically: use the Network Time.
8
Droipad manul
Can also select to set the date, select the time zone, set the time, time
format, date format and other information.
For example, choose to set the date, as follows:
Select +: that the increase of 1 unit,
Select -: that the reduction of 1 unit.
Also can choose the number, enter the input mode. Directly entering the
desired number, then select done. As follows:
Select "Settings". If you enter the number of legitimate, then the
operation is successful, the system will set the option to use the new.
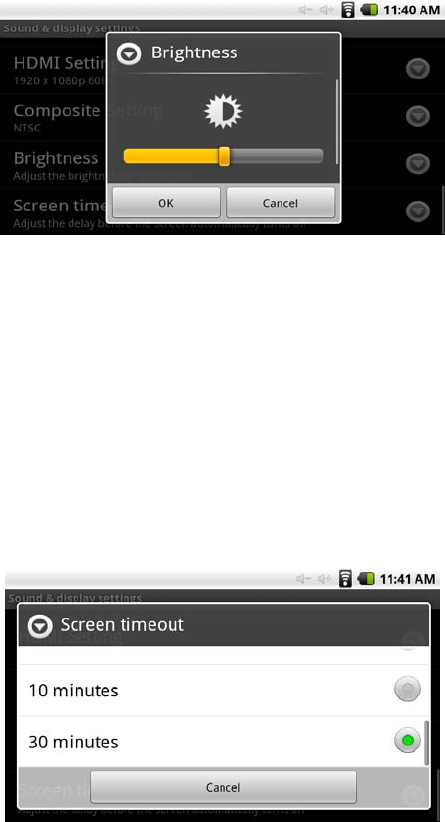
2) Screen brightness:
In the setup interface choose "sound and display settings" to enter the
sound and display settings interface, scroll down section, select
"Brightness", there are interface:
9
Droipad manul
3) Standby screen:
Standby screen: the screen automatically locks the delay before.
In the setup interface choose "sound and display settings" to enter the
sound and display settings interface, scroll down section, select the
"standby screen" interface appears, as follows:
Note: In the video, the screen auto-standby function does not work
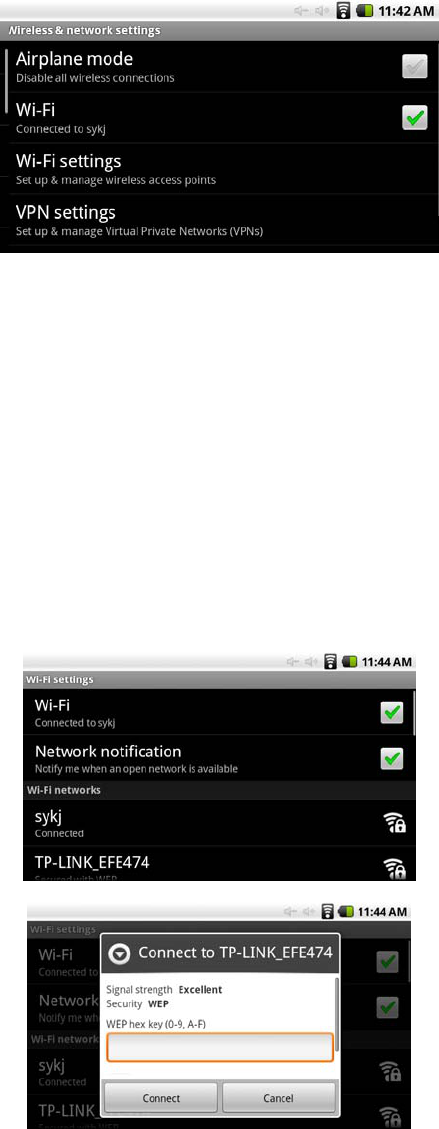
4) WIFI Wireless Connection:
Click the main menu "settings" icon, go to "System Settings" screen,
click on "wireless and network" into the "Wireless and network" setup
interface. Click the "WIFI" section to quickly open the WIFI feature,
click on "WIFI Settings" column enter "WIFI set interface" as shown
below:
10
Droipad manul
In the "WIFI settings" interface(above), click on the WIFI column also
can open click on the WIFI column also can open and close the WIFI
feature, click on the "Network Notice" lists Droipad A8 search to the
wireless router, click the search name will pop up settings window, please
follow the prompts to complete the WIFI net work links. Some encrypted
network, need to enter a valid key. Link diagram below:
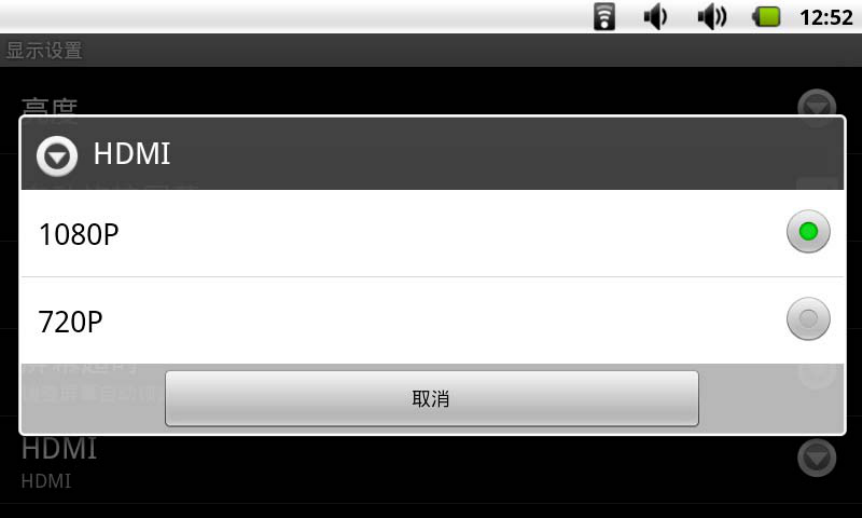
5) HDMI
This product supports HDMI output.
Using the HDMI cable to connect a HDMI input Droipad D9 and
equipment. In the "Settings"/"Sound and display"/"Output Select" to
11
Droipad manul
select HDMI output mode, the system output to HDMI.
If you choose HDMI output, you can "HDMI Setting" which choose to
change the output format. System 1920×1080P and 1280×720P choice
of two formats.
When using the HDMI output on, LCD will display the contents of the
scaled output to external devices at the same time.
6. Install, uninstall, run the application
1) Installation: Adroid install the application there are a variety of ways,
such as through USB install, install third-party program aid. Here we
introduce assisted by the program offered by our compony to install. At
the "settings interface" choice the "allow installing unbeknown origin
program". Then click the ".APK program" to install.
After installation is complete, there will be "open" or "complete" message.
Click "Open" to open to install the program directly. Click "Finish" then
12
Droipad manul
exit the installation interface. Generally installed in the main menu
program to create the corresponding icon. Directly in the main menu you
can click on the icon to open the appropriate application.
Users can "Andrews market" online installation, or download via the
computer, or online through the machine built-in browser to download
and install.
2) Uninstall applications: You can use the appropriate third-party
software management tools or applications that use the Android comes
with management software.
Select "settings"/"application"/"management applications", select the
appropriate application has been installed, to view program information,
the uninstall program and other operations.
7. Network
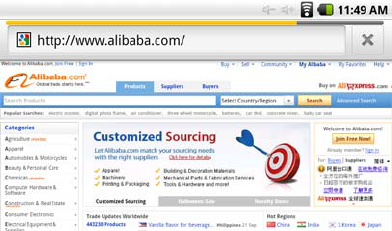
1) Web browsing:
When the connected network, open the Web browser enter the URL, you
can quickly browse the Web; or through the main desktop search bar
enter the URL, open the web page.
2) Online video:
13
Droipad manul
Through "Andrews market" or other means to download online video
player software, online TV player, online music software, then install to
this machine. Open the software installed, you can watch online video or
online TV, listening to radio stations.
Users can also download other third-party Web applications, including
web browsing, video player, web client, instant messaging software, etc.
8. Music
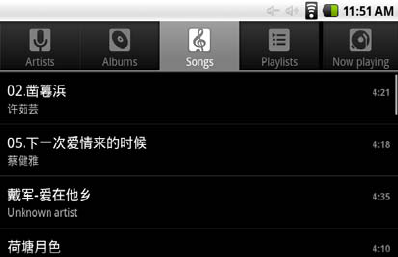
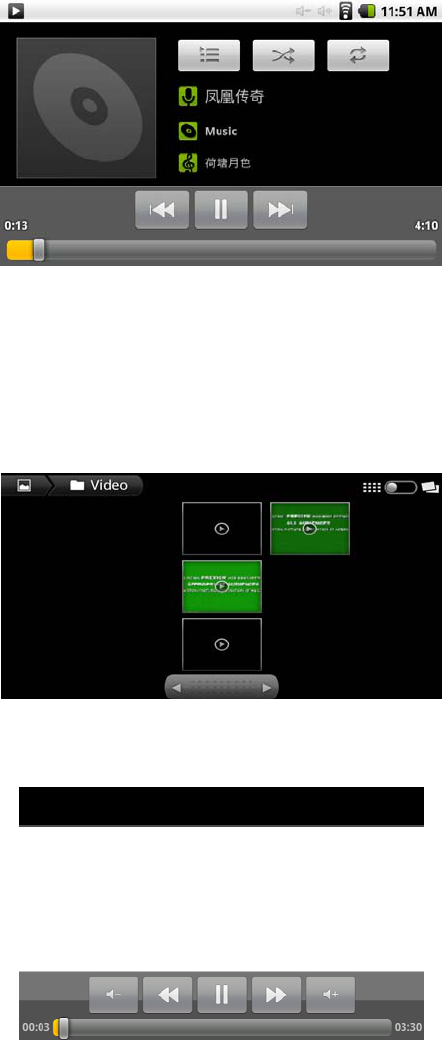
Click the main menu in the "music" icon, you can enter the music player
interface. Here lists the system default user data area of all audio files. As
shown below:
We can spread through the USB audio files synchronized manner, or by
inserting the SD card with audio files were audio files, you can also
download the audio files via the network.
Select the appropriate tab key, you can see for example "artist", "album",
"songs" and other interface. Select song to play.
14
Droipad manul
9. Video
Click the main menu in the "gallery" into the "gallery" the main interface,
there will list all the video files and picture files. As shown below:
Select video file into the video player interface, as shown below:
You can select "play"; "stop"; "volume +"; "volume -"; "fast forward";
"rewind"; "progress bar" and control keys to control playback of the
progress.
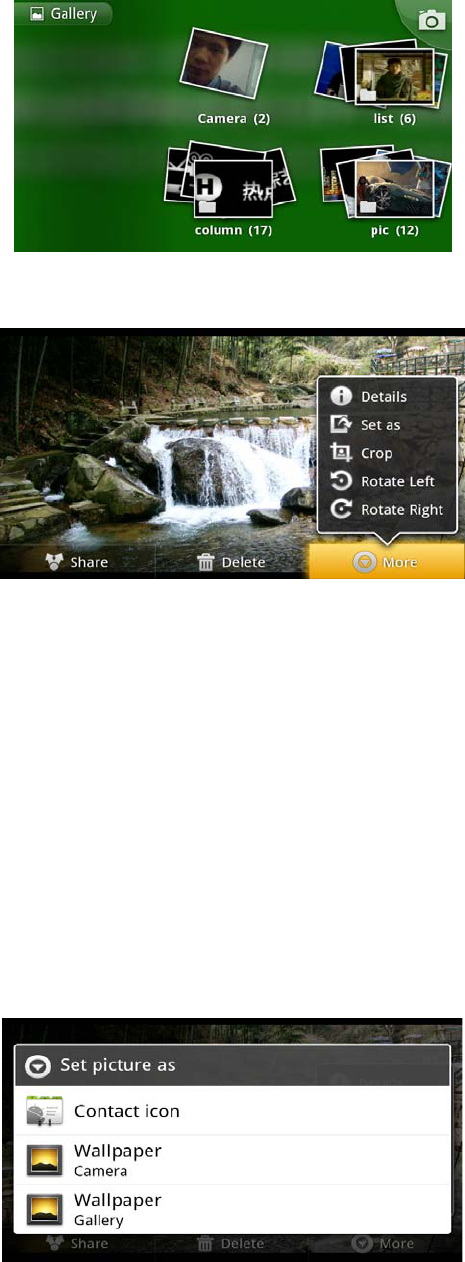
10. Photo Browse
Click the main menu in the "gallery" into the "gallery" the main interface,
15
Droipad manul
there will list all the picture files and video files. As shown below:
Select a picture file, enter the picture playback interface, as shown below,
Can select "zoom"; "narrow"; "sharing"; "previous"; "next"; "set" and
"delete" operation.
11. Wallpaper
System supports static image wallpaper, as well as 3D wallpaper.
In the desktop interface, hold down the menu button, pop-up menu option,
select the "wallpaper", the pop-up "choose wallpaper source" selection
box:
Have the following options:
16
Droipad manul
Select "wallpaper gallery": You can select the system provides a static
picture as wallpaper.
Select "current wallpaper": You can select the system provides 3D
wallpaper.
Select "photo": You can use the picture as wallpaper Customize.
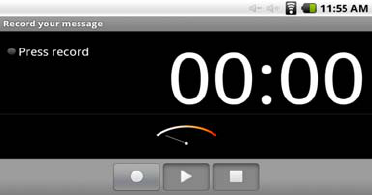
12. Recording
Click the main menu in the "recorder" icon into the "tape" the main
interface. As shown below:
Note: when inserting SD card recording, audio file will be saved in
the SD card.
Select "Record" button recording, recording is completed, select "Stop"
button. At this point you can select the "Play" button plays the sound just
recorded. Select "Use this record" button, save the recording, this can be
found in the SD card in the appropriate recording documentation; If you
do not save, you can select the "Discard" button.
13. E-mail client
In the main menu, click "Email" icon to enter the e-mail client. The first
entry will ask to configure the account information. Then you can
configure the information step by step.
17
Droipad manul
Select a column can view the messages, you can view the column inside a
"reply", "delete", "open attachment" and other operations.
14. External devices
1) USB connection:(As follows)
MID using the USB connection and PC, the default connection method is
the synchronous mode.
"USB connected (Internal)": that built-in memory.
"USB is connected": said external memory (SD card).
If you need to copy data using USB, you can select the load you need the
memory.
Loading is complete, you can see in the PC and of the corresponding
letter.
2) OTG use:(As follows)
Support the FAT32 format for mobile devices: for example, U disk,
mobile hard drive.
Plug and Play connection method.
18
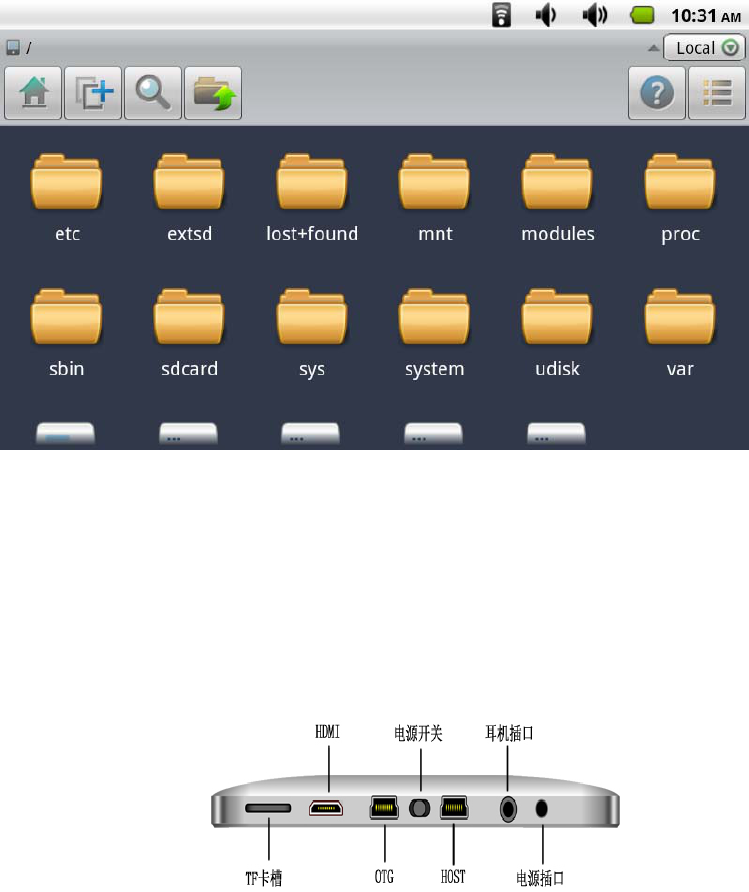
Droipad manul
Use OTG cable Dropad A8 USB OTG port and external device.
EXTSD is tf UDISK is u driver
3) Keyboard Mouse
Support plug and play USB mouse, keyboard equipment.
15. Firmware Upgrade
Android upgrade process will format the internal flash memory and if
necessary, back up your data in advance.
Android PC upgrade client upgrades the use of specialized tools, please
download the latest upgrade tool through our compony network
www.siyisz.com.
Note: the first boot after the upgrade process is relatively slow, this is
normal. The second boot much faster.
19
Droipad manul
16. Frequently Asked Questions Treatment
1) What is Android?
Android is Google on November 5, 2007 announced the open source
Linux-based operating system name.
2) What is APK?
APK is Android Package acronym that Android installation package.
3) How to obtain the APK?
You can download via PC-side installation, you can also "Andrews
market" online to download and install.
4) The machine operating system version?
This machine adopts Android2.1, built-in hardware 3D acceleration,
can run android applications market most.
5) The machine can charge through USB?
No. Recommend the use of Annex DC 9V adapter to charge.
Picture for reference only, product appearance, functionality please
prevail in kind, the product rules and design are subject to change
without prior notice.
Note
* This product is a high precision electronic products, do not disassemble.
* Avoid using this product at the following conditions: extreme
temperature, moisture, dust, magnetic fields strong and long-term
exposure to sunlight.
20
Droipad manul
*When no using, please put the set in the good handbag.
*Please Do not place the set downward with the screen to prevent
destroying the screen.
*Thunderstorm weather, Do not using the set outside. Do not using the
set cross the road to avoid traffic accidents.
* When watch video and listen music, the headphone volume is too large
may cause permanent hearing and speaker damage.
* Please only use permitted chargers and accessories, use any other type
of products would violate the warranty regulations and may be
dangerous.
* Please follow the relevant local environmental regulations to deal with
obsolete machines and accessories.
*When cleaning the set and screen, please use appropriative cleaner.
* Please follow the user manual for standard operation. This product is in
the course of any questions, please contact your local dealer or directly
with the company's customer service center.
21
Droipad manul
22
FCC STATEMENT
THIS DEVICE COMPLIES WITH PART 15 OF THE FCC RULES. OPERATION
IS SUBJECT TO THE FOLLOWING TWO CONDITIONS: (1) THIS DEVICE
MAY
NOT CAUSE HARMFUL INTERFERENCE, AND (2) THIS DEVICE MUST
ACCEPT ANY INTERFERENCE RECEIVED, INCLUDING INTERFERENCE
THAT
MAY CAUSE UNDESIRED OPERATION.
NOTE: This equipment has been tested and found to comply with the
limits for a Class B digital device, pursuant to part 15 of the FCC Rules.
These limits are designed to provide reasonable protection against
harmful interference in a residential installation. This equipment
generates, uses and can radiate radio frequency energy and, if not
installed and used in accordance with the instructions, may cause harmful
interference to radio communications. However, there is no guarantee
that interference will not occur in a particular installation. If this
equipment does cause harmful interference to radio or television
reception, which can be determined by turning the equipment off and on,
the user is encouraged to try to correct the interference by one or more of
the following measures:
- Reorient or relocate the receiving antenna.
- Increase the separation between the equipment and receiver.
-Connect the equipment into an outlet on a circuit different from that to
which the receiver is connected.
-Consult the dealer or an experienced radio/TV technician for help.