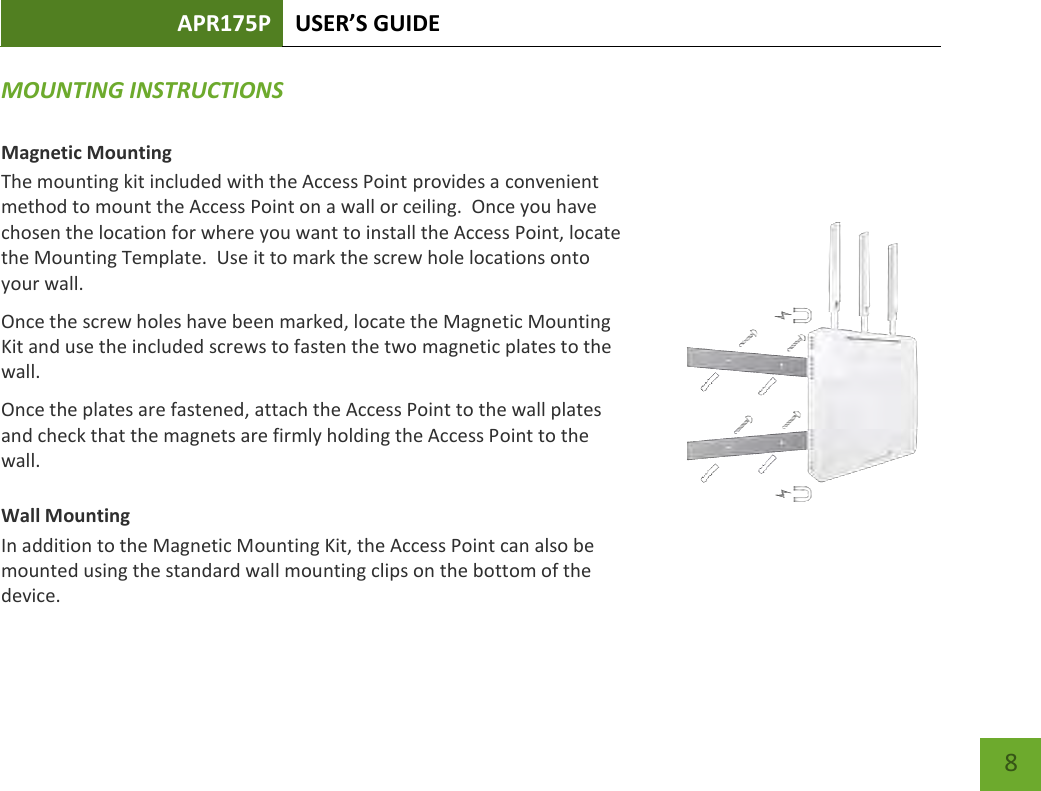
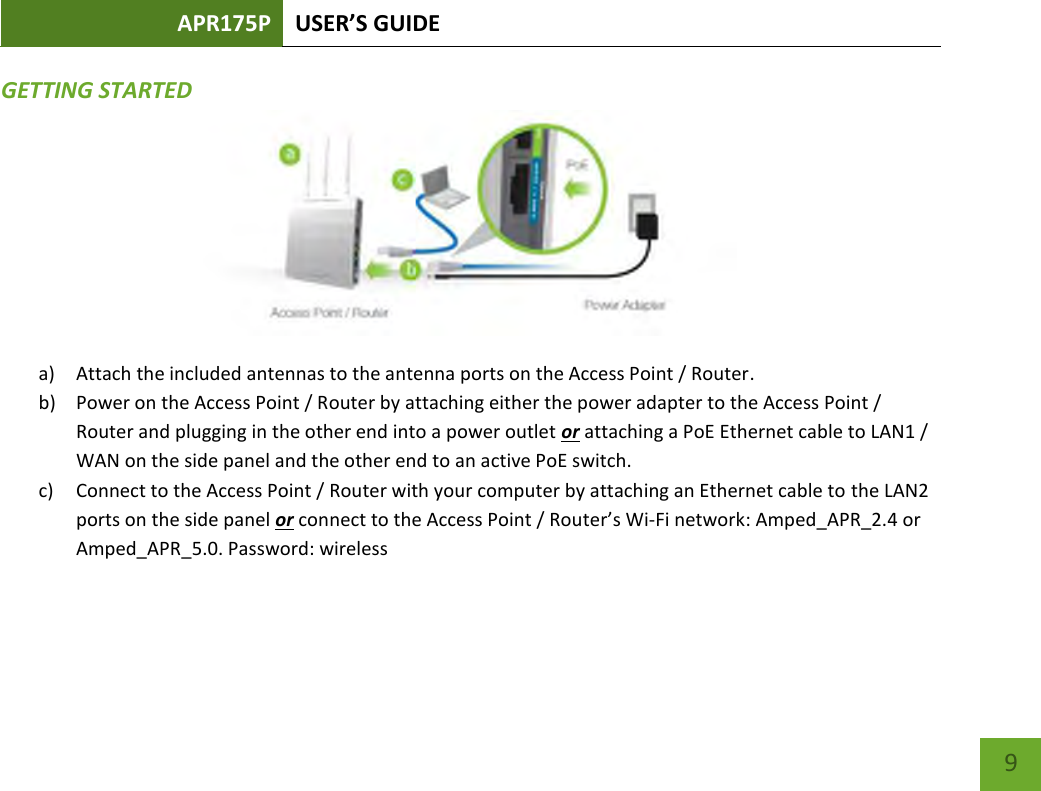
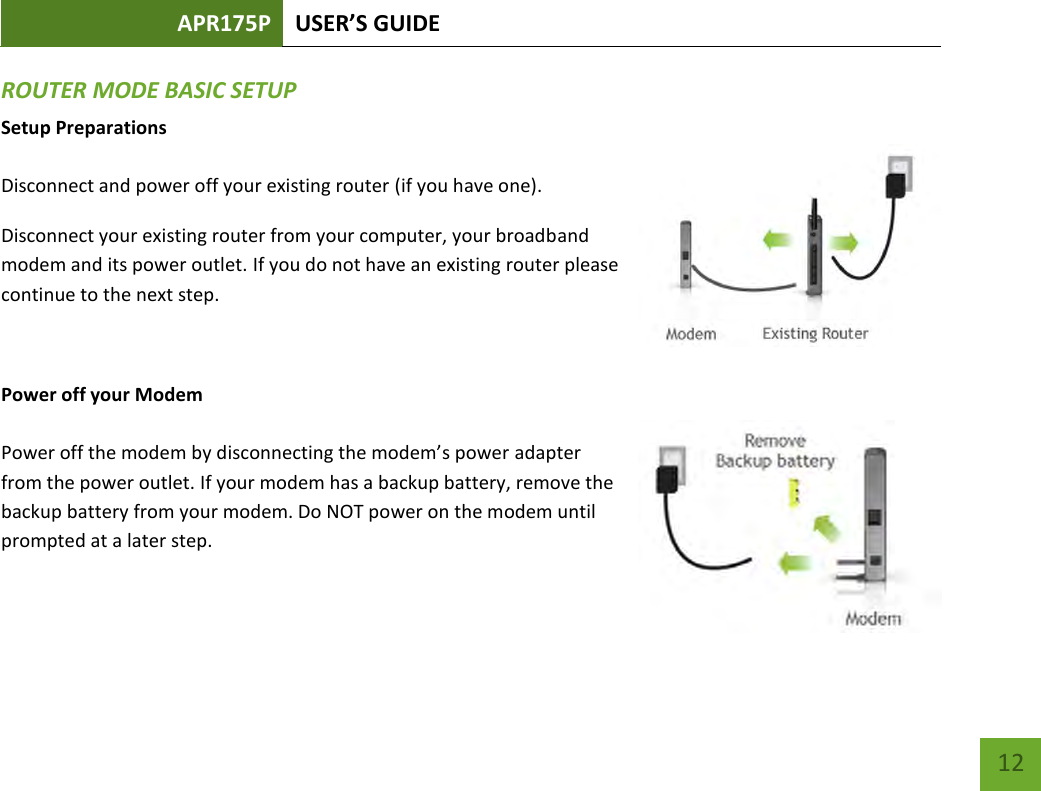
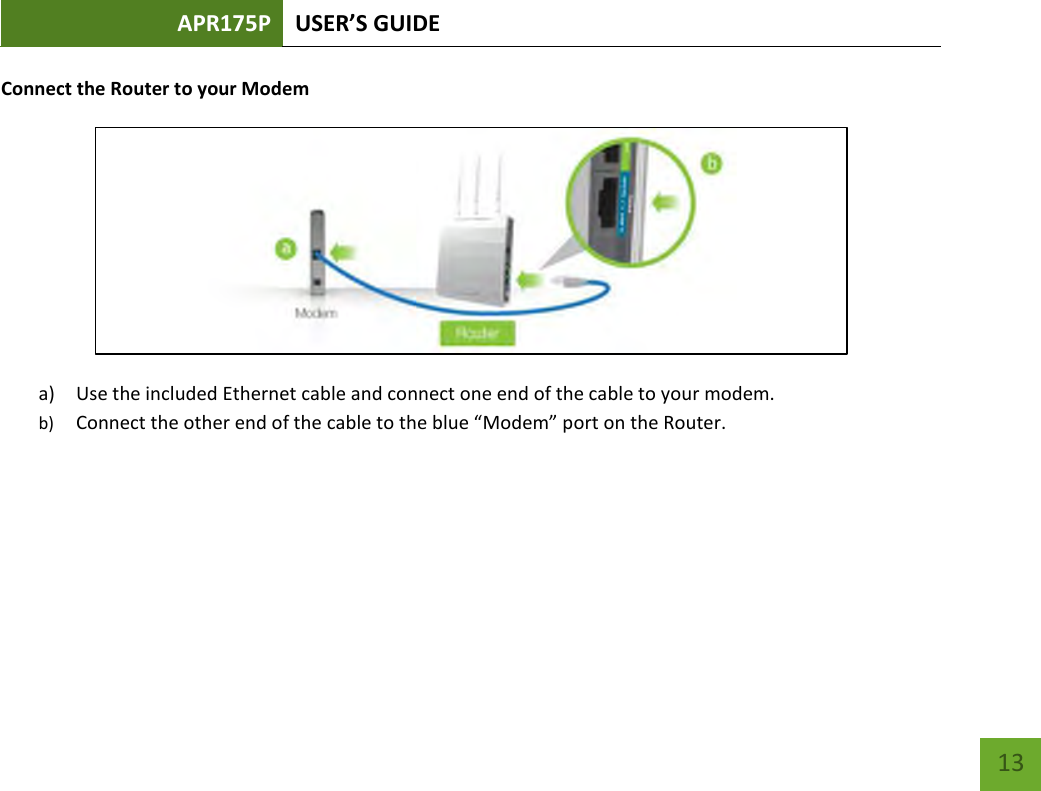
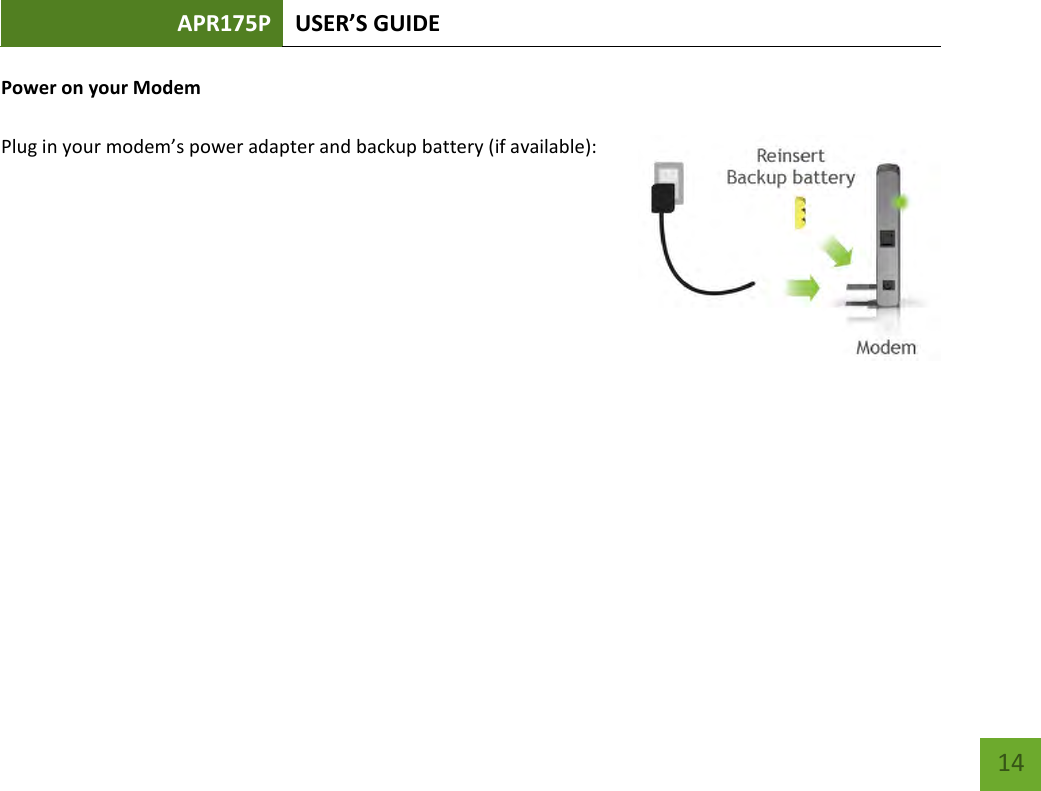
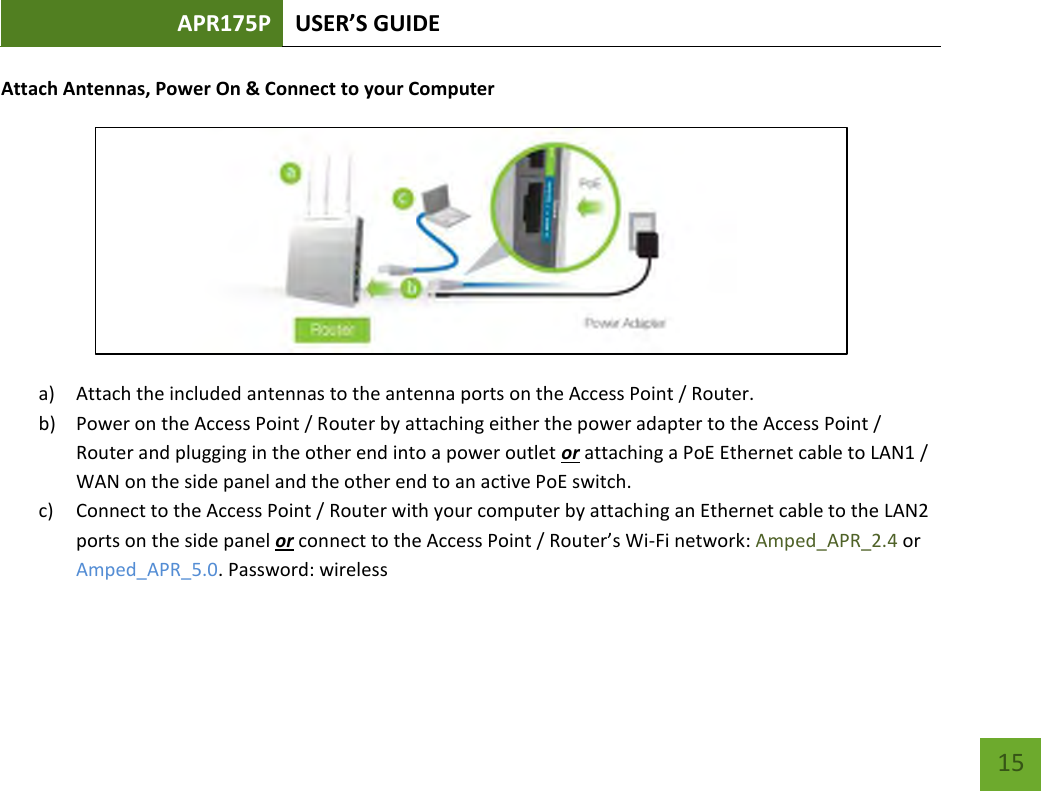
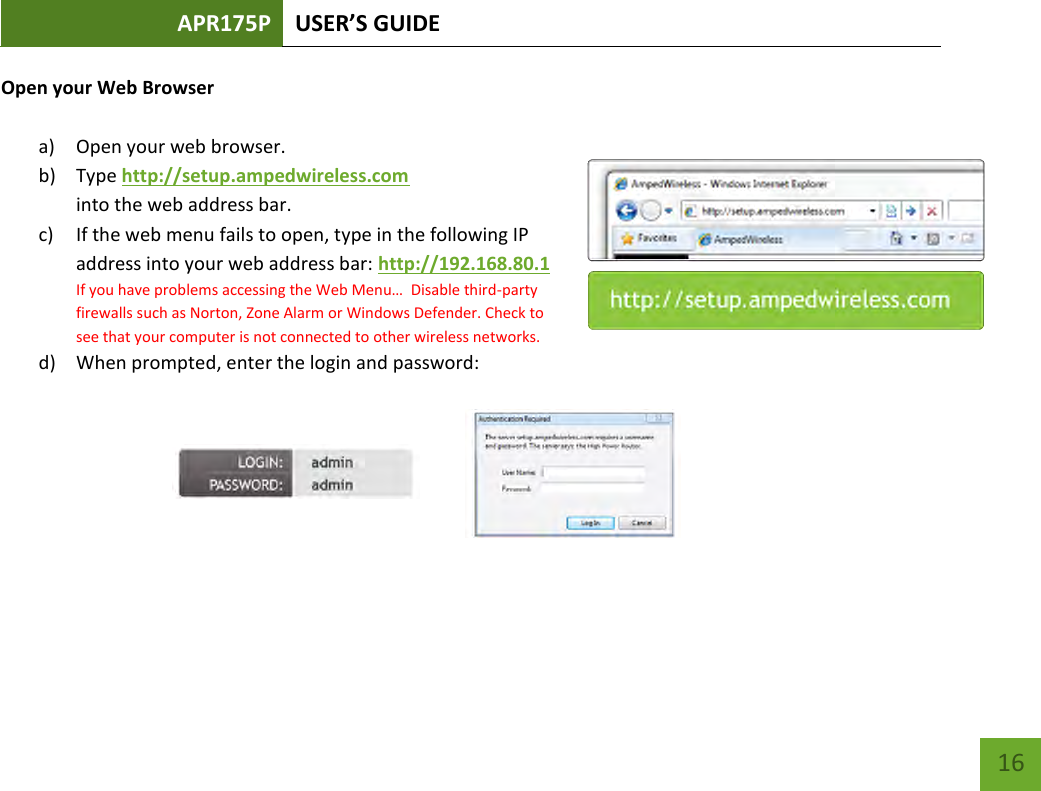
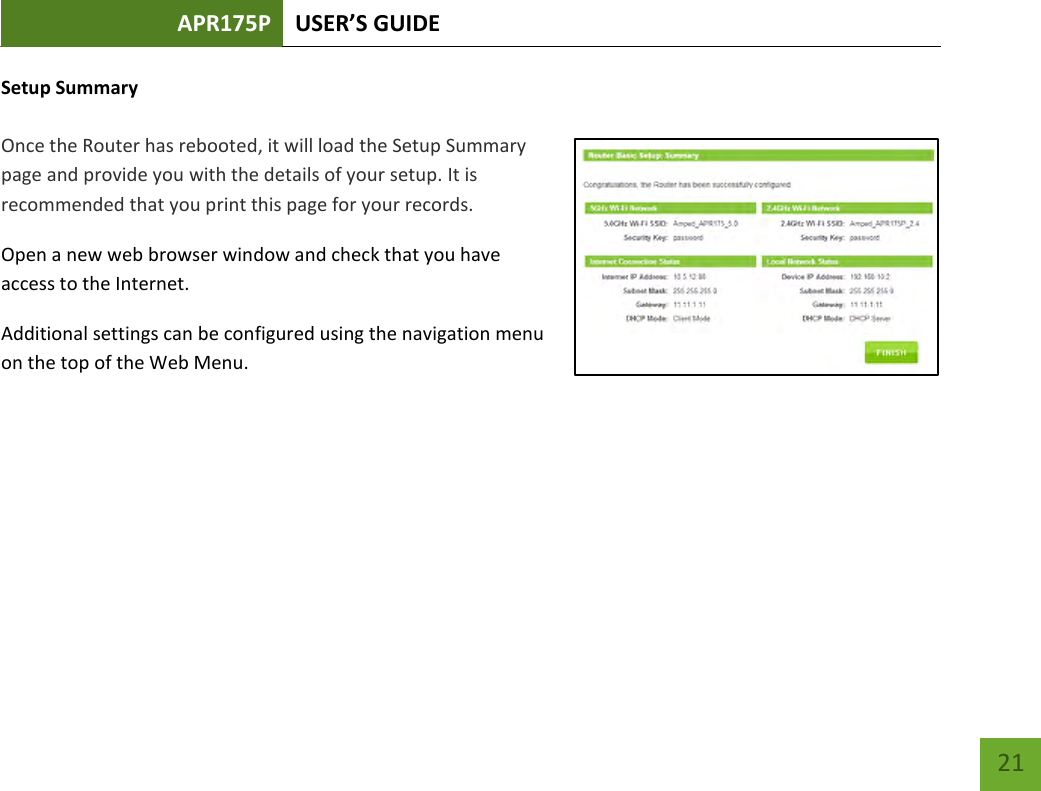
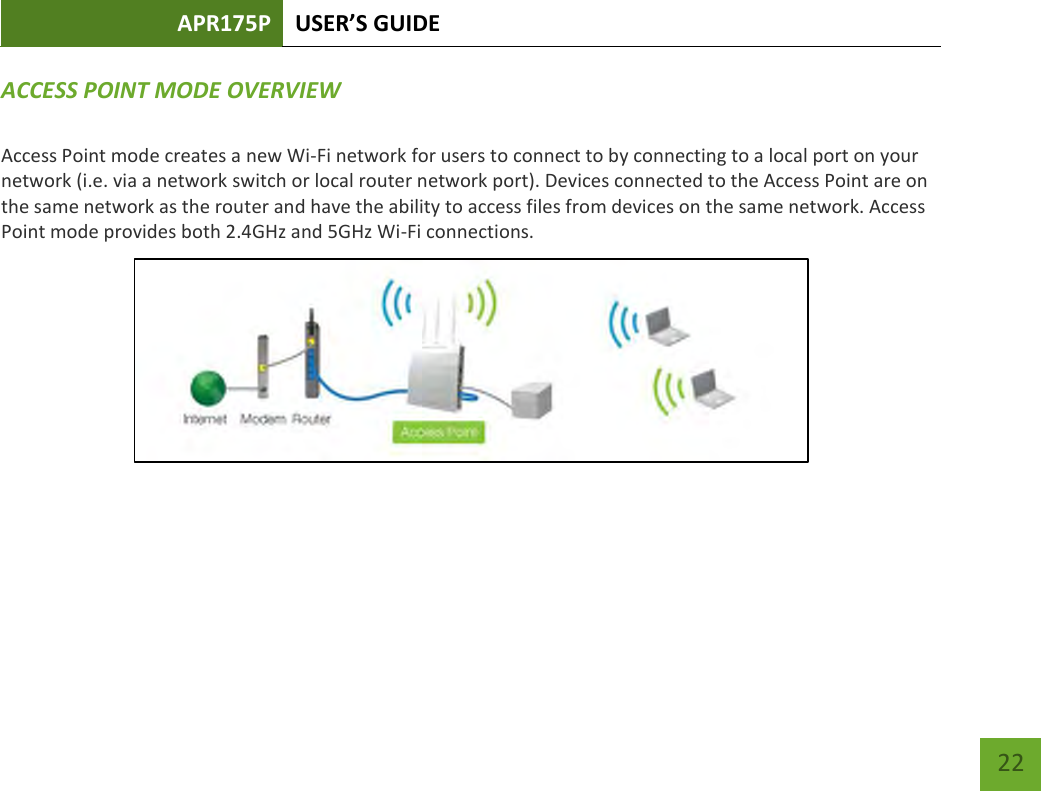
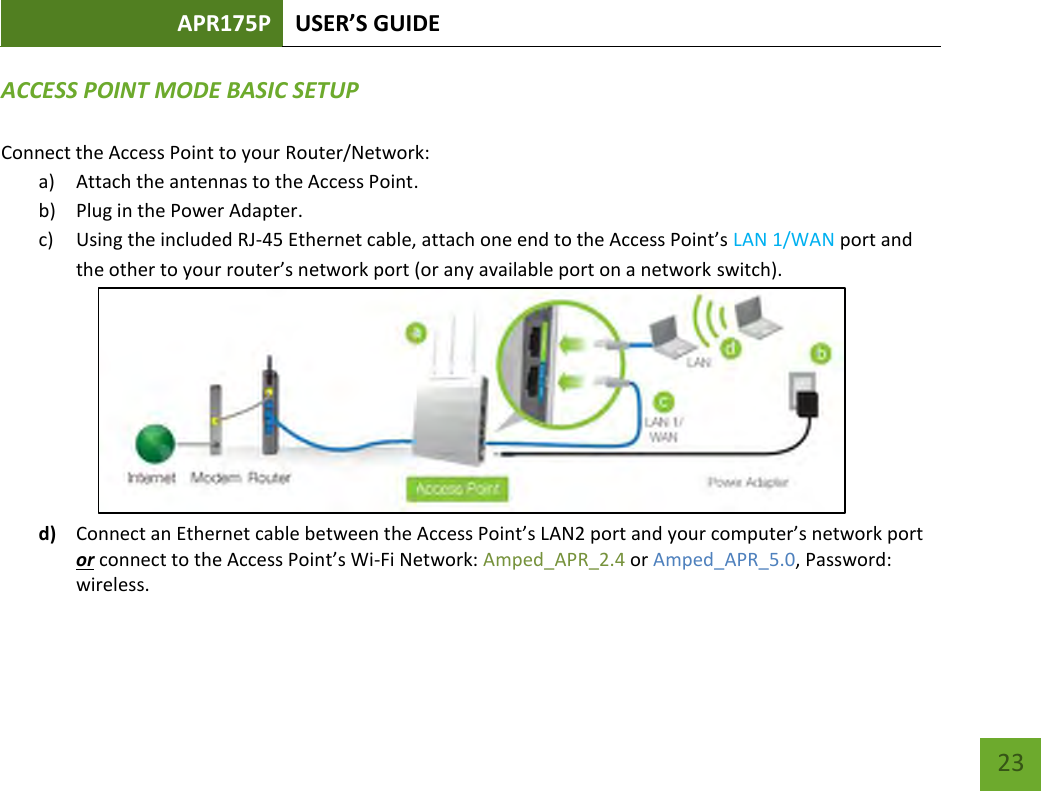
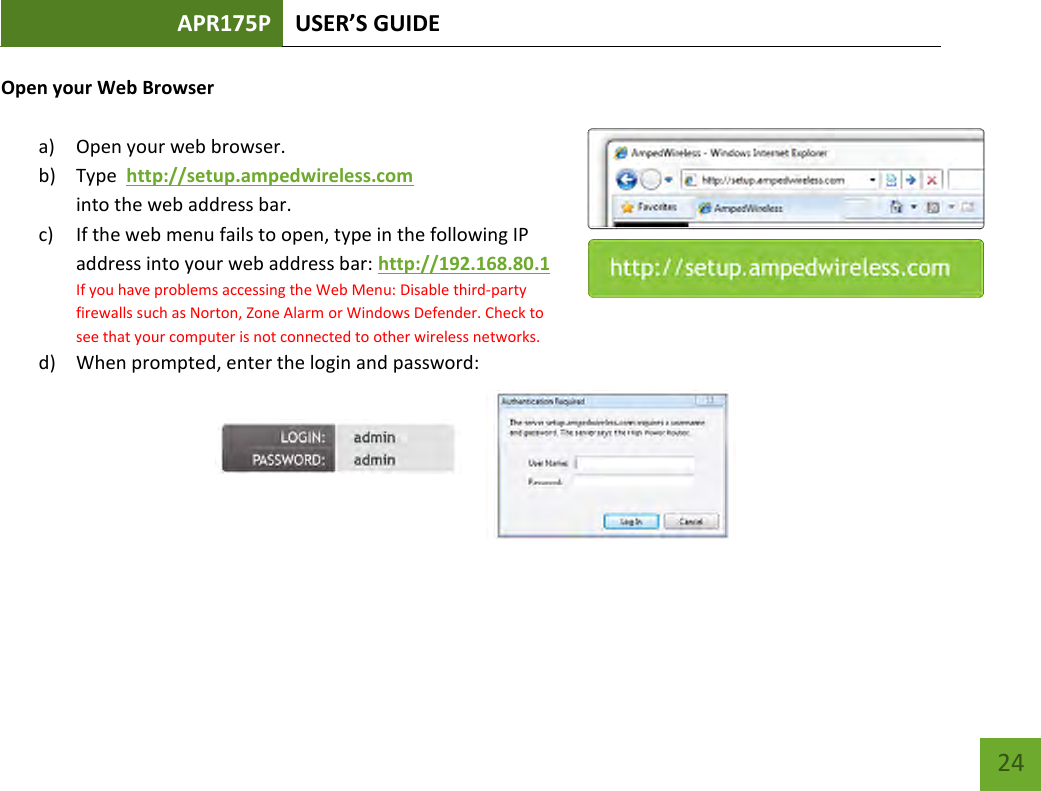
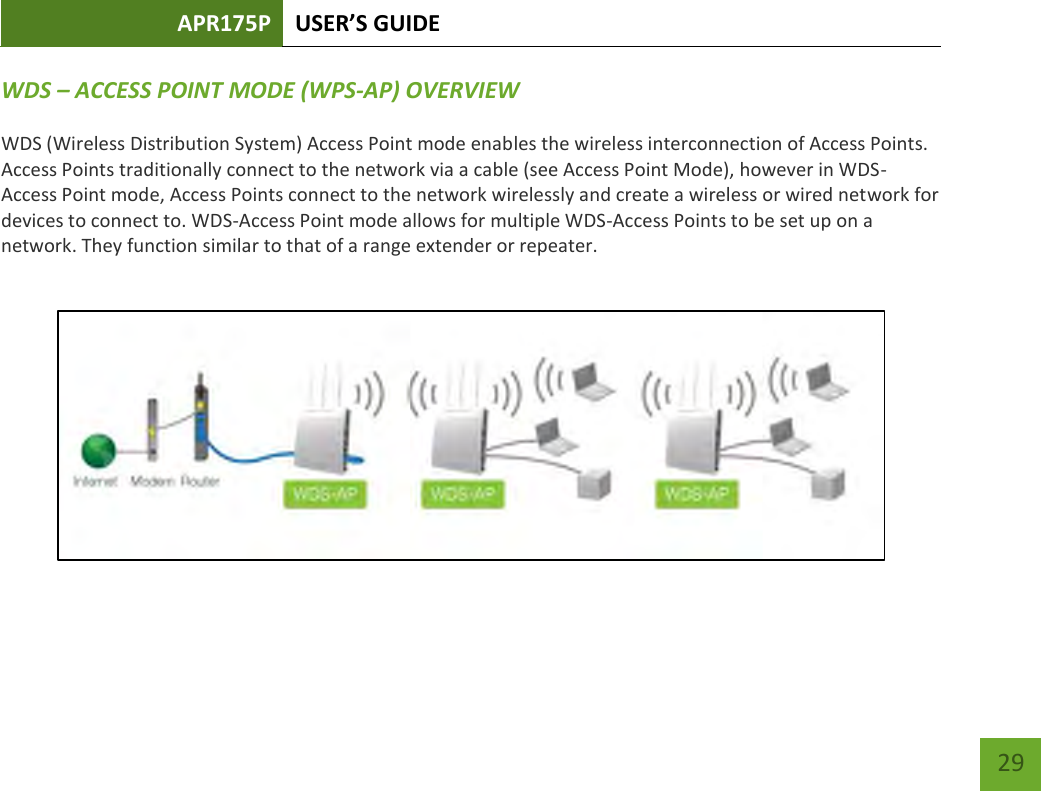
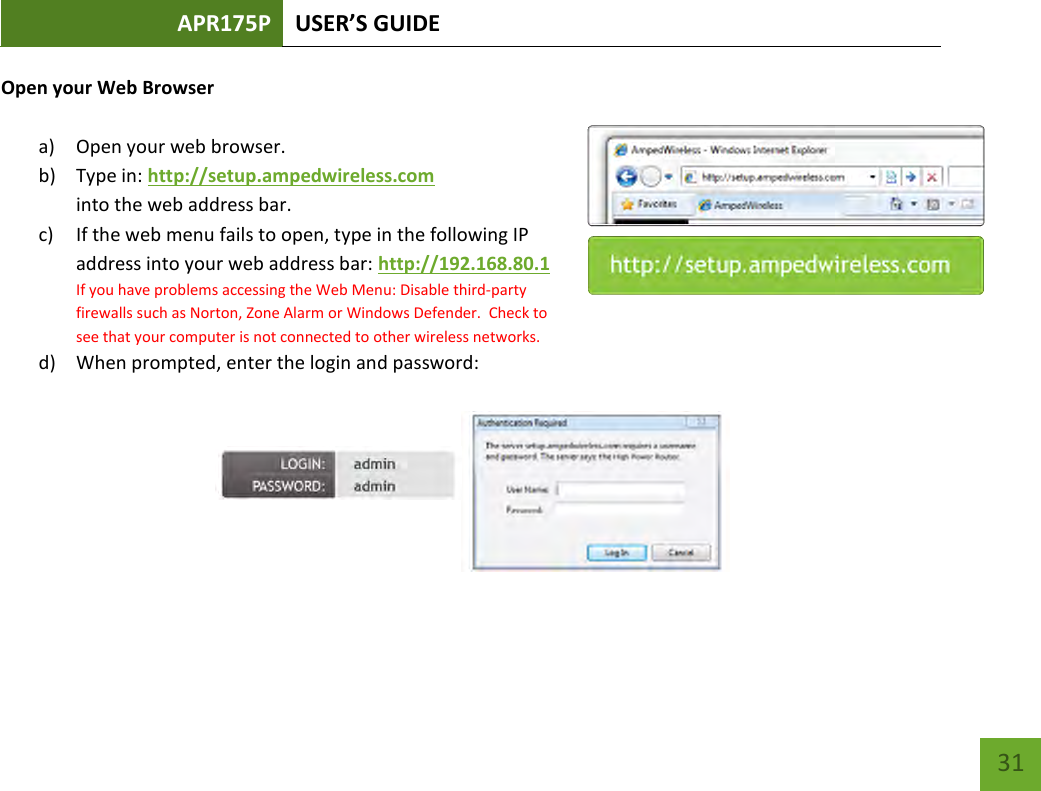
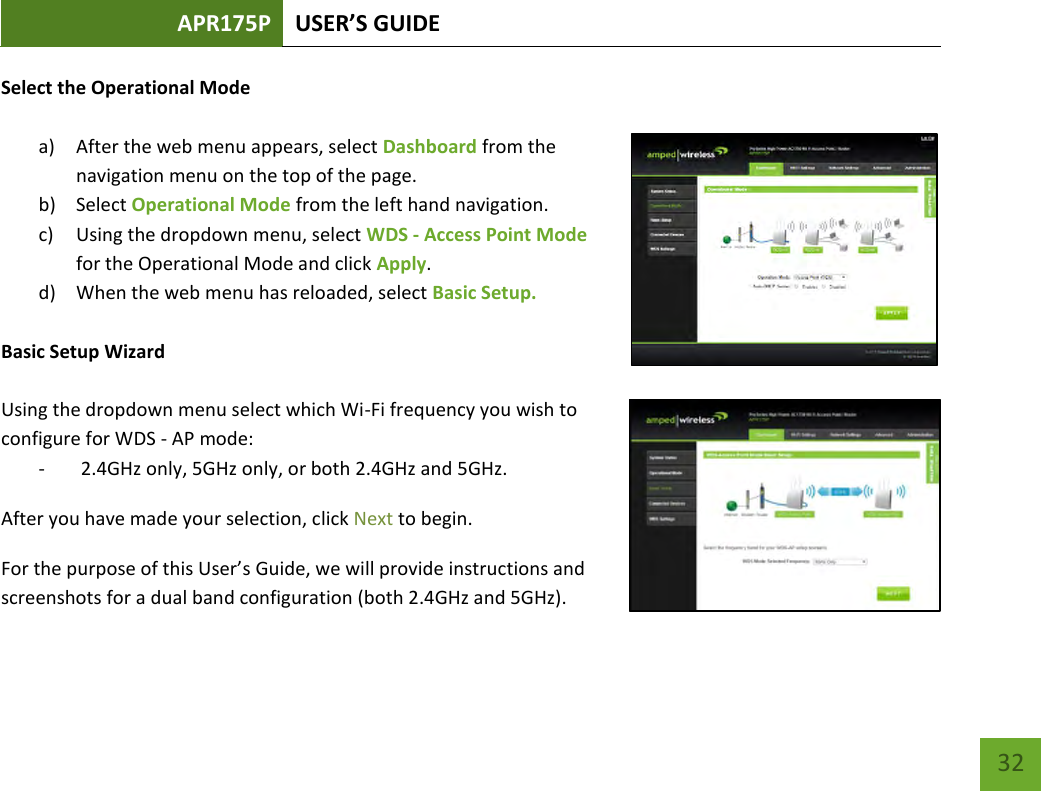
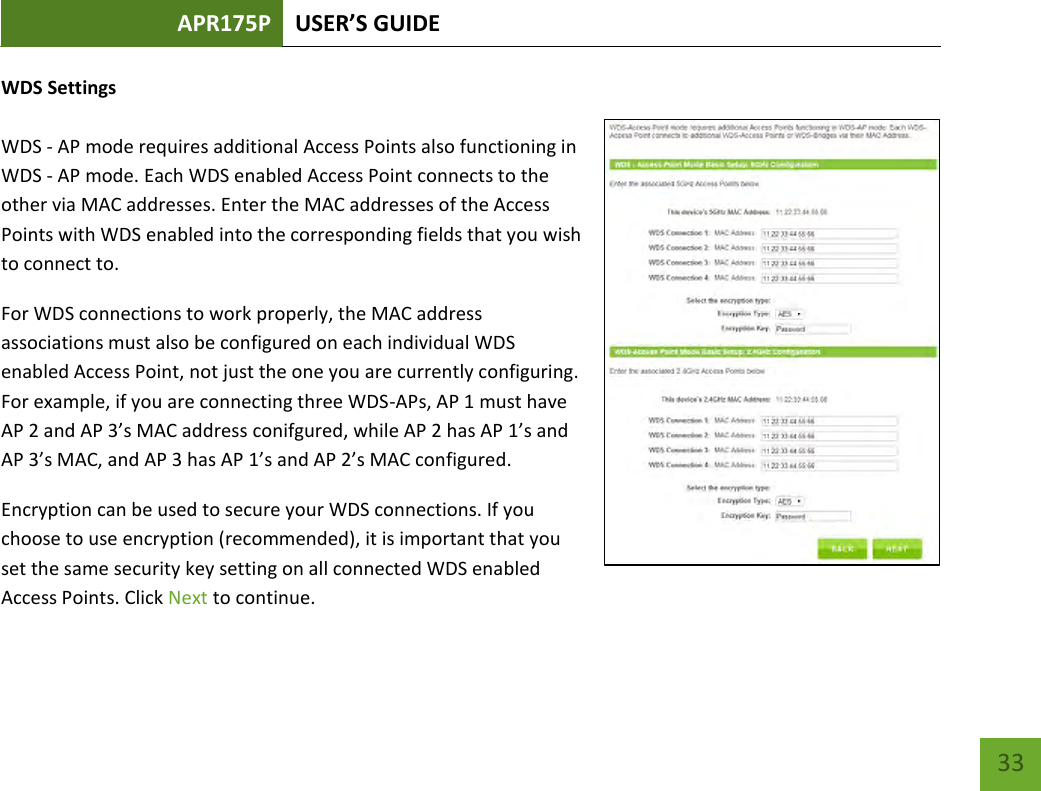
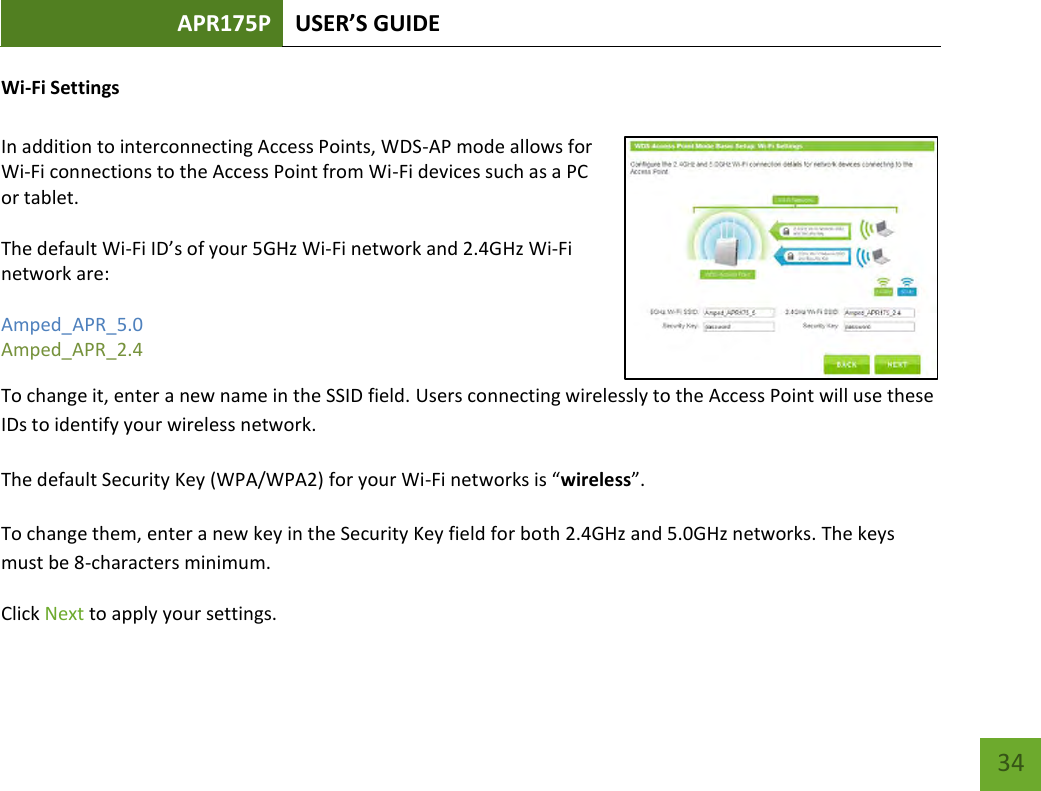
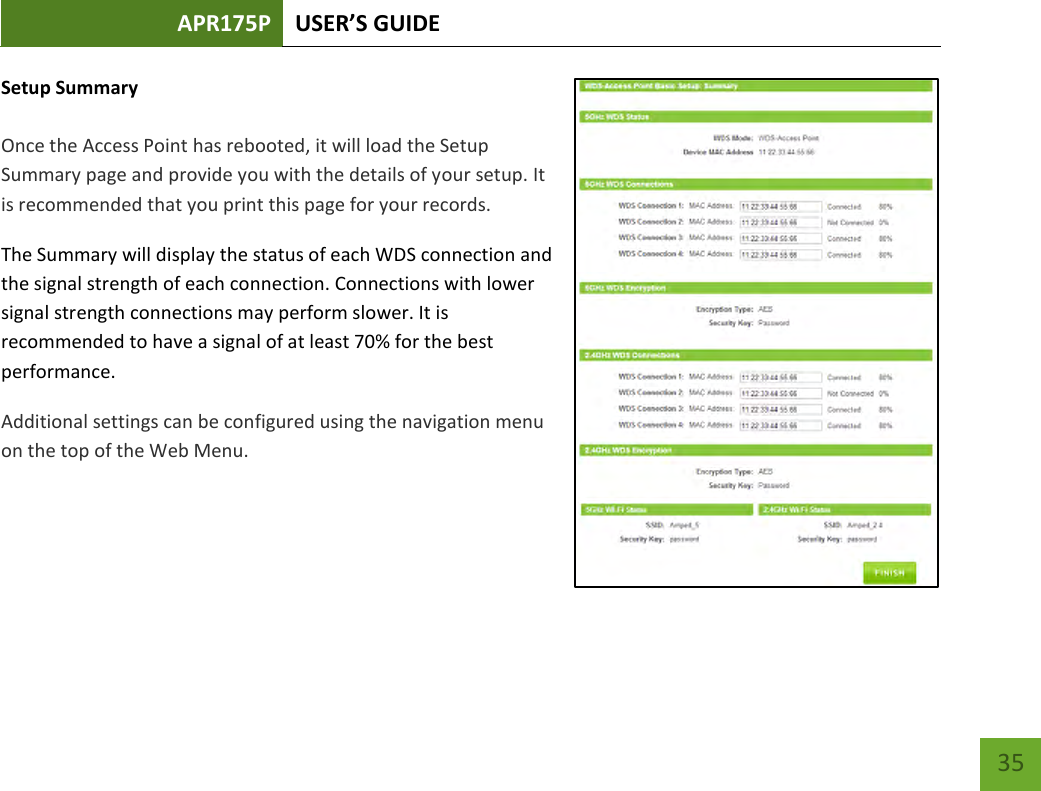
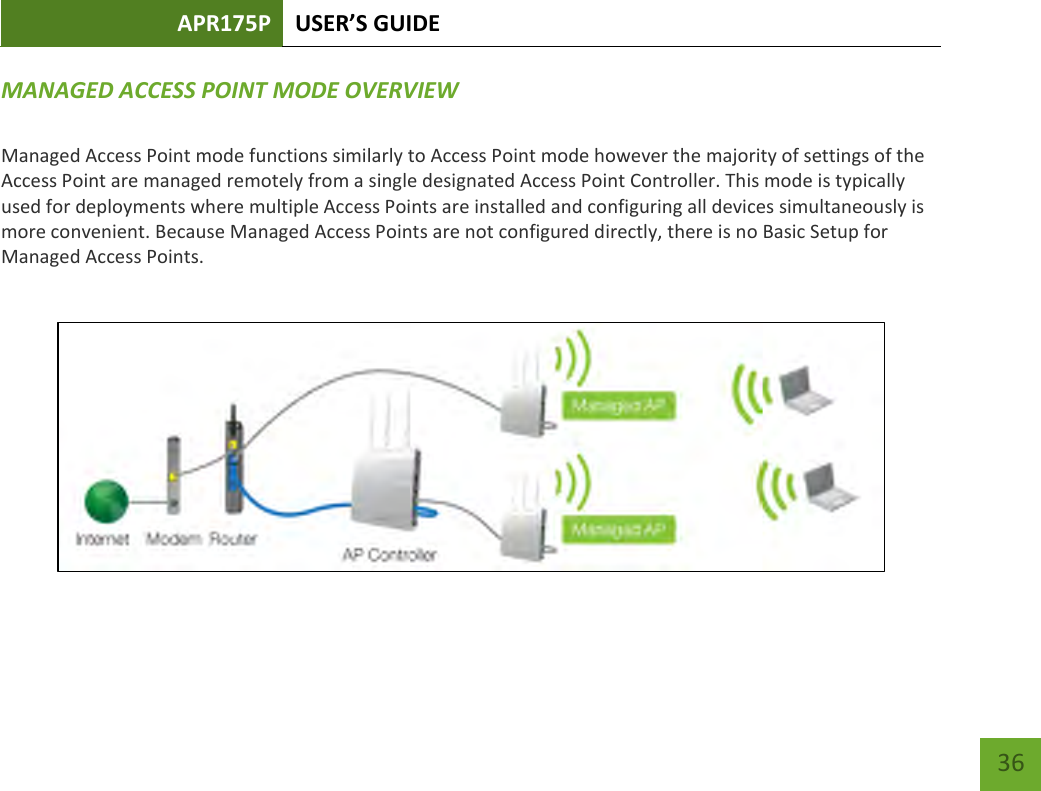
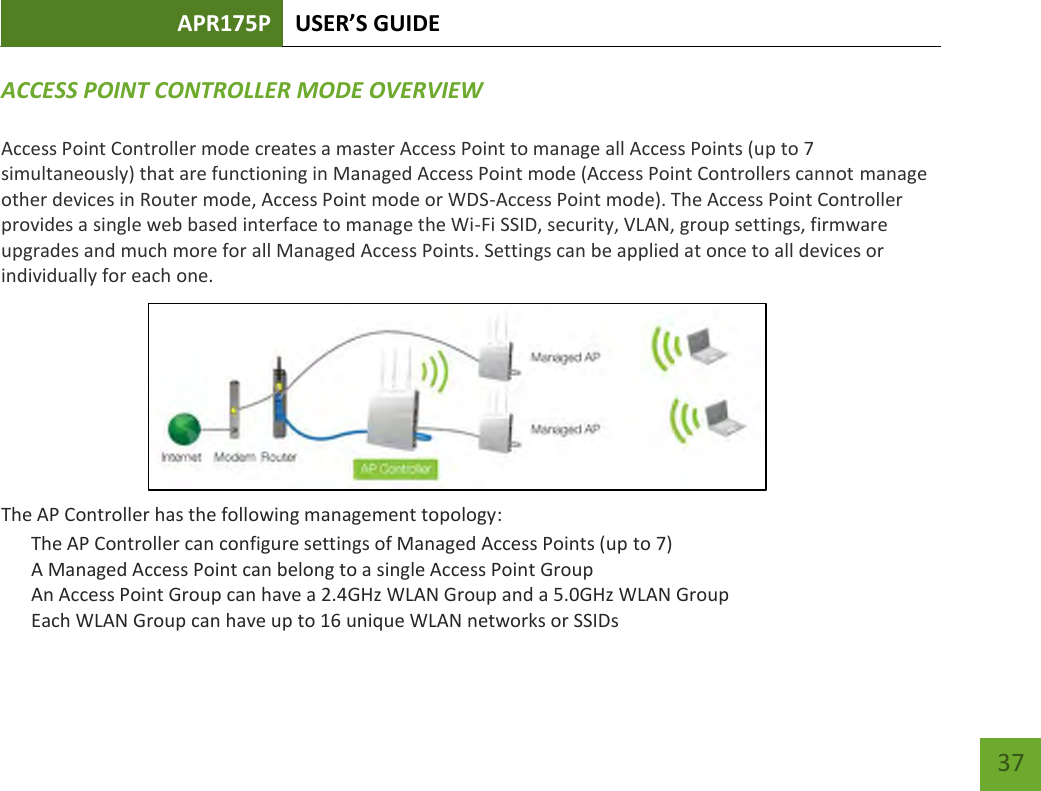
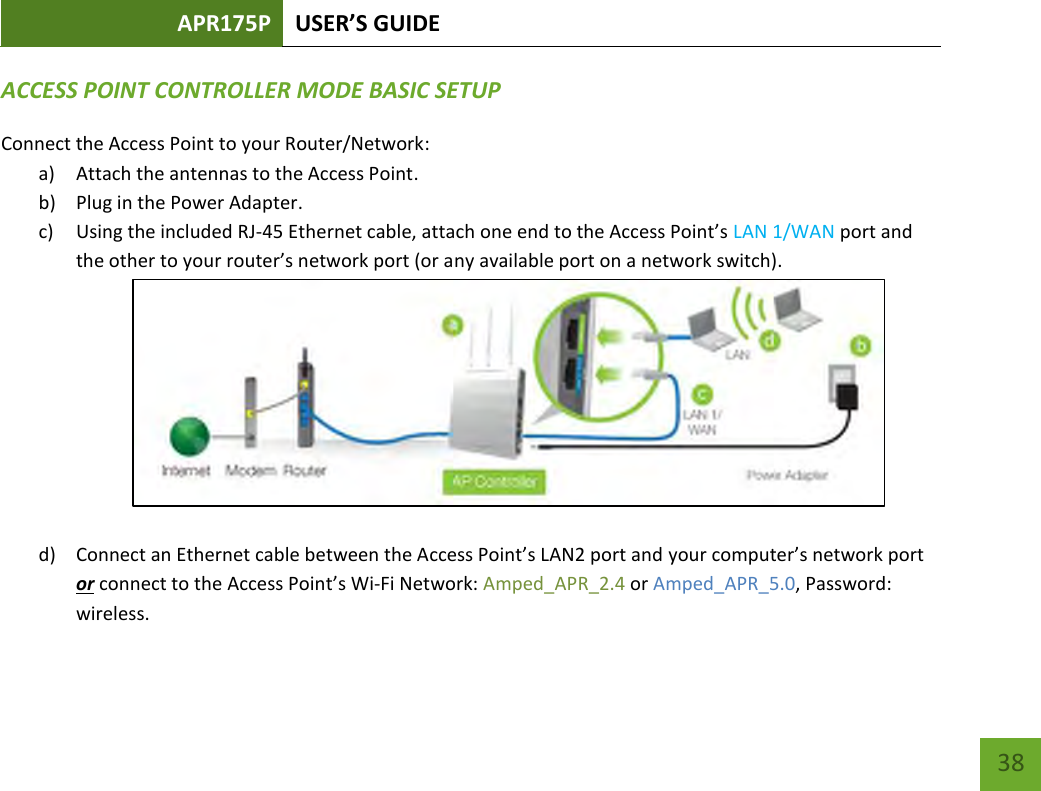
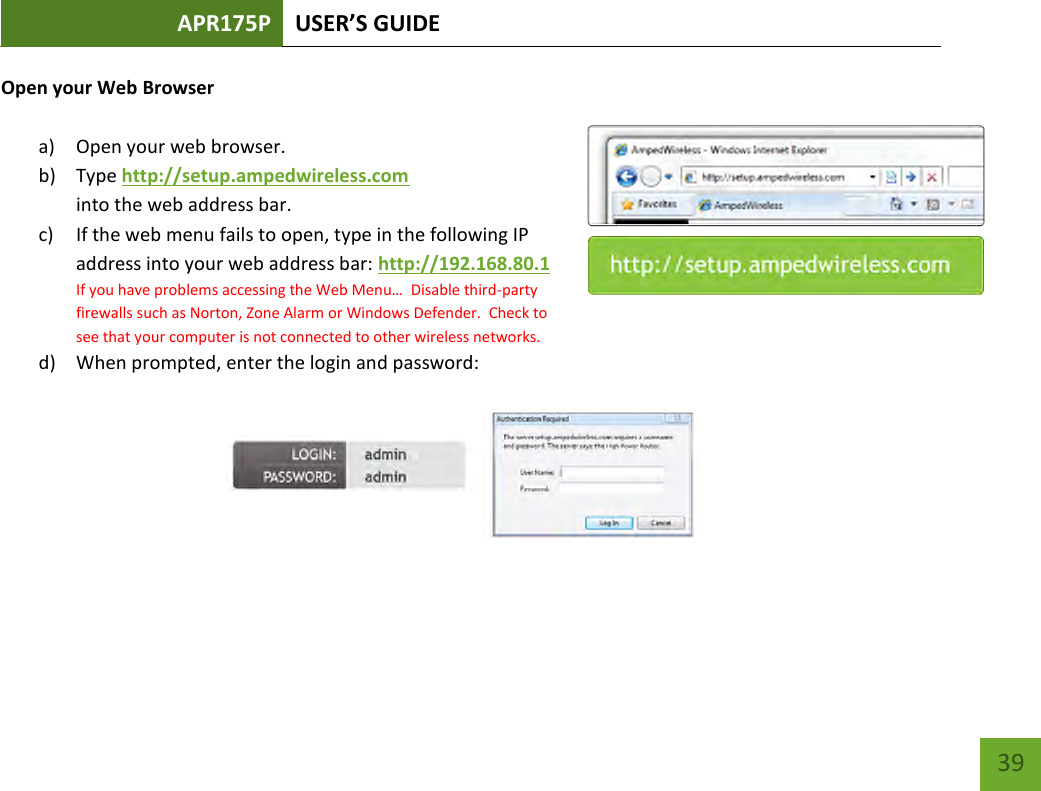
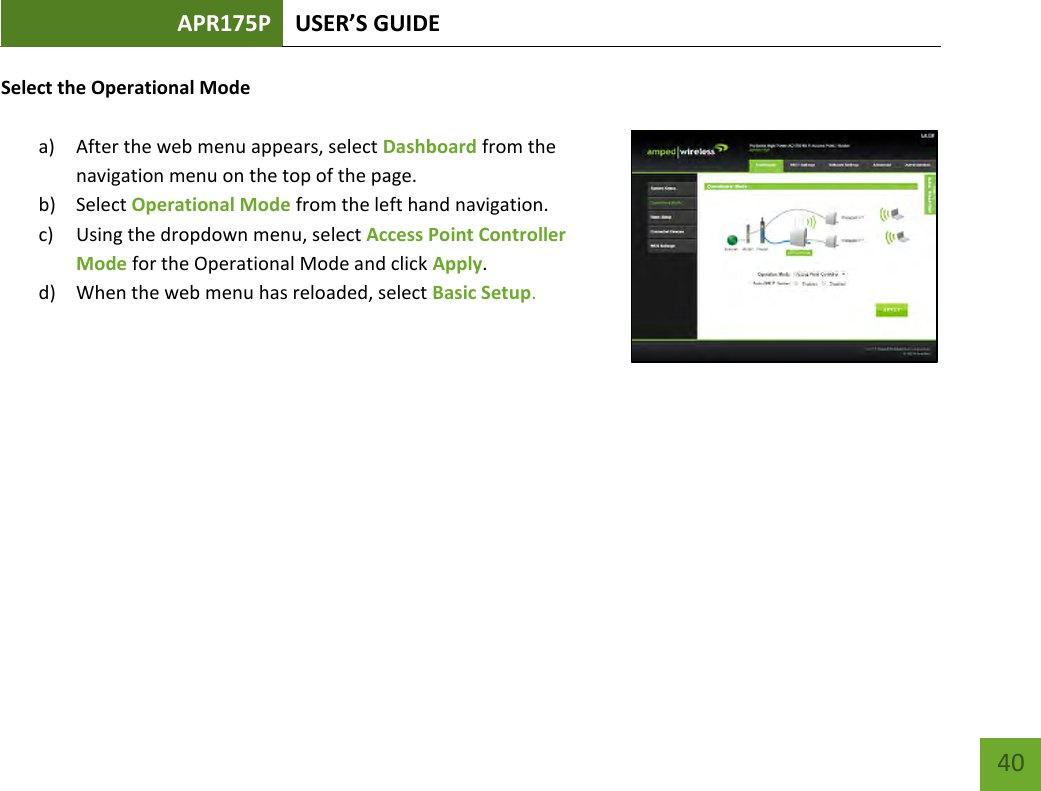
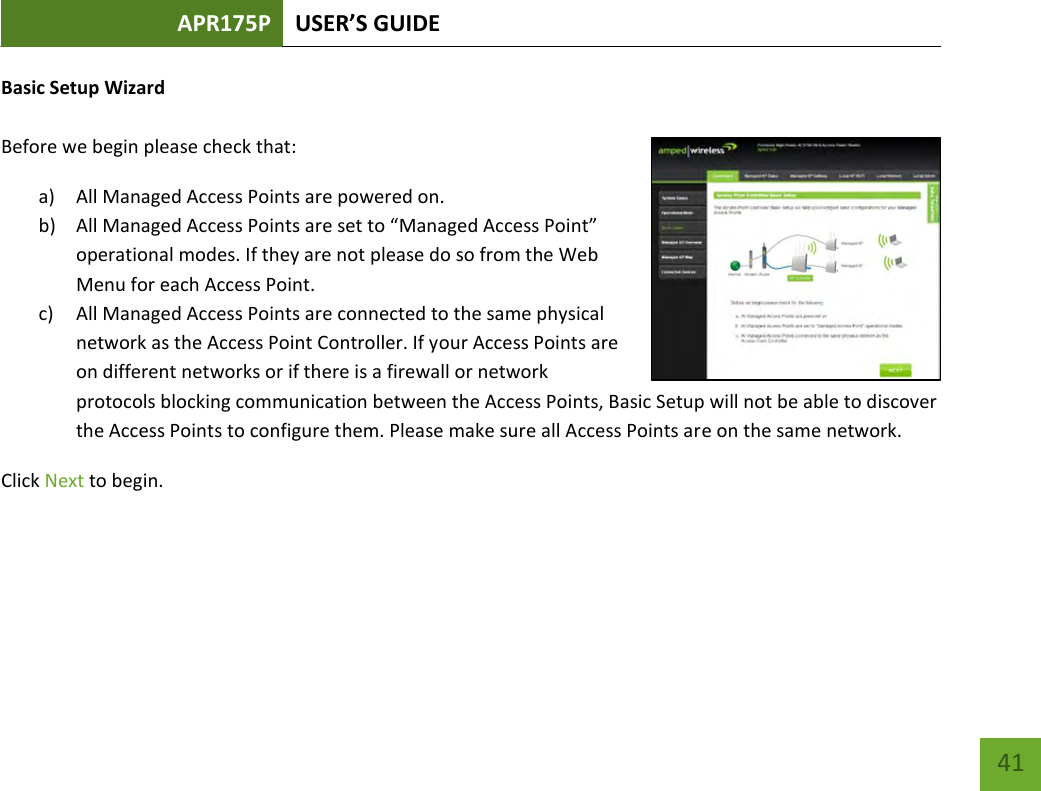
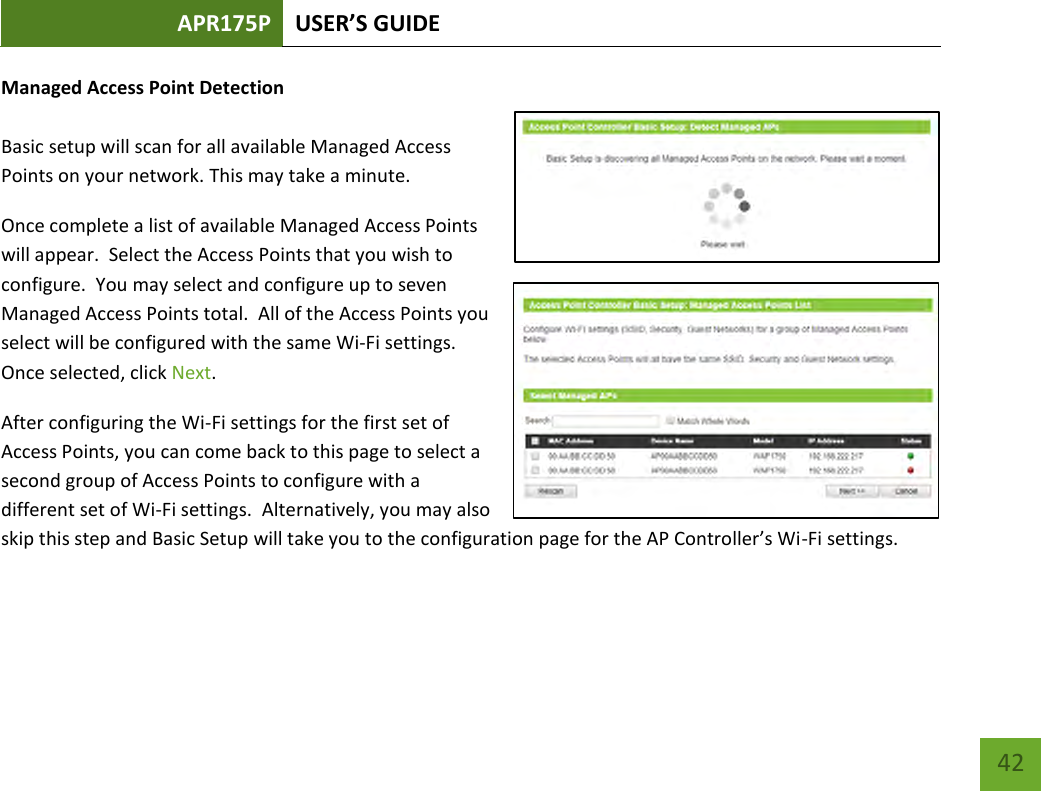
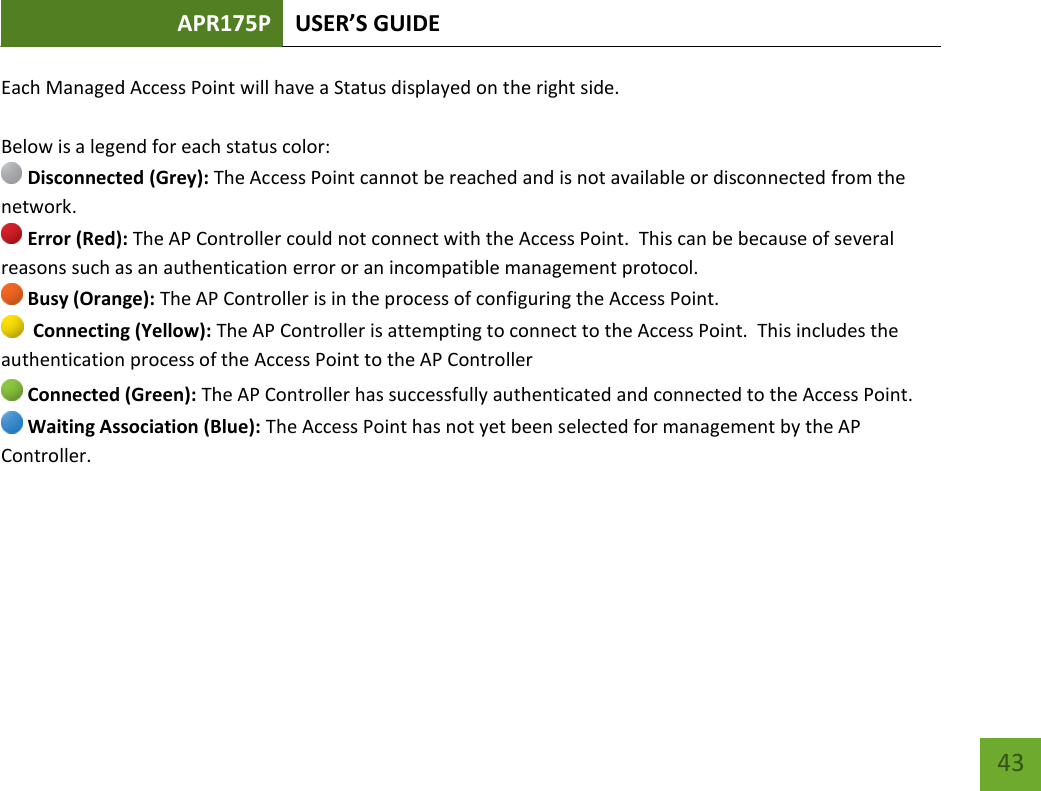
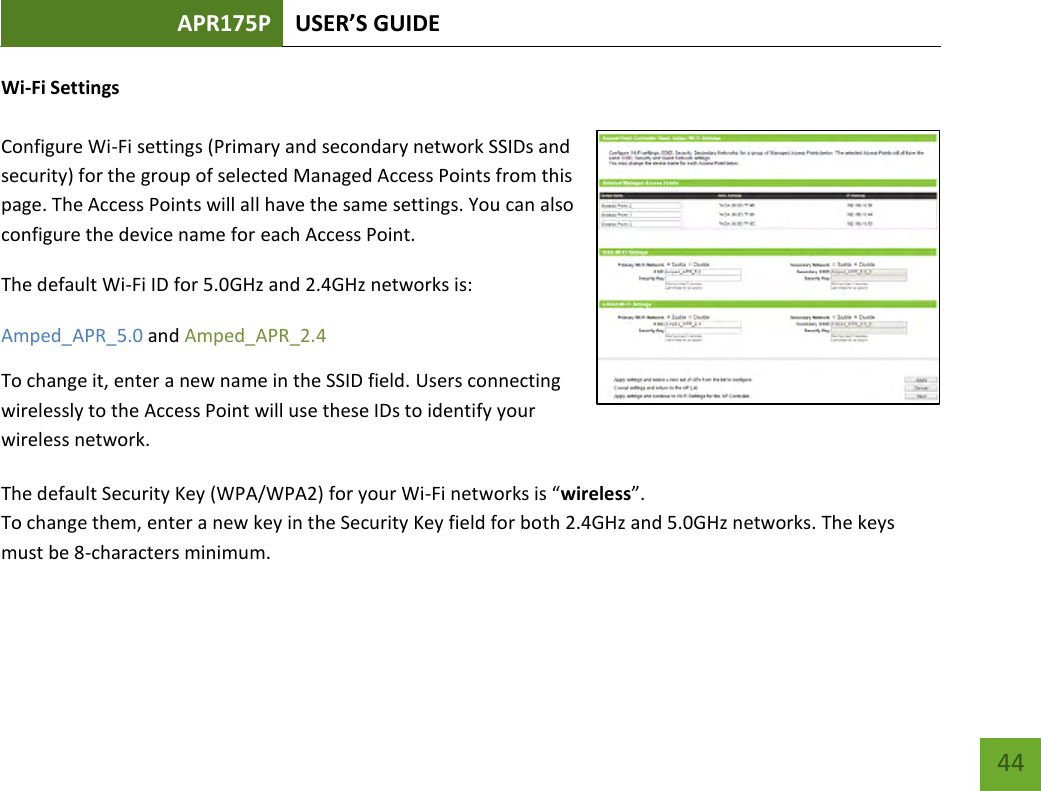
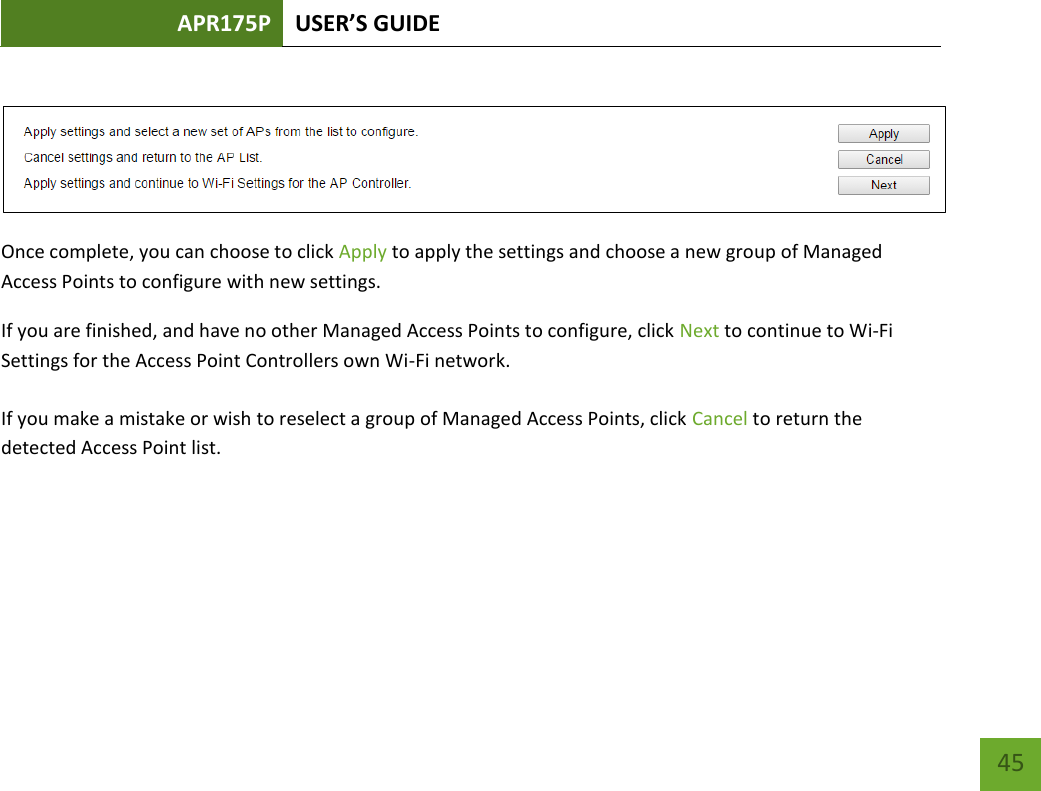
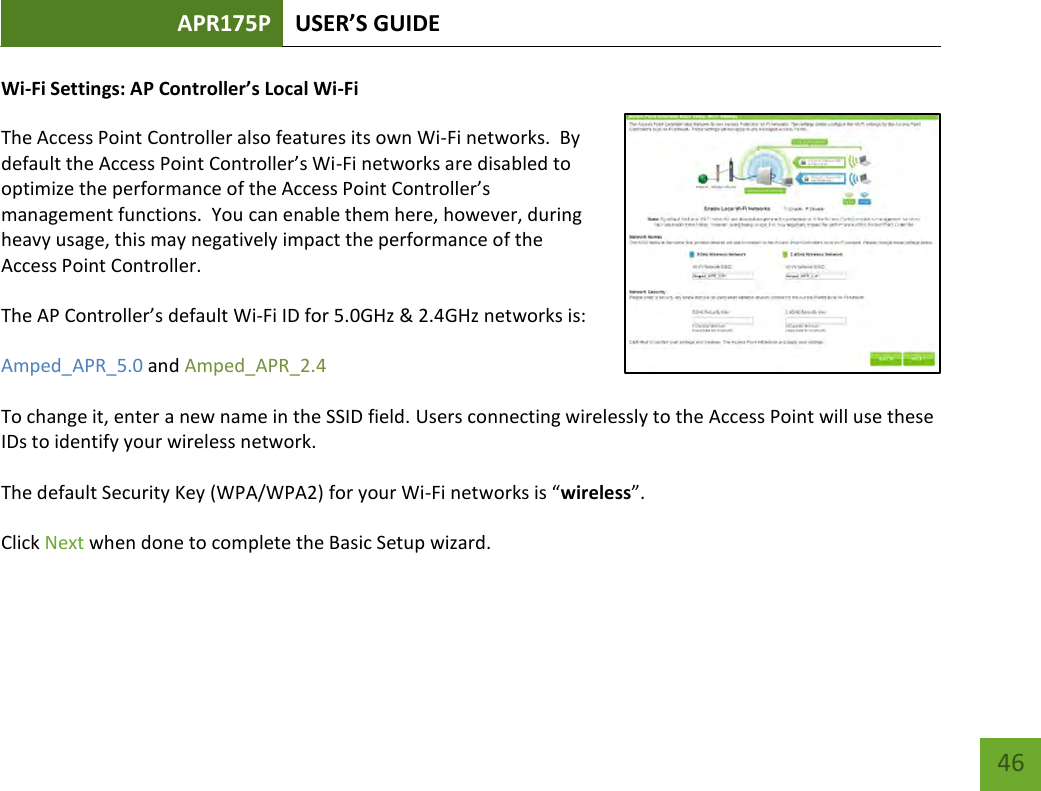
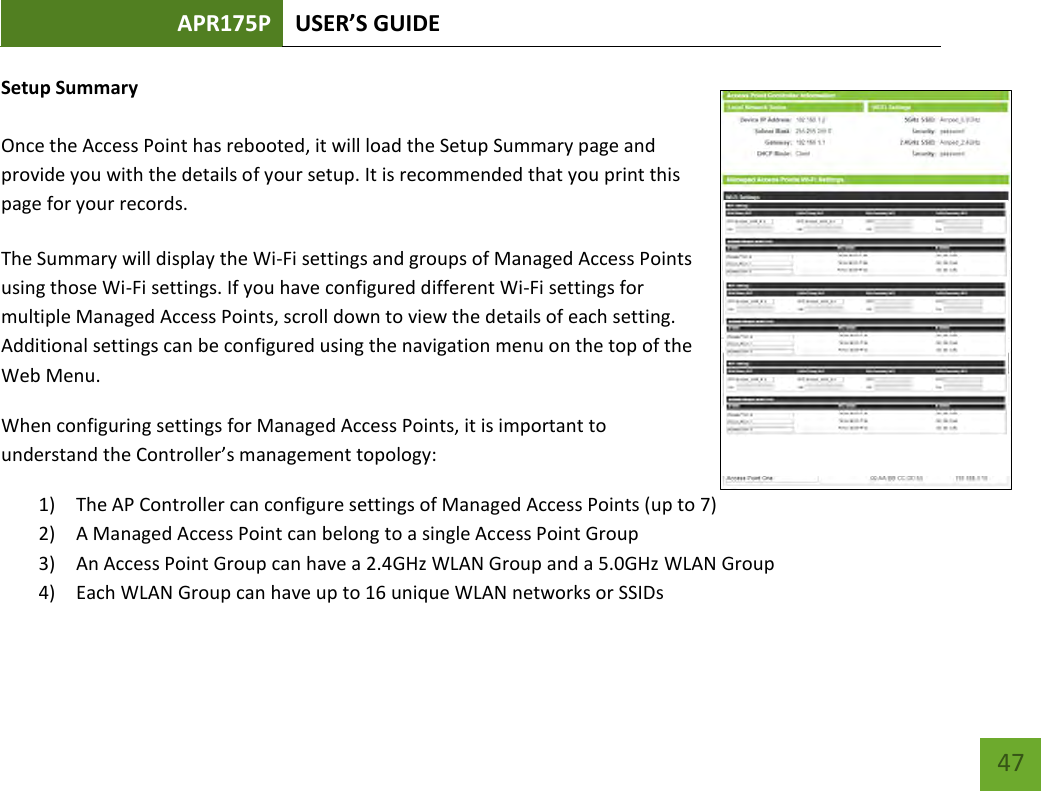
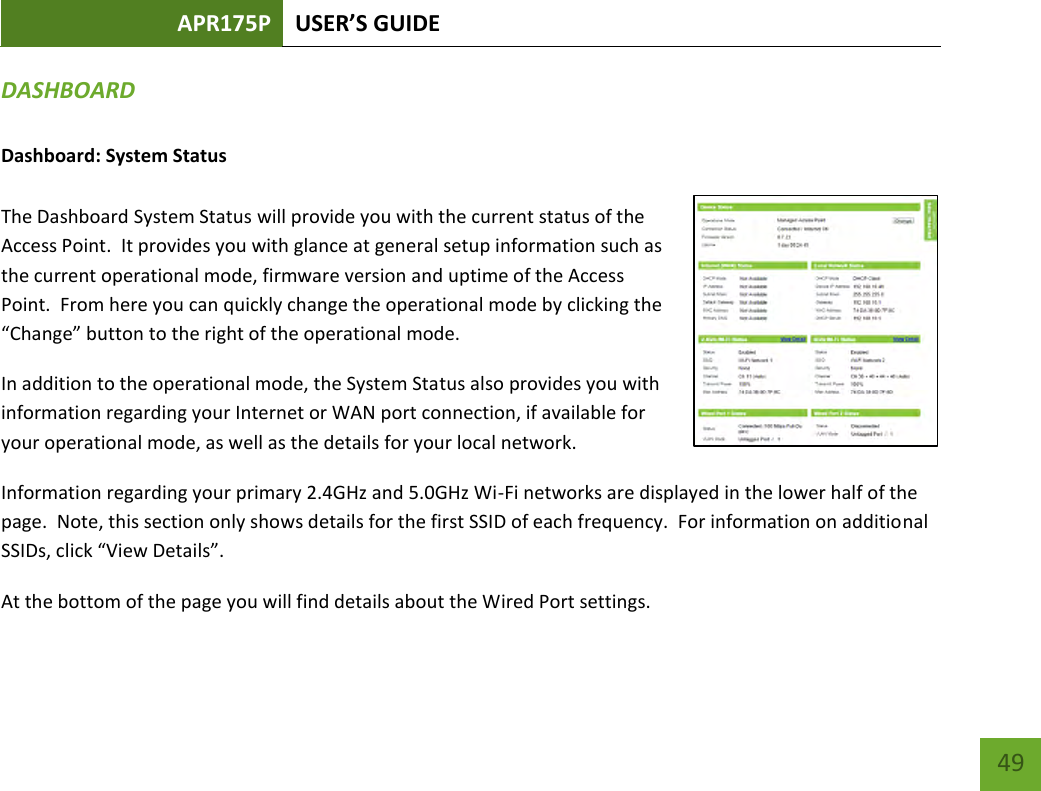
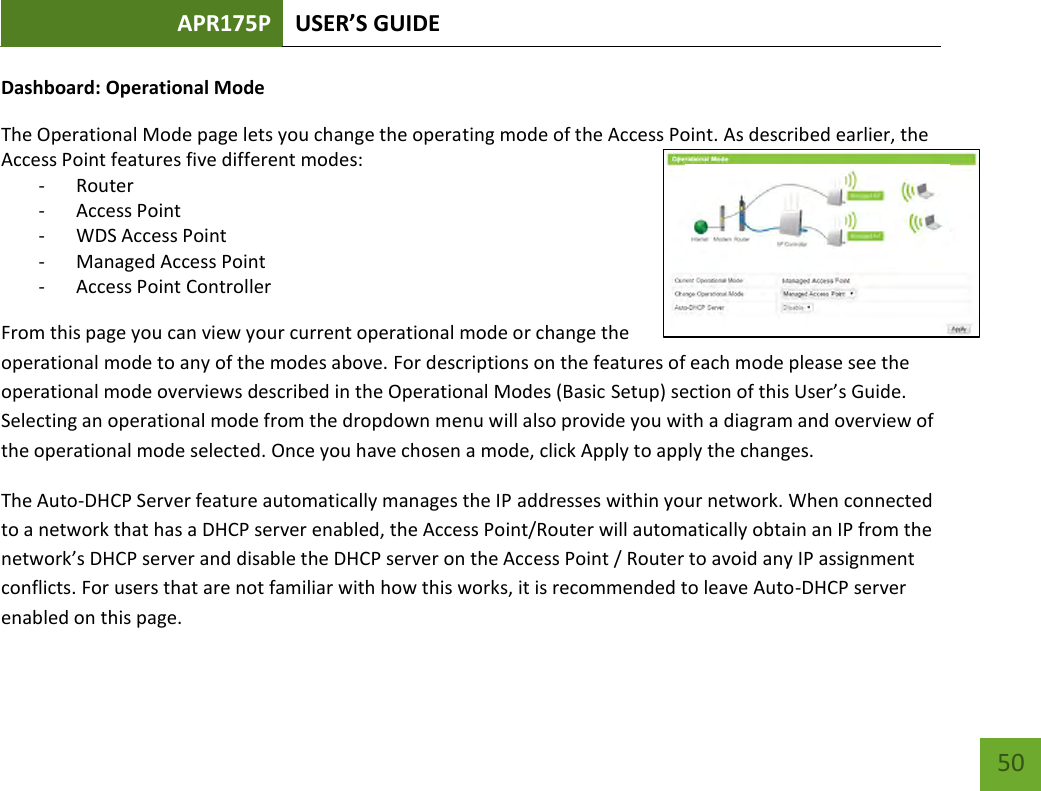
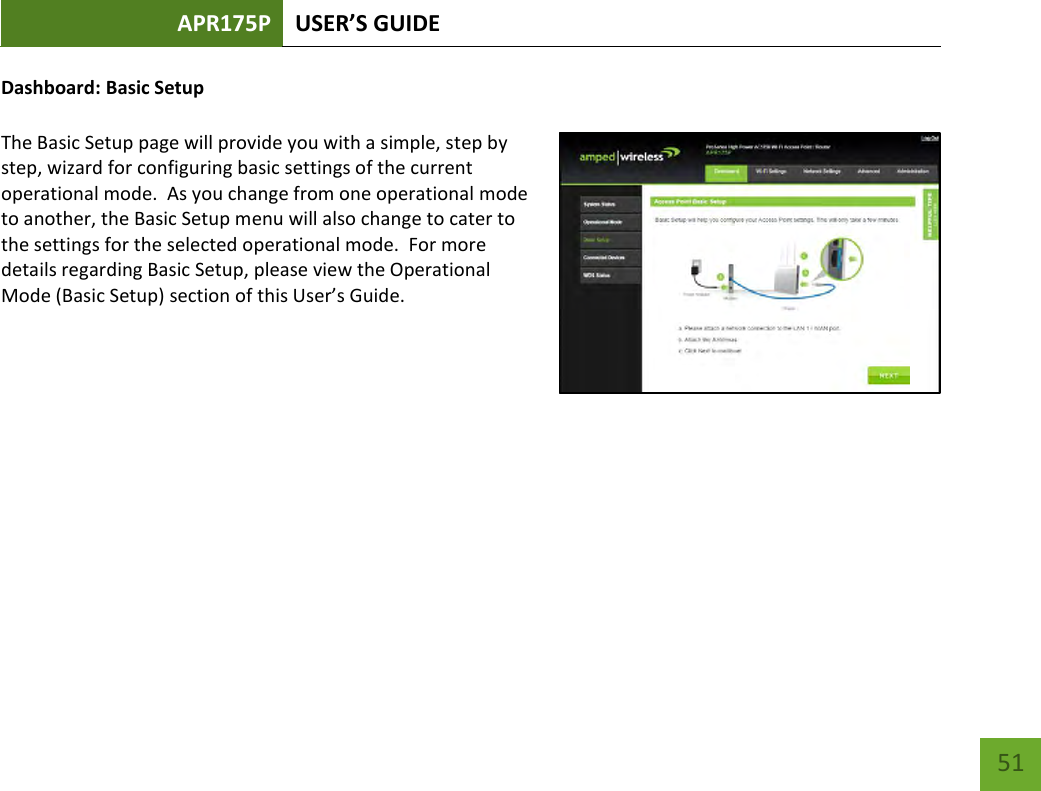
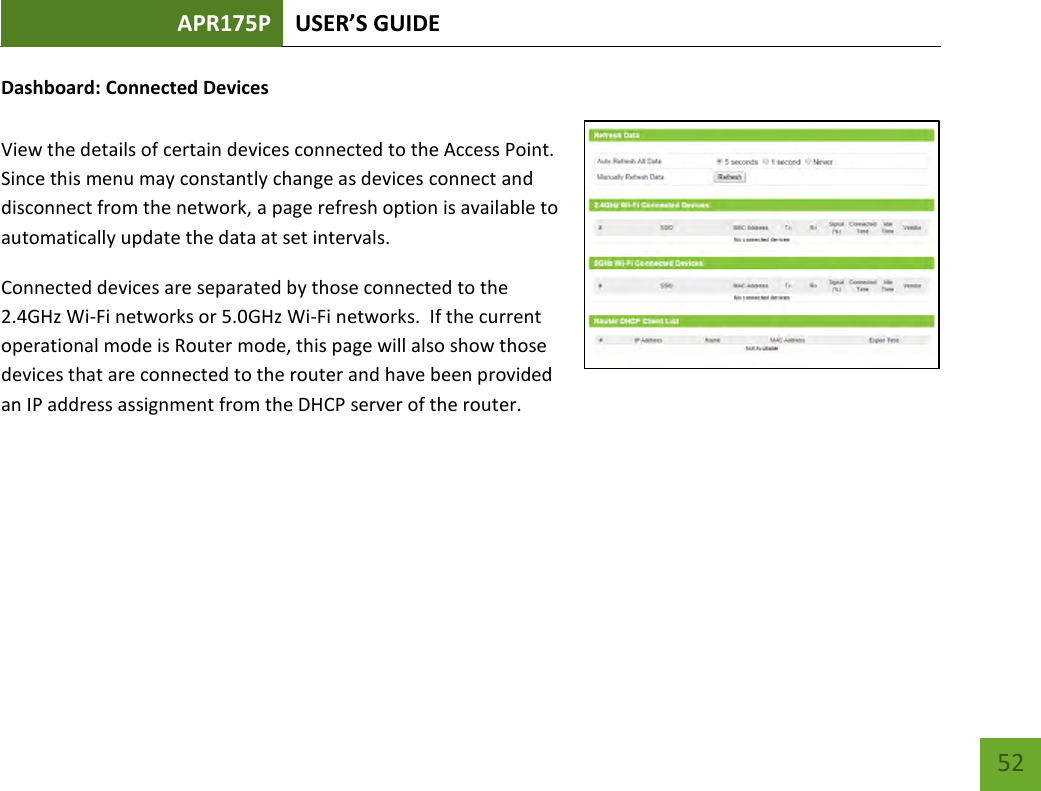
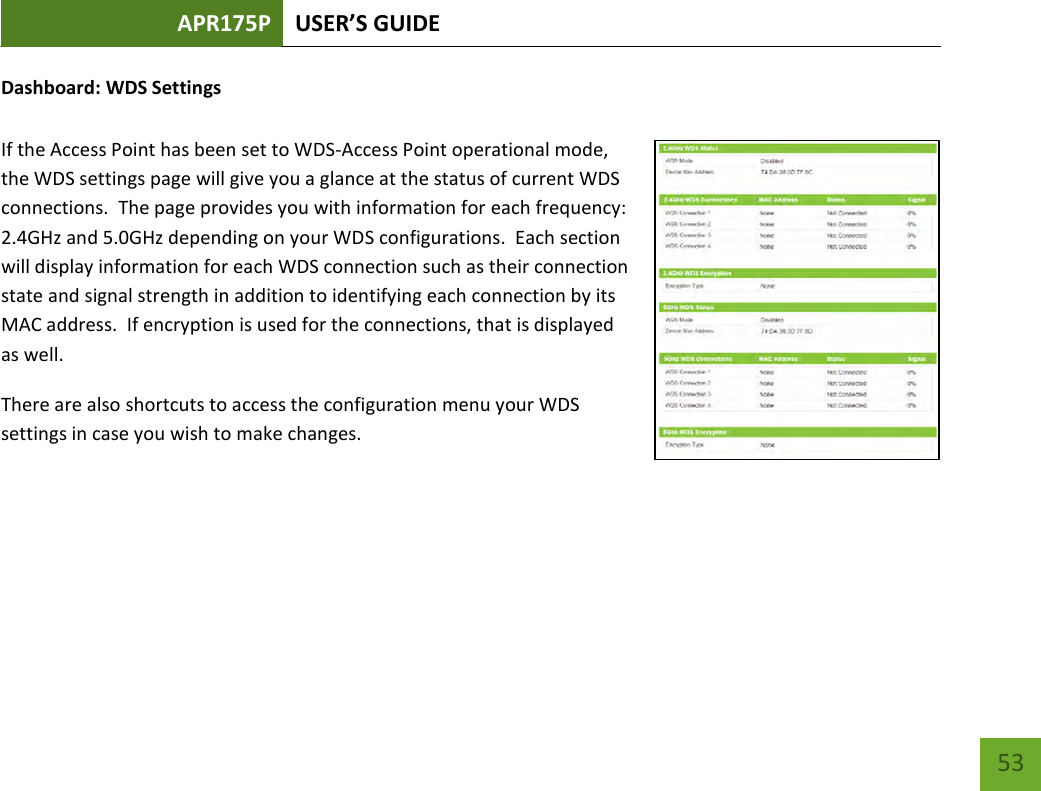
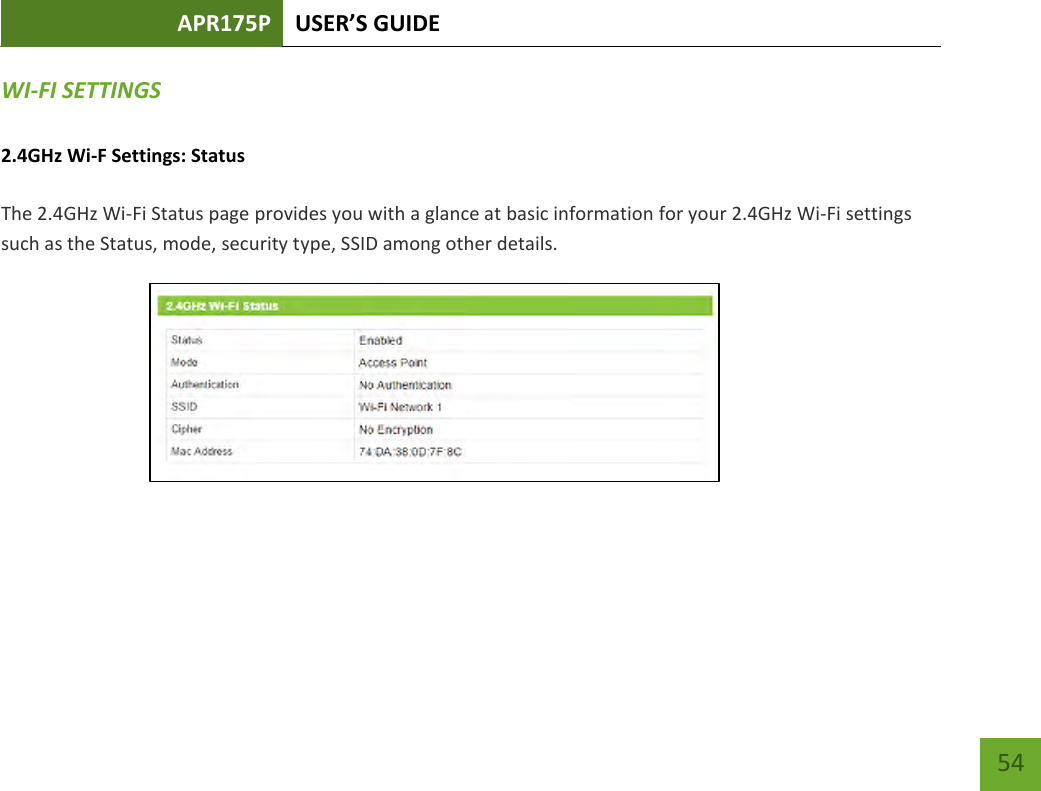
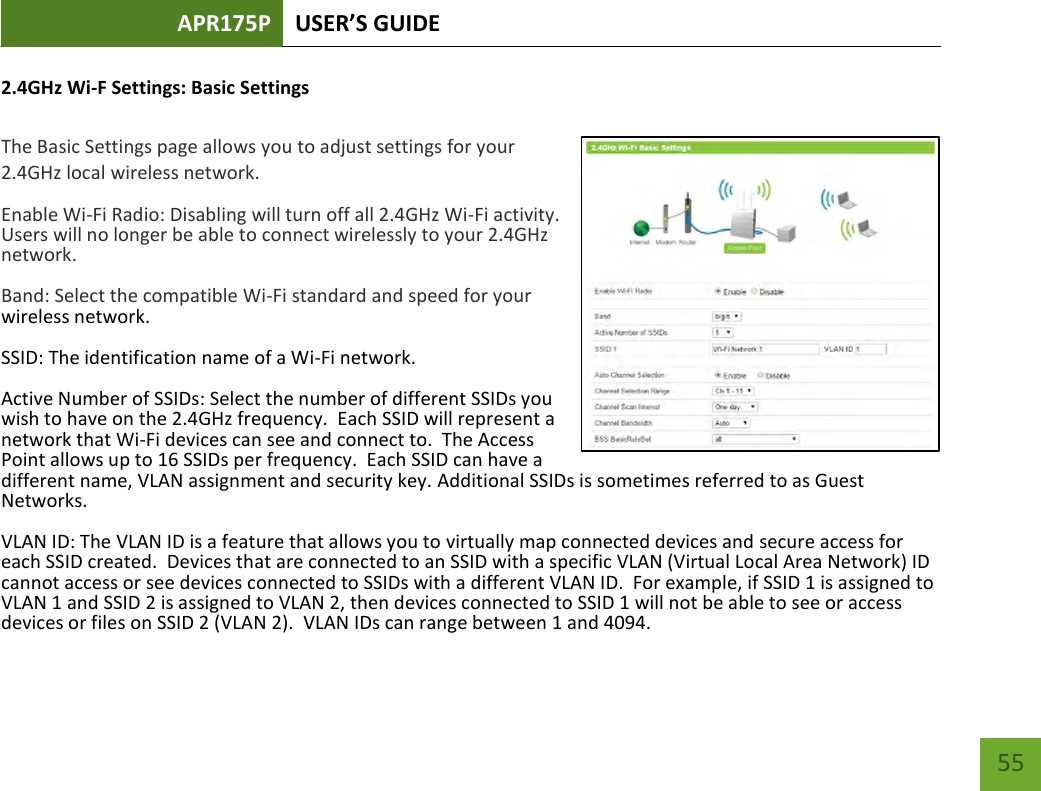
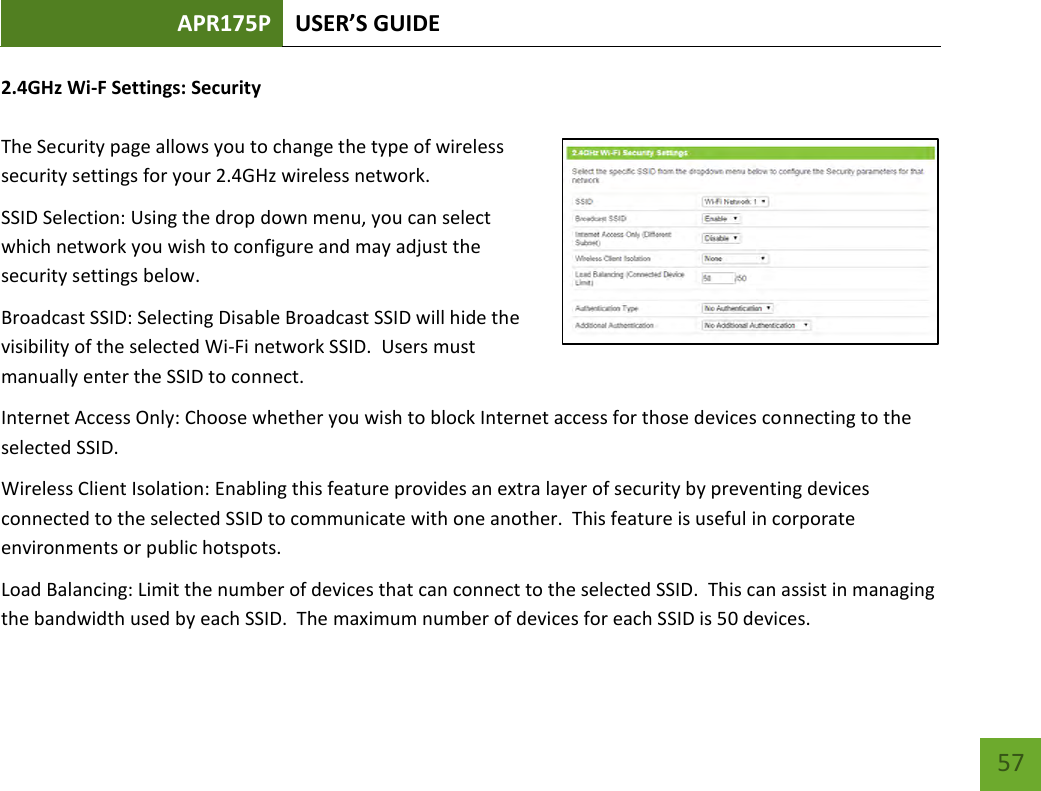
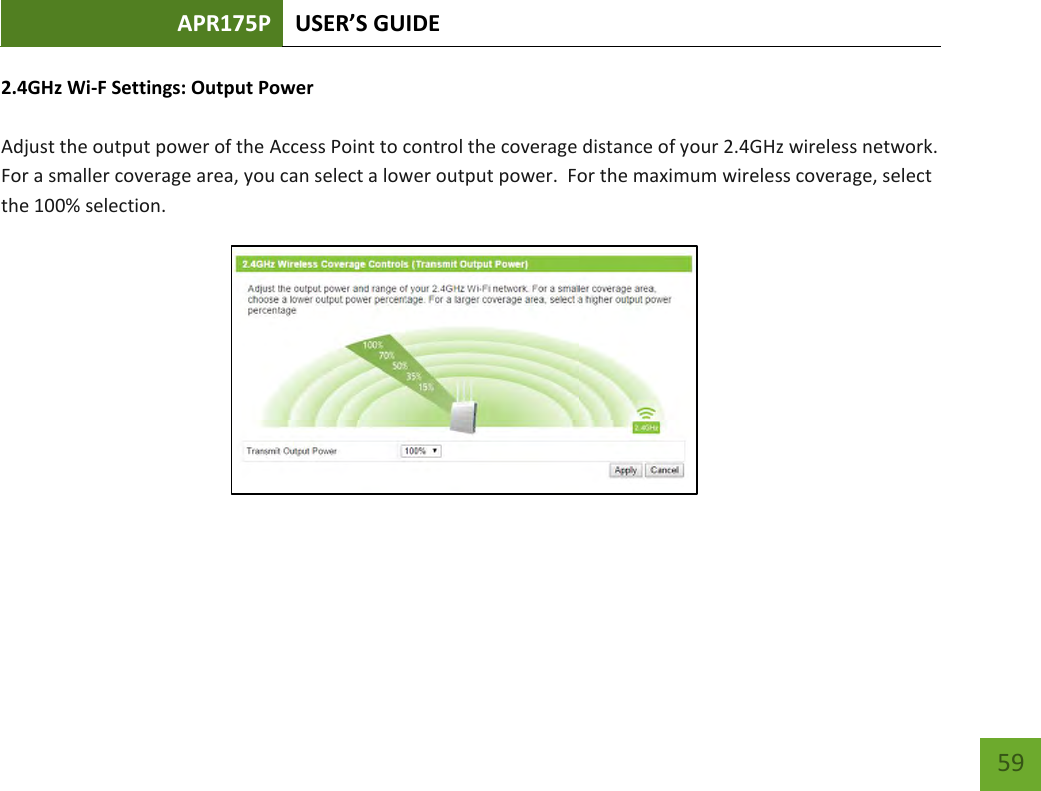
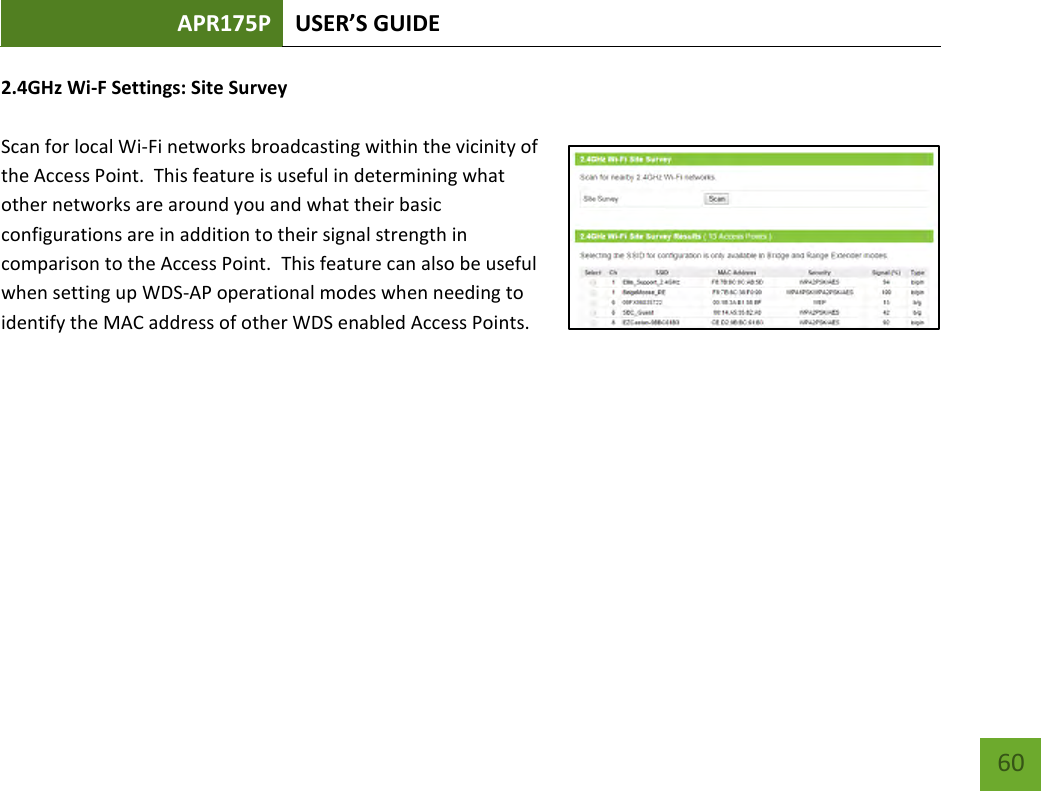
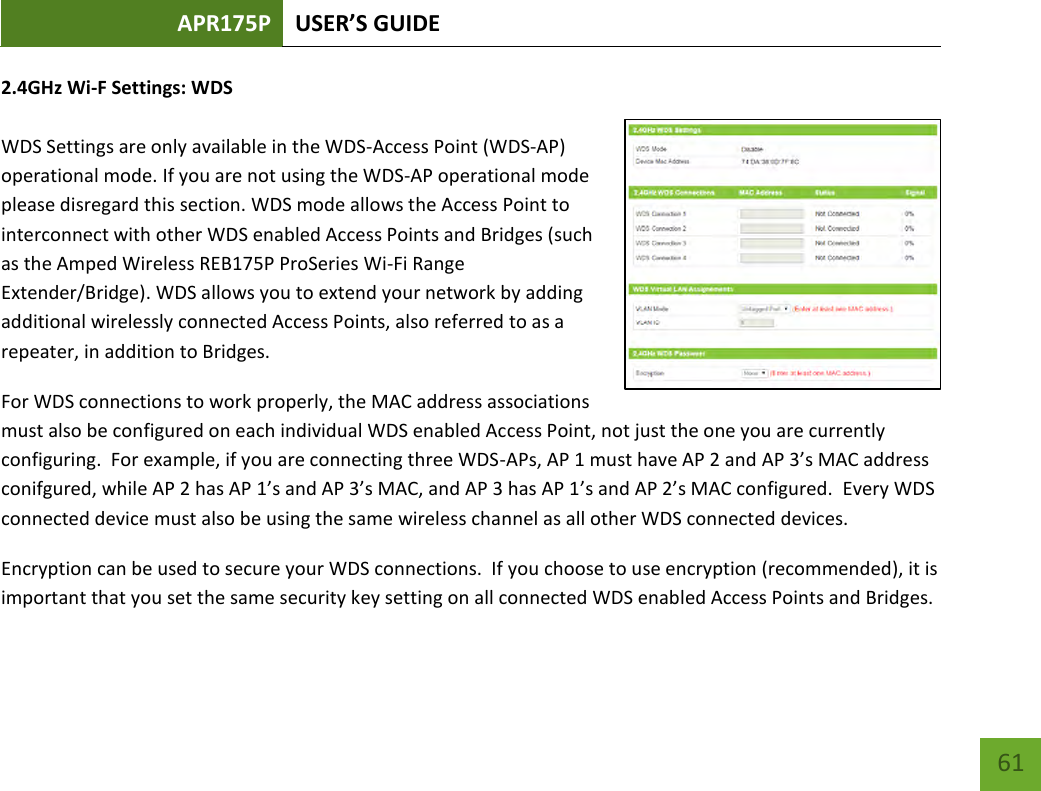
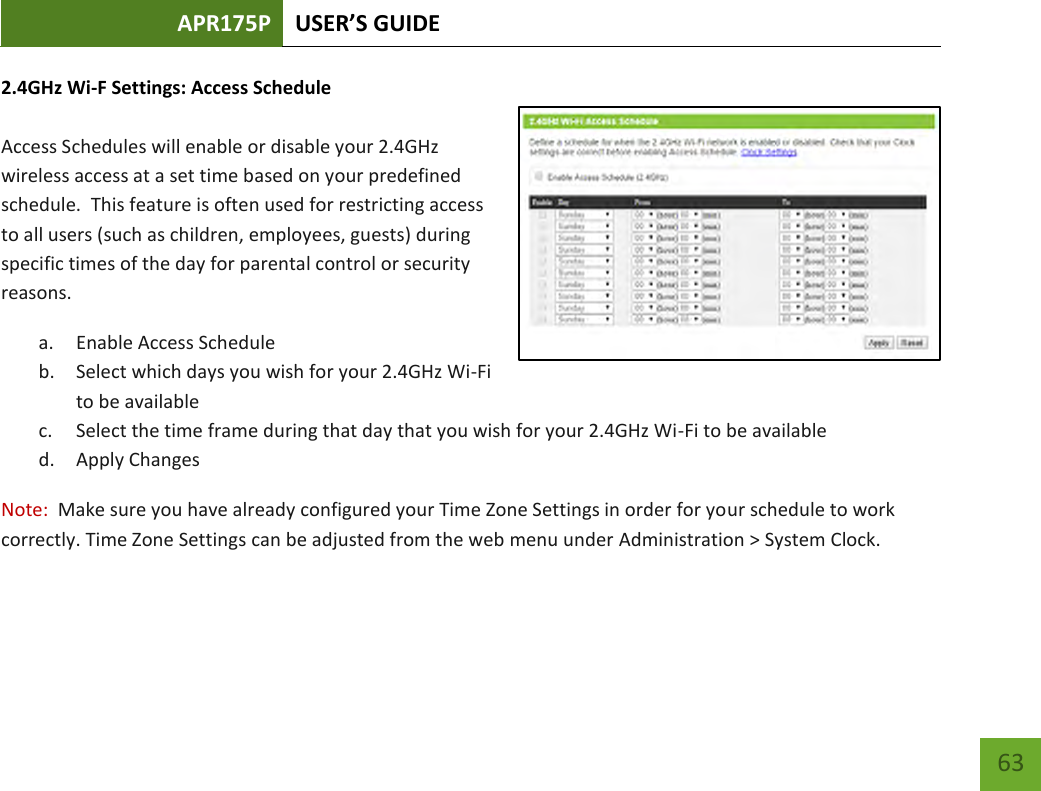
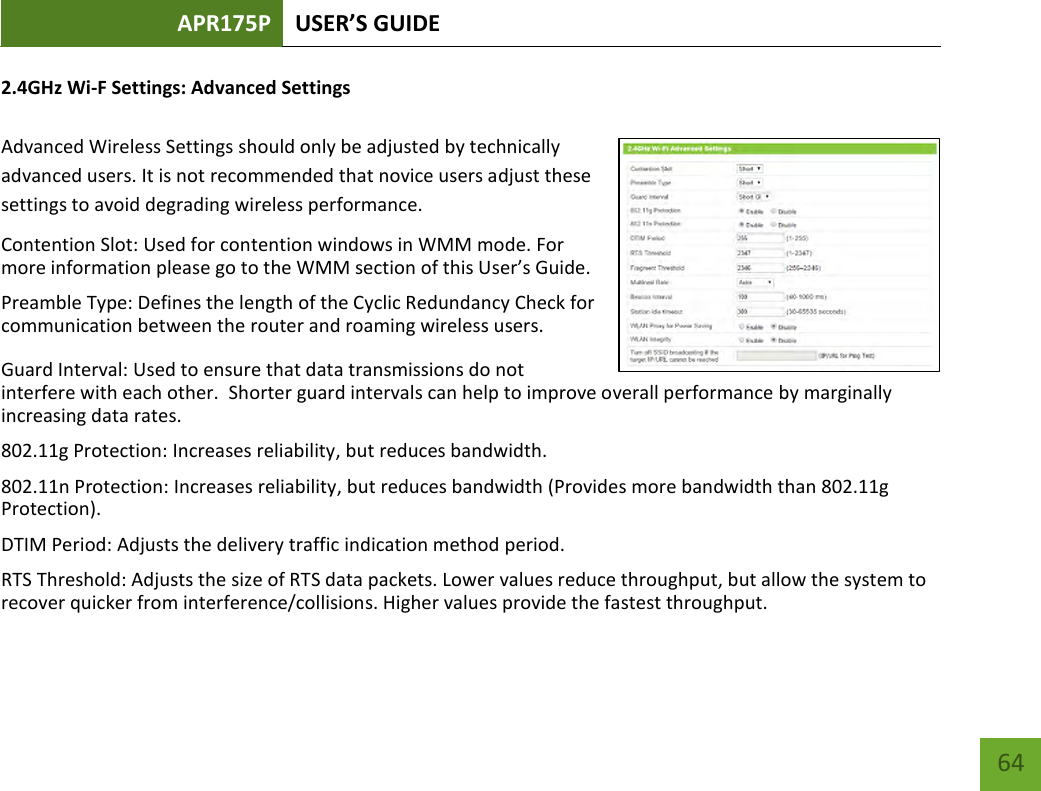
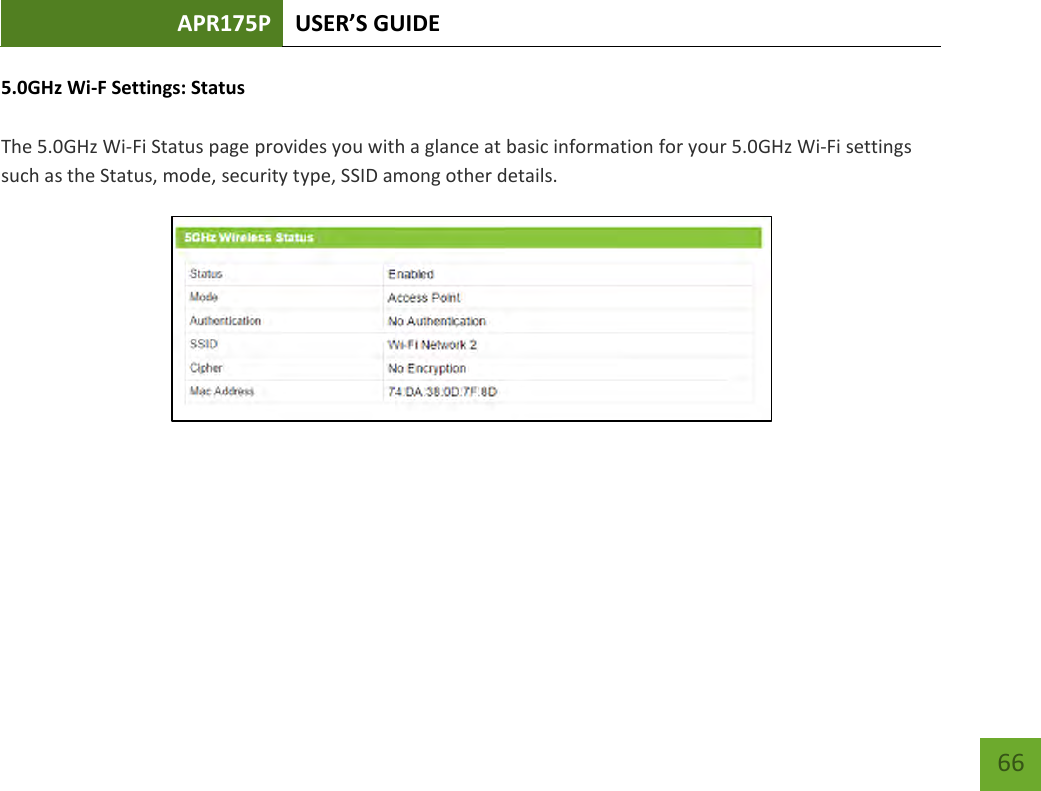
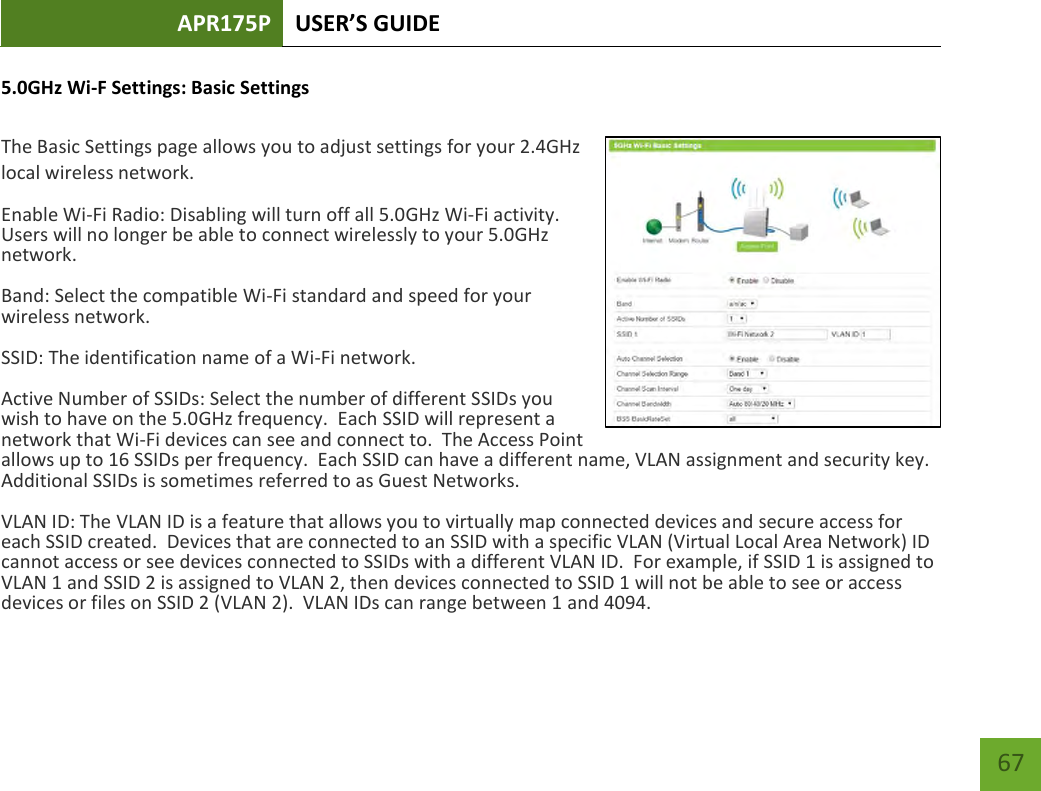
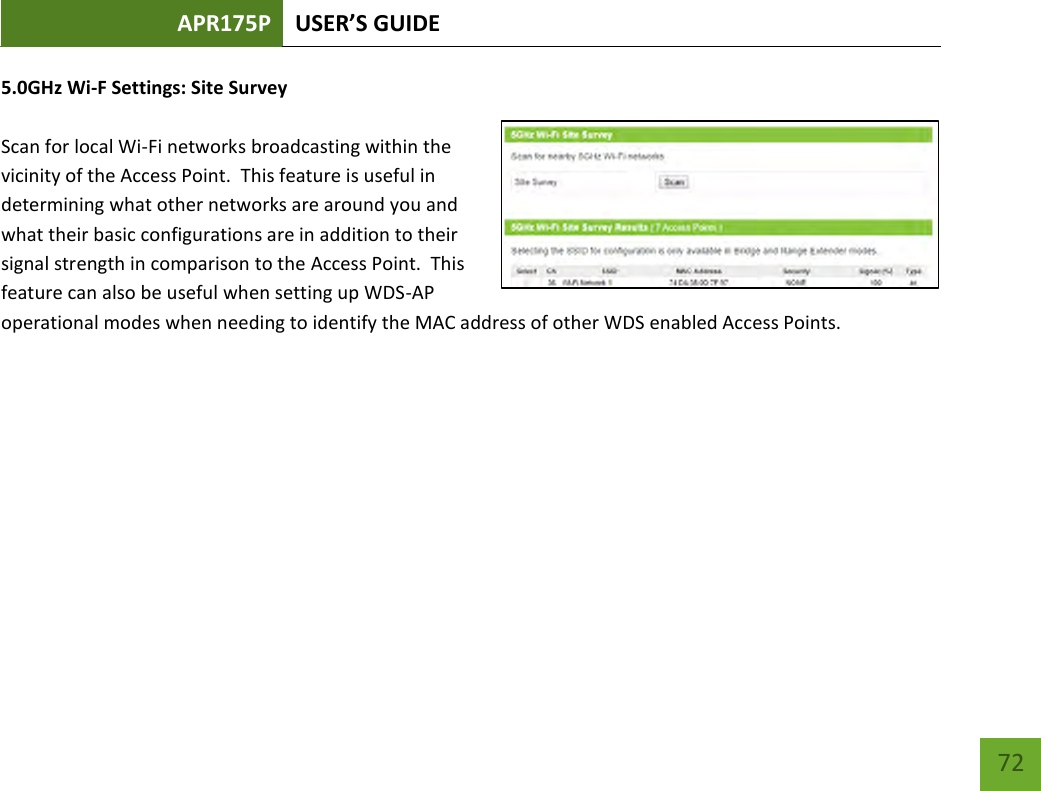
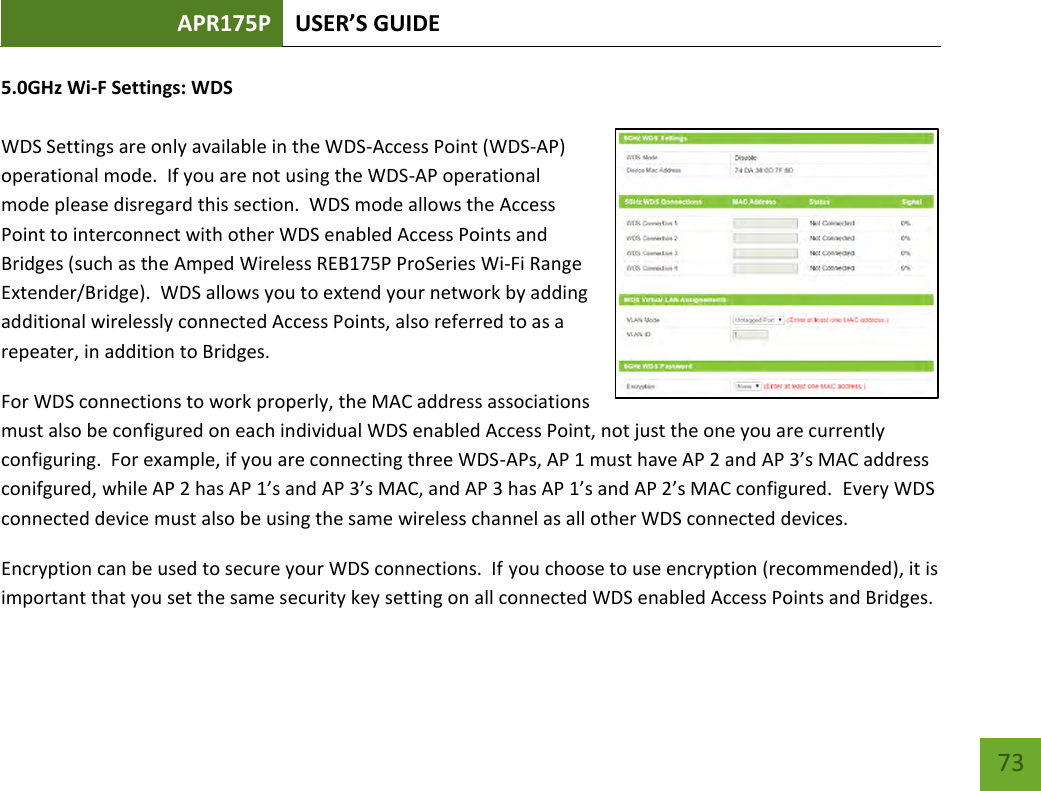
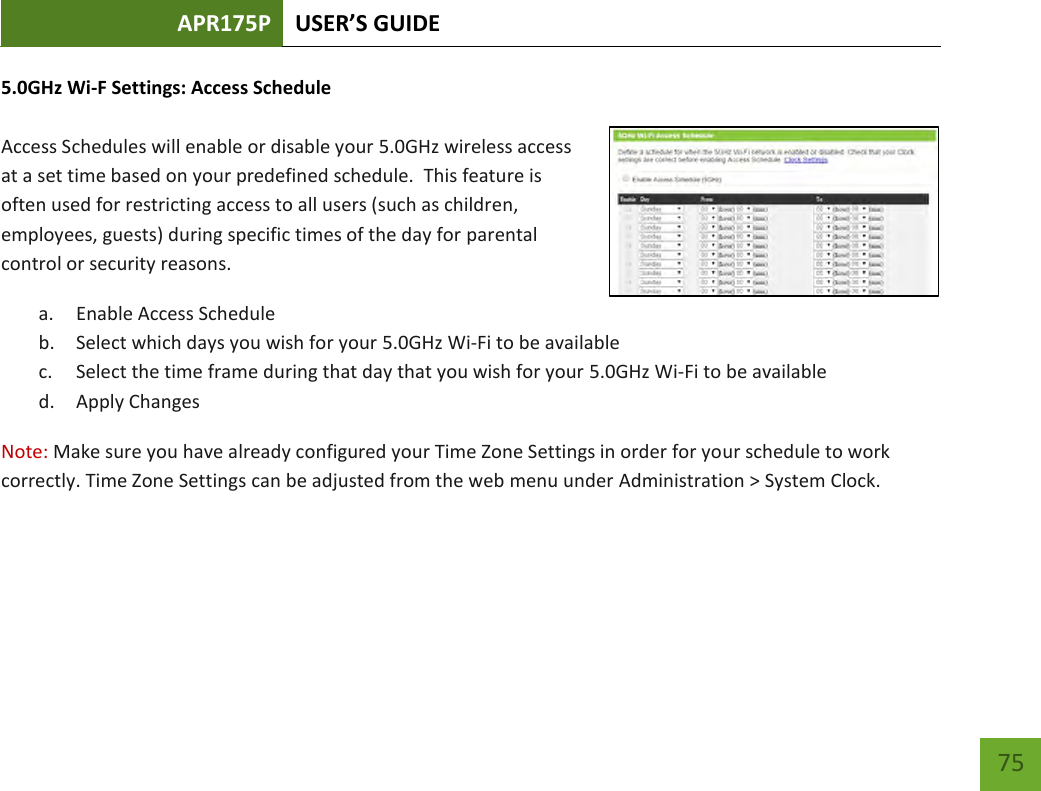
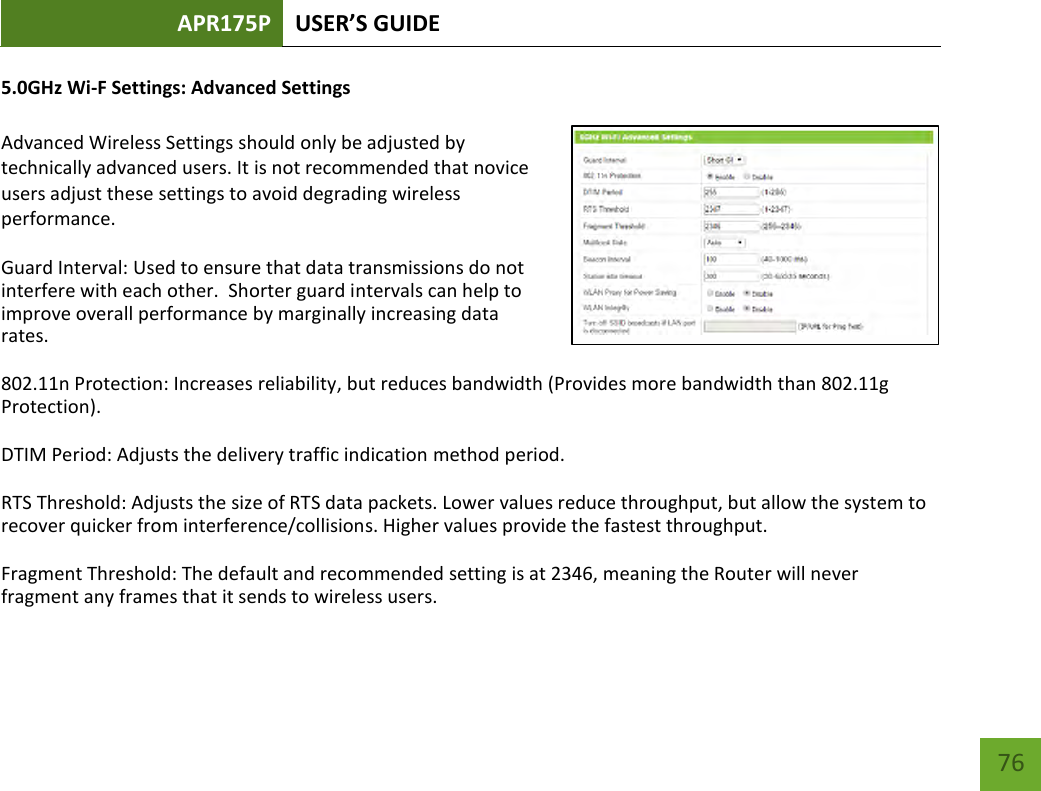
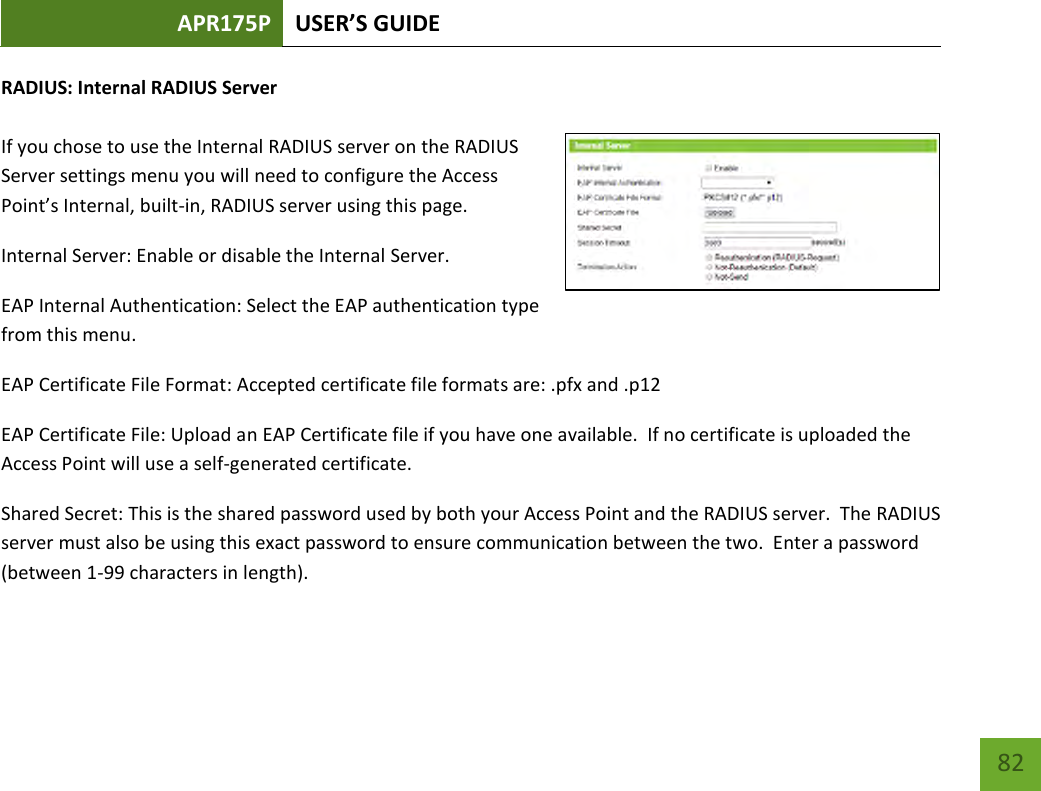
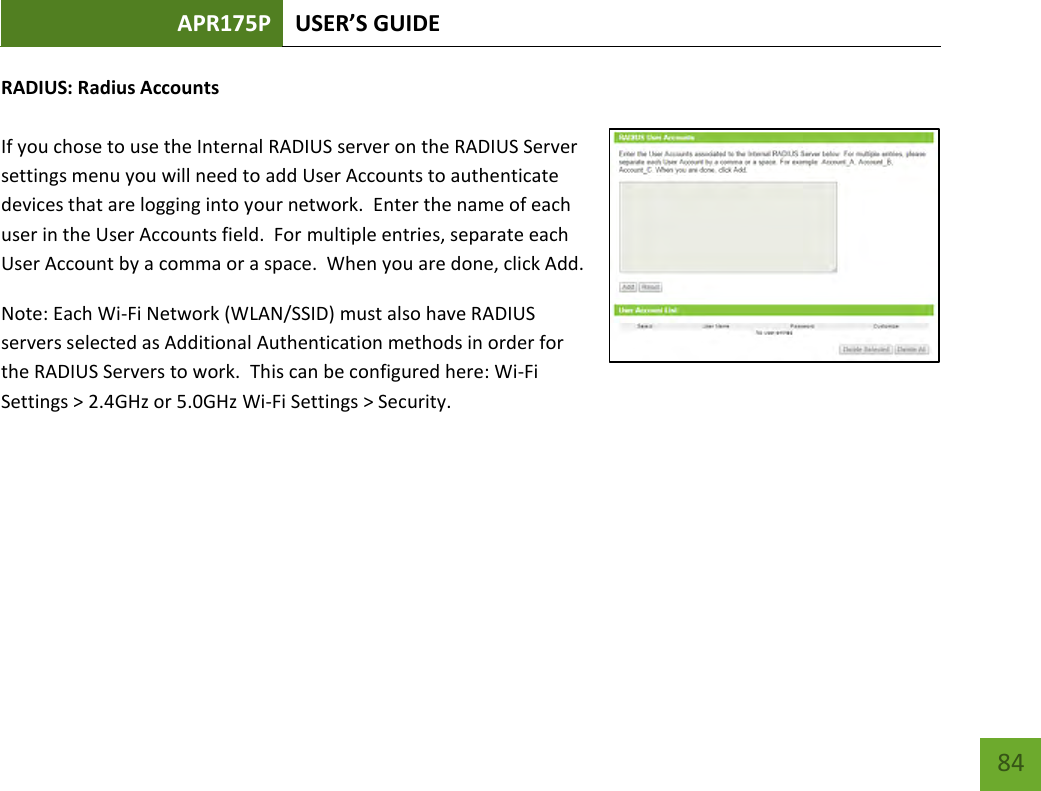
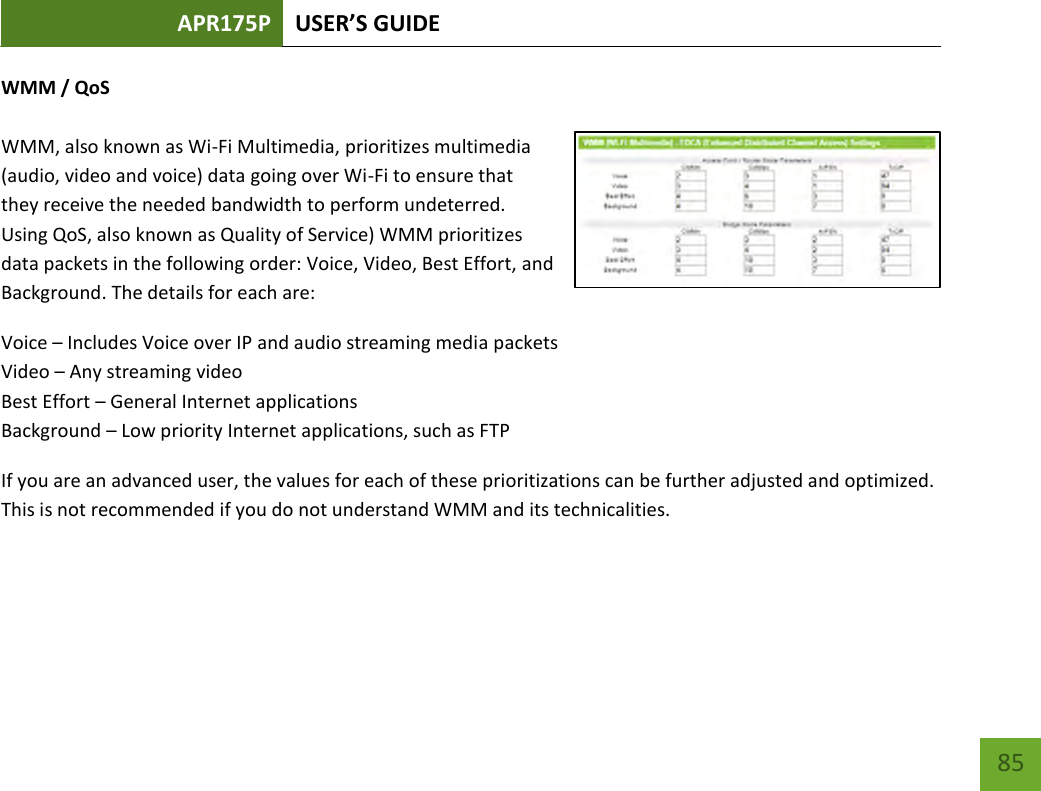
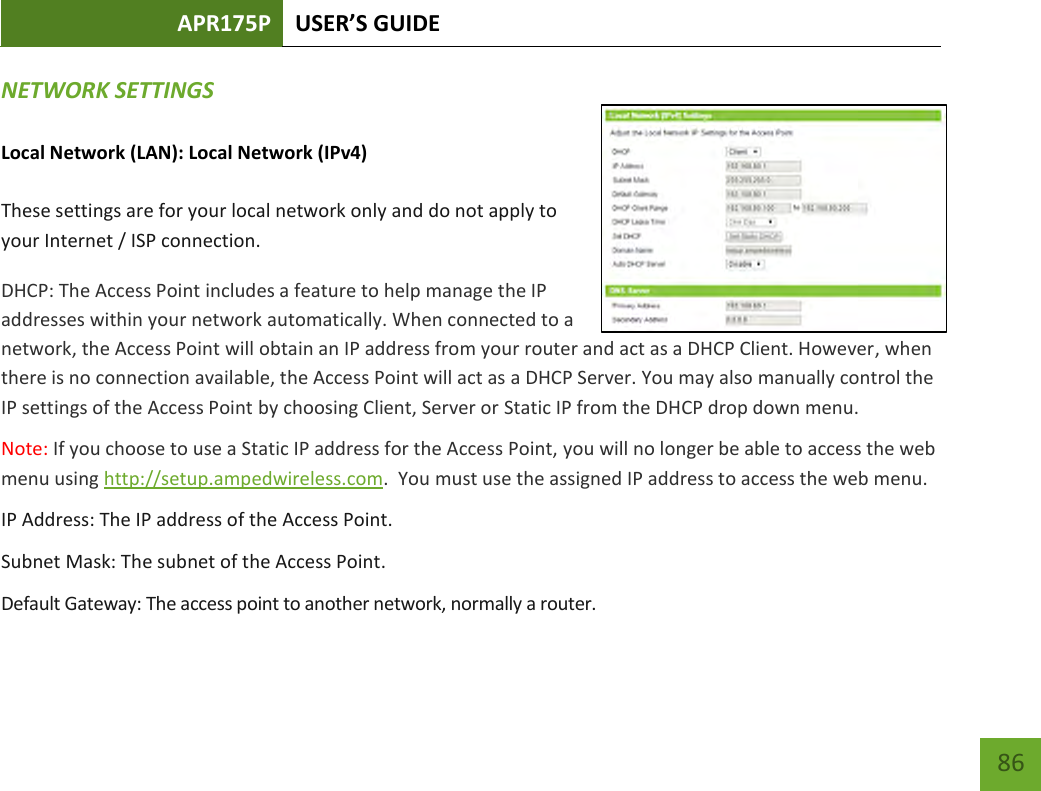
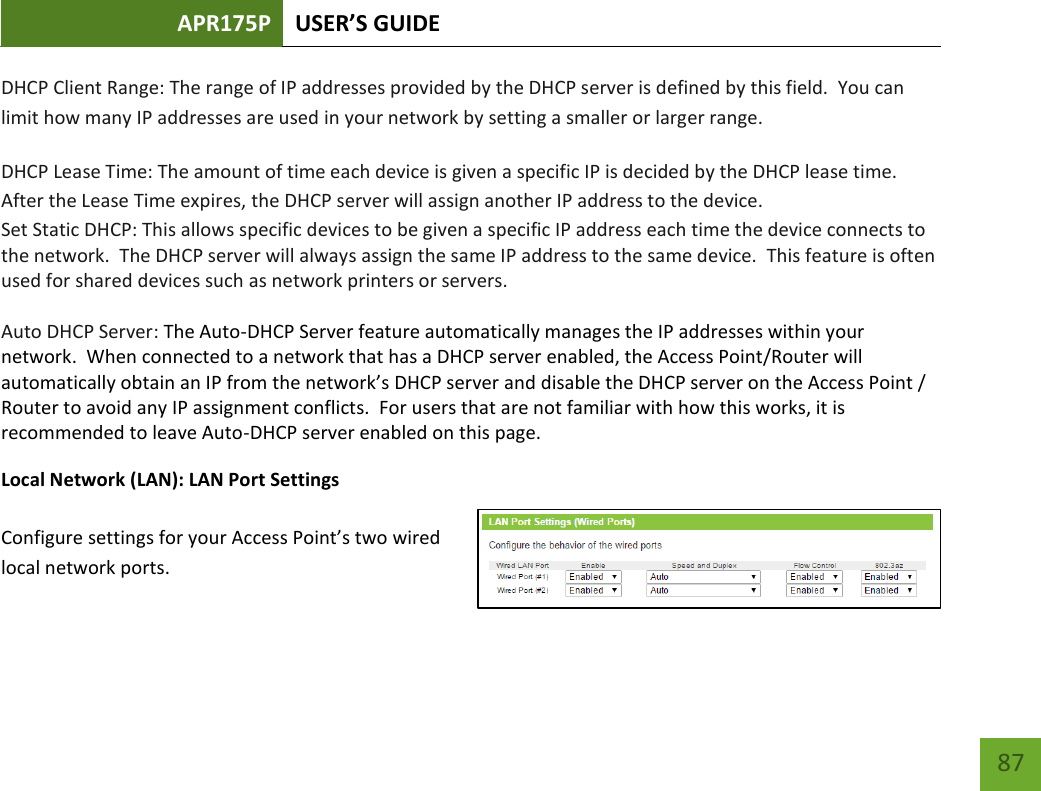
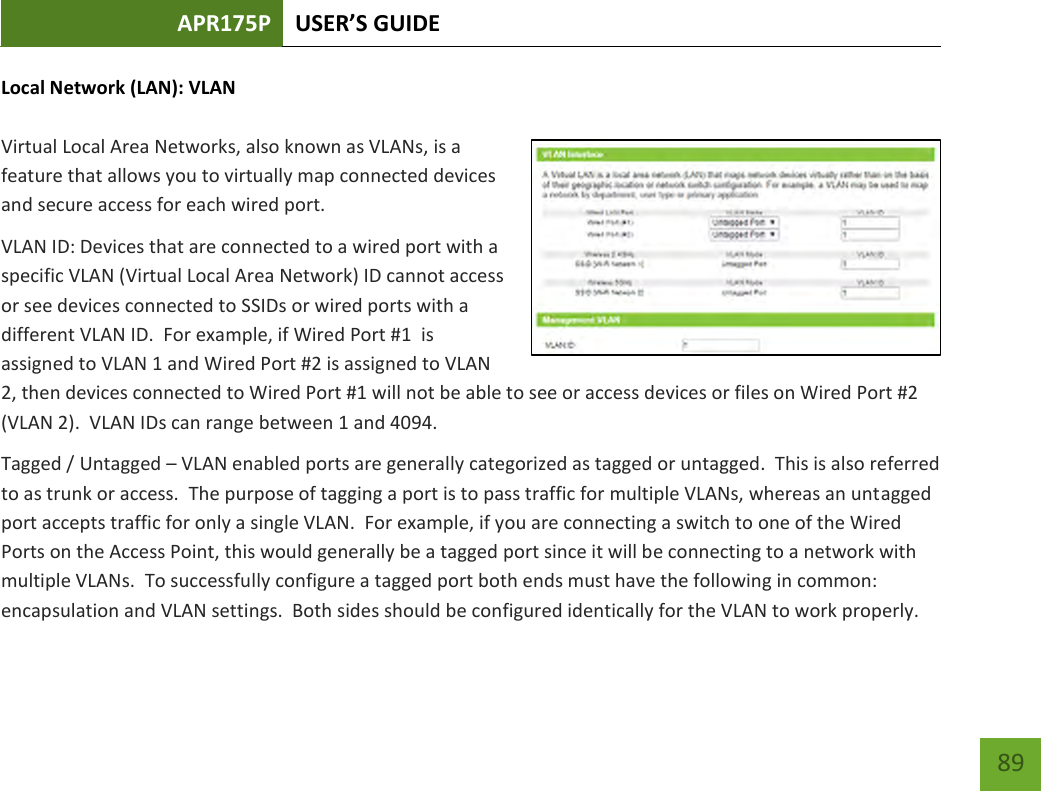
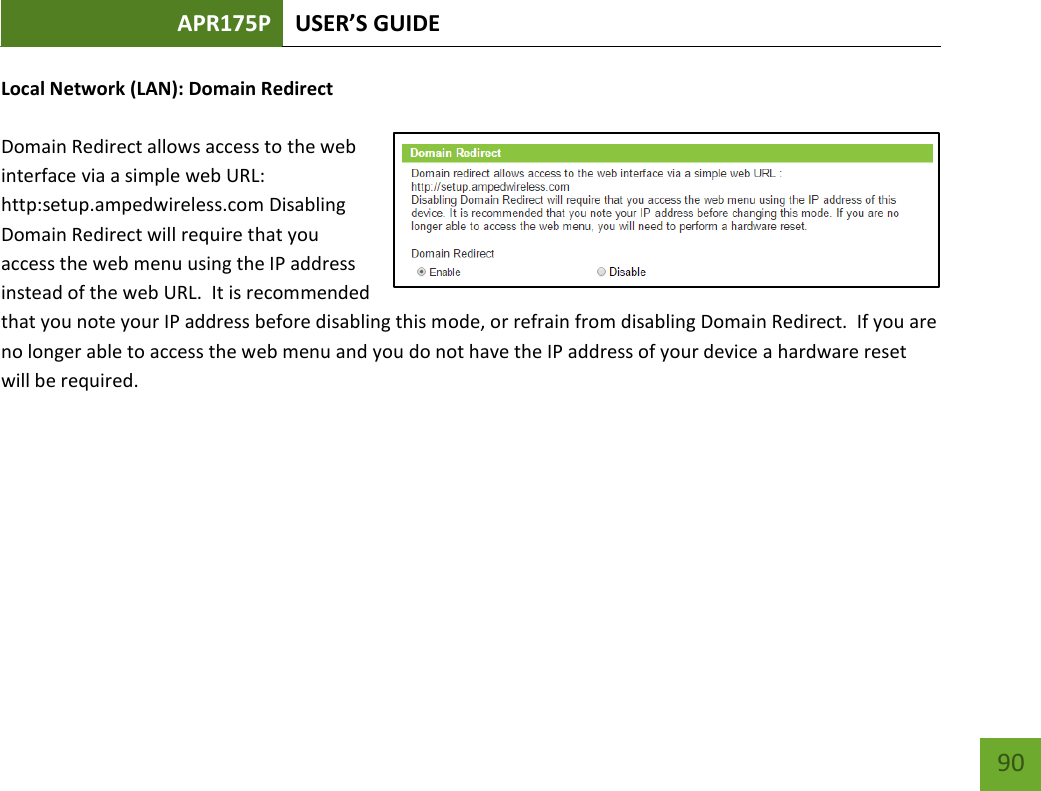
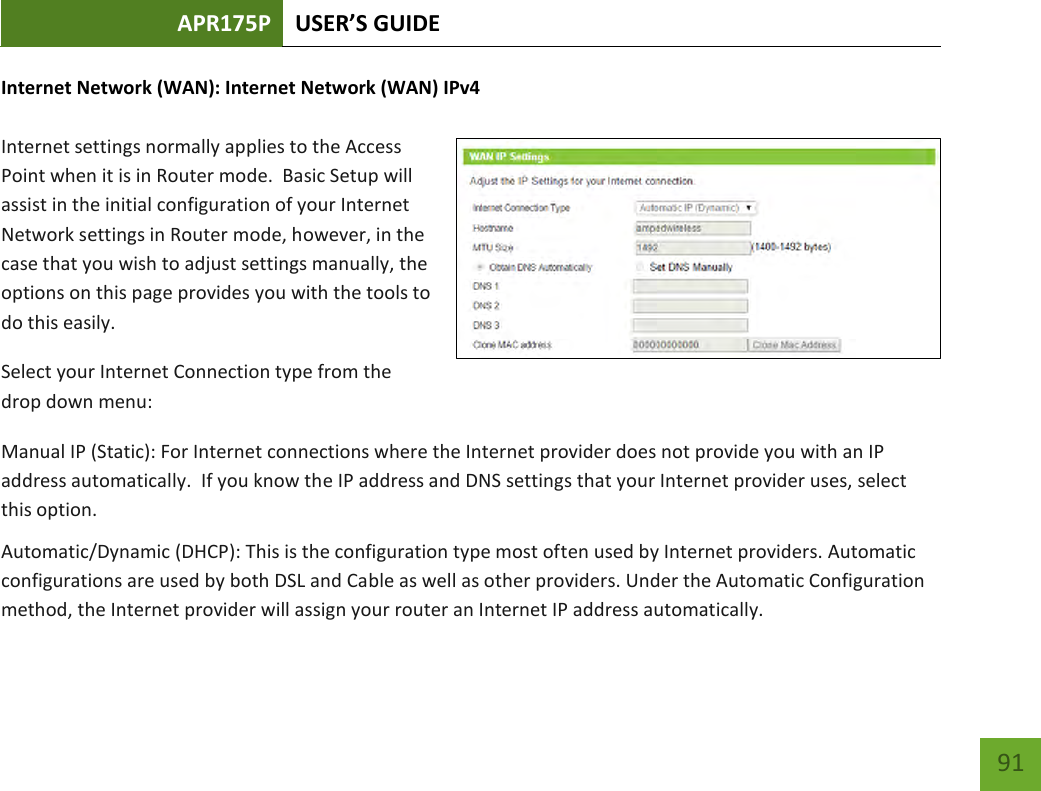
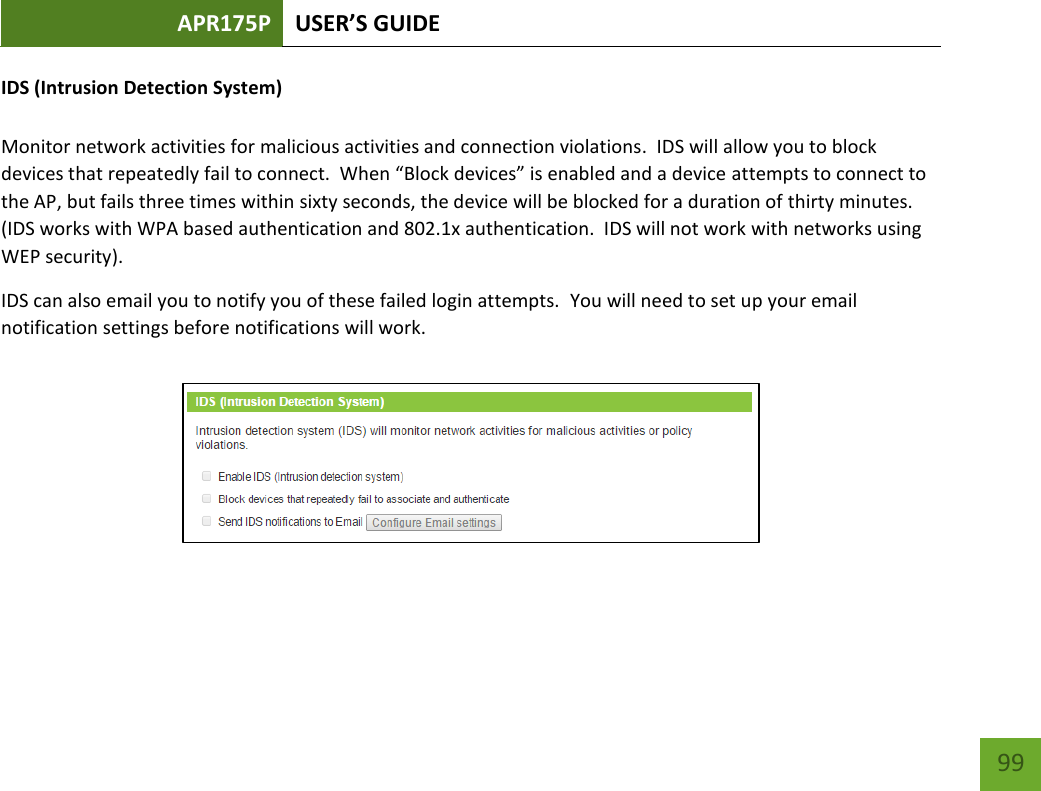
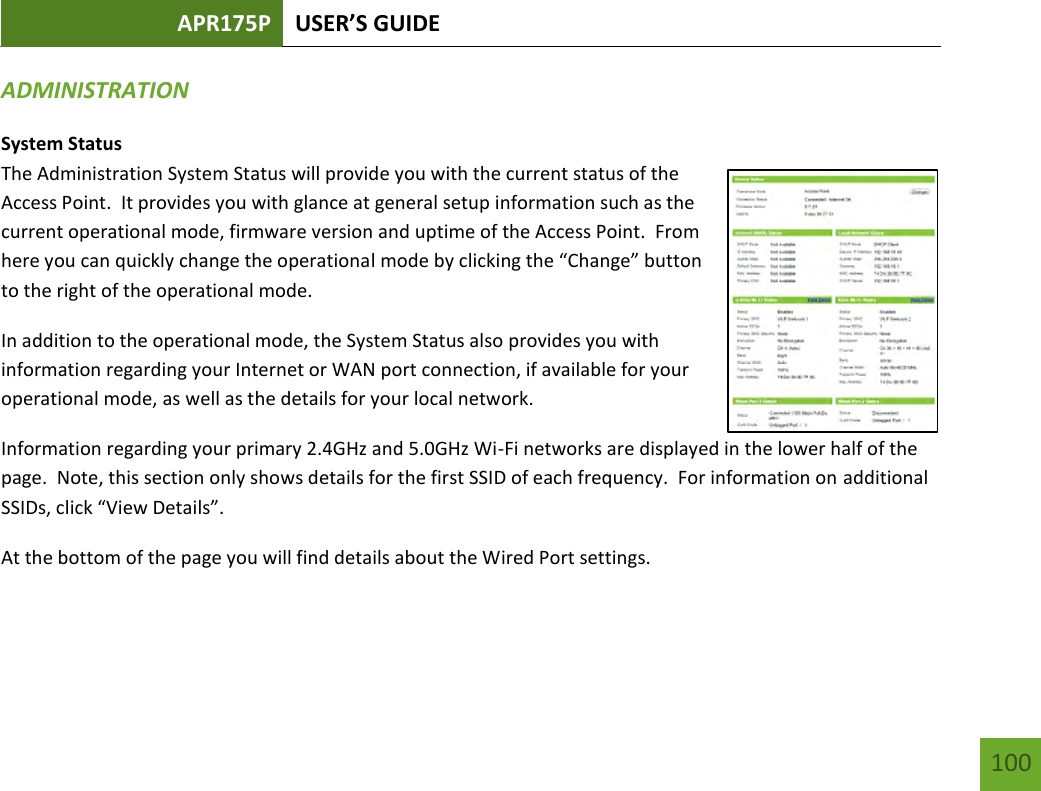
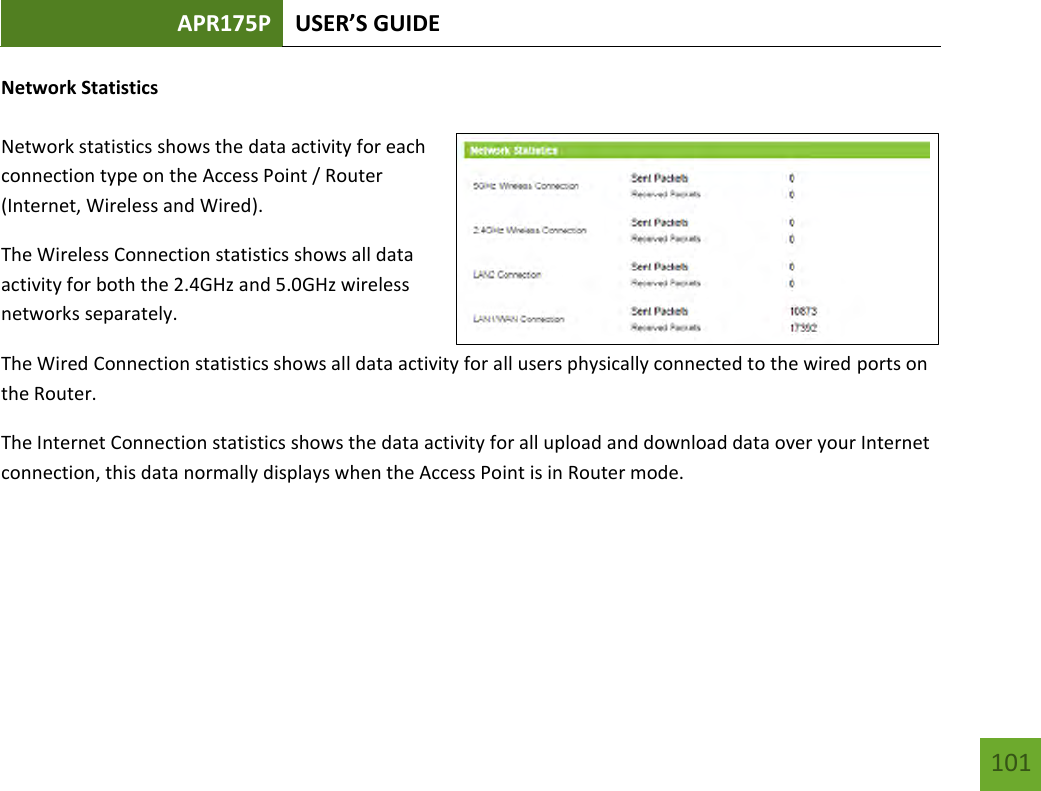
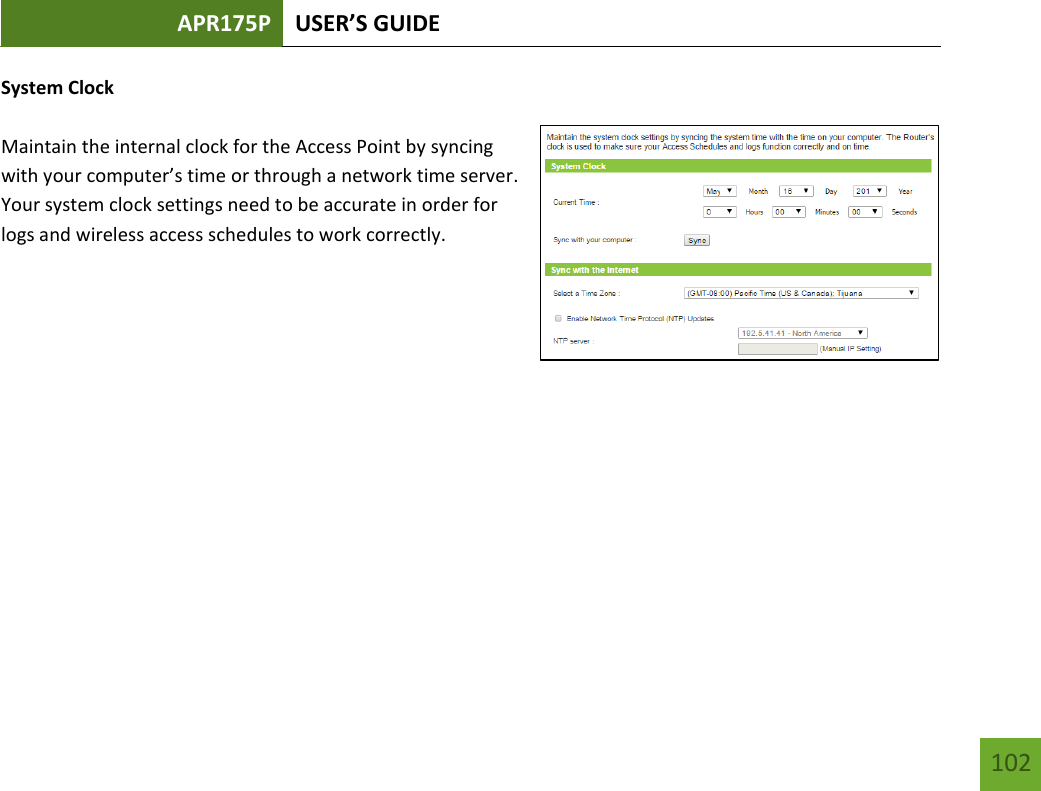
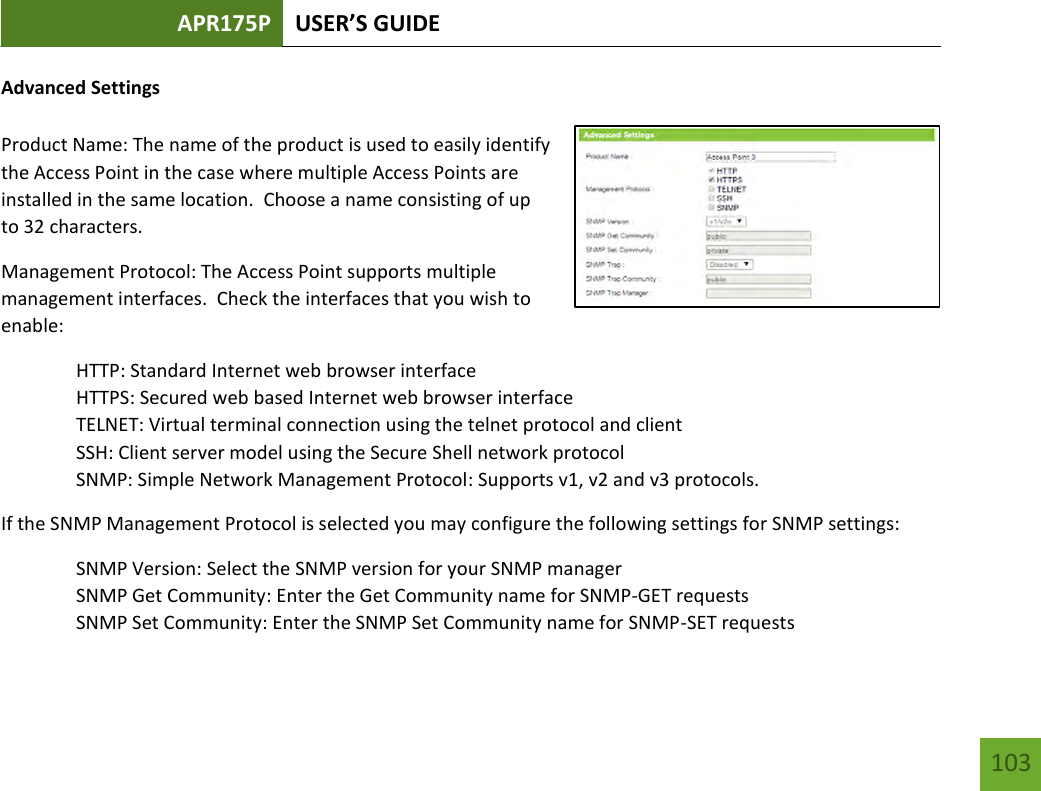
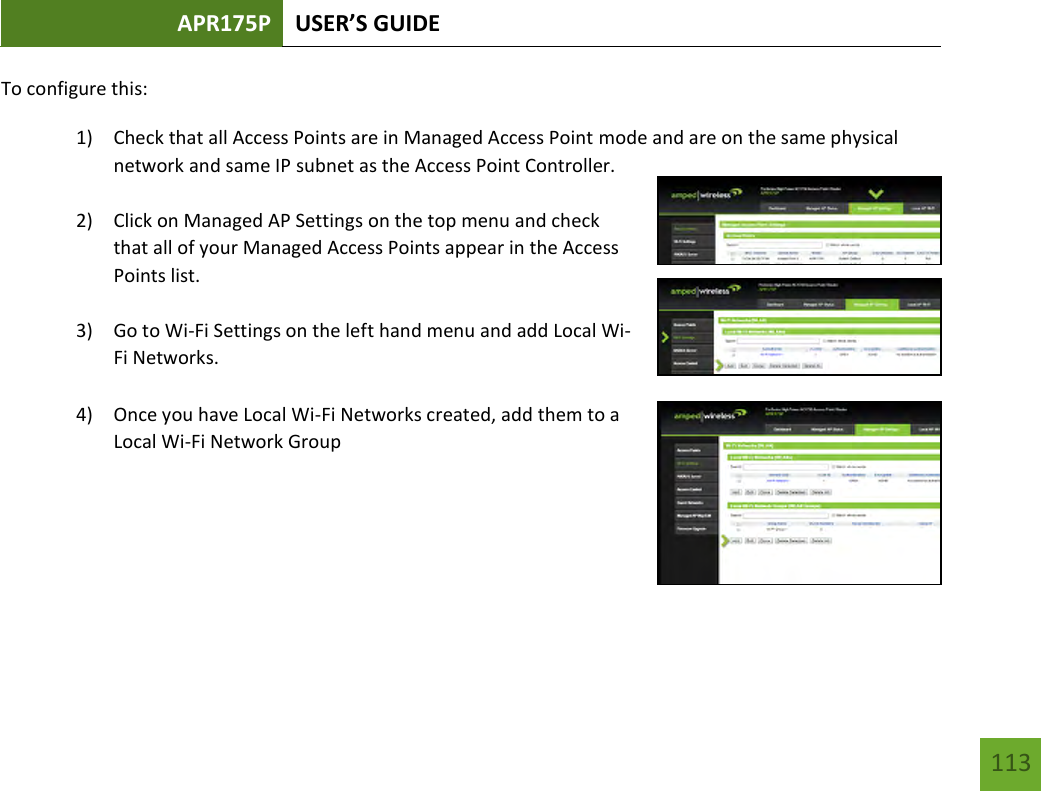
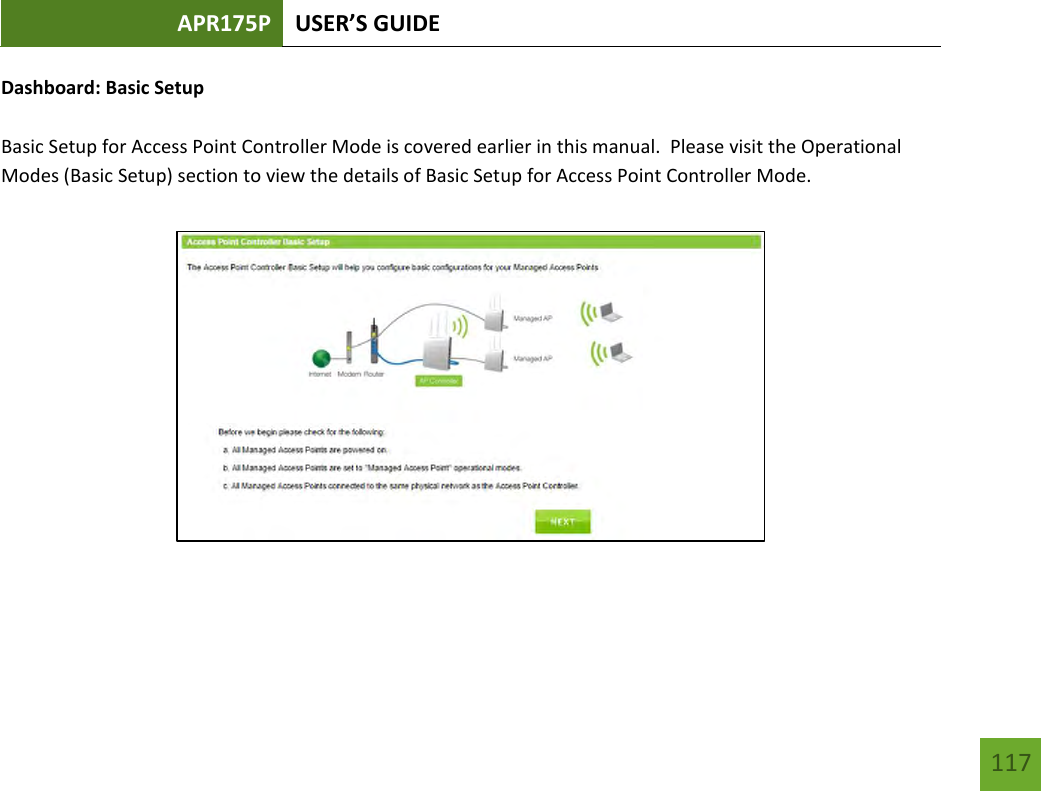
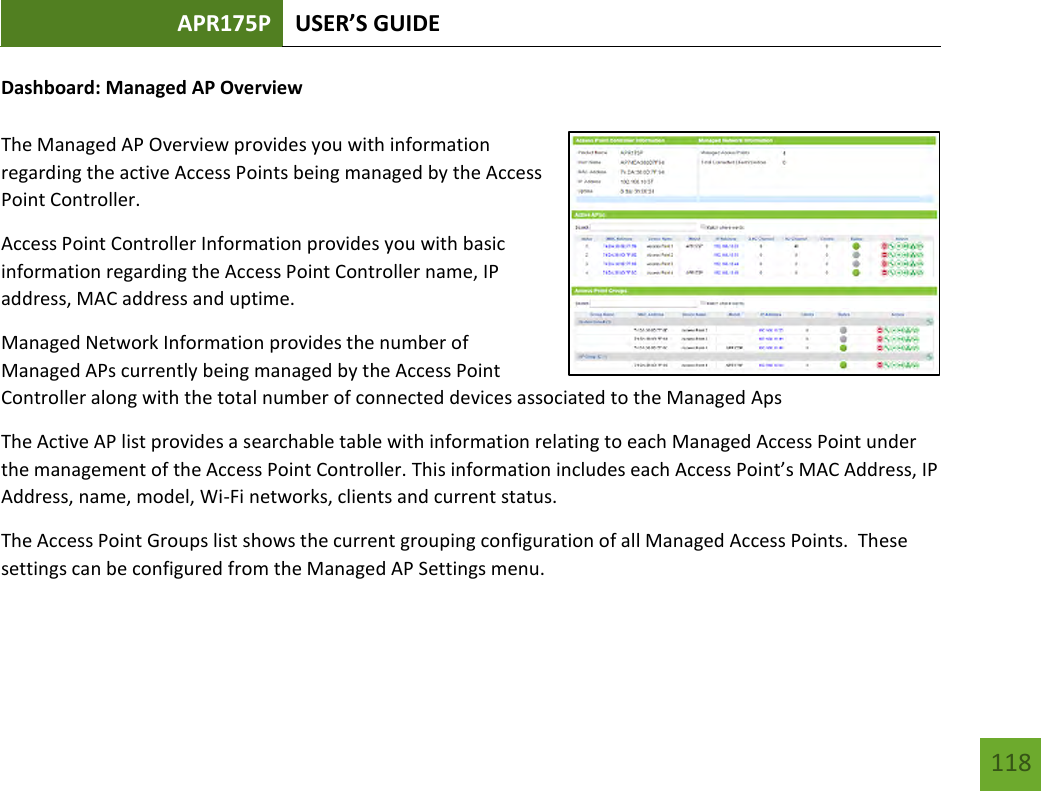
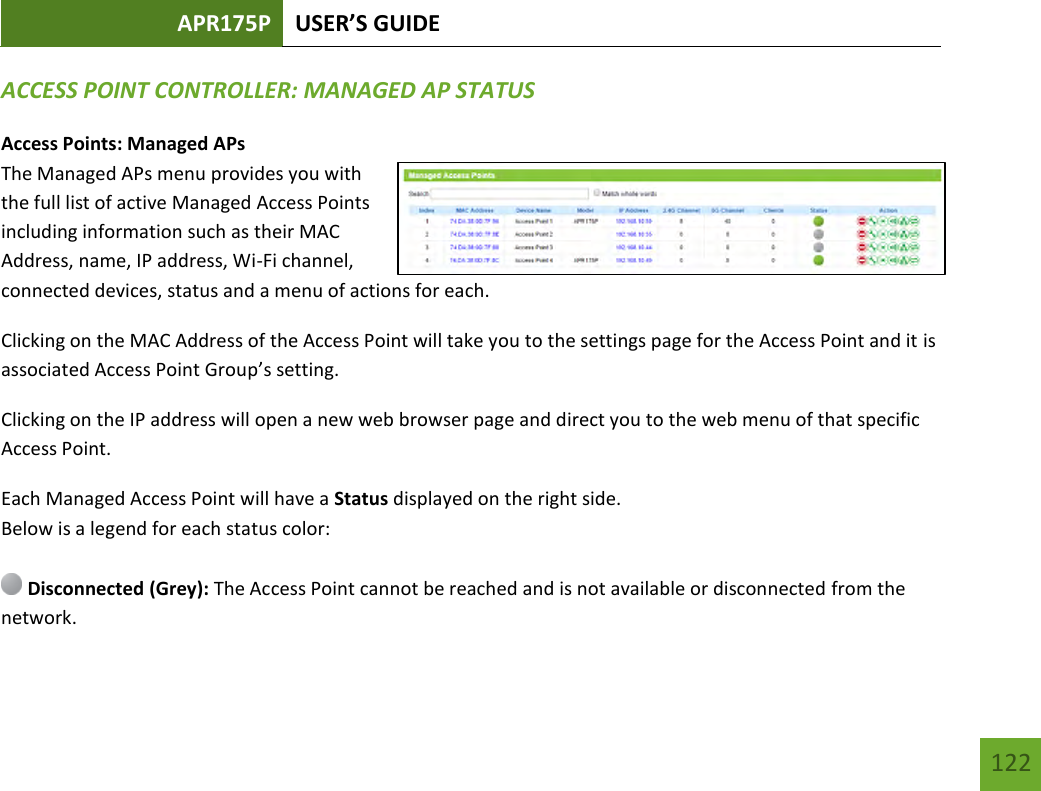
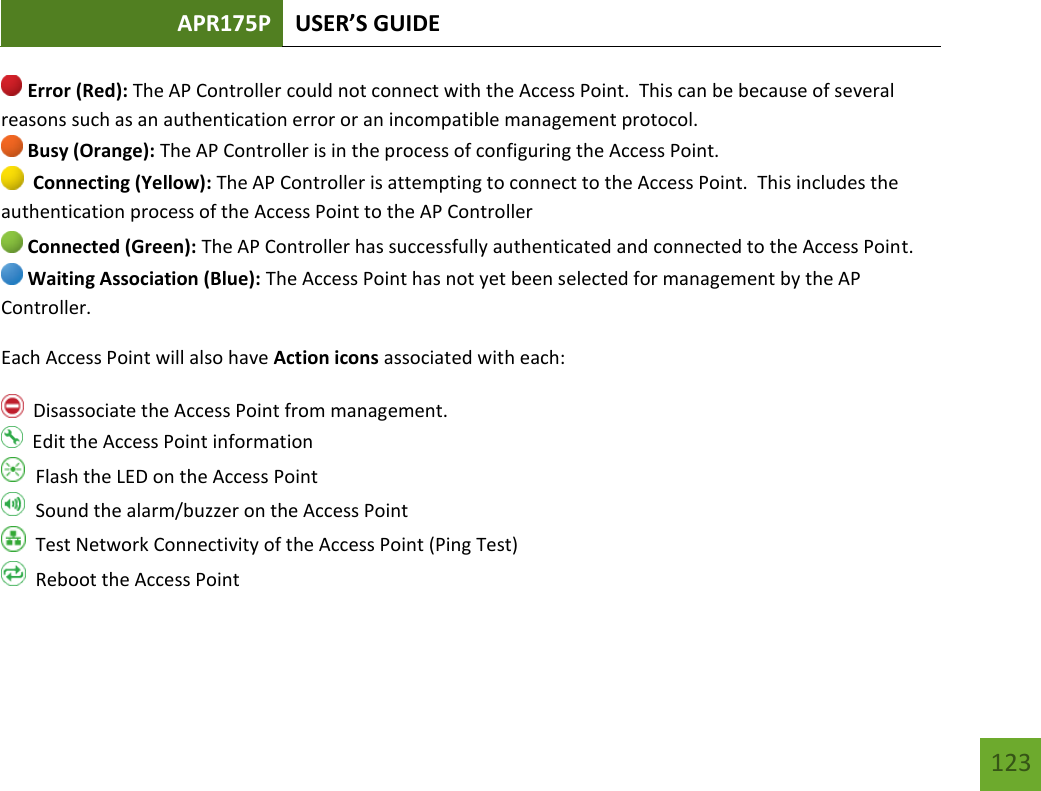
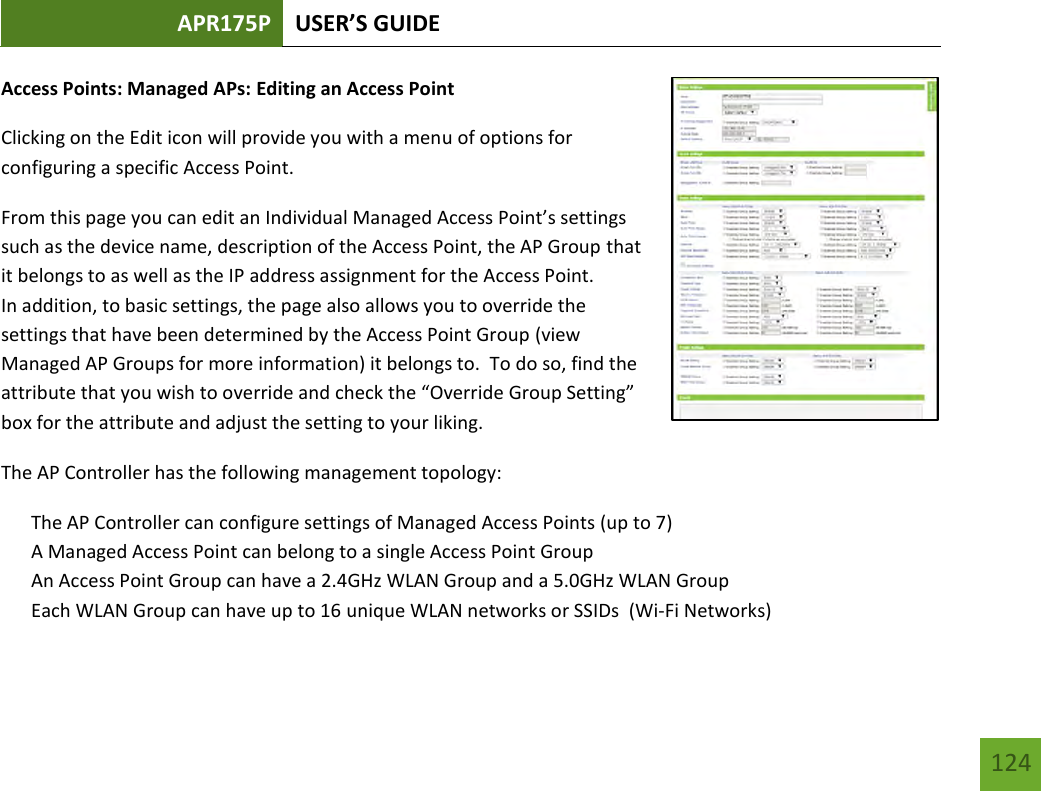
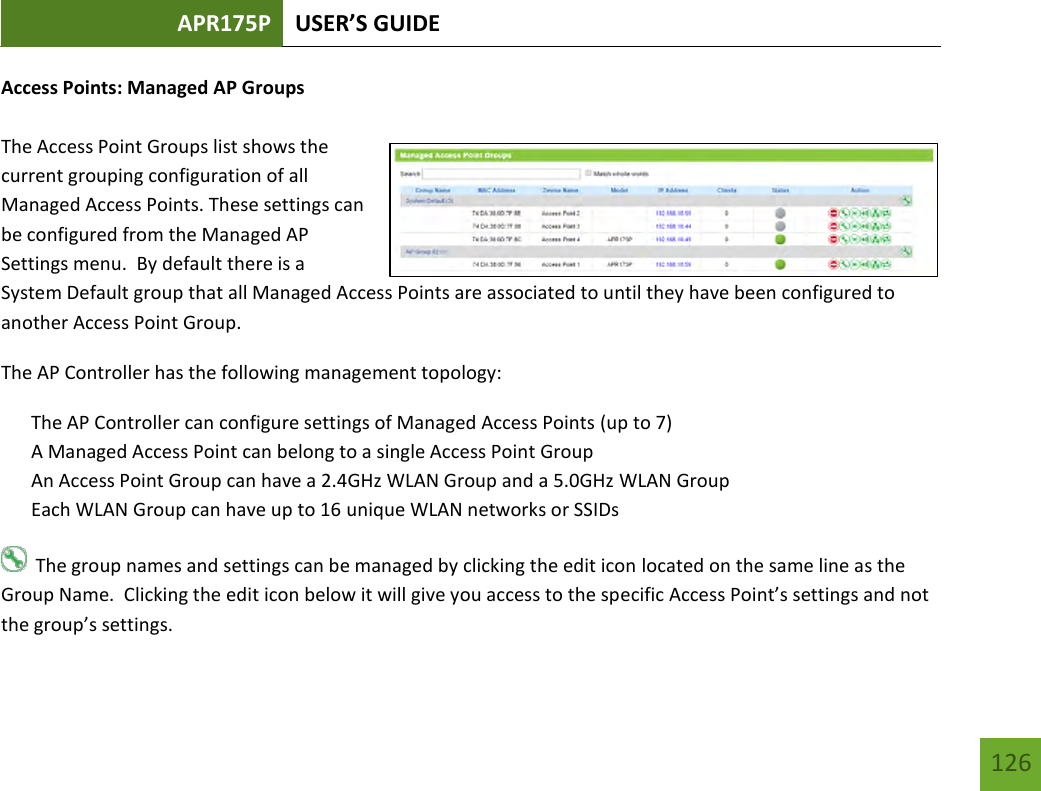
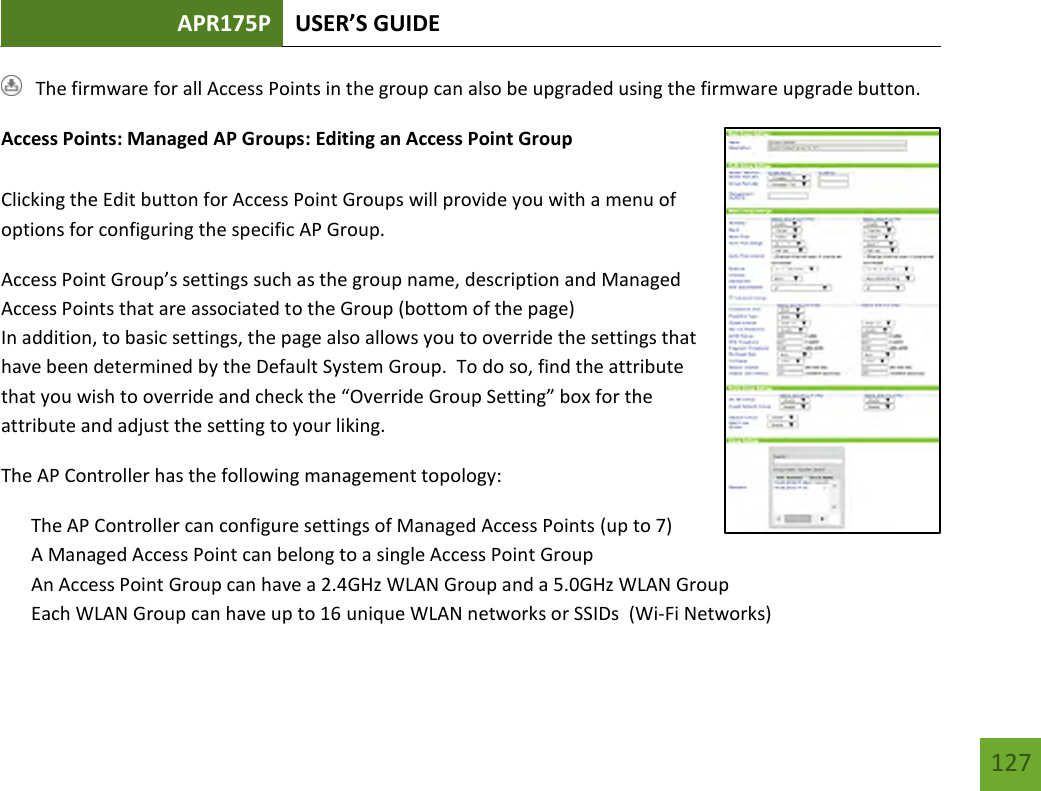
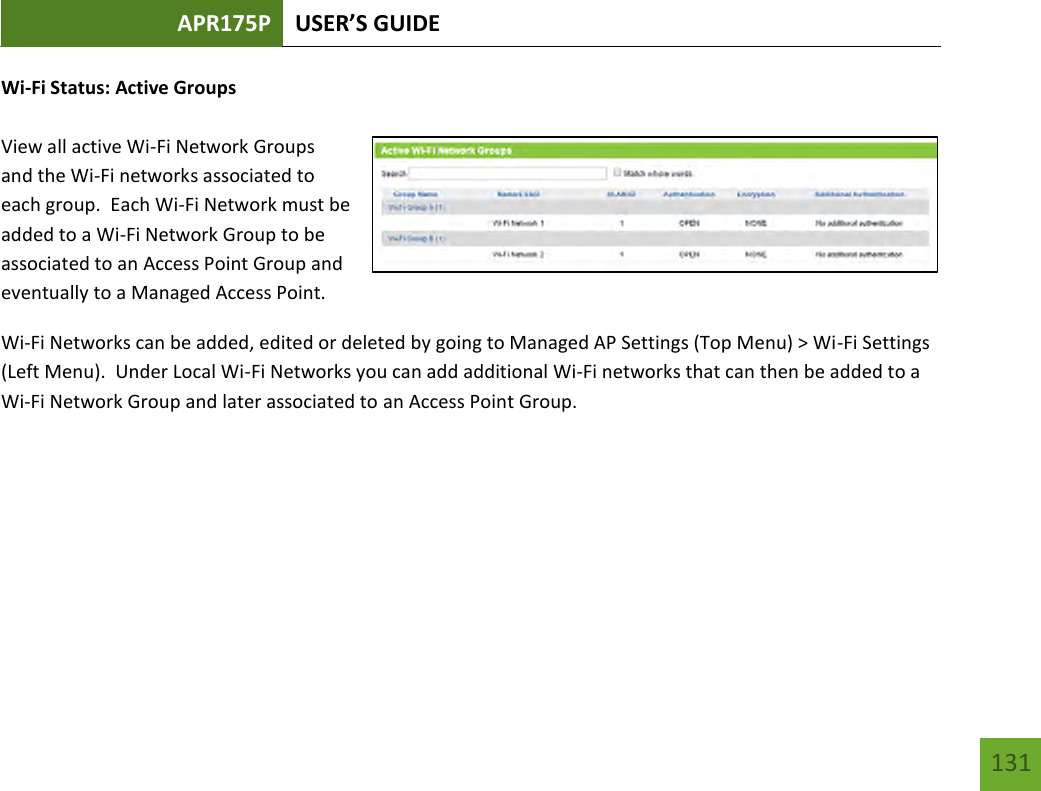
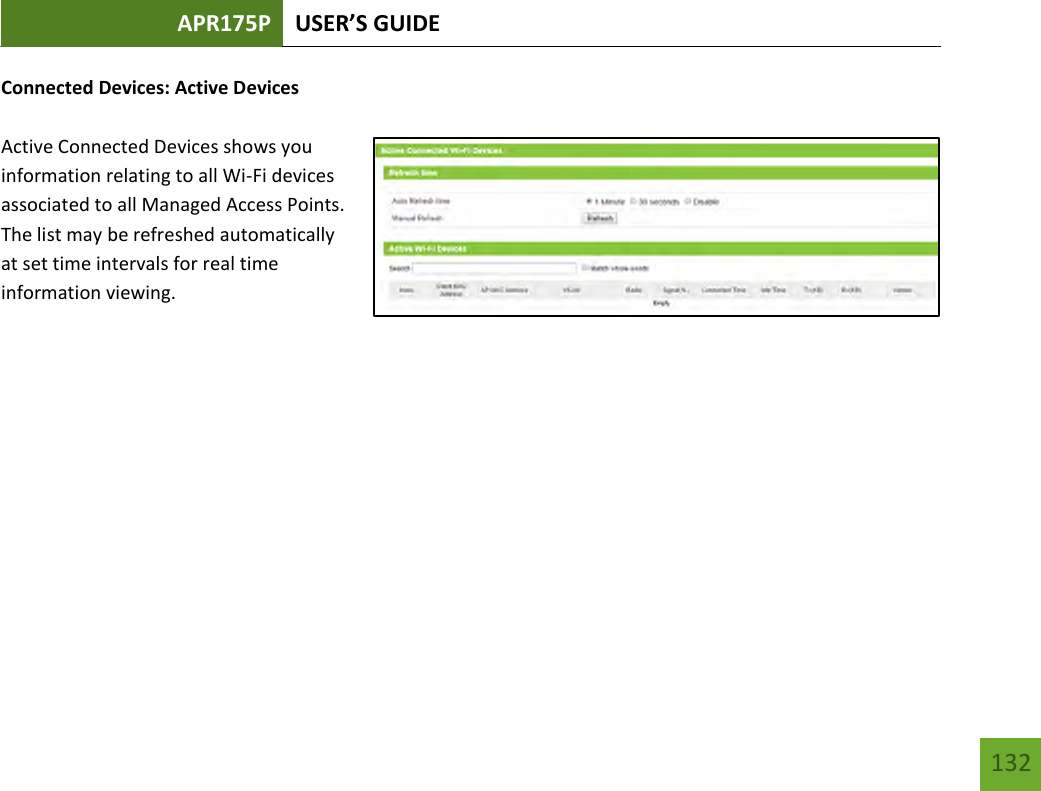
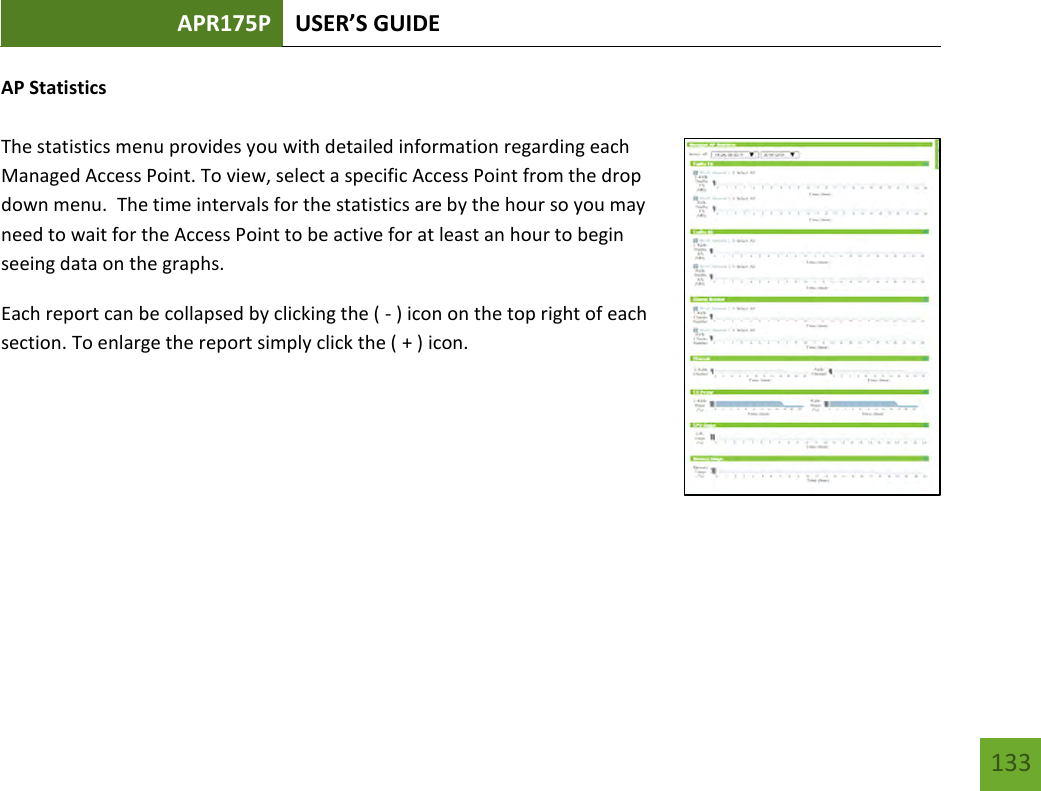
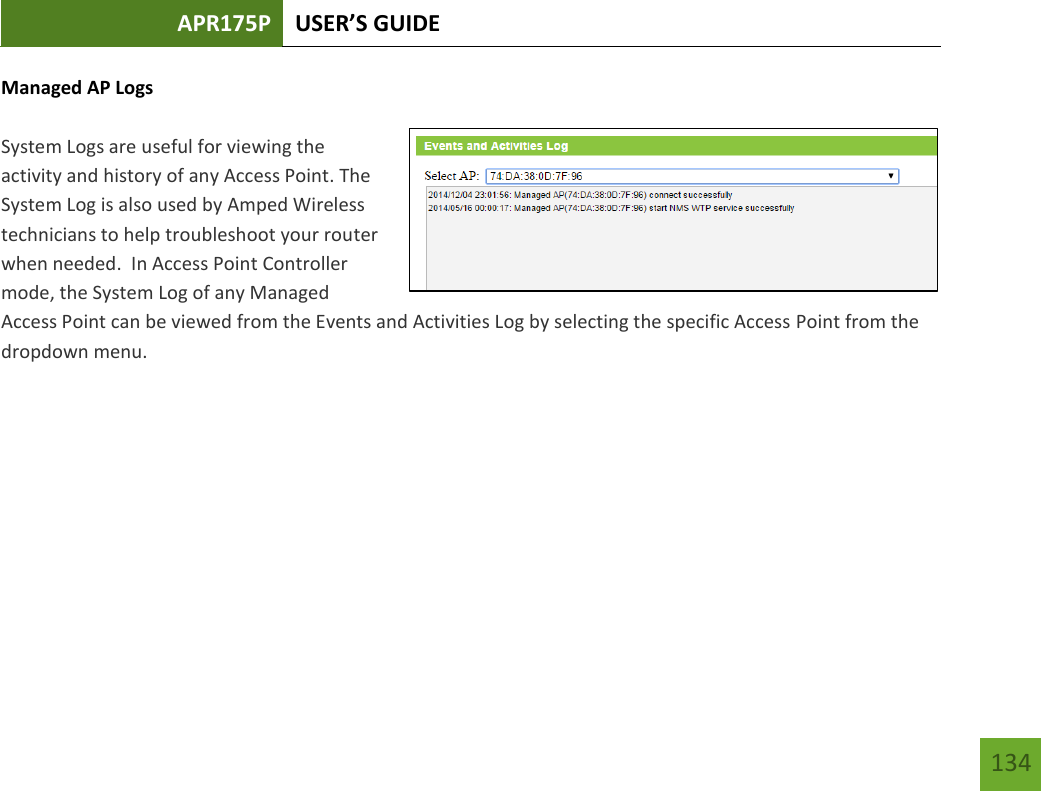
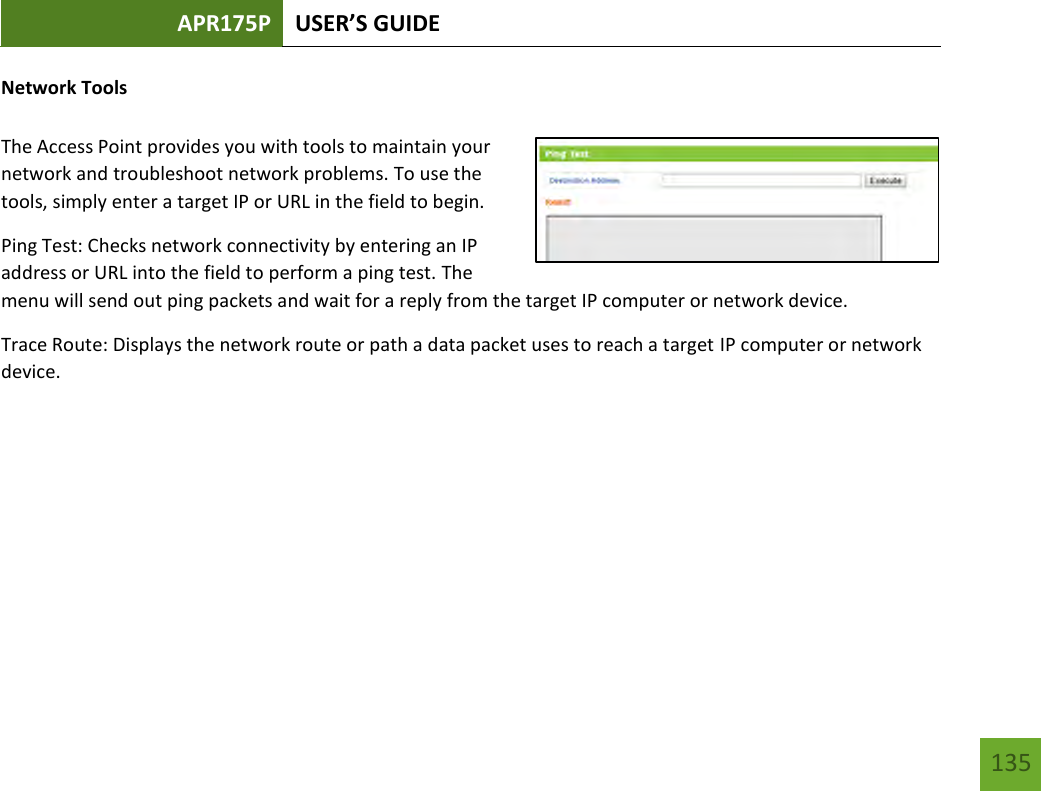
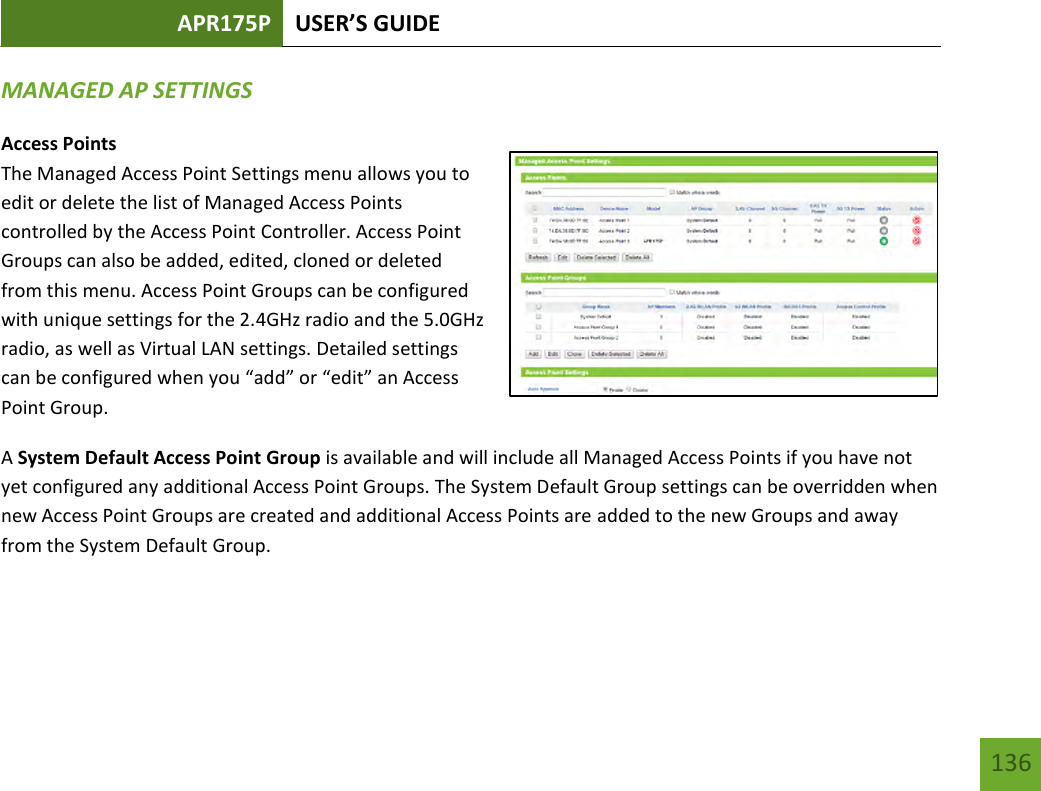
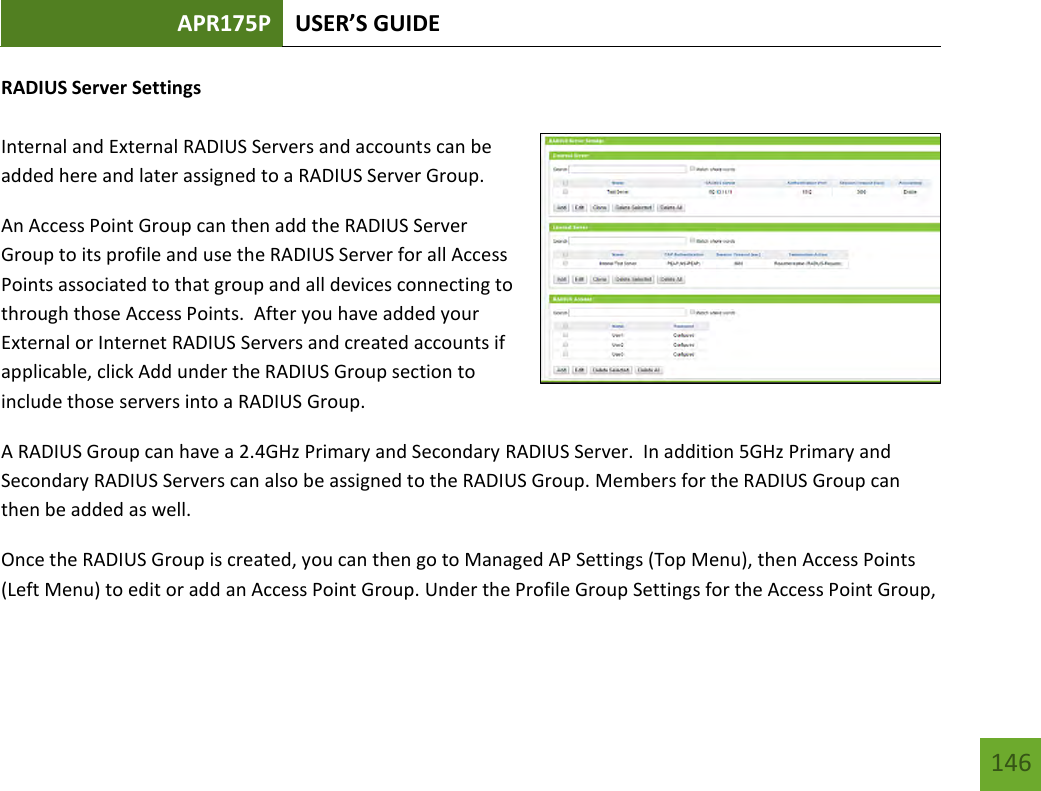
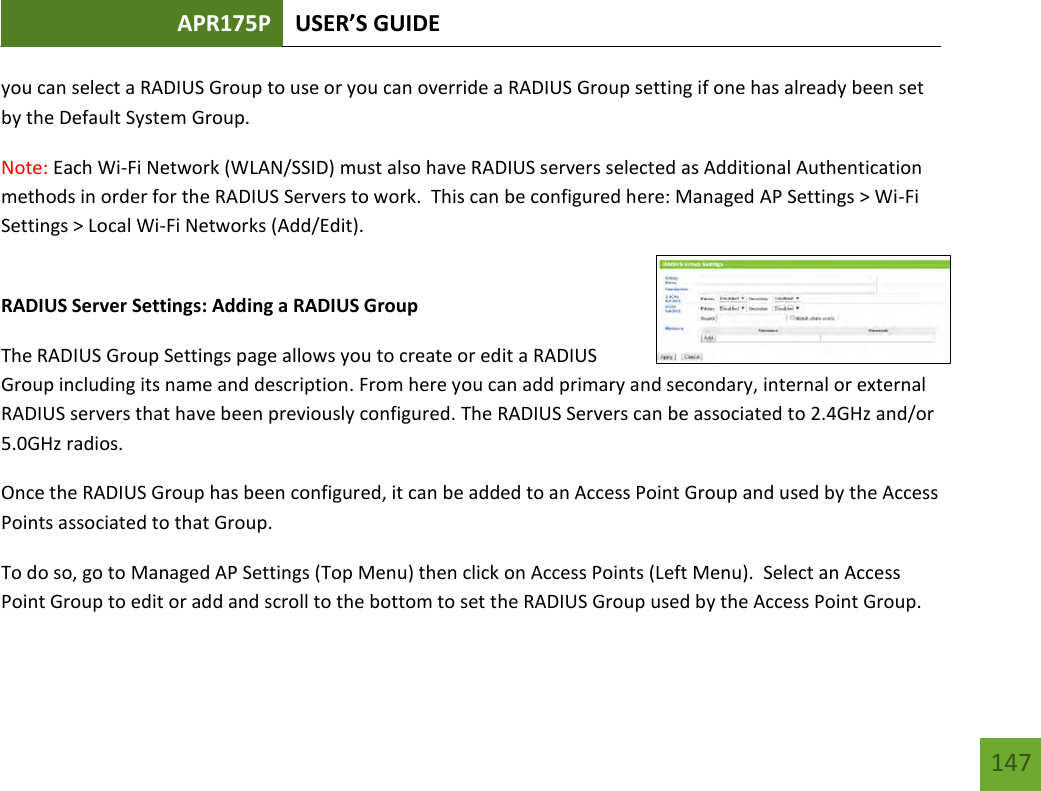
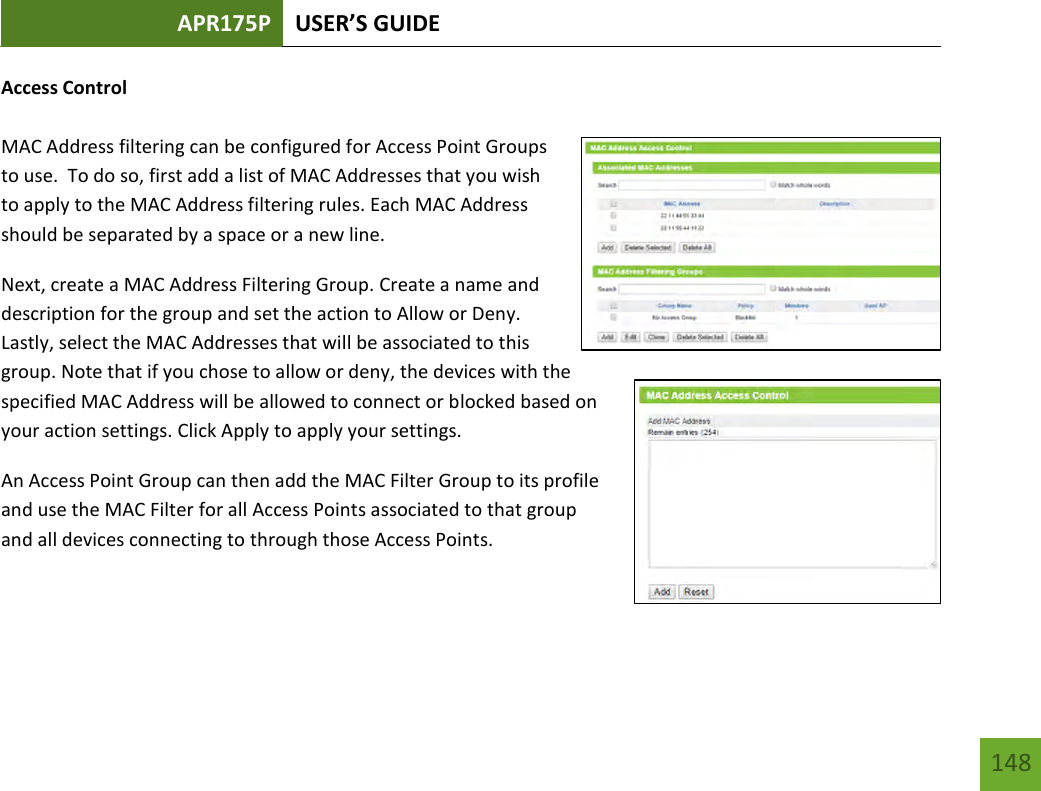
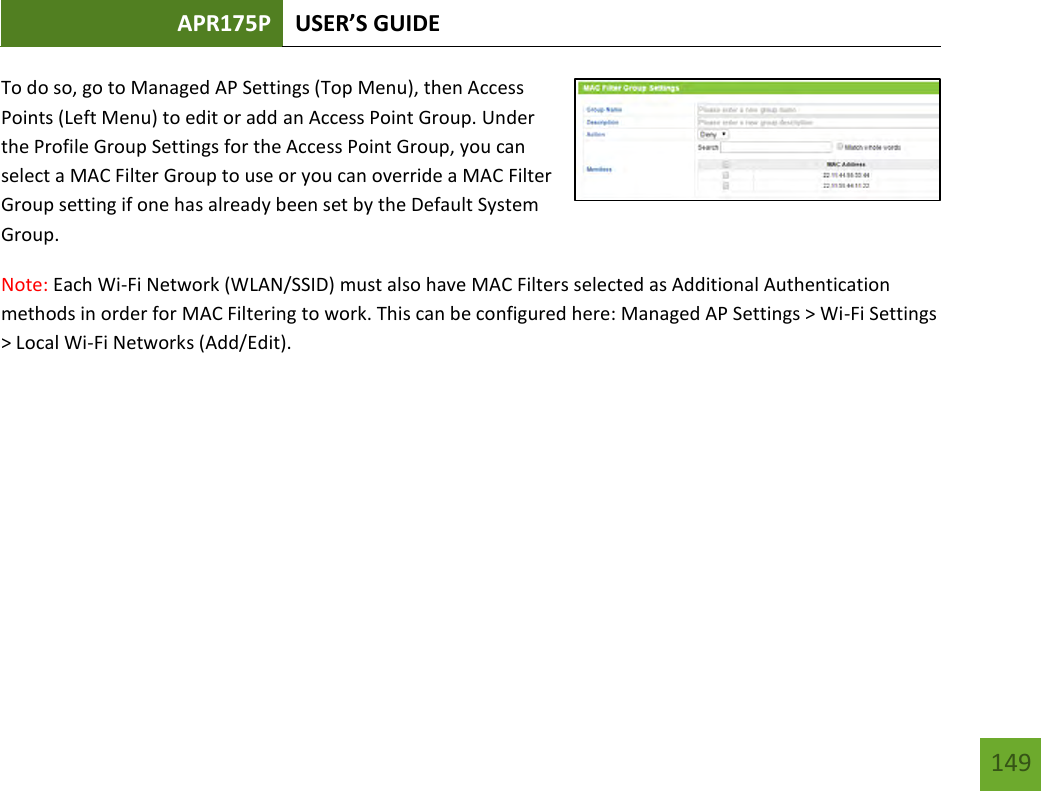
Amped Wireless APR175P ProSeries High Power AC1750 Wi-Fi Access Point / Router / Range Extender / Bridge User Manual Amped Wireless

Amped Wireless ProSeries High Power AC1750 Wi-Fi Access Point / Router / Range Extender / Bridge Amped Wireless

User Manual

APR175PProSeriesHigh Power AC1750 Wi-Fi Access Point / RouterUser’s Guide
APR175P USER’S GUIDE    1 CONTENTS INTRODUCTION ........................................................... 4 GETTING STARTED ....................................................... 5 Package Contents ........................................................... 5 LED Indicators ................................................................. 6 Side Panel Description .................................................... 7 Mounting Instructions .................................................... 8 GETTING STARTED ....................................................... 9 OPERATIONAL MODES (BASIC SETUP) ........................ 10 ROUTER MODE ............................................................. 11 ACCESS POINT MODE .................................................... 22 WDS -  ACCESS POINT MODE ........................................ 29 MANAGED ACCESS POINT MODE ................................. 36 ACCESS POINT CONTROLLER MODE ............................. 37 MORE SETTINGS ........................................................ 48 DASHBOARD ............................................................. 49 System Status................................................................ 49 Operational Mode ........................................................ 50 Basic Setup .................................................................... 51 Connected Devices ....................................................... 52 WDS Settings ................................................................ 53    WI-FI SETTINGS ..........................................................54 2.4GHz Status ................................................................ 54 2.4GHz Basic Settings .................................................... 55 2.4GHz Security ............................................................. 57 2.4GHz Output Power ................................................... 59 2.4GHz Site Survey ........................................................ 60 2.4GHz WDS .................................................................. 61 2.4GHz Access Schedule ................................................ 63 2.4GHz Advanced Settings ............................................ 64 5.0GHz Status ................................................................ 66 5.0GHz Basic Settings .................................................... 67 5.0GHz Security ............................................................. 69 5.0GHz Output Power ................................................... 71 5.0GHz Site Survey ........................................................ 72 5.0GHz WDS .................................................................. 73 5.0GHz Access Schedule ................................................ 75 5.0GHz Advanced Settings ............................................ 76 WPS Settings ................................................................. 78 MAC Address Filtering ................................................... 79
APR175P USER’S GUIDE    2 RADIUS Server ............................................................... 80 Internal RADIUS Server ................................................. 82 Radius Accounts ............................................................ 84 WMM / QoS .................................................................. 85 NETWORK SETTINGS .................................................. 86 Local Network (IPv4) ..................................................... 86 LAN Port Settings .......................................................... 87 VLAN ............................................................................. 89 Domain Redirect ........................................................... 90 Internet Network (WAN) IPv4 ....................................... 91 Advanced Settings ........................................................ 93 ADVANCED SETTINGS ................................................ 95 Port Forwarding ............................................................ 95 Port Filtering ................................................................. 96 DMZ (Demilitarized Zone) ............................................. 97 Denial of Service ........................................................... 98 IDS (Intrusion Detection System) .................................. 99 ADMINISTRATION ................................................... 100 System Status.............................................................. 100 Network Statistics ....................................................... 101 System Clock ............................................................... 102 Advanced Settings ...................................................... 103 System Logs ................................................................ 105 Alarm and LED Settings ............................................... 106 Upgrade Firmware ...................................................... 107 Save / Reload Settings ................................................. 109 Password Settings ....................................................... 110 ACCESS POINT CONTROLLER SETTINGS ..................... 111 DASHBOARD ............................................................... 115 System Status .............................................................. 115 Operational Mode ....................................................... 116 Basic Setup .................................................................. 117 Managed AP Overview ................................................ 118 Managed AP Map........................................................ 121 MANAGED AP STATUS................................................ 122 Access Points: Managed APs ....................................... 122 Access Points: Managed AP Groups ............................ 126 Wi-Fi Status: Active Wi-Fi Networks ........................... 129 Wi-Fi Status: Active Groups ........................................ 131 Connected Devices: Active Devices ............................. 132 AP Statistics ................................................................. 133 Managed AP Logs ........................................................ 134 Network Tools ............................................................. 135
APR175P USER’S GUIDE    3 MANAGED AP SETTINGS ............................................ 136 Access Points .............................................................. 136 Wi-Fi Settings .............................................................. 141 RADIUS Server Settings ............................................... 146 Access Control ............................................................ 148 Managed AP Map Edit ................................................ 150 Firmware Upgrade ...................................................... 151 LOCAL ACCESS POINT SETTINGS ............................... 152 TECHNICAL SPECIFICATIONS ..................................... 153 DEFAULT SETTINGS .................................................. 154 TROUBLESHOOTING & SUPPORT .............................. 155 WARRANTY & REGULATORY INFORMATION ............ 169 LEGAL NOTICES AND DISCLAIMERS………………….……..177
APR175P USER’S GUIDE    4 INTRODUCTION  Thank you for purchasing this Amped Wireless product. At Amped Wireless we strive to provide you with the highest quality products through innovation and advanced technology.  We pride ourselves on delivering products that outperform the competition and go beyond your expectations.  If you have any questions please feel free to contact us.  We’d love to hear from you and thank you for your support! Email: sales@ampedwireless.com Call: 888-573-8830 Web: www.ampedwireless.com
APR175P USER’S GUIDE    5 GETTING STARTED  Package Contents  Check to make sure you have all the contents within your package:  ProSeries High Power AC1750 Wi-Fi Access Point / Router  3 x Detachable High Gain 3dBi Antennas  Magnetic Mounting Kit & Mounting Template  Setup Guide  CD: User’s Guide  Ethernet Cable   Power Adapter
APR175P USER’S GUIDE    6 LED Indicators From left to right:   PoE: Indicates when there is an active PoE connection on the LAN1 wired port.  LED will remain on. USB: Indicates when there is a USB device is attached to the USB port. 5.0GHz Wi-Fi: Blinks rapidly when Wi-Fi data traffic is transmitted or received over the wireless network. 2.4GHz Wi-Fi: Blinks rapidly when Wi-Fi data traffic is transmitted or received over the wireless network. Wired Port 2: Indicates when a networking device is connected to wired port (LAN2) on the Access Point / Router. The LED will blink rapidly when wired data traffic is transmitted or received. Wired Port 1: Indicates when a networking device or modem is connected to wired port (LAN1 / WAN) on the Access Point / Router. The LED will blink rapidly when wired data traffic is transmitted or received. Status: Blinks when the Access Point / Router is booting up or resetting. Power (PWR): Indicates when the Access Point / Router is powered on. The LED will remain on.
APR175P USER’S GUIDE    7 Side Panel Description   PWR: Power adapter port. 12V 4A. LAN1 / WAN (PoE): Gigabit RJ-45 port with Power over Ethernet input.  Connect wired devices or to a PoE switch to use the Access Point without the power adapter.   Functions as the port connected to your network in Access Point modes and WAN port in Router mode.  LAN2: Gigabit RJ-45 local network port for expanding your network.   USB: Attach USB devices to save or load settings, upgrade firmware, save system logs or load boot files. Eject: To safely eject an attached USB device. Console: Connect to a management console for diagnostics. (i.e. HyperTerminal) WPS: Enables Wi-Fi Protected Setup’s push button configuration. On/Off: Device power on/off switch.
APR175P USER’S GUIDE    8 MOUNTING INSTRUCTIONS  Magnetic Mounting The mounting kit included with the Access Point provides a convenient method to mount the Access Point on a wall or ceiling.  Once you have chosen the location for where you want to install the Access Point, locate the Mounting Template.  Use it to mark the screw hole locations onto your wall. Once the screw holes have been marked, locate the Magnetic Mounting Kit and use the included screws to fasten the two magnetic plates to the wall.   Once the plates are fastened, attach the Access Point to the wall plates and check that the magnets are firmly holding the Access Point to the wall.   Wall Mounting In addition to the Magnetic Mounting Kit, the Access Point can also be mounted using the standard wall mounting clips on the bottom of the device.
APR175P USER’S GUIDE    9 GETTING STARTED  a) Attach the included antennas to the antenna ports on the Access Point / Router. b) Power on the Access Point / Router by attaching either the power adapter to the Access Point / Router and plugging in the other end into a power outlet or attaching a PoE Ethernet cable to LAN1 / WAN on the side panel and the other end to an active PoE switch. c) Connect to the Access Point / Router with your computer by attaching an Ethernet cable to the LAN2 ports on the side panel or connect to the Access Point / Router’s Wi-Fi network: Amped_APR_2.4 or Amped_APR_5.0. Password: wireless
APR175P USER’S GUIDE    10 OPERATIONAL MODES (BASIC SETUP) The Access Point features five different operational modes that can be configured via the web menu: - Router - Access Point - WDS Access Point  - Managed Access Point - Access Point Controller
APR175P USER’S GUIDE    11 ROUTER MODE OVERVIEW  Share a single Internet connection via a connection to a broadband modem or other Internet source and provide a secure firewall for your network. Router mode features 2.4GHz and 5.0GHz Wi-Fi connections as well as one wired port for local wired devices and switches.
APR175P USER’S GUIDE    12 ROUTER MODE BASIC SETUP Setup Preparations  Disconnect and power off your existing router (if you have one). Disconnect your existing router from your computer, your broadband modem and its power outlet. If you do not have an existing router please continue to the next step.  Power off your Modem  Power off the modem by disconnecting the modem’s power adapter from the power outlet. If your modem has a backup battery, remove the backup battery from your modem. Do NOT power on the modem until prompted at a later step.
APR175P USER’S GUIDE    13 Connect the Router to your Modem  a) Use the included Ethernet cable and connect one end of the cable to your modem. b) Connect the other end of the cable to the blue “Modem” port on the Router.
APR175P USER’S GUIDE    14 Power on your Modem   Plug in your modem’s power adapter and backup battery (if available):
APR175P USER’S GUIDE    15 Attach Antennas, Power On & Connect to your Computer  a) Attach the included antennas to the antenna ports on the Access Point / Router. b) Power on the Access Point / Router by attaching either the power adapter to the Access Point / Router and plugging in the other end into a power outlet or attaching a PoE Ethernet cable to LAN1 / WAN on the side panel and the other end to an active PoE switch. c) Connect to the Access Point / Router with your computer by attaching an Ethernet cable to the LAN2 ports on the side panel or connect to the Access Point / Router’s Wi-Fi network: Amped_APR_2.4 or Amped_APR_5.0. Password: wireless
APR175P USER’S GUIDE    16 Open your Web Browser  a) Open your web browser.  b) Type http://setup.ampedwireless.com into the web address bar. c) If the web menu fails to open, type in the following IP address into your web address bar: http://192.168.80.1 If you have problems accessing the Web Menu…  Disable third-party firewalls such as Norton, Zone Alarm or Windows Defender. Check to see that your computer is not connected to other wireless networks. d) When prompted, enter the login and password:
APR175P USER’S GUIDE    17 Select the Operational Mode  a) After the web menu appears, select Dashboard from the navigation menu on the top of the page. b) Select Operational Mode from the left hand navigation.   c) Using the dropdown menu, select Router Mode for the Operational Mode and click Apply. d) When the web menu has reloaded, select Basic Setup.
APR175P USER’S GUIDE    18 Basic Setup Wizard  Confirm that your hardware is correctly connected and Click Next to begin.      Internet Connection Detection  The Wizard will try to detect your Internet settings and configure the router. Please be patient.
APR175P USER’S GUIDE    19 If there was a problem with the Automatic Configuration, the wizard will notify you of the issue. If you continue to have problems, contact our support department at 888-573-8820.      If the Internet connection detection was successful, you will see a green check. Click Next to continue.
APR175P USER’S GUIDE    20 Wi-Fi Settings  The default ID of your 5.0GHz Wi-Fi network and 2.4GHz Wi-Fi network is:   Amped_APR_5.0 Amped_APR_2.4   To change it, enter a new name in the SSID field. Users connecting wirelessly to the Router will use these IDs to identify your wireless network. The default Security Key (WPA/WPA2) for your Wi-Fi networks is “wireless”. To change them, enter a new key in the Security Key field for both 2.4GHz and 5.0GHz networks. The keys must be 8-characters minimum. Click Next to apply your settings.
APR175P USER’S GUIDE    21 Setup Summary  Once the Router has rebooted, it will load the Setup Summary page and provide you with the details of your setup. It is recommended that you print this page for your records. Open a new web browser window and check that you have access to the Internet. Additional settings can be configured using the navigation menu on the top of the Web Menu.
APR175P USER’S GUIDE    22 ACCESS POINT MODE OVERVIEW  Access Point mode creates a new Wi-Fi network for users to connect to by connecting to a local port on your network (i.e. via a network switch or local router network port). Devices connected to the Access Point are on the same network as the router and have the ability to access files from devices on the same network. Access Point mode provides both 2.4GHz and 5GHz Wi-Fi connections.
APR175P USER’S GUIDE    23 ACCESS POINT MODE BASIC SETUP  Connect the Access Point to your Router/Network: a) Attach the antennas to the Access Point. b) Plug in the Power Adapter. c) Using the included RJ-45 Ethernet cable, attach one end to the Access Point’s LAN 1/WAN port and the other to your router’s network port (or any available port on a network switch).  d) Connect an Ethernet cable between the Access Point’s LAN2 port and your computer’s network port or connect to the Access Point’s Wi-Fi Network: Amped_APR_2.4 or Amped_APR_5.0, Password: wireless.
APR175P USER’S GUIDE    24 Open your Web Browser  a) Open your web browser.  b) Type  http://setup.ampedwireless.com into the web address bar. c) If the web menu fails to open, type in the following IP address into your web address bar: http://192.168.80.1 If you have problems accessing the Web Menu: Disable third-party firewalls such as Norton, Zone Alarm or Windows Defender. Check to see that your computer is not connected to other wireless networks. d) When prompted, enter the login and password:
APR175P USER’S GUIDE    25 Select the Operational Mode  a) After the web menu appears, select Dashboard from the navigation menu on the top of the page. b) Select Operational Mode from the left hand navigation. c) Using the dropdown menu, select Access Point Mode for the Operational Mode and click Apply. d) When the web menu has reloaded, select Basic Setup.   Basic Setup Wizard  Confirm that your hardware is correctly connected and Click Next to begin.
APR175P USER’S GUIDE    26 Basic setup will detect your network settings and automatically configure the Access Point to your network.   If there was a problem with the configuration, Basic Setup will notify you of the issue. If you continue to have problems, contact our support department at 888-573-8820.  Click Next to continue.
APR175P USER’S GUIDE    27 Wi-Fi Settings  The default Wi-Fi network ID of your 5GHz Wi-Fi network and 2.4GHz Wi-Fi network is:   Amped_APR_5.0 Amped_APR_2.4   To change it, enter a new name in the SSID field.  Users connecting wirelessly to the Access Point will use these IDs to identify your wireless network. The default Security Key (WPA/WPA2) for your Wi-Fi networks is “wireless”. To change them, enter a new key in the Security Key field for both 2.4GHz and 5GHz networks. The keys must be 8-characters minimum. Click Next to apply your settings.
APR175P USER’S GUIDE    28 Setup Summary  Once the Access Point has rebooted, it will load the Setup Summary page and provide you with the details of your setup. It is recommended that you print this page for your records. Open a new web browser window and check that you have access to the Internet. Additional settings can be configured using the navigation menu on the top of the Web Menu.
APR175P USER’S GUIDE    29 WDS – ACCESS POINT MODE (WPS-AP) OVERVIEW WDS (Wireless Distribution System) Access Point mode enables the wireless interconnection of Access Points.  Access Points traditionally connect to the network via a cable (see Access Point Mode), however in WDS-Access Point mode, Access Points connect to the network wirelessly and create a wireless or wired network for devices to connect to. WDS-Access Point mode allows for multiple WDS-Access Points to be set up on a network. They function similar to that of a range extender or repeater.
APR175P USER’S GUIDE    30 WDS – ACCESS POINT MODE (WPS-AP) BASIC SETUP Connect the Access Point to your Router/Network: a) Attach the antennas to the Access Point. b) Plug in the Power Adapter. c) Using the included RJ-45 Ethernet cable, attach one end to the Access Point’s LAN 1/WAN port and the other to your router’s network port (or any available port on a network switch).    d) Connect an Ethernet cable between the Access Point’s LAN2 port and your computer’s network port or connect to the Access Point’s Wi-Fi Network: Amped_APR_2.4 or Amped_APR_5.0, Password: wireless.
APR175P USER’S GUIDE    31 Open your Web Browser  a) Open your web browser.  b) Type in: http://setup.ampedwireless.com into the web address bar. c) If the web menu fails to open, type in the following IP address into your web address bar: http://192.168.80.1 If you have problems accessing the Web Menu: Disable third-party firewalls such as Norton, Zone Alarm or Windows Defender.  Check to see that your computer is not connected to other wireless networks. d) When prompted, enter the login and password:
APR175P USER’S GUIDE    32 Select the Operational Mode  a) After the web menu appears, select Dashboard from the navigation menu on the top of the page. b) Select Operational Mode from the left hand navigation.   c) Using the dropdown menu, select WDS - Access Point Mode for the Operational Mode and click Apply. d) When the web menu has reloaded, select Basic Setup.   Basic Setup Wizard  Using the dropdown menu select which Wi-Fi frequency you wish to configure for WDS - AP mode: -  2.4GHz only, 5GHz only, or both 2.4GHz and 5GHz. After you have made your selection, click Next to begin. For the purpose of this User’s Guide, we will provide instructions and screenshots for a dual band configuration (both 2.4GHz and 5GHz).
APR175P USER’S GUIDE    33 WDS Settings  WDS - AP mode requires additional Access Points also functioning in WDS - AP mode. Each WDS enabled Access Point connects to the other via MAC addresses. Enter the MAC addresses of the Access Points with WDS enabled into the corresponding fields that you wish to connect to. For WDS connections to work properly, the MAC address associations must also be configured on each individual WDS enabled Access Point, not just the one you are currently configuring. For example, if you are connecting three WDS-APs, AP 1 must have AP 2 and AP 3’s MAC address conifgured, while AP 2 has AP 1’s and AP 3’s MAC, and AP 3 has AP 1’s and AP 2’s MAC configured. Encryption can be used to secure your WDS connections. If you choose to use encryption (recommended), it is important that you set the same security key setting on all connected WDS enabled Access Points. Click Next to continue.
APR175P USER’S GUIDE    34 Wi-Fi Settings  In addition to interconnecting Access Points, WDS-AP mode allows for Wi-Fi connections to the Access Point from Wi-Fi devices such as a PC or tablet.    The default Wi-Fi ID’s of your 5GHz Wi-Fi network and 2.4GHz Wi-Fi network are:   Amped_APR_5.0 Amped_APR_2.4   To change it, enter a new name in the SSID field. Users connecting wirelessly to the Access Point will use these IDs to identify your wireless network. The default Security Key (WPA/WPA2) for your Wi-Fi networks is “wireless”. To change them, enter a new key in the Security Key field for both 2.4GHz and 5.0GHz networks. The keys must be 8-characters minimum. Click Next to apply your settings.
APR175P USER’S GUIDE    35 Setup Summary  Once the Access Point has rebooted, it will load the Setup Summary page and provide you with the details of your setup. It is recommended that you print this page for your records. The Summary will display the status of each WDS connection and the signal strength of each connection. Connections with lower signal strength connections may perform slower. It is recommended to have a signal of at least 70% for the best performance. Additional settings can be configured using the navigation menu on the top of the Web Menu.
APR175P USER’S GUIDE    36 MANAGED ACCESS POINT MODE OVERVIEW  Managed Access Point mode functions similarly to Access Point mode however the majority of settings of the Access Point are managed remotely from a single designated Access Point Controller. This mode is typically used for deployments where multiple Access Points are installed and configuring all devices simultaneously is more convenient. Because Managed Access Points are not configured directly, there is no Basic Setup for Managed Access Points.
APR175P USER’S GUIDE    37 ACCESS POINT CONTROLLER MODE OVERVIEW  Access Point Controller mode creates a master Access Point to manage all Access Points (up to 7 simultaneously) that are functioning in Managed Access Point mode (Access Point Controllers cannot manage other devices in Router mode, Access Point mode or WDS-Access Point mode). The Access Point Controller provides a single web based interface to manage the Wi-Fi SSID, security, VLAN, group settings, firmware upgrades and much more for all Managed Access Points. Settings can be applied at once to all devices or individually for each one.     The AP Controller has the following management topology:  The AP Controller can configure settings of Managed Access Points (up to 7)  A Managed Access Point can belong to a single Access Point Group An Access Point Group can have a 2.4GHz WLAN Group and a 5.0GHz WLAN Group Each WLAN Group can have up to 16 unique WLAN networks or SSIDs
APR175P USER’S GUIDE    38 ACCESS POINT CONTROLLER MODE BASIC SETUP Connect the Access Point to your Router/Network: a) Attach the antennas to the Access Point. b) Plug in the Power Adapter. c) Using the included RJ-45 Ethernet cable, attach one end to the Access Point’s LAN 1/WAN port and the other to your router’s network port (or any available port on a network switch).   d) Connect an Ethernet cable between the Access Point’s LAN2 port and your computer’s network port or connect to the Access Point’s Wi-Fi Network: Amped_APR_2.4 or Amped_APR_5.0, Password: wireless.
APR175P USER’S GUIDE    39 Open your Web Browser  a) Open your web browser.  b) Type http://setup.ampedwireless.com into the web address bar. c) If the web menu fails to open, type in the following IP address into your web address bar: http://192.168.80.1 If you have problems accessing the Web Menu…  Disable third-party firewalls such as Norton, Zone Alarm or Windows Defender.  Check to see that your computer is not connected to other wireless networks. d) When prompted, enter the login and password:
APR175P USER’S GUIDE    40 Select the Operational Mode  a) After the web menu appears, select Dashboard from the navigation menu on the top of the page. b) Select Operational Mode from the left hand navigation.  c) Using the dropdown menu, select Access Point Controller Mode for the Operational Mode and click Apply. d) When the web menu has reloaded, select Basic Setup.
APR175P USER’S GUIDE    41 Basic Setup Wizard  Before we begin please check that: a) All Managed Access Points are powered on. b) All Managed Access Points are set to “Managed Access Point” operational modes. If they are not please do so from the Web Menu for each Access Point.   c) All Managed Access Points are connected to the same physical network as the Access Point Controller. If your Access Points are on different networks or if there is a firewall or network protocols blocking communication between the Access Points, Basic Setup will not be able to discover the Access Points to configure them. Please make sure all Access Points are on the same network. Click Next to begin.
APR175P USER’S GUIDE    42 Managed Access Point Detection  Basic setup will scan for all available Managed Access Points on your network. This may take a minute.   Once complete a list of available Managed Access Points will appear.  Select the Access Points that you wish to configure.  You may select and configure up to seven Managed Access Points total.  All of the Access Points you select will be configured with the same Wi-Fi settings.  Once selected, click Next. After configuring the Wi-Fi settings for the first set of Access Points, you can come back to this page to select a second group of Access Points to configure with a different set of Wi-Fi settings.  Alternatively, you may also skip this step and Basic Setup will take you to the configuration page for the AP Controller’s Wi-Fi settings.
APR175P USER’S GUIDE    43 Each Managed Access Point will have a Status displayed on the right side.    Below is a legend for each status color:  Disconnected (Grey): The Access Point cannot be reached and is not available or disconnected from the network.  Error (Red): The AP Controller could not connect with the Access Point.  This can be because of several reasons such as an authentication error or an incompatible management protocol.  Busy (Orange): The AP Controller is in the process of configuring the Access Point.   Connecting (Yellow): The AP Controller is attempting to connect to the Access Point.  This includes the authentication process of the Access Point to the AP Controller  Connected (Green): The AP Controller has successfully authenticated and connected to the Access Point.  Waiting Association (Blue): The Access Point has not yet been selected for management by the AP Controller.
APR175P USER’S GUIDE    44 Wi-Fi Settings  Configure Wi-Fi settings (Primary and secondary network SSIDs and security) for the group of selected Managed Access Points from this page. The Access Points will all have the same settings. You can also configure the device name for each Access Point.  The default Wi-Fi ID for 5.0GHz and 2.4GHz networks is:  Amped_APR_5.0 and Amped_APR_2.4   To change it, enter a new name in the SSID field. Users connecting wirelessly to the Access Point will use these IDs to identify your wireless network. The default Security Key (WPA/WPA2) for your Wi-Fi networks is “wireless”. To change them, enter a new key in the Security Key field for both 2.4GHz and 5.0GHz networks. The keys must be 8-characters minimum.
APR175P USER’S GUIDE    45   Once complete, you can choose to click Apply to apply the settings and choose a new group of Managed Access Points to configure with new settings. If you are finished, and have no other Managed Access Points to configure, click Next to continue to Wi-Fi Settings for the Access Point Controllers own Wi-Fi network.  If you make a mistake or wish to reselect a group of Managed Access Points, click Cancel to return the detected Access Point list.
APR175P USER’S GUIDE    46 Wi-Fi Settings: AP Controller’s Local Wi-Fi The Access Point Controller also features its own Wi-Fi networks.  By default the Access Point Controller’s Wi-Fi networks are disabled to optimize the performance of the Access Point Controller’s management functions.  You can enable them here, however, during heavy usage, this may negatively impact the performance of the Access Point Controller. The AP Controller’s default Wi-Fi ID for 5.0GHz & 2.4GHz networks is: Amped_APR_5.0 and Amped_APR_2.4 To change it, enter a new name in the SSID field. Users connecting wirelessly to the Access Point will use these IDs to identify your wireless network. The default Security Key (WPA/WPA2) for your Wi-Fi networks is “wireless”. Click Next when done to complete the Basic Setup wizard.
APR175P USER’S GUIDE    47 Setup Summary  Once the Access Point has rebooted, it will load the Setup Summary page and provide you with the details of your setup. It is recommended that you print this page for your records. The Summary will display the Wi-Fi settings and groups of Managed Access Points using those Wi-Fi settings. If you have configured different Wi-Fi settings for multiple Managed Access Points, scroll down to view the details of each setting. Additional settings can be configured using the navigation menu on the top of the Web Menu. When configuring settings for Managed Access Points, it is important to understand the Controller’s management topology: 1) The AP Controller can configure settings of Managed Access Points (up to 7) 2) A Managed Access Point can belong to a single Access Point Group 3) An Access Point Group can have a 2.4GHz WLAN Group and a 5.0GHz WLAN Group 4) Each WLAN Group can have up to 16 unique WLAN networks or SSIDs
APR175P USER’S GUIDE    48 MORE SETTINGS   The Access Point has many additional features and settings that can be configured via the Web Menu.  To access these settings start with the navigation menu located on the top of the Web Menu.  Once the desired menu is selected, additional navigational options will appear on the left hand side.  Select the sub menus from here to access the specific settings for each option. Note: Not all settings and features are available for all operational modes.  As you change from one operational mode to another some features and settings will be greyed out and cannot be accessed as they do not apply to the selected operational mode.
APR175P USER’S GUIDE    49 DASHBOARD  Dashboard: System Status  The Dashboard System Status will provide you with the current status of the Access Point.  It provides you with glance at general setup information such as the current operational mode, firmware version and uptime of the Access Point.  From here you can quickly change the operational mode by clicking the “Change” button to the right of the operational mode.  In addition to the operational mode, the System Status also provides you with information regarding your Internet or WAN port connection, if available for your operational mode, as well as the details for your local network. Information regarding your primary 2.4GHz and 5.0GHz Wi-Fi networks are displayed in the lower half of the page.  Note, this section only shows details for the first SSID of each frequency.  For information on additional SSIDs, click “View Details”. At the bottom of the page you will find details about the Wired Port settings.
APR175P USER’S GUIDE    50 Dashboard: Operational Mode The Operational Mode page lets you change the operating mode of the Access Point. As described earlier, the Access Point features five different modes: - Router - Access Point - WDS Access Point  - Managed Access Point - Access Point Controller From this page you can view your current operational mode or change the operational mode to any of the modes above. For descriptions on the features of each mode please see the operational mode overviews described in the Operational Modes (Basic Setup) section of this User’s Guide. Selecting an operational mode from the dropdown menu will also provide you with a diagram and overview of the operational mode selected. Once you have chosen a mode, click Apply to apply the changes. The Auto-DHCP Server feature automatically manages the IP addresses within your network. When connected to a network that has a DHCP server enabled, the Access Point/Router will automatically obtain an IP from the network’s DHCP server and disable the DHCP server on the Access Point / Router to avoid any IP assignment conflicts. For users that are not familiar with how this works, it is recommended to leave Auto-DHCP server enabled on this page.
APR175P USER’S GUIDE    51 Dashboard: Basic Setup  The Basic Setup page will provide you with a simple, step by step, wizard for configuring basic settings of the current operational mode.  As you change from one operational mode to another, the Basic Setup menu will also change to cater to the settings for the selected operational mode.  For more details regarding Basic Setup, please view the Operational Mode (Basic Setup) section of this User’s Guide.
APR175P USER’S GUIDE    52 Dashboard: Connected Devices  View the details of certain devices connected to the Access Point.  Since this menu may constantly change as devices connect and disconnect from the network, a page refresh option is available to automatically update the data at set intervals. Connected devices are separated by those connected to the 2.4GHz Wi-Fi networks or 5.0GHz Wi-Fi networks.  If the current operational mode is Router mode, this page will also show those devices that are connected to the router and have been provided an IP address assignment from the DHCP server of the router.
APR175P USER’S GUIDE    53 Dashboard: WDS Settings  If the Access Point has been set to WDS-Access Point operational mode, the WDS settings page will give you a glance at the status of current WDS connections.  The page provides you with information for each frequency: 2.4GHz and 5.0GHz depending on your WDS configurations.  Each section will display information for each WDS connection such as their connection state and signal strength in addition to identifying each connection by its MAC address.  If encryption is used for the connections, that is displayed as well.   There are also shortcuts to access the configuration menu your WDS settings in case you wish to make changes.
APR175P USER’S GUIDE    54 WI-FI SETTINGS   2.4GHz Wi-F Settings: Status  The 2.4GHz Wi-Fi Status page provides you with a glance at basic information for your 2.4GHz Wi-Fi settings such as the Status, mode, security type, SSID among other details.
APR175P USER’S GUIDE    55 2.4GHz Wi-F Settings: Basic Settings  The Basic Settings page allows you to adjust settings for your 2.4GHz local wireless network. Enable Wi-Fi Radio: Disabling will turn off all 2.4GHz Wi-Fi activity.  Users will no longer be able to connect wirelessly to your 2.4GHz network. Band: Select the compatible Wi-Fi standard and speed for your wireless network. SSID: The identification name of a Wi-Fi network.   Active Number of SSIDs: Select the number of different SSIDs you wish to have on the 2.4GHz frequency.  Each SSID will represent a network that Wi-Fi devices can see and connect to.  The Access Point allows up to 16 SSIDs per frequency.  Each SSID can have a different name, VLAN assignment and security key. Additional SSIDs is sometimes referred to as Guest Networks. VLAN ID: The VLAN ID is a feature that allows you to virtually map connected devices and secure access for each SSID created.  Devices that are connected to an SSID with a specific VLAN (Virtual Local Area Network) ID cannot access or see devices connected to SSIDs with a different VLAN ID.  For example, if SSID 1 is assigned to VLAN 1 and SSID 2 is assigned to VLAN 2, then devices connected to SSID 1 will not be able to see or access devices or files on SSID 2 (VLAN 2).  VLAN IDs can range between 1 and 4094.
APR175P USER’S GUIDE    56 Auto Channel Selection: Enable or disable auto Wi-Fi channel assignment.  When enabled the Access Point will automatically choose the best Wi-Fi channel for operation. Channel Scan Interval: Select the time intervals for when the Access Point re-checks for an optimal Wi-Fi channel to use. Broadcast SSID: Selecting Disable Broadcast SSID will hide the visibility of the router’s 2.4GHz network SSID.  Users must manually enter the SSID to connect. BSS Basic Rate Set: The basic data rate that devices connecting to the Access Point need to support in order to connect.
APR175P USER’S GUIDE    57 2.4GHz Wi-F Settings: Security  The Security page allows you to change the type of wireless security settings for your 2.4GHz wireless network.  SSID Selection: Using the drop down menu, you can select which network you wish to configure and may adjust the security settings below. Broadcast SSID: Selecting Disable Broadcast SSID will hide the visibility of the selected Wi-Fi network SSID.  Users must manually enter the SSID to connect. Internet Access Only: Choose whether you wish to block Internet access for those devices connecting to the selected SSID. Wireless Client Isolation: Enabling this feature provides an extra layer of security by preventing devices connected to the selected SSID to communicate with one another.  This feature is useful in corporate environments or public hotspots. Load Balancing: Limit the number of devices that can connect to the selected SSID.  This can assist in managing the bandwidth used by each SSID.  The maximum number of devices for each SSID is 50 devices.
APR175P USER’S GUIDE    58 Authentication Method:  None: Authentication is disabled and devices are not required to enter a security key when connecting to the SSID. WEP is rated as a low level encryption and is compatible with all wireless devices and operating systems. Using WEP may slow down your wireless performance. WPA-PSK is a medium level encryption and is supported by most wireless devices and operating systems. WPA-EAP requires that the security key is renewed during a set interval. WPA2 is a high level encryption and is supported by most wireless devices and operating systems. WPA Mixed Mode allows the use of both WPA and WPA2 at the same time. If you are not sure which encryption type to use, we recommend you choose WPA/WPA2 Mixed Mode. Additional Authentication Methods: MAC: Restrict access from devices based on their MAC address stored on the MAC Address filter table. MAC + RADIUS: Restrict access from devices based on their MAC address stored on the MAC Address filter table and based on MAC Address authentication via a RADIUS server.  RADIUS: Restrict access from devices based on MAC Address authentication via a RADIUS Server
APR175P USER’S GUIDE    59 2.4GHz Wi-F Settings: Output Power  Adjust the output power of the Access Point to control the coverage distance of your 2.4GHz wireless network.  For a smaller coverage area, you can select a lower output power.  For the maximum wireless coverage, select the 100% selection.
APR175P USER’S GUIDE    60 2.4GHz Wi-F Settings: Site Survey  Scan for local Wi-Fi networks broadcasting within the vicinity of the Access Point.  This feature is useful in determining what other networks are around you and what their basic configurations are in addition to their signal strength in comparison to the Access Point.  This feature can also be useful when setting up WDS-AP operational modes when needing to identify the MAC address of other WDS enabled Access Points.
APR175P USER’S GUIDE    61 2.4GHz Wi-F Settings: WDS  WDS Settings are only available in the WDS-Access Point (WDS-AP) operational mode. If you are not using the WDS-AP operational mode please disregard this section. WDS mode allows the Access Point to interconnect with other WDS enabled Access Points and Bridges (such as the Amped Wireless REB175P ProSeries Wi-Fi Range Extender/Bridge). WDS allows you to extend your network by adding additional wirelessly connected Access Points, also referred to as a repeater, in addition to Bridges. For WDS connections to work properly, the MAC address associations must also be configured on each individual WDS enabled Access Point, not just the one you are currently configuring.  For example, if you are connecting three WDS-APs, AP 1 must have AP 2 and AP 3’s MAC address conifgured, while AP 2 has AP 1’s and AP 3’s MAC, and AP 3 has AP 1’s and AP 2’s MAC configured.  Every WDS connected device must also be using the same wireless channel as all other WDS connected devices.   Encryption can be used to secure your WDS connections.  If you choose to use encryption (recommended), it is important that you set the same security key setting on all connected WDS enabled Access Points and Bridges.
APR175P USER’S GUIDE    62 To further secure a WDS connection, VLAN IDs may be assigned to the WDS connection. Note: When using WDS, it is recommended that you configure the IP address of each WDS connected device to use the same IP subnet and/or ensure that there is only one active router or DHCP server on the network.
APR175P USER’S GUIDE    63 2.4GHz Wi-F Settings: Access Schedule  Access Schedules will enable or disable your 2.4GHz wireless access at a set time based on your predefined schedule.  This feature is often used for restricting access to all users (such as children, employees, guests) during specific times of the day for parental control or security reasons. a. Enable Access Schedule b. Select which days you wish for your 2.4GHz Wi-Fi to be available c. Select the time frame during that day that you wish for your 2.4GHz Wi-Fi to be available d. Apply Changes Note:  Make sure you have already configured your Time Zone Settings in order for your schedule to work correctly. Time Zone Settings can be adjusted from the web menu under Administration > System Clock.
APR175P USER’S GUIDE    64 2.4GHz Wi-F Settings: Advanced Settings  Advanced Wireless Settings should only be adjusted by technically advanced users. It is not recommended that novice users adjust these settings to avoid degrading wireless performance. Contention Slot: Used for contention windows in WMM mode. For more information please go to the WMM section of this User’s Guide. Preamble Type: Defines the length of the Cyclic Redundancy Check for communication between the router and roaming wireless users.  Guard Interval: Used to ensure that data transmissions do not interfere with each other.  Shorter guard intervals can help to improve overall performance by marginally increasing data rates. 802.11g Protection: Increases reliability, but reduces bandwidth. 802.11n Protection: Increases reliability, but reduces bandwidth (Provides more bandwidth than 802.11g Protection). DTIM Period: Adjusts the delivery traffic indication method period. RTS Threshold: Adjusts the size of RTS data packets. Lower values reduce throughput, but allow the system to recover quicker from interference/collisions. Higher values provide the fastest throughput.
APR175P USER’S GUIDE    65 Fragment Threshold: The default and recommended setting is at 2346, meaning the Router will never fragment any frames that it sends to wireless users. Multicast Rate: Adjust the transfer rate for multicast packets or choose the “auto” setting. Beacon Interval: Indicates the frequency interval of the beacon. A beacon is a packet broadcast by the router to synch the wireless network. Station Idle Timeout: This feature will disconnect connected devices that are no longer active based on a set interval of time.   WLAN Proxy for Power Saving: The Access Point will send an Address Resolution Protocol (ARP) packet instead of STA packets to map IP addresses so that network devices do not need to awake from power saving mode to reply to the ARP packages from the Access Point.  This feature only works when the Access Point’s DHCP server is enabled. WLAN Integrity:  This feature will ping the target IP/URL every 60 seconds to verify that a connection is active.  If the ping fails five times consecutively, all of the SSIDs for the 2.4GHz radio will all be disabled.  Thereafter, the Access Point will continue to ping the target IP every 60 seconds and will automatically turn on all SSIDs once the ping is successful.  By default the Target IP will be the DNS or Gateway IP of the active Internet connection.
APR175P USER’S GUIDE    66 5.0GHz Wi-F Settings: Status  The 5.0GHz Wi-Fi Status page provides you with a glance at basic information for your 5.0GHz Wi-Fi settings such as the Status, mode, security type, SSID among other details.
APR175P USER’S GUIDE    67 5.0GHz Wi-F Settings: Basic Settings  The Basic Settings page allows you to adjust settings for your 2.4GHz local wireless network. Enable Wi-Fi Radio: Disabling will turn off all 5.0GHz Wi-Fi activity.  Users will no longer be able to connect wirelessly to your 5.0GHz network. Band: Select the compatible Wi-Fi standard and speed for your wireless network. SSID: The identification name of a Wi-Fi network.   Active Number of SSIDs: Select the number of different SSIDs you wish to have on the 5.0GHz frequency.  Each SSID will represent a network that Wi-Fi devices can see and connect to.  The Access Point allows up to 16 SSIDs per frequency.  Each SSID can have a different name, VLAN assignment and security key.  Additional SSIDs is sometimes referred to as Guest Networks. VLAN ID: The VLAN ID is a feature that allows you to virtually map connected devices and secure access for each SSID created.  Devices that are connected to an SSID with a specific VLAN (Virtual Local Area Network) ID cannot access or see devices connected to SSIDs with a different VLAN ID.  For example, if SSID 1 is assigned to VLAN 1 and SSID 2 is assigned to VLAN 2, then devices connected to SSID 1 will not be able to see or access devices or files on SSID 2 (VLAN 2).  VLAN IDs can range between 1 and 4094.
APR175P USER’S GUIDE    68 Auto Channel Selection: Enable or disable auto Wi-Fi channel assignment.  When enabled the Access Point will automatically choose the best Wi-Fi channel for operation. Channel Scan Interval: Select the time intervals for when the Access Point re-checks for an optimal Wi-Fi channel to use.   Broadcast SSID: Selecting Disable Broadcast SSID will hide the visibility of the router’s 5.0GHz network SSID.  Users must manually enter the SSID to connect. BSS Basic Rate Set: The basic data rate that devices connecting to the Access Point need to support in order to connect.
APR175P USER’S GUIDE    69 5.0GHz Wi-F Settings: Security  The Security page allows you to change the type of wireless security settings for your 5.0GHz wireless network. SSID Selection: Using the drop down menu, you can select which network you wish to configure and may adjust the security settings below. Broadcast SSID: Selecting Disable Broadcast SSID will hide the visibility of the selected Wi-Fi network SSID. Users must manually enter the SSID to connect. Internet Access Only: Choose whether you wish to block Internet access for those devices connecting to the selected SSID.   Wireless Client Isolation: Enabling this feature provides an extra layer of security by preventing devices connected to the selected SSID to communicate with one another.  This feature is useful in corporate environments or public hotspots. Load Balancing: Limit the number of devices that can connect to the selected SSID.  This can assist in managing the bandwidth used by each SSID. The maximum number of devices for each SSID is 50 devices.
APR175P USER’S GUIDE    70 Authentication Method:  None: Authentication is disabled and devices are not required to enter a security key when connecting to the SSID. WEP is rated as a low level encryption and is compatible with all wireless devices and operating systems. Using WEP may slow down your wireless performance. WPA-PSK is a medium level encryption and is supported by most wireless devices and operating systems. WPA-EAP requires that the security key is renewed during a set interval. WPA2 is a high level encryption and is supported by most wireless devices and operating systems. WPA Mixed Mode allows the use of both WPA and WPA2 at the same time. If you are not sure which encryption type to use, we recommend you choose WPA/WPA2 Mixed Mode. Additional Authentication Methods: MAC: Restrict access from devices based on their MAC address stored on the MAC Address filter table. MAC + RADIUS: Restrict access from devices based on their MAC address stored on the MAC Address filter table and based on MAC Address authentication via a RADIUS server.      RADIUS: Restrict access from devices based on MAC Address authentication via a RADIUS Server.
APR175P USER’S GUIDE    71 5.0GHz Wi-F Settings: Output Power  Adjust the output power of the Access Point to control the coverage distance of your 5.0GHz wireless network.  For a smaller coverage area, you can select a lower output power.  For the maximum wireless coverage, select the 100% selection.
APR175P USER’S GUIDE    72 5.0GHz Wi-F Settings: Site Survey  Scan for local Wi-Fi networks broadcasting within the vicinity of the Access Point.  This feature is useful in determining what other networks are around you and what their basic configurations are in addition to their signal strength in comparison to the Access Point.  This feature can also be useful when setting up WDS-AP operational modes when needing to identify the MAC address of other WDS enabled Access Points.
APR175P USER’S GUIDE    73 5.0GHz Wi-F Settings: WDS  WDS Settings are only available in the WDS-Access Point (WDS-AP) operational mode.  If you are not using the WDS-AP operational mode please disregard this section.  WDS mode allows the Access Point to interconnect with other WDS enabled Access Points and Bridges (such as the Amped Wireless REB175P ProSeries Wi-Fi Range Extender/Bridge).  WDS allows you to extend your network by adding additional wirelessly connected Access Points, also referred to as a repeater, in addition to Bridges.  For WDS connections to work properly, the MAC address associations must also be configured on each individual WDS enabled Access Point, not just the one you are currently configuring.  For example, if you are connecting three WDS-APs, AP 1 must have AP 2 and AP 3’s MAC address conifgured, while AP 2 has AP 1’s and AP 3’s MAC, and AP 3 has AP 1’s and AP 2’s MAC configured.  Every WDS connected device must also be using the same wireless channel as all other WDS connected devices.   Encryption can be used to secure your WDS connections.  If you choose to use encryption (recommended), it is important that you set the same security key setting on all connected WDS enabled Access Points and Bridges.
APR175P USER’S GUIDE    74 To further secure a WDS connection, VLAN IDs may be assigned to the WDS connection. Note: When using WDS, it is recommended that you configure the IP address of each WDS connected device to use the same IP subnet and/or ensure that there is only one active router or DHCP server on the network.
APR175P USER’S GUIDE    75 5.0GHz Wi-F Settings: Access Schedule  Access Schedules will enable or disable your 5.0GHz wireless access at a set time based on your predefined schedule.  This feature is often used for restricting access to all users (such as children, employees, guests) during specific times of the day for parental control or security reasons. a. Enable Access Schedule b. Select which days you wish for your 5.0GHz Wi-Fi to be available c. Select the time frame during that day that you wish for your 5.0GHz Wi-Fi to be available d. Apply Changes Note: Make sure you have already configured your Time Zone Settings in order for your schedule to work correctly. Time Zone Settings can be adjusted from the web menu under Administration > System Clock.
APR175P USER’S GUIDE    76 5.0GHz Wi-F Settings: Advanced Settings  Advanced Wireless Settings should only be adjusted by technically advanced users. It is not recommended that novice users adjust these settings to avoid degrading wireless performance. Guard Interval: Used to ensure that data transmissions do not interfere with each other.  Shorter guard intervals can help to improve overall performance by marginally increasing data rates. 802.11n Protection: Increases reliability, but reduces bandwidth (Provides more bandwidth than 802.11g Protection). DTIM Period: Adjusts the delivery traffic indication method period. RTS Threshold: Adjusts the size of RTS data packets. Lower values reduce throughput, but allow the system to recover quicker from interference/collisions. Higher values provide the fastest throughput. Fragment Threshold: The default and recommended setting is at 2346, meaning the Router will never fragment any frames that it sends to wireless users.
APR175P USER’S GUIDE    77 Multicast Rate: Adjust the transfer rate for multicast packets or choose the “auto” setting. Beacon Interval: Indicates the frequency interval of the beacon. A beacon is a packet broadcast by the router to synch the wireless network. Station Idle Timeout: This feature will disconnect connected devices that are no longer active based on a set interval of time. WLAN Proxy for Power Saving: The Access Point will send an Address Resolution Protocol (ARP) packet instead of STA packets to map IP addresses so that network devices do not need to awake from power saving mode to reply to the ARP packages from the Access Point.  This feature only works when the Access Point’s DHCP server is enabled. WLAN Integrity:  This feature will ping the target IP/URL every 60 seconds to verify that a connection is active.  If the ping fails five times consecutively, all of the SSIDs for the 5.0GHz radio will all be disabled.  Thereafter, the Access Point will continue to ping the target IP every 60 seconds and will automatically turn on all SSIDs once the ping is successful.  By default the Target IP will be the DNS or Gateway IP of the active Internet connection.
APR175P USER’S GUIDE    78 WPS Settings  WPS is a Wi-Fi feature created to make Wi-Fi setup simple and easy. Some wireless routers and adapters support this feature with varying names (i.e. one touch setup or WPS). You may enable WPS setup here by selecting the type of WPS setup you wish to use. The Router supports all types of WPS setup: Option A: Push button: You may push the WPS button on the web menu or use the physical button on the back of the Router. Option B: PIN: Some wireless devices use PIN number to access wireless network.  If your wireless device requests for a PIN number, use the PIN code located here. Option C: Enter PIN: If your wireless device has a PIN number, locate the number and enter it into the field.  Press Start PIN when ready.
APR175P USER’S GUIDE    79 MAC Address Filtering  MAC Address Filtering allows you to deny access or allow access to specific users connecting to the network. Each networking device has a unique address called a MAC address (a 12 digit hex number). By inputting the MAC address into the field, you can define whether that device is allowed into your network or not allowed. A MAC Address may sometimes be referred to as a Physical Address. Most networking devices have their MAC Address located on a label on the actual device. For Windows computers with internal networking adapters, the MAC Address can be found by viewing the Network Connection Details of the network adapter. The MAC Address will be listed as the Physical Address.   Be sure to enter the MAC Address without any symbols. For example, a MAC Address of 78-DD-78-AA-78-BB  would be entered as 78DD78AA78BB. Note: Each Wi-Fi Network (WLAN/SSID) must also have MAC Filters selected as Additional Authentication methods in order for MAC Filtering to work. This can be configured here: Wi-Fi Settings > 2.4GHz or 5.0GHz Wi-Fi Settings > Security.
APR175P USER’S GUIDE    80 RADIUS: RADIUS Server  RADIUS servers provide an additional layer of security by requiring that devices be authenticated before gaining access to a network.  Authentication normally includes the use of a user name and password that is verified on a predefined database also known as the RADIUS server.  The Access Point supports the use of primary and secondary (backup) RADIUS servers for each frequency: 2.4GHz and 5.0GHz.  The Access Point also provides an internal RADIUS server in the event that an external RADIUS server is not available.   Note: Each Wi-Fi Network (WLAN/SSID) must also have RADIUS servers selected as Additional Authentication methods in order for the RADIUS Servers to work.  This can be configured here: Wi-Fi Settings > 2.4GHz or 5.0GHz Wi-Fi Settings > Security. RADIUS Type: Select to use an Internal or external RADIUS server. RADIUS Server: If an external RADIUS server is selected, enter the IP address of the server here. Authentication Port: Set the UDP port used by the server to authenticate (Between 1-65535).
APR175P USER’S GUIDE    81 Shared Secret: This is the shared password used by both your Access Point and the RADIUS server. The RADIUS server must also be using this exact password to ensure communication between the two. Enter a password (between 1-99 characters in length).   Session Timeout: Set a duration when a connected device’s session will timeout. (Between 0-86400)  The timeout time begins once the connected device ceases activity with the Access Point. Accounting: Enable or disable RADIUS accounting. Accounting Port: Set the UDP port used by the server for accounting purposes. (Between 1-65535)
APR175P USER’S GUIDE    82 RADIUS: Internal RADIUS Server  If you chose to use the Internal RADIUS server on the RADIUS Server settings menu you will need to configure the Access Point’s Internal, built-in, RADIUS server using this page.   Internal Server: Enable or disable the Internal Server. EAP Internal Authentication: Select the EAP authentication type from this menu. EAP Certificate File Format: Accepted certificate file formats are: .pfx and .p12 EAP Certificate File: Upload an EAP Certificate file if you have one available.  If no certificate is uploaded the Access Point will use a self-generated certificate.  Shared Secret: This is the shared password used by both your Access Point and the RADIUS server.  The RADIUS server must also be using this exact password to ensure communication between the two.  Enter a password (between 1-99 characters in length).
APR175P USER’S GUIDE    83 Session Timeout: Set a duration when a connected device’s session will timeout. (Between 0-86400) The timeout time begins once the connected device ceases activity with the Access Point. Termination Action: Select how the Internal RADIUS server handles a termination action:  Re-authentication: Sends a RADIUS request to the Access Point   Not-Re-authentication: Sends a default termination action to the Access Point   Not-Send: No termination action is sent to the Access Point Note: Each Wi-Fi Network (WLAN/SSID) must also have RADIUS servers selected as Additional Authentication methods in order for the RADIUS Servers to work.  This can be configured here: Wi-Fi Settings > 2.4GHz or 5.0GHz Wi-Fi Settings > Security.
APR175P USER’S GUIDE    84 RADIUS: Radius Accounts  If you chose to use the Internal RADIUS server on the RADIUS Server settings menu you will need to add User Accounts to authenticate devices that are logging into your network.  Enter the name of each user in the User Accounts field.  For multiple entries, separate each User Account by a comma or a space.  When you are done, click Add. Note: Each Wi-Fi Network (WLAN/SSID) must also have RADIUS servers selected as Additional Authentication methods in order for the RADIUS Servers to work.  This can be configured here: Wi-Fi Settings > 2.4GHz or 5.0GHz Wi-Fi Settings > Security.
APR175P USER’S GUIDE    85 WMM / QoS  WMM, also known as Wi-Fi Multimedia, prioritizes multimedia (audio, video and voice) data going over Wi-Fi to ensure that they receive the needed bandwidth to perform undeterred.  Using QoS, also known as Quality of Service) WMM prioritizes data packets in the following order: Voice, Video, Best Effort, and Background. The details for each are: Voice – Includes Voice over IP and audio streaming media packets Video – Any streaming video Best Effort – General Internet applications Background – Low priority Internet applications, such as FTP If you are an advanced user, the values for each of these prioritizations can be further adjusted and optimized.  This is not recommended if you do not understand WMM and its technicalities.
APR175P USER’S GUIDE    86 NETWORK SETTINGS   Local Network (LAN): Local Network (IPv4)  These settings are for your local network only and do not apply to your Internet / ISP connection. DHCP: The Access Point includes a feature to help manage the IP addresses within your network automatically. When connected to a network, the Access Point will obtain an IP address from your router and act as a DHCP Client. However, when there is no connection available, the Access Point will act as a DHCP Server. You may also manually control the IP settings of the Access Point by choosing Client, Server or Static IP from the DHCP drop down menu.  Note: If you choose to use a Static IP address for the Access Point, you will no longer be able to access the web menu using http://setup.ampedwireless.com.  You must use the assigned IP address to access the web menu. IP Address: The IP address of the Access Point. Subnet Mask: The subnet of the Access Point. Default Gateway: The access point to another network, normally a router.
APR175P USER’S GUIDE    87 DHCP Client Range: The range of IP addresses provided by the DHCP server is defined by this field.  You can limit how many IP addresses are used in your network by setting a smaller or larger range. DHCP Lease Time: The amount of time each device is given a specific IP is decided by the DHCP lease time.  After the Lease Time expires, the DHCP server will assign another IP address to the device. Set Static DHCP: This allows specific devices to be given a specific IP address each time the device connects to the network.  The DHCP server will always assign the same IP address to the same device.  This feature is often used for shared devices such as network printers or servers. Auto DHCP Server: The Auto-DHCP Server feature automatically manages the IP addresses within your network.  When connected to a network that has a DHCP server enabled, the Access Point/Router will automatically obtain an IP from the network’s DHCP server and disable the DHCP server on the Access Point / Router to avoid any IP assignment conflicts.  For users that are not familiar with how this works, it is recommended to leave Auto-DHCP server enabled on this page. Local Network (LAN): LAN Port Settings  Configure settings for your Access Point’s two wired local network ports.
APR175P USER’S GUIDE    88 Enable / Disable – Turn the specific wired port on or off Speed & Duplex – Select a speed for the port Flow Control – Enable to allow the Access Point to automatically manage data requests to the wired port and avoid packet collisions 802.3az – Power saving feature that disables the port when not in use to reduce power usage
APR175P USER’S GUIDE    89 Local Network (LAN): VLAN  Virtual Local Area Networks, also known as VLANs, is a feature that allows you to virtually map connected devices and secure access for each wired port.   VLAN ID: Devices that are connected to a wired port with a specific VLAN (Virtual Local Area Network) ID cannot access or see devices connected to SSIDs or wired ports with a different VLAN ID.  For example, if Wired Port #1  is assigned to VLAN 1 and Wired Port #2 is assigned to VLAN 2, then devices connected to Wired Port #1 will not be able to see or access devices or files on Wired Port #2 (VLAN 2).  VLAN IDs can range between 1 and 4094. Tagged / Untagged – VLAN enabled ports are generally categorized as tagged or untagged.  This is also referred to as trunk or access.  The purpose of tagging a port is to pass traffic for multiple VLANs, whereas an untagged port accepts traffic for only a single VLAN.  For example, if you are connecting a switch to one of the Wired Ports on the Access Point, this would generally be a tagged port since it will be connecting to a network with multiple VLANs.  To successfully configure a tagged port both ends must have the following in common: encapsulation and VLAN settings.  Both sides should be configured identically for the VLAN to work properly.
APR175P USER’S GUIDE    90 Local Network (LAN): Domain Redirect  Domain Redirect allows access to the web interface via a simple web URL:  http:setup.ampedwireless.com Disabling Domain Redirect will require that you access the web menu using the IP address instead of the web URL.  It is recommended that you note your IP address before disabling this mode, or refrain from disabling Domain Redirect.  If you are no longer able to access the web menu and you do not have the IP address of your device a hardware reset will be required.
APR175P USER’S GUIDE    91 Internet Network (WAN): Internet Network (WAN) IPv4  Internet settings normally applies to the Access Point when it is in Router mode.  Basic Setup will assist in the initial configuration of your Internet Network settings in Router mode, however, in the case that you wish to adjust settings manually, the options on this page provides you with the tools to do this easily. Select your Internet Connection type from the drop down menu: Manual IP (Static): For Internet connections where the Internet provider does not provide you with an IP address automatically.  If you know the IP address and DNS settings that your Internet provider uses, select this option. Automatic/Dynamic (DHCP): This is the configuration type most often used by Internet providers. Automatic configurations are used by both DSL and Cable as well as other providers. Under the Automatic Configuration method, the Internet provider will assign your router an Internet IP address automatically.
APR175P USER’S GUIDE    92 If for some reason you do not get an IP address and you know that your Internet provider uses DHCP, try resetting your modem. Remove the power adapter from the modem as well as the backup battery (if available). Wait about 30 seconds and then power the modem back on. You can run through the Basic Setup Wizard again to see if that fixes your Internet connection issues. PPPoE connections normally requires login information.  If you do not know the settings for your PPPoE connection, please contact your Internet provider. PPTP and L2TP connections requires login information as well as IP address settings.  If you do not know the settings for your PPTP / L2TP connection, please contact your Internet provider. DNS Settings: Domain name server settings can be set automatically by your Internet service provider or set manually to a DNS server of your choice.   Clone MAC Address: The Router can use a MAC address that you define as its own. This is often used when an Internet Provider only authorizes one MAC address to access the Internet. Cloning the MAC address will make it so that the cloned MAC address is the only MAC address seen by the Internet Provider.
APR175P USER’S GUIDE    93 Advanced Settings  These settings apply to the Local Network and your Internet Connection Network.  If you are not familiar with these settings, please refer to a network administrator to avoid putting your network at risk.   Enable uPnP: Universal Plug and Play is a network feature that allows uPnP enabled devices to “just work” with each other when connected to the same network.  UPnP can work across different network media, such as an Ethernet connection or wireless connection.  With UPnP enabled, network devices may change security settings within the Router’s firewall to allow access over the Internet.  By default, UPnP is disabled to avoid exposing your network to security issues. Enable Web Server Access on WAN (Remote Management): Allows access to the Web Menu over the Internet. Enable Ping Access on WAN: Allows users to ping the WAN interface IP address from the Internet. Port Scan:  Monitors requests to a range of server port addresses to block incoming DoS attacks.
APR175P USER’S GUIDE    94 Enable IPsec pass through on VPN connection: Allows the IP security protocol suite to pass through on a VPN connection. Enable PPTP pass through on VPN connection: Allows the PPTP protocol suite to pass through on a VPN connection. Enable L2TP pass through on VPN connection: Allows the L2TP protocol suite to pass through on a VPN connection. 802.1d Spanning Tree (STP): A network protocol that ensures a loop-free topology for networks that have Ethernet bridges.  The STP prevents bridge loops and allows a network design to include redundant links to provide automatic backup paths if active links fails. Zero Config:  Assigns an IP address (169.254.x.x) to any connected device that cannot obtain an IP address or when there is no DHCP server present on the network.  This allows all devices to have the same subnet to enable communication with each other.  Connecting devices must be in DHCP Client mode (not Static) for this feature to work.
APR175P USER’S GUIDE    95 ADVANCED SETTINGS Many of the features in the Advanced Settings menu are available only in the Router operational mode.  If the Access Point is not in Router mode, these settings may not be available. Port Forwarding Port Forwarding is a rule that tells the Router that if a specific type of request comes in on a specific port, then that request should be forwarded to a specific device on the private network. Port Forwarding is often used for setting up servers, cameras and other devices that require remote access. Enable Port Forwarding: Enables designated ports to begin forwarding. IP Address:  The IP address of the device behind the Firewall that is being designated for Port Forwarding. Protocol: Select UDP, TCP or Both for the protocols to be forwarded. Port Range: Select a range of ports for the designated IP address that you wish to be forwarded. Comment: Create a name that you can use to easily identify this Port Forwarding entry.
APR175P USER’S GUIDE    96 Port Filtering  Port Filtering is a security measure that prevents users from using specific ports for reasons other than what those ports were originally intended for.  For example, TCP port 21 is traditionally used for FTP.  However, there is nothing stopping a user from using port 21 for purposes other than FTP access.  By enabling Port Filtering on TCP port 21, only FTP communications would be allowed.  No other types of communication would be allowed on this port. Hackers may sometimes scan for all open ports on your network as a method of hacking into your network.  Port Filtering and other firewall features help to prevent this from happening. To set up Port Filtering, select a range of ports you wish to filter.  If you are trying to filter a single port, enter the port number twice.  (For example, Port 21:  21 – 21) Select the Protocol of the port you are filtering.  If you do not know what protocol you wish to filter, select “Both”.
APR175P USER’S GUIDE    97 DMZ (Demilitarized Zone)  A DMZ is a network location or IP Address that is not protected by the firewall.  When enabling DMZ, it is important to note that the device on the IP Address designated as part of the DMZ does not have any protection from the Router’s firewall.  The device’s only security would be those built into the operating system. As a general safety rule, devices placed on the DMZ should not have any other network connections to any other devices. Enable DMZ: Enables the Demilitarized Zone. DMZ Host IP Address:  The designated IP Address of the network device to have unrestricted access through the Router’s Firewall.
APR175P USER’S GUIDE    98 Denial of Service  A Denial of Service attack is an attempt by a user (or users) to make a server’s or network’s services unavailable.  The user sends a server multiple requests with false return addresses. The server will attempt to respond by sending a request back to the user; however, since the address is false, the server will wait for a response before closing the connection.  When multiple requests like this occur, servers may often get overloaded with too many requests and stop functioning altogether.  This is a typical DoS attack, although DoS attacks may not be limited to this type of attack. The Router can assist in preventing these types of attacks by scanning the network for patterns of activity that represent DoS attacks.  If a pattern comes in frequently, the Router can attempt to block messages containing that pattern and thus protect the server from becoming overloaded and unresponsive.
APR175P USER’S GUIDE    99 IDS (Intrusion Detection System)  Monitor network activities for malicious activities and connection violations.  IDS will allow you to block devices that repeatedly fail to connect.  When “Block devices” is enabled and a device attempts to connect to the AP, but fails three times within sixty seconds, the device will be blocked for a duration of thirty minutes.  (IDS works with WPA based authentication and 802.1x authentication.  IDS will not work with networks using WEP security). IDS can also email you to notify you of these failed login attempts.  You will need to set up your email notification settings before notifications will work.
APR175P USER’S GUIDE    100 ADMINISTRATION  System Status The Administration System Status will provide you with the current status of the Access Point.  It provides you with glance at general setup information such as the current operational mode, firmware version and uptime of the Access Point.  From here you can quickly change the operational mode by clicking the “Change” button to the right of the operational mode.  In addition to the operational mode, the System Status also provides you with information regarding your Internet or WAN port connection, if available for your operational mode, as well as the details for your local network. Information regarding your primary 2.4GHz and 5.0GHz Wi-Fi networks are displayed in the lower half of the page.  Note, this section only shows details for the first SSID of each frequency.  For information on additional SSIDs, click “View Details”. At the bottom of the page you will find details about the Wired Port settings.
APR175P USER’S GUIDE    101 Network Statistics  Network statistics shows the data activity for each connection type on the Access Point / Router (Internet, Wireless and Wired). The Wireless Connection statistics shows all data activity for both the 2.4GHz and 5.0GHz wireless networks separately. The Wired Connection statistics shows all data activity for all users physically connected to the wired ports on the Router. The Internet Connection statistics shows the data activity for all upload and download data over your Internet connection, this data normally displays when the Access Point is in Router mode.
APR175P USER’S GUIDE    102 System Clock  Maintain the internal clock for the Access Point by syncing with your computer’s time or through a network time server. Your system clock settings need to be accurate in order for logs and wireless access schedules to work correctly.
APR175P USER’S GUIDE    103 Advanced Settings  Product Name: The name of the product is used to easily identify the Access Point in the case where multiple Access Points are installed in the same location.  Choose a name consisting of up to 32 characters. Management Protocol: The Access Point supports multiple management interfaces.  Check the interfaces that you wish to enable:   HTTP: Standard Internet web browser interface   HTTPS: Secured web based Internet web browser interface   TELNET: Virtual terminal connection using the telnet protocol and client   SSH: Client server model using the Secure Shell network protocol   SNMP: Simple Network Management Protocol: Supports v1, v2 and v3 protocols. If the SNMP Management Protocol is selected you may configure the following settings for SNMP settings: SNMP Version: Select the SNMP version for your SNMP manager SNMP Get Community: Enter the Get Community name for SNMP-GET requests SNMP Set Community: Enter the SNMP Set Community name for SNMP-SET requests
APR175P USER’S GUIDE    104 SNMP Trap: Enable or disable SNMP trap to notify managers or network errors SNMP Trap Community: Enter the SNMP Trap Community name for SNMP-TRAP requests SNMP Trap Manager: Specify the IP address for the SNMP Manager
APR175P USER’S GUIDE    105 System Logs  The System Log is useful for viewing the activity and history of the Access Point.  The System Log is also used by Amped Wireless technicians to help troubleshoot your router when needed.  It is recommended that you enable all logs in the event that troubleshooting is required. System Log Server: Enable or disable the use of a System Log Server for storing system logs onto another computer. Transfer Logs: Enter the IP address of a System Log Server if you wish to use. Copy Logs to USB Drive: Enable and attach a USB drive to the USB port to store files locally on a USB drive. Send Logs to Email: Enable to send logs to a designated Email address. Email Settings:  If you have enabled logs to be sent via Email, you will need to configure the outgoing Email server settings to successfully send logs via Email.  Enter the settings for your Email server here.
APR175P USER’S GUIDE    106 Alarm and LED Settings  The Access Point features an internal audio alarm which can be used for multiple purposes.  The alarm can be used to easily identify the location of an Access Point.  You can also set the duration for the sound. LED lights can also be turned on or off.  Select the LED lights that you wish to remain on or off during normal usage.
APR175P USER’S GUIDE    107 Upgrade Firmware  Amped Wireless continuously updates the firmware for all products in an effort to constantly improve our products and their user experiences. When connected to an active connection with Internet access, the Range Extender can automatically check for new firmware updates that are available by pressing Check Now. Follow the prompts to complete the upgrade process. Before upgrading the firmware, remember to always save your current settings first by going to the Save/Reload Settings page. The firmware upgrade process will reset the settings of the Router to default settings. Manual Firmware Upgrade: In the case that the Access Point / Router does not have access to the Internet, you can manually upgrade the firmware by downloading the firmware file from the Amped Wireless Elite Support website. The firmware update is downloaded as a zip file and you will need to have an unzipping program to open the file. Inside the file will be a text document with details on the current firmware release and instructions on how to upgrade the firmware. To manually upgrade your firmware:
APR175P USER’S GUIDE    108 a. Download the file from the www.ampedwireless.com/support website and remember the location where you saved it.  You can save the file to a USB drive and attach the USB drive to the Access Point, or you may save the file to your PC desktop and choose the file from the web menu.  Firmware files may also be provided by Amped Wireless support reps. b. Click Browse and locate the file. c. Click Upload to begin upgrading. Note: Firmware files normally have a .bin file extension.
APR175P USER’S GUIDE    109 Save / Reload Settings  Saving your current settings allows you to back-up your current settings which may be reloaded at a later time.   You can save or load settings from your computer or from a USB drive attached to the Access Point. To save settings, click Save.  For added security, you can also choose to encrypt the saved settings with a password.  If you choose to do so, you will need to enter this password in the future when you choose to reload the saved settings. To reload previously saved settings, click Choose File and find the file that you previously saved on your PC or USB drive.  If you have previously encrypted the file, you will need to enter a password here.You may also reset the Access Point’s settings to factory settings by pressing Reset.  By resetting the Access Point you will lose all previous configurations.   Rebooting the Access Point saves your current configurations and simply power cycles the Access Point.
APR175P USER’S GUIDE   110 110 Password Settings  The default settings for the Router are: Login: admin Password: admin If you wish to enable a password to protect unauthorized access to the web menu, you may enter one here.
APR175P USER’S GUIDE   111 111 ACCESS POINT CONTROLLER SETTINGS Overview  Access Point Controller mode creates a master Access Point to manage Access Points (up to 7 simultaneously) that are functioning in Managed Access Point mode (Access Point Controllers cannot manage other devices in Router mode, Access Point mode, WDS-AP mode).  The Access Point Controller provides a single web based interface to manage the Wi-Fi SSID, security, VLAN, group settings, firmware upgrades and much more for all Managed Access Points.  Settings can be applied at once to all devices or individually for each one.  The instructions in this section will go over the web menu features for Access Point Controller mode.
APR175P USER’S GUIDE   112 112 Introduction  If this is your first time setting up the Access Point Controller the Basic Setup is the easiest way to get up and running with a few Wi-Fi network configurations. Alternatively if you wish to manually configure additional Managed Access Points from the Access Point Controller you can follow these basic instructions: The AP Controller has the following management topology: 1) The AP Controller can configure settings of Managed Access Points (up to 7) 2) A Managed Access Point can belong to a single Access Point Group 3) An Access Point Group can have a 2.4GHz WLAN Group and a 5.0GHz WLAN Group 4) Each WLAN Group can have up to 16 unique WLAN networks or SSIDs
APR175P USER’S GUIDE   113 113 To configure this: 1) Check that all Access Points are in Managed Access Point mode and are on the same physical network and same IP subnet as the Access Point Controller.  2) Click on Managed AP Settings on the top menu and check that all of your Managed Access Points appear in the Access Points list.  3) Go to Wi-Fi Settings on the left hand menu and add Local Wi-Fi Networks.    4) Once you have Local Wi-Fi Networks created, add them to a Local Wi-Fi Network Group
APR175P USER’S GUIDE   114 114  5) Click on Access Points from the Left side menu, and add an Access Point Group.  After setting up the details of your Access Point Group, near the bottom you can configure the Profile Group Settings.  Select the Wi-Fi network (WLAN) Group that you created with the Local Wi-Fi Networks.   6) Last apply the Managed Access Points to this group that you wish to use with the WLAN Group settings.    Repeat these steps for any additional Managed Access Points that you wish to configure.
APR175P USER’S GUIDE   115 115 ACCESS POINT CONTROLLER: DASHBOARD Dashboard: System Status  The Dashboard System Status will provide you with the current status of the Access Point Controller.  It provides you with glance at general setup information such as the firmware version and uptime of the Access Point Controller.  From here you can quickly change the operational mode by clicking the “Change” button to the right of the operational mode.  In addition to the operational mode, the System Status also provides you with information regarding the details for your local network and 2.4GHz and 5.0GHz Wi-Fi networks. Note, this section only shows details for the first SSID of each frequency.  For information on additional SSIDs, click “View Details”. At the bottom of the page you will find details about the Wired Port settings.
APR175P USER’S GUIDE   116 116 Dashboard: Operational Mode  If the Access Point is already in Access Point Controller mode, then the Current Operational Mode should show Access Point Controller.  There is nothing else needed to configure on this page if that is the intended operational mode.  If you wish to change the operational mode, you may do so here.  Selecting an operational mode from the dropdown menu will also provide you with a diagram and overview of the operational mode selected.  Once you have chosen a mode, click Apply to apply the changes.   The Auto-DHCP Server feature automatically manages the IP addresses within your network.  When connected to a network that has a DHCP server enabled, the Access Point/Router will automatically obtain an IP from the network’s DHCP server and disable the DHCP server on the Access Point / Router to avoid any IP assignment conflicts. For users that are not familiar with how this works, it is recommended to leave Auto-DHCP server enabled on this page.
APR175P USER’S GUIDE   117 117 Dashboard: Basic Setup  Basic Setup for Access Point Controller Mode is covered earlier in this manual.  Please visit the Operational Modes (Basic Setup) section to view the details of Basic Setup for Access Point Controller Mode.
APR175P USER’S GUIDE   118 118 Dashboard: Managed AP Overview  The Managed AP Overview provides you with information regarding the active Access Points being managed by the Access Point Controller.   Access Point Controller Information provides you with basic information regarding the Access Point Controller name, IP address, MAC address and uptime. Managed Network Information provides the number of Managed APs currently being managed by the Access Point Controller along with the total number of connected devices associated to the Managed Aps The Active AP list provides a searchable table with information relating to each Managed Access Point under the management of the Access Point Controller. This information includes each Access Point’s MAC Address, IP Address, name, model, Wi-Fi networks, clients and current status. The Access Point Groups list shows the current grouping configuration of all Managed Access Points.  These settings can be configured from the Managed AP Settings menu.
APR175P USER’S GUIDE   119 119 Each Managed Access Point will have a Status displayed on the right side.   Below is a legend for each status color:   Disconnected (Grey): The Access Point cannot be reached and is not available or disconnected from the network.  Error (Red): The AP Controller could not connect with the Access Point.  This can be because of several reasons such as an authentication error or an incompatible management protocol.  Busy (Orange): The AP Controller is in the process of configuring the Access Point.   Connecting (Yellow): The AP Controller is attempting to connect to the Access Point.  This includes the authentication process of the Access Point to the AP Controller  Connected (Green): The AP Controller has successfully authenticated and connected to the Access Point.  Waiting Association (Blue): The Access Point has not yet been selected for management by the AP Controller. Each Access Point will also have Action icons associated with each:   Disassociate the Access Point from management.   Edit the Access Point information   Flash the LED on the Access Point
APR175P USER’S GUIDE   120 120   Sound the alarm/buzzer on the Access Point   Test Network Connectivity of the Access Point (Ping Test)   Reboot the Access Point
APR175P USER’S GUIDE   121 121 Dashboard: Managed AP Map  The AP Map provides a visual map of all Managed Access Points and their coverage area.  This map can be configured by clicking on the Configure button or going directly to the Managed AP Settings > Managed AP Map Edit menu.   The AP Map can be separated by different locations and can be segmented by specific AP Groups that have been assigned.  It can be further segmented by Wi-Fi frequencies, whether it be 2.4GHz or 5.0GHz.   The AP Map view can be zoomed in or out as well.
APR175P USER’S GUIDE   122 122 ACCESS POINT CONTROLLER: MANAGED AP STATUS Access Points: Managed APs  The Managed APs menu provides you with the full list of active Managed Access Points including information such as their MAC Address, name, IP address, Wi-Fi channel, connected devices, status and a menu of actions for each.  Clicking on the MAC Address of the Access Point will take you to the settings page for the Access Point and it is associated Access Point Group’s setting. Clicking on the IP address will open a new web browser page and direct you to the web menu of that specific Access Point. Each Managed Access Point will have a Status displayed on the right side. Below is a legend for each status color:   Disconnected (Grey): The Access Point cannot be reached and is not available or disconnected from the network.
APR175P USER’S GUIDE   123 123  Error (Red): The AP Controller could not connect with the Access Point.  This can be because of several reasons such as an authentication error or an incompatible management protocol.  Busy (Orange): The AP Controller is in the process of configuring the Access Point.   Connecting (Yellow): The AP Controller is attempting to connect to the Access Point.  This includes the authentication process of the Access Point to the AP Controller  Connected (Green): The AP Controller has successfully authenticated and connected to the Access Point.  Waiting Association (Blue): The Access Point has not yet been selected for management by the AP Controller. Each Access Point will also have Action icons associated with each:   Disassociate the Access Point from management.   Edit the Access Point information   Flash the LED on the Access Point   Sound the alarm/buzzer on the Access Point   Test Network Connectivity of the Access Point (Ping Test)   Reboot the Access Point
APR175P USER’S GUIDE   124 124 Access Points: Managed APs: Editing an Access Point Clicking on the Edit icon will provide you with a menu of options for configuring a specific Access Point. From this page you can edit an Individual Managed Access Point’s settings such as the device name, description of the Access Point, the AP Group that it belongs to as well as the IP address assignment for the Access Point.   In addition, to basic settings, the page also allows you to override the settings that have been determined by the Access Point Group (view Managed AP Groups for more information) it belongs to.  To do so, find the attribute that you wish to override and check the “Override Group Setting” box for the attribute and adjust the setting to your liking. The AP Controller has the following management topology: The AP Controller can configure settings of Managed Access Points (up to 7) A Managed Access Point can belong to a single Access Point Group An Access Point Group can have a 2.4GHz WLAN Group and a 5.0GHz WLAN Group Each WLAN Group can have up to 16 unique WLAN networks or SSIDs  (Wi-Fi Networks)
APR175P USER’S GUIDE   125 125 In addition to this topology, each Access Point Group can override settings from the Default System Group and each Access Point can override settings from the Access Point Group that it belongs to. VLAN settings and Wi-Fi Radio Settings can also be configured here, along with Profile Settings for associated WLAN Groups, RADIUS servers and MAC Filters used by the Access Point.
APR175P USER’S GUIDE   126 126 Access Points: Managed AP Groups  The Access Point Groups list shows the current grouping configuration of all Managed Access Points. These settings can be configured from the Managed AP Settings menu.  By default there is a System Default group that all Managed Access Points are associated to until they have been configured to another Access Point Group. The AP Controller has the following management topology: The AP Controller can configure settings of Managed Access Points (up to 7) A Managed Access Point can belong to a single Access Point Group An Access Point Group can have a 2.4GHz WLAN Group and a 5.0GHz WLAN Group Each WLAN Group can have up to 16 unique WLAN networks or SSIDs   The group names and settings can be managed by clicking the edit icon located on the same line as the Group Name.  Clicking the edit icon below it will give you access to the specific Access Point’s settings and not the group’s settings.
APR175P USER’S GUIDE   127 127    The firmware for all Access Points in the group can also be upgraded using the firmware upgrade button. Access Points: Managed AP Groups: Editing an Access Point Group  Clicking the Edit button for Access Point Groups will provide you with a menu of options for configuring the specific AP Group. Access Point Group’s settings such as the group name, description and Managed Access Points that are associated to the Group (bottom of the page) In addition, to basic settings, the page also allows you to override the settings that have been determined by the Default System Group.  To do so, find the attribute that you wish to override and check the “Override Group Setting” box for the attribute and adjust the setting to your liking.   The AP Controller has the following management topology: The AP Controller can configure settings of Managed Access Points (up to 7) A Managed Access Point can belong to a single Access Point Group An Access Point Group can have a 2.4GHz WLAN Group and a 5.0GHz WLAN Group Each WLAN Group can have up to 16 unique WLAN networks or SSIDs  (Wi-Fi Networks)
APR175P USER’S GUIDE   128 128 In addition to this topology, each Access Point Group can override settings from the Default System Group and each Access Point can override settings from the Access Point Group that it belongs to.   VLAN settings and Wi-Fi Radio Settings can also be configured here for the entire Group, along with Profile Settings for associated WLAN Groups, RADIUS servers and MAC Filters used by all Access Points within the Group.
APR175P USER’S GUIDE   129 129 Wi-Fi Status: Active Wi-Fi Networks  The Active Wi-Fi Networks page shows you all Wi-Fi networks that have been configured via the Wi-Fi Settings menu.   Clicking on the Wi-Fi network name/ESSID allows you to edit the settings for that Wi-Fi network.   Each WLAN Group can have a maximum of 16 Wi-Fi Networks associated to it. When adding a Wi-Fi Network on the Wi-Fi Settings page, unique settings can be configured such as the SSID, Description of the network, Virtual LAN settings, security settings, load balancing as well as other advanced features. When adding a Wi-Fi Network Group (WLAN Group), the list of Wi-Fi Networks will be available for you to add to the Wi-Fi Network Group (WLAN Group). The Wi-Fi Settings page also displays information basic information for each Wi-Fi Network and Wi-Fi Network Group created.
APR175P USER’S GUIDE   130 130 Note: When creating a Wi-Fi Network, you cannot choose whether the network is a 2.4GHz network or a 5GHz network. That attribute, along with other Wi-Fi radio settings, is determined by the Access Point Group configuration. The Access Point Group can add the Wi-Fi Network Group to its 2.4GHz or 5.0GHz profile to associate the network IDs (SSIDs) and security settings configured on via the Wi-Fi Settings page to the associated Access Points.
APR175P USER’S GUIDE   131 131 Wi-Fi Status: Active Groups  View all active Wi-Fi Network Groups and the Wi-Fi networks associated to each group.  Each Wi-Fi Network must be added to a Wi-Fi Network Group to be associated to an Access Point Group and eventually to a Managed Access Point. Wi-Fi Networks can be added, edited or deleted by going to Managed AP Settings (Top Menu) > Wi-Fi Settings (Left Menu).  Under Local Wi-Fi Networks you can add additional Wi-Fi networks that can then be added to a Wi-Fi Network Group and later associated to an Access Point Group.
APR175P USER’S GUIDE   132 132 Connected Devices: Active Devices  Active Connected Devices shows you information relating to all Wi-Fi devices associated to all Managed Access Points.  The list may be refreshed automatically at set time intervals for real time information viewing.
APR175P USER’S GUIDE   133 133 AP Statistics  The statistics menu provides you with detailed information regarding each Managed Access Point. To view, select a specific Access Point from the drop down menu.  The time intervals for the statistics are by the hour so you may need to wait for the Access Point to be active for at least an hour to begin seeing data on the graphs. Each report can be collapsed by clicking the ( - ) icon on the top right of each section. To enlarge the report simply click the ( + ) icon.
APR175P USER’S GUIDE   134 134 Managed AP Logs  System Logs are useful for viewing the activity and history of any Access Point. The System Log is also used by Amped Wireless technicians to help troubleshoot your router when needed.  In Access Point Controller mode, the System Log of any Managed Access Point can be viewed from the Events and Activities Log by selecting the specific Access Point from the dropdown menu.
APR175P USER’S GUIDE   135 135 Network Tools  The Access Point provides you with tools to maintain your network and troubleshoot network problems. To use the tools, simply enter a target IP or URL in the field to begin. Ping Test: Checks network connectivity by entering an IP address or URL into the field to perform a ping test. The menu will send out ping packets and wait for a reply from the target IP computer or network device.   Trace Route: Displays the network route or path a data packet uses to reach a target IP computer or network device.
APR175P USER’S GUIDE   136 136 MANAGED AP SETTINGS Access Points The Managed Access Point Settings menu allows you to edit or delete the list of Managed Access Points controlled by the Access Point Controller. Access Point Groups can also be added, edited, cloned or deleted from this menu. Access Point Groups can be configured with unique settings for the 2.4GHz radio and the 5.0GHz radio, as well as Virtual LAN settings. Detailed settings can be configured when you “add” or “edit” an Access Point Group.   A System Default Access Point Group is available and will include all Managed Access Points if you have not yet configured any additional Access Point Groups. The System Default Group settings can be overridden when new Access Point Groups are created and additional Access Points are added to the new Groups and away from the System Default Group.
APR175P USER’S GUIDE   137 137 The AP Controller has the following management topology: The AP Controller can configure settings of Managed Access Points (up to 7) A Managed Access Point can belong to a single Access Point Group An Access Point Group can have a 2.4GHz WLAN Group and a 5.0GHz WLAN Group Each WLAN Group can have up to 16 unique WLAN networks or SSIDs  (Wi-Fi Networks) Each Managed Access Point will have a Status displayed on the right side.   Below is a legend for each status color:   Disconnected (Grey): The Access Point cannot be reached and is not available or disconnected from the network.  Error (Red): The AP Controller could not connect with the Access Point.  This can be because of several reasons such as an authentication error or an incompatible management protocol.  Busy (Orange): The AP Controller is in the process of configuring the Access Point.   Connecting (Yellow): The AP Controller is attempting to connect to the Access Point.  This includes the authentication process of the Access Point to the AP Controller  Connected (Green): The AP Controller has successfully authenticated and connected to the Access Point.
APR175P USER’S GUIDE   138 138  Waiting Association (Blue): The Access Point has not yet been selected for management by the AP Controller. Each Access Point will also have Action icons associated with each:   Disassociate the Access Point from management.   Edit the Access Point information   Flash the LED on the Access Point   Sound the alarm/buzzer on the Access Point   Test Network Connectivity of the Access Point (Ping Test)   Reboot the Access Point
APR175P USER’S GUIDE   139 139 Access Points: Editing a Managed Access Point  Clicking on the Edit button for Access Points will provide you with a menu of options for configuring a specific Access Point. From this page you can edit an Individual Managed Access Point’s settings such as the device name, description of the Access Point, the AP Group that it belongs to as well as the IP address assignment for the Access Point. In addition, to basic settings, the page also allows you to override the settings that have been determined by the Access Point Group (view Managed AP Groups for more information) it belongs to.  To do so, find the attribute that you wish to override and check the “Override Group Setting” box for the attribute and adjust the setting to your liking. VLAN settings and Wi-Fi Radio Settings can also be configured here, along with Profile Settings for associated WLAN Groups, RADIUS servers and MAC Filters used by the Access Point.
APR175P USER’S GUIDE   140 140 Access Points: Adding an Access Point Group Clicking the Add or Edit button for Access Point Groups will provide you with a menu of options for configuring the specific AP Group. Access Point Group’s settings such as the group name, description and Managed Access Points that are associated to the Group (bottom of the page).  In addition, to basic settings, the page also allows you to override the settings that have been determined by the Default System Group.  To do so, find the attribute that you wish to override and check the “Override Group Setting” box for the attribute and adjust the setting to your liking. Each Access Point Group can override settings from the Default System Group and each Access Point can override settings from the Access Point Group that it belongs to. VLAN settings and Wi-Fi Radio Settings can also be configured here for the entire Group, along with Profile Settings for associated WLAN Groups, RADIUS servers and MAC Filters used by all Access Points within the Group. At the bottom of the menu, you can assign Access Points to the Group from a list of available Access Points. Click Apply when done.
APR175P USER’S GUIDE   141 141 Wi-Fi Settings  The Wi-Fi settings page allows you to create or edit Wi-Fi networks (WLAN networks) and Wi-Fi Network Groups (WLAN Groups). Each WLAN Group can have a maximum of 16 Wi-Fi Networks associated to it. When adding a Wi-Fi Network, unique settings can be configured such as the SSID, Description of the network, Virtual LAN settings, security settings, load balancing as well as other advanced features.     When adding a Wi-Fi Network Group (WLAN Group), the list of Wi-Fi Networks will be available for you to add to the Wi-Fi Network Group (WLAN Group). The Wi-Fi Settings page also displays information basic information for each Wi-Fi Network and Wi-Fi Network Group created.
APR175P USER’S GUIDE   142 142 Wi-Fi Settings: Adding a Wi-Fi Network The Wi-Fi settings page allows you to create or edit Wi-Fi networks (WLAN networks) that can then be associated to a Wi-Fi Network Groups (WLAN Groups).   Name/ESSID: The identification name of a Wi-Fi network.     VLAN ID: The VLAN ID is a feature that allows you to virtually map connected devices and secure access for each SSID created. Devices that are connected to an SSID with a specific VLAN (Virtual Local Area Network) ID cannot access or see devices connected to SSIDs with a different VLAN ID. For example, if SSID 1 is assigned to VLAN 1 and SSID 2 is assigned to VLAN 2, then devices connected to SSID 1 will not be able to see or access devices or files on SSID 2 (VLAN 2). VLAN IDs can range between 1 and 4094.  Broadcast SSID: Selecting Disable Broadcast SSID will hide the visibility of this Wi-Fi network. Users must manually enter the SSID to connect. Internet Access Only (Different Subnet): Enabling this will block local network access to all connected Wi-Fi devices.  Devices will only be able to access the Internet and nothing else.
APR175P USER’S GUIDE   143 143 Wireless Client Isolation: Enabling this feature provides an extra layer of security by preventing Wi-Fi devices connected to the selected SSID to communicate with one another (Device Isolation) or by preventing devices connected to an SSID to see devices on another SSID (SSID Isolation). Load Balancing: Limit the number of devices that can connect to the selected SSID. This can assist in managing the bandwidth used by each SSID. The maximum number of devices for each SSID is 50 devices. Authentication Method: Choose a Wi-Fi network encryption type for the network. Additional Authentication Methods: MAC: Restrict access from devices based on their MAC address stored on the MAC Address filter table. MAC + RADIUS: Restrict access from devices based on their MAC address stored on the MAC Address filter table and based on MAC Address authentication via a RADIUS server.  RADIUS: Restrict access from devices based on MAC Address authentication via a RADIUS Server. Note: MAC Filters and RADIUS groups must first be configured and added to an Access Point group before they become active.  On the other hand, Wi-Fi networks without MAC or RADIUS added as additional authentication methods will not have these security features active even though a MAC filter or RADIUS group may have been added to an Access Point group that this Wi-Fi network is associated to.
APR175P USER’S GUIDE   144 144 Smart Handover: When multiple Access Points are installed in an environment where devices roam over a larger area, Smart Handover allows the Access Point to disconnect a connected device once the signal is crosses a defined RSSI decibel (signal receiving sensitivity) threshold to allow it to easily connect to the neighboring Access Point.  Note, some older Wi-Fi devices may not be compatible with the Smart Handover feature. Bandwidth Restriction: When enabled, Bandwidth Restriction limits the amount of bandwidth provided to all devices connecting to the SSID. Note: When creating a Wi-Fi Network, you cannot choose whether the network is a 2.4GHz network or a 5GHz network. That attribute, along with other Wi-Fi radio settings, is determined by the Access Point Group configuration. The Access Point Group can add the Wi-Fi Network Group to its 2.4GHz or 5.0GHz profile to associate the network IDs (SSIDs) and security settings configured on this page.  Wi-Fi Settings: Adding a Wi-Fi Network Group The Wi-Fi Network Group Settings page allows you to create or edit a Wi-Fi Network Group (WLAN Group) including its name and description.  From here you can add or remove Wi-Fi Networks (WLAN) that are associated with the Wi-Fi Network Group (WLAN Group).
APR175P USER’S GUIDE   145 145 Each WLAN Group can have a maximum of 16 Wi-Fi Networks associated to it. The WLAN Groups can later be added to an Access Point Group for use with the Access Points associated to the Access Point Group. The VLAN ID settings for each Wi-Fi Network can also be overridden here.
APR175P USER’S GUIDE   146 146 RADIUS Server Settings  Internal and External RADIUS Servers and accounts can be added here and later assigned to a RADIUS Server Group. An Access Point Group can then add the RADIUS Server Group to its profile and use the RADIUS Server for all Access Points associated to that group and all devices connecting to through those Access Points.  After you have added your External or Internet RADIUS Servers and created accounts if applicable, click Add under the RADIUS Group section to include those servers into a RADIUS Group. A RADIUS Group can have a 2.4GHz Primary and Secondary RADIUS Server.  In addition 5GHz Primary and Secondary RADIUS Servers can also be assigned to the RADIUS Group. Members for the RADIUS Group can then be added as well. Once the RADIUS Group is created, you can then go to Managed AP Settings (Top Menu), then Access Points (Left Menu) to edit or add an Access Point Group. Under the Profile Group Settings for the Access Point Group,
APR175P USER’S GUIDE   147 147 you can select a RADIUS Group to use or you can override a RADIUS Group setting if one has already been set by the Default System Group. Note: Each Wi-Fi Network (WLAN/SSID) must also have RADIUS servers selected as Additional Authentication methods in order for the RADIUS Servers to work.  This can be configured here: Managed AP Settings > Wi-Fi Settings > Local Wi-Fi Networks (Add/Edit).  RADIUS Server Settings: Adding a RADIUS Group The RADIUS Group Settings page allows you to create or edit a RADIUS Group including its name and description. From here you can add primary and secondary, internal or external RADIUS servers that have been previously configured. The RADIUS Servers can be associated to 2.4GHz and/or 5.0GHz radios. Once the RADIUS Group has been configured, it can be added to an Access Point Group and used by the Access Points associated to that Group. To do so, go to Managed AP Settings (Top Menu) then click on Access Points (Left Menu).  Select an Access Point Group to edit or add and scroll to the bottom to set the RADIUS Group used by the Access Point Group.
APR175P USER’S GUIDE   148 148 Access Control  MAC Address filtering can be configured for Access Point Groups to use.  To do so, first add a list of MAC Addresses that you wish to apply to the MAC Address filtering rules. Each MAC Address should be separated by a space or a new line. Next, create a MAC Address Filtering Group. Create a name and description for the group and set the action to Allow or Deny.  Lastly, select the MAC Addresses that will be associated to this group. Note that if you chose to allow or deny, the devices with the specified MAC Address will be allowed to connect or blocked based on your action settings. Click Apply to apply your settings.   An Access Point Group can then add the MAC Filter Group to its profile and use the MAC Filter for all Access Points associated to that group and all devices connecting to through those Access Points.
APR175P USER’S GUIDE   149 149 To do so, go to Managed AP Settings (Top Menu), then Access Points (Left Menu) to edit or add an Access Point Group. Under the Profile Group Settings for the Access Point Group, you can select a MAC Filter Group to use or you can override a MAC Filter Group setting if one has already been set by the Default System Group. Note: Each Wi-Fi Network (WLAN/SSID) must also have MAC Filters selected as Additional Authentication methods in order for MAC Filtering to work. This can be configured here: Managed AP Settings > Wi-Fi Settings > Local Wi-Fi Networks (Add/Edit).
APR175P USER’S GUIDE   150 150 Managed AP Map Edit  The Managed AP Map Edit menu allows you to upload custom floor plans and customize the Map based on your specific installation environment. Follow the instructions to do this: 1) Click Add to create a new floor plan 2) When the menu appears, clock Choose File to locate the image file for your floor plan. Once it has been selected, click Upload. 3) Create a name for your floor plan, such as First Floor and provide a description if needed. 4) Select the Access Points that you wish to associate to the floor plan and click Apply. You will be able to adjust the locations and coverage areas of each Access Point after applying the settings.
APR175P USER’S GUIDE   151 151 Firmware Upgrade  The Access Point Controller provides the ability to upgrade the firmware to multiple Access Points simultaneously.   1) Select the firmware file that you wish to use and Upload it 2) Select the Access Points that you wish to upgrade or select Upgrade All to upgrade all Managed Access Points. The list of Access Point Groups includes associated Access Points for each group.  Each Access Point will have its IP address listed.  The IP Address can be clicked to access the web menu of that specific Access Point.
APR175P USER’S GUIDE   152 152 LOCAL ACCESS POINT SETTINGS Local Access Point Settings are used to configure the Access Point settings of the Access Point Controller.  While in Access Point Controller mode, the Access Point still functions as a standard Access Point and provides access to network devices through 2.4GHz and 5.0GHz Wi-Fi networks. These settings apply only to the Access Point Controller and not to any of the Managed Access Points being configured by the Access Point Controller.  Descriptions and instructions for these settings can be found in the earlier sections of this manual.
APR175P USER’S GUIDE   153 153 TECHNICAL SPECIFICATIONSWireless Standard: 802.11a/b/g/n/ac Frequency Band: 2.4 GHz, 5.0GHz Wireless Speed: 2.4GHz: Up to 450Mbps                               5GHz: Up to 1300Mbps Amplifier: 3 x High Power 5GHz Amplifiers                    3 x High Power 2.4GHz Amplifiers                    3 x 5.0GHz Low Noise Amplifiers    3 x 2.4GHz Low Noise Amplifiers Wireless Security:  WEP, WPA, WPA2, WPA Mixed, WPS Antennas:  3 x Detachable High Gain Antennas  3 x Reverse SMA Connector Ports:  1 x RJ-45 10/100/1000 LAN port  1 x RJ-45 10/100/1000  PoE / LAN / WAN Port  1 x USB 2.0 Port Mounting:  Wall, Magnetic, Desktop Warranty: 1 Year Setup Requirements:  Wired or wireless PC/Mac and an available 802.11b/g/n wireless network  Google Chrome, Internet Explorer  (8.0 and up) or Safari web browser
APR175P USER’S GUIDE   154 154 DEFAULT SETTINGS  The default settings for your Access Point are listed here.  If for some reason you need to return your Access Point back to default settings, hold down the Reset button on the back panel for 10 seconds.  The Access Point will reset back to factory settings as listed below: IP Address:  192.168.80.1 Web Menu Access:  http://setup.ampedwireless.com  Login: admin Password: admin 2.4GHz SSID:  Amped_APR_2.4 5GHz SSID:  Amped_APR_5.0
APR175P USER’S GUIDE   155 155 TROUBLESHOOTING & SUPPORT INFORMATION  We are here to help.  If you have any issues with your Access Point please contact us. To contact Amped Wireless’ Technical Support use one of the following methods: Phone: 888-573-8820 Email: techsupport@ampedwireless.com Web: www.ampedwireless.com/support
APR175P USER’S GUIDE   156 156 Troubleshooting The tips in this guide are listed in order of relevance. Try solution (a) before trying solution (b), etc. Troubleshooting: Web Menu Access Issues I entered setup.ampedwireless.com and it failed to open the web menu. a. Make sure your computer is connected to the Access Point wirelessly and NOT using a network cable. Ensure the power is plugged in and on. Try to access the setup menu again. b. Disconnect wirelessly from the Access Point and use a network cable to connect to the Access Point.  Connect to the LAN2 wired port. c. Enter  the  following  web  address  into  your  web  browser  instead  of  ‘setup.ampedwireless.com’: http://192.168.80.1 d. Power off (unplug the power adapter) the Access Point and power it back on. Try again. e. Power off your PC and power it back on. Try again.  (Release and renew your IP address) f. Try to open your web browser to the default IP address by putting this number into your web browser instead: 192.168.80.1 g. Reset your Access Point to default settings by holding the Reset Button (located on the back panel) for ten (10) seconds and try again.
APR175P USER’S GUIDE   157 157 h. If you are using a Static IP, you will need to enter the assigned IP Address into the web browser to access the web menu.  When using a Static IP, the setup.ampedwireless.com shortcut will no longer work.
APR175P USER’S GUIDE   158 158 Troubleshooting: Connection Issues I do not have Internet access when connecting to the Access Point. a. Your router or original network may not have Internet access. First check to see if you are able to access the Internet by connecting directly with your router. If you cannot, there is a problem with your router that  needs  to  be  fixed  first.  If  you  are  able  to  access  the  internet,  continue  with  the  following troubleshooting options below. b. Your router may be using Static IP assignments. If so, you will need to configure a Static IP for the Access Point.  Connect  your  PC  to the  Access  Point  using  an  Ethernet  cable.  Disconnect  your  PC  from  any wireless networks  that it may be connected  to. Access the  web menu  at  setup.ampedwireless.com using a web browser. Access the IP settings menu from the left hand navigation bar. Select ‘Disable’ under the DHCP dropdown menu and enter an IP address that matches your router’s IP settings. c. Detach the Access Point from your router and reset it back to default settings by holding down the reset button (red circle) on the back panel of the Access Point for 5-10 seconds. After it has reset, reattach it to your router’s network port. Allow up to 2 minutes for the Access Point to reconfigure itself to your network and attempt to access the Internet through the Access Point’s wired or wireless network.
APR175P USER’S GUIDE   159 159 My Access Point was working fine previously, but now I can no longer access the Internet through the Access Point.  a. The settings on your router’s network may have changed or you may have lost internet connection on your  home  router.  Any changes to the  DHCP settings  of  your home router  may  affect  the  Internet connection of the Access Point. Check the settings on your router and try again. b. Reboot the Access Point by unplugging the power adapter and plugging it back in. Allow up to 2 minutes for the Access Point to reconfigure itself to your network. Check to see if your connection has been reestablished by viewing a website.  I can no longer access the web menu or the Access Point no longer responds. a. Double check that you are connected to the Access Point and not to your home router. Use an Ethernet cable and attach it between your computer and the Access Point. Disconnect your computer from all wireless networks and try to access the web menu again. b. If you are advanced in networking troubleshooting, log onto your home router’s web interface. Look for the DHCP client list and try to find the IP address of your Access Point assigned by your home router. Once you have it, connect to the Access Point using an Ethernet cable. Open your web browser and enter the IP address into the address bar.
APR175P USER’S GUIDE   160 160 c. Reset the Access Point back to default settings and try the Basic Setup again. To reset the Access Point back to default settings, hold the Reset Button (on the back panel) down for five (5) to ten (10) seconds. After the Access Point has fully reset, use an Ethernet cable and connect to the Access Point. Log in to the web menu at http://setup.ampedwireless.com and reconfigure the settings for your Access Point. The connection through the Access Point seem slow. File transfers take a long time to transfer. a. You may be too far away from the wireless network. Wireless data transfer speeds degrade as distances increase between your computer and the Access Point. b. You may be downloading from the Internet and not within your local network. Files transferred through the Internet are limited by your ISP speed and the data download speeds from the website that you are downloading from. c. Your  computer  may  be  using  an  older  Wi-Fi  adapter  with  lower  speed  limits  (802.11b/g/n).    For maximum speeds, use 802.11ac Wi-Fi adapters. d. You may have interference on the wireless channel that the Access Point is currently using. Try changing the channel of your wireless network.
APR175P USER’S GUIDE   161 161 Troubleshooting: Wireless Issues I am only getting 3 or 4 wireless signal bars on my wireless computer and I am within 10 feet of the Access Point. a. Step back at least 10 feet from the Access Point and check your signal again. The Access Point emits high power, long range Wi-Fi signals that may confuse your wireless adapter signal reading at close range.  The  speed  and  signal  are  at  100%,  however  your  readout  may  not  be  displaying  the  data correctly. b. Check that your antennas are securely fastened to the antenna connectors. c. The wireless channel that your network is running on may be congested. Change the wireless channel on your Access Point. The range from the Access Point seems low. a. Check to see that your wireless output settings are at 100%. Go to the web menu, Wireless Settings and check the Advanced Settings. Make sure the output power is at 100%. b. Check that your antennas are securely fastened to the antenna connectors. c. Your Access Point may be installed in a poor location. Avoid setting up your Access Point in areas with high interference, such as near fridges, microwaves, metallic objects and low surfaces. Install the Access Point in a higher location if possible.
APR175P USER’S GUIDE   162 162 d. Adjust the Antennas of the Access Point in different angles.  My wireless adapter does not connect at the maximum wireless speed. a. Your wireless network adapter may be outdated and have older wireless technology not capable of achieving the wireless network speeds of the Access Point. To achieve maximum wireless speeds, it is required that you have a 802.11n (2.4GHz) or 802.11ac (5.0GHz) adapter. b. Check that you are using the latest Wi-Fi security type: WPA or WPA2 WEP security may slow down your wireless speeds. c. Check that the Access Point’s wireless data rate is set to AUTO or 11N (2.4GHz) and 11AC (5.0GHz) data rate speeds. d. Wireless speeds degrade as you get further away from the Access Point.   e. Check that  the wireless channel set on the Access Point is not crowded.  Try changing the wireless channel to another channel and test the speed again.
APR175P USER’S GUIDE   163 163 Troubleshooting: Web Menu Feature Issues My Wireless Access Schedule is being erratic and not working at the correct times. a. You need to adjust your Time Zone Settings from the Management web menu page. Wi-Fi Protected Setup (WPS) is not working. Push button configuration does not detect the connection. a. The Access Point supports WPS connections however some companies may use proprietary code for their  own  push  button  configurations.  Try  connecting  using  the  Windows  wireless  utility  or  Mac wireless utility instead. I have enabled Client Isolation and/or SSID Isolation, but I can still see the computers on my network. a. Client Isolation and SSID isolation restricts network access for wireless devices only.  If you have devices connected to the wired ports of the Access Point or Router they will not be isolated. b. To isolate the entire network from connecting wireless devices, enable the Internet Only feature when configuring security settings for your Wi-Fi network.
APR175P USER’S GUIDE   164 164 Many of the features in the Web Menu are greyed out and cannot be selected.  For example, in Advanced Features most features are not selectable.   a. Certain features such as Port Forwarding and DMZ are only available when the Access Point is in Router mode.  Ensure that you are using the proper operational mode for the feature you wish to enable.
APR175P USER’S GUIDE   165 165 Troubleshooting: Access Point Controller Issues I cannot access the Wi-Fi networks of the Access Point Controller.  (Not the Wi-Fi networks of the Managed Access Points). a. The “Local AP Wi-Fi” settings for the AP Controller may be disabled.   b. While in AP Controller mode, select Local AP Wi-Fi from the top navigation menu, then select 2.4GHz or 5.0GHz Wi-Fi Settings > Basic Settings from the left side menu.  Enable the Wi-Fi Radio. I cannot detect any Managed Access Points or do not see any Managed Access Points in  my Managed AP Overview. a. Check that all Managed Access Points are powered on. b. Check that all Managed Access Points are set to “Managed Access Point” operational modes. If they are not please do so from the Web Menu for each Access Point. c. Check that all Managed Access Points are set to “Managed Access Point” operational modes. If they are not please do so from the Web Menu for each Access Point. d. Check that all Managed Access Points are connected to the same physical network as the Access Point Controller. If your Access Points are on different networks or if there is a firewall or network protocols
APR175P USER’S GUIDE   166 166 blocking communication between the Access Points, Basic Setup will not be able to discover the Access Points to configure them. Please make sure all Access Points are on the same network. e. Check  that  all  Managed  Access  Points  are  on  the  same  IP  subnet  as  the  Access  Point  Controller.  Normally IP addresses are provided by the DHCP Server on your network’s router, however  if your network is running a static IP configuration, you will need to manually enter the IP for the AP Controller and all Managed APs before configuring. I have created an Access Point Group, but I cannot see any Wi-Fi networks. a. Access Point Controller Management Topology:  The AP Controller can configure settings of Managed Access Points (up to 7).  A Managed Access Point can belong to a single Access Point Group.  An Access Point Group can have a 2.4GHz WLAN Group and a 5.0GHz WLAN Group. Each WLAN Group can have up to 16 unique WLAN networks or SSIDs. b. The Access Point Group does not have any WLAN Groups associated with it.  Add WLAN Groups to the Access Point Group by editing the Access Point Group:  Managed AP Settings > Access Points
APR175P USER’S GUIDE   167 167 I cannot configure Wi-Fi networks for my Managed Access Points. a. Access Point Controller Management Topology:  The AP Controller can configure settings of Managed Access Points (up to 7).  A Managed Access Point can belong to a single Access Point Group.  An Access Point Group can have a 2.4GHz WLAN Group and a 5.0GHz WLAN Group. Each WLAN Group can have up to 16 unique WLAN networks or SSIDs. b. Check that all Access Points are in Managed Access Point mode and are on the same physical network and same IP subnet as the Access Point Controller.  c. Click on Managed AP Settings on the top menu and check that all of your Managed Access Points appear in the Access Points list. d. Go to Wi-Fi Settings on the left hand menu and add Local Wi-Fi Networks. e. Once you have Local Wi-Fi Networks created, add them to a Local Wi-Fi Network Group. f. Click on Access Points from the Left side menu, and add an Access Point Group. After setting up the details of your Access Point Group, near the bottom you can configure the Profile Group Settings. Select the Wi-Fi network (WLAN) Group that you created with the Local Wi-Fi Networks. g. Last apply the Managed Access Points to this group that you wish to use with the WLAN Group settings.
APR175P USER’S GUIDE   168 168 I have configured MAC Address Filtering and/or RADIUS servers, but they do not work for my Managed Access Points. a. Each  Wi-Fi  Network  (WLAN/SSID)  must  also  have  RADIUS  servers  or  MAC  Filters  selected  as  an Additional  Authentication  method  in  order  for  the  feature  to  work.    This  can  be  configured  here: Managed AP Settings > Wi-Fi Settings > Local Wi-Fi Networks (Add/Edit). I have configured an AP Map, but I cannot see it in the Managed AP Map menu. a. You may have not selected your location in the Managed AP Map menu.  Select the location by clicking on the dropdown menu in the upper right corner of the Map menu.   b. Adjust the transparency of the map or the zoom. I have enabled Smart Handover, but it does not seem to be handing over the devices properly. a. Set the RSSI threshold to a lower number (i.e. 0 to -50)  This will allow the Access Point to handover the device when the signal strength between the device and the Access Point is still moderately strong. b. Change the device to a device that supports the Smart Handover feature.  Some older Wi-Fi adapters do not support the Smart Handover feature.
APR175P USER’S GUIDE   169 169 WARRANTY &  REGULATORY INFORMATION The Amped Wireless (A division of Newo Corporation, Inc.) Limited Warranty  Warranty Period: The Amped Wireless Limited Warranty is for one (1) year from the date of purchase for new products. Refurbished products carry the Limited Warranty for thirty (30) days after the date of purchase.  Guarantee: Amped Wireless warrants to the original purchaser that the hardware of this Amped Wireless product shall be free of defects in design, assembly, material, or workmanship.  Conditions: The Amped Wireless Limited Warranty is for repair or replacement only at the sole discretion of Amped Wireless. Amped Wireless does not issue any refunds for purchased product. In the event that Amped Wireless is unable to repair or replace a product (i.e. discontinued product), Amped Wireless will offer a credit toward the purchase of a similar product of equal or lesser value direct from Amped Wireless. Any repaired or replacement products will be warranted for the remainder of the original Warranty Period or thirty (30) days, whichever is longer. Amped Wireless reserves the right to discontinue any of its products without notice, and disclaims any limited warranty to repair or replace any such discontinued product. Amped Wireless reserves the right to revise or make changes to this product, its documentation, packaging, specifications, hardware, and software without notice. If any portion of the Amped Wireless Limited Warranty is found to be unenforceable, its remaining provisions shall remain in effect. All costs of shipping the product to Amped Wireless shall be borne solely by the purchaser.
APR175P USER’S GUIDE   170 170 Limitations: IN NO EVENT SHALL AMPED WIRELESS’ (NEWO CORPORATION’S) LIABILITY EXCEED THE AMOUNT PAID BY YOU FOR THE PRODUCT FROM DIRECT, INDIRECT, SPECIAL, INCIDENTAL OR CONSEQUENTIAL DAMAGES RESULTING FROM THE USE OF THE PRODUCT, ITS ACCOMPANYING SOFTWARE, ACCESSORIES OR ITS DOCUMENTATION. The Amped Wireless Limited Warranty does not apply if: (a) the product assembly has been opened or damaged, (b) the product or its software or firmware has been altered or modified, (c) the product has not been used and installed in accordance to Amped Wireless’ instructions, (d) the product has been subjected to misuse, or negligence. Amped Wireless does not guarantee the continued availability of a third party’s service for which this product’s use or operation may require. The Amped Wireless Limited Warranty does not protect against acts of God, vandalism, theft, normal wear and tear, obsolescence and environmental damages such as, but not limited to, weather and electrical disturbances. The Amped Wireless Limited Warranty is the sole warranty for this product. There are no other warranties, expressed or, except required by law, implied, including the implied warranty or condition of quality, performance merchantability, or fitness for any particular purpose.  How to Claim Warranty: In the event that you have a problem with this product, please go to www.ampedwireless.com/support to find help on solving your problem. In the event that you cannot and need to file a warranty claim, please call Amped Wireless’ Elite Support or visit http://www.ampedwireless.com/support/center.html#rma to obtain a Support Ticket Number (obtained from Technical Support Reps), fill out a Return Authorization (RMA) form and obtain a Return Authorization (RMA) number. A dated proof of original purchase and the RMA number is required to process warranty claims. You are responsible for properly packaging and shipping the product at your cost and risk to Amped Wireless. The bearer of cost related to shipping repaired or replaced product back to the purchaser will be at the sole
APR175P USER’S GUIDE   171 171 discretion of Amped Wireless and determined based on the details of each RMA case. Customers outside of the United States of America are responsible for all shipping and handling costs including custom duties, taxes and all other related charges.  Technical Support: The Amped Wireless Limited Warranty is not related to the terms, conditions and policies of Amped Wireless Elite Support offerings. For questions regarding support, please contact techsupport@ampedwireless.com
APR175P USER’S GUIDE   172 172 Regulatory Information FCC Statement and Declaration: Amped Wireless declares that this device complies with Part 15 of the FCC Rules and Regulations.  Operation of this device is subject to the following two (2) conditions: (1) This device may not cause harmful interference (2) This device must accept any interference received, including interference that may cause undesired operation. FCC Notice: This equipment has been tested and found to comply with the limits for a Class B digital device, pursuant to Part 15 of the FCC Rules.  These limits are designed to provide reasonable protection against harmful interference in a residential installation.  This equipment generates, uses and can radiate radio frequency energy and, if not installed and used in accordance with the instructions, may cause harmful interference to radio communications.  However, there is no guarantee that interference will not occur in a particular installation.  If this equipment does cause harmful interference to radio or television reception, which can be determined by turning the equipment off and on, the user is encouraged to try and correct the interference by one or more of the following measures:  - Reorient or relocate the receiving antenna. - Increase the distance between the equipment and the receiver.
APR175P USER’S GUIDE   173 173 - Connect the equipment to an outlet on a circuit different from that to which the receiver is connected. - Consult the dealer or an experienced radio/TV technician for help. FCC Caution and Safety Notices: Any changes or modifications (including the antennas) made to this device that are not expressly approved by the manufacturer may void the user’s authority to operate the equipment.  This device and its antenna(s) must not be co-located or operating in conjunction with any other antenna or transmitter.  Avoid use of this product near water or during an electrical storm as there may be a remote risk of electrical shock from lighting.  This product may contain lead, known to the State of California to cause cancer, and birth defects or other reproductive harm.  Wash hands after handling.  This device must always be used with a Listed Computer or device.  For product available in the USA/Canada market, only channel 1~11 can be operated. Selection of other channels is not possible.  This device is restricted to indoor use when operated in the 5.15 to 5.25 GHz frequency range.    FCC requires this product to be used indoors for the frequency range 5.15 to 5.25 GHz to reduce the potential for harmful interference to co-channel Mobile Satellite systems.
APR175P USER’S GUIDE   174 174 FCC Radiation Exposure Statement: This equipment complies with FCC radiation exposure limits set forth for an uncontrolled environment. This equipment should be installed and operated with minimum distance 20cm between the radiator & your body.
APR175P USER’S GUIDE   175 175 Industry Canada Statement: This Class B digital apparatus complies with RSS-210 and ICES-003 of the Industry Canada Rules.  Operation of this device is subject to the following two (2) conditions: (1) This device may not cause harmful interference (2) This device must accept any interference received, including interference that may cause undesired operation. Radiation Exposure Statement: This equipment complies with IC radiation exposure limits set forth for an uncontrolled environment.  This equipment should be installed and operated with minimum distance 20cm between the radiator and your body.   The transmitter must not be co-located or operating in conjunction with any other antenna or transmitter.
APR175P USER’S GUIDE   176 176 Déclaration d’Industrie Canada : Cet appareil numérique de classe B est conforme aux réglementations RSS-210 et ICES-003 d’Industrie Canada. Le fonctionnement de cet appareil est sujet aux deux conditions suivantes:  (1) Cet appareil ne peut pas causer de brouillage préjudiciable (2) Cet appareil doit accepter toute interférence reçue, y compris les interférences pouvant provoquer un dysfonctionnement. Déclaration d’exposition à la radiation : Cet équipement respecte les limites d’exposition aux rayonnements IC définies pour un environnement non contrôlé. Cet équipement doit être installé et mis en marche à une distance minimale de 20 cm qui sépare l’élément rayonnant de votre corps.   L’émetteur ne doit ni être utilisé avec une autre antenne ou un autre émetteur ni se trouver à leur proximité.
APR175P USER’S GUIDE   177 177 LEGAL NOTICES & DISCLAIMERS Copyright Information and Trademark Usage Guidelines © 2014 Amped Wireless / Newo Corporation. All rights reserved. Amped Wireless, Newo Corporation, and the Amped Wireless logo are registered trademarks or trademarks of Newo Corporation. All non-Amped Wireless trademarks, logos, brands and products are trademarks or registered trademarks of their respective owners. Amped Wireless does not claim any relation. Mention of non-Amped Wireless products and brands are for information purposes only and does not constitute an endorsement or affiliation. Amped Wireless authorizes you to copy materials published by Amped Wireless solely for non-commercial use within your organization in support of Amped Wireless products. No other use of this information is authorized. Any copy of these materials which you make shall retain all copyright and other proprietary notices in the same form and manner as on the original. Except as specified above, nothing contained herein shall be construed as conferring by implication, estoppel or otherwise any license or right under any patent, trademark or copyright of Amped Wireless or any third party.  All contents of this product, including Software, are protected by copyright, except as permitted herein. No portion of the information may be reproduced without prior written permission from Amped Wireless. The distribution, modification, publication and transmission of any content of this product for public or commercial
APR175P USER’S GUIDE   178 178 purposes is strictly prohibited.  The Amped Wireless logo requires permission for use. For use of the Amped Wireless logo, please email legal@ampedwireless.com.  Use of Amped Wireless' trademarks requires the use of the proper trademark symbol in all usage cases.  The guidelines for trademark usage apply to all Amped Wireless customers, employees, vendors, consultants, licensees and any other third party. Disclaimers Amped Wireless makes all attempts in providing accurate information on all media. However, Amped Wireless makes no warranty as to the accuracy of the information, including representations and warranties about the accuracy of product specifications, marketing material, product availability, new product launch dates and all other content herein. Amped Wireless reserves the right to update and change information without prior notice. All information provided is provided "AS IS" with all faults without warranty of any kind. Either expressed or implied. Amped Wireless and its suppliers disclaim all warranties, expressed or implied including, without limitation. Amped Wireless and its suppliers shall not be liable for any indirect, special, consequential, or incidental damages including, without limitation, lost profits or revenues, cost of replacement goods, loss or
APR175P USER’S GUIDE   179 179 damage to data arising out of the use or inability to use any Amped Wireless product, damages resulting from use of or reliance on information present, even with prior notice to Amped Wireless. All non-Amped Wireless trademarks, logos, brands and products are trademarks or registered trademarks of their respective owners. Amped Wireless does not claim any relation. Mention of non-Amped Wireless products and brands are for information purposes only and does not constitute an endorsement or affiliation. Product wireless range specifications are based on performance test results. Actual performance may vary due to differences in operating environments, building materials and wireless obstructions. Performance may increase or decrease over the stated specification. Wireless coverage claims are used only as a reference and are not guaranteed as each wireless network is uniquely different. Maximum wireless signal rates are derived from IEEE 802.11 standard specifications. Actual data throughput may vary as a result of network conditions and environmental factors. Wi-Fi Range Extenders may not work with non-standard Wi-Fi routers or routers with altered firmware or proprietary firmware, such as those from third party sources or some Internet service providers. May not work with routers that do not comply with IEEE or Wi-Fi standards.
APR175P USER’S GUIDE   180 180 Software Licenses / Disclaimers This product contains Software (including firmware), licensed to you, the purchaser, by Amped Wireless.  This also includes Software downloaded from an authorized website, such as www.ampedwireless.com or from an authorized application market such as Google Play or Apple’s App Store.   This license allows you to operate the Software in the manner described in the user’s manual for the purchased product.  You can make as many copies of the Software as needed for your personal use.  Modifying of or tampering of the Software, including but not limited to any Open Source Software, is solely at your own risk.  Amped Wireless is not responsible for any such modification or tampering.  Amped Wireless will not support or warrant any product in which you have or have attempted to modify the Software provided by Amped Wireless.  You may not lease, sublicense, resell, redistribute or otherwise transfer the Software without written consent from Amped Wireless.  The Software is provided to you “as is” with all faults and without warranties of any kind.  In particular, Amped Wireless does not guarantee that the Software will be error-free or that the Software will be free from system threats or attacks from viruses.  Amped Wireless does not warrant that the Software will meet your expectations or that the software will be suitable for your particular situation.  Amped Wireless warrants that any media (such as an included CD) on which the Software is provided to be free from defects.  If you have an eligible warranty claim for defective media, Amped Wireless will replace the Software media.
APR175P USER’S GUIDE   181 181 IT IS YOUR RESPONSIBILITY TO BACK UP YOUR SYSTEM INCLUDING, WITHOUT LIMITATION, ANY DATA THAT YOU MAY USE OR POSSESS IN CONNECTION WITH THE PRODUCT.  ANY MATERIAL, INFORMATION OR DATA DOWNLOADED OR OTHERWISE OBTAINED IS ACCESSED AT YOUR OWN DISCRETION AND RISK, AND YOU WILL BE RESPONSIBLE FOR ANY DAMAGE TO YOUR COMPUTER SYSTEM OR PRODUCT, OR LOSS OF DATA THAT RESULTS FROM THE DOWNLOAD OF SUCH MATERIAL, INFORMATION OR DATA.   AMPED WIRELESS IS NOT RESPONSIBLE FOR ANY DAMAGE TO THE PURCHASER’S COMPUTER SYSTEM OR DATA. All title and copyrights in and to the Software and any copies thereof are owned by Amped Wireless or its partners/suppliers.  All title and intellectual property rights in and to the content which may be accessed through use of the Software is the property of the respective content owner and may be protected by applicable copyright or other intellectual property laws and treaties.  This license grants you no rights to use such content.  You may not delete any copyright, trademark or other proprietary notices from the Software or documentation.
APR175P USER’S GUIDE   182 182 Dispute Resolution / Arbitration This section describes how you agree to resolve any disputes with Amped Wireless regarding these Terms of Use or your purchase of any product from Amped Wireless and your use of that product. You and Amped Wireless agree to the following resolution process.  To begin with, you agree that any claim that you might have against us regarding these Terms of Use or your purchase of any Amped Wireless product or use of that product must be resolved through binding arbitration before the American Arbitration Association using its Commercial Arbitration Rules. The arbitrator shall have exclusive authority to the extent permitted by law to resolve all disputes arising out of or relating to the interpretation, applicability, enforceability, or formation of our agreement, including, but not limited to, any claim that all or part of this agreement is void or voidable. The arbitrator shall also have exclusive authority to the extent permitted by law to decide the arbitrability of any claim or dispute between you and Amped Wireless. Because we prefer to resolve our issues with you directly, you agree to arbitrate with Amped Wireless only in your individual capacity, not as a representative or member of a class. As such, your claims may not be joined with any other claims and there shall be no authority for any dispute to be arbitrated on a class-action basis or brought by a purported class representative.
APR175P USER’S GUIDE   183 183 It is important that you understand that the arbitrator’s decision will be binding and may be entered as a judgment in any court of competent jurisdiction. If the arbitrator rules against Amped Wireless, in addition to accepting whatever responsibility is ordered by the arbitrator, we will reimburse your reasonable attorneys' fees and costs. It's important to us that we address any issues you might have promptly. To help us do that, you agree to begin any arbitration within one year after your claim arose; otherwise, your claim is waived. Unless you and Amped Wireless agree otherwise, any arbitration hearings will take place in the county where you reside. If your claim is for $10,000 or less, you may choose whether the arbitration will be conducted solely on the basis of documents submitted to the arbitrator, through a telephonic hearing, or by an in-person hearing as established by the AAA Rules. If your claim exceeds $10,000, the right to a hearing will be determined by the AAA Rules. If your claim against Amped Wireless is for less than $10,000, Amped Wireless will pay all arbitration fees. If your claim against Amped Wireless is for $10,000 or more, you are responsible for paying your own portion of the fees set forth in the AAA’s fee schedule for consumer disputes, and Amped Wireless will pay all remaining arbitration fees. If you believe you cannot afford the AAA’s fee, you may apply to the AAA for a waiver.
APR175P USER’S GUIDE   184 184 As an exception to this arbitration agreement, Amped Wireless is happy to give you the right to pursue in small claims court any claim that is within that court's jurisdiction as long as you proceed only on an individual basis.  We would hope that our customer service agents could resolve any disputes you have with us without resorting to arbitration. Before initiating any arbitration proceeding, you agree to first discuss the matter informally with Amped Wireless for at least 30 days. To do that, please send your full name and contact information, your concern and your proposed solution by mail to us at: 13089 Peyton Dr. #C307, Chino Hills, CA 91709; Attn: Legal Department. This Agreement and the rights of the parties hereunder shall be governed by and construed in accordance with the laws of the State of California, exclusive of conflict or choice of law rules. The  parties  acknowledge  that  this  Agreement  evidences  a  transaction  involving  interstate  commerce. Notwithstanding  the  provision  in  the  preceding  paragraph  with  respect  to  applicable  substantive  law,  any arbitration conducted pursuant to the terms of this Agreement shall be governed by the Federal Arbitration Act (9 U.S.C., Secs. 1-16). Mailing Address Only Amped Wireless 13089 Peyton Dr. #C307 Chino Hills, CA 91709 Email: legal@ampedwireless.com
Amped WirelessA Division of Newo CorporationCopyright © 2014 Amped Wireless / Newo Corporation. All rights reserved.  Amped Wireless, Newo Corporation, and the Amped Wireless Logo are registered trademarks or trademarks of Newo Corporation.888-573-8820techsupport@ampedwireless.comwww.ampedwireless.comtech supporte-mailweb

Navigation menu