Amtran Technology Co 42LD400-UA 42" LCD TV User Manual 2 of 3
Amtran Technology Co Ltd 42" LCD TV 2 of 3
Contents
- 1. User manual 1 of 3
- 2. User manual 2 of 3
- 3. User manual 3 of 3
User manual 2 of 3

OWNER’S MANUAL
LED LCD TV / LCD TV
Please read this manual carefully before operating
your set and retain it for future reference.
www.lg.com
2
WARNING / CAUTION
This reminder is provided to call the CATV
system installer’s attention to Article 820-
40 of the National Electric Code (U.S.A.).
The code provides guidelines for proper
grounding and, in particular, specifies that
the cable ground shall be connected to the
grounding system of the building, as close
to the point of the cable entry as practical.
WARNING / CAUTION
Class B digital device
This equipment has been tested and found
to comply with the limits for a Class B digital
device, pursuant to Part 15 of the FCC Rules.
These limits are designed to provide reasonable
protection against harmful interference in
a residential installation. This equipment
generates, uses and can radiate radio
frequency energy and, if not installed and used
in accordance with the instructions, may cause
harmful interference to radio communications.
However, there is no guarantee that interference
will not occur in a particular installation. If this
equipment does cause harmful interference
to radio or television reception, which can be
determined by turning the equipment off and
on, the user is encouraged to try to correct the
interference by one or more of the following
measures:
- Reorient or relocate the receiving antenna.
- Increase the separation between the
equipment and receiver.
- Connect the equipment to an outlet on a
circuit different from that to which the receiver
is connected.
- Consult the dealer or an experienced radio/
TV technician for help.
This device complies with part 15 of the FCC
Rules. Operation is subject to the following
two conditions: (1) This device may not cause
(harmful) interference, and (2) this device must
accept any interference received, including
interference that may cause undesired
operation (of the device).
Any changes or modifications in construction
of this device which are not expressly approved
by the party responsible for compliance
could void the user’s authority to operate the
equipment.
FCC Notice
To prevent fire or shock hazards, do not expose
this product to rain or moisture.
CAUTION
Do not attempt to modify this product in
any way without written authorization from
LG Electronics. Unauthorized modification
could void the user’s authority to operate this
product.
TO REDUCE THE RISK OF ELECTRIC
SHOCK DO NOT REMOVE COVER
(OR BACK). NO USER SERVICEABLE
PARTS INSIDE. REFER TO QUALIFIED
SERVICE PERSONNEL.
The lightning flash with
arrowhead symbol, within an
equilateral triangle, is intended
to alert the user to the presence of
uninsulated “dangerous voltage” within
the product’s enclosure that may be of
sufficient magnitude to constitute a risk
of electric shock to persons.
The exclamation point within
an equilateral triangle is
intended to alert the user to
the presence of important
operating and maintenance
(servicing) instructions in the literature
accompanying the appliance.
WARNING/CAUTION
TO REDUCE THE RISK OF FIRE
AND ELECTRIC SHOCK, DO NOT
EXPOSE THIS PRODUCT TO RAIN OR
MOISTURE.
NOTE TO CABLE/TV
INSTALLER
3
SAFETY INSTRUCTIONS
Important Safety Instructions
Read these instructions.
Keep these instructions.
Heed all warnings.
Follow all instructions.
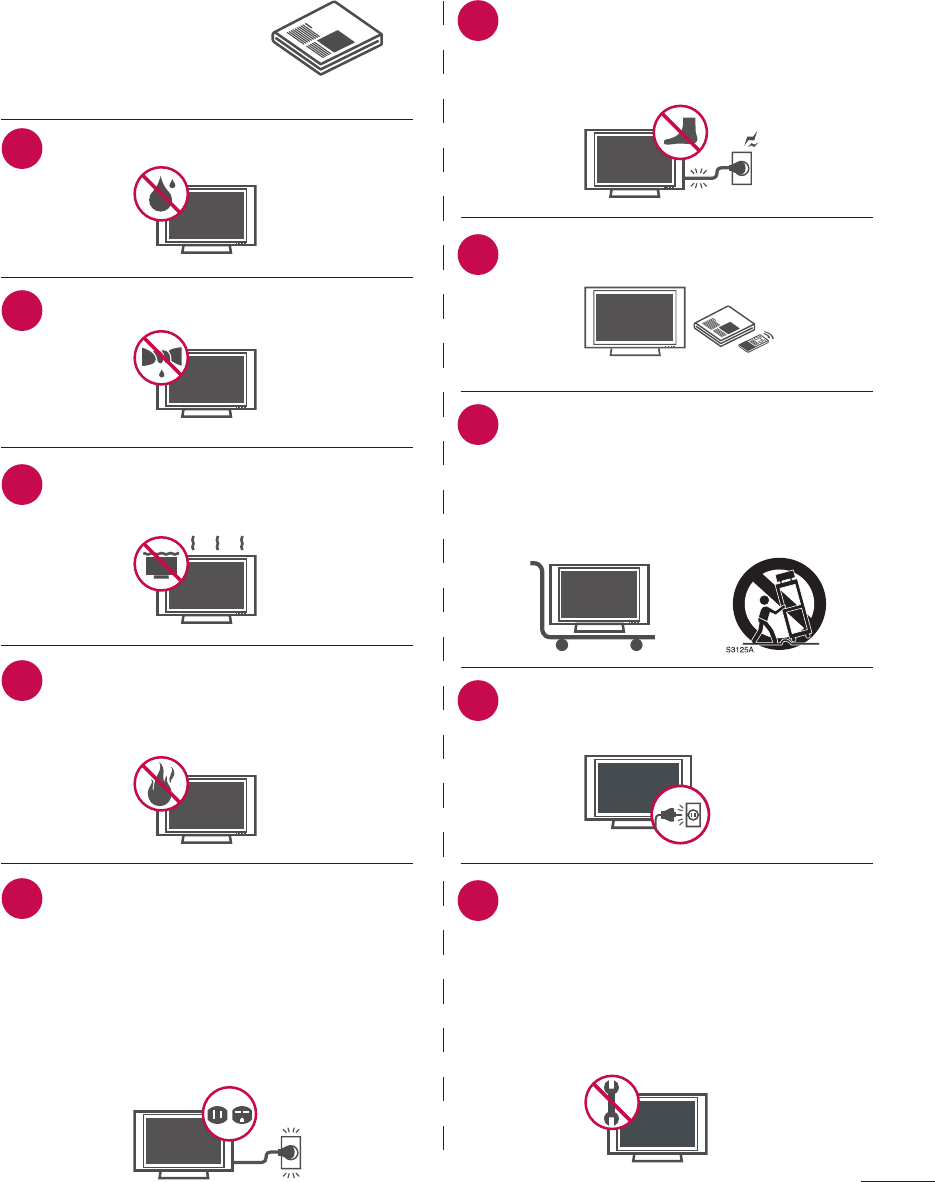
Do not use this apparatus near water.
Clean only with dry cloth.
Do not block any ventilation openings.
Install in accordance with the
manufacturer’s instructions.
Do not install near any heat sources
such as radiators, heat registers,
stoves, or other apparatus (including
amplifiers) that produce heat.
Do not defeat the safety purpose of
the polarized or grounding-type plug.
A polarized plug has two blades with
one wider than the other. A grounding
type plug has two blades and a third
grounding prong, The wide blade or
the third prong are provided for your
safety. If the provided plug does not fit
into your outlet, consult an electrician
for replacement of the obsolete outlet.
Protect the power cord from being
walked on or pinched particularly at
plugs, convenience receptacles, and
the point where they exit from the
apparatus.
Only use attachments/accessories
specified by the manufacturer.
Use only with the cart, stand, tripod,
bracket, or table specified by the
manufacturer, or sold with the
apparatus. When a cart is used,
use caution when moving the cart/
apparatus combination to avoid injury
from tip-over.
Unplug this apparatus during lighting
storms or when unused for long
periods of time.
Refer all servicing to qualified service
personnel. Servicing is required when
the apparatus has been damaged in
any way, such as power-supply cord
or plug is damaged, liquid has been
spilled or objects have fallen into the
apparatus, the apparatus has been
exposed to rain or moisture, does not
operate normally, or has been dropped.
1
2
3
4
5
6
7
8
9
10
4
Never touch this apparatus or antenna
during a thunder or lighting storm.
When mounting a TV on the wall, make
sure not to install the TV by the hanging
power and signal cables on the back of
the TV.
When mounting a TV on the wall, make
sure not to install the TV by the hanging
power and signal cables on the back of
the TV.
CAUTION concerning the Power Cord:
It is recommend that appliances be
placed upon a dedicated circuit; that is,
a single outlet circuit which powers only
that appliance and has no additional
outlets or branch circuits. Check the
specification page of this owner’s
manual to be certain.
Do not connect too many appliances to
the same AC power outlet as this could
result in fire or electric shock.
Do not overload wall outlets. Overloaded
wall outlets, loose or damaged wall
outlets, extension cords, frayed power
cords, or damaged or cracked wire
insulation are dangerous . Any of these
conditions could result in electric shock
or fire. Periodically examine the cord of
your appliance, and if its appearance
indicates damage or deterioration,
unplug it, discontinue use of the
appliance, and have the cord replaced
with an exact replacement part by an
authorized servicer. Protect the power
cord from physical or mechanical abuse,
such as being twisted, kinked, pinched,
closed in a door, or walked upon. Pay
particular attention to plugs, wall outlets,
and the point where the cord exits the
appliance.
Do not use a damaged or loose power
cord. Do not pull on the power cord to
unplug the TV. Grasp the plug when
unplugging the power cord.
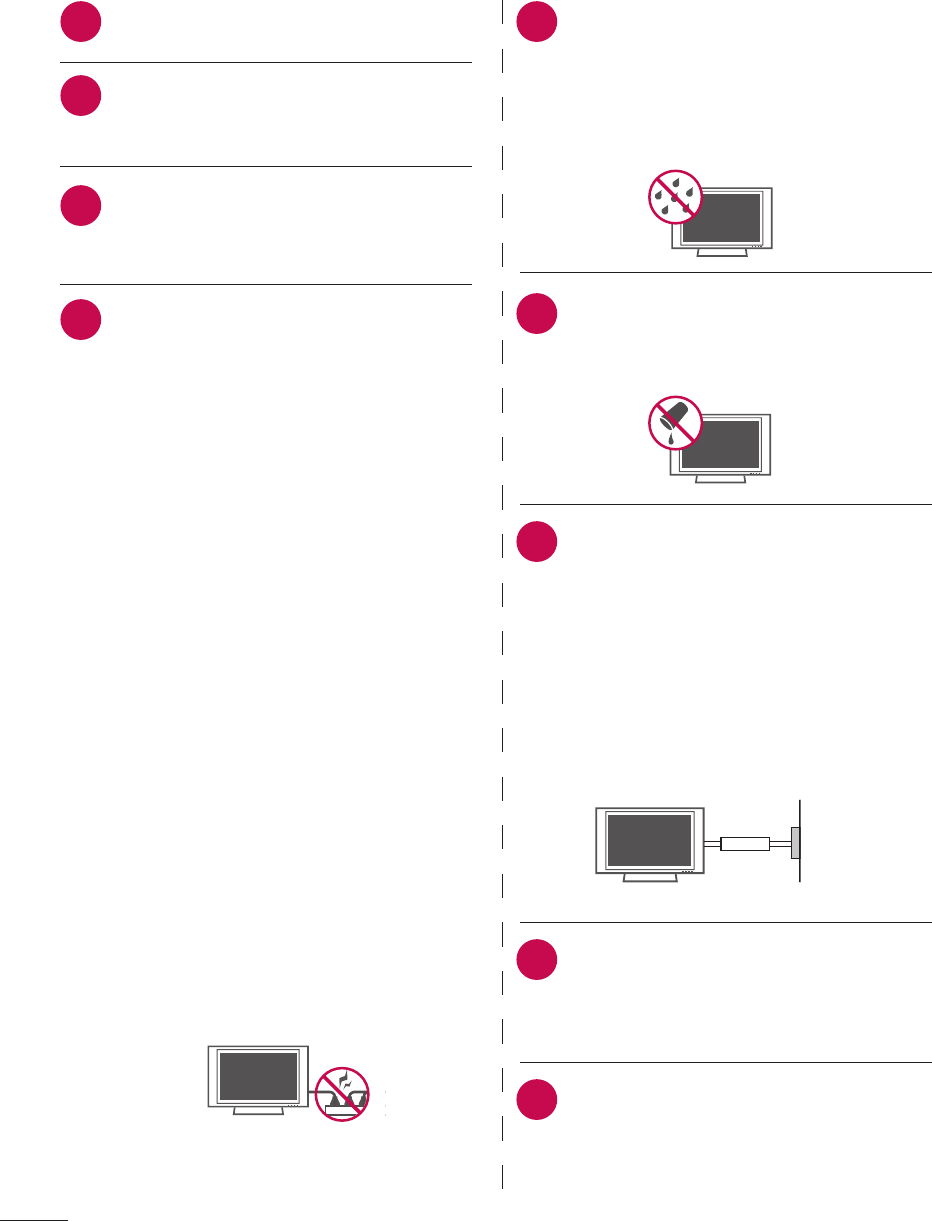
WARNING - To reduce the risk of fire
or electrical shock, do not expose
this product to rain, moisture or other
liquids. Do not touch the TV with wet
hands. Do not install this product near
flammable objects such as gasoline or
candles or expose the TV to direct air
conditioning.
Do not expose to dripping or splashing
and do not place objects filled with
liquids, such as vases, cups, etc. on
or over the apparatus (e.g. on shelves
above the unit).
GROUNDING
Ensure that you connect the earth
ground wire to prevent possible electric
shock (i.e. a TV with a three-prong
grounded AC plug must be connected
to a three-prong grounded AC outlet).
If grounding methods are not possible,
have a qualified electrician install a
separate circuit breaker.
Do not try to ground the unit by
connecting it to telephone wires,
lightening rods, or gas pipes.
DISCONNECTING DEVICE FROM
MAINS
Mains plug is the disconnecting device.
The plug must remain readily operable.
As long as this unit is connected to the
AC wall outlet, it is not disconnected
from AC power even if you turn off the
power switch on the unit.
11 15
16
12
13
14
17
18
19
SAFETY INSTRUCTIONS
Power
Supply
Short-circuit
Breaker
5
ANTENNAS
Outdoor antenna grounding
If an outdoor antenna is installed, follow
the precautions below. An outdoor
antenna system should not be located
in the vicinity of overhead power lines
or other electric light or power circuits,
or where it can come in contact with
such power lines or circuits as death or
serious injury can occur.
Be sure the antenna system is grounded
so as to provide some protection against
voltage surges and built-up static
charges.
Section 810 of the National Electrical
Code (NEC) in the U.S.A. provides
information with respect to proper
grounding of the mast and supporting
structure, grounding of the lead-in
wire to an antenna discharge unit, size
of grounding conductors, location of
antenna discharge unit, connection to
grounding electrodes and requirements
for the grounding electrode.
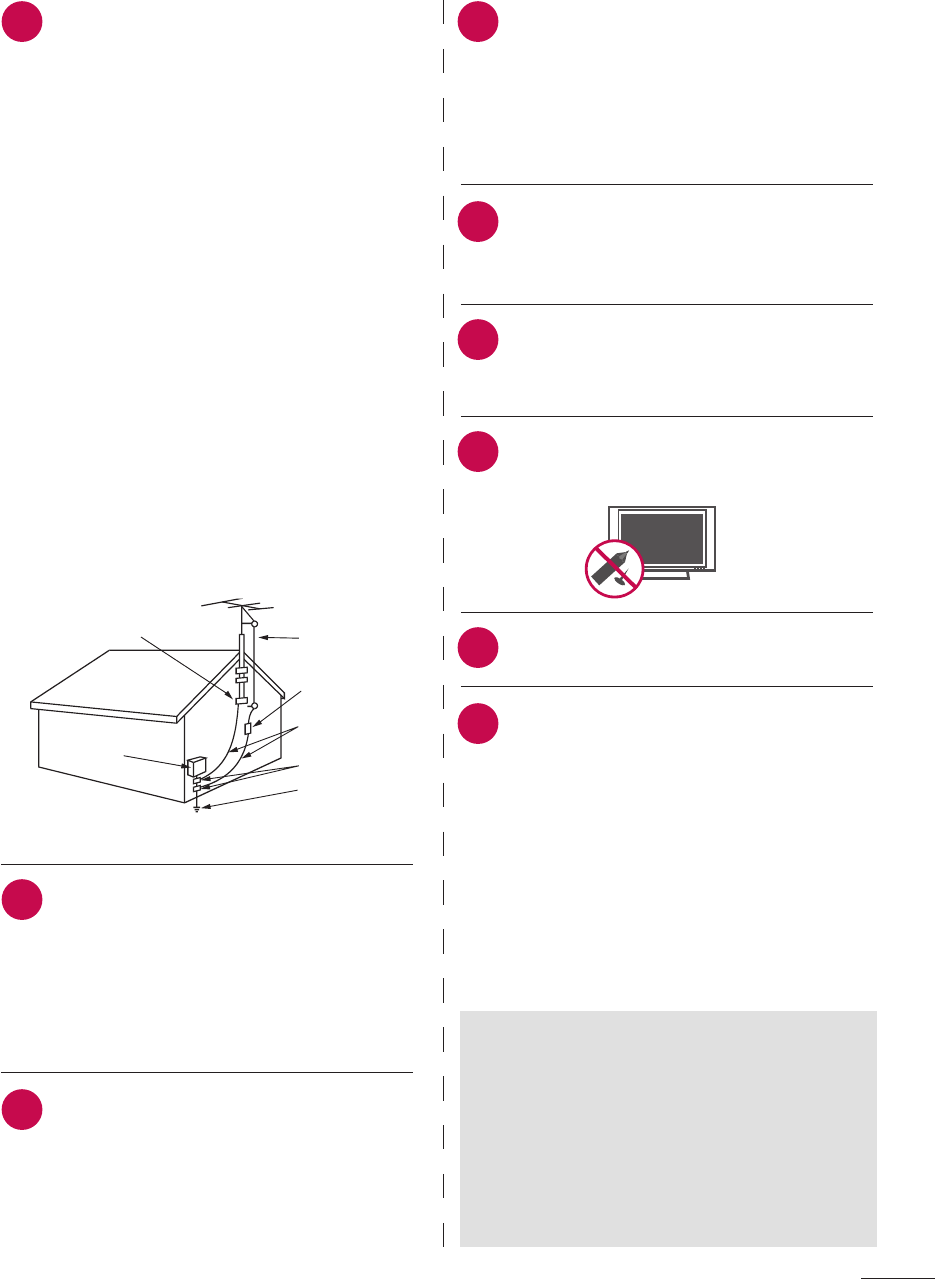
Antenna grounding according to the
National Electrical Code, ANSI/NFPA 70
Cleaning
When cleaning, unplug the power
cord and rub gently with a soft cloth to
prevent scratching. Do not spray water
or other liquids directly on the TV as
electric shock may occur. Do not clean
with chemicals such as alcohol, thinners
or benzene.
Moving
Make sure the product is turned off,
unplugged and all cables have been
removed. It may take 2 or more people
to carry larger TVs. Do not press against
or put stress on the front panel of the
T V.
Ventilation
Install your TV where there is proper
ventilation. Do not install in a confined
space such as a bookcase. Do not
cover the product with cloth or other
materials (e.g.) plastic while plugged
in. Do not install in excessively dusty
places.
Take care not to touch the ventilation
openings. When watching the TV for a
long period, the ventilation openings
may become hot.
If you smell smoke or other odors
coming from the TV or hear strange
sounds, unplug the power cord contact
an authorized service center.
Do not press strongly upon the panel
with hand or sharp object such as nail,
pencil or pen, or make a scratch on it.
Keep the product away from direct
sunlight.
If the TV feels cold to the touch, there
may be a small “flicker” when it is
turned on. This is normal, there is
nothing wrong with TV.
Some minute dot defects may be
visible on the screen, appearing as tiny
red, green, or blue spots. However, they
have no adverse effect on the monitor’s
performance.
Avoid touching the LCD screen or
holding your finger(s) against it for long
periods of time. Doing so may produce
some temporary distortion effects on
the screen.
ON DISPOSAL
(Only Hg lamp used LCD TV)
The fluorescent lamp used in this product
contains a small amount of mercury. Do
not dispose of this product with general
household waste. Disposal of this product
must be carried out in accordance to the
regulations of your local authority.
20
21
23
24
26
22
25
27
28
Ground Clamp
Electric Service
Equipment
Antenna Lead in Wire
Antenna Discharge Unit
(NEC Section 810-21)
Grounding Conductor
(NEC Section 810-21)
Ground Clamps
Power Service Grounding
Electrode System (NEC
Art 250, Part H)

6
Contents
WARNING / CAUTION ............2
SAFETY INSTRUCTIONS ........3
Important Safety Instructions ...................3
FEATURE OF THIS TV .............7
PREPARATION
Accessories ....................................................9
Front Panel Information ............................10
Back Panel Information ............................. 11
Stand Instructions ...................................... 13
Desktop Pedestal Installation ..................14
Swivel Stand ................................................ 14
Antenna or Cable Connection ................ 15
EXTERNAL EQUIPMENT
SETUP
HD Receiver Setup .................................... 16
DVD Setup ................................................... 18
VCR Setup ..................................................20
Other A/V Source Setup ......................... 21
USB Connection......................................... 21
Audio Out Connection ............................22
PC Setup .....................................................23
WATCHING TV/ CHANNEL
CONTROL
Remote Control Functions ......................25
Turning on the TV ..................................... 27
Channel Selection ..................................... 27
Volume Adjustment .................................. 27
Initial Setting ..............................................28
MENU ADJUSTMENTS
On-Screen Menus Selection ..................30
Quick Menu .................................................31
Channel Menu............................................32
Picture Menu ..............................................33
Audio Menu ................................................34
Time Menu ..................................................35
Option Menu ..............................................36
Lock Menu .................................................. 37
Input Menu .................................................39
USB Menu ...................................................40
APPENDIX
Troubleshooting .........................................42
Maintenance ...............................................44
Product Specifications .............................45
9
PREPARATION
PREPARATION
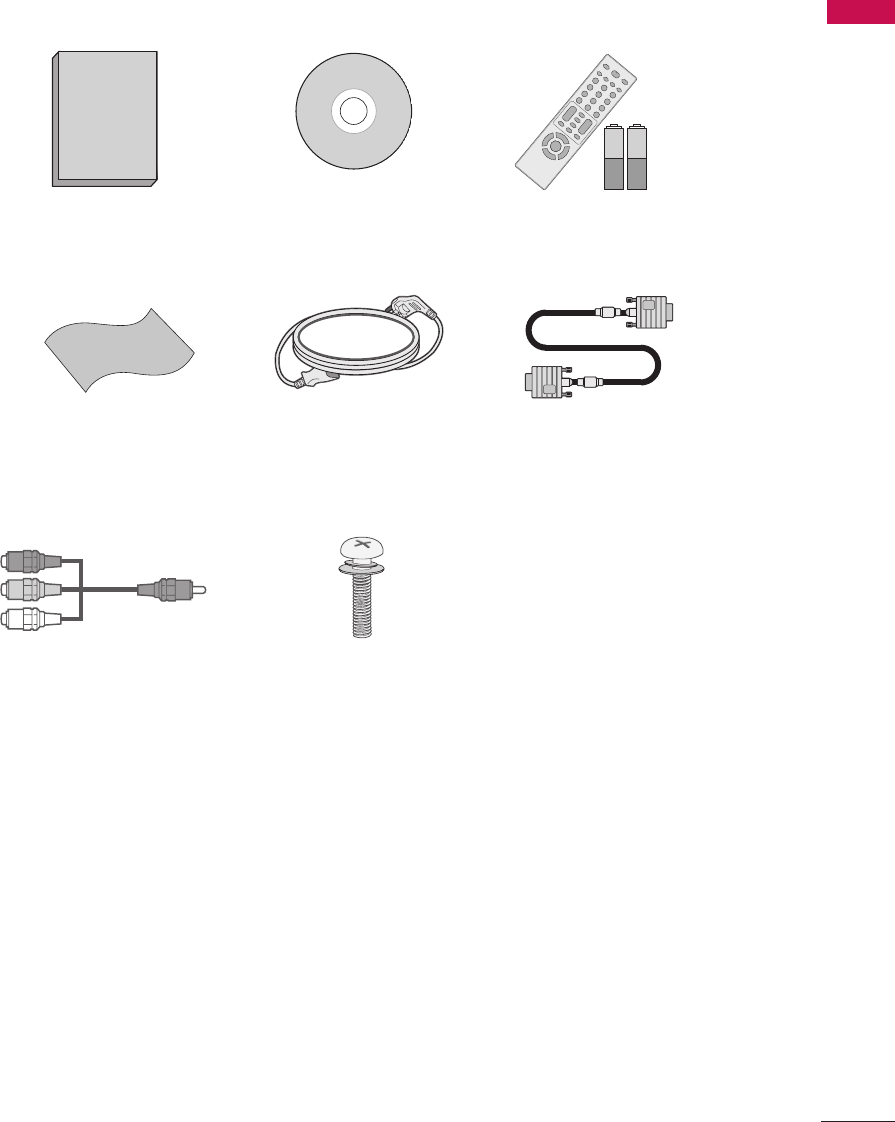
Accessories
Ensure that the following accessories are included with your TV. If an accessory is
missing, please contact the dealer where you purchased the TV.
The accessories included may differ from the images below.
Remote Control, Batteries (AAA)
1.5V 1.5V
CD ManualOwner’s Manual
D-sub 15 pin cable
Power cablePolishing Cloth
Screw for stand fixingAV cable
10
PREPARATION
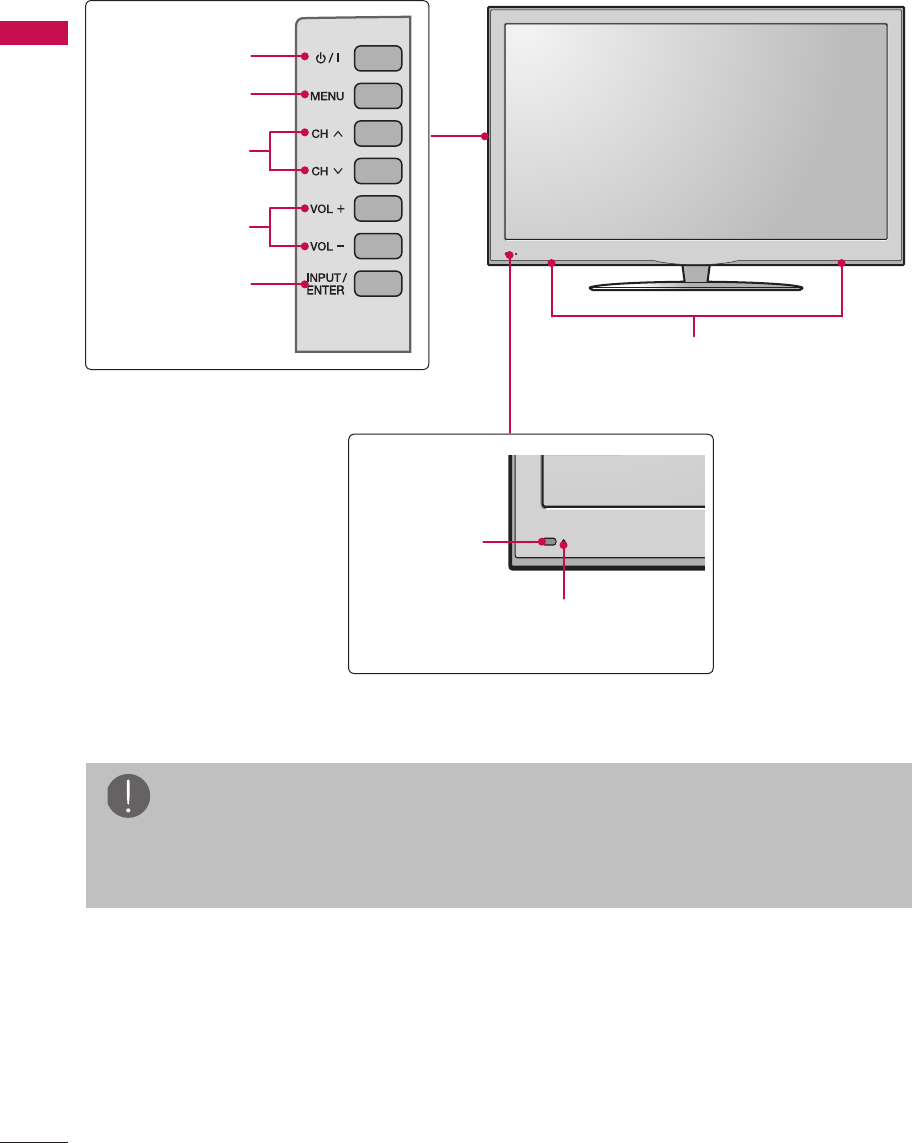
Front Panel Information
r Image shown may differ from your TV.
Remote
Control Sensor
Power/Standby
Indicator
Speaker
POWER button
MENU button
CHANNEL
buttons
VOLUME
buttons
INPUT button
NOTE
a Do not step on the glass stand or subject it to any impact.It may break, causing
possible injury from fragments of glass, or the TV may fall.
a Do not drag the TV. The floor or the product may be damaged.
11
PREPARATION
AC IN
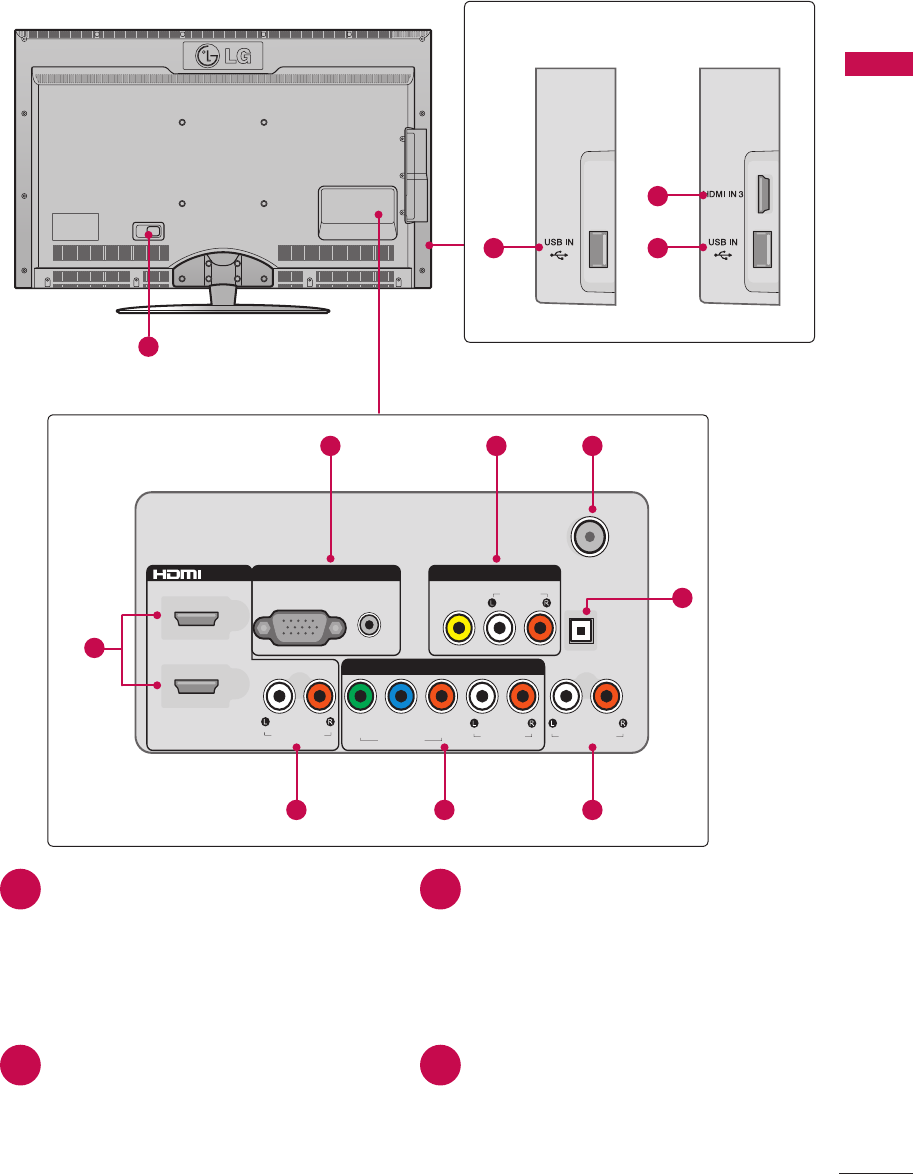
Back Panel Information
r Image shown may differ from your TV.
ANTENNA/
CABLE IN
VIDEO
AV INRGB IN
COMPONENT IN
P
R
P
B
Y
OPTICAL
DIGITAL
AUDIO OUT
AUDIO
AUDIO
AUDIO OUT
AUDIORGB (PC)
1
2
VIDEO
/ DVI IN
DVI AUDIO
9 9
10
1
2 3 4
5
11
678
47LD500
32LD400,
42LD400
HDMI/DVI IN, HDMI IN
Digital Connection.
Supports HD video and Digital audio.
Doesn’t support 480i.
Accepts DVI video using an adapter
or HDMI to DVI cable (not included).
RGB IN (PC)
Analog PC Connection. Uses a D-sub
15 pin cable (VGA cable).
AUDIO IN
0.32 cm (1/8 inch) headphone jack
for analog PC audio input.
AV (Audio/Video) IN
Analog composite connection.
Supports standard definition video
only (480i).
ANTENNA/CABLE IN
Connect over-the-air or cable signals
to this jack.
1 2
3 4
12
PREPARATION
OPTICAL DIGITAL AUDIO OUT
Digital optical audio output for
use with amps and home theater
systems.
Note: In standby mode, this port
doesn’t work.
AUDIO OUT
For use with external speakers.
COMPONENT IN
Analog Connection.
Supports HD.
Uses a red, green, and blue cable for
video & red and white for audio.
DVI AUDIO IN
Digital Connection.
USB INPUT
Used for viewing photos and listening
to MP3s.
HDMI IN 3
Digital Connection.
Supports HD video and Digital audio.
Doesn’t support 480i.
Power Cord Socket
For operation with AC power.
Caution: Never attempt to operate
the TV on DC power.
5 6
7 8
9 10
11
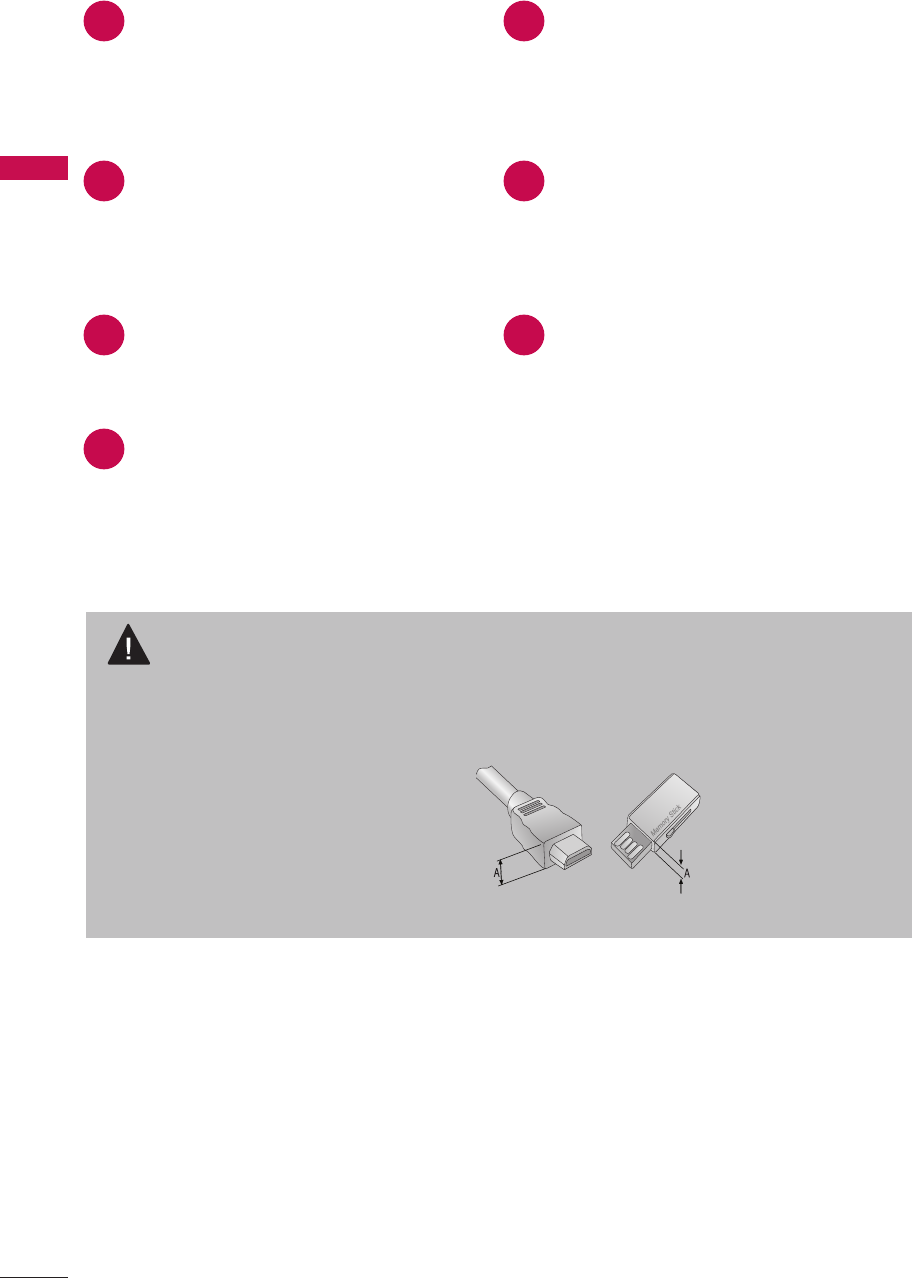
CAUTION
For HDMI IN 3 and USB INPUT
a For an optimal connection, HDMI cables and USB devices should have bezels
less than 10 mm (0.39 inches) thick.
*A is smaller or equals to 10 mm (0.39 inches)
13
PREPARATION
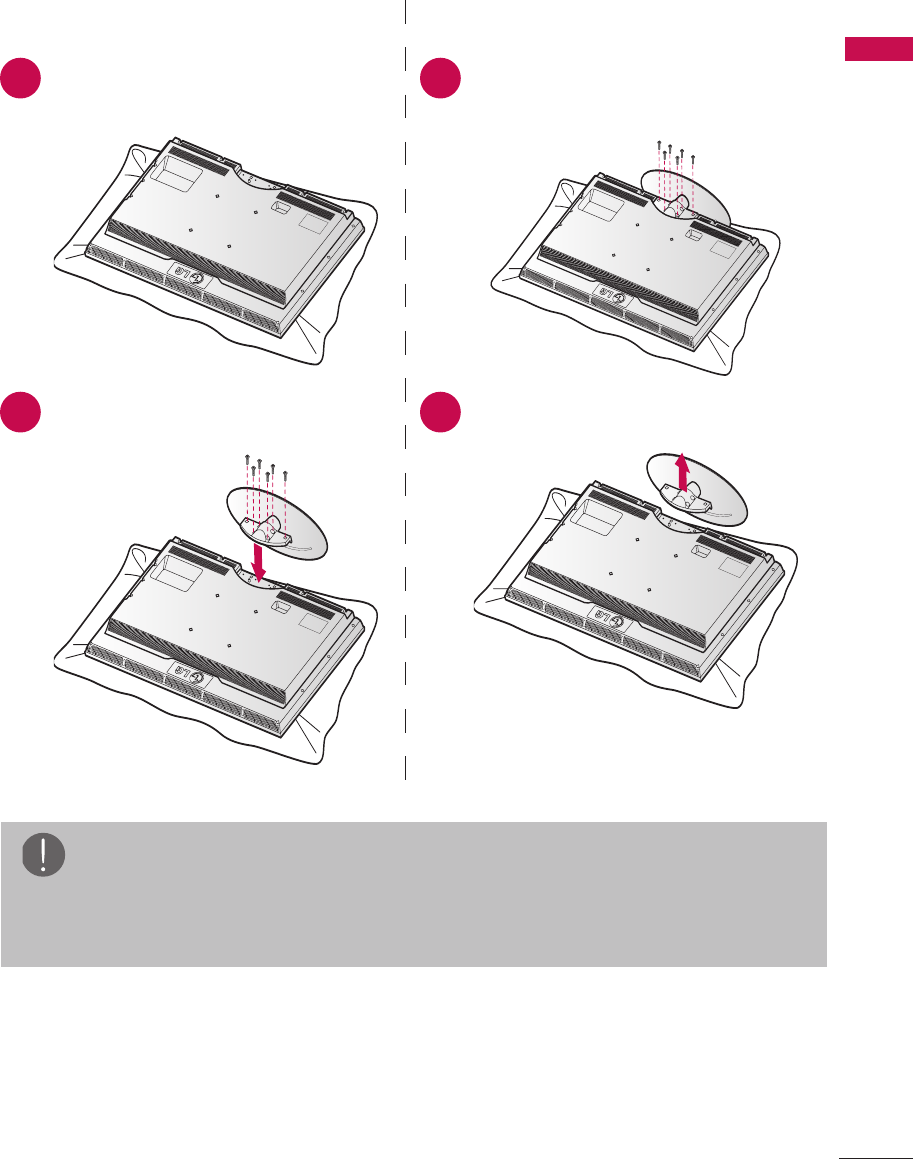
Stand Instructions
r Image shown may differ from your TV.
INSTALLATION DETACHMENT
Carefully place the TV screen side
down on a cushioned surface to
protect the screen from damage.
Carefully place the TV screen side
down on a cushioned surface to
protect the screen from damage.
Assemble the TV and install the 6
screws into the holes as shown.
Remove the screws and detach the
stand from the TV.
1 1
2 2
NOTE
a When assembling the desk type stand, make sure the screws are fully tightened
(If not tightened fully, the TV can tilt forward after the product installation). Do
not over tighten.
14
PREPARATION
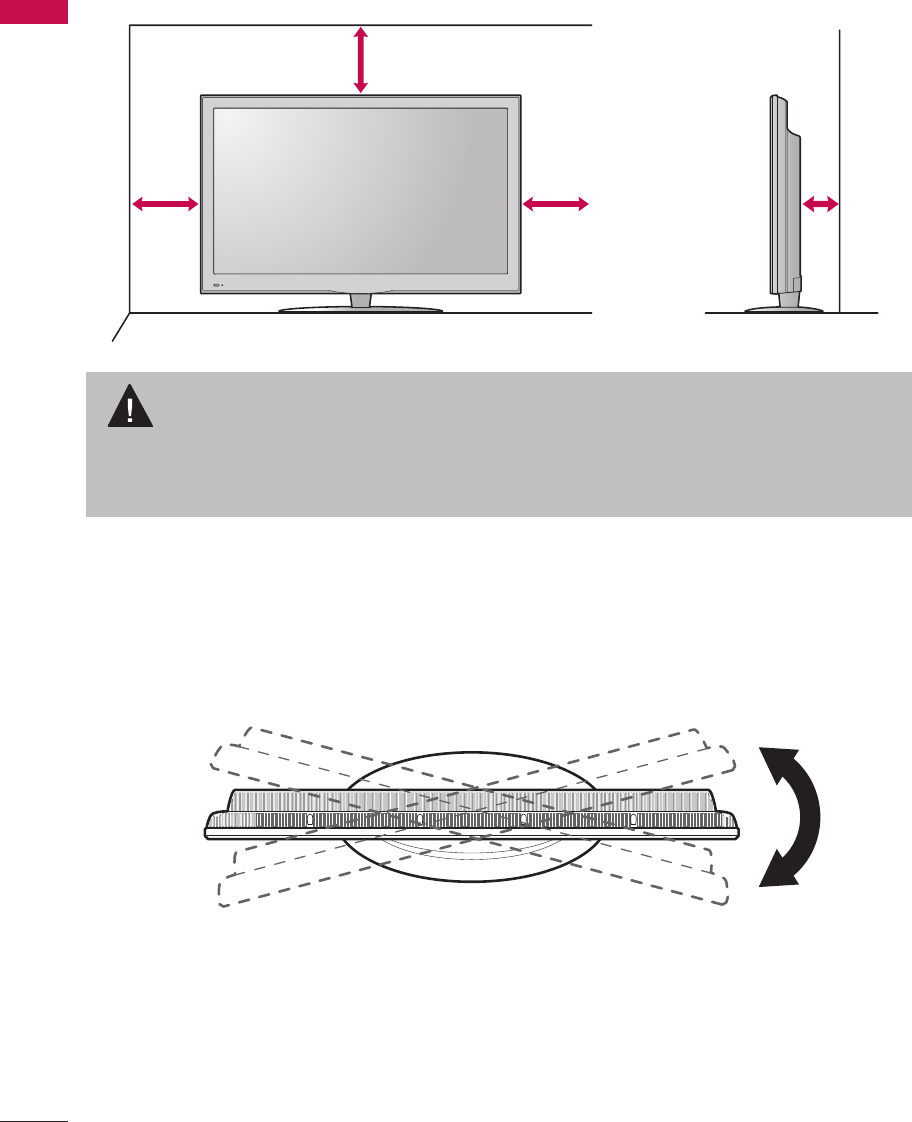
Desktop Pedestal Installation
r Image shown may differ from your TV.
For proper ventilation, allow a clearance of 10.1 cm (4 inches) on all four sides from the
wall.
CAUTION
a Ensure adequate ventilation by following the clearance recommendations.
a Do not mount near or above any type of heat source.
10.1 cm (4 inches)
10.1 cm (4 inches)
10.1 cm
(4 inches)
10.1 cm
(4 inches)
Swivel Stand
After installing the TV, you can adjust the TV set manually to the left or right direction by
20º to suit your viewing position.
15
PREPARATION
ANTENNA/
CABLE IN
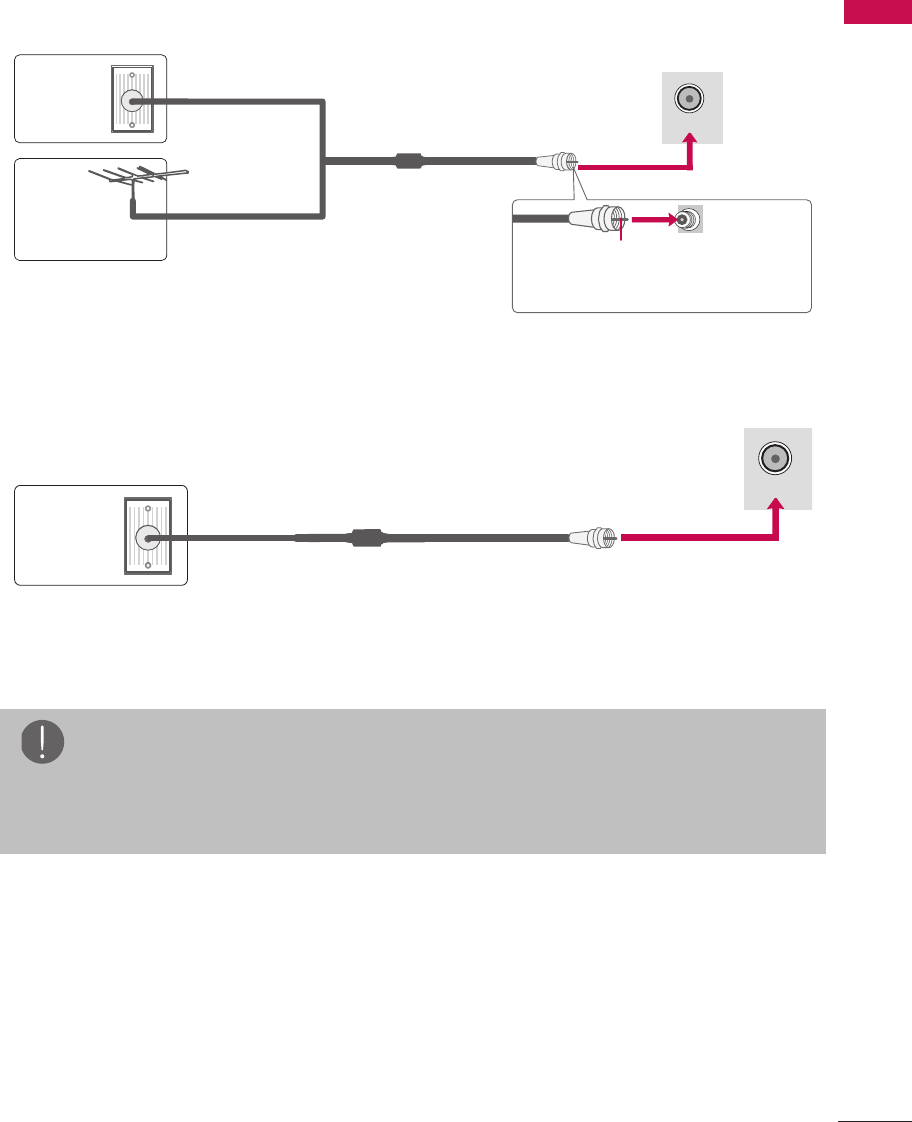
Antenna or Cable Connection
1. Antenna (Analog or Digital)
Wall Antenna Socket or Outdoor Antenna without a Cable Box Connections.
For optimum picture quality, adjust antenna direction if needed. For proper ventilation,
allow a clearance of 10.1 cm (4 inches) on all four sides from the wall.
ANTENNA/
CABLE IN
2. Cable
NOTE
a If the antenna needs to be split for two TV’s, install a 2-Way Signal Splitter.
a For much more information about antennas visit our Knowledgebase at http://
lgknowledgebase.com. Search for antenna.
Wall
Antenna
Socket
Outdoor
Antenna
(VHF, UHF)
Cable TV
Wall Jack
Copper Wire
Single-family Dwellings /Houses
(Connect to wall jack for outdoor antenna)
Multi-family Dwellings/Apartments
(Connect to wall antenna socket)
RF Coaxial Wire (75 Ω)
RF Coaxial Wire (75 Ω)
Be careful not to bend the copper
wire when connecting the antenna.
16
EXTERNAL EQUIPMENT SETUP
EXTERNAL EQUIPMENT SETUP
HD Receiver Setup
This TV can receive digital over-the-air/digital cable signals without an external digital
set-top box. However, if you do receive digital signals from a digital set-top box or other
digital external device.
r To prevent the equipment damage, never plug in any power cords until you have
finished connecting all equipment.
r This part of EXTERNAL EQUIPMENT SETUP mainly use picture of for
32LD400/42LD400.
ANTENNA
/
C
ABLE IN
VIDEO
A
V IN
A
A
R
G
B I
N
C
OMPONENT IN
P
R
P
B
Y
O
PTI
C
A
L
DIGIT
AL
T
T
A
UDIO OU
T
A
UDI
O
A
U
DI
O
A
U
DI
O
OUT
A
U
DI
O
RG
B
(
P
C)
1
2
V
IDE
O
/ D
VI IN
D
D
D
VI A
D
D
U
DI
O
COMPONENT IN
PRPBYAUDIO
VIDEO
Y L RP
B
P
R
1 2
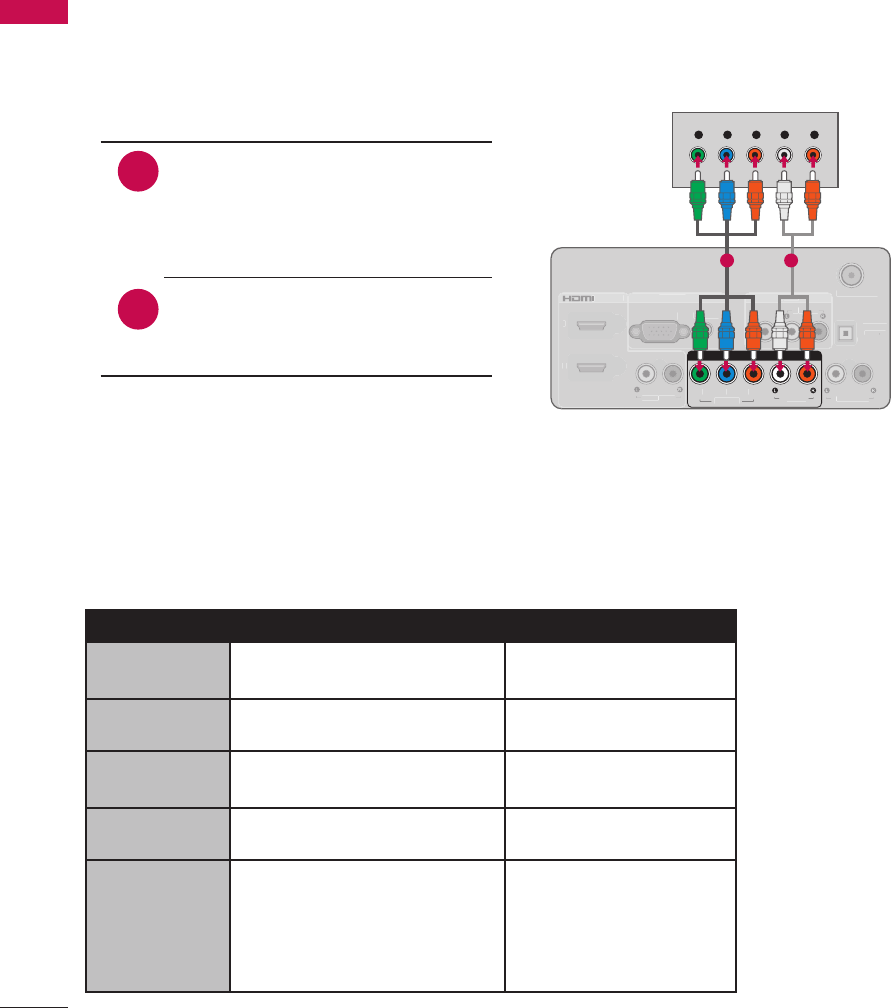
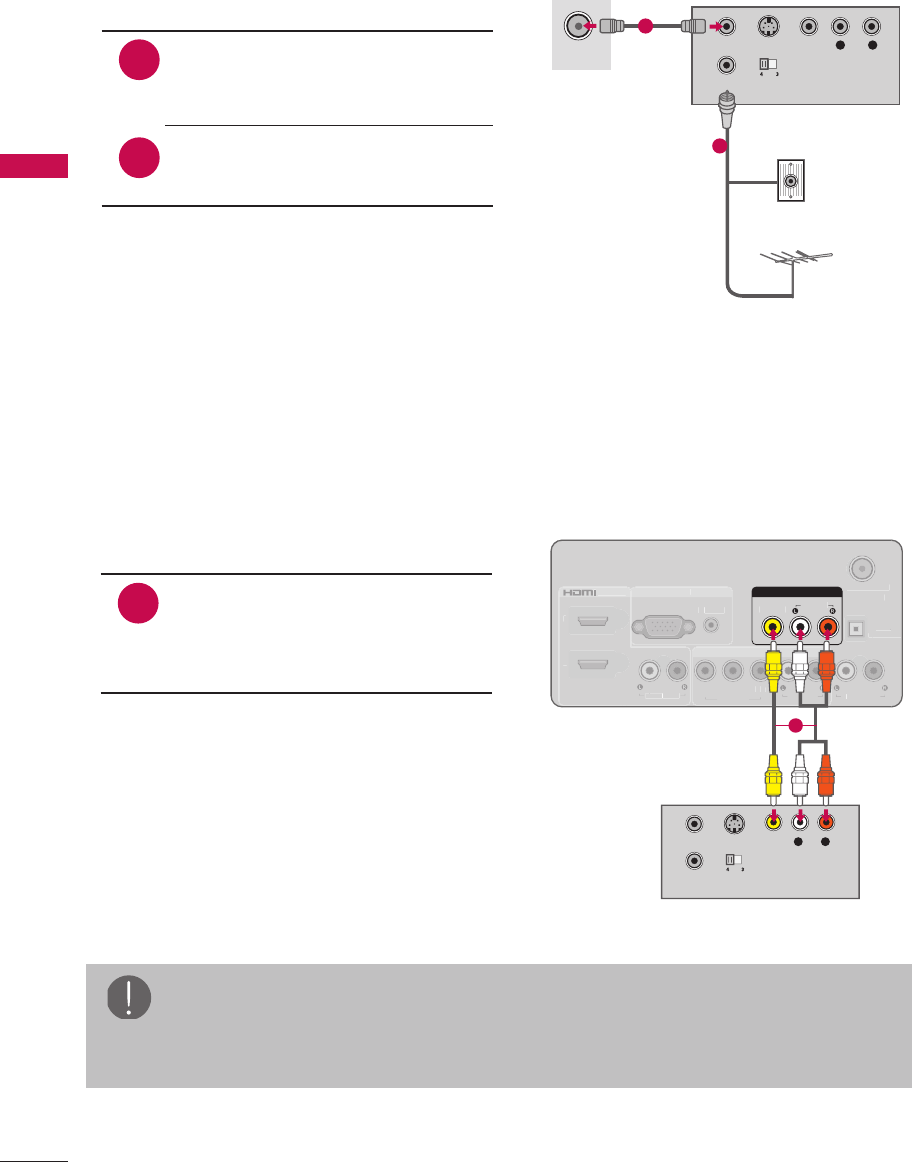
Component Connection
1. How to connect
1
2
Connect the video outputs (Y,
PB, PR) of the digital set-top box
to the COMPONENT IN VIDEO
jack on the TV. Match the jack
colors (Y = green, PB = blue, and
PR = red).
Connect the audio output of
the digital set-top box to the
COMPONENT IN AUDIO jack on
the TV.
2. How to use
r Turn on the digital set-top box.
(Refer to the owner’s manual for the digital set-top box operation.)
r Select the Component input source on the TV using the INPUT button on the remote
control.
Y, CB/PB, CR/PR
Resolution Horizontal Frequency(KHz) Vertical Frequency(Hz)
720x480i 15.73
15.73
59.94
60.00
720x480p 31.47
31.50
59.94
60.00
1280x720p 44.96
45.00
59.94
60.00
1920x1080i 33.72
33.75
59.94
60.00
1920x1080p
26.97
27.00
33.71
33.75
67.4 3 2
67. 5 0
23.976
24.00
29.97
30.00
59.94
60.00
17
EXTERNAL EQUIPMENT SETUP
ANTENNA
/
C
ABLE IN
VIDEO
A
V IN
A
A
R
G
B IN
C
OMPONENT IN
P
R
P
B
Y
O
PTI
C
A
L
DIGIT
AL
T
T
A
U
DI
O
OUT
A
UDI
O
A
U
DI
O
A
U
DI
O
OUT
A
U
DI
O
RG
B
(
P
C)
1
2
V
IDE
O
/ D
VI IN
D
D
D
VI A
D
D
U
DI
O
1
2
/ DV I IN
HDMI OUTPUT
1
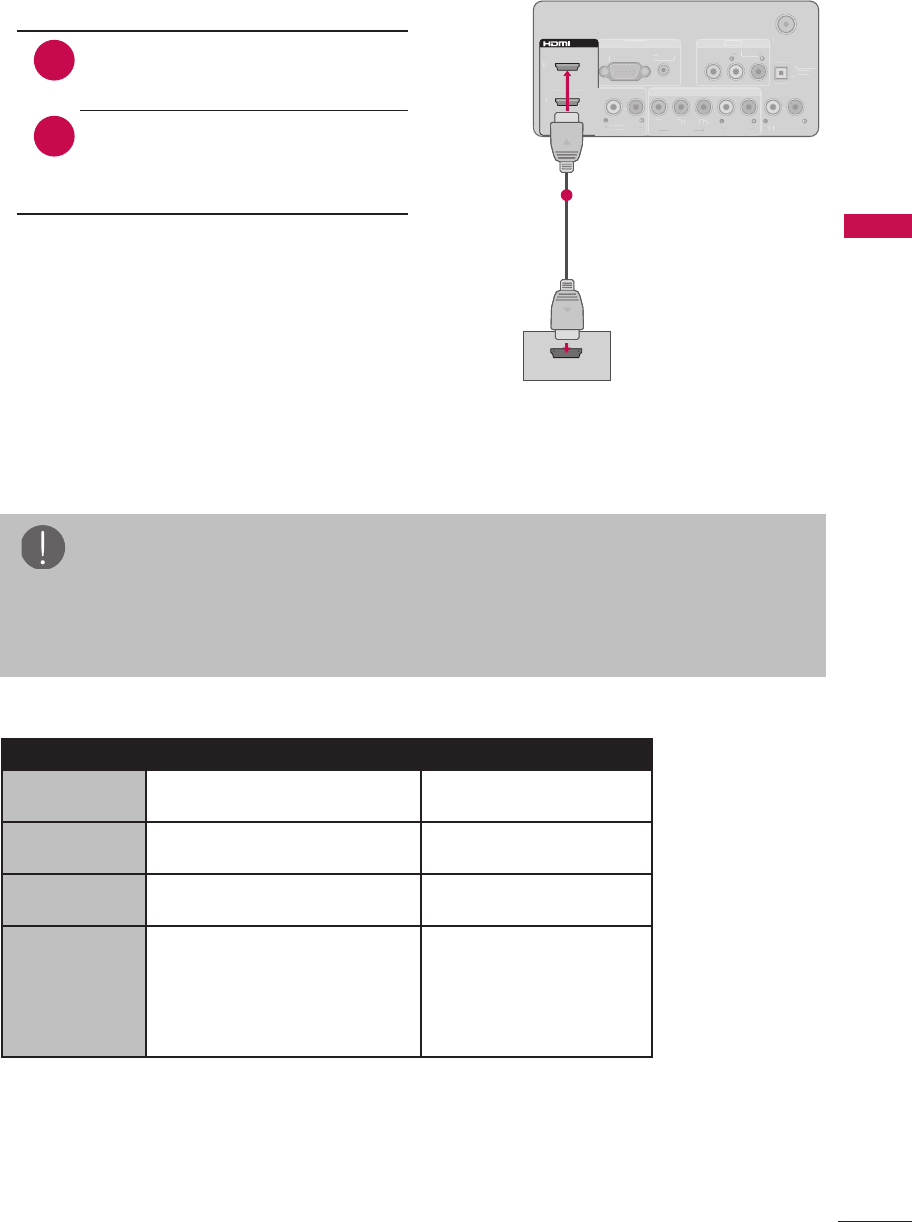
HDMI Connection
1. How to connect
1
2
Connect the digital set-top box
to HDMI/DVI IN 1, 2, or 3* jack
on the TV.
No separate audio connection is
necessary.
HDMI supports both audio and
video.
2. How to use
r Turn on the digital set-top box.
(Refer to the owner’s manual for the digital
set-top box operation.)
r Select the HDMI 1, HDMI 2, or HDMI 3* input
source on the TV using the INPUT button on
the remote control.
* HDMI 3: For 47LD500
HDMI-DTV
Resolution Horizontal Frequency(KHz) Vertical Frequency(Hz)
720x480p 31.47
31.50
59.94
60.00
1280x720p 44.96
45.00
59.94
60.00
1920x1080i 33.72
33.75
59.94
60.00
1920x1080p
26.97
27.00
33.71
33.75
67.4 3 2
67. 5 0
23.976
24.00
29.97
30.00
59.94
60.00
NOTE
a If an HDMI cable doesn’t support High Speed HDMI, it can cause flickers or no
screen display. In this case use the latest cables that support High Speed HDMI.
a HDMI Audio Supported Format: Dolby Digital (32 KHz, 44.1 KHz, 48 KHz),
Linear PCM (32 KHz, 44.1 KHz, 48 KHz)
18
EXTERNAL EQUIPMENT SETUP
ANTENNA
/
C
ABLE IN
VIDEO
A
V IN
A
A
R
G
B IN
C
OMPONENT IN
P
R
P
B
Y
O
PTI
C
A
L
DIGIT
AL
T
T
A
U
DI
O
OUT
A
UDI
O
A
U
DI
O
A
U
DI
O
OUT
A
U
DI
O
RG
B
(
P
C)
1
2
V
IDE
O
/ D
VI IN
D
D
D
VI A
D
D
U
DI
O
1
2
/ DV I IN
DV I AUDIO
1
L R
DVI OUTPUT
AUDIO
2
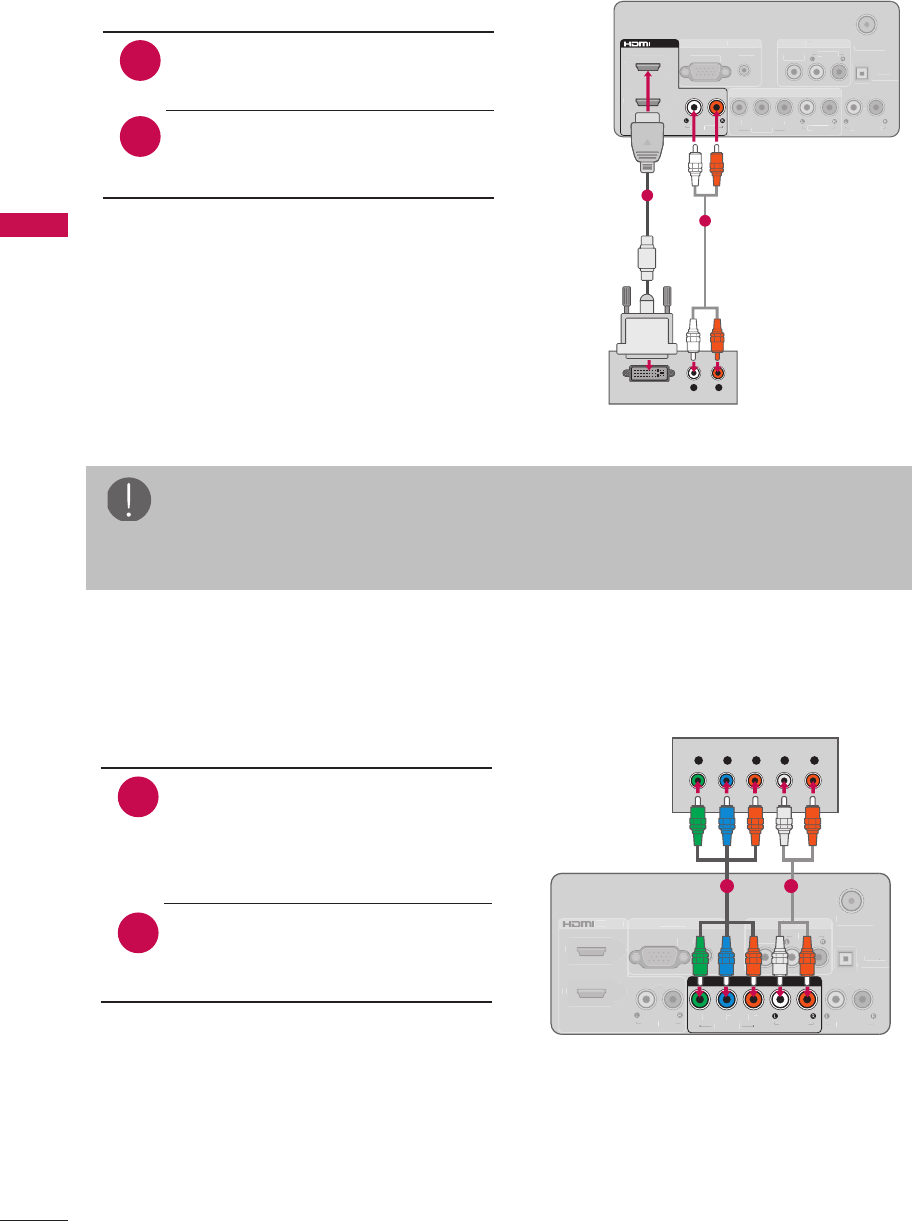
DVI to HDMI Connection
1. How to connect
1
2
Connect the digital set-top box
to HDMI/DVI IN 1 or 2 jack on
the TV.
Connect the digital set-top box
audio output to the DVI AUDIO
jack on the TV.
2. How to use
r Turn on the digital set-top box.
(Refer to the owner’s manual for the digital
set-top box operation.)
r Select the HDMI 1 or HDMI 2 input source on
the TV using the INPUT button on the remote
control.
NOTE
a A DVI to HDMI cable or adapter is required for this connection.
DVI doesn’t support audio, so a separate audio connection is necessary.
DVD Setup
ANTENNA
/
C
ABLE IN
VIDEO
A
V IN
A
A
R
G
B I
N
C
OMPONENT IN
P
R
P
B
Y
O
PTI
C
A
L
DIGIT
AL
T
T
A
UDIO OU
T
A
UDI
O
A
U
DI
O
A
U
DI
O
OUT
A
U
DI
O
RG
B
(
P
C)
1
2
V
IDE
O
/ D
VI IN
D
D
D
VI A
D
D
U
DI
O
COMPONENT IN
PRPBYAUDIO
VIDEO
Y L RP
B
P
R
1 2
Component Connection
1. How to connect
1
2
Connect the video outputs (Y,
PB, PR) of the digital set-top box
to the COMPONENT IN VIDEO
jack on the TV. Match the jack
colors (Y = green, PB = blue, and
PR = red).
Connect the audio output of
the digital set-top box to the
COMPONENT IN AUDIO jack on
the TV.
2. How to use
r Turn on the DVD player, insert a DVD.
r Select the Component input source on the TV using the INPUT button on the remote
control.
r Refer to the DVD player’s manual for operating instructions.

19
EXTERNAL EQUIPMENT SETUP
ANTENNA
/
C
ABLE IN
VIDEO
A
V IN
A
A
R
G
B I
N
C
OMPONENT IN
P
R
P
B
Y
O
PTI
C
A
L
DIGIT
AL
T
T
A
U
DI
O
OUT
A
UDI
O
A
U
DI
O
A
U
DI
O
OUT
A
U
DI
O
RG
B
(
P
C)
1
2
V
IDE
O
/ D
VI IN
D
D
D
VI A
D
D
U
DI
O
VIDEO
AV IN
AUDIO
L R
VIDEO
AUDIO
1
Composite (RCA) Connection
1. How to connect
1Connect the AUDIO/VIDEO
jacks between TV and DVD.
Match the jack colors (Video =
yellow, Audio Left = white, and
Audio Right = red)
2. How to use
r Turn on the DVD player, insert a DVD.
r Select the AV input source on the TV
using the INPUT button on the remote
control.
r Refer to the DVD player’s manual for
operating instructions.
HDMI Connection
ANTENNA
/
C
ABLE IN
VIDEO
A
V IN
A
A
R
G
B IN
C
OMPONENT IN
P
R
P
B
Y
O
PTI
C
A
L
DIGIT
AL
T
T
A
U
DI
O
OUT
A
UDI
O
A
U
DI
O
A
U
DI
O
OUT
A
U
DI
O
RG
B
(
P
C)
1
2
V
IDE
O
/ D
VI IN
D
D
D
VI A
D
D
U
DI
O
1
2
/ DV I IN
HDMI OUTPUT
1
1. How to connect
1
2
Connect the digital set-top box
to HDMI/DVI IN 1, 2, or 3* jack
on the TV.
No separate audio connection is
necessary.
HDMI supports both audio and
video.
2. How to use
r Select the HDMI 1, HDMI 2, or HDMI 3* input
source on the TV using the INPUT button on
the remote control.
r Refer to the DVD player’s manual for
operating instructions.
* HDMI 3: For 47LD500
NOTE
a If an HDMI cable doesn’t support High Speed HDMI, it can cause flickers or no
screen display. In this case use the latest cables that support High Speed HDMI.
a HDMI Audio Supported Format: Dolby Digital (32 KHz, 44.1 KHz, 48 KHz),
Linear PCM (32 KHz, 44.1 KHz, 48 KHz)
20
EXTERNAL EQUIPMENT SETUP
VCR Setup
ANTENNA/
CABLE IN
L R
S-VIDEOVIDEO
AUDIO
OUTPUT
SWITCH
ANT IN
ANT OUT
1
2
Antenna Connection
1. How to connect
1
2
Connect the RF antenna out
socket of the VCR to the
ANTENNA/CABLE IN socket on
the TV.
Connect the antenna cable to
the RF antenna in socket of the
VCR.
2. How to use
r Set VCR output switch to 3 or 4 and
then tune TV to the same channel
number.
r Insert a video tape into the VCR and
press PLAY on the VCR (Refer to the
VCR owner’s manual).
ANTENNA
/
C
ABLE IN
VIDEO
A
V IN
A
A
R
G
B I
N
C
OMPONENT IN
P
R
P
B
Y
O
PTI
C
A
L
DIGIT
AL
T
T
A
U
DI
O
OUT
A
UDI
O
A
U
DI
O
A
U
DI
O
OUT
A
U
DI
O
RG
B
(
P
C)
1
2
V
IDE
O
/ D
VI IN
D
D
D
VI A
D
D
U
DI
O
VIDEO
AV IN
AUDIO
S-VIDEO
OUTPUT
SWITCH
ANT IN
ANT OUT
L R
VIDEO
AUDIO
1
Composite (RCA) Connection
1. How to connect
1Connect the AUDIO/VIDEO
jacks between TV and VCR.
Match the jack colors (Video =
yellow, Audio Left = white, and
Audio Right = red)
2. How to use
r Insert a video tape into the VCR and
press PLAY on the VCR. (Refer to the
VCR owner’s manual.)
r Select the AV input source on the TV
using the INPUT button on the remote
control.
NOTE
a If you have a mono VCR, connect the audio cable from the VCR to the AUDIO
L(MONO) jack of the TV.
21
EXTERNAL EQUIPMENT SETUP
ANTENNA
/
C
ABLE IN
VIDEO
A
V IN
A
A
R
G
B I
N
C
OMPONENT IN
P
R
P
B
Y
O
PTI
C
A
L
DIGIT
AL
T
T
A
U
DI
O
OUT
A
UDI
O
A
U
DI
O
A
U
DI
O
OUT
A
U
DI
O
RG
B
(
P
C)
1
2
V
IDE
O
/ D
VI IN
D
D
D
VI A
D
D
U
DI
O
VIDEO
AV IN
AUDIO
L R
VIDEO
AUDIO
1
1. How to connect
1Connect the AUDIO/VIDEO
jacks between TV and external
equipment. Match the jack
colors. (Video = yellow, Audio
Left = white, and Audio Right =
red)
2. How to use
r Select the AV input source on the TV
using the INPUT button on the remote
control.
r Operate the corresponding external
equipment.
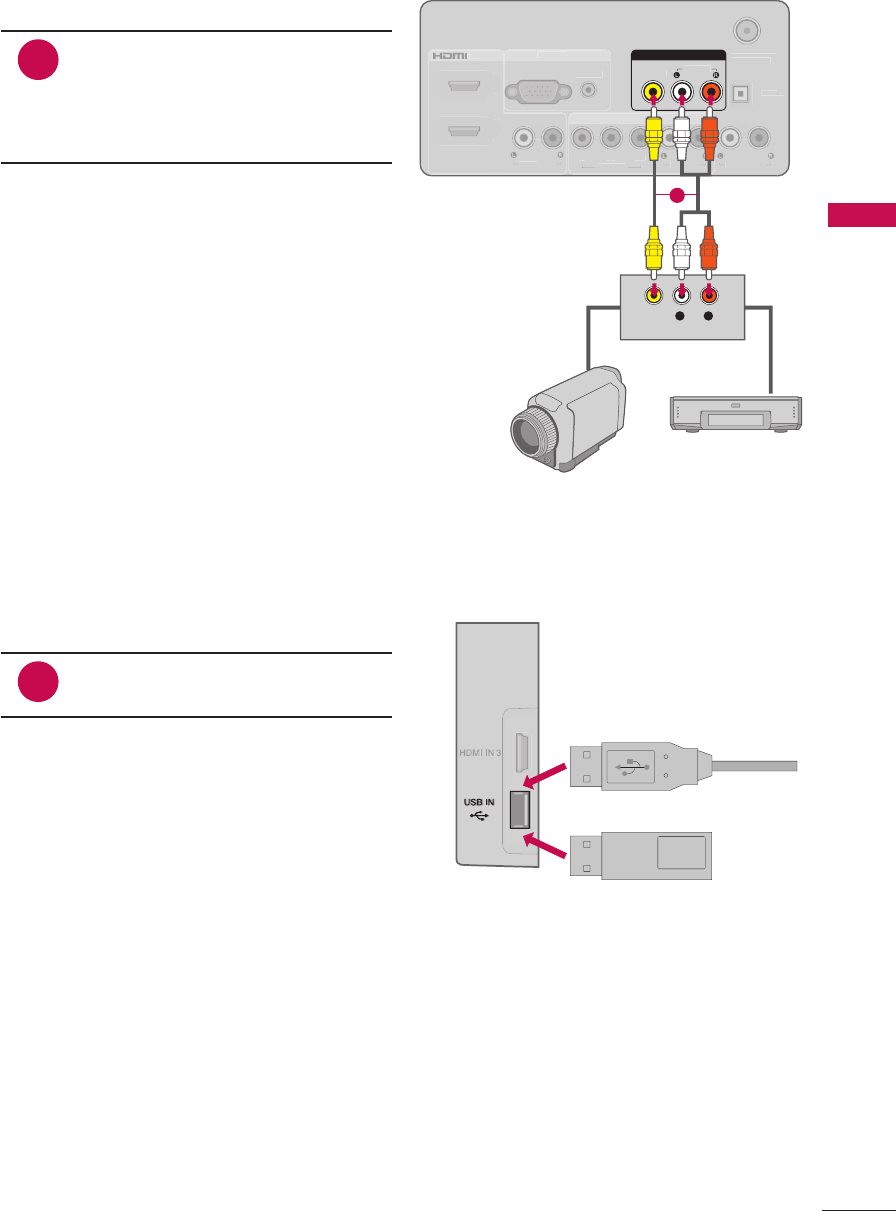
Other A/V Source Setup
Camcorder
Video Game Set
Memory Key
1. How to connect
1Connect the USB device to the
USB IN jack on the side of TV.
2. How to use
r After connecting the USB IN jack, you
use the USB function.
USB Connection
22
EXTERNAL EQUIPMENT SETUP
NOTE
a When connecting with external audio equipment, such as amplifiers or speakers,
you can turn the TV speakers off in the menu.
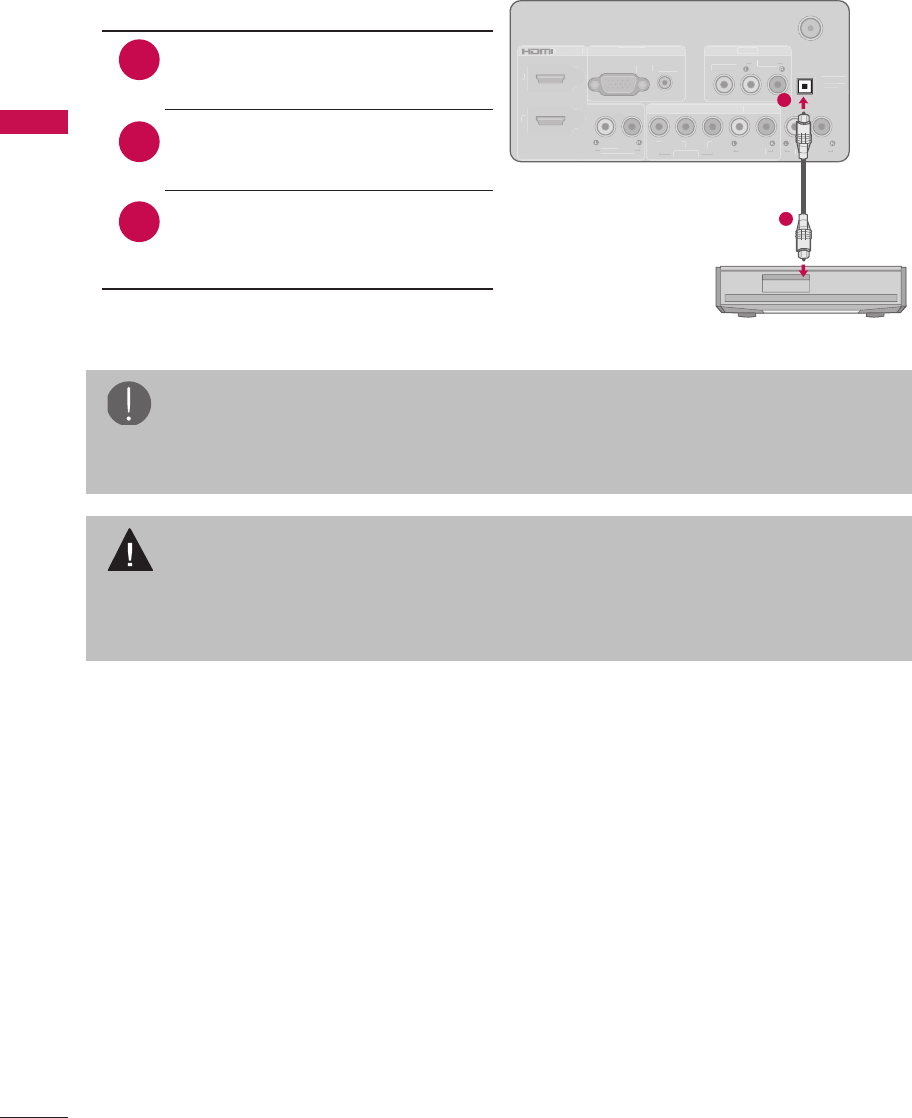
Audio Out Connection
Send the TV’s audio to external audio equipment via the Audio Output port.
If you want to enjoy digital broadcasting through 5.1-channel speakers, connect the
OPTICAL DIGITAL AUDIO OUT terminal on the back of TV to a Home Theater (or amp).
ANTENNA
/
C
ABLE IN
VIDEO
A
V IN
A
A
R
G
B I
N
C
OMPONENT IN
P
R
P
B
Y
O
PTI
C
A
L
DIGIT
AL
T
T
A
U
DI
O
OUT
A
UDI
O
A
U
DI
O
A
U
DI
O
OUT
A
U
DI
O
RG
B
(
P
C)
1
2
V
IDE
O
/ D
VI IN
D
D
D
VI A
D
D
U
DI
O
OPTICAL
DIGITA L
AUDIO OUT
1
2
1. How to connect
1
2
Connect one end of the optical
cable to the TV port of OPTICAL
DIGITAL AUDIO OUT.
Connect the other end of the
optical cable to the digital audio
input on the audio equipment.
Set the “TV Speaker option -
Off” in the AUDIO menu. See
the external audio equipment
instruction manual for operation.
3
CAUTION
a Do not look into the optical output port. Looking at the laser beam may damage
your vision.
a Audio with ACP (Audio Copy Protection) function may block digital audio output.
23
EXTERNAL EQUIPMENT SETUP
PC Setup
This TV provides Plug and Play capability, meaning that a PC adjusts automatically to
the TV’s settings.
ANTENNA
/
C
ABLE IN
VIDEO
A
V IN
A
A
R
G
B I
N
C
OMPONENT IN
P
R
P
B
Y
O
PTI
C
A
L
DIGIT
AL
T
T
A
U
DI
O
OUT
A
UDI
O
A
U
DI
O
A
U
DI
O
OUT
A
U
DI
O
RG
B
(
P
C)
1
2
V
IDE
O
/ D
VI IN
D
D
D
VI A
D
D
U
DI
O
RGB IN
AUDIORGB (PC)
RGB OUTPUT AUDIO
1 2
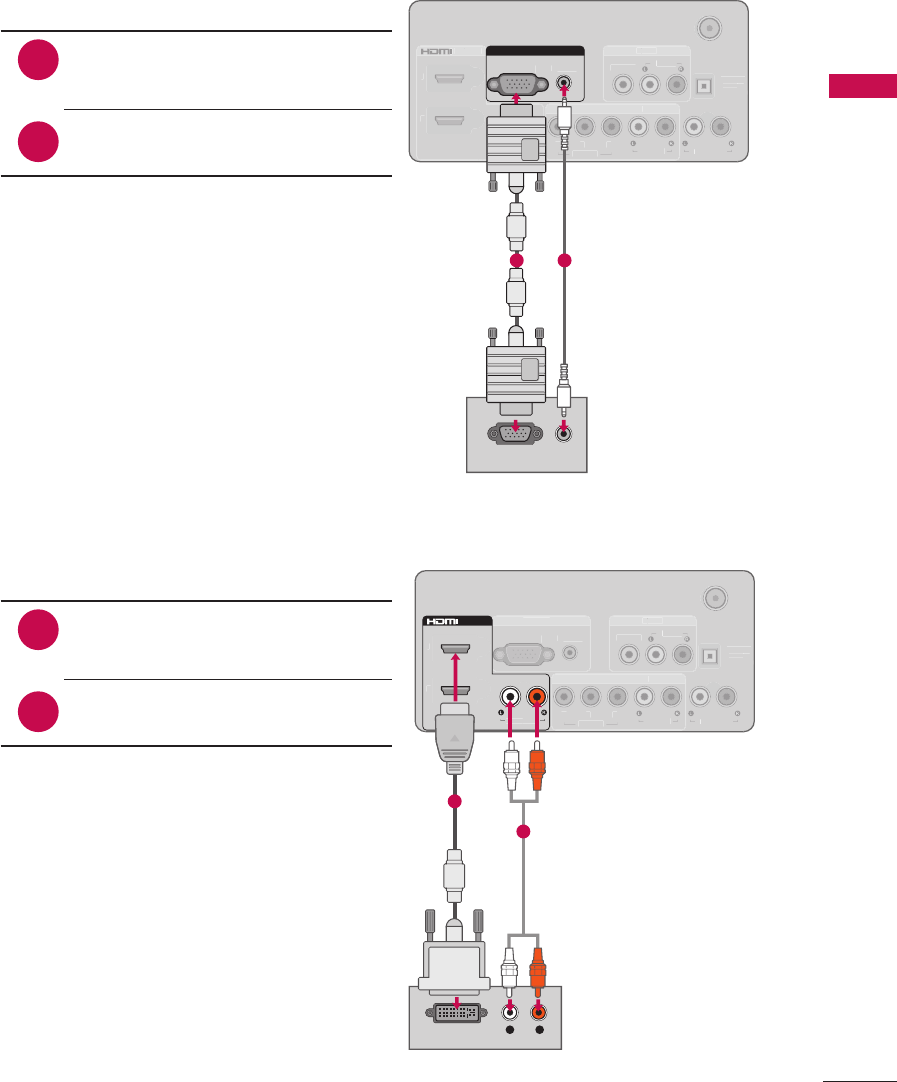
1. How to connect
1
2
Connect the VGA output of the
PC to the RGB IN (PC) jack on
the TV.
Connect PC audio output to the
RGB IN (AUDIO) jack on the TV.
2. How to use
r Turn on the PC and the TV.
r Select the RGB-PC input source on
the TV using the INPUT button on the
remote control.
VGA (D-Sub 15 Pin) Connection
ANTENNA
/
C
ABLE IN
VIDEO
A
V IN
A
A
R
G
B IN
C
OMPONENT IN
P
R
P
B
Y
O
PTI
C
A
L
DIGIT
AL
T
T
A
U
DI
O
OUT
A
UDI
O
A
U
DI
O
A
U
DI
O
OUT
A
U
DI
O
RG
B
(
P
C)
1
2
V
IDE
O
/ D
VI IN
D
D
D
VI A
D
D
U
DI
O
1
2
/ DVI IN
DVI AUDIO
1
L R
DVI OUTPUT
AUDIO
2
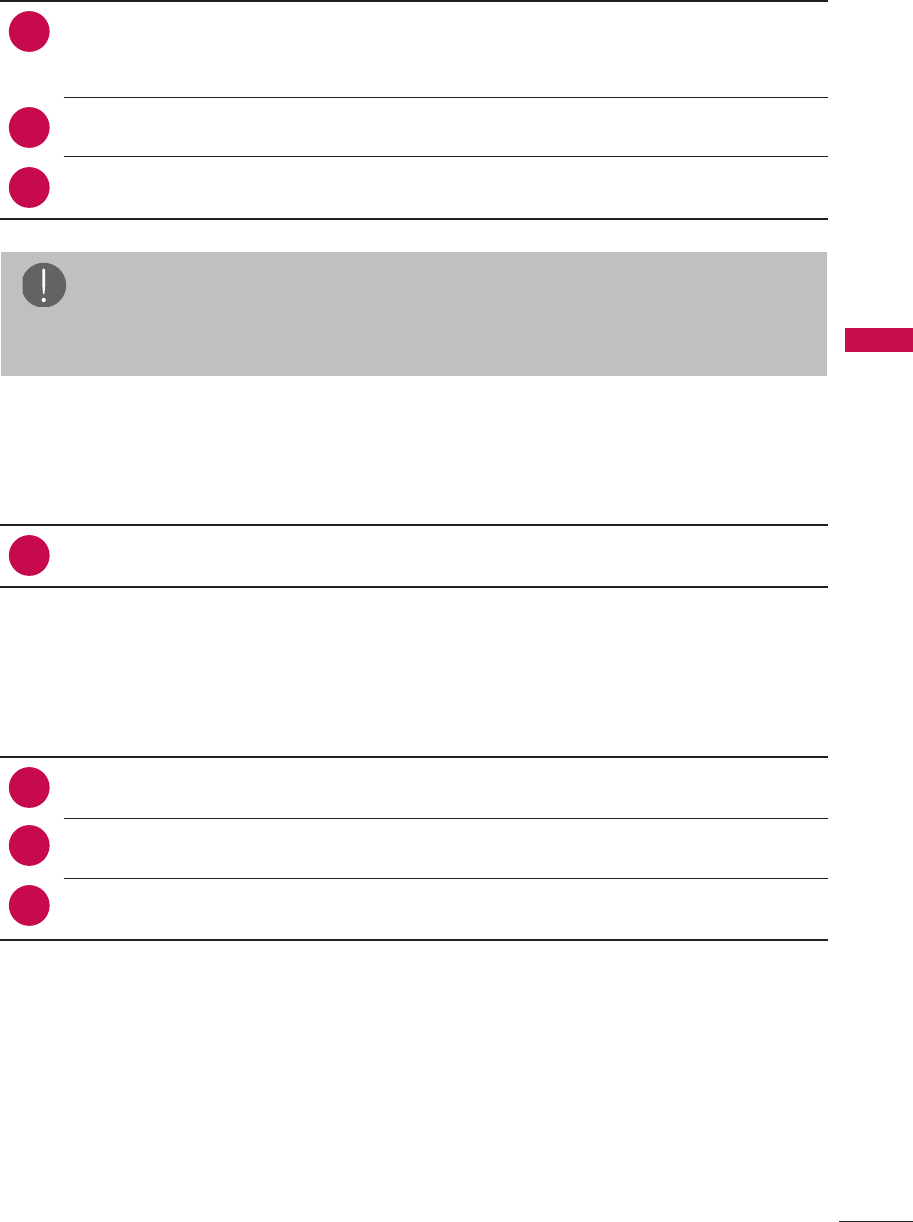
1. How to connect
1
2
Connect the DVI output of the
PC to the HDMI/DVI IN 1 or 2
jack on the TV.
Connect the PC audio output to
the DVI AUDIO jack on the TV.
2. How to use
r Turn on the PC and the TV.
r Select the HDMI 1 or HDMI 2 input
source on the TV using the INPUT
button on the remote control.
DVI to HDMI Connection
24
EXTERNAL EQUIPMENT SETUP
NOTE
a To get the the best picture quality, adjust the PC graphics card to 1360 x 768 or
1920 x 1080.
a Depending on the graphics card, DOS mode may not work if a HDMI to DVI
Cable is in use.
a In PC mode, there may be noise associated with the resolution, vertical pattern,
contrast or brightness.
a If noise is present, change the PC output to another resolution, change the
refresh rate to another rate or adjust the brightness and contrast on the
PICTURE menu until the picture is clear.
a Avoid keeping a fixed image on the screen for a long period of time. The fixed
image may become permanently imprinted on the screen.
a The synchronization input form for Horizontal and Vertical frequencies is
separate.
a Depending on the graphics card, some resolution settings may not allow the
image to be positioned on the screen properly.
Supported Display Specifications (RGB-PC, HDMI-PC)
Resolution Horizontal Frequency(KHz) Vertical Frequency(Hz)
640x350 31.468 70.09
720x400 31.469 70.08
640x480 31.469 59.94
800x600 37.879 60.31
1024x768 48.363 60.00
1280x768 47.776 59.87
1360x768 47.71 2 60.015
1360x768 63.981 60.02
1600x1200 75.00 60.00
1920x1080
RGB-PC
66.587 59.934
1920x1080
HDMI-PC
66.587 59.934

25
WATCHING TV / CHANNEL CONTROL
WATCHING TV/ CHANNEL CONTROL
Remote Control Functions
When using the remote control, aim it at the remote control sensor on the TV.
The remote control may differ from the images below.
PICTURE SOUND
SAP
RATIO
TV
INPUT
POWER
FAV
CC
MUTE
MENU
RETURN
Q.MENU
VOL CH
1 2 3
4 5 6
7 8 9
-
0
FLASHBK
ENTER
MKJ36998105
Group No. Item Description
TV Returns to the last TV channel.
POWER Turns the TV on from standby or off to standby.
INPUT Rotates through inputs.
Also switches the TV on from standby.
RATIO Changes the aspect ratio.
SAP Selects MTS sound.
SOUND Changes the sound model
PICTURE Changes the picture mode.
NUMBER
buttons
Used to enter a program number for multiple program
channels such as 2-1, 2-2, etc.
FLASHBK Tunes to the last channel viewed.
1
1
2
2
3
4

26
WATCHING TV / CHANNEL CONTROL
Installing Batteries
r Open the battery compartment cover on the
back side and install the batteries matching
correct polarity.
r Install two 1.5V AAA batteries. Don’t mix old or
used batteries with new ones.
r Close cover.
Group No. Item Description
CHANNEL
(UP/DOWN)
Changes the channel.
RETURN Allows the user to move return one step in an interactive
application or other user interaction function.
FAV Scroll through the programmed Favorite channels.
CC Switches the caption on or off.
MUTE Switches the sound on or off.
MENU Displays the main menu or clears all on-screen displays
and return to TV viewing.
VOLUME
(UP/DOWN)
Adjusts the volume.
Q.MENU Opens the list of Quick Menu options.
THUMBSTICK
(Up/Down/
Left/Right/
ENTER)
Navigates the on-screen menus and adjusts the system
settings to your preference.
3
4
27
WATCHING TV / CHANNEL CONTROL
Turning on the TV
1
2
First, connect power cord correctly.
At this moment, the TV switches to standby mode.
a In standby mode to turn TV on, press the POWER button.
Select the viewing source by using the INPUT button on the remote control.
When finished using the TV, press press the POWER button. on the remote
control. The TV reverts to standby mode.
3
Channel Selection
1Press the CHANNEL or NUMBER buttons to select a channel number.
Volume Adjustment
1
2
Press the VOLUME button to adjust the volume.
If you want to switch the sound off, press the MUTE button.
You can cancel the Mute function by pressing the MUTE or VOLUME button.
3
NOTE
a If you intend to be away on vacation, disconnect the power plug from the wall
power outlet.
28
WATCHING TV / CHANNEL CONTROL
Initial Setting
This Function guides the user to easily set the essential items for viewing the TV for the
first time when purchasing the TV. It will be displayed on the screen when turning the
TV on for the first time. It can also be activated from the user menus.
r Default selection is “Home”. We recommend setting the TV to “Home” mode for
the best picture in your home environment.
r “In Store” Mode is only intended for use in retail environments. Customers can
adjust the “Picture menu - Picture mode” manually while inspecting the TV, but
the TV will automatically return to preset in-store mode after 5 minutes.
r “In Store” Mode is an optimal setting for displaying at stores. “In Store” mode
initializes the TV to set the image quality.
Enter
Step2. Time Setting
Current Time Setting
Year
Month
Date
Hour
Minute
Time Zone
Daylight Saving
Exit
RETURN
Auto
----
--
--
--
--
Eastern
Auto
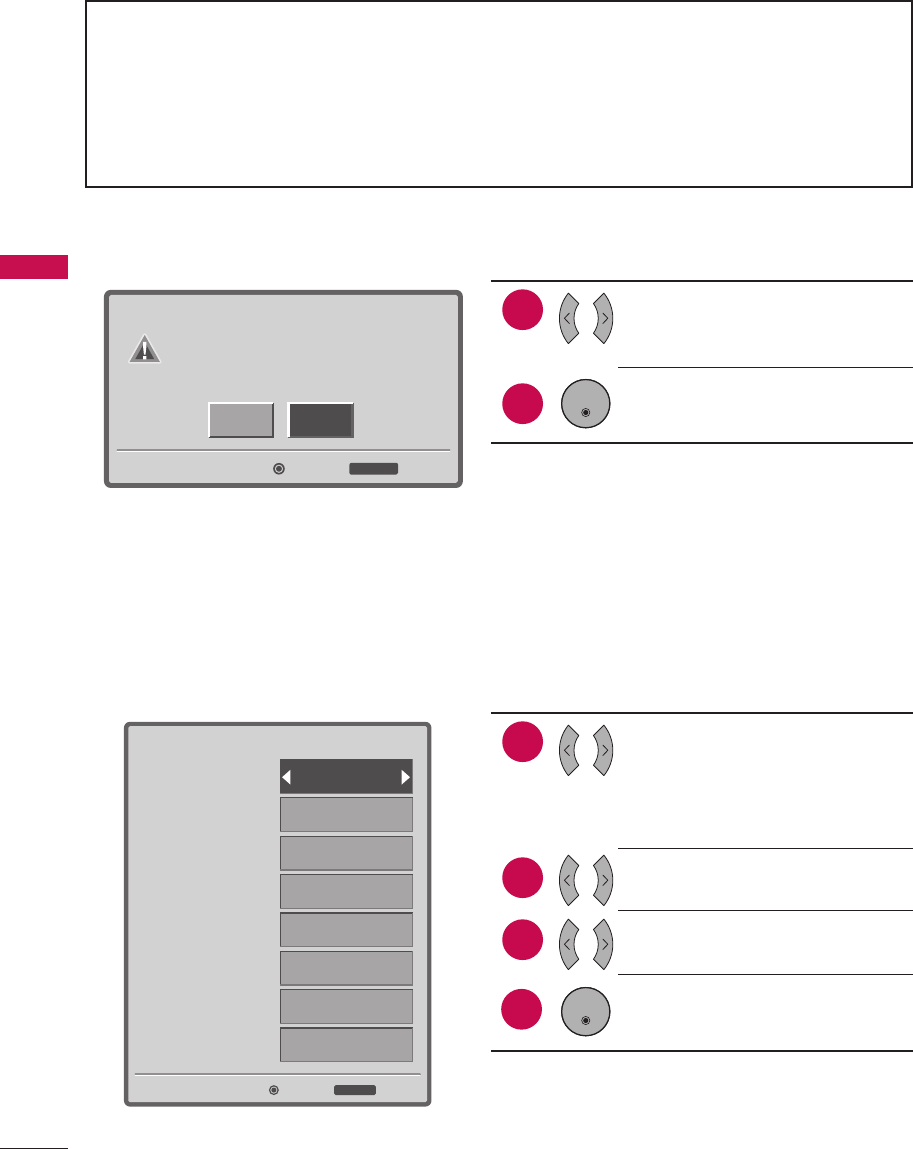
2. Time Setting
1
2
Select Current Time Setting
option.
r If you select “Manual”,
enter the data for Year,
Month, Date, Hour, Minute.
Select Time Zone option.
Select Daylight Saving
option.
After all settings are
completed, press the ENTER
button.
3
4
ENTER
HomeIn Store
Enter
Step1. Mode Setting
Selecting the environment.
Choose the setting mode you want.
Exit
RETURN
1. Mode Setting
1
2
Select Setting Mode option.
Press the ENTER button.
ENTER
29
WATCHING TV / CHANNEL CONTROL
Enter
Step3. Option Setting
1.OSD Language Setting
2.Audio Language Setting
Exit
RETURN
English
English
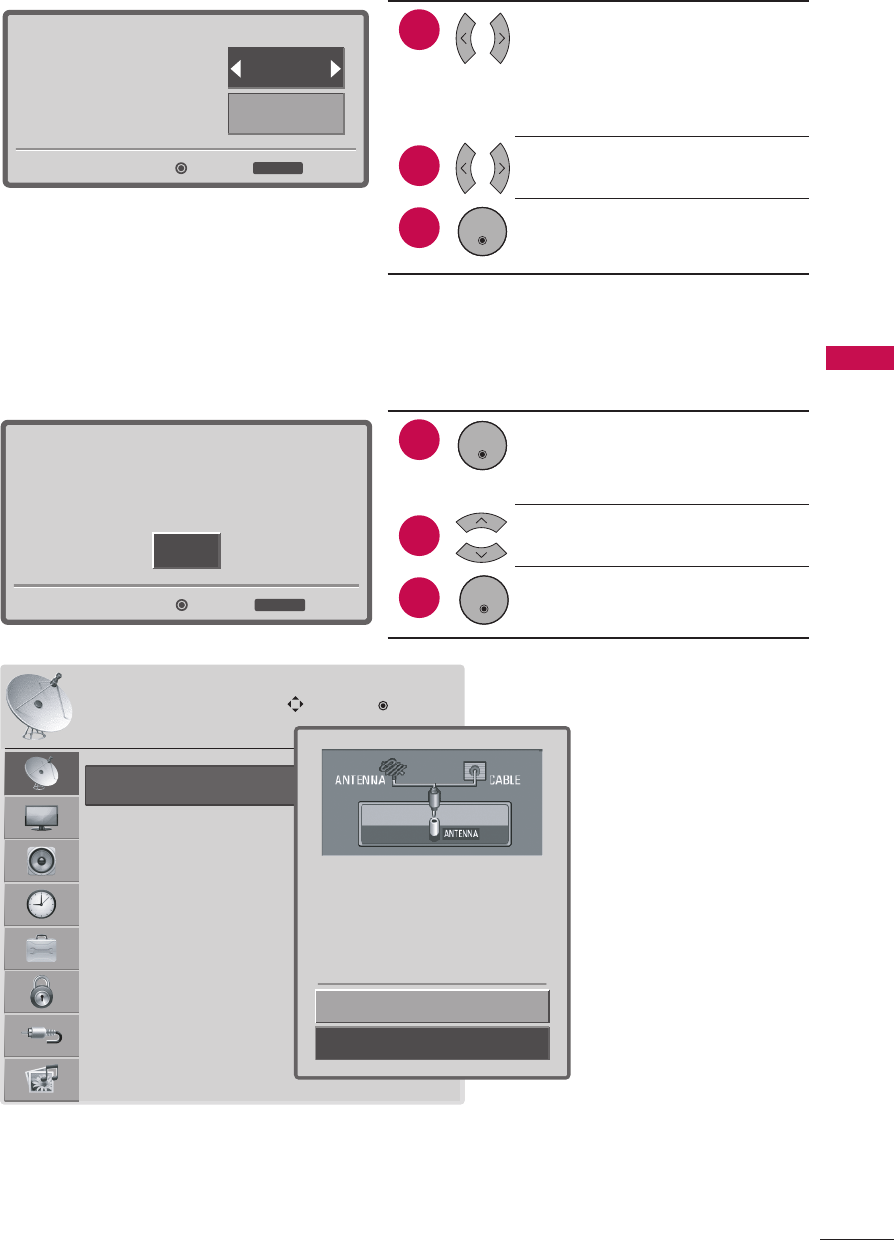
3. Option Setting
1
2
Select OSD Language
Setting option.
Select Audio Language
Setting option.
Press the ENTER button.
3
ENTER
Enter
Enter
Step4. Auto Tuning
Auto Tuning can change channel map.
Do you want to start Auto Tuning?
Exit
RETURN
4. Auto Tuning
1
2
Check your antenna
connection and press the
ENTER button to start Auto
Tuning.
Select Yes to begin auto
tuning.
Press the ENTER button.
3
ENTER
ENTER
Auto Tuning
Manual Tuning
Channel Edit
CHANNEL
Move Enter
Yes
No
Press 'Yes' button to begin
auto tuning.
30
MENU ADJUSTMENTS
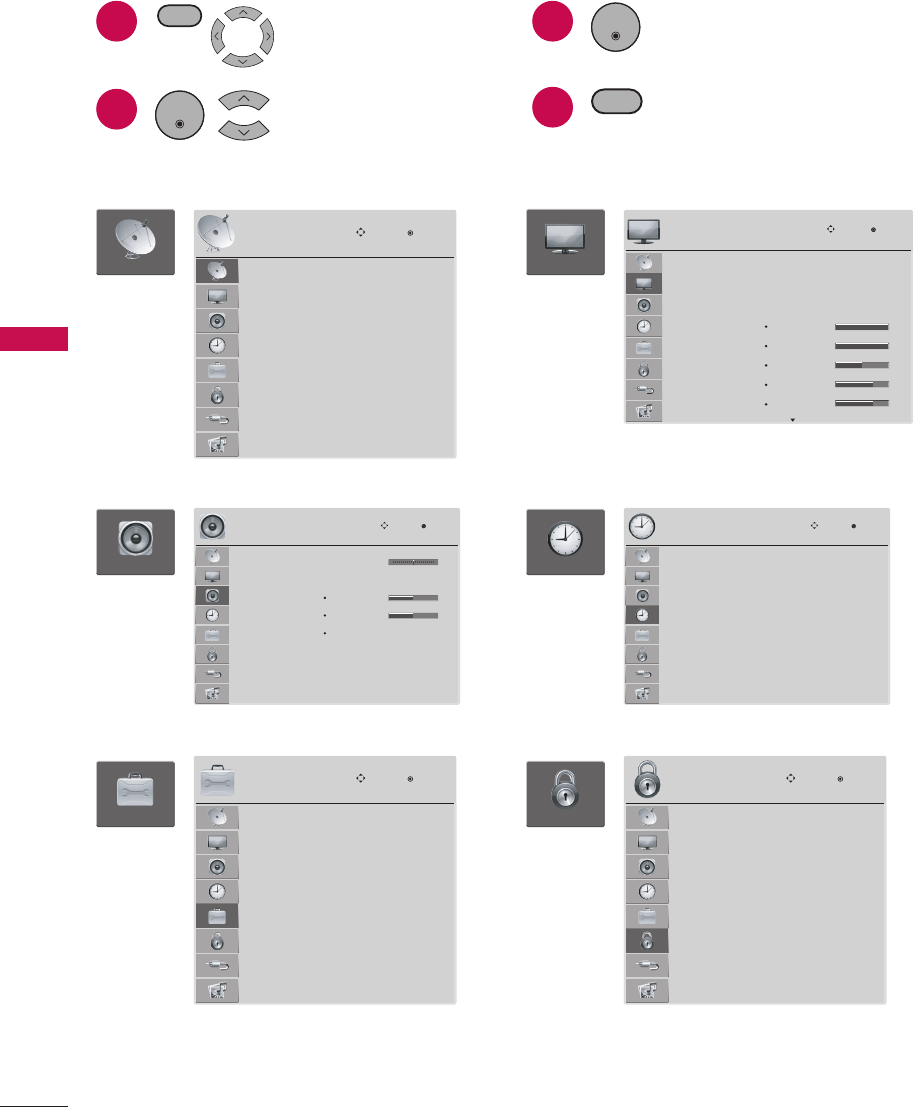
On-Screen Menus Selection
Your TV’s OSD (On Screen Display) may differ slightly from that shown in this manual.
1
2
Display each menu.
Select a menu item.
ENTER
3
4
Accept the current
selection.
Return to TV viewing.
ENTER
RETURN
MENU
Auto Tuning
Manual Tuning
Channel Edit
Move Enter
CHANNEL
CHANNEL
Balance
Sound Mode
TV Speakers
Digital Audio Out
Analog Audio Out
: Standard
T r eble
Bass
Reset
: On
: PCM
: V a riable
0
50
50
AUDIO
Move Enter
LR
AUDIO
OPTION
Language
Input Label
Key Lock
Caption
Initial Setting
Move Enter
OPTION
English
: Off
: Off
Aspect Ratio
Energy Saving
Picture Mode
: Full
: Auto
: Vivid
Backlight
Contrast
Brightness
Sharpness
Color
100
100
50
70
70
PICTURE
Move Enter
PICTURE
Clock
Off Time
On Time
Sleep Timer
Auto Sleep
--
--
----
--
:
--
--
: Off
: Off
: Off
: Off
TIME
Move Enter
TIME
LOCK
Lock System
Set Password
Block Channel
Movie Rating
TV Rating-Children
TV Rating-General
Downloadable Rating
Input Block
Move Enter
LOCK
: Off
MENU ADJUSTMENTS
31
MENU ADJUSTMENTS
TV
AV
Component
RPG-PC
HDMI1
HDMI2
Move Enter
Input
INPUT
PHOTO LIST
MUSIC LIST
Move Enter
USB
USB
* HDMI 3: For 47LD500
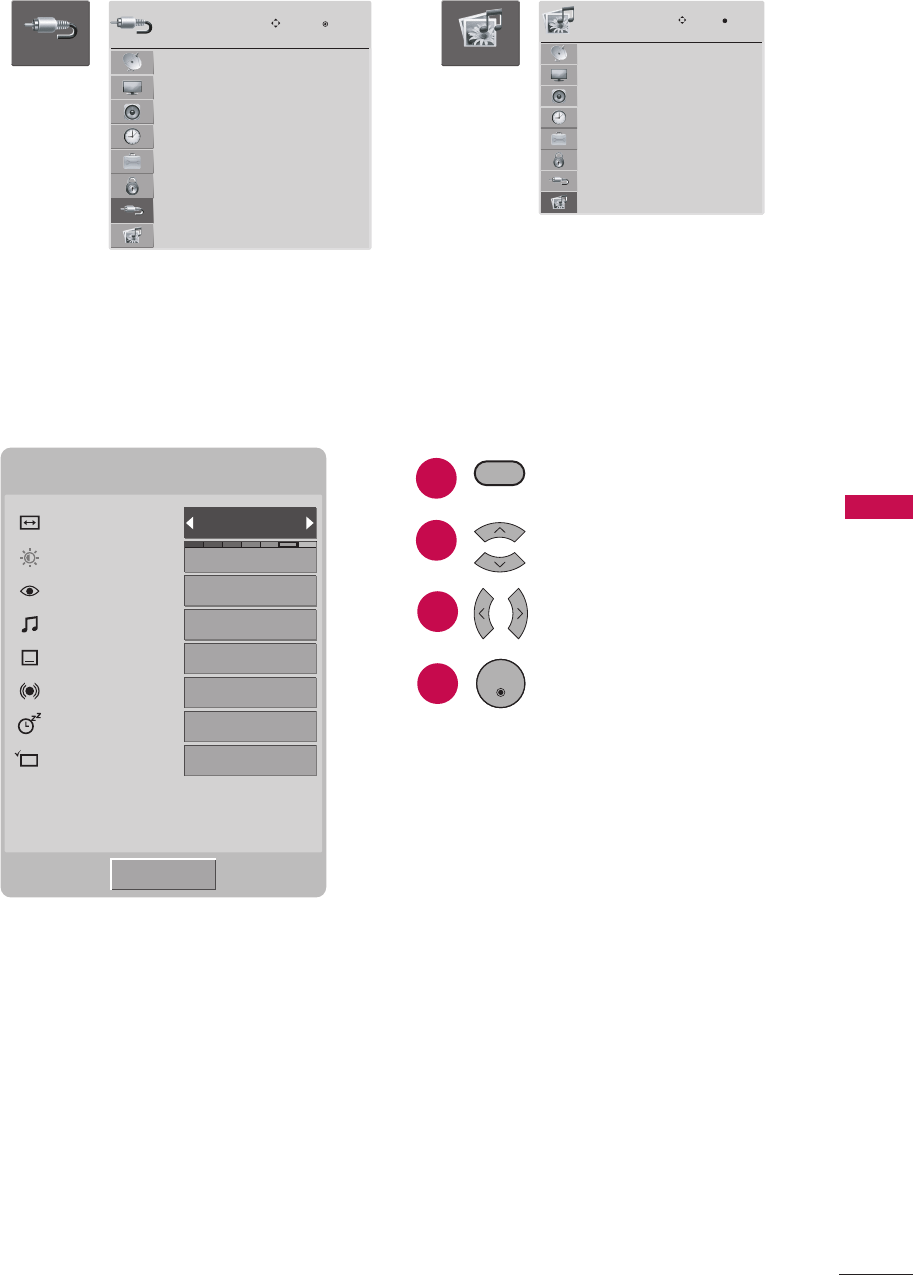
Quick Menu
Your TV’s OSD (On Screen Display) may differ slightly from what is shown in this
manual. Q.Menu (Quick Menu) is a menu of features which users might use frequently.
Q.Menu
Aspect Ratio
Backlight
Picture Mode
Sound Mode
Caption
SAP
Sleep Timer
Del/Add/Fav
Full
5
Standard
Standard
Off
Mono
Off
Add
M
CH
Close
a Aspect Ratio: Selects your desired picture format.
a Picture Mode: Selects the desired preset picture setting.
a Sound Mode: Selects the desired preset sound setting.
a Caption: Sets the caption mode to on or off.
a SAP: Selects MTS sound.
r Analog TV: Mono / Stereo / SAP
r Digital TV: English / French / Spanish / Korean / Japanese / Chinese / German /
Italian / Russian
a Sleep Timer: Turns the TV off at the preset time.
a Del/Add/Fav: Selects channel you want to add, delete, or add to the Favorite list.
3
4
Display Quick menu.
Select a menu item.
Choose the setting.
Accept the current
selection and return to TV
viewing.
ENTER
Q.MENU
1
2
32
MENU ADJUSTMENTS
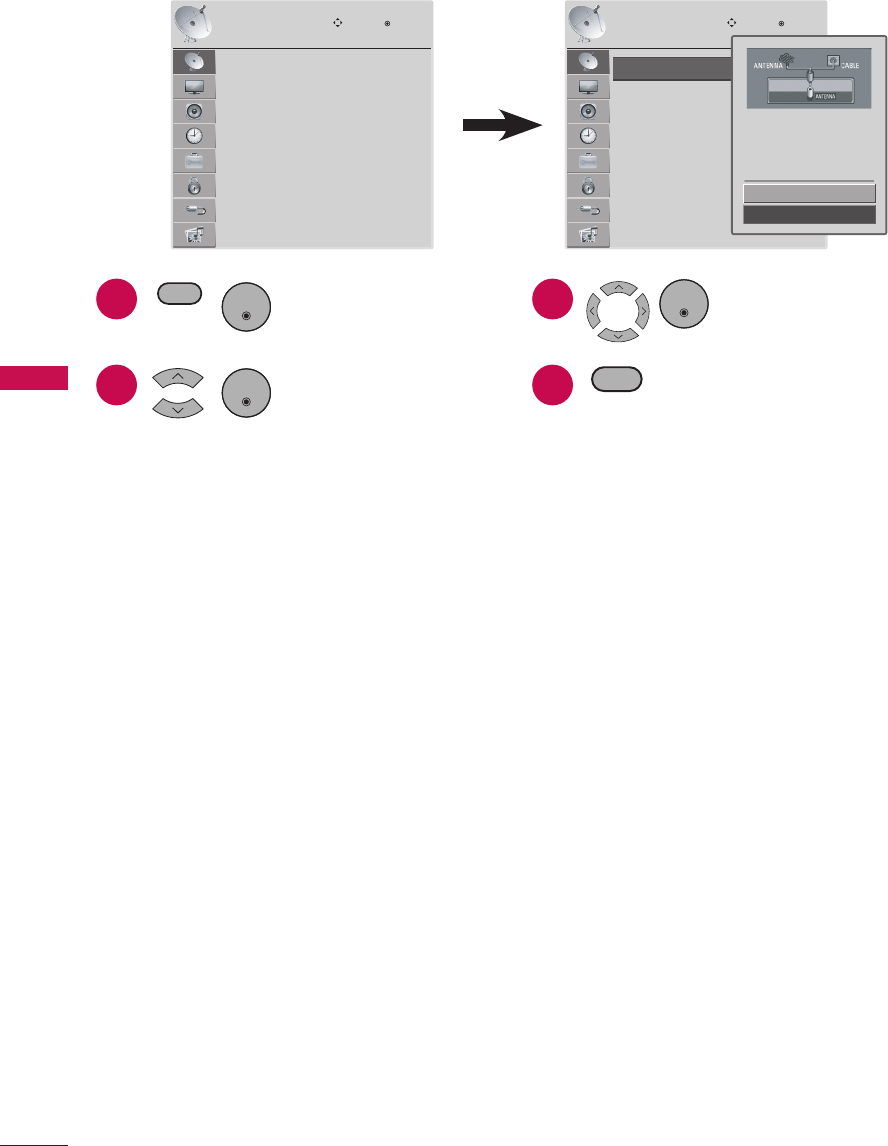
Channel Menu
The Channel menu offers options to setup of your television to receive TV channels.
Auto Tuning
Manual Tuning
Channel Edit
Move Enter
CHANNEL
Auto Tuning
Manual Tuning
Channel Edit
CHANNEL
Move Enter
Ye s
No
Press 'Yes' button to begin
auto tuning.
1
2
Display CHANNEL
menu.
Select a menu item.
ENTER
3
4
Set the setting.
Return to TV viewing.
ENTER
RETURN
MENU
ENTER
a Auto Tuning
r Automatically finds all channels available through antenna or cable inputs, and
stores them in memory on the channel list.
r Run this function if you change your residence or move the TV.
r Auto Tuning memorizes only the channels available at the time.
r Found channels are grouped in the order of DTV, TV, Cable DTV (CADTV) and
Cable TV (CATV).
a Manual Tuning
r When selecting DTV or Cable DTV input signal in Manual Tuning, you can view the
on-screen signal strength monitor to see the quality of the signal being received.
r Select the channel type and RF-channel number. Then select Add or Delete.
a Channel Edit
r The channels in the Channel Edit List are displayed in black and the channels
deleted from the Channel Edit List are displayed in gray.
r When a channel number is deleted, it means that you will be unable to select
it using CHANNEL button during TV viewing. If you wish to select the deleted
channel, directly enter the channel number with the NUMBER buttons or select it
in the Channel Edit menu.
33
MENU ADJUSTMENTS
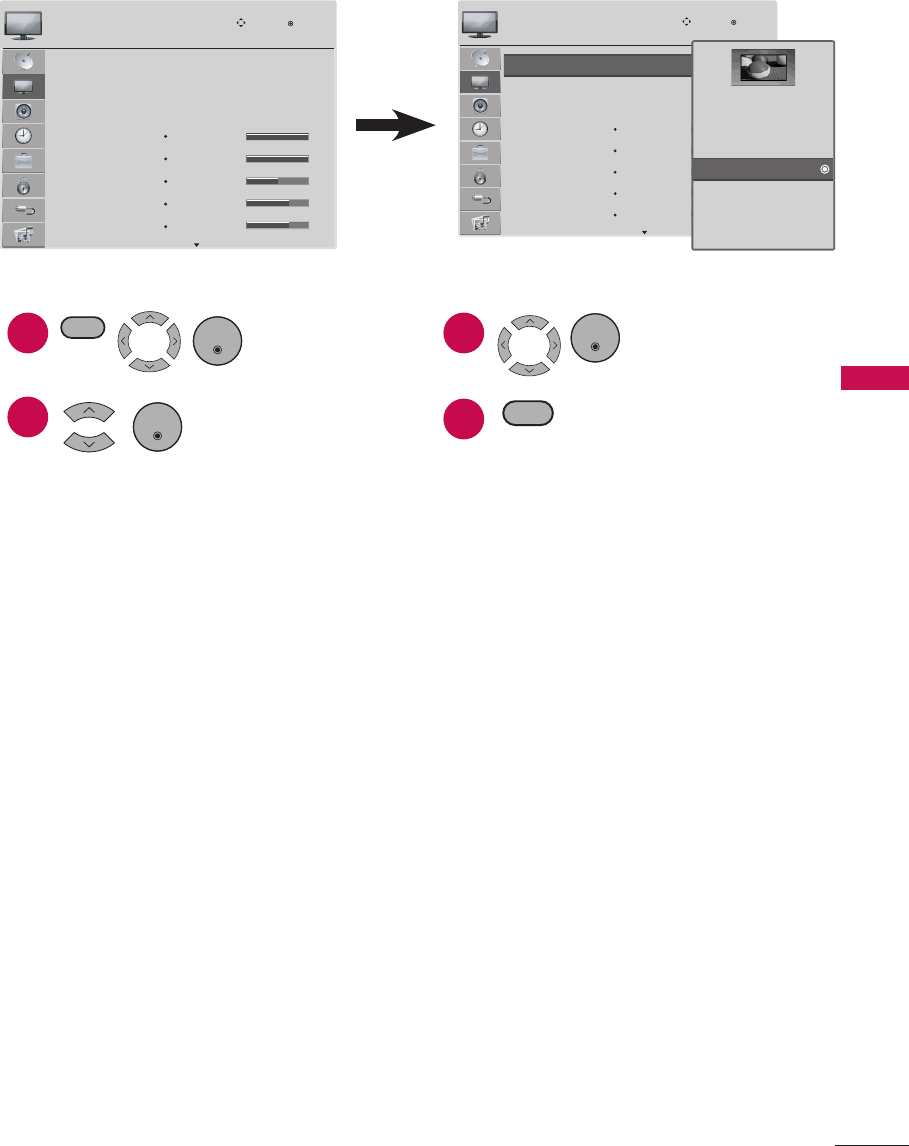
Picture Menu
The Picture menu offers options to enhance and refine the picture displayed on your TV
based on ambient room light and personal preferences.
Aspect Ratio
Energy Saving
Picture Mode
: Full
: Auto
: Vivid
Backlight
Contrast
Brightness
Sharpness
Color
100
100
50
70
70
PICTURE
Move Enter
Aspect Ratio
Energy Saving
Picture Mode
: Full
: Auto
: Vivid
Backlight
Contrast
Brightness
Sharpness
Color
100
100
50
70
70
PICTURE
Move Enter
Set By Program
4:3
16:9
Full
Zoom1
Zoom2
Just Scan
1
2
Display PICTURE
menu.
Select a menu item.
ENTER
3
4
Set the setting.
Return to TV viewing.
ENTER
RETURN
MENU
ENTER
a Aspect Ratio
r This feature lets you choose the way an analog picture with a 4:3 aspect ratio is
displayed on your TV. You can select a different aspect ratio depending on input
source (analog broadcasting, digital broadcasting, aux).
a Energy Saving
r It reduces the TV’s power consumption by lowering the backlight level.
r You can increase the brightness of your screen by adjusting the Energy Saving
level.
r Backlight feature will only work if you adjust “Energy Saving- Off”.
a Picture Mode
r Vivid, Standard, Cinema, Sport, and Game settings are preset for the optimum
picture quality at the factory.
r You can use a preset, change each setting manually.
a Backlight: This function adjusts the brightness of the backlight behind the LCD
screen. Adjusting the backlight is recommended when setting the brightness
of the TV. When decreasing the backlight, the brightness of the black becomes
darker without any loss in video signal and the power consumption is reduced.
a Contrast: Increases or decreases the gradient of the video signal. You may use
Contrast when the bright part of the picture is saturated.
a Brightness: Adjusts the base level of the signal in the picture. You may use
Brightness when the dark part of the picture is saturated.
34
MENU ADJUSTMENTS
a Sharpness: Adjusts the level of crispness in the edges between the light and
dark areas of the picture. The lower the level, the softer the image.
a Color: Adjusts intensity of all colors.
a Tint: Adjusts the balance between red and green levels.
a Advanced Control: Allows you to adjust some of the advanced features of
your LG display such as Color Temperature, Fresh Contrast, Fresh Color, Noise
Reduction, Gamma, Black Level, and Real Cinema settings.
a Reset: Returns to factory default settings.
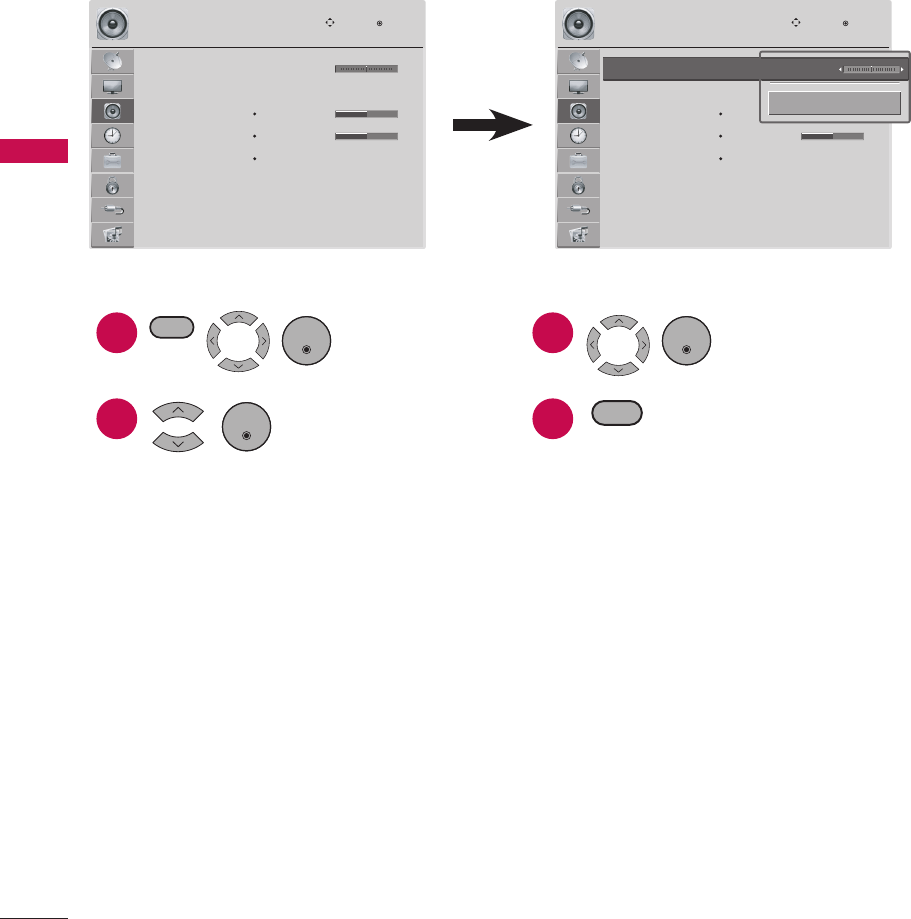
Audio Menu
The Audio menu offers options to enhance and refine the sound setting on your TV
based on personal preferences.
Balance
Sound Mode
TV Speakers
Digital Audio Out
Analog Audio Out
: Standard
Tr eble
Bass
Reset
: On
: PCM
: Va riable
0
50
50
AUDIO
Move Enter
LR
Balance
Sound Mode
TV Speakers
Digital Audio Out
Analog Audio Out
: Standard
Tr eble
Bass
Reset
: On
: PCM
: Va riable
0
50
50
AUDIO
Move Enter
LR
Balance :0
Close
LR
1
2
Display AUDIO
menu.
Select a menu item.
ENTER
3
4
Set the setting.
Return to TV viewing.
RETURN
MENU
ENTER
a Balance
r Adjusts the left/right sound of speaker to suit your taste and room situations.
a Sound Mode
r Standard, Music, Cinema, Sport, and Game are preset for optimum sound quality
at the factory.
a Treble: Adjusts the high frequency intensity setting.
a Bass: Adjusts the low frequency intensity setting.
a Reset: Returns to factory default settings.
a TV Speakers
r If you wish to use an external Hi-Fi system, turn off the TV’s internal speakers.
ENTER
35
MENU ADJUSTMENTS
a Digital Audio Out
r Sets the digital audio out setting.
a Analog Audio Out
r Sets the analog audio out setting.
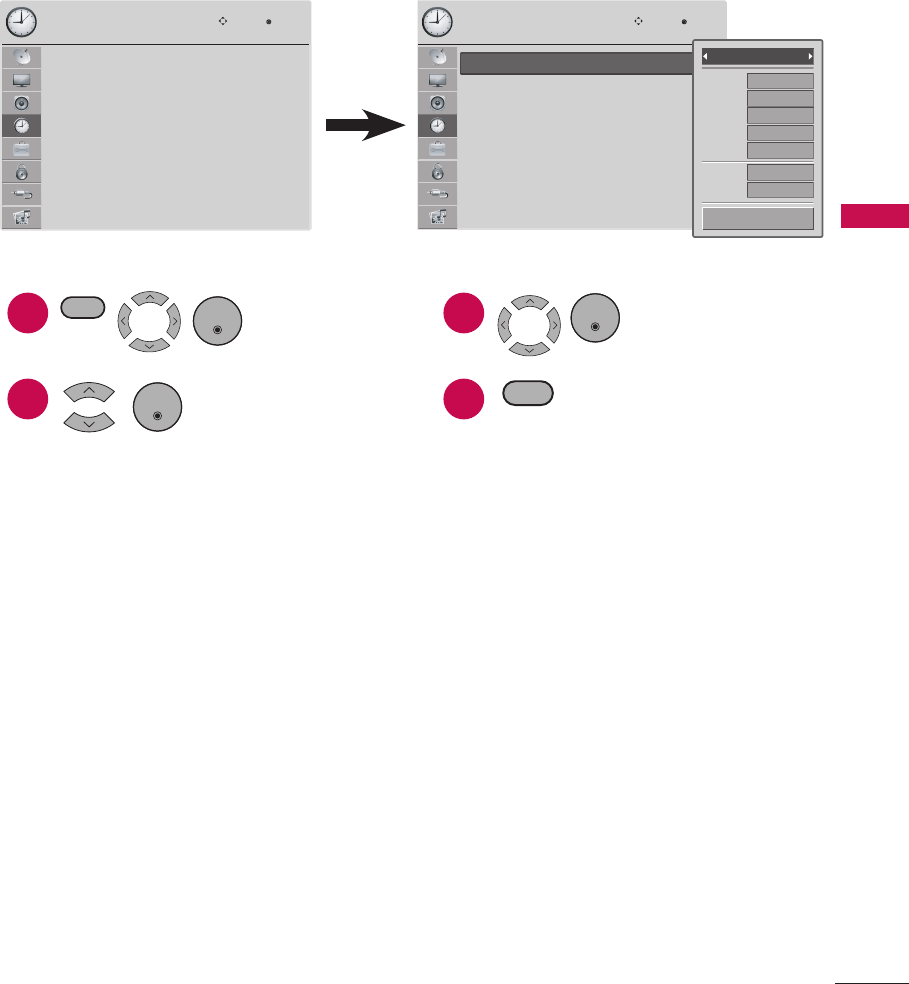
Time Menu
The Time menu offers options to adjust the time setting, set the TV turn/off time, sleep
timer, and auto sleep.
Clock
Off Time
On Time
Sleep Timer
Auto Sleep
--
--
----
--
:
--
--
: Off
: Off
: Off
: Off
TIME
Move Enter
Clock
Off Time
On Time
Sleep Timer
Auto Sleep
--
--
----
--
:
--
--
: Off
: Off
: Off
: Off
TIME
Move Enter
Year
Month
Date
Hour
Minute
Time Zone
Daylight
Saving
----
--
--
--
--
Eastren
Auto
Auto
Close
1
2
Display TIME
menu.
Select a menu item.
ENTER
3
4
Set the setting.
Return to TV viewing.
ENTER
RETURN
MENU
ENTER
a Clock
r Adjusts the time settings on your TV.
r With Auto setting, the time is set automatically from a digital channel signal.
r If the current time setting is wrong, reset the clock manually.
a Off Time
r Sets the time the TV will automatically be turned off.
r This function operates only if the current time has been set.
a On Time
r Sets the time the TV will automatically be turned on.
r This function operates only if the current time has been set.
r The TV must be in standby mode for the On Time to work.
r If you do not press any button within 2 hours after the TV turns on with the On
Time function, the TV will automatically revert to standby mode.
36
MENU ADJUSTMENTS
a Sleep Timer
r Turns the TV off at the preset time.
a Auto Sleep
r If sets “Auto Sleep” to “On”, the TV will automatically turn off in case of:
a TV without signal: You do not press any remote control / TV buttons within 10
minutes.
a TV with signal: You do not press any remote control / TV buttons within 2 hours.
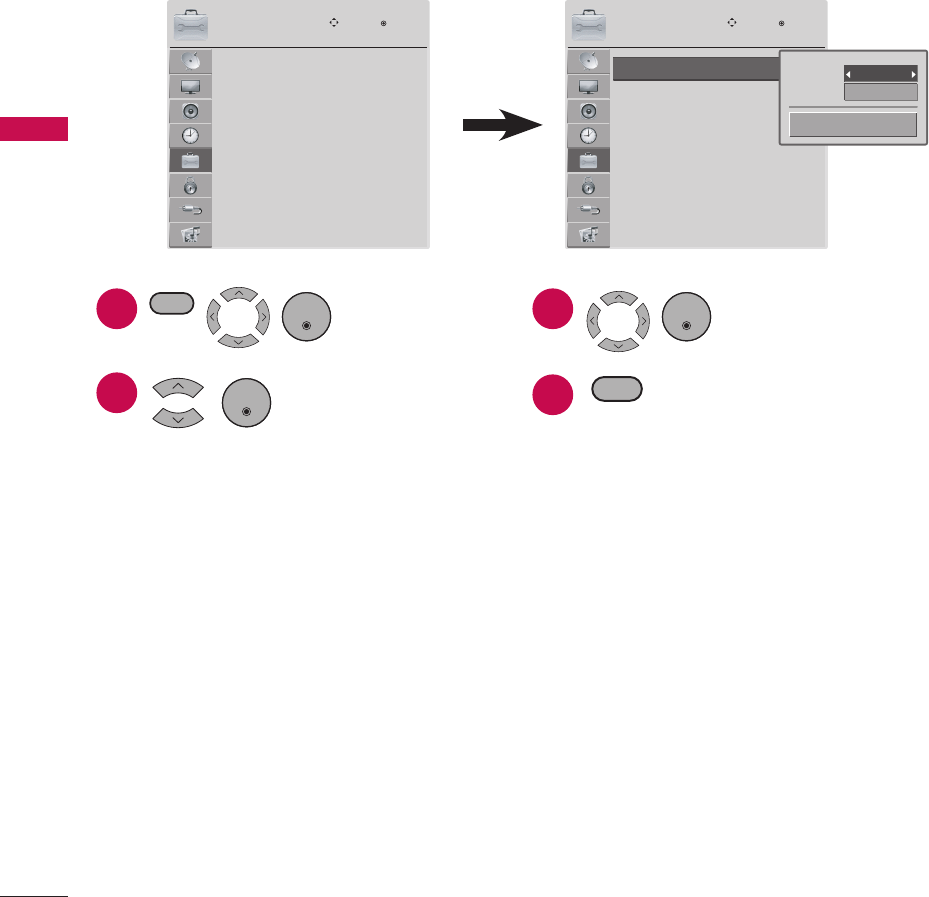
Option Menu
The Option menu offers options to set the TV operating environment.
Language
Input Label
Key Lock
Caption
Initial Setting
Move Enter
OPTION
English
: Off
: Off
Language
Input Label
Key Lock
Caption
Initial Setting
Move Enter
OPTION
English
: Off
: Off
Menu
Audio
English
English
Close
1
2
Display OPTION
menu.
Select a menu item.
ENTER
3
4
Set the setting.
Return to TV viewing.
RETURN
MENU
ENTER
a Language
r Sets the on-screen menus and audio languages.
a Input Label
r Sets the label for each input source.
a AV: Input source from a VCR or other external equipment.
a Component: Input source from DVD or a Digital set-top box.
a RGB-PC: Input source from a computer.
a HDMI1/HDMI2/HDMI3*: Input source from high definition (HD) devices.
* HDMI 3: For 47LD500
a Key Lock
r Sets the key lock on or off.
ENTER
37
MENU ADJUSTMENTS
r If this function is set to On:
a A password is required to gain access to this menu.
a The TV is set up with the initial password “0-0-0-0”.
a Caption
r Captions are provided to help the hearing impaired watch TV. Select a caption
mode for displaying captioning information if provided on a program. Analog
caption displays information at any position on the screen and is usually the
program’s dialog. Caption/Text, if provided by the broadcaster, would be
available for both digital and analog channels on the Antenna/Cable. This TV is
programmed to memorize the caption/text mode which was last set when you
turned the power off.
r This function is only available when Caption Mode is set On.
a Caption (CC1-4): The term for the words that scroll across the bottom of the
TV screen; usually the audio portion of the program provided for the hearing
impaired.
a Text (Text1-4): The term for the words that appear in a large black frame and
almost cover the entire screen; usually messages provided by the broadcaster.
a Initial Setting
r See “Initial Setting” (page 28).
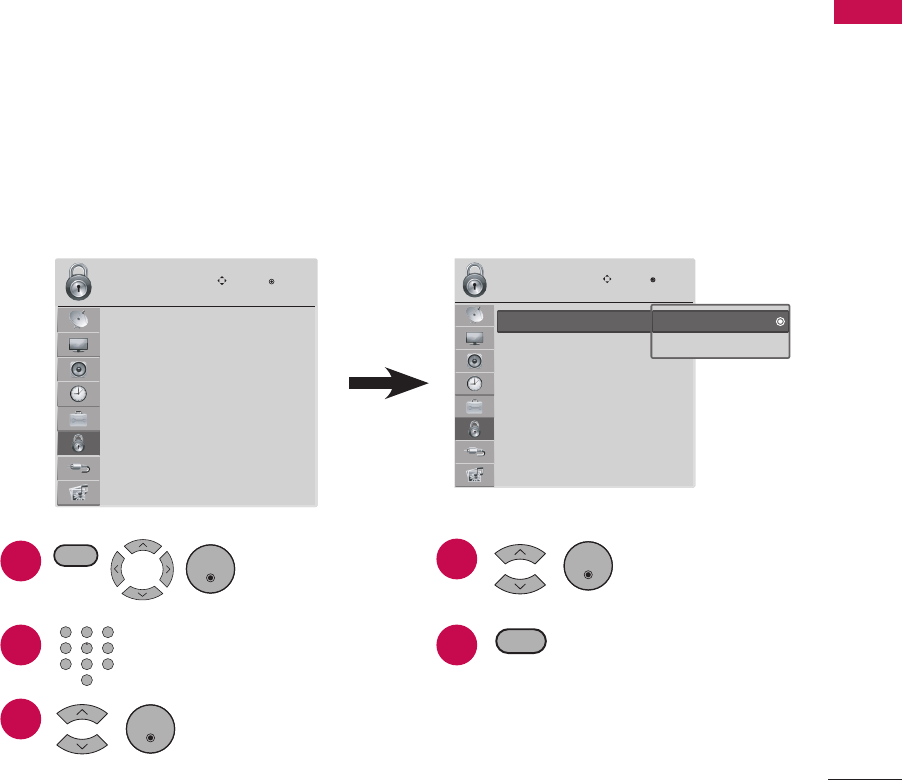
Lock Menu
The Lock menu offers options to set up blocking schemes to block specific channels,
ratings, and external viewing sources. A password is required to gain access to this
menu.
a The TV is set up with the initial password “0-0-0-0”.
Lock System
Set Password
Block Channel
Movie Rating
TV Rating-Children
TV Rating-General
Downloadable Rating
Input Block
Move Enter
LOCK
: Off
Lock System
Set Password
Block Channel
Movie Rating
TV Rating-Children
TV Rating-General
Downloadable Rating
Input Block
Move Enter
LOCK
: Off Off
On
1
2
Display LOCK
menu.
Input the password.
Select a menu item.
ENTER
4
5
Set the setting.
Return to TV viewing.
ENTER
RETURN
MENU
1 2 3
4 5 6
7 8 9
0
3
ENTER

38
MENU ADJUSTMENTS
a Lock System
r Enables or disables the blocking scheme you set up previously.
a Set Password
r Change the password by inputting a new password twice.
a The TV is set up with the initial password “0-0-0-0”.
a Block Channel
r Blocks any channels that you do not want to watch or that you do not want your
children to watch.
a Movie Rating
r Blocks movies according to the movie ratings limits specified, so children cannot
view certain movies. You can set the ratings limit by blocking out all the movies
with the ratings above a specified level. Keep in mind that the movie ratings limit
only applies to movies shown on TV, not TV programs, such as soap operas.
r Movie Rating block options:
a G (General audience)
a PG (Parental guidance suggested)
a PG-13 (Parents strongly cautioned)
a R (Restricted)
a NC-17 (No one 17 and under admitted)
a X (Adult only)
a Blocking Off (Permits all programs)
a If you set PG-13: G and PG movies will be available, PG-13, R, NC-17 and X will
be blocked.
a TV Rating-Children
r Prevents children from watching certain children’s TV programs, according to the
ratings limit set. The children rating does not apply to other TV programs. Unless
you block certain TV programs intended for mature audiences in the TV Rating -
sub menu, your children can view those programs.
r TV Rating-Children block options:
a Age (applies to TV-Y, TV-Y7)
a Fantasy Violence (applies to TV-Y7)
a TV Rating-General
r Based on the ratings, blocks certain TV programs that you and your family do not
want to view.
r TV Rating-General block options:
a Age (applies to TV-G, TV-PG, TV-14, TV-MA).
a Dialogue-sexual dialogue (applies to TV-PG, TV-14).
a Language-adult language (applies to TV-PG, TV-14, TV-MA).
39
MENU ADJUSTMENTS
a Sex-sexual situations (applies to TV-PG, TV-14, TV-MA).
a Violence (applies to TV-PG, TV-14, TV-MA).
a Downloadable Rating
r This function is available only for digital channels.
r This function operates only when TV has received Region5 Rating data.
a Input Block
r Enables you to block an input.
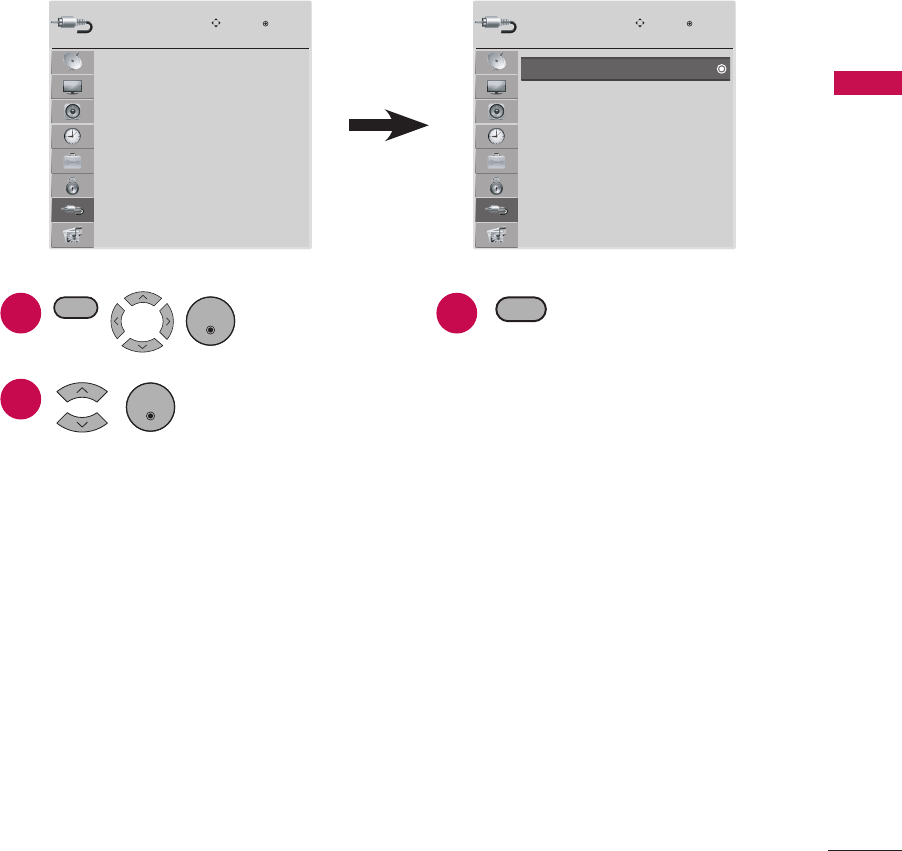
Input Menu
The Input menu offers options to select the desired input source.
TV
AV
Component
RPG-PC
HDMI1
HDMI2
Move Enter
Input
1
2
Display INPUT
menu.
Select the desired
input source.
ENTER
3Return to TV viewing.
RETURN
MENU
ENTER
a TV: Select it to watch over-the-air, cable and digital cable broadcasts.
a AV: Select them to watch a VCR or other external equipment.
a Component: Select them to watch DVD or a Digital set-top box.
a RGB-PC: Select it to view PC input.
a HDMI1/HDMI2/HDMI3*: Select them to watch high definition devices.
* HDMI 3: For 47LD500
TV
AV
Component
RPG-PC
HDMI1
HDMI2
Move Enter
Input
40
MENU ADJUSTMENTS
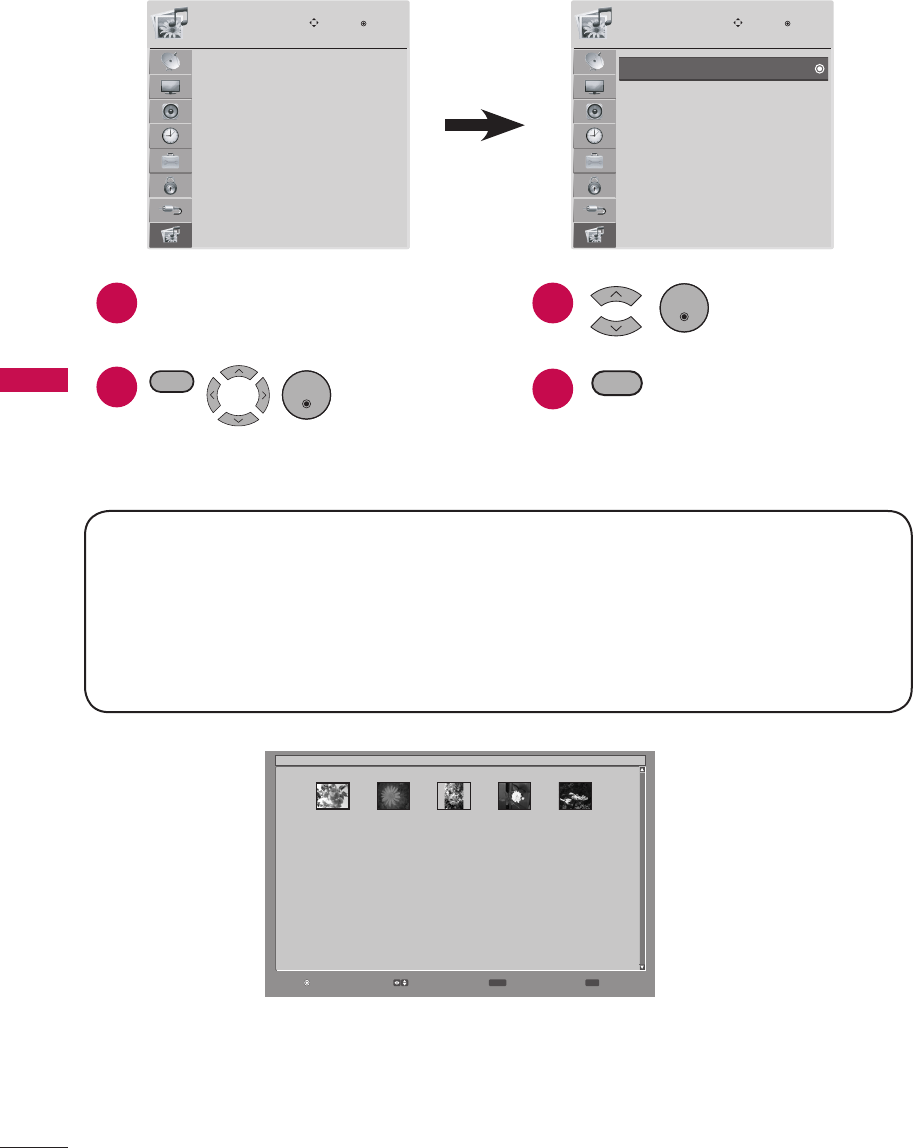
USB Menu
The USB menu will open automatically when you insert a USB drive. USB can also be
accessed by choosing USB in the user menu.
PHOTO LIST
MUSIC LIST
Move Enter
USB
1
2
Connect the USB device to the USB
IN jack on the side of TV.
. Display USB
menu.
ENTER
3
4
Select PHOTO LIST or
MUSIC LIST.
Return to TV viewing.
ENTER
RETURN
MENU
a PHOTO LIST
r To display the image on the screen in full size, select the desired image file and
press the ENTER button.
PHOTO LIST
MUSIC LIST
Move Enter
USB
Supported photo file: *.JPG
1 Baseline: 64 pixel (width) x 64 pixel (height) to 15360 pixel (width) x 8640 pixel
(height)
1 Progressive: 64 pixel (width) x 64 pixel (height) to 1920 pixel (width) x 1440 pixel
(height)
1 You can play JPEG files only.
1 Non-supported files are displayed in the form of predefined icon.
Enter Select Exit
RETURN MENU
/
P0001001.jpg 0001/0005
P0001001.jpg P0001002.jpg P0001003.jpg P0001004.jpg P0001005.jpg
41
MENU ADJUSTMENTS
Enter Select Exit
RETURN MENU
/
P0001001.jpg 0001/0005
P0001001.jpg P0001002.jpg P0001003.jpg P0001004.jpg P0001005.jpg
Slideshow Mode
Slideshow With Music
Repeat
Sort By
Duration
Slideshow Effect
Thumbnail Size
Info
MoveEnter
Photo
Sequence
Off
Off
Photo Date
R5
Random
Small
Off
LR
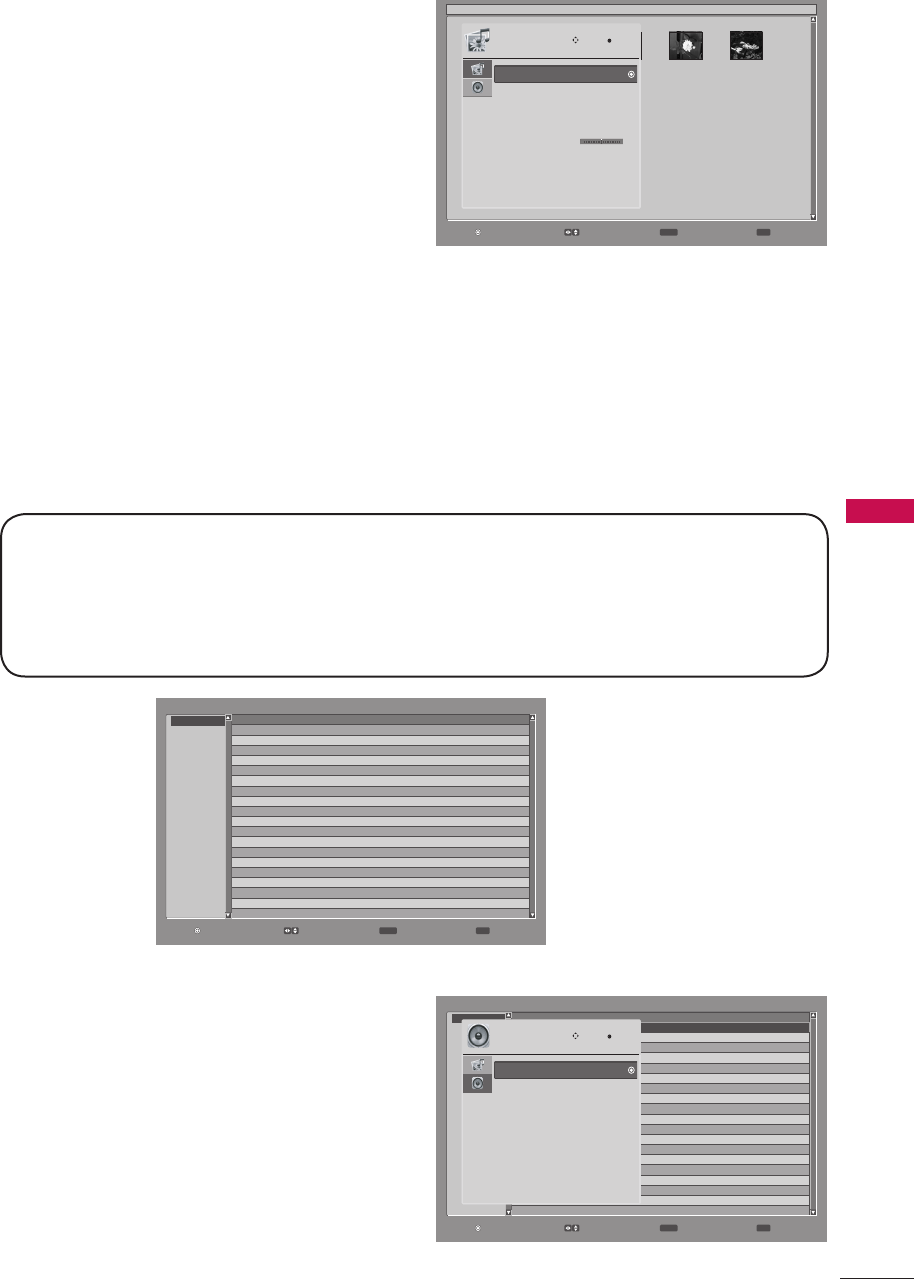
a MUSIC LIST
r To start music playback, select the desired audio file and press the ENTER button.
Enter Select Exit
RETURN MENU
File Name
[\]
\
Title GenreArtistAlbum
A Song About U.mp3A Song About UPop Britney SpearsBlackout
Been A While.mp3 Been A While PopBritney SpearsBlackout
Get Back.mp3 Get Back PopBritney SpearsBlackout
Everybody.mp3 EverybodyPop Britney SpearsBlackout
r Press the MENU button to more
options:
a Slideshow Mode: Selects the
slideshow mode.
a Slideshow With Music: Selects the
slideshow mode with music.
a Music file list: Selects the audio
file that will be playback during the
slideshow.
a Repeat: Sets the repeat mode to on
or off.
a Sort By: Selects the file sorting type.
a Duration: Sets the time interval of the slide show.
a Slideshow Effect: Selects the slideshow transition effect.
a Thumbnail Size: Selects the thumbnail size.
a Info: Sets the information to on or off.
Enter Select Exit
RETURN MENU
File Name
[\]
\
Title GenreArtistAlbum
A Song About U.mp3A Song About UPop Britney SpearsBlackout
Been A While.mp3 Been A While PopBritney SpearsBlackout
Get Back.mp3 Get Back PopBritney SpearsBlackout
Everybody.mp3 EverybodyPop Britney SpearsBlackout
A Song About U 0001/0008
Sort By
Play Mode
Repeat
Info
MoveEnter
Music
Title/File
Sequence
Off
Off
MUSIC (*.MP3) supporting file
Bit rate 32 Kbps - 320 Kbps
1 Sampling rate MPEG1 Layer3: 32 kHz, 44.1 kHz, 48 kHz
1 Sampling rate MPEG2 Layer3: 16 kHz, 22.05 kHz, 24 kHz
1 Sampling rate MPEG2.5 Layer3: 8 kHz, 11.025 kHz, 12 kHz
r Press the MENU button to more
options:
a Sort By: Selects the file sorting
type.
a Play Mode: Selects the play mode.
a Repeat: Sets the repeat mode to on
or off.
a Info: Sets the information to on or
off.
42
APPENDIX
APPENDIX
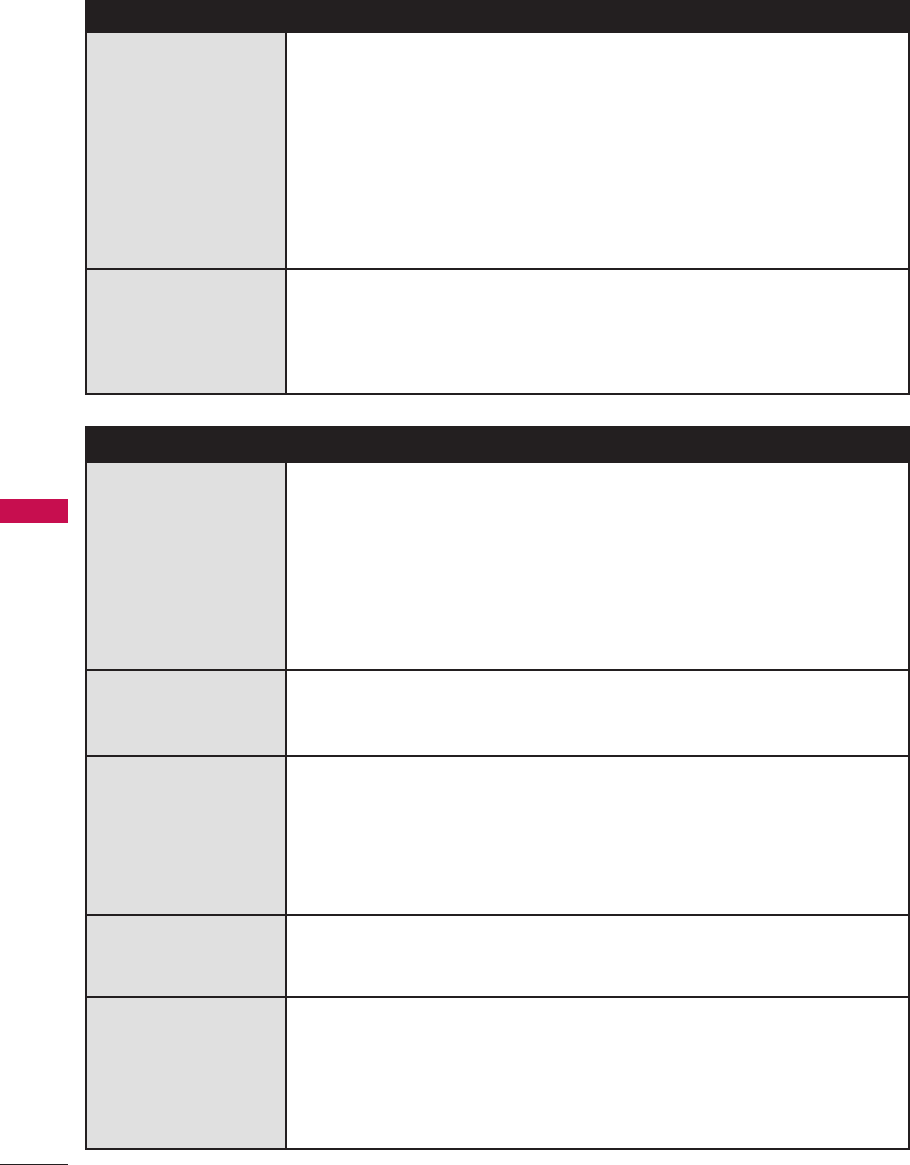
Troubleshooting
Abnormal Operation
The remote control
doesn’t work
a Check to see if there is any object between the product
and the remote control causing obstruction. Ensure you are
pointing the remote control directly at the TV.
a Ensure that the batteries are installed with correct polarity (+
to +, - to -).
a Ensure that the correct remote operating mode is set: TV, VCR
etc.
a Install new batteries.
TV turns off
suddenly
a Is the sleep timer set?
a Check the power control settings. Power interrupted.
a If there is no signal, the TV turns off automatically in 10
minutes.
Video Problems
No picture &No
sound
a Check whether the product is turned on.
a Try another channel. The problem may be with the broadcast.
a Is the power cord inserted into wall power outlet?
a Check your antenna direction and/or location.
a Test the wall power outlet, plug another product’s power cord
into the outlet where the product’s power cord was plugged
in.
Picture appears
slowly after
switching on
a This is normal, the image is muted during the product startup
process. Please contact your service center, if the picture has
not appeared after five minutes.
No or poor color or
poor picture
a Adjust Color in menu option.
a Keep a sufficient distance between the product and the VCR.
a Try another channel. The problem may be with the broadcast.
a Are the video cables installed properly?
a Activate any function to restore the brightness of the picture.
Horizontal/vertical
bars or picture
shaking
a Check for local interference such as an electrical appliance or
power tool.
Poor reception on
some channels
a Station or cable product experiencing problems, tune to
another station.
a Station signal is weak, reorient antenna to receive weaker
station.
a Check for sources of possible interference.
43
APPENDIX
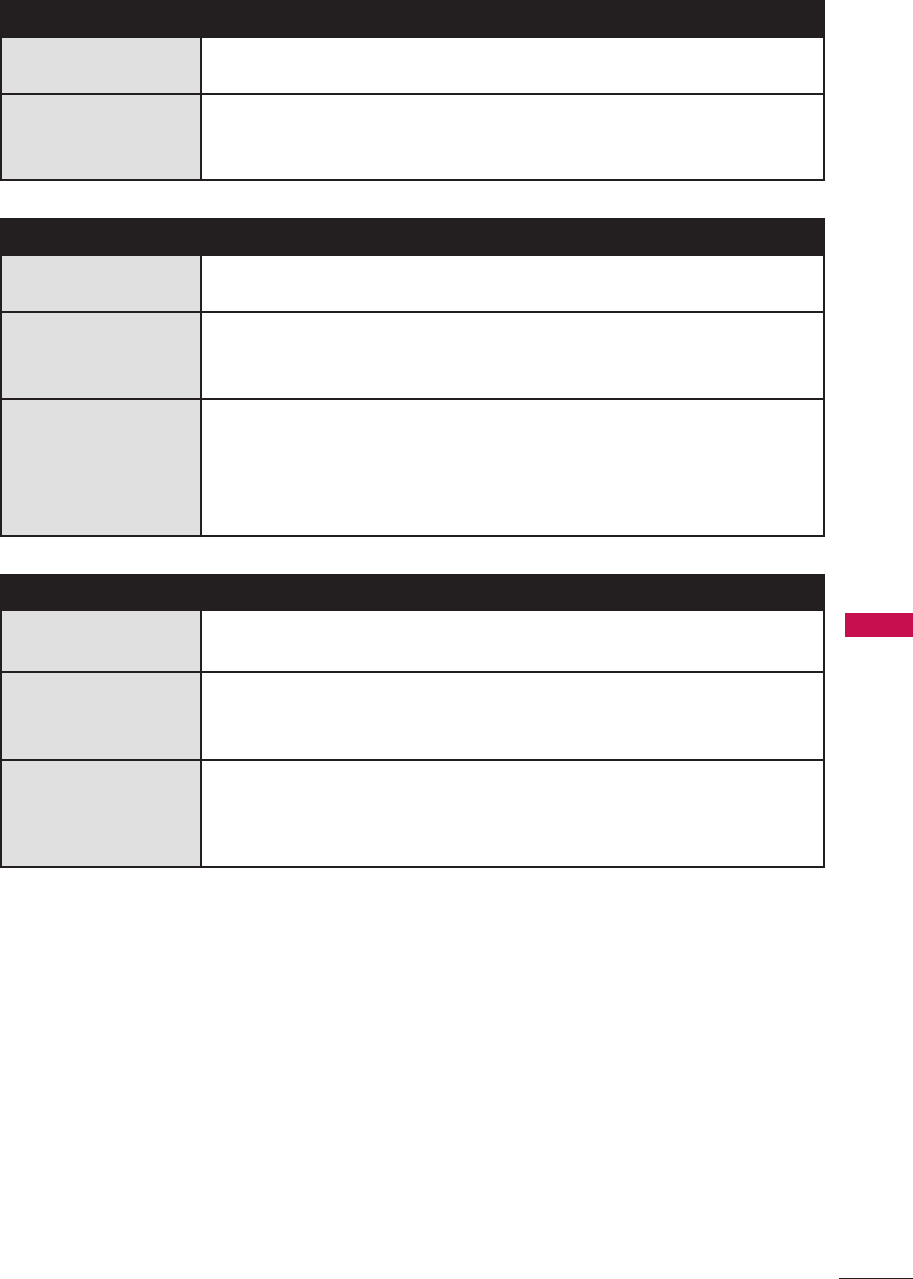
Video Problems
Lines or streaks in
pictures
a Check antenna (Change the direction of the antenna).
No picture when
connecting HDMI
a If an HDMI cable doesn’t support High Speed HDMI, it can
cause flickers or no screen display. In this case use the latest
cables that support High Speed HDMI.
Audio Problems
No output from
one of the speakers
a Adjust Balance in menu option.
Unusual sound
from inside the
product
a A change in ambient humidity or temperature may result in
an unusual noise when the product is turned on or off and
does not indicate a fault with the product.
No sound when
connecting HDMI/
USB
a Check High Speed HDMI cable.
a Check USB cable over version 2.0.
a Use normal MP3 file.
*This feature is not available for all models.
PC Mode Problems
The signal is out of
range
a Adjust Balance in menu option.
Screen color is
unstable or single
color
a Check the signal cable.
a Reinstall the PC video card.
When connecting
the HDMI cable to
the PC, there is no
audio.
a Check the manual for the video card in the PC to see if it
supports HDMI audio and how to set it up properly.

44
APPENDIX
Maintenance
Early malfunctions can be prevented. Careful and regular cleaning can extend the
amount of time you can enjoy your new TV.
Caution: Be sure to turn the power off and unplug the power cord before you begin any
cleaning.
Cleaning the Screen
Here’s a great way to keep the dust off your screen for a while. Wet a soft cloth in
a mixture of lukewarm water and a little fabric softener or dish washing detergent.
Wring the cloth until it’s almost dry, and then use it to wipe the screen.
Make sure the excess water is off the screen, and then let it air-dry before you turn
on your TV.
Cleaning the Cabinet
r To remove dirt or dust, wipe the cabinet with a soft, dry, lint-free cloth.
r Please be sure not to use a wet cloth.
Extended Absence
CAUTION
a If you expect to leave your TV dormant for a long time (such as a vacation), it’s
a good idea to unplug the power cord to protect against possible damage from
lightning or power surges.
1
2
45
APPENDIX
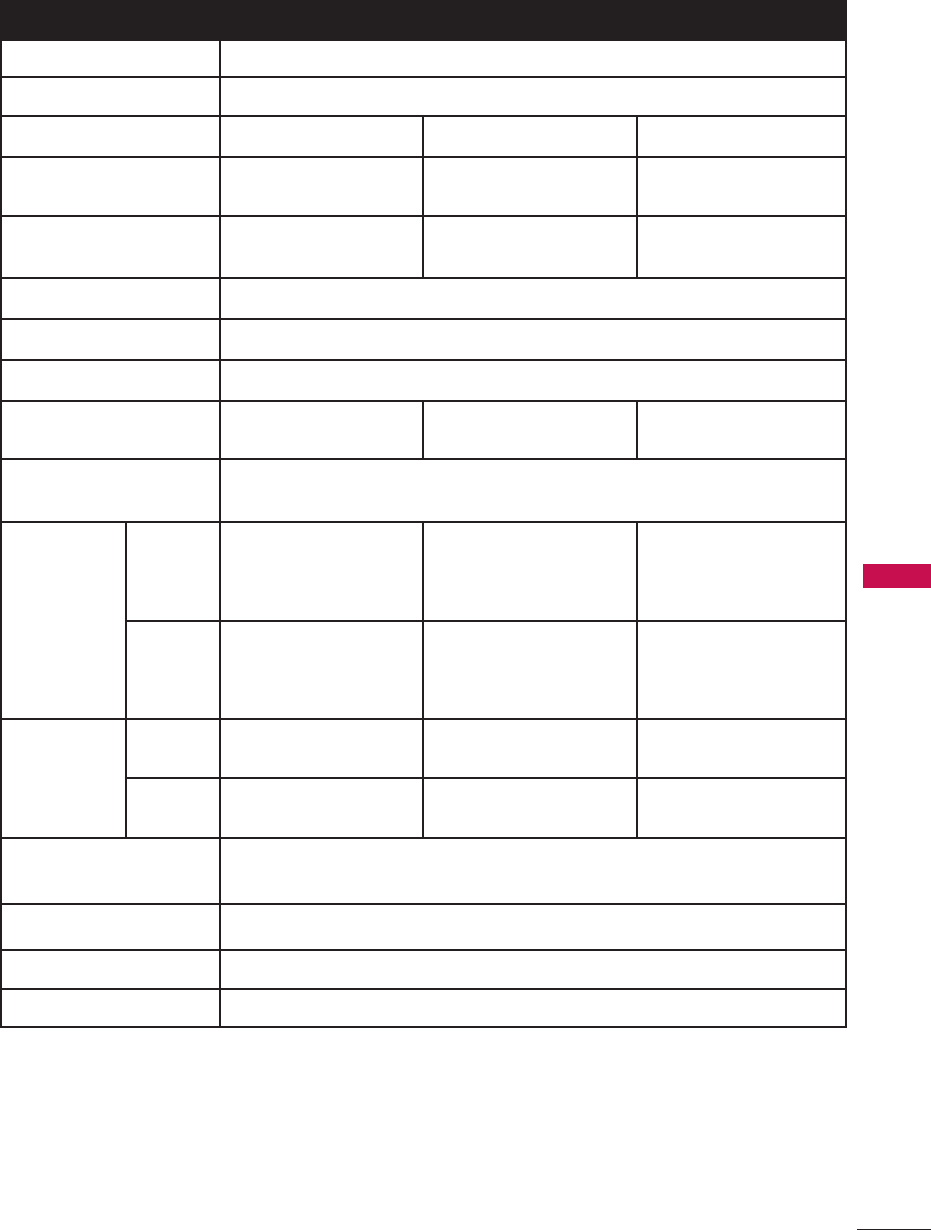
Product Specifications
Models 32LD400 42LD400 47LD500
Resolution 1920 x 1080
Brightness (cd/m2) 500
Contrast Ratio 1400:1 1450:1 1450:1
Number of Colors 8 bit, 16.7M 8 bit, 16.7M 1.06B colors @ 10 bit
Color Depth (D)
Actual Diagonal
Viewable Size (in) 31.55 42.02 46.96
Viewing Angle (deg) 178 (horizontal/vertical)
Display Compatibility 1080P (FHDTV)
Voltage Range 100~240 Vac at 50/60 Hz
Power-On
Consumption 77W 115W 138W
Standby Power
Consumption < 1W
Dimensions
(Width x
Height x
Depth)
With
stand
791 x 561 x 210mm
(31.1” x 22.1” x 8.3”)
1018.5 x 692.7 x
245.8mm
(40.1” x 27.3” x 9.7”)
1136.6 x 759.81 x
245.78mm
(44.7” x 29.9” x 9.7”)
Without
stand
791 x 506 x 82mm
(31.1” x 19.9” x 3.2”)
1018.5 x 632 x
93.6mm
(40.1” x 24.9” x 3.7”)
1136.6 x 698.83 x
88.1mm
(44.7” x 27.5” x 3.5”)
Weight
With
stand 9.9 kg (21.83 lb) 15 kg (33 lb) 20.3 kg (44.7 lb)
Without
stand 9.36 kg (20.62 lb) 14.2 kg (31.3 lb) 18 kg (39.6 lb)
Operating
Temperature 0 °C to 40 °C (32 °F to 104 °F)
Operating Humidity Less than 80 %
Storage Temperature -20 °C to 60 °C (-4 °F to 140 °F)
Storage Humidity Less than 85 %
* The specifications shown above may be changed without prior notice for quality
improvement.

The model and serial number of the TV is located
on the back and one side of the TV.
Record it below should you ever need service.
MODEL
SERIAL