Andon Health 927 Blood Pressure Monitor User Manual
Andon Health Co., Ltd Blood Pressure Monitor Users Manual
User Manual

DN:KD-927-SMSY01 V2.0 Operation Guide
History Revision
NO Revision
date Revision Description Version Drafter Approver
01 2013/09/09 Originated V1.0 王成正 张 飞
02 2014/9/5 Update the address
of EUROPEAN
REPRESENTATION
V2.0 费凡 张飞

DN:KD-927-SMSY01 V2.0 Operation Guide
Operation Guide
(V2.0)
Product/project name:Blood Pressure Monitor
Model name: KD-927
Project number: 2012-066-RJ17
Drafted by: Date
Reviewed by: Date
Approved by: Date

DN:KD-927-SMSY01 V2.0 Operation Guide
1/22
MODEL KD-927
Fully Automatic Arm Cuff Blood Pressure Monitor
(ELECTRONIC SPHYGMOMANOMETER)
OPERATION GUIDE
__________________________________________________________________________
INDEX
IMPORTANT INFORMATION ......................................................................... 2
CONTENTS AND DISPLAY INDICATORS ..................................................... 2
INTENDED USE .............................................................................................. 3
CONTRAINDICATION ..................................................................................... 3
PRODUCT DESCRIPTION .............................................................................. 3
SPECIFICATIONS ........................................................................................... 4
NOTICE ........................................................................................................... 4
SETUP AND OPERATING PROCEDURES .................................................... 6
1. LITHIUM BATTERY CHARGING ................................................................ 6
2. CLOCK AND DATE ADJUSTMENT AND BLUETOOTH SET .................... 6
3. CONNECTING THE CUFF TO THE MONITOR .......................................... 8
4. APPLYING THE CUFF ................................................................................ 9
5. BODY POSTURE DURING MEASUREMENT ............................................ 9
6. TAKING YOUR BLOOD PRESSURE READING AND BLUETOOTH ........ 9
7. DISPLAYING STORED RESULTS AND BLUETOOTH ............................ 11
8. DELETING MEASUREMENTS FROM THE MEMORY ............................. 13
9. DOWNLOAD THE RECORDS TO YOUR COMPUTER ............................ 14
10. ASSESSING HIGH BLOOD PRESSURE FOR ADULTS ....................... 15
11. TECHNICAL ALARM DESCRIPTION ..................................................... 16
12. TROUBLESHOOTING (1) ....................................................................... 16
13. TROUBLESHOOTING (2) ....................................................................... 17
EXPLANATION OF SYMBOLS ON UNIT ..................................................... 18
WARRANTY INFORMATION ........................................................................ 19
SERVICE CENTER ....................................................................................... 19
ELECTROMAGNETIC COMPATIBILITY INFORMATION ............................ 19
DN:KD-927-SMSY01 V2.0 Operation Guide
2/22
IMPORTANT INFORMATION
NORMAL BLOOD PRESSURE FLUCTUATION
All physical activity, excitement, stress, eating, drinking, smoking, body posture and many
other activities or factors (including taking a blood pressure measurement) will influence blood
pressure value. Because of this, it is mostly unusual to obtain identical multiple blood pressure
readings.
Blood pressure fluctuates continually ----- day and night. The highest value usually appears in
the daytime and lowest one usually at midnight. Typically, the value begins to increase at
around 3:00AM, and reaches to highest level in the daytime while most people are awake and
active.
Considering the above information, it is recommended that you measure your blood pressure
at approximately the same time each day.
Too frequent measurements may cause injury due to blood flow interference, please always
relax a minimum of 1 to 1.5 minutes between measurements to allow the blood circulation in
your arm to recover. It is rare that you obtain identical blood pressure readings each time.
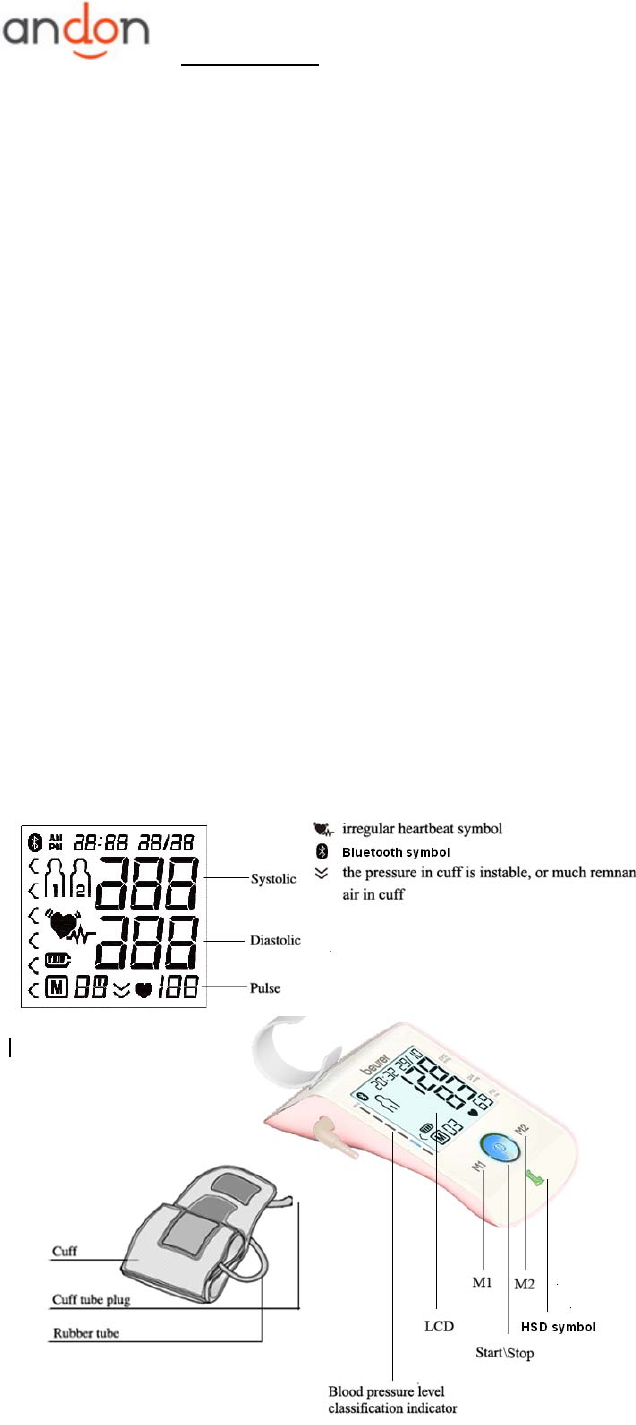
CONTENTS AND DISPLAY INDICATORS

DN:KD-927-SMSY01 V2.0 Operation Guide
3/22
INTENDED USE
Fully Automatic Electronic Sphygmomanometer is for use by medical professionals or at home
and is a non-invasive blood pressure measurement system intended to measure the diastolic
and systolic blood pressures and pulse rate of an adult individual by using a non-invasive
technique in which an inflatable cuff is wrapped around the upper arm. The cuff circumference
is limited to 22cm-44cm (approx. 8 21/32″-17 5/16″).
CONTRAINDICATION
It is inappropriate for people with serious arrhythmia to use this Electronic
Sphygmomanometer.
PRODUCT DESCRIPTION
Based on Oscillometric methodology and silicon integrated pressure sensor, blood pressure
and pulse rate can be measured automatically and non-invasively. The LCD display will show
blood pressure and pulse rate. The most recent 2×60 measurements can be stored in the
memory with date and time stamp. The Electronic Sphygmomanometers corresponds to the
below standards: IEC 60601-1:2005/EN 60601-1:2006/AC:2010 (Medical electrical equipment
-- Part 1: General requirements for basic safety and essential performance),
IEC60601-1-2:2007/EN 60601-1-2:2007 /AC:2010 (Medical electrical equipment -- Part 1-2:
General requirements for basic safety and essential performance - Collateral standard:
Electromagnetic compatibility - Requirements and tests), IEC 80601-2-30:
2009+Cor.2010(Medical electrical equipment –Part 2-30: Particular requirements for the basic
safety and essential performance of automated non-invasive sphygmomanometers)EN 1060-1:
1995 + A1: 2002 + A2: 2009 (Non-invasive sphygmomanometers - Part 1: General
requirements), EN 1060-3: 1997 + A1: 2005 + A2: 2009 (Non-invasive sphygmomanometers -
Part 3: Supplementary requirements for electro-mechanical blood pressure measuring
systems).

DN:KD-927-SMSY01 V2.0 Operation Guide
4/22
SPECIFICATIONS
1. Product name: Blood Pressure Monitor
2. Model: KD-927
3. Classification:ClassⅡ, Type BF applied part,IPX0,No AP or APG,Continuous operation
4. Machine size: Approx. 175.7mmX99.8mmX60mm ( 3 3/4″x 7 5/16″x 2 7/32″)
5. Cuff circumference: 22cm-36cm(8-21/32 ″~14-3/16 ″),35cm-44cm(13-25/32 ″
~17-5/16″) (Optional)
6. Weight: Approx. 310g (10 15/16oz.)
7. Measuring method: Oscillometric method, automatic inflation and measurement
8. Memory volume: 2×60 times with time and date stamp
9. Power source: DC:5V 600mA, battery: 1*3.7V Li-ion 400mAh
10. Measurement range:
Cuff pressure: 0-300mmHg
Systolic: 60-260mmHg
Diastolic: 40-199mmHg
Pulse rate: 40-180 beats/minute
11. Accuracy:
Pressure: ±3mmHg
Pulse rate: ±5%
12. Environmental temperature for operation: 10℃~40℃(50℉~104℉)
13. Environmental humidity for operation: ≤90%RH
14. Environmental temperature for storage and transport: -20℃~55℃(-4℉~131℉)
15. Environmental humidity for storage and transport: ≤90%RH
16. Environmental pressure: 80kPa-105kPa
17. Battery life: Approx 50 times.
18. All components belonging to the pressure measuring system, including accessories:
Pump,Valve, LCD, Cuff, Sensor
Note: These specifications are subject to change without notice.
NOTICE
1. Read all of the information in the operation guide and any other literature in the box before
operating the unit.
2. Stay still, calm and rest for 5 minutes before blood pressure measurement.
3. The cuff should be placed at the same level as your heart.
4. During measurement, neither speak nor move your body and arm.
5. Measuring on same arm for each measurement.
6. Please always relax at least 1 or 1.5 minutes between measurements to allow the blood
circulation in your arm to recover. Prolonged over-inflation (cuff pressure exceed 300
mmHg or maintained above15 mmHg for longer than 3 minutes) of the bladder may cause
ecchymoma of your arm.
DN:KD-927-SMSY01 V2.0 Operation Guide
5/22
7. Consult your physician if you have any doubt about below cases:
1) The application of the cuff over a wound or inflammation diseases;
2) The application of the cuff on any limb where intravascular access or therapy, or an
arterio-venous (A-V) shunt, is present;
3) The application of the cuff on the arm on the side of a mastectomy;
4) Simultaneously used with other monitoring medical equipments on the same limb;
5) Need to check the blood circulation of the user.
8. This Electronic Sphygmomanometers is designed for adults and should never be
used on infants or young children. Consult your physician or other health care
professionals before use on older children.
9. Do not use this unit in a moving vehicle, This may result in erroneous measurement.
10. Blood pressure measurements determined by this monitor are equivalent to those
obtained by a trained observer using the cuff/stethoscope auscultation method, within the
limits prescribed by the American National Standard Institute, Electronic or automated
sphygmomanometers.
11. Information regarding potential electromagnetic or other interference between the blood
pressure monitor and other devices together with advice regarding avoidance of such
interference please see part ELECTROMAGNETIC COMPATIBILITY INFORMATION.
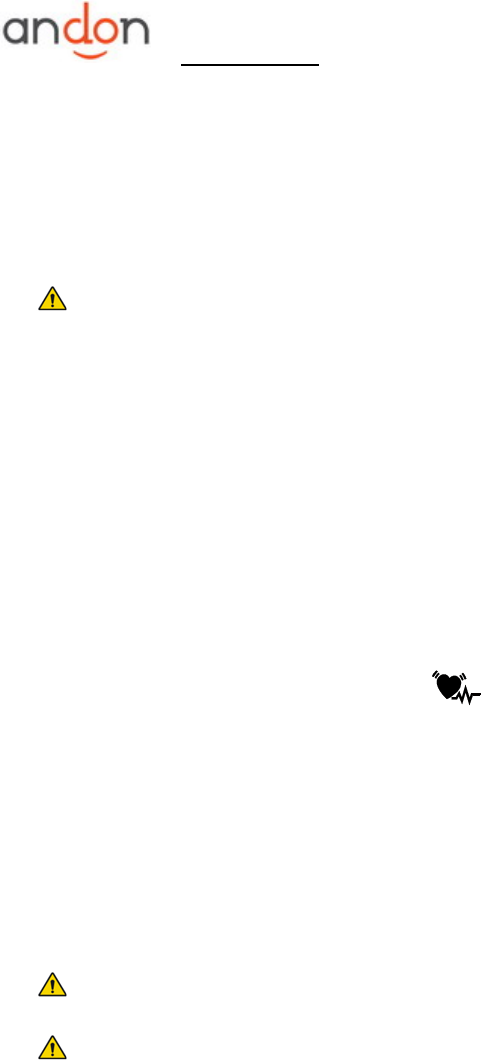
12. If Irregular Heartbeat (IHB) brought by common arrhytihmas is detected in the procedure
of blood pressure measurement, a signal of will be displayed. Under this condition,
the Electronic Sphygmomanometers can keep function, but the results may not be
accurate, it’s suggested that you consult with your physician for accurate assessment.
There are 2 conditions under which the signal of IHB will be displayed:
1) The coefficient of variation (CV) of pulse period >25%.
2) The difference of adjacent pulse period≥0.14s, and the number of such pulse takes
more than 53 percentage of the total number of pulse.
13. Please do not use the cuff other than supplied by the manufacturer, otherwise it may bring
biocompatible hazard and might result in measurement error.
14. The monitor might not meet its performance specifications or cause safety hazard if
stored or used outside the specified temperature and humidity ranges in specifications.
15. Please do not share the cuff with other infective person to avoid cross-infection.
16. Medical AC adapter which output is DC 5.0V and complied with IEC 60601-1/EN
60601-1/UL 60601-1 and IEC 60601-1-2/EN 60601-1-2/UL 60601-1-2 is suitable for this
monitor, such as OH-1048A0500600U2-VDE or (input: 100-240V, 50/60Hz, 120-60mA;
output:DC5V,600mA) .Please note that the monitor jack size: USB mini B
17. This equipment has been tested and found to comply with the limits for a Class B digital
device, pursuant to part 15 of the FCC Rules. These limits are designed to provide
reasonable protection against harmful interference in a residential installation. This
equipment generates, uses and can radiate radio frequency energy and, if not installed
and used in accordance with the instructions, may cause harmful interference to radio
communications. However, there is no guarantee that interference will not occur in a
particular installation. If this equipment does cause harmful interference to radio or
television reception, which can be determined by turning the equipment off and on, the
DN:KD-927-SMSY01 V2.0 Operation Guide
6/22
user is encouraged to try to correct the interference by one or more of the following
measures:
—Reorient or relocate the receiving antenna.
—Increase the separation between the equipment and receiver.
—Connect the equipment into an outlet on a circuit different from that to which the
receiver is connected.
—Consult the dealer or an experienced radio/TV technician for help.
18.This device complies with Part 15 of the FCC Rules. Operation is subject to the
following two conditions:
(1) This device may not cause harmful interference, and
(2) This device must accept any interference received, including interference that
may cause undesired operation.
19.Attention that changes or modification not expressly approved by the party
responsible for compliance could void the user’s authority to operate the equipment.
SETUP AND OPERATING PROCEDURES
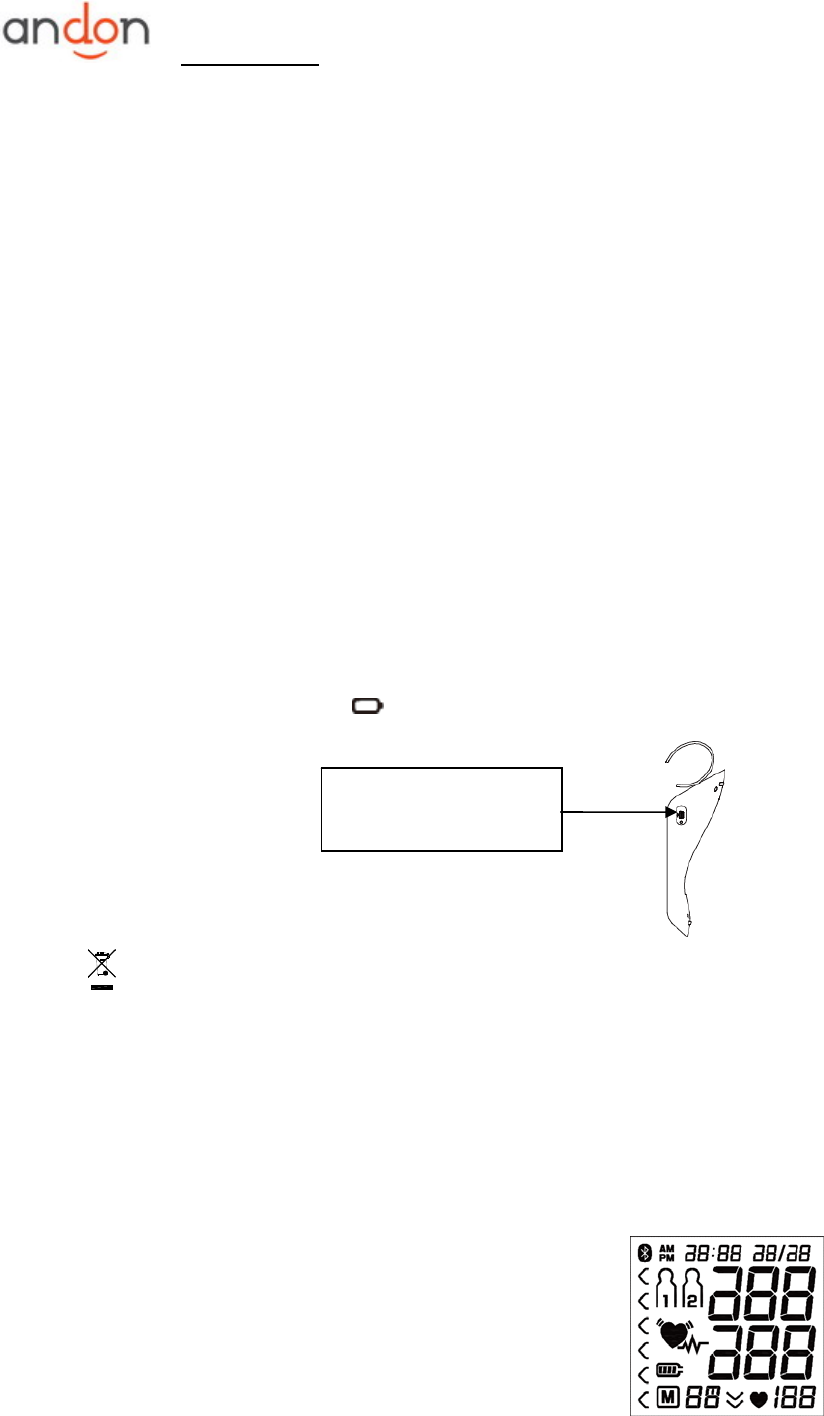
1. LITHIUM BATTERY CHARGING
When LCD twinkles battery symbol , charge the lithium battery.
The monitor and the cuff, must be disposed of according to local regulations at
the end of their usage.
2. CLOCK AND DATE ADJUSTMENT AND BLUETOOTH SET
a. If the Blood Pressure Monitor is no electricity, once you charge the lithium battery ,
All display characters are shown for self-test, see picture 2-1. In case of empty
battery , you can press “START/STOP” button or wait for 1 minute to go back to
standby mode , else after 3 seconds ,you can adjust the
clock and date .
b. If the time of the device is already set and need to be
changed ,setting can be reached by pressing the
“START/STOP” button for five seconds in standby mode .
External charger
socket
DN:KD-927-SMSY01 V2.0 Operation Guide
7/22
Picture 2-1
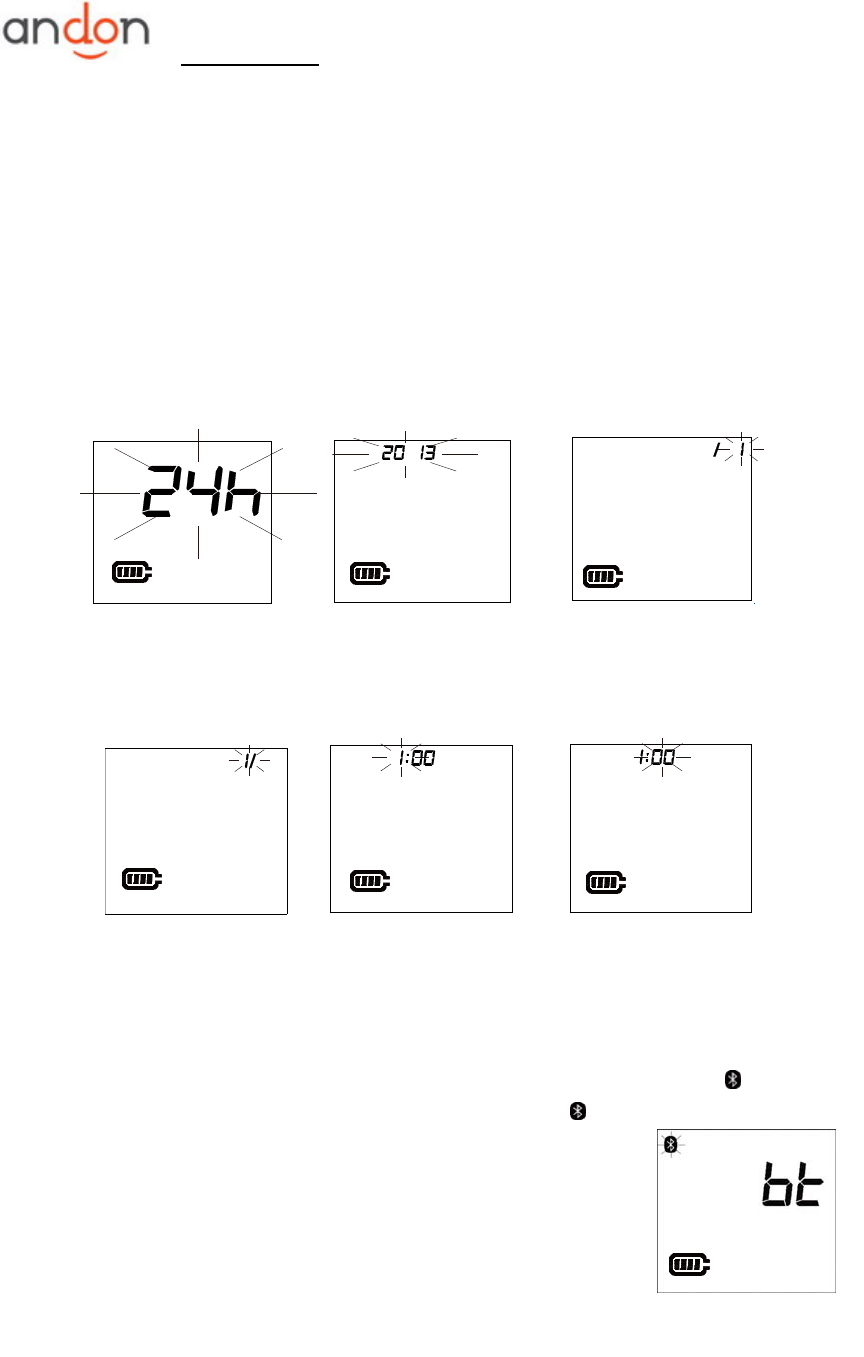
c. In clock and date adjustment Mode , the time format will blink at first , See
picture2-2 .If the monitor has no memory and not set the time format , the default
time format is 24h and the default clock and date is 2013-1-1 1:00,else the default
time format is the last confirmed、clock and date is the most recent result’s.
d. Press the button “START/STOP” repeatedly, the year(first usage :default is
2013 ,range is 2013~2099), month, day, hour and minute will blink in turn. See
picture 2- 3& 2-4 & 2-5 & 2-6 & 2-7. While the number is blinking, press the button
“M2” to increase the number, Keep on pressing the button "M2", the number will
increase fast . press the button “M1” to decrease the number.,Keep on pressing
the button "M1", the number will decrease fast.
Picture 2-2 Picture 2-3 Picture 2-4
Picture 2-5 Picture 2-6 Picture 2-7
e. You can set the bluetooth by pressing “START/STOP” button when the minute
is blinking, then the time and date is confirmed. press the button “M1” or “M2” to
change the state of bluetooth. If bluetooth is on, bluetooth symbol twinkles.
See picture 2- 9. If bluetooth is off, bluetooth symbol don’t show.
f. During adjusting clock and date and setting bluetooth ,
Backlight turning off automatically when no button will be
pressed within 10 seconds, Blood Pressure Monitor turning
off automatically when no button will be pressed within 30
seconds.
Note:
z The clock format (12 or 24 hour) could be set by user.
Picture 2-8
DN:KD-927-SMSY01 V2.0 Operation Guide
8/22
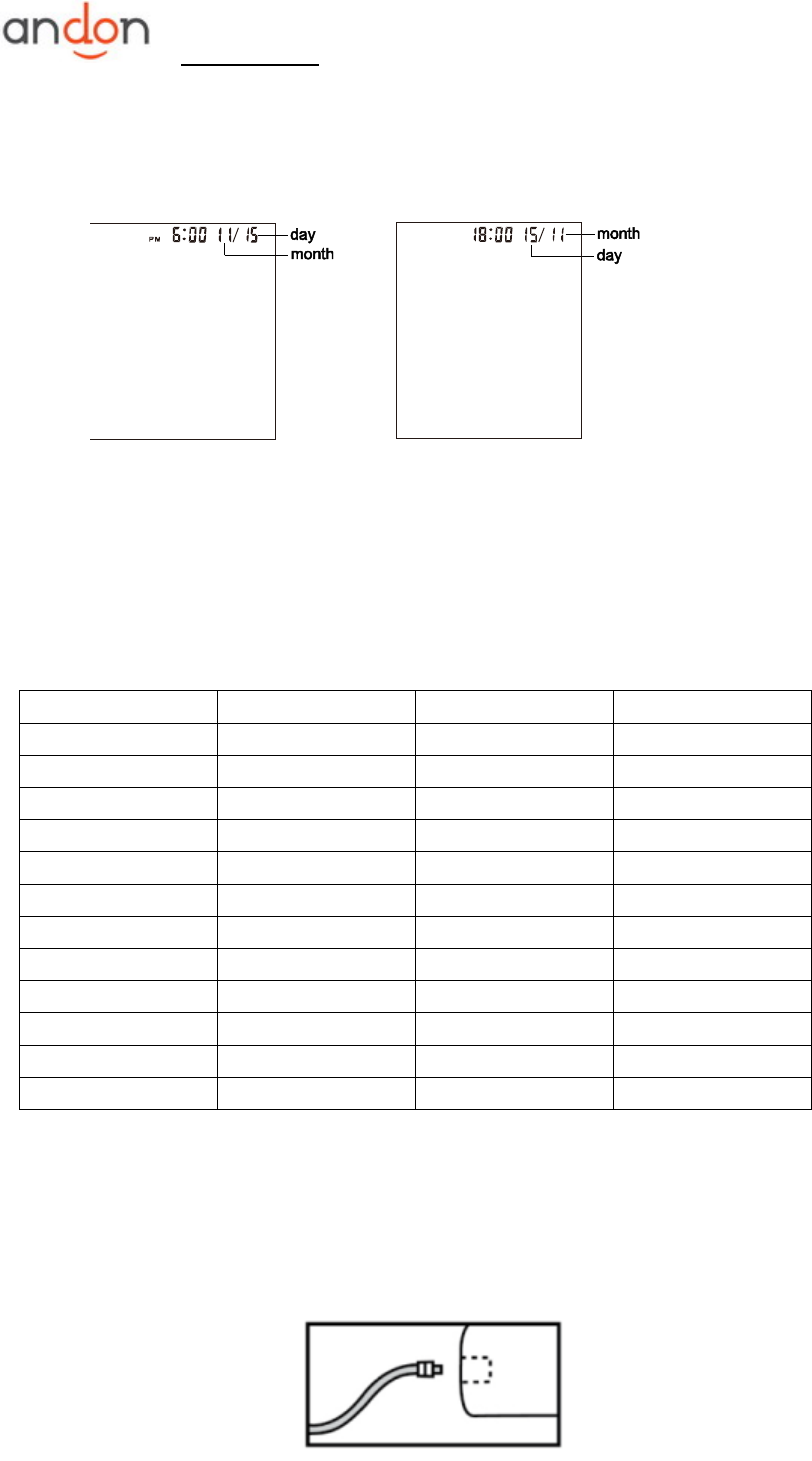
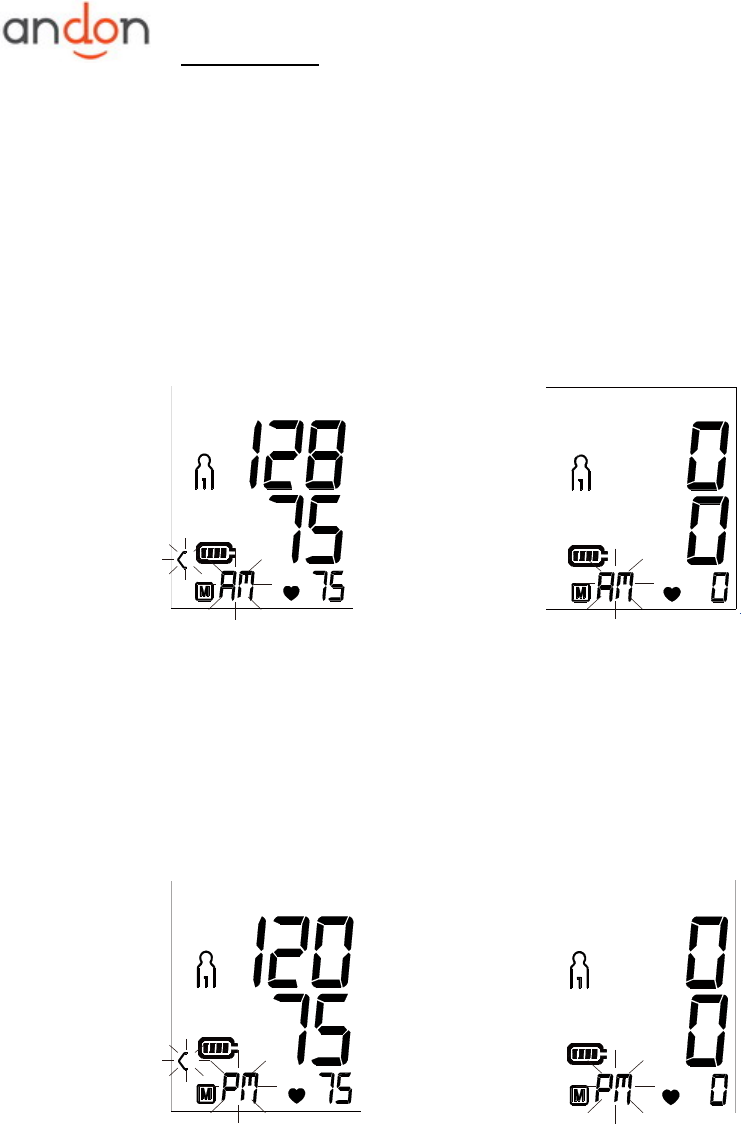
z The display of time and date in 12 hour format is different from 24 hour format.
For example, the date is November 15 and time is 6 o’clock p.m., LCD shows
picture 2-9 in 12 hour format, however, LCD shows picture 2-10 in 24 hour
format.
Picture 2-9 Picture 2-10
z All of the LCD illustrations are 24 hour format in the Operation Guide, except
for the picture 2-9.
z Table 1 instructs the conversion relations between 24 hour format and 12 hour
format.
Table 1
24 hour format 12 hour format 24 hour format 12 hour format
0:00 12:00 AM 12:00 12:00 PM
1:00 1:00 AM 13:00 1:00 PM
2:00 2:00 AM 14:00 2:00 PM
3:00 3:00 AM 15:00 3:00 PM
4:00 4:00 AM 16:00 4:00 PM
5:00 5:00 AM 17:00 5:00 PM
6:00 6:00 AM 18:00 6:00 PM
7:00 7:00 AM 19:00 7:00 PM
8:00 8:00 AM 20:00 8:00 PM
9:00 9:00 AM 21:00 9:00 PM
10:00 10:00 AM 22:00 10:00 PM
11:00 11:00 AM 23:00 11:00 PM
3. CONNECTING THE CUFF TO THE MONITOR
Insert the cuff tubing connector into the socket in the left side of the monitor. Make
certain that the connector is completely inserted to avoid air leakage during blood pressure
measurements.
DN:KD-927-SMSY01 V2.0 Operation Guide
9/22
Avoid compression or restriction of the connection tubing during measurement,
which may cause inflation error, or harmful injury due to continuous cuff pressure.
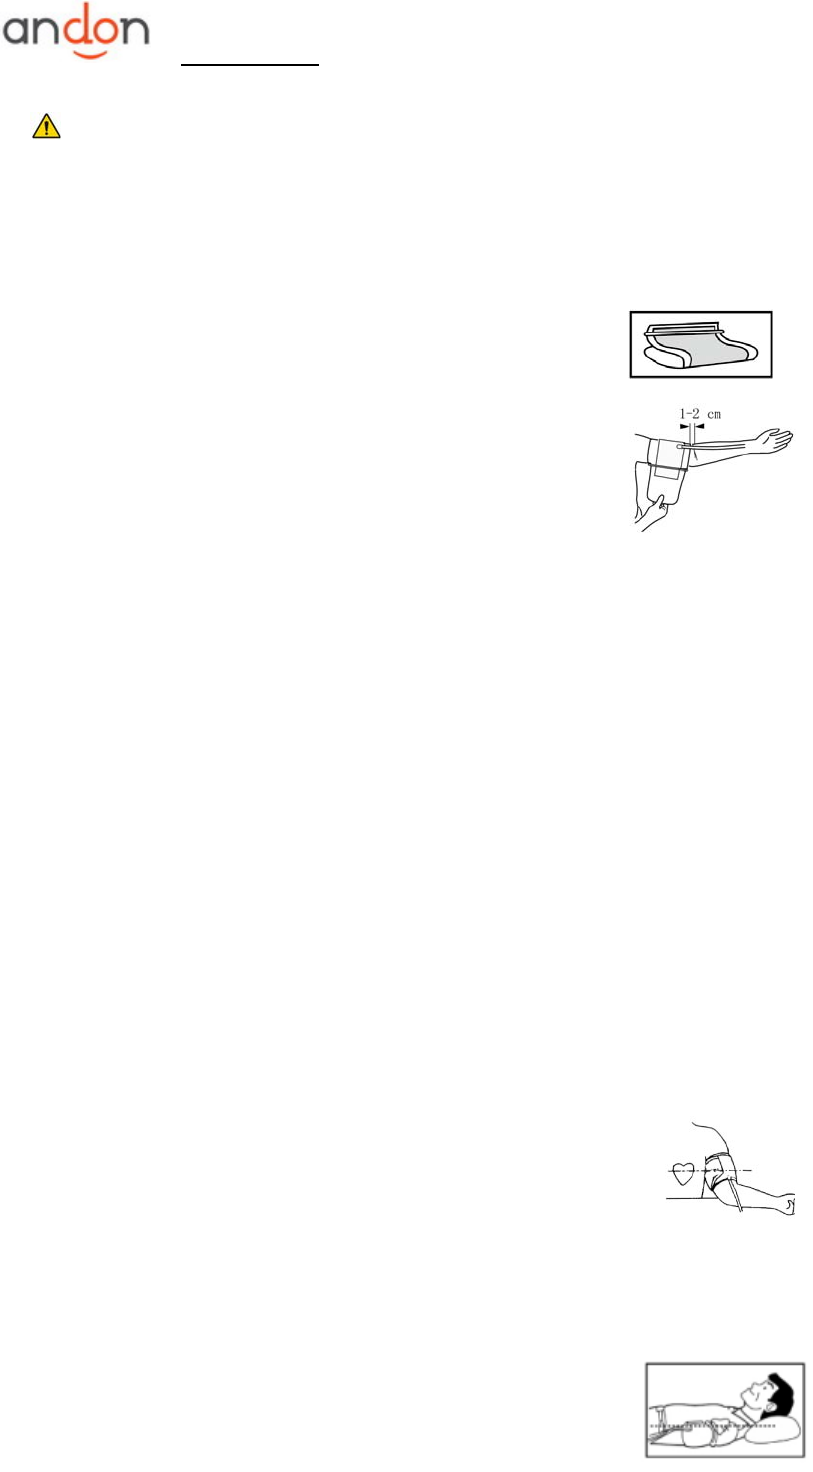
4. APPLYING THE CUFF
a. Pulling the cuff end through the medal loop (the cuff is
packaged like this already), turn it outward (away from
your body) and tighten it and close the Velcro fastener.
b. Place the cuff around a bare arm 1-2cm above the
elbow joint.
c. While seated, place palm upside in front of you on a flat
surface such as a desk or table. Position the air tube in
the middle of your arm in line with your middle finger.
d. The cuff should fit comfortably, yet snugly around your arm. You should be able to
insert one finger between your arm and the cuff.
Note:
1. Please refer to the cuff circumference range in “SPECIFICATIONS” to make
sure that the appropriate cuff is used.
2. Measuring on same arm each time.
3. Do not move your arm, body, or the monitor and do not move the rubber tube
during measurement.
4. Stay quiet, calm for 5 minutes before blood pressure measurement.
5. Please keep the cuff clean. If the cuff becomes dirty, remove it from the monitor
and clear it by hand in a mild detergent, then rinse it thoroughly in cold water.
Never dry the cuff in clothes dryer or iron it. Clean the cuff after the usage of
every 200 times is recommended.
5. BODY POSTURE DURING MEASUREMENT
Sitting Comfortably Measurement
a. Be seated with your feet flat on the floor, and don’t cross
your legs.
b. Place palm upside in front of you on a flat surface such as a
desk or table.
c. The middle of the cuff should be at the level of the right atrium of the heart.
Lying Down Measurement
a. Lie on your back.
b. Place your arm straight along your side with your palm
upside.
DN:KD-927-SMSY01 V2.0 Operation Guide
10/22
c. The cuff should be placed at the same level as your heart.
6. TAKING YOUR BLOOD PRESSURE READING AND BLUETOOTH
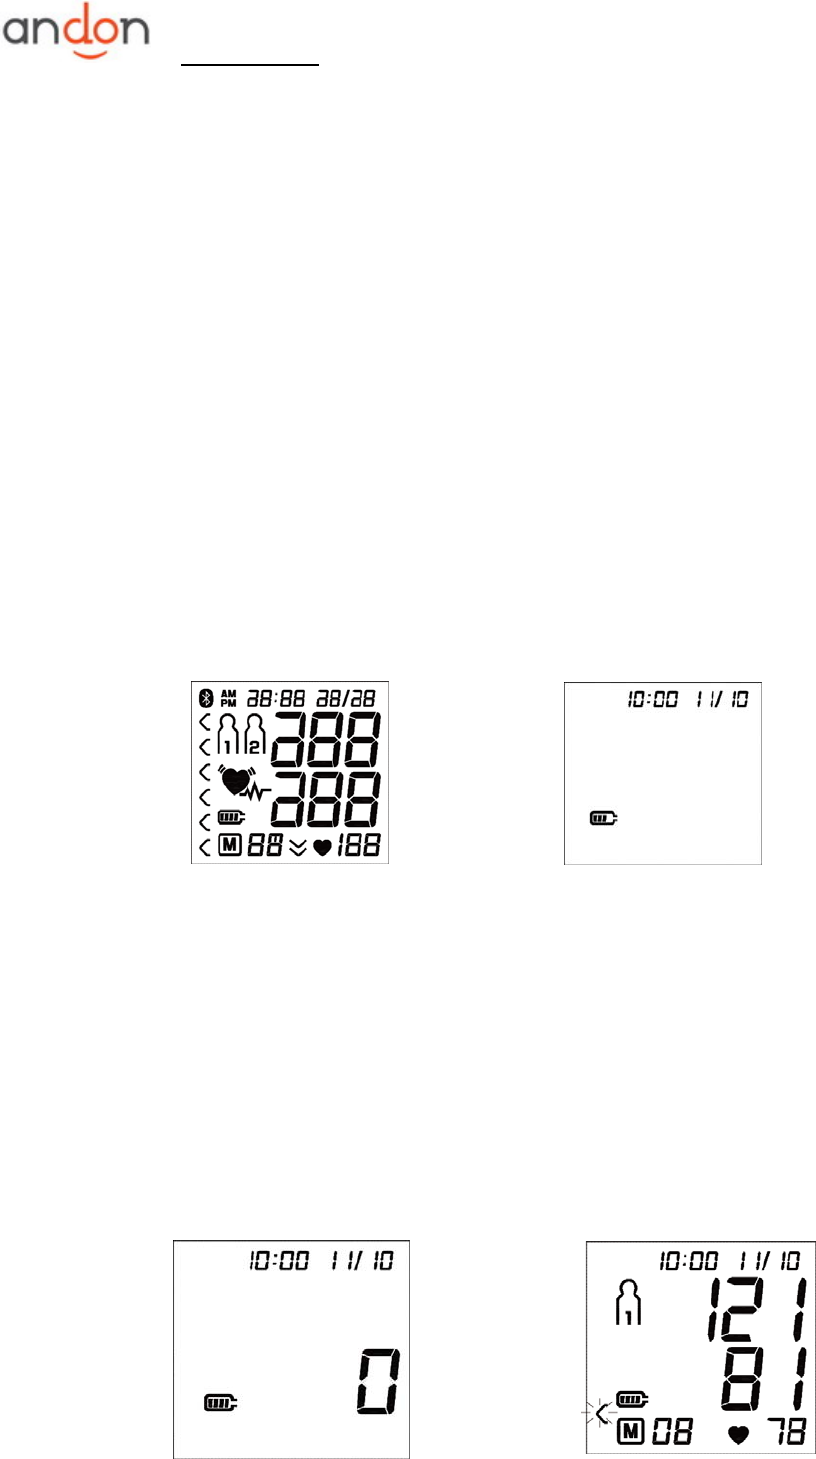
a. In Standby Mode, you can only activate the device by pressing “START/STOP”
button and the LCD full display .You can check the LCD display according to the
picture 6-1. Please contact the service center if segment is missing. In case of
empty battery you will wait for 1 minute or press the “START/STOP” button to go
back to standby mode .
b. After the LCD full display, the device display the clock and date, See picture6-2,
you can press the “START/STOP” button to go to the test mode, or you can
press the button “M1” or “M2“ to go to the memory mode.If you press “M1”
button,you will scan user 1 memory, If you press “M2” button,you will scan user 2
memory.
c. If you no press any button,the device will go to the test mode automatically after
3 seconds.
Picture 6-1 Picture 6-2
d. After applying the cuff and your body is in a comfortable position , you can enter
the test Mode and the LCD display 0 mmHg, See picture6-3;
e. Then the monitor inflates the cuff until sufficient pressure has built up for a
measurement. Then the monitor slowly releases air from the cuff and carries out
the measurement. .Finally the blood pressure and pulse rate will be calculated
and displayed on the LCD. See picture 6-4. The irregular heartbeat symbol (if any)
and blood pressure classification indicator will blink on the LCD. Display HSD
positive/negative symbol .
DN:KD-927-SMSY01 V2.0 Operation Guide
11/22
Picture 6-3 Picture 6-4
f. After measurement, the backlight will turn off automatically after 10 seconds and
the device will turn off automatically after 3 minutes with no operation.
Alternatively, you can press the “START/STOP” button to turn off the monitor
manually.
g. During 3 minutes,you can change the user,until the
device go to standby mode ( If bluetooth is on, the
monitor can transfer memory to IOS device with
bluetooth 4.0.See picture 6- 5 ) ,the result will be stored
in current user.
h. During inflating the cuff and measurement, you can
press the “START/STOP” button to turn off the
monitor manually.
Picture 6-5
Note: Please consult a health care professional for interpretation of pressure
measurements.
Resting indicator measurement
i. The most frequent error made when measuring blood pressure is taking the
measurement when not at rest,which means that both the systolic and the
diastolic blood pressures are incorrect in this case. During blood pressure
measurement, the device automatically determines whether the circulatory system
is sufficiently at rest or not.
j. If the circulatory system is not sufficiently at rest ,the red symbol is displayed,
else the green symbol is displayed. If the red symbol is displayed,the
measurement should be repeated after a period of physical and mental rest.
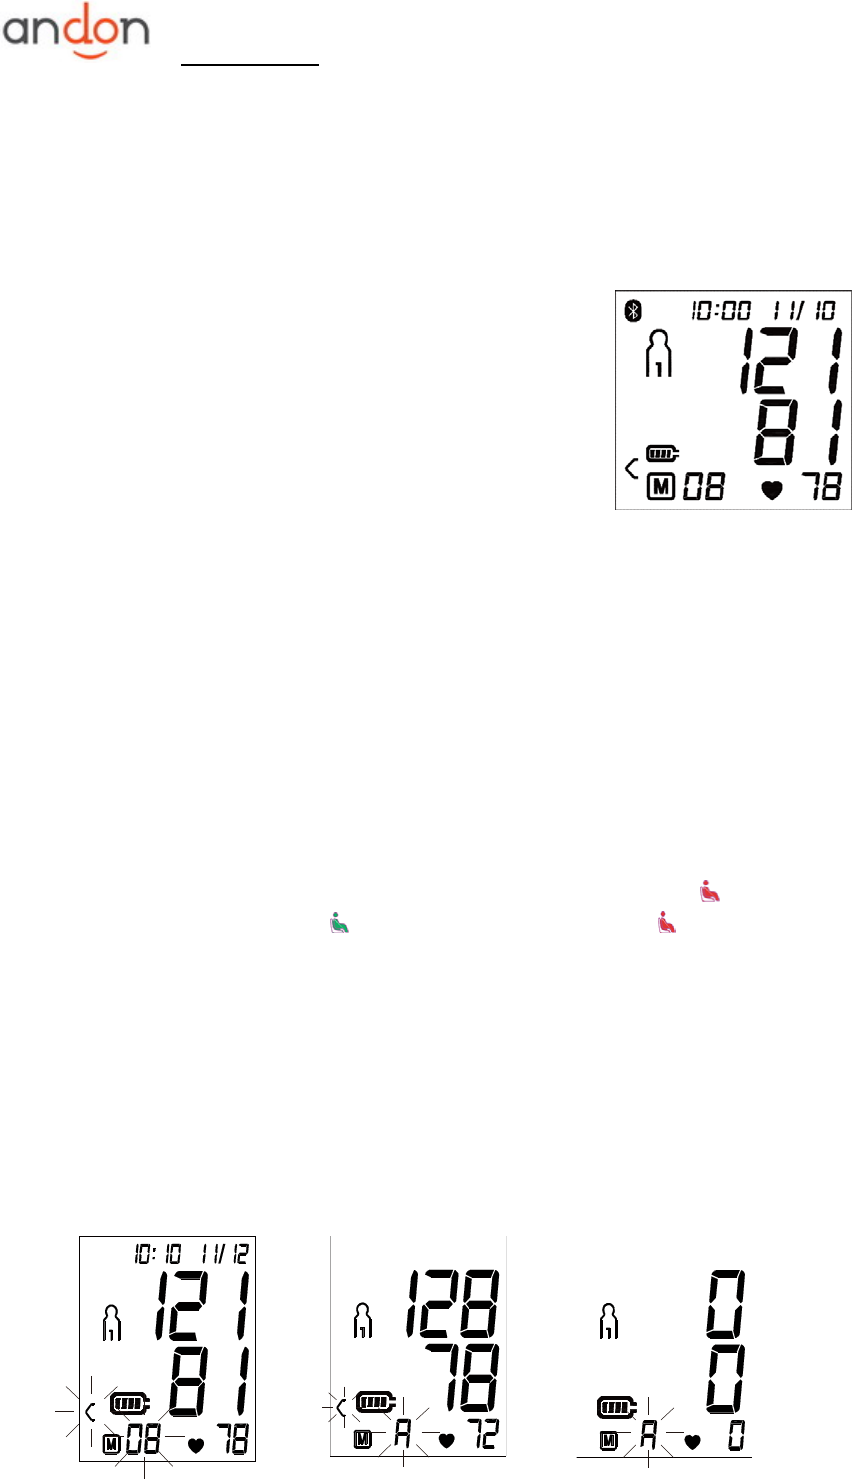
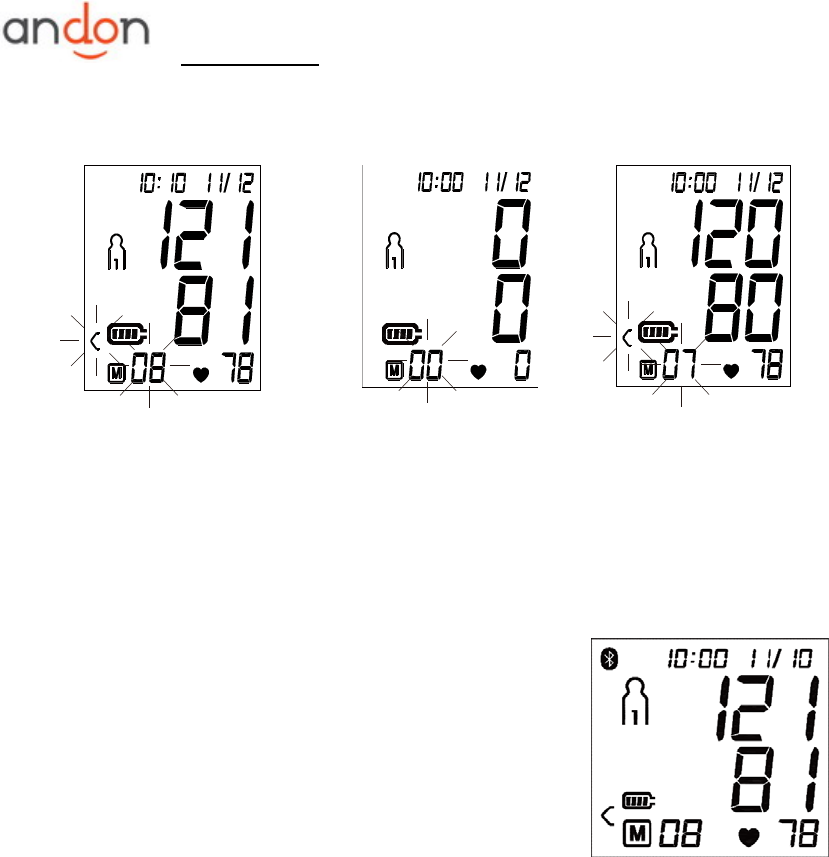
7. DISPLAYING STORED RESULTS AND BLUETOOTH
a. In memory Mode, LCD will display the last measurement result at first if bluetooth is off,
See picture 7-1. Press “M1” button, LCD will display the average value of all results in
the current user, See picture 7-2. If no result stored in the current user, LCD will
display “0” for blood pressure and pulse rate. See picture 7-3. At this time ,the monitor
can go forward by pressing “M1” button.
DN:KD-927-SMSY01 V2.0 Operation Guide
12/22
Picture 7-1 Picture 7-2 Picture 7-3
b. Press the “M1” button, LCD will display the average value of all the results which is
measured from 5 o’clock to 9 o’clock in last 7 days in the current user. See picture 7-4.
If no result stored from 5 o’clock to 9 o’clock in last 7 days, LCD will display “0” for
blood pressure and pulse rate. See picture 7-5. At this time ,you can go forward by
pressing “M1” button.
Picture 7-4 Picture 7-5
c. Press the “M1” button again, LCD will display the average value of all the results which
is measured from 18 o’clock to 20 o’clock in last 7 days in the current user. See picture
7-6. If no result stored from 18 o’clock to 20 o’clock in last 7 days, LCD will display “0”
for blood pressure and pulse rate. See picture 7-7. At this time ,you can go forward by
pressing “M1” button.
Picture 7-6 Picture 7-7
d. Press “M1” button again, the most recent result will be displayed with date and time
stamp,See picture 7-8. Irregular heartbeat symbol (if any)、and blood pressure
classification indicator will blink at the same time. Display HSD positive/negative
symbol. If the monitor has no result stored in the current user, the LCD will display
“0” for blood pressure and pulse rate. See picture 7-9. At this time ,you can go forward
by pressing “M1” button.
e. Press “M1” button again, to review the next result, See picture 7-10. You can review
the results by pressing “M1” button until the oldest result.
DN:KD-927-SMSY01 V2.0 Operation Guide
13/22
Picture 7-8 Picture 7-9 Picture 7-10
f. When displaying the oldest result measured, if you press the button”M1”, LCD will
display the average value of all results in the current user , the memory circle starts
again.
g. The monitor will turn off automatically after 30 seconds with no operation or you can
press the button”START/STOP” to turn off the monitor manually.
h. If bluetooth is on, the monitor will Waiting for
transmission of memory when user enters the memory
mode at first. See picture 7-11.The monitor will go
forward automatically after 30 seconds with no operation
or if you press the button”M1”. you can press the
button”START/STOP” to turn off the monitor manually.
Picture 7-11
Note:
Above assume scan user 1 memory, if you want to scan user 2 memory ,you need to press the
button “M2” to go forward;
8. DELETING MEASUREMENTS FROM THE MEMORY
When the separate measurements is displaying (exclude during displaying all average ),
Press the “M1” button and the “M2” button together for 5 seconds, all results in the current
user will be deleted, then the monitor come to the mode without result. See picture 8-1 &
8-2 . The monitor will turn off automatically after 30 seconds with no operation or you can
press the button ”M1” or“START/STOP” to turn off the monitor manually.
Note:
Above assume delete user 1 memory , if you want to delete user 2 memory ,you
need to press the button ”M2” to turn off the monitor manually.

DN:KD-927-SMSY01 V2.0 Operation Guide
14/22
Picture 8-1 Picture 8-2
9. DOWNLOAD THE RECORDS TO YOUR COMPUTER
a. Ensure that your computer has installed the software “BPM
comm” .
b. While the monitor is in any Mode except the measurement
Mode and bluetooth Mode , connect the monitor to your
computer by USB cable, the device display “PC” and data
and time, See picture 9-1.
Picture 9-1
c. Press the “M1” button or “M2” button to change user . Press “START/STOP” button to
confirm the user, then please run the software “BPM comm” in your computer.
d. Press the Download Label.See picture 9-2..Your computer start to download the
results from the monitor. See picture 9-3.
Download Label
DN:KD-927-SMSY01 V2.0 Operation Guide
15/22
Picture 9-2 Picture 9-3
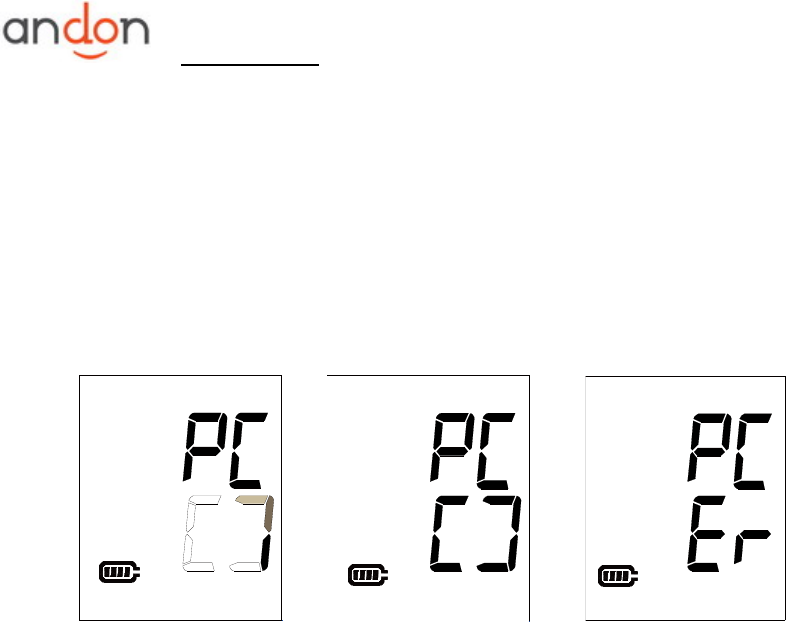
e. The device display “PC” and keep the digits below moving in a circle as long as the
data is transmitted, See picture 9-4. The device display “PC” and full circle when
transmission is successful. The device display “PC” and “Er” if the connection is not
successful. See picture 9-5&9-6.
Picture 9-4 Picture 9-5 Picture 9-6
f. The device will turn off automatically after 5 seconds or you can press
“START/STOP” button to turn off the monitor manually.
g. If transmission is successful you can also remove the cable to turn off the monitor.
h. After transmission, the data will not be deleted from the device.
i. Please turn off the monitor and disconnect it with your computer after downloading.
Note:
1. Don’t turn off the monitor while downloading the results. Otherwise the results can not be
downloaded correctly.
2. If the communication is abnormal, please turn off the monitor and connect the monitor to
your computer again.
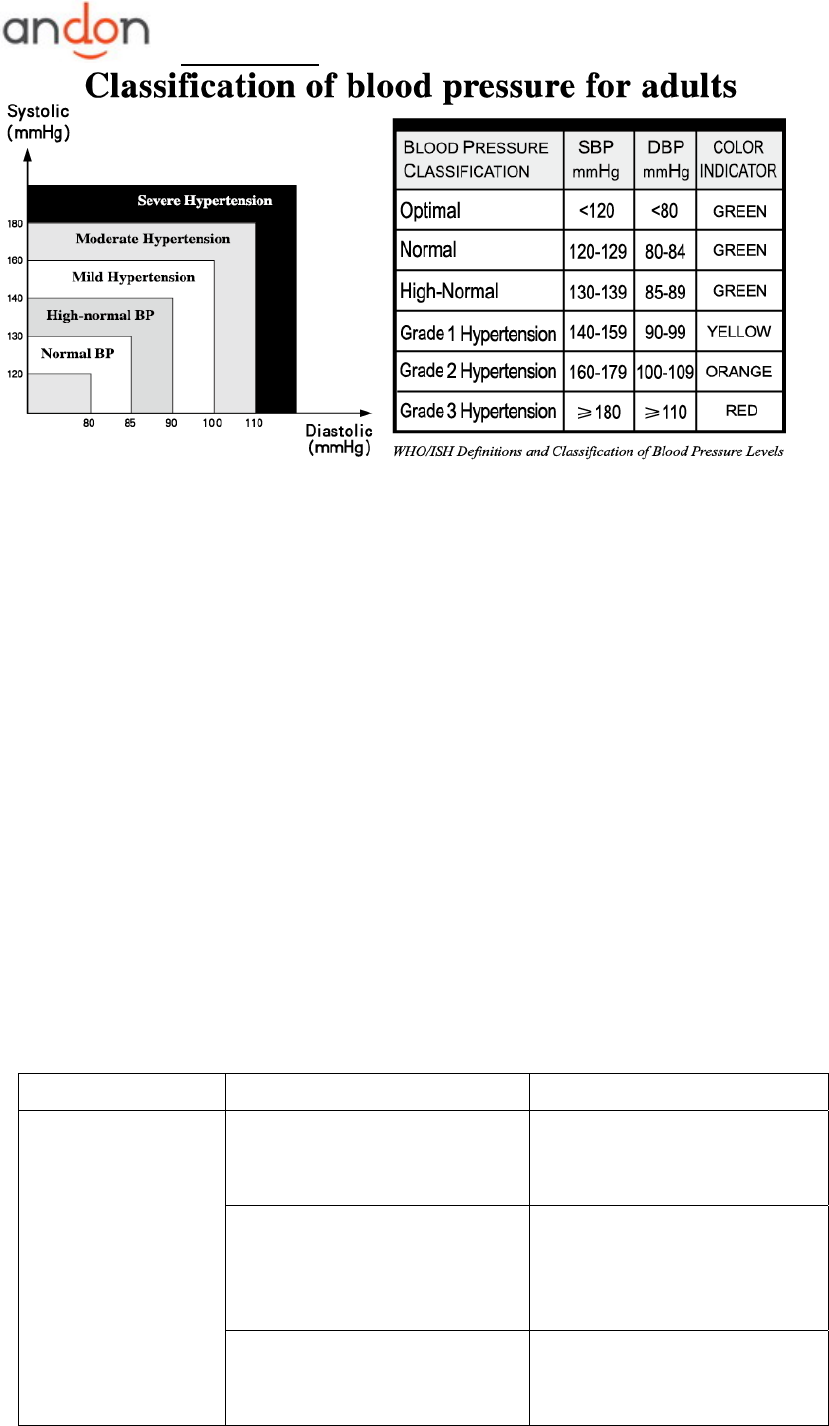
10. ASSESSING HIGH BLOOD PRESSURE FOR ADULTS
The following guidelines for assessing high blood pressure (without regard to age or gender)
have been established by the World Health Organization (WHO). Please note that other
factors (e.g. diabetes, obesity, smoking, etc.) need to be taken into consideration. Consult with
your physician for accurate assessment, and never change your treatment by yourself.
DN:KD-927-SMSY01 V2.0 Operation Guide
16/22
Note:
It is not intended to provide a basis of any type of rush toward emergency
conditions/diagnosis based on the color scheme and that the color scheme is meant only to
discriminate between the different levels of blood pressure.
11. TECHNICAL ALARM DESCRIPTION
The monitor will show 'HI' or 'Lo' as technical alarm on LCD with no delay if the determined
blood pressure (systolic or diastolic) is outside the rated range specified in part
SPECIFICACIONS. In this case, you should consult a physician or check if your operation
violated the instructions.
The technical alarm condition (outside the rated range) is preset in the factory and cannot be
adjusted or inactivated. This alarm condition is assigned as low priority according to IEC
60601-1-8.
The technical alarm is non-latching and need no reset. The signal displayed on LCD will
disappear automatically after about 8 seconds.
12. TROUBLESHOOTING (1)
PROBLEM POSSIBLE CAUSE SOLUTION
LCD Display shows
abnormal result
The cuff position was not
correct or it was not properly
tightened
Apply the cuff correctly and try
again
Body posture was not correct
during testing
Review the “BODY POSTURE
DURING MEASUREMENT”
sections of the instructions and
re-test.
Speaking, arm or body
movement, angry, excited or
nervous during testing
Re-test when calm and without
speaking or moving during the
test
DN:KD-927-SMSY01 V2.0 Operation Guide
17/22
Irregular heartbeat (arrhythmia)
It is inappropriate for people
with serious arrhythmia to use
this Electronic
Sphygmomanometer.
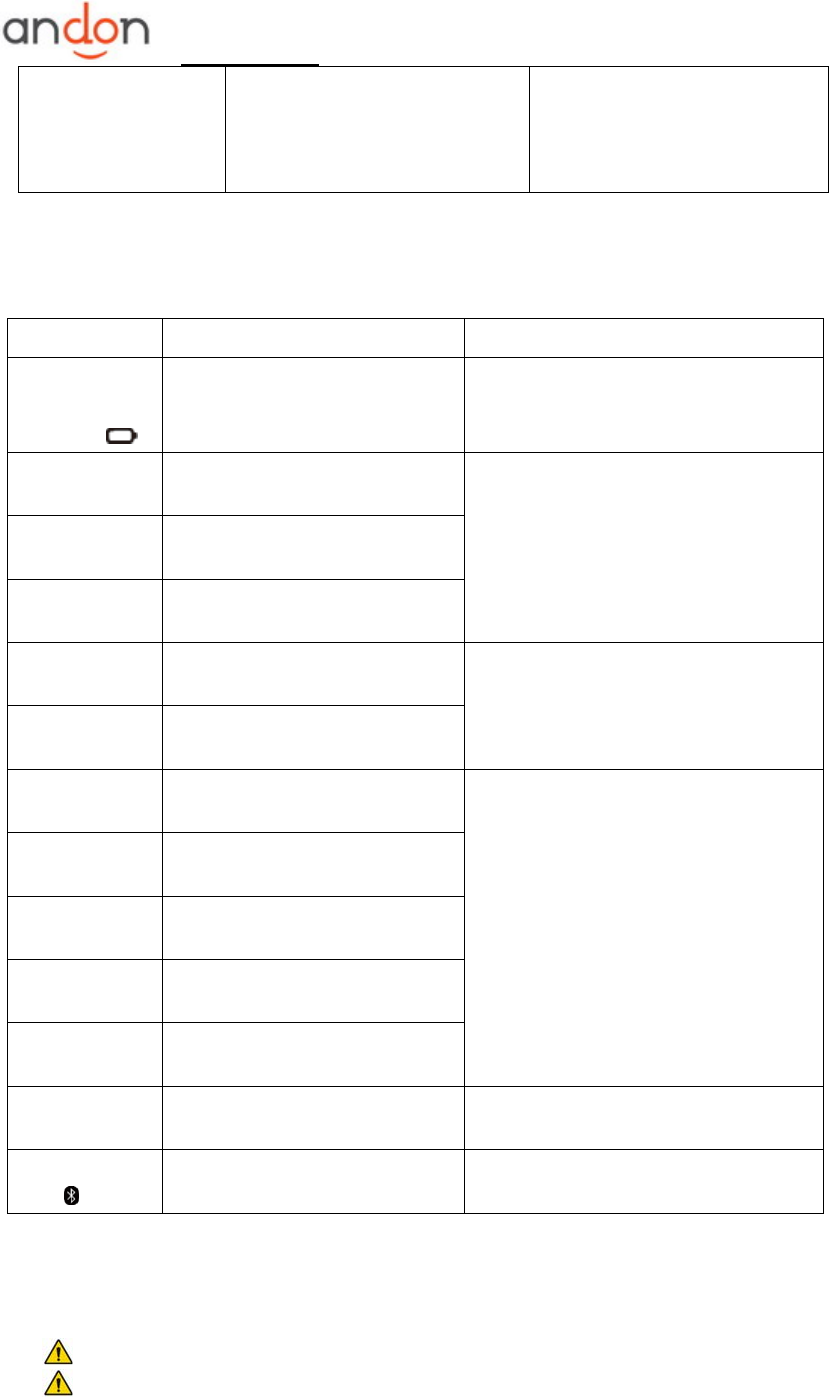
13. TROUBLESHOOTING (2)
PROBLEM POSSIBLE CAUSE SOLUTION
LCD Display
shows battery
symbol
Low Battery charge the lithium battery
LCD shows
“Er 0”
Pressure system is unstable
before measurement
Don’t move and try again.
LCD shows
“Er 1”
Fail to detect systolic pressure
LCD shows
“Er 2”
Fail to detect diastolic pressure
LCD shows
“Er 3”
Pneumatic system blocked or
cuff is too tight during inflation
Apply the cuff correctly and try again
LCD shows
“Er 4”
Pneumatic system leakage or
cuff is too loose during inflation
LCD shows
“Er 5”
Cuff pressure above 300mmHg
Measure again after five minutes. If
the monitor is still abnormal, please
contact the local distributor or the
factory.
LCD shows
“Er 6”
More than 160 seconds with
cuff pressure above 15 mmHg
LCD shows
“Er 7”
EEPROM accessing error
LCD shows
“Er 8”
Device parameter checking
error
LCD shows
“Er A”
Pressure sensor parameter
error
LCD shows
“PC Er ”
PC communicate error Connect the PC correctly and try
again
LCD shows
“ Er ”
BT communicate error Connect the IOS device correctly
and try again
MAINTENANCE
1. Do not drop this monitor or subject it to strong impact.
2. Avoid high temperature and solarization. Do not immerse the monitor in water as this
will result in damage to the monitor.
DN:KD-927-SMSY01 V2.0 Operation Guide
18/22
3. If this monitor is stored near freezing, allow it to acclimate to room temperature before
use.
4. Do not attempt to disassemble this monitor.
5. It is recommended the performance should be checked every 2 years or after repair.
Please contact the service center.
6. Clean the monitor with a dry, soft cloth or a soft cloth squeezed well after moistened with
water, diluted disinfectant alcohol, or diluted detergent.
7. No component can be maintained by user in the monitor. The circuit diagrams,
component part lists, descriptions, calibration instructions, or other information which will
assist the user’s appropriately qualified technical personnel to repair those parts of
equipment which are designated repairably can be supplied.
8. The monitor can maintain the safety and performance characteristics for a minimum of
10,000 measurements or three years, and the cuff integrity is maintained after 1,000
open–close cycles of the closure.
9. It is recommended the cuff should be disinfected 2 times every week if needed (For
example, in hospital or in clinique). Wipe the inner side (the side contacts skin) of the cuff
by a soft cloth squeezed after moistened with Ethyl alcohol (75-90%), then dry the cuff by
airing.
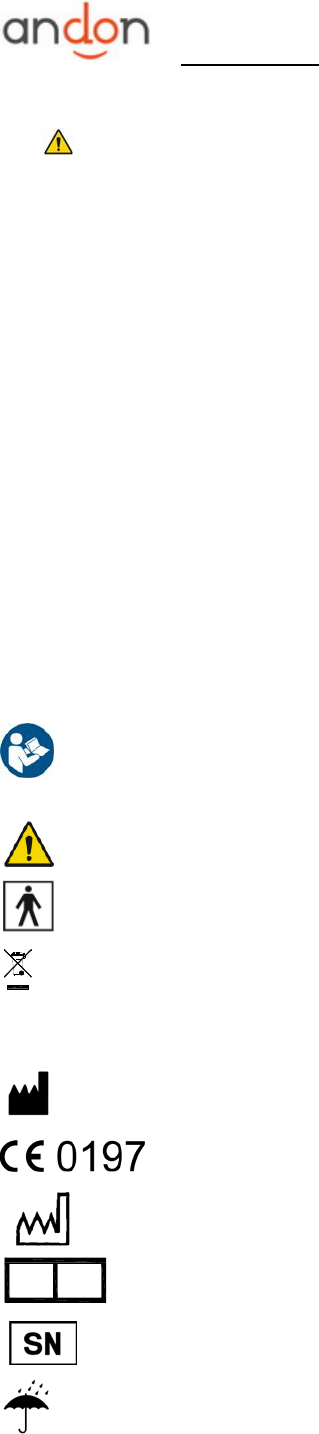
EXPLANATION OF SYMBOLS ON UNIT
Symbol for” THE OPERATION GUIDE MUST BE READ”(The sign background colour:
blue.The sign graphical symbol: white)
Symbol for “WARNING”
Symbol for “TYPE BF APPLIED PARTS” (The cuff is type BF applied part)
Symbol for “ENVIRONMENT PROTECTION – Waste electrical products should not be
disposed of with household waste. Please recycle where facilities exist. Check with your local
Authority or retailer for recycling advice”.
Symbol for “MANUFACTURER”
Symbol for “COMPILES WITH MDD93/42/EEC REQUIREMENTS”
Symbol for “DATE OF MANUFACTURE”
Symbol for “EUROPEAN REPRESENTATION”
Symbol for “SERIAL NUMBER”
Symbol for “KEEP DRY”
EC REP
DN:KD-927-SMSY01 V2.0 Operation Guide
19/22
EC REP
WARRANTY INFORMATION
Only charge the cost of components and transport.
SERVICE CENTER
ANDON HEALTH CO., LTD.
No. 3 Jinping Street, YaAn Road, Nankai District, Tianjin 300190, China.
Tel: 86-22-60526081
Lotus Global Co., Ltd.
1 Four Seasons Terrace West Drayton, Middlesex, London, UB7 9GG,United
Kingdom
Tel: +0044-20-75868010 Fax: +0044-20-79006187
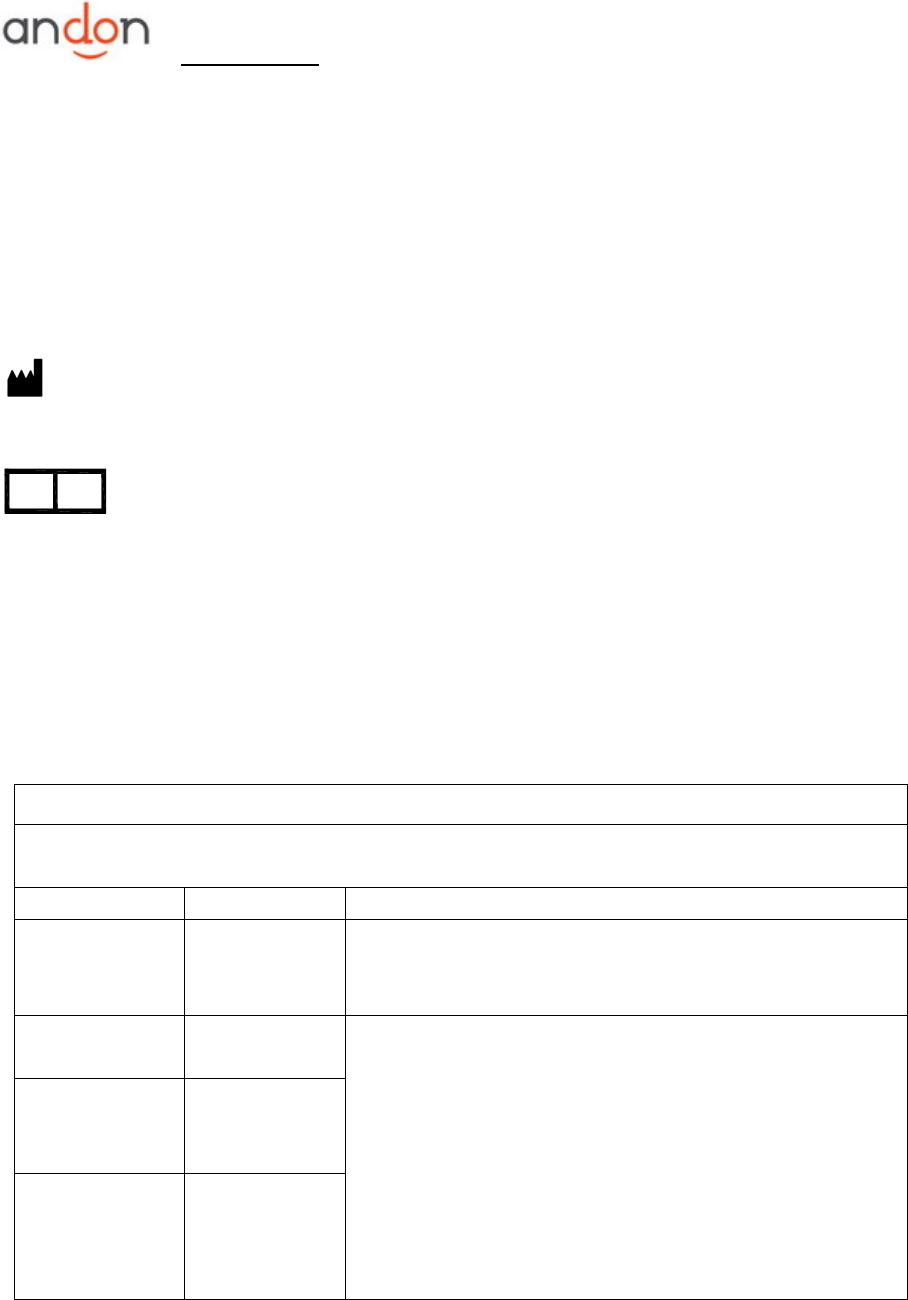
ELECTROMAGNETIC COMPATIBILITY INFORMATION
Table 1
For all ME EQUIPMENT and ME SYSTEMS
Guidance and manufacture’s declaration - electromagnetic emissions
The KD-927 is intended for use in the electromagnetic environment specified below.
The customer or the user of the KD-927 should assure that it is used in such an environment.
Emissions test Compliance Electromagnetic environment - guidance
RF emissions
CISPR 11 Group 1
The KD-927 uses RF energy only for its internal function.
Therefore, its RF emissions are very low and are not likely to
cause any interference in nearby electronic equipment.
RF emissions
CISPR 11 Class B The KD-927 is suitable for use in all establishments, including
domestic establishments and those directly connected to the
public low-voltage power supply network that supplies
buildings used for domestic purposes.
Harmonic
emissions
IEC 61000-3-2
Class A
Voltage
fluctuations/
flicker emissions
IEC 61000-3-3
Complies

DN:KD-927-SMSY01 V2.0 Operation Guide
20/22
Table 2
For all ME EQUIPMENT and ME SYSTEMS
Guidance and manufacturer’s declaration - electromagnetic immunity
The KD-927 is intended for use in the electromagnetic environment specified below. The customer
or the user of the KD-927 should assure that it is used in such an environment.
IMMUNITY
test
IEC 60601test
level Compliance level Electromagnetic environment -
guidance
Electrostatic
discharge
(ESD)
IEC 61000-4-2
± 6 kV contact
± 8 kV air
± 6 kV contact
± 8 kV air
Floors should be wood, concrete or
ceramic tile. If floors are covered
with synthetic material, the relative
humidity should be at least 30 %.
Electrical fast
transient/burst
IEC 61000-4-4
± 2 kV for power
supply lines
± 1 kV for
input/output lines
± 2 kV for power
supply lines
± 1 kV for
input/output lines
Mains power quality should be that
of a typical commercial or hospital
environment.
Surge
IEC 61000-4-5
± 1 kV line(s) to
line(s)
± 2 kV line(s) to
earth
± 1 kV line(s) to
line(s)
± 2 kV line(s) to
earth
Mains power quality should be that
of a typical commercial or hospital
environment.
Voltage dips,
short
interruptions
and
voltage
variations
on power
supply
input lines
IEC
61000-4-11
<5 % UT
(>95 % dip in UT)
for 0.5 cycle
40 % UT
(60 % dip in UT)
for 5 cycles
70 % UT
(30 % dip in UT)
for 25 cycles
<5 % UT
(>95 % dip in UT)
for 5 s
<5 % UT
(>95 % dip in UT)
for 0.5 cycle
40 % UT
(60 % dip in UT)
for 5 cycles
70 % UT
(30 % dip in UT)
for 25 cycles
<5 % UT
(>95 % dip in UT)
for 5 s
Mains power quality should be that
of a typical commercial or hospital
environment. If the user of the
KD-927 requires continued
operation during power mains
interruptions, it is recommended
that the KD-927 be powered from
an uninterruptible power supply or a
battery.
Power
frequency
(50/60 Hz)
magnetic field
IEC 61000-4-8
3 A/m 3 A/m Power frequency magnetic fields
should be at levels characteristic of
a typical location in a typical
commercial or hospital
environment.
NOTE: UT is the a.c. mains voltage prior to application of the test level.
DN:KD-927-SMSY01 V2.0 Operation Guide
21/22
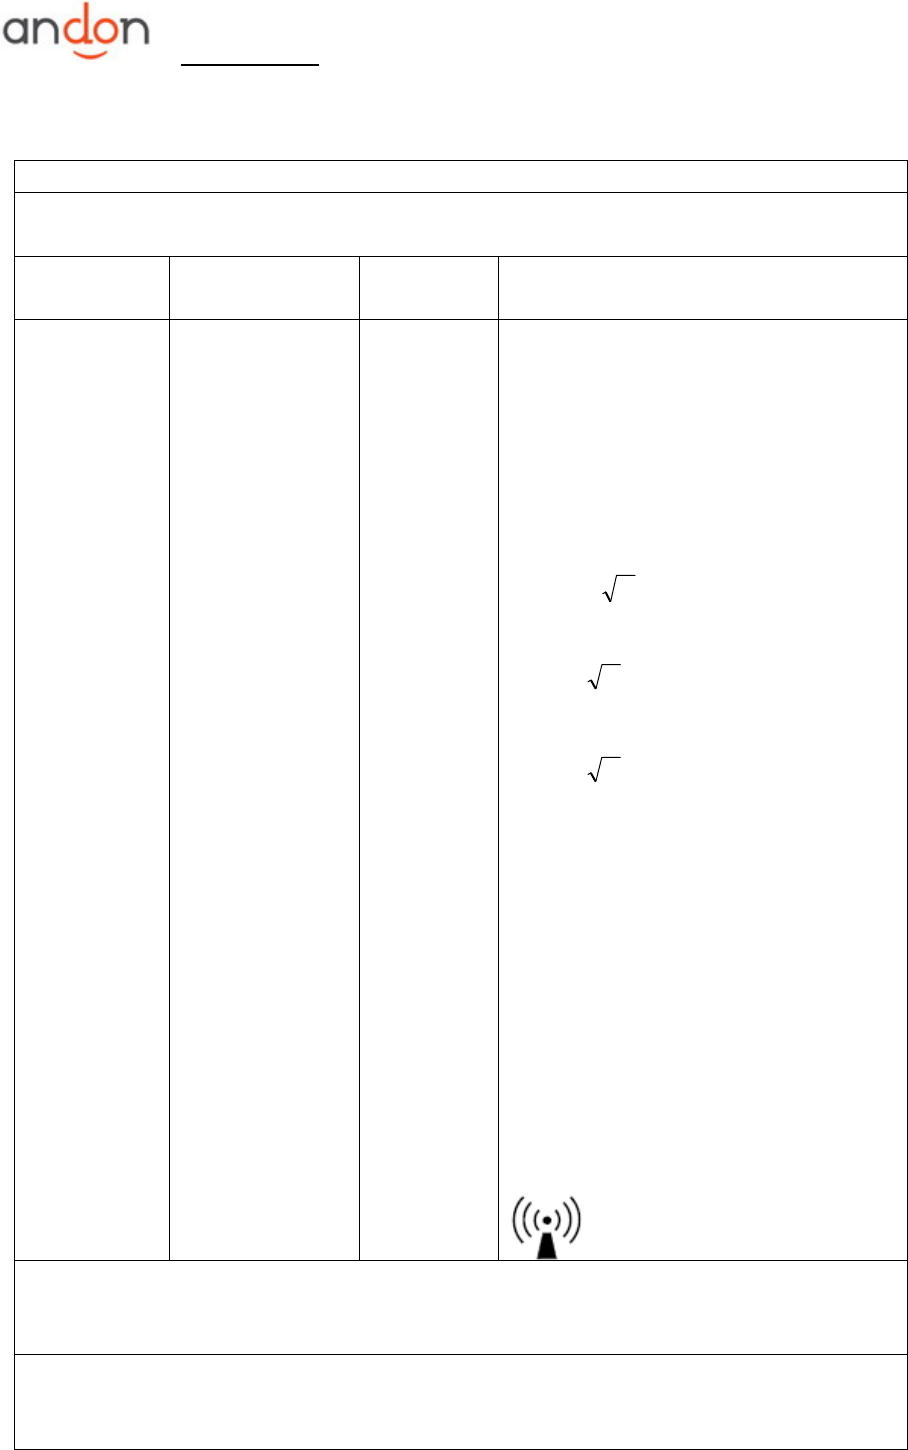
Table 3
For ME EQUIPMENT and ME SYSTEMS that are not LIFE-SUPPORTING
Guidance and manufacturer’s declaration - electromagnetic immunity
The KD-927 is intended for use in the electromagnetic environment specified below. The customer
or the user of the KD-927 should assure that it is used in such an environment.
IMMUNITY
test
IEC 60601test
level
Compliance
level Electromagnetic environment - guidance
Conducted RF
IEC 61000-4-6
Radiated RF
IEC 61000-4-3
3 Vrms 150 kHz to
80 MHz
3 V/m 80 MHz to
2,5 GHz
3 Vrms
3 V/m
Portable and mobile RF communications
equipment should be used no closer to any
part of the KD-927, including cables, than
the recommended separation distance
calculated from the equation applicable to
the frequency of the transmitter.
Recommended separation distance:
80 MHz to 800 MHz
800 MHz to 2,5 GHz
Where P is the maximum output power
rating of the transmitter in watts (W)
according to the transmitter manufacturer
and d is the recommended separation
distance in meters (m).
Field strengths from fixed RF transmitters,
as determined by an electromagnetic site
survey,a should be less than the compliance
level in each frequency range.b
Interference may occur in the vicinity of
equipment
marked with the following symbol:
NOTE 1 At 80 MHz and 800 MHz, the higher frequency range applies.
NOTE 2 These guidelines may not apply in all situations. Electromagnetic propagation is affected
by absorption and reflection from structures, objects and people.
a Field strengths from fixed transmitters, such as base stations for radio (cellular/cordless)
telephones and land mobile radios, amateur radio, AM and FM radio broadcast and TV broadcast
cannot be predicted theoretically with accuracy. To assess the electromagnetic environment due to
Pd
2.1=
Pd 2.1=
Pd 3.2=
DN:KD-927-SMSY01 V2.0 Operation Guide
22/22
fixed RF transmitters, an electromagnetic site survey should be considered. If the measured field
strength in the location in which the KD-927 is used exceeds the applicable RF compliance level
above, the KD-927 should be observed to verify normal operation. If abnormal performance is
observed, additional measures may be necessary, such as re-orienting or relocating the KD-927.
b Over the frequency range 150 kHz to 80 MHz, field strengths should be less than 3V/m.
Table 4
For ME EQUIPMENT and ME SYSTEMS that are not LIFE-SUPPORTING
Recommended separation distances between
portable and mobile RF communications equipment and the KD-927
The KD-927 is intended for use in an electromagnetic environment in which radiated RF
disturbances are controlled. The customer or the user of the KD-927 can help prevent
electromagnetic interference by maintaining a minimum distance between portable and mobile RF
communications equipment (transmitters) and the KD-927 as recommended below, according to
the maximum output power of the communications equipment.
Rated maximum
output
power of
transmitter
W
Separation distance according to frequency of transmitter
m
150 kHz to 80 MHz
80 MHz to 800 MHz
800 MHz to 2,5 GHz
0,01 0,12 0,12 0,23
0,1 0,38 0,38 0,73
1 1,2 1,2 2,3
10 3,8 3,8 7,3
100 12 12 23
For transmitters rated at a maximum output power not listed above, the recommended separation
distance d in meters (m) can be determined using the equation applicable to the frequency of the
transmitter, where P is the maximum output power rating of the transmitter in watts (W) according
to the transmitter manufacturer.
NOTE 1 At 80 MHz and 800 MHz, the separation distance for the higher frequency range applies.
NOTE 2 These guidelines may not apply in all situations. Electromagnetic propagation is affected
by absorption and reflection from structures, objects and people.
Pd 2.1=Pd 2.1=Pd 3.2=