Anker Technology A7908 Bluetooth Speaker User Manual Manual
Anker Technology Co., Limited Bluetooth Speaker Manual
Manual

Anker Portable Bluetooth Speaker
Model No: A7908
Instruction Manual
Package Contents
Anker Portable Bluetooth Speaker
Micro USB cable
3.5mm audio cable
Travel pouch
Instruction manual
Product Features
● Huge 1800mAh capacity delivers 15-20 hours of play time, outlasting even your iPhone 5s.
● Powerful 4W acoustic driver pumps out clear, room-filling sound.
● Latest Bluetooth 4.0 standards enables high definition audio, backward compatible with all
Bluetooth versions.
● Built-in high-sensitivity microphone with advanced CVC (Clear Voice Capture) technology
captures clear sound within a 2-foot (60cm) radius, perfect for use as a speaker phone.
● 3.5mm line-in port for connecting to your non-Bluetooth devices.
● Automatically turns off after 10 minutes when no device is connected.
● Automatically connects to the last-connected device when turned on (both device’s Bluetooth
functions need to be enabled).
Specifications
Bluetooth Standard 4.0
Product Weight 280 ± 10 g / 9.9 ± 0.4oz
Product Size 80 × 80 × 60mm / 3.1 × 3.1 × 2.7in
Lithium Battery Capacity 2100mAh
Play Time 15 - 20 hours
Charge Time 5 hours
Operating Range 10m / 33ft
Speaker Output Power 4W × 1
Audio Cable Type 3.5mm audio cable
Supported Bluetooth
Profiles
HSP, HFP, A2DP and AVRCP
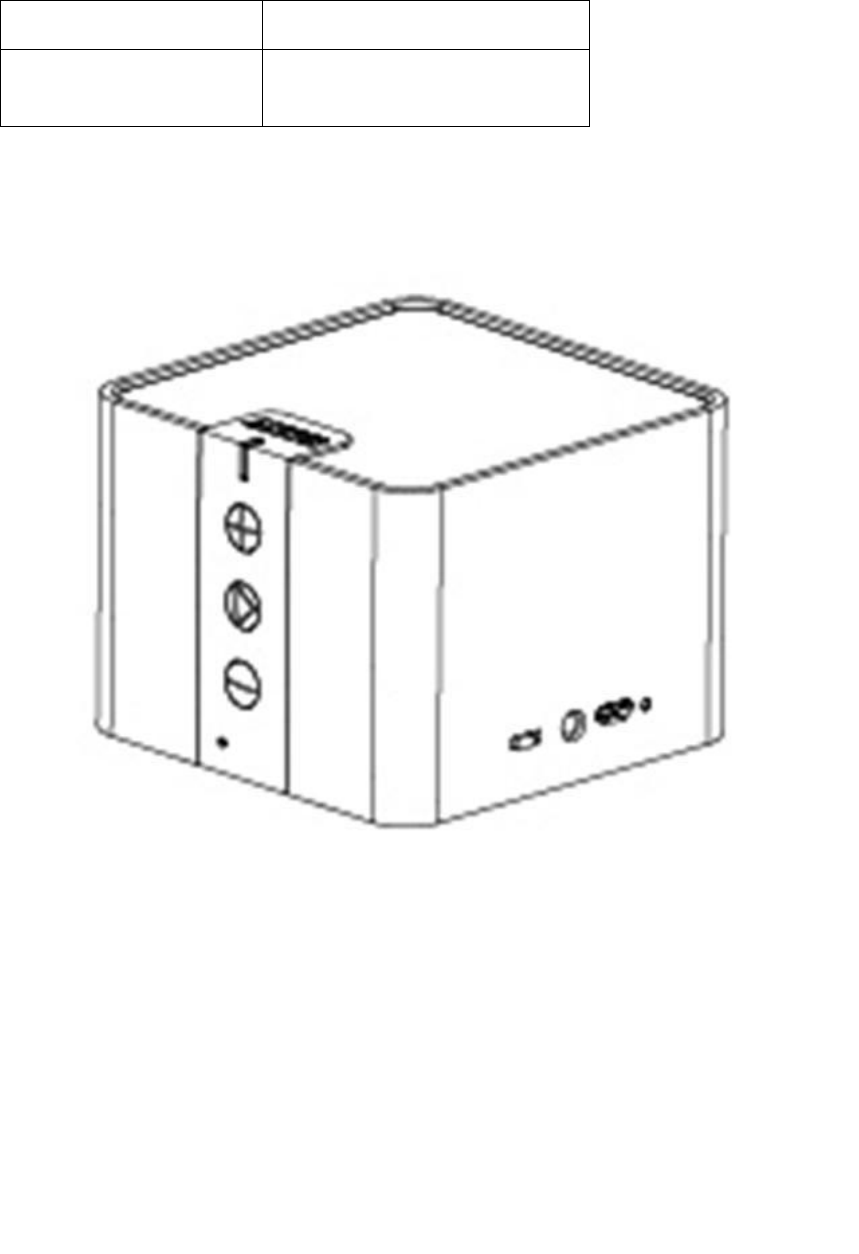
Product Overview
1. Volume Down
2. Volume Up
3. Play/Pause
4. Micro USB Input
5. Audio Input
6. Power Switch
7. Status Indicator
8. Battery Indicator
How to Pair with Your Device
1. Turn the Power Switch on. The Status Indicator will light up. The speaker will enter pairing mode
automatically within 3 seconds, and the Status Indicator will begin to flash.

2. Activate your device’s Bluetooth function and search for the device.
3. Once the Bluetooth speaker has been detected, select the product name “Anker MP141” to connect.
(For devices with Bluetooth versions below 3.0, press “Yes” to confirm pairing. Enter a passkey or PIN
code “0000” (4 zeros), then press the “Yes” or “OK” key to finish pairing.)
4. When the Bluetooth speaker and your device are successfully paired, the Status Indicator will go on
and remain on while connected.
Note: The speaker will automatically connect to the last-connected device once Bluetooth function is
enabled. When pairing with an additional device, disable the Bluetooth function on the previous device
and shut off the speaker, or simply delete the pairing record. Then, repeat the pairing process.
How to Use
Turning the speaker on/off
Slide the switch to the “on” or “off” position to turn the speaker on or off.
Music play/pause
First, make sure your device is connected to the speaker successfully. Open your music software to play
your music from the speaker. Press the “Play/Pause” button to pause music.
Adjusting volume
Press the “Volume Up” or “Volume Down” button to increase or decrease the volume.
Voice dialing
Please ensure your mobile phone supports voice dialing and voice tag recognition to use this feature.
Press the “Play/Pause” button for 2 seconds, then give your voice command. Your device should then
repeat the name to confirm before calling. (On iPhone, this will activate Siri.)
Answering a call
Press the “Play/Pause” button to answer a call, or answer directly from the phone.
Ending a call
Press the “Play/Pause” button to end a call, or end directly from the phone.
Rejecting an incoming call
Press the “Play/Pause” button for 2 seconds to reject an incoming call.
Microphone
Use the microphone directly on the speaker to talk after answering a call. The distance between your
mouth and the speaker should not exceed 2ft/60cm.
Deleting pairing records
When the speaker is in standby mode, press the “Volume Down” and “Volume Up” buttons for 2 seconds
to delete pairing records.

Note: Basic functions may be restricted depending on Bluetooth software compatibility or setting
limitations of your device.
How to Recharge
When the speaker’s battery is low, the speaker will announce, “Battery low”, and the Battery Indicator
will flash 10 times every 5 minutes to remind you.
1. Plug the micro USB cable into the input port of the speaker.
2. Insert the remaining end of the USB power wire into (a) a USB AC adapter (not included) connected to
a wall socket, or (b) a charging computer USB port. A steady red Battery Indicator will show that it is
charging.
3. The red Battery Indicator will go off when the speaker is fully charged.
LED Indicator Instructions
LED indicator Meaning
Blue Status Indicator rapidly flashing Pairing mode
Steady Blue Status Indicator Connected to a device
Red Battery Indicator flashing 10 times every 5
minutes
Low Battery
Steady Red Battery Indicator Charging
Red Battery Indicator goes off Fully charged
Usage Tips
1. Power off the speaker when not in use and before storing.
2. The operational range of the speakers may be influenced by obstructions, such as walls, pillars, etc. To
ensure a stable connection, we recommend avoiding such obstructions whenever possible and/or
shortening the distance during use.
3. To protect the long-term performance of the battery, please do not place the speaker in high
temperatures above 140°F/60 , such as in a hot vehicle or under direct sunlight.℃
4. Do not expose the speaker or any of its supplied parts to rain or other liquids.
FAQ
1. Why can’t the speaker connect to my device?
a. Check to ensure your device’s Bluetooth function is enabled.
b. Make sure your device is within 3ft/1m of the speaker.
c. Delete the pairing record(s) on the speaker or your device.
2. Can I use the speaker to play music while charging?

No. Concurrently charging and using the speaker will cause damage to the speaker’s circuit and affect the
long-term performance of the battery.
3. Can I Skype using this speaker?
Skype is only available when using iOS 6. It cannot currently be used under other operating systems
(Android, iOS versions excluding iOS 6 ).
FCC STATEMENT :
This device complies with Part 15 of the FCC Rules. Operation is subject to the following two conditions:
(1) This device may not cause harmful interference, and
(2) This device must accept any interference received, including interference that may cause undesired
operation.
Warning: Changes or modifications not expressly approved by the party responsible for compliance
could void the user's authority to operate the equipment.
NOTE: This equipment has been tested and found to comply with the limits for a Class B digital device,
pursuant to Part 15 of the FCC Rules. These limits are designed to provide reasonable protection against
harmful interference in a residential installation. This equipment generates uses and can radiate radio
frequency energy and, if not installed and used in accordance with the instructions, may cause harmful
interference to radio communications. However, there is no guarantee that interference will not occur in a
particular installation. If this equipment does cause harmful interference to radio or television reception,
which can be determined by turning the equipment off and on, the user is encouraged to try to correct the
interference by one or more of the following measures:
Reorient or relocate the receiving an tenna.
Increase the separation between the equipment and receiver.
Connect the equipment into an outlet on a circuit different from that to which the receiver is connected.
Consult the dealer or an experienced radio/TV technician for help.
RF warning statement:
The device has been evaluated to meet general RF exposure requirement. The device can be used in
portable exposure condition without restriction.