Anker Repeater 说明书手册 PDF Instruction Manual EN 66ANWNWR WA
User Manual: Anker Instruction Manual-EN en_us
Open the PDF directly: View PDF ![]() .
.
Page Count: 22

Instruction
Manual
Anker Compact Wi-Fi Repeater

1. Anker Compact Wi-Fi Repeater Introduction
2. Quick Installation Guide
Option 1 Repeater Mode Installation
Option 2 AP-Bridge Mode Installation
Option 3 AP-Router Mode Installation
Option 4 Client Mode Installation
3. FAQ - Anker Compact Wi-Fi Repeater
Contents
1
3
3
6
8
11
13
Anker Compact Wi-Fi Repeater
Introduction
The Anker Compact Wi-Fi Repeater is a versatile 4-in-1 wireless solution that can
function as a Repeater, Bridge, Router or Client to serve your unique networking
needs. Its compact design delivers reliable and lightning-fast transfer speeds up to
300Mbps so that you can open up the far corners of your home and office – or even
your hotel when you're on the go. With such a comprehensive solution, it's never been
easier to connect to the wireless web.
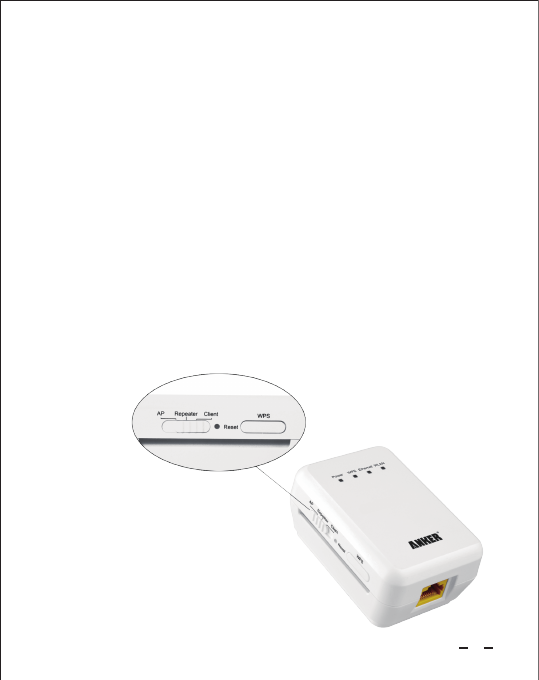
With a simple three-way switch on its side panel, this multi-purpose device allows you
to choose from 4 different modes.
Repeater
Access Point (AP), configured as a Bridge
Access Point (AP), configured as a Router
Client
Please consider the best wireless networking solution for your situation before
starting the setup process:
1.
2.
3.
4.
1
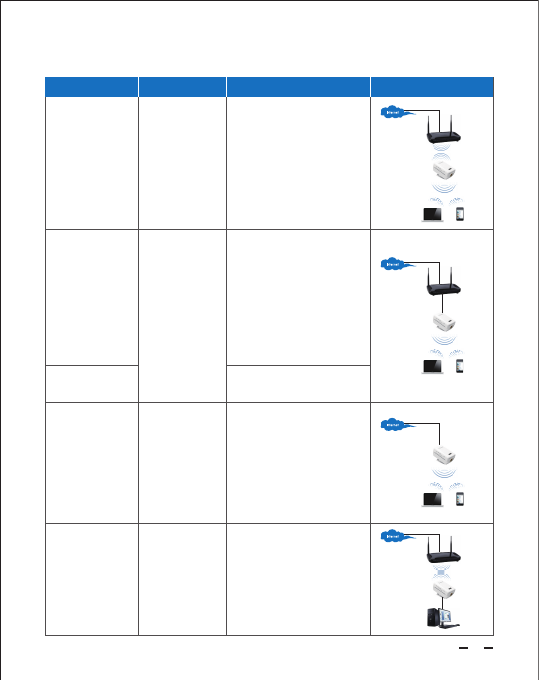
Please select the best mode for your needs.
Extend a wireless
network without cable.
Extend/create a
wireless network
with cable to modem
available.
A mini router for home
use.
Enable WiFi
connection for your
network-port devices.
Expand the coverage of your
existing wireless network with no
need for your wire network
backbone, by detecting the
wireless signal and repeating it to
a farther range. We recommend
this mode when cabling is
impractical or when you require
flexibility to move the repeater
from one room to another.
A compact yet powerful wireless
router. Connect to an existing
modem at home, supporting
multiple WAN modes, including
PPPoE dial-up, Dynamic IP, Static
IP, etc.
Receive wireless signal from your
existing router, and provide
internet access through cable to
your set-top box or
network-port-only computer.
An alterative to Repeater
Mode. Connect to an existing
router/modem with a long
network cable and place this
device in a strategic farther
location for extended wireless
range. Since the cable
provides a stable and direct
signal, we recommend this
mode wherever possible.
Repeater
Access Point (AP)
- Configured as
Bridge
Access Point (AP)
- Configured as
Router
Client
1. 1.
Connect to an Ethernet port at
hotel, just plug and play.
2.
A mini AP for travel
use.
2.
Application Mode Button Description
2

Quick Installation Guide
Option 1 Repeater Mode Installation
If this is not your first time setting up this device, we recommend that you first reset to
start anew, and then follow the steps below. Please refer to the FAQ Question 7 for
reset instructions.
If you would like to set up your Anker device in Repeater mode with the Wi-Fi
Protected Setup (WPS) security option, note that WPS may not support all systems
and may result in network conflicts. To move forward and set up Repeater mode with
WPS, please skip directly to FAQ Question 9 for more details.
We suggest you set your router to a static wireless channel for long term use. If
there are many wireless networks in range and your setting is on “Auto,” the
channel may switch often, causing disconnection. We recommend channels 1, 6,
and 11.From your router's configuration page, your channel settings can typically
be found under the "wireless settings" menu option.
Please verify that your router or modem is working properly and that your existing
devices can connect to the Internet successfully.
Select your desired mode
After reading the different solutions described above, if you decide to choose
Repeater mode, please adjust the three-way switch button on the side panel of
your Anker device to Repeater.
Select the device location
Identify the wall socket where you would like to place the Anker device. Ensure
Step 1. Set your router a static wireless channel and confirm Live Internet
Connection
Step 2. Install the Device
Step 1. Confirm Live Internet Connection
Step 2. Install your Anker Device
Step 3. Connect Computer to your Anker Device Wirelessly
Step 4. Configure your Anker Device
Step 5. Connect to the Wireless Web
1.1
1.2
2.1
2.2
3

Step 3. Connect Computer to Your Anker Device Wirelessly
Step 4. Configure the Device
From your computer, view your available wireless connections (typically
accessible from the corner of your desktop).
Choose the newly available "Anker-Repeater" network and connect to it. Note
that no password is needed at this time. Please do not enter any passwords or
PIN codes if prompted, and proceed to connect anyway.
3.1
3.2
2.3
Click Setup Wizard in the navigation bar on the left.
Select Wireless Universal Repeater Mode and click Next.
Click Site Survey and identify the existing wireless network of your router or
modem from the list of available networks. Select it, record the setting listed under
the Encrypt field and click Next. Please ensure that the signal strength is above
80%
You will be asked to configure the wireless client manually. Please select the same
Wireless Client Security Options as your existing router (recorded in step c) and
input its PassPhrase i.e. password to logon it. Click Next.
Keep Synchronize Wireless Universal Repeater's And Uplink AP's SSID And
Security Options unchecked.
Note: We do NOT recommend this setting, since it enables the wireless roaming
function. For further explanation, please refer to FAQ Question 3.
Customize the SSID, i.e. the name of your new wireless network. The default
a.
b.
c.
d.
e.
4.1 Logon to the device's configuration page
Open a web browser on your computer, and type 192.168.100.253 to reach the
device's configuration page. When the log-on dialogue is displayed, enter your default
UserName/Password: admin/admin to logon to the Anker device's configuration web
page.
4.2 Configure the device
that your desired location has a stable Wi-Fi signal from your original router.
Note: > 80% signal strength is ideal. You can see the single strength in Step 4.2c.
Plug the Anker device into the wall socket; the LED indicators will light after 15
seconds. Please allow a 2-minute start up time.
4

Step 5. Connect to the Wireless Web
Congratulations! You should now be able to surf the Internet with a strong Wi-Fi
signal from your newly configured 4-in-1 Anker Compact Wi-Fi Repeater.
On your computer, view the list of available wireless networks (typically
accessible via a Wi-Fi icon located at the corner of your computer's desktop).
Select the newly named network. If the desired network does not appear, please
wait and refresh until the network becomes available.
Connect to your desired network, and input your password when prompted.
5.1
5.2
f.
After the device fully restarts, connect to the wireless web via it.
Note: You may move your Anker device to different locations as your needs demand.
Your settings will be saved. For optimal performance, always ensure that the wireless
router signal that the device receives is strong (ideally 80%).
setting is Anker-Repeater.
Set Security Options and PassPhrase.
Note: For your PassPhrase, i.e. the password to logon to your new wireless
network, this password must contain at least 8 characters and may include
case-sensitive letters and numbers. This password is not necessarily same as the
one of original router's network. Save your password in a safe place as a backup.
Click Finish to apply the settings. Wait 2 minutes to allow a full restart.
5

Option 2 AP-Bridge Mode Installation
Step 2. Install the Device
Step 3. Connect Computer to your Device
Step 1. Confirm Live Internet Connection
Please verify that your router or modem is working properly and that your existing
devices can connect to the Internet successfully.
Step 1. Confirm Live Internet Connection
Step 2. Install your Anker Device
Step 3. Connect Computer to your Device
Step 4. Configure your Anker Device
Step 5. Connect you router with Anker Device and Connect to the Wireless Web
Select your desired mode
Please select your desired AP mode and adjust the three-way switch button on
the side panel of your Anker device accordingly.
Select a desired location to plug the Anker device into the wall socket; the LED
indicators will light after 15 seconds. Please allow a 2-minute start up time.
2.1
2.2
Connect your computer to the Anker device
From your computer, view your available wireless connections (typically
accessible from the corner of your desktop).
Choose the newly available "Anker-AP" network and connect to it. Note that no
password is needed at this time. Please do not enter any passwords or PIN
codes if prompted, and proceed to connect anyway.
3.1
3.2
If this is not your first time setting up this device, we recommend that you first reset to
start anew, and then follow the steps below. Please refer to the FAQ Question 7 for
reset instructions.
6

Step 4. Configure your Anker device
Step 5. Connect you router with Anker Device and Connect to the Wireless Web
Congratulations! You should now be able to surf the Internet with a strong Wi-Fi
signal from your newly configured 4-in-1 Anker Compact Wi-Fi Repeater.
Logon to the device's configuration page
Open a web browser on your computer, and type 192.168.100.253 to reach the
device's configuration page. When the log-on dialogue is displayed, enter your
default UserName /Password: admin/admin to logon to the Anker device's
configuration web page.
Configure the device
The manufacturer default setting is Bridge Mode. Customize the SSID, set
Security Options and your desired PassPhrase.
Click Finish to apply the settings. Wait 2 minutes to allow a full restart.
Note: If you previously set the Anker device to AP-router mode, then you need to
click Mode settings and choose Bridge Mode. Then the Anker device will
restart. Please wait 2 minutes, reconnect to the wireless network, and then logon
to the configuration page again.
4.1
4.2
Connect you router and Anker Device with a network cable, wait 30 seconds to
allow it restart again.
On your computer, view the list of available wireless networks (typically
accessible via a Wi-Fi icon located at the corner of your computer's desktop).
Select the newly named network. If the desired network does not appear, please
wait and refresh until the network becomes available.
Connect to your desired network, and input your password when prompted.
5.1
5.2
5.3
7

Option 3 AP-Router Mode Installation
Step 1. Confirm Live Internet Connection
Step 2. Install your Anker Device
Step 3. Connect Computer to your Device, and Modify Computer IP Address
Step 4. Configure your Anker Device
Step 5. Connect to the Wireless Web
Step 2. Install the Device
Step 3. Connect Computer to Your Device, and Modify Computer IP Address
Step 1. Confirm Live Internet Connection
Please verify that your router or modem is working properly and that your existing
devices can connect to the Internet successfully.
Select your desired mode
please select your desired AP mode and adjust the three-way switch button on
the side panel of your Anker device accordingly.
Select the device location
Identify the wall socket where you would like to place the Anker device, and make
sure that you have a network cable able to connect to either your existing modem
Do NOT power the device yet. Plug one end of network cable into the Anker
device's network port and the other into the network port of your existing modem.
Plug the Anker device into the wall socket; the LED indicators will light after 15
seconds. Please allow a 2-minute start up time.
Connect your computer to the Anker device
Connect the computer to your Anker device wirelessly:
From your computer, view your available wireless connections (typically
accessible from the corner of your desktop).
2.1
2.2
2.3
3.1
a.
If this is not your first time setting up this device, we recommend that you first reset to
start anew, and then follow the steps below. Please refer to the FAQ Question 7 for
reset instructions.
8

Step 4. Configure the Device According the Selected Mode
Logon to the device's configuration page.
Open a web browser on your computer, and type 192.168.100.253 to reach the
device's configuration page. When the log-on dialogue is displayed, enter your
default UserName/Password: admin/admin to logon to the Anker device's
configuration web page.
Click Mode Settings and confirm it is set to Router Mode (Default setting is
Bridge Mode).
Note: Any change to Mode Settings will cause the device to restart. In this
case, please wait 2 minutes, reconnect to the wireless network, and then logon
to the configuration page again.
Click Setup Wizard in the navigation bar on the left.
Click Yes to allow the setup wizard to automatically detect your connection
type. If you prefer to set this manually, please refer to FAQ Question 5 for
details.
Your Anker repeater will detect one of the three broadband types: DHCP, Static
IP or PPPoE. Click Yes to move forward and complete any required
information required / provided by your Internet Service Provider (ISP). Then
click Finish to apply settings.
Note the following fields are optional:
DHCP: Leave Account Name blank if not provided by your ISP
Static IP: Leave DNS fields blank if not provided by your ISP
4.1
Configure the device
4.2
You will need to temporarily change your IP address to enter the device
configuration page.
On your computer, please visit your network connections settings and navigate to
the IPv4 setting of your wireless connection. Change the computer's IP address
to 192.168.100.1 and the gateway IP address to 192.168.100.253. Please refer
to FAQ Question 2 for more detailed instructions.
3.2
Choose the newly available "Anker-AP" network and connect to it. Note that no
password is needed at this time. Please do not enter any passwords or PIN
codes if prompted, and proceed to connect anyway.
b.
a.
b.
c.
d.
9

Congratulations! You should now be able to surf the Internet with a strong Wi-Fi
signal from your newly configured 4-in-1 Anker Compact Wi-Fi Repeater.
Step 5. Connect to the Wireless Web
After the device fully restarts, connect to the wireless web via it.
On your computer, view the list of available wireless networks (typically
accessible via a Wi-Fi icon located at the corner of your computer's desktop).
Select the newly named network. If the desired network does not appear, please
wait and refresh until the network becomes available.
Connect to your desired network, and input your password when prompted.
Follow return to Step 3.2 to configure the IP address settings to your computer's
wireless connection. Please set to DHCP (or dynamic IP) in IPV4 settings.
5.1
5.2
5.3
Click Next and keep the Wireless Router Radio enabled.
Customize the SSID, i.e. the name of your new wireless network. By default,
the network SSID is named "Anker-AP".
Set Security Options and PassPhrase.
Note: For your PassPhrase, i.e. the password to logon to your new wireless
network, this password must contain at least 8 characters and may include
case-sensitive letters and numbers. Save your password in a safe place as a
backup.
Click Finish to apply the settings. Wait 2 minutes to allow a full restart.
e.
f.
g.
PPPoE: Leave Service Name blank and select Get DNS Address Automati-
cally From ISP, if not provided by your ISP
10

Option 4 Client Mode Installation
Please verify that your router or modem is working properly and that your existing
devices can connect to the Internet successfully.
Step 1. Confirm Live Internet Connection
Step 2. Install the Device
Select your desired mode
Please select your desired Client mode and adjust the three-way switch button
on the side panel of your Anker device accordingly.
Select the device location
For Client mode setup:
Identify the wall socket where you would like to place the Anker device. Ensure
that your desired location has a stable Wi-Fi signal from your original router.
Note: > 80% signal strength is ideal, you can see the signal strength in Step
4.2a.
Plug the Anker device into the wall socket; the LED indicators will light after 15
seconds. Please allow a 2-minute start up time.
2.1
2.2
2.3
Step 1. Confirm Live Internet Connection
Step 2. Install your Anker Device
Step 3. Connect Computer to your Device
Step 4. Configure your Anker Device
Step 5. Connect to the Wireless Web
If this is not your first time setting up this device, we recommend that you first reset to
start anew, and then follow the steps below. Please refer to the FAQ Question 7 for
reset instructions.
If you would like to set up your Anker device in Client mode with the Wi-Fi Protected
Setup (WPS) security option, note that WPS may not support all systems and may
result in network conflicts. To move forward and set up Client mode with WPS, please
skip directly to FAQ Question 9 for more details.
11

Congratulations! You should now be able to surf the Internet with a strong Wi-Fi
signal from your newly configured 4-in-1 Anker Compact Wi-Fi Repeater.
Step 3. Connect Computer to Your Device.
Connect your computer to the Anker device
Please plug one end of the included network cable into the device, and the
other end to the network port of your computer.
Note: This is necessary to complete setting configuration beforehand even if you
want to wirelessly connect and provide your set-top box with Internet access
later.
3.1
3.2
Step 4. Configure the Device According the Selected Mode
Step 5. Connect to the Wireless Web
Logon to the device's configuration page
Open a web browser on your computer, and type 192.168.100.253 to reach the
device's configuration page. When the log-on dialogue is displayed, enter your
default UserName/Password: admin/admin to logon to the Anker device's
configuration web page.
Configure the device
4.1
4.2
Click Site Survey and identify the wireless network of your router or modem
from the ist of available networks. Please ensure that the signal strength is
above 80%, select it and click Next.
Input the PassPhrase of your router or modem to allow your Anker device to
connect to the network.
Click Finish to apply the settings. Wait 2 minutes to allow a full restart.
After the device fully restarts, connect to the wireless web via it.
Your setup is completed, and your newly configured Anker device can now receive
your existing Wi-Fi signal. Please disconnect the Anker device from your computer,
and instead connect to your non-Wi-Fi device such as your set-top box using a
network cable. This connected device can now enjoy Internet access.
You may move your Anker device to different locations as your needs demand. Your
settings will be saved. For optimal performance, always ensure that the wireless
router signal that the device receives is strong (ideally 80%).
a.
b.
c.
12

FAQ
From your computer, view your available wireless connections (typically
accessible from the corner of your desktop) and select the Anker network.
Visit your network connections settings and navigate to the IPv4 setting of your
wireless connection. Temporarily change the connection's IP address to
192.168.100.1 (i.e. into the same subnet of your Anker device) and set the
gateway to 192.168.100.253 (i.e. your Anker device's IP address). Please refer to
FAQ Question 2 for details.
Connect your computer to the Anker device through cable (if on Client mode) or
wirelessly (if on Repeater, AP-Bridge or AP-Router mode).
Open a web browser on your computer, and type 192.168.100.253 to reach the
device's configuration page. When the log-on dialogue is displayed, enter your
default UserName/Password: admin/admin to logon.
Among the list of connections, right click the active Anker network connection,
either "Wireless Connection" (for AP, Repeater mode configuration) or "Local
Connection" (for Client mode configuration).
Click "Properties" in the pop-up menu. The "connection properties" window will
appear.
1. How do I login to configure my repeater's settings?
Please follow the steps below. If your Anker device is set to Client or Repeater mode,
please skip Steps A and B.
2. How do I temporarily change my computer's IP address to 192.168.100.1 and
the gateway setting to 192.168.100.253?
Please follow the steps below:
Anker Compact Wi-Fi Repeater
A.
B.
C.
D.
Open the IP setting dialog on your computer
For PC users
Windows 7
Go to Start > Control Panel > Network & Sharing Center > Change Adapter
Settings (or Manage Network Connections).
Windows XP
Go to Start > Control Panel > Network Connections.
A.
a.
b.
13

3. What is wireless roaming? How do I enable it in Repeater mode?
If identical SSID and security settings (security mode, password) are applied to
wireless networks of both your existing router and new Anker repeater, your wireless
devices, such as a laptop, will treat and display them as one in your list of available
wireless networks. Consequently, your laptop may choose to automatically switch
between two networks when a given network's signal becomes too weak (this
threshold is unique to each device). This is called Wireless Roaming.
For Mac users
Record the current IPv4 settings before proceeding
Note: Computers are often set to "Obtain an IP address automatically" via the
DHCP setting. If it is not, please write down the exact information of your IP
address, subnet mask and default gateway so that you can restore these settings
later.
B.
Temporarily change the IP address of your computer
C.
In this window, double-click "Internet Protocol Version 4(TCP/IPv4)." The IP
setting dialog will appear.
c.
From the IPv4 settings, switch to configure your IP address manually.
Type in the following settings:
IP address: 192.168.100.1
Subnet mask: 255.255.255.0
Default gateway/Router: 192.168.100.253
Note: Do not change DNS settings
Click "OK" and wait a few seconds to allow the new settings to apply.
a.
b.
c.
Click the icon from the top-left corner of your desktop; choose System
Preferences > Network. The network configuration window will appear.
On the left of the window, select your active Anker network connection, usually
"Wi-Fi" (for AP, Repeater mode configuration) or "Ethernet" (for Client mode
configuration). For "Wi-Fi" connections, please proceed to click "Advanced…"
on the lower right corner.
Select the TCP/IP tab, and the IP setting page will appear.
a.
b.
c.
To restore your IP settings later, please follow the same steps and input your backup
information step B above.
14

4. Does my Anker device provide lower peak network throughput in Repeater
Mode?
Yes. As with all wireless repeaters, the Anker device in Repeater Mode splits its
wireless bandwidth to "talk" with both your wireless router and your computer.
Therefore its peak throughput (NOT average throughput) will be lower compared with
AP-Bridge, AP-Router or Client Mode.
For most people who rarely hit peak wireless bandwidth, Repeater Mode may still be
the most convenient choice. For those who constantly use media streaming or
real-time network gaming, we instead recommend AP-Bridge mode to expand the
wireless network with less impact to peak performance.
5. Which Broadband type (or WAN setting) should I choose for Router Mode
setup?
Choose from the following options, consulting with your Internet Service Provider
(ISP) or network administrator for any required connection information:
In most circumstances, we do not recommend use of wireless roaming because:
Many devices will not automatically switch to the stronger network. They will
instead only switch networks after the connected network signal becomes
extremely weak or even nonexistent.
Wireless roaming can obstruct accurate troubleshooting.
Dynamic IP: The most commonly used setting. This option connects your Anker
repeater to most residential gateways, cable modems and some DSL modems with
built-in routing functionality (these units commonly feature multiple Ethernet LAN
ports).
PPPoE: This option connects your Anker repeater to DSL modems that lack a
routing or DHCP function or have been set to bridge mode. In this mode, you will
typically need to input an assigned Username and Password provided by your ISP.
Please leave all other fields at their default settings unless instructed otherwise by
your ISP.
If you still prefer to enable wireless roaming, please follow the instructions of Quick
Installation Guide for Repeater Mode, in Step 4.2.E please select Synchronize
Wireless Universal Repeater's Uplink AP's SSID And Security Options and skip
customizing SSID/password.
1.
2.
15

6. How do I enable WDS (Wireless Distribution System) in Repeater or AP-Rout-
er mode (advanced)?
The Anker device can support WDS, an advanced mode that allows you to create a
network of wireless access points that forward traffic to one another. Because WDS
reduces throughput, flexibility, and compatibility, only advanced users familiar with the
advantages and disadvantages of WDS should select this option.
WDS can be configured under the Repeater or Access Point (AP) router modes.
Please follow the steps below to enable WDS.
Static IP: A less common option, we do not recommend this setting unless required
by your ISP or network administrator.
For WDS-enabled Repeater setup:
Before Setup: Identify the MAC address of both your router and the Anker device.
This information is typically printed directly on the device. You should also be able to
find the router's MAC address by logging into the router's configuration page (see
your router's instruction manual).
a.
b.
c.
Configure the Anker device
Begin standard setup
In the Quick Installation Guide for Repeater Mode, please follow Steps
1-4.1 for Repeater mode to enter the configuration page of the Anker device.
Configure the device
Click Setup Wizard in the navigation bar on the left.
Select WDS Mode and click Next.
In the Repeater IP Address field, enter the Anker repeater IP address.
d.
e.
In the Basic Station MAC Address field, enter the router MAC address,
then click Next.
Customize the SSID, i.e. the name of your new wireless network. By
We recommend using the default IP address of 192.168.100.253. If other
devices in your network environment (e.g., multiple repeaters) also use the
default IP address of 192.168.100.253, a network conflict will occur.
Instead, please enter 192.168.100.x (x being an arbitrary value between 1
to 254). Please save this IP address to access the configuration page
moving forward.
1.
1.1
1.2
16

For WDS-enabled Router setup:
Before Setup: When configured in AP-Router mode, you can enable its WDS function
and allow it to serve as the main WDS base station to which WDS-enabled repeaters
can connect. Please identify the MAC address of your Anker device, printed on the
side of the unit.
f. Click Finish to apply the settings. Wait 2 minutes to allow a full restart.
default, the network SSID is named "Anker-Repeater". Then configure the
repeater to match the same channel and wireless security settings as your
router.
Begin standard setup
In the Quick Installation Guide for AP-Bridge, AP-Router and Client Mode,
please follow Steps 1-5 for AP-Router mode with your Anker device configured as
a Router.
1.
Enable WDS
2.
Configure your existing router
2.
Connect to the wireless web
Please refer to Step 5 of the Quick Installation Guide for Repeater Mode to
complete setup.
3.
Logon to the device's configuration page
Open a web browser on your computer, and type 192.168.100.253 to reach
the device's configuration page. When the log-on dialogue is displayed, enter
your default UserName/Password: admin/admin to logon to the configuration
web page of your repeater.
Click Wireless setting > Wireless basic settings and select your desired
channel.
2.1
2.2
Refer to your router's instruction manual and enter your router's configuration
page.
For your wireless settings, find the WDS configuration setup page.
Follow your router's instructions, and when prompted – enter the Anker
repeater's MAC address. If your router can automatically scan for available
wireless networks, select your newly named SSID to allow the router to
automatically fill in the MAC.
Click Finish or Save to apply the settings. Wait 2 minutes to allow a full restart.
2.1
2.2
2.3
2.4
17

7. How do I return the Anker device to its original factory settings?
Resetting the Anker device and starting anew is sometimes helpful when you're
having trouble connecting.
To reset the device: Make sure the Anker device is connected to a power source,
and press the unit's reset button for 10 seconds before releasing the reset button. The
indicator lights will turn off after several seconds. Wait another 2 minutes to allow the
repeater to restart completely.
8. How do I update the Firmware on my Anker device?
Any newly available firmware upgrades will be published at the Anker website,
http://www.ianker.com/service/download/.
If you find your firmware is out-of-date, please complete the following steps:
Download the updated firmware file to your computer.
Logon to the device's web configuration page. Go to Management Function, and
click Router Upgrade.
Click Scan to upload the new firmware file to your Anker device.
Click Upload to apply it.
Wait about 2 minutes to allow the Anker device to restart.
1.
2.
3.
4.
5.
Do NOT select Auto. Click Apply
Enable the WDS Function
Under the Wireless Settings navigation menu, click on WDS Function and
then check Enable WDS Function. A pop-up box will ask you to confirm that
WDS Function cannot work with WPS; please click Yes.
Under Wireless Basic Station, fill in the MAC addresses of other repeaters
(up to 4) and click Apply.
Your WDS-standard router setup is now configured. For all the other repeaters
connecting to this main WDS router, please enter this newly configured
device's MAC address to each repeater's configuration page. If using other
Anker Compact Wi-Fi Repeaters to connect, you may set up these connecting
Repeaters using the instructions outlined above for WDS-standard Repeater
setup.
2.3
18

9. How do I enable the WPS setting?
Note: WPS allows you to quickly enable security encryption between your Anker
device and your router without having to enter the device's configuration page.
However, to reduce potential network exceptions and unnecessary troubleshooting,
we recommend that users not use WPS and instead select the WPA standard for the
highest security level of Wi-Fi encryption.
10. How do I contact the Anker service and support team?
Our networking products carry a full 12-month warranty. If you have any concerns
about the product or our service within this warranty period, you are welcome to reach
us via the contact information printed on the back of this guide, and our friendly
service team will be happy to assist you.
Enable WPS for your Anker device in Repeater or Client mode:
With your Anker device set to Repeater or Client mode, power up both your device
and your router and position them close to one another.
Press the WPS button located on your router and on the Anker device. The WPS
LED indicators will light.
When the Anker WPS LED indicator begins to flash, the automatic setup of a WPS
connection has begun. Please wait 3 minutes until the Anker WPS LED indicator
remains steadily lit to show that the WPS connection was successful.
Your router and Anker device can now be positioned in your desired locations.
Power off both your router and Anker device and place them in your desired
locations. Then power on both devices and allow a full restart for ongoing Internet
connection with WPS mode.
Connect to the Internet
For Repeater mode: On your computer, find the Anker-Repeater network from the
list of available networks and connect.
For Client mode: Please disconnect the Anker device from your computer, and
instead connect to your non-Wi-Fi device such as your set-top box using a network
cable. This connected device can now enjoy Internet access.
1.
2.
3.
4.
5.
19

Tel: 1-800-988-7973(US)
(Service time: Mon. – Fri. 9:00 – 17:00 PST)
Email: support@ianker.com
Website: http://www.ianker.com
