Anthem Audio Stereo Amplifier Avm 30 Users Manual
AVM 30 to the manual 5db43a6e-523b-47a2-a30e-2602d7526e22
2015-02-05
: Anthem-Audio Anthem-Audio-Anthem-Audio-Stereo-Amplifier-Avm-30-Users-Manual-509736 anthem-audio-anthem-audio-stereo-amplifier-avm-30-users-manual-509736 anthem-audio pdf
Open the PDF directly: View PDF ![]() .
.
Page Count: 86
- Cover
- Safety Precautions
- TABLE of CONTENTS
- 1. INTRODUCTION
- 2. QUICK START
- 3. PANELS/ DISPLAY/REMOTE LAYOUT
- 4. CONNECTIONS
- 5. FRONT PANEL OPERATION
- 6. REMOTE CONTROL OPERATION
- 7. SETUP MENU
- 7.4.1 Set Time / Timers
- 7.4.2 Speaker Configuration
- 7.4.3 Listener Position
- 7.4.4 Speaker Level Calibration
- 7.4.5 Source Setup / Presets
- 7.4.6 Adjust Input Levels
- 7.4.7 A-D / Audio-Out Format
- 7.4.8 Volumes / Rename Paths
- 7.4.9 Triggers / IR / RS-232
- 7.4.10 Displays / Timeout
- 7.4.11 Save / Restore Settings
- 7.4.12 Lockout / Passwords
- 8. SOFTWARE UPDATING
- Appendix A – IR Macros
- Appendix B – Preset Memory Codes
- Specifications
- Warranty
- Big Picture of Front Panel
- Big Picture of Rear Panel
AVM 30
OPERATING MANUAL
UPDATES: www.anthemAV.com
SOFTWARE VERSION 1.1x
™
SAFETY PRECAUTIONS
READ THIS SECTION CAREFULLY BEFORE PROCEEDING!
The lightning flash with arrowpoint within an equilateral triangle
warns of the presence of uninsulated “dangerous voltage” within
the product’s enclosure that may be of sufficient magnitude to
constitute a risk of electric shock to persons.
The exclamation point within an equilateral triangle warns users
of the presence of important operating and maintenance (servicing)
instructions in the literature accompanying the appliance.
WARNING: TO REDUCE THE RISK OF FIRE OR ELECTRIC SHOCK, DO NOT EXPOSE THIS PRODUCT TO RAIN OR MOISTURE.
CAUTION: TO PREVENT ELECTRIC SHOCK, MATCH WIDE BLADE OF PLUG TO WIDE SLOT, FULLY INSERT.
CAUTION: FOR CONTINUED PROTECTION AGAINST RISK OF FIRE, REPLACE THE FUSE ONLY WITH THE SAME
AMPERAGE AND VOLTAGE TYPE. REFER REPLACEMENT TO QUALIFIED SERVICE PERSONNEL.
WARNING: UNIT MAY BECOME HOT. ALWAYS PROVIDE ADEQUATE VENTILATION TO ALLOW FOR COOLING. DO NOT PLACE
NEAR A HEAT SOURCE, OR IN SPACES THAT CAN RESTRICT VENTILATION.
IMPORTANT SAFETY INSTRUCTIONS
WARNING: TO REDUCE THE RISK OF ELECTRIC SHOCK,
DO NOT REMOVE COVER (OR BACK). NO USER-
SERVICEABLE PARTS INSIDE. REFER SERVICING TO
QUALIFIED SERVICE PERSONNEL.
RISK OF ELECTRIC SHOCK
DO NOT OPEN
WARNING
1. Read Instructions – All the safety and operating instructions should be read before the product is operated.
2. Retain Instructions – The safety and operating instructions should be retained for future reference.
3. Heed Warnings – All warnings on the product and in the operating instructions should be adhered to.
4. Follow Instructions – All operating and use instructions should be followed.
5. Cleaning – Unplug this product from the wall outlet before cleaning. Do not use liquid cleaners or aerosol
cleaners. Use a damp, soft cloth for cleaning.
6. Water and Moisture – Do not use this product near water – for example, near a bath tub, wash bowl, kitchen
sink, or laundry tub; in a wet basement; or near a swimming pool; and the like.
7. Accessories – Do not place this product on an unstable cart, stand, tripod, bracket, or table. The product may
fall, causing serious injury to a child or adult, and serious damage to the product. Use only with a cart, stand,
tripod, bracket, or table recommended by the manufacturer, or sold with the product. Any mounting of the product
should follow manufacturer’s instructions, and should use a mounting accessory recommended by the manufacturer.
8. Ventilation – Slots and openings in the cabinet are provided for ventilation and to ensure reliable operation
of the product and to protect it from overheating, and these openings must not be blocked or covered. The openings
should never be blocked by placing the product on a bed, sofa, rug, or other similar surface. This product
should not be placed in a built-in installation such as a bookcase or rack unless proper ventilation is provided or
the manufacturer’s instructions have been adhered to.
9. Power Sources – This product should be operated only from the type of power source indicated on the marking
label. If you are not sure of the type of power supply to your home, consult your product dealer or local power
company. For products intended to operate from battery power, or other sources, refer to the operating instructions.
10. Grounding and Polarization – This product may be equipped with a polarized alternating-current line plug (a plug
having one blade wider than the other). This plug will fit into the power outlet only one way. This is a safety feature.
If you are unable to insert the plug fully into the outlet, try reversing the plug. If the plug should still fail to fit,
contact your electrician to replace your obsolete outlet. Do not defeat the safety purpose of the polarized plug.
11. Power-cord Protection – Power-supply cords should be routed so that they are not likely to be walked on or
pinched by items placed upon or against them, paying particular attention to cords at plugs, convenience
receptacles, and the point where they exit from the product.
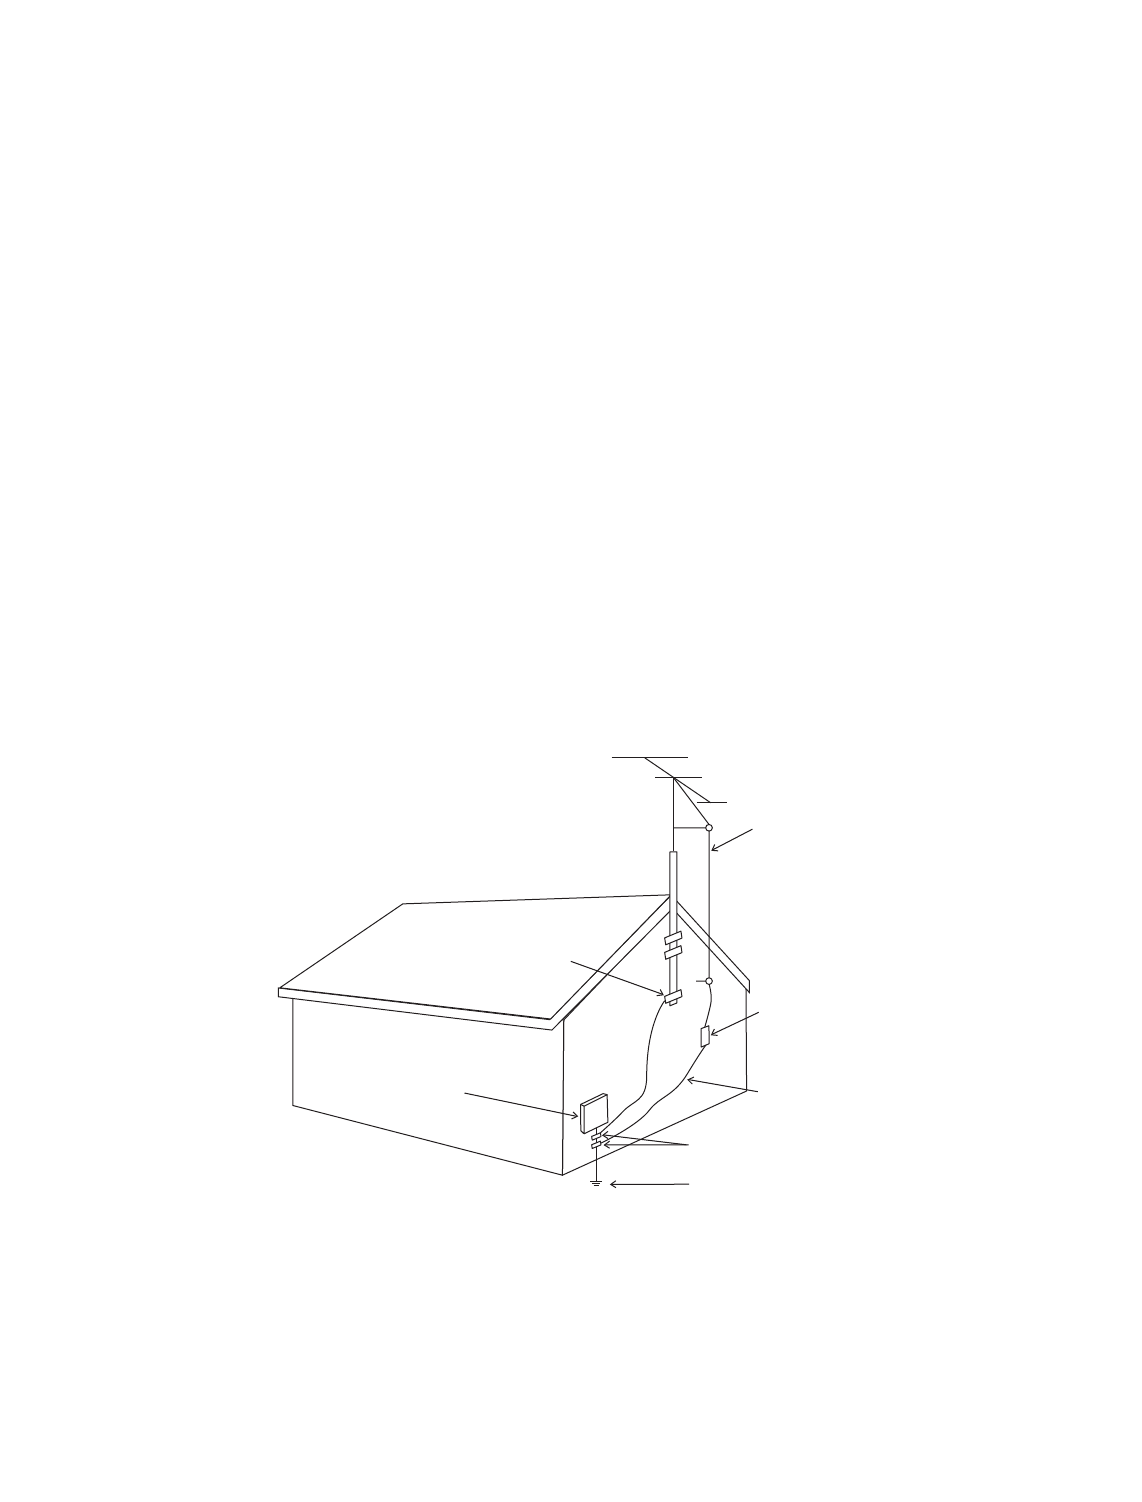
12. Outdoor Antenna Grounding – If an outside antenna or cable system is connected to the product, be sure the
antenna or cable system is grounded so as to provide some protection against voltage surges and built-up
static charges. Article 810 of the National Electrical Code, ANSI/NFPA 70, provides information with regard to
the proper grounding of the mast and supporting structure, grounding of the lead-in wire to an antenna–
discharge unit, size of grounding conductors, location of antenna-discharge unit, connection to grounding
electrodes, and requirements for the grounding electrode.
13. Lightning – For added protection for this product during a lightning storm, or when it is left unattended and
unused for long periods of time, unplug it from the wall outlet and disconnect the antenna or cable systems.
This will prevent damage to the product due to lightning and power-line surges.
14. Power Lines – An outside antenna system should not be located in the vicinity of overhead power lines or
other electric light or power circuits, or where it can fall into such power lines or circuits. When installing an
outside antenna system, extreme care should be taken to keep from touching such power lines or circuits as
contact with them might be fatal.
Antenna Lead-In Wire
Antenna-Discharge Unit
(NEC Section 810-20)
Grounding Conductors
(NEC Section 810-21)
Power Service Grounding
Electronic System
(NEC ART 250. Part H)
NEC-National Electrical Code
Electrical Service
Equiptment
Ground Clamp
Ground Clamps
S2898A

Copyright©Anthem™/Sonic Frontiers International. All rights reserved. The information contained herein may not be reproduced
in whole or in part without our express written permission.
ANTHEM™is a trademark of Sonic Frontiers International. All other trademarks are the property of their respective owners.
Anthem™/Sonic Frontiers International reserves the right to change specifications and/or features without notice as design
improvements are incorporated.
Motorola name and logo are registered trademarks of Motorola, Inc.
PHASTLINK™ is a trade mark of PHAST Corporation.
Manufactured under license from Dolby Laboratories. “Dolby”, “Pro Logic”, “Surround EX”, and the
double-D symbol are trademarks of Dolby Laboratories.
“DTS”, “DTS-ES Extended Surround”, and “Neo:6” are trademarks of Digital Theater Systems, Inc.
Manufactured under license from THX Ltd. U.S. patent numbers 5,043,970; 5,189,703; and/or 5,222,059. European patent
number 0323830. Other U.S. and foreign patents pending. Ultra2 and THX are trademarks or registered trademarks of THX Ltd.
Lucasfilm is a trademark of Lucasfilm Ltd. Surround EX is a trademark of Dolby Laboratories. Used under authorization.
15. Overloading – Do not overload wall outlets, extension cords, or integral convenience receptacles as this can
result in a risk of fire or electric shock.
16. Object and Liquid Entry – Never push objects of any kind through openings as they may touch dangerous voltage
points or short-out parts that could result in a fire or electric shock. Never spill liquid of any kind on this product.
17. Servicing – Do not attempt to service this product yourself, as opening or removing covers may expose you
to dangerous voltage or other hazards. Refer all servicing to qualified service personnel.
18. Damage Requiring Service – Unplug this product from the wall outlet and refer servicing to qualified personnel
under the following conditions:
•When power-supply cord or plug is damaged.
•If liquid has been spilled, or objects have fallen into the product.
•If the product has been exposed to rain or water.
•If the product does not operate normally by following the operating instructions. Adjust only those controls
that are covered by the operating instructions as an improper adjustment of other controls may result in damage
and will require extensive work by a qualified technician to restore the product to its normal operation.
•If the product has been dropped or damaged in any way.
•If the product exhibits a distinct change in performance – this indicates a need for service.
19. Replacement Parts – When replacement parts are required, be sure the technician has used replacement
parts specified by the manufacturer or have the same characteristics as the original part. Unauthorized
substitutions may result in fire, electric shock, or other hazards.
20. Safety Check – Upon completion of any service or repairs to this product, ask the service technician to perform
safety checks to determine that the product is in proper operating condition.
21. Heat – The product should be situated away from heat sources such as radiators, heat registers, stoves, or
other products (including amplifiers) that produce heat.

SECTION PAGE
1. INTRODUCTION 1
1 Receiving and Unpacking the AVM 30 . . . . . . . . . . . . . . . . . . . . . . . . . . . . . . . . . . . . . . . . . . . . . . . . . 1
1.1 Packing List . . . . . . . . . . . . . . . . . . . . . . . . . . . . . . . . . . . . . . . . . . . . . . . . . . . . . . . . . . . . . . . . . . . . . . . . 1
1.2 Important Safety Instructions . . . . . . . . . . . . . . . . . . . . . . . . . . . . . . . . . . . . . . . . . . . . . . . . . . . . . . . . . 1
1.2.1 Before Operating Your AVM 30 1
1.2.2 Supply Power Requirements 2
1.2.3 In-Use Notices 2
1.3 Packing Materials . . . . . . . . . . . . . . . . . . . . . . . . . . . . . . . . . . . . . . . . . . . . . . . . . . . . . . . . . . . . . . . . . . 2
2. QUICK START 3
2.1 Quick Start Guide . . . . . . . . . . . . . . . . . . . . . . . . . . . . . . . . . . . . . . . . . . . . . . . . . . . . . . . . . . . . . . . . . . . 3
2.2 Connector Diagrams and Descriptions . . . . . . . . . . . . . . . . . . . . . . . . . . . . . . . . . . . . . . . . . . . . . . . . 4
2.2.1 CD Player to AVM 30 5
2.2.2 DVD Player and TV to AVM 30 6
2.2.3 VCR and TV to AVM 30 7
2.2.4 AVM 30 to Amplifier and Powered Subwoofer (RCA) 8
2.2.5 AVM 30 to Amplifiers and Powered Subwoofer (XLR) 9
2.3 Speaker Placement . . . . . . . . . . . . . . . . . . . . . . . . . . . . . . . . . . . . . . . . . . . . . . . . . . . . . . . . . . . . . . . 10
3. PANELS / DISPLAYS / REMOTE LAYOUT 11
3.1 Front Panel Layout . . . . . . . . . . . . . . . . . . . . . . . . . . . . . . . . . . . . . . . . . . . . . . . . . . . . . . . . . . . . . . . . . 11
3.2 Front Panel Display . . . . . . . . . . . . . . . . . . . . . . . . . . . . . . . . . . . . . . . . . . . . . . . . . . . . . . . . . . . . . . . . 12
3.3 Rear Panel Layout . . . . . . . . . . . . . . . . . . . . . . . . . . . . . . . . . . . . . . . . . . . . . . . . . . . . . . . . . . . . . . . . . . 13
3.4 Remote Control Layout . . . . . . . . . . . . . . . . . . . . . . . . . . . . . . . . . . . . . . . . . . . . . . . . . . . . . . . . . . . . . 14
4. CONNECTIONS 15
4.1 Connecting Power To The AVM 30 . . . . . . . . . . . . . . . . . . . . . . . . . . . . . . . . . . . . . . . . . . . . . . . . . . . 15
4.2 Audio Connections . . . . . . . . . . . . . . . . . . . . . . . . . . . . . . . . . . . . . . . . . . . . . . . . . . . . . . . . . . . . . . . . 15
4.2.1 Digital Audio Inputs and Outputs . . . . . . . . . . . . . . . . . . . . . . . . . . . . . . . . . . . . . . . . . . . 15
4.2.2 Analog Audio Inputs 15
4.2.3 Left / Right Analog Audio Inputs 16
4.2.4 2-Ch Balanced and 6-Ch Single-Ended Audio Inputs 16
4.2.5 Analog Audio Outputs 16
4.3 Video Connections . . . . . . . . . . . . . . . . . . . . . . . . . . . . . . . . . . . . . . . . . . . . . . . . . . . . . . . . . . . . . . . . . 17
Composite Video 17
S-Video 17
Component Video 17
4.4 Powered I.R. (Infra Red) Receivers. . . . . . . . . . . . . . . . . . . . . . . . . . . . . . . . . . . . . . . . . . . . . . . . . . . . 19
4.5 I.R. (Infra Red) Emitters. . . . . . . . . . . . . . . . . . . . . . . . . . . . . . . . . . . . . . . . . . . . . . . . . . . . . . . . . . . . . . 19
4.6 Relay Triggers . . . . . . . . . . . . . . . . . . . . . . . . . . . . . . . . . . . . . . . . . . . . . . . . . . . . . . . . . . . . . . . . . . . . . 19
4.7 FM • AM Antennas . . . . . . . . . . . . . . . . . . . . . . . . . . . . . . . . . . . . . . . . . . . . . . . . . . . . . . . . . . . . . . . . . . 19
TABLE of CONTENTS

5. FRONT PANEL OPERATION 20
5.1 Power On / Off . . . . . . . . . . . . . . . . . . . . . . . . . . . . . . . . . . . . . . . . . . . . . . . . . . . . . . . . . . . . . . . . . . . . 20
5.2 Path Selection . . . . . . . . . . . . . . . . . . . . . . . . . . . . . . . . . . . . . . . . . . . . . . . . . . . . . . . . . . . . . . . . . . . . . 20
5.2.1 Copying the MAIN Path to ZONE2, ZONE3, or RECORD 21
Down-Mixing to 2-Channel Stereo 21
5.3 Master Control Knob. . . . . . . . . . . . . . . . . . . . . . . . . . . . . . . . . . . . . . . . . . . . . . . . . . . . . . . . . . . . . . . . 21
5.4 Source Selection. . . . . . . . . . . . . . . . . . . . . . . . . . . . . . . . . . . . . . . . . . . . . . . . . . . . . . . . . . . . . . . . . . . 21
5.4.1 6-Channel S/E Input 21
5.4.2 FM • AM Tuner 22
Manual Tuning 22
Automatic Tuning 22
Presets 22
ST / HiB / M 22
5.4.3 Simulcast 22
5.5 Volume Control . . . . . . . . . . . . . . . . . . . . . . . . . . . . . . . . . . . . . . . . . . . . . . . . . . . . . . . . . . . . . . . . . . . . 23
Dialog Normalization 23
Mute 23
5.6 Surround Mode Levels . . . . . . . . . . . . . . . . . . . . . . . . . . . . . . . . . . . . . . . . . . . . . . . . . . . . . . . . . . . . . . 23
5.7 Bass / Treble / Balance . . . . . . . . . . . . . . . . . . . . . . . . . . . . . . . . . . . . . . . . . . . . . . . . . . . . . . . . . . . . . 24
Tone Bypass 24
5.8 Surround Modes . . . . . . . . . . . . . . . . . . . . . . . . . . . . . . . . . . . . . . . . . . . . . . . . . . . . . . . . . . . . . . . . . . . 24
5.8.1 AnthemLogic™25
5.8.2 Dolby Digital 2.0 25
5.8.3 Surround Modes for 2.0-Channel Source Material 26
5.8.4 Dolby Digital EX / Pro Logic IIx for 5.1 Sources 27
5.8.5 DTS-ES 27
5.8.6 THX Ultra2 / THX Surround EX 27
5.8.7 Mode and THX Operation for Stereo Program Material 31
5.8.8 Mode and THX Operation for Dolby Digital 5.1 and 6-Ch S/E 32
5.8.9 Mode and THX Operation for DTS program Material 33
5.8.10 Dynamics 34
5.9 Front Panel Display. . . . . . . . . . . . . . . . . . . . . . . . . . . . . . . . . . . . . . . . . . . . . . . . . . . . . . . . . . . . . . . . . 34
5.10 Status / Setup. . . . . . . . . . . . . . . . . . . . . . . . . . . . . . . . . . . . . . . . . . . . . . . . . . . . . . . . . . . . . . . . . . . . . . 34
6. REMOTE CONTROL OPERATION 35
6.1 Powering the AVM 30 ON and OFF . . . . . . . . . . . . . . . . . . . . . . . . . . . . . . . . . . . . . . . . . . . . . . . . . . . . 35
6.2 Path Selection . . . . . . . . . . . . . . . . . . . . . . . . . . . . . . . . . . . . . . . . . . . . . . . . . . . . . . . . . . . . . . . . . . . . . 36
6.2.1 Copying the MAIN Path to ZONE2, ZONE3, or RECORD 36
6.3 Source Selection. . . . . . . . . . . . . . . . . . . . . . . . . . . . . . . . . . . . . . . . . . . . . . . . . . . . . . . . . . . . . . . . . . . 36
6.3.1 Source Seek 36
6.4 Direct FM • AM Station Entry . . . . . . . . . . . . . . . . . . . . . . . . . . . . . . . . . . . . . . . . . . . . . . . . . . . . . . . . . 36
6.5 Sleep Timer . . . . . . . . . . . . . . . . . . . . . . . . . . . . . . . . . . . . . . . . . . . . . . . . . . . . . . . . . . . . . . . . . . . . . . . 36
6.6 Enable / Disable Auto-On Timers . . . . . . . . . . . . . . . . . . . . . . . . . . . . . . . . . . . . . . . . . . . . . . . . . . . . . 36
6.7 Lip-Sync Delay . . . . . . . . . . . . . . . . . . . . . . . . . . . . . . . . . . . . . . . . . . . . . . . . . . . . . . . . . . . . . . . . . . . . 37

6.8 Controlling Other Components . . . . . . . . . . . . . . . . . . . . . . . . . . . . . . . . . . . . . . . . . . . . . . . . . . . . . . . 37
6.8.1 Entering Manufacturer’s Codes 37
6.8.2 Searching For a Code 37
6.8.3 Volume Lock 37
6.8.4 Learning Function 38
Limitations on Learning 38
Teaching a Key 39
Deleting a Learned Command from a Key 39
6.9 Controlling the AVM 30 with Aftermarket Remotes . . . . . . . . . . . . . . . . . . . . . . . . . . . . . . . . . . . . . . 39
7. SETUP MENU 40
7.1 How to Enter the Setup Menu . . . . . . . . . . . . . . . . . . . . . . . . . . . . . . . . . . . . . . . . . . . . . . . . . . . . . . . . 40
7.2 How to Navigate in the Setup Menu . . . . . . . . . . . . . . . . . . . . . . . . . . . . . . . . . . . . . . . . . . . . . . . . . . 40
7.3 How to Exit the Setup Menu . . . . . . . . . . . . . . . . . . . . . . . . . . . . . . . . . . . . . . . . . . . . . . . . . . . . . . . . . 40
7.4 Setting Up the AVM 30 . . . . . . . . . . . . . . . . . . . . . . . . . . . . . . . . . . . . . . . . . . . . . . . . . . . . . . . . . . . 41
7.4.1 Set Time / Timers 41
7.4.2 Speaker Configuration 42
7.4.3 Listener Position 49
7.4.4 Speaker Level Calibration 50
7.4.5 Source Setup / Presets 52
7.4.6 Adjust Input Levels 56
7.4.7 A-D / Audio-Out Format 57
7.4.8 Volumes / Rename Paths 58
7.4.9 Triggers / IR / RS-232 59
7.4.10 Displays / Timeout 61
7.4.11 Save / Restore Settings 63
7.4.12 Lockout / Passwords 65
8. SOFTWARE UPDATING 66
8.1 Software Version Identification . . . . . . . . . . . . . . . . . . . . . . . . . . . . . . . . . . . . . . . . . . . . . . . . . . . . . 66
8.2 Software Updating Via Your Dealer . . . . . . . . . . . . . . . . . . . . . . . . . . . . . . . . . . . . . . . . . . . . . . . . . . . 66
8.3 Software Updating Via Your Computer and the Internet . . . . . . . . . . . . . . . . . . . . . . . . . . . . . . . . . . 66
Appendix A – IR Macros 68
Appendix B – Preset Memory Codes 69
Specifications 73
Warranty 76
Big Pictures of Front and Rear Panels Inside Back Cover

1
Thank you for purchasing the Anthem AVM 30 Preamplifier • Processor • Tuner.
Anthem Electronics has been manufacturing high-quality, high-end audio equipment for over a decade. In
that time, Anthem has built an enviable reputation for products that can recreate the passion a music lover
experiences when attending a live musical performance, or the thrilling sound a movie buff experiences in
the very best movie theaters. Anthem equipment allows audiophiles to almost “be there” each and every
time they sit and enjoy music or home theater in the comfort of their home. Anthem provides all this with the
highest level of craftsmanship, sophisticated circuit designs, superior quality parts and materials, modern
intuitive ergonomics, and stylish industrial design.
Although Anthem products sound great “right out of the carton”, they will sound even better after they are
thermally stabilized. We therefore recommend that you operate this product for a period of time before doing
any critical listening.
The AVM 30 is a state-of-the-art four path A/V Preamplifier / Surround Sound Processor, with built-in
FM • AM Tuner. It is designed to provide high-end sound and video for both music, home theater, and
multi-room applications.
1RECEIVING AND UNPACKING THE AVM 30
The AVM 30 is shipped in a reinforced shipping box. Please keep this box for any future shipment. Check that
you have received everything in the Packing List below and report any discrepancies to your dealer as soon
as possible. Keep the invoice that you received from your authorized Anthem dealer at time of purchase –
without it, service cannot be given under warranty.
1.1 PACKING LIST
•AVM 30
•Powered IR Terminal Block (on rear panel)
•Remote Control
•2 ‘AA’ Batteries
•Power Cord
•FM Antenna
•75-ohm to 300-ohm FM Antenna Adapter
•AM Loop Antenna
•Operating Manual
1.2 IMPORTANT SAFETY INSTRUCTIONS
•The Front Panel power switches are secondary only; they do not disconnect the AVM 30 from the
AC power line. Line voltage is switched off through the rear panel power switch.
•Failing to comply with any safety instruction, precaution, or warning in this Operating Manual is in
direct violation of the standards of design, manufacture, and intended use of the product.
•Anthem, Sonic Frontiers International, our agents, and any related party assume no liability
whatsoever for the user’s failure to comply with any or all of these requirements.
1.2.1 BEFORE OPERATING YOUR AVM 30
•Do not connect power to the AVM 30 if there are signs of damage to any part of its exterior.
•Install the AVM 30 in a stable location. Do not mount to a wall or from a ceiling.
•Allow six or more inches of unobstructed air space above the ventilation slots in the top cover of
the AVM 30. Do not block any ventilation openings. Do not obstruct bottom vents by removing the
rubber feet or operating the AVM 30 directly on a carpet, sofa, or similar surface.
1. INTRODUCTION

2
1.2.2 SUPPLY POWER REQUIREMENTS
The AVM 30 operates from a single phase AC power source that supplies between 105V and 130V at a
frequency of 60 Hz. It cannot be changed from 120V to 240V operation.
DO NOT USE A POWER LINE CONDITIONER:
• Some Power Line Conditioners are incompatible with the AVM 30 and may cause the AVM 30’s
AC line fuses to blow.
• One is not required because the AVM 30’s power supply has power line filtering and voltage
regulation built in.
1.2.3 IN-USE NOTICES
•Use only the power supply cord with double insulation as supplied.
•Disconnect the AVM 30’s power cord before connecting or disconnecting any components.
•Fuses are not a user serviceable item (see specification section).
•Do not remove the top cover.
•Do not alter or modify the AVM 30 in any way.
1.3 PACKING MATERIALS
Retain the shipping box and all packing material. They are custom designed to prevent shipping damage. Do
not ship or transport the AVM 30 in anything other than the original box and packing material.
1. INTRODUCTION continued …

2. QUICK START
The AVM 30 is a very sophisticated component, providing a multitude of features and connection options,
while providing easy intuitive setup and operation. With your AVM 30 in front of you, browse through the
illustrations in this section to see several quick system hookup options. It’s as simple as following the lines
in the connection diagrams to and from each component.
All of these quick system hookup examples work with the Factory Default settings; none require the
Setup Menu. Just ‘plug & play’! However, references to the Setup Menu section are included to make
you aware of the tremendous versatility of the AVM 30.
For the best sound possible you will still have to calibrate your system in the Setup as outlined in section 7.
Please do not overlook this important system calibration procedure.
2.1 QUICK START GUIDE – Before you start, make sure all components are unplugged.
To connect a CD player, DVD player, TV, VCR, amplifier(s), and powered subwoofer to the AVM 30:
Note:For this Quick start setup section, you will only need to connect either the Composite or S-Video
connections referred to in the following diagrams. Use the S-Video connections wherever
possible for the better video quality.
•CD Player to AVM 30 – see diagram in section 2.2.1
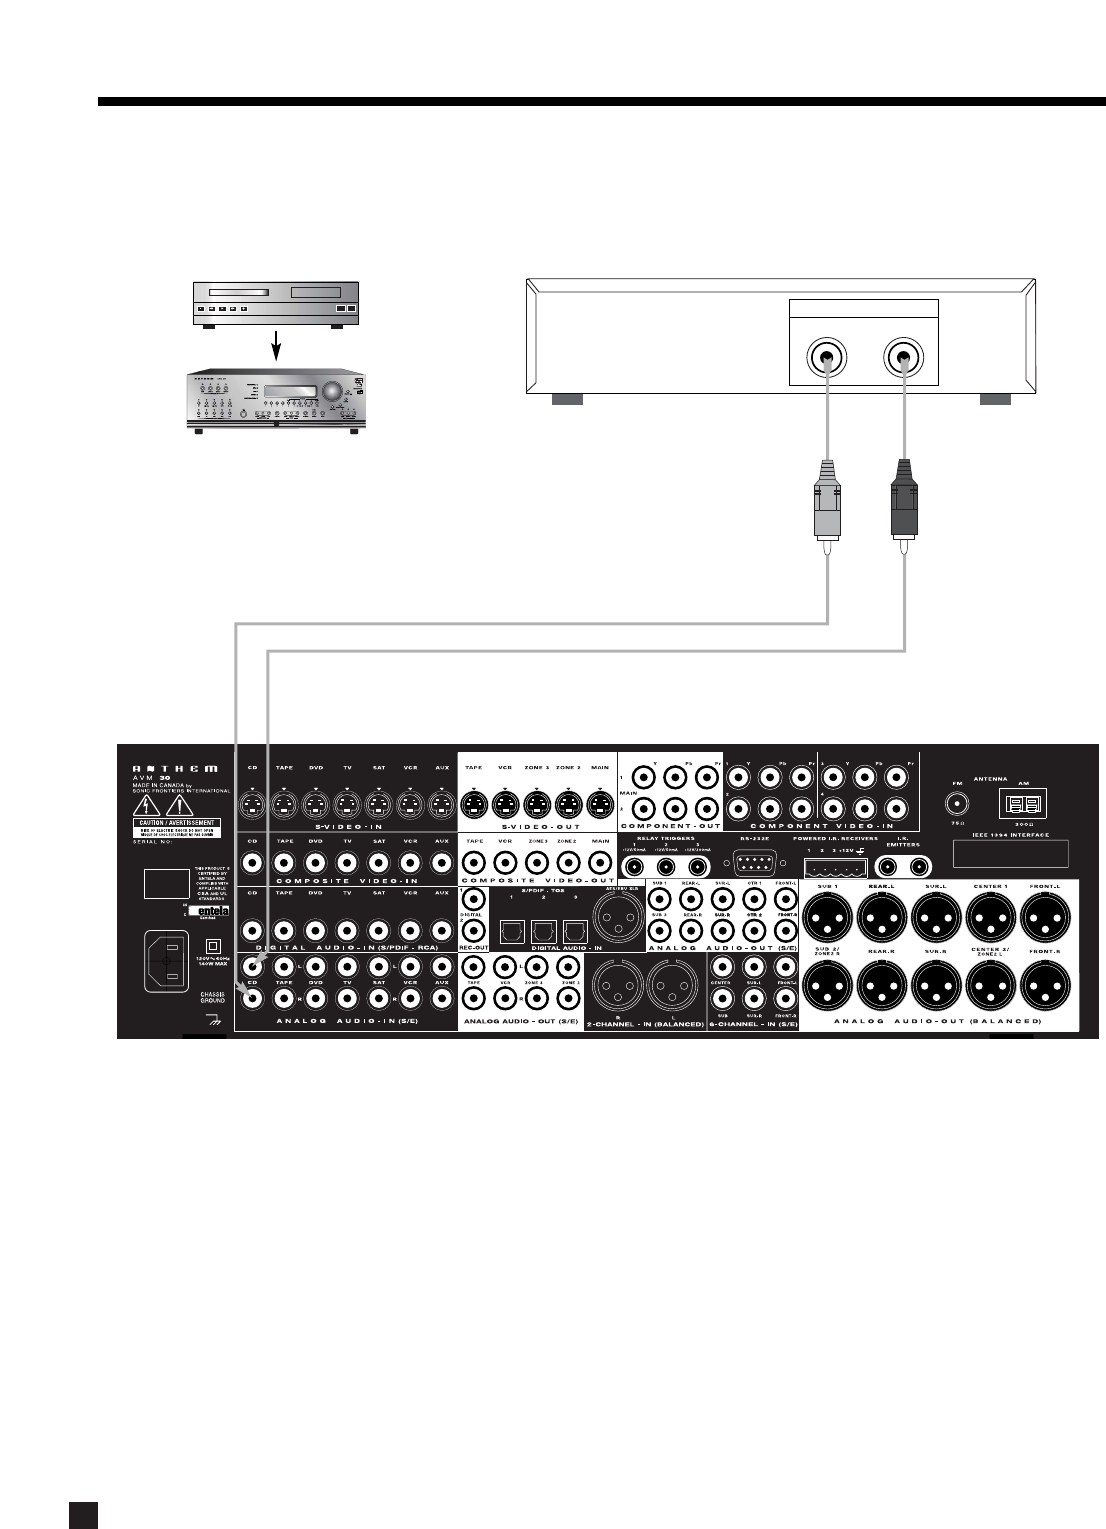
Connect the L/R audio output of the CD player to Analog Audio-In/CD on the AVM 30.
•DVD Player to AVM 30 – see diagram in section 2.2.2
Video: Connect the player’s composite video out to Composite Video-In/DVD on the AVM 30.
Audio: Connect the player’s digital audio output to Digital Audio-In/DVD on the AVM 30.
Make sure your DVD player’s setup menu is configured to output Dolby Digital and DTS material
as “Bitstream”, not “PCM”, otherwise 5.1-channel soundtracks will be turned into 2.0 channels!
•AVM 30 to TV – see diagrams in sections 2.2.2 and 2.2.3
Video: Connect Composite Video-Out/MAIN on the AVM 30 to the TV’s composite video input.
Audio: Connect the L/R audio output of the TV to Analog Audio-In/TV on the AVM 30.
•VCR to AVM 30 – see diagram in section 2.2.3
Video: Connect the VCR’s composite video output to Composite Video-In/VCR on the AVM 30.
To Record: Connect Composite Video-Out/VCR to the VCR’s composite video input.
Audio: Connect the L/R audio output of the VCR to Analog Audio-In/VCR on the AVM 30.
To Record: Connect Analog Audio-Out/VCR to the L/R audio input of the VCR.
•AVM 30 to Amplifier(s) – see diagrams in sections 2.2.4 and 2.2.5
From the AVM 30, connect Front-L, Front-R, Ctr1, Sur-L, Sur-R, Rear-L, and Rear-R Analog
Audio-Out to the Front-L, Front-R, Center, Sur-L, Sur-R, Rear-L, and Rear-R inputs of the
power amplifier(s). Follow the amplifier’s operating manual for connecting the speakers.
•AVM 30 to Powered Subwoofer – see diagrams in sections 2.2.4 and 2.2.5
Connect Analog Audio-Out/Sub1 to the subwoofer’s line/low level input.
Reconnect the power to all components and turn them on. To turn on the AVM 30, move the switch on the
rear panel to the ‘on’ position and then press the POWER – MAIN button on the front panel.
3

4
To Watch a DVD:
•Press DVD Source on the front panel of the AVM 30.
•Select the TV input that corresponds to the one that the AVM 30’s Composite Video-Out/MAIN is
plugged into.
•Place a DVD into the DVD player and press play. You should see the picture on your TV and hear
sound from your speakers. Adjust volume using the Master Control Knob on the AVM 30.
To Watch a Video Tape:
•Press VCR Source on the front panel of the AVM 30.
•With your TV’s remote control, select the input that the AVM 30’s Composite Video-Out/MAIN is
plugged into.
•Insert a tape into the VCR and press play. You should see the picture on your TV and hear sound
from your speakers. Use the AVM 30 Master Control Knob on the front panel to adjust volume.
To Listen to a CD:
•Press CD Source on the front panel of the AVM 30.
•Place a CD into the CD player and press play. You should hear music coming from your speakers.
Use the AVM 30 Master Control Knob on the front panel to adjust volume.
Note about Digital and Analog Inputs:
•You can change any input to Digital or Analog. Digital inputs use the AVM 30’s high-end digital to
analog converters and can be changed from RCA to Toslink or XLR connection. Analog inputs can
be set to Digital Signal Processing for bass management, bass/treble control, time alignment, and
surround modes, or Direct to bypass all digital stages. Auto-Dig uses the digital connection if a
digital signal is sensed, and automatically switches to analog connection if there is no digital
signal. For more information see sections 4.2.1 and 7.4.5.
Note about Your Speakers:
•The AVM 30 allows you to enter information about how many speakers you have in your system,
as well as their relative size, type, and distance from your listening position. This speaker setup
information is important in directing audio signals optimally, ensuring you get the best quality
sound from your system – see sections 7.4.2, 7.4.3, and 7.4.4.
2.2 CONNECTOR DIAGRAMS AND DESCRIPTIONS
The following pages of illustrations contain a variety of standard cable/connectors that are used to connect
components to your AVM 30. The various types, and what they are used for, are shown here:
2. QUICK START continued …
Analog Left
Channel
RCA Black or
White RCA Red RCA Yellow 5-Pin
Mini DIN Toslink XLR Female
(connects to output)
XLR Male
(connects to input)
1/4” Stereo
Analog Right
Channel
Digital S/PDIF or
Composite Video
S-Video Digital Audio
S/PDIF
Analog Balanced
or Digital AES/EBU
Analog Balanced or
Digital AES/EBU
Headphone
3.5mm
Mini (Mono)
Relay Trigger
IR Emitter
RCA Green:
Component Y
RCA Blue:
Component Pb
RCA Red:
Component Pr
5
2. QUICK START continued …
2.2.1 CD Player to AVM 30
CD Player
EJECT
Track 1
CD Player Audio Out
RL
©©
©©
©©
©©
6
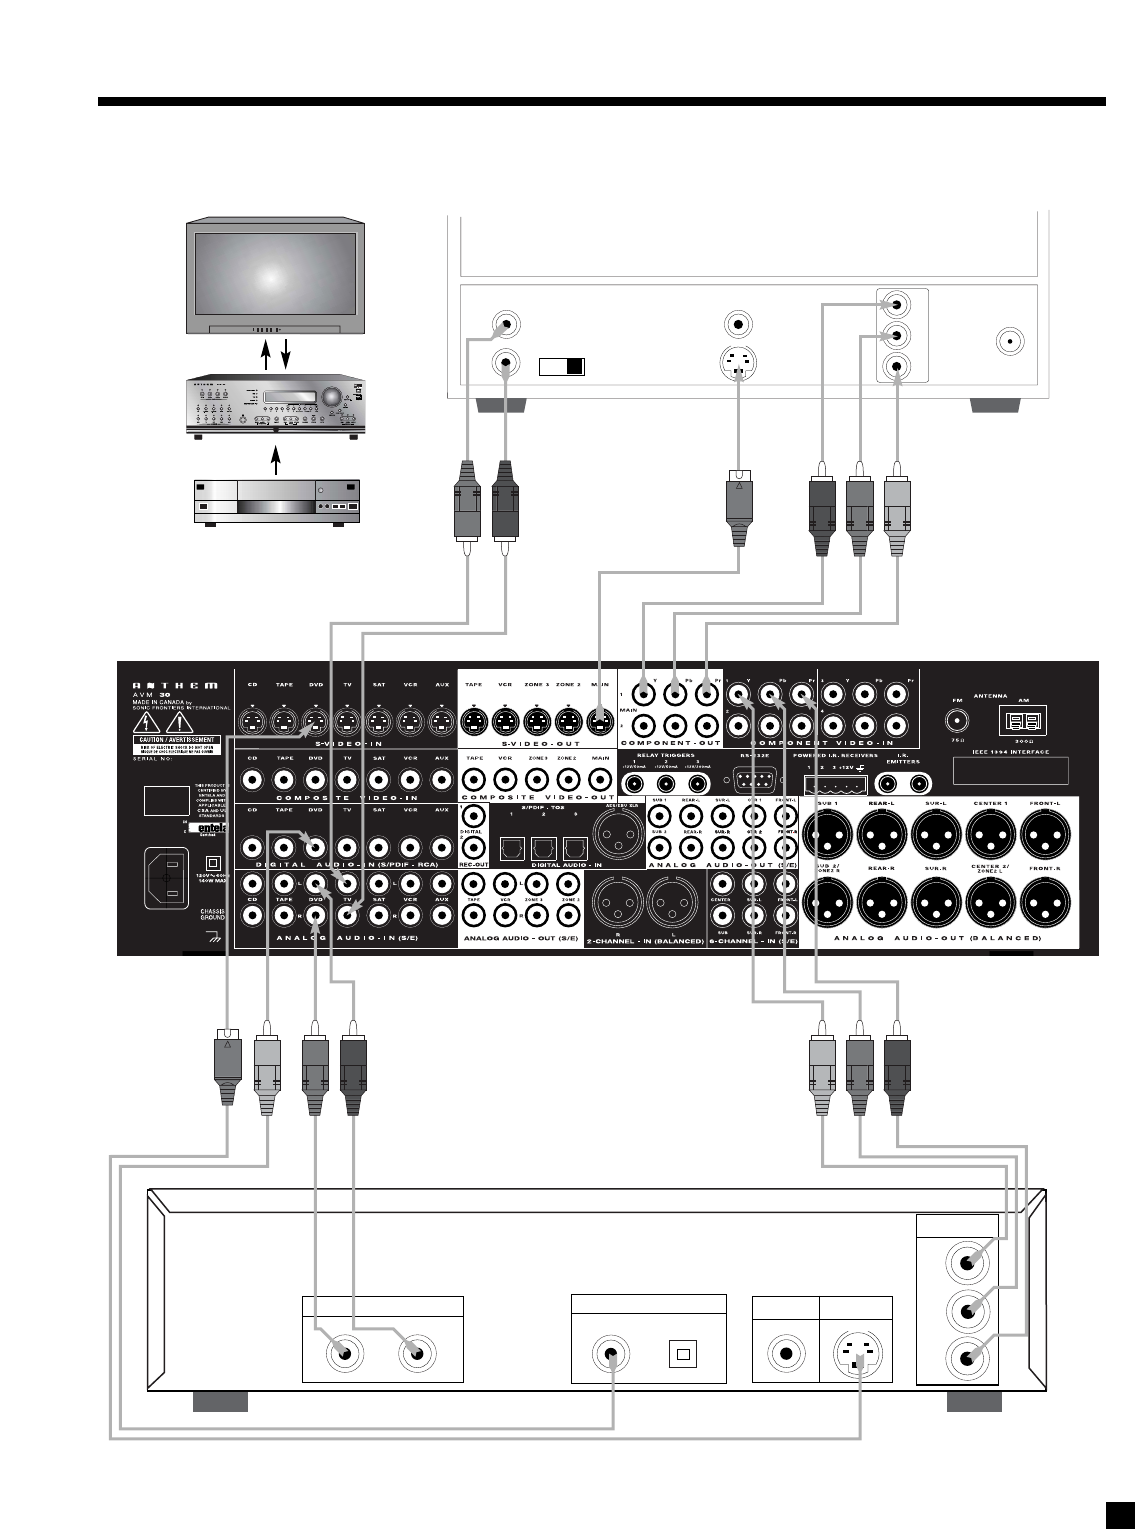
2.2.2 DVD Player and TV to AVM 30
2. QUICK START continued …
DVD
DVD Player
Composite
Video Out S-Video Out
Audio Out
RL
Digital Out
RCA Toslink
Component
Video Out
Pb
Y
Pr
Audio
Out
Composite
Video In Component
Video In
S-Video In
Vari Fixed
L
R
Pb
Pr
Y
Rear Panel of TV
CATV
In
Note:
For info on Component
Video use, see sections
4.3, 7.4.5, and 7.4.10
©©
©©
7
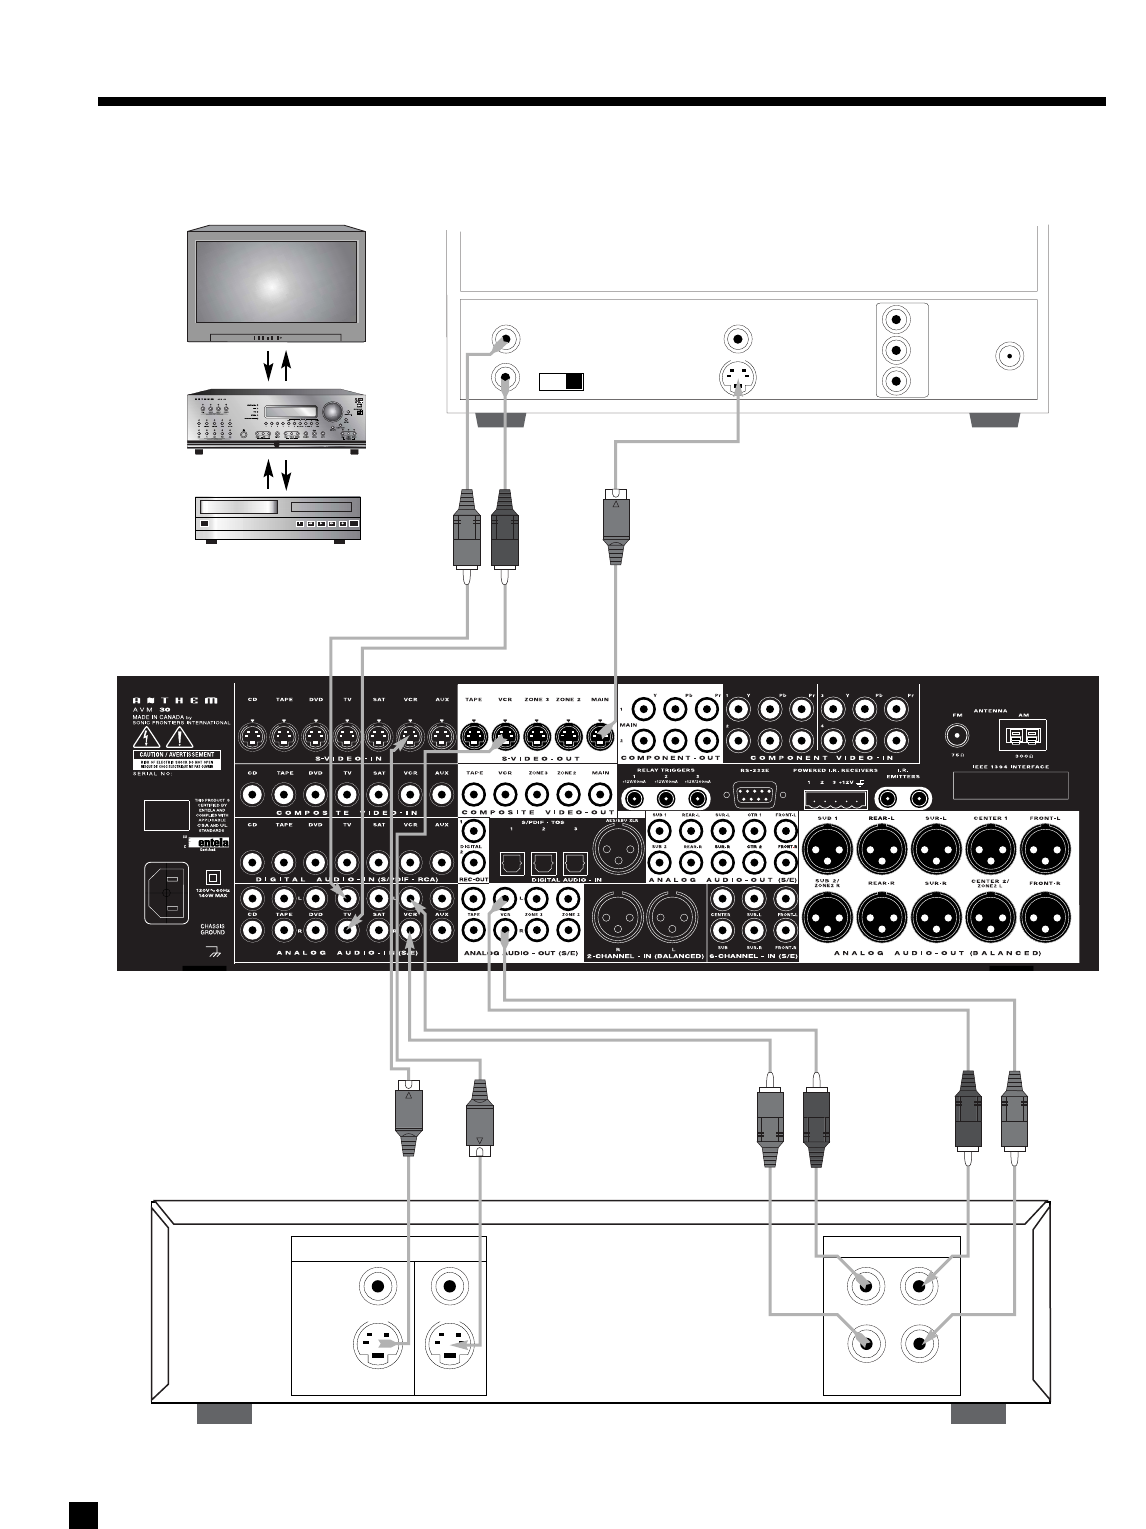
2.2.3 VCR and TV to AVM 30
2. QUICK START continued …
VCR
EJECT
VCR Audio
R
L
OUT IN
OUT
S-Video
Composite
IN
Video
Audio
Out
Composite
Video In Component
Video In
S-Video In
Vari Fixed
L
R
Pb
Pr
Y
Rear Panel of TV
CATV
In
©©
©©
8
P
O
W
E
R
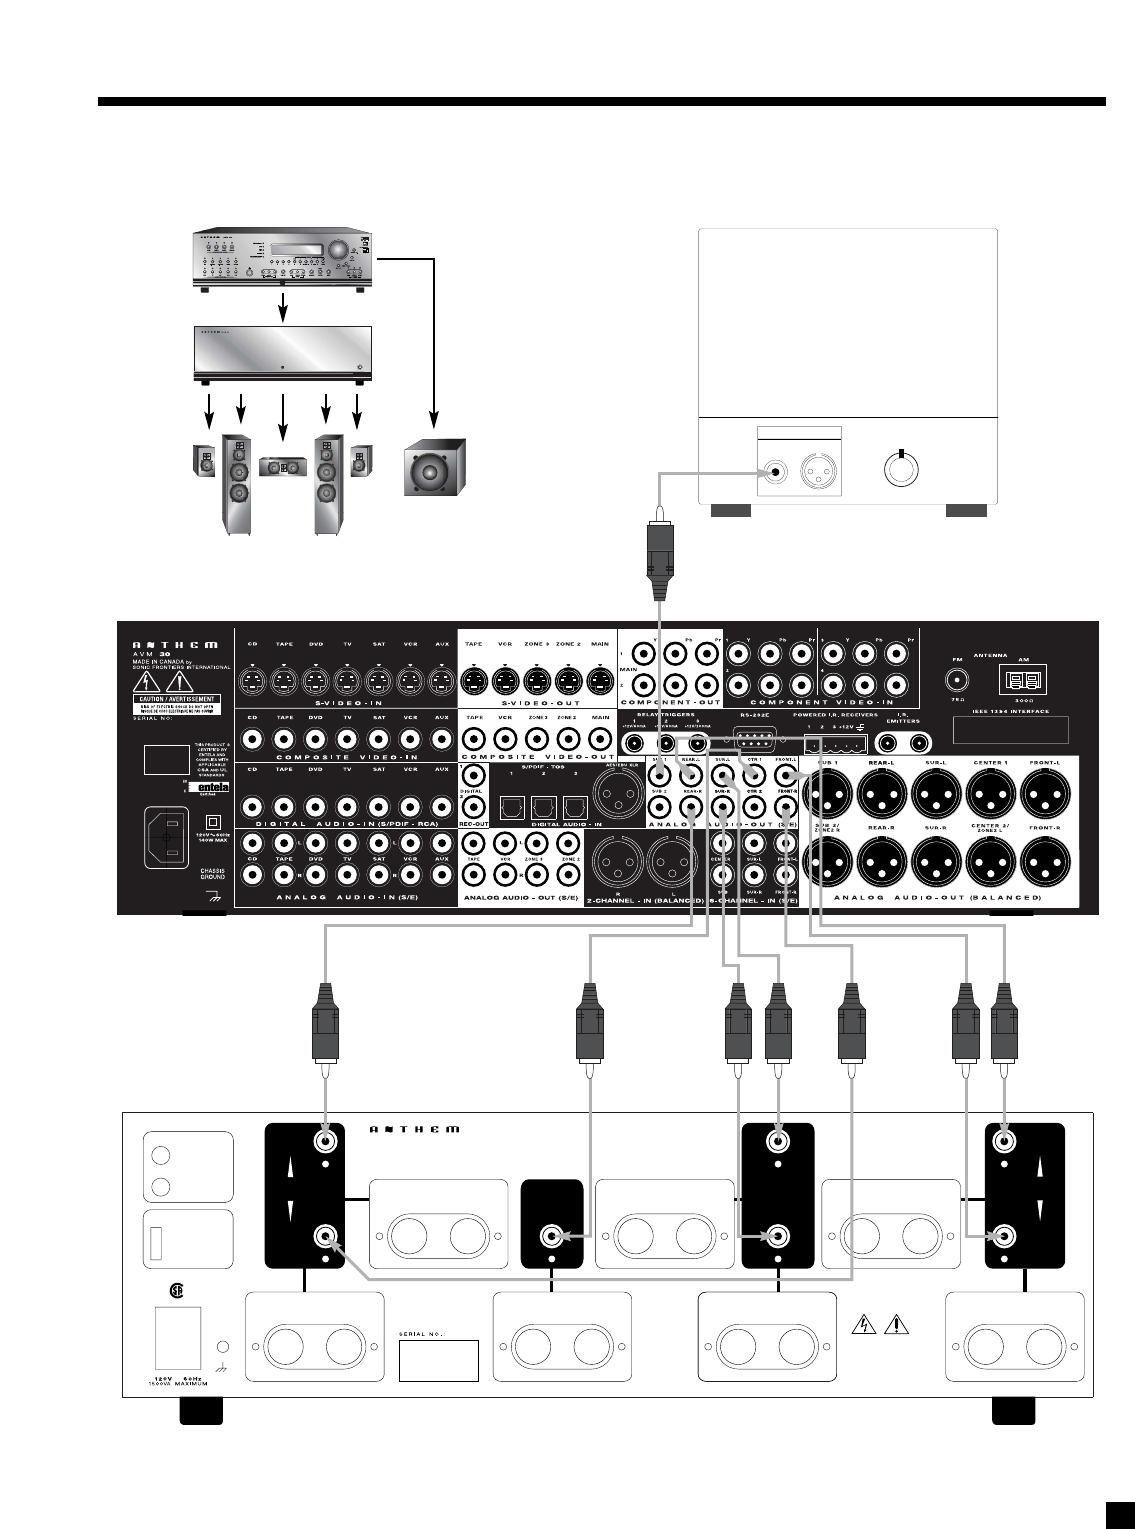
2.2.4 AVM 30 to Amplifier and Powered Subwoofer (RCA)
2. QUICK START continued …
REAR
LEFT
INPUTS
FRONT
LEFT REAR
OUTPUT
+ -
LEFT SURROUND
OUTPUT
+ -
RIGHT REAR
OUTPUT
+ -
LEFT FRONT
OUTPUT
+ -
RIGHT SURROUND
OUTPUT
+ -
SURROUND
INPUTS
RIGHT
LEFT
CENTER
OUTPUT
+ -
RIGHT FRONT
OUTPUT
+ -
RIGHT
INPUTS
REAR
FRONT
CENTER
INPUT
NRTL/C
LR 103255
This product has been
certified by CSA.
CHASSIS
GROUND
~
AUTO
MANUAL
TRIGGER
ON MODES
INPUT
5-24V AC/DC
OUTPUT
TRIGGERS
MADE IN CANADA
THIS PRODUCT IS BUILT WITH
THE FOLLOWING PATENTS:
CDN. 2142644, U.S. 5636288
PVA
7
WARNING:
SHOCK HAZARD DO NOT OPEN.
AVERTISSEMENT:
RISQUE DE CHOC LECTRIQUE
NE PAS OUVRIR.
Powered Subwoofer
Level
RCA
Input
XLR
©©
©©
9
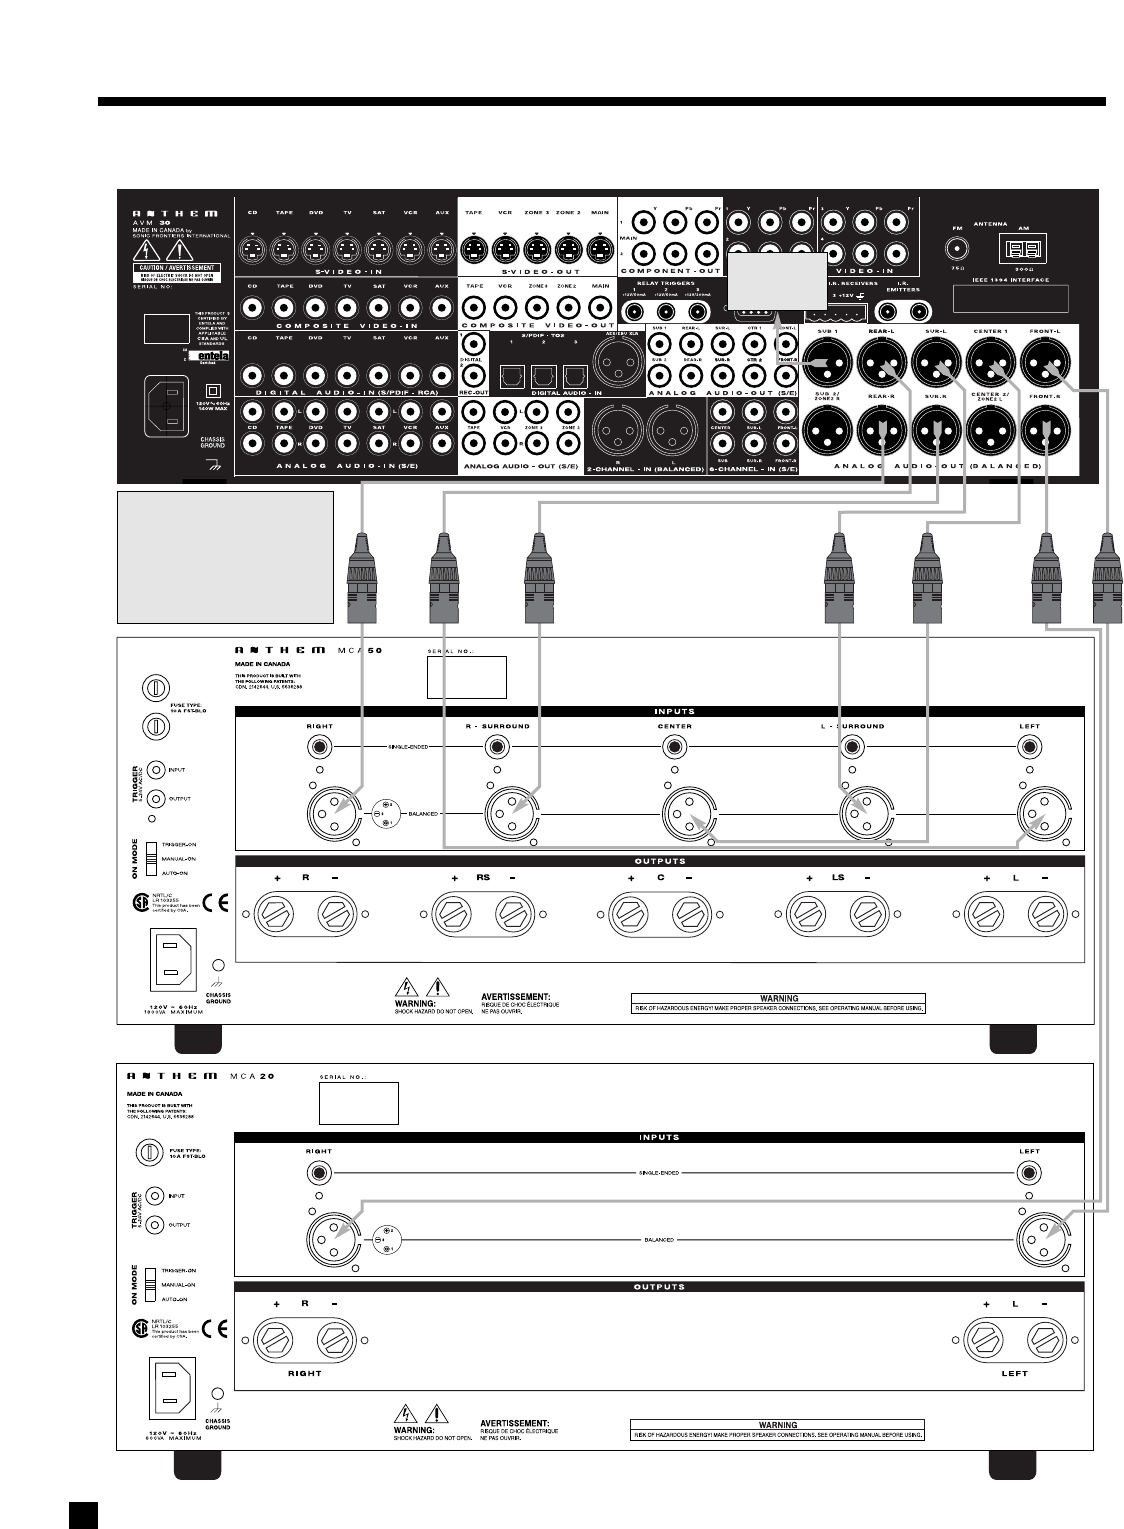
2. QUICK START continued …
2.2.5 AVM 30 to Amplifiers and Powered Subwoofer (XLR)
Trigger Setup Suggestion:
If it is not necessary to have both
amplifiers turned on when stereo
sources are playing, set triggers
to turn on only the 2-channel
amplifier when a stereo source is
selected (see section 7.4.9).
To powered
subwoofer
10
2
3
4
7
8
1
5
6
LAST
SLEEP
INPUT
FRTCTR
T
H
X
T
I
M
E
R
S
S
T
A
T
U
S
PIPSWAPMOVE
AVM SOURCE
COPY
AUXTAPE
DVDTVSATVCR
CD
DVDTVSATVCR
B
A
S
S
T
R
E
B
L
E
B
A
L
A
N
C
E
2-Ch
CD
REC
MAIN
Z2Z3
AVM PATH
D
Y
N
A
M
I
C
S
VOLUMECH PRE-SET
FM/AM PRE-SETS
SEEK
TUNE
SOURCE SEEK
L
E
A
R
N
ENTER
MUTE
78
0
9
SELECT
SUB
LFE
FM
AM
SUR
RR
A
V
M
O
F
F
D
I
S
P
L
A
Y
T
O
N
E
B
Y
P
A
S
S
M
O
D
E
O
N
S
C
R
E
E
N
O
F
N
I
E
D
I
U
G
B
A
C
K
S
E
T
U
P
123
456
P
O
W
E
R
6-Ch
A
V
M
P
A
T
H
110˚ from center
LAST
SLEEP
INPUT
FRTCTR
T
H
X
T
I
M
E
R
S
S
T
A
T
U
S
PIPSWAPMOVE
AVM SOURCE
COPY
AUXTAPE
DVDTVSATVCR
CD
DVDTVSATVCR
B
A
S
S
T
R
E
B
L
E
B
A
L
A
N
C
E
2-Ch
CD
REC
MAIN
Z2Z3
AVM PATH
D
Y
N
A
M
I
C
S
VOLUMECH PRE-SET
FM/AM PRE-SETS
SEEK
TUNE
SOURCE SEEK
L
E
A
R
N
ENTER
MUTE
78
0
9
SELECT
SUB
LFE
FM
AM
SUR
RR
A
V
M
O
F
F
D
I
S
P
L
A
Y
T
O
N
E
B
Y
P
A
S
S
M
O
D
E
O
N
S
C
R
E
E
N
O
F
N
I
E
D
I
U
G
B
A
C
K
S
E
T
U
P
123
456
P
O
W
E
R
6-Ch
A
V
M
P
A
T
H
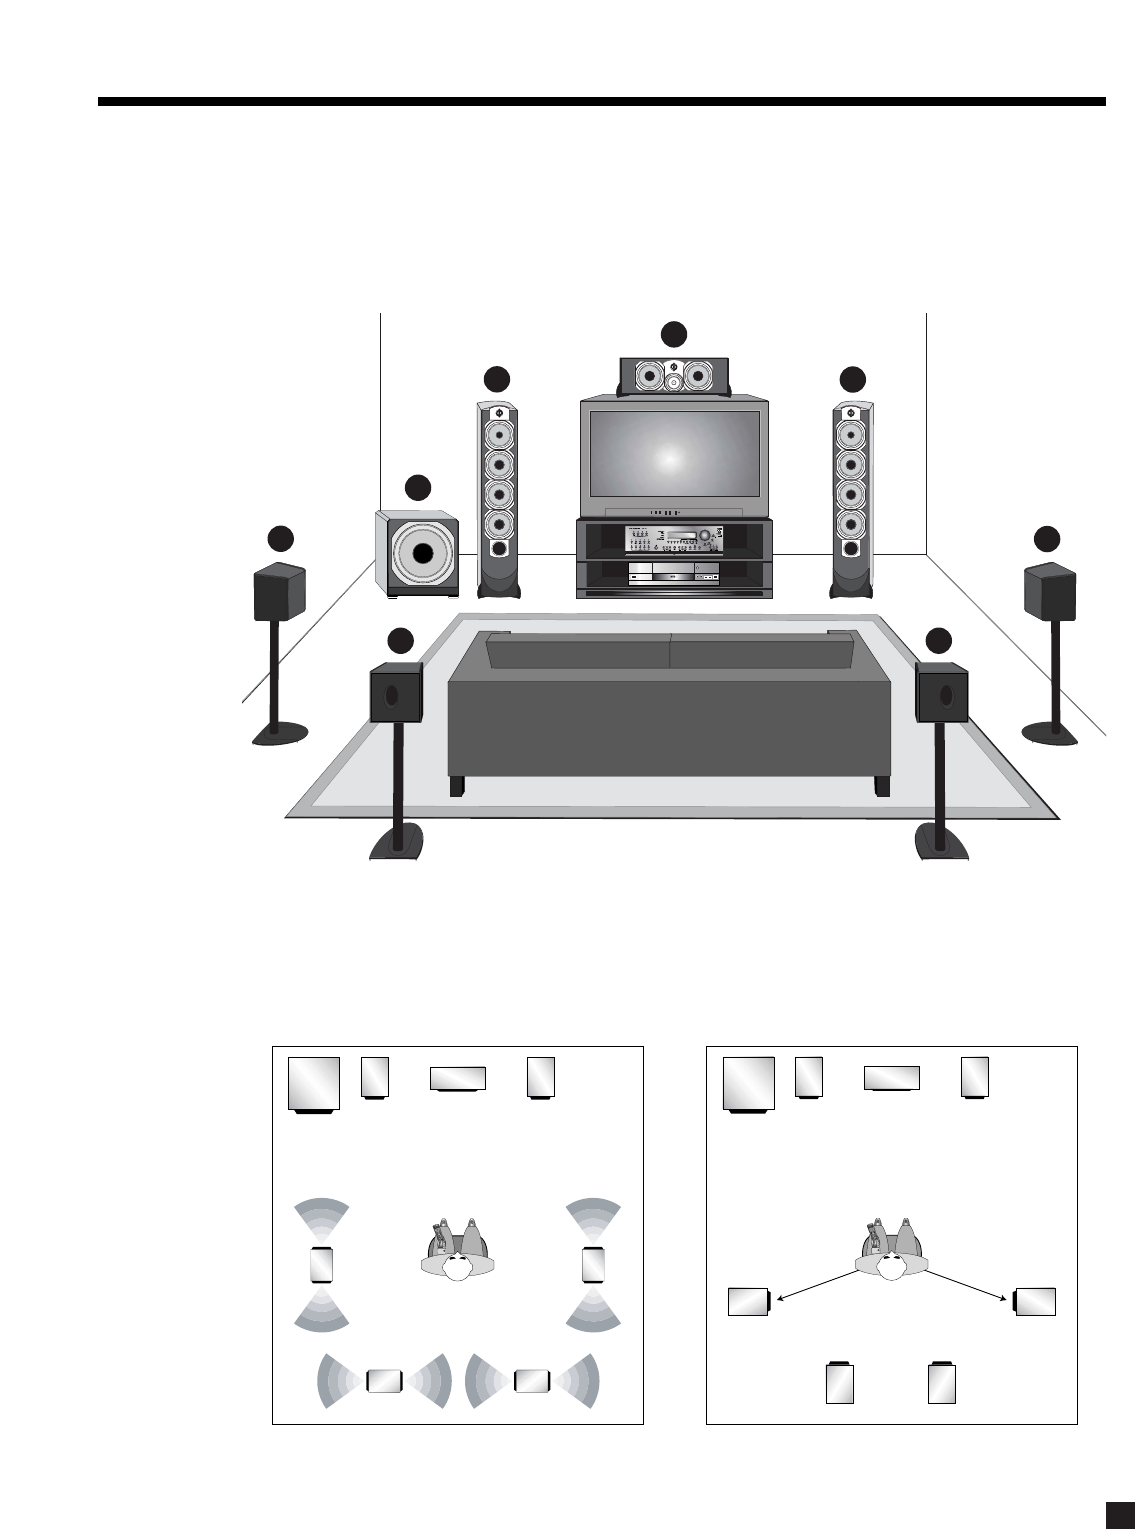
*Dipole shown with ‘null’ facing listening area. Direct radiating – see diagram below.
For accurate soundstage reproduction, speaker size and distance to the listener should be entered in the
Setup Menu (see sections 7.4.2, 7.4.3, and 7.4.4).
1. Front-Left
2. Center
3. Front-Right
4. Surround-Right*
5. Rear-Right*
6. Rear-Left*
7. Surround-Left*
8. Subwoofer
2.3 SPEAKER PLACEMENT
These illustrations show the typical speaker placement for a 7.1-channel surround system, the ‘.1’ channel
being the LFE (Low Frequency Effect). The Front and Center speakers are directed towards the listener from
the front, while the Surround speakers are positioned to the sides, and the Rear speakers are positioned
behind the listener. Ideally, the Surround and Rear speakers should be positioned 2-3 feet above ear level.
2. QUICK START continued …
Surround Speaker Placement – Dipole Surround Speaker Placement – Direct Radiating
slightly behind listening position
11
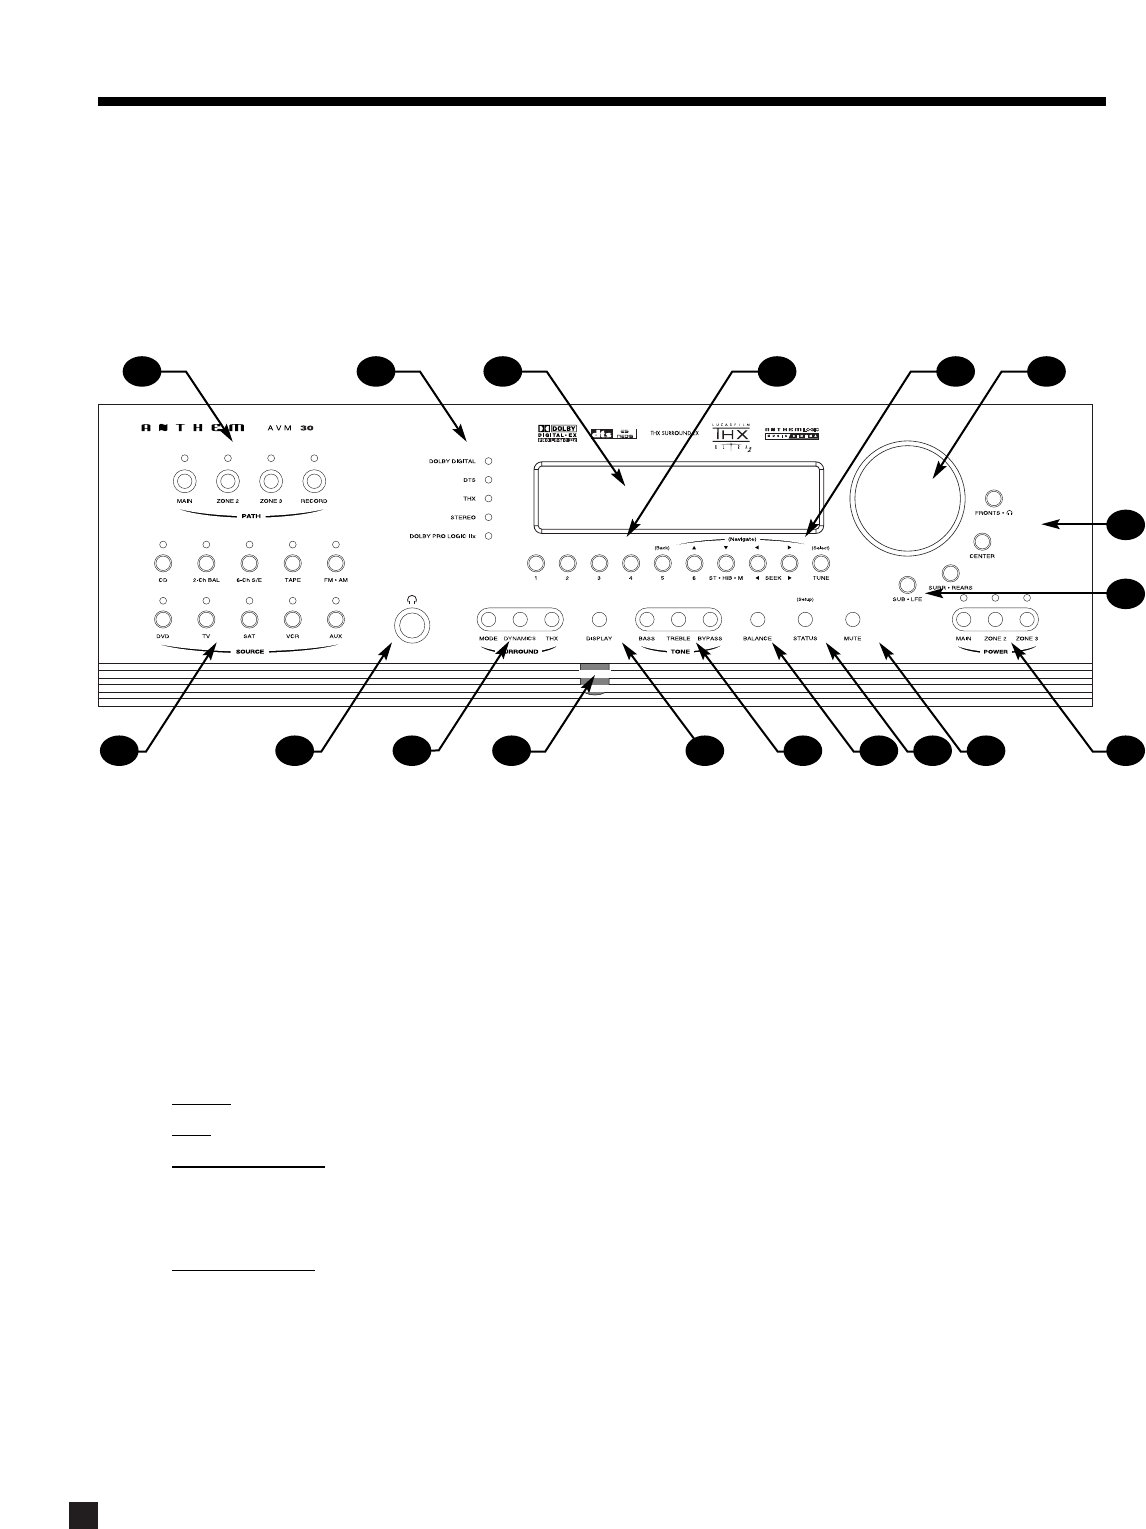
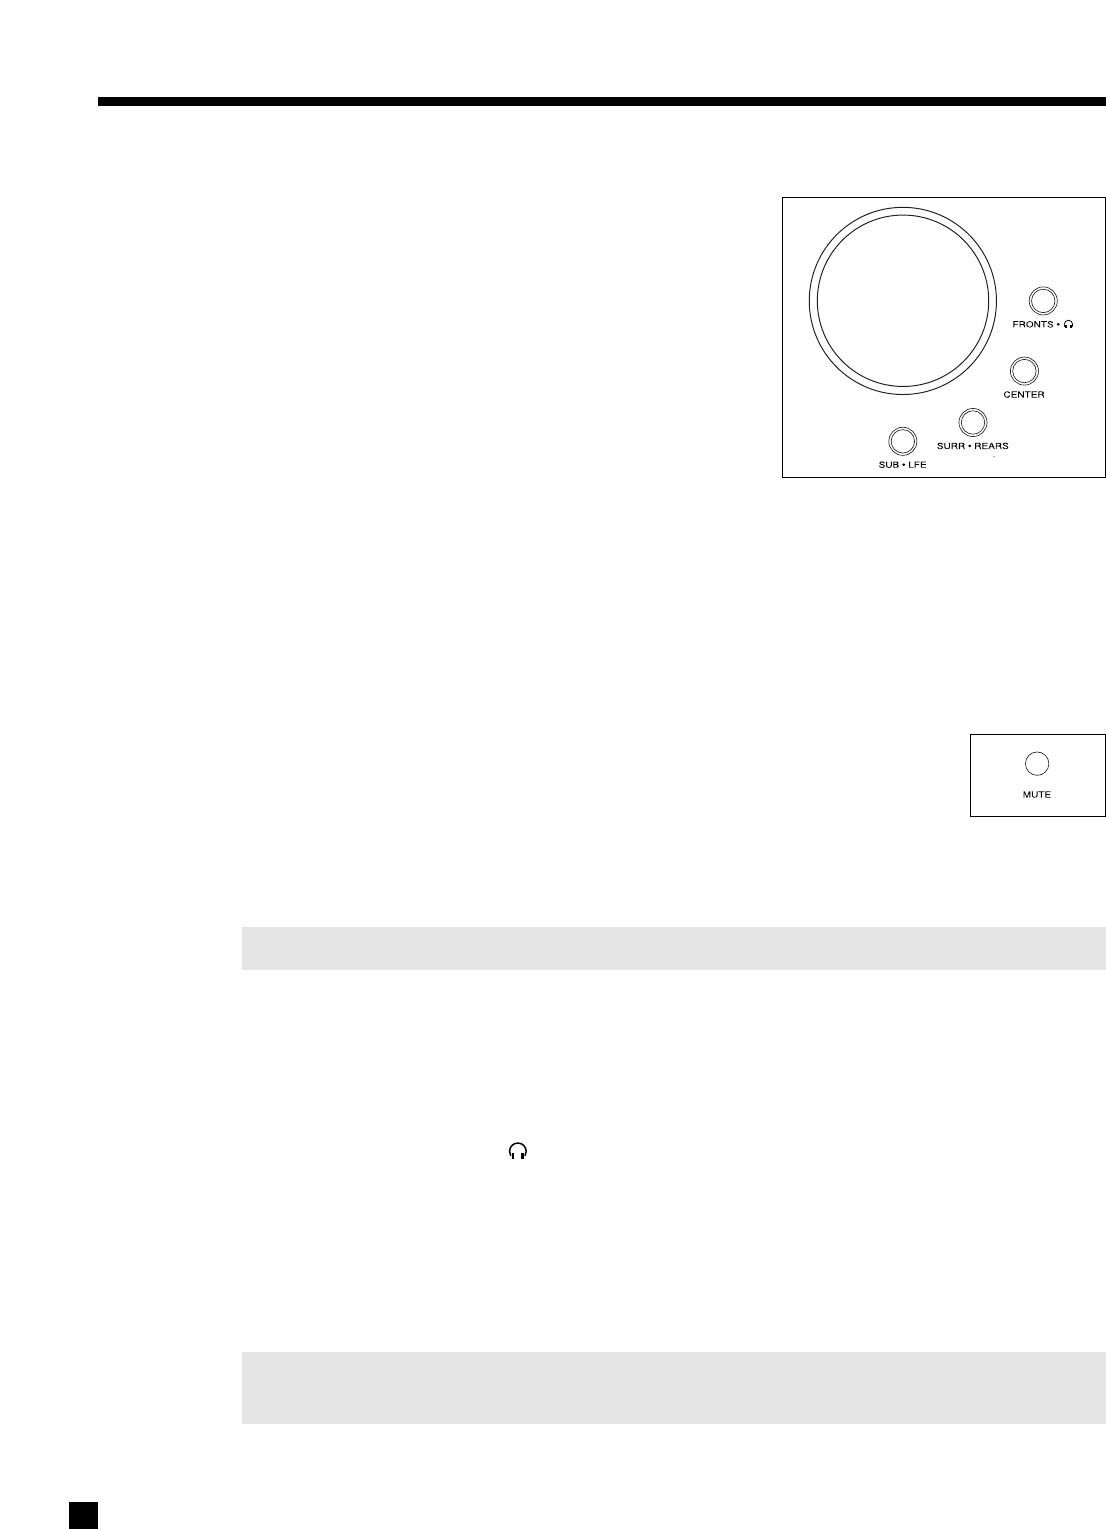
3.1 FRONT PANEL LAYOUT
The front panel of the AVM 30 has the Master Control Knob, selection/navigation buttons, a display, status indicator LEDs, and
the Headphone jack .
See section 5 for complete information on Front Panel operation.
1–Path selection
2–Mode / Surround Decoder indicators
3–Display
4–FM • AM Preset selection
5–FM • AM Tuning / Setup Navigation
6–Master Control Knob
•V
olume
•Tune for FM • AM
•Setting Adjustment for Mode; DD Dynamics; THX
Options; Surround Mode Level / Bass / Treble /
Balance; Path Bass / Treble / Balance; Display
Brightness
•Setup Adjustment for Letters, Numbers, and Times
7–Surround Mode / Headphone settings for Level /
Bass / Treble / Balance
8–Subwoofer / LFE Level settings
9–Power On / Stand-By (MAIN / ZONE2 / ZONE3)
10 –Mute
11 –Status review / Setup (press and hold for 3 seconds)
12 –Balance setting
13 –Bass / Treble settings
14 –LED / Display Brightness setting (see section 7.4.10)
15 –Front Panel Remote Control IR Sensor
16 –Surround Mode / Dynamics / THX Options settings
17 –Headphone Jack
18 –Source selection
3. PANELS / DISPLAY/ REMOTE LAYOUT
1718 16 15 14 13 12 11 10 9
8
7
5 64321
12
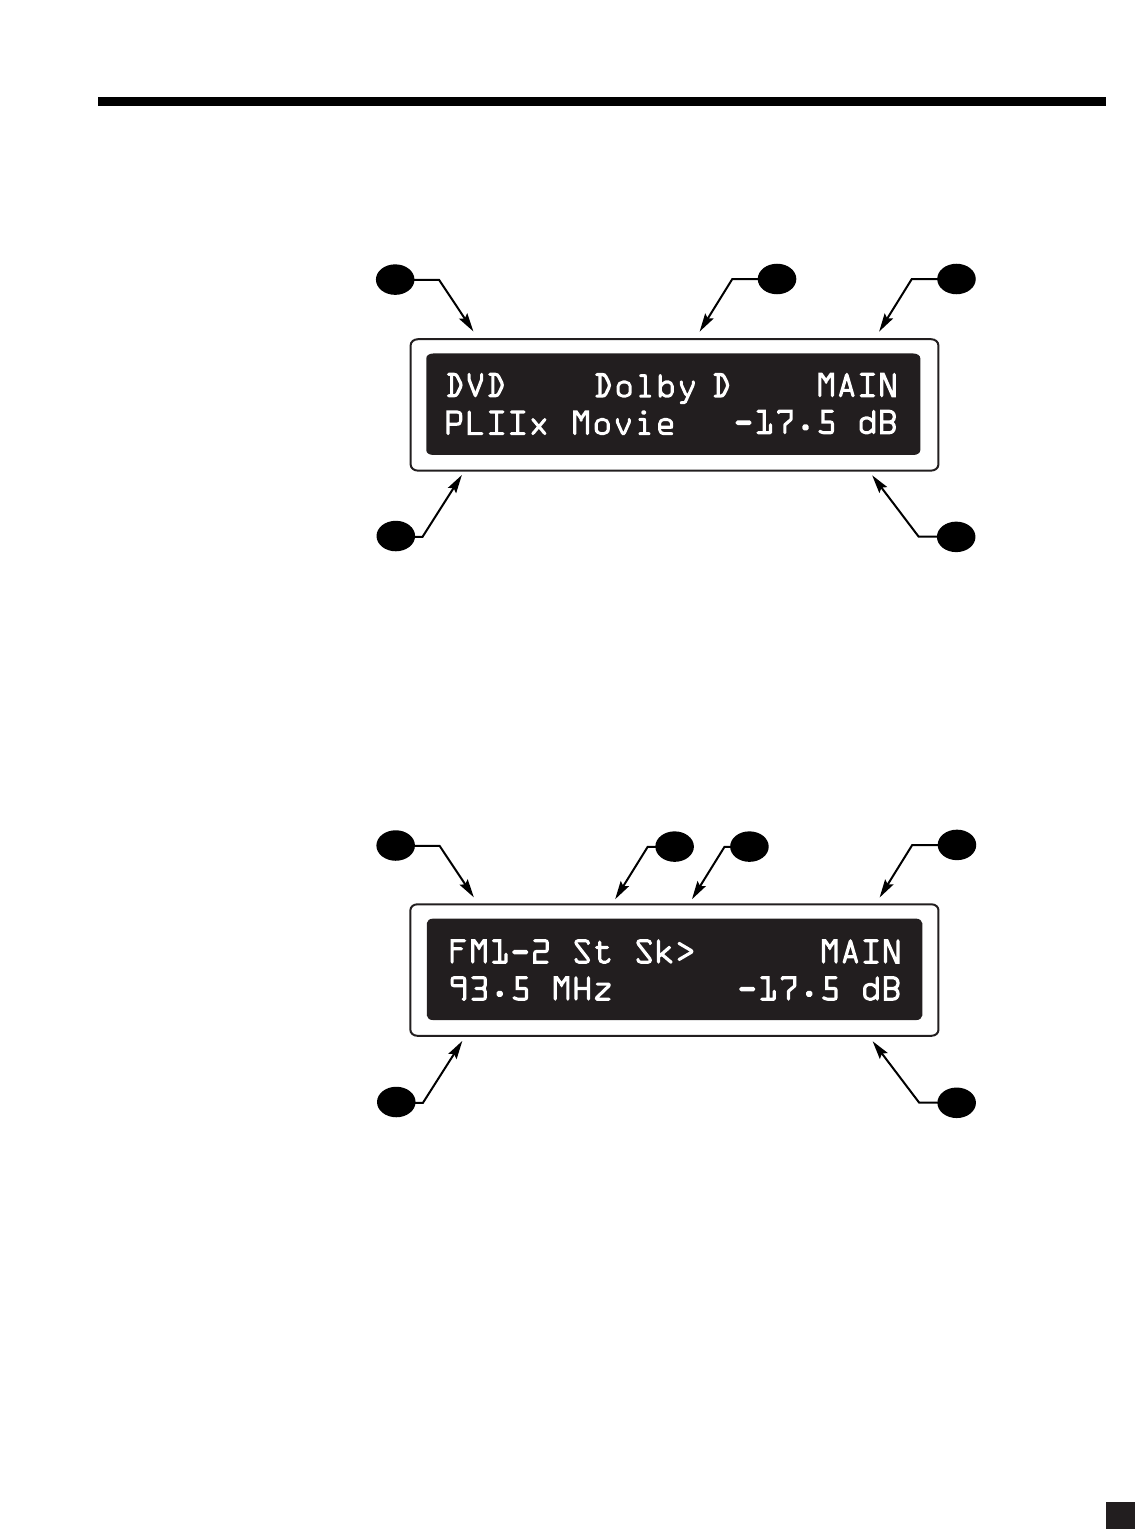
3.2 FRONT PANEL DISPLAY
MAIN Display Example:
1–Source selection (see section 5.4).
2–Audio Input Format (see section 7.4.5) or Sleep Indicator if engaged (see section 6.5).
3–Path that the information on the display refers to (see section 5.2).
4–Volume setting. When MAIN, ZONE2, or ZONE3 are muted, “Muted” flashes instead of the current
volume setting (see section 5.5).
5–Surround Mode (if the Source is FM • AM, then the tuned station appears).
FM • AM Display Example:
1–Source+Band. The tuner has three FM bands (FM1, FM2, and FM3) and one AM band. The number
after the selected band is the preset station (see section 5.4.2).
2–FM mode. Displays “St” when in stereo, “HB” when Hi-Blend is selected, or “Mn” when in mono or
mono is selected (see section 5.4.2).
3–Seek when tuning FM • AM stations (see section 5.4.2).
4–Path (see section 5.2).
5–Volume setting. When MAIN, ZONE2, or ZONE3 are muted, “Muted” flashes instead of the current
volume setting (see section 5.5).
6–Currently tuned FM • AM frequency to the nearest 0.1 MHz for FM and to nearest 10 kHz for AM
(see section 5.4.2).
If changes take place simultaneously in different Paths, the hierarchy of the display info is:
1) Volume changes, 2) Front Panel activity, 3) MAIN, 4) ZONE2, 5) ZONE3, 6) RECORD, 7) HEADPHONE.
3. PANELS / DISPLAY/ REMOTE LAYOUT continued …
54
32
1
65
4
132
13
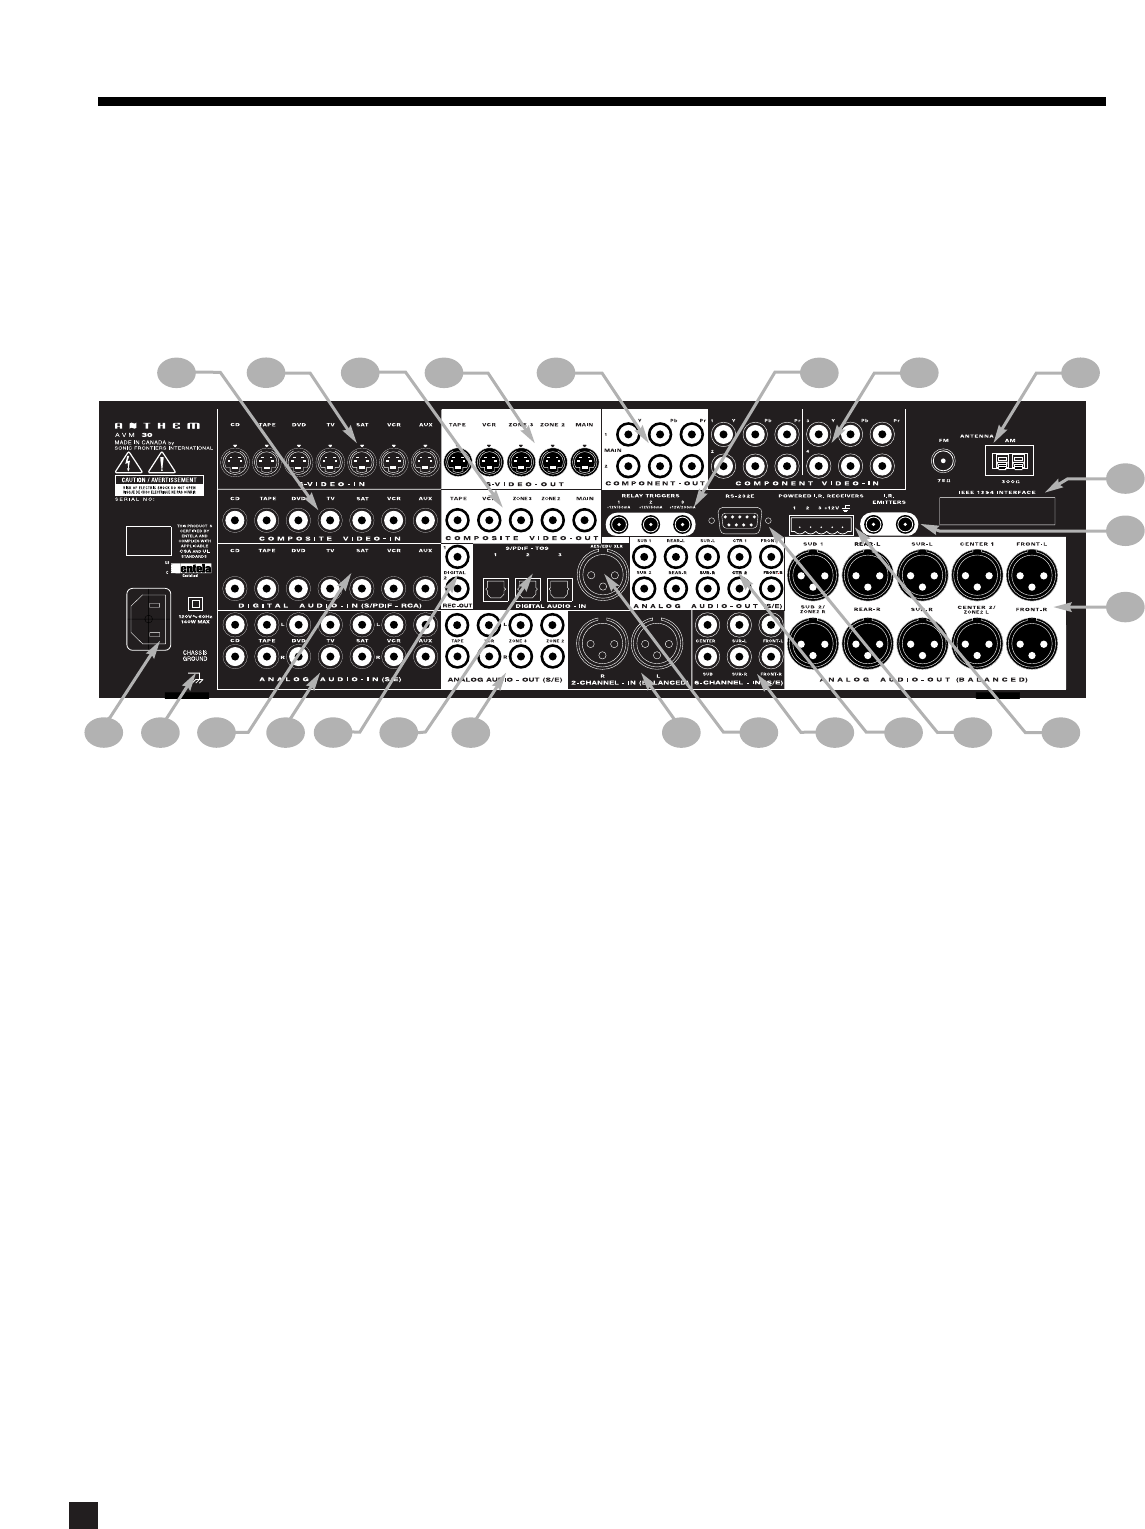
3.3 REAR PANEL LAYOUT
The rear panel of the AVM 30 contains all connections, such as power connection, audio and video inputs and outputs, antenna
connections, and the RS-232 port which allows software upgrades and external control of the AVM 30.
*Interface card requires installation by a qualified dealer.
See section 4 for complete information on Rear Panel connections.
3. PANELS / DISPLAY/ REMOTE LAYOUT continued …
©©
©©
1–7 Composite Video RCA Inputs
2–7 S-Video Inputs
3–5 Composite Video RCA Outputs
4–5 S-Video Outputs
5–2 Component Video Outputs (3 Jacks/ea)
6–3 Relay Trigger 3.5mm Outputs (Assignable)
7–4 Assignable Component Video Inputs (3 Jacks/ea)
8–FM and AM Antenna Inputs
9–IEEE 1394/PHAST Interface provision*
10 –2 I.R. Emitters
11 –MAIN Analog Audio Balanced XLR Output (10 Jacks)
12 –3 12V powered Infra Red (IR) 3.5mm Inputs
13 –RS-232 Interface Port (Bi-Directional)
14 –MAIN Analog Audio RCA Output (10 Jacks)
15 –Analog Audio 6-Channel RCA Input (6 Jacks)
16 –Digital Audio AES / EBU Input (Assignable)
17 –Analog Audio 2-Channel XLR Input (2 Jacks)
18 –ZONE2, ZONE3, and REC Analog Audio RCA Outputs
19 –3 Digital Audio Toslink Inputs (Assignable)
20 –2 Digital Audio RCA REC Outputs
21 –7 Analog Audio RCA Inputs (L/R Jacks)
22 –7 Digital Audio RCA Inputs
23 –Ground Terminal
24 –Power Cord Connection
22
23
24 21 19 18
20 131415 1216
17
7
68
9
10
24 5
13
11
14
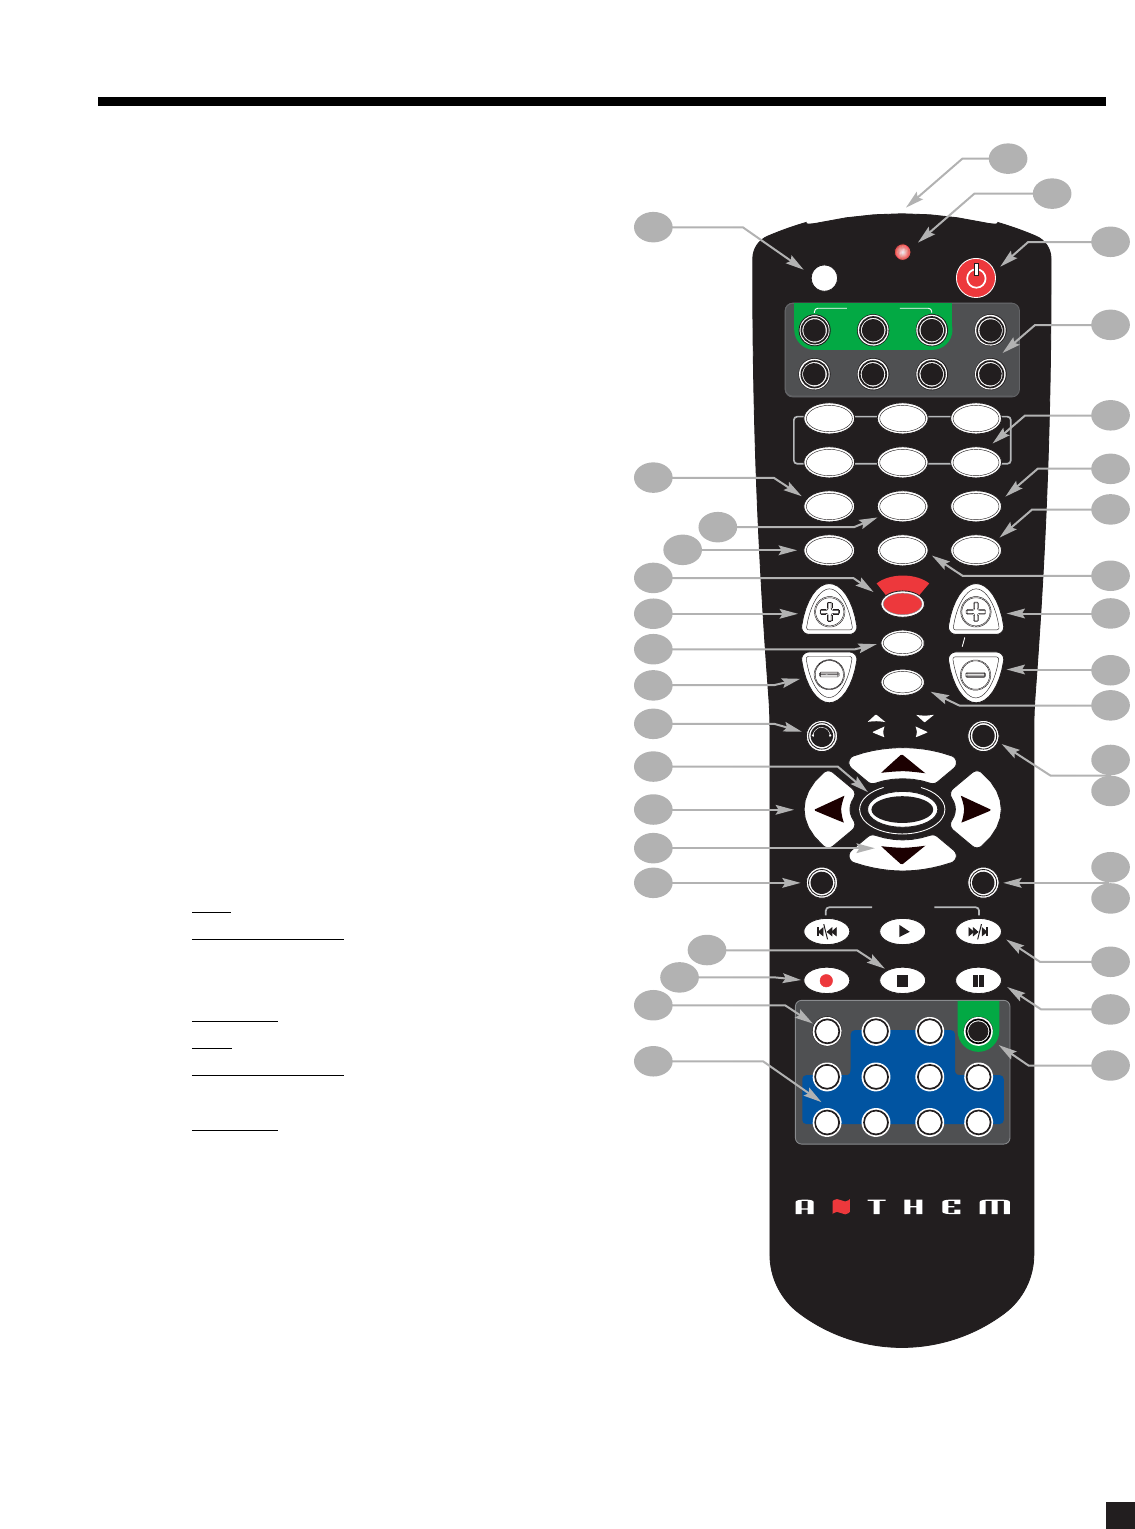
3.4 REMOTE CONTROL LAYOUT
1–IR Transmitter (front face)
2–Transmission Indicator LED (red)
3–Power ON when in MAIN, ZONE2, or ZONE3 personality
Power ON/OFF for other components (see #4)
Note: This does not turn the AVM 30 off (see #31)
4–Path / Component ‘Personality’ selection
5–FM • AM Preset selection (6)
6–Selects Tone Bypass
7–Mode setting
8–Dynamics setting
9–FM • AM Preset Station Up
10 –FM • AM Preset Station Down
11 –THX Options settings
12 –Center Channel setting for Level / Bass / Treble
13 –Back (for Setup)
14 –Subwoofer / LFE Level settings
15 –Setup (Press & Hold for 3 seconds)
16 –Source Seek
17 –Balance setting
18 –RECORD Path selection (Must be in MAIN – see #4)
19 –Source selection (10 inputs)
20 –Copy MAIN when ZONE2, ZONE3, or RECORD is selected
21 –Bass setting
22 –Treble setting
23 –Surrounds / Rears setting for Level / Bass / Treble /
Balance
24 –• Tune for FM • AM
• Setting Adjustment for Mode; DD Dynamics; THX
Options; Surround Mode Level / Bass / Treble; Path
Bass / Treble; Timers; Display Brightness
• Navigation for Setup
25 –• Seek for FM • AM
• Setting Adjustment for Surround Mode Balance;
Path Balance
• Navigation for Setup (North / South / East / West)
26 –Status / FM • AM Direct Entry / Setup selection
27 –Fronts / Headphones setting for Level / Bass / Treble / Balance
28 –Volume Down
29 –Sleep Timer selection / Timers setting
30 –Volume Up
31 –Power OFF when in MAIN, ZONE2, or ZONE3 personality
32 –Mute
33 –Front Panel LED / Display Brightness setting / Lip-Sync Delay
34 –On-Screen Display
35 –Learn (for customization of remote)
See section 6 for complete information on operation of the Remote Control.
3. PANELS / DISPLAY/ REMOTE LAYOUT continued …
SLEEP
INPUT
FRT CTR
T
H
X
T
I
M
E
R
S
S
T
A
T
U
S
PIP SWAP MOVE
SSP SOURCE
COPY
AUX TAPE
DVD TV SAT VCR
CD
DVD TV SAT VCR
B
A
S
S
T
R
E
B
L
E
B
A
L
A
N
C
E
2-Ch
CD
REC
MAIN Z2 Z3
SSP PATH
D
Y
N
A
M
I
C
S
VOLUME CH PRE-SET
FM/AM PRE-SETS
TUNE
SEEK
SOURCE SEEK
L
E
A
R
N
ENTERMUTE
78
0
9
SELECT
SUB
LFE
FM
AM
SUR
RR
S
S
P
O
F
F
D
I
S
P
L
A
Y
T
O
N
E
B
Y
P
A
S
S
M
O
D
E
O
N
S
C
R
E
E
N
I
N
F
O
G
U
I
D
E
B
A
C
K
S
E
T
U
P
1 2 3
456
P
O
W
E
R
6-Ch
S
S
P
P
A
T
H
S
S
P
O
F
F
LAST
2
1
3
4
6
7
8
11
16
17
18
19
35
20
34
26
31
23
21
27
28
33
29
22
12
13
14
15
9
5
10
25
24
30
32
4.1 CONNECTING POWER TO THE AVM 30
Connect the power cord to the back of the AVM 30 and then to a 105 to 130 Volt, 60 Hz AC outlet.
4.2 AUDIO CONNECTIONS
There are two methods of transmitting audio signals: Analog and Digital. Analog is an electrical waveform
representation of sound and requires one cable for each channel. Digital represents sound using a sequence
of numbers and requires only one cable for all channels.
Every audio input in the AVM 30 can be changed from the factory setting to either Digital or Analog, except
2-Ch BAL and 6-Ch S/E, which accept analog signals only (see section 7.4.5).
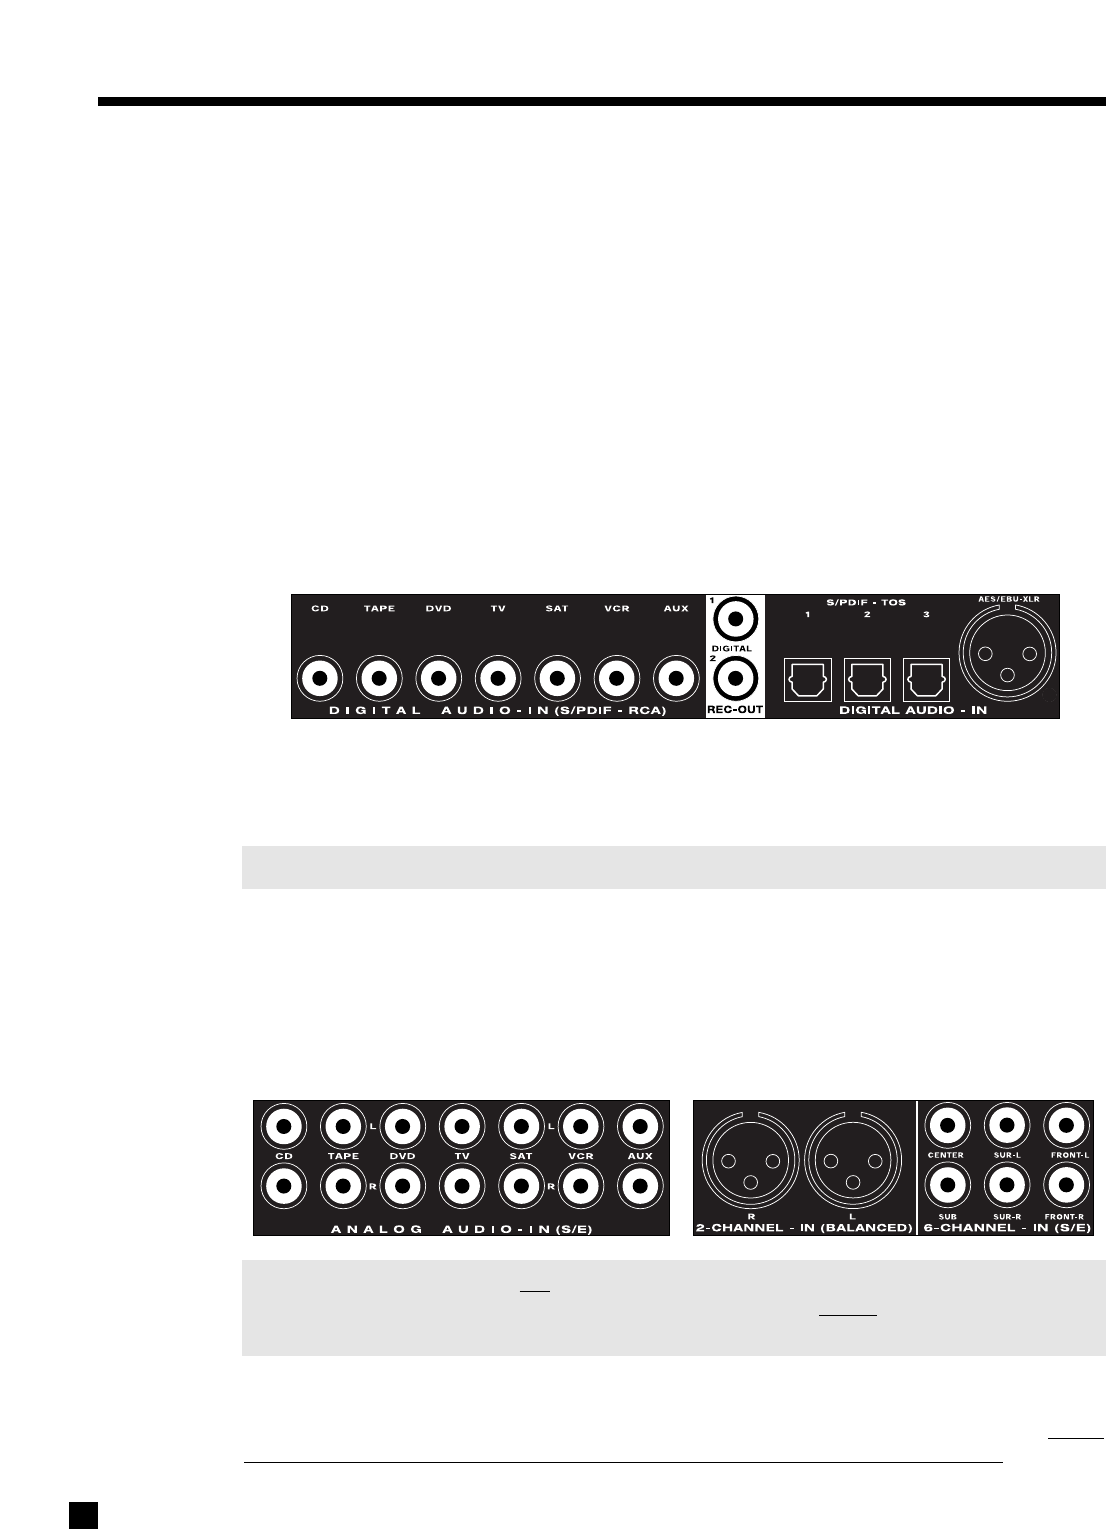
4.2.1 DIGITAL AUDIO INPUTS AND OUTPUTS
Digital Audio-In connections are made through a coaxial (RCA), optical (TOS), or balanced (XLR) cable. From
the factory, DVD and SAT are set to Digital-RCA, whereas CD, TAPE, TV, VCR, and AUX are set to Analog-DSP.
The highest transmission quality is achieved with the AES/EBU connection. The AVM 30 provides one such
input. The S/PDIF-RCA connection offers the next best digital transmission – use for source components with
digital RCA outputs. For source components with Toslink outputs only, use S/PDIF-TOS. Any digital input may
be assigned to any number of Sources that are set to ‘Digital’ (see section 7.4.5).
Note: An external RF demodulator is required if using a Laser Disc player with Dolby Digital/AC-3.
Digital Rec-Out can provide a signal to the digital audio input of a Mini Disc recorder, CD-R, etc., from any
Source set to ‘Digital’ or ‘Anlg-DSP’ (see sections 7.4.5 and 7.4.7).
4.2.2 ANALOG AUDIO INPUTS
Left/Right Analog audio connections are made through a pair of interconnect cables – typically white or
black for the Left channel and red for the Right channel.
Note: Connect both the digital and analog outputs from source components that have both types of
connection (e.g. DVD player) – ZONE2, ZONE3, and RECORD requireanalog audio connection
unless set to ‘copy’ MAIN (see sections 5.2.1 and 7.4.5).
Caution for DTS: With DTS-CDs or DTS Laser Discs, do not use analog connection if your player does not
have the DTS logo on its faceplate, otherwise a loud noise will be produced at the analog outputs of the
player. Players that have the DTS logo can pass a DTS-encoded signal through their digital outputs, though
they do often require a change in their setup menu to enable it (see player’s operating manual).
15
4. CONNECTIONS
16
4.2.3 2-Ch BALANCED AND 6-Ch SINGLE-ENDED (S/E) ANALOG AUDIO INPUTS
The 6-Ch S/E input is intended primarily for DVD-Audio and multichannel SACD players. If unused for this
purpose, the Front-Left and Front-Right connections can be used as an additional 2-channel input.
Note: When 6-Ch S/E is selected as the Source, the video signal from the DVD input will be routed to
the video outputs – connect your player’s video output to the DVD input (sections 4.3 and 7.4.5).
The 2-Ch BAL and 6-Ch S/E inputs can be set to either bypass all digital stages in the AVM 30 or to include
digital stages, so that bass management, time alignment, surround modes, lip-sync delay, bass/treble
control, and THX post-processing can be enabled (see sections 5.7, 5.8, 7.4.2, and 7.4.5).
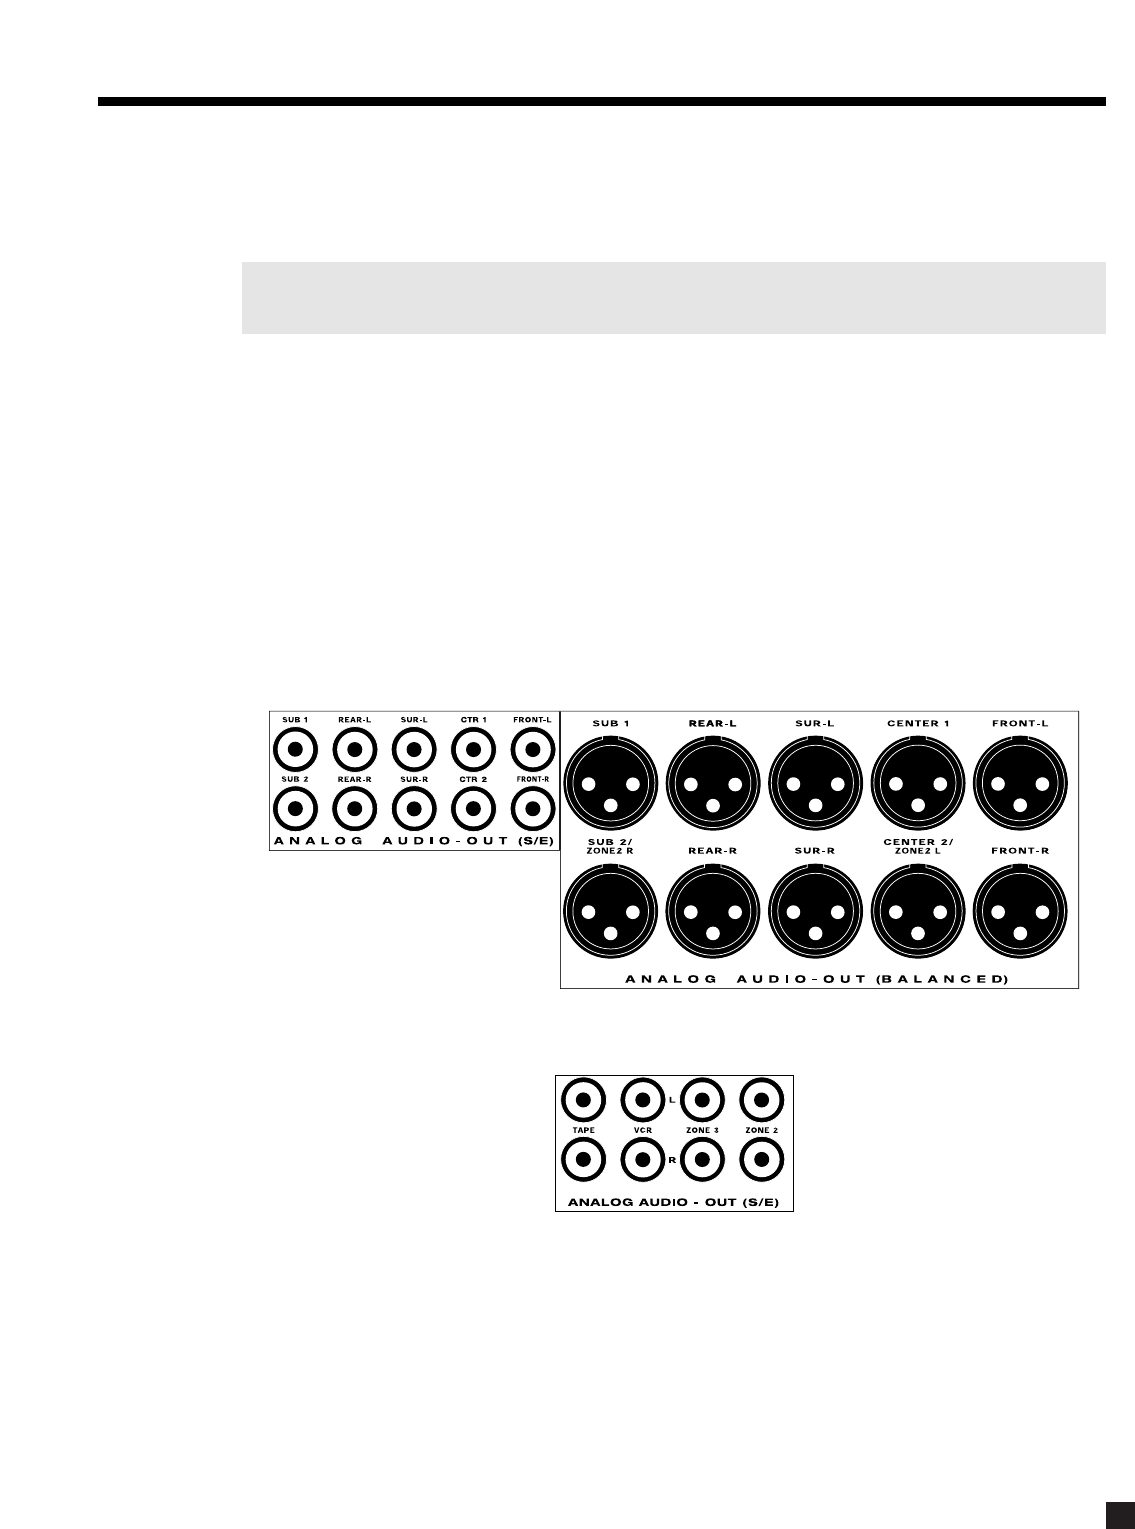
4.2.4 ANALOG AUDIO OUTPUTS
Balanced XLR connection offers the highest transmission quality, particularly over long cable lengths,
because it rejects noise and hum pickup. In the AVM 30, XLR output voltage is twice that of RCA output
voltage (or 6 dB higher). If your amplifier does not have balanced inputs, use Single-Ended RCA connection.
The AVM 30 also provides parallel outputs for a second Center channel and/or Subwoofer. If the Balanced
SUB2 and CENTER2 outputs are not being used for this purpose, they can be re-configured to act as
Balanced outputs for ZONE2 to ensure lower noise with longer cable runs (see sections 5.2 and 7.4.7).
If you’re using one Rear channel, use the Rear-L output for it (see section 7.4.2).
The Analog Audio RECORD outputs for your tape recorder and VCR are shown below, together with the
outputs for ZONE2 and ZONE3 amplifiers:
4. CONNECTIONS continued …

17
4. CONNECTIONS continued …
4.3 VIDEO CONNECTIONS
The AVM 30 provides video switching for three formats: Composite video, S-Video, and Component video.
Format translation is not performed – if only S-Video is used from your VCR, the S-Video output of the
AVM 30 will be the only one with a signal to send to your TV monitor whenever the VCR Source is selected.
Always remember to select the matching video input on your TV monitor/projector.
The choice of video format depends on the type that is available on your TV monitor/projector. If it only
accepts Composite and S-Video, then there is no advantage in connecting Component video from your
DVD player to the AVM 30 – S-Video connection must be used throughout the system.
Composite Video:
This is the oldest video format. It combines the black/white and color information for transmission on a single
coaxial cable with RCA connectors. These signals must then be separated again within the TV monitor by a
comb filter, resulting in some loss of video quality.
S-Video:
S-Video gives better video quality by transmitting color and brightness separately, using a multi-conductor
cable with S-Video connectors (5-pin Mini DIN).
Component Video:
Component video is transmitted over three coaxial cables, is capable of progressive scan mode, and
produces the highest video quality. The AVM 30 has four assignable Component video inputs. Note that all
3-wire connections must be made (Y, Pb, Pr). Component-In and Component-Out are compatible with HDTV,
all the way up to 1080p.
Note: Factory default settings are DVD for Component1 and SAT for Component2 (see section 7.4.5).
The On-Screen Display is available in MAIN and ZONE2 when Composite or S-Video connections are used.
The AVM 30 does not provide On-Screen Display for the Component video output. If you use Component
video, make sure either Composite or S-Video output is also connected from the AVM 30 to your TV. You can
then change to that TV input to view the Setup Menu and make changes more conveniently (see section 7).
©©
©©
18
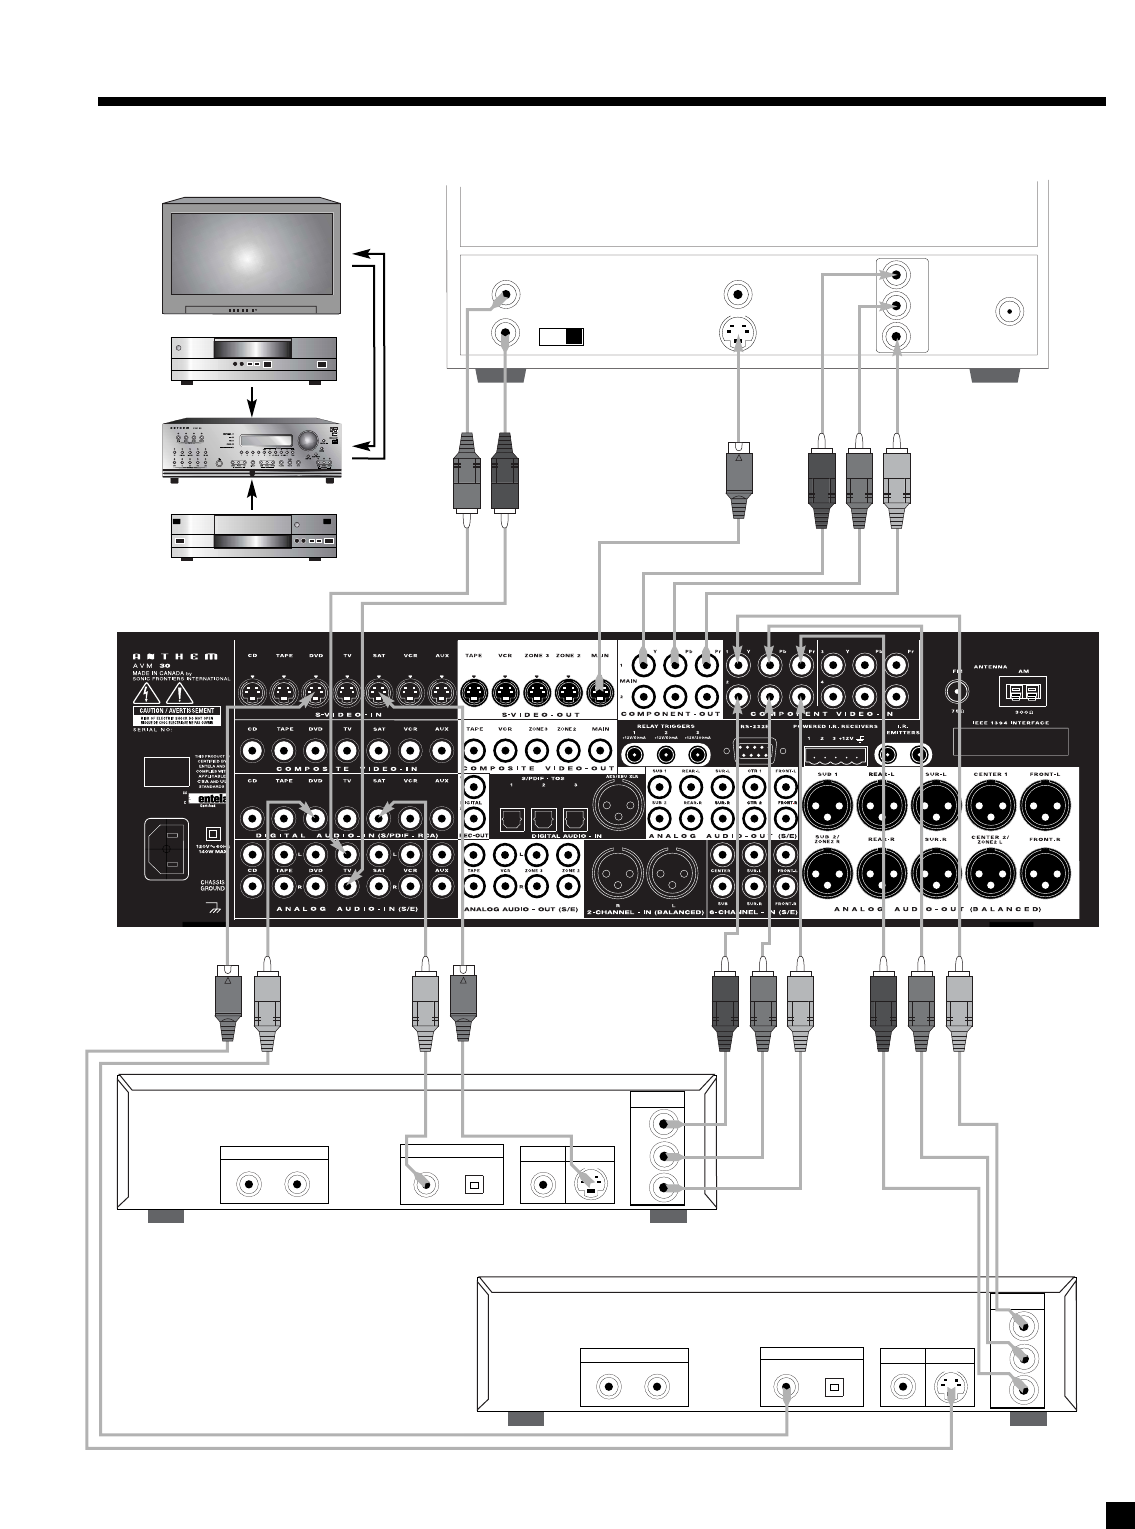
4. CONNECTIONS continued …
DVD Player, Satellite Receiver, and TV Connections with AVM 30 as Video Input Selector
Audio
Out
Composite
Video In Component
Video In
S-Video In
Vari Fixed
L
R
Pb
Pr
Y
Rear Panel of TV
CATV
In
DVD Player
Composite
Video Out S-Video Out
Audio Out
RL
Digital Out
RCA Toslink
Component
Video Out
Pb
Y
Pr
Satellite Receiver
Composite
Video Out S-Video Out
Audio Out
RL
Digital Out
RCA Toslink
Component
Video Out
Pb
Y
Pr
Note:
For info on Component
Video use, see sections
4.3, 7.4.5, and 7.4.10
DVD
SATELLITE
4. CONNECTIONS continued …
19
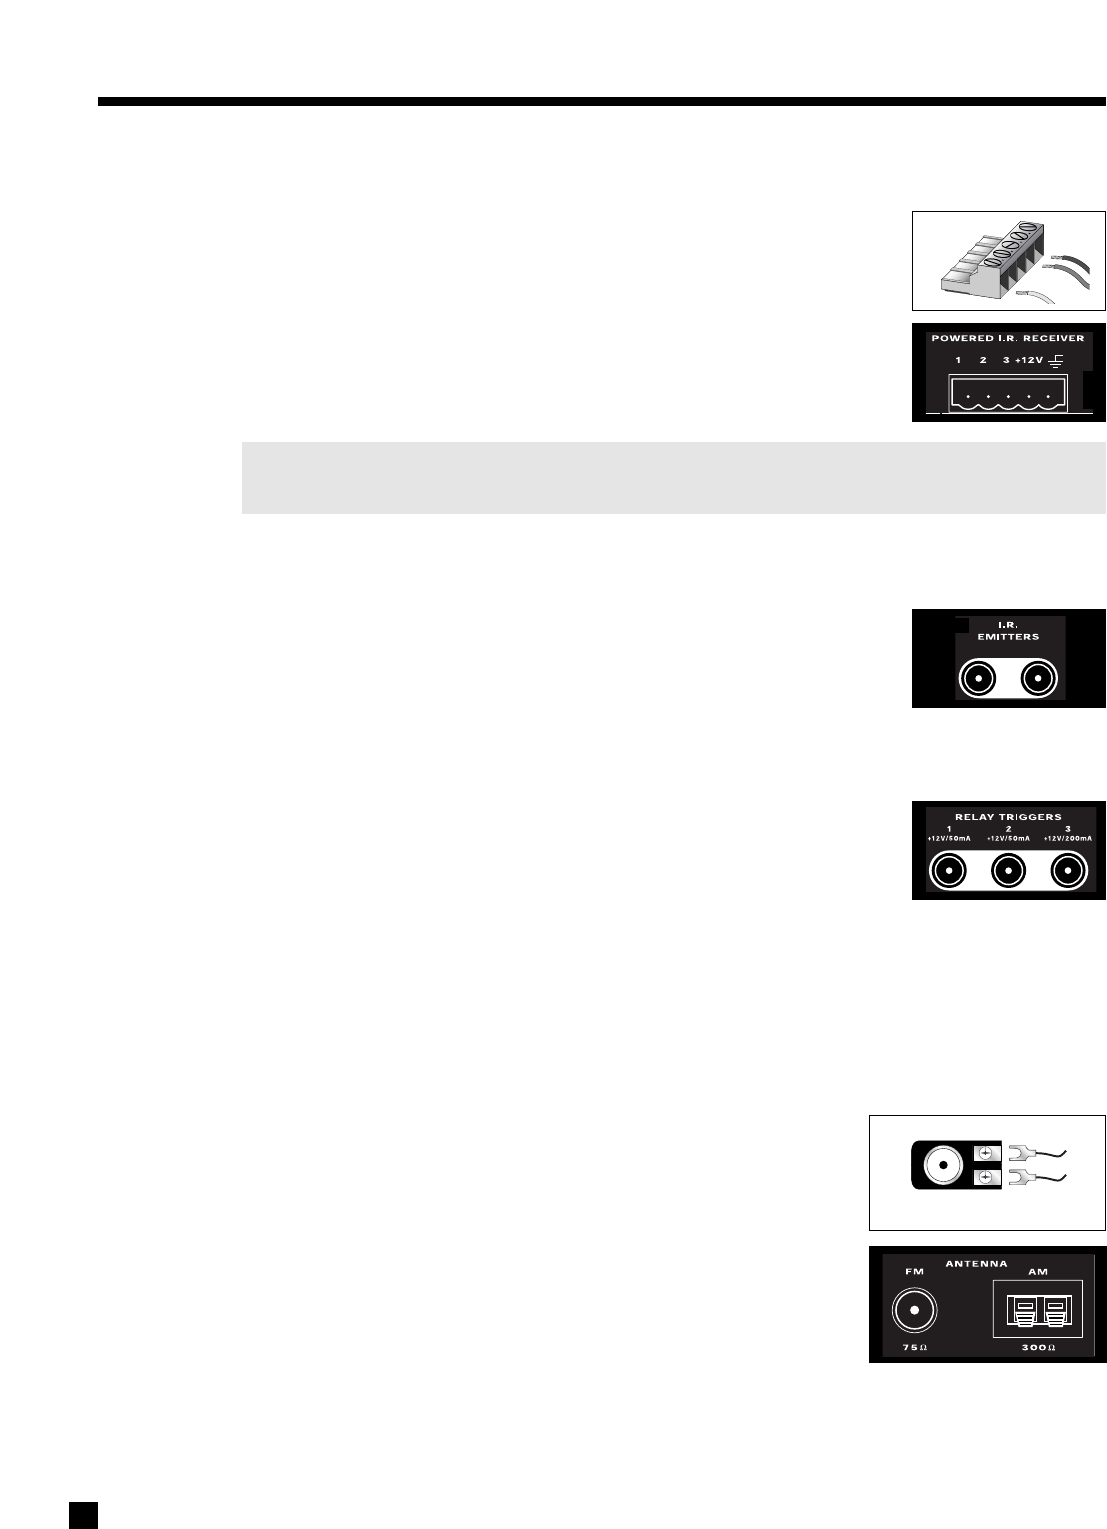
4.4 POWERED I.R. (INFRA RED) RECEIVERS
External IR repeaters allow the Remote Control to be used from other locations in
your home. Once a repeater is wired to a selected room, connect it to one of the
three I.R. RECEIVER inputs through the removable terminal block. To use the
terminal block, remove it from the AVM 30, loosen the proper screw, insert the
wire in the slot, tighten the screw onto the wire, and insert the terminal block into
the AVM 30. See section 7.4.9 for Setup information.
In addition, there is no need for an external 12V supply to power the repeaters –
use the AVM 30’s built-in supply instead for up to three repeaters, and connect
according to the repeater manufacturer’s instructions.
Note: For installers – The AVM 30’s IR inputs sense modulated 38 kHz carrier, not demodulated data.
With some control systems, an emitter face-to-face with an IR repeater may be needed.
4.5 I.R. (INFRA RED) EMITTERS
External IR emitters, also known as flashers, allow control of your source
components from any location in your home that has an IR repeater wired to the
back of the AVM 30. Position a flasher in front of the source components and
connect to one of the two I.R. EMITTER outputs – IR commands coming in through
the rear I.R. RECEIVER inputs are re-transmitted through the flashers.
4.6 RELAY TRIGGERS
If your other components have provisions for a trigger, you can automatically turn
them on and off together with the AVM 30, or when a specified Source is selected.
Connect a trigger output from the AVM 30 to the trigger input of your power
amplifier, TV monitor, etc., using a cable with 3.5mm mono mini plugs.
Trigger3 is designed to provide the extra current (up to 200 mA) required by relays in larger projectors and
motorized screens. Depending on the equipment, a thicker wire gauge may be required (consult your dealer).
The AVM 30 provides flexible trigger options. From the factory, all the triggers are disabled. Through the
Setup Menu, the conditions for enabling triggers can be specified (see section 7.4.9).
4.7 FM • AM ANTENNAS
To connect the FM antenna, first connect the two antenna wires to the
screw terminals of the 75-ohm to 300-ohm adapter. Then connect the
adapter to the FM ANTENNA connector on the AVM 30. If your local cable
company provides FM service, connect the cable directly to the AVM 30
instead of using the adapter.
To connect the AM loop antenna, press the spring-loaded tabs of the AM
ANTENNA connector, insert the bare ends of the wire from the loop antenna
and release the tabs.
Once both antennas are connected, move each of them around until best
reception is found. For the FM antenna, this will usually be in a “T” formation.
75-ohm to 300-ohm adapter
20
The AVM 30 is best understood as a piece of equipment that contains three control components in one
chassis. Path best describes how this tremendous flexibility of the AVM 30 is arranged:
•It is first of all a state-of-the-art Music and Home Theater Preamplifier • Processor • Tuner
(MAIN Path) with independent Source selection for recording (RECORD Path).
•It is also a high-end Whole House Entertainment Control Center that allows you to direct and adjust
the output of a variety of source components to other rooms in your home (ZONE2 and ZONE3 Paths).
5.1 POWER ON/OFF
When turned on, the AVM 30 comes on at the pre-programmed volume setting (see section 7.4.8).
Always turn the power amplifier on last to prevent ‘turn-on pops’ when other components are turned on.
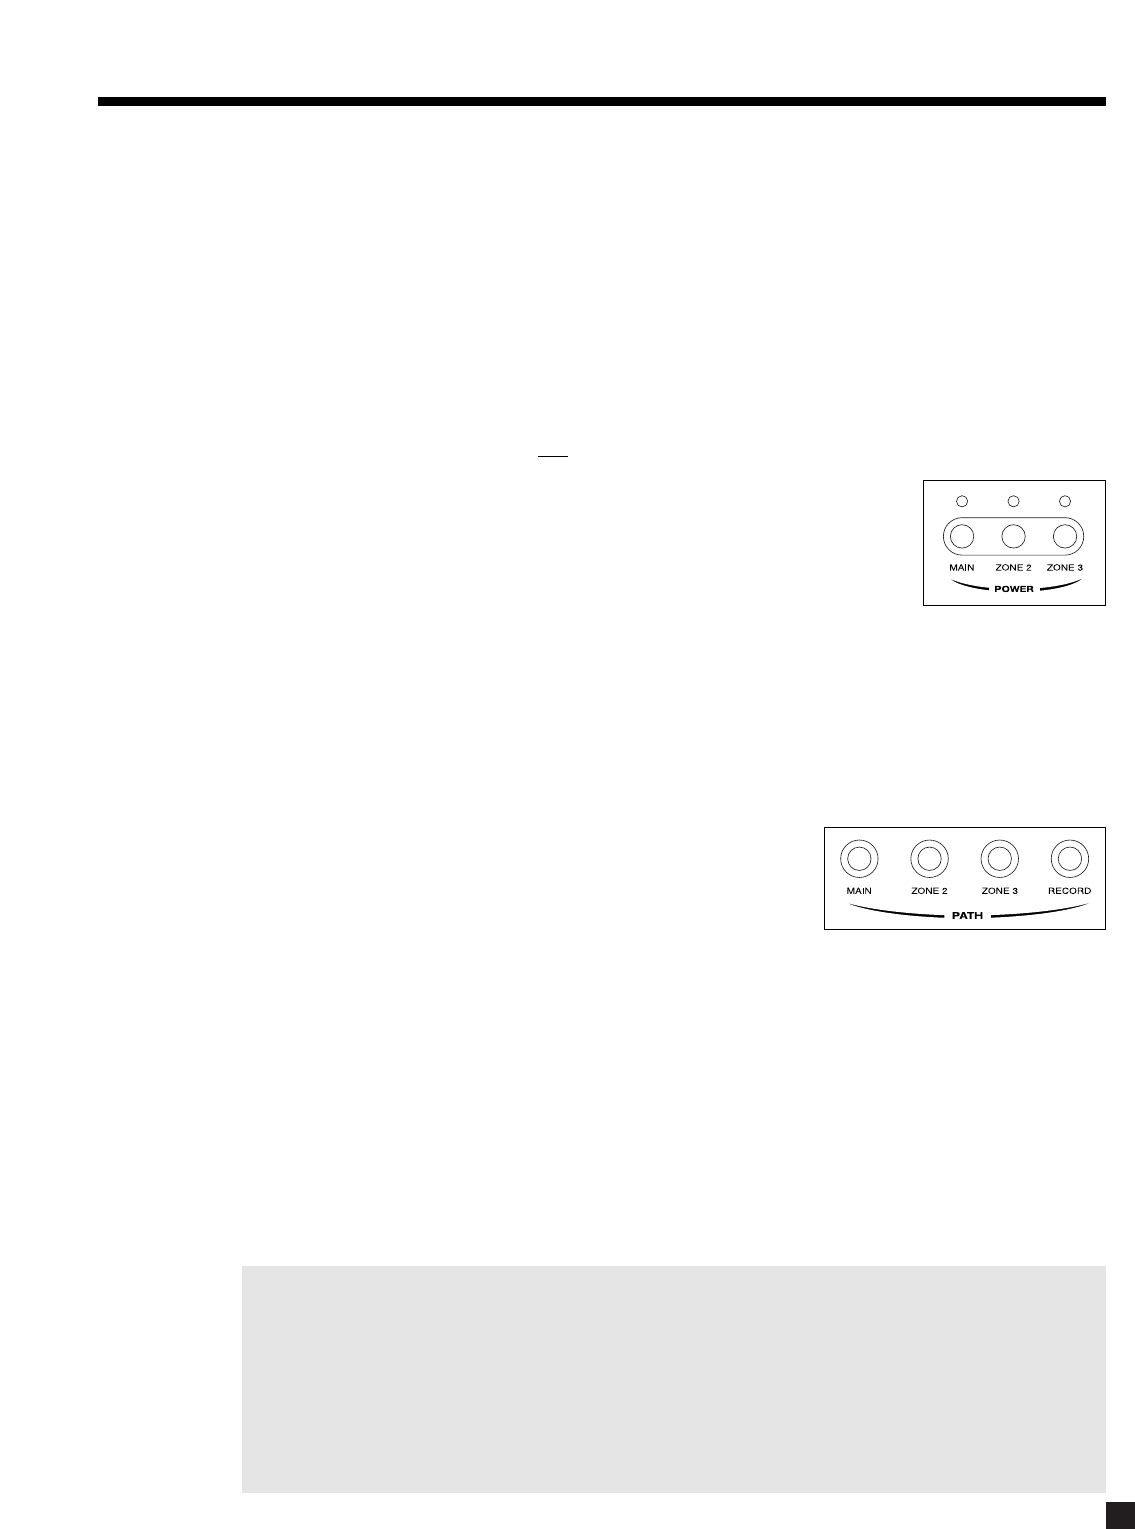
•MAIN On: There are various ways:
•Press MAIN in the POWER group (fig. right) or PATH group (fig. below).
•If ZONE2 and ZONE3 are off, press any SOURCE, FM • AM preset
(1through 6), or TUNE to immediately power-on MAIN.
•ZONE2 or ZONE3 On: Press ZONE2 or ZONE3 in the POWER or PATH group.
•RECORD On: Press RECORD in PATH group. MAIN will turn on simultaneously if not already on. The
Front Panel Display will show MAIN Path information (see highlighted notation in section 5.2).
•MAIN or ZONE2 or ZONE3 Off: Press MAIN or ZONE2 or ZONE3 in the POWER group.
•RECORD Off: Press MAIN in the POWER group. This turns off MAIN and RECORD simultaneously.
5.2 PATH SELECTION
Path routes Sources to the MAIN, ZONE2, ZONE3, or RECORD outputs.
•MAIN: As the name suggests, MAIN routes the audio/video
sources to your main listening/viewing room, with outputs for
your MAIN TV monitor and 7.1-channel audio.
•ZONE2 and ZONE3: Routes any audio/video source to other listening/viewing rooms in your home.
The chosen Source can be either the same or different from the Source selected in other paths.
ZONE2 and ZONE3 each have outputs for a TV monitor and 2-channel audio. To listen to a Source
that doesn’t have L/R Analog Audio-In connected, you must ‘copy’ it from MAIN (see section 5.2.1).
•RECORD: Allows you to record audio/video sources independently of what is selected in other
paths. Composite and S-Video, and fixed-level analog audio outputs are available for your tape
recorder and VCR. In addition, there are two configurable coaxial digital outputs: DIGITAL1 can be
set to output the audio of any digital Source, or convert an analog Source to digital (must be set to
Anlg-DSP in the Setup). DIGITAL2 can be set to output the same signal as DIGITAL1, or any of the
Sources set to Digital. See sections 7.4.5 and 7.4.7 for an explanation on how to set input and output
formats. As with Zones 2 and 3, RECORD has output only when L/R Analog Audio-In is connected,
or when MAIN is ‘copied’ (see section 5.2.1).
The AVM 30 automatically returns to MAIN a few seconds after an adjustment is made in ZONE2, ZONE3,
RECORD, or HEADPHONE*. This is designed to prevent accidents. Say, for example, someone enters the
MAIN room and turns up the volume – if the AVM 30 stayed in ZONE2, then the volume would increase in
ZONE2, not MAIN. Since the person adjusting the volume doesn’t hear any change, chances are he or she
would just keep turning it up and wonder what’s wrong, until something potentially ‘bad’ happens in ZONE2.
If you’ve seen “The Party” and remember the hilarious scene where Peter Sellers messes with the console,
you probably understand. The timeout setting can be changed in the Setup (see section 7.4.10).
*Except when MAIN is off or HEADPHONE is set to ‘Mute’ the MAIN speakers (see section 7.4.8).
5. FRONT PANEL OPERATION
5.2.1 COPYING THE MAIN PATH TO ZONE2, ZONE3, OR RECORD
This unique copy feature allows the Source selected in MAIN to also be directed to ZONE2, ZONE3, or
RECORD from either analog or digital inputs.
If a source component’s audio is connected to the AVM 30 using digital connection only, then the Copy
function is the only way to deliver the sound to another Path.
To set Copy mode using the Front Panel, press MAIN simultaneously with ZONE2, ZONE3, or REC, and use
MAIN to make your Source selections (for remote control operation, see section 6).
When MAIN is copied, the display for the other Paths reads “–MAIN–> ZONE2” (or ZONE3 or REC), along
with the information normally displayed. Copy can also be set permanently – see section 7.4.5.
Down-Mixing to 2-Channel Stereo:
The Center, Surround, and Rear channels can be mixed into the Left and Right Channels for the ZONE2,
ZONE3, TAPE, and VCR outputs. This can be done by the DVD player or the AVM 30:
•AVM 30 Down-mix: If the digital audio output from your DVD player is connected to the AVM 30,
the 2-channel down-mix from Dolby Digital or DTS will be done by the AVM 30 whenever you copy
MAIN to another Path. The same applies to 6-Ch S/E input (section 5.4.1).
•DVD Player Down-mix: If the Left/Right analog outputs from your DVD player are connected to the
AVM 30’s Analog Audio-In, the Dolby Digital down-mix done by your DVD player can be used for
ZONE2, ZONE3, TAPE, and VCR outputs, without having to copy MAIN. Note that DVD players do not
normally provide a down-mix for DTS material.
Note: Even if L/R Analog is connected, keep the digital output from your DVD player connected to
the AVM 30, otherwise MAIN has no way of receiving Dolby Digital and DTS.
5.3 MASTER CONTROL KNOB
Besides being a Volume Control, the MASTER CONTROL KNOB also operates many other functions, including
adjustment of Surround Mode Level / Bass / Treble / Balance, Path Bass / Treble / Balance, FM • AM tuning,
Mode selection, THX options, Dynamics adjustment, and Display Brightness selection.
From this point in the manual, the MASTER CONTROL KNOB (MCK) will be referred to extensively.
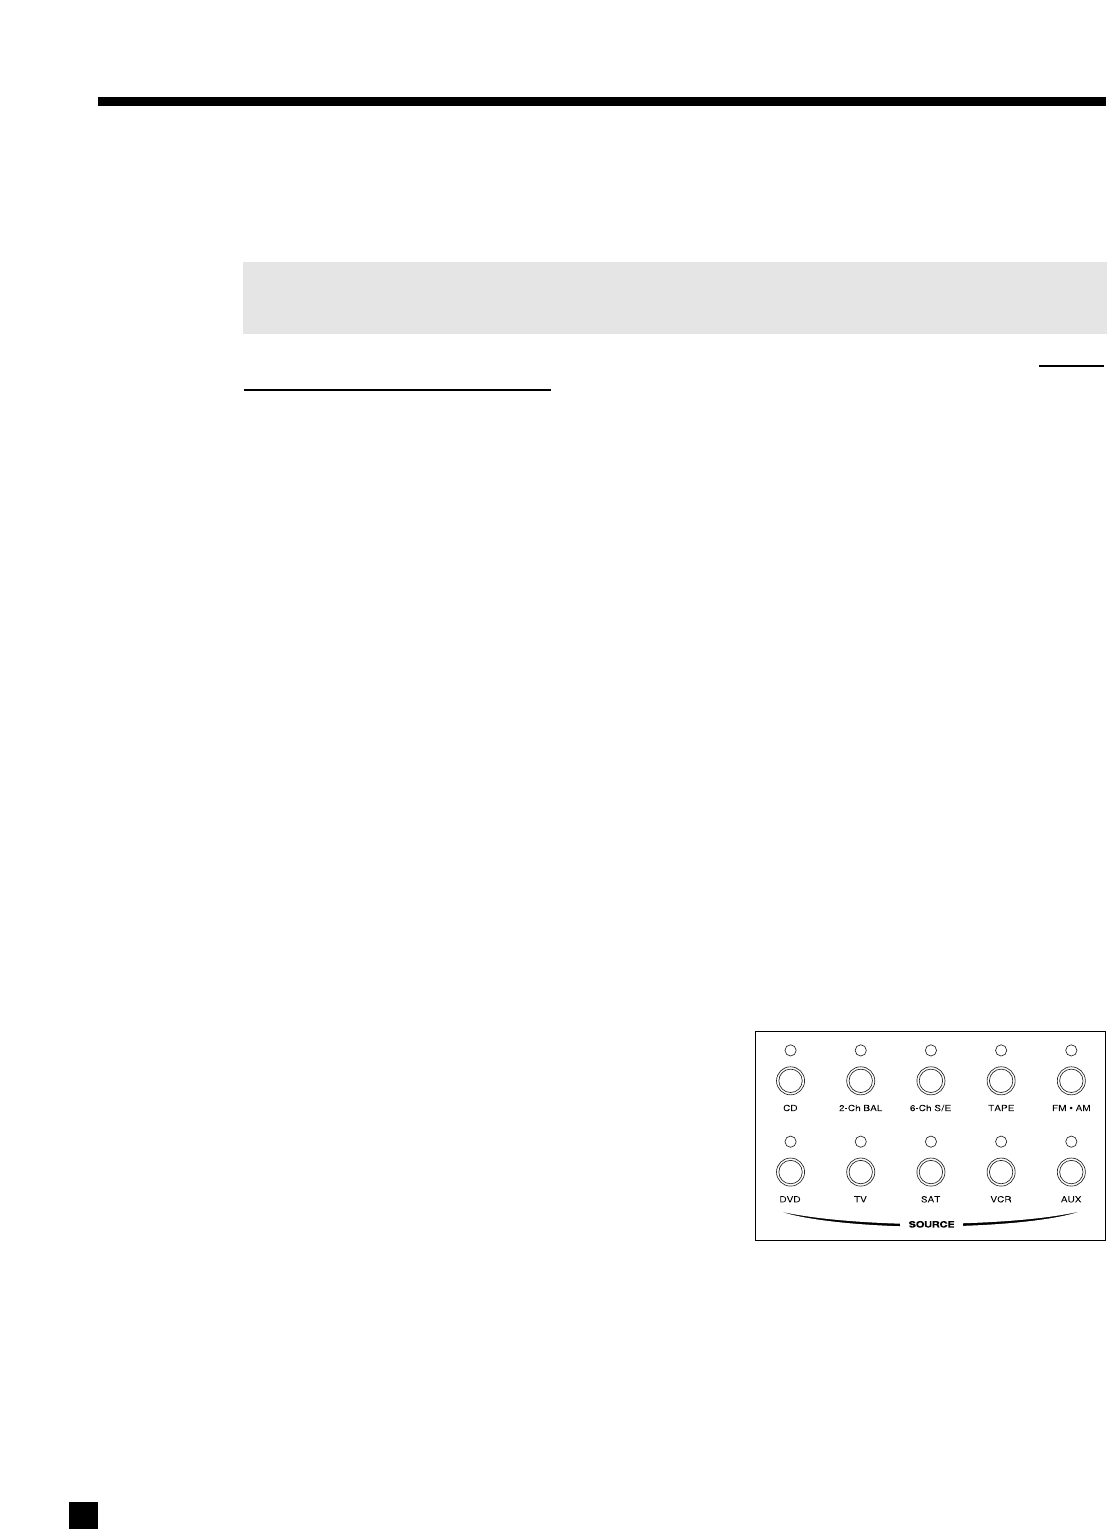
5.4 SOURCE SELECTION
The AVM 30 accommodates up to nine external sources plus
the built-in FM • AM Stereo Tuner.
The Sources on the front panel are: CD, 2-Ch BAL, 6-Ch S/E,
TAPE, FM • AM, DVD, TV, SAT, VCR, and AUX.
You can also change the Source name as it appears on the
Front Panel and On-Screen displays (see section 7.4.5).
5.4.1 6-CHANNEL S/E INPUT
For the most part, the 6-Channel S/E input is intended for multichannel DVD-Audio and SACD players. If
unused for 6-channel audio, the Front-Left and Front-Right inputs can be used as an extra 2-channel input.
When the 6-Channel S/E input is selected, the video signal from the DVD input will be routed to the
Composite, S-Video, and MAIN Component (if assigned to DVD – see section 7.4.5) outputs to allow track
selection and navigation of the disc’s menu. The 6-Ch S/E audio can be routed to ZONE2, ZONE3, and
RECORD outputs as long as Copy mode, which creates the stereo down-mix, is used (see section 5.2.1).
5. FRONT PANEL OPERATION continued …
21
5.4.2 FM • AM TUNER
The AVM 30 has a built-in FM • AM tuner, which is common to all Paths. The station that is selected in either
MAIN, ZONE2, ZONE3, or RECORD is automatically shared with all other Paths.
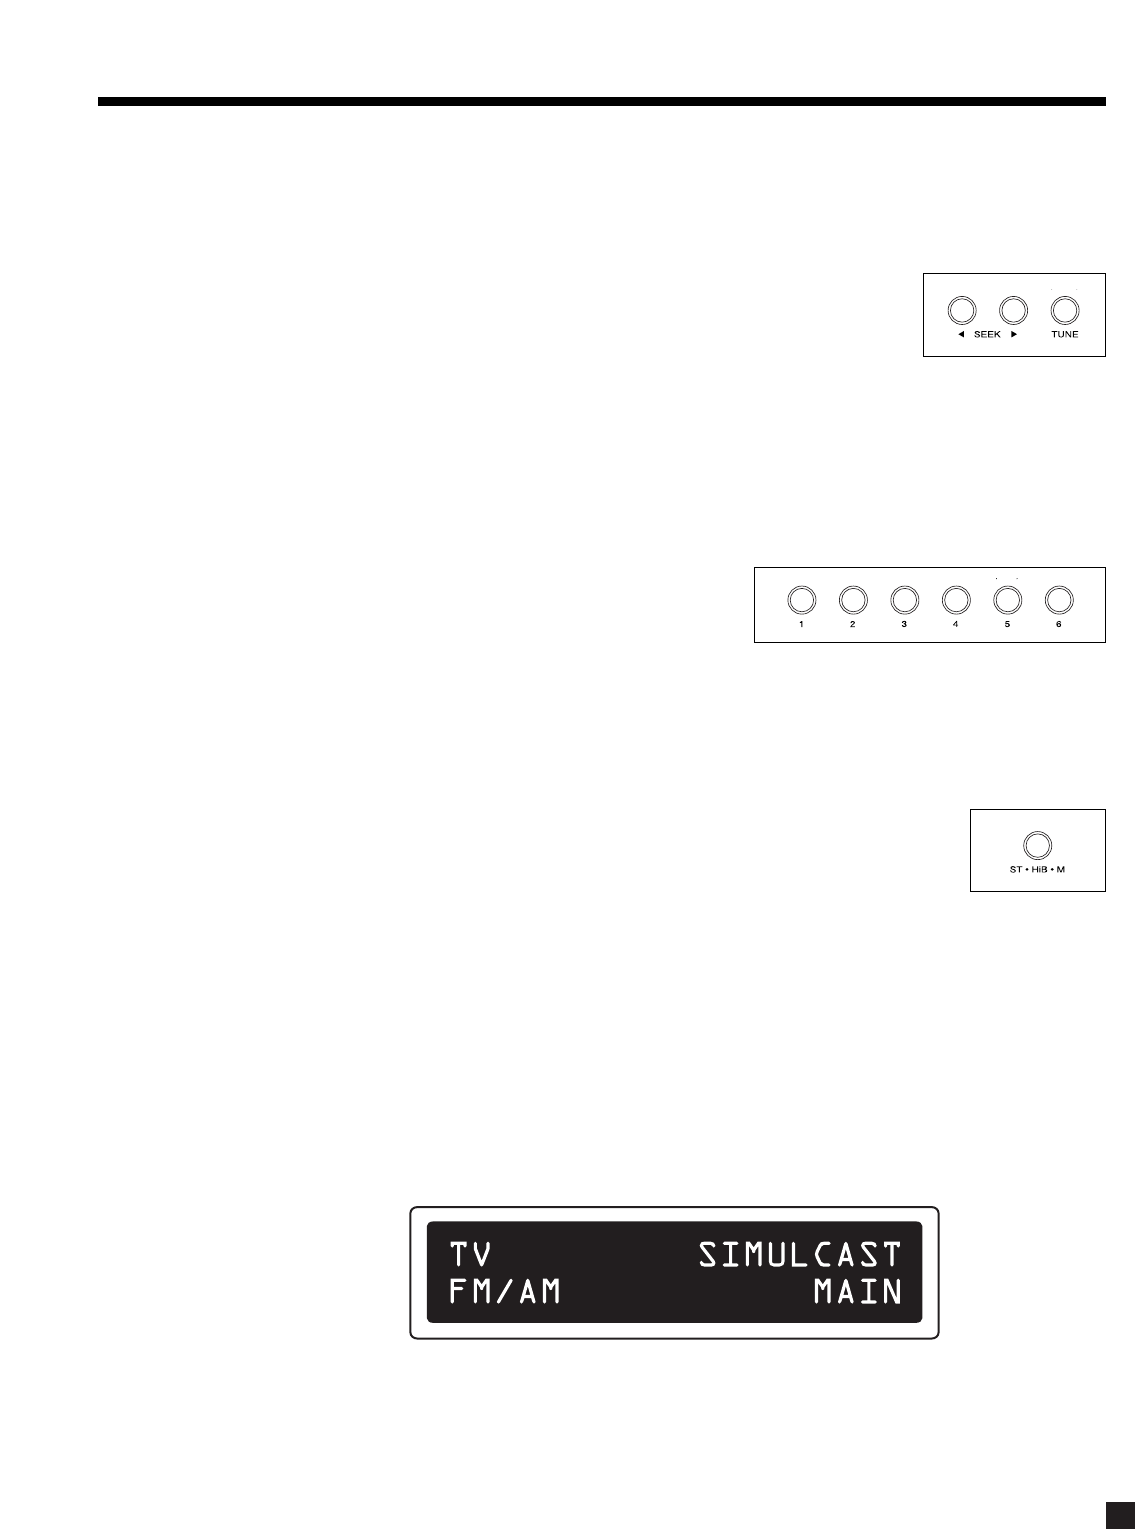
Manual Tuning:
Select the desired band by pressing FM • AM, then press TUNE and rotate the
Master Control Knob.
Automatic Tuning:
To automatically find the next station, press SEEK or SEEK. To scan and listen to all available radio
stations for a few seconds, press and hold SEEK or SEEKfor about a second. The ‘Sk ’ or ‘ Sk’
indicator on the display will change to ‘Prv ’ or ‘ Nxt’. To stop scanning, press one of the
SEEKbuttons to return to Seek mode, or press TUNE to tune manually. Press TUNE a second time to
restore the regular functions and display (the TUNE function does not time out).
Presets:
18 FM and 6 AM stations can be stored in the AVM 30. The
presets are divided into four banks of six. By repeatedly
pressing FM • AM, the display will show that you are cycling
through ‘FM1’, ‘FM2’, ‘FM3’, ‘AM’. Once you have selected the
desired bank, you can store the currently tuned radio station by pressing and holding one of the six preset
keys (1through 6) for about a second. You can even do this while scanning for stations. The lower line of the
display briefly flashes once the station is stored. To recall a preset, select the bank that it is in, then press
the respective preset key. To skip a preset, set it to 87.5 FM or 530 AM.
ST / HiB / M:
If FM reception is weak, switching a station out of stereo can reduce or eliminate
unwanted hiss and noise. Press ST / HiB / M repeatedly to cycle through Stereo, Hi-Blend,
or Mono. Hi-Blend offers an alternative to Mono, offering decreased noise without the
complete loss of stereo – it decreases hiss and noise by reducing some stereo separation
only at higher frequencies. The setting is memorized individually for each preset.
5.4.3 SIMULCAST
The AVM 30’s Simulcast feature allows you to select an alternate audio Source to combine with the currently
selected video Source. For example, you could view a sports event on TV while listening to your favorite
FM/AM station. Simulcast is available for all Paths.
To change the audio Source without changing the currently selected video Source (e.g. TV), simply press and
hold the desired video Source button for 2 seconds. The display will show the video Source (top line), audio
Source and Path (bottom line), for the duration of the Function Timeout (see section 7.4.10) – press another
Source button (e.g. FM/AM) during this period to change the audio Source.
Once the Function Time elapses, the regular display will return, but there will be a ‘+’ beside the displayed
audio Source to indicate Simulcast mode, and the Source Selection LED will still indicate the video Source.
To exit Simulcast mode, after the Function Timeout elapses, press and release any Source button (e.g. TV) –
both the audio and video will switch to this selection. Note that video inputs can also be permanently
assigned – see section 7.4.5.
22
5. FRONT PANEL OPERATION continued …
23
5. FRONT PANEL OPERATION continued …
5.5 VOLUME CONTROL
The volume of each Path is controlled separately.
•MAIN: Adjust using the Master Control Knob. If your
speaker levels have been calibrated to 75 dB SPL, the
THX Reference Level for movie playback is 0 dB, the
level at which the film was originally presented in movie
theaters (see Dialog Normalization and section 7.4.4).
•ZONE2 or ZONE3: Press ZONE2 or ZONE3, then adjust.
•HEADPHONE: Check that the display reads MAIN, press
FRONTS twice, then adjust. MAIN can be set to mute
whenever headphones are inserted (see section 7.4.8).
Dialog Normalization:
Dolby Digital program material contains non-audio data which the AVM 30 uses to adjust playback level,
when necessary, so that volume variations between movies and programs are eliminated. Without Dialog
Normalization, movies not encoded at standardized levels for the dialog could lose dynamic range – higher
levels can result in distorted peaks, lower levels can result in quiet sounds disappearing into the noise floor.
Dialog Normalization also ensures that Dynamics control (section 5.8.10) works as intended.
If the display reads “Dial Norm Offset -4.0 dB” at the start of a movie, it is indicating that the encoded level
is higher than standard by 4.0 dB – the playback level of all channels is then automatically reduced by 4 dB.
Mute:
When MUTE is pressed, the audio of the selected Path is silenced (or reduced – see
section 7.4.8). Press MUTE again, or rotate the Master Control Knob to adjust volume, and
sound will return. MAIN, ZONE2, ZONE3, and Headphone are muted independently.
•MAIN: Press MUTE.
•ZONE2 or ZONE3: Press ZONE2 or ZONE3, then press MUTE.
•HEADPHONE: Check that the display reads MAIN, press FRONTS twice then press MUTE.
Always make sure you are in the Path that you want to adjust before changing Volume or muting.
5.6 SURROUND MODE LEVELS
The AVM 30 memorizes the level of one group of channels relative to another separately for each surround
mode (section 5.8), and for the 6-Ch S/E input. To make a change for the surround mode that is currently playing
and showing on the display, adjust as follows:
•Fronts: Press FRONTS • , then adjust (this changes Left, Center, and Right levels together).
•Center: Press CENTER, then adjust.
•Surrounds: Press SURR • REARS, then adjust.
•Rears: Press SURR • REARS twice, then adjust.
•Subwoofer Only: Press SUB • LFE, then adjust. Pressing SUB • LFE twice allows you to reduce the
level of the ‘.1’ LFE channel while leaving the bass derived from the other channels unchanged.
Certain movies exhibit prodigious levels of bass, and may need LFE adjustment.
Note: When listening in Stereo (CD, FM • AM, etc.) with Front speakers set to ‘Large’, the Subwoofer
must be set to ‘Super’ if you want it to play (see section 7.4.2).
MASTER
CONTROL KNOB
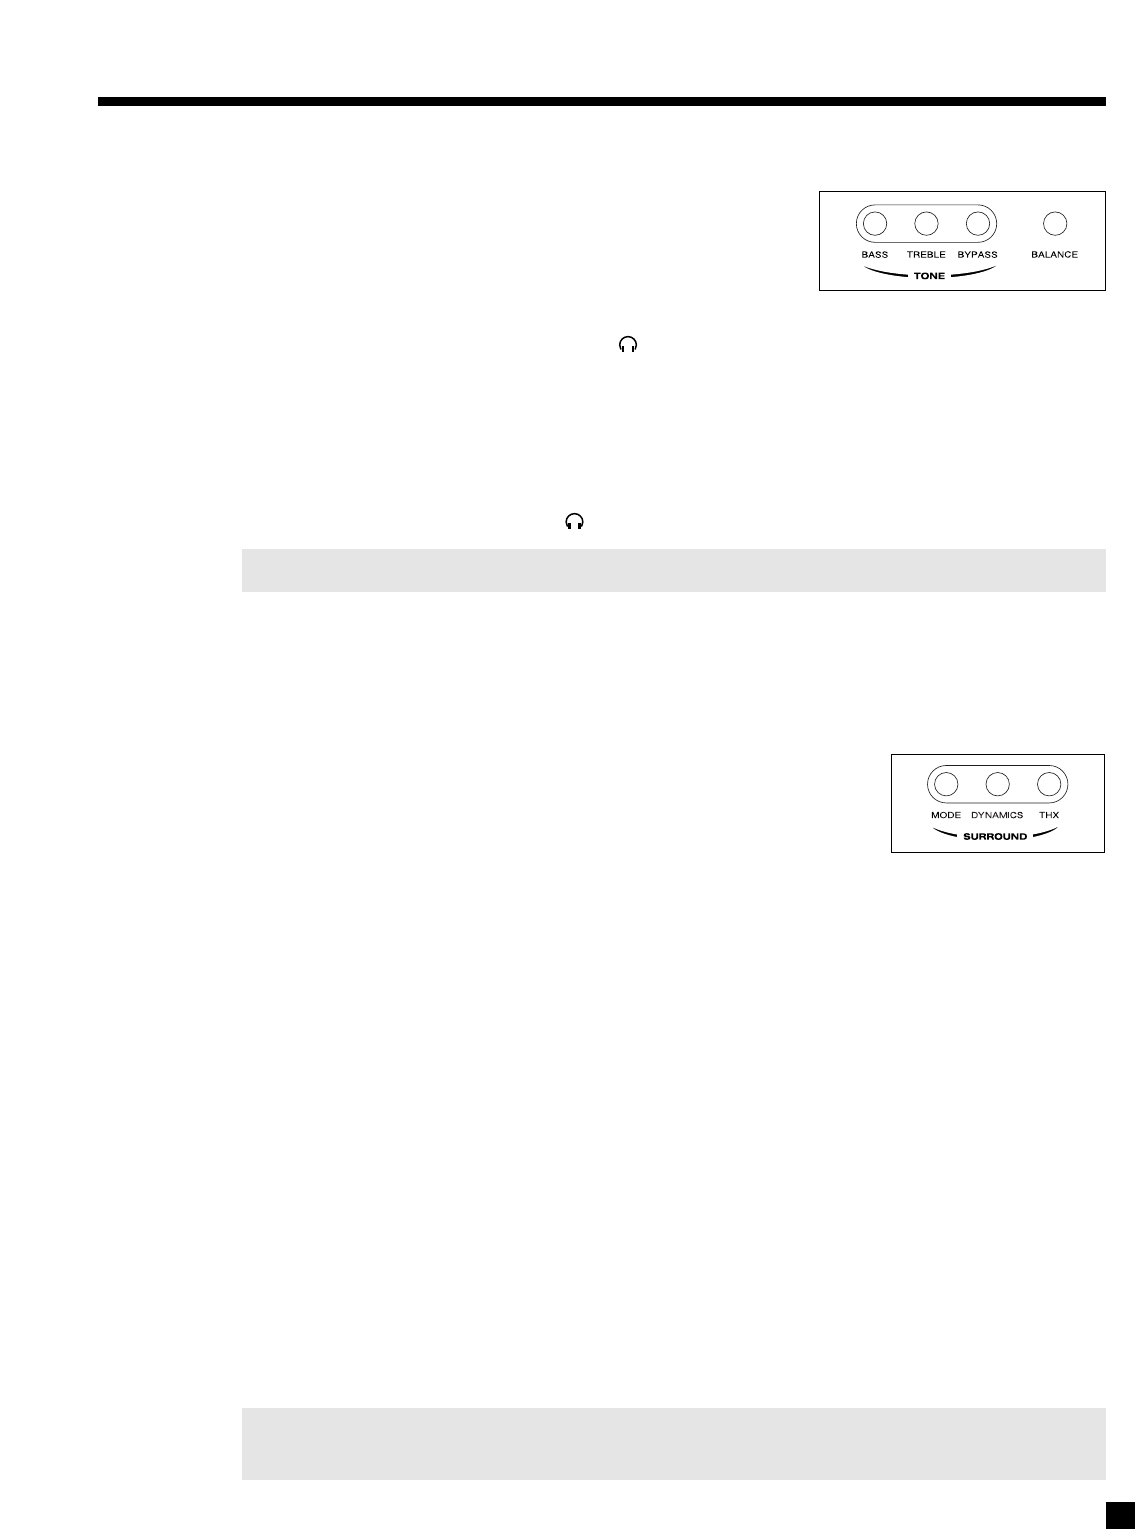
5.7 BASS / TREBLE / BALANCE
MAIN, ZONE2, ZONE3, and HEADPHONE all have independent
Bass/Treble and Balance adjustments.
To change the Bass, Treble, or Balance of:
•MAIN – All Speakers Simultaneously: Press BASS, TREBLE, or BALANCE, then adjust.
•MAIN – Fronts Only: Press FRONTS • , press BASS, TREBLE, or BALANCE, then adjust.
•MAIN – Center Only: Press CENTER, press BASS or TREBLE, then adjust.
•MAIN – Surrounds Only: Press SURR • REARS, press BASS, TREBLE, or BALANCE, then adjust.
•MAIN – Rears Only: Press SURR • REARS twice, press BASS, TREBLE, or BALANCE, then adjust.
•ZONE2 or ZONE3: Press ZONE2 or ZONE3, press BASS, TREBLE, or BALANCE, then adjust.
•HEADPHONE: Press FRONTS • twice, press BASS, TREBLE, or BALANCE, then adjust.
Note: Bass/Treble is not available for sources set to Anlg-Dir (see section 7.4.5).
Tone Bypass:
Pressing TONE BYPASS disables Bass/Treble in the selected Path. To enable Bass/Treble again, be certain
you are in the Path that you want to adjust and press either BASS or TREBLE.
5.8 SURROUND MODES
A surround mode is signal processing that enhances original source material.
There are two main types of surround modes – those that apply to stereo
source material and those that pertain to 5.1-channel source material.
Factory defaults for Surround Modes are set so that all of your surround speakers are used with any type of
source material. To change these defaults, see Mode Presets in section 7.4.5.
Stereo Source Material:
This includes both analog stereo and digital stereo (stereo PCM or Dolby Digital 2.0) source material. Various
surround modes can be applied to provide up to 7.1 channels of output. These are described in depth
throughout this section. Each Source memorizes its own Mode setting, so you can, for example, set VCR to
‘AnthemLogic-Cinema’, and then set CD to ‘AnthemLogic-Music’ – when you change Source, the respective
Modes are remembered.
Surround modes are not available for inputs set to Anlg-Dir (see section 7.4.5).
Regarding analog VCR input: With analog, there is no way for any processor to detect Dolby Surround
encoded material. Dolby Pro Logic must therefore be turned on manually by selecting it in the Mode options.
5.1- and 6.1-Channel Source Material:
The AVM 30 detects the digital format that you select in the DVD menu (Dolby Digital or DTS) and
automatically engages decoding for the selected format. Alternatively, you can select the format on-the-fly
after pressing the player’s remote control ‘Audio’ button. Note that only one format is sent over the digital
connection at a time – the AVM 30 displays and decodes the one that is selected in the player.
As soon as the AVM 30’s display shows the format, you can select additional processing, described
throughout this section – there is usually plenty of time to do so when the film studio’s logos are played at
the beginning of a movie. Your selections are memorized by format and by Source as well.
Make sure your DVD player setup menu is set to leave Dolby Digital and DTS unchanged (“Bitstream”),
otherwise it will have 2.0-channel PCM at the digital output instead of the 5.1 channels on the disc.
24
5. FRONT PANEL OPERATION continued …
Various surround modes produce 6.1 or 7.1 channels of output. If you are using a 5.1 system and
have Rears set to ‘None’ (Speaker Configuration menu – section 7.4.2), Rear channel information
is not lost, but remains in the L/R Surround speakers.
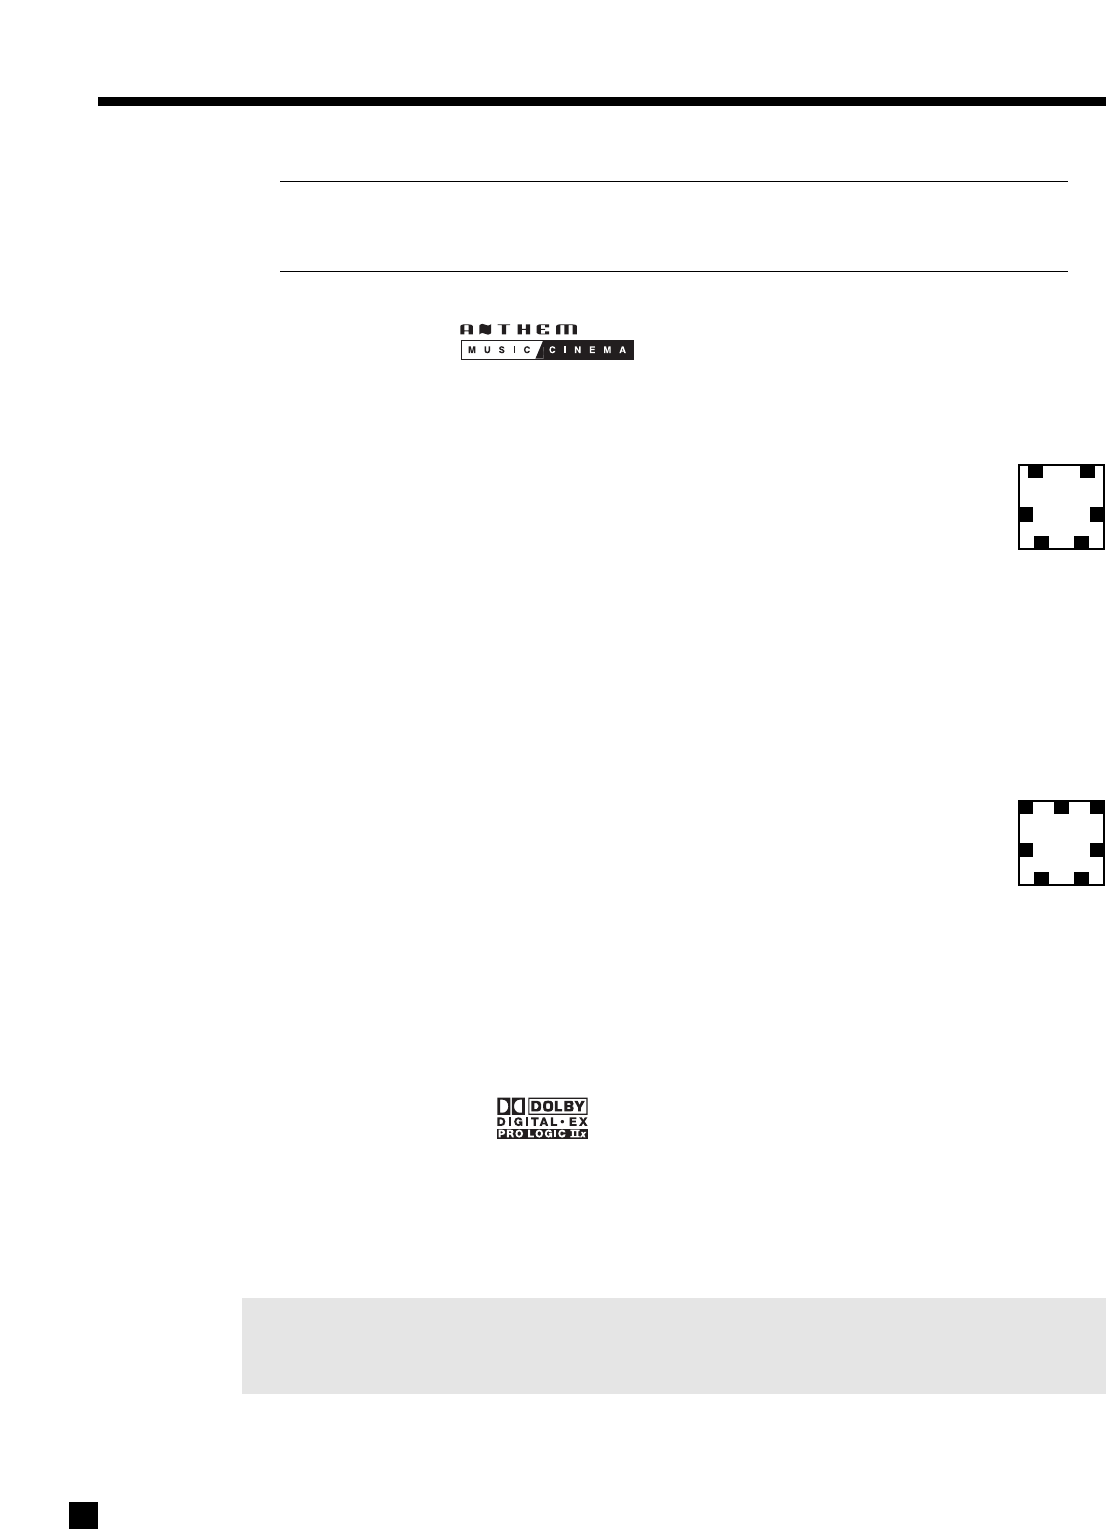
5.8.1 AnthemLogic™
These are proprietary surround modes developed by Anthem that offer outstanding surround performance
and can be applied to any 2-channel source material:
AnthemLogic-Music™
AnthemLogic-Music™enhances the stereo listening experience without detracting from the
stereo soundstage. Through extensive listening tests a very effective design was developed.
This is a minimalist design that uses no echo or reverberation effects which could negatively
affect the purity of the sound.
Depending on your speaker configuration, up to 6.1 channels of output are provided – L/R Fronts, L/R
Surrounds, L/R Rears and Subwoofer. AnthemLogic-Music™does not utilize the Center Channel, to ensure
that the purity of the stereo music soundstage will in no way be compromised when you’re sitting in the
‘sweet spot’ and listening to your favorite stereo recordings.
AnthemLogic-Music™is very effective in creating an expansive musical soundstage that psychoacoustically
helps to remove the barrier of the listening room itself, and it does so in a completely non-intrusive, natural
and very compelling way. This is the factory default 2-channel Mode for CD, 2-Ch BAL, TAPE, and FM • AM.
AnthemLogic-Cinema™
AnthemLogic-Cinema™provides a large, enveloping and dynamic movie listening experience
that makes 2-channel movies sound more like what is experienced in a state-of-the art movie
theater. Again through extensive listening tests a very effective design was developed. This
is also a minimalist design that avoids the use of echo effects, which could otherwise
negatively affect the purity of the sound.
AnthemLogic-Cinema™ uses the rear speakers to provide up to 7.1 channels of output, depending on your
speaker configuration.
AnthemLogic-Cinema™provides the missing link that lets you experience 7.1 channels of output for full
impact home theater sound, from any 2-channel stereo analog source such as VCR or TV, or any Dolby Digital
2-channel source, such as DVD or satellite. This is the factory default Mode for DVD, TV, SAT, VCR, and AUX.
5.8.2 DOLBY DIGITAL 2.0
Dolby Digital 2.0 soundtracks with surround encoding contain a flag that can be used to automatically
activate Pro Logic IIx Movie mode. The AVM 30 can be set to either use this flag or to override it.
To find out if the Dolby Digital 2.0 material being played has the surround flag, press MODE. If flagged, the
first line of the display says ‘DOLBY D 2.0 SUR AUTO’ and if not flagged, it says ‘MODE FOR 2 CH INPUT’.
The Modes in the next section may be selected separately for flagged and unflagged stereo source material.
Note: Movies with mono (single-channel) soundtracks use either the Left/Right channels or the Center
channel depending on how they’re encoded. The Mode changes to Mono if the soundtrack only
uses the Center channel – you can switch it to Mono-Academy or All Channel Mono afterwards.
25
5. FRONT PANEL OPERATION continued …
LOGIC
6.1
CHANNEL
OUTPUT
7.1
CHANNEL
OUTPUT

26
5. FRONT PANEL OPERATION continued …
5.8.3 SURROUND MODES FOR 2.0-CHANNEL SOURCE MATERIAL
Number of output channels for each Mode is indicated below in bold type – ‘.1’ refers to a subwoofer signal
derived through bass management, not a separate channel (see section 7.4.2). Press MODE, then rotate the
Master Control Knob or use North/South arrows on the remote control, to cycle through the following:
THX must be Off for all Modes to be available (see section 5.8.6).
Stereo: No surround mode is applied.
AnthemLogic-Music:
6.1 –
One of Anthem’s proprietary surround modes, specifically designed to
expand the stereo soundstage of stereo music in a very natural way without any
loss of soundstage integrity or image focus. The Center channel is not used.
AnthemLogic-Cinema:
7.1 –
Another proprietary mode from Anthem, designed to provide the impact of
a large theater experience from 2-channel movies and TV programs.
Pro Logic IIx Music:
7.1 –
Created for use with stereo music material. The following three parameters
can be adjusted by pressing the MODE button one, two, or three times while in
Pro Logic IIx Music, and rotating the Master Control Knob:
Center Width is adjustable from 0 to 7 – ‘0’ places all Center sound in the Center
speaker, while ‘7’ places it equally in the Left and Right channels.
Dimension helps achieve the desired front-to-back balance by providing seven
steps of adjustment between the Surround and Center channels.
Panorama is effective for recordings with strong left or right channel elements.
When ‘On’, it extends the front stereo image to include the Surround channels.
Pro Logic IIx Movie:
7.1 –
Dolby Surround decoder for 2-channel movies and TV programs.
Pro Logic IIx Matrix:
7.1 –
A matrix decoder that does not steer the image from one speaker to another.
Pro Logic IIx Game:
7.1 –
Bass from surround effects in video games is optimized for visceral impact.
Dolby Pro Logic:
4.1 –
In case there’s a desire to hear it “as it used to be” (Surrounds are mono).
Neo:6 Music:
6.1 –
Can be used with stereo music material to create 6.1 output channels. The
center image can be adjusted by pressing MODE while in Neo:6 Music, and
rotating the Master Control Knob:
Center Image is adjustable from 0 to 5 – increasing the number gives more
center channel prominence.
Neo:6 Cinema:
6.1 –
A matrix decoder that can be used with any matrix-encoded movie.
Separation is created by allowing various sounds to be placed at different
points in the sound field simultaneously.
All Channel Stereo:
7.1 –
The Left and Right channels are also sent to the Surround and Rear
channels, while the Center channel and Subwoofer receive a combination of
both. Some processing is used to retain image clarity. Useful for playing music
at parties so that it can be heard with equal loudness in all parts of the room.
All Channel Mono:
7.1 –
Combines the Left and Right channels and sends the signal to all speakers.
Mono:
1.1 –
Combines the Left and Right channels and sends them to the Center speaker.
Mono-Academy:
1.1 –
Gives a presentation closer to the original on movies made from the 1930s
to the 1960s, which relied on high-frequency rolloff for sound balance and to
mask inherent hiss. Use with old mono movies that sound overly noisy. Can also
be useful with DVDs of some TV shows if high-pitched noise leakage from a CRT
(cathode ray tube) monitor is audible in the recording.

5. FRONT PANEL OPERATION continued …
5.8.4 DOLBY DIGITAL EX / PRO LOGIC IIx FOR 5.1 SOURCES
Dolby Digital EX and Pro Logic IIx can be used to decode DVDs encoded in Dolby Digital Surround EX by
extracting Rear channel information from the two Surround channels. Dolby Digital EX creates a mono Rear
signal, whereas with Pro Logic IIx, the two Rear channels play a stereo signal. Either one of these Modes
can be applied to any other 5.1-channel material. The Rear channels may or may not be pleasing depending
on the soundtrack.
A list of movies encoded in Dolby Digital Surround EX can be found on the Dolby web site at www.dolby.com
and on the THX web site at www.thx.com. Newer titles contain a flag that can automatically engage Dolby
Digital EX / Pro Logic IIx, whereas older titles do not. Press MODE when a movie starts playing and use the
Master Control Knob to select the Mode that sounds best – the display says ‘DOLBY D 5.1 INPUT’ if the
soundtrack is unflagged, and ‘DOLBY D EX AUTO’ if it is flagged.
5.8.5 DTS-ES
There are two ways that Rear channel information is encoded in DTS-ES – Matrix and Discrete:
•Matrix – DTS-ES Matrix movies contain a matrixed Rear channel. The AVM 30 automatically
engages Neo:6 to decode DTS-ES Matrix. Neo:6 can also be turned on manually and applied to any
other 5.1-channel material – when a movie starts playing, press MODE and use the Master Control
Knob to select. A mono Rear channel is derived from the Left and Right Surround channels. This
Rear channel may or may not be pleasing depending the soundtrack.
•Discrete – DTS-ES Discrete soundtracks contain 6.1 channels with an independent Rear channel.
The AVM 30 automatically engages DTS-ES Discrete decoding.
5.8.6 THX ULTRA2 / THX SURROUND EX
THX is an exclusive set of standards and technologies established by the world-renowned film production
company, Lucasfilm Ltd. THX grew from George Lucas’ personal desire to make your experience of the film
soundtrack, both in movie theaters and in your home theater, as faithful as possible to what the director
intended. Movie soundtracks are mixed in special movie theaters called dubbing stages and are designed to
be played back in movie theaters with similar equipment and conditions. This same soundtrack is very often
transferred to DVD, Laserdisc, VHS tape, etc. without any adjustments for playback in the smaller home
theater environment. THX engineers developed patented technologies to accurately translate the sound
from the movie theater environment into the home, restoring proper tonal and spatial balance.
Each THX mode includes a specific combination of the following:
•Re-Equalization – De-emphasizes high frequencies in the front channels, and in THX Surround EX,
the rear channels as well. Soundtracks commonly have pre-emphasized treble because they are
mixed for movie theaters where high frequencies are usually absorbed. They can then sound overly
bright when played back in the home. Re-Equalization restores the correct tonal balance for
watching a movie soundtrack in a home theater environment. Some TV shows that are broadcast
in Dolby Surround also benefit from Re-Equalization, whereas some movies on DVD have already
been re-adjusted and do not require Re-EQ. To enable or disable Re-EQ, press THX twice to display
“THX RE-EQUALIZATION”, then select On or Off. Re-EQ may also be applied when THX is Off – this
may be useful if the high-pitched noise produced by standard CRT monitors accidentally leaked into
the audio while it was being recorded, and you would like to filter it out.
•Timbre Matching – The human ear changes our perception of a sound depending on the direction
from which the sound is coming. In a movie theatre, there is an array of surround speakers so that
the surround information is all around you. In a home theatre, you use only two speakers located to
the side of your head. Timbre Matching, which includes Re-EQ, filters the information going to the
surround speakers so that they more closely match the tonal characteristics of the sound coming
from the front speakers. This ensures seamless panning between the front and surround speakers.
27

28
•Adaptive Decorrelation – In a movie theatre, a large number of surround speakers help create an
enveloping surround sound experience, but in a home theatre there are usually only two speakers.
Unless you are using properly positioned dipoles, surround speakers can sound like headphones
that lack spaciousness and envelopment – they will also collapse into the closest speaker as you
move away from the middle seating position. Adaptive Decorrelation senses the presence of
identical surround channels (mono) and slightly changes one surround channel's time and phase
relationship with respect to the other. This expands the listening position and creates – with only
two speakers – the same spacious surround experience found in a movie theatre. Adaptive
Decorrelation does not operate when the surround channels are different, as is often the case in
discrete multichannel source material.
•ASA (Advanced Speaker Array) – ASA is a proprietary THX technology that processes the sound
fed to the two surround and two rear speakers to provide an optimal surround sound experience.
When you set up your home theater system using all 7.1 speaker outputs (L-Front, Center, R-Front,
R-Surround, R-Rear, L-Rear, L-Surround, Subwoofer), placing the two Rear speakers close together
will provide the largest sweet spot. If for practical reasons you have to place the Rear speakers
further apart, you will have to go to the Listener Position menu (section 7.4.3) and choose the setting
that most closely corresponds to the speaker spacing to re-optimize the surround soundfield.
Depending on source material and speaker configuration, THX processing is available as follows:
THX Cinema: 5.1 to 7.1 output with 2.0- and 5.1-channel movies (see overview that follows)
Processing: Re-Equalization, Timbre Matching, Adaptive Decorrelation (if applicable)
When THX Cinema is selected, Dolby Pro Logic IIx Movie is automatically
engaged. Alternatively, Dolby Pro Logic or DTS Neo:6 Cinema may be selected.
Other Surround Modes are not available and do not appear when pressing MODE.
THX Ultra2 Cinema: 7.1 output with 5.1-channel movies
Processing: Re-Equalization, Timbre Matching, Adaptive Decorrelation, ASA (Cinema)
THX Ultra2 Cinema mode plays 5.1 movies using all 7.1 speakers giving you the
best possible THX movie watching experience with 5.1 program material. In this
mode, ASA processing blends the L/R-Surround speakers and L/R-Rear speakers
providing the optimal mix of ambient and directional surround sounds.
THX MusicMode: 7.1 output with 5.1-channel music (including DVD-Audio, multichannel SACD)
Processing: Timbre Matching, Adaptive Decorrelation, ASA (Music)
THX MusicMode can be selected when playing multi-channel music. In this mode
THX ASA processing is applied to the surround channels of all 5.1 channel
encoded music sources to provide a wide stable rear soundstage.
THX Games Mode: 7.1 output with 2.0- and 5.1-channel games
Processing: Timbre Matching, ASA (Games)
Game audio is mixed and monitored in a different environment than that of music
and movies. The interactive nature of the audio requires a playback system which
can provide 360 degree panning while preserving the ambient nature of
background sound elements. When playing back 5.1 games, THX Games Mode
may be engaged. Suitable sources are Dolby Digital 5.1 and DTS 5.1 game sources.
If THX Games Mode is engaged with 2.0 input, the source is first converted to 5.1
via Pro Logic IIx Game mode.
5. FRONT PANEL OPERATION continued …

THX Surround EX: 6.1 output with Dolby Digital Surround EX
Processing: Re-Equalization,Timbre Matching
THX Surround EX – Dolby Digital Surround EX is a joint development of Dolby
Laboratories and the THX division of Lucasfilm Ltd.
In a movie theater, film soundtracks that have been encoded with Dolby Digital
Surround EX technology are able to reproduce an extra channel which has been
added during the mixing of the program. This channel (called Surround Back, but
named Rear in the AVM 30), places sounds behind the listener in addition to the
currently available L-Front, Center, R-Front, R-Surround, L-Surround and
Subwoofer channels. This additional channel provides the opportunity for more
detailed imaging behind the listener and brings more depth, spacious ambience,
and sound localization than ever before.
Movies that were created using the Dolby Digital Surround EX technology may
exhibit wording to that effect on the packaging when released on DVD. A list of
movies created using this technology can be found on the Dolby web site at
www.dolby.com. A list of DVD titles encoded with this technology can be found on
the THX web site at www.thx.com.
Bearing the THX Surround EX logo, the AVM 30 will faithfully reproduce this
technology in the home when in THX Surround EX mode.
The AVM 30 also allows you to engage THX Surround EX while playing 5.1-channel
material that is not encoded with Dolby Digital Surround EX. The information
delivered to the Rear channel will be program dependent and may or may not be
pleasing depending on the soundtrack and your listening tastes.
In compliance with THX requirements, Bass/Treble, Surround Mode Level, and Balance adjustments are
reset to +0.0 dB whenever a THX mode is selected, after which you can make adjustments with THX
engaged if you wish to do so. When THX is turned ‘Off’, previous settings are restored, except for
Balance (see sections 5.6 and 5.7). Also note that due to the nature of digital bitstreams, adjustments
made while THX is engaged will be reset to +0.0 dB if the program is paused for longer than 3 seconds.
Outputs indicated are the number of output channels as follows:
6.1 = L-Front, Center, R-Front, R-Surround, Rear*, L-Surround, LFE/Subwoofer
7.1 = L-Front, Center, R-Front, R-Surround, R-Rear, L-Rear, L-Surround, LFE/Subwoofer
*If two rear speakers are used, the same Rear channel information goes to both.
5. FRONT PANEL OPERATION continued …
29

30
5. FRONT PANEL OPERATION continued …
Program Decoding / Processing THX Available Outputs THX Processing
Stereo Selected Mode Off up to 7.1 Off
PLIIx Movie†THX Cinema 7.1 Re-EQ, Timbre
PLIIx Games THX Games Mode 7.1 Timbre, ASA (Gam)
Dolby Pro Logic
THX Cinema 5.1 Re-EQ, Timbre, Adp-Decor
Neo:6 Cinema THX Cinema 6.1 Re-EQ, Timbre
Dolby Digital 5.1 Dolby Digital Off 5.1 Off
Dolby Digital THX Cinema 5.1 Re-EQ, Timbre, Adp-Decor
Dolby D 5.1+PLIIx Movie THX Cinema 7.1 Re-EQ, Timbre
Dolby Digital THX Ultra2 Cinema 7.1 Re-EQ, Timbre, Adp-Decor, ASA (Cin)
Dolby Digital THX MusicMode 7.1 Timbre, Adp-Decor, ASA (Mus)
Dolby Digital THX Games Mode 7.1 Timbre, ASA (Gam)
Dolby Digital EX *THX Surround EX 6.1 Re-EQ, Timbre
Dolby D 5.1+Neo:6 THX Cinema 6.1 Re-EQ, Timbre
DTS 5.1 DTS Off 5.1 Off
DTS THX Cinema 5.1 Re-EQ, Timbre, Adp-Decor
DTS+Neo:6 THX Cinema 6.1 Re-EQ, Timbre
DTS THX Ultra2 Cinema 7.1 Re-EQ, Timbre, Adp-Decor, ASA (Cin)
DTS THX MusicMode 7.1 Timbre, Adp-Decor, ASA (Mus)
DTS THX Games Mode 7.1 Timbre, ASA (Gam)
DTS+PLIIx Movie THX Cinema 7.1 Re-EQ, Timbre
DTS-ES Matrix§DTS+Neo:6 Off 6.1 Off
DTS+Neo:6 THX Cinema 6.1 Re-EQ, Timbre
DTS+PLIIx Movie THX Cinema 7.1 Re-EQ, Timbre
DTS-ES Discrete§DTS-ES Discrete Off 6.1 Off
DTS-ES Discrete THX Cinema 6.1 Re-EQ, Timbre
†DVDs with Dolby Digital 2.0 Surround may be flagged for auto-detection.
* DVDs with Dolby Digital Surround EX may be flagged for auto-detection.
§ DVDs with DTS-ES Matrix and DTS-ES Discrete are flagged for auto-detection.
THX Ultra2 Overview
Key: Re-EQ –De-emphasizes treble. May be turned on or off at any time after pressing THX twice.
Timbre–Matches the sound character, or timbre, of the surround channels to the front channels.
Adp-Decor – When content of L/R-Surrounds is mono, adjusts time and phase to restore spaciousness.
ASA –Surround and Rear channels are processed to provide a wide rear soundstage.
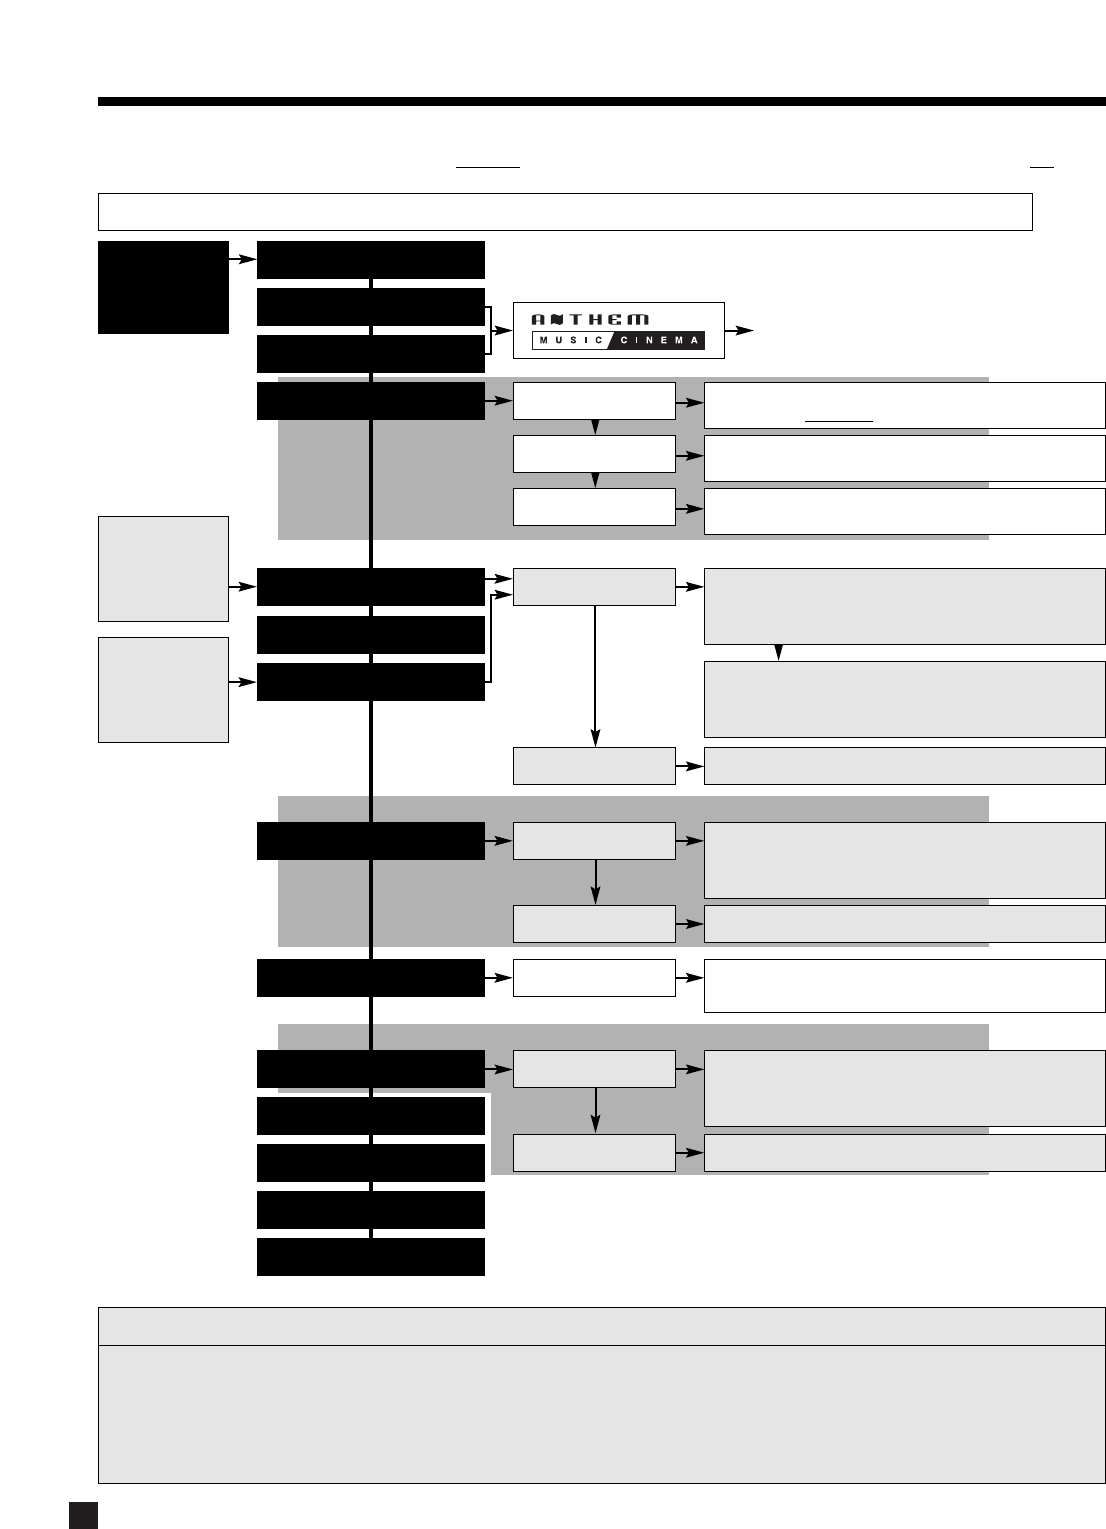
31
5. FRONT PANEL OPERATION continued …
Dimension: Adjust using MCK (or N/S keys)
Front-to-back balance – Center (C----+----S) Surrounds
Dolby PLIIx Music (7.1)
AnthemLogic-Music (6.1)
Stereo (2-Ch)
Press MODE
preset info in
section 7.4.5
Cycle through Modes and THX using
Master Control Knob
(or North/South keys on remote control – see section 6).
If THX Cinema
is selected,
Mode changes
to PLIIx Movie.
Press Mode Once Center Width: Adjust using MCK (or N/S keys)
Increasing # decreases Center level and places it into L/R
See section 5.8.1
DTS Neo:6 Music (6.1) Press Mode Center Image: Adjust using
MCK
(or N/S keys)
Increasing the number makes Center more prominent
Dolby Pro Logic (4.1)
Dolby PLIIx Movie (7.1)
Press Mode Twice
AnthemLogic-Cinema (7.1)
Press Mode 3 Times
Panorama: On using MCK (or N/S keys)
Extends the front stereo image to include Surrounds
5.8.7 Mode and THX Operation for Stereo Program Material – To make all Modes available, turn THX Off.
THX Options
Press THX
Press THX Twice
LOGIC
THX Cinema
Processing – Re-EQ, Timbre Matching, Adp.Decorrelation
Output channels – LF, C, RF, RS, LS, Sub
THX Cinema
Processing – Re-EQ, Timbre Matching
Output channels – All
THX Games Mode
Processing – Timbre Matching, ASA (Game)
Output channels – All
Dolby PLIIx Matrix (7.1)
Dolby PLIIx Game (7.1)
RE-EQ: On/Off
using MCK
(or N/S keys)
All Channel Stereo (7.1)
All Channel Mono (7.1)
Mono (1.1)
Mono Academy (1.1)
DTS Neo:6 Cinema (6.1) Press THX
Press THX Twice
THX Cinema
Processing – Re-EQ, Timbre Matching
Output channels – LF, C, RF, RS, Rear, LS, Sub
RE-EQ: On/Off
using MCK
(or N/S keys)
THX Options
THX Options
If THX Games
is selected,
Mode changes
to PLIIx Game.
Press THX Twice
RE-EQ: On/Off
using MCK
(or N/S keys)
Press THX
Selections are memorized separately for each Source and for Dolby Digital Surround 2.0-flagged vs. unflagged material.
THX Processing (for complete descriptions see section 5.8.6):
• Re-Equalization –De-emphasizes treble. Not applicable to THX Games Mode.
• Timbre Matching –Matches the sound character, or timbre, of the surround channels to the front channels.
• Adaptive Decorrelation
– When content of L/R Surrounds is mono, adjusts time and phase to restore spaciousness.
• ASA
– Surround and Rear channels are processed to provide a wide rear soundstage.
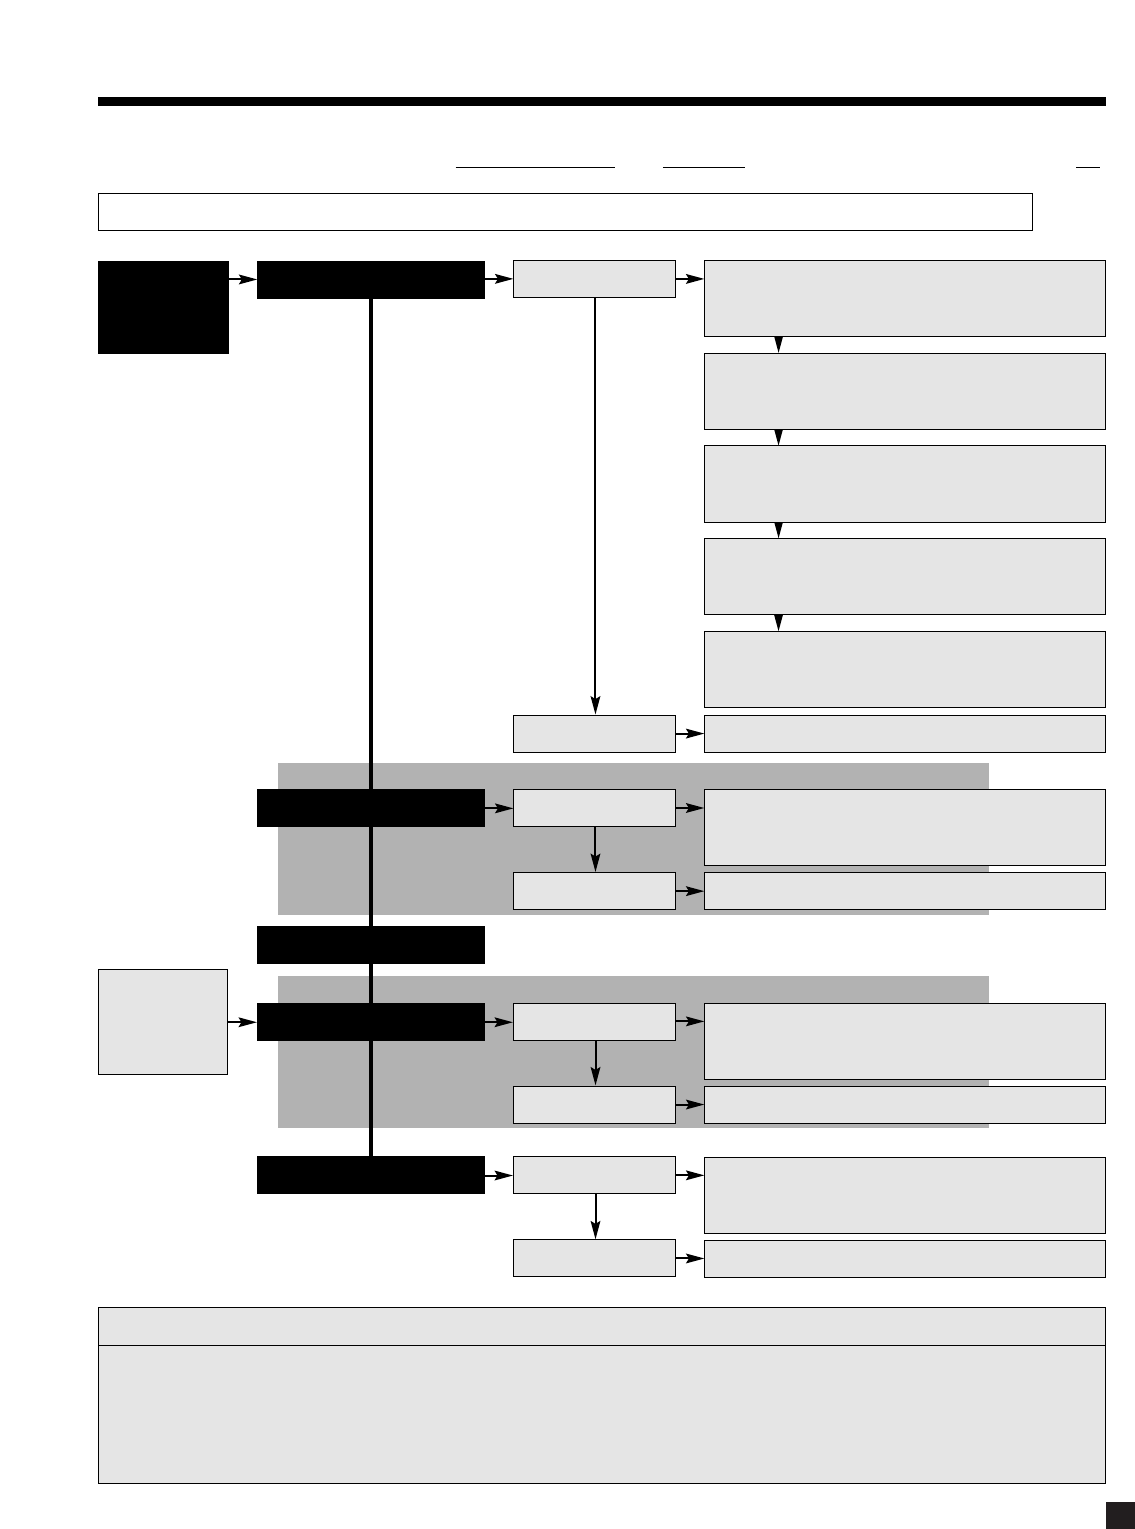
32
5. FRONT PANEL OPERATION continued …
THX Options
Press THX
Press THX Twice
THX Surround EX
Processing – Re-EQ, Timbre Matching
Output channels – All
RE-EQ: On/Off
using MCK
(or N/S keys)
THX Options
Press THX
Press THX Twice
THX Cinema
Processing – Re-EQ, Timbre Matching, Adp.Decorrelation
Output channels – All
RE-EQ: On/Off
using MCK
(or N/S keys)
5.8.8 Mode and THX Operation for Dolby Digital 5.1 and 6-Ch S/E – To make all Modes available, turn THX Off.
Dolby Digital EX (6.1)
Dolby PLIIx Movie (7.1)
None (5.1)
If THX Sur EX
is selected,
Mode changes
to Dolby D EX.
Dolby PLIIx Music (7.1)
THX Cinema
Processing – Re-EQ, Timbre Matching, Adp.Decorrelation
Output channels –
5.1 (LF, C, RF, RS, LS, Sub)
THX Ultra2 Cinema
Processing – Re-EQ, Timbre, Adp.Decor, ASA (Cinema)
Output channels – All
THX Options
Press THX Twice
RE-EQ: On/Off
using MCK
(or N/S keys)
Press THX
THX MusicMode
Processing – Timbre Matching, Adp.Decor, ASA (Music)
Output channels – All
THX Games Mode
Processing – Timbre Matching, ASA (Game)
Output channels – All
THX Surround EX
Processing – Re-EQ, Timbre Matching
Output channels – 6
.1 (LF, C, RF, RS, Rear, LS, Sub)
DTS Neo:6 (6.1)
THX Options
Press THX
Press THX Twice
THX Cinema
Processing – Re-EQ, Timbre Matching
Output channels – 6
.1 (LF, C, RF, RS, Rear, LS, Sub)
RE-EQ: On/Off
using MCK
(or N/S keys)
Selections are memorized separately for each Source and for Dolby Digital Surround EX-flagged vs. unflagged material.
THX Processing (for complete descriptions see section 5.8.6):
• Re-Equalization –De-emphasizes treble. Not applicable to THX MusicMode and THX Games Mode.
• Timbre Matching –Matches the sound character, or timbre, of the surround channels to the front channels.
• Adaptive Decorrelation
– When content of L/R Surrounds is mono, adjusts time and phase to restore spaciousness.
• ASA
– Surround and Rear channels are processed to provide a wide rear soundstage.
Press MODE
preset info in
section 7.4.5
Cycle through Modes and THX using
Master Control Knob
(or North/South keys on remote control – see section 6).

33
5. FRONT PANEL OPERATION continued …
5.8.9 Mode and THX Operation for DTS Program Material – To make all Modes available, turn THX Off.
THX Cinema
Processing – Re-EQ, Timbre Matching, Adp.Decorrelation
Output channels –
5.1 (LF, C, RF, RS, LS, Sub)
THX Ultra2 Cinema
Processing – Re-EQ, Timbre, Adp.Decor, ASA (Cinema)
Output channels – All
THX Options
Press THX Twice
RE-EQ: On/Off
using MCK
(or N/S keys)
Press THX
THX MusicMode
Processing – Timbre Matching, Adp.Decor, ASA (Music)
Output channels – All
THX Games Mode
Processing – Timbre Matching, ASA (Game)
Output channels – All
Selections are memorized separately for each Source and for DTS vs. DTS-ES.
DTS-ES Discrete: The only applicable selection is THX Cinema (6.1, Re-EQ, Timbre Matching).
DTS 96/24
:
Dolby Pro Logic IIx, Dolby Digital EX, and DTS Neo:6 can not be applied.
THX Processing (for complete descriptions see section 5.8.6):
• Re-Equalization –De-emphasizes treble. Not applicable to THX MusicMode and THX Games Mode.
• Timbre Matching –Matches the sound character, or timbre, of the surround channels to the front channels.
• Adaptive Decorrelation
– When content of L/R Surrounds is mono, adjusts time and phase to restore spaciousness.
• ASA
– Surround and Rear channels are processed to provide a wide rear soundstage.
THX Options
Press THX
Press THX Twice
THX Cinema
Processing – Re-EQ, Timbre Matching, Adp.Decorrelation
Output channels – All
RE-EQ: On/Off
using MCK
(or N/S keys)
THX Options
Press THX
Press THX Twice
THX Cinema
Processing – Re-EQ, Timbre Matching
Output channels – 6
.1 (LF, C, RF, RS, Rear, LS, Sub)
RE-EQ: On/Off
using MCK
(or N/S keys)
None (5.1)
Dolby Digital EX (6.1)
Dolby PLIIx Movie (7.1)
Dolby PLIIx Music (7.1)
DTS Neo:6 (6.1)
Press MODE
preset info in
section 7.4.5
Cycle through Modes and THX using
Master Control Knob
(or North/South keys on remote control – see section 6).
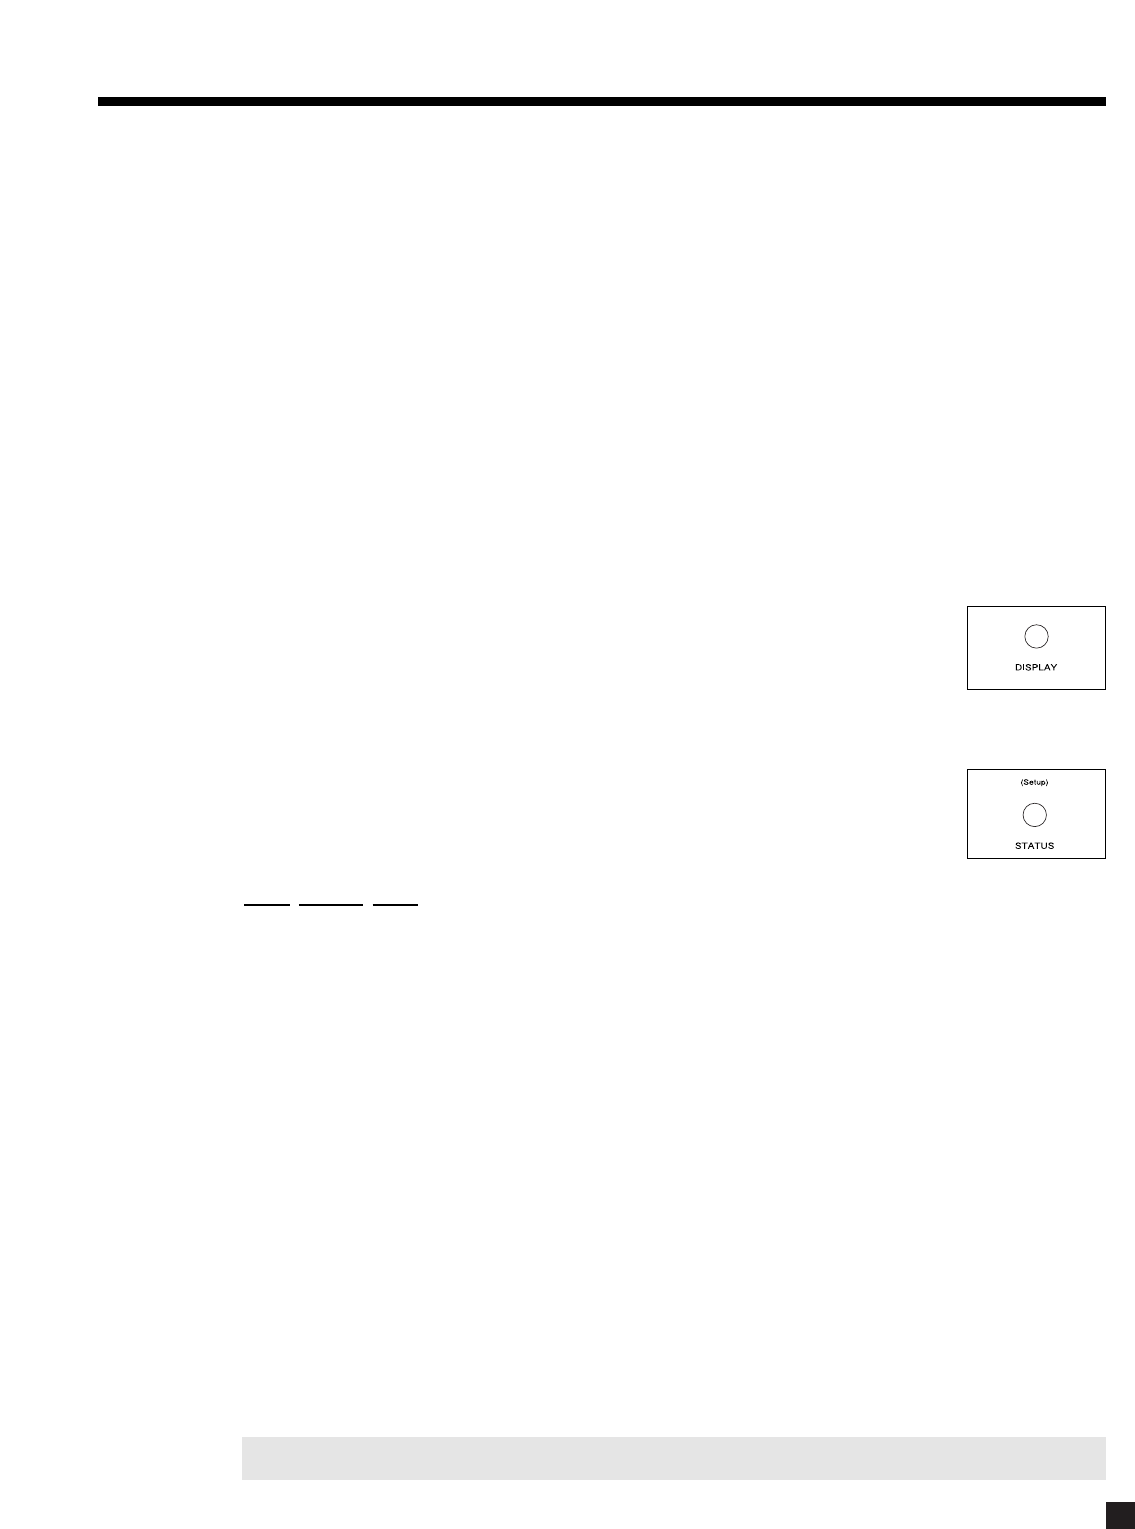
34
5.8.10 DYNAMICS
This allows you to control the difference between the softest and loudest passages on 5.1/6.1-channel
soundtracks, as long as the soundtrack contains dynamic scaling information and at least 5.1 speakers are
used. Press DYNAMICS and then use the Master Control Knob to cycle through the following settings:
Normal: Reproduces the full dynamic range of the recording without changing it.
Reduced: Allows the quieter parts to be heard more easily, and works by raising the level of quieter
sounds and/or reducing the level of louder sounds.
Late Night: Reduces the softest-to-loudest difference even further. The quietest passages can be
heard even more easily, and prevents having to hear sudden loud passages.
When you use ‘Reduced’ or ‘Late Night’, you don’t need to remember to reset Dynamics back to ‘Normal’
because this happens automatically whenever Main power is turned off.
5.9 FRONT PANEL DISPLAY
The intensity of the Front Panel display and LED indicators can be changed. Press
DISPLAY and then use the Master Control Knob to select High, Medium, Low, or Off. The
High, Medium, and Low intensities, and the Front Panel Wake-Up can be modified, as
can the time-to-rest when the display will dim (see section 7.4.10).
5.10 STATUS / SETUP
This button has two functions: It displays information regarding current Software,
settings, and modes of operation. It also lets you access the Setup.
Status:
Press, Release, Press to cycle through display screens that show the following:
•Software version, day, and time.
•Input Signal: Bit rate / sample rate of digital source material being played, or Analog.
•Input Format: Shows which channels are receiving information from the selected Source.
•Listen Format: Which channels are producing output – depends on Audio-In Format and Mode.
•Mode: The surround Mode that is in use (see section 5.8).
•DD/DTS 5.1 Dynamics: Normal, Reduced, or Late Night.
•Tone Controls: Enabled or Bypassed.
•Sleep Mode: Enabled or Disabled (see section 6.5).
•All Timers: Enabled or Disabled (see section 7.4.1).
•Serial Number: This should match the number on the rear panel sticker and shipping carton –
contact Anthem immediately if any of the numbers do not match.
When in ZONE2 or ZONE3, information related only to the selected Path is displayed.
Setup:
Press and hold for a few seconds to enter the Setup. Press BACK to exit. Please read section 7 before
exploring the Setup.
WARNING: If you do explore the Setup, do not enter passwords without reading section 7 first.
5. FRONT PANEL OPERATION continued …
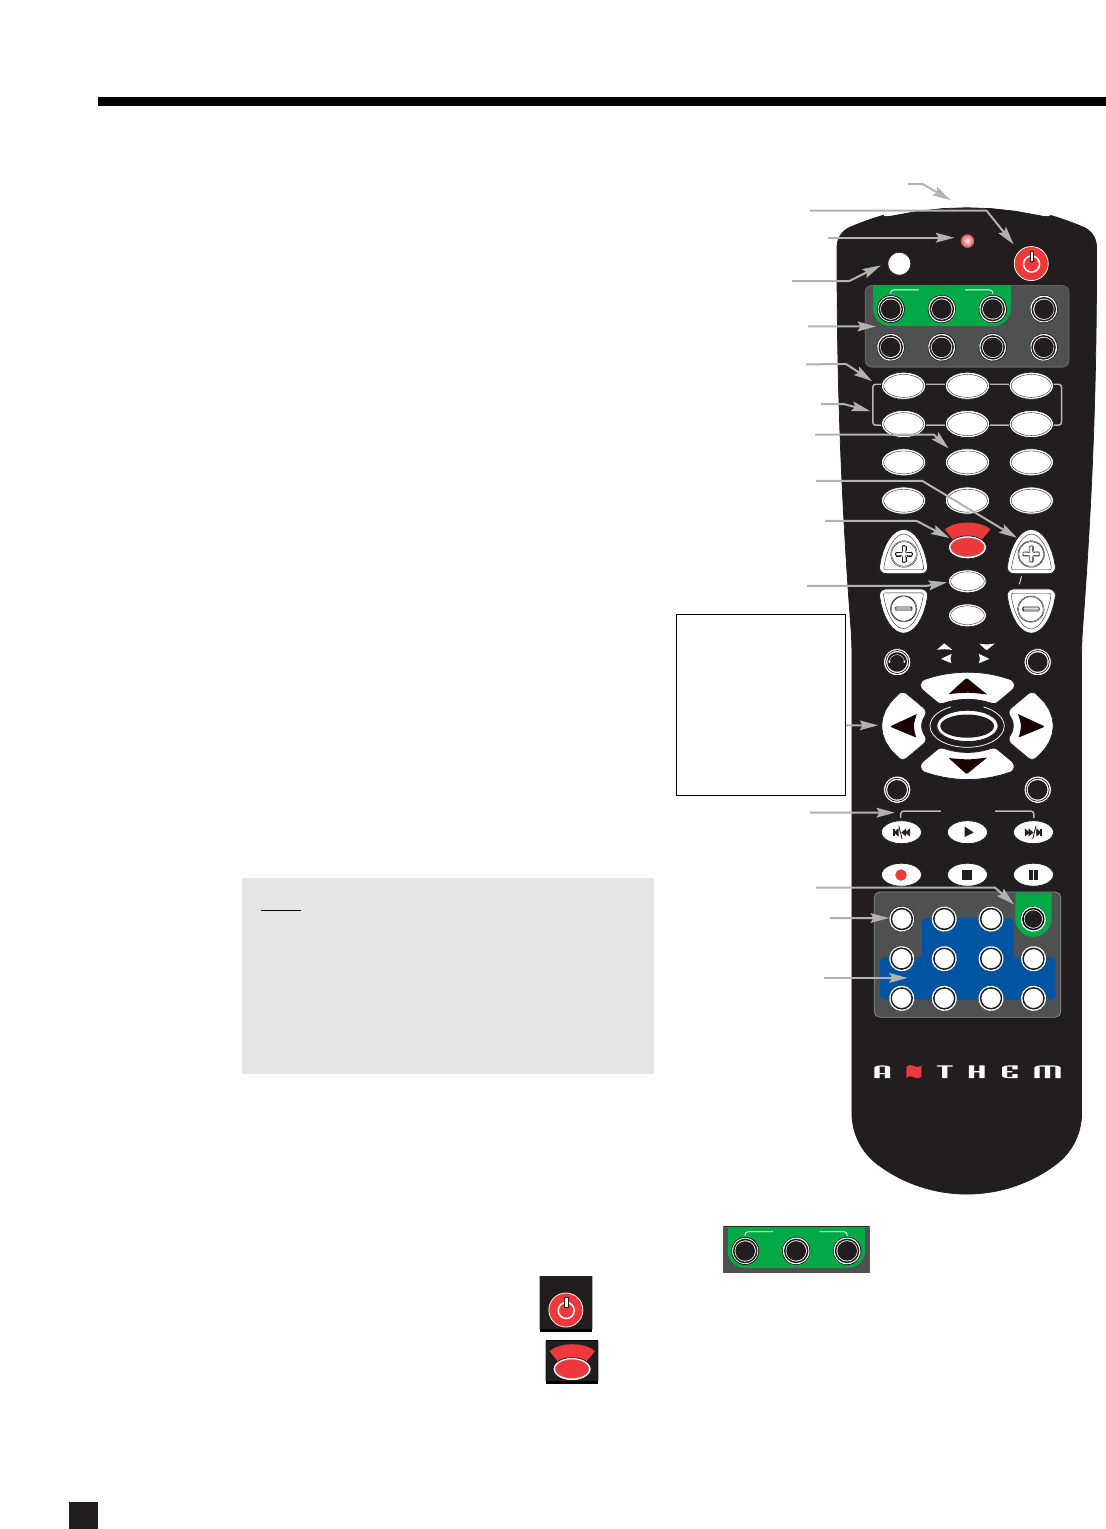
35
6. REMOTE CONTROL OPERATION
Dr. Jekyll and Mr. Hyde, as you may know, were two
very different personalities, even though they were
the same person. Well, the AVM 30 Remote Control
is the host to NINE different personalities! (All of
them ‘good’, of course.)
The AVM 30 Universal Learning Remote Control has
all of the same functions as the front panel buttons
and is operated in a similar way, but there are some
differences. Please take the time to read this
section to fully understand all the functions of the
AVM 30 remote Control.
The keys labeled in this illustration show those that
have a different method of operation from their
front panel counterparts. Those shown in bold
italics indicate keys that are unique to the Remote
Control and not found on the Front Panel. For a
detailed layout diagram see section 3.3.
To install the batteries, remove the cover that is on
the bottom of the remote, and be sure that they’re
installed with the correct polarity. Down the road, if
the keys don’t light up when they’re pressed, and
the red LED blinks twice, it’s an indication that the
batteries need replacement – use only ‘AA’ alkaline.
Before we get started, we have to give the remote
a little attitude adjustment – set the ‘personality’ to
MAIN by pressing MAIN near the top of the remote.
Note: The Path / Component keys do not
transmit any commands to the AVM 30, or
anywhere else. They only determine where
subsequent commands are sent. For example,
if ZONE2 is selected followed by VOL+, then
the volume changes in ZONE2 while MAIN and
all other components remain unaffected.
6.1 POWERING THE AVM 30 ON AND OFF
Two separate keys are used to turn the AVM 30 On/Off, because discrete
power commands are required in most custom installations.
First set MAIN, ZONE2, or ZONE3 personality in SSP Path.
•Power ON: Press POWER.
•Power OFF: Press SSP OFF.
SLEEP
INPUT
FRT CTR
T
H
X
T
I
M
E
R
S
S
T
A
T
U
S
PIP SWAP MOVE
SSP SOURCE
COPY
AUX TAPE
DVD TV SAT VCR
CD
DVD TV SAT VCR
B
A
S
S
T
R
E
B
L
E
B
A
L
A
N
C
E
2-Ch
CD
REC
MAIN Z2 Z3
SSP PATH
D
Y
N
A
M
I
C
S
VOLUME CH PRE-SET
FM/AM PRE-SETS
TUNE
SEEK
SOURCE SEEK
L
E
A
R
N
ENTERMUTE
78
0
9
SELECT
SUB
LFE
FM
AM
SUR
RR
S
S
P
O
F
F
D
I
S
P
L
A
Y
T
O
N
E
B
Y
P
A
S
S
M
O
D
E
O
N
S
C
R
E
E
N
I
N
F
O
G
U
I
D
E
B
A
C
K
S
E
T
U
P
1 2 3
456
P
O
W
E
R
6-Ch
S
S
P
P
A
T
H
S
S
P
O
F
F
LAST
Path/Component
(‘Personality’)
Sleep and Timers
Enable/Disable
Lip-Sync Delay
Source Seek
FM • AM Presets
RECORD Path
IR Transmitter
Power ON
Transmission Indication
Learning Mode
AVM 30 Power OFF
MAIN Source Copy
Source Selection
•FM • AM Seek / Tune
•Level / Bass / Treble /
Balance / Display /
Timers Adjustments
•Mode / DD Dynamics /
THX Options selection
•Navigation (North /
South / East / West)
FM•AM Presets
UP / DOWN
FM•AM Direct Entry
MAIN Z2 Z3
SSP PATH
S
S
P
O
F
F
S
S
P
O
F
F
LAST
P
O
W
E
R
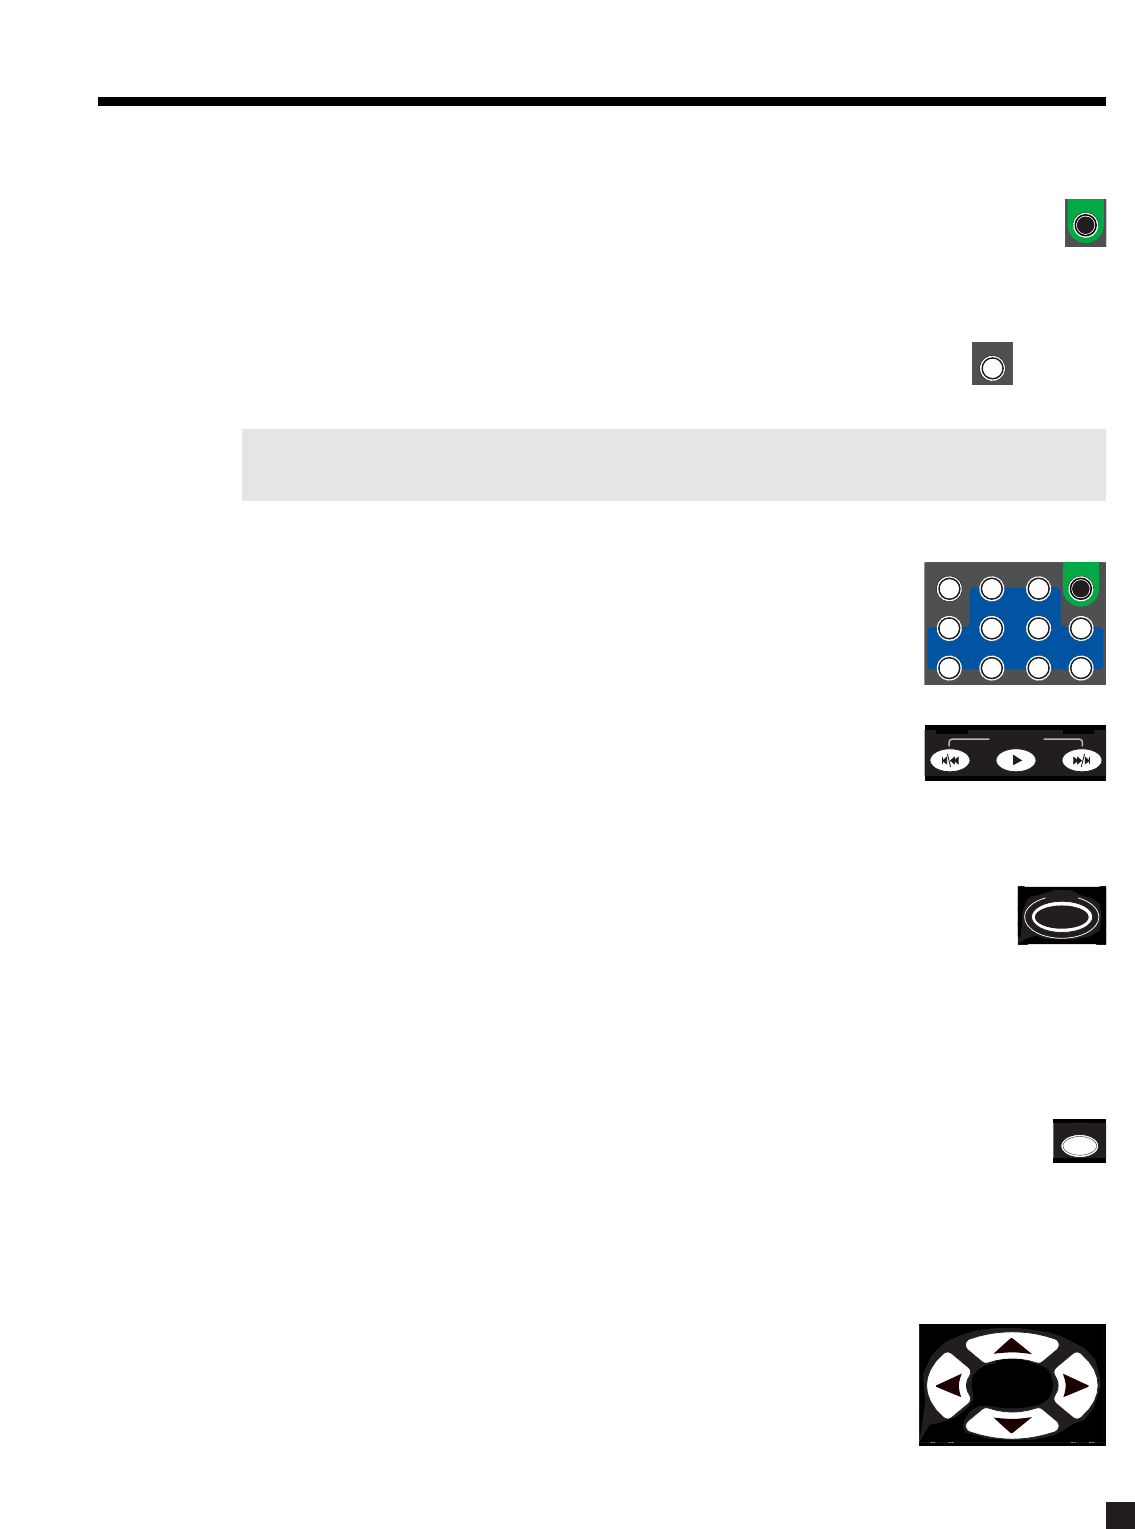
36
6. REMOTE CONTROL OPERATION continued …
6.2 RECORD PATH SELECTION
•Make sure ‘personality’ is set to MAIN, press REC, then select Source within timeout period.
6.2.1 COPYING THE MAIN PATH TO ZONE2, ZONE3, OR RECORD
Select a MAIN Source first and for...
•ZONE2 or ZONE3: Make sure ‘personality’ is set to Z2 (or Z3), then press COPY.
•RECORD: Make sure ‘personality’ is set to MAIN, press REC, then press COPY.
Note: The only way to send digital inputs and 6-Ch S/E input to ZONE2, ZONE3, or RECORD is through
the Copy function (see sections 5.2.1 and 7.4.5).
6.3 SOURCE SELECTION
After selecting the desired Path (MAIN, ZONE2, ZONE3, or RECORD), press one of
ten Source keys in the SSP SOURCE group.
6.3.1 SOURCE SEEK (Remote Control Only)
The SOURCE SEEK keys provides an easy way to find the active Sources. The
keys go to the previous and next Source with a signal on it, while thekey
advances one Source at a time.
6.4 DIRECT FM • AM STATION ENTRY (Remote Control Only)
When using the FM • AM Tuner, the station frequency can be entered as a four-digit number. For
example, to tune into 98.3 FM, press and hold SELECT until the display shows “<blank>0.0” in
the lower left corner, then press 0,9,8,3.
6.5 SLEEP TIMER (Remote Control Only)
If you would like to go sleep while listening to a program or music, the Sleep Timer will automatically turn the
AVM 30 power off after a preselected time. So when you find yourself falling asleep at the ‘tube’, take the
Remote Control and:
•Select the desired Path (MAIN, ZONE2, or ZONE3), then press SLEEP (the Sleep timer will
operate for that Path only).
•The first SLEEP keystroke always resets the timer to 30 minutes. Additional keystrokes then cycle
as follows: Second=60, third=90, fourth=Disabled.
•Once set, the time remaining appears as the number following ‘Zzz’ in the display.
6.6 ENABLE / DISABLE TIMERS (Remote Control Only)
To enable or disable all timers without entering the Setup, press and hold the
SLEEP key until the display shows ‘ALL TIMERS’, then use the keys to
enable/disable (see section 7.4.1).
REC
S
S
P
P
A
T
H
PIP
COPY
S
T
A
T
U
S
SELECT
S
T
A
T
U
S
SELECT
I
N
F
O
S
E
T
U
P
PIP SWAP MOVE
SSP SOURCE
COPY
AUX TAPE
DVD TV SAT VCR
2-Ch
CD
REC
FM
AM
6-Ch
S
S
P
P
A
T
H
SOURCE SEEK
SLEEP
T
I
M
E
R
S

37
6. REMOTE CONTROL OPERATION continued …
6.7 LIP-SYNC DELAY (Remote Control Only)
To adjust Lip-Sync Delay without entering the Setup, press and hold the DISPLAY key until the
display shows “LIP-SYNC DELAY”, then use the keys to move from digit to digit and the
keys to adjust. This can be done while viewing the picture and listening to the soundtrack
simultaneously (see section 7.4.5).
6.8 CONTROLLING OTHER COMPONENTS
The AVM 30 Remote Control can be set up to control your TV, DVD player, CD player, VCR, and satellite
receiver. The codes for various models are in its memory – these can be entered to duplicate another remote
control’s functions. If the codes for your other components are not in the AVM 30 Remote Control’s memory,
the Learn function can be used to customize each key (see section 6.8.4).
6.8.1 ENTERING PRESET MEMORY CODES
In Appendix B at the back of this manual you will find codes for programming the AVM 30’s Remote Control.
If a code for your components is not listed, see section 6.8.2. To enter a code:
1. Press the Path/Component key (e.g. DVD).
2. Press and hold LEARN until the LED flashes twice.
3. Enter the four-digit code from Appendix B. The LED should blink twice.
Codes can onlybe used with their respective Path/Component key. For example, a VCR code can not be
programmed in the DVD Path/Component key.
6.8.2 SEARCHING FOR A CODE
If a code for your component is not listed in Appendix B, you can try the following:
1. Turn the component on (e.g. the TV).
2. Press the matching Path/Component key (e.g. TV).
3. Press and hold LEARN until the LED flashes twice.
4. Press 9,9,1.
5. Aim the remote towards the TV, and alternate between pressing POWER and TV.
6. Stop once the TV turns off. Immediately press and release LEARN to lock the code.
7. If, for future reference, you want to know what the code is, press and hold LEARN until the LED
flashes twice and then press 9,9,0,1. Wait 3 seconds and count the number of flashes. The number
of flashes represent the first digit (i.e. 3 flashes = 3, no flash = 0). Next, press 2for the second digit,
3for the third digit, and 4for the fourth digit, and count the number of flashes each time. Record this
code number in Appendix B for future reference.
If no code is found, see section 6.8.4.
6.8.3 VOLUME LOCK
After entering a code for your TV or satellite receiver, you may find it inconvenient to switch the
Path/Component keys back and forth when you alternate between say, changing channels on your TV and
adjusting the volume of MAIN (AVM 30). Not to worry, the Volume Lock feature takes care of this. When
engaged, the volume keys adjust MAIN volume, regardless of which Path/Component is selected. You can
then adjust the volume of the Statement D1 without having to switch Path/Component from TV to MAIN.
8
D
I
S
P
L
A
Y
L
E
A
R
N

38
6. REMOTE CONTROL OPERATION continued …
In the following example, MAIN volume is locked onto every Path/Component selection except ZONE2:
To engage Volume Lock for MAIN:
1. Press and hold LEARN until the LED flashes twice.
2. Press 9,9,3.
3. Press MAIN.
At this point, the Volume and Mute keys now control MAIN, no matter which of the eight Path/Component
selections the Remote Control is in. However, any individual Path/Component selection can be unlocked if
necessary.
To disengage Volume Lock for ZONE2 (or ZONE3), and re-engage the ZONE2 (or ZONE3) Volume Control:
4. Press ZONE2 (or ZONE3).
5. Press and hold LEARN until the LED flashes twice.
6. Press 9,9,3.
7. Press VOL .
The Volume and Mute keys now control MAIN for every Path/Component selection except for ZONE2. You
may continue to unlock other Path/Components one at a time. To unlock all Path/Components at once and
restore the default setting, press VOL+instead of VOL in step 7.
6.8.4 LEARN FUNCTION
The AVM 30 Remote Control has the ability to learn the command of an individual key from almost any other
remote control. When a new command is programmed onto a key, the original command is still available by
pressing LEARN before pressing the key. We’ll call this the Layer1 method.
If the original command of a particular key is used more than the learned command, it might be better to
program the learned command in Layer2. This means that when a taught key is pressed, the original
command functions as always, and the learned command is accessed by pressing LEARN before pressing
the key. In essence, this is the reverse of the Layer1 method.
The learned commands are retained in the Path/Component selection into which they were
programmed. For instance, if the navigation keys are programmed into the DVD selection, they
won’t perform the learned command if another Path/Component is selected.
Limitations on learning:
Before getting to the learning procedure, please read the following limitations:
•Some codes are not learnable. This includes multi-frequency codes, some high frequency codes,
and other unusual formats.
•All keys, with the exception of the Path/Component keys and LEARN, can be taught.
•Typically, the memory allows up to 24 keys to be taught.
•The Remote can learn only one code per key. It can not be taught a sequence of several keystrokes
on one key.
•In general, we recommend that you do not teach the Record key. The Record key, almost always,
requires a double key press (Rec+Pause or Rec+Play). The double key press will be lost when the
Record key is involved in most learning operations. This lack of consistency does not always allow
for proper function and is best avoided.
•The Source Remote and the AVM 30 Remote should be 1 to 2 inches apart during teaching mode,
and the IR transmitters of the two Remotes should be aligned with each other.

39
6. REMOTE CONTROL OPERATION continued …
•The placement of the IR transmitter in the Source Remote may make it difficult to correctly align the
two Remotes.
•Source Remotes that contain a beam-focusing lens may require more than one attempt at
successful alignment.
•The learning process should be conducted in an area where there is a low level of IR emission. High
levels of natural light or fluorescent lighting could interfere with a learning event.
•The maximum carrier frequency is 135 kHz.
Teaching a key:
To initiate the learning operation, follow these steps:
1. Point the Source Remote and AVM 30 Remote at each other (to be ready for step 5).
2. Press and hold LEARN until the LED flashes twice.
One long blink indicates low battery or faulty memory. The Remote will not go into learn mode if either
of these conditions exist.
3. Press 9,7,5,then the desired Path/Component key.
To place the command in Layer1, follow step 4a. To place the command in Layer2, follow step 4b:
4a. Press the key to be taught. Proceed to step 5.
4b. Press LEARN (don’t hold), then press the key to be taught.
5. The LED flashes rapidly. Within 4 seconds, press and hold the teaching key on the Source Remote
until the LED flashes twice. The LED will go out while it receives a signal from the Source Remote.
One long blink appearing during this step indicates a learning failure, which could mean:
•Bad Capture (try again).
•Memory Full (delete another command).
•Unlearnable Code.
6. Repeat steps 4a or 4b and 5 as often as desired (up to the maximum limit of memory or 24 keys).
7. Wait 10 seconds to exit the learning mode automatically.
Deleting a learned command from a key:
To delete a learned command on one key, you can either overwrite it with a new code on the same key, or
use the following delete sequence:
1. Press and hold LEARN until the LED flashes twice.
2. Press 9,7,6, the Path/Component key,the key to be deleted,the key to be deleted again.
To reset the Remote Control to factory settings:
Press and hold LEARN until the LED flashes twice and then press 9,8,0.
6.9 CONTROLLING THE AVM 30 WITH AFTERMARKET REMOTES
Some keys on the AVM 30 Remote, such as VOL+, VOL , and SETUP (SUB/LFE), have press and hold
commands as well as regular press and release commands. It may be necessary to program your
aftermarket remote to loop or repeat a command to turn it into a ‘press and hold’ command. The methods of
doing this vary with model – contact the remote control manufacturer for more information.
Direct Mode and tuner bank access: If you’re using a macro-capable aftermarket remote, individual
surround Modes and tuner banks can be accessed directly by way of 3-key sequences – see Appendix A.
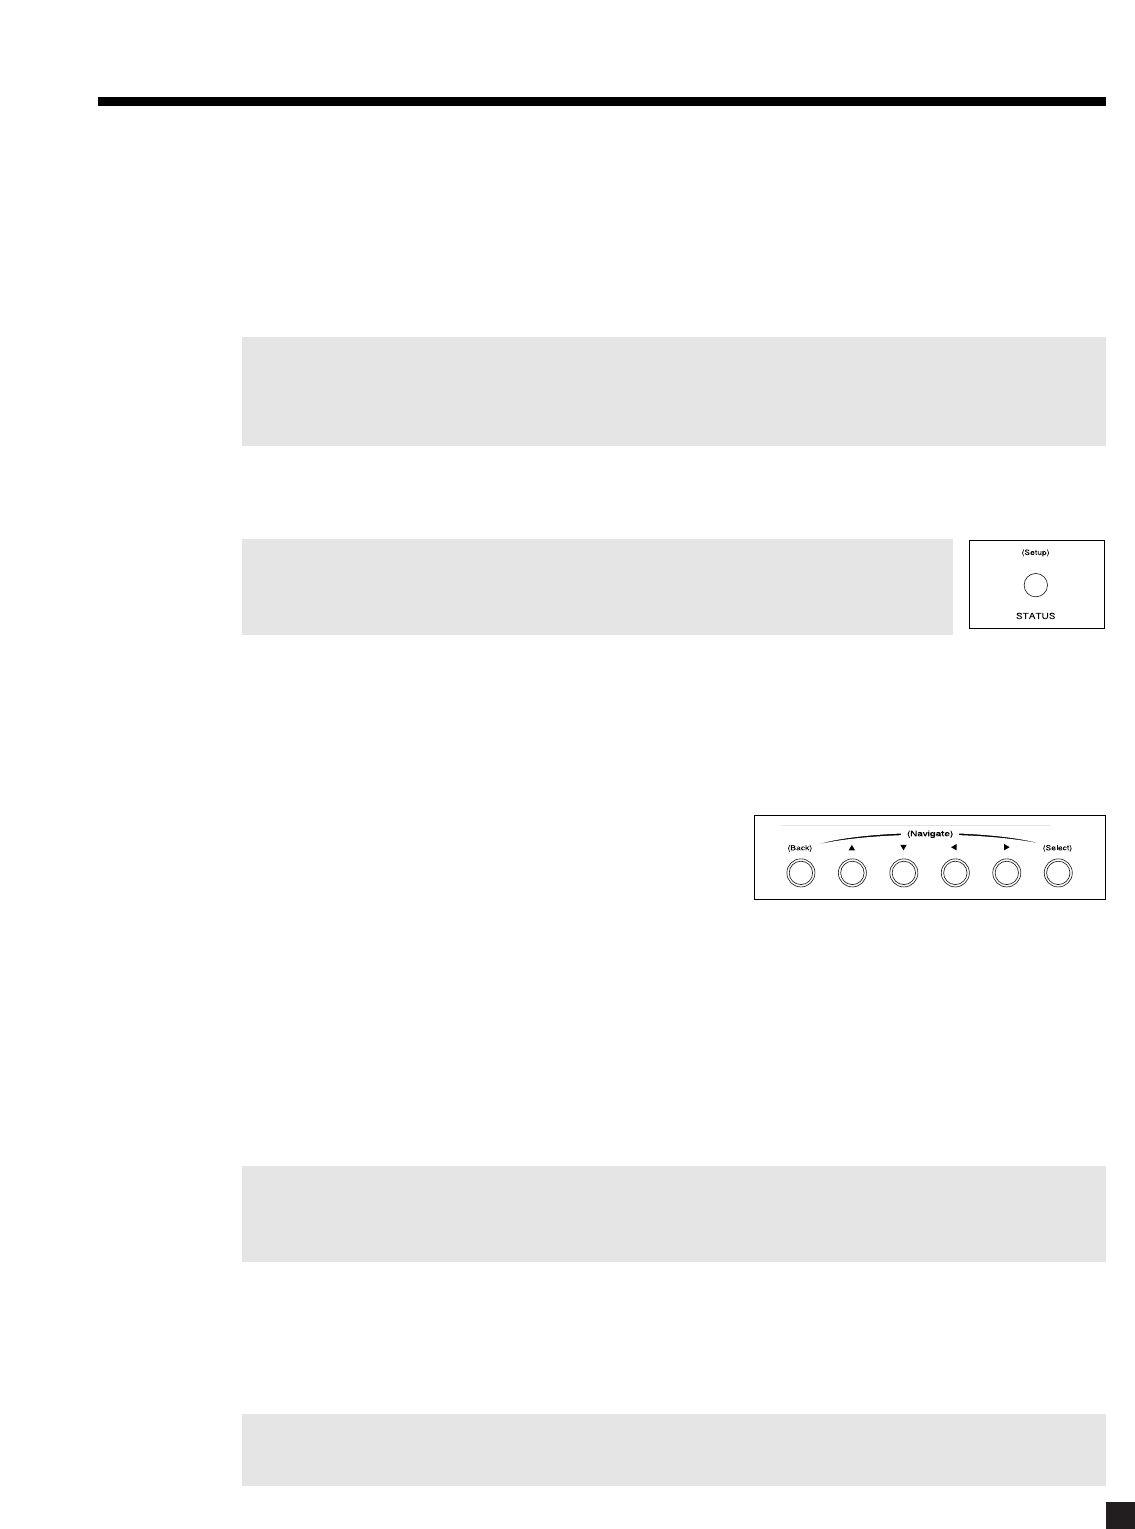
40
7. SETUP MENU
The Setup is where all the user definable operating characteristics, calibrations, and configurations are
entered. For optimum performance and enjoyment, it is crucial that your AVM 30 be properly set up.
It is strongly recommended that the menus are set up in the order that they appear. For ease of viewing, use
of the On-Screen display is recommended whether accessing the Setup by Remote Control or Front Panel.
The On-Screen and Front Panel displays are synchronized with one another. Illustrations throughout this
section show the On-Screen display menus. The Front Panel display shows similar information.
If you are using Component Video, do the following to see the Setup Menus on the On-Screen Display:
•Connect the AVM 30 Composite or S-Video output to your TV’s Composite or S-Video input.
•Temporarily change your monitor’s input to Composite or S-Video by using TV remote control.
7.1 HOW TO ENTER THE SETUP MENU
Note: The Setup Menu can be accessed from the MAIN or ZONE2 Path. When in the
ZONE2 Path, the Setup Menu will not show on the Main TV and vice versa –
press the appropriate path first and then enter the Setup Menu.
•Front Panel: Press and hold STATUS (Setup) for 3 seconds.
•Remote Control: Press and hold SUB/LFE (SETUP) for 3 seconds.
7.2 HOW TO NAVIGATE IN THE SETUP MENU
•Use the buttons to scroll through menus.
•Press SELECT to choose a menu item.
•Use the and buttons to change settings.
•Press BACK to return to previous item or menu.
Example: Enter the distance from your speakers to the listening position (section 7.4.3):
•Enter the Setup (section 7.1).
•Press the button until you reach ‘3. LISTENER POSITION’.
•Press SELECT. This will bring up the ‘3. LISTENER POSITION’ sub-menu.
•Use the buttons to scroll to the speaker(s) that you want to change.
•Use the buttons to change the distance.
•Press BACK to leave the submenu.
Note: The last change made to a Setup item will always be the ‘entered’ result. If you make a change
and then decide that you don’t want the new setting, you must go back to that item and change
it to the original setting.
7.3 HOW TO EXIT THE SETUP MENU
•Press BACK as many times as necessary. Each time BACK is pressed, the Setup returns to the
previous item or menu, until Setup is exited completely and the regular display returns.
Note: The Setup will exit automatically if not used for 5 minutes to prevent burning of a permanent
On-Screen display image in the projector/monitor.

41
7. SETUP MENU continued …
7.4 SETTING UP THE AVM 30
After entering the Setup Menu as described in section 7.1, your On-Screen display will show the menu
below. Only 8 menu items can be displayed at one time – use the buttons to scroll up or down and view
the remaining ones. To go to a submenu, highlight a menu item in red and then press SELECT.
7.4.1 SET TIME / TIMERS
The time and day, plus 6 different timers are set in this menu. The timers in the AVM 30 are similar to an alarm
clock, but allow two different timer settings for each of MAIN, ZONE2, and ZONE3.
Procedure for setting Current Time and Day:
•Enter the Setup (section 7.1). Go to ‘1. SET TIMERS/TIME’ and press SELECT.
•Press the button until you reach ‘c. TIME FORMAT: 12 Hr’.
•Use the buttons and choose ‘12 Hr’ or ‘24 Hr’.
•Press the button to go to ‘a. CURRENT TIME: 12:00 AM’.
•Press SELECT. ‘12’ will be highlighted in red.
•Use the Master Control Knob or the buttons to set the current hour.
•Press thebutton. ‘00’ minutes will be highlighted.
•Use the Master Control Knob or the buttons to set current minutes.
•Press BACK to return to the menu line.
•Press the button to go to ‘b. CURRENT DAY: Sunday’.
•Use the buttons to set the current day.
All Timers:
This allows you to simultaneously ‘Enable’ or ‘Disable’ all Timers for MAIN, ZONE2, and ZONE3.
ANTHEM AVM 30 SETUP MENU
1. SET TIME / TIMERS
2. SPEAKER CONFIGURATION
3. LISTENER POSITION
4. SPEAKER LVL CALIBRATION
5. SOURCE SETUP / PRESETS
6. ADJUST INPUT LEVELS
7. A-D / AUDIO-OUT FORMAT
8. VOLUMES / RENAME PATHS
9. TRIGGERS / IR / RS-232
10. DISPLAYS / TIMEOUT
11. SAVE / RESTORE SETTINGS
12. LOCKOUT / PASSWORDS
1. SET TIME / TIMERS
a. CURRENT TIME : 12:00 AM
b. CURRENT DAY : Sunday
c. TIME FORMAT : 12 Hr
d. ALL TIMERS : Disabled
e. SET MAIN TIMERS
f. SET ZONE2 TIMERS
g. SET ZONE3 TIMERS

42
7. SETUP MENU continued …
Highlighting ‘e. SET MAIN TIMERS’ in menu 1 and then pressing SELECT displays this menu:
Timer Options:
There are two Timers for Main and each Zone to allow greater flexibility. You can set individual week and
weekend auto-on/off times twice – once for the morning and again for the evening, for example.
Using the buttons, TIMER 1 and TIMER 2 choices are:
•‘Off’ – Timer is disabled and will not come on at any time or day.
•‘Week’ – Timer will operate for Monday to Friday only.
•‘Wkend’ – Timer will operate for Saturday and Sunday only.
•‘Wk+Wkend’ – Timer will operate for every day of the week.
On and Off Times:
Individual auto-on/off times are entered for:
T1 or T2 WEEKDAY ON: Sets the Monday to Friday turn-on time.
T1 or T2 WEEKDAY OFF: Sets the Monday to Friday turn-off time.
T1 or T2 WEEKEND ON: Sets the Saturday and Sunday turn-on time.
T1 or T2 WEEKEND OFF: Sets the Saturday and Sunday turn-off time.
Timers may also be set to only turn on or only turn off (see Example 2) – this way, the AVM 30 can be set to
turn on automatically, and it won’t turn off until you turn it off manually when you’re done for the day.
Note: If the AVM 30 is already on, ‘Timer On’ settings are ignored to ensure that Source and Volume are
not changed when you are already listening to a program.
Select Source:
This allows you to select the Source that will play when a Path is turned on by its Timer1 or Timer2 – select
any Source, any preset FM • AM station, or Last Stn (the tuner setting when AVM 30 was last turned off). Be
sure that your selected source component and power amplifier are turned on, or will be on at the Timer
turn-on time. If your components are equipped with trigger inputs, you can set an AVM 30 trigger to turn them
on automatically (see section 7.4.9).
Auto-On Volume:
Sets the Volume that will play when Timer1 or Timer2 turns the power on for its Path. The volume starts at
the minimum volume for that Path and slowly increases until the ‘Auto-On’ setting is reached.
1e. SET MAIN TIMERS
- - - - - - - - TIMER 1 : Off - - - - - - - -
a. T1 WEEKDAY ON : 8:00 AM
b. T1 WEEKDAY OFF : 11:00 PM
c. T1 WEEKEND ON : 10:00 AM
d. T1 WEEKEND OFF : 11:00 PM
e. SELECT SOURCE : Last Stn
f. AUTO-ON VOLUME : –35.0 dB
- - - - - - - - TIMER 2 : Off - - - - - - - -
a. T2 WEEKDAY ON : 8:00 AM
b. T2 WEEKDAY OFF : 11:00 PM
c. T2 WEEKEND ON : 10:00 AM
d. T2 WEEKEND OFF : 11:00 PM
e. SELECT SOURCE : Last Stn
f. AUTO-ON VOLUME : –35.0 dB

43
Example 1: Select a Source for the ZONE2 Timer:
•Enter the Setup (section 7.1). Go to ‘1. SET TIME/TIMERS’ and press SELECT.
•Press the button until you reach ‘f. SET ZONE2 TIMERS’.
•Press SELECT. The ‘1f. SET ZONE2 TIMERS’ submenu will appear.
•Press the button until you reach ‘e. SELECT SOURCE’.
•Use the buttons to change to desired Source.
•Press BACK to leave this submenu and return to the SET TIME/TIMERS menu.
If you selected ‘Last Stn’ as your Timer turn-on Source, you can leave it set to the last station you were
listening to, or choose one of your preset stations. To have the Timer turn on to a Preset Station, do the
following from the ‘e. SELECT SOURCE’ menu line (above):
•Use the buttons to change to ‘Last Stn’.
•Press SELECT to highlight ‘Last Stn’.
•Use the buttons to change to the desired FM • AM Preset. These will scroll from ‘AM 1-1’ to
‘AM 1-6’ to ‘FM1-1’ through to ‘FM3-6’ and back to ‘Last Stn’.
•Press BACK to leave this submenu.
Note: The Timer submenu setup procedure is the same for MAIN, ZONE2, and ZONE3.
Example 2: Change ZONE2, TIMER2 to come on Weekdays at 7:35 AM.
•Enter the Setup (section 7.1). Go to ‘1. SET TIME/TIMERS’ and press SELECT.
•Press the button until you reach ‘f. SET ZONE2 TIMERS’.
•Press SELECT. The ‘1f. SET ZONE2 TIMERS’ submenu will appear.
•Press the button to reach ‘TIMER 2: Off’.
•Use the buttons to change to ‘Week’.
•Press the button until you reach ‘a. T2 WEEKDAY ON: 8:00 AM’.
•Press SELECT. The hour is now in red, use the Master Control Knob or the buttons to set the
hour to ‘7’ AM. (Continuing through ‘12’ will advance the AM/PM settings.)
•Press the button. ‘00’ minutes will be highlighted.
•Use the Master Control Knob or the buttons to set the minutes to ‘35’.
•Press BACK to leave this submenu and return to SET TIME/TIMERS menu.
Note: When scrolling between ‘11 PM’ and ‘12 AM’ settings, the display shows ‘--:--’. Timers set in the
‘--:--’ position will be skipped. Thus, to set the Timer to only turn on, set the Off time to ‘--:--’. To
set the Timer to only turn off, set the On time to ‘--:--’.
7. SETUP MENU continued …

44
7. SETUP MENU continued …
7.4.2 SPEAKER CONFIGURATION
The Speaker Configuration Setup allows you to enter information about how many speakers you have in your
system, and their relative size and type. Here you will also set up the bass management. Entering information
about the size of your speakers will enable the AVM 30 to control bass information so it is not lost or distorted
by smaller speakers that are unable to reproduce large amounts of bass.
Cinema and Music Configurations:
The AVM 30 allows you to set two separate bass management configurations – Music can be tailored for
music (and movies that do not contain a Low Frequency Effects ‘.1’ track), and Cinema for source material
that contains LFE, including all 5.1/6.1 channel movie and music sources. These configurations can be
assigned to each Source.
Using the Music configuration is optional. Once you enter menu 2b. MUSIC SPKR CONFIGURATION, it asks
whether or not you want to use the same settings as the Cinema configuration – ‘Yes’ is the factory default.
Setting up a configuration is described later in this section. Assigning a configuration to a Source or enabling
automatic activation according to presence/absence of LFE is explained in section 7.4.5.
Surround and Rear Speaker Quantity and Type:
Surround speakers fall under two radiation pattern categories: Direct and Dipole. No delay is necessary in
channels using dipole speakers – the sound is already delayed through room reflections. When dipoles are
selected as the SURROUND TYPE and/or REAR TYPE, their distance will automatically equal the greatest
distance in menu 3. LISTENER POSITION (see section 7.4.3).
If you are using one Rear speaker, set d. REAR QTY/TYPE to one speaker and use the Rear-L output.
If your speaker system is 5.1 (thus no Rear channels), simply ignore the d. REAR QTY/TYPE setting.
Center EQ:
When a center channel speaker sits on top of or below a TV, its frequency response can be altered by
reflections coming off the screen, making dialog less natural. With Anthem’s unique CENTER EQ set to ‘Yes’,
timbre can be restored using response curves prepared specifically for cancelling out effects of TV screens.
TV Size For EQ :
This is used to determine the magnitude of the CENTER EQ change. Since room/TV/furniture acoustics vary,
as do characteristics of center channel speakers from model to model, you may wish to spend a little time
experimenting to determine which setting works best – play 3 or 4 different DVDs and listen to center
channel dialog to find the setting that sounds the clearest.
•Select the TV size category that is one higher than what you are using, and then listen. The size
categories are: 18”- 30” / 30”- 42” / 42”- 54” / 54”- 66” / 66”- 78”.
•Leave it in the setting that provides the clearest dialog, even if it doesn’t actually match the size of
your TV. Turning the Center EQ off completely may even sound best. Let your ears be the final judge!
2. SPEAKER CONFIGURATION
a. CINEMA SPKR CONFIGURATION
b. MUSIC SPKR CONFIGURATION
c. SURROUND TYPE : Dipole
d. REAR QTY / TYPE : 2 Dipole
e. CENTER EQ : No
f. TV SIZE FOR EQ : 30-42 in
g. ROOM RESONANCE FILTER
h. SET BASS PEAK LEVEL

45
7. SETUP MENU continued …
Highlighting ‘a. CINEMA SPKR CONFIGURATION’ in menu 2 and then pressing SELECT displays this menu:
Small or Large:
Most speakers should be set to ‘Small’ and be used with a subwoofer, unless they use large drivers that can
handle bass and LFE. Even then, physically large speakers may need a subwoofer for bass frequencies,
particularly the bass of the ‘.1’ LFE channel. All THX certified speakers are designed to be set to ‘Small’. After
highlighting a speaker or speaker group, use the buttons to select to ‘Large’, ‘Small’, or ‘None’.
Subwoofer:
To find the best option for your room and system, first position all of your speakers and then select the option
that gives the most solid sounding bass. The options are:
• ‘None’ All bass is routed to ‘Large’ L/R Front and Surround speakers, including bass from
speakers set to ‘Small’ plus bass from the ‘.1’ LFE (Low Frequency Effects) channel.
•‘1 Sub’ Bass from channels set to ‘Small’ goes to the subwoofer along with bass from the ‘.1’ LFE
channel. This setting is preferred by THX.
•‘1 Super’ The subwoofer plays bass from all channels (Large and Small), together with LFE. This
setting is recommended only for the Music configuration when using full-range speakers
set to ‘Large’ together with the subwoofer.
•‘2 Sub’ or ‘2 Super’ – Select when using both Subwoofer outputs. This adjusts the level of the
subwoofer channel test noise to compensate for the additional subwoofer.
‘None’ Setting for Center, Surrounds, or Rears:
•If CENTER is set to ‘None’, center channel information is redirected to the L/R Fronts (this is also
known as a Phantom center channel).
•If SURROUNDS are set to ‘None’, L-Surround channel information is directed to the L-Front channel,
and R-Surround channel information to the R-Front channel (except in Dolby Pro Logic mode).
•If REARS are set to ‘None’, Rear channel information of Surround EX and DTS-ES DVDs plays in the
Surround channels – no information is lost in the absence of Rear speakers.
Note: If using 5.1 speakers (or less) in your system, the surround speakers must be connected using the
SURROUND channels, and REARS must be set to ‘None’ to properly configure your system.
2a. CINEMA SPKR CONFIGURATION
a. L/R FRONTS : Small
b. CENTER : Small
c. L/R SURROUNDS : Small
d. 7.1-L/R REARS : Small
e. SUBWOOFER : 1 Sub
f. XOVER FREQ : 80 THX
g. ADV SETTINGS : Off
h. L/R FRONTS XOVER : - - Hz
i. CENTER XOVER : - - Hz
j. SURROUNDS XOVER : - - Hz
k. 7.1 REARS XOVER : - - Hz
l. SUB / LFE XOVER : - - Hz
m. SUBWOOFER PHASE : - - Deg
n. SUBW’FR POLARITY : - -
o. BYPASS LFE XOVER : - -

46
Crossover Frequency:
The crossover (Xover) divides the audio signal into two frequency bands, thereby restricting the amount of
bass sent to any speaker set to ‘Small’, and preventing midrange and treble from going to the subwoofer.
Using the buttons, choose a frequency between 25 Hz - 160 Hz suitable for the low frequency capability
of the speakers in your system. If you are using THX certified speakers, the crossover should be set to 80 Hz.
The subwoofer’s built-in crossover should be bypassed – be sure to set it to the highest frequency.
Note that a crossover does not cut frequencies off, but rolls them off. Setting XOVER FREQ to the very limit
of your speakers’ low frequency capability may not give the best results. If XOVER FREQ is set to 80 Hz, for
example, your main speakers will still be playing lower frequencies – they just won’t have to play them as
loudly. This also lightens the load on the amplifier, leaving extra power for mid and high frequencies.
Bass response is most dependent on room acoustics, and some experimentation with subwoofer placement
is highly recommended – start by placing the subwoofer in the listening area, play some music with a range
of bass notes, and walk around the room. Locations where bass sounds even, without certain notes being
much louder than others, are usually good spots for placing the subwoofer and getting response that’s even.
Note: LFE is redirected only when Subwoofer is set to ‘No’. If set to ‘Yes’ or ‘Super’, Cinema Configuration
XOVER FREQ should not be set much lower than 80 Hz, otherwise some LFE information will be lost.
Advanced Settings – Crossover Frequency:
Advanced Settings let you tailor Crossover Frequency settings more precisely. When ‘ADV SETTINGS’ is set
to ‘On’, each speaker type can be set to a Crossover Frequency that best suits its specific low frequency
characteristics. Even large speakers that can handle extended bass benefit because you can set the
Crossover Frequency to a very low setting and prevent them from receiving signals that are better handled
by a high performance subwoofer. Scrolling below ‘25 Hz’ or above ‘160 Hz’ brings the ‘Off’ setting, which
bypasses the crossover and sends a full-range signal to the speaker.
If room acoustics cause cancellation in the crossover region, sound can be improved by overlapping the
Subwoofer setting with the settings of other speakers, for instance setting L/R FRONTS XOVER to 70 Hz while
setting SUB/LFE XOVER to 90 Hz. On the other hand, if there is a bass peak in the crossover region, you can
spread the settings, such as setting L/R FRONTS XOVER to 100 Hz and SUBWOOFER XOVER to 80 Hz.
Advanced Settings – Subwoofer Phase and Polarity:
Room acoustics vary. If you have the flexibility, experiment with subwoofer placement to determine where it
sounds best in your system, providing deep, tight, and well defined bass. Certain subwoofer positions,
however, may cause bass frequency cancellation, meaning that when your front speakers and subwoofer
are “out-of-phase”, they work against each other, resulting in weak and sometimes dislocated sounding
bass. This can be corrected by adjusting the Subwoofer Phase and Polarity settings in this submenu.
If your subwoofer has phase and/or polarity controls, set them to zero/normal before making any
adjustments to the AVM 30’s Subwoofer Phase and Polarity settings.
As a general guide, set Polarity to ‘Normal’ if the subwoofer is placed close to the front speakers, and to
‘Inverted’ if the subwoofer is located behind the listening area or toward the back of the room. With bass
material playing, switch Polarity from ‘Normal’ to ‘Inverted’ as a quick check – leave it in the position where
bass is louder and more solid sounding.
Subwoofer Phase allows you to take things a step further and fine tune the phase alignment of the subwoofer
to your front speakers. Again, adjust Phase for the least amount of cancellation by listening for loudest and
most solid bass. Alternatively, listen to the ‘shhhh’ noise created between FM radio stations, and adjust
Phase until you find the most natural sounding transition between your main speakers and subwoofer.
Advanced Settings – Bypass LFE Crossover:
If you have set SUB/LFE XOVER to much lower than 80 Hz, the upper portion of the LFE signal will be lost.
With BYPASS LFE XOVER set to ‘Yes’, LFE goes to the subwoofer without going through the crossover,
preventing loss of LFE information. This also applies to the 6-Ch input’s SUB input (effectively, an LFE input).
7. SETUP MENU continued …
47
7. SETUP MENU continued …
Highlighting ‘g. ROOM RESONANCE FILTER’ in menu 2 and then pressing SELECT displays this menu:
Rooms often have a single prominent resonance peak which can make bass sound boomy, even with the
finest subwoofer. The AVM 30 has a proprietary set of low frequency test tones that allow you to find and
easily remove that resonance peak.
The Room Resonance Filter is a notch filter – it is not designed to boost weaker bass frequencies. While
running the test tones, if you discover that instead of a prominent peak, there is a prominent dip in response,
the best way to fill it is through a subtle repositioning of the subwoofer and/or listening position. Using
electronics alone to accomplish this is often met with frustration, for example, a 10 dB boost would require
the amplifier to work ten times harder, as well as speakers that can handle that much more power.
Test Tone and Test Tone Level:
Test tones sweep from 18 Hz up to the XOVER FREQ (or the SUB/LFE XOVER frequency) that you have set in
menu 2a. or 2b., whichever is higher. You can vary the level to obtain a comfortable playback volume.
Filter Center Frequency:
The frequency that is reduced the most when the filter is applied is called the Center Frequency. Set this to
the frequency that sounds the loudest or most boomy when the built-in test tones are played. If you’re using
a sound pressure level meter, set it to ‘Flat’ or ‘C-weighting’.
Filter Depth:
This is the amount of center frequency ‘cut’, or reduction in volume, in the subwoofer channel. Frequencies
just above and just below the center frequency are also reduced, but not as much. Range is from 1 to 20 dB.
Filter Width:
This adjustment varies the range and sharpness of the filter. For example, if Filter Width is set to 3 Hz, the
Room Resonance Filter cuts a very narrow range at the filter center frequency. If Filter Width is changed to
18 Hz, a broader range is reduced.
Note: Changing Center Frequency and Depth settings affects the available range of Width and causes
it to automatically decrease if required.
THX Boundary Gain Compensation:
If, for practical or aesthetic reasons, your listening room layout results in most of the listeners being close
to the rear wall, bass may be reinforced by the wall so much that the overall bass sounds boomy. The
AVM 30 provides a Boundary Gain Compensation (BGC) feature to improve bass balance under these
conditions. With a THX Ultra2 certified subwoofer, or a subwoofer that extends down to 20 Hz, BGC can be
enabled by setting THX Ultra2 Subwoofer to ‘Yes’ and then BG Compensation to ‘On’.
2g. ROOM RESONANCE FILTER
a. TEST TONE : Off
b. TEST TONE LEVEL : +0.0 dB
c. TEST TONE FREQ : 21 Hz
d. APPLY FILTER : No
e. FLTR CENTER FREQ : 60 Hz
f. FILTER DEPTH : 1 dB
g. FILTER WIDTH : 20 Hz
h. THX ULTRA2 SUB : No
i. THX BG COMPENSATION : NA
ROOM RESONANCE
RESONANCE FILTER
RESULT
Center Frequency
Filter Depth
Filter Width

48
7. SETUP MENU continued …
Procedure for adjusting Room Resonance Filter:
•Enter the Setup (section 7.1). Go to ‘2. SPEAKER CONFIGURATION’ and press SELECT.
•Press the button until you reach ‘2g. ROOM RESONANCE FILTER’ and press SELECT.
•Use the buttons to set TEST TONE to ‘Auto’. Press SELECT to start automatic sweeping of the
test tones. Alternatively, you can set TEST TONE to ‘Manual’ – to vary the frequency, press the
buttons to reach ‘c. TEST TONE FREQ’, then use the buttons to change frequency.
•Some subwoofers are not able to accurately reproduce frequencies below 30 Hz or so, especially
at higher levels. In addition, it can be quite difficult to hear these frequencies. If playing them
doesn’t ‘sound right’, do not continue to play them.
•Line ‘c. TEST TONE FREQ’ changes to show the frequency being played during automatic sweep.
Listen for (or measure) the frequency that sounds too loud compared to the other frequencies.
•Press the button until you reach ‘e. FLTR CENTER FREQ’ and select the frequency that is closest
to the test tone frequency that was found to be the loudest.
•Press the button until you reach ‘d. APPLY FILTER’ and set to ‘Yes’.
•Press the buttons to go to ‘f. FILTER DEPTH’ and ‘g. FILTER WIDTH’. Adjust both to achieve the
flattest response across the range of test tones.
•Press BACK to stop the test tones and leave this submenu.
Moving to the next menu, highlight ‘h. BASS PEAK LEVEL’ in menu 2 and press SELECT to display:
The loudest part of movie soundtracks is usually the bass that comes from the LFE track. The Bass Peak
Level Manager ‘looks ahead’ at the bass signal, and reduces the chance that your speakers will overload by
tailoring bass output to match their capabilities. If your subwoofer already has its own built-in limiter, it may
be best to leave Current Level at 0 dB. BPLM is disabled if ‘THX Ultra2 Subwoofer’ is set to ‘Yes’ in menu 2g.
Procedure for setting Bass Peak Level:
•Enter the Setup (section 7.1). Go to ‘2. SPEAKER CONFIGURATION’ and press SELECT.
•Press the button until you reach ‘2h. BASS PEAK LEVEL’ and press SELECT.
•Press the button until you reach ‘b. ADJUST LEVEL –50.0 dB’.
•A test signal should be audible. Use the buttons to turn up the level of the test signal until
distortion from the subwoofer (or ‘Large’ L/R Fronts if Subwoofer is set to ‘No’) begins to appear,
then lower the level of the test signal until the distortion just disappears. At this point the sound may
be surprisingly loud even though it’s not distorted – make sure that you do not stop at a setting that
is too low, or very little bass may be heard during movie or music playback.
•Press the button to go to ‘c. SET NEW PEAK LEVEL’.
•Use the buttons to change to ‘Yes’.
•Press SELECT and ‘a. CURRENT LEVEL’ will change to the new setting. The AVM 30 will not allow
bass output to exceed this new setting.
•Press BACK to leave the submenu.
2h. BASS PEAK LEVEL
See OPERATING MANUAL for
detailed instructions
a. CURRENT LEVEL : +0.0 dB
b. ADJUST LEVEL : –50.0 dB
c. SET NEW PEAK LEVEL : No

49
7.4.3 LISTENER POSITION
The Listener Position menu lets you enter the distance between each speaker and the listening area. Ideally,
speakers should be placed at an equal distance so that their sound arrives at the listening area at the same
time, but since this is rarely practical, the AVM 30 can delay the sound coming from speakers that are closer
to the listener. This way, sound reaches the listening area at the same time from all speakers, and proper
imaging can be achieved.
The speaker with the greatest distance setting will have no delay; speakers with shorter distance settings
will be delayed according to their setting.
Units of Measure and Distance Adjustment:
Choose the units you want to use (feet/metres), then enter the distance between your primary listening area
and each speaker. Range is 0-99 ft in 0.5 ft increments or 0-99 m in 0.2 m increments.
Note: Speakers set to ‘Dipole’ in menu 2. SPEAKER CONFIGURATION will automatically have their
distance set to equal the greatest distance of any other speaker (see section 7.4.2).
L-Rear to R-Rear:
ASA is a proprietary THX technology which processes the sound fed to the two surround and two rear
speakers to provide an optimal surround sound experience. Choose the setting that most closely
corresponds to the spacing between your Rear speakers.
Example: Set Right Front speaker distance to 9.5 feet.
•Enter the Setup (section 7.1). Go to ‘3. LISTENER POSITION’ and press SELECT.
•Press the button until you reach ‘d. RIGHT FRONT: 12.0 ft’.
•Use the buttons to change to ‘9.5 ft’.
•When finished, press to go to another menu item, or...
•Press BACK to leave the submenu and return to the main menu.
7. SETUP MENU continued …
3. LISTENER POSITION
a. UNITS OF MEASURE : ft
b. LEFT FRONT : 12.0 ft
c. CENTER : 12.0 ft
d. RIGHT FRONT : 12.0 ft
e. RIGHT SURROUND : 8.0 ft
f. 7.1-RIGHT REAR : 6.0 ft
g. 7.1-LEFT REAR : 6.0 ft
h. LEFT SURROUND : 8.0 ft
i. SUBWOOFER : 12.0 ft
j. L-REAR TO R-REAR : 12.0 ft

50
7. SETUP MENU continued …
7.4.4 SPEAKER LEVEL CALIBRATION
Speaker Level Calibration allows you to match the relative output level of each speaker at the listening
position, using internal test noises.
Note: The FRONTS, CENTER, SURROUNDS, REARS, SUB, and BALANCE buttons on the Front Panel and
Remote Control do not affect settings in this menu – they allow ‘on-the-fly’ adjustment for
individual program material and Modes according to personal preference (sections 5.6 and 5.7).
* Item k. is displayed only when ‘a. SAME AS CINEMA CONFIG’ is set to ‘No’ in menu 2b.
Test Sequence:
Test noise can be set to travel from speaker to speaker manually using buttons, or automatically in two
second intervals by setting TEST SEQUENCE to ‘Auto’ using the buttons and then pressing SELECT.
Note: If the previously selected Source is Anlg-Dir, the AVM 30 switches to FM • AM, which is always
Anlg-DSP, for the duration of the test noise. (‘Anlg-Dir’ bypasses the test noise generator.)
We strongly recommend the use of an SPL meter. The proper meter setting is ‘C-weighted’, but ‘Flat’ can also
be used. Do not use ‘A-’ or ‘B-weighting’. Set the meter to read ‘Slow’ or ‘RMS’ if available. Point the meter
upwards, holding it at the listening position an arm’s length away from your body to prevent reflections.
Noise Reference Level:
This is the ‘master volume’ for the test noises, and allows you reduce how much adjustment each channel
will need based on how much output the Left Front channel has. The setting depends on the sensitivity of
your amplifier(s) and speakers. Using the buttons, adjust NOISE REF LEVEL so the SPL meter reads 75 dB.
Level Calibration:
Balances speaker levels to one another. Since this setup calibrates all speaker levels for your listening area,
use the Remote Control and sit in the primary listening area when calibrating speaker levels. Any speaker
set to ‘None’ in the Speaker Configuration menu will be skipped (see section 7.4.2). Once you have set the
reference level, adjust the level of each speaker using the buttons so the SPL meter reads 75 dB. As a
matter of personal preference, you can set the subwoofer level by ear if more bass is desired.
If Subwoofer is set to ‘Super’ in menu 2a. or 2b., do not rely on an SPL meter to set subwoofer level, because
Speaker Level Calibration cannot take into account the added bass the subwoofer receives from speakers
set to ‘Large’ which results in more bass during playback than the calibrated level. Therefore, if using
‘Super’, set subwoofer level by ear while playing various types of source material.
4. SPEAKER LVL CALIBRATION
a. TEST SEQUENCE : Manual
b. NOISE REF LEVEL : +0.0 dB
c. LEFT FRONT : +0.0 dB
d. CENTER : +0.0 dB
e. RIGHT FRONT : +0.0 dB
f. RIGHT SURROUND : +0.0 dB
g. RIGHT REAR : +0.0 dB
h. LEFT REAR : +0.0 dB
i. LEFT SURROUND : +0.0 dB
j. CINEMA CONFG SUB : +0.0 dB
k. MUSIC CONFG SUB : +0.0 dB*

51
Procedure for Manual Test Sequence:
•Enter the Setup (section 7.1). Go to ‘4. SPEAKER LVL CALIBRATION’ and press SELECT.
•Press the buttons to go from speaker to speaker.
•As each speaker plays, use the buttons to adjust its loudness relative to other speakers.
•Press BACK to stop the test tone.
Procedure for Auto Test Sequence:
•Enter the Setup (section 7.1). Go to ‘4. SPEAKER LVL CALIBRATION’ and press SELECT.
•Use the buttons to set TEST SEQUENCE to ‘Auto’.
•Press SELECT to start the automatic sequence.
•As each speaker plays, use the buttons to adjust its loudness relative to other speakers. Once
set, the sequence will automatically advance to the next speaker for adjustment. It will then
continue to cycle speaker by speaker to allow you to fine tune all levels.
•Press BACK to stop the test tone.
7. SETUP MENU continued …

52
7.4.5 SOURCE SETUP / PRESETS
For each Source, you can change the name and, where applicable, assign digital audio and component video
input, assign speaker configuration, adjust equalization, and set lip-sync delay. You can also pre-select
surround modes that take effect for each Source when the AVM 30 is turned on, or a Source is selected. This
is particularly useful when you have changed Mode settings for a particular program. When another member
of your family uses the AVM 30, presets are recalled, ensuring trouble-free operation.
If you want any Path to always be in Copy mode (see section 5.2.1), change ‘Manual’ to ‘Always’. This is
recommended when you want a Source that has digital-only connection to be used in ZONE2, ZONE3, and/or
REC without having to turn MAIN on, and if you want the Paths that are set to ‘Always’ plus MAIN to change
Source together with the single push of a Source button in any of these Paths. Always Copy is not
recommended if you want all Paths to have independent Source selection – in this case, make sure that your
source components are connected to both the Analog and Digital jacks (see sections 4.2.1 and 4.2.2).
For the following example, highlighting ‘f. DVD’ in menu 5 and then pressing SELECT displays this menu:
7. SETUP MENU continued …
5f. DVD SETUP / PRESETS
a. RENAME : DVD
b. AUDIO IN : Dig RCA DVD
c. MUTING : Med
d. EQ : LF +0.0 dB HF +0.0 dB
e. SPEAKER CONFIG : Cinema
f. COMPONENT VIDEO : Comp1
g. LIP-SYNC DELAY : 0.0 ms
- - - - - - - MODE PRESETS - - - - - - -
h. 2.0 : AnthemLogic-Cin
i. 2.0-Sur : PLIIx Movie
j. DD-5.1 : PLIIx Movie
k. DD-EX : PLIIx Movie
l. DTS-5.1 : Neo:6
m. DTS-ES : DTS-ES Matrix
5. SOURCE SETUP / PRESETS
a. CD
b. 2-Ch
c. 6-Ch
d. TAPE
e. FM/AM
f. DVD
g. TV
h. SAT
i. VCR
j. AUX
k. COPY MAIN->ZONE2: Manual
l. COPY MAIN->ZONE3: Manual
m. COPY MAIN->REC : Manual

53
7. SETUP MENU continued …
Rename Source:
The factory assigned Source names that appear on the Front Panel Display and the On-Screen Display can
be changed to another name, up to six characters long. The following characters are available:
A,B,C....Z,a,b,c....z,blank, dash (–), period (.), slash (/), 0,1,2....9.
After highlighting the RENAME line, press SELECT and use the buttons to move from character to
character, then use the buttons or rotate the Master Control Knob to change the character. It is also
possible to rename ‘ZONE2’, ‘ZONE3’, and ‘RECORD’ – see section 7.4.8.
Audio In (applies to MAIN only):
There are four input formats to choose from – Digital, Analog-DSP, Analog-Direct, or Auto. After highlighting
‘AUDIO IN’ use the buttons to select an input format.
•Dig (Digital – not applicable to 6-Ch S/E, 2-Ch BAL, or FM • AM):Use this setting for any source
component that has a digital output, especially the DVD player – Dolby Digital and DTS are
transmitted only through the digital connection.
•Anlg-DSP (Analog with Digital Signal Processing): If you want your subwoofer to play from an
analog L/R input, use this setting. Analog input is converted to digital through the AVM 30’s high-end
A/D converters to enable bass management, time alignment, Mode, Bass/Treble, Lip-Sync Delay,
and THX. These are also available for the 6-Ch S/E input, since it can also be set to Anlg-DSP. With
the bass management and time alignment that this provides, the resulting sound quality from
DVD-Audio or multichannel SACD is far better than setting the 6-Ch input to Anlg-Dir. If your player
has bass management and time alignment, you can defeat it by setting all channels ‘large’ and to
the same distance. This is necessary when using Anlg-DSP, otherwise the processing occurs twice.
•Anlg-Dir (Analog-Direct – not applicable to FM • AM): A/D conversion and Digital Signal Processing
are bypassed, only leaving Volume, surround mode level, Balance, and Mute functional. Other than
the subwoofer channel of the 6-Ch S/E input, there is no subwoofer output in Anlg-Dir.
•Auto: The AVM 30 automatically switches between Digital and Analog-DSP. When it senses a
digital bitstream, the Digital input is used. At all other times, it switches to the Analog L/R input. This
feature is especially useful with a digital cable box since some channels are broadcast digitally
while others are analog – the AVM 30 switches automatically while you change channels.
Once you have set a Source to ‘Digital’ or ‘Auto’, press SELECT and then use the buttons to choose
between any digital RCA connector, TOS1, TOS2, TOS3, or AES/EBU. Digital input connectors can be
assigned to multiple ‘Digital’ Sources – this allows, for example, two unique Setup/Preset settings for the
same DVD player, one for DVDs using the DVD Source, and the other for CD music using the CD Source.
Muting (applies to MAIN only):
This eliminates ‘popping’ sounds that may occur with some digital source components during a bitstream
change. If popping is heard when changing chapter on a DVD or channel on a digital satellite receiver or
cable box, use Max setting. However, if the beginning of a track is cut off when playing a CD, use Min setting.
EQ (applies to MAIN only):
For Sources set to Digital or Anlg-DSP, you can preset low and high frequency levels. This is useful for source
components that have frequency irregularities. After highlighting the EQ line, press SELECT and use the
buttons to select LF (low frequency) or HF (high frequency), then use the buttons to adjust. In the
FM/AM Setup/Presets menu, FM and AM can be adjusted separately. The EQ settings in this menu and the
‘on-the-fly’ BASS / TREBLE adjustments do not affect each other (see section 5.7).

54
7. SETUP MENU continued …
Speaker Configuration (applies to MAIN only):
Choose between Cinema (menu 2a.) or Music (menu 2b.) configuration – see section 7.4.2.
A third and unique choice is also available: Auto-LFE. When selected, the AVM 30 automatically uses the
Cinema configuration if there is LFE in the source material, and changes to the Music configuration at all
other times. Highly recommended when using the same player for DVDs and CDs, and separate Cinema and
Music configurations. Dolby Digital 2.0 falls under Music configuration since there are no issues with LFE.
Composite Video, S-Video, Component Video:
Assign which video input (or ‘None’) is used when the Source is selected. For example, if you want the
satellite picture always available when you select the FM • AM Tuner, assign the video inputs in the FM/AM
menu to the same ones being used in the SAT menu. All video inputs can be assigned to multiple Sources.
Lip-Sync Delay (applies to MAIN only):
Using line doublers, quadruplers, or scalers causes the video to be delayed, which means that you will hear
sound slightly ahead of seeing the video picture. This can also occur with HDTV and satellite broadcasts. To
compensate, Lip-Sync Delay can delay the sound of all channels simultaneously by up to 85 milliseconds –
please check the owner’s manual for your doubler, quadrupler, or scaler for recommended delay settings. If
you do not know how much delay is in the video, you can also set Lip-Sync Delay ‘on-the-fly’ as described
in section 6.7 – this allows you to see the picture as you make adjustments.
Mode Presets (applies to MAIN only):
You can pre-select the Mode and THX preference that will be applied when a Source is selected or MAIN
power is turned on. Each type of program material has a separate setting. Presets do not apply to Sources
set to Anlg-Dir. To disable a preset, set it to ‘Last Used’ and make new Mode selection after exiting Setup.
For complete descriptions of surround modes and when to use them, refer to section 5.8.
Use the buttons to highlight one of the lines above in the menu, then use the buttons to scroll
through the selections.
Program Preset Selections
• 2.0 For stereo input, select any Mode in section 5.8.3, THX Games Mode, or Last Used. Dolby
Pro Logic, Pro Logic IIx Movie, and Neo:6 Cinema can be set with or without THX Cinema.
The following presets apply to Digital inputs only:
• 2.0-Sur Separate setting especially for surround-flagged Dolby Digital 2.0 material (section 5.8.2),
normally PLIIx Movie but any setting that applies to regular stereo input can also be used.
• DD-5.1 Select your playback preference for Dolby Digital 5.1 material: PLIIx Movie (either with or
without THX Cinema), PLIIx Music, Dolby D EX, THX Surround EX, THX Cinema,
THX Ultra2 Cinema, THX MusicMode, THX Games Mode, Neo:6 (either with or without
THX Cinema), Last Used, or None (see sections 5.8.4 and 5.8.6).
• DD-EX For material encoded in Dolby Digital Surround EX: PLIIx Movie (either with or without
THX Cinema), PLIIx Music, Dolby D EX, THX Surround EX, Neo:6 (either with or without
THX Cinema), Same as DD-5.1, Last Used, or None (see sections 5.8.4 and 5.8.6)
• DTS-5.1 For DTS material: Neo:6 (with or without THX Cinema), PLIIx Movie (either with or without
THX Cinema), PLIIx Music, Dolby D EX, THX Cinema, THX Ultra2 Cinema, THX MusicMode,
THX Games Mode, Last Used, or None (sections 5.8.5 and 5.8.6).
• DTS-ES For DTS-ES: DTS-ES Matrix (with or without THX Cinema), PLIIx Movie (with or without
THX Cinema), PLIIx Music, Dolby D EX, Same as DTS, Last Used, or None (see sections
5.8.5 and 5.8.6). Note that for ES Discrete, this setting is overridden and playback is in 6.1.

55
7. SETUP MENU continued …
SOURCE SETUP/PRESET EXAMPLES
Example 1: Rename AUX to ‘GAME’.
•Enter the Setup (section 7.1). Go to ‘5. SOURCE SETUP / PRESETS’ and press SELECT.
•Press the button until you reach ‘j. AUX’ and press SELECT.
•‘a. RENAME: AUX’ will be highlighted in red.
•Press SELECT. The first character ‘A’ will be highlighted in red.
•Use the Master Control Knob or the buttons to change characters. Change the first one to ‘G’.
•Press the button to move to the next character. Change it to ‘A’.
•Use the buttons to move to each remaining character. Change to ‘M’ and ‘E’.
•Press BACK to leave the submenu and return to the main menu.
Example 2: Change SAT Digital Input from ‘RCA’ to ‘Toslink1’ (TOS1).
•Make sure satellite receiver is connected to TOS1 and playing.
•Enter the Setup (section 7.1). Go to ‘5. SOURCE SETUP / PRESETS’ and press SELECT.
•Press the button until you reach ‘h. SAT’ and press SELECT.
•Press the button until you reach ‘b. AUDIO IN: Dig RCA DVD’ and press SELECT.
•‘RCA DVD’ will be highlighted. Use the buttons to change to ‘TOS1’ (sound will now be heard).
•Press BACK to leave the submenu and return to the main menu.
Example 3: Adjust TAPE Source Equalization.
•Make sure TAPE source component is connected to Analog Inputs and playing.
•Enter the Setup (section 7.1). Go to ‘5. SOURCE SETUP / PRESETS’ and press SELECT.
•Press the button until you reach ‘d. TAPE’ and press SELECT.
•Press the button until you reach ‘c. EQ’ and press SELECT.
•Use the buttons to move to ‘LF’ or ‘HF’. Use the buttons to adjust.
•Press BACK to leave the submenu and return to the main menu.
Example 4: Set SAT Lip-Sync Delay to 60 milliseconds.
•Enter the Setup (section 7.1). Go to ‘5. SOURCE SETUP / PRESETS’ and press SELECT.
•Press the button until you reach ‘h. SAT’ and press SELECT.
•Press the button until you reach ‘f. LIP-SYNC DELAY’ and press SELECT.
•Use the buttons to move from digit to digit and the buttons to adjust to ‘60 ms’.
•Press BACK to leave the submenu and return to the main menu.

56
7. SETUP MENU continued …
7.4.6 ADJUST INPUT LEVELS
For Sources set to Anlg-DSP or Anlg-Dir in menu 5, you can match input levels in MAIN to each other so
there are no large changes in volume as you change Sources.
If a source that is set to Analog-DSP is playing while you adjust the Input Level, you will notice a vertical bar
graph to the left of the dB setting. With the On-Screen display, this Bar Graph changes from green to pink,
to warn that there is 6 dB of headroom left. With pop music material, an occasional transition into the pink
region does not necessarily mean that the input is overloaded. If the bar graph stays pink constantly, reduce
the level until the bar graph becomes green for the most part.
Before making changes or adjustments in this menu, have all connected source components playing
similar music material. Then, as you switch through each highlighted Source, you will hear that
component play. This lets you know that each component is connected to the AVM 30, and it also allows
for easy comparative level adjustments of analog sources. Remember, adjusting input levels only
functions with Sources set to Analog in menu 5, and the bar graph only works with Analog-DSP setting.
Example: Adjust TAPE Input Level.
•Make sure a source component is connected to TAPE Analog L/R Input and playing.
•Enter the Setup (section 7.1). Go to ‘6. ADJUST INPUT LEVELS’ and press SELECT.
•Press the button until you reach ‘d. TAPE: +0.0 dB’.
•Press SELECT. ‘+0.0 dB’ will be highlighted in red.
•Use the buttons to change the Level.
•When finished, press BACK and then to go to another Source, or...
•Press BACK to leave the submenu and return to the main menu.
6. ADJUST INPUT LEVELS
Adjustment only applies when
Audio-In is set to Analog
a. CD : +0.0 dB
b. 2-Ch : +0.0 dB
c. 6-Ch : +0.0 dB
d. TAPE : +0.0 dB
e. FM/AM : –5.0 dB
f. DVD : +0.0 dB
g. TV : +0.0 dB
h. SAT : +0.0 dB
i. VCR : +0.0 dB
j. AUX : +0.0 dB

57
7. SETUP MENU continued …
7.4.7 A-D/AUDIO-OUT FORMAT
In the A-D/Audio-Out Format menu you can re-configure the Surround and Rear channels, set analog to
digital conversion parameters for the digital Record output, and configure the balanced analog outputs.
Reverse Surrounds/Rears:
If you’re using a 7.1 speaker system and prefer the Rear speakers instead of the Surrounds when 6-Ch S/E
is selected, set REVERSE SUR/REAR to ‘Yes’ and re-connect the AVM 30 as follows:Surround outputs on the
AVM 30 to the Rear inputs on your amplifier, and the Rear AVM 30 outputs to the Surround amplifier inputs.
The 6-Ch Surround inputs will now play through your Rear speakers. The AVM 30 flips the SUR/REAR
channels back to normal whenever THX is turned on for the 6-Ch input or when any other input is selected,
thereby maintaining correct speaker configuration at all times.
Copy Surrounds to Rears:
When playing material or using a Mode that has Surround channel information but no Rear information,
setting this to ‘Yes’ plays the Surround channel out of both sets of speakers.
Sampling Frequency (Fs):
When a Source that is set to Anlg-DSP is copied from MAIN to RECORD, the analog signal is converted to
digital using the AVM 30’s high-end A/D converters, and sent to DIGITAL1. This is useful for recording analog
music on a CD burner or computer with S/PDIF input on the sound card. You can select from 44.1, 48, 88.2, or
96 kHz sampling rates. Recording level is set by the input level in menu 6 (see sections 5.2.1 and 7.4.6).
This is also the signal processing rate for MAIN. Neo:6 does not function when ‘2-Ch Anlg-DSP Fs’ is
set to 88.2 kHz or 96 kHz, therefore leave this set to 44.1 or 48 kHz unless a recording is being made, and
then use 48, 88.2, or 96 kHz only if the equipment connected to DIGITAL1 and DIGITAL2 is capable of
accepting those sampling rates – audio CD burners can not.
For the 6-Ch S/E input, a separate setting is used so that bass management, time alignment, Mode,
Bass/Treble, Lip-Sync Delay, and THX can be performed at the same high resolution that DVD-Audio and
SACD provide. When 6-Ch S/E is copied from MAIN to RECORD, the DIGITAL1 output is a 2-channel downmix.
Bit Rate of DIGITAL1 when MAIN is copied to REC:
Choose from 16 or 24 bit output, to match the recorder. At 16 bits, dither is added to improve low level signals.
Output of DIGITAL2:
Set it to have the same output as DIGITAL1, or a fixed output from any Source set to Digital (DVD, SAT, etc.).
DIGITAL1 and DIGITAL2 transmit data from digital sources in the same format it comes in – if it’s Dolby Digital
or DTS encoded, it stays that way and can be linked to other digital equipment.
Balanced Output:
If the Balanced CENTER2 and SUB2 outputs are not in use for a second Center channel or Subwoofer in
MAIN, they can be used as Balanced ZONE2 L/R outputs (see section 4.2.5).
7. A-D/AUDIO-OUT FORMAT
See OPERATING MANUAL for
detailed instructions
a. 6-Ch REVERSE SUR/REAR : No
b. COPY SUR TO REAR : No
c. 6-ch Anlg-DSP Fs : 96 kHz
d. 2-ch Anlg-DSP Fs : 44.1 kHz
e. DIG1 when -MAIN->REC : 24 Bit
f. DIGITAL2 : Digital 1
g. BAL OUT : Ctr2/Sub2

58
7. SETUP MENU continued …
7.4.8 VOLUMES / RENAME PATHS
This menu allows you to define the power-on volume settings, set whether or not MAIN outputs shut off
when headphones are used, and to rename ZONE2, ZONE3, and RECORD.
Mute Amount:
When MUTE is pressed, sound can cut out completely, or decrease in volume by the amount that you set to
keep some of it in the background – select from ‘Silent’, or –5 to –30 dB in 5 dB steps.
Power-On Volume:
When you turn MAIN, ZONE2, or ZONE3 on, or plug in your headphones, the volume for each will come on
at the known levels you have set in this menu. This avoids any potential ‘surprises’ of not knowing the volume
someone had set when turning the AVM 30 off, and then having the power-on volume be either too loud or
quiet. You can set independent volumes for MAIN, ZONE2, ZONE3, and HEADPHONE.
Maximum Volume:
These settings allow you to individually limit the volume of MAIN, ZONE2, ZONE3, or HEADPHONE to avoid
damaging your equipment and/or your ears. This can also serve as a parental volume control feature. The
range of settings available for MAIN is from –95.5 dB to +31.5 dB in steps of .5 dB, and for ZONE2, ZONE3,
and HEADPHONE, the range is from –70.0 dB to +10.0 dB in 1.25 dB steps.
To set a fixed output for ZONE2 or ZONE3, scroll MAX VOL past +10.0 dB to set ‘LockOnVol’ and then set the
desired fixed output level in ON VOL. When the Path is on, ‘Lock’ is displayed beside the volume readout to
indicate that its volume cannot be changed with the volume control.
Headphone Mutes Speakers:
Determines whether or not the MAIN speakers turn off when headphones are plugged into the Front Panel:
•‘Yes’ The MAIN speakers mute. “HPHONE” is displayed instead of “MAIN” to indicate that
adjusting Volume, Bass, Treble, and Balance affect HEADPHONE only.
•‘No’ MAIN speakers continue to play when headphones are plugged in. (To make headphone
adjustments see sections 5.2 to 5.7.)
Rename Path:
The factory assigned Path names that appear on the Front Panel and On-Screen displays can be changed to
another name up to six characters long – procedure is the same as Rename Source (section 7.4.5).
8. VOLUMES / RENAME PATHS
a. MUTE LEVEL : Silent
b. MAIN ON VOLUME : –35.0 dB
c. MAIN MAX VOLUME : +10.0 dB
d. ZONE2 ON VOL : –35.0 dB
e. ZONE2 MAX VOL: +0.0 dB
f. ZONE3 ON VOL : –35.0 dB
g. ZONE3 MAX VOL: +0.0 dB
h. HPHONE ON VOL : –20.0 dB
i. HPHONE MAX VOL : +0.0 dB
j. HPHONE MUTE SPK: No
k. RENAME ZONE2 : ZONE2
l. RENAME ZONE3: ZONE3
m. RENAME RECORD: RECORD

59
7. SETUP MENU continued …
7.4.9 TRIGGERS / IR / RS-232
When a trigger output on the AVM 30 is connected to the trigger input of another component, such as a
power amplifier or video projector, the AVM 30 can turn the component on or off according to the trigger’s
Setup. For components that do not use triggers, a triggerable power bar may work (see your dealer).
•Trigger1 and Trigger2: Provide standard trigger output of 12 volts with up to 50 mA of current,
suitable for typical source components and most amplifiers.
•Trigger3: Provides an output of 12 volts with up to 200 mA of current, suitable for triggers on
motorized projection equipment and very high power amplifiers.
There is a quarter of a second delay between each trigger to minimize momentary line voltage drops caused
by switching on too many devices at the same time.
All Triggers:
When on ‘Disabled’ all triggers remain off. When on ‘Enabled’ the trigger chart below is used to set
conditions. For custom installations, ‘RS-232 Ctrl’ uses external control over all triggers.
Set Trigger:
Highlighting ‘b. SET TRIGGER 1’ and then pressing SELECT displays this menu – in the example shown,
TRIGGER 1 activates whenever MAIN power is turned on:
Under each of the four Paths, MAIN, ZONE2 (Z2), ZONE3 (Z3), and RECORD (REC), notice that there are 40
available Sources (40 dashes) that could be used to activate the trigger. After highlighting POWER ON or a
Source, press SELECT and use the buttons to move from one Path to another, and then to set the trigger
to activate, use the buttons to change the ‘–’ to a ‘*’ (be sure ALL TRIGGERS is set to ‘Enabled’).
9. TRIGGERS / IR / RS-232
a. ALL TRIGGERS : Disabled
b. SET TRIGGER 1
c. SET TRIGGER 2
d. SET TRIGGER 3
e. SET IR-INPUTS
f. BAUD RATE : 19200
g. FLOW CONTROL : None
h. RS-232 TX STATUS : Off
9b. SET TRIG-1 SOURCES - 50mA
MAIN Z2 Z3 REC
a. POWER ON : * – –
b. CD : – – – –
c. 2-Ch : – – – –
d. 6-Ch : –
e. TAPE : – – – –
f. FM/AM : – – – –
g. DVD : – – – –
h. TV : – – – –
i. SAT : – – – –
j. VCR : – – – –
k. AUX : – – – –

60
7. SETUP MENU continued …
Note: Changes to the trigger setup do not take effect until the Setup Menu is exited completely, to avoid
unnecessary rapid turning off and on of triggers while changes are being made.
Set IR Inputs:
This allows you to enable or disable the AVM 30’s Front IR Receiver and Rear IR Inputs. Being able to do so
can be useful when an IR repeater, connected to the AVM 30, is located in the same room as the AVM 30. In
such a case, the AVM 30 can receive two IR signals for the same command – one from the Remote Control
and one from the repeater. The problem is that rear signal is delayed slightly, and may confuse the IR
Receivers’ control circuits. Disabling the Front IR solves this problem.
In other situations, the IR signal may find its way to the internally mounted IR receiver through the vents in
the top cover. This could also cause confusion for the AVM 30. If the Rear IR inputs are not in use, simply
disable them to prevent any potential problems.
After highlighting an IR input, press SELECT and use the buttons to move from one Path to another. To
turn the input off, use the buttons to change the ‘*’ to a ‘–’. Do this through the Front Panel, since
Remote Control commands are ineffective once an IR sensor is turned off.
Note: If the AVM 30 does not respond to Remote Control commands, check the FRONT IR menu – enter
the Setup using the Front Panel buttons, go to menu ‘9. TRIGGERS/IR/RS-232’, followed by
‘e. SET IR-INPUTS’, and make sure the FRONT IR settings are set to ‘*’.
Baud Rate and Flow Control:
The Baud Rate (adjustable from 1200 to 115200 bps), and Flow Control (‘RTS’, ‘CTS’, or ‘None’), allow
configuration of the serial port communication parameters (normally for use by dealer/installers only).
RS-232 TX Status:
When ‘On’, all commands, status changes, and control information are echoed through the RS-232 port
(normally for use by dealer/installers only).
Example: Activate Trigger1 when DVD is selected in MAIN.
•Enter the Setup (section 7.1). Go to ‘9. TRIGGERS/IR/RS-232’ and press SELECT.
•Upon entering this menu item, ‘a. ALL TRIGGERS: Disabled’ will be highlighted in red.
•Use the buttons to change to ‘Enabled’.
•Press the button to go to ‘b. SET TRIGGER 1. Press SELECT.
•Use the buttons to go to ‘DVD’. Press SELECT.
•Use the buttons to change the ‘–’ to ‘*’.
•Press BACK twice to leave this submenu.
9e. SET IR-INPUTS
MAIN Z2 Z3
a. FRONT IR : * * *
b. REAR IR 1 : * * *
c. REAR IR 2 : * * *
d. REAR IR 3 : * * *

61
7.4.10 DISPLAYS / TIMEOUT
This menu allows you to configure both the On-Screen display, Front Panel display and Selection Time.
Main / Z2 On-Screen:
Lets you select the outputs that receive the On-Screen display – ‘Composite’, ‘S-Video’, or both. ‘Bypassed’
turns the On-Screen display off; if you choose ‘Bypassed’, you will have to rely on the Front Panel display.
Note: On-Screen display is not available for Component Video.
Main / Z2 OS Info:
From here, select the Path adjustments that are shown by the MAIN or ZONE2 On-Screen displays. For
example, if ZONE2 is set up with an IR repeater for the Remote Control, and you are using the AVM 30 in the
MAIN room, you may not want to be disturbed by information about adjustments made in ZONE2 by someone
else. In a different situation, you may want to see the ZONE2 information, for example, while adjusting ZONE2
yourself from the MAIN room.
Main / Z2 OS Position:
Allows you to position the On-Screen display to reduce the chance of it interfering with the on-screen
display positions of other video components (e.g. satellite receiver or a TV monitor’s own display, etc.).
Choose from: ‘Bottom’, ‘Mid’, or ‘Top’.
Main / Z2 OS Color:
If the On-Screen display of the Setup Menu appears unstable, it could be that your monitor is not
synchronizing to the blue (factory default) background color. You can change the background color to one
that your projector/monitor can synchronize to – black and magenta are also available.
Front Panel Brightness:
Simultaneously adjusts the intensity level of the Front Panel display and LED indicators. Three separate
adjustments can be made – HI, MED, and LOW when the DISPLAY button is used (section 5.9). Use HI to set
the daytime level, MED for the evening level and LOW for the nighttime level.
Front Panel Wake-Up:
If Display is set to Medium, Low, or Off, it can be made to change to a brighter level while you make any
adjustment, to either one level higher or Hi – choose ‘None’, ‘Up 1’, or ‘Hi’. When ‘None’ is chosen and the
Display is Off, it will behave as if set to ‘Up 1’ to prevent confusion as to whether the power is on or off.
7. SETUP MENU continued …
10. DISPLAYS / TIMEOUT
a. MAIN ON-SCREEN : Comp + S-V
b. MAIN OS INFO : All Zones
c. MAIN OS POS’N : Bottom
d. MAIN OS COLOR : Blue
e. Z2 ON-SCREEN : Comp + S-V
f. Z2 OS INFO : Z2 Only
g. Z2 OS POS’N : Bottom
h. Z2 OS COLOR : Blue
i. FRT PANEL-HI : 15
j. FRT PANEL-MED : 10
k. FRT PANEL-LOW : 5
l. FP WAKE-UP : Up 1
m. FUNCTION TIMEOUT : 5 s

62
Function Timeout:
This is the time that elapses after any adjustment is made. Once the Function Time elapses, the On-Screen
text disappears and the Front Panel display becomes dim. This also applies to how long ZONE2, ZONE3,
RECORD, and HEADPHONE information is displayed before MAIN display information returns. You can set
Function Timeout between 1 and 15 seconds.
Example: Set the position of the MAIN On-Screen information to the middle of the monitor.
•Enter the Setup (section 7.1). Go to ‘10. DISPLAYS/TIMEOUT’ and press SELECT.
•Press the button until you reach ‘c. MAIN OS POS’N: Bottom’.
•Use the buttons to change to ‘Middle’.
•When finished, press to go to another menu item, or...
•Press BACK to leave the submenu and return to the main menu.
7. SETUP MENU continued …

63
7.4.11 SAVE / RESTORE SETTINGS
The AVM 30 enables you to save your entire Setup configuration. Two separate save files are provided: USER
SETTINGS and INSTALLER SETTINGS. If your system is set up by your dealer, the configuration can be saved
in the INSTALLER file by the dealer. You can then make further Setup adjustments – save those settings
separately in your own USER file. FM • AM presets are also saved separately in USER SETTINGS and
INSTALLER SETTINGS.
If someone makes unwanted changes to the Setup Menu of your AVM 30, you can quickly and easily restore
either the dealer’s INSTALLER settings or your USER settings, thereby preventing the need to run through the
Setup procedure all over again. FM • AM presets saved in USER SETTINGS or INSTALLER SETTINGS will also
be restored.
The original FACTORY DEFAULTS can also be reloaded at any time to reset the AVM 30 to the factory settings.
As well, surround mode level, balance and bass/treble adjustments described in sections 5.6 and 5.7 will be
reset to 0 dB, and Mode settings described in section 5.8 will be reset to ‘None’ for all Sources.
Save Settings:
You can save settings with or without the use of a Password. Passwords are very easy to set up (see section
7.4.12) and will protect both USER and INSTALLER files from being changed by anyone who doesn’t have the
Password. New saves will overwrite the previously saved file. The AVM 30 will prompt you to confirm that
you want to over-write currently saved settings – press BACK at this point to abort a save.
Restore or Reload Settings:
You may RESTORE USER SETTINGS, INSTALLER SETTINGS, or RELOAD FACTORY DEFAULTS at will. The
AVM 30 will prompt you to confirm that you want to replace the current settings – press BACK at this point
to abort a restore.
Example 1: Save User Settings.
Note: FM • AM Tuner presets will also be saved in USER SETTINGS.
•Enter the Setup (section 7.1). Go to ‘11. SAVE/RESTORE SETTINGS’ and press SELECT.
•Upon entering this menu item, ‘a. SAVE USER SETTINGS’ will be highlighted in red.
•Press SELECT. You will be asked to confirm that you want to over-write current settings.
•Use the buttons and change to ‘Yes’. If you are using a Password (section 7.4.12), you will be
asked for it. Use the 0 – 9 buttons to enter your Password. The On-Screen display message will then
say ‘Saving Successful’, the Front Panel display will say ‘Done!’.
•When finished, press to go to another menu item, or...
•Press BACK to leave the submenu and return to the main menu.
11. SAVE / RESTORE SETTINGS
a. SAVE USER SETTINGS
b. RESTORE USER SETTINGS
c. SAVE INSTALLER SETTINGS
d. RESTORE INSTALLER SET’NS
e. RELOAD FACTORY DEFAULTS
7. SETUP MENU continued …

64
Example 2: Restore Installer Settings.
Note: FM • AM Tuner presets that were saved in INSTALLER SETTINGS will also be restored.
•Enter the Setup (section 7.1). Go to ‘11. SAVE/RESTORE SETTINGS’ and press SELECT.
•Press the button until you reach ‘d. RESTORE INSTALLER SET’NS’.
•Press SELECT. You will be asked to confirm that you want to restore installer settings.
•Use the buttons to change to ‘Yes’ and press SELECT. On-Screen display message will then say
‘Saving Successful’, the Front Panel display will say ‘Done!’.
•When finished, press to go to another menu item, or...
•Press BACK to leave the submenu and return to the main menu.
Example 3: Reload Factory Defaults.
Note: The current time and FM • AM Tuner presets will be retained. Surround mode level, balance,
bass/treble adjustments (sections 5.6 and 5.7), and Modes (section 5.8) will be reset to +0.0 dB.
•Enter the Setup (section 7.1). Go to ‘11. SAVE/RESTORE SETTINGS’ and press SELECT.
•Press the button until you reach ‘e. RELOAD FACTORY DEFAULTS’.
•Press SELECT. You will be asked to confirm that you want to ‘reload factory settings’.
•Use the buttons to change to ‘Yes’ and press SELECT. On-Screen display message will then say
‘Saving Successful’, the Front Panel display will say ‘Done!’.
•When finished, press to go to another menu item, or...
•Press BACK to leave the submenu and return to the main menu.
7. SETUP MENU continued …

7.4.12 LOCKOUT / PASSWORDS
Passwords are used to protect the saved User and Installer settings. Once you have set a password, it can
also be used as a Lockout to prevent settings from being changed by anyone without one of the passwords.
Set Setup Menu Lockout:
When set to ‘Yes’, this prevents anyone without a password from entering the Setup. When you attempt to
enter the Setup, you will be asked for your Password – either the USER or INSTALLER Password must then
be entered from the Remote Control before you will be allowed to continue.
Set User or Installer Password:
When setting the USER or INSTALLER Password, you will be asked to enter a four digit number. Pick one that
you will remember easily. To enter that number, use the 0 – 9 keys on the Remote Control (password cannot
be entered from the Front Panel). To change an existing password, enter the old one first, then enter (and
confirm) the new one.
Example 1: Set User Password (Remote Control only).
•Enter the Setup (section 7.1). You must enter the USER or INSTALLER Password if there is one.
•Go to ‘12. LOCKOUT/PASSWORDS’ and press SELECT.
•Press the key to go to ‘b. SET USER PASSWORD’.
•Press SELECT. You will be asked to enter a four digit number. Use the 0 – 9 keys to do so. If you are
changing your Password you will be asked to enter your old Password first. You will also be asked
to confirm your new Password (re-enter your new Password).
•When finished, press to go to another menu item, or...
•Press BACK to leave the submenu and return to the main menu.
Clearing the User Password: When asked for your new Password, press the key four times. You will
also be asked to confirm your new Password – press the key four times again. Message will then say
‘User Password Removed’.
Example 2: Set Setup Menu Lockout.
•Enter the Setup (section 7.1). Go to ‘12. LOCKOUT/PASSWORDS’ and press SELECT.
•Upon entering this menu item, ‘a. SET SETUP MENU LOCKOUT’ will be highlighted in red.
•Press SELECT. You will be asked to enter your Password. Either the USER or INSTALLER Password
will work. Use the 0 – 9 keys to do so.
•Use the buttons to change to ‘Yes’ or ‘No’.
•Press SELECT or BACK.
•When finished, press to go to another menu item, or...
•Press BACK to leave the submenu and return to the main menu.
65
12. LOCKOUT / PASSWORDS
a. SET SETUP MENU LOCKOUT
b. SET USER PASSWORD
c. SET INSTALLER PASSWORD
7. SETUP MENU continued …

66
8. SOFTWARE UPDATING
The operational characteristics of the AVM 30 are controlled by software that can be easily upgraded via the
RS-232 port on the Rear Panel. New software can be downloaded from our web site, and then transferred by
connecting the AVM 30 to your computer’s serial port and running the Software Installer.
8.1 SOFTWARE VERSION IDENTIFICATION
If you want to see which Software Version is in your AVM 30, press STATUS. The display will show:
Please contact your dealer or visit the AVM 30 page on our web site at www.anthemAV.com to find the latest
Software, and any operating manual updates that go along with new versions.
8.2 SOFTWARE UPDATING VIA YOUR DEALER
To do this, you will have to take your AVM 30 to your Authorized Anthem Dealer. To save yourself time and
trouble, please remember to call your dealer first to find out if you should get the latest Software version, and
then arrange a time to install the update. Note: Your dealer may charge for this service.
8.3 SOFTWARE UPDATING VIA YOUR COMPUTER AND THE INTERNET
To update the Software through your computer, you will need the following:
•Access to the Internet.
•Serial cable – straight wired, with one end DB9 male for the AVM 30, and the other, DB9 female or
DB25 female for your computer. A similar looking null-modem cable will not work.
Typically, a cable length of up to 100 feet (33 meters) will work for a long distance connection to your
computer. You may also install this cable permanently to enable easy future updates. When it’s not
in use, disconnecting it either behind the computer or the AVM 30 is recommended, to prevent the
possibility of a ground loop.
Computer System Requirements:
•Win9x, NT, ME, 2000, or XP.
•1 MB free space on the hard drive.
•Serial port. The Software Installer automatically detects the port being used (COM1 to COM4).
If your computer does not have a serial port but has a USB port, you will need a USB-to-serial
adapter (its driver program must also be installed on your computer).
Note: Before running the Installer, check your computer’s power management settings – particularly if
using a laptop – to ensure that the Software Update does not get interrupted while running.

67
Software installation procedure:
1. Find out which Software version you currently have by pressing STATUS.
2. Go to the ANTHEM web site (www.anthemAV.com) and locate the latest AVM 30 Software version.
Proceed only if your version is a lower number, indicating that it is older.
3. Click on the download icon. You will be asked where to save a file called ‘avm30install.zip’ – save it
to your computer’s desktop.
4. Double click on ‘avm30install.zip’. If you computer tells you that the file cannot be opened, you can
download a program that can open the file through one of the links on the ANTHEM web site.
5. Drag or extract ‘AVM 30 Installer.exe’ and ‘Read Me First.txt’ to desktop. ‘Read Me First.txt’ lists the
latest software changes. You can now delete ‘avm30install.zip’.
6. Ensure that your current AVM 30 Setup configuration is saved (see section 7.4.11).
7. Turn off your AVM 30 and disconnect the power cord to prevent the possibility of a static discharge
when the serial port is connected. Tuner presets, speaker level settings, bass/treble, etc. are
automatically written to memory if the line voltage is disconnected or during a power failure.
8. Using the serial cable, connect your computer to the AVM 30 via the RS-232 port on the rear panel.
Updating does not require moving the AVM 30 or disconnecting it from your system, as long as you
can connect your computer to the RS-232 port.
9. Plug the AVM 30’s power cord back in and turn the rear panel switch on.
10. Double click on ‘AVM 30 Installer.exe’, then click on ‘Install Upgrade Now’. In a few minutes, the
installation and verification will be completed.
Restore Settings?
You do not need to Restore or Recall any settings after installing new software. The AVM 30 will retain the
settings that were in use before the update, except that the day and time will be set according to your
computer’s day and time settings – if re-adjustment is required, see section 7.4.1.
Troubleshooting:
If the Installer keeps returning a message that says ‘AVM 30 Not Found’ after several attempts, restore
Factory Defaults in the Setup Menu, try installing again, and reload User Settings once the new software is
installed. If that doesn’t work, make sure that the serial port on your computer isn't already being used by
another application, such a docking station for a personal organizer – you must go into the application that
is using it to turn off the serial port.
8. SOFTWARE UPDATING continued …

68
APPENDIX A - IR MACROS
For Stereo sources:
MODE, 0, 1 – Stereo
MODE, 0, 2 – AnthemLogic-Music
MODE, 0, 3 – AnthemLogic-Cinema
MODE, 0, 4 – Pro Logic IIx Music
MODE, 0, 5 – Pro Logic IIx Movie
MODE, 0, 6 – Dolby Pro Logic
MODE, 0, 7 – DTS Neo:6 Music
MODE, 0, 8 – DTS Neo:6 Cinema
MODE, 0, 9 – All Channel Stereo
MODE, 1, 0 – All Channel Mono
MODE, 1, 1 – Mono
MODE, 1, 2 – Mono-Academy
MODE, 1 ,3 – Pro Logic IIx Matrix
MODE, 1, 4 – Pro Logic IIx Game
THX, 0, 1 – THX Off
THX, 0, 2 – THX Cinema
THX, 0, 3 – THX Games Mode
For Surround-flagged Dolby Digital 2.0 sources:
MODE, 2, 1 – Stereo
MODE, 2, 2 – AnthemLogic-Music
MODE, 2, 3 – AnthemLogic-Cinema
MODE, 2, 4 – Pro Logic IIx Music
MODE, 2, 5 – Pro Logic IIx Movie
MODE, 2, 6 – Dolby Pro Logic
MODE, 2, 7 – DTS Neo:6 Music
MODE, 2, 8 – DTS Neo:6 Cinema
MODE, 2, 9 – All Channel Stereo
MODE, 3, 0 – All Channel Mono
MODE, 3, 1 – Mono
MODE, 3, 2 – Mono-Academy
MODE, 3 ,3 – Pro Logic IIx Matrix
MODE, 3, 4 – Pro Logic IIx Game
THX, 0, 4 – THX Off
THX, 0, 5 – THX Cinema
THX, 0, 6 – THX Games Mode
Pro Logic IIx Music adjustment:
MODE, 4, 1 – Center Width display
MODE, 4, 2 – Dimension display
MODE, 4, 3 – Panorama Off
MODE, 4, 4 – Panorama On
Neo:6 Music adjustment:
MODE, 4, 5 – Center Image display
For Dolby Digital 5.1 sources and 6-Ch input:
THX, 1, 0 – THX Off
THX, 1, 1 – THX Cinema
THX, 1, 2 – THX Ultra2 Cinema
THX, 1, 3 – THX MusicMode
THX, 1, 4 – THX Surround EX
THX, 1, 5 – THX Games Mode
THX, 1, 6 – PLIIx Movie
THX, 1, 7 – PLIIx Movie+THX Cinema
THX, 1, 8 – PLIIx Music
THX, 1, 9 – Dolby Digital EX
THX, 2, 0 – Neo:6
THX, 2, 1 – Neo:6+THX Cinema
For Dolby Digital Surround EX-flagged sources:
MODE, 5, 1 – None
MODE, 5, 2 – Dolby Digital EX
MODE, 5, 3 – THX Surround EX
MODE, 5, 4 – PLIIx Movie
MODE, 5, 5 – PLIIx Movie+THX Cinema
MODE, 5, 6 – PLIIx Music
MODE, 5, 7 – Neo:6
MODE, 5, 8 – Neo:6+THX Cinema
For DTS sources:
THX, 4, 0 – THX Off
THX, 4, 1 – THX Cinema
THX, 4, 2 – THX Ultra2 Cinema
THX, 4, 3 – THX MusicMode
THX, 4, 4 – Neo:6+THX Cinema
THX, 4, 5 – THX Games Mode
THX, 4, 6 – PLIIx Movie
THX, 4, 7 – PLIIx Movie+THX Cinema
THX, 4, 8 – PLIIx Music
THX, 4, 9 – Dolby Digital EX
THX, 5, 0 – Neo:6
For DTS-ES sources:
MODE, 6, 1 – None
MODE, 6, 2 – DTS-ES Matrix
MODE, 6, 3 – DTS-ES+THX Cinema
MODE, 6, 4 – PLIIx Movie
MODE, 6, 5 – PLIIx Movie+THX Cinema
MODE, 6, 6 – PLIIx Music
MODE, 6, 7 – Dolby Digital EX
THX Re-EQ:
THX, 3, 0 – Re-EQ Off when THX is on
THX, 3, 1 – Re-EQ On when THX is on
THX, 3, 2 – Re-EQ Off when THX is off
THX, 3, 3 – Re-EQ On when THX is off
FM•AM Banks (ZONE2/3/REC codes also work):
MODE, 9, 0 – AM
MODE, 9, 1 – FM1
MODE, 9, 2 – FM2
MODE, 9, 3 – FM3
Using the factory remote control’s IR codes for MAIN Path, the following 3-key sequences can be programmed into
macro-capable remotes for direct access to Modes and tuner banks:
Some tips if you’re using a macro-capable remote control:
•If you do not want separate Mode selection according to flagged vs. unflagged source material, you can program
macros as a 6-key sequence, for example MODE, 0, 1, MODE, 2, 1 and flag will make no difference to selection.
•You can program your source selection keys with the power-on command preceding each source-select
command. This way, when a Source is selected, the AVM 30 will turn on at the same time if it is off, similar to
Front Panel operation.
•If your source components also have discrete commands for power-on and power-off, you can take the above
idea even further, for example, program the TV button with the following sequence: Power-on the AVM 30, select
TV Source in the AVM 30, power-on the satellite receiver / cable box, power-on the TV. This way, when the entire
system is off and you or a family member wants to watch TV, ‘just push TV’.

69
APPENDIX B – PRESET MEMORY CODES
The following codes are for operating other components with the remote control. Codes can only be used with their
respective Path/Component key (e.g. a VCR code can not be programmed in the DVD Path/Component key). If codes for
one of your components are not in this library, see section 6.8.4 for info on how to teach codes from your source remote.
To enter a 4-digit code:
1. Press the Path/Component key (e.g. DVD).
2. Press and hold LEARN until the LED flashes twice.
3. Enter the 4-digit code. Two LED blinks indicate that the code is accepted.
Statement D1, AVM 20/30 – MAIN 0040
Statement D1, AVM 20/30 – ZONE2 0041
Statement D1, AVM 20/30 – ZONE3 0042
AVM 2 – MAIN 0043
AVM 2 – ZONE2 0044
CD 1 0897
Sonic Frontiers SFT 1 0157
Sonic Frontiers SFCD 1 0157
Sonic Frontiers Transport 3 0157
TVs:
AOC 0030, 0019
Admiral 0093, 0463
Aiko 0092
Akai 0030
Alaron 0179
Ambassador 0177
America Action 0180
Ampro 0751
Anam 0180
Audiovox 0451,0180, 0092, 0623
Baysonic 0180
Belcor 0019
Bell & Howell 0154, 0016
Bradford 0180
Brockwood 0019
Broksonic 0236, 0463
CXC 0180
Candle 0030, 0056
Carnivale 0030
Carver 0054
Celebrity 0000
Cineral 0451, 0092
Citizen 0060, 0030, 0056, 0039,
0092
Concerto 0056
Contec 0180
Craig 0180
Crosley 0054
Crown 0180, 0039
Curtis Mathes 0047, 0054, 0154, 0051,
0451, 0093, 0060, 0030,
0145, 0056, 0016, 0039,
0166, 0466, 1147, 1347
Daewoo 0451, 0019, 0039, 0092,
0623, 0624
Daytron 0019
Denon 0145
Dumont 0017, 0019
Dwin 0720, 0774
Electroband 0000
Emerson 0154, 0236, 0463, 0180,
0282, 0178, 0019, 0179,
0039, 0177, 0623, 0624
Envision 0030
Fisher 0154
Fujitsu 0179
Funai 0180, 0179, 0171
Futuretech 0180
GE 0047, 0051, 0451, 0093,
0282, 0178, 0021, 0135,
1147, 1347
Gibralter 0017, 0030, 0019
GoldStar 0030, 0178, 0019, 0056
Gradiente 0053, 0056
Grunpy 0180, 0179
Hallmark 0178
Harley Davidson 0179
Harman/Kardon 0054
Harvard 0180
Hitachi 0145, 0056, 0151
Infinity 0054
Inteq 0017
JBL 0054
JCB 0000
JVC 0053
KEC 0180
KTV 0180, 0030, 0039
Kenwood 0030, 0019
LG 0056
LXI 0047, 0054, 0154, 0156,
0178
Logik 0016
Luxman 0056
MGA 0150, 0030, 0178, 0019
MTC 0060, 0030, 0019, 0056
Magnavox 0054, 0030, 0179
Majestic 0016
Marantz 0054, 0030
Matsushita 0250
Megatron 0178, 0145
Memorex 0154, 0250, 0463, 0150,
0178, 0056, 0016
Midland 0047, 0017, 0051, 0039,
0135
Minutz 0021
Mitsubishi 0093, 0150, 0178, 0019
Motorola 0093
Multitech 0180
NAD 0156, 0178, 0166
NEC 0030, 0019, 0056
NTC 0092
Nikko 0030, 0178, 0092
Onwa 0180
Optimus 0154, 0250, 0166
Optonica 0093, 0165
Orion 0236, 0463, 0179
Panasonic 0051, 0250
Penney 0047, 0156, 0051, 0060,
0030, 0178, 0021, 0019,
0056, 0039, 0135, 1347
Philco 0054, 0463, 0030, 0145,
0019
Philips 0054
Pilot 0030, 0019, 0039
Pioneer 0166
Portland 0019, 0039, 0092
Prism 0051
Proscan 0047
Proton 0178, 0466
Pulsar 0017, 0019
Quasar 0051, 0250, 0165
RCA 0047, 0051, 0093, 0019,
0090, 0135, 1047, 1147,
1247, 1347
Radio Shack 0047, 0154, 0165, 0180,
0030, 0178, 0019, 0056,
0039
Realistic 0154, 0165, 0180, 0030,
0178, 0019, 0056, 0039
Runco 0017, 0030, 0603
SSS 0180, 0019
Sampo 0030, 0039
Samsung 0060, 0030, 0178, 0019,
0056
Samsux 0039
Sansei 0451
Sansui 0463
Sanyo 0154
Scimitsu 0019
Scotch 0178
Scott 0236, 0180, 0178, 0019,
0179
Sears 0047, 0054, 0154, 0156,
0178, 0179, 0056, 0171
Semivox 0180
Semp 0156
Sharp 0093, 0165, 0039
Shogun 0019
Signature 0016
Sony 0000
Soundesign 0180, 0178, 0179
Squareview 0171
Starlite 0180
Supreme 0000
Sylvania 0054, 0030
Symphonic 0171
TMK 0178, 0056, 0177
Tandy 0093
Technics 0051, 0250
Technol Ace 0179
Techwood 0051, 0056
Teknika 0054, 0180, 0150, 0060,
0019, 0179, 0056, 0016,
0039, 0092
Telefunken 0056
Toshiba 0154, 0156, 0060
Totevision 0039
Vector Research 0030
Victor 0053
Vidikron 0054
Vidtech 0178, 0019
Wards 0054, 0165, 0030, 0178,
0021, 0019, 0179, 0056,
0016
White Westinghouse 0463, 0623, 0624
Yamaha 0030, 0019
Zenith 0017, 0463, 0016, 0092
VCRs:
Admiral 0048, 0209
Adventura 0000
Aiko 0278
Aiwa 0037, 0000
Akai 0041
America Action 0278
American High 0035
Asha 0240
Audiovox 0037
Beaumark 0240
Bell & Howell 0104
Brocksonic 0209
Broksonic 0184, 0121, 0209, 0002
CCE 0072, 0278
Calix 0037
Canon 0035
Carver 0081
Cineral 0278
Citizen 0037, 0278
Colt 0072
Craig 0037, 0047, 0240, 0072,
0271
Curtis Mathes 0060, 0035, 0041, 0162
Cybernex 0240
Daewoo 0045, 0278
Denon 0042
Dynatech 0000
Electrohome 0037
Electrophonic 0037
Emerex 0032
Emerson 0037, 0184, 0000, 0121,
0043, 0209, 0002, 0278

70
APPENDIX B – PRESET MEMORY CODES continued …
Fisher 0047, 0104
Fuji 0035, 0033
Funai 0000
GE 0060, 0035, 0048, 0240
Garrard 0000
Go Video 0526
GoldStar 0037, 0038
Gradiente 0000
HI-Q 0047
Harley Davidson 0000
Harman/Kardon 0081, 0038
Harwood 0072
Headquarter 0046
Hitachi 0000, 0042, 0041
Hughes Net. Sys. 0042
JVC 0067, 0041
Jensen 0041
KEC 0037, 0278
KLH 0072
Kenwood 0067, 0041, 0038
Kodak 0035, 0037
LXI 0037
Lloyd’s 0000
Logik 0072
MEI 0035
MGA 0240, 0043
MGN Technology 0240
MTC 0240, 0000
Magnasonic 0278
Magnavox 0035, 0039, 0081, 0000,
0149
Magnin 0240
Marantz 0035, 0081
Marta 0037
Matsushita 0035, 0162, 0454
Memorex 0035, 0037, 0048, 0039,
0047, 0240, 0000, 0104,
0209, 0046, 1162, 1262
Minolta 0042
Mitsubishi 0048, 0067, 0043
Motorola 0035, 0048
Multitech 0000, 0072
NEC 0104, 0067, 0041, 0038
Nikko 0037
Noblex 0240
Olympus 0035
Optimus 0037, 0048, 0104, 0162,
0454, 1062, 1162, 1262
Orion 0184, 0209, 0002
Panasonic 0035, 0162, 0225, 0454,
1162
Penney 0035, 0037, 0240, 0042,
0038
Pentax 0042
Philco 0035, 0209
Philips 0035, 0081
Pilot 0037
Pioneer 0067
Profitronic 0240
Proscan 0060
Protec 0072
Pulsar 0039
Quarter 0046
Quartz 0046
Quasar 0035, 0162, 0454, 1162
RCA 0060, 0035, 0048, 0240,
0042, 0149
Radio Shack 0000
Radix 0037
Randex 0037
Realistic 0035, 0037, 0048, 0047,
0000, 0104,
0046
Runco 0039
STS 0042
Samsung 0240, 0045
Sanky 0048, 0039
Sansui 0000, 0067, 0209, 0041,
0271
Sanyo 0047, 0240, 0104, 0046
Scott 0184, 0045, 0121, 0043
Sears 0035, 0037, 0047, 0000,
0042, 0104, 0046
Semp 0045
Sharp 0048
Shintom 0072
Shogun 0240
Singer 0072
Sony 0035, 0032, 0000, 0033
Sylvania 0035, 0081, 0000, 0043
Symphonic 0000
TMK 0240
Tatung 0041
Teac 0000, 0041
Technics 0035, 0162
Teknika 0035, 0037, 0000
Thomas 0000
Toshiba 0045, 0043
Totevision 0037, 0240
Unitech 0240
Vector 0045
Vector Research 0038
Video Concepts 0045
Videosonic 0240
Wards 0060, 0035, 0048, 0047,
0081, 0240, 0000, 0042,
0072, 0149
White Westinghouse 0209, 0278
XR-1000 0035, 0000, 0072
Yamaha 0038
Zenith 0039, 0000, 0209, 0033
TV/VCR Combos:
American High 0035 (TV - 0051)
Brocksonic 0002, 0294
Colt 0072
Curtis Mathis 0035 (TV - 0051)
Daewoo 0278
Emerson 0002, 0294, 0479
Funai 0000
GE 0035 (TV - 0051),
0060 (TV - 0047),
0048 (TV - 0093),
0240
Hitachi 0035 (TV - 0051),
0000
HQ 0000
Lloyds 0000
MGA 0240
Magnavox 0081 (TV - 0054),
0035 (TV - 0051),
0000
Magnin 0240
Memorex 0037,
0162 (TV - 0250)
Mitsubishi 0048 (TV - 0093)
Orion 0002, 0294, 0479
Panasonic 0035 (TV - 0051),
0162 (TV - 0250)
Penney 0035 (TV - 0051),
0240,
0162 (TV - 0250)
Quasar 0035 (TV - 0051),
0162 (TV - 0250)
RCA 0060 (TV - 0047),
0035 (TV - 0051),
0048 (TV - 0093)
Sansui 0000, 0479
Sanyo 0240
Sears 0000, 0037
Sharp 0048 (TV - 0093)
Sony 0032 (TV - 0000)
Symphonic 0000
Zenith 0000
Cable Converters:
ABC 0003, 0008, 0014, 0017,
0007, 0011, 0013
Allegro 0153, 0315
Archer 0153, 0797
Bell & Howell 0014
Century 0153
Citizen 0153, 0315
Comtronics 0040
Contec 0019
Eastern 0002
Emerson 0797
Everquest 0015,0040
Focus 0400
Garrard 0153
Gemini 0015
General Instrument 0476, 0276, 0011, 0810
GoldStar 0144, 0040
Goodmind 0797
Hamlin 0020, 0259, 0009, 0034
Hitachi 0011
Hytex 0007
Jasco 0015, 0153, 0315
Jerrold 0003, 0012, 0476, 0276,
0014, 0015, 0011, 0810
Memorex 0000
Movie Time 0063
NSC 0063
Oak 0019, 0007
Optimus 0021
Panasonic 0000, 0107, 0021
Paragon 0000
Philips 0153
Pioneer 0144, 0533
Popular Mechanics 0400
Pulsar 0000
Quasar 0000
RCA 0021
Radio Shack 0015, 0315, 0797, 0883
Recoton 0400
Regal 0020, 0259
Regency 0002
Rembrandt 0011
Runco 0000
SL Marx 0040
Samsung 0144, 0040
Scientific Atlanta 0008, 0477, 0017, 0877
Signal 0015, 0040
Signature 0011
Sprucer 0021
Starcom 0003, 0015
Stargate 0015, 0040, 0797
Starquest 0015
TV86 0063
Teleview 0040
Tocom 0012, 0013
Toshiba 0000
Tusa 0015
Unika 0153
United Artists 0007
Universal 0153, 0191
Viewstar 0063
Zenith 0000, 0525
Zentek 0400
Satellite or DBS Receivers:
AlphaStar 0772
Chaparral 0216
Echostar 0775
Expressvu 0775
General Instrument 0627, 0361, 0869
HTS 0775
Hitachi 0819
Hughes Net. Sys. 0749
JVC 0775
Jerrold 0627, 0361
Magnavox 0724, 0722
Memorex 0724
Next Level 0869
Panasonic 0701
Philips 0724, 0722
Primestar 0627, 0361
RCA 0566, 0143, 0392, 0855
Radio Shack 0869
Realistic 0052
Sony 0639
Star Choice 0869
Toshiba 0790
Uniden 0724, 0722, 0052
Zenith 0856

71
CD Players:
Aiwa 0157, 0124
Burmester 0420
California Audio Lab 0029
Carver 0157, 0179, 0437
DKK 0000
Denon 0003, 0873
Emerson 0305
Fisher 0179, 0174
Garrard 0420, 0393
Genexxa 0032, 0305
Harman/Kardon 0157, 0173
Hitachi 0032
JVC 0072
Kenwood 0028, 0037, 0190, 0681,
0826
Krell 0157
LXI 0305
Linn 0157
MCS 0029
MTC 0420
Magnavox 0157, 0305
Marantz 0029, 0157, 0180
Mission 0157
NSM 0157
Nikko 0174
Onkyo 0101, 0868
Optimus 0000, 0032, 0179, 0305,
0037, 0420, 0145, 0468,
0437
Panasonic 0029, 0303
Parasound 0420
Philips 0157, 0626
Pioneer 0032, 0305, 0468, 0244
Proton 0157
QED 0157
Quasar 0029
RCA 0179, 0305, 0053, 0764
Realistic 0179, 0420, 0180
Rotel 0157, 0420
SAE 0157
Sansui 0157, 0305
Sanyo 0179
Scott 0305
Sears 0305
Sharp 0037, 0180, 0861
Sherwood 0180
Sony 0000, 0185, 0490
Soundesign 0145
Tascam 0420
Teac 0420, 0393, 0174, 0180
Technics 0029, 0303
Victor 0072
Wards 0157, 0053
Yamaha 0036, 0187
Yorx 0461
DVD Players:
Harman/Kardon 0582
JVC 0558
Kenwood 0534
Magnavox 0503
Mitsubishi 0521
Onkyo 0503
Panasonic 0490
Philips 0503, 0539
Pioneer 0525, 0571
Proscan 0522
RCA 0522
Samsung 0573
Sony 0533
Technics 0490
Theta Digital 0571
Toshiba 0503
Yamaha 0490, 0545
Zenith 0503, 0591
LD Players:
Denon 0059
Mitsubishi 0059
NAD 0059
Pioneer 0059
Sony 0193, 0201
Cassette Decks:
Aiwa 0029, 0197
Carver 0029
Denon 0076
Harman/Kardon 0182, 0029
JVC 0244, 0273
Kenwood 0070
Magnavox 0029
Marantz 0029
Onkyo 0135, 0282
Optimus 0027, 0220
Panasonic 0229
Philips 0029
Pioneer 0027, 0220, 0099
Sansui 0029
Sony 0243, 0170, 0291
Technics 0229
Victor 0273
Wards 0027
Yamaha 0097, 0094
Stereo Tuners or Receivers:
ADC 0531
Adcom 0616
Aiwa 0158, 0189, 0121, 0405
Akai 0224
Capetronic 0531
Carver 0189, 0008, 0042, 0360
Casio 0195
Clarinette 0195
Curtis Mathes 0080
Denon 0004
Emerson 0424
Fisher 0042, 0219, 0360
Garrard 0463, 0424
Harman/Kardon 0110, 0189, 0891
JBL 0110
JVC 0074
Kenwood 0027, 0186, 0042, 0077
Koss 0424
LXI 0181
Linn 0189
Lloyd’s 0195
MCS 0039, 0346
Magnavox 0531, 0189, 0195, 0391
Marantz 0039, 0189
Modulaire 0195
NAD 0320
Nakamichi 0097, 0347
Onkyo 0135
Optimus 0531, 0670, 0186, 0042,
0177, 0181, 0219, 0738,
0801, 1023
Panasonic 0039, 0309
Penney 0195
Philips 0189, 0391
Pioneer 0531, 0014, 0150, 0630,
0080, 1023
Quasar 0039
RCA 0531, 0054, 0346, 0360,
0530
Realistic 0195, 0163, 0181
Sansui 0189, 0346
Sanyo 0219, 0801
Scott 0163, 0322
Sharp 0186
Sherwood 0491, 0502
Sony 0158, 0168, 0474
Soundesign 0670
Teac 0463, 0163
Technics 0039, 0309, 0208
Victor 0074
Wards 0158, 0014, 0189, 0080,
0054
Yamaha 0176, 0186
Yorx 0195
Zenith 0857
Stereo Amplifiers:
Aiwa 0406
Carver 0269
Curtis Mathes 0300
Denon 0160
Harman/Kardon 0892
JVC 0331
Linn 0269
Magnavox 0269
Marantz 0269
Panasonic 0308
Philips 0269, 0892
Pioneer 0013, 0300
Sony 0220, 0689
Technics 0308
Victor 0331
Wards 0013
Yamaha 0354
Home Automation:
GE 0240
Lutron 0597
One For All 0167
Radio Shack 0240
Security System 0167
Universal X10 0167
X10 0167
DBS Audio Services:
Aiwa 0010, 0159, 0404
Fisher 0052
Harman/Kardon 0477
JBL 0477
JVC 0073
Jerrold 0459, 0520
RCA 0056
Scientific Atlanta 0460
Sony 0010, 0159
Starcom 0459
Video Accessories:
Archer 0160
GC Electronics 0160
Jebsee 0160
Rabbit 0081
Radio Shack 0160
TeleCaption 0171
APPENDIX B – PRESET MEMORY CODES continued …

72

73
ANALOG AUDIO SECTION
Input Impedance . . . . . . . . . . . . . . . . . . . . . . . . . . . . . . . . . . . . . . . . . . . . . . . . . . . . . . . . . . . . . . . . . . . 20 kΩ
Output Impedance
Main. . . . . . . . . . . . . . . . . . . . . . . . . . . . . . . . . . . . . . . . . . . . . . . . . . . . . 300 Ω(RCA), 600 Ω(XLR)
Zone2/3 & Record . . . . . . . . . . . . . . . . . . . . . . . . . . . . . . . . . . . . . . . . . . . . . . . . . . . . . . . . . . . 51 Ω
Rated Input . . . . . . . . . . . . . . . . . . . . . . . . . . . . . . . . . . . . . . . . . . . . . . . . . . . . . . . . . . . . . . . . . . . . . 2.0 Vrms
Maximum Input
6-Channel S/E . . . . . . . . . . . . . . . . . . . . . . . . . . . . . . . . . . . . . . . . . . . . . . . . . . . . . . . . . . . 3.0 Vrms
All Others . . . . . . . . . . . . . . . . . . . . . . . . . . . . . . . . . . . . . . . . . . . . . . . . . . . . . . . . . . . . . . . 5.3 Vrms
Rated Output (100 kΩload) . . . . . . . . . . . . . . . . . . . . . . . . . . . . . . . . . . . . . . . . . . . . . . . . . . . . . . . . 2.0 Vrms
Minimum Load . . . . . . . . . . . . . . . . . . . . . . . . . . . . . . . . . . . . . . . . . . . . . . . . . . . . . . . . . . . . . . . . . . . . . 5 kΩ
Maximum Output
RCA. . . . . . . . . . . . . . . . . . . . . . . . . . . . . . . . . . . . . . . . . . . . . . . . . . . . . . . . . . . . . . . . . . . . 6.3 Vrms
XLR . . . . . . . . . . . . . . . . . . . . . . . . . . . . . . . . . . . . . . . . . . . . . . . . . . . . . . . . . . . . . . . . . . . 12.6 Vrms
Headphone Output. . . . . . . . . . . . . . . . . . . . . . . . . . . . . . . . . . . . . . . . . . 100 mW into 32 Ωat 0.2% THD+N
Volume Control Range
Main . . . . . . . . . . . . . . . . . . . . . . . . . . . . . . . . . . . . . . . . . . -95.5 to +31.5 dB in 0.5 dB increments
Zone2/3 and Headphone. . . . . . . . . . . . . . . . . . . . . . . . . -62.5 to +10.0 dB in 1.25 dB increments
Crosstalk (at 1 kHz) . . . . . . . . . . . . . . . . . . . . . . . . . . . . . 82 dB between channels, 86 dB between inputs
XLR Pin Configuration . . . . . . . . . . . . . . . . . . . . . . . . . . . . . Pin 1: Ground, Pin 2: Positive, Pin 3: Negative
DIGITAL AUDIO SECTION
Analog to Digital Converters. . . . . . . . . . . . . . . . . . . . . . . . . . . . . . . . . . . . . . . . . . . . . . . . . . . AKM AK5383
Analog to Digital Conversion S/N Ratio at digital Rec output (IEC-A Filter). . . . . . . . . . . . . . . . . . 100 dB
Processor . . . . . . . . . . . . . . . . . . . . . . . . . . . . . . . . . . . . . . . . . . . . . . . . . . . . . . Motorola 56367 at 150 MHz
Digital to Analog Converters. . . . . . . . . . . . . . . . . . . . . . . . . . . . . . . . . . . . . . . . . . . . . . . . . . . AKM AK4382
Crossover
High-Pass Slope (Small Speaker Setting) . . . . . . . . . . . . . . . . . . . . . . 12 dB/octave (2nd order)
Low-Pass Slope (Subwoofer) . . . . . . . . . . . . . . . . . . . . . . . . . . . . . . . . . 24 dB/octave (4th order)
Frequency (Adjustable) . . . . . . . . . . . . . . . . . . . . . . . . . . . . . . . . 25 to 160 Hz in 5 Hz increments
Tone Control
Filter Response Type . . . . . . . . . . . . . . . . . . . . . . . . . . . . . . . . . . . . . . . . . . . . . . . . . . . . . . . . Shelf
Bass Turnover Frequency . . . . . . . . . . . . . . . . . . . . . . . . . . . . . . . . . . . . . . . . . . . . . . . . . . . 200 Hz
Treble Turnover Frequency . . . . . . . . . . . . . . . . . . . . . . . . . . . . . . . . . . . . . . . . . . . . . . . . . . . 2 kHz
Range . . . . . . . . . . . . . . . . . . . . . . . . . . . . . . . . . . . . . . . . . . . . . . . . . . . . . . . . . . . . . . . . . . . ±12 dB
All digital audio inputs and output are to S/PDIF electrical (75 Ω, 0.5 Vp-p), S/PDIF optical (Toslink), or
AES / EBU (110 Ω, 5 Vp-p) standards.
SPECIFICATIONS

74
MAIN Path (RCA & XLR output)
Frequency Response and Bandwidth
6-Ch and 2-Ch BAL Direct Inputs . . . . 10 Hz to 20 kHz (+0, -0.2 dB), 1 Hz to 130 kHz (+0, -3 dB)
2-Ch S/E Direct Inputs . . . . . . . . . . . . . 10 Hz to 20 kHz (+0, -0.2 dB), 1 Hz to 120 kHz (+0, -3 dB)
Analog-DSP Inputs at 24/96 . . . . . . . . . 10 Hz to 20 kHz (+0, -0.3 dB), 2 Hz to 37 kHz (+0, -3 dB)
Digital Inputs at 24/96 . . . . . . . . . . . . . . 10 Hz to 20 kHz (+0, -0.2 dB), 1 Hz to 39 kHz (+0, -3 dB)
THD+N (at Rated Input & Output)
6-Ch S/E Direct Input. . . . . . . . . . . . . . . . . . . . . . . . . . . . . . . . . . . . . . . . . . . . 0.003% (80 kHz BW)
2-Ch BAL Direct Input . . . . . . . . . . . . . . . . . . . . . . . . . . . . . . . . . . . . . . . . . . . 0.004% (80 kHz BW)
2-Ch S/E Direct Inputs . . . . . . . . . . . . . . . . . . . . . . . . . . . . . . . . . . . . . . . . . . . 0.006% (80 kHz BW)
Analog-DSP Inputs at 24/48 . . . . . . . . . . . . . . . . . . . . . . . . . . . . . . . . . . . . . 0.006% (AES17 Filter)
Digital Inputs at 24/48 . . . . . . . . . . . . . . . . . . . . . . . . . . . . . . . . . . . . . . . . . . 0.004% (AES17 Filter)
IMD (CCIF at 15 kHz & 16 kHz)
6-Ch S/E Direct Input. . . . . . . . . . . . . . . . . . . . . . . . . . . . . . . . . . . . . . . . . . . . . . . . . . . . . . . 0.001%
2-Ch BAL Direct Input . . . . . . . . . . . . . . . . . . . . . . . . . . . . . . . . . . . . . . . . . . . . . . . . . . . . . . 0.002%
2-Ch S/E Direct Inputs. . . . . . . . . . . . . . . . . . . . . . . . . . . . . . . . . . . . . . . . . . . . . . . . . . . . . . 0.003%
Analog-DSP Inputs at 24/48 . . . . . . . . . . . . . . . . . . . . . . . . . . . . . . . . . . . . . . . . . . . . . . . . . 0.003%
Digital Inputs at 24/48 . . . . . . . . . . . . . . . . . . . . . . . . . . . . . . . . . . . . . . . . . . . . . . . . . . . . . . 0.001%
S/N Ratio (ref. 2.0 Vrms, IEC-A Filter)
6-Ch S/E Direct Input . . . . . . . . . . . . . . . . . . . . . . . . . . . . . . . . . . . . . . . . . . . . . . . . . . . . . . . 107 dB
2-Ch Direct Inputs . . . . . . . . . . . . . . . . . . . . . . . . . . . . . . . . . . . . . . . . . . . . . . . . . . . . . . . . . 106 dB
Analog-DSP Inputs at 24/48 . . . . . . . . . . . . . . . . . . . . . . . . . . . . . . . . . . . . . . . . . . . . . . . . . 100 dB
Digital Inputs at 24/96 . . . . . . . . . . . . . . . . . . . . . . . . . . . . . . . . . . . . . . . . . . . . . . . . . . . . . . 104 dB
ZONE2 and ZONE3 Paths
Frequency Response and Bandwidth . . . . . . . . 20 Hz to 20 kHz (+0, -0.1 dB), 3 Hz to 140 kHz (+0, -3 dB)
THD+N (at Rated Input & Output) . . . . . . . . . . . . . . . . . . . . . . . . . . . . . . . . . . . . . . . . . . 0.06% (80 kHz BW)
IMD (CCIF at 15 kHz & 16 kHz) . . . . . . . . . . . . . . . . . . . . . . . . . . . . . . . . . . . . . . . . . . . . . . . . . . . . . . . . 0.06%
S/N Ratio (ref. 2.0 Vrms, IEC-A Filter) . . . . . . . . . . . . . . . . . . . . . . . . . . . . . . . . . . . . . . . . . . . . . . . . . . 97 dB
FM TUNER
Sensitivity
50 dB S/N . . . . . . . . . . . . . . . . . . . . . . . . . . . . . . . . . . . . . . . . . . . . . . . . . 13 dBµ typ., 25 dBµ max.
IHF . . . . . . . . . . . . . . . . . . . . . . . . . . . . . . . . . . . . . . . . . . . . . . . . . . . . . . . 10 dBµ typ., 20 dBµ max.
S/N Ratio
Mono . . . . . . . . . . . . . . . . . . . . . . . . . . . . . . . . . . . . . . . . . . . . . . . . . . . . . . . 75 dB typ., 65 dB min.
Stereo. . . . . . . . . . . . . . . . . . . . . . . . . . . . . . . . . . . . . . . . . . . . . . . . . . . . . . . 69 dB typ., 60 dB min.
Distortion
Mono . . . . . . . . . . . . . . . . . . . . . . . . . . . . . . . . . . . . . . . . . . . . . . . . . . . . . . . . 0.2% typ., 1.0% max.
Stereo. . . . . . . . . . . . . . . . . . . . . . . . . . . . . . . . . . . . . . . . . . . . . . . . . . . . . . . . 0.3% typ., 1.5% max.
Stereo Separation . . . . . . . . . . . . . . . . . . . . . . . . . . . . . . . . . . . . . . . . . . . . . . . . . . . . 40 dB typ., 25 dB min.
Adjacent Channel Selectivity (±400 kHz) . . . . . . . . . . . . . . . . . . . . . . . . . . . . . . . . . 70 dB typ., 60 dB min.
Frequency Response . . . . . . . . . . . . . . . . . . . . . . . . . . . . . . . . . . . . . . . . . . . . . . 25 Hz to 15 kHz (+0, -2 dB)
SPECIFICATIONS continued …

75
AM TUNER
Sensitivity (20 dB S/N) . . . . . . . . . . . . . . . . . . . . . . . . . . . . . . . . . . . . . . . . . . . . . . 49 dBµ typ., 56 dBµ max.
S/N Ratio . . . . . . . . . . . . . . . . . . . . . . . . . . . . . . . . . . . . . . . . . . . . . . . . . . . . . . . . . . . . 50 dB typ., 43 dB min.
Distortion. . . . . . . . . . . . . . . . . . . . . . . . . . . . . . . . . . . . . . . . . . . . . . . . . . . . . . . . . . . . . 0.7% typ., 2.0% max.
One Signal Selectivity (±10 kHz) . . . . . . . . . . . . . . . . . . . . . . . . . . . . . . . . . . . . . . . . 24 dB typ., 18 dB min.
VIDEO
Bandwidth of complete path from input to output
Composite & S-Video . . . . . . . . . . . . . . . . . . . . . . . . . . . . . . . . . . . . . . . . . . . . . . . . . . . . . . 70 MHz
Component: Y . . . . . . . . . . . . . . . . . . . . . . . . . . . . . . . . . . . . . . . . . . . . . . . . . . . . . . . . . . . 110 MHz
Pr. . . . . . . . . . . . . . . . . . . . . . . . . . . . . . . . . . . . . . . . . . . . . . . . . . . . . . . . . . . . 90 MHz
Pb . . . . . . . . . . . . . . . . . . . . . . . . . . . . . . . . . . . . . . . . . . . . . . . . . . . . . . . . . . . 80 MHz
All video inputs and outputs are 75 Ω, 1.5 Vp-p. Component video switching is suitable for up to 1080p.
CONTROL
Infra Red
Carrier Frequency. . . . . . . . . . . . . . . . . . . . . . . . . . . . . . . . . . . . . . . . . . . . . . . . . . . . . . . . . . 38 kHz
Max. 12V Supply Current . . . . . . . . . . . . . . . . . . . . . . . . . . . . . . . . . . . . . . . . . . . . . . . . . . . 150 mA
Max. Emitter Current . . . . . . . . . . . . . . . . . . . . . . . . . . . . . . . . . . . . . . . . . . . . . 100 mA per output
RS-232 Interface
Connection. . . . . . . . . . . . . . . . . . . . . . . . . . . . . . . . . . . . . . . . . . . . . . . . . . . DB-9F, straight-wired
Pinout (AVM 30 side). . . . . . . . . . . . . . . . . . . . . . . . . . . . . . . . . Pin 2: Tx, Pin 3: Rx, Pin 5: Ground
Baud rate . . . . . . . . . . . . . . . . . . . . . . . . . . . . . . . . . . . . . . . . . . . . . . . . . . . . . . . . . . 1200 to 115200
Configuration . . . . . . . . . . 8 data bits, 1 stop bit, no parity bits, flow control (RTS, CTS, NONE)
Trigger Outputs
Polarity . . . . . . . . . . . . . . . . . . . . . . . . . . . . . . . . . . . . . . . . . . . . . . . . tip positive, sleeve negative
Max. Current at 12 VDC. . . . . . . . . . . . . . . . . . . . . . . . . 50 mA (Triggers 1, 2), 200 mA (Trigger 3)
Sequential Delay . . . . . . . . . . . . . . . . . . . . . . . . . . . . . . . . . . . . . . . . . . . . . . . . . . . . . . . . . . 250 ms
POWER REQUIREMENTS
Supply Voltage . . . . . . . . . . . . . . . . . . . . . . . . . . . . . . . . . . . . . . . . . . . . . . . . . . . . . . . . . . 105 to 130 V, 60 Hz
Power Consumption. . . . . . . . . . . . . . . . . . . . . . . . . . . . . . . . . . . . . . . . . . . . . . . . . . . . . . . Maximum 140 W
DIMENSIONS
Height . . . . . . . . . . . . . 5 7/8inches (14.9 cm) including feet, rackmounting – 3 rack units without feet
Width . . . . . . . . . . . . . . . . . . . . . . . . . . . . . . . . . . . . . . . . . . . . . . . . . . . . . . . . . . . . 17 1/4inches (43.8 cm)
Depth . . . . . . . . . . . . . . . . . . . . . . . . . . . . . . . . . . . . . . . . . . . . . . . . . . . . . . . . . . . . 14 1/4inches (36.2 cm)
Weight (unpacked) . . . . . . . . . . . . . . . . . . . . . . . . . . . . . . . . . . . . . . . . . . . . . . . . . . . . . . . . . . 28 lb (12.7 kg)
Audio measurements were performed with an Audio Precision System Two. Specifications and features
are subject to change without notice as design improvements are incorporated.
SPECIFICATIONS continued …

76
CANADA & USA
Anthem Electronics warrants to the original purchaser that each Anthem AVM 30 is free from defects in workmanship
and materials, during normal use and service, for a period of five (5) years from the date of sale (one year for the remote
control). This warranty is not transferable unless the product is traded-in with an Authorized Anthem Dealer. During the
warranty period, Anthem Electronics will repair or replace any defective components free of charge.
Warranty is void if the Anthem product is not purchased from an Authorized Anthem Dealer, if the serial number has been
removed, altered, or defaced, if the product has been operated or handled other than in accordance with the instructions
in its Operating Manual or otherwise abused, misused, damaged by accident or while in transport, tampered with,
modified, or repaired by anyone other than Anthem Electronics or an authorized Anthem Electronics service center. If
inspection by Anthem Electronics discloses that the repair required is not covered by this warranty, regular repair
charges shall apply.
Display products sold by an Authorized Anthem Dealer are covered under the same warranty terms, except that the
warranty period commences from the date of the dealer invoice, not the purchaser’s invoice, and cosmetic flaws, if there
are any, are excluded.
If a problem or defect is discovered in your Anthem product, please contact your Authorized Anthem Dealer. It is the
Dealer’s responsibility to determine the nature of the problem and arrange for the appropriate replacement parts, or the
return of the product to Anthem Electronics.
A Return Authorization (RA) number must be obtained from Anthem Technical Support before any product can be
returned to Anthem Electronics for any reason. The RA Number must be clearly visible on the outside of the shipping
carton for Anthem Electronics to accept the return. Product shipped to Anthem Electronics without a RA Number will be
refused and returned to the sender, freight collect. Product shipped to Anthem Electronics for repair must have shipping
and insurance prepaid by the sender, be packaged in the original carton and packing material, and should be
accompanied by a written description of the defect. Anthem Electronics will accept no responsibility for any damage
occurring to a product that is shipped in any type of carton and packing material other than the original carton and
packing material.
To receive service under warranty, an accompanying copy of the original sales receipt is required. Product repaired
under warranty will be returned with shipping and insurance prepaid by Anthem Electronics (within Canada and USA
only). All other repairs are subject to charges for labor, parts, return shipping, and insurance.
Disclaimer of Liability
Under no circumstances does Anthem Electronics assume liability or responsibility for injury or damages sustained in
the use or operation of Anthem products, or for damages to any other connected products.
In no event shall Anthem Electronics, its agents, representatives, or employees, be responsible for any incidental or
consequential damages. Some jurisdictions do not allow limitations of incidental or consequential damages, so this
exclusion may not apply to you.
Anthem Electronics reserves the right to make design changes or improvements to products without any obligation to
revise prior versions. All specifications are subject to change without notice.
On the expiration of the warranty period all liability of Anthem Electronics in connection with the product shall terminate.
This warranty constitutes the only warranty applicable to products sold by Anthem Electronics. No other warranty or
condition, statutory or otherwise, expressed or implied, shall be imposed upon Anthem Electronics, nor shall any
representation made by any person, including a representation by a representative or agent of Anthem Electronics, be
effective to extend the warranty coverage provided herein.
Frequently Asked Question: Is there a warranty on trade-ins?
The balance of the warranty can be transferred on used product only if the product is traded-in at an Authorized Anthem
Dealer, who may resell the product with the remaining warranty if it is cosmetically acceptable, in perfect working
condition, and has not been internally or externally altered in any way.
INTERNATIONAL
Outside of Canada and USA, warranty coverage terms are set and maintained by the Authorized Anthem Distributor, not
Anthem Electronics. Exact terms and conditions may vary. Anthem Electronics will provide warranty replacement parts
to the original purchaser of the product, via the distributor, for a period of five (5) years, via surface mail. Additional
courier freight charges will apply.
WARRANTY
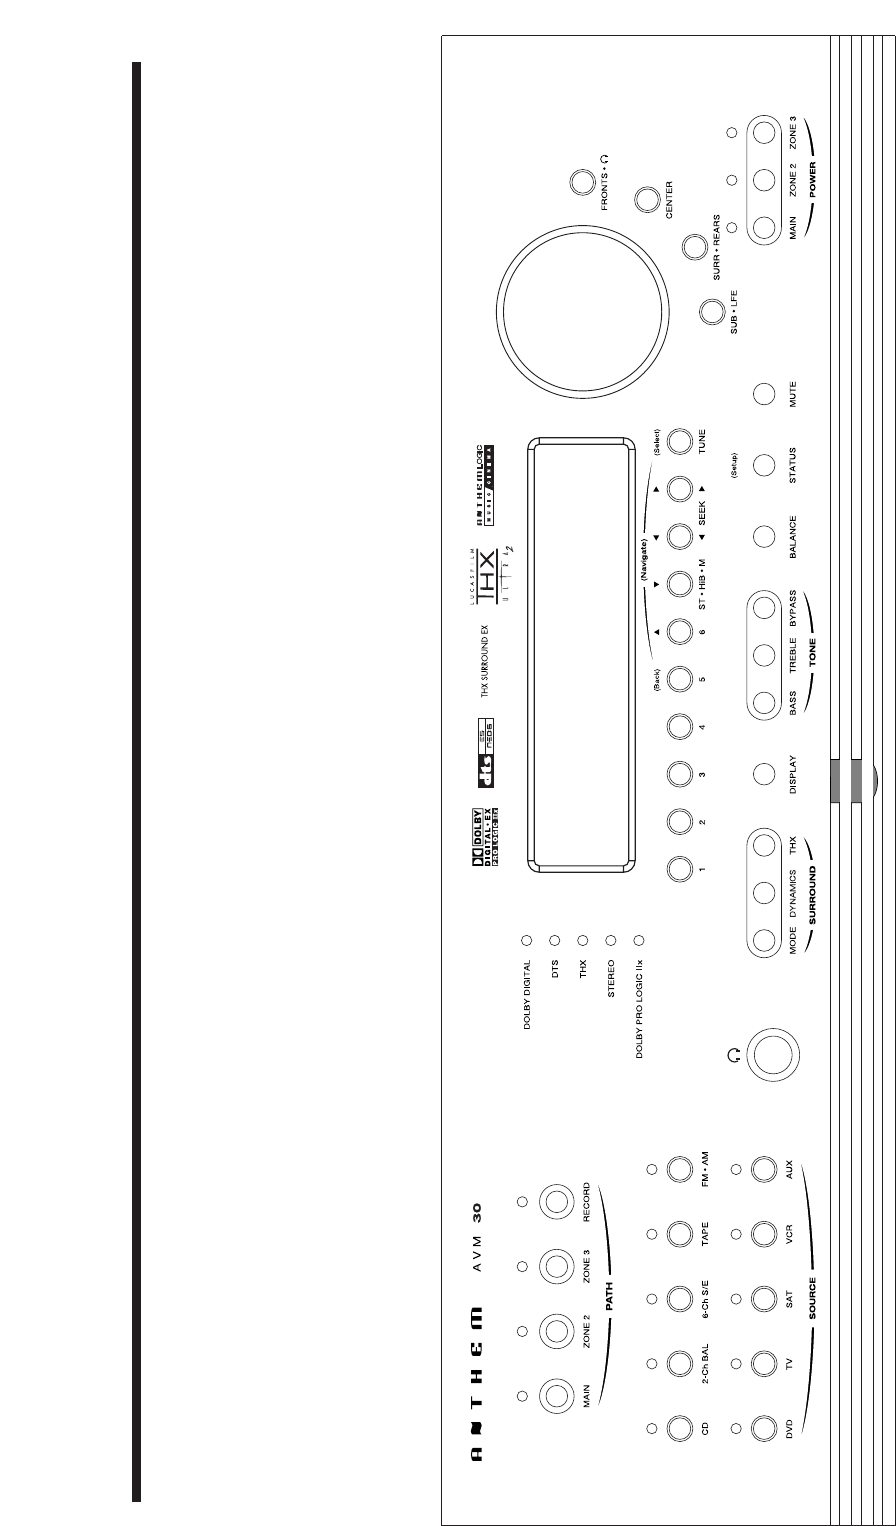
THE BIG PICTURE FRONT PANEL
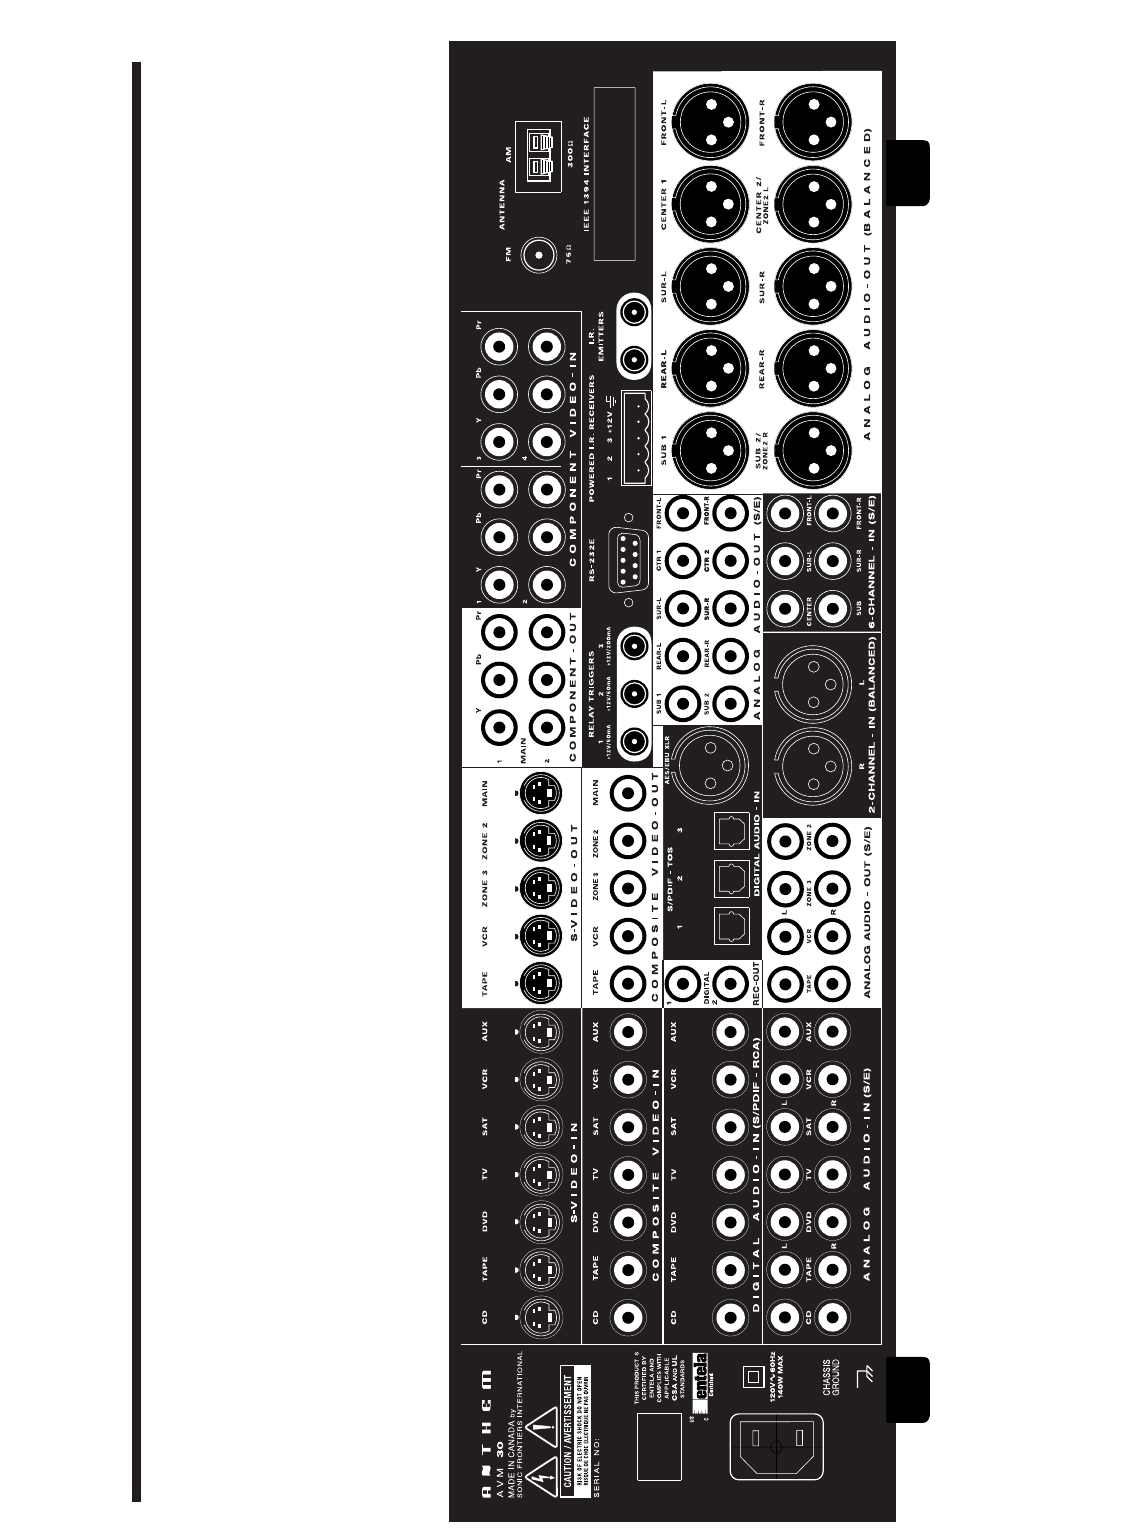
THE BIG PICTURE REAR PANEL
©©
©©

DESIGNED AND MANUFACTURED IN NORTH AMERICA
Anthem™can be reached from 9:00 am to 5:30 pm (EST) by phone 905-362-0958 or 2 4 hours a day by fax 905-564-4642
www.anthemAV.com
1/19/05
OM-810
