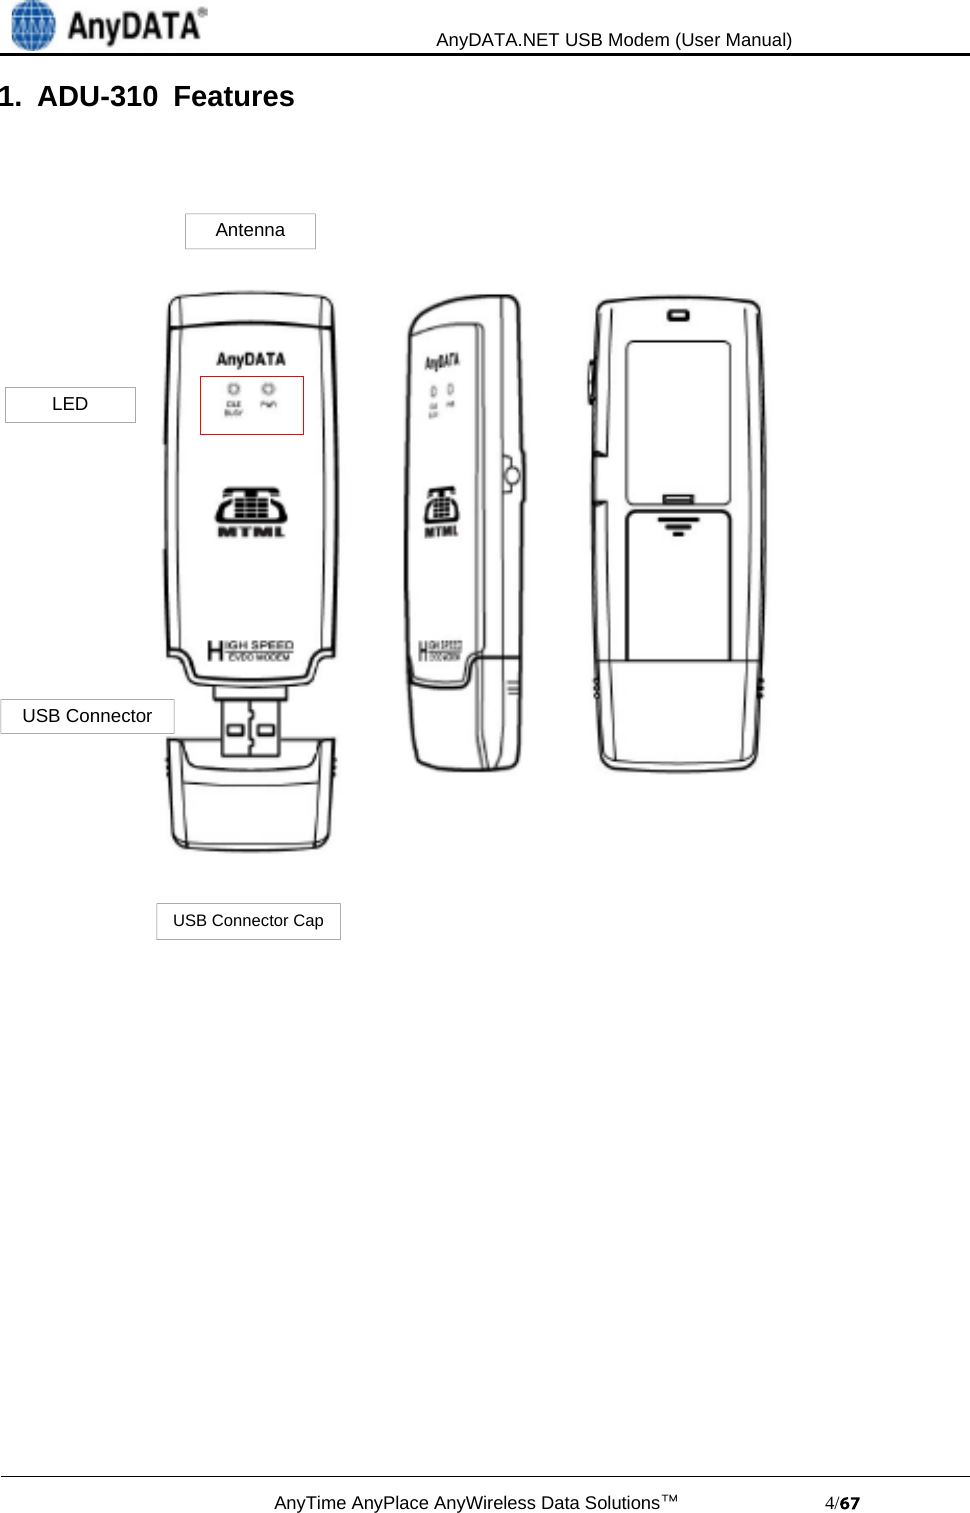
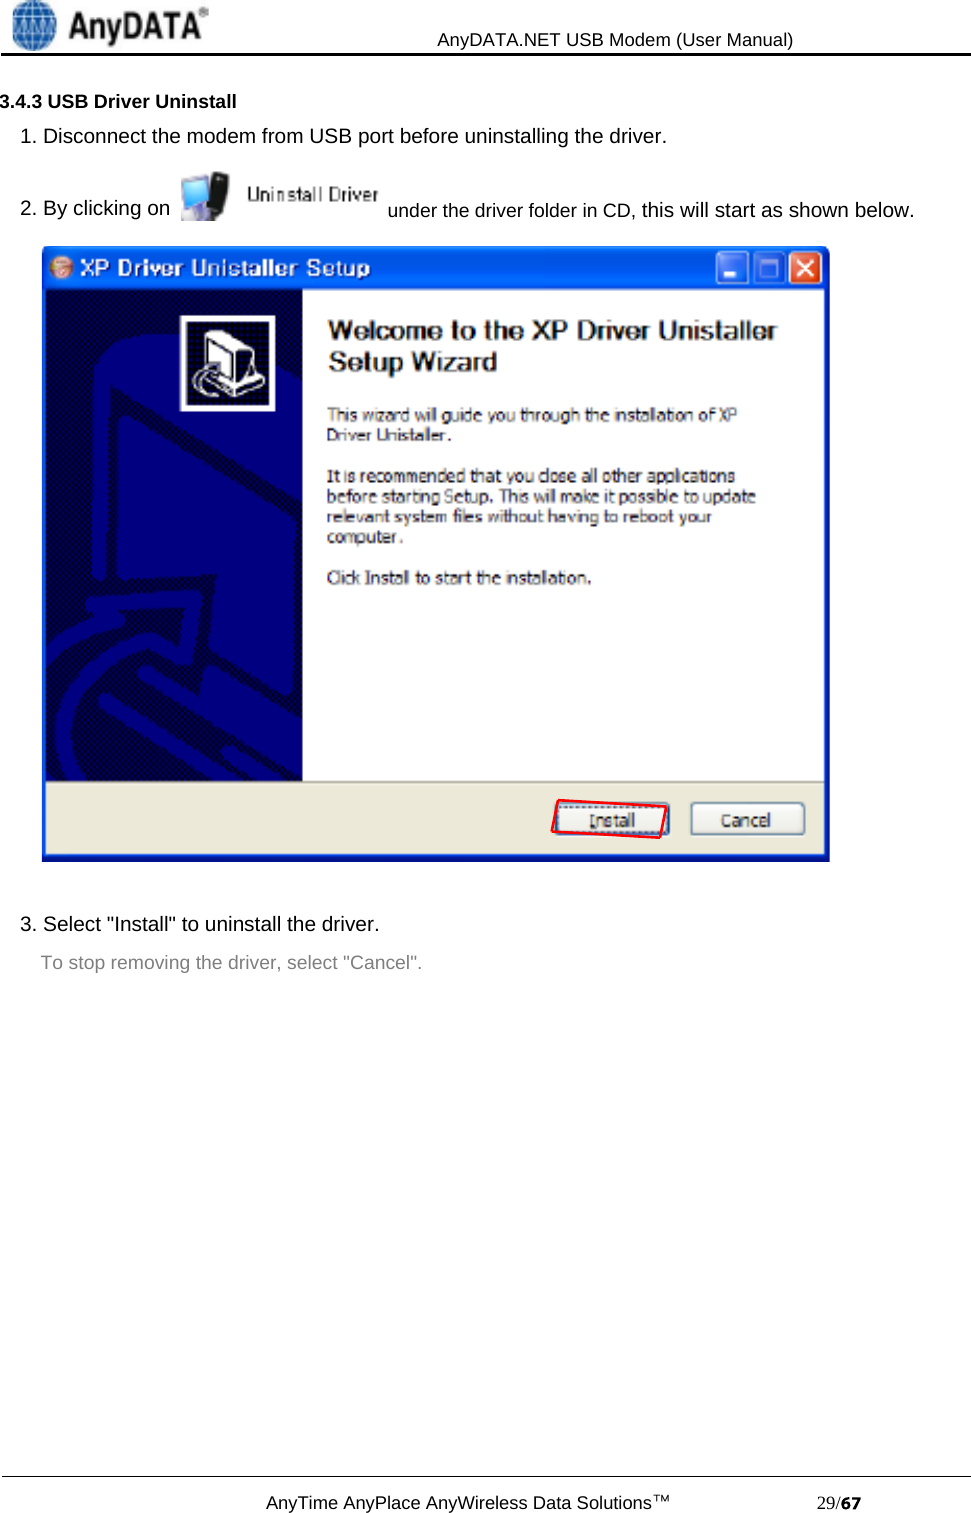
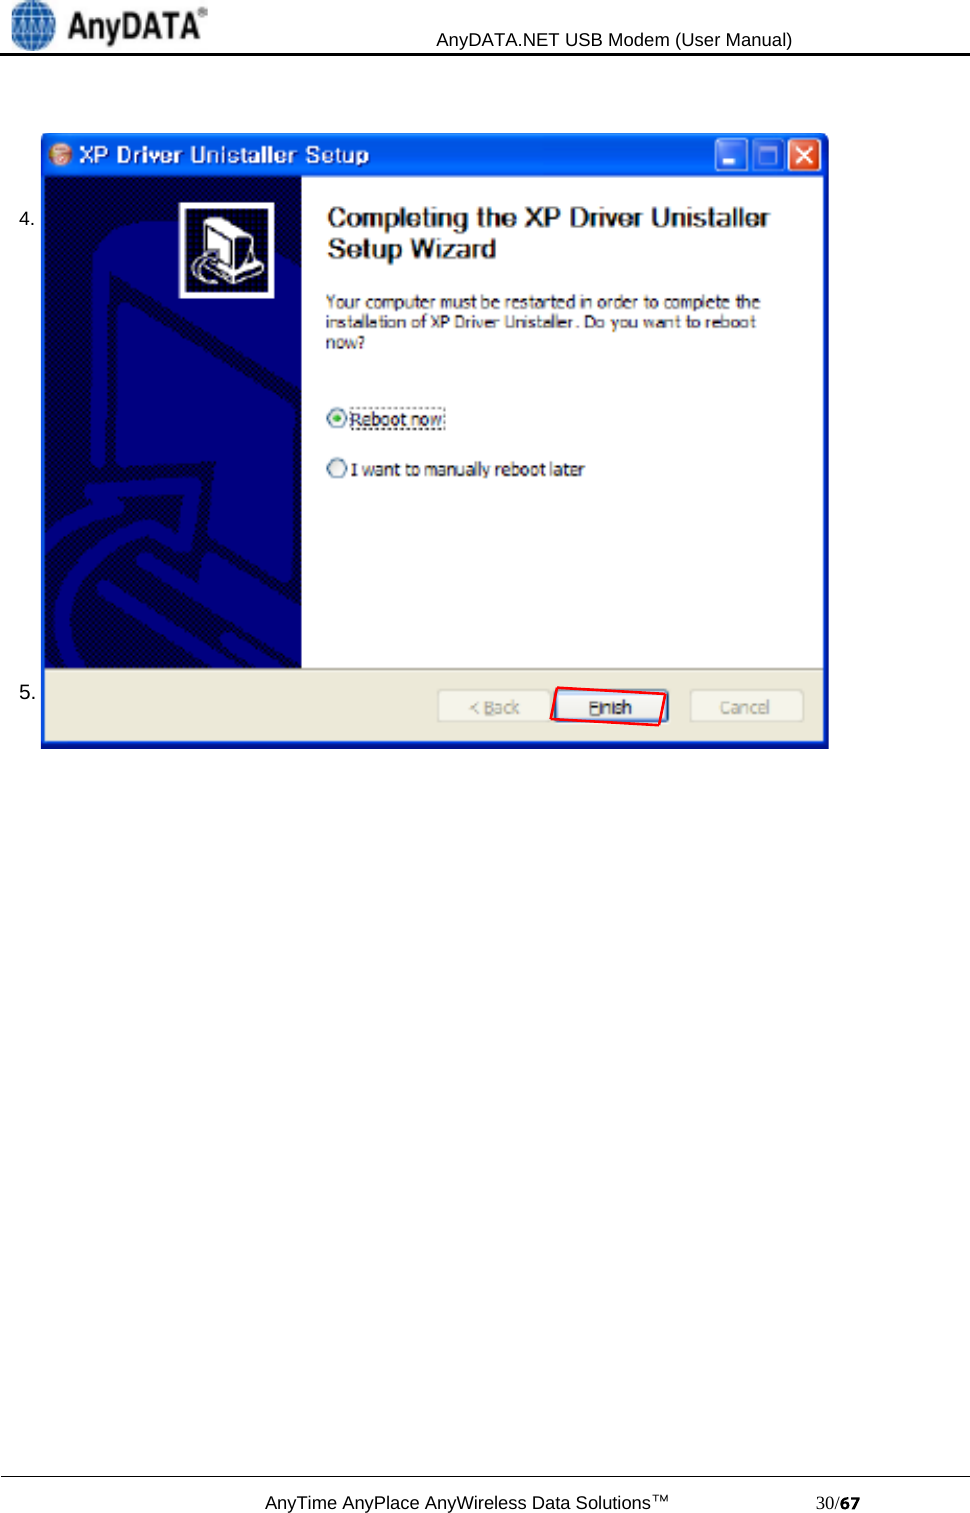
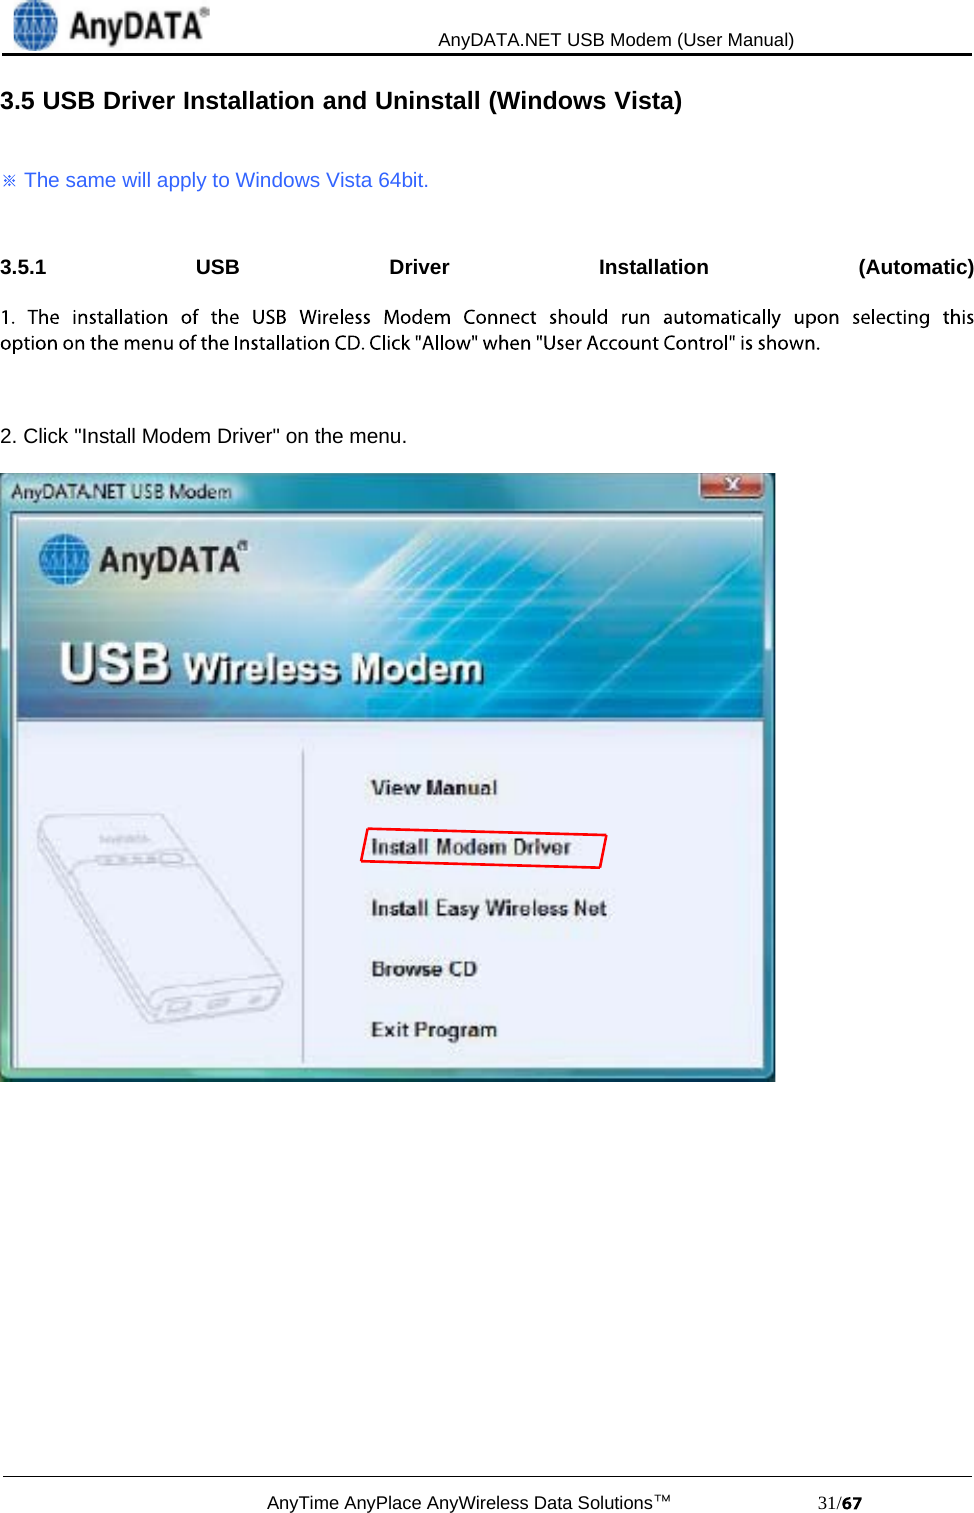
AnyDATA Korea ADU-310C CDMA 1x/EVDO USB Modem User Manual 1
AnyDATA Korea Inc. CDMA 1x/EVDO USB Modem 1
UserManual.wiki
>
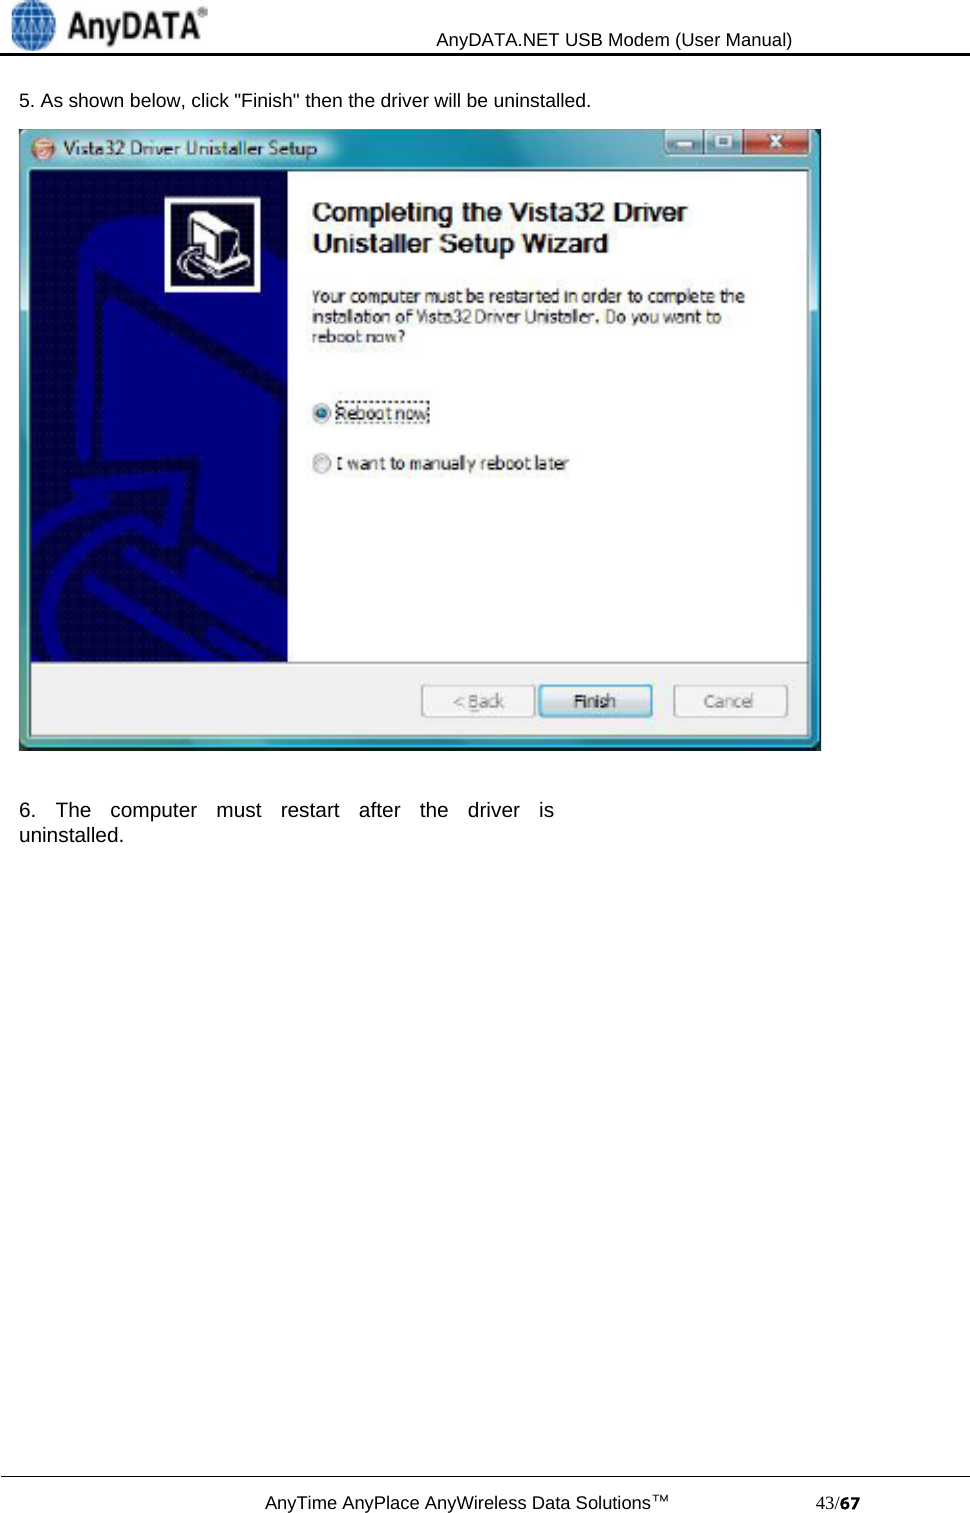
AnyDATA Korea
>
ADU 310C User Manual
Users Manual
Navigation menu
Upload a User Manual
Namespaces
Wiki Guide
HTML
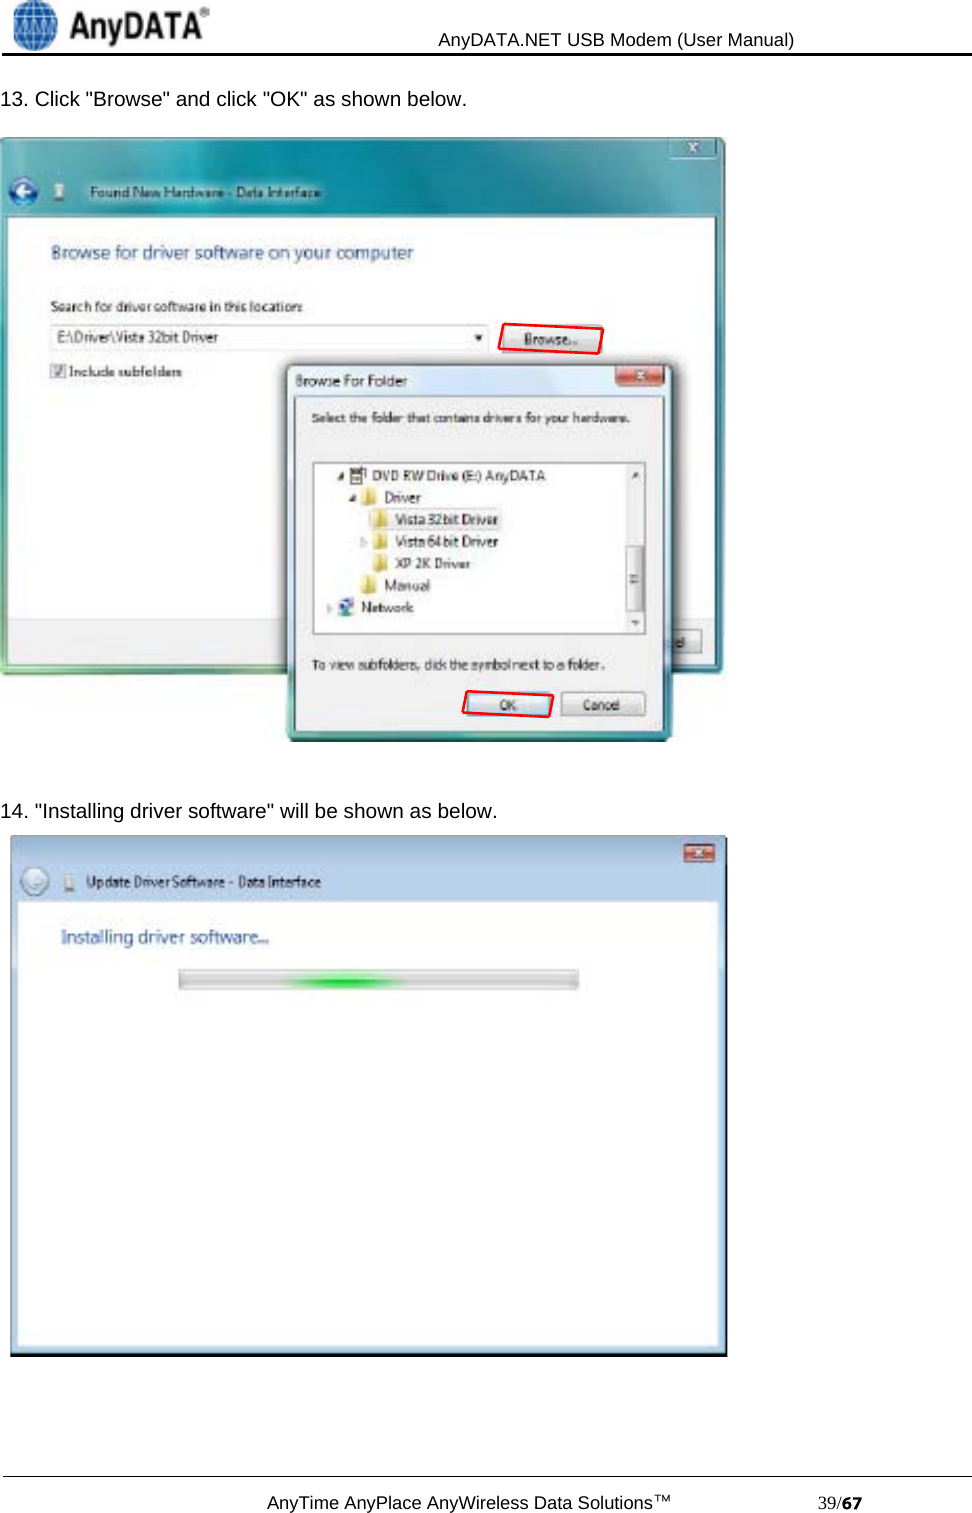
PDF
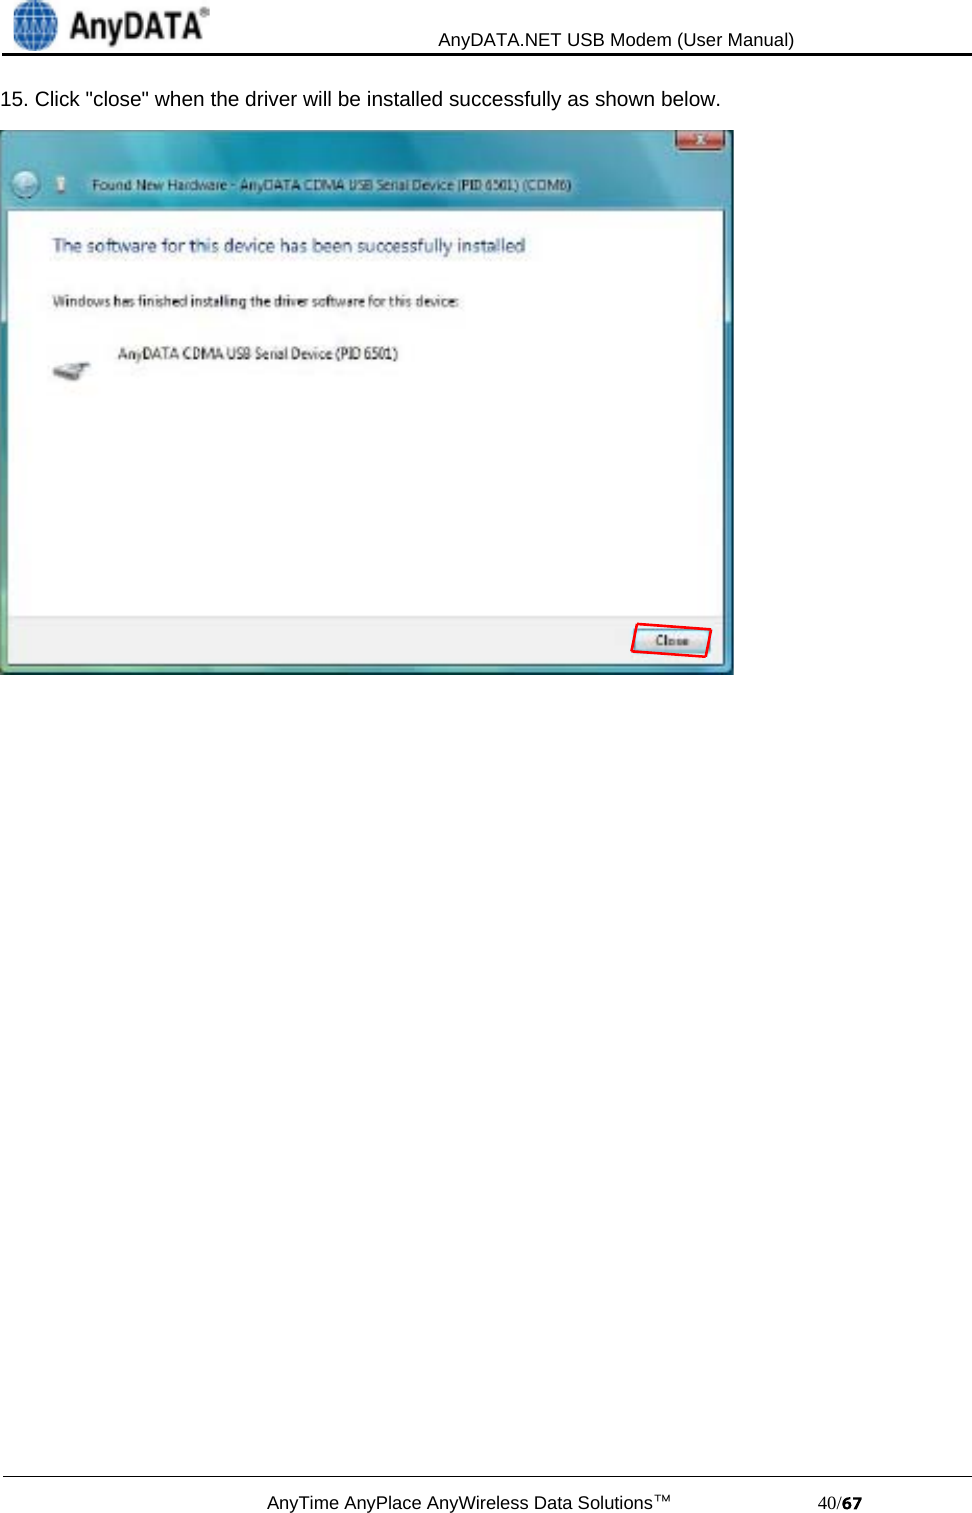
Info
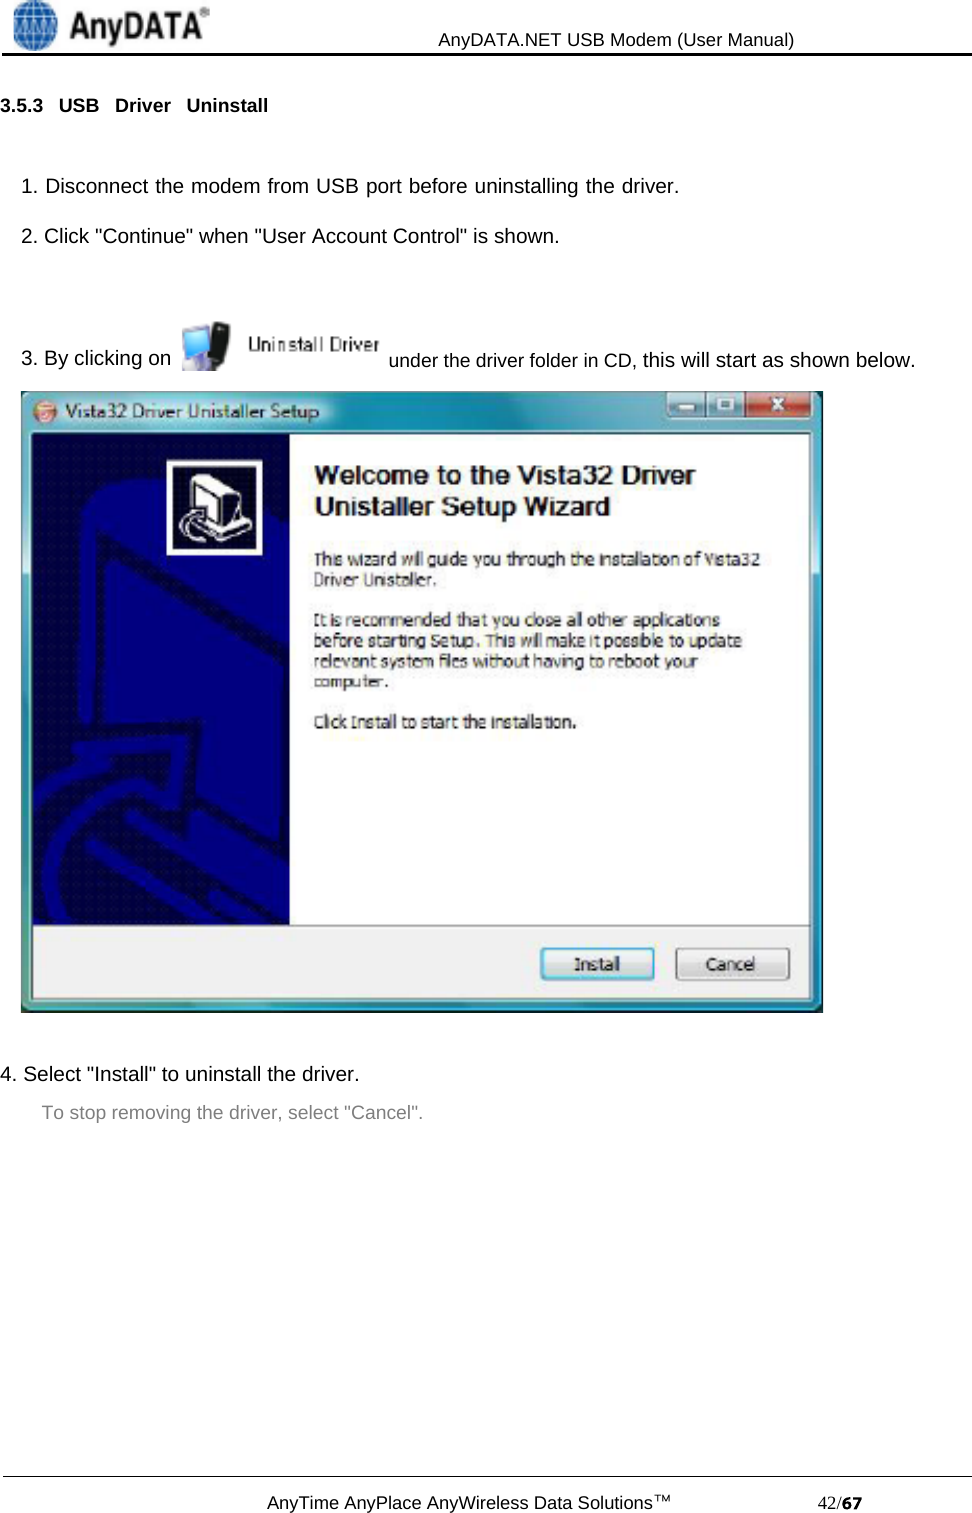
Views
User Manual
Discussion / Help
Navigation

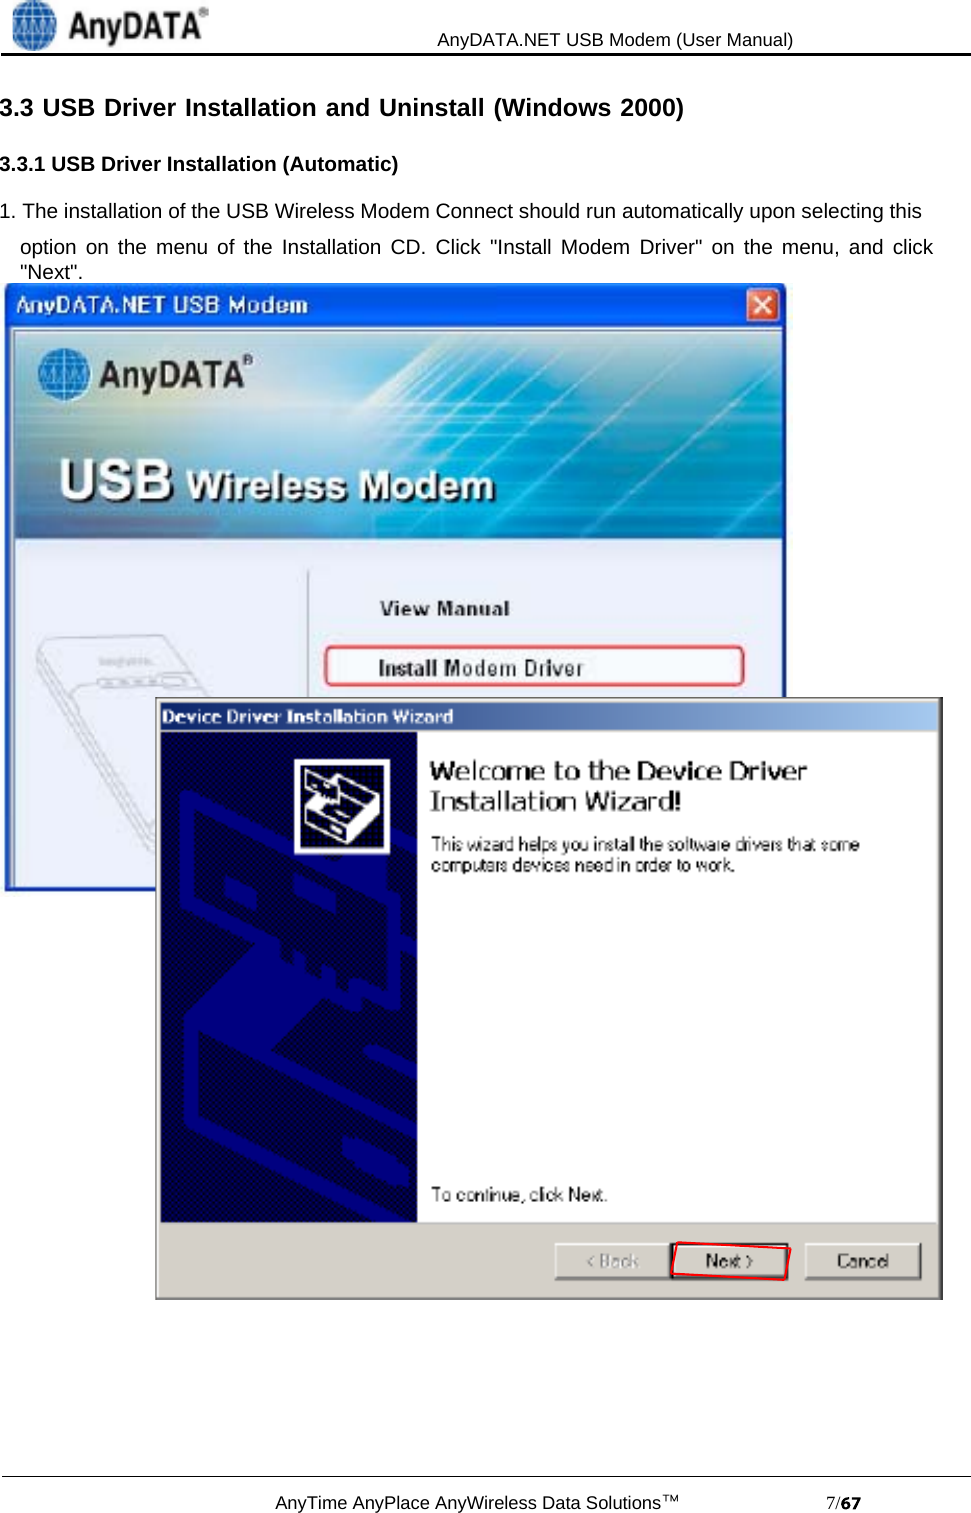
![AnyDATA.NET USB Modem (User Manual)AnyTime AnyPlace AnyWireless Data Solutions™ 9/3. Connect the modem and PC`s USB port, and check if the driver is installed properly in "Device Manager". See the followings to the location of "Device Manager"[Start Control Panel System Hardware Tab Device Manager]As shown in below with red boxed that shows "AnyDATA CDMA USB Modem" and"AnyDATA CDMA USB Serial Device", the driver has been successfully installed.](https://usermanual.wiki/AnyDATA-Korea/ADU-310C/User-Guide-1097205-Page-9.png)


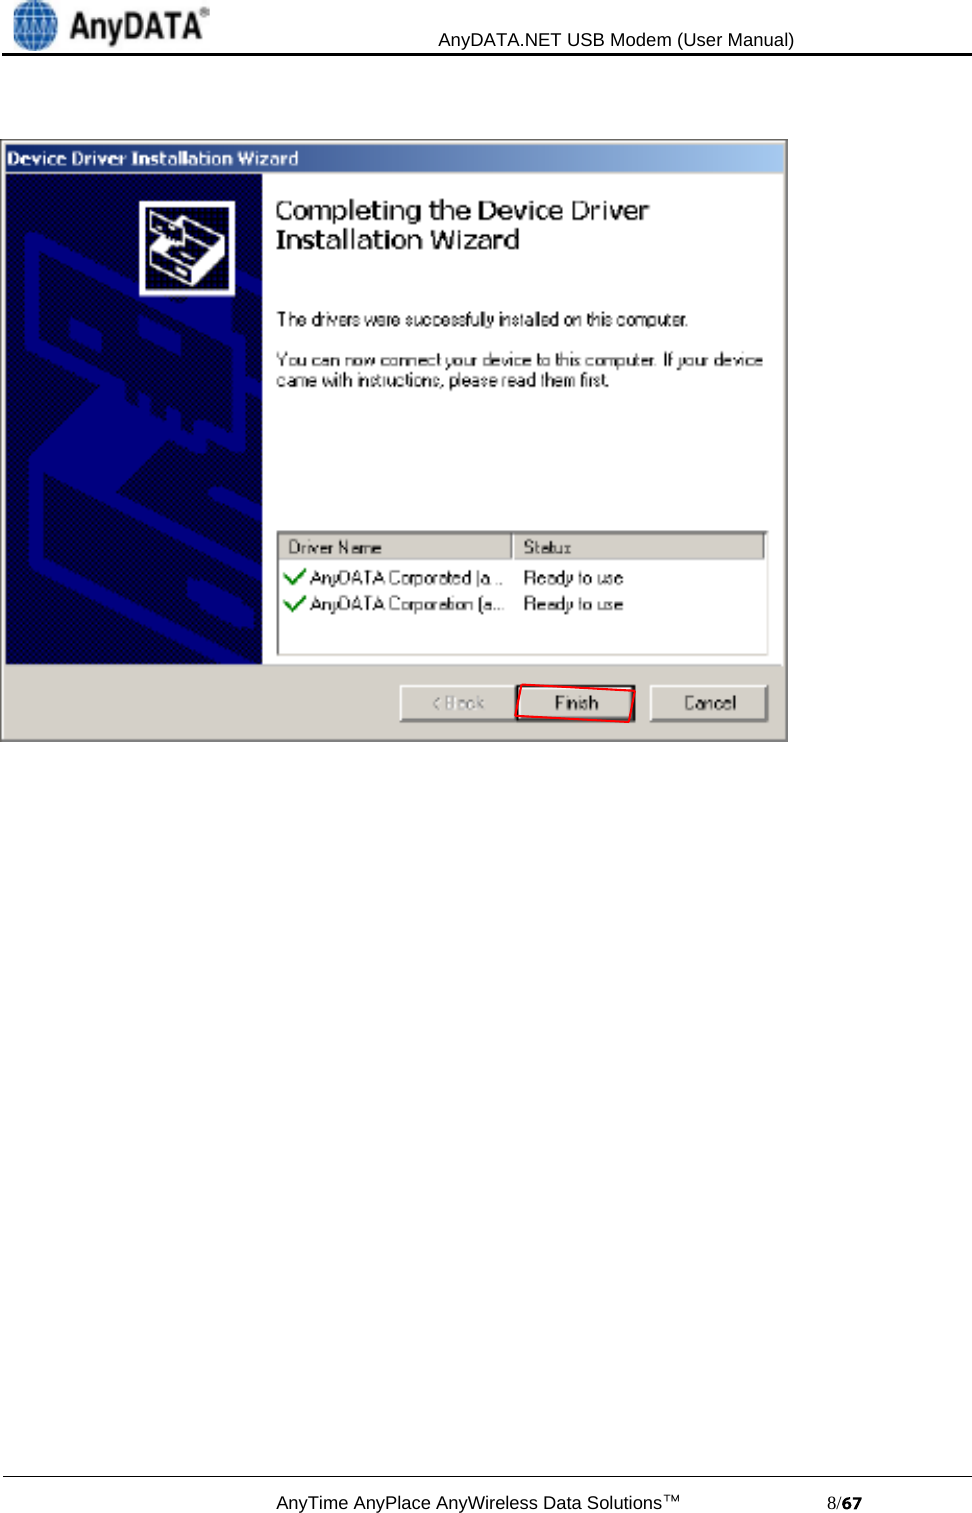
![AnyDATA.NET USB Modem (User Manual)AnyTime AnyPlace AnyWireless Data Solutions™ 17/19. Connect the modem and PC`s USB port, and check if the driver is installed properly in "Device Manager". See the followings to the location of "Device Manager"[Start Control Panel System Hardware Tab Device Manager]As shown in below with red boxed that shows "AnyDATA CDMA USB Modem" and"AnyDATA CDMA USB Serial Device", the driver has been successfully installed.](https://usermanual.wiki/AnyDATA-Korea/ADU-310C/User-Guide-1097205-Page-17.png)

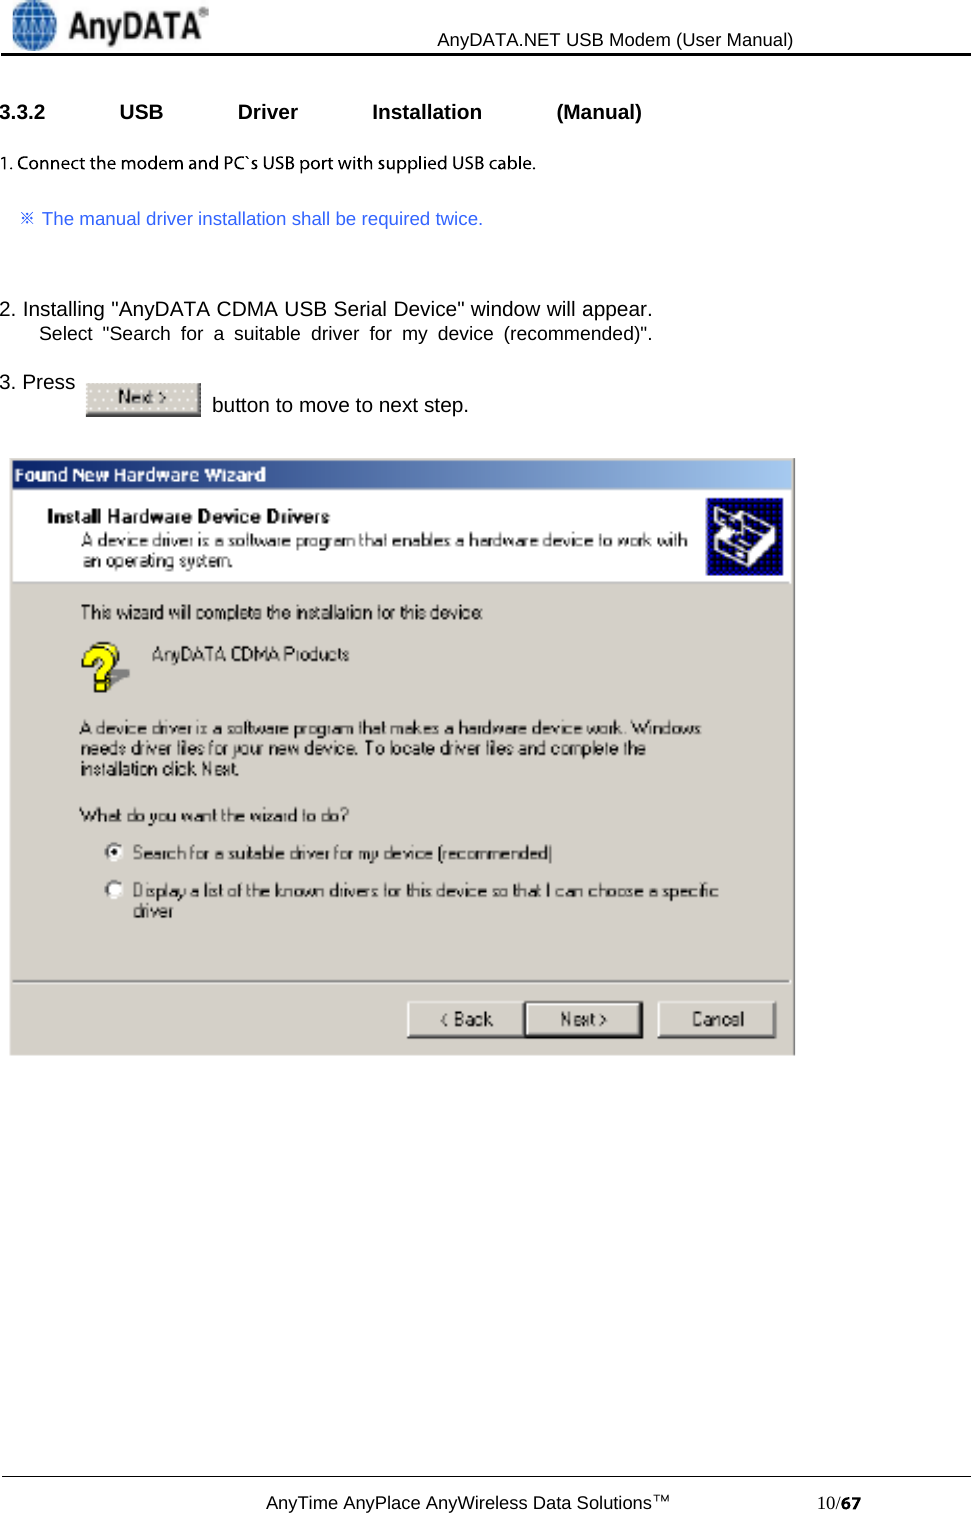
![AnyDATA.NET USB Modem (User Manual)AnyTime AnyPlace AnyWireless Data Solutions™ 22/3. Connect the modem and PC's USB port, and check if the driver is installed properly in "Device Manager". See the followings to the location of "Device Manager"[Start Control Panel System Hardware Tab Devise Manager]As shown in below with red boxed that shows "AnyDATA CDMA USB Modem" and"AnyDATA CDMA USB Serial Device", the driver has been successfully installed.](https://usermanual.wiki/AnyDATA-Korea/ADU-310C/User-Guide-1097205-Page-22.png)
![AnyDATA.NET USB Modem (User Manual)AnyTime AnyPlace AnyWireless Data Solutions™ 28/18. Connect the modem and PC's USB port, and check if the driver is installed properly in "Device Manager". See the followings to the location of "Device Manager"[Start Control Panel System Hardware Tab Devise Manager]As shown in below with red boxed that shows "AnyDATA CDMA USB Modem" and"AnyDATA CDMA USB Serial Device", the driver has been successfully installed.](https://usermanual.wiki/AnyDATA-Korea/ADU-310C/User-Guide-1097205-Page-28.png)
![AnyDATA.NET USB Modem (User Manual)AnyTime AnyPlace AnyWireless Data Solutions™ 33/5. Connect the modem and PC's USB port, and check if the driver is installed properly in "Device Manager". See the followings to the location of "Device Manager"[Start ▶ Control Panel ▶ System and Maintenance ▶ Devise Manager]As shown in below with red boxed that shows "AnyDATA CDMA USB Modem" and"AnyDATA CDMA USB Serial Device", the driver has been successfully installed.](https://usermanual.wiki/AnyDATA-Korea/ADU-310C/User-Guide-1097205-Page-33.png)
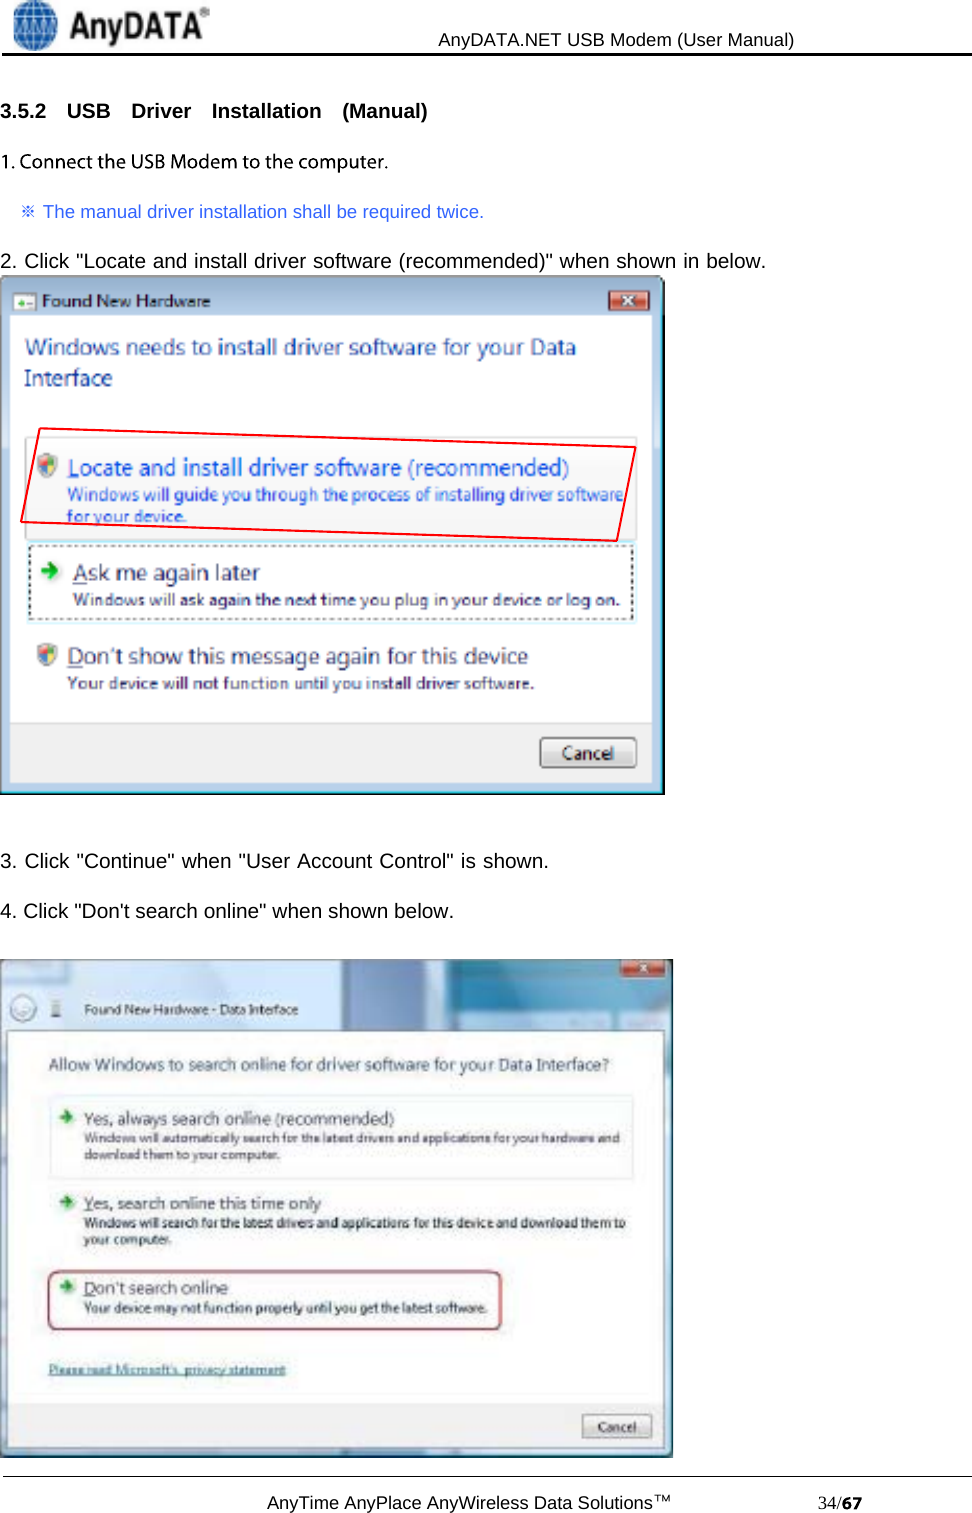

![AnyDATA.NET USB Modem (User Manual)AnyTime AnyPlace AnyWireless Data Solutions™ 41/16. Connect the modem and PC's USB port, and check if the driver is installed properly in "Device Manager". See the followings to the location of "Device Manager"[Start ▶ Control Panel ▶ System and Maintenance ▶ Devise Manager]As shown in below with red boxed that shows "AnyDATA CDMA USB Modem" and"AnyDATA CDMA USB Serial Device", the driver has been successfully installed.](https://usermanual.wiki/AnyDATA-Korea/ADU-310C/User-Guide-1097205-Page-41.png)


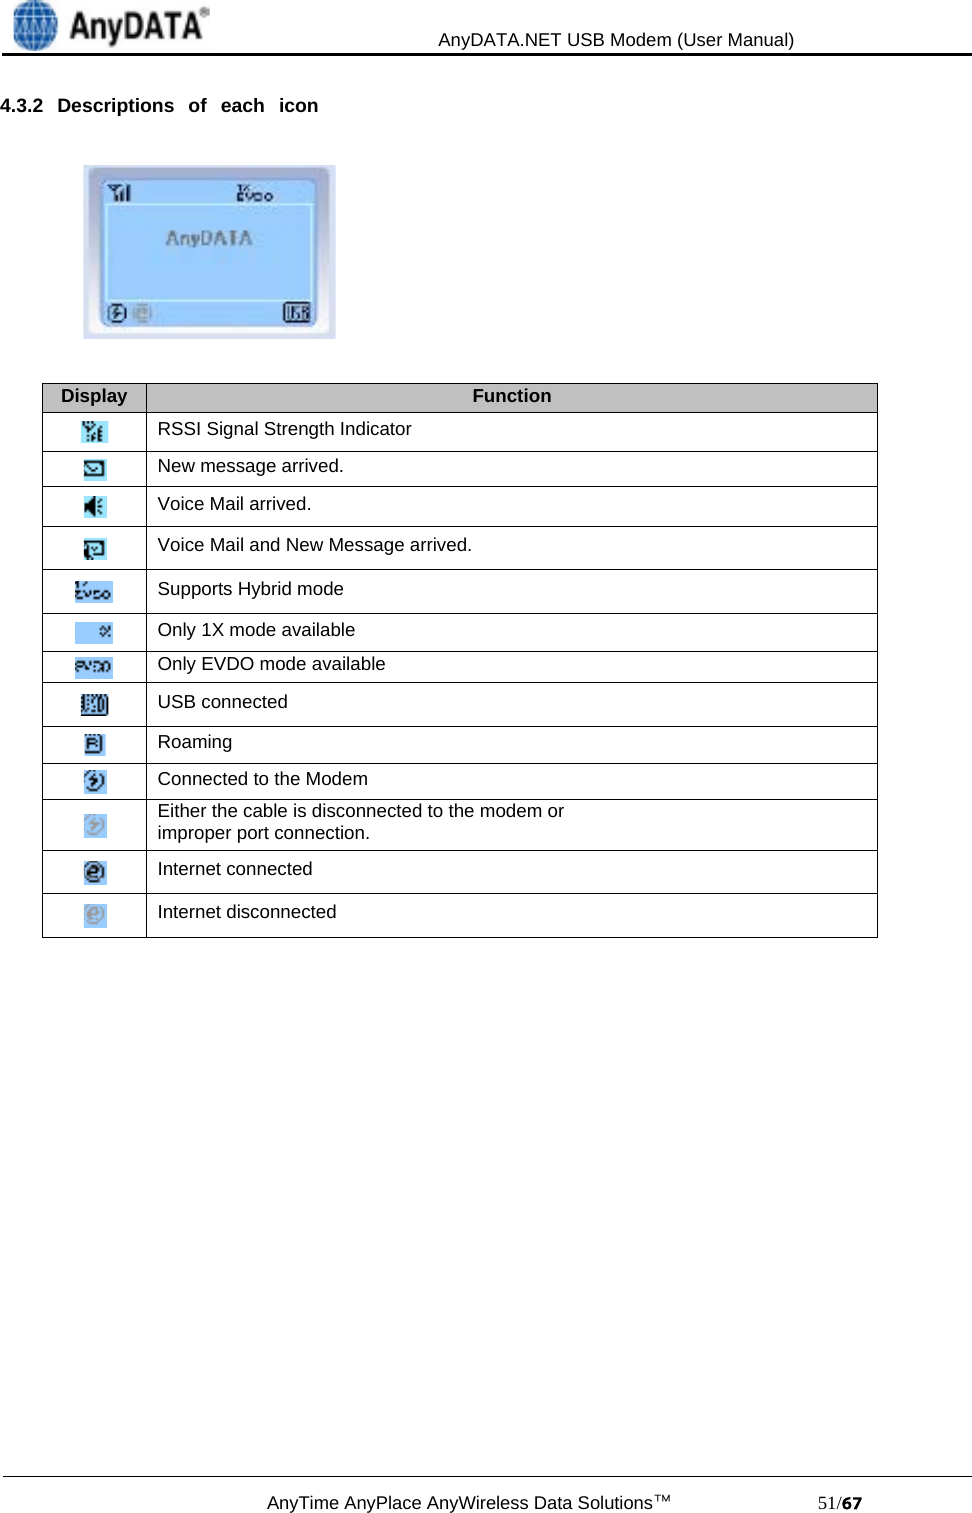
![AnyDATA.NET USB Modem (User Manual)AnyTime AnyPlace AnyWireless Data Solutions™ 52/4.3.3 Setting EnvironmentThere are 4 options and please refer to below for explanations.[ About ] TabDisplay the version for Easy Wireless Net program.](https://usermanual.wiki/AnyDATA-Korea/ADU-310C/User-Guide-1097205-Page-52.png)
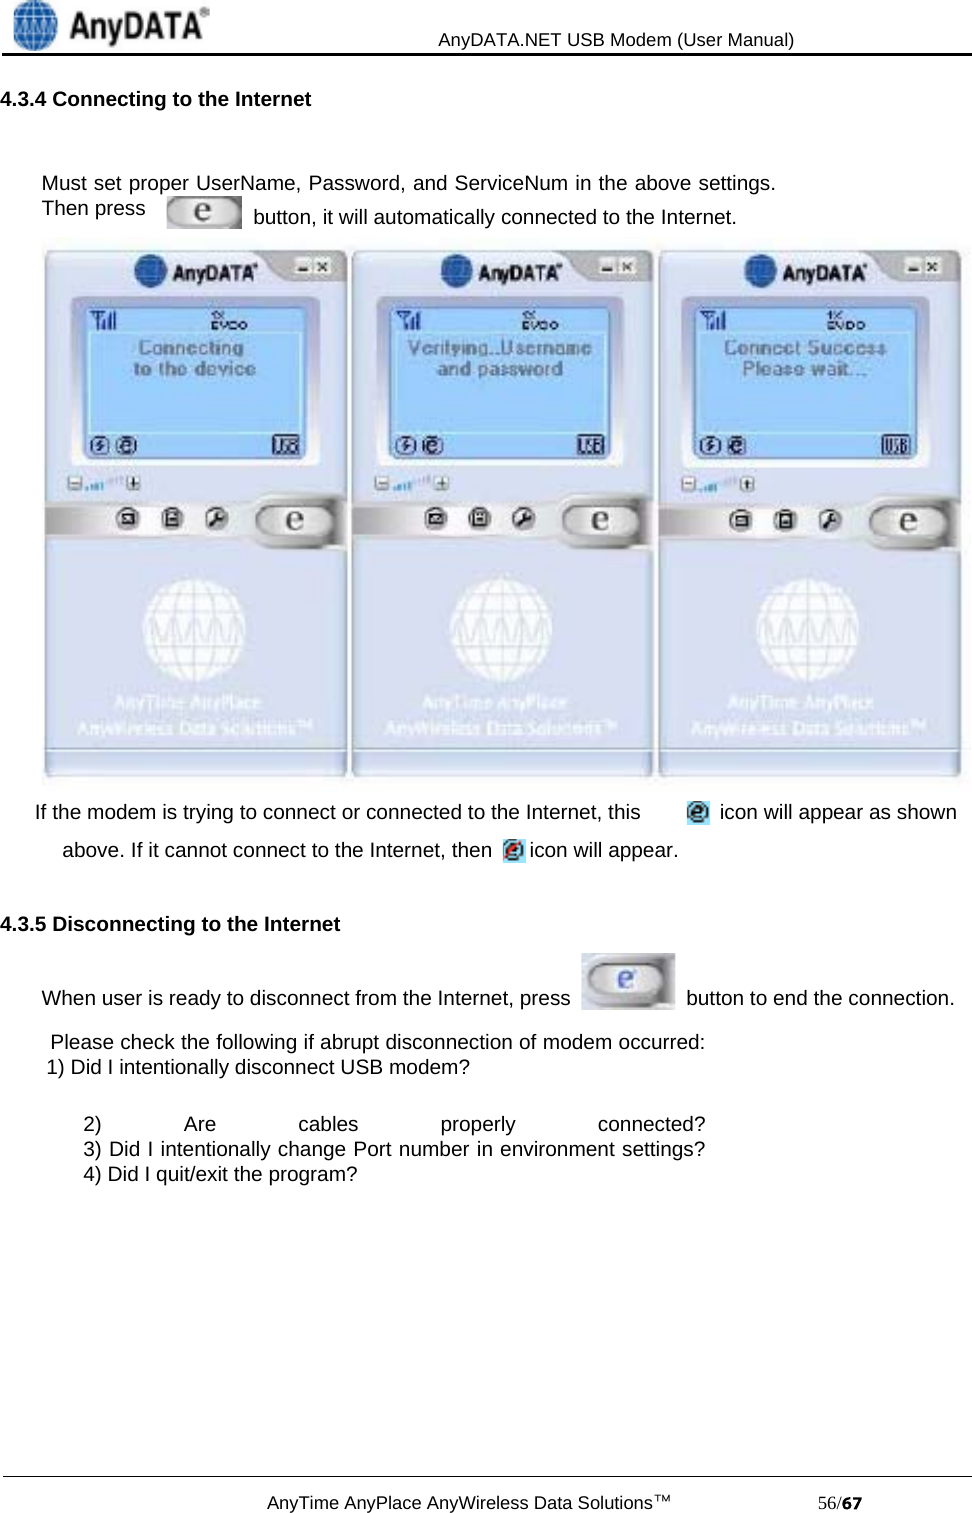
![AnyDATA.NET USB Modem (User Manual)AnyTime AnyPlace AnyWireless Data Solutions™ 53/[ Basic ] TabThe basic configuration for connect to the network using EVDO modem.All values are set automatically, however if wants to change the value then check appropriatebox/boxes in the left and press button to take effect.UserName:Password:ServiceNum: Internet Connect Dial Number](https://usermanual.wiki/AnyDATA-Korea/ADU-310C/User-Guide-1097205-Page-53.png)
![AnyDATA.NET USB Modem (User Manual)AnyTime AnyPlace AnyWireless Data Solutions™ 54/[ Advance] TabThis part is to change the important parameter for EVDO modem.If wants to change the value then check appropriate box/boxes in the left and press button to take effect.PrefMode: Select a mode among "1x only", "EVDO only" and "EVDO + 1X "](https://usermanual.wiki/AnyDATA-Korea/ADU-310C/User-Guide-1097205-Page-54.png)
![AnyDATA.NET USB Modem (User Manual)AnyTime AnyPlace AnyWireless Data Solutions™ 55/[ User]TabIf wants to change the value then check appropriate box/boxes in the leftand press button to take effect. Always Top: The program window will be always top if "ON" is selected.Battery Warning Sound: Battery warning beep will sound when battery is low if "ON" is selected](https://usermanual.wiki/AnyDATA-Korea/ADU-310C/User-Guide-1097205-Page-55.png)
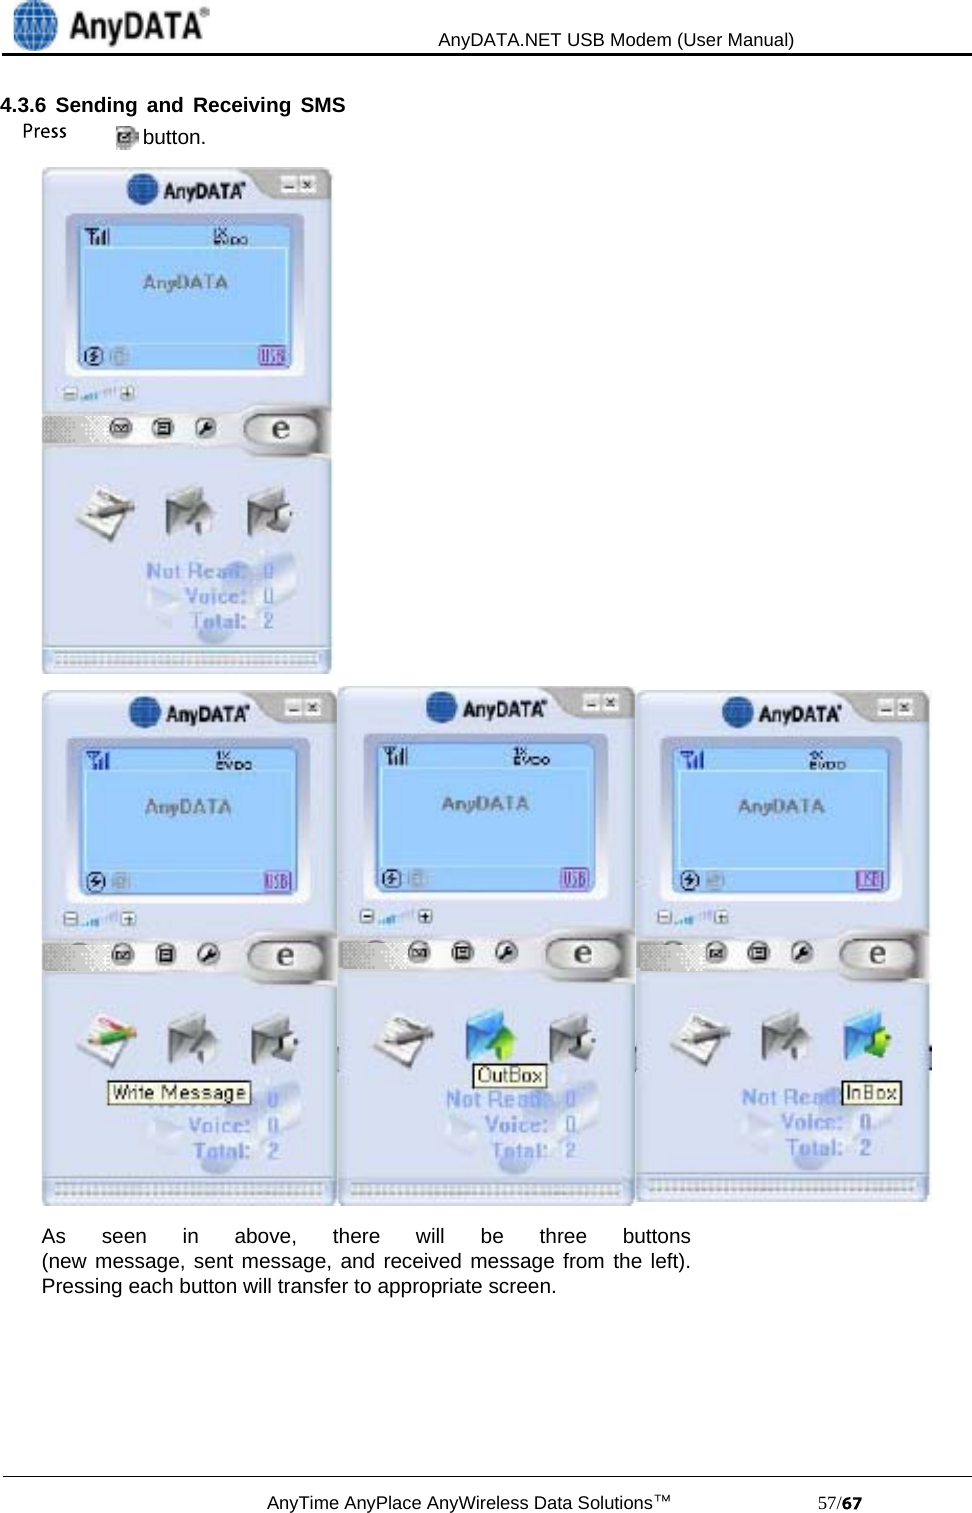
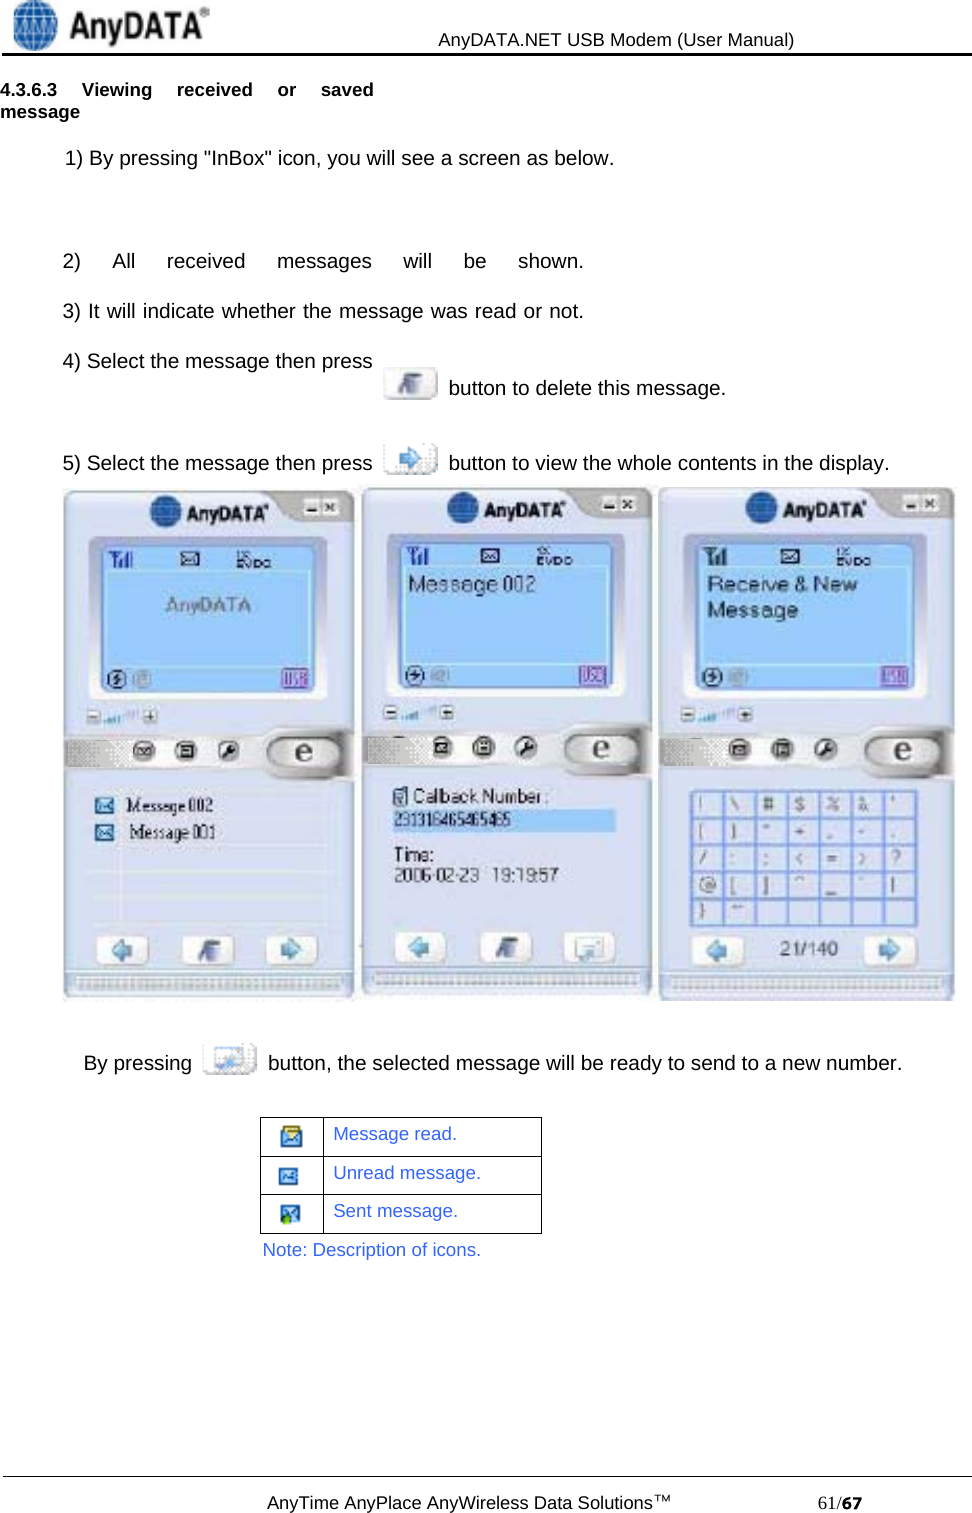
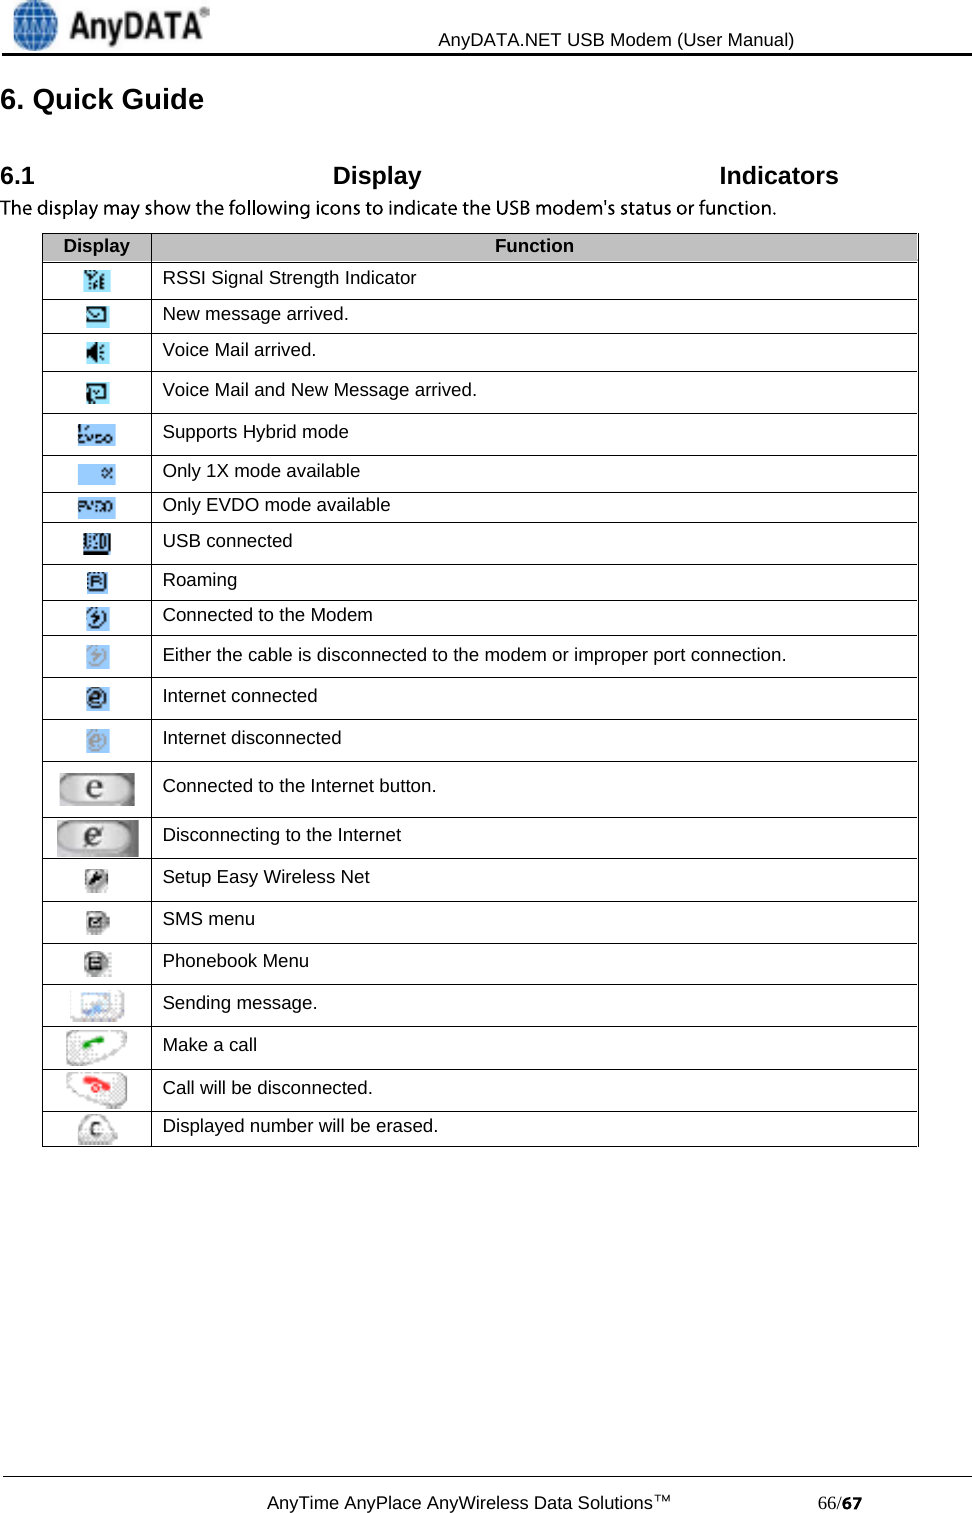
![AnyDATA.NET USB Modem (User Manual)AnyTime AnyPlace AnyWireless Data Solutions™ 62/4.3.7 PhonebookThis is a feature to store phone numbers that uses often into RUIM and to make calls accordingly.By pressing Phonebook button, following window will appear.[8/20] Maximum number of Phone numbers can be stored and currently saved phone numbers. Start searching.All: Find and display any characters that matches from the Phone Number into a PhoneNumber ListIndex: Finds a phone number based on the index.Name: Finds all names that contain any one of the letter to be searched.Phone: Finds all numbers that contains any one of the number to be searched. Sends SMS message to the selected phone number. Calls selected number. Deletes selected number.Saves Phone Number into the recorded Index number.If the same Index number already exists then requires editing of the contents.](https://usermanual.wiki/AnyDATA-Korea/ADU-310C/User-Guide-1097205-Page-62.png)
![AnyDATA.NET USB Modem (User Manual)AnyTime AnyPlace AnyWireless Data Solutions™ 64/A: Q: During the running of the program, following message appears and the program halts.A:the cable is dismounted, cable is disconnected or USB modem power has been turned off. Then try toreconnect the modem.Q: Cannot make a callA:[EVDO] mode then try to make a call. There are three different icons in that field, [1X], [1X/EVDO] and[EVDO].Q: How many people can I send SMS messages at once?A:Q: The program has ended but the USB modem power is turned off.A:automatically is when USB cable is connected to the PC/Notebook. In order to turn off the modem,press ON/OFF button for at least 5 seconds.Q: I tried to turn-on the modem by pressing ON/OFF button but unsuccessful.A:the USB cable. If the power is still not on, please contact A/S center for further information.Q: Easy Wireless Net program displays "DB xxxx Error" message and terminates.A: when using Windows XP, Windows 2000 OS in a computer. However, this type of database file hasbeen removed by some other program.](https://usermanual.wiki/AnyDATA-Korea/ADU-310C/User-Guide-1097205-Page-64.png)
![AnyDATA.NET USB Modem (User Manual)AnyTime AnyPlace AnyWireless Data Solutions™ 67/7. Macintosh7.1 Changing Preference OS from Windows system to MACWindows PC. In order to use ADU-310 on MAC, Preference OS should be converted to Macintoshfrom Windows Systems as described below,1. Preference OS of ADU-310 needs to be changed to MAC on Windows PC.2. MAC Utility ("MED.exe") should be downloaded from provided CD3. Plug ADU-310 and Install driver on Widows PC, see the details in the user's manual.4. Run "MED.exe." (\\Utils\\MED.exe.)5. Once "MAKE STROAGE SUCCESS!" massage is displayed, OS Preference has been changed tooperate ADU-310 on MAC.6. Installing driver for MAC OS can be referred on separate MAC user's manual7.2 Supported Macintosh Versions1. Macintosh OS version 10.4 (Tiger)Tiger version driver is located in a folder [\\Mac Driver\\MAC10.4] from provided CD2. Macintosh OS version 10.5 (Leopard)Leopard version driver is located in a folder [\\Mac Driver\\MAC10.5] from provided CD3. MAC User's ManualLocated in [CD-ROM:\\Mac Driver]](https://usermanual.wiki/AnyDATA-Korea/ADU-310C/User-Guide-1097205-Page-67.png)