Aodelan Technology SRRPBT Wireless Remote Shutter Release Transmitter User Manual SRR PEBBLE Manualx
Shenzhen Aodelan Technology Co., Ltd. Wireless Remote Shutter Release Transmitter SRR PEBBLE Manualx
Users Manual
PEBBLE Wireless Shutter Remote
Thank you for purchasing an Aodelan product:
Note: Before using the Aodelan PEBBLE Wireless Shutter Remote, please read this
instruction manual carefully.
PEBBLE Wireless Shutter Remote consists of a transmitter and receiver. The transmitter can
control the receiver wirelessly to perform autofocus, single shot, delayed release and continuous
release. The receiver can also be used as a wired shutter remote to do autofocus, single shot, and
continuous release.
Warnings:
1. Remove the batteries if the remote will not be used for an extended period.
2. Do not expose the product to high temperature, or use the product in hot place,
such as a closed car in direct sunlight.
3. Please keep the product dry. Do not touch the product with wet hands, immerse it
into water, nor expose it to rain, or it may get damaged.
4. Do not use the remote at flammable environments. Violation of this warning may
cause explosion or fire hazard.
5. When using the product, please keep it away from other 2.4GHz devices to avoid
interference(e.g. WIFI).
FCC Interference Statement
This device complies with part 15 of the FCC Rules. Operation is subject to the
following two conditions: (1) This device may not cause harmful interference, and (2)
this device must accept any interference received, including interference that may
cause undesired operation.
FCC Radiation Exposure Statement
This equipment complies with FCC RF radiation exposure limits set forth for an
uncontrolled environment. This device and its antenna must not be co-located or
operating in conjunction with any other antenna or transmitter.
FCC Compliance Statement
NOTE:
This equipment has been tested and found to comply with the limits for a Class B
digital device, pursuant to Part 15 of the FCC Rules. These limits are designed to

provide reasonable protection against harmful interference in a residential
installation. This equipment generates, uses and can radiate radio frequency energy
and, if not installed and used in accordance with the instructions, may cause harmful
interference to radio communications. However, there is no guarantee that
interference will not occur in a particular installation. If this equipment does cause
harmful interference to radio or television reception, which can be determined by
turning the equipment off and on, the user is encouraged to try to correct the
interference by one or more of the following measures:
-- Reorient or relocate the receiving antenna.
-- Increase the separation between the equipment and receiver.
-- Connect the equipment into an outlet on a circuit different from that to which the
receiver is connected.
-- Consult the dealer or an experienced radio/TV technician for help.
Parts
Transmitter
1. LED Indicator
2. Shutter Button
3. Delay Button
4. Lanyard Slot
5. Battery Compartment
Receiver
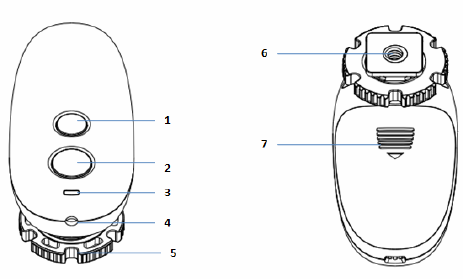
1. Power Button
2. Shutter Button
3. LED Indicator
4. Remote Release Terminal
5. Locking Ring
6. Cold Shoe/Tripod Lug
7. Battery Compartment
Turn on/off
1. Install batteries for the release remote: 1 pc of CR2032 battery for the transmitter,
and 2 pcs of AAA type alkaline or NI-MH batteries for the receiver. Make sure the
batteries are located according to the “ +/-“poles of the compartments.
2. Transmitter: Once the battery is properly installed, the indicator will light green
when half-pressing the shutter button, and turn red when fully pressing the button.
3. Receiver: Pressing the power button for 2s will turn on/off the receiver. When the
receiver is turned on, the indicator will flash green. The indicator will light green
when half-pressing the shutter button, and turn red when fully pressing the button.
Note:
1) When the battery of transmitter is exhausted, the indicator will not light up
when half pressing or fully pressing the shutter button. The transmitter will not
function. Please replace the battery with a new one.
2) At low power warning state, the indicator will blink red at certain frequency.
When the battery is exhausted, the receiver will not function. Please replace the
batteries with new ones.
Setting the Smart Code
The frequency will be pre-set in production, you can use the remote instantly. To
control the receiver with multiple transmitters, follow the below procedures to set the
smart code:
1. Install batteries for the transmitter and receiver.
2. Press and hold the receiver’s power button and shutter button for 2s until the
indicator on receiver continuously blinks (5s).
3. Press the shutter button on transmitter one time to reset the code. When the
code is successfully set, the indicator on receiver will shortly stop blinking.
After that, it will go on blinking quickly, indicating that the receiver remains
in code setting state. You can continue to set the code to pair up with other
transmitters.
Note:
1) When a receiver in code setting state receives the first new code from
transmitter, all the codes memorized before that will be deleted automatically.
2) A receiver in code setting state can memorize up to 100 codes consecutively.
Using the Receiver as a Wired Remote without transmitter
1. Turn off the camera and receiver.
2. Connect one end of the cable to the camera’s remote port, and the other end to
the receiver’s remote release terminal.
3. Turn on the camera and receiver.
4. The shutter button will function exactly the same as the camera’s shutter: A
half-press of the shutter button will autofocus. A full press will take a photo.
When the camera is set to continuous shooting mode, press and hold the
shutter button will take photos continuously.
Note: The wired shutter release function is available when the receiver is turn off or
even without batteries.
Using the Transmitter as a Wireless Remote
1. Connect one end of the shutter release cable to the camera’s remote port, and the
other end to the receiver’s remote release terminal.
2. Turn on the camera and receiver.
3. Half press the shutter button on transmitter to autofocus. The indicators on the
transmitter and receiver will light green simultaneously.
4. Fully press the shutter button to take a photo. The indicators will turn red
simultaneously.
5. Pressing the delay button will take a photo in a 3 second delay. The indicator on
transmitter lights red. The indicator on receiver will blink green and orange in
sequence, and turn red when taking the photo.
6. Set the camera to continuous shooting mode. Press and hold the shutter button on
transmitter until the indicator turns off, and then let go off the button. The camera
will perform continuous shooting. To end the continuous shooting, press the

shutter button on transmitter.
Specification
Frequency 2.4GHz
Power Supply 1 pc of CR2032battery(Transmitter);
2 pcs of AAA alkaline/ NI-MH batteries(Receiver)
Transmission Distance
80m+ (Open space without interference)
Dimension L 67 * W 36 * H 13 mm(Transmitter);
L 90 * W 41 * H 32 mm(Receiver)
Weight 13g(Transmitter); 37g(Receiver)—Excluding
batteries
Please note: Product specification and external design are subject to change without
further notice.
* On compatible cameras.
Troubleshooting Guide
Power doesn’t turn on Trouble shooting
1. Reversed battery polarity Reinstall the battery according to the polarity of
the battery compartment.
2. The batteries run out of power Replace the batteries.
The camera is not triggered Trouble shooting
1. Poor connection between
transmitter and receiver Reset the codes for transmitter and receiver.
2. Transmitter/Receiver low battery Replace the transmitter/receiver’s batteries.
3. Wireless radio interference or large
building
Shut down the interference source and relocate
the product.
Warranty Terms:
1. In case of product malfunctions, the Three Guarantees service ( for refunding, free
repair, replacement) will be available on condition that customer provides valid
purchase invoice and the Three Guarantees certificate ( the Three Guarantee
certificate should be filled by customer in the purchase and sealed by the dealer
for it to take effect).
2. The main unit of product comes with a 1 year warranty from the date of purchase.
3. For other terms, please refer to details of the Three Guarantees policy.

The Warranty Does Not Apply to:
1. Failure to provide invoice, the Three Guarantee certificate, and other proof to
prove that the product is within warranty time of the Three Guarantee service.
2. The main unit, invoice or the content of the Three Guarantees certificate is
inconsistent with the physical goods or has been altered.
3. The main unit and accessories had been subject to abnormal usage or misuse.
Abnormal situations include but not limited to: improper storage, unauthorized
demolition or alteration, improper installation and damages due to elements not
caused by the product itself.
4. Damage caused by misuses such as water or external force damage and etc.
5. Damage caused by improper usage, maintenance or transportation in failure to
follow the product’s manual instructions.
6. Damage caused by force majeure such as earthquake, flood, war and etc.
7. Situations that do not conform to the Three Guarantees policy, or other relevant
national laws and regulations.
In case of product malfunctions, please handle by following the procedures:
1. Log in www.aodelan.net and contact AODELAN Customer Service Center to
confirm whether the product needs to be returned for repair. The shipping cost to
send back the product will be at customer’s expense (AODELAN Customer
Service Center’s reply shall prevails).
2. If you have problems concerning the product usage, please submit inquiry on the
website. Technical advisory service will be provided.
3. When the product is confirmed to require repair, the products should be properly
packaged and sent back to Aodelan company or authorized service center (find the
mailing address on the website). Detailed description of the issue, customer’s
name, contact number and postal address should be provided along with the
package.
The AODELAN Customer Service Center reserves all the rights to explain the above
after-sale& warranty terms. Please pay attention to the latest website announcement.