Aperto Networks SR1000-A1 MMDS Customer Premises Equipment User Manual PW100 Rev A
Aperto Networks MMDS Customer Premises Equipment PW100 Rev A
user manual

070-20000330-01
Rev A, August 2001
PACKETWAVE
Fixed Broadband Wireless Access System
PACKETWAVE 100 SERIES
SUBSCRIBER EQUIPMENT
Installation and Operation Manual
PacketWave 100 Installation and Operation
©Copyright 2001 by Aperto Networks
All rights reserved.
Specifications subject to change.
Aperto, PacketWave, and WaveCenter are trademarks of Aperto Networks.
All other trademarks used herein are the property of their respective owners.
Aperto Networks
1637 South Main Street
Milpitas, CA 95035 USA
Phone: 408.719.9977
Fax: 408.719.9970
www.apertonet.com

iii070-20000330-01
REGULATORY INFORMATION
FCC PART 15
This device complies with Part 15 of the FCC Rules. Operation is subject to the following two con-
ditions:
1) this device may not cause harmful electromagnetic interference, and
2) this device must accept any interference received includinginterference that may cause undes-
ired operations.
FCC NOTICE: Radio and Television Interference
The PacketWave 100 Series Subscriber Equipment has been tested and found to comply with the lim-
its for a Class B digital device, pursuant to Part 15 of the FCC Rules. These limits are designed to
provide reasonable protection against harmful interference in a residential installation. This equipment
generates, uses, and can radiate radio frequency energy and, if not installed and used according to the
instructions, may cause harmful interference to radio communications. However, there is no guarantee
that interference will not occur in a particular installation. If this equipment does cause harmful inter-
ference to radio or television reception, which is found by turning the equipment off and on, the user
is encouraged to try to correct the interference by one or more of the following measures:
• Reorient or relocate the receiving antenna.
• Increase the separation between the equipment or device.
• Connect the equipment to an outlet other than the receiver's.
• Consult a dealer or an experienced radio/TV technician for assistance.
RF Exposure Notice
The installer shall mount all transmit antennas so as to comply with the limits for human exposure to
radio frequency (RF) fields per paragraph 1.1307 of FCC regulations. The FCC requirements incor-
porate limits for Maximum Permissible Exposure (MPE) in terms of electric field strength, magnetic
field strength, and power density.
iv070-20000330-01
CAUTION (5.8 GHz UNII)
To comply with FCC RF exposure requirements, antennas used for this devie must be installed to
provide a separation distance of at leaset 1.5m from all persons to satisfy RF exposure compliance.
CAUTION (2.5 GHz MMDS)
To comply with FCC RF exposure requirements in section 1.1307, a minimum separation distance of
20 cm is required between this antenna and all persons.
This Class B digital apparatus complies with Canadian ICES-003
Cet appareil numérique de la classe B est conforme à la norme NMB-003
du Canada

v070-20000330-01 Rev A
TABLE OF
CONTENTS
Table of C ontents
PREFACE
Scope of This Manual . . . . . . . . . . . . . . . . . . . . . . . . . . . . . . . . . . . . . . . . . . . . . . . . . . . . vii
Conventions Used in This Manual . . . . . . . . . . . . . . . . . . . . . . . . . . . . . . . . . . . . . . . . . . viii
Intended Audience for this Manual . . . . . . . . . . . . . . . . . . . . . . . . . . . . . . . . . . . . . . . . . . viii
General Cautions and Warnings . . . . . . . . . . . . . . . . . . . . . . . . . . . . . . . . . . . . . . . . . . . . ix
CHAPTER 1. QUICKSTART GUIDE
CHAPTER 2. OVERVIEW
Subscriber Equipment . . . . . . . . . . . . . . . . . . . . . . . . . . . . . . . . . . . . . . . . . . . . . . . . . . . . 2-1
Outdoor Unit . . . . . . . . . . . . . . . . . . . . . . . . . . . . . . . . . . . . . . . . . . . . . . . . . . . . . 2-2
Indoor Unit . . . . . . . . . . . . . . . . . . . . . . . . . . . . . . . . . . . . . . . . . . . . . . . . . . . . . . 2-3
Software . . . . . . . . . . . . . . . . . . . . . . . . . . . . . . . . . . . . . . . . . . . . . . . . . . . . . . . . 2-4
CHAPTER 3. SITE PLANNING
Location of the Indoor Unit (Bridge/Router) . . . . . . . . . . . . . . . . . . . . . . . . . . . . . . . . . . . 3-1
Location of the Outdoor Unit (Radio/Antenna) . . . . . . . . . . . . . . . . . . . . . . . . . . . . . . . . . 3-2
Cables and Cable Path . . . . . . . . . . . . . . . . . . . . . . . . . . . . . . . . . . . . . . . . . . . . . . . . . . . 3-3
Subscriber LAN/Computer . . . . . . . . . . . . . . . . . . . . . . . . . . . . . . . . . . . . . . . . . . . . . . . . 3-3
CHAPTER 4. OUTDOOR UNIT INSTALLATION
Installation Requirements . . . . . . . . . . . . . . . . . . . . . . . . . . . . . . . . . . . . . . . . . . . . . . . . . 4-1
Mounting the Outdoor Unit (Radio/Antenna) . . . . . . . . . . . . . . . . . . . . . . . . . . . . . . . . . . . 4-2
Running Cables Between Outdoor and Indoor Units . . . . . . . . . . . . . . . . . . . . . . . . . . . . 4-3
Signal Connection . . . . . . . . . . . . . . . . . . . . . . . . . . . . . . . . . . . . . . . . . . . . . . . . 4-3
Control Connection . . . . . . . . . . . . . . . . . . . . . . . . . . . . . . . . . . . . . . . . . . . . . . . 4-4
Grounding the Outdoor Unit . . . . . . . . . . . . . . . . . . . . . . . . . . . . . . . . . . . . . . . . . . . . . . . 4-5

vi070-20000330-01 Rev A
CHAPTER 1.
CHAPTER 5. INDOOR UNIT INSTALLATION
Installation Requirements . . . . . . . . . . . . . . . . . . . . . . . . . . . . . . . . . . . . . . . . . . . . . . . . . 5-1
Installation Procedure . . . . . . . . . . . . . . . . . . . . . . . . . . . . . . . . . . . . . . . . . . . . . . . . . . . . 5-3
Connecting Radio/Antenna Cables . . . . . . . . . . . . . . . . . . . . . . . . . . . . . . . . . . . 5-3
Connecting to the Local PC or LAN . . . . . . . . . . . . . . . . . . . . . . . . . . . . . . . . . . . 5-4
Powering Up the Indoor Unit . . . . . . . . . . . . . . . . . . . . . . . . . . . . . . . . . . . . . . . . 5-5
CHAPTER 6. STARTING UP
Running the CPE Installation (Antenna Alignment) Tool . . . . . . . . . . . . . . . . . . . . . . . . . 6-1
Connection to the PacketWave Network . . . . . . . . . . . . . . . . . . . . . . . . . . . . . . . . . . . . . 6-2
Setting Up the Local Computer(s) . . . . . . . . . . . . . . . . . . . . . . . . . . . . . . . . . . . . 6-2
CHAPTER 7. MANAGEMENT INTERFACES
Front-Panel LEDs . . . . . . . . . . . . . . . . . . . . . . . . . . . . . . . . . . . . . . . . . . . . . . . . . . . . . . . 7-1
Web Interface (GUI) . . . . . . . . . . . . . . . . . . . . . . . . . . . . . . . . . . . . . . . . . . . . . . . . . . . . . 7-2
Accessing the Web Interface . . . . . . . . . . . . . . . . . . . . . . . . . . . . . . . . . . . . . . . . 7-2
Home Page: Connectivity View . . . . . . . . . . . . . . . . . . . . . . . . . . . . . . . . . . . . . . 7-4
Configuration Pages . . . . . . . . . . . . . . . . . . . . . . . . . . . . . . . . . . . . . . . . 7-5
Device Control Utilities . . . . . . . . . . . . . . . . . . . . . . . . . . . . . . . . . . . . . . 7-8
Fault Reporting . . . . . . . . . . . . . . . . . . . . . . . . . . . . . . . . . . . . . . . . . . . . 7-9
Status and Performance Statistics . . . . . . . . . . . . . . . . . . . . . . . . . . . . . 7-11
SNMP . . . . . . . . . . . . . . . . . . . . . . . . . . . . . . . . . . . . . . . . . . . . . . . . . . . . . . . . . . . . . . . . 7-12
Syslog . . . . . . . . . . . . . . . . . . . . . . . . . . . . . . . . . . . . . . . . . . . . . . . . . . . . . . . . . . . . . . . . 7-12
Command Line Interface (CLI) . . . . . . . . . . . . . . . . . . . . . . . . . . . . . . . . . . . . . . . . . . . . . 7-13
Fault Reporting . . . . . . . . . . . . . . . . . . . . . . . . . . . . . . . . . . . . . . . . . . . . . . . . . . . . . . . . . 7-14
Appendix A. Specifications
Bridge/Router (Indoor Unit) Specifications . . . . . . . . . . . . . . . . . . . . . . . . . . . . . . . . . . . . A-1
Radio/Antenna (Outdoor Unit) Specifications . . . . . . . . . . . . . . . . . . . . . . . . . . . . . . . . . . A-2

vii070-20000330-01 Rev A
PREFACE
This manual is part of the documentation for the PacketWave broadband wireless sys-
tem for delivering high-speed subscriber services. The PacketWave documentation set
includes:
• PacketWave 1000 Base Station Unit Installation, Configuration, and Operation
Manual: Part 070-20000340-01
• PacketWave 100 Series Subscriber Equipment Installation and Operation Man-
ual: part 070-20000330-01
SCOPE OF THIS MANUAL
This manual provides the following information:
•A QuickStart section for rapidly placing PacketWave subscriber equipment in
operation.
• Descriptions of the PacketWave 100 Series hardware components, including
the Indoor Unit (bridge/router) and the Outdoor Unit (radio/antenna).
• Complete site planning and installation instructions for PacketWave 100 Series
subscriber equipment, including the indoor bridge/router unit and the outdoor
radio/antenna unit.
• Descriptions of the PacketWave 100 Series software components, including the
Web GUI and the CPE Installation Tool (antenna pointing utility), and instruc-
tions for using them.
• IP addressing guidelines for the local PC(s).
• Procedures for initializing the PacketWave 100 subscriber equipment.
Complete descriptions of the PacketWave System, its components, the installation of
the cell site equipment, and overall system configuration and operation are provided
in the PacketWave 1000 Base Station Unit Installation, Configuration, and Operation
manual.
CHAPTER 1.
viii070-20000330-01 Rev A
CONVENTIONS USED IN THIS MANUAL
PacketWave manuals represent special kinds of text as follows:
• Files names and URLs are represented in italics, with variables described inside
angle brackets. For example, if the URL http://<IP address>/bsu.htm is refer-
enced, you will replace the variable <IP address> with the appropriate real IP
address.
• Management interface text is represented by a bold font: for example, the
Generate Config File button.
• Labels on equipment are represented in a bold sans serif font: for example, the
Control connector.
WARNING: This format is used to indicate the possibility of personal injury
or damage to equipment.
CAUTION: This format is used to indicate the possibility of system or equip-
ment operation problems.
Items of special importance will be formatted and marked by a pointing-hand
icon, as this paragraph is.
INTENDED AUDIENCE FOR THIS MANUAL
This manual is intended primarily for subscriber equipment installers. It also includes
information of use to subscribers, including a discussion of the Web GUI.
Installation of radio equipment involves numerous factors requiring considerable
expertise. It is assumed that equipment installers are professionals with a full under-
standing of the principles and standard practices and procedures of cell site installa-
tion, with all relevant safety requirements, and with applicable local building codes.

ix070-20000330-01 Rev A
CHAPTER 1.
GENERAL CAUTIONS AND WARNINGS
Observe the following when installing or operating any PacketWave System compo-
nents.
Carefully follow all local building and electrical codes, especially the latest revi-
sion of the National Electrical Code (NEC) and standard safety procedures for
installing and working with this type of equipment. Improper procedures or instal-
lation can result in damage to the equipment or the building, and injury or death.
If you are not sure about whether the installation follows these codes, contact a
licensed building inspector or electrician in the area for assistance.
Always use quality components—including cables, connectors, mounts, etc.—
specifically rated for your particular environmental conditions and system perfor-
mance requirements.
Always use appropriate tools, and follow the instructions of the tool
manufacturers.
All outdoor installation, including equipment mounting and cabling, should be
performed by trained microwave radio technicians familiar with usual and
customary practices and procedures.
Take extreme care to avoid contacting any overhead power lines, lights, and
power circuits while you are installing the Outdoor Unit. Contact with any of
these objects could cause injury and fatality. Do not install the Outdoor Unit near
power lines.
Make sure that the outdoor radio/antenna is grounded in accordance with local,
state, federal, and National Electrical Code (NEC) requirements. Pay special
attention to NEC sections 810 and 820. See the instructions in Chapter 4 of this
manual.
For the PacketWave 100 Series Indoor Unit, use an outlet that contains surge pro-
tection and ground fault protection, or use a surge protection device. This will
protect the Indoor Unit and equipment connected to it from damage resulting fron
ac current surges, lightning, etc. For complete protection, all connections to the
Indoor Unit (i.e., from radio/antenna and PC/hub) should be connected to a surge
protection device. To ensure the best signal, use surge protectors designed for the
the specific application.
Because Aperto Networks cannot be responsible for improper installation or use of its
equipment, failure to follow these and other published cautions and warnings may
void your equipment warranty.

CHAPTER 1.
x070-20000330-01 Rev A

1–1070-20000330-01 Rev A
1
QUICKSTART GUIDE
This chapter outlines the basic procedure for installing PacketWave 100 Series
Subscriber Equipment and putting it into operation. It identifies the minimal require-
ments for getting the equipment up and running, and assumes that configuration using
DHCP and WaveCenter™ Configuration Manager has been performed as described
in the PacketWave 1000 Base Station Unit manual.
WARNING: This QuickStart Guide assumes that outdoor installation proce-
dures will be performed by qualified professionals following all
safety and other requirements and acting in accordance with
standard practices and procedures. Failure to meet safety
requirements and/or non-standard practices and procedures
could result in personal injury and/or damage to equipment.
All of the instructions presented in this chapter are discussed in more detail in subse-
quent chapters of this manual.
Step 1. Prepare for Installation
A. Before visiting the subscriber’s site:
i. Make sure that the necessary system configuration has taken place (as
described in the PacketWave 1000 Base Station Unit manual).
ii. Make sure that the system’s DHCP and TFTP servers are running.
iii. Verify that the subscriber configuration file has been created and saved on
the TFTP server.
iv. Verify that the DHCP server has been configured with the subscriber’s IP
and MAC addresses and its configuration file name.
CHAPTER 1. QUICKSTART GUIDE
1–2070-20000330-01 Rev A
B. At the subscriber’s site:
i. Identify the location for the Indoor Unit (bridge/router).
ii. Identify an appropriate location for mounting the Outdoor Unit. In most
cases, the unit should be pointed at the base station with the least possible
obstruction
iii. Determine the cable path between the Indoor Unit and the Outdoor Unit.
Maximum cable length is 165 feet (50 m).
Step 2. Install the Outdoor Unit (Radio/Antenna)
A. If a mounting pole or other support is to be employed, install it in the chosen loca-
tion, following standard procedures and local building codes.
The Outdoor Unit’s mounting bracket accommodates diameters of 1.5 inches, 2
inches, or 5 cm.
B. Mount the Outdoor Unit to the support or to the building.
Step 3. Install the Indoor Unit (Bridge/Router)
A. For convenience, the Indoor Unit should be temporarily placed close to the Out-
door Unit to facilitate the antenna alignment process. When the installation of the-
Outdoor Unit is complete, move the Indoor Unit to its permanent location.
WARNING: For proper cooling, the Indoor Unit must be installed in the
upright position, with adequate air flow around and through it.
Make sure the Indoor Unit is located near an electrical power outlet or power
extension cord will be needed.
B. Assuming that the Indoor Unit is located at a temporary location, run spare radio
signal and control cables between the Outdoor and Indoor Units.
-Radio signal cable (quad shield coaxial, male F connectors) — Radio RF
connectors on the Outdoor and Indoor Units.
-Radio control cable (shielded outdoor Cat 5, male RJ45 connectors) —
Radio Control connectors on the Outdoor and Indoor Units.
The Radio Control interface on the Indoor Unit has the same physical appearance
as the 10/100Base-T interface. Make sure you connect to the right one.

1–3070-20000330-01 Rev A
CHAPTER 1. QUICKSTART GUIDE
Step 4. Initialize the Subscriber Equipment
A. Connect the power cable between the Indoor Unit and a wall outlet.
B. Perform antenna alignment procedure (see addendum on this subject).
C. Afterthe antenna is aligned, move the Indoor Unit to its permanent location.
WARNING: For proper cooling, the Indoor Unit must be installed in the
upright position, with adequate air flow around and through it.
D. Use the permanent radio signal and control cables to connect the Outdoor Unit to
the Indoor Unit.
-Radio signal cable (quad shield coaxial, male F connectors) — between
Radio RF connectors on the Outdoor and Indoor Units.
-Radio control cable (shielded outdoor Cat 5, male RJ45 connectors) —
between Radio Control connectors on the Outdoor and Indoor Units.
Step 5. Configure Subscriber Hosts
A. Connect the subscriber’s computer(s) to the 10/100Base-T interface on the Indoor
Unit, using a straight Ethernet cable for connection to a hub or a crossover Ether-
net cable for connection directly to a computer.
B. Typically, the only other thing necessary to connect a subscriber host computer to
the PacketWave network and beyond is to configure the host’s TCP/IP to obtain
its IP address using DHCP. Instructions should be available using the computer’s
online help

CHAPTER 1. QUICKSTART GUIDE
1–4070-20000330-01 Rev A
2–1070-20000330-01 Rev A
2
OVERVIEW
As part of Aperto Networks' PacketWave Broadband Multiservice Wireless Access
System, the PacketWave 100 Series Subscriber Equipment delivers high-speed,
always-on Internet access to small businesses, small offices/home offices (SOHO),
and residences.
SUBSCRIBER EQUIPMENT
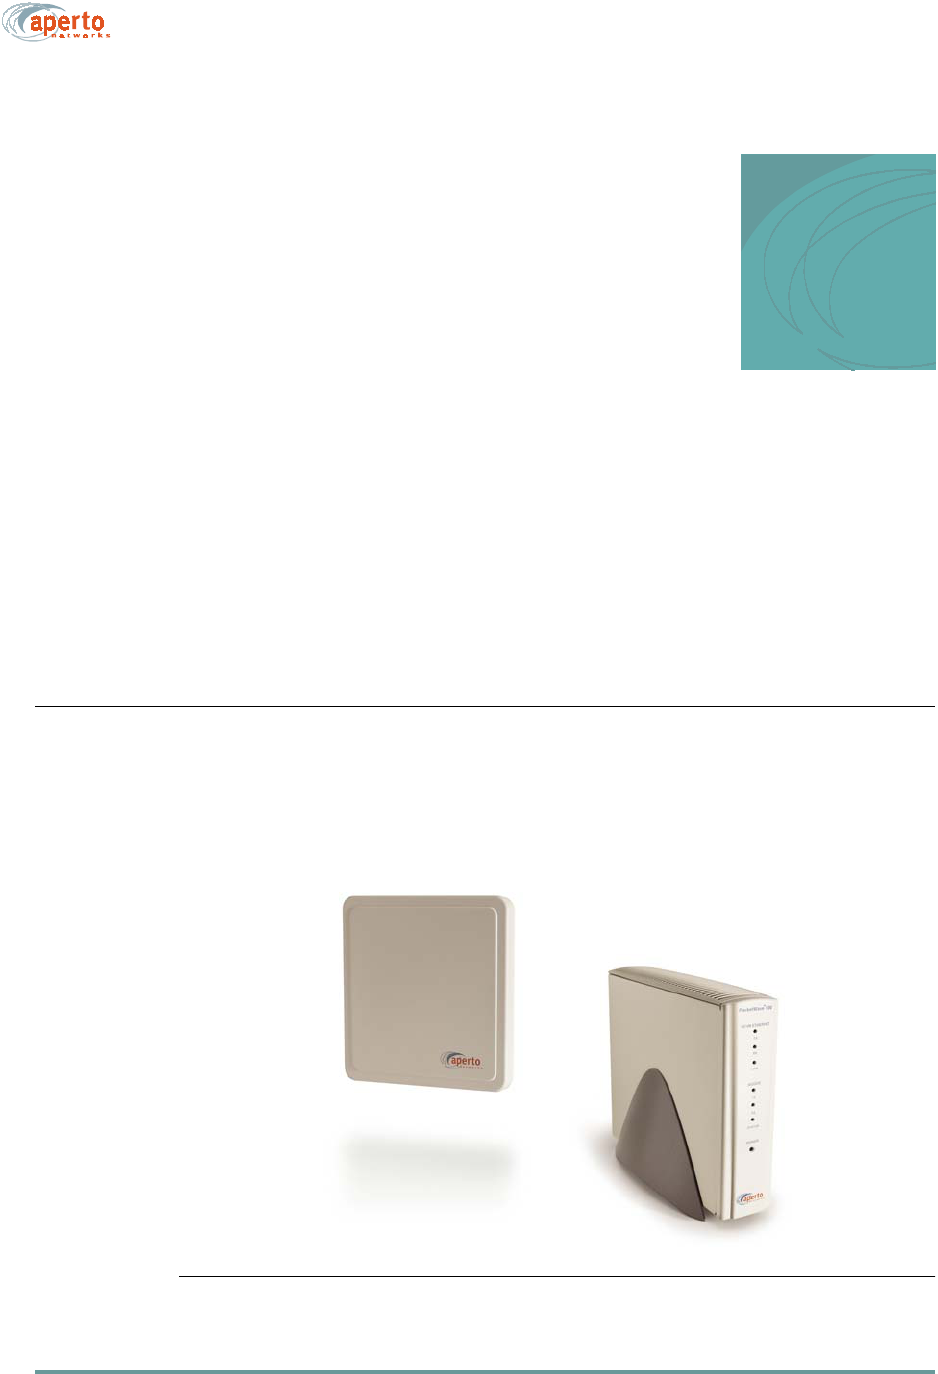
PacketWave 100 Series subscriber equipment consists of an Outdoor Unit (radio/
antenna), and an Indoor Unit (bridge/router), as shown in Figure 2-1.
Figure 2-1 PacketWave Subscriber Equipment
Outdoor Unit
(Radio/Antenna)
Indoor Unit
(Bridge/Router)
CHAPTER 2. OVERVIEW
2–2070-20000330-01 Rev A
Outdoor Unit
The outdoor portion of the subscriber equipment consists of a single unit containing
the radio and antenna. Different models support various frequency bands:
• 2.5 GHz MMDS
• 3.5 GHz FWA
• 5.3 GHz
• 5.8 GHz U-NII
The radio/antenna unit installed at the subscriber site must match the frequency band
employed at the base station.
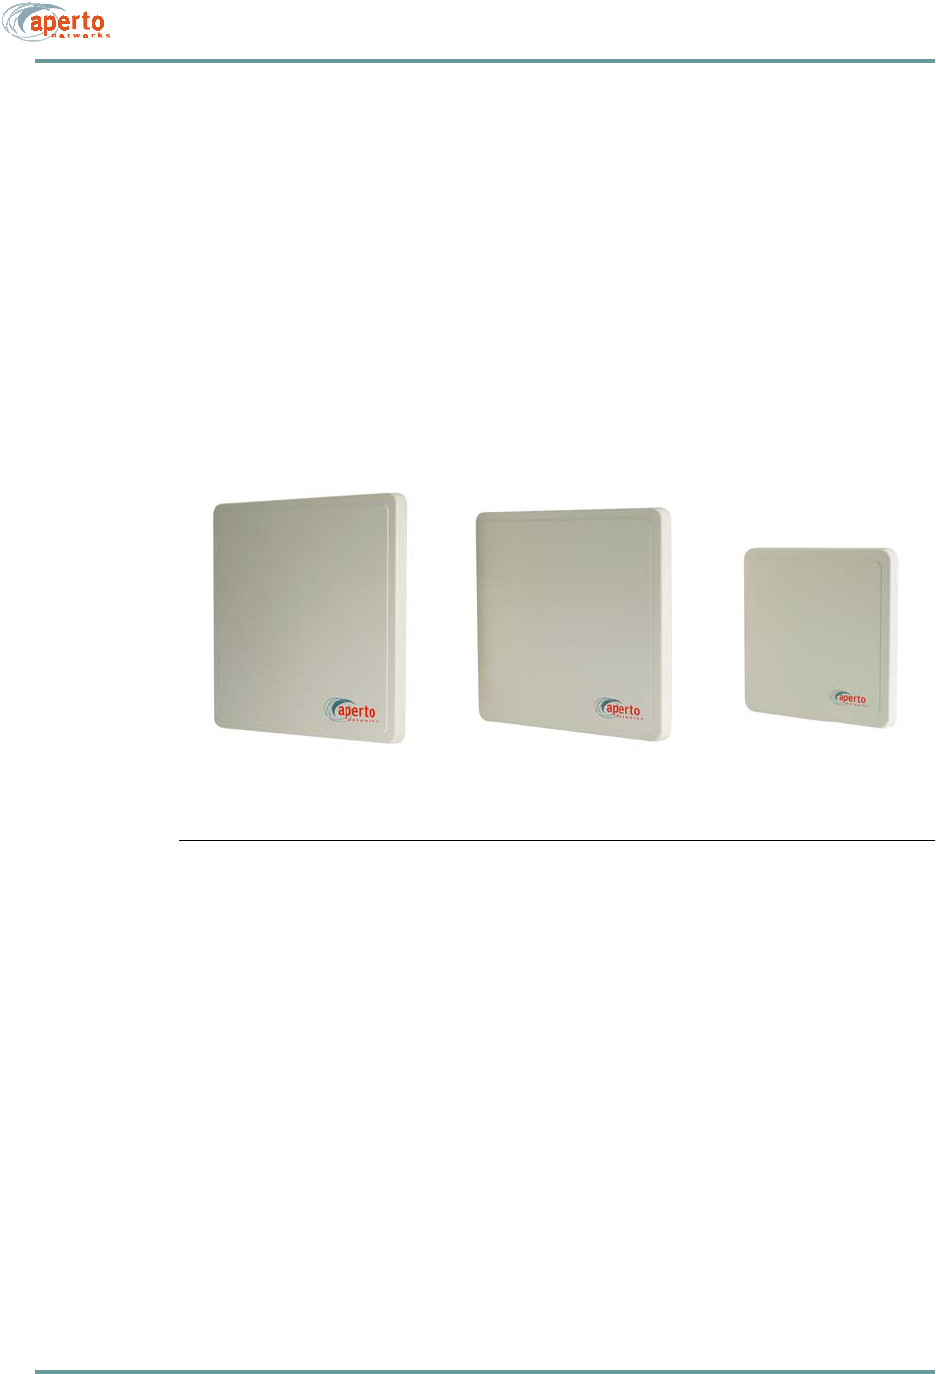
Figure 2-2 Subscriber Outdoor Units
As shown in Figure 2-2, sizes of the antennas vary with the frequency band, from
approximately 9 inches square to approximately 13 inches square. Outdoor units
mount easily on a home or office roof, under the eave, or even in a properly-situated
window.
The subscriber antennas are directional, with a beam width of 17° to 20° horizontally
and vertically depending on frequency. The width of this beam, combined with the
width of the base station antenna beam, means that only rough pointing of the antenna
is needed for establishing a wireless link, though accurate pointing is important for
maximum signal quality.
Depending on distance, a line-of-sight path may not be required for establishment of
a wireless link between the subscriber and the base station. PacketWave’s OptimaLink
technology minimizes the effects of obstructions in the path between the subscriber’s
antenna and the base station antenna.
2.5 GHz MMDS 3.5 GHz FWA 5.3 GHz or
5.8 GHz U-NII
2–3070-20000330-01 Rev A
CHAPTER 2. OVERVIEW
Indoor Unit
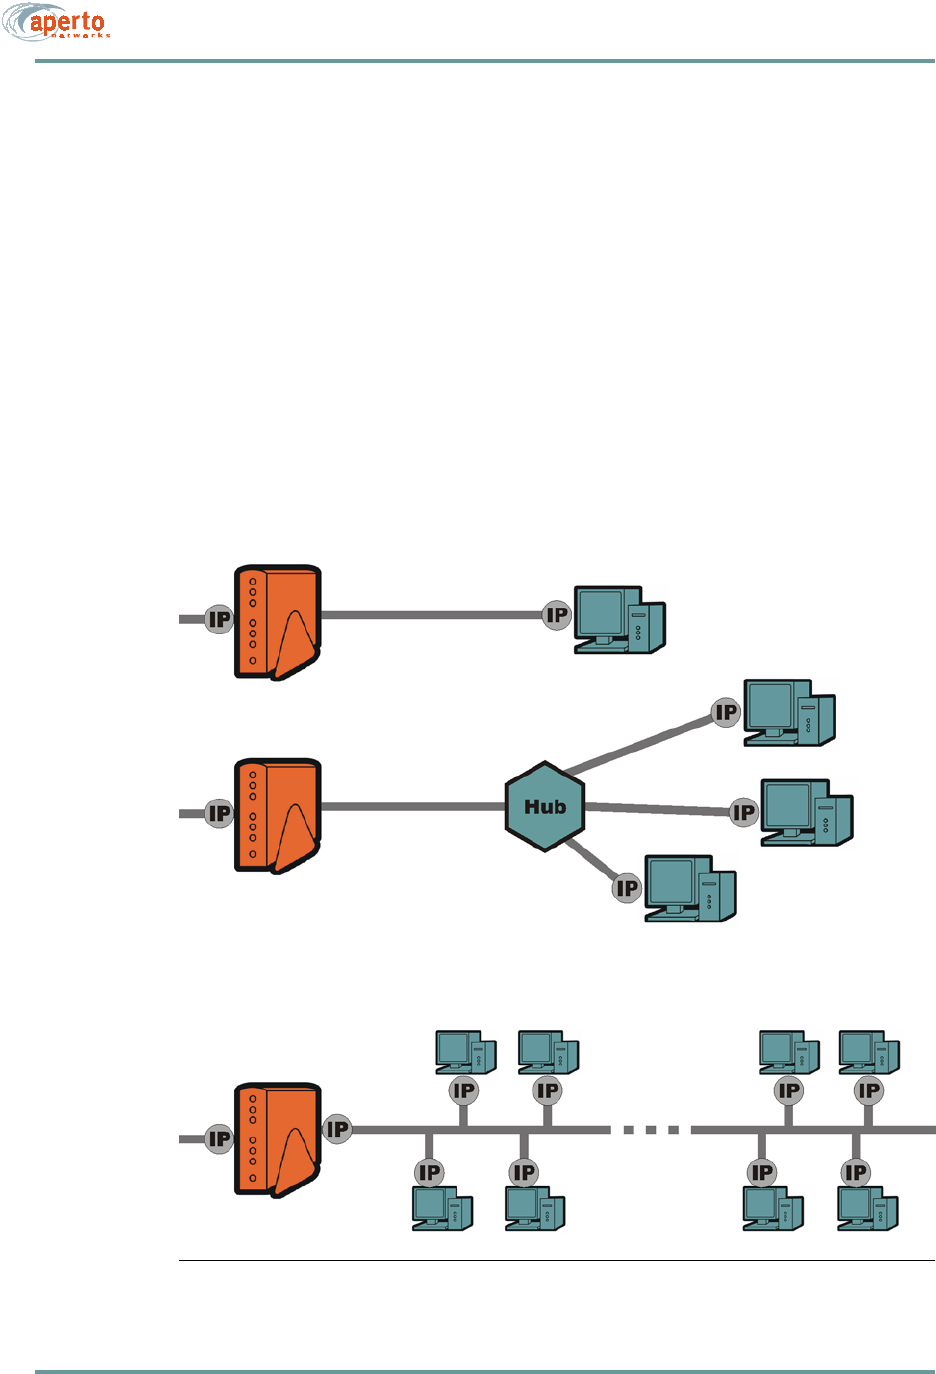
The PacketWave 100 Series Indoor Unit is a bridge/router which, together with the
Outdoor Unit, connects the subscriber’s computer(s) to the wireless service. The first
available model, the PacketWave 130 supports bridging and NAT modes, as shown in
Figure 2-3. IP routing will be supported in the next major software release.
On the radio/antenna side, the Indoor Unit has two interfaces:
• A port for wireless traffic (which also provides power to the Outdoor Unit).
• A port for controlling the radio/antenna.
On the subscriber side, the Indoor Unit has an auto-negotiating 10/100Base-T Ethernet
port. The Indoor Unit plugs into a standard ac wall plug (120 or 220 volts). A power
cord with transformer is provided with the unit.
Figure 2-3 PacketWave 130 Indoor Unit
Bridging Mode
NAT Mode

CHAPTER 2. OVERVIEW
2–4070-20000330-01 Rev A
Software
Subscriber equipment is provisioned using the WaveCenter Configuration Manager,
as described in the PacketWave 1000 Base Station Unit Installation, Configuration,
and Operation manual. On boot-up, the indoor unit downloads its configuration from
the base station’s TFTP server. At the same time, it downloads address and host infor-
mation from the base station’s DHCP server.
The PacketWave 100 Series subscriber equipment includes the following management
software:
•CPE Installation Tool — See addendum on antenna alignment procedure
•Web GUI — Each Indoor Unit includes a graphical user interface (GUI) which
can be accessed via a standard Web browser, either directly or through the Base
Station Unit’s Web GUI. Use of the Web GUI is described in Chapter 7.
•SNMP Agent — Each Indoor Unit includes an SNMP agent which can be
accessed via a standard SNMP manager, either directly or through the Base
Station Unit’s proxy agent. SNMP capability is described in Chapter 7.
•Command Line Interface — A limited command line interface (CLI) to the
Indoor Unit can be accessed via telnet. Use of the CLI is described in Chapter 7.
PacketWave Indoor Units also include servers and other networking functionality:
•DHCP Server — PacketWave 130 Indoor Units include a Dynamic Host
Configuration Protocol (DHCP) server for local address management.
•NAT Server — PacketWave 130 Indoor Units include a built-in NAT (Network
Address Translation) server.

3–1070-20000330-01
3
SITE PLANNING
There are three basic site-planning issues which must be decided before you begin
installation:
• Location of the Indoor Unit (bridge/router).
• Location and mounting method of the Outdoor Unit (radio/antenna).
• Cable path between the Indoor Unit and the Outdoor Unit.
LOCATION OF THE INDOOR UNIT (BRIDGE/ROUTER)
Typically, the Indoor Unit is located near the subscribers hub or computer. However,
the Ethernet cable to the local computer or hub can be up to 330 ft (100 m) in length.
CAUTION: Make sure that the Indoor Unit is installed in a room with tem-
perature and humidity controls such that the temperature
remains between 32 and 104 °F (0 and 40 °C) and the humidity
remains between 10% and 90% noncondensing.

CHAPTER 3. SITE PLANNING
3–2070-20000330-01
LOCATION OF THE OUTDOOR UNIT (RADIO/ANTENNA)
For optimal wireless channel performance, it is advantageous to locate the Outdoor
Unit (radio/antenna) where it has the least-obstructed path to the base station antenna.
If a line-of-site path is available, locate the Outdoor Unit where the path is least likely
to be affected by such obstructions as blowing branches, seasonally changing foliage,
etc. If a clear line-of-site path is not available, choose a path that minimizes obstruc-
tions.
Fine-tuning of the antenna pointing is performed using the CPE Installation
Tool software, as described in Chapter 6 of this manual.
Other factors to consider when choosing a location for the Outdoor Unit include:
•Distance to the Indoor Unit — Locate the Outdoor Unit so that cables to the
Indoor Unit will be no longer than 165 feet (50 m).
•Cable routing — Consider how cables from the Outdoor Unit cables will enter
the building.
•Accessibility — If possible, choose a location that is relatively accessible,
which will simplify installation and any adjustment or repair that might be nec-
essary in the future.
•Mounting method — The antenna/receiver includes an adjustable bracket for
mounting the unit on a pole that is 1.5 inch, 2 inches, or 5 cm in diameter. For
other mounting options (under an eave or on a chimney, for example), mount-
ing hardware may be adapted as desired. Any alternate mounting method
should allow adequate adjusting of the antenna direction, both horizontally and
vertically.
3–3070-20000330-01
CHAPTER 3. SITE PLANNING
CABLES AND CABLE PATH
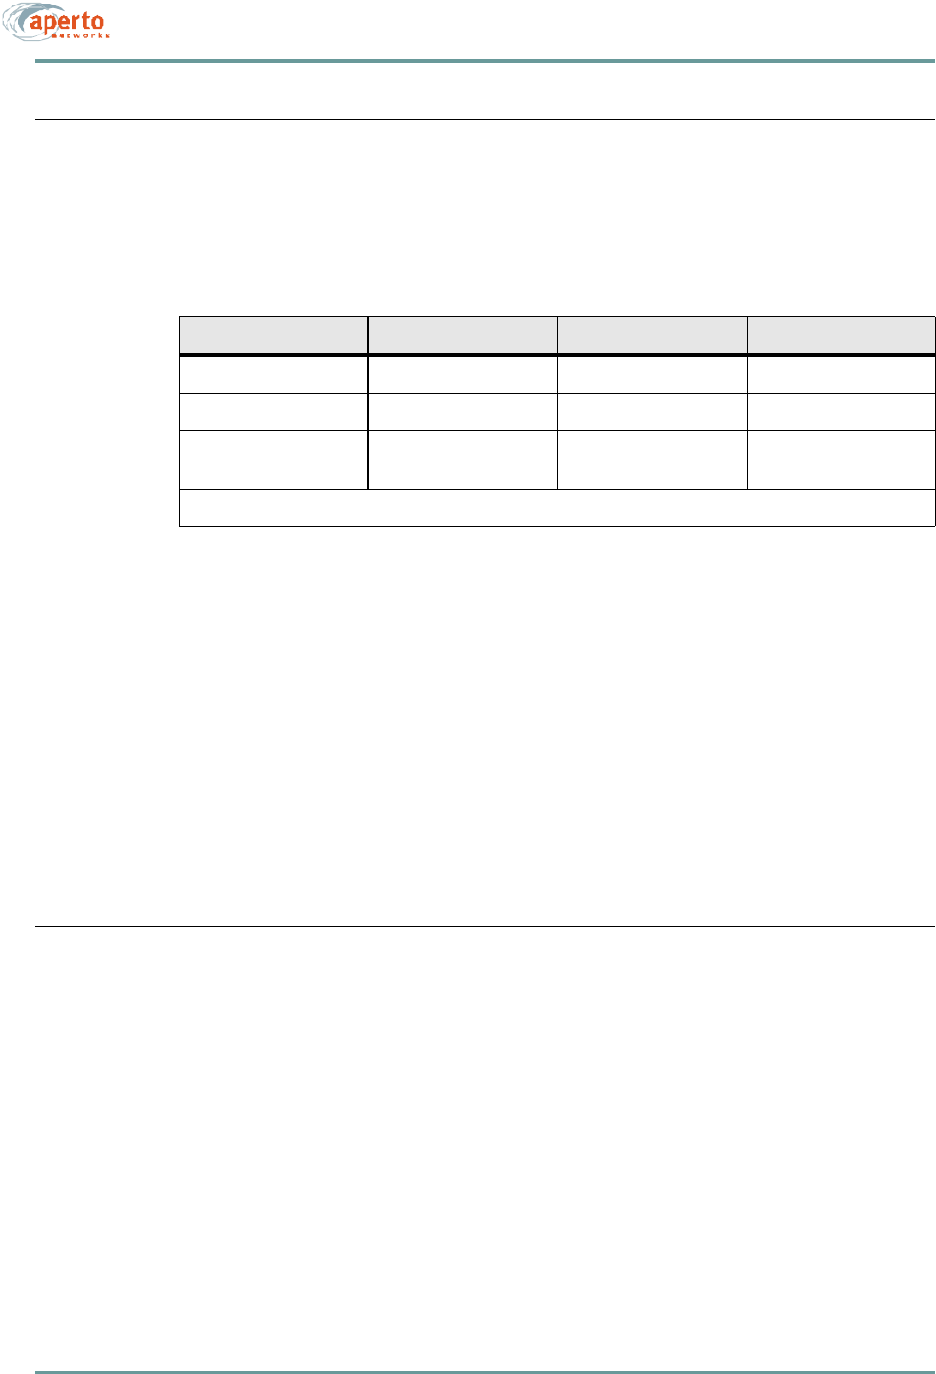
For subscriber equipment installation, you will need the cables and connectors indi-
cated in Table3-A.
Choose the path along which the cables will run between the Indoor Unit and the Out-
door Unit, keeping in mind that a radio signal cable length should be less than 165
feet (50 m).
Carefully consider both the outdoor and indoor portions of the cable run. Decide how
the cable run will be secured, how it will enter the building, and whether it will
include wall jacks.
Consider all local building codes and standard construction practices when planning
the cable path.
SUBSCRIBER LAN/COMPUTER
If the Indoor Unit is functioning in NAT mode, addresses on the local subnet (i.e.,
LAN) will not be visible beyond the subscriber’s subnet. The Indoor Unit will auto-
matically become a DHCP server for the subscriber’s subnet. In addition, in default
setting, the Indoor Unit’s DHCP server will use the DNS server address supplied by
the system’s DHCP server to resolve network addresses.
Table3-A Subscriber Site Cable Requirements
Connection — Qty Cable Type Max. Length Connectors
Ethernet (1) Cat 5 330 ft (100 m) RJ45 male
Radio Signal (1) Quad Shield Coaxial 165 ft. (50 m) * Male F type
Radio Control (1) Shielded Outdoor-
rated Cat 5 165 ft. (50 m) * RJ45 male
* These two cables run over the same path, and so will be of the same length.

CHAPTER 3. SITE PLANNING
3–4070-20000330-01

4–1070-20000330-01 Rev A
4
OUTDOOR UNIT INSTALLATION
In most cases, the installation of the Outdoor Unit should be performed before the
installation of the Indoor Unit (see Chapter 5). For convenience during the installation
of the Outdoor Unit, the Indoor Unit should be temporarily placed close to the Out-
door Unit to facilitate antenna alignment. When the installation of the Outdoor Unit
is complete, the Indoor Unit can be moved to its permanent location.
INSTALLATION REQUIREMENTS
You will need the following tools and supplies when installing the Outdoor Unit:
• Drill (for cable entry through walls, etc.)
• Phillips screwdriver
• Wrench (7/16 inch)
• Cabling tools
• Spare radio signal and control cables with connectors (each 30 feet or longer)
• Cable ties, staples, or clamps for dressing cables
• Silicone sealant
You will also need the following cables and connectors:
• Coaxial cable (quad shield) and two male F connectors
• Shielded Cat 5 cable (outdoor rated) and two RJ45 male connectors
• Ethernet cable with RJ45 male connectors (straight-through for connection to
hub, or crossover for connection to computer)
CHAPTER 4. OUTDOOR UNIT INSTALLATION
4–2070-20000330-01 Rev A
MOUNTING THE OUTDOOR UNIT (RADIO/ANTENNA)
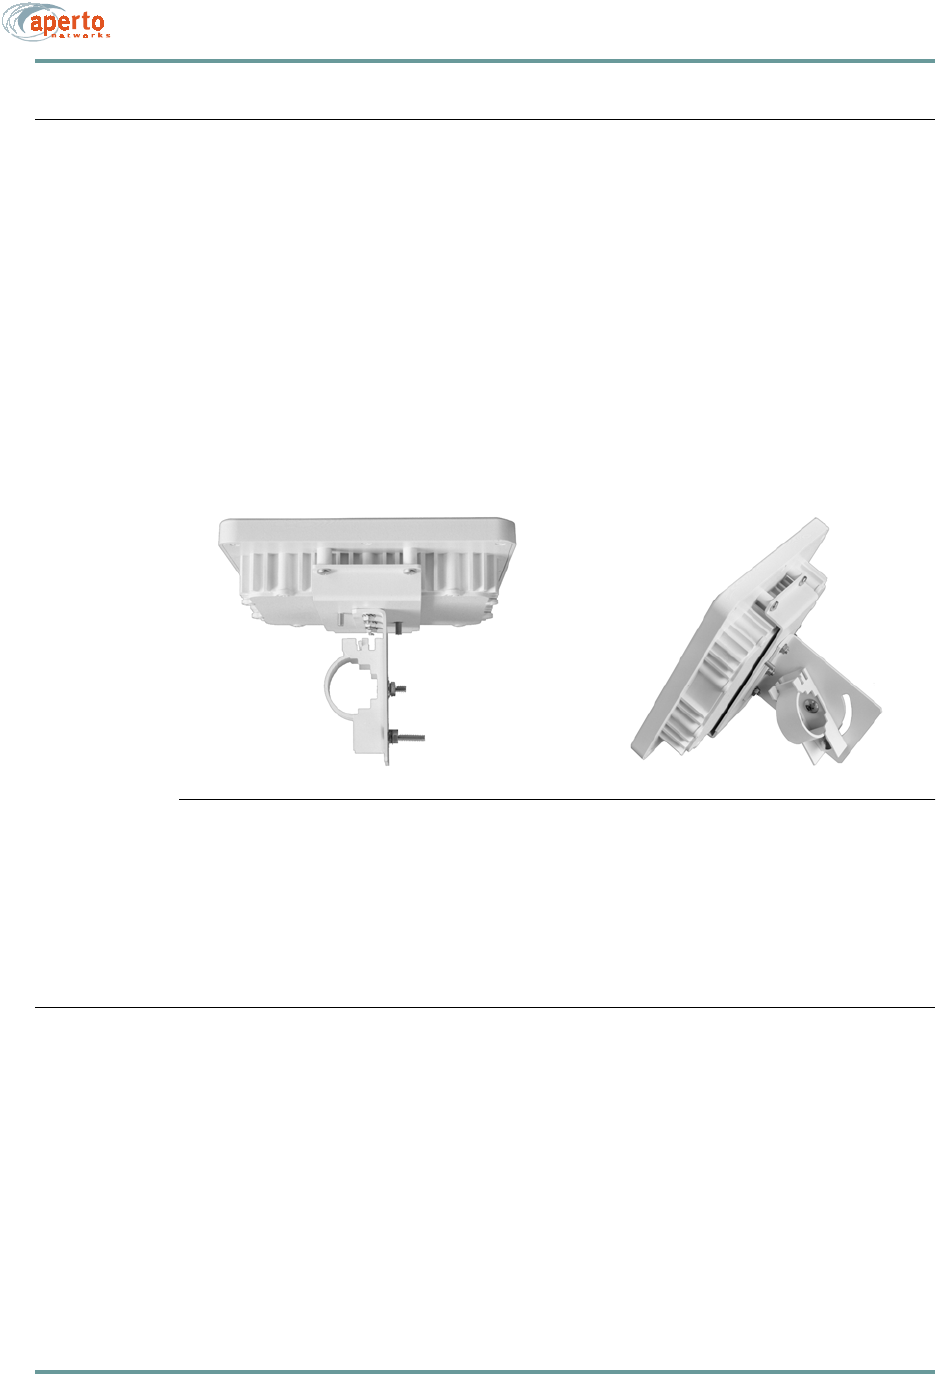
Subscriber Outdoor Units are designed for mounting on a pole or antenna mast with
a diameter of 1.5 inch, 2 inches, or 5 cm, using a rear-mounted bracket as shown in
Figure 4-1.
To mount an Outdoor Unit on a pole:
1. Loosen the pole clamp bolt and open the pole clamp.
2. Close the pole clamp around the pole.
3. Adjust the azimuth and elevation orientation of the radio/antenna.
4. Tighten the pole clamp bolt until the Outdoor Unit is secured in position.
Figure 4-1 Outdoor Unit Mounting Bracket
Other mounting options, such as under an eave or in a window, can also be employed.
In such cases, appropriate mounting hardware must be obtained.
RUNNING CABLES BETWEEN OUTDOOR AND INDOOR UNITS
As described in Chapter 2, there are two cables that connect the Outdoor Unit to the
Indoor Unit:
• A quad shield coaxial cable for the subscriber signal (which also provides ac
power to the Outdoor Unit).
• A shielded Cat 5 cable for controlling the Outdoor Unit.
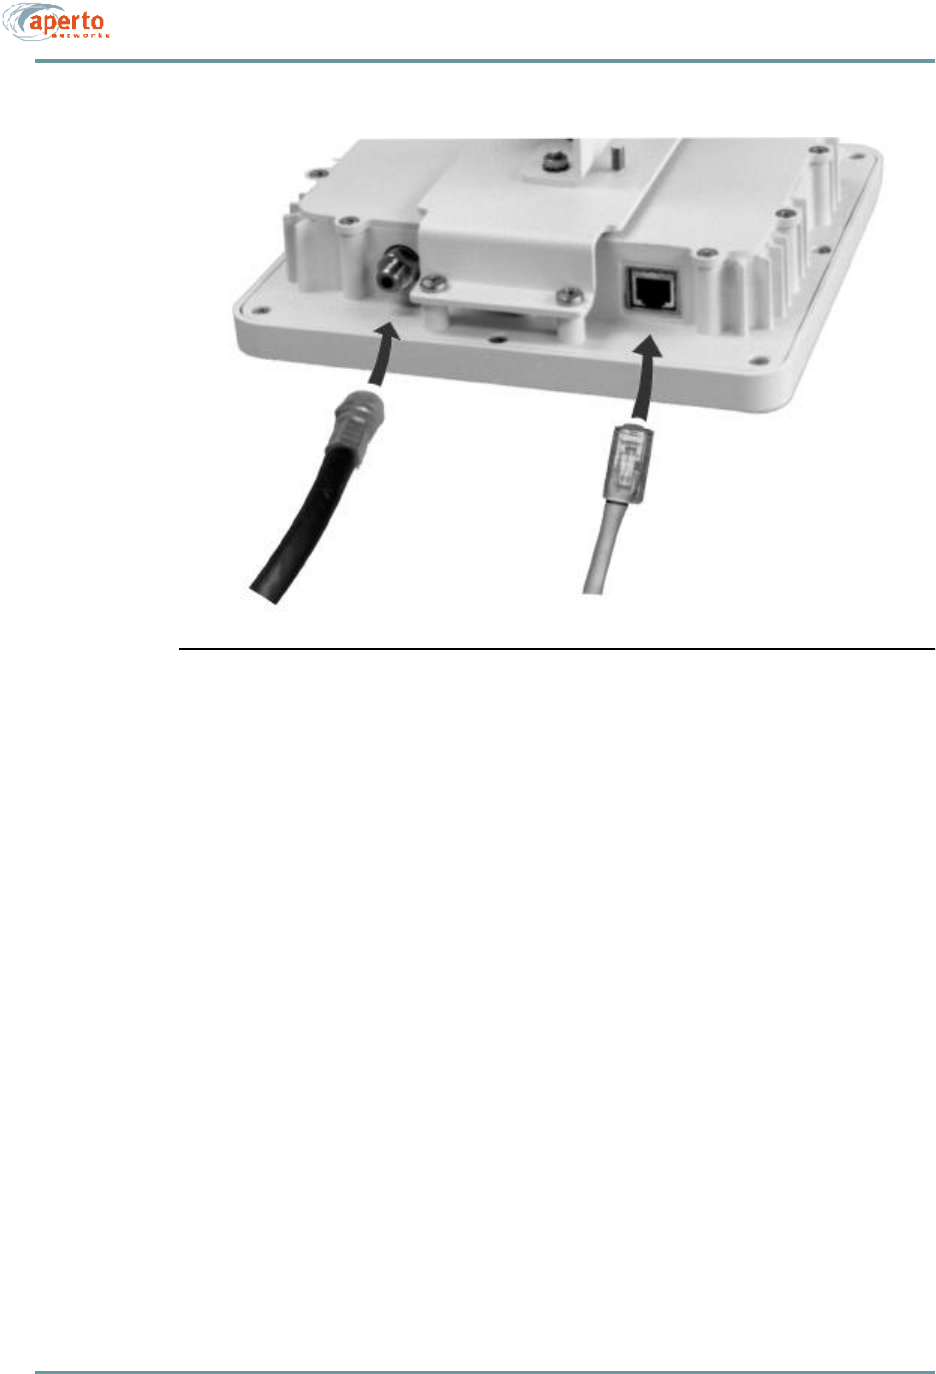
The connectors on the Outdoor Unit are located on the back, at the bottom of the radio
enclosure, as shown in Figure 4-2.
4–3070-20000330-01 Rev A
CHAPTER 4. OUTDOOR UNIT INSTALLATION
These cables run from outdoors to indoors, so a suitable cable run and building entry
point must be identified, as discussed in Chapter 3.
For these outdoor-to-indoor connections, the order of the steps in the installation
procedure will vary depending on a number of factors, including site particulars
and installers’ preferred practice. For example, in some cases it may be best to
run unterminated cable and then attach connectors; in others it may be more effi-
cient to attach one or both connectors to the cable before running it, or to use a
pre-assembled cable. Also, cable dressing at various locations may be best per-
formed at different points in the procedure. Therefore, the procedures given for
these connections should be taken as a list of necessary steps and a suggested
order, and modified as appropriate for your particular circumstances.
CAUTION: If the Indoor Unit has already been installed and connected as
described in Chapter 5, be sure that power is disconnected from
the Indoor Unit before attaching the cables from the Outdoor
Unit.
Signal Connection
The radio signal cable should be quad shield 75-ohm coaxial cable with a maximum
length of 165 feet (50 m). The cable terminates with a male F connector at each end.
To install the radio signal cable, perform the following steps
1. Obtain an appropriate length of cable, and run it from the Indoor Unit to the
Outdoor Unit. Include a service/drip loop as appropriate.
2. Install a male F connector at the radio/antenna end of the cable.
3. Attach the cable to the female F connector on the Outdoor Unit, as shown in
Figure 4-2. Tighten the connector until the cable is firmly secured, but do not
overtighten.
4. Dress the outdoor portion of the cable as appropriate.
CHAPTER 4. OUTDOOR UNIT INSTALLATION
4–4070-20000330-01 Rev A
Figure4-2 Connections to the Outdoor Unit (Radio/Antenna)
Control Connection
The control cable should be shielded outdoor-rated Cat 5, terminating with an RJ45
male connector (plug) at each end. The cable should be outdoor-rated, and may be up
to 165 feet (50 m) in length.
1. Obtain an appropriate length of cable, and run it from the Indoor Unit to the
Outdoor Unit. Include a service/drip loop as appropriate.
2. Place the supplied rubber boot over the radio/antenna end of the cable.
3. Install an RJ45 male connector on the radio/antenna end of the cable.
4. Plug the cable into the RJ45 socket on the Outdoor Unit as shown in
Figure4-2.
5. Put the rubber boot in position to protect the R-J45 connection and secure it in
place with a cable tie.
6. Dress the outdoor portion of the cable as appropriate.
7. Seal the entry of both cables to the building as appropriate.
Radio RF connector
To Indoor Unit’s
Radio Control connector
To Indoor Unit’s
4–5070-20000330-01 Rev A
CHAPTER 4. OUTDOOR UNIT INSTALLATION
GROUNDING THE OUTDOOR UNIT
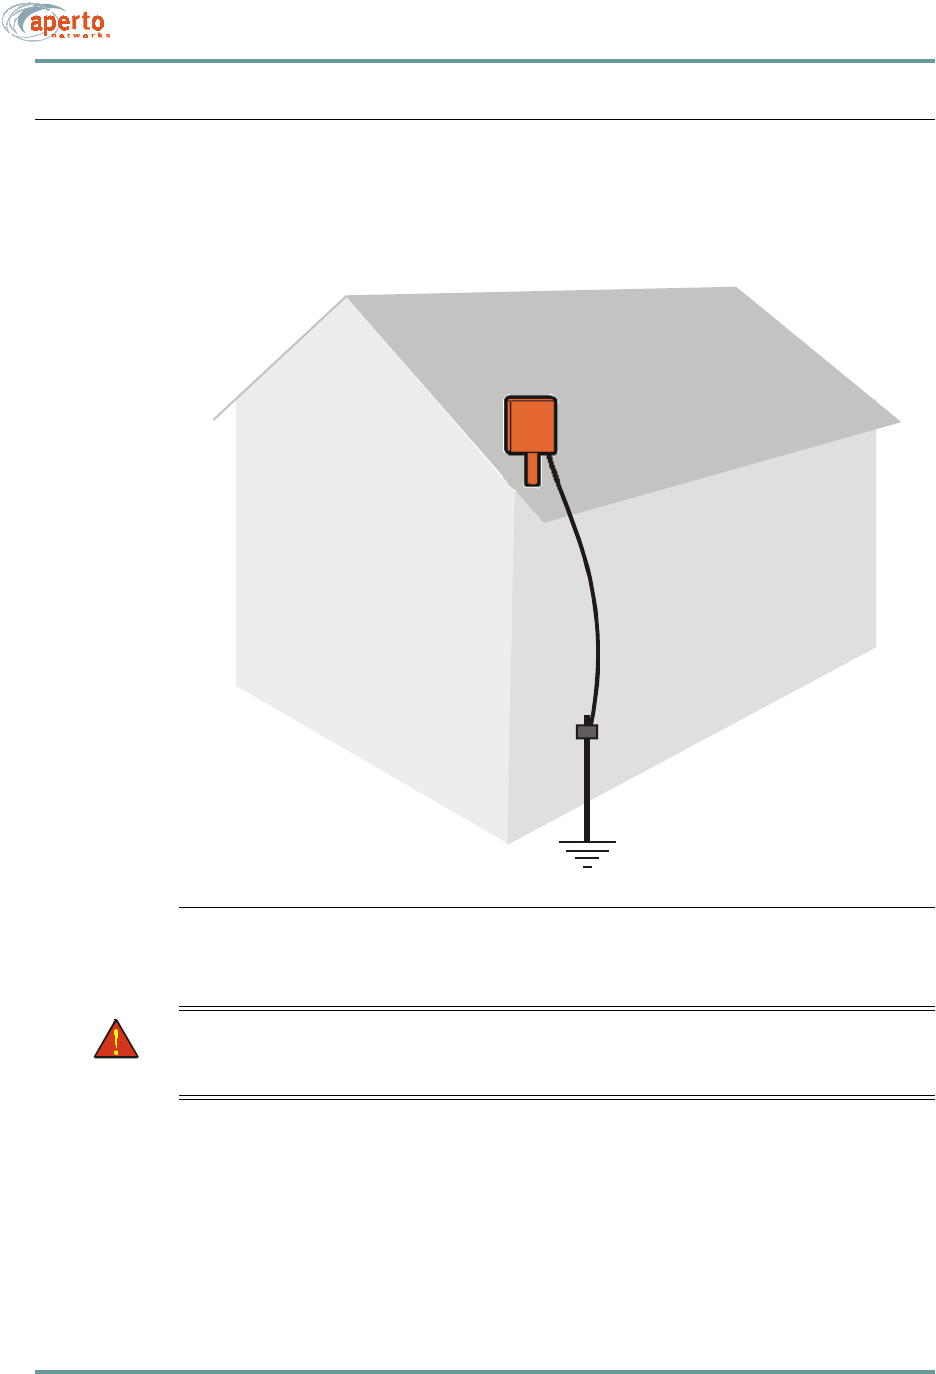
Grounding of the outdoor radio/antenna is an essential part of the installation process.
A proper grounding circuit is illustrated in Figure 4-3.
Figure 4-3 Grounding the Outdoor Unit (Radio/Antenna)
WARNING: Make sure that the outdoor raio/antenna is grounded in accordance
with local, state, federal, and National Electrical Code (NEC)
requirements.
Connection to
Radio/Antenna
Ground Lug
Grounding Conductor
(NEC Section 810-21)
Grounding Clamp
CHAPTER 4. OUTDOOR UNIT INSTALLATION
4–6070-20000330-01 Rev A
To properly ground the Outdoor Unit:
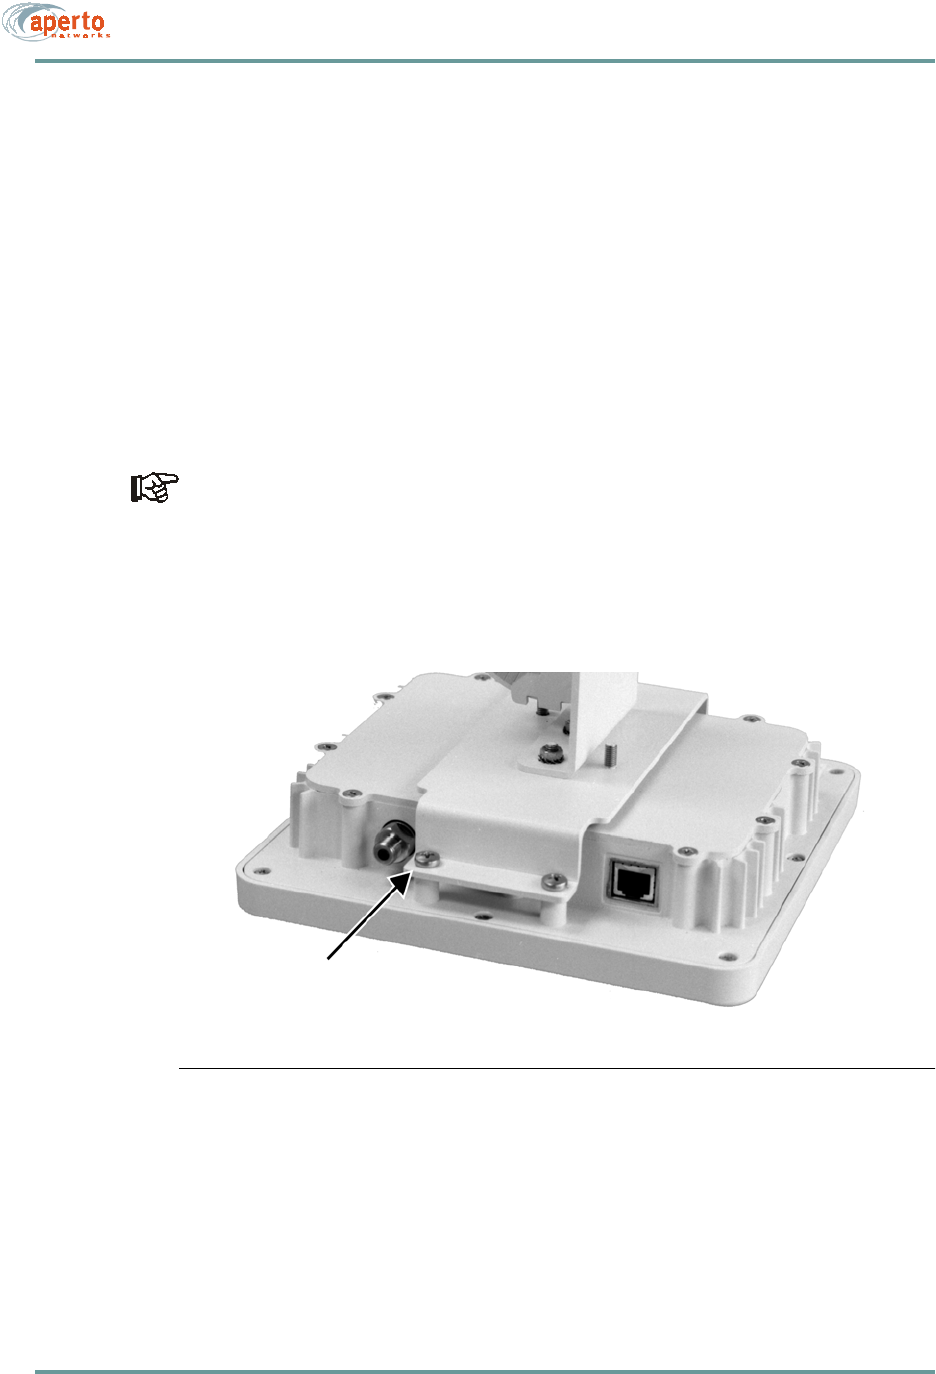
1. Locate the ground point on the back of the Outdoor Unit. It is the screw in the
lower left corner (the unpainted corner) of the mounting bracket support
attached to the rear of the Outdoor Unit. (See Figure 4-4.)
2. Secure a lug to the grounding screw on the Outdoor Unit.
3. Provide a proper grounding conductor (NEC Section 810-21) long enough to
reach from the Outdoor Unit to the earth ground.
4. Attach one end of the conductor to the lug installed in step 2.
5. Connect the other end of the grounding conductor to an appropriate earth
ground using a grounding clamp.
If you install a grounding electrode separate from the power service grounding
electrode system, connect the separate electrode to the grounding system in
accordance with the National Electrical Code (NEC) and local electrical
codes.
Figure 4-4 Location of Grounding Screws on Outdoor Unit (Radio/Antenna)
Ground Connection
Point — Attach Lug Here

5–1070-20000330-01 Rev A
5
INDOOR UNIT INSTALLATION
In most cases, the installation of the Outdoor Unit (see Chapter 4) should be per-
formed before the installation of the Indoor Unit. For convenience during the instal-
lation of the Outdoor Unit, the Indoor Unit should be temporarily placed close to the
Outdoor Unit to facilitate antenna alignment. When the installation of the Outdoor
Unit is complete, the Indoor Unit can be moved to its permanent location.
INSTALLATION REQUIREMENTS
You will not need any tools to install the Indoor Unit. Cable and power connections
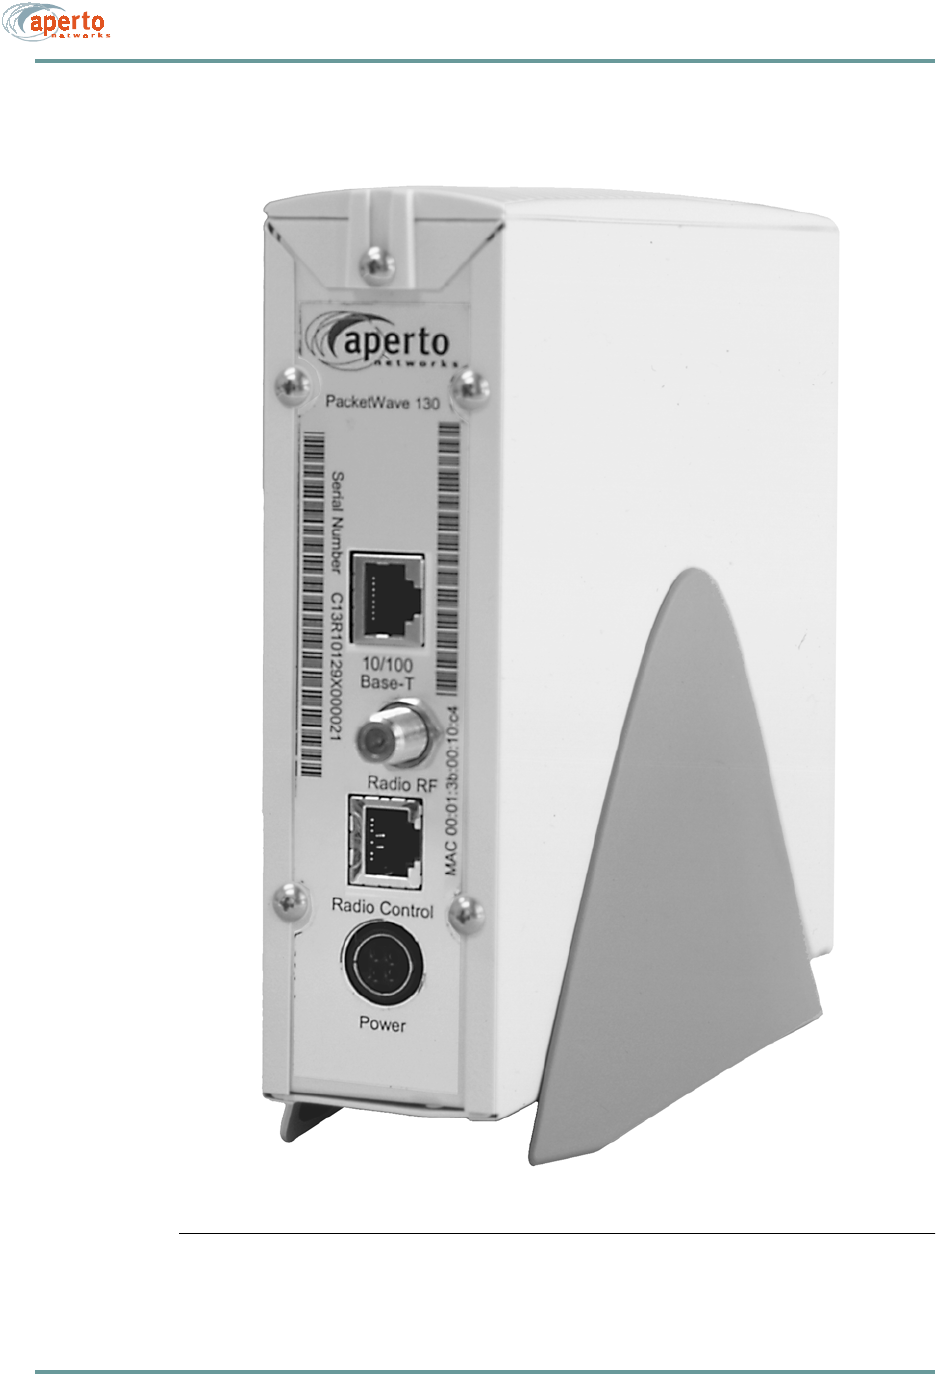
are made to the Indoor Unit’s rear panel, illustrated in Figure 5-1.
The subscriber must have either an Ethernet LAN or a computer with an Ethernet
interface. You will need to supply an Ethernet cable of sufficient length, with an RJ45
plug on each end. Use a straight cable for connection to a hub or router, or a crossover
cable for connection to a PC.
CHAPTER 5. INDOOR UNIT INSTALLATION
5–2070-20000330-01 Rev A
Figure 5-1 Indoor Unit Rear Panel
5–3070-20000330-01 Rev A
CHAPTER 5. INDOOR UNIT INSTALLATION
INSTALLATION PROCEDURE
Installation of the Indoor Unit involves placing the unit in the desired location, con-
necting radio/antenna and local Ethernet cables to the rear panel, and applying power.
Position the Indoor Unit as desired.
WARNING: For proper cooling, the Indoor Unit must be installed in the
upright position, with adequate air flow around and through it.
Connecting Radio/Antenna Cables
To connect the radio antenna to the Indoor Unit
1. Locate the radio signal cable. If the cable does not already have one, install a
male F connector on the end of the cable.
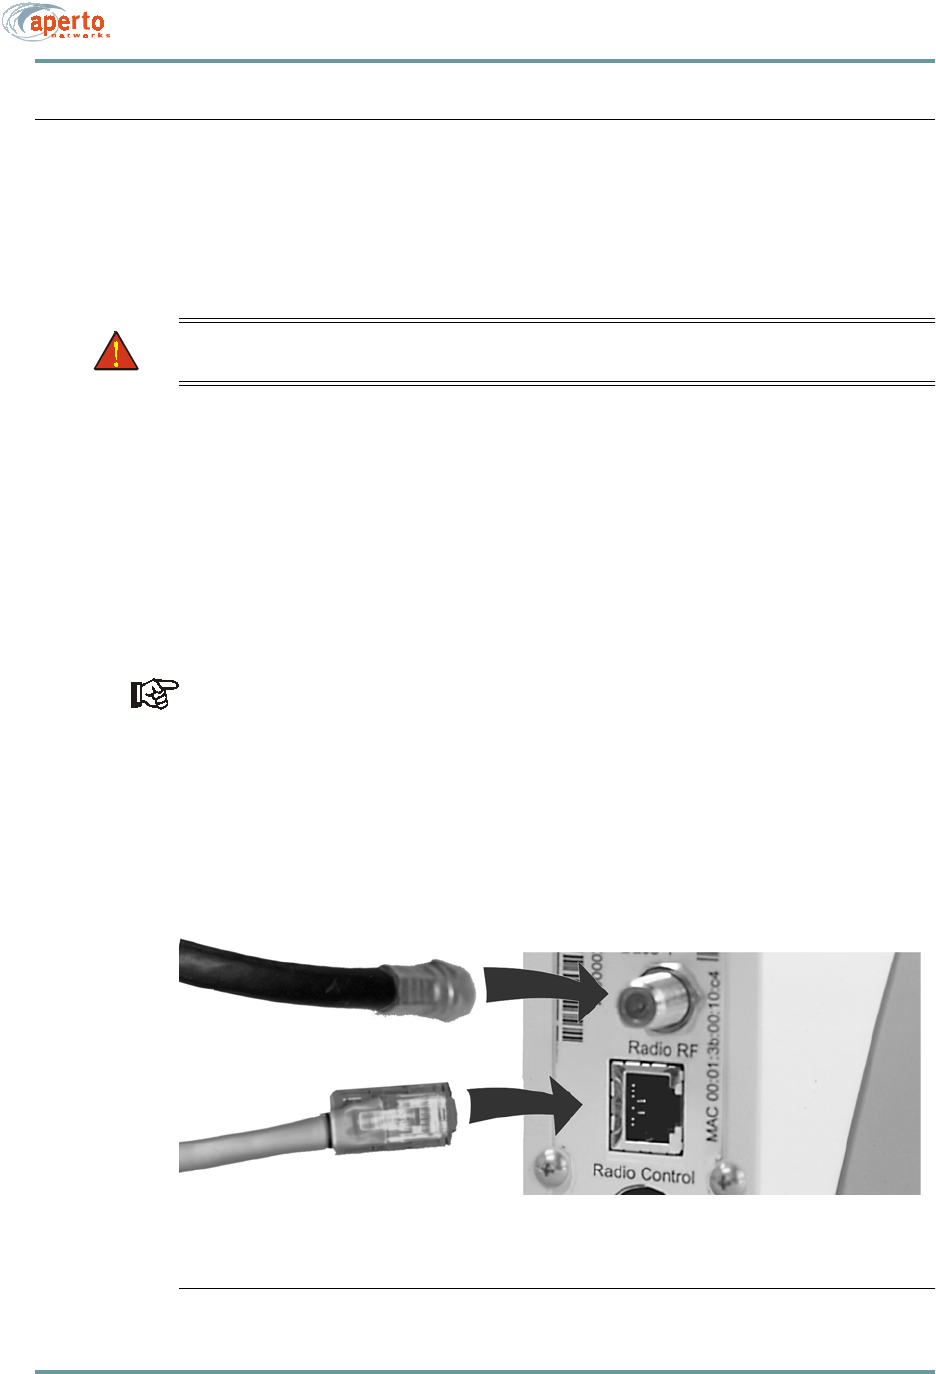
2. Attach the cable to the RADIO RF connector on the Indoor Unit as illustrated in
Figure 5-2.
The Radio Control interface of the Indoor Unit has the same physical appearance
as the 10/100Base-T interface. Make sure you connect to the right one.
3. Locate the radio control cable. If does not already have one, install a male RJ45
connector (plug) on the end of the cable.
4. Attach the cable to the RADIO Control connector on the Indoor Unit as shown
in Figure 5-2.
5. Dress the indoor portions of the radio cables as desired.
Figure 5-2 Indoor Unit Connections from Outdoor Unit
To radio/antenna’s
Radio RF connector
To radio/antenna’s
Radio Control connector
CHAPTER 5. INDOOR UNIT INSTALLATION
5–4070-20000330-01 Rev A
Connecting to the Local PC or LAN
To connect the Indoor Unit to subscriber’s computers
1. Provide an appropriate Cat 5 Ethernet cable with an RJ45 male connector at each
end. Use a straight-through cable for connection to a hub or router. Use a cross-
over cable for connection directly to a computer. (See Table 5-A for pinouts.)
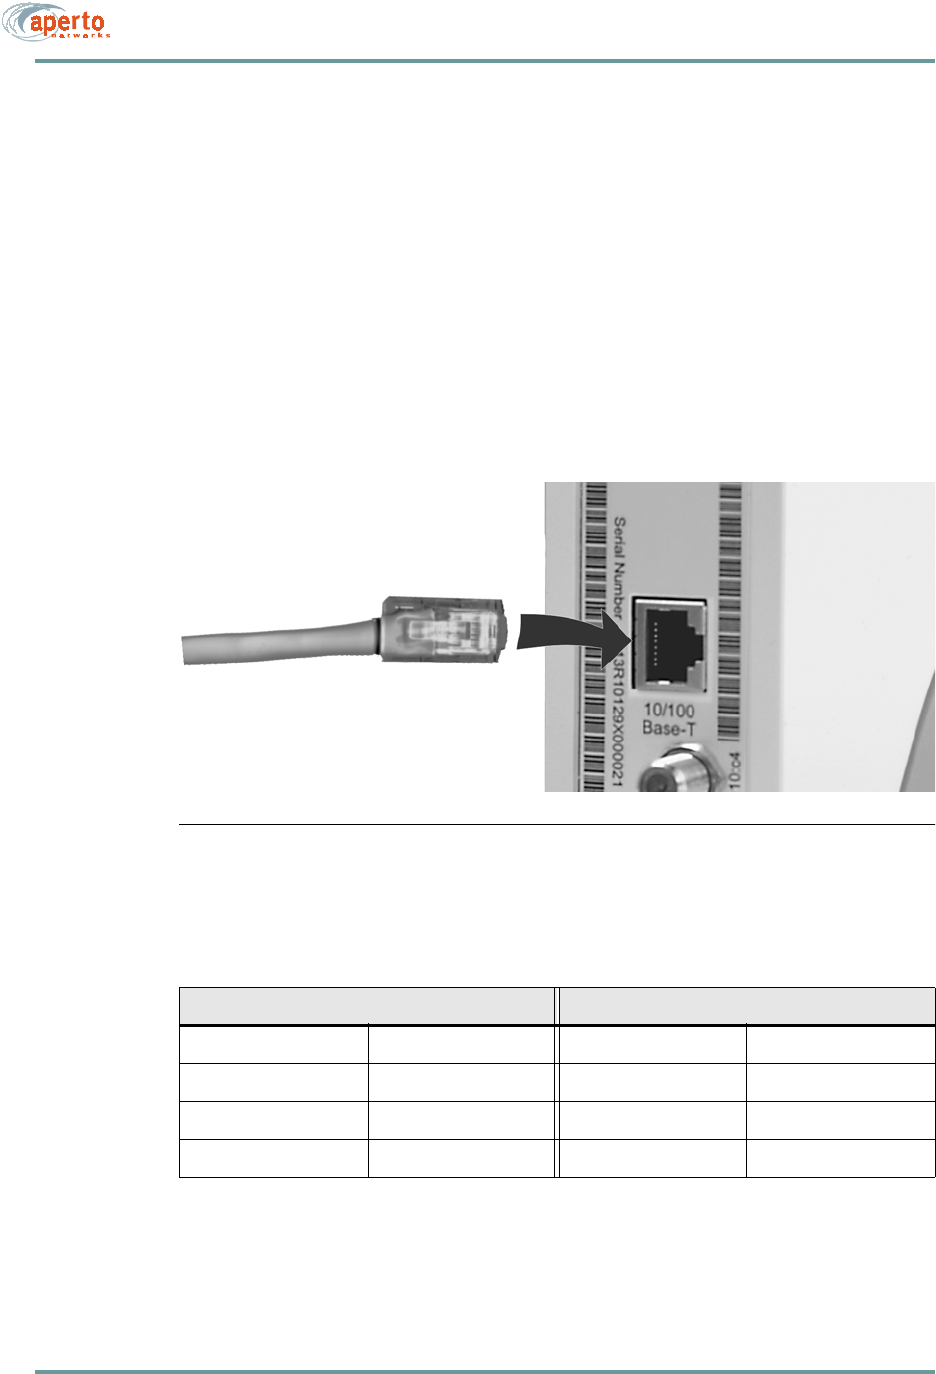
2. Plug one end of the Ethernet cable into the RJ45 socket labeled 10/100Base-T
on the Indoor Unit, as illustrated in Figure 5-3.
3. Plug the other end of the Ethernet cable into the socket on the local hub or com-
puter.
Figure 5-3 Subscriber Ethernet Connection
Table 5-A Ethernet Cable Pinouts
Straight Cable (to Hub or Router) Crossover Cable (to PC)
Pin 1: Tx+ Pin 1: Rc+ Pin 1: Rc+ Pin 3: Tx+
Pin 2: Tx- Pin 2: Rc- Pin 2: Rc- Pin 6: Tx
Pin 3: Rc+ Pin 3: Tx+ Pin 3: Tx+ Pin 1: Rc+
Pin 6: Rc- Pin 6: Tx- Pin 6: Tx- Pin 2: Rc-
To computer’s Ethernet
port or Ethernet hub
5–5070-20000330-01 Rev A
CHAPTER 5. INDOOR UNIT INSTALLATION
Powering Up the Indoor Unit
WARNING: For the PacketWave 100 Series Indoor Unit, use an outlet that con-
tains surge protection and ground fault protection, or use a surge pro-
tection device. This will protect the Indoor Unit and equipment
connected to it from damage resulting fron ac current surges, light-
ning, etc. For complete protection, all connections to the Indoor Unit
(i.e., from radio/antenna and PC/hub) should be connected to a surge
protection device. To ensure the best signal, use surge protectors
designed for the the specific application
To apply power to the Indoor Unit:
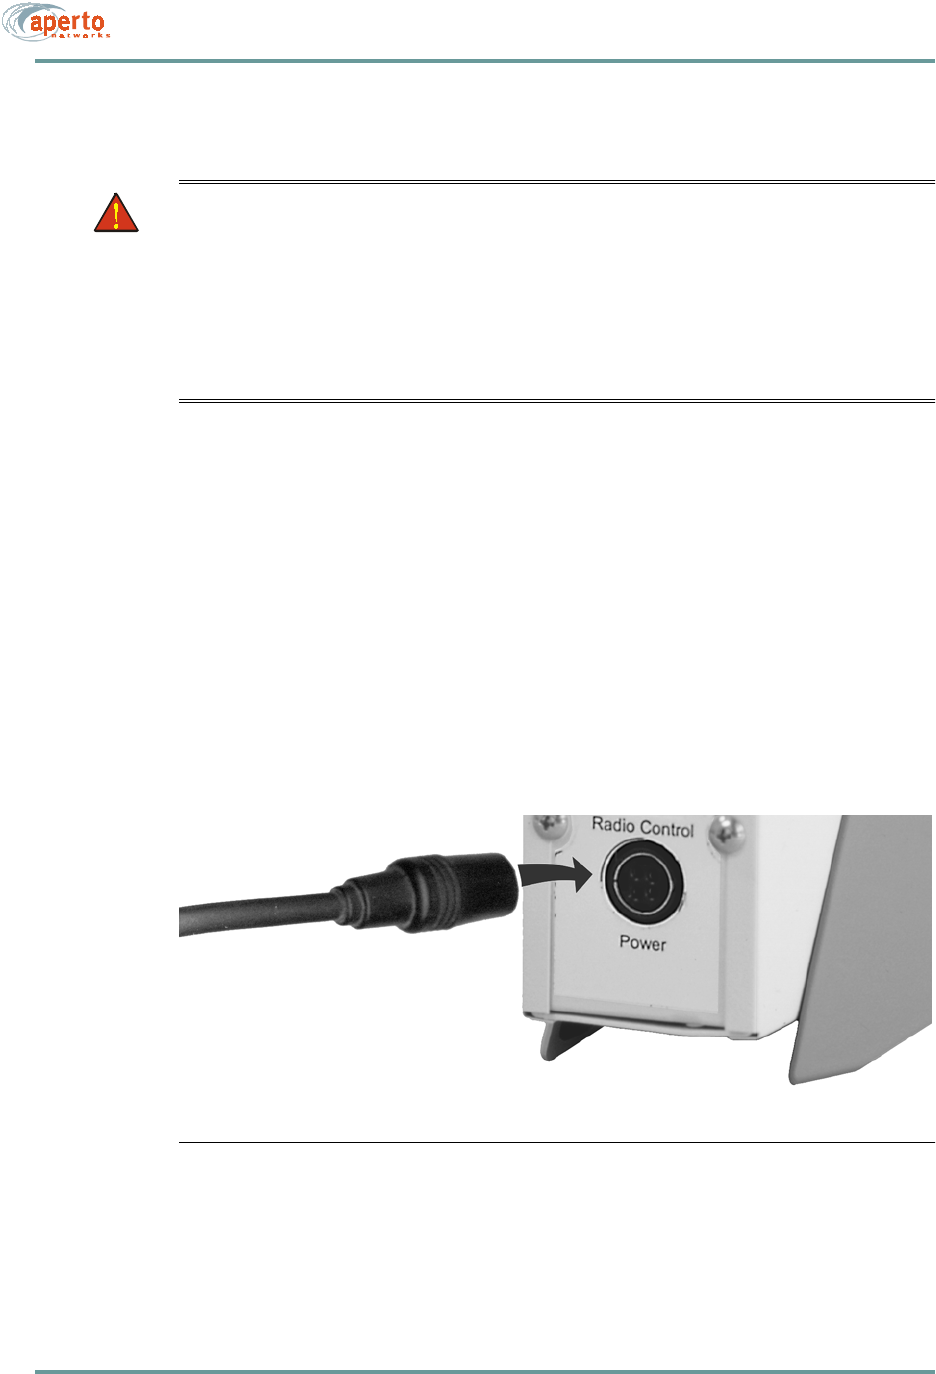
1. Plug the power cord into the POWER connector on the Indoor Unit, as illus-
trated in Figure 5-4.
2. Plug the power cord/transformer into a surge-protected ac outlet.
The Indoor Unit does not have an on/off switch; to turn the unit off, disconnect power
at the power outlet.
NOTE: The Outdoor Unit receives power from the Indoor Unit via the coaxial radio
signal cable.
Figure 5-4 Indoor Unit Power Connection

CHAPTER 5. INDOOR UNIT INSTALLATION
5–6070-20000330-01 Rev A

6–1070-20000330-01 Rev A
6
STARTING UP
Once you have completed the connections described in Chapters 4 and 5, there is one
procedure you need to complete before the local computers can access the Packet-
Wave network and the Internet. That procedure involves using the CPE Installation
Tool software to optimize antenna pointing.
When the Indoor Unit is first installed, its software knows that the antenna-point-
ing procedure has not been performed. It will not allow itself to access the
PacketWave network until the procedure has been performed.
Once the antenna-pointing procedure has been executed, it should not be required
again.
RUNNING THE CPE INSTALLATION (ANTENNA ALIGNMENT) TOOL
See the accompanying addendum for antenna alignment instructions.

CHAPTER 6. STARTING UP
6–2070-20000330-01 Rev A
CONNECTION TO THE PACKETWAVE NETWORK
When the Indoor Unit reboots at the end of the installation/antenna alignment process
described above, it performs an initialization procedure that brings it up as part of the
PacketWave network. During this procedure:
• The Indoor Unit requests an IP address from the system’s DHCP server. (The
DHCP request is passed along by the BSU’s DHCP relay agent.)
• The DHCP server responds with the IP address and other information, includ-
ing the name of the Indoor Unit’s configuration file. The Base Station Unit and
the Indoor Unit both learn the new IP address.
• The Indoor Unit downloads its configuration file (as previously created using
the WaveCenter Configuration Manager) from the TFTP server.
Note: For information about the WaveCenter Configuration Manager
software, see the PacketWave 1000 Base Station Unit Installa-
tion, Configuration, and Operation manual.
• The Indoor Unit configures itself according to the received configuration file
and activates for subscriber traffic.
• If the Indoor Unit is functioning in NAT mode, the IP addresses of its attached
computers are obtained from the local DHCP server built into the Indoor Unit.
Setting Up the Local Computer(s)
Whether the subscriber’s computers are connected to a Indoor Unit functioning in
bridge or NAT mode, each host needs an IP address. The simplest solution is to con-
figure each computer to obtain its IP address using DHCP. It is also possible to man-
ually enter the IP addresses. For larger subscriber LANs, a local DHCP server may
be preferable.

7–1070-20000330-01 Rev A
7
MANAGEMENT INTERFACES
The PacketWave 130 Indoor Unit includes several management interfaces which
allow the installer and user to monitor the wireless and LAN connections, diagnose
problems, and perform some local configuration changes.
These interfaces include:
• Front-panel LEDs.
• A Web-browser-accessed graphical user interface (GUI) for real-time monitor-
ing and limited “on-the-fly” configuration changes.
•SNMP.
• A simple command line interface (CLI) for basic troubleshooting and debugging.
This chapter provides information about all of these interfaces.
FRONT-PANEL LEDS
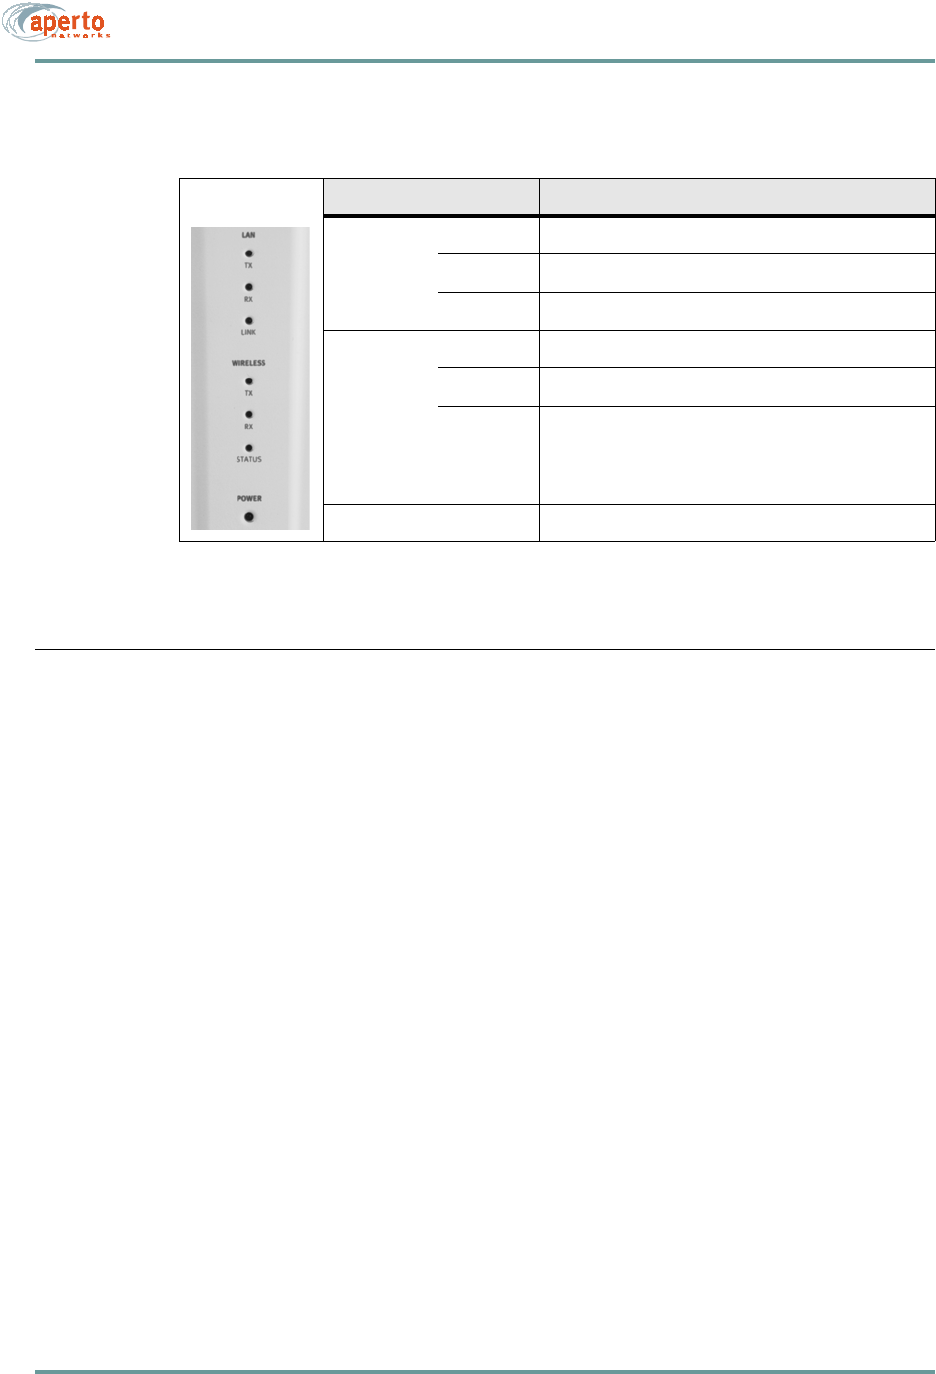
The LEDs on the Indoor Unit’s front panel provide operational information as
described in Table 7-A.
NOTE: The WIRELESS STATUS LED shows the progress of initialization of the
Indoor Unit, with slow and fast blinking indicating different phases of the initializa-
tion process.
CHAPTER 7. MANAGEMENT INTERFACES
7–2070-20000330-01 Rev A
WEB INTERFACE (GUI)
The Indoor Unit includes a Java-based graphical user interface (GUI) which runs on
a standard Web browser (Netscape 4.74 or higher, or Internet Explorer 5.0). Functions
of the Web GUI include:
• Viewing network topology.
• Monitoring status and performance.
• Reviewing configuration.
• Making basic configuration changes.
• Resetting Indoor Units.
Accessing the Web Interface
To access the graphical user interface:
1. Establish a connection and open your browser.
2. Enter the URL, http://<Indoor Unit IP address>/cpe.htm.
3. Respond to the user name prompt with Aperto and to the password prompt
with otrepa.
NOTE: The user name and password are case-sensitive, so be sure to capitalize the
A in Aperto when entering the user name.
Table 7-A Front-Panel LEDs
LED Indications
LAN TX Blinks on Ethernet transmit activity.
RX Blinks on Ethernet receive activity.
LINK On when Ethernet link is up; Off when it is down.
WIRELESS TX Blinks on wireless transmit activity.
RX Blinks on wireless receive activity.
STATUS Off: Indoor Unit is not operational.
Slow blink: received wireless initialization signals.
Fast Blink: in ranging process.
On: configuration file received; Indoor Unit operational.
POWER On when Indoor Unit is receiving power from ac source.
7–3070-20000330-01 Rev A
CHAPTER 7. MANAGEMENT INTERFACES
4. If the browser prompts that it needs to load a plug-in, allow it to do so.
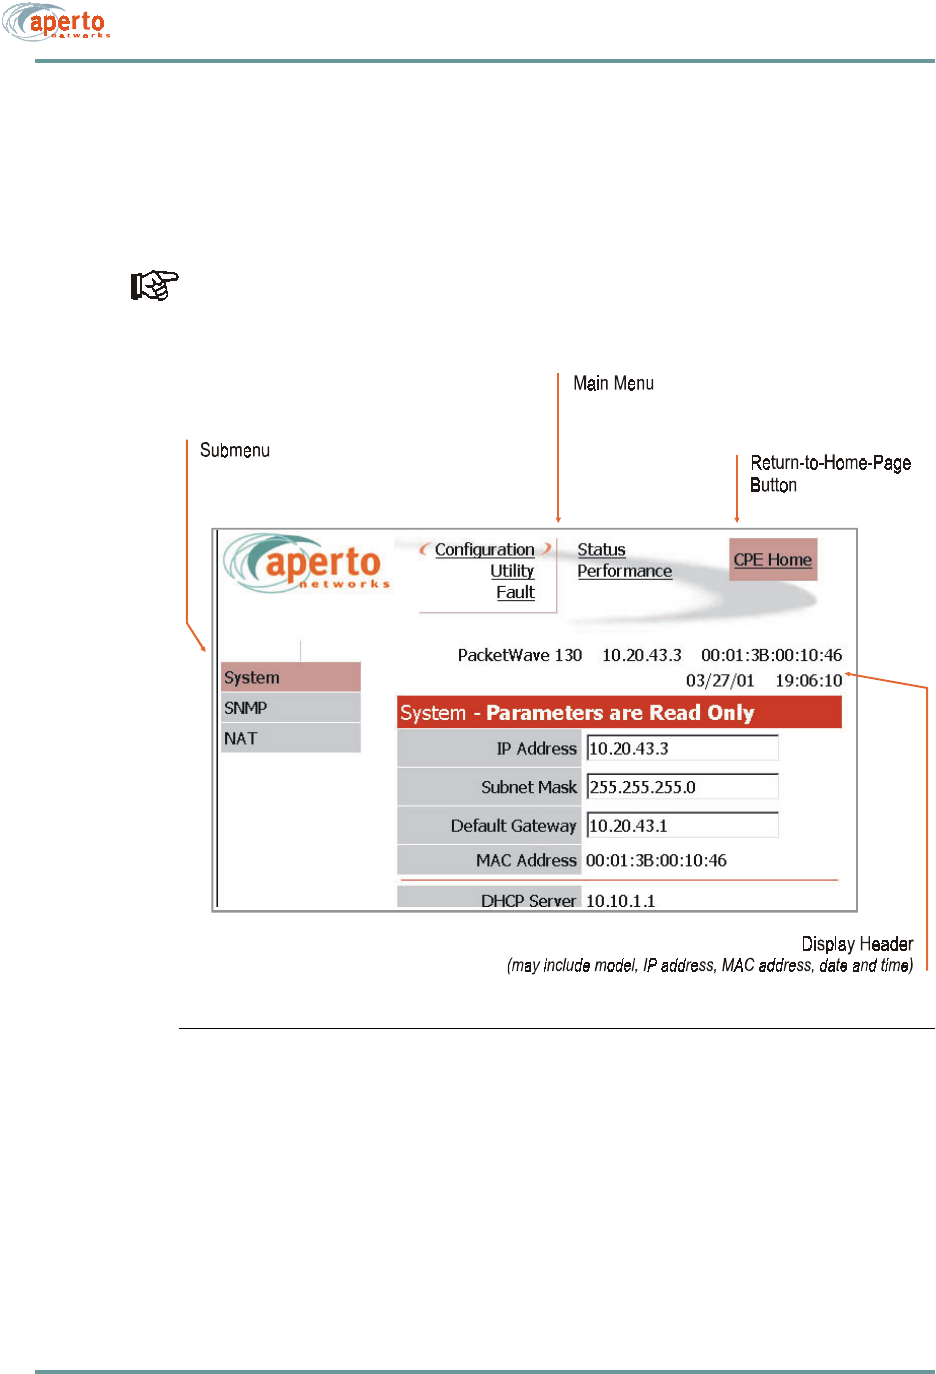
5. Wait for the Web interface home page to open, a shown in Figure 7-1.
Figure 7-1 Web GUI Home Page
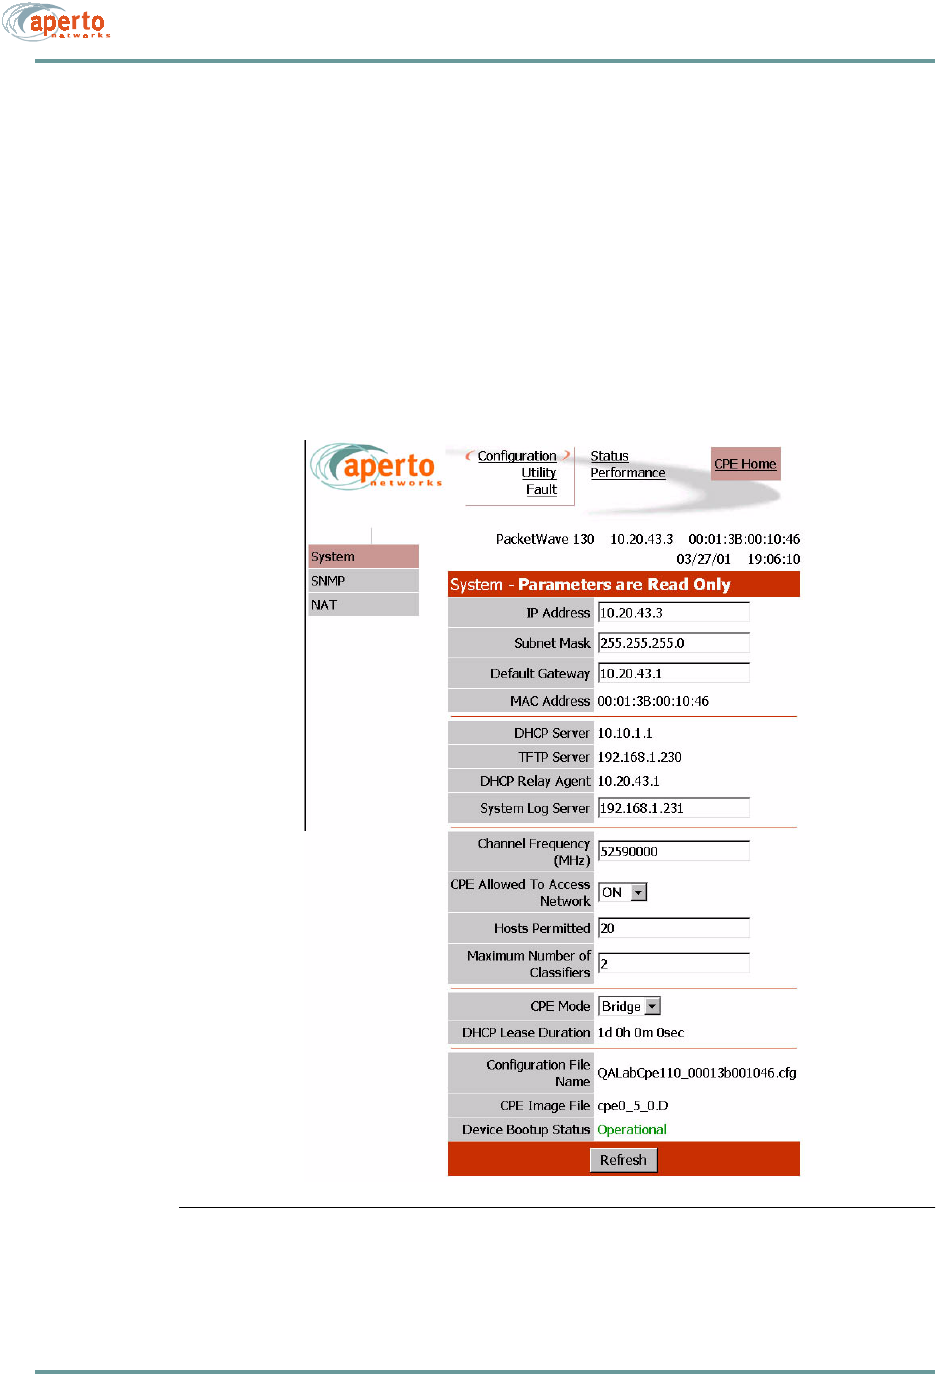
The Web interface pages share the basic elements identified in Figure 7-2.
CHAPTER 7. MANAGEMENT INTERFACES
7–4070-20000330-01 Rev A
Home Page: Connectivity View
As shown in Figure 7-1, the home page provides a graphical representation of base
station-to-subscriber connectivity. The arrow pointing to the Indoor Unit icon indi-
cates wireless channel status: green if good or red if down.
Status indications on the connectivity view are updated dynamically every 30
seconds.
Figure 7-2 Basic Elements of Web GUI
7–5070-20000330-01 Rev A
CHAPTER 7. MANAGEMENT INTERFACES
Configuration Pages
The Web GUI lets you check, and in some cases alter, the configuration of the Indoor
Unit. There are four configuration pages which may be displayed, as indicated by the
submenu at the left of the page; they are illustrated in Figure 7-3 through Figure 7-6.
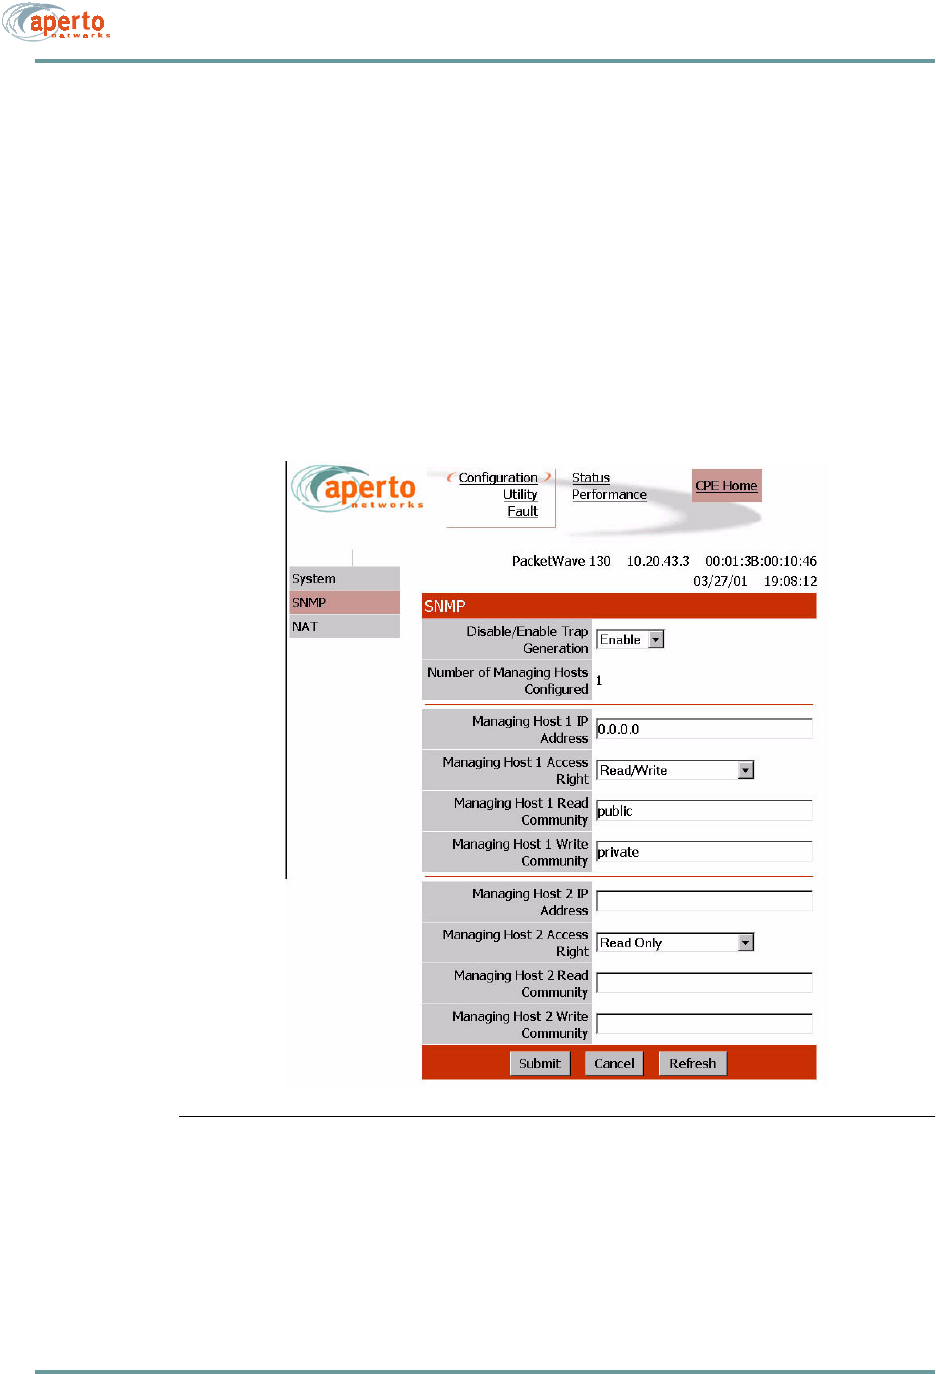
System Configuration
As shown in Figure 7-3, the system configuration page provides an overview of the
Indoor Unit’s network and operating parameters. These parameters are read-only.
Figure 7-3 System Configuration Page
CHAPTER 7. MANAGEMENT INTERFACES
7–6070-20000330-01 Rev A
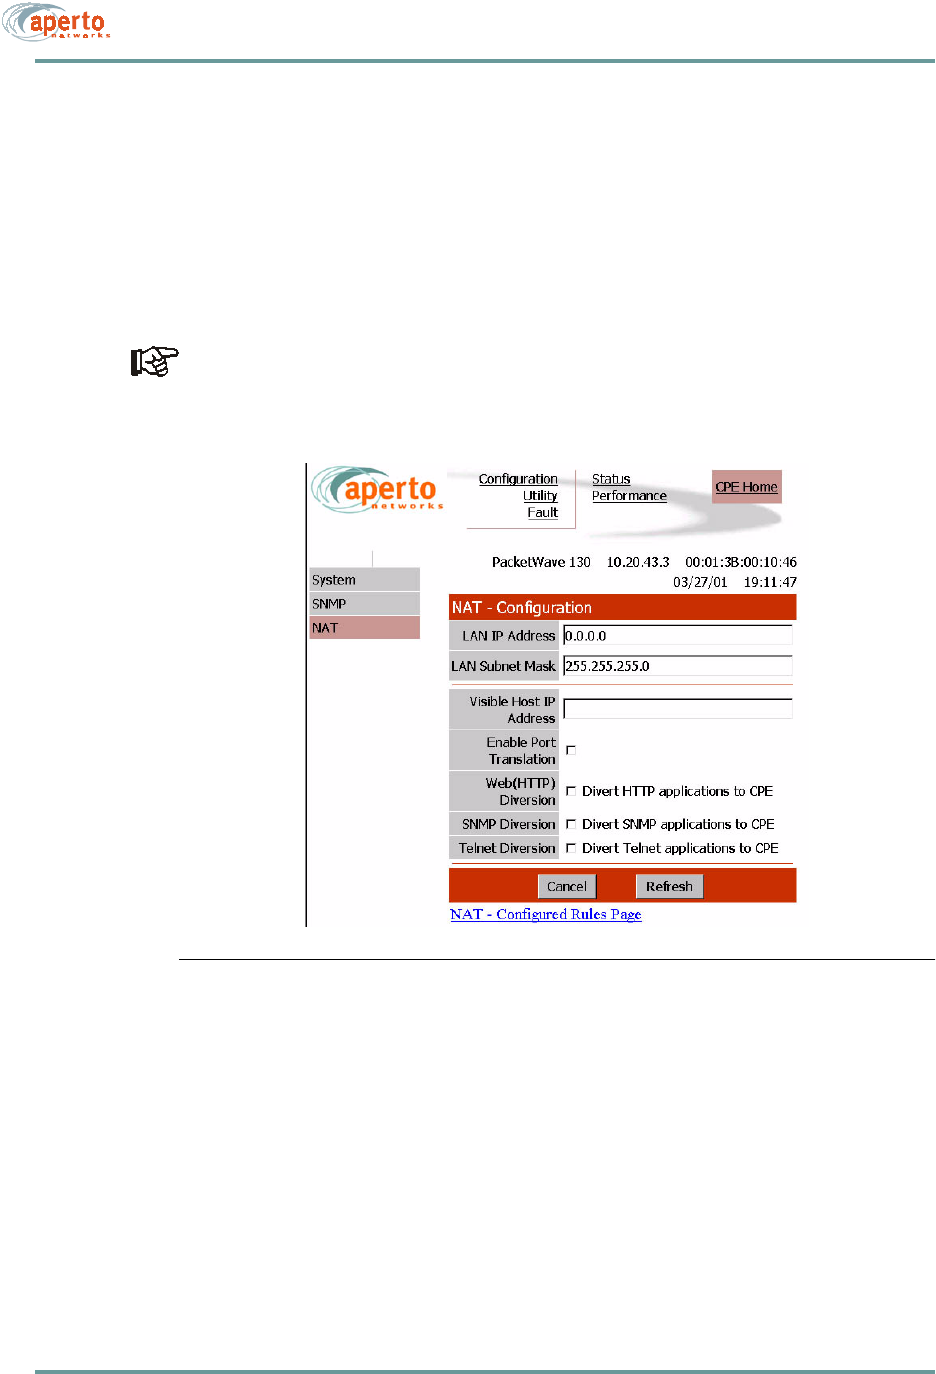
SNMP Configuration
As shown in Figure 7-4, the SNMP configuration page allows the viewing and alter-
ing of SNMP parameters:
• Whether traps will be generated.
• What SNMP manager(s) will be recognized, and what level of access they will
have.
Click on the Submit button to activate any changes made on this page.
Figure 7-4 SNMP Configuration Page
7–7070-20000330-01 Rev A
CHAPTER 7. MANAGEMENT INTERFACES
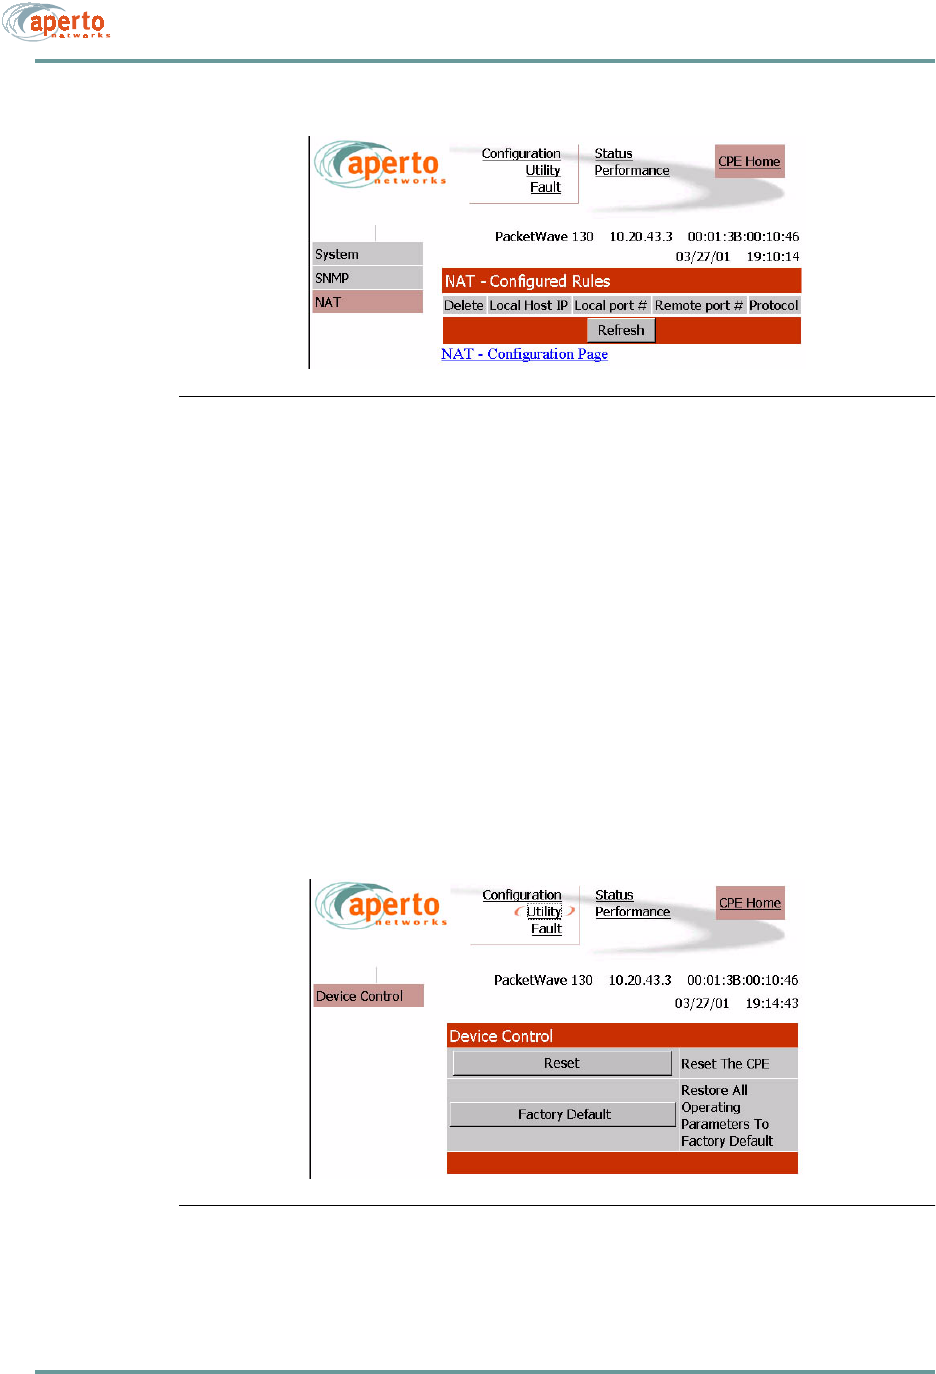
NAT Configuration
As shown in Figure 7-5 and Figure 7-6, there are two configuration pages related to
NAT (Network Address Translation) routing. These read-only pages apply only when
the Indoor Unit is in NAT mode.
To move between the two NAT configuration pages, click on the hyperlinks at the bot-
toms of the pages.
NAT configuration should be performed by network administrator.
Figure 7-5 NAT Configuration Page
CHAPTER 7. MANAGEMENT INTERFACES
7–8070-20000330-01 Rev A
Figure 7-6 NAT Configured Rules Page
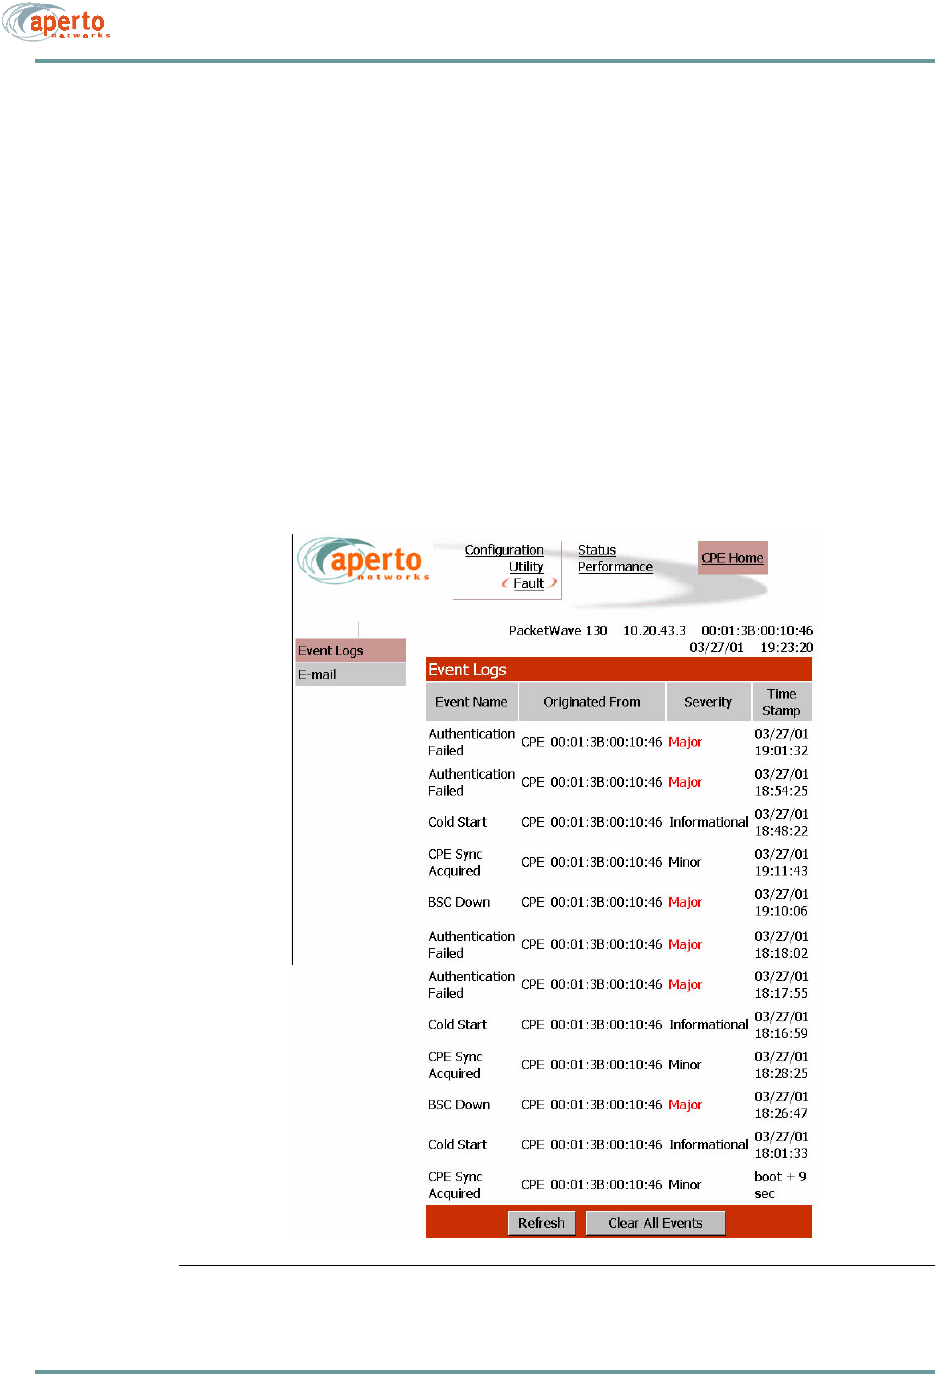
Device Control Utilities
The device control page, illustrated in Figure 7-7, provides access to a pair of impor-
tant functions:
• Resetting the Indoor Unit.
• Restoring factory defaults for all subscriber equipment configuration options.
The interface will prompt for confirmation before performing a selected function.
Figure 7-7 Device Control Page
7–9070-20000330-01 Rev A
CHAPTER 7. MANAGEMENT INTERFACES
Fault Reporting
The subscriber fault reporting functions include an event log and email configuration,
as shown in Figure 7-8 and Figure 7-9.
Event Log Page
The event log page, shown in Figure 7-8, includes all logable events reported by the
Indoor Unit.
NOTE: The data base used to generate the log is updated in real time. However, the
pages do not update dynamically; you must click on the Refresh button to see later
status.
You can empty the log by clicking on the Clear All Events button.
Figure 7-8 Event Log Page
CHAPTER 7. MANAGEMENT INTERFACES
7–10070-20000330-01 Rev A
E-mail Page
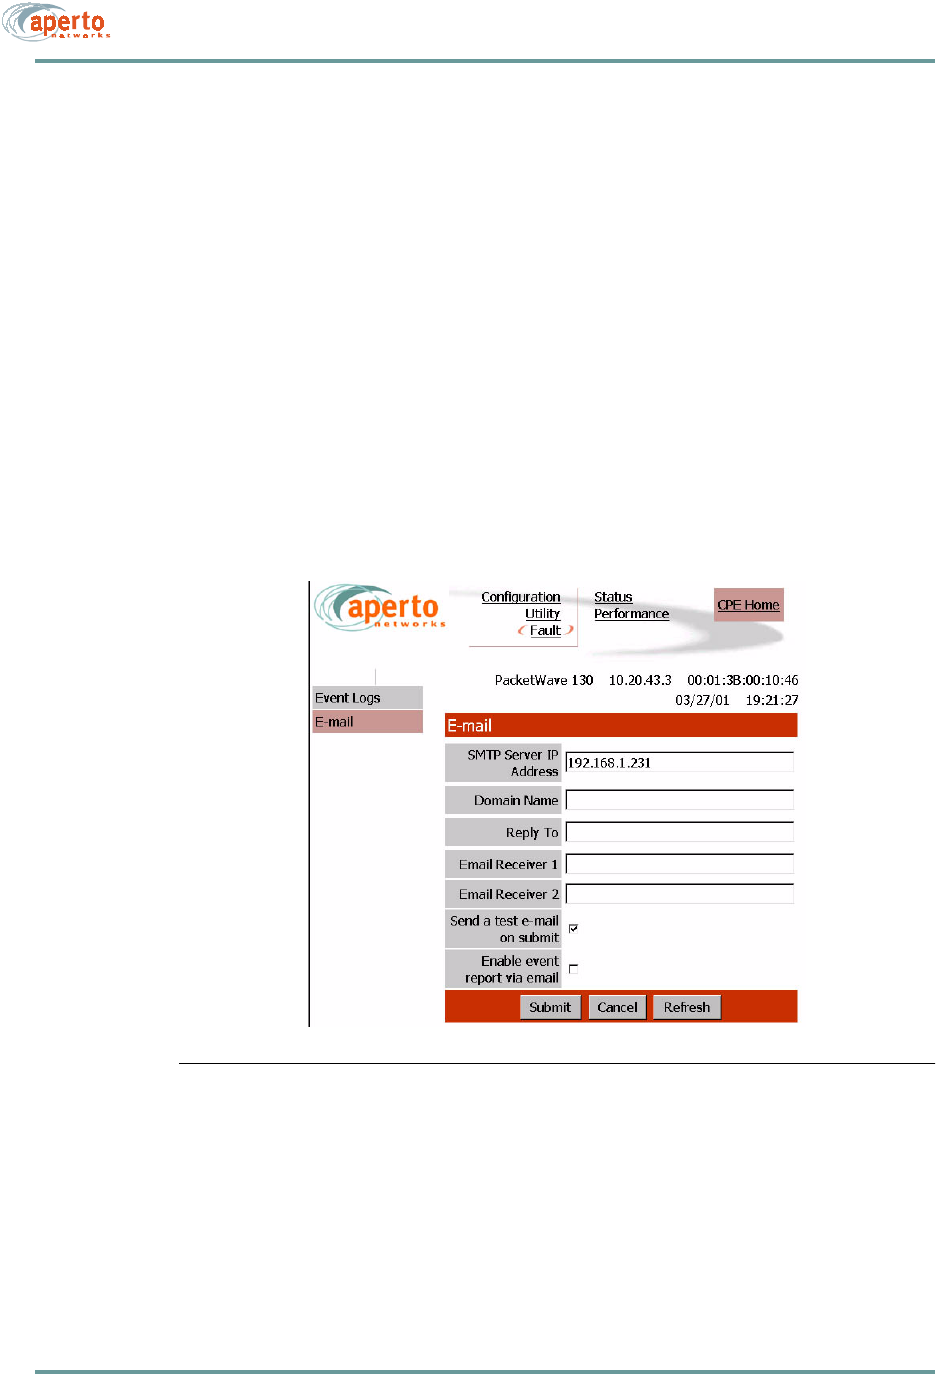
The E-mail configuration page, shown in Figure 7-9, allows the viewing and altering
of Email event reporting parameters:
• The address of the SMTP server (may be configured here or in the subscriber
configuration file).
• The E-mail domain name.
• Reply-to and receiver E-mail addresses.
• A test E-mail may be sent.
• Event reporting via E-mail may be turned on and off as desired.
Click on the Submit button to activate any changes made on this page.
Figure 7-9 Email Page
7–11070-20000330-01 Rev A
CHAPTER 7. MANAGEMENT INTERFACES
Status and Performance Statistics
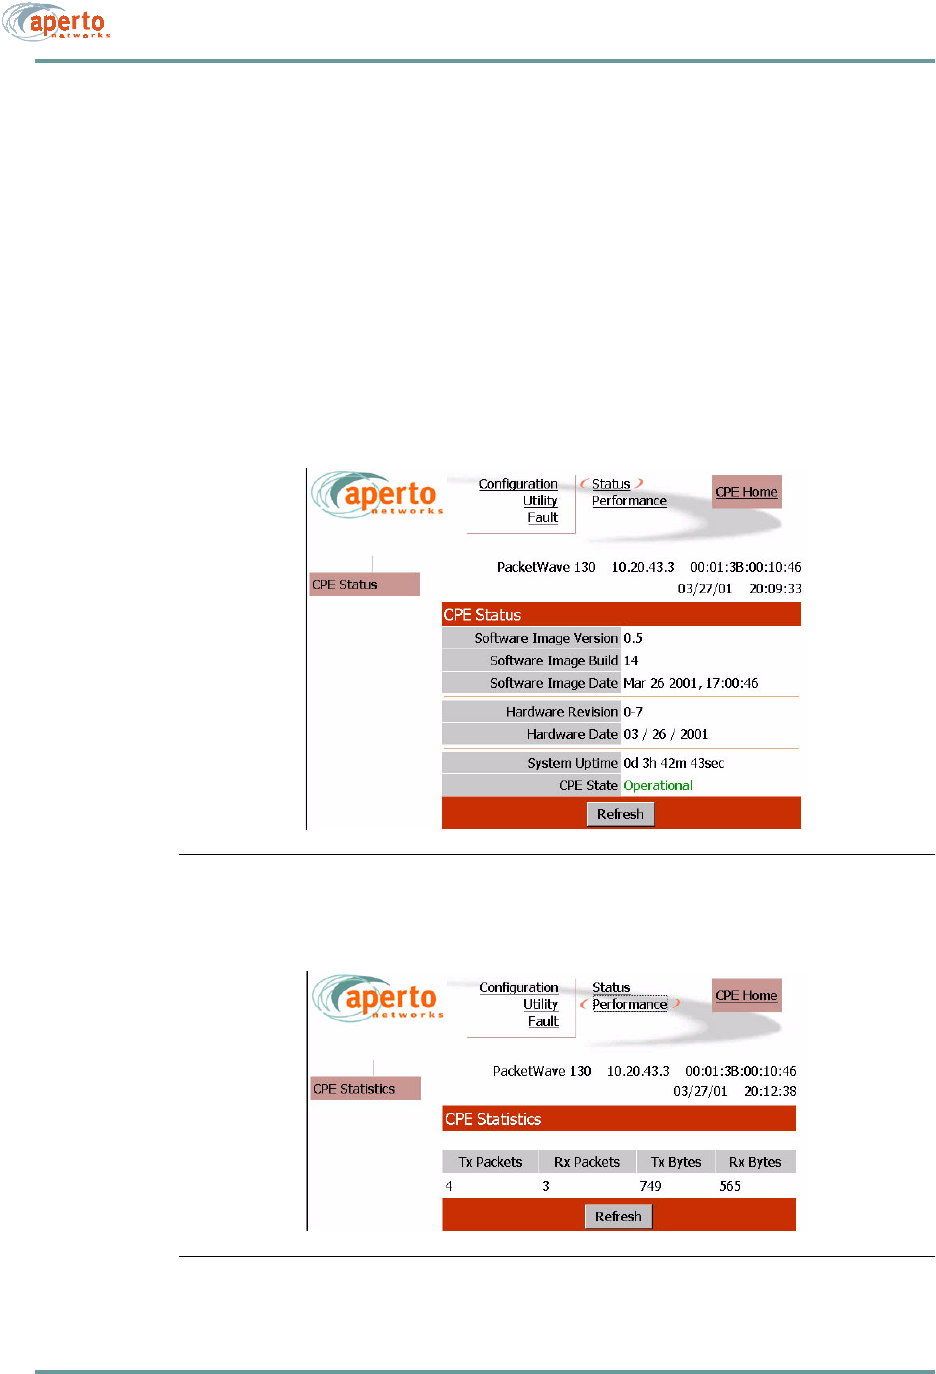
The status page, shown in Figure 7-10, identifies the Indoor Unit, its software and
hardware, and its current operational status.
As shown in Figure 7-11, the performance page provides transmit and receive statis-
tics in a table format.
NOTE: The data used to generate these pages is updated in real time. However, the
pages do not update dynamically; you must click on the Refresh button to see new
information. No configuration or other operation can be initiated from these pages.
Figure 7-10 Status Page
Figure 7-11 Performance Page

CHAPTER 7. MANAGEMENT INTERFACES
7–12070-20000330-01 Rev A
SNMP
Each Indoor Unit includes an SNMP agent supporting the following MIBs:
•SNMP MIB (RFC 1157)
• MIB II (RFC 1213)
• Aperto private MIB
The complete MIBs provided on the PacketWave CD-ROM, and are available on the
Aperto Web site, www.apertonet.com.
The SNMP agents support trap reporting. Trap-reporting parameters can be specified
via the WaveCenter Configuration Manager and the Web GUI as well as via SNMP.
NOTE: All SNMP parameters are read-only in R1P1.
SYSLOG
The Indoor Units support logging of event messages to a designated server according
to the Syslog protocol. The Syslog server may be identified in the subscriber config-
uration files.
7–13070-20000330-01 Rev A
CHAPTER 7. MANAGEMENT INTERFACES
COMMAND LINE INTERFACE (CLI)
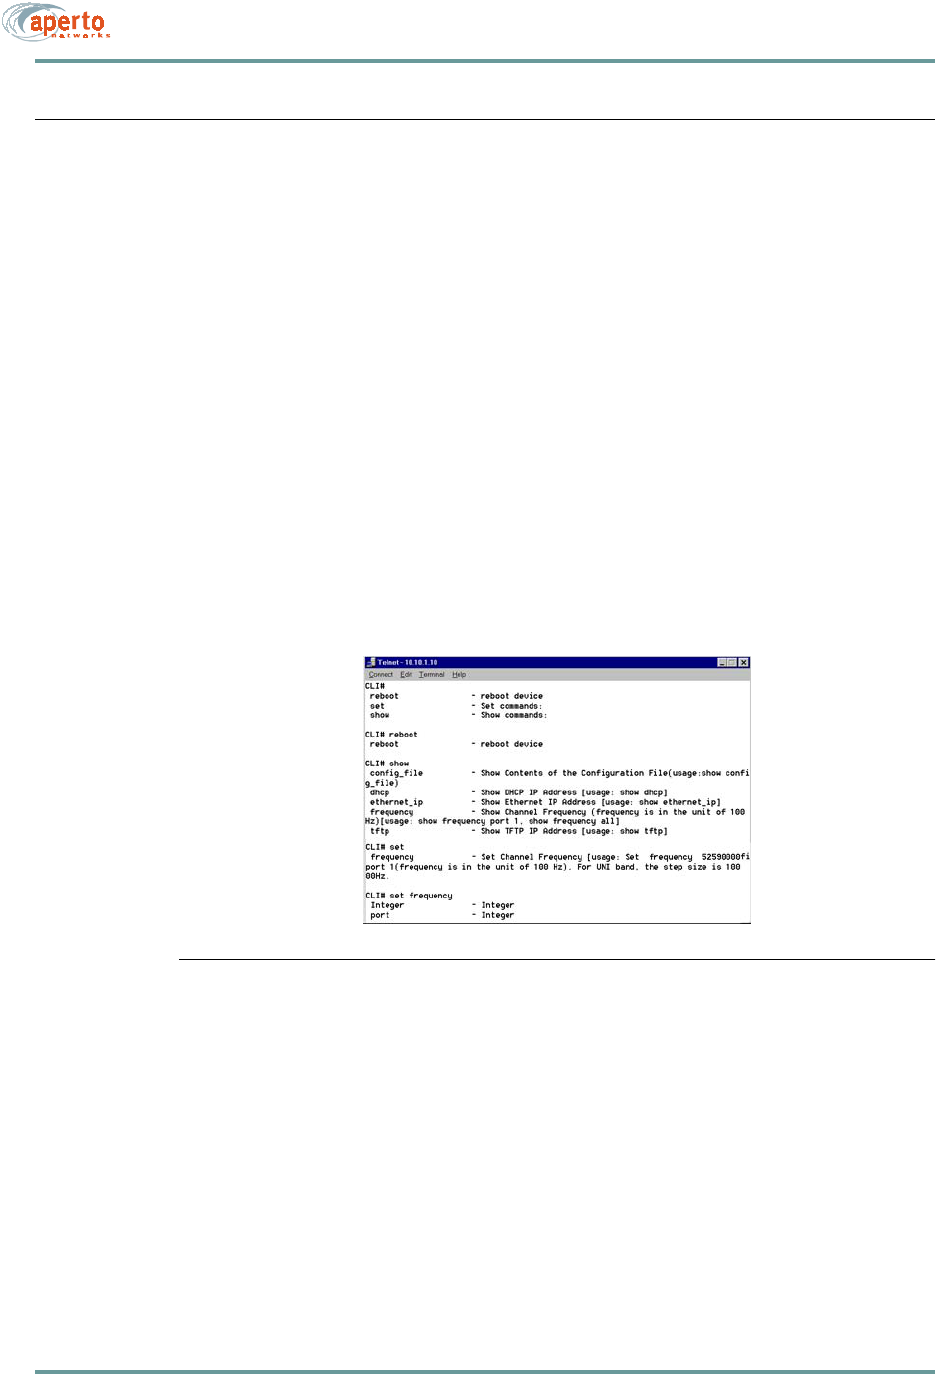
Each Indoor Unit includes a simple command line interface (CLI) accessible via
telnet.
To use the CLI:
1. Telnet to the Indoor Unit’s IP address.
2. Enter the correct user name (Aperto) and password (Aperto) as prompted.
3. When the CLI# prompt appears, you are in the CLI. For a list of commands,
type ? (the ? will not appear on the screen). The CLI will respond with a list
of the available commands groups, as shown in Figure 7-12.
4. To see the specific commands in a group, type the group name followed by ?
(again, the ? will not appear). Figure 7-12 shows the commands in each group.
5. To display information about the use of a specific commands, including com-
mand parameters, enter the command followed by ?.
Figure 7-12 Example of Command Line Interface (CLI)
6. Use the CLI commands to show configuration data, set the channel frequency,
and/or reboot the unit, as desired.
NOTE: The show config_file command is not support in the current release.
7. If there is no activity on a connection for 30 minutes, the CLI will disconnect.
8. When you are finished with the CLI, disconnect.
CHAPTER 7. MANAGEMENT INTERFACES
7–14070-20000330-01 Rev A
FAULT REPORTING
The PacketWave subscriber equipment can be configured to report events by several
means:
• Email event messages.
•SNMP traps.
• Logging to a Syslog server.
• Event logs presented on request via SNMP or Web GUI.
Reportable events are identified in Table 7-B.
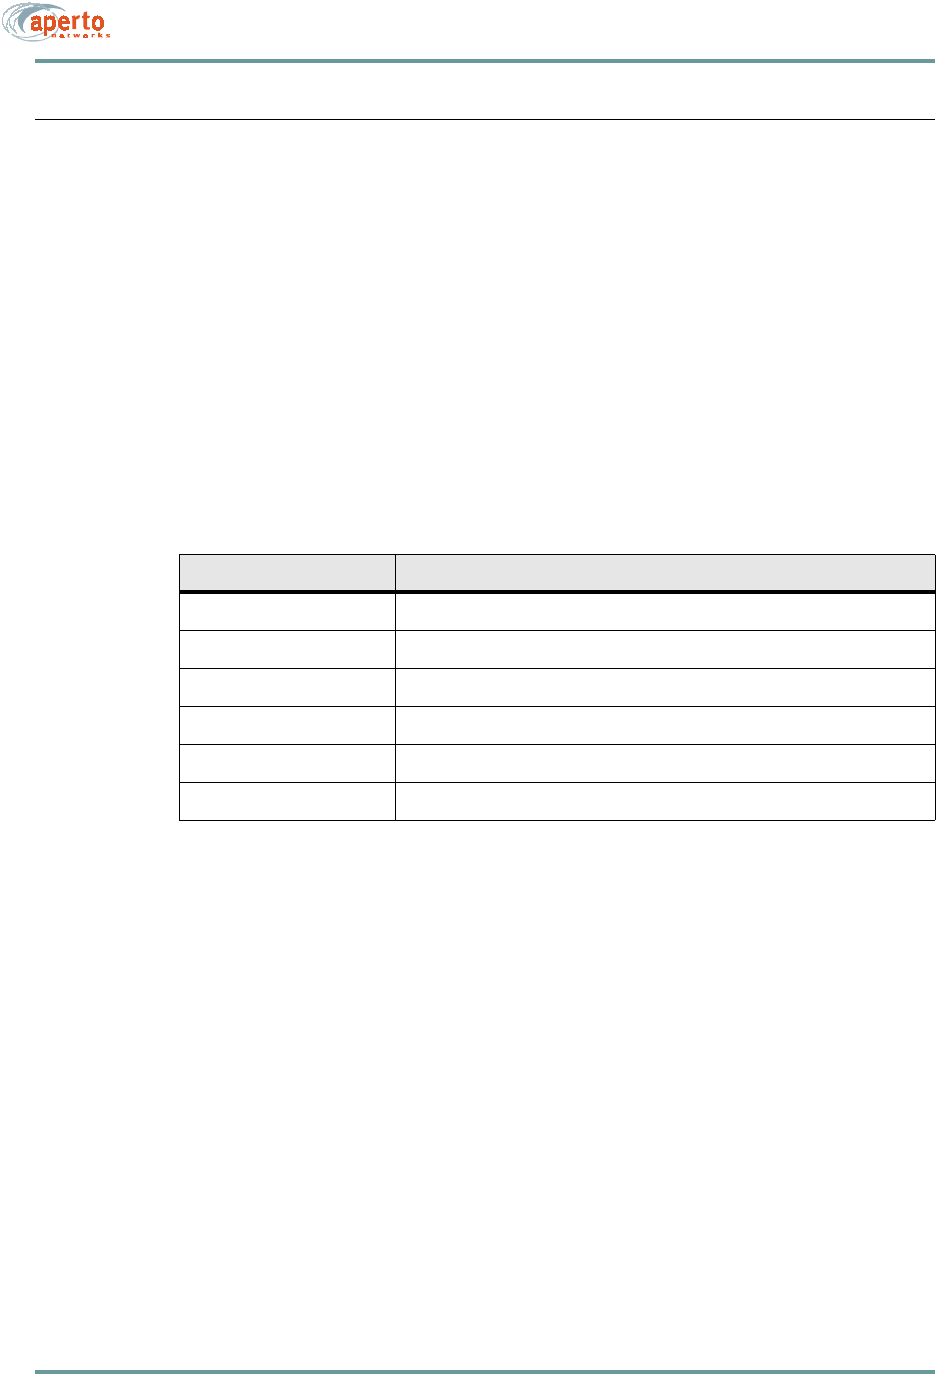
Table 7-B Events Reported
Fault Event Description
Cold Start Indoor Unit has performed a full hardware boot.
Warm Start BSU has performed a software reboot.
Authentication Failure Invalid user name or password?
CPE Up Indoor Unit has started communication with the BSU.
CPE Down Indoor Unit has ceased communication with the BSU.
DHCP Failed A failure has occurred in the retrieval of required data from the DHCP server.

A–1070-20000330-01 Rev A
APPENDIX A
SPECIFICATIONS
BRIDGE/ROUTER (INDOOR UNIT) SPECIFICATIONS
Models
PacketWave 130 — Bridging or NAT modes
Interfaces
10/100Base-T Ethernet — RJ-45 connector
Radio — F connector
Radio Control — shielded RJ-45 connector
Power Requirement — 100 to 240 V ac, 47 to 63 Hz
Power Consumption — 30 Watts for Indoor and Outdoor Unit
Networking and Protocols
Bridging
DHCP server and client
NAT
Management
Service Provider
Subscriber provisioning using Java-based WaveCenter Configuration
Manager on Windows 98/2000/Pro, Linux, and Sun Solaris 2.8
Embedded WaveCenter agent supporting SNMP and web browser
SNMP, MIB II (RFC 1213), Aperto Enterprise MIBs
Software updates via TFTP

CHAPTER A. SPECIFICATIONS
A–2070-20000330-01 Rev A
Subscriber
Web-based interface for subscriber-side
DHCP server and NAT configuration
CPE Installation Tool
Facilitates antenna alignment process
LED Indicators
Power
Wireless — Transmit, Receive, Status
LAN — Link, Transmit, Receive
Environmental
Operating Temperature — 32 to 104 °F (0 to 40 °C)
Humidity — 10 to 90%, noncondensing
Dimensions and Weight
W x H x D — 1.5 x 6.6 x 9.1 inches (3.8 x 16.8 x 23.1 cm)
Weight — 2.2 lbs (1.0 kg)
Regulatory Approvals
FCC Class B
CE, ETSI (in process)
RADIO/ANTENNA (OUTDOOR UNIT) SPECIFICATIONS
RF
Data Rates — from 64 kbps with burst mode up to 20 Mbps in a 6 MHz channel
Modulation — QPSK,16 QAM
Cables and Connectors
Radio Signal — Quad shield coaxial cable; Male F-type connector
Radio Control — Shielded Cat 5 cable (outdoor rated); Male RJ45 connector
Cable Lengths — Up to 165 feet (50 m)
Mounting
Clamping bracket for pole with diameter of 1.5 inch, 2 inches, or 5 cm
Adjustable elevation

A–3070-20000330-01 Rev A
CHAPTER A. SPECIFICATIONS
Environmental
Operating Temperature — -22 to 140 °F (-30 to 60 °C)
Storage Temperature — -40 to 257 °F (-40 to 125 °C)
Humidity — 0 to 100%
2.5 GHz Outdoor Unit
Frequency Range — 2500 to 2686 MHz; Maximum EIRP * — 33 dBm
Dimensions: W x H x D — 12.6 x 12.6 x 1.9 inches (32.0 x 32.0 x 4.8 cm)
3 dB Beamwidth — Azimuth 20°; Elevation 20°
Polarization — Horizontal and vertical
3.5 GHz Outdoor Unit
Frequency Range — 3300 to 3800 MHz; Maximum EIRP * — 38 dBm
Dimensions: W x H x D — 10.2 x 10.2 x 1.9 inches (25.9 x 25.9 x 4.8 cm)
3 dB Beamwidth — Azimuth 20°; Elevation 20°
Polarization — Horizontal and vertical
5.3 GHz Outdoor Unit
Frequency Range — 5250 to 5350 MHz; Maximum EIRP * — 33 dBm
Dimensions: W x H x D — 8.1 x 8.1 x 1.9 inches (20.6 x 20.6 x 4.8 cm)
3 dB Beamwidth — Azimuth 17°; Elevation 17°
Polarization — Horizontal and vertical
5.8 GHz Outdoor Unit
Frequency Range — 5725 to 5875 MHz; Maximum EIRP * — 33 dBm
Dimensions: W x H x D — 8.1 x 8.1 x 1.9 inches (20.6 x 20.6 x 4.8 cm)
3 dB Beamwidth — Azimuth 17°; Elevation 17°
Polarization — Horizontal and vertical
* The maximum EIRP varies depending on country regulations.
Contact Aperto Networks sales for more information

CHAPTER A. SPECIFICATIONS
A–4070-20000330-01 Rev A