Manual

Time Capsule
Setup Guide

3
Contents
5Chapter 1: Getting Started
7
About Your Time Capsule
8
About the AirPort Software
9
What You Need to Get Started
11
The Time Capsule Status Light
13 Chapter 2: Setting Up Your Time Capsule
14
Using Your Time Capsule to Create Your Wireless Network
17
Using AirPort Utility
19
Creating a New Wireless Network
19
Configuring and Sharing Internet Access
21
Setting Advanced Options
22
Allowing Wireless Clients to Access Your Network Without Entering a Password
23
Using Time Machine with Your Time Capsule
25 Chapter 3: Tips and Troubleshooting
25
If You Can’t Connect to the Internet
25
If You Forgot Your Network Password or Time Capsule Password
26
If Your Time Capsule Isn’t Responding
27
If Your Time Capsule Status Light Flashes Amber

4
Contents
28
If Your Printer Isn’t Responding
29
Updating AirPort Software
29
Time Capsule Placement Considerations
30
Items That Can Cause Interference with AirPort
31 Chapter 4: Learning More, Service, and Support
33 Appendix: Time Capsule Specifications and Safety Guidelines
36
Regulatory Compliance Information

1
5
1
Getting Started
Congratulations on purchasing your Time Capsule. Read this
guide to get started.
The new Time Capsule offers you the simplicity of fully automated backup for your
Wi-Fi network. Using the Time Machine application in Mac OS X v10.5.2 Leopard or
later, it’s easy and automatic to back up all the computers on your network to a single
Time Capsule.
The Time Capsule is also a fully featured AirPort Extreme Base Station that provides
simultaneous dual-band wireless networking. When you set up your Time Capsule,
it creates two high-speed Wi-Fi networks:
Â
A 2.4 gigahertz (GHz) network for 802.11b, 802.11g, and 802.11n devices, such as
iPhone, iPod touch, and older computers
Â
A 5 GHz network for 802.11n and 802.11a devices, such as newer computers and
Apple TV
Wireless devices join the network that provides them the best performance and
compatibility, and the Time Capsule shares your broadband Internet connection with
computers and devices on your network.

6 Chapter 1
Getting Started
With your Time Capsule, you can:
Â
Use the Time Machine application in Mac OS X v10.5.2 (or later) to back up all the
computers on your wireless network, as well as computers connected to your Time
Capsule using Ethernet.
Note:
Your first backup with Time Capsule and Time Machine could take overnight or
longer, depending on how much data you’re backing up. To speed up the initial
backup, use an Ethernet cable to connect your computer to the LAN port on your
Time Capsule. For more information about using Time Machine, see “Using Time
Machine with Your Time Capsule” on page 23.
Â
Create a password-protected wireless home network, and then connect to the
Internet and share the connection with other computers and Wi-Fi devices, such as
iPhone, iPod touch, and Apple TV. You can also share files among computers
connected to the network.
Â
Create a guest network with or without password protection, to provide Internet-
only access to wireless devices, such as computers, iPhone, iPod touch, and Apple TV.
Â
Connect your Time Capsule to your Ethernet network. Wireless-equipped Macintosh,
Windows XP, or Windows Vista computers can then have access to an entire network
without being connected by a cable.
Â
Connect a supported USB printer to your Time Capsule. Compatible computers on
the AirPort network, both wireless and wired, can print to it.
Â
Connect an additional USB hard drive to your Time Capsule. Compatible computers
on the AirPort network, both wireless and wired, can access information on the
hard disk.

Chapter 1
Getting Started
7
Â
Connect a USB hub to your Time Capsule, and then connect multiple USB devices,
such as printers or hard disks. All computers on the network have access to those
devices.
Important:
Install AirPort Utility 5.4 from the CD that came with your Time Capsule,
or download it using Software Update. Previous versions of AirPort Setup Assistant and
AirPort Admin Utility are not compatible with this Time Capsule.
About Your Time Capsule
Your Time Capsule has five ports on the back:
Â
One 10/100/1000Base-T Gigabit Ethernet Wide Area Network (WAN) port for
connecting a DSL or cable modem, or for connecting to an existing Ethernet network
Â
Three 10/100/1000Base-T Gigabit Ethernet Local Area Network (LAN) ports for
connecting Ethernet devices, such as printers or computers, or for connecting to an
existing Ethernet network
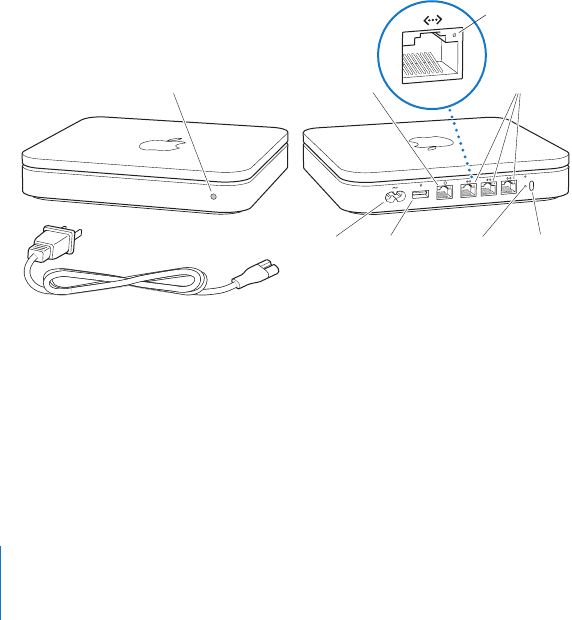
8 Chapter 1
Getting Started
Â
One USB port for connecting a compatible USB printer, hard drive, or hub for
connecting several devices
The reset button next to the ports is used for troubleshooting your Time Capsule.
The status light on the front shows the current status.
About the AirPort Software
Your Time Capsule works with AirPort Utility, included on the Time Capsule CD.
Install AirPort Utility and follow the instructions on the following pages to set up your
Time Capsule and your AirPort wireless network.
Status light Internet WAN port
Power port
Power cord
Reset buttonUSB port
Ethernet ports
Security slot
Ethernet
activity light

Chapter 1
Getting Started
9
Note:
You must use AirPort Utility v5.4 to set up your Time Capsule. This Time Capsule
is not compatible with previous versions of AirPort software.
What You Need to Get Started
To use your Time Capsule, you need a wireless-enabled computer that’s compliant with
IEEE 802.11a, 802.11b, or 802.11g standards, or with an IEEE 802.11n draft specification. To
set up your Time Capsule, your computer must meet the requirements listed below.
Note:
To use your Time Capsule with Time Machine in Mac OS X Leopard, you need to
use Mac OS X v10.5.2 or later.
To set up your Time Capsule using a Macintosh, you need the following:
Â
A Macintosh computer with an AirPort or AirPort Extreme Card installed to set it up
wirelessly, or a Macintosh computer connected to your Time Capsule with an
Ethernet cable to set it up using Ethernet
AirPort Utility
Use AirPort Utility to set up your Time Capsule to create a wireless network, connect
to the Internet, and share compatible USB printers and hard disks. You can also
connect your Time Capsule to an existing AirPort Extreme wireless network.
AirPort Utility is also an advanced tool for setting up and managing the Time
Capsule, AirPort Extreme, and AirPort Express Base Stations. Use it to manually adjust
network, routing, and security settings and other advanced options.
Z
AirPort status menu
Use the AirPort status menu in the menu bar to switch quickly between AirPort
networks, monitor the signal quality of the current network, create a computer-to-
computer network, and turn AirPort on or off. The status menu is available on
computers using Mac OS X.

10 Chapter 1
Getting Started
Â
Mac OS X v10.4 or later
Â
AirPort Utility v5.4 or later
To set up your Time Capsule using a Windows PC, you need the following:
Â
A Windows PC with 300 MHz or higher processor speed and a compatible 802.11a,
802.11b, or 802.11g wireless card, or a wireless card that complies with an IEEE 802.11n
draft specification
Â
Windows XP Home or Professional (with Service Pack 2 installed) or Windows Vista
Â
AirPort Utility v5.4 or later
Plugging In Your Time Capsule
Before you plug in your Time Capsule, first connect the appropriate cables to the ports
you want to use:
Â
Connect the Ethernet cable that’s connected to your DSL or cable modem (if you will
connect to the Internet) to the Ethernet WAN (<
) port.
Â
Connect a USB cable connected from the USB (d
) port on your Time Capsule to a
compatible USB printer (if you will print to a USB printer), a hard disk, or a hub.
Â
Connect an Ethernet cable from any Ethernet device to the Ethernet LAN (G
) ports.
After you’ve connected the cables for all the devices you plan to use, connect the
power cord to the power port and plug your Time Capsule into a power outlet. There is
no power switch.
Important:
Use only the power cord that came with your Time Capsule.

Chapter 1
Getting Started
11
When you plug your Time Capsule into a power outlet, the status light flashes green
for one second and then glows amber while your Time Capsule starts up. After your
Time Capsule has started up completely, the status light flashes amber until your Time
Capsule has been updated with the correct settings. The status light glows solid green
after your Time Capsule is properly set up and connected to the Internet or a network.
When you connect Ethernet cables to the Ethernet ports, the lights above them glow
solid green.
The Time Capsule Status Light
The following table explains the Time Capsule light sequences and what they indicate.
Light Status/description
Off
Your Time Capsule is unplugged.
Solid amber
Your Time Capsule is completing its startup sequence.
Flashing amber
Your Time Capsule can’t establish a connection to the network
or the Internet, or is encountering a problem. Make sure you
have installed AirPort Utility and use it to get information about
what might cause the status light to flash amber. See “If Your
Time Capsule Status Light Flashes Amber” on page 27.
Solid green
Your Time Capsule is on and working properly. If you choose
Flash On Activity from the Status Light pop-up menu (in the
Base Station pane of AirPort settings in AirPort Utility), the status
light may flash green to indicate normal activity.
Flashing amber and green
There may be a problem starting up. Your Time Capsule will
restart and try again.

12 Chapter 1
Getting Started
What’s Next
After you plug in your Time Capsule, use AirPort Utility to set it up to work with
your Internet connection, USB printer or hard disk, or an existing network. AirPort
Utility is located in the Utilities folder in the Applications folder on a computer using
Mac OS X, and in Start > All Programs > AirPort on a computer using Windows XP or
Windows Vista.
Solid blue
Your Time Capsule is ready to allow a wireless client access to
the network. See “Allowing Wireless Clients to Access Your
Network Without Entering a Password” on page 22.
Light Status/description

2
13
2
Setting Up Your Time Capsule
This chapter provides information and instructions for
connecting your Time Capsule to the Internet, and using
AirPort Utility to set it up to create or join a wireless network.
This chapter provides an overview of connecting your Time Capsule to the
Internet, and using the setup assistant in AirPort Utility to set up your network
and other features of your Time Capsule. For more information about wireless
networking, and for information about the advanced features of AirPort Utility, refer
to “Designing AirPort Networks Using AirPort Utility (Mac OS X v10.5 + Windows)” at
www.apple.com/support/airport.
After you install AirPort Utility from the CD that came with your Time Capsule, you can
do most of your network setup and configuration tasks using the setup assistant in
AirPort Utility. To set advanced options, choose Manual Setup from the Base Station
menu of AirPort Utility. See “Setting Advanced Options” on page 21.

14 Chapter 2
Setting Up Your Time Capsule
Using Your Time Capsule to Create Your Wireless Network
When you set up your Time Capsule to provide network and Internet access, the
following computers and devices can access the wireless AirPort network to share files,
play games, and use Internet applications such as web browsers and email
applications:
Â
Macintosh computers with AirPort or AirPort Extreme Cards
Â
802.11a, 802.11b, 802.11g, and IEEE 802.11n draft specification wireless-equipped
computers
Â
Other Wi-Fi devices
Computers connected to your Time Capsule using Ethernet can also access the
network to share files and connect to the Internet.
With Mac OS X v10.5.2 or later you can set up Time Machine to back up all the
computers on the network to your Time Capsule. See “Using Time Machine with Your
Time Capsule” on page 23 for more information.
When you connect a compatible USB printer to your Time Capsule, supported
computers on the network (wired and wireless) can print to it.

Chapter 2
Setting Up Your Time Capsule
15
Using Time Capsule to create a wireless network
To set it up:
1
Connect your DSL or cable modem to your Time Capsule using the Ethernet WAN (<
)
port.
to Internet
DSL or cable modem
Internet WAN port
<
Shared printer
Time Capsule
to USB port
2.4 GHz
2.4 or 5 GHz
2.4 or 5 GHz

16 Chapter 2
Setting Up Your Time Capsule
2
If you plan to share a USB printer on the network, connect it to the Time Capsule USB
(d
) port or to a USB hub, using a USB cable.
3
Open AirPort Utility (located in the Utilities folder in the Applications folder on a
computer using Mac OS X, and in Start > All Programs > AirPort on a computer using
Windows), select your Time Capsule, and then click Continue.
4
Follow the onscreen instructions to create a new network.
To print from a computer using Mac OS X v10.5:
1
Choose Apple > System Preferences, and then click Print & Fax.
2
Click Add (+) and select your printer from the list.
3
Click the Add button.
If your printer isn’t in the list, use the buttons in the toolbar to search for it.
To print from a computer using Mac OS X v10.3 or 10.4:
1
Open Printer Setup Utility (located in the Utilities folder in the Applications folder).
2
Select the printer from the list.
If the printer isn’t in the list, click Add and choose Bonjour from the pop-up menu, and
then select the printer from the list.
To print from a computer using Windows XP or Windows Vista:
1
Install Bonjour for Windows from the CD that came with your Time Capsule.
2
Follow the onscreen instructions to connect to your printer.
Computers using AirPort or other compatible wireless cards or adapters can connect to
the Internet through your Time Capsule. Computers connected to the Time Capsule
Ethernet ports can also access the network and connect to the Internet.

Chapter 2
Setting Up Your Time Capsule
17
Wireless computers and computers connected to the Ethernet ports can also
communicate with each other through your Time Capsule.
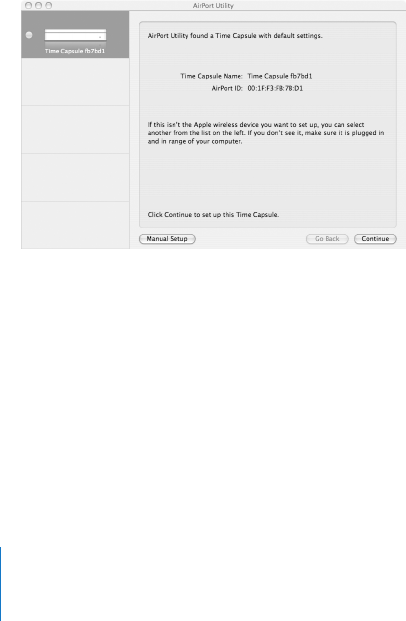
Using AirPort Utility
To set up and configure your Time Capsule, use the setup assistant in AirPort Utility.
AirPort Utility is installed on your computer when you install the software from the
Time Capsule CD.
On a Macintosh computer using Mac OS X v10.4 or later:
1
Open AirPort Utility, located in the Utilities folder in the Applications folder.
2
Select your Time Capsule and click Continue.
If you don’t see the Time Capsule you want to configure, click Rescan to scan for
available wireless devices, and then select your Time Capsule from the list.
3
Follow the onscreen instructions to set up your Time Capsule and your wireless
network.
On a computer using Windows XP (with Service Pack 2) or Windows Vista:
1
Open AirPort Utility, located in Start > All Programs > AirPort.
2
Select your Time Capsule and click Continue.
18 Chapter 2
Setting Up Your Time Capsule
3
Follow the onscreen instructions to set up your Time Capsule and your wireless
network.
The AirPort Utility setup assistant asks you questions about the type of network you
want to use and the services you want to set up, and helps you enter the appropriate
settings.
If you’re using your Time Capsule to connect to the Internet, you need a broadband
(DSL or cable modem) account with an Internet service provider (ISP), or a connection
to the Internet using an existing Ethernet network. If you received specific information
from your ISP (such as a static IP address or a DHCP client ID), you may need to enter it
in AirPort Utility. Have this information available when you set up your Time Capsule.

Chapter 2
Setting Up Your Time Capsule
19
Creating a New Wireless Network
You can use the AirPort Utility setup assistant to create a new wireless network. The
setup assistant guides you through the steps necessary to name your network, protect
your network with a password, and set other options.
If you plan to share a USB printer or USB hard disk on your network:
1
Connect the printer or hard disk to the Time Capsule USB (d
) port.
2
Open AirPort Utility, located in the Utilities folder in the Applications folder on a
Macintosh, or in Start > All Programs > AirPort on a computer using Windows XP.
3
Select your Time Capsule and click Continue.
If you don’t see the Time Capsule you want to configure, click Rescan to scan for
available wireless devices, and then select your Time Capsule from the list.
4
Follow the onscreen instructions to create a new network.
Configuring and Sharing Internet Access
If you plan to share your Internet connection with wireless-enabled computers on your
network or with computers connected to the Ethernet ports, you need to set up your
Time Capsule as an AirPort Base Station. After your Time Capsule is set up, computers
access the Internet through the AirPort network. Your Time Capsule connects to the
Internet and transmits information to the computers over the wireless network.
Before you use AirPort Utility to set up your Time Capsule, connect your DSL or cable
modem to the Time Capsule Ethernet WAN (<
) port. If you’re connecting your Time
Capsule to an Ethernet network that already has Internet access, connect it to the
Ethernet network.

20 Chapter 2 Setting Up Your Time Capsule
Use the AirPort Utility setup assistant to enter your ISP settings and configure how your
Time Capsule shares the settings with other computers.
1Open AirPort Utility, located in the Utilities folder in the Applications folder on a
computer using Mac OS X, or in Start > All Programs > AirPort on a computer using
Windows XP.
2Select your Time Capsule and click Continue.
If you’re making changes to a Time Capsule that has already been set up,
you might have to connect to the network it’s created before making changes
to the Time Capsule.
To choose the wireless network you want to change on a Macintosh, use the AirPort
status menu in the menu bar. On a computer using Windows XP, hold the pointer over
the wireless connection icon until you see the network name (SSID), and then choose it
from the list if there are multiple networks available.
3Follow the onscreen instructions to configure and share Internet access on your
Time Capsule.
AirPort Utility provides a quick and easy way to set up your Time Capsule and network.
If you want to set additional options for your network, such as restricting access to your
network or setting advanced DHCP options, choose Manual Setup from the Base
Station menu of AirPort Utility.

Chapter 2 Setting Up Your Time Capsule 21
Setting Advanced Options
Use AirPort Utility to set up your Time Capsule manually if you want to set advanced
Time Capsule options such as advanced security options, closed networks, DHCP lease
time, access control, power controls, user accounts, and more.
To set advanced options:
1Open AirPort Utility, located in the Utilities folder in the Applications folder on a
Macintosh, and in Start > All Programs > AirPort on a computer using Windows XP.
2If there’s more than one wireless device in the list, select the one you want to
configure. If you don’t see the Time Capsule you want to configure, click Rescan to scan
for available wireless devices, and then select your Time Capsule from the list.
If you’re making changes to a Time Capsule that has already been set up, you might
have to connect to the network it’s created before making changes to your Time
Capsule.
To choose the wireless network you want to change, on a Macintosh use the AirPort
status menu in the menu bar. On a computer using Windows XP, hold the pointer over
the wireless connection icon until you see the network name (SSID), and then choose it
from the list if there are multiple networks available.
3Choose Manual Setup from the Base Station menu. If you’re prompted for a password,
enter it.
For more about the manual setup features in AirPort Utility, see “Designing AirPort
Networks Using AirPort Utility (Mac OS X v10.5 + Windows)” at www.apple.com/
support/airport.

22 Chapter 2 Setting Up Your Time Capsule
Allowing Wireless Clients to Access Your Network Without
Entering a Password
If your network is password-protected using WPA Personal or WPA/WPA2 Personal, you
can provide wireless clients access to your network without requiring them to enter the
network password.
When you allow a client access to your network, the client’s name and wireless MAC
address (or AirPort ID) are stored in the access control list of AirPort Utility until you
remove the client from the list. You can also provide 24 hours of access, after which
time the client will no longer be able to access your network.
When you give a client access to your wireless network, the client doesn’t need to enter
the network password.
To allow a client to access your network without entering the network password:
1Open AirPort Utility, select your Time Capsule, and then choose Manual Setup from the
Base Station menu. Enter the password if necessary.
2Choose Add Wireless Clients from the Base Station menu.
3Select how you want the client to access the network:
ÂSelect PIN to enter the eight-digit number provided by the client requesting network
access.
ÂSelect “First attempt” to allow network access to the first client attempting to join the
network.
While the Time Capsule waits for a client to join the network, the LED glows blue.

Chapter 2 Setting Up Your Time Capsule 23
Select “Limit client’s access to 24 hours” if you want to provide just one day of access to
your network. If you don’t select this option, the client will have access until you
remove the client from the list.
Using Time Machine with Your Time Capsule
With the Time Machine application in Mac OS X Leopard you can back up everything
on your computer, including your photos, music, movies, and documents.
After you set up Time Machine, it automatically backs up your computer on a regular
basis.
If you’re using Mac OS X v10.5.2 or later, the first time you connect to your Time
Capsule, Time Machine asks if you’d like to use it to back up your files. Click “Use as
Backup Disk,” and Time Machine takes care of the rest.
Use the Time Machine pane of System Preferences in Mac OS X Leopard to set up
automatic backups, change to a different backup disk, or adjust other settings.
To set up or adjust Time Machine on a computer using Mac OS X Leopard:
1Choose Apple > System Preferences, and then click Time Machine.
2Slide the switch to ON.
3Click Change Disk.
4Choose your Time Capsule and click “Use for Backup.”

24 Chapter 2 Setting Up Your Time Capsule
Your first backup with Time Capsule and Time Machine could take overnight or longer,
depending on how much data you’re backing up. To speed up the initial backup,
connect your Time Capsule to your computer using Ethernet. In each subsequent
backup, Time Machine backs up only files that have changed since the previous
backup, so the backups don’t take as long.
Time Capsule is a great wireless backup solution for portable computers. Since the
first backup can take some time, plug your portable into a power adapter—this
conserves battery power and guarantees that backups won’t be interrupted. Also,
for the best wireless performance, place your portable computer in the same room as
your Time Capsule.
If you shut down your Mac or put it to sleep during a backup, Time Machine stops the
backup and then continues from where it left off after your Mac starts up again.
For more information about Time Machine, choose Help > Mac Help from the Finder
menu on a computer using Mac OS X Leopard, and then type Time Machine in the
search field.

3
25
3Tips and Troubleshooting
You can quickly solve most problems with your Time Capsule
by following the advice in this chapter.
If You Can’t Connect to the Internet
ÂTry connecting to the Internet directly from your computer. If you can’t connect,
check to make sure your network settings are correct. If they appear to be correct
and you still can’t connect, contact your Internet service provider (ISP).
ÂMake sure you’re connecting to the correct wireless network.
If You Forgot Your Network Password or Time Capsule
Password
You can clear the AirPort network password or Time Capsule password by resetting
your Time Capsule.
To reset the Time Capsule password:
1Use something pointed (such as a ballpoint pen) to press and hold down the reset
button for one second.
Important: If you hold the reset button for more than one second, you may lose your
network settings.

26 Chapter 3 Tips and Troubleshooting
2Select your AirPort network.
ÂOn a Macintosh, use the AirPort status menu in the menu bar to select the network
created by your Time Capsule (the network name doesn’t change).
ÂOn a computer using Windows XP, hold the pointer over the wireless connection icon
until you see your AirPort network name (SSID), and choose it from the list if there
are multiple networks available.
3Open AirPort Utility (in the Utilities folder in the Applications folder on a Macintosh,
and in Start > All Programs > AirPort on a computer using Windows XP).
4Select your Time Capsule, and then choose Manual Setup from the Base Station menu.
5Click AirPort in the toolbar, and then click Base Station.
6Enter a new password for your Time Capsule.
7Click Wireless and choose an encryption method from the Wireless Security pop-up
menu to turn on encryption and activate password protection for your AirPort network.
If you turn on encryption, enter a new password for your AirPort network.
8Click Update to restart your Time Capsule and load the new settings.
If Your Time Capsule Isn’t Responding
Try unplugging it and plugging it back in.
If your Time Capsule stops responding completely, you may need to reset it to the
factory default settings.
Important: Resetting your Time Capsule to factory default settings erases all of the
current settings and resets them to the settings that came with your Time Capsule.

Chapter 3 Tips and Troubleshooting 27
To return your Time Capsule to the factory settings:
mUse something pointed (such as a ballpoint pen) to press down and hold the reset
button until the status light flashes quickly (about 5 seconds).
Your Time Capsule resets with the following settings:
ÂYour Time Capsule receives its IP address using DHCP.
ÂThe network name is reset to Apple Network XXXXXX (where XXXXXX is replaced
with the last six digits of the AirPort ID).
ÂThe Time Capsule password is reset to public.
If your Time Capsule still isn’t responding, try the following:
1Unplug your Time Capsule.
2Use something pointed to press and hold down the reset button while you plug in
your Time Capsule.
If Your Time Capsule Status Light Flashes Amber
The Ethernet cable may not be connected properly, your Time Capsule may be out of
range of an AirPort network, or there may be a problem with your Internet service
provider. If you’re connected to the Internet with a DSL or cable modem, the modem
may have lost its connection to the network or the Internet. Even if the modem seems
to be working properly, try disconnecting it from its power supply, waiting a few
seconds, and then reconnecting it. Make sure your Time Capsule is connected directly
to the modem via Ethernet before reconnecting power to the modem.

28 Chapter 3 Tips and Troubleshooting
For more information about why the light is flashing, open AirPort Utility, select your
Time Capsule, and then choose Manual Setup from the Base Station menu. Click Base
Station Status to display information about the flashing light.
You can also select “Monitor base station for problems” in AirPort preferences. If the
base station has a problem, AirPort Utility opens and walks you through solving the
problem.
If Your Printer Isn’t Responding
If you connected a printer to the USB port on your Time Capsule and the computers on
the AirPort network can’t print, try the following:
1Make sure the printer is plugged in and turned on.
2Make sure the cables are securely connected to the printer and to the Time Capsule
USB port.
3Make sure the printer is selected in the Printer List window on client computers.
On a Macintosh using Mac OS X v10.5 or later:
ÂChoose Apple > System Preferences, and then click Print & Fax.
ÂClick Add (+) and select your printer in the list, and then click Add (+).
On a Macintosh using Mac OS X v10.2.7 or later:
ÂOpen Printer Setup Utility, located in the Utilities folder in the Applications folder.
ÂIf the printer isn’t in the list, click Add.
ÂChoose Bonjour from the pop-up menu, select the printer and click Add (+).

Chapter 3 Tips and Troubleshooting 29
On a computer using Windows XP:
ÂOpen “Printers and Faxes” from the Start menu.
ÂSelect the printer. If the printer isn’t in the list, click Add Printer and then follow the
onscreen instructions.
4Turn off the printer, wait a few seconds, and then turn it back on.
Updating AirPort Software
Apple periodically updates AirPort software. It is recommended that you update your
Time Capsule to use the latest software.
You can select “Check for updates when opening AirPort Utility,” or “Check for updates”
in AirPort preferences. If you select “Check for updates,” choose an increment of time,
such as weekly, from the pop-up menu to automatically check for updates.
Time Capsule Placement Considerations
The following recommendations can help your Time Capsule achieve the best wireless
range and network coverage.
ÂPlace your Time Capsule in an open area where there are few obstructions, such as
large pieces of furniture or walls. Try to place it away from metallic surfaces.
ÂIf you place your Time Capsule behind furniture, keep at least an inch of space
between the Time Capsule and the edge of the furniture.
ÂAvoid placing your Time Capsule in areas surrounded by metal surfaces on three or
more sides.

30 Chapter 3 Tips and Troubleshooting
ÂIf you place your Time Capsule in an entertainment center with your stereo
equipment, avoid surrounding your Time Capsule with audio, video, or power cables.
Place your Time Capsule so that the cables are to one side. Maintain as much space
as possible between your Time Capsule and the cables.
ÂTry to place your Time Capsule at least 25 feet (7.6 meters) from any microwave oven,
2.4 or 5 gigahertz (GHz) cordless phone, and other sources of interference.
ÂDo not place other objects (books, papers, small pets, etc.) on top of the Time
Capsule. It may interfere with Time Capsule cooling.
Items That Can Cause Interference with AirPort
The farther away the interference source, the less likely it is to cause a problem.
The following can interfere with AirPort communication:
ÂMicrowave ovens
ÂDirect Satellite Service (DSS) radio frequency leakage
ÂThe original coaxial cable that came with certain types of satellite dishes. Contact the
device manufacturer and obtain newer cables.
ÂCertain electrical devices such as power lines, electrical railroad tracks, and power
stations
ÂCordless telephones that operate in the 2.4 or 5 GHz range. If you have problems
with your phone or AirPort communication, change the channel your base station or
Time Capsule uses, or change the channel your phone uses.
ÂNearby base stations using adjacent channels. For example, if base station A is set to
channel 1, base station B should be set to channel 6 or 11.

4
31
4Learning More,
Service, and Support
You can find more information about using your Time Capsule
on the web and in onscreen help.
Online Resources
For the latest information about the Time Capsule, go to www.apple.com/airport.
To register your Time Capsule (if you didn’t do it when you installed the software on
the Time Capsule CD), go to www.apple.com/register.
For AirPort support information, forums with product-specific information and
feedback, and the latest Apple software downloads, go to www.apple.com/support/
airport.
For support outside of the United States, go to www.apple.com/support, and then
choose your country.

32 Chapter 4 Learning More, Service, and Support
Onscreen Help
To learn more about using AirPort Utility with your Time Capsule, open AirPort Utility
and choose Help > AirPort Utility Help.
Obtaining Warranty Service
If your Time Capsule appears to be damaged or doesn’t function properly, please
follow the advice in this booklet, the onscreen help, and the online resources.
If your Time Capsule still doesn’t function, go to www.apple.com/support for
information about getting warranty service.
Finding the Serial Number of Your Time Capsule
The serial number is printed on the bottom of your Time Capsule.

33
Appendix
Time Capsule Specifications and
Safety Guidelines
Time Capsule Specifications
ÂFrequency Band: 2.4 and 5 GHz
ÂRadio Output Power: Up to 23 dBm (nominal)
ÂStandards: 802.11 DSSS 1 and 2 Mbps standard, 802.11a, 802.11b, 802.11g
specifications, and a draft 802.11n specification
Interfaces
Â1 RJ-45 10/100/1000Base-T Gigabit Ethernet WAN (<)
Â3 RJ-45 10/100/1000Base-T Gigabit Ethernet LAN (G)
ÂUniversal Serial Bus (USB d) 2.0
Â802.11 a/b/g/n AirPort Extreme wireless
Environmental Specifications
ÂOperating Temperature: 32° F to 95° F (0° C to 35° C)
ÂStorage Temperature: –13° F to 140° F (–25° C to 60° C)
ÂRelative Humidity (Operational): 20% to 80% relative humidity
ÂRelative Humidity (Storage): 10% to 90% relative humidity, noncondensing

34 Appendix Time Capsule Specifications and Safety Guidelines
Size and Weight
ÂLength: 7.75 inches (197.0 mm)
ÂWidth: 7.75 inches (197.0 mm)
ÂHeight: 1.43 inches (36.33 mm)
ÂWeight: 3.5 pounds (1.6 kilograms)
Hardware Media Access Control (MAC) Addresses
The Time Capsule has three hardware addresses printed on the bottom of the case:
ÂAirPort ID: The two addresses used to identify the Time Capsule on a wireless
network.
ÂEthernet ID: You may need to provide this address to your ISP to connect your Time
Capsule to the Internet.
Using Your Time Capsule Safely
ÂThe only way to shut off power completely to your Time Capsule is to disconnect it
from the power source.
ÂWhen connecting or disconnecting your Time Capsule, always hold the plug by its
sides. Keep fingers away from the metal part of the plug.
ÂYour Time Capsule should not be opened for any reason, even when it’s unplugged.
If your Time Capsule needs service, see “Learning More, Service, and Support” on
page 31.
ÂNever force a connector into a port. If the connector and port don’t join with
reasonable ease, they probably don’t match. Make sure that the connector matches
the port and that you’ve positioned the connector correctly in relation to the port.

Appendix Time Capsule Specifications and Safety Guidelines 35
About Operating and Storage Temperatures
ÂWhen you’re using your Time Capsule, it is normal for the case to get warm. The Time
Capsule case functions as a cooling surface that transfers heat from inside the unit to
the cooler air outside.
Avoid Wet Locations
ÂKeep your Time Capsule away from sources of liquid, such as drinks, washbasins,
bathtubs, shower stalls, and so on.
ÂProtect your Time Capsule from direct sunlight and rain or other moisture.
ÂTake care not to spill any food or liquid on your Time Capsule. If you do, unplug it
before cleaning up the spill.
ÂDo not use your Time Capsule outdoors. The Time Capsule is an indoor product.
Do Not Make Repairs Yourself
About Handling
Your Time Capsule may be damaged by improper storage or handling. Be careful not
to drop your Time Capsule when transporting it.
WARNING: To reduce the chance of shock or injury, do not use your Time Capsule in
or near water or wet locations.
WARNING: Do not attempt to open your Time Capsule or disassemble it. You run
the risk of electric shock and voiding the limited warranty. No user-serviceable parts
are inside.

36
Regulatory Compliance Information
Wireless Radio Use
This device is restricted to indoor use due to its
operation in the 5.15 to 5.25 GHz frequency range to
reduce the potential for harmful interference to co-
channel Mobile Satellite systems.
Cet appareil doit être utilisé à l’intérieur.
Exposure to Radio Frequency Energy
The radiated output power of this device is well below
the FCC and EU radio frequency exposure limits.
However, this device should be operated with a
minimum distance of at least 20 cm between its
antennas and a person’s body and the antennas used
with this transmitter must not be colocated or operated
in conjunction with any other antenna or transmitter
subject to the conditions of the FCC Grant.
FCC Declaration of Conformity
This device complies with part 15 of the FCC rules.
Operation is subject to the following two conditions: (1)
This device may not cause harmful interference, and (2)
this device must accept any interference received,
including interference that may cause undesired
operation. See instructions if interference to radio or
television reception is suspected.
Radio and Television Interference
This computer equipment generates, uses, and can
radiate radio-frequency energy. If it is not installed and
used properly—that is, in strict accordance with Apple’s
instructions—it may cause interference with radio and
television reception.
This equipment has been tested and found to comply
with the limits for a Class B digital device in accordance
with the specifications in Part 15 of FCC rules. These
specifications are designed to provide reasonable
protection against such interference in a residential
installation. However, there is no guarantee that
interference will not occur in a particular installation.
You can determine whether your computer system is
causing interference by turning it off. If the interference
stops, it was probably caused by the computer or one of
the peripheral devices.
If your computer system does cause interference to
radio or television reception, try to correct the
interference by using one or more of the following
measures:
ÂTurn the television or radio antenna until the
interference stops.
ÂMove the computer to one side or the other of the
television or radio.
ÂMove the computer farther away from the television or
radio.
ÂPlug the computer into an outlet that is on a different
circuit from the television or radio. (That is, make
certain the computer and the television or radio are on
circuits controlled by different circuit breakers or
fuses.)
If necessary, consult an Apple Authorized Service
Provider or Apple. See the service and support
information that came with your Apple product. Or,
consult an experienced radio/television technician for
additional suggestions.
Important: Changes or modifications to this product
not authorized by Apple Inc. could void the EMC
compliance and negate your authority to operate the
product.
37
This product was tested for FCC compliance under
conditions that included the use of Apple peripheral
devices and Apple shielded cables and connectors
between system components. It is important that you
use Apple peripheral devices and shielded cables and
connectors between system components to reduce the
possibility of causing interference to radios, television
sets, and other electronic devices. You can obtain Apple
peripheral devices and the proper shielded cables and
connectors through an Apple-authorized dealer. For
non-Apple peripheral devices, contact the manufacturer
or dealer for assistance.
Responsible party (contact for FCC matters only)
Apple Inc., Corporate Compliance, 1 Infinite Loop M/S 26-A,
Cupertino, CA 95014-2084
Industry Canada Statement
This Class B device meets all requirements of the
Canadian interference-causing equipment regulations.
Cet appareil numérique de la Class B respecte toutes les
exigences du Règlement sur le matériel brouilleur du
Canada.
VCCI Class B Statement
Europe—EU Declaration of Conformity
For more information, see www.apple.com/euro/
compliance.
European Union — Disposal Information
This symbol means that according to local laws and
regulations your product should be disposed of
separately from household waste. When this product
reaches its end of life, take it to a collection point
designated by local authorities. Some collection points
accept products for free. The separate collection and
recycling of your product at the time of disposal will
help conserve natural resources and ensure that it is
recycled in a manner that protects human health and
the environment.
Disposal and Recycling Information
This product has an internal battery. Please dispose of it
according to your local environmental laws and
guidelines. For information about Apple’s recycling
program, go to www.apple.com/environment.
California: The coin cell battery in your product
contains perchlorates. Special handling and disposal
may apply. Refer to www.dtsc.ca.gov/hazardouswaste/
perchlorate.
Deutschland: Dieses Gerät enthält Batterien. Bitte nicht
in den Hausmüll werfen. Entsorgen Sie dieses Gerätes
am Ende seines Lebenszyklus entsprechend der
maßgeblichen gesetzlichen Regelungen.
Nederlands: Gebruikte batterijen kunnen worden
ingeleverd bij de chemokar of in een speciale
batterijcontainer voor klein chemisch afval (kca) worden
gedeponeerd.
38
Taiwan:
Singapore Wireless Certification
Taiwan Warning Statements
Korea Warning Statements
© 2009 Apple Inc. All rights reserved.
Apple, the Apple logo, AirPort, AirPort Express, AirPort
Extreme, Apple TV, Bonjour, iPod, Leopard, Macintosh,
Mac OS, and Time Capsule are trademarks of Apple Inc.,
registered in the U.S. and other countries. Finder,
iPhone, and Time Machine are trademarks of Apple Inc.
Other product and company names mentioned herein
may be trademarks of their respective companies.

www.apple.com/airport
www.apple.com/support/airport
034-5084-A
Printed in XXXX