Apple A1416 iPAD with 802/11 a/b/g/n and BT LE User Manual iPad User Guide
Apple Inc. iPAD with 802/11 a/b/g/n and BT LE iPad User Guide
UserManual.wiki
>
Apple
>
A1416 User Manual
>
User Manual 2 of 2
Contents
1.
User Manual 1 of 2
2.
User Manual 2 of 2
3.
Regulatory section of user manaul
4.
Regulatory section of user manual
User Manual 2 of 2
Navigation menu
Upload a User Manual
Namespaces
Wiki Guide
HTML
PDF
Info
Views
User Manual
Discussion / Help
Navigation
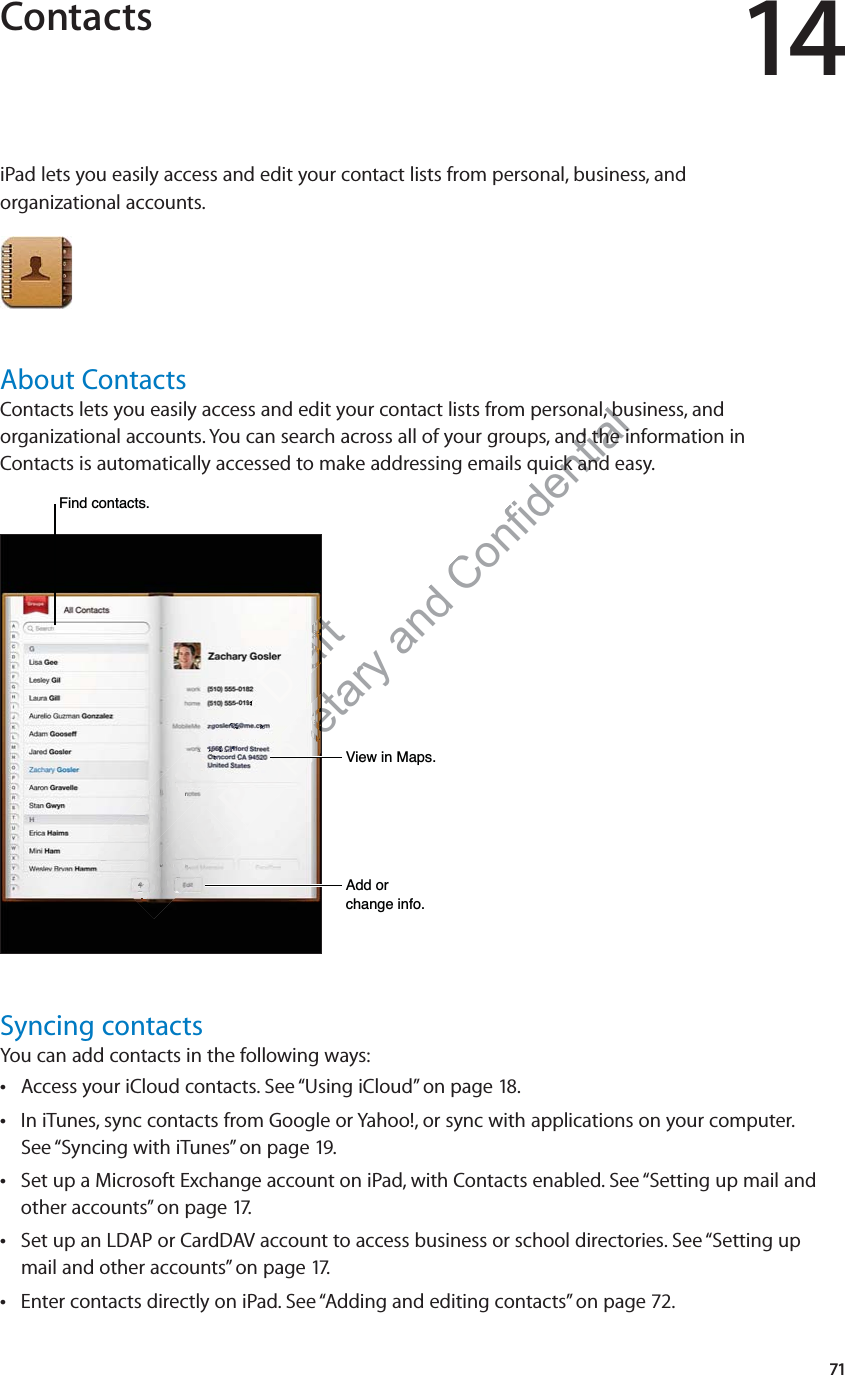
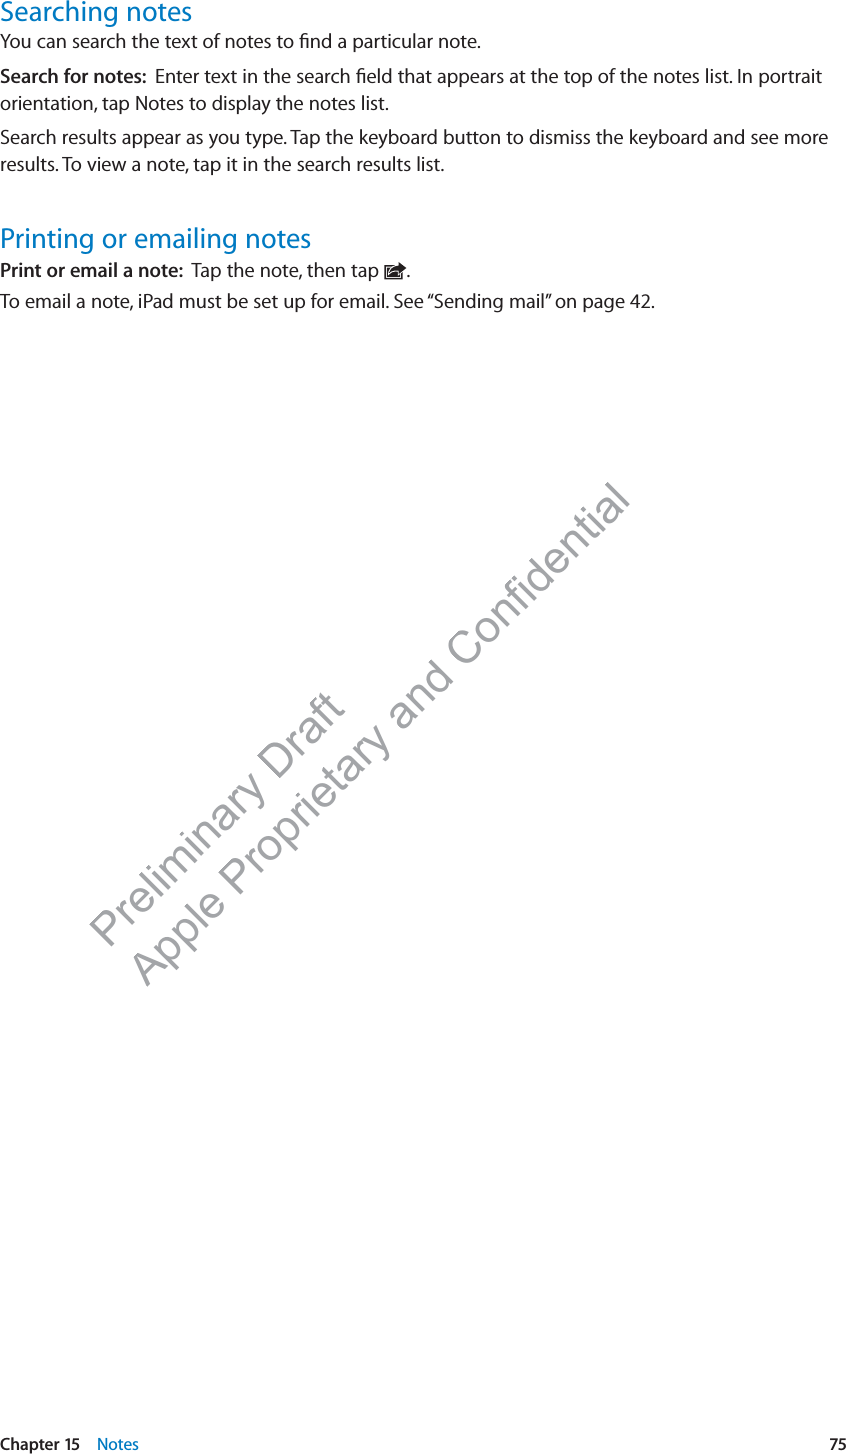
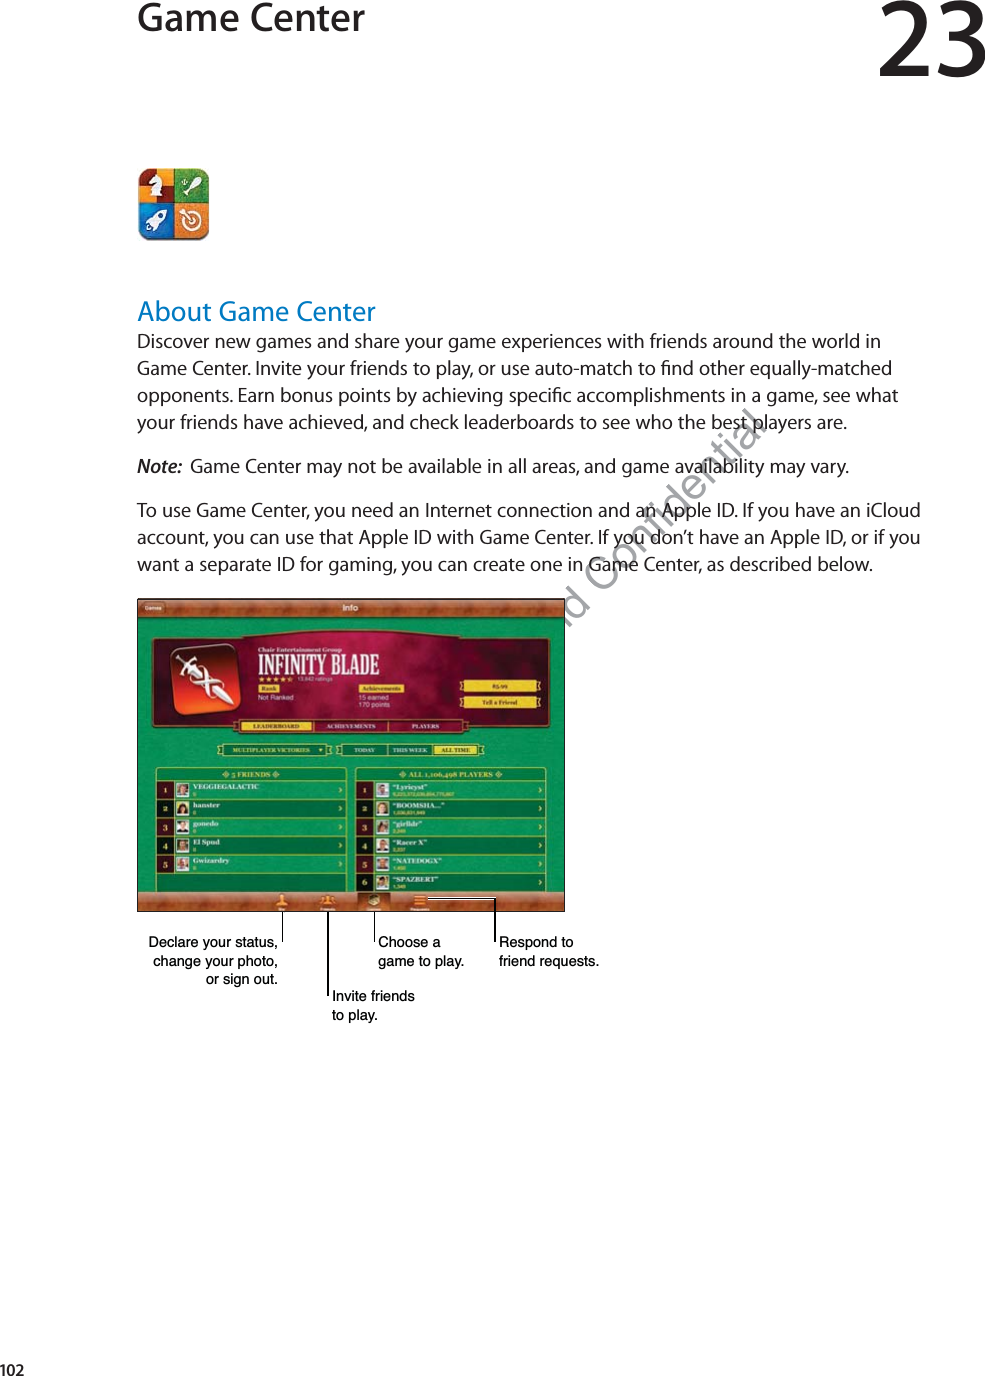
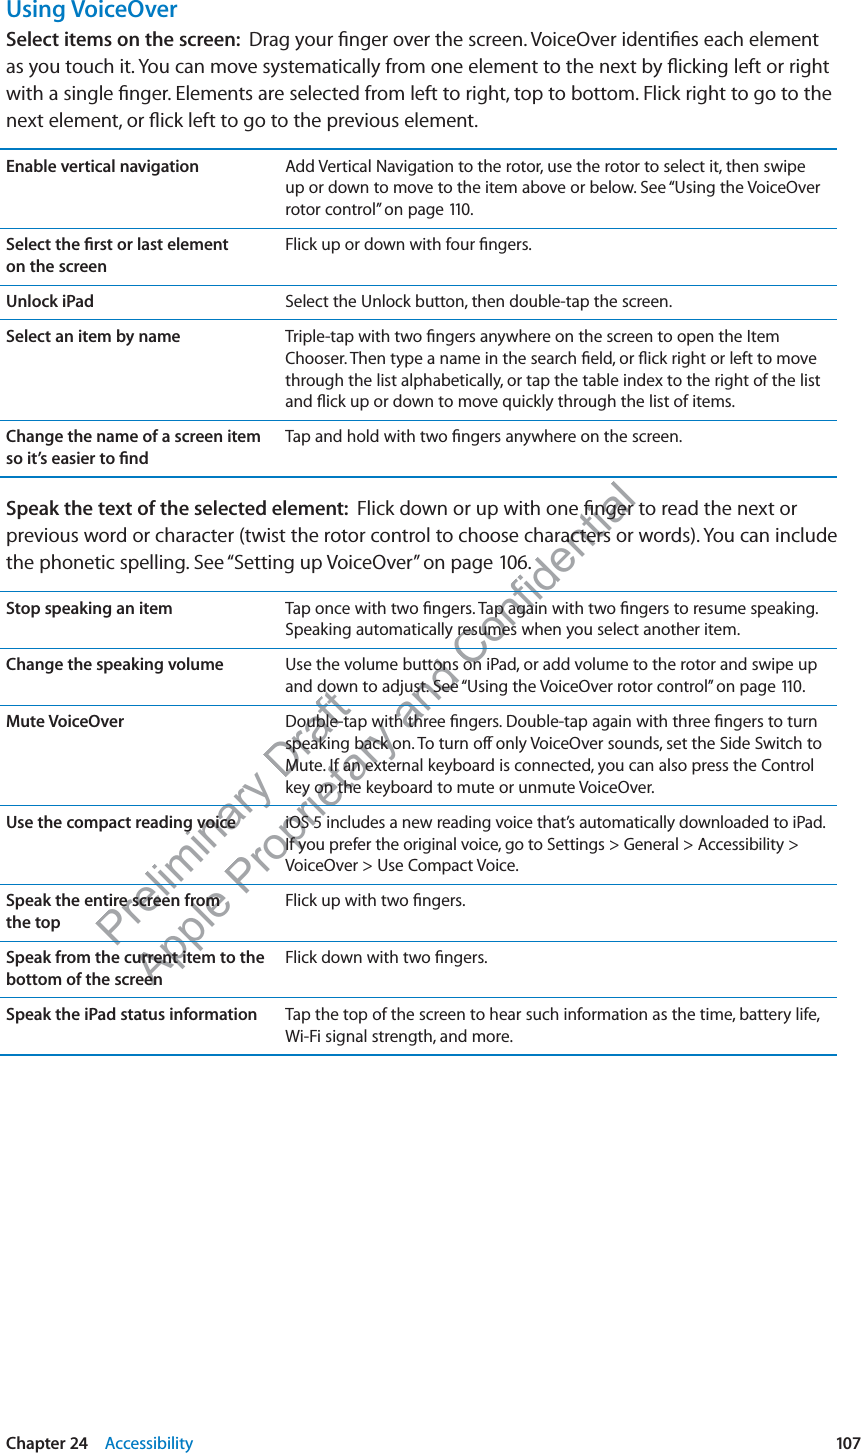
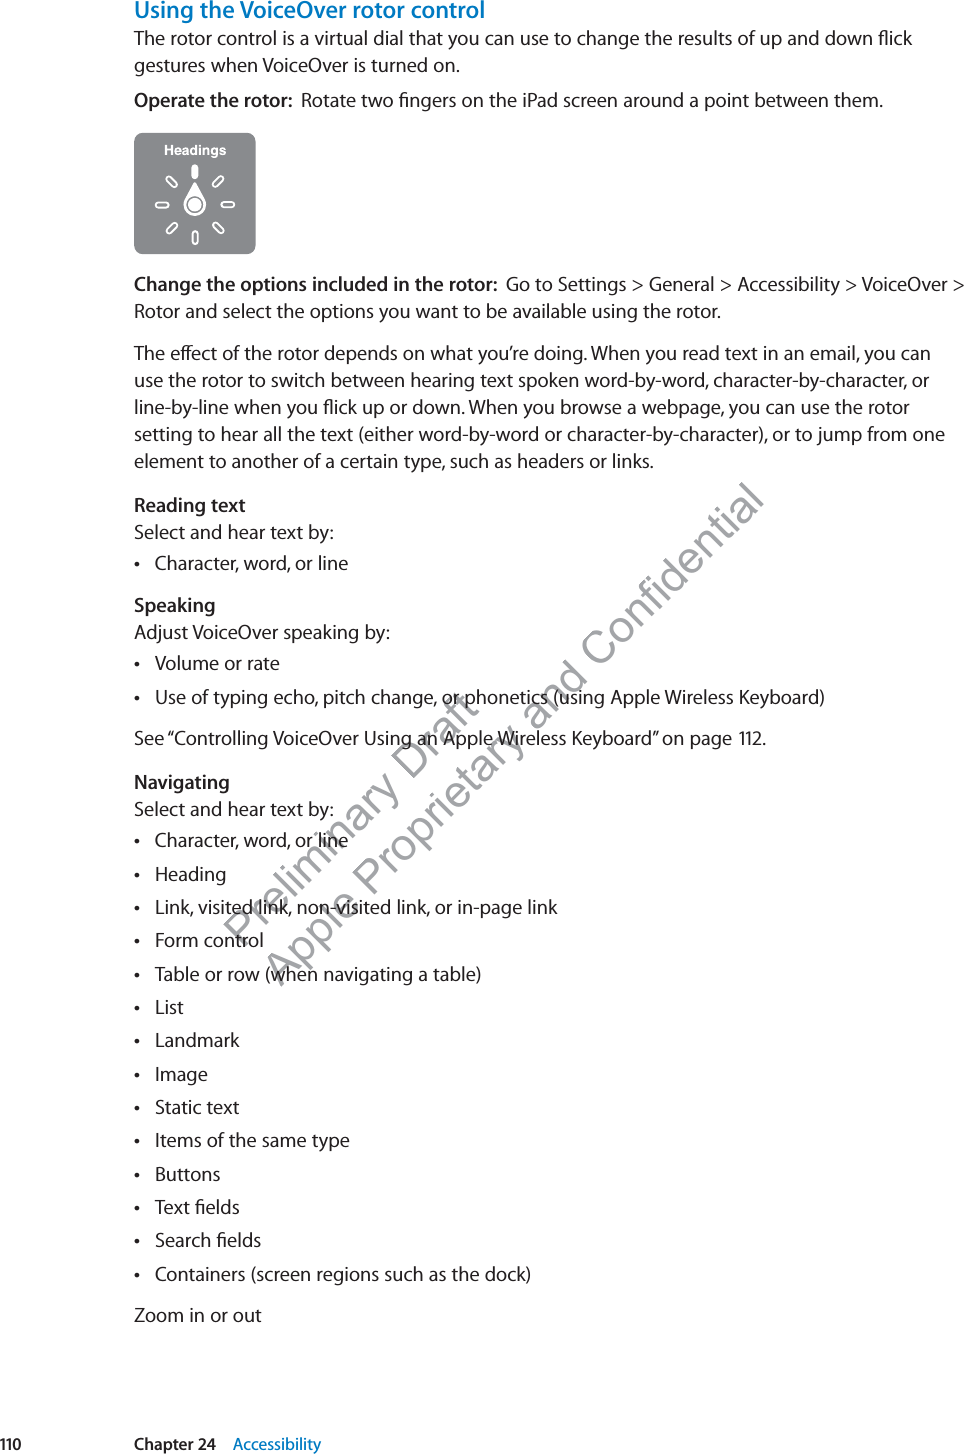
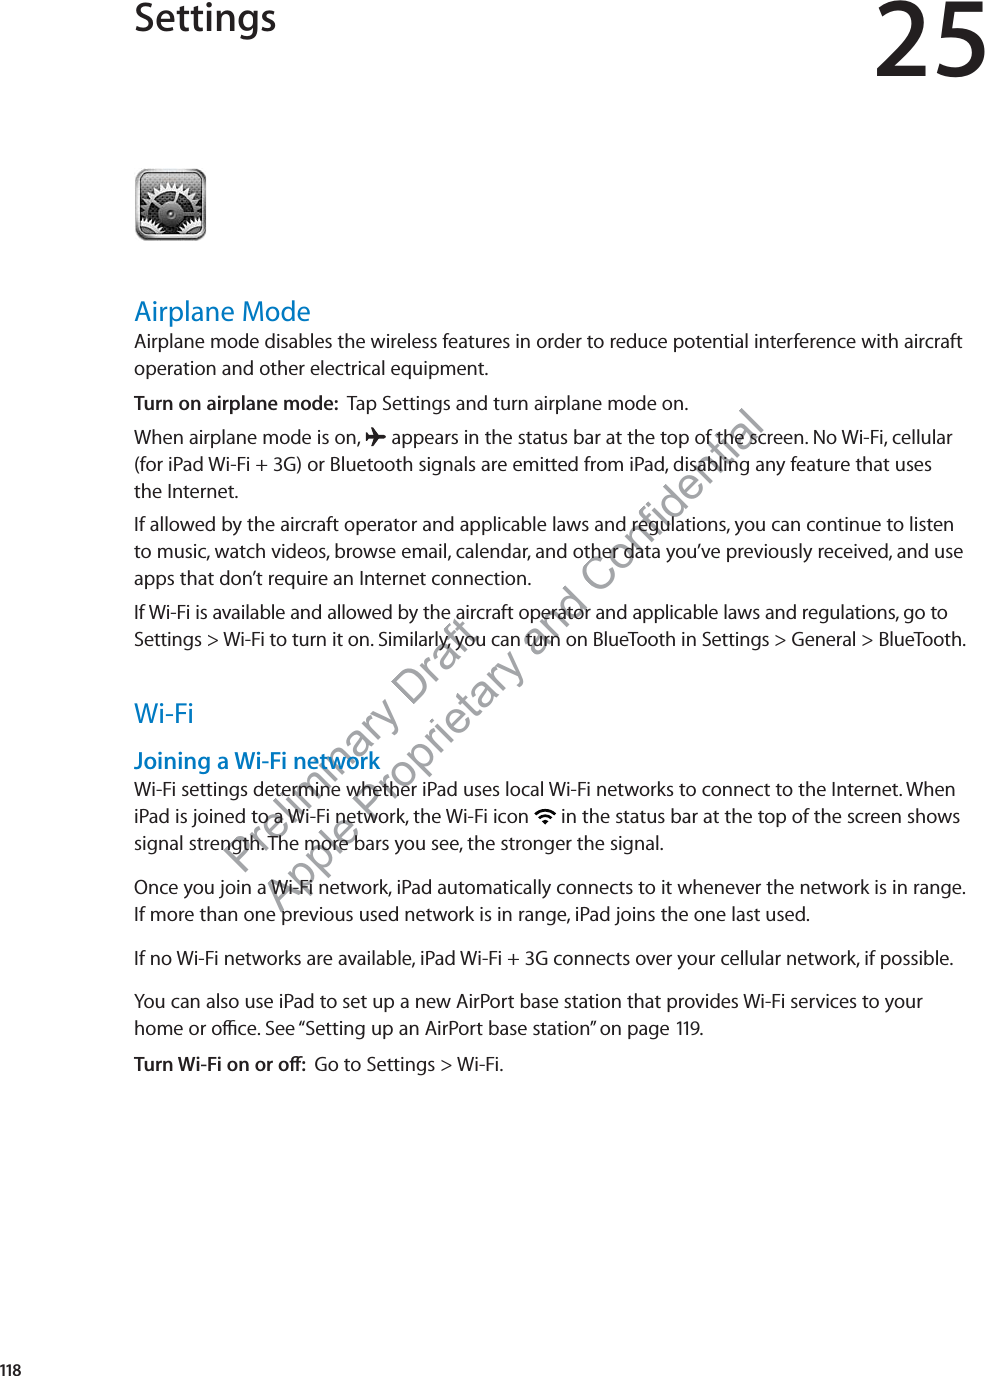
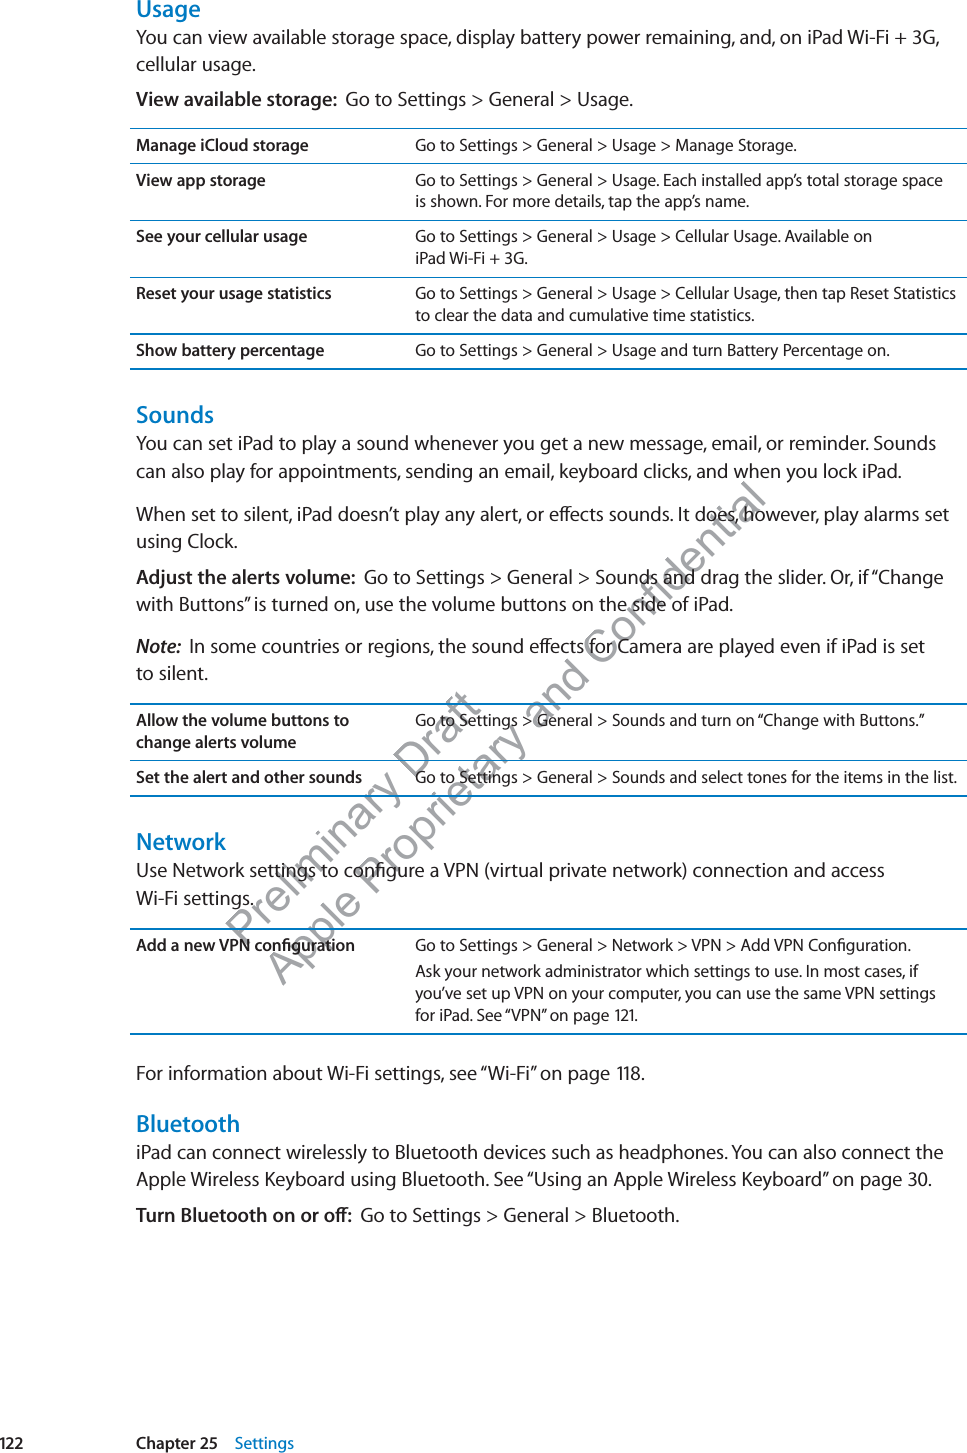
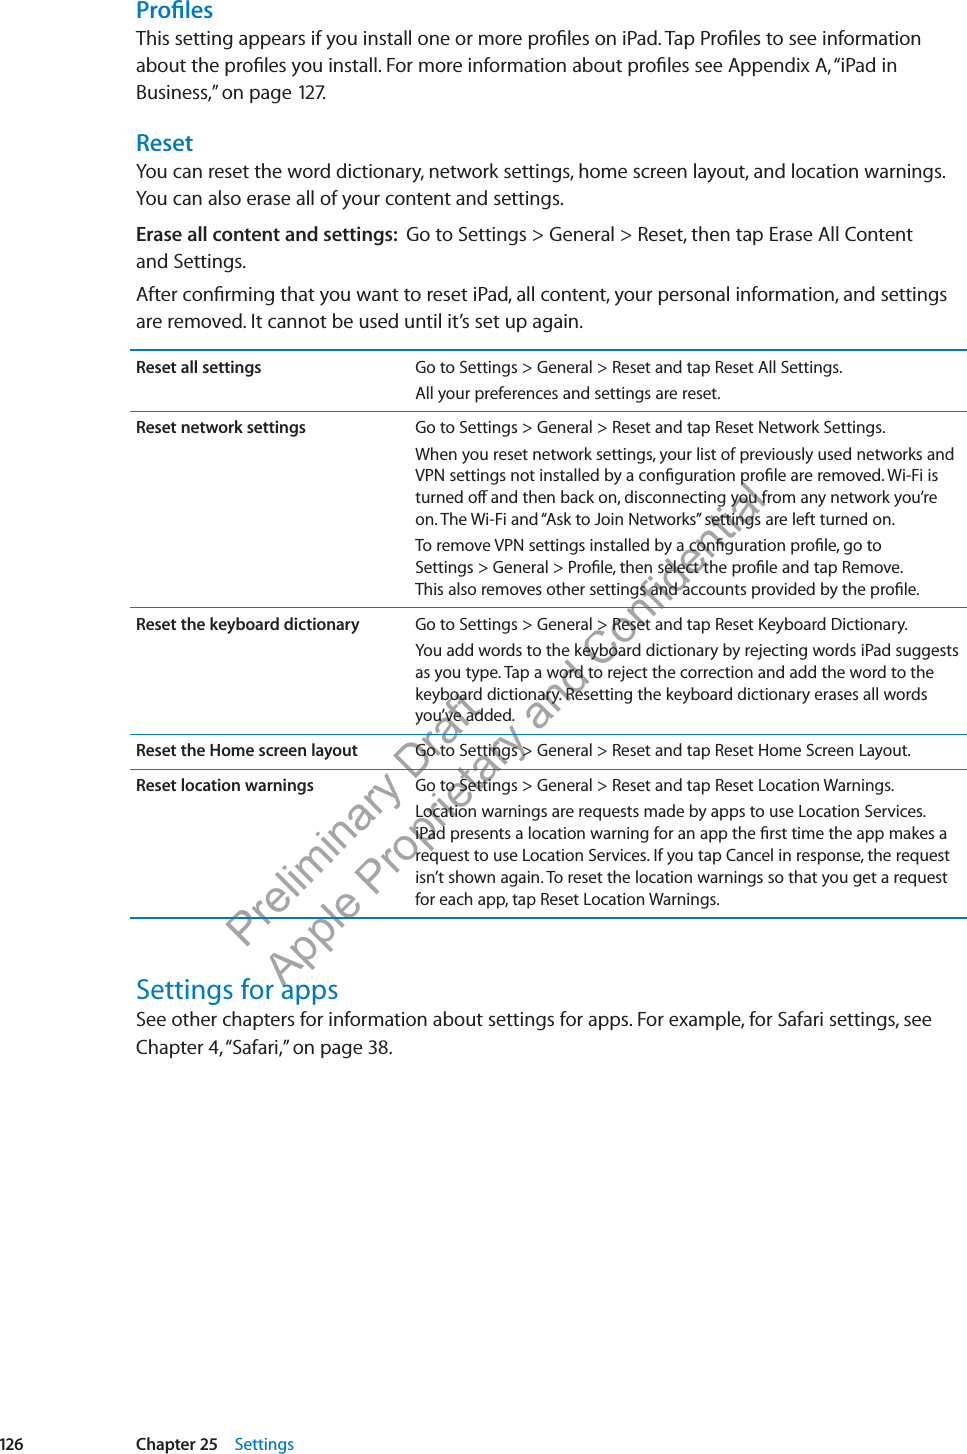
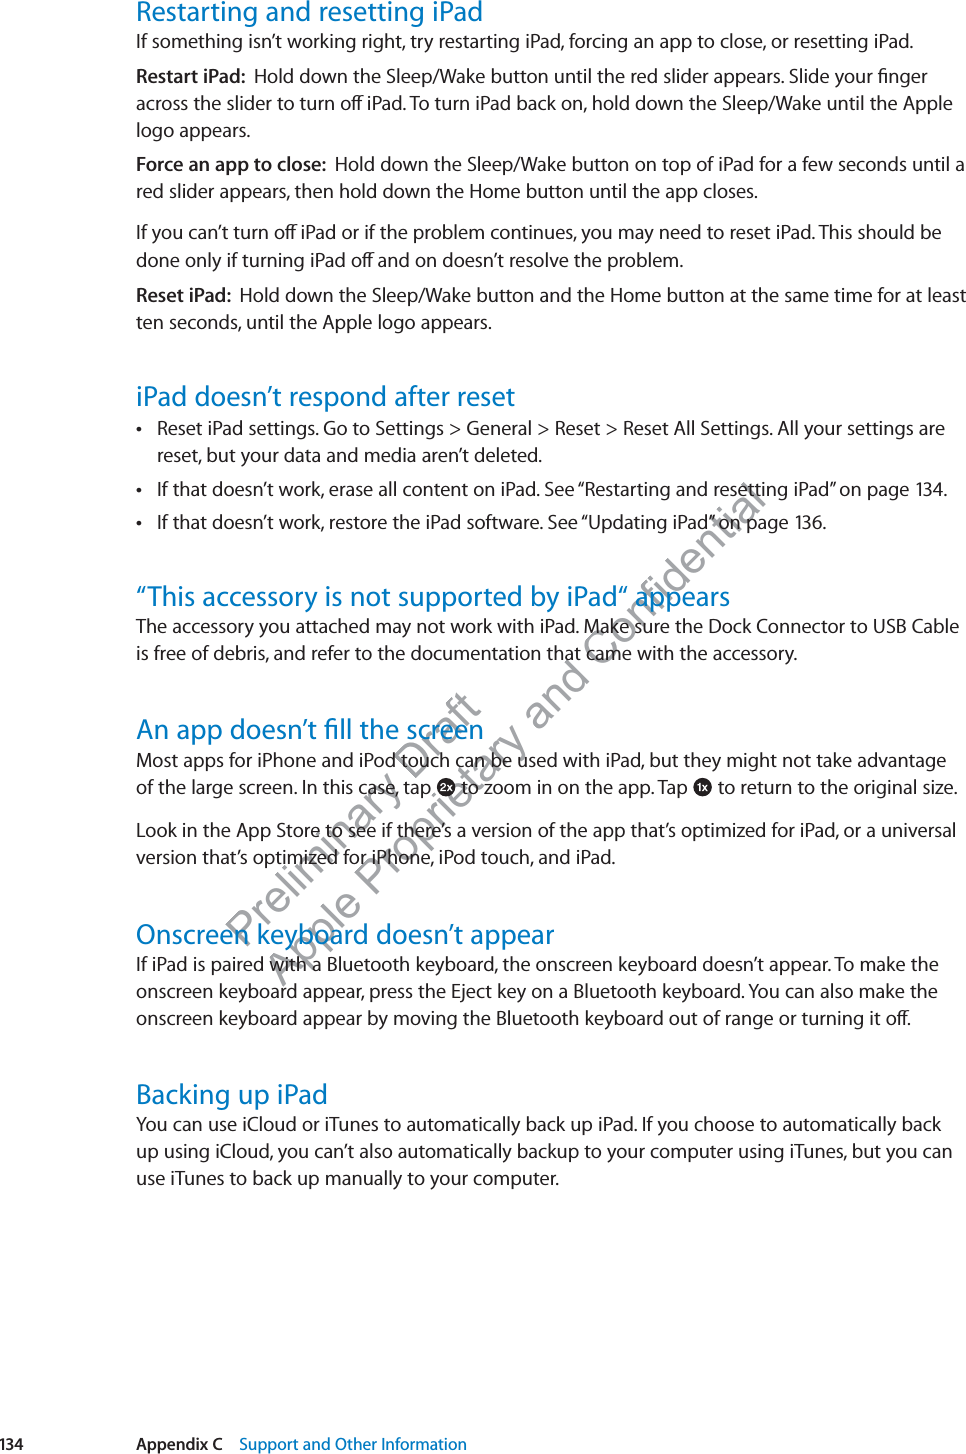
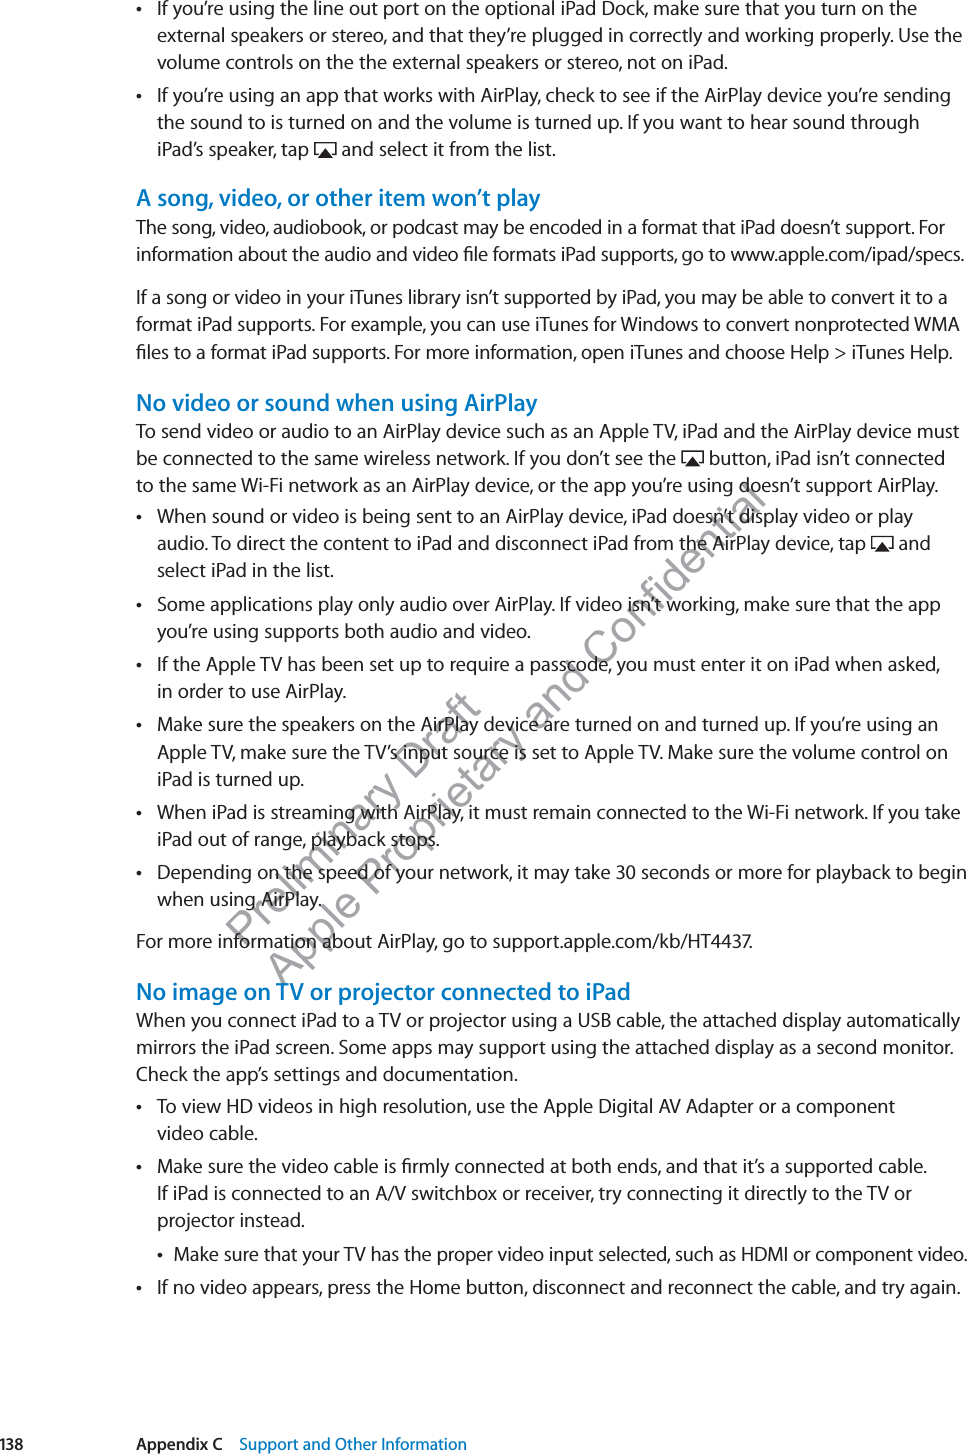
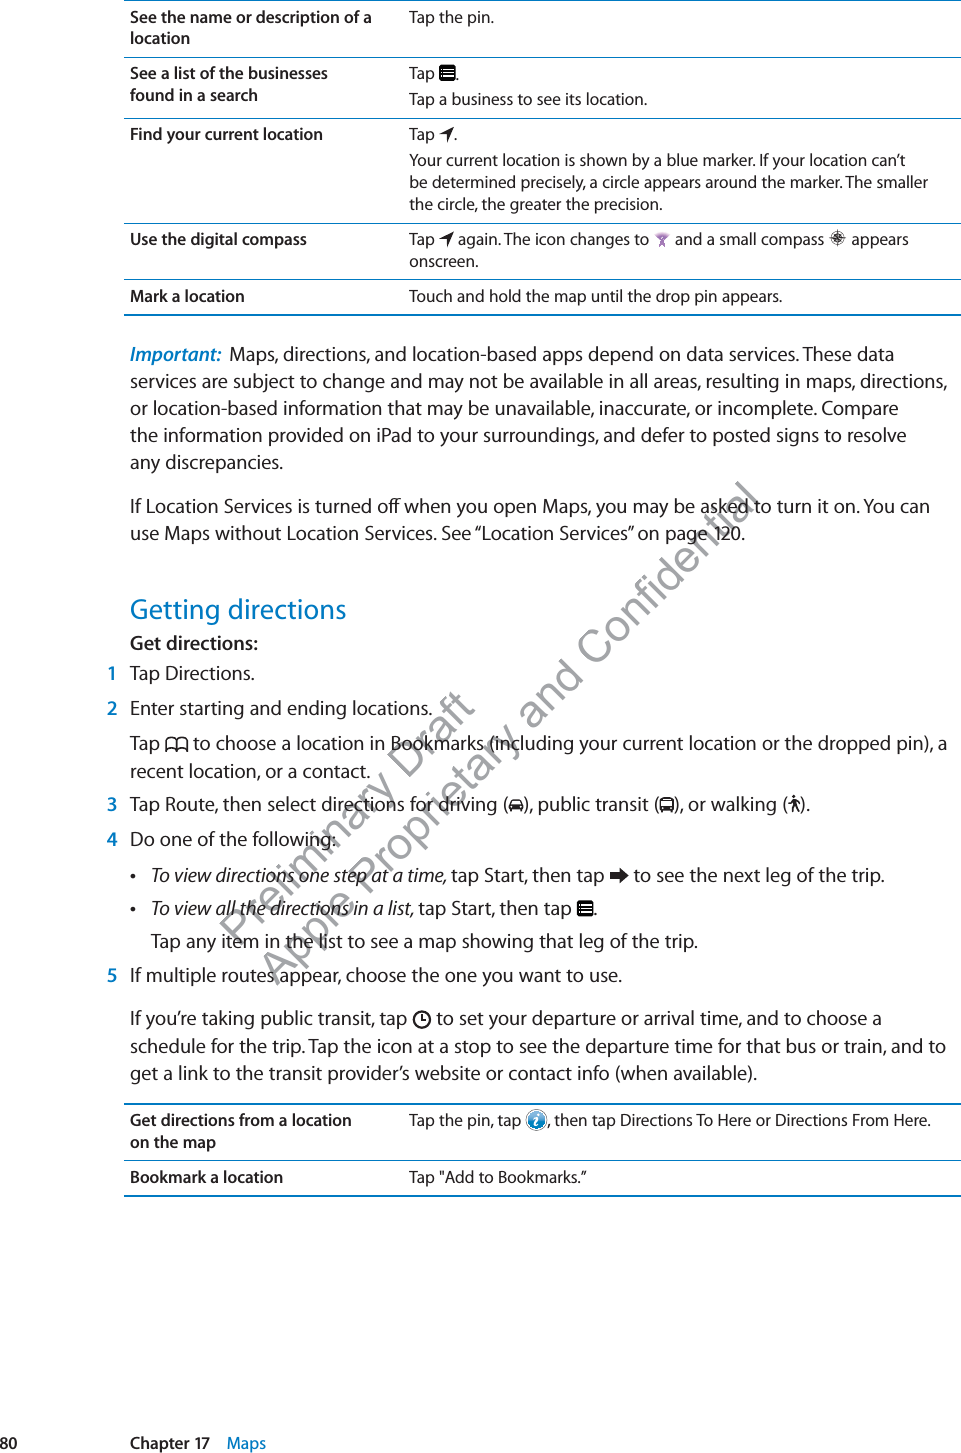
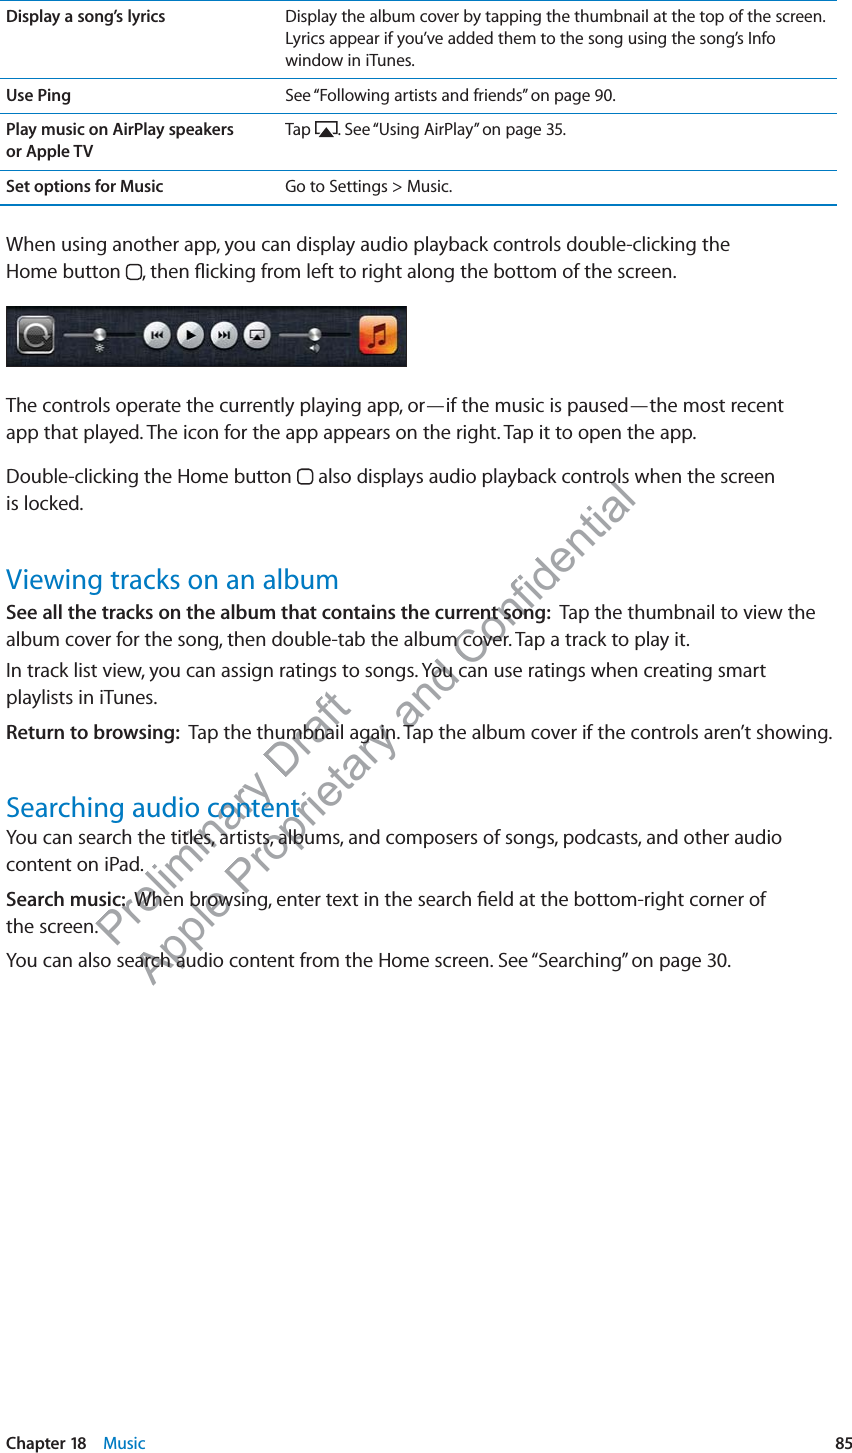
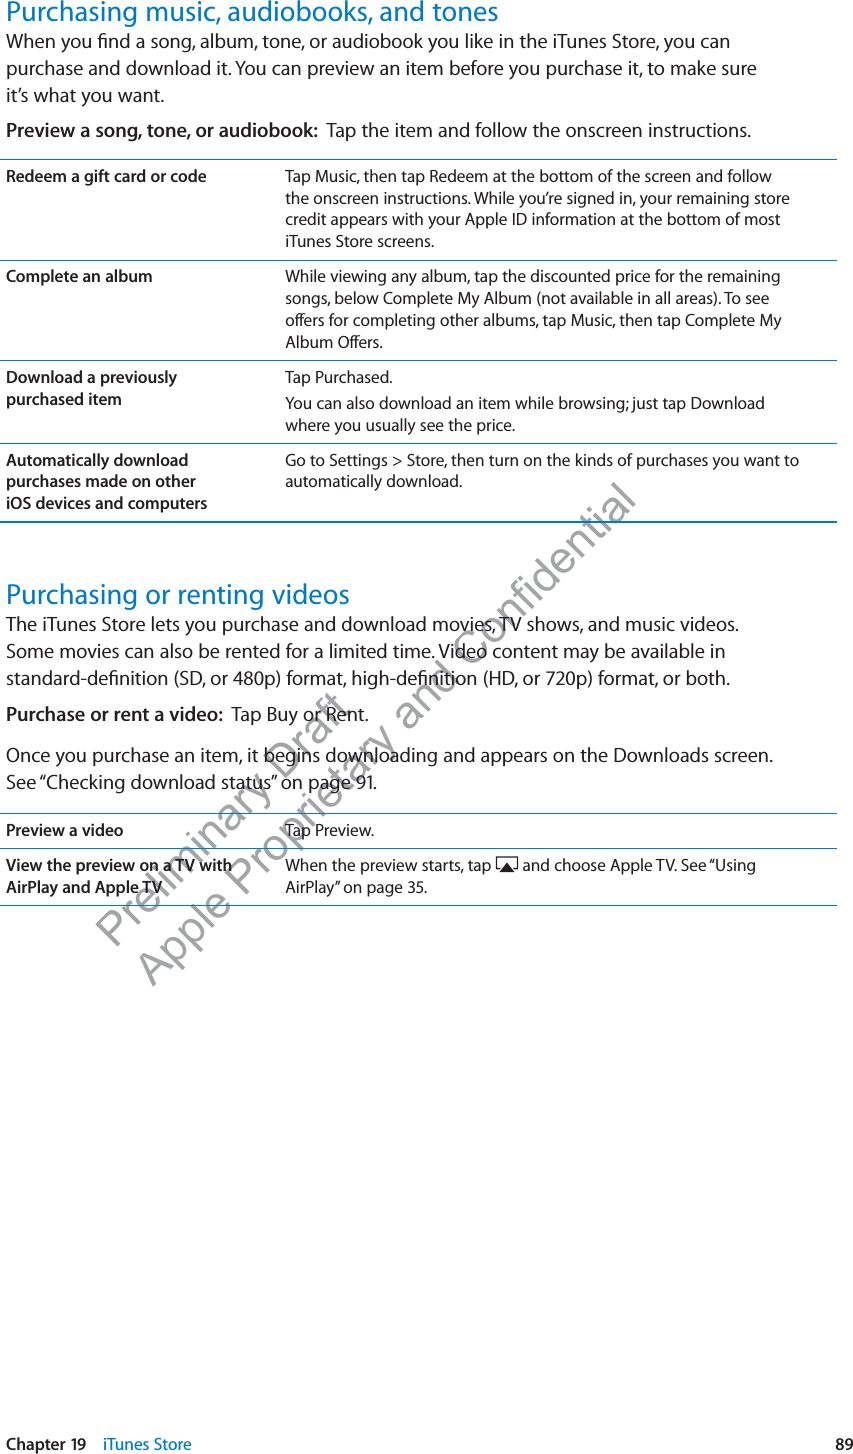
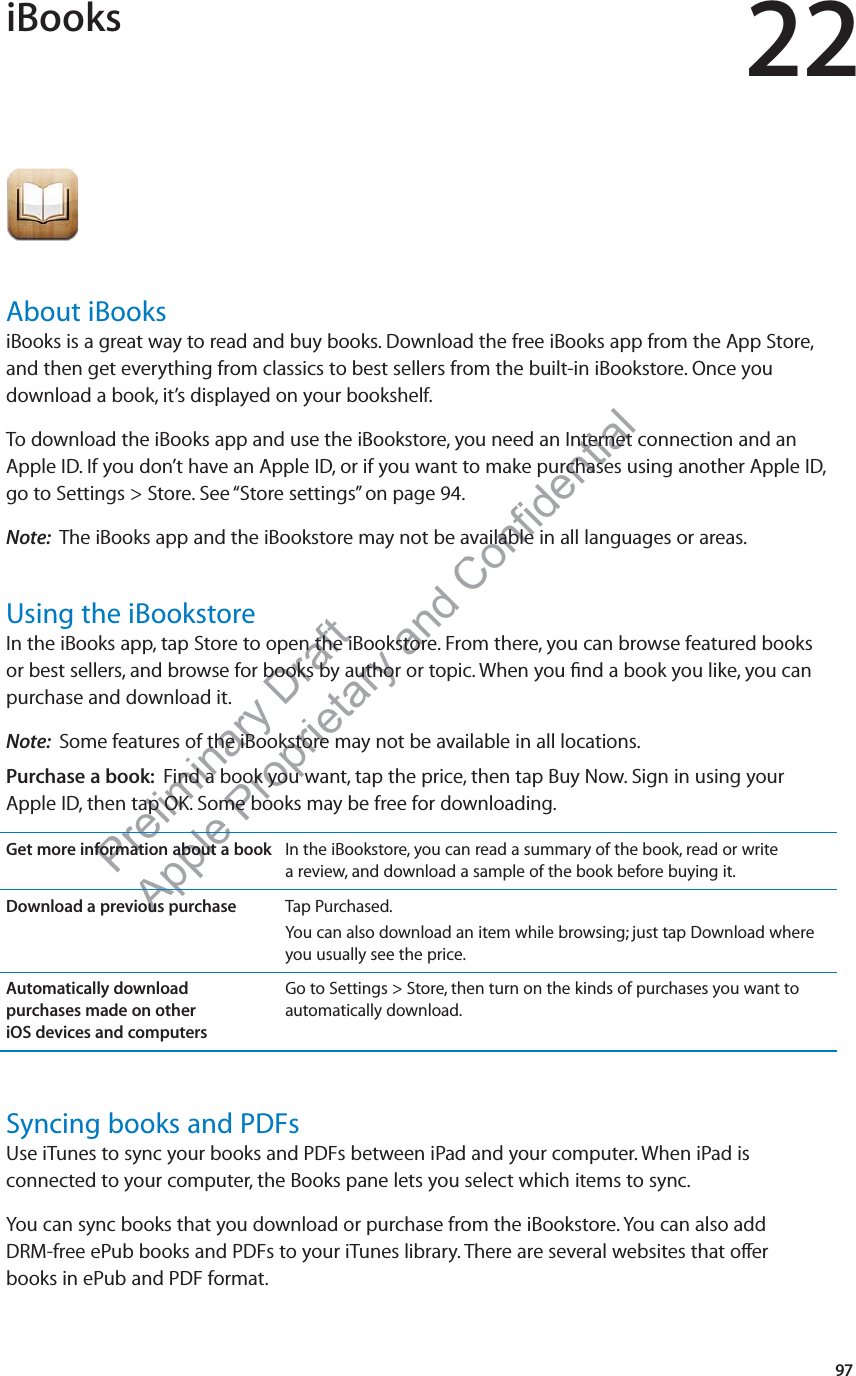
![aft etary and Confidential Maps 17Finding locationsWARNING: For important information about driving and navigating safely, see the Important Product Information Guide at www.apple.com/support/manuals/ipad.PPPPPPPPPPPPPPPPPPPPPPPPPPPPPPPPPPPPPPPPPPPPPPPPPPPPPPPPPPPPPPPPPPPPPPPPPPPPPPPPPPPPPPPPPPPPPPPPPPPPPPPPPPPPPPPPPPPPPPPPPPPPPPPPPPPPPPPPPPPPPPPrrrrrrrrrrrrrrrrrreeeeeeeeeeeeeeeeeeeeeeeeeeeeeeeeeeeeeeeeeeeeeeeeeeeeeeeeeeeeeeeeeeeeeeeeeeeeeeeeelllllllllllllllllllllllllllllllllllllllllllllllllllllllllllllllllllllllllllllllllllllllllllllllllllllllllllllllllllllllllllliiiiiiiiiiiiiiiiiiiiiiiiiiiiiiiiiiiiiiiiiiiiiiiiiiiiiiiiiiiiiiiiiiiiiiiiiiiiiiiiiiiiiiiiiiiiiiiiiiiiiiiiiiiiiiiiiiiiiiiiiiiiiiiiiiiiiiiiiiiiiiiiiiiiiiiiiiiiiiiiiiiiiiiiiiiiiiiiiiiiiiiiiiiimmmmmmmmmmmmmmmmmmmmmmmmmmmmmmmmmmmmmmmmmmmmmmmmmmmmmmmmmmmmmmmmmmmmmmmmmmmmmmmmmmmmmmmmmmmmmmmmmmmmmmmmmmmmmmmmmmmmmmmmmmmmmmmmmmmmmmmmmmmmmmmmmmmmmmmmmmmmmmmmmmmmmmmmmmmmmmmmmmmmmmmmmmmmmmmmmmmmmmmmmmmmmmmmmmmmmmmmmmmmmmmmmmmmmmmmmmmmmmmmmmmmmmmmmmmmmmmmmmmmmmmmmmmmmmmmmmmmmmmmmmmmmmmmmmmmmmmmmmmmmmmmiiiiiiiiiiiiiiiiiiiiiiiiiiiiiiiiiiiiiiiiiiiiiiiiiiiiiiiiiiiiiiiiiiiiiiiiiiiiiiiiiiiiiiiiiiiiiiiiiiiiiiiiiiiiiiiiiiiiiiiiiiiiiiiiiiiiiiiiiiiiiiiiiiiiiiiiiiiiiiiiiiiiiiiiiiiiiiiiiiiiiiiiiiiiiiiiiiiiiiiiiiiiiiiiiiiiiiiiiiiiiiiinnnnnnnnnnnnnnnnnnnnnnnnnnnnnnnnnnnnnnnnnnnnnnnnnnnnnnnnnnnnnnnnnnnnnnnnnnnnnnnnnnnnnnnnnnnnnnnnnnnnnnnnnnnnnnnnnnnnnnnnnnnnnnnnnnnnnnnnnnnnnnnnnnnnnnnnnnnnnnnnnnnnnnnnnnnnnnnnnnnnnnnnnnnnnnnnnnnnnnnnnnnnnnnnnnnnnnnnnnnnnnnnnnnnnnnnnnnnnnnnnnnnnnnnnnnnnnnnnnnnnnnnnnnaaaaaaaaaaaaaaaaaaaaaaaaaaaaaaaaaaaaaaaaaaaaaaaaaaaaaaaaaaaaaaaaaaaaaaaaaaaaaaaaaaaaaaaaaaaaaaaaaaaaaaaaaaaaaaaaaaaaaaaaaaaaaaaaaaaaaaaaaaaaaaaaaaaaaaaaaaaaaaaaaaaaaaaaaaaaaaaaaaaaaaaaaaaaaaaaaaaaaaaaaaaaaaaaaaaaaaaaaaaaaaaaaaaaaaaaaaaaaaaaaaaaaaaaaaaaaaaaaaaaaaaaaaaaaaaaaaaaaaaaaaaaaaaaaaaaaaaaaaaaaaaaaaaaaaaaarrrrrrrrrrrrrrrrrrrrrrrrrrrrrrrrrrrrrrrrrrrrrrrrrrrrrrrrrrrrrrrrrrrrrrrrrrrrrrrrrrrrrrrrrrrrrrrrrrrrrrrrrrrrrrrrrrrrrrrrrrrrrrrrrrrrrrrrrrrrrrrrrrrrrrrryyyyyyyyyyyyyyyyyyyyyyyyyyyyyyyyyyyyyyyyyyyyyyyyyyyyyyyyyyyyyyyyyyyyyyyyyyyyyyyyyyyyyyyyyyyyyyyyyyyyyyyyyyyyyyyyyyyyyyyyyyyyyyyyyyyyyyyyyyyyyyyyyyyyyyyyyyyyyyyyyyyyyyyyyyyyy DDDDDDDDDDDDDDDDDDDDDDDDDDDDDDDDDDDDDDDDDDDDDDDDDDDDDDDDDDDDDDDDDDDDDDDDDDDDDDDDDDDDDDDDDDDDDDDDDDDDDDDDDDDDDDDDDDDDDDDDDDDDDDDDDDDDDDDDDDDDDDDDDDDDDDDDDDDDDDDDDDDDDDDDDDDDDDDDDDDDDDDDDDDDDDDDDDDDDDDDDDDDDDDDDDDDDDDDDDDDDDDDDDDDDDDDDDDDDDDDDDDDDDDDDDDDDDDDDDDDDDDDDDDDDDDDDDDDDDDDDDDDDDDDDDDDDDDDDDDDDDDDDDDDDDDDDDDDDDDDDDDDDDDDDDDDDDDDDDDDDDDDDDDDDDDDDDDDDDDDDDDDDDDDDDDDDDDDDDDDDDDDDDDDDDDrrrrrrrrrrrrrrrrrrrrrrrrrrrrrrrrrrrrrrrrrrrrrrrrrrrrrrrrrrrrrrrrrrrrrrrrrrrrrrrrrrrrrrrrrrrrrrrrrrrrrrrrrrrrrrrrrrrrrrrrrrrrrrrrrrrrrrrrrrrrrrrrrrrrrrrrrrrrrrrrrrrrrrrrrrrrrrrrrrrrrrrrrrrrrrrrrrrrrrrrrrrrrrrrrrrrrrrrrrrrrrrrrrrrrrrrrrrrrraaaaaaaaaaaaaaaaaaaaaaaaaaaaaaaaaaaaaaaaaaaaaaaaaaaaaaaaaaaaaaaaaaaaaaaaaaaaaaaaaaaaaaaaaaaaaaaaaaaaaaaaaafffffffffffffffffffffffffffffffffffffffffffffffffffffffffffffffffffffffffffffffffffffffffffffffffffffffffffffffffffffffffttttttttttttttttttttttttttttttttttttttttttttttttttttAAAAAAAAAAAAAAAAAAAAAAAAAAAAAAAAAAAAAAAAAAAAAAAAAAAAAAAAAAAAAAAAAAAAAAAAAAAAAAAAAAAAAAAAAAAAAAAAAAAAAAAAAAAAAAAAAAAAAAAAAAAAAAAAAAAAAAAAAAAAAAAAAAAAAAAAAAAAAAAppppppppppppppppppppppppppppppppppppppppppppppppppppppppppppppppppppppppppppppppppppppppppppppppppppppppppppppppppppppppppppppppppppppppppppppppppppppppppppppppppppppppppppppppppppppppppppppppppppppppppppppppppppppppppppppppppppppppppppppppppppppppppppppppppppppppppppppppppplllllllllllllllllllllllllllllllllllllllllllllllllllllllllllllllllllllllllllllllllllllllllllllllllllllllllllllllllllllllllllllllllllllllllllllllllllllllllllllllllllllllllllllllllllllllllllleeeeeeeeeeeeeeeeeeeeeeeeeeeeeeeeeeeeeeeeeeeeeeeeeeeeeeeeeeeeeeeeeeeeeeeeeeeeeeeeeeeeeeeeeeeeeeeeeeeeeeeeeeeeeeeeeeeeeeeeeeeeeeeeeeeeeeeeeeeeeeeeeeeeeeeeeeeeeeeeeeeeeeeeeeeeeeeeeeeeeeeeeeeeeeeeeeeeeeeeeeeeeeeeeeeeeeeeeeeeeeeeeeeeeeeeeeeeeeeeeeeeeeeeeeeeeeeeeeeeeeeeeeeeeeeeeeeeeeeeeeeeeeeeeeeeeeee PPPPPPPPPPPPPPPPPPPPPPPPPPPPPPPPPPPPPPPPPPPPPPPPPPPPPPPPPPPPPPPPPPPPPPPPPPPPPPPPPPPPPPPPPPPPPPPPPPPPPPPPPPPPPPPPPPPPPPPPPPPPPPPPPPPPPPPPPPPPPPPPPPPPPPPPPPPPPPPPPPPPPPPPPPPPPPPPPPPPPPPPPPPPPPPPPPPPPPPPPPPPrrrrrrrrrrrrrrrrrrrrrrrrrrrrrrrrrrrrrrrrrrrrrrrrrrrrrrrrrrrrrrrrrrrrrrrrrrrrrrrrrrrrrrrrrrrrrrrrrrrrrrrrrrrrrrrrrrrrrrrooooooooooooooooooooooooooooooooooooooooooooooooooooooooooooooooooooooooooooooooooooooooooooooooooooooooooooooooooooooooooooooooooooooooooooooooooooooooooooooooooooooooooooooooooooooooooooooooooooooooooooooooooooooooooooooooooooooooooooooooooooooooooooooooooooooooooooooooooooooooooooooooooooooooooooooooooooooooooooooooooooooooooooooooooooooooooooooooooooooooooooooooooooooooooooooooooooooooooooooooppppppppppppppppppppppppppppppppppppppppppppppppppppppppppppppppppppppppppppppppppppppppppppppppppppppppppppppppppppppppppppppppppppppppppppppppppppppppppppppppppppppppppppppppppppppppppppppppppppppppppppppppppppppppppppppppppppppppppppppppppppppppppppppppppppppppppppppppppppppppppppppppppppppppppppppppppppppppppppppppppppppppppppppppppppppppppppppppppppppppppppppppppppppppppppppppppppppppppppppppppppppppppppppppppppppppppppppppppppppppppppppppppppppppppppppppppppppppppppppppppppppppppprrrrrrrrrrrrrrrrrrrrrrrrrrrrrrrrrrrrrrrrrrrrrrrrrrrrrrrrrrrrrrrrrrrrrrrrrrrrrrrrrrrrrrrrrrrrrrrrrrrrrrrrrrrrrrrrrrrrrrrrrrrrrrrrrrrrrrrrrrrrrrrrrrrrrrrrrrrrrrrrrrrrrrrrrrrrrrrrrrrrrrrrrrrrrrrrrrrrrrrrrrrrrrrrrrrrrrrrrrrrrrrrrrrrrrrrrrrrrrrrrrrrrrrrrrrrrrrrrrrrrrrrrrrrrrrrrrrrrrrrrrrrrrrrrrrrrrrrrrrrrrrrrrrrrrrrriiiiiiiiiiiiiiiiiiiiiiiiiiiiiiiiiiiiiiiiiiiiiiiiiiiiiiiiiiiiiiiiiiiiiiiiiiiiiiiiiiiiiiiiiiiiiiiiiiiiiiiiiiiiiiiiiiiiiiiiiiiiiiiiiiiiiiiiiiiiiiiiiiiiiiiiiiiiiiiiiiiiiiiiiiiiiiiiiiiiiiiiiiiiiiiiiiiiiiiiiiiiiiiiiiiiiiiiiiiiiiiiiiiiiiiiiiiiiiiiiiiiiiiiiiiiiiiiiiiiiiiiiiiiiiiiiiiiiiiiiiiiiiiiiiiiiiiiiiiiiiiiiiiiiieeeeeeeeeeeeeeeeeeeeeeeeeeeeeeeeeeeeeeeeeeeeeeeeeeeeeeeeeeeeeeeeeeeeeeeeeeeeeeeeeeeeeeeeeeeeeeeeeeeeeeeeeeeeeeeeeeeeeeeeeeeeeeeeeeeeeeeeeeeeeeeeeeeeeeeeeeeeeeeeeeeeeeeeeeeeeeeeeeeeeeeeeeeeeeeeeeeeeeeeeeeeeeeeeeeeeeeeeeeeeeeeeeeeeeeeeeeeeeeeeettttttttttttttttttttt0RUHLQIRUPDWLRQ'RXEOHWDEWR]RRPLQWDSZLWKWZRILQJHUVWR]RRPRXW2USLQFKWR]RRPLQRURXW6HWRSWLRQVVXFKDVVKRZLQJWUDIILFRUVDWHOOLWHYLHZ*RRJOH0DSGDWD*RRJOH*HWGLUHFWLRQVE\FDUSXEOLFWUDQVLWRUZDONLQJ (QWHUDVHDUFK'LVSOD\WKHORFDWLRQRIDEXVLQHVVRUSHUVRQLQ\RXUFRQWDFWVOLVW6KRZ\RXUFXUUHQWORFDWLRQFind a location: Tap Search, then tap the search field to bring up the keyboard. Type an address or other information, then tap Search.You can search for information such as:Intersection (“8th and market”) Area (“greenwich village”) Landmark (“guggenheim”) Zip code Business (“movies,” “restaurants san francisco ca,” “apple inc new york”) You can also tap to find the location of a contact.79](https://usermanual.wiki/Apple/A1416.User-Manual-2-of-2/User-Guide-1637817-Page-9.png)
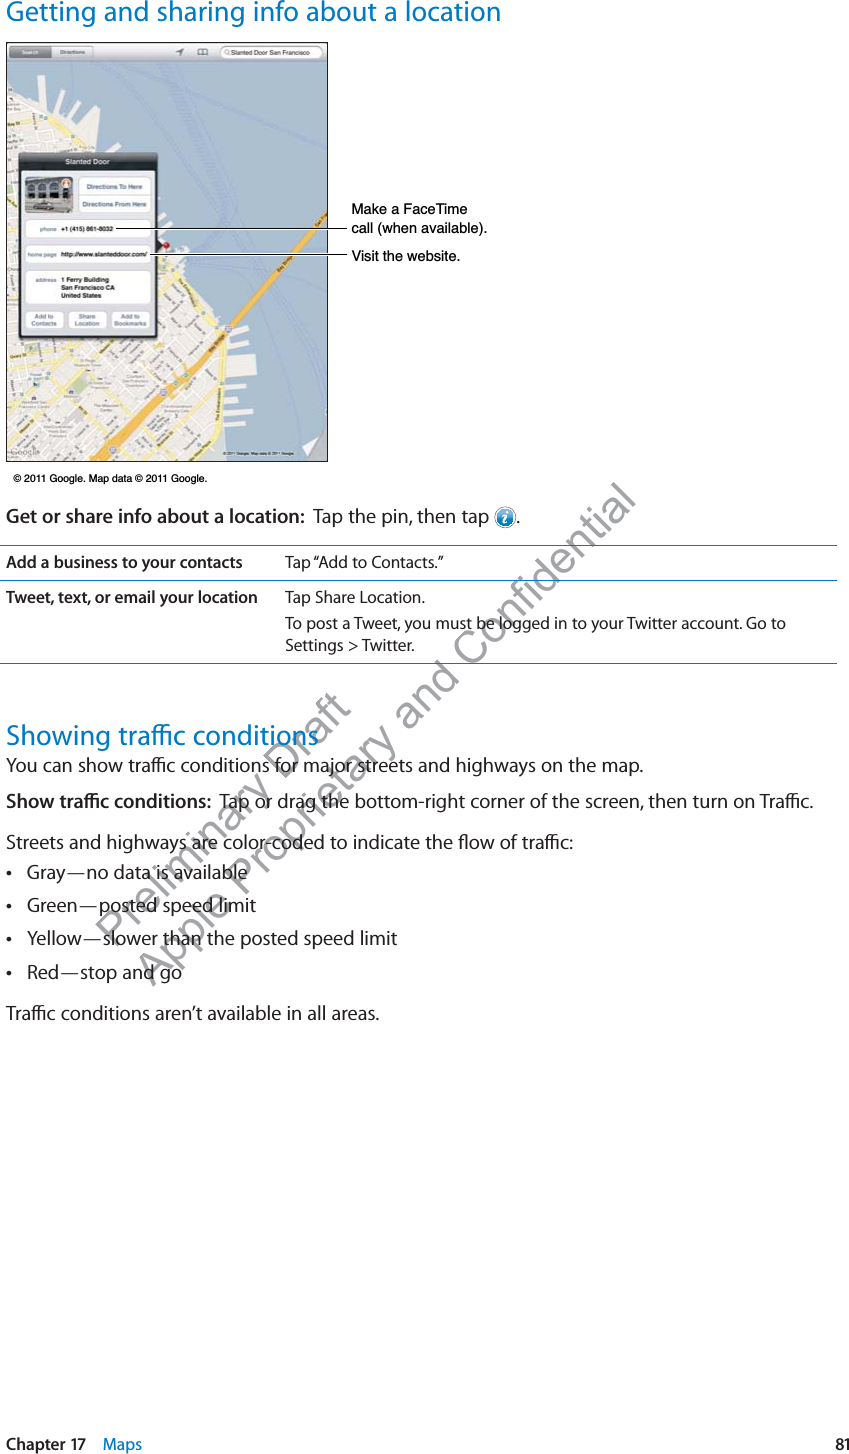

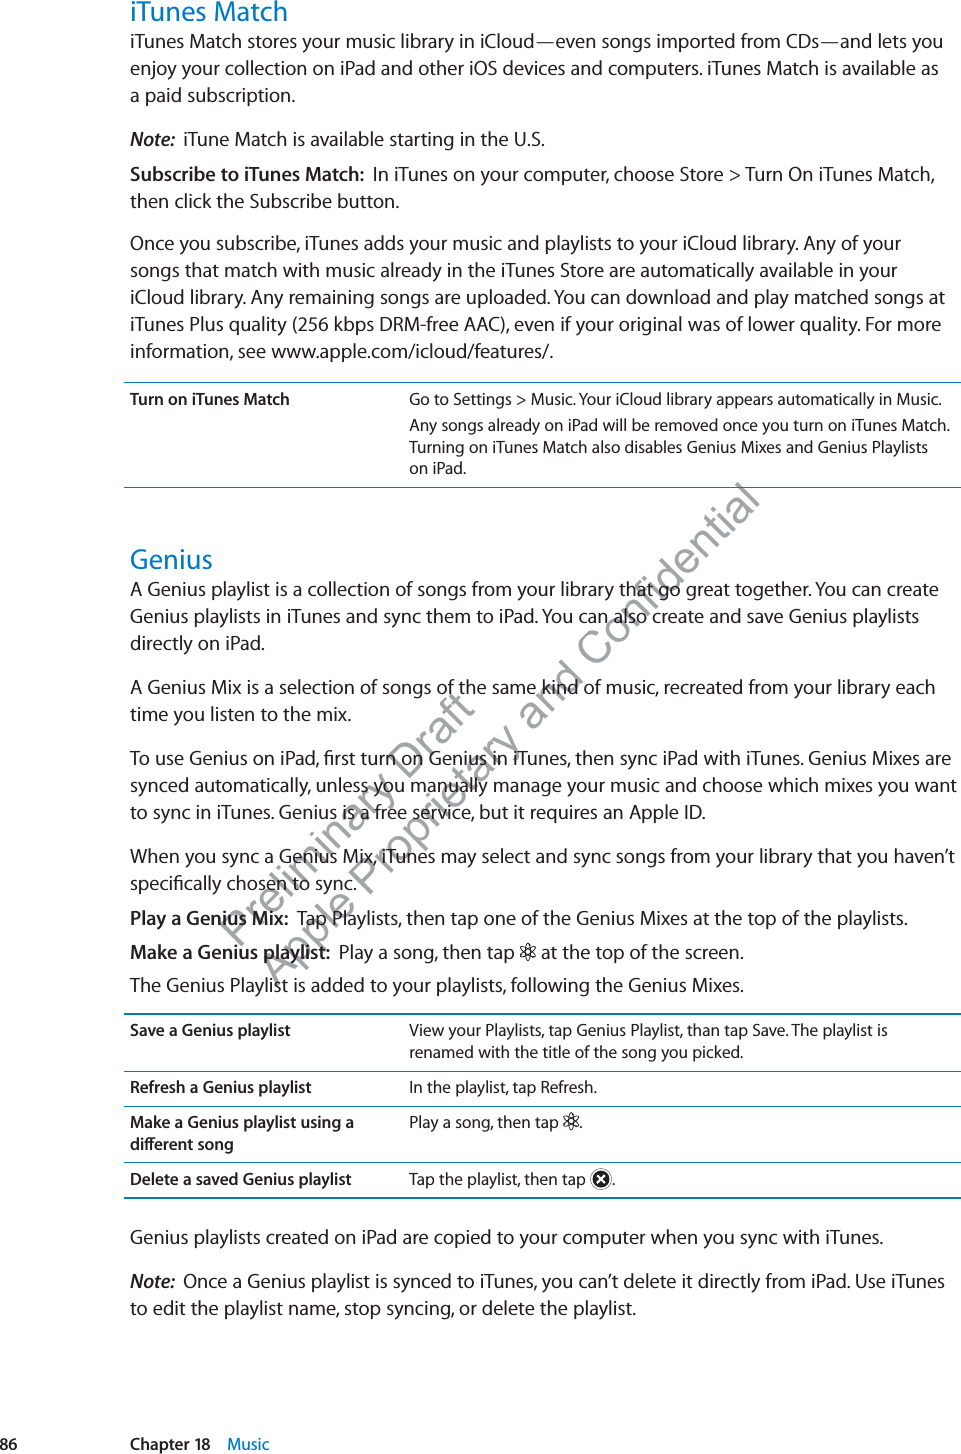
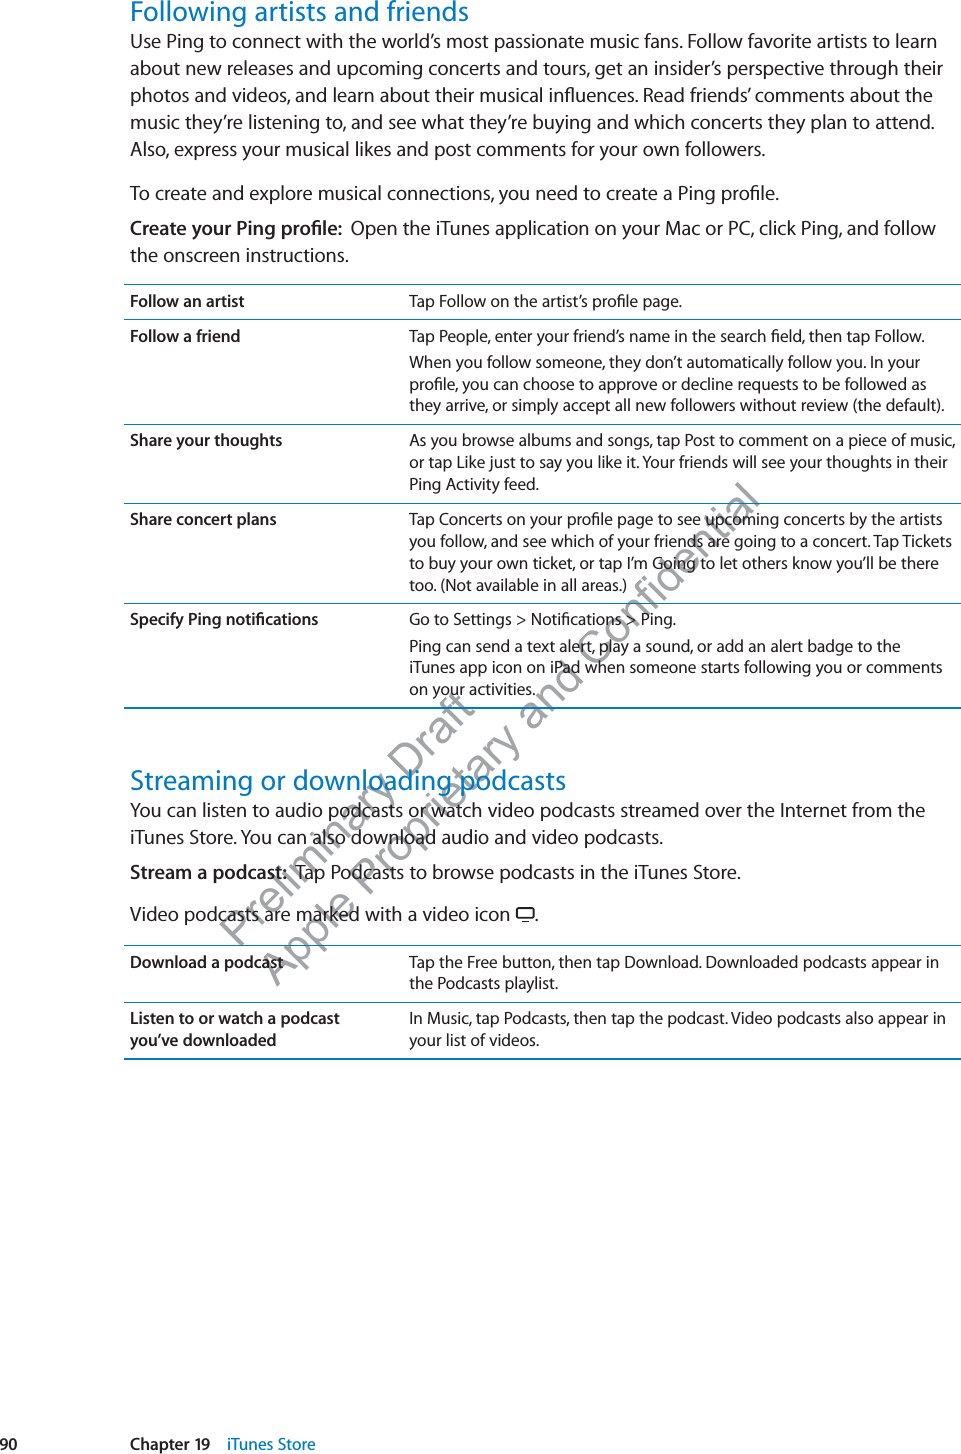
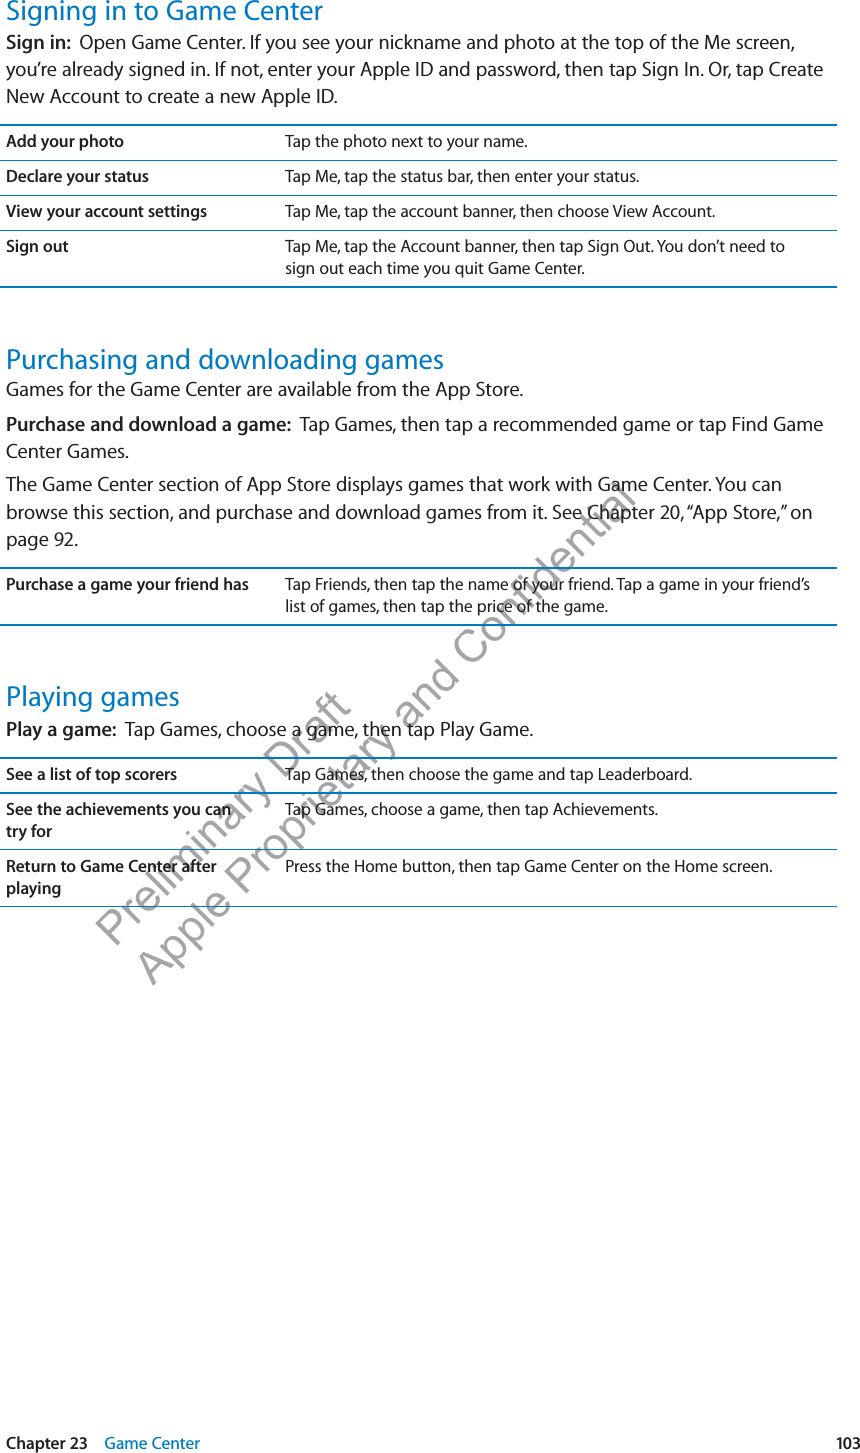
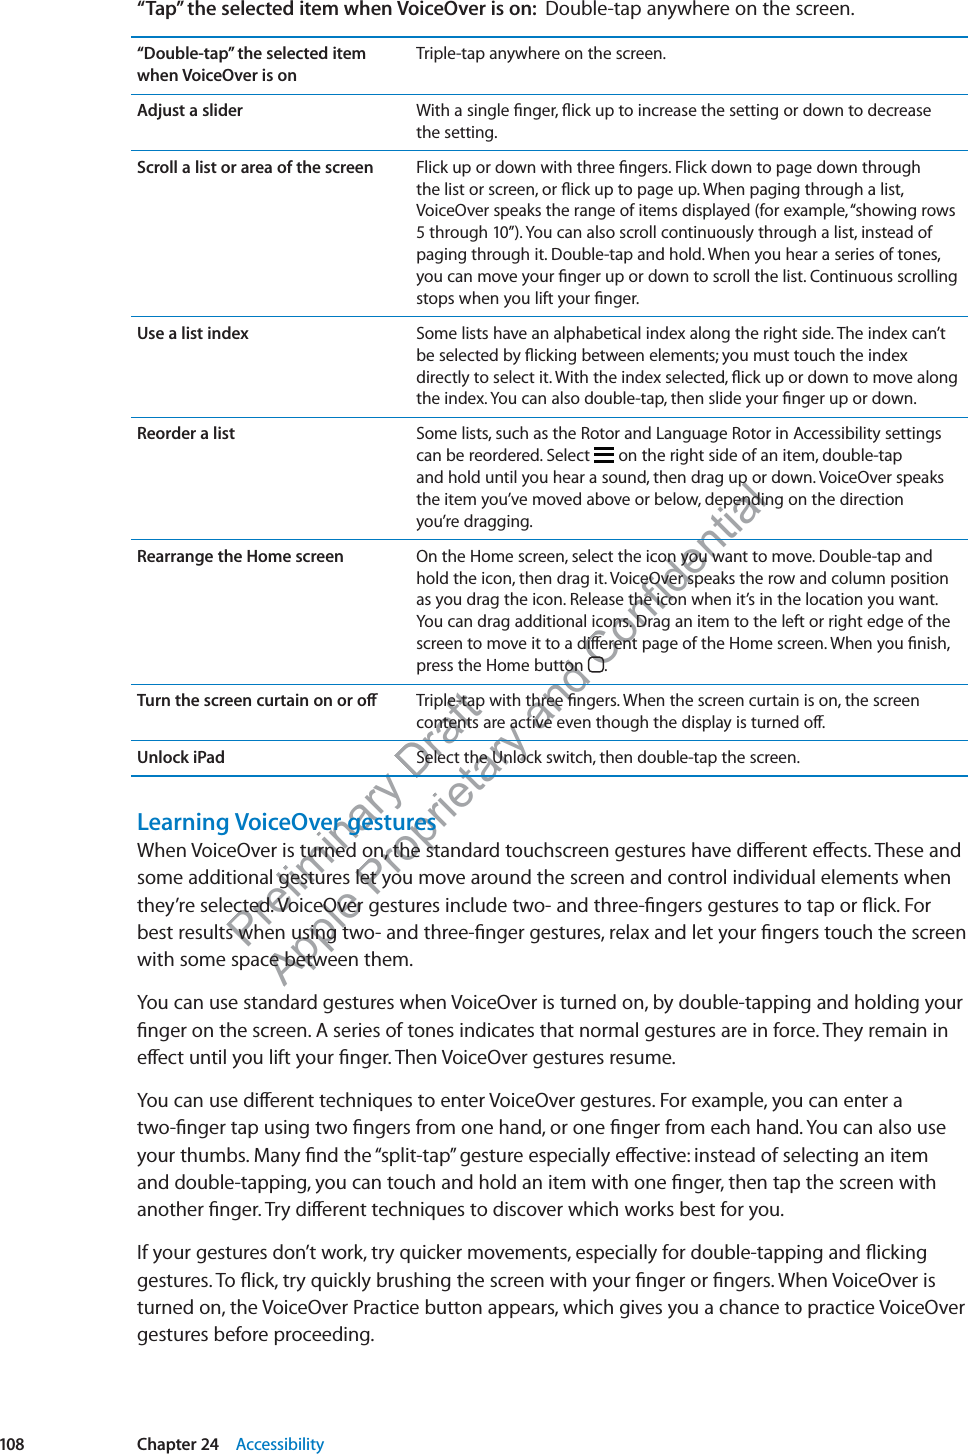
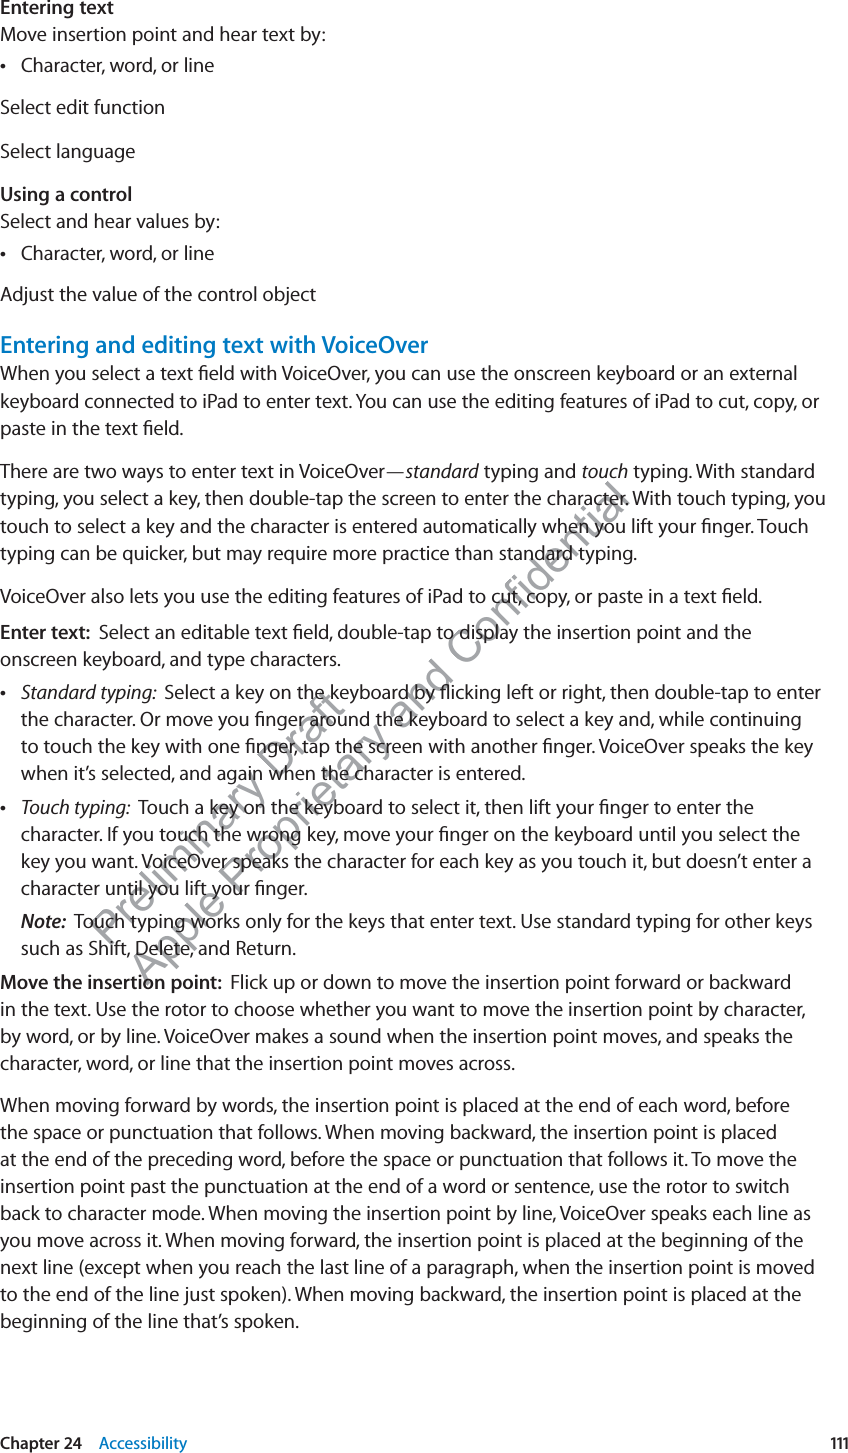
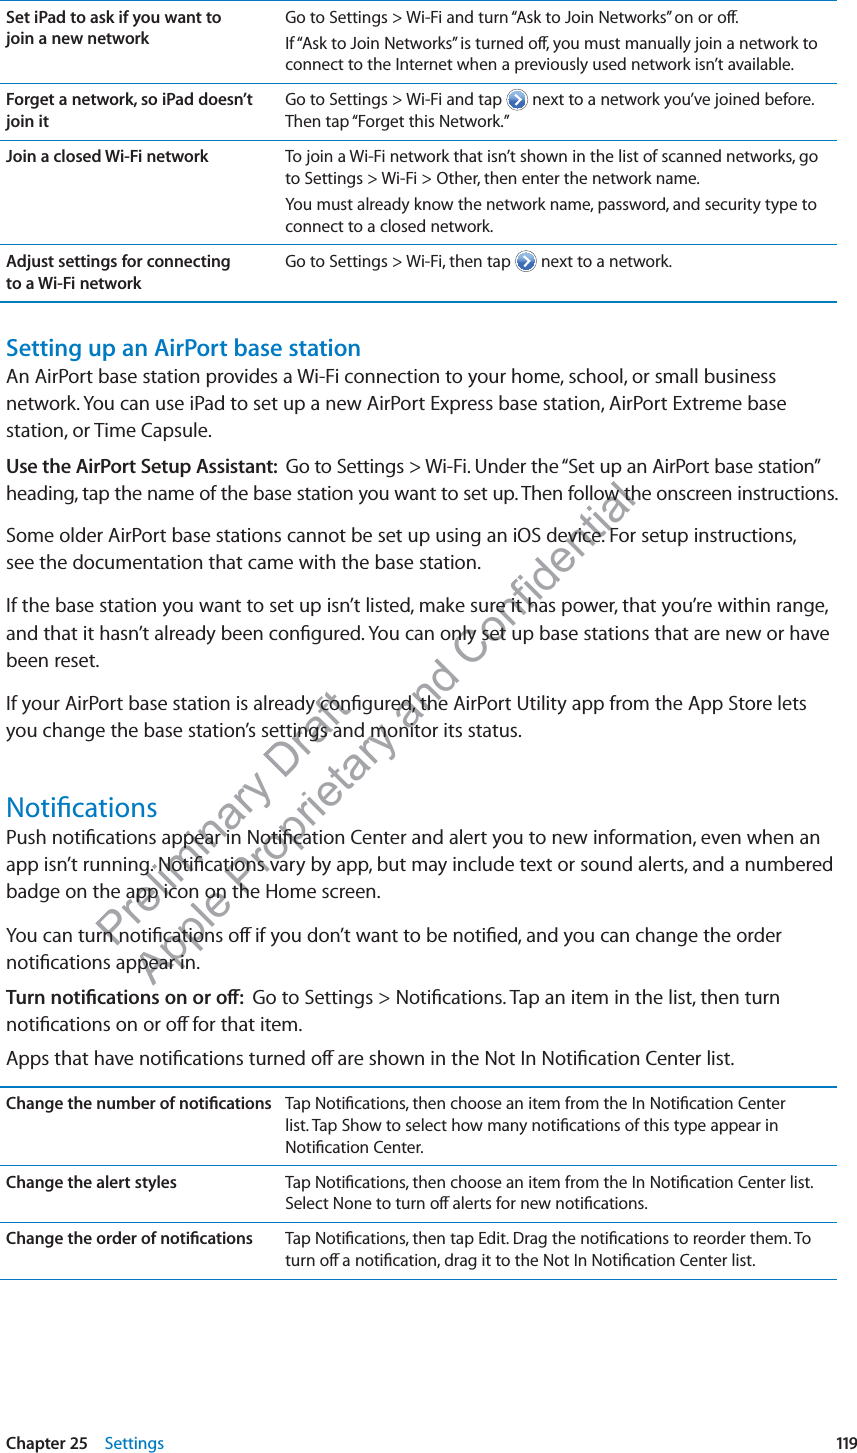
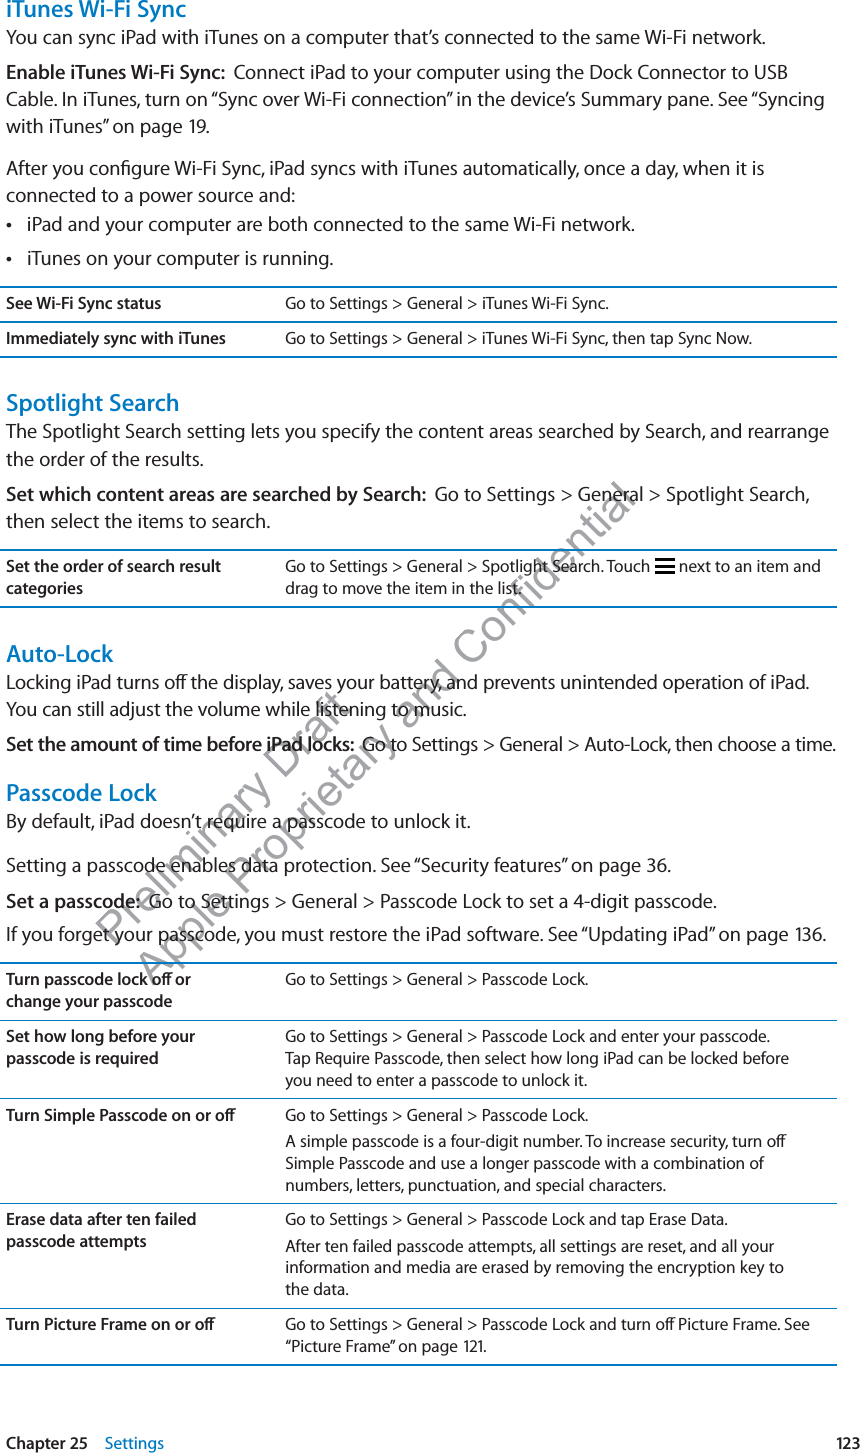
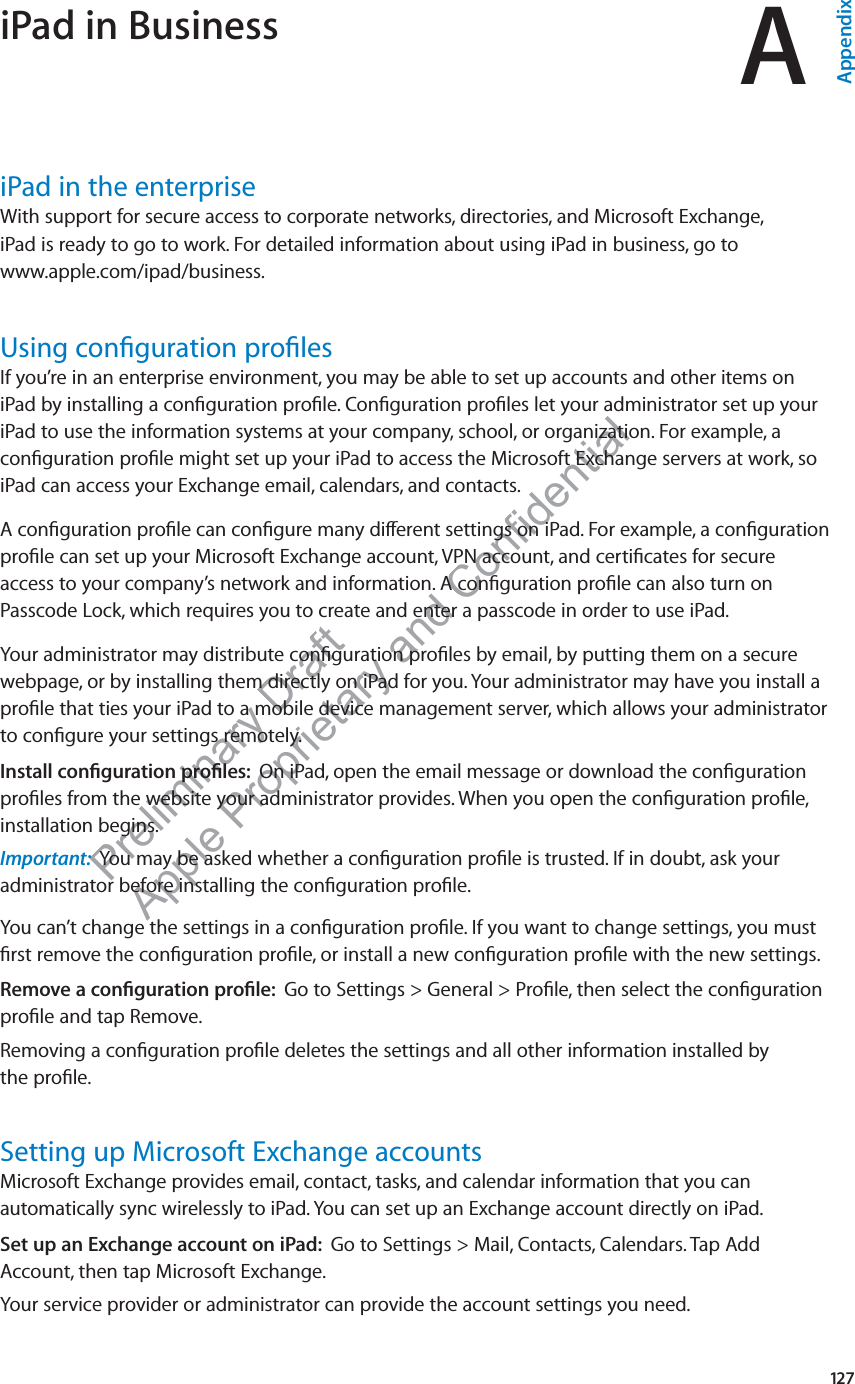
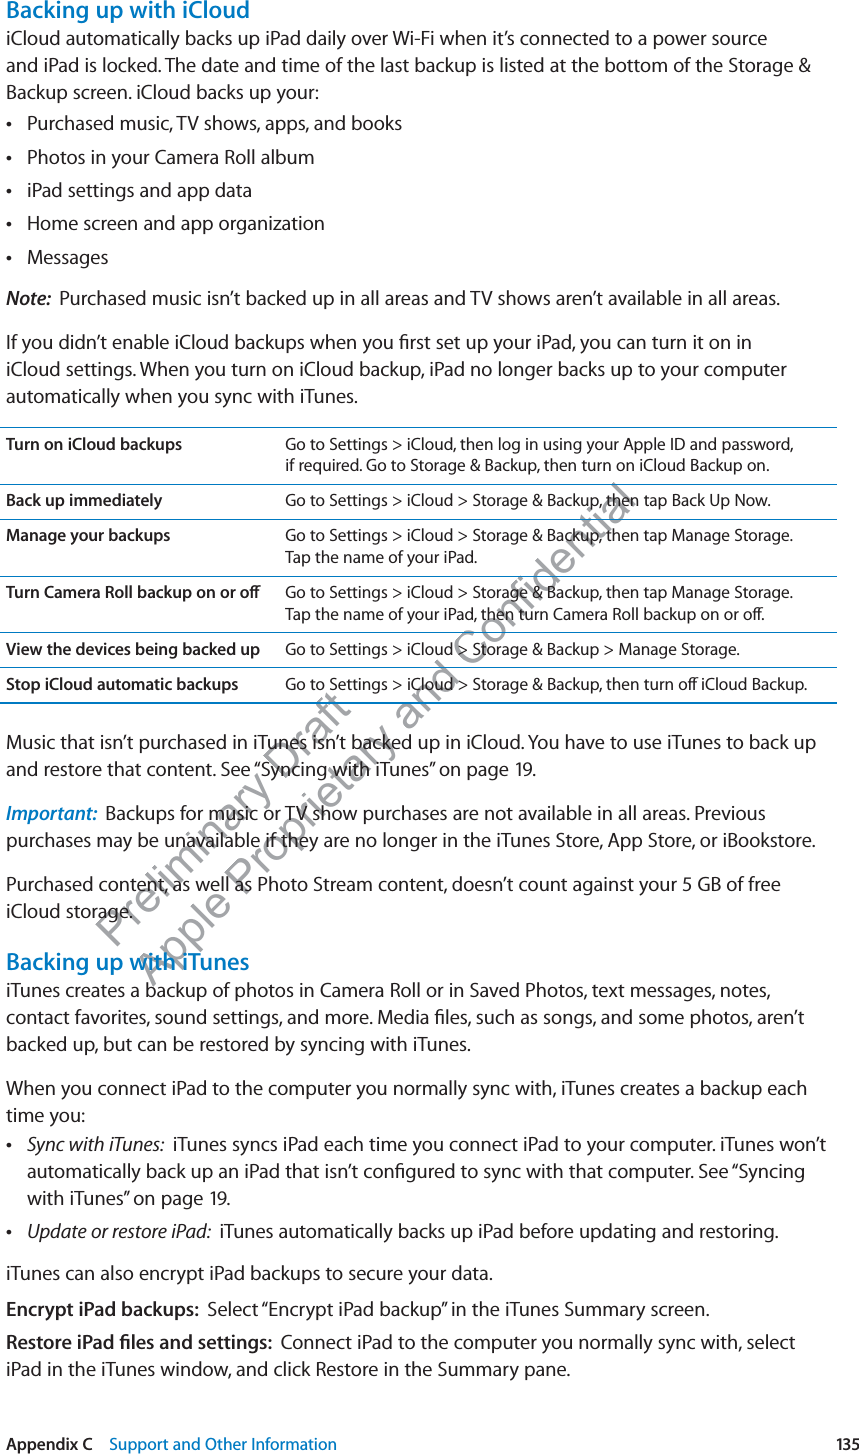
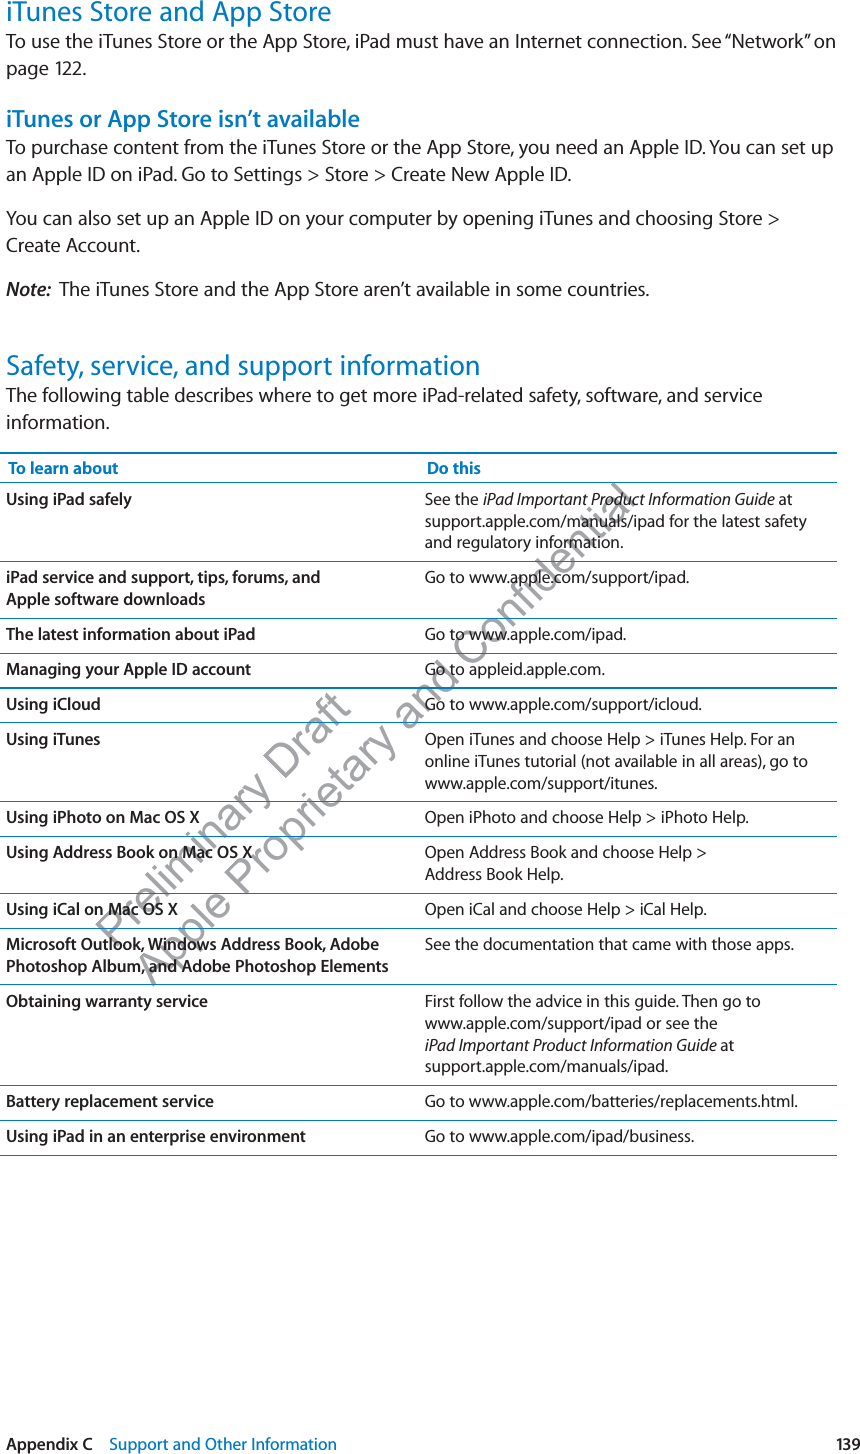
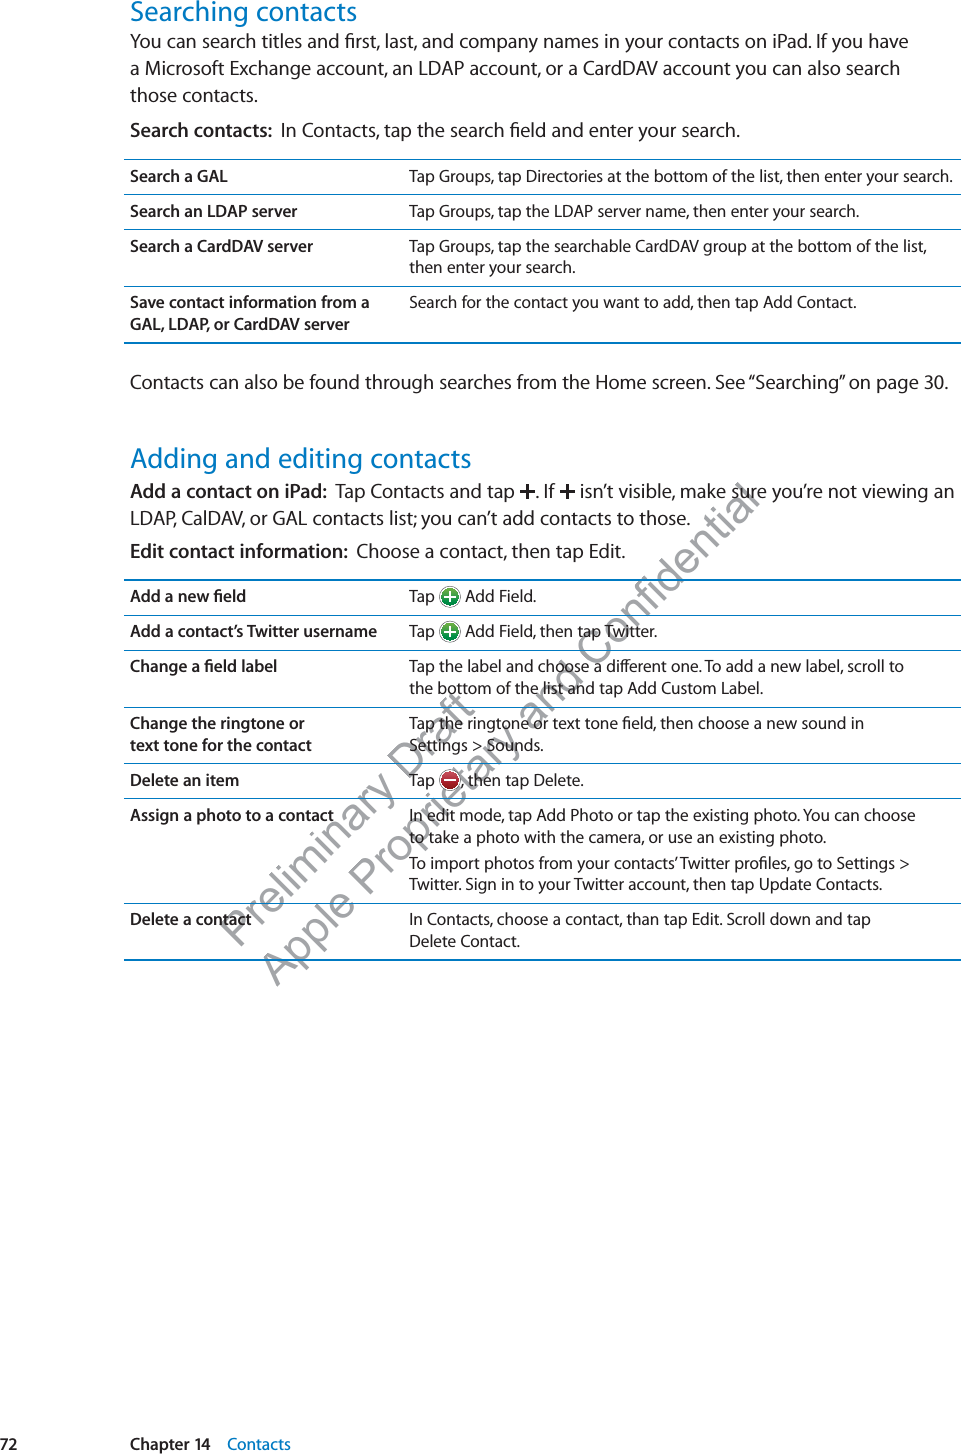
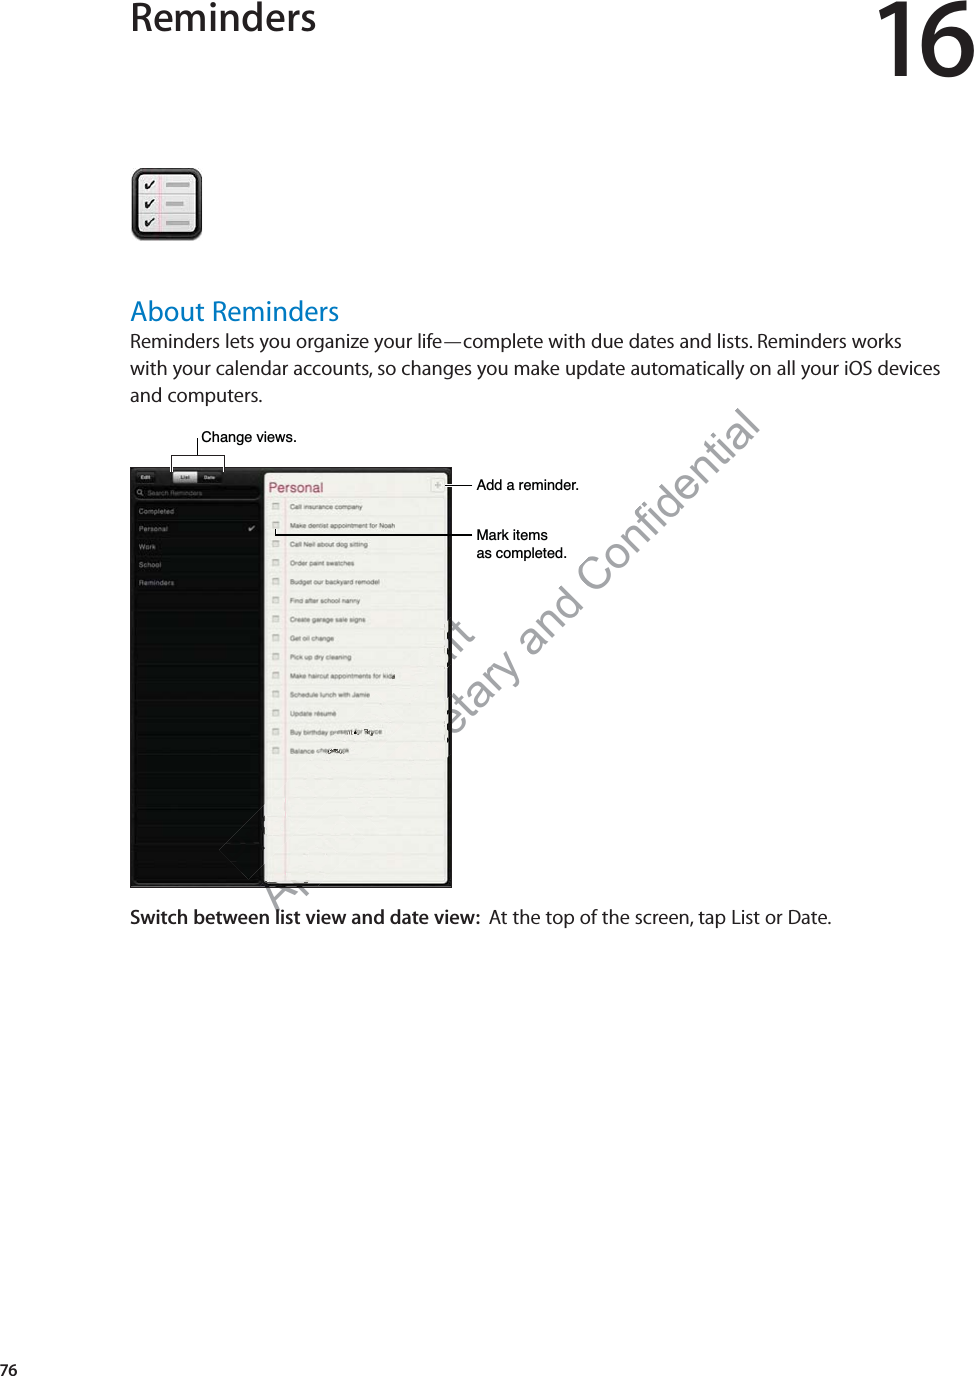
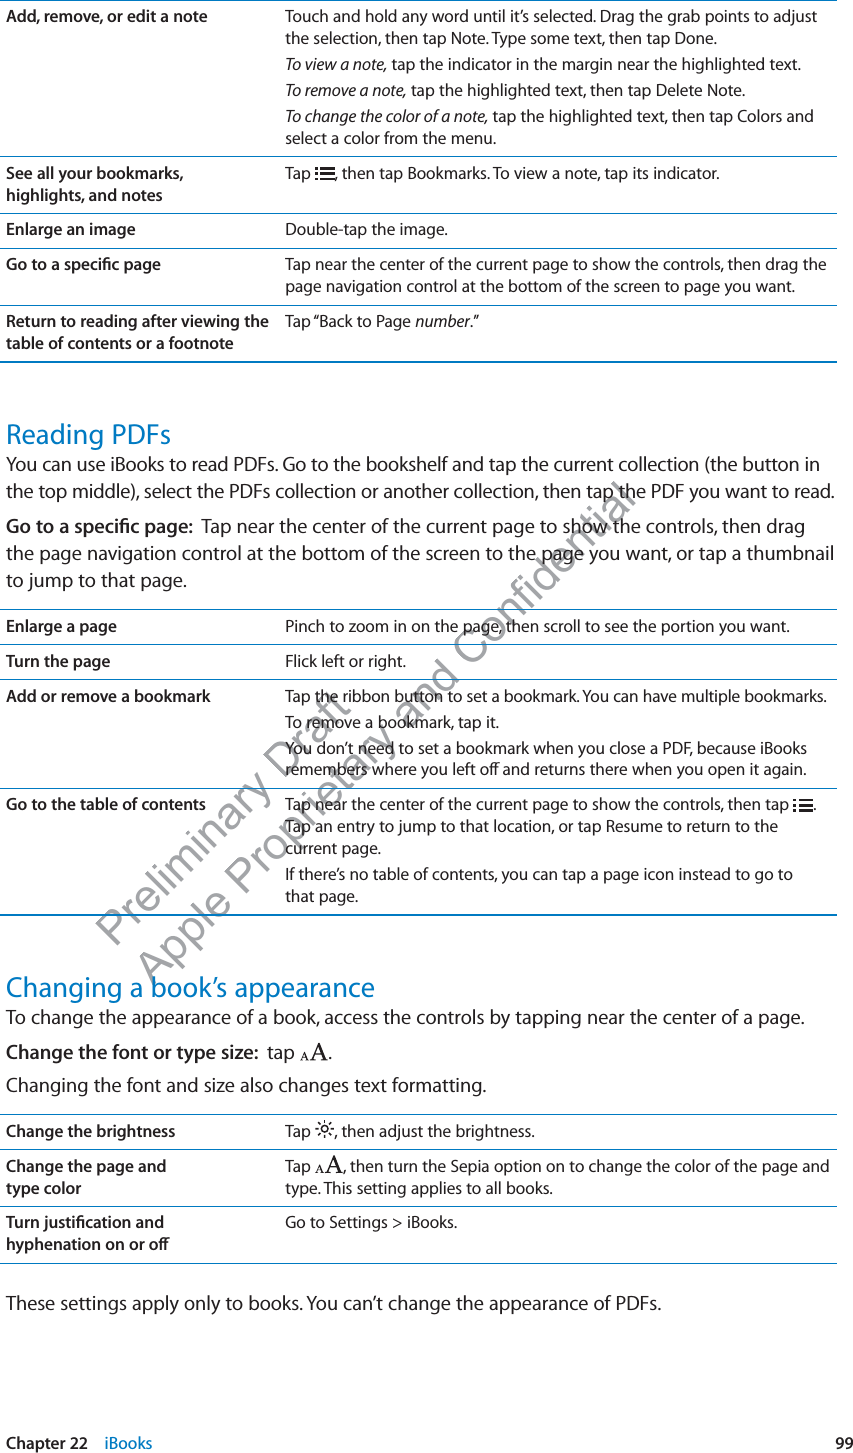
![Preliminary Draft Apple Proprietary and Confidential Sync an ePub book or PDF to iPad: In iTunes on your computer, choose File > Add to Library and select the file. Select the book or PDF in the Books pane in iTunes, and then sync.To add a PDF to iBooks without syncing, email the PDF to yourself from your computer. Open the email message on iPad, then tap the PDF attachement and choose “Open in iBooks” from the menu that appears. Reading booksReading a book is easy. Go to the bookshelf and tap the book you want to read. If you don’t see the book you’re looking for, tap the name of the current collection at the top of the screen to go to other collections.$GGDERRNPDUN'RXEOHWDSWR]RRP*RWRDGLIIHUHQWSDJHRead a book while lying down: Use the portrait orientation lock to prevent iPad from rotating the screen when you rotate iPad. See “Viewing in portrait or landscape” on page 15.Turn the page Tap near the right or left margin of the page, or flick left or right. To change the direction the page turns when you tap the left margin, go to Settings > iBooks.Go to the table of contents Tap near the center of the page to show the controls, then tap . Tap an entry to jump to that location, or tap Resume to return to the current page.Add or remove a bookmark Tap the ribbon button to set a bookmark. You can have multiple bookmarks. To remove a bookmark, tap it. You don’t need to set a bookmark when you close a book, because iBooks remembers where you left o∂ and returns there when you open the book again.Add, remove, or edit a highlight Touch and hold any word until it’s selected. Drag the grab points to adjust the selection, then tap Highlight. To remove a highlight, tap the highlighted text, then tap Remove Highlight. To change the color of a highlight, tap the highlighted text, then tap Colors and select a color from the menu.98 Chapter 22 iBooks](https://usermanual.wiki/Apple/A1416.User-Manual-2-of-2/User-Guide-1637817-Page-28.png)
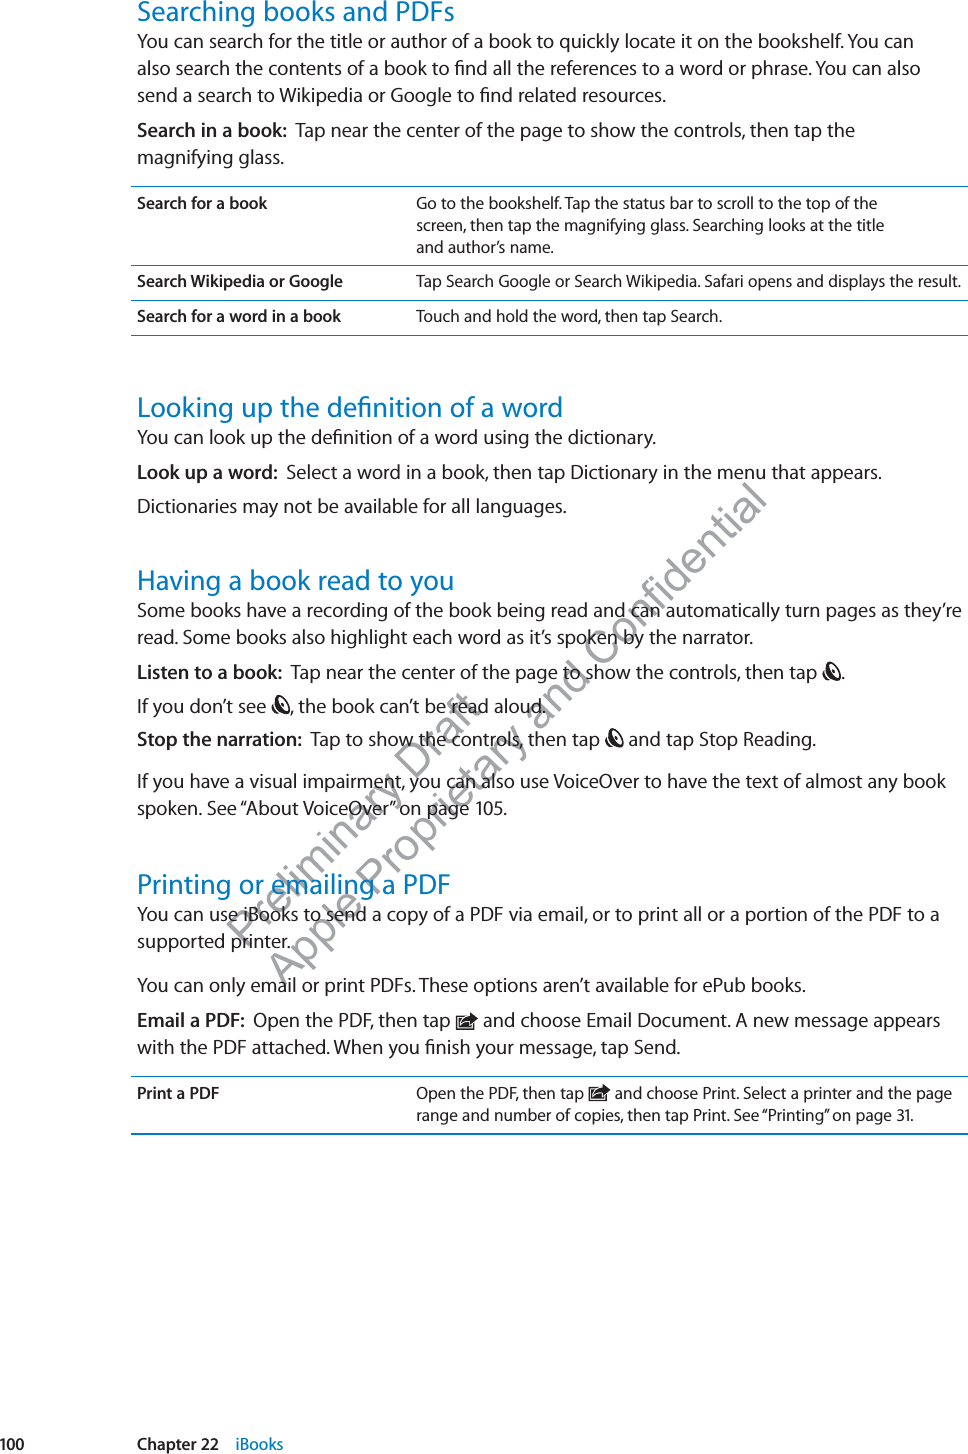
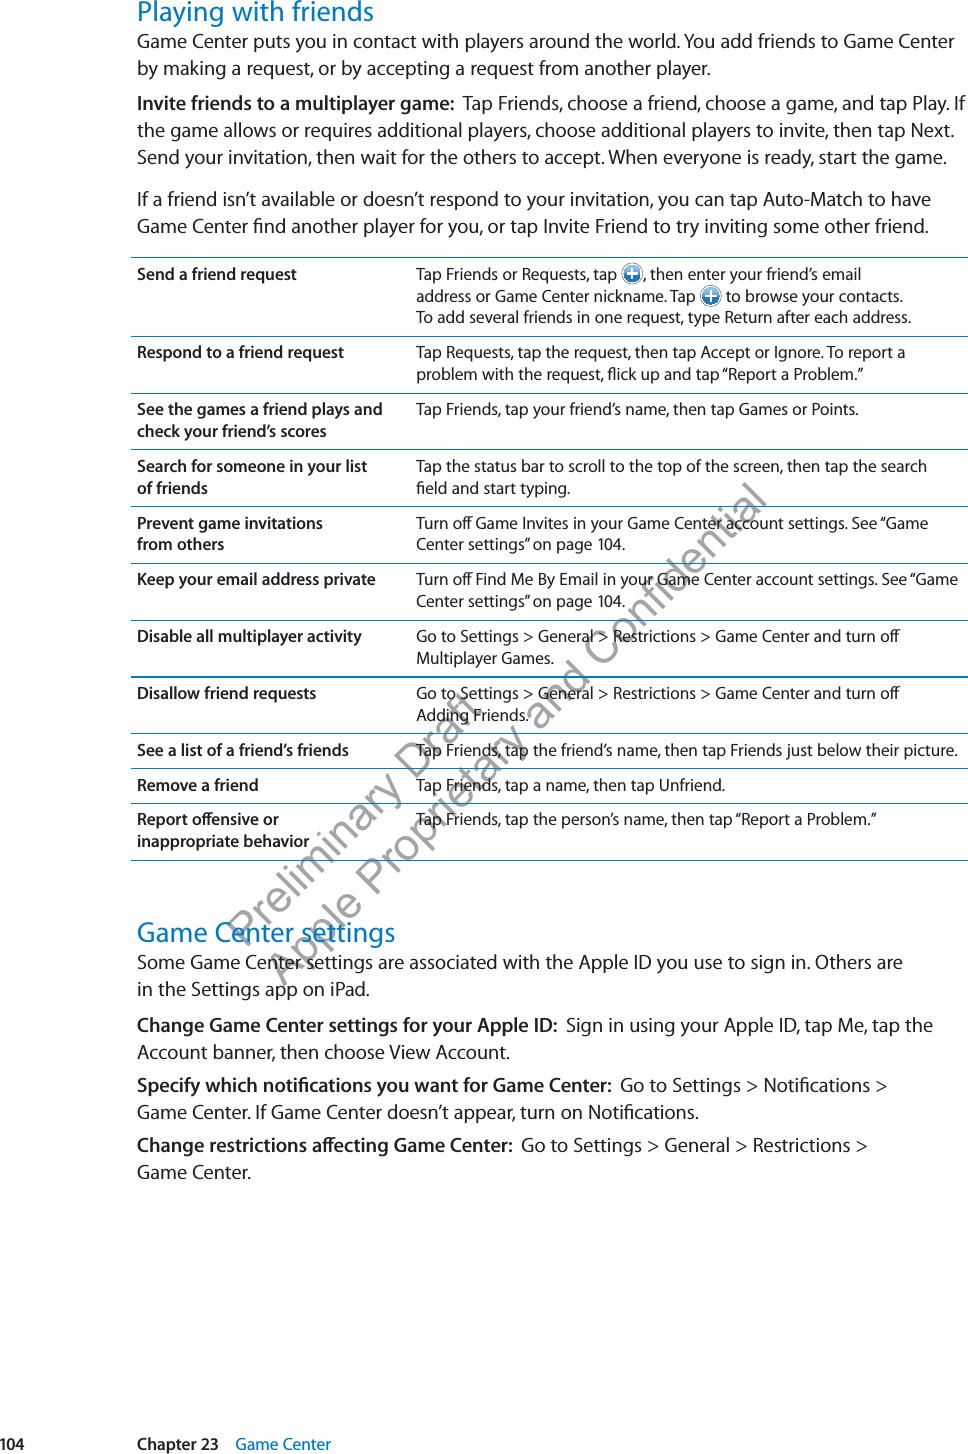
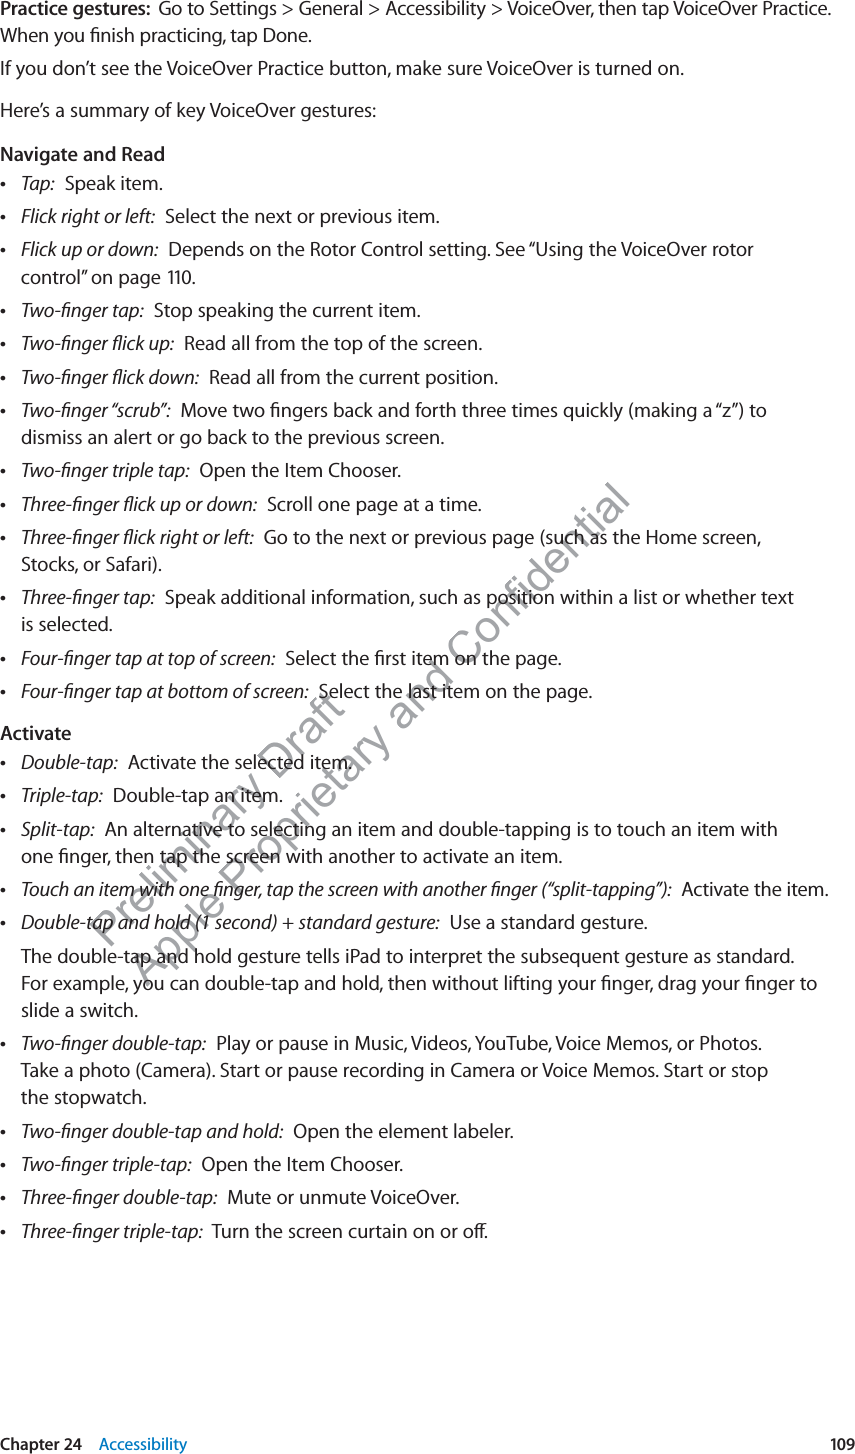
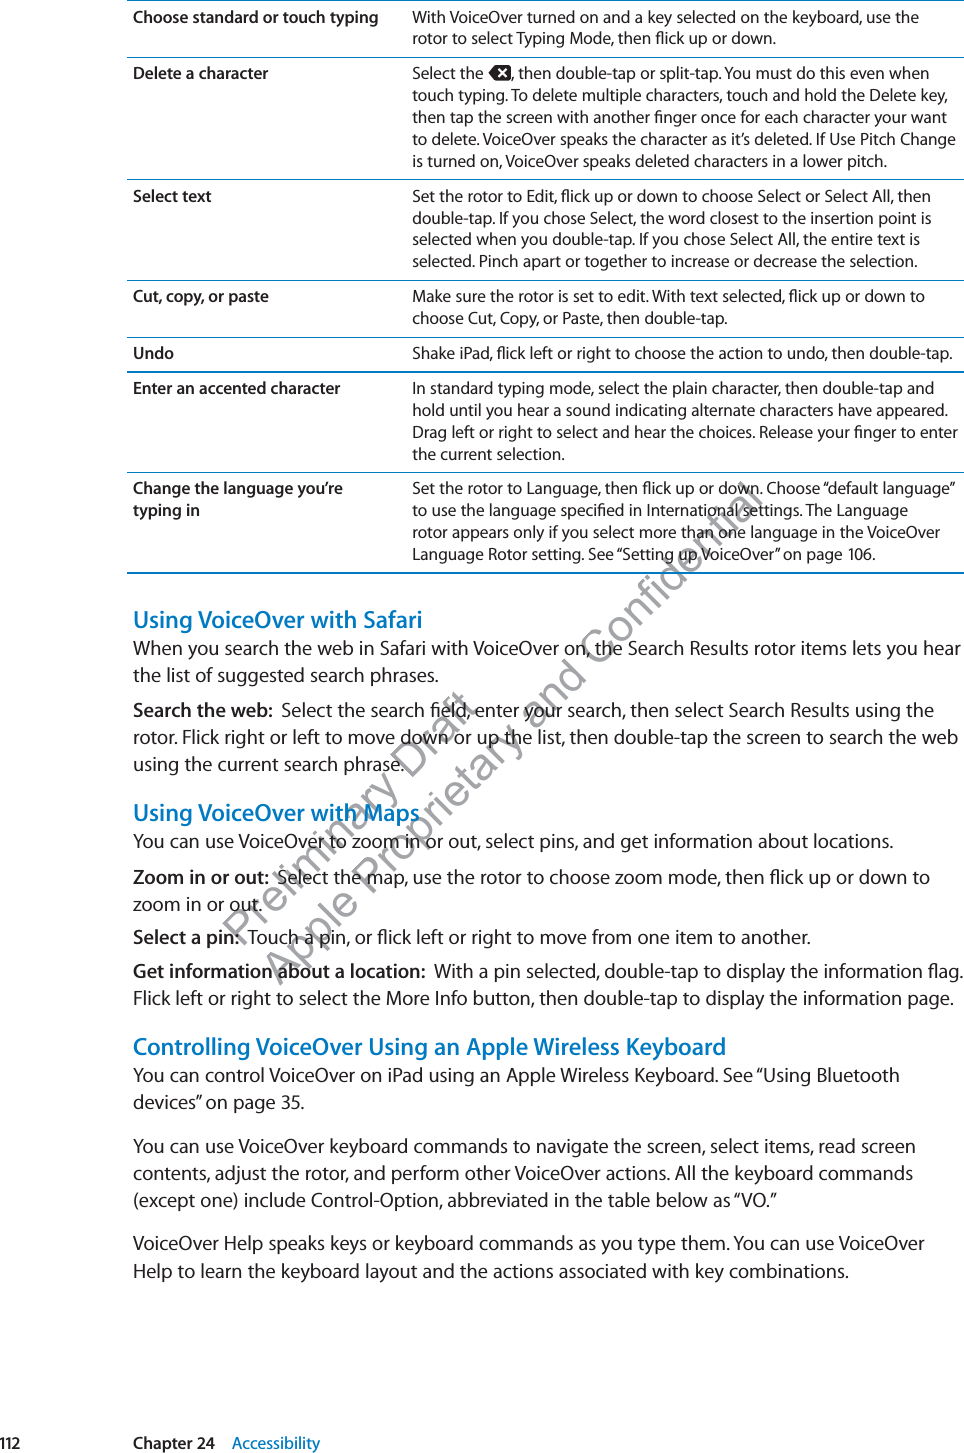
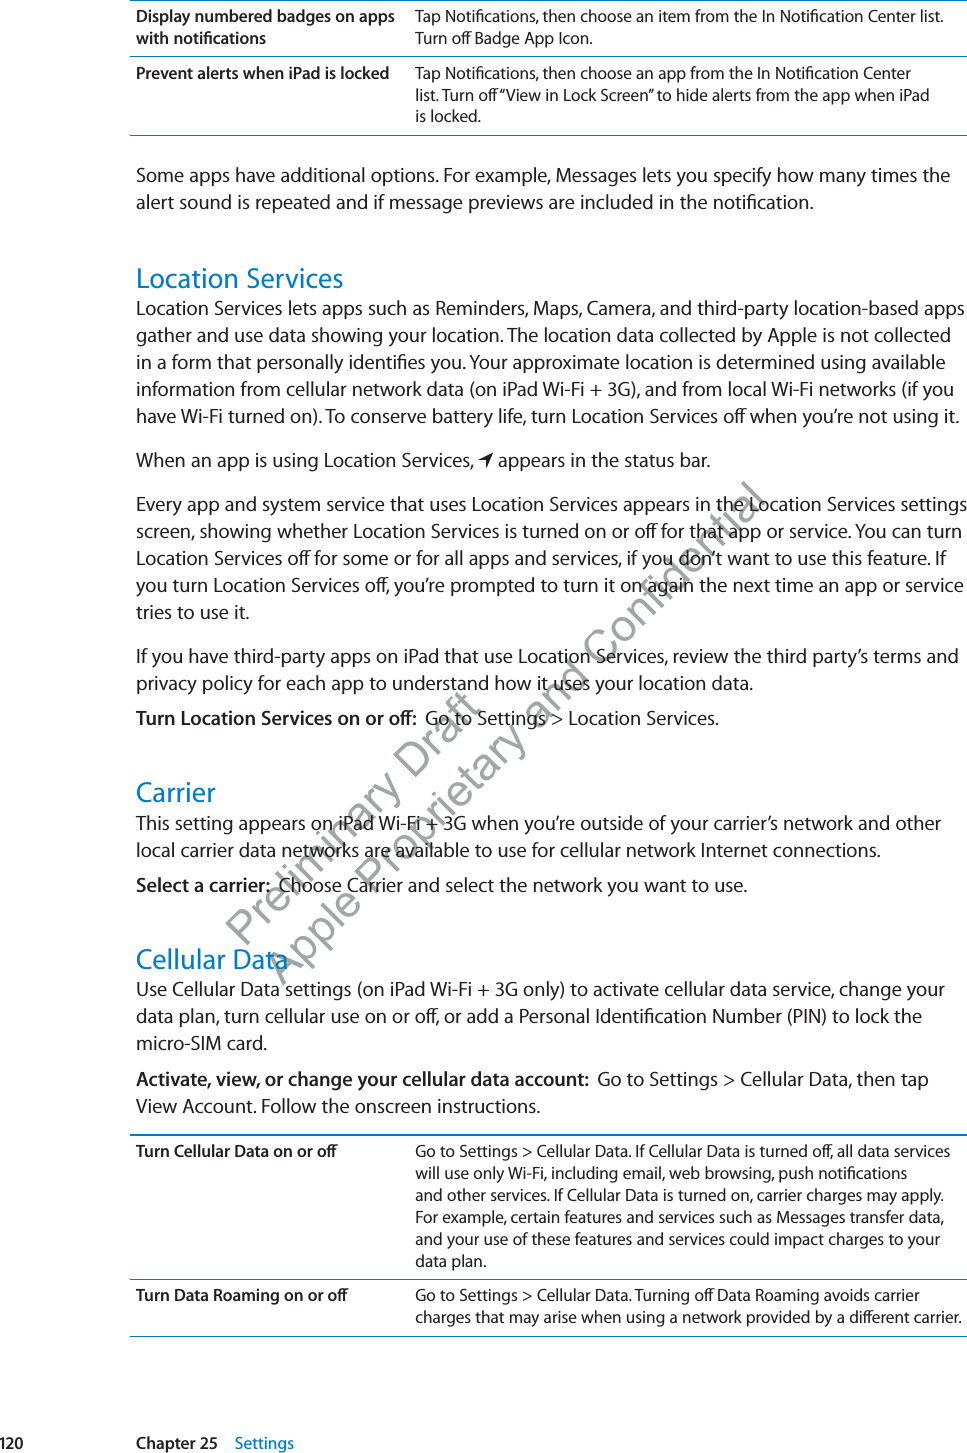
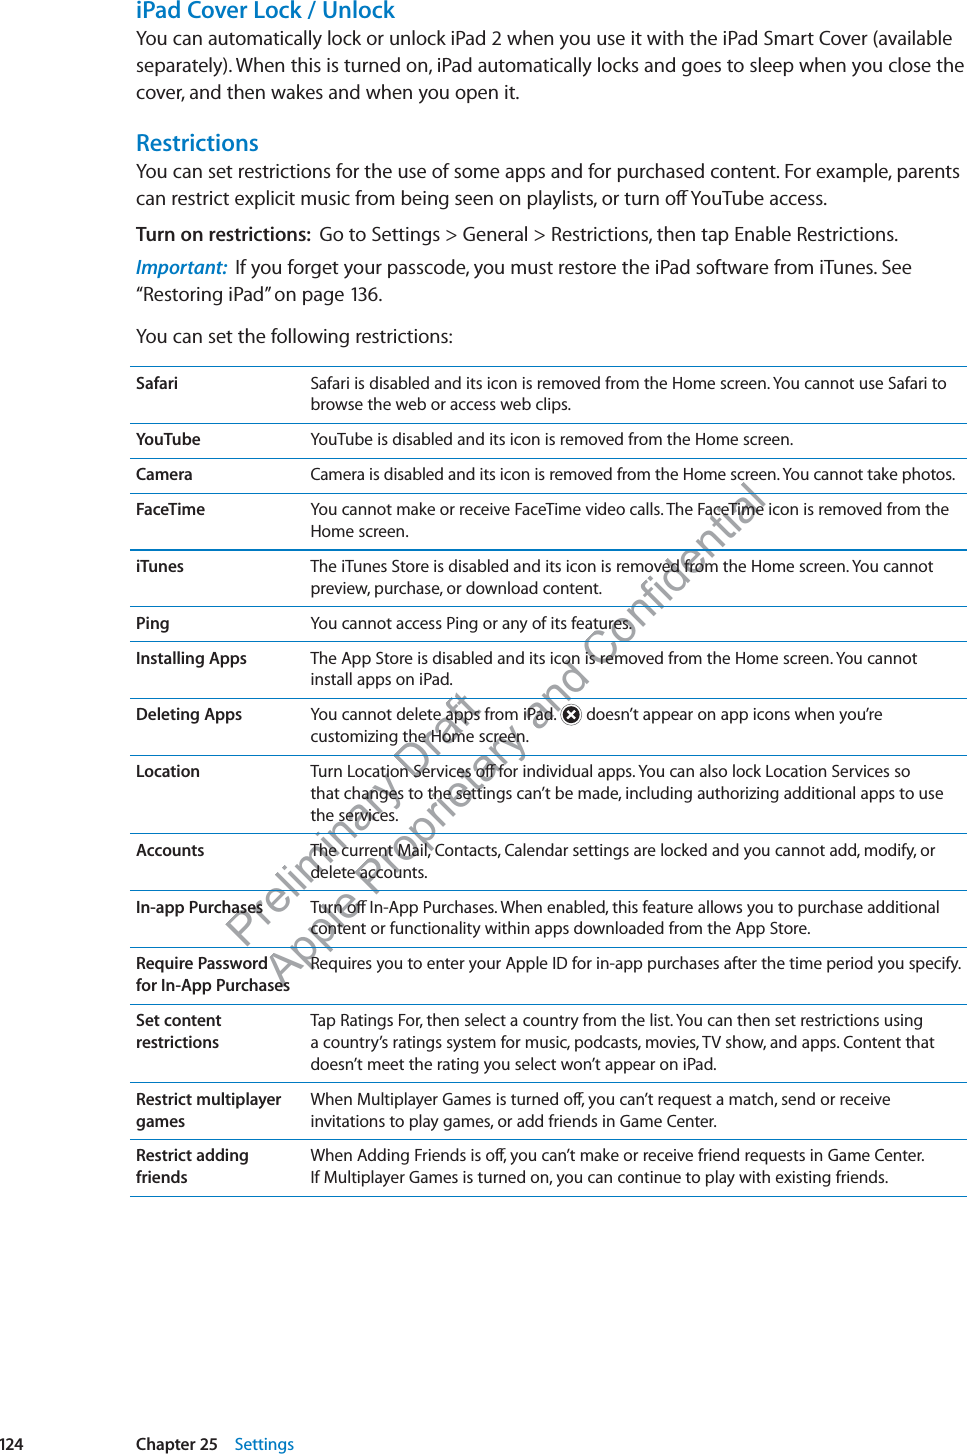
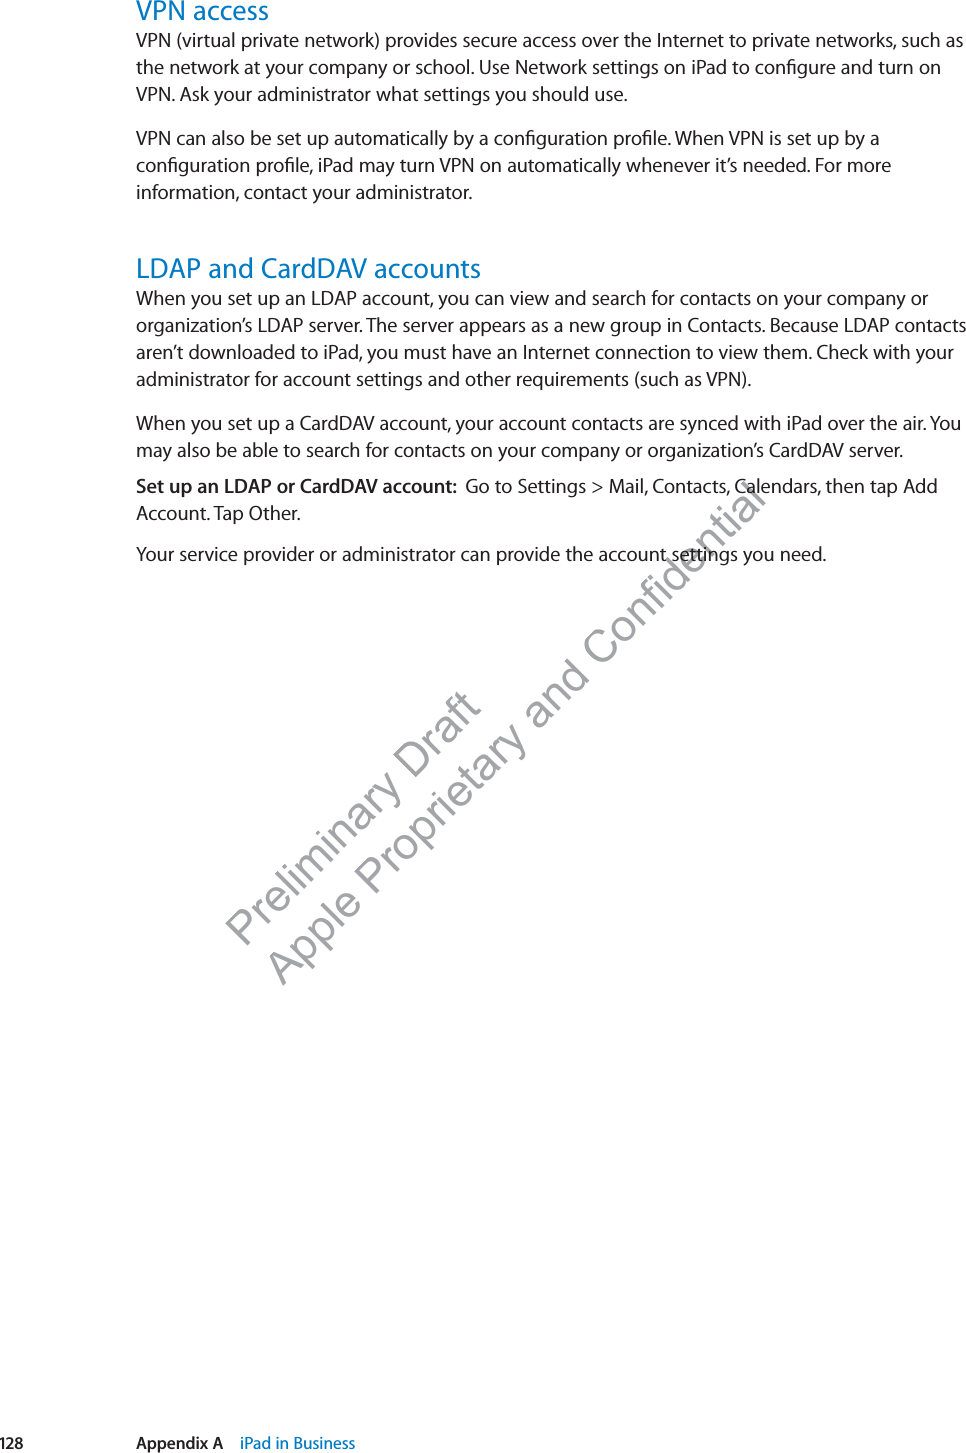
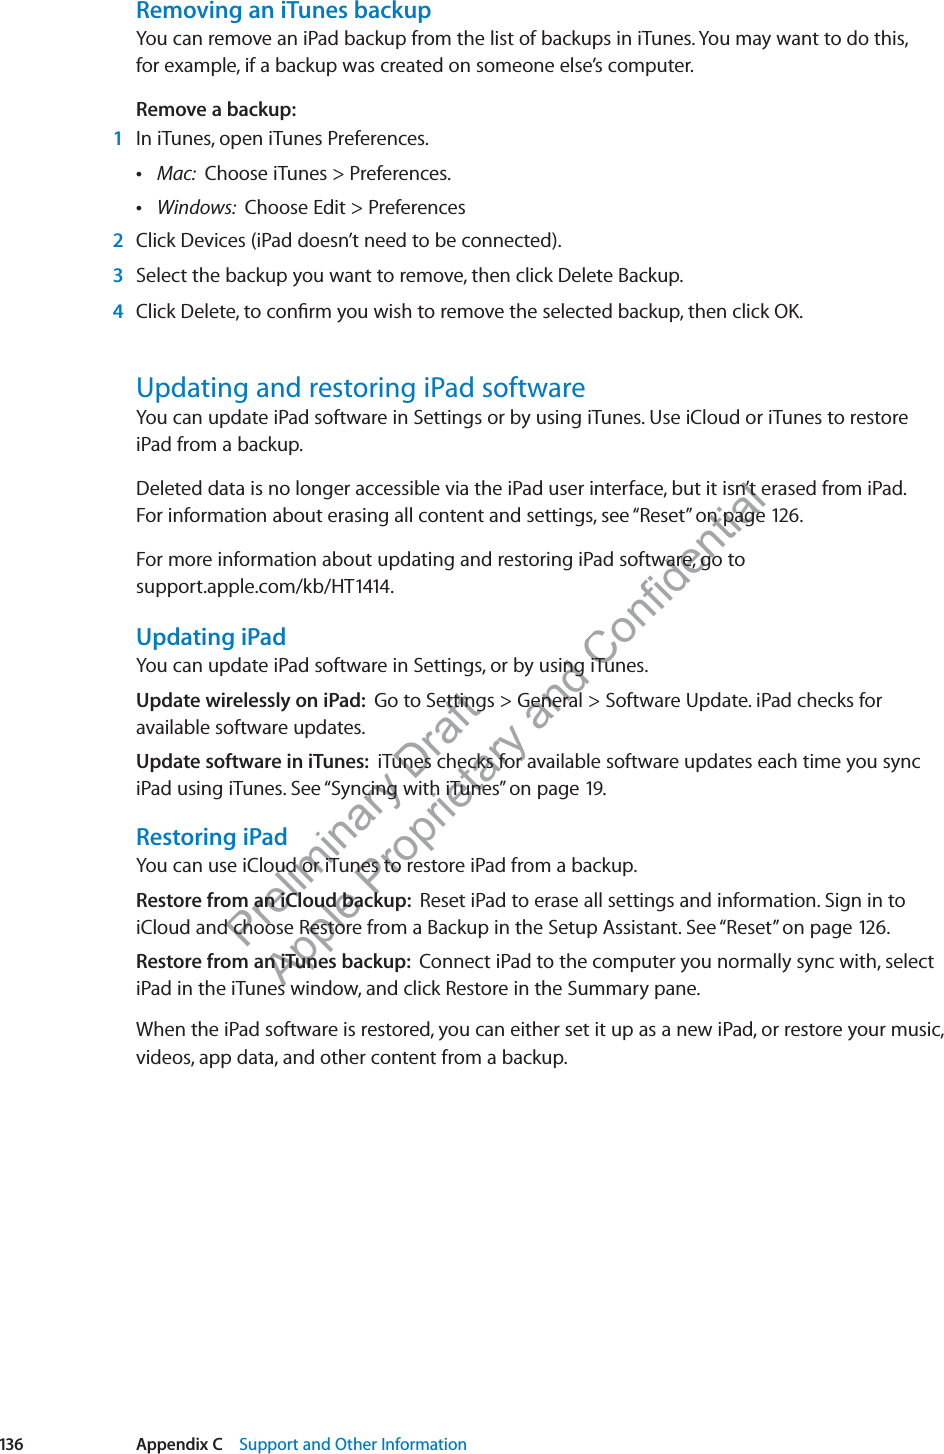
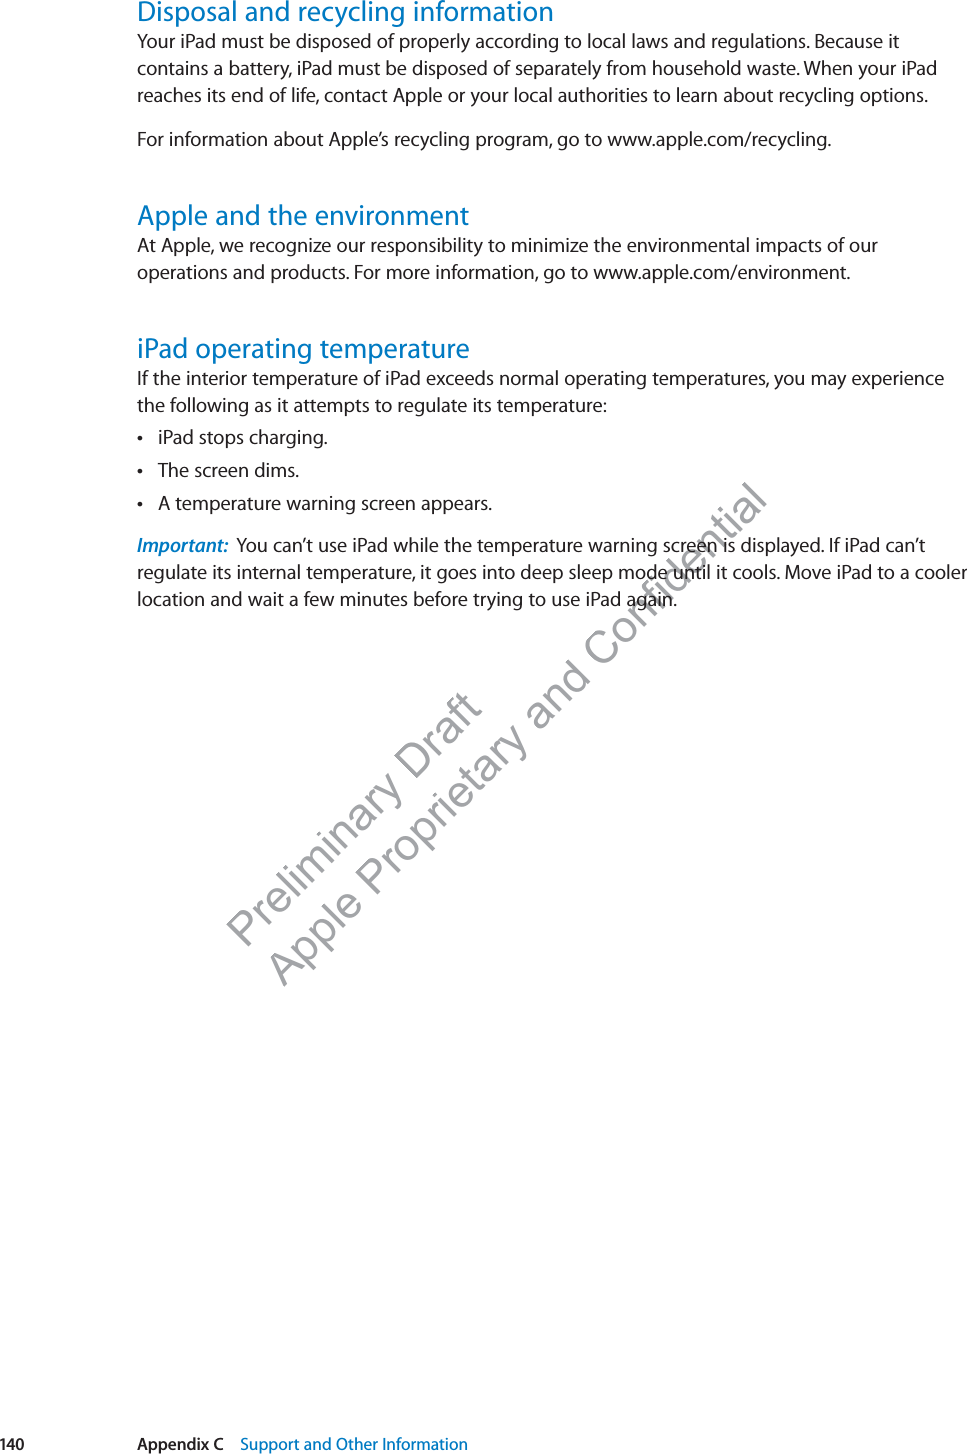
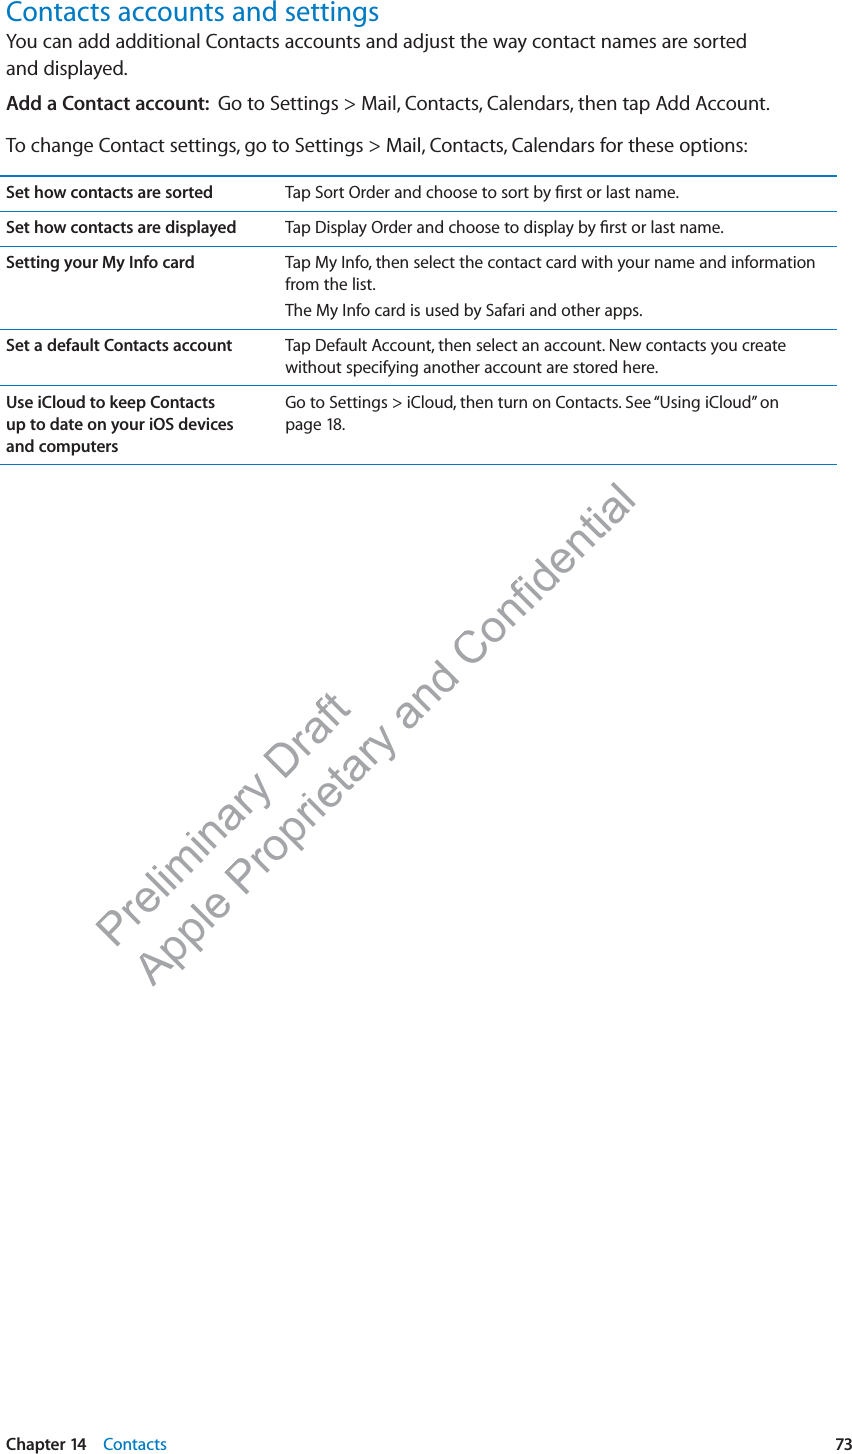
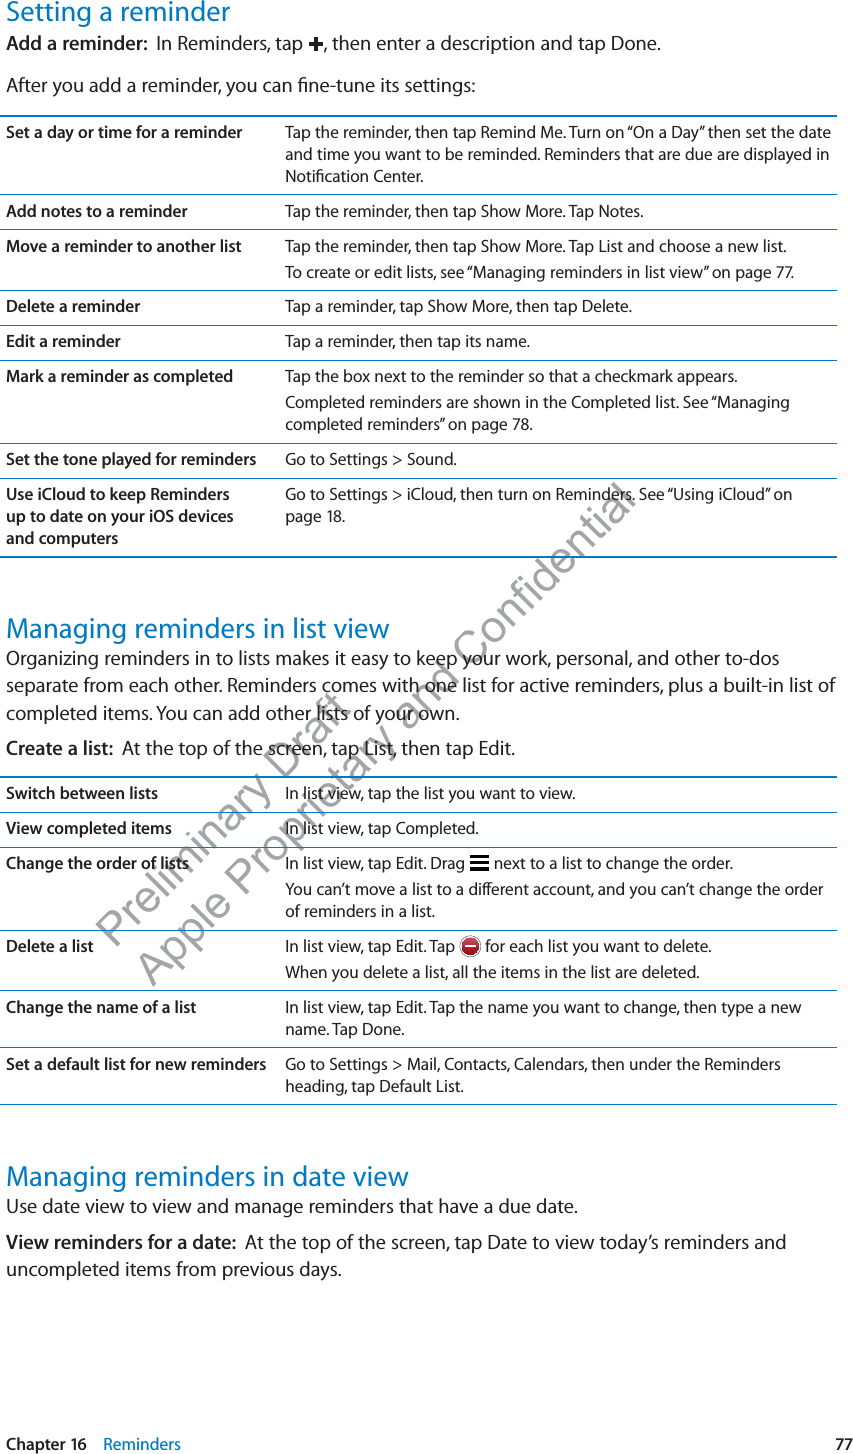
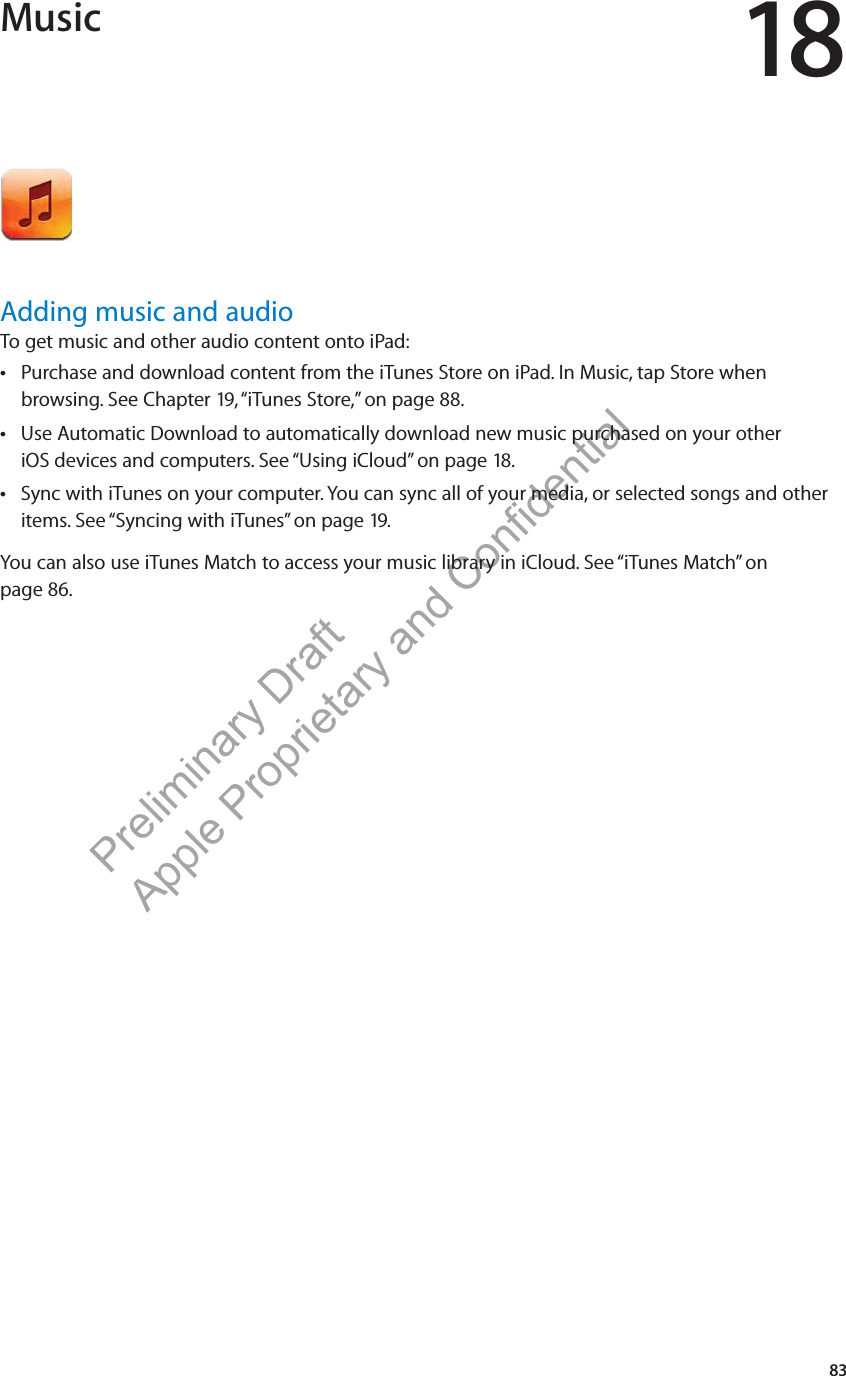
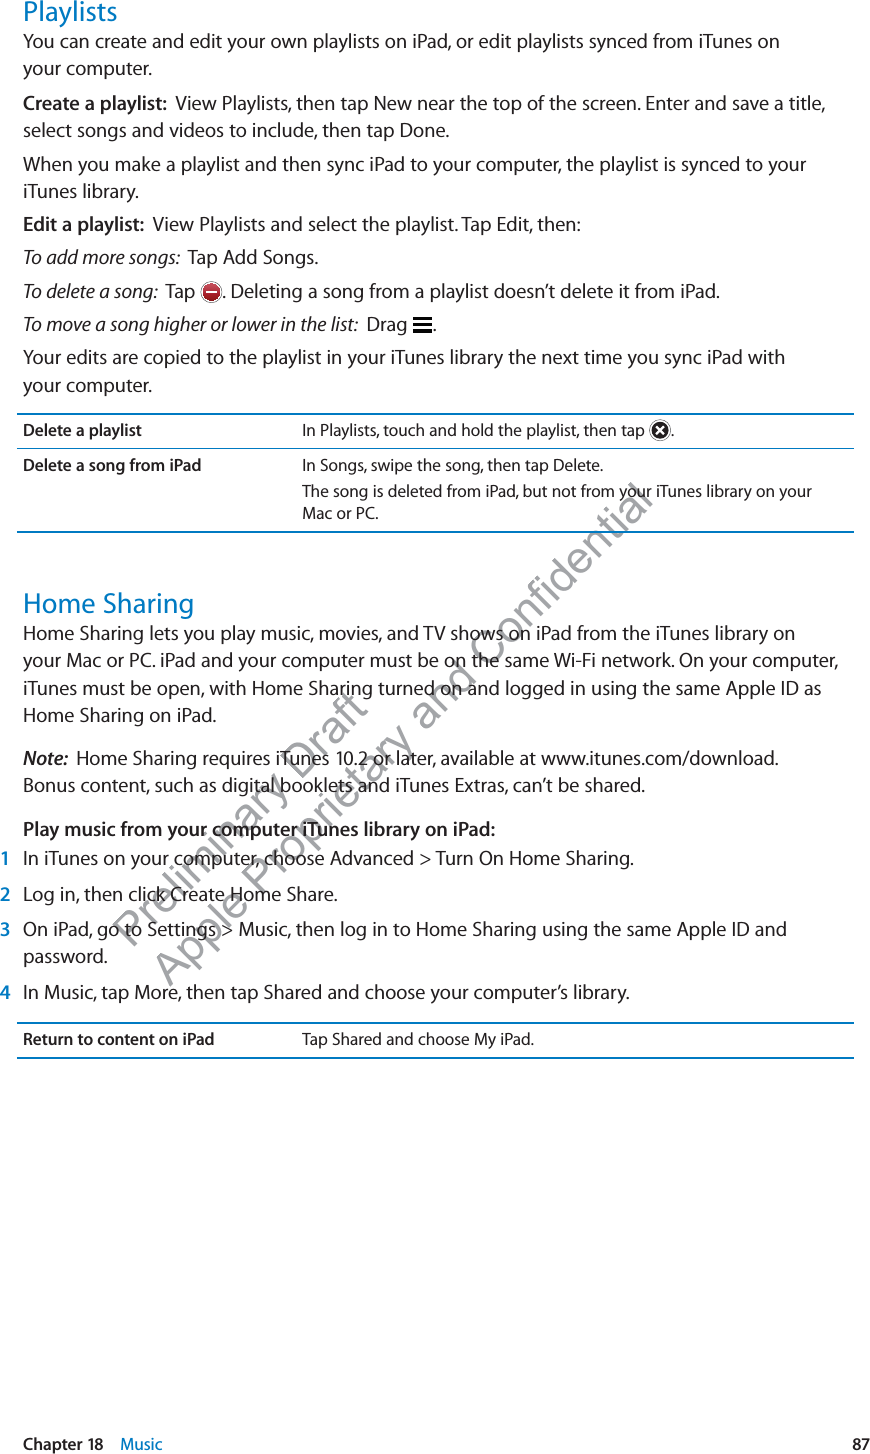
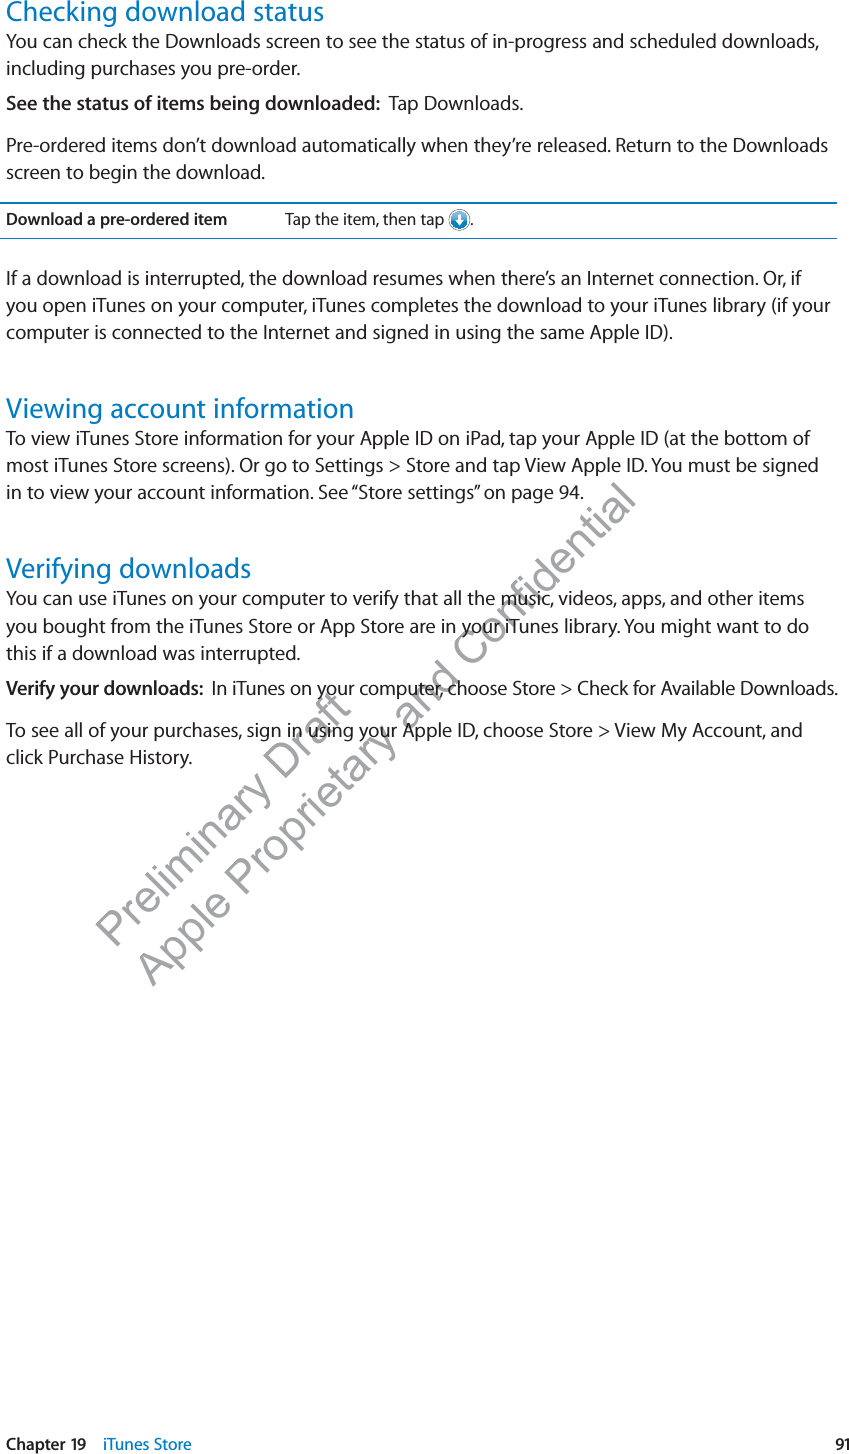
![Preliminary Draft Apple Proprietary and Confidential Organizing the bookshelfUse the bookshelf to browse your books and PDFs. You can also organize items in collections.(]HPSHISLVU[OLP)VVRZ[VYL;P[SLH]HPSHIPSP[`PZZ\IQLJ[[VJOHUNL7RXFKDQGKROGDERRNWRUHDUUDQJHMove a book or PDF to a collection: Go to the bookshelf and tap Edit. Select the items you want to move, then tap Move and select a collection.When you add a book or PDF to your bookshelf, it appears in the Books or PDF collection. From there, you can move it to a di∂erent collection. You might want to create collections for work and school, for example, or for reference and leisure reading.View a collection Tap Collections, then pick a new collection from the list that appears.Manage collections Tap Collections to display the collections list.To edit the name of a collection, tap its name.You can’t edit or remove the built-in Books and PDFs collections. Sort the bookshelf Tap the status bar to scroll to the top of the screen, then tap and select a sort method from the choices at the bottom of the screen.Delete an item from the bookshelf Tap Edit, then tap each book or PDF that you want to delete so that a checkmark appears. Tap Delete. When you finish deleting, tap Done. If you delete a book you purchased, you can download it again from Purchases in the iBookstore.Sync bookmarks and notesiBooks saves your bookmarks, notes, and current page information with your Apple ID account, so they’re always up to date and you can read a book seamlessly across multiple iOS devices. For PDFs, the bookmarks and current page information are synced.Turn bookmark syncing on or o∂: Go to Settings > iBooks.You must have an Internet connection to sync your settings. iBooks syncs information for all of your books when you open or quit the app. Information for individual books is also synced when you open or close the book.101Chapter 22 iBooks](https://usermanual.wiki/Apple/A1416.User-Manual-2-of-2/User-Guide-1637817-Page-31.png)