Apple A1432 Tablet Device User Manual iPad User Guide
Apple Inc. Tablet Device iPad User Guide
Apple >
Contents
User Manual 4 of 8

Making a FaceTime call
To make a FaceTime call, choose someone from your contacts or favorites, or list of recent calls.
When you open FaceTime, you may be prompted to sign in using your Apple ID, or to create a
new account.
Call a contact: Tap Contacts, choose a name, then tap the phone number or email address the
person uses for FaceTime. FaceTime must be turned on in Settings > FaceTime.
Restart a recent call Tap Recents, then choose the call from the list.
Add a favorite Tap Favorites, then tap , choose a contact and select the phone number
or email address that the person uses for FaceTime.
Call a favorite Tap Favorites, then tap a name in the list.
Add a contact Tap Contacts, then tap .
For a contact outside your region, be sure to enter the complete number,
including country code and area code.
Set options for FaceTime Go to Settings > FaceTime.
While on a FaceTime call
While talking to someone using FaceTime, you can switch cameras, change the orientation of iPad,
your call.
Switch between the front and
back cameras
Tap .
Change the orientation of iPad Rotate iPad. The image your friend sees changes to match.
To avoid unwanted orientation changes as you move, lock the iPad
orientation. See “Viewing in portrait or landscape” on page 15.
Mute the call Tap . Your friend can still see you, and you can still see and hear your
friend.
Move your picture-in-picture
display
Drag the inset window to any corner.
Use another app during a call Press the Home button , then tap an app icon. You can still talk with your
friend, but you can’t see each other. To return to the call, tap the green bar
at the top of the screen.
End the call Tap .
56 Chapter 8 FaceTime
Draft
Apple Confidential

Photo Booth 9
About Photo Booth
If you have an iPad 2 or later, it’s easy to take a photo using Photo Booth. Make your photo more
back cameras.
Selecting an efect
Tap
Distort an image:
the distortion. You can also pinch, swipe, or rotate the image to change the distortion.
57
Draft
Apple Confidential

Taking a photo
To take a Photo Booth photo, just aim iPad and tap.
Take a photo: Aim iPad and tap .
When you take a photo, iPad makes a shutter sound. You can use the volume buttons on the side
of the iPad to control the volume of the shutter sound. You won’t hear a sound if you set the Side
Switch to silent. See “Buttons” on page 10.
Note:
Switch between the front and back cameras: Tap at the bottom of the screen.
Review the photo you’ve just taken: Tap the thumbnail of your last shot. Swipe left or right to
view more thumbnails.
If you don’t see the controls, tap the screen to display them.
Delete a photo: Select a thumbnail, then tap .
Manage photos: Tap one or more thumbnails. Tap , then tap Email, Copy, or Delete.
Viewing and sharing photos
The photos you take with Photo Booth are saved in your Camera Roll album in the Photos app
on iPad.
View photos in your Camera Roll album:
the photos, tap the left or right button, or swipe left or right. See “Viewing photos and videos” on
page 59.
You can use Mail to send a Photo Booth photo in an email message.
Email a photo: Tap a thumbnail to select the photo, or tap again to select more than one photo.
Tap , then tap the Email button at the bottom of the screen.
Mail opens and creates a new message with the photo attached.
Uploading photos to your computer
Upload the photos you take with Photo Booth to photo applications on your computer, such as
iPhoto on a Mac.
Upload photos to your computer: Connect iPad to your computer using the Dock Connector to
USB cable.
ÂMac: Select the photos to upload, then click the Import or Download button in iPhoto or other
supported photo application on your computer.
ÂPC: Follow the instructions that came with your photo application.
If you delete the photos from iPad when you upload them to your computer, they’re removed
from your Camera Roll album. You can use the Photos settings pane in iTunes to sync photos to
the Photos app on iPad.
58 Chapter 9 Photo Booth
Draft
Apple Confidential

Photos 10
Viewing photos and videos
Photos lets you view photos, and videos that you capture on or sync to iPad, in your:
Camera Roll album—photos and videos you take with the built-in camera, or save from an Â
email, text message, webpage, or screenshot
Photo Stream album—photos streamed from iCloud (see “ ÂPhoto Stream” on page 54)
Last Import album—photos and videos imported from a digital camera, iOS device, or SD Â
memory card (see “Importing photos and videos” on page 62)
Photo Library and other albums synced from your computer (see “ ÂSyncing with iTunes” on
page 20)
Note: On an iPad without a camera, the Camera Roll album is named Saved Photos.
Select a photo to view.
Select a photo to view.
Edit the photo.
Edit the photo.
Play a slideshow.
Play a slideshow.
Delete the photo.
Delete the photo.
Stream slideshow to
an HDTV using AirPlay.
Stream slideshow to
an HDTV using AirPlay.
Share the photo,
assign it to a contact,
use it as wallpaper,
or print it.
Share the photo,
assign it to a contact,
use it as wallpaper,
or print it.
Tap the screen to
display the controls.
Tap the screen to
display the controls.
59
Draft
Apple Confidential

View photos and videos: Tap one of the buttons at the top of the screen. For example, tap
Album, then tap an album to see its thumbnails. Tap a thumbnail to see the photo or video
full-screen.
You can also pinch to open or close an album, view a photo or video full-screen, or return to
thumbnail view.
Albums you sync with iPhoto 8.0 (iLife ’09) or later, or Aperture v3.0.2 or later, can be viewed by
events or by faces. You can also view photos by location, if they were taken with a camera that
supports geotagging.
Show or hide the controls Tap the full-screen photo or video.
See the next or previous photo
or video
Flick left or right.
Zoom in or out Double-tap or pinch.
Pan a photo Drag the photo.
Play a video Tap in the center of the screen.
Stream a video to an HDTV See “Using AirPlay” on page 37.
Edit photos or trim videos See “Editing photos” or “Trimming videos” on page 53.
Viewing slideshows
View a slideshow: Tap Slideshow. Select slideshow options, then tap Start Slideshow.
Stream a slideshow to an HDTV See “Using AirPlay” on page 37.
Stop a slideshow Tap the screen.
Set additional options Go to Settings > Photos.
Organizing photos and videos
You can create, rename, and delete albums on iPad to help you organize your photos and videos.
Create an album: When viewing albums, tap Edit, then tap Add. Select photos to add to the new
album, then tap Done.
Note: Albums created on iPad aren’t synced back to your computer.
Rename an album Tap Edit, then select an album.
Rearrange albums Tap Edit, then drag up or down.
Delete an album Tap Edit, then tap .
60 Chapter 10 Photos
Draft
Apple Confidential

Sharing photos and videos
Choose a photo or video, then tap .
If you don’t see , tap the screen to show the controls.
To post a Tweet, you must be logged in to your Twitter account. Go to Settings > Twitter.
The size limit of attachments is determined by your service provider. iPad may compress photo
and video attachments, if necessary.
Send multiple photos or videos While viewing thumbnails, tap , select the photos or videos, then tap Share.
Copy a photo or video Tap , then tap Copy.
Copy multiple photos or videos Tap , select the photos and videos, then tap Copy.
Paste a photo or video in an
email or text message
Touch and hold where you want to place the photo or video, then tap Paste.
Save a photo or video from an
email message
Tap to download the item if necessary, tap the photo or touch and hold the
video, then tap Save.
Save a photo or video from a
text message
Tap the image in the conversation, tap , than tap Save.
Save a photo from a webpage Touch and hold the photo, then tap Save Image.
Photos and videos that you receive, or that you save from a webpage, are saved to your Camera
Roll album (or to Saved Photos, on an iPad with no camera).
Printing photos
Print a photo: Tap , then tap Print.
Print multiple photos: While viewing a photo album, tap . Select the photos you want to print,
then tap Print.
For more information, see “Printing” on page 33.
Using Picture Frame
When iPad is locked, you can display a slideshow of all, or selected albums, of your photos.
Start Picture Frame: Press the Sleep/Wake button to lock iPad, press the button again to turn the
screen on, then tap .
Pause the slideshow Tap the screen.
Stop the slideshow Pause the slideshow, then tap .
Set options for Picture Frame Go to Settings > Picture Frame.
Go to Settings > General > Passcode Lock.
61
Chapter 10 Photos
Draft
Apple Confidential
Importing photos and videos
With the iPad Camera Connection Kit (sold separately), you can import photos and videos directly
from a digital camera, another iOS device with a camera, or from an SD memory card.
Import photos:
1 Insert the SD Card Reader or Camera Connector, included in the iPad Camera Connection Kit, into
the iPad dock connector.
ÂTo connect a camera or iOS device: Use the USB cable that came with the camera or iOS device,
and connect it to the USB port on the Camera Connector. If you’re using an iOS device, make
sure it’s turned on and unlocked. To connect a camera, make sure the camera is turned on and
in transfer mode. For more information, see the documentation that came with the camera.
ÂTo use an SD memory card: Insert the card in the slot on the SD Card Reader. Don’t force the
For more information, see the iPad Camera Connection Kit documentation.
2 Unlock iPad.
3 The Photos app opens and displays the photos and videos that are available for importing.
4 Select the photos and videos you want to import.
ÂTo import all the items: Tap Import All.
ÂTo import just some of the items: Tap the ones you want to include (a checkmark appears on
each), tap Import, then select Import Selected.
5 After the photos are imported, keep or delete the photos and videos on the card, camera, or
iOS device.
6 Disconnect the SD Card Reader or Camera Connector.
To view the photos, look in the Last Import album. A new Event contains all the photos that were
selected for import.
To transfer the photos to your computer, connect iPad to your computer and import the images
with a photo application such as iPhoto or Adobe Elements.
62 Chapter 10 Photos
Draft
Apple Confidential

Videos 11
About Videos
You can use iPad to view movies, music videos, video podcasts, and, if they’re available in your
area, TV shows. iPad also supports special features such as chapters, subtitles, alternate audio, and
closed captioning.
You can rent or purchase videos from the iTunes Store, and you can use a video adapter cable
to watch videos on a TV or projector. If you have an Apple TV, you can use AirPlay to watch the
videos wirelessly on a TV.
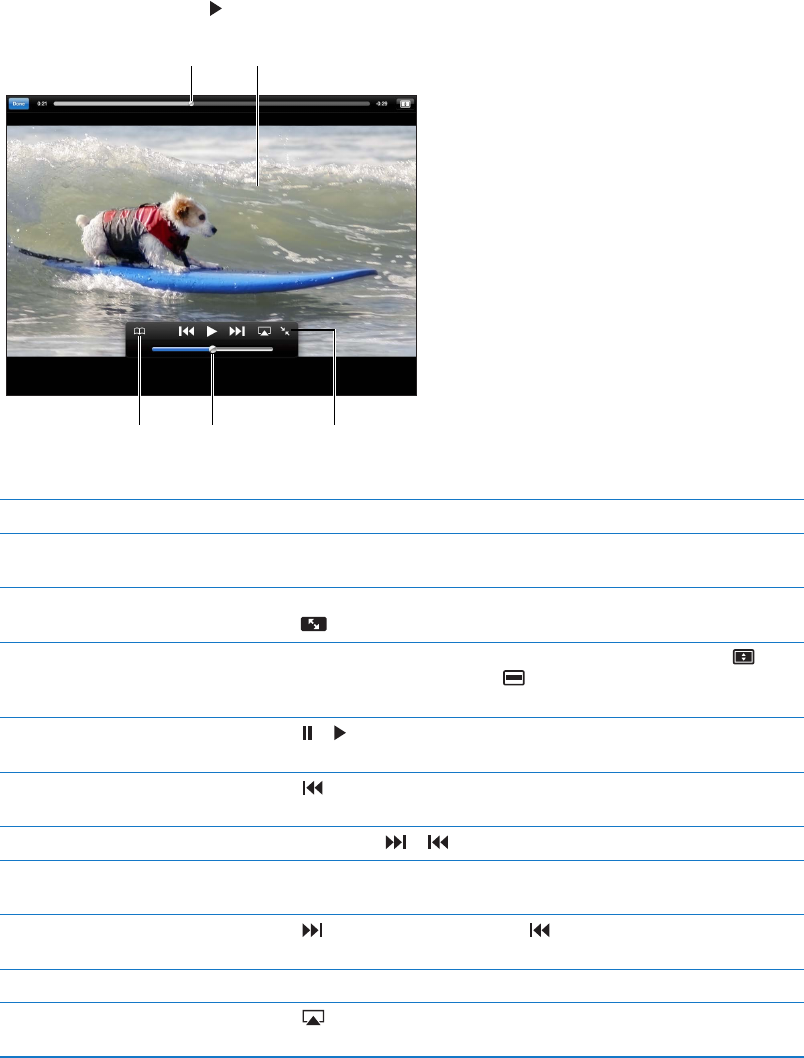
Playing videos
Play a video: Tap Videos, then tap a category of videos, such as Movies. Tap the video you want to
watch. If the video has chapters, tap Chapters, and then tap a chapter title, or just tap .
Cars 2 © Disney/Pixar.
Cars 2 © Disney/Pixar.
Drag to skip forward or back.
Drag to skip forward or back.
Tap the video
to show or hide
the controls.
Tap the video
to show or hide
the controls.
Watch the
video on a TV
with Apple TV.
Watch the
video on a TV
with Apple TV.
Drag to adjust
the volume.
Drag to adjust
the volume.
Show or hide the playback controls While a video is playing, tap the screen.
Adjust the volume Drag the volume slider, or use the volume buttons on the side of iPad or
the buttons on a compatible headset.
Watch widescreen Rotate iPad.
Double-tap the screen. Or, tap
63
Draft
Apple Confidential
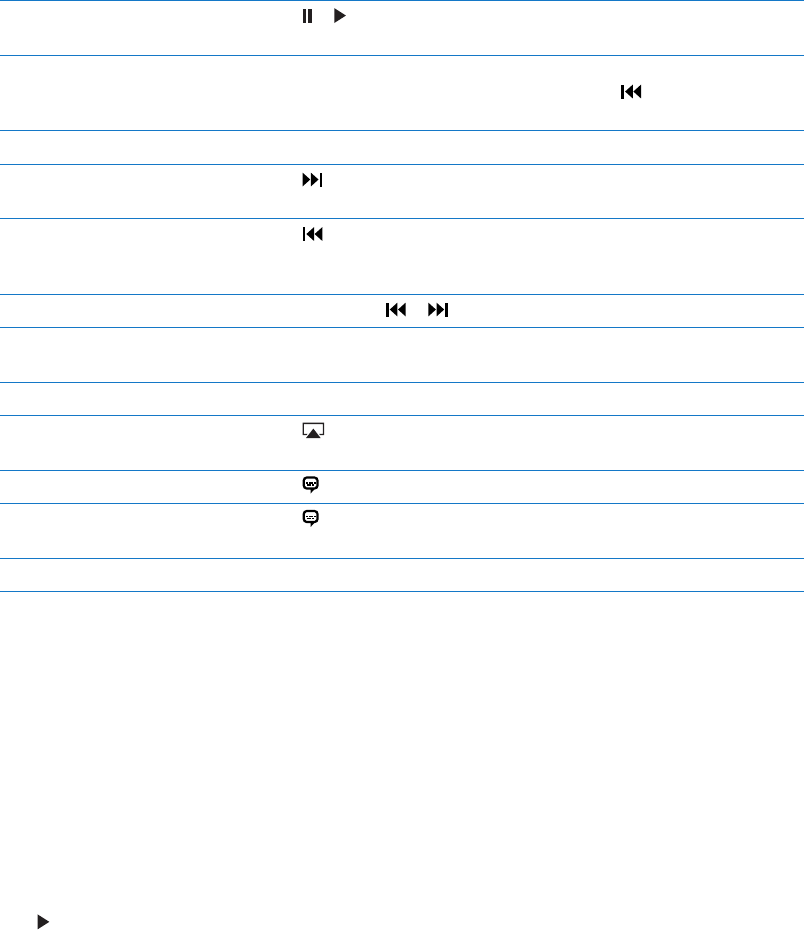
Pause or resume playback Tap or , or press the center button (or equivalent button) on a
compatible headset.
Start over from the beginning If the video contains chapters, drag the playhead along the scrubber bar
all the way to the left. If there are no chapters, tap . If you’re less than
5 seconds into the video, the previous video in your library opens.
Tap Done, tap Chapters, then choose a chapter. (Not always available.)
Skip to the next chapter Tap or press the center button (or equivalent button) on a compatible
headset twice quickly. (Not always available.)
Skip to the previous chapter Tap or press the center button (or equivalent button) on a compatible
headset three times quickly. If you’re less than 5 seconds into the video, the
previous video in your library opens. (Not always available.)
Rewind or fast-forward Touch and hold or .
Skip to any point in a video
the scrub rate from fast to slow.
Stop watching a video Tap Done.
Play a video on Apple TV
using AirPlay
Tap and choose an Apple TV. See “Watching videos on a TV” on page 64.
Tap , then choose a language from the Audio list. (Not always available.)
Show or hide subtitles Tap
available.)
Show or hide closed captioning Go to Settings > Video. (Not always available.)
Watching rented movies
watch them on iPad. You can download rented movies to iPad, or transfer them to iPad from
iTunes on your computer. (Rented movies aren’t available in all areas.)
A movie must be completely downloaded before you can watch it. You can pause a download
and continue it later. Rented movies expire after a certain number of days, and once you start a
when they expire. Before renting a movie, check the iTunes Store for the expiration time.
View a rented movie: Tap Movies, tap the video you want to watch, then select a chapter or just
tap . If you don’t see the video in your list, it might still be downloading.
Transfer rented movies to iPad: Connect iPad to your computer. Then select iPad in the iTunes
sidebar, click Movies, and select the rented movies you want to transfer. Your computer must be
connected to the Internet. Movies rented on iPad cannot be transferred to a computer.
Watching videos on a TV
You can stream videos wirelessly to your TV using AirPlay and Apple TV, or connect iPad to your
TV using one of the following cables:
Apple Digital AV Adapter and an HDMI cable Â
Apple Component AV Cable Â
Apple Composite AV Cable Â
Apple VGA Adapter and a VGA cable Â
Apple cables are available for purchase in many countries. Go to www.apple.com/store or check
with your local Apple retailer.
64 Chapter 11 Videos
Draft
Apple Confidential

Stream videos using AirPlay: Start video playback, then tap and choose your Apple TV from
the list of AirPlay devices. If doesn’t appear or if you don’t see Apple TV in the list of AirPlay
devices, make sure it’s on the same wireless network as iPad. For more information, see “Using
AirPlay” on page 37.
While video is playing, you can exit Videos and use other apps. To return playback to iPad, tap
and choose iPad.
Stream videos using a cable: Use the cable to connect iPad to your TV or AV receiver and select
the corresponding input.
Connect using an Apple Digital
AV Adapter
Attach the Apple Digital AV Adapter to the iPad Dock connector. Use an
HDMI cable to connect the HDMI port of the adapter to your TV or receiver.
To keep iPad charged while watching videos, use an Apple Dock Connector
to USB Cable to connect the 30-pin port of the adapter to your iPad 10W
USB Power Adapter.
Connect using an AV cable Use the Apple Component AV Cable, Apple Composite AV Cable, or other
authorized iPad-compatible cable. You can also use these cables with the
Apple Universal Dock to connect iPad to your TV. You can use the dock’s
remote to control playback.
Connect using a VGA Adapter Attach the VGA Adapter to the iPad Dock connector. Connect the VGA
Adapter with a VGA cable to a compatible TV, projector, or VGA display.
With iPad 2 or later, when the cable is connected to a TV or projector, the iPad screen is
automatically mirrored on the external display at a resolution of up to 1080p, and videos play at
a resolution of up to 1080p. Some apps such as Keynote may use the external display as a second
video monitor. With previous iPad models, only certain apps (including YouTube, Videos, and
Photos) can use the external display.
With iPad 2 or later, you can also mirror the screen on a TV wirelessly, using AirPlay Mirroring and
Apple TV. See “Using AirPlay” on page 37.
If you use the Apple Digital AV Adapter or the Apple Component AV Cable, high-resolution videos
are shown in HD quality.
Deleting videos from iPad
To save space, you can delete videos from iPad.
Delete a video: In the videos list, tap and hold a movie until the delete button appears, then
tap
When you delete a video (other than rented movies) from iPad, it isn’t deleted from your iTunes
library on your computer, and you can sync the video back to iPad later. If you don’t want to sync
the video back to iPad, set iTunes to not sync the video. See “Syncing with iTunes” on page 20.
Important: If you delete a rented movie from iPad, it’s deleted permanently and can’t be
transferred back to your computer.
Using Home Sharing
Home Sharing lets you play music, movies, and TV shows on iPad from the iTunes library on your
Mac or PC. See “Home Sharing” on page 89.
65
Chapter 11 Videos
Draft
Apple Confidential
YouTube 12
About YouTube
YouTube lets you watch short videos submitted by people from around the world. Some YouTube
features require a YouTube account. To set up an account, go to www.youtube.com.
To use YouTube, iPad must have an Internet connection. See “Network” on page 125.
Note: YouTube isn’t available in all languages and locations.
Browsing and searching for videos
Browse videos: Tap any browse button at the bottom of the screen.
Search for a video
See more videos from this
YouTube user
While watching full-screen, tap the screen to see the controls, and then
tap . In the sidebar, tap “More From.” You must be signed in to a
YouTube account.
See videos similar to this one In the sidebar, tap “Related.”
66
Draft
Apple Confidential
Playing videos
Watch a video: Tap any video as you browse. Playback starts when enough of the video is
downloaded to iPad. Tap to start the video sooner.
Drag to skip
forward or back.
Drag to skip
forward or back.
Tap the video to show
or hide the controls.
Tap the video to show
or hide the controls.
Drag to adjust
the volume.
Drag to adjust
the volume.
See video information,
related videos, and
comments.
See video information,
related videos, and
comments.
Add this video to
your YouTube
Favorites.
Add this video to
your YouTube
Favorites.
Show or hide the video controls Tap the screen.
Adjust the volume Drag the volume slider, or use the iPad volume buttons or the volume
buttons on a compatible headset.
Watch full-screen Rotate iPad to landscape orientation. If you still see video information,
tap .
While watching full-screen, double-tap the video. You can also tap to
Pause or resume playback Tap or . You can also press the center button (or equivalent button) on a
compatible headset.
Start over from the beginning Tap
of the video, you’ll skip instead to the previous video in the list.
Scan forward or back Touch and hold or .
Skip to any point
the scrub rate from fast to slow.
Skip to the next or previous
video in a list
Tap to skip to the next video. Tap twice to skip to the previous video.
Stop watching a video Tap Done.
Play a video on Apple TV using
AirPlay
Tap and choose Apple TV. For information, see “Using AirPlay” on
page 37.
67
Chapter 12 YouTube
Draft
Apple Confidential

Keeping track of videos you like
Show the controls for managing videos: While watching a full-screen video, tap to display the
playback controls, then tap .
Add a video to Favorites Tap Add, then select Favorites. If you’re watching the video, tap .
Add a video to a playlist Tap Add, then select the playlist. If you don’t see your playlists, sign in.
Subscribe to videos by this
YouTube user
Tap More From, then tap Subscribe. You must be signed in to a
YouTube account.
Delete a favorite Tap Favorites, then tap Edit.
Delete a video from a playlist
or an entire playlist
Tap Playlists, then tap Edit.
Flag a video Tap .
Sharing videos, comments, and ratings
While watching a full-screen video, tap
to display the controller, then tap .
Rate a video Tap Like or Dislike. You must be signed in to a YouTube account.
Add a comment
YouTube account.
Add a video to Favorites or
a playlist
Tap Add, then select Favorites or a playlist.
Email a link to a video Tap Share.
Flag a video Tap the movie to display the toolbar, then tap .
Send your own video to YouTube Open the Photos app, select the video, then tap .
Watching YouTube on a TV
If you have an Apple TV, you can use AirPlay to watch YouTube videos on a TV. See “Playing
videos” on page 67.
You can also use a cable to connect iPad to your TV or a projector. See “Watching videos on a
TV” on page 64.
68 Chapter 12 YouTube
Draft
Apple Confidential
Calendar 13
About Calendar
Calendar makes it easy to stay on schedule. You can view individual calendars, or several calendars
at once. You can view your events by day, by month, or in a list. You can search the titles, invitees,
locations, and notes of events. If you enter birthdays for your contacts, you can view those
birthdays in Calendar.
You can also make, edit, or cancel events on iPad, and sync them back to your computer. You can
subscribe to iCloud, Google, Yahoo!, or iCal calendars. If you have a Microsoft Exchange or iCloud
account, you can receive and respond to meeting invitations.
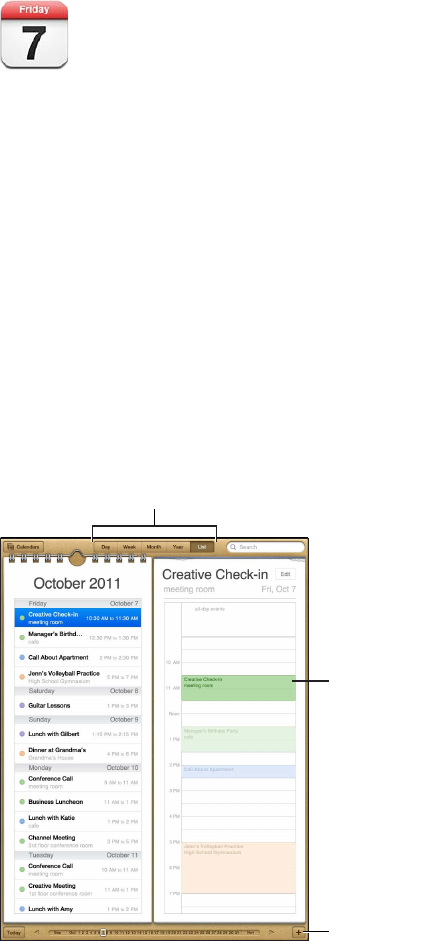
Viewing your calendars
You can view calendars individually or as a combined calendar, making it easy to manage work
and family calendars at the same time.
Choose a view.
Choose a view.
Add an event.
Add an event.
Touch and
drag to adjust.
Touch and
drag to adjust.
Change views: Tap List, Day, Year, or Month.
69
Draft
Apple Confidential

View the Birthdays calendar Tap Calendars, then tap Birthdays to include birthdays from your Contacts
with your events.
See the details of an event Tap the event. You can tap information about the event to get more details.
Edit or delete a calendar Tap Calendars, then tap Edit.
Select calendars to view Tap Calendars, then tap to select the calendars you want to view. The
events for all selected calendars appear in a single calendar on iPad.
Adding events
You can add and update calendar events directly on iPad.
Add an event: Tap and enter event information, then tap Done.
You can also touch and hold to add a new event to an empty spot on a calendar. Drag the grab
points to adjust the event’s duration.
Set an alert Tap Alert, then set an alert for 5 minutes to two days before the event.
Set a default alert for events Go to Settings > Mail, Contacts, Calendar > Default Alert Times.
Update an event Tap Edit, then change event information.
To adjust an event’s time or duration, touch and hold the event to select it.
Then drag it to a new time, or drag the grab points to change its duration.
Delete an event Tap the event, tap Edit, then scroll down and tap Delete Event.
Invite others to an event Tap Invitees to select people from Contacts. Requires an iCloud, Microsoft
Exchange, or CalDAV account.
Responding to invitations
If you have an iCloud, Microsoft Exchange, or a supported CalDAV account you can receive and
respond to meeting invitations from people in your organization. When you receive an invitation,
the meeting appears in your calendar with a dotted line around it, and appears in the lower-
right corner of the screen.
Respond to an invitation: Tap a meeting invitation in the calendar, or tap to display the Event
screen and tap the invitation.
See the organizer’s contact
information
Tap “invitation from.”
See other invitees Tap Invitees. Tap a name to see the person’s contact information.
Add comments in reply Tap Add Comments. Your comments are visible to the organizer but not
to other attendees. Comments may not be available, depending on the
calendar service you’re using.
Set your availability
reserved when someone invites you to a meeting.
70 Chapter 13 Calendar
Draft
Apple Confidential
Searching calendars
calendars. Calendar searches the events for the calendars you’re currently viewing.
Search for events:
Calendar events can also be included in searches from the Home screen. See “Searching” on
page 32.
Subscribing to calendars
You can subscribe to calendars that use the iCalendar (.ics) format. Many calendar-based services
support calendar subscriptions, including iCloud, Yahoo!, Google, and the iCal application in OS X.
Subscribed calendars are read-only. You can read events from subscribed calendars on iPad, but
you can’t edit them or create new events.
Subscribe to a calendar: Go to Settings > Mail, Contacts, Calendars, then tap Add Account. Tap
Other, then tap Add Subscribed Calendar.
You can also subscribe to an iCal (or other .ics) calendar published on the web by tapping a link to
the calendar.
Importing calendar events from Mail
Syncing calendars
You can sync Calendar in these ways:
ÂIn iTunes: Use the device settings panes to sync with iCal or Microsoft Entourage on a Mac, or
with Microsoft Outlook 2003, 2007, or 2010 on a PC, when you connect iPad to your computer.
ÂIn Settings: Turn on Calendars in your iCloud, Microsoft Exchange, Google, or Yahoo! accounts
to sync your calendar information over the Internet, or to set up a CalDAV account if your
company or organization supports it. See “Setting up mail and other accounts” on page 18.
71
Chapter 13 Calendar
Draft
Apple Confidential

Calendar accounts and settings
There are several settings available for Calendar and your calendar accounts. Go to Settings > Mail,
Contacts, Calendars.
Calendar accounts are also used to sync to-do items for Reminders.
Add a CalDAV account: Go to Settings > Mail, Contacts, Calendars, tap Add an Account, then tap
Other. Under Calendars, tap Add CalDAV Account.
These options apply to all of your calendars:
Set calendar alert tones Go to Settings > Sounds > Calendar Alerts.
Sync past events Go to Settings > Mail, Contacts, Calendars > Sync, then choose a time
period. Future events are always synced.
Set alerts to sound when you
receive a meeting invitation
Go to Settings > Mail, Contacts, Calendars, and tap “New Invitation Alerts.”
Turn on Calendar time zone
support
Go to Settings > Mail, Contacts, Calendars > Time Zone Support, then turn
on Time Zone Support.
Set a default calendar Go to Settings > Mail, Contacts, Calendars > Default Calendar.
Use iCloud to keep Calendar
up to date on your iOS devices
and computers
Go to Settings > iCloud, then turn on Calendar. See “Using iCloud” on
page 19.
Important: When Time Zone Support is on, Calendar displays event dates and times in the time
zone of your current location as determined by your Internet connection. When you travel, iPad
may not display events or sound alerts at the correct local time. To manually set the correct time,
see “Date & Time” on page 12 8 .
72 Chapter 13 Calendar
Draft
Apple Confidential
Contacts 14
About Contacts
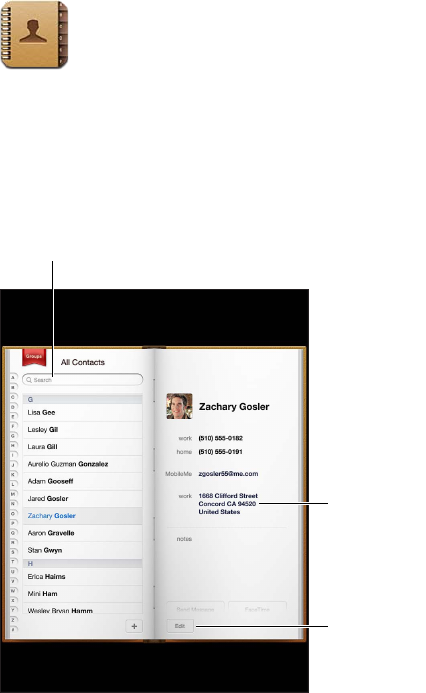
Contacts lets you easily access and edit your contact lists from personal, business, and
organizational accounts. You can search across all of your groups, and the information in Contacts
is automatically accessed to make addressing emails quick and easy.
View in Maps.
View in Maps.
Add or
change info.
Add or
change info.
Find contacts.
Find contacts.
Syncing contacts
You can add contacts in the following ways:
Use your iCloud contacts. See “ ÂUsing iCloud” on page 19.
In iTunes, sync contacts from Google or Yahoo!, or sync with applications on your computer. See Â
“Syncing with iTunes” on page 20.
Set up a Microsoft Exchange account on iPad, with Contacts enabled. See “ ÂContacts accounts
and settings” on page 75.
Set up an LDAP or CardDAV account to access business or school directories. See “ ÂContacts
accounts and settings” on page 75.
Enter contacts directly on iPad. See “ ÂAdding and editing contacts” on page 74.
73
Draft
Apple Confidential