Apple A1538 Tablet Device User Manual A1538 User Manual v1 0 Part2
Apple Inc. Tablet Device A1538 User Manual v1 0 Part2
Apple >
Contents
- 1. A1538_User_Manual_v1.0_Part1
- 2. A1538_User_Manual_v1.0_Part2
- 3. A1538_User_Manual_v1.0_Part3
- 4. A1538_User_Manual_v1.0_Part4
A1538_User_Manual_v1.0_Part2
Chapter 3 Basics 29
Enter text
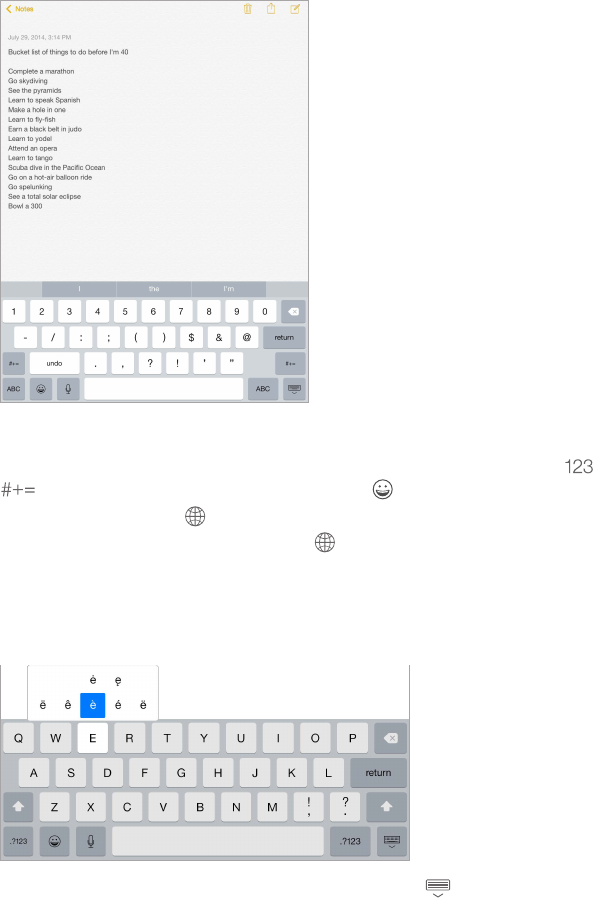
Tapatexteldtoseetheonscreenkeyboard,thentapletterstotype.Ifyoutouchthewrong
key,youcanslideyourngertothecorrectkey.Theletterisn’tentereduntilyoureleaseyour
ngerfromthekey.
Tap Shift to type uppercase, or touch the Shift key and slide to a letter. Double-tap Shift for caps
lock. To enter numbers, punctuation, or symbols, tap the Number key or the Symbol key
. If you haven’t added any keyboards, tap toswitchtotheemojikeyboard.Ifyouhave
several keyboards, tap to switch to the last one you used. Continue tapping to access other
enabled keyboards, or touch and hold ,thenslidetochooseadierentkeyboard.Toquickly
endasentencewithaperiodandaspace,justdouble-tapthespacebar.
Enter accented letters or other alternate characters. Touch and hold a key, then slide to choose
one of the options.
Hide the onscreen keyboard. Tap the Keyboard key .
If you see a word underlined in red, tap it to see suggested corrections. If the word you want
doesn’t appear, type the correction.
Apple Confidential
Chapter 3 Basics 30
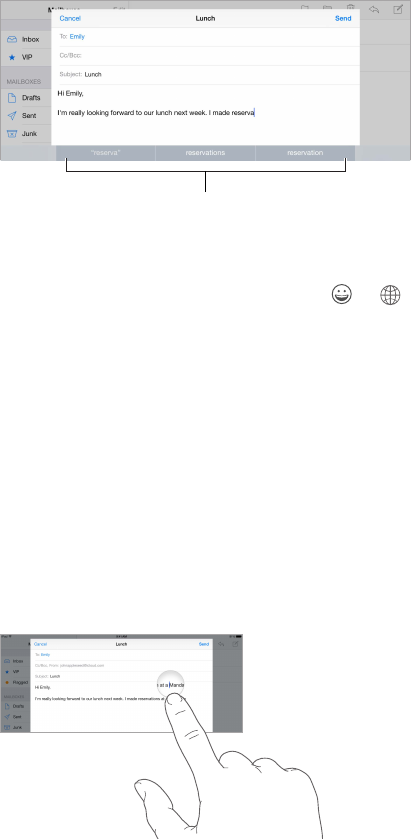
As you write, the keyboard predicts your next word (not available in all languages). Tap a word
to choose it, or accept a highlighted prediction by entering a space or punctuation. When you
tap a suggested word, a space appears after the word. If you enter a comma, period, or other
punctuation,thespaceisdeleted.Rejectasuggestionbytappingyouroriginalword(shownas
the predictive text option with quotation marks).
Predictive text
Predictive text
Hide predictive text. Pull down the suggested words. Drag the bar up when you want to see the
suggestions again.
Turn o predictive text. Touch and hold or , then slide to Predictive.
Ifyouturnopredictivetext,iPadmaystilltrytosuggestcorrectionsformisspelledwords.
Acceptacorrectionbyenteringaspaceorpunctuation,orbytappingreturn.Torejecta
correction,tapthe“x.”Ifyourejectthesamesuggestionafewtimes,iPadstopssuggestingit.
Set options for typing or add keyboards. Go to Settings > General > Keyboard.
You can also use an Apple Wireless Keyboard to enter text. See Use an Apple Wireless
Keyboard on page 31. To dictate instead of typing, see Dictate on page 32.
Edit text
Revise text. Touch and hold the text to show the magnifying glass, then drag to position the
insertion point.
Apple Confidential

Chapter 3 Basics 31
Select text. Tap the insertion point to display the selection options. Or double-tap a word
to select it. Drag the grab points to select more or less text. In read-only documents, such as
webpages, touch and hold to select a word.
Grab points
Grab points
You can cut, copy, or paste over selected text. With some apps, you can also get bold, italic, or
underlinedtext(tapB/I/U);getthedenitionofaword;orhaveiPadsuggestanalternative.You
may need to tap to see all the options.
Undo the last edit. Shake iPad, then tap Undo.
Justify text. Select the text, then tap the left or right arrow (not always available).
Save keystrokes
Ashortcutletsyouenterawordorphrasebytypingjustafewcharacters.Forexample,type
“omw” to enter “On my way!” That one’s already set up for you, but you can also add your own.
Create a shortcut. Go to Settings > General > Keyboard, then tap Shortcuts.
Have a word or phrase you use and don’t want it corrected? Create a shortcut, but leave the
Shortcuteldblank.
Use iCloud to keep your personal dictionary up to date on your other devices. Go to Settings >
iCloud, then turn on iCloud Drive or Documents & Data.
Use an Apple Wireless Keyboard
You can use an Apple Wireless Keyboard (available separately) to enter text on your iPad. The
keyboardconnectsviaBluetooth,soyoumustrstpairitwithiPad.
Note: The Apple Wireless Keyboard may not support keyboard features that are on your device.
For example, it doesn’t anticipate your next word or automatically correct misspelled words.
Pair an Apple Wireless Keyboard with iPad. Turn on the keyboard, go to Settings > Bluetooth
and turn on Bluetooth, then tap the keyboard when it appears in the Devices list.
Once it’s paired, the keyboard reconnects to iPad whenever it’s in range—up to about 33 feet (10
meters). When it’s connected, the onscreen keyboard doesn’t appear.
Save your batteries. TurnoBluetoothandthewirelesskeyboardwhennotinuse.Youcanturn
oBluetooth inControlCenter.Toturnothekeyboard,holddowntheOn/oswitchuntilthe
greenlightgoeso.
Unpair a wireless keyboard. Go to Settings > Bluetooth, tap next to the keyboard name, then
tap Forget this Device.
See Bluetooth devices on page 41.
Apple Confidential
Chapter 3 Basics 32
Add or change keyboards
Youcanturntypingfeatures,suchasspellchecking,onoro;addkeyboardsforwritingin
dierentlanguages;andchangethelayoutofyouronscreenkeyboardorAppleWireless
Keyboard.
Set typing features. Go to Settings > General > Keyboard.
Add a keyboard for another language. Go to Settings > General > Keyboard > Keyboards > Add
New Keyboard.
Switch keyboards. If you haven’t added any keyboards, tap toswitchtotheemojikeyboard.
If you have several keyboards, tap to switch to the last one you used. Continue tapping to
access other enabled keyboards, or touch and hold ,thenslidetochooseadierentkeyboard.
For information about international keyboards, see Use international keyboards on page 156.
Change the keyboard layout. Go to Settings > General > Keyboard > Keyboards, select a
keyboard, then choose a layout.
Keyboard layouts
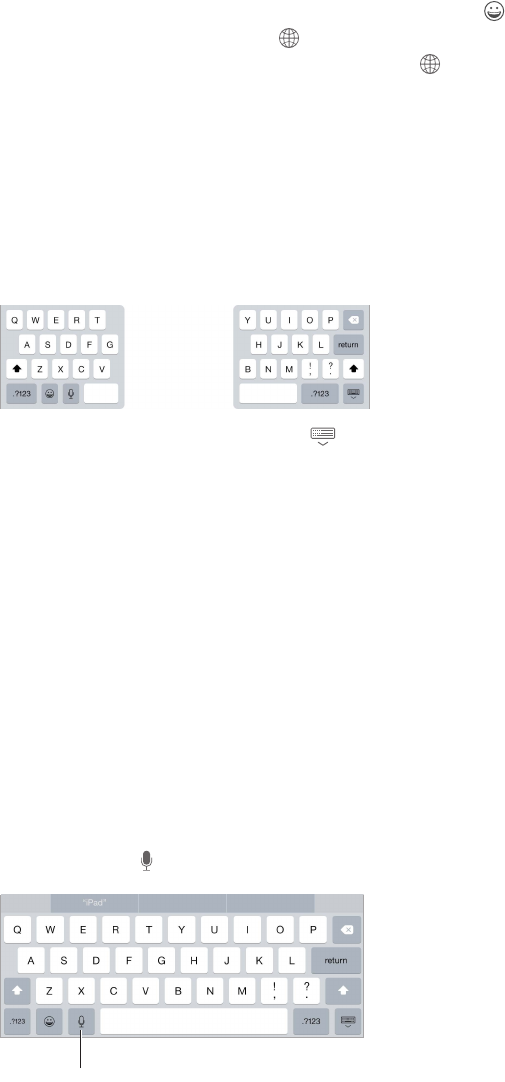
On iPad, you can type with a split keyboard that’s at the bottom of the screen, or undocked and
in the middle of the screen.
Adjust the keyboard. Touch and hold , then:
•Use a split keyboard: SlideyourngertoSplit,thenrelease.Orspreadthekeyboardapartfrom
the middle.
•Move the keyboard to the middle of the screen: SlideyourngertoUndock,thenrelease.
•Return to a full keyboard: SlideyourngertoDockandMerge,thenrelease.
•Return a full keyboard to the bottom of the screen: SlideyourngertoDock,thenrelease.
Turn Split Keyboard on or o. Go to Settings > General > Keyboard > Split Keyboard.
Dictate
If you like, you can dictate instead of typing. Make sure Enable Dictation is turned on (in
Settings > General > Keyboard) and iPad is connected to the Internet.
Note: Dictation may not be available in all languages or in all areas, and features may vary.
Cellular data charges may apply. See Cellular settings on page 166.
Dictate text. Tap ontheiPadkeyboard,thenspeak.Whenyounish,tapDone.
Tap to begin dictation.
Tap to begin dictation.
Apple Confidential

Chapter 3 Basics 33
Add text. Tap againandcontinuedictating.Toinserttext,taptoplacetheinsertionpointrst.
You can also replace selected text by dictating.
Add punctuation or format text. Say the punctuation or format. For example, “Dear Mary
comma the check is in the mail exclamation mark” becomes “Dear Mary, the check is in the mail!”
Punctuation and formatting commands include:
•quote … end quote
•new paragraph
•new line
•cap—to capitalize the next word
•capson…capso—tocapitalizetherstcharacterofeachword
•all caps—to make the next word all uppercase
•allcapson…allcapso—tomaketheenclosedwordsalluppercase
•nocapson…nocapso—tomaketheenclosedwordsalllowercase
•nospaceon…nospaceo—torunaseriesofwordstogether
•smiley—to insert :-)
•frowny—to insert :-(
•winky—to insert ;-)
Search
Search apps
Manyappsincludeasearcheldwhereyoucantypetondsomethingwithintheapp.For
example,intheMapsapp,youcansearchforaspeciclocation.
Spotlight Search
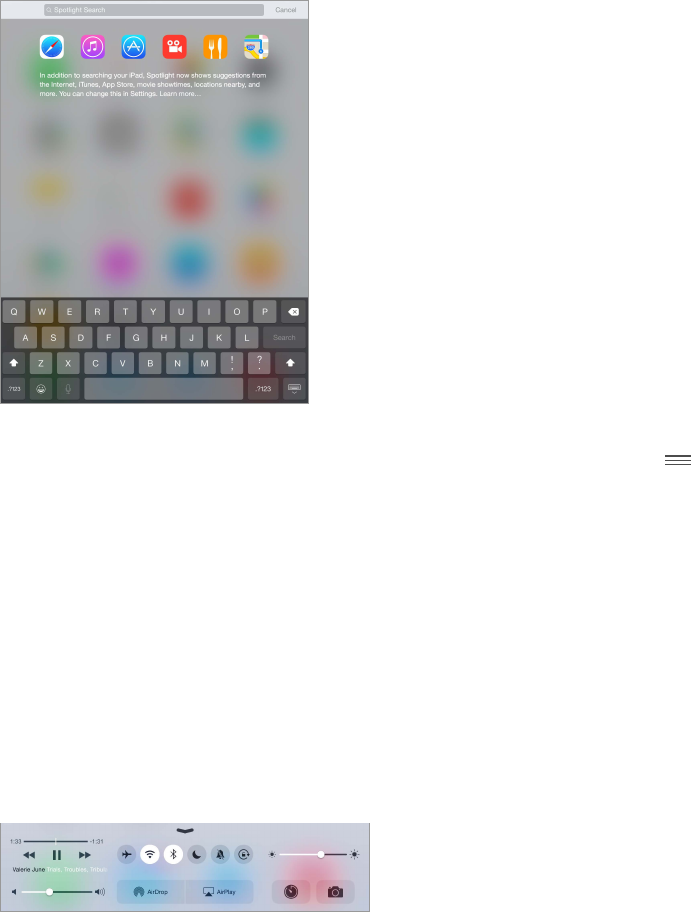
Spotlight Search not only searches your iPad, but also shows suggestions from the App Store and
the Internet. You may see suggestions for movie showtimes, nearby locations, and more.
Search iPad. DragdownthemiddleofanyHomescreentorevealthesearcheld.Resultsoccur
as you type; to hide the keyboard and see more results on the screen, tap Search. Tap an item in
the list to open it.
Apple Confidential
Chapter 3 Basics 34
YoucanalsouseSpotlightSearchtondandopenapps.
Choose which apps and content are searched. Go to Settings > General > Spotlight Search,
then tap to deselect apps or content. To change the search order, touch and drag to a
new position.
Limit Spotlight Search to your iPad. Go to Settings > General > Spotlight Search, then tap
Spotlight Suggestions to deselect it.
Turn o Location Services for Spotlight Suggestions. Go to Settings > Privacy > Location
Services.TapSystemServices,thenturnoSpotlightSuggestions.
Control Center
Control Center gives you instant access to the camera, AirPlay, control and playback of currently
playingaudio,andotherhandyfeatures.Youcanalsoadjustthebrightness,lockthescreenin
portraitorientation,turnwirelessservicesonoro,andturnonAirDrop.Formoreinformation
about AirDrop, see AirDrop on page 37.
Open Control Center. Swipe up from the bottom edge of any screen (even the Lock screen).
Open the currently playing audio app. Tap the song title.
Close Control Center. Swipe down, tap the top of the screen, or press the Home button.
Turn o access to Control Center in apps or on the Lock screen. Go to Settings > Control Center.
Alerts and Notication Center
Alerts
Alertsletyouknowaboutimportantevents.Theycanappearbrieyatthetopofthescreen,or
remain in the center of the screen until you acknowledge them.
Apple Confidential

Chapter 3 Basics 35
Some apps may include a badge on their Home screen icon, to let you know how many new
items await—for example, the number of new email messages. If there’s a problem—such as a
message that couldn’t be sent—an exclamation mark appears on the badge. On a folder, a
numberedbadgeindicatesthetotalnumberofnoticationsforalltheappsinside.
Alerts can also appear on the Lock screen.
Respond to an alert without leaving your current app. Pull down on the alert when it appears
at the top of your screen.
Note: This feature works with text and email messages, calendar invitations, and more.
Respond to an alert when iPad is locked. Swipe the alert from right to left.
Silence your alerts. Go to Settings > Do Not Disturb. You can also use Siri to turn Do Not Disturb
onoro.Say“TurnonDoNotDisturb”or“TurnoDoNotDisturb.”
Set sounds. Go to Settings > Sounds.
Notication Center
NoticationCentercollectsyournoticationsinoneplace,soyoucanreviewthemwhenever
you’re ready. View details about your day—such as the weather forecast, appointments,
birthdays, stock quotes, and even a quick summary of what’s coming up tomorrow. Tap the
Noticationstabtoreviewallyouralerts.
Open Notication Center. Swipe down from the top edge of the screen.
Set Today options. To choose what information appears, tap the Edit key at the end of your
information on the Today tab. Tap + or — to add or remove information. To arrange the order of
your information, touch , then drag it to a new position.
Set notication options. GotoSettings>Notications.Tapanapptosetitsnoticationoptions.
Forexample,choosetoviewanoticationfromtheLockscreen.YoucanalsotapEdittoarrange
theorderofappnotications.Touch , then drag it to a new position.
Apple Confidential

Chapter 3 Basics 36
Choose whether to show Today and Notications View on a locked screen. Go to Settings >
Touch ID & Passcode (iPad models with Touch ID) or Settings > Passcode (other models), then
choose whether to allow access when locked.
Close Notication Center. Swipe up, or press the Home button.
Sounds and silence
YoucanchangeorturnothesoundsiPadplayswhenyougetaFaceTimecall,textmessage,
email, tweet, Facebook post, reminder, or other event.
Set sound options. Go to Settings > Sounds for options such as alert tones and ringtones, and
ringer and alert volumes.
IfyouwanttotemporarilysilenceincomingFaceTimecalls,alerts,andsoundeects,seethe
following section.
Do Not Disturb
Do Not Disturb is an easy way to silence iPad, whether you’re going to dinner or to sleep. It keeps
FaceTime calls and alerts from making any sounds or lighting up the screen.
Turn on Do Not Disturb. Swipe up from the bottom edge of the screen to open Control Center,
then tap . When Do Not Disturb is on, appears in the status bar.
Note: Alarms still sound, even when Do Not Disturb is on. To make sure iPad stays silent, turn
ito.
Congure Do Not Disturb. Go to Settings > Do Not Disturb.
You can schedule quiet hours, allow FaceTime calls from your Favorites or groups of contacts, and
allow repeated FaceTime calls to ring through for those emergency situations. You can also set
whether Do Not Disturb silences iPad only when it’s locked, or even when it’s unlocked.
Sharing
Share from apps
In many apps, you can tap Share or to choose how to share your information. The choices vary
depending on the app you’re using. Additional options may appear if you’ve downloaded apps
with sharing options. For more information, see App extensions on page 25.
Use Twitter, Facebook, Flickr, Vimeo or other third-party apps with sharing options. Sign in to
your account in Settings. The third-party sharing buttons take you to the appropriate setting if
you’re not yet signed in.
Customize the dierent ways you share, view, and organize your information. Tap the More
button, then touch and drag to move items to new positions.
Apple Confidential
Chapter 3 Basics 37
AirDrop
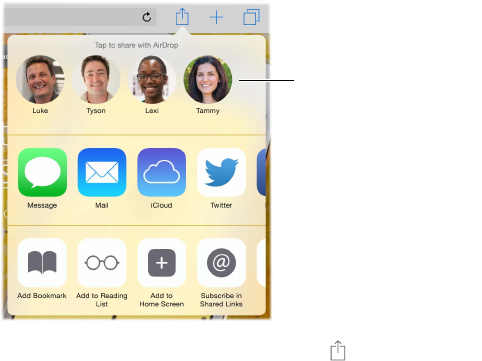
AirDrop lets you share your photos, videos, websites, locations, and other items wirelessly
with other nearby devices (iOS 7 or later). With iOS 8, you can share with Mac computers
with OS X Yosemite. AirDrop transfers information using Wi-Fi and Bluetooth—both must be
turned on. To use AirDrop, you need to be signed in to iCloud using your Apple ID. Transfers are
encrypted for security.
Tap to share with a nearby
friend using AirDrop.
Tap to share with a nearby
friend using AirDrop.
Share an item using AirDrop. Tap Share , then tap the name of a nearby AirDrop user.
Receive AirDrop items from others. Swipe up from the bottom edge of the screen to open
Control Center. Tap AirDrop, then choose to receive items from Contacts only or from Everyone.
You can accept or decline each request as it arrives.
Family Sharing
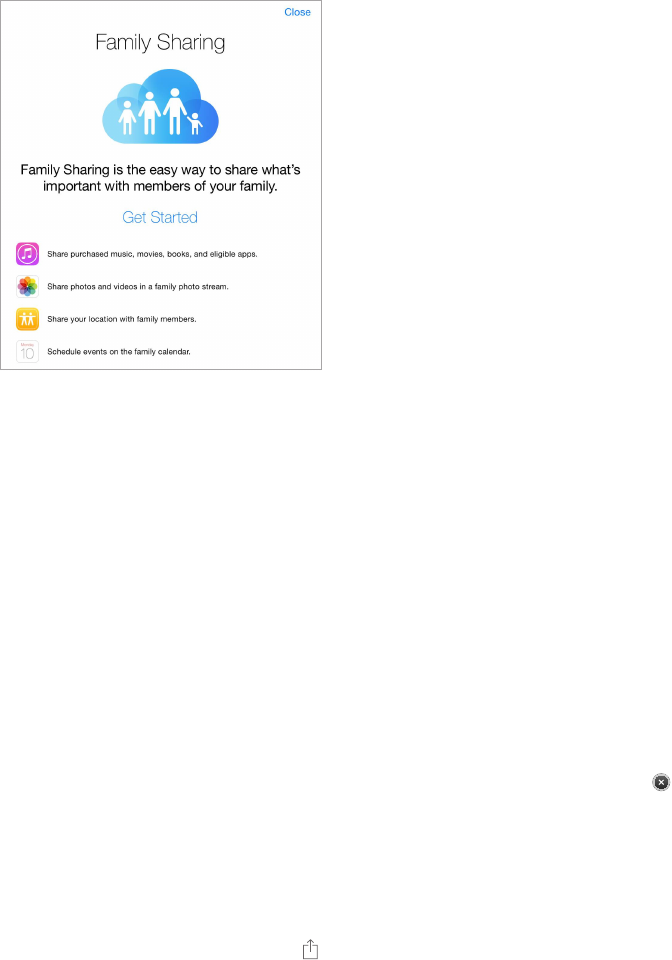
With Family Sharing, up to six family members can share their iTunes Store, iBooks Store, and
App Store purchases, a family calendar, and family photos, all without sharing accounts.
Oneadultinyourhousehold—thefamilyorganizer—invitesfamilymemberstojointhefamily
group and agrees to pay for any iTunes Store, App Store, and iBooks Store purchases those family
members initiate while part of the family group. Once set up, family members get immediate
access to each other’s music, movies, TV shows, books, and eligible apps. In addition, family
members can easily share photos in a shared family album, add events to a family calendar,
share their location with other family members, and even help locate another family member’s
missing device.
Children under 13 can participate in Family Sharing, too. As a parent or legal guardian, the family
organizer can provide parental consent for a child to have his or her own Apple ID, and create it
on the child’s behalf. Once the account is created, it’s added to the family group automatically.
Family Sharing requires you to sign in to iCloud with your Apple ID. You will also be asked to
conrmtheAppleIDyouusefortheiTunesStore,AppStore,andiBooksStore.Itisavailableon
devices with iOS 8, Mac computers with OS X Yosemite, and PCs with iCloud for Windows 4.0. You
can be part of only one family group at a time.
Set up Family Sharing. Go to Settings > iCloud > Set Up Family Sharing. Follow the onscreen
instructionstosetupFamilySharingasthefamilyorganizer,theninvitefamilymemberstojoin.
Create an Apple ID for a child. Go to Settings > iCloud > Family, scroll to the bottom of the
screen, then tap Create an Apple ID for a child.
Apple Confidential
Chapter 3 Basics 38
Accept an invitation to Family Sharing. Make sure you are signed in to iCloud, and that you can
accept a Family Sharing invitation from your iOS device (iOS 8 required), Mac (OS X Yosemite
required), or PC (iCloud for Windows 4.0 required). Or, if the organizer is nearby during the setup
process, he or she can simply ask you to enter the Apple ID and password you use for iCloud.
Access shared iTunes Store, App Store, and iBooks Store purchases. Open iTunes Store, iBooks
Store, or App Store, tap Purchased, then choose a family member from the menu that appears.
When a family member initiates a purchase, it is billed directly to the family organizer’s account.
Once purchased, the item is added to the initiating family member’s account and is shared with
the rest of the family. If Family Sharing is ever disabled, each person keeps the items they chose
to purchase—even if they were paid for by the family organizer.
Turn on Ask to Buy. The family organizer can require young family members to request approval
for purchases or free downloads. Go to Settings > iCloud > Family, then tap the person’s name.
Note: Age restrictions for Ask to Buy vary by area. In the United States, the family organizer can
enable Ask to Buy for any family member under age 18; for children under age 13, it’s enabled
by default.
Hide your iTunes Store, App Store, and iBooks Store purchases. Open iTunes on your computer,
then click iTunes Store. Under Quick Links, click Purchased, then choose the content type
(for example, Music or Movies). Hover over the item you want to hide, then click . To make
purchases visible again, return to Quick Links, then click Account. Scroll down to iTunes in the
Cloud, then click Manage (to the right of Hidden Purchases).
Share photos or videos with family members. When you set up Family Sharing, a shared album
called “Family” is automatically created in the Photos app on all family members’ devices. To share
a photo or video with family members, open the Photos app, then view a photo or video or
select multiple photos or videos. Tap , tap iCloud Photo Sharing, add comments, then share to
your shared family album. See iCloud Photo Sharing on page 85.
Add an event to the family calendar. When you set up Family Sharing, a shared calendar called
“Family” is automatically created in the Calendar app on all family members’ devices. To add a
family event, open the Calendar app, create an event, then choose to add the event to the family
calendar. See Share iCloud calendars on page 81.
Apple Confidential
Chapter 3 Basics 39
Set up a family reminder. When you set up Family Sharing, a shared list is automatically created
in the Reminders app on all family members’ devices. To add a reminder to the family list, open
the Reminders app, tap the family list, then add a reminder to the list. See Reminders at a
glance on page 107.
Share your location with family members. Family members can share their location by tapping
Settings>iCloud>ShareMyLocation(underAdvanced).Tondafamilymember’slocation,
use the Find My Friends app (download it for free from the App Store). Or, use the Messages
app (iOS 8 required). For more information about using Messages to share or view locations, see
Share photos, videos, your location, and more on page 53.
Keep track of your family’s devices. If family members have enabled Share My Location in
iCloud, you can help them locate missing devices. Open Find My iPhone on your device or at
iCloud.com. For more information, see Find My iPad on page 45.
Leave Family Sharing. Go to Settings > iCloud > Family, then tap Leave Family Sharing. If you are
the organizer, go to Settings > iCloud > Family, tap your name, then tap Stop Family Sharing. For
more information, see support.apple.com/kb/HT201081.
iCloud Drive
About iCloud Drive
iCloud Drive stores your presentations, spreadsheets, PDFs, images, and other kinds of
documents in iCloud so you can access these documents from any of your devices set up
withiCloud.Itallowsyourappstosharedocumentssoyoucanworkonthesameleacross
multiple apps.
iCloud Drive works with devices with iOS 8, Mac computers with OS X Yosemite, PCs with iCloud
for Windows 4.0, or on iCloud.com. To access iCloud Drive, you must be signed in to iCloud using
your Apple ID. iCloud Drive works with supported apps including Pages, Numbers, Keynote,
GarageBand,andsomethird-partyapps.StoragelimitsaresubjecttoyouriCloudstorageplan.
Set up iCloud Drive
You can set up iCloud Drive using Setup Assistant when you install iOS 8, or you can set it up
later in Settings. iCloud Drive is an upgrade to Documents & Data. When you upgrade to iCloud
Drive, your documents are copied to iCloud Drive and become available on your devices using
iCloud Drive. You won’t be able to access the documents stored in iCloud Drive on your other
devices until they are also upgraded to iOS 8 or OS X Yosemite. For more information about
upgrading to iCloud Drive, see support.apple.com/kb/HT6345.
Set up iCloud Drive. Go to Settings > iCloud > iCloud Drive, turn on iCloud Drive, then follow the
onscreen instructions.
Transfer les
ThereareseveralwaystotransferlesbetweeniPadandyourcomputerorotheriOSdevice.
Transfer les using iTunes. Connect iPad to your computer using the included cable. In iTunes on
your computer, select iPad, then click Apps. Use the File Sharing section to transfer documents
betweeniPadandyourcomputer.AppsthatsupportlesharingappearintheAppslist.To
deleteale,selectitintheDocumentslist,thenpresstheDeletekey.
YoucanalsoviewlesreceivedasemailattachmentsoniPad.
Apple Confidential

Chapter 3 Basics 40
Withsomeapps,youcantransferlesusingAirDrop.SeeAirDrop on page 37.
Personal Hotspot
Use Personal Hotspot to share your iPad (Wi-Fi + Cellular models) Internet connection.
Computers can share your Internet connection using Wi-Fi, Bluetooth, or a USB cable. Other iOS
devices can share the connection using Wi-Fi. Personal Hotspot works only if iPad is connected to
the Internet over the cellular data network.
Note: This feature may not be available with all carriers. Additional fees may apply. Contact your
carrier for more information.
Share an Internet connection. Go to Settings > Cellular Data, then tap Personal Hotspot—if it
appears—to set up the service with your carrier.
After you turn on Personal Hotspot, other devices can connect in the following ways:
•Wi-Fi: On the device, choose your iPad in the list of available Wi-Fi networks.
•USB: Connect your iPad to your computer using the cable that came with it. In your
computer’sNetworkpreferences,chooseiPad,thencongurethenetworksettings.
•Bluetooth: On iPad, go to Settings > Bluetooth, then turn on Bluetooth. To pair and connect
iPad with your device, refer to the documentation that came with your device.
Note: When a device is connected, a blue band appears at the top of the iPad screen. The
Personal Hotspot icon appears in the status bar of iOS devices using Personal Hotspot.
Change the Wi-Fi password for iPad. Go to Settings > Personal Hotspot > Wi-Fi Password, then
enter a password of at least eight characters.
Monitor your cellular data network usage. Go to Settings > Cellular. See Cellular settings on
page 166.
AirPlay
Use AirPlay to stream music, photos, and video wirelessly to Apple TV and other AirPlay-enabled
devices. If you don’t see your AirPlay-enabled devices when you tap , you may also need to
make sure everything is on the same Wi-Fi network.
Display the AirPlay controls. Swipe up from the bottom edge of the screen to open Control
Center, then tap .
Stream content. Tap , then choose the device you want to stream to.
Switch back to iPad. Tap , then choose iPad.
Mirror the iPad screen on a TV. Tap , choose an Apple TV, then tap Mirroring. A blue bar
appears at the top of the iPad screen when AirPlay mirroring is turned on.
YoucanalsoconnectiPadtoaTV,projector,orotherexternaldisplayusingtheappropriate
Apple cable or adapter. See support.apple.com/kb/HT4108.
AirPrint
Use AirPrint to print wirelessly to an AirPrint-enabled printer from apps such as Mail, Photos, and
Safari. Many apps available on the App Store also support AirPrint.
Apple Confidential

Chapter 3 Basics 41
iPad and the printer must be on the same Wi-Fi network. For more information about AirPrint,
see support.apple.com/kb/HT4356.
Print a document. Tap or (depending on the app you’re using).
See the status of a print job. Double-click the Home button, then tap Print Center. The badge on
the icon shows how many documents are in the queue.
Cancel a job. Select it in Print Center, then tap Cancel Printing.
Apple Pay
On iPad models with Touch ID, you can use Apple Pay to make payments in supporting apps (not
available in all areas). These apps sell physical goods and services such as apparel, electronics,
health and beauty products, tickets, reservations, and more.
Set up Apple Pay. Go to Settings > Passbook & Apple Pay, then enter information for up to
eight supported credit or debit cards, your shipping and billing details, and your contact
information. When you add a card to use with Apple Pay, the card issuer determines if your
card is eligible to be added and may ask you to provide additional information to complete the
vericationprocess.
Note: Many U.S. credit and debit cards can be used with Apple Pay. For information about Apple
Pay availability and current card issuers, go to support.apple.com/kb/HT6288.
Pay in an app. Tap the Apple Pay button, then review the information that appears (for example,
the card you’re using for the payment, your email, and the shipping method). Make any changes
before using Touch ID or your passcode to complete the payment.
Youmayreceiveanoticationwiththemerchantname,andtheamountauthorizedforthe
purchase. Your zip code may be provided to the merchant to calculate tax and shipping costs.
Payment information—such as billing and shipping addresses, email address, and phone
number—may also be provided to the merchant once you authorize the payment with Touch ID
or a passcode.
View Apple Pay activity. Your Apple Pay activity will appear on the statement you receive from
your card issuer. You may also be able to view Apple Pay activity on supported credit cards by
going to Settings > Passbook & Apple Pay.
Suspend and remove cards. You have several options for removing or suspending credit and
debit cards. To remove a credit or debit card from Apple Pay, go to Settings > Passbook &
Apple Pay, tap an existing credit or debit card, then scroll to the bottom and tap Remove. If your
iPad is lost or stolen, and you have enabled Find My iPad, you can use it to help you locate and
secure your iPad—including suspending the use of, or removing, your credit and debit cards
used for Apple Pay. See Find My iPad on page 45. You can log in to your account at iCloud.com
and remove your cards in Settings > My Devices. You can also call the issuers of your cards.
Bluetooth devices
You can use Bluetooth devices with iPad, such as stereo headphones or an Apple Wireless
Keyboard.ForsupportedBluetoothproles,gotosupport.apple.com/kb/HT3647.
WARNING: For important information about avoiding hearing loss and avoiding distractions
that could lead to dangerous situations, see Important safety information on page 159.
Apple Confidential

Chapter 3 Basics 42
Note: TheuseofcertainaccessorieswithiPadmayaectwirelessperformance.NotalliPhone
and iPod touch accessories are fully compatible with iPad. Turning on Airplane Mode may
eliminate audio interference between iPad and an accessory. Reorienting or relocating iPad and
the connected accessory may improve wireless performance.
Turn Bluetooth on or o. Go to Settings > Bluetooth. You can also turn Bluetooth onoroin
Control Center.
Connect to a Bluetooth device. Tap the device in the Devices list, then follow the onscreen
instructions to connect to it. See the documentation that came with the device for information
about Bluetooth pairing. For information about using an Apple Wireless Keyboard, see Use an
Apple Wireless Keyboard on page 31.
iPad must be within about 33 feet (10 meters) of the Bluetooth device.
Return audio output to iPad. Turnoorunpairthedevice,turnoBluetoothinSettings>
Bluetooth, or use AirPlay to switch audio output to iPad. See AirPlay on page 40. Audio output
returns to iPad if the Bluetooth device moves out of range.
Unpair a device. Go to Settings > Bluetooth, tap next to the device, then tap Forget this
Device. If you don’t see the Devices list, make sure Bluetooth is on.
Restrictions
You can set restrictions for some apps, and for purchased content. For example, parents can
restrict explicit music from appearing in playlists, or disallow changes to certain settings. Use
restrictions to prevent the use of certain apps, the installation of new apps, or changes to
accounts or the volume limit.
Turn on restrictions. Go to Settings > General > Restrictions, then tap Enable Restrictions. You’ll
beaskedtodenearestrictionspasscodethat’snecessarytochangethesettingsyoumake.This
canbedierentfromthepasscodeforunlockingiPad.
Important: If you forget your restrictions passcode, you must restore the iPad software. See
Restore iPad on page 166.
Privacy
Privacy settings let you see and control which apps and system services have access to Location
Services, and to contacts, calendars, reminders, and photos.
Location Services lets location-based apps such as Reminders, Maps, and Camera gather and
use data indicating your location. Your approximate location is determined using available
information from local Wi-Fi networks, if you have Wi-Fi turned on. The location data collected
byAppleisn’tcollectedinaformthatpersonallyidentiesyou.WhenanappisusingLocation
Services, appears in the status bar.
Turn Location Services on or o. GotoSettings>Privacy>LocationServices.Youcanturnito
forsomeorforallappsandservices.IfyouturnoLocationServices,you’repromptedtoturnit
on again the next time an app or service tries to use it.
Turn Location Services o for system services. Several system services, such as location-based
ads,useLocationServices.Toseetheirstatus,turnthemonoro,orshow in the status
bar when these services use your location, go to Settings > Privacy > Location Services >
System Services.
Apple Confidential
Chapter 3 Basics 43
Turn o access to private information. Go to Settings > Privacy. You can see which apps and
features have requested and been granted access to the following information:
•Contacts
•Calendar
•Reminders
•Photos
•Bluetooth Sharing
•Microphone
•Camera
•HomeKit
•Motion Activity
•Twitter
•Facebook
Youcanturnoeachapp’saccesstoeachcategoryofinformation.Reviewthetermsandprivacy
policy for each third-party app to understand how it uses the data it’s requesting. For more
information, see support.apple.com/kb/HT6338.
Security
Security features help protect the information on your iPad from being accessed by others.
Use a passcode with data protection
For better security, you can set a passcode that must be entered each time you turn on or wake
up iPad.
Set a passcode. Go to Settings > Touch ID & Passcode (iPad models with Touch ID) or Settings >
Passcode (other models), then set a 4-digit passcode.
Setting a passcode turns on data protection, using your passcode as a key to encrypt Mail
messages and attachments stored on iPad, using 256-bit AES encryption. (Other apps may also
use data protection.)
Increase security. TurnoSimplePasscodeandusealongerpasscode.Toenterapasscodethat’s
a combination of numbers and letters, you use the keyboard. If you prefer to unlock iPad using
the numeric keypad, set up a longer passcode using numbers only.
Add ngerprints and set options for the Touch ID sensor. (iPad models with Touch ID) Go to
Settings > Touch ID & Passcode. See Touch ID, below.
Allow access to features when iPad is locked. Go to Settings > Touch ID & Passcode (iPad
models with Touch ID) or Settings > Passcode (other models). Optional features include:
•Today (see NoticationCenter on page 35)
•NoticationsView(seeNoticationCenter on page 35)
•Siri (if enabled, see Siri settings on page 49)
Allow access to Control Center when iPad is locked. Go to Settings > Control Center. See Control
Center on page 34.
Apple Confidential
Chapter 3 Basics 44
Erase data after ten failed passcode attempts. Go to Settings > Touch ID & Passcode (iPad
models with Touch ID) or Settings > Passcode (other models), then tap Erase Data. After ten
failed passcode attempts, all settings are reset, and all your information and media are erased by
removing the encryption key to the data.
If you forget your passcode, you must restore the iPad software. See Restore iPad on page 166.
Touch ID
OniPadmodelswithTouchID,youcanunlockiPadbyplacingangerontheHomebutton.
Touch ID also lets you:
•Use your Apple ID password to make purchases in the iTunes Store, App Store, or iBooks Store
•Provide debit and credit card info, billing and shipping addresses, and contact info when
payinginanappthatoersApplePayasamethodofpayment
Set up the Touch ID sensor. Go to Settings > Touch ID & Passcode. Set whether you want to
useangerprinttounlockiPad,andtomakepurchases.TapAddaFingerprint,thenfollowthe
onscreeninstructions.Youcanaddmorethanonengerprint(yourthumbandforenger,for
example, or one for your spouse).
Note: IfyouturniPadoaftersettinguptheTouchIDsensor,you’llbeaskedtoconrmyour
passcodewhenyouturniPadbackonandunlockitthersttime.You’llalsobeaskedforyour
AppleIDpasswordfortherstpurchaseyoumakeintheiTunesStore,AppStore,oriBooksStore.
Delete a ngerprint. Tapthengerprint,thentapDeleteFingerprint.Ifyouhavemorethanone
ngerprint,placeangerontheHomebuttontondoutwhichngerprintitis.
Name a ngerprint. Tapthengerprint,thenenteraname,suchas“Thumb.”
Use the Touch ID sensor to make a payment in the iTunes Store, App Store, or iBooks Store.
When purchasing from the iTunes Store, App Store, or iBooks Store, follow the prompts to enable
purchaseswithyourngerprint.OrgotoSettings>TouchID&Passcode,thenturnoniTunes&
App Store.
Use Touch ID to make a payment in an app that supports Apple Pay. Go to Settings >
Touch ID & Passcode to ensure that Apple Pay is enabled with your Touch ID. For more
information, see Apple Pay on page 41.
iCloud Keychain
iCloud Keychain keeps your Safari website user names and passwords, credit card information,
and Wi-Fi network information up to date. iCloud Keychain works on all your approved devices
(iOS 7 or later) and Mac computers (OS X Mavericks or later).
iCloud Keychain works with Safari Password Generator and AutoFill. When you’re setting up a
new account, Safari Password Generator suggests unique, hard-to-guess passwords. You can
use AutoFill to have iPad enter your user name and password info, making login easy. See Fill in
forms on page 64.
Note: Some websites do not support AutoFill.
iCloud Keychain is secured with 256-bit AES encryption during storage and transmission, and
cannot be read by Apple.
Set up iCloud Keychain. Go to Settings > iCloud > Keychain. Turn on iCloud Keychain, then
follow the onscreen instructions. If you set up iCloud Keychain on other devices, you need to
approve use of iCloud Keychain from one of those devices, or use your iCloud Security Code.
Apple Confidential
Chapter 3 Basics 45
Important: Your iCloud Security Code cannot be retrieved by Apple. If you forget your security
code, you have to start over and set up your iCloud Keychain again.
Set up AutoFill. Go to Settings > Safari > Passwords & AutoFill. Make sure Names and Passwords,
and Credit Cards, are turned on (they’re on by default). To add credit card info, tap Saved
Credit Cards.
The security code for your credit card is not saved—you have to enter that manually.
Toautomaticallyllinnames,passwords,orcreditcardinfoonsitesthatsupportit,tapatext
eld,thentapAutoFill.
To protect your personal information, set a passcode if you turn on iCloud Keychain and AutoFill.
Limit Ad Tracking
Restrict or reset Ad Tracking. Go to Settings > Privacy > Advertising. Turn on Limit Ad Tracking
topreventappsfromaccessingyouriPadadvertisingidentier.Formoreinformation,tapAbout
Advertising & Privacy.
Find My iPad
Find My iPad can help you locate and secure your iPad using the free Find My iPhone app
(available through the App Store) on another iPad, iPhone, or iPod touch, or using a Mac or PC
web browser signed in to www.icloud.com/nd. Find My iPhone includes Activation Lock, which
is designed to prevent anyone else from using your iPad if you ever lose it. Your Apple ID and
passwordarerequiredtoturnoFindMyiPadortoeraseandreactivateyouriPad.
Turn on Find My iPad. Go to Settings > iCloud > Find My iPad.
Important: To use these features, Find My iPad must be turned on before your iPad is lost. iPad
must be able to connect to the Internet for you to locate and secure the device. iPad sends its
last location prior to the battery running out when Send Last Location in Settings is turned on.
Use Find My iPhone. Open the Find My iPhone app on an iOS device, or go to
www.icloud.com/nd on your computer. Sign in, then select your device.
•Play Sound: Play a sound at full volume for two minutes, even if the ringer is set to silent.
•Lost Mode: Immediately lock your missing iPad with a passcode and send it a message
displaying a contact number. iPad tracks and reports its location, so you can see where it’s
been when you check the Find My iPhone app. Lost Mode also suspends the use of your credit
and debit cards used for Apple Pay (iPad models with Touch ID). See Apple Pay on page 41.
•Erase iPad: Protect your privacy by erasing all the information and media on your iPad and
restoring it to its original factory settings. Erase iPad also removes your credit and debit cards
used for Apple Pay (iPad models with Touch ID). See Apple Pay on page 41.
Note: Before selling or giving away your iPad, you should erase it completely to remove all of
yourpersonaldataandturnoFindMyiPadtoensurethenextownercanactivateandusethe
device normally. Go to Settings > General > Reset > Erase All Content and Settings. See Sell or
give away iPad on page 167.
Apple Confidential
Chapter 3 Basics 46
Charge and monitor the battery
iPad has an internal, lithium-ion rechargeable battery. For more information about the battery—
including tips for maximizing battery life—see www.apple.com/batteries/.
WARNING: For important safety information about the battery and charging iPad, see
Important safety information on page 159.
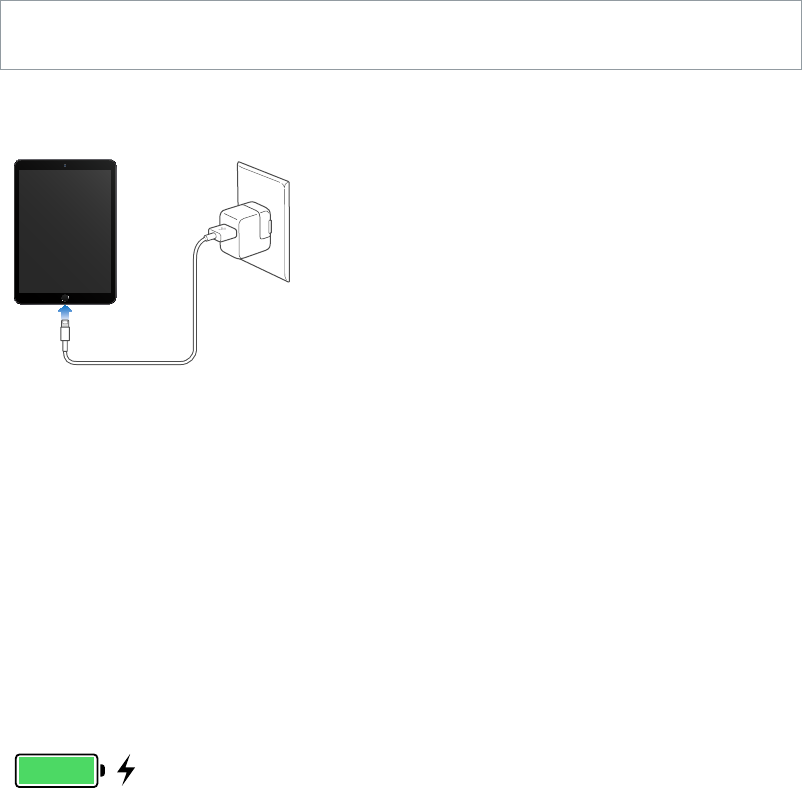
Charge the battery. The best way to charge the iPad battery is to connect iPad to a power outlet
using the included cable and USB power adapter.
Note: Connecting iPad to a power outlet can start an iCloud backup or wireless iTunes syncing.
See Back up iPad on page 165 and Sync with iTunes on page 20.
iPad may also charge slowly when you connect it to a USB 2.0 port on your computer. If your
Mac or PC doesn’t provide enough power to charge iPad, a “Not Charging” message appears in
the status bar.
Important: The iPad battery may drain instead of charge if iPad is connected to a computer
that’sturnedoorisinsleeporstandbymode,toaUSBhub,ortotheUSBportonakeyboard.
See proportion of battery used by each app. Go to Settings > General > Usage, then tap
Battery Usage.
The battery icon in the upper-right corner of the status bar shows the battery level or
charging status.
Display the percentage of battery charge. Go to Settings > General > Usage, then turn on
Battery Percentage.
Important: If iPad is very low on power, it may display an image of a nearly depleted battery,
indicating that iPad needs to charge for up to twenty minutes before you can use it. If iPad is
extremely low on power, the display may be blank for up to two minutes before the low-battery
image appears.
Rechargeable batteries have a limited number of charge cycles and may eventually need to
be replaced. The iPad battery isn’t user replaceable; it should be replaced only by Apple or an
authorized service provider. See www.apple.com/batteries/service-and-recycling/.
Apple Confidential

Chapter 3 Basics 47
Travel with iPad
Some airlines let you keep your iPad turned on if you switch to Airplane Mode. Wi-Fi and
Bluetooth are disabled so you can’t make or receive FaceTime calls or use features that require
wireless communication, but you can listen to music, play games, watch videos, or use other
apps that don’t require Internet access. If your airline allows it, you can turn Wi-Fi or Bluetooth
back on to enable those services, even while in Airplane Mode.
Turn on Airplane Mode. Swipe up from the bottom edge of the screen to open Control Center,
then tap .YoucanalsoturnAirplaneModeonoroinSettings.WhenAirplaneModeison,
appears in the status bar at the top of the screen.
YoucanalsoturnWi-FiandBluetoothonoroinControlCenter.SeeControl Center on page 34.
When you travel abroad, you may be able to sign up for cellular service with a carrier in the
country you’re visiting, right from your iPad (available on iPad models with cellular and Touch ID).
For more information see Sign up for cellular service on page 15.
Apple Confidential
4
48
Use Siri
Siri (iPad 3rd generation or later) lets you speak to iPad to send messages, schedule meetings,
make FaceTime calls, and much more. Siri understands natural speech, so you don’t have to
learn special commands or keywords. Ask Siri anything, from “set the timer for 3 minutes” to
“what movies are showing tonight?” Open apps, and turn features like Airplane Mode, Bluetooth,
DoNotDisturb,andVoiceOveronoro.Siriisgreatforkeepingyouupdatedwiththelatest
sports info, helping you decide on a restaurant, and searching the iTunes Store or App Store
for purchases.
Note: To use Siri, iPad must be connected to the Internet. See Connect to Wi-Fi on page 16.
Cellular charges may apply.
Summon Siri. Press and hold the Home button until Siri beeps, then make your request.
Control when Siri listens. Instead of letting Siri notice when you stop talking, you can continue
toholddowntheHomebuttonwhileyouspeak,thenreleaseitwhenyounish.
Hey Siri. With iPad connected to a power source (or if you’ve already started a conversation with
Siri), you can use Siri without even pressing the Home button. Just say “Hey Siri,” then make your
request.ToturnHeySirionoro,gotoSettings>General>Siri>Allow“HeySiri”.
If you’re using a headset, you can use the center or call button in place of the Home button.
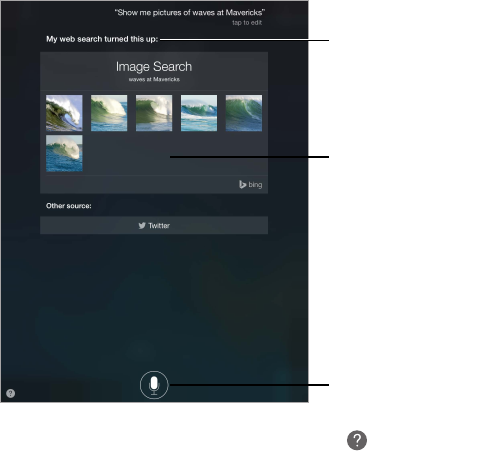
Tap to speak to Siri.
Response from Siri
Often you can tap the
screen for additional
info or further action.
For hints, ask Siri “what can you do,” or tap .
Depending on your request, the onscreen response from Siri often includes information or
images that you can tap for additional detail, or to perform some other action like searching the
web or opening a related app.
Siri
Apple Confidential

Chapter 4 Siri 49
Change the voice gender for Siri. Go to Settings > General > Siri (may not be available in all
areas).
Adjust the volume for Siri. Use the volume buttons while you’re interacting with Siri.
Siri and apps
Siri works with many of the apps on iPad, including FaceTime, Messages, Maps, Clock, Calendar,
and more. For example, you can say things like:
•“FaceTime Mom”
•“Do I have any new texts from Rick?”
•“I’m running low on gas”
•“Set an alarm for 8 a.m.”
•“Cancel all my meetings on Friday”
More examples of how you can use Siri with apps appear throughout this guide.
Tell Siri about yourself
If you tell Siri about yourself—including things like your home and work addresses, and your
relationships—you can get personalized service like, “remind me to call my wife when I get
home.”
Tell Siri who you are. Fill out your contact card in Contacts, go to Settings > General > Siri > My
Info, then tap your contact card.
To let Siri know about a relationship, say something like “Emily Parker is my wife.”
Note: Siri uses Location Services when your requests require knowing your location. See
Privacy on page 42.
Make corrections
If Siri doesn’t get something right, you can tap to edit your request.
Tap an icon to start
a FaceTime call.
Tap an icon to start
a FaceTime call.
Or tap again, then clarify your request verbally.
Want to cancel that last command? Say “cancel,” tap the Siri icon, or press the Home button.
Siri settings
To set options for Siri, go to Settings > General > Siri. Options include:
•TurningSirionoro
•TurningAllow“HeySiri”onoro
•Language
•Voice gender (may not be available in all areas)
•Voice feedback
•My Info card
Apple Confidential
Chapter 4 Siri 50
Prevent access to Siri when iPad is locked. Go to Settings > Touch ID & Passcode (iPad models
with Touch ID) or Settings > Passcode (other models). You can also disable Siri by turning on
restrictions. See Restrictions on page 42.
Apple Confidential

5
51
iMessage service
With the Messages app and the built-in iMessage feature, you can send text messages over
Wi-Fi to others using iOS 5 or later, or OS X Mountain Lion or later. Messages can include photos,
videos, and other info. You can see when people are typing, and let them know when you’ve read
their messages. If you’re signed in to iMessage using the same Apple ID on other iOS devices or
a Mac (OS X Mavericks or later), you can start a conversation on one device and continue it on
another. For security, messages you send with iMessage are encrypted before they’re sent.
With Continuity (iOS 8 or later), you can also send and receive SMS and MMS messages on your
iPad, relayed through your iPhone. Both your iPad and iPhone must be signed in to iMessage
using the same Apple ID. Charges may apply to the text messaging service for your iPhone. See
About Continuity features on page 25.
Sign in to iMessage. Go to Settings > Messages, then turn on iMessage.
WARNING: For important information about avoiding distractions that could lead to dangerous
situations, see Important safety information on page 159.
Note: Cellular data charges or additional fees may apply for you, and for the iPhone and iPad
users you exchange messages with over their cellular data network.
Messages
Apple Confidential

Chapter 5 Messages 52
Send and receive messages
Tap the compose button to
start a new conversation.
Tap the compose button to
start a new conversation.
Send a photo or video.
Send a photo or video.
Get info, make a voice
or FaceTime call,
share your location,
or mute notifications.
Get info, make a voice
or FaceTime call,
share your location,
or mute notifications.
Add your voice to
the conversation.
Add your voice to
the conversation.
Blue indicates an
iMessage conversation.
Blue indicates an
iMessage conversation.
Start a conversation. Tap , then enter a phone number or email address, or tap , then
choose a contact. You can also start a conversation by tapping a phone number in Contacts,
Calendar, or Safari, or from a recent contact in the multitasking screen.
Note: An alert appears if a message can’t be sent. Tap the alert in a conversation to try
sending the message again.
Use Siri. Say something like:
•“Send a message to Emily saying how about tomorrow”
•“Read my messages”
•“Read my last message from Bob”
•“Reply that’s great news”
Resume a conversation. Tap the conversation in the Messages list.
Hide the keyboard. Tap in the lower-right corner.
Use picture characters. Go to Settings > General > Keyboard > Keyboards > Add New Keyboard,
thentapEmojitomakethatkeyboardavailable.Thenwhiletypingamessage,tap to bring up
theEmojikeyboard.SeeSpecial input methods on page 157.
Tap to Talk. Touch and hold to record a message, then swipe up to send it. To delete it,
swipe left.
To save space, Tap to Talk audio messages that you receive are deleted automatically two
minutes after you listen to them, unless you tap Keep. To keep them automatically, go to
Settings > Messages > Expire (under Audio Messages), then tap Never.
See what time a message was sent or received. Drag any bubble to the left.
See a person’s contact info. In a conversation, tap Details, then tap . Tap the info items to
perform actions, such as making a FaceTime call.
Send messages to a group. Tap , then enter multiple recipients.
Apple Confidential

Chapter 5 Messages 53
Give a group a name. While viewing the conversation, tap Details, drag down, then enter the
nameintheSubjectline.
Add someone to a group. TaptheToeld,thentapAddContact.
Leave a group. Tap Details, then tap Leave this Conversation.
Keep it quiet. TapDetails,thenturnonDoNotDisturbtomutenoticationsfortheconversation.
Block unwanted messages. On a contact card, tap Block this Caller. You can see someone’s
contact card while viewing a message by tapping Details, then tapping . You can also block
callers in Settings > Messages > Blocked. You won’t receive FaceTime calls or text messages from
blocked callers. For more information about blocking calls, see support.apple.com/kb/HT5845.
Manage conversations
Conversations are saved in the Messages list. A blue dot indicates unread messages. Tap a
conversation to view or continue it.
Forward a message or attachment. Touch and hold a message or attachment, tap More, select
additional items if desired, then tap .
Delete a message or attachment. Touch and hold a message or attachment, tap More, select
additional items if desired, then tap .
Delete a conversation. In the Messages list, swipe the conversation from right to left, then
tap Delete.
Search conversations. IntheMessageslist,tapthetopofthescreentodisplaythesearcheld,
then enter the text you’re looking for. You can also search conversations from the Home screen.
See Spotlight Search on page 33.
Share photos, videos, your location, and more
You can send photos, videos, locations, contact info, and voice memos. The size limit of
attachments is determined by your service provider—iPad may compress photo and video
attachments when necessary.
Quickly take and send a photo or video. Touch and hold . Then slide to or to take a
photo or video. Photos are sent immediately. Tap to preview your video. To send your Video
Message, tap .
To save space, Video Messages that you receive are deleted automatically two minutes after you
view them, unless you tap Keep. To keep them automatically, go to Settings > Messages > Expire
(under Video Messages), then tap Never.
Apple Confidential

Chapter 5 Messages 54
Send photos and videos from your Photos library. Tap . Recent shots are right there; tap
Photo Library for older ones. Select the items you want to send.
View attachments. While viewing a conversation, tap Details. Attachments are shown in reverse
chronological order at the bottom of the screen. Tap an attachment to see it in full screen. In full-
screen mode, tap to view the attachments as a list.
Send your current location. Tap Details, then tap Send My Current Location to send a map that
shows where you are.
Share your location. Tap Details, tap Share My Location, then specify the length of time. The
person you’re texting can see your location by tapping Details. To turn Share My Location on
oro,ortoselectthedevicethatdeterminesyourlocation,gotoSettings>iCloud>ShareMy
Location (under Advanced).
Send items from another app. In the other app, tap Share or , then tap Message.
Share, save, or print an attachment. Tap the attachment, then tap .
Copy a photo or video. Touch and hold the attachment, then tap Copy.
Messages settings
Go to Settings > Messages, where you can:
•TurniMessageonoro
•Notify others when you’ve read their messages
•Specify phone numbers, Apple IDs, and email addresses to use with Messages
•ShowtheSubjecteld
•Block unwanted messages
•Set how long to keep messages
•Manage the expiration of audio messages and video messages created within Messages
(audio or video attachments created outside of Messages are kept until you delete them
manually)
Manage notications for messages. See NoticationCenter on page 35.
Set the alert sound for incoming text messages. See Sounds and silence on page 36.
Apple Confidential