Contents
Manual 4
Print photos
Print to an AirPrint-enabled printer.
Print a single photo: Tap , then tap Print.
Print multiple photos: While viewing a photo album, tap Select, select the
photos, tap , then tap Print.
See AirPrint (on page) .
Import photos and videos
You can import photos and videos directly from a digital camera, from another
iOS device with a camera, or from an SD memory card. For iPad (4th
generation or later) or iPad mini, use the Lightning to SD Card Camera Reader
or the Lightning to USB Camera Adapter (both sold separately). For earlier iPad
models, use the iPad Camera Connection Kit (sold separately), which includes
both an SD card reader and a camera connector.
Import photos
1. Insert the SD card reader or camera connector into the iPad Lightning
connector or 30-pin dock connector.
Use an SD memory card: Insert the card in the slot on the SD card reader.
Don’t force the card into the slot; it fits only one way.
Apple Confidential
121
DRAFT

Connect a camera or iOS device: Use the USB cable that came with the
camera or iOS device, and connect it to the USB port on the camera
connector. If you’re using an iOS device, make sure it’s turned on and
unlocked. To connect a camera, make sure the camera is turned on and in
transfer mode. For more information, see the documentation that came
with the camera.
2. Unlock iPad.
3. The Photos app opens and displays the photos and videos available for
importing.
4. Select the photos and videos to import.
Import all items: Tap Import All.
Import just some items: Tap the items you want to import (a checkmark
appears for each), tap Import, then tap Import Selected.
5. After the photos are imported, keep or delete the photos and videos on the
card, camera, or iOS device.
6. Disconnect the SD card reader or camera connector.
A new event in the Last Import album contains all the photos you just
imported.
To transfer the photos to your computer, connect iPad to your computer and
import the images with a photo app such as iPhoto or Adobe Elements.
Photos settings
Settings for Photos are in Settings > Photos & Camera. These include:
iCloud Photo Library, My Photo Stream, iCloud Photo Sharing, and Upload
Burst Photos
Photos Tab
Slideshow
Camera Grid
HDR (High Dynamic Range)
Camera
Apple Confidential
122
DRAFT
Camera at a glance
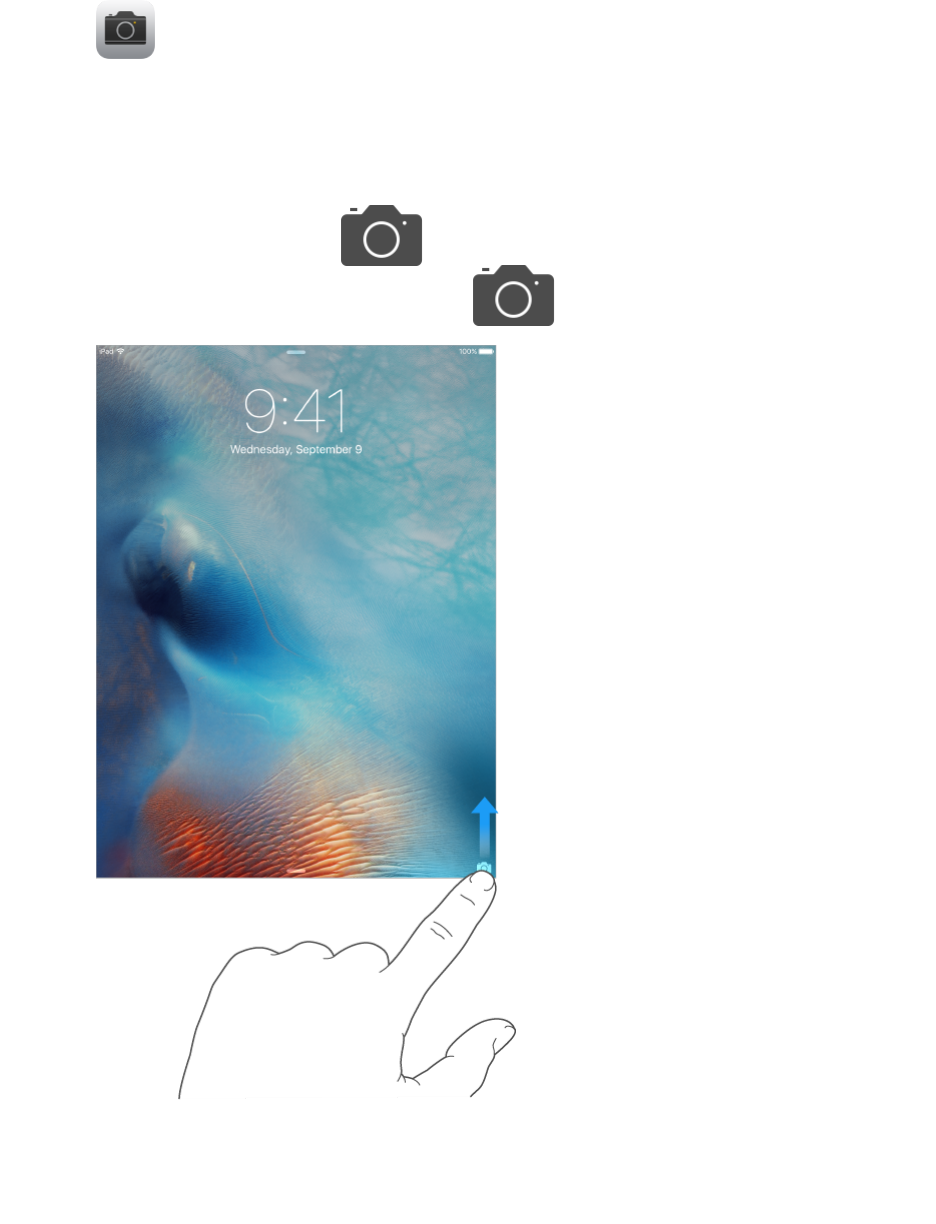
Quick! Get the camera!
From the Lock screen, just swipe up. Or swipe up from the bottom
edge of the screen to open Control Center, then tap .
With iPad, you can take both still photos and videos using the front FaceTime
camera or the back camera.
Apple Confidential
123
DRAFT
Take photos and videos
Camera offers several modes, which let you shoot stills, square-format photos,
time-lapse, videos, and panoramas.
Choose a mode.
Drag up or down, or tap the camera mode labels to choose Time-Lapse, Video,
Photo, Square, or Pano.
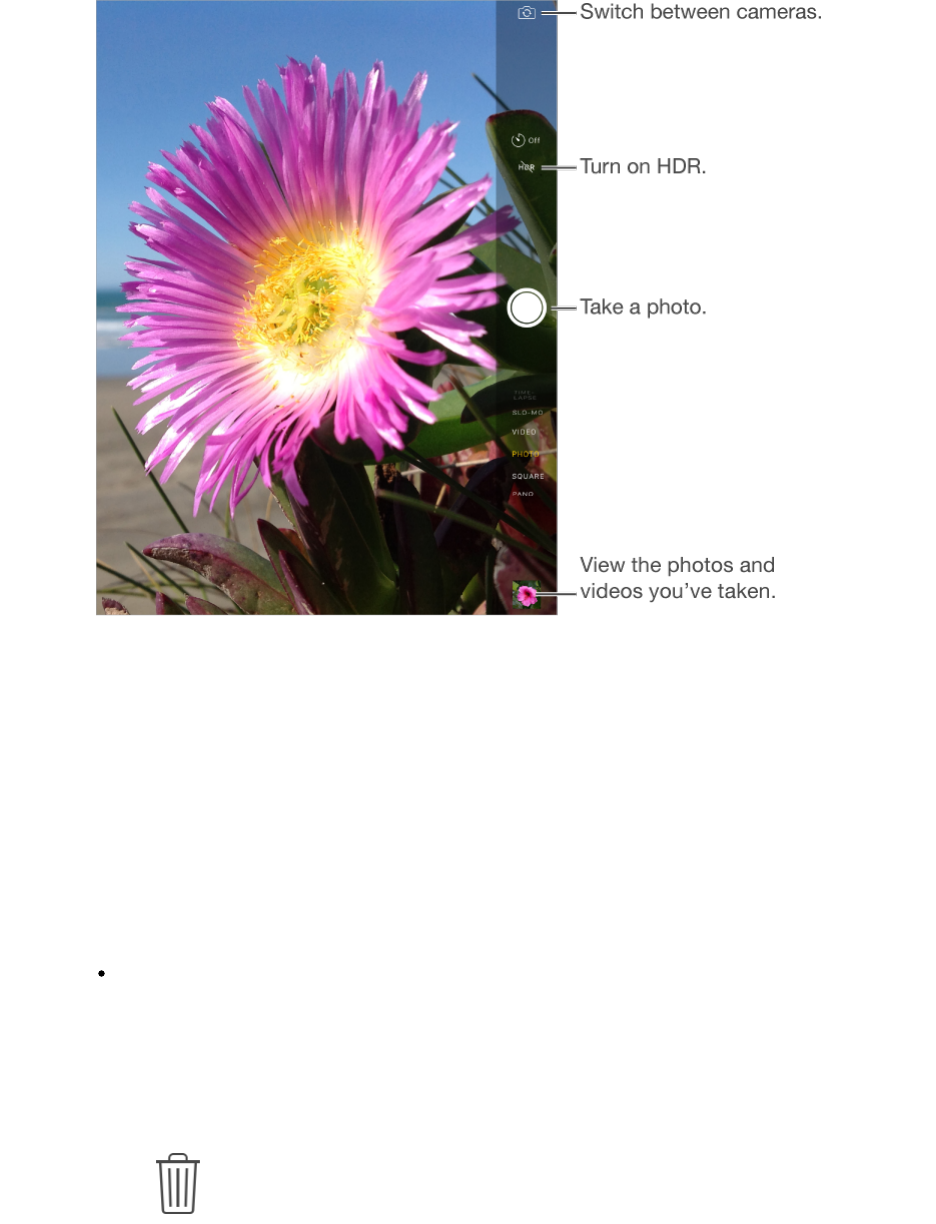
Take a photo.
Choose Photo, then tap the white Take Picture button or press either volume
button.
Take Burst shots: (iPad Air 2 and iPad mini 4) Touch and hold the Take
Picture button to take rapid-fire photos in bursts (available while in Square or
Photo mode). The shutter sound is different, and the counter shows how
many shots you’ve taken, until you lift your finger. To see the suggested
shots and select the photos you want to keep, tap the thumbnail, then tap
Select. The gray dot(s) under the thumbnails mark the suggested photos. To
copy a photo from the burst as a separate photo in Photos, tap the circle in
the lower-right corner of the photo. To delete the burst of photos, tap it, then
tap .
Apple Confidential
124
DRAFT

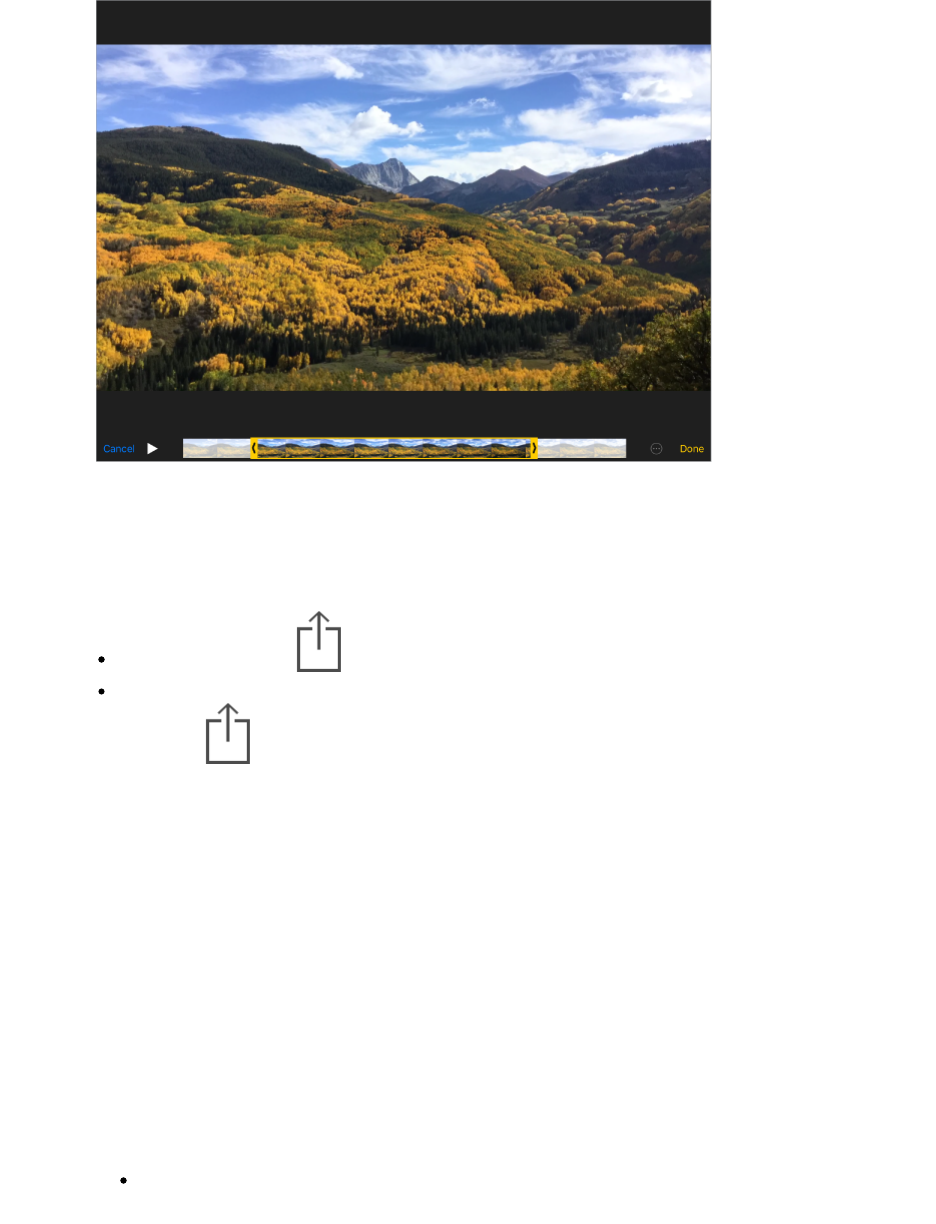
Apply a filter: Tap to apply different color effects, such as Mono
or Chrome. To turn off a filter, tap , then tap None. You can also
apply a filter later, when you edit the photo. See Edit photos and trim videos
(on page) .
A rectangle briefly appears where the exposure is set. When you photograph
people, face detection (iPad 3rd generation or later) balances the exposure
across up to 10 faces. A rectangle appears for each face detected.
Exposure is automatic, but you can set the exposure manually for the next shot
by tapping an object or area on the screen. With an iSight camera, tapping the
screen sets the focus and the exposure, and face detection is temporarily
turned off. To lock the exposure and focus, touch and hold until the rectangle
pulses. The screen indicates when exposure and focus are locked. Take as
many photos as you want. When you tap the screen again, exposure and focus
unlock, and the automatic settings and face detection turn back on.
Adjust the exposure.
Tap to see next to the exposure rectangle, then slide up or down to
adjust the exposure.
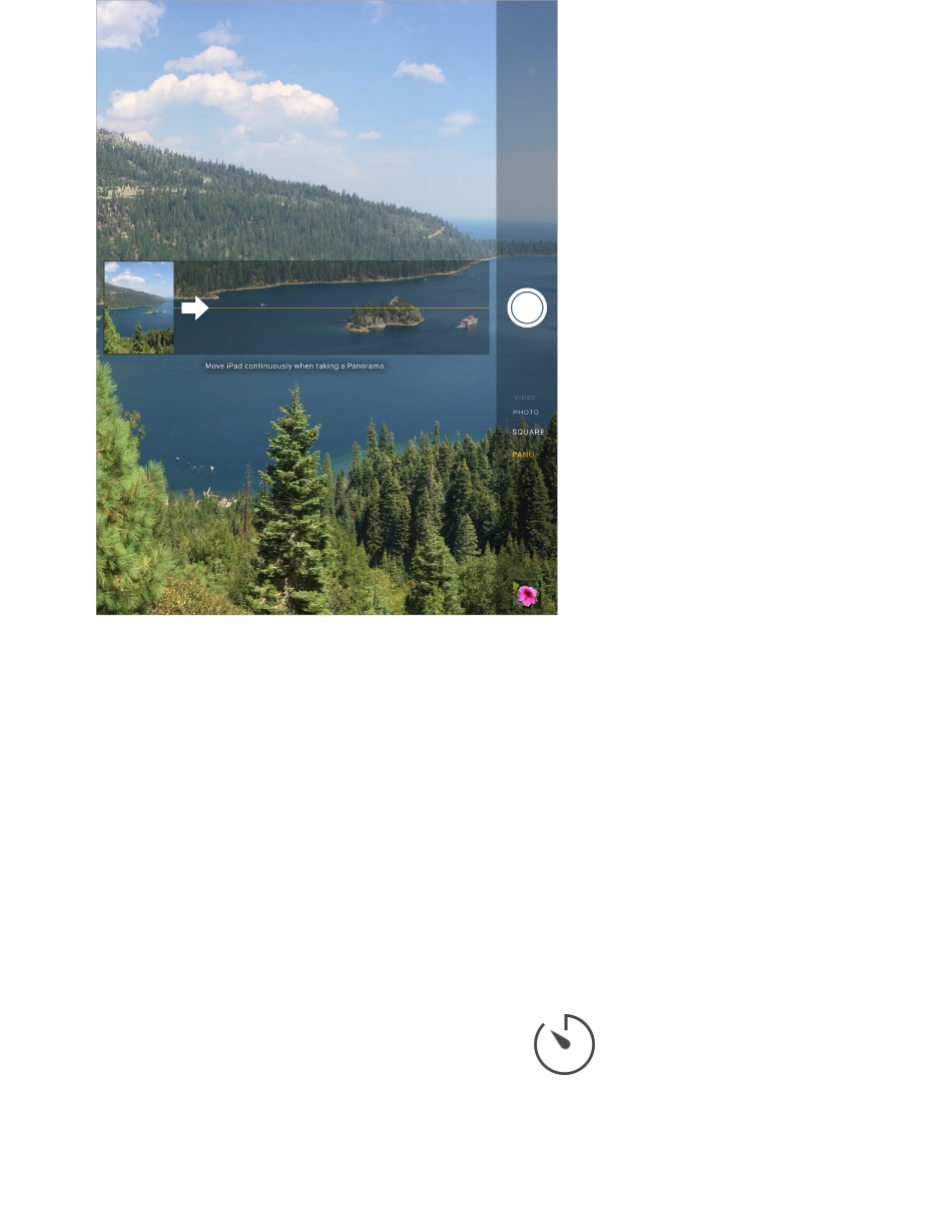
Take a panorama photo.
(iSight camera) Choose Pano, tap the Take Picture button, then pan slowly in
the direction of the arrow. You can stop the panorama at any point by pressing
the Take Picture button again. To pan in the other direction, first tap the arrow.
To pan vertically, first rotate iPad to landscape orientation. You can reverse the
direction of a vertical pan, too.
Apple Confidential
125
DRAFT
Capture an experience with time-lapse.
Choose Time-Lapse, set up iPad where you want, then tap the Record Time-
Lapse Video button to start capturing a sunset, a flower opening, or other
experiences over a period of time. Tap the Record Time-Lapse Video button
again to stop. The time-lapse photos are compiled into a short video that you
can watch and share.
Zoom in or out.
(iSight camera) Pinch the image on the screen. With iPad Air (all models) and
iPad mini 2 and later, zooming works in video mode as well as photo mode.
If Location Services is turned on, photos and videos are tagged with location
data that can be used by apps and photo-sharing websites. See Privacy (on
page) .
Use the capture timer to put yourself in the shot.
Avoid “camera shake” or add yourself to a picture by using the capture timer. To
include yourself, first stabilize iPad and frame your shot. Tap , tap 3s
(seconds) or 10s, then tap the Take Picture button.
Want to capture what’s displayed on your screen?
Simultaneously press and release the Sleep/Wake and Home buttons. The
screenshot is added to the Photos tab in Photos and can also be viewed in the
Camera Roll album or All Photos album (if you’re using iCloud Photo Library).
Apple Confidential
126
DRAFT

Make it better.
You can edit photos and trim videos, right on iPad. See Edit photos and trim
videos (on page) .
Ask Siri Say something like:
“Open Camera”
“Take a picture”
Shoot some video
Make a video.
Choose Video, then tap the Record Video button or press either volume button
to start and stop recording. Video records at 30 fps (frames per second).
Take it slow.
(iPad Air 2 and iPad mini 4) Choose Slo-Mo to shoot slow motion video at 120
fps. You can set which section to play back in slow-motion when you edit the
video.
Set the slow-motion section of a video.
Tap the thumbnail, then tap Edit. Use the vertical bars beneath the frame
viewer to set the section you want to play back in slow motion.
HDR
HDR (High Dynamic Range) helps you get great shots in high-contrast
situations. iPad takes multiple photos in rapid succession, at different exposure
settings—and blends them together. The resulting photo has better detail in the
bright and mid-tone areas.
Use HDR.
(iSight camera on iPad 3rd generation or later) Tap HDR. For best results, keep
iPad steady and avoid subject motion.
Keep the normal photo and the HDR version.
Go to Settings > Photos & Camera > Keep Normal Photo. Both the normal and
HDR versions of the photo appear in Photos. HDR versions of photos in your
albums are marked with “HDR” in the corner.
View, share, and print
Photos and videos you take on iPad are saved in Photos. With iCloud Photo
Library enabled, all new photos and videos are automatically uploaded and
available in Photos on all your iOS 8.1 or later devices set up with iCloud Photo
Library. See iCloud Photo Library (on page) . When iCloud Photo Library is
turned off, you can still collect up to 1,000 of your most recent photos in the My
Apple Confidential
127
DRAFT

Photo Stream album from your devices set up with iCloud. See My Photo
Stream (on page) .
View your photos.
Tap the thumbnail image, then swipe left or right to see the photos you’ve taken
recently. Tap All Photos to see everything in the Photos app.
Tap the screen to show or hide the controls.
Get sharing and printing options.
Tap . See Share from apps (on page) .
Upload photos and videos.
Use iCloud Photo Library to upload photos and videos from your iPad to iCloud
and access them on your iOS 8.1 or later devices signed in to iCloud using the
same Apple ID. You can also upload and download your photos and videos from
the Photos app on iCloud.com. See iCloud Photo Library (on page) .
Sync photos and videos to iPad from your Mac.
Use the Photos settings pane in iTunes. See Sync with iTunes (on page) .
Camera settings
Go to Settings > Photos & Camera for camera options, which include:
iCloud Photo Library, My Photo Stream, and iCloud Photo Sharing
Slideshow
Grid
HDR
Video
Adjust the volume of the shutter sound with the Ringer and Alerts settings in
Settings > Sounds. Or mute the sound using the Ring/Silent switch. (In some
countries muting is disabled.)
Contacts
Apple Confidential
128
DRAFT
iPad lets you access and edit your contact lists from personal, business, and
other accounts.
Contacts at a glance
Set your My Info card for Safari, Siri, and other apps.
Go to Settings > Mail, Contacts, Calendars, tap My Info, then select the contact
card with your name and information.
Ask Siri Say something like:
“Sarah Castelblanco is my sister”
“Send a message to my sister”
“What’s my brother’s work address?”
Find a contact.
Tap the search field at the top of the contacts list, then enter your search. You
can also search your contacts using Search (see Search (on page) ).
Use Siri.
Say, for example, “What’s my brother’s work address?”
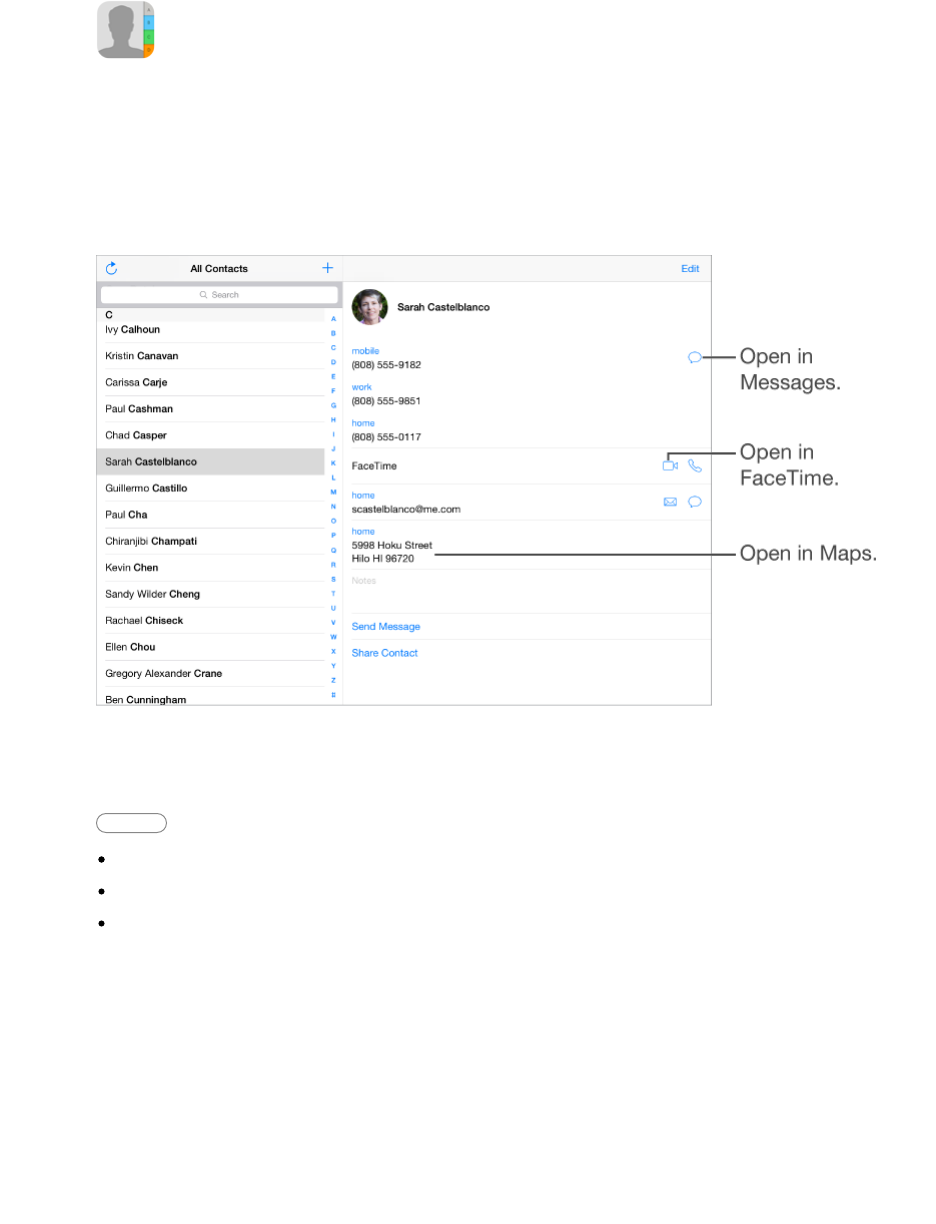
Share a contact.
Tap a contact, then tap Share Contact. See Share from apps (on page) .
Sharing a contact shares all the info from the contact’s card.
Change a label.
Apple Confidential
129
DRAFT

If a field has the wrong label, such as Home instead of Work, tap Edit. Then tap
the label and choose one from the list, or tap Custom Field to create one of your
own.
Add your friends’ social profiles.
While viewing a contact, tap Edit, then tap “add social profile.” You can add
Twitter, Facebook, LinkedIn, Flickr, Myspace, and Sina Weibo accounts, or
create a custom entry.
Delete a contact.
Go to the contact’s card, then tap Edit. Scroll down, then tap Delete Contact.
Add contacts
Besides entering contacts, you can:
Use your iCloud contacts: Go to Settings > iCloud, then turn on Contacts.
Import your Facebook Friends: Go to Settings > Facebook, then turn on
Contacts in the “Allow These Apps to Use Your Accounts” list. This creates a
Facebook group in Contacts.
Use your Google contacts: Go to Settings > Mail, Contacts, Calendars, tap
your Google account, then turn on Contacts.
Access a Microsoft Exchange Global Address List: Go to Settings > Mail,
Contacts, Calendars, tap your Exchange account, then turn on Contacts.
Set up an LDAP or CardDAV account to access business or school
directories: Go to Settings > Mail, Contacts, Calendars > Add Account >
Other. Tap Add LDAP account or Add CardDAV account, then enter the
account information.
Sync contacts from your computer: In iTunes on your computer, turn on
contact syncing in the device info pane. For information, see iTunes Help.
Import contacts from a vCard: Tap a .vcf attachment in an email or message.
Search a directory.
Tap Groups, tap the GAL, CardDAV, or LDAP directory you want to search, then
enter your search. To save a person’s info to your contacts, tap Add Contact.
Show or hide a group.
Tap Groups, then select the groups you want to see. This button appears only if
you have more than one source of contacts.
Update your contacts using Twitter, Facebook, and Sina Weibo.
Go to Settings > Twitter, Settings > Facebook, or Settings > Sina Weibo, then
tap Update Contacts. This updates contact photos and social media account
names in Contacts.
Unify contacts
When you have contacts from multiple sources, you might have multiple entries
Apple Confidential
130
DRAFT

for the same person. To keep redundant contacts from appearing in your All
Contacts list, contacts from different sources that have the same name are
linked and displayed as a single unified contact. When you view a unified
contact, the title Unified Info appears.
Unify contacts.
If two entries for the same person aren’t linked automatically, you can unify them
manually. Edit one of the contacts, tap Link Contact, then choose the other
contact to link to.
Linked contacts aren’t merged. If you change or add information in a unified
contact, the changes are copied to each source account where that information
already exists.
If you link contacts with different first or last names, the names on the individual
cards won’t change, but only one name appears on the unified card. To choose
which name appears when you view the unified card, tap Edit, tap the linked
card with the name you prefer, then tap Use This Name For Unified Card.
Contacts settings
Go to Settings > Mail, Contacts, Calendars, where you can:
Change how contacts are sorted
Display contacts by first or last name
Change how long names are shortened in lists
Choose to show recent contacts in the multitasking screen
Set a default account for new contacts
Set your My Info card
Set if new contacts and updates are automatically derived from mail you
receive
Clock
Apple Confidential
131
DRAFT
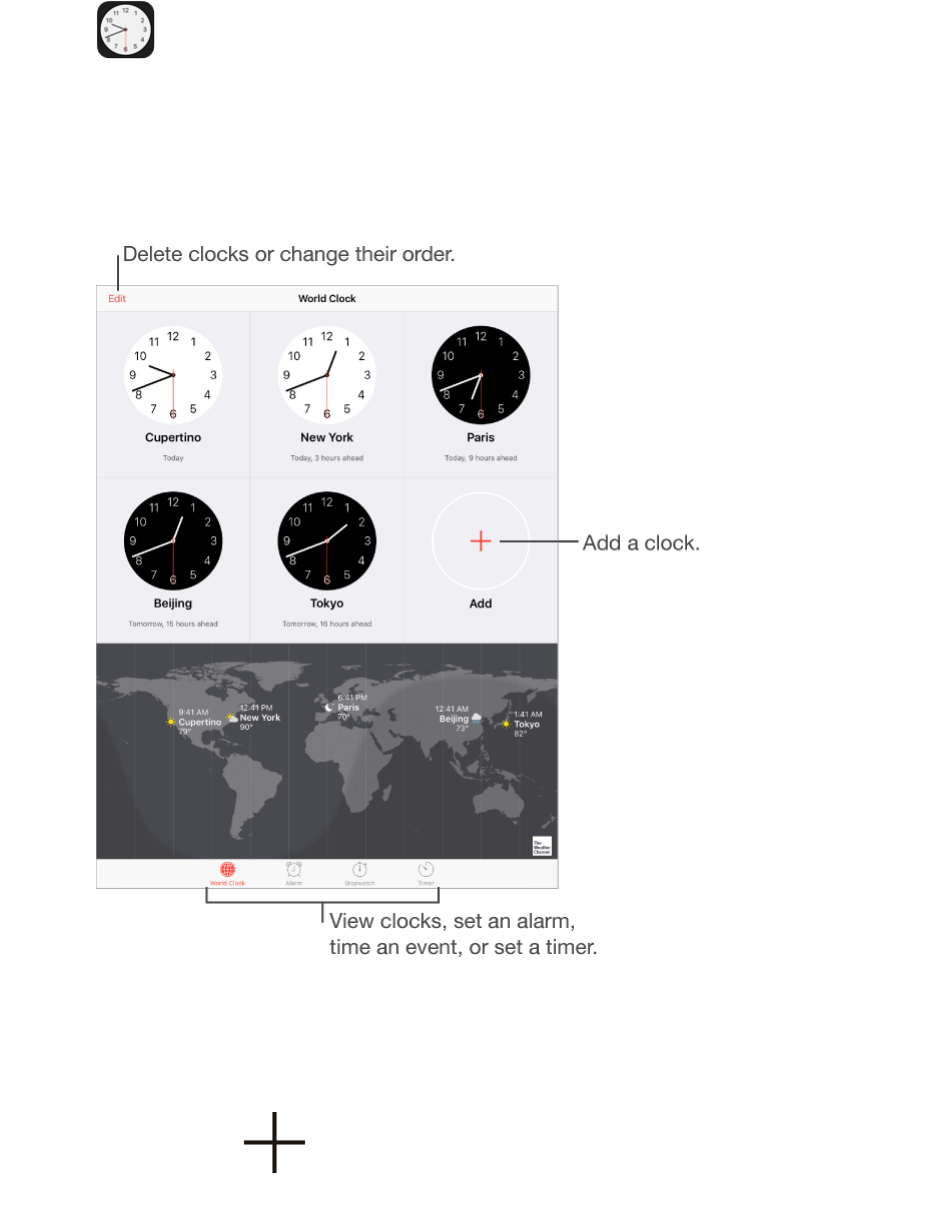
Clock at a glance
The first clock displays the time based on your location when you set up iPad.
Add other clocks to show the time in other major cities and time zones.
Alarms and timers
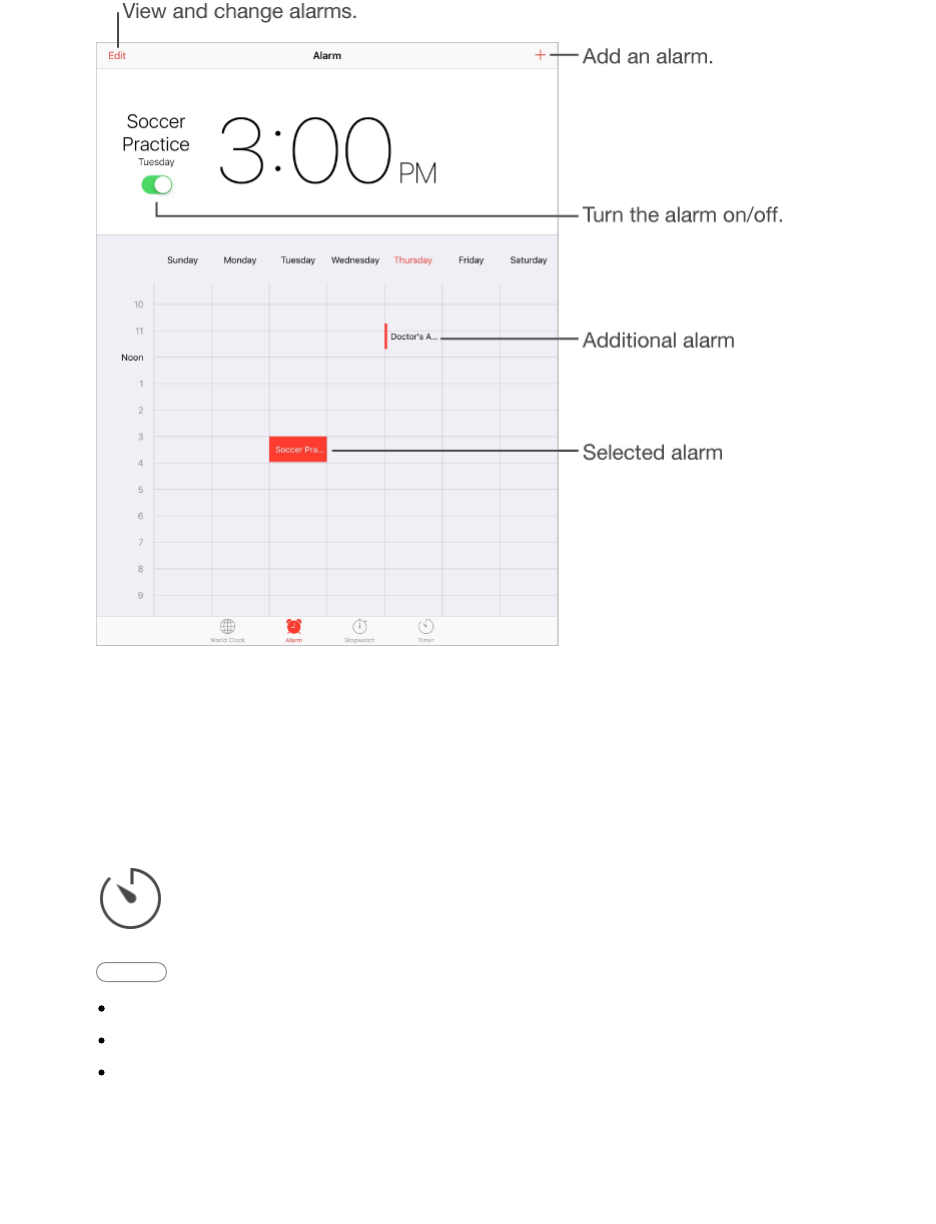
Want iPad to wake you?
Tap Alarm, then tap . Set your wake-up time and other options, then
give the alarm a name (like “Good morning”).
Apple Confidential
132
DRAFT
Keep track of time.
Use the stopwatch to keep time, record lap times, or set a timer to alert you
when time’s up.
Want to fall asleep to music or a podcast?
Tap Timer, tap When Timer Ends, then choose Stop Playing at the bottom.
Get quick access to clock features.
Swipe up from the bottom edge of the screen to open Control Center, then tap
. You can access Timer from Control Center even when iPad is locked.
You can also navigate to the other clock features.
Ask Siri Say something like:
“Set the timer for 3 minutes”
“Wake me up tomorrow at 7 a.m.”
“What alarms do I have set?”
Apple Confidential
133
DRAFT

Maps
Find places
WARNING: For important information about navigation and avoiding
distractions that could lead to dangerous situations, see Important safety
information (on page) . See also Privacy (on page) .
Apple Confidential
134
DRAFT
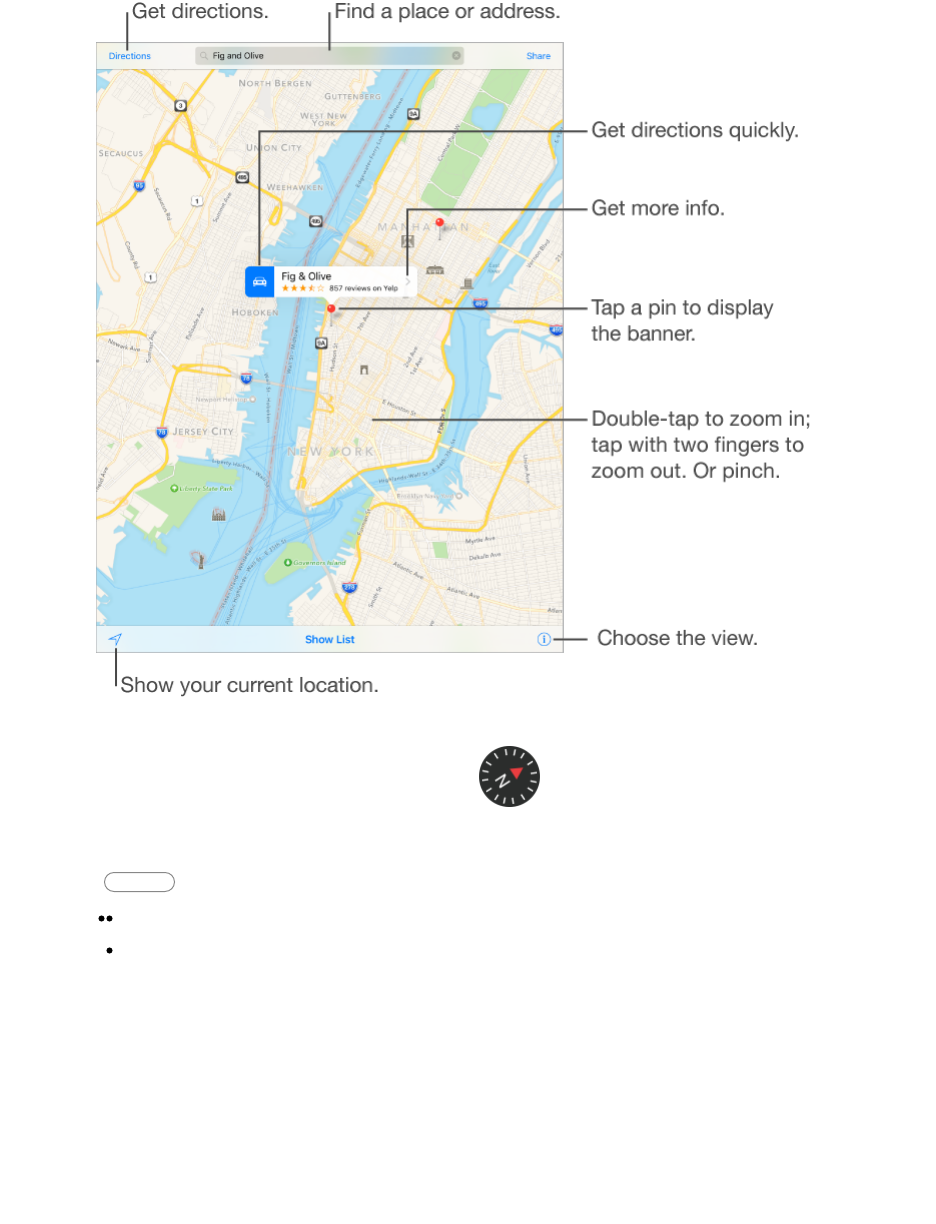
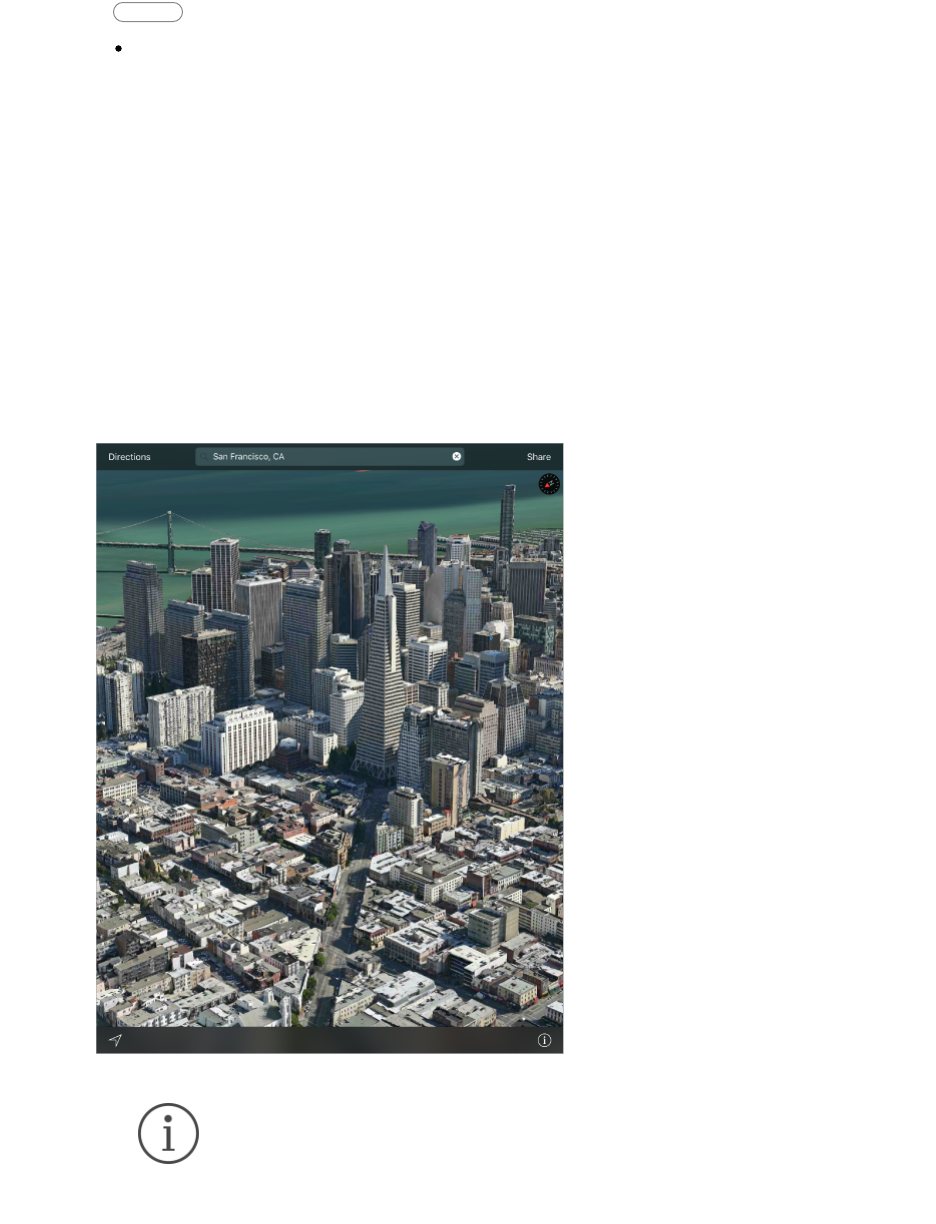
Move around Maps by dragging the screen. To face a different direction, rotate
with two fingers. To return to north, tap the compass in the upper
right.
Ask Siri Say something like:
“Find coffee near me”
“Show me the Golden Gate Bridge”
Zoom in or out.
Double-tap with one finger to zoom in; tap with two fingers to zoom out—or
pinch open or closed. The scale appears in the upper left while zooming and
when you continue touching the screen with two fingers. To change how
distance is shown (in miles or kilometers), go to Settings > Maps.
Find nearby attractions, services, and more.
Tap the search field, then choose an interest.
Search for a location.
Apple Confidential
135
DRAFT

Tap the search field. You can search for a location in different ways. For
example:
Intersection (“8th and Market”)
Area (“Greenwich Village”)
Landmark (“Guggenheim”)
Zip code
Business (“movies,” “restaurants San Francisco CA,” “Apple Inc New York”)
Maps may also list recent locations, searches, or directions that you can choose
from.
Find a favorite location.
Tap the search field, tap Favorites, then tap Favorites.
Find the location of a contact.
Tap the search field, tap Favorites, tap Contacts, then tap the name of a contact.
Choose your view.
Tap , then choose Map, Transit, or Satellite.
If transit information is unavailable, tap View Routing Apps to use an app for
public or other modes of transportation. (Not available on iPad 2, iPad 3, or the
original iPad mini.)
Mark a location.
Touch and hold the map until a dropped pin appears.
Important: Maps depends on data services. These data services are subject
to change and may not be available in all areas, resulting in maps and location-
based information that may be unavailable, inaccurate, or incomplete.
Compare the information provided in Maps to your surroundings. Use common
sense when navigating. Always observe current road conditions and posted
signs to resolve any discrepancies. Some Maps features require Location
Services.
Share a location
Tap a pin or other location (such as a restaurant or museum) to display its
banner, tap , tap , then choose an option such as Mail or AirDrop.
See Share from apps (on page) .
Apple Confidential
136
DRAFT
Get more info
Get info about a location.
Tap a location to display its banner, then tap . Info might include Yelp
reviews and photos, a phone number, a webpage link, directions, and more.
Add the location to your Favorites: Tap .
Add the contact information to Contacts: Tap Create New Contact or Add
to Existing Contact.
Remove a dropped pin: Tap Remove Pin.
Find out about traffic conditions.
Tap , tap Map or Satellite, then tap Show Traffic. Orange dots show
slowdowns, and red dots show stop-and-go traffic. To see an incident report,
tap a marker.
Help improve Maps.
To report an incorrect label, a missing location, or other issue, tap ,
then tap Report an Issue.
Get directions
Note: To get directions, iPad must be connected to the Internet. To get
directions involving your current location, Location Services must also be on.
Ask Siri Say something like:
“Give me directions home”
“Transit directions to my dad’s work”
“What’s my ETA?”
“Find a gas station”
If you tell Siri about yourself—including things like your home and work
addresses, and your relationships—you can get directions to locations like
“home” and “my dad’s work.” See Tell Siri about yourself.
Find a route to a location.
Tap the location, then tap the icon in the banner. Directions are from your
current location. To get other directions, tap the search field.
Find a route between any two locations.
Apple Confidential
137
DRAFT

Tap Directions, enter the starting and ending locations, then tap Route. Or,
choose a location or a route from the list, if available.
Choose an alternate route.
If multiple routes appear, tap the one you want to take.
Change the view to show a driving, walking, or transit route.
Tap Drive, Walk, or Transit.
In select cities, Maps provides public transportation information and multi-
modal routing, from walking to a bus stop or train station to hopping off at
your destination.
If transit routes are unavailable in your area, tap View Routing Apps to use an
app for other modes of transportation. (On iPad 2, iPad 3, and the original
iPad mini, tap Apps for other modes of transportation.)
Choose a transit time or date.
Find a transit route, tap Options, then select a time or date for departure or
arrival. You can also choose which transit vehicles to consider.
Share a route.
Find a route, tap Share, then choose an option like Mail or AirDrop. See Share
from apps (on page) .
Get turn-by-turn directions.
Find a route, then tap Start.
Hear directions (iPad Wi-Fi + Cellular): Maps follows your progress and
speaks turn-by-turn directions to your destination. If iPad auto-locks, Maps
stays onscreen and continues to announce directions.
Even if you open another app, Maps continues to give you turn-by-turn
directions. To return to Maps, tap the banner across the top of the screen.
View directions (iPad Wi-Fi only): Swipe each instruction left.
See the route overview: Tap Overview. To return to turn-by-turn directions,
tap Resume.
View directions as a list: Tap . To view transit details, tap Details
or Stops. To return to turn-by-turn directions, tap anywhere outside the list.
Choose a faster route (iPad Wi-Fi + Cellular): If Maps alerts you to a faster
route from turn-by-turn driving directions, tap Go to accept the suggested
route.
Ask Siri Say something like:
“Take the faster route.”
"Don’t change my route.”
Maps may reroute you automatically in case of road closure. Maps may
also alert you to heavy traffic, construction, an accident, or other incidents
ahead.
Stop turn-by-turn directions.
Tap End.
Apple Confidential
138
DRAFT
Ask Siri Say something like:
“Stop navigating.”
Use Maps on your Mac to get directions.
Open Maps on your Mac (OS X Mavericks or later), get directions for your trip,
then choose File > Share > Send to [your device]. Your Mac and iPad must
both be set up with iCloud to use the same Apple ID.
You can also use Handoff to pick up directions on one device where you left off
on another. See Handoff.
3D and Flyover
With 3D and Flyover, on iPad 3rd generation or later, you can see three-
dimensional views and even fly over many of the world’s major cities.
View a 3D map.
Tap , then tap 3D Map. Or, drag two fingers up. (Zoom in for a closer
look if the 3D map doesn’t appear.) For best effect, use the satellite view. Tap
Apple Confidential
139
DRAFT

, then tap Satellite.
Adjust the angle.
Drag two fingers up or down.
Take a 3D tour with Flyover.
An aerial tour is available for select cities, indicated by next to the
city name. (Zoom out if you don’t see any markers.) Tap the name of
the city to display its banner, then tap Tour to begin the tour.
Aerial tours are also available for selected locations. Tap Flyover Tour in their
banners.
To stop the tour, tap End Flyover Tour. To return to standard view, tap
, then tap Map.
Maps settings
Go to Settings > Maps. Settings include:
Navigation voice volume (iPad Wi-Fi + Cellular)
Distances in miles or kilometers
Map labels (these appear in the language specified in Settings > General >
Language & Region > iPad Language)
Videos
Apple Confidential
140
DRAFT
You can use iPad to view movies, music videos, and, if they’re available in your
area, TV shows.
Videos at a glance
Open the Videos app to watch movies, TV shows, and music videos. To watch
video podcasts, open the Podcasts app—see Podcasts at a glance (on page) .
To watch videos you record using Camera on iPad, open the Photos app.
WARNING: For important information about avoiding hearing loss, see
Important safety information (on page) .
Watch a video.
Tap the video in the list of videos.
What about videos you shot with iPad?
Open the Photos app.
Stream or download?
Apple Confidential
141
DRAFT

If appears on a video thumbnail, you can watch it without
downloading it to iPad, if you have an Internet connection. To download the
video to iPad so you can watch without using a Wi-Fi or cellular connection, tap
in the video details.
Looking for podcasts or iTunes U videos?
Open the Podcasts app or download the free iTunes U app from the App Store.
Set a sleep timer.
Open the Clock app and tap Timer, then swipe to set the number of hours and
minutes. Tap When Timer Ends and choose Stop Playing, tap Set, then tap
Start.
Add videos to your library
Buy or rent videos from the iTunes Store.
Tap Store in the Videos app, or open the iTunes Store app on iPad, then tap
Movies or TV Shows. The iTunes Store is not available in all areas. See
iTunes Store at a glance (on page) .
Transfer videos from your computer.
Connect iPad, then sync videos from iTunes on your computer. See Sync with
iTunes (on page) .
Stream videos from your computer.
Turn on Home Sharing in iTunes on your computer. Then, on iPad, go to
Settings > Videos and enter the Apple ID and password you use for Home
Sharing on your computer. Then open Videos on iPad, and tap Shared at the top
of the list of videos.
Convert a video for iPad.
If you try to sync a video from iTunes and a message says the video can’t play
on iPad, try converting the video. Select the video in iTunes on your computer,
then choose File > Create New Version > Create iPad or Apple TV Version. Then
sync the converted video to iPad.
Delete a video.
Tap Edit in the upper right of your collection, then tap on the video
thumbnail. If you don’t see the Edit button, look for on your video
thumbnails—those videos haven’t been downloaded to iPad, so you can’t delete
them. To delete an individual episode of a series, tap the series, then swipe left
on the episode in the Episodes list.
Deleting a video (other than a rented movie) from iPad doesn’t delete it from the
iTunes library on your computer or from your purchased videos in iCloud, and
you can sync the video or download it to iPad again later. If you don’t want to
Apple Confidential
142
DRAFT