Contents
- 1. User Manual Part 1
- 2. User Manual Part 2
User Manual Part 2

Chapter 2 Get started 31
Optimize storage. Set options in the Recommendations pane. Go to Apple menu > About This
Mac, click Storage, then click Details. When your Mac is low on storage, you’ll see an alert that will
open the Recommendations pane.
Set options to:
•Optimize iCloud Storage:
•Store les in iCloud, where they stay secure and available. You can turn on iCloud Drive to
store les on your desktop and in your Documents folder in iCloud.
•Turn on iCloud Photo Library to store items from the Photos app in iCloud.
Even though your les are stored in the cloud, you can get access to them right where you left
them on your Mac. For more information, see Access your content anywhere with iCloud.
•Optimize Storage: Remove iTunes movies and TV shows you’ve watched, and keep only recent
email attachments.
•Erase Trash Automatically: Automatically erase items that have been in the Trash for more than
30 days.
•Reduce Clutter: Review documents and delete older ones stored on your MacBook Pro.
macOS Sierra also prevents you from downloading the same le twice from Safari, alerts you to
remove installer software when you nish installing a new app, clears logs and caches that are
safe to remove when you’re low on storage, and more, to help you save space as you work.
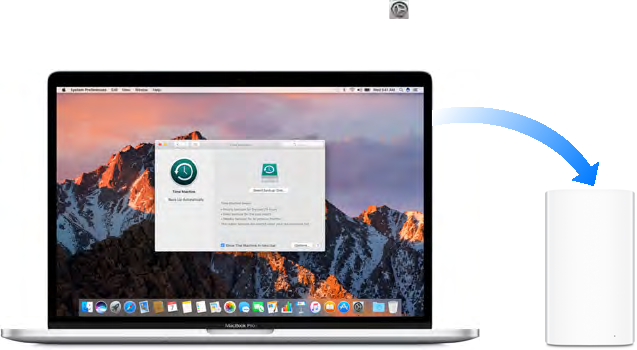
Back up and restore
To keep your les safe, it’s important to back up your MacBook Pro regularly. The easiest way to
back up is to use Time Machine—which is built into your MacBook Pro—with a wireless AirPort
Time Capsule (sold separately), or an external storage device connected to your MacBook Pro.
Files stored in iCloud Drive and photos in iCloud Photo Library are automatically backed up to
iCloud and don’t need to be part of your Time Machine or other backup.
74% resize factor
Apple Confidential
Chapter 2 Get started 32
Set up Time Machine. Make sure your MacBook Pro is on the same Wi-Fi network as your
AirPort Time Capsule, or connect your AirPort Time Capsule or external storage device to your
MacBook Pro. Click the System Preferences icon in the Dock, click Time Machine, then click On.
Select the drive you want to use for backup, and you’re all set.
Time Machine:
•Automatically backs up everything on your MacBook Pro, including system les, apps,
accounts, preferences, music, photos, movies, and documents.
•Remembers how everything looked on any given day, so you can revisit your MacBook Pro as
it appeared in the past or retrieve an older version of a document.
•Lets you restore your MacBook Pro from a Time Machine backup. So if anything happens to
your MacBook Pro, your les and settings are safe and sound.
To learn more about backing up and restoring your MacBook Pro, go to Mac Help (see Mac Help)
and search for “Time Machine,” “external storage device,” “backup,” or “restore.” To learn more
about AirPort Time Capsule, go to www.apple.com/airport-time-capsule.
AirPort Time Capsule is sold separately at apple.com or your local Apple Store.
74% resize factor
Apple Confidential
3
33
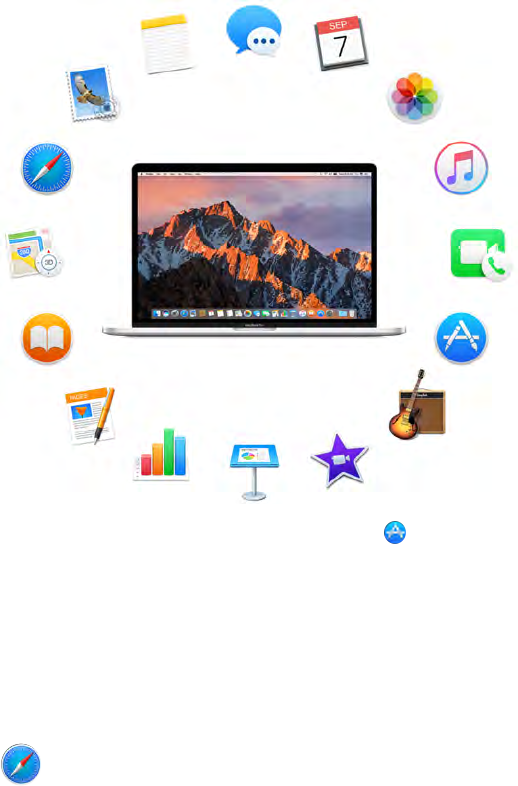
Included apps
Your MacBook Pro comes with a collection of great apps for things you do every day, like surng
the web, sending mail and messages, and arranging your calendar. It also comes with apps
like Photos, iMovie, GarageBand, Pages, Numbers, and Keynote—so you can be creative and
productive right from the start. The apps that come with your MacBook Pro are described in the
following sections.
Find even more apps. Click the App Store icon in the Dock to nd apps for everything you
want to do. See App Store to learn more.
Use the Touch Bar. If your MacBook Pro includes a Touch Bar, you can use it to perform shortcuts
for common tasks. Learn more in the app sections that follow.
Get help for any app. Click the Help menu (in the menu bar at the top of the screen) when
you’re using the app.
Safari
Safari is the fastest, safest, and most energy-ecient way to surf the web on your Mac.
Apps
74% resize factor
Apple Confidential

Chapter 3 Apps 34
Start searching. Click the Smart Search eld at the top of the window to see websites you visit
most frequently. Or start typing a word or website address—Safari shows you matching websites,
as well as Safari Suggestions for news, Wikipedia articles, iTunes music, weather forecasts, sports
scores and player stats, stock prices, help from Apple, and nearby points of interest.
Type what you’re looking
for or click a favorite.
Spread the word. It’s easy to share a webpage on social media, save it to your bookmarks or
reading list, or add it to Notes or Reminders. Just click the Share button at the top of the
window and choose an option.
View multiple pages in one window. Click at the far right of the tab bar to open a new tab,
then enter an address. To keep a website handy, drag its tab left to “pin” it, and it stays put in the
tab bar.
Drag a tab to the left
to pin it in the tab bar.
See what’s open on each of your devices. You can see open webpages on all your devices that
are signed in to the same iCloud account. Just click the Show All Tabs button at the top of the
window and scroll down if necessary.
Read without distraction. If the article you’re reading includes animations or ashy ads, you can
use Reader view to strip out the distractions and focus on the text. Click the Reader button in
the Smart Search eld (if it’s available).
Tip: In a webpage, force click a word to see its denition or a Wikipedia article, if one is
available. Try force clicking text in other apps, like Messages or Mail, to get more info.
Shop with Apple Pay. When you’re shopping online on a supported website, click the Apple
Pay button to make a purchase. To complete the transaction, use Touch ID or the passcode on
your iPhone, or double-click the side button on your unlocked Apple Watch. If you’re using a
MacBook Pro that has Touch ID, use the Power button with Touch ID to complete your purchase.
Use the Touch Bar. Tap the Search eld in the Touch Bar, then tap a favorite to open it. Click to
open a new tab.
74% resize factor
Apple Confidential
Chapter 3 Apps 35
Click the right and left arrow buttons to go backward or forward. Tap the tab scrubber in the
Touch Bar to move between open tabs.
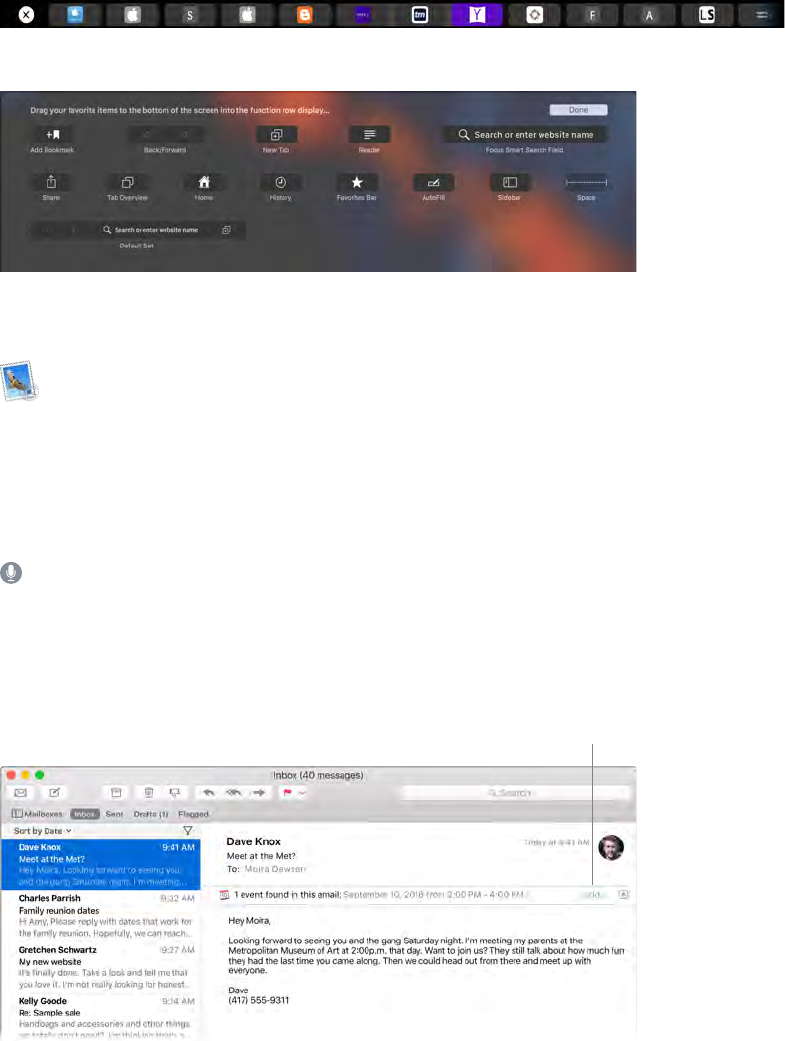
Customize the Touch Bar to add your favorite controls (choose View > Customize Touch Bar).
See Customize the Touch Bar for more information.
Mail
Mail lets you manage all your email accounts from a single app. It works with most popular email
services, such as iCloud, Gmail, Yahoo Mail, and AOL Mail.
One-stop email. Tired of signing in to multiple websites to check your email accounts? Set
up Mail with all your accounts so you can see all your messages in one place. Choose Mail >
Add Account.
Ask Siri. Say something like: “Any new mail from Laura today?”
Add events and contacts right from Mail. When Mail detects a new email address or event in a
message, just click Add to add it to Contacts or Calendar. Force click an address to see a preview
of the location, which you can open in Maps.
Add names or events to
your contacts or calendar
with a single click.
74% resize factor
Apple Confidential
Chapter 3 Apps 36
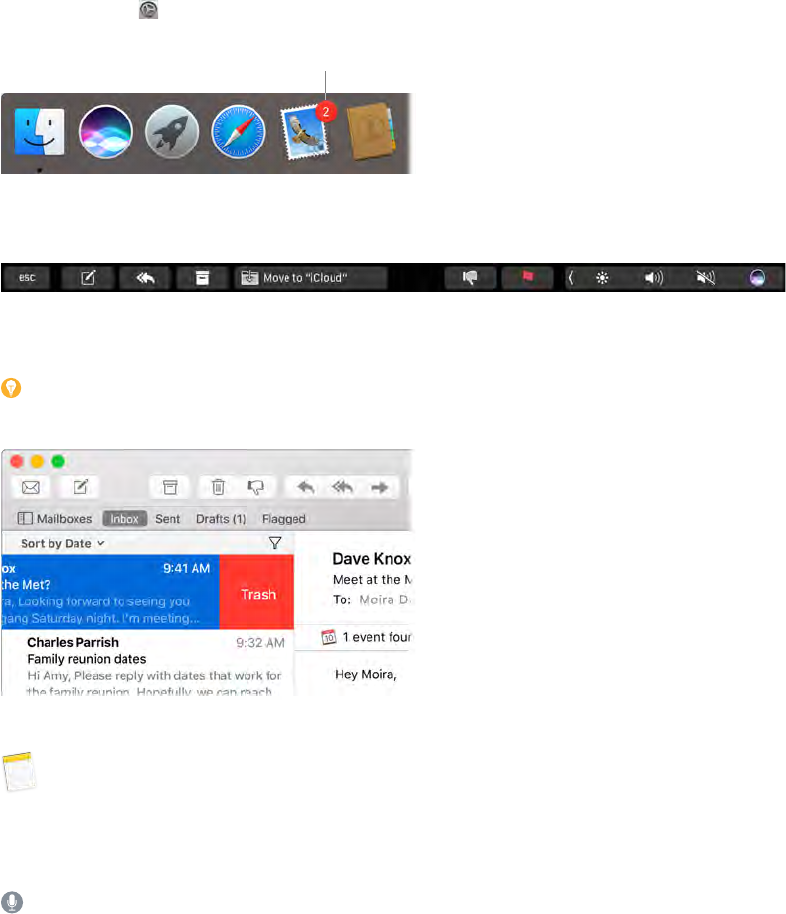
Never miss an email. Check the Mail icon in the Dock to see the number of unread messages.
When you get new email, a notication also appears at the top-right of the screen so you can
quickly preview the new messages. (Don’t want notications? To turn them o, click the System
Preferences icon in the Dock, then click Notications.)
You have unread
messages.
Use the Touch Bar. Use the Touch Bar for many common tasks, like composing, replying,
archiving, agging, marking as junk, and moving messages.
Customize the Touch Bar to add your favorite controls (choose View > Customize Touch Bar). See
Customize the Touch Bar for more information.
Tip: To quickly delete a message in your inbox, swipe left across the message with two ngers
on the trackpad, then click Trash. Or swipe right to mark the message as Unread.
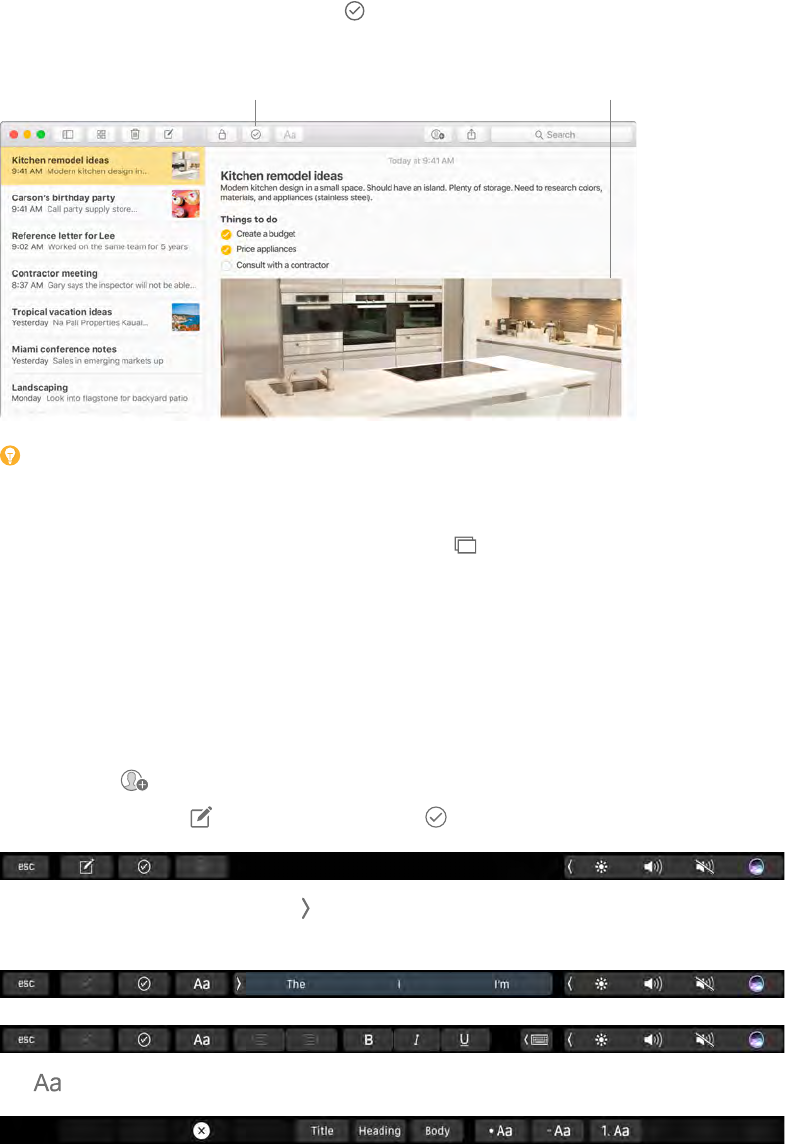
Notes
Notes are more than just text. Add a checklist, and check o items as you complete them. Or
add photos, videos, and content from other apps, such as a web link from Safari or a location
from Maps.
Ask Siri. Say something like: “Create a new note.”
74% resize factor
Apple Confidential
Chapter 3 Apps 37
Check o tasks. Click the Checklist button to add an interactive checklist to a note—perfect
for completing a to-do list or working through a recipe.
Create a checklist.
Drag photos and other
items into your notes.
Tip: When you’re signed in to iCloud, your notes are kept up to date on all your devices—so
you can create a to-do list on your Mac, then check o items on your iPhone while you’re on
the go.
Add photos, videos, and more. Click the Photos button to add items from your Photos library
to a note. Or drag a photo, video, PDF, or other document from the desktop.
Sort notes. You can sort your notes by Date Created, Date Edited, or Title. Select “All iCloud,”
“Notes,” or a folder, then choose View > Sort Notes By and select a sort option.
Lock a note. You can lock a note with a password to make sure that only those who know the
password can see the note. Choose Notes > Set Password to assign a password to use with all
locked notes. Then select the note you want to lock, and choose File > Lock Note.
Share a note. You can invite people to view and edit your notes by sharing them. Click the
People button and select a method for sending the link.
Use the Touch Bar. Tap to create a new note. Tap to add a checklist item to your note.
Tap predictive input options and tap to display text formatting buttons to align text left or
right, and apply bold, italic, or underscore styles.
Tap to add note paragraph styles, like numbered or bulleted lists, or headings.
74% resize factor
Apple Confidential

Chapter 3 Apps 38
Messages
With Messages, it’s easy to stay in touch. Connect with one or more people through text, audio,
or video. And if you want to share les, you can do that too.
Start a FaceTime call.
Start a conversation.
Sign in and send. Sign in with your Apple ID to exchange unlimited iMessage texts—including
text, photos, live photos, video, and more—with anyone with a Mac, iPhone, iPad, iPod touch, or
Apple Watch.
Tip: You can also send and receive SMS and MMS messages on your Mac, so you can text
friends with an iPhone from your Mac, if your iPhone (with iOS 8.1 or later) is signed in to
Messages with the same Apple ID. On your iPhone, go to Settings & Messages, tap Message
Forwarding, then tap the name of your Mac to turn on Text Message Forwarding. On your Mac,
you’ll see an activation code. Enter this on your iPhone, then tap Allow.
Ask Siri. Say something like: “Read my last message from Mitch.”
Make messages fun. Liven up discussions by responding to messages with large emoji or
Tapbacks. To add a Tapback, force click or control-click a message bubble, then choose Tapback.
And look out for stickers, Digital Touch, invisible ink, and handwritten messages that your friends
send you from their iOS device or Apple Watch.
74% resize factor
Apple Confidential
Chapter 3 Apps 39
When a text isn’t enough. If your friend also has FaceTime, you can start a FaceTime video or
audio chat right from a conversation in Messages. Just click Details in the message window, then
click the Audio or Video button.
Share your screen. You can share your screen with a friend—and vice versa—and even open
folders, create documents, and copy les by dragging them to the desktop on the shared screen.
Click Details, then click the Screen Share button .
Use the Touch Bar. Tap to create a new message. Tap the predictive input options in Touch
Bar to add words, and tap to open the emoji picker and add emoji to your message. Click a
message in the thread to see Tapbacks on the Touch Bar, and tap to add them.
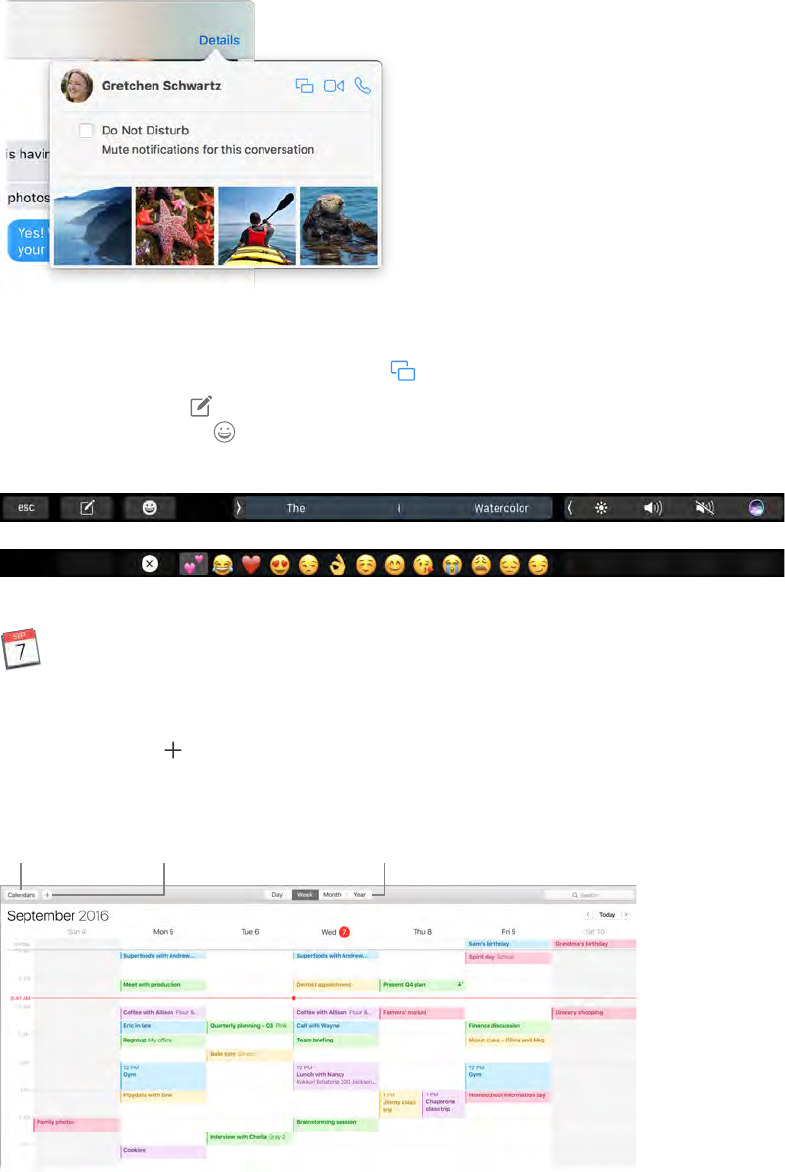
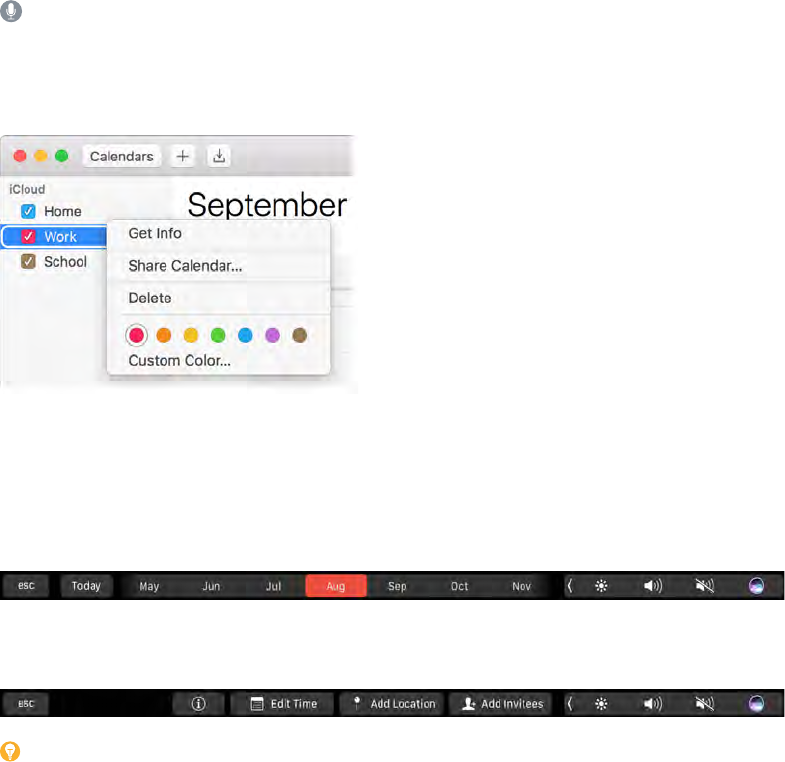
Calendar
Never miss an appointment with Calendar. Keep track of your busy schedule by creating multiple
calendars, and manage them all in one place.
Create events. Click to add a new event. To invite someone, double-click the event, click
the Add Invitees section, then type an email address. Calendar lets you know when your
invitees reply.
Create a
new event.
Show the
calendar list.
Change the
calendar view.
74% resize factor
Apple Confidential
Chapter 3 Apps 40
See all your calendars—or just a few. Click the Calendars button to see a list of all your
calendars; click the ones you want to see in the window.
Ask Siri. Say something like: “Set up a meeting with Mark at nine in the morning.”
A calendar for every part of your life. Create separate calendars—for example, for home, work,
and school—each with its own color. Choose File > New Calendar to create a calendar, then
Control-click each calendar to choose a new color.
Share across your devices and with others. When you’re signed in to iCloud, your calendars are
kept up to date on all your Macs, iOS devices, and Apple Watch. You can also share calendars
with other iCloud users.
Use the Touch Bar. Tap the Today button to view or edit today’s events, and a slider to select the
month—past or future.
Select an event in your calendar, and tap buttons to get the event details, edit the time and
place, and add or delete invitees.
Tip: If you add a location to an event, Calendar shows you a map, estimated travel time
and time to leave, and even the weather forecast. Force click any event in Calendar to see
more details.
74% resize factor
Apple Confidential

Chapter 3 Apps 41
Photos
Use Photos to organize, edit, and share your photos, live photos, and videos, and keep your
entire photo library up to date on all your devices with iCloud Photo Library. You can also create
slideshows and beautiful photo gifts.
Find photos by what’s in them.Rediscover favorite occasions.
Relive meaningful moments. Click Memories to see favorite and forgotten occasions from your
photo library. Memories automatically creates photo collections from events like a wedding or
family vacation.
Find the perfect shot. Search your photos based on what’s in them. Photos identies objects,
scenes, and people, so you don’t have to use keywords to tag each photo.
Ask Siri. “Show me pictures of Sally at the beach.”
Tip: You can add location info to any photo. While viewing the photo, click the Info button ,
click Assign a Location, then start typing. Choose your location in the list, or type it and
press Return.
See who’s in your photo albums. The People feature automatically organizes your photo library
by people in your photos. The People album is arranged by how often each person appears
in your library. Make someone a favorite by dragging their photo to the top and they’ll always
appear at the top of the album.
See where you’ve been. Click the Places album to view your photo collection on a world map.
You can zoom in to see exactly where you took each shot.
Use the Touch Bar. The Touch Bar displays a scrubber organized by year, which speeds your
search for just the right photo. You can also quickly tap to rotate a selected photo or mark it
as a favorite . Tap to display the editing controls.
Select a photo to edit it. Tap to view editing options (crop, lters, adjust, retouch, and red-eye),
and tap the X when you nish.
74% resize factor
Apple Confidential
Chapter 3 Apps 42
Tap to enhance a photo, and tap and hold to view the before and after eects of your
edits. Adjust the red-eye and resize the photo. When you’re happy with your changes, tap Done.
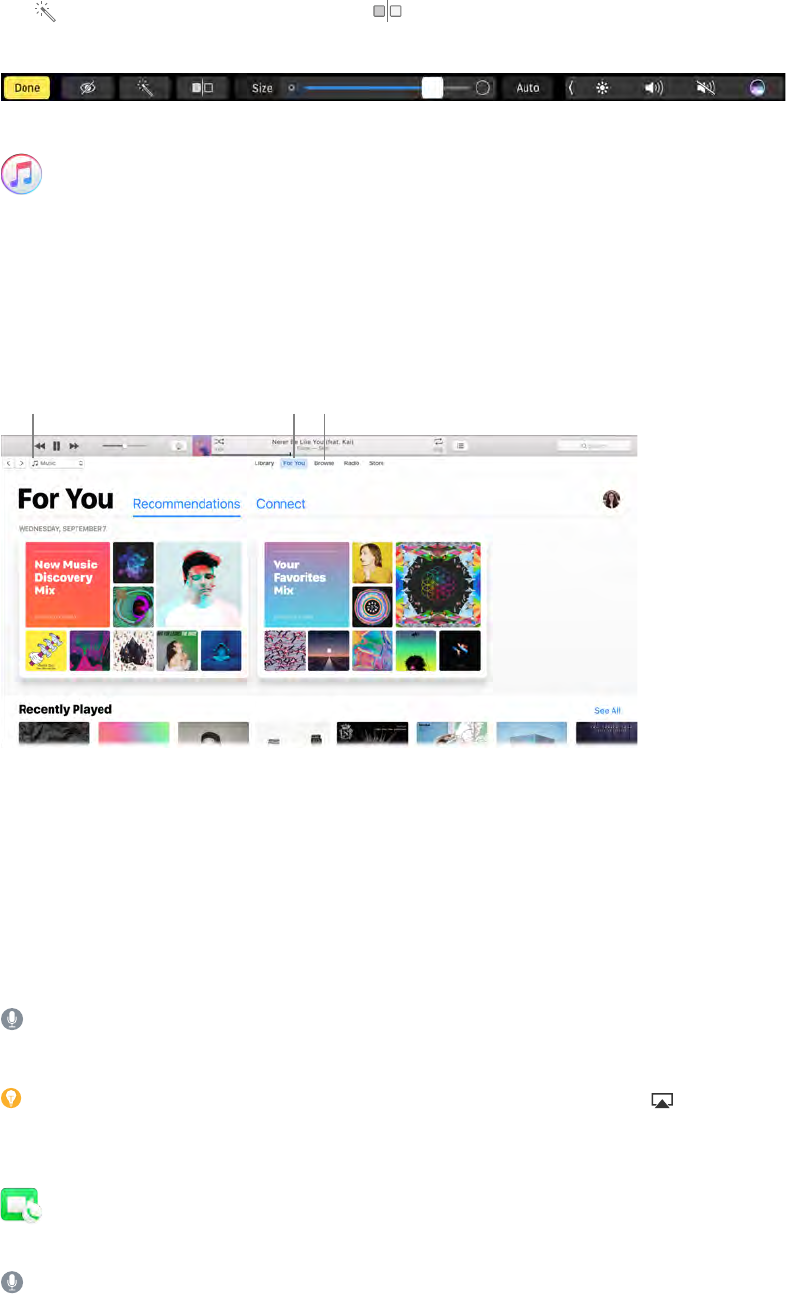
iTunes
iTunes makes it easy to organize and enjoy the music, movies, and TV shows you have—and
shop for the ones you want. iTunes includes Apple Music (which lets you listen to millions of
songs on demand), Beats 1 live radio, and Connect, a fun way for fans and artists to interact.
It’s in your library. Your iTunes library contains your music, movies, TV shows, podcasts, iTunes U
content, audiobooks, apps, ringtones, and Internet radio. Click the menu in the top-left corner to
change views.
Subscribe to
Apple Music.
Explore new
music releases.
View the items
in your library.
Find your new favorite song. Click For You to browse albums and playlists recommended for you
based on the artists and genres you love. The reorganized, easy-to-understand sections highlight
why each album or playlist was selected for you. For You also shows posts from artists you follow,
so it’s easier than ever to discover new music.
Browse the best of Apple Music. Click Browse to see new music and exclusive releases from
Apple Music. Choose from a huge selection of playlists to nd the perfect mix for any moment.
Tune in. Click Radio to tune in to Beats 1 live or listen to any episode from the Beats 1 family of
shows. Explore the wide variety of music-only stations created for almost every genre of music.
Ask Siri. “Play NPR Radio.”
Use the Touch Bar. {need info; haven’t seen any content in DFR yet}
Tip: To play music or radio from a speaker using AirPlay, click the AirPlay icon in the menu
bar and select an available speaker.
FaceTime
Make video and audio calls from your Mac with FaceTime.
Ask Siri. Say something like: “Make a FaceTime call to Sharon.”
74% resize factor
Apple Confidential

Chapter 3 Apps 43
Video or audio only? Click the Video button to make a FaceTime video call. If it’s not convenient
to make a video call, click the Audio button to make an audio-only call.
Tip: While a video call is in progress, you can drag the small picture-in-picture window to any
corner of the FaceTime window.
Search or enter
contact details.
List of recent calls.
Choose the
type of call.
Leave a message. If your FaceTime video call is declined or unanswered, click Message to send
an iMessage.
Make a phone call. If you have an iPhone with iOS 8 or later, make phone calls right from your
Mac using FaceTime. Just make sure your Mac and iPhone are signed in to the same iCloud
account and have the feature turned on. (On your Mac, open FaceTime, choose FaceTime >
Preferences, then select “Calls from iPhone.”)
Note: A Wi-Fi connection is required in order to make or receive calls on your MacBook Pro.
Use the Touch Bar. Make and answer voice or video calls, get info about a caller, and send a
message when you can’t talk, all from the Touch Bar.
74% resize factor
Apple Confidential
Chapter 3 Apps 44
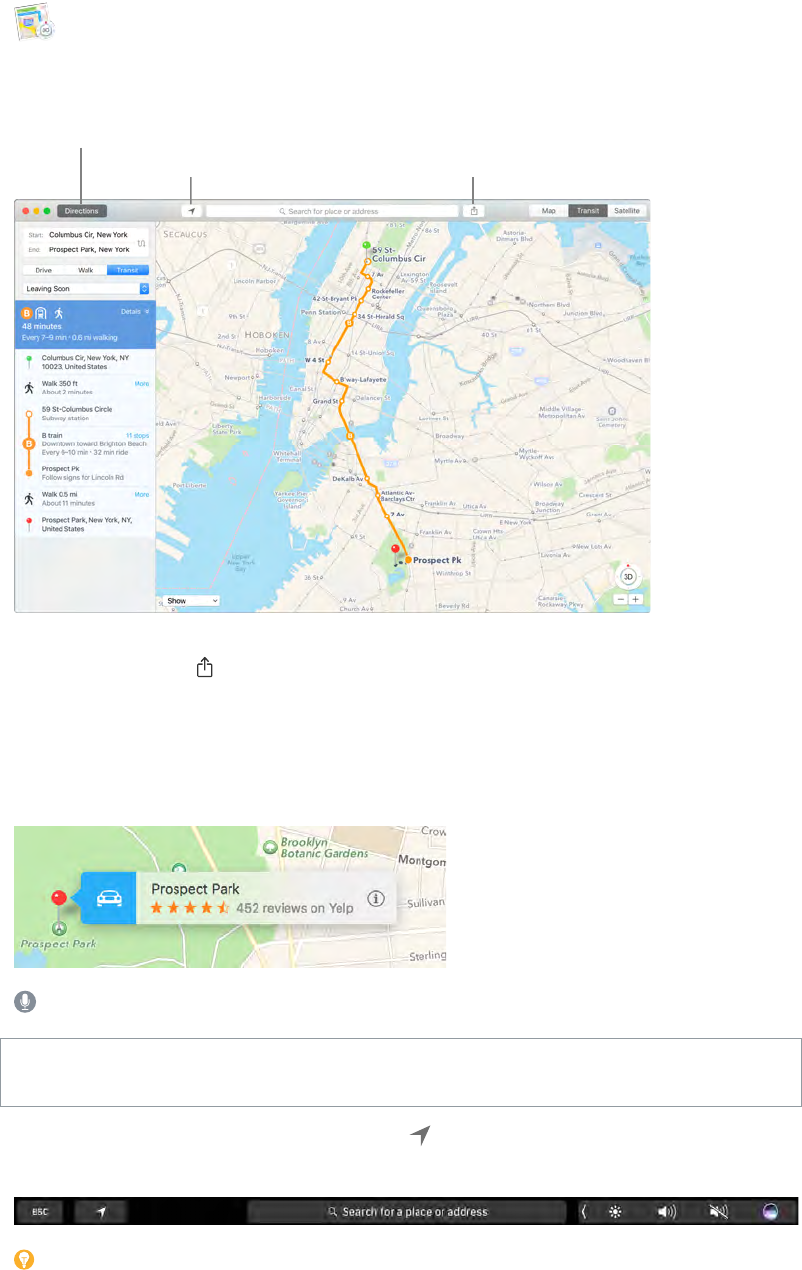
Maps
Get directions and view locations using a map or a satellite image. Or use Flyover to view select
cities in 3D. Force click a location to drop a pin there.
Get detailed directions, including
for travel by mass transit. Send directions
to your iPhone.
Show your current location.
Let iPhone show you the way. Click Directions to nd the best route to your destination, then
click the Share button to send the directions to your iPhone for turn-by-turn voice navigation.
Get there on public transit. Maps provides public transit information for select cities. Click
Transit, then click a destination to get suggested travel routes and estimated travel time.
More than just maps. For local points of interest such as hotels and restaurants, Maps shows you
phone numbers, photos, and even reviews.
Ask Siri. Say something like: “Find coee near me.”
WARNING: For important information about navigation and avoiding distractions that could
lead to dangerous situations, see Important safety information.
Use the Touch Bar. Specify your current location on the map and open the search eld to
enter where you want to go. Tap the Directions button to get the route.
Tip: Maps can show you what trac is like in both Map and Satellite view. Click Show, then
choose Show Trac.
74% resize factor
Apple Confidential
Chapter 3 Apps 45
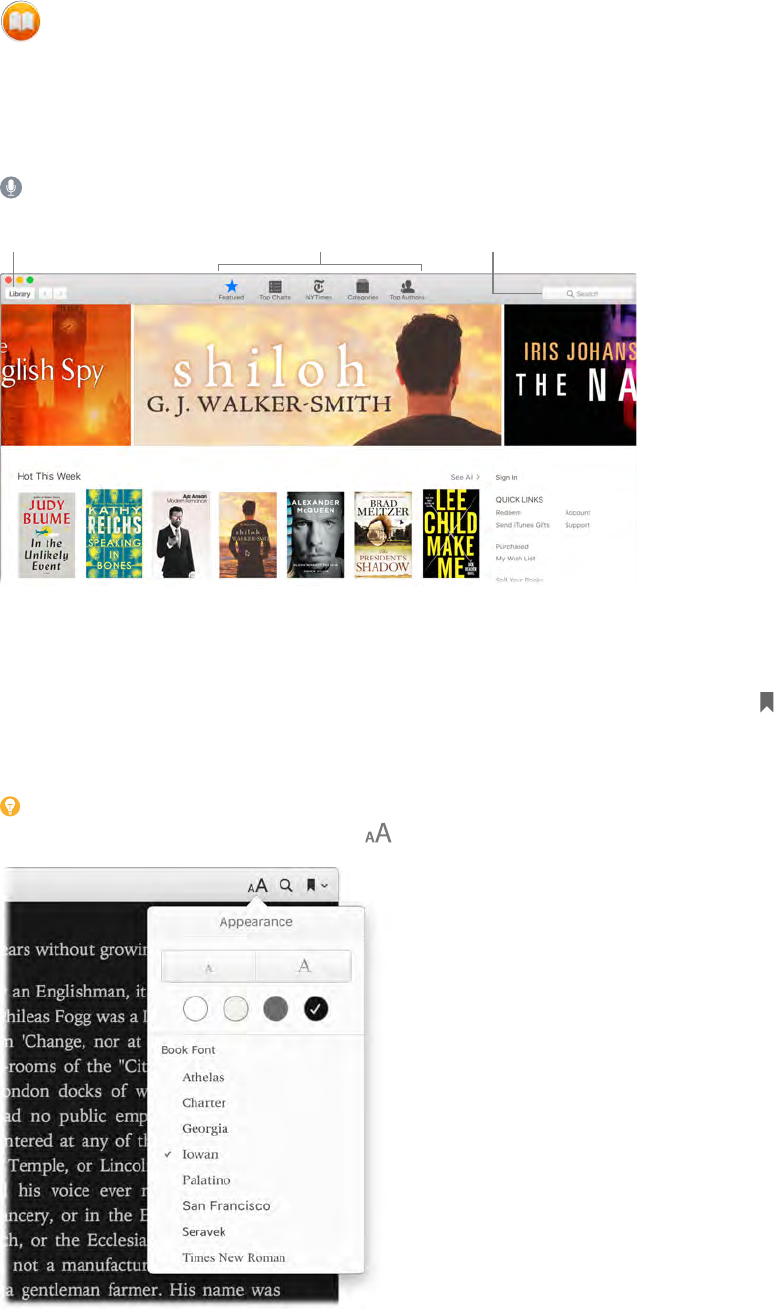
iBooks
Use iBooks to read and organize your library of books, and to purchase new books on your Mac.
A bookshelf right on your Mac. Browse or search all the items in your library—or click iBooks
Store to nd new books and other publications. To buy, just sign in with your Apple ID: Choose
Store > Sign in.
Ask Siri. Say something like: “Find books by Jane Austen.”
Type what you’re
looking for.
View your books.
Browse curated
content.
Never lose your place or your markups. Your purchased books, collections, highlights, notes,
bookmarks, and the current page are available automatically on your Mac and iOS devices, if
you’re signed in on them with the same Apple ID.
Find your way back. You can quickly go to pages you’ve bookmarked. Click the arrow next to
to view your list of bookmarks.
Use the Touch Bar. {need info}
Tip: Change to Night mode to read more easily in low-light situations. Choose View > Theme,
then choose Night. Or click the Fonts button , then click the black circle.
74% resize factor
Apple Confidential

Chapter 3 Apps 46
Pages
Use the Pages app to create stunning, media-rich documents on your Mac. Open and edit
Microsoft Word les, and easily share a link to your work in Mail or Messages, right from
the toolbar.
Look good! Pages includes a variety of beautiful templates for yers, newsletters, reports, and
résumés, among others, making it easy to start your project.
Add charts, movies,
and more.
Share your
document.
Open or close the
Format sidebar.
All your formatting tools, in one place. Click the Format button in the toolbar to open the
Format inspector. Select an item in your document, and the formatting options for it appear.
Flow text around graphics. When you add an image to a text document, the text ows
automatically around the image. You can ne-tune how the text wraps in the Format sidebar.
Move a graphic into a text block… …and the text wraps around the
graphic automatically.
Start on your Mac, nish on iPad. You can keep documents up to date across all your devices
when you sign in to iCloud with the same Apple ID. So you can start composing on one device,
and pick up where you left o on another.
Tip: Turn on change tracking to see the changes you and others make to the document. Each
person’s edits and comments are color-coded so you can see who made the change. Choose
Edit > Turn on Tracking to show the change tracking toolbar.
74% resize factor
Apple Confidential
Chapter 3 Apps 47
Use the Touch Bar. Tap to align text left or right, and to add predictive text. Tap to see more
formatting options.
Tap to choose text color, style options (bold, italic, and so on), line spacing, and bullet and list
formats. Tap to return to predictive input.
Tap Styles to see paragraph style format options, like Title, Subtitle, and Heading.
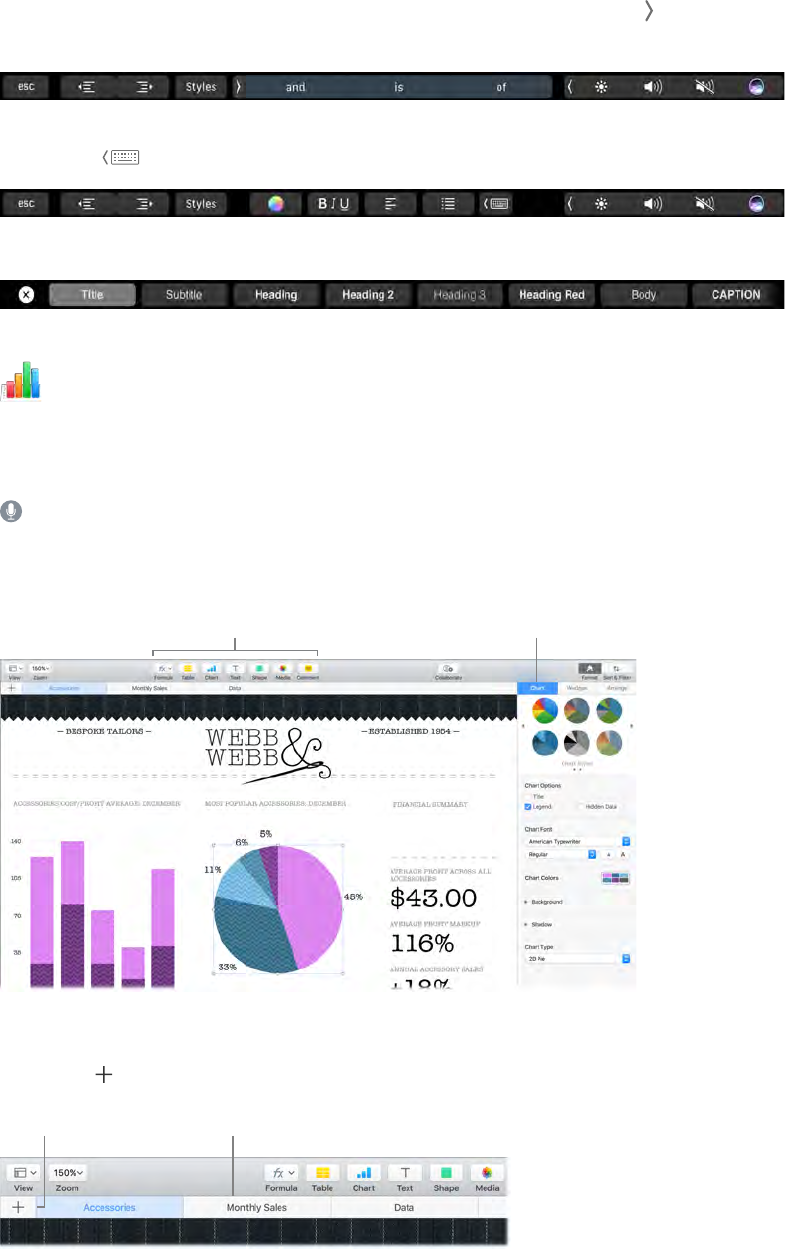
Numbers
Use Numbers to create attractive and powerful spreadsheets on your Mac. More than 30 Apple-
designed templates give you a head start creating budgets, invoices, team rosters, and more.
Numbers can also open and export Microsoft Excel spreadsheets.
Ask Siri. Say something like: “Open a new spreadsheet.”
Start with a template—then add what you want. Select the sample text in the template, then
type new text. To add images, drag a graphic le from your Mac onto the placeholder image.
Add objects like
shapes and charts.
View formatting options
for the selected object.
Get organized with sheets. Use multiple sheets or tabs to show dierent views of your
information. For example, use one sheet for your budget, another for a table, and a third for
notes. Click to add a new sheet. Drag a tab left or right to reorder sheets.
Click + to add
a new sheet.
Drag a tab left or right
to reorder sheets.
74% resize factor
Apple Confidential
Chapter 3 Apps 48
Formulas are a snap. Get built-in help for more than 250 powerful functions—just type the
equal sign (=) in a cell, and you see a list of all the functions and their descriptions in the sidebar.
Start typing a formula to get instant suggestions.
Tip: To get instant calculations based on a series of values, select the range of cells containing
the values. At the bottom of the window you’ll see the sum, average, minimum, maximum, and
count of the selected values. Click the Settings button to see even more options.
Use the Touch Bar. Tap Format, Autoll, and Formula to display the options shown below, or tap
text style and format buttons to display more Touch Bar controls for choosing color, justication,
wrapping, and top/bottom alignment for text.
Tap Format to display these text formatting buttons.
Tap Autoll to display these autoll options.
Tap Formula to display the quick formula buttons.
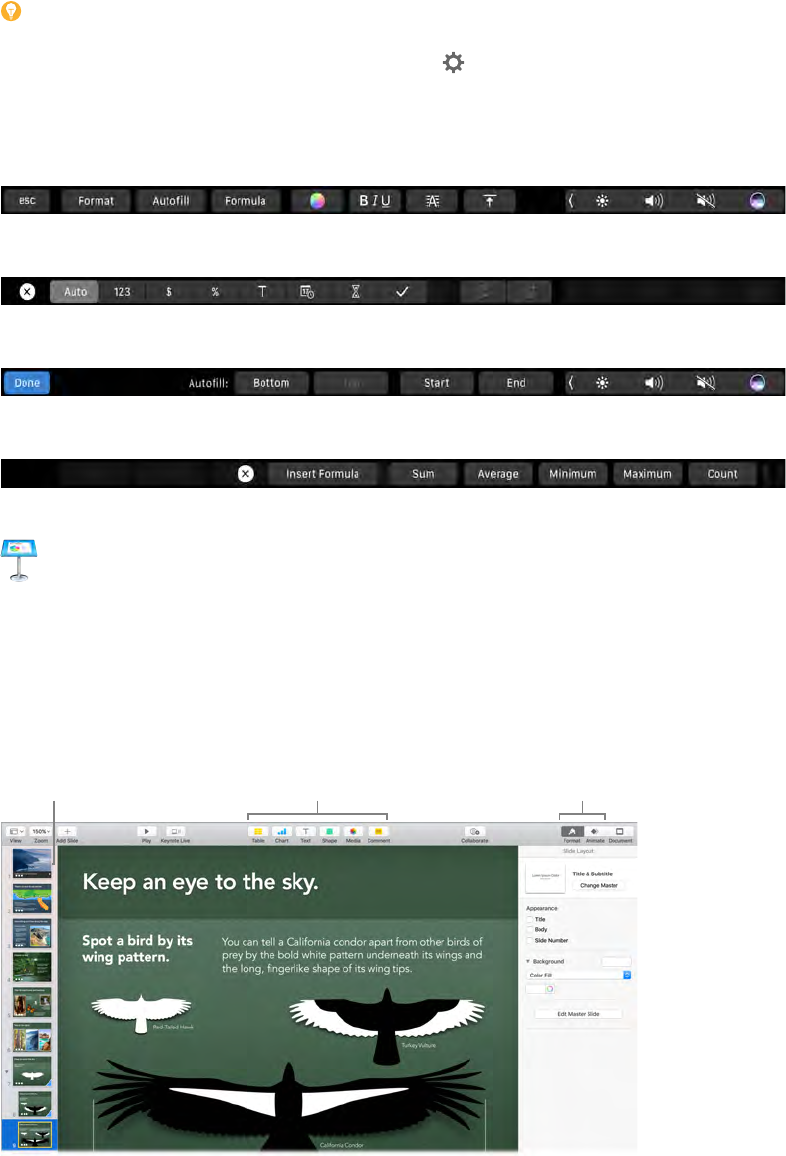
Keynote
Create professional, cutting-edge presentations with Keynote. Start with one of the more than
30 predesigned themes and make it your own by adding text, new objects, and changing the
color scheme.
Organize visually. Use the slide navigator on the left to quickly add, delete, or rearrange slides.
Click a slide to see it in the main window, drag a slide to change its order, or select it and press
Delete to remove it.
Drag to
reorder slides.
Add objects to
your slides.
See format and
animation options.
74% resize factor
Apple Confidential
Chapter 3 Apps 49
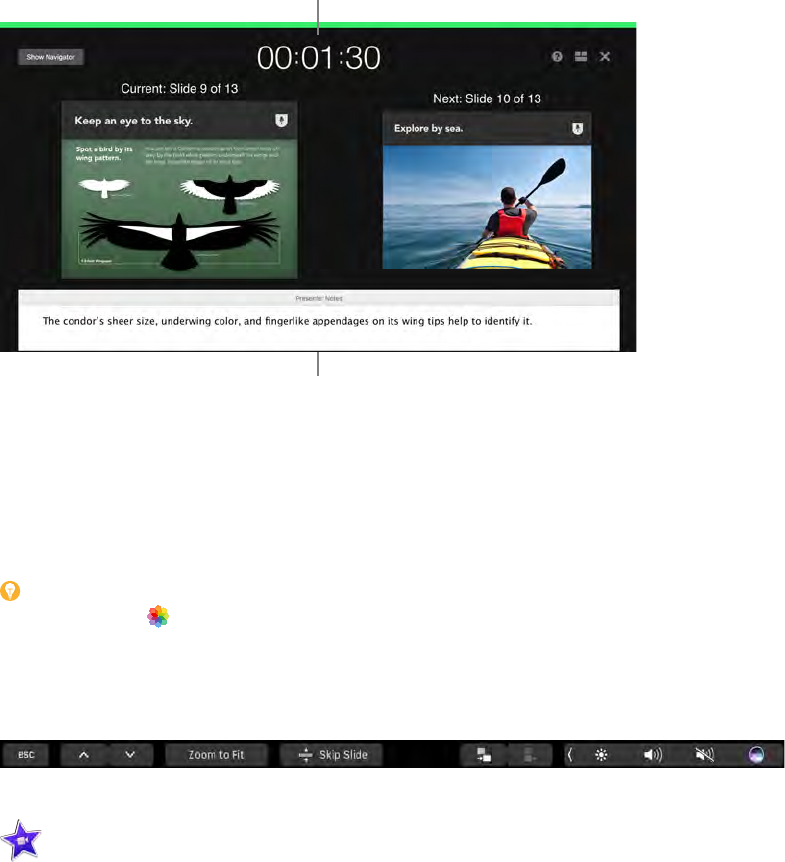
Practice makes perfect. To rehearse your presentation, choose Play > Rehearse Slideshow. You’ll
see each slide along with your notes—and a clock to keep you on track.
See how you’re doing on time.
Remind yourself
of key points to make.
Share your presentation. If your manager wants to review your presentation or you want to
share it with others on a conference call, click Share > Send a Copy to send a copy by Mail,
Messages, AirDrop, or even social media.
Follow the bouncing ball. Get their attention by animating an object on a slide. Select the
object, click Animate in the toolbar, click Action in the sidebar, then click Add an Eect.
Tip: You can embed a video in your presentation. Click where you want it to be, then click
the Media button in the toolbar. Click Movies, then nd the movie you want and drag it to
your slide.
Use the Touch Bar. Tap the arrow keys to move up and down through your slides, tap buttons to
zoom or skip a slide, and tap to group or ungroup slides.
iMovie
iMovie lets you turn your home videos into beautiful movies and epic Hollywood-style trailers,
and makes it easy to share your clips.
74% resize factor
Apple Confidential

Chapter 3 Apps 50
Import a video. Import video or photos from your iPhone, iPad, or iPod touch, from a camera, or
from media les already on your Mac. iMovie creates a new library and event for you.
Correct and adjust
color in your clip.
Share a movie,
trailer, or clip.
View your
projects.
Record video with the built-in camera. Use the FaceTime camera on your Mac to record video
and add it to your project. Select an event in the sidebar, click Import in the toolbar, select
FaceTime HD Camera (Built-in), then click the Record button to start and stop recording.
Tip: Shooting video with a handheld device can produce shaky results, but you can stabilize
the video so the playback is smoother. Select the shaky clip in the timeline, click the Stabilization
button , then click Stabilize Shaky Video.
Create Hollywood-style trailers. Make clever trailers, complete with titles and music. Just add
your own movie clips and customize the credits. Click the New button , click Trailer, then
choose a template from the Trailer window. Click Create, select the event you want to use, type a
name, then click OK.
Click Play to
preview the trailer.
Use the Touch Bar. Tap buttons to mark a favorite clip, delete, play, add a clip to a movie, or add
as an overlay.
74% resize factor
Apple Confidential
Chapter 3 Apps 51
When a clip is playing, use the Touch Bar buttons to rewind, play, fast-forward, and split the clip
into two parts, at the point where you click. Tap the volume button to open the volume slider.
GarageBand
GarageBand is an app for creating, recording, and sharing your music. It has everything you
need in order to learn to play an instrument, write music, or record a song—your own home
recording studio.
Create a new project. You can start with a song template, select a tempo, key, and other options,
then click Record and start playing. Build your song—for example, with dierent tracks and
loops. Click Quick Help and hold the pointer over items to learn what they are and how
they work.
Show Smart Controls.
View Editors.
View Apple Loops.
Open the Note Pad.Tracks area
No more excuses—learn to play. GarageBand comes with a lesson to start learning piano and
one for guitar. Open the Lesson Store in the Project Chooser to view more lessons to download
or purchase—including Artist Lessons from famous musicians.
74% resize factor
Apple Confidential
Chapter 3 Apps 52
Record your voice. Connect a microphone, choose Track > New Track, then select the
microphone under Audio. Click the triangle next to Details to set options for input, output, and
monitoring, then click Create. Click the Record button to start recording or the Play button to
stop recording. Don’t forget to sing!
Click to record your voice.
Hear yourself while you record.
Use the Touch Bar. {need info; content coming 9/2 or 9/3}
Tip: Make your own ringtones, then sync them to your iPhone using iTunes. Choose File >
New, select Ringtone, click Choose, then import a le to use. Customize the ringtone the way you
want it, then choose Share > Ringtone to iTunes.
App Store
Search the App Store to nd and download apps, and get the latest updates for your apps.
Find the perfect app. Know exactly what you’re looking for? Type the name in the search eld,
then press Return. Or click Top Charts to see the most popular apps.
Click a category
to browse it.
Search for an
app by name.
Ask Siri. Say something like: “Find apps by Apple.”
74% resize factor
Apple Confidential
Chapter 3 Apps 53
All you need is an Apple ID. To download apps, just sign in with your Apple ID—choose Store >
Sign In, or click Sign In on the right side of the window. If you don’t have an Apple ID yet, choose
Store > Create Account. If you can’t remember your password, click the Forgot link in the login
window to recover it.
Get the latest updates. If you see a badge on the App Store icon in the Dock, there are updates
available for your apps or macOS. Click the icon to open App Store, then click Updates in the
toolbar.
You have
available updates.
Use the Touch Bar. {need info; don’t see anything}
Tip: You can spread the word about your favorite apps to your friends. While viewing an app,
click the down arrow next to the price, then choose Tell a Friend.
74% resize factor
Apple Confidential
4
54
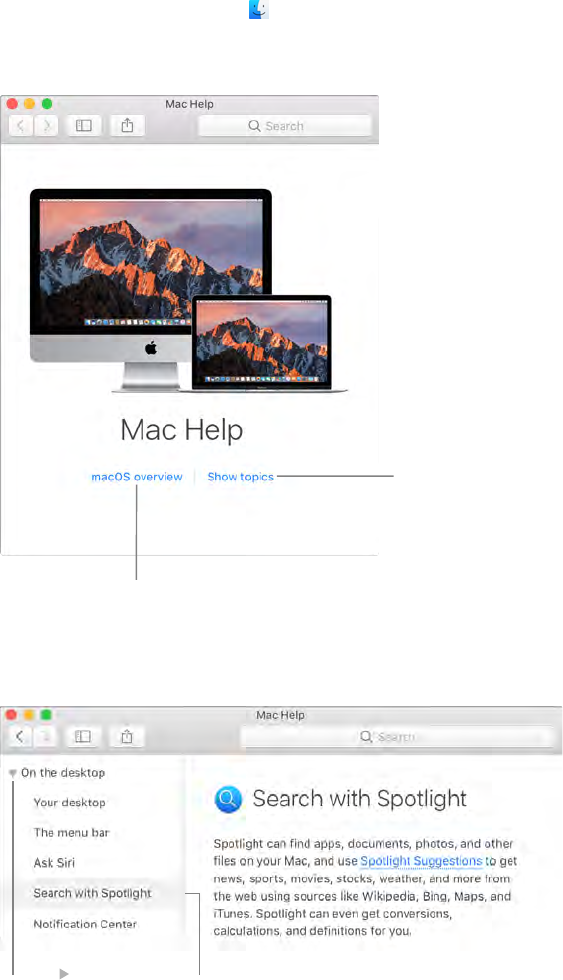
Mac Help
Mac Help has a lot more information about how to use your MacBook Pro.
Get help. Click the Finder icon in the Dock, then click the Help menu in the menu bar and
choose Mac Help. Or type a question or term in the search eld, then choose a topic in the
results list.
Show the table
of contents.
Learn about macOS.
Explore topics. To nd a topic in Mac Help, you can browse or search. To browse, click “Show
topics” to see the list of topics, then click a topic to read it. Or type what you want to nd in the
search eld to go right to your answer.
Click to view
more topics.
Click a topic
to read it.
Find answers
74% resize factor
Apple Confidential

Chapter 4 Find answers 55
Find out what’s new. Click the Help menu, then choose “What’s New in macOS” to nd out more
about the latest features of macOS.
Tip: If you can’t remember the location of a menu item in an app, search for it in Help. Place
the pointer over the result, and an arrow shows you the command.
Common questions
How do I get support for my MacBook Pro? Go to www.apple.com/support/macbookpro.
Where’s my serial number? Choose Apple menu > About This Mac. The serial number is the last
item in the list. If your computer isn’t turned on, you can nd the serial number printed on the
bottom of your MacBook Pro.
Ask Siri. Say something like: “What’s my computer’s serial number?”
How do I get help for an app? When you’re using the app, click the Help menu in the menu bar
at the top of the screen.
Where is the safety information for my MacBook Pro? See Important safety information.
How do I nd the technical specications? Go to www.apple.com/macbook-pro/specs or
choose Apple menu > About This Mac and click the buttons at the top for displays, storage,
and memory.
Ask Siri. Ask Siri for information about your Mac. Say something like:
•“How fast is my Mac?”
•“How much memory does my Mac have?”
•“How much free space do I have on my Mac?”
•“How much iCloud storage do I have left?”
How do I check my disk for problems? Use Disk Utility. See the Apple Support article
support.apple.com/HT201639.
Keyboard shortcuts
You can press key combinations to do things on your MacBook Pro that you’d normally do with a
trackpad, mouse, or other device. Here’s a list of commonly used keyboard shortcuts.
Shortcut Description
Command-X Cut the selected item and copy it to the Clipboard.
Command-C Copy the selected item to the Clipboard.
Command-V Paste the contents of the Clipboard into the current
document or app.
74% resize factor
Apple Confidential

Chapter 4 Find answers 56
Shortcut Description
Command-Z Undo the previous command. Press Command-Z
again to redo.
Command-A Select all items.
Command-F Open a Find window, or nd items in a document.
Command-G Find again, or nd the next occurrence of the item
you’re searching for. Press Command-Shift-G to nd
the previous occurrence.
Command-H Hide the windows of the front app. Press Command-
Option-H to view the front app but hide all other
apps.
Command-M Minimize the front window to the Dock. Press
Command-Option-M to minimize all windows of the
front app.
Command-N Open a new document or window.
Command-O Open the selected item, or open a dialog to select a
le to open.
Command-P Print the current document.
Command-S Save the current document.
Command-W Close the front window. Press Command-Option-W to
close all windows of the app.
Command-Q Quit the app.
Command-Option-Esc Choose an app to Force Quit.
Command-Tab Switch to the next most recently used app among
your open apps.
Command-Shift-3 Take a screenshot of the entire screen. Press
Command-Shift-4 to take a screenshot of a selected
area of the screen.
If you switched to the Mac from a PC, or if you like to use the keyboard instead of the trackpad,
check out www.apple.com/support/macbasics/pctomac for a list of Mac keyboard shortcuts and
the dierences between Mac and Windows keyboards. For a more complete list of keyboard
shortcuts, see the Apple Support article support.apple.com/HT201236.
More resources, service, and support
You can nd more information about your MacBook Pro in System Report, in Apple Diagnostics,
and through online resources.
System Report. To get information about your MacBook Pro, use System Report. It shows you
what hardware and software is installed, the serial number and operating system version, how
much memory is installed, and more. To open System Report, choose Apple menu > About This
Mac, then click System Report.
Apple Diagnostics. You can use Apple Diagnostics to help determine if there’s a problem with
one of the computer’s components, such as the memory or processor. Apple Diagnostics helps
to identify the potential source of a hardware issue and provides rst steps to try and resolve it.
Apple Diagnostics will also help you get in touch with Apple Support if you need more help.
Before using Apple Diagnostics, disconnect any external devices, such as a hard disk or external
display. Be sure your MacBook Pro is connected to the Internet.
74% resize factor
Apple Confidential

Chapter 4 Find answers 57
To start Apple Diagnostics, restart your MacBook Pro and hold down the D key as it starts up.
If prompted, select the language for your location. Press the Return key or click the right arrow
button. The basic Apple Diagnostics test takes a few minutes to complete. If an issue is found, a
description of the issue appears in Apple Diagnostics with additional instructions. Make a note of
any reference codes before you exit Apple Diagnostics.
Online resources. For online service and support information, go to www.apple.com/support.
You can learn about Apple products, view online manuals, and check for software updates.
Connect with other Apple users, and get service, support, and professional advice from Apple.
AppleCare support. If you need assistance, AppleCare representatives can help you with
installing and opening apps, and with troubleshooting. Call the support center number nearest
you (the rst 90 days are complimentary). Have the purchase date and your MacBook Pro serial
number ready when you call.
Your 90 days of complimentary telephone support begins on the date of purchase.
Country Phone number Web address
United States 1-800-275-2273 www.apple.com/support
Australia (61) 1-300-321-456 www.apple.com/au/support
Canada 1-800-263-3394 English:
www.apple.com/ca/support
French:
www.apple.com/ca/fr/support
Ireland 1-800-804-062 www.apple.com/ie/support
New Zealand 00800-7666-7666 www.apple.com/nz/support
United Kingdom (44) 0844 209 0611 www.apple.com/uk/support
Telephone numbers are subject to change, and local and national telephone rates may apply. A
complete list is available on the web at www.apple.com/support/contact/phone_contacts.html.
74% resize factor
Apple Confidential

5
58
Important safety information
WARNING: Failure to follow these safety instructions could result in re, electric shock, or other
injuries, or damage to your MacBook Pro or other property. Read all safety information below
before using your MacBook Pro.
Built-in battery. Don’t attempt to replace or remove the battery yourself—you may damage the
battery, which could cause overheating and injury. The lithium-ion battery in your MacBook Pro
should be replaced by Apple or an authorized service provider, and must be recycled or disposed
of separately from household waste. Don’t expose your MacBook Pro to extreme heat sources,
such as radiators or replaces, where temperatures might exceed 212°F (100°C).
For information about battery service and recycling, go to
www.apple.com/batteries/service-and-recycling.
Handling. Handle your MacBook Pro with care. It is made of metal, glass, and plastic and has
sensitive electronic components inside. Place your MacBook Pro on a stable work surface that
allows for adequate air circulation under and around the computer. Your MacBook Pro can be
damaged if dropped, burned, punctured, or crushed, or if it comes in contact with liquids, oils,
and lotions. Don’t use a damaged MacBook Pro, such as one with a cracked screen, as it may
cause injury.
Liquid exposure. Keep your MacBook Pro away from sources of liquid, such as drinks, oils, lotions,
washbasins, bathtubs, shower stalls, and so on. Protect your MacBook Pro from dampness,
humidity, or wet weather, such as rain, snow, and fog.
Repairing. Your MacBook Pro doesn’t have any user-serviceable parts. Do not open or
disassemble MacBook Pro or attempt to repair it or replace any components. Disassembling your
MacBook Pro may damage it or may cause injury to you. If your MacBook Pro needs service, is
damaged, malfunctions, or comes in contact with liquid, contact Apple or an Apple-authorized
repair center, such as an Apple Authorized Service Provider. If you attempt to open your
MacBook Pro, you risk damaging your computer, and such damage isn’t covered by the limited
warranty on your MacBook Pro.
Navigation. Maps, directions, and location-based apps depend on data services. These data
services are subject to change and may not be available in all areas, resulting in maps, directions,
or location-based information that may be unavailable, inaccurate, or incomplete. Compare the
information provided on your MacBook Pro to your surroundings and defer to posted signs to
resolve any discrepancies. Do not use these services while performing activities that require your
full attention. Always comply with posted signs and the laws and regulations in the areas where
you are using your MacBook Pro and always use common sense.
Charging. Charge MacBook Pro only with the included USB-C Charge Cable and 61W or 87W
USB-C Power Adapter, or with other third-party USB-C charge cables and USB-C power adapters
that are compliant with applicable regulations.
Safety, handling, and support
74% resize factor
Apple Confidential
Chapter 5 Safety, handling, and support 59
Using damaged cables or chargers, or charging when moisture is present, can cause re, electric
shock, injury, or damage to your MacBook Pro or other property. When you use the included
USB-C Charge Cable and 61W or 87W USB-C Power Adapter to charge your MacBook Pro, make
sure the AC plug is fully inserted into the power adapter before you plug the adapter into a
power outlet. You will hear and may feel a vibration when it connects.
Prolonged heat exposure. Your MacBook Pro and its 61W or 87W USB-C Power Adapter may
become very warm during normal use. The MacBook Pro and its 61W or 87W USB-C Power
Adapter comply with applicable surface temperature standards and limits dened by the
International Standard for Safety of Information Technology Equipment (IEC 60950-1). However,
even within these limits, sustained contact with warm surfaces for long periods of time may
cause discomfort or injury.
Use common sense to avoid situations where your skin is in prolonged contact with a device
or its power adapter when it’s operating or plugged into a power source. For example, don’t
sleep with a device or power adapter when it’s plugged into a power source. Don’t operate your
MacBook Pro on a pillow, blanket, or other soft material that can block ventilation openings.
It’s important to keep your MacBook Pro and its 61W or 87W USB-C Power Adapter in a well-
ventilated area when in use or charging.
Never push anything into the ventilation openings, as doing so may be dangerous and cause
your computer to overheat. Never place anything over the keyboard when operating your
MacBook Pro. If your MacBook Pro is on your lap and gets uncomfortably warm, remove it from
your lap and place it on a stable, well-ventilated work surface. Take special care if you have a
physical condition that aects your ability to detect heat against the body.
61W or 87W USB-C Power Adapter. To operate the 61W or 87W USB-C Power Adapter safely and
reduce the possibility of heat-related injury or damage, do one of the following:
•Plug the 61W or 87W USB-C Power Adapter directly into a power outlet.
•If you’re using an AC power cord such as the Apple Power Adapter Extension
Cable, sold separately, place the power adapter on a desk, table, or on the oor in a
well-ventilated location.
Disconnect the power adapter and any cables if any of the following conditions exists:
•You want to clean the case (use only the recommended procedure, described in Important
handling information).
•The power cord or plug becomes frayed or otherwise damaged.
•Your MacBook Pro or 61W or 87W USB-C Power Adapter is exposed to rain, excessive moisture,
or liquid spilled into the case.
•Your MacBook Pro or 61W or 87W USB-C Power Adapter has been dropped, the case has been
damaged, or you suspect that service or repair is required.
61W USB-C Power Adapter specications:
•Frequency: 50 to 60 Hz, single phase
•Line Voltage: 100 to 240 V
•Output Voltage: 20.3 V, 3 A (USB PD) or 9 V, 3 A (USB PD) or 5.2 V, 2.4 A
87W USB-C Power Adapter specications:
•Frequency: 50 to 60 Hz, single phase
•Line Voltage: 100 to 240 V
•Output Voltage: 20.2 V, 4.3 A (USB PD) or 9 V, 3 A (USB PD) or 5.2 V, 2.4 A
74% resize factor
Apple Confidential

Chapter 5 Safety, handling, and support 60
Take special care if you have a physical condition that aects your ability to detect heat against
the body.
Hearing loss. Listening to sound at high volumes may damage your hearing. Background noise,
as well as continued exposure to high volume levels, can make sounds seem quieter than they
actually are. Use only compatible earbuds, headphones, or earpieces with your MacBook Pro.
Turn on the audio and check the volume before inserting anything into your ear. For more
information about hearing loss, see www.apple.com/sound.
WARNING: To prevent possible hearing damage, do not listen at high volume levels for
long periods.
Radio frequency exposure. MacBook Pro uses radio signals to connect to wireless networks. For
information about radio frequency (RF) energy resulting from radio signals and steps you can
take to minimize exposure, see www.apple.com/legal/rfexposure.
Medical device interference. MacBook Pro contains components and radios that emit
electromagnetic elds, which may interfere with pacemakers, debrillators, or other medical
devices. Maintain a safe distance of separation between your medical device and MacBook Pro.
Consult your physician and medical device manufacturer for information specic to your medical
device. If you suspect MacBook Pro is interfering with your pacemaker or any other medical
device, stop using MacBook Pro.
Medical conditions. If you have a medical condition that you believe could be aected by
using MacBook Pro (for example, seizures, blackouts, eyestrain, or headaches), consult with your
physician prior to using MacBook Pro.
Repetitive motion. When you perform repetitive activities such as typing or playing games on
MacBook Pro, you may experience discomfort in your hands, arms, wrists, shoulders, neck, or
other parts of your body. If you experience discomfort, stop using MacBook Pro and consult
a physician.
Choking hazard. Some MacBook Pro accessories may present a choking hazard to small children.
Keep these accessories away from small children.
High-consequence activities. Your MacBook Pro is not intended for use where the failure of the
computer could lead to death, personal injury, or severe environmental damage.
Explosive atmospheres. Charging or using your MacBook Pro in any area with a potentially
explosive atmosphere, such as areas where the air contains high levels of ammable chemicals,
vapors, or particles (such as grain, dust, or metal powders), may be hazardous. Obey all signs
and instructions.
Important handling information
Operating environment. Operating your MacBook Pro outside these ranges may aect
performance:
•Operating temperature: 50° to 95° F (10° to 35° C)
•Storage temperature: -13° to 113° F (-25° to 45° C)
•Relative humidity: 0% to 90% (noncondensing)
•Operating altitude: Tested up to 10,000 feet (0 to 3048 meters)
Carrying your MacBook Pro. If you carry your MacBook Pro in a bag or briefcase, make sure there
are no loose items (such as paper clips or coins) that could accidentally get inside the computer
through vent openings or get stuck inside a port.
74% resize factor
Apple Confidential

Chapter 5 Safety, handling, and support 61
Using connectors and ports. Never force a connector into a port. When connecting a device,
make sure the port is free of debris, that the connector matches the port, and that you have
positioned the connector correctly in relation to the port.
Storing your MacBook Pro. If you are going to store your MacBook Pro for an extended period
of time, keep it in a cool location (ideally, 71° F or 22° C) and discharge the battery to 50 percent.
When storing your computer for longer than ve months, maintain the capacity of the battery by
charging the battery to 50 percent every six months or so.
Cleaning your MacBook Pro. When cleaning the outside of your MacBook Pro and its
components, rst shut down your MacBook Pro, then unplug the USB-C Charge Cable and
the 61W or 87W USB-C Power Adapter. Then dampen a clean, soft, lint-free cloth to wipe the
MacBook Pro exterior. Avoid getting moisture in any openings. Don’t spray liquid directly on the
computer. Don’t use aerosol sprays, solvents, abrasives, or cleaners containing hydrogen peroxide
that might damage the nish.
Cleaning the MacBook Pro screen. To clean your MacBook Pro screen, rst shut down your
MacBook Pro and unplug the USB-C Charge Cable and the 61W or 87W USB-C Power Adapter.
Dampen a clean, soft, lint-free cloth with just water and wipe the screen. Don’t spray liquid
directly on the screen.
Understanding ergonomics
When you use the keyboard and mouse, your shoulders should be relaxed. Your upper arm and
forearm should form an angle that is slightly greater than a right angle, with your wrist and hand
in roughly a straight line.
Not thisThis
Use a light touch when typing or using the trackpad and keep your hands and ngers relaxed.
Avoid rolling your thumbs under your palms.
Not thisThis
Change hand positions often to avoid fatigue. Some computer users might develop discomfort
in their hands, wrists, or arms after intensive work without breaks. If you begin to develop
chronic pain or discomfort in your hands, wrists, or arms, consult a qualied health specialist.
External mouse. If you use an external mouse, position the mouse at the same height as the
keyboard and within a comfortable reach.
Chair. An adjustable chair that provides rm, comfortable support is best. Adjust the height of
the chair so your thighs are horizontal and your feet are at on the oor. The back of the chair
should support your lower back (lumbar region). Follow the manufacturer’s instructions for
adjusting the backrest to t your body properly.
74% resize factor
Apple Confidential
Chapter 5 Safety, handling, and support 62
Built-in display. Adjust the angle of the display to minimize glare and reections from overhead
lights and windows. Do not force the display if you meet resistance. The display is not designed
to open past 135 degrees.
You can adjust the brightness of the screen when you take the computer from one work location
to another, or if the lighting in your work area changes.
For more information about ergonomics, see www.apple.com/about/ergonomics.
Regulatory information
Regulatory information, certication, and compliance marks specic to MacBook Pro are
available on-device. Choose Apple menu > About This Mac and click Support. Choose Important
Information, then choose Regulatory Certication.
FCC regulatory compliance
This device complies with part 15 of the FCC rules. Operation is subject to the following two
conditions: (1) This device may not cause harmful interference, and (2) this device must accept
any interference received, including interference that may cause undesired operation.
Note: This equipment has been tested and found to comply with the limits for a Class B digital
device, pursuant to part 15 of the FCC Rules. These limits are designed to provide reasonable
protection against harmful interference in a residential installation. This equipment generates,
uses, and can radiate radio frequency energy and, if not installed and used in accordance with
the instructions, may cause harmful interference to radio communications. However, there is
no guarantee that interference will not occur in a particular installation. If this equipment does
cause harmful interference to radio or television reception, which can be determined by turning
the equipment o and on, the user is encouraged to try to correct the interference by one or
more of the following measures:
•Reorient or relocate the receiving antenna.
•Increase the separation between the equipment and receiver.
•Connect the equipment to an outlet on a circuit dierent from that to which the receiver
is connected.
•Consult the dealer or an experienced radio/TV technician for help.
Important: Changes or modications to this product not authorized by Apple could void the
electromagnetic compatibility (EMC) and wireless compliance and negate your authority to
operate the product.
This product has demonstrated EMC compliance under conditions that included the use of
compliant peripheral devices and shielded cables (including Ethernet network cables) between
system components. It is important that you use compliant peripheral devices and shielded
cables between system components to reduce the possibility of causing interference to radios,
television sets, and other electronic devices.
If necessary, contact Apple or take your MacBook Pro to an Apple-authorized repair center, such
as an Apple Authorized Service Provider. Or consult an experienced radio/television technician
for additional suggestions.
Responsible party (contact for FCC matters only):
Apple Inc. Corporate Compliance
1 Innite Loop, MS 91-1EMC
Cupertino, CA 95014
74% resize factor
Apple Confidential

Chapter 5 Safety, handling, and support 63
Canadian regulatory compliance
This device complies with Industry Canada license-exempt RSS standard(s). Operation is subject
to the following two conditions: (1) this device may not cause interference, and (2) this device
must accept any interference, including interference that may cause undesired operation of
the device.
Operation in the band 5150–5250 MHz is only for indoor use to reduce the potential for harmful
interference to co-channel mobile satellite systems.
Users are advised that high-power radars are allocated as primary users (that is, priority users) of
the bands 5250–5350 MHz and 5650–5850 MHz and these radars could cause interference and/
or damage to LE-LAN devices.
Le présent appareil est conforme aux CNR d’Industrie Canada applicables aux appareils
radio exempts de licence. L’exploitation est autorisée aux deux conditions suivantes : (1)
l’appareil ne doit pas produire de brouillage, et (2) l’utilisateur de l’appareil doit accepter tout
brouillage radioélectrique subi, même si le brouillage est susceptible d’en compromettre
le fonctionnement.
La bande 5150–5250 MHz est rserve uniquement pour une utilisation l’intrieur an de
réduire les risques de brouillage préjudiciable aux systèmes de satellites mobiles utilisant les
mêmes canaux.
Les utilisateurs sont avisés que les utilisateurs de radars de haute puissance sont désignée
utilisateurs principaux (c.-à-d., qu’ils ont la priorité) pour les bandes 5250–5350 MHz et
5650–5850 MHz et que ces radars pourraient causer du brouillage et/ou des dommages aux
dispositifs LAN-EL.
Industry Canada Statement
Complies with CAN ICES-3 (B)/NMB-3(B).
EU compliance statement
Hereby, Apple Inc. declares that this wireless device is in compliance with the essential
requirements and other relevant provisions of the R&TTE Directive.
A copy of the EU Declaration of Conformity is available at www.apple.com/euro/compliance.
Apple’s EU representative is Apple Distribution International, Hollyhill Industrial Estate, Cork,
Ireland.
This device can be used in the European Community.
European Community Restrictions
This device is restricted to indoor use in the 5150 to 5350 MHz frequency range.
74% resize factor
Apple Confidential

Chapter 5 Safety, handling, and support 64
ENERGY STAR® compliance statement
As an ENERGY STAR partner, Apple has determined that standard congurations of this
product meet the ENERGY STAR guidelines for energy eciency. The ENERGY STAR program is
a partnership with electronic equipment manufacturers to promote energy-ecient products.
Reducing energy consumption of products saves money and helps conserve valuable resources.
MacBook Pro is shipped with power management enabled, with the computer set to sleep after
10 minutes of user inactivity. To wake your computer, click the trackpad or press any key on the
keyboard. To change this setting, click the System Preferences icon in the Dock, then click
Energy Saver.
For more information about ENERGY STAR, go to www.energystar.gov.
Apple and the environment
At Apple, we recognize our responsibility to minimize the environmental impacts of our
operations and products.
For information, go to www.apple.com/environment.
Regional disposal and recycling information
This symbol indicates that this product and/or battery should not be disposed of with household
waste. When you decide to dispose of this product and/or its battery, do so in accordance with
local environmental laws and guidelines.
For information about Apple’s recycling program, recycling collection points, restricted
substances, and other environmental initiatives, visit www.apple.com/environment.
Información sobre eliminación de residuos y reciclaje
El símbolo de arriba indica que este producto y/o su batería no debe desecharse con los residuos
domésticos. Cuando decida desechar este producto y/o su batería, hágalo de conformidad
con las leyes y directrices ambientales locales. Para obtener información sobre el programa de
reciclaje de Apple, puntos de recolección para reciclaje, sustancias restringidas y otras iniciativas
ambientales, visite www.apple.com/la/environment o www.apple.com/mx/environment.
Brasil—Informações sobre descarte e reciclagem
O símbolo acima indica que este produto e/ou sua bateria não devem ser descartados no
lixo doméstico. Quando decidir descartar este produto e/ou sua bateria, faça-o de acordo
com as leis e diretrizes ambientais locais. Para informações sobre substâncias de uso restrito,
o programa de reciclagem da Apple, pontos de coleta e telefone de informações, visite
www.apple.com/br/environment.
74% resize factor
Apple Confidential

Chapter 5 Safety, handling, and support 65
European Union—Disposal Information
The symbol above means that according to local laws and regulations your product and/or its
battery shall be disposed of separately from household waste. When this product reaches its
end of life, take it to a collection point designated by local authorities. The separate collection
and recycling of your product and/or its battery at the time of disposal will help conserve
natural resources and ensure that it is recycled in a manner that protects human health and
the environment.
Battery disposal information
The battery in your MacBook Pro should be serviced, replaced, or recycled by Apple or an
authorized service provider, and must be recycled or disposed of separately from household
waste according to your local environmental laws and guidelines. For information about battery
service and recycling, go to www.apple.com/batteries/service-and-recycling.
Battery Charger Energy Eciency
Software License Agreement
Use of MacBook Pro constitutes acceptance of the Apple and third-party software license terms
found at www.apple.com/legal/sla.
74% resize factor
Apple Confidential
KApple Inc.
© 2016 Apple Inc. All rights reserved.
Use of the “keyboard” Apple logo (Option-Shift-K) for
commercial purposes without the prior written consent of
Apple may constitute trademark infringement and unfair
competition in violation of federal and state laws.
Apple, the Apple logo, AirDrop, AirPlay, AirPort,
AirPort Time Capsule, AirPrint, Apple Music, Apple Pay,
Apple TV, Apple Watch, FaceTime, Finder, Flyover, GarageBand,
Hando, iBooks, iMessage, iMovie, iPad, iPhone, iPhoto, iPod,
iPod touch, iTunes, iTunes U, Keynote, Launchpad, Lightning,
Mac, MacBook Pro, MagSafe, Mission Control, Numbers, Pages,
Photo Booth, Safari, Siri, Spaces, Spotlight, and Time Machine
are trademarks of Apple Inc., registered in the U.S. and
other countries.
macOS and Multi-Touch are trademarks of Apple Inc.
AppleCare, Apple Store, App Store, iCloud, iTunes Radio, and
iTunes Store are service marks of Apple Inc., registered in the
U.S. and other countries.
iBooks Store is a service mark of Apple Inc.
Apple
1 Innite Loop
Cupertino, CA 95014-2084
408-996-1010
www.apple.com
IOS is a trademark or registered trademark of Cisco in the U.S.
and other countries and is used under license.
The Bluetooth® word mark and logos are registered
trademarks owned by Bluetooth SIG, Inc. and any use of such
marks by Apple Inc. is under license.
ENERGY STAR® is a U.S. registered trademark.
Other company and product names mentioned herein may be
trademarks of their respective companies.
Every eort has been made to ensure that the information in
this manual is accurate. Apple is not responsible for printing or
clerical errors.
Some apps are not available in all areas. App availability is
subject to change.
019-00264/2016-09
74% resize factor
Apple Confidential