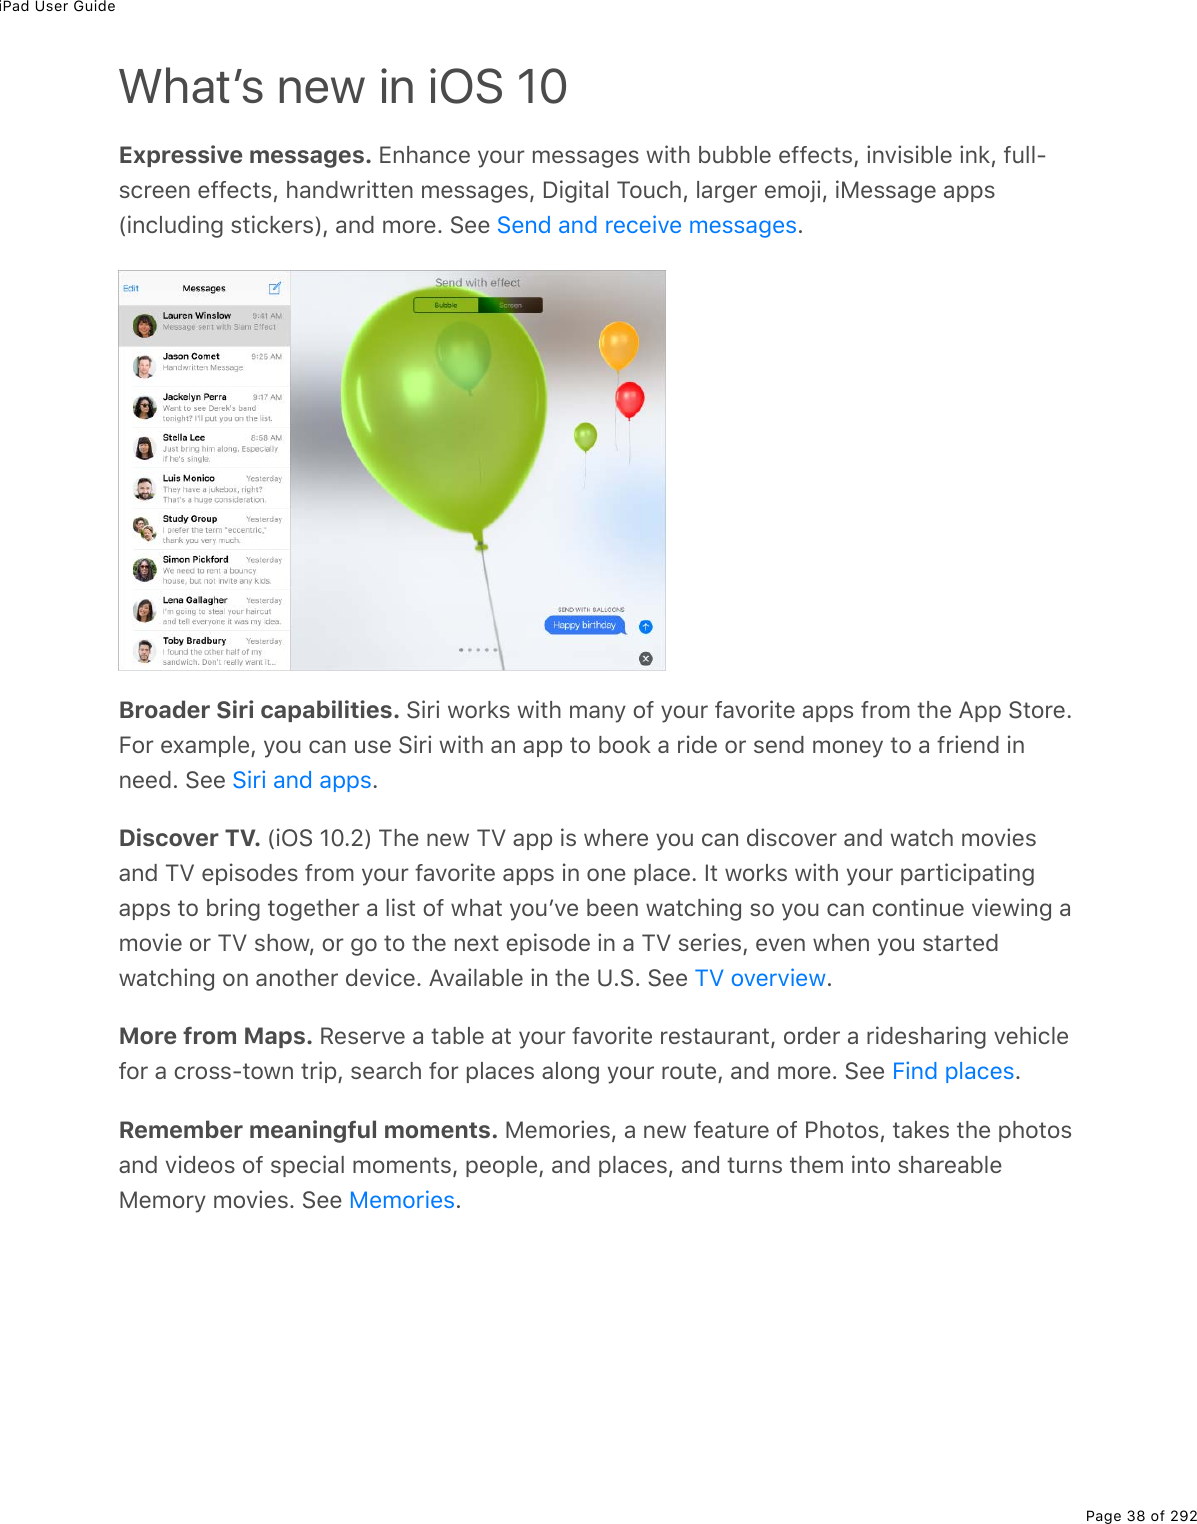
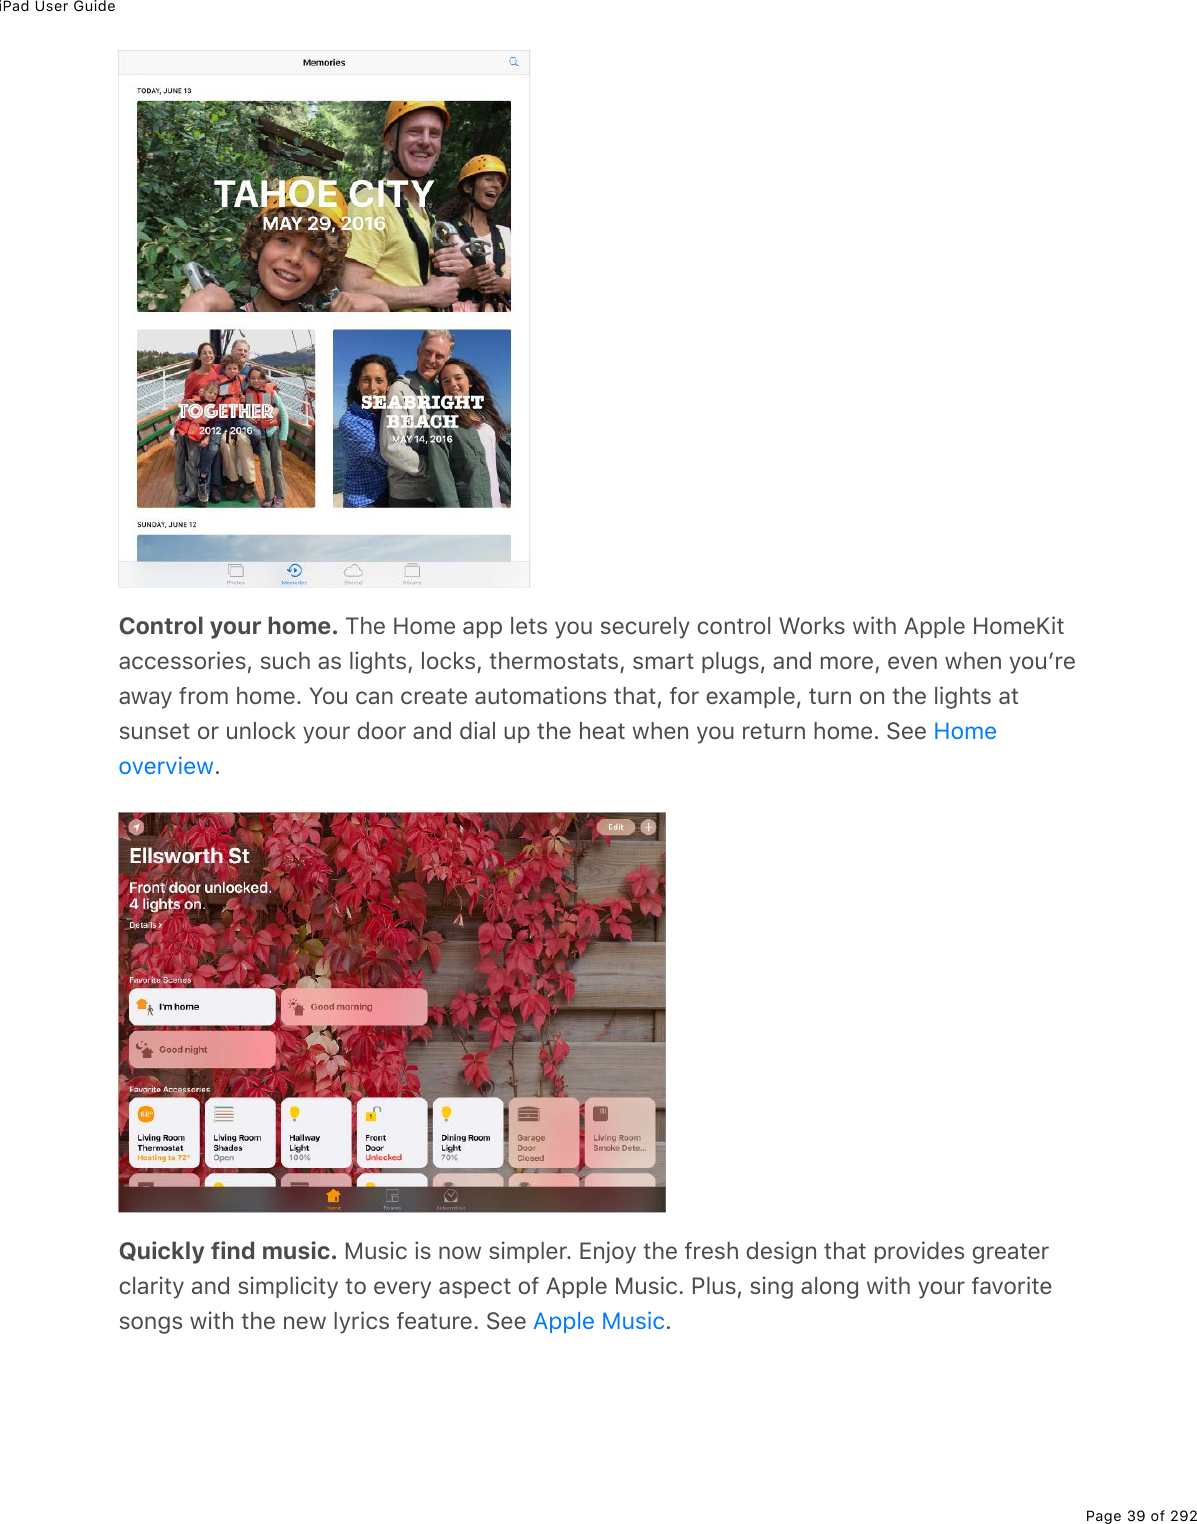
Apple A1823 Tablet Device User Manual iPad User Guide
Apple Inc. Tablet Device iPad User Guide
Apple >
Contents
- 1. A1822_A1823_User_Manual_v1.0_Part1
- 2. A1822_A1823_User_Manual_v1.0_Part2
- 3. A1823_RF_Exposure_Info_v1.0
- 4. A1823_Info_Guide_v1.0
A1822_A1823_User_Manual_v1.0_Part1

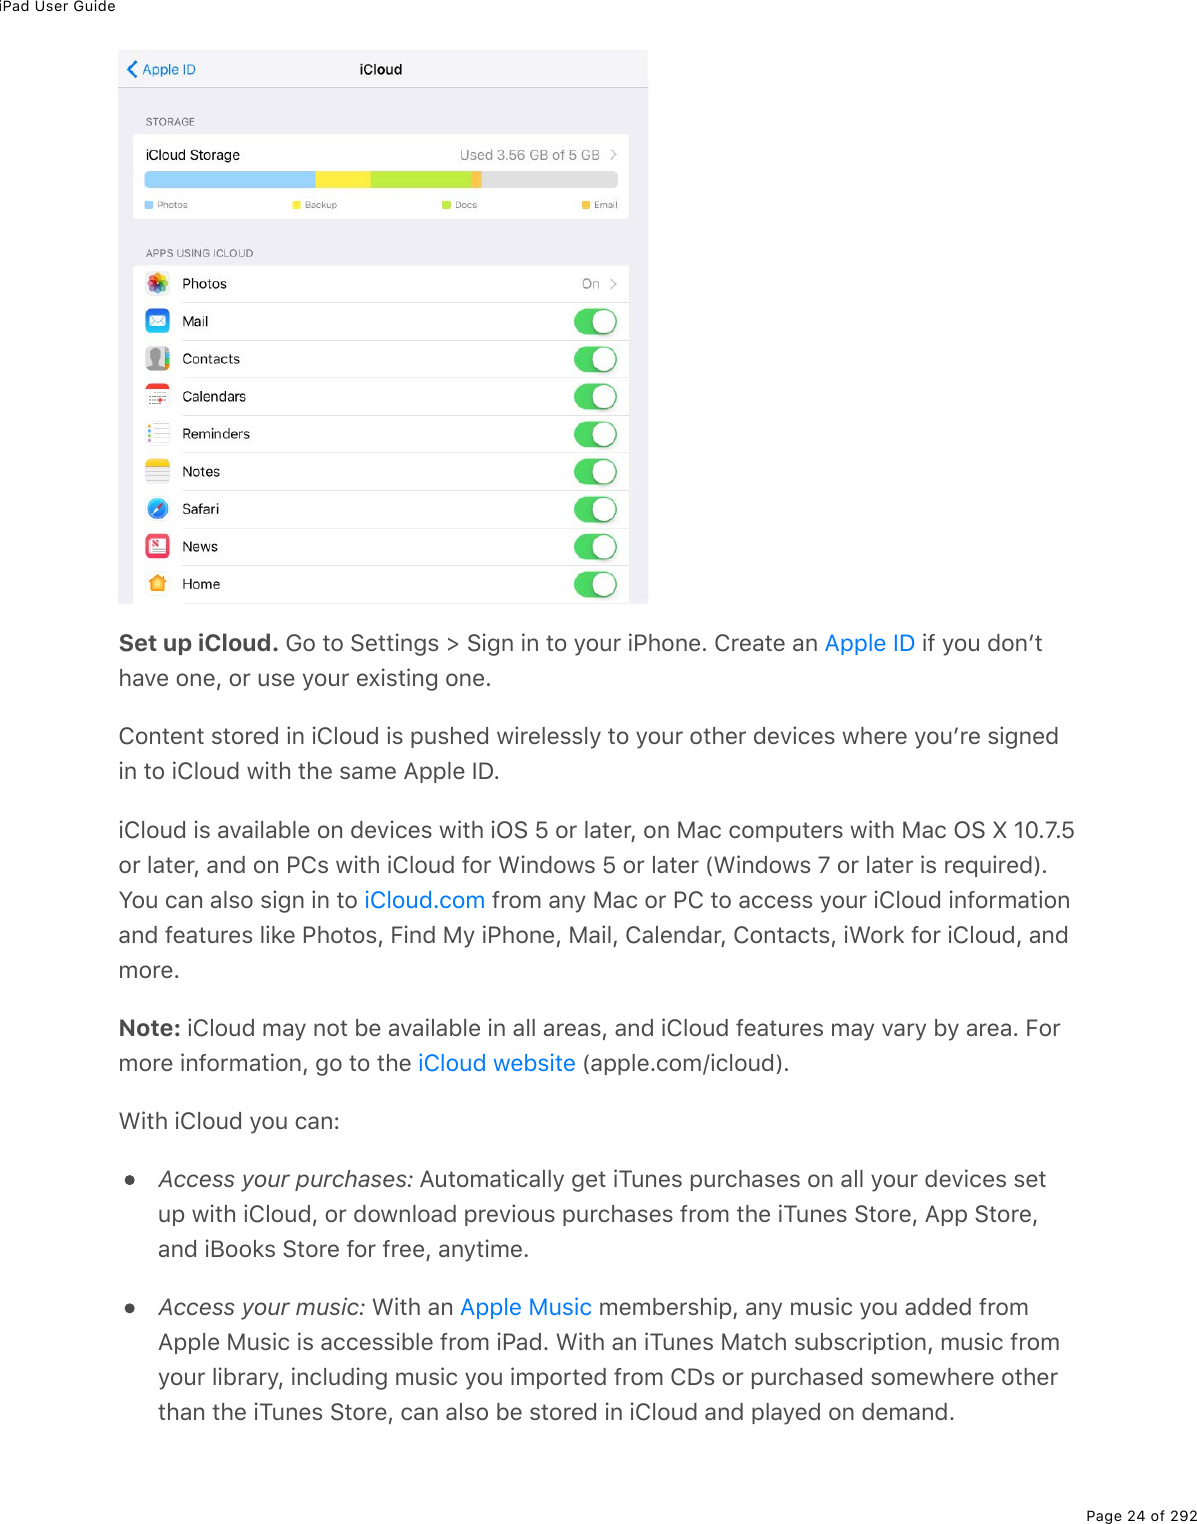
![iPad User GuidePage 26 of 292a message, or erase all the data on it. Find My iPhone also includes Activation Lock,which requires your Apple ID and password to disable Find My iPhone, erase iPad, orreactivate your device. See .Find your friends: Use to share your location with friends and family.Store and access your passwords and credit card information: keepspasswords and credit card information up to date across all your designated devices.With iCloud, you get a free email account and 5 GB of storage for your mail, documents,photos and videos, and backups. Your purchased music, apps, TV shows, and booksdonʼt count against your available storage space. You can purchase additional storageright from your device.Upgrade your iCloud storage. Go to Settings > [your name] > iCloud > iCloud Storage,then tap Change Storage Plan. For information about upgrading your iCloud storage, see.View and download previous or shared purchases. You can download purchases fromthe iTunes Store, App Store, and iBooks Store.iTunes Store purchases: Go to the iTunes Store, then tap Purchased. You can alsoaccess your purchased songs and videos in the Music app (see ), the TV app(see ), and the Videos app (see ).App Store: Go to the App Store, then tap Purchased.iBooks Store: Go to iBooks, then tap Purchased.If you donʼt see your previous or shared purchases, make sure youʼre signed in with yourApple ID in Settings > iTunes & App Store.Turn on Automatic Downloads for music, apps, or books. Go to Settings > iTunes &App Store.For more information about iCloud, go to the . For support information, goto the .Set up iPadWARNING: To avoid injury, read before using iPad.With only a Wi-Fi connection, you can easily set up iPad. You can also set up iPad by and using iTunes.Find your iPadFind My FriendsiCloud KeychainiCloud HelpLibraryLibrary Add videos to your libraryiCloud websiteiCloud Support websiteImportant safety informationconnecting it to your computer](https://usermanual.wiki/Apple/A1823.A1822-A1823-User-Manual-v1-0-Part1/User-Guide-3322635-Page-26.png)
![iPad User GuidePage 35 of 292Stop or resume iCloud backups. Go to Settings > [your name] > iCloud, then turniCloud Backup off or on.Back up immediately on iCloud. Go to Settings > [your name] > iCloud >iCloud Backup, then tap Back Up Now.View or remove iCloud backups. Go to Settings > [your name] > iCloud > iCloudStorage > Manage Storage.Important: Backups for music, movies, or TV show purchases arenʼt available in allcountries. Previous purchases may not be restored from iCloud Backup if they're nolonger in the iTunes Store, App Store, or iBooks Store.If you replace your iPad, you can use its backup to transfer your information to a newdevice. See .For more information, see the Apple Support article .Back up iPad with iTunesConnect to iTunes and back up. Open iTunes on your computer, then connect iPad.(See .) Click the iPad button, then click Summary in thesidebar. To create a manual backup, click Back Up Now (below Backups). To turn onautomatic iTunes backups, click “This computer” (below Backups). iTunes automaticallybacks up iPad when you connect it to your computer.iTunes backups donʼt include:Content from the iTunes and App Stores, or PDFs downloaded directly to iBooksContent synced from iTunes, such as imported MP3s or CDs, videos, books, andphotos (see )Photos already stored in the cloud, such as in iCloud Shared Streams, My PhotoStream, and iCloud Photo LibraryTouch ID settingsApple Pay information and settingsKeychain dataTo back up this content, select “Encrypt local backup” (below Backups) in iTunes.Back up iPad with iCloud DriveAbout backups for iOS devicesConnect iPad to your computerSync with iTunes](https://usermanual.wiki/Apple/A1823.A1822-A1823-User-Manual-v1-0-Part1/User-Guide-3322635-Page-35.png)

![iPad User GuidePage 60 of 292Save keystrokesA shortcut lets you enter a word or phrase by typing just a few characters. For example,type “omw” to enter “On my way!” That oneʼs already set up for you, but you can alsoadd your own.Create a shortcut. Go to Settings > General > Keyboard, then tap Text Replacement.Have a word or phrase you use and donʼt want it corrected? Create a shortcut, butleave the Shortcut field blank.Use iCloud to keep your personal dictionary up to date on your other devices. Go toSettings > [your name] > iCloud, then turn on iCloud Drive.Add or change keyboardsYou can turn typing features, such as spell checking, on or off; add keyboards for writingin different languages; and change the layout of your onscreen keyboard or AppleWireless Keyboard.If youʼve added keyboards in other languages, you can type in two languages withouthaving to switch between keyboards. Your keyboard automatically switches between thetwo languages you type in most often. (Not available for all languages.)Tip: On iPad Pro (12.9 inch), if youʼve added a Chinese, Korean, Japanese, or Hebrewkeyboard, you can use the Caps Lock key to quickly switch back and forth between Latinscript and the other keyboard youʼre using.Set typing features. Go to Settings > General > Keyboard.Add a keyboard for another language. Go to Settings > General > Keyboard >Keyboards > Add New Keyboard.Switch keyboards. Touch and hold , then slide your finger to the name of thekeyboard.You can also tap to switch from one keyboard to the other. Continue tapping toaccess other enabled keyboards.For information about international keyboards, see .Use international keyboards](https://usermanual.wiki/Apple/A1823.A1822-A1823-User-Manual-v1-0-Part1/User-Guide-3322635-Page-60.png)

![iPad User GuidePage 69 of 292Set up Apple Pay. Go to Settings > Wallet & Apple Pay, then tap Add Credit or DebitCard. The first time you add a card to Apple Pay, you may be prompted to use the cardyou use with iTunes. Then tap Next on the following screen, and position iPad so thatyour card appears in the frame.The card issuer determines if your card is eligible for Apple Pay, and may ask you foradditional information to complete the verification process. See the Apple Support article.You can add up to eight credit and debit cards, including store cards.Note: If you sign out of iCloud (in Settings > [your name]), all the credit and debit cardsyou added to Apple Pay on iPad are removed. You can add the cards again the next timeyou sign in to iCloud.Manage Apple Pay settings. Go to Settings > Wallet & Apple Pay. You can:Set your default card.Specify the shipping address and contact information for purchases.Pay within an app or on a website. During checkout, tap the Apple Pay or Buy withApple Pay button, then review the payment information. Make any changes to theshipping and billing information, or choose a different card. Then, use Touch ID or yourpasscode to complete the payment.Apple Pay participating banks](https://usermanual.wiki/Apple/A1823.A1822-A1823-User-Manual-v1-0-Part1/User-Guide-3322635-Page-69.png)

![iPad User GuidePage 72 of 292Turn on Share My Location. Go to Settings > [your name] > iCloud > Share MyLocation.Share your location with a friend. Open Find Friends, then tap Add. Select a contactʼsname, or type a name in the To field. Choose how long you want to share your location.Share your location using AirDrop. Tap Add, then select a friend who appears inAirDrop. Choose how long you want to share your location.Set a notification. Select a friend, then tap Notify Me. Choose whether you want to benotified when a friend leaves from or arrives at a location. Choose the friendʼs currentlocation, or tap Other to create a new location for the notification.Travel with iPadSome airlines let you keep your iPad turned on if you switch to Airplane Mode. Wi-Fi andBluetooth are disabled so you canʼt make or receive FaceTime calls or use features thatrequire wireless communication, but you can listen to music, play games, watch videos,or use other apps that donʼt require Internet access. If your airline allows it, you can turnWi-Fi or Bluetooth back on to enable those services, even while in Airplane Mode.Turn on Airplane Mode. Swipe up from the bottom edge of the screen to open ControlCenter, then tap . You can also turn Airplane Mode on or off in Settings. When AirplaneMode is on, appears in the status bar at the top of the screen.You can also turn Wi-Fi and Bluetooth on or off in Control Center. See .When you travel abroad, you may be able to sign up for cellular service with a carrier inthe country youʼre visiting, right from your iPad (available on iPad models with cellularand Touch ID). For more information see .Control CenterSign up for cellular service](https://usermanual.wiki/Apple/A1823.A1822-A1823-User-Manual-v1-0-Part1/User-Guide-3322635-Page-72.png)

![iPad User GuidePage 94 of 292Open a link in a new tab. Touch and hold the link, then tap Open in New Tab. Toautomatically switch to the new tab whenever you open a link in a new tab, go toSettings > Safari, then turn off Open New Tabs In Background.View two pages side-by-side. Turn iPad to landscape orientation, then do one of thefollowing:Open a link in Split View: Touch and hold the link, then tap Open in Split View.Open a blank page in Split View: Touch and hold , then tap Open Split View.Open a link on the other side of Split View: Tap with two fingers on the link.Move a tab to the other side of Split View: Drag the tab left or right from the tab bar.Merge or close all tabs: Touch and hold again.Browse open tabs. Tap , or pinch closed with three fingers to view all your open tabs.If you have several open tabs, tabs for the same site are stacked.Close a tab: Tap in the upper-left corner, or swipe the tab to the left.Return to viewing a single tab: Tap a tab, tap Done, or pinch open with three fingers.View tabs that are open on your other devices. If you sign in to iCloud with the sameApple ID on all your devices, and you turn on Safari in Settings > [your name] > iCloud oniPad, you can view tabs that are open on your other devices. Tap , then scroll to the listat the bottom. To close a tab, swipe left, then tap Close.View recently closed tabs. Touch and hold .Get back to the top. Tap the top edge of the screen to quickly return to the top of a longpage.See more of the page. Turn iPad to landscape orientation.Refresh the page. Tap next to the address in the search field.See a tabʼs history. Touch and hold or .View the desktop version of a site. To see the full desktop version of a site instead ofthe mobile version, tap , then tap Request Desktop Site.Show or hide the tab bar. Go to Settings > Safari, then turn Show Tab Bar on or off.Block pop-ups. Go to Settings > Safari, then turn Block Pop-ups on or off.](https://usermanual.wiki/Apple/A1823.A1822-A1823-User-Manual-v1-0-Part1/User-Guide-3322635-Page-94.png)
![iPad User GuidePage 96 of 292Choose which favorites appear when you tap the search field. Go to Settings >Safari > Favorites.See your Mac bookmarks on iPad. Go to Settings > [your name] > iCloud, then turn onSafari. Bookmarks on your Mac appear in Favorites on iPad.Add an icon for the current page to your Home screen. To quickly access the pagefrom your Home screen, tap , then tap Add to Home Screen. The icon appears only onthe device where you add it.Save a reading list for laterSave interesting items in your reading list so you can revisit them later. You can readpages in your reading list even when youʼre not connected to the Internet.Add the current page to your reading list. Tap , then tap Add to Reading List.Add a linked page without opening it. Touch and hold the link, then tap Add to ReadingList.View your reading list. Tap , then tap .Delete an item from your reading list. In your reading list, swipe the item to the left.Limit downloads to Wi-Fi connections (Wi-Fi + Cellular models). To prevent readinglist downloads from using cellular data, go to Settings > Safari, then turn off Use CellularData (below Reading List).](https://usermanual.wiki/Apple/A1823.A1822-A1823-User-Manual-v1-0-Part1/User-Guide-3322635-Page-96.png)


![iPad User GuidePage 104 of 292Delete multiple messages at once. While viewing a list of messages, tap Edit, selectsome messages, then tap Trash. If you change your mind, shake iPad immediately toundo.Recover a deleted message. Go to the accountʼs Trash mailbox, open the message,then tap and move the message. Or, if you just deleted it, shake iPad to undo. To seedeleted messages across all your accounts, add the All Trash mailbox. To add it, tap Editin the mailboxes list, then select it in the list.Archive instead of delete. Instead of deleting messages, you can archive them sotheyʼre still around, in the Archive mailbox, if you need them. How you turn this option onvaries by the type of mail account you have configured. Go to Settings > Mail >Accounts > [account name]. Then, in the Advanced settings, change the destinationmailbox for discarded messages to Archive. After youʼve turned this option on, to deletea message instead of archiving it, touch and hold , then tap Trash Message.Stash your trash. You can set how long deleted messages stay in the Trash mailbox. Goto Settings > Mail > Accounts > [account name] > Advanced > Remove. Some emailservices might override your selection; for example, iCloud doesnʼt keep mail messageslonger than 30 days, even if you select Never.AttachmentsPreview an attachment. Touch and hold an attachment, then tap Quick Look.Save a photo or video to Photos. Touch and hold the photo or video until a menuappears, then tap Save Image.Mark up attachments. You can use Markup to annotate an image or PDF attachment.Touch and hold the attachment, then tap Markup (if itʼs an attachment youʼre sending) or“Markup and Reply” (if itʼs an attachment youʼve received). If you have iPad Pro, you canannotate with Apple Pencil.](https://usermanual.wiki/Apple/A1823.A1822-A1823-User-Manual-v1-0-Part1/User-Guide-3322635-Page-104.png)


![iPad User GuidePage 126 of 292PhotosPhotos overview<."*%"*(%@*2"2&%#--%=2>%)#0%D.(1L%2$;#0.K(L%&*#$(L%#07%(7."%-*2"2&%#07%D.7(2&OM#'(0%1."*%4#/($#%20%.@#7!"2$(7%.0%.432>7%W&((% X!*#$(7%5=%2"*($&%W&((% X!=0)(7%9$2/%=2>$%)2/->"($%W&((% X!#D(7%9$2/%#0%(/#.3L%"(,"%/(&&#;(L%1(5-#;(L%2$%&)$((0&*2"S/-2$"(7%9$2/%=2>$%)#/($#Y2>%)#0%#3&2%*#D(%@*2"2&%)$(#"(%]>.)'%/2D.(&%9$2/%"*(%-*2"2&%#07%D.7(2&%.0%=2>$%3.5$#$=W&((% XE8(/2$.(&%.&%#D#.3#53(%20%.@#7%?.$%#07%3#"($EM*(%@*2"2&%#--%.0)3>7(&%@*2"2&L%8(/2$.(&L%!*#$(7L%#07%?35>/&E%Z&(%"*(%"#5&%#"%"*(52""2/%29%@*2"2&%"2%D.(1%#07%12$'%1."*%=2>$%-*2"2&OM#-%@*2"2&%"2%&((%#33%=2>$%-*2"2&%#07%D.7(2&L%2$;#0.K(7%5=%Y(#$&L%4233()".20&L%#0782/(0"&E%M2%]>.)'3=%5$21&(%"*(%-*2"2&%.0%#%)233()".20%2$%=(#$L%"2>)*%#07%*237%#"*>/50#.3L%"*(0%7$#;E.432>7%@*2"2%V.5$#$=.432>7%@*2"2%!*#$.0;!=0)%1."*%.M>0(&8(/2$.(&](https://usermanual.wiki/Apple/A1823.A1822-A1823-User-Manual-v1-0-Part1/User-Guide-3322635-Page-126.png)
![iPad User GuidePage 127 of 292M#-%8(/2$.(&%"2%D.(1%-*2"2&%#07%D.7(2&%5#&(7%20%$(3#"(7%7#"(&L%-3#)(&L%-(2-3(L%#07/2$(E%!((% EM#-%!*#$(7%"2%&((%-*2"2&%#07%D.7(2&%=2>%&*#$(7%1."*%2"*($&%2$%"*#"%2"*($&%&*#$(71."*%=2>E%!((% EM#-%?35>/&%"2%)$(#"(%#07%D.(1%=2>$%#35>/&E%!((% EView photos and videosBrowse your photos and videos. M#-%@*2"2&L%"*(0%"#-%#%-*2"2E%<*.3(%D.(1.0;%#%-*2"2L&1.-(%"*(%"*>/50#.3&%"2%5$21&(%-*2"2&L%"*(0%"#-%#%"*>/50#.3%"2%D.(1%#%-*2"2E%P$#;%7210"*(%-*2"2%"2%)20".0>(%5$21&.0;%82/(0"&%2$%?35>/&ENote: J=%7(9#>3"L%@*2"2&%7.&-3#=&%#%$(-$(&(0"#".D(%&>5&("%29%=2>$%-*2"2&%1*(0%=2>%D.(15=%=(#$%2$%5=%)233()".20E%M2%&((%#33%=2>$%-*2"2&L%;2%"2%!("".0;&%[%@*2"2&%\%4#/($#L%"*(0">$0%299%!>//#$.K(%@*2"2&EPlay a Live Photo. S9%=2>%"#'(%#%V.D(%@*2"2%20%.@#7%@$2%WeEfQ.0)*XL%2$%.9%=2>%$()(.D(%#V.D(%@*2"2%D.#%.8(&&#;(L%.432>7%@*2"2%!*#$.0;L%2$%?.$P$2-L%=2>%)#0%5$.0;%."%"2%3.9(%20%=2>$.@#7%W.G!%e%2$%3#"($%$(]>.$(7XE%M2>)*%#07%*237%"*(%V.D(%@*2"2%"2%-3#=%."ES9%&2/(20(%&*#$(&%#%V.D(%@*2"2%1."*%=2>%D.#%(/#.3L%=2>%$()(.D(%."%#&%#%H_%8@%&".33%./#;(EW?%V.D(%@*2"2L%1*.)*%)#0%5(%"#'(0%20%&2/(%/27(3&%29%.@*20(%#07%.@#7L%)#-">$(&%"*(/2/(0"&%U>&"%5(92$(%#07%#9"($%#%-.)">$(%.&%"#'(0EXMake a still photo from a Live Photo. T.(1%"*(%V.D(%@*2"2L%"#-% L%"#-% L%"*(0%"#-P>-3.)#"(%#&%!".33%@*2"2E8(/2$.(&.432>7%@*2"2%!*#$.0;G$;#0.K(%-*2"2&%#07%D.7(2&](https://usermanual.wiki/Apple/A1823.A1822-A1823-User-Manual-v1-0-Part1/User-Guide-3322635-Page-127.png)
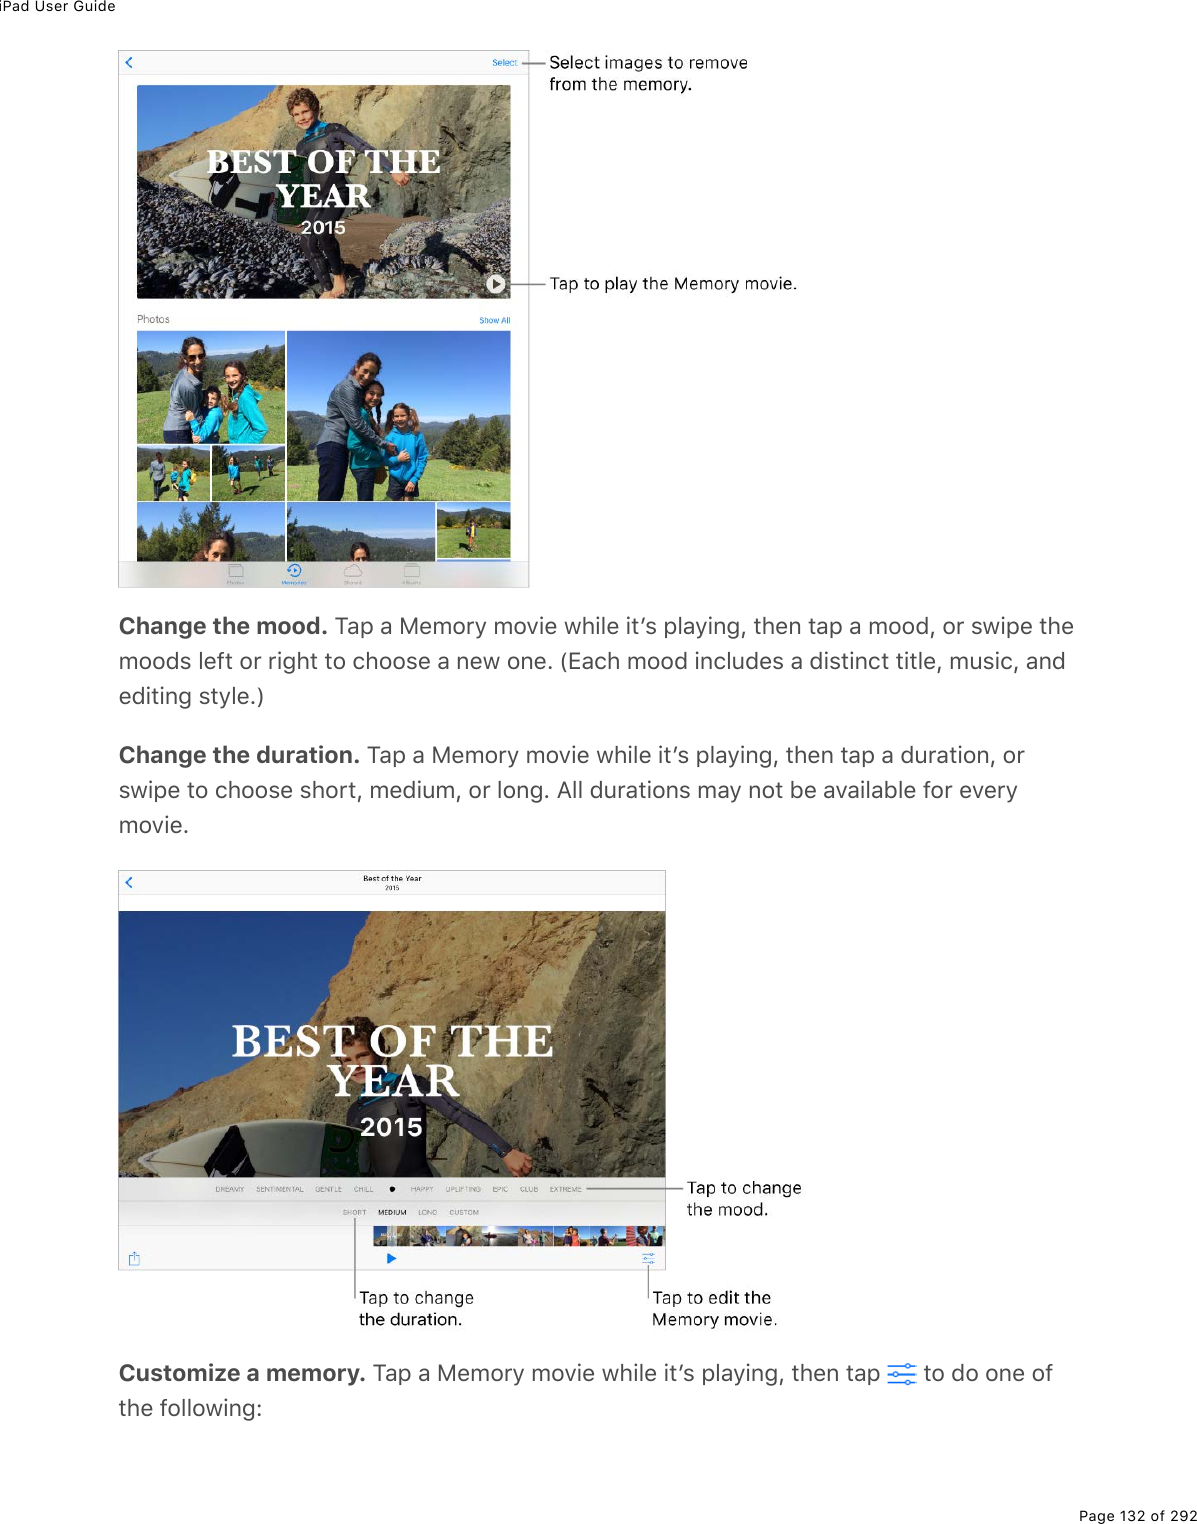
![iPad User GuidePage 133 of 292Edit the title: M#-%M."3(L%"#-%"*(%"."3(%#07%&>5"."3(%"2%(7."%"*(/L%"*(0%)*22&(%#%"."3(%&"=3(EChoose different music: M#-%8>&.)L%"*(0%)*22&(%/>&.)%9$2/%#%&2>07"$#)'%2$%9$2/=2>$%/>&.)%3.5$#$=%W203=%/>&.)%=2>%210%"*#"F&%&"2$(7%20%.@#7%.&%#D#.3#53(XEChoose a custom duration: M#-%P>$#".20EChoose photos and videos: M#-%@*2"2&%\%T.7(2&L%"#-% L%"*(0%"#-%"*(%-*2"2&%#07D.7(2&%=2>%1#0"%.0%"*(%/2D.(E%P(&(3()"%-*2"2&%#07%D.7(2&%)>$$(0"3=%.0%"*(%8(/2$=/2D.(%"2%$(/2D(%"*(/EDelete a photo or video from the Memory movie: M#-%@*2"2&%\%T.7(2&L%"#-%#%-*2"2%2$D.7(2%.0%"*(%"./(3.0(L%"*(0%"#-% %"2%$(/2D(%."%9$2/%"*(%/2D.(ETrim a video in the Memory movie: M#-%@*2"2&%\%T.7(2&L%"#-%#%D.7(2%.0%"*(%"./(3.0(L"*(0%"$./%"*(%D.7(2E%!((% EPeople@*2"2&%&)#0&%=2>$%-*2"2%3.5$#$=%92$%-(2-3(F&%9#)(&%#07%#77&%"*(%/2&"%9$(]>(0"3=%92>079#)(&%"2%"*(%@(2-3(%#35>/E%Y2>%)#0%#&&.;0%0#/(&%"2%"*(%-(2-3(%@*2"2&%9.07&L%#77%-(2-3(1*2%#--(#$%3(&&%9$(]>(0"3=L%/#$'%-(2-3(%#&%9#D2$."(&L%#07%D.(1%/(/2$.(&%"*#"%)20"#.0&-().9.)%-(2-3(E%M*(%/2$(%-*2"2&%=2>%*#D(L%"*(%320;($%"*(%9.$&"%&)#0%"#'(&ENote: @(2-3(%.7(0".9.(7%.0%"*(%@(2-3(%#35>/%#$(0F"%&=0)(7%#)$2&&%7(D.)(&E%M*(%@(2-3(9(#">$(%.&%#D#.3#53(%20%.@#7%?.$%#07%3#"($E+7."%-*2"2&%#07%"$./%D.7(2&](https://usermanual.wiki/Apple/A1823.A1822-A1823-User-Manual-v1-0-Part1/User-Guide-3322635-Page-133.png)
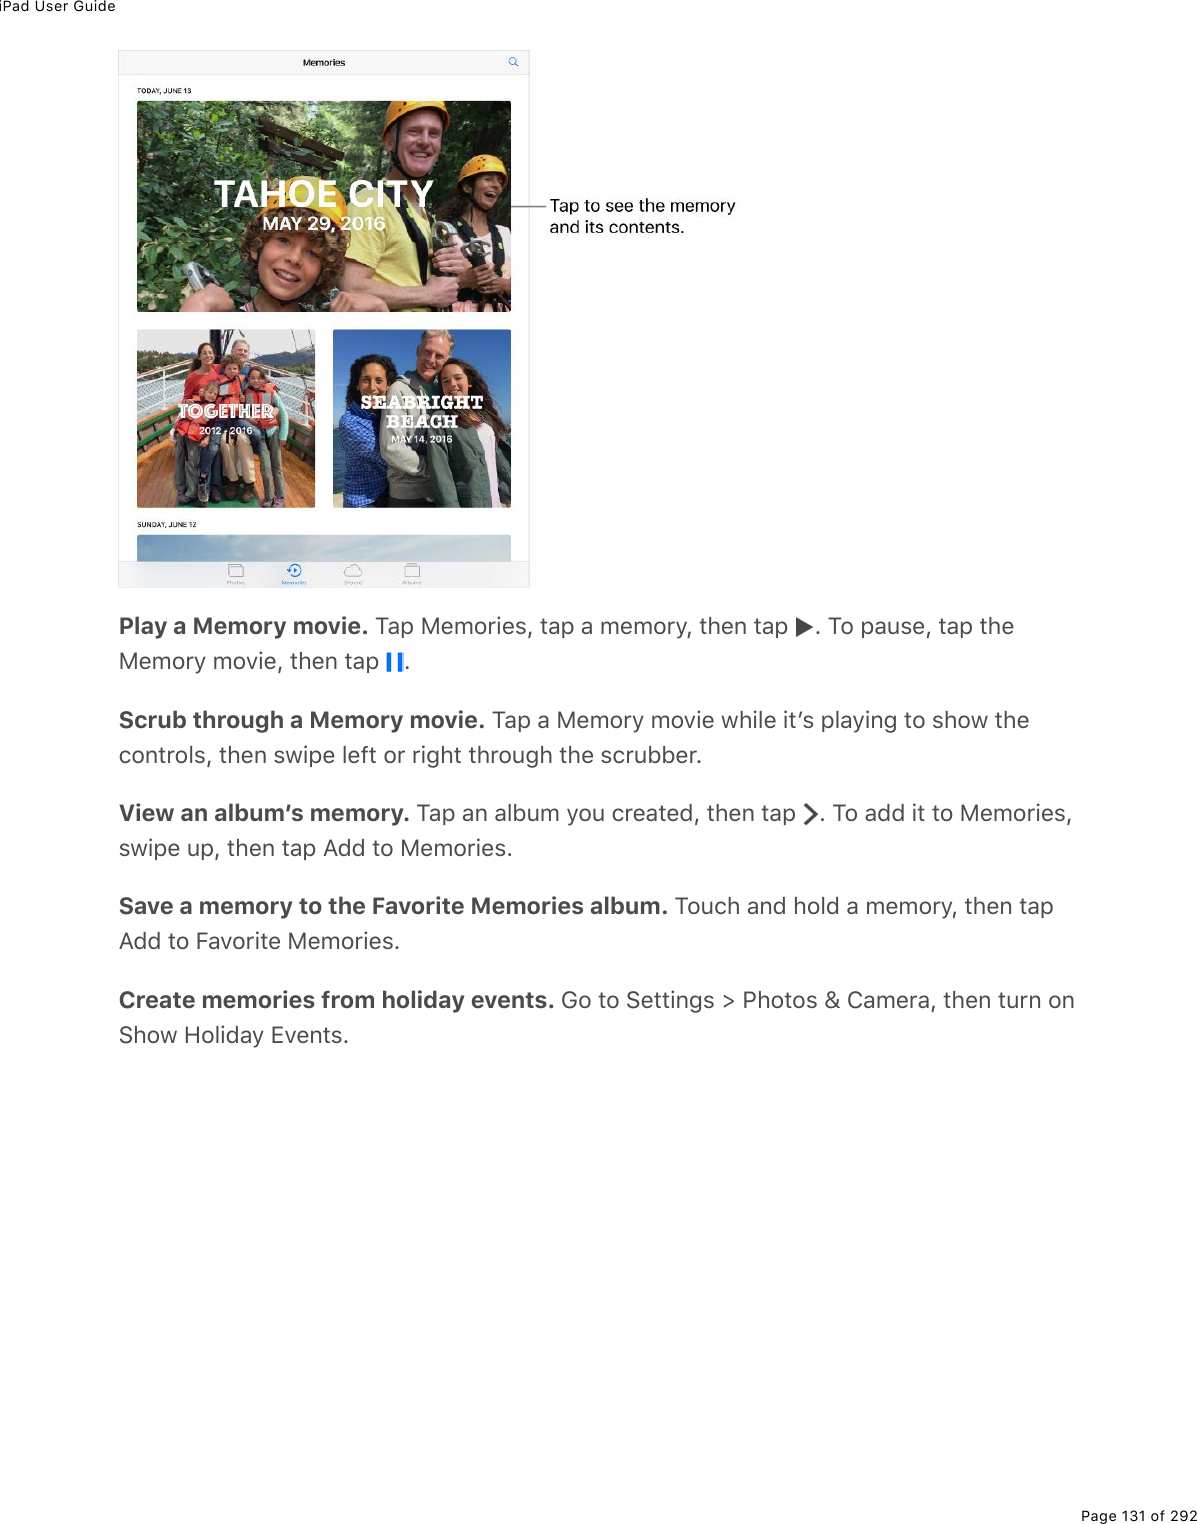
![iPad User GuidePage 135 of 292View a location-based Memory movie. Tap Albums, tap Places, tap a location that hasseveral images, tap , then tap .iCloud Photo LibraryiCloud Photo Library automatically uploads the photos and videos you take and storesthem in their original format at full resolution. You can access your photos and videos iniCloud Photo Library from any device where youʼre signed in using the same Apple ID.Use the Photos app on iOS devices and Mac computers to open and edit your photosand videos. Any changes you make are updated on all your devices. See .To use iCloud Photo Library, you need a device with iOS 8.1 or later, a Mac with OS X10.10.3 or later, or a PC with iCloud for Windows 5 or later.Note: If you turn on iCloud Photo Library, you canʼt use iTunes to sync photos and videosto iPad.Turn on iCloud Photo Library. Go to Settings > [your name] > iCloud > Photos, or go toSettings > Photos & Camera.Optimize your storage or keep all your photos and videos in full-resolution on iPad.If your iCloud storage plan is over 5 GB, Optimize iPad Storage is on by default. Itmanages space on your iPad by automatically keeping your full-resolution photos andvideos in iCloud and lightweight versions on your iPad, as needed. To keep the full-resolution originals on your iPad, go to Settings > [your name] > iCloud > Photos, thenselect Download and Keep Originals. Your originals are always stored in iCloud.Download a full-resolution photo or video. If youʼre not storing original versions oniPad, pinch to zoom in to 100%, or tap .Note: To upload photos and videos to iCloud Photo Library, iPad must be connected tothe Internet. Using a cellular connection on iPad cellular models, you can download up to100 MB at a time.If your uploaded photos and videos exceed your storage plan, you can upgrade youriCloud storage. Go to Settings > [your name] > iCloud > iCloud Storage > ChangeStorage Plan to learn about the options.Edit photos andtrim videos](https://usermanual.wiki/Apple/A1823.A1822-A1823-User-Manual-v1-0-Part1/User-Guide-3322635-Page-135.png)
![iPad User GuidePage 136 of 292My Photo StreamMy Photo Stream automatically uploads your most recent photos to iCloud, so you canimport them to devices that arenʼt using iCloud Photo Library. (My Photo Stream doesnʼtupload Live Photos or videos.)Photos in My Photo Stream donʼt count against your iCloud storage, and theyʼre kept for30 days in iCloud (up to 1000 photos). Download photos to your computer or iOS deviceif you want to keep them permanently. For more information, see the Apple Supportarticle .Turn My Photo Stream on or off. Go to Settings > [your name] > iCloud > Photos, or goto Settings > Photos & Camera.Use My Photo Stream without iCloud Photo Library. Photos you take with iPad areadded to the My Photo Stream album when you leave the Camera app and iPad isconnected to Wi-Fi. Any photos you add—including screenshots and photos saved fromemail, for example—also appear in your My Photo Stream album. Photos added to MyPhoto Stream on your other devices appear in your My Photo Stream album on iPad.Manage My Photo Stream contents. In the My Photo Stream album, tap Select.Save your best shots on iPad: Select the photos, then tap Add To.Share, print, or copy: Select the photos, then tap .Delete photos: Select the photos, then tap .Note: Although deleted photos are removed from My Photo Stream on all your devices,the original photos remain in Photos on the device on which they were taken. Photos thatyou save to another album on a device or computer also arenʼt deleted. See the AppleSupport article .iCloud Photo SharingWith iCloud Photo Sharing, you can invite others who are using iCloud Photo Sharing toview your photos and videos. If theyʼre using iCloud Photo Sharing on a device with iOS 6or later or on a Mac with OS X 10.8 or later, they can view your albums and leavecomments. If theyʼre using iOS 7 or later or OS X 10.9 or later, they can add their ownphotos and videos. You can also publish your album to a website for anyone to view.iCloud Photo Sharing works with or without iCloud Photo Library and My Photo Stream.My Photo Stream FAQMy Photo Stream FAQ](https://usermanual.wiki/Apple/A1823.A1822-A1823-User-Manual-v1-0-Part1/User-Guide-3322635-Page-136.png)