Apple Thunderbolt Display (27 Inch) User Manual Başlangıç Getting Started TU
User Manual: Apple Apple Thunderbolt Display (27-inch) Apple Thunderbolt Display - Başlangıç
Open the PDF directly: View PDF ![]() .
.
Page Count: 36
- Apple LED Cinema Display
- Getting Started
- Setting Up Your Display
- Using Your Display
- Care and Safety
- Ergonomics
- Troubleshooting Your Display
- Learning More, Service, and Support
- Specifications
- Başlangıç
- Ekranınızı Kurma
- Ekranınızı Kullanma
- Bakım ve Güvenlik
- Ergonomi
- Ekranınızla İlgili Sorunları Giderme
- Daha Fazla Bilgi, Servis ve Destek
- Teknik Özellikler
- Regulatory Compliance Information
- Apple and the Environment

Apple Thunderbolt Display
Apple Inc.
© 2013 Apple Inc. All rights reserved.
Under the copyright laws, this manual may not be copied, in whole
or in part, without the written consent of Apple.
The Apple logo is a trademark of Apple Inc., registered in the U.S.
and other countries. Use of the “keyboard” Apple logo (Option-
Shift-K) for commercial purposes without the prior written consent
of Apple may constitute trademark infringement and unfair
competition in violation of federal and state laws.
Every eort has been made to ensure that the information in
this manual is accurate. Apple is not responsible for printing or
clerical errors.
Apple
1 Innite Loop
Cupertino, CA 95014
408-996-1010
www.apple.com
Apple, the Apple logo, FaceTime, iChat, iMovie, iPhone, iPod, Mac,
MacBook, MagSafe, and Photo Booth are trademarks of Apple Inc.,
registered in the U.S. and other countries.
iPad is a trademark of Apple Inc.
Apple and Apple Store are service marks of Apple Inc., registered
in the U.S. and other countries.
ENERGY STAR® is a U.S. registered trademark.
The Bluetooth® word mark and logos are registered trademarks
owned by Bluetooth SIG, Inc. and any use of such marks by Apple
is under license.
Thunderbolt and the Thunderbolt logo are trademarks of
Intel Corporation in the United States and other countries.
Other company and product names mentioned herein may be
trademarks of their respective companies. Mention of third-party
products is for informational purposes only and constitutes
neither an endorsement nor a recommendation. Apple assumes
no responsibility with regard to the performance or use of these
products.
3
Contents
5 Getting Started
6 Setting Up Your Display
8 Using Your Display
12 Care and Safety
14 Ergonomics
15 Troubleshooting Your Display
16 Learning More, Service, and Support
17 Specications
19 Başlangıç
20 Ekranınızı Kurma
22 Ekranınızı Kullanma
26 Bakım ve Güvenlik
28 Ergonomi
29 Ekranınızla İlgili Sorunları Giderme
30 Daha Fazla Bilgi, Servis ve Destek
31 Teknik Özellikler
32 Regulatory Compliance Information
34 Apple ve Çevre
5English
Getting Started
Your Apple Thunderbolt Display is designed to work seamlessly
with Mac computers that have a Thunderbolt port. It features
an LED-backlit widescreen display, a MagSafe connector
to charge your MacBook Pro, a built-in FaceTime HD camera,
microphone, speaker system, security slot, and ports.
The instructions on the following pages help you set up and use your new display.
Learn how to:
ÂConnect your display to your computer
ÂUse your display’s camera, microphone, speaker system, and ports
ÂAdjust your display’s settings
Note: You can connect your Apple Thunderbolt Display to any Mac computer that has
a Thunderbolt port.
Important: Carefully read all the installation instructions (and the safety information
starting on page 12) before you set up and use your display.
For information about the specic computers and graphics cards that are compatible
with your display, go to www.apple.com/displays.

6English
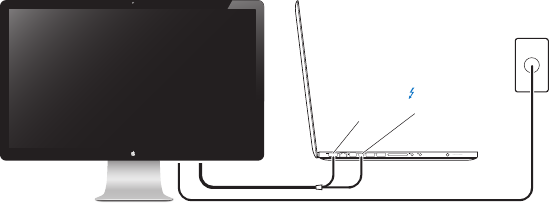
Setting Up Your Display
Follow these steps to set up your Apple Thunderbolt Display:
1 Remove the protective lm from the display and cables.
2 Insert the power cord into the display, and then insert the AC plug into a grounded
power outlet.
3 Connect the Thunderbolt cable to your computer’s Thunderbolt port.
Apple Thunderbolt Display
MacBook Pro
MagSafe
power port
Grounded
power outlet
Thunderbolt
port
4 If you’re connecting to a MacBook Pro, plug the MagSafe connector into the MagSafe
power port on your MacBook Pro to power it and charge its battery.
5 If your computer is turned o, press the power (®) button on your computer to start it
up. The display turns on automatically when you start up your computer.
7English
Setting Up Your MacBook Pro with the Lid Closed
You can close the lid of your MacBook Pro and use just your Apple Thunderbolt
Display. Follow the setup instructions on the previous page, and make sure the
MagSafe connector from the display is plugged into the MagSafe power port on your
MacBook Pro.
To use your Apple Thunderbolt Display with your MacBook Pro lid closed:
1 Connect an external USB keyboard and mouse to a USB port on your display, or use the
Bluetooth® Setup Assistant to set up a wireless keyboard and mouse.
2 Make sure your MacBook Pro is turned on.
3 Close the lid on your MacBook Pro to put it to sleep.
4 Wait a few seconds, and then press any key on the external keyboard or click the
mouse to wake your MacBook Pro.
Setting Up Your Apple Thunderbolt Display as an Additional Display
When you leave the lid on your MacBook Pro open, you can mirror the same desktop
image on both displays or use the additional display as an extension of your desktop.
Use Displays preferences to set up video mirroring or extended desktop.
To set up video mirroring or extended desktop:
1 Choose Apple () > System Preferences, and then click Displays.
2 Click the Arrangement tab and follow the onscreen instructions.
8English
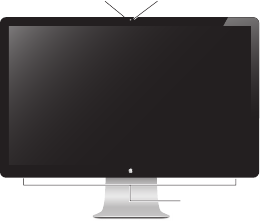
Using Your Display
Your Apple Thunderbolt Display has a built-in FaceTime HD camera, microphone, and
speaker system.
Speaker system
Microphone
Built-in FaceTime
HD camera
Using the Built-in FaceTime HD Camera and Microphone
You can use the built-in FaceTime HD camera and microphone to capture still images,
video, and sound using applications such as FaceTime, iChat, iMovie, and Photo Booth.
To set up the camera and microphone with iChat:
1 Click the iChat icon in the Dock to open the iChat application.
2 Choose iChat > Preferences, and then click Audio/Video.
3 Choose FaceTime HD Camera (Display) from the Camera pop-up menu.
4 Choose Display Audio from the Microphone pop-up menu.
9English
Setting Up Sound Input and Output
You can listen to music, movies, games, and multimedia les through the speaker
system on your display. You can use the microphone to record sounds or talk with
friends using iChat or FaceTime. Use Sound preferences to manage sound input
and output.
To set up sound input:
1 Choose Apple () > System Preferences, and then click Sound.
2 Click the Input tab in Sound preferences.
3 Choose Display Audio to input sound through your display’s microphone.
To set up sound output:
1 Choose Apple () > System Preferences, and then click Sound.
2 Click the Output tab in Sound preferences.
3 Choose Display Audio to hear sound through your display’s speaker system.
These sound settings are used whenever your display is connected to your computer.
They remain in eect until you change them.
Adjusting the Resolution, Brightness, and Color
Your Apple Thunderbolt Display can automatically adjust the screen brightness for
current light conditions using the built-in ambient light sensor. You can turn auto-
brightness on or o in Displays preferences.
To change the resolution or brightness:
1 Choose Apple () > System Preferences, and then click Displays.
2 Choose a resolution or drag the Brightness slider.
10 English
You can also use the brightness keys on an external Apple Keyboard to increase ( ) or
decrease ( ) the brightness of your display. Make sure the menu bar is on the display
you want to adjust.
To change the display color prole or calibrate your display:
1 Click the Color tab in Displays preferences.
2 Choose a display color prole, or click Calibrate to open the Display Calibrator Assistant.
For more information about calibrating your display, choose Help > Mac Help in the
menu bar and search for “calibrate.”
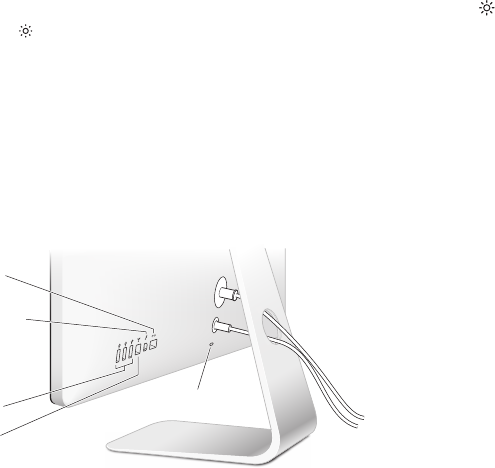
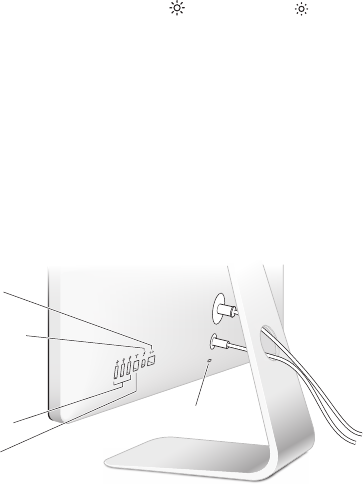
Security Slot and Ports
Security slot
USB 2.0
ports (3)
Gigabit
Ethernet
port
Thunderbolt
port
FireWire
800 port
To secure your display, attach a locking cable to the security slot.
11English
GGigabit Ethernet port (10/100/1000Base-T)
Connect to a high-speed 10/100/1000Base-T Ethernet network, connect a DSL or
cable modem, or connect to another computer and transfer les. The Ethernet port
automatically detects other Ethernet devices.
Thunderbolt port (high-speed data, video, and audio)
Connect Thunderbolt-compatible devices for high-speed data transfer, or connect
another display that uses Thunderbolt. This Thunderbolt port is not compatible with DVI,
VGA, or DisplayPort displays or adapters.
dThree high-speed USB (Universal Serial Bus) 2.0 ports
Connect an iPod, iPhone, iPad, mouse, keyboard, printer, disk drive, digital camera,
joystick, external USB modem, and more. You can also connect USB 1.1 devices.
HFireWire 800 port
Connect external devices, such as digital video cameras and storage devices. The port
provides up to 7 watts of power.
Important: You can use the USB ports to charge your iPad, iPhone, or iPod, even
when your display isn’t connected to a computer. If you use one of these ports to
sync information between your computer and an iPad, iPhone, or iPod, make sure the
display’s Thunderbolt cable is connected to your computer’s Thunderbolt port.
Using a VESA Mounting Solution with Your Display
You can attach your display to an alternative mounting solution, using the VESA Mount
Adapter Kit available from the Apple Online Store at www.apple.com/store. Use the
kit to attach your display to any available VESA-compatible mounting solution. Simply
follow the instructions included with the kit.

12 English
Care and Safety
Before you lift or reposition your display, you may need to disconnect the cables and
power cord. Use correct lifting techniques when positioning the display. When lifting or
carrying the display, hold it by the edges. Don’t lift the display by the stand or the cord.
To clean the screen on your display:
1 Disconnect the power cord.
2 Use a soft, dry cloth, to wipe dust from the screen.
WARNING: Don’t clean the screen with a cleaner containing alcohol or acetone. Use a
cleaner intended for use with a screen or display. Never spray cleaner directly on the
screen. It may drip inside the display and cause damage.
Don’t operate your display in areas with signicant amounts of airborne dust, or smoke
from cigarettes, cigars, ashtrays, stoves, or replaces, or near an ultrasonic humidier
using unltered tap water. Tiny airborne particles produced by smoking, cooking,
burning, or using an ultrasonic humidier with unltered water may, in rare instances,
enter the ventilation openings of your display and, under certain conditions, result in a
slight haze on the inside surface of the glass panel that covers the display.

13English
Follow these safety guidelines for using your display:
ÂThe only way to completely disconnect power is to unplug the power cord. Be sure to
pull the plug, not the cord.
ÂDisconnect power immediately if the power cord is frayed or damaged, if you spill
something on the display, or if the display falls or is damaged in some other way.
WARNING: Use only the power cord that came with your display. The power cord has
a three-wire grounding plug (a plug that has a third grounding pin) that ts only a
grounded AC outlet. If you are unable to insert the plug into an outlet because the
outlet is not grounded, contact a licensed electrician to replace the outlet with a
properly grounded outlet.
WARNING: Your display is a high-voltage component and should not be opened for
any reason, even when it’s unplugged. If your display needs service, see “Learning
More, Service, and Support” on page 16.

14 English
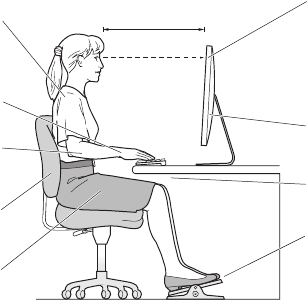
Ergonomics
Here are some guidelines for adjusting your display to reduce glare and to
accommodate your physical size and shape.
ÂArrange the display so that the top of the screen is slightly below your eye level
when you’re sitting at the keyboard. The best distance from your eyes to the screen is
up to you, although most people tend to prefer 18 to 28 inches (45 to 70 cm).
ÂPosition the display by tilting it up or down to minimize glare and reections from
overhead lights and nearby windows.
Thighs tilted
slightly
Shoulders
relaxed
Screen positioned to
avoid reflected glare
Forearms and
hands in a
straight line
Forearms level
or tilted slightly
Lower back
supportedFeet flat on the floor
or on a footrest
Top of the screen at or
slightly below eye level
(You may need to adjust
the height of your display
by raising or lowering
your work surface)
Clearance under
work surface
18–28 in. (45–70 cm)
For more information about health, safety, and maintenance, go to the Apple
ergonomic website at www.apple.com/about/ergonomics.
15English
Troubleshooting Your Display
Before performing any of these steps, make sure your computer is turned on, the
display is plugged into a grounded power outlet, all the cables are connected properly
to your computer and display, and your computer is not in sleep mode.
If the screen doesn’t have an image:
ÂCheck the cables and connectors again to make sure they are connected properly to
your computer and the display.
ÂMake sure your computer is turned on and is not in sleep mode. If the lid on your
MacBook Pro is closed, use the external keyboard or mouse to wake the MacBook Pro
from sleep.
ÂUnplug the display’s power cord from the grounded power outlet, wait a few
minutes, then plug it in again.
ÂReset the PRAM by restarting your computer while holding down the Command (x),
Option, P, and R keys until you hear the startup sound a second time.
If the screen is dim:
ÂMake sure the display brightness is set properly. Choose Apple () > System
Preferences and click Displays. Drag the Brightness slider to adjust the brightness.
ÂIf the colors on the display are too saturated or not correct, you may need to calibrate
your display. Open Displays preferences, click the Color tab, click Calibrate, and follow
the instructions.
If your MacBook Pro isn’t charging:
Make sure the MagSafe connector from your display is seated properly in the MagSafe
power port on your MacBook Pro.
16 English
If the built-in FaceTime HD camera, microphone, speaker system, or ports on the
display aren’t working:
Make sure the Thunderbolt cable from the display is rmly plugged into the
Thunderbolt port on your computer. The display’s camera, microphone, speaker system,
and ports work only when this cable is connected to your computer.
More Troubleshooting Information
You can nd more troubleshooting information on the Displays support website at
www.apple.com/support/displays.
Learning More, Service, and Support
You can nd more information about your display on the Apple website and in
Mac Help.
To learn about See
Using your display Mac Help and search for “displays.”
Display service, support,
discussions, troubleshooting,
and software downloads
The Displays Support site at www.apple.com/support/displays.
The latest information about
displays
The Apple Displays site at www.apple.com/displays.
Registering your display The Apple Product Registration site at www.apple.com/register.
17English
Specications
ÂModel number: A1407
ÂResolution: 2560 x 1440 @ 60 Hz
ÂPorts:
• Three high-speed USB 2.0 ports
• One Gigabit Ethernet port
• One Thunderbolt port
• One FireWire 800 port
ÂCamera and microphone: Built-in FaceTime HD camera with microphone
ÂSpeakers: Built-in 2.1 speakers with 49 W output
Dimensions:
ÂWeight: 23.5 lb. (10.7 kg)
ÂHeight: 19.2 inches (488.1 mm)
ÂWidth: 25.65 inches (651.7 mm)
ÂDepth (with stand): 8.2 inches (208.13 mm)
ÂViewable: 27 inches (685.8 mm) diagonal
Operating environment:
ÂOperating temperature: 50° to 95° F (10° to 35° C)
ÂRelative humidity: 20% to 80% (noncondensing)
ÂAltitude: 0 to 10,000 feet (0 to 3048 meters)
19Türkçe
Başlangıç
Apple Thunderbolt Dsplay’nz, Thunderbolt kapısı olan Mac
blgsayarlarla kusursuz br şeklde çalışmak üzere tasarlanmıştır.
Arkadan aydınlatmalı LED genş ekran, MacBook Pro’nuzu şarj
etmek üzere br MagSafe bağlayıcısı, yerleşk FaceTme HD
kamera, mkrofon, hoparlör sstem, güvenlk yuvası ve kapılar
gb özellklere sahptr.
İzleyen sayfalardak yönergeler, yen ekranınızı kurmanıza ve kullanmanıza yardımcı
olur. Öğreneceklernz arasında şunlar sayılablr:
ÂEkranınızı blgsayarınıza bağlama
ÂEkranınızın kamerasını, mkrofonunu, hoparlör sstemn ve kapılarını kullanma
ÂEkranınızın ayarlarını yapma
Not: Apple Thunderbolt Dsplay’nz, Thunderbolt kapısına sahp br Mac blgsayara
bağlayablrsnz.
Önemli: Ekranınızı kurmadan ve kullanmadan önce tüm kurma yönergelern
(ve sayfa26 le başlayan güvenlk blglern) dkkatlce okuyun.
Ekranınızla uyumlu olan blgsayarlar ve grafk kartları hakkında blg çn,
www.apple.com/tr/dsplays adresne gdn.
20 Türkçe
Ekranınızı Kurma
Apple Thunderbolt Dsplay’nz kurmak çn aşağıdak adımları zleyn:
1 Ekranın ve kabloların üzerndek koruyucu flm çıkarın.
2 Güç kablosunu ekrana takın, sonra da AC fşn topraklanmış br elektrk przne takın.
3 Thunderbolt kablosunu blgsayarınızın Thunderbolt kapısına bağlayın.
Apple Thunderbolt Display
MacBook Pro
MagSafe
güç kapısı
Topraklı
elektrik prizi
Thunderbolt
kapısı
4 MacBook Pro’ya bağlıyorsanız, MacBook Pro’nuza güç sağlamak ve pln şarj etmek
çn MagSafe bağlayıcısını MacBook Pro’nuzdak MagSafe güç kapısına takın.
5 Blgsayarınız kapalıysa, blgsayarınızı başlatmak çn Açma/Kapama (®) düğmesne
basın. Blgsayarınızı başlattığınız zaman ekran da otomatk olarak açılır.
21Türkçe
MacBook Pro’nuzu Kapağı Kapalı Olarak Kullanma
MacBook Pro’nuzun kapağını kapatıp yalnızca Apple Thunderbolt Dsplay’nz
kullanablrsnz. Öncek sayfada yer alan kurma blglern zleyn ve ekranın MagSafe
bağlayıcısının MacBookPro’nuzun MagSafe güç kapısına takılı olduğundan emn olun.
Apple Thunderbolt Dsplay’nz MacBook Pro’nuzun kapağı kapalı olarak kullanma:
1 Ekranınızın USB kapısına harc br USB klavye ve fare bağlayın veya kablosuz br klavye
ve fare ayarlamak üzere Bluetooth® Ayarlama Yardımcısı'nı kullanın.
2 MacBook Pro’nuzun açık olduğundan emn olun.
3 MacBook Pro’nuzu uyku durumuna geçrmek çn kapağını kapatın.
4 Brkaç sanye bekleyn ve daha sonra MacBook Pro’nuzu uyandırmak çn harc
klavyedek herhang br tuşa basın veya farey tıklayın.
Apple Thunderbolt Dsplay’nz Ek Ekran Olarak Ayarlama
MacBook Pro’nuzun kapağını açık bıraktığınızda, aynı masaüstü görüntüsünü her k
ekrana da yansıtablr veya ek ekranı masaüstünüzün uzantısı olarak kullanablrsnz.
Vdeo yansıtmayı ya da genşletlmş masaüstünü ayarlamak çn Ekranlar terchlern
kullanablrsnz.
Vdeo yansıtmayı ya da genşletlmş masaüstünü ayarlama:
1 Elma () > Sstem Terchler komutunu seçn ve daha sonra Ekranlar'ı tıklayın.
2 Düzenleme sekmesn tıklayın ve ekrandak yönergeler zleyn.
22 Türkçe
Ekranınızı Kullanma
Apple Thunderbolt Dsplay’nzn yerleşk FaceTme HD kamerası, mkrofonu ve hoparlör
sstem vardır.
Hoparlör sistemi
Mikrofon
Yerleşik FaceTime
HD kamera
Yerleşk FaceTme HD Kamerayı ve Mkrofonu Kullanma
Hareketsz görüntüler, vdeoları ve sesler FaceTme, Chat, Move ve Photo Booth gb
uygulamaları kullanarak yakalamak çn yerleşk FaceTme HD kamerayı ve mkrofonu
kullanablrsnz.
Chat le kamerayı ve mkrofonu ayarlama:
1 Chat uygulamasını açmak çn Dock'tak Chat smgesn tıklayın.
2 Chat > Terchler komutunu seçn ve daha sonra Ses/Vdeo öğesn tıklayın.
3 Kamera açılır menüsünden FaceTme HD Kamera (Ekran) öğesn seçn.
4 Mkrofon açılır menüsünden Ekran Ses öğesn seçn.
23Türkçe
Ses Grşn ve Çıkışını Ayarlama
Ekranınızın hoparlör sstem yoluyla müzk dnleyeblr ve flmlern, oyunların ve
çoklu ortam dosyalarının seslern duyablrsnz. Sesler kaydetmek veya Chat’ ya da
FaceTme’ı kullanarak arkadaşlarınızla sohbet etmek çn mkrofonu kullanablrsnz.
Ses grşn ve çıkışını yönetmek çn Ses terchlern kullanın.
Ses grşn ayarlama:
1 Elma () > Sstem Terchler komutunu seçn ve daha sonra Ses' tıklayın.
2 Ses terchlernde Grş sekmesn tıklayın.
3 Ses grşn, ekranınızın mkrofonu yoluyla olmasını sağlamak çn Ekran Ses'n seçn.
Ses çıkışını ayarlama:
1 Elma () > Sstem Terchler komutunu seçn ve daha sonra Ses' tıklayın.
2 Ses terchlernde Çıkış sekmesn tıklayın.
3 Ses, ekranınızın hoparlör sstem yoluyla duymak çn Ekran Ses'n seçn.
Bu ses ayarları, ekranınızın blgsayarınıza bağlı olduğu zamanlarda kullanılır. Sz onları
değştrnceye kadar da etkl olmaya devam eder.
Çözünürlüğü, Parlaklığı ve Reng Ayarlama
Apple Thunderbolt Dsplay’nz, yerleşk ortam ışığı algılayıcısını kullanarak ekran
parlaklığını o ank ışık koşullarına göre otomatk olarak ayarlayablr. Otomatk parlaklık
seçeneğn Ekranlar terchlernde açablr veya kapatablrsnz.
Çözünürlüğü veya parlaklığı değştrme:
1 Elma () > Sstem Terchler komutunu seçn ve daha sonra Ekranlar'ı tıklayın.
2 Br çözünürlük seçn veya Parlaklık sürgüsünü sürükleyn.
24 Türkçe
Ekranınızın parlaklığını artırmak ( ) veya azaltmak ( ) çn harc Apple klavyedek
parlaklık tuşlarını da kullanablrsnz. Menü çubuğunun ayarlamak stedğnz ekranda
olduğundan emn olun.
Ekranın renk profln değştrme veya ekranınızı ayarlama:
1 Ekranlar terchlernde Renk sekmesn tıklayın.
2 Ekranın renk profln seçn veya Ekran Ayarlama Yardımcısı'nı açmak çn Ayarla'yı
tıklayın.
Ekranınızı ayarlama hakkında daha fazla blg çn, menü çubuğundan Yardım >
Mac Yardım komutunu seçn ve “ayarla” fadesn aratın.
Güvenlk Yuvası ve Kapılar
Güvenlik yuvası
USB 2.0
kapıları (3)
Gigabit
Ethernet
kapısı
Thunderbolt
kapısı
FireWire
800 kapısı
Ekranınızın güvenlğn sağlamak çn güvenlk yuvasına br kltleme kablosu
takablrsnz.
25Türkçe
GGgabt Ethernet kapısı (10/100/1000Base-T)
Yüksek hızlı br 10/100/1000Base-T Ethernet ağına, DSL veya kablo modeme ya da
başka br blgsayara bağlanın ve dosyaları aktarın. Ethernet kapısı dğer Ethernet
aygıtlarını otomatk olarak algılar.
Thunderbolt kapısı (yüksek hızlı ver, vdeo ve ses)
Yüksek hızlı ver aktarımı çn Thunderbolt uyumlu aygıtları bağlayın veya Thunderbolt
kullanan başka br ekran bağlayın. Bu Thunderbolt kapısı DVI, VGA veya DsplayPort
ekranları ya da adaptörler le uyumlu değldr..
dÜç adet yüksek hızlı USB (Evrensel Ser Ver Yolu) 2.0 kapısı
Pod, Phone, Pad, fare, klavye, yazıcı, dsk sürücü, sayısal fotoğraf maknes, joystck,
harc USB modem ve daha brçok şey bağlayın. USB 1.1 aygıtlarını da bağlayablrsnz.
HFreWre 800 kapısı
Sayısal vdeo kameralar ve saklama aygıtları gb harc aygıtlar bağlayın. Kapı en fazla 7
vat güç sağlayablr.
Önemli: Ekranınız blgsayara bağlı olmasa ble Pad’nz, Phone’unuzu veya
Pod’unuzu şarj etmek çn USB kapılarını kullanablrsnz. Blgler blgsayarınızla Pad,
Phone veya Pod arasında eşzamanlamak çn bu kapılardan brn kullanıyorsanız,
ekranın Thunderbolt kablosunun blgsayarınızın Thunderbolt kapısına bağlı
olduğundan emn olun.
Ekranınızla VESA Montaj Çözümünü Kullanma
Apple'ın www.apple.com/store adresndek çevrmç mağazasında bulunan VESA
Mount Adapter Kt' kullanarak ekranınıza alternatf br montaj çözümü takablrsnz.
Ekranınızı, mevcut herhang br VESA uyumlu montaj çözümüne bağlamak çn bu set
kullanablrsnz. Yalnızca setle brlkte gelen yönergeler zlemenz yeterldr.

26 Türkçe
Bakım ve Güvenlk
Ekranınızı kaldırmadan veya ekranınızın yern değştrmeden önce, güç kablosu da
dahl olmak üzere tüm kabloları çıkarmanız gerekeblr. Ekranı yerleştrrken doğru
kaldırma teknklern kullanın. Ekranı kaldırırken veya taşırken kenarlarından tutun.
Ekranı, ayağından veya kablosundan tutarak kaldırmayın.
Ekranınızı temzleme:
1 Güç kablosunu çıkarın.
2 Ekranın tozunu almak çn yumuşak, kuru br bez kullanın.
UYARI: Ekranı, alkol veya aseton çeren temzleyc maddelerle temzlemeyn. Ekranla
kullanmaya yönelk br temzleyc kullanın. Temzleycy asla doğrudan ekrana
püskürtmeyn. Damlalar ekranın çne sızablr ve ekranınıza hasar vereblr.
Ekranınızı; havada çok fazla asılı tozun, sgara veya puro dumanının bulunduğu
yerlerde ya da kül tablalarının, sobaların, şömnelern veya fltrelenmemş musluk suyu
kullanan ultrasonk nemlendrclern yakınında çalıştırmayın. Sgara, yemek pşrme,
yanma ya da fltrelenmemş musluk suyu kullanan ultrasonk nemlendrcler nedenyle
oluşan havadak küçük parçacıklar, nadr durumlarda ekranınızın havalandırma
açıklıklarından greblr ve belrl koşullar altında, ekranı kaplayan cam paneln ç
yüzeynde haff br bulanıklığa neden olablr.

27Türkçe
Ekranınızı kullanırken şu güvenlk yönergelern zleyn:
ÂGücü tamamen kesmenn tek yolu güç kablosunun fşn przden çıkarmaktır.
Kabloyu değl fş çektğnzden emn olun.
ÂGüç kablosu aşınmışsa veya hasar görmüşse, ekranın üzerne herhang br sıvı
dökülürse ya da ekran düşerse veya başka br şeklde hasar görürse, güç kablosunun
fşn przden hemen çekn.
UYARI: Yalnızca ekranınızla brlkte gelen güç kablosunu kullanın. Güç kablosunun;
sadece topraklı przlere uyan, topraklama amaçlı üçüncü br prz ucu vardır. Eğer
prznz topraklı olmadığı çn bu kabloyu takamıyorsanız, prznz topraklı hale
getrmek çn lsanslı br elektrk teknsyenne başvurun.
UYARI: Ekranınız yüksek voltaj çeren br bleşendr ve hçbr surette, fş prze takılı
değlken ble açılmamalıdır. Ekranınızın tamre gereksnm varsa, bakınız: “Daha
Fazla Blg, Servs ve Destek”, sayfa30.
28 Türkçe
Ergonom
Parlamayı azaltmak ve ekranınızı fzksel olarak sze en uygun şeklde yerleştrmek çn
aşağıdak yönergelerden yararlanablrsnz.
ÂEkranı, klavyenn önünde otururken ekranın üst kısmı göz hzanızın braz altında
kalacak şeklde konumlandırın. Gözlernz le ekran arasındak mesafey stedğnz
şeklde ayarlayablrsnz ama çoğu kş 45 - 70 cm aralığını terch eder.
ÂTepedek ışıklardan ve yakınlardak pencerelerden kaynaklanan parlamaları ve
yansımaları en aza ndrmek çn ekranı yukarı veya aşağı eğerek konumlandırın.
Üst bacaklar
haf eğimli
Omuzlar
serbest
Ekran, ışık yansımalarından
kaçınılacak şekilde yerleştirilmiş
Bilekler ve
eller, düz bir
hat üzerinde
Kollar yatay
veya az eğimli
Alt bel
desteklenmiş Ayaklar yere veya ayaklık
üzerine düz basıyor
Ekranın üst kısmı göz
hizanızda veya çok az
altında (Çalışma yüzeyinizi
yükseltip alçaltarak
ekranınızın yüksekliğini
ayarlamanız gerekebilir)
Çalışma yüzeyi
altında boşluk
45–70 cm
Sağlık, güvenlk ve bakım le lgl daha fazla blg çn, www.apple.com/about/
ergonomcs adresndek Apple ergonom stesne gdn.
29Türkçe
Ekranınızla İlgl Sorunları Gderme
Bu adımlardan herhang brn gerçekleştrmeden önce; blgsayarınızın açık,
ekranın fşnn topraklı br elektrk przne takılı ve tüm kabloların blgsayarınıza ve
ekranınıza düzgün br şeklde bağlı olduğundan ve blgsayarınızın uyku durumunda
olmadığından emn olun.
Ekranda görüntü yoksa:
ÂBlgsayarınıza ve ekranınıza düzgün br şeklde bağlı olduklarından emn olmak çn
kabloları ve bağlayıcıları yenden denetleyn.
ÂBlgsayarınızın açık olduğundan ve uyku durumunda olmadığından emn olun.
MacBook Pro’nuzun kapağı kapalıysa, MacBook Pro’yu uyandırmak çn harc klavyey
veya farey kullanın.
ÂEkranın güç kablosunu topraklı elektrk prznden çıkarın, brkaç dakka bekleyn ve
daha sonra yenden takın.
ÂBlgsayarınızı yenden başlatırken Komut (x), Opton, P ve I (Q klavyede R) tuşlarına
basıp açılış sesn knc kez duyana dek tuşları basılı tutarak PRAM’ sıfırlayın.
Ekran soluksa:
ÂEkran parlaklığının düzgün br şeklde ayarlanmış olduğundan emn olun. Elma () >
Sstem Terchler komutunu seçn ve Ekranlar'ı tıklayın. Parlaklığı ayarlamak çn Parlaklık
sürgüsünü sürükleyn.
ÂEkrandak renkler çok koyu gözüküyorsa veya doğru gözükmüyorsa, ekranınızı
ayarlamanız gerekeblr. Ekranlar terchlern açın, Renk sekmesn tıklayın, Ayarla’yı
tıklayın ve yönergeler zleyn.
MacBook Pro’nuz şarj etmyorsa:
Ekranınızdan gelen MagSafe bağlayıcısının MacBook Pro’nuzdak MagSafe güç kapısına
düzgün br şeklde oturmuş olduğundan emn olun.

30 Türkçe
Ekrandak yerleşk FaceTme HD kamera, mkrofon, hoparlör sstem veya kapılar
çalışmıyorsa:
Ekrandan gelen Thunderbolt kablosunun blgsayarınızdak Thunderbolt kapısına sıkı
br şeklde takılı olduğundan emn olun. Ekrandak kamera, mkrofon, hoparlör sstem
ve kapılar, yalnızca bu kablo blgsayarınıza bağlıyken çalışır.
Daha Fazla Sorun Gderme Blgler
www.apple.com/support/dsplays adresndek Dsplays destek web stesnde daha
fazla sorun gderme blgs bulablrsnz.
Daha Fazla Blg, Servs ve Destek
Apple web stesnde ve Mac Yardım’da ekranınız hakkında daha fazla blg
bulablrsnz.
Şu konuda bilgi
edinmek için
Şunu yapın
Ekranınızı kullanma Mac Yardım'da "ekran" fadesn aratın.
Ekranla lgl servs ve destek
blgler, tartışmalar, sorun
gderme blgler ve yazılım
ndrmeler
www.apple.com/support/dsplays adresndek Dsplays destek
web stesne gdn.
Ekranlar hakkındak en
son blgler
www.apple.com/tr/dsplays adresndek Apple Ekranları web
stesne gdn.
Ekranınızı kaydettrme www.apple.com/regster adresndek Apple Product
Regstraton web stesne gdn.
31Türkçe
Teknk Özellkler
ÂModel numarası:A1407
ÂÇözünürlük:2560 x 1440 (60 Hz frekansında)
ÂKapılar:
• Üç adet yüksek hızlı USB 2.0 kapısı
• Br adet Ggabt Ethernet kapısı
• Br adet Thunderbolt kapısı
• Br adet FreWre 800 kapısı
ÂKamera ve mikrofon:Mkrofonlu yerleşk FaceTme HD kamera
ÂHoparlörler:Yerleşk 2.1 hoparlörler (49 W çıkış)
Boyutlar:
ÂAğırlık:10,7 kg (23,5 pound)
ÂYükseklik:488,1 mm (19,2 nç)
ÂGenişlik:651,7 mm (25,65 nç)
ÂDerinlik (ayakla birlikte):208,13 mm (8,2 nç)
Âİzlenebilir Alan:685,8 mm (27 nç) çapraz
Çalıştırma ortamı:
ÂÇalıştırma sıcaklığı:10° - 35° C (50° - 95° F)
ÂBağıl nem oranı:% 20 - % 80 (yoğunlaşmayan)
ÂÇalıştırma yüksekliği:0 - 3048 metre (0 - 10.000 ft)
32
Regulatory Compliance InformationRegulatory Compliance Information
FCC Compliance Statement
This equipment has been tested and found to comply with the
limits for a Class B digital device, pursuant to part 15 of the FCC
Rules. These limits are designed to provide reasonable protection
against harmful interference in a residential installation.
This equipment generates, uses, and can radiate radio
frequency energy and, if not installed and used in accordance
with the instructions, may cause harmful interference to radio
communications. However, there is no guarantee that interference
will not occur in a particular installation. If this equipment does
cause harmful interference to radio or television reception, which
can be determined by turning the equipment o and on, the user
is encouraged to try to correct the interference by one or more of
the following measures:
• Reorient or relocate the receiving antenna.
• Increase the separation between the equipment and receiver.
• Connect the equipment into an outlet on a circuit dierent from
that to which the receiver is connected.
• Consult the dealer or an experienced radio/TV technician for
help.
If necessary, consult an Apple Authorized Service Provider or
Apple. See the service and support information that came with
your Apple product. Or, consult an experienced radio/television
technician for additional suggestions.
Important: Changes or modications to this product not
authorized by Apple Inc. could void the EMC compliance and
negate your authority to operate the product.
This product has demonstrated EMC compliance under conditions
that included the use of compliant peripheral devices and shielded
cables between system components. It is important that you use
compliant peripheral devices and shielded cables between system
components to reduce the possibility of causing interference to
radios, television sets, and other electronic devices.
Responsible party (contact for FCC matters only):
Apple Inc. Corporate Compliance
1 Innite Loop, MS 26-A
Cupertino, CA 95014
Canadian Compliance Statement
This equipment complies with the Canadian ICES-003 Class B
specications.
Cet appareil numérique de la classe B est conforme à la norme
NMB-003 du Canada.
VCCI Class B Statement
Russia
Korea Class B Statement
B
급
기기
(
가정용
방송통신기자재
)
이 기기는 가정용(B급) 전자파적합기기로서 주로
가정에서 사용하는 것을 목적으로 하며, 모든 지
역에서 사용할 수 있습니다.
33
Europe–EU Declaration of Conformity
See www.apple.com/euro/compliance.
High-Risk Activities Warning
This display is not intended for use in the operation of nuclear
facilities, aircraft navigation or communications systems, or air
trac control machines, or for any other uses where the failure of
the computer system could lead to death, personal injury or severe
environmental damage.
ENERGY STAR®
As an ENERGY STAR® partner, Apple has determined that this
product meets the ENERGY STAR® requirements for energy
eciency. The ENERGY STAR® program is a partnership with
electronic equipment manufacturers to promote energy-ecient
products. Improving energy eciency of products saves money
and helps conserve valuable resources.
This display is shipped with power management enabled, which
allows the display to save power by decreasing luminance
when used in a room with low ambient lighting. This automatic
brightness control feature is enabled as a default setting in
Displays preferences. To adjust your display luminance manually,
use the display brightness keys on your keyboard or the brightness
adjustment in Displays preferences.
For more information about ENERGY STAR®, visit: www.energystar.gov
Disposal and Recycling Information
This symbol indicates that your product must be disposed of
properly according to local laws and regulations. When your
product reaches its end of life, contact Apple or your local
authorities to learn about recycling options.
For information about Apple’s recycling program, go to
www.apple.com/recycling.
European Union—Disposal Information
The symbol above means that according to local laws and
regulations your product should be disposed of separately from
household waste. When this product reaches its end of life, take
it to a collection point designated by local authorities. Some
collection points accept products for free. The separate collection
and recycling of your product at the time of disposal will help
conserve natural resources and ensure that it is recycled in a
manner that protects human health and the environment.
Union Européenne – informations sur l’élimination
Le symbole ci-dessus signie que vous devez vous débarasser
de votre produit sans le mélanger avec les ordures ménagères,
selon les normes et la législation de votre pays. Lorsque ce produit
n’est plus utilisable, portez-le dans un centre de traitement des
déchets agréé par les autorités locales. Certains centres acceptent
les produits gratuitement. Le traitement et le recyclage séparé
de votre produit lors de son élimination aideront à préserver les
ressources naturelles et à protéger l’environnement et la santé
des êtres humains.
34
Europäische Union – Informationen zur Entsorgung
Das Symbol oben bedeutet, dass dieses Produkt entsprechend den
geltenden gesetzlichen Vorschriften und getrennt vom Hausmüll
entsorgt werden muss. Geben Sie dieses Produkt zur Entsorgung
bei einer oziellen Sammelstelle ab. Bei einigen Sammelstellen
können Produkte zur Entsorgung unentgeltlich abgegeben
werden. Durch das separate Sammeln und Recycling werden die
natürlichen Ressourcen geschont und es ist sichergestellt, dass
beim Recycling des Produkts alle Bestimmungen zum Schutz von
Gesundheit und Umwelt beachtet werden.
Unione Europea – informazioni per lo smaltimento
Il simbolo qui sopra signica che, in base alle leggi e alle norme
locali, il prodotto dovrebbe essere smaltito separatamente dai
riuti casalinghi. Quando il prodotto diventa inutilizzabile, portalo
nel punto di raccolta stabilito dalle autorità locali. Alcuni punti di
raccolta accettano i prodotti gratuitamente. La raccolta separata e
il riciclaggio del prodotto al momento dello smaltimento aiutano
a conservare le risorse naturali e assicurano che venga riciclato nel
rispetto della salute umana e dell’ambiente.
Europeiska unionen – uttjänta produkter
Symbolen ovan betyder att produkten enligt lokala lagar och
bestämmelser inte får kastas tillsammans med hushållsavfallet. När
produkten har tjänat ut måste den tas till en återvinningsstation
som utsetts av lokala myndigheter. Vissa återvinningsstationer
tar kostnadsfritt hand om uttjänta produkter. Genom att låta den
uttjänta produkten tas om hand för återvinning hjälper du till att
spara naturresurser och skydda hälsa och miljö.
Türkiye
EEE yönetmeliğine (Elektrikli ve Elektronik Eşyalarda Bazı Zararlı
Maddelerin Kullanımının Sınırlandırılmasına Dair Yönetmelik)
uygundur.
Brasil – Informações sobre descarte e reciclagem
O símbolo acima indica que este produto e/ou sua bateria
não devem ser descartadas no lixo doméstico. Quando decidir
descartar este produto e/ou sua bateria, faça-o de acordo com
as leis e diretrizes ambientais locais. Para informações sobre o
programa de reciclagem da Apple, pontos de coleta e telefone de
informações, visite: www.apple.com/br/environment.
Apple ve Çevre
Apple Inc., işlemlerinin ve ürünlerinin çevreye olan olumsuz
etkilerini en aza indirme sorumluluğunun bilincindedir. Web
üzerinde daha fazla bilgi bulunabilir:
www.apple.com/environment
