Apple IMacG5(20 Inch) IMac G5 20 Inch Hard Drive Replacement Instructions (Do It Yourself Manual) User Manual I Mac G520 Instructions(Do Imacg5 20inch
User Manual: Apple iMacG5(20-inch) iMacG520-inchHardDriveReplacementInstructions(DoItYourselfManual)
Open the PDF directly: View PDF ![]() .
.
Page Count: 14
033-2490 Rev. D
iMac G5
Hard Drive, 20-inch
Replacement Instructions
Follow the instructions in this document carefully. Failure to follow these instructions could
damage your equipment and void its warranty.
Note:
Online instructions are available at http://www.apple.com/support/doityourself/.
Tools Required
• Use the screwdriver provided, or a Phillips #2 screwdriver, preferably with a
magnetized tip
• Needlenose pliers
• Screw tray or equivalent to hold the screws
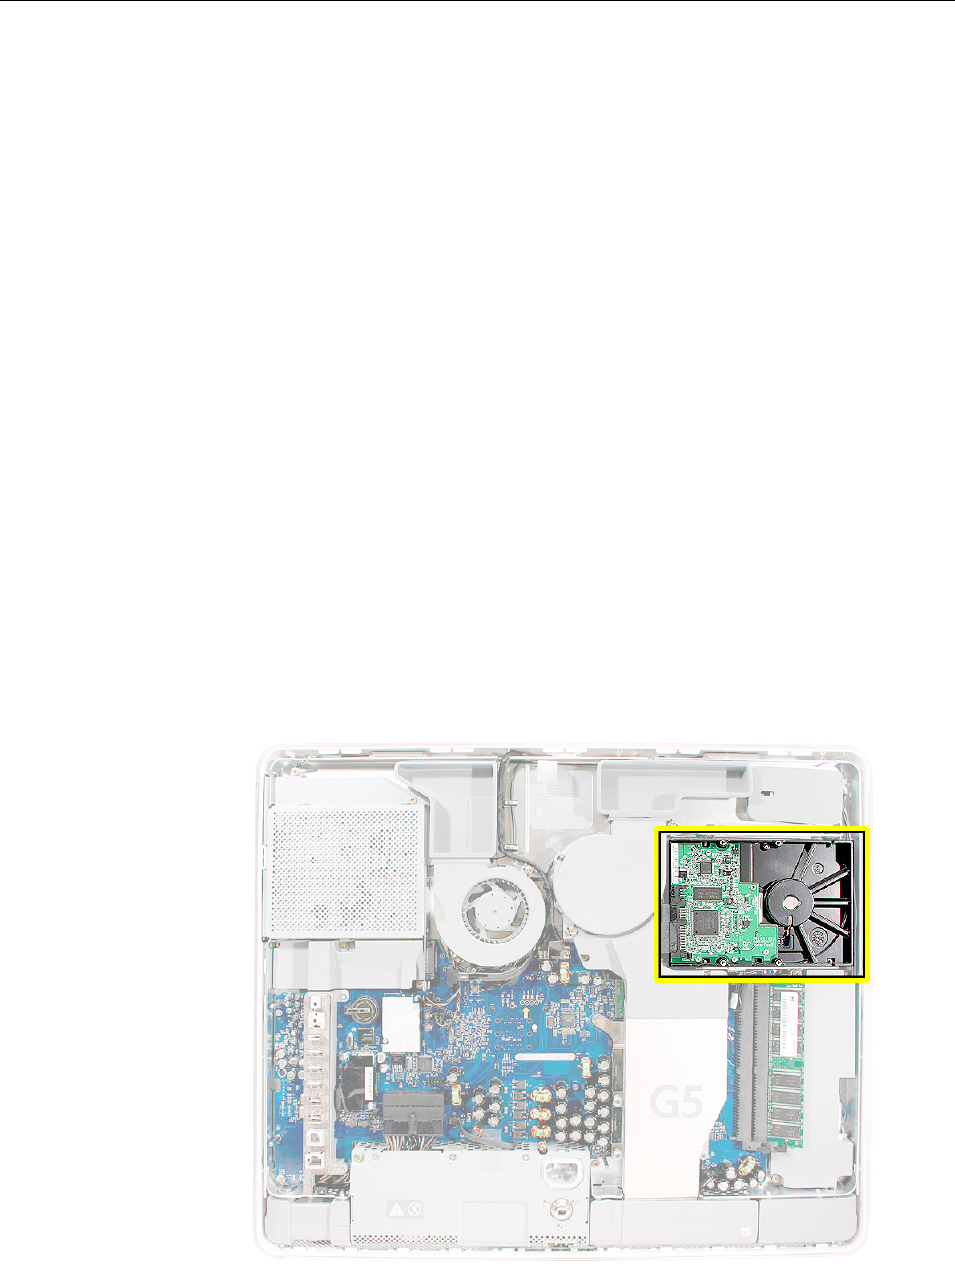
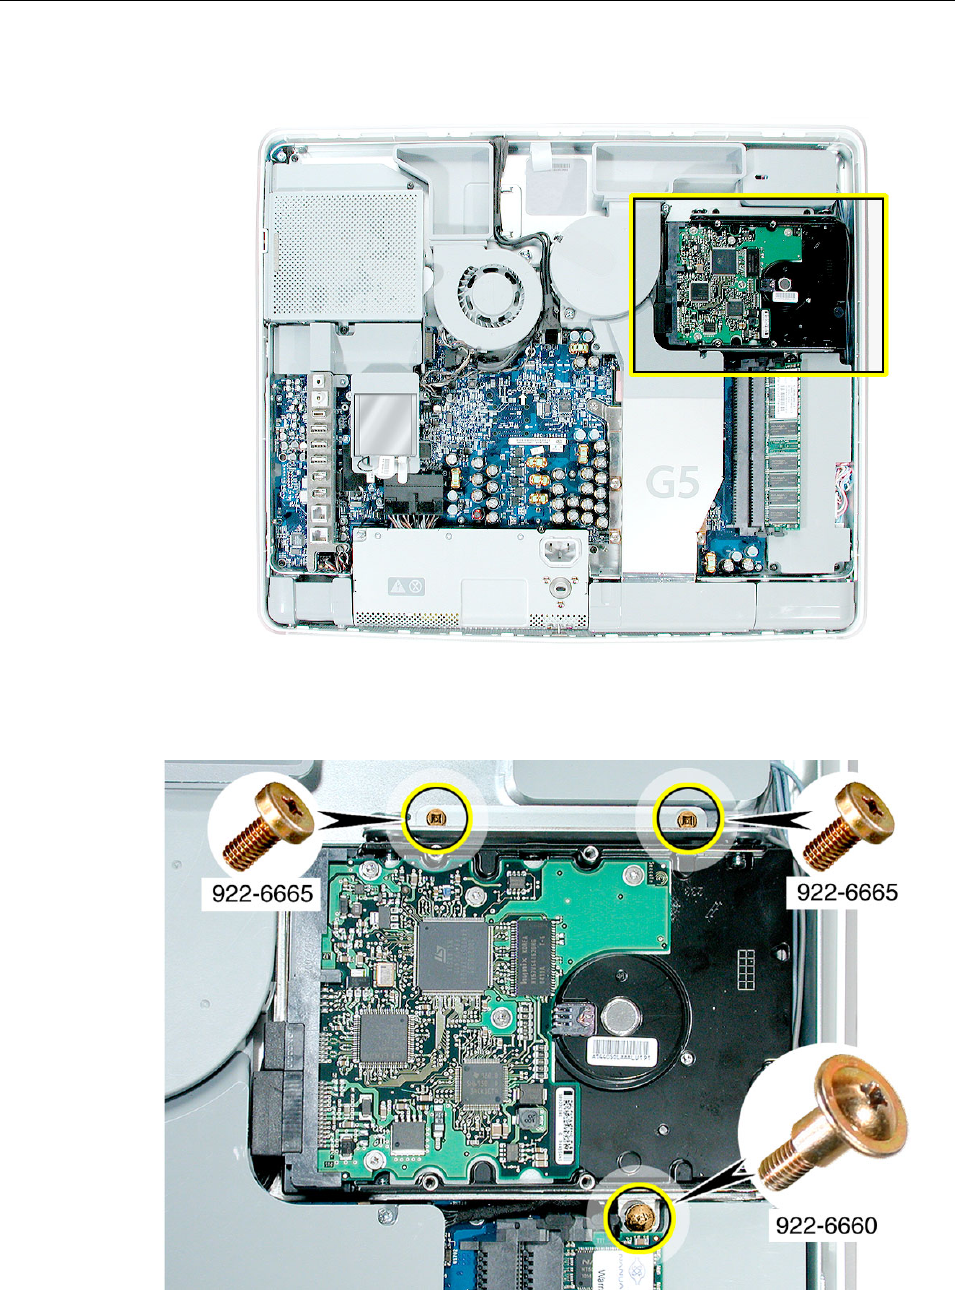
Part Location

2 -
iMac G5 Hard Drive, 20-inch
Important Things to Know
1.
All customer removable screws are brass colored. Do not remove screws
unless they are brass colored, or you will void your warranty
.
2. A magnetized “L”-shaped Phillips screwdriver is included with the replacement part.
3. Ground yourself when working on the computer. The procedure will show you how to
ground yourself.
4. Do not pull on individual wires when disconnecting a part; pull on the connector.
5. Keep drinks and other liquids away from the area you are working on the iMac.
iMac G5 Hard Drive, 20-inch -
3
Opening the Computer
Note:
These instructions cover the iMac G5 (20-inch) models. The models may look
slightly different from one shown in the illustration; however, the following
procedure applies to both models.
1. Turn off your computer by choosing Shut Down from the Apple (
K
) menu.
2. Disconnect all cables, and unplug the power cord from your computer.
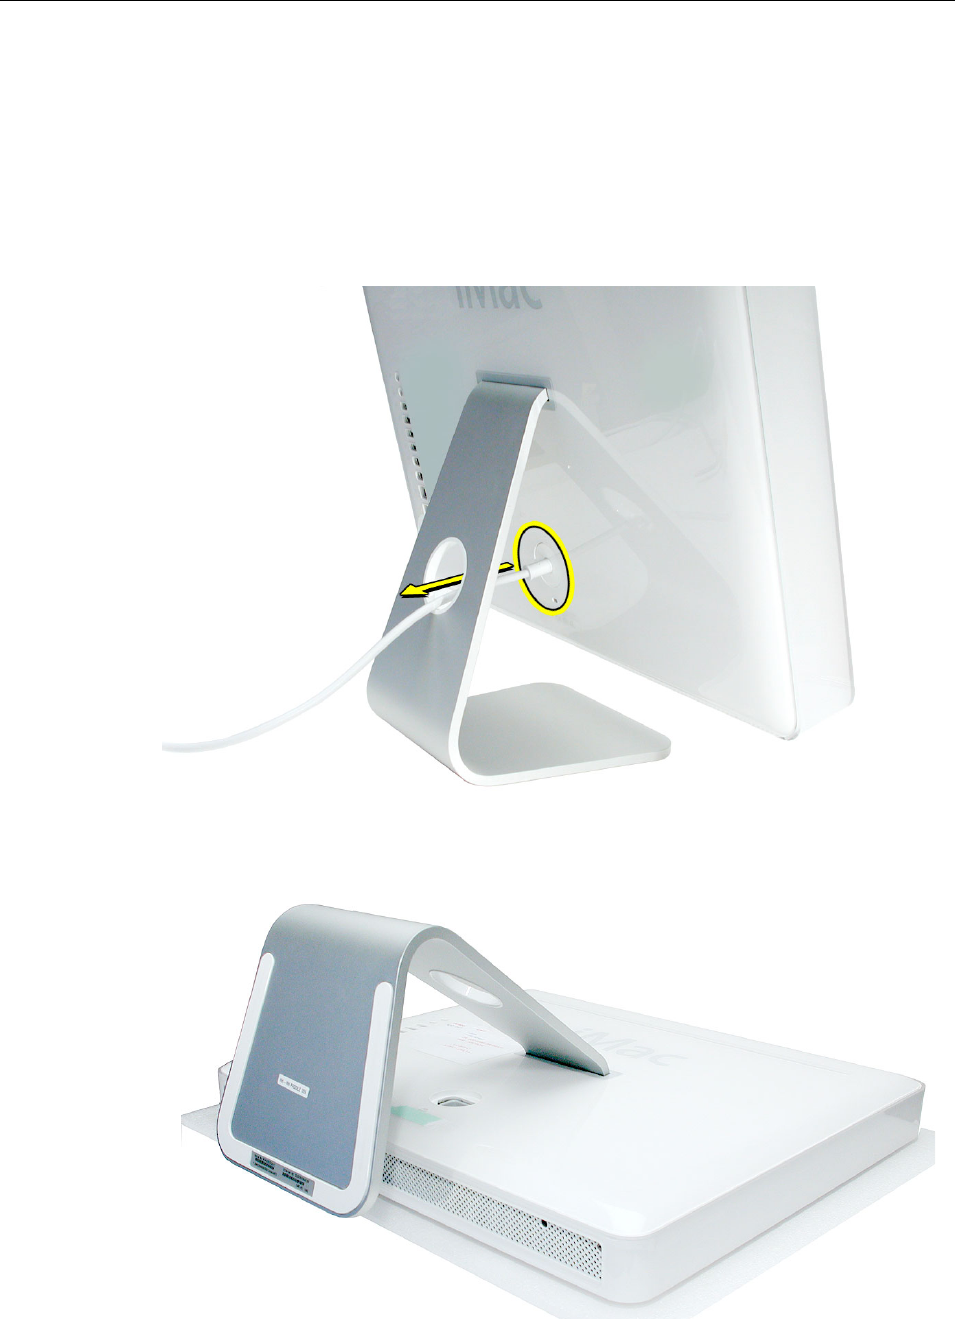
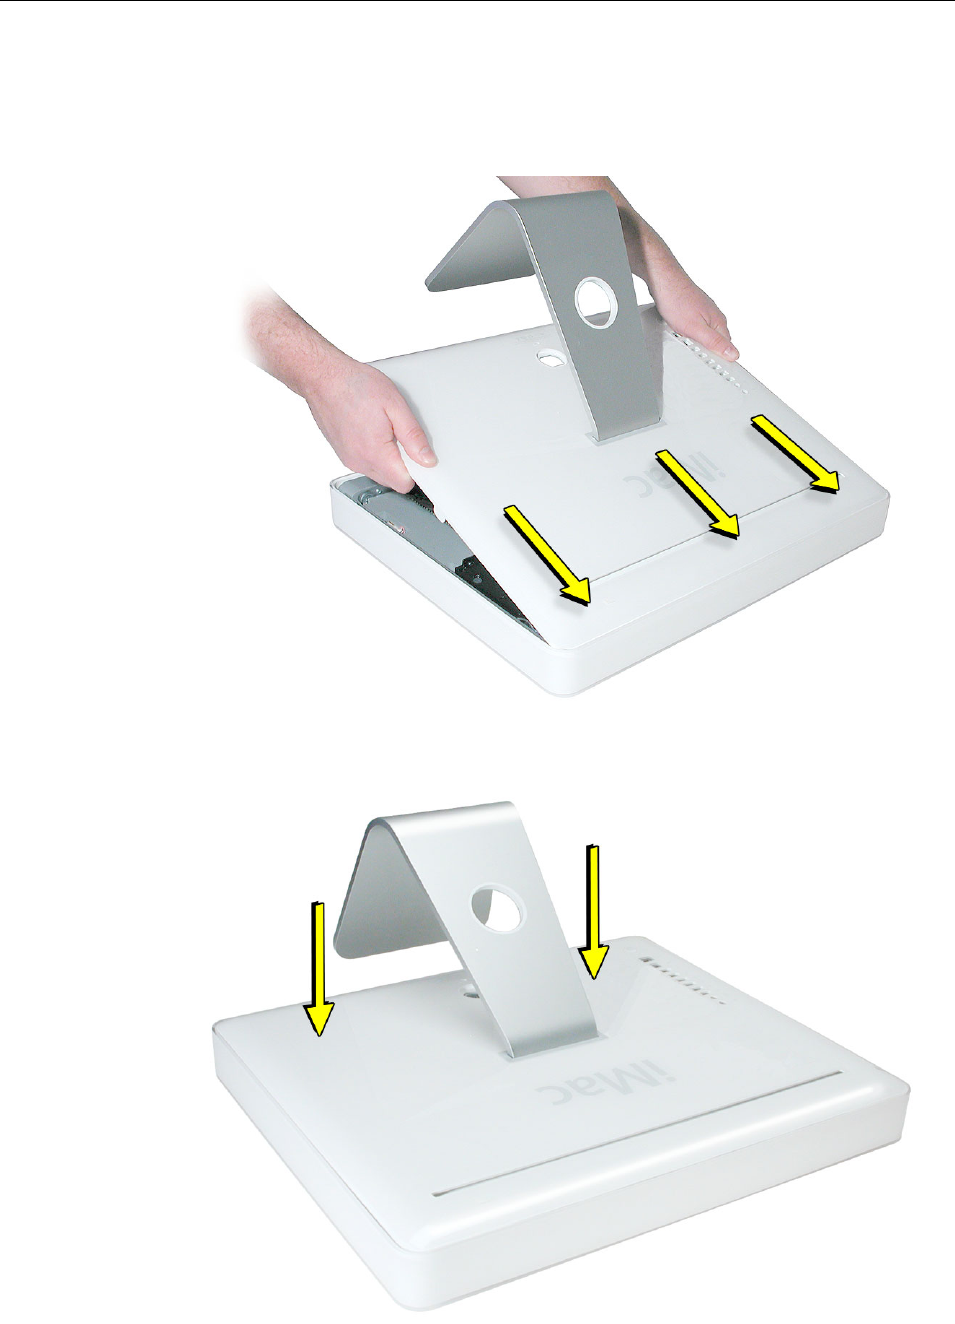
3. Place a soft, clean towel or cloth on the desk or surface. Hold the sides of the
computer and slowly lay the computer face down as shown.
4 -
iMac G5 Hard Drive, 20-inch
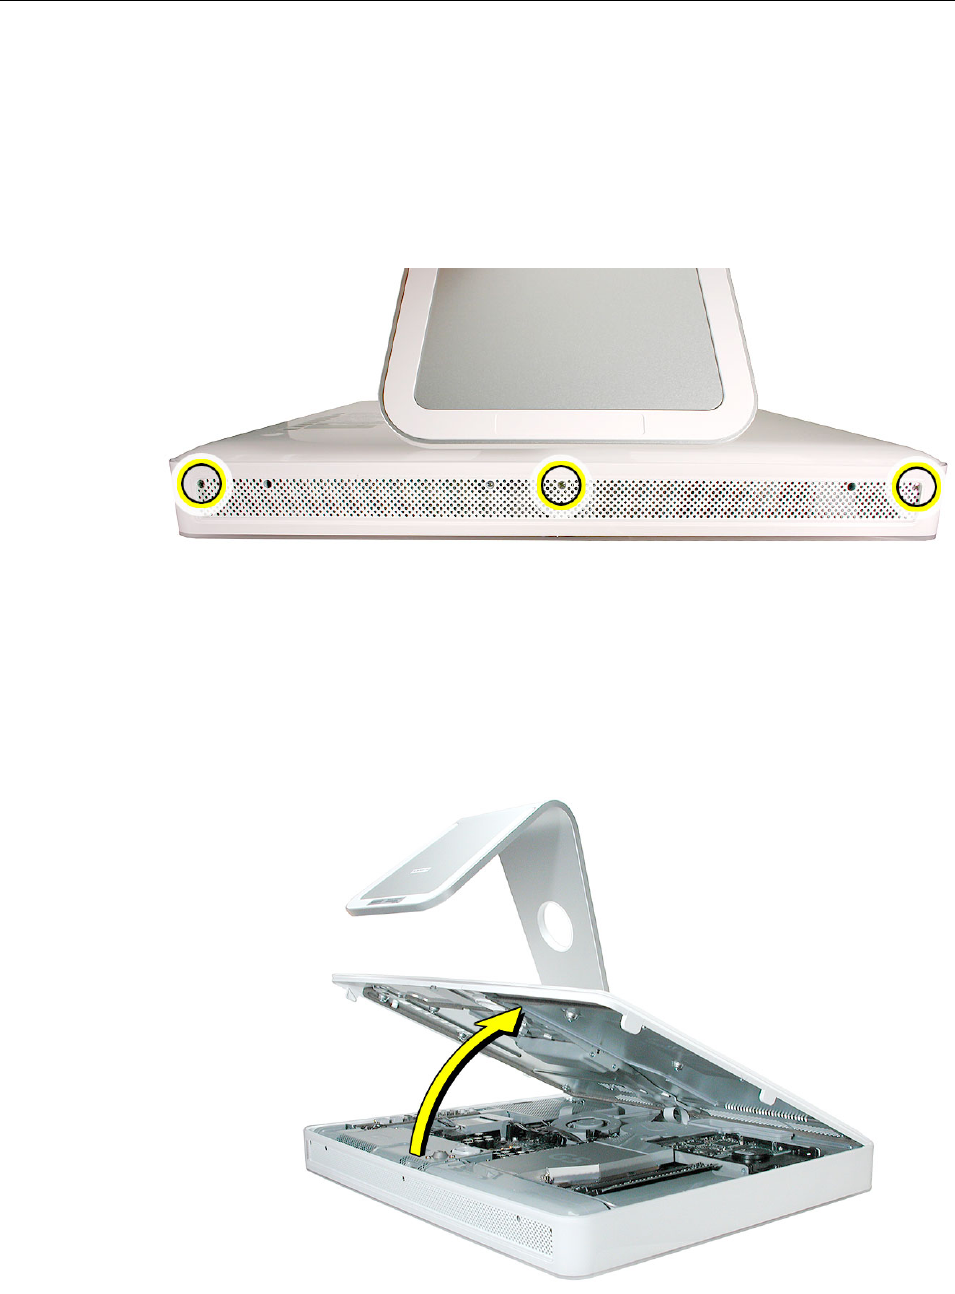
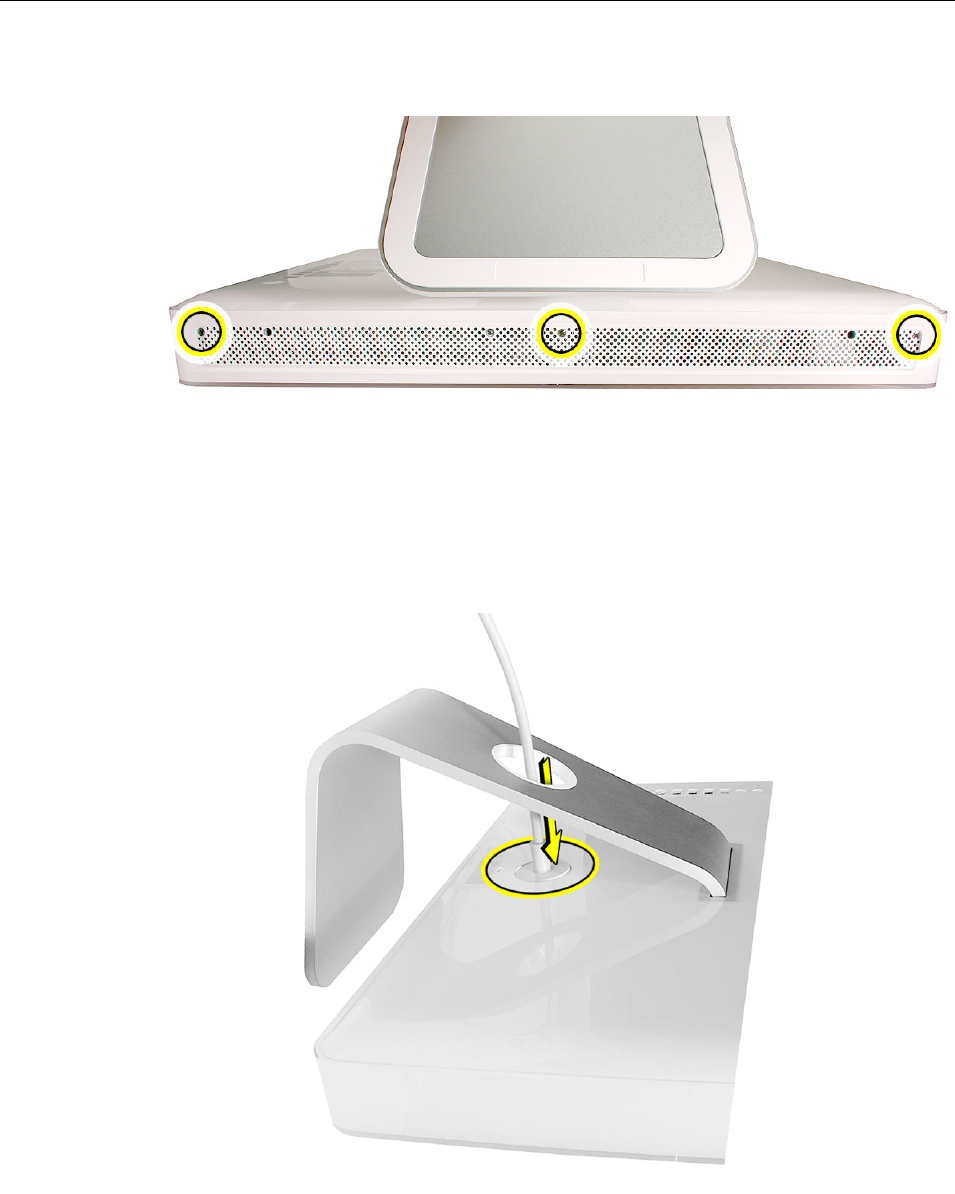
4. Locate the three silver case screws circled below. You may have to lift the stand to
locate the middle case screw.
Note:
These screws are captive; they are part of the
display/bezel assembly and cannot be removed.
Using the tool provided, or a Phillips #2 screwdriver, loosen the three captive screws.
Turn the screws to the left until they stop turning.
Don’t force the screws once they
stop turning
.
5. Holding the back cover by the metal foot, tilt the cover up and lift it off the computer.
Set the back cover aside.
iMac G5 Hard Drive, 20-inch -
5
Removing the Hard Drive
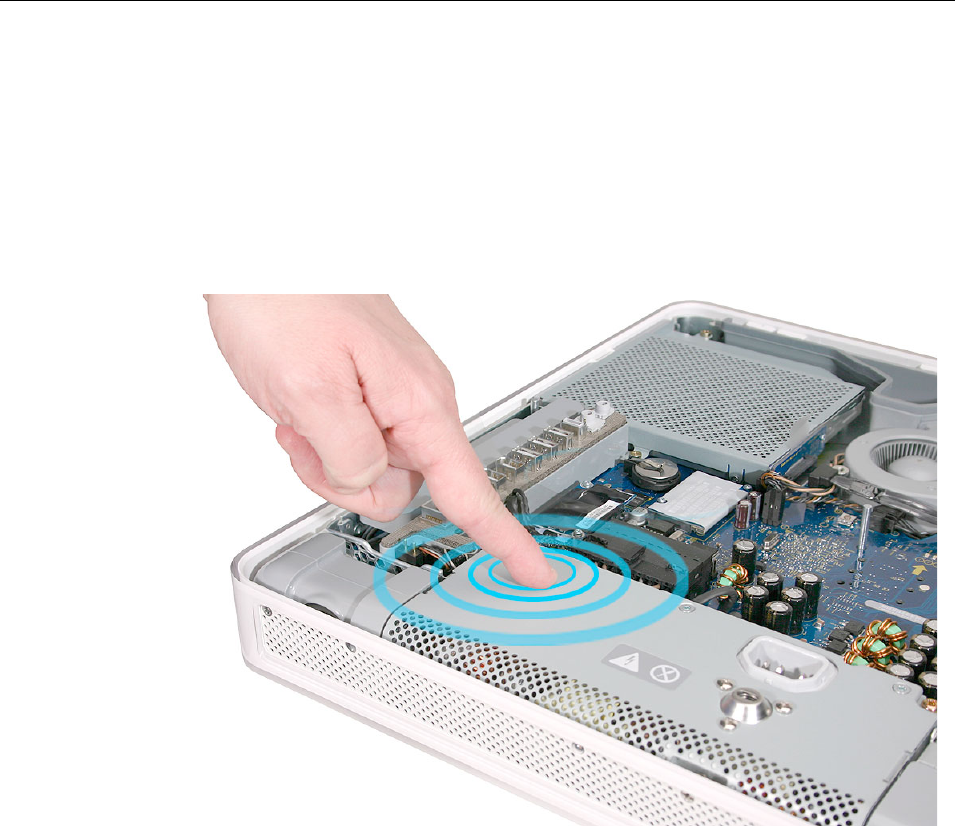
1. Ground yourself. Touch the metal surface (as shown below) on the inside of the
computer to discharge any static electricity.
Warning:
Always discharge static electricity before you touch any parts or
install any components inside the computer. To avoid generating static
electricity, do not walk around the room until you have finished installing the
part and closed the computer
.
6 -
iMac G5 Hard Drive, 20-inch
2. Locate the hard drive near the top right corner.
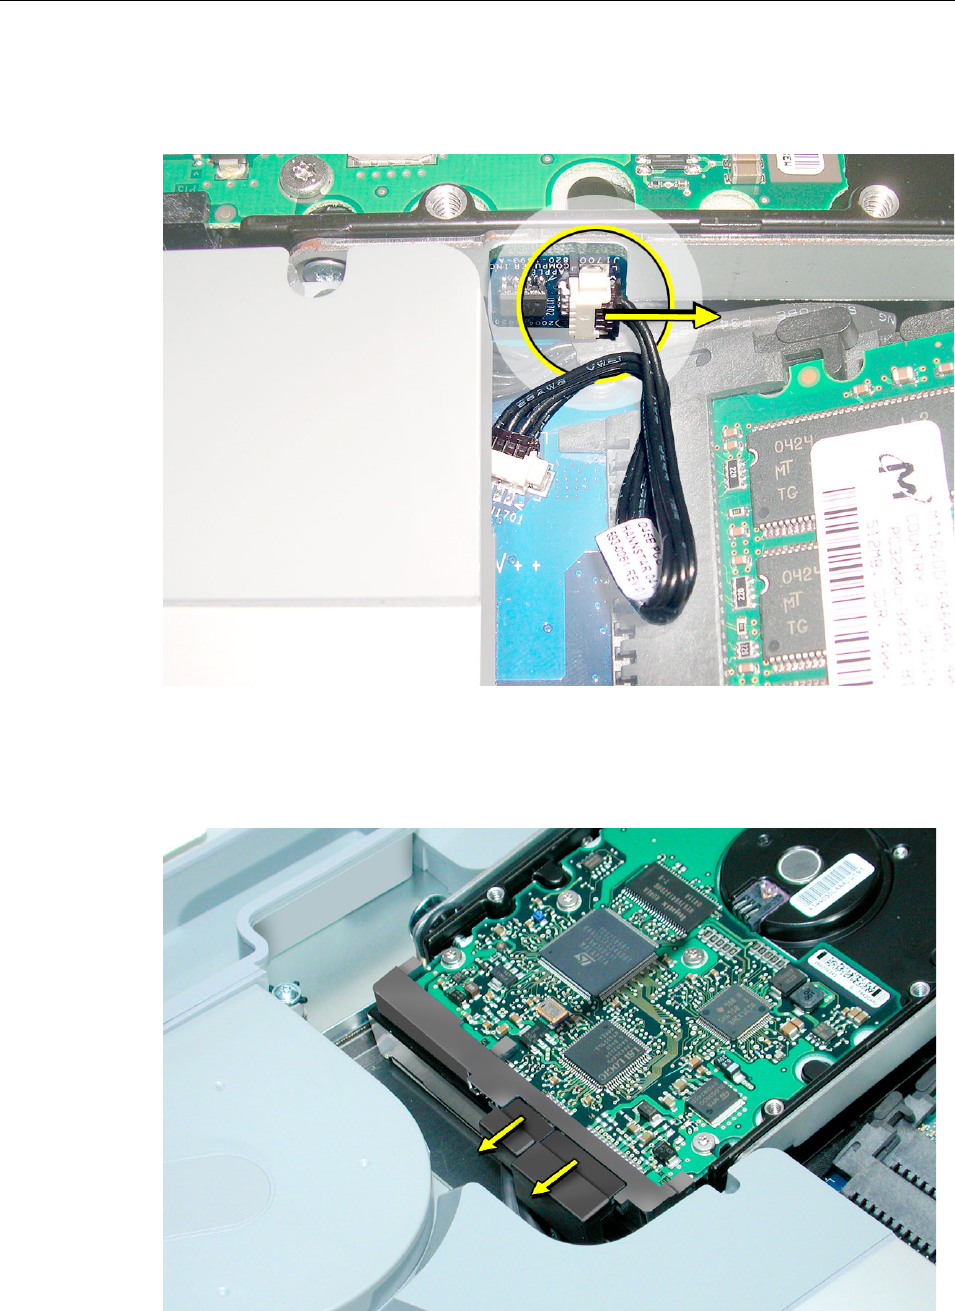
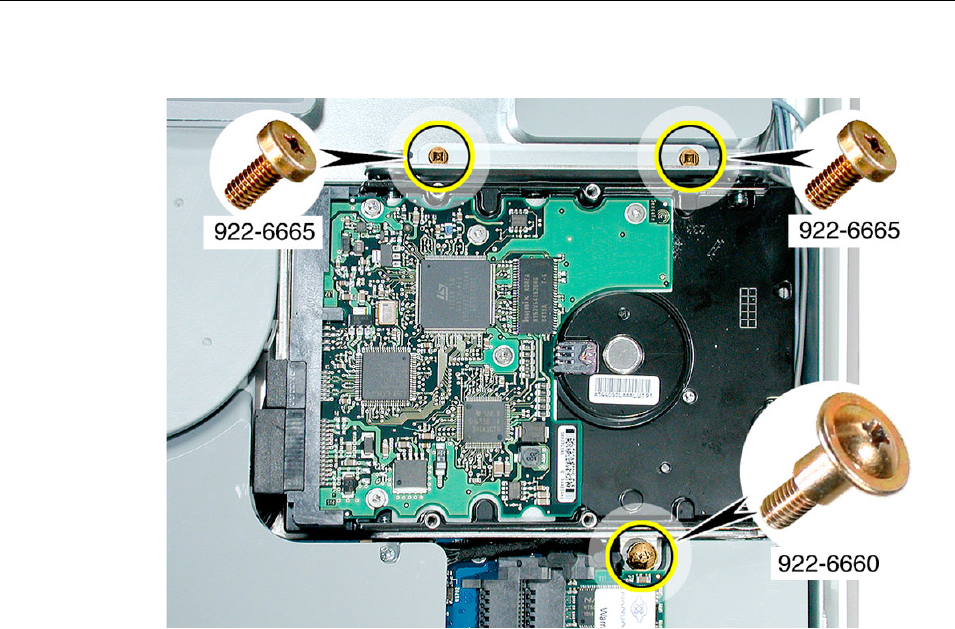
3. Remove the three hard drive screws. Set the screws aside.
iMac G5 Hard Drive, 20-inch -
7
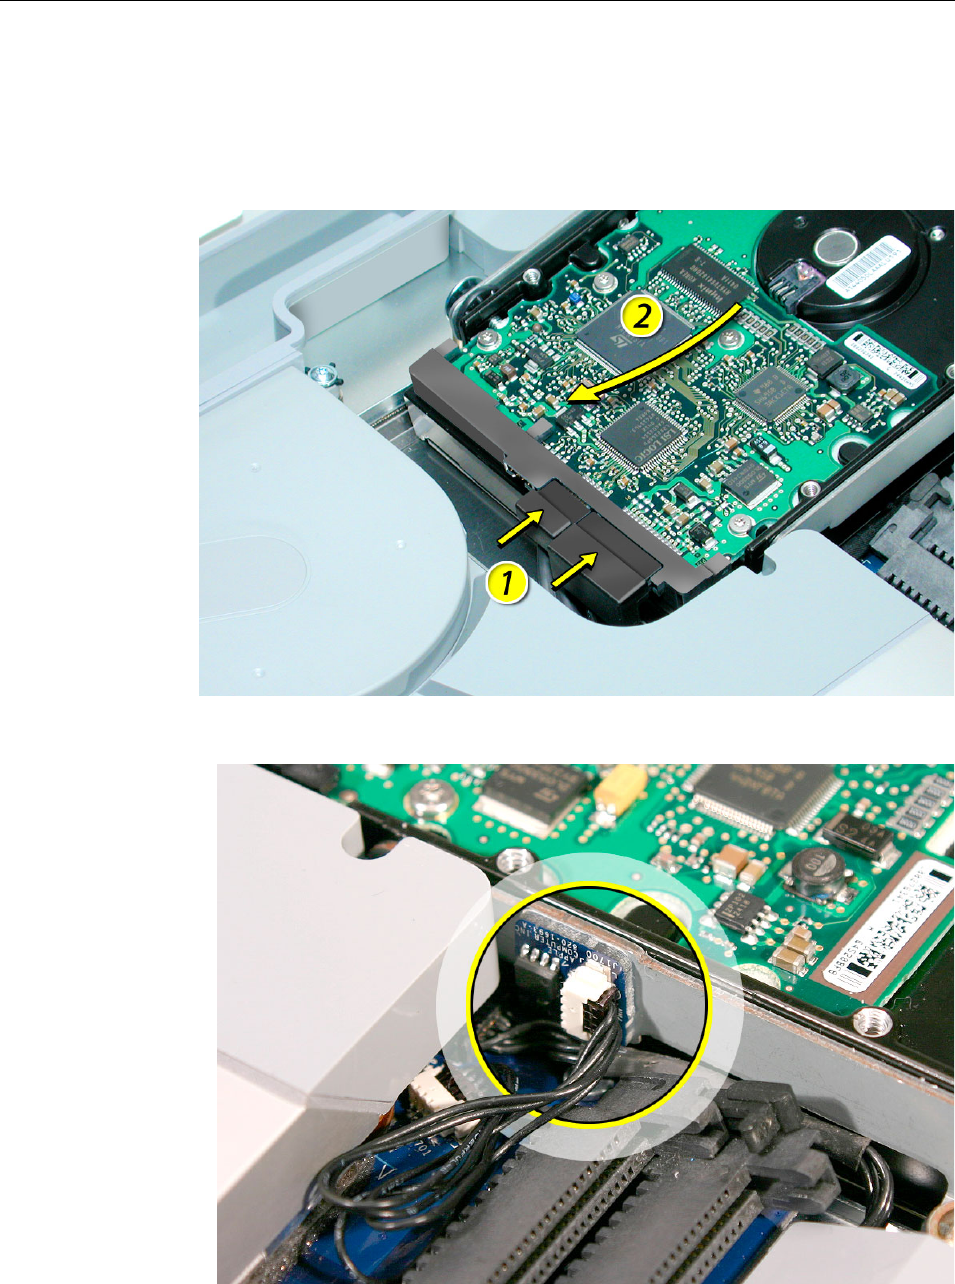
4. Lift the hard drive straight up, about one inch, to access a connector. Disconnect the
black connector from the side of the hard drive.
Note:
Do not disconnect the other
end of the cable from the board.
5. Using your fingers, disconnect the hard drive power and data cables. Lift the hard
drive up and out of the midplane assembly. Set the hard drive aside.
Important:
Return this hard drive to Apple in the packaging provided.
8 -
iMac G5 Hard Drive, 20-inch
Installing the Replacement Hard Drive
1. Remove the replacement hard drive from its packaging.
2. Connect the drive data cable and power cable to the hard drive. Lower the hard drive
into place on the midplane.
3. Reconnect the black connector on the side of the hard drive.
iMac G5 Hard Drive, 20-inch -
9
4. Replace the hard drive screws.
10 -
iMac G5 Hard Drive, 20-inch
Closing the Computer
1. Replace the cover so that the slots on the top edge of the cover mate with the tabs on
the display housing.
2. Lower and press the cover into place until it fits snugly on the computer.
iMac G5 Hard Drive, 20-inch -
11
3. Tighten the case screws by turning them clockwise.
4. Reconnect the power cord while the computer is face down and then position the
computer in the upright position. Turn on the computer.

12 -
iMac G5 Hard Drive, 20-inch
Reinstalling the Software That Came with Your Computer
Use the software install discs that came with your computer to install Mac OS X, the
applications that came with your computer, and to install Mac OS 9.
Installing Mac OS X and Applications
1. To install Mac OS X and the applications that came with your computer, follow these
steps:
2. Back up your essential files, if possible.
3. Insert the Mac OS X Install Disc 1 that came with your computer.
4. Double-click “Install Mac OS X and Bundled Software.”
5. Follow the onscreen instructions.
6. After selecting the destination disk for installation, continue following the onscreen
instructions. Your computer may restart and ask you to insert the next Mac OS X
Install disc 2.
Note:
If you want to restore Mac OS X on your computer to the original factory settings,
click Options in the “Select a Destination” pane of the Installer, and then select “Erase and
Install”.
Installing Applications
To install just the applications that came with your computer, follow the steps below. Your
computer must have Mac OS X already installed.
1. Back up your essential files, if possible.
2. Insert the Mac OS X Install disc 1 that came with your computer.
3. Double-click “Install Bundled Software Only.”
4. Follow the onscreen instructions.
5. After selecting the destination disk for installation, continue following the onscreen
instructions. Your computer may restart and ask you to insert the next Mac OS X
Install disc 2.
Note:
To install iCal, iChat AV, iMovie, iPhoto, iSync, iTunes, and Safari, follow the
“Installing Mac OS X and Applications” instructions above.

iMac G5 Hard Drive, 20-inch -
13
Installing Mac OS 9
If you want to use Mac OS 9 applications with your computer, use the “Additional Software
& Apple Hardware Test” disc to install Mac OS 9.
Follow these steps to install Mac OS 9:
1. Back up your essential files, if possible.
2. Insert the “Additional Software & Apple Hardware Test” disc.
3. Double-click “Install Additional Software.”
4. Follow the onscreen instructions.
5. After selecting the destination disk for installation, continue following the onscreen
instructions.

14 -
iMac G5 Hard Drive, 20-inch
Apple Computer, Inc.
© 2005 Apple Computer, Inc. All rights reserved.
This document is protected under U.S. Copyright Law and International Treaties, and no
part of this document may be reproduced in any form without written permission from
Apple.
Apple is not responsible for typographical, printing, or inadvertent errors.
Apple Computer, Inc.
1 Infinite Loop
Cupertino, CA 95014-2084
USA
+ 1 408 996 1010
http://www.apple.com
Apple, the Apple logo, iMac, Mac, Macintosh, and the Mac logo are trademarks of Apple
Computer, Inc., registered in the U.S. and other countries.
