Apple IMovie 019 0264 User Manual I Movie HD Getting Started (Manual)
2005-08-02
User Manual: Apple iMovie iMovie HD Getting Started (Manual)
Open the PDF directly: View PDF ![]() .
.
Page Count: 83
- Getting Started
- Contents
- Introduction
- iMovie HD at a Glance
- Creating Your First Movie
- Bringing Video Into iMovie HD
- Editing Basics
- Adding Transitions and Photos
- Using Special Effects
- Adding Titles and Chapter Markers
- Working With Sound
- Adding Sound Effects
- Adding Music From a CD or iTunes
- Adding a Voiceover
- Working With Audio Clips
- Positioning and Trimming an Audio Clip
- Adjusting Sound Volume
- Adjusting the Volume of Your Movie
- Fine-Tuning Volume Levels in Clips
- Locking Audio Clips in Place
- Extracting Audio From Your Video
- Aligning Audio With Video
- Getting Well-Synchronized Sound
- Sharing Your Finished Movie
- Keyboard Shortcuts

iMovie HD
Getting Started
Includes explanations for importing video,
editing footage, adding transitions, effects,
titles, and more

3
1
Contents
Chapter 16 Introduction
6
Using This Document
7
What’s New in iMovie HD
Chapter 29 iMovie HD at a Glance
10
iMovie HD Project Window
11
Main Window
12
Clip Viewer
13
Timeline Viewer
14
Clips Pane
15
Photos Pane
16
Audio Pane
17
Titles Pane
18
Transitions Pane
19
Effects Pane
20
iDVD Pane
Chapter 321 Creating Your First Movie
21
Steps for Creating a Movie
22
Movies in Just Minutes
25
A Quick Tour of Video Editing With iMovie HD
Chapter 431 Bringing Video Into iMovie HD
31
About Importing Video From Your Camera
32
Before You Begin
32
Importing Video From a Digital Video (DV) or High Definition Video (HDV) Camera
37
Capturing Live Video With an Apple iSight Camera
37
Importing Video from an MPEG-4 Camera or Device
Chapter 538 Editing Basics
38
Building Your Movie From Video Clips
39
Previewing Your Video Clips
40
Removing Unwanted Video
41
Editing Clips with Direct Trimming

4
Contents
44
Splitting a Video Clip
44
Undoing an Edit
44
About Gaps (Black Clips)
45
Creating Still Images From a Video Clip
45
Copying and Pasting Clips and Images
46
Saving as You Work
Chapter 647 Adding Transitions and Photos
47
Adding a Transition Between Scenes
49
Deleting and Editing Transitions
49
Applying Transitions to Multiple Clips
50
Adding Photos
51
Adding Motion to a Photo
Chapter 754 Using Special Effects
55
Motion Effects
56
Video Effects
Chapter 859 Adding Titles and Chapter Markers
59
Adding Titles
61
Placing Titles Over a Black or Colored Clip
62
Placing Titles Over Video Footage
62
Editing an Existing Title
63
Creating Chapter Markers for a DVD
Chapter 964 Working With Sound
65
Adding Sound Effects
66
Adding Music From a CD or iTunes
67
Adding a Voiceover
68
Working With Audio Clips
68
Positioning and Trimming an Audio Clip
69
Adjusting Sound Volume
69
Adjusting the Volume of Your Movie
70
Fine-Tuning Volume Levels in Clips
71
Locking Audio Clips in Place
72
Extracting Audio From Your Video
72
Aligning Audio With Video
73
Getting Well-Synchronized Sound
Chapter 10 75 Sharing Your Finished Movie
76
Sending Your Movie By Email
76
Preparing Your Movie for a .Mac HomePage
76
Exporting to Your Video Camera
77
Exporting to iDVD

1
6
1
Introduction
Welcome to iMovie HD Getting Started. This document
will get you on your way to having fun creating great
movies that have both polish and impact.
iMovie HD is the fastest and easiest way to turn your home video into your own motion
picture. Now iMovie HD is the perfect companion for the latest high definition video
cameras and the smallest and most affordable flash cameras. Magic iMovie gives you a
helping hand to get started with any new movie project by importing and organizing
your video, adding transitions and even a soundtrack —all automatically. And with
faster, easier editing and a wealth of new video and audio effects iMovie HD makes it a
snap to create an award-winner to share on the Internet or on DVD.
Using This Document
This document is organized into ten chapters and a Keyboard Shortcuts appendix,
allowing you easy access to the information you’ll need.
•
Chapter 1, Introduction:
In this chapter you’ll get a brief description of the major
new features of iMovie HD.
•
Chapter 2, iMovie HD at a Glance:
This chapter shows you the various views and
controls in the iMovie HD window. Looking through these pages will enable you to
easily follow the steps in the chapters that follow. You can also use the At a Glance
for handy reference as you create your own iMovie HD projects.
•
Chapter 3, Creating Your First Movie:
Learn the basics for using iMovie HD to create
your first movie. This chapter introduces iMovie HD in a broad overview, and
provides just enough information and tips to help you get started. The chapters that
follow provide the step-by-step procedures and details you need as a reference for
using iMovie HD features.
•
Chapter 4, Getting Your Video Into iMovie HD:
Follow these instructions to connect
your camcorder and import your video.
•
Chapter 5, Editing Basics:
After you import your video into iMovie HD, learn to how
to “clean up” your video footage, editing out the parts you don’t like and keeping
only the best footage to include in your movie.

Chapter 1
Introduction
7
•
Chapter 6, Adding Transitions and Photos:
In this chapter, you’ll learn how to use
transitions and place photos from iPhoto into a movie.
•
Chapter 7, Using Special Effects:
Learn to use special effects to change the look of
motion in a video, perhaps speeding up or slowing down your video, or add visual
effects such as electrical flashes or fog to a scene to increase visual impact.
•
Chapter 8, Adding Titles and Chapter Markers:
Learn to add titles, credits, and other
text to your footage to identify people, places, and dates, add commentary, or
anything you like. For movies that you want to share on a disc with iDVD, learn to set
up your movie in chapters so that viewers can play specific scenes.
•
Chapter 9, Working With Sound:
Learn to add sound effects, music, and voiceovers
to your videos to give them a professional flare.
•
Chapter 10, Watching Your Finished Movie:
Learn
to export your project into a
finished movie format so that it can be viewed on the web, on DVD, as a QuickTime
movie, or with format options used by experts.
•
Keyboard Shortcuts:
Common keyboard shortcuts are presented for easy reference
in the appendix.
What’s New in iMovie HD
iMovie HD adds many new features that make movie making faster and easier, with
more professional results than ever:
Support for High Definition (HD):
iMovie HD continues to lead with support for the
most advanced standards and cameras. Import high definition widescreen video (HDV
720p and 1080i) from the latest HD cameras. Do everything you expect from iMovie HD
with HD content; edit, add effects, and share.
Support for More Video Formats and Devices:
More choices to use even the smallest
and most affordable video cameras, including support for MPEG-4 from flash media
video devices. Natively capture from iSight without converting formats. iMovie HD also
supports 16:9 widescreen standard definition DV.
Automated Movie Making with Magic iMovie:
Just plug in your camcorder and
iMovie HD automatically imports and arranges your video on the Timeline, creating a
movie from start to finish—optionally adding titles, transitions, chapter markers, and
even a soundtrack. Even send to iDVD, automatically.
Editing Is Faster and Easier:
Creating even the most advanced projects in iMovie HD is
fast and easy with dramatically increased overall performance, including launching,
editing, and saving—no matter how large or complex your project. Copy and paste
clips between iMovie HD projects, and even drag and drop clips to and from the
Timeline. Even rearrange your clips in the Timeline.

8 Chapter 1
Introduction
More Special Effects:
Enhance your movies with even more choices to add style and
excitement to your movie with new video effects and additional new Skywalker Sound
effects.
Even Tighter iLife Integration:
All your digital media—your songs and music, photos
and movies—work together to create movies and slideshows that you can share via
email, on the web or on DVD.
•
iDVD:
iMovie HD automatically sends your Magic iMovie to iDVD. Even drag and
drop video clips directly from iMovie HD to iDVD drop zones.
•
iPhoto:
Browse and select video clips and photos directly from the iPhoto browser.
•
iTunes:
iTunes playlist support gives you the ability to use any of your custom
playlists in iMovie HD.
To take a look at the windows and controls of iMovie HD, go to Chapter 2, “iMovie HD
at a Glance.”

2
9
2
iMovie HD at a Glance
Welcome to the iMovie HD at a Glance. Here you’ll find
a quick presentation of the iMovie HD interface and
controls.
Take a look at these pages to familiarize yourself with iMovie HD features and
terminology. It’ll help you learn the names of the iMovie HD controls found in the
instructions in iMovie HD Help.
If you just want to get started creating a movie, skip to Chapter 3, “Creating Your First
Movie,” which provides an overview of how to create a movie.
10 Chapter 2
iMovie HD at a Glance
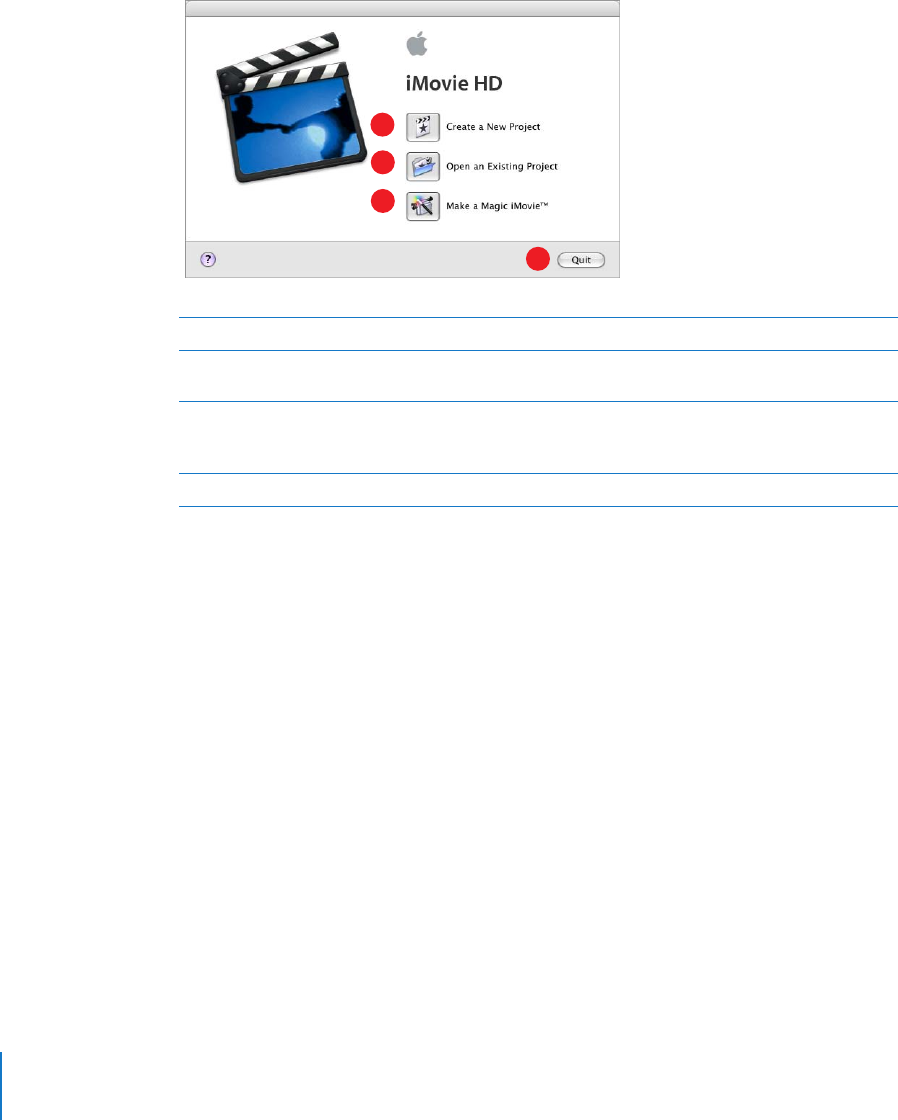
iMovie HD Project Window
When you open iMovie HD, the Project window appears. You can use it to start a new
project or open an existing one.
A
Create a New Project button:
Click this button to create a new project and import your footage.
B
Open an Existing Project button:
Click this button to open and continue working on an existing
project already saved on your computer.
C
Make a Magic iMovie button:
Click this button to let iMovie HD create a new movie for you
automatically. Just hook up your video camera, click this button, and find out how easy movie-
making can be.
D
Quit:
Click Quit to close iMovie HD.
A
B
C
D
Chapter 2
iMovie HD at a Glance
11
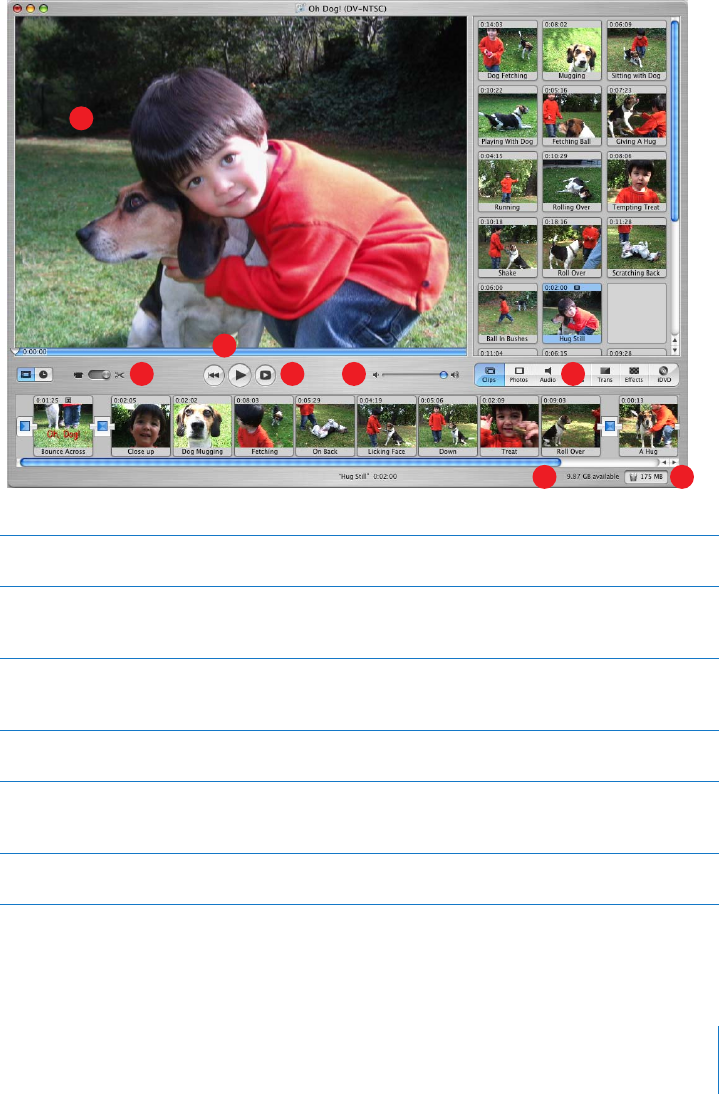
Main Window
Here’s the main iMovie HD window, your command console for movie editing. Here
you can view your movie, arrange scenes, edit clips, and add professional polish to your
movie. Let’s take a closer look.
AiMovie monitor: Watch your clips play in this window. You can play clips that are in the Clips
pane or the clip viewer.
BScrubber bar: Drag the playhead along the scrubber bar to move through a clip frame by frame.
The number near the playhead indicates how far (minutes:seconds:frames) the selected frame is
into the movie.
CMode switch: Click to switch between camera mode and edit mode. Use camera mode to choose
an input device and transfer your raw video into the computer. Use edit mode to work on your
movie.
DPlayback controls: Use these controls to skip to the beginning of a selected clip, play or pause
the clip in the iMovie monitor, or play the clip full screen on your computer’s monitor.
EVolume slider: Slide this control to change the volume of the computer’s speaker while you work
in iMovie HD. This won’t change the recorded volume levels of your video or audio clips. You
make that kind of adjustment using the controls in the timeline viewer.
FPane buttons: Click these buttons to see the different panes of the iMovie HD window. See a
description of each pane later in this chapter.
A
C
B
DE F
GH

12 Chapter 2 iMovie HD at a Glance
Clip Viewer
Use the clip viewer, shown below, to add clips to your movie and arrange them in the
order you want them to appear in your movie. When you create titles and transitions,
or add photographs from your iPhoto library, drag them to the clip viewer.
GTrash: Drag unwanted clips to the Trash icon to delete them, or simply select a clip and press
Delete. You can open the iMovie Trash and restore deleted video and audio from the iMovie
Trash any time you want or permanently delete it.
HDisk space indicator: Monitor your free disk space as you work. You should always have about
2 GB free disk space for optimal performance of iMovie HD. When the text turns yellow, you are
starting to run low on disk space. When it turns red, you must free up some space to continue
working on your movie.
AClip viewer button: Click the clip viewer button to switch from the timeline viewer to the
clip viewer.
BClip: Each section of video footage and any still images you import are called clips.
CTransition marker: Transition markers indicate that two clips are linked by a transition.
A
B
C
Chapter 2 iMovie HD at a Glance 13
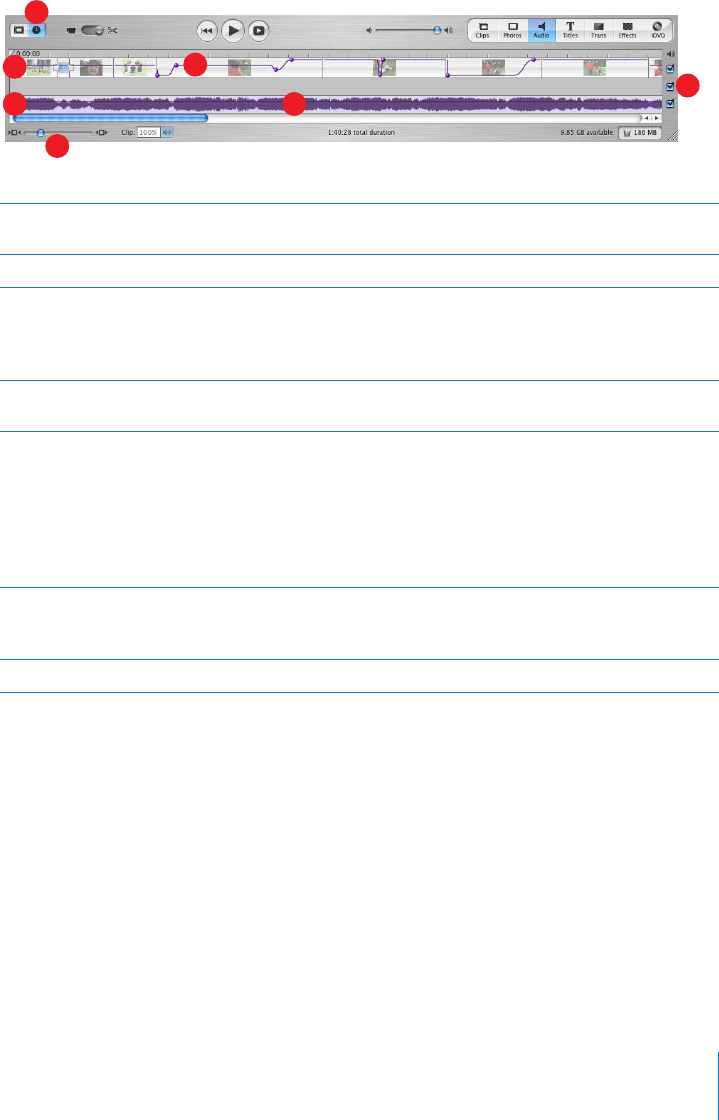
Timeline Viewer
Use the timeline viewer, shown below, to edit your movie’s video and audio clips, and
synchronize your audio and video.
ATimeline viewer button: Click the timeline viewer button to switch from the clip viewer to the
timeline viewer.
BVideo track: Select clips in this track to edit or add effects or titles that play over your footage.
CAudio tracks: Place and arrange audio clips in these tracks and drag them into position to
synchronize audio with video clips. Use these tracks to add sound effects, music, and voiceover
recordings. Deselecting the checkbox to the right of the track mutes all the audio clips in that
track.
DZoom slider: Move the slider to make clips appear larger or smaller in the timeline. Enlarging or
reducing the size of clips can make them easier to select and edit.
EVolume level bar: When you choose View > Show Clip Volume Levels, you see a volume level bar
appear as a line across your clips. Select a clip, clips, or a portion of a clip, and click the clip
volume control icon under the audio tracks to display a volume slider. Drag the slider to raise or
lower the volume of a selected clip, clips, or clip segment. Or directly change the clip volume by
dragging the volume level bar up or down. You can also click the bar to add markers, then drag
the markers to adjust the volume for sections of audio clips. You can use this to make audio fade
in or fade out.
FAudio waveforms: You can choose View > Show Audio Waveforms to display representations of
audio intensity in audio clips. Use audio waveforms to align video to audio events such as a
certain drumbeat or the exact beginning or end of the audio.
GAudio checkboxes: Select a checkbox to hear the audio in a track. Deselect it to mute the track.
A
B
C
D
E
F
G

14 Chapter 2 iMovie HD at a Glance
Clips Pane
Click the Clips button to open the Clips pane. The video footage and still images you
import into iMovie HD first appear here. You can drag a clip from the Clips pane to the
clip viewer to add it to your movie. You can also drag clips to the timeline viewer, to
your desktop, into other applications, and even iDVD drop zones.
AClip name: Each clip is assigned a unique filename. You can select the name to change it to
something more meaningful to you.
BDuration: The length of a video or audio clip is read as minutes:seconds:frames. For example,
01:08:15 is 1 minute, 8 seconds, and 15 frames into the movie.
A
B
Chapter 2 iMovie HD at a Glance 15
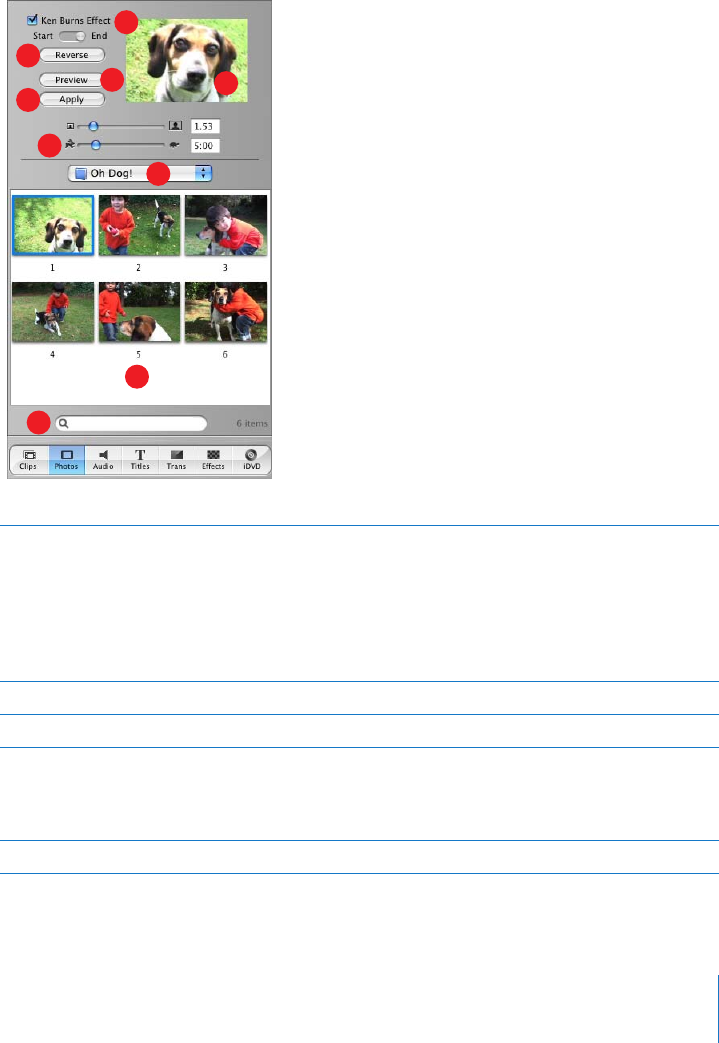
Photos Pane
Click the Photos button to open the Photos pane. Photos, drawings, or images you put
in your iPhoto library automatically appear here. You can drag an image directly from
the pane into the clip or timeline viewer. You can also use the Ken Burns Effect to add
panning and zooming effects to an image, and choose how long the image appears in
your movie.
AKen Burns Effect: Use these controls to set up panning and zooming effects for your photos and
images. Turn the effect off or on by selecting or deselecting the Ken Burns Effect checkbox. Click
Start and set how an image should first appear, then click Finish and set how the image should
appear at the end of the effect. Drag the image in the preview monitor to the positions you
want. Use the Zoom slider (below the monitor) to set the zoom. The Ken Burns Effect then
smoothly changes the image size and location on screen as the image is displayed in your
movie.
BReverse: Click to reverse the direction of the pan and zoom effect.
CPreview: Click to see how the effect looks in the preview monitor.
DApply: When you have the effect the way you want, click this button to apply the effect to the
photograph. This creates a new clip in the Clips pane that you can drag to the location you want
in your movie. You can also drag an image into your movie and then select it and apply changes
later.
EDuration: Move the slider to set how many seconds the image remains in view.
F
G
A
B
C
D
E
H
I
16 Chapter 2 iMovie HD at a Glance
Audio Pane
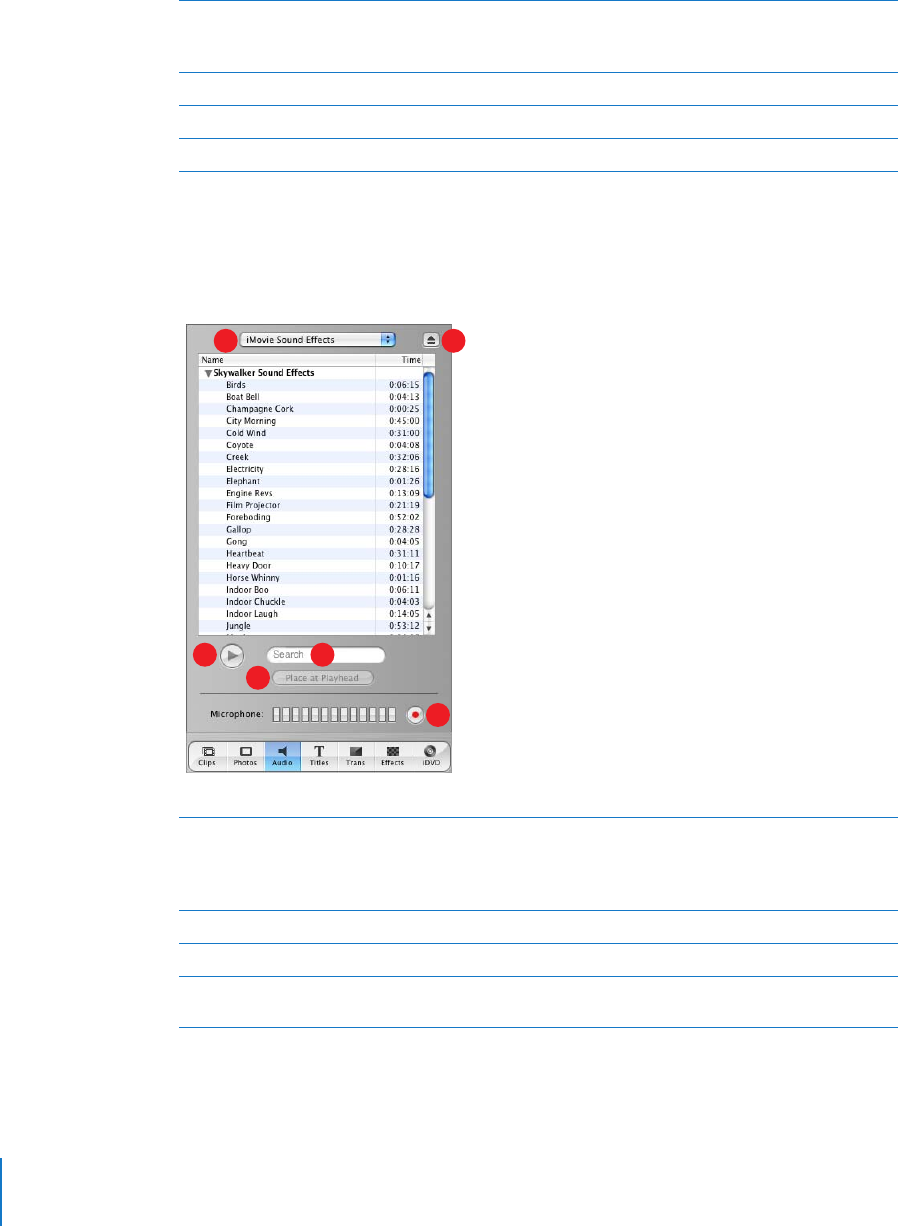
Click the Audio button to open the Audio pane. You use this pane to add sound effects,
record a voiceover, or import music from a CD or your iTunes music library.
FiPhoto pop-up menu: Choose your iPhoto library or an iPhoto album from this menu to view and
select your iPhoto photographs and images. You can drag an image from the Photos pane to the
clip viewer to add it to your movie.
GPreview monitor: Use this monitor to set up and preview effects for a selected photo or image.
HPhoto browser: Select the photos and images you want to add to your movie here.
ISearch field: Enter the name of a photo or image here to quickly locate it.
AAudio pop-up menu: Use this pop-up menu to display lists of music and sound effects that you
can add to a movie. You can choose a track from your iTunes library or a music CD, or an iMovie
HD sound effect. You can drag an audio clip from the list to one of the two audio tracks in the
timeline viewer to add it to your movie.
BEject button: Click the button to eject a CD from the optical drive.
CPlay: Click the button to play or pause a selected track.
DSearch field: Type some words from a title to search for a particular audio file in your iTunes
library. You can search by title or artist.
A
DC
E
F
B
Chapter 2 iMovie HD at a Glance 17
Titles Pane
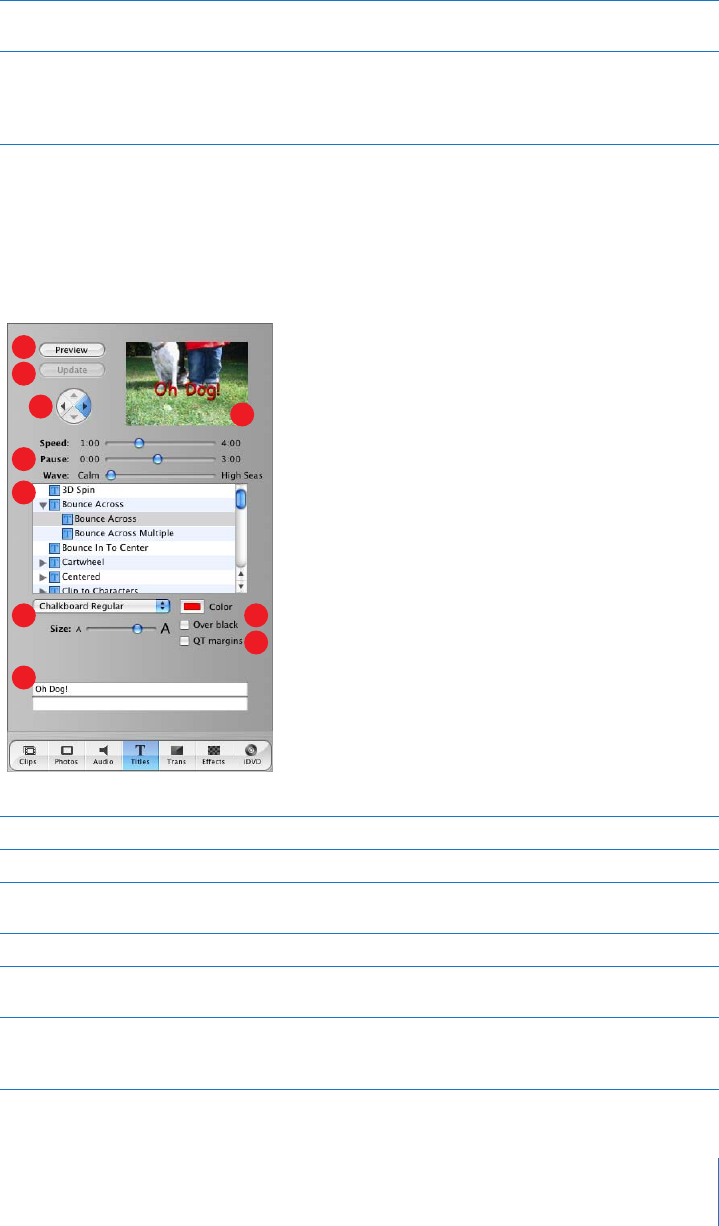
Click the Titles button to open the Titles pane. You can add opening titles, rolling
commentary, end credits, and more. You can also choose a title style, font, and text
color.
EPlace at Playhead: Click to import a selected track into your movie. The imported track appears in
one of the audio tracks in the timeline viewer.
FRecord/Stop: Click to record a voiceover or other sound through your computer’s built-in
microphone or an external microphone. The input meter displays the sound level; sound quality
is best if it stays within the yellow range. Click the button a second time to stop recording. The
newly recorded audio clip appears in the audio track where you can select and edit it.
APreview: Click to see how the title will look.
BUpdate: Click to apply changes to a title you’ve already added to your movie.
CArrow buttons: For some titles you can click the arrow buttons to set the direction you want the
title to move.
DPreview monitor: Use this monitor to view title styles and preview your settings.
ETiming controls: Move the sliders to set how quickly you want the titles to appear and how long
to pause before disappearing. Other options may be available, depending on the title style.
FTitles list: Select a title style for the text you want to add to your movie. Click the disclosure
triangle next to a title to see more titles in that category. When you’re done setting options for
the title, drag the title style from this list to the timeline viewer to place the title in your movie.
D
E
C
I
J
B
A
H
F
G
18 Chapter 2 iMovie HD at a Glance
Transitions Pane
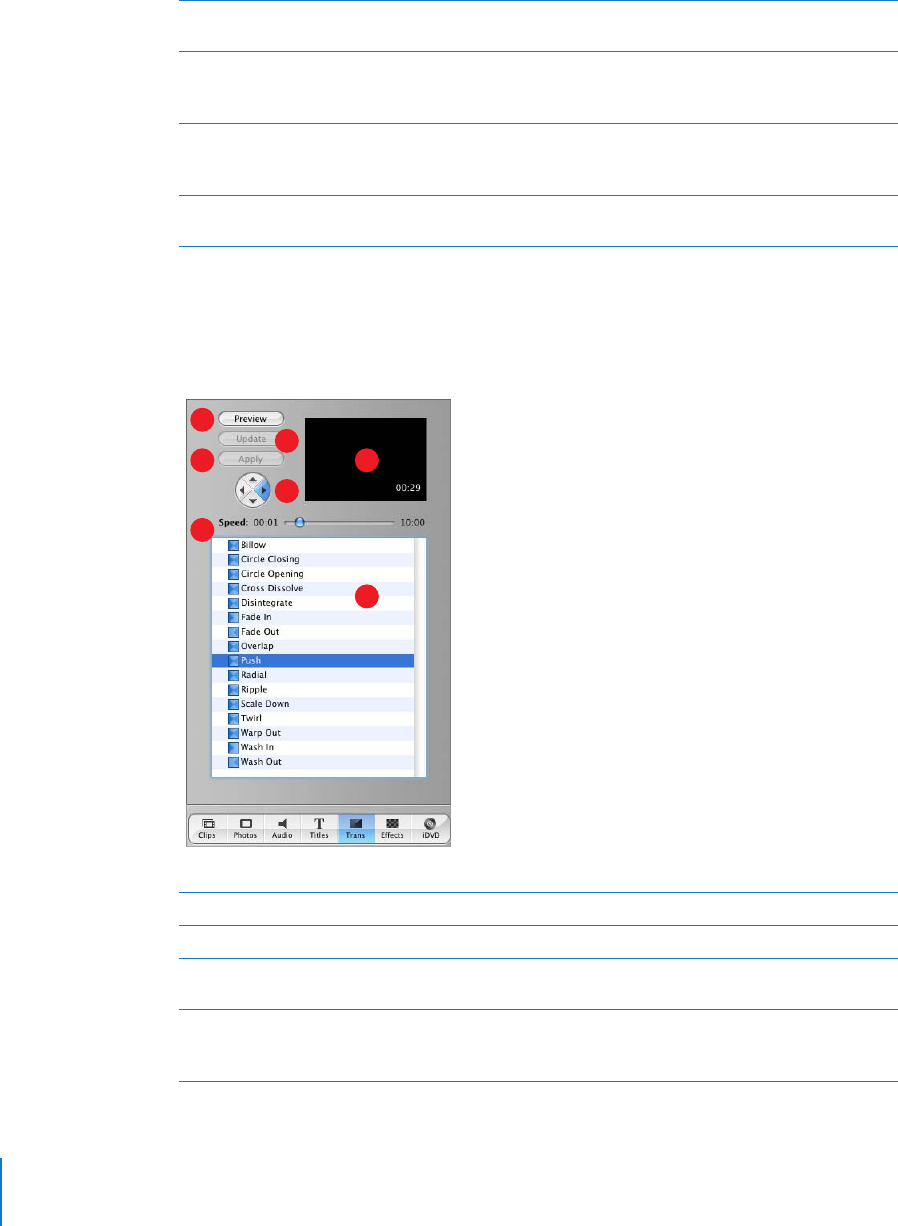
Click the Transitions button to open the Transitions pane. You can add transitions to
smoothly change scenes in your movie.
GFont controls: Choose a font, then move the slider left or right to adjust the font size. Choose a
font color using the color box.
HOver black: Select this option to make the title appear over a black video clip instead of one of
your video clips. (You can also change the color of the title clip by double-clicking it in the clip
viewer.)
IQT Margins: Select this option if you plan to export the movie to QuickTime. This option adjusts
the size of the text to display within the TV safe area of the screen. Deselect it if you want to
show the movie on a television screen.
JText fields: Type your text in these fields. If the style you choose allows multiple lines of text, use
the plus and minus buttons to add or remove additional lines.
APreview: Click to see how the transition will look in the preview monitor.
BUpdate: Click to apply changes to a transition already in a movie.
CApply: Click to apply the transition to a selected transition in your movie. You can also select
and change multiple transitions all at once.
DArrow buttons: For some transitions, you can click an arrow button to set the direction you
want the transition to move. For example, a transition might “push” a scene from right to left
or left to right.
G
F
C
E
A
B
D
Chapter 2 iMovie HD at a Glance 19
Effects Pane
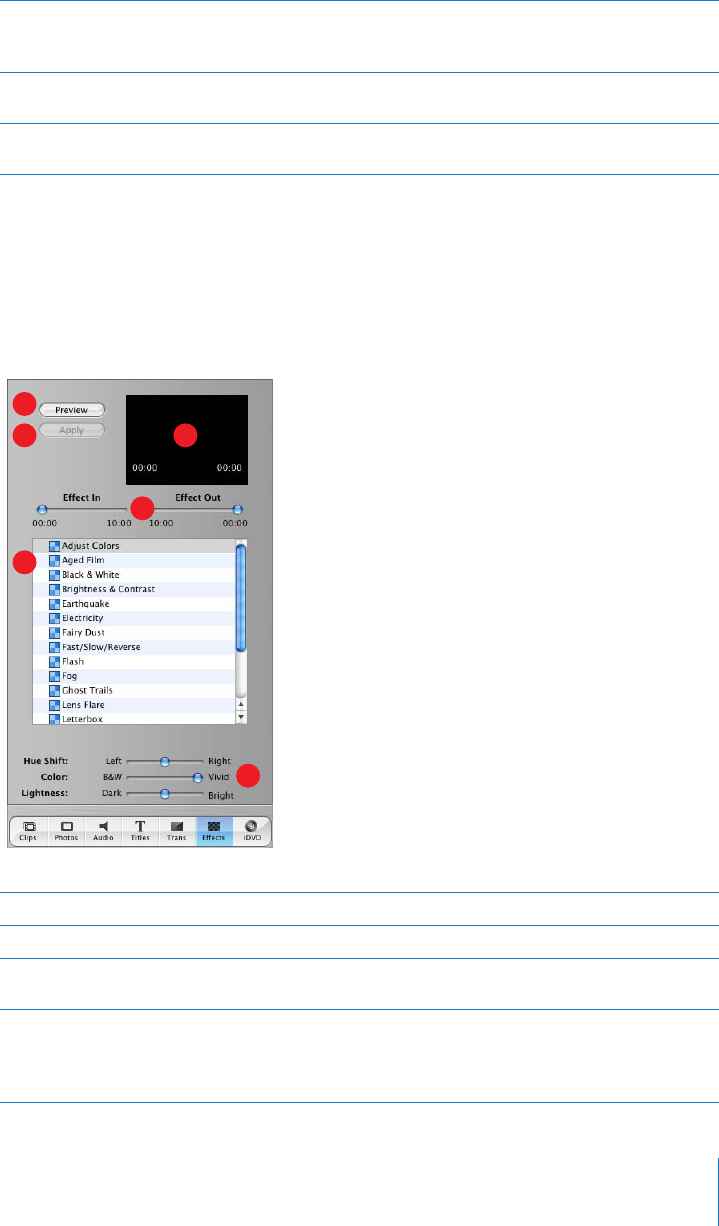
Click the Effects button to open the Effects pane. Here you can add special effects to
change the look of your movie clips. For example, you can change color video to black
and white, adjust the image brightness and contrast, or add playful effects like fairy
dust.
ETiming controls: Move the sliders to set the speed of the transition and make other adjustments,
depending on the transition style. You can also select the timing settings that appear in the
preview monitor and change them for precise control of transition timing.
FPreview monitor: View a selected video clip and transition here. You can select and change the
speed settings that appear here.
GTransitions list: Select a transition in this list. When you’re done setting options for the transition,
drag the transition from this list to where you want it to appear in the clip viewer.
APreview: Click to see how the effect will appear in the selected clip.
BApply: Click to apply the effect to the selected clip in your movie.
CEffect In/Effect Out: Move these sliders to the points in the selected clip where you want
the effect to appear and disappear.
DPreview monitor: Use this monitor to preview the effects you set up. With some effects, you can
position the pointer over the preview monitor to change the location of an effect. You can also
select the timing settings that appear in the preview monitor and change them for precise
control of effects.
E
D
F
A
B
C
20 Chapter 2 iMovie HD at a Glance
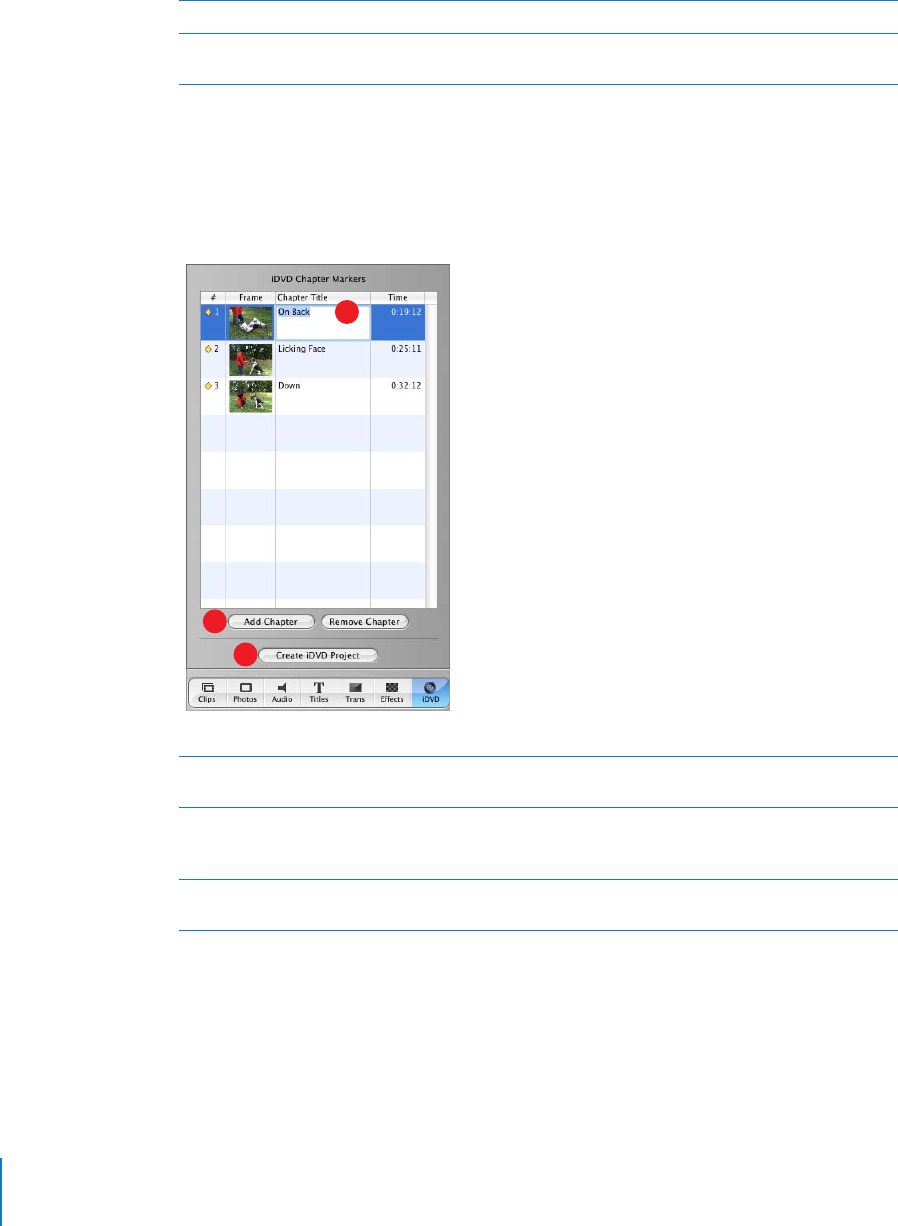
iDVD Pane
Click the iDVD button to open the iDVD pane. You can add chapter markers to your
movie and export it to iDVD. Once in iDVD, your movie will appear in sections or
“chapters” that can be selected and viewed individually.
EEffects list: Select an effect in this list to change the appearance of clips in your movie.
FAppearance controls: Move these sliders to make adjustments to the selected effect.
These options will vary, depending on the effect you choose.
A Chapter titles: A new chapter appears in the list each time you add a marker. Type a name for
each chapter that you want to use in your iDVD scene selection menu.
B Add Chapter/Remove Chapter: Click to add or remove a chapter marker in your movie. If you
export your movie to iDVD to create a DVD, the markers you add are used to create scene
selection menus in iDVD.
C Create iDVD Project: Click to export your movie directly to iDVD. This opens iDVD and your movie
appears as a project in the iDVD window.
B
A
C

3
21
3Creating Your First Movie
This chapter presents the general steps for creating a
movie and provides an overview of the major features of
iMovie HD. If you have video ready to import into iMovie
HD, you can try out making your first movie.
Steps for Creating a Movie
If you’ve never worked on a movie before, here are the general steps you take. You
might follow a different order depending on your work preferences.
1Film or capture your video.
2Add any photos, designs, or images you might want in your movie to your iPhoto
library.
3Add any music for your movie to your iTunes library or select the CD you’d like to
import music from. You can also create your own music clips with GarageBand and
export them into iTunes.
4Import your video footage into iMovie HD.
5Review the imported clips, deleting those you don’t want, and naming clips to make
them easily identifiable.
6Make rough edits of your clips to cut them to approximate sizes.
7Plan the order of your clips, and plan transitions and any special effects you’ll need.
8Drag your rough cut clips, photos, or other images into the clip or timeline viewer in
the order you want.
9Add titles where appropriate to your rough cut.
10 Polish the timing of your video clips and add transitions.
11 With the clip sequence of your movie in good shape, add audio clips to your sound
track. Record any voiceover, add music, and position any sound effects.

22 Chapter 3 Creating Your First Movie
12 Review the movie and make adjustments.
13 Save the movie in a format appropriate for distribution, or export the movie to an iDVD
project to be burned on a DVD.
The iMovie HD Share feature enables you to choose a method of distribution and
selects the appropriate video format corresponding to your choice. You can choose to
share a movie via email, a .Mac homepage or webpage, video camera tape, DVD disc
created in iDVD, QuickTime movie, or Bluetooth wireless technology.
Next, let’s take a look at how you accomplish these tasks in iMovie HD.
Movies in Just Minutes
Whether this is your first movie or you’ve made many, you can let iMovie HD make the
movie for you to create a complete video or to give you a headstart on editing. The
Make a Magic iMovie feature can automatically import video from your video camera,
compose it into a movie, and put it into iDVD so you can burn it on a DVD disc. You can
optionally specify for Magic iMovie to add a title, transitions between scenes, and a
soundtrack, and iMovie HD sits in the director’s chair and does the rest.
Once your movie is created, you can explore and try out other iMovie HD features to
learn how they work.
To create a Magic iMovie, you need:
•Your video camera and footage you want in an iMovie HD.
•A FireWire cable to connect your camera to the computer.
Note: You can’t use the Make a Magic iMovie feature with MPEG-4 video cameras and
devices that connect to your computer using a USB cable. For information about
importing video from such devices, see “Importing Video from an MPEG-4 Camera or
Device” on page 37. After importing your video, return to the overview section, “A
Quick Tour of Video Editing With iMovie HD” on page 25.

Chapter 3 Creating Your First Movie 23
To set up your camera:
1Insert the tape with your video footage, turn on the camera, and switch the camera to
VTR mode.
2Connect your video camera to your computer using a FireWire cable, as shown above.
3Open iMovie HD.
4Click Make a Magic iMovie in the iMovie HD project window.
5Enter a project name and choose a location on your computer for the new project.
iMovie HD is preset to import video from a standard digital video camera. If your
camera is a high definition or widescreen camera, click the Video format disclosure
triangle and choose the video format of your camera.
6Click Create.
The Make a Magic iMovie dialog appears. Here you can select how iMovie HD creates
your video.

24 Chapter 3 Creating Your First Movie
7Choose the Magic iMovie options you want.
•Enter a title for your movie in the Movie Title box.
•Select the checkbox for adding transitions to have iMovie HD automatically use
smooth transitions between scenes. For your first movie, use the preselected
transition.
•Select the music sound track checkbox and choose a song for your movie from those
available in your iTunes library.
•Deselect the “Send to iDVD” checkbox so iMovie HD won’t export your movie to
iDVD. For now, you’ll leave the video in iMovie HD so you can explore iMovie HD
features.
8Click Create.
Your camera rewinds and iMovie HD begins importing your video and creating your
first movie. Easy as that. After importing your video (the length of time it takes
depends on the length of your video footage), iMovie HD’s main window appears
showing your new movie.
Use the playback controls to watch the movie.
Show full screen
Play/Pause
Rewind
Chapter 3 Creating Your First Movie 25
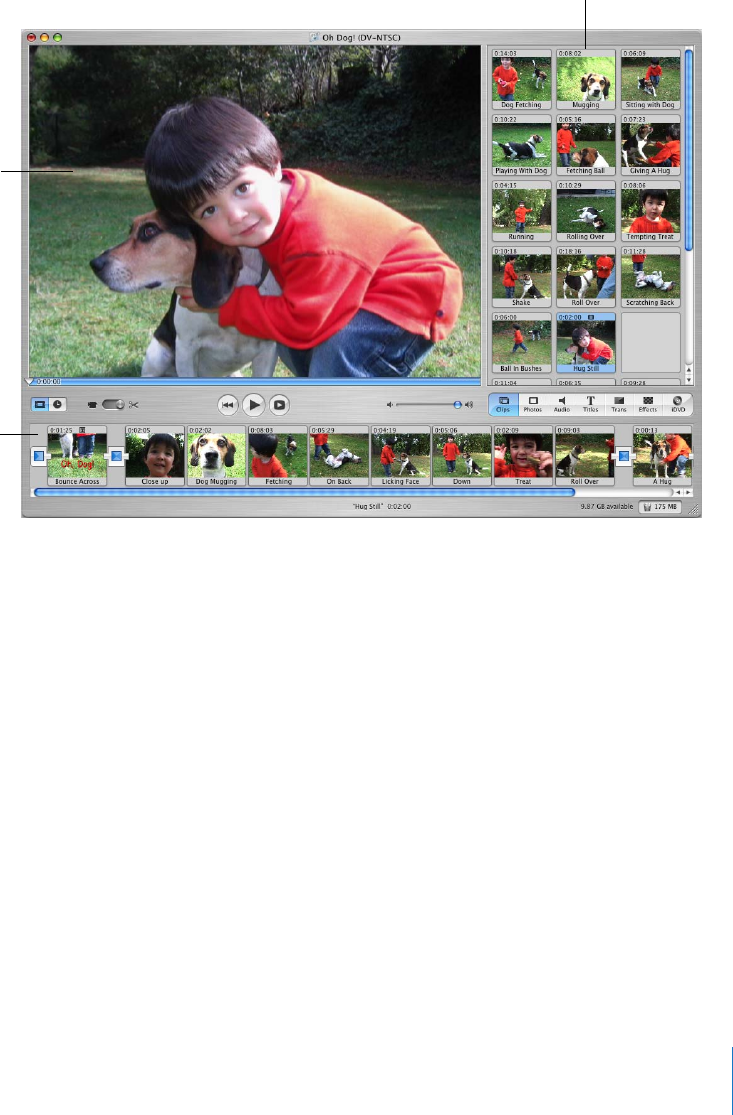
A Quick Tour of Video Editing With iMovie HD
When you play your video using the playback controls, the video appears in the iMovie
monitor.
The individual scenes or “clips” of a movie appear in the clip viewer. You can select and
drag the clips into any order you want for your movie. As the movie plays, you see the
playhead pass over the clips as frames are displayed.
When you import video yourself using a FireWire connection, iMovie HD first stores the
clips in the Clips pane. You compose your movie by dragging clips from the Clips pane
into the clip viewer, arranging them as you want.
You can also select an individual clip in the Clips pane or in the clip viewer and view it
with the playback controls. When a clip is selected you can edit it, cropping or
trimming footage you don’t need or deleting entire clips.
iMovie monitor
Clip viewer
Clips pane

26 Chapter 3 Creating Your First Movie
You add photos to your movie by clicking the Photos button. The Photos pane appears
showing images from your iPhoto library.
Just like video clips, you can drag photos from the Photos pane into your movie. You
simply drop them where they should appear in the clip viewer. There are also options
that determine how long the photo appears on screen, and whether the photo moves
or zooms in or out.
Drag photos into
your movie.
Chapter 3 Creating Your First Movie 27
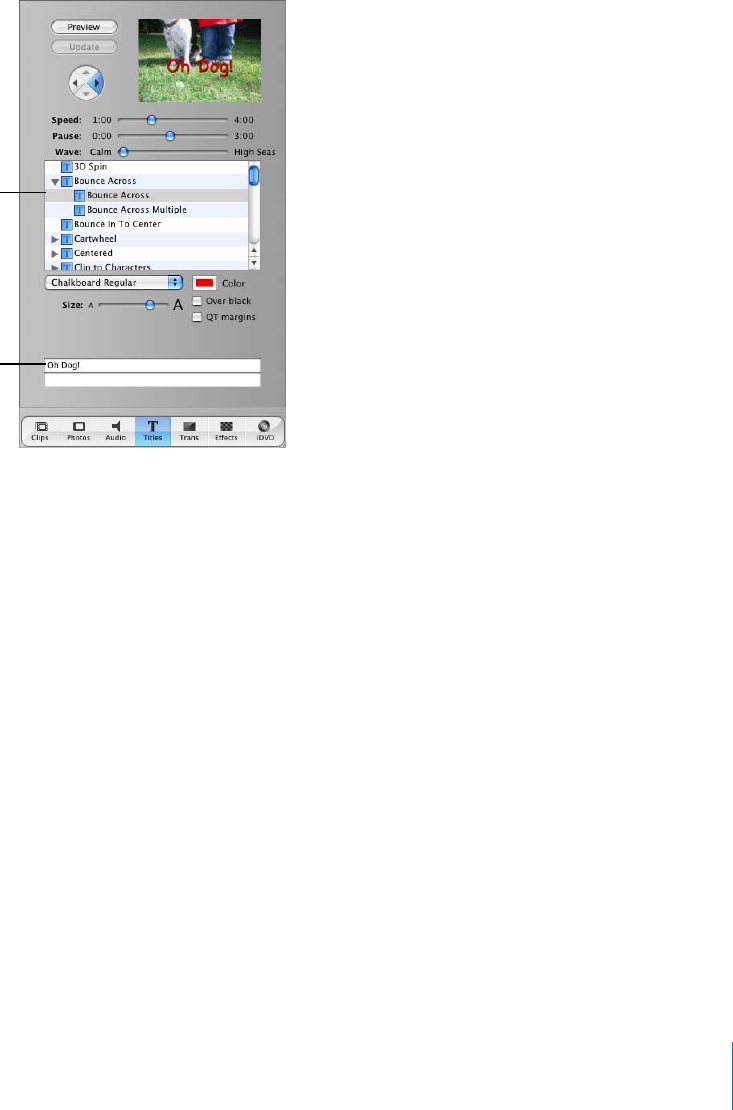
Text often appears at the beginning of a movie as the title of the movie, or at the end
as credits. You can add titles to your movie by clicking the Titles button.
You select a title style in the Titles pane and enter the text you want to appear.
Each title style displays text in a different way. For example, you can select the Bounce
Across style to have the text bounce across the screen. Each title style has different
options that allow you to determine how long the text will appear, what direction it
moves, font size and color, and other options depending on the specific title style.
To add a title to the movie, drag the title style name into the clip or timeline viewer
where the title should appear. If you select “Over black,” iMovie HD adds a black clip
and your title appears over the clip. If “Over black” is not selected, iMovie HD places the
title over the video clip you dragged the title to.
Drag a title style
into your movie.
Enter title text.
28 Chapter 3 Creating Your First Movie
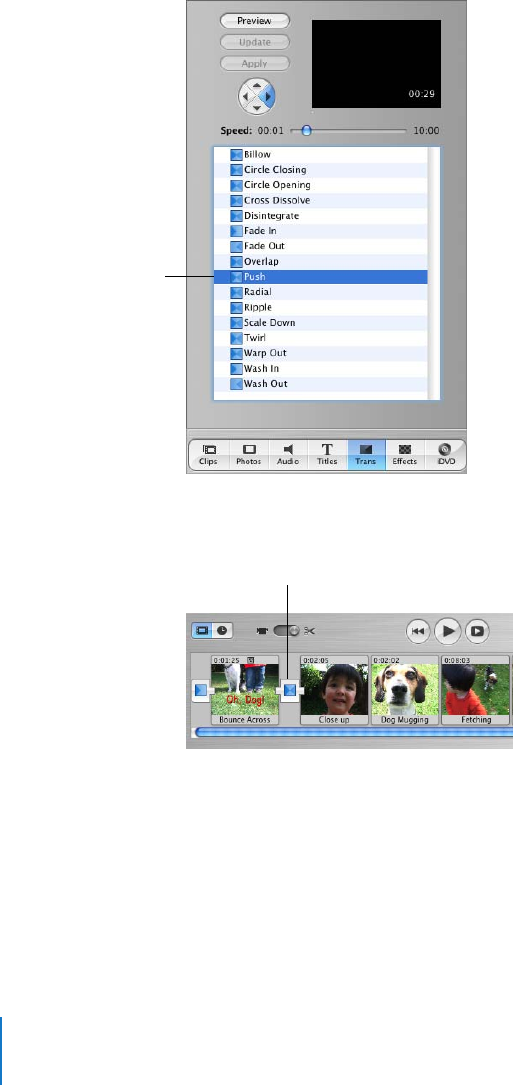
After you add video clips, photos, and titles to your movie, you can add transitions
between clips so the scenes change smoothly from one to another, or change in
interesting ways. For example, you might have one scene dissolve into the next.
To add a transition between clips, click the Trans button. The Transitions pane appears.
Click a transition to select it and specify how long you want the transition to take. You
can then drag the transition to the clip viewer and place it between two clips.
iMovie HD may take a few moments to create, or “render,” the transition, during which
time you see a red line moving on the transition. Once the transition is rendered, you
can play the movie and see how your scenes change. You can select and change your
transitions later, too.
Drag a transition into
your movie.
Transition
Chapter 3 Creating Your First Movie 29
You can also display your movie in a slightly different way by clicking the timeline
viewer button. The timeline viewer appears and displays your video and any audio
clips.
You can select and edit clips in the timeline viewer, and arrange and adjust the audio
clips to go with your movie, too. Your video clips appear in the top track, and audio
clips appear in the two audio tracks below.
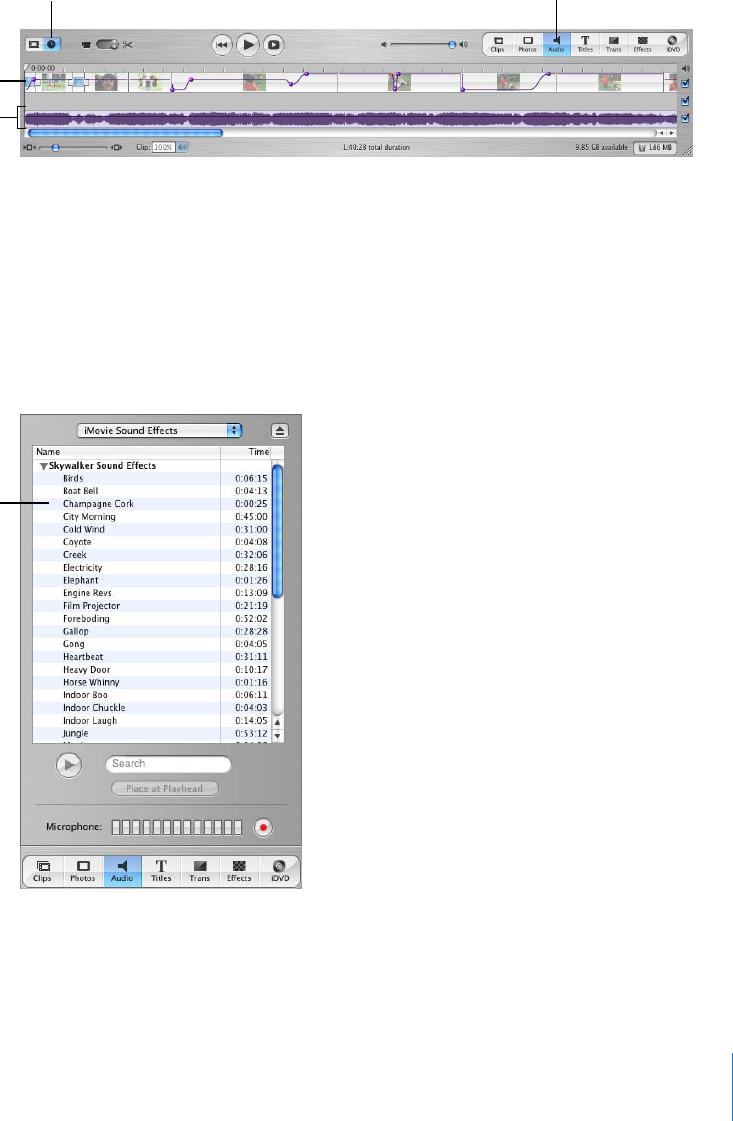
To add audio clips to your movie, click the Audio button and the Audio pane appears.
You use this pane to add sound effects, record a voiceover, or import music from a CD
or your iTunes music library or GarageBand music. Choose the type of audio you want
to use from the pop-up menu at the top of the Audio pane.
Timeline viewer button Audio button
Video track
Audio tracks
Drag a song or sound
effect into your movie.
30 Chapter 3 Creating Your First Movie
For example, to add a song from your iTunes library, you drag a song title from the
Audio pane into one of the audio tracks in the timeline viewer. You can then edit and
position it as needed in your movie. iMovie HD also provides a list of interesting sound
effects, and you can use a microphone to record a voiceover using the Record button.
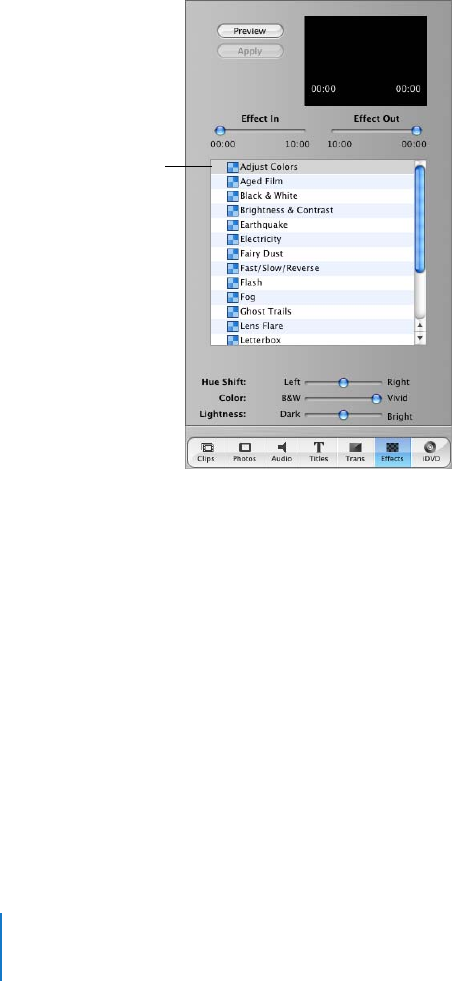
On occasion you may want to change a video clip with a special video effect. For
example, you might want to show a sports scene in slow motion. To add a special
effect, select the clip you want to change and then click the Effects button. The Effects
pane appears.
The Effects pane shows a list of professionally mastered video effects you can use.
Select an effect and then choose the options you want. You can preview the effect by
clicking the Preview button. Once the effect is set up just right, click Apply to add the
effect to the selected clip.
When your movie is finished, you save your project and select a method of distribution.
iMovie HD has a Share command that allows you to share your movie on the web, burn
it on DVD, send it via email or Bluetooth wireless technology, record it on video tape,
and distribute it as a QuickTime movie in many advanced formats.
You now know the major features of iMovie HD for creating a great-looking movie. In
the following chapters, you’ll find step-by-step procedures for creating and editing a
movie. With a little practice, you’ll quickly be making movies that really impress.
Select an effect.

4
31
4Bringing Video Into iMovie HD
This chapter explains how to bring your video into iMovie
HD. The process of transferring video from your camera
into iMovie HD is called importing.
You can import video footage directly into your project from many commonly used
video cameras using a FireWire cable. It’s quick and easy to import video using the
controls in the iMovie HD window. You can also import video footage from MPEG-4
cameras or devices that use a USB cable by dragging the footage either into your
iMovie HD project or onto your hard disk for later importing.
iMovie HD supports the most advanced video standards and cameras. You can import
high definition video (HDV 720p and 1080i) from the latest HD camcorders and edit
stunning HD video projects. iMovie HD also supports capturing 16:9 Widescreen
Standard Definition DV, MPEG-4 video, and capturing native footage from Apple iSight
cameras.
If you have transferred video files of different formats to your computer, you can also
import or drag video files from your hard disk into an iMovie HD project.
About Importing Video From Your Camera
The method you use to import your video may differ depending on your type of
camera or device.
•If you have a digital video (DV) video camera, you can use a FireWire cable to directly
import your footage into an iMovie HD project. iMovie HD can read the video
directly from your camera and break it up into “scenes” or clips ready to use in a
movie. The video on your camera is not changed or deleted, so you can always
import footage again. You can also drag or import DV video clips into a iMovie HD
project.
•If you have a high definition (HDV) video camera, you can use a FireWire cable to
directly import your footage into iMovie HD just as you can with a DV video camera.
You can also drag or import your video clips into a iMovie HD project.

32 Chapter 4 Bringing Video Into iMovie HD
•If you have an Apple iSight camera, you can use a FireWire cable to capture live video
in an iMovie HD project. You use the same procedure for importing video as you do
with DV and HDV cameras, except your video is captured live.
•If you have an MPEG-4 video camera or device, you can use a USB cable to connect
your camera or device to your Macintosh. Your MPEG-4 device will appear as a hard
disk on your desktop and you can open it and drag the video into an iMovie HD
project or onto your hard disk for later importing. When you import footage by
dragging it into your project , the footage is brought in as a single clip which you can
edit and break up into smaller clips later.
Before You Begin
In many tasks shown in these chapters and in iMovie HD Help, you are asked to choose
menu commands, which look like this:
Choose Edit > Clear.
This type of command means “Click the Edit menu in the iMovie HD menu bar and
choose the Clear command.”
Importing Video From a Digital Video (DV) or High
Definition Video (HDV) Camera
iMovie HD uses the same procedure to import video from many different types of
cameras and in different video formats, including standard definition DV cameras
(including those that support widescreen) and high definition (HDV) cameras. In most
cases, you’ll find iMovie HD can automatically recognize and import the video you’re
using, so you don’t have to pay attention to video formats.
Note: You can also use the Make a Magic iMovie feature to automatically import your
footage and create a complete movie that you can edit and change later. You’ll find it
provides a fast head start to creating any movie.
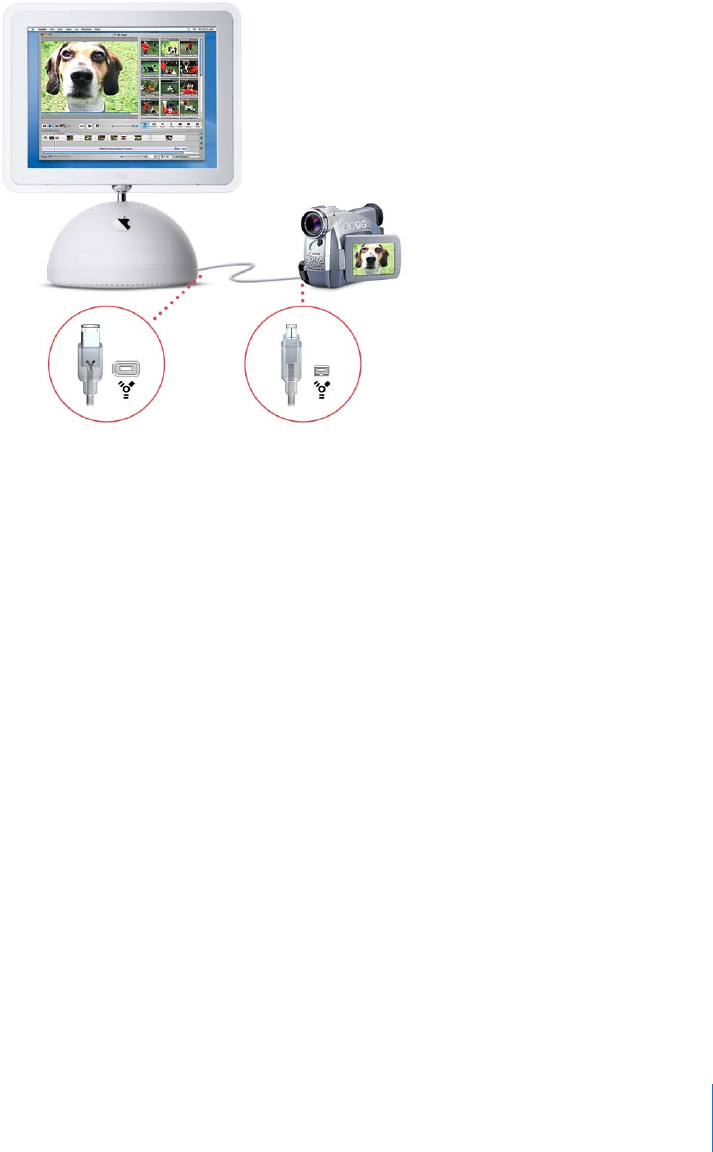
Chapter 4 Bringing Video Into iMovie HD 33
Follow these instructions to connect your video camera and import your video
manually.
To import your video into iMovie HD:
1Insert the tape with your video footage, turn on the camera, and switch the camera to
VTR mode.
2Connect your camera to your computer using a FireWire cable.
3Open iMovie HD and click Create a New Project in the iMovie HD project window.
4In the Create Project dialog, enter a project name.
In most cases, iMovie HD automatically detects the type of camera you’ve connected
and selects the appropriate video format. You can also specify the video format of your
project by clicking the Video Format disclosure triangle and choosing a format from
the pop-up menu that appears.
5Click Create.
6In the main iMovie HD window, set the mode switch under the iMovie monitor to
camera mode, as shown below.

34 Chapter 4 Bringing Video Into iMovie HD
If you have more than one camera or device connected to your computer, click the
camera button and choose your camera from the pop-up menu.
7Use the capture controls, shown above, to view the tape in the iMovie monitor.
8Rewind the tape to a few seconds before the point at which you want to start
importing.
9Click the Play button.
10 Click Import when you see the start of the scene that you want to import.
11 When you’re done importing, click Import again to stop.
If you’re having trouble getting your video camera to communicate with iMovie HD,
click the Connection Help button in the iMovie monitor. It connects you to useful
information in iMovie HD Help.
Fast forward
Play
PauseRewind
Stop
Camera mode
Chapter 4 Bringing Video Into iMovie HD 35
About Automatic Scene Detection
As you import your video footage from a standard or high defintion camera
connected via FireWire, iMovie HD detects where you made a break in recording,
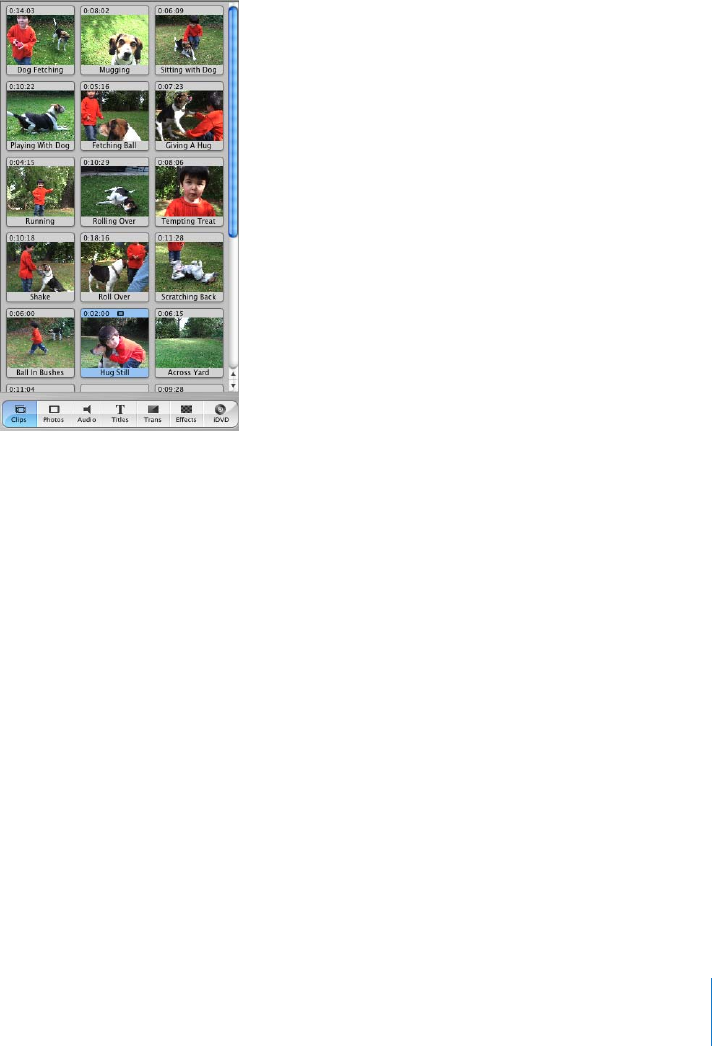
and automatically divides the video into separate scenes or “clips.” Each sequence
of recorded video is then made into a video clip that is stored in the Clips pane,
shown below.
You can also have iMovie HD automatically place clips in the timeline, if you prefer.
To have clips placed automatically in the timeline:
1Choose iMovie HD > Preferences.
2Click Import.
3Select the “Movie Timeline” radio button.
If you prefer, you can turn off automatic scene detection and manually create the
breaks between video clips as you import.
To turn off automatic scene detection:
1Choose iMovie HD > Preferences.
2Click Import.
3Deselect the checkbox labeled “Start a new clip at each scene break.”
To manually create scene breaks, click the Import button to start or stop importing as
you import each scene. Or, you can import long scenes and then split them in the Clips
pane using the “Split Video Clip at Playhead” command in the Edit menu.

36 Chapter 4 Bringing Video Into iMovie HD
Did You Know? — About Video Formats and Frame Rates
When you create a new project, you can specify whether the project is for standard
definition DV, high definition, DV widescreen, MPEG-4 video, or the format for an
iSight camera.
iMovie supports the following video formats:
•DV NTSC
•DV PAL
•DV NTSC Widescreen
•DV PAL Widescreen
•MPEG-4
•iSight
•HDV 720p
•HDV 1080i
In most cases, you don’t need to specify anything for your video format. iMovie HD
is preset to import standard definition digital video (DV), and it can automatically
detect whether you have connected a high definition video camera or an Apple
iSight camera and switch your project to the appropriate settings. However, with
standard video formats, you may at times want to specify a particular format, such
as DV widescreen.
To specify a video format for a new project, choose File > New Project or click the
Create a New Project button in the iMovie HD project window. In the Create Project
dialog, click the “Video format” triangle to display format options. Choose the video
format options you want.
Different video formats use different frame rates. Most video formats, including
standard definition, high definition, and widescreen, use either 29.97 frames per
second or 25 frames per second. For example, NTSC (National Television Standards
Committee) and PAL (Phase Alternating Line) are two common digital video (DV)
formats. NTSC format, which is used in North America and Japan, has a frame rate of
29.97 frames per second (fps). PAL format, which is used in most of the world outside
North America, has a frame rate of 25 fps. When you first import video into a project,
iMovie HD automatically detects the correct frame rate of the incoming footage.

Chapter 4 Bringing Video Into iMovie HD 37
Capturing Live Video With an Apple iSight Camera
If you have an iSight camera connected to your computer, you can use it with
iMovie HD to capture live video. Follow the instructions for connecting your camera via
FireWire and importing video footage found in “Importing Video From a Digital Video
(DV) or High Definition Video (HDV) Camera” on page 32. When you switch iMovie HD
to camera mode, iMovie HD first looks for a video camera. If it doesn’t find one, it looks
for an iSight and displays your iSight video in the iMovie monitor. If you have both a
camera and iSight connected to your computer, set the mode switch to camera mode
and choose iSight from the pop-up menu.
Your iSight video is directly imported into iMovie HD project. You can edit and use it
just as you would any other iMovie HD footage
Importing Video from an MPEG-4 Camera or Device
MPEG-4 video cameras or devices may use a USB connection to connect the device to
your computer. When you connect an MPEG-4 camera or device, it appears as a hard
disk icon on your desktop. You can open the device’s icon and drag the footage directly
into an iMovie HD project, or to your desktop for later importing. When you drag
MPEG-4 video into an iMovie HD, project, iMovie HD imports the video as a single clip
which you can then break up into scenes and edit, if you want.
If your device uses a USB connection, you cannot directly import video into a project
using the import controls and procedure used for cameras connected via FireWire, or
use the Make a Magic iMovie feature to import video and automatically create a movie.
Did You Know? — Importing Clips From Your Hard Disk
If you already have digital video or still images on your computer’s hard disk, or an
external hard disk, you can import them into your iMovie HD project.
You can drag video clips from your desktop into iMovie HD or choose File > Import.
Choose the images you want to import and click Open.
When you import clips in a format different from your project, they are converted to
the video format of your movie. For example, if you have created a movie using high
definition video format throughout, any standard definition clips that you import are
converted to the project's high definition format.
Tip: If you want to use clips from another iMovie HD project, open the project and
select the clips you want, and copy and paste them into your new project. You can
also drag the clips to your desktop and then open another project and drag them
into it.

5
38
5Editing Basics
After you import your video into iMovie HD, you can
preview the clips to see what you have to work with. You
can arrange clips in the order you want them to appear
in your movie, and “clean up” your video footage, editing
out the parts you don’t like and keeping only the best
footage to include in your movie.
You’ll find iMovie HD provides easy and efficient methods for cropping, trimming, and
rearranging your clips within a movie.
Building Your Movie From Video Clips
Once your footage has been imported to the Clips pane, you need to move it to the
clip viewer to start creating your movie. In the clip viewer, you put the clips in the
sequence you want them to appear in your movie.
To add a clip to your movie:
mDrag the clip to the clip viewer and position it where you want it to appear.

Chapter 5 Editing Basics 39
Sometimes you may want to use a clip several times in a video. In this case, you can
drag a copy of the clip into your movie and leave the original in the Clips pane.
To move a copy of the clip to your movie:
mHold down the Option key while you drag a clip from the Clips pane.
Adding copies of clips is useful because you always have an untouched clip to go back
to if you make mistakes in editing that you can’t reverse.
Previewing Your Video Clips
Each second of video is made up of many separate pictures, or frames. To find the exact
moments that you want to keep or delete from your clips, you can play through each
clip at normal speed, or move through it frame by frame.
You can select and play clips in the Clips pane, clip viewer, and timeline viewer.
To move through a clip at normal speed:
•Select the clip and click Play in the iMovie HD playback controls.
•Click Rewind to move to the beginning of your movie or sequence of clips.
•Click Play Full Screen to play the video in full-screen mode. (Click anywhere on the
screen to return to normal view.)
Did You Know? — Easy Editing by Dragging
Once you’ve placed clips in the clip viewer or timeline viewer, you can easily drag
clips just about wherever you want. You can:
•Drag clips to different positions forward or backward in the clip viewer or timeline
viewer.
•Drag clips out of the clip viewer or timeline viewer into the Clips pane for later use
•Select several clips at once and drag them to new positions
•Drag clips into the iMovie Trash and drag them out of the iMovie Trash to the clip
viewer, timeline viewer, of Clips pane, if you change your mind
•Drag clips out of a movie to your desktop or to another application, or into iDVD
drop zones
•Drag clips from the desktop into your iMovie HD project
Play Full Screen
Rewind
Play/Pause

40 Chapter 5 Editing Basics
To play through a clip frame by frame:
1Select the clip in the Clips pane, clip viewer, or timeline viewer.
2Press the Right and Left Arrow keys on your keyboard to move forward or back one
frame.
You can also hold down the Shift key as you press the arrow keys to move forward or
back 10 frames at time.
To play through the entire sequence of clips in the clip viewer:
1Choose Edit > Select None.
2Move the playhead to the beginning of the movie.
3Click Play.
Removing Unwanted Video
After importing your video, you can select clips in the Clips pane and delete any you
don’t want. Click an unwanted clip to select it and press the Delete key or drag it to the
iMovie HD Trash. The clip remains available in the Trash until you empty it or drag it
back out.
To create a polished movie, you also trim and crop individual clips so that they show
only the footage you want to include.
There are three ways to get rid of unwanted frames in a video clip:
•Trimming: Removes the frames you select. Use this when you want to delete frames
from one end or another.
•Cropping: Preserves the selected part of a clip and removes the frames before and
after your selection. Use this when you want to keep most of the clip, but you want
to delete the beginning and the end.
•Splitting: Breaks a scene into two separate clips. Use this when you want to separate
a clip into two pieces. You can then delete one of the pieces or use it elsewhere in
your movie.
Depending on how you like to work, you can review and make rough cuts to clips in
the Clips pane, or do all your editing in the clip viewer or timeline viewer. Fine
adjustments to the timing and duration of clips are usually made in the timeline viewer,
where you can also use a method of editing called “direct trimming.”
Chapter 5 Editing Basics 41
Editing Clips with Direct Trimming
You can trim and crop your clips using an editing technique called direct trimming.
Click the timeline viewer button (it has a clock on it) to open the timeline viewer. You
can then select a clip and drag either end to shorten it. There are some important
points to understand before you start, however.
Where You Grab Your Clip Matters
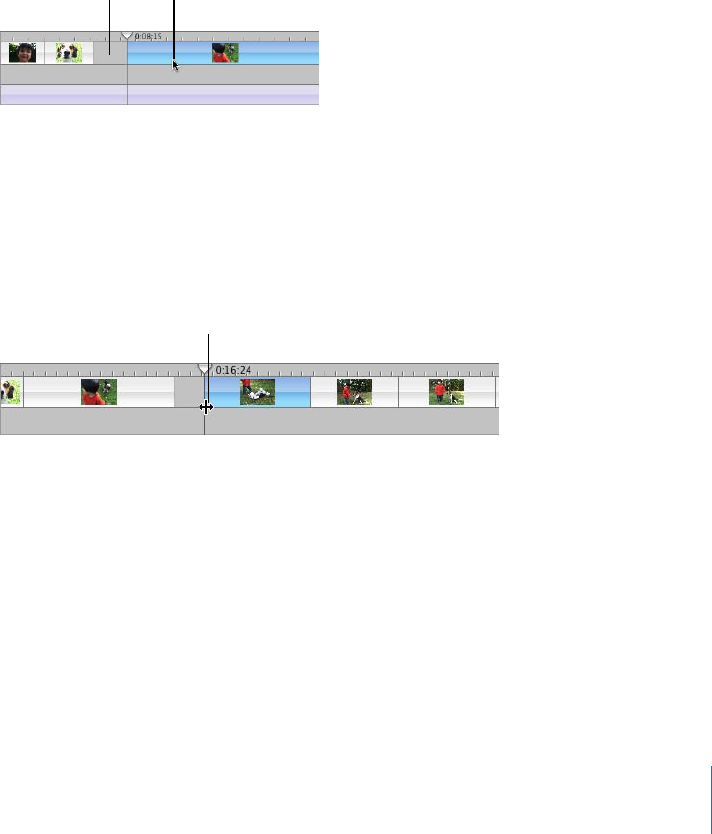
In the timeline viewer, you get different results depending on where you place the
pointer when you drag a clip.
Dragging from the center of the clip moves the clip to a different location in your
movie. As you move the clip to the right, a gap is created. You can drag other clips to
fill the gap, or you can leave a gap for your own artistic reasons (they’re handy
backgrounds for text or can add an extra dimension to a transition or effect).
Tip: A fast way to get rid of a gap is to view it in the clip viewer, where it appears as a
black clip. Select the black clip and delete it.
Dragging from the end of a clip toward the center of the clip shortens the clip. The
trimmed video is still present, but it won’t appear in your movie. If you decide to
lengthen the clip later, you can drag the end to lengthen the clip again and the hidden
footage is restored.
Rippling and Overwriting Clips
If you move a clip over an empty space in the timeline viewer, the clip replaces, or
overwrites, the empty space. If you move a clip over another clip, the clip you’re
moving pushes aside the clip and all the adjoining clips, moving them all in the
direction you’re dragging.
If you decide that you want to overwrite a clip with another clip, you can hold down
the Command key as you drag. The clip you’re moving overwrites (or trims) the other
clip.
Gap Drag pointer
Direct trimming pointer

42 Chapter 5 Editing Basics
Identifying Full and Cropped Clips
Once you begin moving clips, you’ll notice a difference in the appearance of clips in the
timeline viewer. Full clips have rounded corners. Clips that have been trimmed or
cropped have straight edges where they’ve been shortened. You can always extend a
clip with straight ends.
Trimming a Clip Using Crop Markers
You can also trim clips using crop markers that appear under the iMovie HD monitor
and scrubber bar. You can use the crop markers to trim clips selected in the clip viewer,
timeline viewer, or Clips pane.
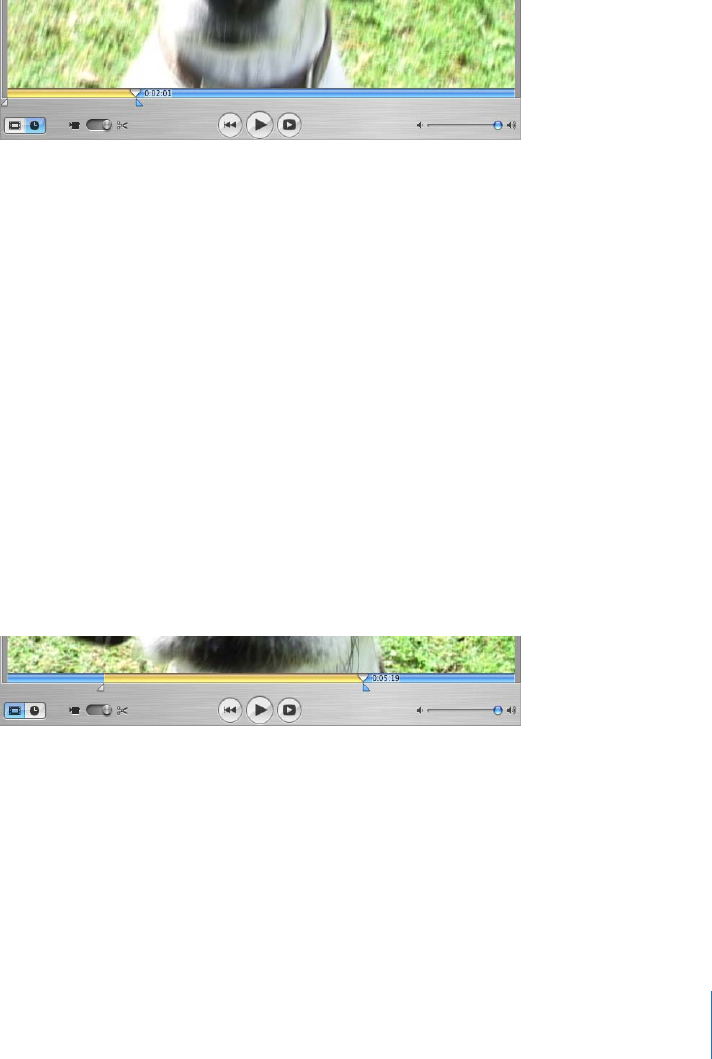
To trim a clip, you drag the crop markers to select the frames in the clip that you don’t
want to keep.
Did You Know? — Selecting Multiple Clips at Once
•To select a range of video clips in the clip viewer or timeline viewer, hold down the
Shift key as you select the first and last clips in the range you want.
•To select a range of video clips in the clip viewer or timeline viewer, drag to create
a selection box around the clips you want to select.
•To select clips that aren't adjacent to each other, hold down the Command key as
you select the clips you want.
•To select all the clips of a certain type, such as all the transitions in a movie, select a
clip of the type you want to change and choose Edit > Select Similar Clips.
•To select all the clips in the timeline viewer or clip viewer, select a clip in the viewer,
then press Command-A.
•To select all the clips in the Clips pane, select one and press Command-A. To select
a subset of clips in the Clips pane, hold down the Shift key as you click the clips, or
click an empty spot in the Clips pane and drag to encompass the clips.
•To select all the audio clips in a track, select one clip and choose Edit > Select All.
Trimmed clip
Full clip
Chapter 5 Editing Basics 43
To trim a video clip:
1Select a clip in the Clips pane, clip viewer, or timeline viewer.
2Position the pointer over the scrubber bar to display the crop markers.
3Drag the left crop marker until you see the first frame you want to remove displayed in
the iMovie monitor.
4Drag the right crop marker to the last frame that you want to remove.
The selected frames in the clip appear yellow in the scrubber bar, as shown above.
5Choose Edit > Clear (or press the Delete key) to trim the selected frames from the clip.
Cropping a Video Clip Using Crop Markers
To crop a clip, you select the frames that you want to keep and delete the rest of the
clip. Cropping is often the easiest method when you want to preserve the middle part
of a clip and delete the beginning and the end.
To crop a clip:
1Select a clip in the clip viewer or timeline viewer.
2Position the pointer over the scrubber bar to display the crop markers.
3Drag the right crop marker along the scrubber bar until you see the last frame that you
want to keep.
4Drag the left crop marker along the scrubber bar until you see the first frame that you
want to keep.
5Choose Edit > Crop to delete the frames outside the range of frames you selected.
The selected frames are preserved.

44 Chapter 5 Editing Basics
Splitting a Video Clip
When you split a video clip, you simply break it into two clips, preserving both parts.
You can then delete the part you don’t want or save it to use elsewhere in your movie.
To split a video clip:
1Select a clip in the Clips pane, clip viewer, or timeline viewer.
2Drag the playhead in the scrubber bar to the frame where you want to split the clip.
3Choose Edit > Split Video Clip at Playhead.
A new clip immediately appears.
Undoing an Edit
If you make a mistake as you work, you can always undo your action.
To undo an action:
mChoose Edit > Undo.
You can choose Undo multiple times to undo your changes one after the other.
About Gaps (Black Clips)
When you drag clips to the right in the timeline viewer, you can create a gap between
clips. The gaps, or empty spaces, are called “black clips”. When you switch to the clip
viewer, you see a black clip has been added to the project. When you view your movie,
you see only black video where gaps appear. You can change these black clips to any
color you want by creating a “color clip”.
You can use color clips as spacers or placeholders in your movie, or you can use them
as background for text or titles. You can’t select or move them in the clip viewer.
Did You Know? — Undoing Your Changes
When you trim a clip, the footage you delete is not lost. You can choose the
Undo command multiple times to cancel your changes one after another. You
can also undo all your changes to a clip at once by selecting the clip and choosing
Advanced > Revert Clip to Original. If you trimmed too much from a clip, you can
also bring back the trimmed footage using the direct trimming method, explained
next.

Chapter 5 Editing Basics 45
To create a color clip:
1In the timeline viewer, drag a clip to create a gap.
2Select the black clip in the clip viewer and choose File > Show Info or double-click
the clip.
3Click the color box and choose a new color.
4Click Set.
5Close the Colors window.
Creating Still Images From a Video Clip
You can use photos and still images as backgrounds for titles or to hold a particular
image on screen for a period of time. You can easily create a still image from any frame
in a clip. For example, you might want to show a title over a still image of a dog and
then show that image coming to life as a real dog. To do so, you create a still image
from first frame of your dog clip. The new image appears as five-second clip in the Clips
pane. You can then place that still image before your video clip and add the title you
want.
To create a still frame from your movie:
1Select a clip and position the playhead to display the image you want.
2Choose Edit > Create Still Frame.
After a still image appears in the Clips pane, you can rename it and change its duration
to match the needs of your movie.
Copying and Pasting Clips and Images
You can cut, copy, and paste selections of your video as you edit. For example, you can
copy an image or clip and paste it into different places in a movie. You can replace a
section of video by selecting it and pasting another clip over it. You can delete video or
move it to different locations in the movie. You can also copy a video clip from a
different iMovie into the one you're working on.
To edit your video, you drag clips to different locations or use the Copy, Cut, Paste, and
Clear commands, much as you do to edit text in a word-processing application.
To copy a clip to a new position in the movie:
1Select the video clip or frame range you want to cut or copy, then choose Edit > Cut
or Copy.
2Move the playhead where you want the chosen clip to appear.
3Choose Edit > Paste.

46 Chapter 5 Editing Basics
Saving as You Work
It’s a good idea to save your work periodically as you make changes. Because iMovie
HD saves your original footage even after trimming, you can still retrieve trimmed
footage after you save.
To save your project:
mChoose File > Save Project.
At times you may want to open your project as it was last saved and start over,
cancelling any unsaved changes.
To revert to the last saved version of your project:
mChoose File > “Revert to Saved”.
Did You Know? — Copying And Pasting Clips Between Projects
You can easily transfer clips from one iMovie HD project to another. Select the clip
you want and choose Edit > Copy. Open another iMovie HD project and paste the
clip where you want it. It’s that easy. You can also drag a clip out of your movie to the
Finder desktop, then drag it from the desktop into another iMovie HD project.
Did You Know? — Creating Different Versions of Your Project
You can save a copy of your project, giving it a different name. You can then create a
different version of the movie or use parts of the movie in a new project.
Saving multiple copies of a project can be extremely useful, but can use large
amounts of disk space.
To save a copy of your project with a different name, choose File > Save Project As.
Enter a name and choose a location for the copy of the project and click Save.

6
47
6Adding Transitions and Photos
This chapter explains how to use transitions and place
photos from iPhoto into a movie.
You’ve arranged your video clips in the order you want them. But the change from one
scene to the next is abrupt, and you’d like to smooth things out. You can do this using
transitions.
Transitions blend the ends of clips together in a variety of ways—for example, fading
one scene into the next, dissolving one scene into another, or “pushing” the last scene
offscreen as the next scene comes on.
You can also add great photos to your movie and add movement to them for visual
impact.
Adding a Transition Between Scenes
You can place a transition between any two clips in your movie, or at the beginning or
end of the movie. Keep in mind that some transitions, like Cross Dissolve and Push, will
cut a few seconds from the length of your movie. For instance, if you put a 2-second
cross dissolve between two clips, iMovie HD overlaps 2 seconds from the first clip and
2 seconds from the second clip to create the transition. This shortens your movie by
2 seconds.
Note: You can’t place a long transition between two short clips that don’t provide
enough footage to make the transition.
As a rule of thumb, when planning the length of clips used with transitions, extend the
time of the clip by half of the transition. For example, when using a 2-second transition,
leave an extra second (1/2 the transition) at the beginning of the clip so that when the
transition is over, the clip shows the footage you want.

48 Chapter 6 Adding Transitions and Photos
You select and set up transitions in the Transitions pane, shown below. When you click
a transition in the list, you see what the transition looks like in the preview monitor. If
you position the playhead where you want to add a transition, and then click a
transition, you’ll have an idea of how it will look in the selected clip.
To add a transition between scenes:
1Click the Transitions button to open the Transitions pane.
2Select a transition in the list.
3Set the length of your transition using the Speed slider under the preview monitor.
The transition length is shown in the lower-right corner of the preview monitor. The
duration is read as seconds:frames, so a timecode reading “15:08” means “15 seconds
and 8 frames.”
Tip: You can select the timecodes in the preview monitor and change them to the
precise timing you want.
Some transitions provide additional settings. For example, if you select Push, you can
also use the arrow buttons to choose the direction from which the next scene enters.
Other transitions, such as Scale Down, allow you to set where the transition originates.
If the pointer changes to a crosshair when you click in the preview monitor, you can
click again to select the origination point of the transition.
4Click Preview to see how the transition will look with the settings you made.
You can continue to make adjustments and preview them until you have the effect you
want.

Chapter 6 Adding Transitions and Photos 49
5Drag the title of the transition from the transitions list to the clip viewer, placing it
between the two clips you want it to join.
You can continue to work in your movie while the transition is rendered.
In the clip viewer, a rendered transition is identified with an icon, shown below.
Deleting and Editing Transitions
You can select and delete transitions, just as you can clips. If you delete a clip, the
transitions before or after it are deleted automatically as well.
To delete a transition:
mSelect the transition and press the Delete key, or choose Edit > Clear.
When you delete a transition, your clips are restored to their original length. You can
then move them, apply video effects to them, or add a different transition between
them.
If you change your mind about the length of a transition you have already added, you
can edit it.
To edit a transition:
1Select the transition in the clip viewer.
2In the Transitions pane, adjust the length of the transition using the Speed slider.
3Click Update.
Applying Transitions to Multiple Clips
If you want to use the same transition for more than one clip—or all your clips—you
can select the clips, set up the transition settings you want, and click Apply. Depending
on the size of your project, this can be a big time saver. You can also delete or edit
multiple transitions in the same way.
Transition icon
50 Chapter 6 Adding Transitions and Photos
To select multiple clips:
•Hold down the Shift key and select the first and last clips in a range. All the clips in
between are also selected.
•Hold down the Command key to select individual clips that aren’t next to each other
(discontiguous clips).
Keep in mind that rendering transitions for multiple clips takes longer than rendering
just one transition.
If you chose a duration that is too long for some of your clips, you’ll see a message
asking you if you want iMovie HD to automatically adjust the duration for the short
clips. If you agree, the duration for the shorter clips is up to half the clips’ duration.
Adding Photos
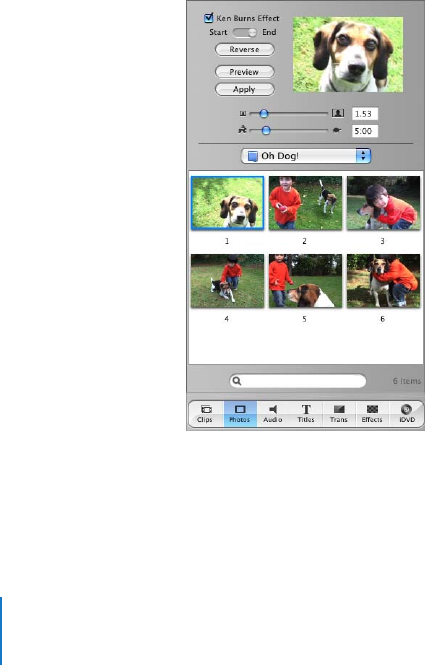
iMovie HD lets you easily add photos from your iPhoto library to your movie. You can
add photos as still shots that linger for as long as you like, or you can pan and zoom in
or out with the Ken Burns effect. Use the Photos pane, shown below, to select photos
and add motion to them.
Note: To see photos in the Photos pane, you must have iPhoto installed, and you must
have at least one photo in your iPhoto library.

Chapter 6 Adding Transitions and Photos 51
To add a still photo to your movie:
1Click the Photos button to open the Photos pane.
2Choose an album from the pop-up menu.
3Make sure the Ken Burns Effect checkbox is not selected.
4Select a photo from the photos displayed and drag it to the clip viewer or timeline
viewer.
Remember to select the Ken Burns Effect checkbox when you want to add motion to a
photo.
Adding Motion to a Photo
You can add motion to a photograph by panning across the image or by zooming in or
out. This is called the “Ken Burns Effect” (after the technique developed by the noted
film documentarian Ken Burns). You use the controls in the Photos pane (shown below)
to add motion to your photos.
Zooming a Photo
Zooming a photo enlarges or reduces a photo on screen over time. It makes the photo
appear as if the camera is moving into or away from the photo.
To zoom a photo:
1Click the Photos button and make sure the Ken Burns Effect checkbox is selected.
2Select a photo in your iPhoto library and click Start.
3Move the Zoom slider to the left or right until you find the point where you want to
begin the zoom.
4Click Finish.
5Move the Zoom slider until you see where you want to end the zoom.
6Move the Duration slider to set the length of time you want the zoom to take.
7Click Preview to see the overall effect.
8Click Apply when the effect looks the way you want.
The photo appears as a clip at the end of your movie in the timeline viewer. You can
drag the clip to where you want it to appear in your movie.
Start and End button Pan control
Zoom slider

52 Chapter 6 Adding Transitions and Photos
Panning a Photo
Panning a photo makes the photo move across the screen. The camera appears to
sweep across the face of the photo, adding interesting movement to still shots.
To pan a photo:
1Click the Photos button and make sure the Ken Burns Effect checkbox is selected.
2Select a photo in your iPhoto library and click Start.
3Move the pointer over the image in the preview monitor until a hand appears, then
press the mouse button and drag the image until you see the place in the image where
you want to begin the pan.
4Click Finish.
5Drag the image to where you want to end the pan.
6Move the Duration slider to set the length of time you want the pan to take.
7Click Preview to see the overall effect.
Click Reverse to quickly change the direction of the movement.
8Click Apply when the effect looks the way you want.
The photo appears as a clip at the end of your movie in the timeline viewer. You can
drag the clip to where you want it to appear in your movie.
Using Pan and Zoom Together
You can use pan and zoom together to draw attention to something in your
photograph, such as one member in a group photo. If your photo is not large enough
to use a pan effect, you can also zoom in at the start to give you a larger area to work
with.
Combine the instructions above if you want to add both pan and zoom to a
photograph. When you click Start or Finish, you can set the amount of zoom and move
the photograph to the position you want for the start or end of the pan.
To make your photos really stand out, you can use pan and zoom to crop them before
you add them to your movie. Cropping allows you to remove unnecessary or
undesirable parts of the picture and change the focus to what you want to emphasize.

Chapter 6 Adding Transitions and Photos 53
To crop a photo before you add it to your movie:
1Click the Photos button and make sure the Ken Burns Effect checkbox is selected.
2Select a photograph from your iPhoto library and use the pan and zoom controls to
position your photo how you like it.
3Click Start.
4Press the Option key and click Finish.
5Set the duration of the clip.
6Click Apply or drag the photo to your project.
Applying Motion to Multiple Photos
You can quickly apply the same motion settings to more than one photo at a time.
For example, if you are creating a slideshow of your photographs, you may want all the
photos (or some of the photos) to play for the same length of time. You can select the
photos (up to 10 at a time), set the duration and any other pan and zoom effects you
want, then click Apply (or Update if you’re making changes to photos already in your
movie).
To select multiple clips:
•Hold down the Shift key and select the first and last clips in a range. All the clips in
between are also selected.
•Hold down the Command key to select individual clips that aren’t next to each other
(discontiguous clips).
Did You Know? — Copying Pan and Zoom Settings
for a Clean Finish
Setting up a Ken Burns Effect requires you to set up how the image appears at the
start of the effect, and then set up the image as it should appear at the end.
Sometimes the ending image should be very similar to the start.To save time
adjusting the image, you can have iMovie transfer the starting image settings to the
ending settings so that you need to make only small adjustments.
To copy the starting settings to the ending settings, click the Photos button and
make sure the Ken Burns Effect checkbox is selected. Select a photograph from your
iPhoto library and click Start. Set up the pan and zoom effect you want. Press the
Option key and click Finish. Make the final pan and zoom changes your image needs.
Drag the photo into the clip viewer or timeline viewer.
7
54
7Using Special Effects
There are two general kinds of special effects that you
can easily add to your movie: motion effects and video
effects.
Motion effects change the look of motion in a video, perhaps speeding up or slowing
down your video, or making it play in reverse. Video effects change the look or tone of
your footage. For example, a video effect might soften the focus or change the
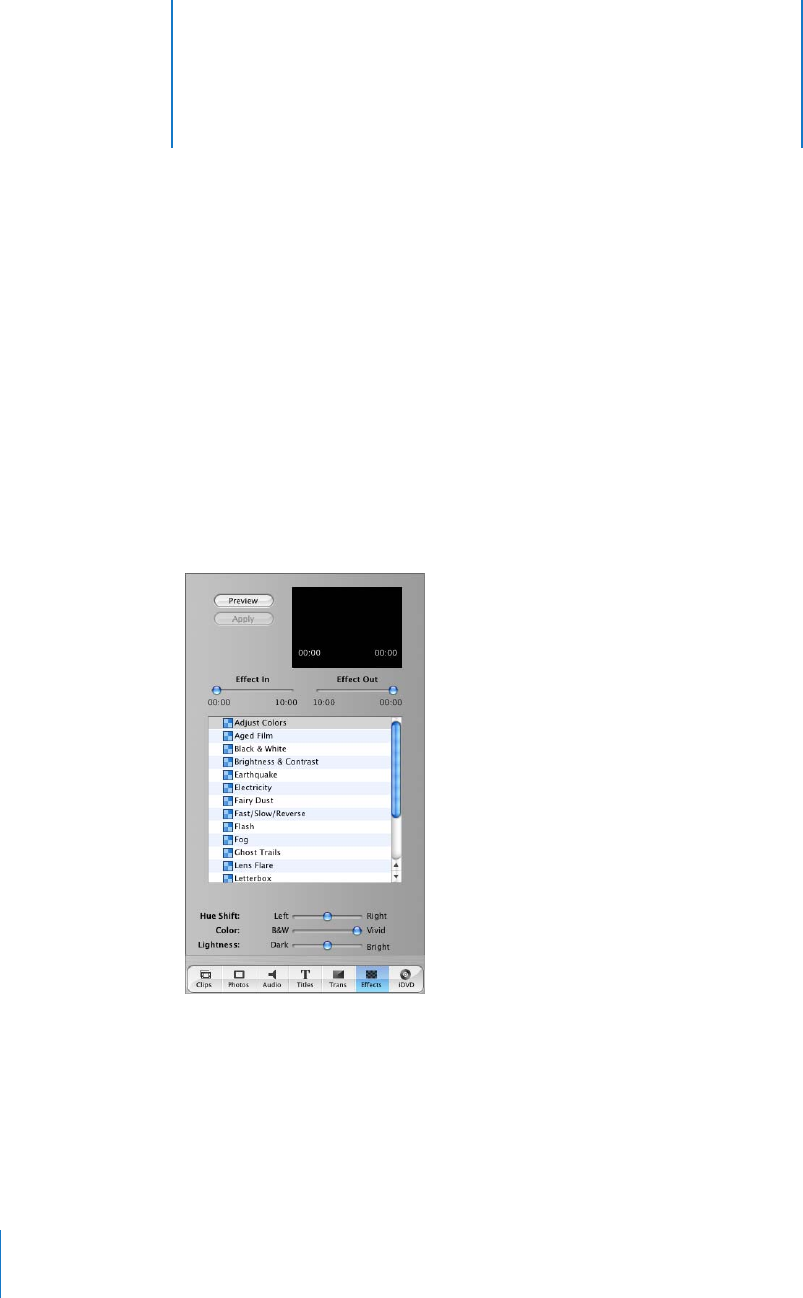
brightness or contrast. Use the Effects pane, shown below, to add effects to your video.
Chapter 7 Using Special Effects 55
Motion Effects
You can make a clip play backward, and you can make whole clips or parts of clips play
in slow motion or fast motion. If you reverse the direction of a clip, you can also slow it
down or speed it up in reverse.
Making a Clip Play in Reverse
You can apply the reverse-motion effect only to a whole clip. If you want to make only
a few frames play backwards, separate those frames into their own clip by splitting the
clip at the start and end of the desired frames.
To reverse clip direction:
1Select the clip you want to reverse. You can select a clip in the clip viewer, the timeline
viewer, or in the Clips pane.
2Click Effects.
3In the Effects pane, choose the Fast/Slow/Reverse effect.
4Click the Reverse Direction checkbox.
5Click Apply.
An icon appears on the clip in the clip viewer to indicate that the clip has been altered.
When you play the clip, it plays backward.
You can choose Edit > Undo to cancel the effect, or select the clip and press the Delete
key.
Speeding Up or Slowing Down Your Video
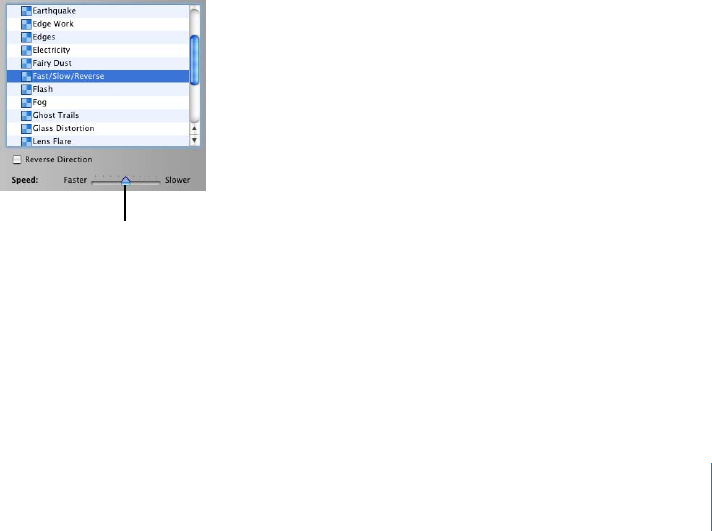
You add slow- and fast-motion effects using the clip speed slider that appears in the
Effects pane.
Clip speed slider

56 Chapter 7 Using Special Effects
To adjust the speed of a video clip:
1Click the timeline viewer button (it has a clock on it) to open the timeline viewer.
2Select the clip you want to speed up or slow down.
3Click Effects.
4In the Effects pane, choose the Fast/Slow/Reverse effect.
5Move the speed slider left or right to adjust the speed of your video clip.
6Click Apply.
Move the slider one tick to the left to make it play twice as fast, or one tick to the right
makes it twice as slow. Adjust the slider to the speed you want. Play the clip in the
iMovie monitor to see the effect of slowing down or speeding up the clip.
The size of each clip in the timeline viewer corresponds to its length in the movie,
giving you a visual indication of how long each of your movie elements is. When you
adjust the clip speed slider, the selected clip in the timeline viewer grows longer or
shorter.
Video Effects
iMovie HD provides an array of interesting video effects that are easy to add to your
movie. You can change a whole clip or parts of clips. Like transitions, video effects take
time to render, but you can preview the effect before you apply it.
Different effects have different attributes that you set to get just the look you want. For
example, if you select Adjust Colors, you can adjust the Hue Shift, Color, and Lightness
using the sliders that appear at the bottom of the Effects pane.
Some effects allow you to set where the effect will appear in the clip. For example, if
you select Fairy Dust, you can choose where the fairy dust will arc, or choose where the
electricity will strike for the Electricity effect. If the pointer changes to a crosshair when
you click in the preview monitor, you can click again to select the origination point of
the effect. If you don’t see a crosshair pointer when you click in the preview monitor,
you can’t set the position.
Note: If a clip has a transition attached when you apply an effect, iMovie HD warns you
that the transition will be invalidated. iMovie HD then allows you to re-render the
transition to include the effect.
To add a video effect to your movie:
1Click the Effects button to open the Effects pane.
2Select the clip you want to change in the clip viewer or timeline viewer.
3Scroll through the list of effects and select the one you want to apply.

Chapter 7 Using Special Effects 57
4Drag the Effect In and Effect Out sliders to indicate how quickly you want the effect to
fade in and out.
Setting the sliders to 00:00 will make the effect appear and disappear suddenly, rather
than fade in and out gradually.
5Once you have the effect set up, click Preview to see what it will look like.
You can continue adjusting the attributes until you see the results you want.
6Click Apply to render the effect.
You can apply more than one effect to the same video clip. Just repeat these steps for
each effect you want to add.
Editing Effects
You can layer effects to create a unique look. For example, you could have fairy dust
streaking across a foggy scene.
If you change your mind, you can remove an effect. There are several ways to remove
an effect.
To remove an effect:
•Choose Edit > Undo after adding the effect.
•Select the clip with the effect you want to remove and press Delete.
•Select the clip and Choose Advanced > Revert Clip to Original to remove all changes
to the clip and restore the original footage.
Did You Know? — iMovie HD automatically adjusts footage to
better fit the screen
Different formats of footage, such as widescreen or high definition, potentially may
not fit the format of your video well. For example, if you import widescreen footage
into a standard definition DV project, the widescreen footage wouldn't fit well within
the normal screen size of standard definition DV. iMovie HD solves this problem by
automatically adjusting incoming footage to fit the screen size.
Digital video footage is recorded using standard ratios of width to height, called the
aspect ratio. Standard definition video has an aspect ratio of 4:3, meaning for every
four pixels of width the frame has 3 pixels of height. Widescreen video has a 16:9
aspect ratio, meaning that the width of the frame is nearly twice its height.

58 Chapter 7 Using Special Effects
Applying an Effect to Part of a Clip or Multiple Clips
You can apply video effects to multiple clips or to parts of clips, rather than to the
whole clip.
To apply an effect to part of a clip, you must first select a frame range, or a portion of
the frames within the clip. (You can also select a frame range across a series of
contiguous clips in the clip viewer.)
To select a frame range:
1Select the clip or series of clips that include the frames that you want to edit.
Hold down the Shift key to select more than one clip.
2Drag the crop markers below the scrubber bar to select the frames to which you want
to apply an effect.
The selected frame range is yellow in the scrubber bar.
3Add motion or video effects as you would to a clip, as described above.
You can hold down the Command key to select discontiguous clips. Then apply the
same effect to all the selected clips.

8
59
8Adding Titles
and Chapter Markers
Any text you place in your movie is called a title. You
can add titles to introduce and end a movie, identify
people, places, and dates; to add commentary; or
anything you like.
If you want to burn your movie on a DVD with iDVD, you might also want to set up
your movie with chapters so that viewers can easily navigate to or select specific
scenes, just like a Hollywood DVD. iMovie HD also lets you create chapter markers that
export to iDVD.
Adding Titles
You can have text appear onscreen in interesting ways. You might have text bounce in,
do a cartwheel, or even change color and shine. iMovie offers you many choices of title
styles.
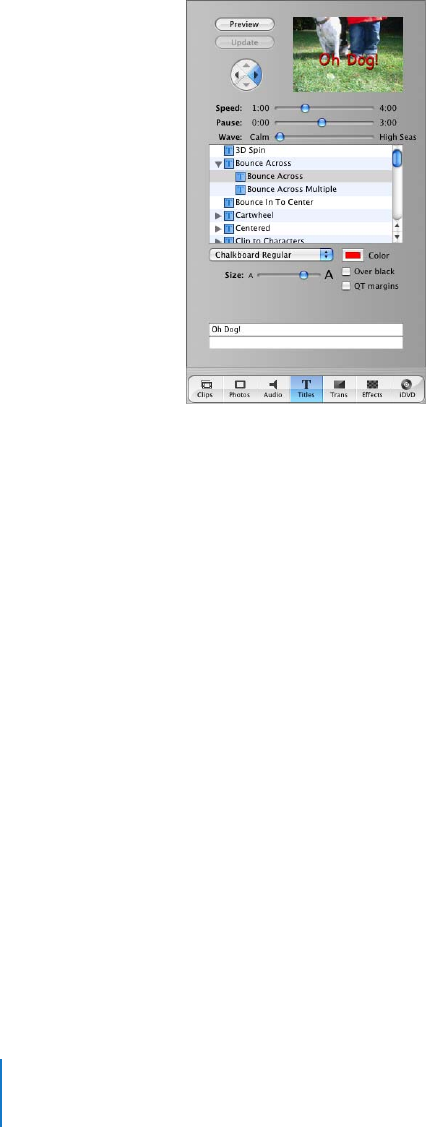
60 Chapter 8 Adding Titles and Chapter Markers
Each title style has a different set of options, and each lets you put different amounts of
text on the screen at once. Use the Titles pane, shown below, to add titles to your
movie.
To set up a title:
1Click the Titles button to open the Titles pane.
2Select a title style in the list.
3Type the text you want to appear onscreen in the text fields.
4Choose the font, text size, and text color.
5Set the duration sliders.
The Speed slider sets how fast the titles move into and out of the movie. The Pause
slider sets how long the words hold still on the screen (most of the title styles
incorporate word movement or fading in and out).
The title’s duration is shown at the bottom of the preview monitor. This duration
represents how long the title is from beginning to end.
6If the title style you chose has arrow buttons, click them to select the direction from
which the title should enter the screen.
7Click Preview to see how your title looks.
To find out how to add the title to your movie, see the next section.

Chapter 8 Adding Titles and Chapter Markers 61
Placing Titles Over a Black or Colored Clip
You can place titles over movie footage or over a black or colored background.
To place a title on a black background:
1Choose a title style and set up the title as you want it.
2Select “Over black” and drag the title into the movie.
Placing a title on a background adds a few seconds to your video.
To place a title on a colored clip:
1Add a black clip to your movie by dragging a clip to the right in the timeline viewer
and then switch to the clip viewer.
2Select the black clip and choose File > Show Info.
3Click the color box.
4Choose the color you want in the Colors window (shown below).
5Click Set.
6Drag the title you want onto the color clip.
You can change the color of colored clips.

62 Chapter 8 Adding Titles and Chapter Markers
To change a title’s background color:
1In the clip or timeline viewer, select a title clip with a background color.
2Press the Delete key once to delete the title.
3Choose File > Show Info.
4Click the Color box. Close the Colors window and then click Set.
5Add the title to the clip again.
Placing Titles Over Video Footage
You can place a title over video footage by dragging a title in front of a clip. iMovie HD
then renders the title over the clip.
To place a title over a video clip:
1Choose a title style and set up the title as you want it.
2Drag the name of the title style in front of the video clip over which you want it to
appear.
Make sure the “Over black” option is deselected.
iMovie HD renders the title over the footage. If your footage is longer than the duration
of the title, iMovie HD splits the clip at the point where the title ends. You can delete
the split-off portion of the original clip or use it in your movie.
Editing an Existing Title
Once you add a title to your movie, you can always make changes to it. Just select the
title clip in your movie, make the changes you want, and click Update. To remove a title,
select the title clip and press the Delete key once. If you need to make the same
change to more than one clip with text, select them all and make the change once.

Chapter 8 Adding Titles and Chapter Markers 63
Creating Chapter Markers for a DVD
If you’re planning to create a DVD of your movie, you can designate chapters in your
movie so that viewers can play specific scenes. You can quickly add chapter markers
and chapter titles to your movie and then export them to iDVD. Use the iDVD pane,
shown below, to create chapter markers.
To create chapter markers:
1Drag the playhead to the frame where you want to set a chapter marker.
2Click the iDVD button to open the iDVD pane.
3Click Add Chapter.
The new chapter appears in the chapter list of the iDVD pane, along with the timecode
of the frame where the chapter marker is set.
4Type a name for the chapter title.
Chapters are represented in the timeline viewer as diamond-shaped markers.
Note: Versions of iDVD earlier than iDVD 3.0 do not support chapter markers.

9
64
9Working With Sound
Once you have all your video arranged the way you want
it, you can then synchronize the audio clips with specific
frames in your video and lock them into place.
Your video is imported automatically into a iMovie HD project with its recorded sound.
You can enhance the sound recorded with your own video footage by making it louder
or softer, or having it fade in or fade out. You can even separate the sound from one
part of your video and play it over a different part of the video as a storytelling device,
or to add interest to your video.
In iMovie HD, there are three other ways to add sound to your movie:
•Use one of the sound effects included with iMovie HD.
•Add a musical track from a CD or from your iTunes music library or a GarageBand
track.
•Record your own voiceover.
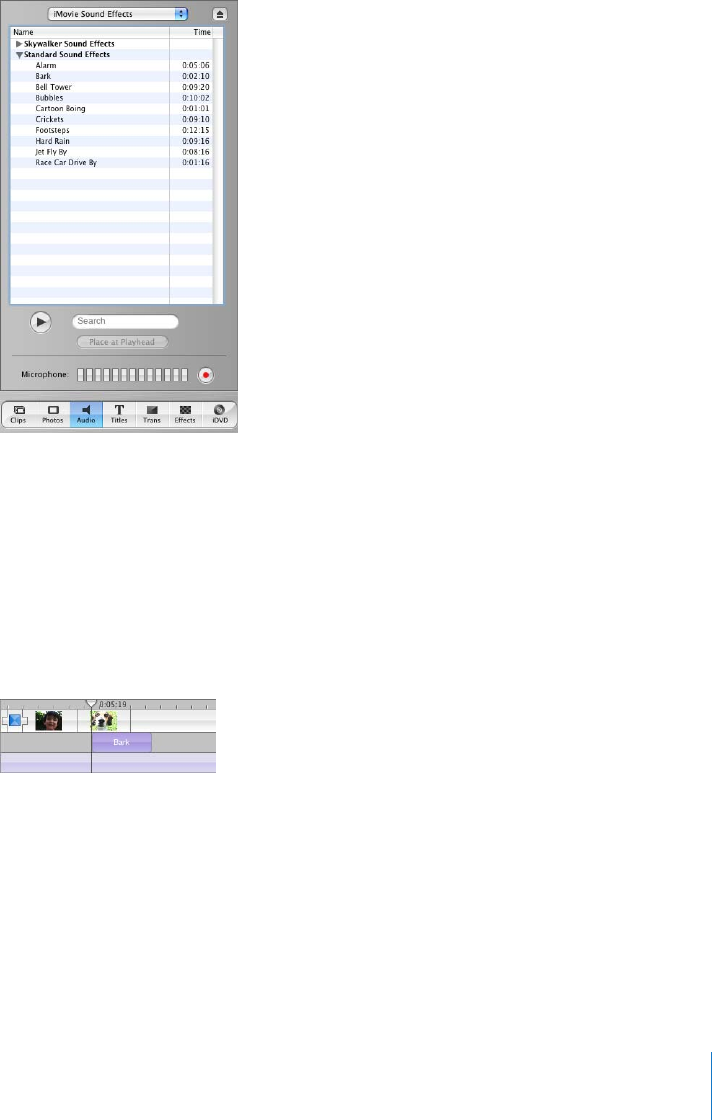
Chapter 9 Working With Sound 65
Adding Sound Effects
iMovie HD comes with a selection of short sound effects that you can use to enhance
your movie. Use the Audio pane, shown below, to add sound effects.
To add a sound effect:
1Click the timeline viewer button (it has a clock on it) to open the timeline viewer.
2Click the Audio button to open the Audio pane.
3Choose iMovie Sound Effects from the pop-up menu.
A list of sound effects appears.
4Drag the sound effect you want into one of the audio tracks in the timeline viewer. The
sound effect appears as an audio clip in the track.
5Adjust the position of the audio clip by dragging it until you see the frame in which
you want the sound effect to begin.
Tip: You can also create your own musical sound effects in GarageBand. If you want a
trumpet call or bass drum beat at a particular point in a movie, create one as a short
song in GarageBand and export it into iTunes. You can even create whole soundtracks
for your movies in GarageBand, if you want.

66 Chapter 9 Working With Sound
Adding Music From a CD or iTunes
You can add music to your movie from a CD or from your iTunes library.
To add music from a CD:
1Click the timeline viewer button to open the timeline viewer.
2Click the Audio button to open the Audio pane.
3Insert a CD into the disc drive.
4Choose the CD from the pop-up menu. A list of CD tracks appears.
5Move the playhead to the frame where you want the music to begin.
6Select the track you want and click “Place at Playhead.”
Preview your work by selecting the clip where you added the track and clicking Play in
the iMovie HD playback controls. You can continue to adjust the position of the clip
until you get it where you want it.
To add music from your iTunes library:
1Select the video clip in which you want the audio track to begin in the timeline viewer.
2Click the Audio button and choose iTunes Library from the pop-up menu.
3Move the playhead to the frame where you want the music to begin.
4Select the track you want.
You can search for a particular track by typing some words from the title in the Search
field. Click the Play button to the left of the Search field to listen to a track in the list.
5Click “Place at Playhead.”
The audio file appears as an audio clip in the second audio track.
Preview your work by selecting the video clip where you added the audio and clicking
Play in the iMovie HD playback controls. You can continue to adjust the position of the
audio clip until you get it where you want it.
Note: You must have QuickTime 6.5.2 or later installed on your computer to hear your
iTunes music play in your iMovie HD project.
You can download QuickTime from the QuickTime website at
www.apple.com/quicktime/download.
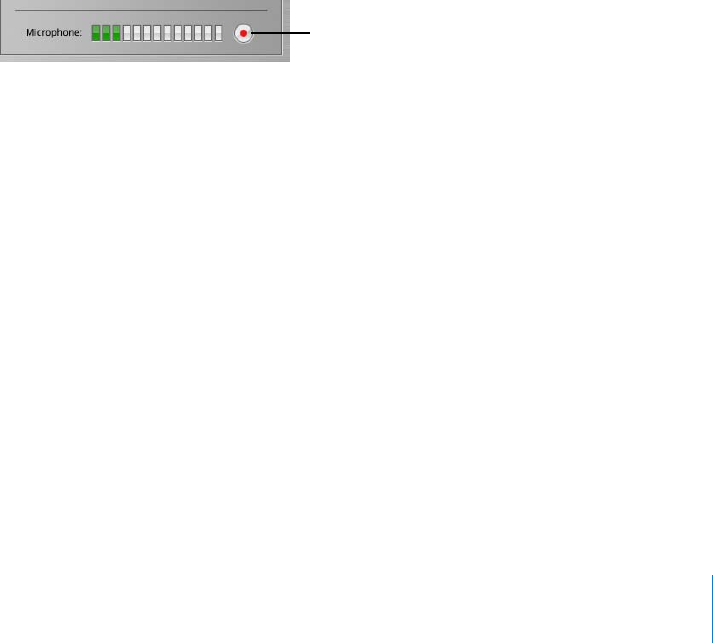
Chapter 9 Working With Sound 67
Adding a Voiceover
You can record sound directly into iMovie HD if you have a built-in microphone or an
external microphone connected to your computer. You can use this feature to create
your own voiceover narrations or commentaries.
Your microphone records at the input level set in the Sound pane of System
Preferences. To turn the recording level of a mike up or down, use the “Input volume”
slider in the Sound pane.
To set the recording level of a microphone:
1Open System Preferences and click Sound.
2Click Input.
3Select the microphone you want to use.
4Adjust the “Input volume” slider to raise or lower the volume that the microphone
records at.
To record a voiceover:
1In the timeline viewer, drag the playhead until you see the frame where you want the
voiceover to begin.
2Click the Audio button to open the Audio pane.
3Click the Record button.
4Speak clearly into the microphone.
While you are speaking, the input meter should be yellow. If it turns red, you are
speaking too loudly.
5Click the Stop button to stop recording.
The sound you recorded appears in the first audio track. Like any other audio clip, it can
be dragged to a new position in either of the audio tracks.
Record/Stop button
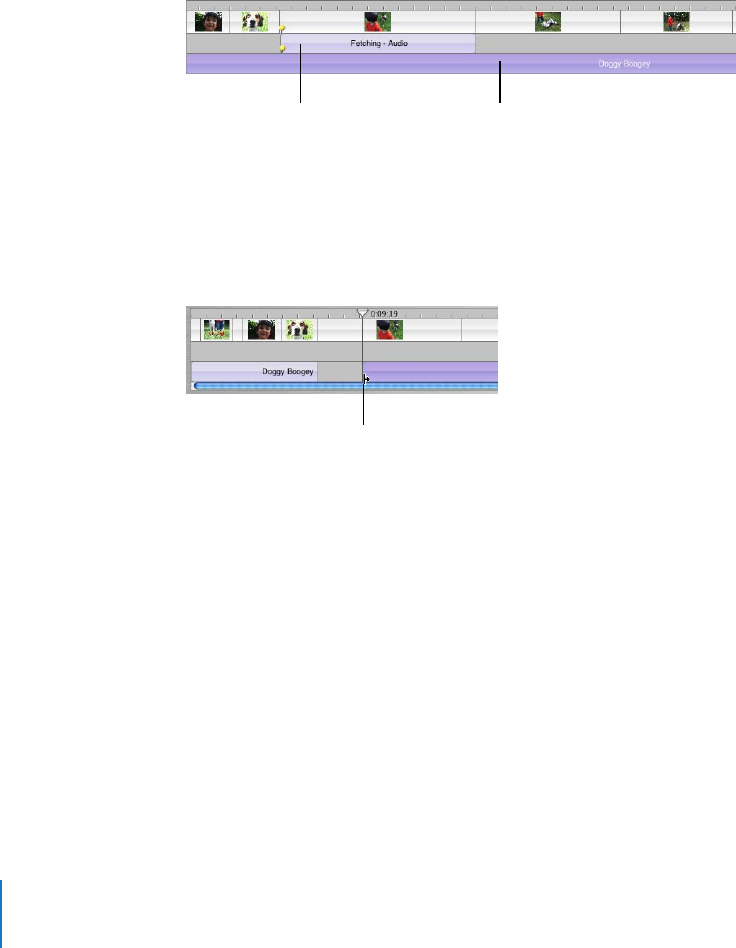
68 Chapter 9 Working With Sound
Working With Audio Clips
Audio files, which are in MP3, WAV, or AIFF format, appear as audio clips in either of the
two audio tracks in the timeline viewer, shown in the following illustration. Your video
also contains an audio track that you can extract from video clips and edit like other
audio clips.
Extracted audio is placed in the first track and imported audio is placed in the second
track. You can add more audio clips to any part of your movie by overlapping clips in
the audio tracks. You can also drag audio clips from one track to another and reposition
them to synchronize audio with your video.
Positioning and Trimming an Audio Clip
Dragging from the center of an audio clip moves the clip to a different location in your
movie. Leave a gap if you want silence. If you move an audio clip over another audio
clip in the same track, the clips overlap and you hear both clips at the same time.
You trim audio clips using the direct trimming technique. Dragging from the end of an
audio clip toward the center of the audio clip shortens the audio clip. The trimmed
audio is still present, but it isn’t displayed and you won’t hear it in your movie. Full clips
have rounded corners. Trimmed clips have straight edges where they’ve been
shortened.
To extend the audio clip back to its original size (or close to the original size), you can
drag the end you want to extend.
You can also split an audio clip.
To split an audio clip:
1Select the audio clip and drag the playhead to where you want the music to end.
2Choose Edit > Split Selected Audio Clip at Playhead.
3Select the unwanted portion of the audio clip and press the Delete key.
Imported music
Extracted audio
Drag pointer
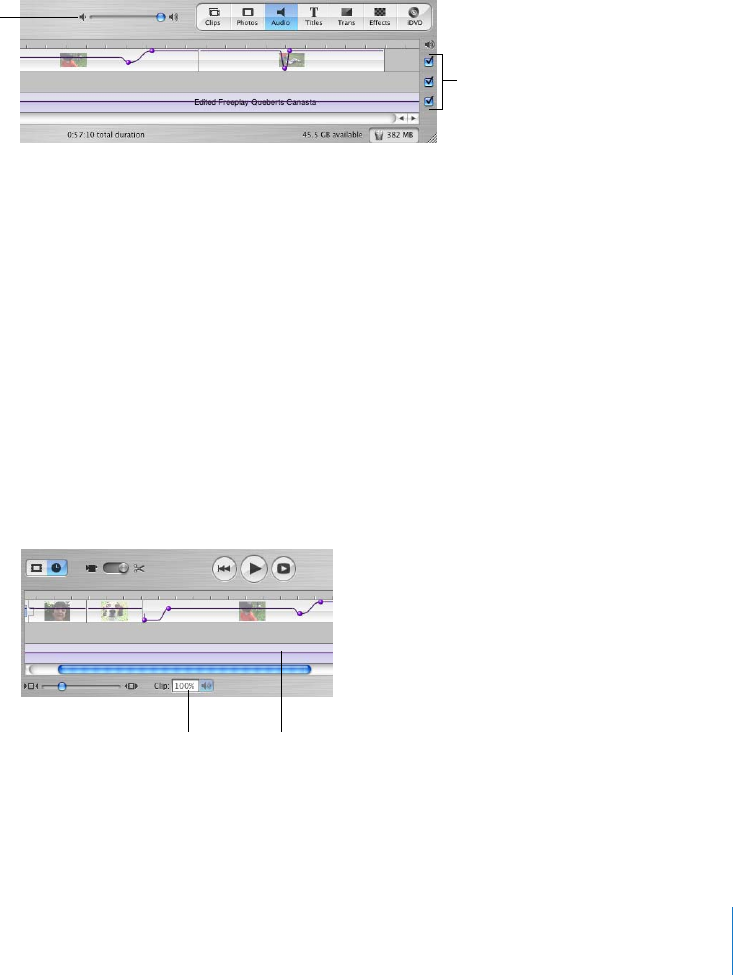
Chapter 9 Working With Sound 69
Adjusting Sound Volume
As you work on a video, you may want to temporarily turn the sound on your
computer up or down. To change the volume in iMovie HD up or down while you’re
working, use the Volume slider under the iMovie monitor. This slider changes the sound
coming from your speakers within the volume range set in Sound preferences.
Important: This slider doesn’t increase or decrease the level of sound that viewers of
the video will eventually hear. It only changes the level of sound on your computer as
you play and listen to your audio.
Turning Off Audio
You can mute audio tracks, including the audio track that’s contained within the video
track (the audio you recorded along with your video). Muting can help you focus on
the sounds in one track at a time as you work. If you keep a track muted in the finished
video, your audience won’t hear the audio in that track.
To mute an audio track:
mDeselect the checkbox at the right end of the track.
Adjusting the Volume of Your Movie
You can increase or decrease the volume of the sound that your audience will
eventually hear. To adjust the sound volume up or down, you select the clips that you
want to change and use the clip volume controls, shown below.
You can select and change the volume of all your clips at once, or change them
individually. You can change the clip volume from zero to 150 percent of the recorded
volume.
Audio
checkboxes
iMovie HD
speaker volume
Volume level barClip volume controls
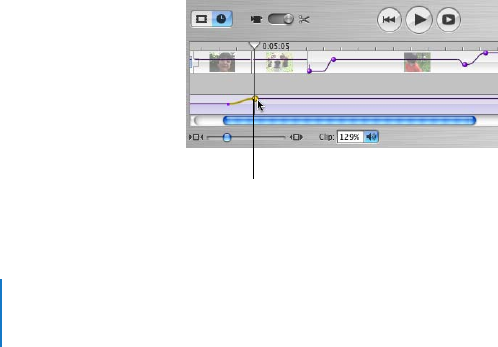
70 Chapter 9 Working With Sound
To adjust the volume of an audio clip:
1Select the clip, clips, or portion of a clip in the timeline viewer.
2Choose View > Show Clip Volume Levels.
A volume level bar appears in all audio clips to show the current volume level of each
clip.
3Click the speaker icon of the clip volume controls and drag the slider to adjust the
volume up or down.
If you make an adjustment to the volume while you are playing a clip, iMovie HD
pauses playback and then immediately plays the clip with your adjustment. This makes
it easier to get the results you want.
Remember: The volume setting in the Sound pane of System Preferences only sets how
loud or soft sounds play on your computer. It doesn’t set how loud your movie will
sound when you play it for others. Use the clip volume controls below the audio tracks
in the timeline viewer to increase or decrease the volume of a movie.
Fine-Tuning Volume Levels in Clips
You can select a clip and use the volume level bar to adjust the volume within the
clip up and down, make it fade in and out, or make it drop out completely in certain
sections. This gives you greater control over what you hear in your movie.
By editing the volume of your audio tracks, you can enhance your movie’s sound by:
•Muting or quieting a video’s audio track so you can better hear a voiceover, sound
effect, or music on another track.
•Adjusting the mix of the three tracks (for example, making the video track’s audio
louder compared to the other tracks).
•Muting video clips entirely so all you hear is the audio in the other tracks.
To adjust volume levels in a clip:
1In the timeline viewer, choose View > Show Clip Volume Levels.
A bar appears across the audio tracks of the timeline viewer, showing the current
volume levels for each clip.
Volume level marker
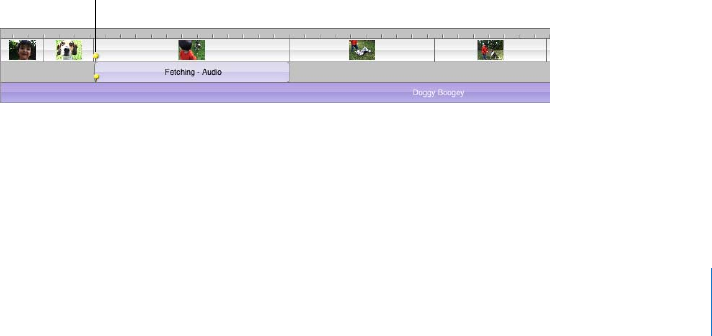
Chapter 9 Working With Sound 71
2Click the bar at the point at which you want to begin increasing or decreasing the clip
volume.
A marker appears.
3Drag the marker up or down to increase or decrease the volume from that point to the
end of the clip.
You can create as many markers as you need to adjust the volume as finely as you
want. To make the volume adjustment more gradual, drag the small end of the marker
to create more of a slope.
To delete a volume level marker:
mSelect the volume level marker and press Delete.
To make the audio clip fade in and out:
1Select the clip in the timeline viewer.
2Choose View > Show Clip Volume Levels.
3Click a point on the volume level bar where you want to adjust the volume.
A marker appears.
4Drag the marker to where you want the sound adjustment to end (if fading in) or begin
(if fading out).
5Drag the smaller point on the marker up or down, depending on whether you want
the volume to get louder or softer.
You can adjust how rapidly the volume changes with the slope of the marker.
Locking Audio Clips in Place
When your audio clips are lined up with your video the way you want, you can lock
them to the video so that if you move a video clip, it won’t misalign your audio.
To lock audio to video:
1Position your audio clip where you want it to begin in your movie.
2Choose Advanced > “Lock Audio Clip at Playhead”.
The pins indicate that the audio clip is locked to the video clip.
Locking pins

72 Chapter 9 Working With Sound
To unlock audio from a video clip:
1In the timeline viewer, select the audio clip.
2Choose Advanced > Unlock Audio Clip.
Extracting Audio From Your Video
The video you import has an embedded audio track. Sometimes you may want to
separate the audio track from your video and delete it or move it to a different place in
the movie. With this technique, called extracting audio, you can move the sound or
dialogue from one video clip to another.
For instance, you might have recorded video of your grandmother telling stories about
her youth, and you may also have some old photos of her that you scanned into iPhoto
and imported into iMovie HD. Using the audio extraction feature, you can easily
separate Grandma’s narration from the video of her telling stories, and then add her
narration to the photos.
When you extract the audio from a video clip, it appears as an audio clip in one of the
audio tracks. You can then move it around as you would any audio clip.
To extract the audio from a video clip:
1In the timeline viewer, select the video clip.
2Choose Advanced > Extract Audio.
The extracted audio clip appears in the first audio track directly below the clip from
which it was extracted. The audio is locked to the video, but you can unlock it if you
want to move it to another part of your movie.
Aligning Audio With Video
To synchronize an audio clip with specific frames, you align the audio clip so that it
begins with the video frame you want.
To align an audio clip with a specific frame:
1Click the timeline viewer button (it has a clock on it) to see the timeline viewer.
2Drag the audio clip along the track until you see the frame you want to start with (you
can watch the frames play in the iMovie monitor).
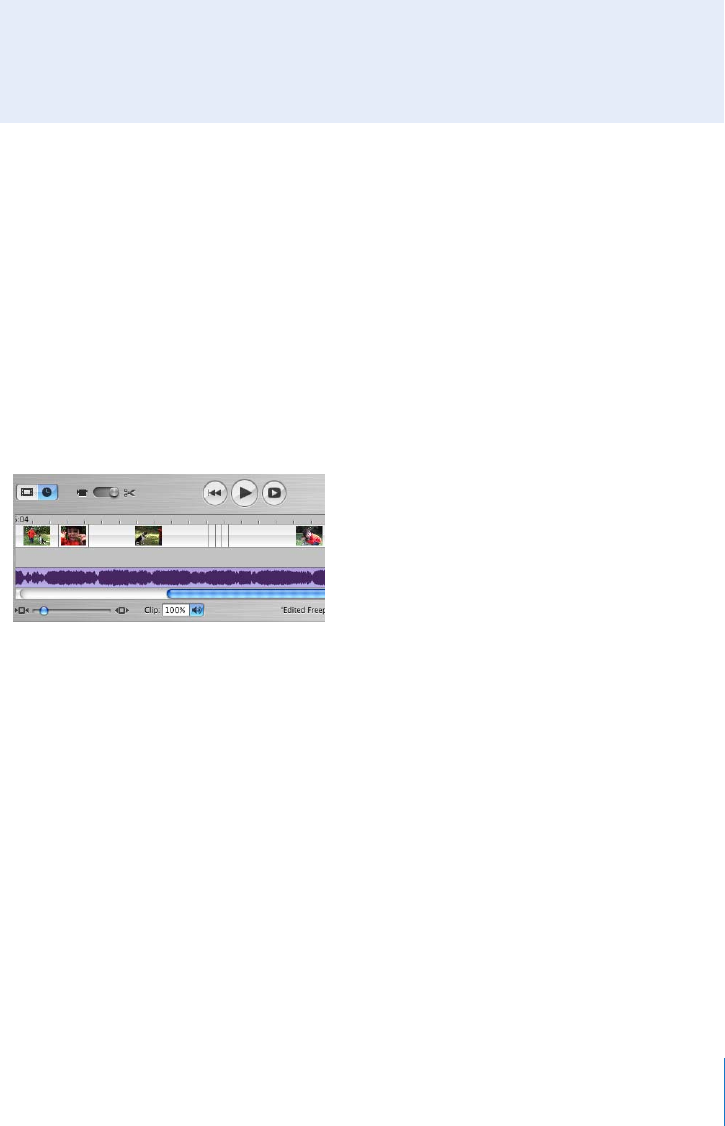
Chapter 9 Working With Sound 73
3Select the clip where you added the audio clip and click Play in the iMovie HD playback
controls to preview your work.
You can continue to adjust the position of the clip until you get it where you want it.
Getting Well-Synchronized Sound
To polish audio in your movie, making sounds occur just where you want them, you
can use iMovie HD’s audio waveforms to align, or “snap,” key video frames to key audio
events. For example, you can set video frames to start or end exactly at the start or end
of the audio with no awkward moments of silence. If you’re creating a slideshow, you
can make your photo clips change at audio peaks (such as a drum beat).
Viewing Audio Waveforms
Audio waveforms, shown below, are a graphic representation of audio intensity. While
an individual audio file can have a number of channels (such as left and right), iMovie
HD’s waveforms average all the channels in one waveform.
You can use waveforms to see where an audio clip builds in intensity and use these
visual cues to better align your video frames to the audio. Increasing the zoom of a clip
allows you to see more detail in the waveform.
To turn on waveforms:
mChoose View > Show Audio Waveforms.
If you don’t see waveforms in your tracks, choose View > Show Audio Waveforms to
turn off the feature. To see more detail in the waveforms, move the Zoom slider to the
right.
Did You Know? — Play Audio as You Move the Playhead
To help align sound with video, you can play the audio tracks as you drag the
playhead.
•Hold down the Option key as you drag the playhead.

74 Chapter 9 Working With Sound
Snapping Audio to Video
When snapping is turned on in your movie, you’ll see a yellow snap line (shown in the
illustration above) appear as you reach the end of video and audio clips or come within
3 or more frames of audio silence. When the yellow snap lines of your audio and video
align, you’ll have a very precise fit that would be difficult to achieve without snap lines.
To turn on snapping:
1Choose iMovie HD > Preferences.
2Click General and click the “Snap to Items in Timeline” checkbox.

10
75
10 Sharing Your Finished Movie
When you finish your iMovie HD project, you can
determine how you want to watch your movie and share
it with others.
You can:
•Send it in an email message.
•Post it on your .Mac HomePage.
•Save it to DV tape.
•Burn it on a DVD with iDVD.
•Save it as a QuickTime movie in a variety of formats.
•Send it via Bluetooth® wireless technology to other computers, mobile phones,
personal digital assistants, and more.
No matter which way you choose to view your movie, iMovie HD makes it easy to
create a movie file in the proper format. Exporting the finished movie is called sharing
the movie, and iMovie HD’s Share dialog makes it easy to do.
To share your movies with friends and family, you can use the standard export options
and iMovie HD sets up the movie with the appropriate format automatically. Start with
the Share dialog, shown below, and choose an option.
mTo see the Share dialog, choose File > Share.

76 Chapter 10 Sharing Your Finished Movie
Tip: If you want to share just part of your movie, you can select the clip or clips you
want to share and select the “Share selected clips only” checkbox.
Sending Your Movie By Email
You can send your movie as an attachment in an email message. When you click Email
in the Share dialog, you can select your email program and specify the movie name,
and your movie is automatically attached to a blank email. All you have to do is type an
address and a message and click Send.
Preparing Your Movie for a .Mac HomePage
You can transfer your movie .Mac HomePage to publish it on the Internet. Just click
HomePage in the Share dialog and type a name for your movie. When you click Share,
your movie is automatically sent to your HomePage so you can post it on the Internet.
Exporting to Your Video Camera
You can save your finished movie on DV tape in your video camera in raw digital video
format. This preserves the full quality of the original video, just as you shot it. Once the
movie is exported back to a tape in your video camera, you can view it in your camera
or watch it on TV by connecting your video camera directly to your television.
To export your movie back to tape:
1Connect your camera to your computer using a FireWire cable.
For more information, see Chapter 4, “Bringing Video Into iMovie HD.”
2Make sure you have a blank tape in your camera (or a tape that you don’t mind taping
over) and set your camera to VTR mode.
3Choose File > Share.
4Click Videocamera in the toolbar, then specify if you want to add black footage on the
tape before and after your movie.
5Click Share.
When the movie is finished exporting, you can use the tape as you would any other
digital videotape.
Note: If you have trouble exporting back to your camera, check to see if your tape is
write-protected. Or you may have a PAL device that has FireWire input disabled.
Contact the device manufacturer for more information.

Chapter 10 Sharing Your Finished Movie 77
Exporting to iDVD
iMovie HD can easily transfer your project to iDVD as a new iDVD project. You can
export your project complete with chapter markers.
To export a movie to iDVD using the Share dialog:
1Choose File > Share.
2Click iDVD.
3Click Share.
iMovie HD takes a little while to compress and export your movie. (The time it takes
depends on the length of your movie.) It’s best not to use your computer for other
tasks during the export process.
Your movie is transferred into a new iDVD project complete with theme and drop
zones ready for burning to a DVD.
You can share just a selection of clips and send them to an iDVD project. Select the
clips you want in the clip viewer or timeline viewer, and select the “Share selected clips
only” checkbox in the Share dialog box.
You can also use the iDVD pane to export your movie to iDVD. The advantage of using
the iDVD pane is that you can specify the chapters and chapter titles you want for a
movie before exporting.
To export a movie to iDVD using the iDVD pane:
1Click the iDVD button to open the iDVD pane.
2Click the Add Chapter button to add chapters. You can also select and change the
chapter titles.
3Click “Create iDVD Project.”
iMovie HD can also automatically import your video, compose your movie, and export
it to iDVD using the Make a Magic iMovie feature. When you create a Magic iMovie, you
can select the option to your movie become a new iDVD project this way as well.
Exporting for QuickTime Viewing Formats
All viewing formats (except for DV tape) are QuickTime formats that differ in size
depending on what they will be used for. For example, you can choose to set up a
movie for web viewing or transfer to a CD-ROM.
To export to QuickTime:
1Choose File > Share.
2Click QuickTime in the toolbar.
3Choose the type of file you want to create from the “Compress move for” pop-up menu
and click Share.

78 Chapter 10 Sharing Your Finished Movie
4Type a name for your movie file and select a destination.
5Click Save.
iMovie HD takes a little while to compress and save your movie. It’s best not to use your
computer for other tasks during the export process. How long it takes depends
primarily on how long your movie is, but also on how small the final movie file will be.
Smaller movie files take longer to compress.
The exported movie is a QuickTime file. To watch the movie on your computer screen,
double-click the movie file in the Finder.
Note: If you create a QuickTime movie using the Full Quality option, iMovie HD does
not export chapter markers or chapter titles in the movie.
QuickTime Expert Export Settings
If one of the preset export options doesn’t work for you, you can experiment with your
own QuickTime compression settings to get video output that’s best suited for your
needs.
To apply your own compression settings:
1Choose File > Share.
2Click QuickTime in the toolbar.
3Choose Expert Settings from the “Compress movie for” pop-up menu.
4Click Share.
5Choose the type of export format you want and click Options.
Here are a few guidelines to keep in mind as you experiment with your own
compression settings:
•MPEG-4 is the current standard codec (or compression/decompression format) used
for movies that will be viewed on the web.
•For movies that will be viewed on older Windows computer systems, you may want
to use the Motion JPEG codec.
•For a high-quality movie, you can export your movie in the Sorenson Video codec.
This format reduces the file size of the movie while retaining relatively high quality.
•In general, choose settings that give you the best tradeoff between file size and
video playback quality.
•Pick your desired movie frame size first. Frame size is the primary determiner of the
movie file size.

Chapter 10 Sharing Your Finished Movie 79
•Set the number of key frames next. A low number (such as every 10 frames) creates a
better quality movie with a larger file size.
•Set the frame rate last. You may get choppy video playback if you set the frame rate
to less than 12 frames per second.
Sharing Your Movies Via Bluetooth Wireless Technology
You can use Bluetooth technology to transfer movies wirelessly to other computers,
mobile phones, personal digital assistants, and more. To use Bluetooth devices with
iMovie HD, your Bluetooth device must be compliant with the Third Generation
Partnership Program (3G-PP) and have an appropriate video application to be able to
display movies.
When you click the Bluetooth icon in the Share dialog, iMovie HD automatically
prepares your movie for wireless transfer. It then presents a dialog that allows you to
discover and transfer your movie to a device that has the Bluetooth wireless
technology. You must have previously set up your computer to use Bluetooth wireless
technology using the Bluetooth preferences in the System Preferences pane.
Did You Know? Archiving a Project on DVD Disc
You can archive a copy of an iMovie HD project on a recordable CD or DVD disc. Most
projects will require the amount of space provided by a DVD disc. The archived copy
includes all the assets used in the project. You can then transfer the project and its
files to another computer, or keep the disc for safekeeping. Later you can use the disc
to restore the project onto your computer for further editing. Depending on the
capabilities of your optical disc drive, you can use iMovie HD to burn the archived
project on DVD-R, DVD-RW, DVD+R, and DVD+RW discs.
When you archive a project on DVD disc, you can’t play the DVD in DVD players,
QuickTime, or DVD Player. To create a DVD you can view your movie from, export the
movie to iDVD.
To archive a project on DVD disc, choose File > Burn Project to Disc. Confirm that you
want to create an archive of your project. Insert a blank DVD disk and click Burn.

Appendix
80
Keyboard Shortcuts
You can use your keyboard to quickly accomplish many
tasks in iMovie HD. To find the shortcuts for common
commands, look in the menus (or see the menu shortcuts
below). To complete an action, press the shortcut keys
indicated below.
Action Shortcut
Navigation
Play/Stop and Start/Stop capture Space bar
Move playhead to beginning of movie Home (not available on some keyboards)
Move playhead to end of movie End (not available on some keyboards)
Move playhead and play audio Option-drag playhead
Forward one frame Right Arrow
Forward ten frames Shift-Right Arrow
Move playhead forward Hold down Right Arrow
Back one frame Left Arrow
Back ten frames Shift-Left Arrow
Move playhead backward Hold down Left Arrow
Selection
Select multiple items Shift-click items
Select a range of items (in the clip viewer or
timeline viewer)
Click first item then Shift-click last item
Select items that are discontiguous (not
adjacent to each other)
Command-click items
Moving/cropping
Move audio clip Click clip, then Left Arrow or Right Arrow
Move audio clip ten frames Click clip, then Shift-Left Arrow or Right Arrow
Move video clip to create black frames Click clip in timeline viewer then Control-Left
Arrow or Right Arrow

Appendix Keyboard Shortcuts 81
Move video clip to create ten black frames Click clip in timeline viewer, then Control-Shift-
Left Arrow or Right Arrow
Move video crop marker Click marker, then Left Arrow or Right Arrow
Move video crop marker ten frames Click marker, then Shift-Left Arrow or Right
Arrow
Accept/cancel
Accept dialog (OK) Return
Cancel dialog Esc
Cancel rendering Command-period (.)
Titling
Move between text fields Tab
iMovie HD menu
Preferences Command-comma (,)
Hide iMovie HD Command-H
Hide Others Option-Command-H
Quit iMovie HD Command-Q
File menu
New Project Command-N
Open Project Command-O
Close Window Command-W
Save Project Command-S
Import Shift-Command-I
Share Shift-Command-E
Save Frame Command-F
Show Info Command-I
Show Trash Shift-Command-T
Empty Trash Shift-Command-Delete
Edit menu
Undo Command-Z
Redo Shift-Command-Z
Cut Command-X
Copy Command-C
Paste Command-V
Select All Command-A
Select Similar Clips Option-Command-A
Select None Shift-Command-A
Action Shortcut

82 Appendix Keyboard Shortcuts
Crop Command-K
Split Video Clip at Playhead Command-T
Create Still Frame Shift-Command-S
View menu
Switch to Clip Viewer or Timeline Viewer Command-E
Scroll to Playhead Option-Command-P
Scroll to Selection Option-Command-S
Zoom to Selection Option-Command-Z
Show Clip Volume Levels Shift-Command-L
Show Audio Wave Forms Shift-Command-W
Markers menu
Add Bookmark Command-B
Delete Bookmark Shift-Command-B
Previous Bookmark Command-[
Next Bookmark Command-]
Add Chapter Marker Shift-Command-M
Delete Chapter Marker Option-Command-M
Advanced menu
Extract Audio Command-J
Paste Over at Playhead Shift-Command-V
Lock Audio Clip at Playhead Command-L
Window menu
Minimize Command-M
Help menu
iMovie Help Command-?
Action Shortcut
www.apple.com/ilife/imovie
© 2005 Apple Computer, Inc. All rights reserved.
Apple, the Apple logo, FireWire, iLife, iMovie, iPod, iTunes, Mac, Macintosh, Mac OS, and QuickTime are
trademarks of Apple Computer, Inc., registered in the U.S. and other countries. GarageBand, iPhoto, and iSight
are trademarks of Apple Computer, Inc. .Mac is a service mark of Apple Computer, Inc. PowerPC is a trademark
of International Business Machines Corporation, used under license therefrom. The Bluetooth word mark and
logos are owned by the Bluetooth SIG, Inc., and any use of such marks by Apple Computer, Inc. is under license.
019-0264
