Aputure Imaging DECGRIP DEC Vari-ND Grip User Manual 082 20170217
Aputure Imaging Industries Co., Ltd DEC Vari-ND Grip 082 20170217
User Manual
Product Manual
English
Nomenclature
FCC Compliance Statement
Detailed product manual for Aputure DEC Vari-ND can be found on the movie solution page on www.aputure.com .
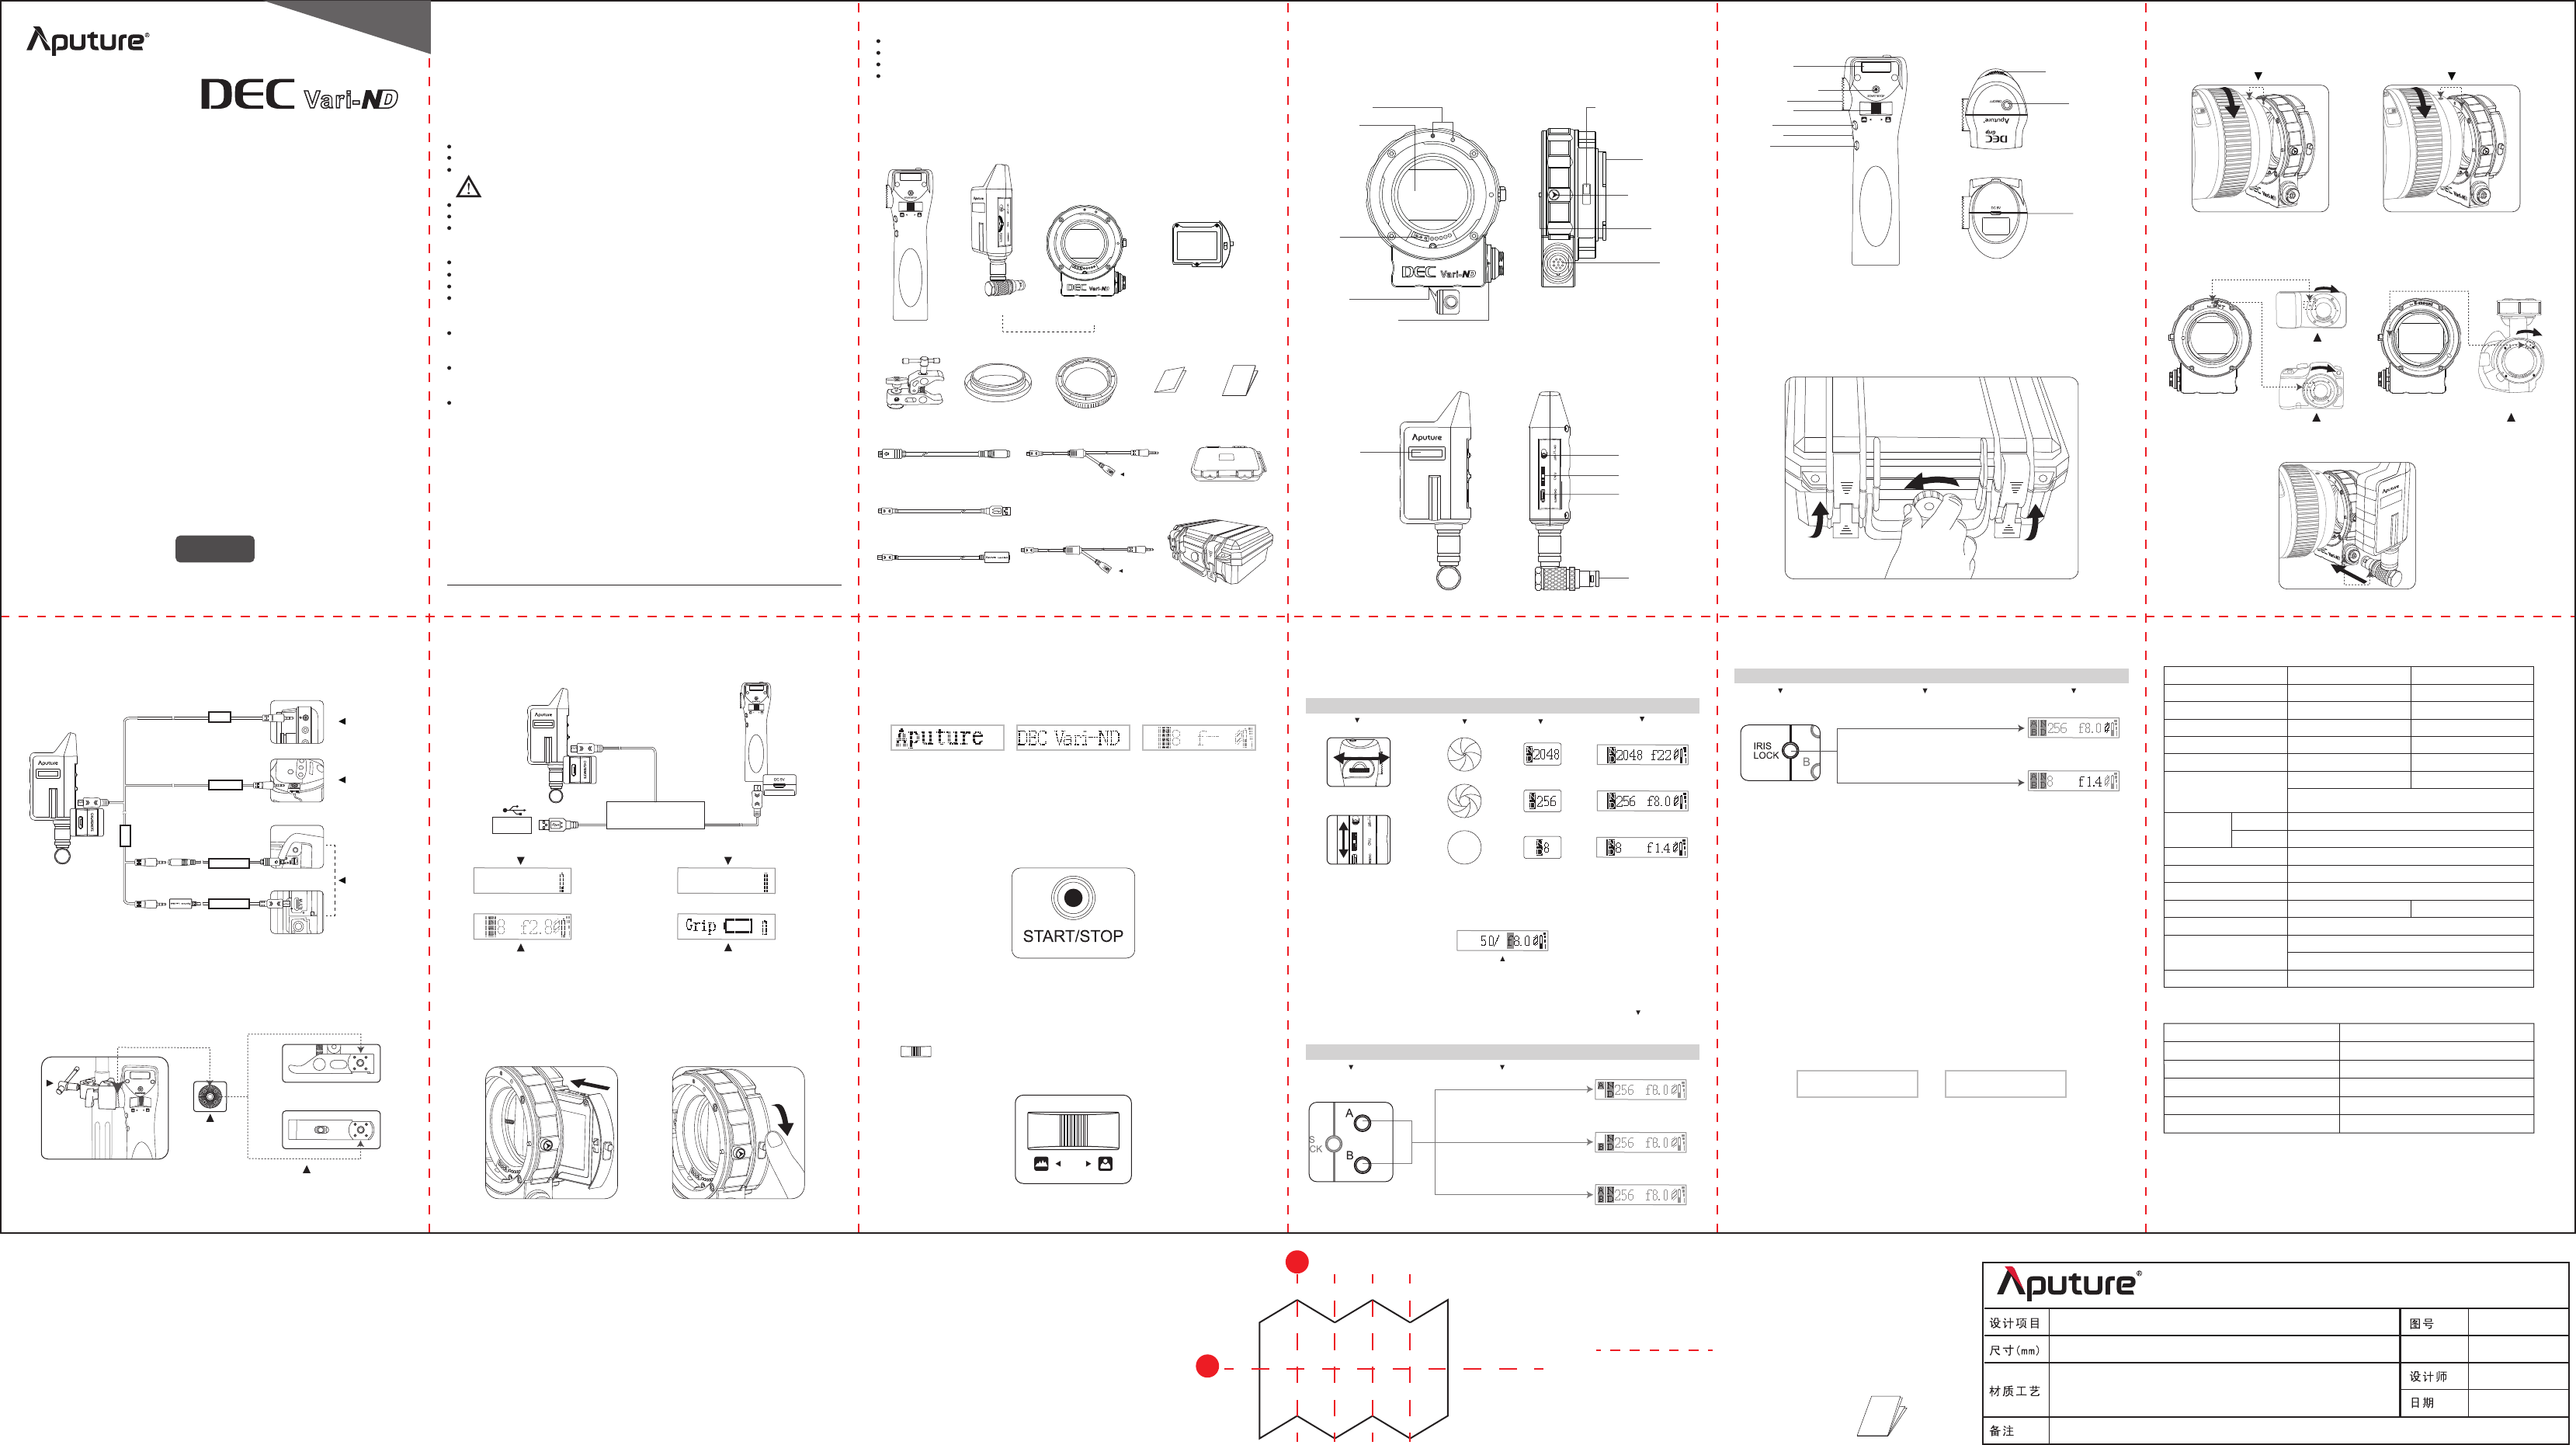
Item check list
Power switch
Charge / Remote /
Update port
OLED screen
The battery icon will blink while charging When this icon shows, that means the battery is fully charged.
Tips and trouble setting
6. Max aperture mode & Vibration mode
Dial < >to move the focus. Turn left to move the focus faraway and right for closer. The more you move
the focus shifter, the faster the focus change will be.
* The grip will blink as follows:
1. Please charge the Aputure DEC Vari-ND within 3 minutes after the low battery icon appeared in case of
unstable work.
2. Please charge for the grip before using it again if it was powered o because of low battery.
3. The aperture value of some lenses might not be displayed correctly.
4. Numerous focus pulling may change the memory of stop A and B.
5. Suggest to use the Canon EF L lens or Canon STM lens. Other lenses especially made by the third party may
cause the incoherent movement when being controlled by the DEC Vari-ND.
6. If the lens is taken from a cold environment into a warm one, condensation may develop on the lens surface
and internal parts. To prevent condensation in this case, rst put the lens into an airtight plastic bag before
taking it from a cold to warm environment. Then take out the lens after it has warmed gradually. Do the same
when taking the lens from a warm environment into a cold one.
7. Aputure DEC Vari-ND has been paired before shipping. You can follow the steps below if it is needed:
1) Adapter keeps OFF;
2) First press <START/STOP> of the Grip,then simultaneously Press<ON/OFF> of the Grip. The Grip will display
"Pairing..."
3) Pull <ON/OFF> of the adapter to <ON>.The OLEDs both display "Pair_OK". This means pairing is nished
8. If you use manual-focus lens to DEC Vari-ND, you cannot adjust focus remotely.
9. Firmware of adapter is constantly under development, which means Aputure may release latest rmware on
ocial website:
1) Website: http://www.aputure.com/DEC-Vari-ND/Update
2) Please update rmware following the instructions on our ocial website.
Pairing... Pair_OK
Showing low battery of the adapter
(the same display appears on the adapter)
Showing low battery of the grip
(without display on the adapter)
1. Adapter
Release the shifts on both sides to open the safe case. You need loosen the balance valve anticlockwise before
if needed.
2. Attaching
-1- -2- -3- -4- -5-
-6- -7- -8- -9- -10- -11-
折页方式:
折页成型(英文在正面):
1
2
为折线(不印刷)
082 说明书 AP-082-PR-02
20170119
Jolin
版 本 V1.0
深圳市爱图仕影像器材有限公司
585*280 mm 折页尺寸:97.5*140mm
70g 书纸,正反两面印刷
料号:
The list of tested compatible Lenses is below and more can be found on the ocial website:
http://www.aputure.com/DEC-Vari-ND/technique
2. Start/Stop recording
3. Adjust focus
4. Adjust aperture and ND
Adapter: Switch Power switch to ON to start up. Switch Power switch to OFF to close down.
Grip: Short press the Power switch to switch the state of starting up and closing down.
Feature
1. Power on/o
* Please full charge the Aputure DEC Vari-ND the rst time you use it.
Max aperture mode
(Short press: open/close max aperture mode
Vibration mode
(Long press: open/close vibration mode)
5. A、B stops
Short pressing <A>/<B> on grip can set the position memory of location. After setting both
positions, moving focus between A and B can be achieved by dialing.
3. Connect remote cable
According to the port of your camera, please choose the correspond remote cable to connect adapter to your
camera.
2. Control box
Connector
3. Grip
OLED screen
A stop
B stop
IRIS LOCK
START/STOP button
Focus shifter
1/4”socket
Charge port
Aperture/ND wheel
Power switch
Preparation
1. Open safe case
1) Align Lens mount indexes on the adapter and lens, then turn the lens by the arrow until it snaps into place.
2) Align the indexes on the adapter and camera, and then turn the adapter by the arrow until it snaps into place.
3) Align the indexes on the connectors, plug in the direction shown by picture.
*Aputure DEC Vari-ND is able to work while charging by connecting to USB cable which attached to an AC
adapter (5V 1A).
The grip can be set on rocker, tripod, shoulder and other supporting systems.
4. Install Claw Clip
* You can choose either side as the picture shows according to
your need.
Locking part
Charge the grip and the adapter by connecting Charge & Update cable, which should be attached to an AC
adapter (5V 1A).
5. Charging
6. Install lens assembly
5V/1A Charge & Update
Button Meaning
Button Meaning Display
Specications
Battery Durance
1400mAh
5V
≤500mA
≤10h
Based on a fully charged Li-ion battery, a Canon EF 24-70mm/
2.8L II USM and CIPA testing standards.
65±20% (without condensation)
2.4GHz
≤100m
2600 mAh
Micro USB
5V
3.7V 3.7V
≤300mA
≤48h
0℃-40℃
-20℃-60℃
ND Range ND8~ND2048
Components
Battery Capacity
Charge/Remote/Update port
Charge Voltage
Battery Voltage
Peak Current
Temperature Operation
Storage
Humidity
Remote Rate
Remote Range
Construction Accessories
Lens Compatibility
Adapter
1/4” jack
Grip
Claw clip
Micro USB (charge only)
Camera Compatibility
MFT(Micro 4/3 )-mount (for all frame sizes) camera
This device complies with Part 15 of the FCC Rules. Operation is subject to the following two conditions:
(1) This device may not cause harmful interference, and(2) This device must accept any interference received,
including interference that may cause undesired operation.
Warning: Changes or modications not expressly approved by the party responsible for compliance could void
the user's authority to operate the equipment.
NOTE: This equipment has been tested and found to comply with the limits for a Class B digital device, pursuant
to Part 15 of the FCC Rules. These limits are designed to provide reasonable protection against harmful
interference in a residential installation. This equipment generates uses and can radiate radio frequency energy
and, if not installed and used in accordance with the instructions, may cause harmful interference to radio
communications. However, there is no guarantee that interference will not occur in a particular installation. If
this equipment does cause harmful interference to radio or television reception, which can be determined by
turning the equipment o and on, the user is encouraged to try to correct the interference by one or more of
the following measures:
Reorient or relocate the receiving antenna.
Increase the separation between the equipment and receiver.
Connect the equipment into an outlet on a circuit dierent from that to which the receiver is connected.
Consult the dealer or an experienced radio/TV technician for help.
RF warning statement:
The device has been evaluated to meet general RF exposure requirement. The device can be used in portable
exposure condition without restriction.
Trademarks
Canon is a trademark or registered trademark of Canon INC in the P.R.C. and other countries.
Panasonic is a trademark or registered trademark of Panasonic Corporation in the P.R.C. and other countries.
BMD is a trademark or registered trademark of Blackmagic Design Pty. Ltd in the P.R.C. and other countries.
Sony is a trademark or registered trademark of Sony Corporation in the P.R.C. and other countries.
All other corporate and product names and trademarks mentioned in this manual are the property of their respective
owners.
short press< A >: Set/Cancel A stop.
short press< B >: Set/Cancel B stop.
set both A and B stop successfully.
* Please rst set the camera to be in "Release without Lens enabled" mode if it does have before using together with
the DEC Vari-ND.
Aperture/ND wheel
After connecting adapter to your camera with remote cable, by pressing <Start/Stop>, you can start
or stop the video recording.
Vari-ND Version DEC Adapter
Instructions
Aputure DEC Vari-ND is a wireless remote adapter that allows you to attach Canon EF-mount lenses to MFT
mount or E-mount cameras. In addition to retain all the DEC features, but also equipped with electronic Vari-ND
lens assembly, from ND8 to ND2048, multi-steps light adjusting, even in bright light can also use large aperture
motion blur shooting, and also helps you to expand the possibilities of Canon EF-mount lenses when you
capture video with cine style camera.
Foreword
WARNING:
Please read this product manual carefully.
Keep this product manual. Always include this product manual when passing the products on to third parties.
Heed all warnings and follow all instructions in this product manual.
Do not place the product in a place where there are corrosive chemicals to protect the
product from corrosion, corrosion may cause the product to malfunction.
Use only a microber and dry cloth for cleaning the product.
Operate carefully to not cause any damage by dropping or physical shocking it.
Do not leave the product near anything that has a strong magnetic eld such as a magnet or electric motor.
Also avoid using or leaving the product near anything emitting strong radio waves such as a large antenna.
Strong magnetic elds can cause the product to malfunction or destroy data transferring.
Do not leave the product in excessive heat, high temperatures can cause the product to malfunction.
To reduce the risk of re or electric shock, do not use the product near water.
Keep storing the product in a dry, clean, dust-free environment.
Please have the product checked by the authorized service or agent if your product has some problems.
Please note that this warranty does not apply to repair arising out of the malfunction of unauthorized
disassembly, although you may request such repairs on a chargeable basis.
Use of original Aputure cable accessories is recommended. Please note that this warranty does not apply to
repairs arising out of the malfunction of non-original Aputure accessories, although you may request such
repairs on a chargeable basis.
The product is certicated by RoHS, CE, FCC and JAPAN MIC. Please operate the product in full compliance
with the operation standards. Please note that this warranty does not apply to repair arising from malfunction,
although you may request such repairs on a chargeable basis.
The instructions and information in this manual are based on thorough, controlled company testing
procedures. Further notice will not be given if the design or specications change.
Adapter
(Include Vari-ND lens assembly)
Grip
Charge & Update cable
Lanc cable
GH series cable (for Panasonic GH series)
Warranty card Product manual
Safe case
Safe case for lens assembly
DC IN
DC IN
Control box
DEC Vari-ND adapter
Claw clip Lens cap Lens rear cap
Sony D Type cable (for SONY series)
Lanc 2 Multi Adapter Cable
(just for E-mount)
Transparent lens assembly
BMD series
Lanc
GH Series
Sony D Type
Lanc 2 Multi
CHG
Lanc
* Turn it the opposite direction can cause the lens to demount.
* Please rst turn o all the power of the devices, then push down the lens release button as the pasted arrow
shows on the button before detaching or changing the lens.
Panasonic GH series
Sony E-mount series
Aperture/ND wheel Aperture ND Display
Display
MaxMin
Max
Min
E-mount (for all frame sizes) camera
EF 35mm f/1.4L USM
EF 40mm f/2.8 STM
EF 50mm f/1.4 USM
EF 24-105mm f/4L USM
EF-S 18-55mm f/3.5-5.6
EF-S 18-200mm f/3.5-5.6 IS
EF 50mm f/1.8 II
EF 16-35mm f/2.8L II USM
EF 24-70mm f/2.8L II USM
EF 70-200mm f/2.8L IS II USM
EF 100mm f/2.8L II USM
EF 85mm f/1.2L II USM
Lens lock pin
Contacts
Lens mount index
Camera mount
Connector
1/4” Thread
Connector mount index
Lens assembly
Lens release button
*Directed by the arrow
Lens assembly release button
BMD series
Panasonic GH series Sony E-mount series
Canon EF mount lens(red dot)Canon EF-S mount lens(white dot)
Package includes the following items:
Push the lens assembly release button, you can eject the lens assembly. Depending on the use, you can replace
the installation of Vari-ND lens assembly or transparent lens assembly. Note that save the replaced lens assembly
in the lens assembly safe case.
Short pressing <Aperture/ND wheel> on grip or control box can switch to adjust the aperture or ND, then dial
the wheel to adjust the aperture or ND. The OLED screens on both adapter and grip will display the f or ND value.
Canon EF, EF-S AF lenses
* When the transparent lens assembly is used,the OLED screens on both adapter and grip will display the focal length
and aperture information , then only the aperture can be adjusted.
* In the max aperture mode,do not support the grip for remote control to start and stop video shooting.
Thank you for purchasing the Aputure DEC Vari-ND!
2.转接环安装
产品视图
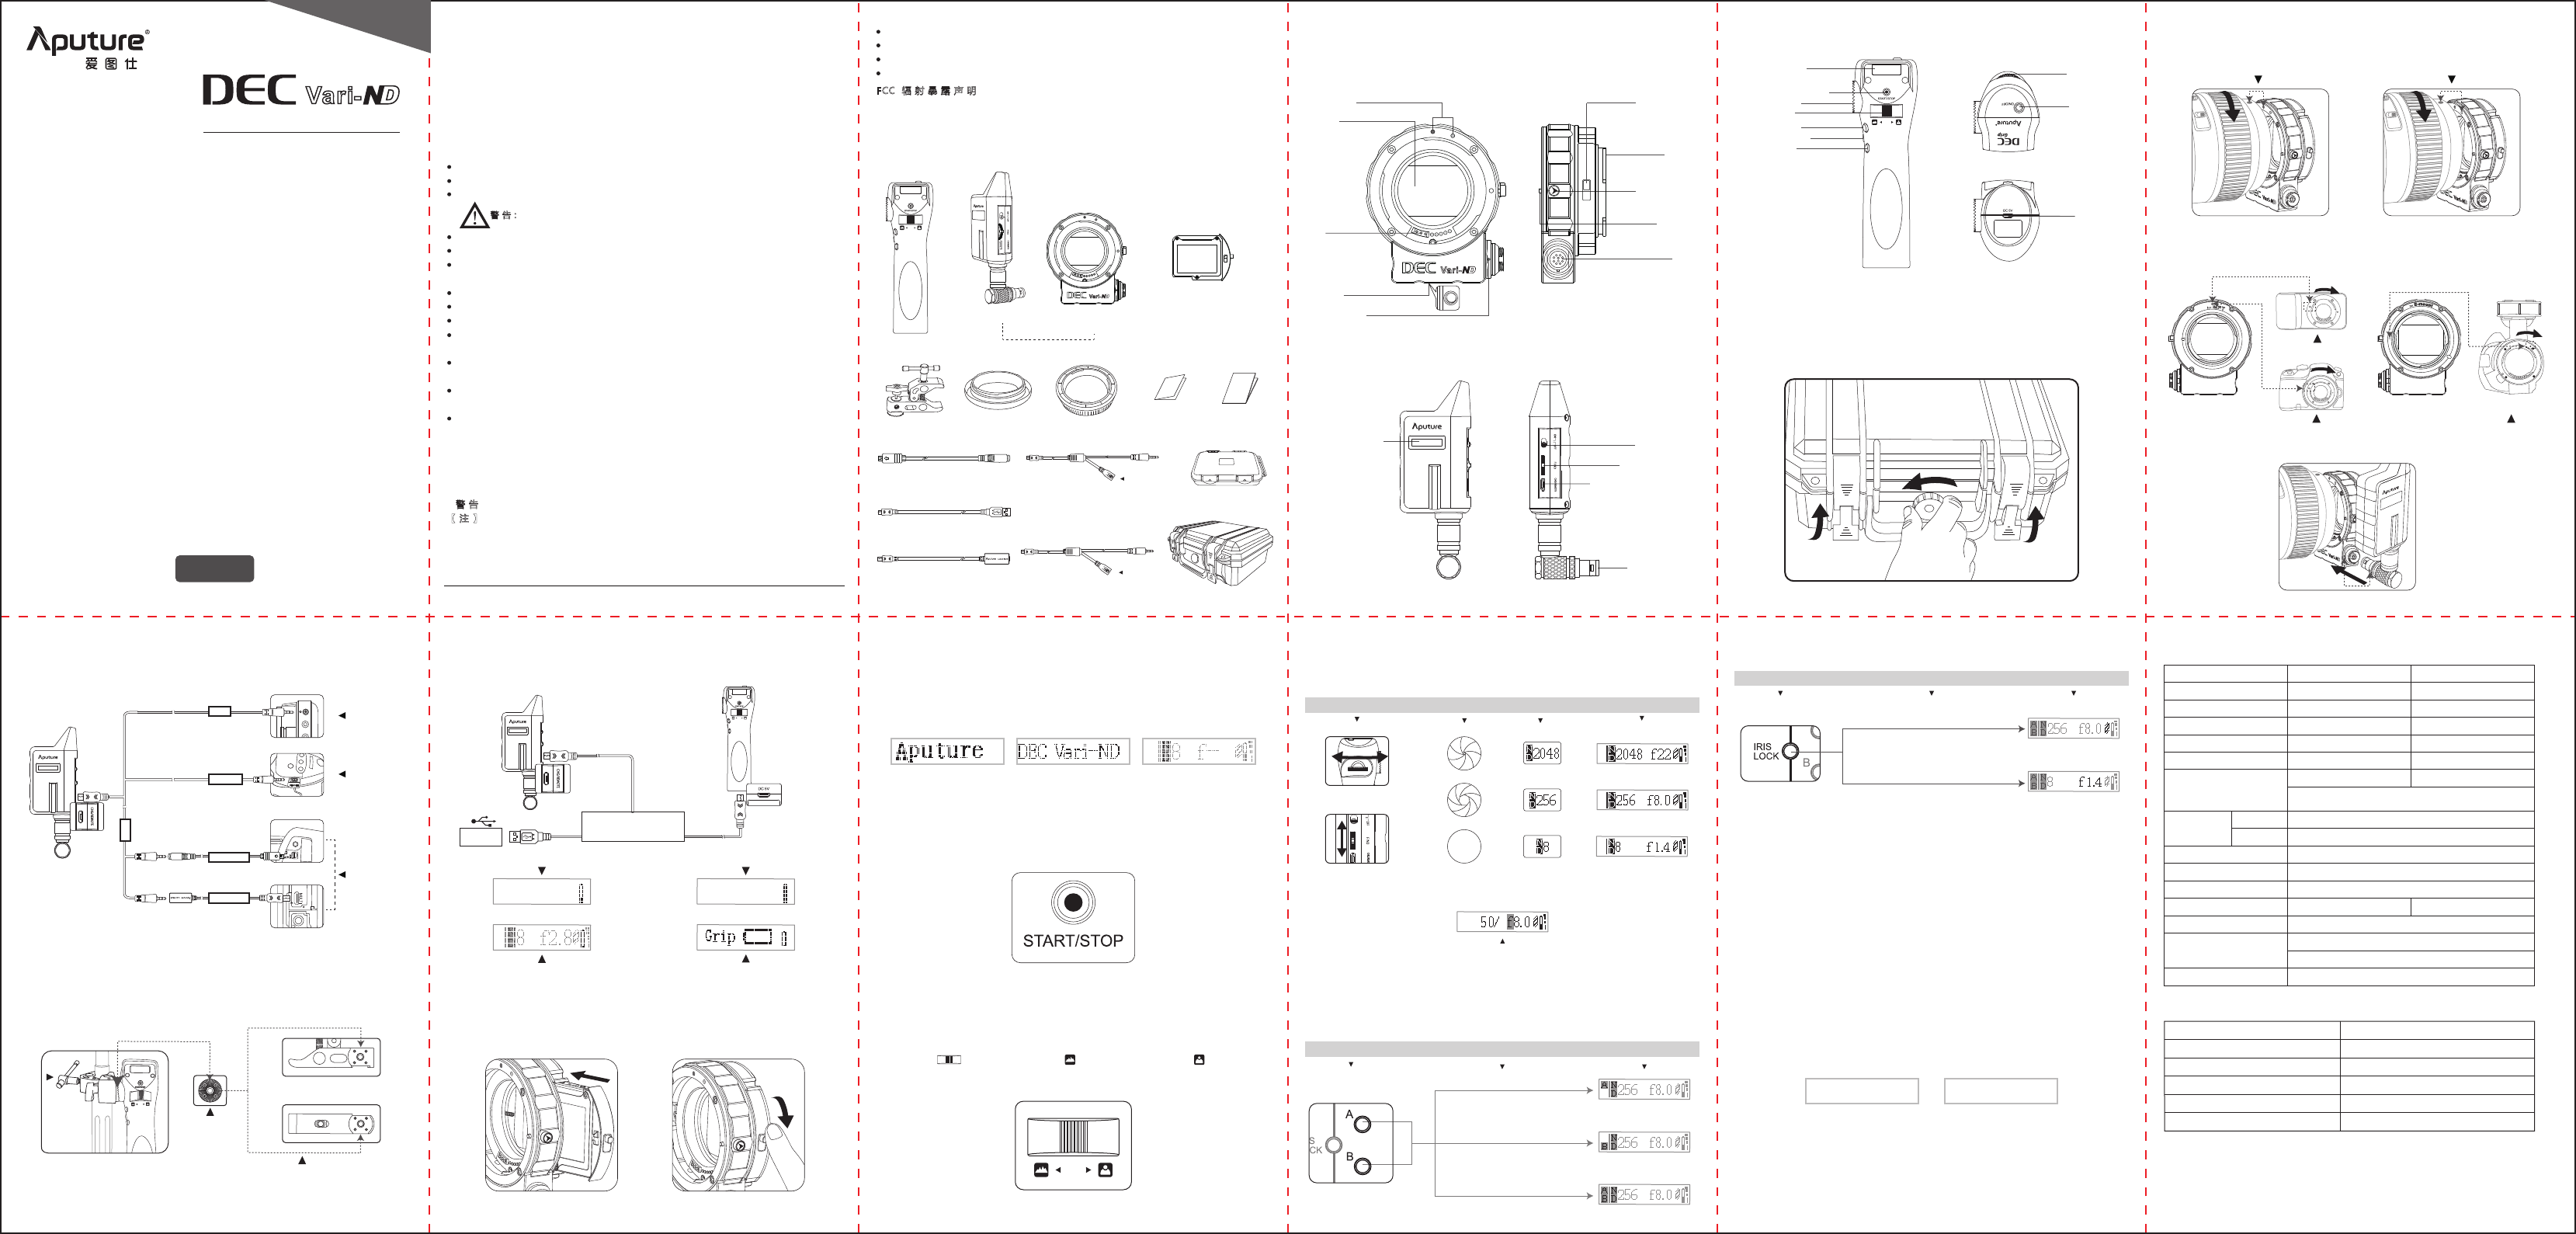
物品清单
安装与使用
向上提起安全箱两侧扳扣,即可打开。在有些情况下,您需要先逆时针旋松气压平衡阀。
1.开箱
2.开始/停止拍摄视频
常见问题及小提示
1.转接环
2.控制盒
3.手柄
使 用 者 指 南
中文
1)安装镜头:对准镜头与转接环的安装标识,按箭头方向旋转镜头安装至转接环。
2)安装相机: 对准相机安装标识,按箭头方向旋转相机安装至转接环。
1. 当出现低电报警时请及时充电,否则3分钟内产品会自动关机,并有可能造成工作不稳定。
2. 手柄低电关机后需进行充电才能开机。
3. 有些镜头的最大光圈值可能不能正确显示。
4. A、B限位在多次往复运动后可能会发生位置偏移。
5. 建议使用佳能EF L镜头或STM 镜头,佳能低端的镜头或第三方的EF镜头会导致镜头运动的不连贯。
6. 如果将转换器从寒冷的环境拿到温暖的环境中,转换器表面和内部零件可能会发生结露。
为防止在这种情况下出现结露,将转接器从寒冷的环境拿到温暖的环境之前,先将转接器放入密封的塑
料袋里。转接器逐渐变暖以后,再将其拿出来使用。将镜头从温暖的环境拿到寒冷的环境中时,也请使
用同样的方法。
7. 本产品出厂时已经完成对码。特殊情况下需要对码,请按照以下方式操作:
1)确定转接器处于关闭状态;
2)保持长按手柄<START/STOP>按键,然后短按手柄 <ON/OFF>,至手柄OLED屏显示“Pairing...”
字样,再释放手柄<START/STOP>按键。
3)将转接器的电源开关推至ON。两部分显示屏会显示“Pair_OK”字样。配对成功。
两部分显示屏将显示转接器上的信息:焦距或者ND、光圈、电池电量、信号场强等。
8. 使用手动调焦镜头,远程控制焦距功能将不能使用。
9. 本产品的接环部分支持固件升级:
1)升级固件下载网址:http://www.aputure.com/cn/DEC-Vari-ND/Update
2)升级固件时,请务必参照升级固件页面的步骤指引。
规格参数
* 相反的操作可卸下镜头,按照镜头释放按钮上的指示方向按下镜头释放按钮,反向旋转镜头即可卸下镜头。
Pairing... Pair_OK
爱图仕电子密度镜版多功能镜头转接器是一款连接佳能EF卡口镜头与MFT(Micro 4/3)卡口或
E-mount 卡口摄影机的无线控制转接器。除了保留DEC所有功能外,还配备电子可调密度镜,
从ND8到ND2048,多级调光,即使在强光下也能使用大光圈拍摄运动模糊,同时可使您的EF卡
口镜头轻松适配多种相机、摄像机,满足日益丰富的视频拍摄需求。
前言
感谢您购买爱图仕产品
重要提示
FCC 符合声明
您可以在本公司网站 中的炫彩视频系列产品栏目下找到本设备的详细使用者指南。www. aput ure.com.cn
OLED显示屏
A限位按键
B限位按键
光圈锁定按键
录制启动/停止按键
调焦拨杆
1/4”螺孔
充电口
光圈/ND拨盘
电源开关
-1- -2- -3- -4- -5-
-10- -11--6- -7- -8- -9-
安全箱
控制盒
充电升级线 (Charge & Update)
松下系列遥控线 (GH series) 镜片组件安全箱
保修卡 使用者指南
供电口
供电口
转接环
(可调密度镜片组件)
电子密度镜版多功能镜头转接器
手柄
镜头盖蟹钳夹 镜头后盖
光圈全开模式
(短按: 开启/关闭光圈 全开模式)
3)安装转接器: 对准控制盒与转接环安装标识,按箭头方向插入。
转接器电源开关拨至ON,开机;拨至OFF,关机。短按手柄电源开关ON/OFF,切换手柄开关机
状态。机器成功开启后,屏幕如下显示:
可夹持于摇臂、肩托、脚架等固定设备上。
4.蟹钳夹安装
* 蟹钳夹两个面都可安装手柄与之配合的紧固件,
请根据您的使用需要进行选择。
松下 GH 系列 索尼 E-mount 系列
BMD 系列
3.连接遥控线与相机
如图所示,根据不同的相机遥控插孔,用不同的遥控线连接控制盒和相机
* 若需实现边充电边工作,可使用5V1A适配器或移动电源通过充电线接入充电口。
功能介绍
1.开机
5V/1A
充电时,使用充电升级线 (Charge & Update)。Micro USB端连接需充电的手柄或转接器,USB端连接
5V1A的交流适配器(另购)。
5.充电
6.安装镜片组件
充电中,电池图标会闪动 此图标显示电池已充满
* 发生电池低电压情况时,手柄的显示屏将分别提示如下:
显示手柄电量不足(转接器上将不显示此提示)显示转接器电量不足(转接器上也将显示)
Charge & Update
6.光圈全开模式和震动提示
*初次使用本产品请先充满电。
震动提示
(长按: 开启/关闭 震动提示)
OLED显示屏 电源开关
遥控口/充电口/升级口
连接器插头
按键 功能 显示
4.光圈/ND拨盘调节
5.A、B焦点位置记忆
短按手柄上的<A>/<B>按键,可设置记忆焦点位置。当焦点位置A、B都设置完成后拨动调焦拨杆,可实
现在焦点A、B之间变速调焦.
紧固件
松下 GH 系列
索尼 E-mount 系列
BMD 系列
* 更换或卸下镜头前请先关闭所有设备的电源。
请认真阅读本使用者指南。
请妥善保管使用者指南。将产品交给他人使用时,请务必附带本使用者指南。
请注意所有警告提示并遵守使用者指南内的所有指令。
请勿将本产品放置在有腐蚀性化学物品的地方,以免产品受到腐蚀,被腐蚀可能
引起产品故障。
请用软布、干布清洁本设备。
本产品属于精密仪器,请避免使用时掉落、碰撞或承受重击。
请勿将本产品靠近具有强磁场的物体,如磁铁或电动机。另外也要避免将本产品靠近发出较强
无线电波的物体,如天线。强磁场可能引起产品故障或破坏数据传输。
请勿将本产品放置在温度过高的地方,高温可能导致设备内电池受损或爆炸。
请勿在滴水或易溅湿的环境使用本产品,否则有短路或电击的危险。
请将本产品保存在干燥、干净、无尘的环境中。
需要维修时请联系授权的维修人员。本产品内有精密电子线路。未经许可擅自拆卸导致故障,
不在本司保修范围内,但用户可以付费维修。
建议使用爱图仕原厂线缆。由于使用非爱图仕原厂附件导致本产品的任何损坏,不在本司保修
范围内,但用户可以付费维修。
本产品已通过RoHS、CE、FCC和日本MIC认证,请参考相关国家标准使用和操作。因使用操
作不当而造成机器损坏,不在保修范围内,但用户可以付费维修。
此使用者指南依据本公司严格测试制定。设计和规格如有变更,恕不另行通知。
警告:
此设备符合 FCC 规则第 15 部分中的规范。操作设备须符合以下两个条件:
(1) 此设备不会导致有害干扰;
(2) 此设备可承受任何外来干扰,包括可能导致非预期操作的干扰。
【警告】如果用户未经爱图仕明确许可而进行改动或改装,可能会丧失继续操作该设备的权利。
【注】此设备经测试确定符合 B 类数码设备(依照 FCC 规则第 15 部分规范)的限制。这些限
制的设计旨在为居住场所安装条件下的有害干扰提供合理的保护。此设备生成、使用并可以发射
射频能量。如果未按照指示安装和使用,可能对无线电通信造成有害干扰。但是,在特定安装条
件下,不保证这类干扰不会发生。如果此设备确实对无线电或电视机接收信号造成有害干扰,而
这点可以通过关闭和打开设备来确定,那么建议用户尝试使用以下一种或多种措施来消除干扰:
调整接收天线的方向或重新放置。
扩大设备与接收器之间的距离。
将设备连接到其他电路的插座中,而不是接收器所连接电路的插座。
咨询经销商或有经验的无线电/电视机技术人员以获得帮助。
FCC 辐射暴露声明
本设备符合FCC针对未受控制环境所制定的辐射暴露限制。最终用户必须遵守射频暴露符合性的特
定使用说明。
3.变速调焦
拨动调焦拨杆< >,向左表示焦点向远处< >运动,向右表示焦点向近处< >运动。此外还
可根据使用需要控制调焦速度,向左或向右的拨动幅度越小,焦点运动的速度越慢。反之,则越快。
* DEC Vari-ND与部分相机适配时,请先将相机设置到“无镜头拍摄“模式。如GH4,设置为“自定义—无镜头拍
摄—开”。
* 使用透明镜片组件时,转接器和遥控手柄显示屏上将显示焦距和光圈信息,此时只能调节光圈。
* 在光圈全开模式时,不支持手柄进行遥控启动和停止视频拍摄。
光圈/ND拨盘
将遥控线连接控制盒和相机后,按下<Start/Stop>按键,启动视频拍摄;再次按下<Start/Stop>按键,
停止视频拍摄。
透明镜片组件
Vari-ND Version DEC Adapter
电子密度镜版多功能镜头转接器
Lanc
GH Series
Sony D Type
Lanc 2 Multi
CHG
Lanc
索尼D口遥控线
(Sony D Type,仅用于E-mount 版本)
遥控线(Lanc)
Lanc 至多功能USB转接线
(仅用于E-mount 版本)
MaxMin
Max
Min
按键 功能 显示
短按< A >: 记忆/取消 当前焦点位置
短按< B >: 记忆/取消 当前焦点位置
A、B设置成功
光圈/ND拨盘 光圈 ND 显示
镜头固定销
触点
镜头安装标志
相机卡口
连接器
1/4”螺孔
连接器安装标志
镜片组件
镜头释放按钮
*箭头指示方向为释放镜头方向
镜片组件释放按钮
佳能 EF镜头 (红点) 佳能 EF-S镜头 (白点)
Canon等是佳能公司在中国或其他国家的商标及产品型号。
Panasonic等是松下公司在中国或其他国家的商标及产品型号。
BMPCC等是Black Magic Design公司在中国或其他国家的商标及产品型号。
Sony等是索尼公司在中国或其他国家的商标及产品型号。
以上未被提及的其他名称和产品可能为其各自公司的商标或注册商标。
商标声明
经测试兼容镜头列表,更多兼容镜头请查询:
http://www.aputure.com/cn/DEC-Vari-ND/technique
EF 35mm f/1.4L USM
EF 40mm f/2.8 STM
EF 50mm f/1.4 USM
EF 24-105mm f/4L USM
EF-S 18-55mm f/3.5-5.6
EF-S 18-200mm f/3.5-5.6 IS
EF 50mm f/1.8 II
EF 16-35mm f/2.8L II USM
EF 24-70mm f/2.8L II USM
EF 70-200mm f/2.8L IS II USM
EF 100mm f/2.8L II USM
EF 85mm f/1.2L II USM
电池容量
充电/遥控/升级端口
充电电压
工作时长
温度 工作温度
储存温度
湿度
遥控频率
遥控距离
安装附件
兼容镜头
兼容相机
ND范围
转接器
1400mAh
5V
≤500mA
≤10h
以CIPA标准测试(EF 24-70mm/2.8L II USM)
65±20%(不结露)
2.4GHz
≤100m
1/4”螺孔
Micro 4/3 (MFT)卡口的相机
手柄
2600 mAh
Micro USB(仅供充电)
Micro USB
5V
电池电压 3.7V
≤300mA
≤48h
蟹钳夹
0℃-40℃
-20℃-60℃
工作峰值电流
3.7V
ND8~ND2048
类别
E-mount卡口的相机
佳能EF,EF-S卡口AF镜头
包装内包含以下物品:
拨动镜片组件释放拨钮,可以弹出镜片组件。根据使用需要,可以替换安装可调密度镜组件或透明镜片组
件使用。注意将替换下的镜片组件保存在镜片组件安全盒里。
短按手柄或控制盒上光圈/ND拨盘可切换调节光圈或ND,拨动拨盘即可调整光圈或ND大小,转接器和遥
控手柄显示屏上将实时显示调整后的光圈或ND数值。
显示