Aram Huvis APICT API-CT User Manual API ct100 EN preview 20180614
Aram Huvis Co.,LTD. API-CT API ct100 EN preview 20180614
User manual
CT
User Manual
Application Settings
CRM
Analysis Skin Tone
Content
H/W Parts
System Settings
Application Settings - Skin Tone
3
4
5
7
8
9
10
11
12
14
Warranty
Components
Troubleshooting & FAQ
Download & Install
How to Connect with Programm
Device Functions
Device Settings
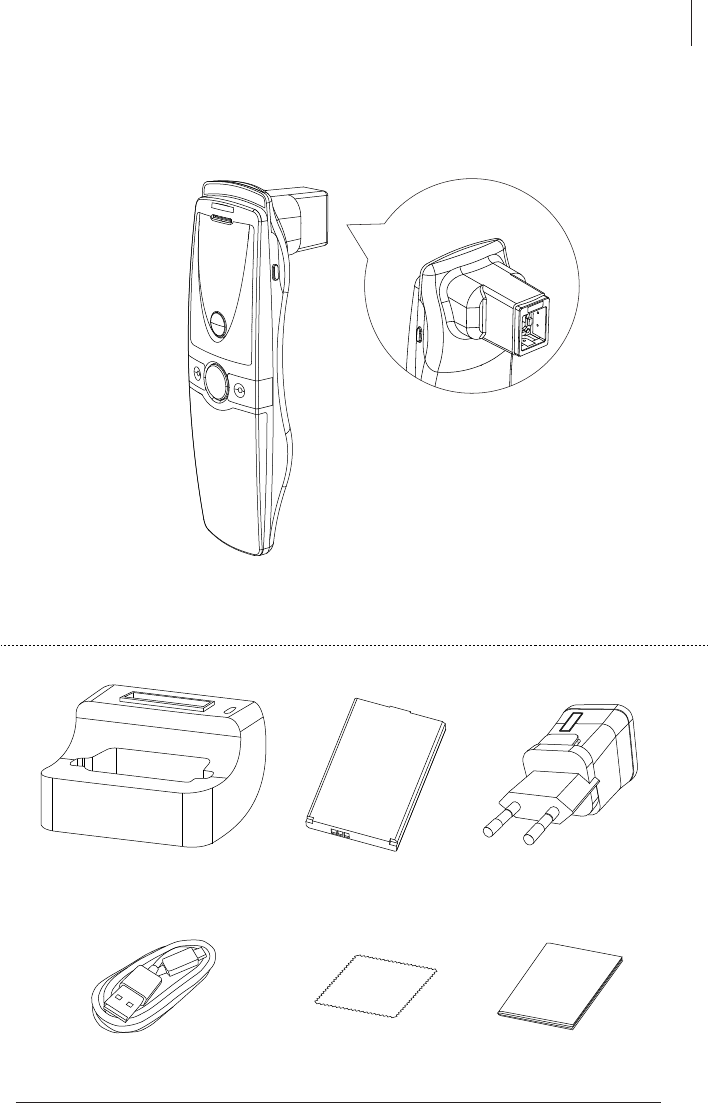
Components
Components
3
Charger
Manual
Battery
USB cable
Cradle
Main body
Cleaning cloth
API CT
4
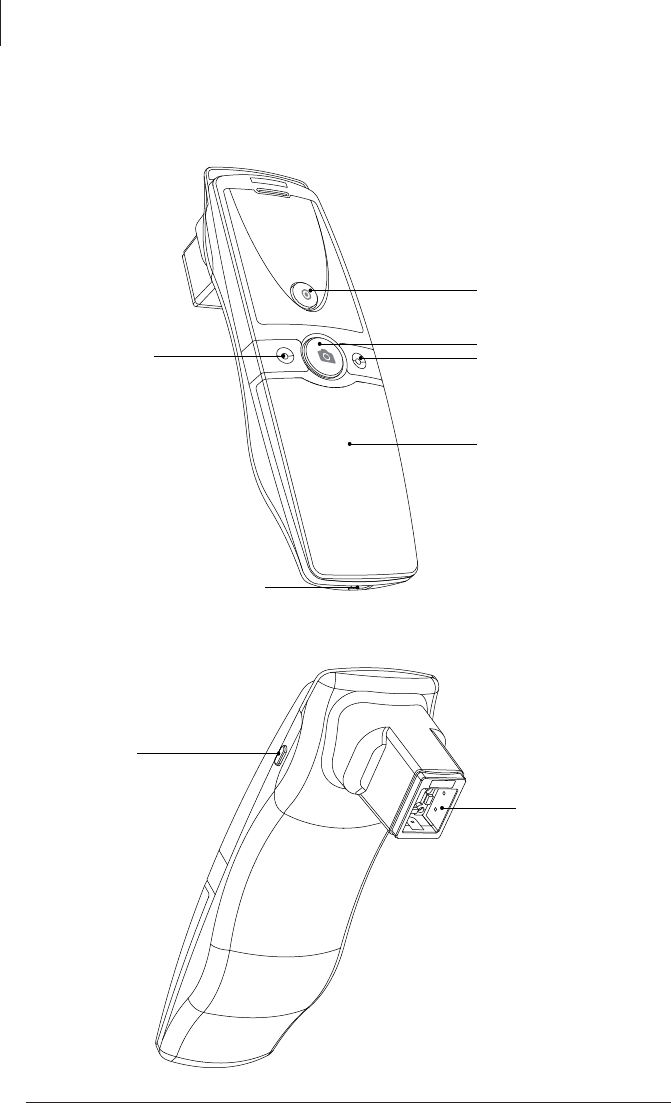
Device Functions
H/W Parts
Battery cover
LED light & lens
Mode up Mode down
Capture
Start, Analysis, Result
External adaptor connection
Power on & off

H/W Parts
5
Insert the battery
Open the battery cover by pushing it down with finger.
Insert the battery and gently press the battery into place.
Close the cover.
1
2
To turn on the power
Press and hold “power” button.
"Indicate LED" starts twinkling in blue light.
When it stops, the device is ready to use.
1
2
To turn off the power
Press and hold "power" button.
"Indicate LED" will be turned off.
1
2
3
1
1
2
3
2
Device Settings
6
Device Settings / Download & Install
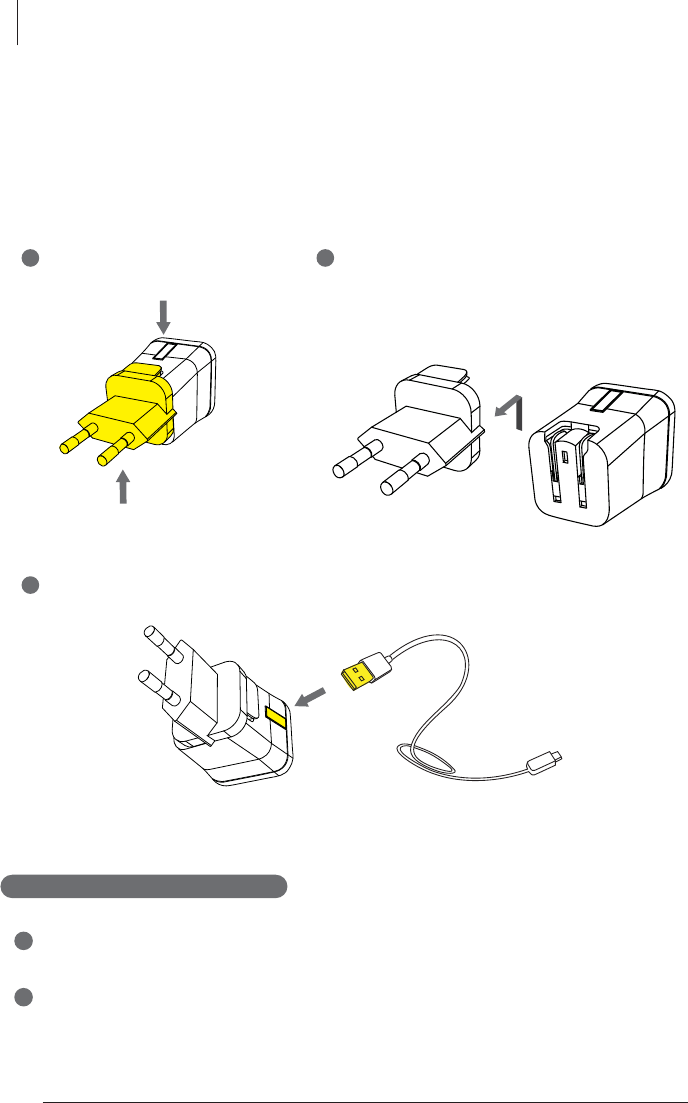
Charger can be used for American type & European type. The default
is European type.
Push the plug up.
1
Then 220V European type is disassembled
and you can see the 110V-220V
American type inside of the charger.
2
3
Choose the one you want to use and connect USB cable in adaptor.
H/W Parts
1
2
Tablet device or Smartphone user
iOS : Go to "App Store" and search "Solutionist" to download the program.
Android : Go to "Google Play Store" and download it.
7
System Settings
2
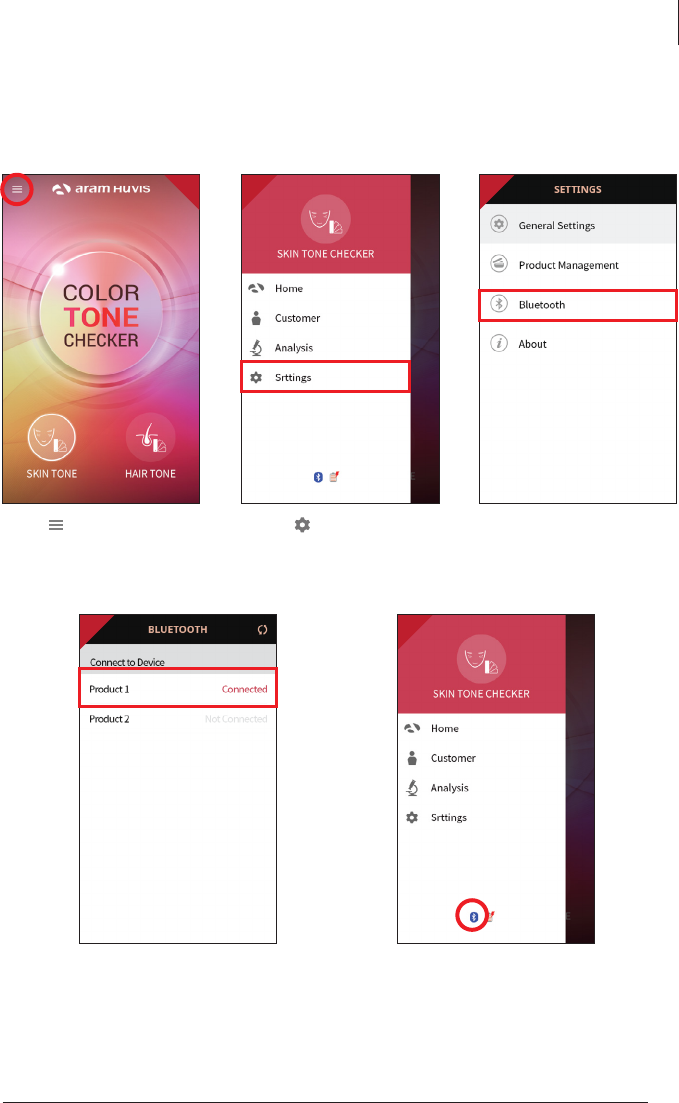
How to Connect with Program
Wait until the device is
connected to with Bluetooth.
Bluetooth list will be appeared.
Among the lists, select the
Bluetooth connection you
could use.
4 5
2 3
Touch to “settings”. Go to "Blue tooth".
1
Press button.
8
2
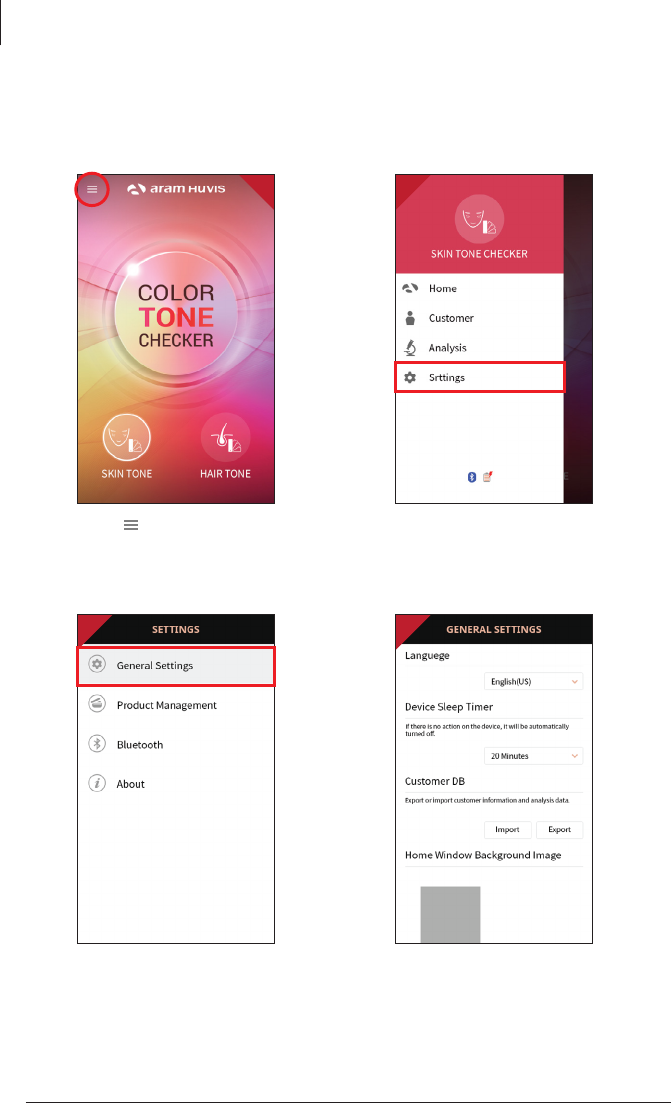
Application Settings
Language, version , email
setting is available.
Go to "General Settings".
Go to "Settings".Press button.
1 2
3 4
Application - Skin Tone
9
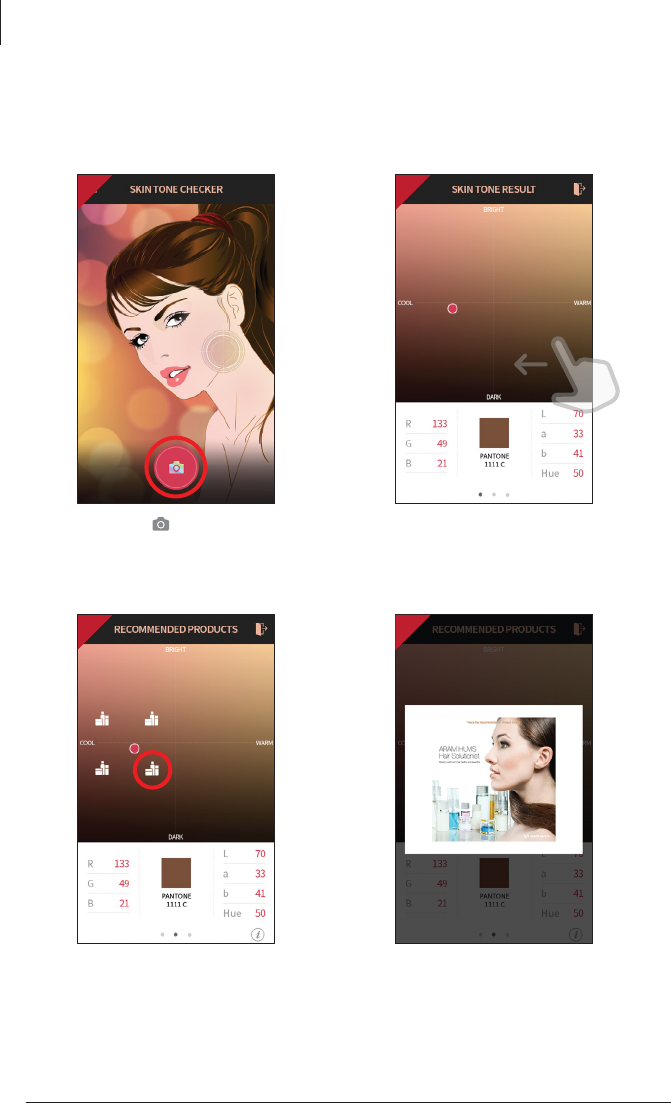
Application - Skin Tone
Touch button to start
analyzing.
1
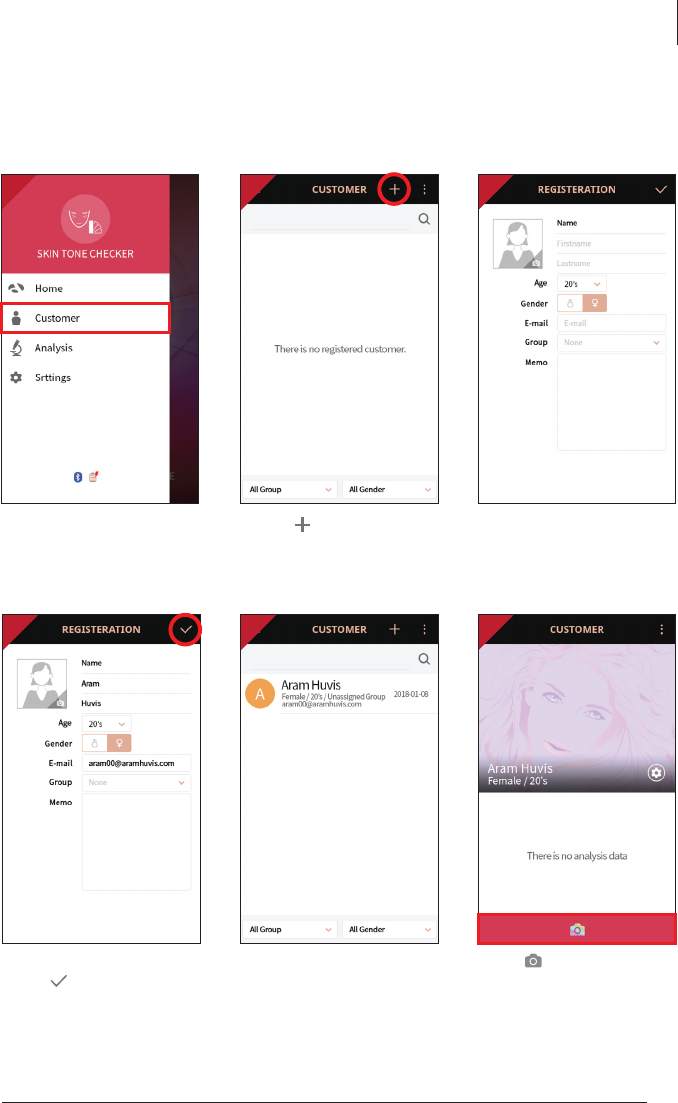
CRM
2 3
4 5 6
Touch to register
new customer.
After putting all information,
touch .
Touch "Customer".
User's profile is created on the
list. Then touch user's profile
to start analyzing.
Input the information.
10
Application - Skin Tone
Please choose the icon
of recommendation
products near dots.
1
Touch the button.
*All surface of the sensor should
be pushed completely.
Checking your color tone
and push slide to left.
Analysis Skin Tone
The window for Recom-
mendation products pops
up.
2
3 4
Please choose for close
and save.
11
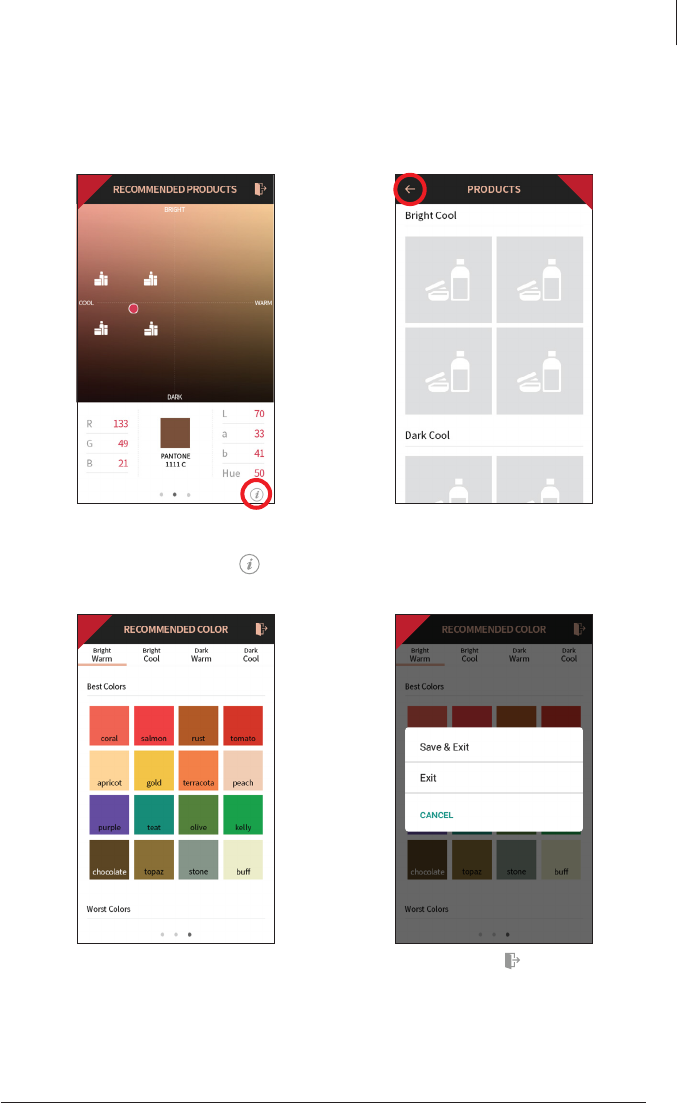
Application - Skin Tone
User may check the
information of additional
products by selecting in
the previous screen.
5
7 8
All recommendation
products are shown
according to each color.
6
Checking the best or the
worst color accoring to
each tone.
Analysis Skin Tone

12
Troubleshooting & FAQ
1
2
3
4
5
6
7
8
I cannot turn on the device.
Connect and charge the device (or the battery) using the adaptor provided the supplier.
(The battery charging indicator will be shown on the system main page.)
I cannot power on the device even the battery is still full.
The battery might be dislocated on the device. Please separate the battery from the device
and put it on, and then power on again.
The battery is not charging very well.
Separate the battery from the device and put it on again.
Check the connection among a device, a battery and a charger.
A battery cannot be charged if there is an alien substance on the charging port.
In this case, please use the device after cleaning the charging port of the device or check
Whether the sticker is attached on charging port.
The using time of the battery is different from the manual.
The battery using time will be shorten if you put the charged battery in a low or high temperature.
The battery using time varies in service type, using environment, using period of the battery.
The battery is consumed without using the device, and the battery using time will be shorten
If you use additional functions of the device.
The device turns on but the diagnosis doesn’t work.
Check the smart card is correctly inserted (SD card slot on the button of the device.)
There are dust on the device.
Clean the dust by using a smooth fabric. Do not use benzene, alcohol, and a synthetic detergent.
The screen is frozen and the keys not working when using the device.
Separate the battery from the device and put it on again.
If the device is still not working please contact to the customer service center.
A “force close” message appears on the screen.
The repetition of commands can trigger a bug. Sometimes there may be a brief delay
before the command is completed. Do not repeat/multiply the tasks as the device will no longer
be able to follow them.
I cannot connect to Bluetooth
Check the pairing status and try to re-pair the device with host device.
9

13
Troubleshooting & FAQ
The touchscreen doesn’t react to my finger commands.
Before using for the first time remove the protective plastic film.
I cannot connect to Blue-tooth.
Make sure to use the Bluetooth hosting devices that have Bluetooth certified with the logo.
You may need an external Bluetooth dongle for those devices that do not have Bluetooth feature.
Bring the device to closer with the Bluetooth hosting device.
Try to re-pair the device with host device.
The password of pairing is “0”(number).
* Blue-tooth function is not allowed to use in IOS device without APPLE’S official permission.
The screen was turned off.
Press the on/off button to turn on the screen.
The device has a power save function that turn the screen off after 1minute.
For the setting, please refer to Page 8.
I can see the black screen only during measurement.
Check the LED light inside lens on the head part when you try to measurement.
If you cannot see the light, please contact the customer service via email or phone call.
The image is not clear.
Tap the screen while capturing focus.
1
2
3
4
5

14
Warranty
The product undergoes strict quality management and inspection process before production
and introduction to market.
1
In case of functional or operational defect occurs under normal condition of use within
10 days after purchase, we will repair it for free or replace in new product.
2
When this product goes out under the normal use, we will repair it free of charge under warranty.
3
Please keep the warranty card when you ask for repair service.
4
Customer needs to pay repair charge after warranty runs out.
5
For this product, warranty period is 14 months from the Invoice date.
6
Cost
Within warranty : Sending delivery(Buyer), repair cost and returning delivery(Aram)
- If the product is broken by user's fault, repair cost could be charged.
- After warranty : Sending delivery and repair cost(Buyer), returning delivery(Aram)
7
How to send :
- As sending a present from person to person by EMS or FEDEX.
(Do not write the company name)
- Total value should be under US $99.(Write non-commercial value)
8
15
Service request form
Date of
purchase
Contact person
Address :
Tel :
Product name, serial No :
Problems :
Company
/ /
PRODUCTION DIVISION & FACTORY (SHIPPING ADDRESS) :
#909 Byucksan Technopia, 560, Dunchon-daero, Jungwon-gu, Seongnam-si,
Gyeonggi-do, 13230 Rep. Korea
Tel: 070-4687-1712 / Fax: 031-732-6330 / Email: support@aramhuvis.com
http://www.aramhuvis.com
Warranty

HEAD OFFICE
#401~402 Bundang Seoul National University Hospital Health Care Innovation Park, 172, Dolma-ro,
Bundang-gu, Seongnam-si, Gyeonggi-do, 13605 Rep. Korea
PRODUCTION DIVISION & FACTORY
#909 Byucksan Technopia, 560, Dunchon-daero, Jungwon-gu, Seongnam-si, Gyeonggi-do, 13230 Rep. Korea
Tel: 070-4687-1712 / Fax: 031-732-6330 / Email: info@aramhuvis.com
http://www.aramhuvis.com
FCC Compliance Statement
This device complies with part 15 of the FCC rules. Operation is subject to the following two
conditions: (1) This device may not cause harmful interference, and (2) this device must accept any
interference received, including interference that may cause undesired operation.
FCC Interference Statement
This equipment has been tested and found to comply with the limits for a Class B digital device,
pursuant to part 15 of the FCC Rules. These limits are designed to provide reasonable protection
against harmful interference in a residential installation. This equipment generates, uses and can
radiate radio frequency energy and, if not installed and used in accordance with the instructions,
may cause harmful interference to radio communications. However, there is no guarantee that
interference will not occur in a particular installation. If this equipment does cause harmful
interference to radio or television reception, which can be determined by turning the equipment
off and on, the user is encouraged to correct the interference by one of the following measures:
• Reorient or relocate the receiving antenna.
• Increase the separation between the equipment and receiver.
• Connect the equipment into an outlet on a circuit different from which the receiver is connected.
• Consult the dealer or an experienced radio/TV technician for help.
FCC Caution
Any changes or modifications not expressly approved by the party responsible for compliance could
void the user's authority to operate this equipment. This transmitter must not be co-located or
operating in conjunction with any other antenna or transmitter.