Aram Huvis ASNII PORTABLE SKIN/HAIR DIAGNOSIS SYSTEM User Manual
Aram Huvis Co., Ltd. PORTABLE SKIN/HAIR DIAGNOSIS SYSTEM
User Manual
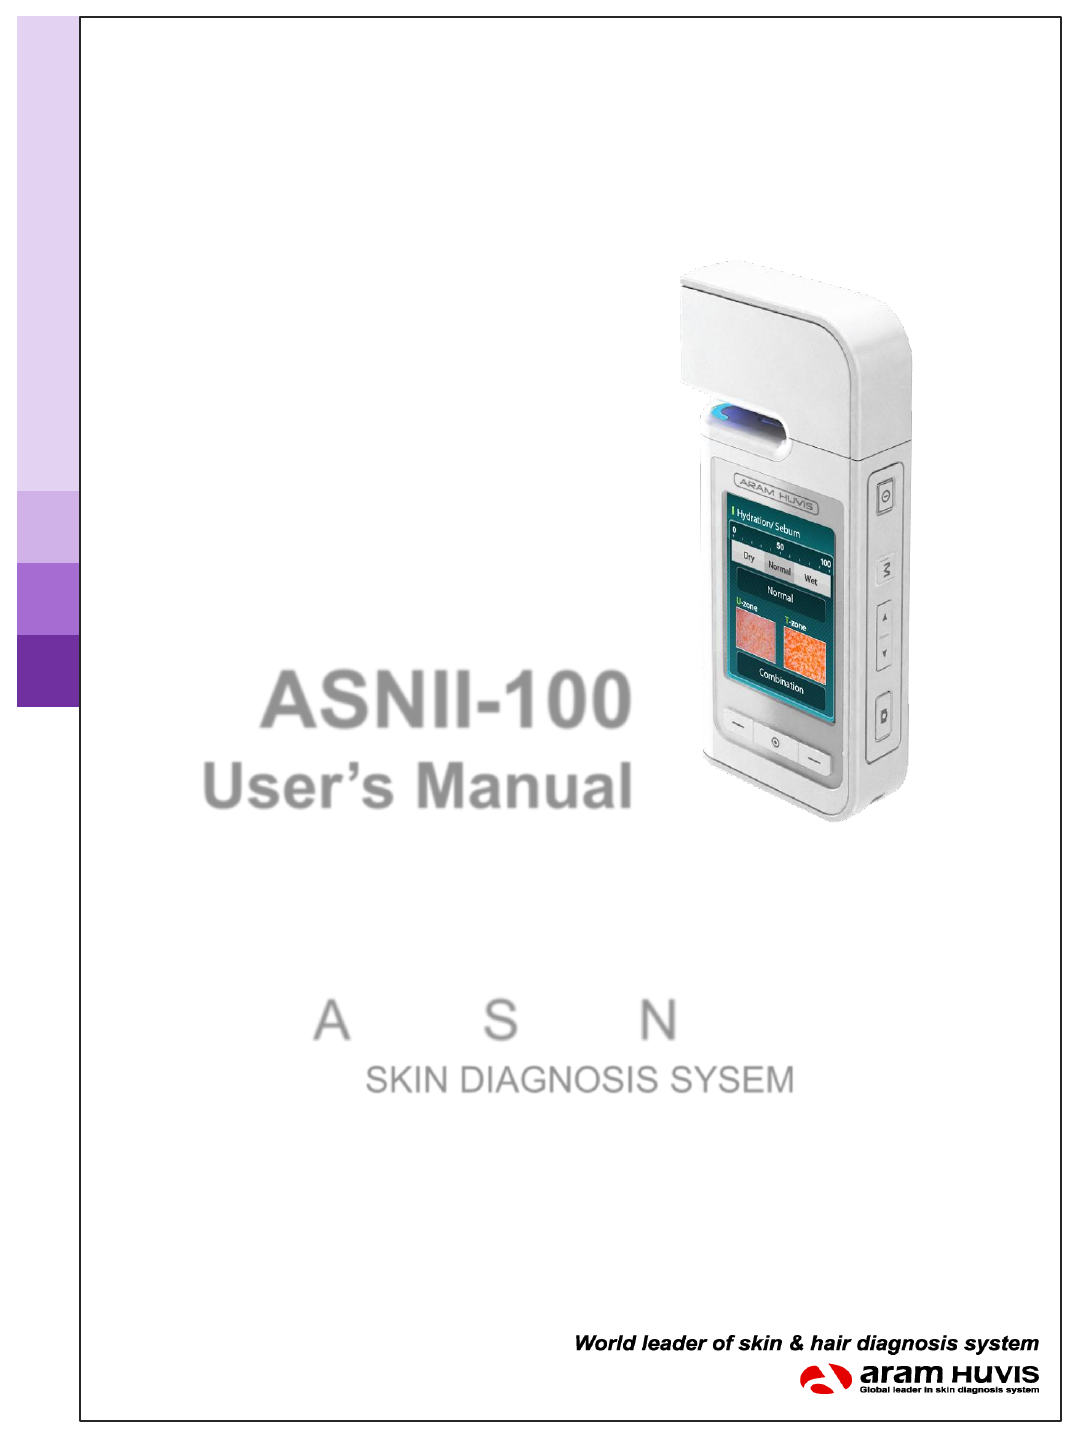
ASNII-100
User’s Manual
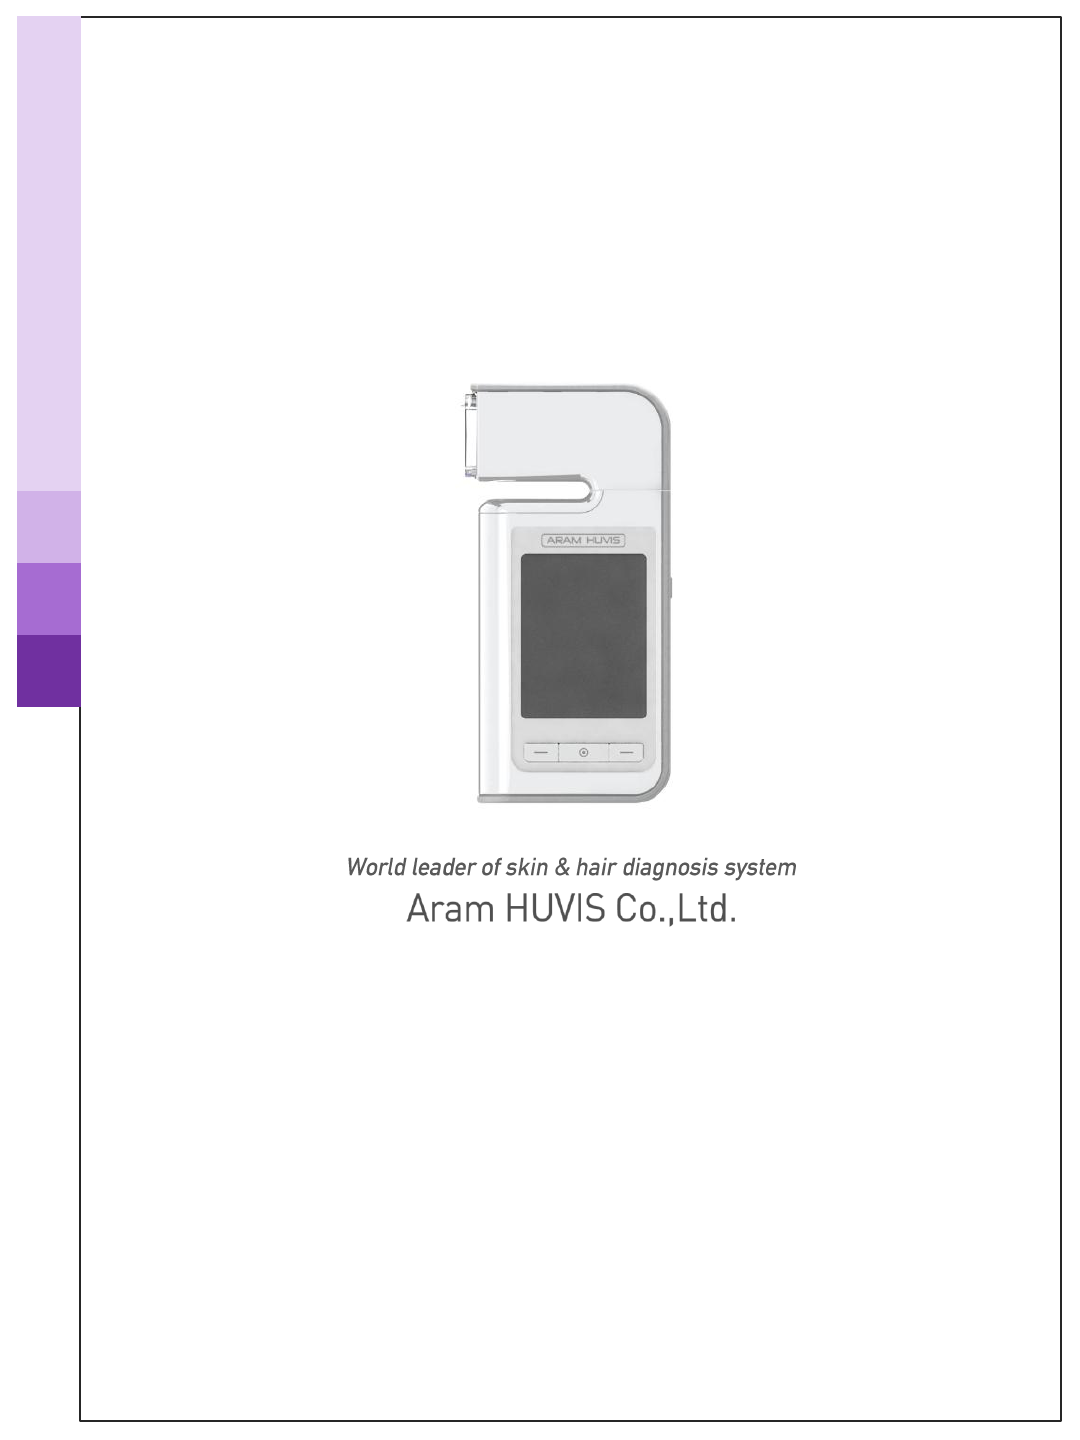
Aramo Smart Navigator
SKIN DIAGNOSIS SYSEM
Aramo Smart NavigatorII-100

FCC Statement
This device complies with Part 15 of the FCC Rules. Operation is subject to the following
two conditions:
(1) This device may not cause harmful interference. and
(2) This device must accept any interference received, including interference that may cause
undesired operation.
Caution
Any changes or modifications (including the antenna) made to this device that are not
expressly approved by the manufacturer may void the user’s authority to operate the
equipment.
This equipment has been tested and found to comply with the limits for a Class B digital
device, pursuant to part 15 of the FCC Rules. These limits are designed to provide reasonable
protection against harmful interference in a residential installation.
This equipment generates uses and can radiate radio frequency energy and, if not installed
and used in accordance with the instructions, may cause harmful interference to radio
communications. However, there is no guarantee that interference will not occur in a
particular installation. If this equipment does cause harmful interference to radio or television
reception, which can be determined by turning the equipment off and on, the user is
encouraged to try to correct the interference by one or more of the following measures:
—Reorient or relocate the receiving antenna.
—Increase the separation between the equipment and receiver.
—Connect the equipment into an outlet on a circuit different from that to which the receiver
is connected.
—Consult the dealer or an experienced radio/TV technician for help.

Content
1. How to use
2. How to operate
•System setting
•Wireless & network setting
3. How to diagnosis
•Full mode
•View mode
4. How to set
5. Additional information
•Standard & Features
•Troubleshooting Guide & FAQ
•CAUTION UPON INSTALL & USE
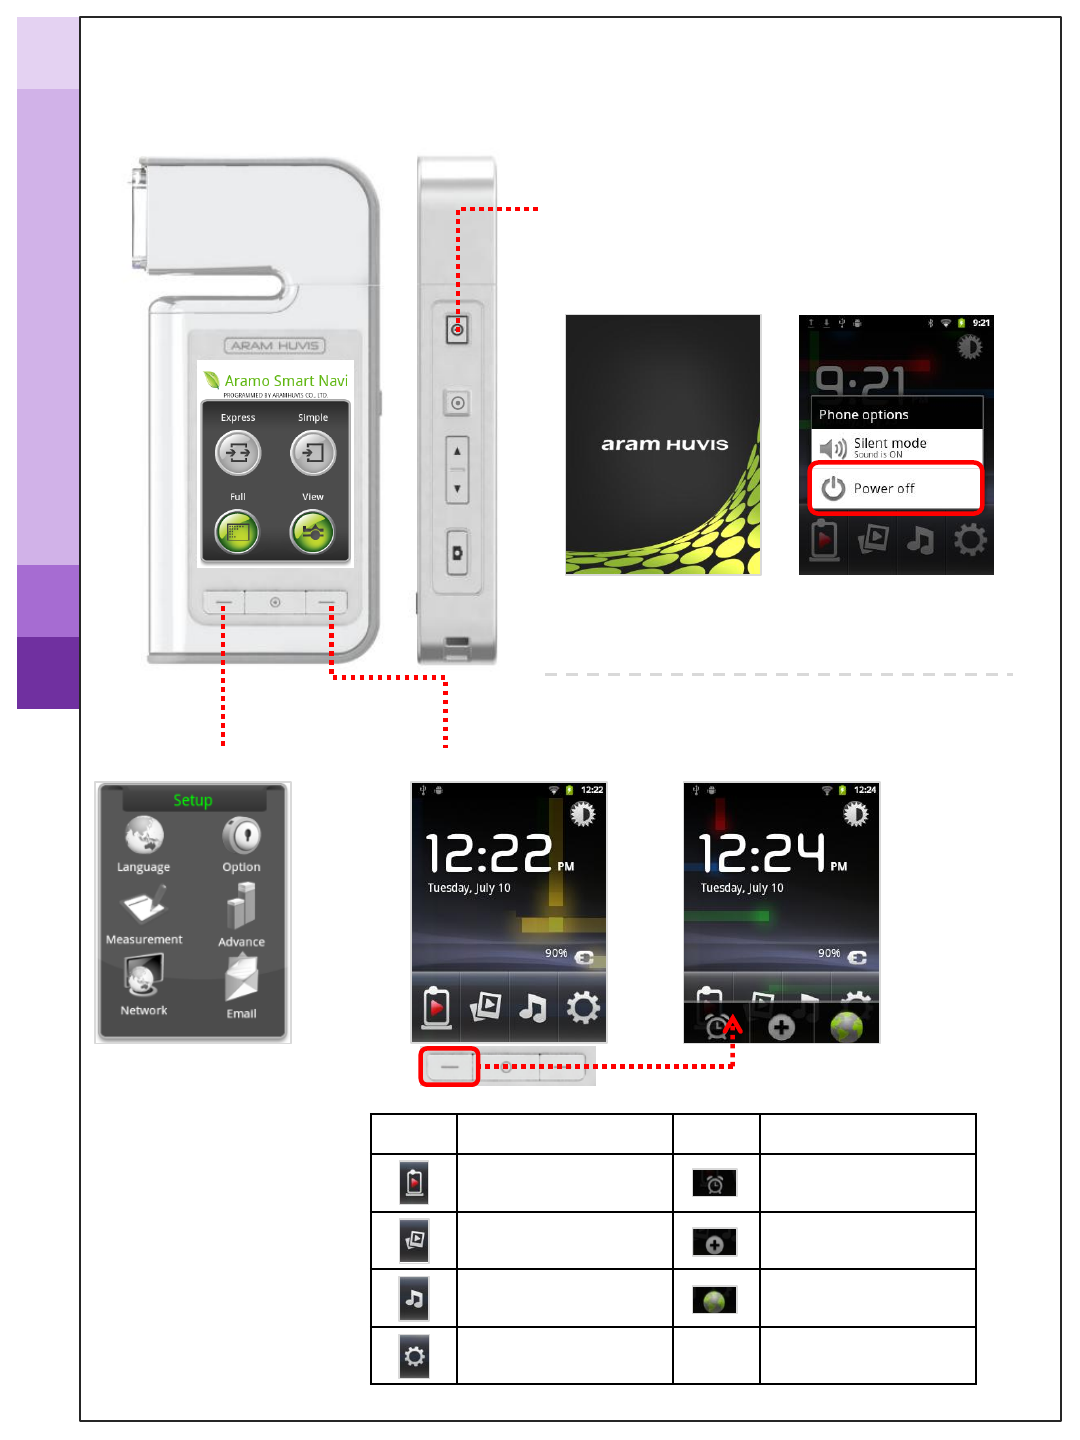
Aramo Smart NavigatorII-100
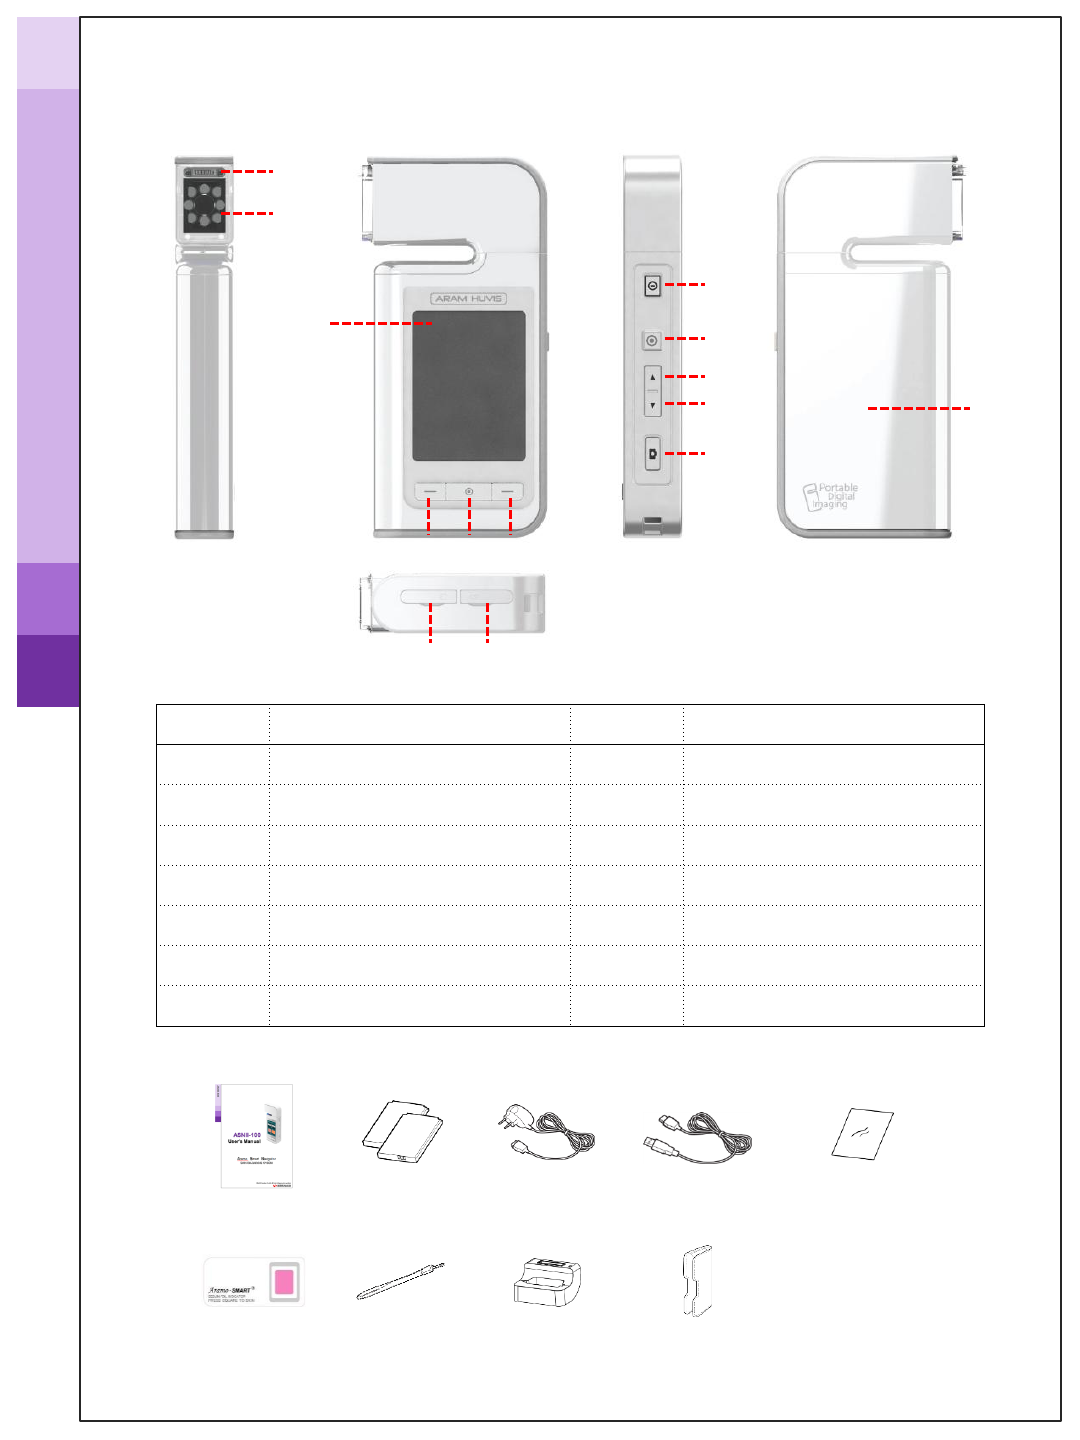
System and components
2 Batteries Manual Charger USB cable Cleaning cloth
Sebum paper
(100 paper)
Hand strip
①
②
③
④ ⑤ ⑥
⑦ ⑧
⑨
⑬
⑩
⑪
⑫ ⑭
Number
Function Number
Function
①
Moisture/Elasticity sensor
⑧
SD memory card slot
②
LED light & Lens
⑨
On / Off
③
Touch screen
⑩
No function
④
Go to "Setup"
⑪
Volume on MP3
⑤
Capture button
⑫
Volume on MP3
⑥
Go to "Back"
⑬
Capture button
⑦
External Adaptor connection
⑭
Battery cover
Cradle Leather case
How to use
Touch pen
Battery uses
Open the cover. Insert the battery. Close the cover.
How to charge
By Battery charger By Cradle
Charge the unit after connecting the
cable.
Plug the charger into the cradle and
connect the device to the cradle.
* Available to check the charging status on system main page
Note
Available to re-charge the spare bat
tery on back side of cradle.
Battery front side
How to use
The touch screen lets you select items or perform function. Learn basic
actions to use touch screen.
•Tap : Touch once with your finger to select or launch the menu option, or
application
•Drag : Tap and drag your finger up, down, left, or right to move to items on lists.
•Tap and hold : Tap an item and hold it for more than 2 seconds to open pop-up
option list
•Double-tap : Tap twice quickly with your finger to zoom in or out while viewing
photos.
Use the touch screen
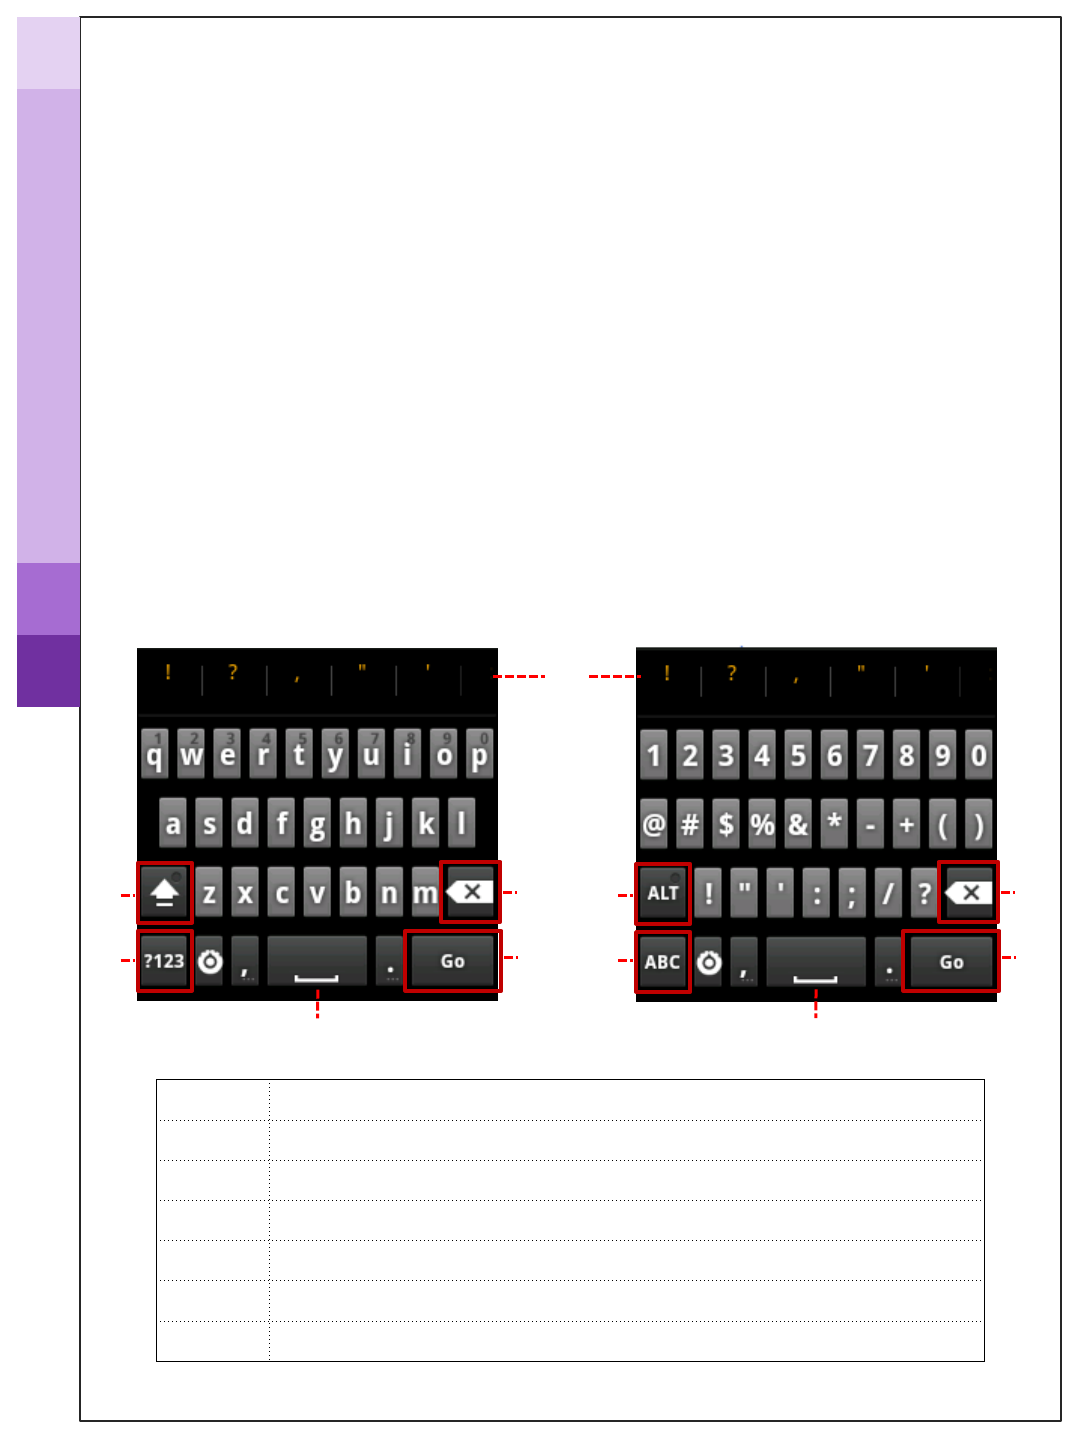
Enter text
Enter text by selecting characters on the virtual keypads
①
③
②
No. Function
①
Shortcuts for frequent use
②
Capitals lock key
③
Switch between ABC and Number(symbol) mode
④
Space
⑤
Delete
⑥
Start new line
④
⑤
⑥
④
③
② ⑤
⑥
How to use
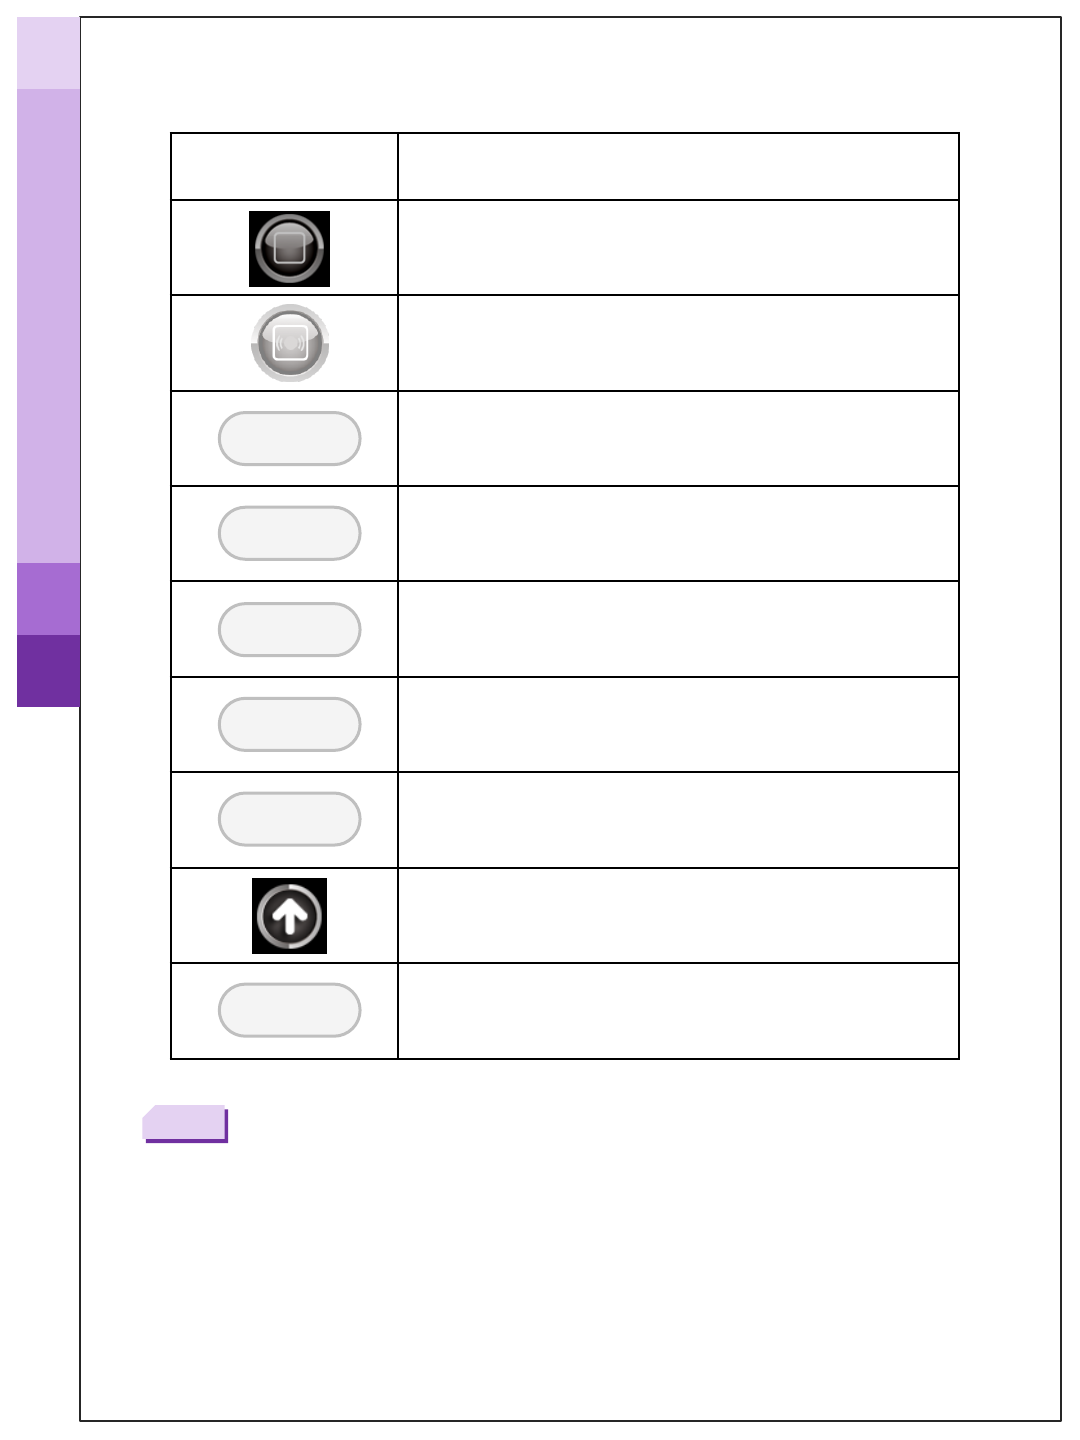
Icons to operate in Manual
Icons To do
Touch to take images from the device
Go to capturing page
OK
Go back to previous page
Use the image taken for diagnosis
Analyze the image
3D Image
Go back to previous page on skin image
Change the lighting mode
OK
Cancel
Analysis
3D
USE
Mode
* Touch the “>” or fling the screen to go to next page.
* Tap the screen to focus.
Note
How to use
Icons
To do Icons
To do
Diagnosis application Alarm
Gallery (album) Add alarm
MP3 Internet
System setting
Turn on / off & System main page
How to operate_ Turn on/off
Go back to system main page Go to “setup” page
- On/Off button: Press and hold for 3 seconds
- “Sleep” mode on / off : Press the button
* Tap in red box
Turning on… Turning off…
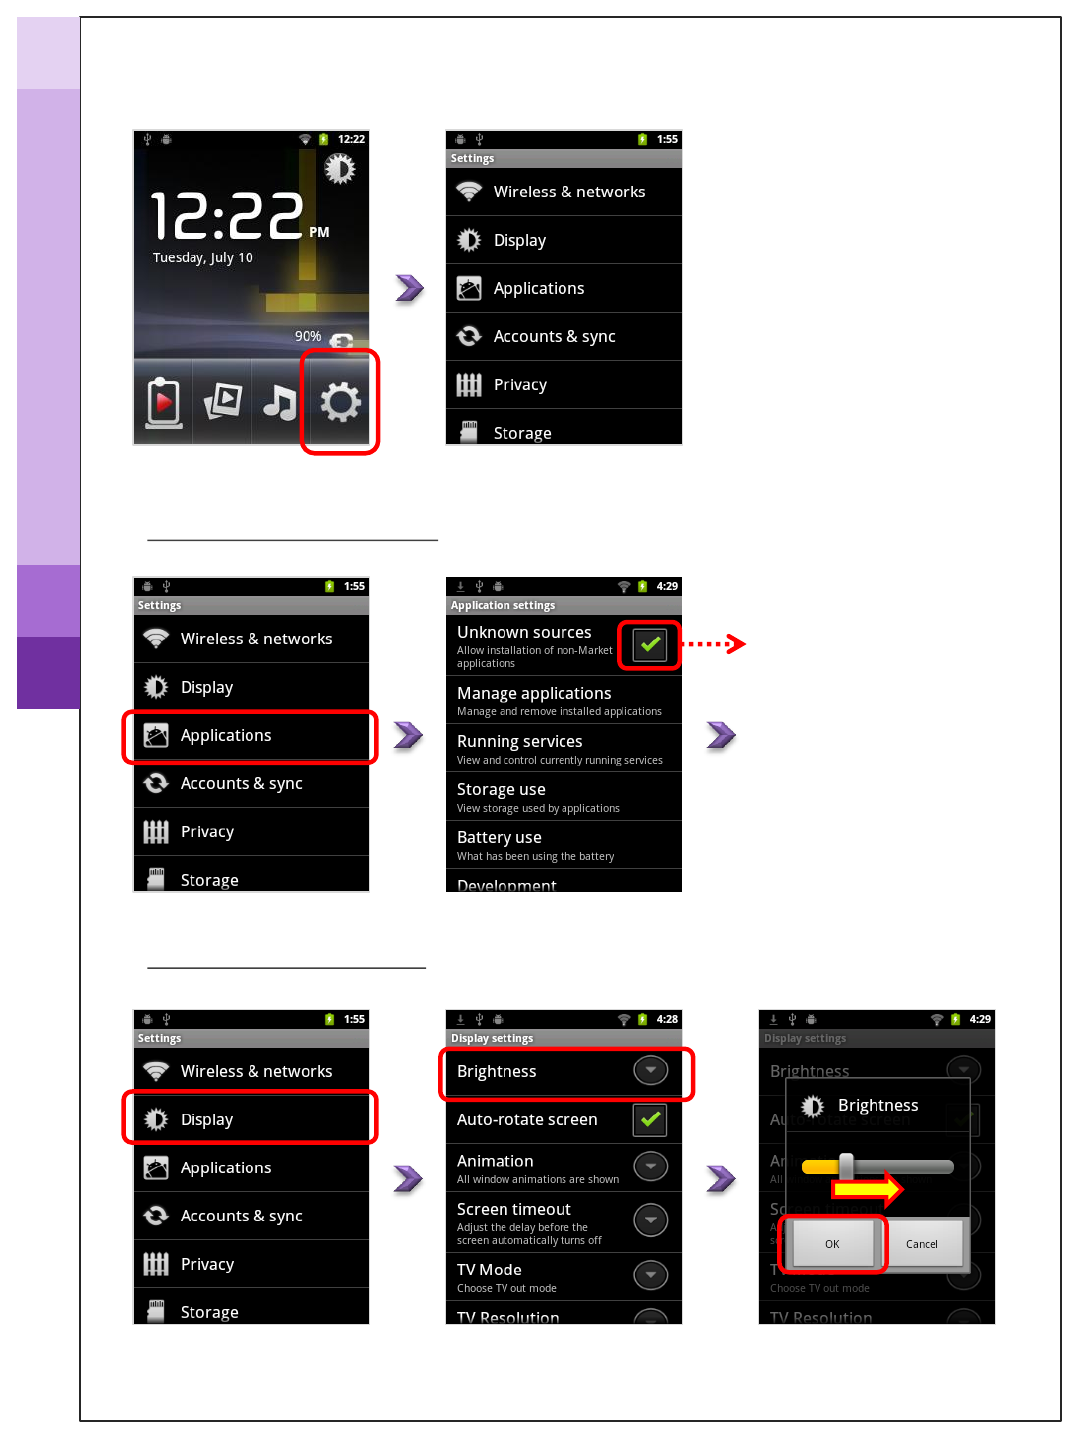
≫ Brightness setting
How to set the system
Adjust the Brightness to display the application
more effectively.
How to operate_ System setting
* Tap in red box
Check the “√” mark.
The setting have to be a
ctivated to download ap
plication.
≫ Application setting
Deactivate
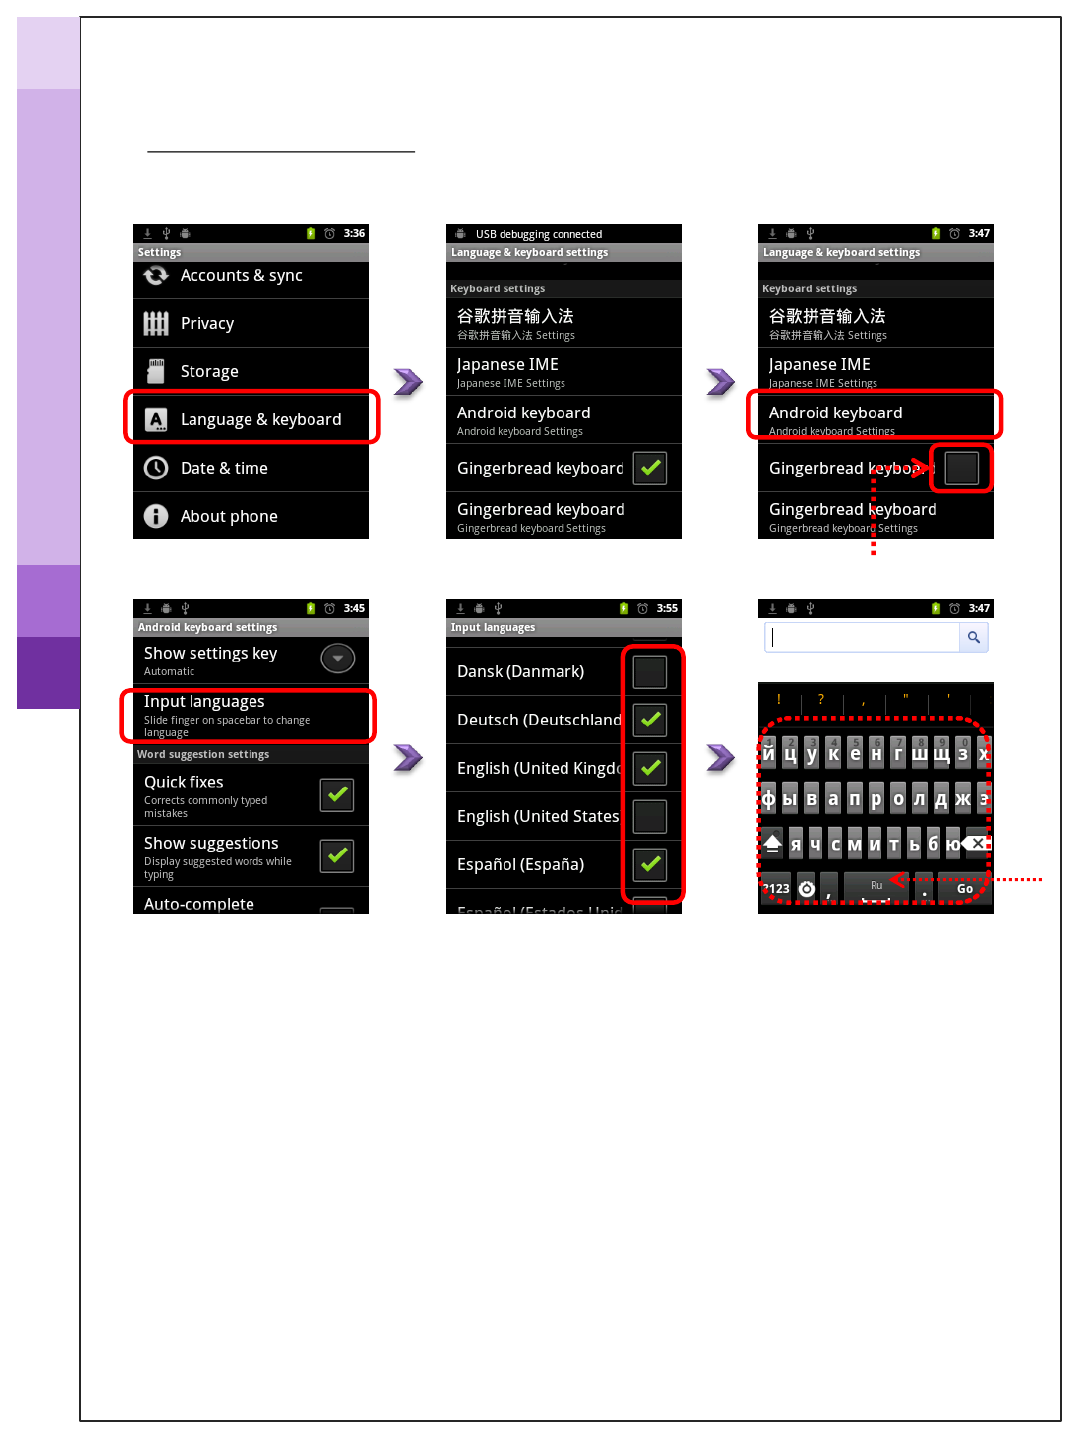
Changed the keyboard
language
Select the language you
want to use
①
②
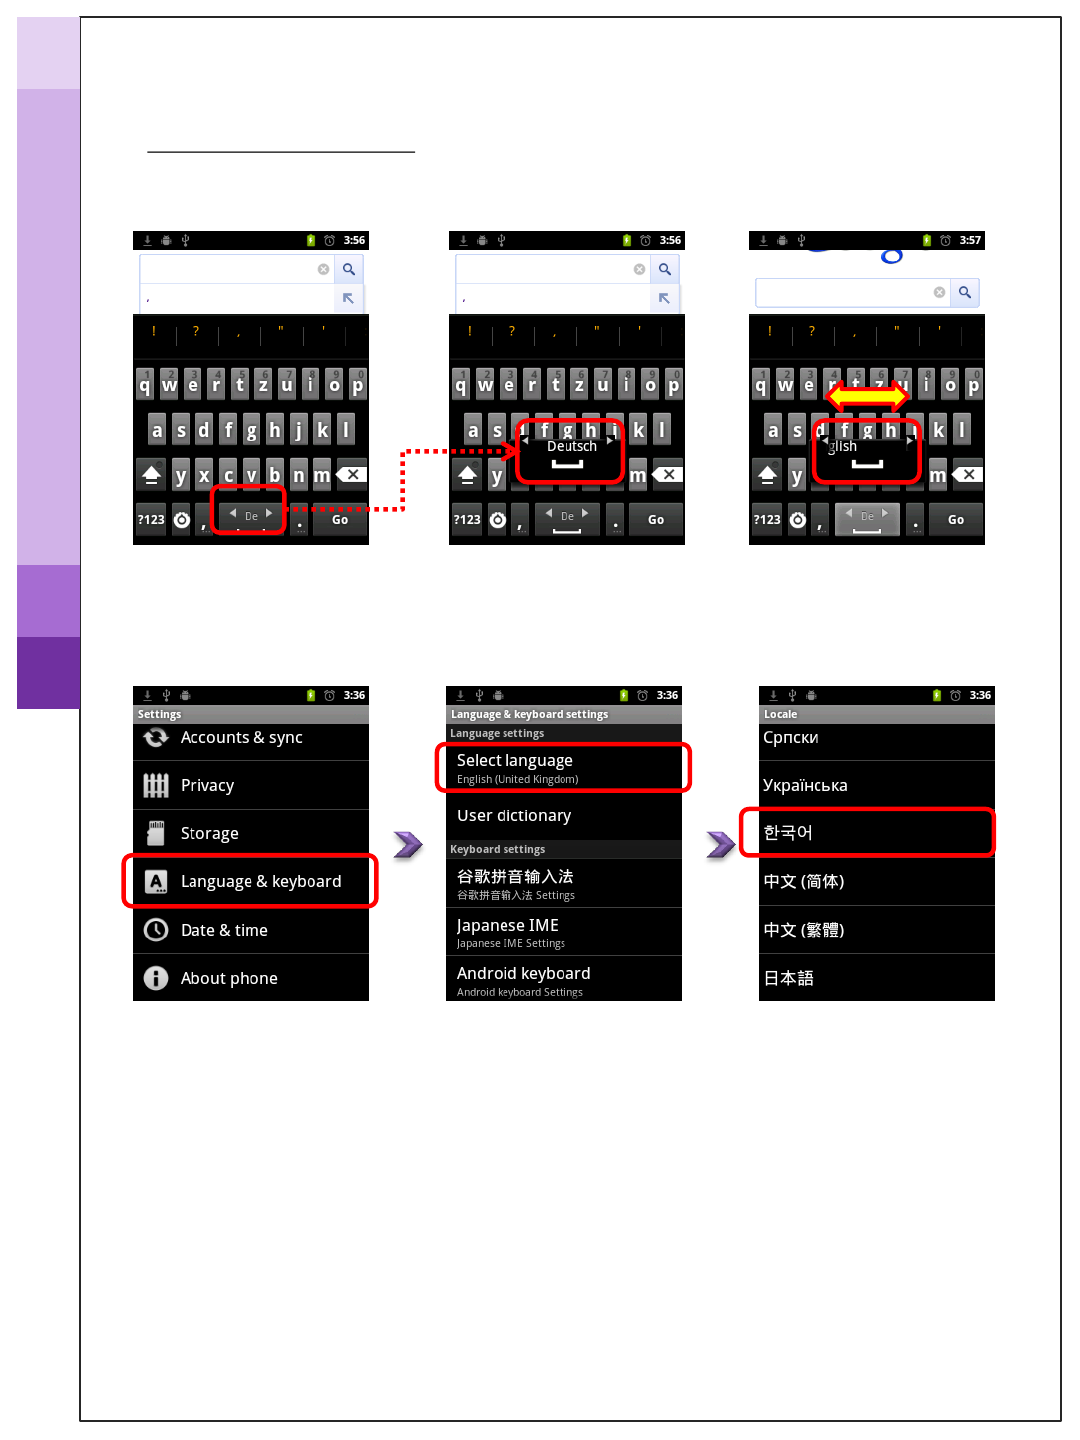
≫ Language setting
Keyboard language
How to operate_ System setting
* Tap in red box
How to set the system
How to operate_ System setting
* Tap in red box
How to set the system
≫ Language setting
How to change the System language
Select the language you want
to use
How to change the keyboard language
Drag left or right to choose
the language
Press and hold the “space-bar” to show the language
selection
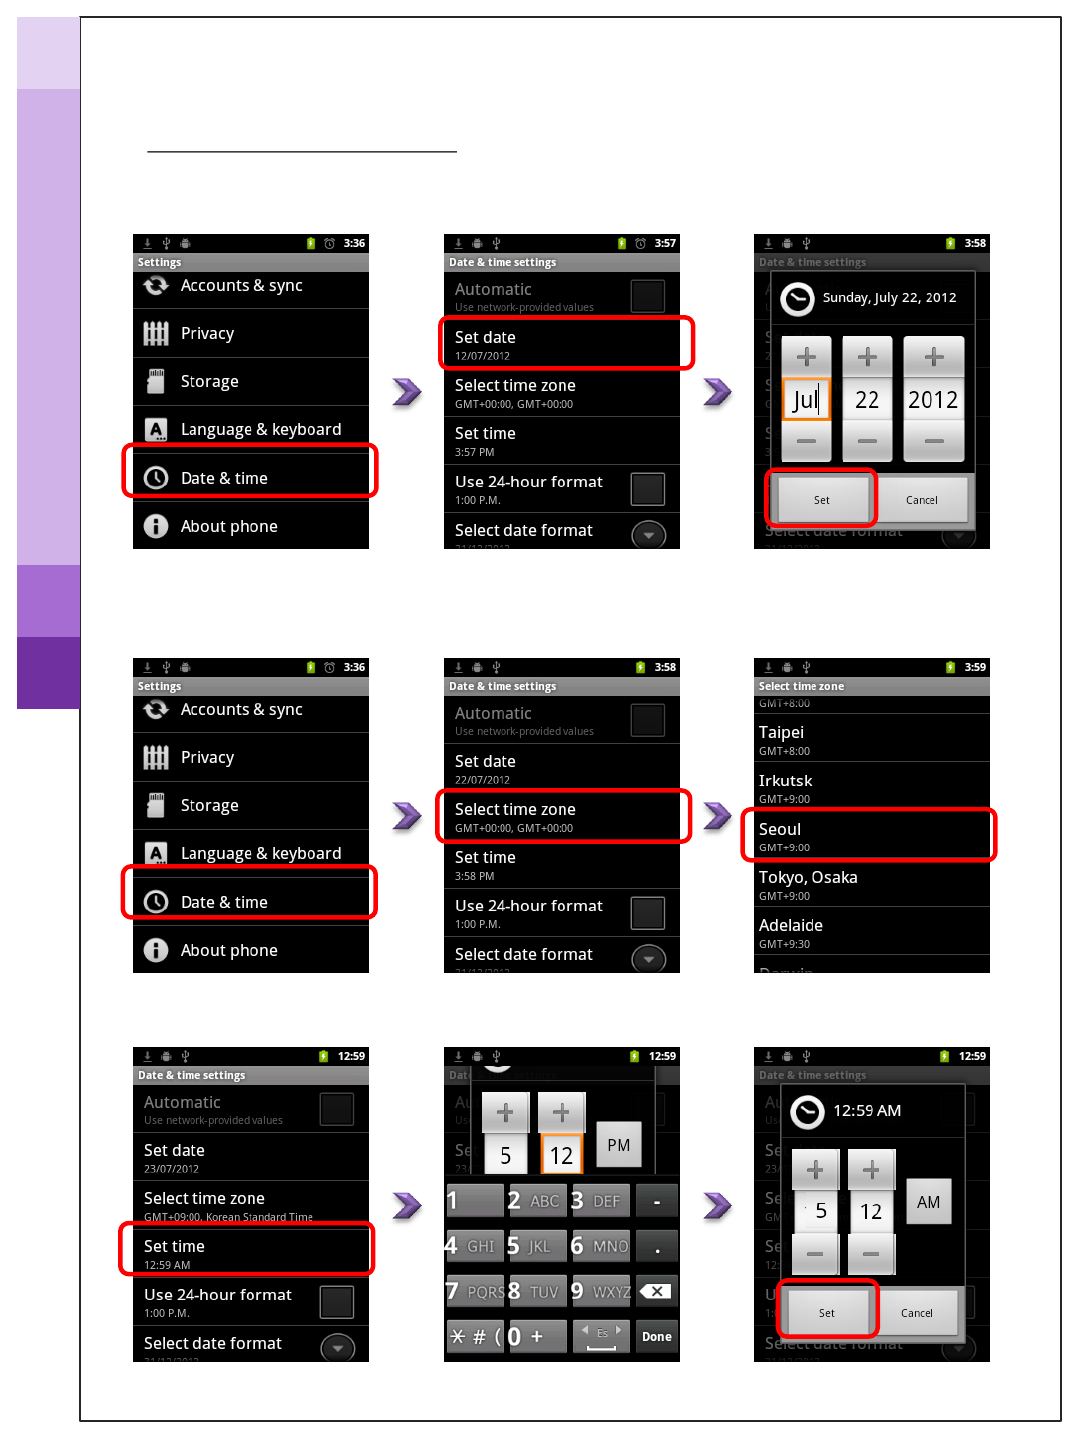
≫ Date & Time setting
How to set date
Enter the current date
How to set time zone & time
Select user’s time zone or
city name
Enter the current time
How to operate_ System setting
* Tap in red box
How to set the system
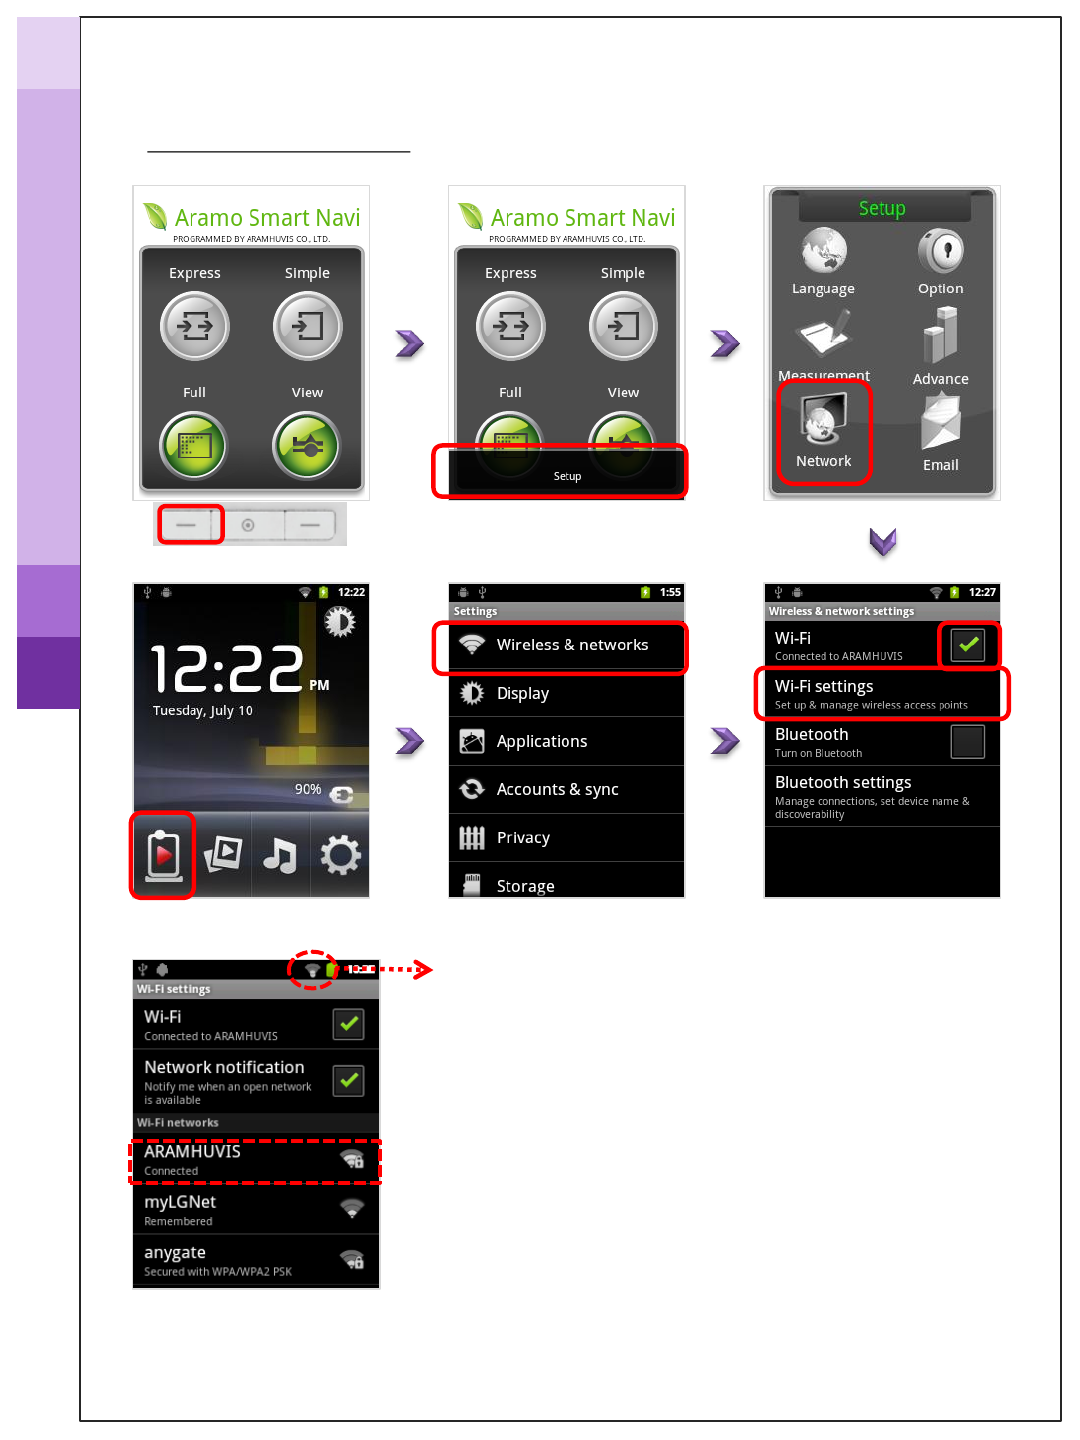
Tap “setup”.
On System main page
Find and connect the available Wi-Fi
①
②
Check the Wi-Fi mark
≫ Wi-Fi connection
How to operate_ System setting
* Tap in red box
How to set the system
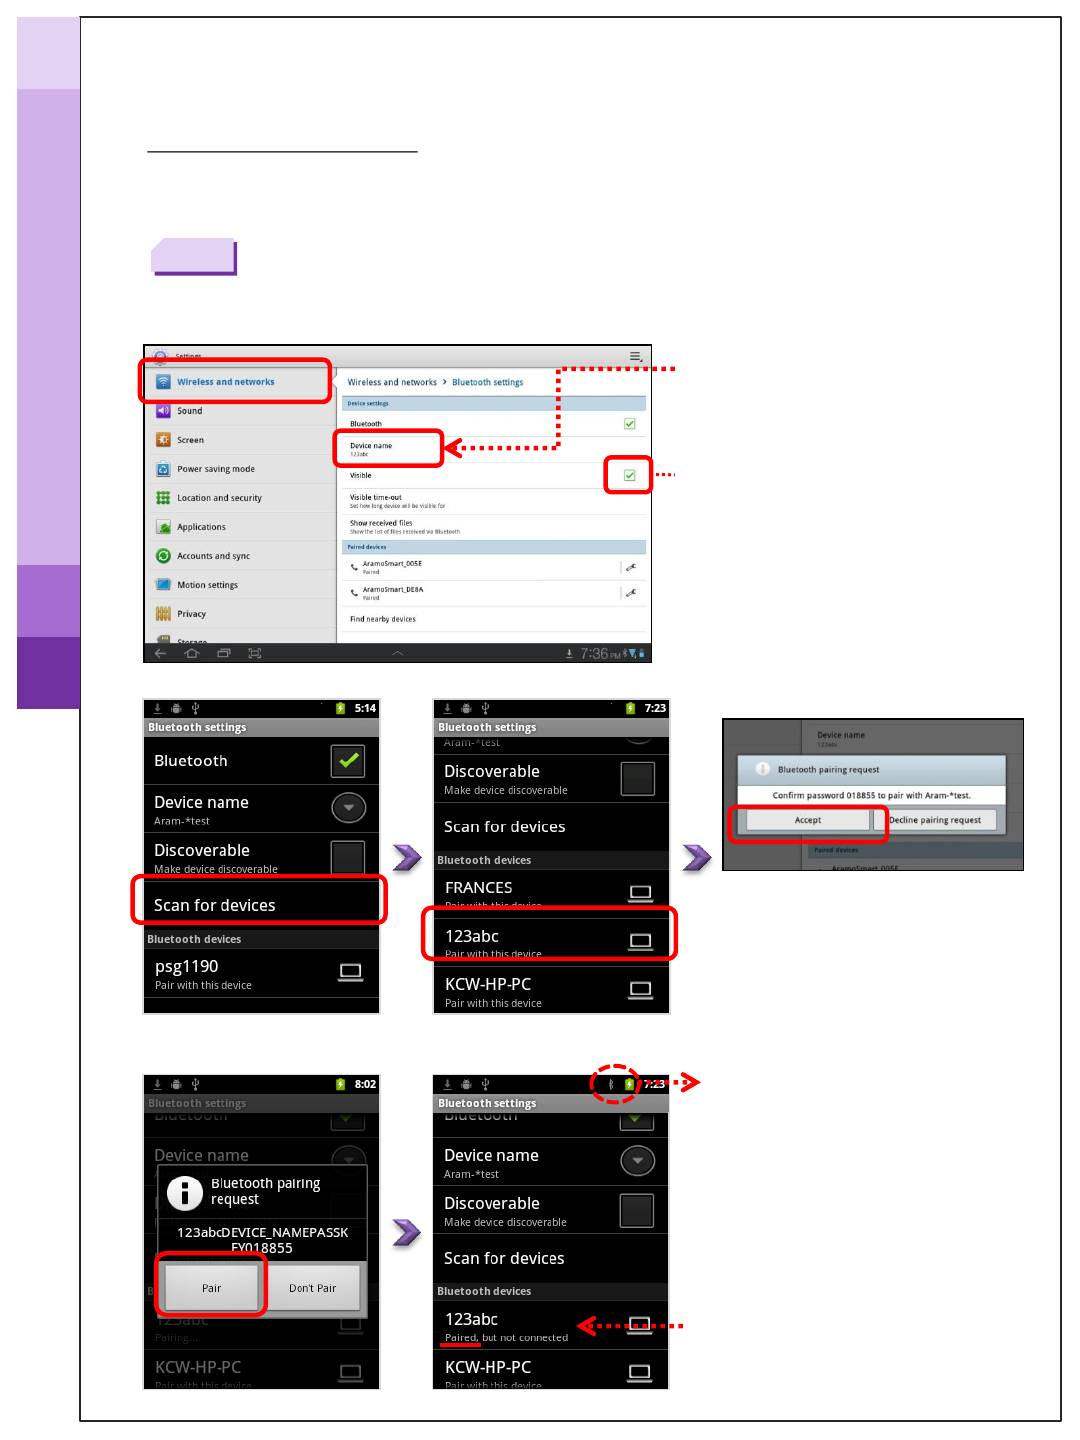
≫ Bluetooth Pairing
How to pair the diagnosis system with the host device
* Host device : all kinds of PC including tablet PC you want to send the
diagnosed result or the related images.
Note
Check the name of host device
Select the host device
Activate the Bluetooth function
on host device for the diagnosis
system to search and pair with
host device.
← Example image
Scan for host device
Accept the paring request sent
from diagnosis system.
Password: 0 (number)
On host device
Check the pairing status
Check the Bluetooth mark
How to operate_ System setting
* Tap in red box
How to set the system
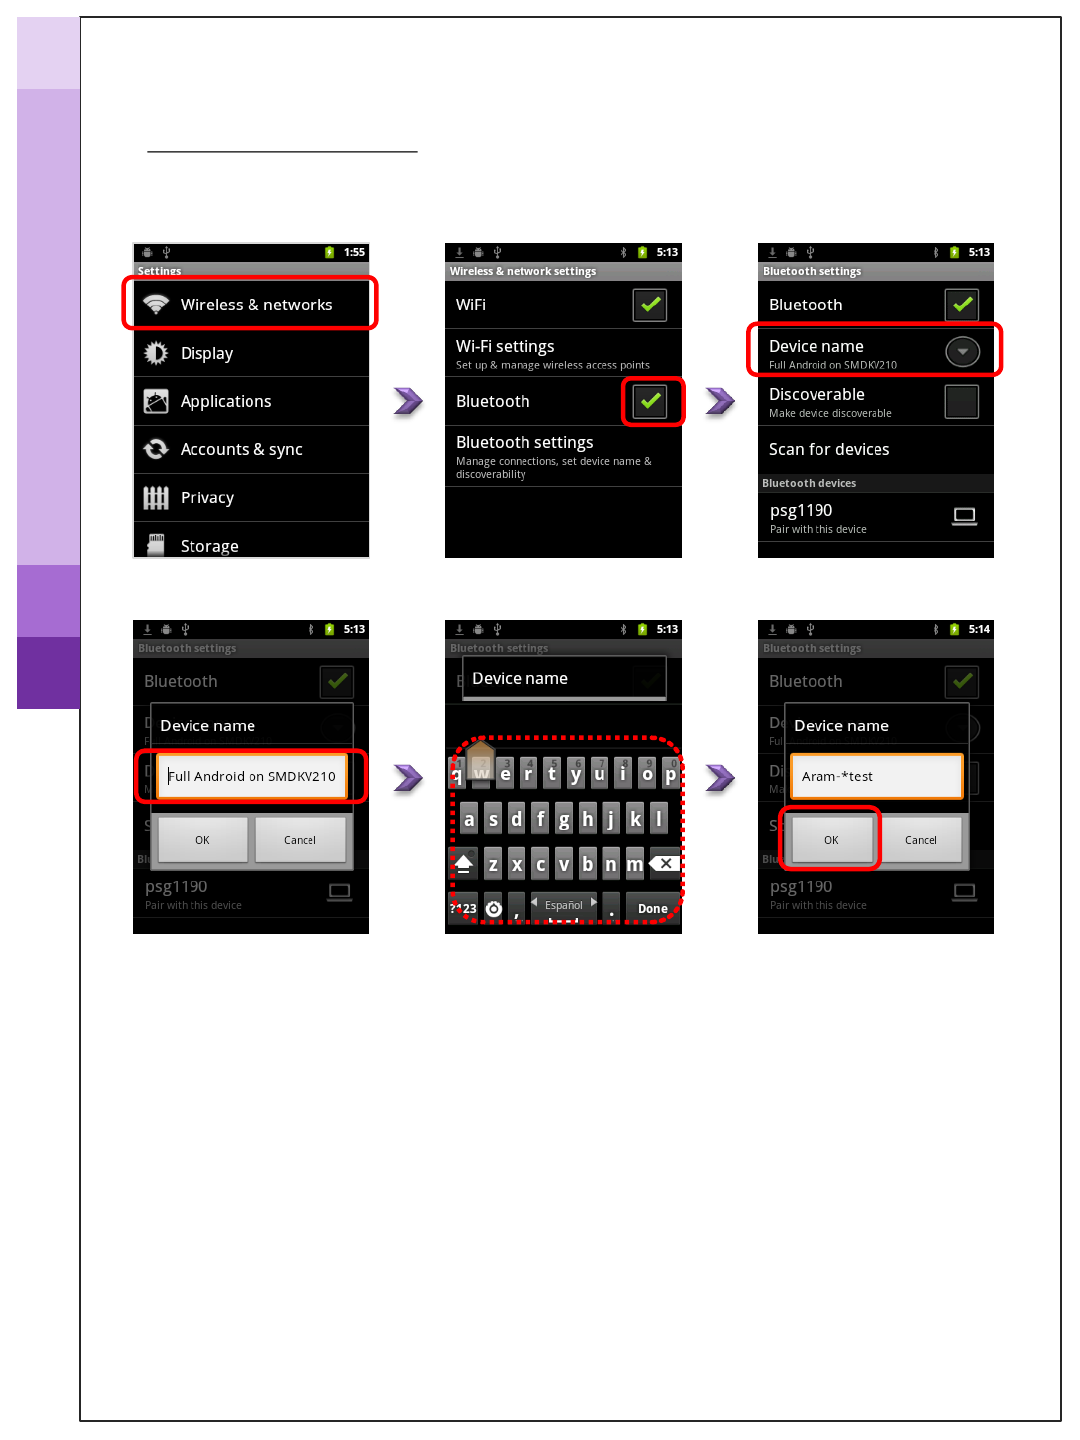
≫ Bluetooth Pairing
Enter the device name
what you want
How to change the name of diagnosis system
How to operate_ System setting
* Tap in red box
How to set the system
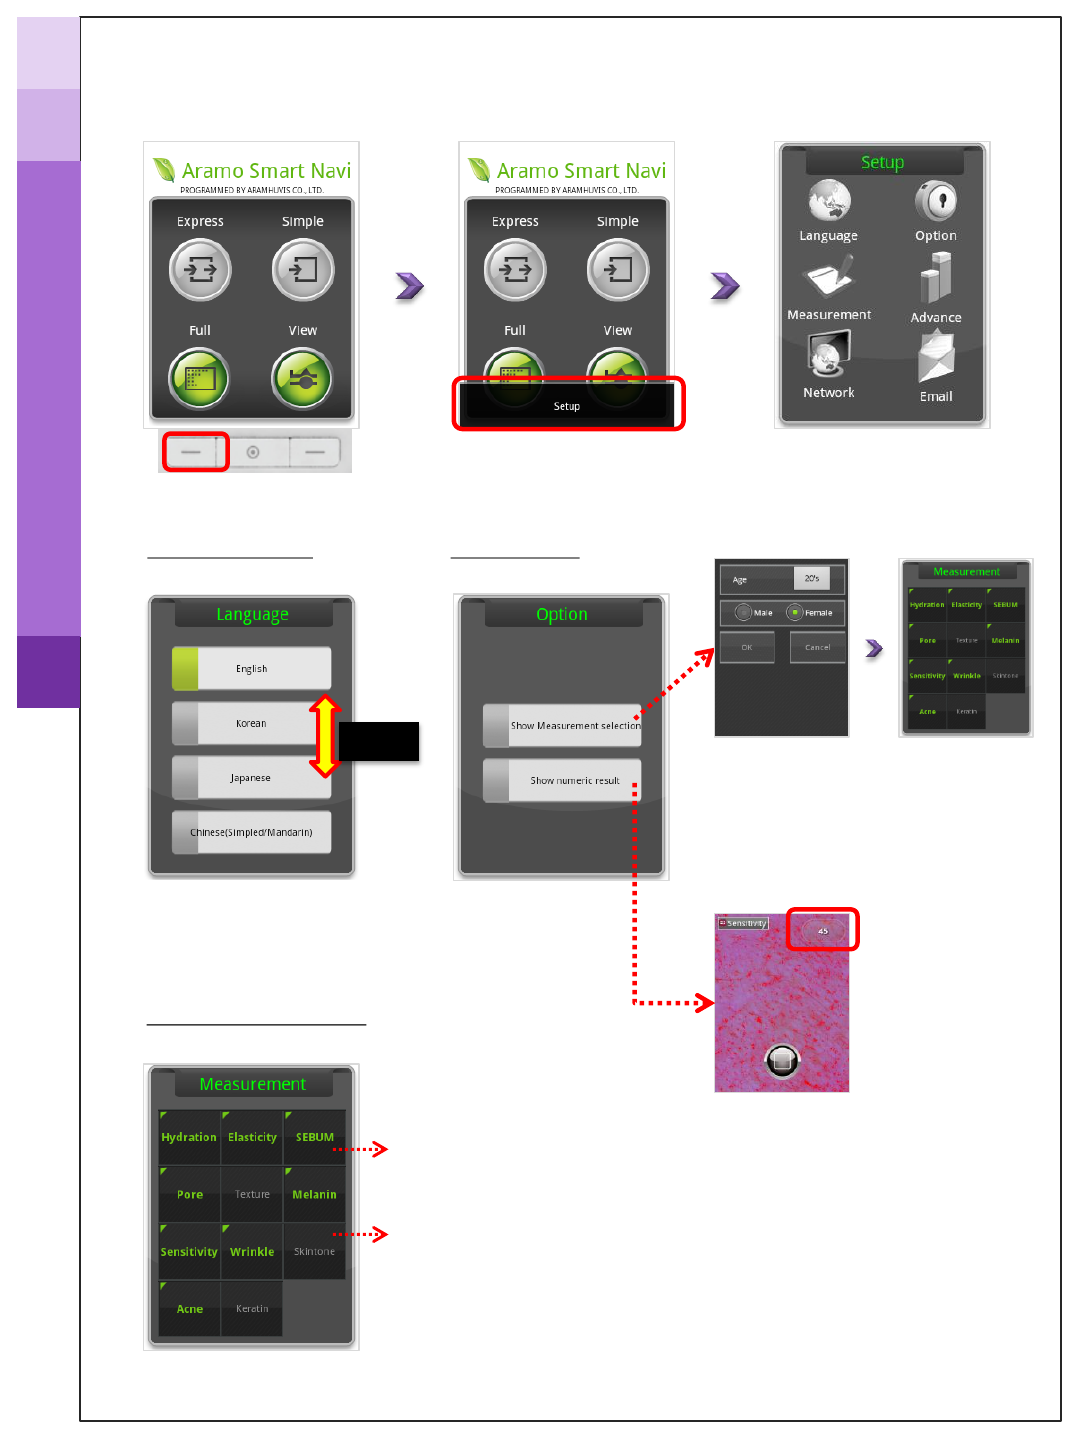
Diagnosis Process ≫ How to setup
Tap “setup”.
≫ Language
Select the language
≫ Option
* Show measurement page before
starting diagnosis.
- Green: activate status
- Gray: deactivate status
≫ Measurement
Select what you want to diagnose
* Show the diagnosed result
by number on the capture page.
Green : activate → Analyze
Gray : deactivate → Do not analyze
How to operate_ setting
* Tap in red box
Drag

Diagnosis Process ≫ How to setup
≫ Advance ≫ Network
Check the version of
application Set Wireless connection; Wi-Fi or Bluetooth
Register the sender’s email account
Selected status
Unselected status
≫ Email
Enter the ID (ex. abcd1234)
Enter the Domain (ex. @gmail.com)
Enter the Password (ex. aaaa1234)
* Tap in red box
How to operate_ setting
Place the sensor onto your skin and tap
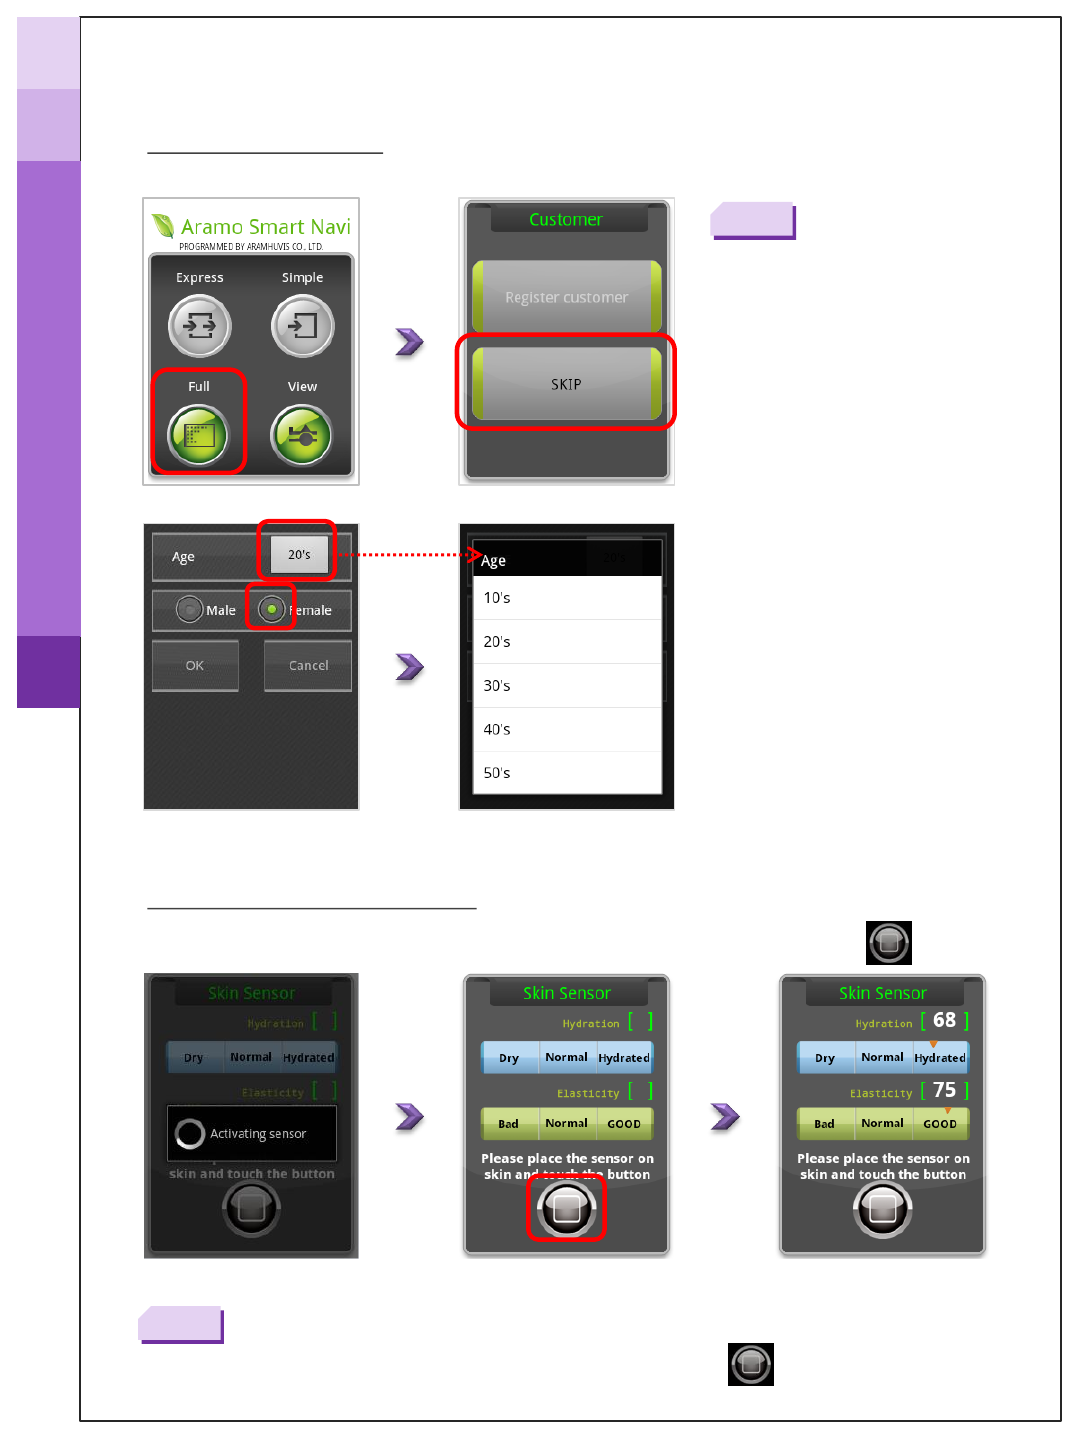
Diagnosis Process ≫ Full mode
Note
* Gray : deactivate status
* Black : activate status
Enter age group and gender
of customer
≫ Start diagnosis
≫ Hydration & Elasticity
Note
* Do NOT move during the measurement.
* “Please, rescan…” : To measure again by taping
How to diagnose_ Full mode
* Tap in red box
U - ZONE
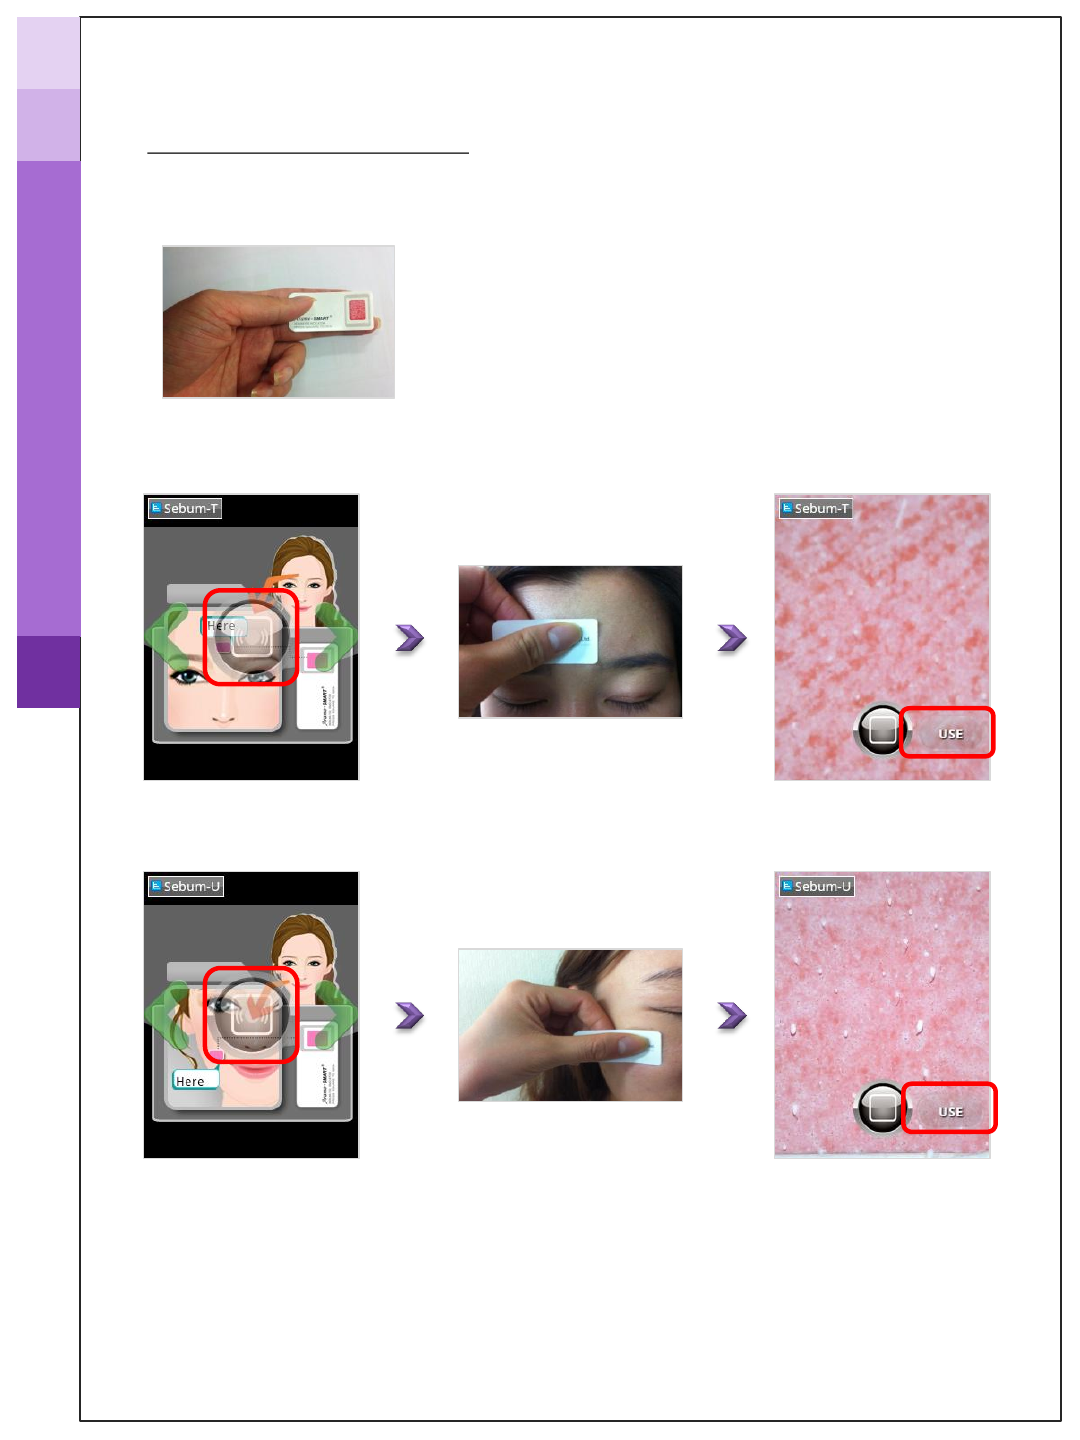
Diagnosis Process ≫ Full mode
Put the below sebum tape (pink area) onto the U or T-zone of your face for 3 seconds.
T - ZONE
≫ Sebum ( T & U zone)
* Tap in red box
How to diagnose_ Full mode
→ How to hold the sebum paper
How to put the sebum paper on T-zone
How to put the sebum paper on U-zone
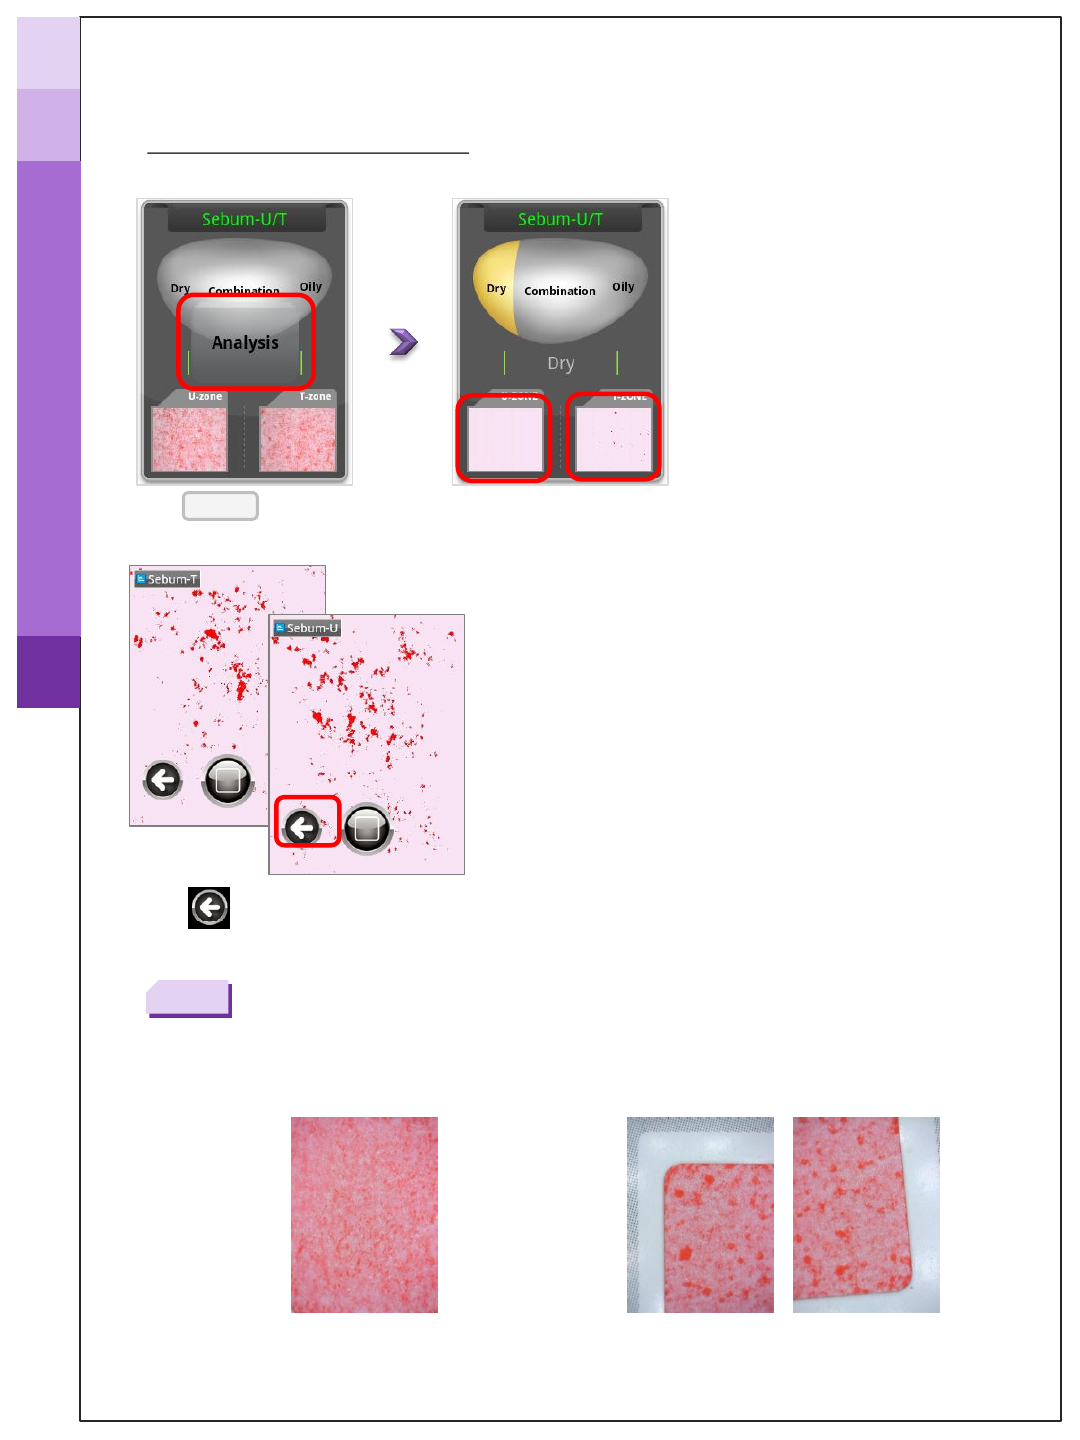
Diagnosis Process ≫ Full mode
≫ Sebum ( T & U zone)
Tap
Tap to go back to “Sebum-U/T” page.
Analysis Tap each image to magnify
* Touch the “>” or fling the screen to go to next page.
* Tap the screen to focus.
* Take the image without any white blank.
Note
* Tap in red box
How to diagnose_ Full mode
X
O
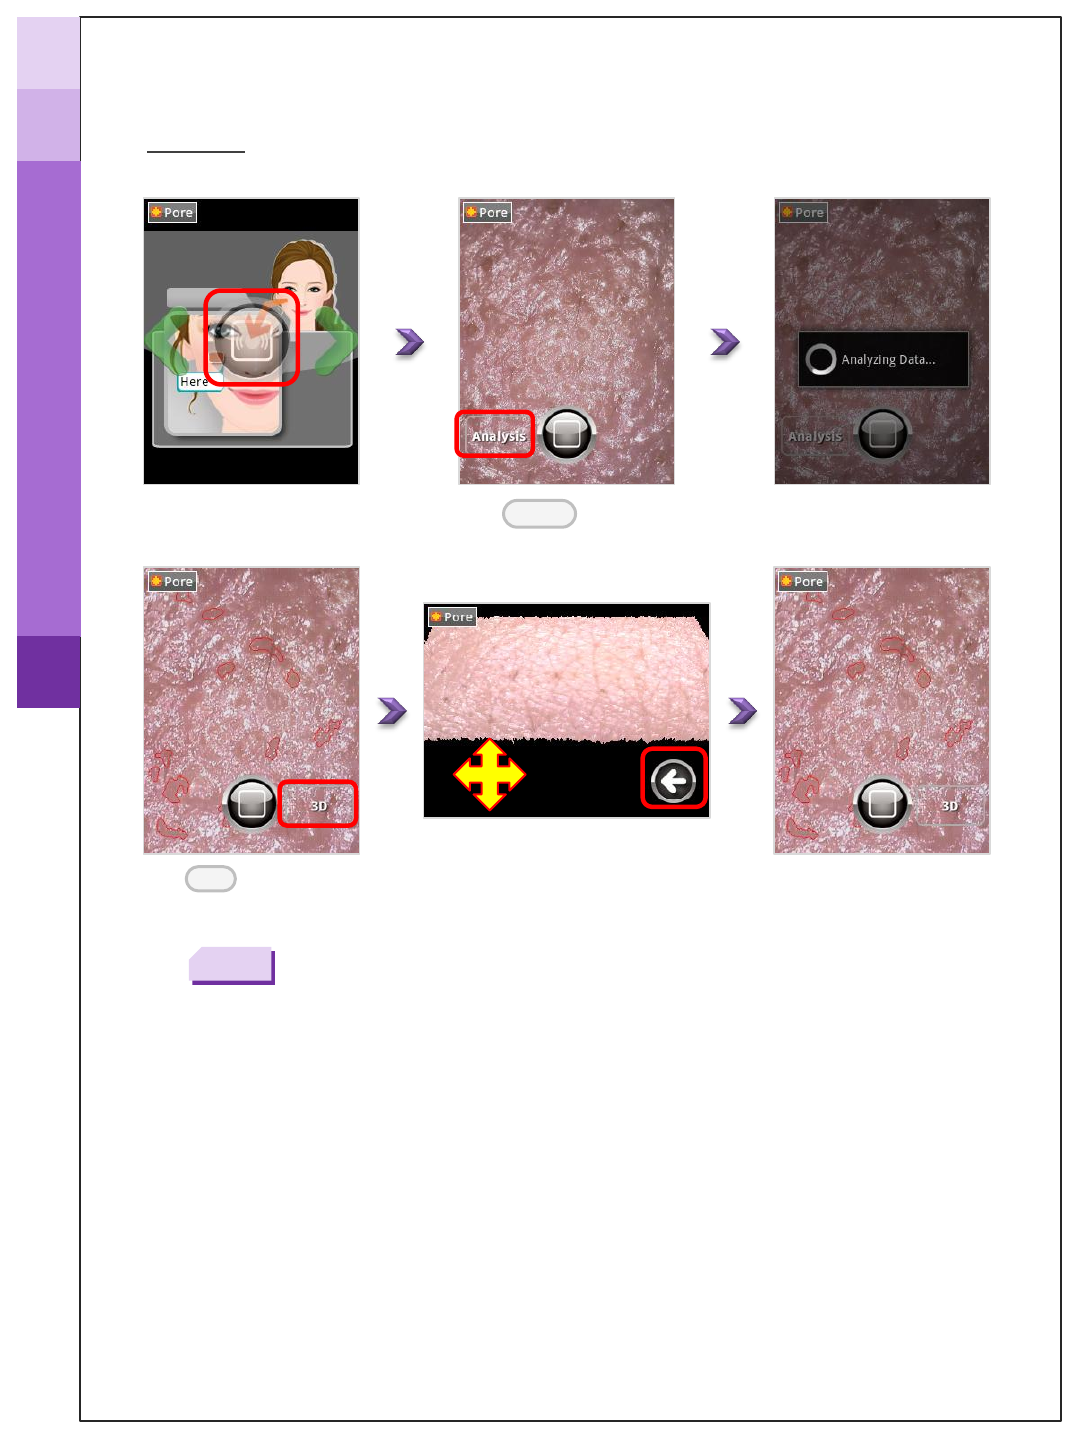
Diagnosis Process ≫ Full mode
Tap. Analysis
≫ Pore
Tap 3D image
3D
* Touch the “>” or fling the screen to go to next page.
* Tap the screen to focus.
Note
* Tap in red box
Drag
How to diagnose_ Full mode
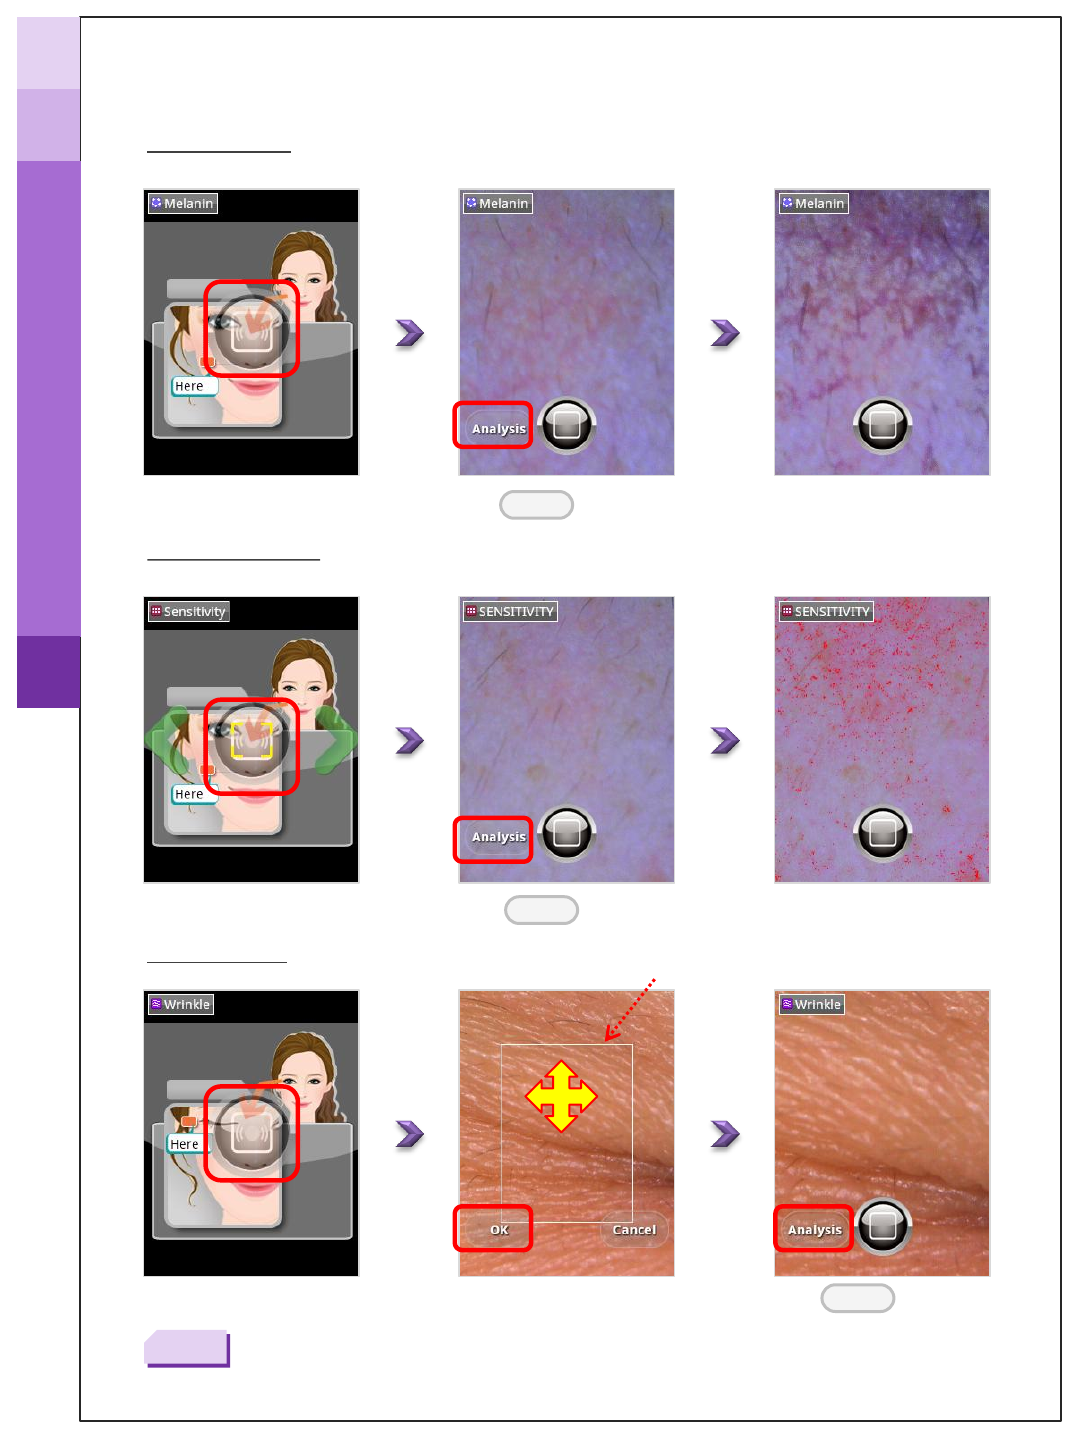
Diagnosis Process ≫ Full mode
Tap. Analysis
≫ Melanin
Tap.
* Touch the “>” or fling the screen to go to next page.
* Tap the screen to focus.
Note
≫ Sensitivity
Analysis
≫ Wrinkle
Tap. Analysis
Choose the area by moving
the white box
* Tap in red box
How to diagnose_ Full mode
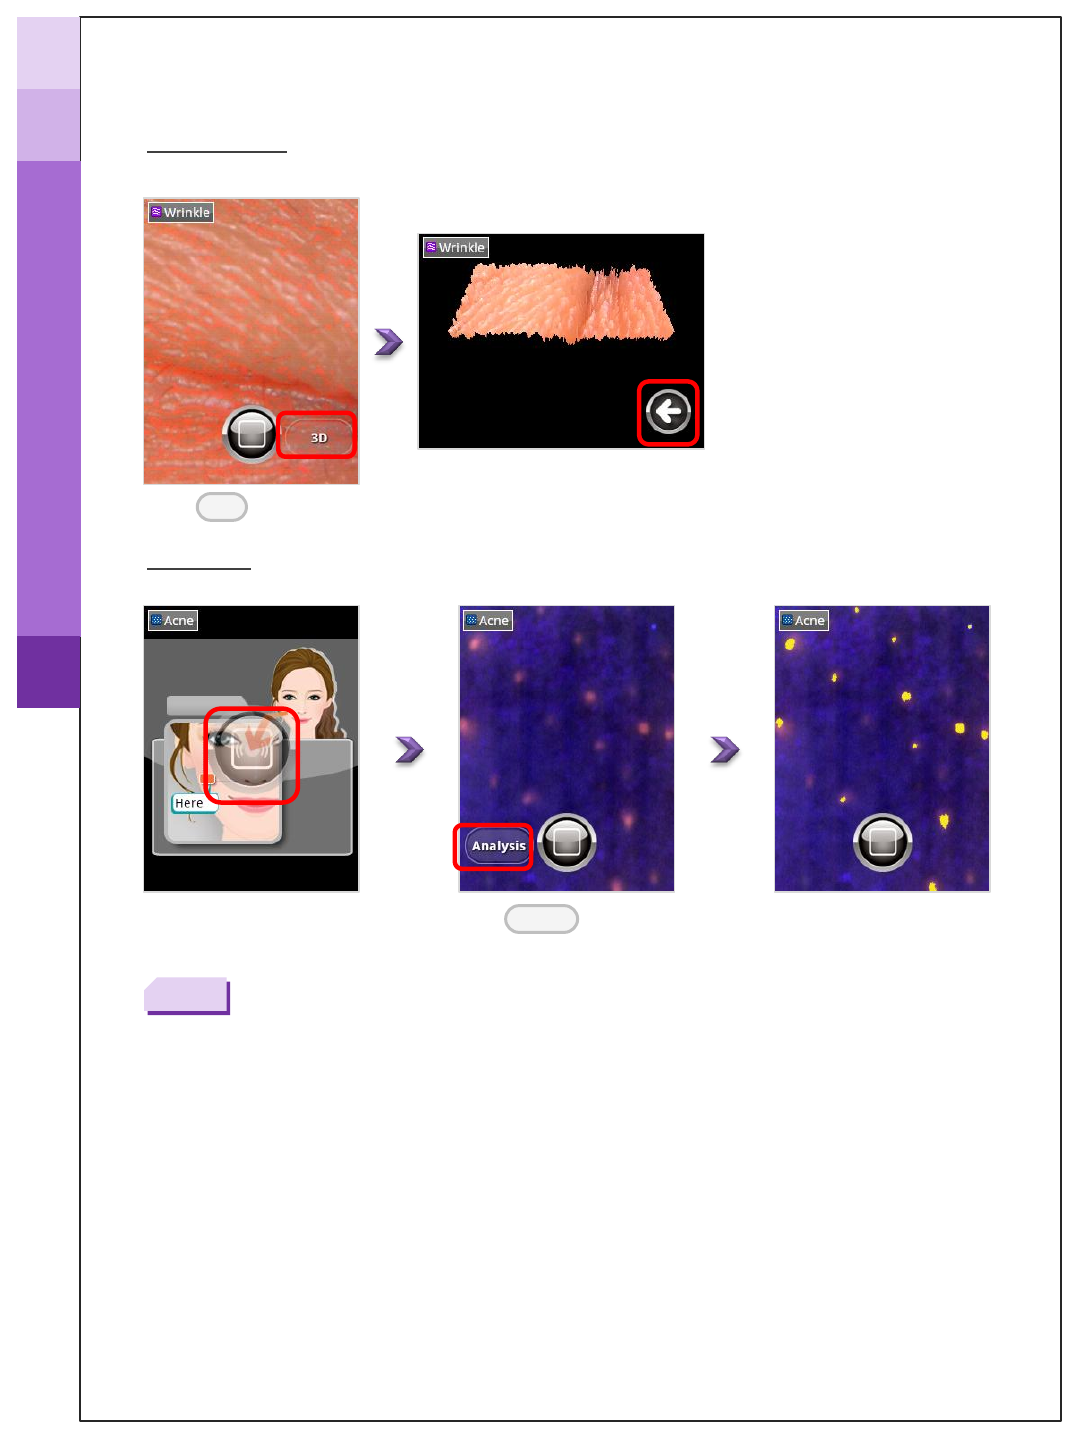
Diagnosis Process ≫ Full mode
Tap 3D
≫ Wrinkle
Tap
* Touch the “>” or fling the screen to go to next page.
* Tap the screen to focus.
Note
≫ Acne
Analysis
* Tap in red box
3D image
How to diagnose_ Full mode
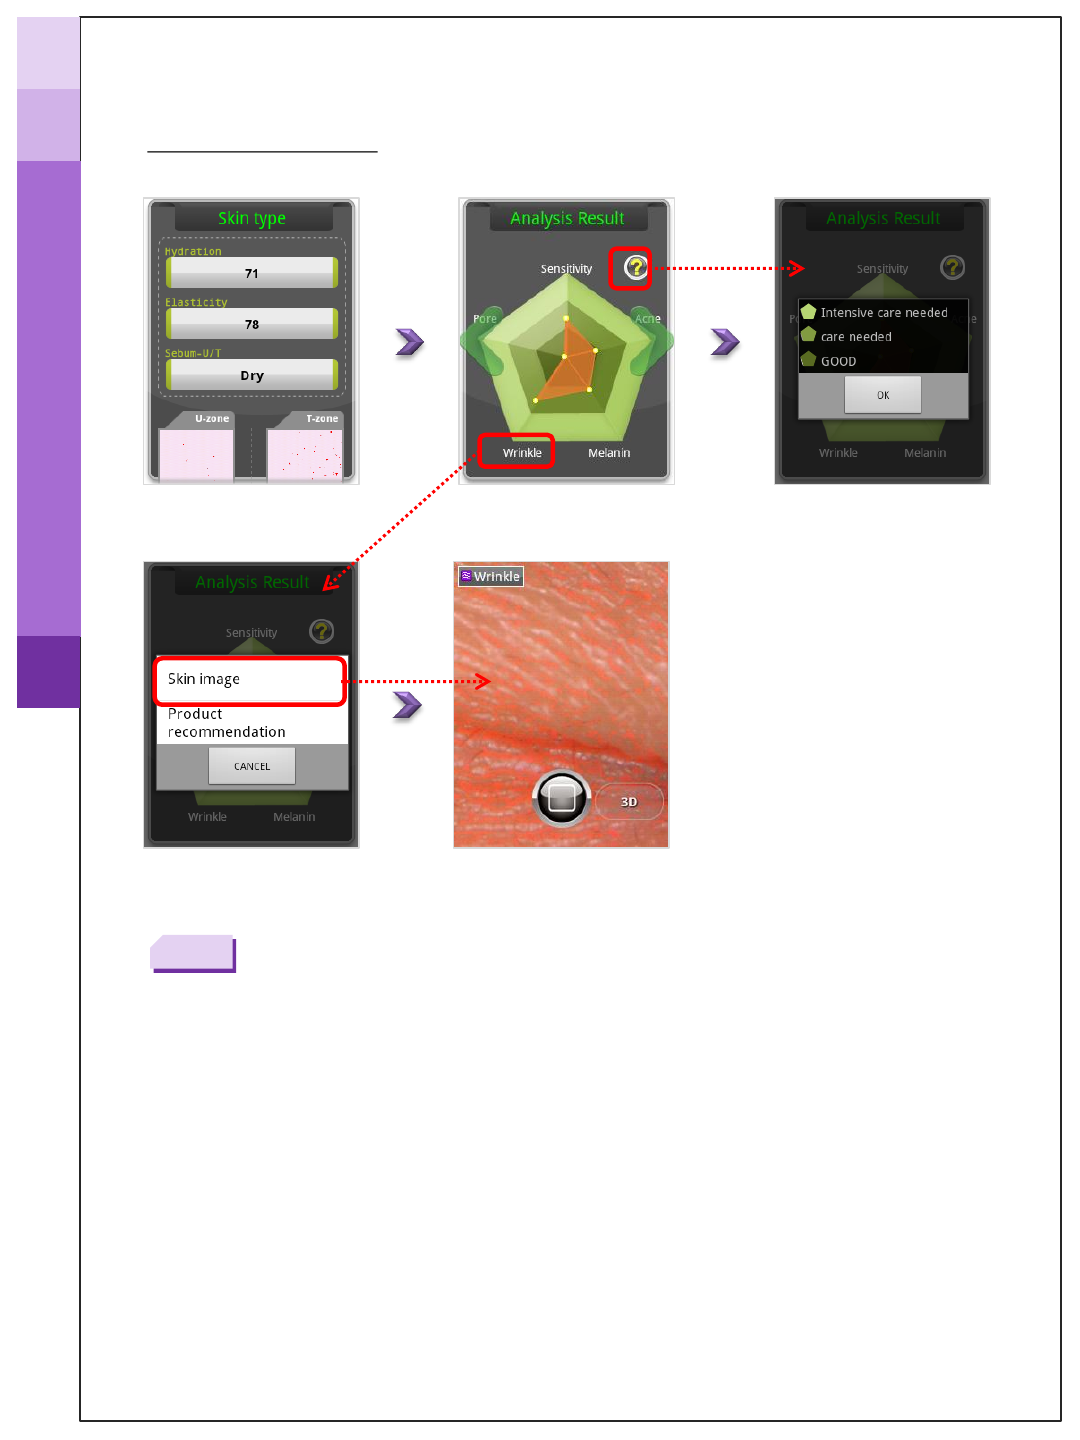
Diagnosis Process ≫ Full mode
≫ Analysis result
Note
* Product recommendation : to be updated
* Tap in red box
How to diagnose_ Full mode
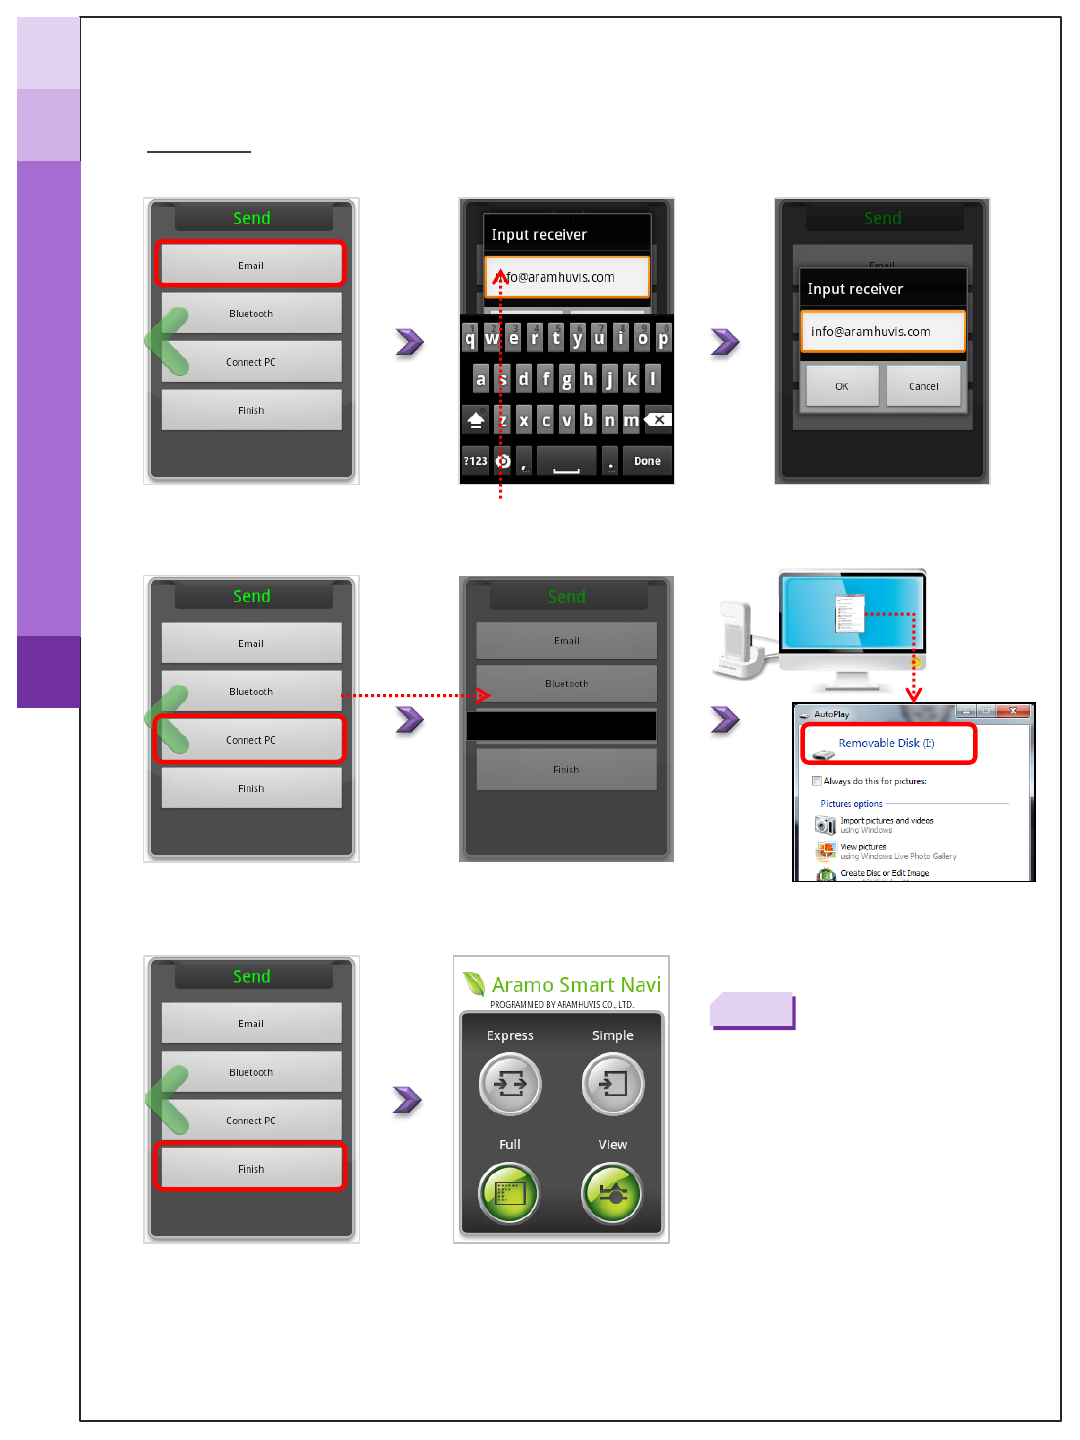
Diagnosis Process ≫ Full mode
Enter the customer’s email address.
≫ Send
* Bluetooth : to be updated
Note
Turn to USB storage…
Recognized as a Removabl
e disk on PC
* Tap in red box
How to diagnose_ Full mode
Diagnosis Process ≫ View mode
≫ NL mode (for Wrinkle)
Turn to USB storage…
Tap to change
the lighting mode.
≫ PL mode (for Melanin)
Tap to change the lighting mode.
Mode
Mode
* Tap in red box
Choose the area by moving
the white box
3D image
* Touch the “>” or fling the screen to go to next page.
* Tap the screen to focus.
Note
How to diagnose_ View mode
Diagnosis Process ≫ View mode
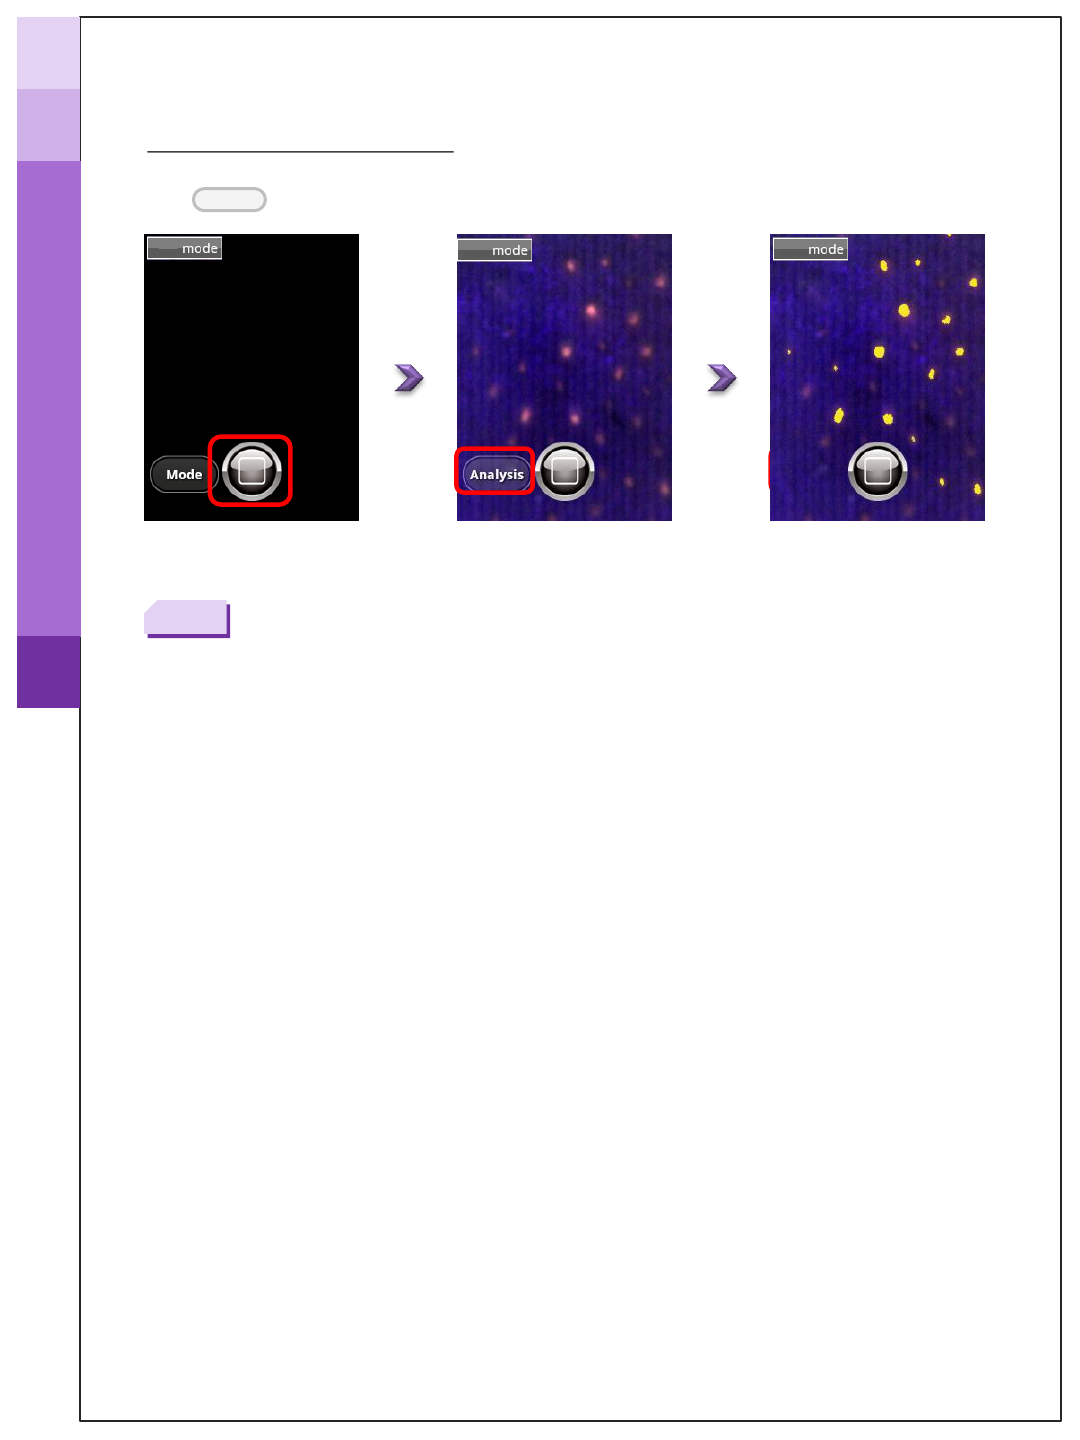
≫ UV mode (for Acne)
UV UV UV
* Touch the “>” or fling the screen to go to next page.
* Tap the screen to focus.
Note
* Tap in red box
Tap to change the lighting mode.
Mode
How to diagnose_ View mode
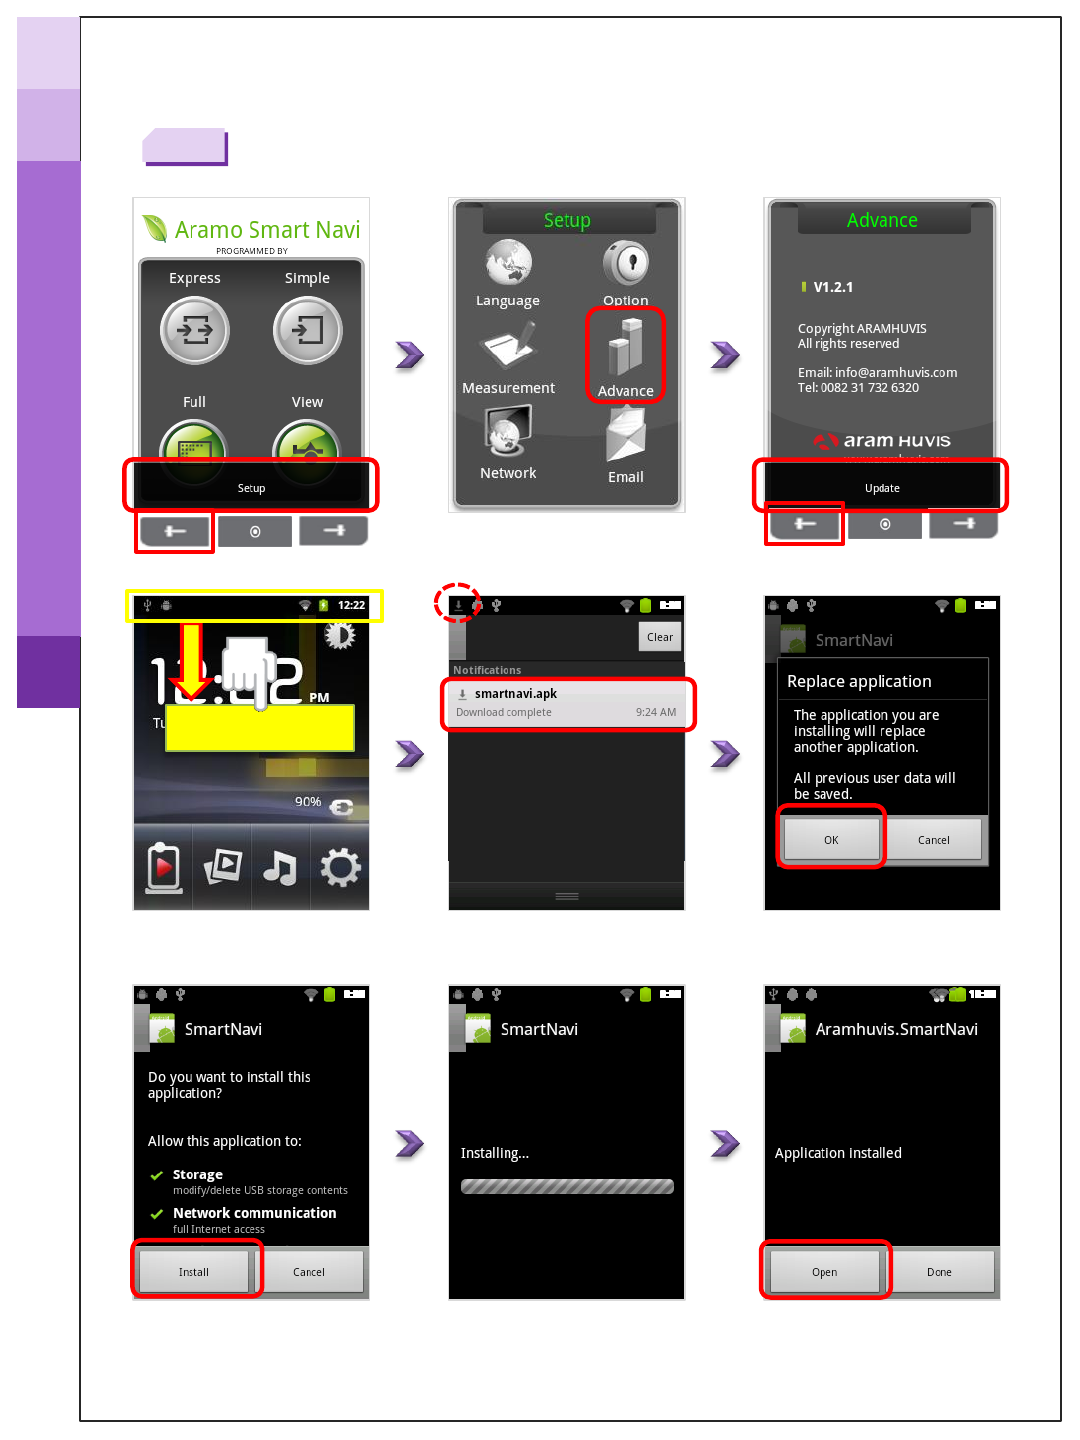
How to update the application
* Check the Wi-Fi connection before updating
Note
②
①
①
②
Drag down
How to set the ASNII-100
* Tap in red box
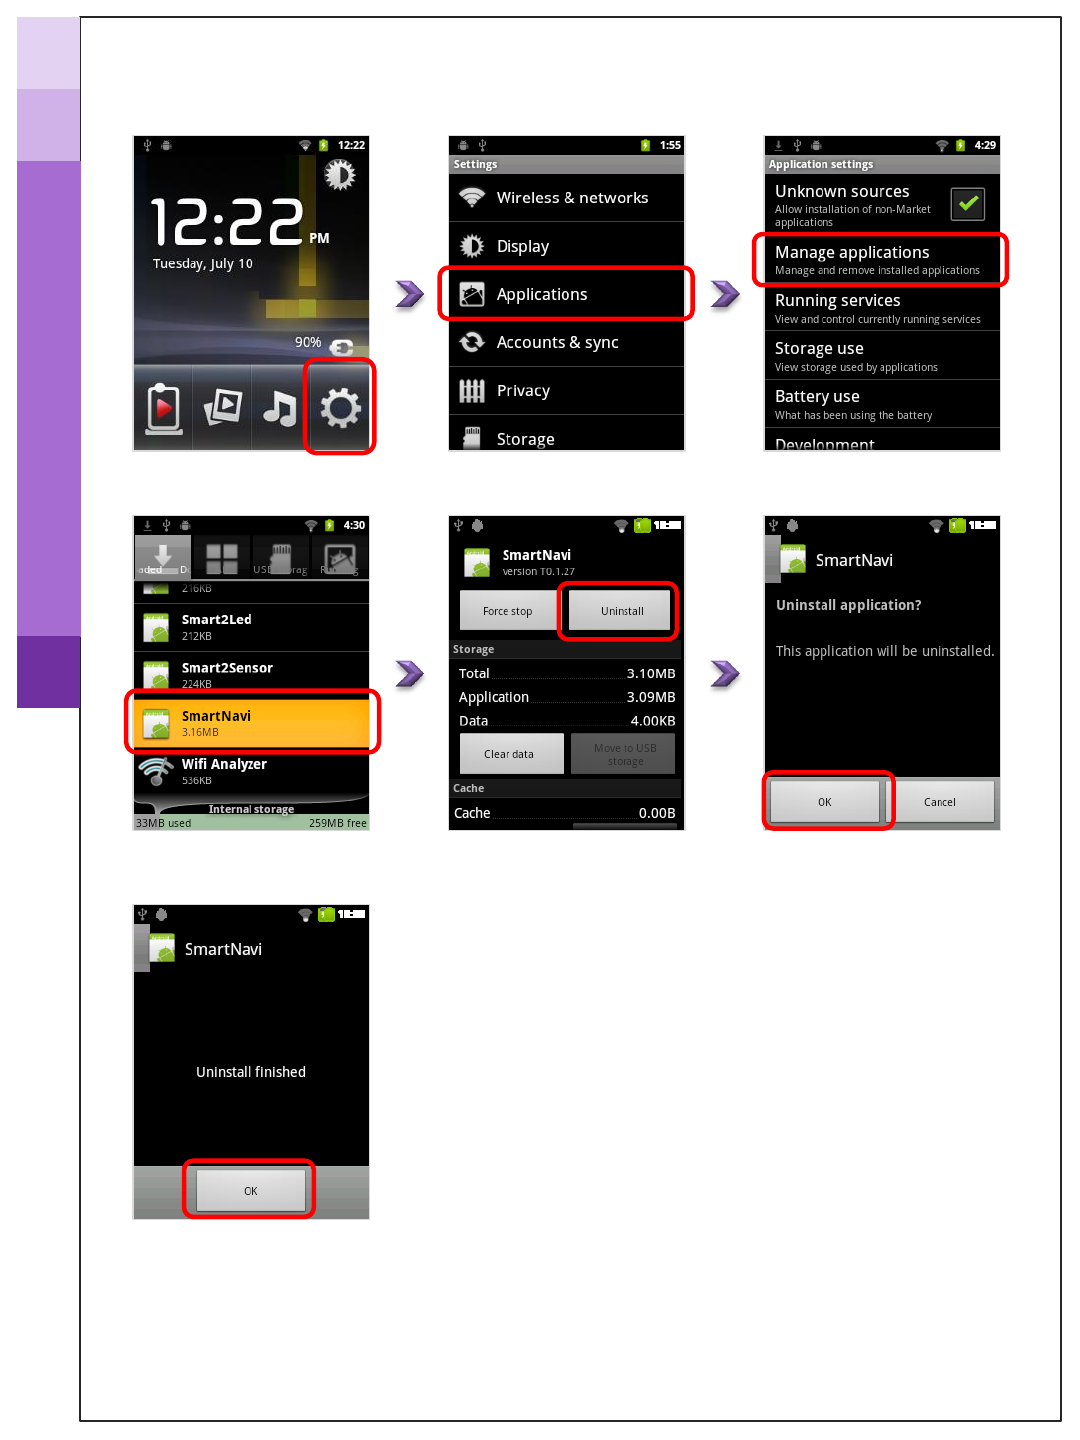
How to remove the application
On System main page
Find “Smartnavi” application.
How to set the ASNII-100
* Tap in red box

Standard & Features
Additional information
Section Item Contents
Optical/Camera
Camera
5M pixel CMOS
Sensor
X30,X60 TPL
AF
VCM
Sensor
Hydration
Light
Normal, Polarize, UV
-[3CH]
HW
CPU
S5PV210 ARM
-CORTEX A8 [1GHz]
Memory
DDR2 SDRAM (512MB) / NAND FLASH (512MB)
SD Memory
T-
Flash (Micro SD)
LCD
2.2Inch TFT LCD QVGA (240*320)
Touch
R
-TOUCH
Wi
-Fi
Wireless 802.11b/g/n (Wi
-Fi Direct Avail)
Bluetooth
BT ver3.0+HS
Audio
AC97 , Codec (
WM1800)
SPEAKER
Max 1.0 W,
Internal Speaker
USB
USB 2.0 HOST/DEVICE
Battery
Li
-ion (1150mAh)
Adaptor
AC Adaptor DC 5V / 2000mA
Key Pad
Power , 4
-direction navi Key ,Left , Right
Microphone
Internal MIC
Storage
Micro
SD ver2.0 (2GB)
Weight
127g
(with battery)
Dimension (mm)
57(W)
x 116(H) x 18 (D)
SW
Bootloader
u-
boot-1.3.2
OS
Android Gingerbread 2.3
Media
MPEG4(SP/ASP)/H.263(Profile3)/H.264(BP/MP/HP)
Applications
Google app.
Debugging Port
USB Client/UART

Troubleshooting Guide & FAQ
Additional information
I cannot turn on the device.
•
Connect and charge the device (or the battery) using the adaptor provided the supplier.
(The battery charging indicator will be shown on the system main page.)
I cannot power on the device even the battery is still full.
•
The battery might be dislocated on the device. Please separate the battery from the de
vice and put it on, and then power on again.
The battery is not charging very well.
•
Separate the battery from the device and put it on again.
•
Check the connection among a device, a battery, and a charger.
•A battery cannot be charged if there is an alien substance on the charging port. In this
case, please use the device after cleaning the charging port of the device or check whe
ther the sticker is attached on charging port.
The using time of the battery is different from the manual.
•
The battery using time will be shorten if you put the charged battery in a low or high t
emperature.
•
The battery using time vary in service type, using environment, using period of the batt
ery.
•
The battery is consumed without using the device, and the battery using time will be s
horten if you use additional functions of the device.
The device turns on but the diagnosis doesn’t work.
•
Check the smart card is correctly inserted (SD card slot on the button of the device).
There are dust on the device.
• Clean the dust by using a smooth fabric. Do not use benzene, alcohol, and a synthetic d
etergent.
The screen is frozen and the keys not working when using the device.
•
Separate the battery from the device and put it on again.
If the device is still not working, please contact to the customer service center.
A "force close" message appears on the screen
.
•
The repetition of commands can trigger a bug. Sometimes there may be a brief delay
before the command is completed. Do not repeat/multiply the tasks as the device will
no longer be able to follow them.

Troubleshooting & FAQ
Additional information
I cannot connect to Wi
-Fi.
•
Check the connection status on setting page.
•
Try to connect to another Wi-Fi.
•
- Bluetooth : Check the pairing status and try to re-pair the device with host device.
I cannot connect to Blue
-tooth.
•
Make sure to use the Bluetooth hosting devices that have Bluetooth certified with the
logo. You may need an external Bluetooth dongle for those devices that do not have
Bluetooth feature.
•
Bring the device to closer with the Bluetooth hosting device.
•
Try to re-pair the device with host device.
•
The password of pairing is “0”(number).
The touchscreen doesn’t react to my finger commands.
•
Before using for the first time remove the protective plastic film.
•
Use the stylus-pen provided from supplier.
The screen was
turned off.
•
The device has a power save function that turns the screen OFF after 1 minute. Press
the on/off button to turn on the screen.
I can see the black screen only during measurement.
•
Check the LED light inside lens on the head part when you try to measurement. If you
cannot see the light, please connect the customer service center.
The image is not clear.
•
Tap the screen while capturing to focus.
I cannot update the diagnosis application.
•
Check the network connection, the update process can be done after connect to Wi-Fi.
CAUTION UPON INSTALL & USE
Additional information
Thanks for using the product of Aram HUVIS Co., Ltd.. The product undergoes strict quality
management and inspection process before production and introduction to market. Product defect or
trouble during warranty period is entitled to free repair.
Please, fill out warranty and keep it with receipt to enjoy better service in the future.
▶Warranty Period
14 MONTHS from the products arrival.
▶Service Free of Charge
Service is provided free of charge only if product defect occurs within 1 year from the date of
purchase (within Warranty Period).
▶ Repair with Charge
* Cases except for product defect
If service is requested due to the reasons except for defect, service fee may be charged.
- Defect resulting from the mistreatment by the user
- Defect resulting from the lack of caution (leakage or shock) or unauthorized repair or remodeling
- Defect due to natural disasters such as fire, earthquake or flood
Model Serial No.
Date of Purchase Customer Name
Place of Purchase Contact
Information
Case
Service
Within Warranty Period After Warranty Period
Functional or operational defect which occurs
under normal condition of use within 10 days
after purchase
Product replacement
Functional or operational defect which occurs
under normal condition of use within 14 year
after purchase
Free of charge
Defect which results from the mistreatment
by the user
Partial free repair Or
Repair with charge Repair with charge

CAUTION UPON INSTALL & USE
Additional information
1. Humidity
Do not install the product in the place with rain leakage or of high humidity. If the product is
leaking, it may cause damage or fire.
2. Repair
Do not disassemble or remodel the product because it may cause danger such as an electric shock.
When a problem occurs, do not attempt to repair it. Instead, contact the seller.
3. Electricity
Do not use electricity except for what is prescribed here. Using improper electricity may cause an
electric shock or danger.
4. Installation Environment
Do not install the product in a too hot or cold place. (Recommended Temperature : 15℃ ~ 35℃ )
5. Sunlight
Do not expose the camera of the product to the sun or a direct ray of light. It may cause product
damage
6. Shock or Vibration
Do not drop the product or give it a strong shock or vibration.
7. If the product does not work properly
If a problem occurs while using the product (unidentified noise, smell or smoke), stop using it and
turn the power off and contact the seller.
8. Dirt on Lens
Make sure that keep camera lenses clean and away from pollution. If it polluted by finger print or
external dirt, cleanse it with cotton stick socked with 70% Ethyl Alcohol solution or use air blower
to remove the dust. Those products are available at camera shop.
9. For After-Service
When any of the following occurs, turn the power off and have the product repaired at the place of
purchase.
i. Power Connector is damaged
ii. The product is leaking
iii. Liquid is spilt over the product or it has alien substance.
iv. Product does not work as indicated in this manual.
(Attempting to operate the product against manual may cause more serious damage.)
v. Product is dropped to the floor and seriously damaged.
Rm.801 Byucksan Technopia, #434-6 Sangdaewon-dong, Jungwon-gu, Seongnam-city, Gyeonggi-do, KOREA 462-716
TEL [82-31] 732.6320 FAX [82-31] 732.6330 E-MAIL info@aramhuvis.com WEBSITE www.aramhuvis.com
Aramo Smart NavigatorII-100