Arcade Ice Age Manual User
Ice Age Manual Ice Age Manual
2013-09-30
User Manual: Arcade Ice Age Manual
Open the PDF directly: View PDF ![]() .
.
Page Count: 24
OWNERS AND SERVICE MANUAL
INNOVATIVE CONCEPTS IN ENTERTAINMENT INC.
10123 MAIN STREET, CLARENCE, NY 14031
SERVICE: 1-716-759-0360
FAX: 1-716-759-0884
E-MAIL: service@icegame.com
WEBSITE: www.icegame.com
2
3
Table of Content
Getting started
Installing the marquee top 4
Cabinet Access 5
AC Power Connections
Meter Location 6
Loading Tickets
Changing the volume
Program Options 7
Diagnostic - Repair - Trouble Shooting
Computer Access and Recovery 12
Power supply replacement 13
Monitor Controls
I/O board removal 14
Marquee illumination 15
Outside illumination
Acorn Hit board Dipswitches
Cover Top removal 16
Marquee Assembly removal 17
Acorn Blue LED strip Replacement 18
42” LCD main display replacement
Cabinet Cooling Fan replacement 19
Assemblies
Acorn 20
Cabinet 22
Spare list 23
Warranty 24
Rev B - 12/22/2011
4
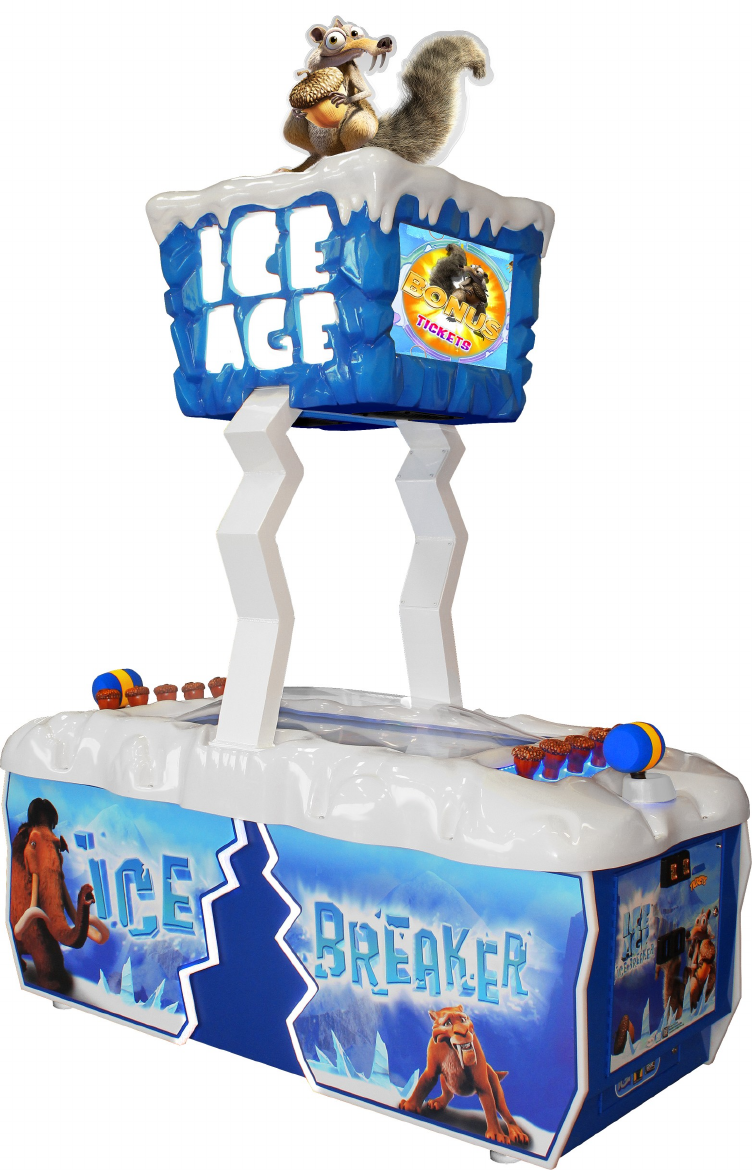
STEP 1:
Insert “Scrat” through the slot on top
of the marquee top and secure it by
using the two included bolts and
nuts. They can be found in the cash
box.
Marquee Top Assembly
STEP 2:
The marquee top is attached with
Hook and Loop. Place assembly on
top of marquee assembly.
5
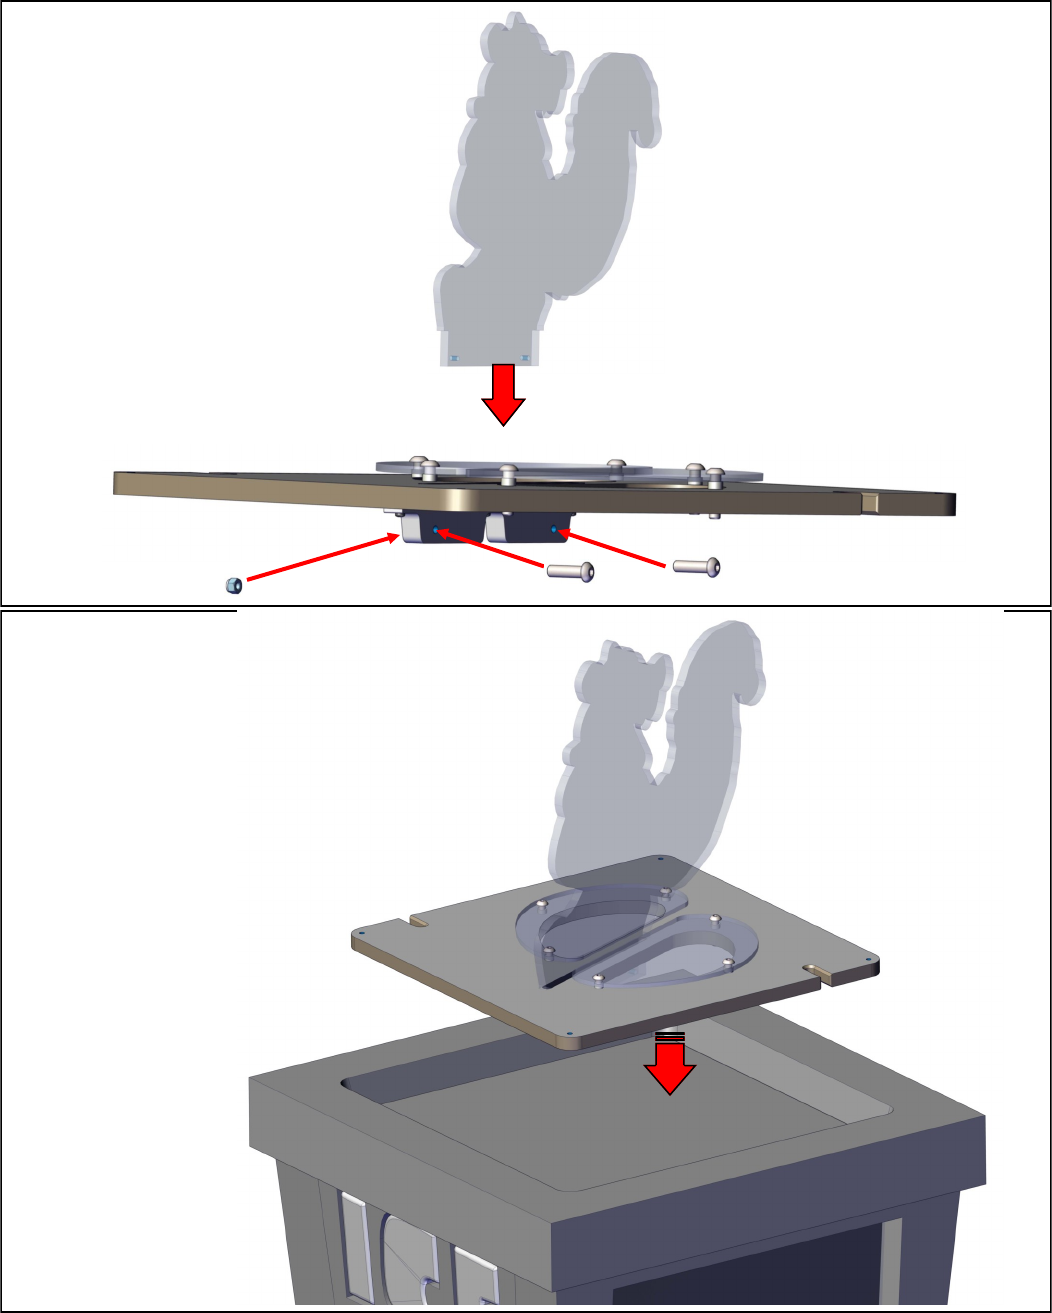
Cabinet Access
There are two cabinet doors located on either side of the game. This allows access
to the game’s electronics, coin mechanisms, and setup control buttons.
Cash box
drawers
Cabinet doors
on both sides
Cabinet doors
on both sides
Cash box
drawers
on both sides
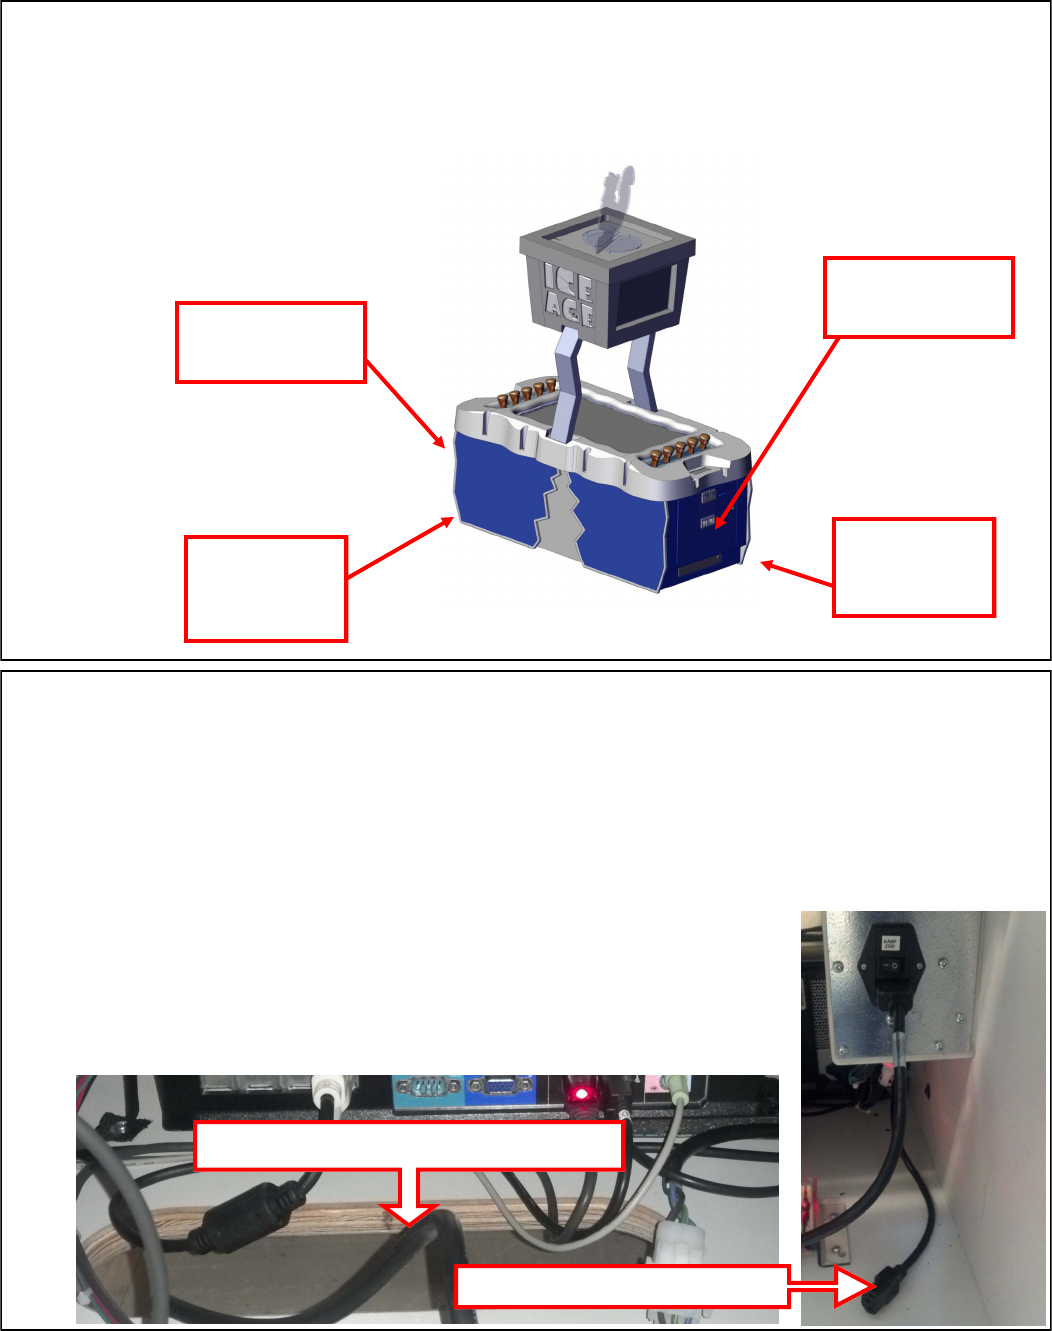
AC Power connections
Located inside the cabinet on one side is the AC power switch and two different options for in-
coming AC power cords. If your AC power receptacles are located in the ceiling use the AC
power cord pre-mounted in the game. You will have to remove the marquee top to route the
power cord to your AC receptacle. See section “Marquee illumination access”. If your AC outlet
is located on the floor or wall, use the provide AC cord found in your parts box and route it
through the floor opening shown below.
Route AC cord through here for Floor/Wall power
Use this cord for ceiling mount
6
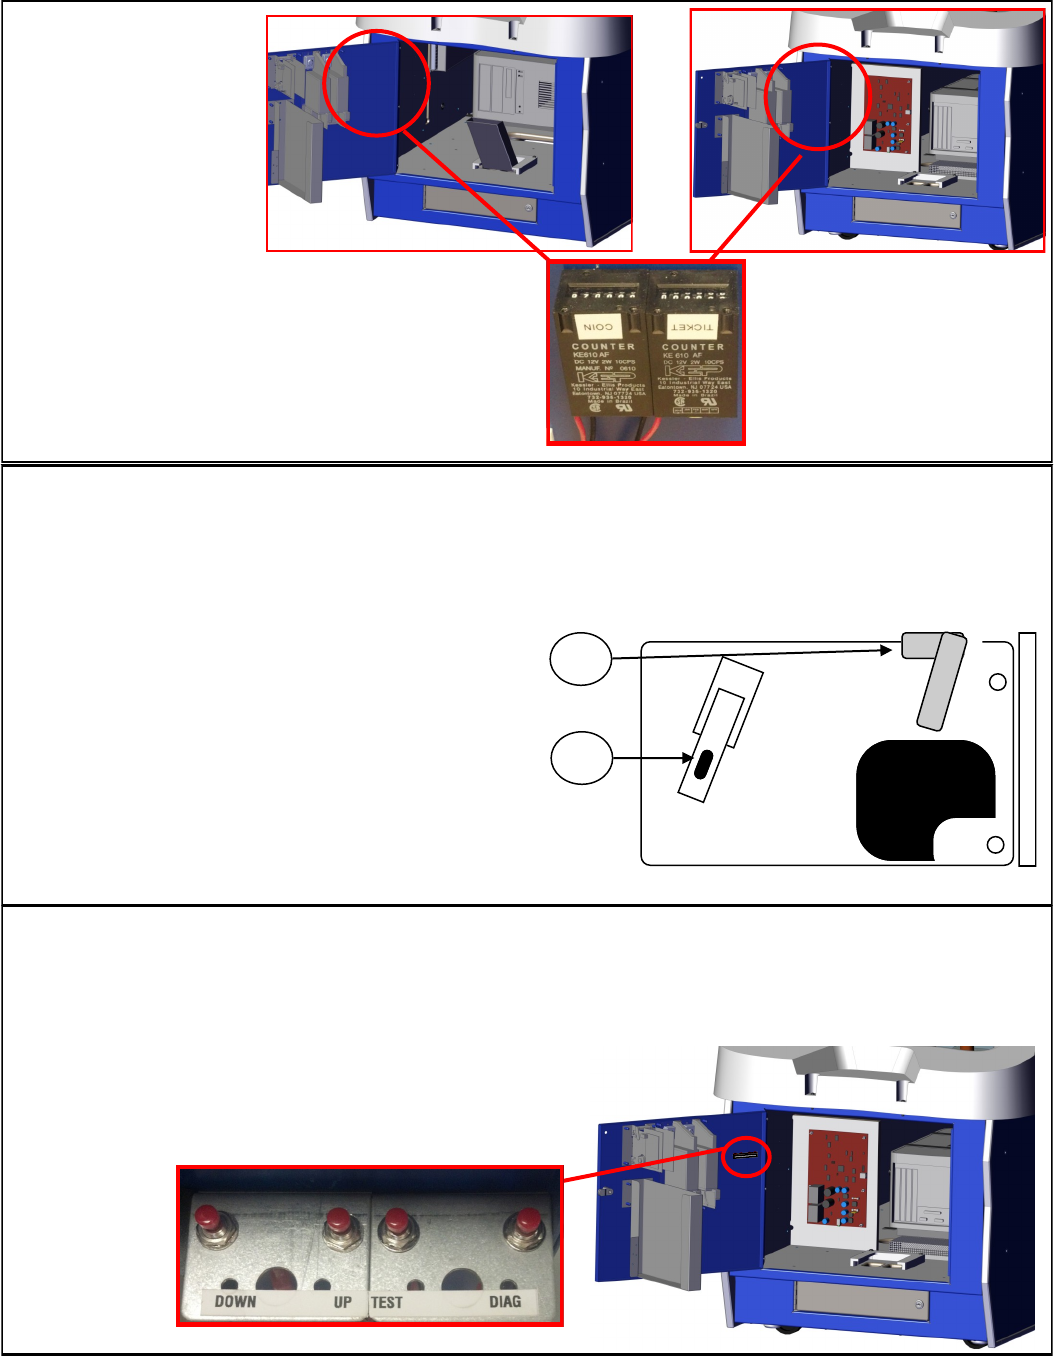
Meter
Locations
Volume and Diagnostics buttons
During game mode the Up and Down buttons will increase and lower the volume. The test button
will issue a credit without adding a number to the coin meter. Pressing the “Diag” button will al-
low you to enter your program options. See Program
options for further details.
Loading Tickets
To load tickets, loosen the side bracket (labeled 2 below) so that you can move the bracket up or
down. Moving the bracket up will decrease the width of a ticket and moving the bracket down will
increase the ticket width. Tighten when adjusted
for your ticket width. Now slide the ticket
through the two guide plates until they reach the
rollers. Lift the top level (labeled 1) up to disen-
gage the rollers so that a ticket can be pushed
through. Press the ticket advance button located
on the backside of the dispenser to test the ticket
function.
2
1

7
MAIN MENU:
Press the “diag” button shown on page 5 to
enter the main menu. Use the up and down
buttons to scroll through the menus or options.
Press the “diag” button to select a option or
menu.
Operator adjustments lets you configure your
game.
General audits give important information about
your game statistics.
Reset menu will set things back to factory
default.
System information will give you version
information.
System tests lets you test various items of your
game.
View log will show you any errors your game
has encountered.
Ice Age Version 01.15.00 STD
Main Menu
Exit
Operator Adjustments
General Audits
Reset Menu
System Information Menu
System Tests menu
View Log
Ice Age Version 01.15.00 STD
Operator Adjustments
EXIT
Game Adjustments
Ticket Mech Adjustment
Coin Adjustments
Player Cost and Payout
Volume
Program Options
Version 01.17.00 STD
OPERATOR ADJUSTMENTS:
Game adjustments allows you to change how
the game plays and what type of prize you win
to play.
Ticket mech adjustment will allow you to en-
able or disable the ticket mech and set double
tickets.
Coin adjustment allows you to change your
currency and currency values.
Player cost and payout menu allows you to
change the game cost along with how the
game pays out.
The volume menu allows you to adjust the
games volume and set the attract audio levels.

8
Ice Age Version 01.17.00 STD
Game Adjustments
EXIT
Countdown Timer 10
Player 1 hit threshold 10
Player 2 Hit Threshold 10
Prize Type Tickets
Enable Lamp Animation On
Display Character Values Off
Reduced Characters On
Acorn Orientation version 2
GAME ADJUSTMENTS:
Countdown timer adjusts how long you have
to hit a acorn before the game decides to hit
one for you.
Player 1 and 2 Hit Threshold settings adjust
the sensitivity of the I/O boards. These values
should only be changed by advisement from
ICE service department.
Prize type allows you to select what you are
paying the player, either tickets, coupons, or
nothing.
Enable Lamp Animation allows you to either
enable or disable the flashing lights.
Display Character Values allows you to either
show what each character is worth or not. We
recommend not showing the values of the
characters.
Reduced Characters creates less obstacles
for the players to hit.
Acorn Orientation determines which acorn
assembly is used in this game. This is set at
the factory and should not be changed.
Ice Age Version 01.17.00 STD
Ticket Mech Adjustments
EXIT
Ticket Output On
Ticket divisor 1
Ticket Mech Adjustments:
Ticket Output will enable or disable the ticket
dispenser.
Ticket Divisor will divide the amount of tickets
owed by this value.
Program Options
Version 01.17.00 STD

9
Ice Age Version 01.17.00 STD
Coin Adjustments
EXIT
FREEPLAY Off
CURRENCY TYPE Dollar
Coin 1 value .25
Coin 2 value .25
Coin 3 value or dbv pulse .25
Coin Adjustments:
Free Play when enabled it will allow the players to
play with no money.
Currency Type allows you to change what is
displayed as currency accepted to start a game.
This can be set to tokens or card swipe if no
money is used.
Coin 1,2,3 values allow you to configure what each
pulse is worth to the game.
See our recommended setup examples for
further details.
Ice Age Version 01.17.00 STD
Player cost and payout
EXIT
Game Start cost .50
Hits per game 5
Row 1 value 1
Row 2 value 1
Ring ticket value 4
Wall block value 1 3
Wall block value 2 2
Wall block value 3 1
Bonus value 500
Target payout pct. 0.40
Ticket value 0.010
Player Cost and Payout:
Game Start Cost allows you to set the price of
play.
Hits per game option tells the game how many
times you let the player hit the acorns per game.
Row 1 value is how many tickets/coupons you win
for that row. See bottom screen shot for location.
Row 2 value is how many ticket/coupons you win
for that row. See bottom screen shot for location.
Ring Ticket Value is how many tickets you win
when you hit the outer ring. See bottom screen
shot for location.
Wall block values 1 through 3 is how many tickets/
coupons you win when you hit the outer walls.
They are labeled WB1—3 on bottom screen shot
for location.
Bonus value is how many tickets you win when
you hit the center of the ring. See bottom screen
shot for location.
Target payout pct is the percentage you wish to
pay back to the player.
Ticket value determines the value of your tickets/
coupons.
See our recommended setup examples for further
details.
R
O
W
2
R
O
W
1
R
O
W
1
R
O
W
2
WB2
WB2
WB1
WB3
WB1
WB3
** BONUS ** BONUS ** BONUS**
Program Options
Version 01.17.00 STD
Ring
Ring

10
Volume Adjustments:
Game volume adjusts only the volume during
game play.
Attract volume adjusts only the volume during
attract screens.
Minimum Volume sets the lowest you can adjust
your volume level to.
Attract Sounds allows the game to either make
sounds when not being played, play sounds all the
time, or be quiet until coined up.
Ice Age Version 01.17.00 STD
Volume
EXIT
Game Volume 24
Attract volume 24
Minimum Volume 4
Attract sounds Occasional
Ice Age Version 01.17.00 STD
General Audits
EXIT
Game Audits
Acorn audits
Ticket Audits
System Audits
Coin Audits
Ice Age Version 01.17.00 STD
Reset Menu
EXIT
Reset Game Audits
RESET CREDITS
RESET COIN COUNTERS
RESET ADJUSTMENTS
RESET TICKET
FACTORY RESET
General Audits:
Game audits shows what targets the players have
hit during play.
Acorn Audits shows how many times each acorn
has been hit.
Ticket Audits gives you the average tickets per hit,
per game, and current payout percentage it has
paid out. It also shows how many tickets still
owed.
System Audits shows if any errors had occurred.
Coin Audits shows information on coin inputs.
Reset Menu:
Reset Game Audits resets game hit totals.
Reset Credits zeros out all credits owed.
Reset Coin Counters zeros out all recorded coins.
Reset Adjustments resets all game adjustments
made.
Reset Ticket resets all tickets owed.
Factory Reset restores game to factory defaults
Program Options
Version 01.17.00 STD

11
Ice Age Version 01.17.00 STD
System Information menu
EXIT
Version list
Dipswitch settings
Ice Age Version 01.17.00 STD
System Tests menu
EXIT
HITPAD TEST
SWITCH TEST
SCREEN TESTS
SOUND TEST
FILE TEST
COIN METER 1 TEEST
COIN METER 2 TEST
TICKET METER 1 TEST
TICKET METER 2 TEST
TICKET DISPENSER TEST 1
TICKET DISPENSER TEST 2
WATCHDOG TEST
Ice Age Version 01.17.00 STD
View log
EXIT
WELCOME TO ICE AGE
Received message from...
System Information Menu:
Version List displays the version numbers of the
drivers used for this version of the game.
Dipswitch is not used for this game.
System Tests Menu:
Hitpad test allows you to confirm the functions of
your Acorns.
Switch test allows you to confirm the functions of
your switches.
Screen tests will produce screen patterns to check
the functions of your monitors.
Sound test verifies your computer and amplifier for
sound.
File test will verify your game is free of file
corruption.
Coin meter 1 and 2 tests will advance the meters by
1 pulse to test their functions.
Ticket dispenser tests 1 and 2 will dispense 1 ticket
to ensure the function of your ticket mechs.
Watchdog test will reset your computer testing the
function of the watchdog board. Its function is to
reset the computer if it happens to “lock up” or
“freeze”.
View Log:
The purpose of this log is to show the
communication between the PC and the games’
different hardware and is used in the process of
troubleshooting.
Program Options
Version 01.17.00 STD
12
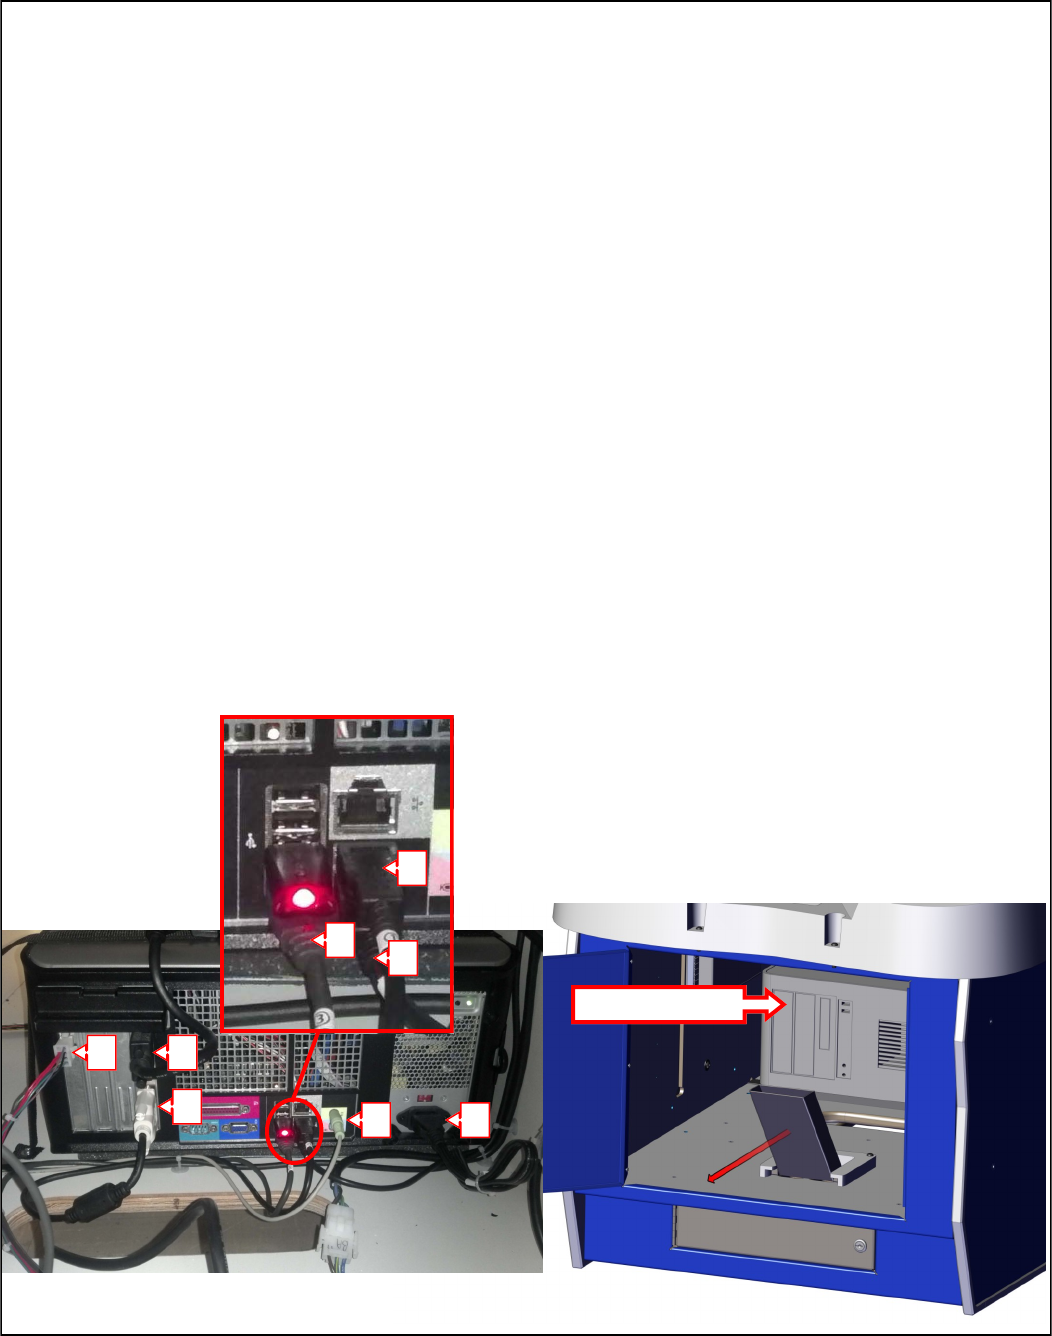
Computer Front Access - Hard drive recover procedure
In the event that the computer’s hard drive becomes corrupt you can simply run the restore disk
included with your game. Open the cabinet door from which you turned the cabinet’s AC power
on. Even though the computer’s DVD drive is in a horizontal position the computer doesn’t have
to be removed in order to perform the restore process. With the cabinet’s AC turned on, press
the eject button located on the DVD drive. Place the DVD with the label facing towards the left
(or to the top of the computer case itself). Push gently on the DVD drive tray and the DVD tray
will close. Press and hold the PC”s power button until the PC turns off. Press the power button
again to turn the PC back on. The restore process is automatic and will begin on its own. When
the restore disk is finished, it will eject the disk and inform you to cycle power.
To remove the computer, you will first need to access the other side in order to unplug the cables
that connect to the computer. Disconnect all connections shown below labeled A through H.
D,E,F are USB connections and have can be plugged into any USB port available in any order. B
is the video for the marquee monitors. C is for the main monitor. G is for sound and H is for
power. A connects to your I/O board for power and watchdog feature.
Remove the coin chute by sliding the coin out as shown below in the direction of the arrow. Re-
lease the straps that hold the computer to the cabinet. To do so, press the tabs located on the
side of the strap to unbuckle them. The pc can now slide out the side that you removed the coin
funnel from.
DVD Eject button
A B
C G H
D
E
F
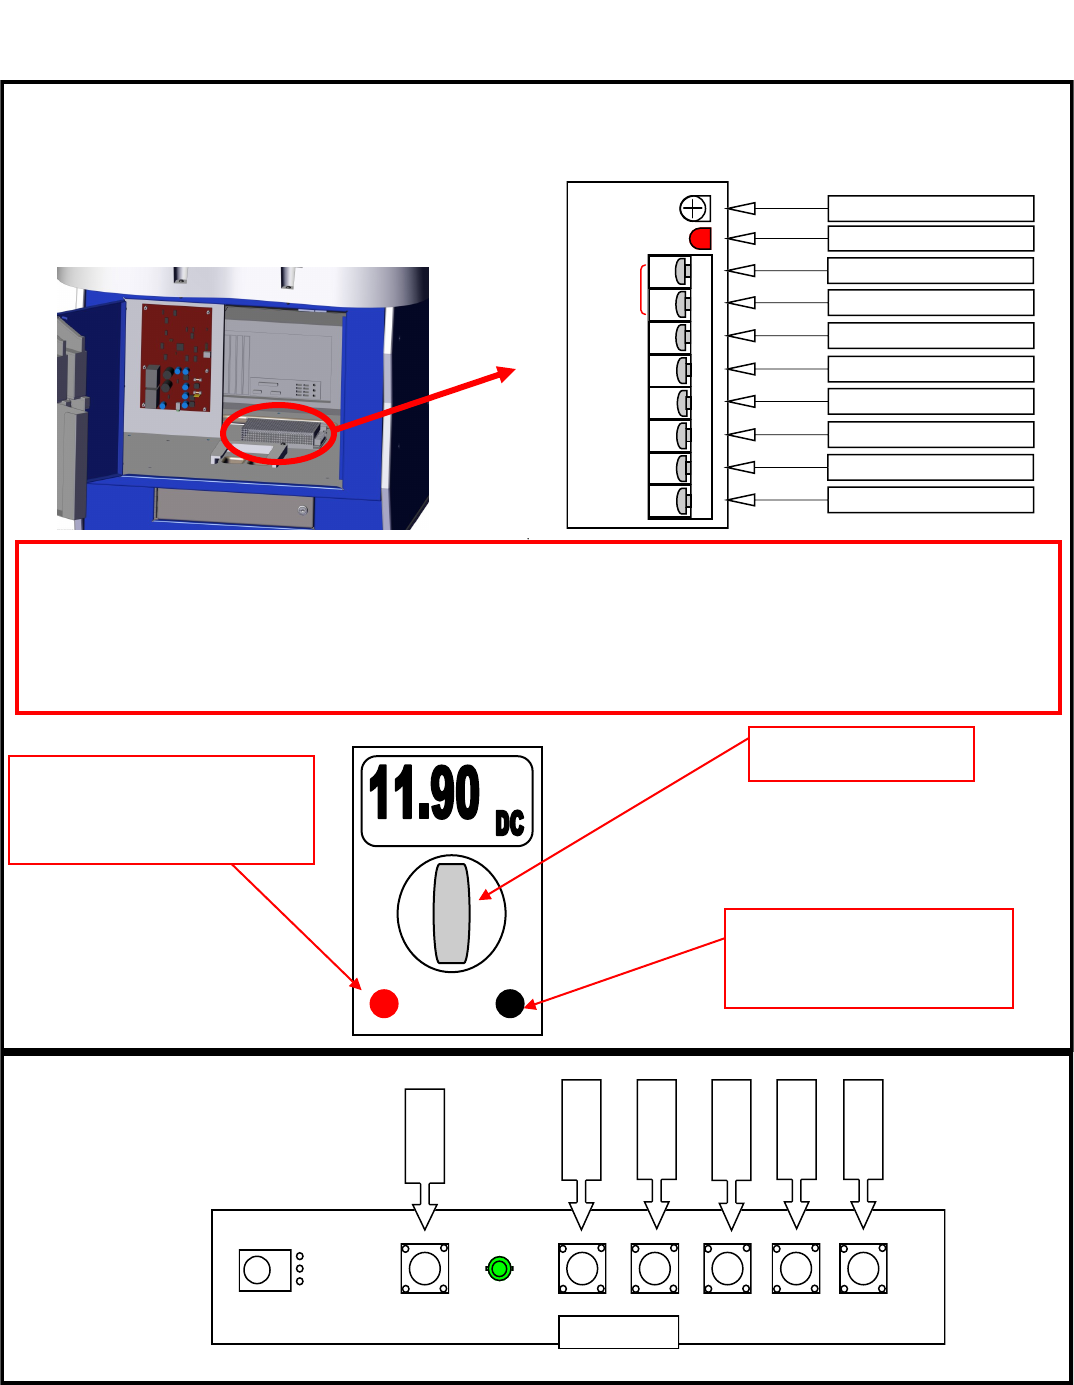
13
Checking DC Voltages
+12 Volt Test with Volt meter set to DC voltage.
Voltage range can be plus or minus 5%.
Ground Probe:
Connect to GND on power supply
(Black wire to power supply)
Positive Probe:
Connect to +12V on power supply
(orange wire to power supply)
Turn to DC voltage check
TROUBLESHOOTING
Main Monitor: Controls
Menu
Down
Decrease
Increase
Source
Power
Power supply
The power supply used for cabinet power is a
IA2010. It has only +12 volts of DC power at
10 Amps.
SUZO HAPP Power Pro
Turn clockwise to increase power if low
Power on status
+ 12 Volts DC - 10Amps - Orange
+ 12 Volts DC - 10Amps - Orange
DC Ground - Black
DC Ground - Black
DC Ground - Black
AC Earth Ground - Green with Yellow
AC Line - Black or Brown
AC Neutral - White or Blue
GND
GND
GND
FG
Input
95V - 135VAC
3.2A
190V - 250VAC
1.6A
47Hz - 63Hz
AC
(L)
AC
(N)
+12V
10A
ON
ADJ
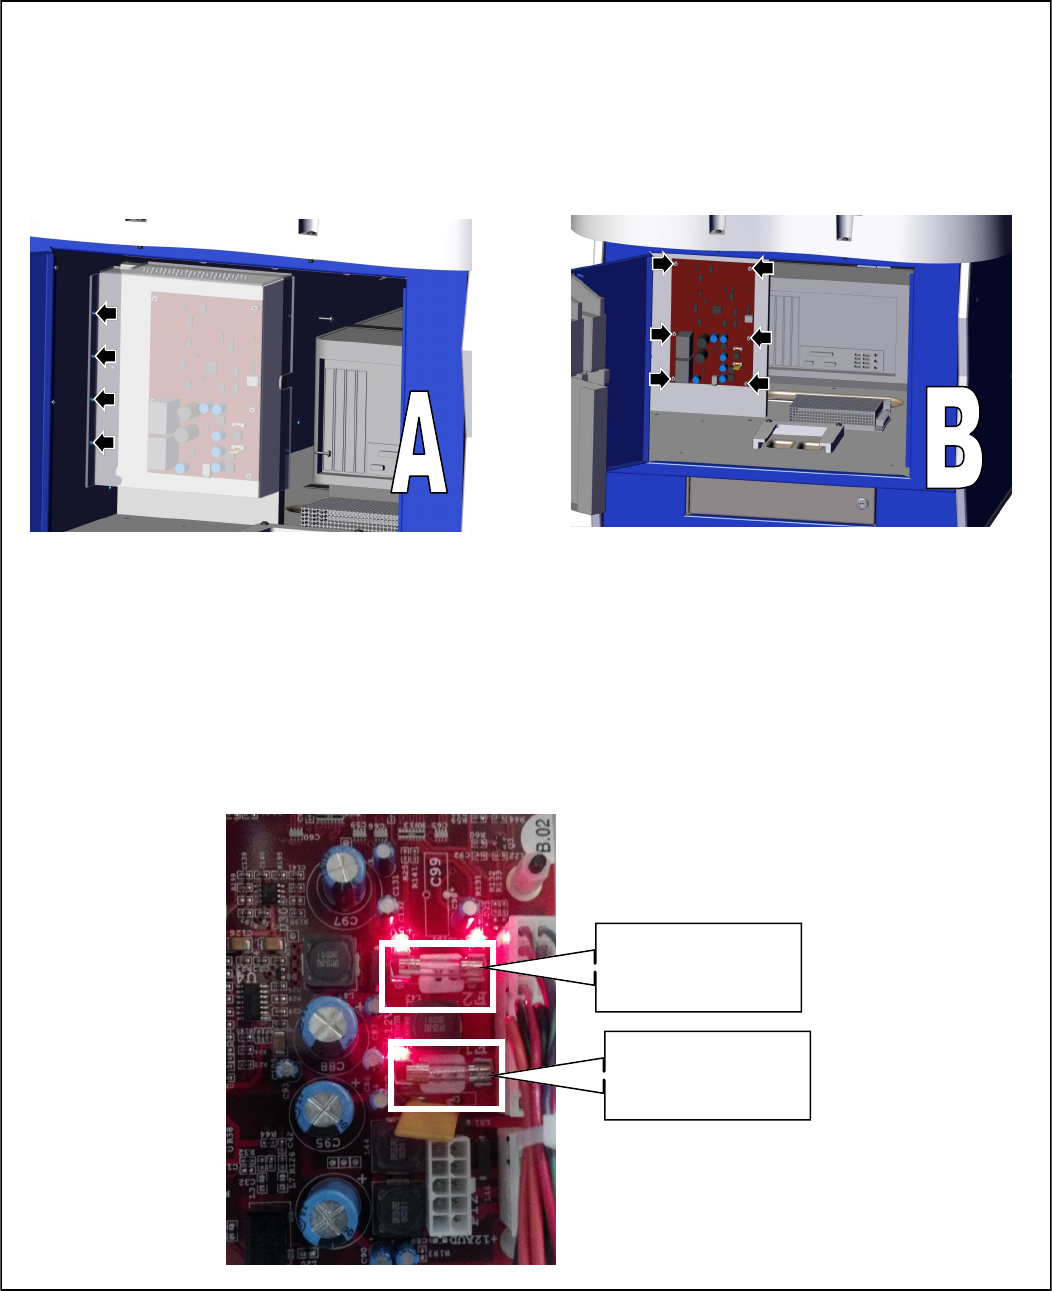
14
Game I/O removal
In the event you need to replace the I/O board, open the side of the cabinet where the I/O board
is mounted. Remove the four screws holding the plastic cover over the I/O board. See Picture A
below. Disconnect all harnessing to the I/O board. Remove the 6 plastic standoffs that hold the I/
O board. See picture B below. Assembly in reverse.
Normal operation of the I/O board should show three LED’s on. This indicates that the Fuses are
good and no faults are presenting in the +12 and +5 volt lines. If a LED is not on and you have
checked for the proper operation of the +12 volt main power supply found on page 13, check F1
and F2 fuses. F1 fuse should be a 7Amp fast blow while F2 fuse should be a 3 amp fast blow
fuse. You will have to remove the plastic shield in order to test the fuses. If the fuses are found
to be open, locate the short or failed device before replacing the fuse. Check all wiring for any
that could be pinched, cut, or broken.
F2 : 3 AMP
F1 : 7 AMP
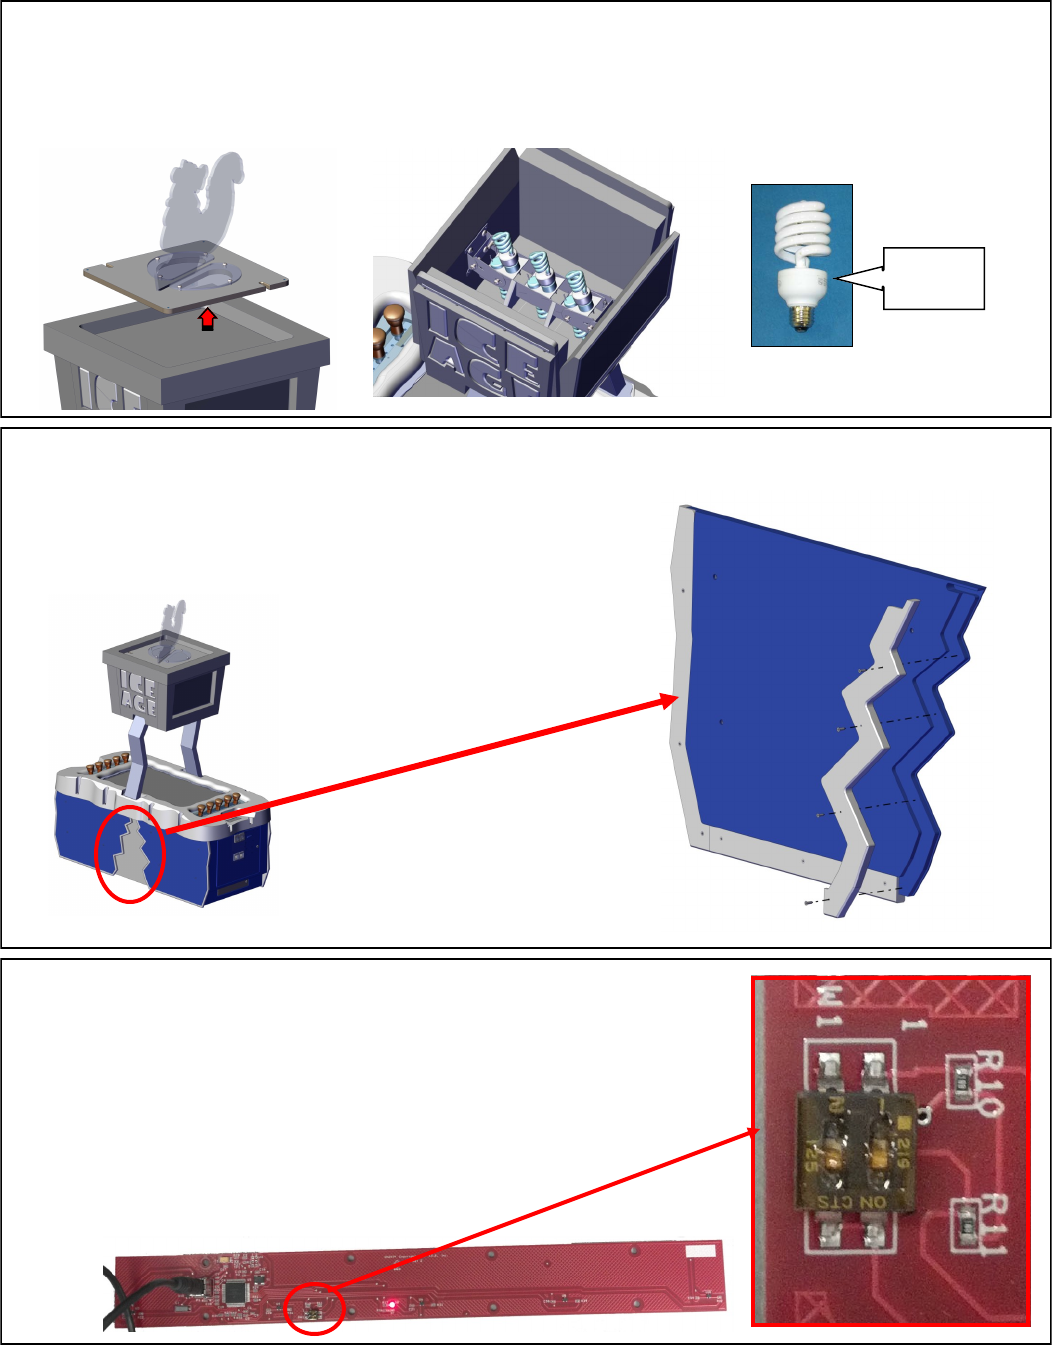
15
Marquee illumination: bulb replacement
The upper marquee is illuminated by 6 curly bulbs. Remove the top marquee cover by lifting up
the top marquee cover. Replace the defective bulb and reattach the marquee cover.
Outside Cabinet illumination: LED Strip replacement
To access the outside illumination, remove the side strips
shown below. There are four of them. Replace with
E00418IAAX.
Ice Part
E00382
Acorn Hit sensor Dip Switches
To change the acorn hit sensors from player 1 side to player 2 side,
slide both dipswitches to on for player 1 and slide both dipswitches to
off for player 2. The part number is IA2039X. To access this board
in your game, refer to “Accessing Hit Sensor boards”.
16
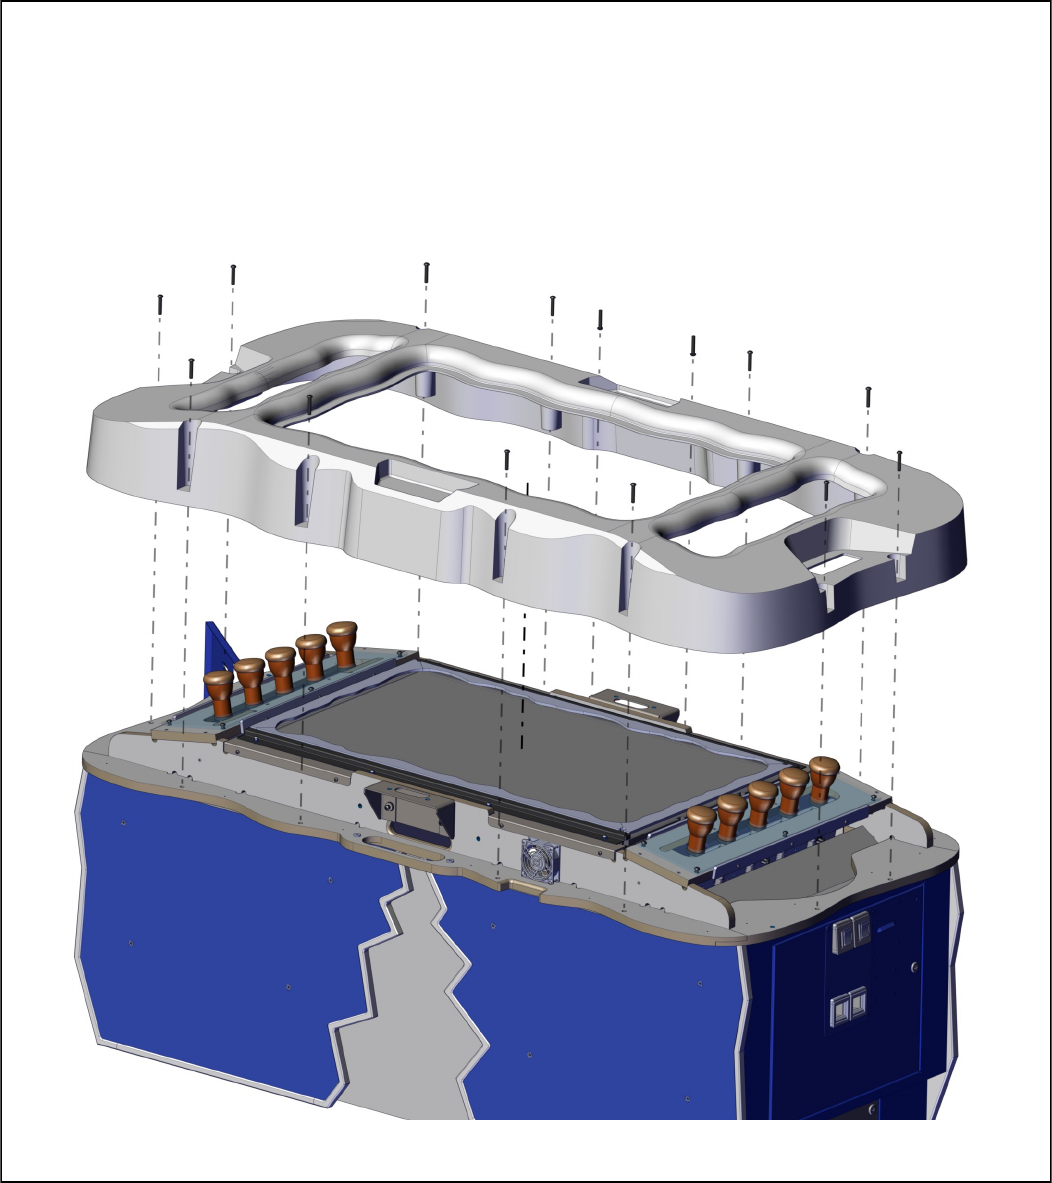
Cover top removal
To access the Acorn assemblies, Cabinet fans, or replace the main monitor, remove
the screws shown below and carefully lift the plastic cover off the top of the cabinet.
You will have to remove the top Marquee assembly first. Refer to the section
“Marquee Assembly Removal” for further details.
17
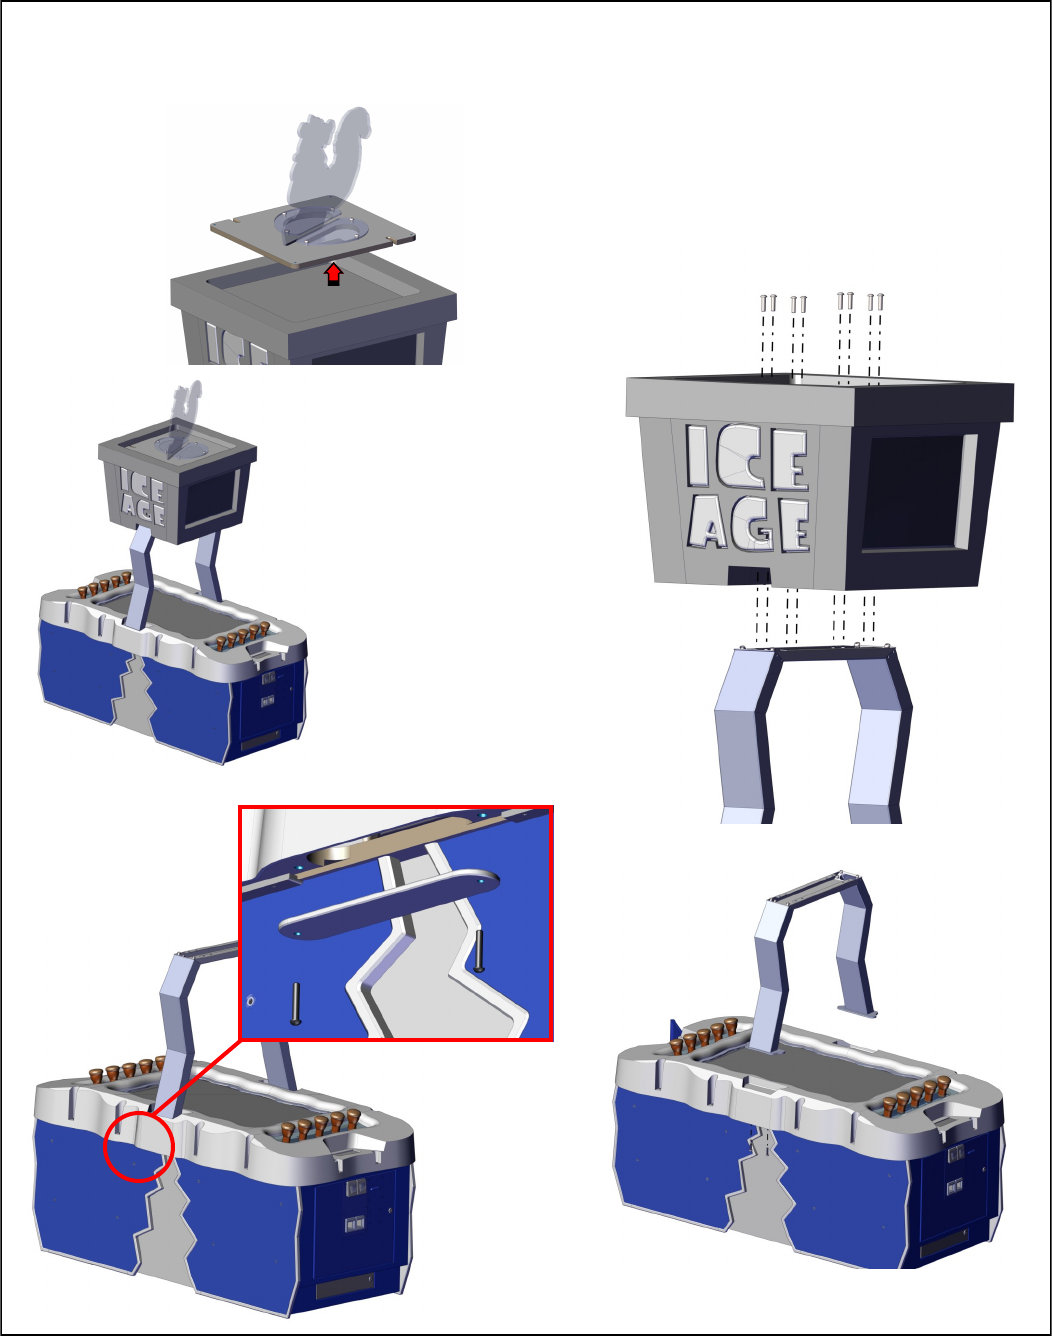
Marquee Assembly Removal
Step 2
Step 3
Step 4
Step 1
18
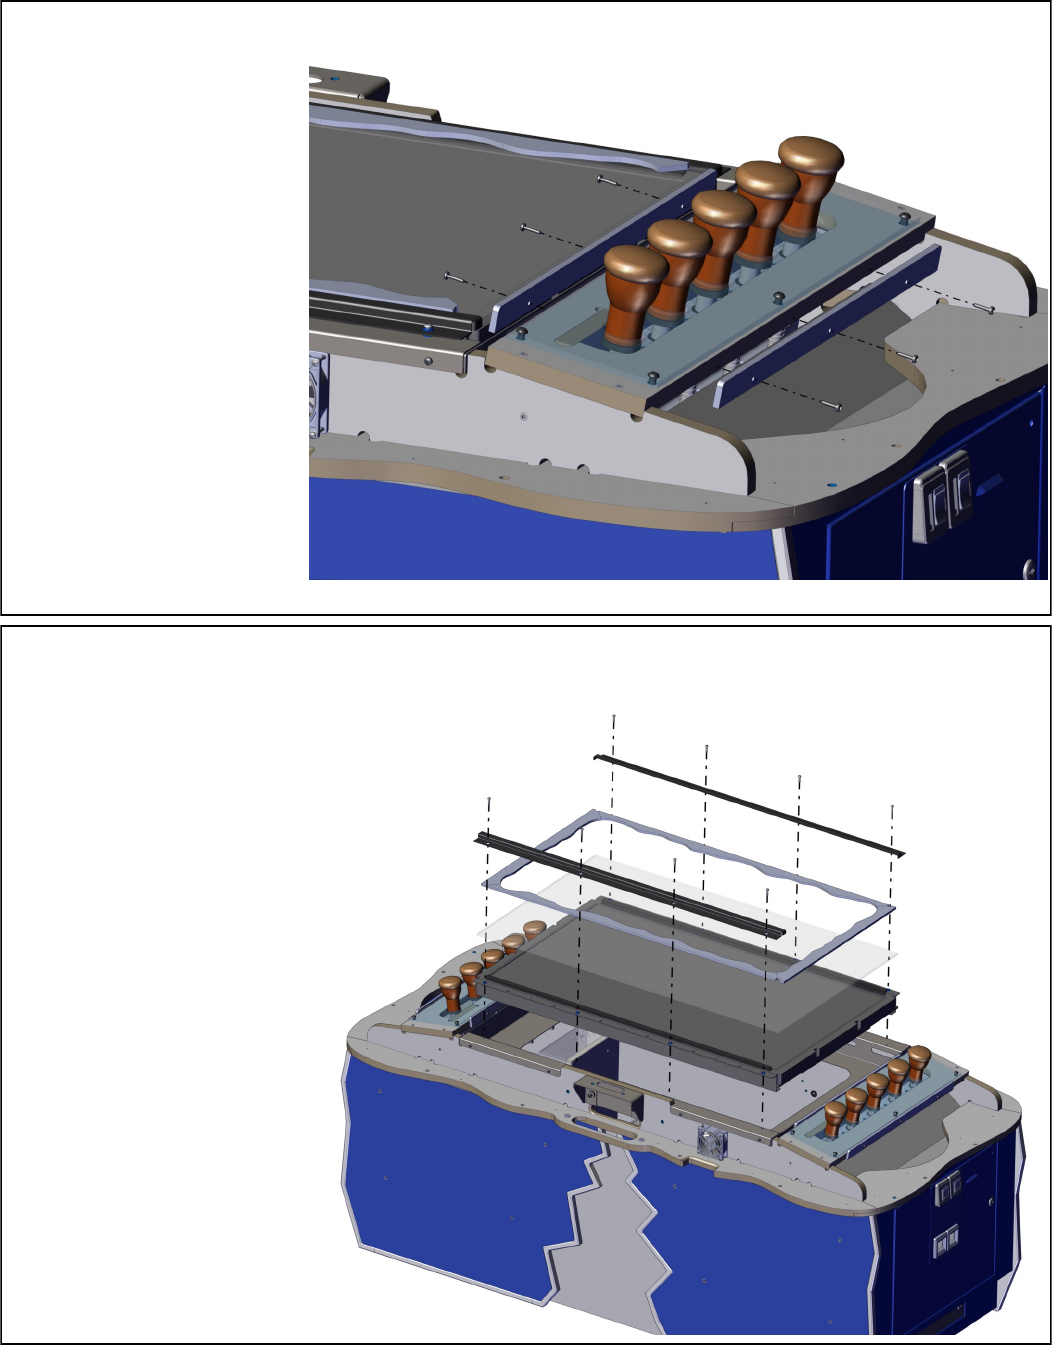
Acorn Blue LED Strip replacement
To access the Acorn LED
strips you will need to first
refer to the section on how
to remove marquee
assembly and then refer to
the section on how to
remove the top cover.
Once removed, refer to the
picture to remove the LED
strips. Replace with part
number E00414IAX.
42” LCD Main Display replacement
To remove the monitor you
will need to first refer to the
section on how to remove
marquee assembly and then
refer to the section on how
to remove the top cover.
Once removed, refer to the
picture to remove the moni-
tor. Replace with part num-
ber MON42LCD.
19
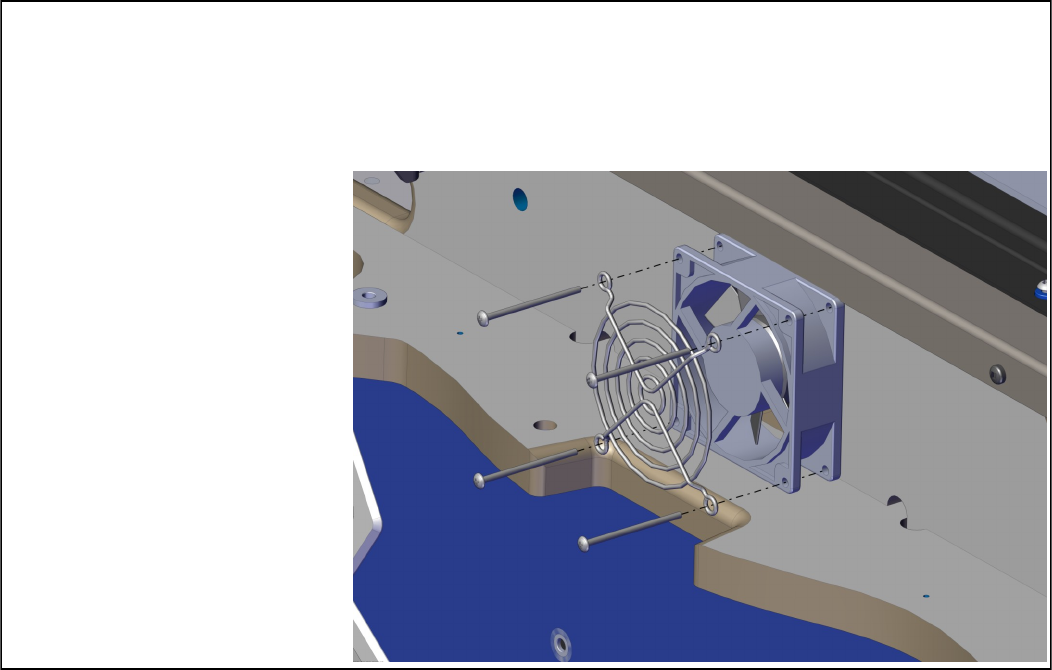
Cabinet Cooling Fans replacement
To replace the cooling fans you will need to first refer to the section on how to remove marquee
assembly and then refer to the section on how to remove the top cover. Once removed, refer to
the picture to remove the Fan Assembly. There is one on each side. Replace with part number
IA2364X.
20
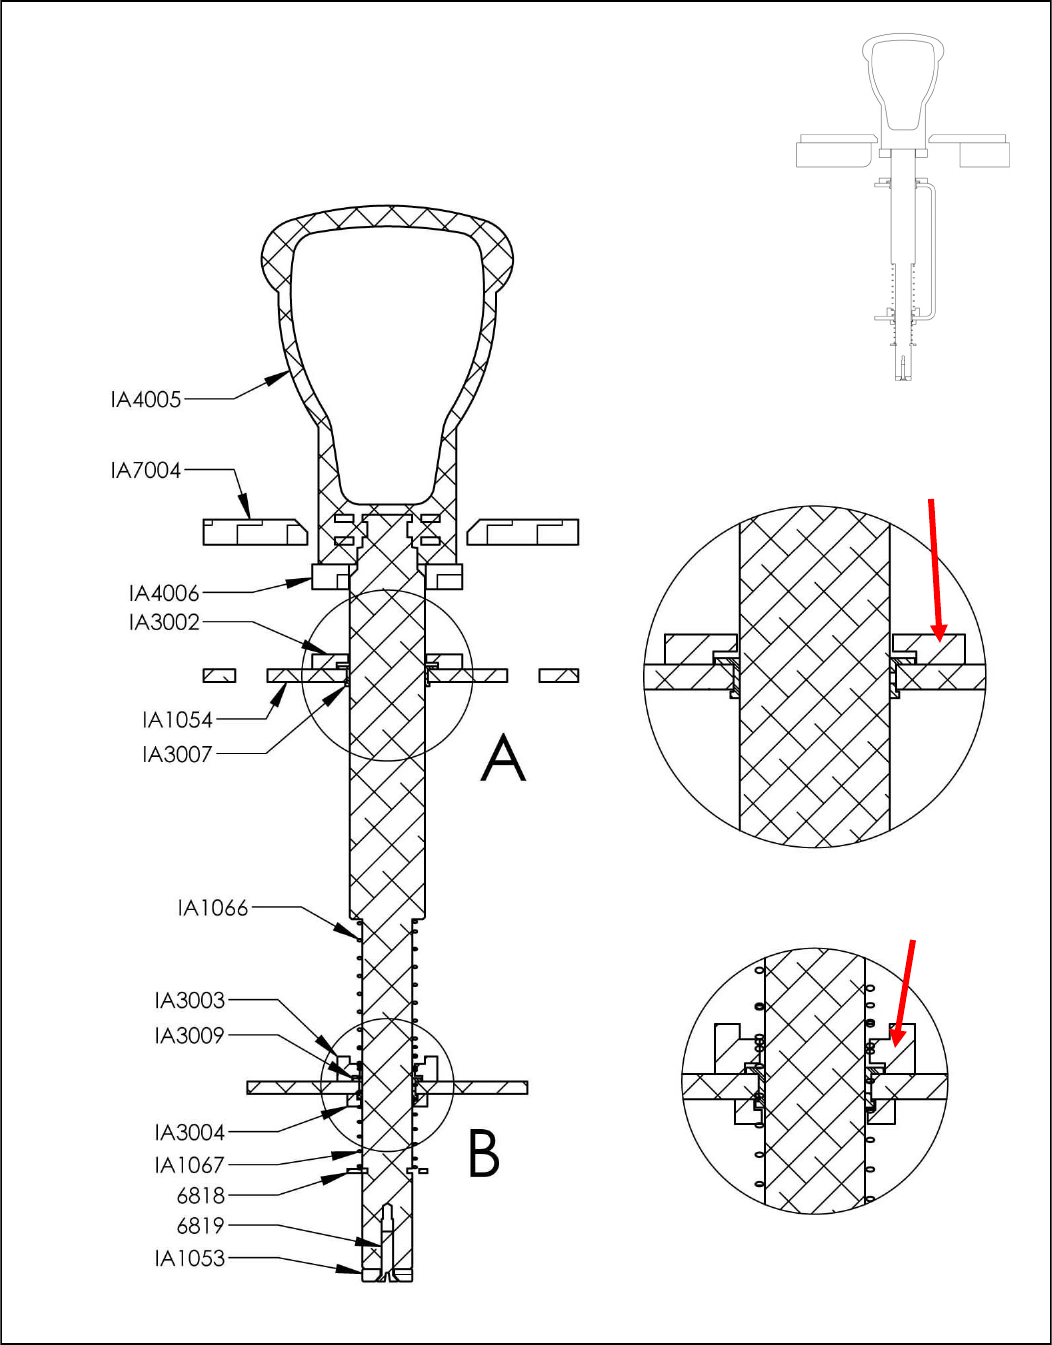
Acorn Assemblies
It is important when working with the acorns that the proper washers are
used in the correct places as they protect the bearings from being
damaged over time when continually being hit with the mallet.
WASHER
IA3002
WASHER
IA3003
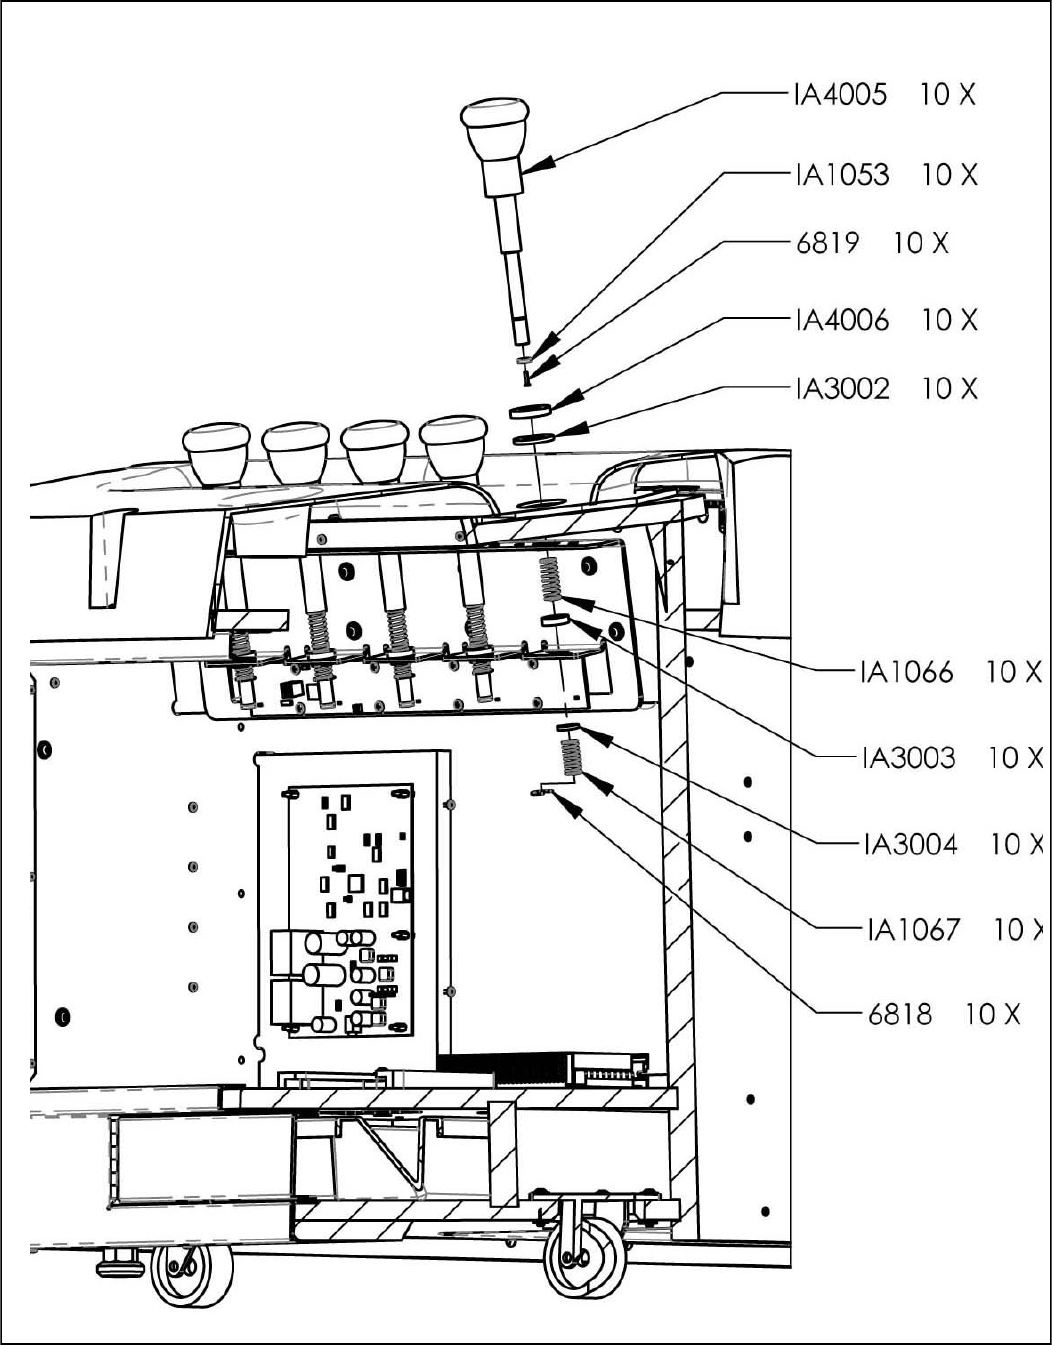
21
Acorn Assemblies
22
23
Spares:
AR2007 Speaker (6x9)
E00382 Bulb CF 27W
IA7030 Scrat marquee top
MON22LG Marquee monitor 22” LG wide DVI
BX2000IAX Ice Age computer w/power adaptor
BX2034X Rio I/O board
E00474 DVI-D M/M 6’ cable
E00599 6’ USB A/B cable
E00613 HD15 VGA to 2 HD15 VGA adaptor (for marquee)
5014 45 lock
HH5005CL Ticket Dispenser
IA1012-P802 Coin funnel
IA1053 Acorn magnet
IA1066 Upper spring
IA1067 Lower spring
IA2010 +12vdc 10 amp power supply
IA2014 Dongle
IA2039X Hall effect sensor (hit sensor). Dips determine player.
IA2364X DC fan assembly
IA2090X Restore Disk for Ice Age
IA3028 Monitor cover glass
IA4010 Mallet
MON42LCD 42” LCD monitor
PH2007X 6 Amp power mod
E00418IAAX Crack LED lighting strip
E00418IAX Under Snow Lighting
E004141IAX Blue Acorn LED strips
CC3012 Bottom Coin drawer
Graphics
IA7000 Side decal Left
IA7001 Side Decal Right
IA7004 Playfield Panel
IA7005 Coin Door Decal
IA7006 Cash Box Door Decal
IA7007 Coin Mech Plate Decal
IA7030 Scrat (Squirrel)
IA7036 Inside Letter “A”

24
WARRANTY POLICY
I.C.E. Inc warrants all components in new machines to be free of defects in materials and workmanship for the
period listed below:
■ 180 days on Main PCB’s, Computers & Motors
■ 1 year on all LCD monitor panels
■ 90 days on all other electronic and mechanical components
■ 30 days on all I.C.E. repairs and parts purchases
I.C.E. Inc shall not be obligated to furnish a warranty request under the following conditions:
■ Equipment or parts have failed through normal wear and tear
■ Equipment has been subjected to unwarranted stress, abuse or neglect
■ Equipment has been damaged as a result of arbitrary repair/modification
Products will only be covered under warranty by obtaining an I.C.E. authorized RMA #. To obtain an RMA #
please provide I.C.E. tech support with the game serial # or original I.C.E. invoice # and a detailed description
of the failure or fault symptoms.
I.C.E. Inc will assume no liability whatsoever for costs associated with labor or travel time to replace defective
parts. All defective warranty covered components will be replaced with new or factory refurbished components
equal to OEM specifications.
I.C.E. Inc will cover domestic UPS ground, or comparable shipping costs during the warranty period. Interna-
tional or expedited shipments are available for an additional charge. To obtain credit defective parts must be
returned to I.C.E. Inc, at the customer’s expense, within 30 days. After 30 days a 15% re-stocking fee will apply
to all returns.
ICE distributors are independent, privately owned and operated. In their judgment, they may sell parts and/or
accessories other than those manufactured by I.C.E. Inc. We cannot be responsible for the quality, suitability
or safety of any non-I.C.E. part or modification (including labor) that is performed by such a distributor.
Innovative Concepts in Entertainment
10123 Main St.
Clarence, NY 14031
Phone #: (716) - 759 – 0360
Fax #: (716) – 759 – 0884
www.icegame.com
