Arcelik A S Diswasher Plant ARWM02 Dishwasher with 2.4GHz WLAN User Manual 15 9925 01 00 AG BEKO E8 USA 6mb
Arcelik A.S. Diswasher Plant Dishwasher with 2.4GHz WLAN 15 9925 01 00 AG BEKO E8 USA 6mb
User Guide
DIT39432
DDT39432X
DDT39432CF
DDT39432XIH
USA
Document Number :
Dishwasher
User manual
15 9925 01 00_AF_BEKO_E8_USA/ 25-10-18.(14:20)

To prevent accidents, which could cause serious injury or death, as well
as machine damage read these instructions before installation and / or
use.
CONTENTS
1. IMPORTANT SAFETY INSTRUCTIONS 1
2. RECYCLING 4
3. GETTING TO KNOW YOUR DISHWASHER 5
4. LOADING THE DISHWASHER 6
4.1 UPPER RACK 8
4.2 LOWER RACK 11
4.3 PROPER AND IMPROPER LOADING OF DISHWARE 17
5. WHAT SHOULD NOT BE WASHED IN YOUR DISHWASHER 18
6. OPERATING THE PRODUCT 19
PROGRAMME SELECTION / PROGRAMME CANCEL KEY 20
FUNCTION KEYS 20
PREPARING THE MACHINE 20
PROGRAMME SELECTION 20
6.4 AUXILIARY FUNCTIONS 23
HOMEWHIZ FUNCTION 24
HOMEWHIZ SETUP AND USER ACCOUNT SETTINGS 24
6.5 SCHEDULING THE WASHING TIME 28
6.6 STARTING THE PROGRAM 28
6.7 CANCELLING THE PROGRAM 29
6.8 SALT INDICATOR ( )29
6.9 RINSE AID INDICATOR ( )29
6.10 END OF PROGRAM 30
6.11 WATER CUT-OFF WARNING 30
6.12 OVERFLOWING WARNING 30
7. DETERGENT 31
7.1 ADDING DETERGENT 31
7.2 TABLET DETERGENTS 32
7.3 RINSE AID 33
8. ADJUSTING THE WATER SOFTENING SYSTEM 34
9. FILLING THE DISHWASHER SALT DISPENSER 35
10. CARE AND MAINTENANCE 36
10.1 CARING FOR YOUR DISHWASHER EXTERIOR 37
10.2 CARING FOR YOUR DISHWASHER INTERIOR 37
10.3 CLEANING THE FILTERS 38
10.4 CLEANING THE HOSE FILTER 39
10.5 CLEANING THE WASH ARMS 39
11. TROUBLESHOOTING 41
12. TECHNICAL FEATURES 46
13. WARRANTY STATEMENT FOR THE BEKO DISHWASHERS 47

1USA
INTRODUCTION
Please read ths user manual and
partcularly the safety nstructons
completely and carefully. They wll save
you tme and effort and help to ensure
optmum dshwasher performance.
Be sure to observe all lsted warnngs
and cautons. Look partcularly for the
cons wth exclamaton marks nsde. The
nformaton con wll also provde mportant
references.
AWARNING:
Indcates a
potentally hazardous stuaton
whch, f not avoded, could
result n death or serous njury.
ACAUTION:
Indcates a
potentally hazardous stuaton
whch, f not avoded, may result
n njury. It may also be used to
alert aganst unsafe practces.
CNOTICE:
Indcates a
potentally hazardous stuaton
whch, f not avoded, may result
n damage to the dshwasher,
the table-ware, the equpment
or the envronment.
1. IMPORTANT SAFETY
INSTRUCTIONS
AWARNING:
When usng
the dshwasher, follow basc
precautons, ncludng the
followng:
Read all nstructons before
usng the dshwasher! Save
these operatng nstructons
and pass them on to any future
user.
A
“Ths devce comples wth Part
15 of the FCC Rules. Operaton
s subject to the followng two
condtons:
(1) ths devce may not cause
harmful nterference, and
(2) ths devce must accept any
nterference receved, ncludng
nterference that may cause
undesred operaton.”
“No changes shall be made to
the equpment wthout the
manufacturer’s permsson
as ths may vod the user’s
authorty to operate the
equpment”
Ths equpment has been tested and found
to comply wth the lmts for a Class B dgtal
devce, pursuant to part 15 of the FCC
Rules. These lmts are desgned to provde
reasonable protecton aganst harmful
nterference n a resdental nstallaton.
Ths equpment generates, uses and
can radate rado frequency energy and,
f not nstalled and used n accordance
wth the nstructons, may cause harmful
nterference to rado communcatons.
However, there s no guarantee that
nterference wll not occur n a partcular
nstallaton. If ths equpment does cause
harmful nterference to rado or televson
recepton, whch can be determned
by turnng the equpment off and on,
the user s encouraged to try to correct
the nterference by one or more of the
followng measures:
- Reorent or relocate the recevng
antenna.
- Increase the separaton between the
equpment and recever.
- Connect the equpment nto an outlet on
a crcut dfferent from that to whch the
recever s connected.
- Consult the dealer or an experenced
rado/TV techncan for help.

2USA
•Ths equpment comples wth FCC
radaton exposure lmts set forth
for an uncontrolled envronment n
accordance wth FCC rule part 2.1093
and KDB 447498.
•Use the dshwasher only for ts
ntended purpose as descrbed n
ths user manual. Ths applance s
ntended for normal household use
only.
•
The manufacturer disclaims
responsibility for damage or
injury caused by improper use
of this appliance.
•The nformaton n ths user manual
must be followed to mnmze the rsk
of fre or exploson and to prevent
property damage, personal njury or
loss of lfe.
•Do not operate your dshwasher
unless all the enclosure panels are
properly n place.
•Do not tamper wth the controls.
•Do not abuse, st on, stand n or on the
door or dsh rack of the dshwasher.
•The cup racks are desgned to support
cups, glasses and ktchen utensls.
When the cup racks are n the
dshwasher do not lean on or use the
cup racks to support your body weght.
•To reduce the rsk of njury, do not
allow chldren to play n, on or near the
dshwasher.
•Use only detergents or rnse ads
recommended for use n a household
dshwasher and keep them n a dry
place out of the reach of chldren.
Check that the detergent dspenser
s empty after the completon of each
wash program.
•Dshwasher detergents contan
chemcals that can cause sckeness
and may be f they are nhaled or
swallowed. Also, be careful when
openng the door due to hot steam
that s producded durng operaton.
Consult a doctor mmedately f
detergent has been swallowed or
nhaled.
•f the hot water has not been used
n several weeks, we recommend
runnng the hot water taps to remove
any bult up hadrogen gases.
•Do not store or use flammable
lquds or vapors n the area of the
dshwasher.
•When loadng tems to be washed,
poston sharp tems so that they are
not lkely to damage the door seal and
load sharp knves wth the handles up
to reduce the rsk of cut-type njures.
•Do not wash plastc tems unless they
are marked “dshwasher safe” or the
equvalent. For plastc tems not so
marked, check the manufacturer’s
recommendatons.
•If a malfuncton occurs, swtch off
the applance and turn off the water
supply to the dshwasher.
•Please do not attempt to carry the
dshwasher by yourself n order
to avod potental njures. Two or
more people are needed to move a
dshwasher.
•Before cleanng or carryng out
mantenance, swtch off the
applance, dsconnect the power plug
and turn off the water supply.
•Repars and techncal modfcatons
must be carred out exclusvely by a
Authorzed techncan.
•If the dshwasher s not n use for an
extended perod of tme (.e. vacaton
home), we recommend remove all
tems from the dshwasher, leave
the door cracked open to allow ar to
crculate and turn off both the power
and water supply to the dshwasher.

3USA
•Ths applance comes wth a three
prong NEMA 5-15P 15A power cord.
It must be connected to a Grounded
and Polarzed wall receptacle that
has been nstalled and tested by an
lcensed electrcan and that t has
been nstalled based on all Local, State
and Federal Electrcal codes.
AWARNING:
Improper
connecton of the equpment-
groundng conductor can result
n a rsk of electrc shock. Check
wth a qualfed electrcan
or servce representatve f
you are n doubt whether the
applance s properly grounded.
Do not modfy the plug provded
wth the applance, f t wll not
ft the outlet, have a proper
outlet nstalled by a qualfed
electrcan.
•Ths applance produces ozone
wthn the washng compartment
durng normal operaton. Long-term
exposure to ozone or exposure
at elevated levels may result n
respratory problems, especally for
the nfrmed, elderly and chldren.
•Chdren should not operate ths
machne wthout adult supervson.
•Be Careful to not leave the door
fully open when not beng loaded or
unloaded to prevent someone from
trppng on the unt.
AWARNING:
If your dshwasher
s equpped wth nternal
llumnaton, lamp should only
be replaced by the Authorzed
Servce Agent n case of falures
that may occur on the lamp.
AWARNING:
Ths product
can expose you to chemcals
ncludng Nckel (Metallc)
whch s known to the State of
Calforna to cause cancer.
For more nformaton go to
www.P65Warnngs.ca.gov
Note: Nckel s a component n all
stanless steel and some other
metal components.
SAVE THESE INSTRUCTIONS

4USA
•Servce should be performed by a
qualfed nstaller. Work by unqualfed
persons could be dangerous and may
vod the warranty.
•Do not operate the applance f
damaged, malfunctonng, partally
dsassembled or f t has mssng or
broken parts.
•Before nstallaton or servce,
dsconnect the power supply to
the work area by unpluggng the
unt, “trppng” the crcut breaker or
removng the fuse.
•For safety reasons, dshwasher must
be secured to adjacent cabnetry usng
the brackets provded. Falure to do
ths may cause damage to property or
bodly njury.
•Do not use any extenson cord or
portable outlet devce to connect the
dshwasher to a power supply.
2. RECYCLING
•Remove the door to the washng
compartment when removng an old
dshwasher from servce or dscardng
t. Ensure that the applance presents
no danger to chldren whle beng
stored for dsposal.
•Remove the door lock or door of
the washng compartment before
dsposng dshwasher so that chldren
or small anmals can not trapped
nsde.
•Old applances may contan materals
that can be recycled. Please contact
your local recyclng authorty about
the possblty of recyclng these
materals.
•Please check the water supply lne
perodcally. It s susceptble to
breakage. It becomes less flexble as
tme goes by.Replace t mmedately
when t s torn, cut, swollen or there s
water leakage.
•Please keep the dshwasher package
out of the reach of chldren after
unpackng t.
AWARNING:
Danger of
suffocaton! Ensure that any
plastc wrappngs, bags, small
peces etc. are dsposed of
safely and kept out of the reach
of chldren.
5USA
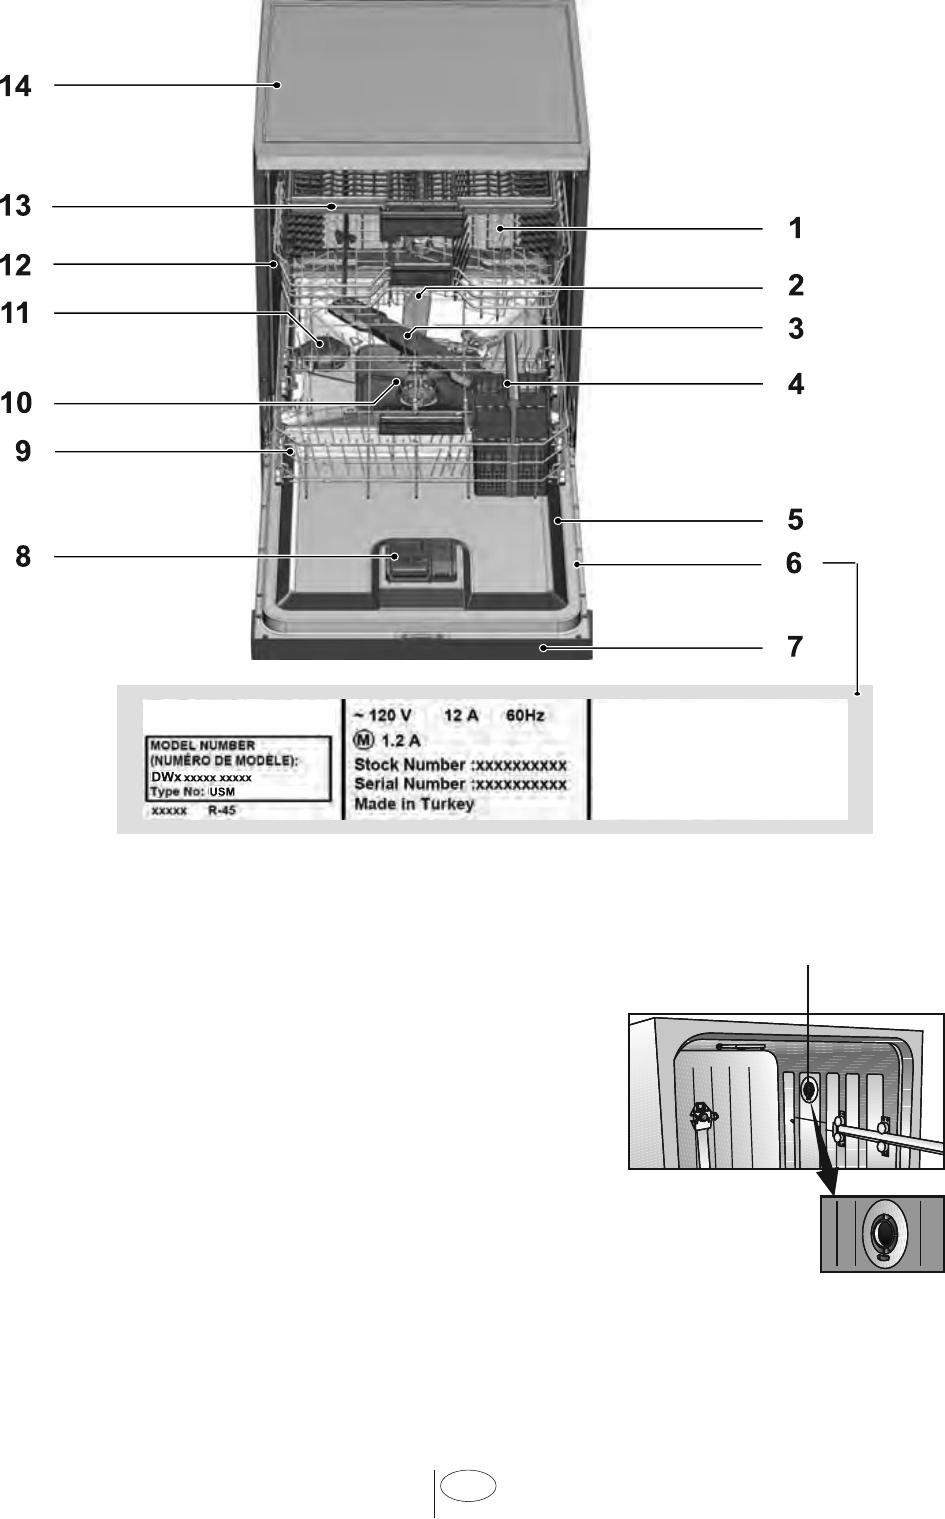
15
1. Upper basket
2. Upper mpeller
3. Lower mpeller
4. Cutlery basket
5. Door
6. Model and Seral Tag
7. Control panel
8. Detergent and rnse agent dspenser
9. Lower basket
10. Flters
11. Salt contaner (Select Models)
12. Upper basket ral
13. Upper cutlery basket (Select Models)
14. Tabletop (Select Models)
15. Turbo fan heat dryng system (Select Models)
3. GETTING TO KNOW YOUR DISHWASHER

6USA
4. LOADING THE
DISHWASHER
1. Pull the handle to open the door. If the
door s opened durng operaton, the
dshwasher wll stop runnng. Once
the door s closed the program wll
contnue.
2. Remove coarse food leftovers from
tableware.
3. Now you can load the dshwasher.
Upper rack (Standard Pattern)
Top rack load pattern for 12 place settngs
accordng to the AHAM DW-1 Standards
Lower rack (Standard Pattern)
Bottom rack load pattern for 12 place
settngs accordng to the AHAM DW-1
Standards
Upper rack (International Pattern)
Internatonal Loadng Pattern – Top rack
(12 place settngs)
Lower rack (International Pattern)
Internatonal Loadng Pattern – Bottom
rack (12 place settngs)

7USA
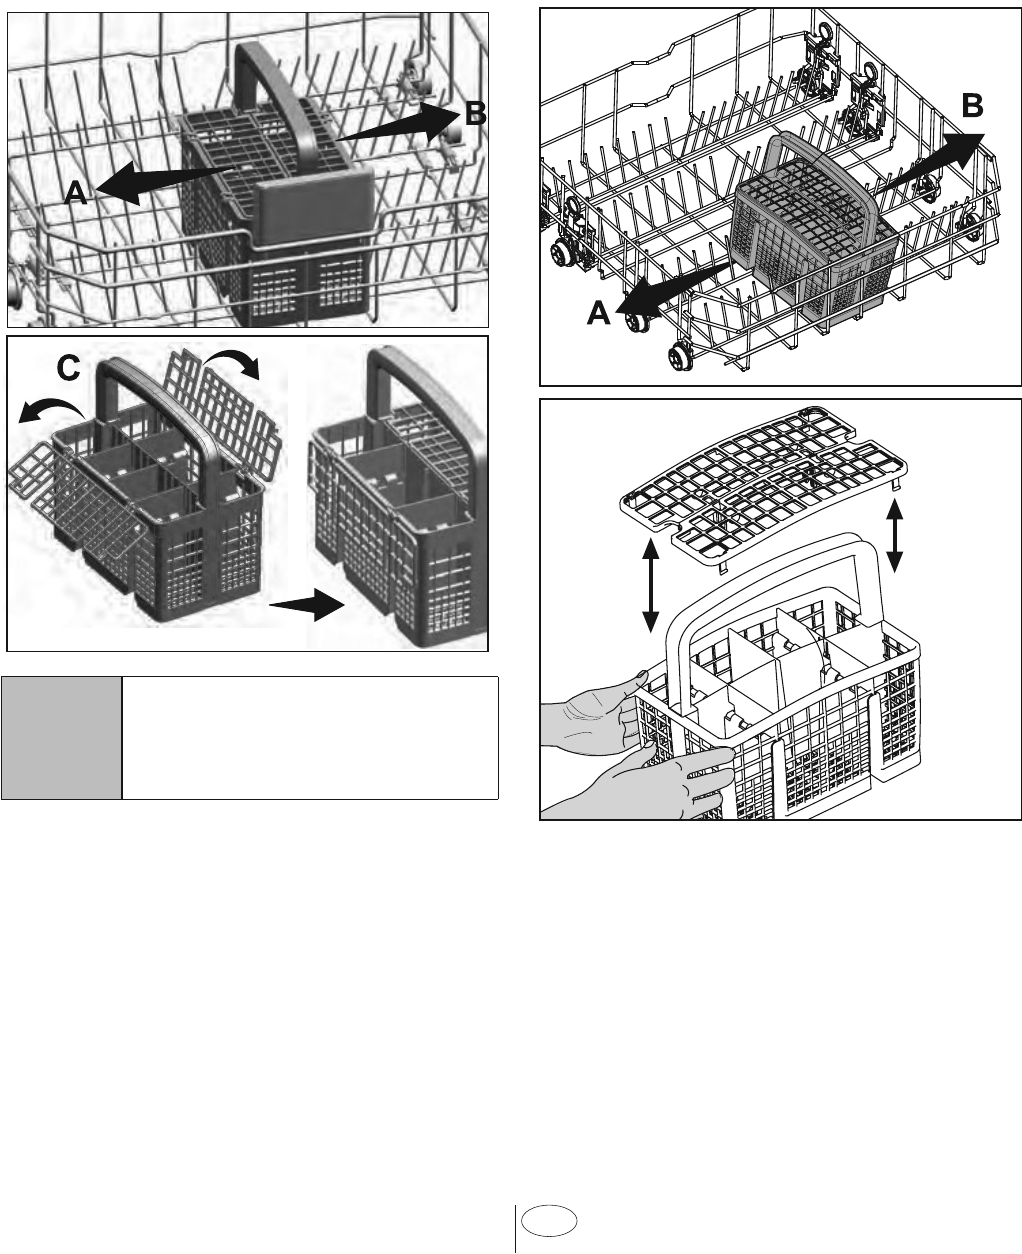
Upper cutlery basket (Select
Models)
Internatonal Loadng Pattern – Upper
cutlery basket (12 place settngs)
Upper rack (Select Models)
Addtonal Loadng Pattern – Top rack (10
place settngs)
Lower rack (Select Models)
Addtonal Loadng Pattern – Bottom rack
(10 place settngs)
Upper cutlery basket (Select
Models)
Upper cutlery basket (MODEL
DEPENDING)
Internatonal Loadng Pattern – Upper
cutlery basket (10 place settngs)

8USA
ACAUTION:
Large knves and
other utensls wth sharp tps
and edges must be placed
horzontally nto the upper
rack due to rsk of njury. Other
smaller knves and sharp
utensls should be placed wth
sharp sde down n the cutlery
basket.
ACAUTION:
Use extreme
cauton when removng knves
and other sharp utensls from
the dshwasher. These tems
may have shfted poston
durng the wash program, and
may be wet or slppery.
ACAUTION:
Hot steam can
escape! Danger of serous burns
or other njury.
CNOTICE:
3rd basket should be
removed out of the dshwasher
durng the tests accordng to
AHAM DW-1.
•Your dshwasher holds a maxmum of
12 place settngs.
•Place all contaners such as cups,
glasses and pots nto the dshwasher
wth the openng facng downwards
(so that no water can collect).
•Small and lght tems can go nto the
upper rack.
•Long and narrow tems are placed n
the mddle of the racks.
•Place all large and very drty tems n
the lower rack.
•Load dshes accordngly and be careful
when loadng glasses so they do not
ht each other durng the wash cycle.
Also, make sure that both wash arms
are not n contact wth any dshware.
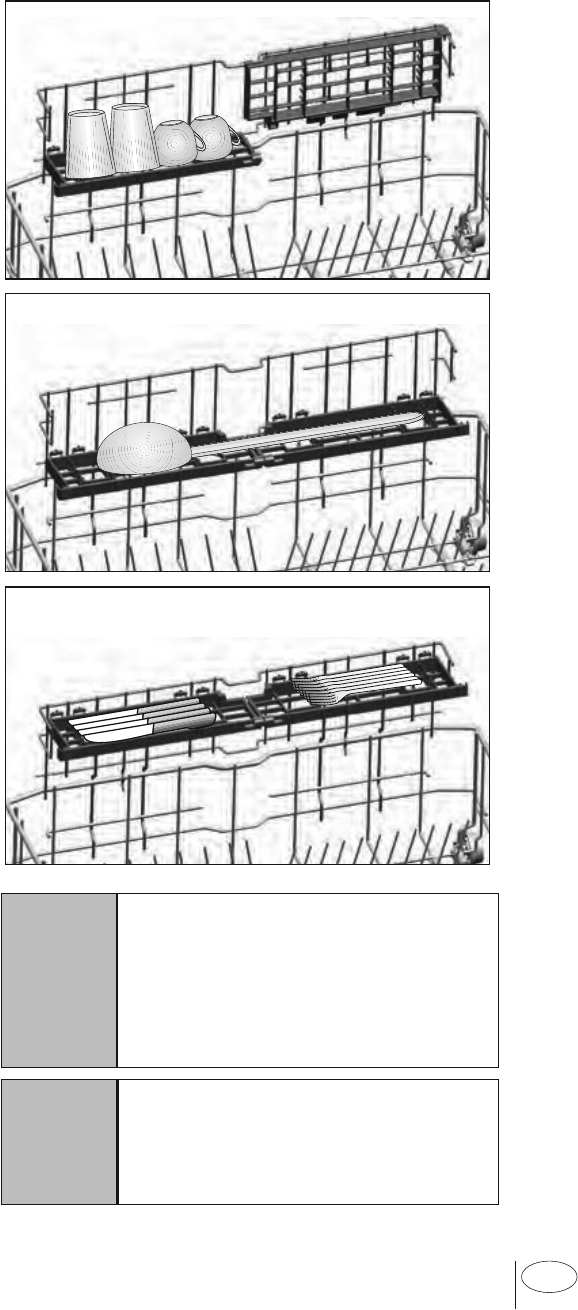
4.1 UPPER RACK
Load the upper rack wth dessert plates,
cups, glasses etc.
ADJUSTABLE SHELVES
(Select Models)
Dependng on the sze of the glasses and
cups, the shelf heght settng may be
adjusted.
1. Fold the shelf upwards
A
.
2. Postonng at the desred heght
B
.
3. Fold the shelf agan downwards
C
.
•Do not overload your dshwasher
and pay attenton to manufacturer
nstructons regardng dshes whch
are approprate for use n for a
dshwasher. Only wth sutable dshes
(mentoned n secton 5) wll you
obtan optmal washng results wth a
sensble use of energy.

9USA
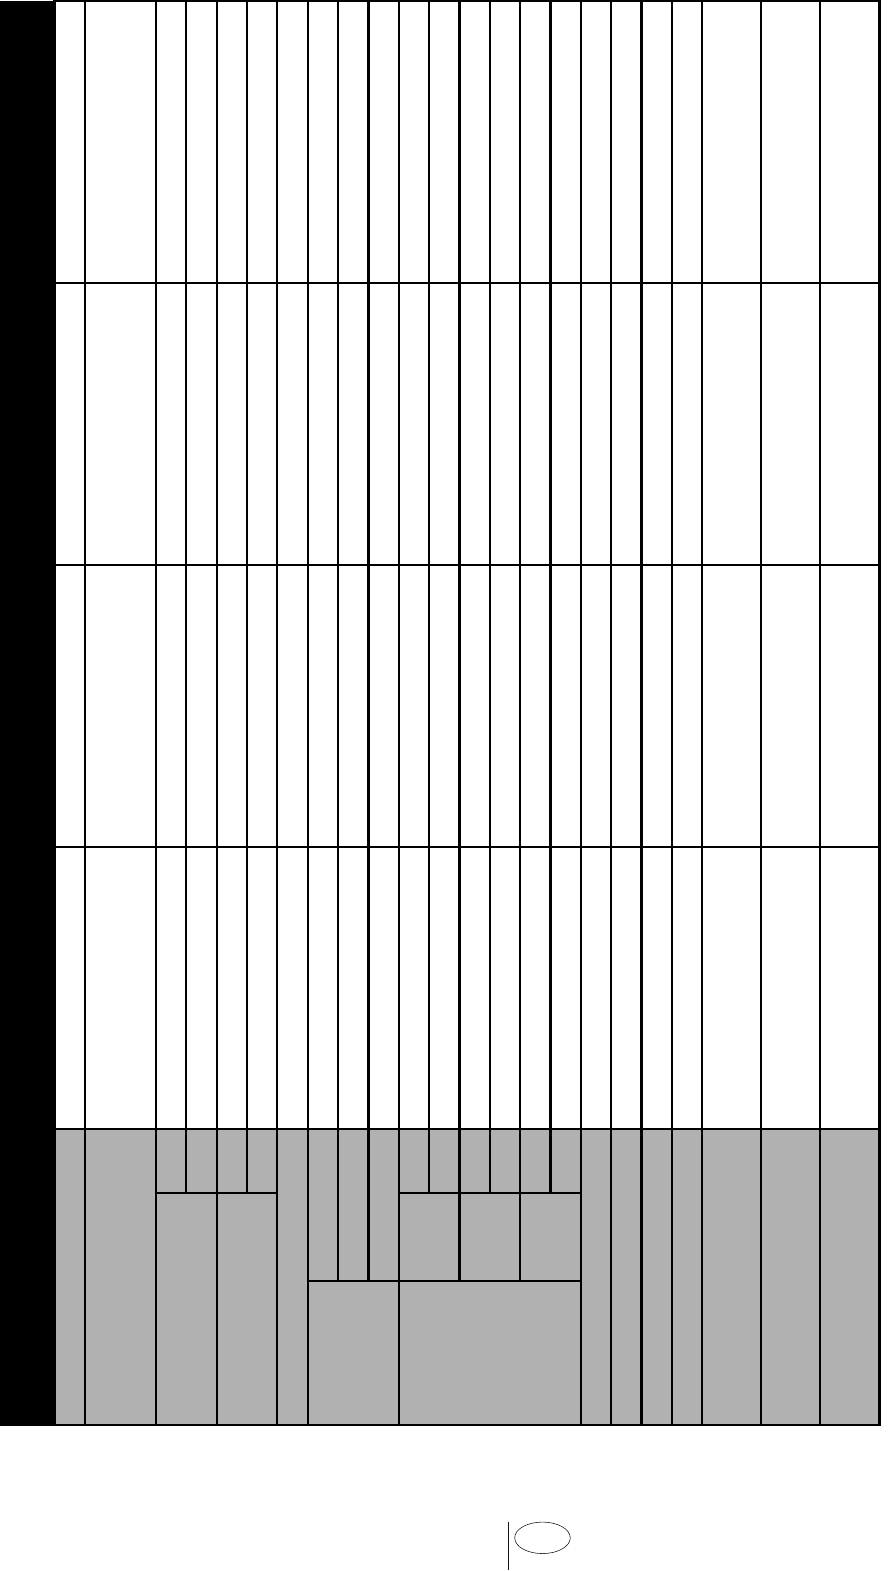
COLLAPSIBLE UPPER BASKET
WIRES
(Select Models)
You can use collapsble wres when you
need a larger space for your dshes n the
upper basket of your machne.
To brng the collapsble wres nto
horzontal poston, grab the wre from
the mddle poston and push them n the
drecton of arrow n the fgure. Place your
larger dshes nto the area created. To brng
the wres back to vertcal poston, just lft
them up.
C
Brngng the wres to the
horzontal poston by holdng
them from the tps may cause
them to bend. Therefore, hold
the wres from ther stems
whle brngng them to the
horzontal or vertcal postons.
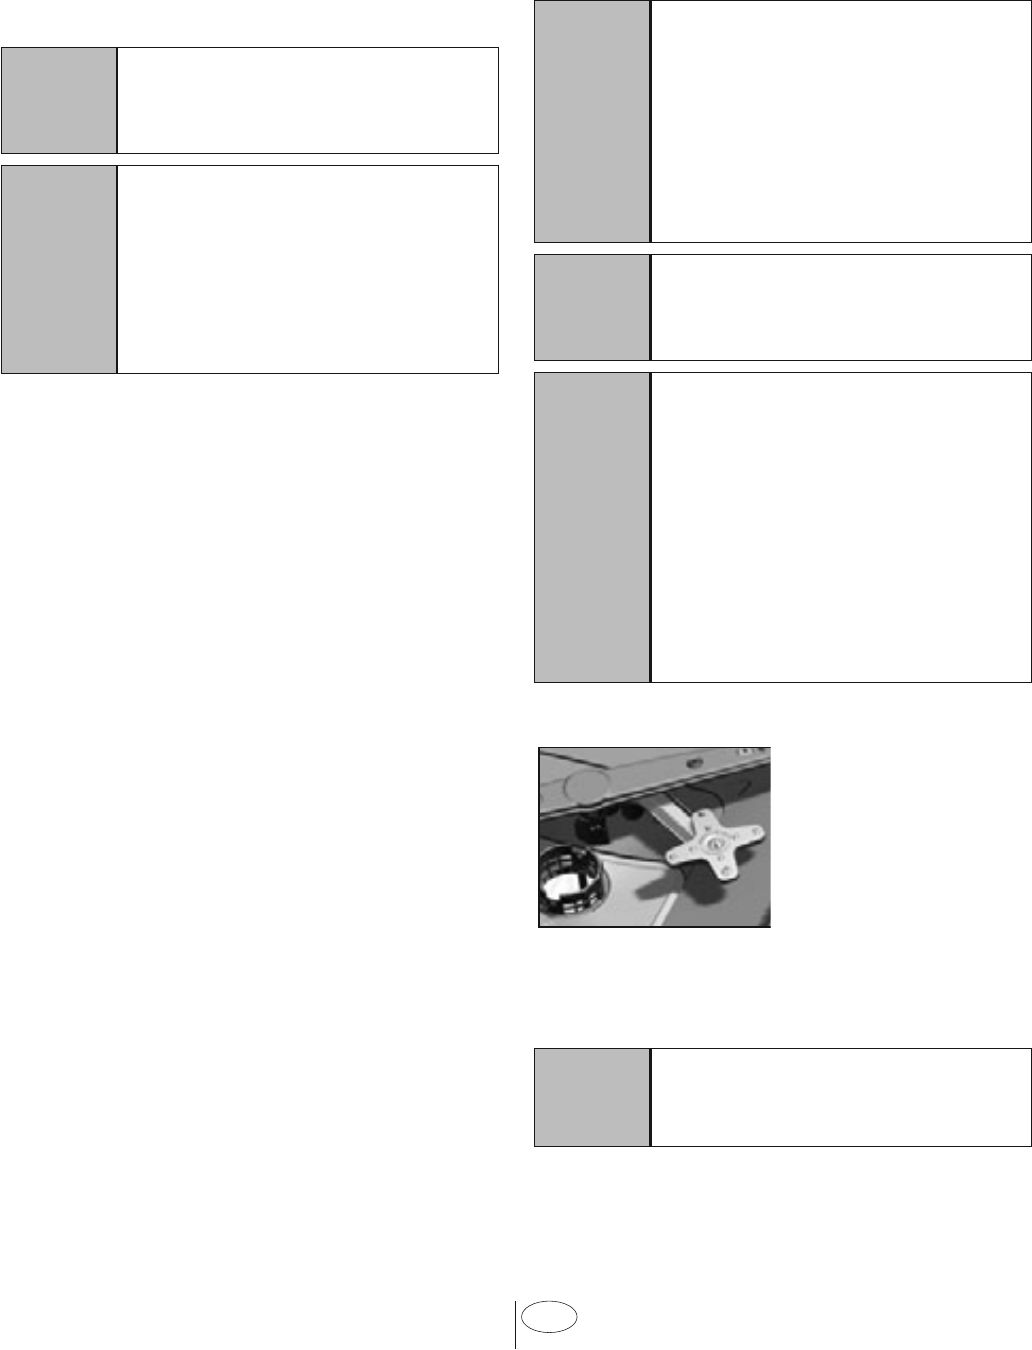
UPPER BASKET MULTIPURPOSE
SERVICE RACK
(Select Models)
Ths accessory located at the upper basket
of your machne allows you to easly wash
peces such as extra long ladles and bread
knves.
You can lft up the upper basket
multpurpose servce rack to remove t f
you do not want to use t.
If you want to use the upper basket
multpurpose servce rack agan, you can
easly attach t to the sde secton of your
upper basket.

10 USA
To lower the basket, whle t s n the
uppermost poston;
1. Hold the upper basket wres wth both
hands, slghtly lft up the basket and
smultaneously push and release the
latches shown n the fgure (B).
2. Lower the basket from ts current
poston to the lower one.
3. Release the basket after t has reached
one level down.
Repeat the process f the heght s not
suffcent.
C
The movement mechansm
may not functon properly f the
upper basket s overloaded or
f the weght dstrbuton s not
balanced. In heaver condtons,
there s the rsk of fallng one
level down.
C
Make sure that the adjustment
mechansm has the same
postons on the rght and left
sdes of the upper basket.
ADJUSTING THE HEIGHT OF THE
UPPER BASKET
(Select Models)
The upper basket heght adjustment
mechansm has been desgned for you to
create large spaces n the lower or upper
sectons of your machne dependng on
your needs by adjustng the heght n the
upper or lower drecton whle your basket
s empty or loaded.
Thanks to ths mechansm, you can use
your basket n three dfferent postons,
namely lower, mddle and upper postons
(1, 2, 3).
1. To rase your basket, hold the upper
basket wres wth both hands whle the
basket s n the lowermost poston and
pull them up (A).
2. You wll hear a "Clck" from the rght
and left mechansms, ndcatng that
the basket has reached the next level.
Release the basket.
Repeat the process f the heght s not
suffcent.
1
2
3

11 USA
HEIGHT SETTING
(Select Models)
In certan models, the heght settng of
the upper rack may be changed usng the
wheels whch are present at two heght
levels.
ACAUTION:
Make sure that
the rack s empty. Changng
the heght settng whle the
rack contans tableware could
cause the contents to dslodge,
causng personal njury or
damage to the tableware.
1. Release the latches on both the rght
and left tracks of the upper rack by
turnng them to the outsde
A.
2. Pull out the rack completely
B
.
3. Place the rack nto the tracks agan at
the desred heght
C
.
4. Push the latches back nto the correct
poston.
4.2 LOWER RACK
Use the lower rack for plates, bowls, pots
etc.

12 USA
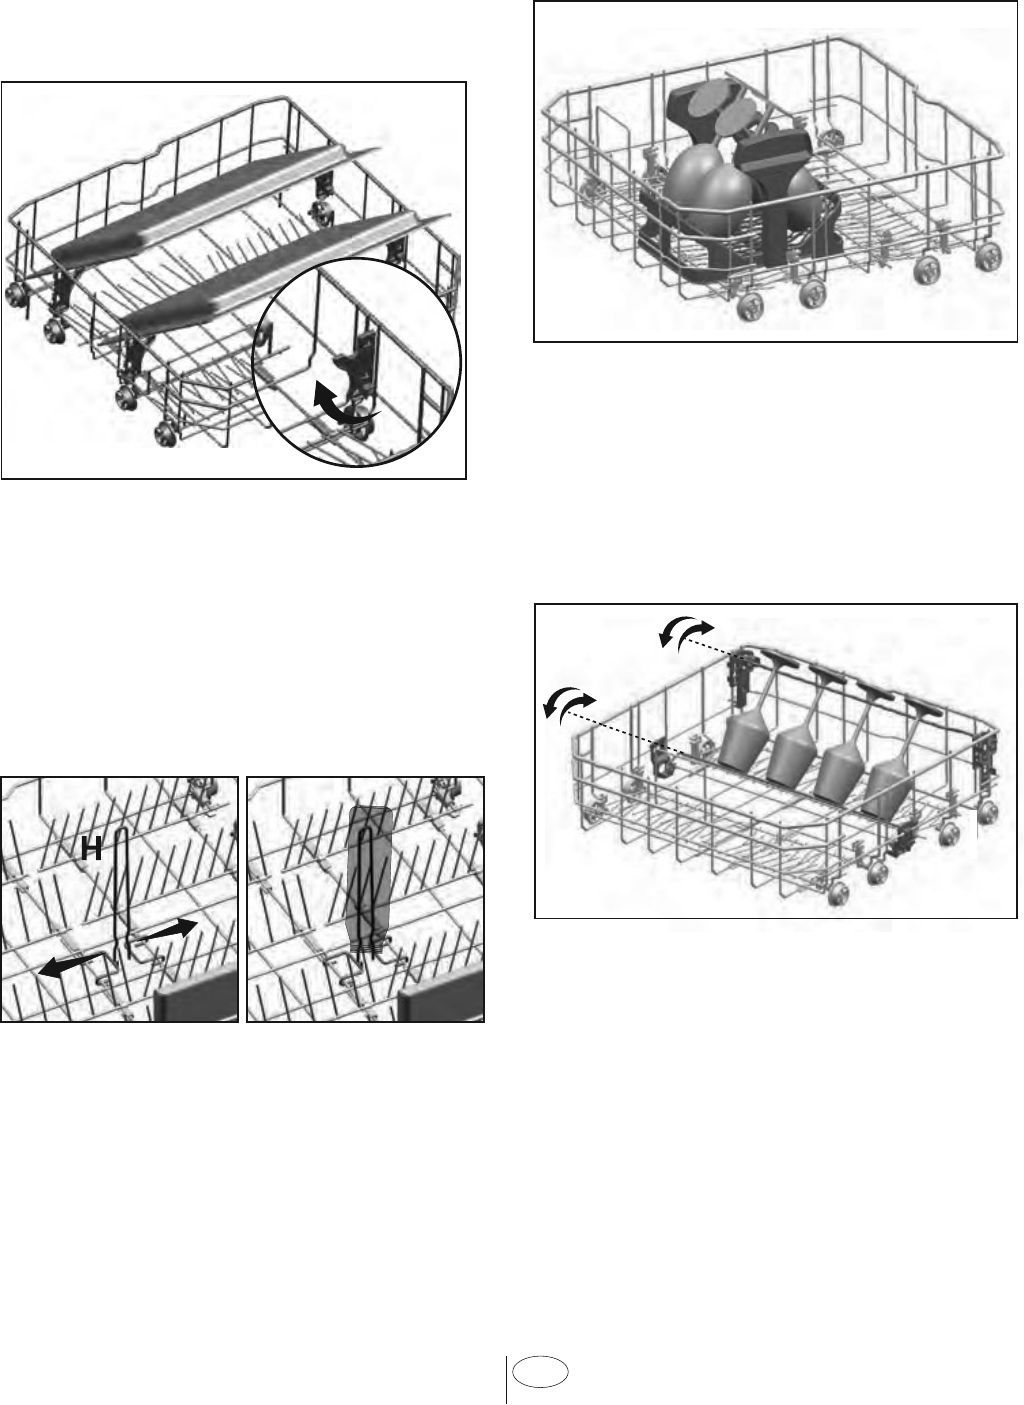
COLLAPSIBLE LOWER BASKET
TINES
(Select Models)
There are foldable tnes (A) located at
the lower basket of the machne are
desgned for an easer placement of large
peces such as pans, bowls, etc. You can
create larger spaces by foldng each tnes
ndvdually or all of them at once.
To brng the collapsble tnes nto horzontal
poston, grab the tnes from md poston
and push them n the drectons of arrows
(B). To brng the tnes back to vertcal
poston, just lft them up. Collapsble tnes
wll clck nto the latch agan (C).
C
Brngng the tnes to the
horzontal poston by holdng
them from the tps may cause
them to bend. Therefore, t
wll be approprate to brng the
tnes n the mddle to horzontal
or vertcal poston by holdng
them from ther stems and
pushng n the drecton of
arrow.
13 USA
SILVERWARE BASKET
(Select Models)
Slverware basket s desgned to wash your
dshes such as knfe, fork, spoon, etc. n a
cleaner manner.
Snce the cutlery basket can be moved
(A, B), you can create a wder space whle
placng your dshes to the lower basket and
free up space for your dshes n dfferent
szes.
CNOTICE:
When fnshed, test
to ensure that the spray arm can
stll move freely.
SILVERWARE BASKET
(Select Models)
Slverware basket s desgned to wash your
dshes such as knfe, fork, spoon, etc. n an
effcent manner.
Snce the slverware basket can be moved
(A, B), you can create more space whle
placng your dshes n the lower basket and
free up space for your dshes of dfferent
szes.
14 USA
TRAY WASH SUPPORTS
(Select Models)
Use the supports to wash trays n the
bottom basket.
See the Auxlary functons secton
for approprate program and functon
selecton.
SOFTTOUCH ACCESSORY
(Select Models)
The SoftTouch Accessory found n the
lower basket of your machne enables a
safe washng for your fragle glasses.
LOWER BASKET GLASS HOLDER
(Select Models)
Lower Basket Glass Holder found n the
lower basket of your machne enables a
safe washng for your overszed and tall
glasses.
LOWER BASKET BOTTLE WIRE
(Select Models)
The bottle wre s desgned for easer
washng of long peces wth wde mouths.
You may take out the bottle wre from the
basket when not n use by pullng t out
from both sdes (H).
15 USA
LOWER BASKET MULTIPURPOSE
/ HEIGHT ADJUSTABLE SERVICE
RACK
(Select Models)
Ths accessory located at the lower basket
of your machne allows you to easly wash
peces such as extra glasses, long ladles
and bread knves.
C
You may use the racks as
requred by movng them to
lower or upper poston, or close
them to create a wder space n
your lower basket.
A
Make sure that the mpeller
does not touch the dshes you
placed on the racks.

16 USA
CEILING CUTLERY BASKET
(Select Models)
Celng cutlery basket s desgned to wash
your cutlery tems such as forks, spoons
and etc. by placng them between the bars
on the basket.
1
In models wth partal movement feature,
pushng the bar (1) on the handle enables
the central tray of the basket to get to
the lower poston and the system gets
unlocked. Thus rght and left sde trays can
be used as movng parts.
The free space enabled by the sde trays
allows long parts to be loaded n the upper
basket.
When the central tray s n the lower
poston, you can load long/hgh tems
such as coffee cups, ladles, etc. on the
tray. When the sde trays lean on two sde
walls, the handle can be pulled to allow the
central tray to rse and the system to be
locked.
CEILING CUTLERY BASKET
(Select Models)
Celng cutlery basket s desgned to wash
your cutlery tems such as forks, spoons
and etc. by placng them between the bars
on the basket..

17 USA
4.3 PROPER AND IMPROPER LOADING OF DISHWARE
1: Salad Fork
2: Teaspoon
3: Dnner fork
4: Knfe-sold handle
5: Servng spoon
6: Servng fork Sldng Cutlery Basket load pattern for 12 place
settngs accordng to the AHAM DW-1 Standards
•Place all contaners such as cups, glasses and pots nto the dshwasher wth the openng
facng downwards (so that no water can collect).
•The movement of the spray arms must not be hndered.
•Do not overload your dshwasher.
•Only wth sutable dshes (mentoned n secton 5) wll you obtan optmal washng
results wth a sensble use of energy.
incorrect incorrect
incorrect incorrect
6
5
5
4
444 44
33
3
33
3
222
2
2
2
2
2
22
2
2
2
2
2
2
2
2
2
2
22
1
1
1
1
1
111
1
1
1
1
44 444
32 4 3 2
3333

18 USA
5. WHAT SHOULD NOT
BE WASHED IN YOUR
DISHWASHER
•Rust-senstve steel parts lke ron
and cast ron that can rust and stan
other utensls and damage the nteror
stanless steel lner of the dshwasher
and vod the warranty. Do not wash
copper, brass, pewter, bronze or tn.
•Cutlery wth wooden or horn handles
and cutlery wth mother-of-pearl or
porcelan handles wll deterorate over
tme f put n the dshwasher.
•Plastcs may lose ther shape or color
wth hot water, please follow the
nstructons of plastc manufacturers.
Be sure that plastc tems are marked
“dshwasher safe”.
•Glued dshes or cutlery are not
sutable for machne washng snce
certan adhesves may get soft or
dssolve wth hot water.
•Alumnum may fade over tme.
Mnerals n water and detergent may
cause the alumnum to darken or spot.
•Sterlng slver artcles should not be
washed n the dshwasher because
they tend to dscolor and become dull
by dshwasher detergent.
•Slverware and stanless steel tems
should not be n contact wth each
other. Mxng these tems can cause
stanng. Remove and hand dry these
tems mmedately when the program
ends.
•Decorated glasses, porcelan, fne
chna and chna wth gold rms are
senstve to machne washng. They
may lose ther patterns and colors
over tme.
•Crystal and very fne glassware may
become opaque (etch) losng ther
shne over tme. You may prefer to
wash them by hand.
•Do not wash sponges or dsh cloths n
dshwasher.
•Do not wash art and craft artcles n
dshwasher.
•Dsposable plastcs and dsposable
alumnum cannot wthstand hgh
temperatures; do not wash them n
the dshwasher.
ACAUTION:
If n doubt, wash by
hand or follow the nstructons
from the manufacturer of
utensls, dshes, glasses or pots
and pans.
Do not wash tems soled wth
cgarette ash, candle wax,
varnsh, pants or chemcals
snce they can damage your
dshwasher.
CNOTICE:
We recommend
when buyng new dshware, try
to choose ones that are sutable
for machne washng (marked as
dshwasher safe).
CARING FOR YOUR TABLE-WARE
The combnaton of hgh temperatures and
dshwasher detergent may cause damage
to some tems f they are washed n the
dshwasher. Remember, f there s any
doubt about any aspect concernng tems
to be washed n the dshwasher, follow the
nstructons from the manufacturer of the
tems, or wash the tems by hand.

19 USA
8. Functon Selecton Keys
F1
F2
F3
F4
F5
9. Programme Selecton Keys
10 11 12
18
13 14 15 16 17
192021222324
10. Tablet Detergent Indcator (depends on the model)
11. Lqud Detergent Dosng Indcator (depends on the model)
12. Auto Door Open Indcator (depends on the model)
13. Flter Cleanng Functon Indcator (depends on the model)
14. IonGuard Functon Indcator (depends on the model)
15. Delay Tme / Programme Tme Indcator
16. Delayed Start Indcator
17. End of Programme Indcator
18. Rnse Ad Indcator
19. Salt Indcator (Select Models)
20. Water Cut-off Indcator
21. Sound Settngs Menu Indcator
22. Water Hardness Settngs Menu Indcator
23.
24.
1 2 3
8
9
4 5 6 7
1. On / Off Key
2.
3. Menu Key
4. Tme Delay Selecton / Menu Drecton
Selecton Keys
5. Selecton / Confrmaton Key
6. Dsplay
7. Start / Pause / Cancel Key
6. OPERATING THE PRODUCT
RemoteStart Key
HomeWhz Indcator
HomeWhz Settng Indcator
Fast Functon
SteamGloss Functon
Santze Functon
AquaIntense Functon
Half Load Functon

20 USA
On/Off Key
When you press the On/Off key, the
ndcator lghts llumnate on the dsplay
for ON poston. The lghts turn off n OFF
poston.
PROGRAMME SELECTION /
PROGRAMME CANCEL KEY
Select the desred programme usng the
“programme selecton keys” and press the
button.
To cancel the runnng programme, open
the door of the machne and press and hold
the Programme Start/Pause/Cancel key for
3 seconds.
After the 3 - 2 - 1 countdown, 0:01 s
dsplayed, close the door of the product
and wat for the dranng process complete.
Dranng s completed n 2 mnutes and the
machne gves an audble warnng when t
s completed.
FUNCTION KEYS
If you press any of the Functon keys
durng programme selecton or tme delay
selecton, an affrmatve key sgnal wll be
heard provded that the relevant functon
s supported by the selected programme.
Functon wll be deemed selected when the
ndcator of the selected functon s lt.
To cancel the selected functon, keep the
functon key pressed untl the functon
ndcator dsappears.
PREPARING THE MACHINE
1. Open the door of the dshwasher.
2. Place the dshes n accordance wth the
nstructons n the user manual.
3. Make sure that the upper and lower
mpellers rotate freely.
4. Put adequate amount of detergent
nto the detergent dspenser.
PROGRAMME SELECTION
1. Press the On/Off button to turn on
your machne.
2. Check the Salt and Rnse Ad ndcators
and add salt and/or rnse ad f needed.
3. Refer to the table of "Programme data
and average consumpton values"
to determne a washng programme
sutable for your dshes.
4. Selected programme wll start when
you close the door of your machne.

21 USA
123456789
Auto AquaFlex Heavy+ Normal * GlassCare Quick&Shine Express Rinse & Hold Downlaod Cycle
(°C)
50-55 55 70 50-55 45 49 45 0
(°F)
142-157 131 158 122-131 113 120 113 0
(°C)
61-67 66 75 61-67 65 71 55 0
(°F)
122-131 151 167 142-157 149 160 131 0
Medium - High
Medium High Medium Few
Few - Medium
Few -
------+-
++++++ - -
- +++ - + - -
ml
25-40 40 40 25-40 25 25-40 15-25 -
tsp
5-88 85-855-83-5-
ml
15-40 40 40 25 15-25 25 15 -
tsp
3-8 8 8 5 3-5 5 3 -
ml
15-40 25-40 25-40 15-25 15 15-25 15 -
tsp
3-8 5-8 5-8 3-5 3 3-5 3 -
+++++ - - +
+++++++ -
++++++ - -
+-++---
100-152 182 122 100-152 101 58 35 15
9,0-21,2 19,2 20,2 9,0-21,2 13,6 10,4 11,6 4,2
2,38-5,55 5,02 5,34 2,38-5,55 3,40 2,70 3,10 1,10
PROGRAM TABLE
The consumption values shown in the table were determined under standard conditions. For this reason, deviations are possible under practical
conditions. * The energy-usage label is based on this program.
15 ml
15-25 ml
+ 5 ml
Hard
water
Medium
water
Soft
water
Recommended
detergent
amount
Detergent in
dispenser
section
Program number
Program name
Degree of dirtiness
Wash Temperatures
Rinse Temperatures
Sanitize
Water (gallons)
Wash
Main wash
Dry
Duration (minutes)
Water (liters)
22 USA
1234
+HDY\ 'DLO\ 6LOHQW:DVK ,QQHU&OHDQ
(°C)
(°F)
(°C)
(°F)
+LJK 0HGLXP 0HGLXP
ml
tsp
ml
tsp
ml
tsp
'RZQORDG&\FOH
15 ml
15-25 ml
+ 5 ml
Hard
water
Medium
water
Soft
water
Recommended
detergent
amount
Detergent in
dispenser
section
Program number
Program name
Degree of dirtiness
Wash Temperatures
Rinse Temperatures
Sanitize
Water (gallons)
Wash
Main wash
Dry
Duration (minutes)
Water (liters)
The default Download Cycle of the product s shown wth (*).
23 USA
6.4 AUXILIARY FUNCTIONS
Washng programs of your dshwasher are
desgned to obtan the best cleanng effect,
consderng the type of the solng, solng
degree and propertes of the dshes to be
washed.
Auxlary functons allow you save from
tme, water and power.
C
Auxlary functons may cause
changes n the program
duraton.
C
Auxlary functons are not
sutable for all washng
programs. Indcator of the
auxlary functon that s not
compatble wth the program
wll not be actve.
AquaIntense Function
AquaIntense mpeller
located under the
lower mpeller helps
washng your heavly
soled dshes places n
the rght sde of the
lower basket. It wll gve better results to
place the most soled dsh to the rght front
sde.
C
Do not try to remove the
AquaIntense mpeller!
Fast Function
It shortens the tme of the washng cycle
selected and decreases water consumpton
by enablng washng under hgher pressure.
SteamGloss Function
It provdes superor dryng performance.
Sanitize Function
Santze functon rases the water
temperature n the fnal rnse to meet the
requrements of NSF/ANSI STANDARD
184 for Resdental Dshwashers. Certfed
resdental dshwashers are not ntended
for lcensed food establshments.
C
At the end of a succesfull
santzaton “SAN“ s dsplayed
on the dsplay. “SAN” s not
dsplayed on the dsplay f the
cycle s nterrupted or the water
could not be heated to the
requred temperature.
C
Avalable programs are
ndcated on Program Table
chart.
C
Note: Only santzng cycles
have been desgned to meet
the requrements of NSF/ANSI
Standard 184 for sol removal
and santzaton effcacy.
There s no ntenton, ether
drectly or ndrectly, that all
cycles have passed santzaton
performance tests.
Half Load function
It s used to operate the machne wthout
loadng t completely.
1. Load your dshes n the machne as you
lke. You can use both upper and lower
racks.
2. Turn the machne on wth On/Off key.
3. Select the desred program and press
the Half Load key. The Half Load
ndcator wll lght on the dsplay n the
Functon Selected ndcator.
4. Close the door of the machne to start
the program.

24 USA
HOMEWHIZ FUNCTION
You can check your dshwasher and learn
about ts status va your smart devce wth
the HomeWhz functon.
C
You can use your machne va
your smart devce whle the
functon s selected. You can
montor your machne through
the applcaton when the
functon s not selected.
C
You can check the ndcator
on the product to see f the
functon s enabled or not.
If the functon s dsabled, the
Wreless ndcator wll be off
or contnuously flash at short
ntervals. For example, when
the wreless connecton settng
s off or the door of the machne
s open.
C
The functon wll be dsabled
when the door of the
dshwasher s open or when
operatons regardng On/Off are
performed on the machne. It
can be enabled agan wth the
remote control key.
The dsplay when HomeWhz s enabled.
HOMEWHIZ SETUP AND
USER ACCOUNT SETTINGS
Install the HomeWhz applcaton from the
applcaton store of your smart devce to
use the WLAN functon of your machne.
Make sure that your smart devce s
connected to the nternet to use the
applcaton.
If you are usng the applcaton for the frst
tme, complete the regstraton process
wth your e-mal address on the applcaton.
Once you've completed the regstraton
process, you can use all HomeWhz
supported applances n your house
through ths account.
You can tap "Add/Remove Applance"
under the "Applances" secton to see the
applances pared wth your account. You
can perform the user parng processes of
these applances from ths page.
Initial setup
1 Tap "Add/Remove Applance" secton
on the HomeWhz applcaton.
2 Tap "Tap here to setup a new
applance".
3. When the product s off, press the on/off
and remote start keys smultaneously
to enter the settngs menu. Press the
selecton key to set the product to
“wreless connecton setup” status.
4. Then, n the settngs secton of your
smart devce, connect to “HomeWhz
xxx-xxxx” network under the Wreless
settngs. Password of the network can
be seen on the HomeWhz applcaton.
5. Connect your smart devce to the
HomeWhz network and return
to the HomeWhz applcaton. On
the applcaton, you can see the
dshwasher you are addng. Tap Next
to proceed to the next step.
6. Select the network to whch you want
to connect your dshwasher and enter
the password.
7. Whle the dshwasher s connectng to
the selected network, you wll see the
Wreless con ( ) flashng. Once the
connecton has been establshed, the
sad con wll become on permanently.

25 USA
8. Once your dshwasher s connected
to the selected network, you need to
connect to the same network on your
smart devce. If your smart devce does
not get connected automatcally, go
to ts settngs and connect t to the
network to whch your dshwasher s
connected.
9. Return to the HomeWhz applcaton
and gve a name to your dshwasher.
Ths s the last step. You can see your
product on the “Products” page.
10. Once the setup of the dshwasher
has been performed successfully, the
product wll show the man screen
automatcally and return to the use
mode.
11. If the setup has faled, or f t could
not be completed wthn 5 mnutes n
the setup mode, the Wreless con wll
go off and the product wll swtch to
the off mode. To perform setup agan,
please repeat the steps startng from
step 1.
Using the dishwasher on more
than one device
You can use your dshwasher on more than
one smart devce. Install the HomeWhz
applcaton on the other smart devce
to use ths feature. You need to log n
wth your account upon launchng the
applcaton.
C
If the account you have logged
on s the one to whch you have
added applance(s) before, you
can start usng your dshwasher
drectly after loggng n.
Follow the steps below to use
an already setup dishwasher
through a new account.
1. Create a new account and use ths
account to log nto the HomeWhz
applcaton. Make sure that your smart
devce and dshwasher are connected
to the same network.
2. Tap “Add/Remove Applance” on
the Products page. You can see the
applance and the user t belongs to
under “Other Applances” tab.
3. Tap (+) next to the dshwasher you
want to add and gve a name to the
applance.
4. Your request to add the applance wll
be sent to ts owner va e-mal. You can
start to use the applance jontly once
the owner confrms your request.
C
Your smart devce and
dshwasher do not need to be
connected to the same network
once the setup processes are
complete. You can use your
applance as long as your smart
devce s connected to the
nternet.
C
You can tap "Add/Remove
Applance" under the
"Applances" secton to see the
applances pared wth your
account. You can perform the
user parng processes of these
applances from ths page.
HomeWhiz on/off
Press the remotestart key to enable the
functon.
Product ndcator when the functon s
enabled.
If you press the remote start key whle
the functon s enabled, the Home Whz
functon wll be dsabled, and the product
ndcator wll return to the delay tme/

26 USA
programme tme dsplay. In the off poston,
the HomeWhz key LED wll go off.
C
You can check the ndcator on
the product to see f wreless
connecton s enabled or not.
If the wreless connecton s off,
you can see that the Wreless
con s off.
If the Wreless con s on,
ths means that the wreless
connecton of the product s on
and the product s connected
to the wreless network. If the
Wreless con s contnuously
flashng at regular ntervals,
ths means that t s enabled but
could not connect or s tryng to
connect the network.
Wreless connecton s on / off When the
machne s on, press the “Menu” key for
1 second to enter the settngs menu.
Follow the screen and press <- and +>
keys on the panel, then wat untl the
Wreless connecton ndcator comes on.
Press the selecton key and f the Wreless
connecton s on, turn t off; f t s off, turn
t on. In the wreless connecton on/off
settngs menu, f the wreless connecton
s on, the Wreless connecton ndcator wll
lght permanently; f t s off, the Wreless
connecton ndcator wll flash at short
ntervals.
Once the wreless connecton has been
turned “On”, your machne wll connect
to the home network by usng the setup
settngs you made before.
Deleting the HomeWhiz settings
Whle the dshwasher s on, press and hold
Remote start and Menu Drecton Selecton
(-) keys on the panel for 5 seconds. After
the 5 - 4 - 3 - 2 - 1 countdown on the
dsplay, your settngs wll be deleted.
HomeWhiz troubleshooting
Follow these nstructons f you encounter
a control or connecton problem. If t
perssts, take the next step.
1. Check f your smart devce s connected
to the nternet.
2. Close the HomeWhz applcaton on
your smart devce and start t agan.
3. Restart your smart devce.
4. Check the wreless connecton status
of your dshwasher. If you see "WLAN:
Off", swtch t to "WLAN: On" and wat
for the machne to connect. Then close
the HomeWhz applcaton on your
smart devce and start t agan.
5. If the connecton cannot be
establshed followng the nstructons
above, repeat the ntal setup settngs
on the applance.
6. If the problem perssts, contact the
authorsed servce.

27 USA
Interior Lighting
(Select Models)
Some models have nteror lghtng to
llumnate the nteror when the door s
opened.
Changing the interior lighting
setting
1. After swtchng on your machne, press
the Menu key for 1 second.
2. Press <- and +> to proceed to “L:” on
the dsplay. Select the poston you
want wth the Selecton key. Interor
lghtng s off n “L:0” poston and on n
“L:1” poston.
3. Press the Menu key to ext the settngs
menu. Your settng wll be saved
automatcally.
Changing the Download Cycle
You can use the HomeWhz applcaton to
change the Download Cycle, whch s the
last program on the product.
You can check the Table of Program Data
and Average Consumpton Values
to see what the downloaded programs
mght be and the default Download Cycle.
To change the Download Cycle:
•Connect to your product on the
HomeWhz applcaton.
•Turn on the Remote Control functon
for the product.
•Go to the settngs page of the product
on the HomeWhz applcaton.
•On the settngs page of the product,
proceed to the Download Cycle
Program page.
•On the Download Cycle Program page,
select a program to download on your
product.
•Select the desred program on the
Download Cycle page, and press
Download Cycle on the HomeWhz
applcaton.
•Whle the program s beng
downloaded, you wll see an anmaton
on the program and HomeWhz
applcaton.
•Once the download procedure s
complete, you can select and nstall
the Download Cycle on the product or
the HomeWhz applcaton.
C
You can check the Table of
Program Data and Average
Consumpton values to see the
programs you can download on
your product.
C
If you download another
program on the product, your
prevous selecton wll be
cancelled.
C
You can download as many
programs as you wsh on
the product, and change the
Download Cycle whenever you
want. You just need to make
sure that your smart devce
and product are connected to
the nternet and the Remote
Control functon of the product
s turned on.

28 USA
Floor illumination
Illuminates to show program is
still running.
(Select Models)
Your machne reflects a lght to the floor
durng the washng process. Ths lght turns
off after the washng process s complete.
C
Floor llumnaton cannot be
cancelled by the user.
Changing Warning Sound Volume
1. After swtchng on your machne, press
the Menu key for 1 second.
2. Press <- and +> to proceed to “S:” on
the dsplay.
3. Each pressng on the Selecton key wll
change the warnng sound volume as
“S:0” off, “S:1” medum and “S:2” hgh.
4. Press the Menu key to ext the settngs
menu. Your settng wll be saved
automatcally.
C
Factory settng of your machne
s "S:2".
3. Set the desred tme by pressng the
Tme Delay key. Tme wll ncrease
wth ncrements of 30 mnutes up
to 6 hours and after that n 1 hour
ncrements up to 24 hours every tme
you press the key.
4. Close the door of your machne after
settng the Delayed Start. Once
the delay tme s over, the selected
program wll start automatcally.
Changing the settings while Time
Delay function is active
Whle the Tme Delay functon s actvated,
you cannot make changes n the washng
program, auxlary functons or the duraton
of delay tme.
C
Program and auxlary functons
cannot be set/changed after
the program has started.
To cancel the Time Delay function
Open the door of the product Press and
hold the Program Selecton / Program
Cancel keys for 3 seconds. After the 3 -
2 - 1 countdown, 0:01 s dsplayed, close
the door of the product and wat for the
dranng process complete. Dranng s
completed n 2 mnutes and the machne
gves an audble warnng when t s
completed.
C
You can select and start a
new program followng the
cancellaton of Tme Delay
functon.
C
Tme Delay functon cannot be
set after the program starts.
6.6 STARTING THE
PROGRAM
Close the door of your machne to start t
after selectng the program and auxlary
functons.
6.5 SCHEDULING THE
WASHING TIME
Time Delay
If an economcal electrcty tarff s appled
n your regon, you can use the Tme
Delay functon to wash your dshes durng
approprate hours.
You can delay the start of the selected
program untl 24 hours.
1. Press the Tme Delay functon key
after selectng the washng program
and other auxlary functons.
2. Once you press the Tme Delay key,
Dsplay Informaton Lne wll show
"0:30" and Tme Delay ndcator wll
start flashng.
29 USA
C
Select Models:
Your machne performs water
softenng dependng on the
hardness level of the supply
water. Washng tme can
change whle the program
s runnng dependng on the
ambent temperature where
your machne s nstalled,
temperature of the supply
water and amount of the
dshes.
C
Pay attenton not to open the
door of the machne when t s
runnng. There may be a rush of
vapour when you open the door
of your machne; be careful.
C
The machne wll be swtched
off f no button s pressed
wthn 5 seconds after openng
the door whle the machne s
runnng.
C
After the door has been
opened, f any button s pressed
wthn 5 seconds and the door
s closed, the selected program
resumes; otherwse, the
machne wll be swtched off.
Open the door after the
machne has been swtched off,
press On/Off button and close
the door wthn 5 seconds. The
program wll resume washng.
C
The machne wll reman slent
n pause mode for some tme
n order to remove the water
from the machne and on the
dshes completely and to have
the water softener cleaned, and
then t wll resume runnng n
dryng mode.
6.7 CANCELLING THE
PROGRAM
Open the door of the product press and
hold the Program Selecton / Program
Cancel keys for 3 seconds. After the 3 -
2 - 1 countdown, 0:01 s dsplayed, close
the door of the product and wat for the
dranng process complete. Dranng s
completed n 2 mnutes and the machne
gves an audble warnng when t s
completed.
C
There mght be resdues of
detergent or rnse ad n the
machne and/or on the peces
beng washed dependng on
the step the program you have
cancelled was n.
6.8 SALT INDICATOR ( )
(MODEL DEPENDING)
Please check the salt ndcator on the
dsplay to see whether there s adequate
amount of softenng salt n the dshwasher
or not. You need to refll the salt reservor
wth salt whenever salt ndcator appears
on the dsplay of your machne.
C
Adjustng the water hardness
level s explaned n Water
Softenng System secton.
6.9 RINSE AID INDICATOR (
)
Please check the rnse ad ndcator on the
dsplay to see whether there s adequate
amount of rnse ad n the dshwasher or
not. You need to refll the rnse ad reservor
wth rnse ad whenever rnse ad ndcator
appears on the dsplay of your machne.

30 USA
6.10 END OF PROGRAM
C
When the program you have
selected comes to an end, an
audble warnng sgnal wll warn
you to turn off your machne.
Ths audble sgnal wll warn you
wth certan ntervals before t
turns off.
End of Program ndcator wll lght up when
the washng program s over.
1. Open the door of the machne.
2. Press On/Off key to turn off your
machne.
3. Close the tap.
4. Unplug the machne from the socket.
C
For energy savng, the machne
s automatcally turned off
followng the completon of the
program or f the program s not
started.
C
Leave your dshes n the
machne for about 15 mnutes
to allow them cool down after
they are washed. Your dshes
wll dry n a shorter tme f you
leave the door of your machne
ajar durng ths perod. Ths
process wll ncrease the dryng
effectveness of your machne.
6.11 WATER CUT-OFF
WARNING
If mans water s cut or water nlet tap s
turned off the machne cannot take water
n and E:02 con wll flash on the program
ndcator. As long as the problem contnues,
washng program s paused and the water
nlet s checked regularly by the machne;
when the water s restored E:02 con wll
dsappear after a whle and the washng
program resumes.
6.12 OVERFLOWING
WARNING
If the machne ntakes too much water or
there s leakage at any of the components
then the machne wll detect ths and E:01
con wll flash on the Program ndcator. As
long as the overflowng contnues safety
algorthm wll be actve and try to dscharge
the water. If overflowng stops and safety
s assured, E:01 con wll dsappear. If E:01
does not dsappear, there s a permanent
fault. In ths case the authorsed servce
should be contacted.
Adjusting the amount of rinse aid
1. After swtchng on your machne, press
the Menu key for 1 second.
2. Usng <- and +> keys, proceed to “P:”
on the dsplay.
3. Set to the approprate level wth the
Selecton key.
4. Press the Menu key to ext the settngs
menu. Your settng wll be saved
automatcally.
No rnse ad dspensed n P:0 wash poston.
1 dose of rnse ad s dspensed n P:1
poston.
2 doses of rnse ad are dspensed n P:2
poston.
3 doses of rnse ad are dspensed n P:3
poston.
4 doses of rnse ad are dspensed n P:4
poston.

31 USA
7. DETERGENT
You can use powder, lqud/gel or tablet
detergents n the machne.
A
Only use n the machne
the detergents produced
partcularly for use wth
dshwashers. We recommend
you not to use detergents that
contan chlorne and phosphate
as they are harmful for the
envronment.
7.1 ADDING DETERGENT
C
Pay attenton to the warnngs
on the detergent packagng
to get better washng and
dryng results. Contact the
manufacturer of the detergent
for further questons.
A
Do not put solvents nto the
detergent dspenser. There s
the rsk of exploson!
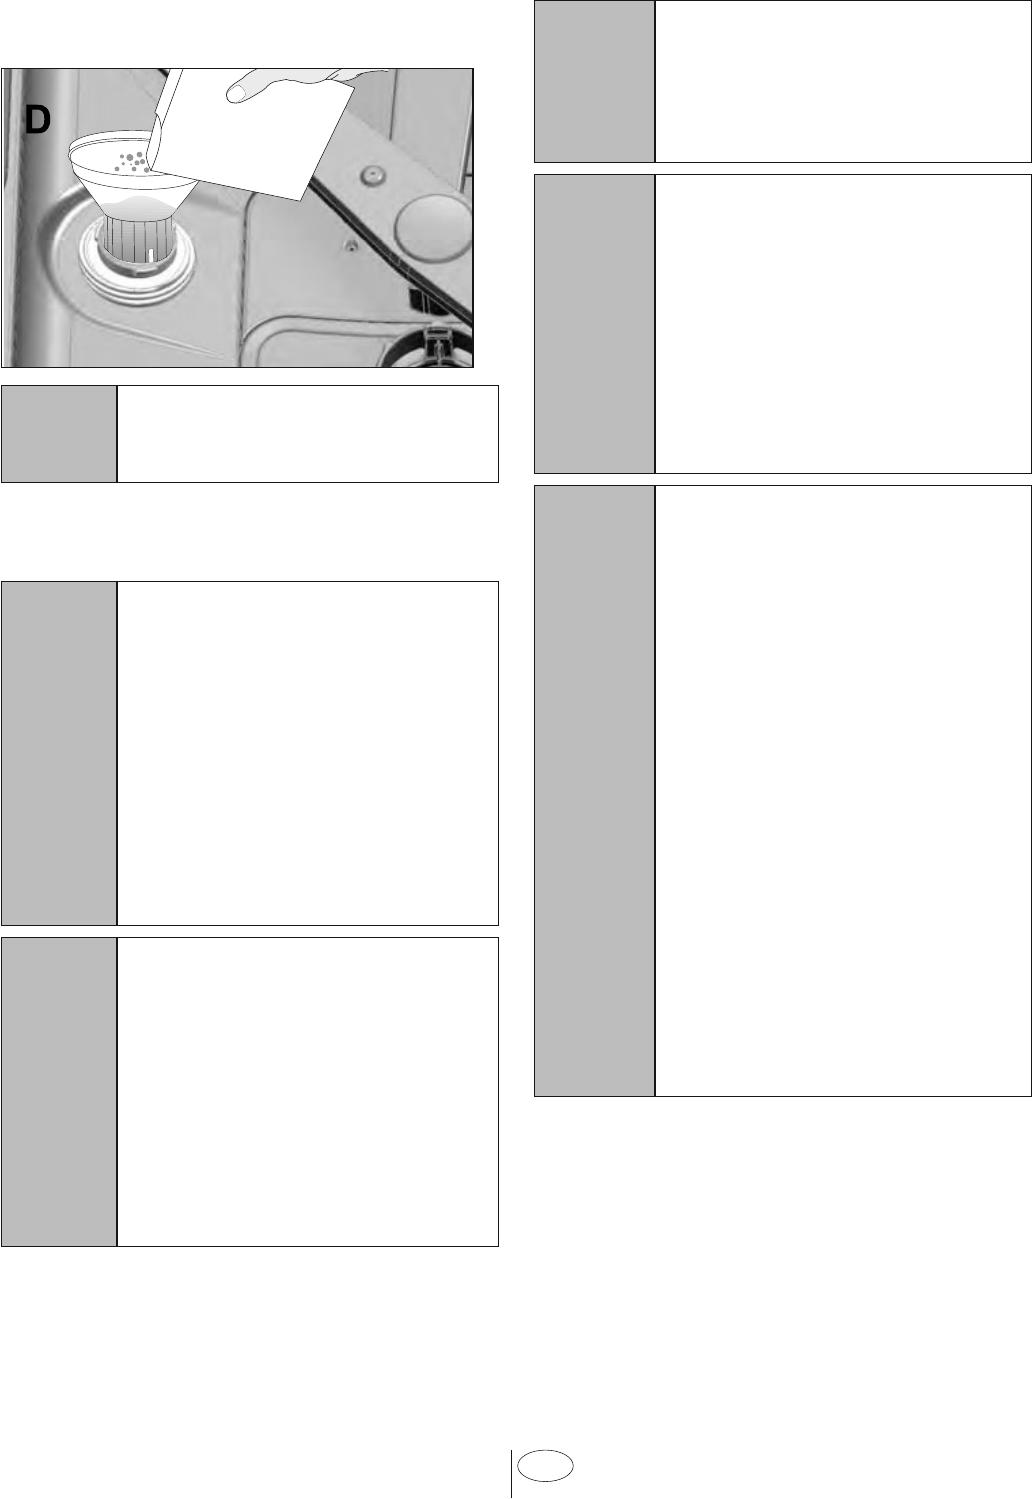
Put the detergent nto the detergent
dspenser just before operatng the
machne as llustrated below.
1. Push the latch to rght to open the
detergent dspenser ld (A).
2. Put suggested amount of powder,
lqud/gel or tablet detergent n the
reservor.
C
Insde the detergent dspenser
there are level markngs that
help you use approprate
amount of powder detergent.
When brmful, detergent
dspenser wll contan 1.5
Ounces (45 cm) of detergent.
Fll detergent up to .5 Ounces
(15 cm) or .85 ounces (25 cm)
level marks n the detergent
dspenser accordng to fullness
of the machne and/or solng
degree of the dshes. One
tablet s enough f you are usng
detergent tablets.

32 USA
f the water hardness level s above the
mentoned level.
C
The best washng performance
n dshwashers s obtaned
by usng detergent, rnse
ad and water softenng salt
ndvdually.
C
Observe the nstructons of the
detergent manufacturer on
the package when usng tablet
detergents.
C
Contact the detergent
manufacturer f your dshes
are wet and/or f you notce
lmescale spots partcularly on
your glasses after the washng
program s over when usng a
tablet detergent.
When you switch to powder
detergent from tablet detergent:
1. Make sure that salt (Select Models) and
rnse ad reservors are full.
2. Set the water hardness to the hghest
level and perform an empty run.
3. After the empty washng cycle, revew
the user manual and readjust the
water hardness level so as to sut the
water supply.
4. Make the approprate rnse ad
settngs.
3. Push the ld of the detergent dspenser
to close t. A "clck" wll be heard when
the ld s closed.
1
2
3
C
Use powder or lqud/gel
detergent n short programs
wthout prewash snce
the solublty of the tablet
detergent changes dependng
on the temperature and tme.
7.2 TABLET DETERGENTS
In addton to the conventonal tablet
detergents, there are also commercally
avalable detergent tablets that show
water softenng salt and/or rnse ad
effect. Some types of these detergents
contan specal-purpose components such
as glass and stanless steel protectors.
These tablets show ther effects up to
a certan water hardness level (59 gpg).
Water softenng salt and rnse ad must
also be used together wth the detergent

33 USA
7.3 RINSE AID
C
The rnse ad used n
dshwashers s a specal
combnaton that ams to
ncrease dryng effcency and
prevent water or lme stans
on the washed tems. For ths
reason, care must be pad
to have rnse ad n the rnse
ad reservor and to use rnse
ads produced specally for
dshwashers only.
1. Open the ld of the rnse ad reservor
wth the help of the latch.
2. Fll the reservor untl “MAX” level.
3. Slghtly press the pont (B) of the
reservor ld to close t.
4. If there are stans on tableware tems
after washng, level must be ncreased
and f there s a blue trace after wpng
them by hand, t must be decreased.
Ths s set to poston 3 as factory
default.
C
The rnse ad adjustment s
descrbed under "Adjustng
the amount of rnse ad" n
the secton for operatng the
machne.
C
Wpe clean any splled rnse ad
outsde the reservor. Rnse
ad that splled accdentally
wll cause foamng and t wll
eventually decrease washng
performance.
34 USA
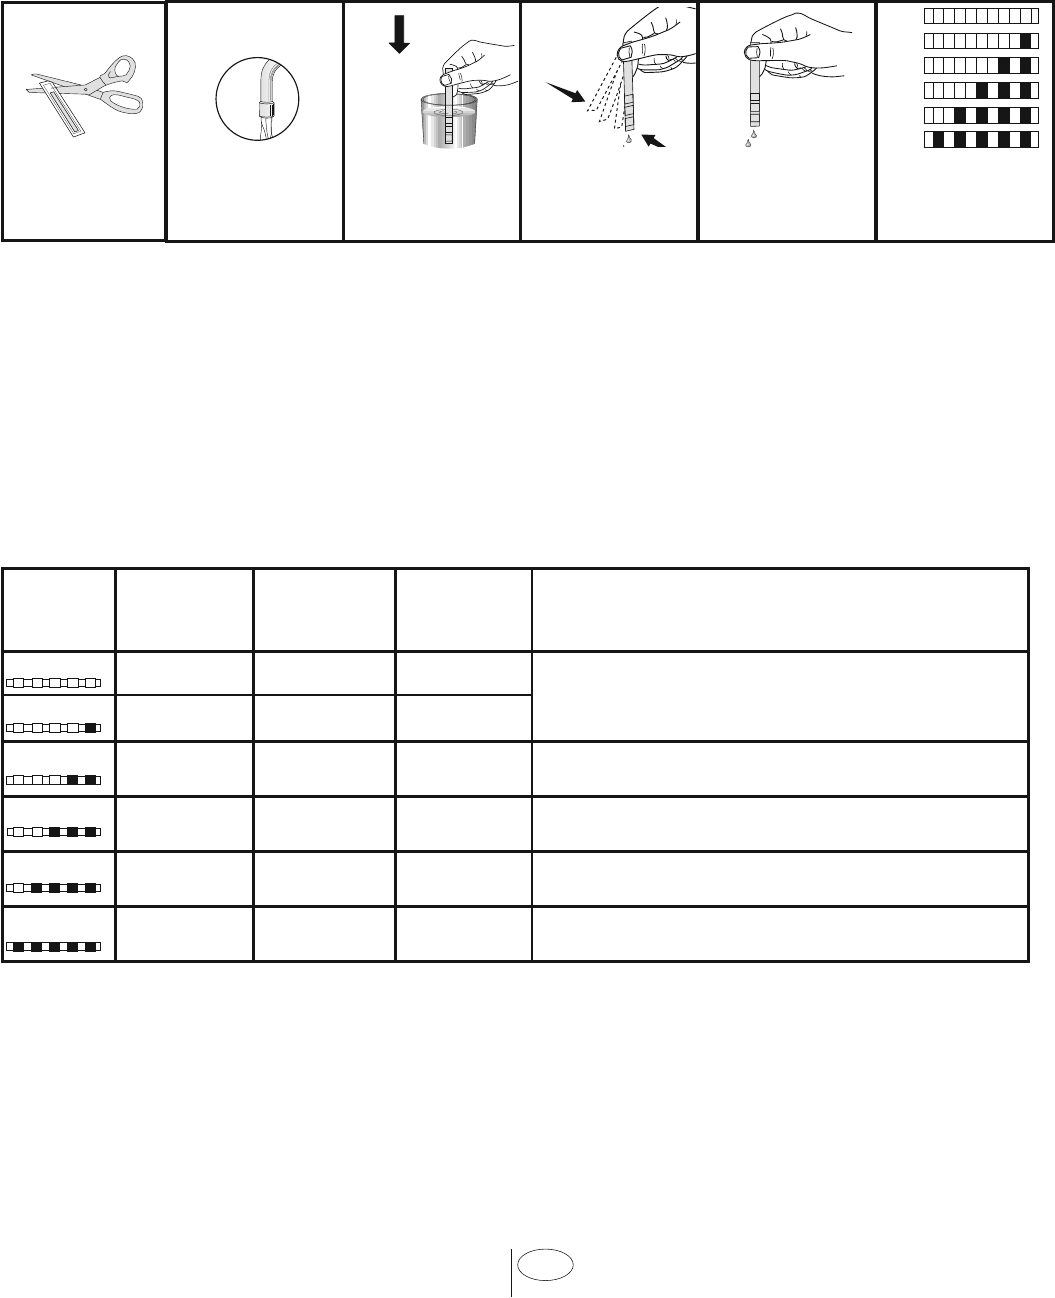
8. ADJUSTING THE WATER SOFTENING SYSTEM
(Select Models)
Cleanng, rnsng and dryng performance of your dshwasher wll ncrease when water
softenng system s adjusted properly.
Adjust the new water hardness level accordng to the Water hardness level nstructon n
ths booklet.
Use the test strp suppled wth the product accordng to the steps gven below to
determne hardness level of your supply water.
ab cdef
Remove the test
strip from the
packet.
Turn on the tap and
let the water run for
about a minute.
Hold the test strip in
the water for about
a second.
Remove the test
strip from the water
and shake it.
Wait for 1 minute. The test strip shows
you the hardness
level.
1 Second
1 Minute
1 min.
After determnng hardness level of the supply water:
1. After swtchng on your machne, long press the Menu key
2. Pres the settngs menu key for 3 seconds to enter the Settngs Menu.
3. Usng <- and +> keys, proceed untl the water hardness settng ndcator becomes on
(“r” poston wll be dsplayed).
4. Usng the Selecton key, adjust water hardness level accordng to the hardness of the
supply water. For correct settng please see “Water hardness level settng table”.
5. Press the Menu key to ext the settngs menu. Your settng wll be saved automatcally.
Water hardness level adjustment table
Hardness
Level
Grains Per
Gallon (gpg)
German Water
Hardness °dH
French Water
Hardness °dF Water Hardness Level Indicator
Level 0 0-14 0-4 0-8 Press the Selection key to switch the water
hardness level to position 1. (r1)
Level 1 15-22 5-7 9-13
Level 2 23-37 8-12 14-22 Press the Selection key to switch the water
hardness level to position 2. (r2)
Level 3 38-46 13-15 23-27 Press the Selection key to switch the water
hardness level to position 3. (r3)
Level 4 47-58 16-19 28-34 Press the Selection key to switch the water
hardness level to position 4. (r4)
Level 5 59-154 20-50 35-90 Press the Selection key to switch the water
hardness level to position 5. (r5)
If the hardness level of the supply water s above 154 gpg (grans per gallon) or f you are
usng well water, then t s recommended to use water purfcaton devces and specal
flters.
If the hardness level of the supply water s below 22 gpg, there s no need to use salt
n your dshwasher. If ths s the case, “No Salt Warnng Indcator” (f any) llumnates
contnuously on the panel of your machne.
35 USA
If the water hardness level adjustment
s set to level 1, the “No salt warnng
ndcator” wll llumnate contnuously
although t s not necessary to use salt. If
you use salt under ths condton, salt wll
not be consumed and the Salt ndcator wll
not llumnate.
C
If you move your house, t s
necessary to readjust water
hardness level of your machne
by consderng the nformaton
gven above accordng to the
hardness level of the supply
water n your new locaton.
Your machne wll dsplay the
most recently adjusted water
hardness level.
C
Salt reservor wll be flled
wth water when you start
the product. For ths reason,
add salt before operatng the
machne.
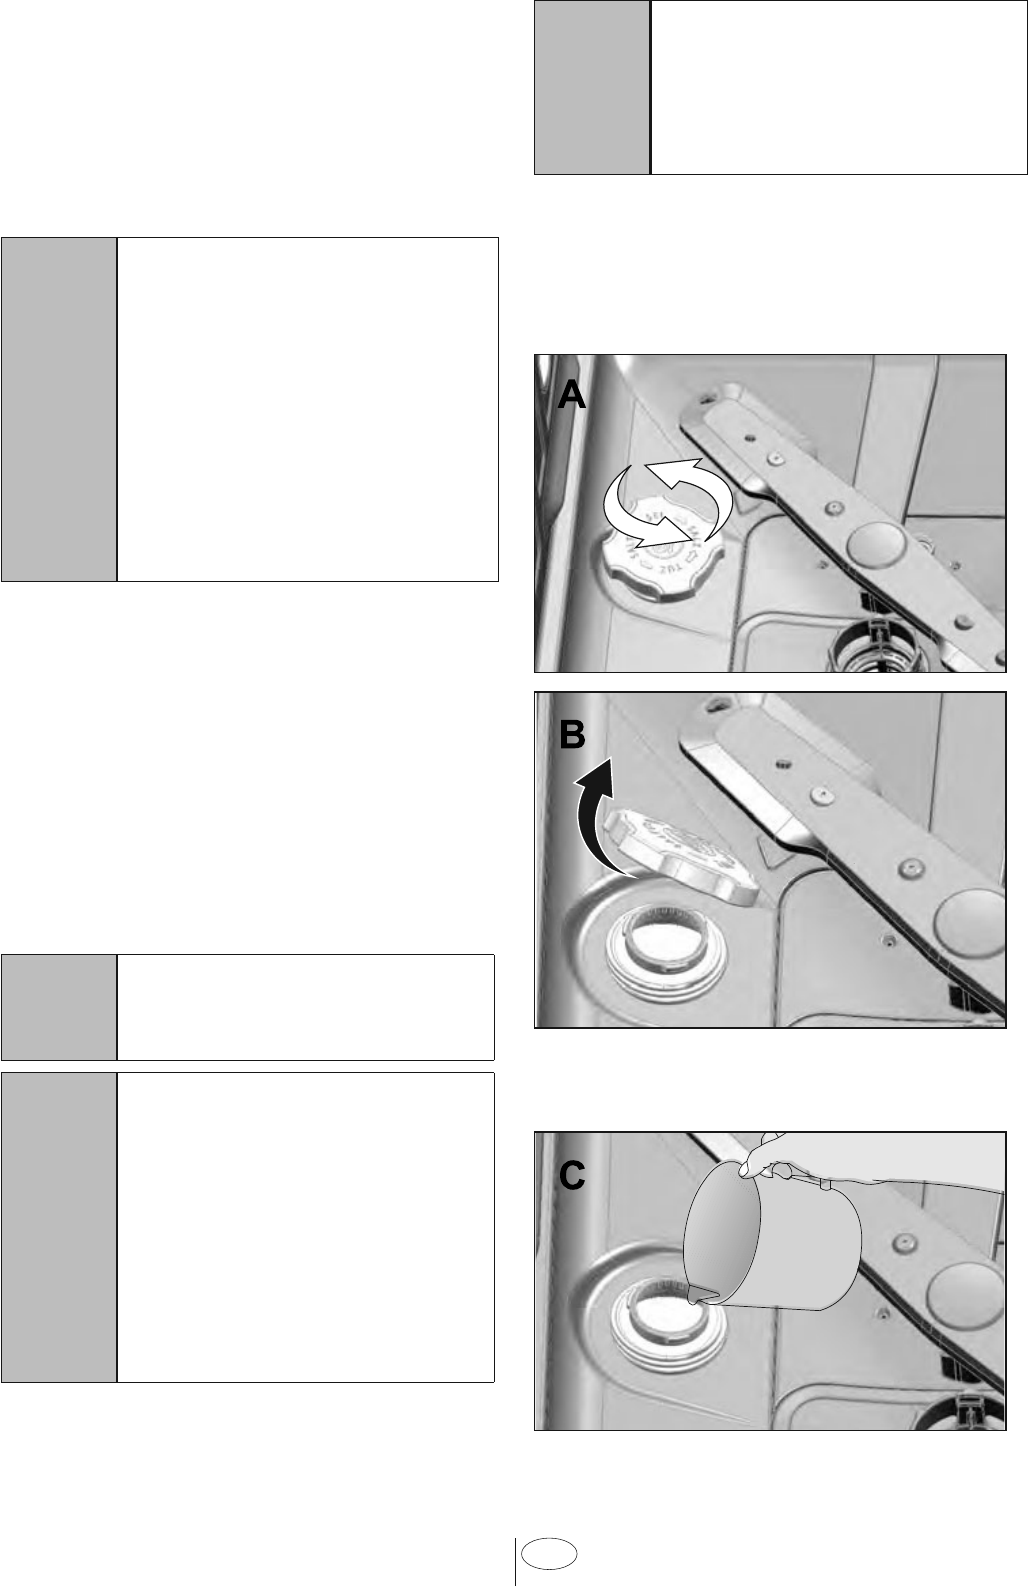
1. Frstly, take the lower basket out to
add softenng salt.
2. Turn the salt reservor ld counter-
clockwse to open t (A, B).
3. Add 4 cups of water to salt reservor of
your machne only n ntal use (C).
9. FILLING THE
DISHWASHER SALT
DISPENSER
(Select Models)
Water softenng system needs to be
regenerated n order for the product
operates wth the same performance
contnuously. Dshwasher salt s used for
ths purpose.
C
Use only specal softenng salts
produced partcularly for the
dshwashers n your machne.
C
It s recommended to use
granule- or powder-formed
softenng salts n the water
softenng system. Do not use
salts that do not completely
dssolve n water such as table
salt or rock salt. Otherwse the
performance of the system
may deterorate n tme.
36 USA
4. Fll the salt reservor wth salt by
usng the salt funnel (D). To speed up
dssoluton rate of salt n water, str t
wth a spoon.
C
You can put about 4.4 Pounds
of softenng salt nto the salt
reservor.
5. Replace the ld and tghten t when the
reservor s full.
C
You need to add salt rght
before startng the machne.
Thus, the overflowng
salty water wll be flushed
mmedately, preventng the rsk
of corroson n machne. In cases
where you would not start
washng mmedately, run your
machne empty n the shortest
program.
C
Snce dfferent salt brands
n the market have dfferent
partcle szes and snce the
water hardness may vary,
dssoluton of the salt n water
may take a couple of hours.
Therefore, Salt Indcator
remans on for a whle after
addng salt nto the machne.
10. CARE AND
MAINTENANCE
AWARNING:
Before cleanng
or carryng out mantenance,
swtch off the applance,
dsconnect the mans plug and
turn off the water tap.
AWARNING:
Do not repar
or replace any part of the
dshwasher or attempt any
servcng unless specfcally
recommended by ths manual.
We recommend that the
dshwasher only be repared by
an authorzed servce agent.
ACAUTION :
To avod the
possblty of slppng, keep the
floor around the dshwasher
clean and dry.
Keep your applance free
from the accumulaton of
combustble materals, such as
lnt, rags, and chemcals.
If the dshwasher s not n use
for an extended perod of tme,
we recommend you check that
the baskets are empty, leave the
nsde of the dshwasher clean,
the door cracked open to allow
ar to crculate, turn off both the
power and water supply to the
dshwasher.

37 USA
10.1 CARING FOR YOUR
DISHWASHER EXTERIOR
ACAUTION :
Possble
dshwasher damage: Abrasve
cleaners, scourng pads,
abrasve cloths (paper towels)
can damage the dshwasher
decoratve door.
Cleaning the control panel:
Use only
soft cloth that s lghtly dampened wth
mld detergent. Clean the control panel only
wth a most cloth and clear water.
Cleaning the colored doors:
Use only
soft cloth that s lghtly dampened wth
mld detergent.
Cleaning the stainless steel doors:
Use a soft cloth wth a cleaner made for
cleanng stanless steel. For the best
results, apply the stanless steel cleaner
to a soft cloth and wpe the surface n the
drecton of the gran.
Cleaning the door gasket:
Regularly
clean the door gasket wth a damp cloth to
remove food partcles and other debrs. Use
a gentle household cleaner for the outsde
and the door seals, and rnse thoroughly.
10.2 CARING FOR YOUR
DISHWASHER INTERIOR
CNOTICE:
Cleanng your
dshwasher at regular ntervals
ensures longer product lfe and
reduces the rsk of recurrng
problems. Always dsconnect
the power to machne before
cleanng.
ACAUTION :
When cleanng the
undersde of the man flter,
care must be taken on the sharp
outer edge to avod the rsk of
cut type njures.

38 USA
4. Clean all three flters under tap water
by means of a brush.
5. Replace the metal/plastc flter.
6. Place the coarse flter nto the
mcroflter. Make sure that t s properly
seated. Turn the coarse flter clockwse
untl a “clck” sound s heard.
C
Do not use the dshwasher
wthout flter.
C
Incorrect placement of the flters
wll reduce washng effcency.
10.3 CLEANING THE FILTERS
Clean the flters at least once a week n
order for the machne operates effcently.
Check f food resdues are left on the flters.
If there are food resdues on flters, take
them out and clean well under runnng
water.
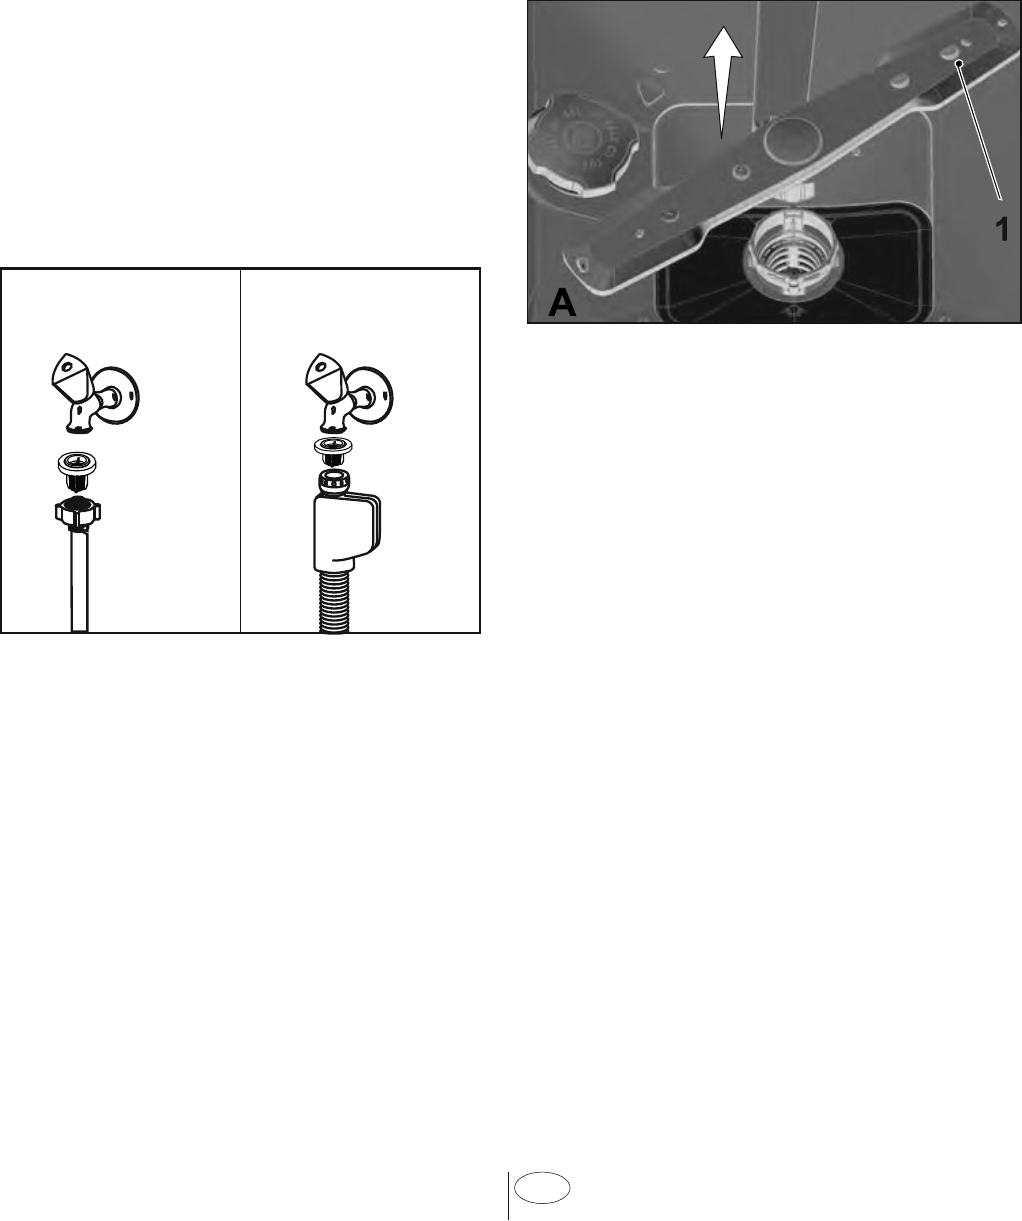
1. Turn the mcro flter (1) and coarse
flter (2) assembly counterclockwse
and pull t out from ts seatng.
2. Pull out the metal / plastc flter (3)
from the seatng.
3. Press the two tabs on the coarse flter
nwards and separate the coarse flter
from the assembly.
39 USA
10.4 CLEANING THE HOSE
FILTER
Damages on the machne that may be
caused by mpurtes comng from the
urban supply water or your own water
nstallaton (such as sand, drt, rust, etc.)
can be prevented by means of the flter
attached to the water nlet hose. Check the
flter and the hose regularly and clean them
f necessary.
1. Turn off the tap and remove the hose.
2. After takng out the flter, clean t
under runnng tap water.
3. Place the cleaned flter back to ts seat
n the hose.
4. Install the hose to tap.
(Select Models)
10.5 CLEANING THE WASH
ARMS
Clean the wash arms at least once a
week n order for the machne operates
effcently.
LOWER WASH ARMS
Check f the holes on the lower wash arms
(1) are clogged. If they are clogged, remove
and clean the mpeller. Pull the lower wash
arms up to remove t.

40 USA
UPPER WASH ARMS
Check f the holes on the upper mpeller (1)
are clogged. If they are clogged, remove
and clean the wash arms. Turn ts nut to
left to remove the upper wash arms.
Make sure that the nut s tghtened well
when nstallng the upper wash arms.

41 USA
11. TROUBLESHOOTING
Machine does not start.
•Power cable s unplugged. >>> Check f the power cable s plugged n.
•Ccut Breaker s blown. >>> Check the Ccut Breaker n your house.
•Water s cut. >>> Make sure that the water nlet tap s open.
•Door of the machne s open. >>> Make sure that you have closed the door of the
machne.
•On / Off button s not pressed. >>> Make sure that you have turned on the machne
by pressng the On / Off button.
Dishes are not washed clean
•Dshes are not placed orderly n the machne. >>> Load the dshes as descrbed n the
user manual.
•Selected program s unsutable. >>> Select a program wth a hgher temperature and
cycle tme.
•Wash arms are stuck. >>> Pror to startng the program, turn the lower and upper
Wash arms by hand to make sure that they rotate freely.
•Wash arms holes are clogged. >>> Lower and upper Wash arms holes mght be
clogged wth small food partcles and debrs. Clean the Wash arms regularly as
llustrated n secton “Cleanng and Care”.
•Flters are clogged. >>> Check f the flter system s clean. Clean the flter system
regularly as llustrated n secton “Cleanng and Care”.
•Flters are nstalled ncorrectly. >>> Check the flter system and make sure that t s
nstalled correctly.
•Baskets are overloaded. >>> Do not overload the baskets n excess of ther capacty.
•Detergent s stored under unsutable condtons. >>> If you are usng powder
detergent, do not store the detergent package n humd places. Keep t n a closed
contaner f possble. For ease-of-storng, we recommend you to use tablet
detergents.
•Detergent s not suffcent. >>> If you are usng powder detergent, adjust the
amount of detergent accordng to the solng degree of your dshes and/or program
defntons. We recommend you to use tablet detergents for optmum results.
•Rnse ad s not suffcent. >>> Check the rnse ad ndcator and add rnse ad f
necessary. Increase the rnse ad settng f there s enough amount of rnse ad n the
machne.
•Detergent dspenser ld s left open. >>> Make sure that the detergent dspenser ld s
closed tghtly after addng detergent.
Dishes are not dry at the end of cycle
•Dshes are not placed orderly n the machne. >>> Place your dshes n a way that no
water wll accumulate n them.
•Rnse ad s not suffcent. >>> Check the rnse ad ndcator and add rnse ad f
necessary. Increase the rnse ad settng f there s enough amount of rnse ad n the
machne.

42 USA
•Machne s unloaded rght after the program s over. >>> Do not unload your
machne rght after washng process s completed. Slghtly open the door and wat
for evacuaton of the steam nsde for a whle. Unload the dshes after the peces
cool down to a touchable level. Start unloadng process from the lower basket. Thus,
droppng of water remaned on a pece at upper basket onto the peces at lower
basket s prevented.
•Selected program s unsutable. >>> Snce rnsng temperature s low at program
wth short duraton, dryng performance wll also be low. Select program wth longer
duraton for a hgher dryng performance.
•Surface qualty of the ktchen utensls s deterorated. >>> Desred washng
performance can not be obtaned at ktchen utensls wth deterorated surfaces and
t s not sutable to use such utensls n terms of hygene as well. Also, water can not
flow easly on deterorated surfaces. It s not recommended to wash such ktchen
utensls n dshwasher.
C
It s normal that dryng complants can be experenced wth Teflon ktchen
utensls. It s assocated wth the structure of Teflon. Snce the surface
tensons of Teflon and water are dfferent, water droplets wll reman as
beads on the Teflon surface.
Stains remaining on dishes when cycle has completed.
•Selected program s unsutable. >>> Select a program wth a hgher temperature and
cycle tme.
•Surface qualty of the ktchen utensls s deterorated. >>> Tea and coffee stans
or other dye spots may not be cleaned n dshwasher when they have penetrated
n deterorated surfaces. Desred washng performance can not be obtaned at
ktchen utensls wth deterorated surfaces and t s not sutable to use such utensls
n terms of hygene as well. It s not recommended to wash such ktchen utensls n
dshwasher.
•Detergent s stored under unsutable condtons. >>> If you are usng powder
detergent, do not store the detergent package n humd places. Keep t n a closed
contaner f possble. For ease-of-storng, we recommend you to use tablet
detergents.
Lime traces remain on dishes and glassware gains a misty appearance
•Rnse ad s not suffcent. >>> Check the rnse ad ndcator and add rnse ad f
necessary. Increase the rnse ad settng f there s enough amount of rnse ad n the
machne.
•Water hardness settng s low or salt level s nsuffcent >>> Measure the hardness
of the supply water approprately and check the water hardness settng.
•Salt leakage exsts. >>> Pay attenton not to spll salt around the salt fllng hole
whle addng salt. Make sure that the salt reservor ld s tghtly closed after fnshng
the fllng process. Run the prewash program to remove the salt that splled nsde
the machne. Snce the salt granules that wll reman under the ld wll dssolve durng
prewash, causng the ld loosen, check the ld once agan at the end of the program.

43 USA
There is a different odor in the machine
C
A new machne has a pecular odor. It wll fade out after a couple of washng.
•Flters are clogged. >>> Check f the flter system s clean. Clean the flter system
regularly as llustrated n secton “Cleanng and Care”.
•Drty dshes are kept n dshwasher for 2-3 days. >>> If you are not gong to start
the machne rght after you have put the dshes nto t, remove the remnants on the
dshes and run the Prewash program wthout detergent every 2 days. In such cases,
do not close the door of the machne completely n order to avod odor buld up n
machne. You can also use commercally avalable odor removers or machne cleaners.
Rust, discoloration or surface deterioration occurs on dishes
•Salt leakage exsts. >>> Salt may cause deteroraton and oxdaton on metal
surfaces. Pay attenton not to spll salt around the salt fllng hole whle addng salt.
Make sure that the salt reservor ld s tghtly closed after fnshng the fllng process.
Run the prewash program to remove the salt that splled nsde the machne. Snce
the salt granules that wll reman under the ld wll dssolve durng prewash, causng
the ld loosen, check the ld once agan at the end of the program.
•Salty food remnants have remaned on dshes for a long tme. >>> If slverware soled
wth such foods wll be kept watng n machne, drt must be removed by prewash or
dshes must be washed wthout beng kept watng.
•Electrc nstallaton s not grounded. >>>Check f your machne s connected to the
actual groundng lne. Otherwse, the statc electrc created n the product causes arcs
on the surfaces of metal tems creatng pores, removng the protectve cover on the
surface and causng dscoloraton.
•Intensve cleansers such as bleaches are used. >>> Protectve cover on metal
surfaces gets damaged and looses ts effcency n tme when t gets n contact wth
cleansers such as bleach. Do not wash your dshes wth bleach.
•Metal tems partcularly such as knves are used for purposes other then ther
ntended uses. >>> Protectve cover on the edges of knves may get damaged when
they are used for purposes such as openng cans. Do not use metal ktchen utensls
out of ther ntended uses.
•Slverware are made of low qualty stanless steel. >>> Corroson on such tems s
nevtable; they should not be washed n dshwashers.
•Ktchen utensls that are already corroded are washed n dshwasher. >>> Rust on a
corroded tem can mgrate to other stanless steel surfaces and cause corroson on
those surfaces as well. Such tems should not be washed n dshwashers.
Detergent remains in detergent dispenser.
•Detergent dspenser was damp when addng detergent. >>> Make sure that the
detergent dspenser s dred well pror to fllng t wth detergent.
•Detergent s added long before the washng process. >>> Pay attenton to add
detergent shortly before start-up of the washng.

44 USA
•Openng of the detergent dspenser ld s prevented durng washng. >>> Place the
dshes n a way that wll not prevent the detergent dspenser ld from openng and the
water gong nto the machne from mpellers.
•Detergent s stored under unsutable condtons. >>> If you are usng powder
detergent, do not store the detergent package n humd places. Keep t n a closed
contaner f possble. For ease-of-storng, we recommend you to use tablet
detergents.
•Wash Arm holes are clogged. >>> Lower and upper Wash Arm holes mght be clogged
wth food remnants such as lemon pps. Clean the Wash Arm regularly as llustrated n
secton “Cleanng and Care”.
Decorations and ornaments on kitchen utensils are being erased.
C
Decorated glasses and decorated luster porcelans are not sutable for
washng n the dshwasher. Manufacturers of glassware and porcelan
tableware tems do not recommend washng such ktchen utensls n the
dshwashers ether.
Dishes are scratched.
C
Ktchen utensls that contans or are made of alumnum should not be washed
n dshwasher.
•Salt leakage exsts. >>> Pay attenton not to spll salt around the salt fllng hole whle
addng salt. Splled salt can cause scratches. Make sure that the salt reservor ld s
tghtly closed after fnshng the fllng process. Run the prewash program to remove
the salt that splled nsde the machne. Snce the salt granules that wll reman under
the ld wll dssolve durng prewash, causng the ld loosen, check the ld once agan at
the end of the program.
•Water hardness settng s low or salt level s nsuffcent >>> Measure the hardness
of the supply water approprately and check the water hardness settng.
•Dshes are not placed orderly n the machne. >>> When placng the glasses and
other glassware nto the basket lean them not aganst other dshes but the edges
or racks of the basket or the glass support wre. Strkng of the glasses to each other
or to other dshes due to the mpact of water durng washng can cause breaks, or
scratches on ther surfaces.
A smear remains on glasses that resembles milk stain which can not be
removed when wiped by hand. A bluish / rainbow appearance occurs when
the glass is pointed to light.
•Excessve rnse ad s used. >>>Lower rnse ad settng. Clean the splled rnse ad
when addng rnse ad.
•Corroson has occurred on glass due to soft water. >>> Measure the hardness of the
supply water approprately and check the water hardness settng. If your supply water
s soft (<15 gpg), do not use salt. Choose programs that wash n hgher temperatures
(140-149 degress Fahrenhet). You can also use glass protectve detergents that are
commercally avalable.

45 USA
Foam forms in the machine.
•Dshes are washed wth hand-wash detergent by hand but not rnsed before placng
them nto the machne. >>> Hand-wash detergents do not contan antfoam. There
s no need to hand-wash the dshes before placng them nto the machne. Removng
the coarse sol on the dshes under tap water, wth a sponge or towel.
•Rnse ad has splled nto the machne when addng rnse ad. >>> Take care that rnse
ad s not splled n the machne when you are fllng t. Clean any splled rnse at wth
the help of a tssue paper/towel.
•Ld of the rnse ad reservor s left open. >>> Make sure that the ld of the rnse ad
reservor s closed after addng rnse ad.
Kitchen utensils are broken.
•Dshes are not placed orderly n the machne. >>> Load the dshes as descrbed n the
user manual.
•Baskets are overloaded. >>> Do not overload the baskets n excess of ther capacty.
Water remains in the dishwasher at the end of the program.
•Flters are clogged. >>> Check f the flter system s clean. Clean the flter system
regularly as llustrated n secton “Cleanng and Care”.
•Dscharge hose s clogged/blocked. >>> Check the dscharge hose. If necessary,
remove the dscharge hose, clear the blockage and nsert s as llustrated n the user
manual.
C
If you cannot elmnate the problem although you follow the nstructons n
ths secton, consult your dealer or the Authorzed Servce Agent. Never try to
repar a nonfunctonal product yourself.

46 USA
12. TECHNICAL FEATURES
Load capacity
16 place settngs
Permissible water
pressure
4.35 - 145 ps (0.3 - 10 bars)
Electrical connection
120 V (volts), 12 A (amps), 60Hz (hertz)
Total power
1400 W (watts)
Heater power
1100 W (watts)
CNOTICE:
Because we
contnually strve to mprove
our products, we may change
our specfcatons and desgn
wthout pror notce.
Ths devce corresponds to the
followng drectves:
UL 749 Household Dshwasher
drectve.

47 USA
13. WARRANTY STATEMENT FOR THE BEKO
DISHWASHERS
The warrantes provded by Beko n
these statements only apply to Beko
dshwashers sold to the orgnal purchaser
or homeowner n the US and Canada. The
warranty s not transferable. To obtan
warranty servce, please contact our
nearest dstrbutor as lsted by state and
provnce. You wll need your dshwasher
model number, seral number, retaler
name and address, where purchased and
purchase date / nstallaton date. Ths
warranty gves you specfc legal rghts, and
you may also have other rghts whch vary
from state to state. Also, please make sure
you regster your product for warranty at
www.beko.us
1 year (*) full warranty from date of
first installation
Beko wll repar or replace at no cost to
the consumer any defectve parts of the
dshwasher f used under normal household
condtons
(warranty is void if the product
is used commercially e.g., bed
+ breakfast, nursing home etc.).
Service must also be performed by
an authorized Beko service agency.
(Cosmetic defects must be reported
within 10 business days from
installation). 1 year warranty on the
accessories is for the parts only and
doesnot include labor.
2 year*++ limited warranty from
date of first installation (Parts only)
Beko will repair or replace any
parts at no cost to the consumer if
material defects or workmanship
have caused the damage or failure
of these components. Again the
dishwasher must have been used
under normal household conditions
and not commercially as stated
above (Labor charges are the
responsibility of the consumer).
2-5 year (*, **) limited warranty from
date of first installation
(parts only 2-5 years) Beko wll repar or
replace any compressors, evaporators,
condensers and dryers at no cost to
the consumer f materal defects or
workmanshp have caused the damage or
falure of these components.
The dishwasher must have been
used under normal household
conditions and not commercially
(Labor charges are the
responsibility of the consumer)
Disclaimers of warranties and
exclusions:
Warranty does not cover service
costs by an authorized service
agent to correct installation,
electrical problems or educational
instruction on the use of the
dishwasher. The warranty also
does not cover defects or damage
caused by an act of God (such as
storms, floods, fires, mudslides,
etc.), damage cause by use of the
dishwasher for purposes other than
those for which it was designed,
misuse, abuse, accident, alteration,
improper installation, maintenance,
travel fees, service calls outside
normal service hours, pick up
and delivery, any food loss due

48 USA
to product failure, unauthorized
service work or work.
This product is fully tested and
went through official quality
assurance inspections before
leaving the original manufacturing
site. Warranty terms for this
Beko household appliance is not
valid if the product is altered,
tampered, modifed, additional parts
assembled, fixed and re-packed by
an authorized distributor, servicer, a
third party retailer, reseller or by any
other unauthorized person(s).
TO THE EXTENT PERMITTED BY
LAW, THIS WARRANTY IS IN LIEU
OF ALL OTHER EXPRESSED AND
IMPLIED WARRANTIES, INCLUDING
THE IMPLIED WARRANTIES
OF MERCHANTABILITY AND
FITNESS FOR A PARTICULAR
PURPOSE. BEKO UNDERTAKES
NO RESPONSIBILITY FOR THE
QUALITY OF THIS PRODUCT
EXCEPT AS OTHERWISE
PROVIDED IN THIS WARRANTY
STATEMENT. BEKO ASSUMES
NO RESPONSIBILITY THAT THE
PRODUCT WILL BE FIT FOR ANY
PARTICULAR PURPOSE FOR
WHICH YOU MAY BE BUYING THIS
PRODUCT, EXCEPT AS OTHERWISE
PROVIDED IN THIS WARRANTY
STATEMENT.
Beko does not assume any
responsibility for incidential or
consequential damages. Such
damages include, but are not
limited to, loss of profits, loss of
savings or revenue, loss of use of
the dishwasher or any associated
equipment, cost of capital, cost of
any substitute equipment, facilities
or services, downtime, the claims of
third parties, and injury to property.
Some states do not allow the
exclusion or limitation of incidental
or consequential damages, so the
above limitations or exclusion may
not apply to you.
(*) Installation date shall refer to
either purchase date or 5 business
days after delivery of the product to
the home, whichever is later.
(**) Parts replaced will assume the
identity of the original parts + their
original warranty.
No Other Warrantes. Ths Warranty
Statement s the complete and exclusve
warranty from the manufacturer. No
employee of Beko or any other party
s authorzed to make any warranty
statements n addton to those made n
ths Warranty Statement.
Please keep ths warranty card, user
manual and your sales slp for future
reference.
HOW TO GET SERVICE
Please contact your local authorzed Beko
dealer, or call our Toll Free Customer
Hotlne number at 1-888-352 BEKO (2356)
for drecton to an Authorzed Beko Servce
Agent or contact va http://www.beko.
us . You can also look up for authorzed
dealer lst at “Where To Buy” secton at the
webste for further reference.