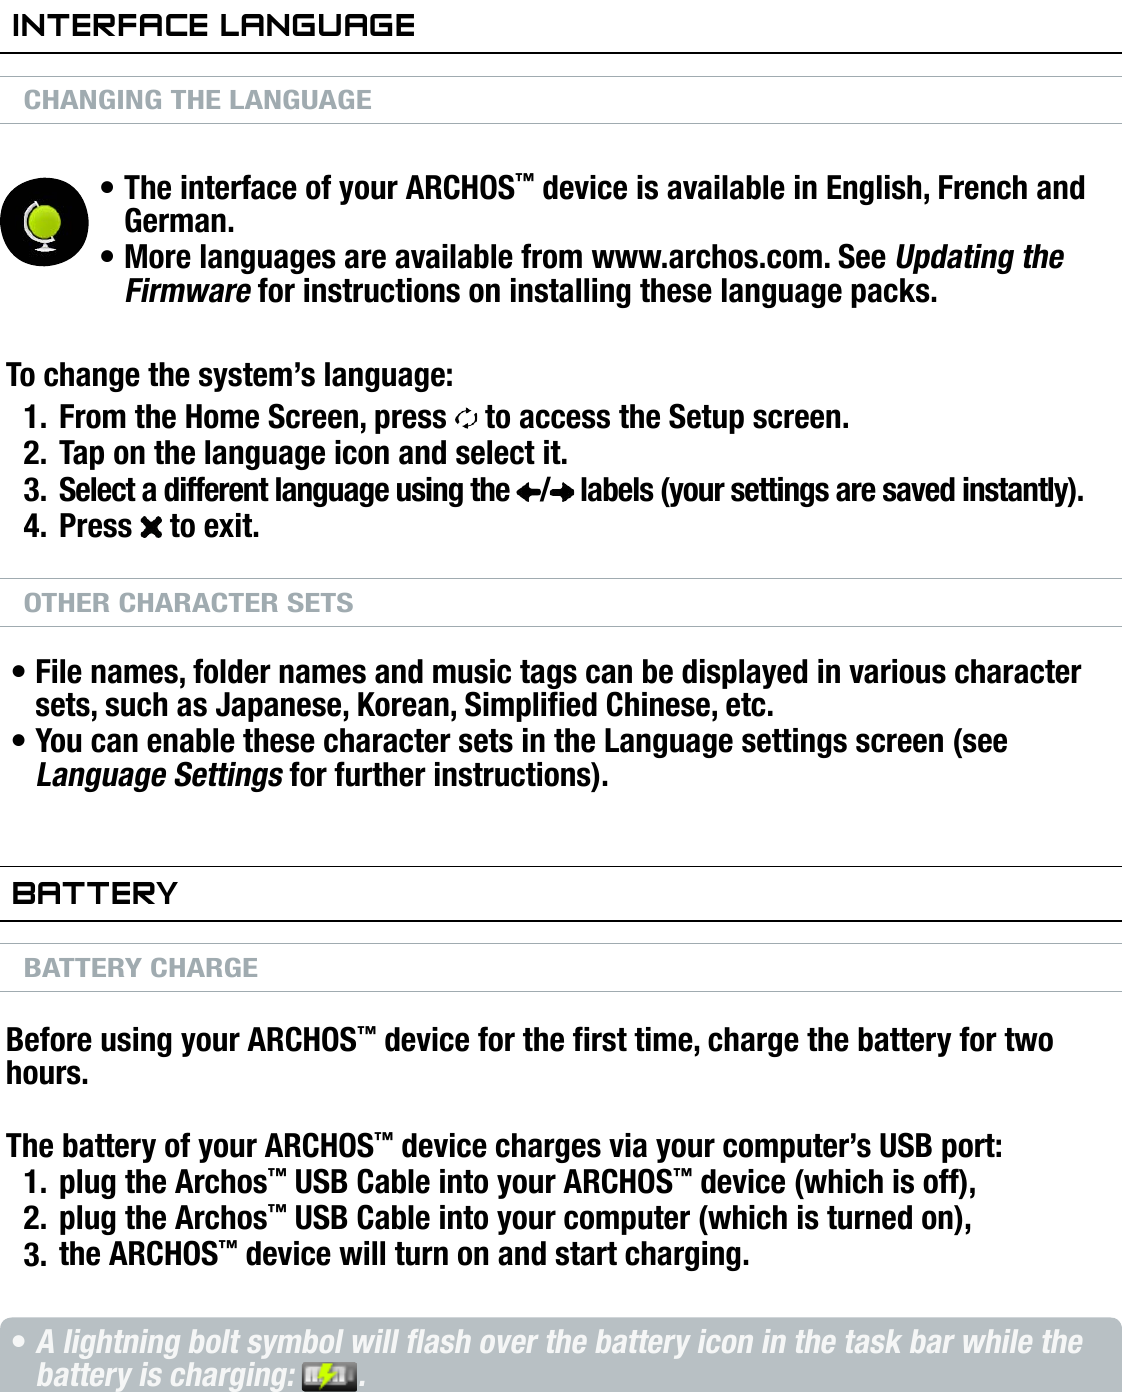
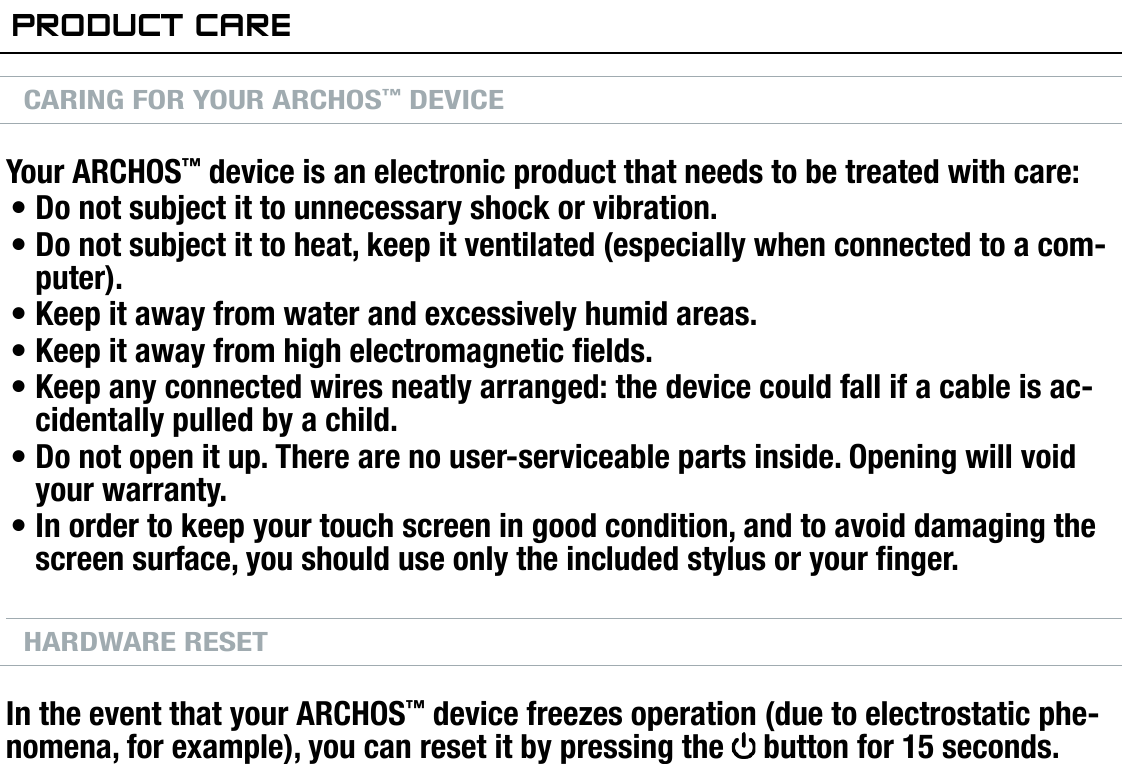
Archos 42725 Portable Media Player with WiFi User Manual Annex No 5a 01
Archos SA Portable Media Player with WiFi Annex No 5a 01
UserManual.wiki
>
Archos
>
42725 User Manual
>
user manual part 1
Contents
1.
user manual part 1
2.
user manual part 2
user manual part 1
Navigation menu
Upload a User Manual
Namespaces
Wiki Guide
HTML
PDF
Info
Views
User Manual
Discussion / Help
Navigation
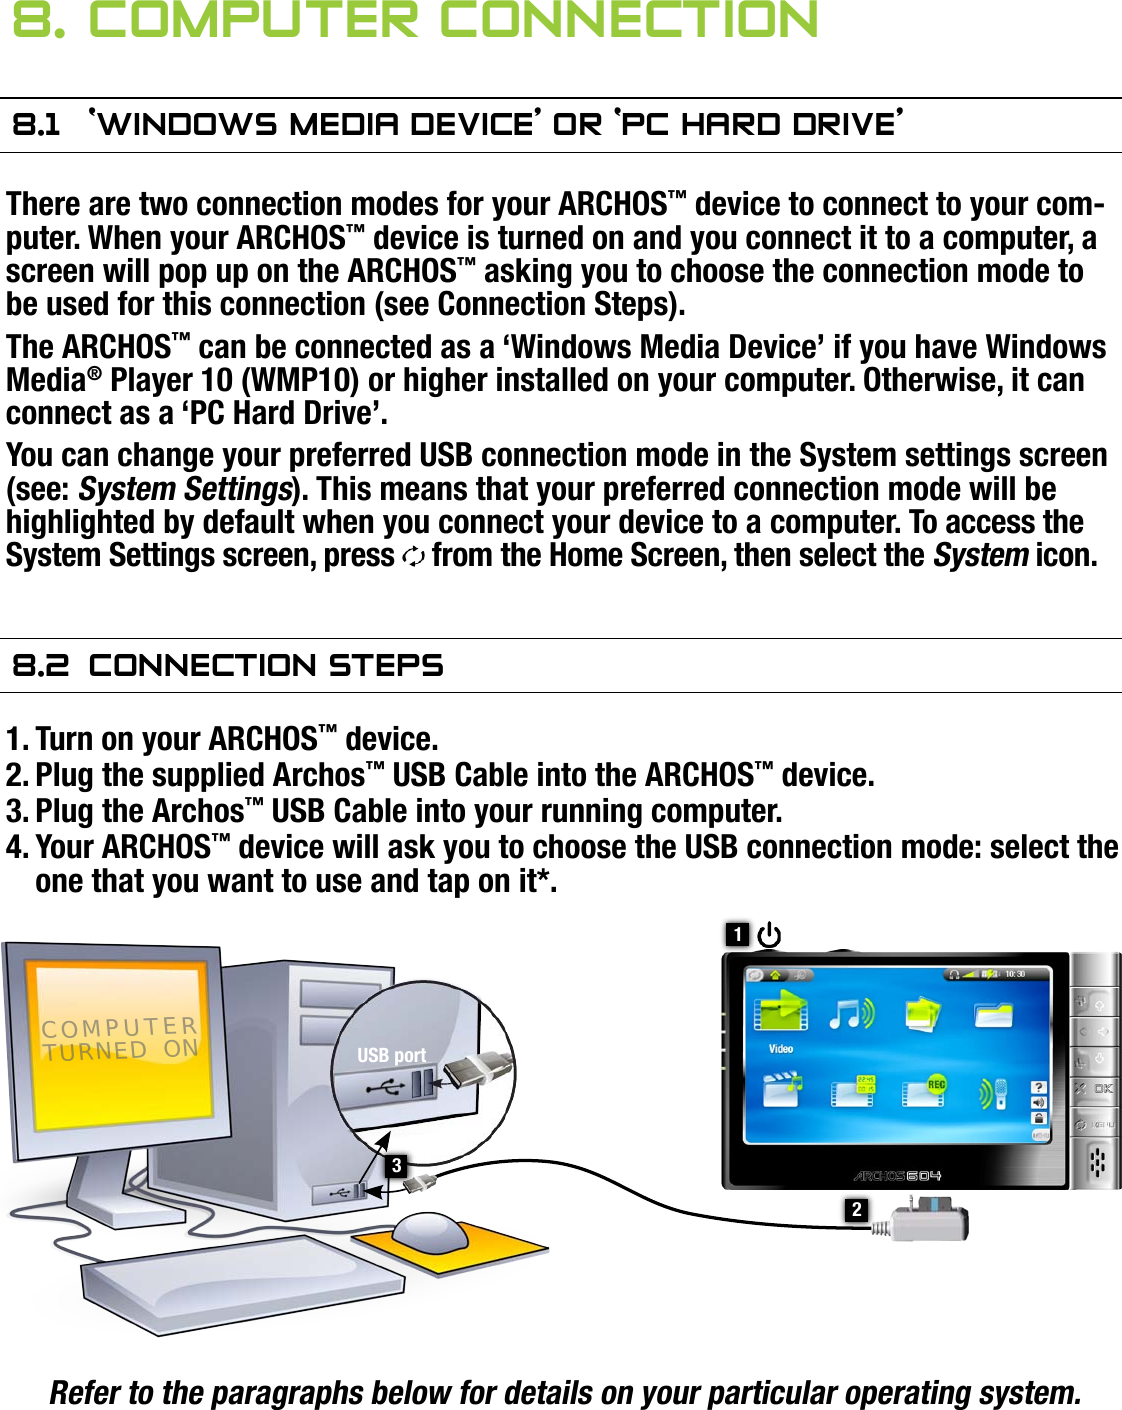
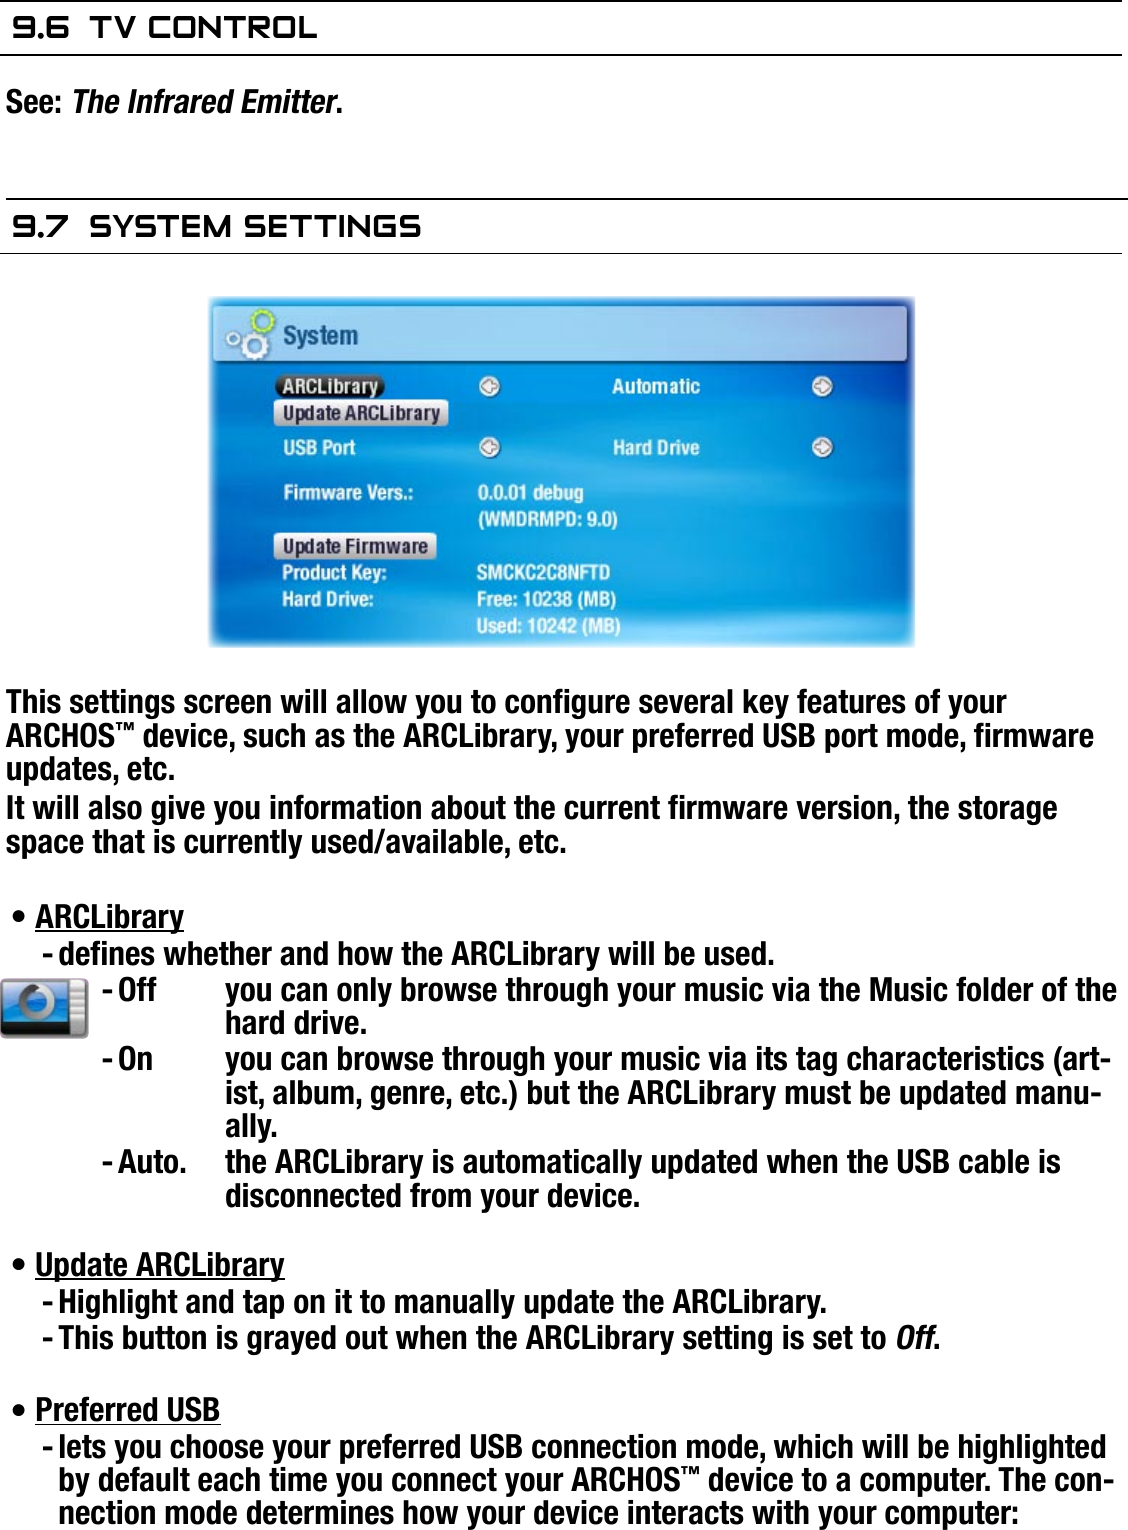
![704MANUAL V0.0PLAYING VIDEO > p. 101.2 VideO PlaybaCkHighlight a video le, tap on it to play it.VIDEO PLAYBACK SCREENVIDEO PLAYBACK BUTTON CONTROLSDuring video playback, the buttons of your ARCHOS™ device will act as follows:VIDEO PLAYBACK MENU ITEMSInfodisplays a message box with all the available information about the current video le.Press to close the info screen.--increase volumefast forwarddecrease volumepause/playdisplay the menuaccelerated fast forwardfast rewindaccelerated fast rewindstopcurrent play modevideo le namecurrent display formatvolume levelvideo progression barthe menu overlay disappears after a few seconds[ placeholder ]](https://usermanual.wiki/Archos/42725.user-manual-part-1/User-Guide-755930-Page-11.png)


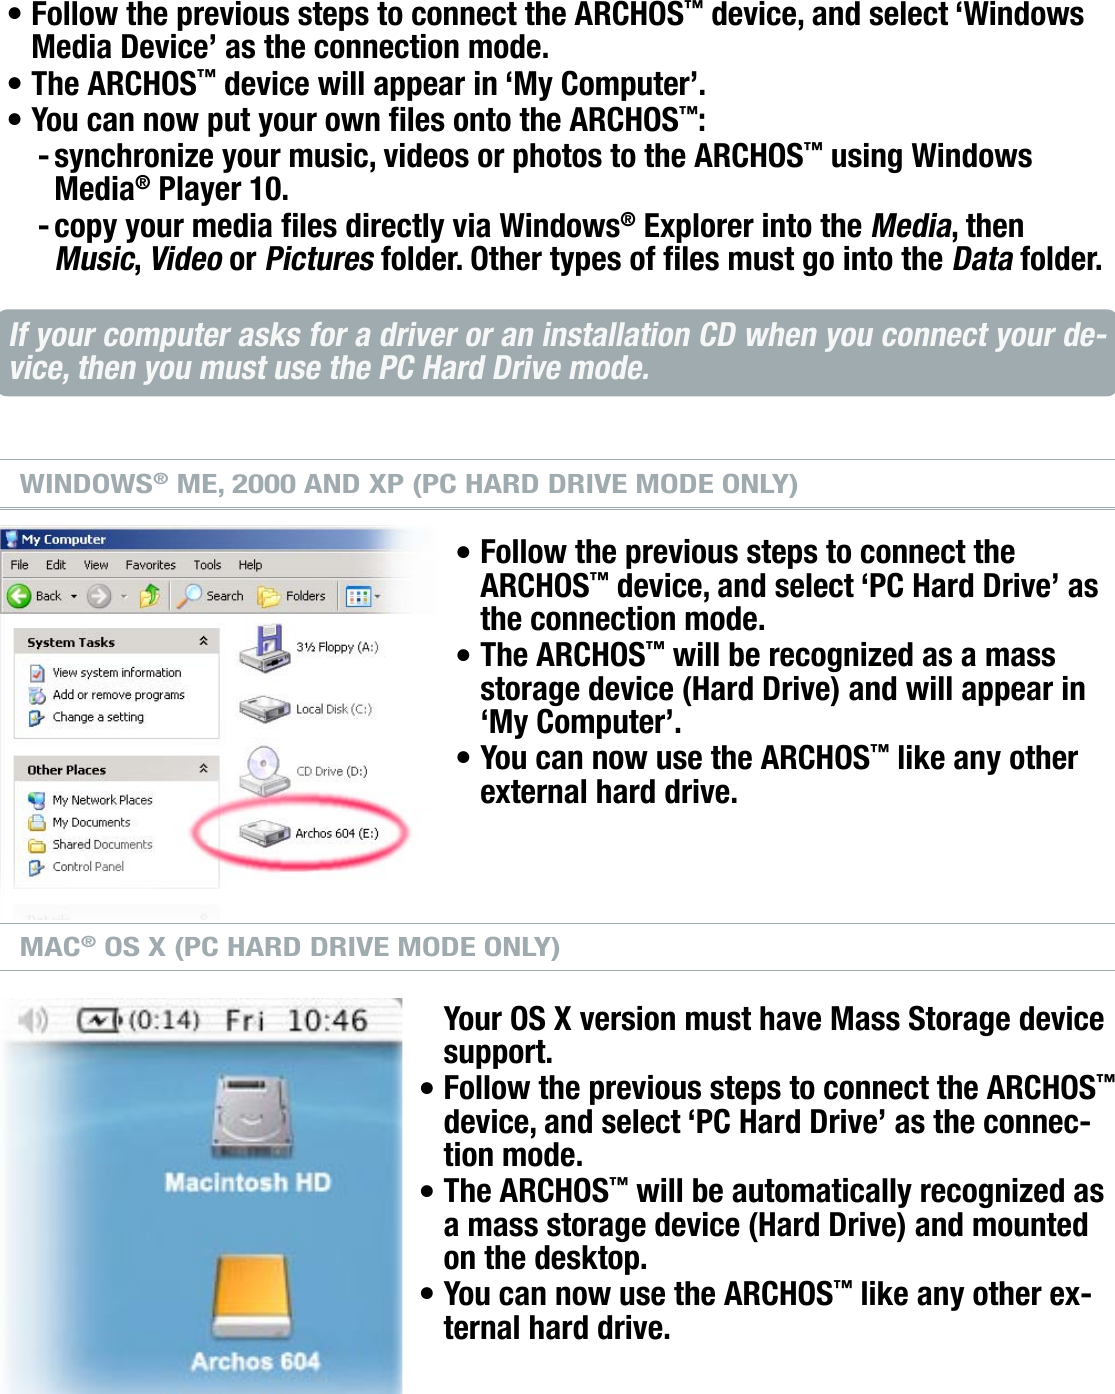
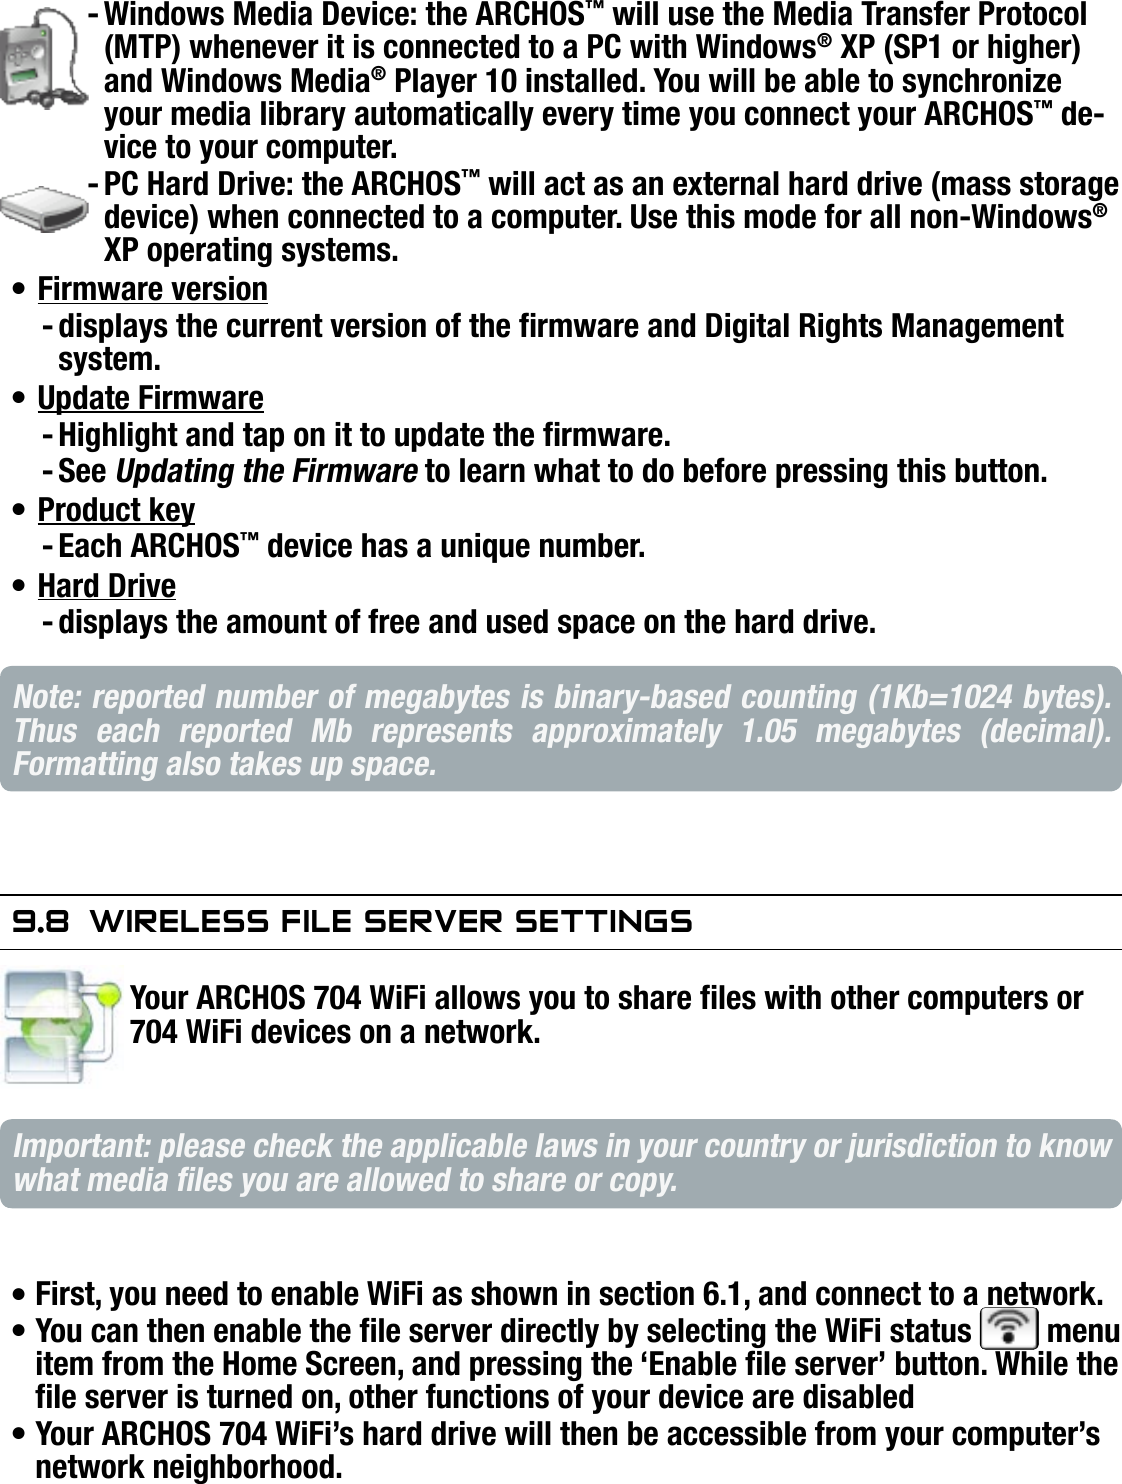
![704MANUAL V0.0PLAYING MUSIC > p. 162.2 Playing MusiCHighlight an audio le, tap on it to play it.MUSIC PLAYBACK SCREENMUSIC PLAYBACK BUTTON CONTROLSDuring music playback, the buttons of your ARCHOS™ device will act as follows:current play modeprevious tracksong titleartist namealbum titletrack numbernext trackvolume levelremaining timeelapsed timeprogression barincrease volumepress once: next song hold: fast forwarddecrease volumepause/playdisplay the menuaccelerated fast forwardpress once: back to the beginning of the song, or previous song (in the rst 10 seconds of a track) hold: fast rewindaccelerated fast rewindstoptabs back to the browser or ARCLibrary window that you launched the song from[ placeholder ]](https://usermanual.wiki/Archos/42725.user-manual-part-1/User-Guide-755930-Page-17.png)
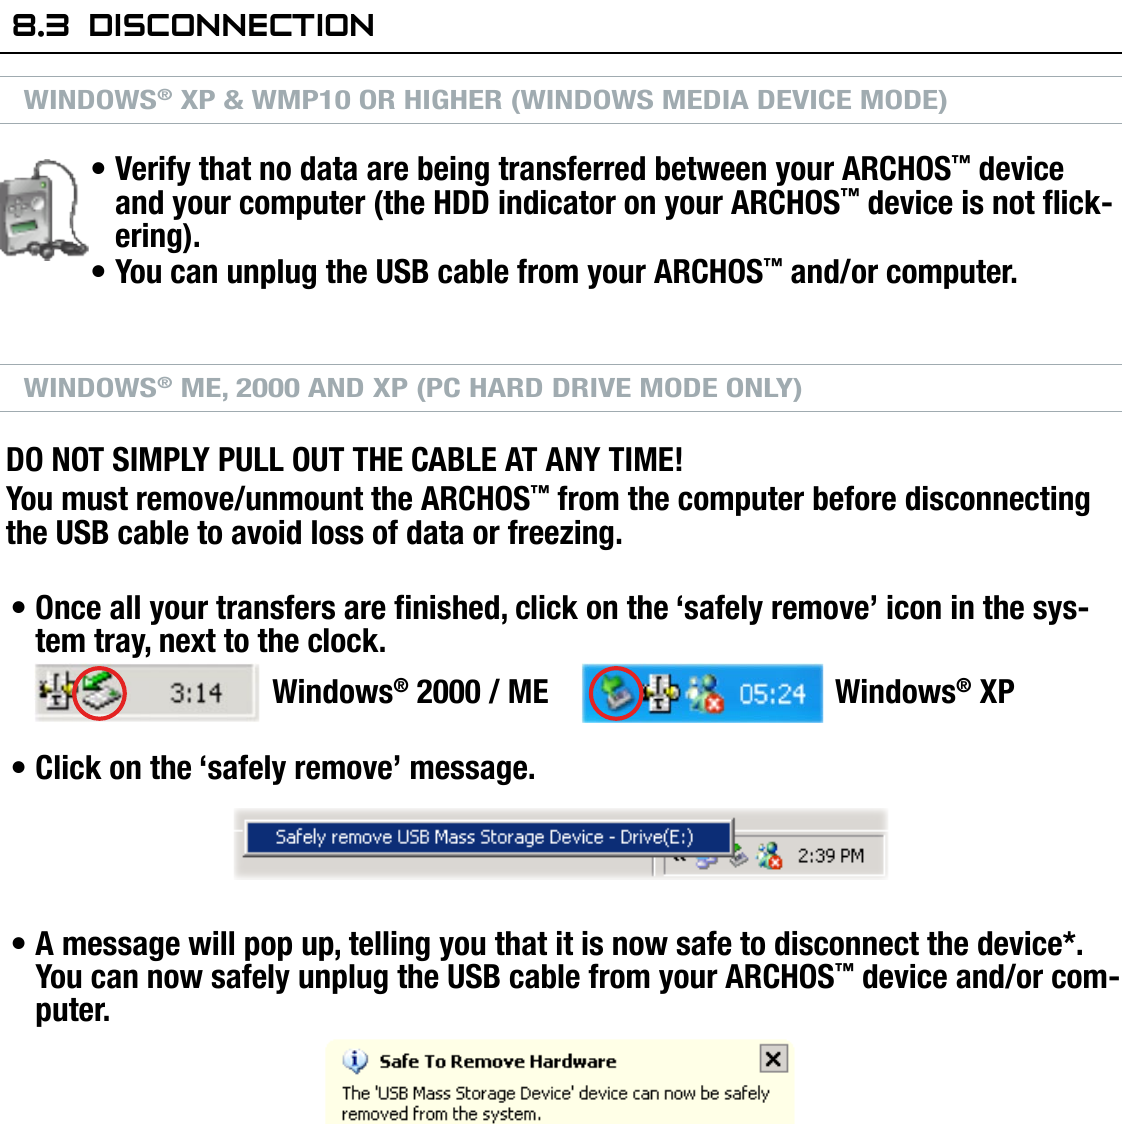
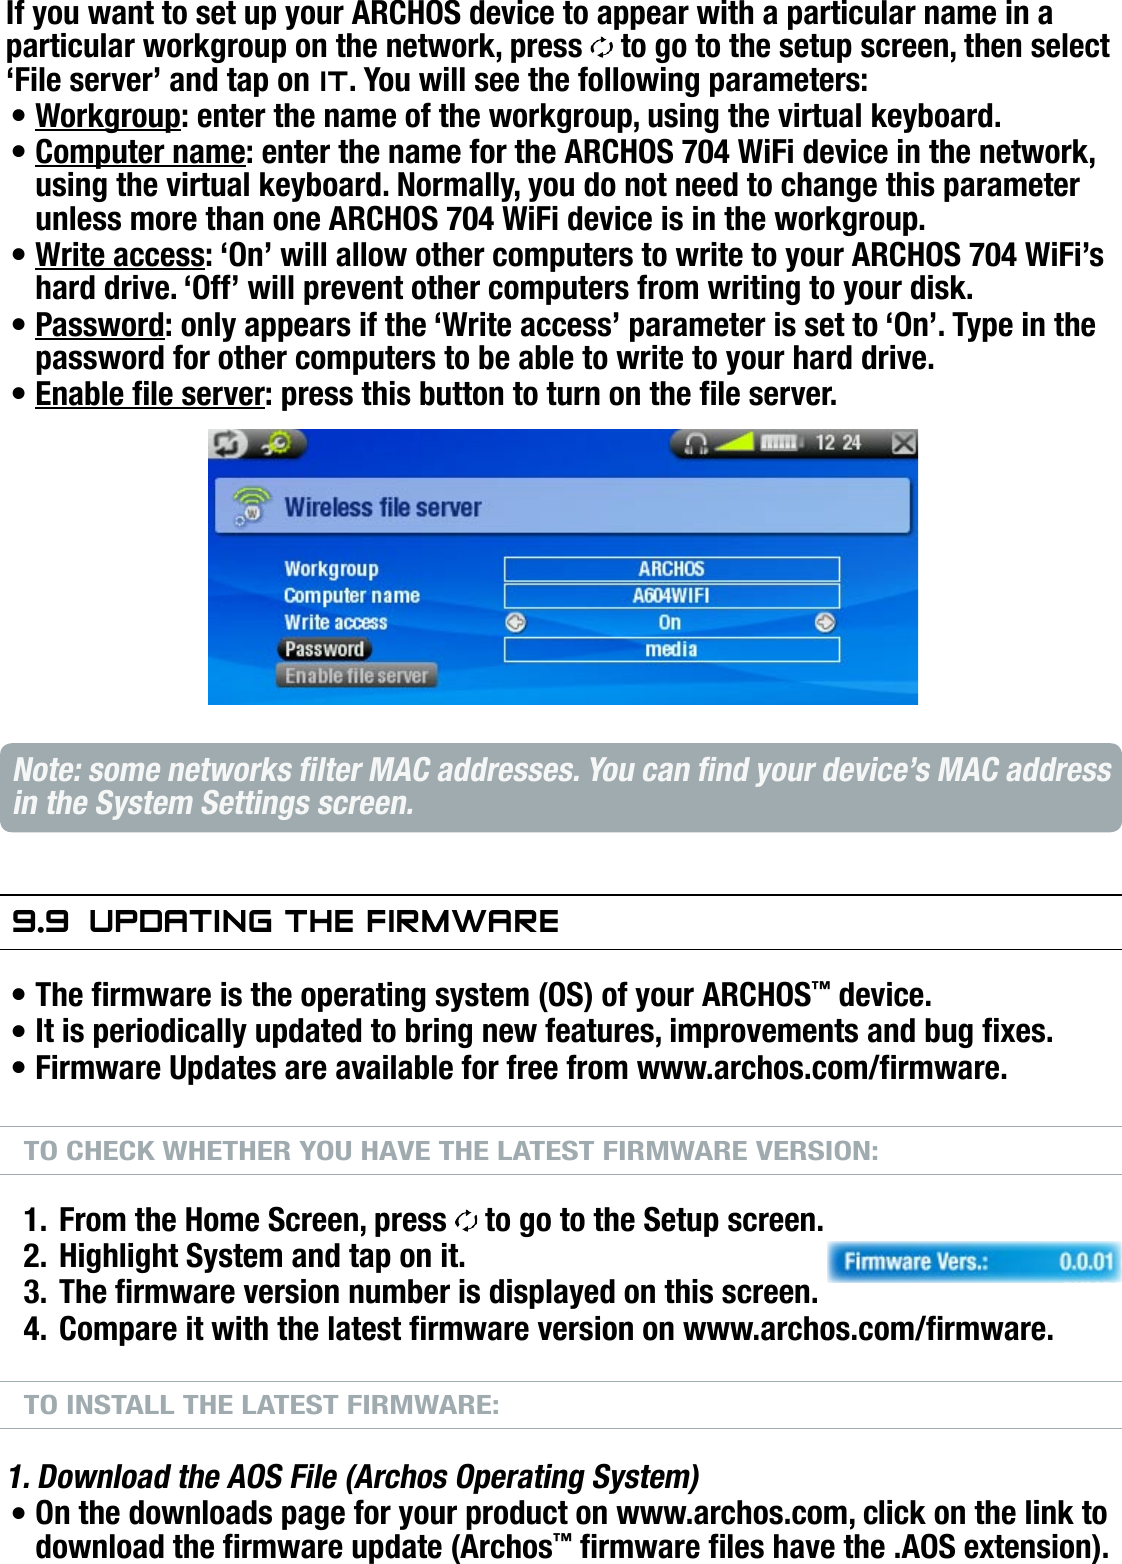
![704MANUAL V0.0VIEWING PHOTOS > p. 284.2 Viewing PhOTOsHighlight a picture le, tap again to view it.The menu overlay will disappear automatically after a few seconds.PHOTO VIEWER BUTTON CONTROLSWhen viewing photos, the buttons of your ARCHOS™ device will act as follows:When zooming, / / / are used to scroll. You must unzoom to recover their origi-nal functions.PHOTO VIEWER MENU ITEMSInfodisplays a message box with all the available information about the current picture.Press to close the info screen.Zoom inmagnies the current picture. Zoom outunmagnies the current picture.Rotate leftrotates the picture 90° counterclockwise.Rotate rightrotates the picture 90° clockwise.------rotate leftnext photorotate rightstart/pause a slideshowdisplay the menuzoom inprevious photozoom outclose photo viewer[ placeholder ]](https://usermanual.wiki/Archos/42725.user-manual-part-1/User-Guide-755930-Page-29.png)
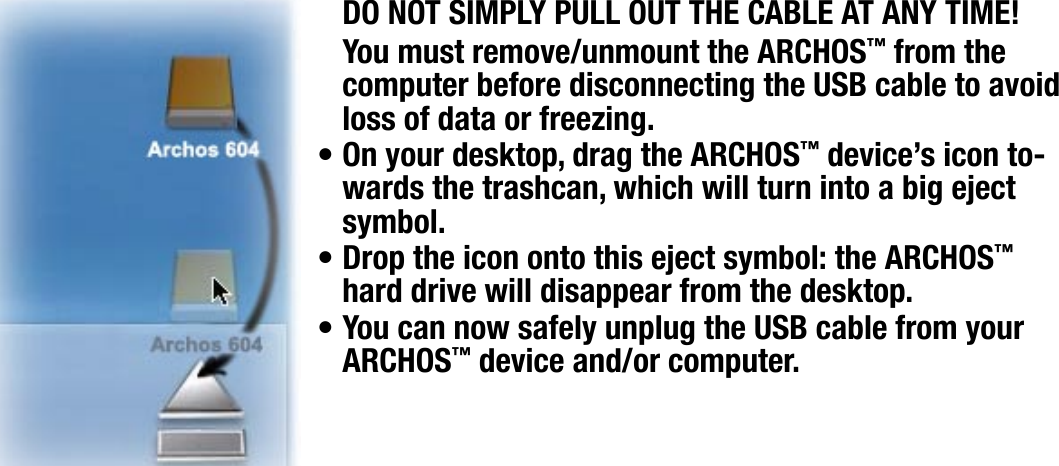
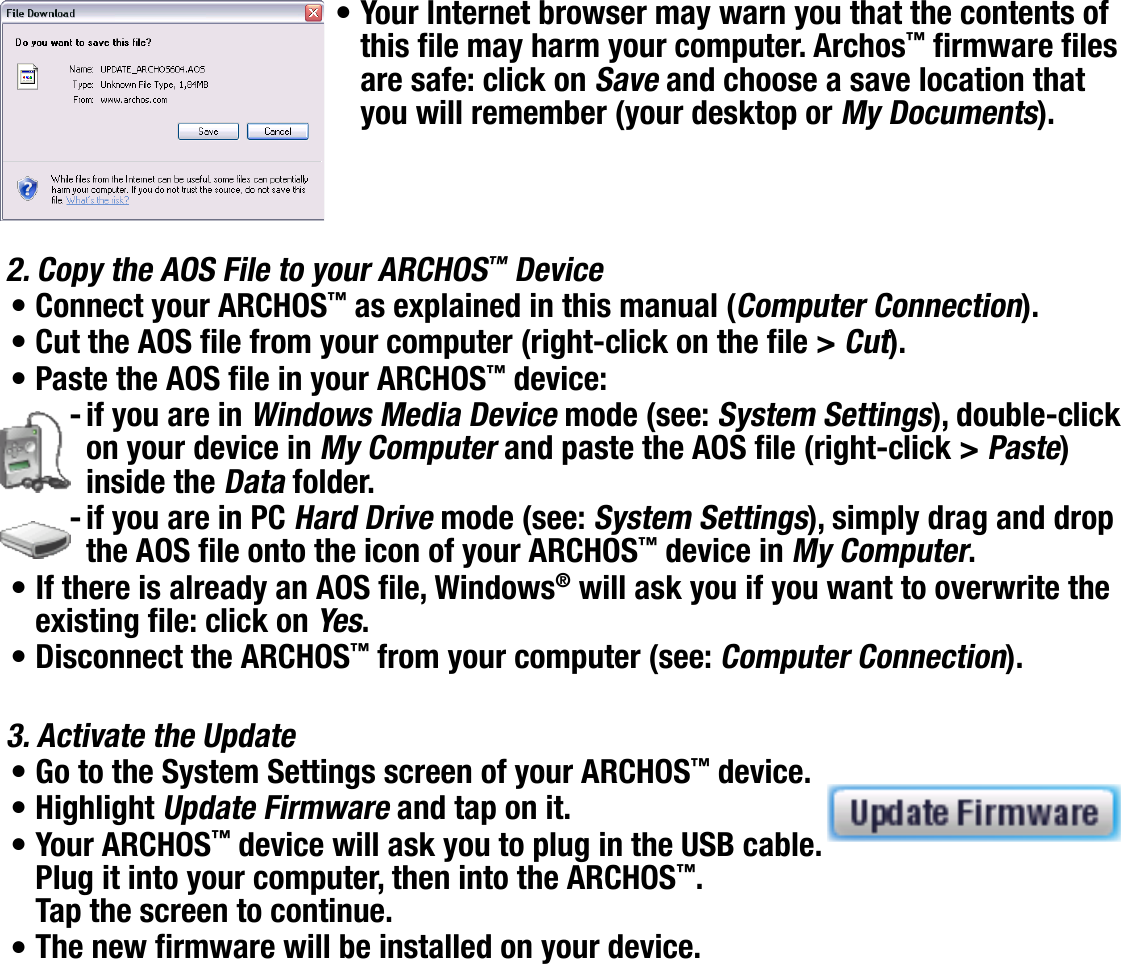
![704MANUAL V0.0USING THE BROWSER > p. 315. using The brOwserThe Archos™ File Browser gives you the possibility to navigate the le sys-tem of your ARCHOS™ device’s hard drive.In the Home Screen, tap on the Browser icon and tap again to enter the File Browser.You will see two panels:the one on the left is the panel that you usually use to navigate through your de-vice’s hard drive,the panel on the right is the one you will use when you want to copy or move les and folders (see: Copying and moving les and folders). About your ARCHOS™ device’s hard driveARCHOS™ recommends that you keep the original folders: Music, Pictures, Video, Playlists. The icons on the Home Screen lead directly to some of these folders (Video, Music, Photo...) and they may no longer work correctly if the folders are deleted or renamed.5.1 naVigaTiOnBROWSER BUTTON CONTROLSUse / to select a le or folder, then tap again to enter it.To go back up one level in the folder hierarchy, press .Press at any time to leave the Browser and go back to the Home Screen.Press if you need to jump between the left and right panels.••••••[ placeholder ]](https://usermanual.wiki/Archos/42725.user-manual-part-1/User-Guide-755930-Page-32.png)

![704MANUAL V0.0USING THE BROWSER > p. 33COPYING AND MOVING FILES AND FOLDERSIn the left panel, highlight the le or folder that you want to copy or move.Press to focus on the right panel.Navigate to the location where you wish to copy or move the le or folder that you highlighted in the left panel.Press to go back to the left panel.Choose the Copy, Copy all les or Move menu item, depending on the action that you want to carry out.5.2 using The VirTual keybOardThe virtual keyboard is an interface that allows you to type in text, for instance to rename a le or folder, or when you want to give a title to a playlist that you have just created.VIRTUAL KEYBOARD BUTTON CONTROLS•••••navigate the virtual keyboardenters the highlighted characterdisplay the menu to validate the current nameplace cursor at end of le nameplace cursor at beginning of le nameclose keyboard without savingjump from the character keys to the keyboard functions on the right[ placeholder ]](https://usermanual.wiki/Archos/42725.user-manual-part-1/User-Guide-755930-Page-34.png)
![704MANUAL V0.0USING THE BROWSER > p. 355.4 using The Pdf readerYour ARCHOS™ device features a PDF reader with hyperlink support.In the Browser, PDF les are displayed with this icon: .To open a PDF document, tap on the PDF document in the File Browser and Tap again.PDF READER BUTTON CONTROLSFOLLOWING HYPERLINKSSome PDF documents have hyperlinks (for instance, a table of contents, links to an external website, etc.).Links are surrounded by a blue outline, a highlighted link (active link) is sur-rounded by a red outline.To follow a link, highlight the link (red outline) and tap again.If you want to go back to the previous page (where you ‘clicked’ the link), select the Link back menu item.Note that hyperlinks referring to an external document or to a URL may not work.PDF READER MENU ITEMSPrevious pagegoes to the previous page in the document.••••••-navigate within current pagedisplay the available menunext pageprevious page1st press: t to width (if zoomed) 2nd press: exit PDF reader[ placeholder ]](https://usermanual.wiki/Archos/42725.user-manual-part-1/User-Guide-755930-Page-36.png)
![704MANUAL V0.0BROWSING THE WEB WITH OPERA™ > p. 42OPERA™ BROWSER BUTTON CONTROLSIn the Opera™ browser, the buttons of your ARCHOS device will act as follows:scroll upscroll rightscroll downvalidate (Enter button)display the menu itemsnext pagescroll leftprevious pageclose Opera™go from tab to tabOPERA™ BROWSER MENU ITEMSZoomZoom In: magnies the current Web page.Zoom Out: unmagnies the current Web page.Set zoom: allows you to set the zoom level directly by dragging a cursor.Render modeChanges the way the Web page is displayed.Auto: will reformat the Web page to t the width of your screen, so that no hori-zontal scrolling is necessary.Desktop: will display the Web page as on a large display. Vertical and Horizontal scrolling is necessary to view all parts of the page.NavigationBack: will go back to the previous page that you browsed.Forward: will go to the next page in your browsing history, if you used ‘Back’ before.--------[ placeholder ]](https://usermanual.wiki/Archos/42725.user-manual-part-1/User-Guide-755930-Page-43.png)