Archos 54V18S Personal Multimedia Player User Manual Annex No 5a 01
Archos SA Personal Multimedia Player Annex No 5a 01
Archos >
Contents
- 1. Manual part 2
- 2. Manual part 11
- 3. Manual part 12
Manual part 12
MANUAL
V1.0
605 WIFI USING THE BROWSER > p. 36
4. USING THE FILE BROWSER
The ARCHOS File Browser gives you the possibility to navigate the le
system of your ARCHOS’ hard drive. In the Home screen, select the
“Files” icon to enter the File Browser.
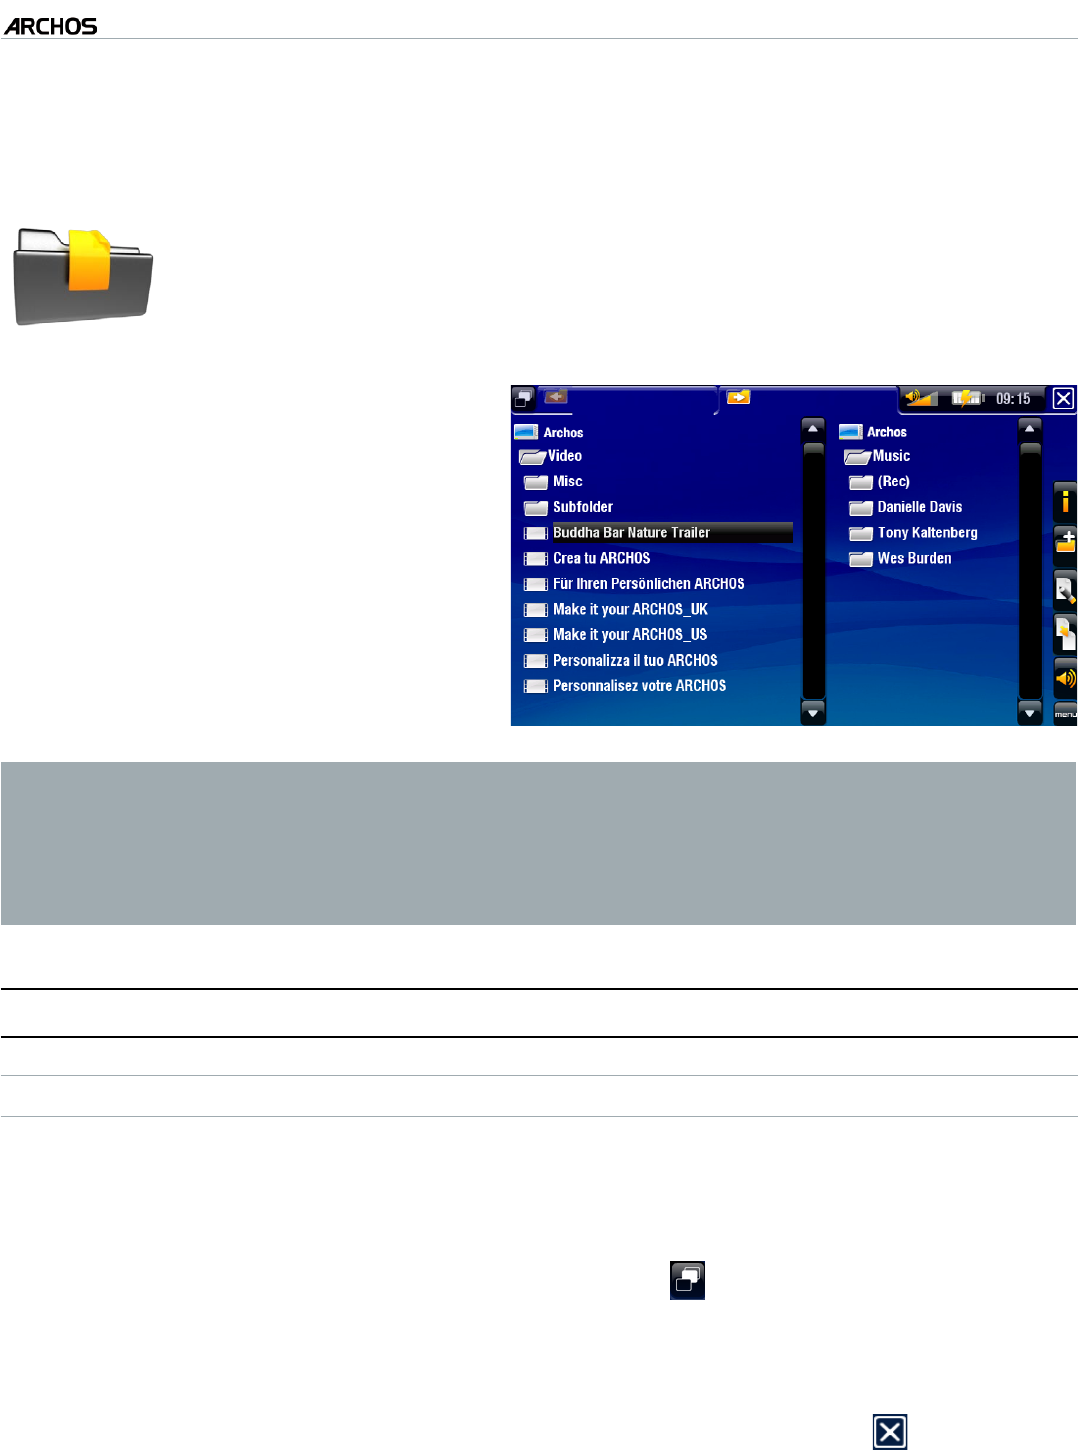
You will see two panels:
the one on the left is the panel that
you usually use to navigate through
your device’s hard drive,
the panel on the right is the one you
will use when you want to copy or
move les and folders (see:
Copying
and Moving Files and Folders
).
•
•
About your ARCHOS’ hard drive:
ARCHOS recommends that you keep the original folders: Music, Pictures, Video,
Playlists, etc. The icons on the Home screen (“Video, “Music”, “Photo”...) lead
directly to some of these folders and they may no longer work correctly if the folders
are deleted or renamed.
4.1 NAVIGATION
TOUCHSCREEN CONTROLS
You can drag the scroll bar up and down to scroll the le list up and down. You
can also scroll faster by tapping above or below the cursor in the scroll bar.
To open a le or folder, tap on it to highlight it, then tap on it again.
To jump between the left and right panels, tap on , or tap directly on the panel
that you want to highlight.
To execute a menu item’s function, simply tap on its icon. In order to display a
text description of the icon, tap on the menu word.
To leave the File Browser and go back to the Home screen, tap on at any time.
•
•
•
•
•
MANUAL
V1.0
605 WIFI USING THE BROWSER > p. 37
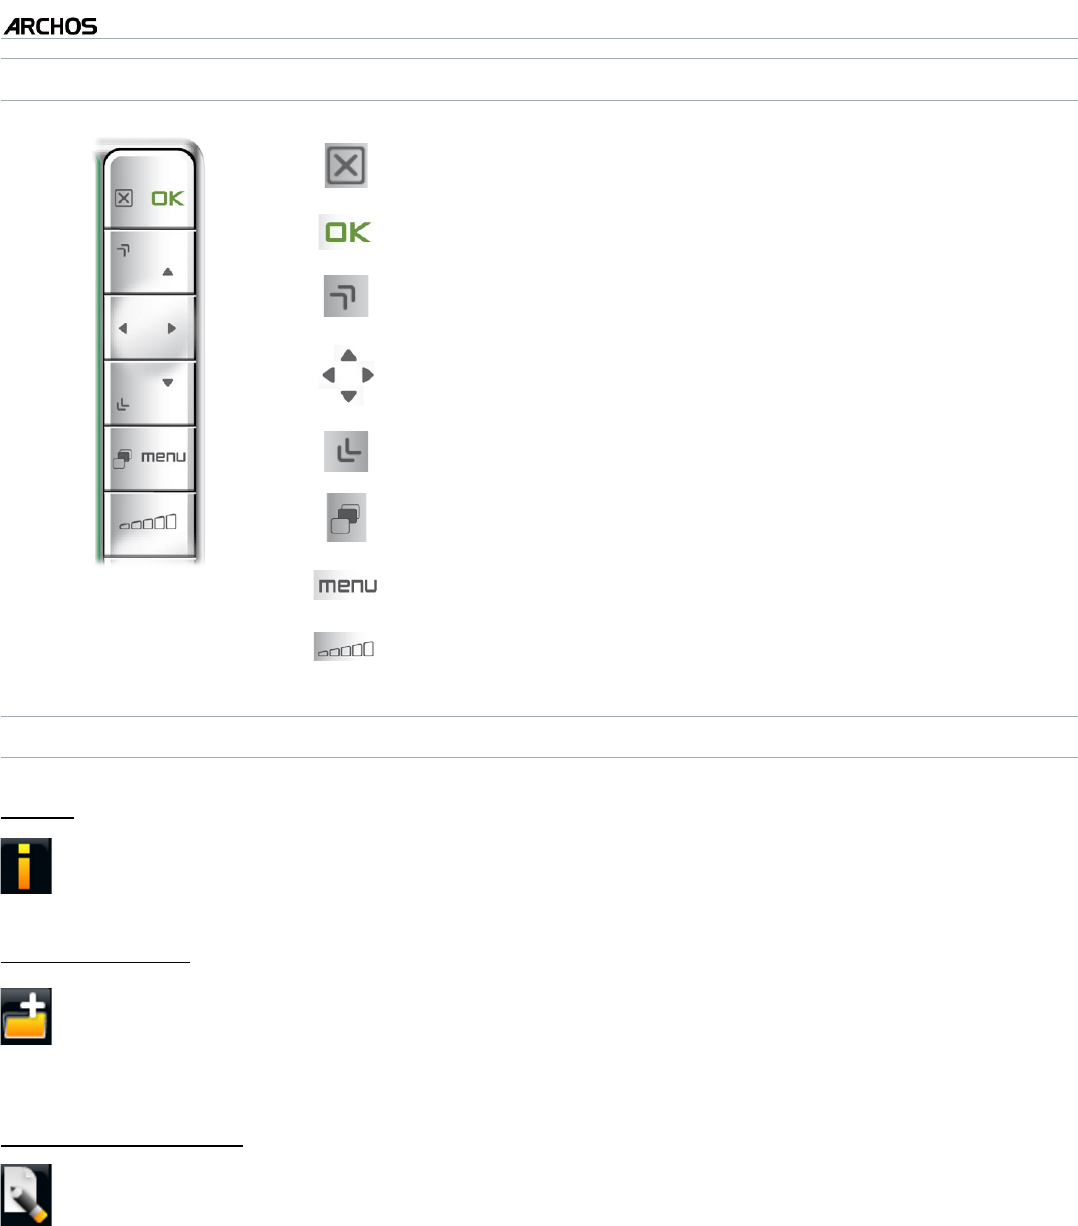
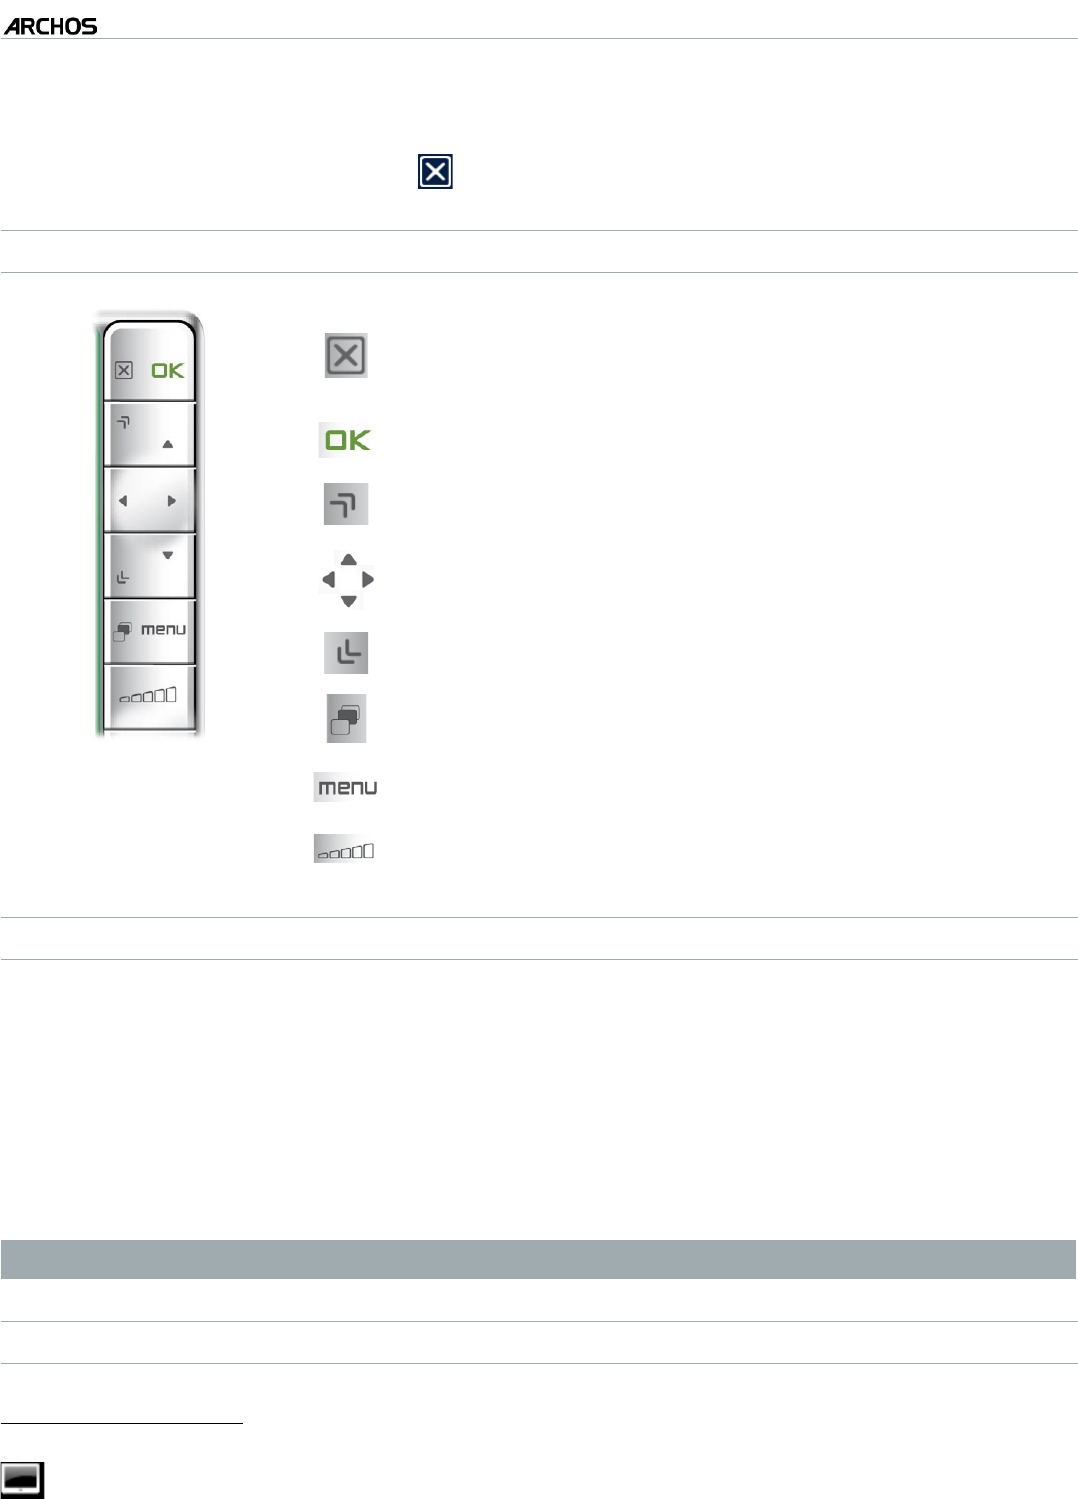
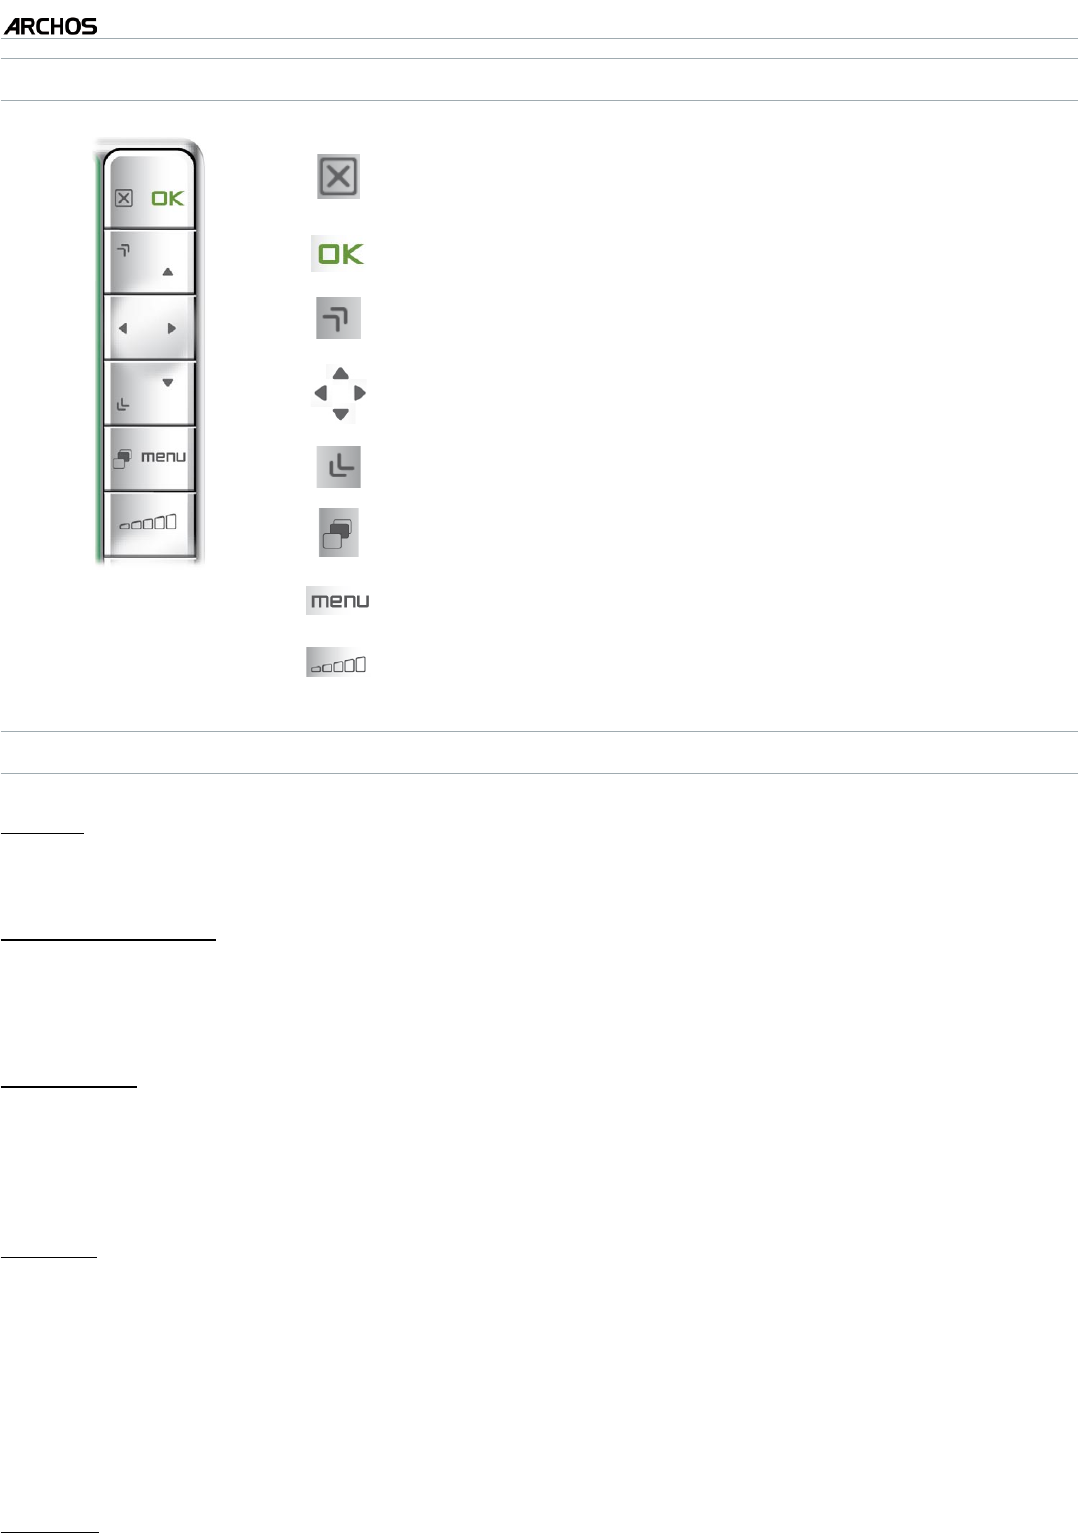
BUTTON CONTROLS
close the File Browser
open a le or folder
scroll up the le list faster
left: go back up one level in the folder hierarchy
up/down: scroll the le list up and down
scroll down the le list faster
jump between the left and right panels.
display available menu items
-
BROWSER MENU ITEMS
“Info”
displays a message box with all the available information about the highlight-
ed le.
-
“Create folder”
creates a folder at the current location.
you will have to enter the folder’s name with the virtual keyboard (see:
Using
the Virtual Keyboard
).
-
-
“File Management”
“Rename”: allows you to change the name of the highlighted le or folder us-
ing the virtual keyboard. See:
Using the Virtual Keyboard
.
“Delete”: allows you to delete the highlighted le or folder (and all its con-
tents). A conrmation screen will pop up.
-
-
MANUAL
V1.0
605 WIFI USING THE BROWSER > p. 38
“Copy”
“Copy”: allows you to copy the highlighted le or folder to the location de-
ned in the other browser panel.
“Copy all les”: allows you to copy all the les of the current folder to the
location dened in the other browser panel.
“Move”: allows you to move the highlighted le or folder to the location de-
ned in the other browser panel.
-
-
-
“Sound”
will display the “Sound” settings screen (see:
Sound Settings
).
you may want to access these settings if you are listening to music while
browsing through your les.
-
-
Note that some of the above menu items may not appear if they are not available for
the highlighted le or folder.
COPYING AND MOVING FILES AND FOLDERS
In the left panel, highlight the le/folder that you want to copy or move.
In the right panel, navigate to the location where you wish to copy the le/folder.
Go back to the left panel, select the “Copy” menu item and then choose “Copy”,
“Copy all les” or “Move”, depending on the action that you want to carry out.
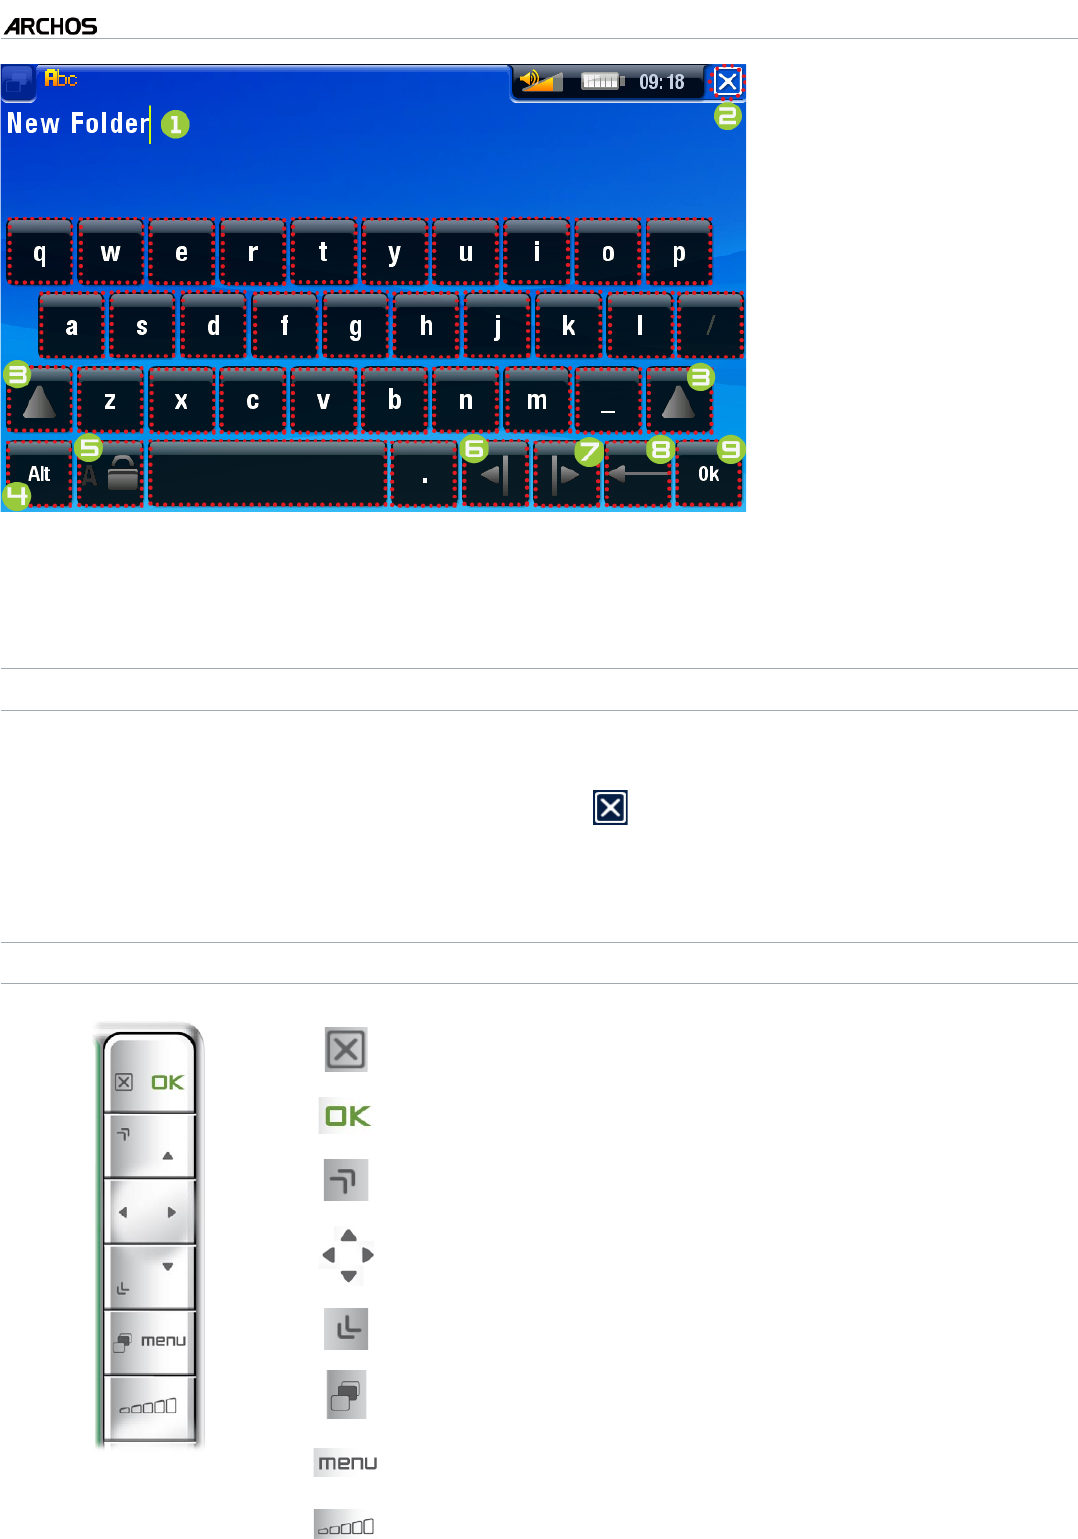
4.2 USING THE VIRTUAL KEYBOARD
The virtual keyboard is an interface that allows you to type in text, for instance to
rename a le or folder, or when you want to give a title to a playlist that you have
just created.
•
•
•
•
MANUAL
V1.0
605 WIFI USING THE BROWSER > p. 39
1. current name of the
le/folder
2. “Exit” icon
3. Shift key
4. Alt/Alt Gr key : en-
able/disable the keys’
secondary functions
5. Caps Lock key
6. move cursor one
character to the left
7. move cursor one
character to the right
8. delete character be-
fore cursor
9. save the name.
KEYBOARD TOUCHSCREEN CONTROLS
To enter a character, tap on the corresponding key.
To exit the keyboard without saving, tap on (see n° 2 in the previous screen).
When you are satised with the name, tap on the Ok key (see n° 9) to save it
and exit the keyboard. A conrmation screen will pop up.
KEYBOARD BUTTON CONTROLS
close keyboard without saving
enters the highlighted character
same as the Shift key
jump from one key to another
same as the Alt/Alt Gr key
-
-
-
•
•
•

MANUAL
V1.0
605 WIFI USING THE BROWSER > p. 40
4.3 BROWSING OTHER COMPUTERS ON THE NETWORK
When you are connected to a Windows® network, you can browse* the shared
folders of other computers in the network, using the ARCHOS File Browser.
From the Home screen, select the “Files” icon. Once in the browser, select
“Network”. Your device will search for other computers in the Windows® network
and you can start browsing their shared contents.
* If the computer with the shared folders normally has a Windows® username and
password, you will be asked to enter these before you can access the folder con-
tents.
Using the ARCHOS double browser, you will be able to transfer les from a computer
onto your device, or transfer les from your device onto a computer’s write-enabled
shared folder (see
Copying les and folders
).
If the WiFi is not enabled or if you are not connected to a network, the device will
scan for available networks and connect to a known network or display the list of
available networks so that you can connect to one of them.
4.4 USING THE PDF READER
Your ARCHOS features a PDF reader with hyperlink support.
In the Browser, PDF les are displayed with this icon: .
To view a PDF document, highlight the PDF document in the File Browser and
open it.
PDF TOUCHSCREEN CONTROLS
To follow a link, highlight the link (red outline) and tap again.
To display the menu overlay while viewing a PDF document, tap once in the bot-
•
•
•
•
•
•
•
MANUAL
V1.0
605 WIFI USING THE BROWSER > p. 41
tom right corner of the screen.
To go to the next/previous page, tap on the Next/Previous page menu item.
To exit the PDF reader, tap on .
PDF BUTTON CONTROLS
1st press: t to width (if zoomed)
2nd press: exit PDF reader
follow a highlighted link)
previous page
navigate within the current page
next page
-
display available menu items
-
FOLLOWING HYPERLINKS
Some PDF documents have hyperlinks (for instance, a table of contents, links to
an external website, etc.).
Links are surrounded by a blue outline. A highlighted link (active link) is surround-
ed by a red outline.
If you want to go back to the previous page (where you ‘clicked’ the link), select
the Link back menu item.
Note that hyperlinks referring to an external document or to a URL may not work.
PDF READER MENU ITEMS
“Hide text overlay”
will hide all overlaid graphics (status bar, menu items, etc.) to only show the
PFD document.
-
•
•
•
•
•
MANUAL
V1.0
605 WIFI USING THE BROWSER > p. 42
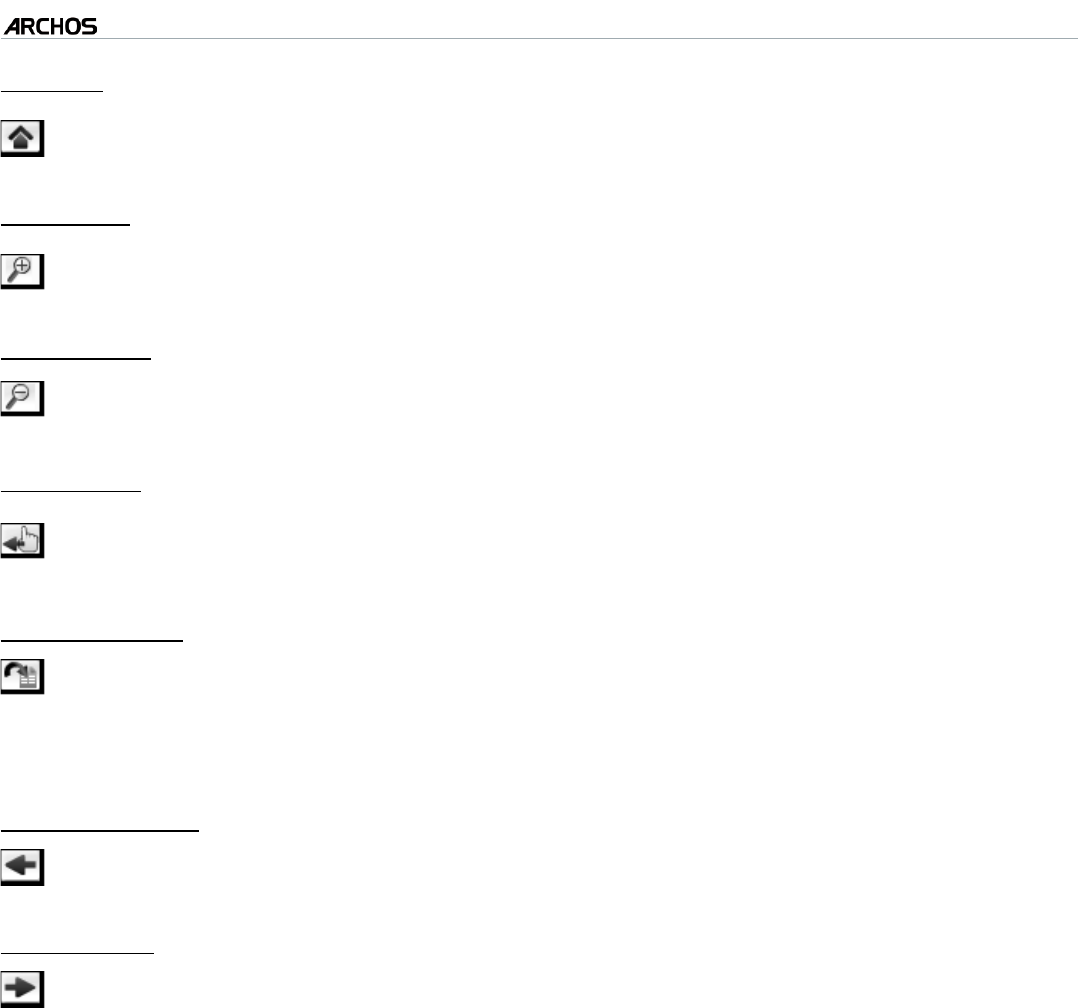
“Home”
allows you to go back to the Home screen.-
“Zoom in”
magnies the document.-
“Zoom out”
demagnies the document.-
“Link back”
will take you back to the page that you came from.
only appears when you have previously followed a link.
-
-
“Go to page...”
allows you to select a specic page.
use the left/right buttons to select a page number.
Select “Ok” to go to this page.
-
-
-
“Previous page”
goes to the previous page in the document.-
“Next Page”
goes to the next page in the document.-
MANUAL
V1.0
605 WIFI CONNECTING TO A WIFI NETWORK > p. 43
5.
CONNECTING TO A WIFI NETWORK
Your ARCHOS can connect to a variety of wireless networks. You will nd
below the procedure to connect to these different WiFi networks.
5.1 WIFI CONNECTION PROCEDURE
ENABLING WIFI
From the Home screen, select the “Enable Wi” menu item . Your device will scan
for available WiFi networks.
The rst time you use your device, you may get a message “No congured net-
works found”. Select “View available networks”, and the list of available net-
works will be displayed.
If your ARCHOS nds networks that you have previously used and congured, it
will connect automatically to one of them.
If you get the message “Could not connect to any Wi network!”, select “View
available networks”, and the list of available networks will be displayed.
Once you are connected to a WiFi network, the status bar icon (WiFi not con-
nected) will become (WiFi connected). There is no status bar icon at all when WiFi
is not enabled.
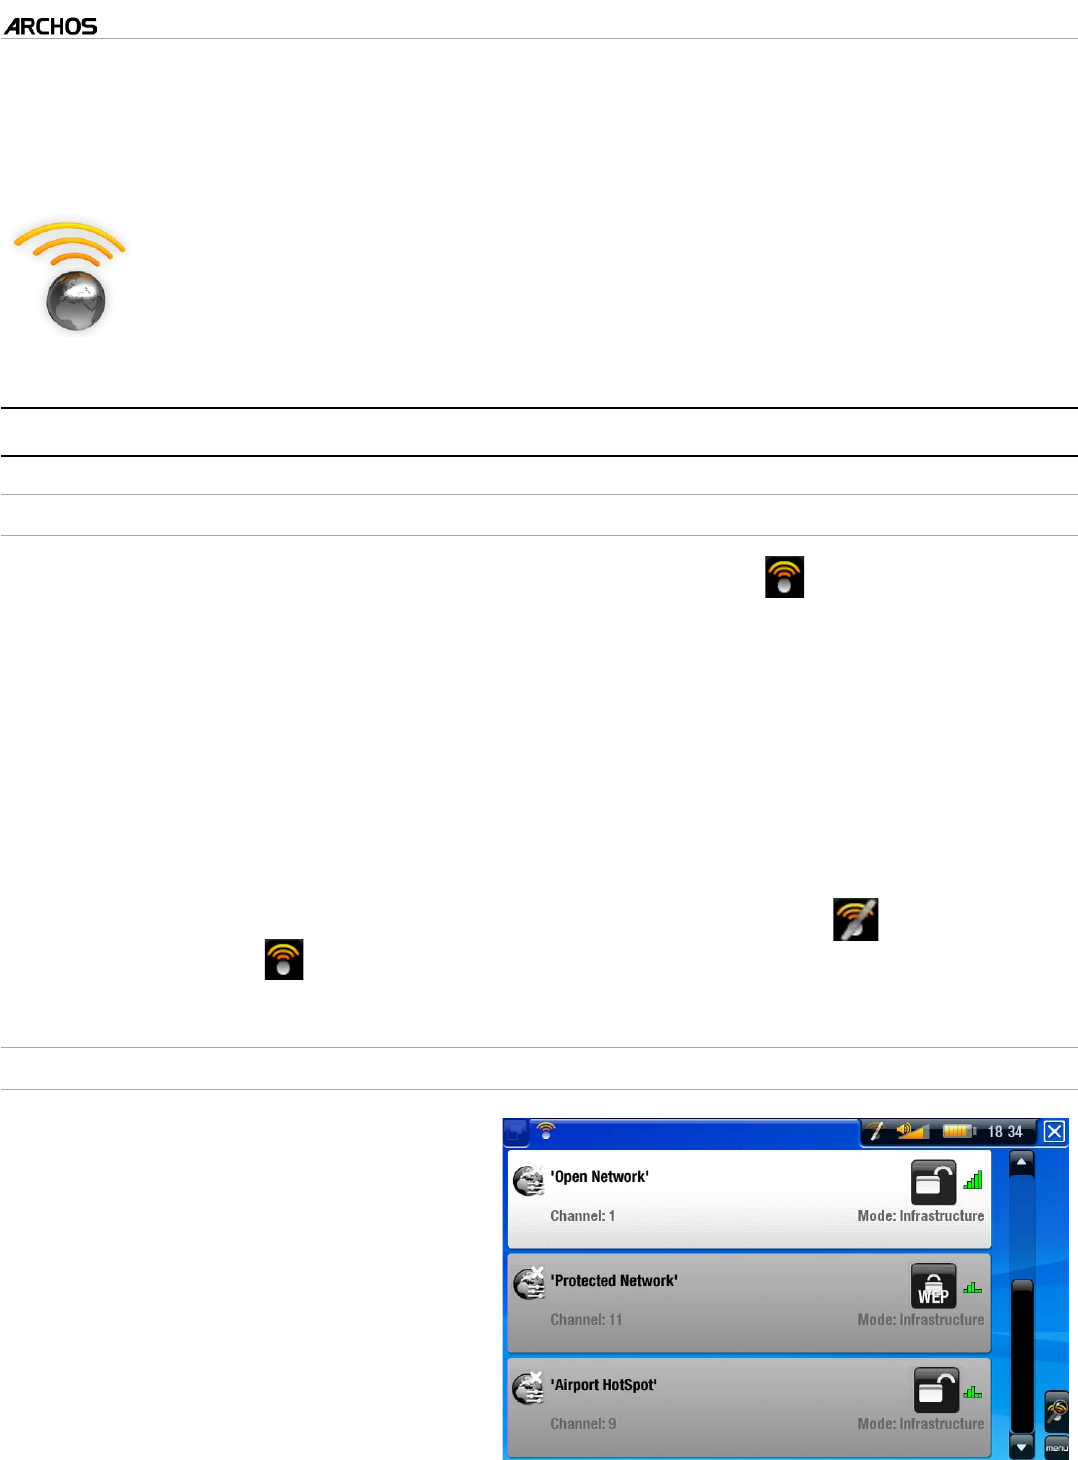
THE LIST OF AVAILABLE NETWORKS
The list of available networks shows
all the wireless networks in range of
your device.
To refresh the list, select the “Scan
for networks” menu item.
In the list of available networks, for
each network you will see the fol-
lowing information:
•
•
•
•
•
•
MANUAL
V1.0
605 WIFI CONNECTING TO A WIFI NETWORK > p. 44
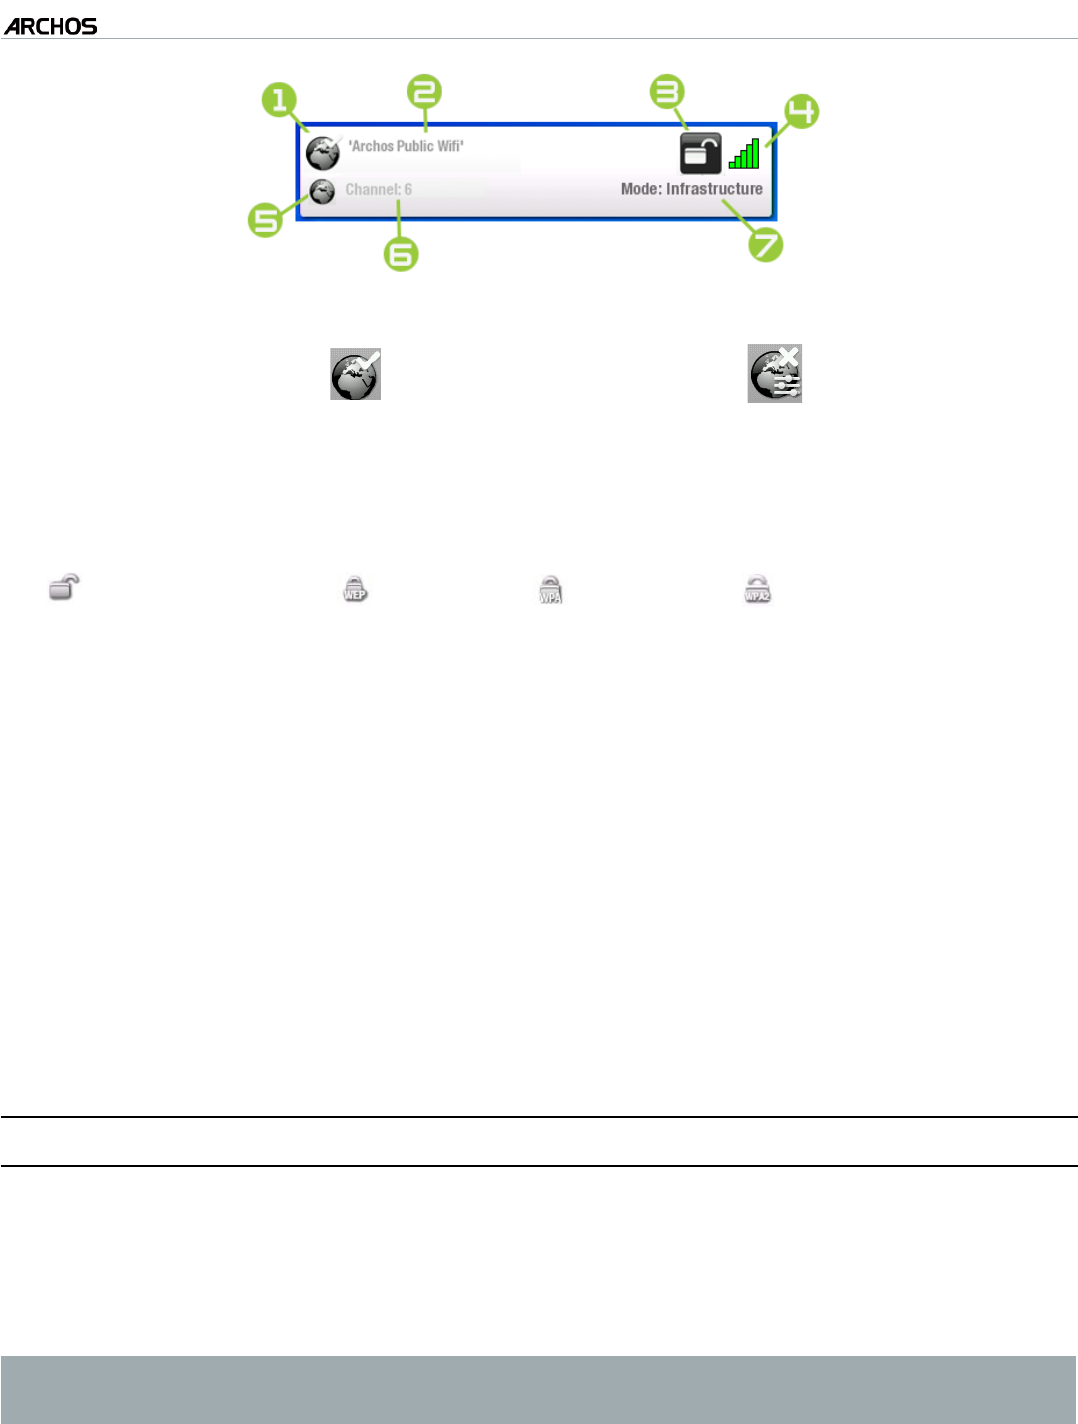
1. conguration status: congured network
uncongured network
2. the name of the network (SSID), if it is broadcasted
(if the SSID is not broadcasted,
you will be prompted to enter it in the next conguration screen
3. the type of encryption key that is required:
Open network WEP key WPA key WPA2 key
4. the strength of the signal
5. this icon will appear if you are currently connected to this network
6. the channel used by the network
7. the type of network (Infrastructure or Ad-Hoc)
(Ad-Hoc networks are not sup-
ported at this time)
Select the network that you want to connect to (your home wireless network or
a free hotspot).
You will be taken to the conguration screen for this network, where you will
have to enter some information to set up your access to this network.
5.2 WIFI NETWORK CONFIGURATION
In order to connect to a wireless network, the ARCHOS will need some specic in-
formation about the network. Your device will automatically pick up certain pieces of
information that it needs. You can enter the rest of the information manually in the
network’s conguration screen, as shown in the following sections.
Note that your device will remember the network connection information that you en-
ter, in order to re-use it and connect automatically to the network when it is in range.
•
•
MANUAL
V1.0
605 WIFI CONNECTING TO A WIFI NETWORK > p. 45
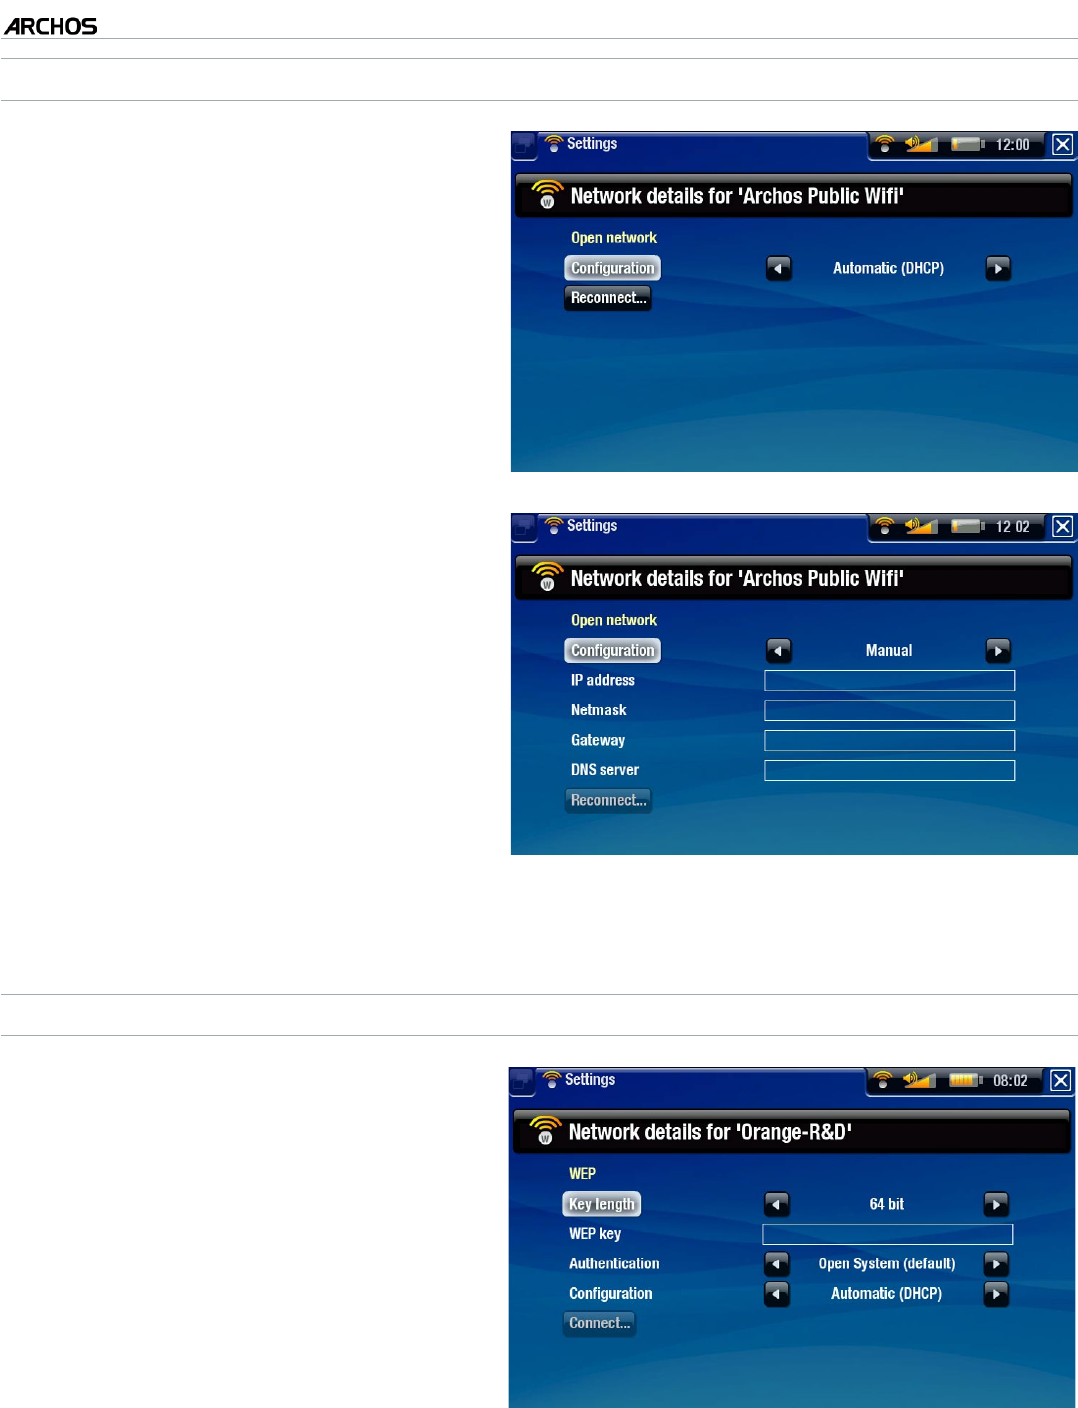
OPEN NETWORKS
Open networks do not require an
authentication key.
If the network has automatic con-
guration turned on (DHCP), sim-
ply tap on the “Connect” button,
and your ARCHOS will connect to
this network, provided the signal is
strong enough.
•
•
If the network needs to be cong-
ured manually, use the left/right ar-
rows to select the “Manual” setting
on the “Conguration” parameter.
Other parameters will appear: the
required information can be ob-
tained from the person who man-
ages the network.
•
•
When you have nished entering all the information, tap on the “Connect” button,
and your ARCHOS will connect to this network, provided the signal is strong enough.
PROTECTED NETWORKS (WEP, WPA OR WPA2 KEY)
Protected networks require an en-
cryption key to connect.
The type of key (WEP, WPA or
WPA2) will be detected automati-
cally by your device.
The rest of the required information
can be obtained from the person
who manages the network.
•
•
•
MANUAL
V1.0
605 WIFI CONNECTING TO A WIFI NETWORK > p. 46
You will have to specify the following settings:
“Key length” (for WEP networks only)
the authentication key can be 10 characters long (64bit) or 26 characters long
(128bit) (hexadecimal characters).
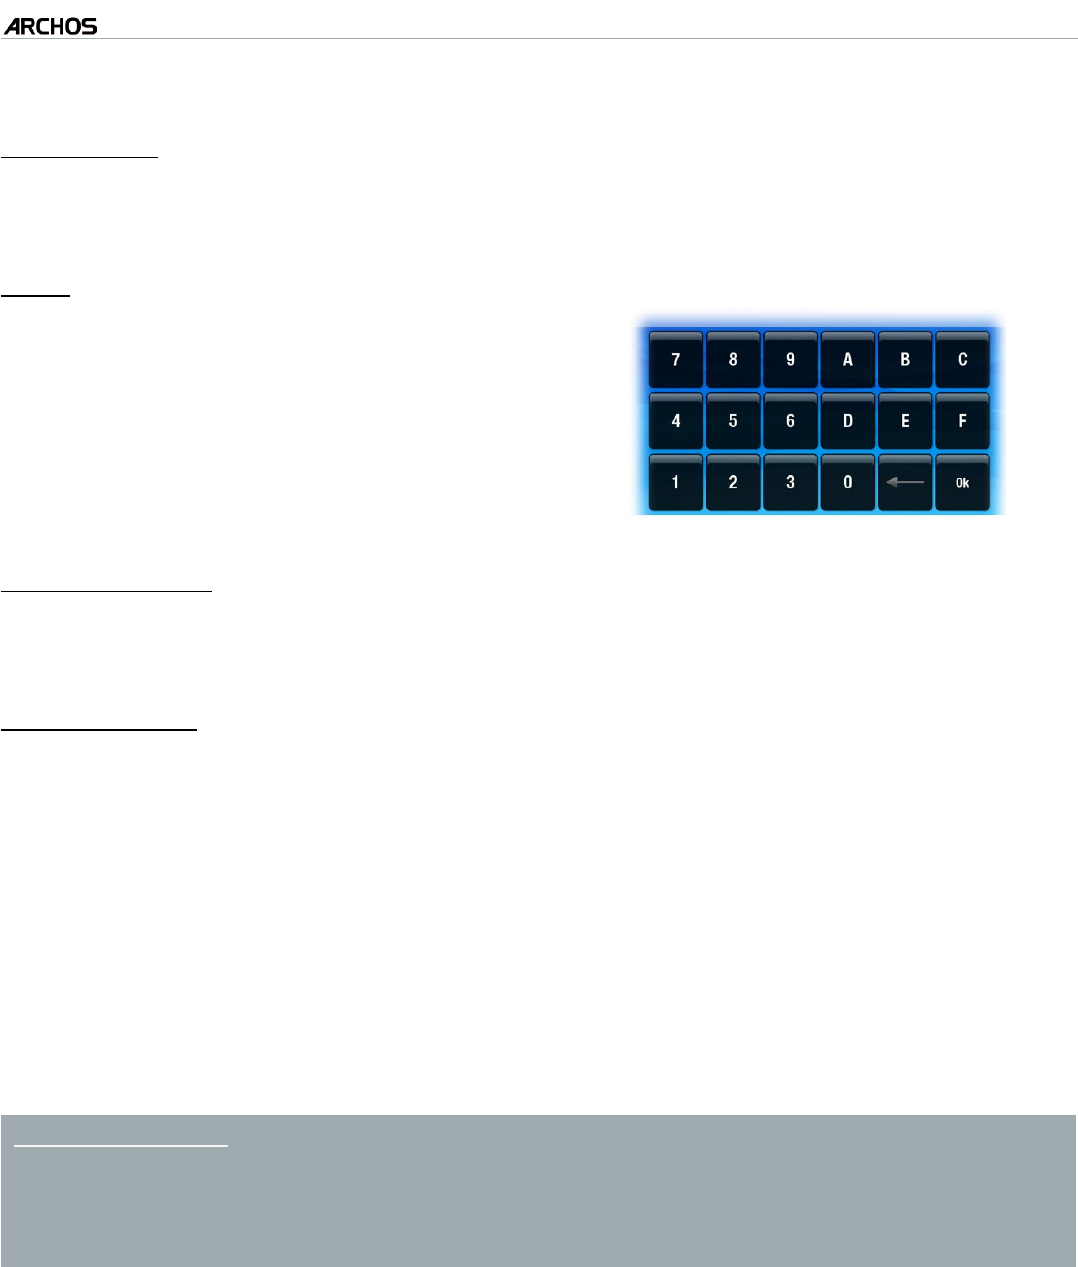
“Key” (WEP or WPA)
type in the authentication key.
you will be taken to a virtual numeric
keyboard.
type in the key and tap on “OK” when
you have nished.
-
-
-
“Authentication” (for WEP networks only)
the network’s authentication method can be based on an “Open System (de-
fault)” or a “Shared Key”.
“Conguration”
it can be “Automatic (DHCP)” or “Manual”.
if it is “Automatic (DHCP)”, then you do not have to enter any more information.
Simply use the “Connect” button, and your ARCHOS will connect to this network,
provided the signal is strong enough.
if you must congure the network manually, select the “Manual” setting. Other
parameters will appear: the required information can be obtained from the person
who manages the network.
When you have nished entering all the information, use the “Connect” button, and
your ARCHOS will connect to this network, provided the signal is strong enough.
Filtered networks: If your network manager allows only specic devices to connect
to the network (known as MAC address ltering), you can supply the network man-
ager with the MAC address of your ARCHOS. To nd out what your MAC address is,
select the “System” menu item from the Home screen, then choose “System”. See:
System Settings.
-
-
-
-
-
MANUAL
V1.0
605 WIFI THE WIFI FEATURES > p. 47
6. THE WIFI FEATURES
When connected to a WiFi network, your ARCHOS gives you the possibil-
ity to:
browse the web with the optional Web Browser plug-in, available at
www.archos.com.
play shared media les stored on other computers in your network.
purchase and play on-line media content (videos, music, etc.).
•
•
•
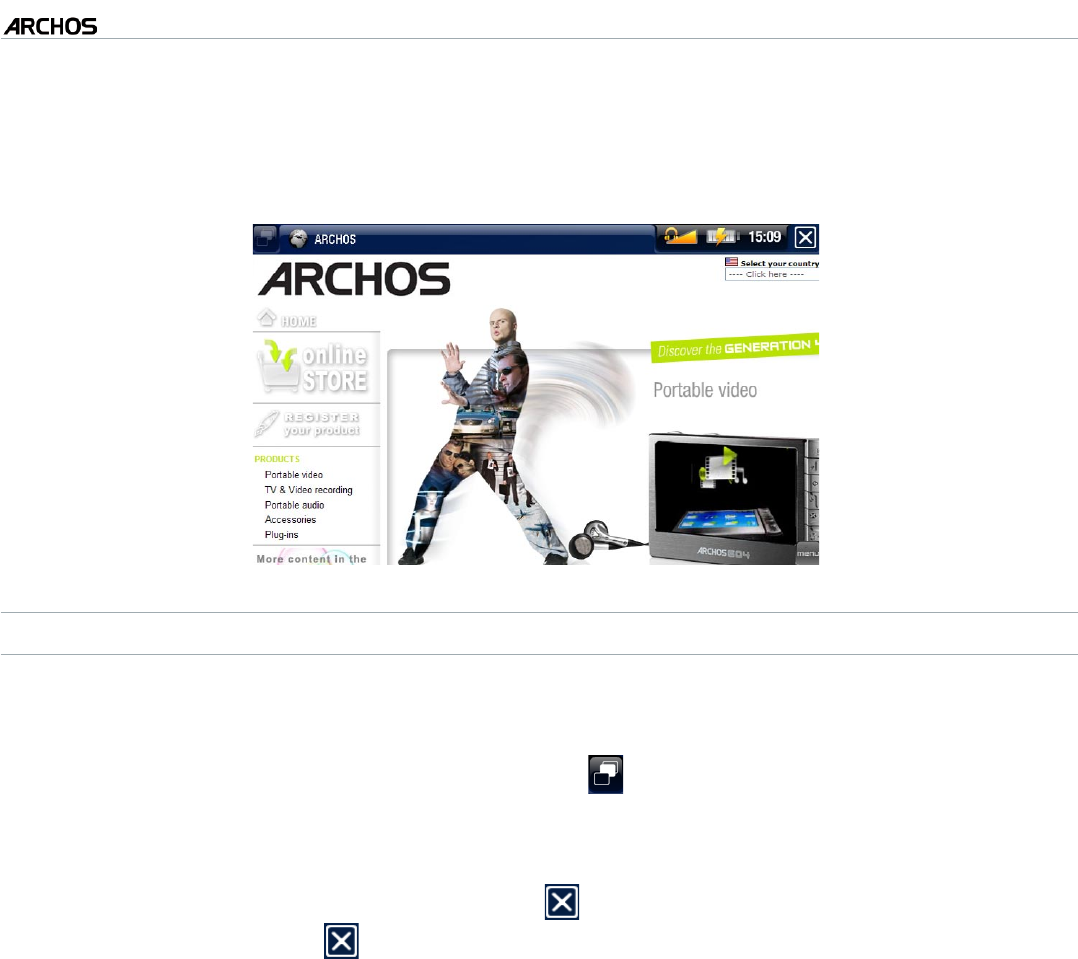
6.1 BROWSING THE WEB
In order to browse the web, you will need the Web Browser plug-in, avail-
able at www.archos.com. With this Internet browser, specially designed
for your ARCHOS, you will have the possibility to browse websites*, use
web-base e-mailing, download content, etc.
*supports websites with Flash™ content
LAUNCHING THE WEB BROWSER
From the Home screen, select the “Web” icon.
If you are already connected to a network, the Web browser will simply open and
you can start browsing the Web.
If WiFi is not enabled or if you are not connected to a network, the device will
scan for available networks and connect to a known network or display the list of
available networks so that you can connect to one of them.
Please note: not all wireless networks offer access to the Internet. Some WiFi net-
works only link several computers together, without any Internet connection.
If the time & date are not correctly set, you might not be able to access certain web
pages (See Clock settings). If you choose to set the clock automatically when the
ARCHO connects to a wi network, you will need to select your Region and City/
Zone (see Language and Region Settings).
USING THE WEB BROWSER
You can use the Web browser to read your Web-based e-mail, view Web sites,
download documents from the Internet, etc.
The menu overlay will disappear after a few seconds.
•
•
•
•
•
MANUAL
V1.0
605 WIFI THE WIFI FEATURES > p. 48
The Web browser features ‘tabbed browsing’. You can open several pages at the
same time: they will appear in the tabs area, in the upper left corner of the screen.
When several pages are open, simply select a tab to access the page that you
want. See next section.
WEB BROWSER TOUCHSCREEN CONTROLS
You can use your stylus to scroll the current web page horizontally or vertically. To
open a link, simply tap on it.
To jump between the available tabs, tap on , or tap directly on the correspond-
ing tab.
To display available menu items, tap on the menu word.
When several tabs are displayed, tap on to close the current one. When there
is only one tab, tap on to exit the Web browser.
•
•
•
•
•
MANUAL
V1.0
605 WIFI THE WIFI FEATURES > p. 49
WEB BROWSER BUTTON CONTROLS
when several tabs are displayed: close the current one
when there is only one tab: close the Web browser
validate (enter button)
next page
scroll left/right/up/down
previous page
go from tab to tab
display available menu items
increase/decrease volume
BROWSER MENU ITEMS
“Back”
will go back to the previous page that you browsed.
“Reload” / “Stop”
will stop loading the web page, if it is currently loading
will refresh the current web page, if it has stopped loading
“Favorites”
will open the “Favorites” manager. Here you can sort your favorites, delete them,
etc.
select a favorite to open the corresponding web page in a new tab.
“Go to”
“Enter URL...”: allows you to enter the address of a Web site you’d like to visit.
Enter the address with the virtual keyboard (see:
Using the Virtual Keyboard
) and
select “OK”.
“Search...”: allows you to search directly in one of the congured search engines.
Enter the address with the virtual keyboard (see:
Using the Virtual Keyboard
) and
select “OK”.
“Zoom”
changes the way the web page is displayed.
-
-
-
-
-
-
-
-

MANUAL
V1.0
605 WIFI THE WIFI FEATURES > p. 50
select a zoom mode.
“Settings”
will open the “Webbrowser” settings screen. Here you can decide whether to ac-
cept/ignore popup windows, enable/disable ash contentand you can also delete
your Internet history and cookies.
Please note that some Web features requiring special plug-in software or Active X
controls may not work in this special version of the Web Browser.
6.2 PLAYING YOUR PC’S SHARED MEDIA FILES
Your ARCHOS gives you the possibility to play, directly on your device, shared
media les (videos, music, photos) stored on a PC.
This is especially useful when you have a large library of music and video and you
cannot t it all onto the internal hard drive of the ARCHOS.
For this to work, you will only need a WiFi connexion and Windows Media® Player
11 or higher installed on your PC*.
* Your ARCHOS uses the UPnP protocol (Universal Plug and Play) to stream media.
If you cannot install Windows Media® Player 11 or higher, there is another way for
you to stream les stored on your desktop PC. See Browsing Other Computers on
the Network.
SETTING WINDOWS MEDIA® PLAYER’S SHARING OPTIONS
Your ARCHOS needs to be turned on and connected to your home WiFi network (see
Connecting to a WiFi Network
).
-
-
•
•
•
MANUAL
V1.0
605 WIFI THE WIFI FEATURES > p. 51
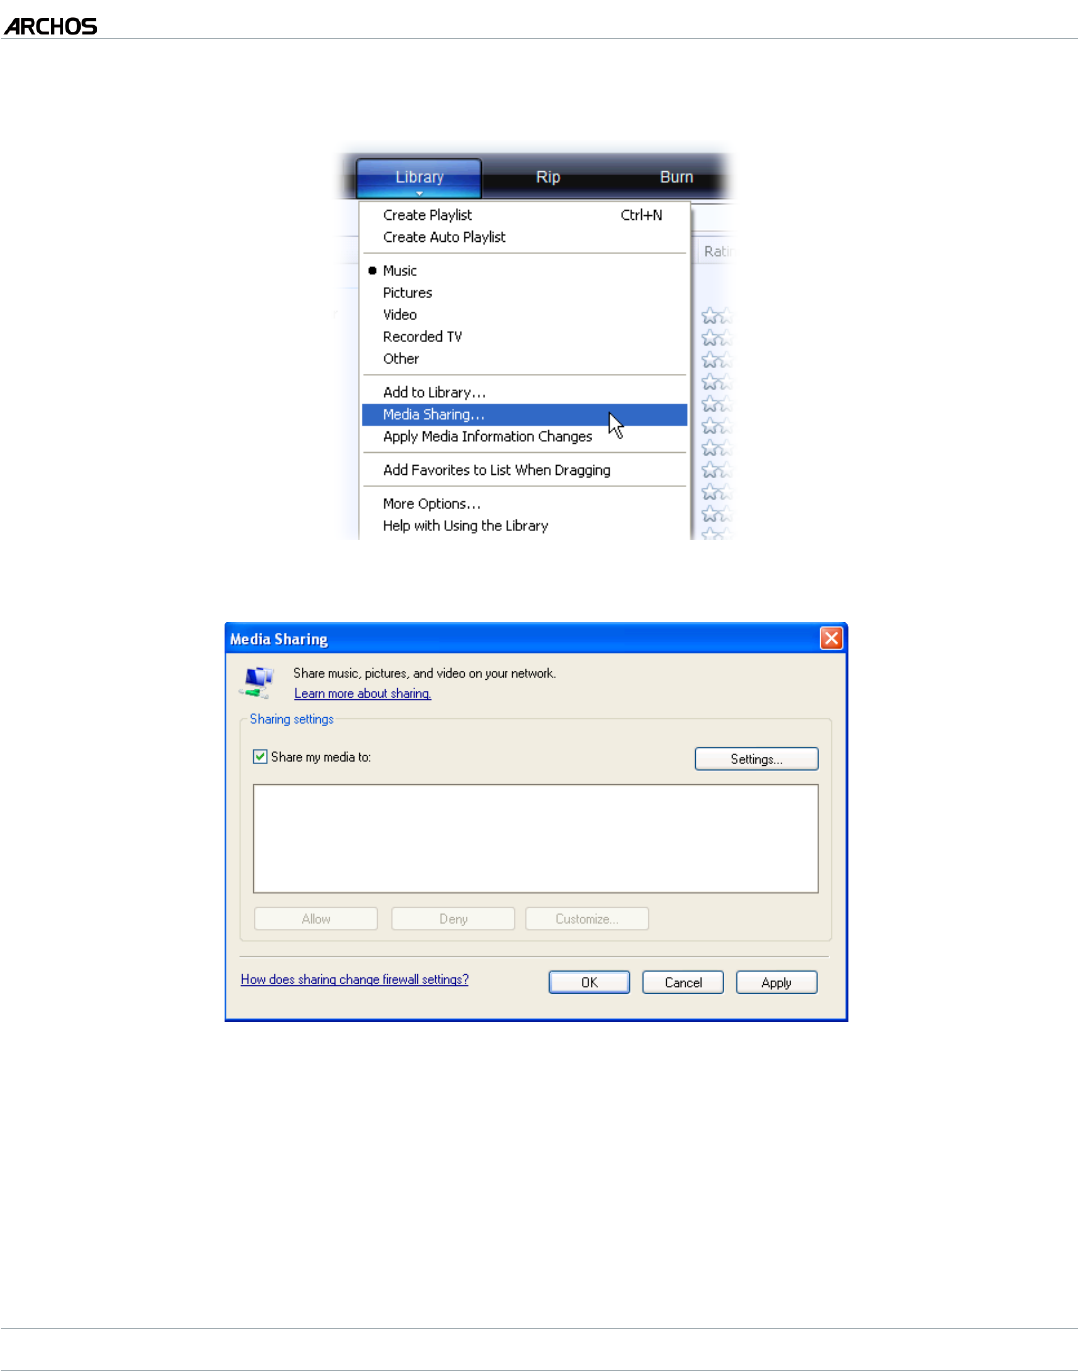
On your PC, start Windows Media® Player 11 or higher.
Click on the Library tab, and select Media sharing...
Check the box Share my media to, and click on OK.
To modify your sharing settings, click on Settings. You can, for example, enter a
name for your shared media les. Click on OK to save the modications.
Click on OK to close the Media Sharing window.
You can now close Windows Media® Player, and start viewing your PC’s shared
media les directly on your ARCHOS (see next section).
PLAYING YOUR SHARED MEDIA FILES ON THE ARCHOS
On your ARCHOS, enter the Video, Music or Photo mode.
Open the rst item in the list, and your device will start scanning for other
computers on the network.
If you entered in Windows Media® Player, it should appear. Open it, and you will
see all your shared videos, songs or photos.
1.
2.
3.
4.
5.
6.
1.
2.
3.
MANUAL
V1.0
605 WIFI THE WIFI FEATURES > p. 52
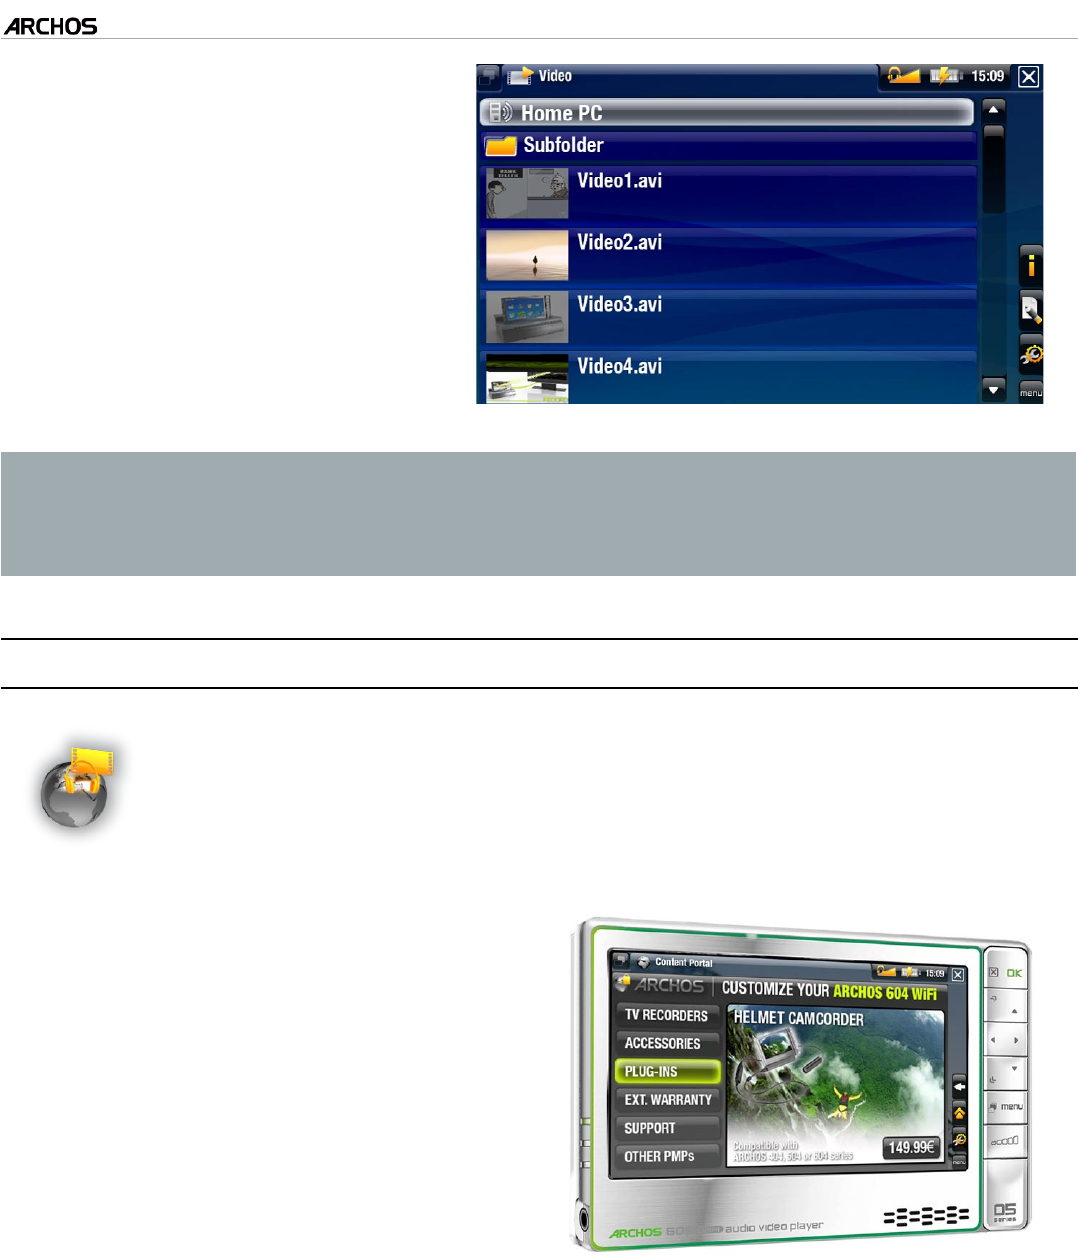
If you are in the Video mode,
you will see all the videos/sub-
folders stored in the folder My
videos of your PC.
In the same way, the Music and
Photo modes will allow you to
see all the music/photos stored
in your folder My Music/My
Pictures.
•
•
Note: You may have some video les of very high quality and these require that the
WiFi connection transfers data at a high speed. If your ARCHOS is far away from
your WiFi box, it may happen that the connection speed is reduced thus not allowing
some video les to stream from your PC to the ARCHOS and the television.
6.3 THE ARCHOS CONTENT PORTAL
With ARCHOS’ video and music partners, you can purchase or rent audio
and video content directly on your ARCHOS without using your com-
puter. Or, if your ARCHOS is connected to the optional DVR Station you
can select your internet video content directly from your television.
Register your ARCHOS product on-
line at the ARCHOS web site (www.
archos.com/register).
Make sure you have congured your
ARCHOS on a WiFi network (see:
Connecting to a WiFi Network
).
Select the ARCHOS Video and Music
Portal icon to view available on-line
media stores.
You can also visit the ARCHOS on-line
store to purchase accessories.
1.
2.
3.
4.
MANUAL
V1.0
605 WIFI TRANSFERRING FILES > p. 53
7. TRANSFERRING FILES
The rst sections explain how to transfer les from your computer to
your ARCHOS when it is set to the default USB connection mode. To
learn more about the other connection modes, see
System Settings
(for
advanced users).
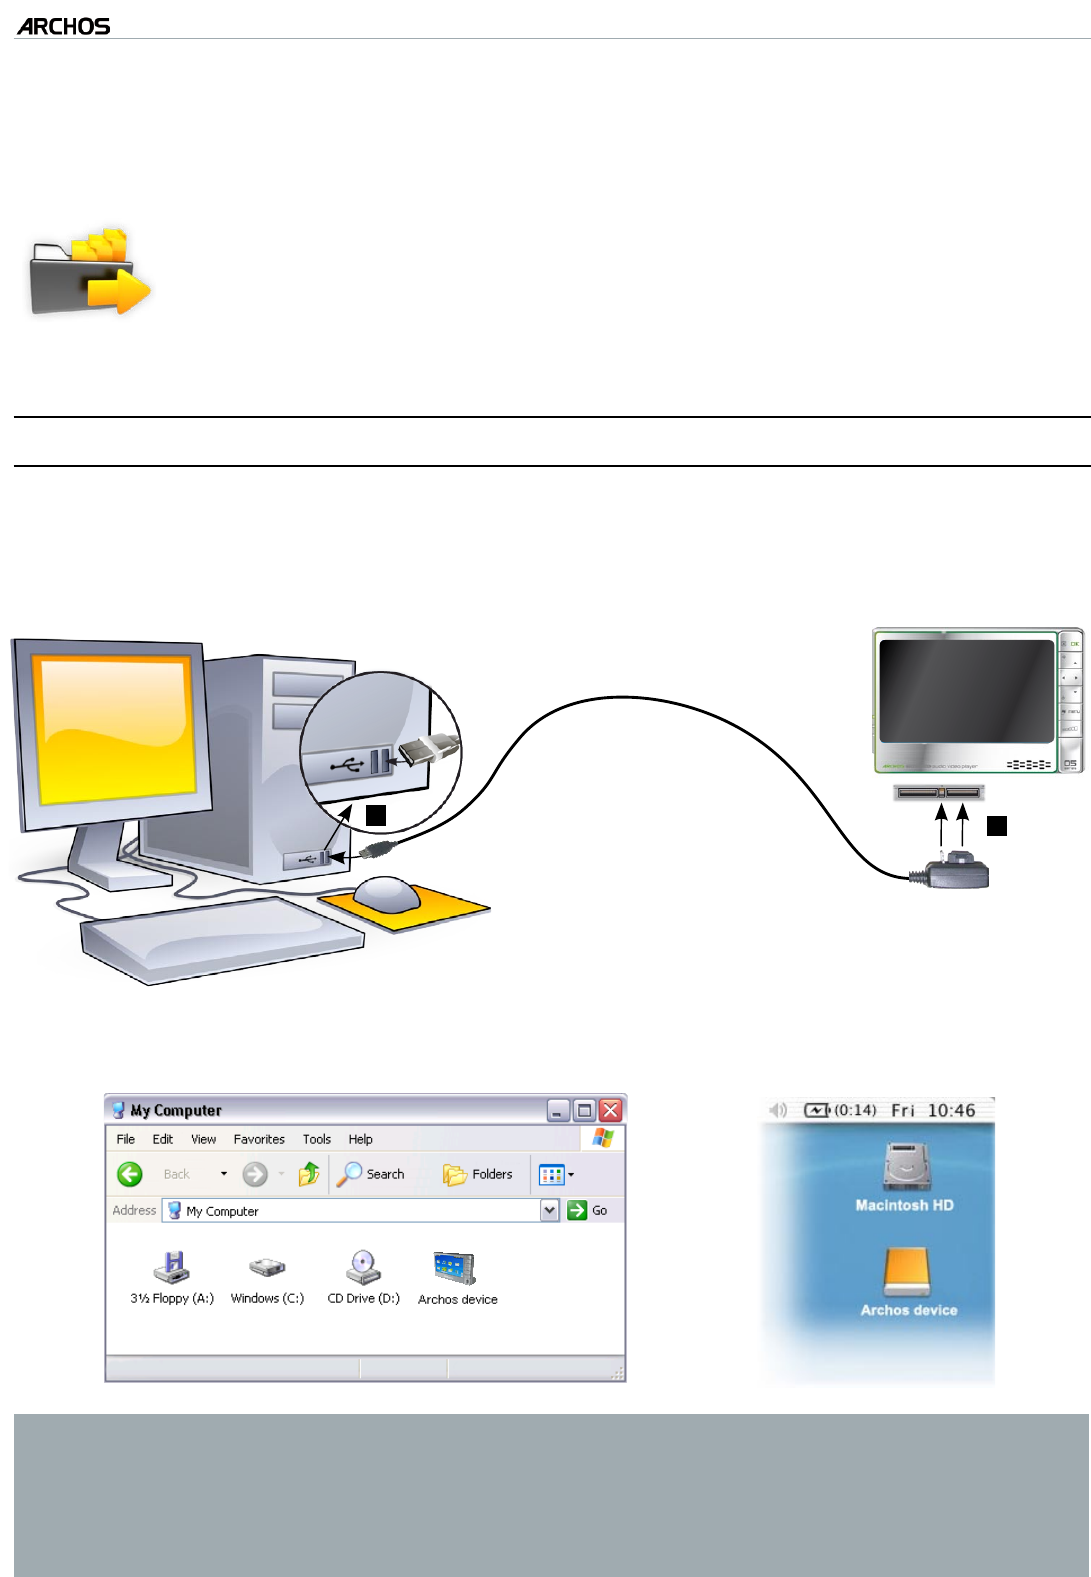
7.1 CONNECTING THE ARCHOS TO A COMPUTER
Turn on your ARCHOS.
Plug the ARCHOS USB cable into the ARCHOS.
Plug the USB end of the cable into your computer.
Computer
turned on
USB
21
The ARCHOS device turns on and its icon will appear on your computer. The
ARCHOS will start charging and you will be able to transfer les onto your device*.
* Only if you have Windows® XP or higher and Windows Media® Player 10 or higher
installed on your PC.
If you have Windows® 2000, Me, Mac® OS X or Linux, the ARCHOS will ask you if
you want to charge it or connect it as a mass storage device (Hard Drive). Choose to
connect it as a mass storage device.
1.
2.
3.
4.
MANUAL
V1.0
605 WIFI TRANSFERRING FILES > p. 54
7.2 PUTTING FILES ONTO THE ARCHOS
There are two main methods to transfer your les onto the ARCHOS:
Copy your media les (videos, music, photos) with Windows Media® Player 10 or
higher*:
* For best performance, we recommend that users update to Windows Media®
Player 11 or higher.
The Synchronize button in Windows Media® Player is a one way ‘sync’ button. It will add video,
music and photo les to your ARCHOS. If will give you the possibility to have the same digital
media on your ARCHOS as you have in your Windows Media® Player media library.
Connect your ARCHOS to the computer. See
Connecting the AR-
CHOS to a Computer
.
On your computer, start Windows Media® Player.
Select the Sync tab.
Choose the media les you want to transfer.
Click on the Start Sync button.
The selected videos, songs or photos will be copied directly into the
corresponding Video, Music or Pictures folder of the ARCHOS.
See your Windows Media® Player help instructions for more information.
1.
2.
3.
4.
5.
6.
Copy and paste your les from your computer into the Video, Music or Pictures
folder of your ARCHOS.
You cannot copy les bigger that 2 GB to the ARCHOS, due to of the FAT32 lesys-
tem.
7.3 DISCONNECTING
Windows® XP or higher & WMP10 or higher
Verify that no data are being transferred between your ARCHOS and your com-
puter (the HDD indicator on your ARCHOS is not ickering).
You can unplug the USB cable from your ARCHOS and/or computer.
•
•
•
•
MANUAL
V1.0
605 WIFI TRANSFERRING FILES > p. 55
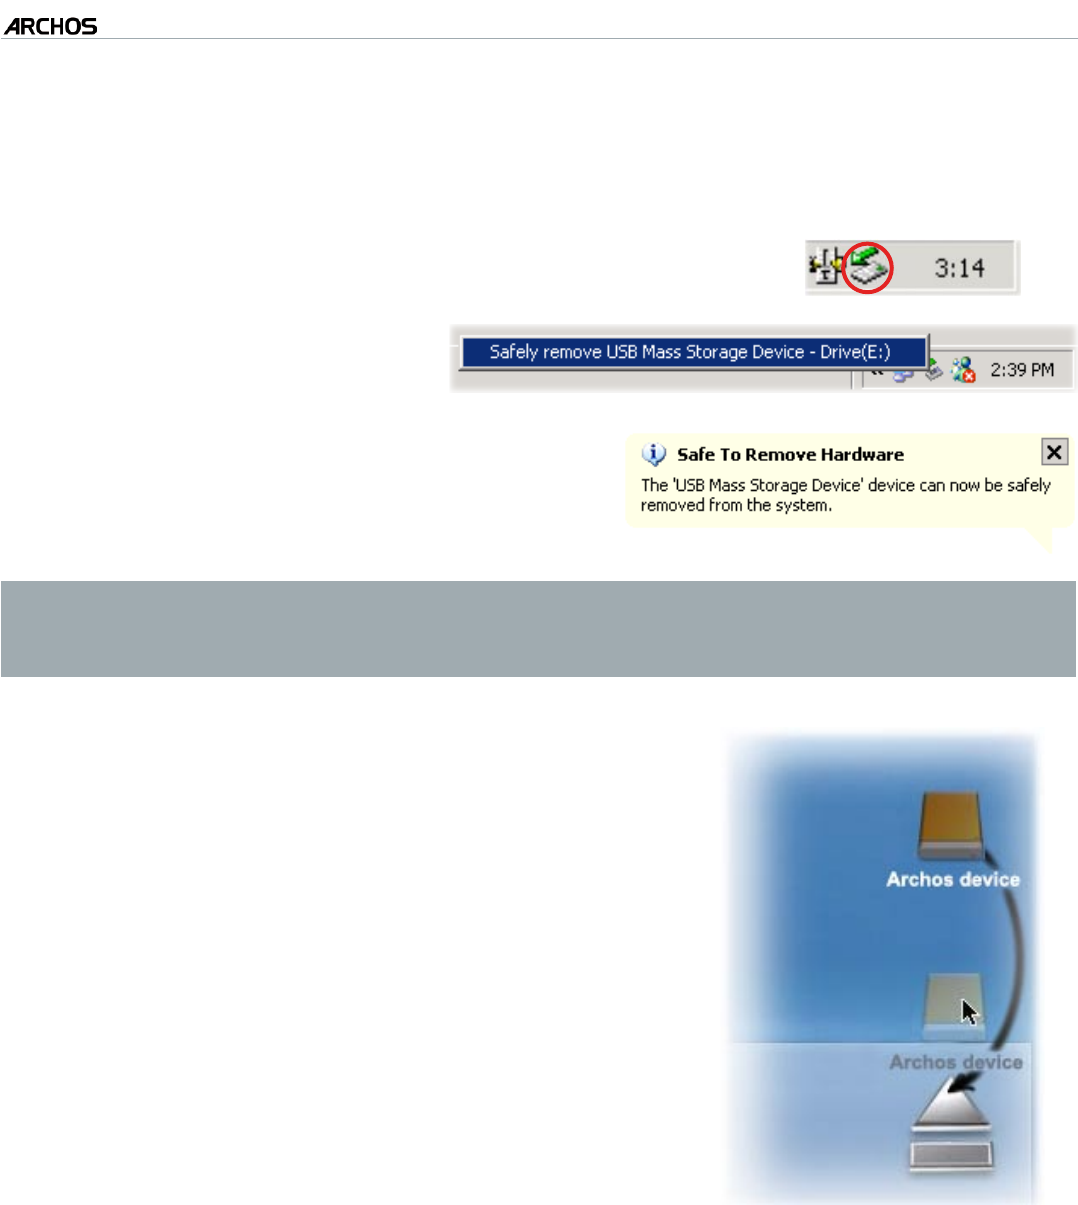
Windows® 2000 or Me
DO NOT SIMPLY PULL OUT THE CABLE AT ANY TIME! You must remove/unmount the
ARCHOS from the computer before disconnecting the USB cable to avoid loss of data
or freezing.
Once all your transfers are nished, click on the ‘safely
remove’ icon in the system tray, next to the clock.
•
Click on the ‘safely remove’
message.
•
A message will pop up, telling you that it is
now safe to disconnect the device*. You can
now safely unplug the USB cable from your
ARCHOS and/or computer.
•
* If you get a message saying that the device cannot be removed, close any com-
puter program that may still be using data on your device, such as media players or
Windows® Explorer.
Mac® OS X
DO NOT SIMPLY PULL OUT THE CABLE AT ANY TIME!
You must remove/unmount the ARCHOS from the
computer before disconnecting the USB cable to avoid
loss of data or freezing.
On your desktop, drag the ARCHOS’ icon towards
the trashcan, which will turn into a big eject sym-
bol.
Drop the icon onto this eject symbol: the ARCHOS’
hard drive will disappear from the desktop.
You can now safely unplug the USB cable from
your ARCHOS and/or computer.
•
•
•
MANUAL
V1.0
605 WIFI TRANSFERRING FILES > p. 56
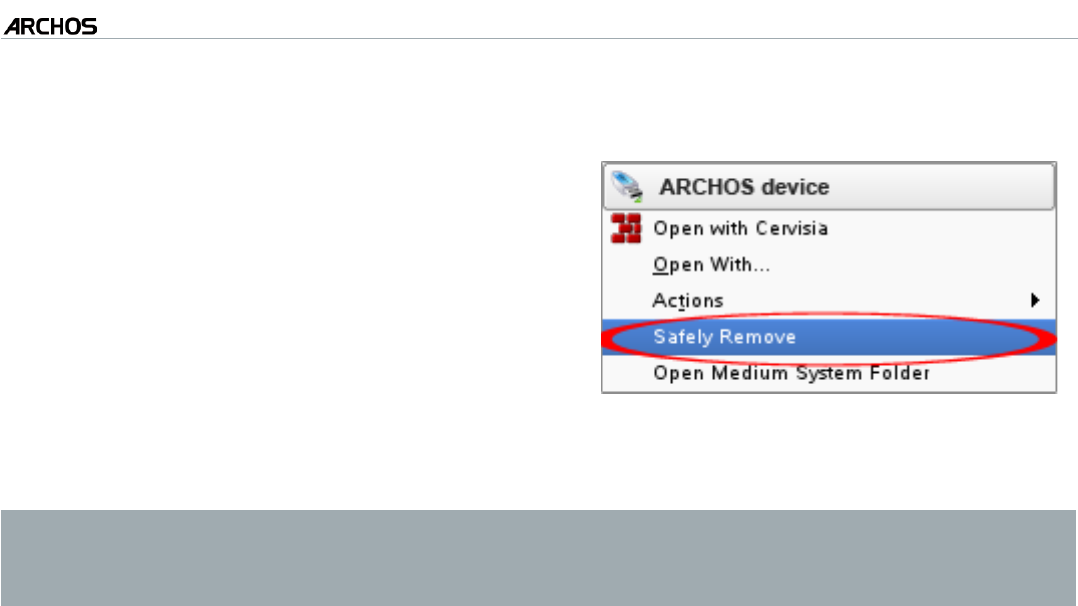
Linux
DO NOT SIMPLY PULL OUT THE CABLE AT
ANY TIME!
You must remove/unmount the ARCHOS from
the computer before disconnecting the USB
cable to avoid loss of data or freezing.
On your computer, right-click on the
ARCHOS icon and select Safely Remove.
Wait until the ARCHOS icon disappears,
and safely unplug the USB cable from your
ARCHOS and/or computer.
•
•
When you disconnect the ARCHOS from a computer, your device automatically up-
dates the ARCHOS Music Library, so that the media les you just copied appear in
the Music Library. This should only take a few seconds.

MANUAL
V1.0
605 WIFI MAIN SETTINGS > p. 57
8. MAIN SETTINGS
In the Home screen, select the “Settings” menu item and choose a setting.
SETTINGS TOUCHSCREEN CONTROLS
Tap on the “Settings” menu item, and choose a setting to open its correspond-
ing screen.
Once you are in a settings screen:
tap on a parameter to highlight it.
tap on the left/arrows to select a different setting.
when you have nished adjusting your settings, tap on to save them and
go back to the Home screen.
When it is possible, drag the scroll bar up and down to scroll the screen up
and down.
SETTINGS BUTTON CONTROLS
To open a settings screen, press the menu button, use the navigation pad to
highlight the “Settings” menu item, and press OK.
Once you are in a settings screen:
use the up/down navigation buttons to highlight a parameter.
use the left/right navigation buttons to select a different setting.
when you have nished adjusting your settings, press the Exit button to
save them and go back to the Home screen.
When it is possible, use the up/down navigation buttons to scroll the screen
up and down.
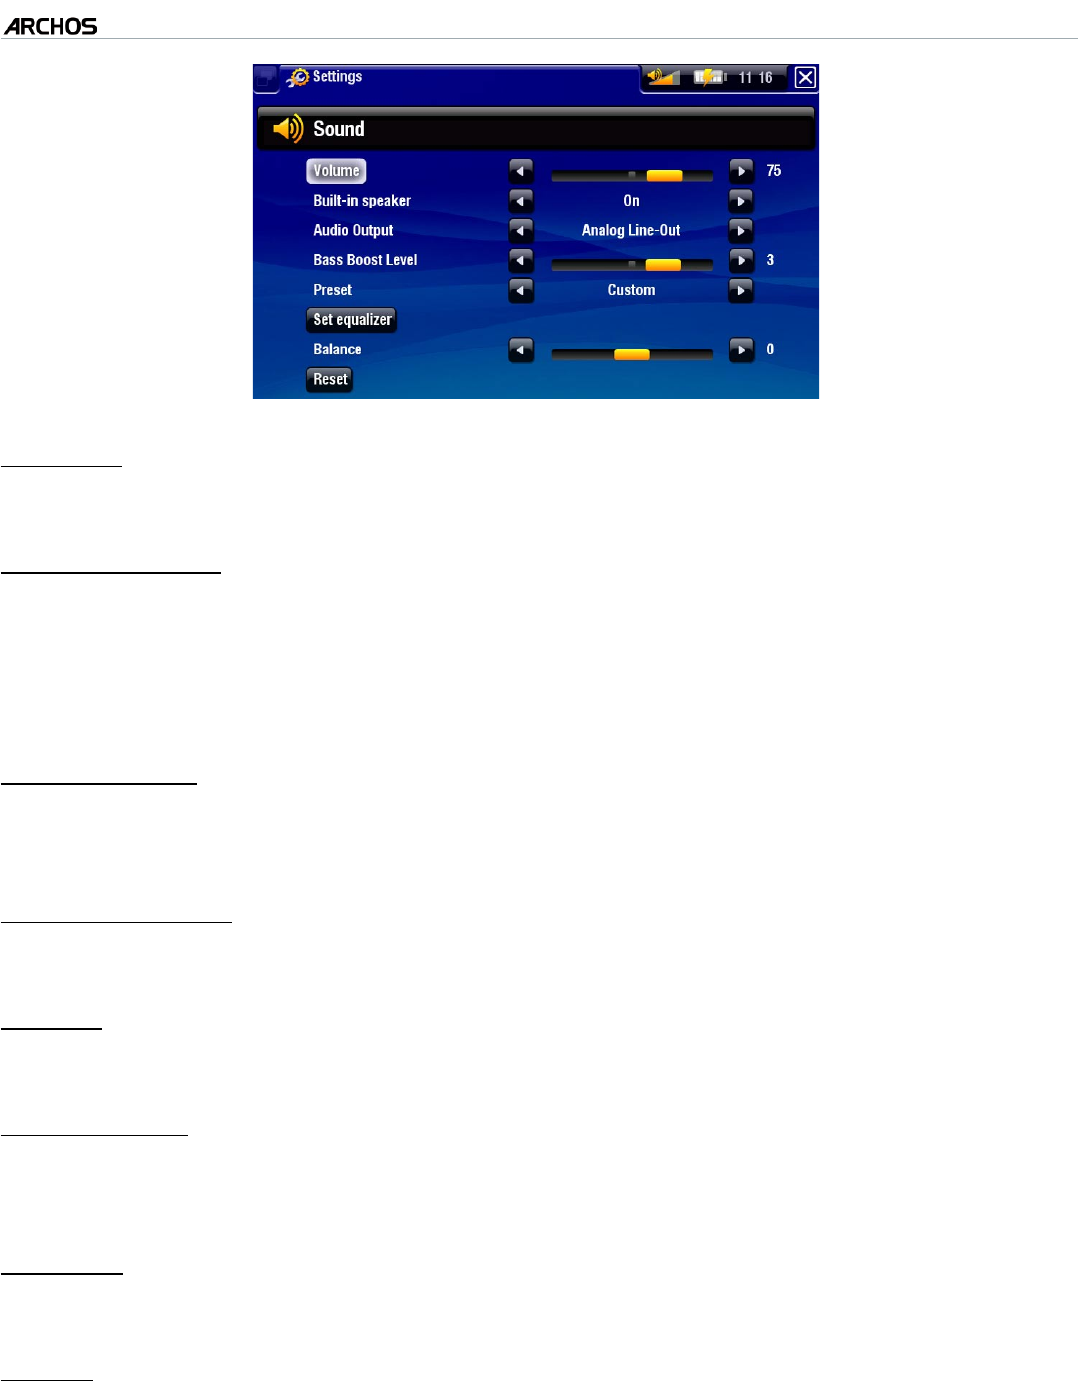
8.1 SOUND SETTINGS
This screen allows you to adjust the sound settings of your ARCHOS to your personal
taste.
•
•
-
-
-
-
•
•
-
-
-
-
MANUAL
V1.0
605 WIFI MAIN SETTINGS > p. 58
“Volume”
adjusts the output volume.
“Built-in speaker”
“ON”/“OFF”: the built-in speaker remains on or off regardless if headphones are
attached.
“Automatic”: the built-in speaker automatically turns off when you plug in head-
phones or connect your ARCHOS to the optional DVR Station.
“Audio Output”
denes whether the audio signal is sent out via the “Analog Line-Out” or the
“SPDIF” interface when connected to a DVR Station.
“Bass Boost Level”
adjusts the bass boosting level.
“Preset”
allows you to quickly select a sound prole.
“Set equalizer”
allows you to use a custom sound prole. Select this option to enter the equalizer
screen (see next section).
“Balance”
allows you to balance the sound between the left and right stereo channels.
“Reset”
resets the sound parameters to the default values.
-
-
-
-
-
-
-
-
-

MANUAL
V1.0
605 WIFI MAIN SETTINGS > p. 59
EQUALIZER SCREEN
Your ARCHOS features a 5-band
equalizer.
Select a band (Bass, Mid. bass, Mid.
range, Mid. treble or Treble), then
use the up/down arrows to change
the gain level for these frequency
ranges.
•
•
It is advised that you change these set-
tings while listening to music, in order to
be able to appreciate the sound changes.
8.2 DISPLAY SETTINGS
TV SETTINGS
“TV Standard”
choose between the “NTSC (USA)” and “PAL (Europe)” systems (select the one
that is compatible with your country’s television system).
“TV Format”
“4:3” or “16:9” - the format used by your television set to display images.
the option “Wide screen” becomes available when you set the “TV standard”
parameter to “PAL (Europe)”.
“Video Output”
choose between “Internal LCD” and “External TV” (to do this, you can also press
the TV/LCD button on the device).
-
-
-
-

MANUAL
V1.0
605 WIFI MAIN SETTINGS > p. 60
“External Display”
choose between “Composite” / “S-Video” / “Component” / “RGB”. Use this set-
ting based on how you have cabled the video out of your DVR Station to your
television.
for example, if you are using the yellow video connector as the video out, then
select “Composite”.
LCD SETTINGS
“LCD Backlight”
adjusts the level of backlight of the built-in screen.
“LCD settings”
use this button to access the “LCD
settings” screen.
it allows you to adjust the level of
contrast, brightness and gamma of
the built-in screen.
You can also reset the LCD param-
eters to the default values (“Reset”
button).
-
-
-
TOUCH-SCREEN SETTINGS
In the Home screen, select the
“Settings” menu item and
choose “File server” to display
the “Wireless le server” settings
screen.
You will see the following param-
eters:
•
•
If the touchscreen is not responding properly, use the “Calibration” button and follow
the instructions on screen.
If this does not work or if you cannot access the touchscreen settings, you can force
the touchscreen calibration (see: System Recovery).
-
-
-
MANUAL
V1.0
605 WIFI MAIN SETTINGS > p. 61
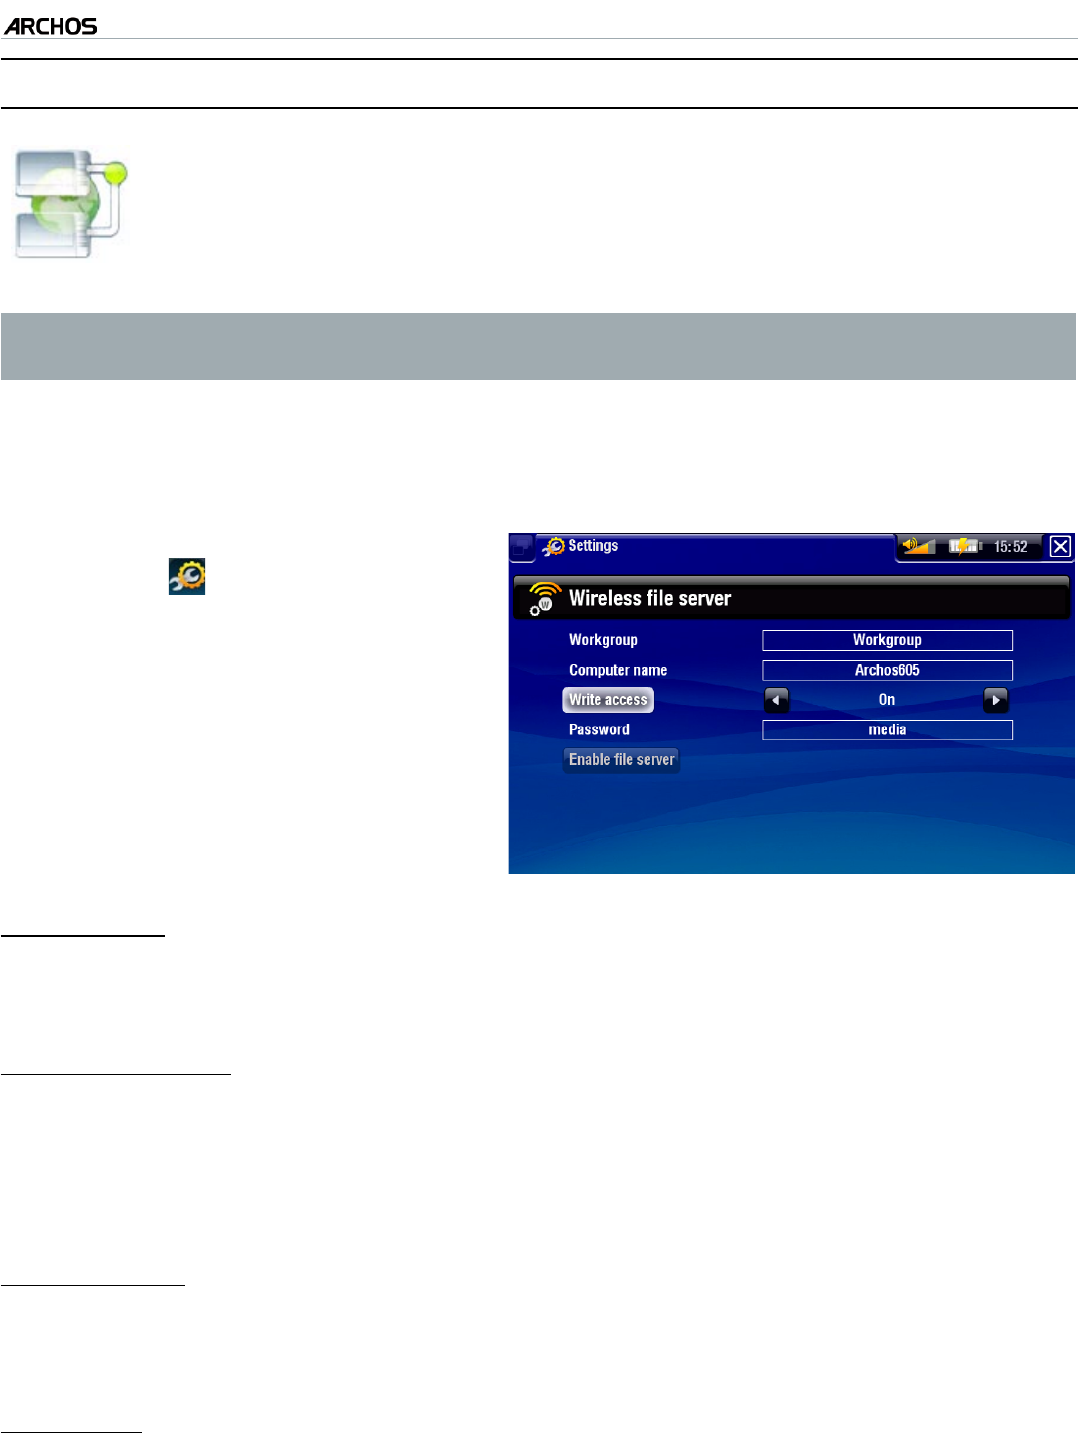
8.3 FILE SERVER SETTINGS
Your ARCHOS allows you to share les with other computers or WiFi de-
vices on a network.
Important: please check the applicable laws in your country or jurisdiction to know
what media les you are allowed to share or copy.
First, you need to connect to a WiFi network. See:
Connecting to a WiFi Network
.
Your ARCHOS’ hard drive will then be accessible from your computer’s network
neighborhood.
In the Home screen, select the
“Settings” menu item and
choose “File server” to display
the “Wireless le server” settings
screen.
You will see the following param-
eters:
•
•
“Workgroup”
enter the name of the workgroup, using the virtual keyboard. See:
Using the
Virtual Keyboard.
“Computer name”
enter the name for the ARCHOS in the network, using the virtual keyboard. See
Using the Virtual Keyboard
.
normally, you do not need to change this parameter unless more than one
ARCHOS is in the workgroup.
“Write access”
“On” will allow other computers to write to your ARCHOS’ hard drive.
“Off” will prevent other computers from writing to your disk.
“Password”
only appears if the “Write access” parameter is set to “On”.
type in the password for other computers to be able to write to your hard drive.
See
Using the Virtual Keyboard
.
•
•
-
-
-
-
-
-
-
MANUAL
V1.0
605 WIFI MAIN SETTINGS > p. 62
“Enable le server”
use this button to turn on the le server. While the le server is turned on, other
functions of your device are disabled.
Note: some networks lter MAC addresses. You can nd your device’s MAC address
in the “System” settings screen (see: System Settings).
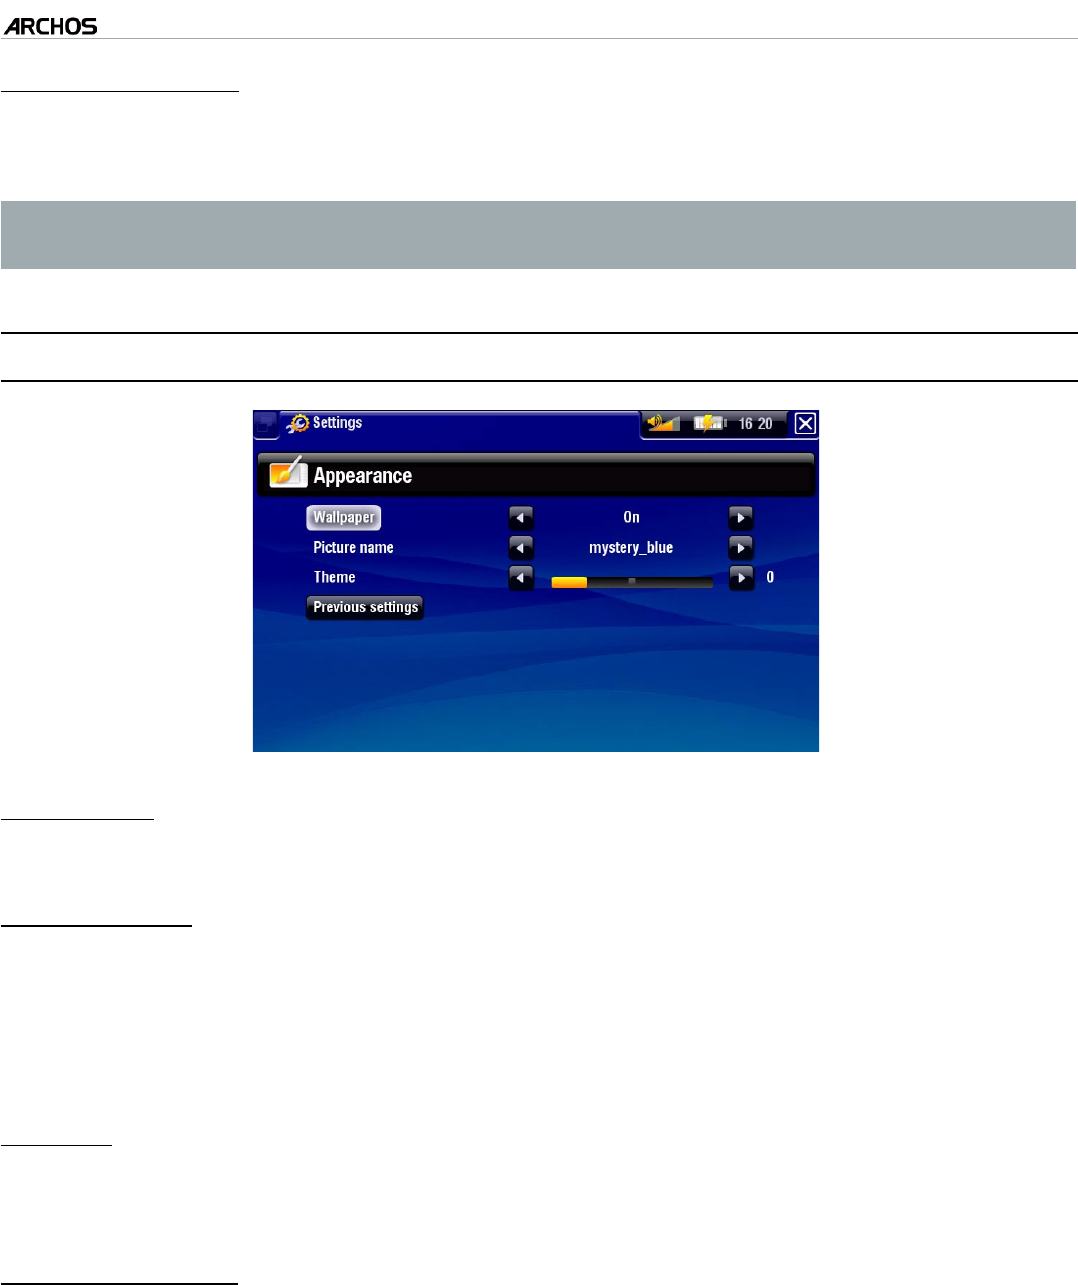
8.4 APPEARANCE SETTINGS
“Wallpaper”
enables or disables the use of a background image.
“Picture name”
allows you to select a picture to use as a background image.
you can choose between all default backgrounds or the images that you have
previously set as wallpapers.
you can also set a picture as wallpaper from the Photo and Video modes.
“Theme”
denes the theme color for your icons (and for the background, if you have dis-
abled use of a wallpaper).
“Previous settings”
use this button to discard any changes you may have made since entering this
screen.
-
-
-
-
-
-
-
MANUAL
V1.0
605 WIFI MAIN SETTINGS > p. 63
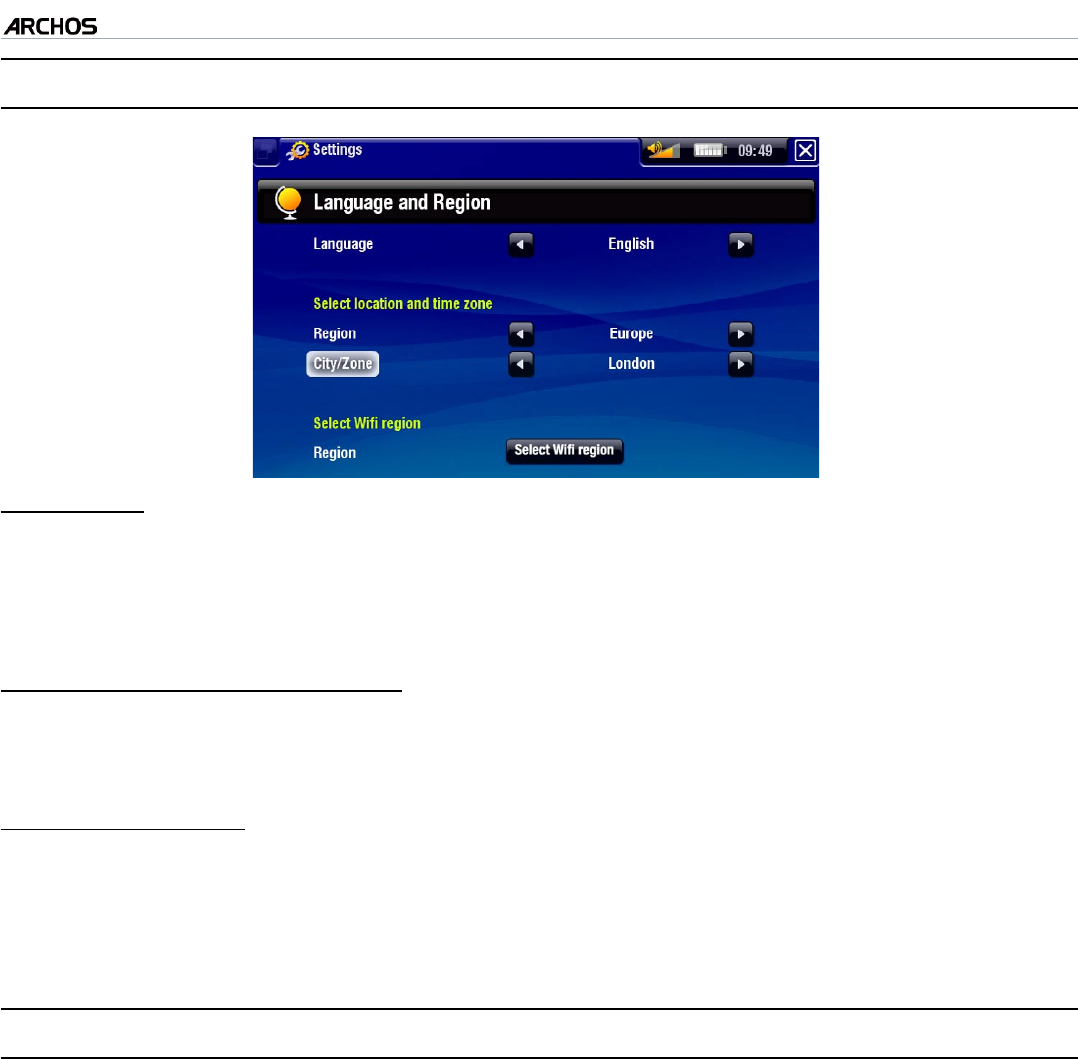
8.5 LANGUAGE AND REGION SETTINGS
“Language”
choose a language.
visit www.archos.com to check the availability of other languages that you can
download and install.
“Select location and time zone”
if your clock is set to “Automatic” (see
Clock Settings
), select your “Region”, and
“City/Zone”.
“Select Wi region”
use the button to select your Wi region.
this will be set automatically if you have already selected a “Region” and a “City/
Zone”.
8.6 TV CONTROL SETTINGS
See:
The Infrared Emitter
.
-
-
-
-
-
MANUAL
V1.0
605 WIFI MAIN SETTINGS > p. 64
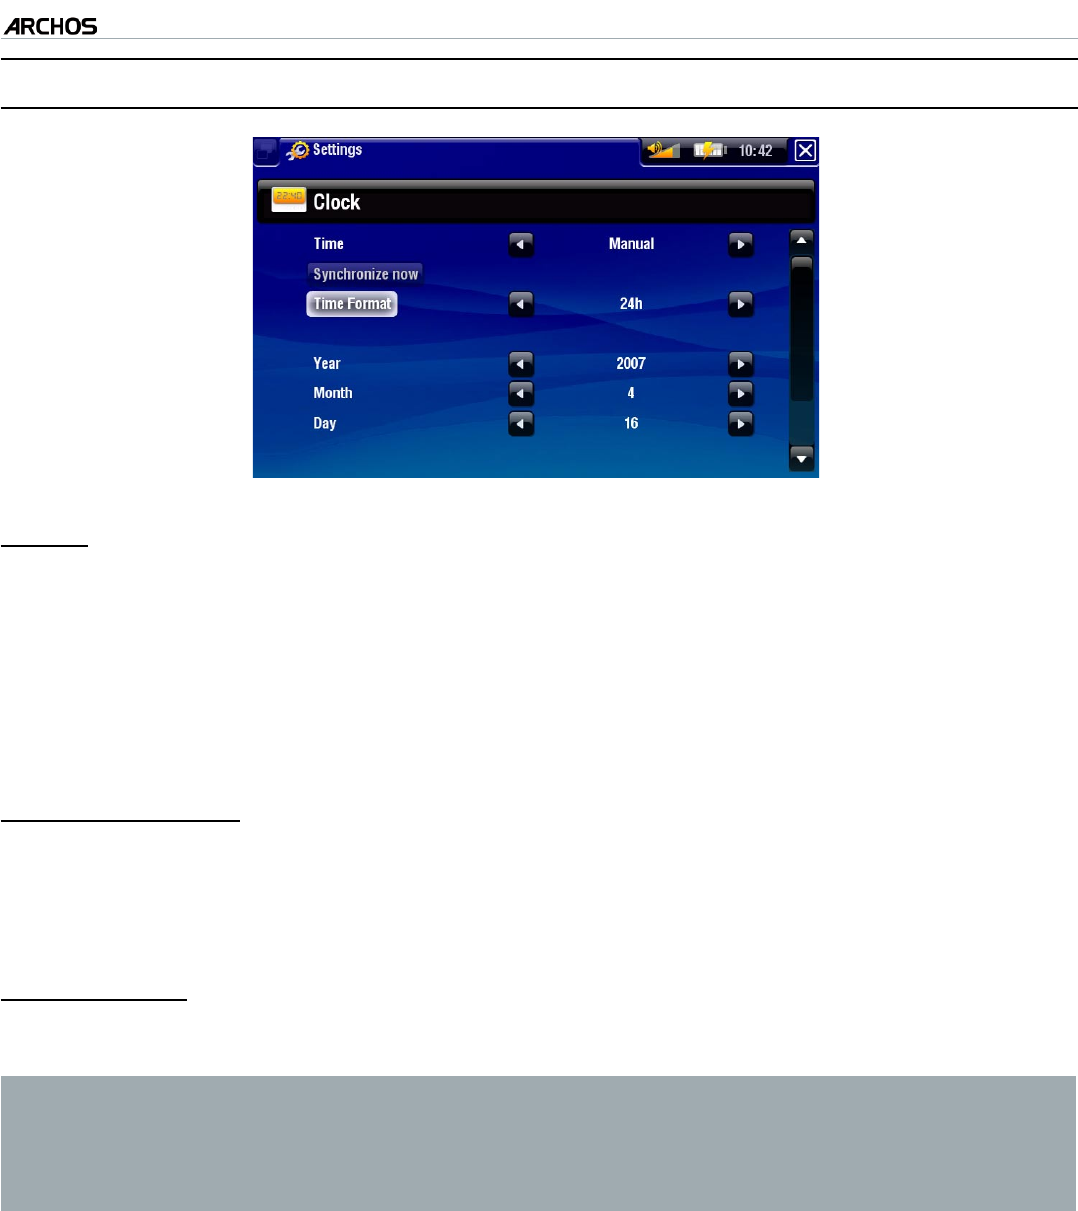
8.7 CLOCK SETTINGS
“Time”
“Automatic”: select this setting if you want to set the clock automatically
when your ARCHOS is connected to a Wi network. You will need to select your
“Region”, and “City/Zone” in the “Language and Region” settings screen (see
Language and Region Settings
).
“Manual”: select this setting to set the current date & time manually: “Year”,
“Month”, “Day”, “Hour”, “Minute”.
“Synchronize now”
if the “Time” parameter is set to “Automatic”, use this button to set the clock
automatically via a wi network.
for this to work, the ARCHOS needs to be connected to a Wi network
“Time Format”
choose between 12h or 24h mode.
ATTENTION: If the time & date are not correctly set, you might not be able to access
certain web pages.
If you use the optional DVR Station to schedule video recordings on your TV sys-
tem, make sure that the time and date are set correctly!
-
-
-
-
-
MANUAL
V1.0
605 WIFI MAIN SETTINGS > p. 65
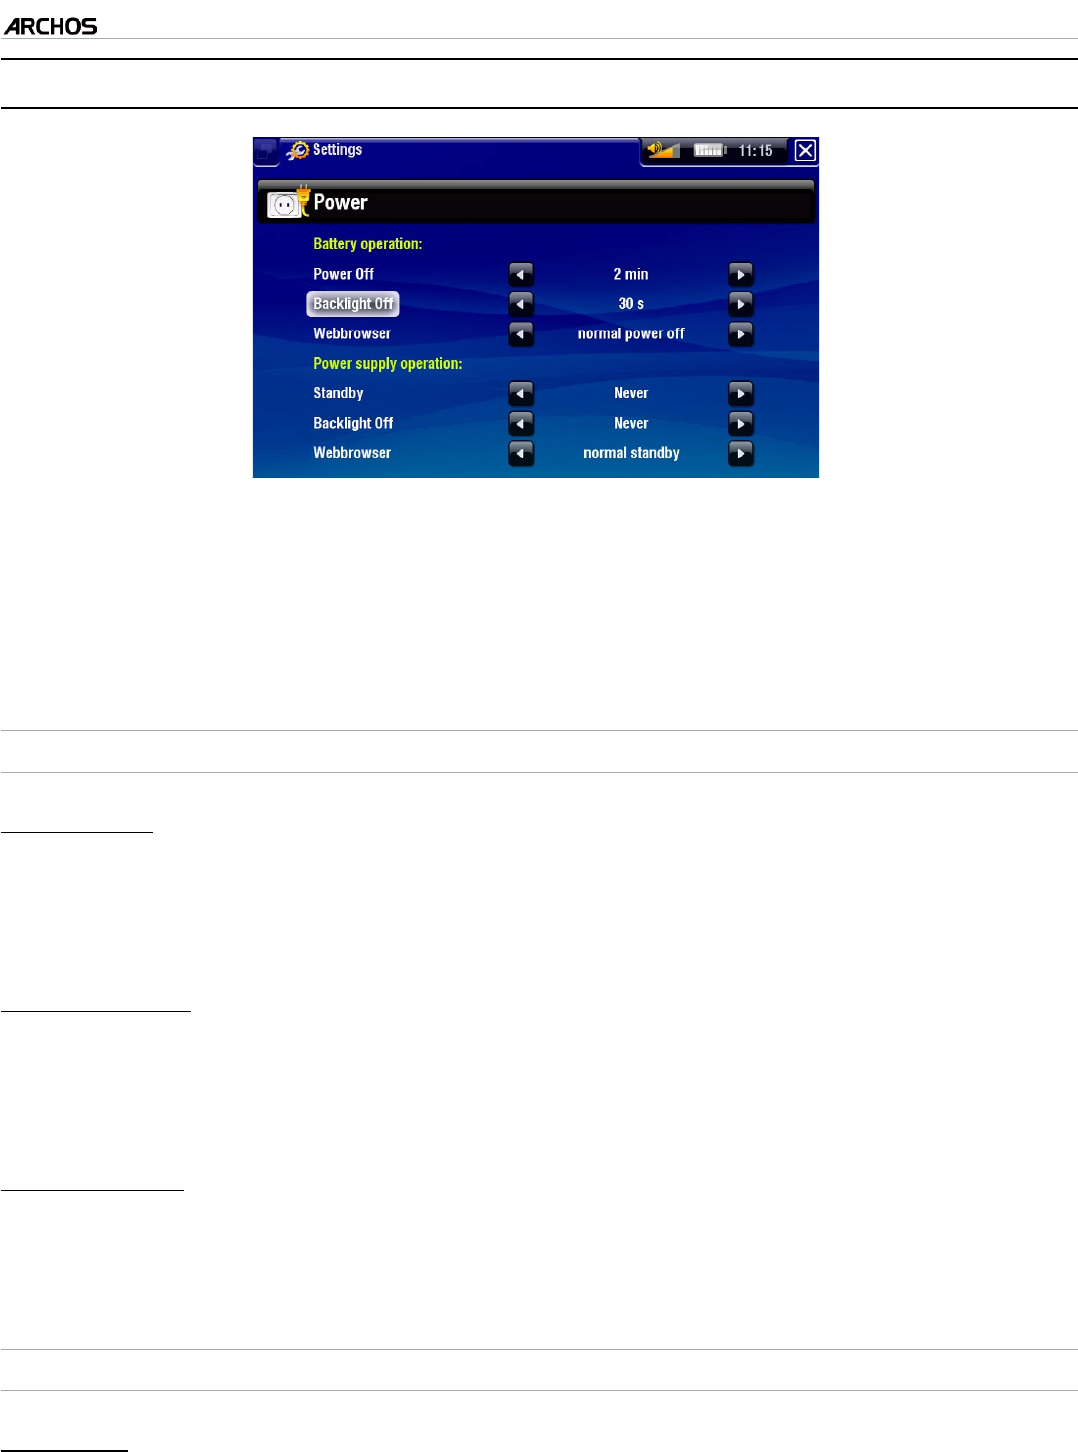
8.8 POWER SETTINGS
These settings will help you save battery power, thus allowing a longer battery
autonomy.
You can adjust settings for both battery operation and power supply operation
(when the ARCHOS is connected to a powered DVR Station, Mini Dock or Battery
Dock).
BATTERY OPERATION
“Power Off”
the amount of time of user inactivity before the system shuts down.
the system will not shut down during a slideshow, audio/video playback, audio/
video recording, USB connection or while browsing the web.
“Backlight Off”
the amount of time of user inactivity before the LCD display turns off.
the display will not turn off while a video or slideshow is playing, or when you are
browsing the web.
“Webbrowser”
“normal power off”: while browsing the web, the system will shut down accord-
ing to the setting selected for the “Power Off” parameter.
“prevents power off”: while browsing the web, the system will never shut down.
POWER SUPPLY OPERATION
“Standby”
the amount of time of user inactivity before the system goes into Standby mode.
the system will not go into Standby mode during a slideshow, audio/video play-
back, audio/video recording, USB connection or while browsing the web.
•
•
-
-
-
-
-
-
-
-
MANUAL
V1.0
605 WIFI MAIN SETTINGS > p. 66
“Backlight Off”
the amount of time of user inactivity before the LCD display turns off.
the display will not turn off while a video or slideshow is playing, or when you are
browsing the web.
“Webbrowser”
“normal power off”: while browsing the web, the system will go into Standby
mode according to the setting selected for the “Standby” parameter.
“prevents power off”: while browsing the web, the system will never go into
Standby mode.
Your ARCHOS will consume more power as these parameters are set to higher val-
ues.
In battery operation, it is advised to set these parameters to lower values in order to
save power.
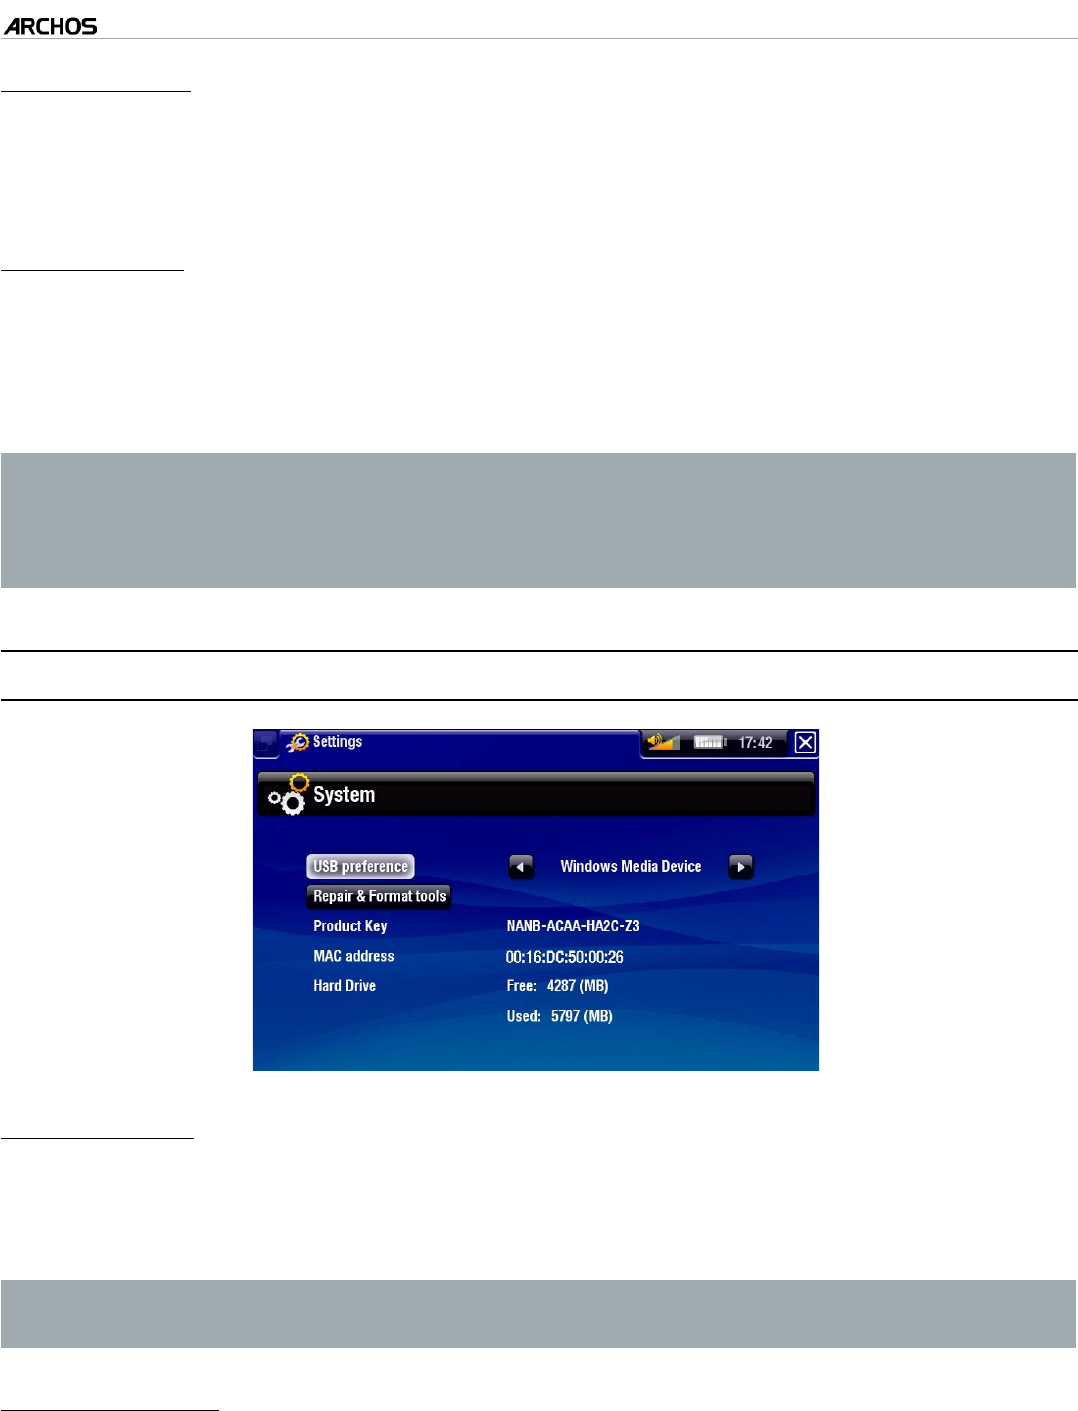
8.9 SYSTEM SETTINGS
“Update Index”
When you disconnect the ARCHOS from a computer, the “PC Hard Drive (not
indexed)” USB mode only does a quick Music Library update. Use the “Update
Index” button is you want to do a full Music Library update.
“Update Index” only appears if you chose the “PC Hard Drive (not indexed)” USB
mode.
“USB preference” (advanced users)
Your preferred connection mode will be used everytime you connect the ARCHOS
to a computer. The connection mode determines how your device interacts with
your computer:
Mode 1: “Windows Media Device (default)”: Recommended for users of
-
-
-
-
-
-
-
MANUAL
V1.0
605 WIFI MAIN SETTINGS > p. 67
Windows® XP or higher & WMP10 or higher. When set to this mode, the ARCHOS
uses the Media Transfer Protocol (MTP). It allows you to charge your ARCHOS and
transfer les onto it at the same time. You will be able to synchronize your media
library automatically every time you connect your ARCHOS to your computer
(with WMP10 or higher). When your le transfer is over, simply unplug the cable
from the ARCHOS, and your device will update the Music Library.
Mode 2: “PC Hard Drive (indexed)”: Recommended for users of Windows® XP
and WMP 9, Windows® 2000, Me, Mac® OS X or Linux. The ARCHOS will ask
you if you want to charge it or connect it as a mass storage device (Hard Drive).
Choose to connect it as a mass storage device (external hard drive). When con-
nected to your computer, your ARCHOS will be locked Disconnection: when the
le transfer is over, safely disconnect the ARCHOS and your device will update
the Music Library.
Mode 3: “PC Hard Drive (not indexed)”: Same as mode 2, but with a faster Music
Library update at disconnection.
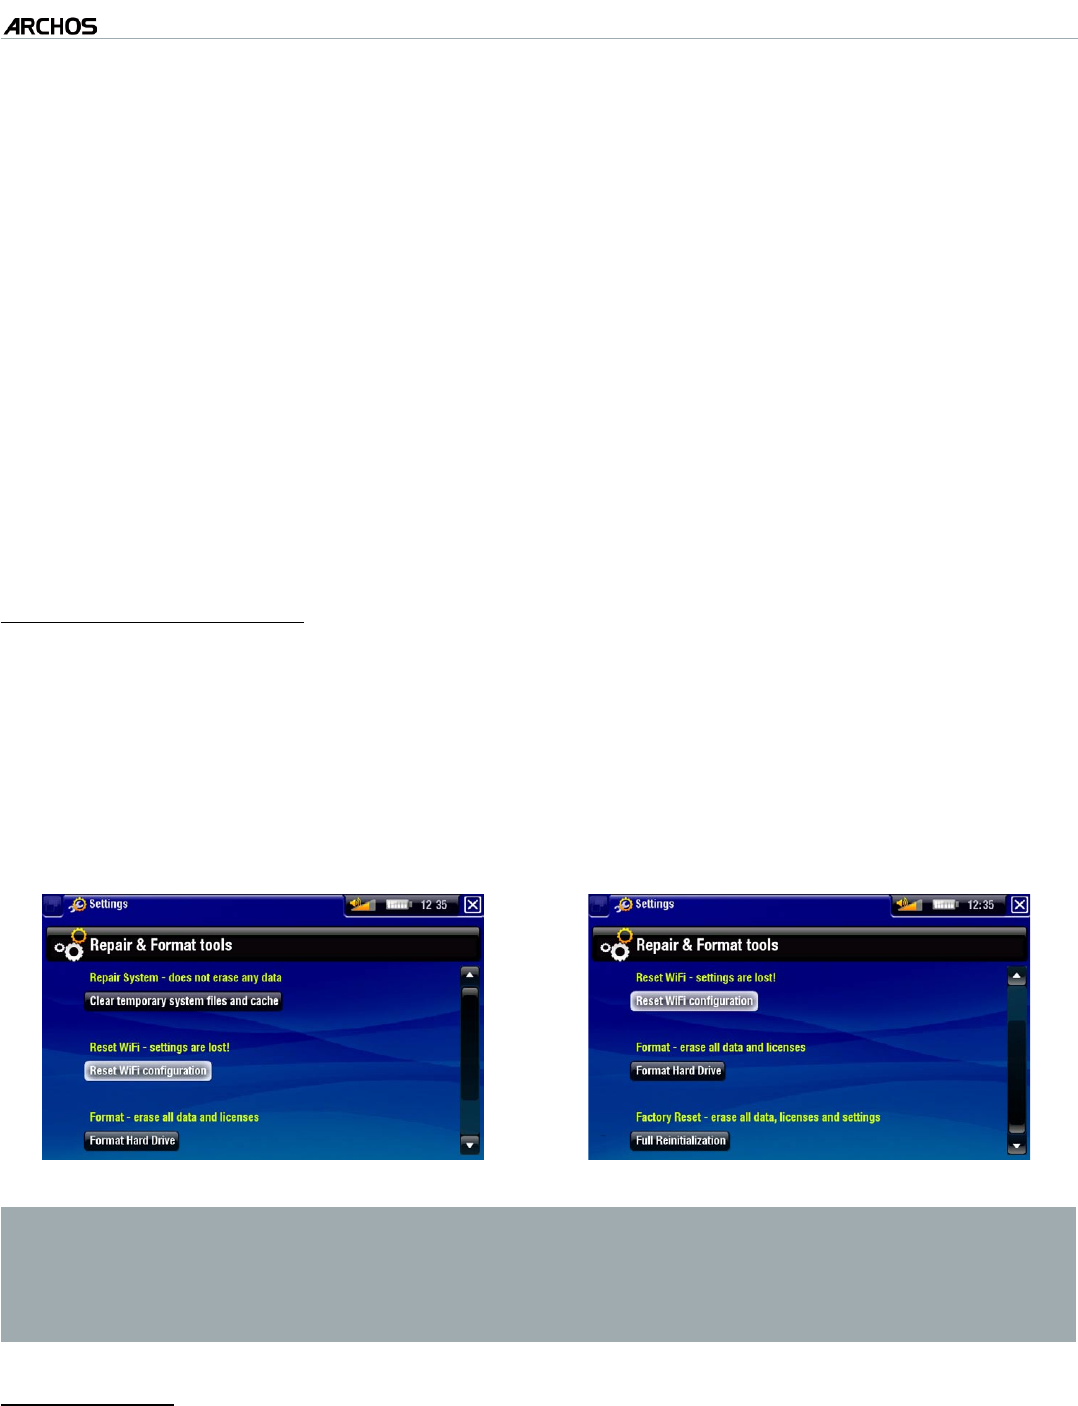
“Repair & Format tools”
use this button to access the “Repair & Format tools” settings screen. This screen
allows you to do the following actions:
“Clear temporary system les and cache” (does not erase any data)
“Reset WiFi conguration” (WiFi settings are lost)
“Format Hard Drive” (erase all data, media les, and licenses)
“Full Reinitialization” (erase all data, media les, licenses and settings)
In the event that your ARCHOS freezes operation (due to electrostatic phenomena,
for example), try to reset it (see: Product Care).
If this does not work or if you cannot access the repair and format tools, you can try
a system recovery (see: Product Care).
“Product key”
each ARCHOS has a unique number.
you will need this number to register your product online (www.archos.com/reg-
ister).
-
-
-
-
-
-
-
-
-
MANUAL
V1.0
605 WIFI MAIN SETTINGS > p. 68
“MAC address”
some WiFi networks lter MAC addresses. You might need to communicate this
address to the person who manages the network.
“Hard Drive”
displays the amount of free and used space on the hard drive.
Note: reported number of megabytes is binary-based counting (1Kb=1024 bytes).
Thus each reported Mb represents approximately 1.05 megabytes (decimal).
Formatting also takes up space.
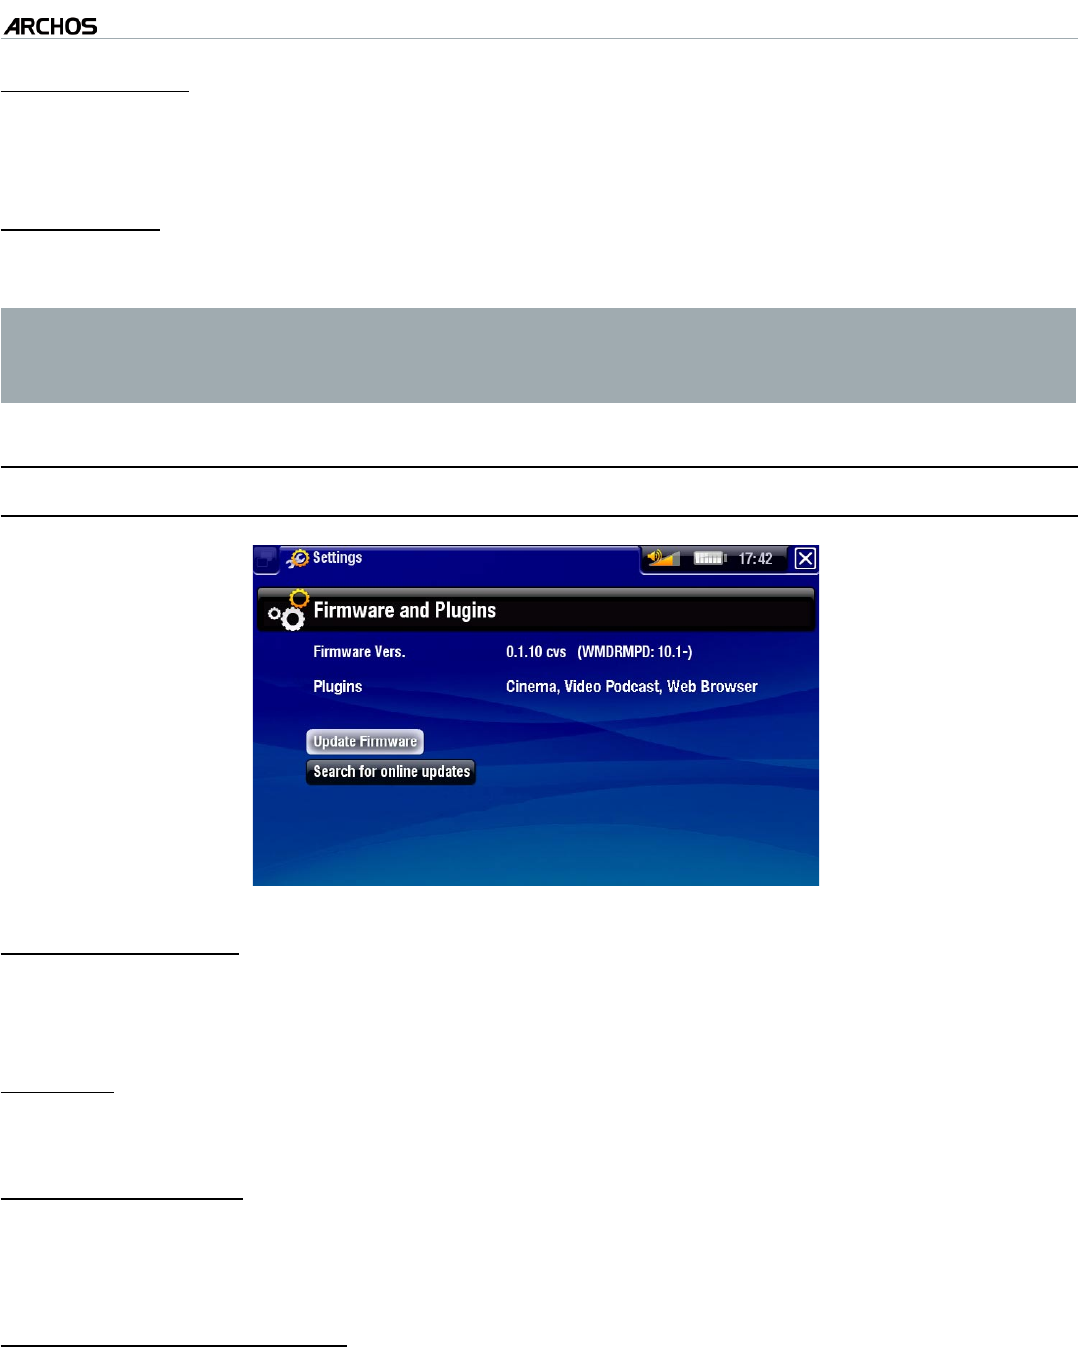
8.10 FIRMWARE AND PLUGINGS SETTINGS
“Firmware version”
displays the current version of the rmware and Digital Rights Management
(DRM) system.
“Plugins”
displays the current plugins installed on your device.
“Update Firmware”
use this button to update the rmware manually.
see
Updating the Firmware
to learn how to update the rmware.
“Search for online updates”
when connected to a wi network, use this button to search for an online update.
If there is one available, it will be installed automatically.
see
Updating the Firmware
to learn how to update the rmware.
-
-
-
-
-
-
-
-
-
MANUAL
V1.0
605 WIFI MAIN SETTINGS > p. 69
8.11 UPDATING THE FIRMWARE
The rmware is the operating system (OS) of your ARCHOS. It is periodically updated
to bring new features, improvements and bug xes. There are two main ways to up-
date your product’s rware:
directly on your ARCHOS if it as connected to a Wi network
with a computer connected to the internet
UPDATE DIRECTLY ON THE ARCHOS (WIFI CONNECTION NEEDED)
This is the easiest way to update the rmware. For this to work, you only need to con-
nect your ARCHOS to a Wi network. See
Connecting to a Wi Network
.
Once your ARCHOS is connected to a Wi network, go to the Home screen,
select the “Settings” menu item, and choose “System”.
Use the “Search for online updates” button.
The ARCHOS will search on-line for a new rmware. If there is one available, it
will start downloading, and it will be installed automatically.
UPDATE USING A COMPUTER (INTERNET CONNECTION NEEDED)
If you cannot connect your ARCHOS to a Wi network, you can also update the rm-
ware using a computer connected to the internet:
On your PC, go to www.archos.com/rmware.
Search for the rmwares available for your ARCHOS.
Compare the lastest on-line version with the one installed on your ARCHOS: your
ARCHOS’ rwmare version number appears in the “Firmware and Plugings” set-
tings screen (see
Firmware and Plugings Settings
).
If the on-line version is more recent than yours, follow the instructions to down-
load and install it.
Your Internet browser may warn you that the contents of the rmware le may harm
your computer. Ignore this message.
•
•
1.
2.
3.
1.
2.
3.
4.
MANUAL
V1.0
605 WIFI OPTIONAL FUNCTIONALITIES > p. 70
9. OPTIONAL FUNCTIONAL-
ITIES
9.1 ARCHOS ACCESSORIES
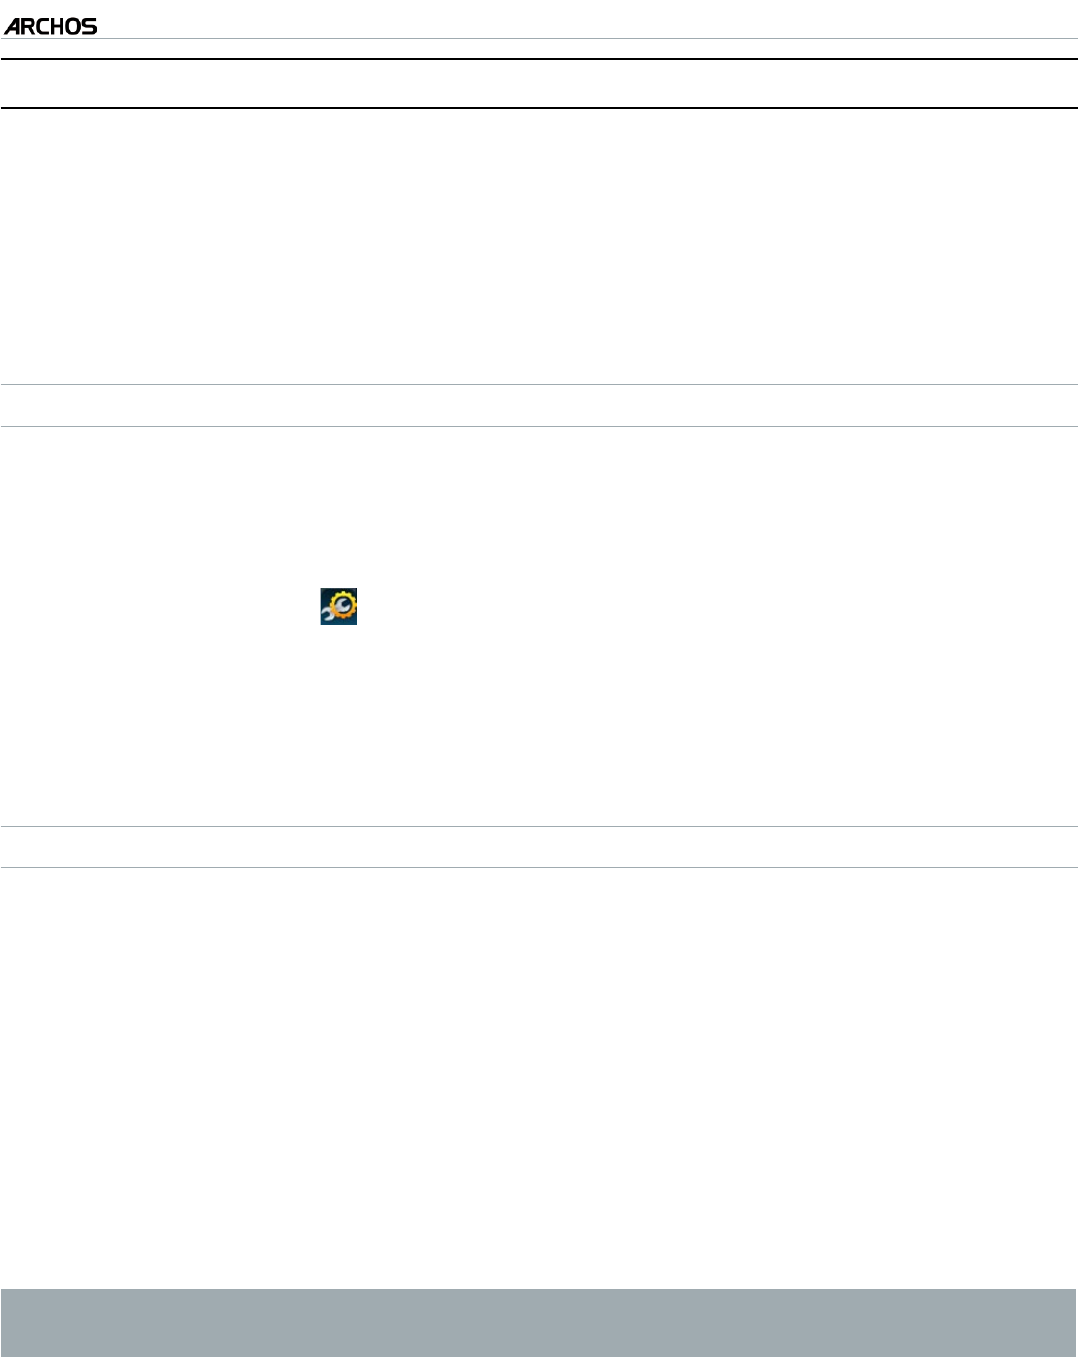
DVR STATION
When connected to your ARCHOS and to your home enter-
tainment system, the DVR Station will allow you to:
schedule TV recordings very easily via the ARCHOS EPG
Program Guide.
record audio/video, directly on your ARCHOS, from most
any standard audio/video source.
connect a compatible USB device to your ARCHOS.
display the image of the ARCHOS on your TV.
charge your ARCHOS.
•
•
•
•
•
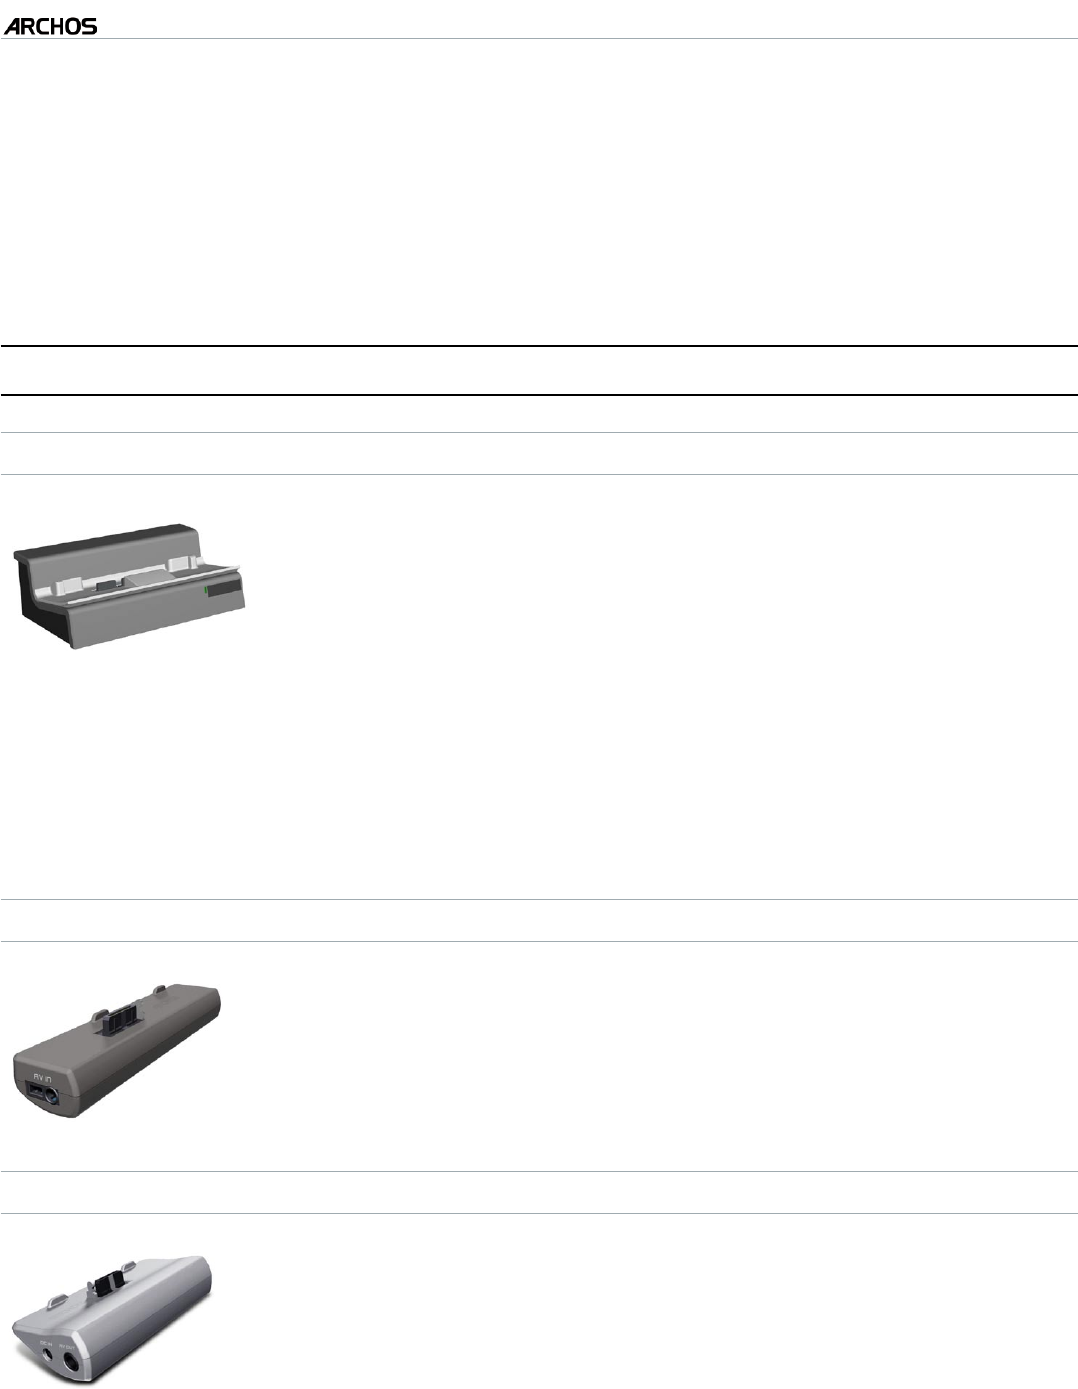
DVR TRAVEL ADAPTER
When connected to your ARCHOS, the DVR Travel Adapter will
allow you to:
record audio/video, directly on your ARCHOS, from most
any standard audio/video source.
•
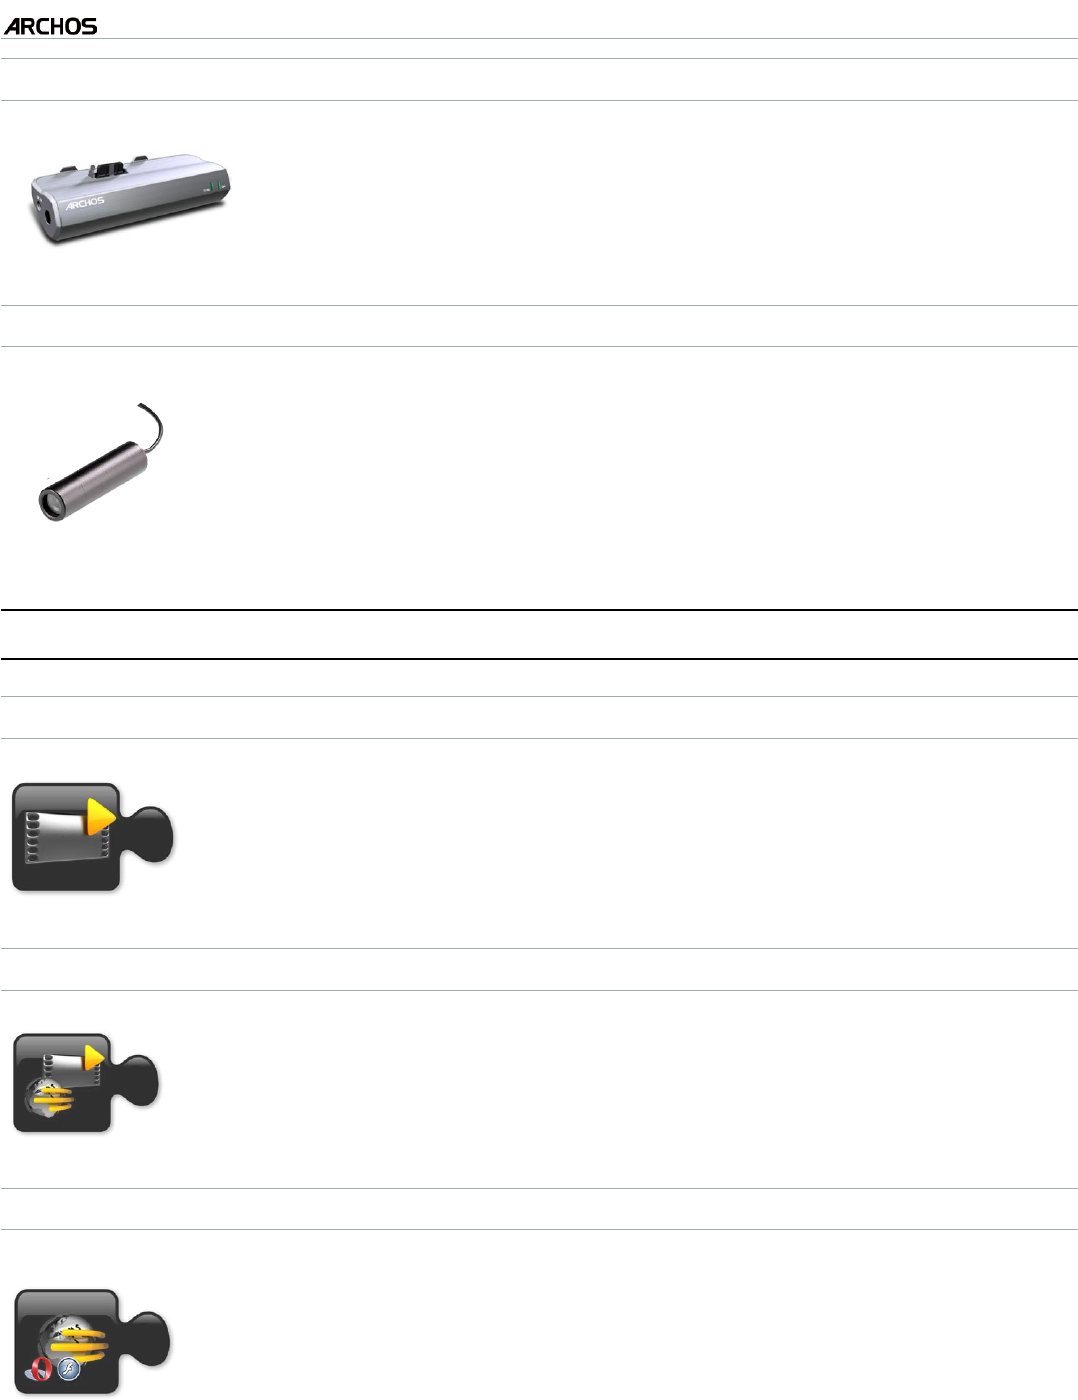
MINI DOCK
When connected to your ARCHOS, the Mini Dock will allow you
to:
display the image of the ARCHOS on your TV.
connect a compatible USB device to your ARCHOS.
charge your ARCHOS.
•
•
•
MANUAL
V1.0
605 WIFI OPTIONAL FUNCTIONALITIES > p. 71
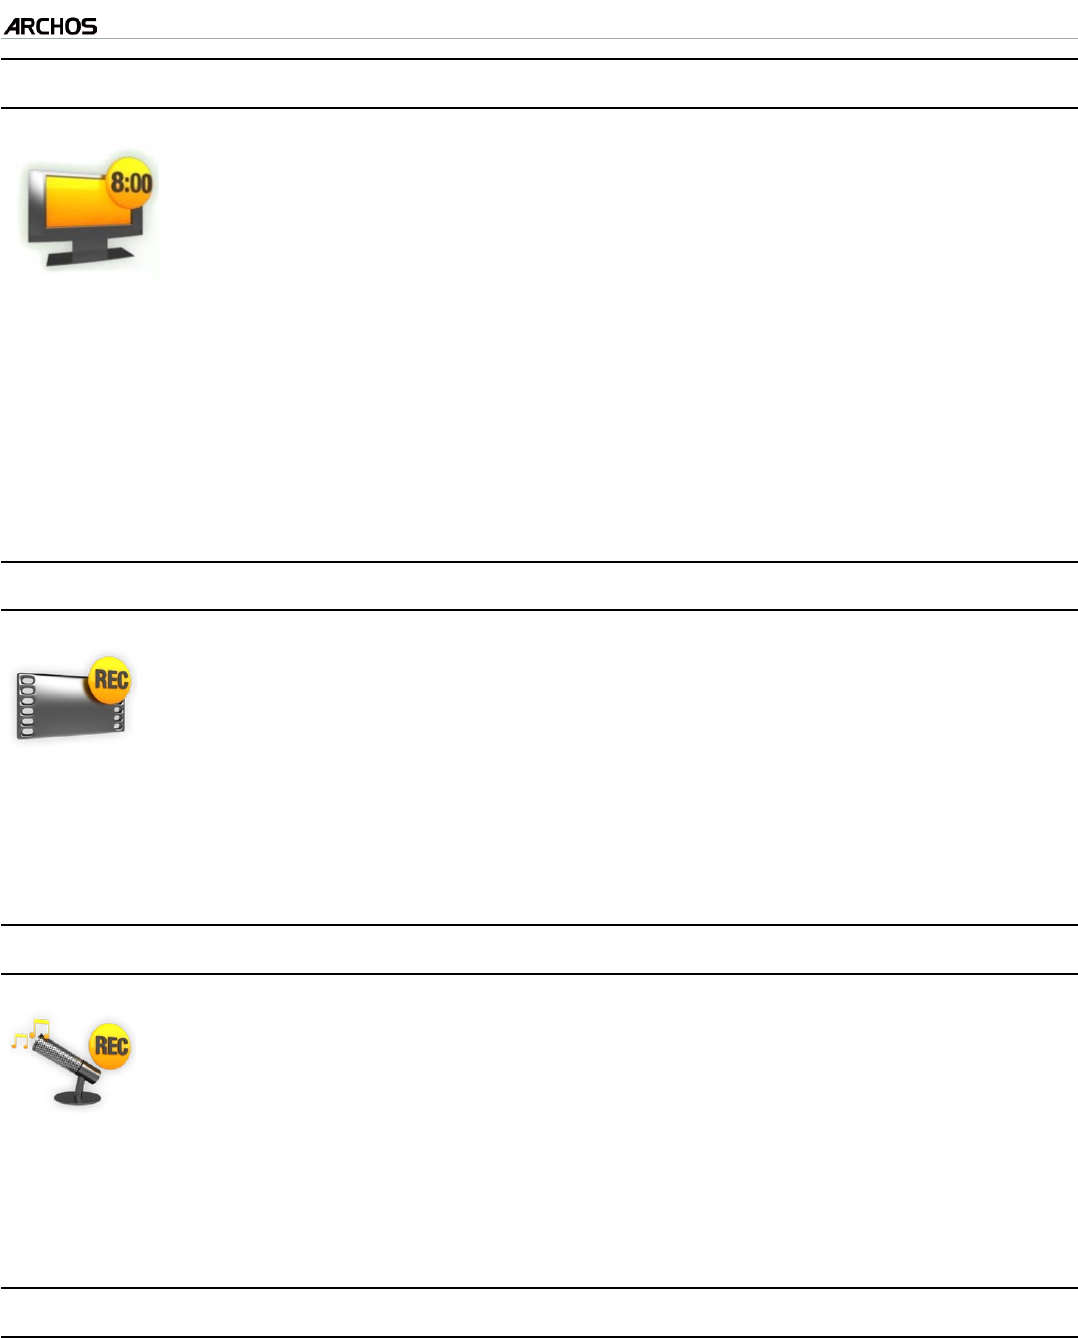
BATTERY DOCK
the battery dock is like the Mini Dock but also includes a battery
to give your ARCHOS extra play time.
HELMET CAMCORDER
High resolution Mini-Cam with remote control and micro-
phone.
9.2 ARCHOS PLUGINS
CINEMA PLUG-IN
To allow you to play MPEG2 video les without any re-encoding (type
of le found on DVDs).
VIDEO PODCAST PLUG-IN
To allow you to play H.264 video les without any special re-encod-
ing (type of le often used for video podcasts).
WEB BROWSER PLUG-IN
A specially designed Internet browser for your ARCHOS that will
allow you to surf the web on your ARCHOS. Supports websites
with Flash™.
MANUAL
V1.0
605 WIFI OPTIONAL FUNCTIONALITIES > p. 72
9.2 SCHEDULING A TV RECORDING
With the optional DVR Station connected to your home tuner,
you will be able to schedule recordings very easily via the Recorder
function.
See the DVR Station manual to learn how to record sheduled re-
cordings
Once In the Home screen, select the “Recorder” icon to display the
EPG TV program guide.
Simply select the program you want to record, and when the time
comes, your ARCHOS will automatically start recording the sched-
uled program.
•
•
•
•
9.3 RECORDING EXTERNAL VIDEO MANUALLY
With the optional DVR Station or DVR Travel Adapter, you will be
able to record video from most any standard video source.
In the Home screen, select the “Recorder” and enter the “Video
recorder” mode.
You can now tell the ARCHOS to start recording from the video
source.
•
•
•
9.4 RECORDING EXTERNAL AUDIO MANUALLY
With the optional DVR Station, you will be able to record audio
from most any standard audio source.
In the Home screen, select the “Recorder” and enter the
“Audiocorder” mode.
You can now tell the ARCHOS to start recording from the audio
source.
•
•
•
9.5 RECORDING EXTERNAL AUDIO MANUALLY
With the optional DVR Station, Battery Dock or Mini dock, you will be able to dis-
play the image of the ARCHOS on your TV.record audio from most any standard
audio source.
Connect the ARCHOS with the adapter to the TV, press the TV/LCD button on the
ARCHOS, and the display switches to the TV.
•
•

MANUAL
V1.0
605 WIFI TECHNICAL SPECIFICATIONS > p. 73
TECHNICAL SPECIFICATIONS
LCD PIXEL POLICY
The LCD screen on your ARCHOS unit has been manufactured to rigorous standards
to provide a high quality viewing experience. Nevertheless, your LCD screen may have
slight imperfections. This is not particular to the ARCHOS screen, but to all devices
which have LCD screens regardless of the original manufacturer of the LCD. Each prod-
uct vendor guarantees that his screen will contain no more than a certain number of
defective pixels. Each screen pixel contains three dot elements (Red, Blue, and Green).
One or all of the dots in a given pixel may be stuck on or stuck off. A single dot stuck
off is the least noticeable. All three dots of a pixel stuck on is the most noticeable.
ARCHOS guarantees that this device’s screen will have no more than 3 defective pix-
els (regardless if these pixels have one or more defective dots). This means that during
the period of guarantee for your country or jurisdiction, if the screen on your product
has four or more defective pixels, ARCHOS will repair or replace your product at its
cost. Thus, three or less defective pixels is not grounds for replacement or repair of the
product.

MANUAL
V1.0
605 WIFI TECHNICAL SUPPORT INFORMATION > p. 74
All brands and product names are registered trademarks and the property of their re-
spective owners.
Windows Media® and Windows® are trademarks or registered trademarks of Microsoft
Corporation in the United States and/or other countries. change without notice. Errors
or omissions excepted. Images and illustrations may not always match contents.
All the information contained in this guide was correct at the time of publication.
COPYRIGHT ARCHOS © 2007. All rights reserved.
TECHNICAL SUPPORT INFOR-
MATION
Need Help? You can nd the information you need:
On our Website: see the frequently asked questions section on www.archos.com/faq
By asking our technical support team: visit www.archos.com/support for e-mail support.
U.S. & Canada: Call 877-300-8879 (toll free).
•
•
•