Archos 6700 Personal Multimedia Player, Model Number 6700 User Manual manual
Archos SA Personal Multimedia Player, Model Number 6700 manual
Archos >
manual

Annex No.5
Page 1 of 102
Functional Description / User manual
Archos G6L
(Archos 5 & 7 User manual & legal booklet)
Dear Customer,
Thank you for choosing this ARCHOS product. We hope that you will enjoy
using it and that it will give you satisfaction for many years to come.
Please do register your product on our website (www.archos.com/register)
to ensure that you get access to our technical support as well as FREE and
PURCHASABLE offers from our website and from the ARCHOS Media Club.
You can also register directly on your ARCHOS via the WiFi.
Wishing you the best multimedia experience,
The ARCHOS Team.
All the information contained in this manual was correct at the time of
publication. However, as we are often updating and improving our prod-
ucts, your device’s software may have a slightly different appearance or
modied functionality than presented in this manual.
ENGLISH
Please visit www.archos.com/manuals to download the latest version of this manual.
ENGLISH USER MANUAL
Entertainment
way
5 7
FCC

MANUAL
FCC
5g+ TABLE OF CONTENTS > P. 2
Table Of COnTenTs
InTrOduCTIOn ...............................................................................................4
ARCHOS DESCRIPTION ..........................................4
FIRST TIME USAGE .............................................5
TURNING THE ARCHOS ON/OFF ....................................5
THE INSTALLATION WIZARD ......................................5
USING THE ARCHOS INTERFACE ...................................6
PRODUCT CARE ................................................7
1. PlayIng VIdeO ..........................................................................................8
1.1 BROWSING THROUGH YOUR VIDEOS . . . . . . . . . . . . . . . . . . . . . . . . . . . . .8
1.2 VIDEO PLAYBACK ............................................9
1.3 VIDEO PLAYER SETTINGS ....................................11
1.4 PUTTING VIDEOS ONTO YOUR ARCHOS . . . . . . . . . . . . . . . . . . . . . . . . . .12
1.5 PLAYING YOUR PC’S SHARED VIDEOS (UPNP) . . . . . . . . . . . . . . . . . . . .13
1.6 WATCHING WEB TV .........................................13
2. PlayIng MusIC ......................................................................................15
2.1 BROWSING THROUGH YOUR MUSIC FILES . . . . . . . . . . . . . . . . . . . . . . .15
2.2 MUSIC PLAYBACK ..........................................17
2.3 MUSIC PLAYER SETTINGS ....................................18
2.4 PLAYLISTS ................................................20
2.5 PUTTING MUSIC ONTO YOUR ARCHOS . . . . . . . . . . . . . . . . . . . . . . . . . . .22
2.7 PLAYING YOUR PC’S SHARED MUSIC (UPNP) . . . . . . . . . . . . . . . . . . . . .23
2.8 LISTENING TO WEB RADIOS ..................................24
3. VIewIng PhOTOs .................................................................................25
3.1 BROWSING THROUGH YOUR PHOTOS . . . . . . . . . . . . . . . . . . . . . . . . . . .25
3.2 PHOTO VIEWER ............................................26
3.3 PHOTO VIEWER SETTINGS ....................................28
3.4 PLAYING A SLIDESHOW ......................................28
3.5 PUTTING PHOTOS ONTO YOUR ARCHOS . . . . . . . . . . . . . . . . . . . . . . . . .29
3.6 PLAYING YOUR PC’S SHARED PHOTOS (UPNP) . . . . . . . . . . . . . . . . . . . .29
4. usIng The fIle brOwser .............................................................30
4.1 NAVIGATION ...............................................30
4.2 USING THE VIRTUAL KEYBOARD . . . . . . . . . . . . . . . . . . . . . . . . . . . . . . .32
4.3 BROWSING OTHER COMPUTERS ON THE NETWORK . . . . . . . . . . . . . . . .32
5. COnneCTIng TO The wIfI ............................................................. 34
5.1 WIFI CONNECTION PROCEDURE . . . . . . . . . . . . . . . . . . . . . . . . . . . . . . . .34
5.2 WIFI NETWORK CONFIGURATION . . . . . . . . . . . . . . . . . . . . . . . . . . . . . . .35
TABLE OF CONTENTS CONTINUED ON NEXT PAGE...

MANUAL
FCC
5g+ TABLE OF CONTENTS > P. 3
6. The InTerneT feaTures ..............................................................38
6.1 BROWSING THE WEB ........................................38
6.2 PLAYING YOUR PC’S SHARED MEDIA FILES (UPNP) . . . . . . . . . . . . . . . .40
6.3 THE ARCHOS MEDIA CLUB ....................................42
6.4 MAIL .....................................................42
6.5 CONTACTS ................................................42
7. TransferrIng fIles....................................................................... 43
7.1 CONNECTING THE ARCHOS TO A COMPUTER . . . . . . . . . . . . . . . . . . . . .43
7.2 PUTTING FILES ONTO THE ARCHOS . . . . . . . . . . . . . . . . . . . . . . . . . . . . .44
7.3 DISCONNECTING ...........................................44
8. MaIn seTTIngs ................................................................................... 46
8.1 “SOUND” SETTINGS .........................................46
8.2 “SCREEN” SETTINGS ........................................47
8.3 “TV OUT” SETTINGS .........................................48
8.4 “APPEARANCE” SETTINGS ...................................49
8.5 “LANGUAGE AND REGION” SETTINGS . . . . . . . . . . . . . . . . . . . . . . . . . . .50
8.6 “TV CONTROL” SETTINGS ....................................50
8.7 “CLOCK” SETTINGS .........................................51
8.8 “POWER” SETTINGS ........................................52
8.9 “STORAGE” SETTINGS .......................................53
8.10 “PARENTAL CONTROL” SETTINGS . . . . . . . . . . . . . . . . . . . . . . . . . . . . .54
8.11 “CUSTOMER ASSISTANCE” SETTINGS. . . . . . . . . . . . . . . . . . . . . . . . . .55
8.12 “FIRMWARE AND PLUG-INS” SETTINGS . . . . . . . . . . . . . . . . . . . . . . . .56
8.13 UPDATING THE FIRMWARE ..................................56
8.14 “SYSTEM INFO” SETTINGS ..................................57
9. OTher funCTIOns ..............................................................................58
9.1 PLAYING GAMES ...........................................58
9.2 TV FUNCTIONS .............................................58
9.3 TOOLS ...................................................58
10. arChOs Plug-Ins and aCCessOrIes .................................63
10.1 ARCHOS PLUG-INS .........................................63
10.2 ARCHOS ACCESSORIES .....................................63
TrOubleshOOTIng ................................................................................ 65
RESETTING YOUR ARCHOS ......................................65
SYSTEM RECOVERY ............................................65
TOUCHSCREEN PROBLEMS ......................................66
REPAIR AND FORMATTING TOOLS .................................66
REPLACING THE BATTERY .......................................67
TeChnICal sPeCIfICaTIOns ...............................................................68
TeChnICal suPPOrT InfOrMaTIOn ....................................................................................69
MANUAL
FCC
5g+ INTRODUCTION > P. 4
InTrOduCTIOn
The information presented in this manual might vary according
to which ARCHOS model you have.
Every time you see one of these icons, it means that the fol-
lowing section will concern this and only this model.
•
•
5
7
arChOs desCrIPTIOn
MAIN BUTTONS
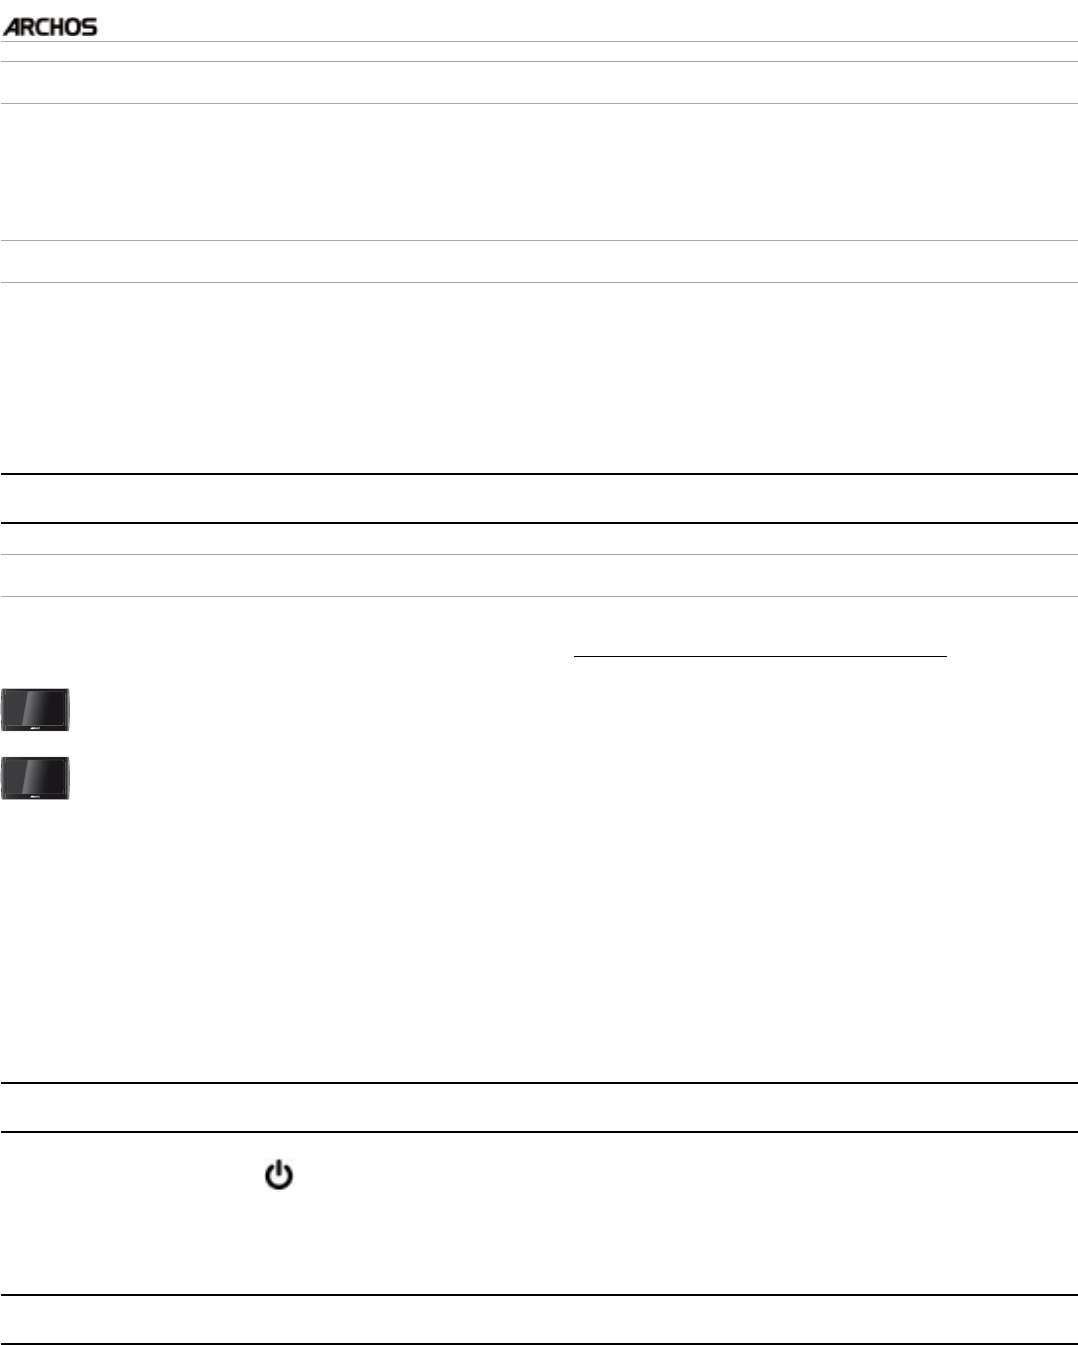
Press and hold to turn your ARCHOS on/off.*
The green LED indicator lights up when the device is on.
•
•
* When you keep the Power button held down, two messages will appear, one
after the other. If you release the button during the rst message, your device
will keep using a small amount of battery power to allow a quick start up.
If you do not plan on using the ARCHOS for an extended period of time, keep
the button held down until you see a second message appear. The device will
shut down completely, and there will be absolutely no battery usage.
VOl Volume button: to increase/decrease volume.
LED INDICATORS
Chg Battery charge indicator
light on: the battery is charging
blinking: the battery is fully charged
•
•
CONNECTORS
On the side of the device:
7Power jack : charge the battery of your ARCHOS device
(see
Charging the Battery
).
•
Headphone Jack: to connect headphones.•
ARCHOS 7
Underneath the device:
These connectors allow you to:
Connect your ARCHOS to a computer (see
Connecting the ARCHOS to a Computer
)
5Charge the battery of your ARCHOS (see
Charging the Battery
)•
Connect an optional accessory. See
ARCHOS Accessories.
•
•
MANUAL
FCC
5g+ INTRODUCTION > P. 5
BUILT-IN LOUDSPEAKER
A single speaker (ARCHOS 5) or two speakers (ARCHOS 7) are located on the front of
the device.
LEG STAND
Your ARCHOS is equipped with a leg stand, located on the back of the device.
Carefully pull it out, and it will allow your ARCHOS to stand by itself on a at,
stable surface.
fIrsT TIMe usage
CHARGING THE BATTERY
Before using your ARCHOS for the rst time, completely charge its battery:
5Connect the USB cable to the ARCHOS and to a running computer.•
7Simply plug the ARCHOS Charger/Adapter into the power jack. The ARCHOS
has a removable battery. To learn how to replace it, see: Troubleshooting.
•
The ARCHOS will turn on and start charging:
The Chg LED indicator is on while the battery is charging. It will blink when
the battery is fully charged.
A lightning bolt symbol will ash over the battery icon in the upper right corner
of the screen while the battery is charging.
TurnIng The arChOs On/Off
Press and hold the button to turn your ARCHOS on/off. See
ARCHOS Description
.
The green LED indicator lights up when the device is on.
The InsTallaTIOn wIzard
The rst time you turn on the ARCHOS, the installation wizard will help you con-
gure the main functions of your ARCHOS: the language, the WiFi connection, the
clock, etc.
At the end of the wizard, you will be requested to register your product (a WiFi con-
nection is required) so that you have access to our technical support as well as FREE
and PURCHASABLE offers from our website and from the ARCHOS Media Club.
•
•
•
-
-
•
•
•
•
MANUAL
FCC
5g+ INTRODUCTION > P. 6
usIng The arChOs InTerfaCe
INTERFACE DESCRIPTION
Status Bar
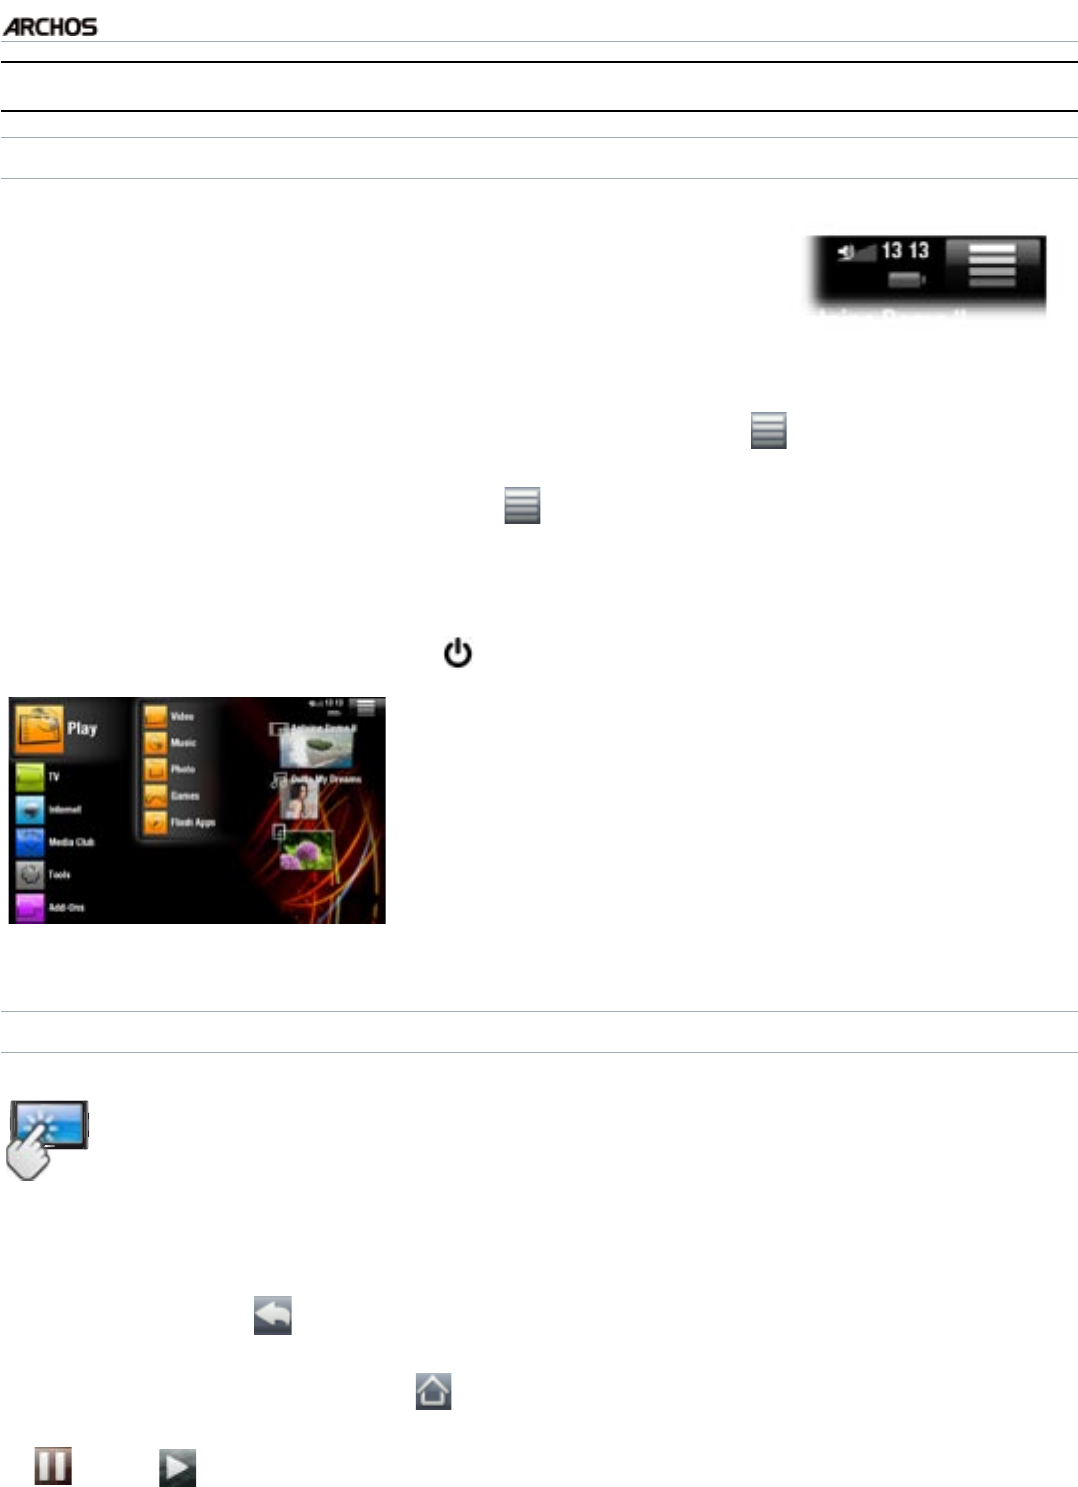
In the top right corner of the screen, the status bar indi-
cates the volume, the battery level, the current time of day
and the
WiFi connection
status.
•
Contextual Menu
In the upper right corner of the screen, tap on the Menu icon to display available
menu items. The available options will vary, depending on where you are in the interface.
On the Home screen, the Menu icon allows you to:
manage the Home screen shortcuts.
lock your device’s touchscreen. This can be useful if your ARCHOS is in your
pocket, for example, and you do not want to touch the screen by accident. To
unlock the device, press the button. A conrmation screen will pop up.
Home Screen
This is the main screen of your ARCHOS, show-
ing its main functions.
Choose one of the main categories, on the left
side of the screen (ex: “Play”), then select a sub-
category (ex: “Video”).
The right side of the Home Screen can contain up to
four media items. These are considered as shortcuts.
•
•
•
USING THE TOUCHSCREEN
Your ARCHOS is equipped with a touchscreen. Below is a description of the
main tactile screen areas and a few tips on how to use the touchscreen.
Main Touchscreen Actions
In the different applications, you can go back one level in the interface by tapping
on the Back icon (in the top right corner of the screen).
Wherever you are in the interface, you can go back directly to the Home screen
by tapping on the Home icon (in the top left corner of the screen).
While playing a video or song, you can pause/resume it by tapping on the Pause
/ Play icon.
•
•
-
-
•
•
•
MANUAL
FCC
5g+ INTRODUCTION > P. 7
Other Touchscreen Actions
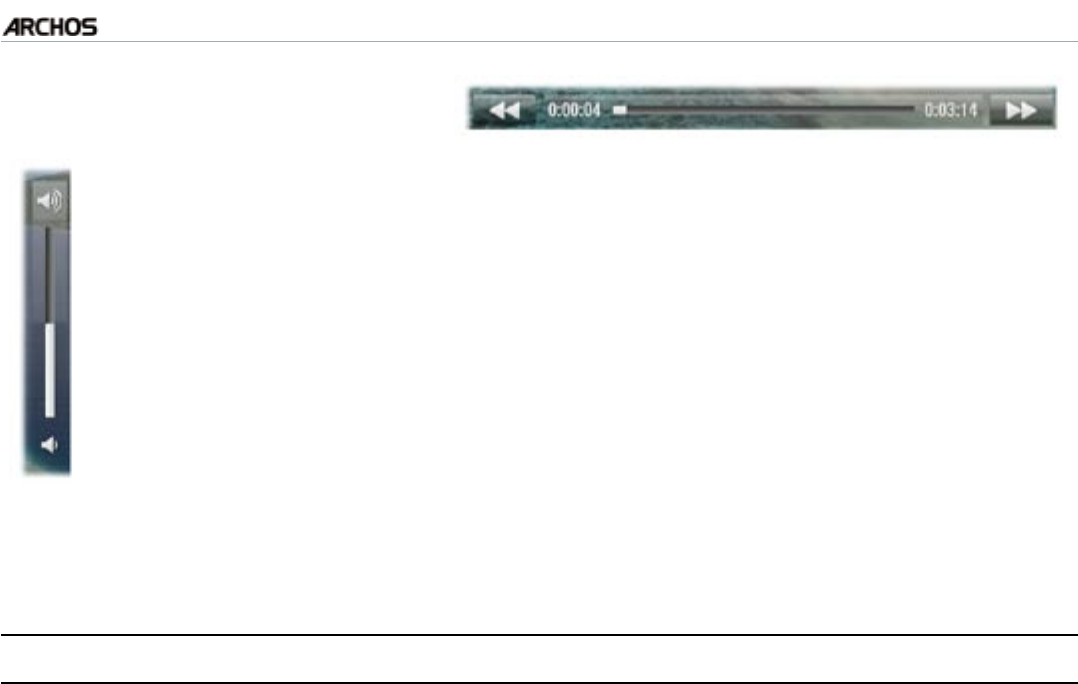
When watching a video or listening to music, you can tap on the progres-
sion bar to go directly to a different location in the video or song. You can
also use your nger to drag the cursor in the progression bar to another
location in the video or song.
In the screens where it appears, the volume bar can be dragged in the same
way.
In the different browsers (File, Music, Video, Photo, etc.), you can drag the
scroll bar up and down to scroll the le list up and down. You can also scroll
faster by tapping above or below the cursor in the scroll bar.
•
•
•
In the Web browser or the PDF viewer, you can scroll up and down by tapping on
the page and dragging it up or down (be careful however not to tap on a link!).
PrOduCT Care
Your ARCHOS is an electronic product that needs to be treated with care:
Do not subject it to shock or vibration.
Do not subject it to heat, keep it ventilated (especially when connected to a com-
puter).
Keep it away from water and excessively humid areas.
Keep it away from high electromagnetic elds.
Do not open it up. There are no user-serviceable parts inside. Opening will void
your warranty.
•
•
•
•
•
•
MANUAL
FCC
5g+ PLAYING VIDEO > P. 8
1. PlayIng VIdeO
In the Home screen, tap on “Play”, then choose the “Video” icon to en-
ter the Video mode.
1.1 brOwsIng ThrOugh yOur VIdeOs
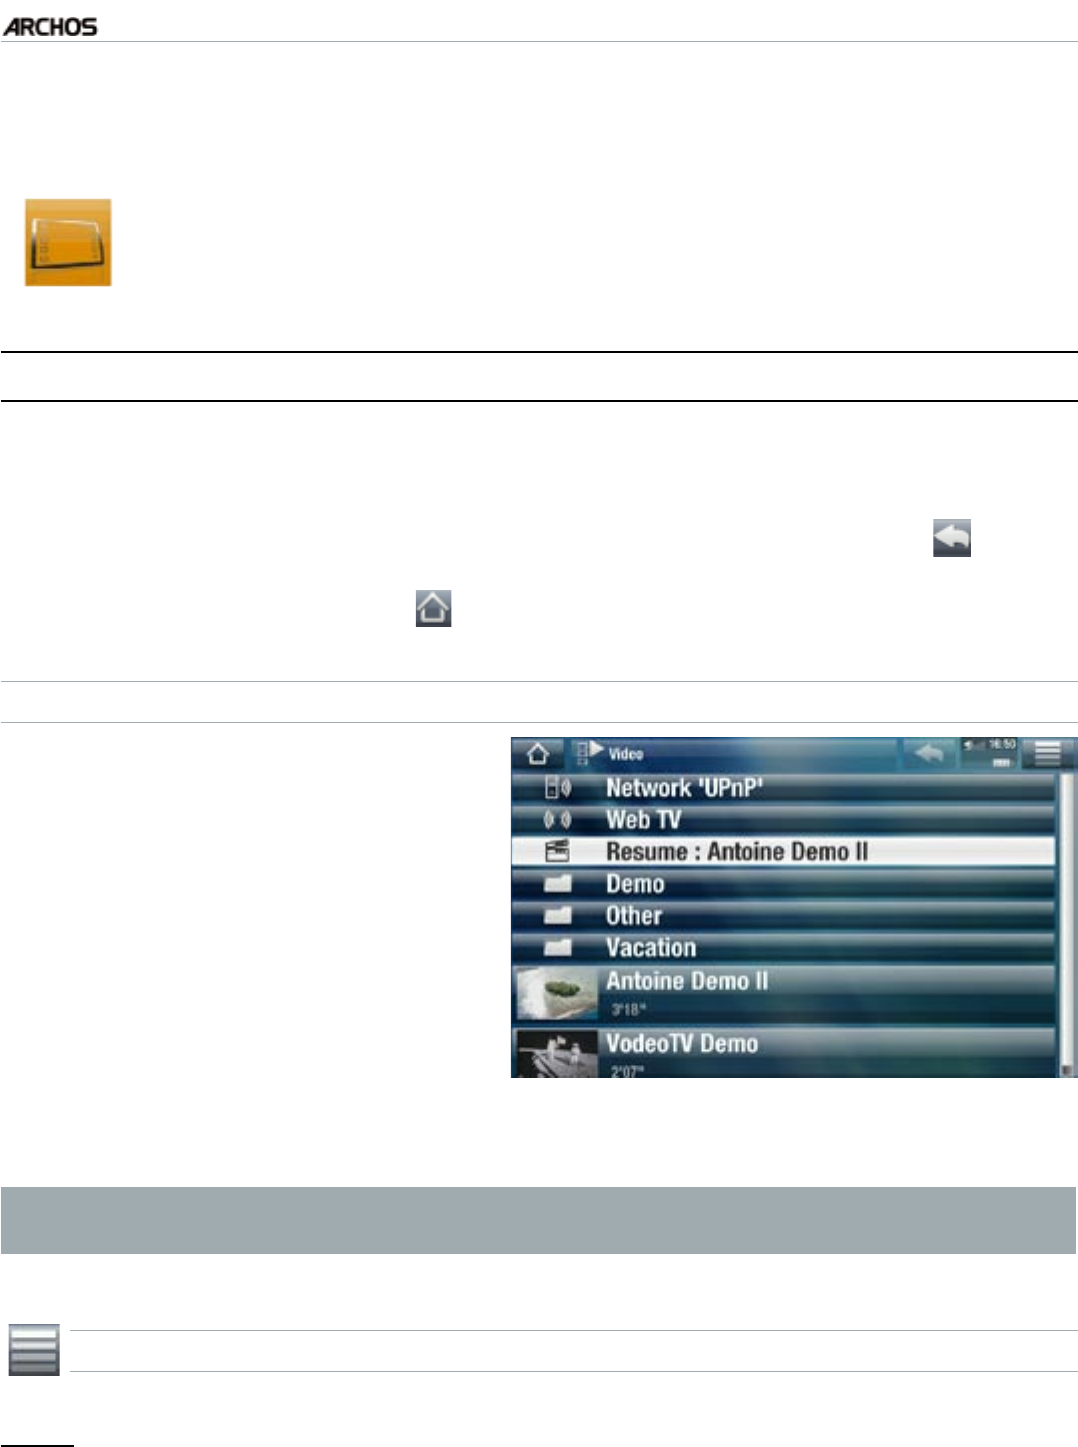
The “Video” browser allows you to navigate through the Video folder of the
ARCHOS hard drive.
You can go back one level in the interface by tapping on the Back icon .
Wherever you are in the interface, you can go back directly to the Home screen
by tapping on the Home icon .
THE VIDEO BROWSER
The rst screen of the Video mode
shows you all the videos and sub-
folders located in the Video folder.
The “Resume” line allows you to
resume the last-played video le, if
it was interrupted before the end. If
the “Resume” line does not appear,
it means that no video le playback
can be resumed.
•
•
To play a video, highlight it, then open it. If a video is in a subfolder of the Video
folder, open the subfolder, and you will see it.
In the “Video” browser, each video le appears with a thumbnail, displayed on
the left of the le’s name.
VIDEO BROWSER MENU ITEMS
“Info”
displays a message box with information about the highlighted video le.
•
•
•
-
MANUAL
FCC
5g+ PLAYING VIDEO > P. 9
“File Management”
“Rename”: allows you to change the name of the highlighted video le using the
virtual keyboard. See:
Using the Virtual Keyboard
.
“Delete”: allows you to delete the highlighted video le. A conrmation screen
will pop up.
“Permissions”: allows you to dene the le/folder as adult content, so that other
users can’t see it. To use this, your “Parental Mode” needs to be set to “Adult (un-
restricted access)”. See Parental Control Settings.
“Create Home Shortcut”
Creates a shortcut to this video on the Home screen.
“Bookmark”
“Resume”: will resume playing the highlighted video from the bookmark.
“Clear”: will remove the bookmark from the highlighted video le.
“Bookmark” only appears in the menu when a bookmarked video le is highlighted.
See Video Playback Menu Items to set a bookmark on a given video.
“Search”
Allows you to search for a particular video by entering a few letters or a word.
See:
Using the Virtual Keyboard
.
“Settings”
you can choose to display the Video Player settings screen (see:
Video Player
Settings
) or the “Sound” settings screen (see:
“Sound” Settings
).
1.2 VIdeO PlaybaCk
To play a video, highlight the le and open it.
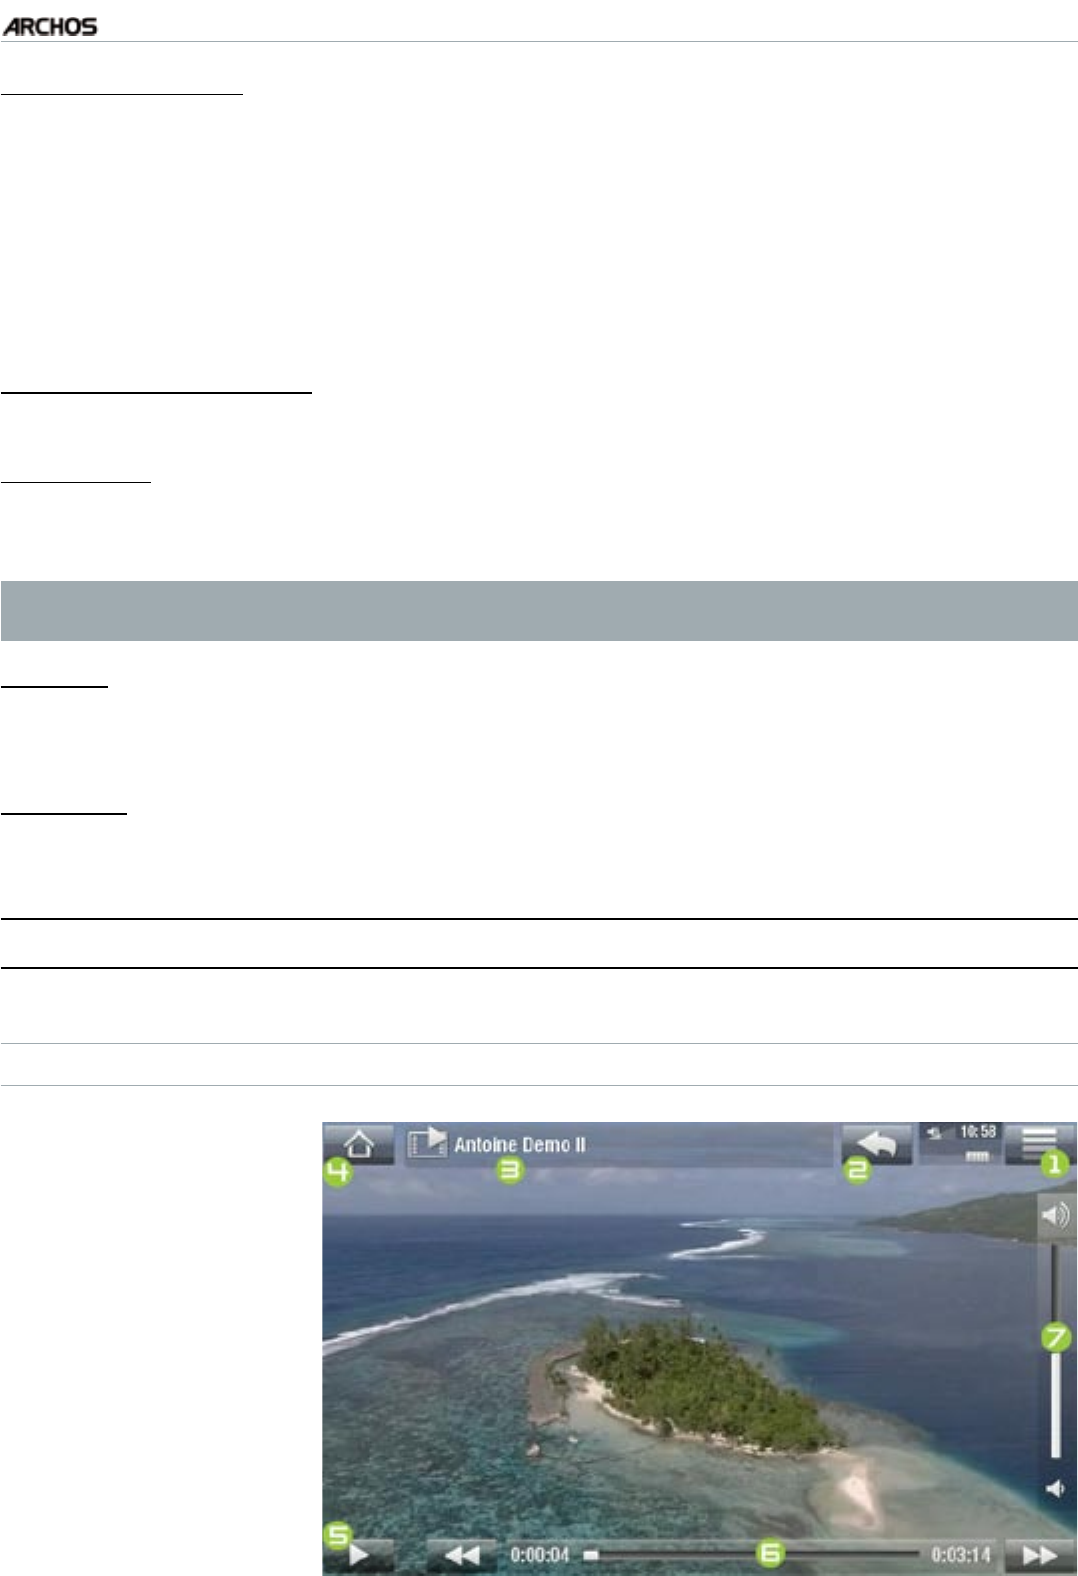
VIDEO PLAYBACK SCREEN
1. Menu icon
2. Back icon
3. video le name
4. Home icon
5. play / pause icon
6. video progression bar
7. volume level
-
-
-
-
-
-
-
-
MANUAL
FCC
5g+ PLAYING VIDEO > P. 10
VIDEO PLAYBACK TOUCHSCREEN CONTROLS
To pause/resume the video, tap on the Pause / Play icon (see n° 5 in the
previous screen).
To display the menu overlay, tap once anywhere on the screen. To make it disap-
pear, tap again.
You can tap on the progression bar to go directly to a different location in the
video. You can also use your nger to drag the cursor in the progression bar to
another location in the video (see n° 6).
The volume bar can be dragged in the same way (see n° 7).
To display the available menu items, tap on the menu icon (see n° 1).
To stop the video and go back to the “Video” browser, tap on the Back icon
(see n° 2).
To exit the Video mode and go back directly to the Home screen,
tap
on the Home icon (see n° 4).
VIDEO PLAYBACK MENU ITEMS
“Info”
displays a message box with information about the current video le.
“Soundtrack” and/or “Subtitles”
allows you to select a different audio track*.
allows you to choose subtitles**.
* Only if the video le contains several audio tracks.
** Only if the subtitles are in a separate le. The supported le types are: .srt,
.ssa, .sub (text based) and .smi.
“Format”
allows you to change the way the image is displayed.
“Auto”: adjusts the video size to best adapt to the built-in screen (or TV, with the
optional DVR Station, Mini Dock or Battery Dock: see
ARCHOS Accessories
).
“Full Screen”: enlarges the picture to ll the screen. In order to t the ARCHOS
screen, your device might need to cut small parts of the image, most likely at the
top and bottom.
“Maximized”: enlarges the picture to ll the screen, assuming the image has an
aspect ratio of 2.35 with black bands at the top and bottom.
“Original”: displays the entire picture in its original format.
“Speed”
will play the current video in slow motion or high speed.
while paused in slow motion, you can advance frame by frame, using the right arrow.
•
•
•
•
•
•
-
-
-
-
-
-
-
-
-
-
MANUAL
FCC
5g+ PLAYING VIDEO > P. 11
“Set”
“Bookmark”: sets a bookmark at the current spot in the video. Only one bookmark
per le is allowed. You can bookmark up to 32 les. Bookmarked videos will appear,
in the “Video” browser, with a bookmark symbol and a progression bar.
to resume playing a video from a bookmark, go to the “Video” browser and high-
light the bookmarked video le. Select the “Bookmark” menu item, then choose
“Resume” (“Clear” will remove the bookmark from the video).
“Thumbnail”: saves the current image as a new thumbnail image in the “Video”
browser.
“Wallpaper”: the current image will be dened as your device’s background image.
“Settings”
you can choose to display the Video Player settings screen (see:
Video Player
Settings
) or the “Sound” settings screen (see:
“Sound” Settings
).
1.3 VIdeO Player seTTIngs
In the Video mode, you can access the Video Player settings screen by using the
“Settings” menu item.
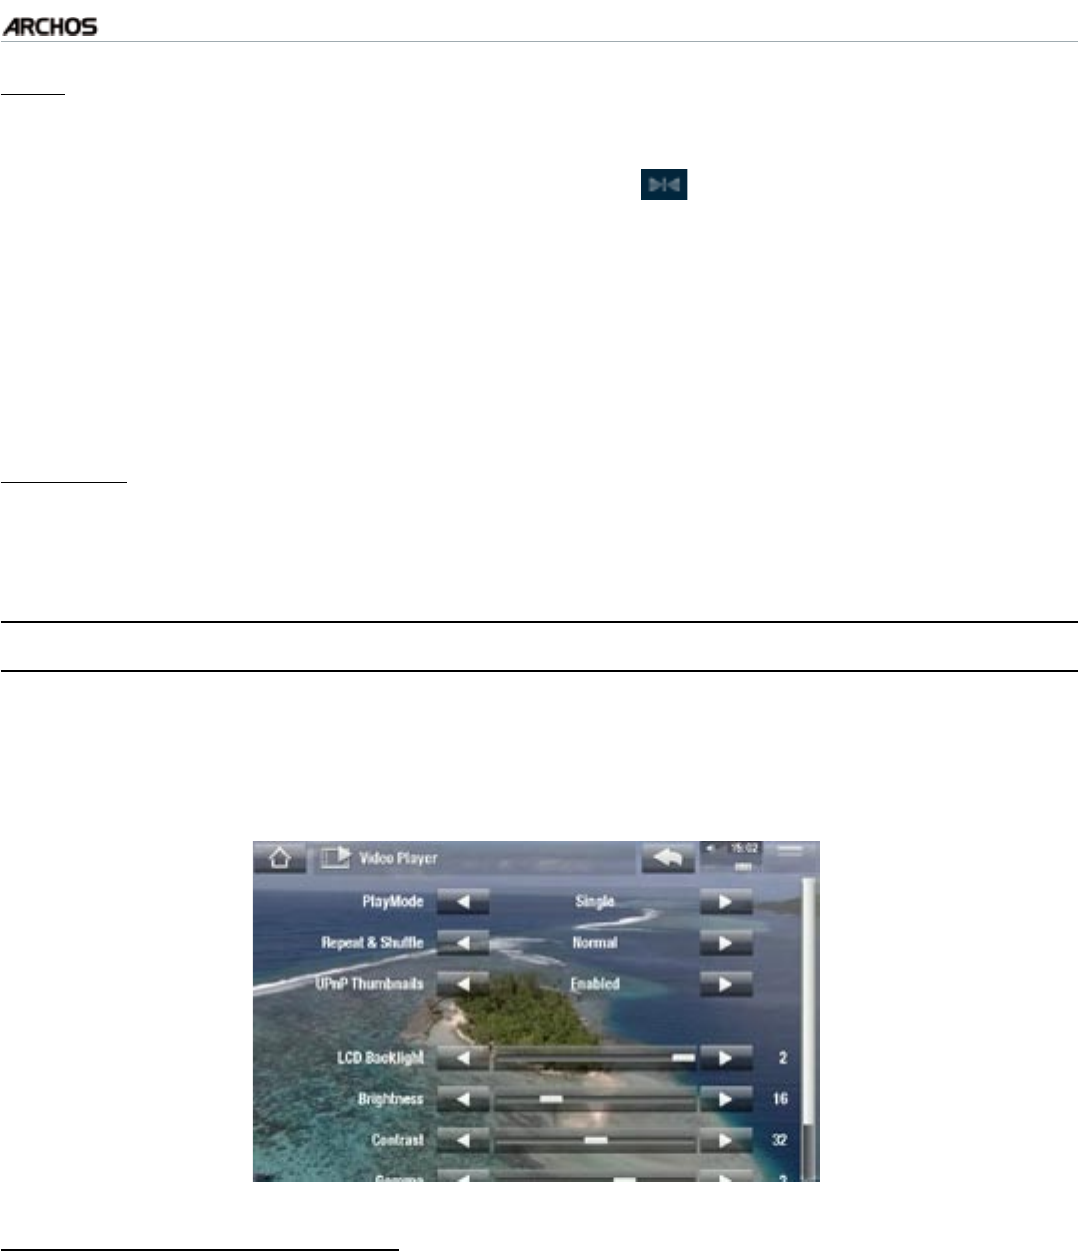
Use the left/right arrows to select a different setting for a parameter.
“PlayMode”, “Repeat & Shufe”
the following table explains how the video player will work according to the set-
tings you chose in “PlayMode” AND “Repeat & Shufe”.
-
-
-
-
-
•
•
-
MANUAL
FCC
5g+ PLAYING VIDEO > P. 12
“PlayMode” “Repeat &
Shufe” What the video player does...
“Single” “Normal”plays the current video le and then stops.-
“Repeat”plays the current video le repeatedly.-
“Folder”“Normal”plays all the video les of the current folder
one after the other, and then stops.
-
“Repeat”plays all the video les of the current folder
one after the other. This will be repeated in-
denitely.
-
“Shufe” plays all the videos of the current folder ran-
domly.
-
“UPnP Thumbnails”
Here you can enable/disable the video thumbnails while browsing through your
PC’s shared videos. See:
Playing your PC’s Shared Media Files (UPnP)
. If you
choose “Disabled”, you will be able to browse through your PC’s shared videos
faster.
“LCD Backlight”, “Brightness”, “Contrast” and “Gamma”
adjusts the level of backlight/contrast/brightness/gamma of the built-in screen.
you can also reset the LCD parameters to the default values (“Reset” button).
1.4 PuTTIng VIdeOs OnTO yOur arChOs
The ARCHOS Media Club gives you the possibility to purchase or rent videos
directly from your ARCHOS, without using a computer. See: The ARCHOS
Media Club.
There are two main methods to transfer the videos stored on your computer onto the
ARCHOS:
Windows Media® Player: copy your videos using Windows Media® Player 10 or
higher*:
Use Windows Media® Player 10 or higher* (Sync tab) to synchronize your
computer’s video les to the ARCHOS. See
Putting Files onto the ARCHOS
for more details.
* For best performance, we recommend that users update to Windows Media®
Player 11 or higher.
-
-
-
1.
MANUAL
FCC
5g+ PLAYING VIDEO > P. 13
Windows® Explorer: Copy and paste your video les from your computer into the
Video folder of your ARCHOS.
To learn how to connect/disconnect the ARCHOS from your computer, see the
Transferring Files
section.
CREATING COMPATIBLE VIDEO FILES WITH YOUR COMPUTER
If some of your videos don’t play on your ARCHOS, you may need to convert them to
a compatible format:
The easiest way to do this is by using Windows Media® Player 10 or higher to
transfer videos to your ARCHOS. Windows Media® Player will automatically con-
vert most formats to the WMV format that your device can play.
See your Windows Media
®
Player help instructions for more information.
If you don’t want to use Windows Media® Player, a search on the Internet should
allow you to nd suitable utility programs to do this job.
If you would like to simply copy and paste unprotected DVD video les from your
PC onto your ARCHOS without converting them to WMV format, you can pur-
chase the Cinema plug-in from the ARCHOS website (www.archos.com) or from
the Media Club. The same is also true for video podcasts in the H.264 format. In
this case, purchase the Video Podcast plug-in.
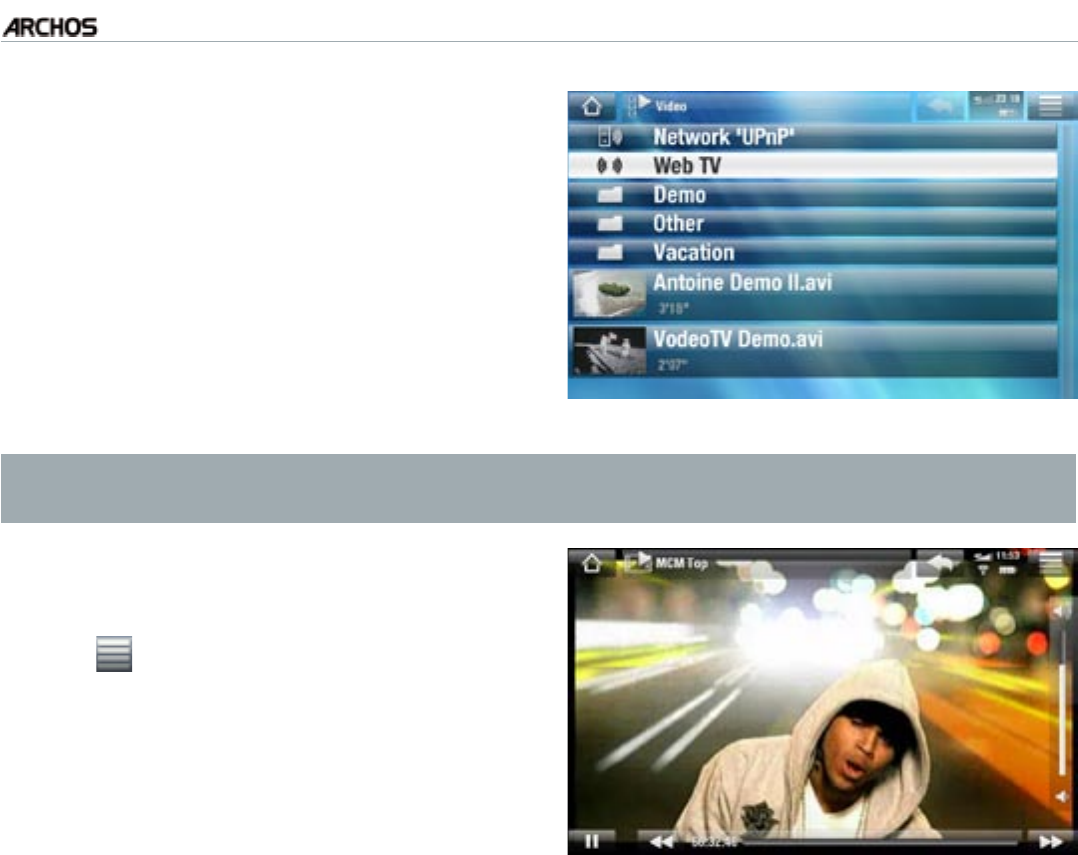
1.5 PlayIng yOur PC’s shared VIdeOs (uPnP)
When connected to your home WiFi network, your ARCHOS gives
you the possibility to watch, directly on your device, shared videos
stored in your PC’s Windows Media® Library.
•
For this to work, you will need a WiFi connection and Windows Media® Player 11
or higher* installed on your PC.
The ARCHOS uses the UPnP (Universal Plug-and-play) standard to stream shared
videos from your PC’s Windows Media® Library.
See:
Playing your PC’s Shared Media Files (UPnP)
.
* There are other products on the market that also can share media les using
the UPnP standard.
1.6 waTChIng web TV
In order to be able to watch numerous Internet TV channels, directly on your ARCHOS,
your device will need to be registered.
2.
•
•
•
•
•
•
MANUAL
FCC
5g+ PLAYING VIDEO > P. 14
From the Home Screen, tap on “Play”,
then choose “Video”.
Select “Web TV”. If your device is not
connected to the Internet, it will try to
make a connection.
The “Web TV” interface is organized by cat-
egory, such as “Location”, “Genre”, “Most
Popular Stations” etc. Browse the catego-
ries to nd the channel you want to watch.
1.
2.
3.
To nd more information about how to connect to the Internet, see: Connecting
to the WiFi
The TV channel you select will open in
the video player. Selecting the menu
icon will display several options:
“Info”: to view the information con-
cerning the TV channel.
“Format”: allows you to change the
way the image is displayed
4.
-
-
“Add to favorites” / “remove favorite”: adds the current Web TV station as a
favorite (or removes it from the favorites).
“Settings”: you can choose to display the Video Player settings screen (see:
Video Player Settings
) or the “Sound” settings screen (see:
“Sound” Settings
).
-
-
MANUAL
FCC
5g+ PLAYING MUSIC > P. 15
2. PlayIng MusIC
In the Home screen, tap on “Play”, then choose the “Music” icon to en-
ter the “Music” player.
2.1 brOwsIng ThrOugh yOur MusIC fIles
There are two types of views for you to browse through your songs: the Music
Library and the Music Browser.
In both views, you can go back one level in the interface by tapping on the Back
icon . Wherever you are in the interface, you can go back directly to the Home
screen by tapping on the Home icon .
When you leave the music playback screen while the song is still playing,
it will keep playing in the background. This allows you to browse your hard
drive, view your photos or surf the Web while listening to music. To stop the
song, tap on pause in the music playback screen and then tap on Home.
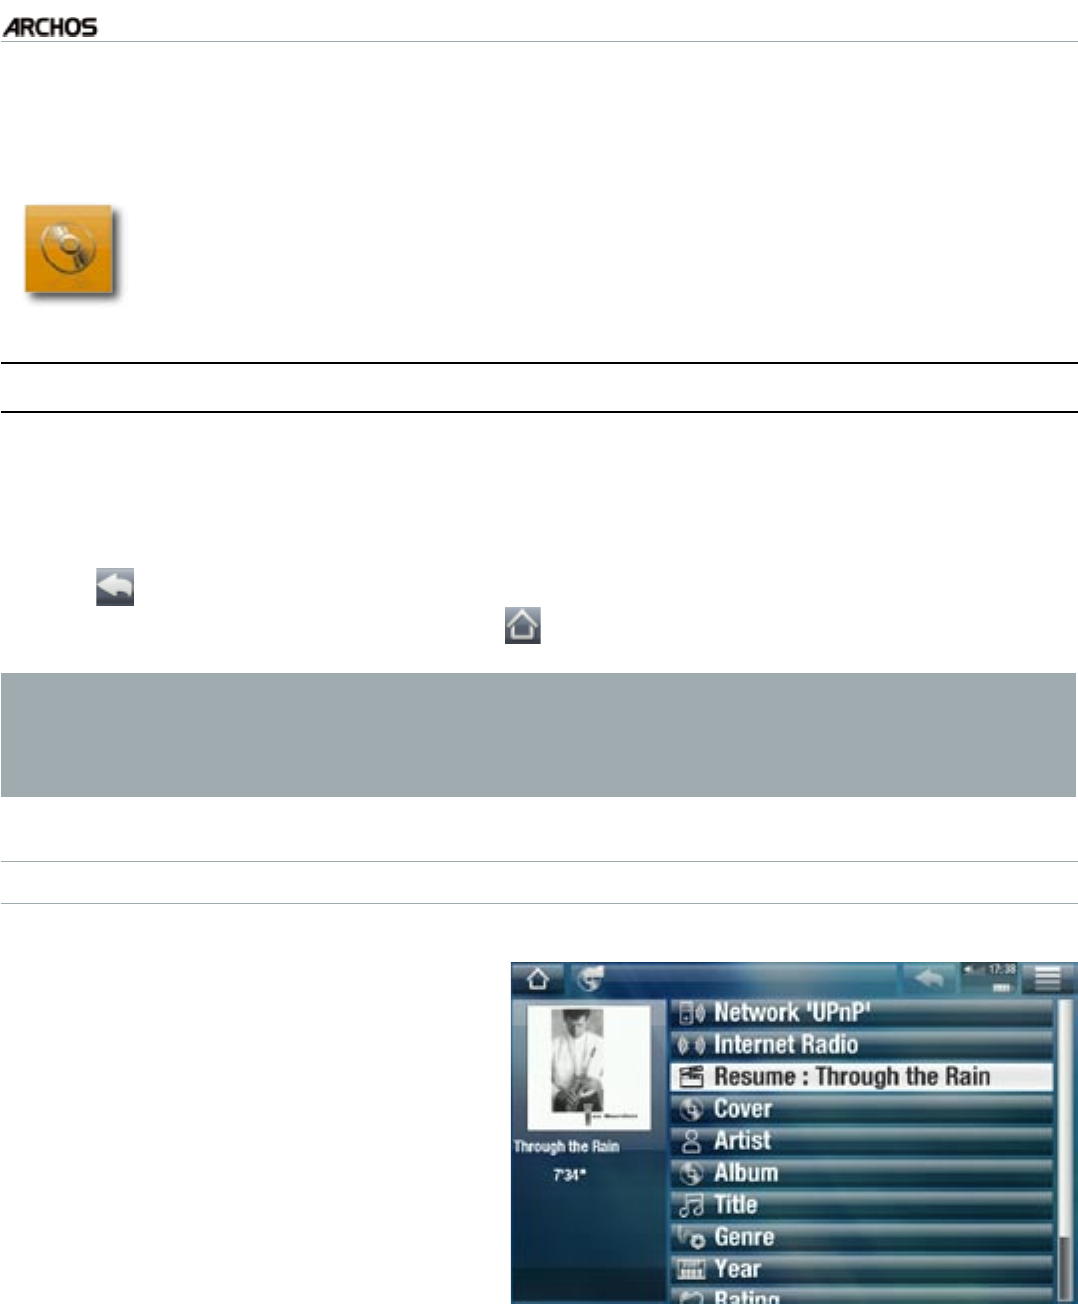
THE MUSIC LIBRARY
The Music Library (default view)
shows your music sorted by catego-
ries (Cover, Artist, Album, Genre, etc.)
if your music les contain these song
information tags.
When new music is copied to the
ARCHOS, the Music Library will be
updated automatically.
If some of your music les do not con-
tain information tags, they will be classi-
ed as (Unknown) in the Music Library.
•
•
•
The “Resume” line allows you to resume the last-played music le, if it was in-
terrupted before the end. If the “Resume” line does not appear, it means that no
music le playback can be resumed.
•
•
•
MANUAL
FCC
5g+ PLAYING MUSIC > P. 16
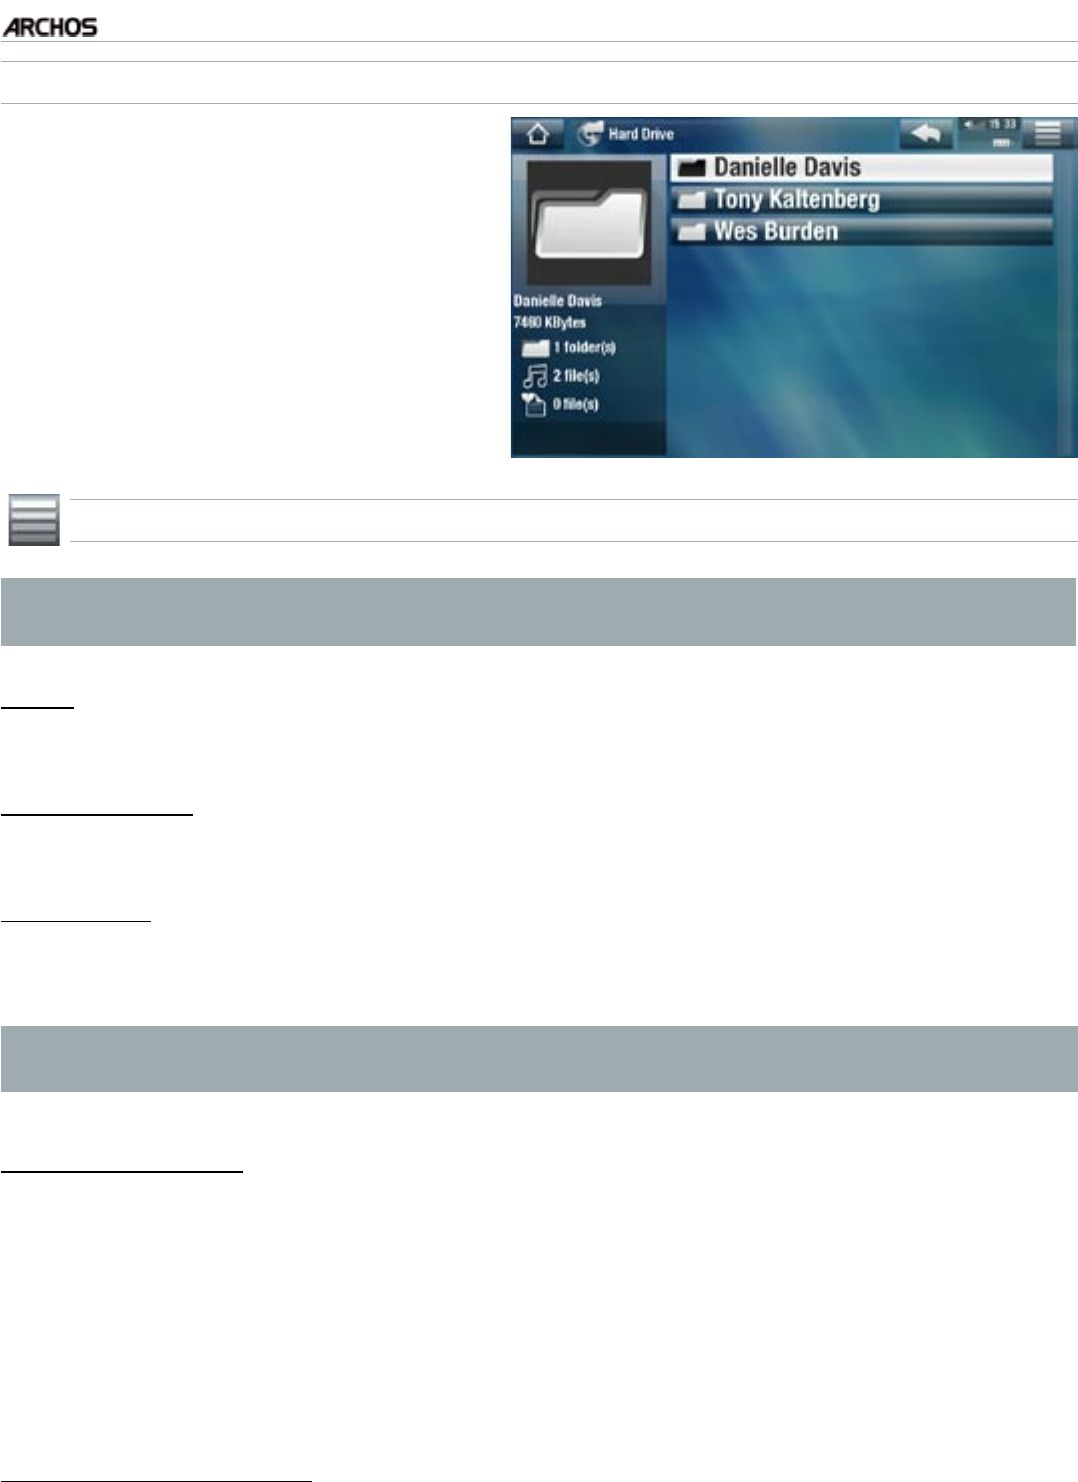
THE MUSIC BROWSER
The music browser allows you to
navigate through the Music folder
of your device’s hard drive.
To use it, select “Hard Drive” in the
initial Music Library view.
•
•
MUSIC LIBRARY AND MUSIC BROWSER MENU ITEMS*
* The available menu items will vary depending on the mode you chose (Music
Library or Music Browser).
“Info”
displays a message box with information about the highlighted music le.
“Show playlist”
opens a playlist edition window on the right (see:
Playlists
).
“Bookmark”
“Resume”: will resume playing the highlighted song from the bookmark.
“Clear”: will remove the bookmark from the highlighted music le.
“Bookmark” only appears in the menu when a bookmarked music le is high-
lighted.
“File Management”
“Rename”: allows you to change the name of the highlighted music le using the
virtual keyboard. See:
Using the Virtual Keyboard
.
“Delete”: allows you to delete the highlighted music le. A conrmation screen
will pop up.
“Permissions”: allows you to dene the le/folder as adult content, so that other
users can’t see it. To use this, your “Parental Mode” needs to be set to “Adult (un-
restricted access)”. See Parental Control Settings.
“Create Home Shortcut”
Creates a Home screen shortcut to the highlighted song, artist, album, folder, etc.
-
-
-
-
-
-
-
-
MANUAL
FCC
5g+ PLAYING MUSIC > P. 17
“Search”
Allows you to search for a specic song by entering a few letters or a word. See:
Using the Virtual Keyboard
.
“Settings”
you can choose to display the Music Player settings screen (see:
Music Player
Settings
) or the “Sound” settings screen (see:
“Sound” Settings
).
2.2 MusIC PlaybaCk
Use the scroll bar to browse through the list of audio tracks.
To play a song, highlight the corresponding le and open it.
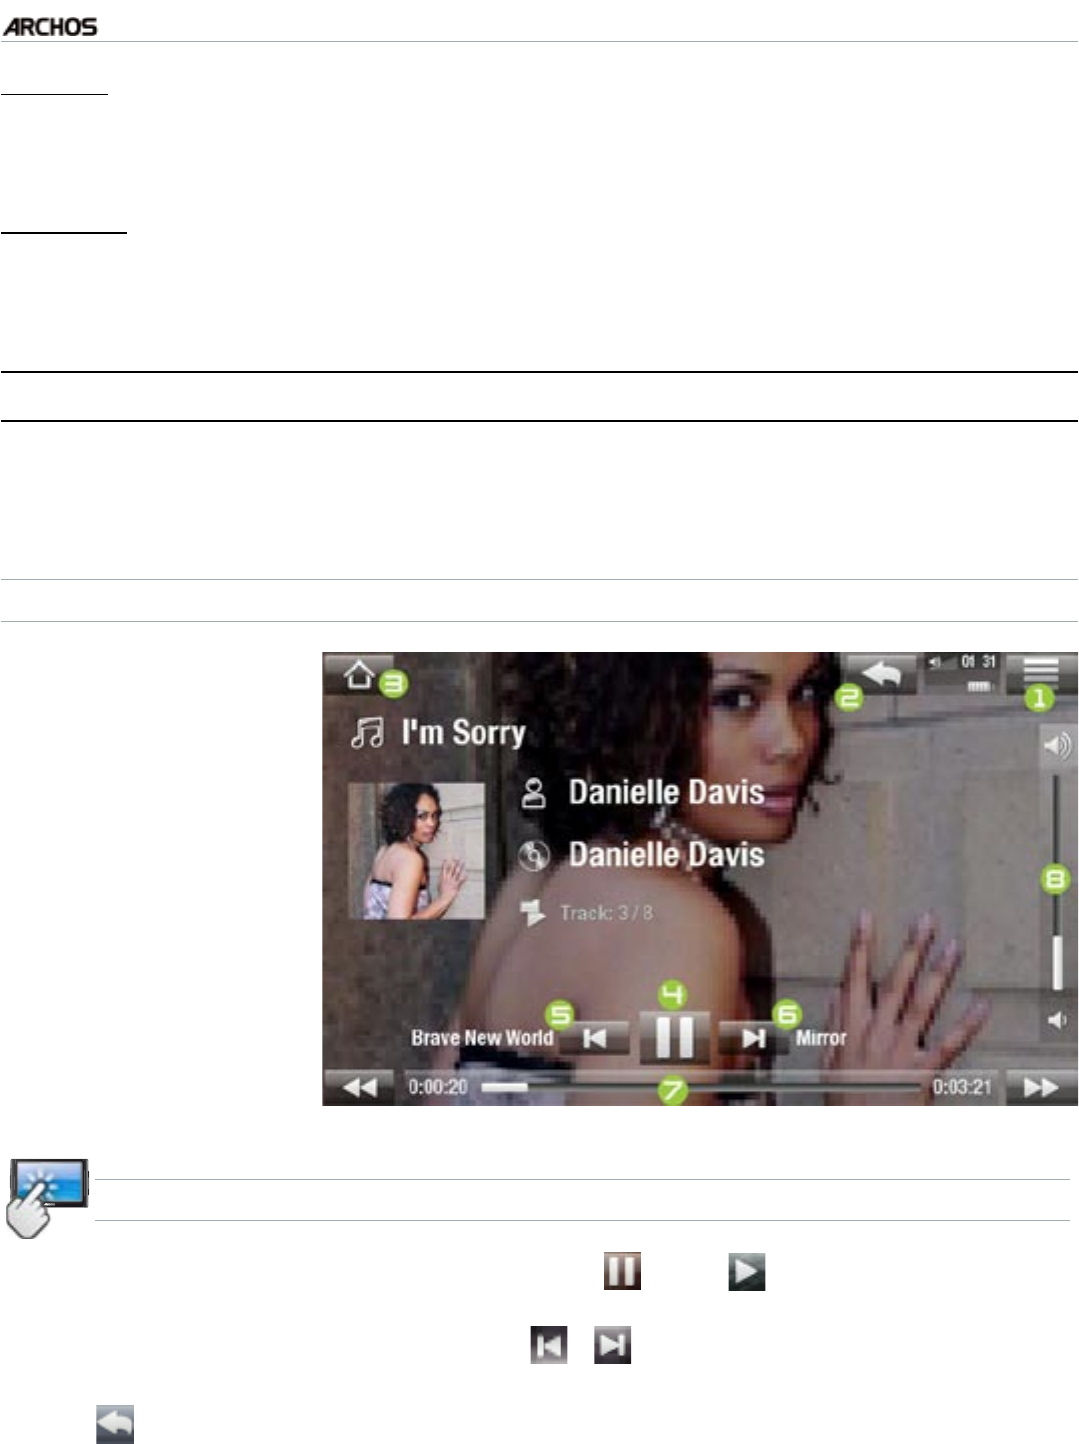
MUSIC PLAYBACK SCREEN
1. Menu icon
2. Back icon
3. Home icon
4. Play / Pause icon
5. previous track
6. next track
7. progression bar
8. Volume level
MUSIC PLAYBACK TOUCHSCREEN CONTROLS
To pause/resume the song, tap on the Pause / Play icon (see n° 4 in the
previous screen).
To play the previous/next song, tap on / (n° 5 or 6).
To browse through your songs while listening to music, simply tap on the Back
icon . This will take you to the Music Library or browser screen that you
launched the current song from (see n° 2).
You can tap on the progression bar to go directly to a different location in the
song. You can also drag the cursor in the progression bar to another location in
the song (see n° 7).
-
-
•
•
•
•
•
•
MANUAL
FCC
5g+ PLAYING MUSIC > P. 18
The volume bar can be dragged in the same way (see n° 8).
To display the available menu items, tap on the menu icon (see n° 1).
To go back directly to the Home screen, tap on the Home icon
(see n° 3)
.
When you leave the music playback screen while the song is still playing,
it will keep playing in the background. This allows you to browse your hard
drive, view your photos or surf the Web while listening to music. To stop the
song, tap on pause in the music playback screen and then tap on Home.
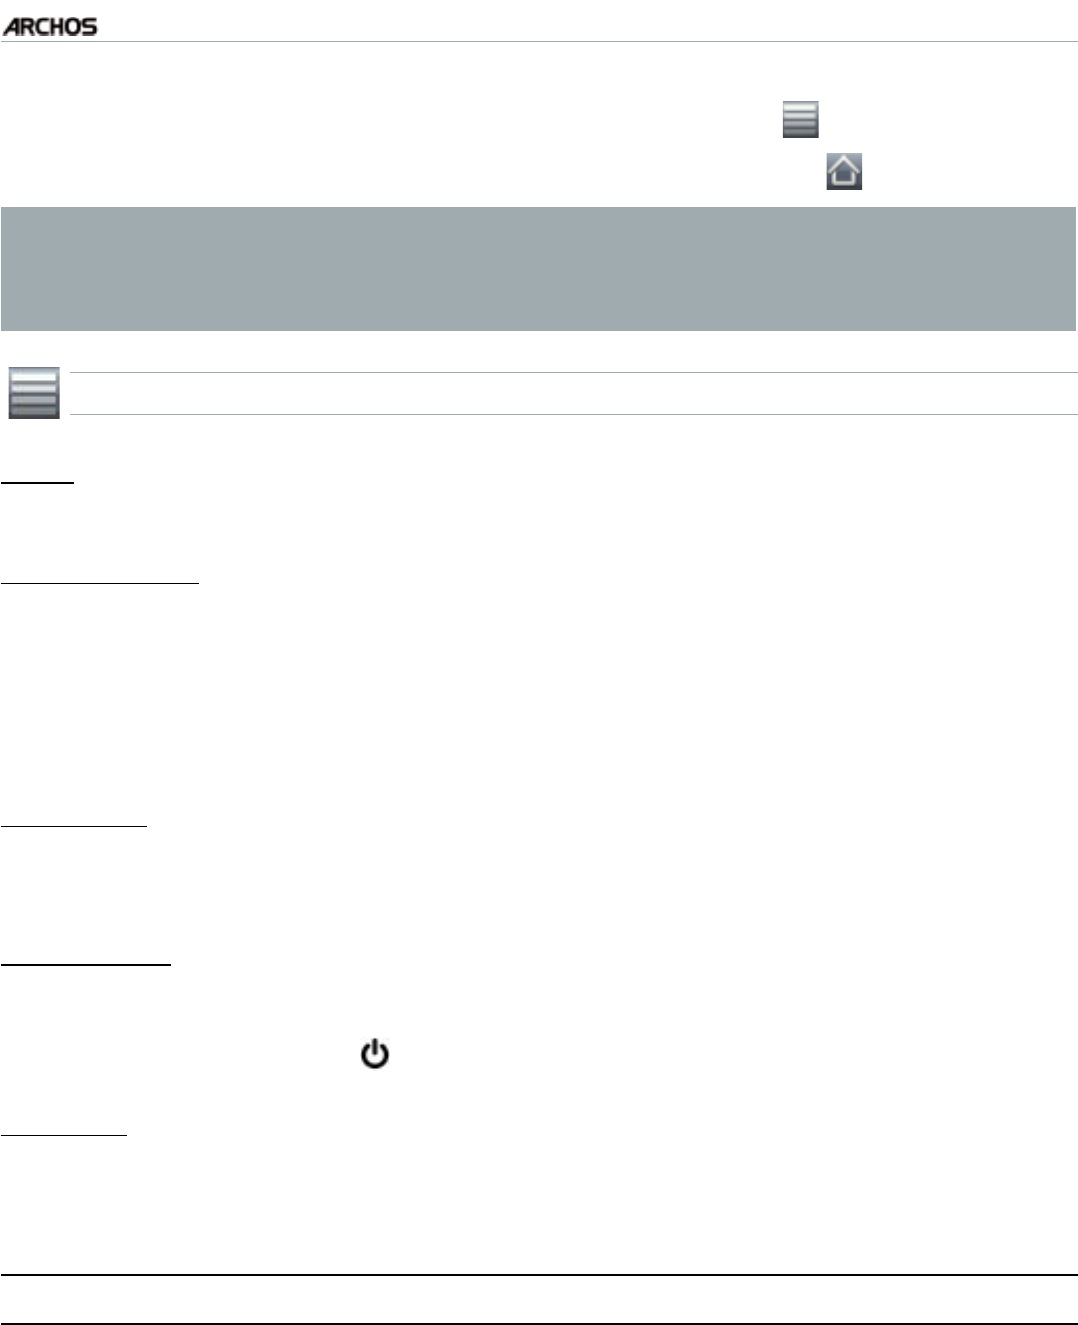
MUSIC PLAYBACK MENU ITEMS
“Info”
displays a message box with information about the current music le.
“Set bookmark”
sets a bookmark at the current spot in the song. Only one bookmark per le is al-
lowed. You can bookmark up to 32 les.
to resume playing a song from a bookmark, go to the Music Library or the Music
Browser, highlight the bookmarked music le. Select the “Bookmark” menu item,
then choose “Resume” (“Clear” will remove the bookmark from the song).
“Set rating”
allows you to give a rating to the current song (1-5) or to remove the rating
(none).
“Lock device”
locks your device’s touchscreen. This can be useful if your ARCHOS is in your
pocket, for example, and you do not want to touch the screen by accident. To un-
lock the device, press the button. A conrmation screen will pop up.
“Settings”
you can choose to display the Music Player settings screen (see next section) or
the “Sound” settings screen (see:
“Sound” Settings
).
2.3 MusIC Player seTTIngs
In the Music mode, you can access the Music Player settings screen by using the
“Settings” menu item.
Use the left/right arrows to select a different setting for a parameter.
•
•
•
-
-
-
-
-
-
•
•

MANUAL
FCC
5g+ PLAYING MUSIC > P. 19
“PlayMode”, “Repeat & Shufe”
the following table explains how the audio player will work according to the set-
tings you chose in “PlayMode” AND “Repeat & Shufe”.
An icon shows the current modes in the Music playback screen.
“PlayMode” “Repeat &
Shufe” What the video player does...
“Single”“Normal”plays the current song and then stops.-
“Repeat”plays the current song repeatedly.-
“Folder”“Normal” plays all the songs of the current folder one
after the other, and then stops.
-
“Repeat”plays all the songs of the current folder one
after the other. This will be repeated inde-
nitely.
-
“Shufe”plays the songs of the current folder ran-
domly.
-
“All”“Normal”plays all the songs of your ARCHOS one
after the other, and then stops.
-
“Repeat”plays all the songs of your ARCHOS one
after the other. This will be repeated inde-
nitely.
-
“Shufe”plays all the songs of your ARCHOS ran-
domly.
-
-
-
MANUAL
FCC
5g+ PLAYING MUSIC > P. 20
“Queue”allows you to select a track to be played after the current one
is nished.
while a track is playing, switch to the browser window, select
a track to highlight it, then open it. This is your queued track,
which will be played after the current track.
you can only queue one track at a time.
-
-
-
“Intro”plays the rst few seconds of each track. You can dene the
length to play in “Intro duration”.
-
“Intro duration”
denes for how long each track will be played when “PlayMode” is set to “Intro”.
2.4 PlaylIsTs
A playlist is a list of audio tracks that the music player will automatically play one
after the other.
On your ARCHOS, you can play, create and edit as many playlists as you want.
Note: when you delete a playlist, you are only deleting the list and not the mu-
sic itself.
PLAYING A PLAYLIST
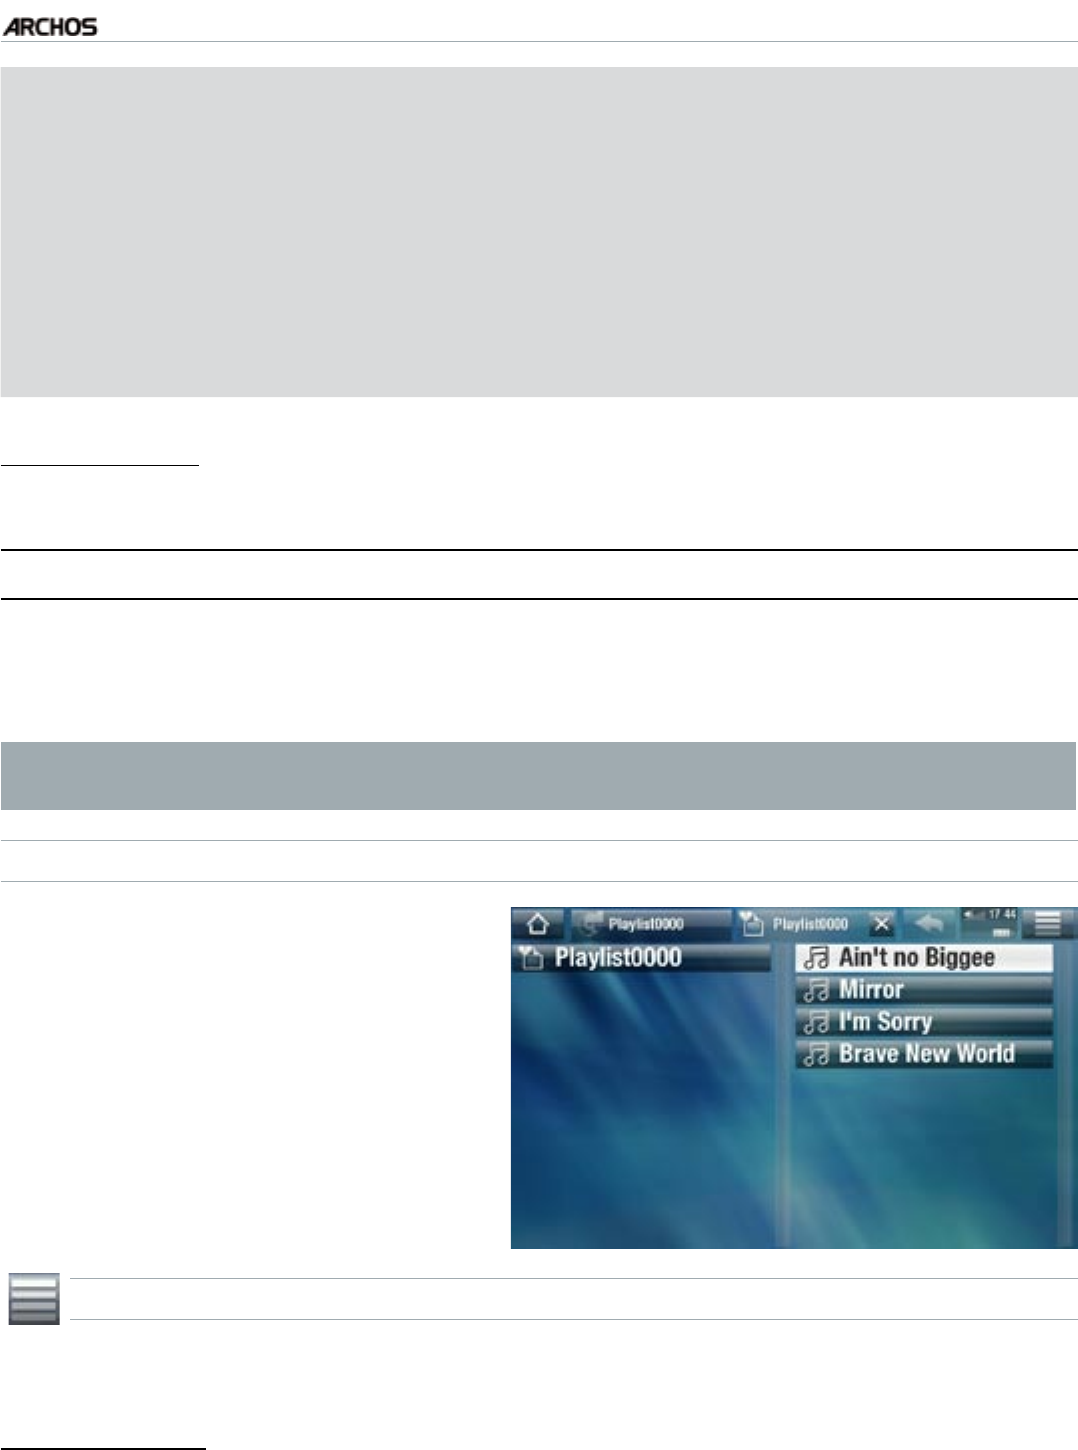
In the Music Library, highlight the
“Playlist” line and open it.
Highlight a playlist and open it. A
panel showing the contents of the
playlist will open on the right.
Open the rst item in the playlist to
start playing from the rst track.
•
•
•
PLAYLIST MENU ITEMS
These menu items appear when a music le is highlighted on the left panel:
“Add to playlist”
“Selected le”: will add the highlighted track at the end of the current playlist.
“All les”: will add all the tracks (from the left panel) at the end of the current playlist.
-
•
•
-
-

MANUAL
FCC
5g+ PLAYING MUSIC > P. 21
“Insert in playlist”
“Selected le”: will insert the highlighted track before the selected item in the
current playlist.
“All les”: will add all the tracks (from the left panel) before the selected item the
current playlist.
These menu items appear when the focus is on the right panel (playlist editor):
“Track”
“Remove track”: deletes the highlighted track from the playlist.
“Move”: allows you to change the position of the highlighted track within the
playlist. Highlight the track you want to move, select the “Track” menu item, then
choose “Move”. Now highlight the position to which you want to move the track
and validate.
“Playlist”
“Clear”: clears the current playlist.
“Shufe”: randomly shufes the order of the songs in the current playlist.
“Save playlist”
“Save”: saves the current playlist to the Playlists folder.
“Save As”: same as “Save”, but it also allows you to give a personalized name to
the playlist. See:
Using the Virtual Keyboard
.
“Hide playlist”
closes the playlist editor.
“Settings”
you can choose to display the Music Player settings screen (see
Music Player
Settings
) or the “Sound” settings screen (see:
“Sound” Settings
).
CREATING A NEW PLAYLIST
While you are in the Music browser, select the “Show playlist” menu item. A
playlist panel will open on the right. By default, the new playlist contains the
same songs as the last opened playlist. You can now start modifying the playlist.
In the left panel, locate the songs you would like to add to your playlist. Highlight
a song and open it to add it to the playlist. Repeat this operation with all the
tracks you want.
To add all the songs of a folder to a playlist: open the folder in the left panel
and highlight the rst song. Then use the “Add to playlist” or “Insert in playl-
ist” menu item and choose “All les”.
-
-
-
-
-
-
-
-
-
-
1.
2.
MANUAL
FCC
5g+ PLAYING MUSIC > P. 22
When you are satised with your new playlist, select the “Save playlist” menu
item, and then choose “Save as”.
Enter the name of your new playlist with the virtual keyboard (see:
Using the
Virtual Keyboard
) and select “OK”.
Use the tabs to jump back and forth between the left and right panels.
EDITING A PLAYLIST
To edit an existing playlist:
In the Music Library, highlight the “Playlist” line and open it.
Highlight the playlist you want to modify and open it. A panel showing the con-
tents of the playlist will open on the right.
You can now add, shufe, move or remove tracks within the playlist, using the
appropriate menu items. The available menu items will vary according to which
panel you selected (see:
Playlist Menu Items
).
After you have made the changes you want, select the “Save playlist” menu item
and choose “Save” to save the playlist. If you wish to give it a different name,
choose “Save As”.
2.5 PuTTIng MusIC OnTO yOur arChOs
There are two main methods to transfer the music stored on your computer onto the
ARCHOS:
Windows Media® Player: copy your music using Windows Media® Player 10 or
higher*:
Use Windows Media® Player 10 or higher* (Sync tab) to synchronize your
computer’s music les to the ARCHOS. See
Putting Files onto the ARCHOS
for more details.
* For best performance, we recommend that users update to Windows Media®
Player 11 or higher.
Windows® Explorer: Copy and paste your music les from your computer into the
Music folder of your ARCHOS.
To learn how to connect/disconnect the ARCHOS from your computer, see the
Transferring Files
section.
3.
4.
1.
2.
3.
4.
1.
2.
MANUAL
FCC
5g+ PLAYING MUSIC > P. 23
TRANSFERRING YOUR CD COLLECTION TO YOUR ARCHOS
You can easily create music les with your computer by using Windows Media® Player
10 or higher to convert your CDs to a playable format for your ARCHOS:
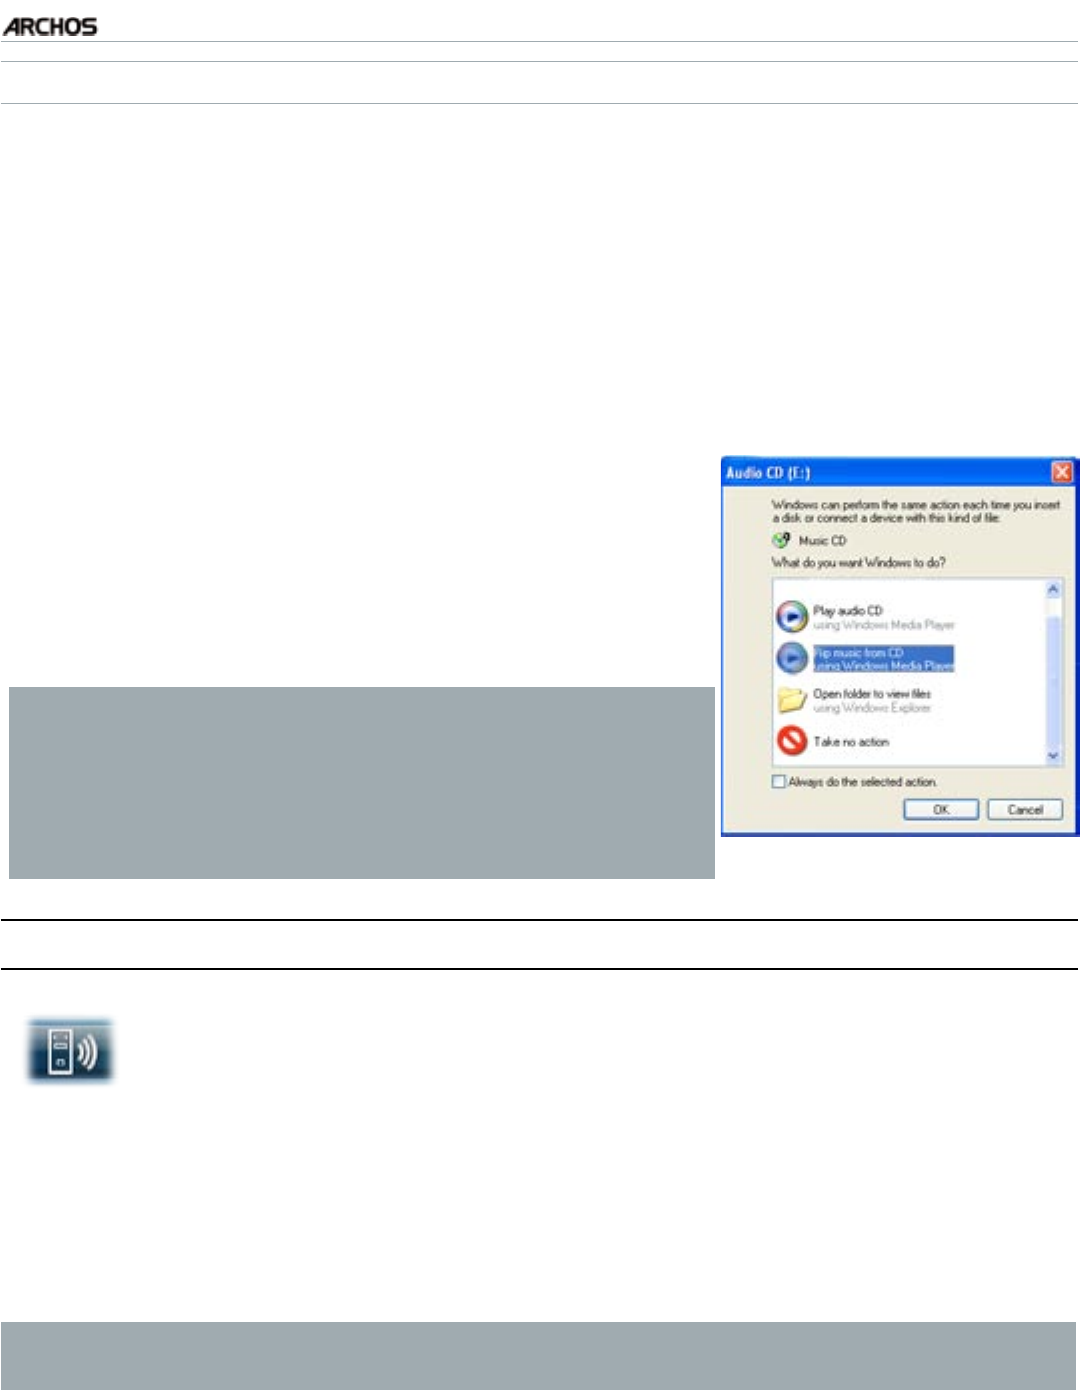
Place a music CD in your computer, and Windows® will ask you what action you
would like to perform.
Choose Rip music from CD, and Windows Media® Player will start ripping the
CD. The songs will be automatically extracted from the CD and encoded into the
MP3 or WMA format, according to what you chose in Windows Media® Player’s
ripping options. The default format is WMA.
Once this is done, the album will become part of
your Music Library.
See
Transferring Files
to learn how to transfer the
ripped music les onto the ARCHOS.
See your Windows Media® Player help instructions for more
information.
Check the laws and regulations in your country
or jurisdiction to know if private copying of your
CDs for your own use is authorized.
Some music CDs have a special copy protection
system that will not allow Windows Media® Player
to make music les from them.
•
•
3.
4.
2.7 PlayIng yOur PC’s shared MusIC (uPnP)
When connected to your home WiFi network, your ARCHOS gives you
the possibility to play, directly on your device, shared music stored in
your PC’s Windows Media® Library.
•
For this to work, you will need a WiFi connection and Windows Media® Player 11
or higher* installed on your PC.
The ARCHOS uses the UPnP (Universal Plug-and-play) standard to stream shared
music from your PC’s Windows Media® Library.
See:
Playing your PC’s Shared Media Files (UPnP)
.
* There are other products on the market that also can share media les using
the UPnP standard.
1.
2.
•
•
•
MANUAL
FCC
5g+ PLAYING MUSIC > P. 24
2.8 lIsTenIng TO web radIOs
In order to be able to listen to thousands of different radio stations and various pod-
casts worldwide, your device will need to be registered.
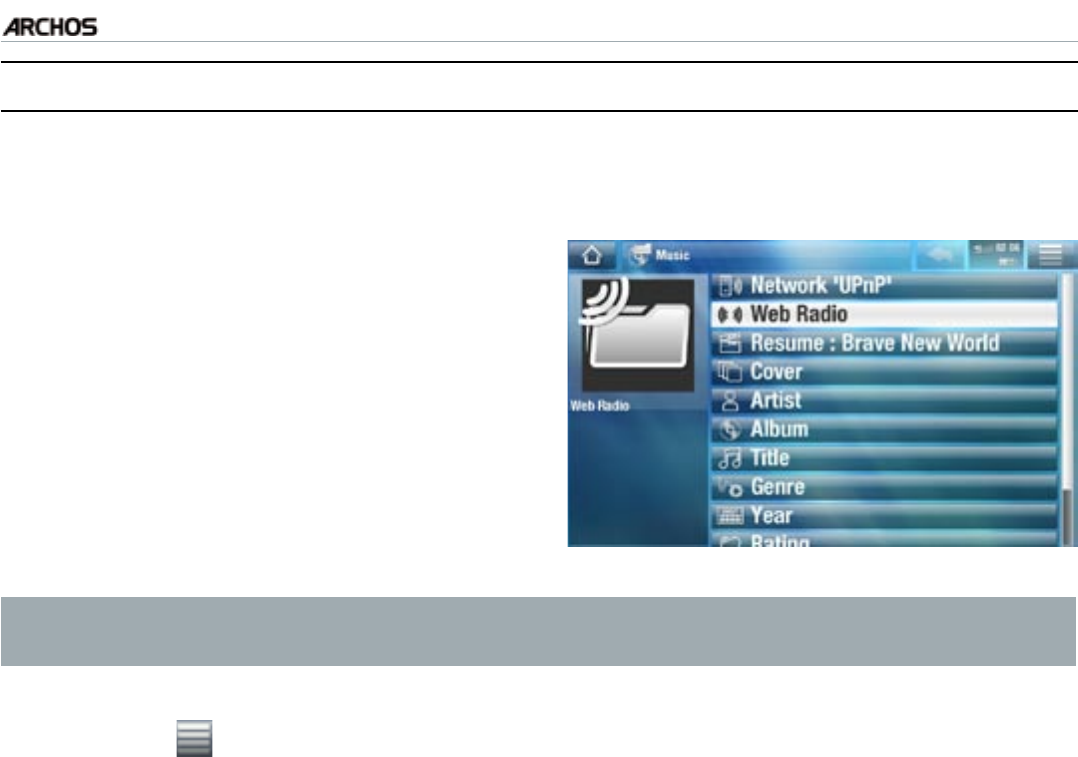
From the Home Screen, tap on “Play”,
then choose “Music”.
Select “Web Radio”. If your device is not
connected to the Internet, it will try to
make a connection.
The “Web Radio” interface is orga-
nized by category, such as “Location”,
“Genre”, “Most Popular Stations” etc.
Browse the categories to nd the radio
station/podcast you want to listen to.
1.
2.
3.
To nd more information about how to connect to the Internet, see: Connecting
to the WiFi.
The radio station/podcast you select will open in the music player. Selecting the
menu icon will display several options:
“Info”: to view the information concerning the radio station/podcast.
“Add to favorites” / “remove favorite”: adds the current Web TV station as a
favorite (or removes it from the favorites).
“Settings”: you can choose to display the Music Player settings screen (see
Music Player Settings
) or the “Sound” settings screen (see:
“Sound” Settings
).
4.
-
-
-
MANUAL
FCC
5g+ VIEWING PHOTOS > P. 25
3. VIewIng PhOTOs
In the Home screen, tap on “Play”, then choose the “Photo” icon to
enter the “Photo” mode.
3.1 brOwsIng ThrOugh yOur PhOTOs
The “Photo” browser allows you to navigate through the Pictures folder of the
ARCHOS hard drive.
You can go back one level in the interface by tapping on the Back icon .
Wherever you are in the interface, you can go back directly to the Home screen
by tapping on the Home icon .
THE PHOTO BROWSER
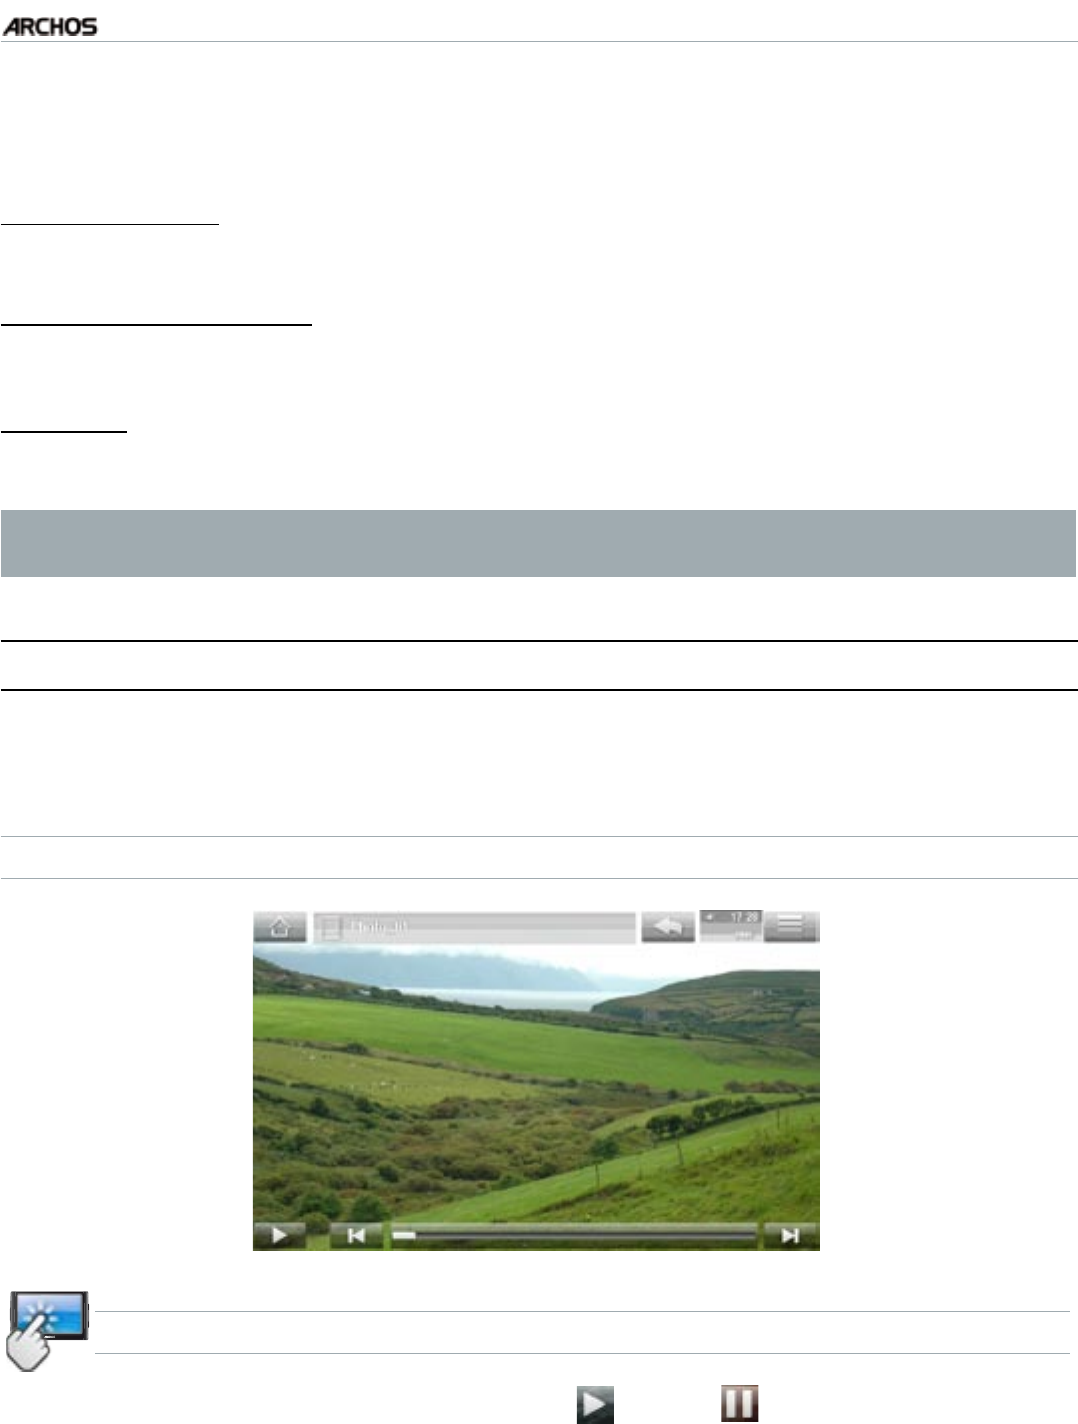
The rst screen of the Photo mode
shows all the photos and subfolders
located in the Pictures folder.
To view a photo, highlight its
thumbnail, then open it. If a photo is
in a subfolder of the Pictures folder,
open the subfolder, and you will see
your photo.
The Photo Browser also allows you
to view your pictures, sorted by date.
•
•
•
The “Resume” line allows you to resume the last-viewed photo.
In the “Photo” browser each photo is displayed with a thumbnail.
PHOTO BROWSER MENU ITEMS*
“Info”
displays a message box with information about the highlighted picture.
“File Management”
“Delete”: allows you to delete the highlighted photo. A conrmation screen will
pop up.
•
•
•
-
-
MANUAL
FCC
5g+ VIEWING PHOTOS > P. 26
“Permissions”: allows you to dene the le/folder as adult content, so that other
users can’t see it. To use this, your “Parental Mode” needs to be set to “Adult (un-
restricted access)”. See Parental Control Settings.
“Start slideshow”
starts a slideshow from the highlighted image.
“Create Home Shortcut”
Creates a shortcut to this picture on the Home screen.
“Settings”
will display the Photo viewer settings screen (see
Photo Viewer Settings
).
* The available menu items will vary depending on where you are in the
“Photo” Browser.
3.2 PhOTO VIewer
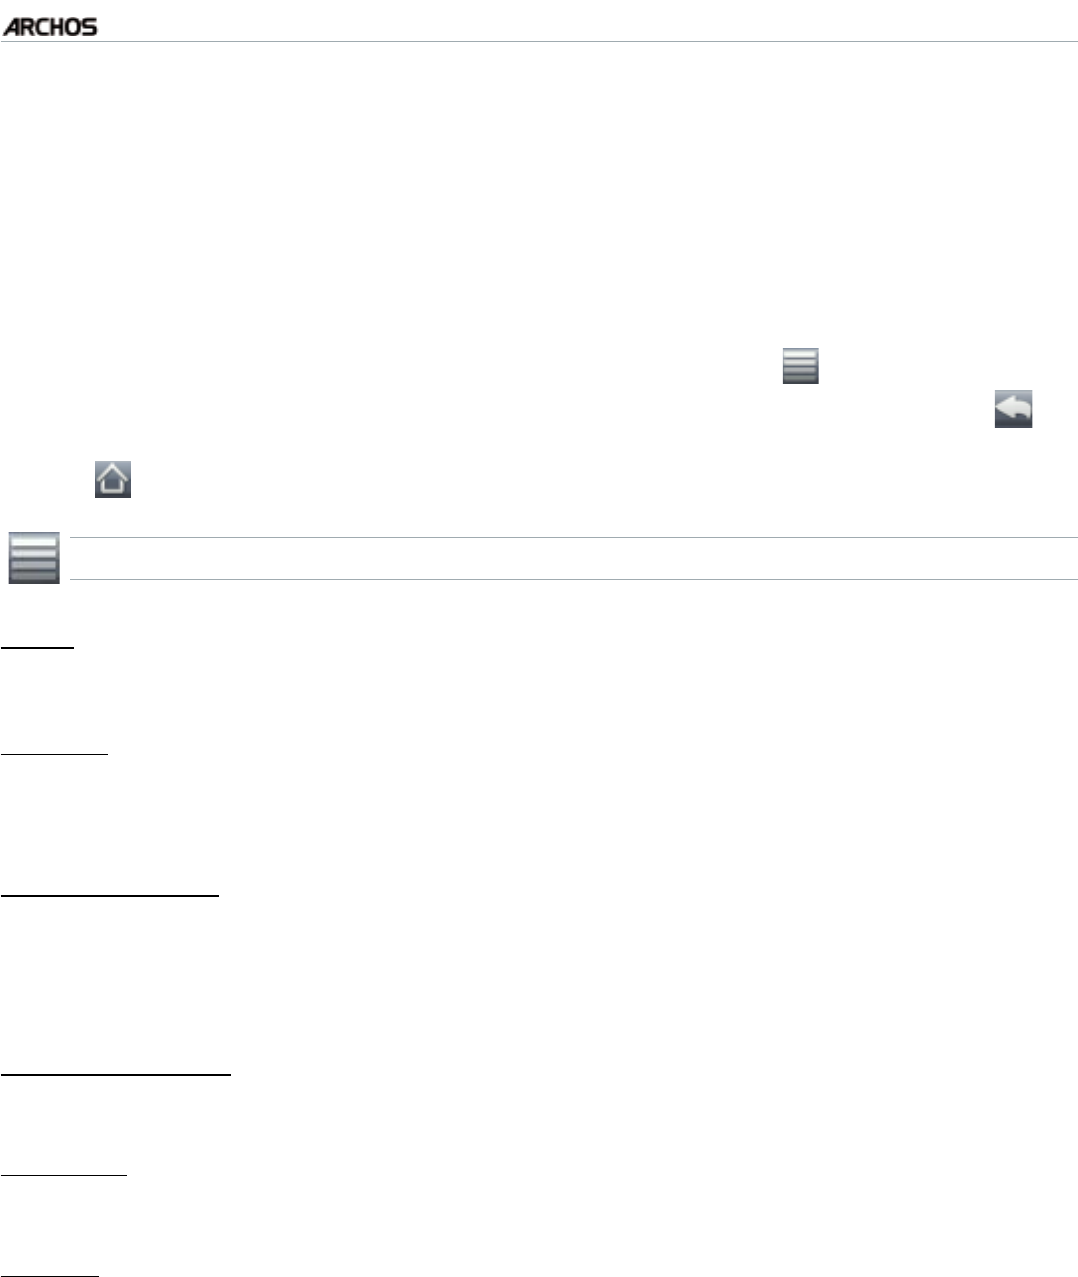
To view a picture, highlight the corresponding thumbnail and open it. The menu over-
lay will disappear automatically after a few seconds.
PHOTO VIEWER SCREEN
PHOTO VIEWER TOUCHSCREEN CONTROLS
To start/pause a slideshow, tap on the Play / Pause icon.
To display the menu overlay again, tap once anywhere on the screen. To make it
disappear again, tap again.
To display the next picture, drag your nger from left to right. Drag from right to
left to go back one picture.
-
-
-
-
•
•
•
MANUAL
FCC
5g+ VIEWING PHOTOS > P. 27
To rotate the picture 90° counterclockwise, drag your nger from bottom to top. To
rotate the picture 90° clockwise, drag from top to bottom.
To magnify the current picture, hold down anywhere on the screen until you are
satised with the zoom level. You can then drag your nger to move the picture.
To display the image in its original format, tap twice (rapidly) anywhere on the
screen.
You can use the progression bar to go directly to another photo of the current
folder.
To display the available menu items, tap on the menu icon .
To close the photo and go back to the “Photo” browser, tap on the Back icon .
To exit the Photo mode and go back directly to the Home screen, tap on the Home
icon .
PHOTO VIEWER MENU ITEMS
“Info”
displays a message box with information about the current picture.
“Rotate”
choose “Left” to rotate the picture 90° counterclockwise.
choose “Right” to rotate the picture 90° clockwise.
“Start slideshow”
starts a slideshow from the current image.
the “Pause slideshow” menu item will appear, allowing you to pause the slide-
show.
“Set as wallpaper”
denes the current picture as your ARCHOS background image.
“Settings”
will display the Photo viewer settings screen (see next section).
“Zoom”
use the slider to magnify/demagnify the current picture.
•
•
•
•
•
-
-
-
-
-
-
-
-
MANUAL
FCC
5g+ VIEWING PHOTOS > P. 28
3.3 PhOTO VIewer seTTIngs
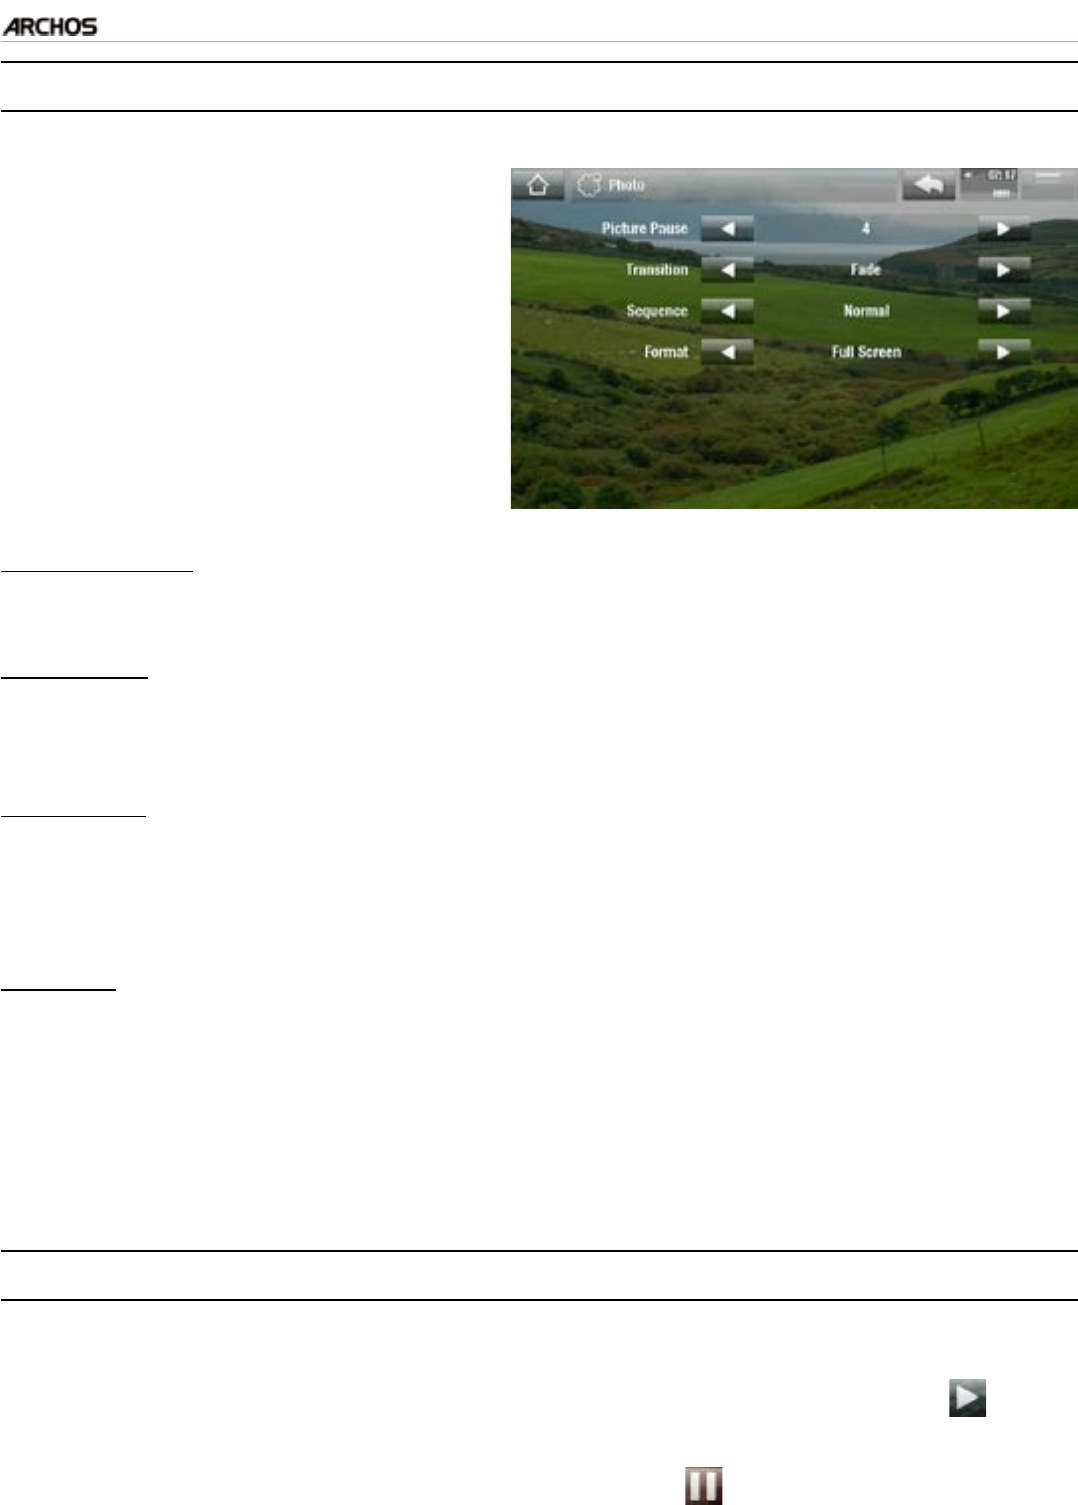
In the Photo mode, you can access
the Photo viewer settings screen via
the “Settings” menu item.
Use the left/right arrows to select a
different setting for a parameter.
•
•
“Picture Pause”
denes the time that each picture will be displayed during a slideshow.
“Transition”
denes the transition effect to be used between two pictures. There are several
cool effects that you can choose from.
“Sequence”
allows you to enable/disable the shufe mode. If this parameter is set to
“Shufe”, your pictures will be displayed randomly. To disable the shufe mode,
select “Normal”.
“Format”
allows you to change the way the picture is displayed.
“Original”: displays the entire picture in its original format.
“Full Screen”: enlarges the picture to ll the screen. In order to t the ARCHOS
screen, your device might need to cut small parts of the image, most likely at the
top and bottom.
3.4 PlayIng a slIdeshOw
To view a slideshow, highlight a picture le in the “Photo” browser or while viewing
a photo, and choose the “Start slideshow” menu item, or tap on the Play icon.
While a slideshow is playing, you can pause it at any time by selecting the “Pause
slideshow” menu item or by tapping on the Pause icon.
You can dene the time that each picture is displayed and the transition effects in
the “Photo” settings (see:
Photo Viewer Settings
).
-
-
-
-
-
-
•
•
•
MANUAL
FCC
5g+ VIEWING PHOTOS > P. 29
3.5 PuTTIng PhOTOs OnTO yOur arChOs
There are two main methods to transfer the pictures stored on your computer onto
the ARCHOS:
Windows Media® Player: copy your pictures using Windows Media® Player 10 or
higher*:
Use Windows Media® Player 10 or higher* (Sync tab) to synchronize your
computer’s pictures to the ARCHOS. See
Putting Files onto the ARCHOS
for more details.
* For best performance, we recommend that users update to Windows Media®
Player 11 or higher.
Windows® Explorer: Copy and paste your pictures from your computer into the
Pictures folder of your ARCHOS.
To learn how to connect/disconnect the ARCHOS from your computer, see the
Transferring Files
section.
3.6 PlayIng yOur PC’s shared PhOTOs (uPnP)
When connected to your home WiFi network, your ARCHOS gives
you the possibility to view, directly on your device, shared photos
stored in your PC’s Windows Media® Library.
•
For this to work, you will need a WiFi connection and Windows Media® Player 11
or higher* installed on your PC.
The ARCHOS uses the UPnP (Universal Plug-and-play) standard to stream shared
photos from your PC’s Windows Media® Library.
See:
Playing your PC’s Shared Media Files (UPnP)
.
* There are other products on the market that also can share media les using
the UPnP standard.
1.
2.
•
•
•
MANUAL
FCC
5g+ USING THE FILE BROWSER > P. 30
4. usIng The fIle brOwser
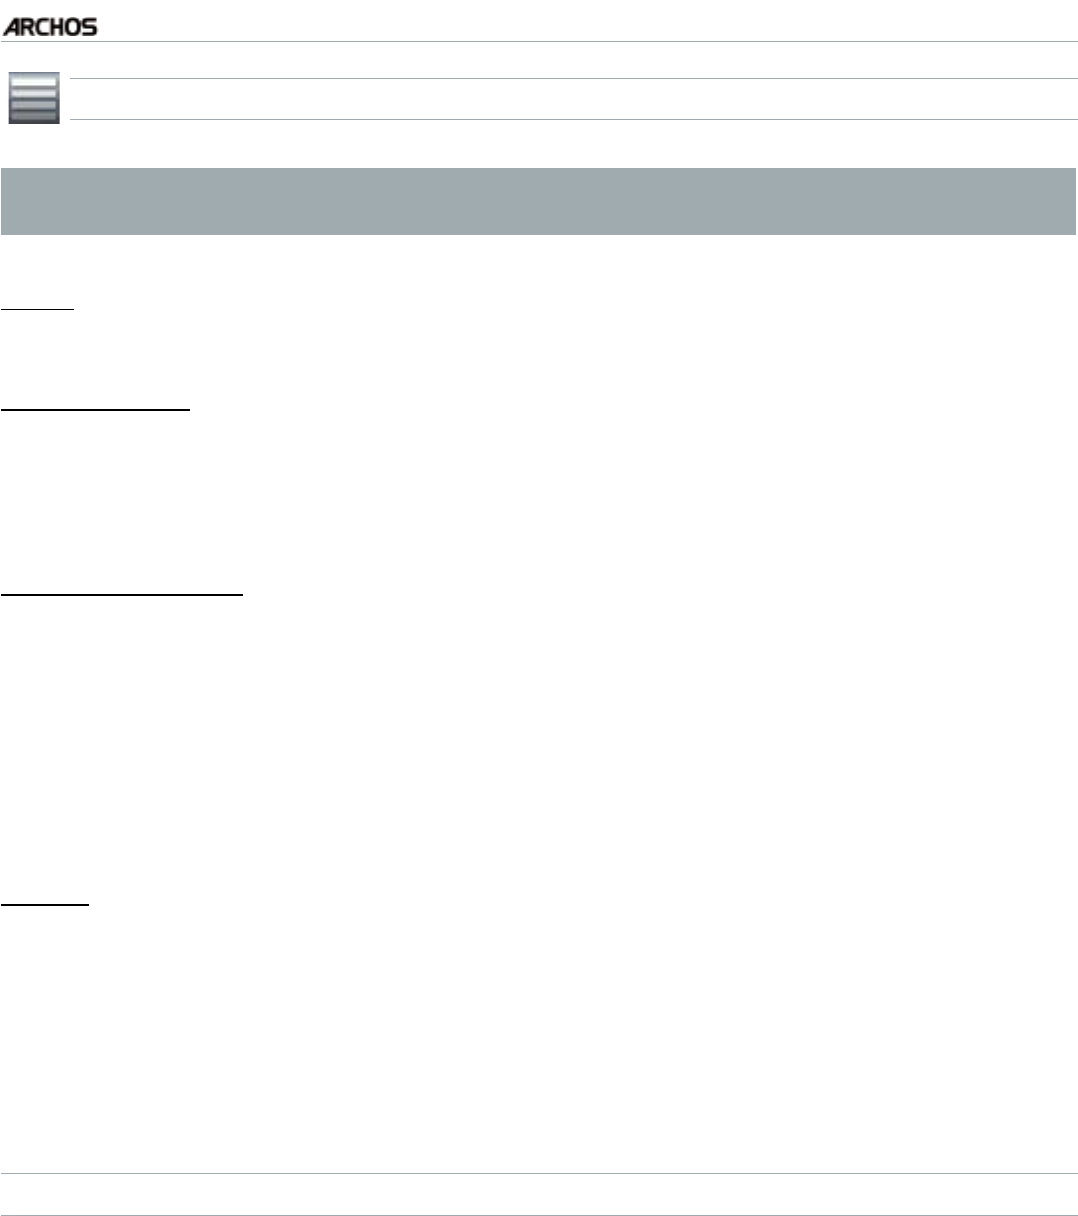
The ARCHOS File Browser gives you the possibility to navigate the le
system of your ARCHOS hard drive. In the Home screen, tap on “Tools”,
then choose the “Files” icon to enter the File Browser.
You will see two panels:
The one on the left is the panel that
you usually use to navigate through
your device’s hard drive.
The panel on the right is the one
you will use when you want to
copy or move les and folders
(see:
Copying and Moving Files and
Folders
).
•
•
About your ARCHOS hard drive:
DO NOT delete or rename the original folders: “Music”, “Pictures”, “Video”,
“Playlists”, etc. In the Home screen, the icons under the “Play” item (“Video,
“Music”, “Photo”...) lead directly to these folders and they will no longer work
if the folders are deleted or renamed.
4.1 naVIgaTIOn
TOUCHSCREEN CONTROLS
You can drag the scroll bar up and down to scroll the le list up and down. You
can also scroll faster by tapping above or below the cursor in the scroll bar.
To open a le or folder, tap on it to highlight it, then tap on it again.
To jump between the left and right panels, tap directly on the panel that you
want to highlight.
To display the available menu items, tap on the menu icon .
You can go back one level in the interface by tapping on the Back icon .
Wherever you are in the interface, you can go back directly to the Home screen
by tapping on the Home icon .
•
•
•
•
•
MANUAL
FCC
5g+ USING THE FILE BROWSER > P. 31
FILE BROWSER MENU ITEMS
Note that some of the above menu items may not appear if they are not avail-
able for the highlighted le or folder.
“Info”
displays a message box with information about the highlighted le.
“Create folder”
creates a folder at the current location.
you will have to enter the folder’s name with the virtual keyboard (see:
Using the
Virtual Keyboard
).
“File Management”
“Rename”: allows you to change the name of the highlighted le or folder using
the virtual keyboard. See:
Using the Virtual Keyboard
.
“Delete”: allows you to delete the highlighted le or folder (and all its contents).
A conrmation screen will pop up.
“Permissions”: allows you to dene the le/folder as adult content, so that other
users can’t see it. To use this, your “Parental Mode” needs to be set to “Adult (un-
restricted access)”. See Parental Control Settings.
“Copy”
“Copy”: allows you to copy the highlighted le or folder to the location dened in
the other browser panel.
“Copy all les”: allows you to copy all the les of the current folder to the loca-
tion dened in the other browser panel.
“Move”: allows you to move the highlighted le or folder to the location dened
in the other browser panel.
COPYING AND MOVING FILES AND FOLDERS
In the left panel, highlight the le/folder that you want to copy or move.
In the right panel, navigate to the location where you wish to copy the le/folder to.
Go back to the left panel, select the “Copy” menu item and then choose “Copy”,
“Copy all les” or “Move”, depending on the action that you want to carry out.
-
-
-
-
-
-
-
-
-
•
•
•
MANUAL
FCC
5g+ USING THE FILE BROWSER > P. 32
4.2 usIng The VIrTual keybOard
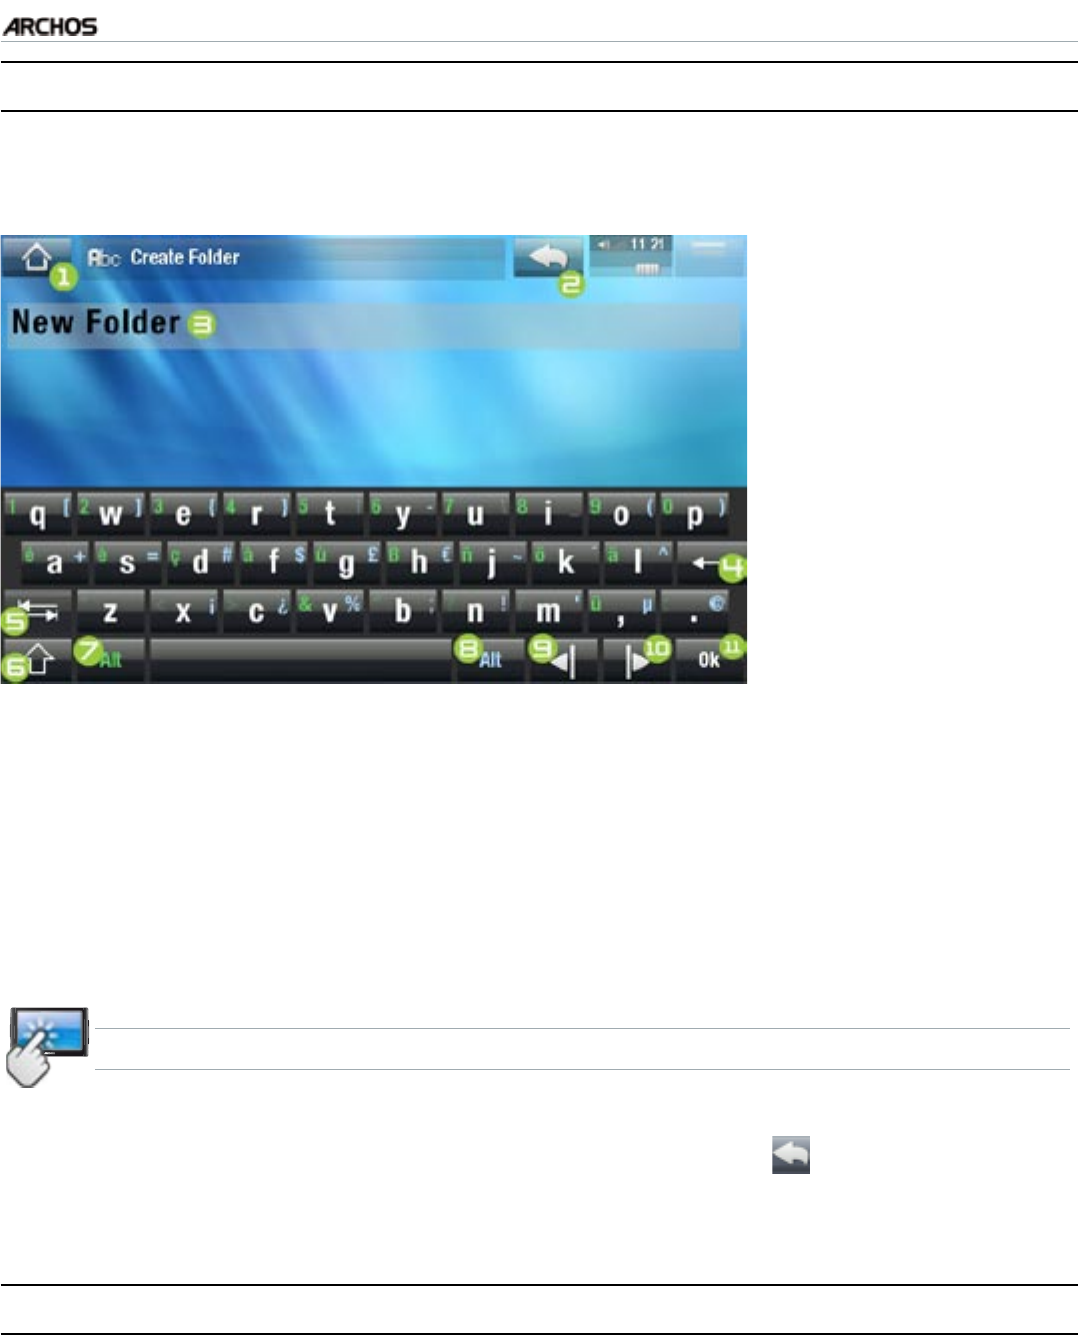
The virtual keyboard is an interface that allows you to type in text, for instance to rename
a le or folder, or when you want to give a title to a playlist that you have just created.
the virtual keyboard might vary according to where you are
in the interface.
if a key is transparent, it means that it is disabled.
•
•
1. Home icon
2. Back icon
3. current name of the
le/folder
4. delete character be-
fore cursor
5. Tab key
6. Shift key
7.
green Alt key: enable/
disable the keys’ green
secondary functions.
8. blue Alt key: enable/
disable the keys’ blue
secondary functions.
9. move cursor one
character to the left
10.move cursor one
character to the right
11. save the name
KEYBOARD TOUCHSCREEN CONTROLS
To enter a character, tap on the corresponding key.
To exit the keyboard without saving, tap on the Back icon (see n° 2).
When you are satised with the name, tap on the Ok key (see n° 11) to save it
and exit the keyboard. A conrmation screen will pop up.
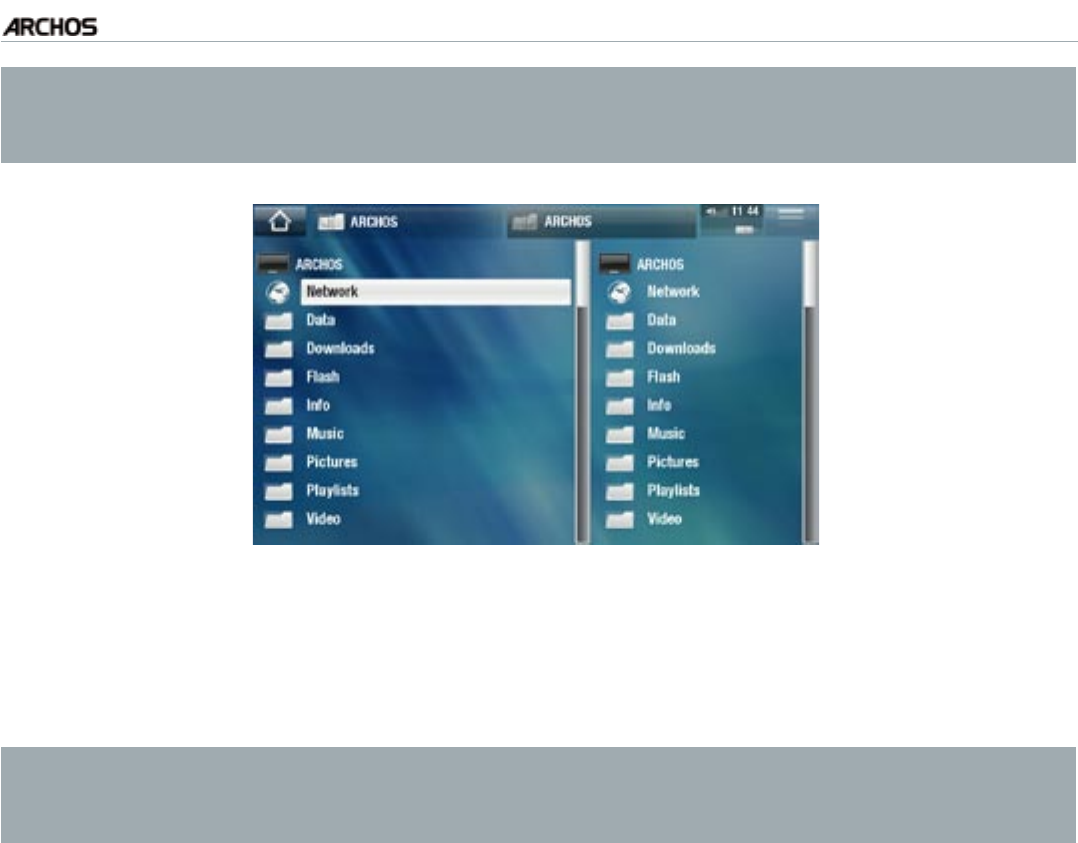
4.3 brOwsIng OTher COMPuTers On The neTwOrk
When you are connected to a Windows® network, you can browse* the shared
folders of other computers in the network, using the ARCHOS File Browser.
From the Home screen, select tap on “Tools”, then select “Files”. In the left panel
of the browser, select the rst line in the list (“Network”). Your device will connect
to your WiFi access point and then search for other computers in the Windows®
network. You can then choose a computer and start browsing its shared folders.
•
•
•
•
•
MANUAL
FCC
5g+ USING THE FILE BROWSER > P. 33
* If the computer with the shared folders normally has a Windows® username
and password, you will be asked to enter these before you can access the
folder contents.
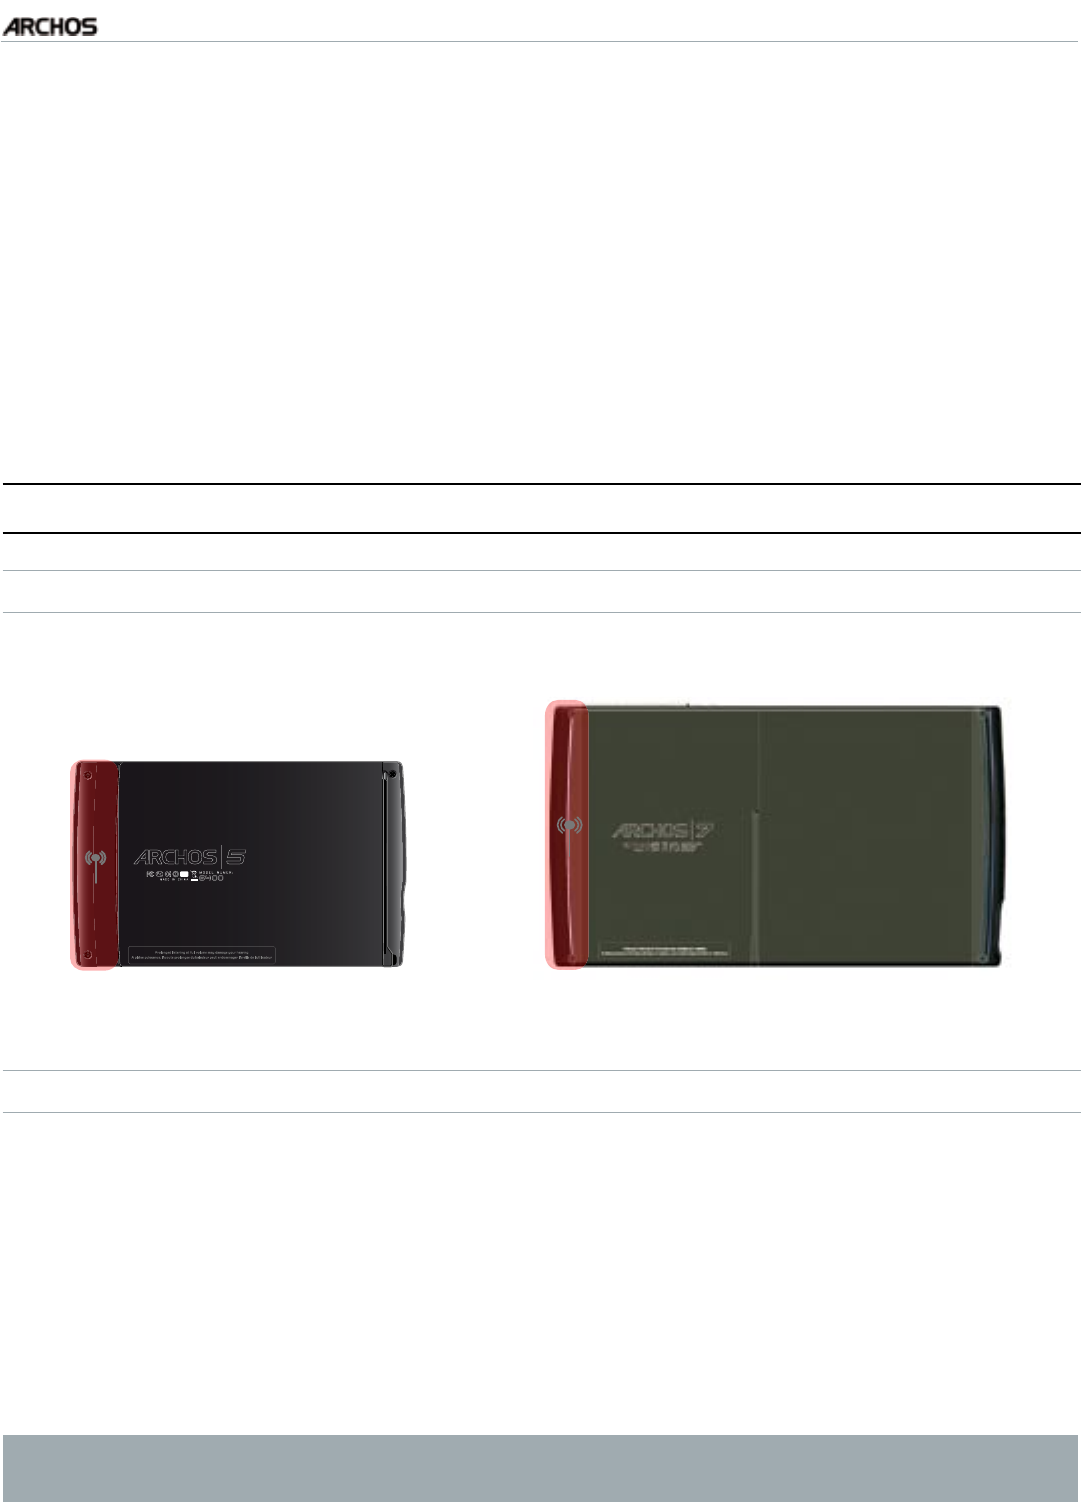
Using the ARCHOS double browser, you will be able to play media les or transfer any
le from a networked computer onto your device. You can also transfer les from your
device onto a computer’s write-enabled shared folder (see
Copying and Moving Files
and Folders
).
If the WiFi is not enabled or if you are not connected to a network, the device
will scan for available networks and connect to a known network or display
the list of available networks so that you can connect to one of them.
MANUAL
FCC
5g+ CONNECTING TO THE WIFI > P. 34
5. COnneCTIng TO The wIfI
The rst time you start the ARCHOS, the installation wizard will help you con-
gure your WiFi connection. Every time you launch an Internet application, the
ARCHOS will try to connect automatically to a WiFi network.
For the procedure to work, you must be in a WiFi zone that will allow you to con-
nect to it.
5.1 wIfI COnneCTIOn PrOCedure
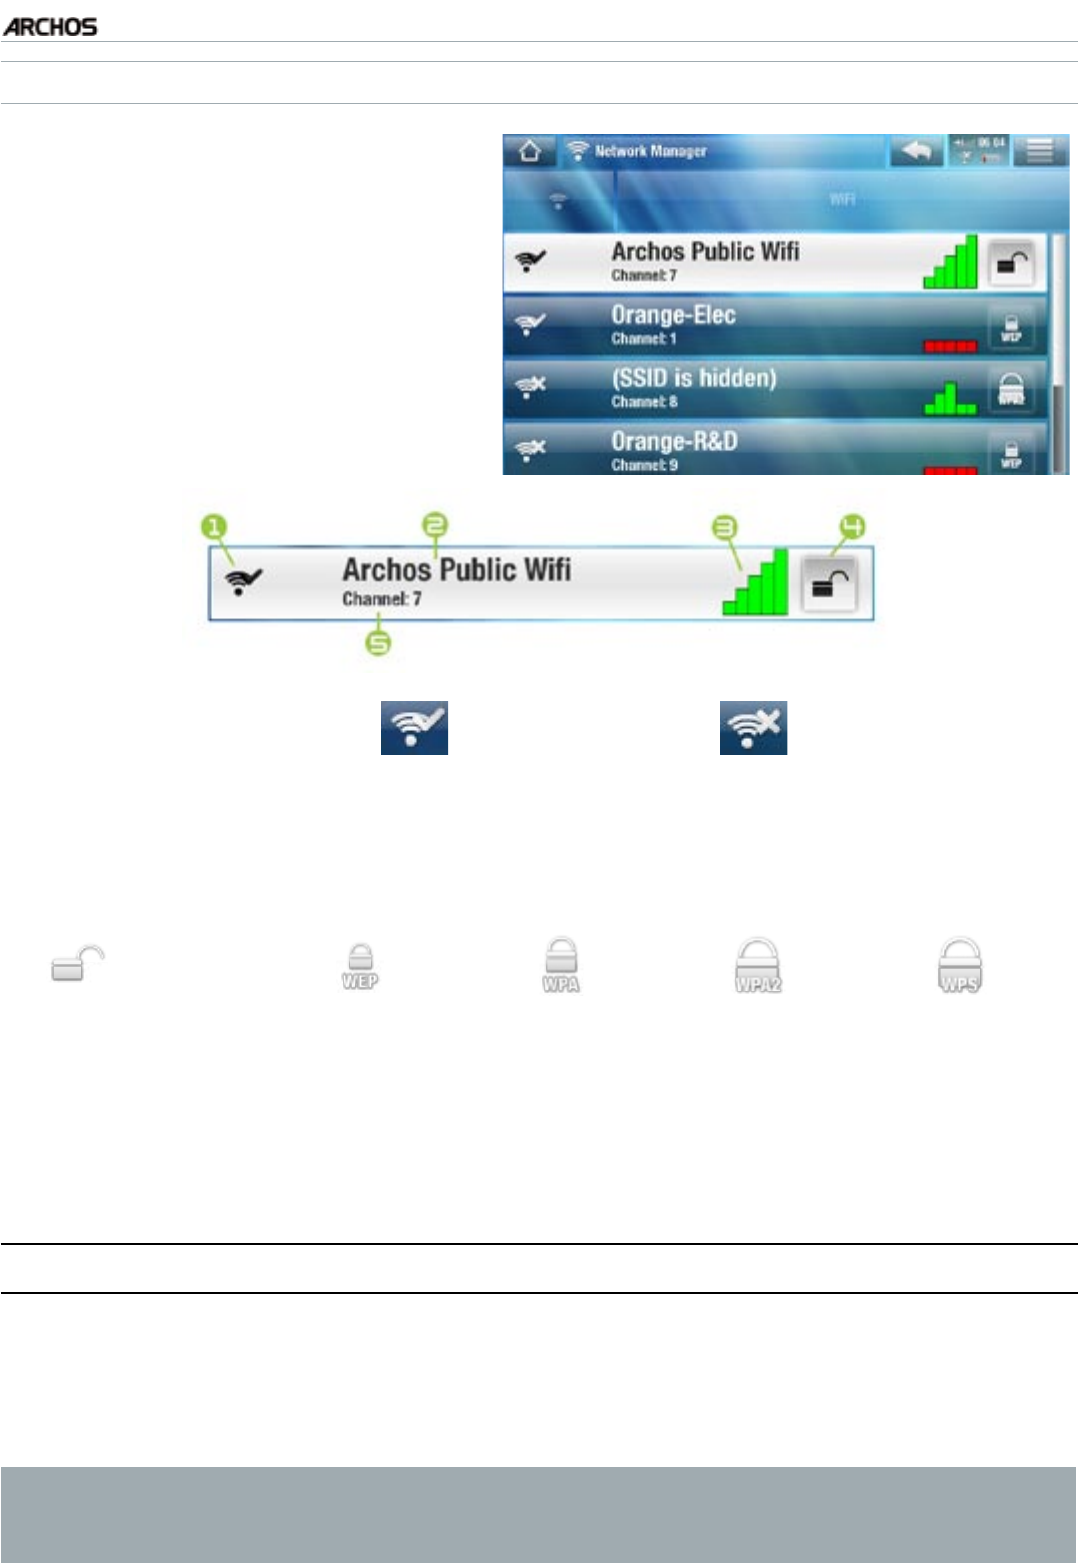
HOW TO IMPROVE WIFI RECEPTION
In order to improve your device’s WiFi reception, avoid placing your ngers in front of
the WiFi antenna area:
ARCHOS 5 ARCHOS 7
ENABLING WIFI
When you launch an Internet application such as “Internet”>“Web”, the ARCHOS will
scan for available WiFi networks. If it nds a pre-congured one, it will connect to it.
The rst time you use your device, you may get a message “No congured net-
work found”. Select “View available networks”, and the list of available networks
will be displayed.
If you get the message “Could not connect to any WiFi network!”, select “View
available networks”, and the list of available networks will be displayed.
You can also use the “Internet”>“Connection” menu if you want to display
available networks and congure them manually.
•
•
•
•
MANUAL
FCC
5g+ CONNECTING TO THE WIFI > P. 35
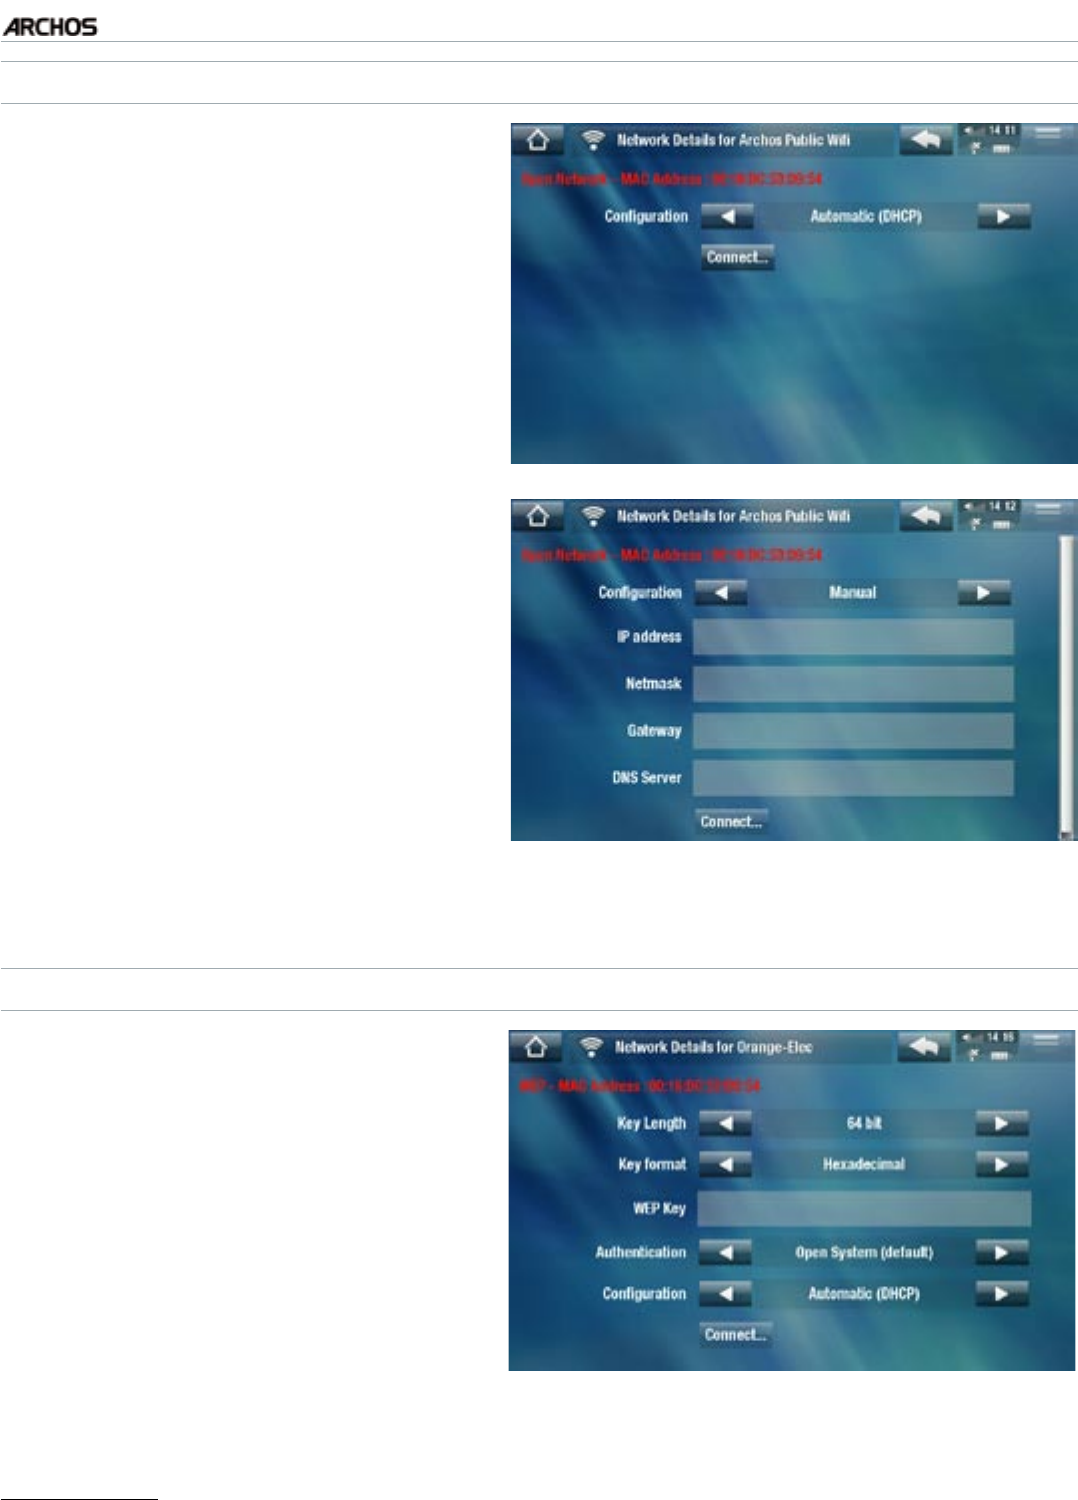
THE LIST OF AVAILABLE NETWORKS
The list of available networks shows
all the wireless networks in range of
your device.
The list is constantly refreshed au-
tomatically.
In the list of available networks, for
each network you will see the fol-
lowing information:
•
•
•
1. Conguration status: congured network uncongured network
2. The name of the network (SSID), if it is broadcasted
(if the SSID is not broadcasted,
you will be prompted to enter it in the next conguration screen).
3. The strength of the signal.
4. The type of encryption key that is required:
Open network
(no key) WEP key WPA key WPA2 key WPS
5. The channel used by the network.
Select the network that you want to connect to (your home wireless network or
a free hotspot).
You will be taken to the conguration screen for this network, where you will
have to enter some information to set up your access to this network.
5.2 wIfI neTwOrk COnfIguraTIOn
In order to connect to a wireless network, the ARCHOS will need some specic informa-
tion about the network. Your device will automatically pick up certain pieces of infor-
mation that it needs from the WiFi hot spot. You can enter the rest of the information
manually in the network’s conguration screen, as shown in the following sections.
Note that your device will remember the network connection information that
you enter, in order to re-use it and connect automatically to the network when
it is in range.
•
•
MANUAL
FCC
5g+ CONNECTING TO THE WIFI > P. 36
OPEN NETWORKS
Open networks do not require an
authentication key.
If the network has automatic con-
guration turned on (DHCP), sim-
ply tap on the “Connect” button,
and your ARCHOS will connect to
this network, provided the signal is
strong enough.
•
•
If the network needs to be cong-
ured manually, use the left/right ar-
rows to select the “Manual” setting
on the “Conguration” parameter.
Other parameters will appear: the
required information can be ob-
tained from the person who man-
ages the network.
•
•
When you have nished entering all the information, tap on the “Connect” button,
and your ARCHOS will connect to this network, provided the signal is strong enough.
PROTECTED NETWORKS (WEP, WPA OR WPA2 KEY)
Protected networks require an en-
cryption key to connect.
The type of key (WEP, WPA or
WPA2) will be detected automati-
cally by your device.
The rest of the required information
can be obtained from the person
who manages the network.
•
•
•
You will have to specify the following settings:
“Key length” (for WEP networks only)
the authentication key can be 10 characters long (64bit) or 26 characters long
(128bit).
-

MANUAL
FCC
5g+ CONNECTING TO THE WIFI > P. 37
“Key format” (for WEP networks only)
in some cases you may need to change the key format in order to enter a passphrase/
password (if your key only includes the numbers 0-9 and A-F, then it is probably a
hexadecimal key).
See the documentation that came with your WiFi router or modem.
“Key” (WEP or WPA)
type in the authentication key.
you will be taken to a virtual keyboard (see:
Using the Virtual Keyboard
).
type in the key and tap on “OK” when you have nished.
“Authentication” (for WEP networks only)
the network’s authentication method can be based on an “Open System (de-
fault)” or a “Shared Key”.
“Conguration”
it can be “Automatic (DHCP)” or “Manual”.
if it is “Automatic (DHCP)”, then you do not have to enter any more information.
Simply use the “Connect” button, and your ARCHOS will connect to this network,
provided the signal is strong enough.
if you must congure the network manually, select the “Manual” setting. Other
parameters will appear: the required information can be obtained from the person
who manages the network.
When you have nished entering all the information, use the “Connect” button, and
your ARCHOS will connect to this network, provided the signal is strong enough.
Filtered networks: If your network manager allows only specic devices to
connect to the network (known as MAC address ltering), you can supply the
network manager with the MAC address of your ARCHOS. To nd out what
your MAC address is, tap on the “Tools” menu from the Home screen, then
select “Settings”, and choose “System Info”. See: “System Info” Settings.
WPS (WIFI PROTECTED SETUP) NETWORKS
WPS is a standard, used by certain types of WiFi modems, that provides you with a
secure and easy way to connect devices to your WiFi network.
On the ARCHOS, in the list of the available networks, select the WPS network you
want to connect to (WPS networks are represented by this icon: ).
A message will pop up, telling you to press a button on the modem. Press the cor-
responding “device connection” button on your WiFi modem (if needed, check the
documentation of your modem).
Press the “OK” button on the ARCHOS, and it will start communicating with your
WiFi modem in order to make a connection.
-
-
-
-
-
-
-
-
1.
2.
3.

MANUAL
FCC
5g+ THE INTERNET FEATURES > P. 38
6. The InTerneT feaTures
The rst time you start the ARCHOS, the installation wizard will help you congure
your WiFi connection. Every time you launch an Internet application, the ARCHOS will
try to connect automatically to a WiFi network.
6.1 brOwsIng The web
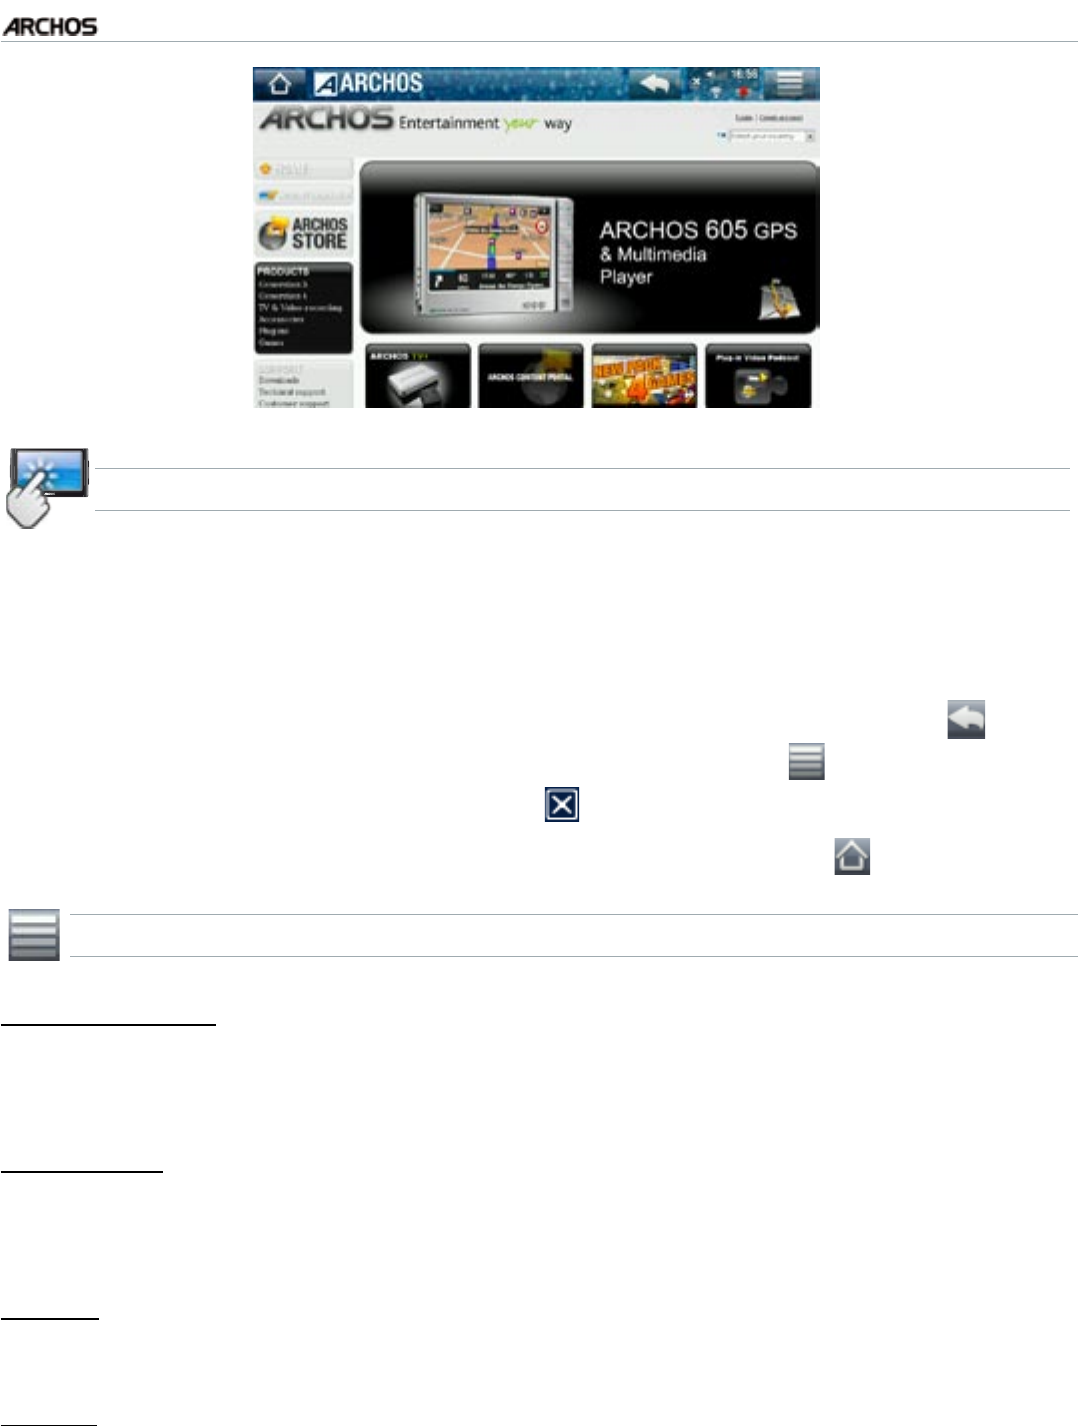
With the Internet browser, specially designed for your ARCHOS, you will
have the possibility to browse websites*, watch videos from shared video
web sites (such as Daily Motion), download content, etc. For this to work,
your device will need to be registered.
*supports Flash™ content and Javascript. The Java virtual machine is not supported.
LAUNCHING THE WEB BROWSER
From the Home screen, tap on “Internet”, then select “Web”.
If you are already connected to a network, the Web browser will simply open and
you can start browsing the Web.
If you are not connected to the Internet, the ARCHOS will try to connect auto-
matically to a WiFi network.
Please note: not all wireless networks offer access to the Internet. Some WiFi net-
works only link several computers together, without any Internet connection.
If the time and date are not correctly set, you might not be able to access certain
web pages (See: “Clock” settings). If you choose to set the clock automatically
when the ARCHOS connects to a WiFi network, you will need to select your
Country and City/Zone (see: “Language and Region” Settings).
USING THE WEB BROWSER
You can use the Web browser to browse websites, watch videos from shared video
web sites (such as Daily Motion) or download content.
The Web browser features ‘tabbed browsing’. You can have several pages opened
at the same time. They will appear in the tabs area, in the upper left corner of the
screen. When several pages are open, simply select a tab to access the page that
you want. See next section.
•
•
•
•
•
MANUAL
FCC
5g+ THE INTERNET FEATURES > P. 39
WEB BROWSER TOUCHSCREEN CONTROLS
You can use your nger to scroll the current web page horizontally or vertically. To
open a link, simply tap on it.
To switch between the available tabs, tap directly on the corresponding tab, in the
upper left corner of the screen.
To go back to the previous page that you browsed, tap on
the Back icon .
To display the available menu items, tap on the Home icon .
When several tabs are displayed, tap on to close the current one
To go back directly to the Home screen, tap on the Home icon .
WEB BROWSER MENU ITEMSBROWSER MENU ITEMS
“Reload” / “Stop”
will stop loading the web page, if it is currently loading.
will refresh the current web page, if it has stopped loading.
“Navigation”
“Forward”: will go to the next page that you browsed.
“Back”: will go back to the previous page that you browsed.
“Zoom”
changes the way the web page is displayed. Select a zoom mode.
“Go to”
“Enter URL...”: allows you to enter the address of a Web site you’d like to visit.
Enter the address with the virtual keyboard (see:
Using the Virtual Keyboard
).
Select “OK” to open the website in the current window, or select “Open in new
tab” to open it in a new window.
•
•
•
•
•
•
-
-
-
-
-
-
MANUAL
FCC
5g+ THE INTERNET FEATURES > P. 40
“Search...”: allows you to enter a search term into one of the congured search
engines. Enter the key words using the virtual keyboard (see:
Using the Virtual
Keyboard
). Select “OK” to open the results in the current window, or select “Open
in new tab” to open them in a new window.
“Favorites”
will open the “Favorites” manager. Here you can add favorites, rename or delete
them. Select a favorite and use the “Open in new tab” menu item to open the
corresponding web page in a new window.
“Settings”
will open the “Web Browser” settings screen. Here you can decide whether to ac-
cept/ignore popup windows, enable/disable Flash™ content, delete your Internet
history and cookies, etc.
Please note that some Web features requiring special plug-in software or
Active X controls may not work in this special version of the Web Browser.
6.2 PlayIng yOur PC’s shared MedIa fIles (uPnP)
When connected to your home WiFi network, your ARCHOS gives you the possi-
bility to watch, directly on your device, shared media les (videos, music or pho-
tos) stored in your PC’s Windows Media® Library.
For this to work, you will need a WiFi connection and Windows Media® Player 11
or higher installed on your PC*.
This is especially useful when you have a large library of music and video and you
cannot t it all onto the internal hard drive of the ARCHOS.
The ARCHOS uses the UPnP (Universal Plug-and-play) standard to stream shared
media les from your PC’s Windows Media® Library.
* If you cannot install Windows Media® Player 11 or higher, it is possible to ac-
cess and stream your PC’s les from the ARCHOS File Browser. See Browsing
Other Computers on the Network.
SETTING WINDOWS MEDIA® PLAYER’S SHARING OPTIONS
Connect the ARCHOS to your WiFi network (see
Connecting to the WiFi
).
Connect your PC to the same WiFi network and
start Windows Media® Player, version 11 or higher.
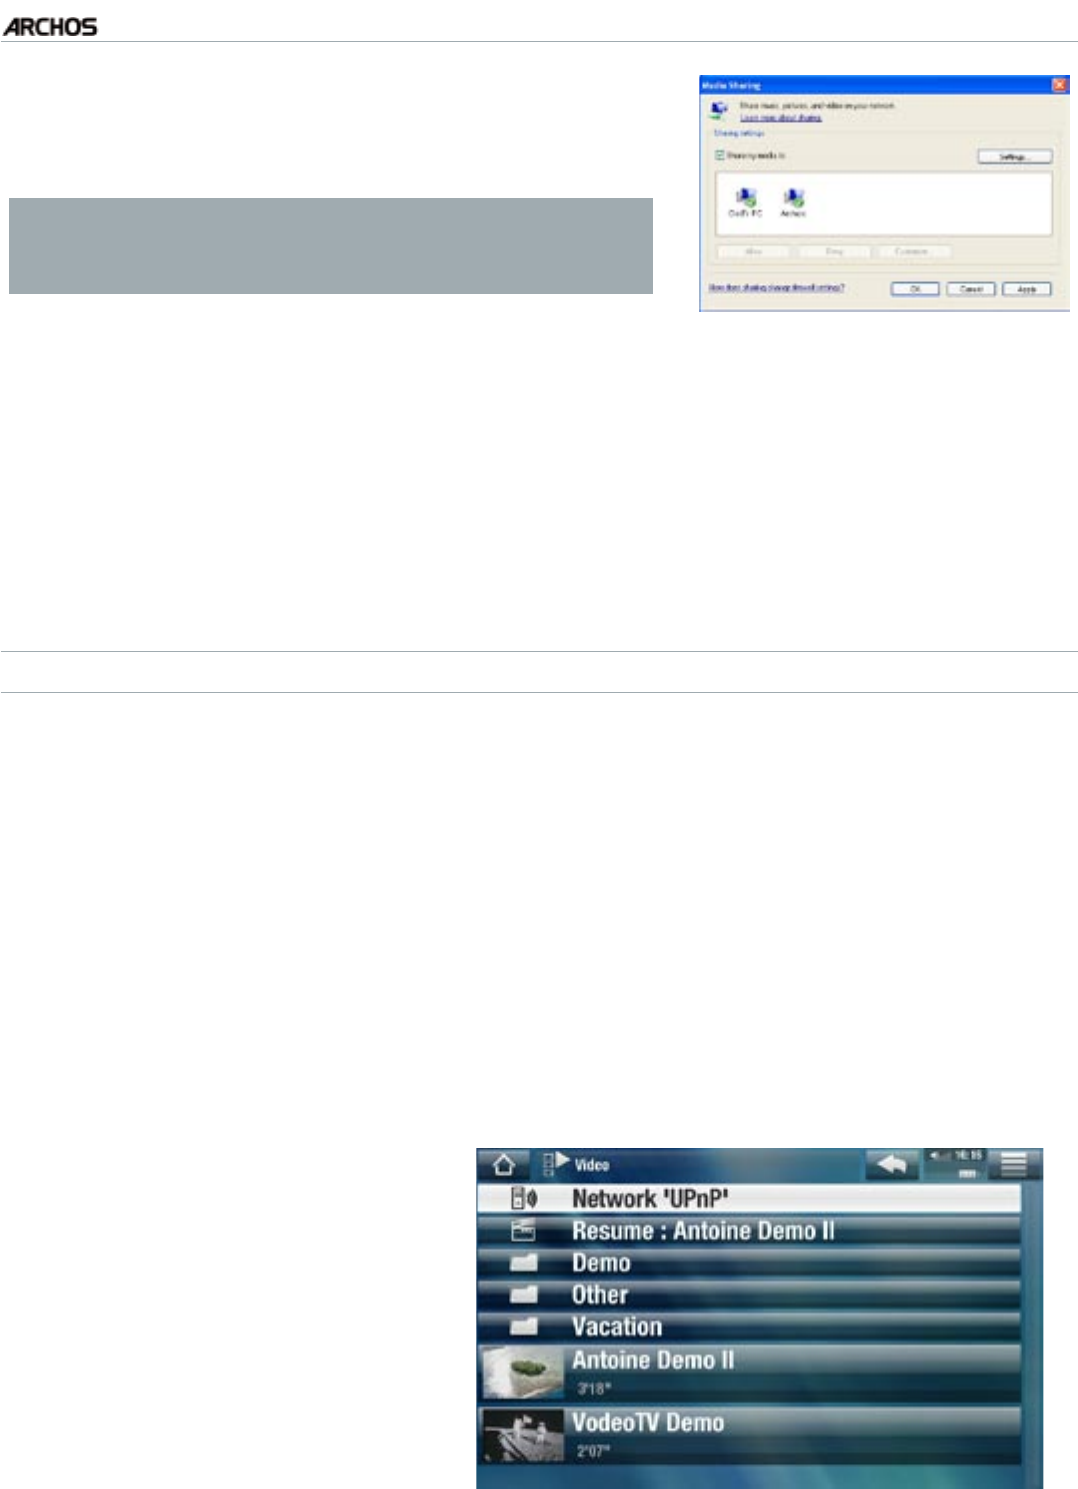
Click on the Library tab, and select Media shar-
ing...
1.
2.
3.
-
-
-
•
•
•
•
MANUAL
FCC
5g+ THE INTERNET FEATURES > P. 41
Check the box Share my media to, and click on
OK. The ARCHOS icon should appear in the win-
dow, with a warning symbol next to it*.
* ATTENTION: the rst time you set your shar-
ing options, it might take a couple of minutes
for your PC to display the ARCHOS icon.
4.
Select the ARCHOS icon and click on the Allow button.
To modify your sharing settings, click on Settings. You can, for example, enter a
name for your shared media les. You will then see this name on your ARCHOS.
Click on OK to save the modications.
Click on OK to close the Media Sharing window.
You can now close Windows Media® Player, and start viewing your PC’s shared
media les directly on your ARCHOS (see next section).
PLAYING YOUR SHARED MEDIA FILES ON THE ARCHOS
Your PC needs to be connected to the same WiFi network as the one the ARCHOS will
connect to. You also need to have congured Windows Media® Player’s sharing op-
tions (see the previous section).
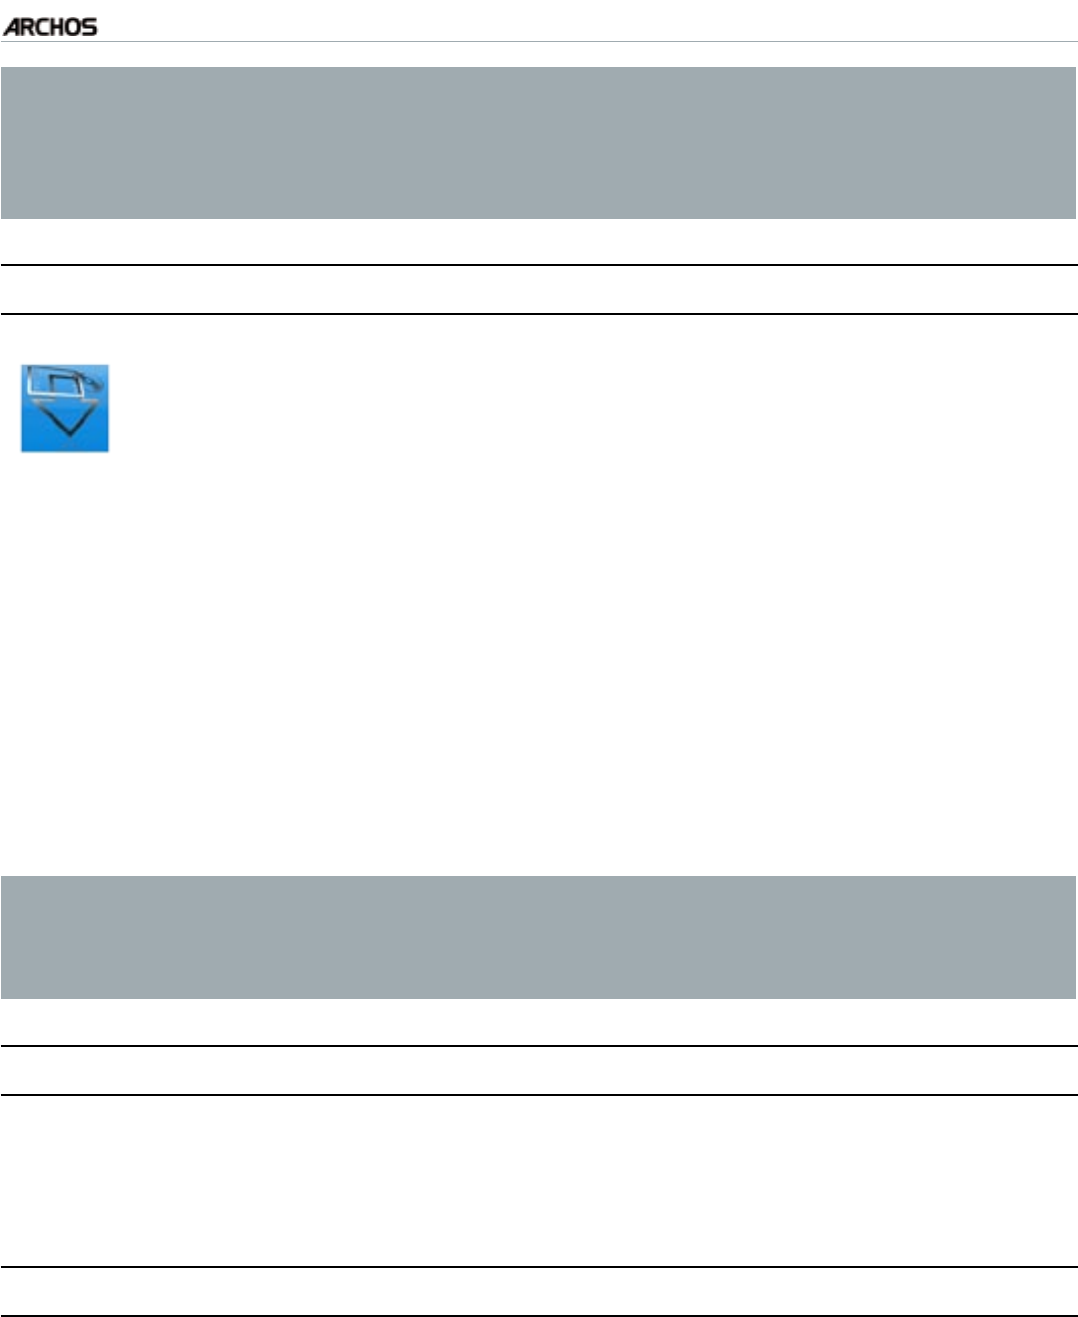
On your ARCHOS, enter the Video, Music or Photo mode.
You will notice that the rst item in the list is the shared media les: “Network
‘UPnP’”. Open this item to start scanning for devices and computers sharing
their media les on the WiFi network.
If you entered a name for your shared media les in Windows Media® Player, it
should appear. Open it, and you will see all your shared videos, songs or photos.
If you are in the Video mode,
you will then have access to all
the videos stored in your PC’s
Windows Media® Library.
In the same way, the Music and
Photo modes will allow you
to access all the music/photos
stored in your PC’s Windows
Media® Library.
•
•
5.
6.
7.
8.
1.
2.
3.
MANUAL
FCC
5g+ THE INTERNET FEATURES > P. 42
Note: You may have some video les of very high quality and these require
that the WiFi connection transfers data at a high speed. If your ARCHOS is far
away from your WiFi box, it may happen that the connection speed is reduced
thus not allowing some video les to stream from your PC to the ARCHOS and
the television.
6.3 The arChOs MedIa Club
The ARCHOS Media Club gives you access to media content directly
on your ARCHOS. This portal gives you access to video or music con-
tent that is either free, for rent, or for purchase. No need for your com-
puter, the media streams directly off the Internet into your ARCHOS.
•
Or, if your ARCHOS is connected to the optional DVR Station, you will be able to
select your internet media content directly from your television.
In order to activate The ARCHOS Media Club, you will need to register your
ARCHOS product on-line on the ARCHOS web site (www.archos.com/register).
Make sure you have congured your ARCHOS to connect to a WiFi network (see:
Connecting to the WiFi
).
On the Home screen, select the ARCHOS “Media Club” and choose a category.
The ARCHOS connects to theWiFi, and you can start browsing the content.
Depending on your connection speed, you will have the possibility to start
playing the video/song you purchased or rented while it’s being downloaded.
The videos/songs you get from The ARCHOS Media Club are saved in the
“Video”/“Music” folders.
6.4 MaIl
From the Home Screen, select “Internet”, then “Mail”. This built-in e-mail application,
similar to ones used on a regular computer, allows for e-mail accounts of the type
POP, POPS, IMAP and IMAPS.
6.5 COnTaCTsCOnTaCTs
From the Home Screen, select “Internet”, then “Contacts”. This icon will allow you to
manage your contacts. You can:
Add information about a given contact
Import and export your contact list to/from your desktop computer
Send a message to a particular contact
•
1.
2.
3.
4.
•
•
•
MANUAL
FCC
5g+ TRANSFERRING FILES > P. 43
7. TransferrIng fIles
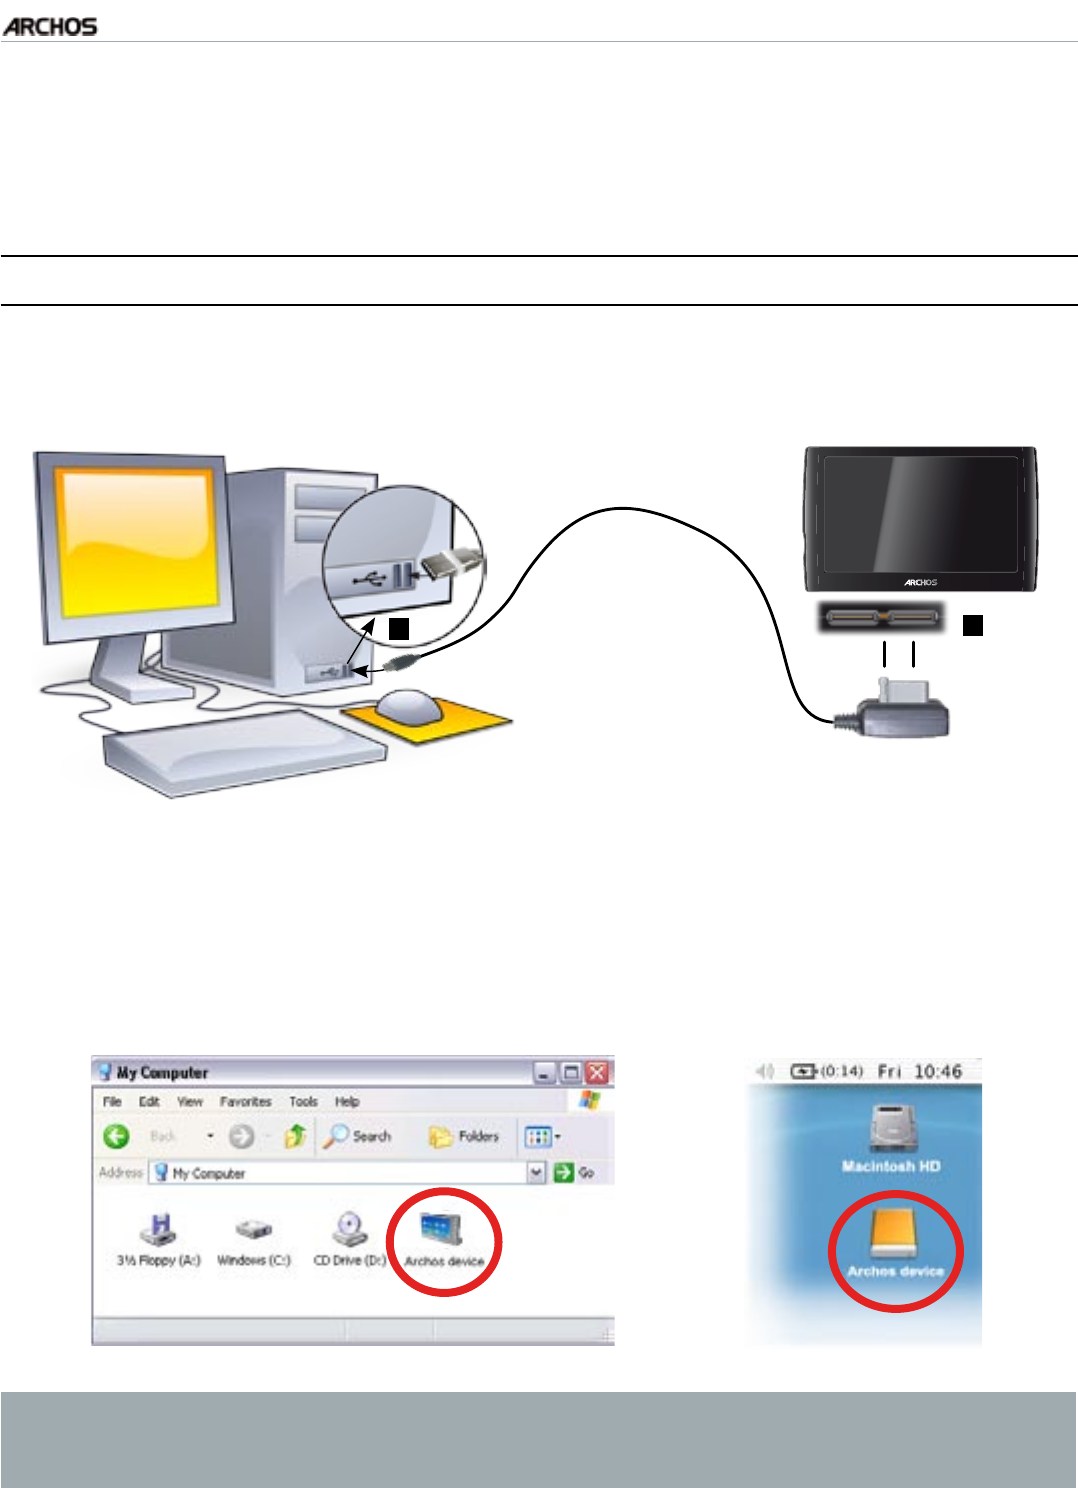
7.1 COnneCTIng The arChOs TO a COMPuTer
Plug the ARCHOS USB cable into the ARCHOS.
Plug the USB end of the cable into your computer.
Computer
turned on
USB
21
▲ ▲
The ARCHOS will ask you if you want to charge it or connect it. Choose to con-
nect it.
The ARCHOS icon will appear on your computer. The ARCHOS starts charging and
you can start transferring les to it.
If you do not have Windows Media® Player 10 or higher installed on your com-
puter, the ARCHOS will ask you if you want to charge its battery or connect it
as a mass storage device (Hard Drive). Choose to connect it.
1.
2.
3.
4.

MANUAL
FCC
5g+ TRANSFERRING FILES > P. 44
7.2 PuTTIng fIles OnTO The arChOs
There are two main methods to transfer your les onto the ARCHOS:
Copy your media les (videos, music, photos) with Windows Media® Player 10 or
higher*:
* For best performance, we recommend that users update to Windows Media®
Player 11 or higher.
The Synchronize button in Windows Media® Player is a one way ‘sync’ button. It will add
video, music and photo les to your ARCHOS. If will give you the possibility to have the
same digital media on your ARCHOS as you have in your Windows Media® Player media
library.
Connect your ARCHOS to the computer. See
Connecting the ARCHOS
to a Computer
.
On your computer, start Windows Media® Player.
Select the Sync tab.
Choose the media les you want to transfer.
Click on the Start Sync button.
The selected videos, songs or photos will be copied directly into the
corresponding Video, Music or Pictures folder of the ARCHOS.
See your Windows Media
®
Player help instructions for more information.
1.
2.
3.
4.
5.
6.
The second method is to use Windows® Explorer to copy and paste your les
from your computer to the Video, Music or Pictures folder of your ARCHOS.
You cannot copy les larger that 2 GB to the ARCHOS due to the FAT32 le
system constraints. For advanced users: in “PC Hard Drive” connection
modes (mode 2 and 3), the maximum size is 2 GB for .AVI les and 4 GB for
any other type of le. See: Storage Settings.
7.3 dIsCOnneCTIng
When you disconnect the ARCHOS from a computer, your device automati-
cally updates the ARCLibrary, so that the media les you just copied appear in
the Music and Photo Libraries.
Windows® XP or higher & WMP10 or higher
Verify that no data are being transferred between your ARCHOS and your computer.
Now unplug the USB cable from your ARCHOS and/or computer.
1.
2.
•
•
MANUAL
FCC
5g+ TRANSFERRING FILES > P. 45
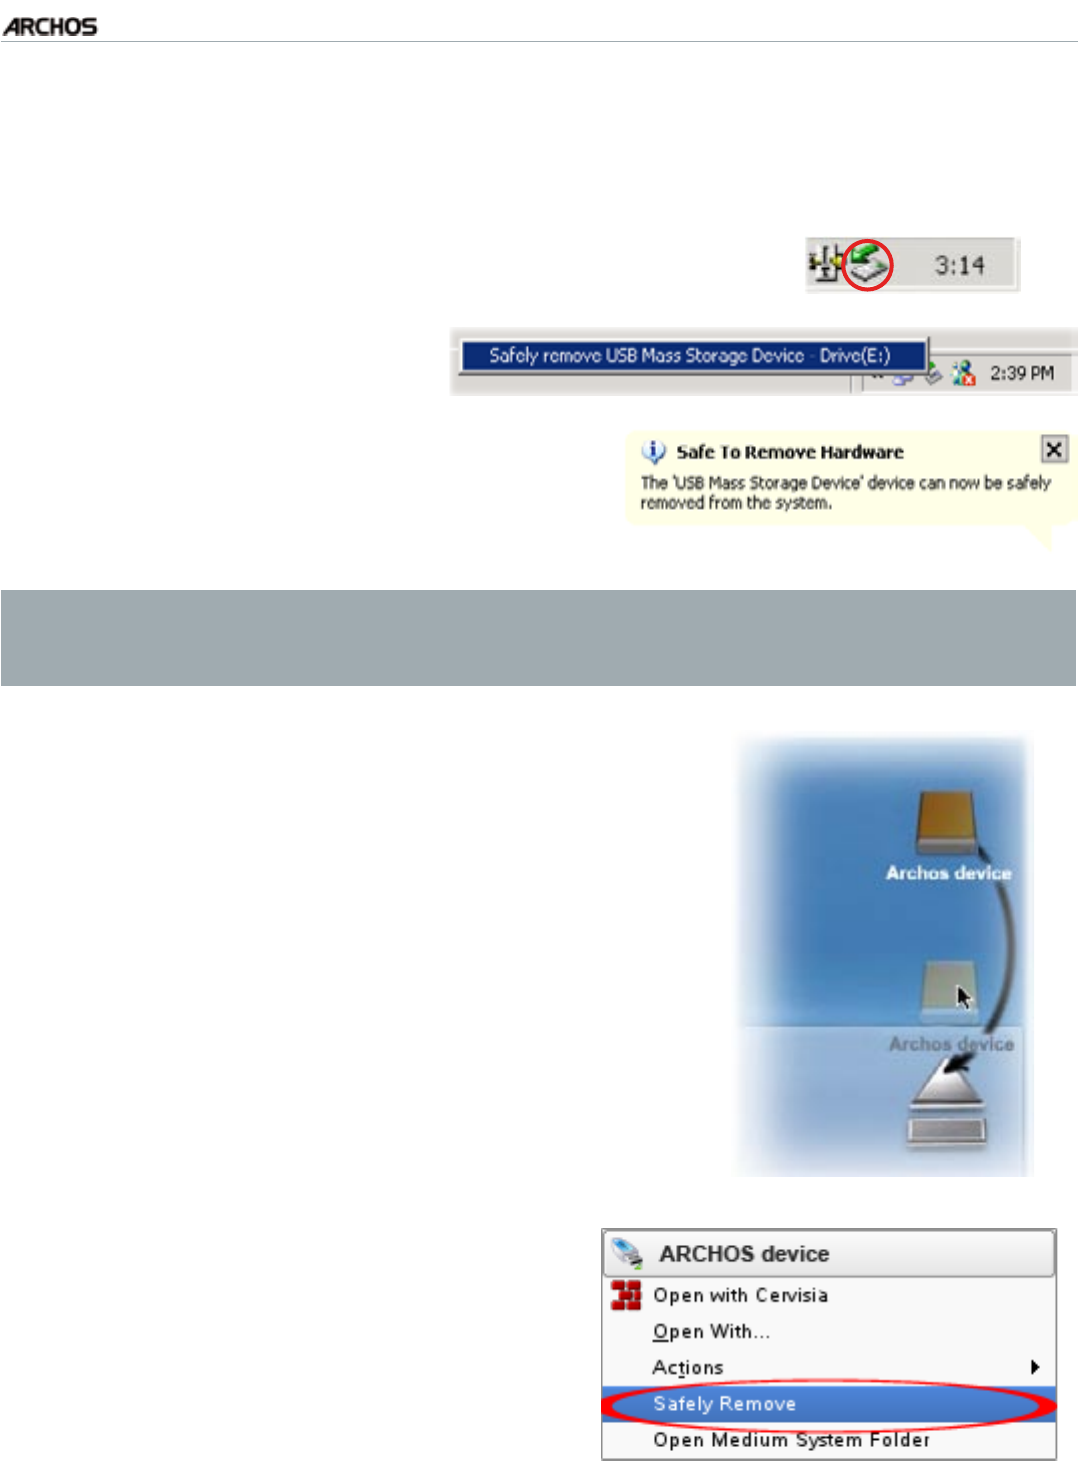
Windows® 2000 or Me
DO NOT SIMPLY PULL OUT THE CABLE AT ANY TIME! You must remove/unmount the
ARCHOS from the computer before disconnecting the USB cable to avoid loss of data
or freezing.
Once all your transfers are nished, click on the ‘safely
remove’ icon in the system tray, next to the clock.
•
Click on the ‘safely remove’
message.
•
A message will pop up, telling you that it is
now safe to disconnect the device*. You can
now safely unplug the USB cable from your
ARCHOS and/or computer.
•
* If you get a message saying that the device cannot be removed, close any
computer program that may still be using data on your device, such as media
players or Windows® Explorer.
Mac® OS X
DO NOT SIMPLY PULL OUT THE CABLE AT ANY TIME!
You must remove/unmount the ARCHOS from the
computer before disconnecting the USB cable to avoid
loss of data or freezing.
On your desktop, drag the ARCHOS icon towards the
trashcan, which will turn into a big eject symbol.
Drop the icon onto this eject symbol: the ARCHOS
hard drive will disappear from the desktop.
You can now safely unplug the USB cable from
your ARCHOS and/or computer.
•
•
•
Linux
DO NOT SIMPLY PULL OUT THE CABLE AT
ANY TIME!
You must remove/unmount the ARCHOS from
the computer before disconnecting the USB
cable to avoid loss of data or freezing.
On your computer, right-click on the ARCHOS icon and select Safely Remove.
Wait until the ARCHOS icon disappears, and safely unplug the USB cable from
your ARCHOS and/or computer.
•
•
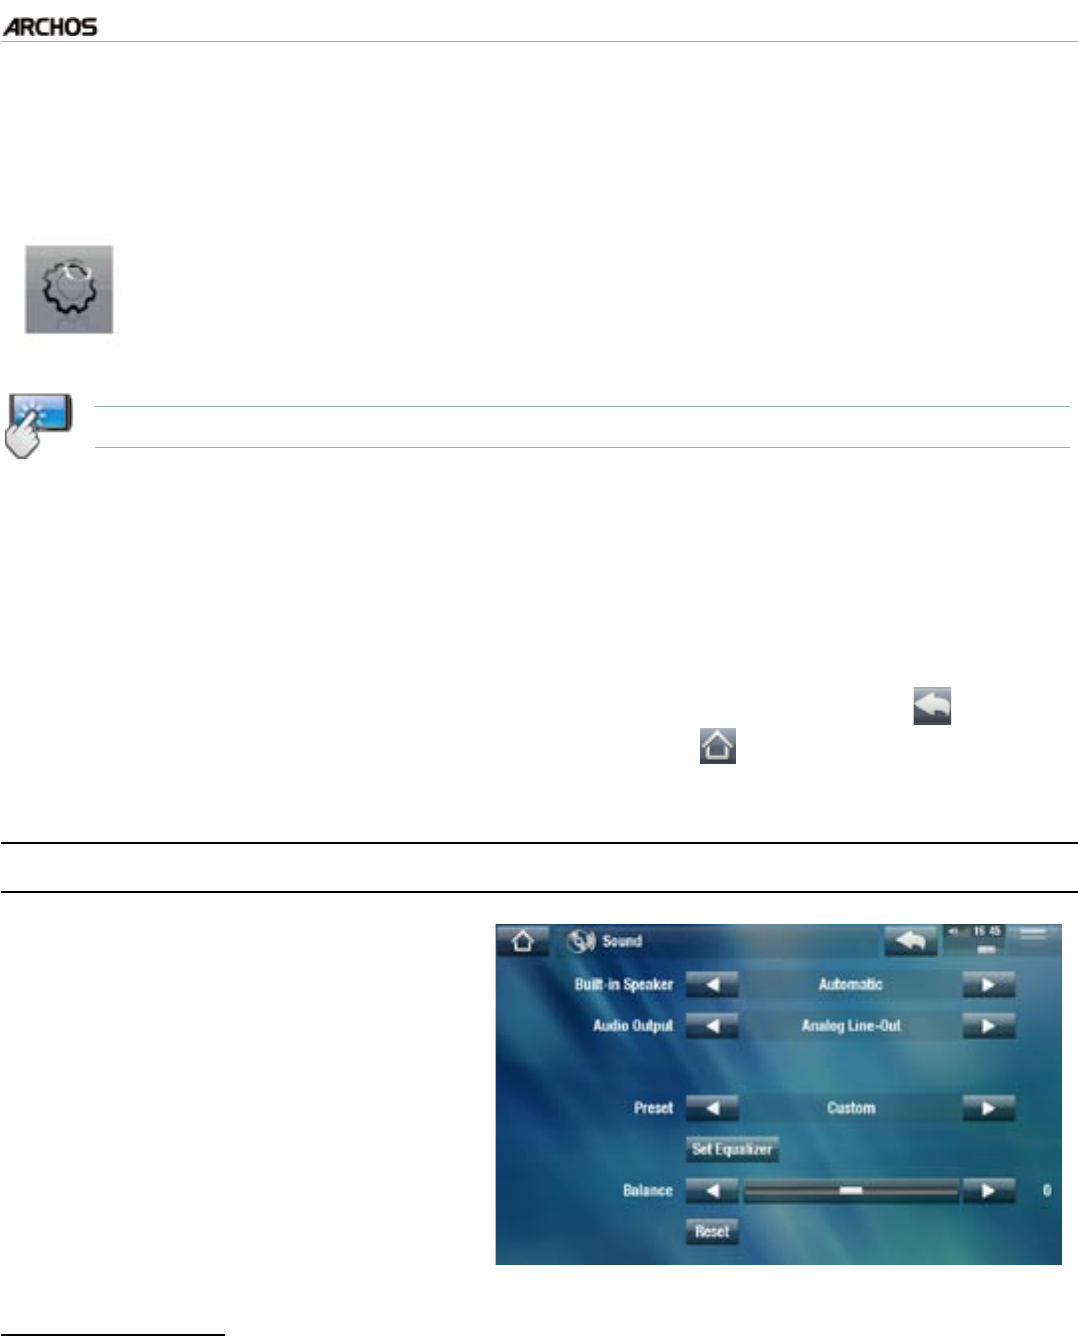
MANUAL
FCC
5g+ MAIN SETTINGS > P. 46
8. MaIn seTTIngs
In the Home screen, tap on “Tools”, select “Settings” then choose a set-
ting to open its corresponding screen.
USING THE TOUCHSCREEN
Once you are in a settings screen:
tap on a parameter to highlight it.
tap on the left/right arrows to select a different setting.
When it is possible, tap on the up/down arrows to scroll the screen up and down.
when you have nished adjusting your settings, tap on the Back icon to go
back to the list of settings, or tap on the Home icon to go directly to the
Home screen. Your settings are saved instantly.
8.1 “sOund” seTTIngs
This screen allows you to adjust the
sound settings of your ARCHOS to
your personal taste.
“Built-in Speaker”
“ON” / “OFF”: the built-in speaker remains on or off regardless if headphones are
attached.
“Automatic”: the built-in speaker automatically turns off when you plug in head-
phones or connect your ARCHOS to the optional DVR Station.
•
•
•
•
-
-
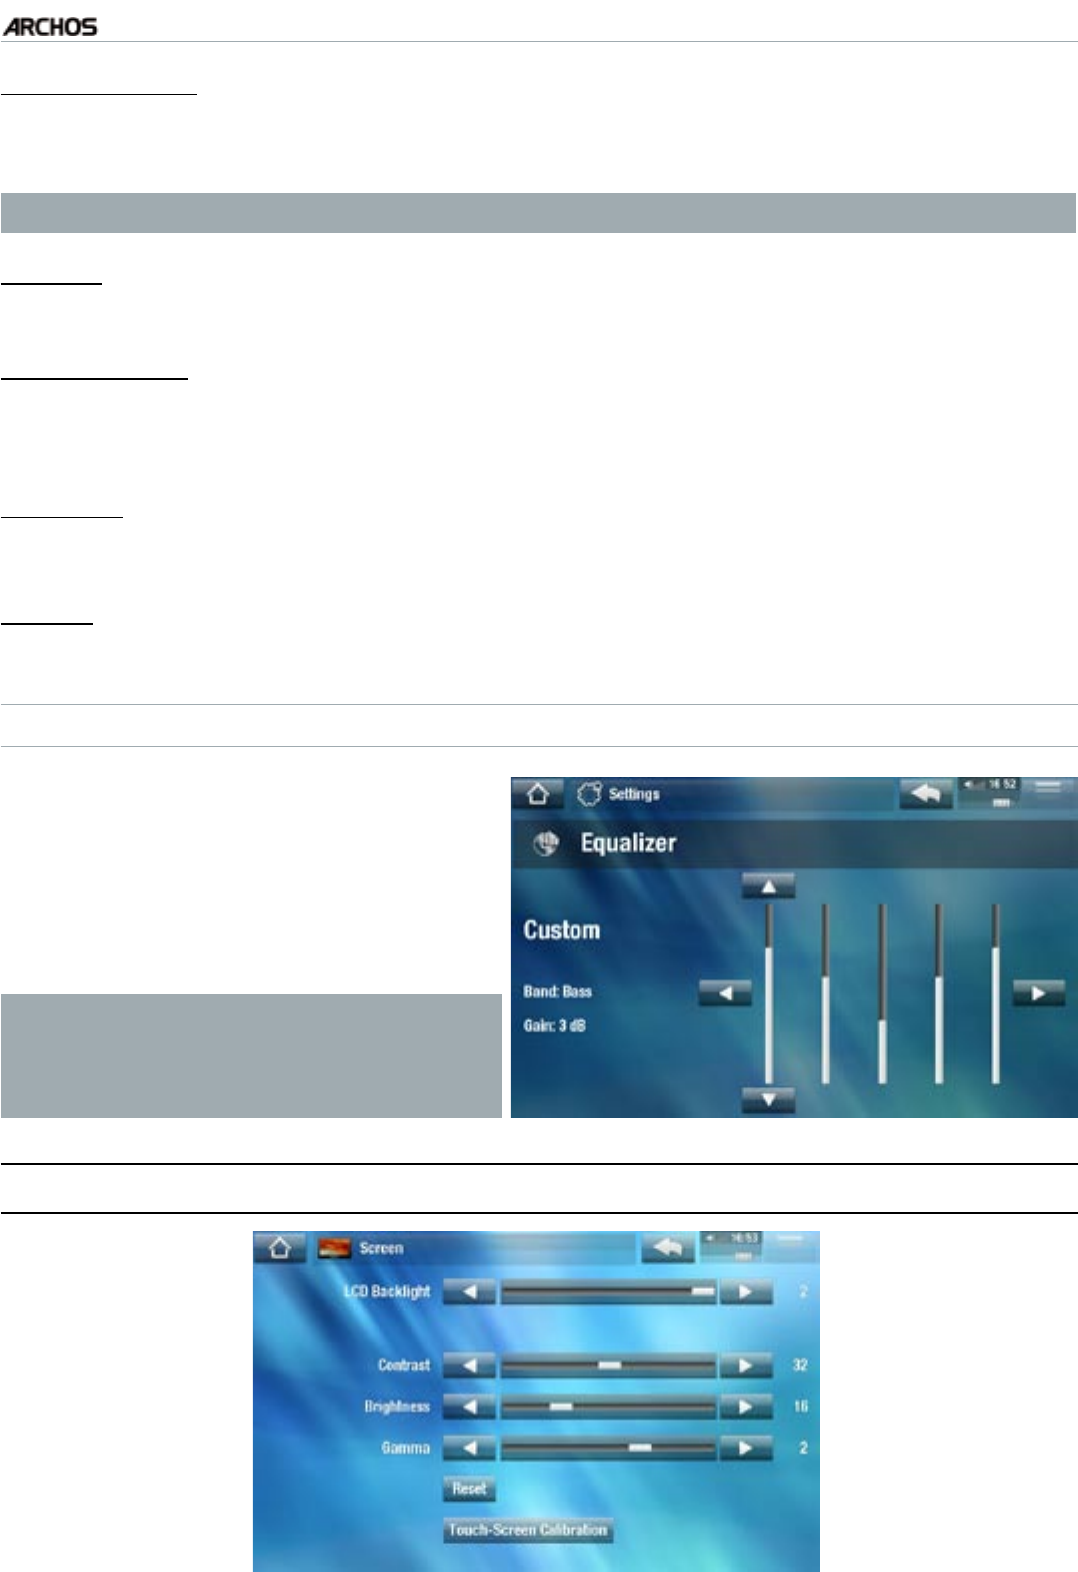
MANUAL
FCC
5g+ MAIN SETTINGS > P. 47
“Audio Output”
denes whether the audio signal is sent out via the “Analog Line-Out”, “HDMI”*
or “SPDIF”* interface.
* When connected to a DVR Station.
“Preset”
allows you to quickly select a sound prole.
“Set Equalizer”
allows you to use a custom sound prole. Select this option to enter the equalizer
screen (see next section).
“Balance” (not available in HDMI output mode)
allows you to balance the sound between the left and right stereo channels.
“Reset”
resets the sound parameters to the default values.
“EQUALIZER” SCREEN
Your ARCHOS features a 5-band
equalizer.
Select a band (Bass, Mid. bass, Mid.
range, Mid. treble or Treble), then use
the up/down arrows to change the
gain level for these frequency ranges.
•
•
It is advised that you change these
settings while listening to music, in
order to be able to appreciate the
sound changes.
8.2 “sCreen” seTTIngs
-
-
-
-
-
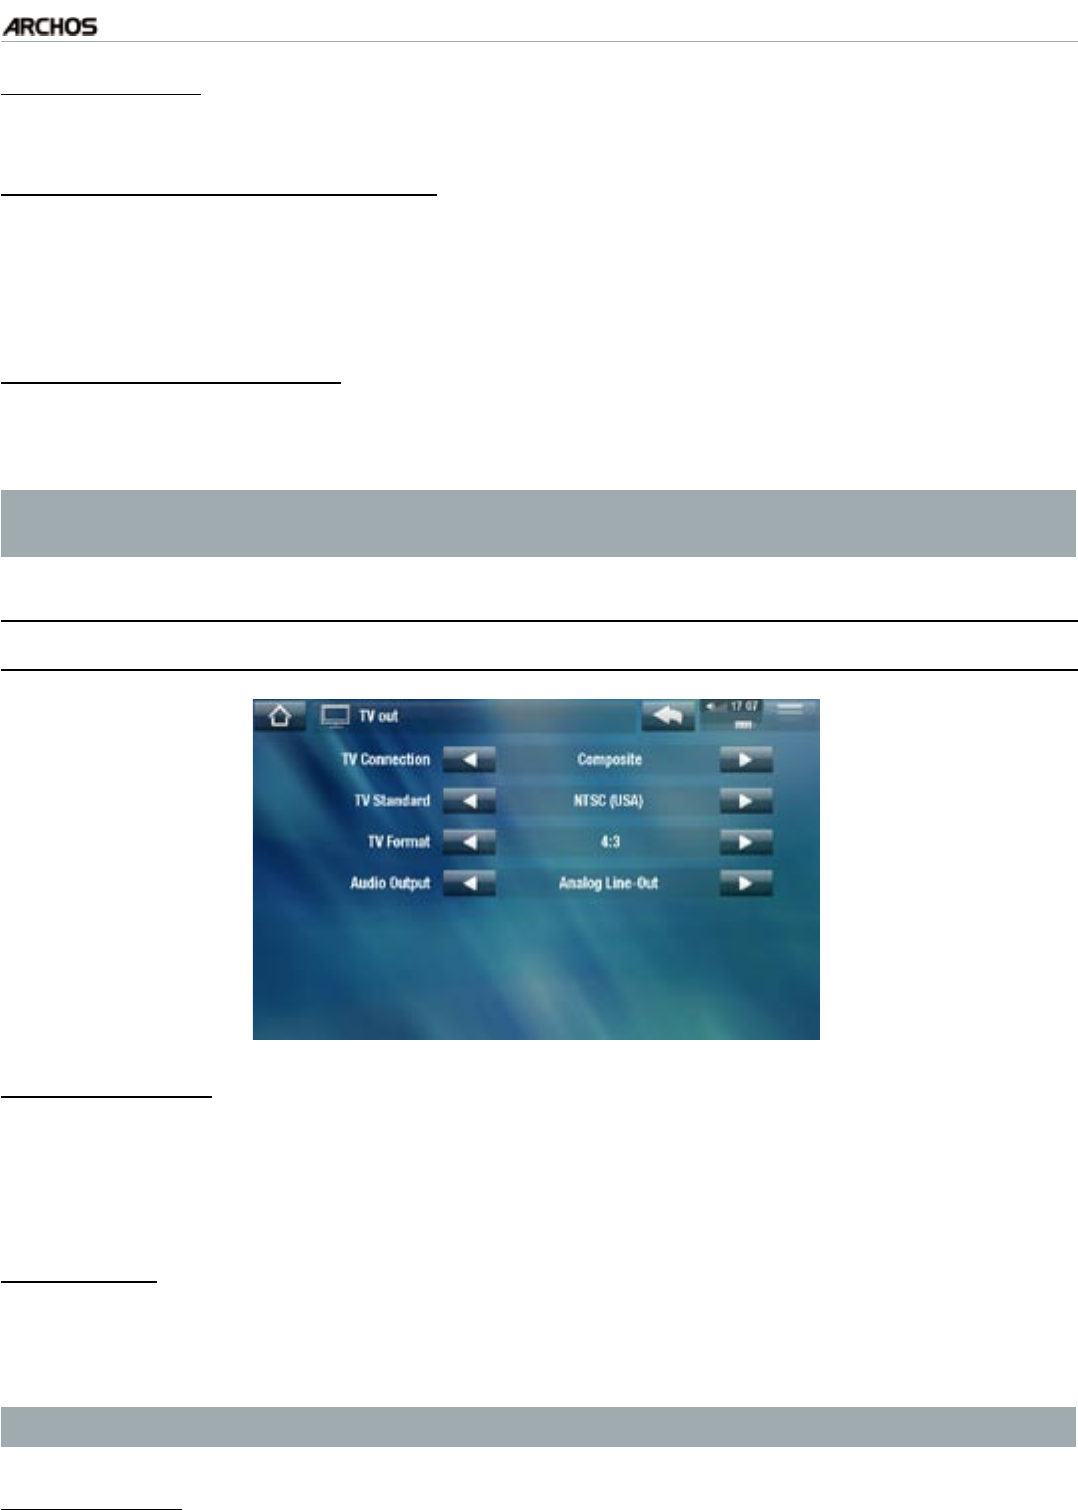
MANUAL
FCC
5g+ MAIN SETTINGS > P. 48
“LCD Backlight”
adjusts the level of backlight of the built-in screen.
“Brightness”/“Contrast”/“Gamma”
use these sliders to adjust the display parameters of the built-in screen (contrast,
brightness and gamma).
you can also reset the display parameters to their default values (“Reset” button).
“Touch-Screen Calibration”
If the touchscreen is not responding properly, use this button and follow the in-
structions on the screen.
If this does not work or if you cannot access the touchscreen settings, you
can force the touchscreen calibration (see: System Recovery).
8.3 “TV OuT” seTTIngs“TV OuT” seTTIngs
“TV Connection”
when your ARCHOS is connected to the optional DVR Station (available at www.
archos.com), select the type of video output (“Composite”, “S-Video”, “RGB”,
“Component” or “HDMI”), based on how you have connected the DVR Station to
your TV.
“Resolution” *
select the resolution that best adapts to your TV: “VGA 4/3 (640x480 60Hz)”,
“480p 16/9 (720x480 60Hz)”, “576p 16/9 (720x576 50Hz)” or “720p 16/9
(1280x720 50Hz)”.
* This parameter only appears if you choose the “HDMI” TV connection mode.
“TV Standard” **
choose between the “NTSC (USA)” and “PAL (Europe)” systems (select the one
that is compatible with your country’s television system).
-
-
-
-
-
-
-
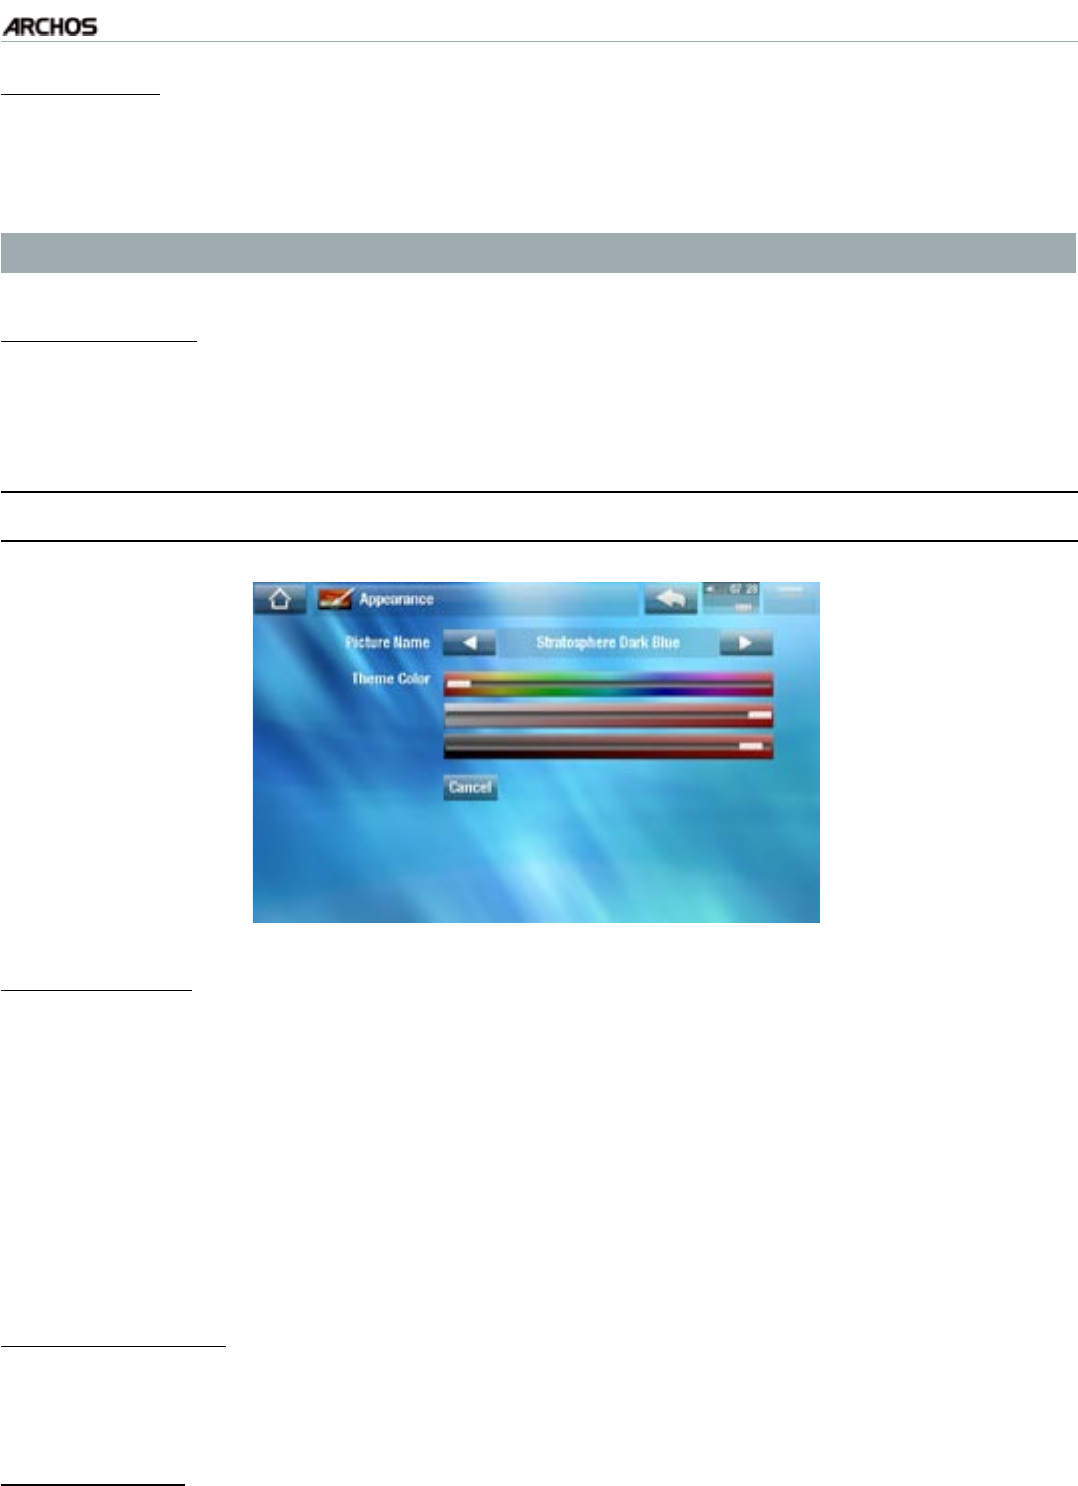
MANUAL
FCC
5g+ MAIN SETTINGS > P. 49
“TV Format” **
“4:3” or “16:9” - the format used by your television set to display images.
the option “Wide screen” becomes available when you set the “TV standard”
parameter to “PAL (Europe)”.
** These parameters do not appear if you choose the “HDMI” TV connection mode.
“Audio Output”
denes whether the audio signal is sent out via the “Analog Line-Out”, “HDMI” or
“SPDIF” interface depending on how you have connected the ARCHOS to your TV.
8.4 “aPPearanCe” seTTIngs
“Picture name”
allows you to choose a wallpaper for your ARCHOS. The wallpaper can be either
an image or a video. Select “None” if you do not want any background image or
video.
you can choose between all default backgrounds or the images that you have
previously set as wallpapers.
you can also set a picture as wallpaper from the Photo and Video modes.
To use a video as a wallpaper you need to copy it rst into the System folder of
the ARCHOS.
“Wallpaper color”
denes the color for your wallpaper, if you have disabled the use of a background
image or video.
“Theme color”
denes the theme color for your icons.
-
-
-
-
-
-
-
-
-
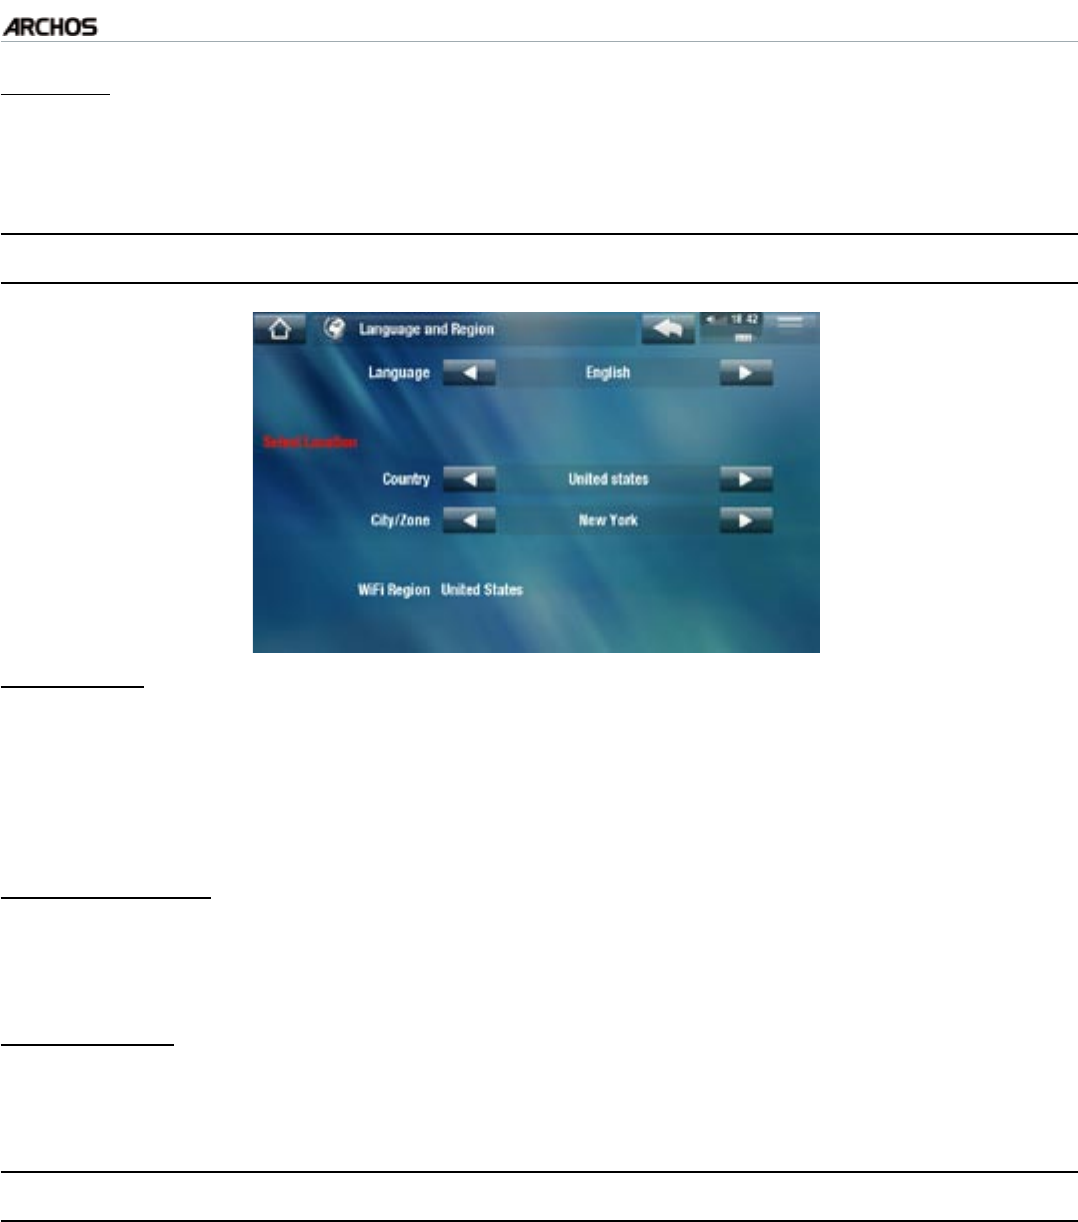
MANUAL
FCC
5g+ MAIN SETTINGS > P. 50
“Cancel”
use this button to discard any changes you may have made since entering this
screen.
8.5 “language and regIOn” seTTIngs
“Language”
choose a language.
visit www.archos.com to check the availability of other languages. New lan-
guages are included in the rmware as they become available. See
Updating the
Firmware
.
“Select location”
if your clock is set to “Automatic” (see
“Clock” Settings
), select your “Country”,
and “City/Zone”.
“WiFi Region”
this is congured automatically according to how you set your location.
8.6 “TV COnTrOl” seTTIngs
This is where you can set the DVR Station’s IR emitter to communicate with
your tuner. This will allow you to schedule recordings easily via the ARCHOS TV
Program Guide (EPG).
See the manual of the optional DVR Station.
-
-
-
-
-
•
•
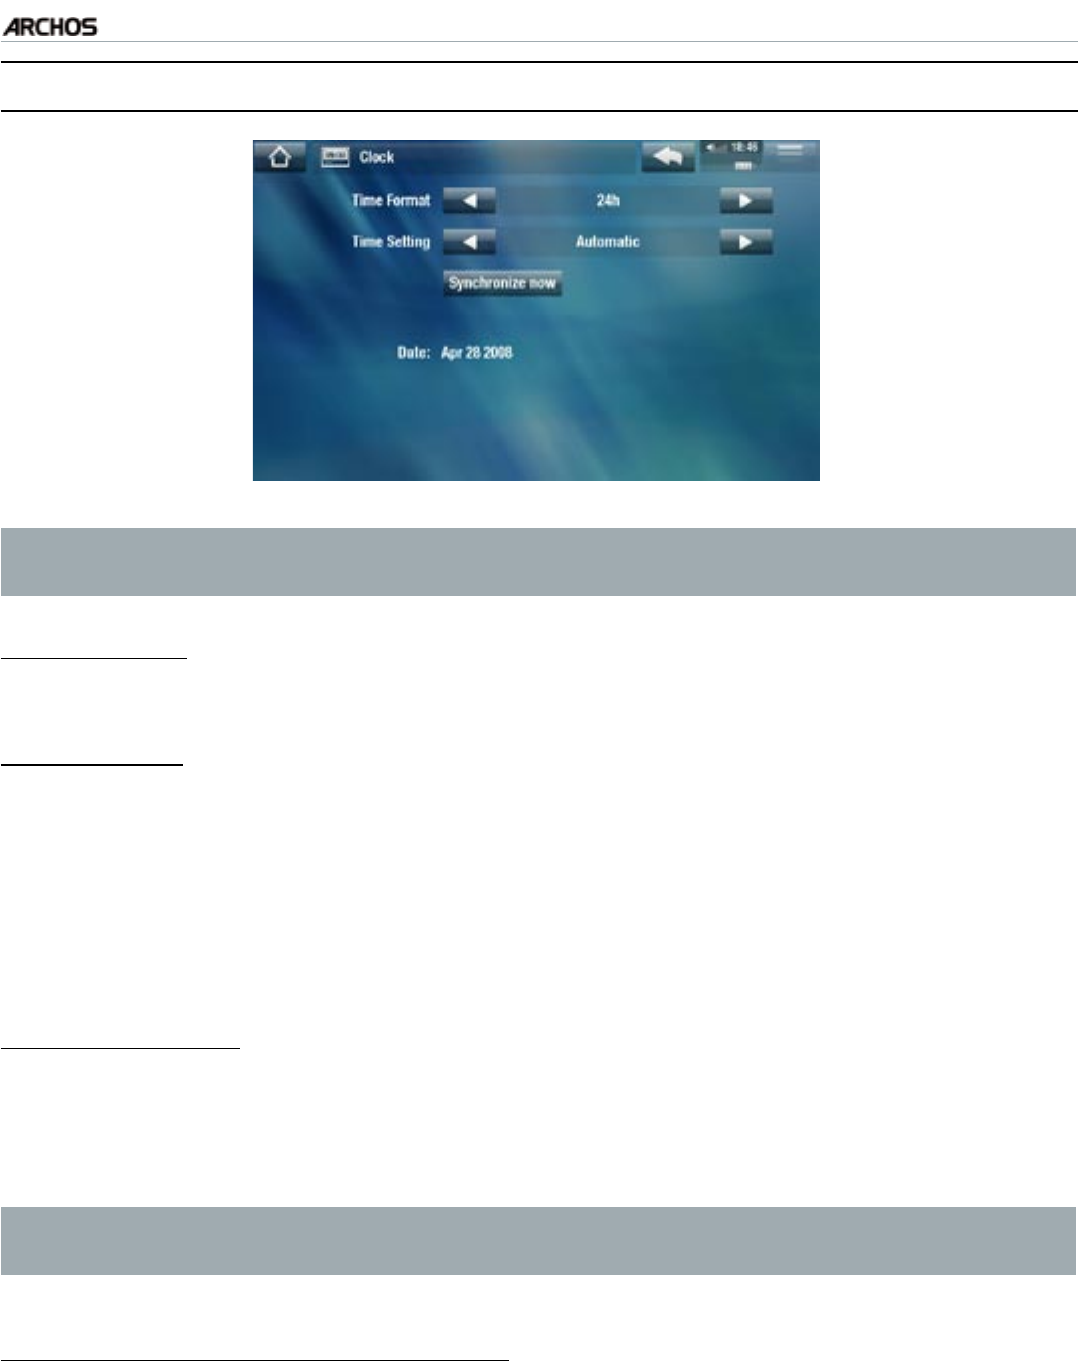
MANUAL
FCC
5g+ MAIN SETTINGS > P. 51
8.7 “ClOCk” seTTIngs
If you use the optional DVR Station to schedule video recordings on your TV
system, make sure that the time and date are set correctly!
“Time Format”
choose between 12h or 24h mode.
“Time setting”
“Automatic”: select this parameter if you want to set the clock automatically
when your ARCHOS is connected to a WiFi network. You will need to select your
location in the “Language and Region” settings screen (see:
“Language and
Region” Settings
).
“Manual”: select this parameter to set the current date & time manually. The fol-
lowing parameters will appear: “Hour”, “Minute”, “Year”, “Month” and “Day”.
“Synchronize now”
if the “Time setting” parameter is set to “Automatic”, use this button to set the
clock automatically via the WiFi.
for this to work, the ARCHOS needs to be connected to a WiFi network.
ATTENTION: If the time & date are not correctly set, you might not be able to
access certain web pages.
“Hour”, “Minute”, “Year”, “Month”, “Day”
these parameters allow you to set the current time and date manually.
-
-
-
-
-
-
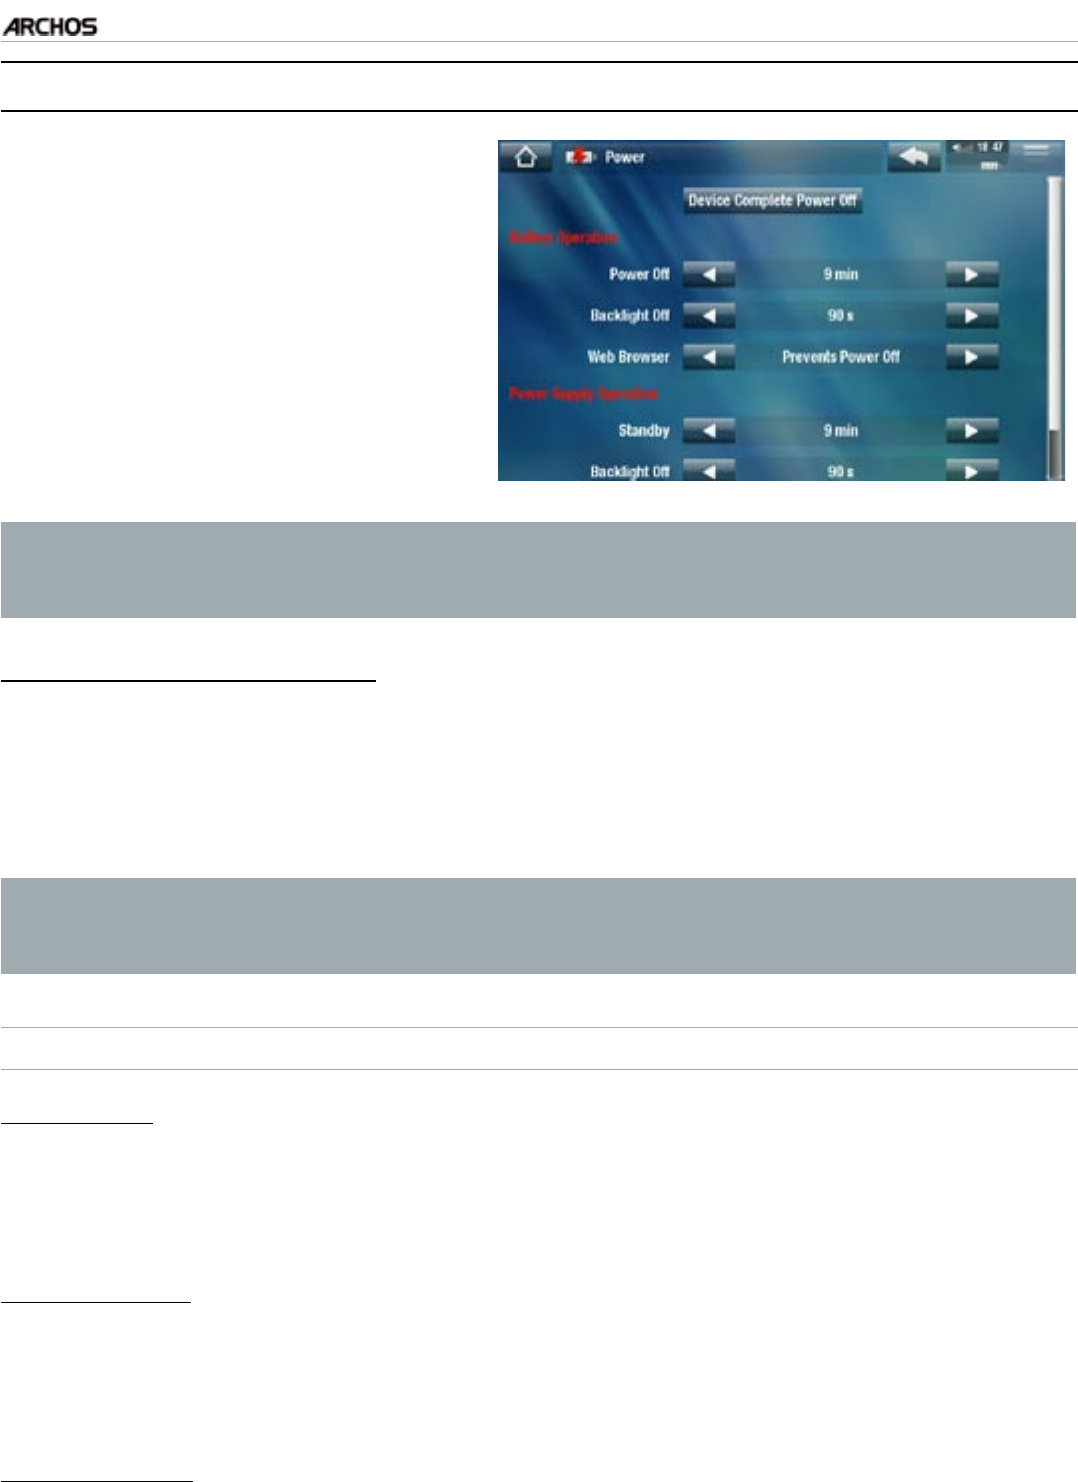
MANUAL
FCC
5g+ MAIN SETTINGS > P. 52
8.8 “POwer” seTTIngs
These settings will help you save
battery power, thus allowing a lon-
ger battery autonomy.
You can adjust settings for both
battery operation and power sup-
ply operation (when the ARCHOS is
connected to a powered accessory).
•
•
Your ARCHOS will consume more power as these parameters are set to higher
values. In battery operation, it is advised to set these parameters to lower val-
ues in order to save power.
“Device Complete Power Off”
If you do not plan on using the ARCHOS for an extended period of time, use this
button to completely turn off your device, so that there is absolutely no battery
usage.
You can also turn off your device completely by holding the Power button until
the second “shutdown” message appears*.
See ARCHOS Description.
* Remember that when you release the Power button during the rst “shut-
down” message, your device will keep using a small amount of battery power
to allow a quick start up.
“BATTERY OPERATION”
“Power Off”
the amount of time of user inactivity before the device shuts off.
the device will not shut down during a slideshow, audio/video playback, audio/
video recording, or USB connection.
“Backlight Off”
the amount of time of user inactivity before the LCD display turns off.
the display will not turn off while a video or slideshow is playing, or when you are
browsing the web.
“Web Browser”
“Normal Power Off”: while browsing the web, the ARCHOS will shut down ac-
cording to the setting selected for the “Power Off” parameter.
-
-
-
-
-
-
-
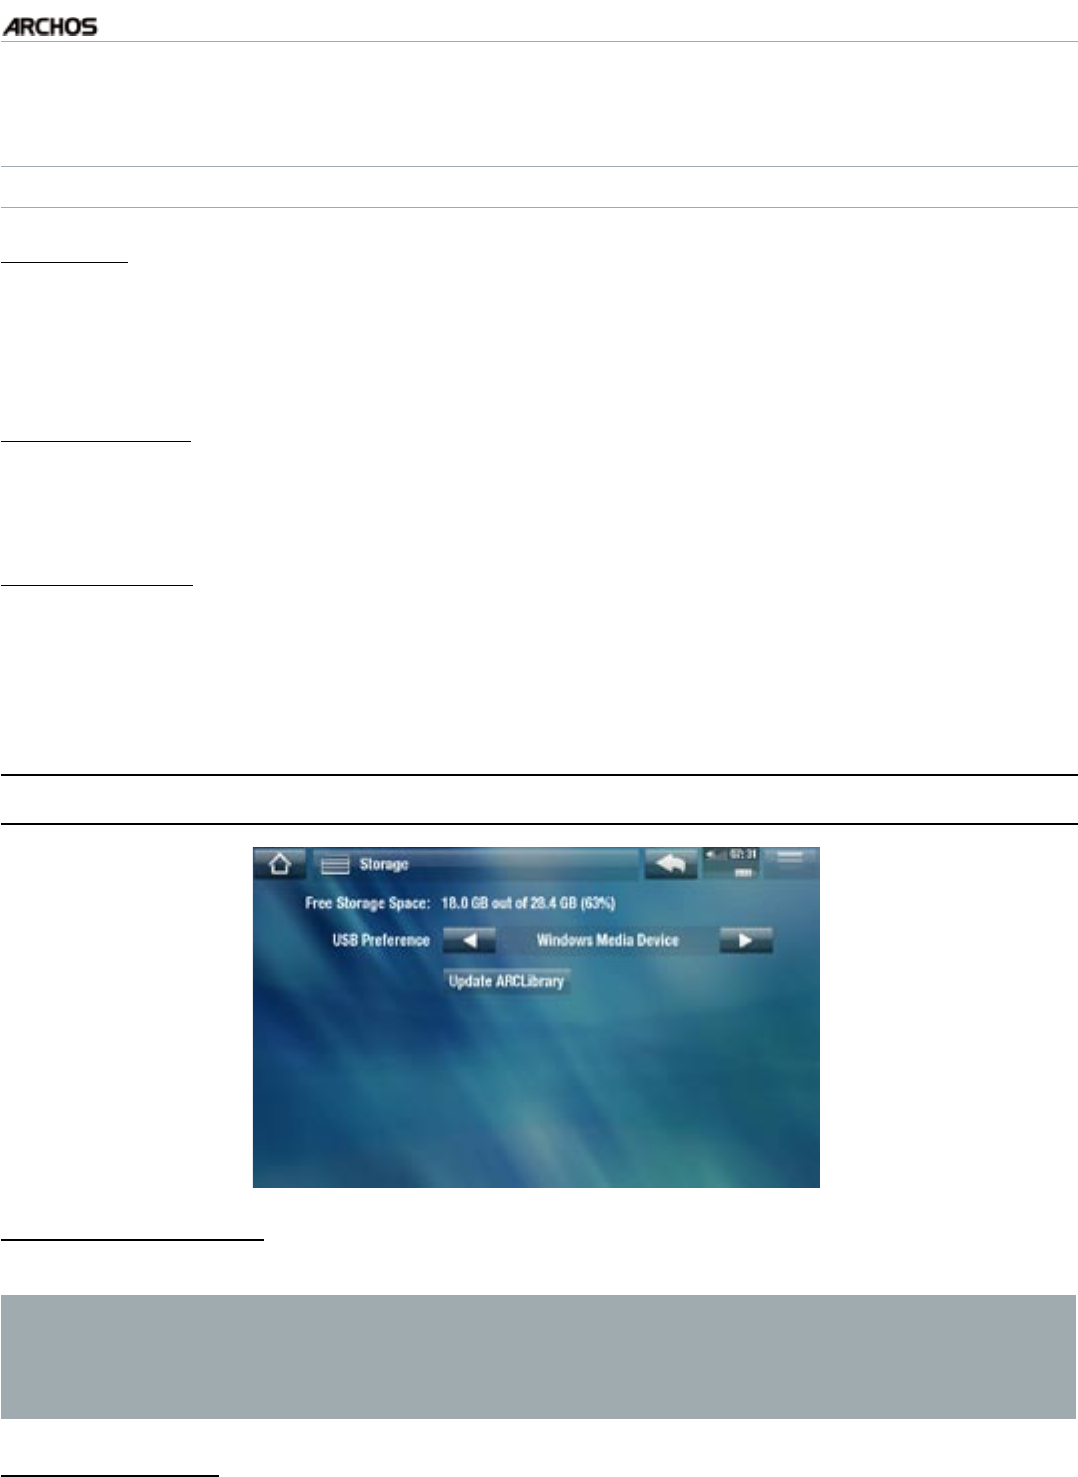
MANUAL
FCC
5g+ MAIN SETTINGS > P. 53
“Prevents Power Off”: while browsing the web, the ARCHOS will not shut off au-
tomatically from user inactivity.
“POWER SUPPLY OPERATION”
“Standby”
the amount of time of user inactivity before the ARCHOS goes into Standby mode.
the system will not go into Standby mode during a slideshow, audio/video play-
back, audio/video recording, or USB connection.
“Backlight Off”
the amount of time of user inactivity before the LCD display turns off.
the display will not turn off while a video or slideshow is playing.
“Web Browser”
“Normal Standby”: while browsing the web, the ARCHOS will go into Standby
mode according to the setting selected for the “Standby” parameter.
“Prevents Standby”: while browsing the web, the system will never go into
Standby mode.
8.9 “sTOrage” seTTIngs
“Free Storage Space”
displays the amount of free space on the hard drive.
Note: reported number of megabytes is binary-based counting (1Kb=1024
bytes). Thus each reported Mb represents approximately 1.05 megabytes
(decimal), and each reported Gb represents approximately 1.07 gigabytes.
Formatting also takes up space.
“USB preference” (for advanced users)
Your preferred connection mode will be used every time you connect the
ARCHOS to a computer. The connection mode determines how your device inter-
acts with your computer:
-
-
-
-
-
-
-
-
-
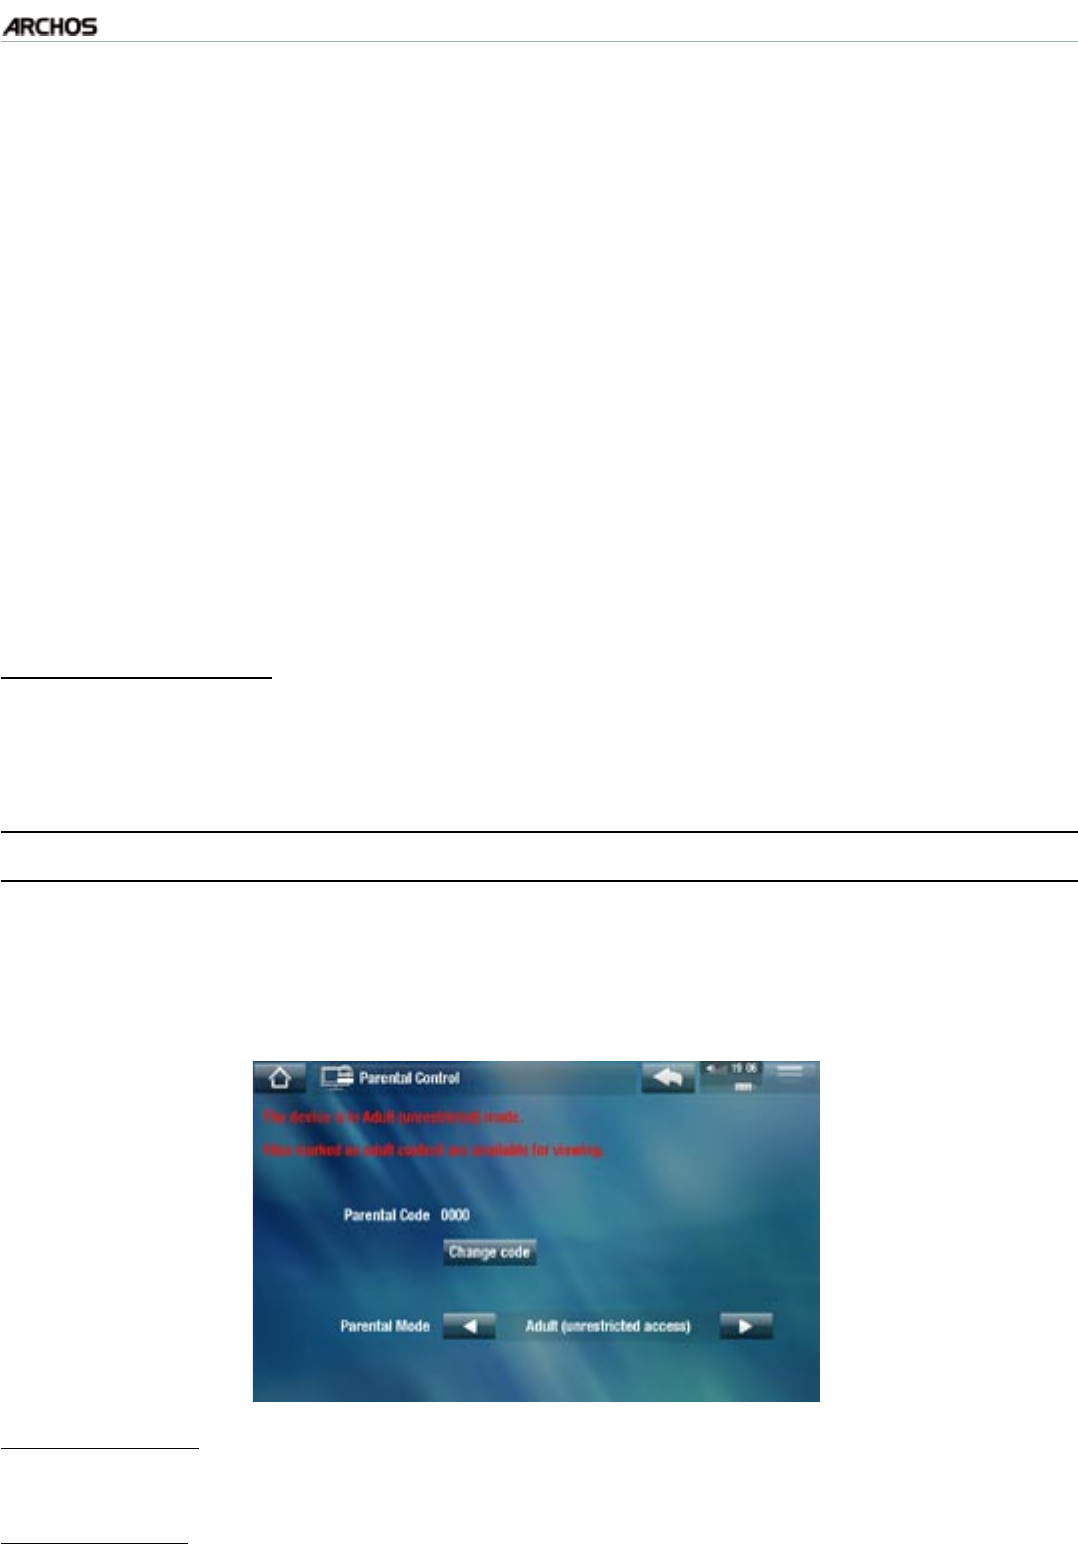
MANUAL
FCC
5g+ MAIN SETTINGS > P. 54
Mode 1: “Windows Media Device”: Recommended for users of
Windows Media®
Player (WMP) version 10 or higher
. When set to this mode, the ARCHOS uses the
Media Transfer Protocol (MTP). It allows you to charge your ARCHOS and transfer
les onto it at the same time.
Your ARCHOS will be locked only when it is opened
in Windows® Explorer.
You will be able to synchronize your media library auto-
matically every time you connect your ARCHOS to your computer. When your
le transfer is nished, simply unplug the cable from the ARCHOS, and your de-
vice will update the ARCLibrary (Music/Photo libraries).
Mode 2: “PC Hard Drive”: Recommended for users of Windows® XP with Windows
Media® Player 9, Windows® 2000, Me, Mac® OS X or Linux. The ARCHOS will ask
you if you want to charge it or connect it as a mass storage device (Hard Drive).
Choose to connect it as a mass storage device (external hard drive). When con-
nected to your computer, your ARCHOS will be locked. Disconnection: when the le
transfer is over, safely unmount the ARCHOS (See:
Disconnecting
) and your device
will do a quick ARCLibrary update (Music/Photo libraries). May not index all les.
Mode 3: “PC Hard Drive (auto-ARCLib)”: Same as mode 2, but with a full
ARCLibrary update (Music/Photo libraries) at disconnection.
“Update ARCLibrary”
Available only when “USB Preference” is set to “PC Hard Drive” (mode 2).
This USB mode only does a quick ARCLibrary update (Music/Photo libraries). Use
the “Update ARCLibrary” button if you want to do a full ARCLibrary update.
8.10 “ParenTal COnTrOl” seTTIngs
The parental code system allows you to create a passcode and hide any le or folder
from view. This is useful, for example, if you have adult content which you prefer not
to be accessible by others. By default, your device is set to “Adult (unrestricted ac-
cess)” and the default parental code is “0000”.
“Parental Code”
displays your current parental code.
“Change code”
to change your parental code, the device must be set to “Adult (unrestricted access)”.
-
-
-
-
-
-
-
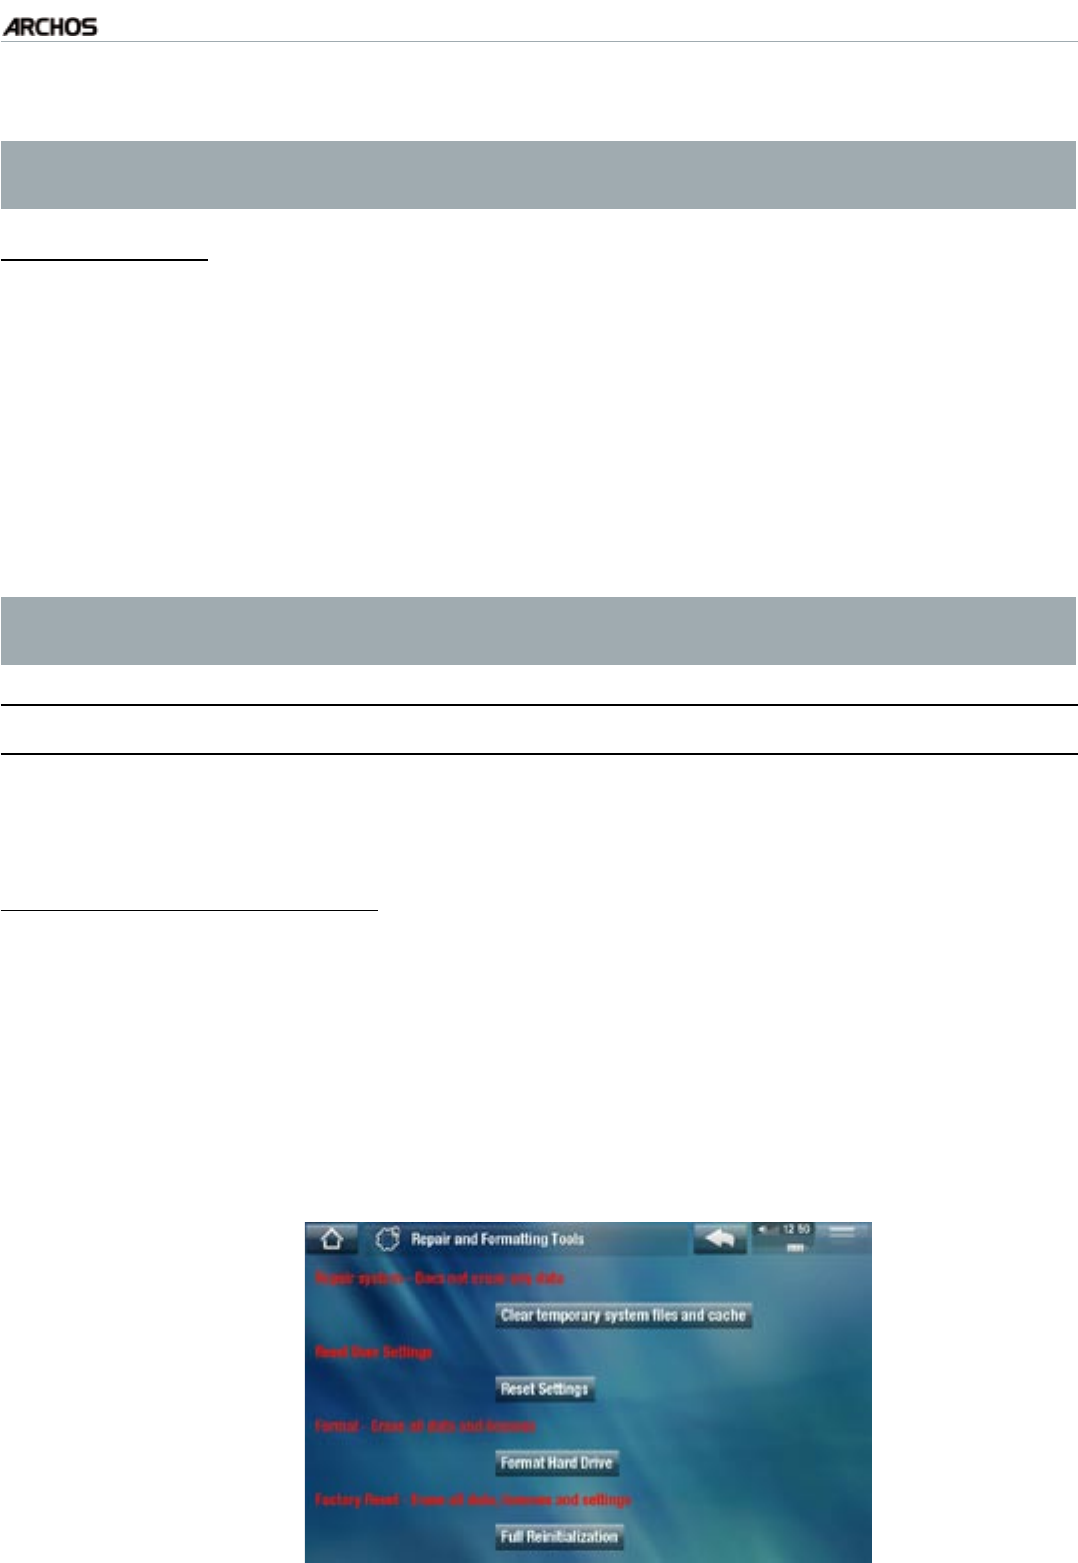
MANUAL
FCC
5g+ MAIN SETTINGS > P. 55
tap on this button to dene your 4 digit password code, using the virtual key-
board. See:
Using the Virtual Keyboard
.
If you have changed your code and forgot it, please contact our technical sup-
port team (www.archos.com/support).
“Parental Mode”
You have the choice between 2 modes:
“Adult (unrestricted access)”*: all les are visible.
“Child (restricted access)”: les marked as adult content will not be visible.
Every time you connect the device to a computer, it will ask for the parental
code.
You also have the possibility to select “Request (Ask me at startup)”: every time
the device turns on, you will be asked to enter the parental code. If you enter it,
the device will be set to “Adult” mode, and if you don’t, the ARCHOS will be in
“Child” mode.
* If you go from “Child” to “Adult” mode, you will be required to enter your
parental code.
8.11 ““CusTOMer assIsTanCe” seTTIngs
Here you can nd ARCHOS technical support information, view the PDF user manual
or access the “Repair and Formatting Tools”:
“Repair and Formatting Tools”
use this button to access the “Repair and Formatting Tools” settings screen. This
screen allows you to do the following actions:
“Clear temporary system les and cache” (does not erase any data)
“Reset Settings” (resets all user settings)
“Format Hard Drive” (erase all data, media les, and licenses)
“Full Reinitialization” (erase all data, media les, licenses and settings)
-
-
-
-
-
-
-
-
-
-

MANUAL
FCC
5g+ MAIN SETTINGS > P. 56
In the event that your ARCHOS freezes or does not respond anymore, try to
reset it (see: Troubleshooting).
If this does not work or if you cannot access the Repair and Formatting Tools,
you can try a system recovery (see: Troubleshooting).
8.12 “fIrMware and Plug-Ins” seTTIngs
“Firmware Ver.”
displays the current version of the rmware and Digital Rights Management
(DRM) system.
“Plug-ins”
displays the current plug-ins installed on your device.
“Product Key”
each ARCHOS has a unique number.
you will need this number to register your product online (www.archos.com/register).
“Firmware Update”
use this button to update the rmware manually (see:
Updating the Firmware)
“Online Firmware Update”
use this button to search for an online update via a WiFi network. If there is one
available, it will be installed automatically. See
Updating the Firmware
to learn more.
8.13 uPdaTIng The fIrMware
The rmware is the operating system (OS) of your ARCHOS. It is periodically updated
to bring new features, improvements and bug xes. There are two main ways to up-
date your product’s rmware:
Directly on your ARCHOS if your device can connect to a WiFi network.
With a computer connected to the internet
UPDATE DIRECTLY ON THE ARCHOS (WIFI CONNECTION NEEDED)
This is the easiest way to update the rmware. For this to work, you only need a con-
nection to a WiFi network. See
Connecting to the WiFi
.
From to the Home screen, tap on “Tools”, select “Settings” and choose
“Firmware and Plug-ins”.
Tap on the “Online Firmware Update” button.
The ARCHOS will connect to the WiFi and search on-line for a new rmware. If there
is one available, it will start downloading, and it will be installed automatically.
-
-
-
-
-
-
•
•
1.
2.
3.
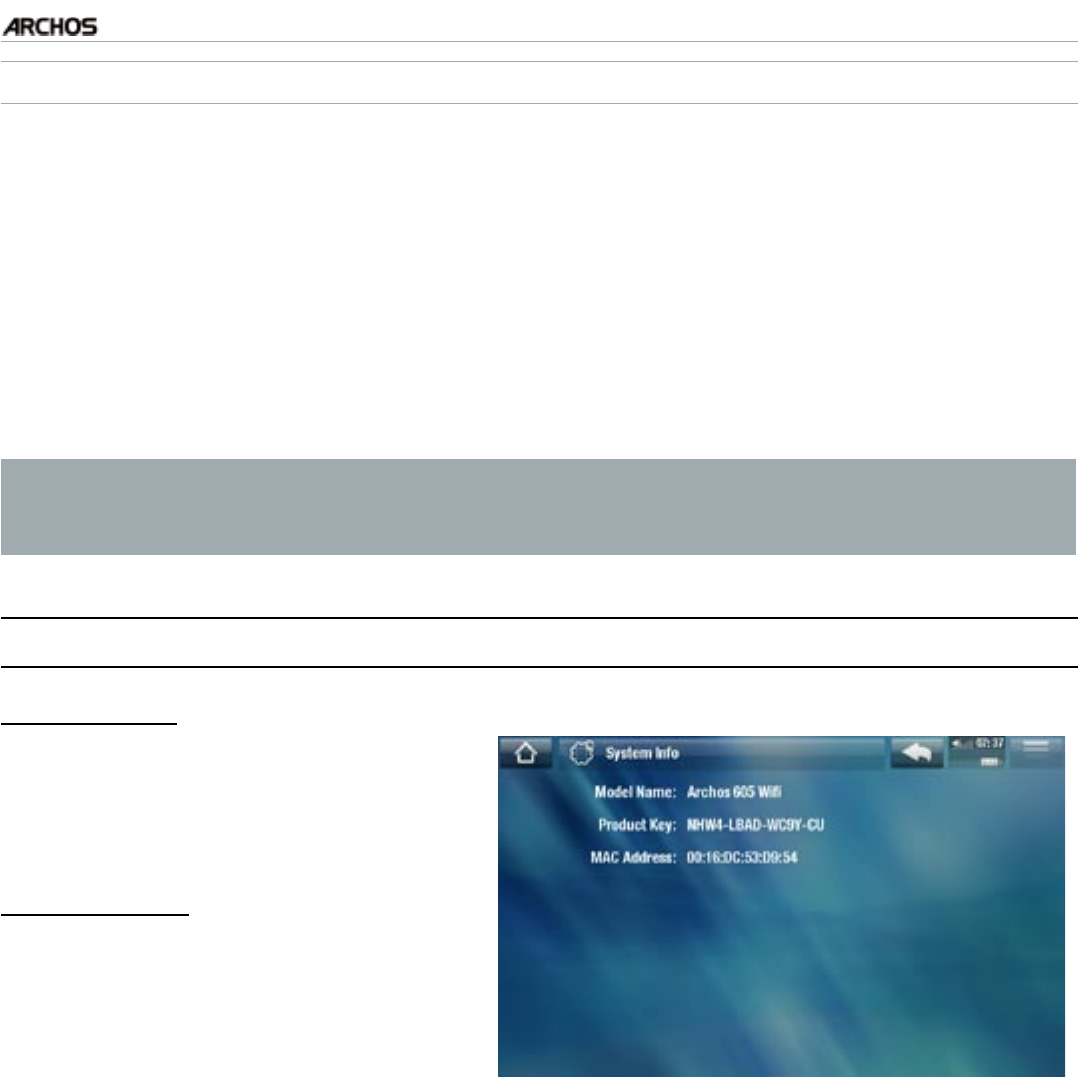
MANUAL
FCC
5g+ MAIN SETTINGS > P. 57
UPDATE USING A COMPUTER (INTERNET CONNECTION NEEDED)
You can also update the rmware using a computer connected to the internet:
On your PC, go to www.archos.com/rmware.
Search for the latest rmware available for your ARCHOS.
Compare the latest on-line version with the one installed on your ARCHOS: your
ARCHOS rmware version number appears in the “Firmware and Plug-ins” set-
tings screen (see:
“Firmware and Plug-ins” Settings
).
If the on-line version is more recent than yours, follow the instructions to down-
load and install the new rmware.
Your Internet browser may warn you that the contents of the rmware le
could harm your computer. ARCHOS has taken precautions to insure that this
le will not harm your computer.
8.14 “sysTeM InfO” seTTIngs
“Product Key”
each ARCHOS has a unique number.
If you register your product on-line
using a computer (www.archos.com/
register), this number will be needed.
“MAC address”
each ARCHOS has a unique MAC
address.
some WiFi networks lter MAC
addresses. You might need to com-
municate this address to the per-
son who manages the network.
-
-
-
-
1.
2.
3.
4.
MANUAL
FCC
5g+ OTHER FUNCTIONS > P. 58
9. OTher funCTIOns
9.1 PlayIng gaMes
In the Home screen, tap on “Play” and choose “Games”. Go on www.archos.com to
purchase games and learn how to install and use them.
9.2 TV funCTIOns
In the Home screen, tap on “TV” and choose a category. To benet from these func-
tions, you have a choice of accessories that can be purchased at the ARCHOS web
site.
TV PROGRAM GUIDE
Using the optional DVR Station accessory, you can easily schedule TV recordings from
the grid of programs (includes program summary info) using the TV program Guide.
TV SCHEDULER
Allows you to manually schedule a TV recording using the optional DVR Station or TV
Snap-on accessories.
RECORDINGS
Display the list of TV programs you have recorded with your DVR Station, DVR Snap-
on, or TV Snap-on.
DIGITAL TV
Select this icon to watch digital TV (DVB-T) when you have connected the optional TV
Snap-on accessory to your ARCHOS.
9.3 TOOls
In the Home screen, tap on “Tools” and choose one of the following categories:

MANUAL
FCC
5g+ OTHER FUNCTIONS > P. 59
SETTINGS
This menu allows you to congure your device’s settings. See Main Settings.
WIDGETS
Widgets are little applications (calculator, weather forecast, currency converter,
note writer, etc) that add your favorite features to your ARCHOS. It gives you a
fun, quick and easy access to hundreds of tools… right on the device.
Go on www.archos.com to learn how to get widgets for your ARCHOS and how
to install and use them.
FILES
Select this icon to navigate the le system of your ARCHOS hard drive. See Using the
File Browser.
FLASH APPS
Select this icon to display the Flash™ applications stored in the Flash folder of
your ARCHOS.
Tap on a Flash™ application to launch it.
PDF DOCUMENTS
Select this icon to display the PDF documents stored in the PDF folder of your
ARCHOS.
Tap on a PDF le to open it with the PDF reader.
Your ARCHOS features a PDF reader with hyperlink support.
ATTENTION: The ARCHOS PDF reader may not implement all PDF features.
For example, you will not be able to open password protected PDF les.
PDF Touchscreen Controls
To follow a link (red/blue outline), simply tap on it.
To display the menu overlay while viewing a PDF document, tap in the top right
corner of the screen.
To scroll the page up and down, tap on the page and drag it up or down.
Once arriving at the bottom of a PDF page, pull the page up to reveal the next
page. Proceed similarly to go to the previous page.
To go back to the Home screen, tap the Home icon .
•
•
•
•
•
•
•
•
•
•
•
•

MANUAL
FCC
5g+ OTHER FUNCTIONS > P. 60
Following Hyperlinks
Some PDF documents have hyperlinks (for instance, a table of contents, links to
an external website, etc.).
Links are surrounded by a blue outline. A highlighted link (active link) is surround-
ed by a red outline.
If you want to go back to the previous page (where you ‘clicked’ the link), select
the “Link back” menu item.
Note that hyperlinks referring to an external document or to a URL may not
work.
PDF Reader Menu Items
“Hide text overlay”
will hide all overlaid graphics (status bar, menu items, etc.) to only show the PDF
document.
“Zoom”
allows you to adjust the zoom level.
“Previous page”
goes to the previous page in the document.
“Next Page”
goes to the next page in the document.
“Link back”
will take you back to the page that you came from.
only appears when you have previously followed a link.
“Go to page...”
allows you to select a specic page.
use the left/right buttons to select a page number.
Select “Ok” to go to this page.
FILE SHARING
Your ARCHOS allows you to share les with other computers or ARCHOS devices on
a WiFi network.
•
•
•
-
-
-
-
-
-
-
-
-
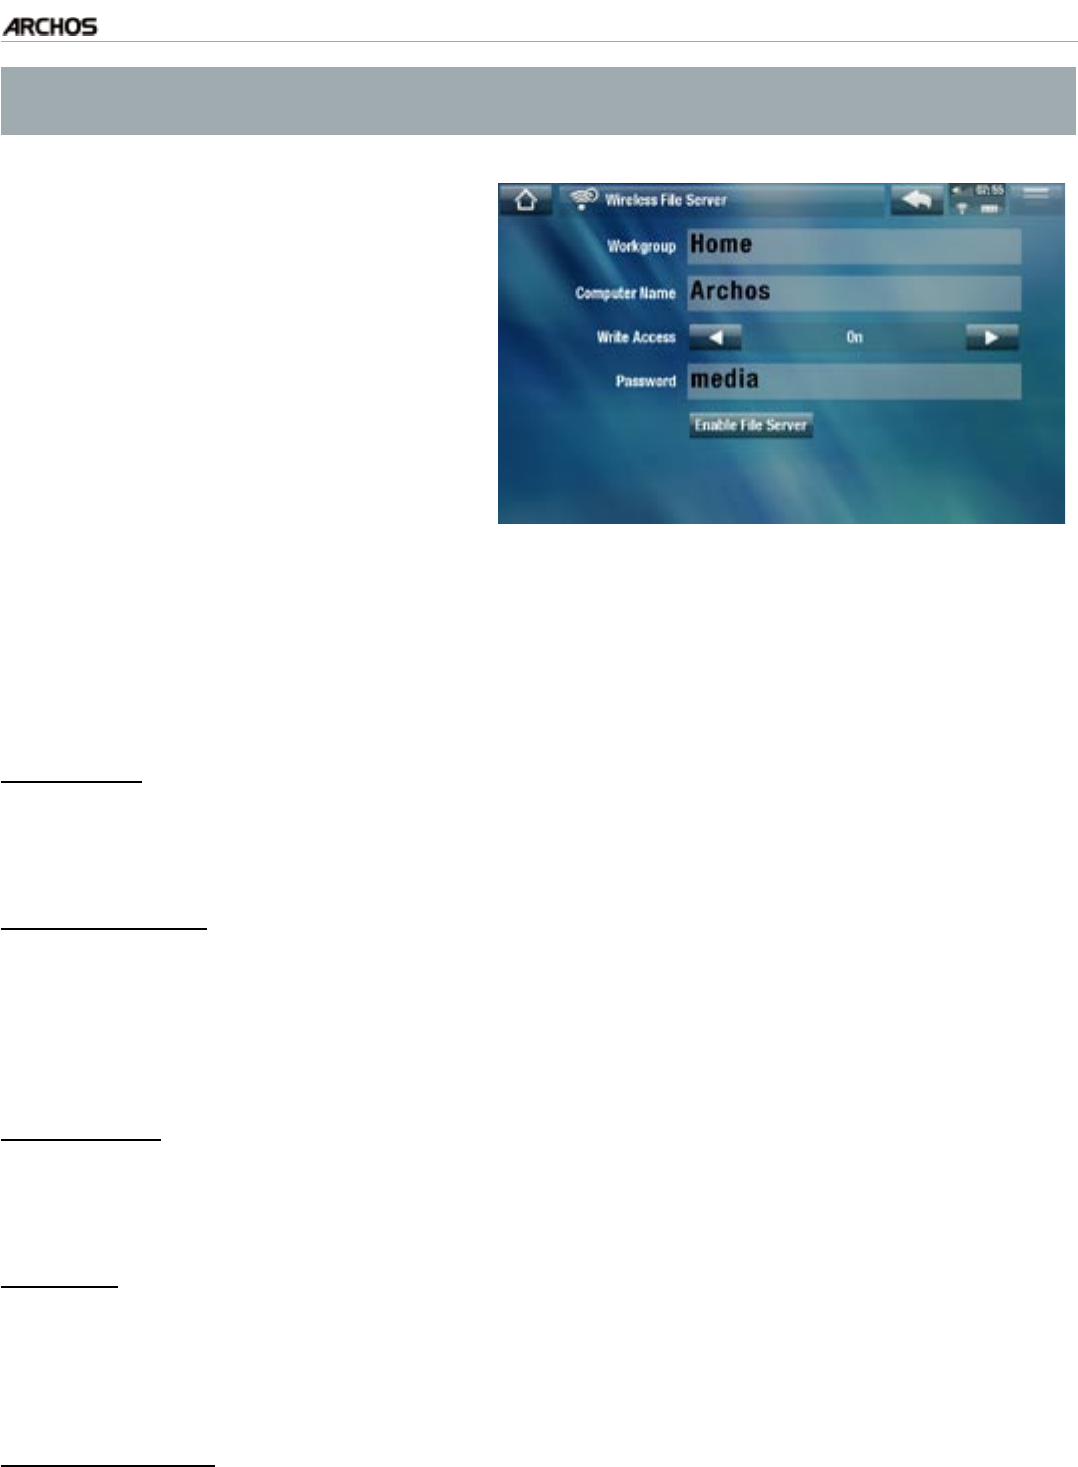
MANUAL
FCC
5g+ OTHER FUNCTIONS > P. 61
Important: please check the applicable laws in your country or jurisdiction to
know what media les you are allowed to share or copy.
First, you need to connect to a
WiFi network. See
Connecting to
the WiFi
. The device you want to
share les with needs to be con-
nected to the same WiFi network.
To enable the le server directly, tap
on “Tools” from the Home Screen,
choose “File Sharing”, and tap on the
“Enable File Server” button. While
the le server is turned on, other
functions of your device are disabled
•
•
Your ARCHOS hard drive will then be accessible from your computer’s network
neighborhood.
If you want to set up your ARCHOS device to appear with a particular name in a
particular workgroup on the network, you can change the following parameters
(in the
“File Sharing” screen)
:
Workgroup
enter the name of the workgroup, using the virtual keyboard.
see:
Using the Virtual Keyboard
.
Computer name
enter the name for the ARCHOS device in the network, using the virtual keyboard
(see
Using the Virtual Keyboard
).
normally, you do not need to change this parameter unless more than one
ARCHOS device of the same model name is in the workgroup.
Write access
“On” will allow other computers to write to your ARCHOS hard drive.
“Off” will prevent other computers from writing to your device.
Password
only appears if the “Write access” parameter is set to “On”.
Type in the password for other computers to be able to write to your hard drive
(see
Using the Virtual Keyboard
).
Enable le server
tap on this button to turn on the le server.
•
•
-
-
-
-
-
-
-
-
-

MANUAL
FCC
5g+ OTHER FUNCTIONS > P. 62
HELP
Select this icon to display a list of useful PDF documents such as this full PDF
manual, or other useful guides.
The documents will be in the language that you selected in the “Language and
Region” settings.
Tap on a document to open it with the PDF reader. See PDF Documents.
•
•
•
MANUAL
FCC
5g+ ARCHOS PLUG-INS AND ACCESSORIES > P. 63
10. arChOs Plug-Ins and
aCCessOrIes
You can purchase the following accessories or plug-ins to extend the
functionality of your ARCHOS. They can be purchased from the ARCHOS
web site (www.archos.com).
10.1 arChOs Plug-InsarChOs Plug-Ins
Visit www.archos.com to check what plug-ins are available for your ARCHOS device
and to learn how to install and use them.
10.2 arChOs aCCessOrIes
When you connect one of the following accessories, the “Add-ons” icon,
on the Home screen, changes so that you can access the particular func-
tions of the accessory. Read the manual of your accessory to learn how
to use its functions.
DVR STATION
When connected to your ARCHOS and to your home enter-
tainment system, the DVR Station will allow you to:
schedule TV recordings easily via the ARCHOS TV Program
Guide (EPG) (available for most countries)
record video directly to your ARCHOS, from your cable box, sat-
ellite receiver, digital tuner, or most any standard video source
connect to your ARCHOS a compatible USB device (Mass
Storage or PTP): external hard drive, digital camera, etc.
play video back to your TV
charge your ARCHOS
•
•
•
•
•
DVR SNAP-ON
When connected to your ARCHOS, the DVR Snap-on will allow
you to:
record audio/video, directly on your ARCHOS, from most
any standard audio/video source.
•
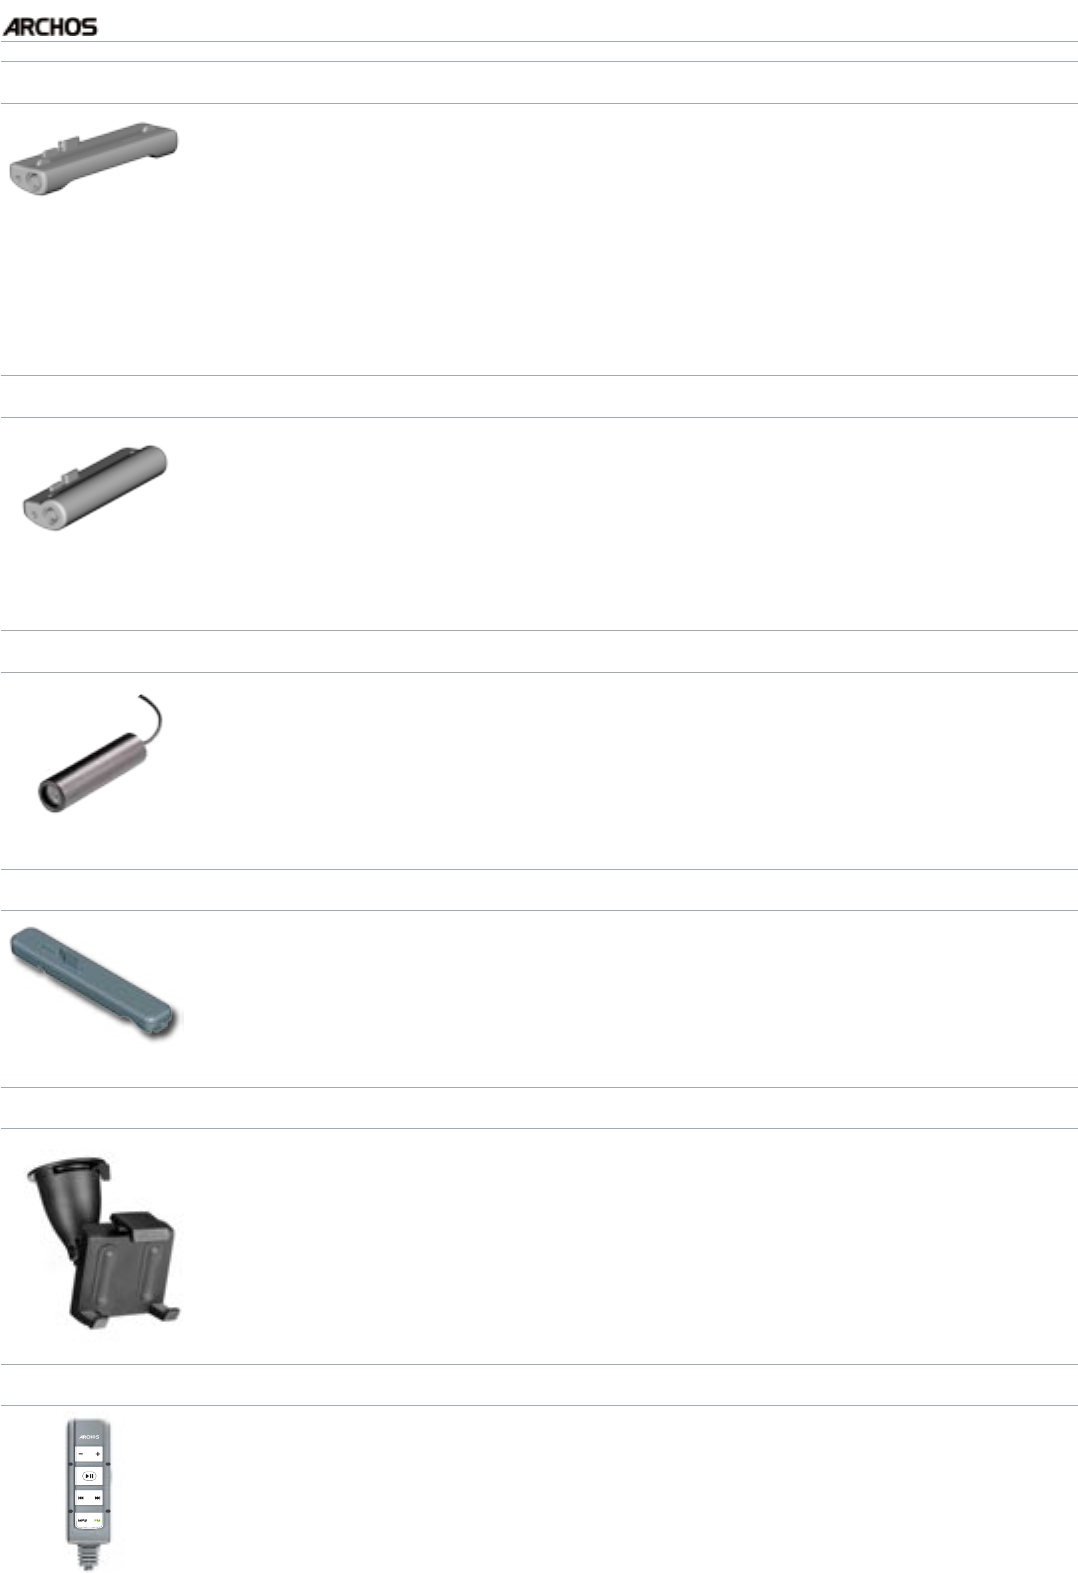
MANUAL
FCC
5g+ ARCHOS PLUG-INS AND ACCESSORIES > P. 64
MINI DOCK
When connected to your ARCHOS, the Mini Dock will allow you to:
display the image of the ARCHOS on your TV (S-Video and
composite outputs).
connect to your ARCHOS a compatible USB device (Mass
Storage or PTP): external hard drive, digital camera, etc.
charge your ARCHOS.
•
•
•
BATTERY DOCK
The battery dock is like the Mini Dock but also includes a battery to
give your ARCHOS extra play time.
HELMET CAMCORDER
Mini video camera with headmount, remote control and micro-
phone.
TV SNAP-ON
Digital TV receiver which allows you to watch and record digital TV
(DVB-T) directly on your ARCHOS.
GPS CAR HOLDER
Transform your ARCHOS into a full-edged car GPS (Nav Sat) navi-
gation system.
FM REMOTE
FM remote control which allows you to listen to the radio directly
on your ARCHOS. It also allows you to record from its built-in micro-
phone.
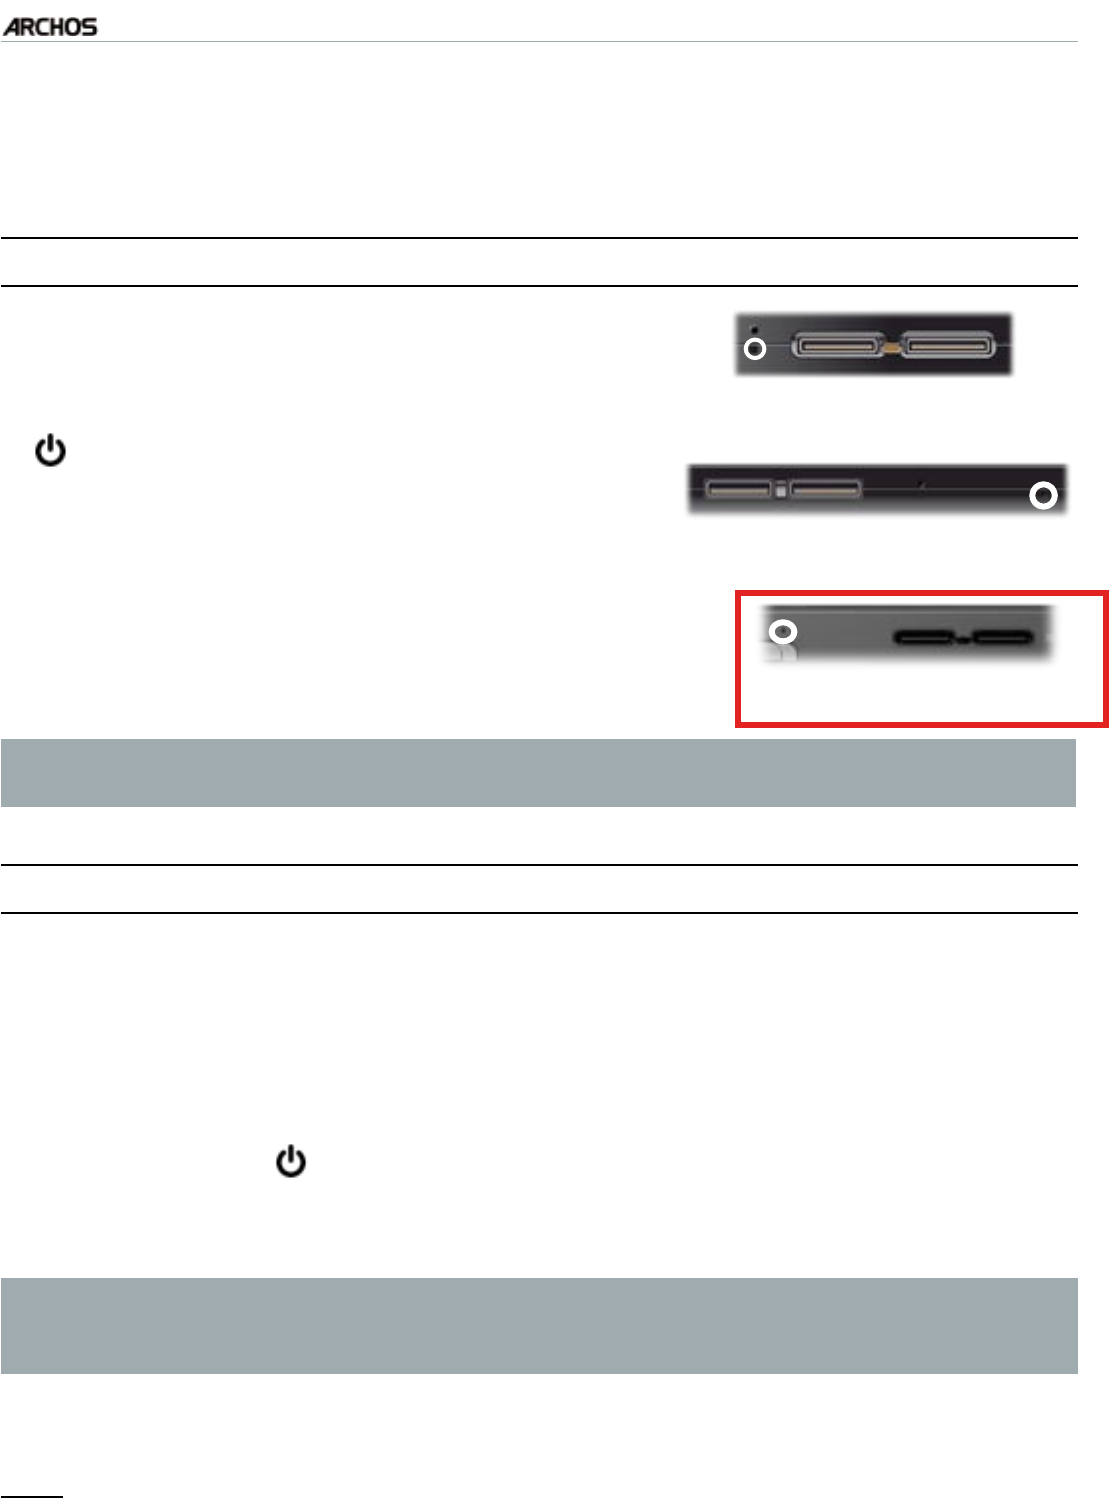
MANUAL
FCC
5g+ TROUBLESHOOTING > P. 65
TrOubleshOOTIng
reseTTIng yOur arChOs
In the event that your ARCHOS freezes or does
not respond anymore, try to reset it: press the
button for 15 seconds (the ARCHOS will shut
down completely) and turn it on as usual.
If this does not work, you can also press the
“master reset” button located underneath the
device as shown below. You can use the end of a
paper clip to press the button in the hole.
•
•
ARCHOS 5 Slim
ARCHOS 5 Regular
ARCHOS 7
Note: Resetting your ARCHOS will not erase any data from your device.
However some settings will be reset to their factory defaults.
sysTeM reCOVery
If your ARCHOS does not respond correctly, or does not show certain songs or
videos that you have copied to it, try using the “Repair and Formatting Tools”
(see:
Customer Assistance Settings
).
If using the “Repair and Formatting Tools” did not solve your problem, you can
try a system recovery. It allows you to repair the hard drive, format it, etc.
Press and hold the button to turn on your device.
When the screen turns on, immediately press and hold the Volume + button until
the Recovery mode starts (white screen).
Since the system recovery mode is activated, the touchscreen is currently dis-
abled. To move from an option to another, use the volume buttons. To validate
an option, press the ON/OFF button.
The system recovery mode gives you several options:
“No”
cancels the system recovery.
•
•
1.
2.
-
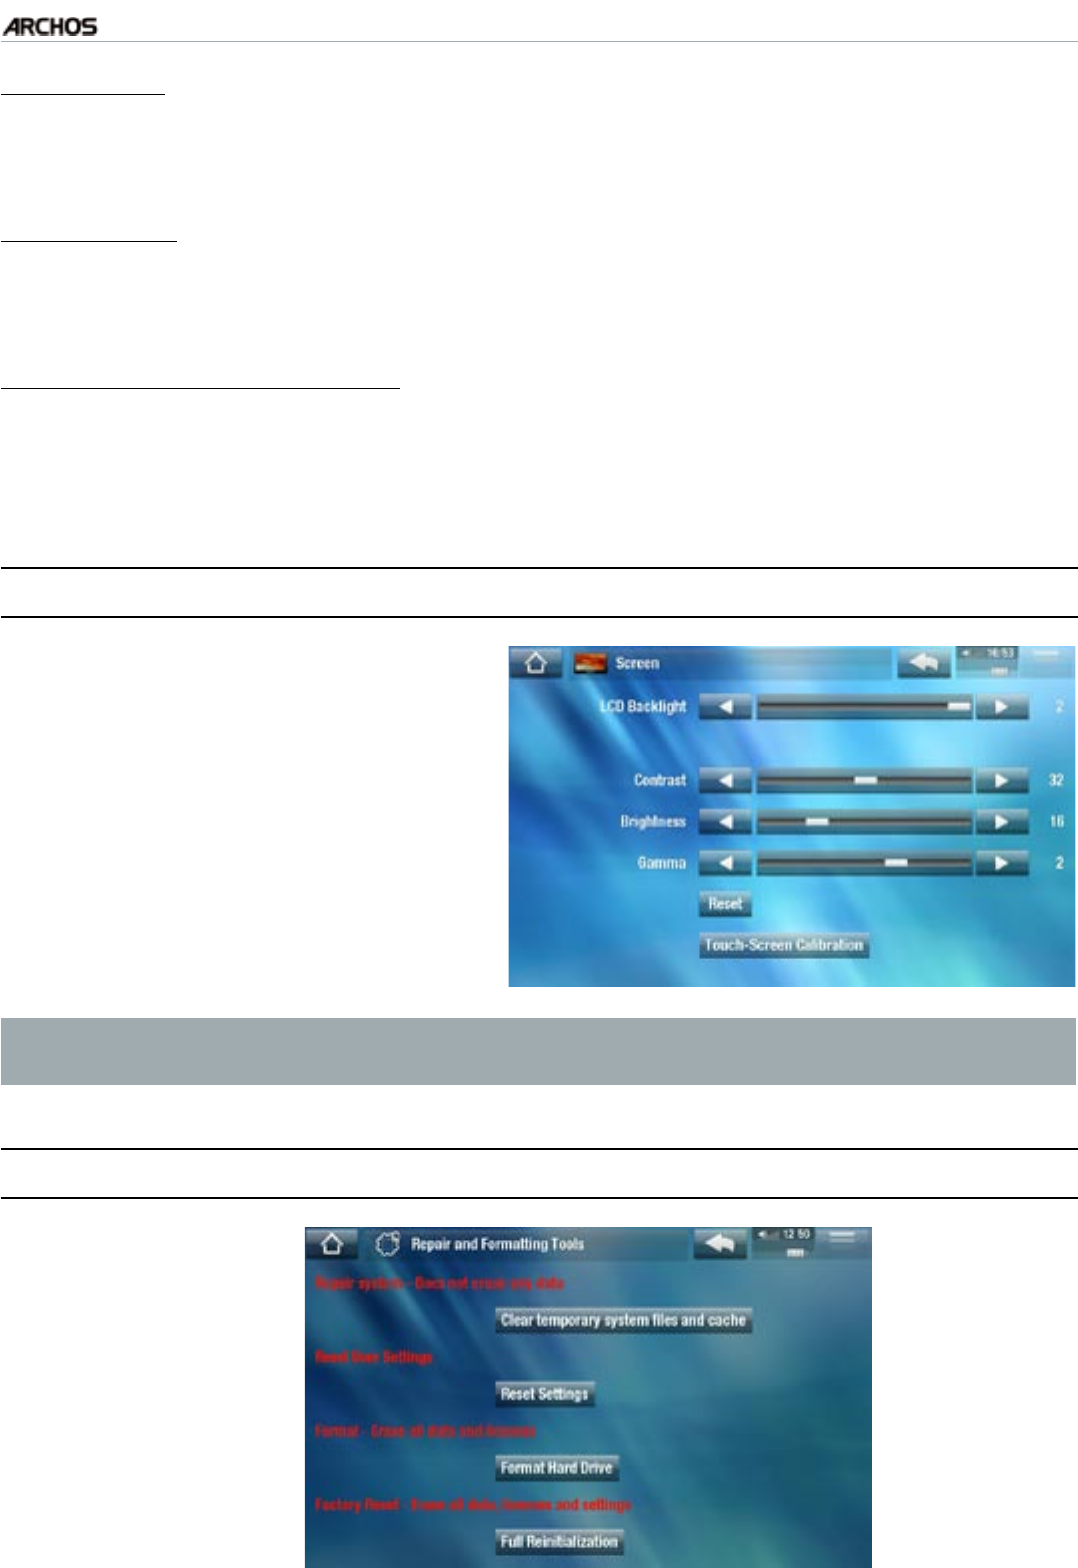
MANUAL
FCC
5g+ TROUBLESHOOTING > P. 66
“Repair Disk”
attempts to repair the le structure on the hard drive.
does not erase any data.
“Format Disk”
formats the hard drive.
all data (music, photos, videos, etc.), licenses and settings are erased.
“Force Touchscreen Calibration”
use this option if the touchscreen does not respond correctly and if you cannot
access the touchscreen settings (see:
Screen Settings
).
follow the instructions on the screen.
TOuChsCreen PrObleMs
If the touchscreen is not responding
properly try to go to the “Screen”
settings screen.
Then use the “Touch-Screen
Calibration” button, and follow the
instructions on the screen.
•
•
If this does not work or if you cannot access the touchscreen settings, you
can force the touchscreen calibration (see: System Recovery).
rePaIr and fOrMaTTIng TOOls
-
-
-
-
-
-
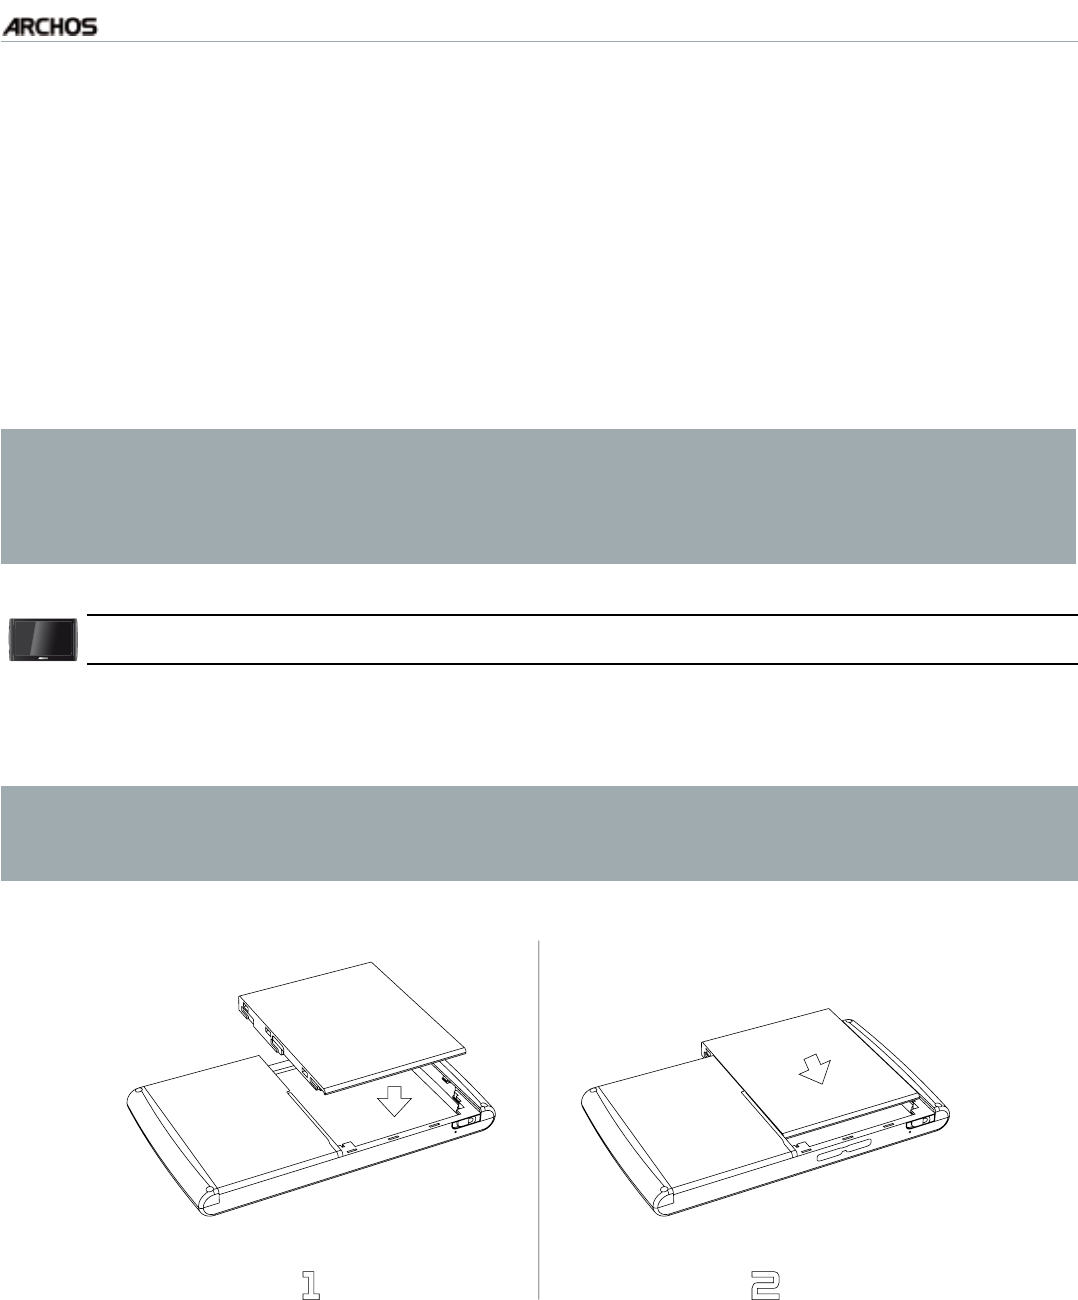
MANUAL
FCC
5g+ TROUBLESHOOTING > P. 67
to access the “Repair and Formatting Tools” settings screen: from the Home
screen, tap on “Tools”, select “Settings” and choose “Customer Assistance”.
Then use the “Repair and Formatting Tools” button. This screen allows you to do
the following actions:
“Clear temporary system les and cache” (does not erase any data)
“Reset Settings” (resets all user settings)
“Format Hard Drive” (erase all data, media les, and licenses)
“Full Reinitialization” (erase all data, media les, licenses and settings)
In the event that your ARCHOS freezes or does not respond anymore, try to
reset it (see: Resetting your ARCHOS).
If this does not work or if you cannot access the Repair and Formatting Tools,
you can try a system recovery (see: System Recovery).
7rePlaCIng The baTTery
The ARCHOS has a removable battery. You can purchase extra batteries from
www.archos.com.
Caution: if the battery is incorrectly replaced or short-circuited, this could re-
sult in damage to the product and/or serious injuries to the user. Replace only
with an original ARCHOS battery.
To replace the battery, follow these steps:
-
-
-
-
-

MANUAL
FCC
5g+ TECHNICAL SPECIFICATIONS > P. 68
TeChnICal sPeCIfICaTIOns
LCD PIXEL POLICY
The LCD screen on your ARCHOS unit has been manufactured to rigorous standards
to provide a high quality viewing experience. Nevertheless, your LCD screen may have
slight imperfections. This is not particular to the ARCHOS screen, but to all devices
which have LCD screens regardless of the original manufacturer of the LCD. Each prod-
uct vendor guarantees that his screen will contain no more than a certain number of
defective pixels. Each screen pixel contains three dot elements (Red, Blue, and Green).
One or all of the dots in a given pixel may be stuck on or stuck off. A single dot stuck
off is the least noticeable. All three dots of a pixel stuck on is the most noticeable.
ARCHOS guarantees that this device’s screen will have no more than 3 defective pix-
els (regardless if these pixels have one or more defective dots). This means that during
the period of guarantee for your country or jurisdiction, if the screen on your product
has four or more defective pixels, ARCHOS will repair or replace your product at its
cost. Thus, three or less defective pixels is not grounds for replacement or repair of the
product.

MANUAL
FCC
5g+
All brands and product names are registered trademarks and the property of their respec-
tive owners. Windows Media® and Windows® are trademarks or registered trademarks
of Microsoft Corporation in the United States and/or other countries. Specications
are subject to change without notice. Errors or omissions excepted. Images and illus-
trations may not always match contents. All the information contained in this manual
was correct at the time of publication.
COPYRIGHT ARCHOS © 2008. All rights reserved.
TECHNICAL SUPPORT INFORMATION > P. 69
TeChnICal suPPOrT InfOrMaTIOn
Need Help? You can nd the information you need:
On our Website: see the frequently asked questions section on
www.archos.com/faq
By asking our technical support team: visit www.archos.com/support for e-mail
support.
U.S. & Canada: Call 877-300-8879 (toll free).
•
•
•

ENGLISH LEGAL AND SAFETY NOTICES p.2
FRANÇAIS MENTIONS LéGALES ET CONSIGNES DE SéCURITé p.6
DEUTSCH RECHTS- UND SICHERHEITSHINWEISE p.10
ESPAÑOL AVISOS LEGALES Y CONSIGNAS DE SEGURIDAD p.14
ITALIANO INFORMAZIONI LEGALI E SULLA SICUREZZA p.18
NEDERLANDS JURIDISCHE EN VEILIGHEIDSINFORMATIE p.22
PORTUGUÊS CONTRATO DE LICENÇA DESTINADO AO UTILIZADOR FINAL p.26
ПО-РУССКИ p.27
legal and safety notices
Legal_Booklet_PN106740V2.indd 1 25/08/2008 15:03:52

2
ENGLISH
Warranty and limited liaBility
MANUFACTURER SHALL NOT BE LIABLE FOR ANY SPECIAL, INCIDENTAL OR CONSEQUENTIAL DAMAGES. EVEN IF INFORMED OF THE
POSSIBILITY THEREOF IN ADVANCE.
may not apply to you.
ARCHOS
▲
▲
▲
!
litHium-ion Battery caution
legal and safety notices
Legal_Booklet_PN106740V2.indd 2 25/08/2008 15:03:52

3
ENGLISH
Warnings and safety instructions
CAUTION
WARNING
SAFETY
fcc compliance statement
USA: - This device complies with Part 15 of the FCC Rules. Operation is subject to the following two conditions:
- FCC Radiation Exposure Statement:
Canada: - Operation is subject to the following two conditions:
Legal_Booklet_PN106740V2.indd 3 25/08/2008 15:03:52
4
ENGLISH
electrostatic discHarge (esd)
avoiding Hearing damage
environmental considerations
Batteries :
The Product :
copyrigHt notice
end user license agreement for arcHos softWare
PROMPTLY SEE YOUR VENDOR OR CONTACT ARCHOS DIRECTLY IN ORDER TO FIND AN ADEQUATE SOLUTION TO THIS DISAGREEMENT.
Legal_Booklet_PN106740V2.indd 4 25/08/2008 15:03:52

ENGLISH
1. GRANT OF LICENSE
2. TITLE
3. LIMITATIONS
4. COPYRIGHT / INTELLECTUAL RIGHTS
5. NO WARRENTY / LIMITED LIABILITY
6. LICENSED COMPONENTS
7. ILLEGAL USE
8. TRANSFER
9. TERMINATION
10. DECOMPOSITION
GOVERNING LAW
Legal_Booklet_PN106740V2.indd 5 25/08/2008 15:03:53
FRANÇAIS
garantie et responsaBilité limitée
LE FABRICANT NE PEUT ÊTRE TENU RESPONSABLE DES DOMMAGES EXCEPTIONNELS, ACCIDENTELS OU INDIRECTS MEME S’IL A ETE
INFORME DE CETTE EVENTUALITE A L’AVANCE.
ARCHOS
▲
▲
▲
!
mises en garde sur la Batterie litHium-ion !
mentions légales et consignes de sécurité
Legal_Booklet_PN106740V2.indd 6 25/08/2008 15:03:53

7
FRANÇAIS
mises en garde et consignes de sécurité
ATTENTION
MISE EN GARDE
SÉCURITÉ
déclaration de conformité fcc
Canada: - Utilisation soumise aux deux conditions suivantes :
décHarge électrostatiQue
p rotection de l’audition
Legal_Booklet_PN106740V2.indd 7 25/08/2008 15:03:53

FRANÇAIS
considérations en matière d’environnement
Les Piles :
Le Produit :
etc..)
avis sur les droits d’auteur
contrat de licence utilisateur final pour le logiciel arcHos
REVENDEUR OU CONTACTEZ ARCHOS DIRECTEMENT AFIN UNE SOLUTION ADéQUATE PERMETTANT DE REMéDIER à CE DéSACCORD.
ATTRIBUTION DE LICENCE
TITRE
ARCHOS.
Legal_Booklet_PN106740V2.indd 8 25/08/2008 15:03:53

FRANÇAIS
LIMITATIONS
DROITS DE REPRODUCTION/ DROITS INTELLECTUELS
ABSENCE DE GARANTIE / RESPONSABILITÉ LIMITÉE
ou autre de son LOGICIEL.
COMPOSANTS SOUS LICENCE
UTILISATION ILLÉGALE
CESSION
RÉSILIATION
DÉCOMPOSITION
LOI COMPÉTENTE
Legal_Booklet_PN106740V2.indd 9 25/08/2008 15:03:54
DEUTSCH
garantie und eingescHrÄnkte produktHaftung
DER HERSTELLER ÜBERNIMMT KEINERLEI HAFTUNG FÜR FOLGESCHÄDEN. DIES GILT AUCH DANN, WENN ER DARÜBER INFORMIERT
WAR, DASS DERARTIGE SCHÄDEN ENTSTEHEN KÖNNEN.
ARCHOS
▲
▲
▲
!
WarnHinWeis: litHium-ionen-akku
recHts- und sicHerHeitsHinWeise
Legal_Booklet_PN106740V2.indd 10 25/08/2008 15:03:54

11
DEUTSCH
sicHerHeitsHinWeise
ACHTUNG
VORSICHT
SICHERHEITSHINWEISE
elektrostatiscHe ladungen
gefaHr von geHÖrscHÄden
rÜcksicHt auf unsere umWelt
Batterien:
Legal_Booklet_PN106740V2.indd 11 25/08/2008 15:03:54
12
DEUTSCH
Das Produkt:
copyrigHt-vermerk
endBenutZer-liZenZvertrag fÜr arcHos-softWare
LIZENZGEWÄHRUNG
werden.
RECHTSANSPRÜCHE DES LIZENZNEHMERS
BESCHRÄNKUNGEN
KEINE GEWÄHRLEISTUNG / HAFTUNGSBESCHRÄNKUNG
Legal_Booklet_PN106740V2.indd 12 25/08/2008 15:03:54

13
DEUTSCH
LIZENZIERTE KOMPONENTEN
ILLEGALE VERWENDUNG
ÜBERTRAGUNG
KÜNDIGUNG
TEILNICHIGKEIT
GELTENDES RECHT
Legal_Booklet_PN106740V2.indd 13 25/08/2008 15:03:54
14
ESPAÑOL
garantÍa y responsaBilidad limitadas
EL FABRICANTE NO SE HARÁ RESPONSABLE DE LOS DAÑOS EXTRAORDINARIOS, FORTUITOS O INDIRECTOS, AUN HABIENDO SIDO
INFORMADO PREVIAMENTE DE DICHA POSIBILIDAD.
▲
▲
▲
!
precauciÓn BaterÍa de iones de litio
avisos legales y consignas de seguridad
avisos legales y consignas de seguridad
Legal_Booklet_PN106740V2.indd 14 25/08/2008 15:03:55
ESPAÑOL
advertencias y consignas de seguridad
ATENCIÓN
ADVERTENCIA
SEGURIDAD
descarga electrostÁtica
prevenciÓn de lesiones auditivas
criterios medioamBientales
Baterías :
Legal_Booklet_PN106740V2.indd 15 25/08/2008 15:03:55
ESPAÑOL
El producto:
copyrigHt
contenido.
anteriormente.
acuerdo de licencia del softWare arcHos
LEA DETENIDAMENTE LOS TéRMINOS Y CONDICIONES DEL ACUERDO DE LICENCIA ANTES DE UTILIZAR SU PRODUCTO ARCHOS. USTED
de hardware ARCHOS) INCLUIDO CON ESTE DISPOSITIVO. LA UTILIZACIÓN DEL SOFTWARE DE ESTE DISPOSITIVO IMPLICA LA PLENA
DERECHO A REVOCAR SU LICENCIA DE USO.
QUE ENCUENTREN UNA SOLUCIÓN A ESTE DESACUERDO.
CONCESIÓN DE LICENCIA
TÍTULO
SOFTWARE ARCHOS.
RESTRICCIONES
DERECHOS INTELECTUALES / DE COPYRIGHT
SIN GARANTÍA / RESPONSABILIDAD LIMITADA
Legal_Booklet_PN106740V2.indd 16 25/08/2008 15:03:55

17
ESPAÑOL
cualquier otra de su SOFTWARE.
COMPONENTES BAJO LICENCIA
USO ILEGAL
TRANSFERENCIA
RESCISIÓN
acuerdo.
DESCOMPOSICIÓN
LEGISLACIÓN APLICABLE
Legal_Booklet_PN106740V2.indd 17 25/08/2008 15:03:55

ITALIANO
garanZia e responsaBilitÀ limitata
IL PRODUTTORE NON È RESPONSABILE DI DANNI SPECIALI, INCIDENTALI O INDIRETTI. ANCHE SE PREVENTIVAMENTE INFORMATO DELLA
POSSIBILITÀ DI TALI DANNI
▲
▲
▲
!
precauZioni relative alla Batteria agli ioni di litio
informaZioni legali e sulla sicureZZa
Legal_Booklet_PN106740V2.indd 18 25/08/2008 15:03:56
ITALIANO
avvertenZe e istruZioni per la sicureZZa
ATTENZIONE
AVVERTENZA
di tali materiali .
SICUREZZA
scaricHe elettrostaticHe
come evitare danni acustici
rispetto amBientale
Batterie:
usate.
Il Prodotto:
Legal_Booklet_PN106740V2.indd 19 25/08/2008 15:03:56

ITALIANO
note sul copyrigHt
contenuto.
contratto di licenZa per utente finale del softWare arcHos
QUALUNQUE PARTE DI QUESTO CONTRATTO
ADEGUATA SOLUZIONE A QUESTO DISACCORDO.
CONCESSIONE DELLA LICENZA
TITOLO
SOFTWARE ARCHOS.
LIMITAZIONI
COPYRIGHT/DIRITTI DI PROPRIETÀ INTELLETTUALE
NESSUNA GARANZIA/RESPONSABILITÀ LIMITATA
COMPONENTI CONCESSI IN LICENZA
Legal_Booklet_PN106740V2.indd 20 25/08/2008 15:03:56

21
ITALIANO
UTILIZZO ILLEGALE
TRASFERIMENTO
TERMINE
DECOMPOSIZIONE
LEGGE DISCIPLINANTE
Legal_Booklet_PN106740V2.indd 21 25/08/2008 15:03:56
22
NEDERLANDS
garantie en Beperkte aansprakeliJkHeid
DE FABRIKANT IS NIET AANSPRAKELIJK VOOR ENIGE SPECIALE, INCIDENTELE SCHADE OF GEVOLGSCHADE, ZELFS INDIEN HIJ OP DE
HOOGTE WERD GESTELD VAN DERGELIJKE MOGELIJKE SCHADE OF VERLIEZEN.
JuridiscHe en veiligHeidsinformatie
Legal_Booklet_PN106740V2.indd 22 25/08/2008 15:03:56

23
NEDERLANDS
▲
▲
▲
!
pas op litHium-ion BatteriJ !
WaarscHuWingen en veiligHeidsinstructies
VOORZICHTIG!
WAARSCHUWING
VEILIGHEID
elektrostatiscHe ontlading
geHoorscHade vermiJden
aandacHt voor Het milieu
Legal_Booklet_PN106740V2.indd 23 25/08/2008 15:03:57

24
NEDERLANDS
Batterijen:
Het produkt:
auteursrecHtaanduiding
geBruiksrecHtovereenkomst voor arcHos-softWare
VERLENING VAN HET GEBRUIKSRECHT
EIGENDOM
SOFTWARE.
BEPERKINGEN
AUTEURSRECHT / INTELLECTUELE RECHTEN
GEEN GARANTIE / BEPERKTE AANSPRAKELIJKHEID
Legal_Booklet_PN106740V2.indd 24 25/08/2008 15:03:57

NEDERLANDS
IN LICENTIE GEGEVEN ONDERDELEN
ILLEGAAL GEBRUIK
OVERDRACHT
BEËINDIGING
ONTBINDING
TOEPASSELIJKE WETGEVING
Legal_Booklet_PN106740V2.indd 25 25/08/2008 15:03:57

PORTUGUÊS
contrato de licenÇa para o utiliZador final do softWare arcHos
LEIA CUIDADOSAMENTE OS SEGUINTES TERMOS E CONDIÇÕES DO CONTRATO DE LICENÇA DESTINADO AO UTILIZADOR FINAL DESTE SOFTWARE
DESTE SOFTWARE.
A ESTE DESACORDO.
CONCESSÃO DA LICENÇA
TITULO
PRESCRIÇÕES
DIREITOS DE AUTOR / DIREITOS INTELECTUAIS
NÃO GARANTIA / RESPONSABILIDADE LIMITADA
do seu SOFTWARE.
COMPONENTES LICENCIADOS
USO ILEGAL
TRANSFERÊNCIA
CESSAÇÃO
DECOMPOSIÇÃO
LEIS REGULADORAS
Legal_Booklet_PN106740V2.indd 26 25/08/2008 15:03:57

27
ПО-РУССКИ
ЛИЦЕНЗИОННОЕ СОГЛАШЕНИЕ КОНЕЧНОГО ПОЛЬЗОВАТЕЛЯ ПРОГРАММНОГО ОБЕСПЕЧЕНИЯ ARCHOS
ПРЕДОСТАВЛЕНИЕ ЛИЦЕНЗИИ
ПРАВОВОЙ ТИТУЛ TITLE
ОГРАНИЧЕНИЯ
АВТОРСКОЕ ПРАВО/ ПРАВА НА ИНТЕЛЛЕКТУАЛЬНУЮ СОБСТВЕННОСТЬ
ОТКАЗ ОТ ГАРАНТИИ / ОГРАНИЧЕННАЯ ГАРАНТИЯ
СОСТАВНЫЕ ЧАСТИ
ЗАПРЕЩЕННОЕ ИСПОЛЬЗОВАНИЕ
РАСТОРЖЕНИЕ
РАЗДЕЛИМОСТЬ
ПРИМЕНИМОЕ ЗАКОНОДАТЕЛЬСТВО
Legal_Booklet_PN106740V2.indd 27 25/08/2008 15:03:57
WWW.arcHos.com
Legal_Booklet_PN106740V2.indd 28 25/08/2008 15:03:57

29
NEDERLANDS
van de in licentie gegeven materialen. De uitsluiting van impliciete garanties wordt niet toegestaan in sommige
rechtsgebieden, waardoor de bovengenoemde beperking mogelijk niet op u van toepassing is.
In geen geval zullen ARCHOS’ licentiegever(s), hun directeurs, secretarissen, werknemers of agenten (gezamenlijk
ARCHOS’ licentiegever genoemd) aansprakelijk worden gesteld voor enige gevolgschade, incidentele of onrechtstreekse
schade (met inbegrip van winstderving, schade door onderbreking van de activiteiten, verlies van zakelijke informatie,
en dergelijke) die voortvloeien uit het gebruik van of de onmogelijkheid tot gebruik van de geleverde materialen zelfs
indien de ARCHOS’ licentiegever vooraf op de hoogte werd gesteld van de mogelijkheid van dergelijke schade. Omdat
sommige rechtsgebieden dergelijke uitsluiting of beperking van aansprakelijkheid voor gevolgschade of incidentele
schade niet toestaan, is het mogelijk dat de bovenstaande beperkingen niet op u van toepassing zijn.
ILLEGAAL GEBRUIK – U mag de ARCHOS-SOFTWARE niet gebruiken in het kader van illegale activiteiten waaronder
reproductie, opslag en/of distributie van auteursrechtelijk beschermde materialen als u daarvoor niet de uitdrukkelijke
schriftelijke toestemming heeft.
OVERDRACHT – U kunt uw rechten op de ARCHOS-SOFTWARE permanent overdragen aan een andere partij via de
overdracht of verkoop van uw ARCHOS-hardwareproduct. U mag geen enkele kopie van de software, upgrades, versies
of documentatie bewaren, en de partij aan wie u de Overeenkomst overdraagt dient schriftelijk kennis te geven dat hij de
voorwaarden van de Overeenkomst aanvaardt.
BEËINDIGING – U mag deze overeenkomst te allen tijde opzeggen, waarna u de ARCHOS-SOFTWARE niet langer mag
gebruiken. Bij opzegging dient u alle originele versies en kopieën van de ARCHOS-software alsook alle documentatie te
vernietigen. U kunt ARCHOS schrijven voor instructies over hoe de software van uw toestel te verwijderen. Deze licentie
verloopt automatisch (zonder kennisgeving van ARCHOS) in geval van een inbreuk op om het even welk deel van deze
gebruiksrechtovereenkomst.
ONTBINDING – Indien een deel of voorwaarde van deze overeenkomst ongeldig of onuitvoerbaar wordt bevonden door
toepasselijk recht, dan zal deze uitvoerbaar blijven zover toegestaan door de wet. Dit zal geen invloed hebben op de
geldigheid van de rest van de Overeenkomst.
TOEPASSELIJKE WETGEVING – Het recht van Frankrijk is van toepassing op deze Overeenkomst. Als u vragen heeft
met betrekking tot deze Gebruiksrechtovereenkomst, kunt u schrijven naar: ARCHOS SA., Legal Department, 12 rue
Ampère, 91430 Igny, Frankrijk.
Legal_Booklet_PN105849.indd 29Legal_Booklet_PN105849.indd 29 02/07/2007 10:24:5402/07/2007 10:24:54

30
PORTUGUÊS
CONTRATO DE LICENÇA PARA O UTILIZADOR FINAL DO SOFTWARE ARCHOS
LEIA CUIDADOSAMENTE OS SEGUINTES TERMOS E CONDIÇÕES DO CONTRATO DE LICENÇA DESTINADO AO UTILIZADOR FINAL DESTE
SOFTWARE (“EULA”), ANTES DE UTILIZAR O SEU PRODUTO ARCHOS. O “SOFTWARE ARCHOS” (todo o software distribuído com os produtos hardware
ARCHOS) DESTE DISPOSITIVO É-LHE LICENCIADO, NÃO É PROPRIEDADE SUA. AO UTILIZAR ESTE SOFTWARE NO DISPOSITIVO, ESTÁ A DAR O
SEU CONSENTIMENTO PARA FICAR SUJEITO A ESTE CONTRATO. SE NÃO CONCORDAR COM ALGUMA DAS PARTES DESTE “EULA”, ARCHOS NÃO
LHE AUTORIZARÁ O USO DESTE SOFTWARE. NESTE CASO, CONTACTE O SEU VENDEDOR OU ARCHOS DE MODO A ENCONTAREM DE COMUN
ACORDO UMA SOLUÇAO VALIDA A ESTE DESACORDO.
CONCESSÃO DA LICENÇA – Sujeita aos termos e condições desta licença, a ARCHOS concede-lhe o direito não exclusivo de uso do software existente no
seu produto hardware ARCHOS. O SOFTWARE ARCHOS só pode ser utilizado no produto ARCHOS que lhe foi distribuído.
TITULO – Não tem título, direitos de posse, direitos ao acesso a segredos de comércio, ou direitos intelectuais sobre o SOFTWARE ARCHOS.
PRESCRIÇÕES – Não pode alterar, decifrar, desmontar, decompor, ou fazer qualquer manobra de engenharia reversa em parte ou na totalidade do SOFTWARE
ARCHOS, com excepção do que é permitido pelas leis mandatárias em vigor.
DIREITOS DE AUTOR / DIREITOS INTELECTUAIS - O SOFTWARE ARCHOS está protegido pelas leis e tratados dos Estados Unidos de América e pelos
direitos de autor internacionais, como também pelas leis internacionais de propriedade intelectual.
NÃO GARANTIA / RESPONSABILIDADE LIMITADA
O SOFTWARE ARCHOS é-lhe licenciado “como aparece” e a utilização do mesmo é por sua própria conta e risco.
ARCHOS não garante, nem expressamente nem implicitamente a correcção, exactidão, fi abilidade ou a conveniência do uso para um desígnio em particular
ou outros do seu SOFTWARE.
Se o SOFTWARE ARCHOS apresentar defeito VOCÊ, e não a ARCHOS, deve suportar os encargos fi nanceiros ou outro qualquer tipo de responsabilidade para
que o produto volte ao seu estado funcional original ou qualquer outra responsabilidade que advenha deste facto.
Em caso algum, a ARCHOS, seus subsidiários, directores ou trabalhadores serão responsáveis por qualquer dano, incluído, mas não limitado, a qualquer
prejuízo, ou a quaisquer outros danos acidentais, indirectos ou consequência do uso do SOFTWARE ARCHOS, mesmo que a ARCHOS tenha sido informada da
possibilidade desses danos. Devido a que algumas jurisdições não permitem a exclusão ou limitação de responsabilidade por determinados danos, as limitações
prévias podem não ser aplicáveis.
COMPONENTES LICENCIADOS – Dentro do SOFTWARE ARCHOS existem componentes licenciados à ARCHOS e a esses licenciantes são reservados
direitos que podem não fi car aqui expressos. O(s) licenciante(s) da ARCHOS não realiza garantias, expressas ou implícitas, incluidas, mas não limitadas, às
garantias implícitas de comèrcio, conveniência para uma fi nalidade específi ca, no que corresponde aos materiais licenciados. O licenciante(s) da ARCHOS
não atesta, garante ou realiza qualquer representação em relação ao uso ou aos resultados da utilização dos materiais licenciados em termos de correcção,
exactidão, fi abilidade, ou outros. Você assume o risco total no que refere aos resultados e rendimento dos materiais licenciados. A exclusão das garantias
implícitas não é permitida por algumas jurisdições. A exclusão anterior pode não ser aplicável a você.
Em caso nenhum o licenciante(s) da ARCHOS, os seus directores, administradores, trabalhadores ou agentes (colectivamente, licenciante da ARCHOS) será
responsável perante si por qualquer dano consequencial, incidental ou indirecto (inclusive, danos por perda de lucros das empresas, interrupção de negócio,
perda de informação das empresas, ou outros similares) gerados pela falta de capacidade em utilizar os materiais licenciados, mesmo que o licenciante da
ARCHOS tenha sido informado da possibilidade destes danos. Devido a que algumas jurisdições não permitem a exclusão ou limitação de responsabilidade por
danos causados consequenciais ou acidentais, as limitações prévias podem não lhe ser aplicáveis.
USO ILEGAL – Não pode usar o SOFTWARE ARCHOS para empreender actividades ilegais, inclusive a reprodução, armazenagem e/ou distribuição de
materiais com direitos de autor se não tiver o consentimento expresso por escrito
TRANSFERÊNCIA – Pode transferir permanentemente os seus direitos sobre o SOFTWARE ARCHOS através da venda do seu produto de hardware ARCHOS
a uma terceira pessoa. Não poderá conservar uma cópia do software, das actualizações, versões ou documentos e a entidade ou pessoa para a qual transferiou
o contrato deve informar por escrito que aceita as condições deste EULA.
CESSAÇÃO – Pode terminar este contrato a qualquer momento, sendo que a partir dessa data deixará de poder usar o SOFTWARE ARCHOS. Para isso
deve destruir os originais e cópias do Software ARCHOS e toda a documentação. Pode escrever a ARCHOS para obter instruções sobre a forma de remover o
software do seu dispositivo. Esta licença cessará automaticamente (sem aviso de ARCHOS) se for infringida alguma das partes deste contrato.
DECOMPOSIÇÃO – Se alguma das partes ou condições deste contrato for inválida ou não executória segundo as leis reguladoras, essa parte será executória
até ao ponto permitido por lei e não terá efeito nas outras secções deste contrato.
LEIS REGULADORAS – Esta licença está regida pelas leis de França. Se tiver alguma questão sobre este Contrato de Licença ao Utente Final, escreva para:
ARCHOS SA., Legal Department, 12 rue Ampère, 91430 Igny, França.
Legal_Booklet_PN105849.indd 30Legal_Booklet_PN105849.indd 30 02/07/2007 10:24:5402/07/2007 10:24:54

31
ПО-РУССКИ
ЛИЦЕНЗИОННОЕ СОГЛАШЕНИЕ КОНЕЧНОГО ПОЛЬЗОВАТЕЛЯ ПРОГРАММНОГО ОБЕСПЕЧЕНИЯ ARCHOS
ПРЕЖДЕ ЧЕМ ИСПОЛЬЗОВАТЬ ИЗДЕЛИЕ ОТ ARCHOS, ВНИМАТЕЛЬНО ПРОЧИТАЙТЕ УСЛОВИЯ ЛИЦЕНЗИОННОГО СОГЛАШЕНИЯ КОНЕЧНОГО ПОЛЬЗОВАТЕЛЯ
(EULA). ПРОГРАММНОЕ ОБЕСПЕЧЕНИЕ ОТ ARCHOS(программное обеспечение прилагается к изделиям ARCHOS) ДАННОГО УСТРОЙСТВА ЛИЦЕНЗИРОВАНО ВАМ,
НО ВАМ НЕ ПРИНАДЛЕЖИТ. ИСПОЛЬЗУЯ ДАННЫЙ ПРОГРАММНЫЙ ПРОДУКТ НА ВАШЕМ УСТРОЙСТВЕ, ВЫ ТЕМ САМЫМ СОГЛАШАЕТЕСЬ С ПОЛОЖЕНИЯМИ
ДАННОГО СОГЛАШЕНИЯ. ЕСЛИ ВЫ НЕ СОГЛАСНЫ С КАКОЙ-ЛИБО ЧАСТЬЮ ДАННОГО СОГЛАШЕНИЯ (EULA), ARCHOS ОТКАЗЫВАЕТ ВАМ В ЛИЦЕНЗИИ НА
ЛЮБОЕ ИСПОЛЬЗОВАНИЕ ДАННОГО ПРОГРАММНОГО ОБЕСПЕЧЕНИЯ. В ЭТОМ СЛУЧАЕ, ОПЕРАТИВНО УЗНАЙТЕ У ВАШЕГО ПОСТАВЩИКА ИЛИ СВЯЖИТЕСЬ
НАПРЯМУЮ С ARCHOS С ЦЕЛЬЮ НАЙТИ АДЕКВАТНОЕ РЕШЕНИЕ ДАННОГО НЕСООТВЕТСТВИЯ.
ПРЕДОСТАВЛЕНИЕ ЛИЦЕНЗИИ – В рамках условий данного соглашения ARCHOS предоставляет Вам неисключительные права на использование данного программного
обеспечения на устройствах от ARCHOS. ПРОГРАММНОЕ ОБЕСПЕЧЕНИЕ фирмы ARCHOS может быть использовано только на изделиях от ARCHOS, к которым оно прилагается.
ПРАВОВОЙ ТИТУЛ TITLE – Вы не обладаете ни правовым титулом, ни правом собственности, ни правом продавать коммерческую тайну, ни правами на
интеллектуальную собственность на программное обеспечение от ARCHOS.
ОГРАНИЧЕНИЯ – Вы не имеете право модифицировать, декодировать, демонтировать, декомпилировать программное обеспечение ARCHOS или выполнять на
его основе обратное проектирование, если такая деятельность явно не разрешается в соответствии с применимым законом, кроме тех случаев, когда применимое
законодательство запрещает применение настоящего требования.
АВТОРСКОЕ ПРАВО/ ПРАВА НА ИНТЕЛЛЕКТУАЛЬНУЮ СОБСТВЕННОСТЬ – ПРОГРАММНОЕ ОБЕСПЕЧЕНИЕ от ARCHOS защищено конвенциями и законами
Международного авторского права и законами США, а также международными законами об интеллектуальной собственности.
ОТКАЗ ОТ ГАРАНТИИ / ОГРАНИЧЕННАЯ ГАРАНТИЯ
Вы получаете лицензию на программное обеспечение от ARCHOS в таком виде в каком оно есть и Вы берете на себя всю ответственность за его использование.
ARCHOS не предоставляет никаких прямых или подразумеваемых гарантий относительно правильности, аккуратности, надежности, прочности при использовании с
определенной целью или по иному назначению данного программного обеспечения.
Если в программном обеспечении от ARCHOS обнаружены дефекты, ВЫ, а не ARCHOS несете финансовую или любую другую ответственность за возвращение
изделия в исходное функциональное состояние или же другую ответственность, вытекающую из такого случая.
Ни в коем случае ARCHOS, его дочерние компании, служащие или работники по найму не несут ответственности за какие-либо повреждения, включая (но не
ограничиваясь) коммерческие убытки или другие побочные или косвенные убытки, вытекающие из использования программного обеспечения ARCHOS, даже если
компания ARCHOS была проинформирована о таковых. Поскольку некоторые законодательства не допускают исключений или ограничений относительно определенных
убытков, то вышеперечисленные ограничения могут к Вам не относиться.
ЛИЦЕНЗИРОВАННЫЕ СОСТАВНЫЕ ЧАСТИ – В программном обеспечении ARCHOS имеются составные части, лицензия на которые была выдана ARCHOS. Эти
лицензиары обладают правами, которые здесь не указаны. Лицензиары ARCHOS не предоставляют никаких гарантий, явных или косвенных, включая, без ограничения,
подразумеваемые гарантии о товарном состоянии или пригодности использования в определенных целях лицензированных материалов. Лицензиары ARCHOS
не ручаются, не дают гарантию о правильности, аккуратности, надежности и т.д. использования или результатах использования лицензированного материала. Вы
берете на себя полную ответственность за результаты и функционирование лицензированных материалов. Некоторые законодательства не допускают исключений
подразумеваемых гарантий. Вышеизложенное исключение может к Вам не относиться.
Ни в коем случае лицензиары ARCHOS, их директора, сотрудники, работники по найму или агенты (вместе - лицензиары ARCHOS) не несут ответственности перед Вами за
косвенные или побочные убытки (включая потерю коммерческих прибылей, приостановку коммерческой деятельности, потерю коммерческой информации и т.д.), вытекающие
из невозможности использования лицензированных материалов, даже если лицензиары ARCHOS были проинформированы о такой возможности. Поскольку по некоторым
законодательствам исключения или ограничения ответственности за косвенные или побочные убытки не допускаются, вышеприведенные ограничения могут к Вам не относиться.
ЗАПРЕЩЕННОЕ ИСПОЛЬЗОВАНИЕ – Вы не имеете право копировать, запоминать программное обеспечение ARCHOS и/или распространять материалы, защищенные
авторским правом, если у Вас на это нет письменного согласия.
ПЕРЕДАЧА – Вы можете передать свои права на программное обеспечение ARCHOS, передав или продав устройство ARCHOS второй стороне. Вы не должны
сохранять копию программного обеспечения, его новые версии, версии или документацию. Сторона, которой Вы передали соглашение, должна сделать письменное
заявление, что она принимает условия EULA.
РАСТОРЖЕНИЕ – Вы можете расторгнуть данное соглашение в любой момент. Для этого необходимо уничтожить все оригиналы и копии программного обеспечения
ARCHOS и всю документацию. Вы можете обратиться к ARCHOS за инструкциями о том как удалить программное обеспечение с Вашего устройства. Данное соглашение
будет считаться расторгнутым автоматически (без предупреждения от ARCHOS) в случае несоблюдения Вами какого-либо условия данного соглашения.
РАЗДЕЛИМОСТЬ – Если какая-либо часть или какое-либо условие данного соглашения в рамках применяемого закона считаются юридически недействительными
или не могут применяться в принудительном порядке, эта часть или условие будут иметь исковую силу в пределах, позволяемых законом и не будут иметь никакого
действия на остальные разделы данного соглашения.
ПРИМЕНИМОЕ ЗАКОНОДАТЕЛЬСТВО – К любым действиям, имеющим отношение к данному законодательству, применимо законодательство Франции. Если у Вас есть какие-
либо вопросы относительно лицензионного соглашения конечного пользователя, обращайтесь по адресу: ARCHOS SA., Legal Department, 12 rue Ampère, 91430 Igny, Франция
Legal_Booklet_PN105849.indd 31Legal_Booklet_PN105849.indd 31 02/07/2007 10:24:5502/07/2007 10:24:55
PN: 105849
COPYRIGHT ARCHOS © 2007. All rights reserved.
WWW.ARCHOS.COM
WWW.ARCHOS.COM
Legal_Booklet_PN105849.indd 32Legal_Booklet_PN105849.indd 32 02/07/2007 10:24:5502/07/2007 10:24:55