User Manual
www
?
1
English
Version 1.0 - P/N: 109235
NEED HELP?
As we are often updating and improving our products, your device’s software may have
a slightly different appearance or modified functionality than presented in this Quick Start Guide.
On our Website: See the Frequently Asked Questions section on www.archos.com/faq
Contact our Technical Support Team: Visit www.archos.com/support for e-mail support
.
Europe: please register your product before contacting Technical Support (see
Register your Product
).
REgistER youR PRoDuct!
Thank you for choosing this ARCHOS product. We hope that you will enjoy using it and that it will give you satisfaction for many
years to come. Once you unpack your ARCHOS product, we recommend that you take a few minutes to register it
(www.archos.com/register). This will allow you to get access to ARCHOS technical support (www.archos.com/support).
On the web at www.archos.com/register Ä
Archos_70b_eReader_EN_pn109235.indd 1 16/11/2010 15:57:08
2
10 9876
11 11
1
2
3
5
5
4
English
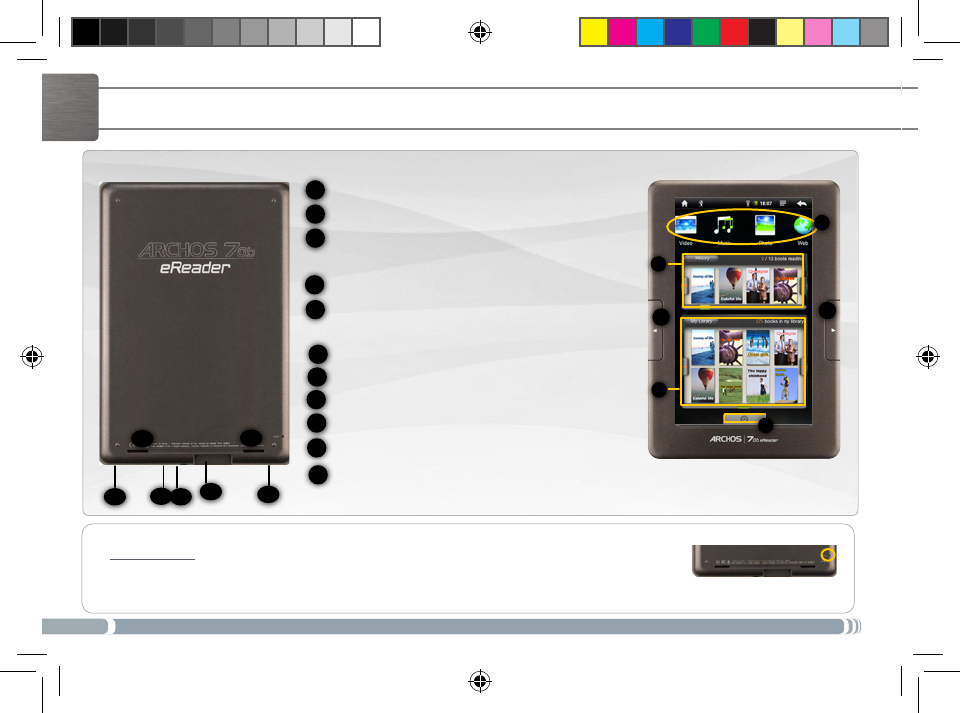
DEscRiPtioN aND PREsENtatioN
1
2
8
7
6
5
4
3
9
HISTORY: displays the last consulted books.
MY LIBRARY: displays all your books.
APPLICATON SHORTCUTS: Web browser, photo,
video, music
APPLICATION TAB: access button to all applications
PREVIOUS PAGE/NEXT PAGE: available when read-
ing a book.
POWER CONNECTOR
SD CARD READER
HEADPHONE JACK
USB PORT
ON/OFF BUTTON
LOUDSPEAKERS
10
11
Hardware Reset: In the event that your ARCHOS freezes operation, you can press the “pinhole reset” button,
located on the back the device, by using a sharp object such as a toothpick.
Archos_70b_eReader_EN_pn109235.indd 2 16/11/2010 15:57:24
3
1
2
▲
!
EUR
UK
1
English
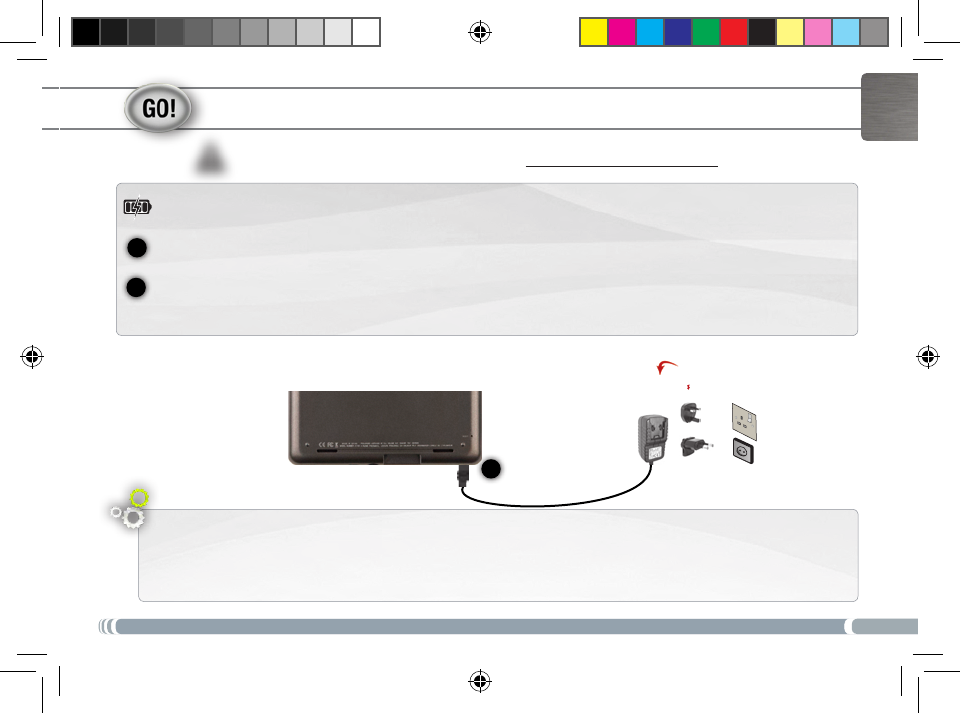
staRtiNg uP
Installation Wizard
The first time you start up your ARCHOS, the installation wizard will bring you through a few screens to help you set up
the principal settings: Language, country, time, etc.
Before using your ARCHOS for the rst time, completely charge the battery!
Charging the Battery
Connect the supplied power cable to the ARCHOS Power connector and to a wall outlet.
The ARCHOS device will turn on and start charging.
A message indicates that the battery is being charged and the percentage available.
Archos_70b_eReader_EN_pn109235.indd 3 16/11/2010 15:57:27
4
▼
▼ ▼
▼
▼▼
English
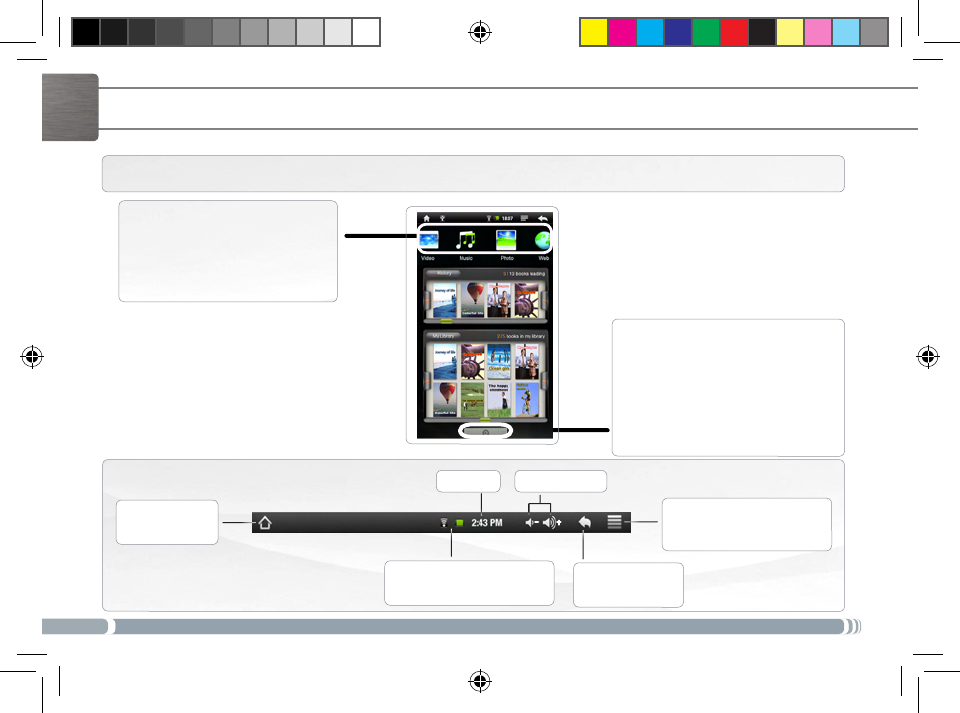
tHE aRcHos iNtERFacE
Top bar of the Interface
Press this icon
to return to the
Home screen
Press this icon
to return to the
previous screen
Tap on Menu to see menu op-
tions according to the current
screen.
Your ARCHOS device is equipped with a touchscreen. Most screen areas will react when you tap on them with your finger.
Status icons: (WiFi connection
status, battery level, etc.)
These are the default
Android™ shortcuts (Web
Browser, Music, etc.). Tap
on an icon to open the cor-
responding application.
Applications Tab
Tap on this icon to reveal all the
Android™ applications installed on your
ARCHOS (Email, Alarm clock, etc.).
Applications you download from
APPSLIB will be available here.
Time Volume
Archos_70b_eReader_EN_pn109235.indd 4 16/11/2010 15:57:30
5
English
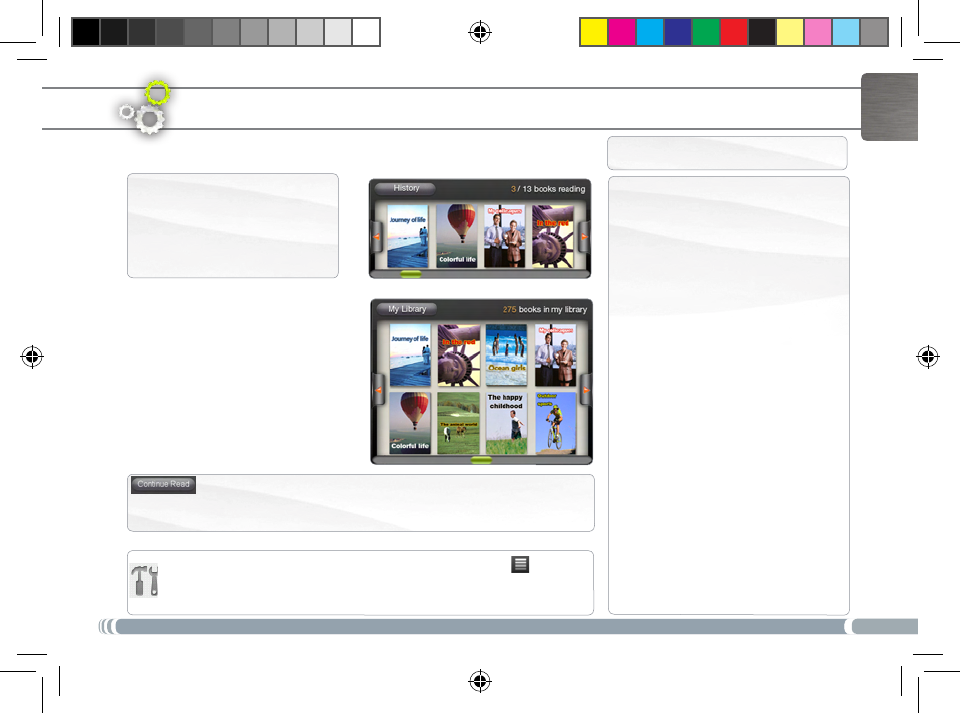
My Library
The My Library menu allows to have
access to all your eBooks.
Press the My Library button.
In the My Library menu, choose a
display option for your eBooks:
- Title, Author or Size
Ebook mENu
Search function: From the Ebook menu, tap on the Menu icon ,
then tap on the Search icon. Type keywords corresponding to your search.
The Search function is only available from the Ebook menu.
History
The last books you started reading
are displayed in the History menu.
Continue Reading:
Select the desired book. Tap on the Continue Read button to keep on
reading a book that you began or to start a new book.
IMPORTANT: ADOBE DIGITAL EDITIONS
You can download the most recent
books in protected ePub and PDF
format and transfer them onto your
eReader. To do so, you need to down-
load and install Adobe Digital Editions®
onto your computer. This program will
help you when you order and transfer
your eBooks onto your ARCHOS. Follow
these steps to install Adobe Digital
Editions.
1. Go to www.adobe.com/products/
digitaleditions.
2. Click on the START INSTALLATION
button.
3. Follow the Installation wizard.
4. You can now transfer Adobe DRM epub
and PDF eBooks to your ARCHOS eReader.
ADOBE DIGITAL RIGHTS MANAGEMENT
Archos_70b_eReader_EN_pn109235.indd 5 16/11/2010 15:57:32
6
www
1
2
3
4
English
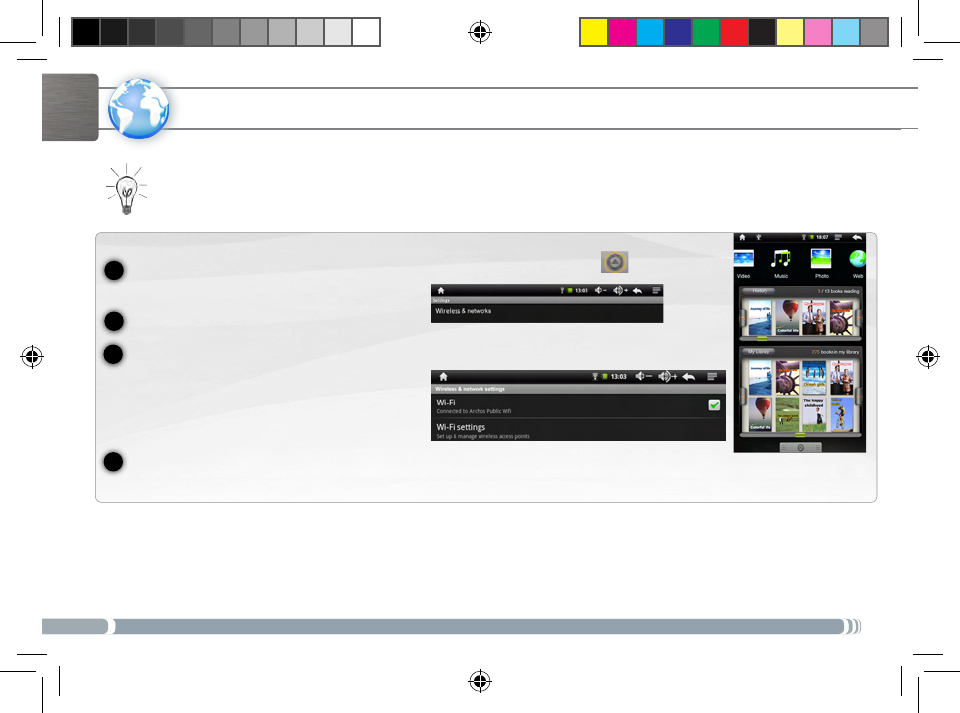
coNNEctiNg to tHE iNtERNEt
First of all, you need to configure a WiFi network. For this procedure to work, you need to be in a WiFi zone that will allow
you to connect to it. Every time the ARCHOS is in range of a network that you have already configured once, it will at-
tempt to make a connection.
* For free access WiFi points, there is no need to enter any special information. For secured networks, you will need either a key (a series of numbers and/or letters)
of the type WEP, WPA, or WPA2. Refer to your WiFi provider to obtain the exact connection parameters required.
To configure a new WiFi network, go on the Home screen, tap on the Application tab , then select
Settings.
In the Settings screen, select Wireless & networks.
If the WiFi is off, tap on the Wi-Fi line to turn it on. Then select Wi-Fi settings. The ARCHOS will
scan for available WiFi networks and display them.
Tap on the network you want to connect to, enter the required network information* and then tap on Connect. Your ARCHOS will
now attempt to establish a connection to that WiFi hot spot with the network parameters you entered.
Archos_70b_eReader_EN_pn109235.indd 6 16/11/2010 15:57:33
7
1
2
3
English
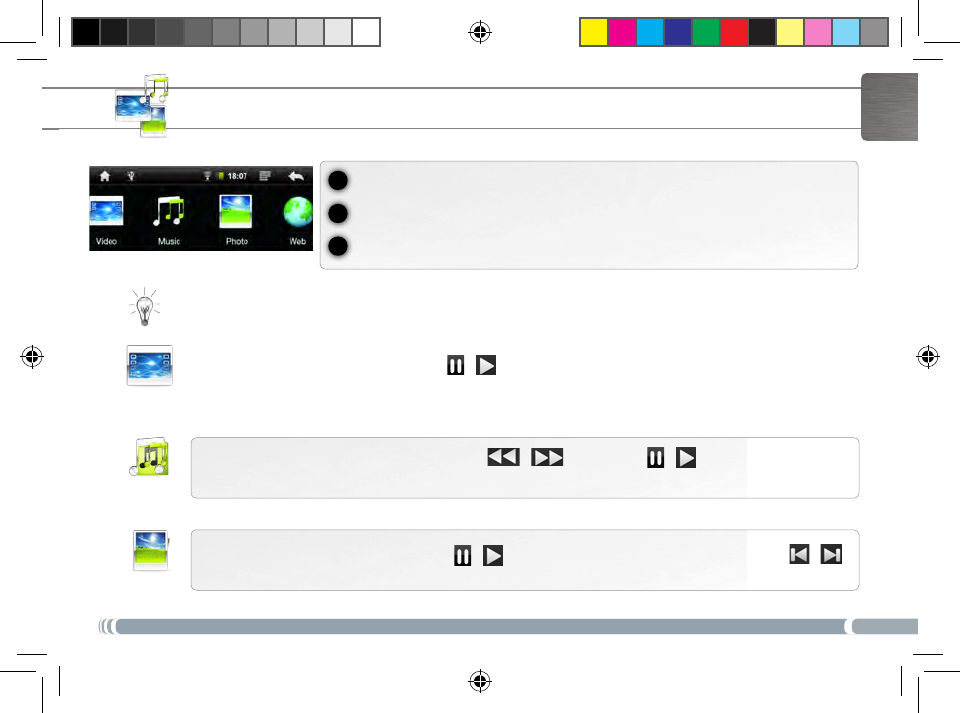
PLayiNg muLtimEDia FiLEs
From the Home screen, tap on the video, audio or photo application.
The ARCHOS will display a list of les or folders corresponding to the selected category.
Tap on an item to start playing it.
Only in Video and Photo modes: to display/hide the on-screen controls, tap anywhere on the screen.
To pause or resume a video, tap on the icon / (bottom of screen). To go to any particular point in the video,
slide the progression bar to the desired point.
To play the next or previous song, tap on the icons / . Use the icons / and the progression bar as
in the video player screen (see above).
To start or pause a slide show, tap on the icon
/
. To view the next or previous photo, tap on the icons / .
Video
Music
Photo
Archos_70b_eReader_EN_pn109235.indd 7 16/11/2010 15:57:38
8
2
3
4
1
USB
1
English
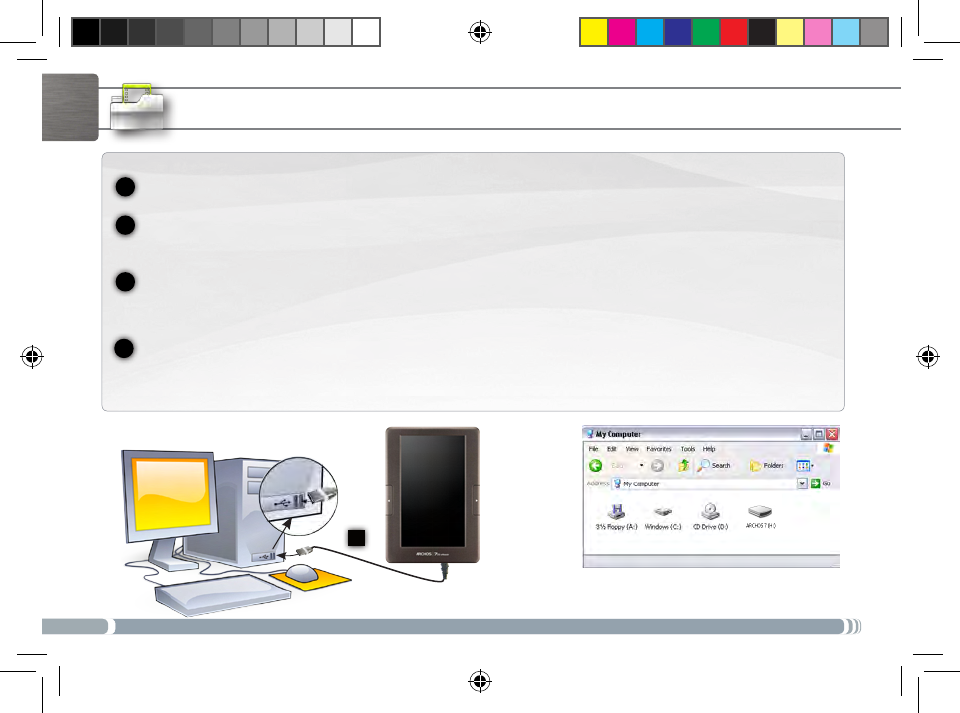
tRaNsFERRiNg mEDia to youR aRcHos
Computer
turned on
Connect the supplied USB cable to the ARCHOS and to a running computer.
The ARCHOS will turn on and ask you if you want to connect it. Tap on “Mount” to connect it. Within a few seconds the
ARCHOS will appear as an icon on your computer.
You can transfer your media files to the ARCHOS either by copy/pasting them into the respective folders using Win-
dows® Explorer (or the Finder on a Mac®), or by using Windows Media® Player. Open Windows Media Player® and then
use the Sync tab to synchronize your music, videos, and photos onto your ARCHOS. See Windows Media Player®’s Help
to learn more about this.
Once all your file transfers are finished, close Windows® Explorer and any other program that may have read or written to
the ARCHOS. Click on the ‘safely remove’ icon in the system tray, next to the clock. You can now unplug the USB cable.
Archos_70b_eReader_EN_pn109235.indd 8 16/11/2010 15:57:51
Warning statement
This equipment has been tested and found to comply with the limits for a Class B digital device, pursuant to part 15 of the FCC Rules. These limits are designed to provide reasonable protection
against harmful interference in a residential installation. This equipment generates, uses and can radiate radio frequency energy and, if not installed and used in accordance with the instructions,
may cause harmful interference to radio communications. However, there is no guarantee that interference will not occur in a particular installation. If this equipment does cause harmful
interference to radio or television reception, which can be determined by turning the equipment off and on, the user is encouraged to try to correct the interference by one or more of the following
measures:
• Reorient or relocate the receiving antenna.
• Increase the separation between the equipment and receiver.
• Connect the equipment into an outlet on a circuit different from that to which the receiver is connected.
• Consult the dealer or an experienced radio/TV technician for help.
Caution: Any changes or modifications to this device not explicitly approved by manufacturer could void your authority to operate this equipment.
This device complies with part 15 of the FCC Rules and RSS Gen of Industry Canada.
Operation is subject to the following two conditions:
(1) This device may not cause harmful interference, and
(2) this device must accept any interference received, including interference that may cause undesired operation.
RF warning statement:
The device has been evaluated to meet general RF exposure requirement. The device can be used in portable exposure condition without re striction.
CE in which countries where the product may be used freely: Germany, UK, Italy, Spain, Belgium, Netherlands, Portugal, Greece, Ireland, Denmark, Luxembourg, Austria, Finland, Sweden,
Norway and Iceland. France: except the channel 10 through 13, law prohibits the use of other channels.