Users Manual

1
AC101NE
User Manual

2
1. Appearance ...............................................................................................................................1
2. Beginning Use...............................................................................................................................2
2.1 Charge the battery ...............................................................................................................2
2.2 Use the storage card............................................................................................................2
2.3 Hot plug of storage card......................................................................................................2
2.4 Memory space.....................................................................................................................3
2.5 Power on/off........................................................................................................................3
2.6 Connect to wireless networks..............................................................................................3
3. Home Screen.................................................................................................................................5
3.1 Status and notifications .......................................................................................................5
3.2 Shortcuts to Add widgets ....................................................................................................7
3.3 Finger gestures....................................................................................................................8
3.4 Coping files to and from the storage card ...........................................................................8
3.5 Searching the device and the web.......................................................................................9
4. Personalizing...............................................................................................................................11
4.1 Change the Notification ringtone......................................................................................11
4.2 Change your wallpaper .....................................................................................................11
4.3 Personalize your Home screen with widgets.....................................................................12
4.4 Rearrange or remove widgets and icons on your Home screen ........................................13
5. Web browsing..............................................................................................................................14
6 Manage Applications....................................................................................................................15
7. Typical applications introduction................................................................................................16
7.1 Music Player .....................................................................................................................16
7.2 Video Player......................................................................................................................17
7.3 Gallery...............................................................................................................................18
7.4 File Manager.....................................................................................................................20
7.5 Instant Messaging tools.....................................................................................................22
7.6 Emails ...............................................................................................................................22
8. Settings........................................................................................................................................23
8.1 Wireless & networks.........................................................................................................23
8.2 Sound ................................................................................................................................23
8.3 Display..............................................................................................................................24
8.4 Storage ..............................................................................................................................25
8.5 Apps ..................................................................................................................................26
8.6 Accounts& Sync................................................................................................................27
8.7 Location service................................................................................................................28
8.8 Security settings................................................................................................................28
8.9 Language & Keyboard setting ..........................................................................................28
8.10 Backup &reset.................................................................................................................28
8.11Date & Time setting .........................................................................................................29
8.12Accessibility.....................................................................................................................30
8.13Developer options ............................................................................................................30
8.14About Device ...................................................................................................................31
9. Troubleshooting ..........................................................................................................................32

3
9.1 Force shutdown.................................................................................................................32
9.2 Restore default settings.....................................................................................................32
9.3 System updating................................................................................................................32
9.4 Reset..................................................................................................................................32
10 FCC statement............................................................................................................................33

1
1. Appearance
AC101NE series include several products with different physical dimensions.

2
2. Beginning Use
Statement: The software updates sporadically since we continuously devote to
product quality improvements. When operation for the product(s) your
purchased differs from that described in this manual, please follow your
product(s).
2.1 Charge the battery
AC101NE comes with a built-in polymer rechargeable battery and is designed to
use only manufacture-specified original batteries and accessories. When the battery is
low, please charge it timely.
Charge by Charger
Plug one terminal of the charger into the power adapter socket, and the other to
the power jack of the device to charge it.
2.2 Use the storage card
Insert the storage card
The storage card slot is on the right panel, just insert the TF Flash card with its
gold contacts facing down and push it in until it licks into place.
Browse files in the storage card
To browser the files in the storage card, do one of the following:
● run “File Manager to view files in the storage card
● you can also install and run any other third party file browser applications
Remove the storage card
Simply push the storage card in to eject it from its slot.
To avoid data loss or damage, please stop using files/ programs in the storage
card before remove the T-Flash card, and then tap Settings> Storage> Unmount SD
card to remove it safely.
[Note]:
1. Make sure the location and direction of the storage card is correct when
inserting, otherwise it is easy to cause damage/destroy to the storage card.
2. To avoid incompatibility or unrecognized of the storage card, major
brands of storage card are recommended.
2.3 Hot plug of storage card
Please do not hot plug the storage card when using or browsing its files.
3
For example, when you are running the Music/Video Player/ Gallery, the storage
card may damage if you push out the storage card directly and the running program
will stop automatically to protect the device. As for details of inserting/removing
storage card, see 2.2 Use the storage card.
2.4 Memory space
The device contains 2 memory spaces: local storage & extended storage card.
Local storage appears as “Local” and extended storage card as “EXTSD” in the
device. The capacity of built-in flash varies from 8GB and 16GB because of different
model of the AC101NE series. The built-in flash capacity of your device depends on
the model your purchased. AC101NE series support extended storage card of capacity
maximum 32GB.
2.5 Power on/off
1. Power on: press down the Power Button to turn on the device when the battery is
full enough
2. Power off: press down the Power Button for about 8 seconds and then a menu
with options will popup, select Power Off to turn off the device
3. Screen Lock:press down the Power Button to shutdown the screen to save battery
life. Press down the Power Button again to activate the locked Home Screen. After
unlocking, the device will resume the screen before locking the screen.
2.6 Connect to wireless networks
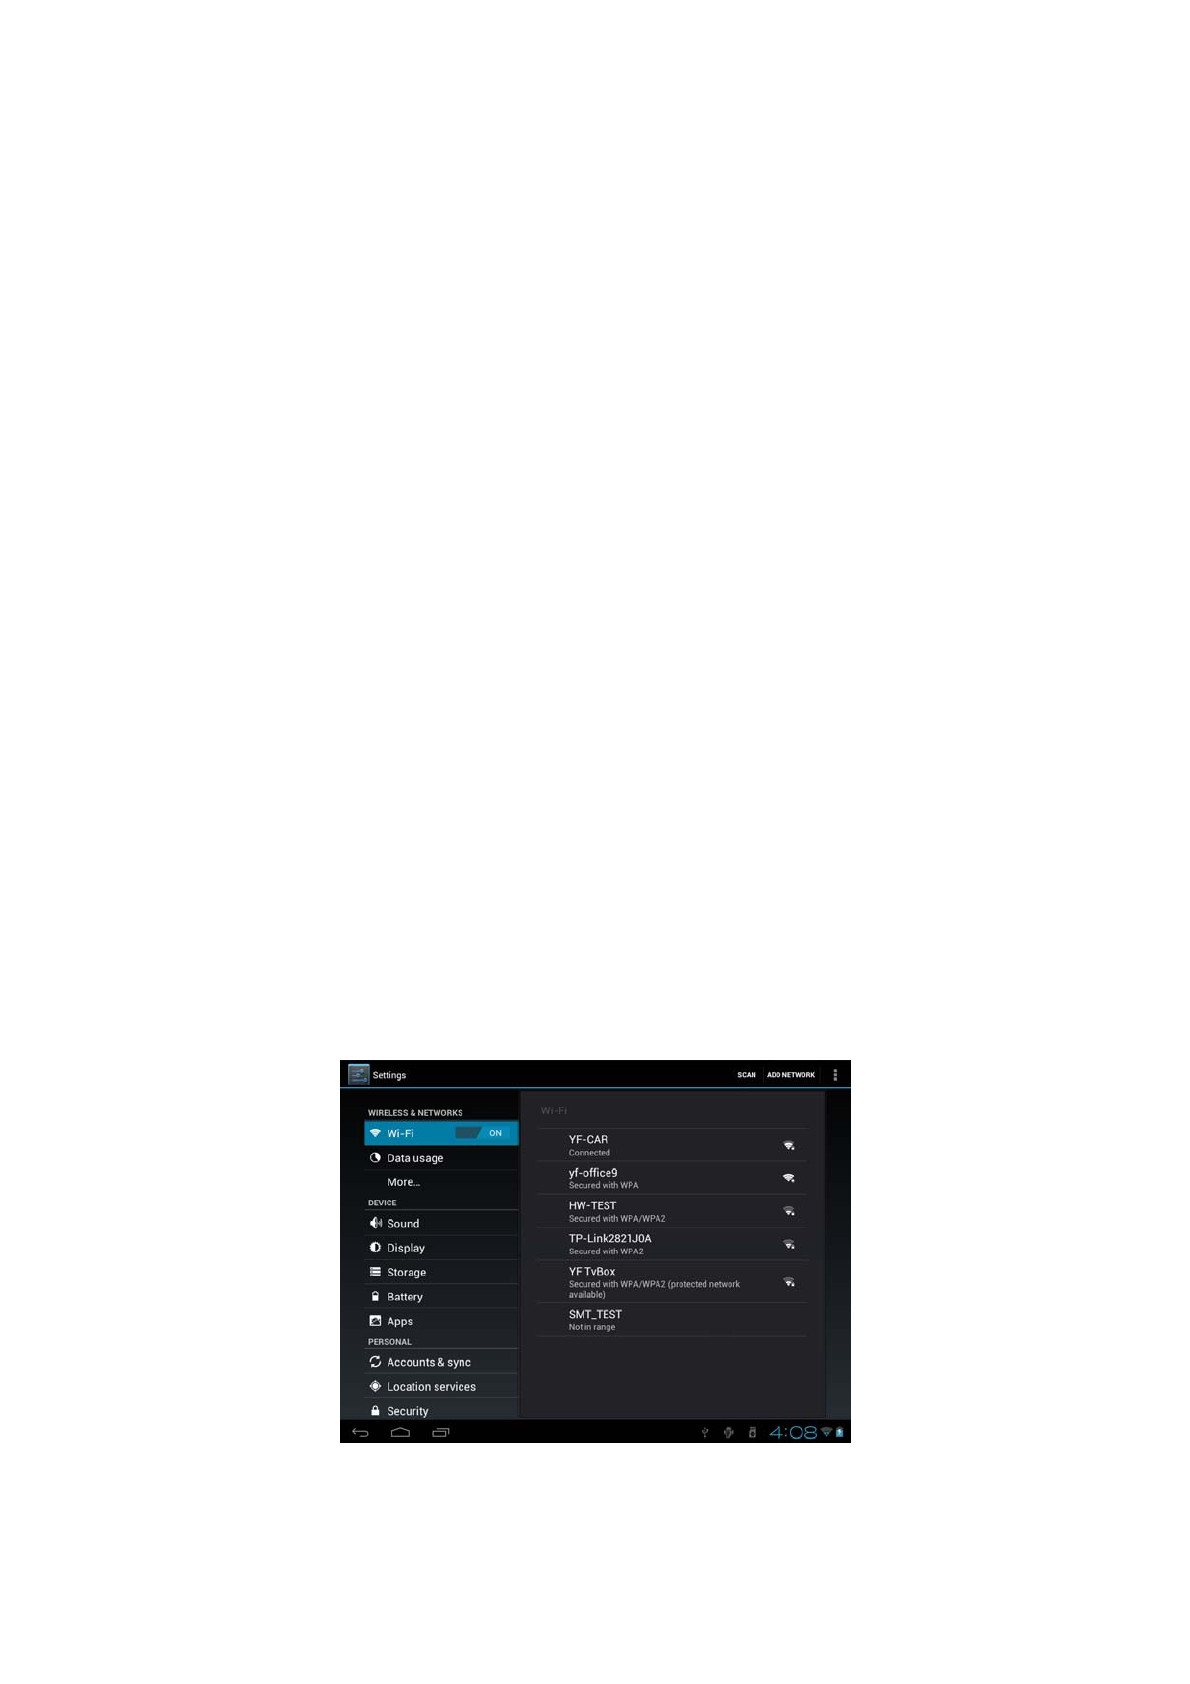
To connect to a wireless network, you should follow:
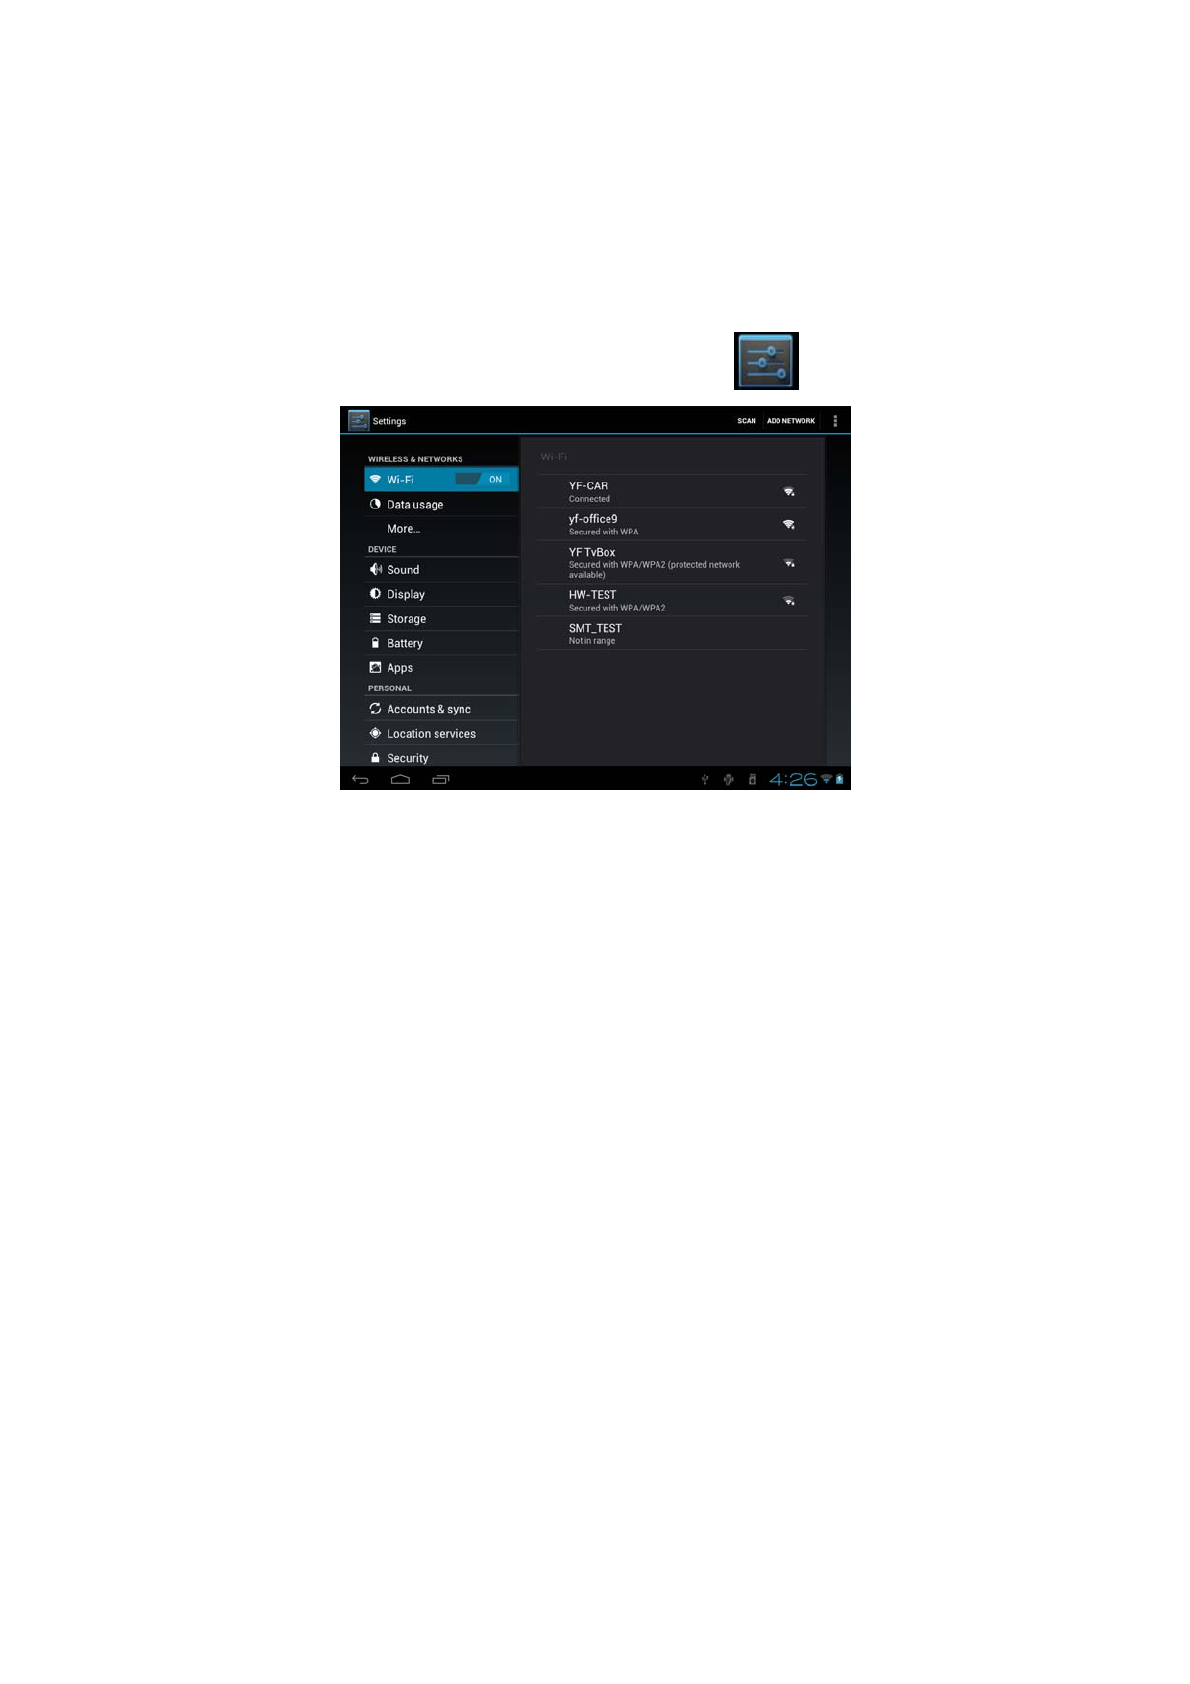
1. tap Settings on the Home screen;

4
2. tap Wi-Fi;
3. select ON;
4. the network names and security settings of detected Wi-Fi networks are
displayed in the Wi-Fi networks section;
5. tap a Wi-Fi network to connect. If you selected an open network, you will be
automatically connected to the network. If you selected a network that is secured with
WEP, enter the key and then tap Connect.
Depending on the network type and its security settings, you may also need to enter
more information or choose a security certificate.
6. after successful connection, the Wi-Fi connected icon will appears on the
status bar.
5
3. Home Screen
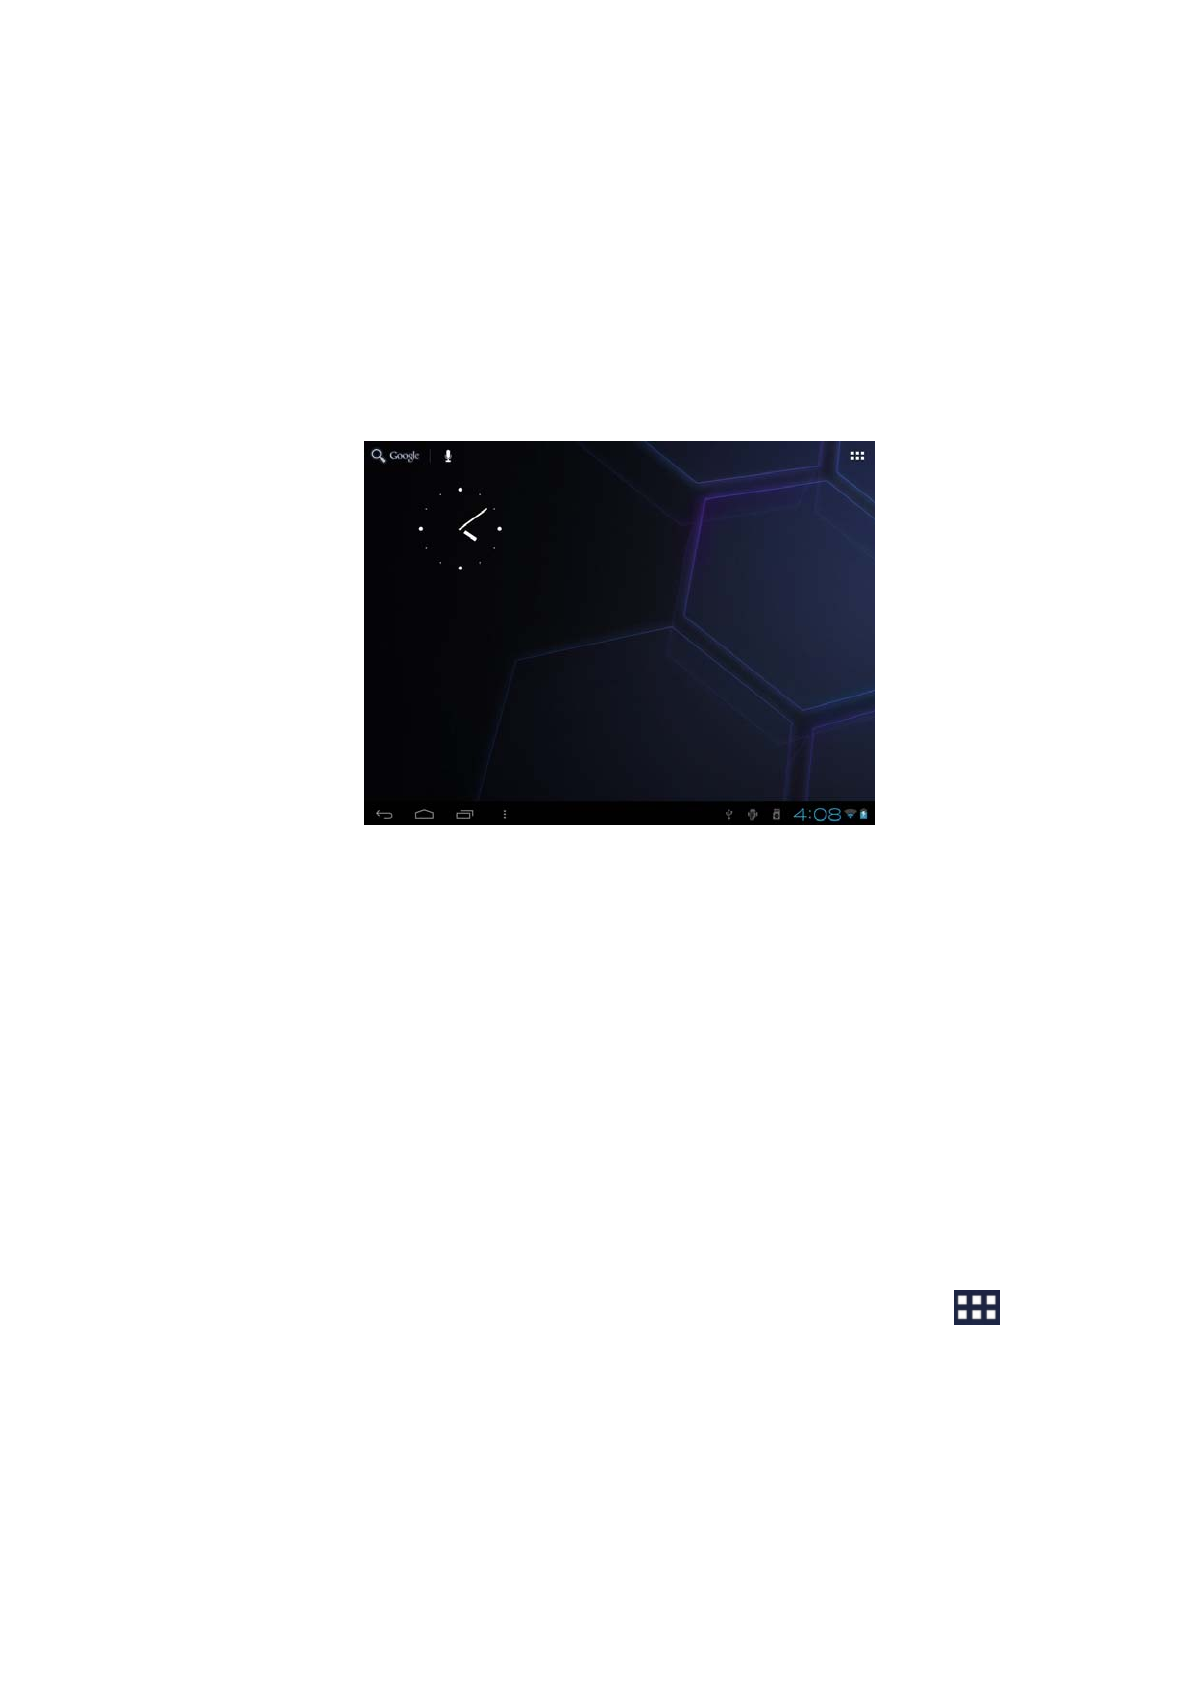
The Home screen is your starting point to access all the features on you device. It
displays application icons, widgets, shortcuts, and other features. You can customer
the Home screen with different wallpaper& widgets and display items you want. See
the Personalizing chapter.
When you sign in, the Home screen opens.
Sleep mode
Sleep mode suspends your device to a low power state while the display is off in
order to save battery power. You will still be able to receive messages and calls while
the device is in Sleep mode.
Switch to sleep mode
Simply press down the Power Button; and the device will automatically
shutdown the display screen when there is no operation on the screen for a period
of time.
Wake up from sleep mode
To wake up your device manually, press the Power Button. You will then see that
the device has locked the screen.
Unlocking the screen
Press the bar on the lock screen and then slide your finger upwards to unlock the
screen.
Browse Home Screen
You can go to the extended Home screen by sliding your finger horizontally
across the screen to go to the left or right side of the Home screen. Tap the icon
to view all applications on your device.
3.1 Status and notifications
Status and Notification Icons may appear
6
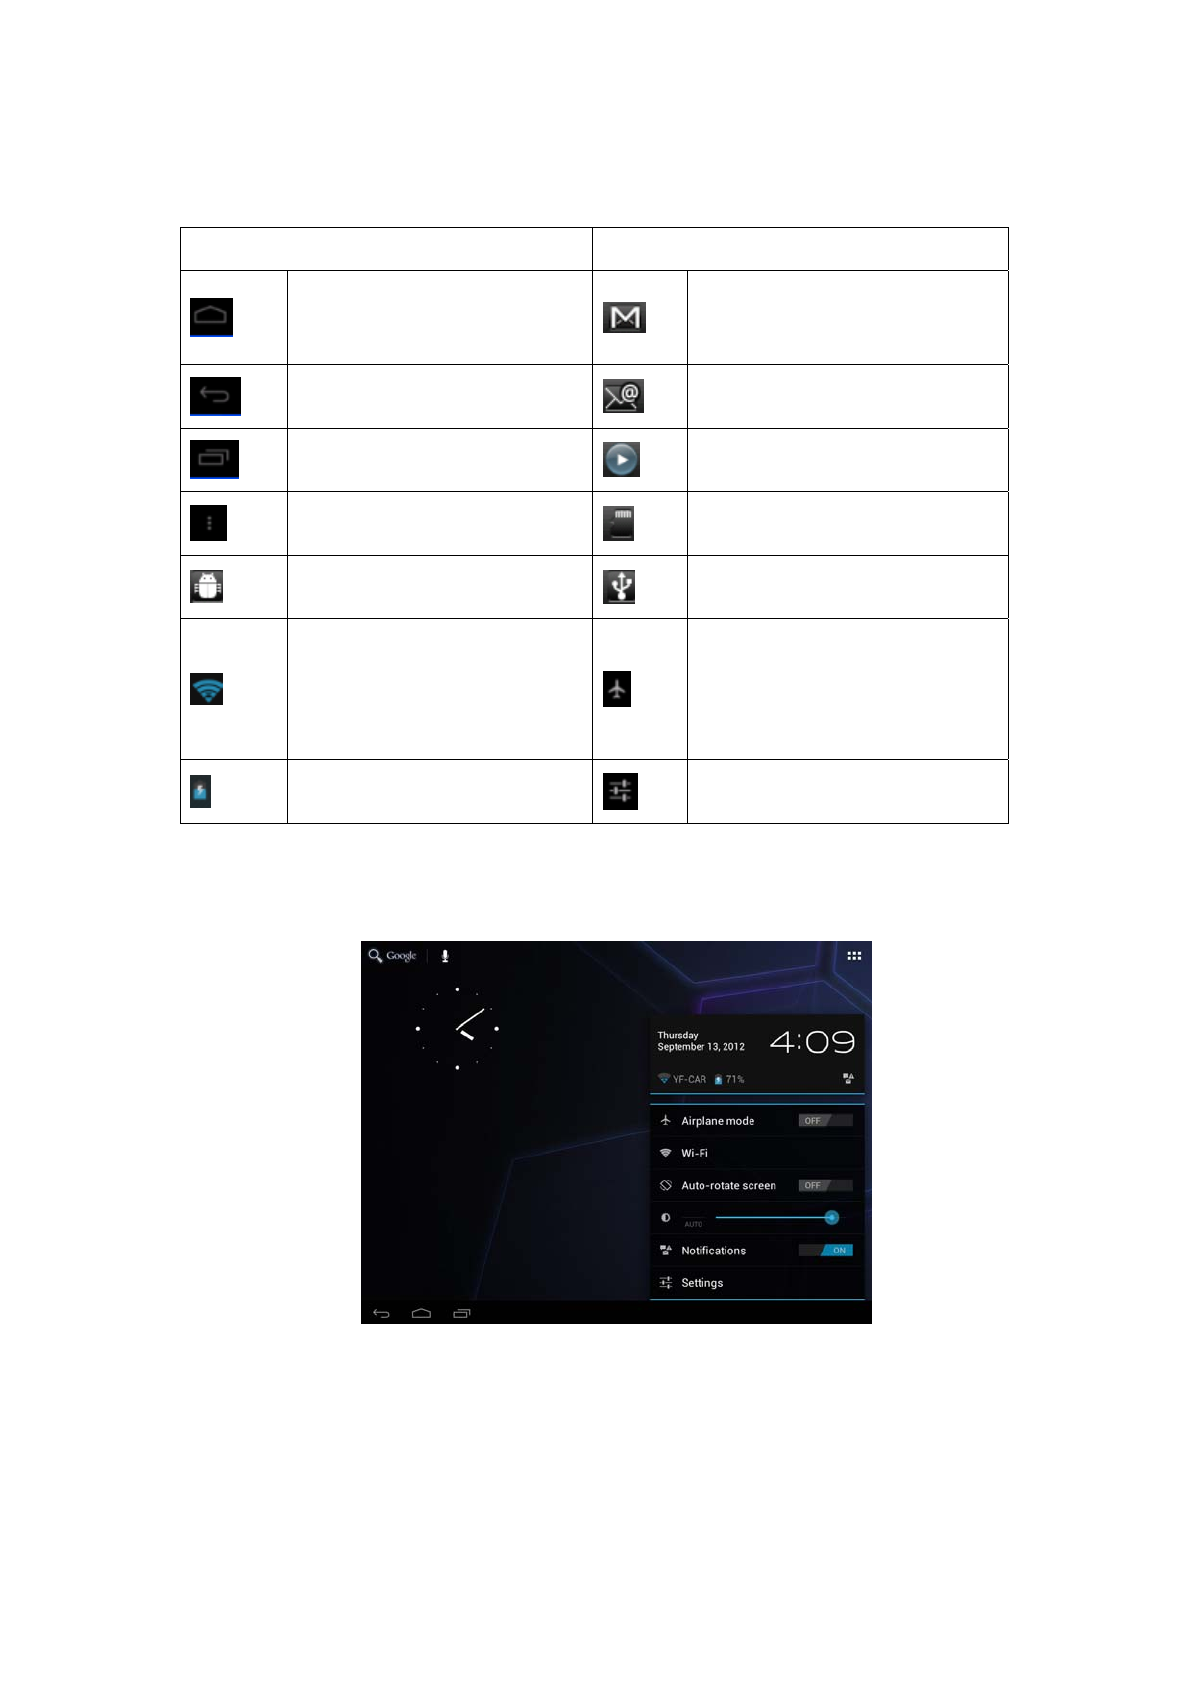
The status bar (as the above) presents media volume, networks condition, battery
condition, time and so on. When an application is running, corresponding notification
icon will appear in the notification area. Icons you may often see are listed as follows:
Status icons and its meanings Notification icons its meanings
Tap to go to the Home screen New Gmail/Google Mail
message
Back New Email message
Recently windows viewed Music player is ongoing
Menu icon SD card is mounted
Notification USB Connected
Connected to a Wi-Fi
network and display the
signal strength
Airplane mode
Battery is charging Settings
Open notification panel
When new notification icon displays in the status bar, press and hold the status
bar, then slide your finger downward to open the Notifications panel as follows:
If you have several notifications, you can scroll down the screen to view more
notifications.
[Tip]: You can also open the Notifications panel on the Home screen by pressing
Menu icon on the panel and then tapping Notifications.
7
In the dropdown notification panel, there are shortcut buttons for turning on/off Wi-Fi,
airplane mode, auto-rotate screen and for adjusting screen brightness.
Close the Notifications panel
Simply press the Back button on the device panel.
3.2 Shortcuts to Add widgets
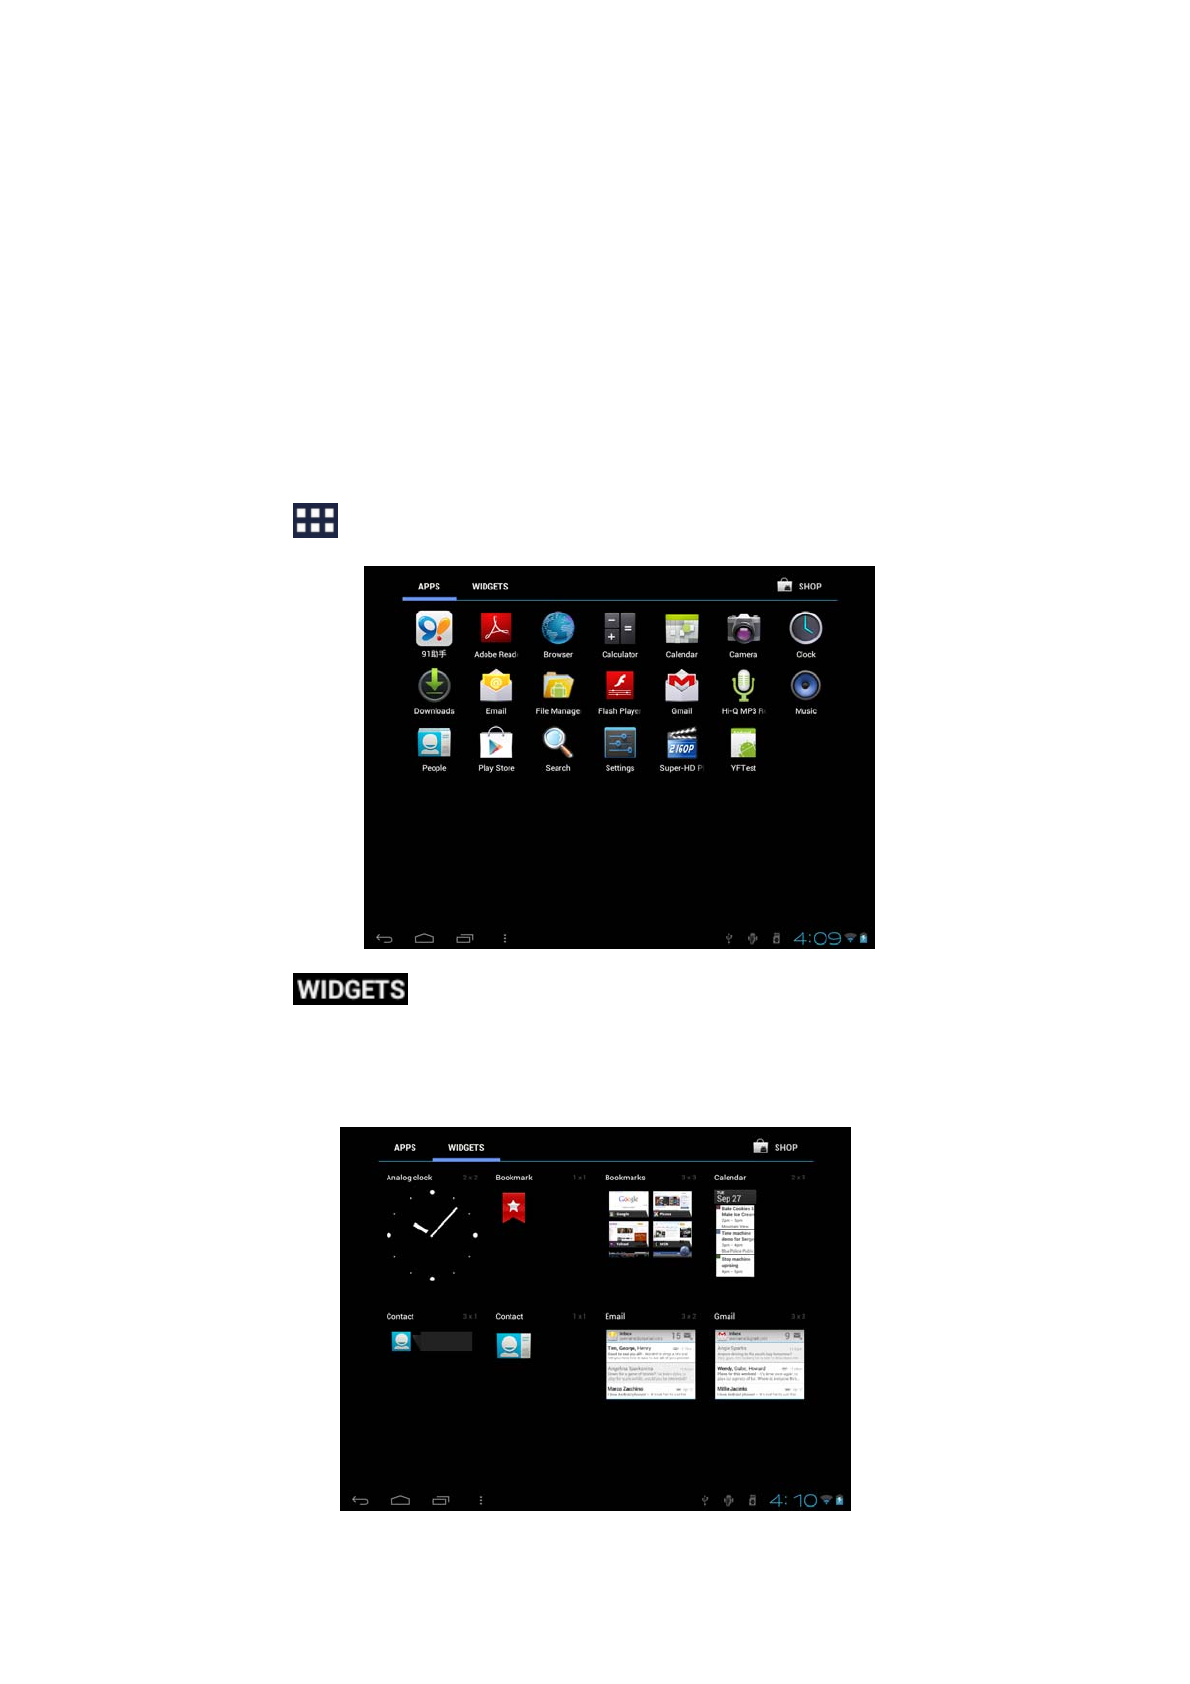
To add widgets to Home screen, you can
1. tap on the home screen to enter into all apps interface as follows
2. tap
3. select one item.
Slide your finger horizontally on the home screen to check widgets that can be
added to the home screen. Widgets selectable are as follows:

8
3.3 Finger gestures
Tap: When you want to type using the keyboard, select items onscreen such as
application and settings icons, or press onscreen buttons, simply tap them with your
finger.
Press and hold: To open the available option for an item (e.g. contact or link in a web
page), simply press and hold the item.
Swipe or slide: To swipe or slide means to drag your finger vertically or horizontally
across the screen.
Drag: Press and hold your finger with some pressure before you start to drag. While
dragging, do not release your finger until you have reached the target position.
Rotate: For most screens, you can automatically change the screen orientation from
portrait to landscape by turning the device sideways. When entering text, you can turn
the device sideways to bring up a bigger keyboard. Refer to Settings chapter for more
details.
3.4 Coping files to and from the storage card
You can copy music, photos/pictures and others to your device to personalize your
device.
1. Use the USB cable that came with your device to connect it to a USB port on your
computer.
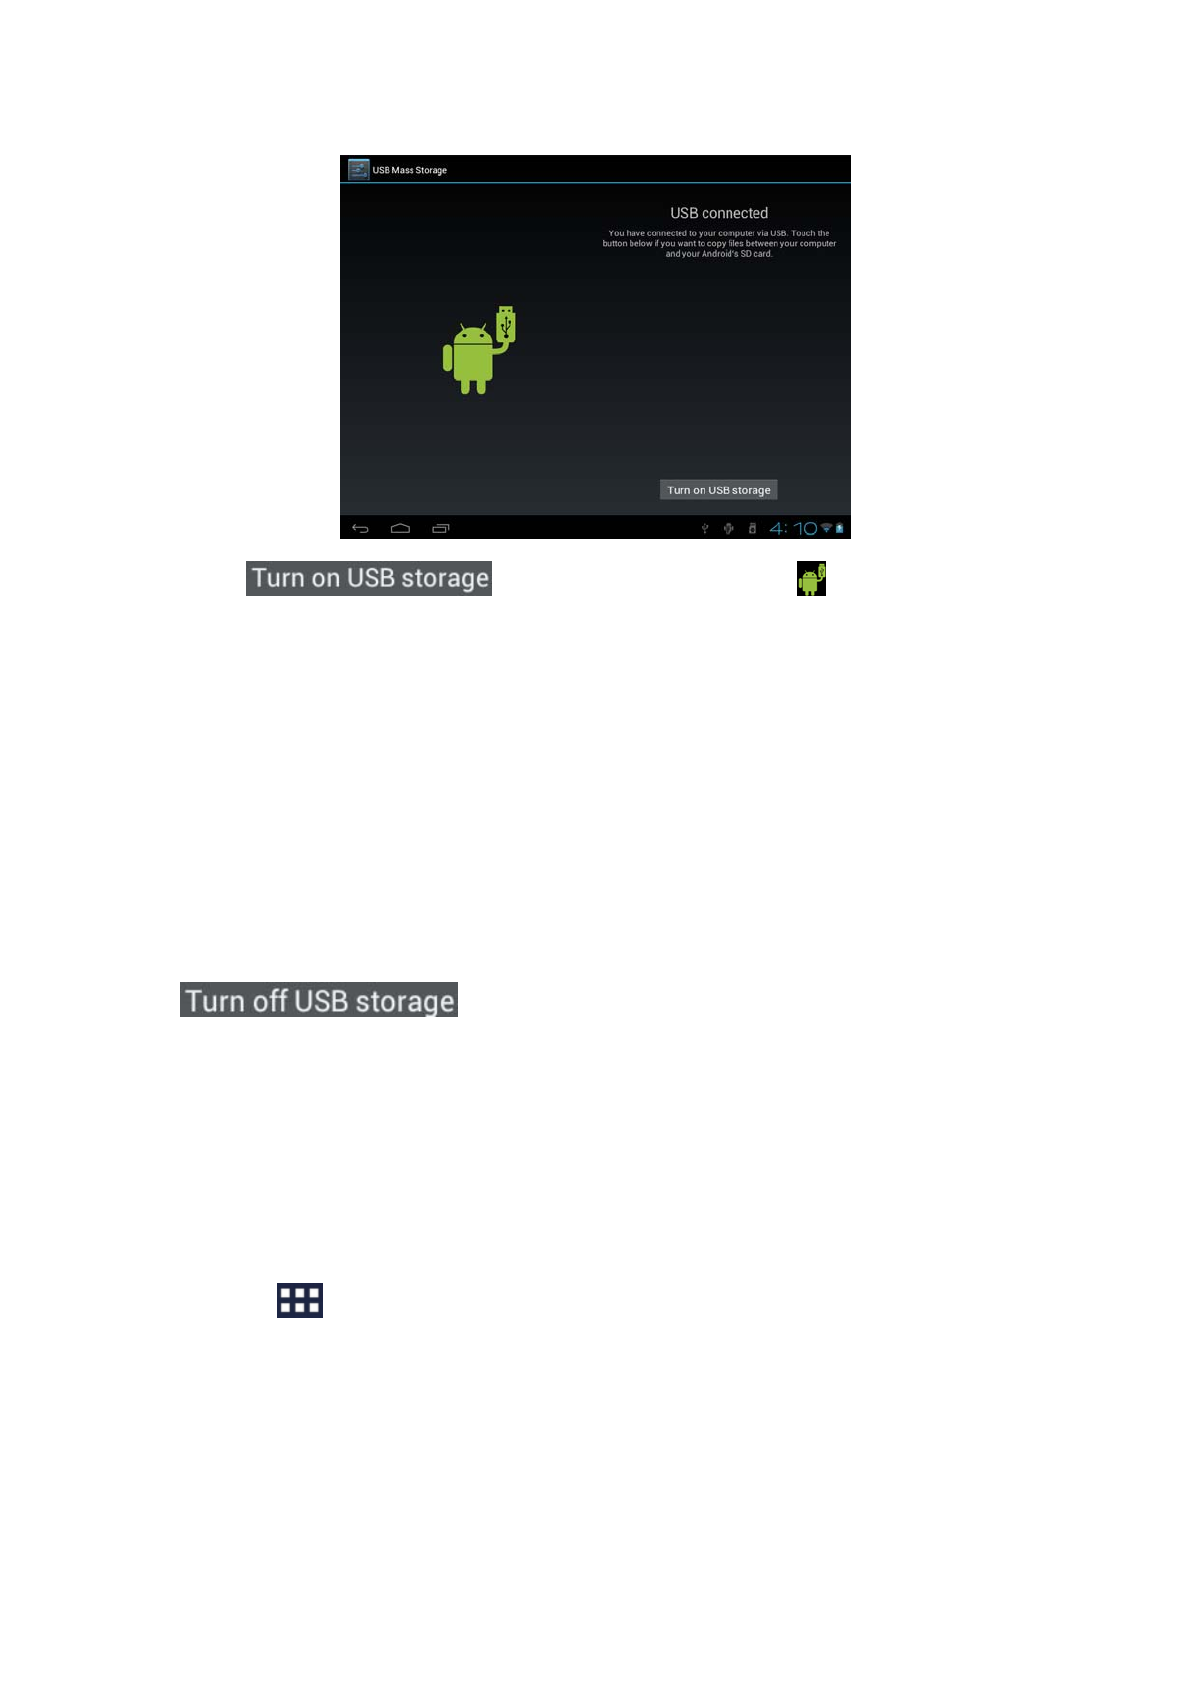
2. when the icon appears in the notification area, open the notification panel
and tap USB Connected to popup the following screen:
9
3. tap , when the notification icon turns yellow, the
computer will recognize your device as a removable disk;
4. find the removable disk and open it. Do one of the followings:
Copy the files from the computer to the storage card’s root folder.
Copy the files from the storage card to a folder in your computer or computer
desktop.
5. after copying the files, unmount the removable disk (that is, your device) as
required by your computer’s operating system to safely remove your device.
6. disconnect your device from the computer.
If your want your device remain connecting to the computer and enable reading its
storage card, you can open the Notifications panel and tap
.
[Note]: you can also realize communication between the device and the computer by
tapping Settings> Developer options>USB Debugging.
3.5 Searching the device and the web
You can search for information on your device and on the Web by using the Quick
Search Box.
1. press on the home screen to enter into all apps interface;
2. tap Search and then enter the search item in the Quick Search Box
As you type, matching items on your device and suggestions from Google web search
are shown as a list. The suggested items that appear will depend on the options that
you have selected in the search settings.
3. Do one of the following:
If what you’re searching for is in the list of suggestions, tap it in the list. The

10
item opens in the appropriate application.
If what you’re searching for is not in the list, tap to open the search
option menu. Tap Web and then tap to search the Web. The web
browser opens, displaying results of a Google search on the Web

11
4. Personalizing
4.1 Change the Notification ringtone
Choose from the available selections of notification ringtones on your device. You can
also download or copy notification ringtones or songs to your device' storage card and
choose one to use as your notification ringtone. To find out how you can copy files to
your storage card, see “Coping files to and from the storage card”.
1. In the Home screen, tap Settings > Sound > Notification ringtone.
2. Tap the notification ringtone you want to use. The notification ringtone briefly
plays when selected.
3. Tap OK.
4.2 Change your wallpaper
Personalizing your Home screen wallpaper with your favorite photo is a quick and
easy way to change the feel of your device and give it a fresh look. Browse the
collection of wallpapers included in your device or choose from photos that you have
taken with the camera.
To change your Home screen or lock screen wallpaper, you can:
1. on the Home screen press or tap settings>display
2. and then tap Wallpaper.
【Note】: you can also press and hold the Home screen until the “Choose wallpaper
from” option menu popup.
3. choose source of wallpaper
you can do one of the following:
Tap Super-HD Player to select a photo/picture that you have taken using the
camera or copied to your storage card. Tap Crop to crop the photo/picture
and set the cropped picture as wallpaper.

12
Tap Wallpapers gallery to choose from preset wallpapers and then tap Set
wallpaper.
Tap Live Wallpapers gallery to choose from preset wallpapers and then tap
Set wallpaper.
4.3 Personalize your Home screen with widgets
Widgets put at-a-glance important information and media content up front on your
Home screen. Some widgets are already added to your Home screen for your
convenience. You can add more from the available selections of widgets, or download
more widgets.
① adding a widget to your Home screen
For details on how to add a widget to your Home screen, please refer to section 3.2
Shortcuts to Add widgets.
[Note]: To remove a widget, press and hold the widget until the icon appears,
drag the widget onto it and release your finger.
②Adding folders on your Home screen
Use folders to group related applications and other shortcuts to keep your Home
screen tidy and organized.
Press and hold the application shortcut and drag it onto another shortcut to create a
folder for the applications you want to file together, and then release your finger to
finish creating a folder. You can drag any other application shortcut into the new
folder.
To rename a folder:
1. Tap the folder to open it.
2. Tap Unnamed Folder to prompt the keyboard.
3. Enter a new folder name and then tap OK.

13
4.4 Rearrange or remove widgets and icons on your Home screen
Rearrange the widgets and icons on your Home screen to give room for adding more
items to the Home screen. You can also remove widgets and icons that you don’t
frequently use.
① Moving a widget or icon
1. Press and hold the widget or icon you want to move.
You’ll see a yellow box around the widget or icon. Don’t release your finger.
2. Drag the widget or icon to a new location on the screen.
Pause at the left or right edge of the screen to drag the widget or icon onto another
Home screen panel.
3. When the widget or icon is where you want it, release your finger.
If you’ve released your finger but a message shows that there’s no space to place
the widget or icon, drag it right or left again to another Home screen panel.
② Removing a widget or icon
1. Press and hold the widget or icon you want to remove. You’ll see a yellow box
around the widget or icon. Don’t release your finger.
2. Drag the widget onto the cross icon on the screen.
3. When the widget or icon also turns red, release your finger.
14
5. Web browsing
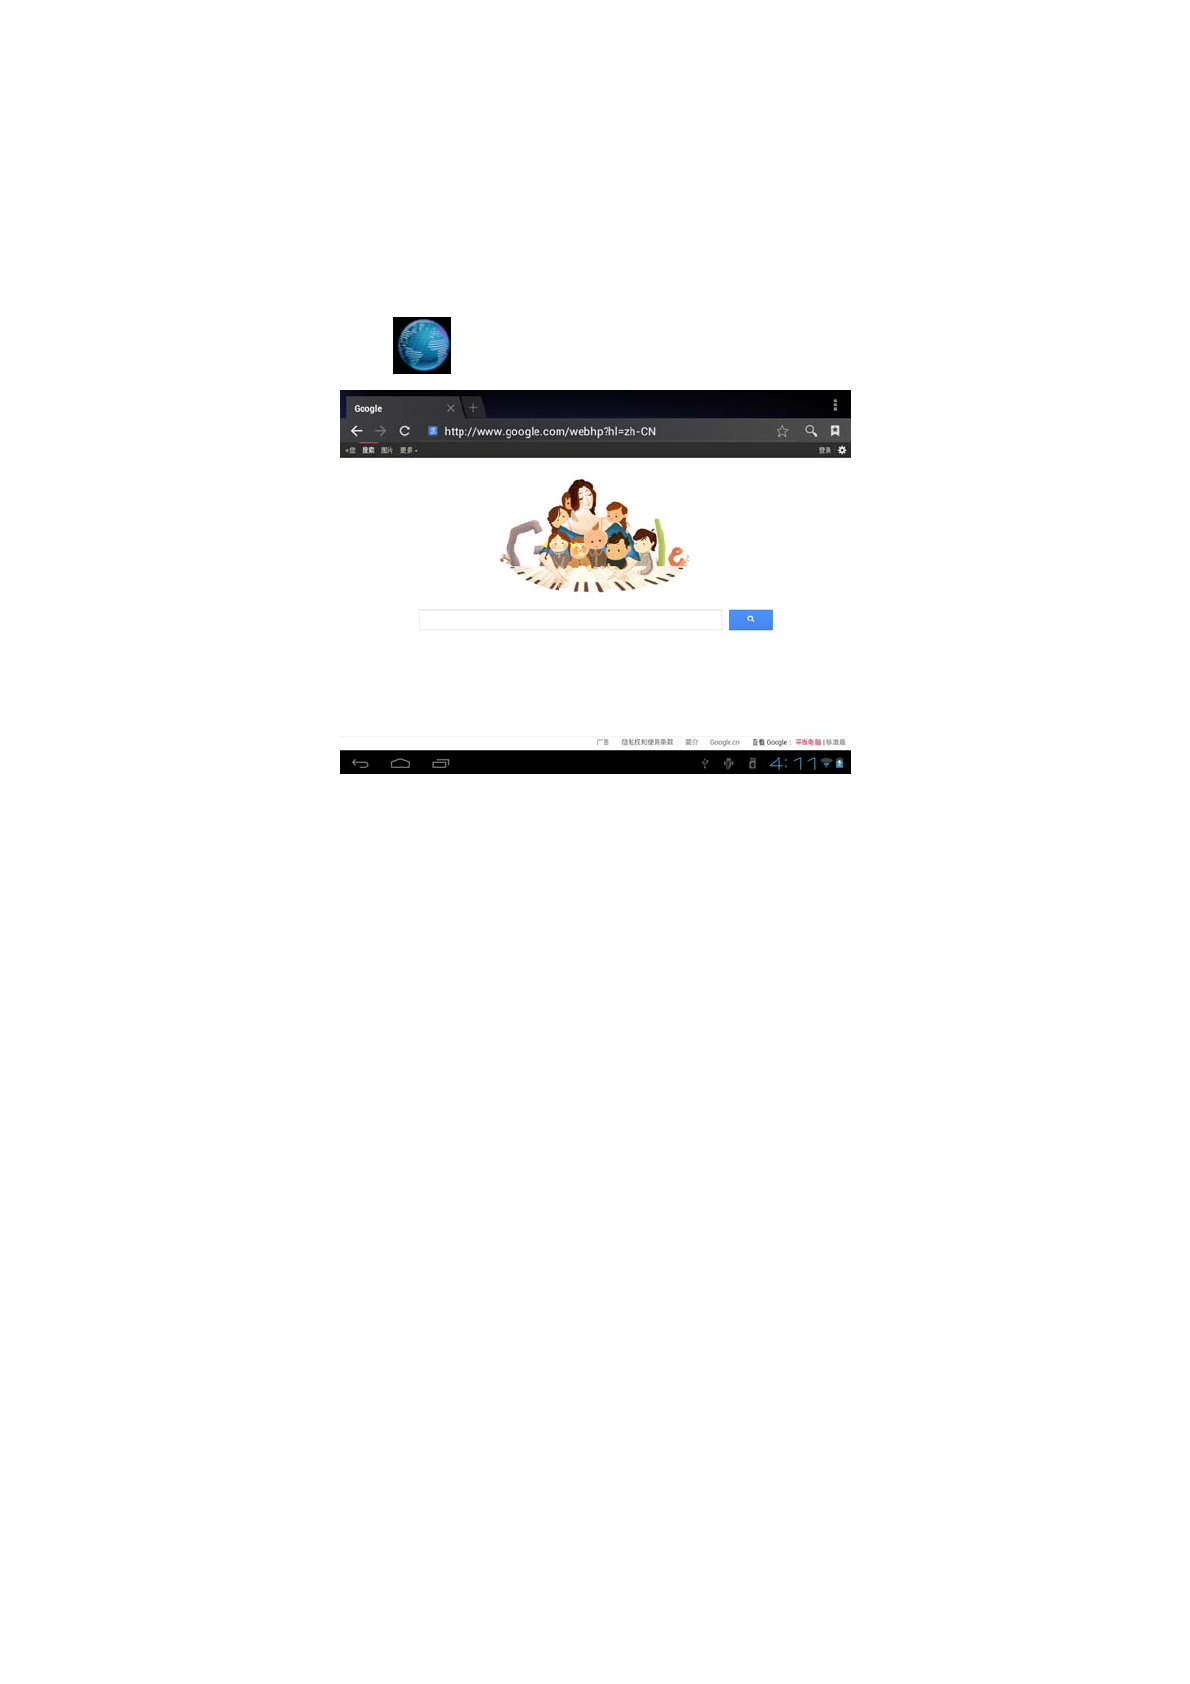
User can connect to the network via the browser.
Tap the browser icon on the Home screen to open it as follows:

15
6 Manage Applications
You can personalize and enrich your AC101NE by installing a wide variety of
free and paid apps ranging from productivity apps, entertainment, to games. When
you find a program you want, you can easily download and install it on your
AC101NEwith just a few steps as follows:
How to install Android third-party programs
1. download the programs you want from web sites and store them into your
storage card or local memory. You can also copy programs downloaded on
your computer into your storage card or local memory;
2. run the application File Manager
3. find the third-party program you want, and then use functions of File Manager
o install it to your device.
How to uninstall Android third-party programs
To dismount the program, you can also use functions of File Manager And you
can also by tapping Settings > Apps> Downloaded to uninstall a third-party
application.
16
7. Typical applications introduction
7.1 Music Player
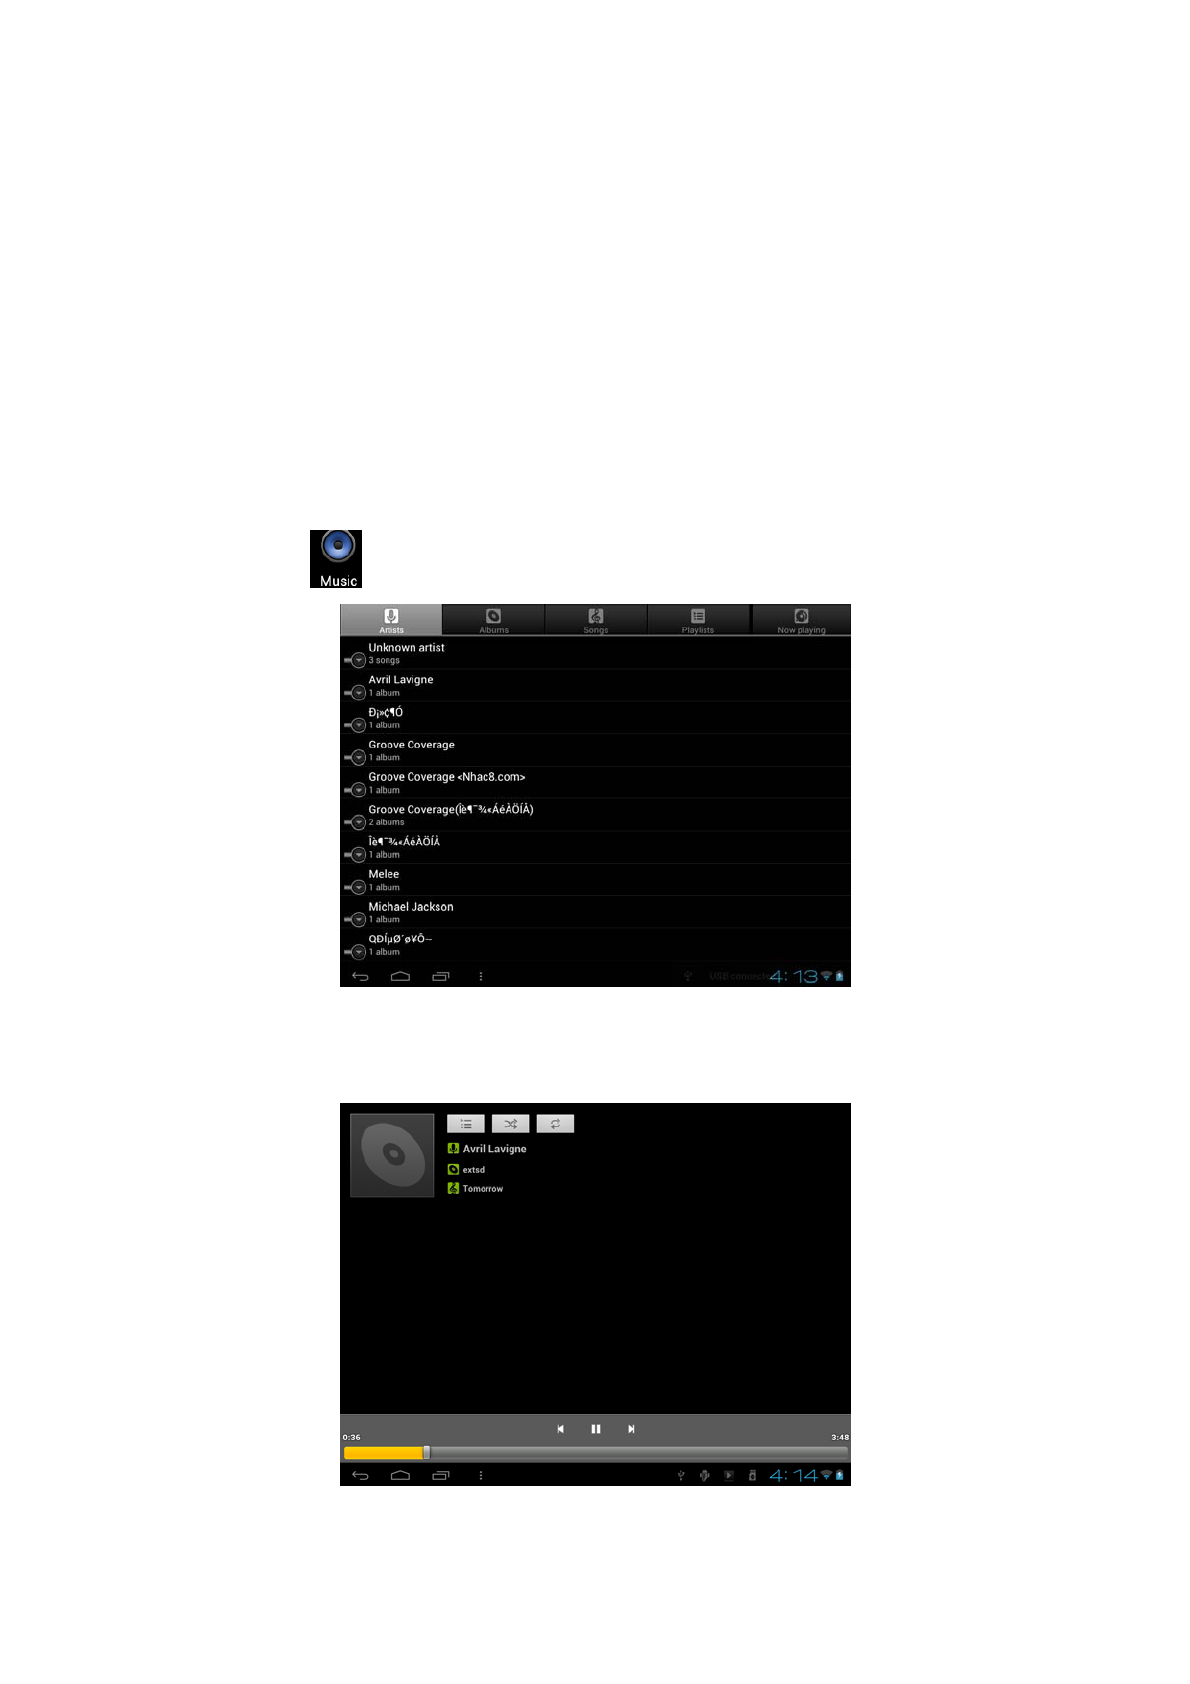
Enjoy listening to songs and music on your AC101NE using the Music application.
You need to copy music files to your storage card first to use the Music application to
play music. To find out how to copy files, see “Copying files to and from the storage
card”. Audio formats supported include/wav/ac3/aac/ogg /ra/amr/m4a/wma and so
on.
Tap the icon on the Home screen to enter the following screen:
Your music is organized into different categories such as Artists, Songs and Albums.
Tsp one of the category tabs to view a category.
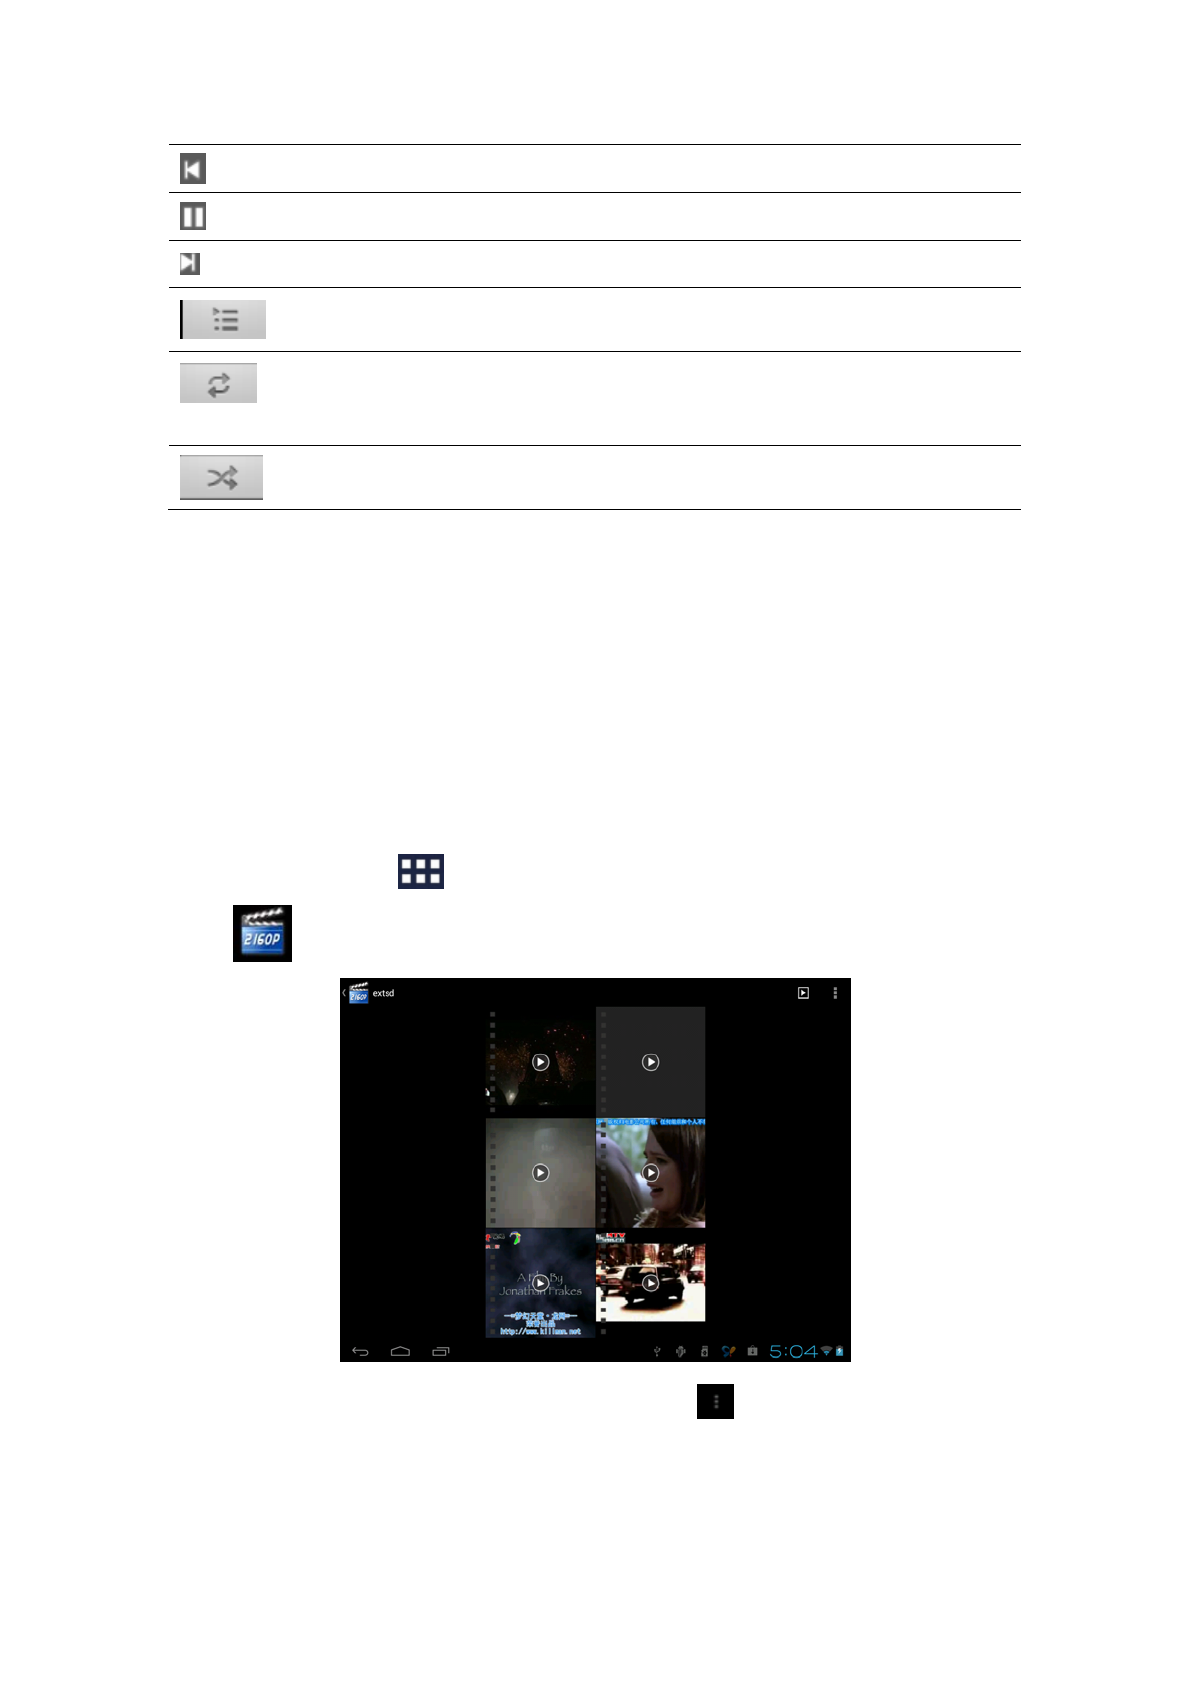
Select a song in the playlist and tap on it to start playing as follows:
17
Tap to go to the previous song.
Tap to play, pause, or resume playing the song
Tap to go to the next song
Tap to go to the now playing list
Tap to switch the following repeat modes: repeat all songs;
repeat current songs; .do not repeat
Tap to shuffle the current playlist.
When you are playing music and the screen turns off, you can control the music
playback right from the Lock screen when you “wake up” the device by pressing
POWER button. If you do not see the playback controls on the Lock screen, tap
anywhere on the screen to display the playback controls.
7.2 Video Player
Tap the launcher icon on the Home screen and the tap the Super-HD player
icon to go to the following interface:
When there are multiple video files in the player, tap to display all video files in
thumbnail mode or in details display mode. Double tap on a video file to start playing
it.
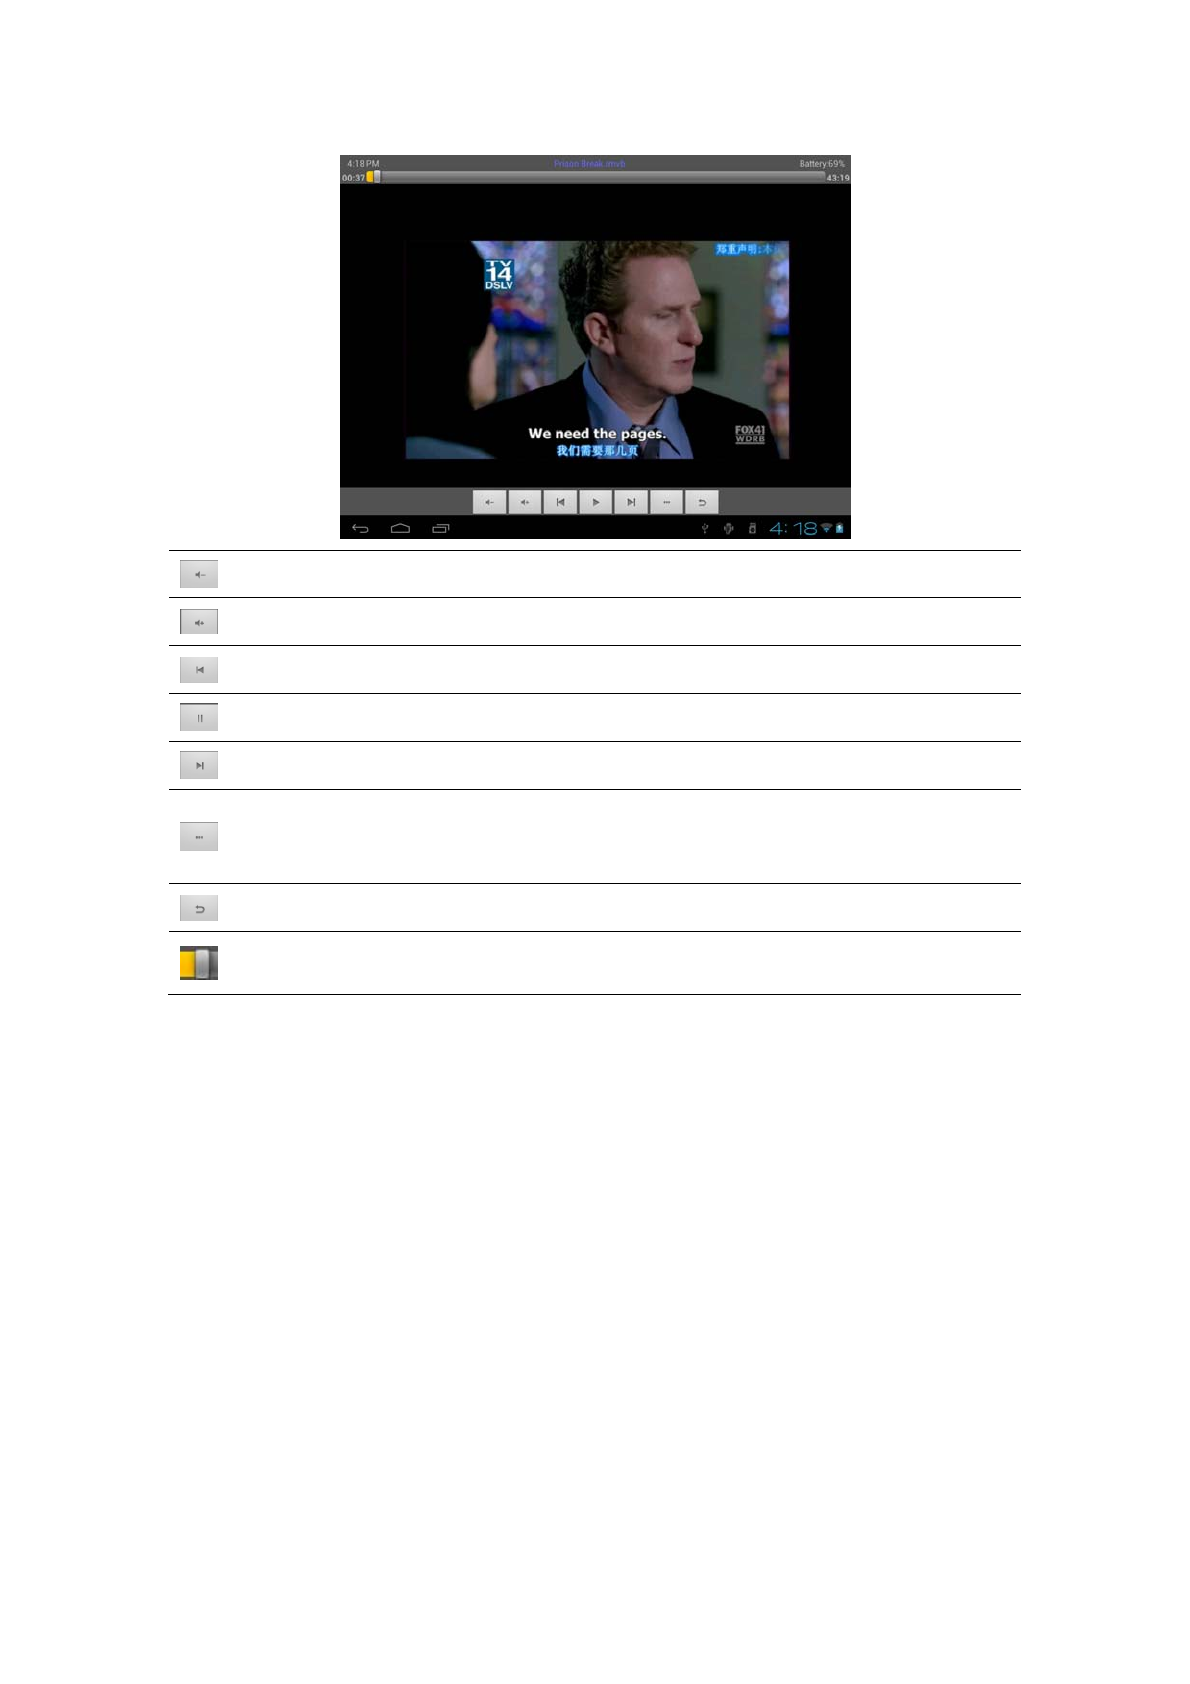
On the video playing screen, tap on the screen to popup the control bar as follows:
18
volume down
volume up
Tap to play the previous video file in the video list
Tap to play/pause the Now playing video file
Tap to play the next video file in the video list
Tap to unfold the control bar for personalizing the play mode, such as video
track, zoom mode and so on
Tap this icon to go back to the video file list interface
Drag the slider to adjust playing progress
To quit the video playing screen, press the Back icon in the status bar directly.
7.3 Gallery
You use Gallery to view pictures and play videos that you’ve taken with Camera,
downloaded, or copied onto your SD card. You can perform basic editing tasks on
pictures and set them as your wallpaper or contact picture. You can also share your
pictures and videos with friends.
On the Home screen tap the Super-HD player icon, photos and videos are classified
automatically for easy view. The gallery application will run.
Browse & edit pictures/photos
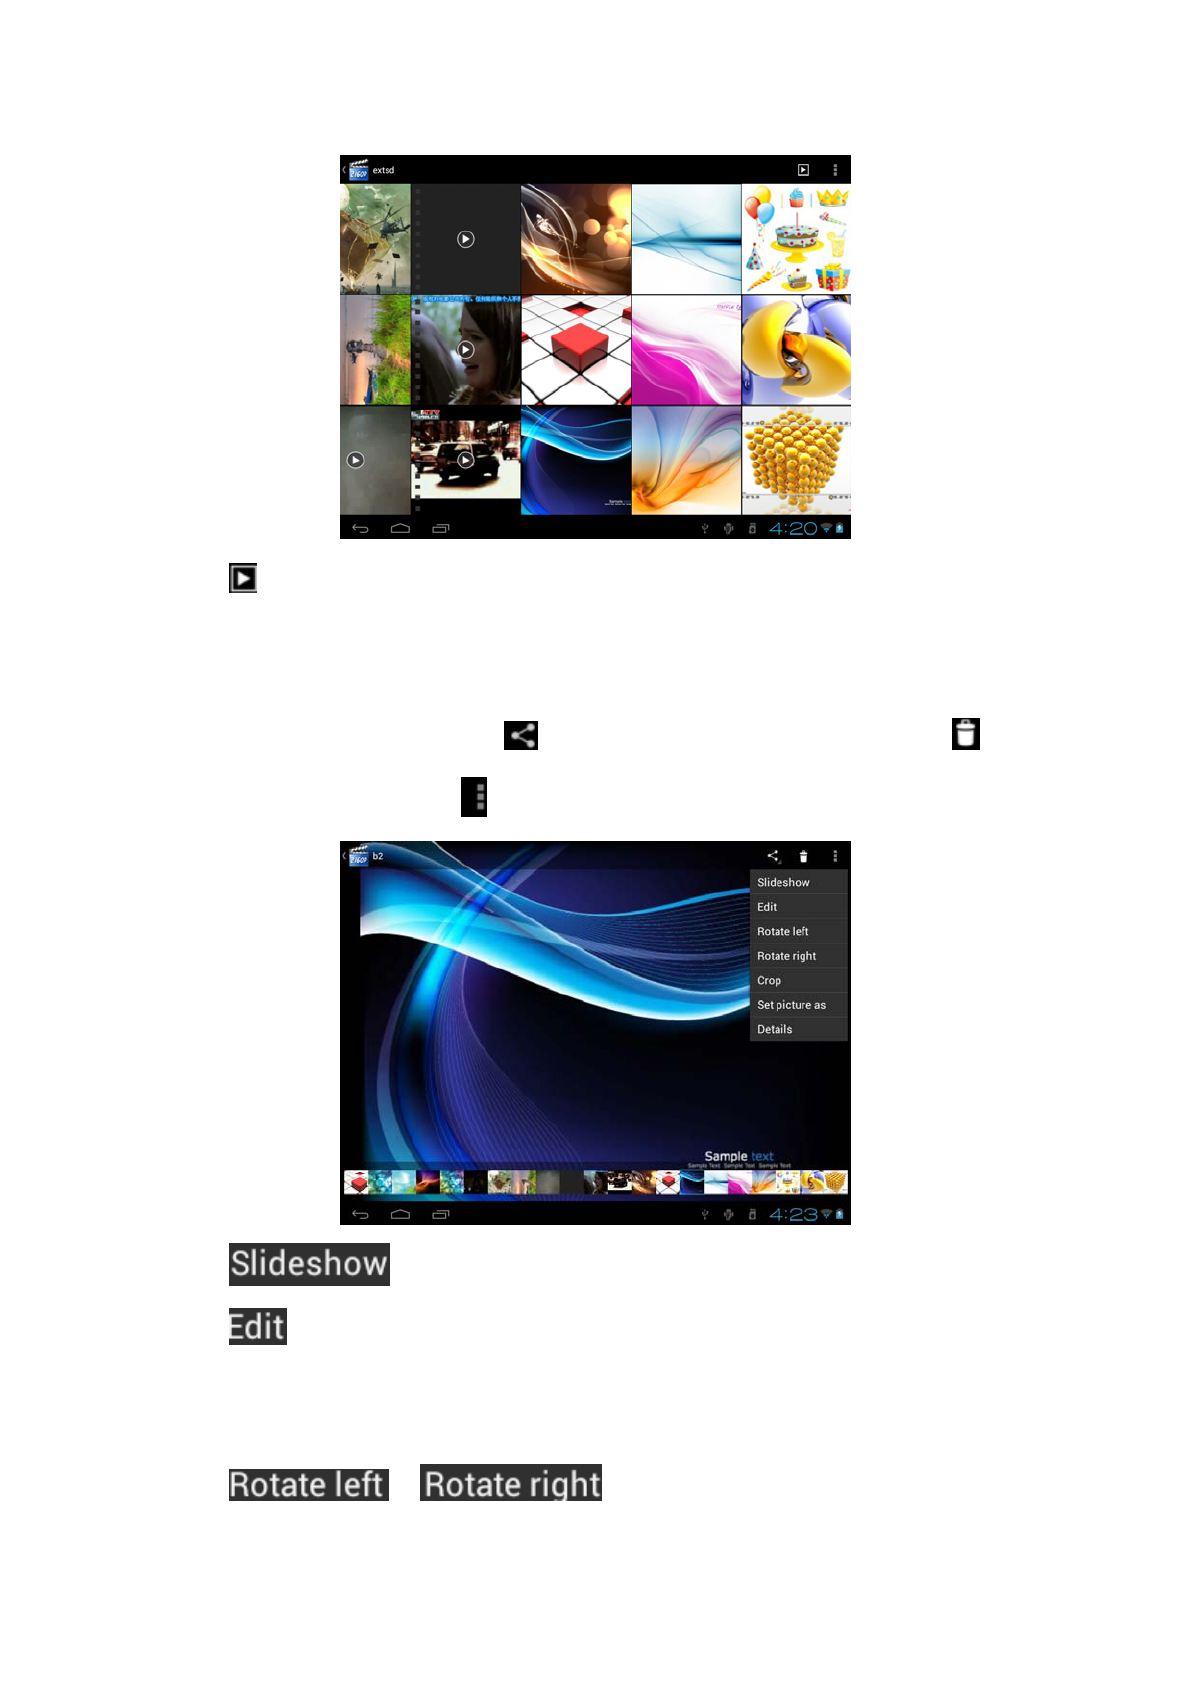
Tap an album to open it and view its contents;
19
Tap on upper right corner of the screen to browse all photos/pictures in slideshow
mode.
Select a picture to view it in full screen mode; drag left or right to view the next or
previous picture in the album; move you fingers inward/outward to zoom out/zoom in
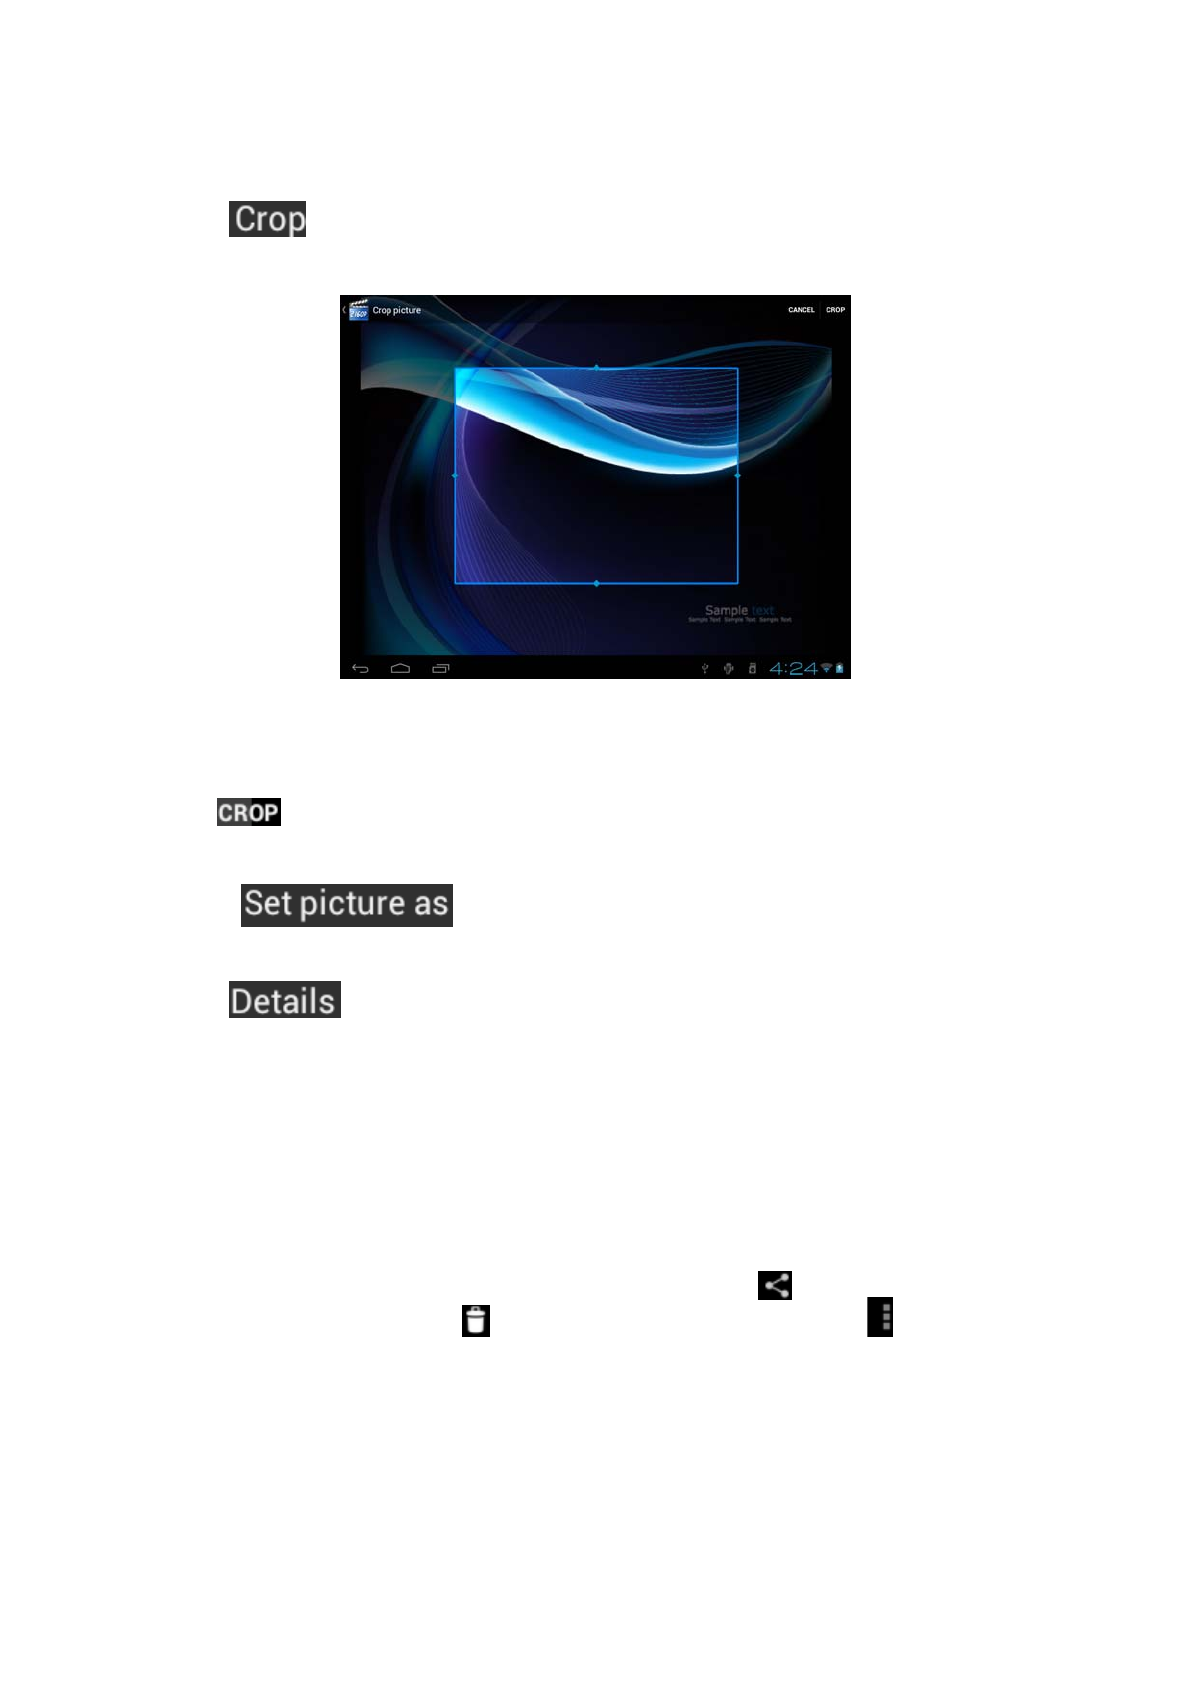
the selected photo/picture. Tap to share it with friends via email, tap to
delete/cancel deleting it, tap to pop up the following control bars:
Tap to slide show all pictures in the album;
Tap to edit it. When the picture is zoomed in, drag the picture to view parts that
are not in view. When the picture is zoomed to fit the window, drag left or right to
view the next or previous picture in the album.
Tap or to rotate the picture/photo 90°
20
anticlockwise or clockwise;
Tap and then the following cropping rectangle will appear on top of the
picture/photo:
Drag from the inside of the cropping tool to move it; drag an edge of the cropping tool
to resize it to any proportion; drag a corner of the cropping tool to resize it with a
fixed proportions.
Tap to save a copy of the picture as you cropped it. The original uncropped
version remains on your SD card.
Tap to set the current picture/photo as wallpaper/ contact
icon;
Tap to more details about the current picture/photo;
Browse & play music/video
Use Gallery to play videos/music or that in your SD card. And you can also share
them with others.
Open a Gallery album containing videos /music and tap one to play it.
During playing, tap on the screen to popup the playback controls.
To quit the playing screen, press the power button, and tap Back icon in the status bar.
Share a video/music
When browsing the video/music in the gallery, you can tap to share the video/
music with your friends; tap to delete the selected video/music; tap to get
more details about the video/music.
7.4 File Manager
Introduction to ①File Manager
21
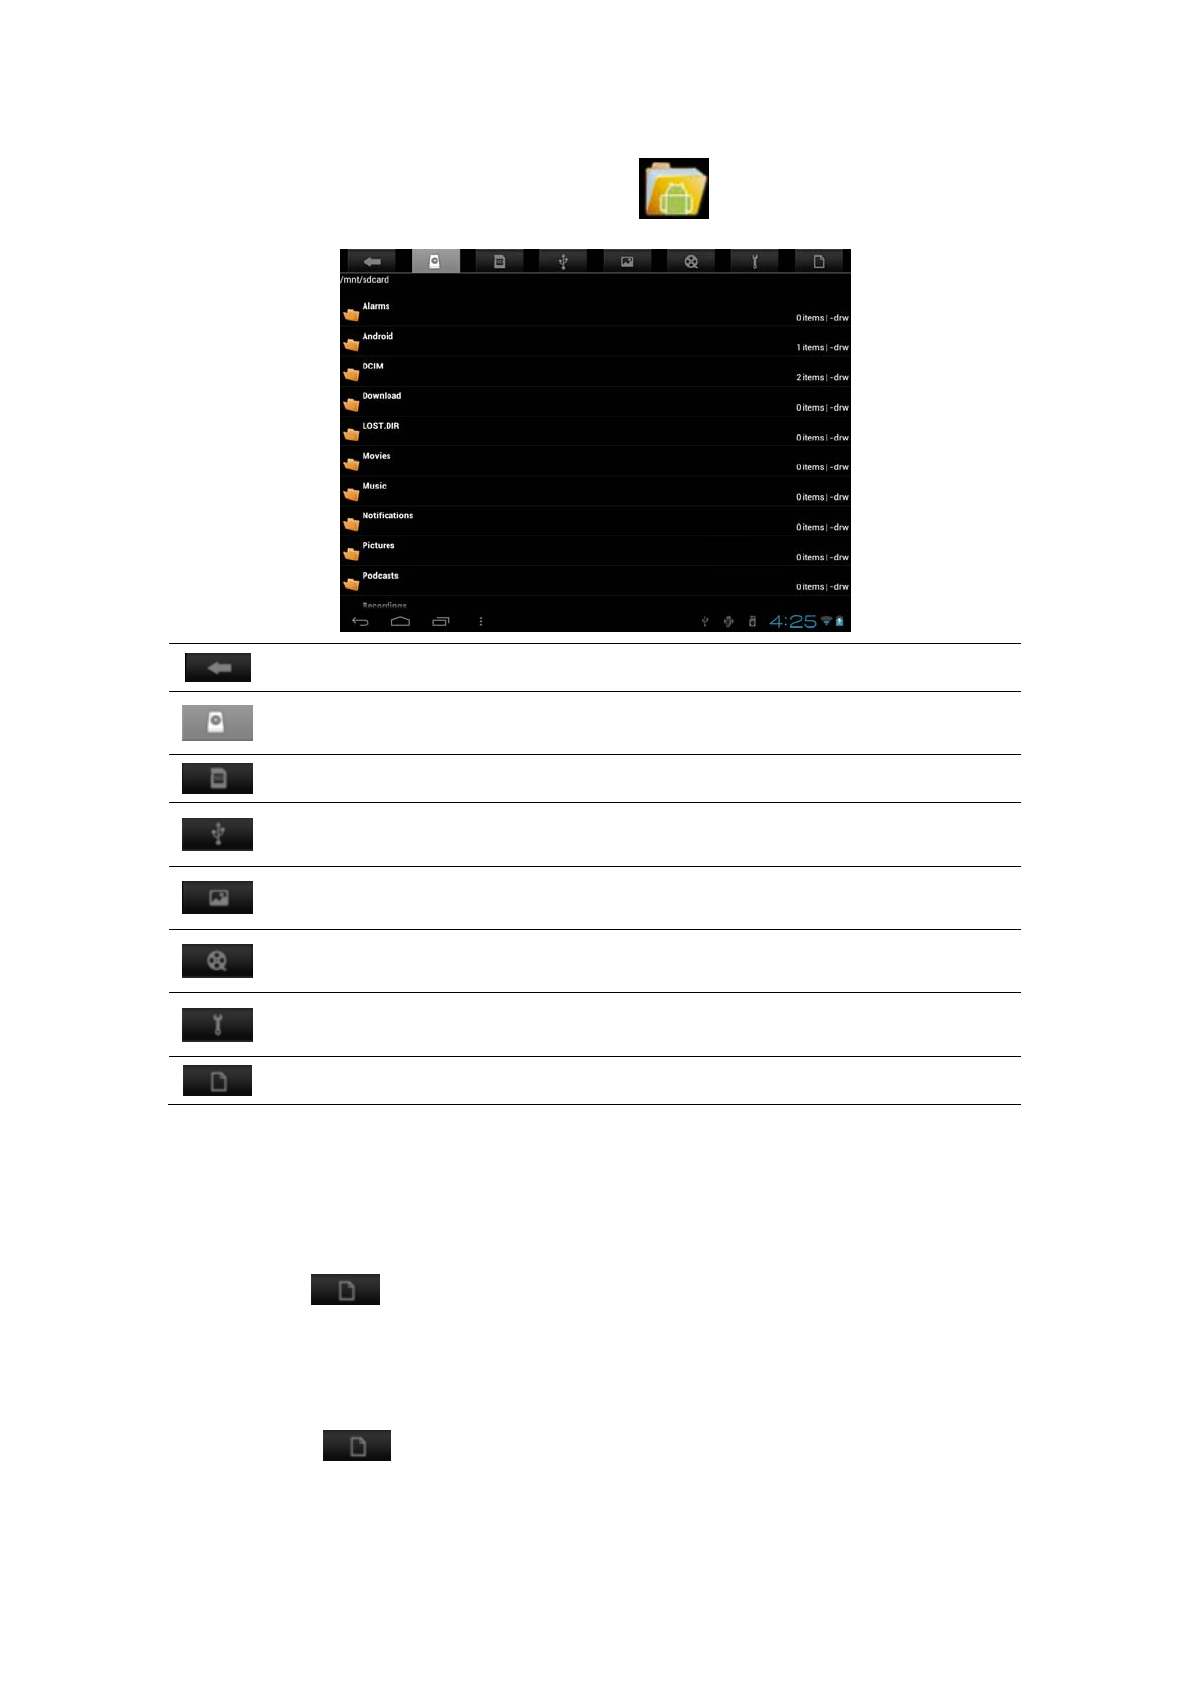
On the Home screen, tap the file manager icon to open it as follows:
Tap to back to the previous interface
Tap to display files in local storage card
Tap to display files in T Flash card
Tap to display files in other external storage device
Tap to display all pictures/photos
Tap to display all video files
Tap to open the tool box for process info and application backup
Tap to open/shutdown multiple choice of items
File Management ②
In the above screen, you can search a wanted file quickly and you can also manage
your files in the local disk and your storage card. In addition, you can create/rename
file folder(s) and uninstall a third party application.
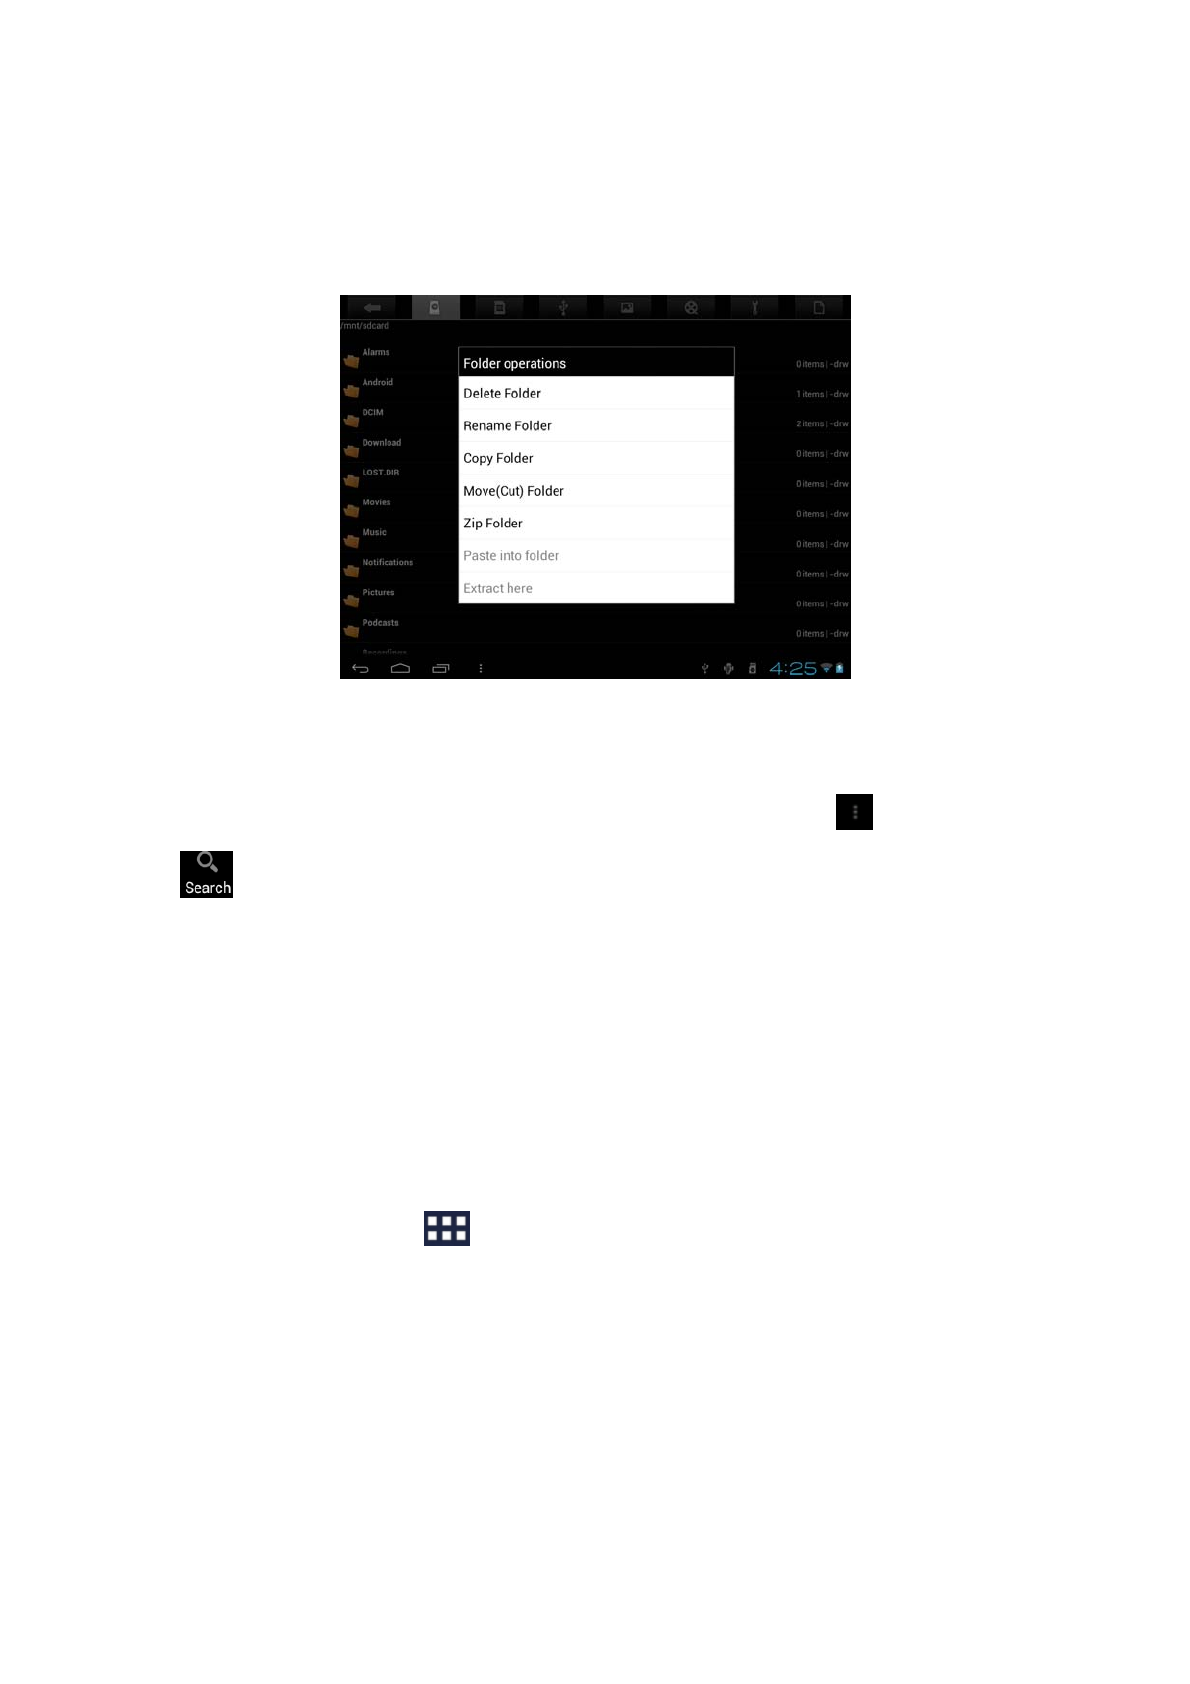
Paste: press to select an item/multiple items in the list and tap Copy/Move,
and then go to the file folder where you want to copy/move the item(s) in, then press
and hold the folder until the Folder operation menu popup, select Paste into Folder.
Delete: press to select an item/multiple items and tap Delete to delete the
item(s) directly.
22
Folder operation
Press and hold any folder in the local disk or your storage card until the Folder
operation menu pop up as follows:
You can select an option to execute corresponding operations.
Search: when you do not know the definite location of an item or there are many
items in the list, to find it quickly, you can tap the Menu icon and then tap
to open the keyboard to search it.
7.5 Instant Messaging tools
You can download and install chat tools on your device such as Fring, MSN Massager
and so on.
7.6 Emails
Tap the launcher icon on the Home screen to display all icons, tap the
Email/Gmail icon to run it. You can:
1. set mail accounts
2. create new mails
3. receive and send mails
4. download or open the attached files
23
8. Settings
Control and customize your device settings on the Settings screen.
To open the Settings screen, simply tap the Settings icon on the Home screen.
You can scroll on the screen upwards/downwards to check the rest setting items.
8.1 Wireless & networks
Configure your device’s wireless connections, e.g., Wi-Fi, enable the Airplane mode,
or set the options for mobile networks, Virtual Private Networks, and more.
Wi-Fi
To turn on/off Wi-Fi, simply slide your finger rightward/leftward on the control bar.
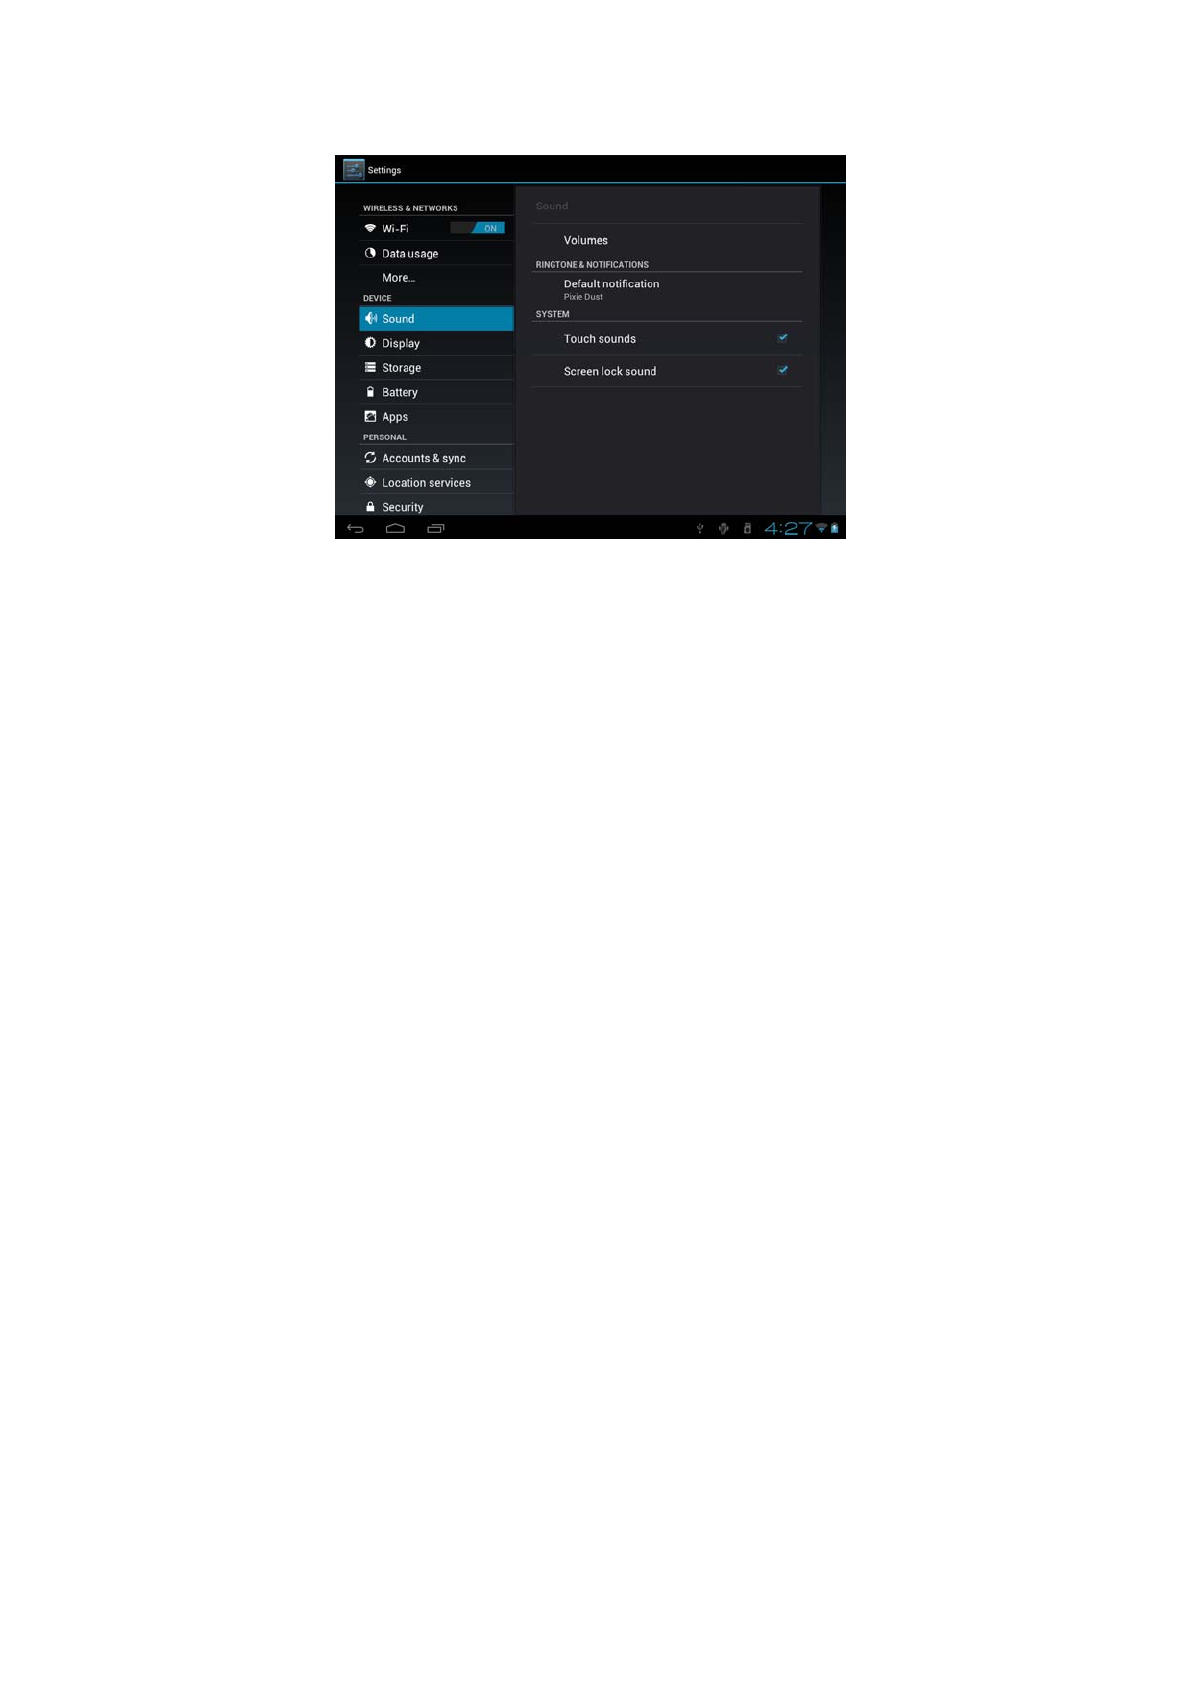
8.2 Sound
Set the device and notification ring tones, volume adjust, vibrate and silent mode
operation.
24
Volume
To adjust the volume for media, ringtone, notification and alarms:
1. tap Settings > Sound > Volume;
2. drag the control bar leftwards/rightwards to turn down/up the
volume for media and notification;
3. tap OK .
Notification ringtone
To set a notification ringtone:
4. tap Settings > Sound > Notification ringtone
5. tap a ringtone to listen to it
6. enable a ringtone as notification ringtone by tapping OK.
Touch sound
Check to enable sounds when touching the screen.
Screen lock sounds
Check to enable playing sound when making screen selection.
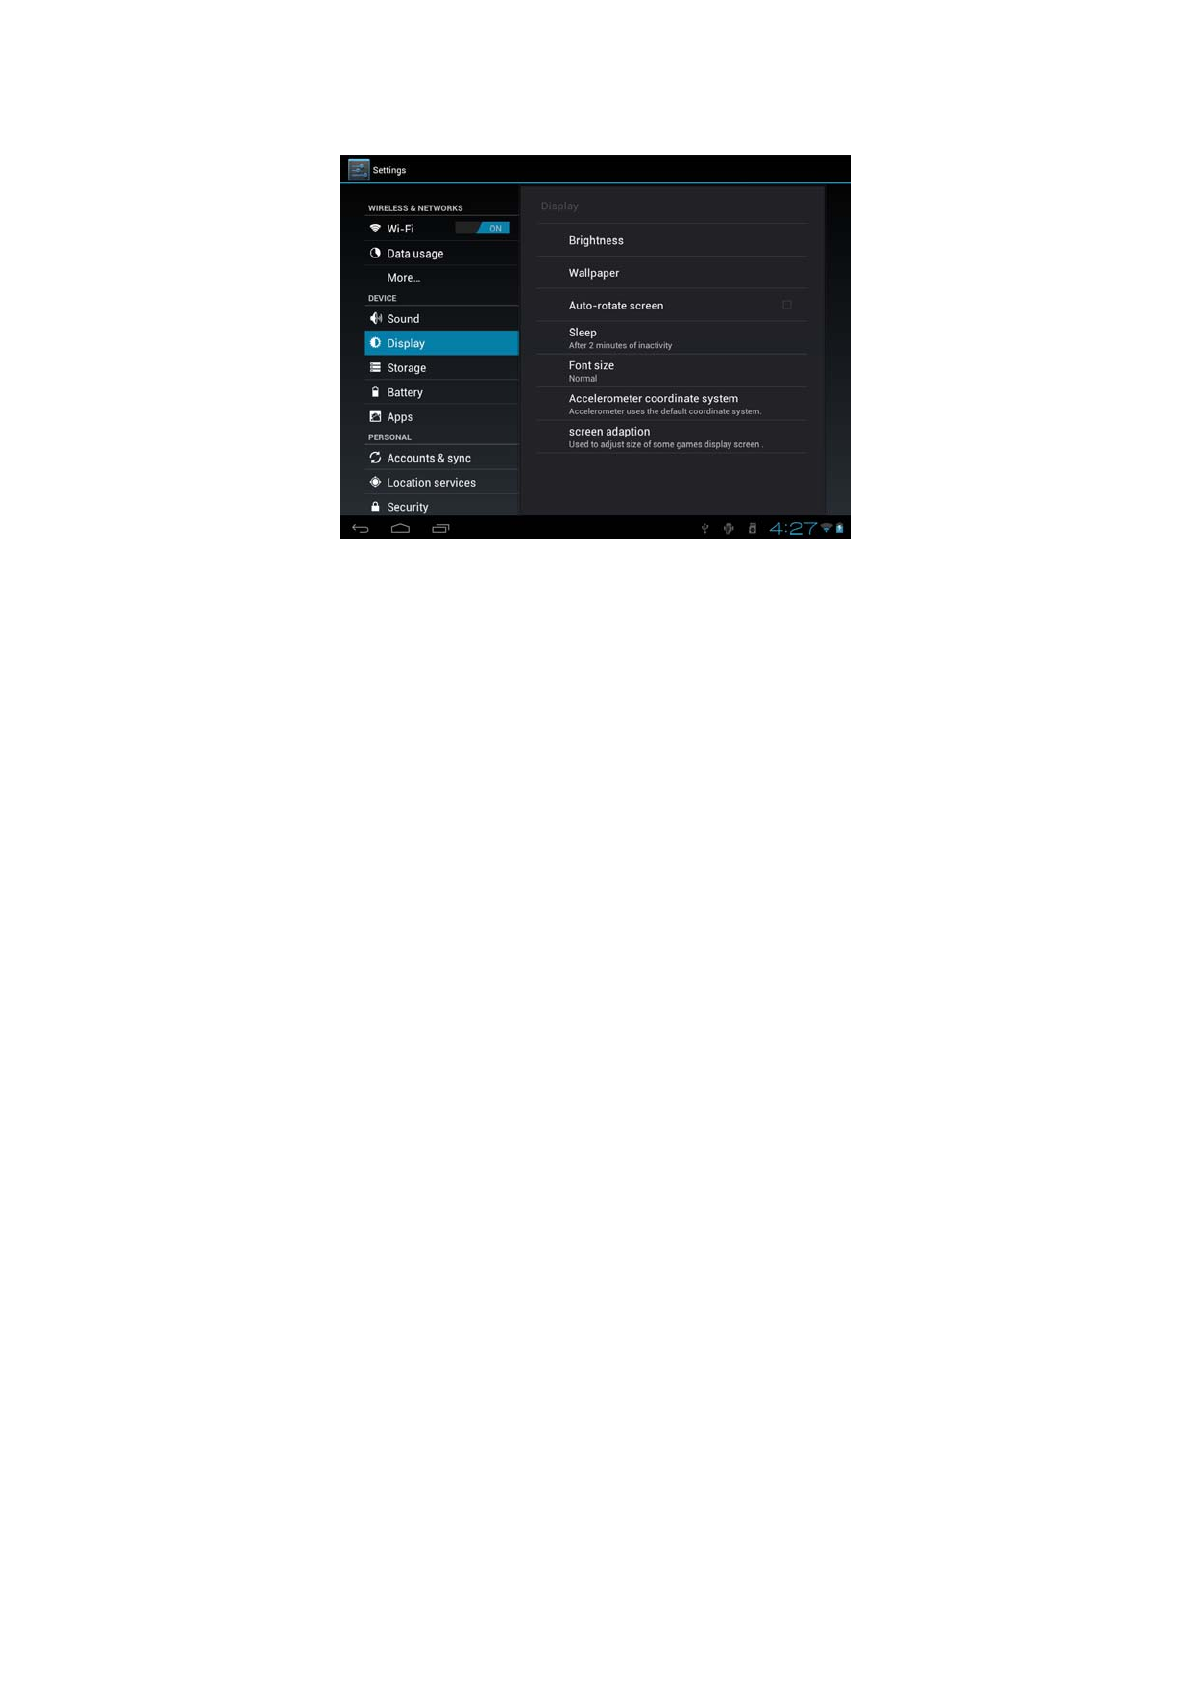
8.3 Display
Set the screen brightness, auto-rotate, animation and screen timeout.
25
Brightness
Use the slider to set a brightness level you want at all times when using the AC101NE.
For the best battery performance, use the dimmest comfortable brightness.
Wallpaper
Tap to select source of wallpaper and set wallpaper for the device.
Auto-rotate screen
Check to automatically switch the orientation of the screen as you turn the device
sideways or even upside down.
Sleep
Opens a dialog where you can set how long to wait after you tap the screen or press a
button before the screen darkens. For the best battery performance, use the shortest
convenient timeout.
Font size
Opens a dialog where you can set font size.
Accelerometer coordinate system
Open a dialog where you can set the coordinate system for the device.
Screen adaption
Check to enable screen adaption.
8.4 Storage
Check the usage condition of the storage space on the internal l& external storage
card. You can erase all data on the SD card and unmount the external SD card for
safety removal.
You can scroll on the screen upwards/downwards to check the rest items.
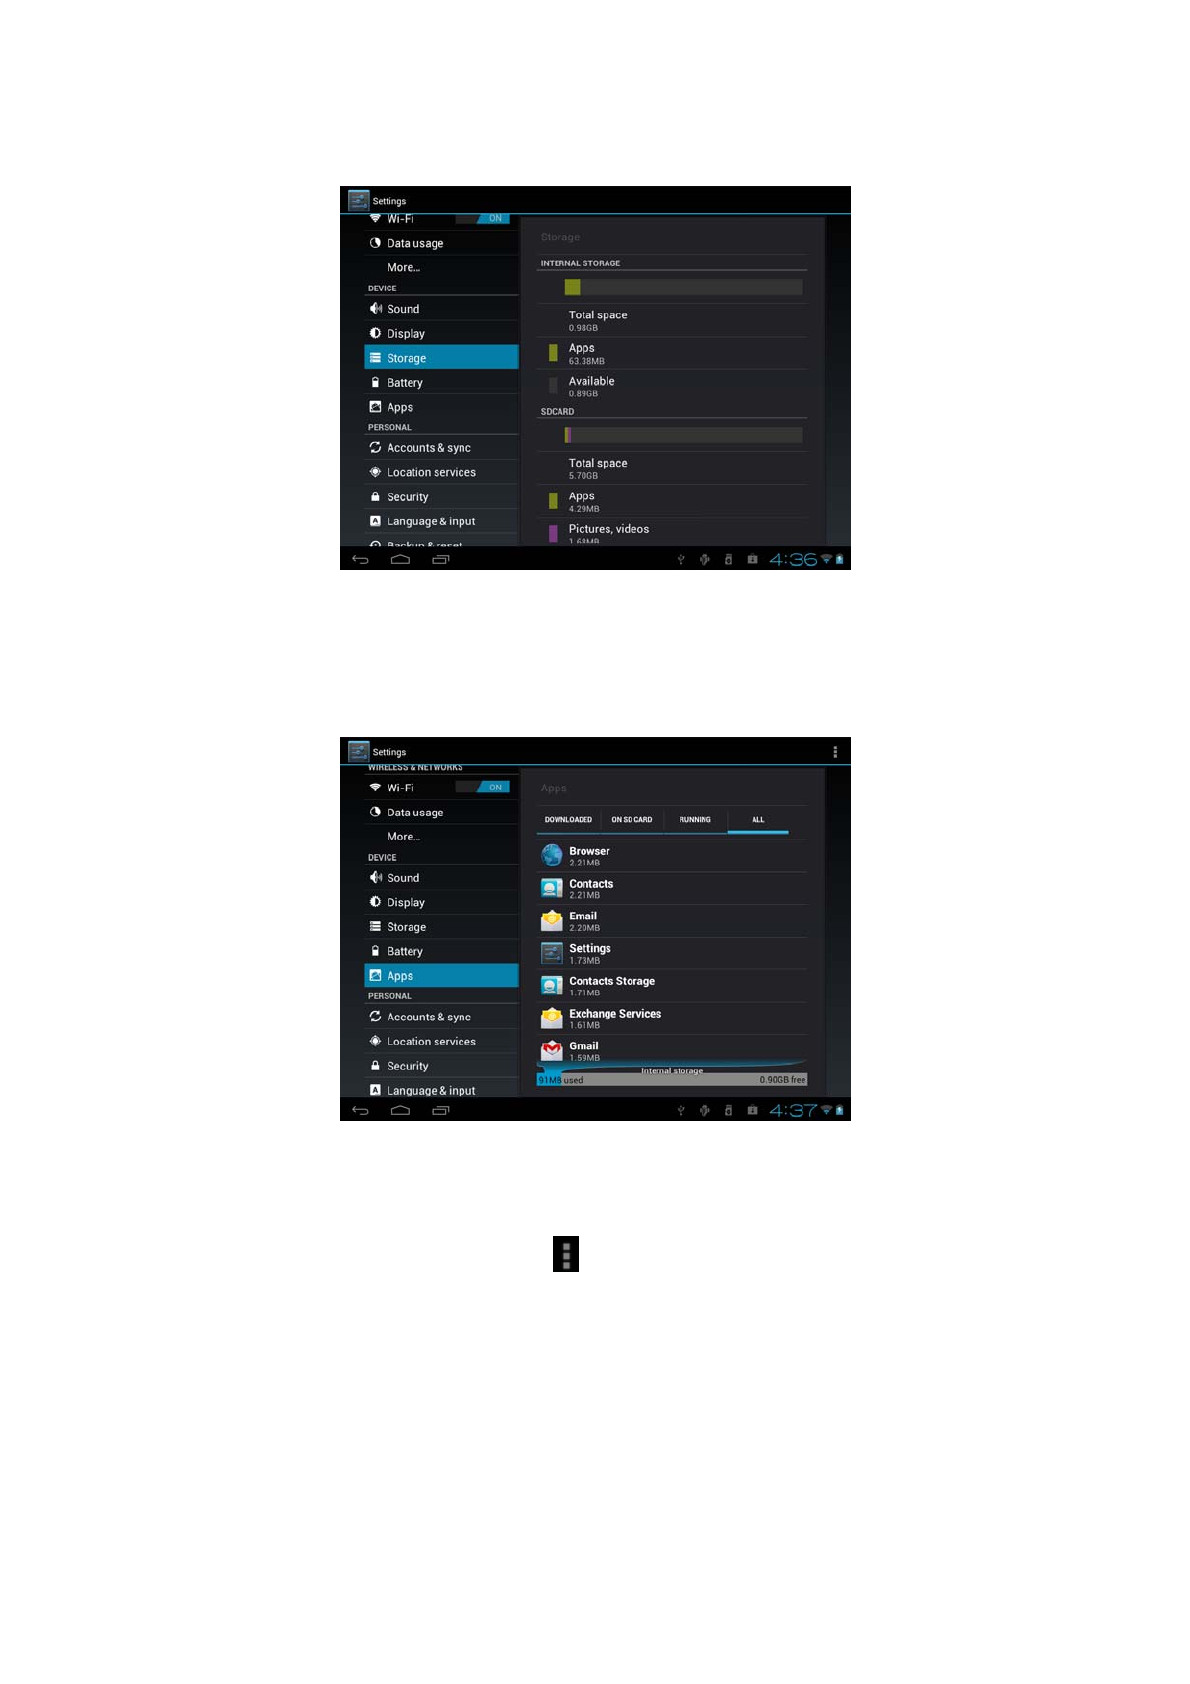
26
Unmount the SD card: tap settings > storage > unmount SD card > OK.
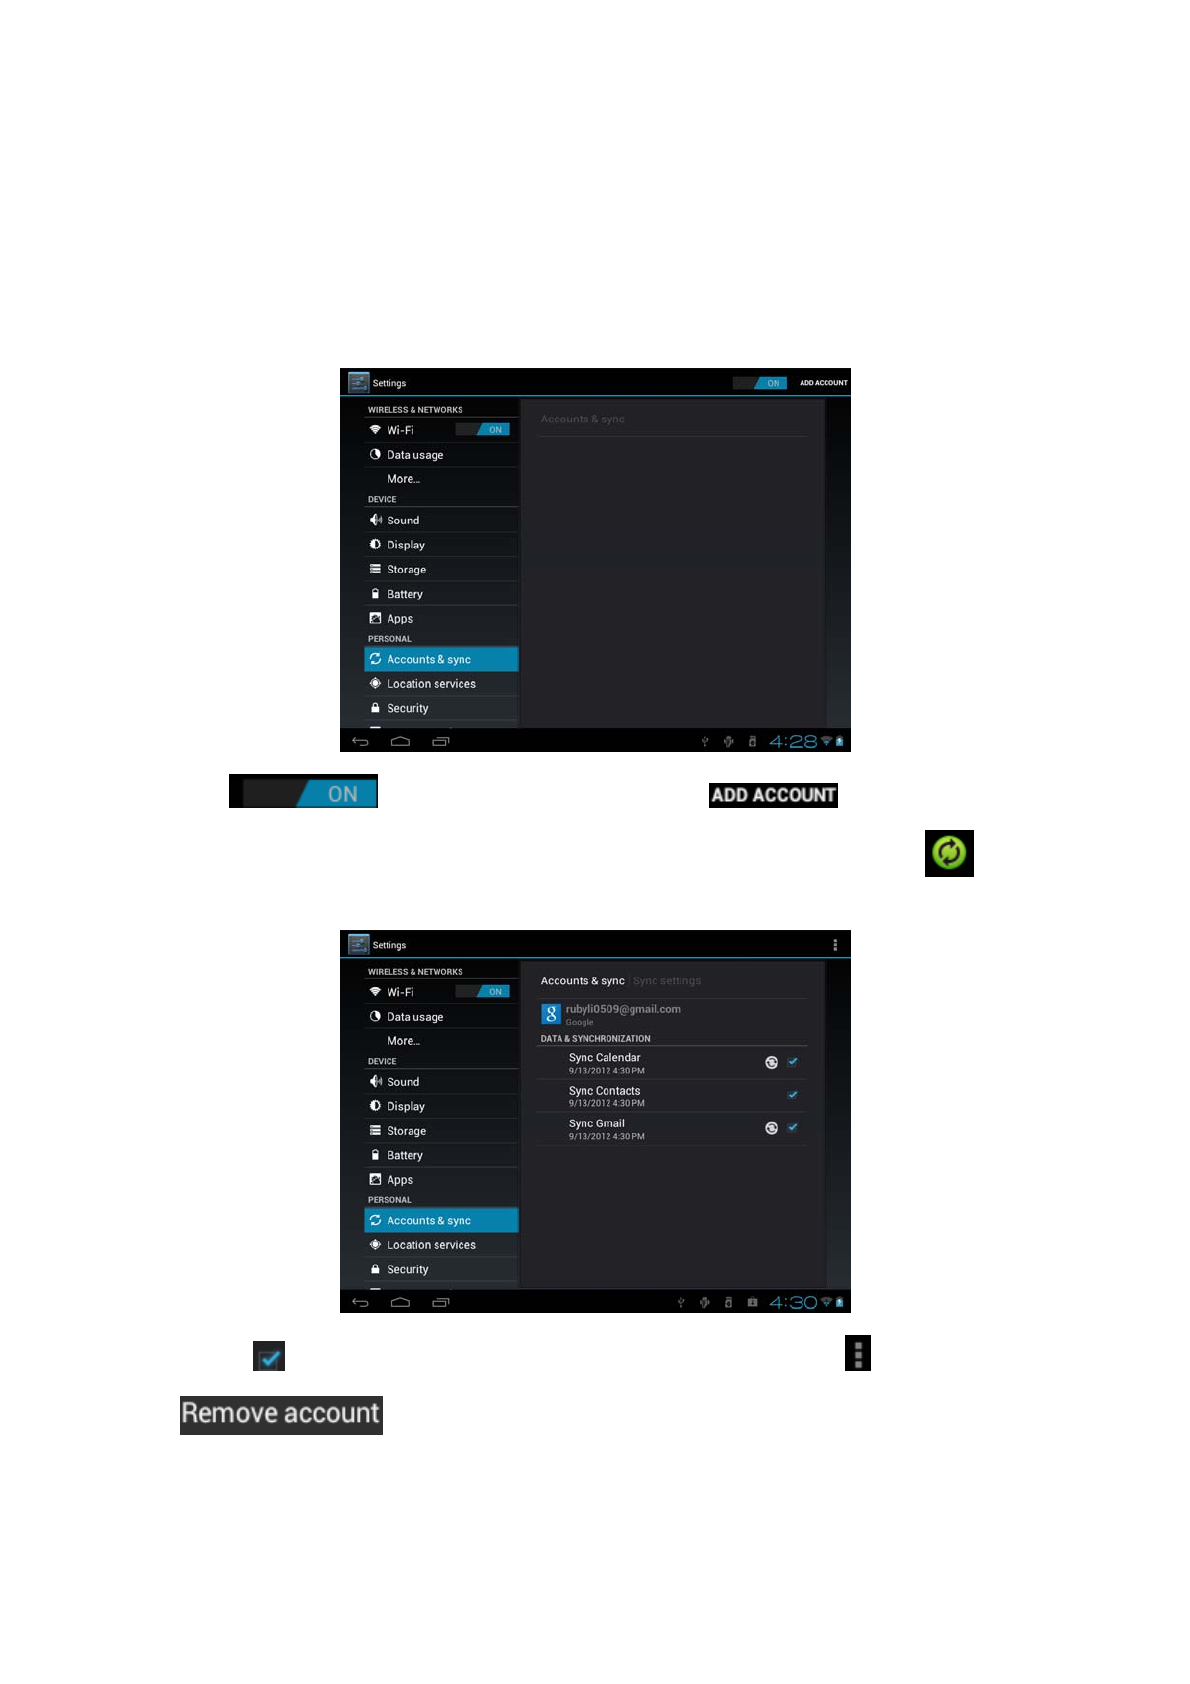
8.5 Apps
Manage applications and installation of new programs.
Apps
Opens a list of all the applications and other software installed on your AC101NE,
along with their sizes. By default, only downloaded applications are shown, and they
are sorted in alphabetical order. Press and tap Sort by size to display applications
in order by size. Tap an application to open its Application Info screen.
To manage and /or remove uploaded applications, tap Settings > Apps > Downloaded.
Running services
To check and control running service, tap Settings > Apps > Running services.
27
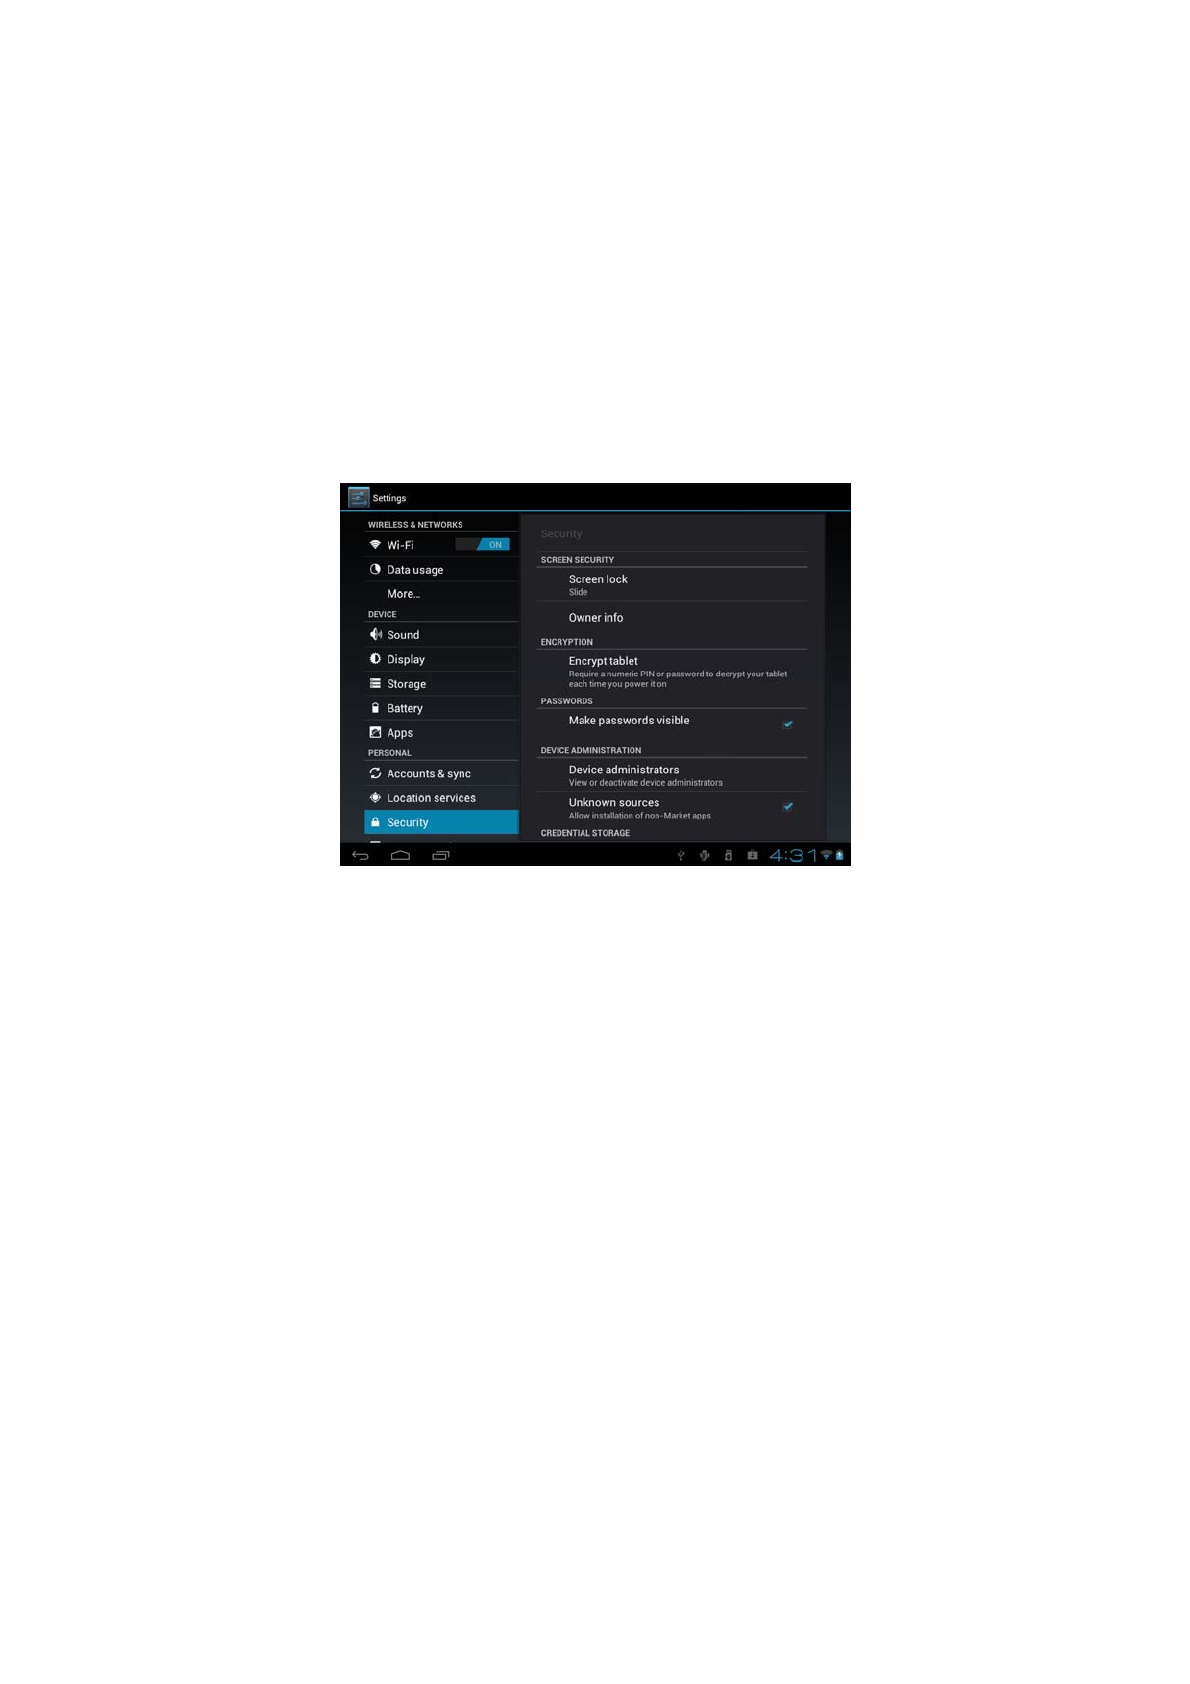
8.6 Accounts& Sync
Log in or out from your social network accounts, Google Account, and Exchange
ActiveSync account. You can also manage synchronization and other settings for your
accounts.
Tap to turn on\off account sync. Tap in the above
screen to add new accounts by following onscreen instructions. Tap the icon to
prompt the following screen to manage your accounts:
Check to turn on/off data synchronization, press the menu icon and then tap
to remove the selected account from your device.
28
8.7 Location service
Enable applications using data from sources such as Wi-Fi and mobile networks to
orientate your location and improve Google search results via check the options.
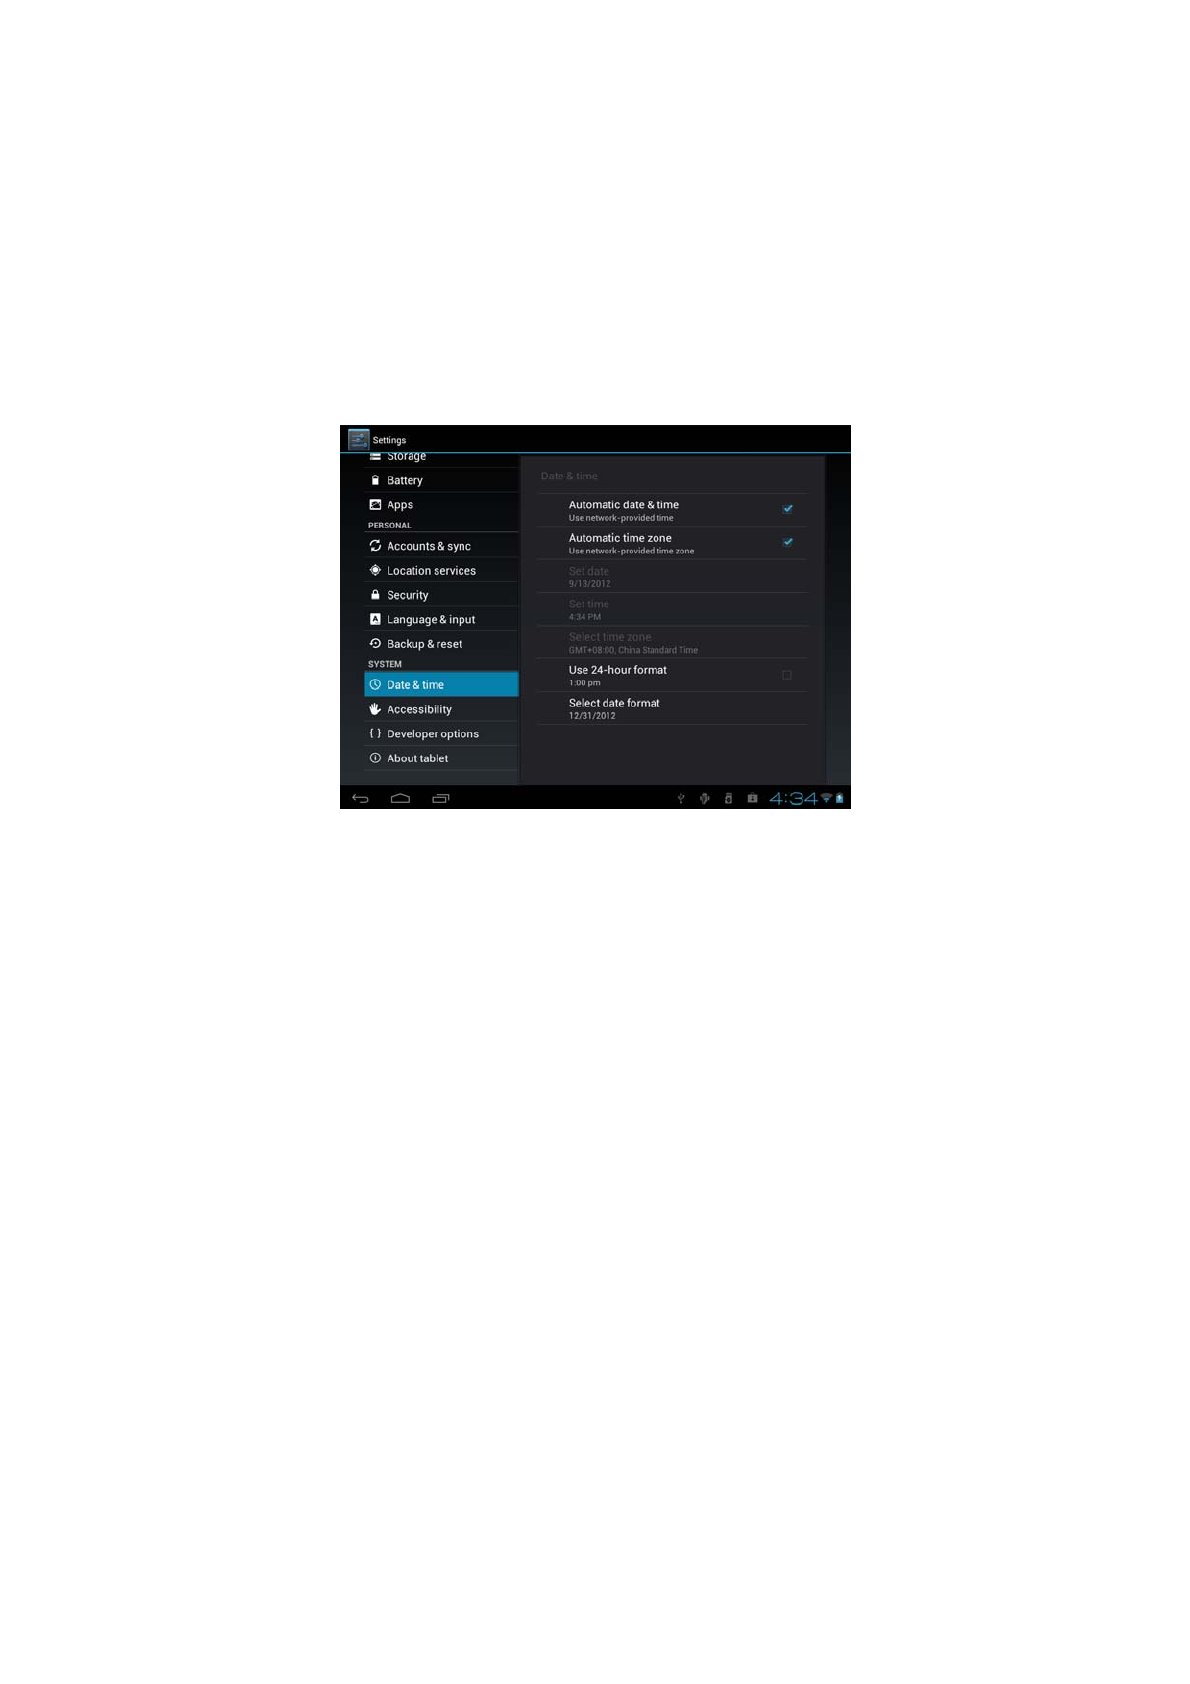
8.8 Security settings
Set the screen lock mode and owner information, encrypt your device, manage
password and administrate your device.
To set screen lock mode, tap Settings > Security> Screen lock to personalize the
screen lock mode for you device.
Unknown source
Check to permit installation of applications that you obtain from web sites, email, or
other locations other than Android Market.
When the storage card remains in your device, you can tap SD1 > Mount SD card to
mount and read data in the storage card.
8.9 Language & Keyboard setting
Set the operating system language and region. You can also set onscreen keyboard
options.
8.10 Backup &reset
You can enable or disable the automatic backup feature of the device and reset the
device.
[Note]: after factory data reset, you personalizing settings and the installed third-party
29
applications will be removed from your device. Before restoring default settings, it is
suggested to backup data/applications you want and remove your storage card safely
in case of data loss or damage during restoring factory default settings.
8.11Date & Time setting
Set the date and time, time zone, and date or time format. To turn off auto time
synchronization and be able to manually change time zone settings.
Automatic: Uncheck to set the date, time, and time zone on PE08 manually, rather
than obtaining the current time from the mobile network.
Set date: If Automatic is unchecked, opens a dialog where you can manually set
PE08’s date.
Select time zone : If Automatic is unchecked, opens a dialog where you can set
PE08’s time zone.
Set time: If Automatic is unchecked, opens a dialog where you can set PE08’s time.
Use 24-hour format: Check to display the time using 24-hour time format, for
example, 13:00 rather than 1:00 pm.
Select date format: Opens a dialog where you can select the format for displaying
dates
30
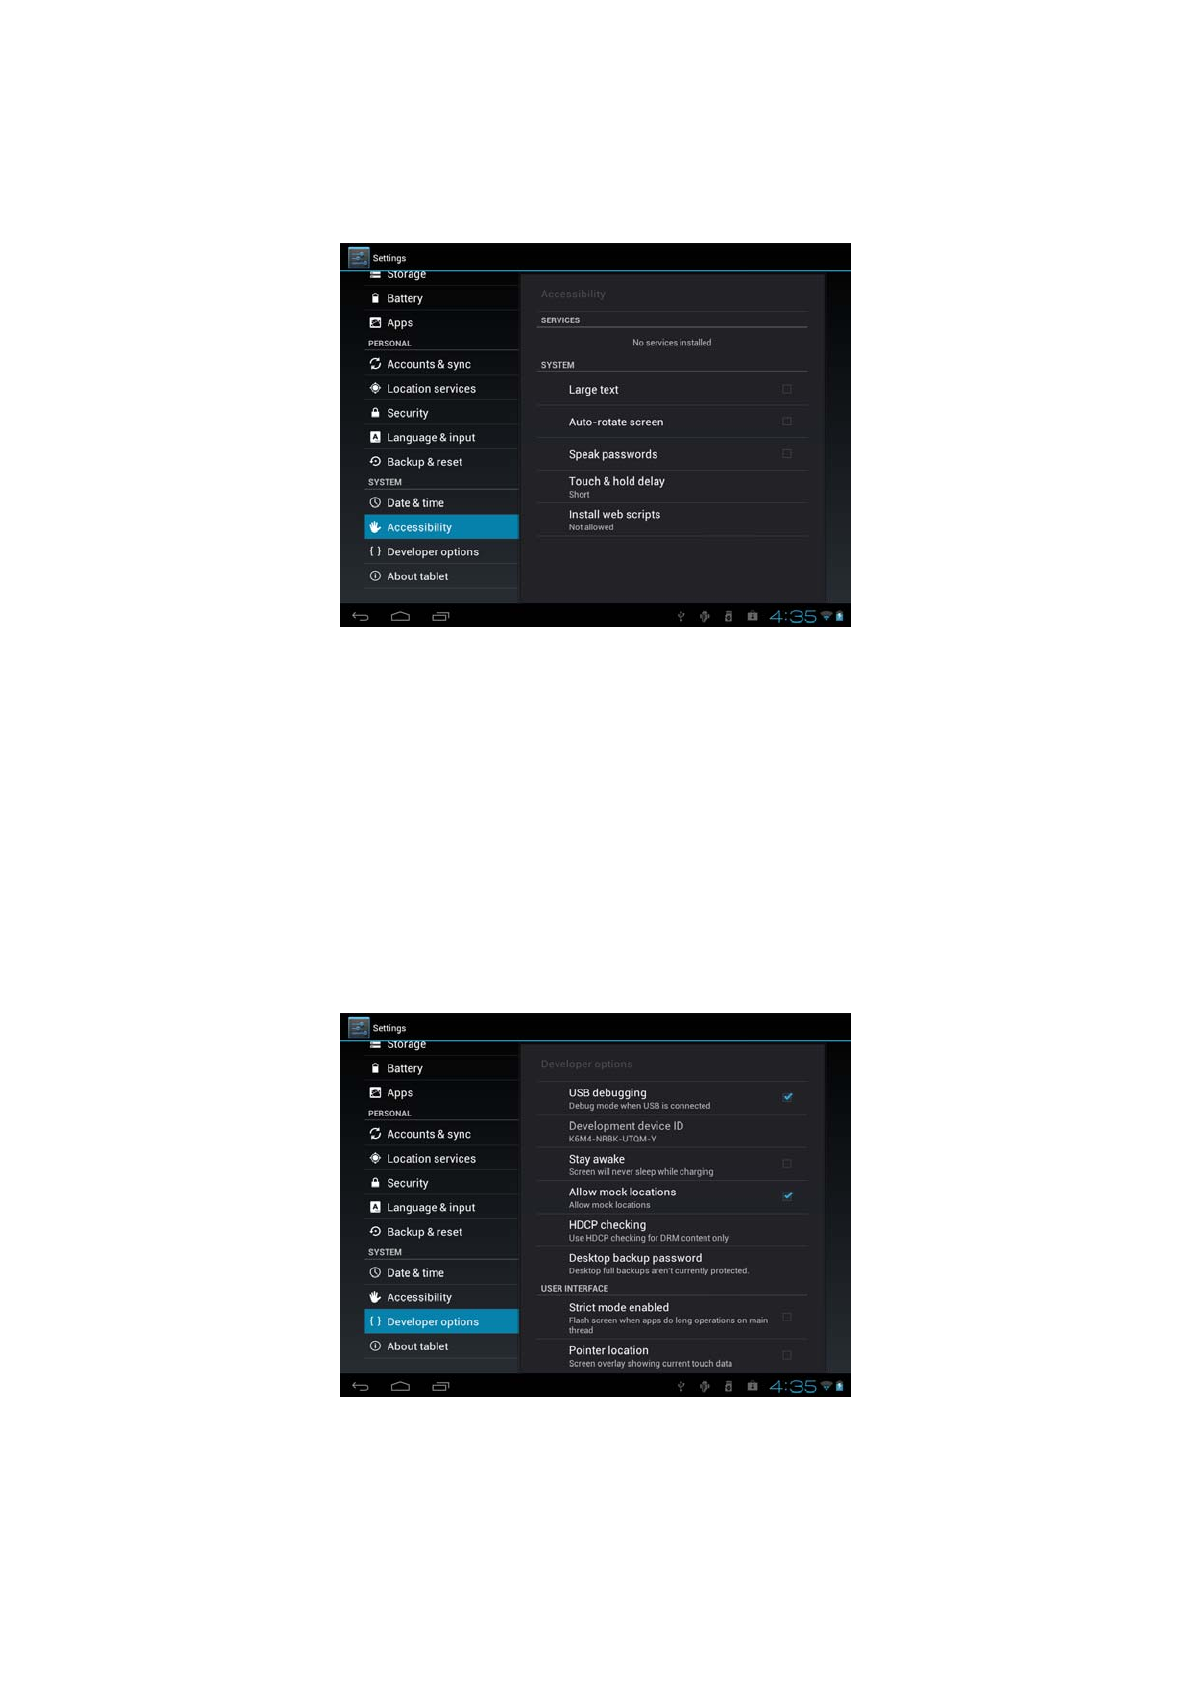
8.12Accessibility
Large text: check to enlarge text
Auto-rotate screen: Check to automatically switch the orientation of the screen as
you turn the device sideways or even upside down.
Speak password: check to enable speak password
8.13Developer options
You can set the USB debugging mode, select screen stay awake and so on. And you
can also manage user interface and apps.
USB debugging: Check to permit debugging tools on a computer to communicate
with your AC101NE via a USB connection.
Stay awake: Check to prevent the screen from dimming and locking when the

31
AC101NE is connected to a charger or to a USB device that provides power. Don’t
use this setting with a static image on the AC101NE for long periods of time, or the
screen may be marked with that image.
Allow mock locations: Check to permit a development tool on a computer to control
where the AC101NE believes it is located, rather than using the AC101NE’s own
internal tools for this purpose.
8.14About Device
View the device status such as the network type, battery power level, and network
name. You can also check the battery use of individual applications or view the legal
information and software version of your AC101NE.

32
9. Troubleshooting
9.1 Force shutdown
Press the Power Button for about 5 seconds and the device will be forced shutdown
9.2 Restore default settings
To restore the factory default settings, you can tap Settings > Backup& reset> Factory
data reset.
Warning: data of your Google account, your personalized settings, installed
appellations will be removed from your device once you execute factory default
settings, so please make a careful decision whether to restore default settings. Before
restoring default settings, it is suggested to backup data/applications you want.
9.3 System updating
After system update/upgrade, it may occur that the uploaded third-party can not run or
its data loss/damage. This is normal phenomena rather than system fault. You just
need to upload and installed the third-party applications again in the device. It is
recommended to backup data of the third-party applications before system
update/upgrade.
9.4 Reset
When the system halts accidentally or does not response, please press the Reset key to
restart the system or press and hold the power button for 8 seconds to turn off the
device forcibly.
[Note]: it is normal for the device feels hot during charging, please use at ease.

33
10 FCC statement
1. This device complies with Part 15 of the FCC Rules.
Operation is subject to the following two conditions:
(1) This device may not cause harmful interference, and
(2) This device must accept any interference received, including interference that may
cause undesired operation.
2. Changes or modifications not expressly approved by the party responsible for
compliance could void the user’s authority to operate the equipment.
NOTE: This equipment has been tested and found to comply with the limits for a
Class B digital device, pursuant to Part 15 of the FCC Rules. These limits are
designed to provide reasonable protection against harmful interference in a residential
installation. This equipment generates, uses and can radiate radio frequency energy
and, if not installed and used in accordance with the instructions, may cause harmful
interference to radio communications. However, there is no guarantee that
interference will not occur in a particular installation.
If this equipment does cause harmful interference to radio or television reception,
which can be determined by turning the equipment off and on, the user is encouraged
to try to correct the interference by one or more of the following measures:
-- Reorient or relocate the receiving antenna.
-- Increase the separation between the equipment and receiver.
-- Connect the equipment into an outlet on a circuit different from that to which the
receiver is connected.
-- Consult the dealer or an experienced radio/TV technician for help.
FCC Radiation Exposure Statement:
The device has been evaluated to meet general RF exposure requirement.
The device can be used in portable exposure condition without RF striction.