Archos ACWS01SUS Weather Station Soil Module US User Manual
Archos SA Weather Station Soil Module US Users Manual
Archos >
Users Manual
ENGLISH
FRANÇAIS
DEUTSCH
ESPAÑOL
ITALIANO
NEDERLANDS
PORTUGUÊS
PYCCKИЙ
Quick Start Guide
QSG_Weather Station_cover.indd 1 26/08/2014 12:21:30
All brands and product names are registered trademarks and the property of their respective owners. Windows Media® and Windows® are trademarks
or registered trademarks of Microsoft Corporation in the United States and/or other countries. Android, Google Play, Google Maps, Google Talk are
trademarks of Google Inc. Rovio entertainment 2012. Use of this trademark is subject to Google Permissions. Specifications are subject to change
without notice. Errors or omissions excepted. Images and illustrations may not always match contents. All the information contained in this guide was
correct at the time of publication.
COPYRIGHT ARCHOS © 2014. All rights reserved.
www.archos.com
P/N: 112980
QSG_Weather Station_cover.indd 2 26/08/2014 12:21:30
1
EN
Table of Contents
Package Contents.................................................................................................2
ARCHOS Indoor Module.........................................................................................3
ARCHOS Outdoor Module.......................................................................................5
ARCHOS Soil Module..............................................................................................6
Getting Stared......................................................................................................7
ARCHOS Weather Station- First Time Setup.............................................................8
ARCHOS Weather Station- Interface......................................................................10
ARCHOS Weather Station- Managing stations........................................................11
ARCHOS Weather Station- Managing modules........................................................15
Troubleshoting...................................................................................................16
For more information, please consult the FAQs of your product on www.archos.com. Make sure to read them before
considering any product return. Changes can occur in the procedures due to application updates.
Consult the declaration of conformity on http://www.archos.com/products/declaration_conformity.html
QSG_Weather Station_book.indd 1 26/08/2014 17:27:36
2
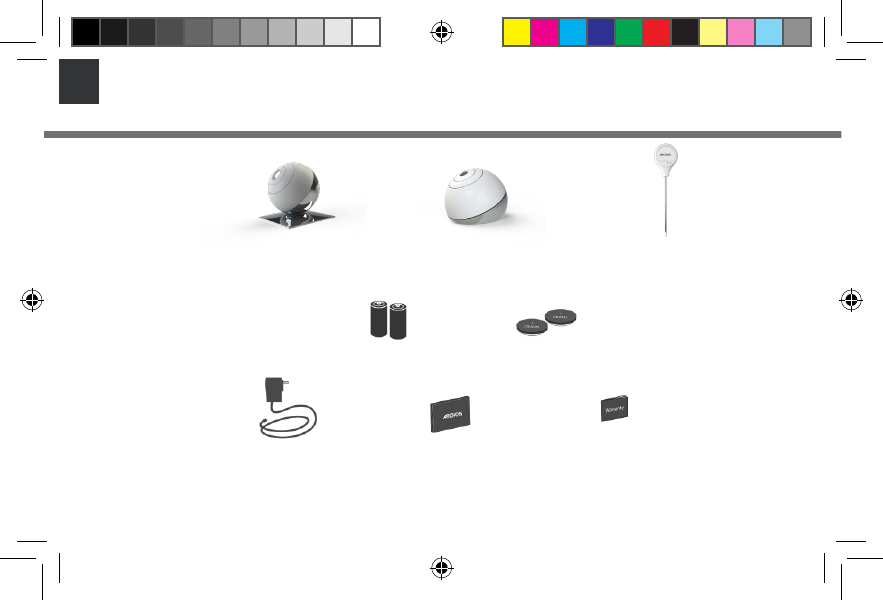
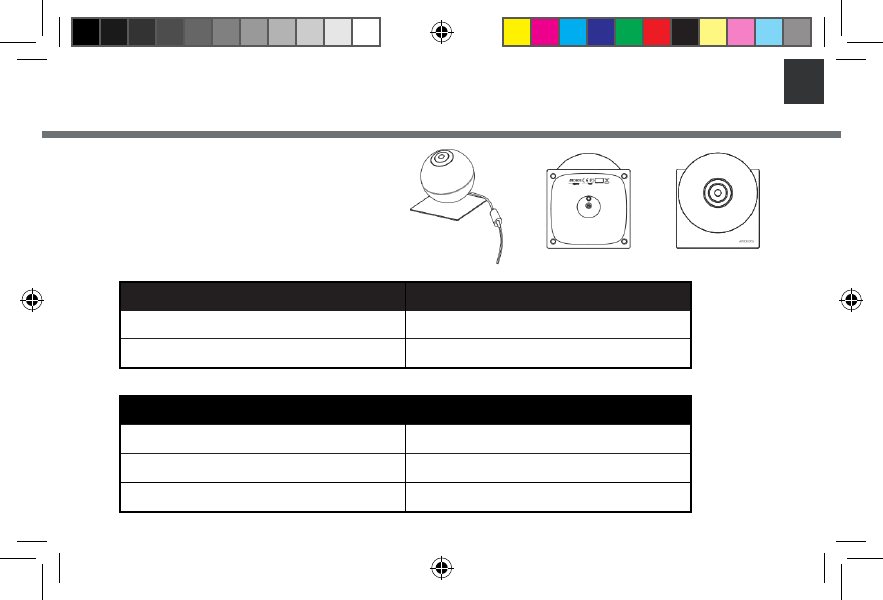
EN Package Contents
ARCHOS Indoor Module ARCHOS Outdoor Module
2 x AA batteries
AC Adapter QSG Booklet Warranty,
Legal & Safety Booklet
2x CR2032 batteries
ARCHOS Soil Module
QSG_Weather Station_book.indd 2 26/08/2014 17:27:37
3
EN
ACTION LED STATUS
Module in pairing mode and waiting to be connected to device LED blinks Blue
Mobile connected to module successfully Blue LED always on
ACTION LED STATUS
Module in pairing mode and attempting to connect Blue LED Flash almost immediately after power on
Module attempting to connect or lost connexion LED blinks RED
Module connect successfully Green LED on for 10s
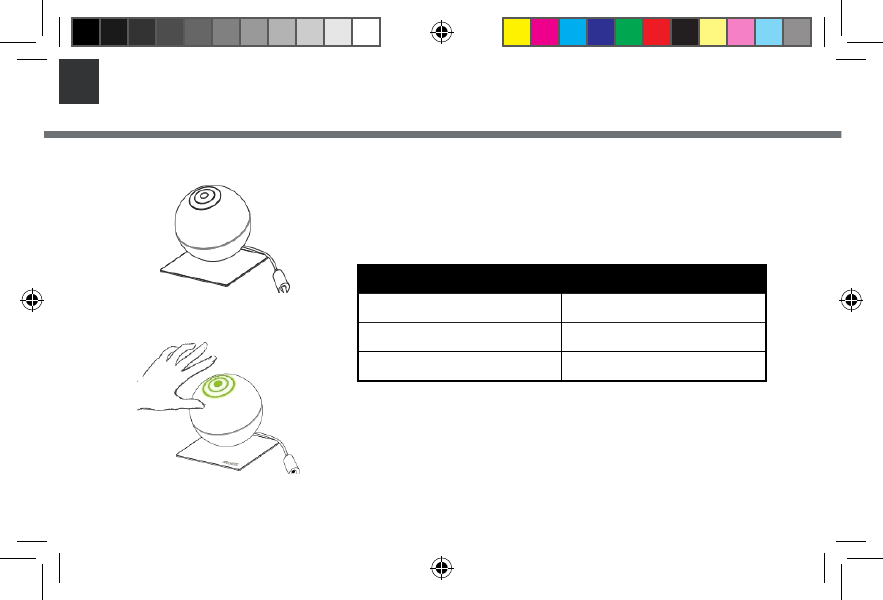
Description of the Indoor Module
1. Reset button
2. Pairing indicator & Air quality LED
3. Power Connector
LED state indicators every time you want to reconnect your indoor module or during use.
ARCHOS Indoor Module
QSG_Weather Station_book.indd 3 26/08/2014 17:27:37
4
EN
LED state indicator
Pass your hand over the LED and check the CO2 level according to the LED color
to know your home air quality.
ARCHOS Indoor Module
COLOR AIR QUALITY
Green Good Quality
Yellow Quality could be improved
Red Room should be ventilated
QSG_Weather Station_book.indd 4 26/08/2014 17:27:37
5
EN
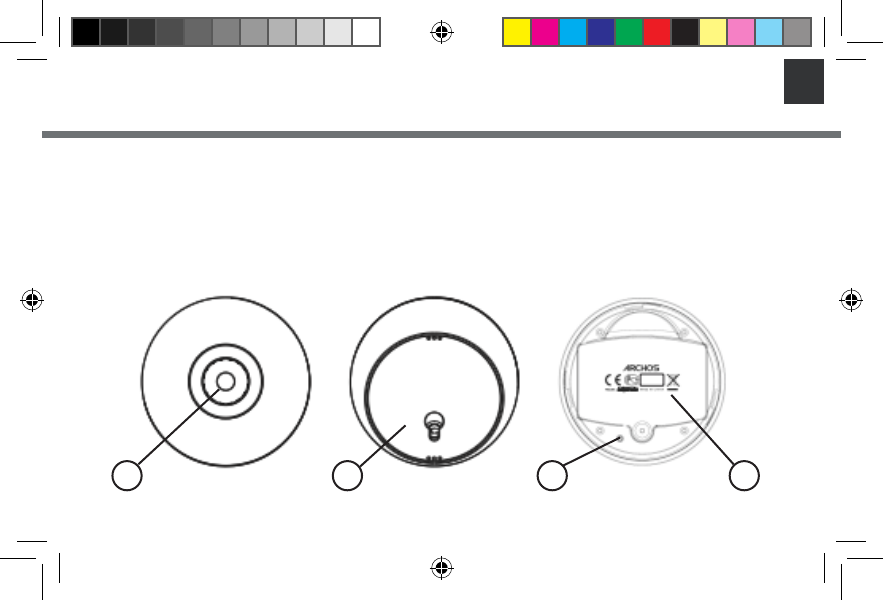
1. Pairing indicator
2. Base
3. Reset button
4. Battery holder
Description of the Outdoor Module
ARCHOS Outdoor Module
The pairing is done by inserting the batteries. If no suc-
cess, use the reset button to activate the pairing mode.
2 3 41
QSG_Weather Station_book.indd 5 26/08/2014 17:27:37
6
EN
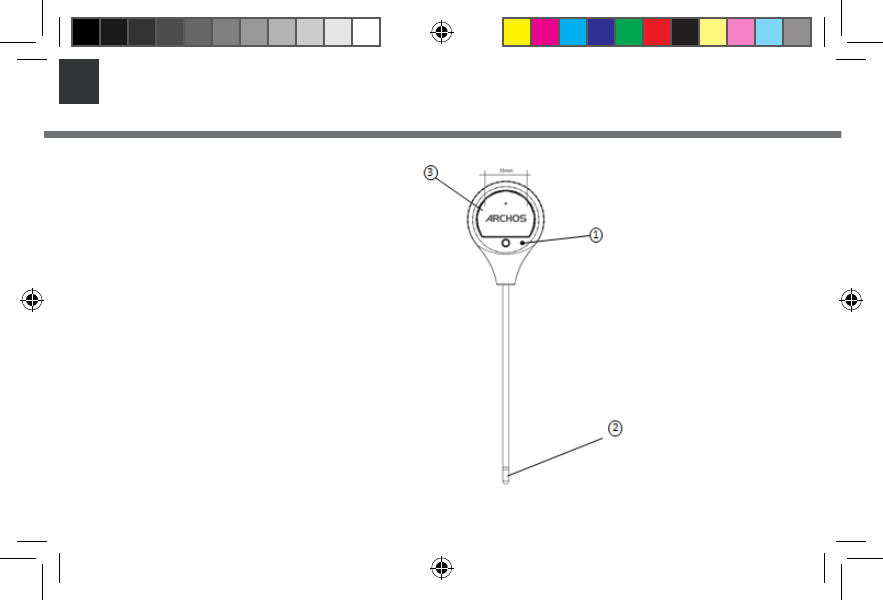
1. Reset button
2. Temperature & Humidity captor
3. Batteries compartment
Description of the Soil Module
ARCHOS Soil Module
QSG_Weather Station_book.indd 6 26/08/2014 17:27:38
7
EN
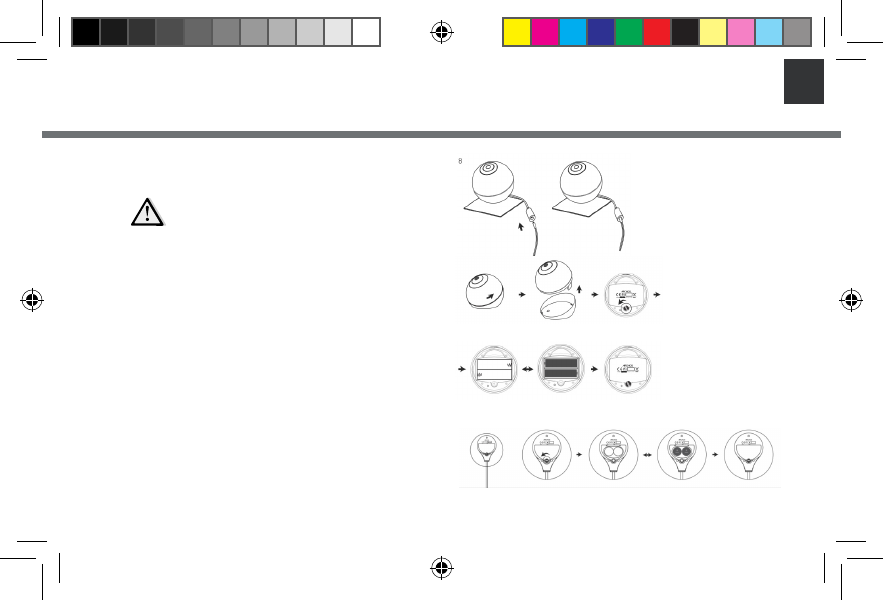
Getting Started
1. Connect your power cable into the Indoor
Module power connector.
2. Download the ARCHOS Weather Station
Application from Google Play Store or Apple Store
and follow the conguration steps.
3. Put the Outdoor Module into service.
1. Unscrew the Outdoor module
2. Unscrew the Batteries compartment
3. Place two AA batteries
4. Screw back up compartment and close the
Module
4. Put the Soil Sensor into service
1. Unscrew the Batteries compartment
2. Place two CR2032 batteries
3. Screw back up
Your main device has to be permanently
connected to the power supply
1.
2.
3.
QSG_Weather Station_book.indd 7 26/08/2014 17:27:38
8
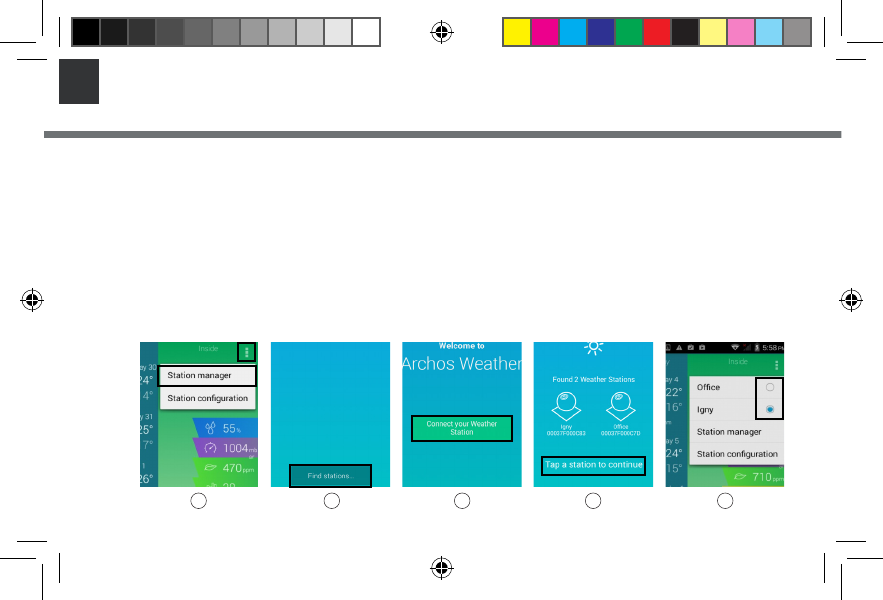
EN ARCHOS WEATHER STATION- First Time Setup
The rst time you launch the app, you will need to connect your weather station.
1. Download the ARCHOS Weather Station App from Google Play or Apple Store
2. Switch on the WiFi on your smartphone or tablet.
3. Launch the ARCHOS Weather Stationapp
4. Look for Archos weather stations by clicking on Connect your Weather Station and then select yours.
5. Select your Wi network and send the password to the weather station so that it can connect to internet.
6. Wait for your weather station to connect.
7. Register your weather station and set up your information: location, name
A new Weather Station must be powered ON to be recognized by the application and once selected, the
LED must blink in blue. If it is not the case after a few minutes, perform a long press on the button below
the station until the light blinks in blue.
QSG_Weather Station_book.indd 8 26/08/2014 17:27:39

9
EN
ARCHOS WEATHER STATION- First Time Setup
When your Weather Station is connected, add new sensors.
To pair the Outdoor Module
1. Make sure the two AA batteries are well placed in their support.
2. As soon as the batteries are in the module, it is in pairing mode.
3. Click on “add a new sensor” on your application.
4. Pairing success, if not try again the process and press the reset button.
To pair the Soil Module
1. Make sure the two CR2032 batteries are well placed in their support.
2. As soon as the batteries are in the module, it is in pairing mode.
3. Click on “add a new sensor” on your application .
4. Pairing success, if not try again the process and press the reset button.
QSG_Weather Station_book.indd 9 26/08/2014 17:27:39
10
EN
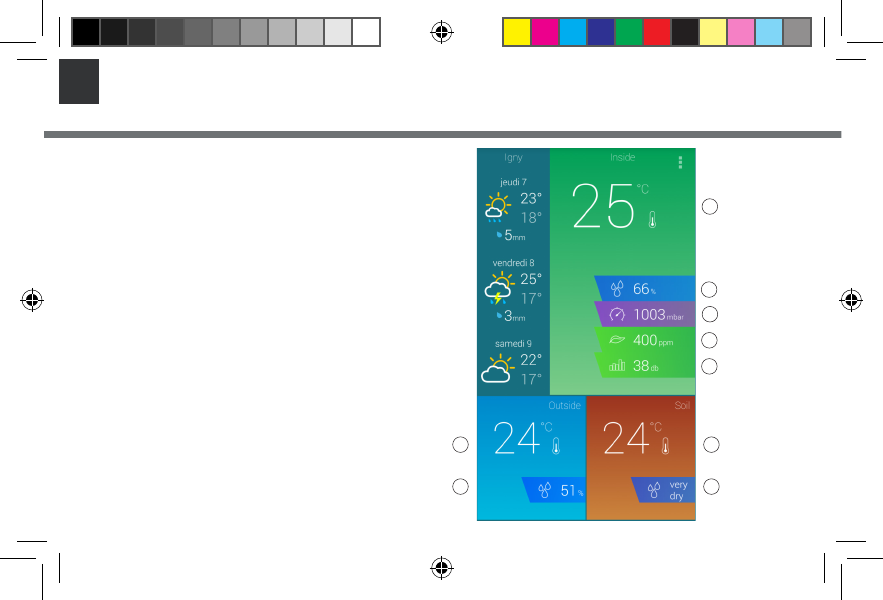
1. Weather Forecast for the next 6 days
2. Indoor sensors
A. Temperature
B. Humidity
C. Atmospheric pressure
D. CO2 level
E. Noise level
3. Outdoor sensors
A. Temperature
B. Humidity
4. Soil sensors
A. Temperature
B. Humidity
ARCHOS WEATHER STATION - Interface
1.
3.
2.
4.
A
AA
B
BB
C
D
E
QSG_Weather Station_book.indd 10 26/08/2014 17:27:40
11
EN
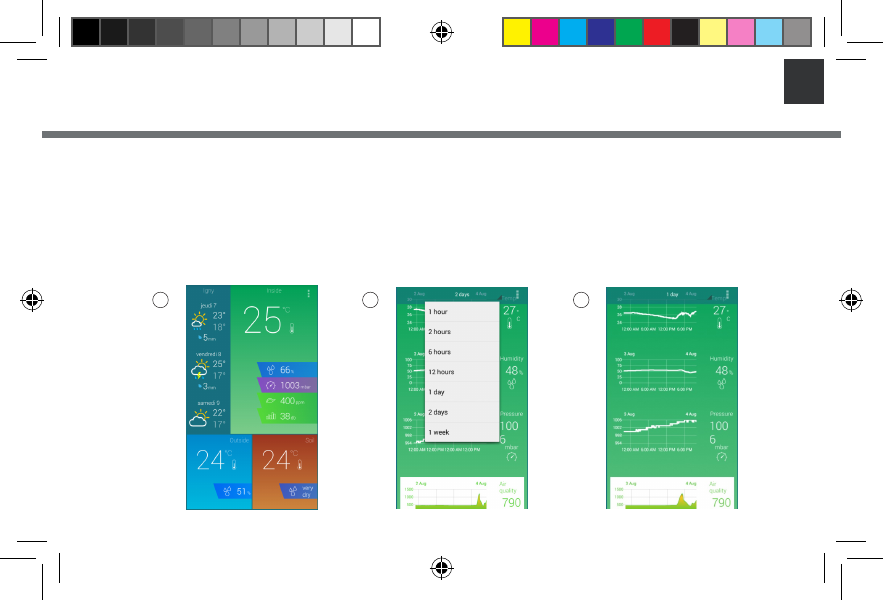
ARCHOS WEATHER STATION- Managing stations
When your are connected on your Archos Weather Station Application, check your modules’
sensors data at any time.
1. Select the module sensor you’re interested in and tap its icon.
2. Select your scale (1h, 2h, 6h, 12h, 1day, 2 days, 1 week).
3. Follow the evolution over time and compare against previous days/months/years through all the graphics
provided by the application. Each sensor has its dedicated graph.
1 2 3
QSG_Weather Station_book.indd 11 26/08/2014 17:27:40
12
EN
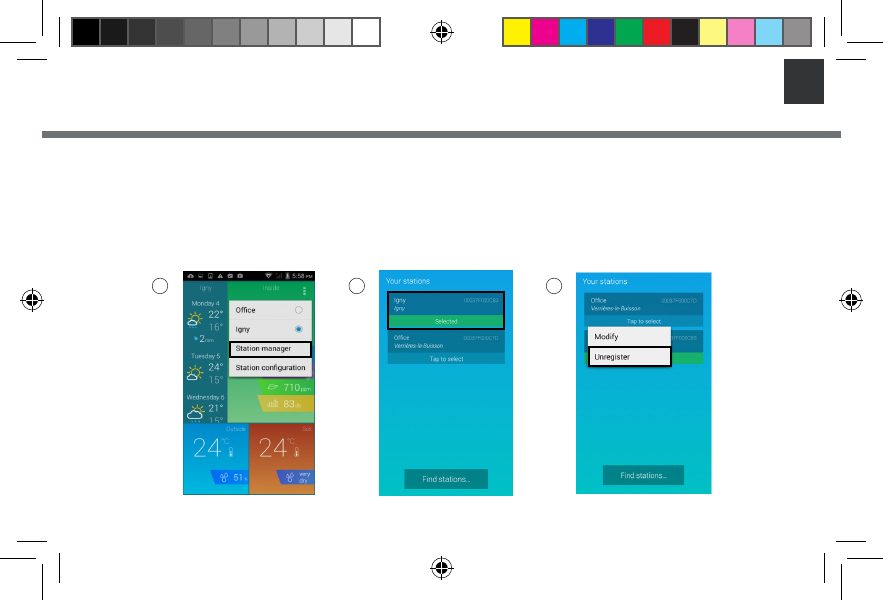
ARCHOS WEATHER STATION - Managing stations
You can add or remove Weather Stations at any time.
To add a Weather Station
1.Launch the Archos Weather Station app.
2. Tap (icon avec les 3 points) and select Station Manager.
3. Select Find stations.
4. You are redirected to the ARCHOS Weather Station home page.
5. Select Connect your Weather Station
6. Select the station you want to add.
7. Tap (icon 3 points) and switch between your stations by selecting the one you want.
2 3 5 6 7
QSG_Weather Station_book.indd 12 26/08/2014 17:27:41
13
EN
To remove a Weather Station from the App
1. Launch the Archos Weather Station app.
2. Select Station Manager on parameter menu.
3. Select a station with a long press on its name.
4. Select Unregister.
2 3 4
ARCHOS WEATHER STATION- Managing stations
QSG_Weather Station_book.indd 13 26/08/2014 17:27:42
14
EN
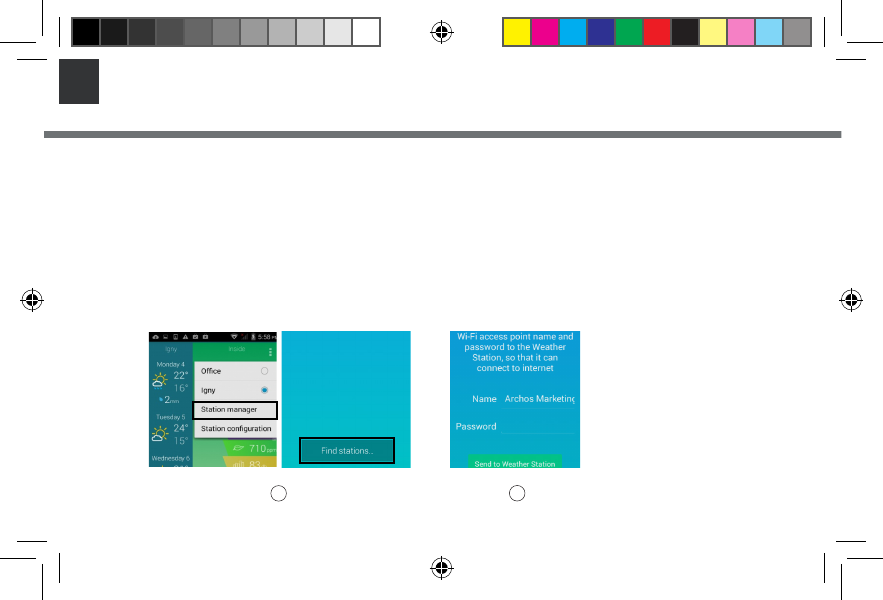
ARCHOS WEATHER STATION - Managing stations
To connect your Weather Station to another Wi network
1. Launch the ARCHOS Weather Station app.
2. Pass your hand over the Indoor Module to see the green light indicator of air quality.
3. Hold your hand over the Indoor Module for at least 15 seconds.
4. The Indoor Module will blinks blue and the station will turn in Access Point mode.
5. Tap (icon), select Station Manager and then Find stations.
6. Select your Wi network and send the password to the Weather Station so that it can connect to internet.
7. While your Weather Station is connecting, the Indoor Module blinks red.
8. No need to register your Weather Station again.
56
TIPS:
If you trigger this mode by
accident, you can wait without
doing any action on your ARCHOS
Weather Station and after few
minutes, it will automatically
reconnect
QSG_Weather Station_book.indd 14 26/08/2014 17:27:42
15
EN
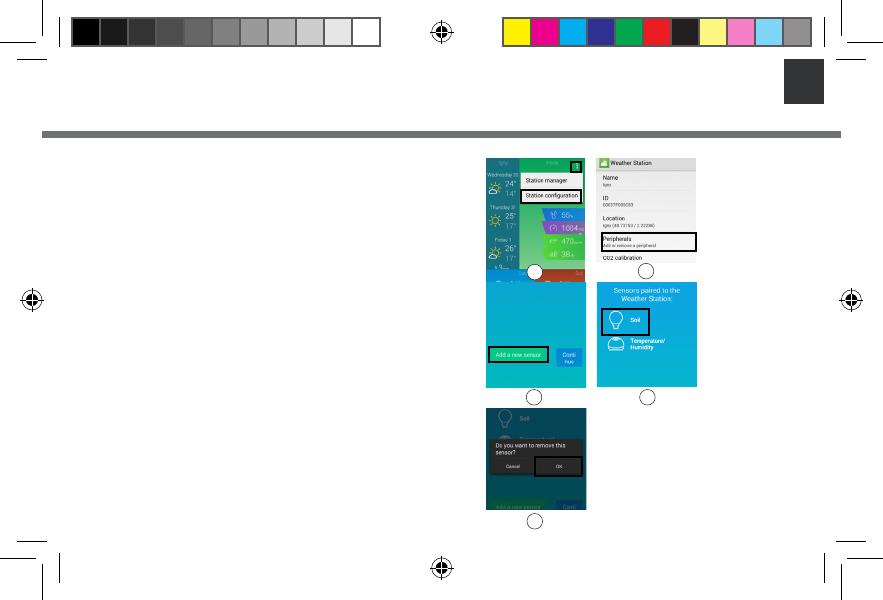
ARCHOS WEATHER STATION- Managing modules
To add/remove a ARCHOS Weather Station sensor
1. Launch the ARCHOS Weather app
2. Make sure the sensors are in pairing mode
3. Tap (icon) and select Station Conguration (gure1)
4. Select Add or Remove a peripheral (gure2)
To add a new sensor
1. Select Add a new sensor (gure3)
2. Success, if not, check if the batteries are inserted and try again
To remove a sensor
1. Press the icon of the sensor you want to remove (gure4)
2. Click on OK to remove your sensor (gure5)
2
3 4
5
1
QSG_Weather Station_book.indd 15 26/08/2014 17:27:43

16
EN Troubleshooting
Why can’t I connect to my Weather Station with my mobile device ?
Check if your mobile device and your Weather Station are both connected to the same WiFi.
Check if your device is paired to your Weather Station
Why aren’t my sensors responding ? No data or no updated data. Are they correctly paired to your Archos
Weather Station ? You can check this information in ‘Station Conguration’ < ‘Peripherals’Check if Wi is ON in your device.
Check if the batteries are not empty for the Outdoor module and soil sensor. In that case you need to change them.
Check if your sensors are enough close to your Indoor Module.
How can I restore my Weather Station to its default settings ?
Use the reset button under your ARCHOS Weather Station.
Go to your ARCHOS Weather application settings: ‘Station manager’< ‘Select a station’< ‘Unregister
QSG_Weather Station_book.indd 16 26/08/2014 17:27:43

National restrictions
This device is intended for home and oce use in all EU countries (and other countries following the EU
directive 1999/5/EC) without any limitation except for the countries mentioned below:
Country Restriction Reason/remark
Bulgaria None General authorization required for outdoor
use and public service
France Outdoor use limited
to 10 mW e.i.r.p.
within the band
2454-2483.5 MHz
Military Radiolocation use. Refarming of the
2.4 GHz band has been ongoing in recent
years to allow current relaxed regulation.
Full implementation planned 2012
Italy None If used outside of own premises, general
authorization is required.
Luxembourg None General authorization required for network
and service supply (not for spectrum)
Norway Implemented This subsection does not apply for the
geographical aera within a radius of 20 km
from the centre of Ny-Alesund
Russian Federation None Only for indoor applications
Note: Frequency 2454-2483.5MHZ are restricted to indoor use in France.
Consult the declaration of conformity on http://www.archos.com/products/declaration_conformity.html
QSG_Weather Station_book.indd 129 26/08/2014 17:28:46
Open Source Software Oer
The software bundled with this product includes software les subject to certain open source license
requirements. Such open source software les are subject solely to the terms of the relevant open source
software license. Such open source software is provided on an “AS IS” basis to the maximum extent
permitted by applicable law.
For the open source les contained herein, please access “Open source license” section located at:
Settings\About tablet\Legal information on the device for the relevant copyright and licensing terms.
You may obtain a copy of Apache License, Version 2.0 at http://www.apache.org/licenses/LICENSE-2.0.
You may also obtain a copy of GNU General Public License, Version 2 at the Free Software Foundation,
INC, 51 Franklin Street, Fifth Floor, Boston, MA 02110-1301, USA.
Until the date that is three years after our last shipment of this product, you may obtain a copy of the
source code corresponding to the binaries for any GPL-Licensed le by contacting ARCHOS customer
service at http://www.archos.com and ARCHOS will send you a link to such source code or will provide
instructions to get the source on a physical medium.
This oer is valid to anyone in receipt of this information.
Archos company declares that this device is in compliance with the essential requirements and other relevant provisions of
Directive 1999/5/EC.
This device complies with part 15 of the FCC Rules. Operation is subject to the following two conditions: (1) This device may
not cause harmful interference, and (2) this device must accept any interference received, including interference that may
cause undesired operation.
QSG_Weather Station_book.indd 130 26/08/2014 17:28:46
Note: This equipment has been tested and found to comply with the limits for a Class
B digital device, pursuant to Part 15 of the FCC Rules. These limits are designed to
provide reasonable protection against harmful interference in a residential installation.
This equipment generates, uses and can radiate radio frequency energy and, if not
installed and used in accordance with the instructions, may cause harmful interference
to radio communications.
However, there is no guarantee that interference will not occur in a particular
installation. If this equipment does cause harmful interference to radio or television
reception, which can be determined by turning the equipment off and on, the user is
encouraged to try to correct the interference by one or more of the following
measures:
Reorient or relocate the receiving antenna.
Increase the separation between the equipment and receiver.
Connect the equipment into an outlet on a circuit different from that to which the
receiver is connected.
Consult the dealer or an experienced radio/TV technician for help.
Warning: Changes or modifications to this unit not expressly approved by the part
responsible for compliance could void the user’s authority to operate the equipment.
FCC Radiation Exposure Statement
The device has been evaluated to meet general RF exposure requirement. The device can be used
in portable exposure condition without restriction.