Archos Jbm 10 Users Manual EN_Manual_Camera100_v2
JBM 10 EN_Manual_Camera100_v2
jbm20jbm10 64f04155-a735-4011-8543-f72d6810a465 Archos Digital Camera JBM 20 User Guide |
2015-02-05
: Archos Archos-Jbm-10-Users-Manual-510619 archos-jbm-10-users-manual-510619 archos pdf
Open the PDF directly: View PDF ![]() .
.
Page Count: 6

User Guide
Camera 100
Add-on Module for
• Archos Jukebox Multimedia (JBM 20 and JBM 10)
• Archos Jukebox Multimedia 120 (JBM 120)
• Archos Video AV120 & AV140
User Guide for the Archos Camera 100
Please visit our website to download the most recent manual and software for this product
2
Warranty and Limited Liability
This product is sold with a limited warranty and specific remedies are available to the original purchaser in the
event the product fails to conform to the limited warranty. Manufacturer’s liability may be further limited in
accordance with its sales contract.
In general, the manufacturer shall not be responsible for product damages caused by natural disasters, fire, static
discharge, misuse, abuse, neglect, improper handling or installation, unauthorized repair, alteration or accident. In
no event shall the manufacturer be liable for loss of data stored on disk media.
MANUFACTURER SHALL NOT BE LIABLE FOR ANY SPECIAL, INCIDENTAL OR CONSEQUENTIAL
DAMAGES. EVEN IF INFORMED OF THE POSSIBILITY THEREOF IN ADVANCE.
ARCHOS licensor(s) makes no warranties, express or implied, including, without limitation, the implied
warranties of merchantability and fitness for a particular purpose, regarding the licensed materials.
ARCHOS’s licensor(s) does not warrant, guarantee or make any representations regarding the use or the
results of the use of the licensed materials in terms of its correctness, accuracy, reliability, correctness or
otherwise. The entire risk as to the results and performance of the licensed materials is assumed by you. The
exclusion of implied warranties is not permitted by some jurisdictions. The above exclusion may not apply to
you.
In no event will ARCHOS’s licensor(s), and their directors, officers, employees or agents
(collectively ARCHOS’ licensor) be liable to you for any consequential, incidental or indirect
damages (including damages for loss of business profits, business interruption, loss of business
information, and the like) arising out of the use of inability to use the licensed materials even if
ARCHOS’ licensor has been advised of the possibility of such damages. Because some jurisdiction
do not allow the exclusion or limitation of liability for consequential or incidental damages, the
above limitations may not apply to you.
Please see your sales contract for a complete statement of warranty rights, remedies and limitation of liability.
Furthermore, warranty does not apply to:
• Damages or problems resulting from misuse, abuse, accident, alteration or incorrect electrical current or
voltage.
• Any product tampered-with or damaged warranty seal or serial number label.
• Any product without a warranty or serial number label.
• Batteries and any consumable items delivered with or in the equipment.
•
Warnings and Safety Instructions
CAUTION
To prevent risks of electric shock, this unit must only be opened by qualified service personnel.
Power off and disconnect the power supply cable before opening the unit.
WARNING
To prevent fire or shock hazard, do not expose the unit to rain or moisture.
Use of this product is for personal use only. Copying CDs or loading music, video, or picture files for sale or other
business purposes is or may be a violation of copyright law. Copyrighted materials, works of art, and/or
presentations may require authorization to be fully or partially recorded. Please be aware of all such applicable
laws concerning the recording and use of such for your country and jurisdiction.

3
FCC Compliance Statement
FCC Compliance
This equipment has been tested and found to comply with limits for a Class B digital device, pursuant to Part 15 of
the FCC Rules. These limits are designed to provide reasonable protection against harmful interference in a
residential installation. This equipment generates, uses and can radiate radio frequency energy and, if not installed
and used in accordance with instructions, may cause harmful interference to radio communications. However,
there is no guarantee that interference will not occur in a particular installation. If this equipment does cause
harmful interference to radio or television reception, which can be determined by turning the equipment off and on,
the user is encouraged to try to correct the interference by one or more of the following measures:
• Reorient or relocate the receiving antenna.
• Increase the separation between the equipment and receiver.
• Connect the equipment into an outlet on a circuit different from that to which the receiver is connected.
• Consult the dealer or an experienced radio/TV technician for help.
Note: During file transfer or in the PC mode, if the End User Terminal (EUT) or computer suddenly freezes or does
not respond, it may be due to the electrostatic phenomenon. Please follow the procedures below to recover the
operation:
Unplug the USB cable from the End User Terminal (EUT)
Close the software application in the computer (or re-boot the computer if necessary)
Re-connect the USB cable to the End User Terminal (EUT)
In case of Electrostatic Discharge, the AV300 may lose function. Just power off and on in order to restore.
CAUTION : Modifications not authorized by the manufacturer may void users authority to operate this device.
FCC Part 15 - Operation is subject to the following two conditions:
1. This device may not cause harmful interference;
2. This device must accept any interference received including interference that may cause undesired operation.
Copyright Notice
Copyright ARCHOS © 2003 All rights reserved.
This document may not, in whole or part, be copied, photocopied, reproduced, translated or reduced to any
electronic medium or machine-readable form without prior consent, in writing, from ARCHOS. All brands and
products names are registered trademarks and the property of their respective owners. Specifications are subject
to change without notification. Errors and omissions accepted. Images and illustrations may not always match
contents. Copyright ® ARCHOS. All rights reserved.
Disclaimer of warranty: to the extent allowed by applicable law, representations and warranties of non-infringement of
copyrights or other intellectual property rights resulting from the use of the product under conditions other than as here above
specified, are hereby excluded.
4
Dear Customer,
We’d like to thank you for your choice of this ARCHOS camera add-on module for your
Jukebox Multimedia or AV model. By adding this camera to your Archos device, you
now have all the functionality of a 1.3 Megapixel Digital still camera AND a video
camcorder. Please be careful to treat it like you would a regular camera by handling it
carefully and cleaning the lens with a cleaner specific to camera lenses. Don’t forget to
consult our web site to get the very latest operating system (OS) for your multimedia
device so that your camera works optimally.
Wishing you the best Video, Music, and Photo experience,
The ARCHOS TEAM
1.1 Software Requirements
Please check the OS version of your Jukebox Multimedia. If it is less than 1.1.0, your Camera 100
will not work and you will have to update your Jukebox Multimedia Operating System (OS). All
versions of the AV120 operating system support the Camera 100. The latest version of the
operating system is available on our web site at www.archos.com. If your Camera comes with a
CD, it will have an OS that supports the Camera 100, but it may not be the most recent version.
Please check your manual for detailed instructions on updating your Jukebox Multimedia
Operating System.
5
Technical Specifications
Optics size ½ inch
Sensor resolution 1280x1024
Pixel size 6,0 µm x 6,0 µm
Focus Range 1,2 m (47”) – infinity
Aperture 3,0
Focal length 9,8 mm
24 x 36 equivalent focal length 45 mm
Still Image File Format JPEG
Still image Resolutions 1280x1024 and 640x480
Video file format AVI with a video stream format of MPEG4 and sound stream in
MP3 (192 kb/s) CBR (constant bit rate)
JBM120/AV120 : bit rate 500, 1000, 1500, 2000 kb/s
Video Image Resolution QVGA (320x240)
JBM120/AV120 : 18 fps
JBM20 : 12,5 fps
Digital zoom 2X
Exposure Automatic exposure control
White balance Automatic White Balance Control, with Auto, Daylight,
Tungsten and Fluorescent lighting settings.
6
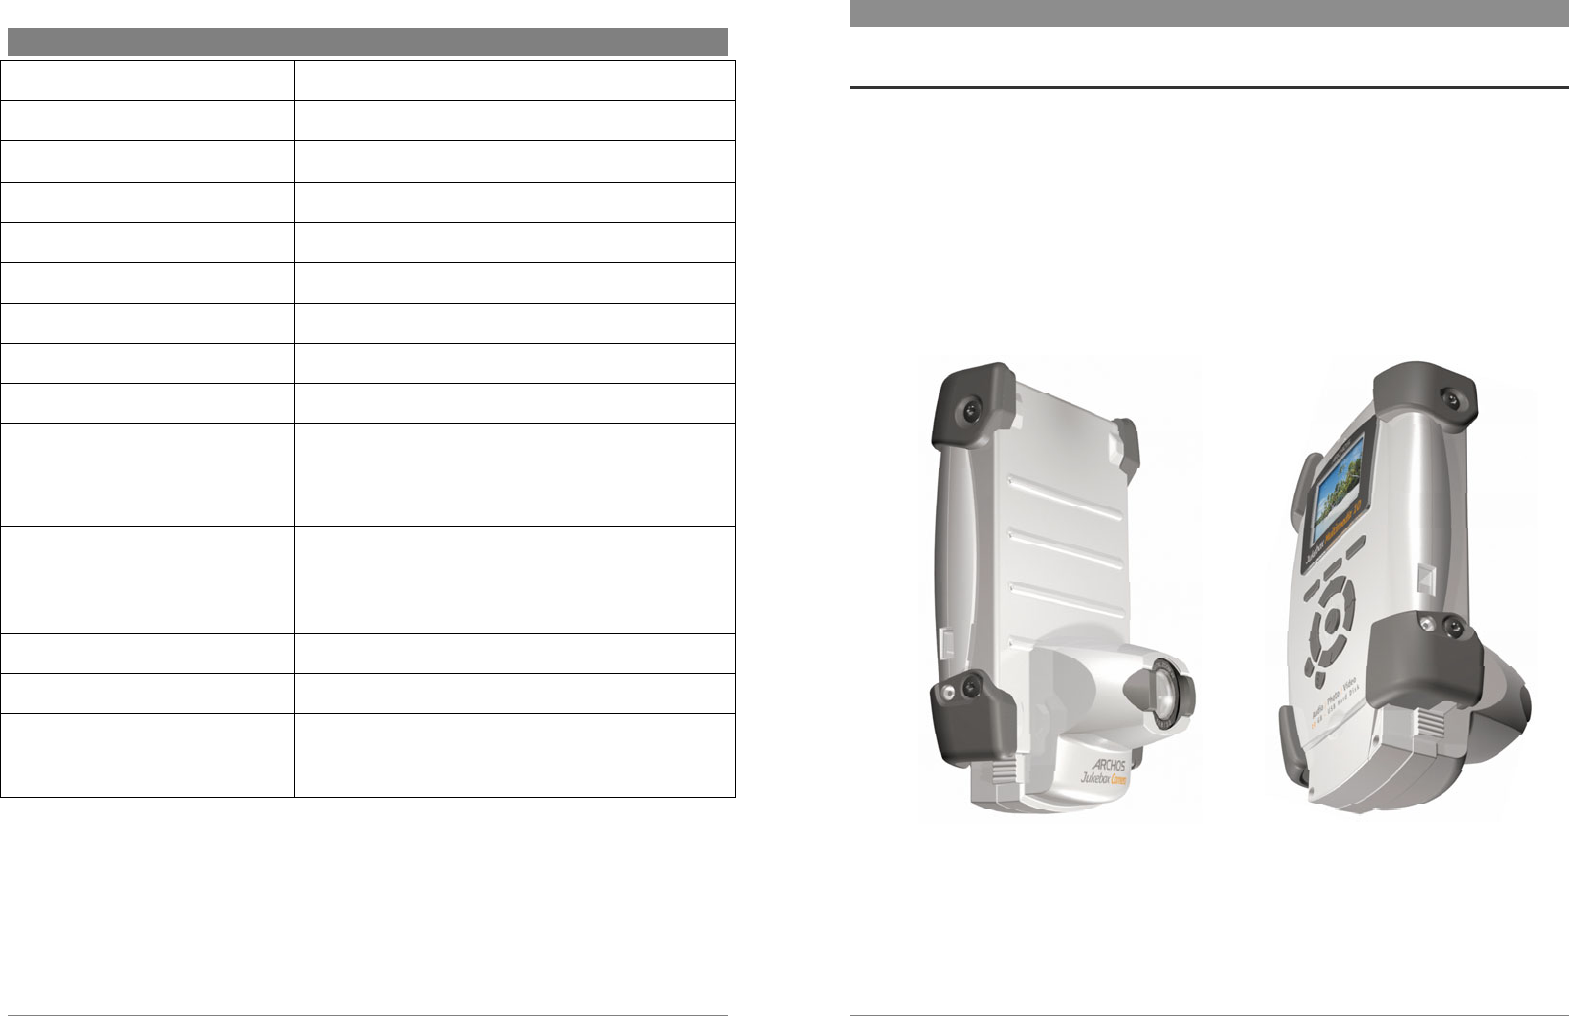
2 Connecting and Using the Camera 100
2.1 Connecting the Camera 100 to the Jukebox Multimedia
• Your Jukebox must be OFF before connecting the Camera module to the expansion port.
• Press the OFF button for 3 seconds to shut down your Jukebox Multimedia.
• Remove the protective cover from the expansion port, located along the bottom edge of your unit. (see
diagram)
• Carefully connect the Camera module to the expansion port. Make sure that the two metal retaining tabs on
the Camera module are properly inserted into the matching slots on the case of the Jukebox. As the module
is attached, it will click as it locks into the expansion port.
7
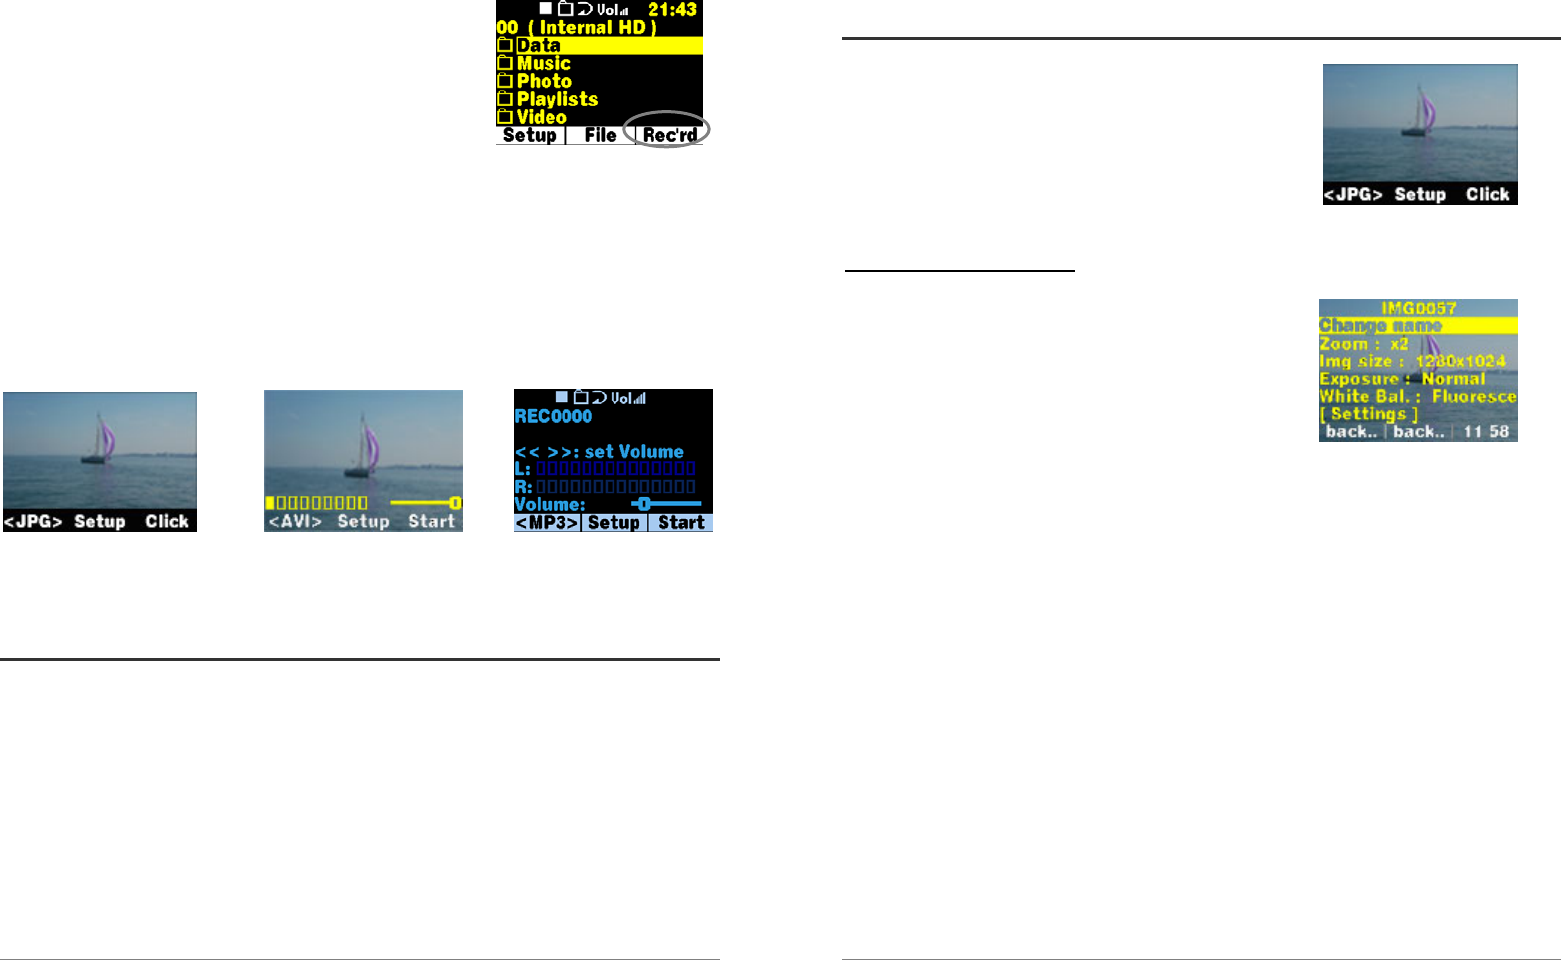
• Turn your Jukebox Multimedia on (press “ON” for 3 seconds).
• After the Camera module is connected to the Jukebox Multimedia,
pressing the “Rec’rd” (F3) will change the features of the function
buttons. (F1) now allows you to toggle switch between <JPEG> (still
image recording), <AVI> (video image recording) or <MP3> (Sound
recording).
• When the camera module is detected by the Jukebox, the “Rec’rd” (F3) button goes to still image camera
preview. The (F1) button is labelled “<JPG>” versus “<MP3>” without the module. (F1) button enables to
select the recording function between “<JPG>” for still images, “<AVI>” for videos, and “<MP3>” for sound.
Recording Type
Photo Mode Video Mode MP3 Audio Mode
2.2 Disconnecting the Camera 100 from your Jukebox Multimedia
• Turn off your Jukebox Multimedia BEFORE disconnecting the camera module.
• Press the two side buttons on the camera module to disengage the expansion port locks.
• Gently remove the camera module from the Jukebox, and replace protective expansion port cover.
8
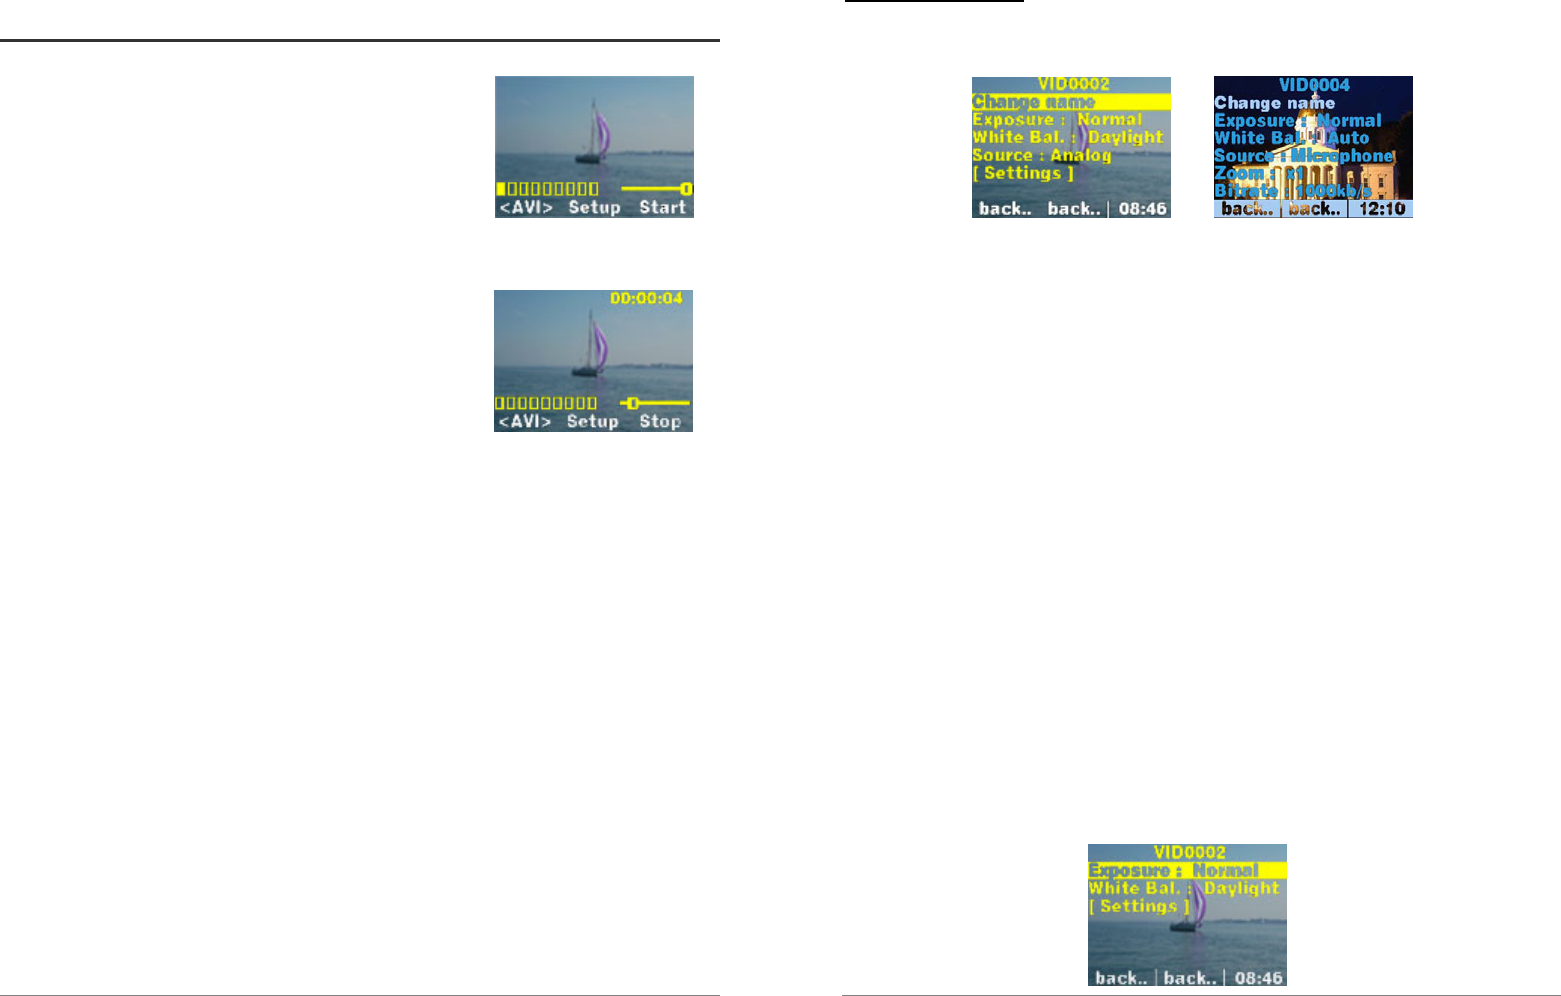
2.3 Taking Photos
• Switch on the Jukebox multimedia.
• Press “Rec’rd” (F3) button. The jukebox enters still image preview.
• Wait a second or two to let the exposure parameters stabilize.
• Press the “Click” (F3) button to take the picture.
Camera Setup Parameters:
• Press “Setup” (F2) button. The still image setup menu appears.
• Use UP and DOWN to select a parameter to adjust.
• “Change name”: Allows you to change the name of a still image
file. By default, image files are stored in the current folder
(directory) with the name IMG.xxx.jpg (xxxx is incremented
automatically starting from 0000).
• “Zoom”: use “>>”or “<<” arrow keys to select 1X or 2X digital Zoom.
• “Img size”: use “>>”or “<<” arrow keys to select 1280x1024 or 640x480 image resolution.
• “Exposure”: use “>>”or “<<” arrow keys to select between “Normal”, “Darker”, and “Brighter”.
• “White Bal.”: The jukebox camera uses an automatic white balance algorithm. This algorithm needs to
assume some light spectrum composition to make accurate adjustments of the color channels. The light
spectrum type can be chosen “Auto” (automatic setting), “Daylight”, “Tungsten” (for normal indoor lighting)
and “Fluorescent” (for indoor fluorescent lighting).
• “Settings”: Gives access to the general settings menu.
9
2.4 Recording Videos
• Turn ON your Jukebox Multimedia.
• Press “Rec’rd” (F3) button. The jukebox will enter Still Image Preview
Mode.
• Press “<JPG>” (F1) button. The (F1) button will change to “<AVI>”,
and the jukebox will enter Video Image Preview Mode.
• The Bar Graph displays sound level. Use “>>” or “<<” arrow keys to
adjust the Sound Level slider.
• Press “Start” (F3) button. The (F3) button changes to “<Stop>”, and
video recording begins. The elapsed time is displayed in the upper
right corner.
• Press “Stop” (F3) button, or general “Stop” button: The (F3) button
reverts to “<Start>”, while the video is being stopped and stored on
the hard disk.
• While your are recording, you can press once on the Play/Pause button to pause the recording. Press it
again to recommence the recording.
10
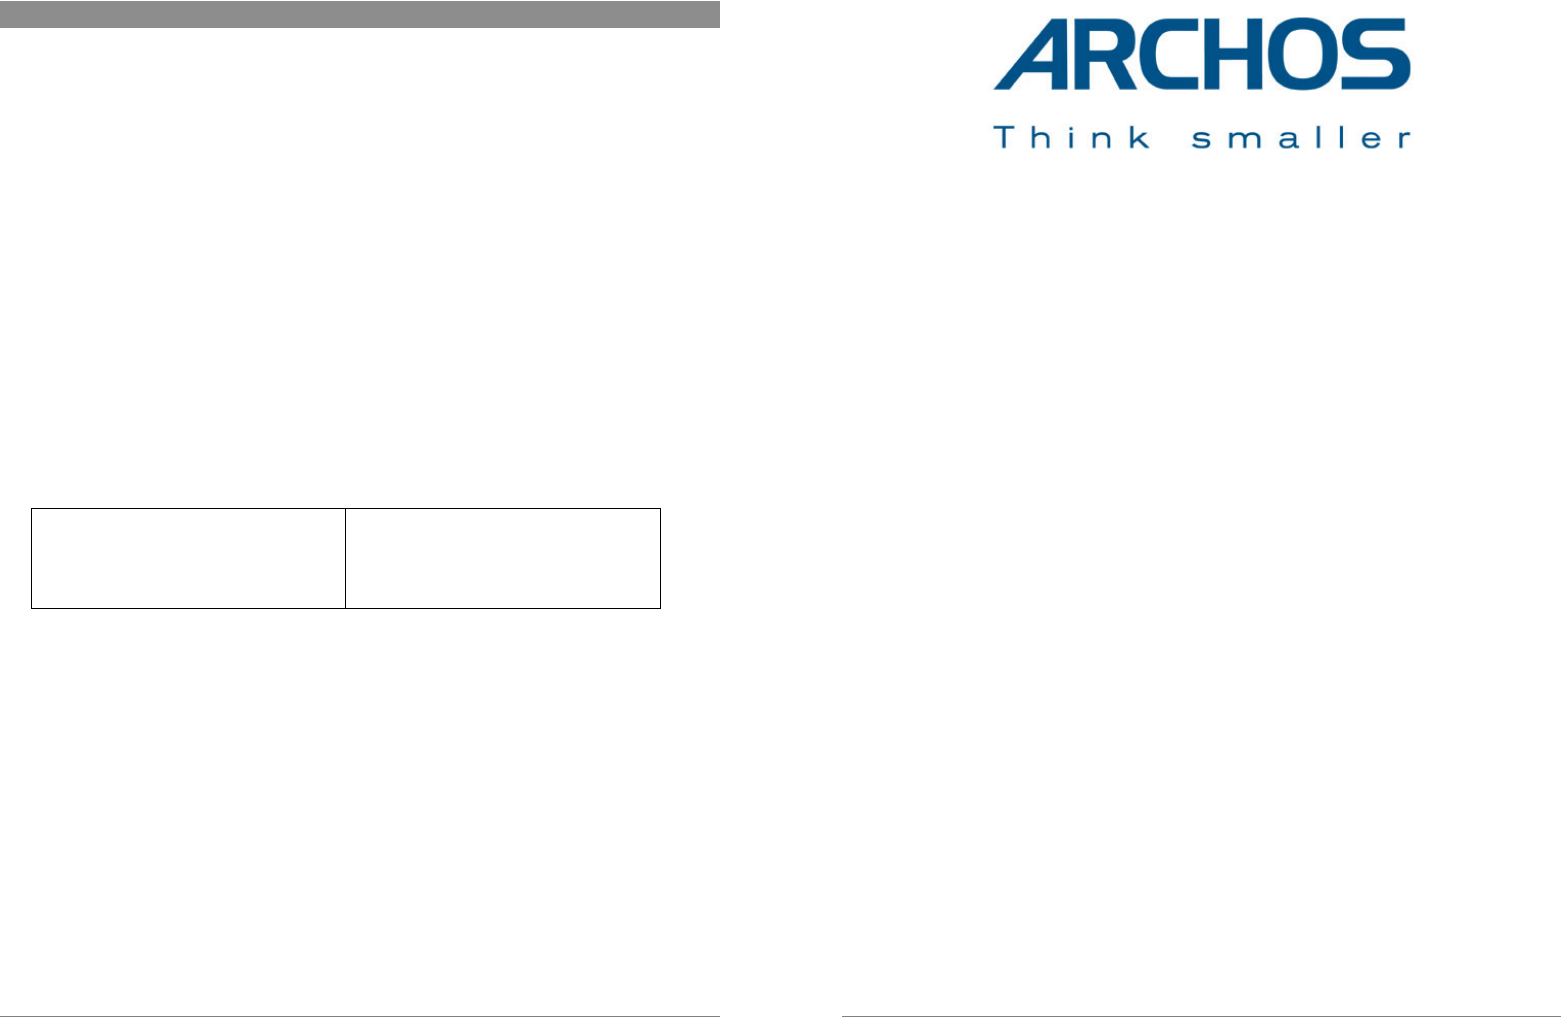
Pre-Record Settings: Several parameters can be adjusted before recording a video
• Press “Setup” (F2) button. The video record setup menu is shown.
Menu JBM20 Menu AV120
• Use UP and DOWN to select the parameter to adjust.
• “Change name”: allows to change the name of a video image file. By default, video files are stored in the
current folder (directory) with the name VID.xxxx.avi (xxxx is incremented automatically starting from 0000).
• “Exposure” : Use the “>>” and “<<” to choose among “Normal”, “Darker” and “Brighter” in accordance with
the ambient lighting.
• “White Bal.” : Depending on the lighting conditions, you can set the White Balance to “Auto” automatic,
“Daylight” (Outside light), “Tungsten” (normal indoor lighting), and “Fluorescent” for areas with fluorescent
lighting.
• “Source” : Use the buttons “>>” and “<<” to choose between “Analog” (Line-in audio) and “Microphone” for
the built -in microphone.
• « Zoom » : Use this setting to choose between 1X (normal view) and 2X (optical zoom).
• « Bitrate » : Use this to choose the quality of the video image. Choose from 500 kb/s, 1000kb/s, 1500kb/s
and 2000kb/s. The higher the number, the greater the data rate which translates to a higher quality image
but also will generate larger video file sizes. Thus can choose between smaller data files with lower image
quality or larger files with higher quality
• Settings” : Will bring you to the main settings menu of the Jukebox.
During a video recording, you can access only the Exposure and White balance settings
ash shown here.
11
3 Technical Support
• If technical support determines that your product needs to be returned, please contact the
place of purchase to have your product repaired or replaced (depending on problem type).
Customers who purchased directly from the Archos web site should fill out the form on the
web site under Support : Product Returns : RMA Request form.
• There is an FAQ – Frequently Asked Questions section at the ARCHOS Website
www.archos.com that can help answer many of your questions.
• If you need technical help, you may contact ARCHOS directly in your own language via
these phone numbers. For other countries, please e-mail our technical support.
Telephone Support:
DO NOT USE PHONE SUPPORT FOR PRESALES
INFORMATION. These numbers are to aid those who
have technical difficulties / malfunctions. Our technicians
can only help you with technical issues.
949-609-1400 (USA, Canada)
01 70 20 00 30 (France)
0207-949-0115 (UK)
069-6698-4714 (Germany)
09-1745-6224 (Spain)
02-4827-1143 (Italy)
02-050-405-10 (Netherlands)
E-mail Support:
technical-support@archos.com (United States and Canada customers) English
support-technique@archos.com (Europe and rest of the planet) English and French
support.de@archos.com (Germany) German
To respond to your e-mails efficiently, when sending one, please indicate the product name and
question type in the Subject of the e-mail.
For example:
To: technical-support@archos.com
Subject: Cam100 – Video recording
12
WWW.ARCHOS.COM
Worldwide Offices
United States & Canada Europe & Asia
ARCHOS Technology
3, Goodyear – Unit A
Irvine, CA 92618 USA
Phone: 1 949-609-1483
Fax: 1 949-609-1414
ARCHOS S.A.
12, rue Ampère
91430 Igny
France
Phone: +33 (0) 169 33 169 0
Fax: +33 (0) 169 33 169 9
United Kingdom Germany
ARCHOS (UK) Limited
Regus House
Windmill Hill Business Park
Whitehill Way
Swindon
Wiltshire SN5 6QR UK
Phone: +44 (0) 1793 44 15 10
Fax: +44 (0) 1793 44 16 10
ARCHOS Deutschland GmbH
Bredelaerstrasse 63
40474 Düsseldorf
Germany
Tel: +49 211 1520 384
Fax: +49 211 1520 349
