User Manual

T0
Owner’s Handbook
1
Read these instructions.
Keep these instructions.
Heed all warnings.
Follow all instructions.
Do not use this apparatus near water.
Clean only with a slightly damp cloth.
Do not block any ventilation openings.
Install in accordance with the manufacturer’s instructions.
Do not install or operate near any heat sources such as radiators,
stoves, or other apparatus that produce heat.
Unplug this apparatus during lightning storms or when unused for
long periods of time.
Refer all servicing to qualied service personnel. Servicing is
required when the apparatus has been damaged in any way, such
as the power-supply cord or plug is damaged, liquid has been
spilled or objects have fallen into the apparatus, the apparatus has
been exposed to rain or moisture, does not operate normally, or
has been dropped.
Warning: To reduce the risk of re or electrical shock, do not expose
this product to rain or moisture. The product must not be exposed
to dripping and splashing and no object lled with liquids such as
a vase of owers should be placed on the product.
No naked ame sources such as candles should be placed on the
product.
Caution: Changes or modications not expressly approved by
the manufacturer could void the user’s authority to operate this
device.
Caution: Usage of controls or adjustments or performance
of procedures other than those specied herein may result in
hazardous exposure.
IMPORTANT
This equipment generates, uses and can radiate radio frequency
energy and, if not installed and used in accordance with
the instructions, may cause harmful interference to radio
communication. However, this is no guarantee that interference
will not occur in a particular installation. If this equipment does
cause harmful interference to radio or television reception, which
can be determined by turning the equipment o and on, the user
is encouraged to try to correct the interference by one of the
following measures:
- Reorient or relocate the receiving antenna.
- Increase the separation between the equipment and receiver.
- Connect the equipment into an outlet on a circuit dierent from
that to which the receiver is connected.
- Consult the dealer or an experienced radio/TV technician for
help.
This symbol indicates that there are important
operating and maintenance instructions in the literature
accompanying this unit.
This symbol indicates that dangerous voltage
constituting a risk of electric shock is present within this
unit.
CAUTION!
RISK OF ELECTRIC SHOCK
DO NOT OPEN
TO REDUCE THE RISK OF ELECTRIC SHOCK
DO NOT REMOVE COVER (OR BACK)
IMPORTANT SAFETY INFORMATION
ELECTRICAL INFORMATION
Use this appliance only with the supplied AC Adapter/charger.
Using non-approved power supplies will void the warranty.
Mains Supply: The mains operating voltage of this unit is marked
on a rating plate on the AC adapter/charger.
The means of disconnecting this appliance from the mains supply
is the AC adapter/mains plug. This should be unobstructed and
readily operable at all times.
BATTERY CAUTIONS
The speaker has internal batteries. Batteries (a battery pack or
installed batteries) shall not be subject to excessive heat such as
sunshine, re or the like.
Do not service the internal battery. Have it examined (and replaced
if needed) by a competent service centre.
Discard used batteries in accordance with recycling regulations in
force in your area.
CAUTIONS IN USE
Your tablet is designed for use in a temperature within the range 0°C
- 30°C. Never use it in a temperature which is hotter or cooler than
this range. If the tablet has been stored in temperatures outside of
this range, allow one hour for the temperature to stabilise at room
temperature before use.
Never leave the tablet in direct sunlight. If the tablet is to be left
in a car, ensure that it is safely out of sight and away from direct
sunlight.
Never attempt to operate the tablet while driving or operating any
machinery. Only a passenger should operate it.
If the tablet is being used in a car, ensure that it is solidly secured.
Avoiding mounting it near the airbag opening areas. Equipment
that is not securely xed in a car could result in serious injury when
the airbag activates.
To prevent possible hearing damage, do not listen at
high volumes for long periods.

2
Use of this product is for personal use only. Copying CDs or loading
music, video, or picture les for sale or other business purposes is
or may be a violation of copyright law.
LEGAL INFORMATION
PLEASE CAREFULLY READ THE BELOW TERMS AND CONDITIONS
OF THE END USER LICENSE AGREEMENT (EULA) BEFORE USING
YOUR ARCHOS PRODUCT. THE “ARCHOS SOFTWARE” (all software
distributed within the ARCHOS hardware product) ON THIS
DEVICE IS LICENSED TO YOU, YOU DO NOT OWN IT. BY USING
THE SOFTWARE ON THE DEVICE, YOU ARE THUS GIVING YOUR
CONSENT TO BE BOUND BY THIS AGREEMENT. IF YOU DO NOT
AGREE WITH ANY PART OF THIS EULA, ARCHOS WILL NOT LICENSE
THE SOFTWARE TO YOU. IN SUCH A CASE, PROMPTLY SEE YOUR
VENDOR OR CONTACT ARCHOS DIRECTLY IN ORDER TO FIND AN
ADEQUATE SOLUTION TO THIS DISAGREEMENT.
GRANT OF LICENSE – Subject to the terms and conditions
1.
of this license, ARCHOS grants you the nonexclusive right
to use the software within the ARCHOS hardware product.
The ARCHOS SOFTWARE can only be used on the ARCHOS
manufactured product that it is delivered with.
TITLE – You have no title, ownership rights, rights to trade
2.
secrets, or intellectual rights to the ARCHOS SOFTWARE.
LIMITATIONS - You may not alter, decrypt, disassemble,
3.
decompile, or reverse engineer in part or in whole the ARCHOS
SOFTWARE , except as permitted by mandatory applicable
law.
COPYRIGHT / INTELLECTUAL RIGHTS – The ARCHOS SOFTWARE
4.
is protected by United States and International Copyright laws
and treaties as well as by international intellectual property
laws.
NO WARRANTY / LIMITED LIABILITY
5.
A. ARCHOS SOFTWARE is licensed to you “as is” and your use of
such is at your sole risk.
B. ARCHOS makes not guarantees either expressed or implied
as to the correctness, accuracy, reliability, tness of use for a
particular purpose or otherwise of its SOFTWARE.
C. If ARCHOS SOFTWARE proves to be defective, YOU and not
ARCHOS bear any nancial or other liability for returning the
product to its original functional state or any other liability
arising out of such an event.
D. In no event will ARCHOS, its subsidiaries, ocers, or employees
be liable for any damages, including but not limited to, any
loss, or other incidental, indirect or consequential damages
due to the use of the ARCHOS SOFTWARE, even if ARCHOS
has been advised of the possibility of such damages. Because
certain jurisdictions do not allow the exclusion or limitation
of liability for certain damages, the above limitations may
not apply to you.
LICENSE AGREEMENT
LICENSED COMPONENTS – Within the ARCHOS SOFTWARE 6.
are components licensed to ARCHOS and such licensors
reserve rights that may not be expressed herein. ARCHOS
licensor(s) makes no warranties, express or implied, including,
without limitation, the implied warranties of merchantability
and tness for a particular purpose, regarding the licensed
materials. ARCHOS’ licensor(s) does not warrant, guarantee or
make any representations regarding the use or the results of
the use of the licensed materials in terms of its correctness,
accuracy, reliability, or otherwise. You assume the entire risk
as to the results and performance of the licensed materials.
The exclusion of implied warranties is not permitted by some
jurisdictions. The above exclusion may not apply to you.
In no event will ARCHOS’ licensor(s), and their directors,
ocers, employees or agents (collectively ARCHOS’ licensor)
be liable to you for any consequential, incidental or indirect
damages (including damages for loss of business prots,
business interruption, loss of business information, and the
like) arising out of the use of inability to use the licensed
materials even if ARCHOS’ licensor has been advised of the
possibility of such damages. Because some jurisdiction do not
allow the exclusion or limitation of liability for consequential
or incidental damages, the above limitations may not apply
to you.
ILLEGAL USE – You cannot use the ARCHOS SOFTWARE to
7.
engage in illegal activities including the reproduction, storage
and/or distribution of copyrighted materials that you do not
have the express written consent to.
TRANSFER – You can permanently transfer your rights to
8.
the ARCHOS SOFTWARE through the transfer or the sale
of your ARCHOS hardware product to a second party. You
must not retain any copy of the software, upgrades, versions,
or documentation, and the party to whom you transfer the
agreement must make written notice that he accepts the
conditions of this EULA.
TERMINATION – You may terminate this agreement at any time,
9.
at which point you cannot use the ARCHOS SOFTWARE. To do
so, you must destroy all originals and copies of the ARCHOS
Software and all documentation. You can write to ARCHOS
for instructions on having the software removed from your
device. This license will terminate automatically (without
notice from ARCHOS) if any part of this license agreement is
violated.
DECOMPOSITION – If any part or condition of this agreement
10.
is held by governing law to be invalid or unenforceable, such
part will be enforceable to the extent allowed by law and will
have no eect on any other sections of this agreement.
GOVERNING LAW – This license is governed by the laws of France.
If you have any questions about this End User License Agreement,
please write to: ARCHOS SA., Legal Department, 12 rue Ampère,
91430 Igny, France.
This information is subject to be updated periodically. Please check
the ocial Archos web site.
Copyrighted materials, works of art, and/or presentations may
require authorization to be fully or partially recorded. Please be
aware of all such applicable laws concerning the recording and use
of such for your country and jurisdiction.

3
INDEX
Important safety information .............................................................................................. 1
License agreement .................................................................................................................. 2
Legal information ..................................................................................................................... 3
Overview ..................................................................................................................................... 4
Controls and connectors ....................................................................................................... 5
Connecting power ................................................................................................................... 6
Power control ............................................................................................................................. 6
Using passwords ....................................................................................................................... 6
Installation wizard .................................................................................................................... 7
Working with the touch screen ........................................................................................... 8
The home page .......................................................................................................................10
Applications, books, movies and games ........................................................................12
Widgets ......................................................................................................................................13
Browsing the Internet, YouTube, and social networking .........................................14
Email - setting up an account ............................................................................................15
Email - receiving and sending............................................................................................16
Reading books .........................................................................................................................17
Taking a still photo .................................................................................................................18
Filming a video ........................................................................................................................18
Taking a panorama photo ...................................................................................................18
Clock and alarms ....................................................................................................................19
Music, Photo, Video and Data le transfer .....................................................................20
Docking a Micro-SD card .....................................................................................................20
Transferring music from a Windows Media Player library .......................................21
Transferring photos and videos from a Windows Media Player library ..............22
Transferring les using Windows Explorer ....................................................................23
Managing the les on your tablet ....................................................................................24
Playing music ...........................................................................................................................25
Browsing digital photos .......................................................................................................26
Watching videos and movies .............................................................................................27
Settings ......................................................................................................................................28
Troubleshooting .....................................................................................................................31
Care and maintenance .........................................................................................................32
Specications ...........................................................................................................................32
Warranty ....................................................................................................................................32

4
OVERVIEW
INTRODUCTION
Congratulations on the purchase of your Technika tablet.
Your tablet is fully portable, and powered by an internal
rechargeable battery.
The tablet includes built in wi and 8MB of ash memory for your
data. A Micro-SD card port enables you to dock a Micro-SD card
and expand the memory available by up to a further 32GB.
WHAT CAN I DO WITH MY TABLET?
If you have access to the Internet via a wi connection you can use
your tablet to stay in touch through email and social networking,
you can search the Internet or browse for your favourite videos on
Youtube.
You can load your choice of music, digital photos, movies or e-books
into the built-in memory which can be expanded if required.
Once your les are loaded you can play music*, browse photos*
read books* or watch movies* on the 8” display screen. You can
choose to play sound through the built-in speakers or connect a
pair of headphones (not supplied) for personal listening.
The interactive touch-screen will zoom to suit your requirements
and will display full QWERTY or numeric keyboards when text or
number input is required. Quick links on-screen enable you to
easily switch between screens you have recently used or to return
to the Home page.
The dual built-in cameras enable you to take photos or movies and
also to make video phone calls or messaging (suitable applications
will be required).
In addition, many compatible gaming, leisure or business
applications are available and can be ordered and installed directly
from the on-line store.
*Compatible le formats only.
PRELIMINARIES
UNPACKING
Carefully unpack the unit. If it is damaged, please return it to
your nearest Tesco store for replacement. Remember to take your
purchase receipt with you.
Retain the User Handbook. If you pass the unit on to a third party
make sure you pass on the handbook.
We suggest you retain the packaging. If you dispose of it, do so
having regard to any recycling regulations in your area.
CONTENTS
The carton should contain:
The tablet•
AC adaptor/charger•
Micro-USB cable•
Quick Start Guide•
Safety and legal information leaet•
If any items are missing or damaged, contact your nearest TESCO
store for a replacement. Have your receipt ready when you call.
Retain the packaging. If you dispose of it, do so having regard to
any recycling regulations in your area.
5
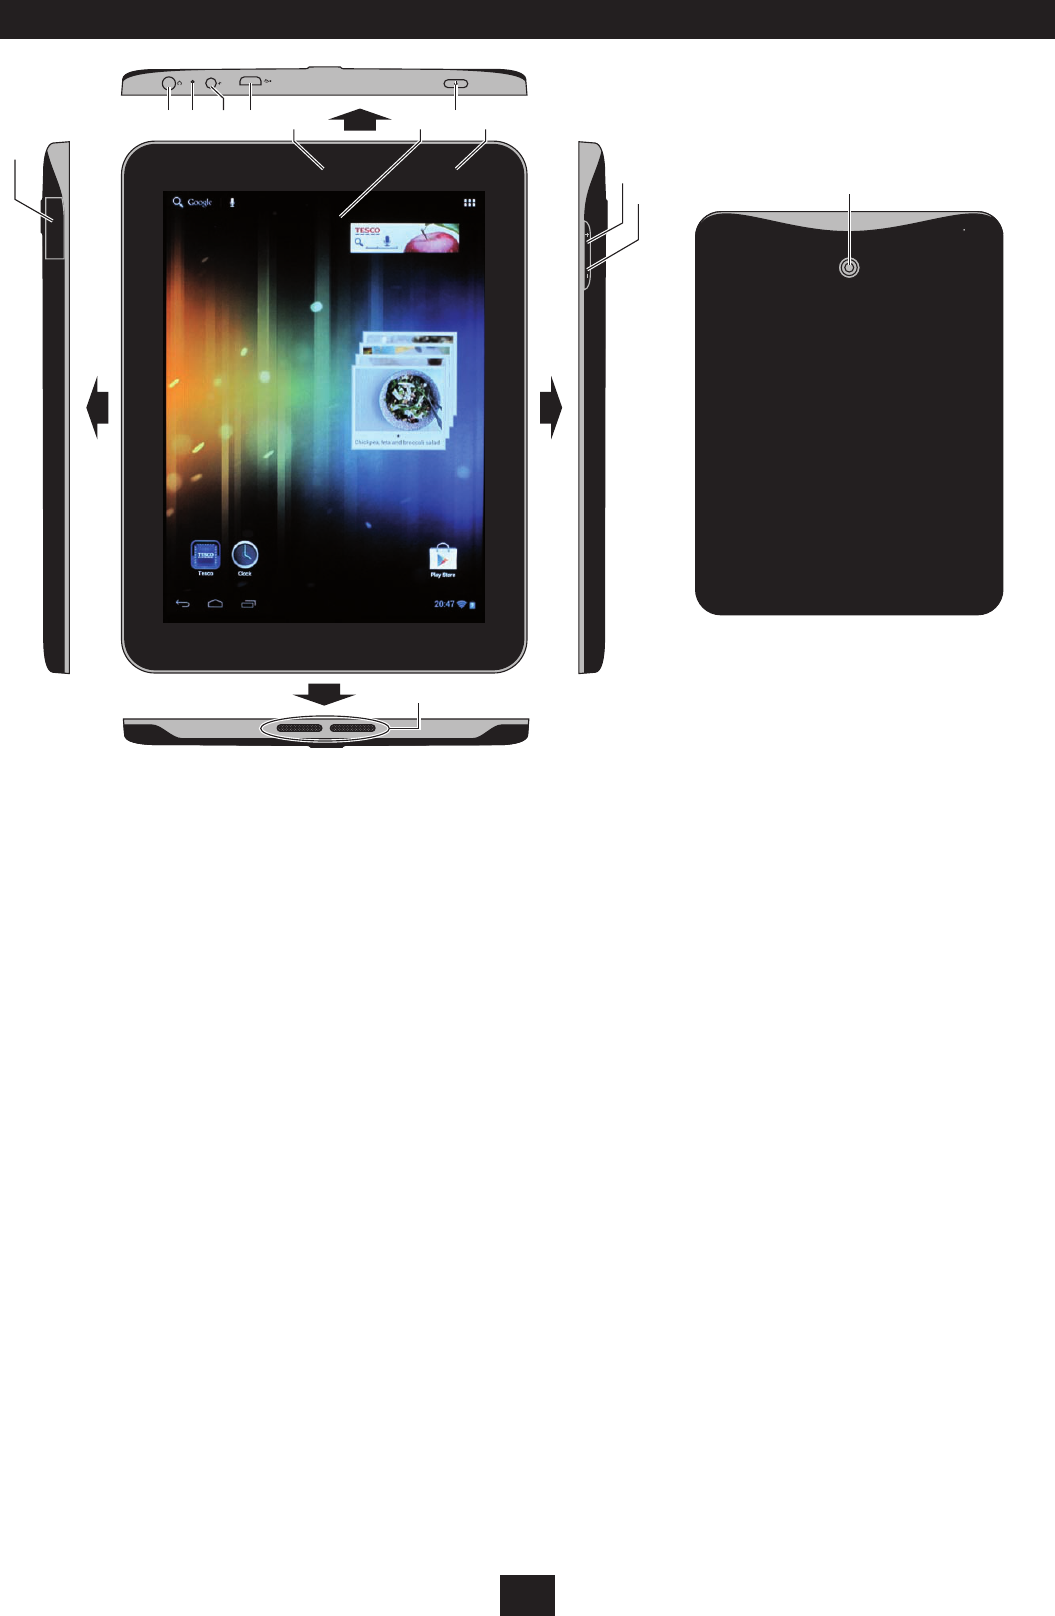
Micro-SD card dock (under cover)1.
Headphone jack2.
Microphone3.
DC-In jack4.
Micro-USB jack5.
Front camera6.
Touch screen display7.
Sleep/Power button8.
Charge indicator9.
Volume up button10.
Volume down button11.
Speakers12.
CONTROLS AND CONNECTORS
BACK
MIC
1!
1)
a
1@
b
c d e h
fgi
FRONT & SIDES
a
Back camera1.
6
GETTING STARTED
CONNECTING POWER
Check that the mains voltage marked on the rating plate on •
the AC adapter/charger is the same as the voltage in your
area.
Plug the cord from the AC adapter/charger into the DC-In •
jack.
Plug the AC adaptor into an AC outlet and switch the mains •
power on.
Your tablet will start to charge and the Charge indicator will light red.
You can continue to use the tablet while the charger is connected.
Charging for the rst time:
NOTE: Your tablet can only be charged using the supplied charger.
It is not possible to charge it via a USB connection.
Always ensure that you have enough time available (approximately
8 hours) to fully charge the battery when you connect the charger
for the rst time.
In regular use, set the tablet to Sleep when you are not using it.
Music etc will continue to play in sleep, but the display will switch
o to conserve power. Switch the power o completely if you are
not planning to use your tablet for some time or if you want to
conserve battery power.
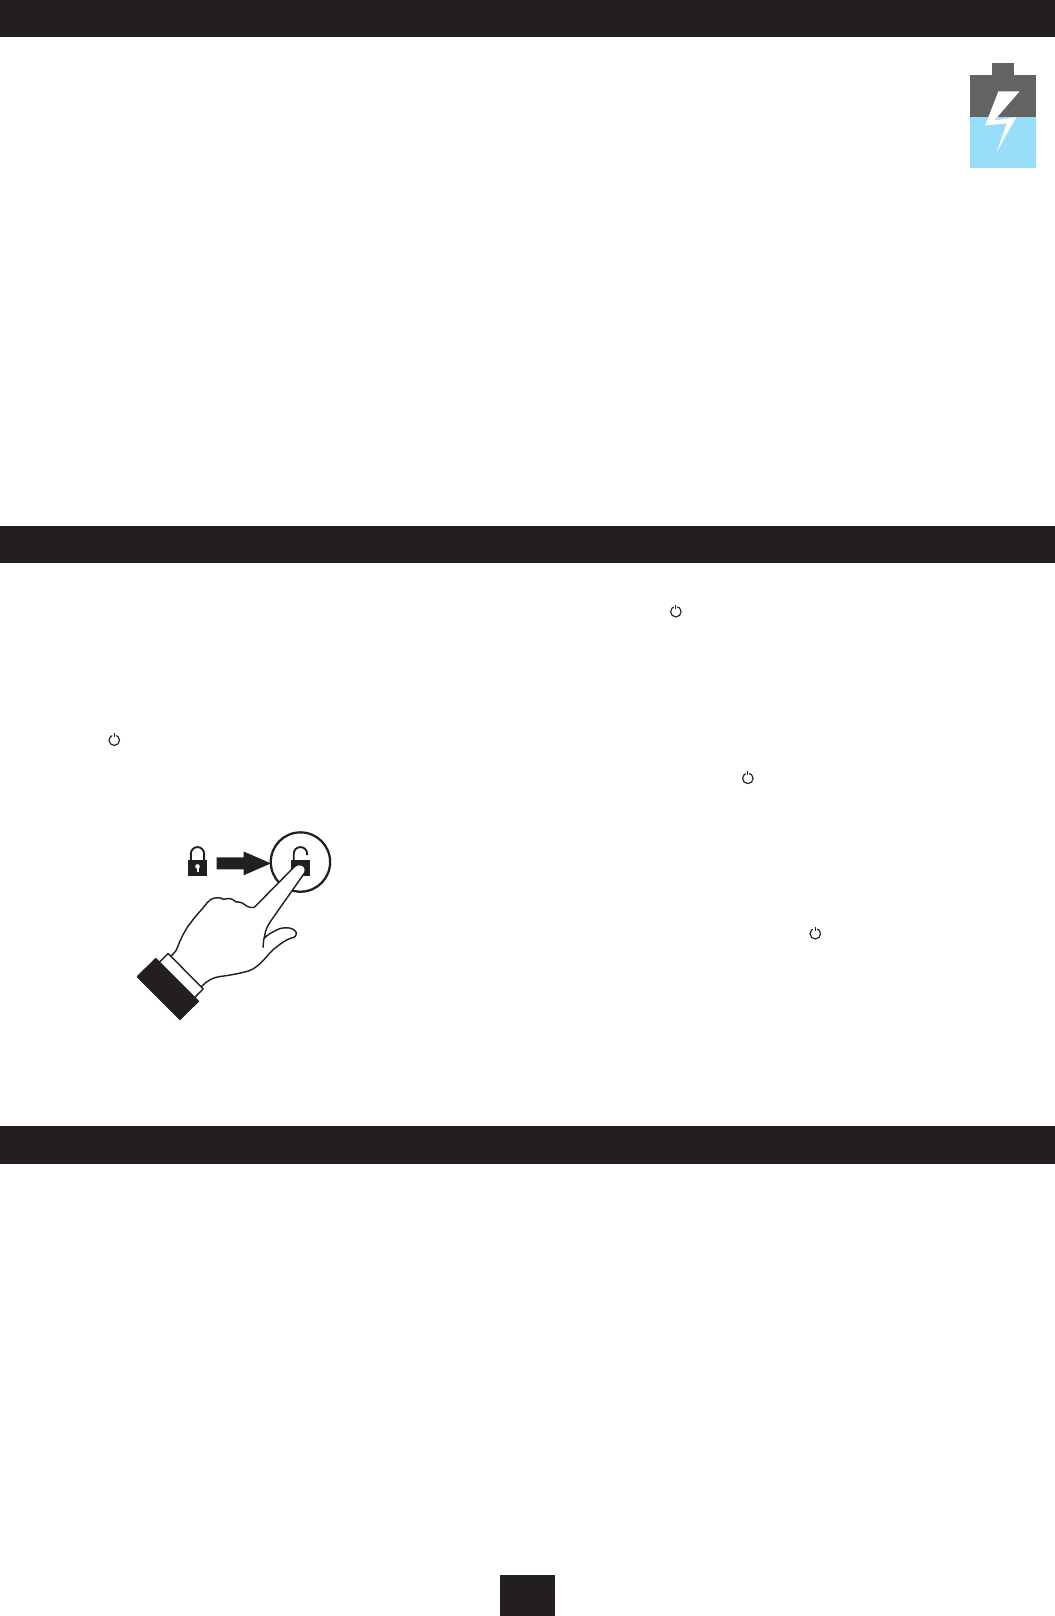
Switching on:
Press the • (Sleep/Power) button to switch power on.
The screen will light and show the lock icon on-screen.
Touch the lock icon and slide the circle across to the unlock •
icon.
The tablet will unlock and the display will show the last screen you
used.
Battery care:
To ensure maximum life from the battery in your tablet, follow
these guidelines:
Discharge the battery completely twice a year.•
If the tablet hasn’t been used for a long period of time, •
discharge the battery completely, then fully charge it for 8
hours before use.
Never charge the tablet for more than 24 hours.•
Never recharge the battery in a temperature below 0°C.•
Avoid recharging the battery in direct sunlight or near a •
radiating heat source.
POWER CONTROL
Setting Sleep:
Press the • (Sleep/Power) button to set Sleep.
Auto Sleep:
Your tablet will automatically set to Sleep if you haven’t touched
the screen for a while. You can change the Auto Sleep period if
required. Refer to the Settings section for more information.
Switching o the power completely:
Press and • hold the Sleep/Power button.
The screen will respond with the message ‘Would you like to shut
down’.
Touch ‘OK’ to continue.•
The tablet will shut down and power will switch o.
NOTE: If the power has been switched o completely it will be
necessary to press and hold the Sleep/Power button to switch
the power back on.
USING PASSWORDS
You can set an optional password, PIN or pattern security setting to
protect your tablet from unauthorised access.
Once you have familiarised yourself with the operation of your
tablet, refer to PERSONAL > Security > SCREEN SECURITY in the
security settings section of this instruction booklet on page 30 for
more details about setting up security.
Battery level:
The battery level is shown in the battery symbol at
the bottom right of the screen. The blue level in this
example shows half-charge.
The ash shown in the example will be present
when the battery is charging.
7
When you rst power up your tablet the Installation Wizard will
run. This will help you step through the initial settings you need to
choose to get your tablet set up.
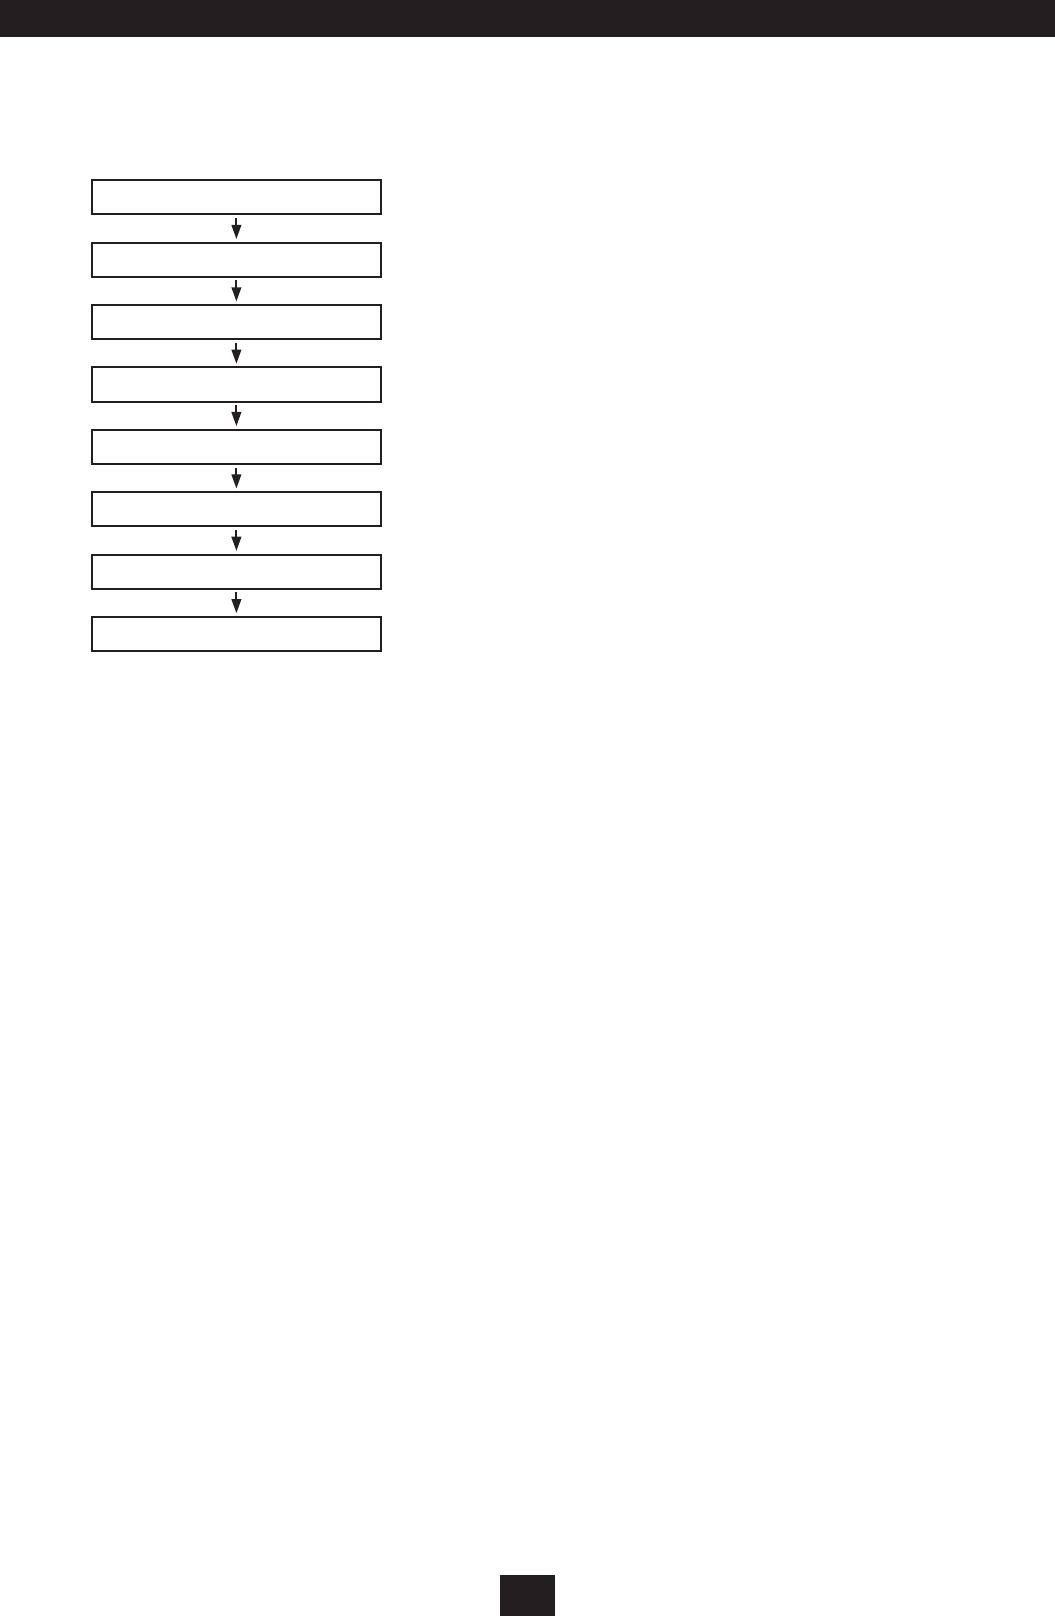
The settings sequence is shown here -
INSTALLATION WIZARD
Touch-Screen calibration:
This process will start automatically and requires no intervention
from the user.
Language:
You can choose your preferred language for the display.
Disclaimer:
Choose ‘OK’ when you have read the legal and safety notices in this
handbook.
Date and Time:
If you make no change at this screen the clock will set automatically
as soon as you connect to the Internet.
If you are not planning to connect to the Internet, you can manually
set the clock by selecting ‘Advanced settings’.
Wi connection:
This screen will display wireless networks that are within connection
range of your tablet.
Touch the name of the network that you want to connect to.•
If the network is password protected, a keyboard will be shown for you
to type in the network password.
Once you have entered the password, touch ‘Connect’.•
After a short delay the network should connect.
NOTE: You can choose to connect to many networks in dierent
places that you visit. Your tablet will remember the login details
and connect automatically to the network that is closest in range.
My location:
You can choose to enable locations services. If you enable location
services, applications that require your location will be able to
function correctly. You can also choose to make your location
available for search queries to give better search results in your
area.
Third party applications:
Read the statement about the applications that will be installed
on your tablet and choose ‘Install’ if you want to install the
applications.
Thank you!
Conrms that you have completed the Installation Wizard. The
Wizard will exit when you touch ‘OK’.
TOUCH SCREEN CALIBRATION
LANGUAGE
DISCLAIMER
DATE AND TIME
WIFI CONNECTION
MY LOCATION
THIRD PARTY APPLICATIONS
THANK YOU!
NOTE: You can re-run the Installation Wizard at any time. Refer to
the SYSTEM > About tablet > Startup Wizard section on page 30 for
instructions to run the Installation Wizard.
8
WORKING WITH THE TOUCH-SCREEN
HOW DOES THE TOUCH-SCREEN WORK?
The touch-screen is a dual purpose interactive display and input
device. No keyboard or mouse is required to make selections or
write text.
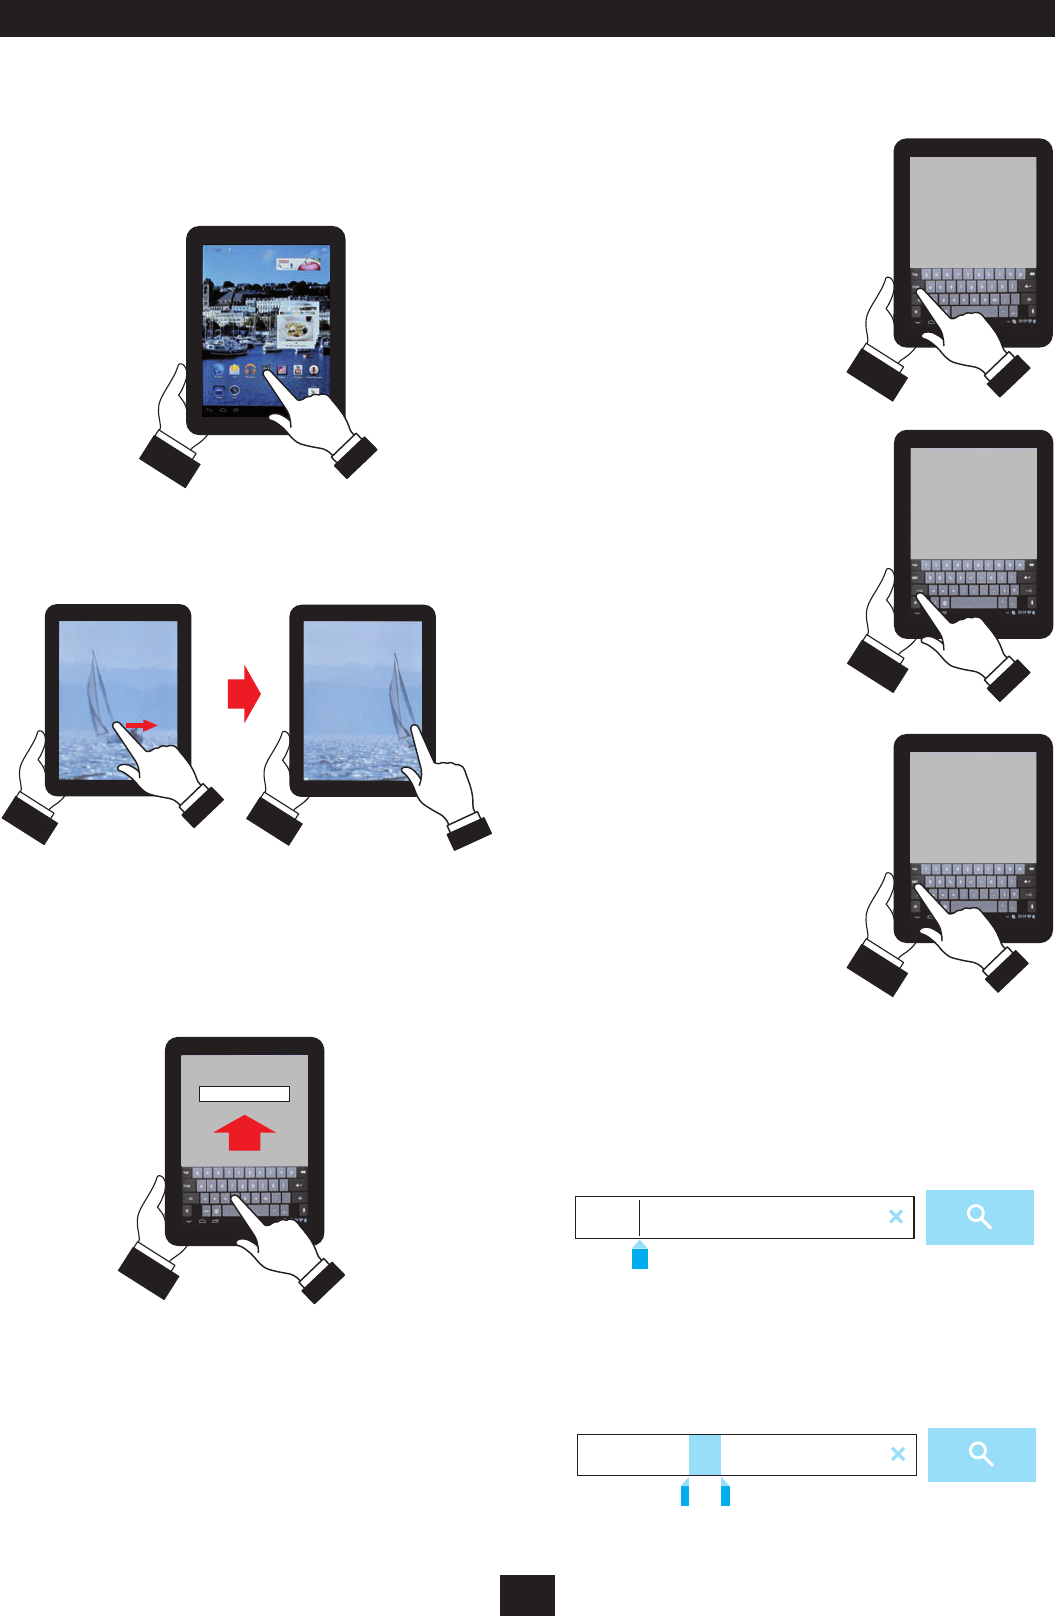
Selecting on-screen icons:
You can touch icons or sections of the screen to make selections.
Switching between the text and numeric keypads:
There are three keypads - QWERTY, numeric/punctuation and
additional punctuation.
Entering text or numbers:
When you need to enter text or numbers a QWERTY keypad will
appear on-screen.
Typing:
You can touch-type on the keypad.
text entry
Changing screens or moving items:
You can also slide your nger across the screen to change screens
or move items.
From the text keyboard, •
touch the ?123 key to switch
to the numeric/punctuation
keyboard.
From the numeric/punctuation •
keyboard, touch the ~/{ key
to switch to the additional
punctuation keyboard
Touch the ABC key to return to •
the QWERTY keyboard.
or
Editing text in a text entry box:
Occasionally, you may want to correct the text entered in a text
entry box.
Correcting a letter:
Touch the text you are entering.•
A pointer will appear as shown in this Internet search example.
reciprs for fish
Slide the pointer to the place you want to correct.•
Correct the text.•
Correcting a word:
Touch and hold the word you want to correct.•
The word will be highlighted.
Correct the word.•
recipes for fish
9
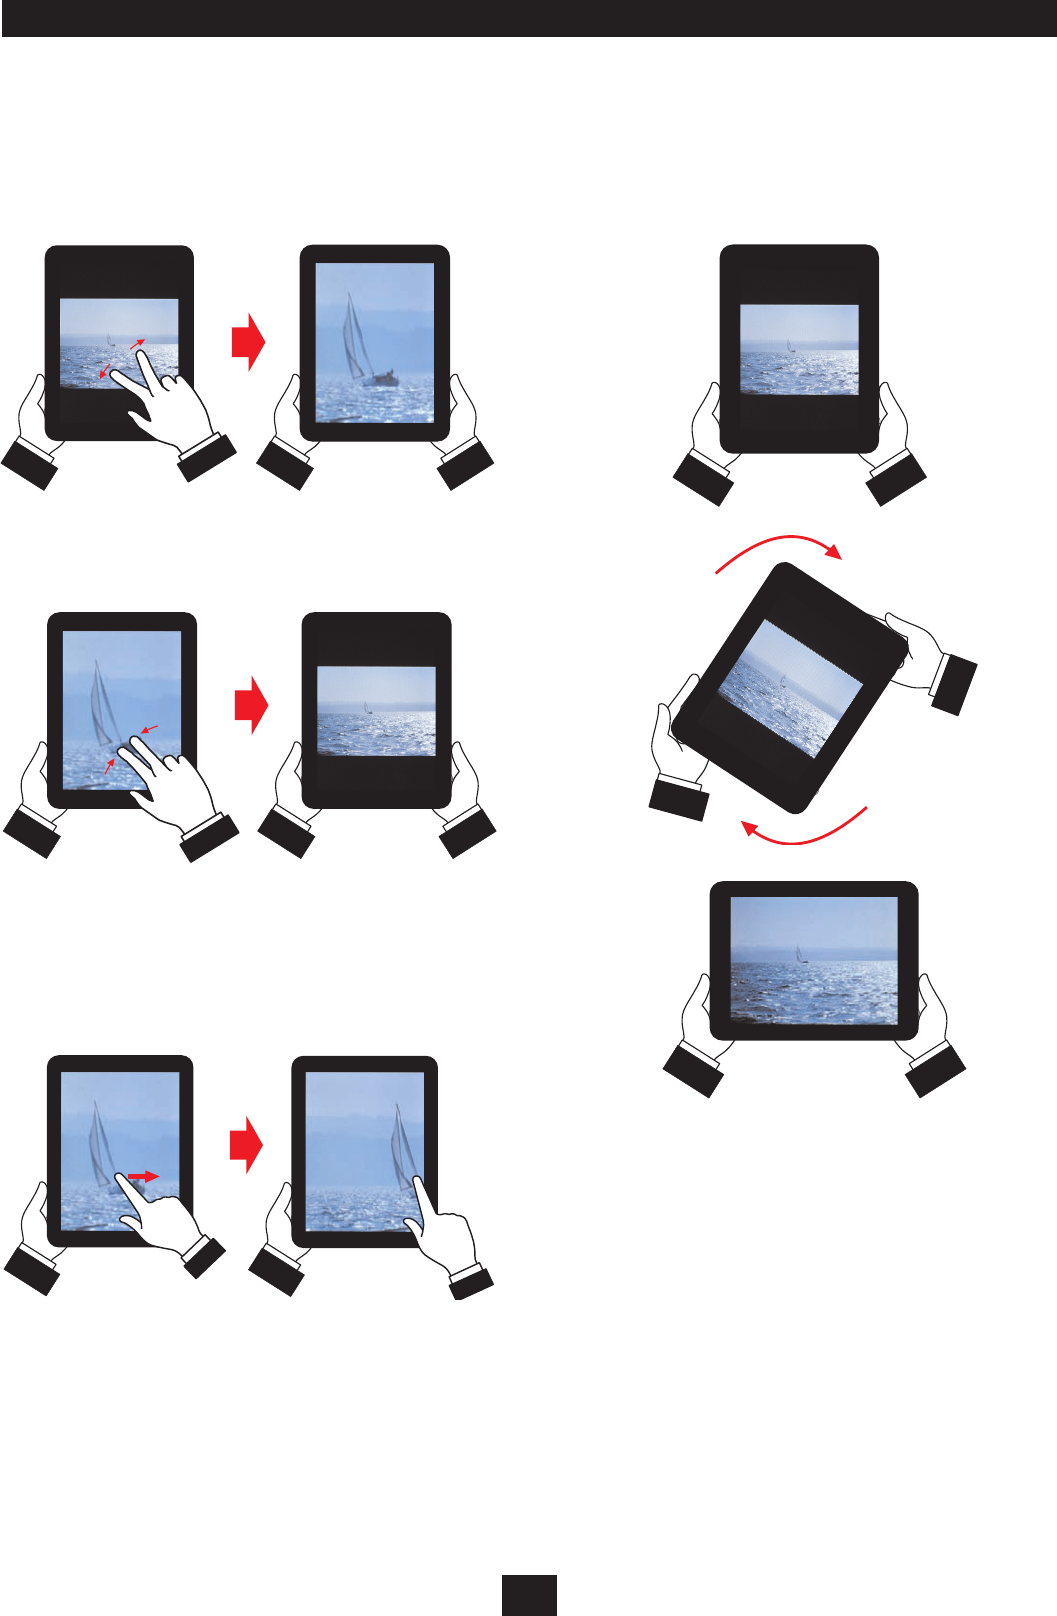
WORKING WITH THE TOUCH-SCREEN
For some applications such as Internet browsing etc, you can
zoom the display in and out to view sections of the screen in more
detail.
Zoom in:
Place two ngers on the screen and slide them apart to zoom •
in.
Zoom out:
Place two ngers on the screen and slide them together to •
zoom out.
Panning:
Once you have zoomed in you can move (pan) around the screen.
Moving a zoomed image:
When a zoomed view is displayed, place a single nger on the •
screen and slide it in the direction you want to pan.
Portait or Landscape viewing:
At any time you can set the screen to display in portrait or landscape
format.
Documents and photos of people may display best in portrait view
whilst movies and photos of groups and scenes are best displayed in
Landscape view.
Rotate the screen to switch between portrait and landscape •
view.
The tablet will sense which way you are holding the screen and adjust
the display view accordingly.
10
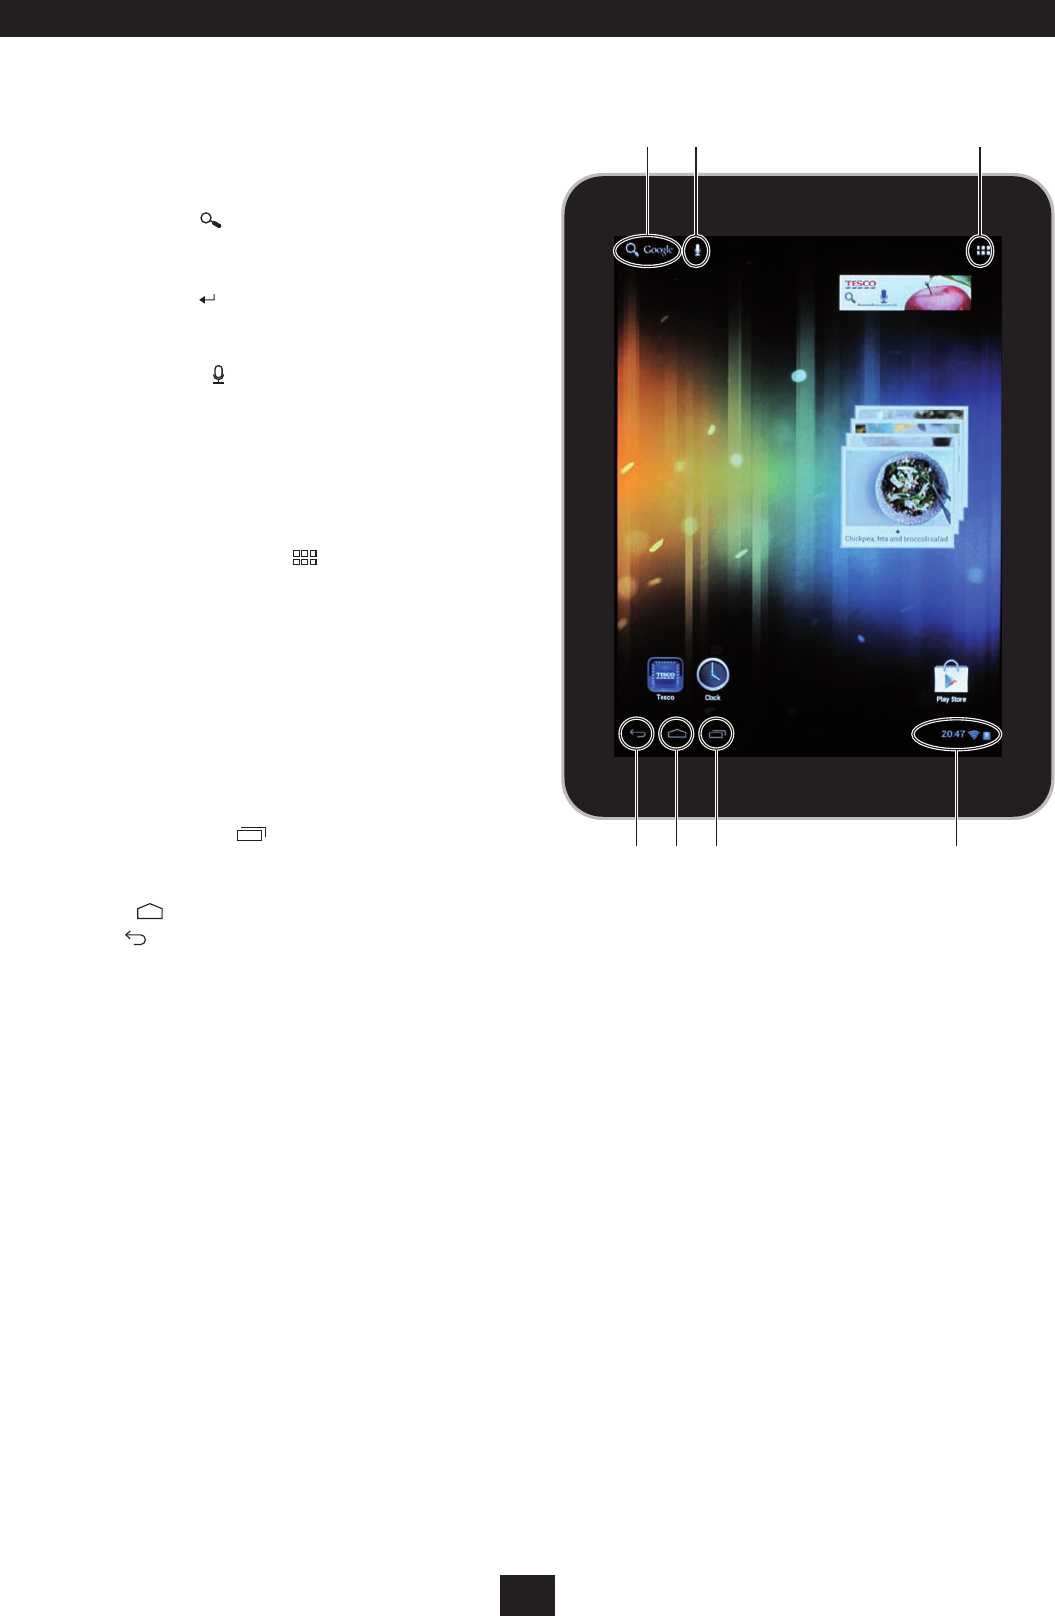
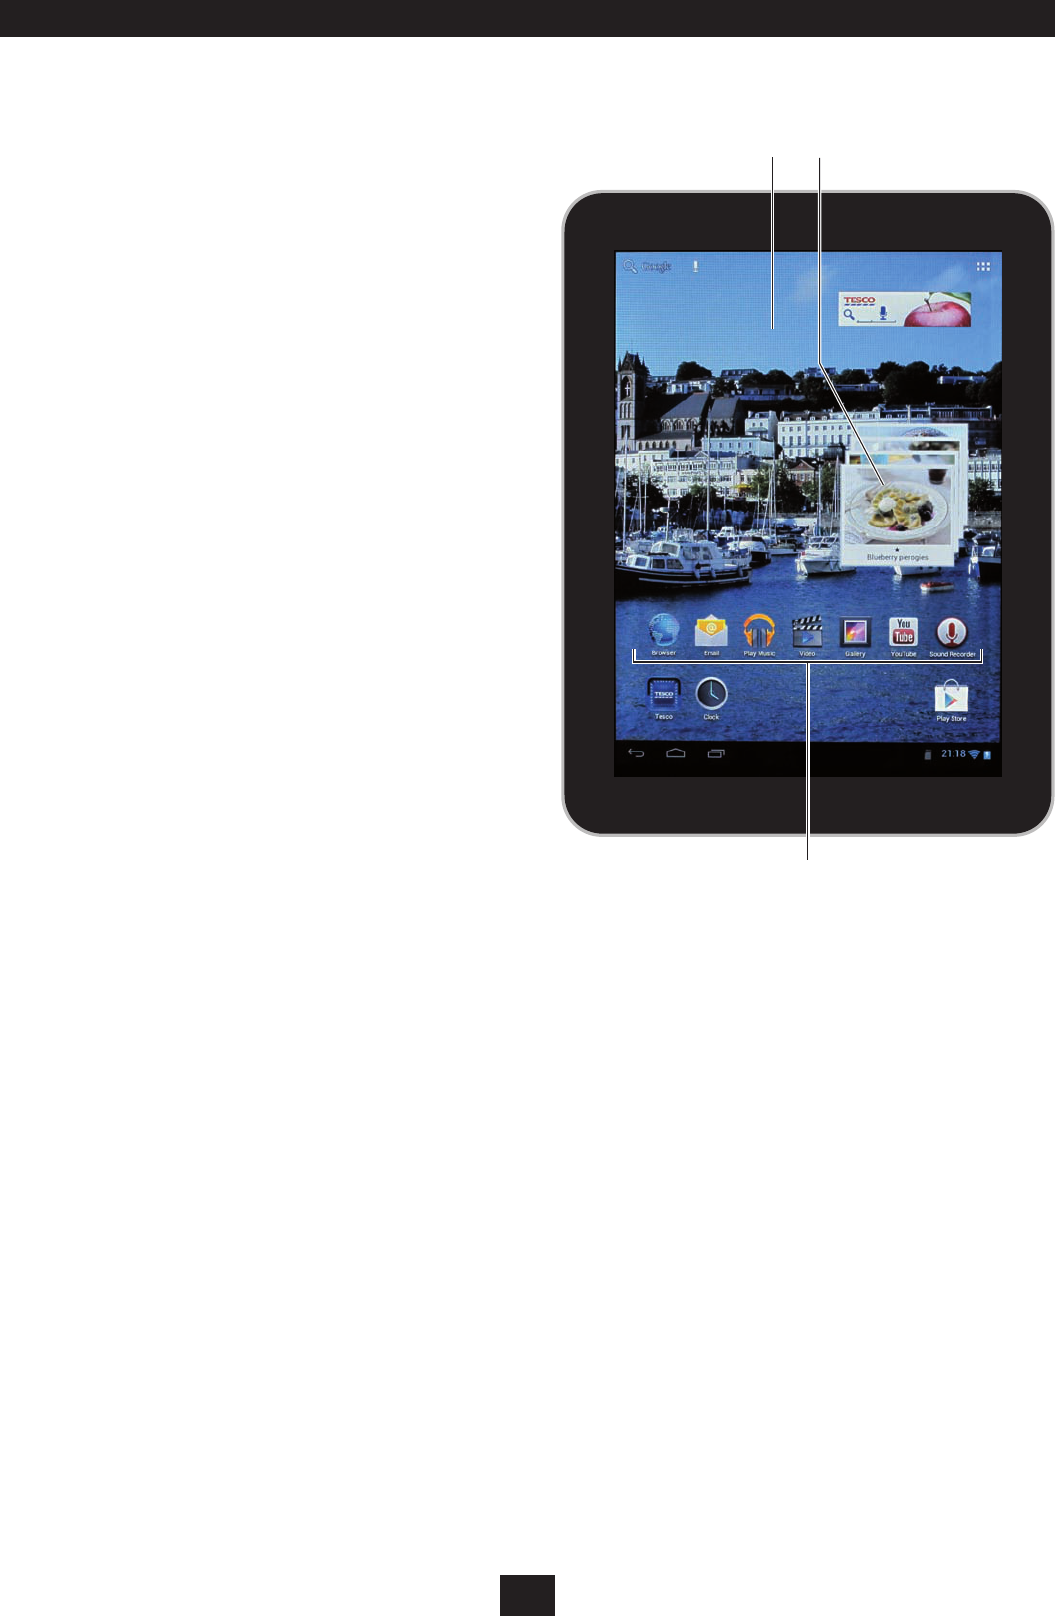
USING THE HOME PAGE
Applications are necessary to make things happen on your tablet.
The Home Page is the place where you have your most-used
applications. Just touch the application that you want to launch.
The factory default Home Page screen layout is shown here.
From the Home page you can also:
Touch Google Search
1. to search the Internet.
A text window will open with a keyboard.
Type in your search query on the keyboard then touch •
the return arrow on the keyboard.
If the Internet is connected, your tablet will search for information
about your query and display results.
Touch the microphone
2. to make a voice search.
The ‘Speak now’ pane will open.
Speak your search query clearly, close to the tablet.•
After a short delay, the tablet will search for your query. If the
speech analyser did not detect a clear query, several options may
be displayed.
You can touch the option that matches your query.•
Touch the ‘All Applications’ icon
3. to switch to the main
application screen.
From here you can scroll through the application pages and
select any application installed on your tablet.
The status display shows the time, wi signal (when connected)
4.
and battery level, Touch the status display to open the status
pane.
The status pane will display the time, day and date. It will also
show power remaining in the battery and the name of the
wireless network (when connected). When music is playing, track
details etc will be displayed (if available).
Touch Application history
5. to open a scrolling pane that
shows the recent activity on your tablet.
Touch any application in the list to re-visit it.•
Touch Home
6. to return to the Home page at any time.
Touch Back 7. to step back one screen.
NOTE: The toolbar that includes items 4-7 is available for quick
navigation on all screens.
THE HOME PAGE
Google search.1.
Voice search.2.
Go to the All applications screen.3.
Status display. Touch to open the 4.
status pane.
View recently used applications.
5.
Go to the Home page.6.
Go back one page.7.
HOME PAGE
d
g f e
abc
11
HOME PAGE WALLPAPER
The wallpaper is the background picture on the home page. You
can change this to other designs in the library or you can use one
of your favourite digital photos as in the example shown.
To change the wallpaper:
Touch and hold the screen in an area where there are no •
application icons.
The ‘Choose wallpaper’ pane will open.
Choose from ‘Gallery’ (your own digital photos), ‘Live Wallpaper‘ •
(moving images, maps etc) or ‘Wallpaper’ (still images).
Select a picture from the location you chose.•
If you chose to use one of your own pictures -
Blue lines will now mark two areas of the photo that will be used for
the wallpaper in portrait and landscape orientation.
You can drag the visible area around the photo and change •
the size of the marked areas.
Once the photo is set the way you want it, touch ‘CROP’ in the •
top right corner of the screen.
The picture will now be cropped and set as your wallpaper.
PERSONALISING THE HOME PAGE APPLICATIONS
Moving Home Page application icons:
New applications will be added to your Home Page as you get
them. If you want to change the position of application icons on
the Home Page -
Touch and hold the application icon.•
Drag the icon to a new position.•
NOTE: If you drag an icon beyond the Home page, another page
will be revealed.
Adding application icons to the Home Page:
The example shows some regularly used applications added to a
personalised Home page.
If you want to add more applications to your Homepage, refer to
the next page where the All applications screen is covered in more
detail.
Removing Home Page application icons:
Touch and hold the application icon.•
Drag the icon over ‘X Remove’ at the top of the screen.•
The icon will be removed from the Home Page, but will still be available
to launch the application on the All Applications screen.
Widgets:
You can also personalise your home page by adding widgets.
For example, the Tesco recipes widget visible on the Home page
illustration is a widget that shows a selection of recipes.
To read more about nding widgets and installing them, refer to
the Widgets section on page 13.
c
ab
THE HOME PAGE
Home page wallpaper.1.
Tesco recipes widget.2.
Personalised Home page icons3.
A PERSONALISED HOME PAGE
12
APPLICATIONS, BOOKS, MOVIES AND GAMES
Your tablet is bundled with many applications (apps).
The supplied applications may vary, but include an Internet browser,
Email app, Social networking links, Photo viewers, Music and Video
players, Maps of the world, Navigation route nder and more.
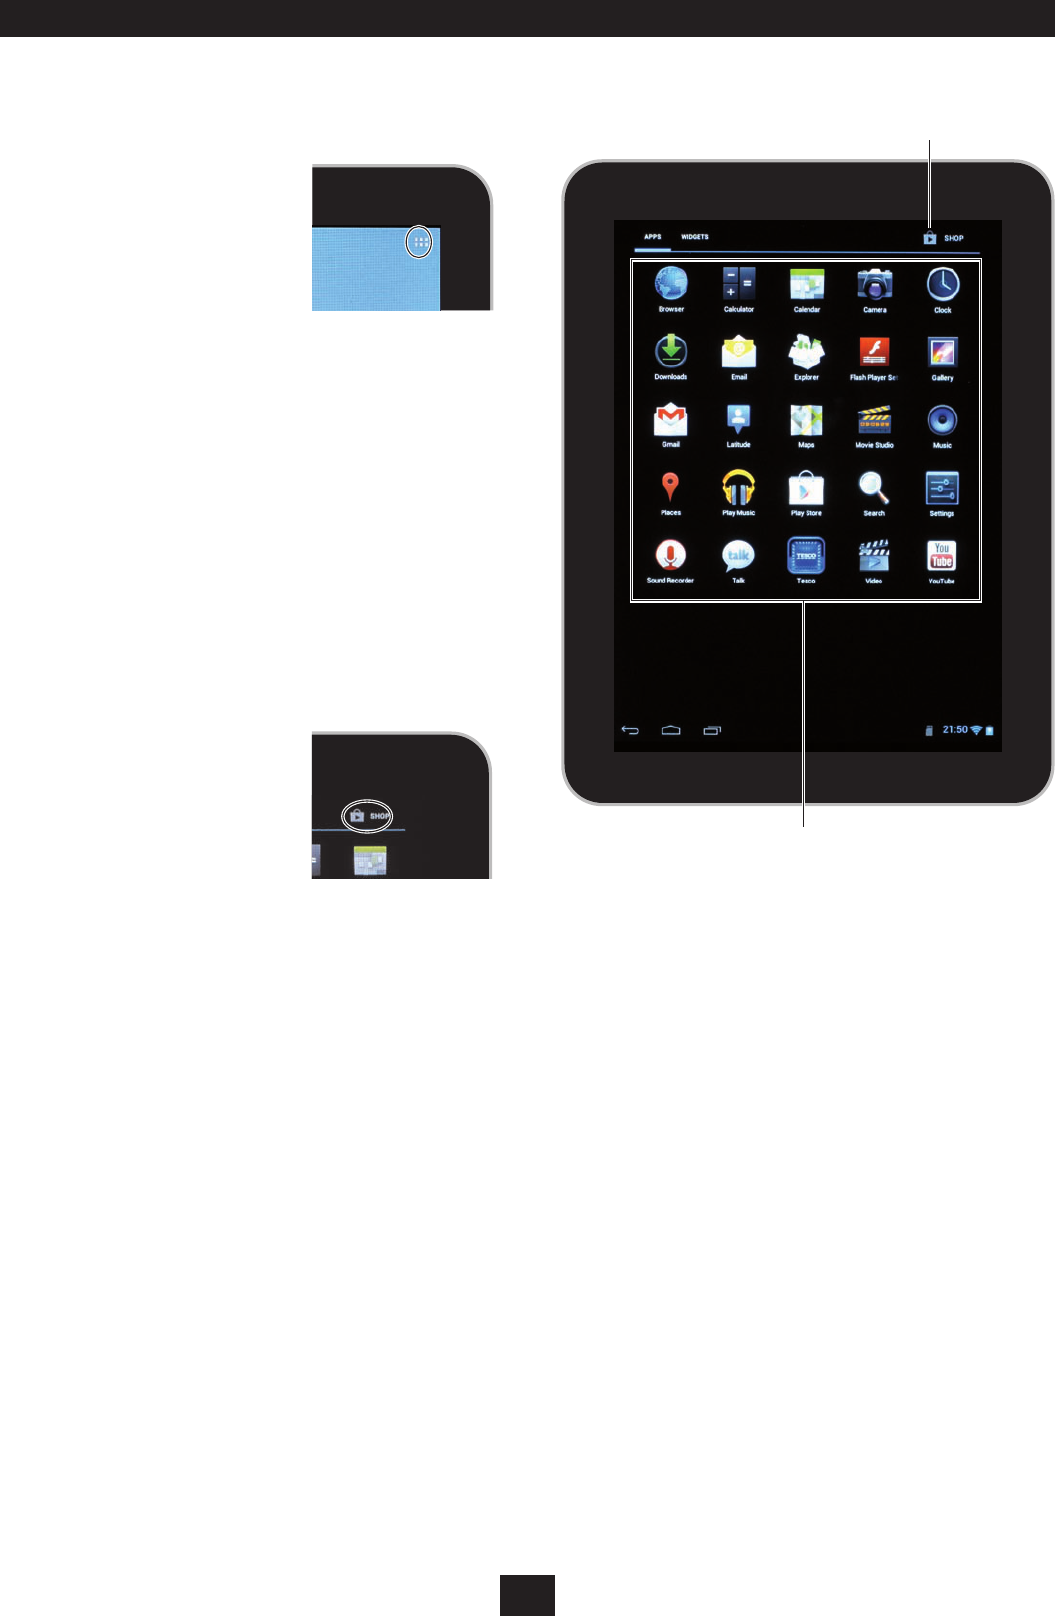
To view all the applications:
Navigate to the Home Page and •
touch the ‘All Applications’ icon
in the top right corner.
The Applications will be displayed.
If you install more applications, they may be spread across several
screens.
To view other screens of applications:
Slide the screen to the left or the right.•
To launch an application:
Touch the application icon on the screen.•
The application will launch.
Applications will have interactive on-screen prompts to help you
understand the operation of the application.
Adding more applications:
Each user will have dierent requirements and uses for their tablet. To
personalise your tablet with the applications you want you can visit
the Google Play store on-line and browse for more applications.
NOTE: You can only visit the Google Play store if you have an active
wi- connection.
Touch the ‘SHOP’ icon in the top •
right corner of the Applications
screen.
You will be asked to sign in with the
details of your Google account. If you
don’t have a Google account you can
select the option to set one up (there is
currently no charge to set up a Google
account).
Once your account is set up you can go straight to the shop and
choose a category to browse.
Remember to fully explore the pages by dragging pages up, down
and sideways. The category index will often be found by scrolling
the pages to the left. There are often free apps available if you
touch the ‘TOP FREE’ tab at the top of the page.
Adding applications to your Home page:
You may want to add your regularly used applications from the All
applications screen to your Home page for quick access.
Navigate to the ‘All applications’ screen.•
Touch and hold the icon for the application you want to add •
to your Home page.
The application will be added to your Home page.
Deleting applications:
Refer to the instructions under DEVICE/Apps in the SETTINGS •
section of these instructions to uninstall an application.
BOOKS, MOVIES AND GAMES
Once logged into the shop you can also search for books to read,
movies to watch or games to play. If you download chargeable
items, they are billed to your on-line account and charged to the
payment card you registered.
If you nd an app, book, movie or game you like, follow the •
prompts to download and install it.
ALL APPLICATIONS SCREEN (Example shown)
a
b
Shop icon.1.
Applications.2.
NOTE: This screen is shown as an example, not all the applications
shown are supplied with the tablet.
13
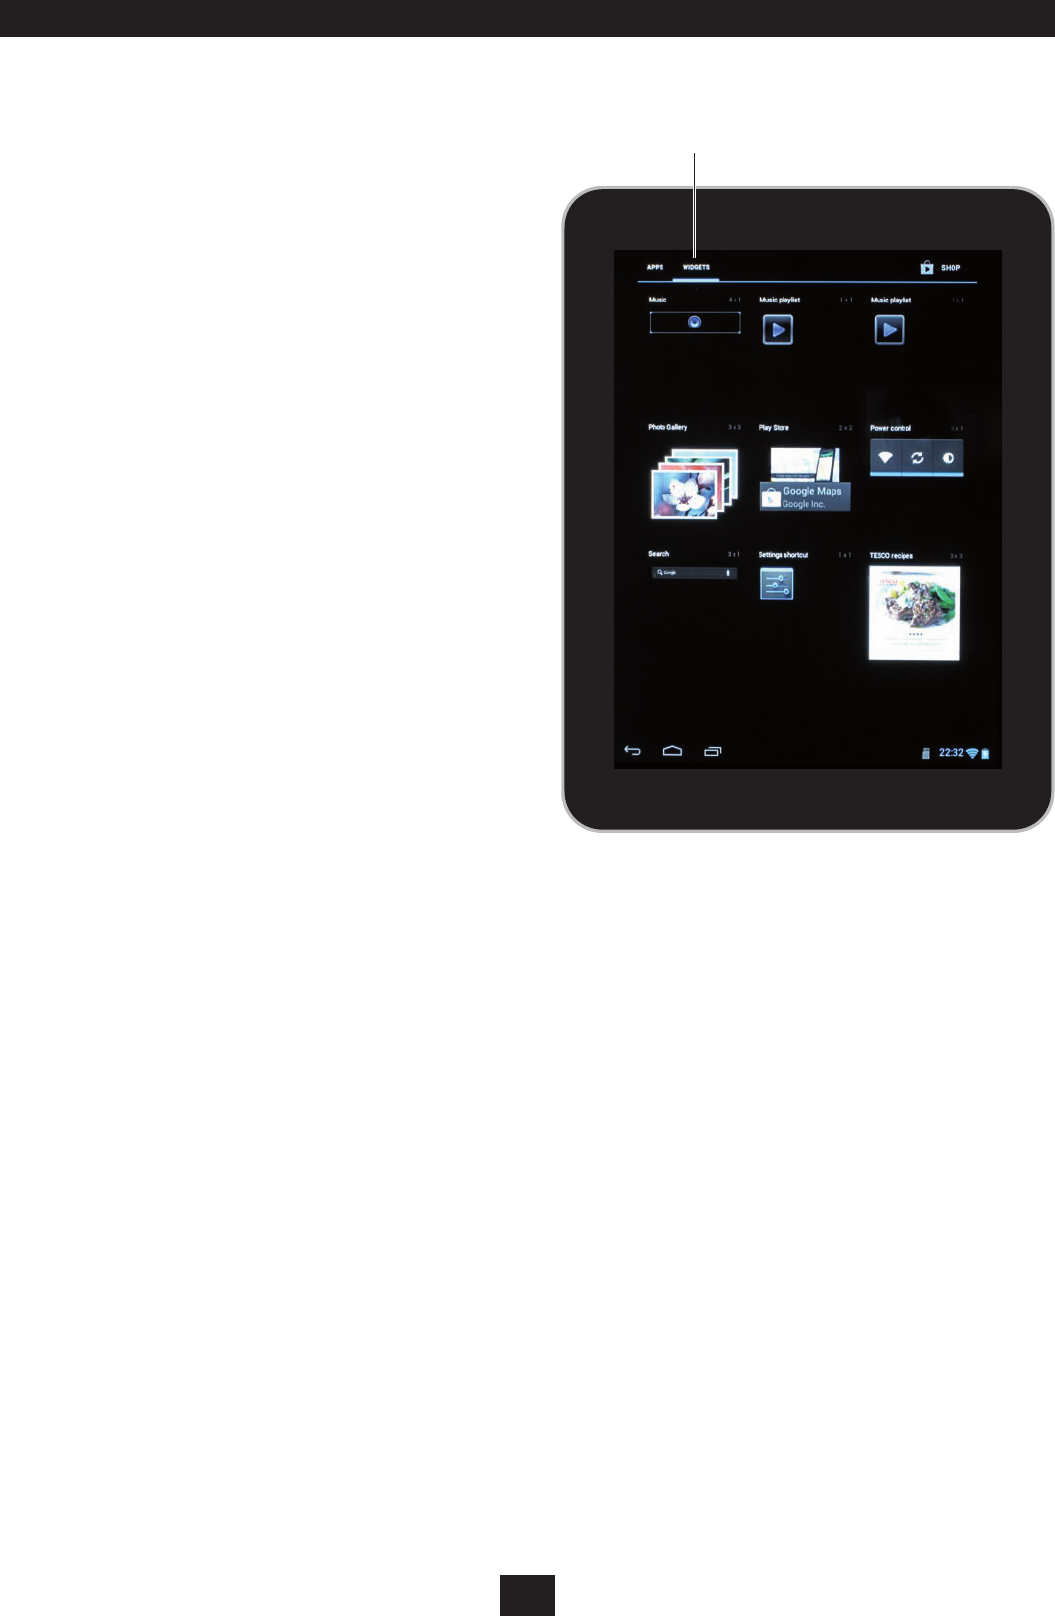
WIDGETS
Your tablet is also bundled with many useful widgets including
quick links to apps that you may use regularly.
To browse the widgets that are available:
Navigate to the All Applications screen.•
Touch the ‘WIDGETS’ tab at the top of the screen.•
A page of widgets will be displayed.
Drag the page to the left or right to see more widgets.•
Adding a widget to your Home page:
If you nd one or more widgets that you like you can add them to
your home page.
Navigate to the page with the widget you want to add.•
Touch and hold the widget you want to add.•
The display will switch to the Home page and you will be able to
position the widget where you want on the page.
The widget is now in place and functioning on the Home page.
Moving widgets around your Home page:
Touch and hold the widget.•
Drag the widget to a new position.•
NOTE: If you drag a widget beyond the Home page, another page
will be revealed.
Removing widgets from your Home page:
Touch and hold the widget.•
Drag the widget over ‘X Remove’ at the top of the screen.•
The widget will be removed from the Home Page.
A SCREEN OF WIDGETS
a
Widget tab1.
14
BROWSING THE INTERNET
NOTE: You can only browse the Internet if you have an active wi-
connection.
The Internet browser on your tablet works in exactly the same way
as the Internet browser on a computer.
You can search for a subject that interests you and browse the •
results that you see (for example, ‘tennis’).
Alternatively, if you know the web address (URL) of the site •
you want to visit (for example, ‘www.tesco.com’), you can
enter this directly.
Searching for a subject of interest:
Navigate to the Home Page•
Touch the ‘Browser’ icon.•
The Google search screen will open.
Touch the Search bar in the centre of the page.•
Type in your search query on the keyboard.•
Touch the Search button next to the Search bar to search.•
The search results will be displayed.
Click on a search result to visit the website.•
The website will be displayed.
Click links within the website to explore further into the site.•
Remember that you can zoom in and pan around a web page •
if you need to read small print or view detail of a picture on a
website.
Entering a web address (URL) directly:
Navigate to the Home Page•
Touch the ‘Browser’ icon.•
The Google search screen will open.
Touch the URL bar at the top of the screen.•
The current page address will be highlighted.
Press the X on the right of the bar to erase the text in the bar.•
Using the keyboard, enter the URL of the website you want •
to visit.
Touch the Return key on the keyboard.•
The browser will navigate directly to the website you have entered.
Stepping back through the pages you have visited recently:
To step back through pages you have recently visited, touch •
‘Back’ in the toolbar at the bottom of the screen.
The browser will step back through your recent browsing history one
page at a time.
Viewing/managing multiple web pages (using the page tabs):
The browser includes a tab feature to allow multiple web pages to
be open at once.
To open another browser window, touch the ‘+’ tab visible in •
the browser header bar.
Another tab will open.
You can now run a separate, new search without aecting the •
results of your current search.
When multiple search tabs are open -
You can switch between active tabs by touching a tab at the •
top of the screen.
You can close a tab by pressing the ‘X’ next to the address in •
the tab.
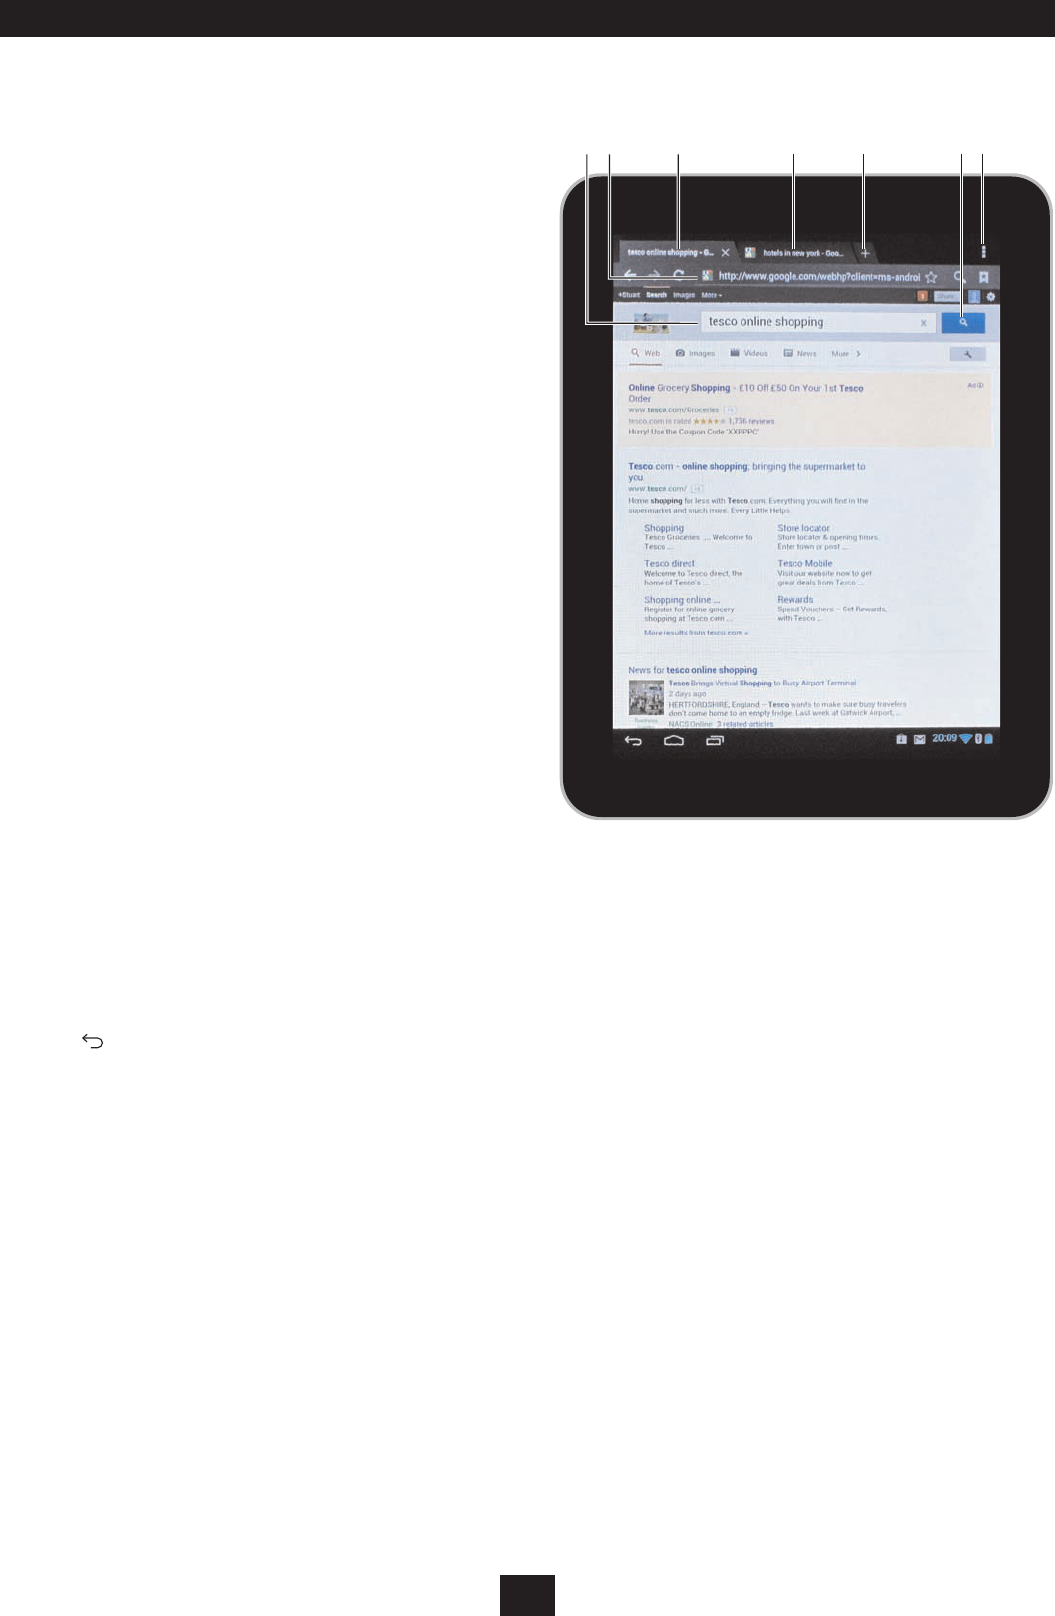
BROWSING THE INTERNET, YOUTUBE AND SOCIAL NETWORKING
YOUTUBE AND SOCIAL NETWORKING
You can browse to YouTube or your favourite social networking
websites by launching the Internet browser, navigating to the site
of your choice and creating or logging in to your account.
For YouTube there is an app bundled with your tablet that allows
you to search for video content and also to upload content lmed
by your tablet.
Some social networking sites may also have apps available for your
tablet. Available apps may be found by visiting the Google Play
shop and searching for the app you want.
c
badefg
BROWSER SCREEN (Example shown)
Touch to enter a search query.1.
Touch to enter a web address (URL).2.
Tab for the main page.3.
Second page tab.4.
Touch here to open another search page.5.
Touch here to start the search.6.
Touch here to see more options.7.

15
You can set up and use one or more email accounts from your
tablet. You will need to have a wi connection to set up or use
email.
SETTING UP AN EXISTING EMAIL ACCOUNT
If you already have an email account you can set this up on your
tablet.
You will need to know the email address and login password for
your account before starting.
Navigate to the Home Page.•
Touch the ‘Email’ icon.•
If no email accounts have been set up on your tablet as yet, the email
setup screen will be shown with a keyboard.
Enter your email address and password in the boxes •
provided.
Press the ‘Next’ icon when you are ready.•
Your login and incoming server settings (for messages you receive)
will be conrmed on the next screen.
Touch ‘Next’ if these are correct.•
Your tablet will now check the settings.
If the server settings are correct, the outgoing server settings (for
messages you send) will be shown.
Touch ‘Next’ if these are correct.•
If the outgoing server settings are correct you will now see an options
screen for the account you just created.
Set the options as you would like them and touch ‘Next’ when •
you are ready.
The nal setup screen is shown with options you can choose for
account naming.
Correct these details if necessary and touch ‘Next’ when you •
are ready.
You will be taken to the Email app screen that displays messages in
your Inbox and where you compose new messages.
If your login or server settings are found to be incorrect:
Check and re-enter the details you have used when •
prompted.
If you receive the same message a second time, there is no point to
continue setting up the account as your login details may not be
right.
Make a note of the information reported as incorrect, then •
contact your email service provider and ask them to send
you login or server details that will enable you to set up your
account. If the problem reported is server setup, you may nd
these details on your email service provider’s website.
EMAIL
IF YOU DON’T HAVE AN EMAIL ACCOUNT
Most users will already have acquired an email account when
setting up an Internet connection at home.
If this is not the case you may also have created a Google identity
for the Google Play store which comes with a ‘gmail.com’ email
address.
Either of the above email addresses will be suitable to set up an
email account on your tablet.
If you don’t have an email account, you can browse the Internet to
nd a suitable email service provider and set up an account. Once
you have the account access details, you can follow the instructions
above to set email up on your tablet.
16
RECEIVING AND SENDING EMAIL
Once you have set up your email account you are ready to receive
or send email.
Navigate to the Home Page.•
Touch the ‘Email’ icon.•
If your email accounts are live you will now see the email Inbox
summary of messages you have received.
Reading a message:
Touch the message you want to read.•
Sending a message:
Touch the ‘New message’ icon.•
You can now enter the email address, subject and message text that
you want to send.
Touch the ‘SEND’ icon at the top of the screen when your •
message is ready to go.
Synchronising email:
Your email will send and receive periodically. The default time for
this is to check for mail every 15 minutes.
You can change this setting by opening the email settings pane
(touch ) or you can manually send and receive by touching the
email sync icon .
nobody
nobody@gmail.com
a
b
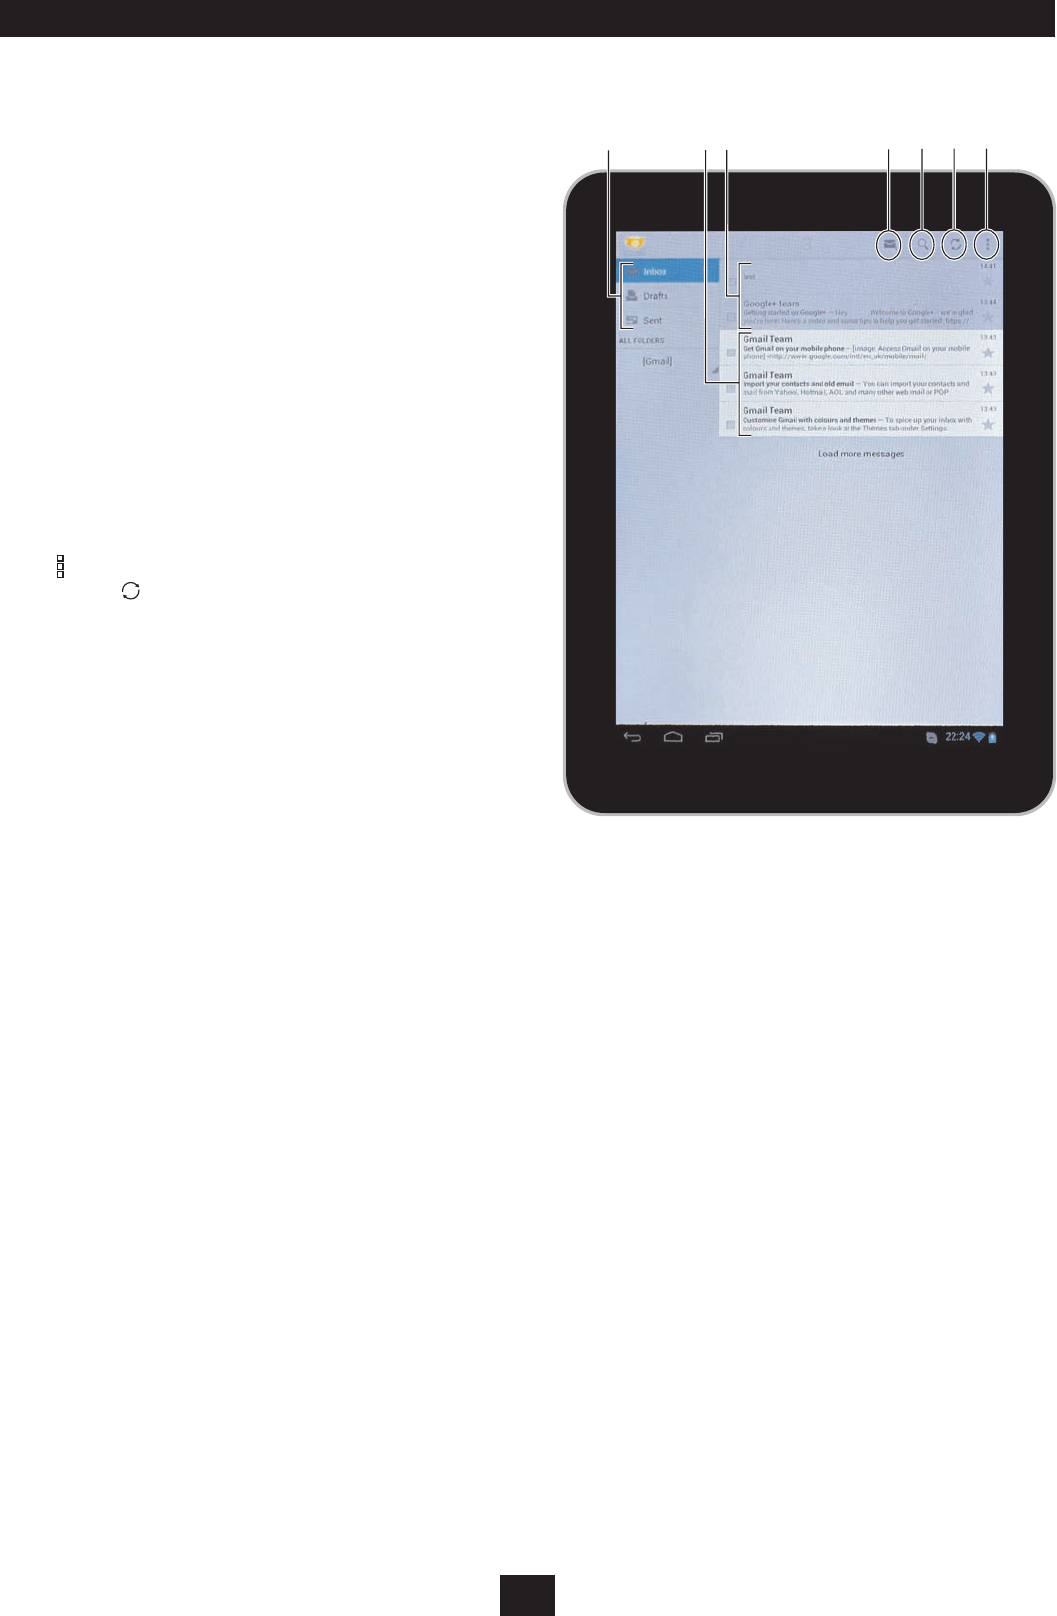
cdefg
Mail folders.1.
Unread email.2.
Read email.3.
New message icon. Touch to send a new email4.
Search your email folders for text that you enter.5.
Sync your email (send and receive).6.
Open email settings.7.
EMAIL
EMAIL INBOX
17
On your tablet you can read ebooks that you have downloaded
on-line from the Internet or Google Play store.
Book reading apps:
When you download books from the Google Play store you may be
prompted to download the Google Play book reader.
If you want to read books from the store, follow the prompts •
to download and install the reader.
Once the reader is installed, you can read books you have downloaded
from the store.
If you download books from other on-line stores, they may require
a dierent reader.
In this case, identify the reader app that you need and install •
it.
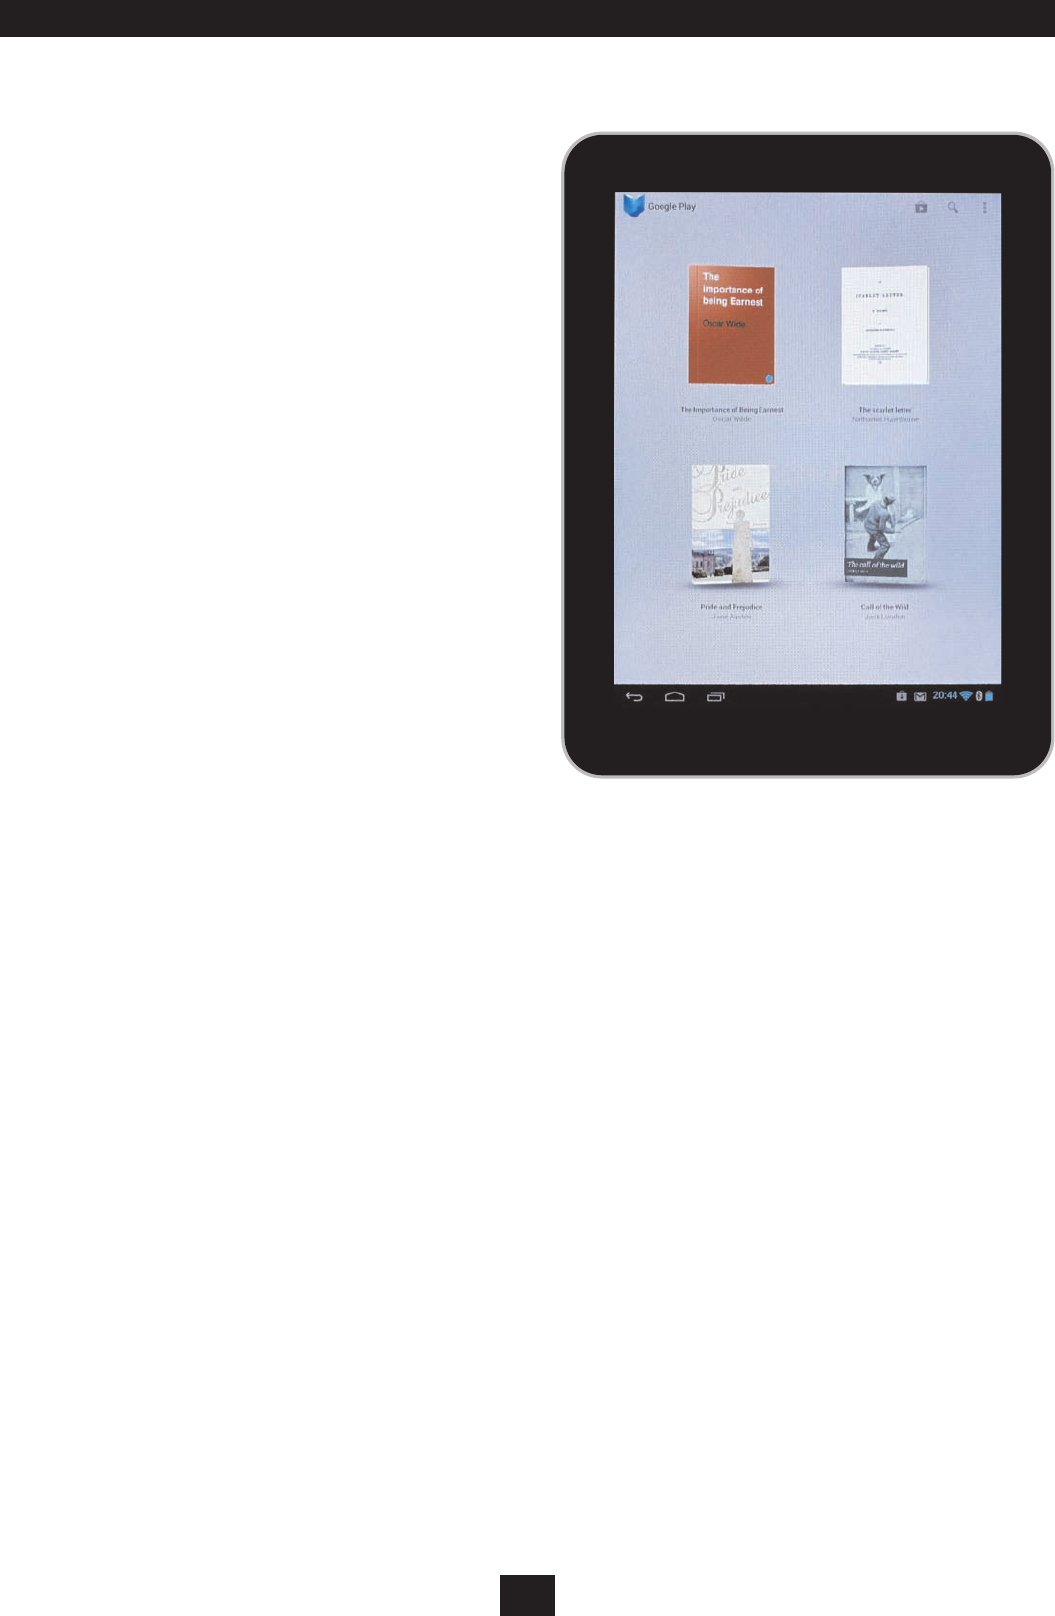
The example screen shows the Google Play book reader.
READING BOOKS
BOOK READER (Example shown)
18
DUAL CAMERAS
Your tablet includes two cameras, one on the back panel and one
forward-facing positioned above the screen.
Both cameras can be used for taking photos. The screen mounted
camera can also be used for video phone calls and messaging
(suitable applications will be required).
USING THE CAMERAS
Navigate to the Home Page.•
Touch the Camera icon.•
The camera application will open.
Touch the Camera selector icon if you want to switch between •
the back and front camera.
The display will show the photo you are about to take, there are
also controls to set the zoom level, access camera settings and to
set the operational mode.
Selecting the operational mode:
Touch one of the mode icons to select the option you want from -
Still photo (in Still mode the shutter button is blue).•
Movie (in Movie mode the shutter button is red).•
Panorama (in Panorama mode the shutter button is green).•
TAKING STILL PHOTOS
You will always get a better photo if you set up the camera carefully
before taking the photo.
Rotate the tablet into portrait or landscape orientation to best •
t the photo you are taking.
If the colour balance of the photo is not correct, you may •
prefer to open the camera settings pane and use manual
white balance setting for the light conditions you are in.
NOTE: In the settings pane you can also choose a memory
location to store the photo you are taking.
Set the zoom control so that the photo lls the frame on the •
screen nicely.
Hold the tablet steady and level. Making sure your ngers •
are clear of the lens on the back side of the tablet, touch the
shutter button to take the photo.
The photo will be taken and a thumbnail image will appear at the top
of the control pane.
MAKING A MOVIE
Open the camera application.•
Touch the ‘Video’ mode icon.•
The shutter button will change to red.
In the settings pane for Videos you can choose to manually set •
the white balance, you can also choose to take a time-lapse
movie by setting a time-frame between one and ten seconds
for each frame.
Set the zoom control so that the photo lls the frame on the •
screen nicely.
Hold the tablet steady and level. Making sure your ngers •
are clear of the lens on the back side of the tablet, touch the
shutter button to start the movie recording.
Video and sound will record until you touch the shutter button again
to stop recording.
TAKING PHOTOS
adg h i
ef
bc
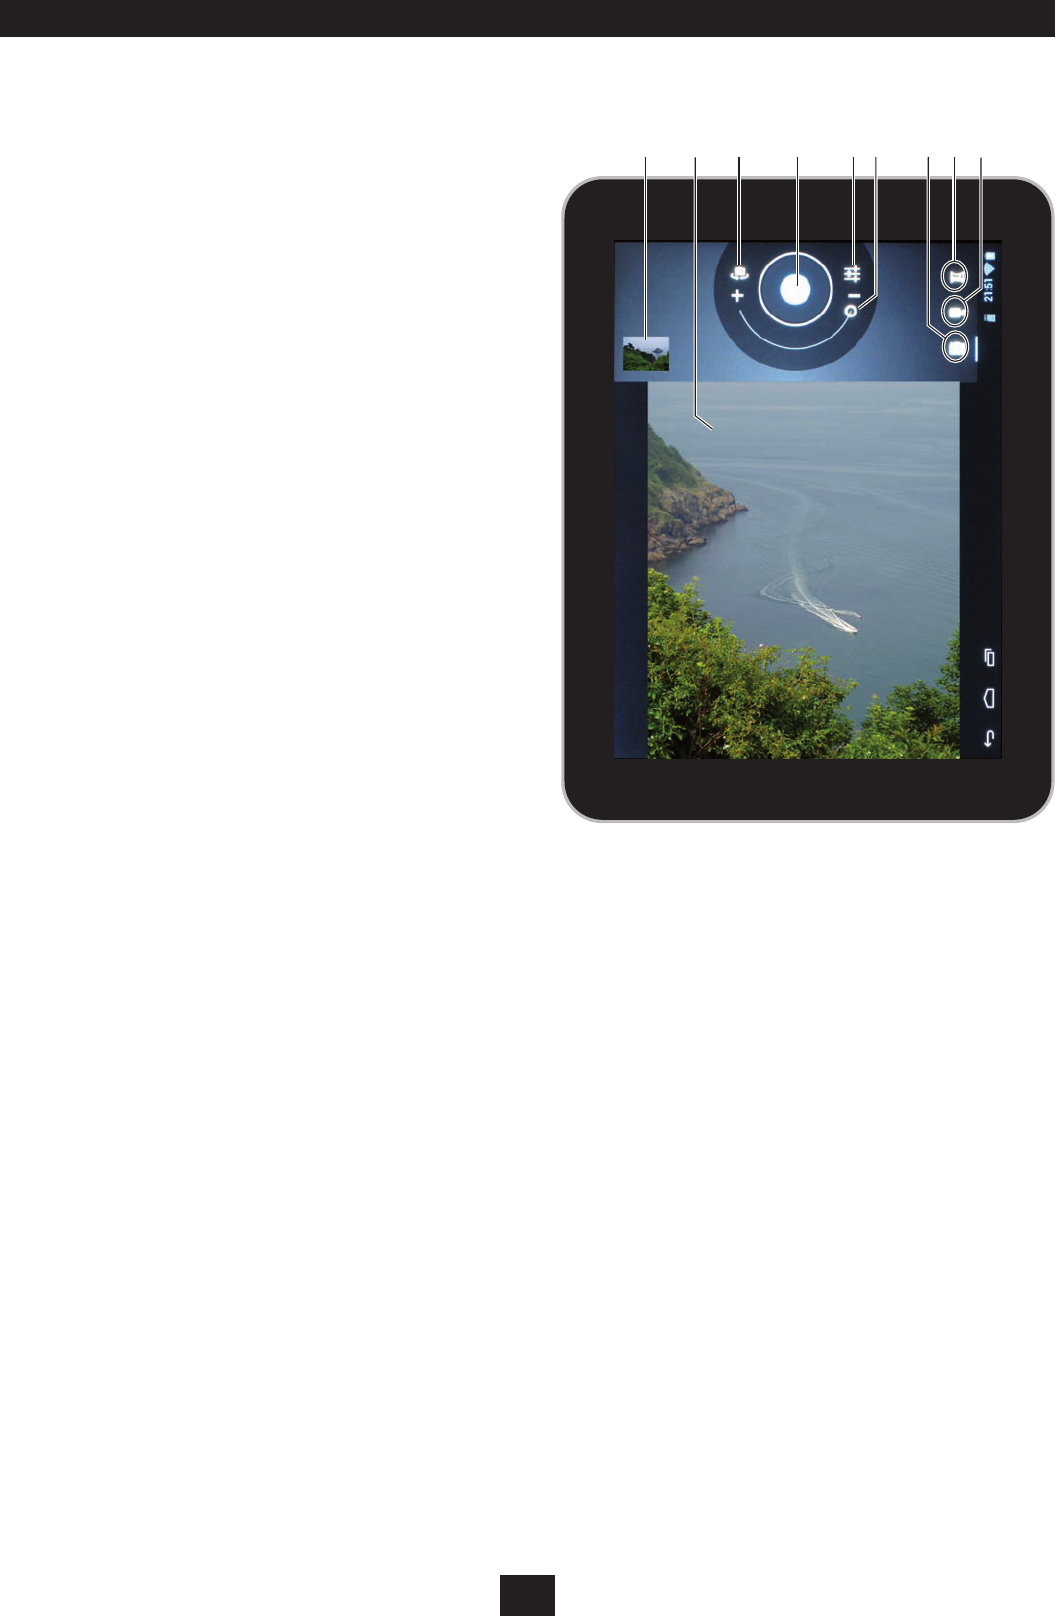
CAMERA SCREEN (Example shown)
Thumbnail of the last picture you took.1.
Viewnder of the picture you are taking.2.
Camera selector. Touch to select the front or back camera.3.
The shutter. Touch here to take a picture.4.
Open the settings menu.5.
Zoom indicator. Drag it from - to + to change zoom settings.6.
Touch for still Photo mode.7.
Touch for Panorama mode.8.
Touch for Video mode.9.
TAKING A PANORAMA PHOTO
A Panorama photo will capture a wide eld of view as you swing
the camera through a wide viewing angle.
Open the camera application.•
Touch the ‘Panorama’ mode icon.•
The shutter button will change to green.
Set up the camera as you would to take a normal photo.•
When you are ready to take the photo, press the shutter •
button.
Holding the tablet steadily at a constant height, watch the •
screen and rotate your position slowly and steadily to capture
the panorama you want.
If you move too quickly a red border will appear around the screen
with the legend ‘too fast’. Adjust your speed accordingly.
The panorama indicator under the photo will show when the full
panorama has been captured.
19
CLOCK AND ALARMS
CLOCK APPLICATION
You can use the clock application to display the time in large format
on the screen.
In the clock application you can also enable multiple alarms to
wake or alert you at dierent preset times.
To show the clock display or to use the alarms:
Navigate to the Home page.•
Touch the Clock application.•
The screen will show a large format clock.
To dim the clock display if you are using the clock at night:
Touch the display.•
The display will dim.
Touch the display again to restore full brightness.•
NOTE: If your tablet is battery powered, the display will switch
o when the tablet sets to sleep to conserve battery life. If the
charger is connected, the display will stay lit so you can continue
to see the clock display.
USING THE ALARMS
Launch the clock application.•
Touch the alarm icon under the clock display.•
The Alarms pane will open.
In the example shown there are two alarms set. One labelled
Weekends, one labelled Work days. The tick in the checkbox on the
example activates the Work days alarm.
The alarms will still sound if you are using other applications on your
tablet so you can use the alarm to remind you of appointments,
meetings etc while you are working.
Adding an alarm setting:
Touch the ‘+’ icon to add another alarm setting.•
The Set alarm pane will open.
Touch each line on this pane to set this alarm time and to •
choose a label to identify this alarm.
Touch OK when you have nished setting this alarm.•
This alarm will now appear in the Alarms pane. You can activate it/
deactivate it as you need it.
When an alarm sounds:
A screen will open with the options of ‘Snooze’ or ‘Dismiss’.
Touch one of these options.•
If you choose the ‘Snooze’ option, the alarm will sound again after 10
minutes.
If you choose ‘Dismiss’, the alarm will reset, but will remain activated
to sound again on the next day set.
Set alarm
Turn alarm on
OKCancel
Time
Repeat
Ring tone
Label
Default ringtone (Cesium)
Never
10:43
Alarms
Done
Add alarm
07:30
09:00
Sat, Sun
Mon, Tue, Wed, Thu, Fri Work days
Weekends
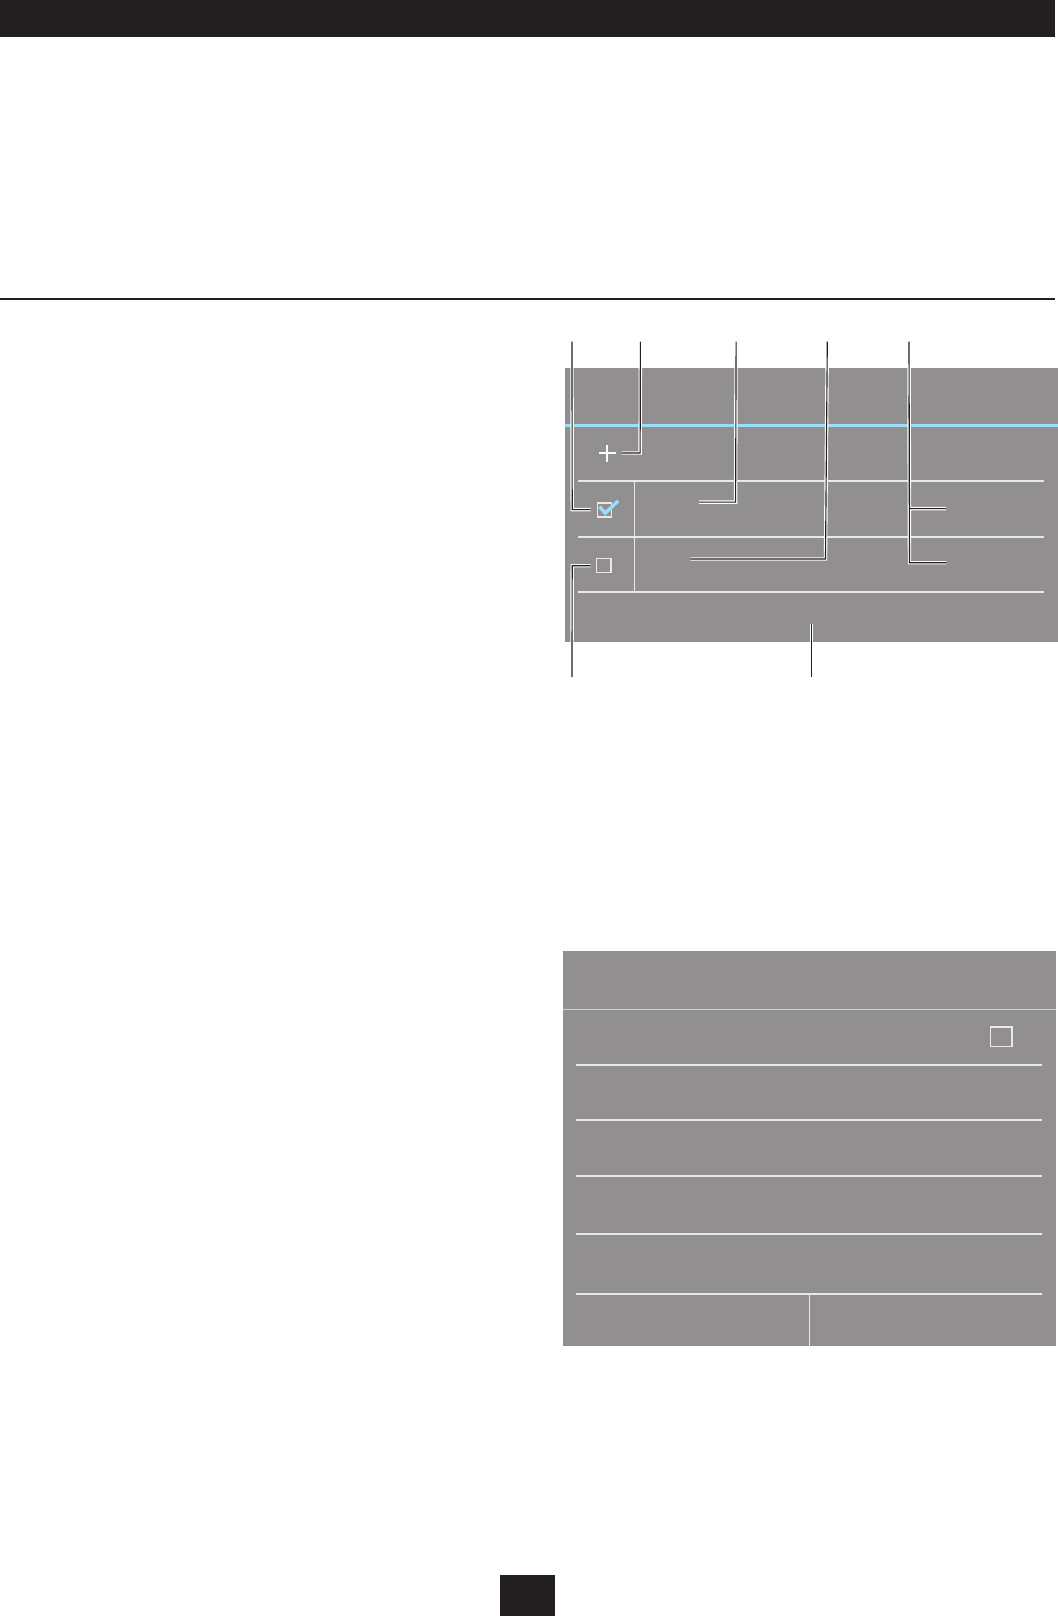
abcd
fg
e
Touch to activate alarm 1.1.
Touch to add another alarm setting.2.
Alarm 1 settings display.3.
Alarm 2 settings display.4.
Alarm labels.5.
Touch to close this screen.6.
Touch to activate alarm 2.7.
20
MUSIC, PHOTO, VIDEO AND COMPUTER DATA FILE TRANSFER
MUSIC, PHOTOS AND VIDEOS
You can play compatible music les, browse digital photos and
watch video les on your tablet.
The music, photos and videos that you play are transferred from
your computer to the ash memory in your tablet via the USB
cable (supplied). Alternatively, you can dock a Micro-SD card into
your tablet that already contains music, photo or video les.
See below for more details of working with a Micro-SD card.
Transferring music, photo and video les via the USB cable:
There are two ways to transfer your les - you can
Sync your tablet to Windows Media Player (recommended •
if you use Windows Media Player to play music etc on your
computer).
or
Use Windows Explorer/My Computer.•
If you plan to use Windows Media Player to sync your tablet, you
should check that you have version 11 (for Windows XP) or version
12 or later (for Vista/Windows 7) installed on your computer. If
necessary, you can upgrade your copy of Windows Media Player by
visiting Microsoft at www.microsoft.com.
Refer to pages 21 - 22 for instructions to sync to Windows Media
Player.
DATA FILES (DOCUMENTS, DIGITAL BOOKS ETC)
Data les such as documents, digital books and spreadsheets are
transferred from your computer using Windows Explorer or My
Computer.
If you have installed suitable applications you can transfer word-
processor documents, spreadsheets or presentations to view on
your tablet.
Refer to pages 20 - 23 for instructions to transfer data les.
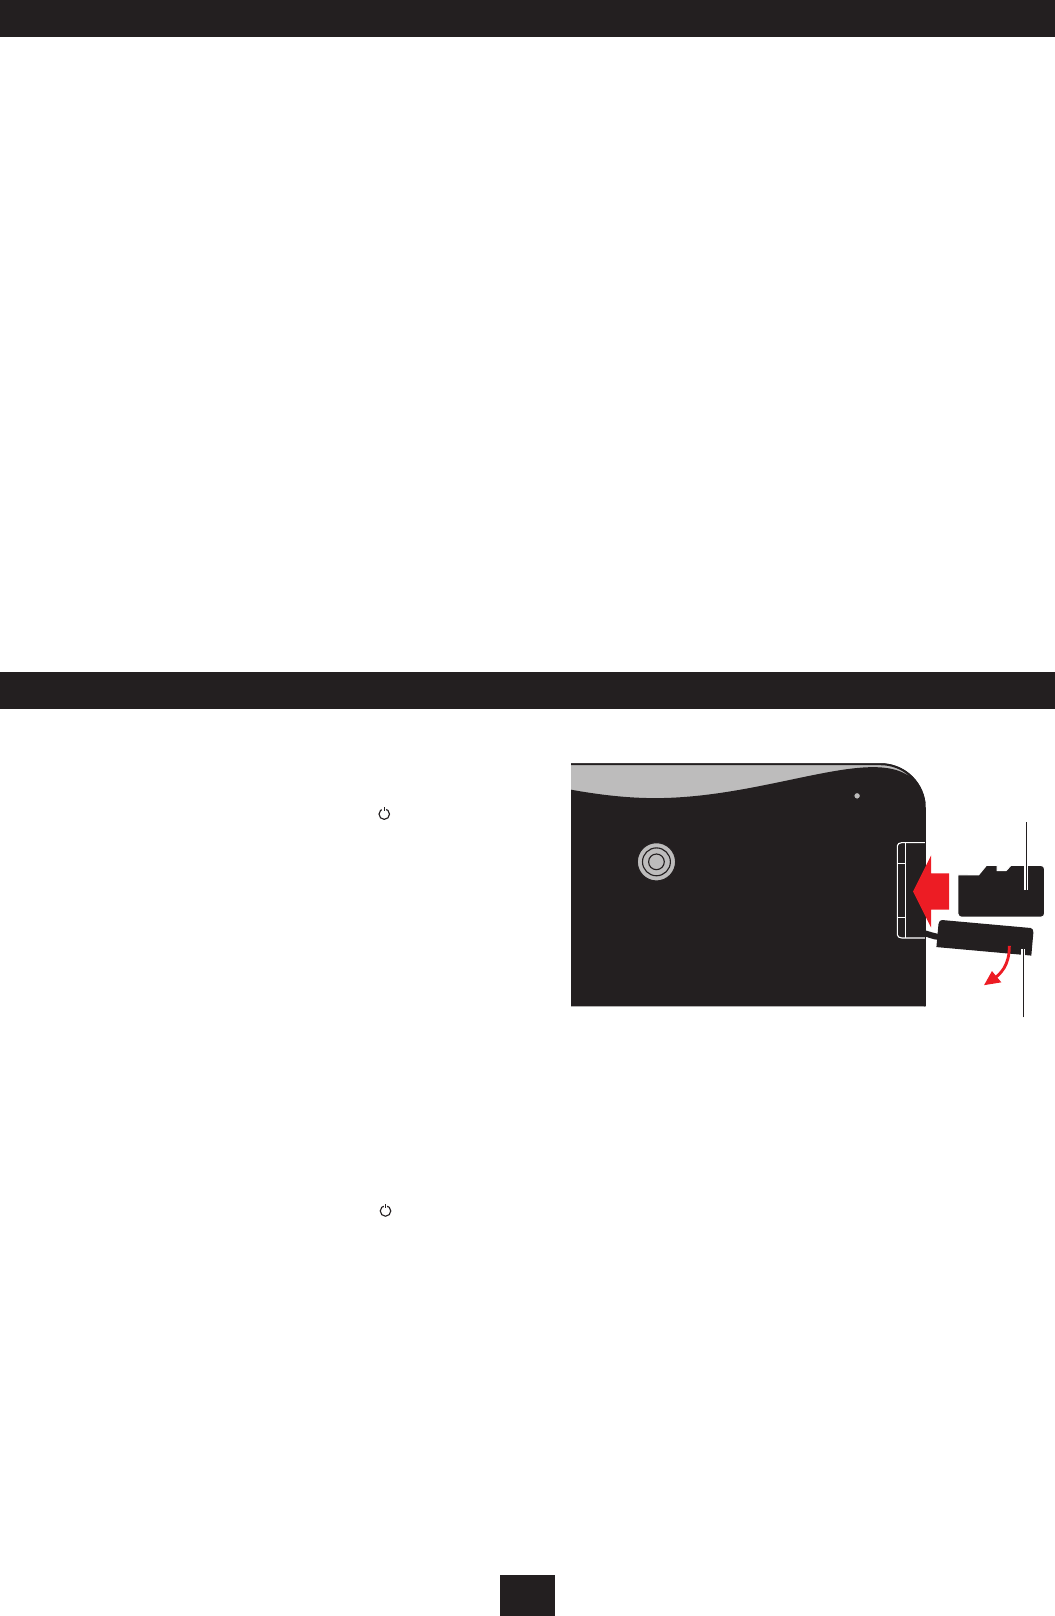
DOCKING A MICRO-SD CARD
You can dock a Micro-SD card to add up to 32GB additional memory
storage to your tablet.
Docking a Micro-SD card:
Before docking the card, press and hold the • Sleep/Power
button to switch the power o.
Locate the cover over the Micro-SD port.•
Gently open the cover.•
Insert the Micro-SD card into the port.•
The Micro-SD card is polarised so must only be inserted as shown in
the diagram.
Press the Micro-SD card into the port until it clicks into place.•
Close the cover.•
Switch on the power.•
You can now use the expanded memory on your Micro-SD card.
Removing a docked Micro-SD card:
CAUTION: You may have applications, data and media les stored
on a Micro-SD card. These will not be available for use on your
tablet if you remove the card.
Before removing the card, press and hold the • Sleep/Power
button to switch the power o.
Gently open the cover.•
Press the tip of the Micro-SD card.•
The Micro-SD card will pop out of the dock slightly.
Remove the card from the dock.•
Close the cover.•
Switch on the power.•
Micro-SD card
Cover
21
Drag an album into the sync pane
The sync pane appears when the tablet is connected
Drag an album into the sync pane
technika8 -...
tesco
1.8 GB
1.2 GB remaining
Drag items here
to create a list to sync to
technika8 - SD Card’
to ‘KD’.
Drag a track into the sync pane
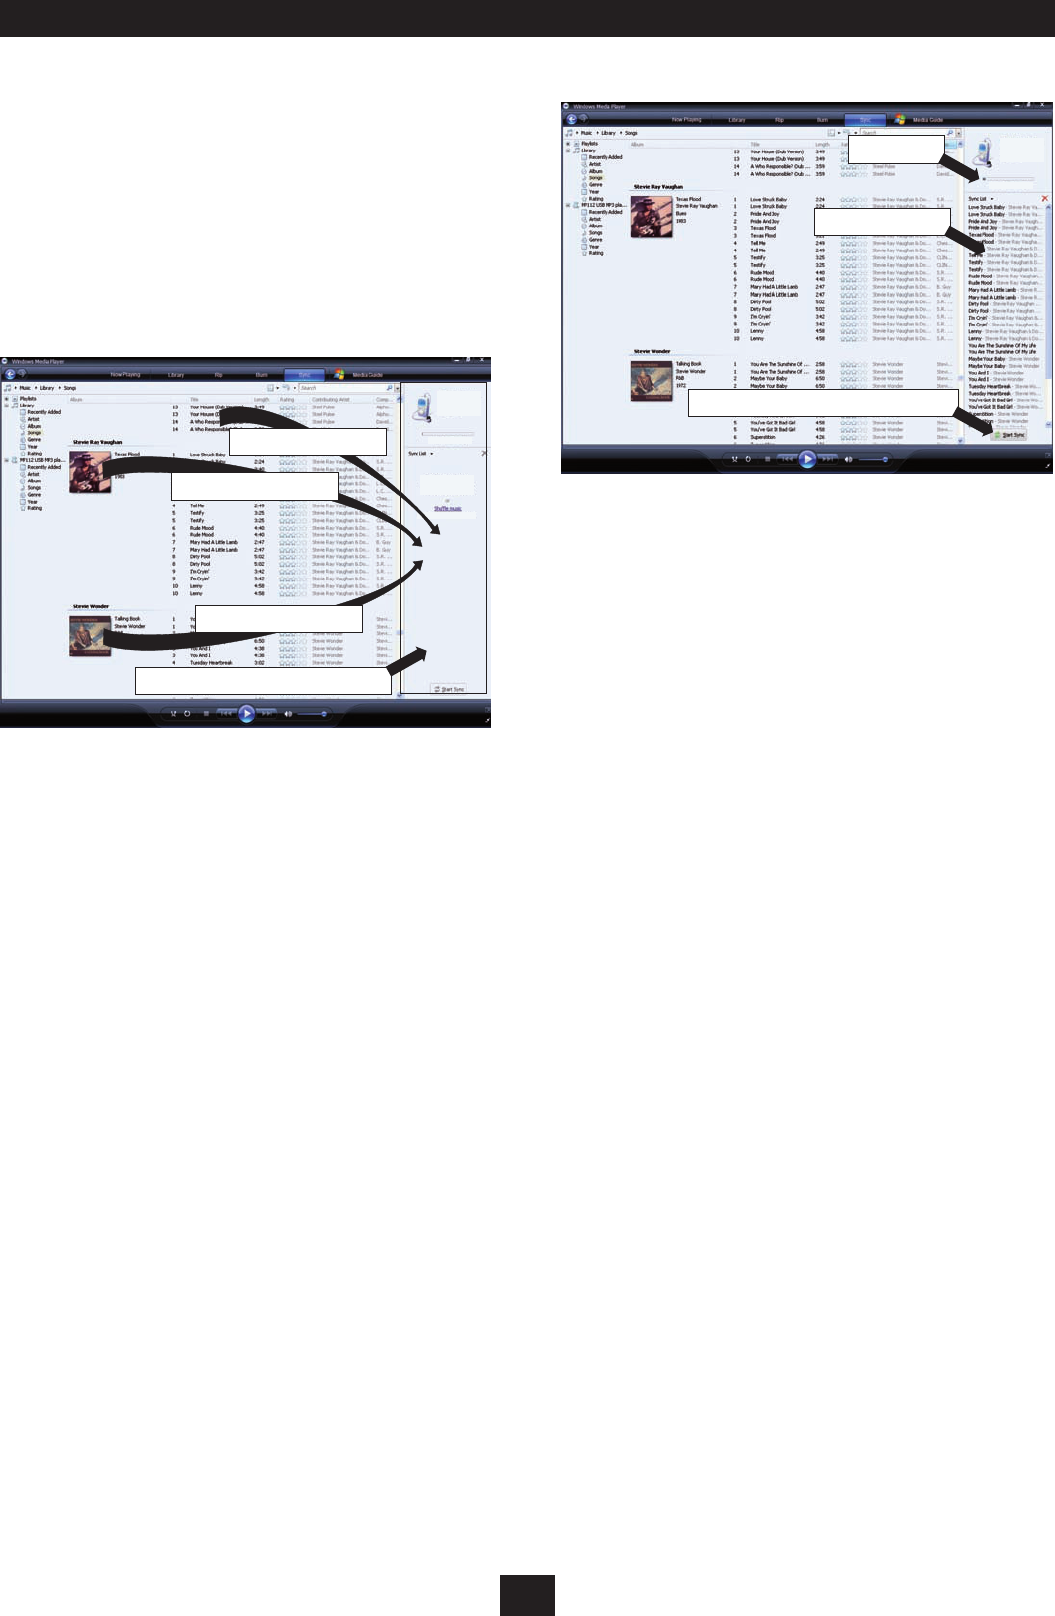
TRANSFERRING MUSIC FROM A WINDOWS MEDIA PLAYER LIBRARY
You can transfer music to your tablet from the Windows Media
Player library on your computer using Windows Media Player
version 11 or later.
Switch on your computer.•
Open Windows Media Player.•
Connect the USB cable (supplied) to your tablet.•
Connect the other end of the cable to a convenient USB port •
on your computer.
After a short delay, a window will open on the right of the Windows
Media Player display on your computer titled ‘Sync List’.
In the main library, click on the albums or tracks that you want •
to transfer and drag them across to the sync list.
List of tracks ready to sync
Click the Start Sync button to copy the les to the tablet
Memory available
3.2 GB remaining
1.2 GB remaining
technika8 -...
tesco
1.8 GB
NOTE: You can drag individual tracks from the track list or click on
the album symbol to select an entire album.
When you have added all the les you want to transfer, press •
the ‘Start Sync’ button at the bottom of the sync list (version
11) or at the top of the sync list (version 12).
Synchronisation will start as Windows Media Player copies the les to
your tablet. Progress bars display synchronisation progress. Leave the
tablet docked to the computer until synchronisation is nished.
NOTE: Synchronisation may take some time if you are copying a
large number of les to the tablet.
When synchronisation is complete, a message will be displayed to
conrm you can disconnect.
Unplug the tablet.•
The display above the sync list will show the available memory in
your tablet.
22
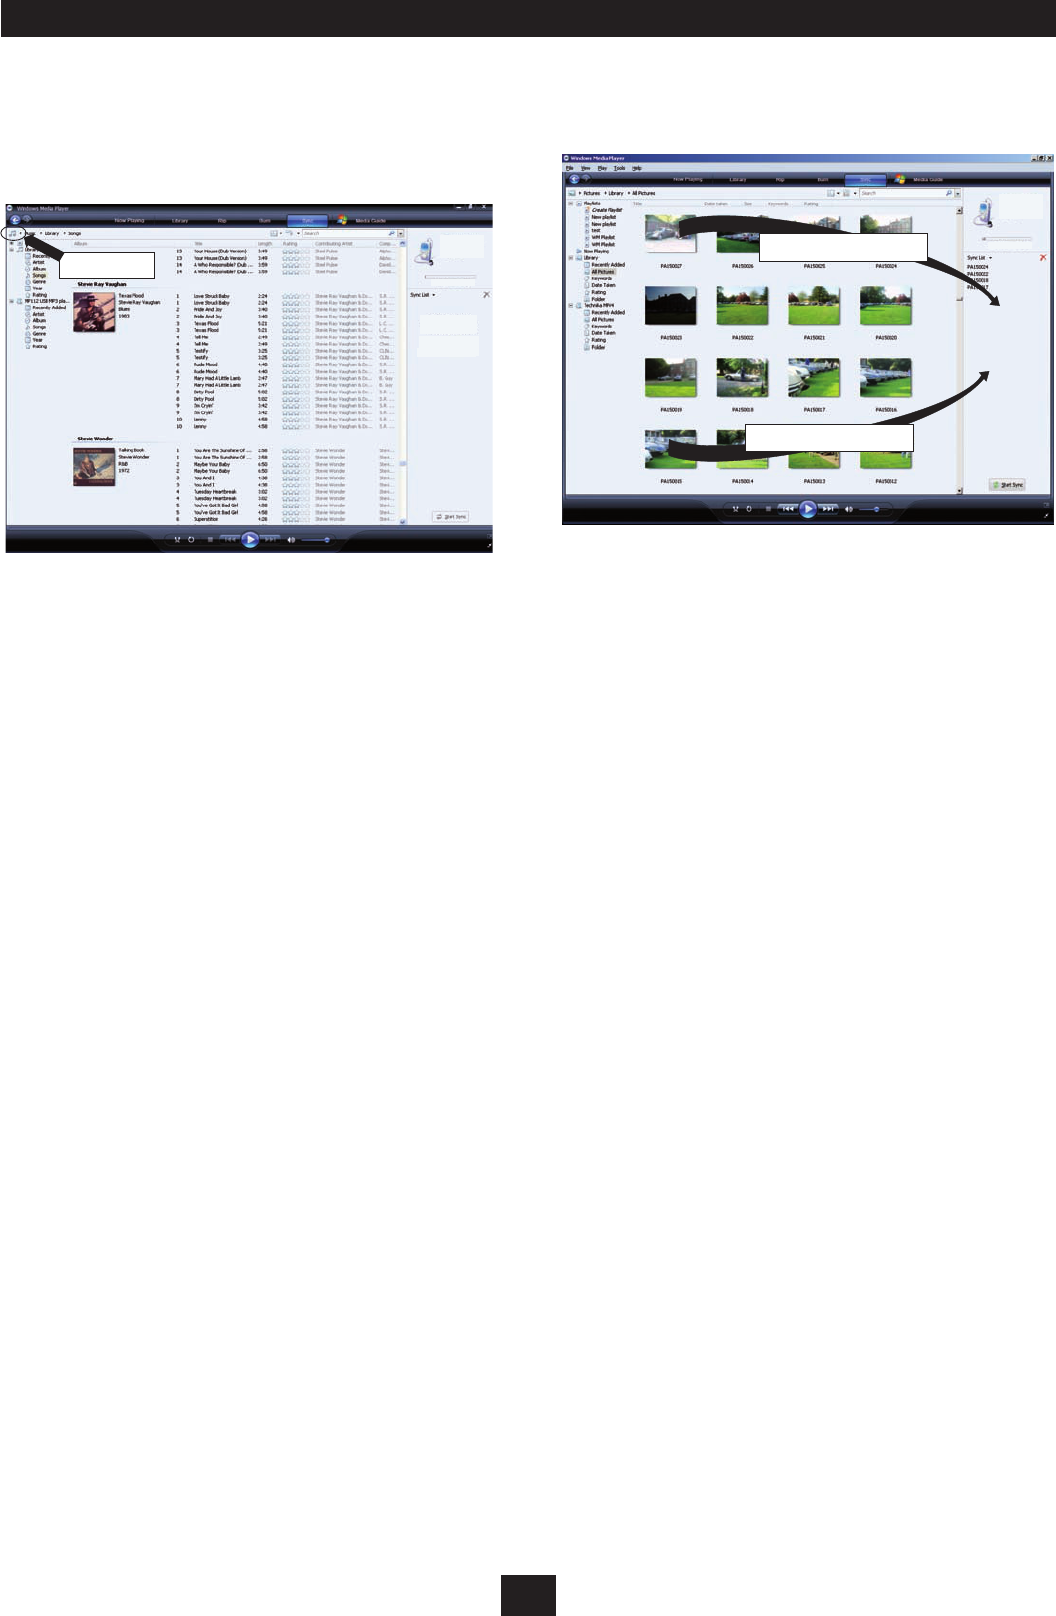
You can also switch the Windows Media Player screen to display a
library of the Pictures or Videos stored on your computer.
To change between libraries, click on the Media Select icon at •
the top left of the screen to drop down a selection menu for
dierent media types.
You can then choose to display pictures or videos.
TRANSFERRING PHOTOS AND VIDEOS FROM A WINDOWS MEDIA PLAYER LIBRARY
Drag pictures into the sync pane
Drag pictures into the sync pane
1.2 GB remaining
technika8 -...
tesco
1.8 GB
Media select
1.2 GB remaining
technika8 -...
tesco
1.8 GB
Drag items here
to create a list to sync to
technika8 - SD Card’
Windows Media Player will be factory set to display pictures stored
in the ‘My Pictures’ folder on your computer and videos stored in
the ‘My Videos’ folder. You can add other folders by clicking the
Library tab and selecting ‘Add to Library’.
When you have added all the les you want to transfer, press •
the ‘Start Sync’ button at the bottom of the sync list.
Synchronisation will start as Windows Media Player copies the les to
your tablet. Progress bars display synchronisation progress. Leave the
tablet docked to the computer until synchronisation is nished.
NOTE: Synchronisation may take some time if you are copying a
large number of les.
When synchronisation is complete, a message will be displayed to
conrm you can disconnect.
Unplug the tablet.•
Picture and video les may be transferred to your tablet in the
same way as music les.
With the library set to the correct mode, begin by dragging •
the les you want to transfer to the sync list.
23
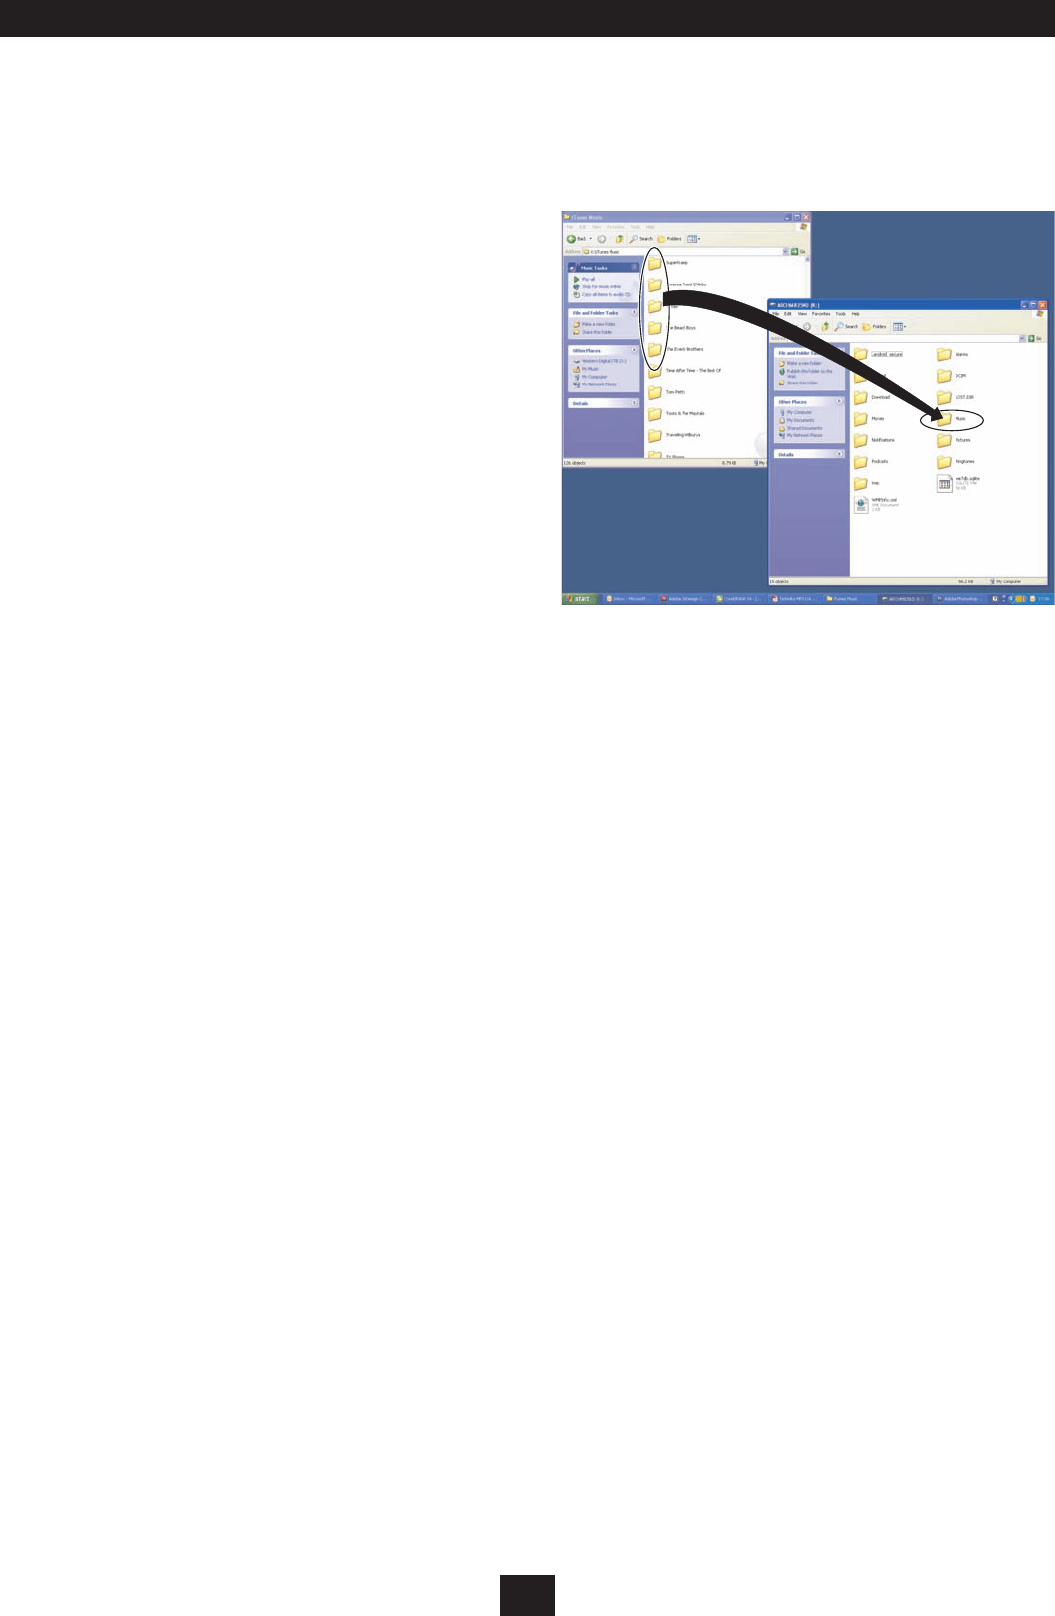
For users familiar with computer le transfer, Windows Explorer can
be used as an alternative to Windows Media Player to transfer les
or folders to your tablet. Windows Explorer is also used to transfer
other data les such as documents, spreadsheets and ebooks.
Switch on the computer.•
In Windows XP, navigate to ‘My Computer’ (Click Start>My •
Computer). In Windows 7, navigate to ‘Computer’ (Click the
Windows logo> Computer)
Connect the USB cable (supplied) to the USB jack on the •
tablet.
Connect the other end of the cable to a convenient USB port •
on your computer.
On your computer, browse to the list of drives.•
After a short delay, the tablet will appear in the drive list as a
‘Removable Disk’ with the identity ARCHM805KD, Technika
Connect.
NOTE: When a Micro-SD card is docked to the tablet to expand the
memory, this will appear as a separate drive.
Double click to open the Technika Connect drive and you will see •
a group of folders. Some of these hold media and other data for
your tablet such as -
MUSIC (for uploading music).•
PICTURES (for digital photos).•
MOVIES (for videos and movies).•
DCIM (for photos and videos taken by the tablet •
camera).
Open a second window of ‘My Computer’.•
TRANSFERRING FILES USING WINDOWS EXPLORER
Uploading les/folders:
Browse to the folders or les you want to copy from your •
computer and drag them onto a folder to upload them.
In the example, music albums are being dragged onto the MUSIC
folder on the tablet. The process is the same for other types of le, but
the destination folder will be dierent.
NOTE: Music les must be in MP3, WAV, APE, OGG or FLAC format,
videos must be in AVI, MP4, MKV, MOV or FLV format and photo
les must be in JPG, BMP, GIF or PNG format.
Creating folders on the tablet from your computer:
You can create new folders on your tablet to organise your •
documents, spreadsheets etc, just as you would on your
computer.
Once you have created the folders you need you can copy your les
to them.
24
The ‘Explorer’ application included on your tablet will manage
the les on your tablet in a similar way to Windows Explorer/My
Computer managing them on your computer.
Using Explorer:
Navigate to the All Applications screen.•
Touch the ‘Explorer’ icon.•
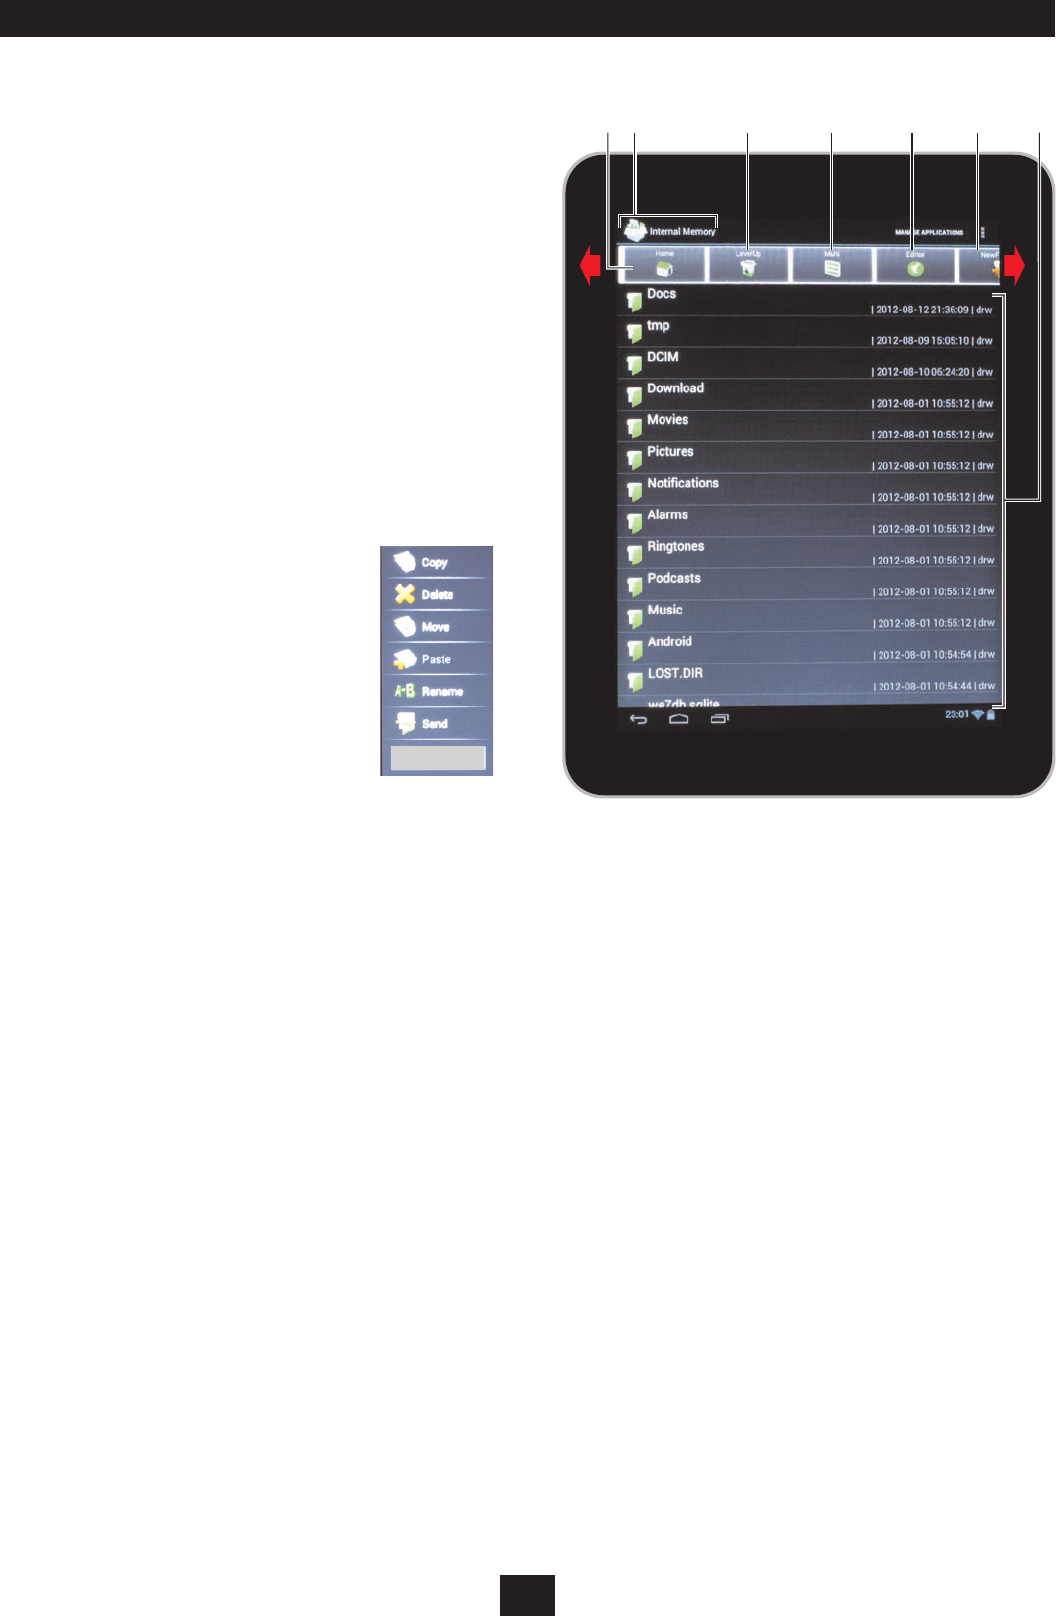
The Explorer screen will open. The rst screen will show you memory
locations available including the Internal Memory on your tablet and
a Micro-SD card (when tted).
Choose a memory location to browse.•
The folders and les in this memory location will be listed as in the
example shown.
Touch a folder in the list to open it.•
The icons in the header bar enable you to navigate and manage
your les.
Touch Home in the header bar to return to the memory •
location list.
Touch Level Up in the header bar to navigate up the folder •
tree.
MANAGING THE FILES ON YOUR TABLET
aefg
bcd
Cancel
Touch Editor in the header bar to open the •
editor pane. You can also touch and hold a
le/folder to open the editor.
You can manage your les with the options on the
editor pane.
Touch New Folder in the Header Bar to create a new folder in •
the current memory location/folder.
EXPLORER (Example shown)
Home tab. Touch to return to the root folder.
1.
The memory location that you are currently browsing.2.
Level up tab. Touch to go up the folder tree by one level.3.
Multi tab.4.
Editor tab. Open the le editor to manage the folders/les you 5.
have selected..
New folder tab. Touch to create a new folder in the current
6.
location.
Main window display of folders and les.
7.
NOTE: You can slide the toolbar to reveal additional next and back
page tabs.
25
Once you have uploaded music les to your tablet, they will be
available to play.
Navigate to the All applications screen.•
Touch the ‘Play Music’ icon.•
The Music index screen will open. The screen will show you music
albums and tracks that are available to play in all memory locations
on your tablet including a Micro-SD card (when tted).
NOTE: The index screen will only display music albums and tracks
that are in one of the compatible, playable formats of MP3, WAV,
APE, OGG or FLAC.
Music Index toolbar:
The tab at the top of this screen enables you to change the way
your music is displayed.
Touch the tab and select Recent, Albums, Artists, Songs, •
Playlists or Genres to change to the display you want.
Your music will be sorted in the way you selected.
Playing a complete album, all songs by an artist or a playlist:
Touch and hold an entry in the Music index (this may be an •
album, artist’s name or a playlist).
The Music function pane will open.
Touch the Play tab to play the album.•
The album will play.
Touch the album again and the Now playing screen will be displayed.
Playing a single track:
Continue browsing the music index until you reach the list of •
tracks you want.
Touch the track you want to play.•
The track will play and the Now playing screen will be displayed. If the
track is part of an album, the album will continue to play when the
track has nished.
The Music function pane:
The music function pane can be used to play any entry from the
music index, and also for some additional functions.
Touch and hold an entry in the Music index (this may be an •
album, artist’s name or a playlist).
The Music function pane will open.
The options available in this pane are shown here.
PLAYING MUSIC
Play
Add to queue
Add to playlist
More by artist
Shop for artist
Play the track/album
Touch this tab to add this
track/album to the queue
Touch this tab to add an item
to a playlist
Touch this tab to see more
music by this artist
Touch this tab to visit the shop
for other music by this artist
ab
f egh
d
c
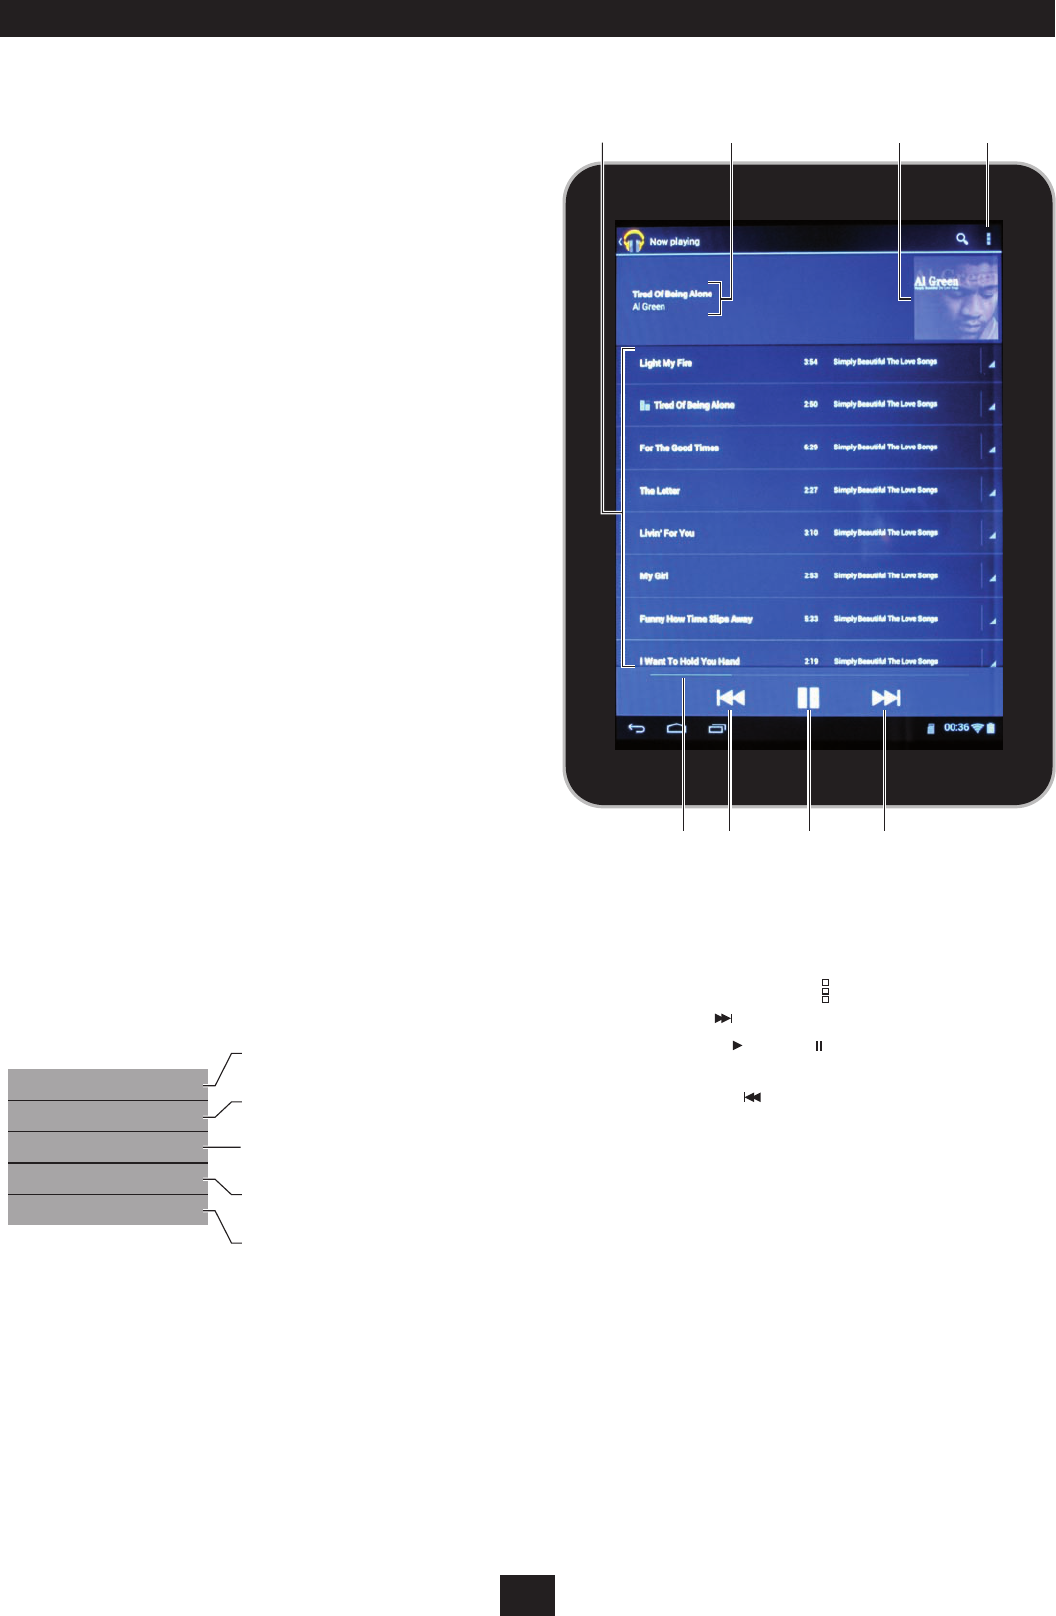
NOW PLAYING SCREEN (Example shown)
Tracks now playing.1.
Artist and album information.2.
Album artwork display (displayed when an artwork image is 3.
available).
Touch the Music settings icon
4. to see more settings options.
Touch the Next 5. icon to select the next track.
Touch the or Play 6. or Pause icon to step between play and
pause mode.
Touch the Previous
7. icon to select the previous track.
Progress indicator bargraph.8.
26
You can view photos you have taken with the tablet and also
photos you have copied to the tablet from your computer.
Navigate to the All Applications screen.•
Touch the ‘Gallery’ icon.•
The Gallery screen will open. The screen will show you memory
locations available including photos taken by the built-in camera,
those in the Internal Memory on your tablet and a Micro-SD card
(when tted).
Touch a memory location to browse photos stored in that •
location.
The photos will be displayed as a screen of thumbnails. If there •
are several screens of thumbnails you can slide them across to
browse them.
Viewing photos full-screen:
Touch a thumbnail to view a photo full-screen. You can browse •
the photos by sliding them to the left or right.
Touch a full-screen photo to reveal a toolbar at the top of the •
screen and a strip of selection thumbnails at the bottom of
the screen.
Sharing photos:
Touch the share icon • in the toolbar to share this photo with
friends.
From the share pane you can choose to email the photo or to share it
via social networking.
BROWSING DIGITAL PHOTOS
cd
ab
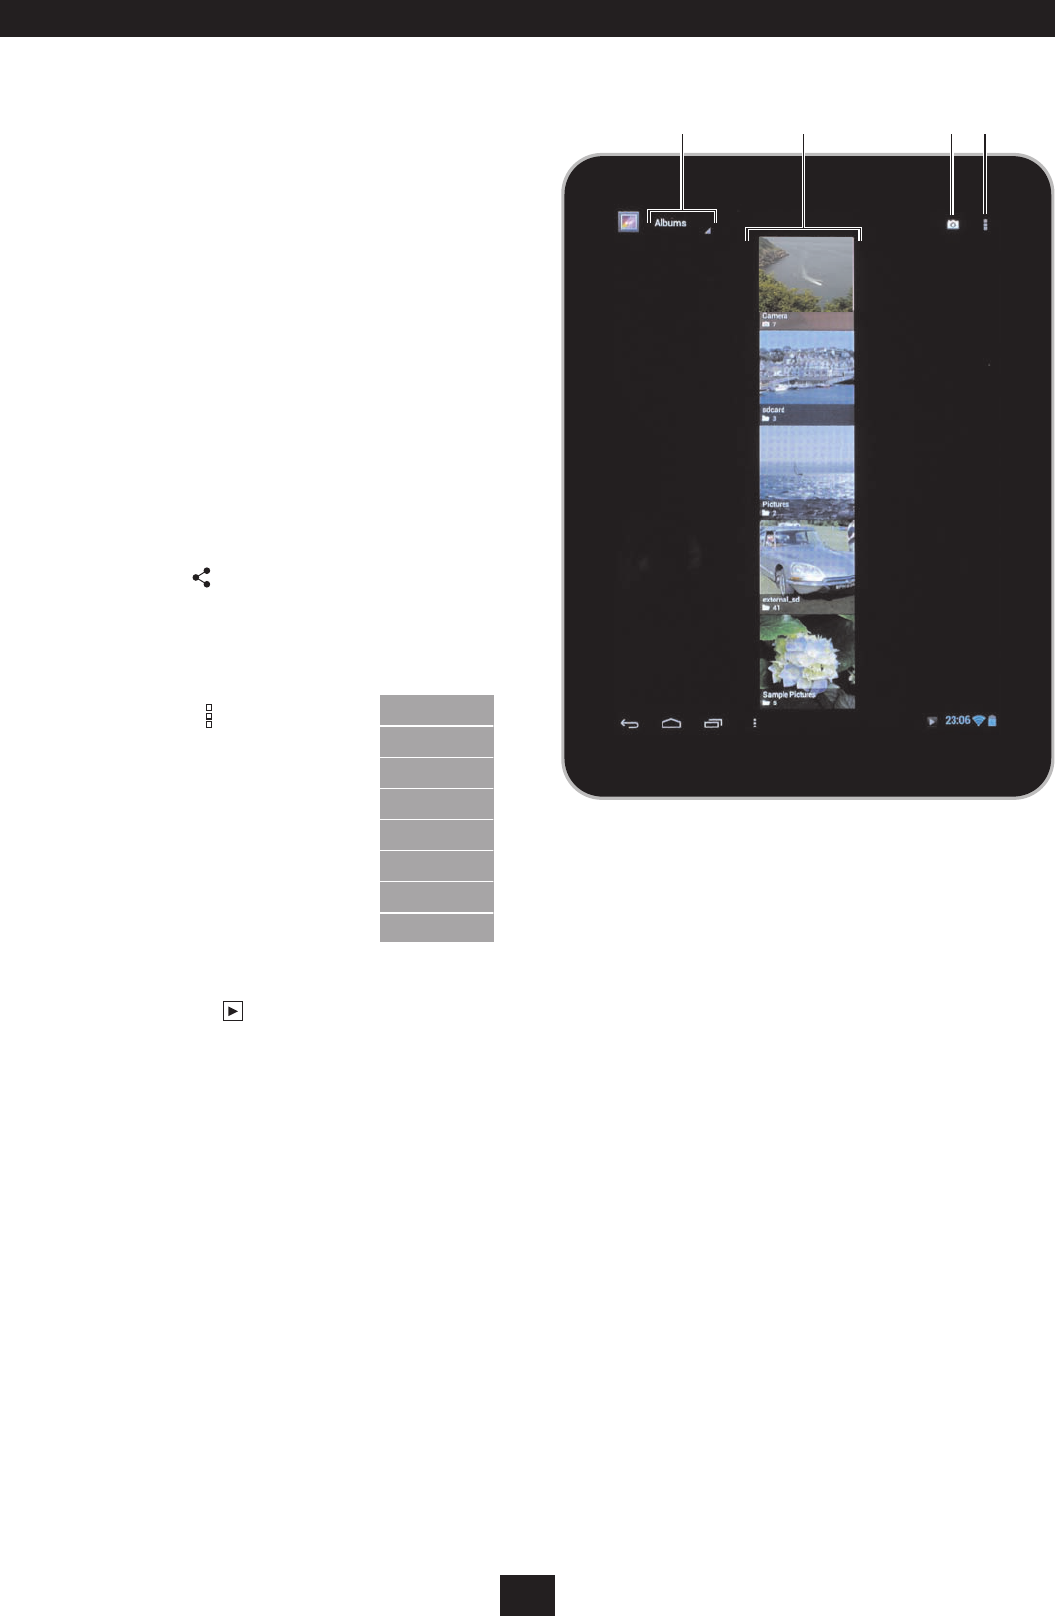
GALLERY (Example shown)
Index tab. You can choose to look at your pictures sorted by 1.
Albums, Locations, Times, People or Tags.
Thumbnails to show photo storage locations. Locations may
2.
typically be photos taken by the camera, photos stored in
folders in the tablet’s memory, photos stored on an external
SD card etc.
Camera tab. Touch this tab to switch to the camera and take
3.
a photo.
Gallery settings. Touch this tab to open the Gallery settings
4.
pane.
Slideshow
Edit
Rotate left
Rotate right
Crop
Details
Set picture as
Details
Editing photos:
Touch the tools icon • in the toolbar to
open the edit pane.
You can edit the photo displayed by touching the
edit option you want on the edit pane.
Starting a slideshow:
Navigate to the thumbnail screen.•
Touch the slideshow icon • at the top of the thumbnail screen
to start a slideshow of all photos in the current location.
The slideshow will be displayed full-screen.
Touch the screen to stop the slideshow and return to the •
thumbnail screen.
27
You can watch movies you have lmed with the tablet and also
movies you have copied to the tablet from your computer.
Navigate to the All applications screen.•
Touch the ‘Video’ icon.•
The Video listing will open. The screen will show you videos available
to play in all memory locations, including videos lmed on the built-in
camera.
Touch a video in the listing to watch it.•
The video will start to play immediately. When the video ends, the next
video will start to play.
Opening the video toolbar:
Touch the screen while a video is playing to open the video •
toolbar at the bottom of the screen.
An example of the video screen is shown with the toolbar open.
WATCHING VIDEOS AND MOVIES
b
a
cdfghi1!1) 1@
e
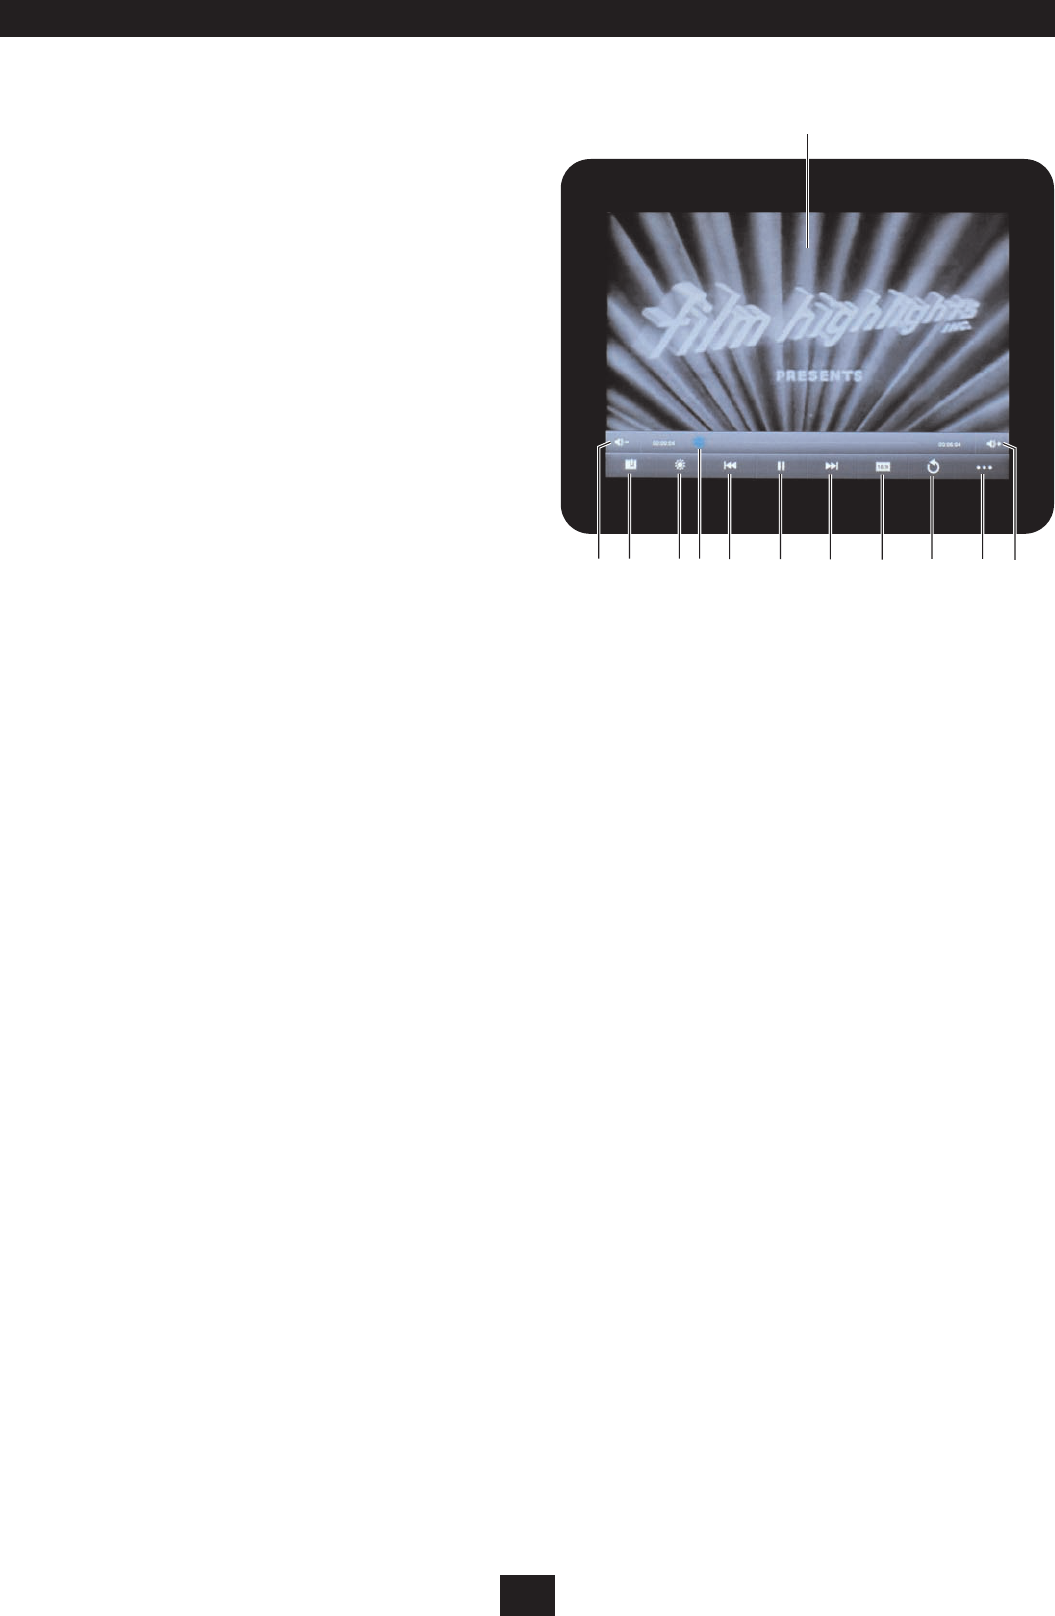
MOVIE DISPLAY (Example shown, including toolbar)
Movie display screen.1.
Touch to turn the volume down.2.
Touch to add a bookmark at places you would like to return.3.
Touch repeatedly to adjust the screen brightness in steps.4.
Progress indicator. You can also drag the progress indicator to 5.
watch from a dierent place in the movie.
Touch to select the previous movie. Touch and hold to fast-
6.
search backwards.
Touch to switch between play and pause.
7.
Touch to select the next movie. Touch and hold to fast-search 8.
forwards.
Touch repeatedly to step through the screen formats
9.
available.
Touch to return to the Video listing.
10.
Touch to open the Selection menu with more options.11.
Touch to turn the volume up.12.
28
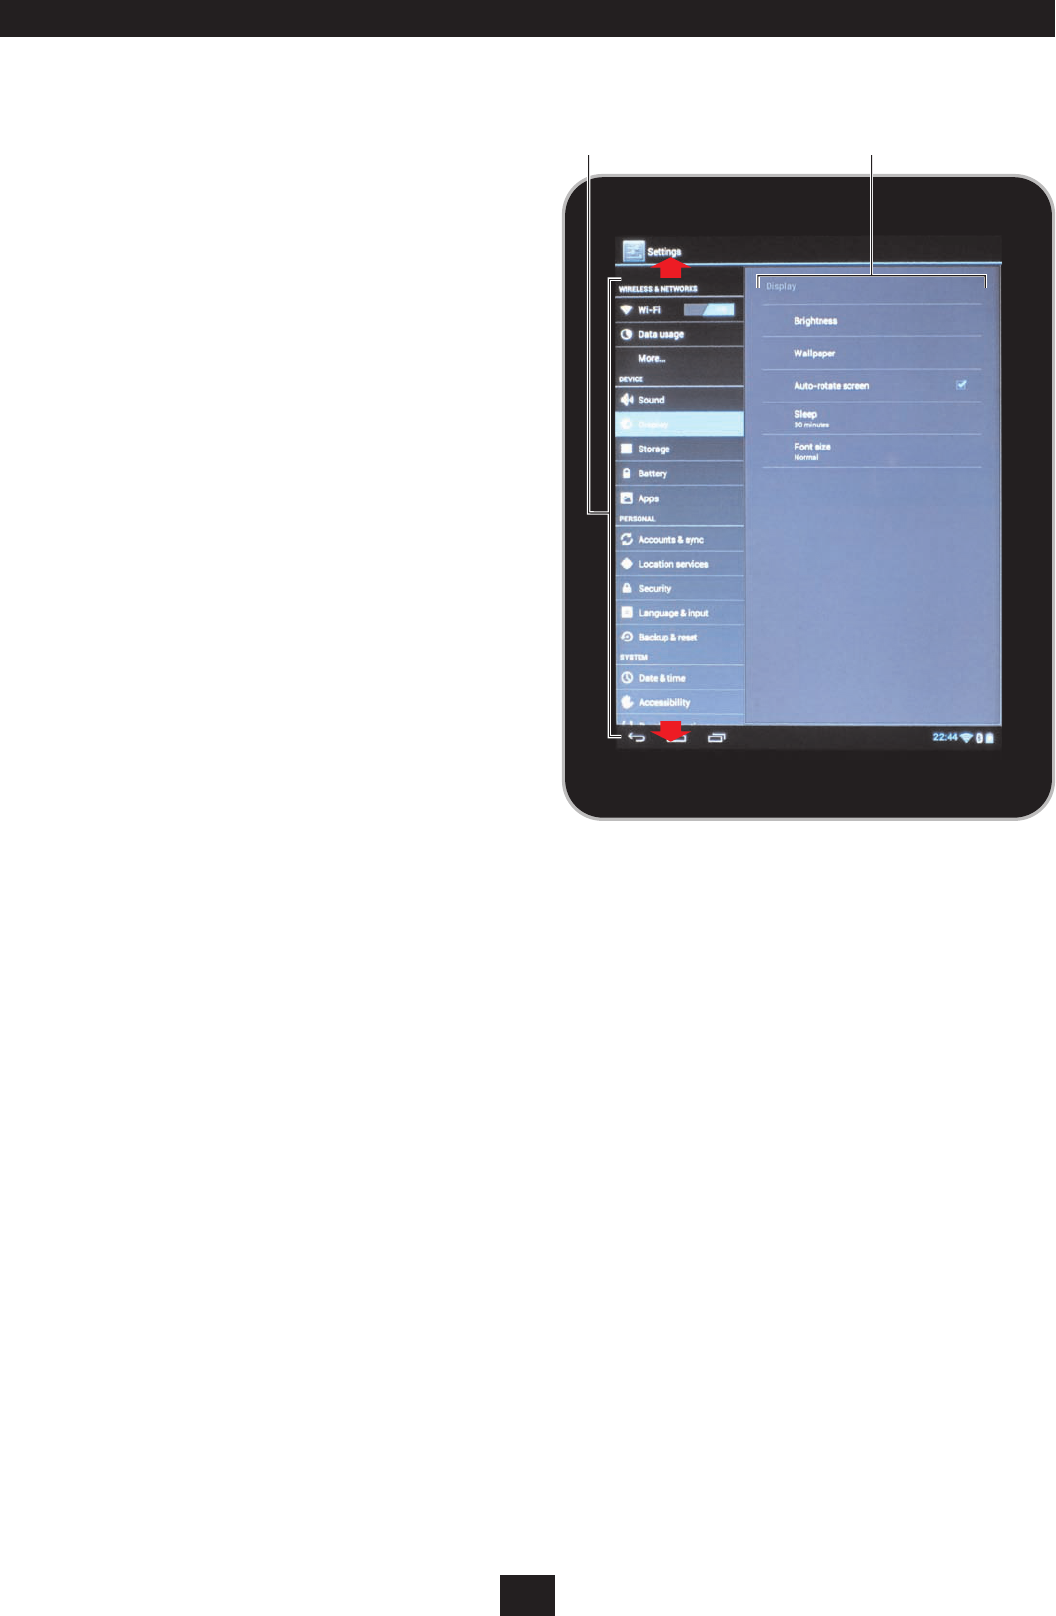
SETTINGS
The settings screens of your tablet enable you to set up and
personalise your tablet to your own requirements.
Opening the Settings screen from the Home Page:
Navigate to the Home page.•
Touch the Settings icon.•
The Settings screen will open. More settings are available by dragging
the index up or down.
Touch the setting you want to change in the setting index on •
the left of the screen.
The options for this setting will be shown.
Follow the on-screen prompts to change options to your •
requirements.
The following pages include more information about each group of
settings for your tablet.
ab
SETTINGS DISPLAY (Example shown)
Settings index.1.
Options for the setting selected.2.

29
DEVICE > Sound:
Touch this option to change the settings for sounds generated •
by your tablet in response to actions you take.
On this screen you can enable or disable sounds, change the
notication sound and set the volume for generated sounds.
DEVICE > Display:
Touch this option to change the settings for the display of •
your tablet.
On this screen you can set the brightness, change the background
wallpaper, enable/disable auto-rotation for the screen, set the auto-
sleep time or change the default font size .
DEVICE > Storage:
Touch this option to view a breakdown of the usage of •
memory on your tablet.
DEVICE > Storage > NAND FLASH > Erase Internal Storage:
Navigate to this option to erase the data storage memory on •
your tablet.
CAUTION: Touching this option is not reversible. It will erase all user
data (such as music and photos) stored in the internal memory of
the tablet.
DEVICE > Storage > SD CARD > Unmount SD card:
Navigate to this option if you want to remove the SD card •
from your tablet.
Once the card has been unmounted you can safely remove the card
from your tablet.
DEVICE > Storage > SD CARD > Erase SD card:
Navigate to this option to erase the data storage memory on •
your SD card.
CAUTION: Touching this option will erase all user data including
apps stored in the internal memory of a docked Micro-SD card.
DEVICE > BATTERY:
Touch this option to see the charge status of the battery.•
An estimate of battery life remaining and a graphic illustration of
recent battery charge level are also displayed.
Touch the graph to view more detail.•
DEVICE > APPS:
Touch this option to view a breakdown of the Applications •
installed on your tablet.
You can click on the toolbar on the list header to change the way this
information is presented.
Touch an application in the list to show more information •
about an application.
Other options may be available to setup, move or uninstall the
displayed application.
SETTINGS > WIRELESS & NETWORKS
WIRELESS & NETWORKS > Wi:
Touch this option to see if your tablet is connected to a wireless
network and also to see any other wireless networks that will
connect when you are within range of them.
Touch the ON/OFF button on the Wi-Fi tab to switch wireless •
networking on or o.
The toolbar at the top of the screen includes some more options -
Touch SCAN in the toolbar to initiate a scan for new wireless •
networks.
Touch ADD NETWORK in the toolbar to manually enter the •
details for a wireless network.
Touch the settings icon • to open the Advanced settings
pane.
Here there are more settings to change the way your tablet interacts
with wireless networks.
WIRELESS & NETWORKS > Data usage:
This option displays the wireless bandwidth used by your tablet
over time.
The MOBILE tab is not active in this model.
WIRELESS & NETWORKS > More...:
CAUTION: Do not change any of the settings in this category unless
you fully understand the technologies involved.
Touch the More... tab to open a screen of additional wireless •
settings. These are - VPN, Portable hotspot and WiFi direct.
WIRELESS & NETWORKS > More... > VPN:
Touch the VPN (Virtual Private Network) option to enable your •
tablet to communicate with a remote network.
This option is typically used to connect your tablet to your home or
work network when you are travelling. Setting up and logging into a
remote network are complex tasks. If you want to do this, but have no
experience of setting up a VPN, the help of an IT professional is highly
recommended.
WIRELESS & NETWORKS > More... > Portable hotspot:
The Portable hotspot option is not active in this model.
WIRELESS & NETWORKS > More... > WiFi direct:
Wi-Fi direct is a technology where your tablet will communicate
directly with other network components point-to-point via wi-,
rather than communication via your router/modem. If your tablet
is communicating successfully with your wireless network you
should leave this setting unchanged.
WIRELESS & NETWORKS > More... > Mobile networks
The Mobile networks option is not activated in this model.
SETTINGS > DEVICE

30
Touch this tab to change the settings for time and other •
settings that relate to the operating system of your tablet.
SYSTEM > Date & time:
Touch this tab to set the time or to choose manual time setting •
and set the clock.
You can also choose dierent formats for the time and date •
displays.
SYSTEM > Accessibility:
Touch this tab to personalise accessibility settings to make •
your tablet easier to use.
SYSTEM > Developer options:
Developer options are provided for the development of apps. If
you are not developing an application you are strongly advised to
leave these settings unchanged.
SYSTEM > About tablet:
Touch this tab to open a screen which will display information •
about the hardware and rmware of your tablet.
SYSTEM > About tablet > System updates:
Touch this tab to display information about the status of the •
rmware on your tablet.
SYSTEM > About tablet > Status:
Touch this tab to display the current status of the battery, •
network and other information.
SYSTEM > About tablet > Legal information:
Touch this tab to display the licenses and legal information •
that are applicable to your tablet and rmware.
SYSTEM > About tablet > Startup Wizard:
Touch this tab to initiate the Startup Wizard.•
Switch o the power (do not set to sleep mode).•
When you next switch on your tablet, the Wizard will automatically
run through the initial sequence of settings that get you started with a
new tablet or after a reset.
PERSONAL > Accounts & sync:
Touch this option to display email and other accounts that are •
setup on your tablet.
Touch an account in the list to display more information about •
an account and to change account or sync settings.
PERSONAL > Location services:
Touch this option to enable or disable notication of your •
location to Google. Location details are used in navigation
apps or to improve search results and other services that
depend on location.
PERSONAL > Security:
This section of settings enables you to set your security preferences
for your tablet.
PERSONAL > Security > SCREEN SECURITY:
Touch this tab to enable/disable a password, PIN or pattern •
that will be needed to unlock your tablet from Sleep mode.
You can choose your method of security and enter the details.
CAUTION: Don’t forget to make a note of the security you put in
place!
PERSONAL > Language & input:
Touch this tab to change language, spelling and keyboard •
options. You can also enable/disable speech-to-text.
PERSONAL > Backup & reset:
Touch this tab to change options for backup and restore of •
your application data, also to erase all personal data on your
tablet.
PERSONAL > Backup & reset > BACKUP & RESTORE:
If you check the ‘Back up my data’ option, your application data, Wi-
Fi passwords and settings will be backed up to Google’s servers.
You can also choose to restore application data automatically.
PERSONAL > Backup & reset > PERSONAL DATA:
Touch the Factory data reset tab to erase all data from the •
internal memory of your tablet.
This will include - Google accounts, System and app data and settings
and downloaded apps.
Check the ‘Erase SD card’ box if you also want to erase music, •
picture and other data from a docked Micro-SD card.
CAUTION: These operations cannot be undone.
SETTINGS > PERSONAL SETTINGS > SYSTEM

31
TROUBLESHOOTING
Unable to browse the Internet:
Go to Settings > WIRELESS & NETWORKS.•
Check that Wi-Fi is switched on in the Wi-Fi tab.•
Check that there is a wireless network connected (wireless •
networks will be listed in the information pane).
If the tablet is not connected to the network, it may be out of wireless
range.
Move closer to the network hub and re-try.•
If the wireless network is connected, but the Internet is not accessible,
it may be that the network is not connecting correctly to the Internet.
Connect a computer to the network and try connecting this •
the Internet.
If the computer will not connect you may need to enlist the help of an
IT professional to check the network.
Unable to play some music, photo or movie les:
Music les of incompatible formats will not be visible when you browse
to play music, photos or videos.
Check that the les you have transferred are compatible with •
your tablet.
There is a list of compatible formats in the specications section.
Unable to use applications that require your location:
Location services may not be switched on.
Go to Settings > PERSONAL > Location services.•
Enable location services. •
Unable to access a Micro-SD card memory:
The Micro-SD card may not be fully inserted.
Switch o the power.•
Open the cover.•
Remove the Micro-SD card and re-insert it.•
Switch on the power.•
Check if the card is accessible.•
If the card is still not accessible, it may be faulty.
Check the card by reading it with a computer.•
Strange behaviour:
Go to Settings > DEVELOPER OPTIONS.•
Check that none of the options have been inadvertently •
selected.
FACTORY RESET
If you encounter problems that you can’t resolve, then you may
prefer to reset your tablet to factory settings.
CAUTION: Resetting your tablet will delete all applications, erase
les from ash memory and erase all passwords and other personal
settings.
Press the • (Sleep/Power) button and hold it down for at least
15 seconds.
The tablet will be reset to factory settings when you next switch
it on.
FCC Warning:
z This device complies with Part 15 of the FCC Rules. Operation is subject to the
following two conditions:
z (1) this device may not cause harmful interference, and
z (2) this device must accept any interference received, including interference that
may cause undesired operation.
z Changes or modifications not expressly approved by the party responsible for
compliance could void the user's authority to operate the equipment.
z NOTE: This equipment has been tested and found to comply with the limits for a
Class B digital device, pursuant to Part 15 of the FCC Rules. These limits are
designed to provide reasonable protection against harmful interference in a
residential installation. This equipment generates, uses and can radiate radio
frequency energy and, if not installed and used in accordance with the
instructions, may cause harmful interference to radio communications. However,
there is no guarantee that interference will not occur in a particular installation. If
this equipment does cause harmful interference to radio or television reception,
which can be determined by turning the equipment off and on, the user is
encouraged to try to correct the interference by one or more of the following
measures:
z -- Reorient or relocate the receiving antenna.
z -- Increase the separation between the equipment and receiver.
z -- Connect the equipment into an outlet on a circuit different from that to which
the receiver is connected.
z -- Consult the dealer or an experienced radio/TV technician for help.
FCC RF warning statement: The device has been evaluated to meet general RF
exposure requirement.The device can be used in portable exposure condition
without restriction.