Arcwave ARC12550 Point To Multipoint Wireless System User Manual ARCi Internet
Arcwave, Inc. Point To Multipoint Wireless System ARCi Internet
Arcwave >
Contents
- 1. User Manual 1 of 2
- 2. User Manual 2 of 2
User Manual 1 of 2

ARCell
Planning and Installation Guide
The ARCell License-Free
Point-To-Multipoint
Wireless Broadband Solution
October 2003
© 2001-2003 Arcwave, Inc., 910 Campisi Way, Suite 1F, Campbell, CA 95008 USA
Phone: 408-558-2300
www.arcwaveinc.com
Customer Service: 408-748-7570
PN: 820-00001-002
LIMITED WARRANTY. Arcwave warrants to Buyer at the time of delivery that the equipment will be free
from defects in material and workmanship under normal use and service. Arcwave's sole obligation under
these warranties is limited to replacing or repairing, at its option, at its factory, any equipment that is
returned to Arcwave, transportation, duties, and taxes prepaid, within twelve (12) months after delivery. In
the case of products not of Arcwave's own manufacture, the only warranty available is that provided by
the original equipment manufacturer. Arcwave shall return the equipment to Buyer freight prepaid. THIS
WARRANTY IS EXPRESSED IN LIEU OF ALL OTHER WARRANTIES, EXPRESS, IMPLIED OR
STATUTORY, INCLUDING THE IMPLIED WARRANTIES OF MERCHANTABILITY AND FITNESS FOR
A PARTICULAR PURPOSE, AND OF ALL OTHER OBLIGATIONS OR LIABILITIES ON THE PART OF
Arcwave, AND IT NEITHER ASSUMES NOR AUTHORIZES ANY OTHER PERSON TO ASSUME FOR
ARCWAVEANY OTHER LIABILITIES IN CONNECTION WITH THE SALE OF PRODUCTS. IN NO
EVENT WILL Arcwave BE LIABLE FOR CONSEQUENTIAL DAMAGES EVEN IF Arcwave HAS BEEN
ADVISED OF THE POSSIBILITY OF SUCH DAMAGES. This Warranty does not apply to any of such
products, which shall have been repaired or altered, except by Arcwave, or which shall have been
subjected to misuse, negligence, or accident or operation outside the environmental specifications.
Repairs or replacements of Equipment made during the warranty period or thereafter will be warranted,
as provided above, for the remainder of the original warranty period or for ninety days from the date of
return, as applicable, whichever is longer.
RETURN OF EQUIPMENT UNDER WARRANTY: If an item of Equipment malfunctions or fails in normal
intended usage and maintenance within the applicable Warranty Period:
(a) The Customer shall promptly notify Arcwave of the problem and the serial number of the defective
item;
(b) Arcwave shall, at its sole option, either resolve the problem over the telephone or provide the
Customer with a Returned Materials Authorization number (RMA #) and the address of the location
to which the Customer may ship the defective item;
(c) If the problem is not resolved over the telephone, the Customer shall attach a label to each returned
item describing the fault and the Customer's return address. The Customer shall, at its cost, properly
pack the item to be returned, prepay the insurance and shipping charges, and ship the item to the
specified location;
(d) If the Arcwave product shall prove to be defective in material or workmanship upon examination by
Arcwave, Arcwave shall either repair or replace the returned item at its sole option. The replacement
item may be new or refurbished; if refurbished, it shall be equivalent in operation to new Equipment.
If Arcwave replaces a returned item, the Customer agrees that the returned item shall become the
property of Arcwave.
(e) Arcwave shall ship the repaired item or replacement to the Customer's return address by carrier and
method of delivery chosen by Arcwave at its cost. If Customer has requested some other form of
conveyance, such as express shipping, then the Customer shall pay the cost of return shipment.
NOTE: This publication may include technical inaccuracies or typographical errors. Changes are
periodically made to the information herein; these changes will be incorporated in new editions of this
publication. Arcwave may make improvements and/or changes in the product(s) described in this
publication at any time without notice.
FCC NOTICE: This device complies with Part 15 of the FCC Rules. Operation is subject to the following
two conditions: (1) this device may not cause harmful interference, and (2) this device must accept any
interference received, including interference that may cause undesired operation.
: ARCell and DBWA are Trademarks of Arcwave, Inc. DOCSIS is a registered trademark of Cable
Television Laboratories, Inc. Other product and company names mentioned herein may be the
trademarks of their respective owners.
June 2003 ii
Table of Contents
Table of Contents......................................................................................................................... iii
1 Introduction ........................................................................................................................1-1
1.1 Subscriber Site...........................................................................................................1-2
1.2 Hub Site......................................................................................................................1-3
1.3 Frequency Band of Operation ....................................................................................1-6
1.4 Data Rates .................................................................................................................1-7
2 Subscriber Installation Detail..............................................................................................2-1
2.1 Transceiver.................................................................................................................2-1
2.2 Cable Connection and Grounding..............................................................................2-6
2.3 DC Power Supply.......................................................................................................2-7
2.4 Wireless Cable Modem ..............................................................................................2-8
2.5 Installations Close to Hub...........................................................................................2-9
2.6 Frequency Channel....................................................................................................2-9
2.7 Modem http Interface .................................................................................................2-9
3 Hub Installation Detail – Omni + 4x90................................................................................3-1
3.1 Installation Detail – AR2250 Transmitter/Antenna .....................................................3-2
3.2 Installation Detail – AR1205 Receiver/Antenna .........................................................3-5
3.3 Installation W-CMTS BSR1000W...............................................................................3-7
3.4 Network Management ................................................................................................3-9
3.5 Wireless Network Addresses .....................................................................................3-9
3.6 Wireless Network System Testing............................................................................3-14
4 Antenna and Frequency Planning......................................................................................4-1
4.1 Antenna Patterns........................................................................................................4-1
4.2 Frequency Planning – Downstream ...........................................................................4-1
4.3 Frequency Planning – Upstream................................................................................4-6
5 Hub Installation Detail – 6x60 ............................................................................................5-1
5.1 Installation Detail – AR1255 60-degree Hub Transceiver ..........................................5-1
5.2 Installation Detail – Outdoor Junction Box (OJB) .......................................................5-5
5.3 Installation Detail – Indoor Equipment........................................................................5-8
5.4 Hub Interfaces..........................................................................................................5-13
5.5 System Level-Setting Notes.....................................................................................5-14
5.6 Installation Tuning ....................................................................................................5-16
5.7 Installation Labeling and Documentation .................................................................5-20
5.8 Hub Power Cable Convention..................................................................................5-23
June 2003 iii
5.9 Downtilt.....................................................................................................................5-24
6 Hub Installation Checklist – 6x60-degree...........................................................................6-1
6.1 ARCell Hub Outdoor Transceiver...............................................................................6-1
6.2 Outdoor Junction Box (OJB) – If Employed ...............................................................6-1
6.3 Other Suppliers’ Outdoor Equipment .........................................................................6-2
6.4 Equipment Room Installation – Cable Entrance and Grounding................................6-2
6.5 Equipment Room Installation – Inside Equipment......................................................6-3
6.6 Base Station Installation Documentation....................................................................6-3
7 Link Budget Parameters for 6x60 Hub ...............................................................................7-1
8 Wireless Cable Modem Configuration – CXC150W...........................................................8-1
9 W-CMTS BSR1000W Setup Guide....................................................................................9-1
9.1 Factory Settings BSR1000W......................................................................................9-1
9.2 Connecting to the BSR1000 CMTS............................................................................9-1
9.3 Setting the System Passwords...................................................................................9-2
9.4 Configure the Ethernet IP Address.............................................................................9-2
9.5 Configure Cable IP Address.......................................................................................9-3
9.6 Configure the CMTS...................................................................................................9-3
9.7 Configure Downstream Port .......................................................................................9-3
9.8 Configure Upstream Ports:.........................................................................................9-4
9.9 Configure Basic Routing.............................................................................................9-4
9.10 Save the Configuration...............................................................................................9-4
9.11 Creating a static route from the server to the BSR1000.............................................9-5
10 Windows 2000 DHCP Server.......................................................................................10-1
10.1 Setup Procedures.....................................................................................................10-1
10.2 Configuring Server Options......................................................................................10-3
10.3 Registering Modems ................................................................................................10-4
10.4 Restricting Addresses ..............................................................................................10-7
10.5 Viewing Leases ........................................................................................................10-7
11 Time-of-Day Server Setup Guide.................................................................................11-1
11.1 Install TimeSync.......................................................................................................11-1
11.2 Configure TimeSync.................................................................................................11-1
12 BSR1000W SNMPc View and Community ..................................................................12-1
13 SolarWinds’ TFTP-Server ............................................................................................13-1
13.1 Installing the server ..................................................................................................13-1
13.2 Configure the Window’s Service ..............................................................................13-1
June 2003 iv
13.3 Configure the TFTP Server ......................................................................................13-2
14 Cable System Basics ...................................................................................................14-1
14.1 Tuning ......................................................................................................................14-1
14.2 Ranging....................................................................................................................14-2
14.3 Connection ...............................................................................................................14-2
14.4 Configuration............................................................................................................14-2
14.5 Registration ..............................................................................................................14-2
14.6 Maintenance.............................................................................................................14-2
15 Reader Feedback.........................................................................................................15-1
June 2003 v
1 Introduction
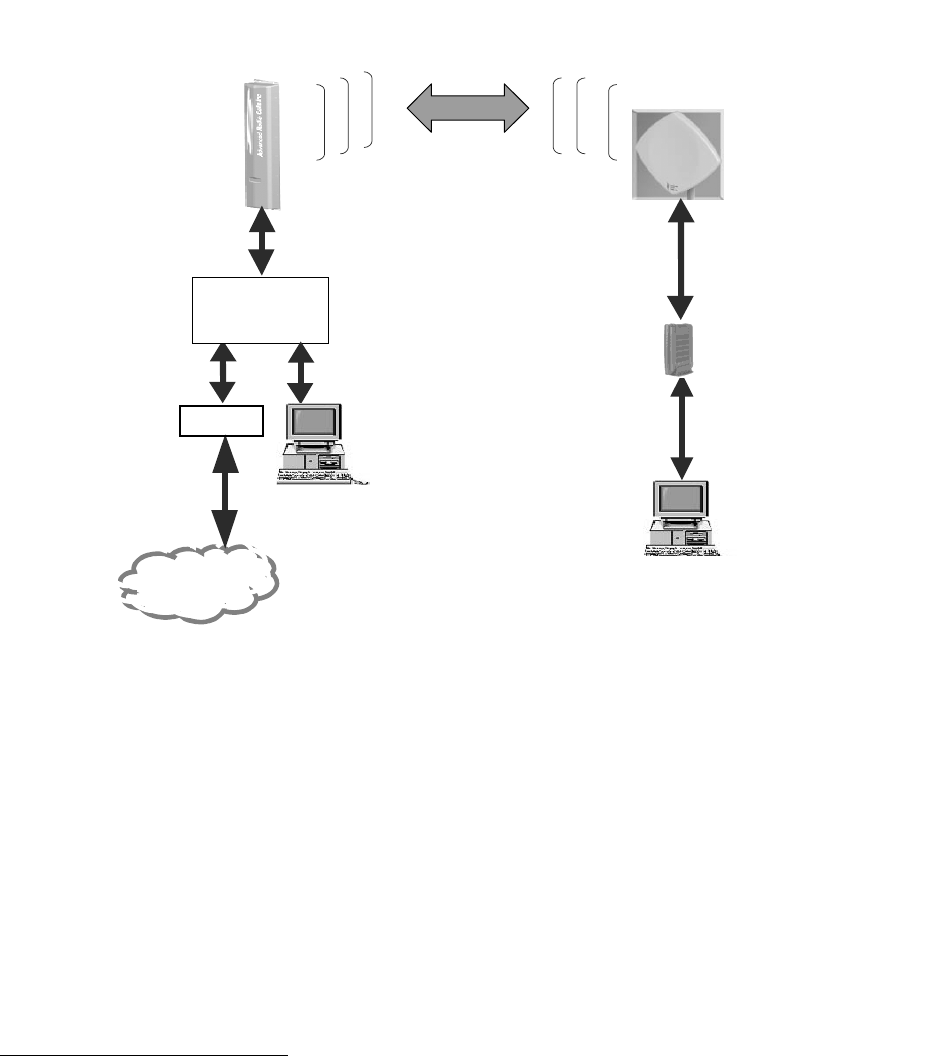
The Arcwave License-Free, Point-to-Multipoint Wireless Broadband Solution provides a
complete end-to-end solution for Cable MSOs, Wireless ISPs and other fixed wireless operators
seeking to expand their markets by offering wireless delivery of the Internet to their customers at
performance levels that normally exceed DSL.
TCP/IP
Cable
Modem
AR3155
Subscriber
Transceiver
Internet
Wireless Cable Modem
Wireless CMTS
AR1255
Hub Transceiver
5 GHz
UNII Band
Network Manager
Gateway
Subscriber’s LAN & PCs
Figure 1-1: ARCell License-free Point-to-Multipoint Wireless Broadband Solution.
The ARCell Wireless System is typically mounted on a building roof. The ARCell Hub may be
mounted on a tower structure, but tower or roof, the Hub usually has an unobstructed view of
the geographic area to be served. The area has a radius of about 5 miles.
A typical Hub in a point-to-multipoint system illuminates a full circle, or 360 degrees. The
ARCell Hub equipment can do this several ways:
1) 90-degree Hub Receivers plus an omni-directional (360 degree) Transmitter
2) 60-degree Hub Transceivers – with 6 of these the full circle is illuminated.
June 2003 Page 1-1
Arcwave and ARCell are trademarks of Arcwave, Inc.

An ARCell Wireless System looking up a narrow canyon from one end may have only one
ARCell Hub Transceiver.
Cables are run from the Hub Transceiver(s) to the base station’s Wireless Cable Modem
Termination System (W-CMTS) in the equipment room. The equipment room also has a
Gateway to access the Internet, the transceiver power supply, etc.
The ARCell AR3155 Subscriber Transceiver is mounted outdoors at the subscriber location with
line of sight to the Hub Transceiver. A single TV-type coaxial cable is run indoors to the modem
and computer(s).
The transceivers have a weatherproof housing containing transmit and receive antennas and
electronics.
The Wireless CMTS (W-CMTS) Base Station controls the flow of data between the Internet and
each subscriber’s Wireless Cable Modem (WCM) using the DOCSIS suite of protocols. The
W-CMTS transmits Downstream (Hub to subscriber) a continuous flow of user data interspersed
with control commands to each WCM in the system. When a user has data to transmit
Upstream (subscriber to Hub) to the Internet, the WCM turns on its transmitter, sends its data to
the Hub Transceiver, and then turns off its transmitter. The DOCSIS protocol manages the time
slot assignment.
The Arcwave Network Manager is an IBM-compatible PC with the Windows 2000 operating
system plus management and provisioning software, including an SNMP package. It also
provides the system with TCP/IP-related services such as DHCP, TFTP and TOD1. V3000W
requires an external PC and ARCell’s network management package. The BSR1000W comes
with command-line management internal and ARCell’s network management package can be
added to provide TCP/IP services, if they are not already available in the network.
The Gateway to the Internet provides certain TCP/IP and ISP functions such as routing, address
translation, caching, security, etc. The Gateway consists of a router or a PC running ISP-
provided software (possibly a form of Unix) and may also include external hardware such as a
router, CSU/DSU, etc.
The protocols that govern the operation of the ARCell License-Free, Point-to-Multipoint Wireless
Broadband Solution generally conform to the cable TV industry DOCSIS standard, as enhanced
for wireless operation.
1.1 Subscriber Site
The ARCell License-Free, Point-to-Multipoint Wireless Broadband Solution subscriber
installation consists of the AR3155 Integrated Subscriber Transceiver mounted on the exterior
of the subscriber facility and the Wireless Cable Modem (WCM) located inside the structure. A
DOCSIS is a trademark of Cable Television Laboratories, Inc.
1 SNMP = Simple Network Management Protocol
TCP = Transmission Control Protocol
IP = Internet Protocol
DHCP = Dynamic Host Configuration Protocol
TFTP = Trivial File Transfer Protocol
TOD = Time of Day
June 2003 Page 1-2
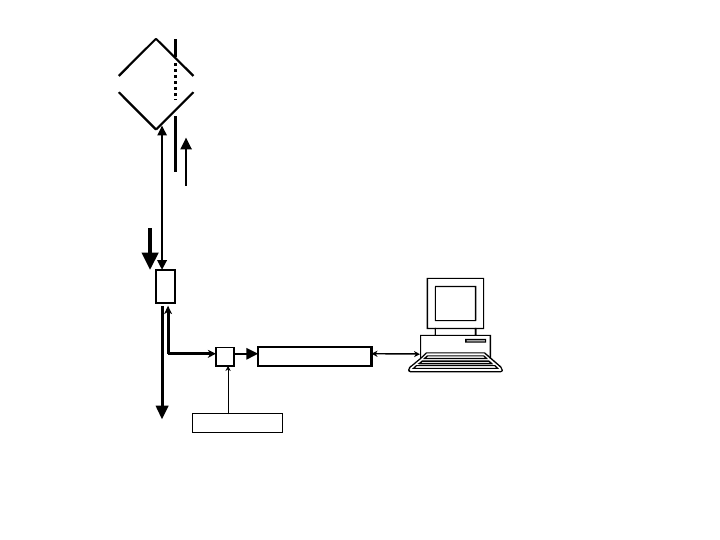
single power and signal cable is run between the Subscriber Transceiver and the modem
location. See Figure 1-2.
The Subscriber Transceiver is mounted on a chimney or a tripod similar to a TV antenna, or on
a short pipe or bent-arm mounting arrangement similar to a small satellite TV dish, or a light
duty non-penetrating flat roof mount. It must be in a position with line of sight to the Hub
Transceiver location. At the time of installation the Subscriber Transceiver is carefully aimed to
transmit and receive to/from the Hub Transceiver.
The Subscriber Transceiver Installation Details section of this manual provides mounting
information and grounding recommendations for the integrated antenna.
Wireless Cable Modem
DC Inserter
Grounding
Device
Ground
per
code
ARCell
Subscriber
Transceiver
Upstream
DC Power
Downstream
Figure 1-2: Subscriber Configuration.
Inside the Subscriber Location, the WCM is connected to the PC by means of a standard
Ethernet LAN cable. Alternatively a LAN hub or switch may be employed between the WCM
and the PC(s), as the WCM has a gateway function that will support up to 75 PCs sharing the
modem. A small DC inserter device is connected between the WCM and the lead to the
outdoor unit. The inserter and the modem each have a cord mounted power supply.
1.2 Hub Site
The License-Free, Point-to-Multipoint Wireless Broadband Solution Hub is the base station. It
consists of one or more Hub Transceivers mounted outdoors on the building, tower or monopole
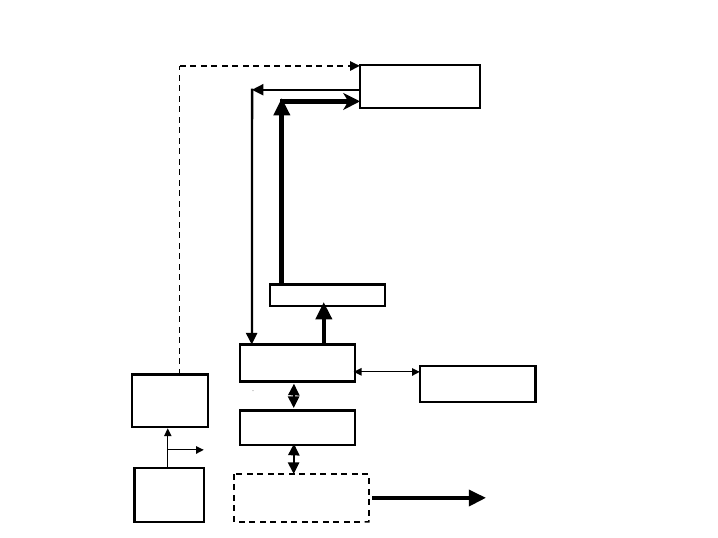
structure. The associated equipment is located in the interior equipment room. Signal and
power cables are run from the Hub Transceiver(s) to the equipment room. See Figure 1-3.
June 2003 Page 1-3
All ac
Upstream
DC
Power
Base
Station
UPS
AC/DC
Power
Converter
Backhaul to ISP
DOCSIS
Wireless CMTS
Upconverter
Downstream
Network
Management PC
100 Mbps
Ethernet Sw
ISP-Furnished
Gateway & Router
ARCell Hub
Transceiver/ant
Figure 1-3: Single-Sector Hub Configuration.
The Hub Transceiver is aimed at the geographic area of the Subscriber Transceivers to be
served. From one to four Hub Transceivers are required at the base station, depending on the
desired subscriber coverage, as each Hub Transceiver “illuminates” a sector (arc).
The details of antenna coverage and frequency utilization are covered in the
Frequency/Coverage Planning section of this manual.
Each Hub Transceiver requires a separate upstream and downstream IF cable, so a single-
sector Hub system requires 2 IF coaxial cables, and a six-sector Hub requires 12 IF cables.
The DC power for the Transceivers can be run in parallel to the coax cables, one per
Transceiver, or a larger shared cable can be run to an Outdoor Junction Box on the roof, and
power distributed from there. Details are discussed in the Base Station Installation Details
section of this manual.
The Base Station Installation Details section provides mounting, test access and system
grounding recommendations for the Hub Transceiver.
The Link Budget Parameters section provides radio frequency details that are useful in those
special cases when RF link planning is needed.
Located in the equipment room are:
1) Wireless CMTS (W-CMTS)
2) Network Manager System
3) Upconverter (in some configurations)
4) 100 Mbps Ethernet switch
5) ISP Access: Gateway, Router, Backhaul, as required
June 2003 Page 1-4

6) DC power supply for the Hub Transceiver electronics
7) Uninterruptible Power Supply system (UPS) to protect all the equipment
The ISP’s Internet access equipment is selected and configured according to the requirements
of the particular ISP and the backhaul transmission equipment between the base station and the
ISP’s facilities.
The installer must provide an AC/DC power supply with sufficient capacity to operate the
outdoor Hub Transceiver. An Uninterruptible Power Supply (UPS) is strongly recommended to
protect system operation during short outages, as well as to provide isolation between incoming
power line anomalies and all of the base station equipment. See the Base Station Installation
Details section of this manual.
1.2.1 Hub Transceiver
Industry standard interfaces are employed between the various elements of the Hub system.
Note that specific manufacturer and part numbers are given in the Installation Details section of
this manual.
Transmit and receive signal interfaces:
• Upstream signal frequency 6.4 through 32 MHz.
• Downstream signal frequency 477 through 577 MHz.
1.2.2 Wireless CMTS
• Network connection 100baseT Ethernet with RJ-45 jack (female) connector.
• Upstream input signal frequency 6.4 through 32 MHz.
• Downstream output depends upon whether the Upconverter function is internal or
external to the W-CMTS.
a. If external, 44 MHz.
b. If internal, 477 through 577 MHz.
1.2.3 Upconverter
If Upconverter is external to the W-CMTS:
• Input signal frequency 44 MHz.
• Output signal frequency 477 through 577 MHz.
1.2.4 Amplifier
If the Upconverter is external, there may need to be an amplifier between it and the W-CMTS.
1.2.5 100 Mbps Ethernet Switch
• The Ethernet switch is the connection point for all TCP/IP data flow on the ARCell
Wireless System side of the Gateway (subnet).
• Subscriber traffic flows through the Gateway to the Internet via the switch, as does
network management traffic to and from the W-CMTS and the Internet.
• Other devices such as a laptop computer can be plugged into the switch.
1.2.6 Network Manager PC
The network manager PC provides three categories of services to the ARCell Wireless System.
June 2003 Page 1-5

• Firmware residence and configuration utilities for the W-CMTS Base Station and
Wireless cable modems.
• TCP/IP services such as DHCP, TFTP and time server
• SNMP network manager and W-CMTS- and WCM-specific interfaces.
1.2.7 Gateway
This equipment provides functions required to interface the wireless network to the backhaul
transmission facility to the ISP. The ISP will normally specify and configure this equipment. It
interconnects with the ARCell Wireless System via a standard port on the 100 Mbps Ethernet
switch.
The ARCell Wireless System is simply a standalone IP network that requires the presence of a
gateway through which packets are routed between the wireless network and the Internet. The
network interface on the ARCell side of the gateway must be Ethernet 100baseT. The gateway
itself is typically one of two types depending on the network IP address:
• If the network IP address is registered with its country’s Network Information Center then
the gateway may be a conventional router.
• If the network IP address is one of the RFC1597 private addresses the gateway must be
a proxy server of some sort. For example, the gateway may provide RFC1631 Network
Address Translation (NAT) services.
The ISP may use additional security measures, such as firewalls.
1.2.8 DC Power Supply
The DC power supply is located in the equipment room and supplies DC power to operate all of
the Hub Transceivers in the installation. In a single sector Hub Transceiver configuration a
single power cable is run along with the signal cables from the Hub Transceiver to the base
station equipment room.
In a multi-sector Hub Transceiver configuration separate power cables can be run to the
equipment room from each Hub Transceiver, or an Outdoor Junction Box (OJB) can be installed
in the vicinity of the Hub Transceivers (on the rooftop or tower structure) and a single
appropriately sized cable run to the equipment room. See the Hub Transceiver Installation
Details section of this manual for more information.
The electronics in the Hub Transceiver are designed to function with a DC voltage at the hub
nominally 8 – 8.5 VDC. See the Hub Transceiver Installation Details section of this manual for
more information on recommended power supplies.
1.3 Frequency Band of Operation
This system operates in the frequency band designated by the FCC as UNII and is governed by
Part 15, Subpart E, of the FCC Rules and Regulations (http://ftp.fcc.gov/oet/info/rules/). The
components that Arcwave sells comply with these Rules.
This device complies with Part 15 of the FCC Rules. Operation is subject to the following two
conditions: (1) this device may not cause harmful interference, and (2) this device must accept any
interference received, including interference that may cause undesired operation.
Briefly, the UNII rules are:
• Lower band is 5.15-5.35 GHz
o Transmitted power in the band 5.25 – 5.35 GHz cannot exceed 250 mW.
June 2003 Page 1-6
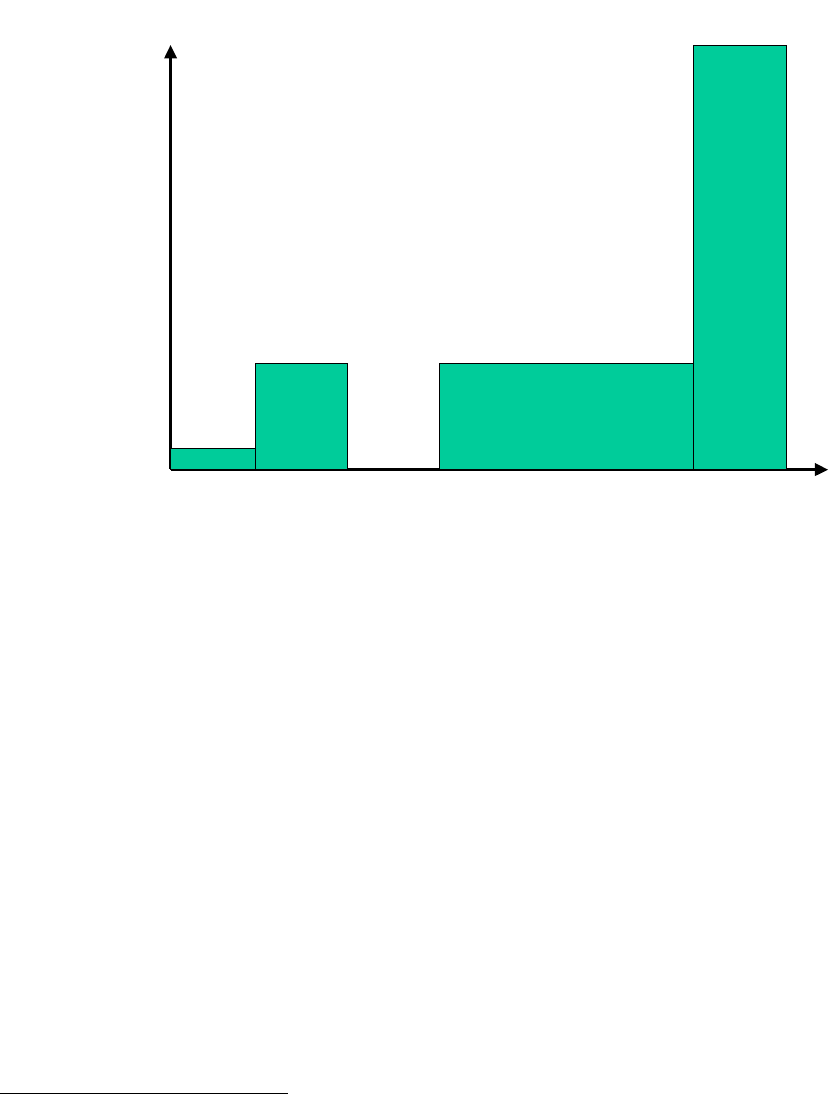
o The band 5.15 – 5.25 GHz is for indoor use, and is not used by ARCell.
• Upper band is 5.725-5.825 GHz
o Transmitted power in the band 5.725-5.825 GHz cannot exceed 1 Watt2.
50 mW
Indoor
only
5.15 5.25 5.35 5.47 5.725 5.825
Frequency (GHz)
250 mW 250 mW
FCC proposal May03
1000 mW
Transmitter Power
Figure 1-4: Transmitter power limitations set by FCC.
1.4 Data Rates
The downstream data path can be configured for one of two data rates within the 6 MHz CATV
channelization:
1. 10 Mbps: QPSK modulation, 10.608 Mbps modulated data, 8 Mbps throughput
2. 20 Mbps: 16-QAM modulation, 20.216 Mbps modulated data, 17 Mbps throughput.
The Downstream data is received by all the subscribers’ modems, and each modem selects the
packets addressed to it.
The Upstream path is “5 Mbps” in a 3.2 MHz channel: QPSK modulation, 5.12 Mbps modulated
data, 5 Mbps throughput.
Each modem’s transmission upstream is controlled by the W-CMTS, which assigns it a time slot
in which to transmit the RF signal containing the packet data.
2 In May 2003 the FCC issued a Notice of Proposed Rule Making (NPRM) to enhance the 5 GHz band.
Arcwave is following that NPRM activity and will enhance products as the Rules are finalized.
June 2003 Page 1-7
2 Subscriber Installation Detail
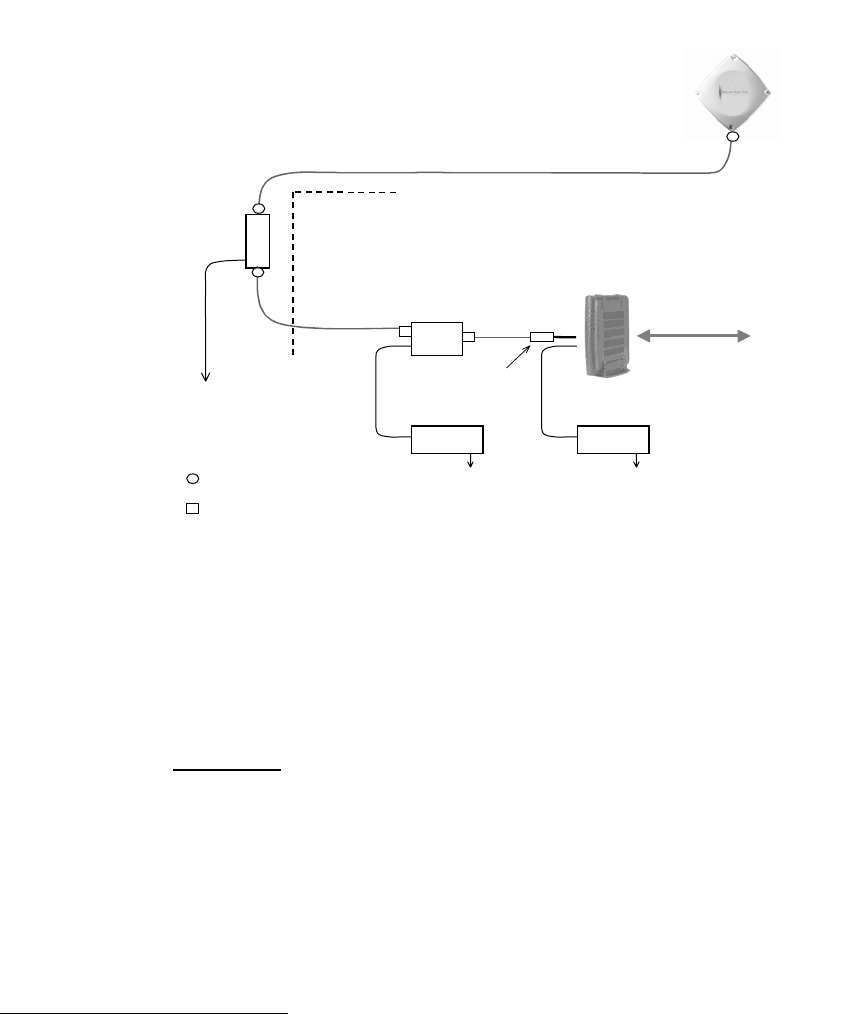
Installation at the subscriber’s site is very simple – one small outdoor unit (the transceiver) and one
cable modem indoors. Power for the outdoor unit is carried over the TV-type coaxial cable between
the two units.
Frequency of operation, RF power, etc. are all determined automatically. There are no settings to
be made on site, with very few exceptions, which are discussed in this Section.
DC
Inserter
P/Supply P/Supply
Pad
Grounding
Device Building
Entrance
Ground
per NEC
LAN
to/from user
ARCi
Subscriber
ODU
TV cable
(length between 50 & 200 ft.)
TV cable
TV cable
Wireless modem
120 or 220 Vac 120 or 220 Vac
Weatherproof F-type
Indoor F-type connector
Figure 2-1: Schematic diagram subscriber installation.
2.1 Transceiver
The Subscriber Transceiver contains a transmitter, a receiver and the antenna, all in one integrated
weatherized unit that is about 1x1 foot square.
2.1.1 Mounting
Mount the Subscriber Transceiver on a vertical pipe with at least 12 inches clear of any hardware or
other impediments. The mounting brackets will accommodate pipe outside diameter from 1.25 to 2
inches. The front face of the antenna must point in the direction of the system base station and
have a clear view of the Hub Transceiver antenna3.
Up-tilt or down-tilt is accomplished by loosening the cap screws on the sides of the mounting
assembly, as in Figures 2-2 & 2-3. Do not over tighten the mounting bolts or the up/down tilt cap
screws. The F-type connector must be waterproofed after installation, to keep out moisture. This is
typically done with electrical tape.
3 Subscriber installations located close to the base station installation may work successfully through tree
foliage, so called “near line of sight”, but this must be verified in the field. A rule of thumb for the loss through
deciduous foliage is 0.15 dB / ft in the UNII band.
June 2003 Page 2-1
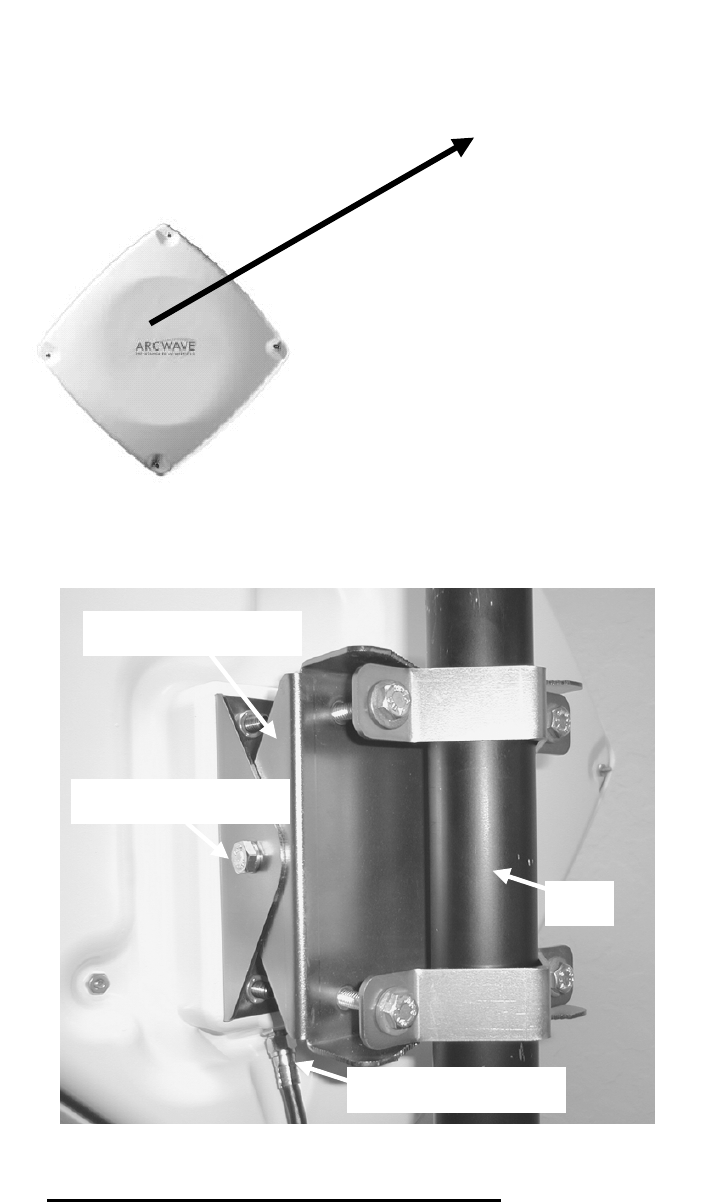
Figure 2-2: Subscriber Transceiver pointing towards Hub.
Mounting bracket (included)
Elevation alignment bolt
Tape F-connector after install
Pipe
Figure 2-3: Subscriber Transceiver mounted on pipe.
2.1.2 Subscriber Transceiver Alignment Methods
There are three recommended methods for aligning the Subscriber Transceiver for maximum
performance:
• Arcwave Signal Strength Meter (AR100)
June 2003 Page 2-2

• Dedicated modem signal meter (Sencore MSM980)
• Spectrum analyzer (Anritsu MS2711B)
• Channel-selectable cable-TV meter.
They are described below.
All devices measure the downstream signal level received from the base station. This provides an
optimum alignment as the downstream receive antenna has a narrower beam width than does the
upstream transmit antenna also housed in the Transceiver. By optimizing the downstream, the
upstream is optimized automatically.
Once the particular alignment method is chosen, and connected to measure the downstream signal
level (receive), the Subscriber Transceiver is peaked as follows:
1. Using a 7/16” open end, box or socket wrench, loosen the two elevation alignment bolts until
the Transceiver can be oriented up or down by hand, but will hold its position.
2. Observe the display of the alignment device being employed and orient the Transceiver up
and down to achieve a maximum peak signal. There may be other smaller peaks, but the
main one should be evident.
3. Tighten the elevation alignment bolts slightly.
4. Using the same wrench loosen the four mounting bolts so the transceiver can be oriented
side to side by hand.
5. Observe the display of the alignment device being employed and orient the transceiver side
to side to achieve a maximum peak signal. There may be other smaller peaks, but the main
one should be evident.
6. Tighten the elevation alignment bolts slightly.
7. Repeat the elevation (up or down) adjustment, and then the azimuth (side by side)
adjustment once again.
8. Tighten the elevation alignment bolts taking care not to over tighten.
9. Tighten the mounting bolts firmly, but do not over tighten as that simply bends the mounting
brackets.
The three pieces of equipment are discussed below.
2.1.3 AR100 Signal Strength Meter
The AR100 Signal Strength Meter (SSM) is a small hand held device that is temporarily inserted
between the Transceiver end of the coaxial cable down lead and the Transceiver itself.
June 2003 Page 2-3
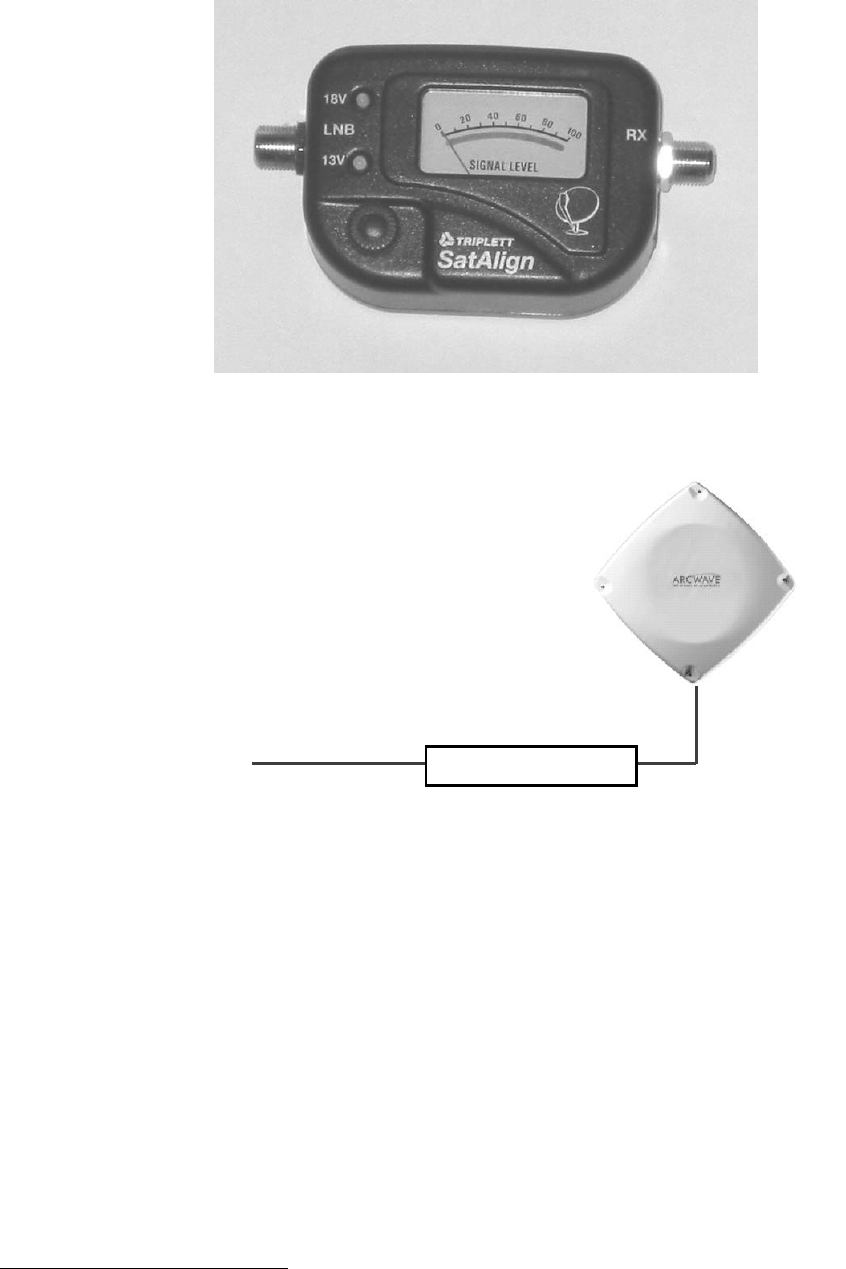
Figure 2-x: Photo of the AR100 Signal Strength Meter (SSM).
Rx SSM LNB
Figure 2-4: AR100 Signal Strength Meter (SSM) at transceiver.
Complete the subscriber physical installation (at least the Subscriber Transceiver and power
inserter). Connect the coax lead from the indoor power inserter to the SSM "RX" port and a short
coax jumper from the SSM "LNB" port to the Transceiver. The SSM and the Transceiver will then
be powered from the power inserter4. Align the Transceiver by peaking the signal on the SSM's
meter, adjusting the sensitivity control on the SSM as needed.
Note that the AR100 SSM is a very broadband device which responds to energy below 500 MHz. It
will “see” all energy from few hundred MHz to at least 1900 MHz, and thus can be spoofed by a
stray signal near the Transceiver and SSM.
4 The external power jack on the SSM is unused.
June 2003 Page 2-4
2.1.4 Sencore MSM980
The Sencore MSM980 is a dedicated test device, which provides a number of tests and storage of
results related to the installation and troubleshooting of subscriber units. One of its basic modes is
to display in large numbers on its LCD screen the received signal level (from the Subscriber
Transceiver) when connected to the Transceiver in lieu of (or in parallel with) the wireless cable
modem.
Connect the Sencore meter to the coaxial cable from the Subscriber Transceiver. Select the Install
main menu, and then DS Level. Align the Transceiver by peaking the signal on the display.
The MSM980 is battery operated and has the additional feature that its battery can feed DC power
to the Subscriber Transceiver, so the installation can be completed outdoors without additional AC
power. Contact Sencore at 1-800-SENCORE (736-2673).
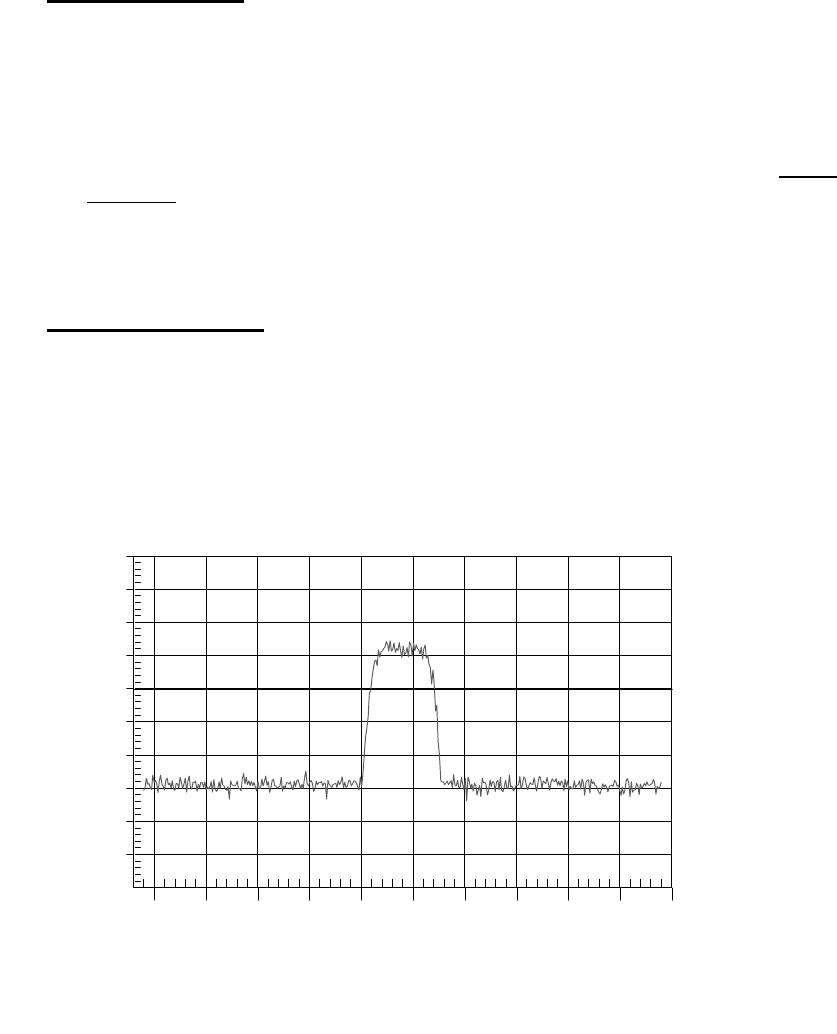
2.1.5 Spectrum Analyzer
Connect the spectrum analyzer in place of or in parallel (via a 2-way splitter) with the wireless cable
modem. Adjust the spectrum analyzer to display the downstream IF signal from the Subscriber
Transceiver (which will be between 425 and 525 MHz). Reduce the frequency span and adjust the
amplitude to achieve a trace similar to the one below.
-50
-40
-30
-20
-10
0
10
20
30
40
435
440
445
450
455
460
465
470
475
480
485
Ref Level :
40.0 dBmV
dB / Div :
10.0 dB
Spectrum Analyzer
GOOD
Model: MS2711B Serial #: 00215050
Date: 05/23/2002 Time: 11:55:01
RBW: 1 MHz VBW: 30 kHz Detection: Average
CF: 459.0 MHz SPAN: 50.0 MHz Attenuation: 0 dB
dBmV
Frequency (434.0 - 484.0 MHz)
Figure 2-5: Proper Downstream IF input to subscriber’s modem.
The spectrum analyzer settings were as in Table 2-1:
June 2003 Page 2-5

Table 2-1: Typical spectrum analyzer settings.
Parameter Setting
Center Frequency IF frequency in use
(481 – 571 MHz)
Span 50 MHz
RBW 1 MHz
VBW 30 kHz
Vertical Scale linear, 10 dB / division
Reference Level +40 dBmV
Attenuation 20 dB
Detection Mode Averaging
Align the subscriber Transceiver antenna as described above, adjusting for maximum signal
amplitude.
2.2 Cable Connection and Grounding
Attach the single RG-6 coaxial cable to the F connector on the rear of the Subscriber Transceiver.
See Figure F2. Waterproof the connection using a suitable method such as taping with Scotch #88.
Be sure to leave sufficient slack to allow the antenna to be oriented and that the cable runs directly
downward from the connector to avoid water running down the cable and into the F connection.
Route the coaxial cable to the building entry point utilizing UV-resistant tie-wraps and staples or
cable clamps as required.
UV-rated cable should be used outdoors, and UV- or Riser-rated cable can be used indoors. In
some buildings, a Plenum-rated or riser-rated cable is required. Consult the local codes.
Mount the grounding device (e.g. Radio Shack 15-909C in Figure 3-4) as near as practicable to the
point of cable entry to the structure. Connect the grounding device to a suitable “grounding
electrode”.5 Connect the RG-6 coaxial cable from the Subscriber Transceiver to the grounding
device and waterproof all outdoor F connectors as described above.
5 The National Electric Code, sections 820-33 and 820-40, describes this requirement in detail.
June 2003 Page 2-6
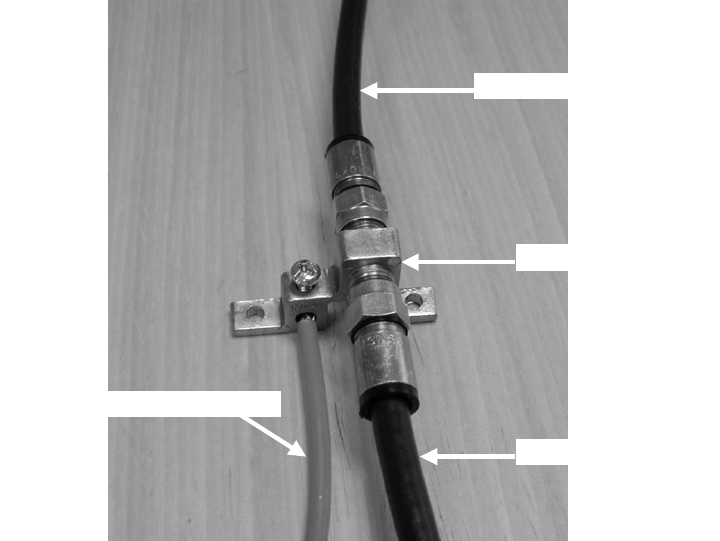
To ARCell ODU (AR3155)
Grounding device
Ground wire (green or bare)
To cable modem
Figure 2-4: Typical grounding device at subscriber premises.
2.3 DC Power Supply
The Transceiver is powered over the coaxial cable via a Power Inserter (Figure 2-5) provided with
the Transceiver.
Inside the building, route the RG-6 from the building entrance point to the wireless cable modem
location. Install an F connector on the cable. Connect the transceiver cable to the “To Antenna” F-
type female connector of the Power Inserter.
June 2003 Page 2-7
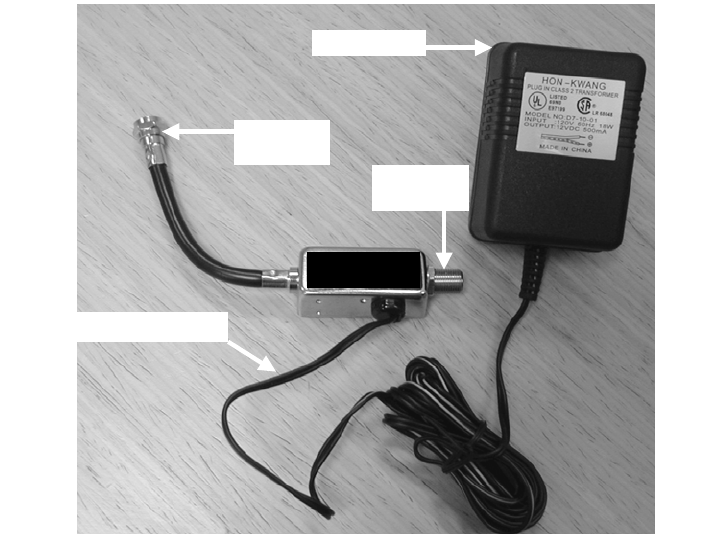
To modem
(no DC)
To AR3155
(with DC)
To AC power
DC power being inserted
to to
modem antenna
Figure 2-5: Power Inserter and AC/DC converter.
2.4 Wireless Cable Modem
Place the wireless cable modem where it will be used and attach the short cable on the power
inserter (labeled “To Modem” in Figure 2-5) to the F connector on the rear of the modem. Connect
the (separate) modem wall-mounted power supply (included with the wireless cable modem) to the
power connector on the rear of the modem. Plug both wall mounted power supplies into suitable
AC power sources – preferably a UPS or surge protected power strip. Connect a straight-through
10/100BaseT LAN cable between the RJ-45 jack on the modem and the user hub, router or
personal computer.
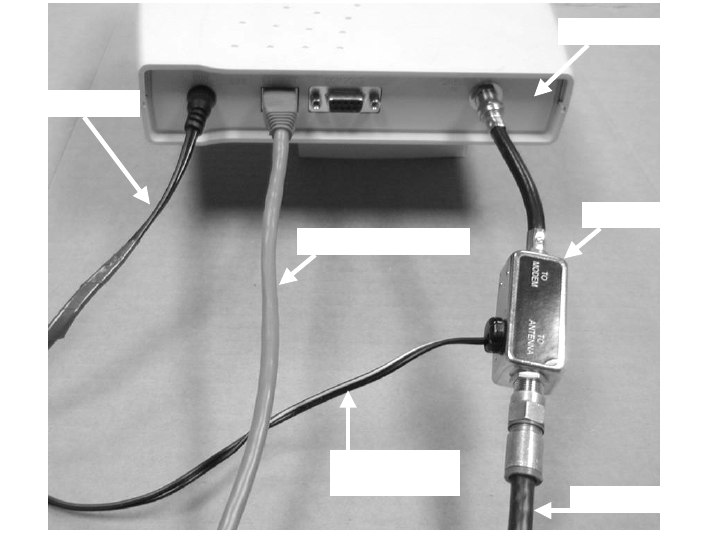
Figure 2-6 illustrates the modem connections at the back of a typical modem. The DB-9 connector
is a maintenance port for the modem shown.
June 2003 Page 2-8
The WCM, when it is first powered up or when it has lost the downstream signal, will “step” through
the standard EIA channel list looking for the downstream signal. Alternatively, the WCM may be
optioned through its administrator interface to lock onto a specific downstream frequency.
Power inserter
Cable to AR3155
Modem rear panel
Modem power
Ethernet (LAN) cable
Power inserter
power cord
Figure 2-6: Rear view of typical wireless cable modem.
2.5 Installations Close to Hub
The subscriber installation Schematic Diagram (Figure 2-1) shows a 6 or 10 dB attenuator (pad)
installed between the power inserter and the wireless cable modem (“dry” side of the power
inserter). Small pads of many values are available with F-type connectors to screw in line with the
coaxial cable connection, such as Channel Visions #3000-10, and they may be cascaded to sum
their attenuation. At the time of system set-up it may be determined that such pads are required in
subscriber installations extremely close (less than a mile) from the base station site to reduce
excess downstream signal.
2.6 Frequency Channel
The cable modem will automatically search for the active channels, go through a handshake with
the Hub, and be told all the parameters it will need to join the wireless network.
2.7 Modem http Interface
The modem status can be determined by the LEDs and by a browser interface.
The LEDs and their use are:
• Power: ON = power OK
• Cable: ON = ranged & registered with CMTS, blinking= in process
• LAN: ON = connected
June 2003 Page 2-9
• USB: ON = connected [some modems have both USB & LAN connectors]
• Activity: blinking = data (transmit or receive)
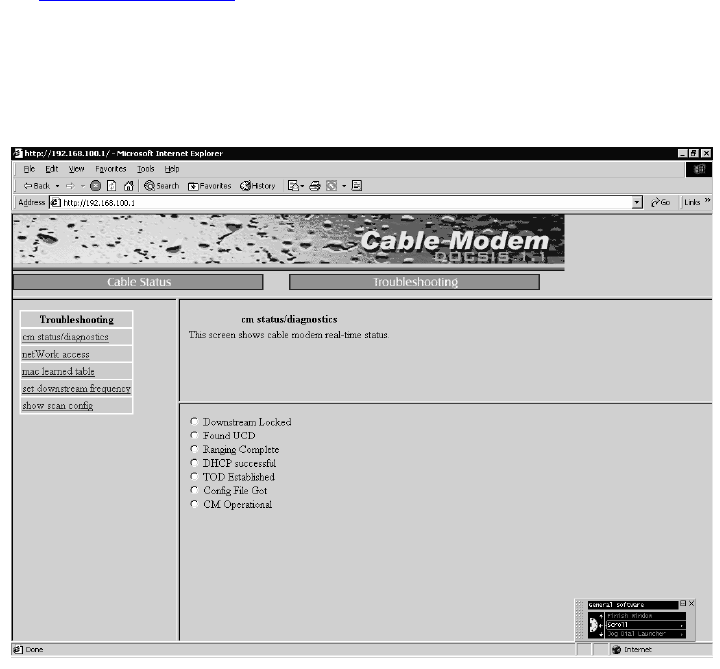
The browser interface is available on some modems and contains more information. To reach it,
follow these steps:
• Connect a PC to either the modem’s USB or the Ethernet interface
• Launch the PC’s browser, such as Microsoft’s Internet Explorer
• Address: http://192.168.100.1
• User: (leave this blank)
• Password: cable
The screen looks like Figure 2-7.
Figure 2-7: Screen for cable modem status.
June 2003 Page 2-10
3 Hub Installation Detail – Omni + 4x90
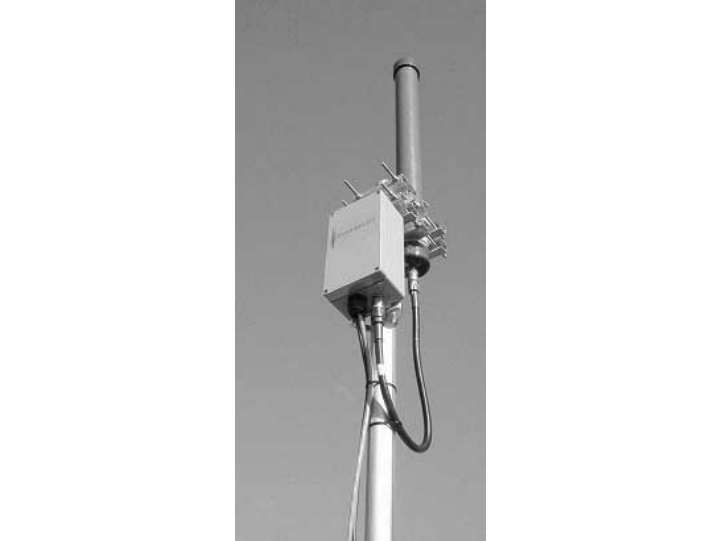
One popular design for the Hub is to transmit from an omnidirectional antenna, as in Figure 3-1,
and receive in 90-degree sectors.
The transmit traffic capacity is 20 Mbps, and each of the receive traffic capacities is 5 Mbps, so
the total receive capacity is equal to the transmit capacity, i.e., 20 Mbps.
Figure 3-1: Omnidirectional transmitter and antenna.
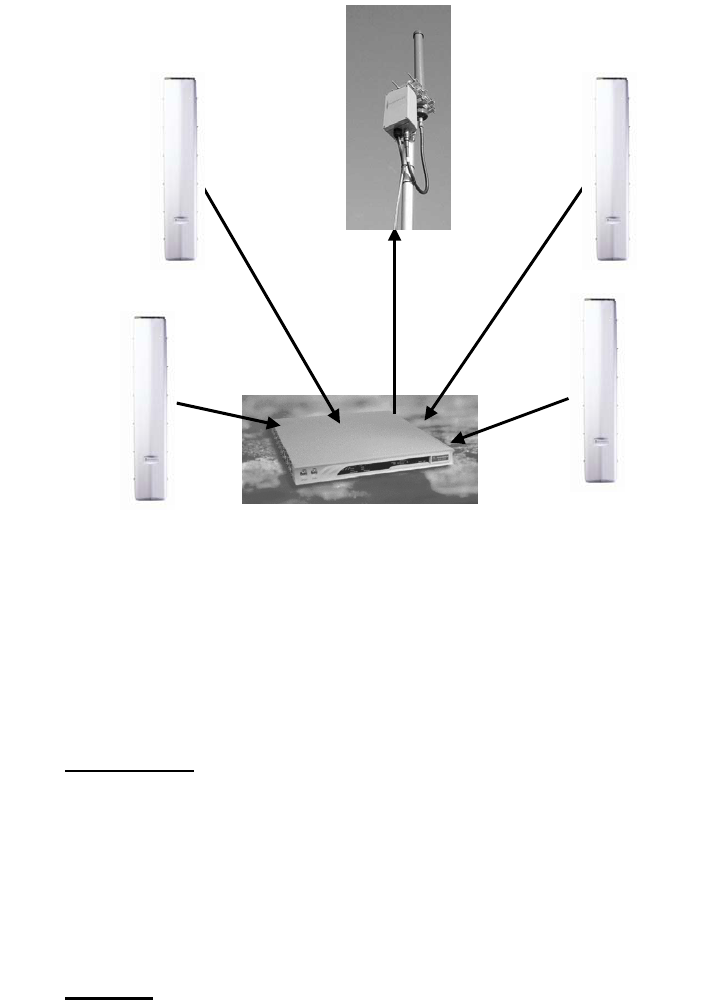
The system diagram is shown in Figure 3-2. The four receive/antenna units connect directly to
the Wireless Cable Modem Termination System (W-CMTS), which is using DOCSIS protocols
to control the subscriber’s wireless cable modems.
The BSR1000W W-CMTS can handle a large number of subscriber’s modems, more than will
normally be in the wireless cell. The specified capacity is 16,000 service flows, so it easily
supports over 1000 cable modems.
June 2003 Page 3-1
AR1205
AR2205-2
Figure 3-2: System diagram.
3.1 Installation Detail – AR2250 Transmitter/Antenna
The Transmitter and Antenna are two units joined with a short coaxial cable. They are normally
mounted on the same pipe.
3.1.1 Pole Mount
The omnidirectional antenna is mounted at the top of a 1.25 to 2.0-inch Outside Diameter (OD)
pipe, so that it radiates unobstructed in a full 360 degree circle.
The antenna is inside a cylindrical “plastic” PVC radome. It is connected to the Transmitter via
a short coaxial cable.
The Transmitter is a transmit module inside a weatherproof housing with pipe mounting
hardware.
3.1.2 Cabling
There are three cables between the equipment room and the Transmitter:
• IF coaxial cable
• DC power twisted pair cable
• Grounding wire
Arcwave recommends the use of premium quad-shielded RG-6 coaxial cable (such as Belden
1189A) for base station installations. This is used by the cable TV industry and it reduces
leakage through the shielding, as well as minimizing interference from outside sources.
June 2003 Page 3-2
UV-rated coax and power cable should be used outdoors, and UV-, plenum- or Riser-rated
cable can be used indoors. In some buildings, a Plenum-rated cable is required. Consult the
local codes.
The ground wire should be #6AWG copper connecting the pipe and Transmitter housing to
building ground. Follow the local code requirements.
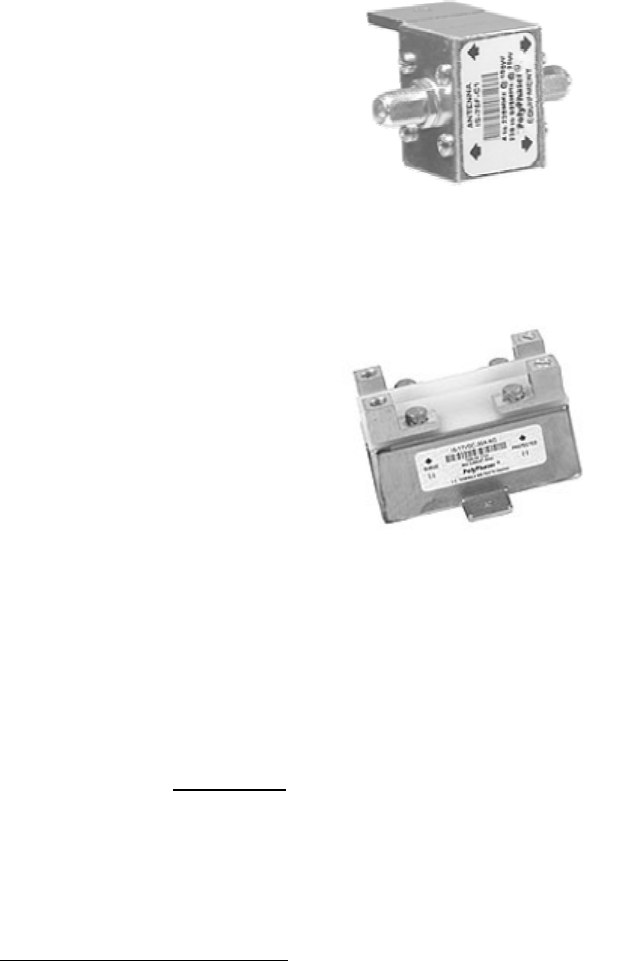
A surge suppressor6 is needed at the building entrance or in the equipment room; the location
depends upon local code. Arcwave recommends the PolyPhaser IS-75F-C1 protector, as in
Figure 3-3, for the IF coaxial cable.
Figure 3-3: PolyPhaser coaxial cable lightning protector.
Arcwave recommends the PolyPhaser IS-17VDC-30A-NG protector shown in Figure 3-4 for DC
power.
Figure 3-4: PolyPhaser DC lightning protector #IS-17VDC-30A-NG.
If the installation requires a separation between the Transmit module and the omni antenna,
then the installer will have to use a suitable coaxial cable type, with N-type connectors at each
end. Suitable cable at the 5.8 GHz transmit frequency is Cablewave Low-Loss ½ inch foam
FLC 12-50J, which has about 6.1 dB loss/100 ft, so a 10 ft cable is suitable. So are FSJ2-50
and Times LMR-400.
3.1.3 DC Power
The AR2250 Transmitter must be powered from 8.0 to 8.5 Vdc at the Transmitter connector.
The Transmitter typically consumes 550-650 mA (see Data Sheet).
The wire gauge can be selected, preferably for less than ¼ Volt drop from the power supply to
the Transmitter.
6 The manual uses the terms “surge suppressor” and “lightning protector” interchangeably. It is
understood that a lightning bolt has enough energy to light a town for a year, so a direct lightning strike
will melt/damage all the metal it touches, including the antenna.
June 2003 Page 3-3

The DC power takes a wire pair to the Outdoor Junction Box (OJB), and thence to each of the
Transceivers. The negative lead is grounded in the equipment room, inside the OJB and inside
the Transceiver.
Examples of voltage-drop calculations:
1. The standard cable shipped with the Transmitter is 25 feet of #18 AWG shielded twisted
pair annealed copper wire (Belden 3124A), which will have a 0.1 Volt drop at 600 mA.
Remember that the ground return is #18 in parallel with the #6 and some building
ground, so the return resistance is negligible.
2. If the installer splices on an additional 50 feet of #14 AWG twisted pair power cable to
the factory cable (to avoid changing the connector), the additional cable will have a
voltage drop of 0.1 Volts, so the total drop is 0.2 Volts.
Table 3-1: Wire resistance (annealed copper)
AWG Ohms/100ft
24 2.567
22 1.614
20 1.015
18 0.6385
16 0.4016
14 0.2525
3.1.4 Transmitter
The radiated power from the antenna is 1 Watt (30 dBm). This maximum power is set by FCC
regulations. The user must not add any amplifiers or make any other changes that will exceed
this wattage.
The omnidirectional antenna gain is 13 dBi. Assuming the transmitter is located a short
distance from the antenna, so that the loss in the coaxial cable is negligible, the output of the
transmitter must be no more than 17 dBm.
The omnidirectional antenna radiates 360 degrees (hence the name) horizontally, and about 5
degrees vertically.
The antenna is designed so that when the mechanical mounting is true vertical, there is an
electrical downtilt of one degree. That makes the radiated pattern 1.5 degrees above and 3.5
degrees below horizontal. An inexpensive tool to help establish true vertical is a level made for
fence posts, which has two spirit/liquid levels at right angles.
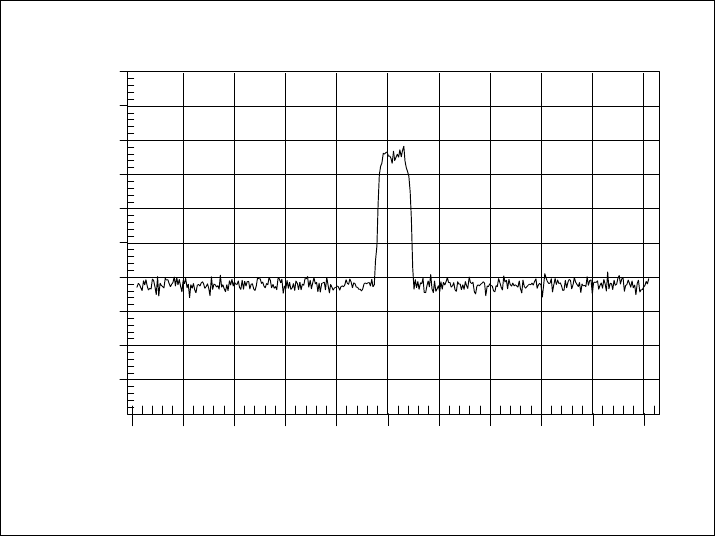
The spectrum at the input to the transmitter will look like Figure 3-5.
June 2003 Page 3-4
-50
-40
-30
-20
-10
0
10
20
30
40
460 470 480 490 500 510 520 530 540 550 560
Ref Level :
40.0 dBmV
dB / Div :
10.0 dB
Spectrum Analyzer
NEW GAIN 30DB
Model: MS2711A Serial #: 00115024
Date: 09/19/2002 Time: 11:04:17
RBW: 1 MHz VBW: 30 kHz Detection: Average
CF: 511.0 MHz SPAN: 100.0 MHz Attenuation: 20 dB
dBmV
Frequency (461.0 - 561.0 MHz)
Figure 3-5: Spectrum at the input to the Hub Transmitter for properly driven IF.
The transmit frequency is a configuration setting for the Downstream upconverter (internal or
external to the W-CMTS).
3.2 Installation Detail – AR1205 Receiver/Antenna
Mount the AR1205 Receiver/Antenna on a vertical pipe with at least 44 vertical inches clear of
unrelated hardware or other impediments. The Receiver mounting brackets will accommodate
pipe from 1.5 to 2.25 inches in outside diameter. Up-tilt or down-tilt is accomplished by means
of adjusting the nuts on the 5/16 inch threaded bolts captive to the mounting assembly. See
Figure 4-4 for mounting details.
The standard carrier frequencies for the Receivers are 5287.2 and 5290.4 MHz. One frequency
must be chosen and specified when ordering.
Ground the Receiver/Antenna to the metallic mounting structure (tower or monopole) or suitable
rooftop ground point according to local codes and installation practices. Normally #6 AWG or
larger wire is utilized for this purpose. A ¼-20 ground bolt is provided on the bottom flange of
the Hub Receiver to attach the ground wire. This is illustrated in Figure 3-6 & 3-7.
June 2003 Page 3-5
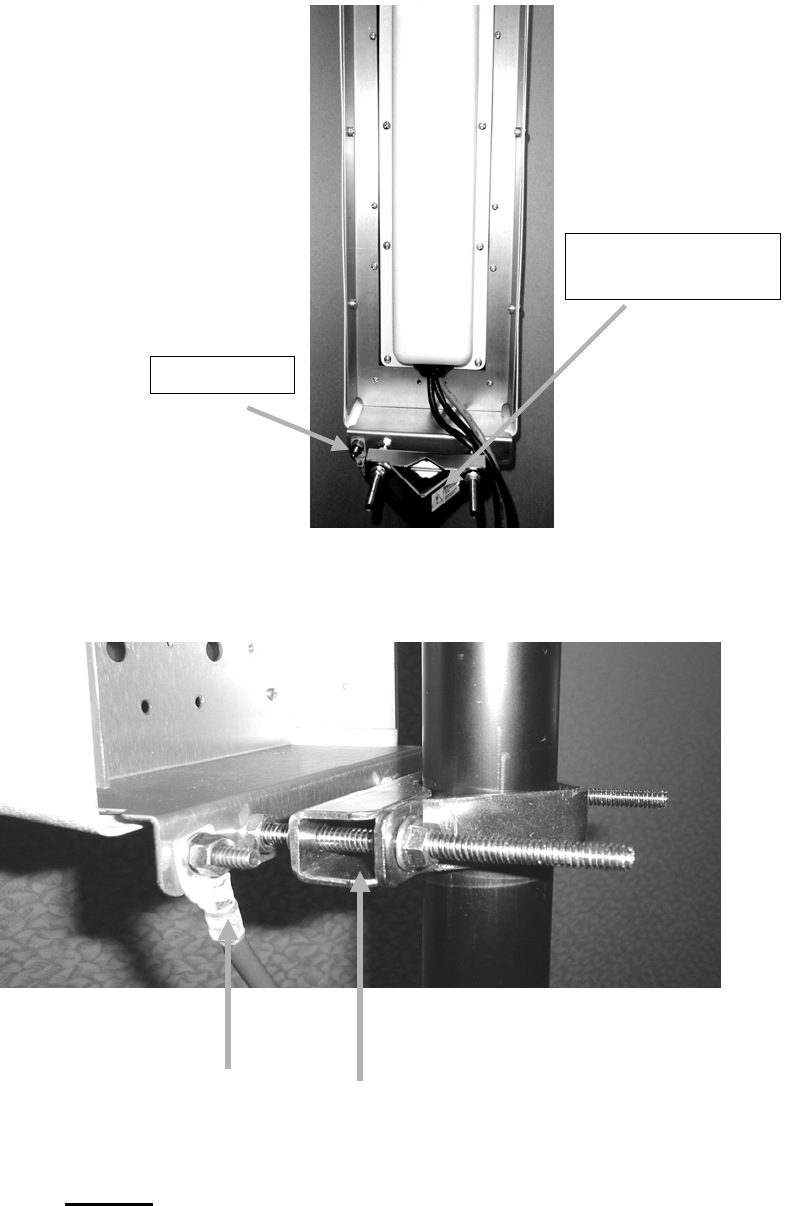
Ground lug
Mounting bracket
(top & bottom)
Figure 3-6: Cable installation and dressing with weather cap installed.
Ground lead lug installed Pipe clamps installed
Figure 3-7: Hub Receiver Bracket Close-up Details
3.2.1 Cabling
The AR1205 Receiver requires three cables:
• IF coaxial cable
• DC power twisted pair
June 2003 Page 3-6
• Ground wire
As with the Transmitter, Arcwave recommends quad-shielded RG-6 coaxial cable (Belden 1189)
and twisted pair of a suitable gauge wire.
When the equipment room is a short distance from the transmitter and receiver installation, the
simplest cabling is to install separate cables for each unit, i.e., 5 coaxial cables, 5 power cables
and 1 ground wire.
The AR1205 Receiver must be powered from 8.0 to 8.5 Vdc at the Receiver connector.
The Receiver typically consumes 275-350 mA.
The wire gauge can be selected, preferably for less than ¼ Volt drop from the power supply to
the Transmitter. For example, the standard power cable (25 ft. of #18 AWG) will have a voltage
drop (round trip) at 300 mA of under 0.05 Volts, which is negligible.
Arcwave recommends a common Uninterruptible Power Supply (UPS), such as the APC1400,
to protect all the base station equipment.
The coaxial cables terminate directly on the W-CMTS.
In a later Section, we will discuss the fault-isolation advantage of inserting a “tap” just before the
coaxial cable is attached to the W-CMTS.
In a later Section we will discuss an installation option of having a common DC power supply in
the equipment room and sharing the power cable in the building riser. This goes to an Outdoor
Junction Box, where the individual DC cables terminate.
The Receiver and its pipe must be grounded to the building or tower ground system with #6
AWG or larger wire. Follow the local building code.
The Hub Receiver is factory-tuned to its Receive Carrier Frequency and Receive Output
Frequency to be delivered to the W-CMTS Upstream input. Hence the frequency planning must
be done prior to ordering equipment and the frequency must be specified in the purchase order.
These details are discussed in the Section on Frequency Planning.
3.3 Installation W-CMTS BSR1000W
The BSR 1000W is a compact, DOCSIS-compatible high-performance Wireless-Cable Modem
Termination System (W-CMTS) and full-featured router, which enables wireless broadband
service providers to cost-effectively deliver voice, data and multimedia content and services to
over 1000 subscribers.
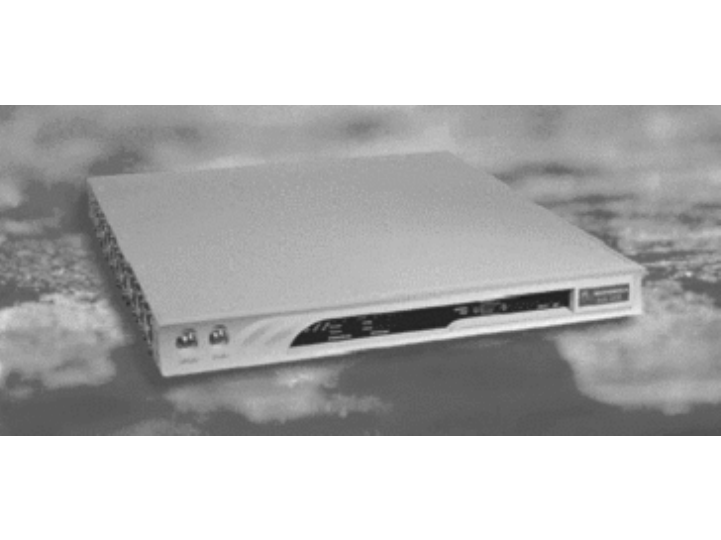
The Wireless CMTS BSR1000W is a single “pizza box” W-CMTS that can be placed on a table
or rack mounted.
The BSR1000W has 1 downstream output supporting 10 and 20 Mbps. The lower speed
occurs when the robust modulation is used, called QPSK. The higher speed occurs when the
higher 16-QAM modulation is used.
The BSR1000W has 4 upstream input ports supporting 5 Mbps each.
The BSR1000W can connect directly to the Omnidirectional Transmitter (AR2250-2) and up to 4
of the 90-degree Receivers (AR1205). It does not need external amplifiers or upconverters.
Networking features include:
1. INTEROPERABILITY
a. DOCSIS 1.0-qualified,
June 2003 Page 3-7
b. EuroDOCSIS 1.0-qualified,
c. DOCSIS 1.1-compatible,
d. EuroDOCSIS 1.1-compatible,
e. PacketCable 1.0-compatible
2. NETWORK MANAGEMENT AND PROVISIONING
a. Cisco-compatible CLI
b. SNMP v1 and v3
c. Standard DOCSIS and IETF MIBs
d. Motorola MIBs
e. LDAP v3
f. Open Interfaces to Provisioning, Accounting and Billing Applications
g. HTTP/Java/XML Integration
h. DHCP Relay
i. Multiple Levels of Account/Password
j. Authentication
k. Telnet with Security Extensions
l. Multiple Community Strings
3. INTRADOMAIN/ INTERDOMAIN ROUTING
a. RIP v1 OSPF v2
b. RIP v2 BGP4
c. IS-IS VRRP
4. MULTICAST ROUTING SUPPORT
a. DVMRP IGMP v2
b. PIM-SM/DM MBGP
5. BRIDGING AND ROUTING
a. Layer 2 Bridging Layer 3 Routing
b. SmartFlow Wire-speed QoS
c. Forwarding and Flow Classification
Figure 3-8: BSR1000W on table.
June 2003 Page 3-8

3.3.1 Default Configuration
3.3.2 Server Software
This is discussed in other Sections of this manual. The server software is pre-loaded at the
factory.
3.4 Network Management
For a multi-sector Hub with dozens of subscribers, the alarming and other features in the
Arcwave Network Management is really key to operating a successful system.
However, Arcwave’s network management software is optional and for a single Hub sector and
a few subscribers, a technician may prefer to start with just a Command Line Interface and
manually check the performance of the links hourly or daily.
3.4.1 PC Installation
Arcwave recommends a PC be installed locally at the Hub so maintenance logs and other
information are not dependent upon a backhaul link.
The Arcwave software assumes a Microsoft Windows 2000 system.
3.4.2 SNMP
For large BSR1000W networks, Motorola’s Advanced Provisioning Manager may be suitable
since it includes extensive SNMP functionality. See http://www.gi.com/ipns%5Fapm.html
3.5 Wireless Network Addresses
This purpose of this Section is to assist you in feeding in your Internet connection
through the W-CMTS to subscriber wireless modems. In order to accomplish this, you configure
a gateway (router) with Internet access on the local network (10.10.10.x), and configure the
Windows 2000 DHCP server running in the NMS Server machine.
IP addresses used as an example in Figure 3-6:
ISP Addresses
ISP Gateway 169.245.0.1
ISP Subnet mask 255.255.255.248
Assigned IP address from ISP 169.245.0.2
Router Addresses
WAN (internet) Address 169.245.0.2
WAN Sub mask 255.255.255.248
LAN Address 10.10.10.200
LAN DHCP server OFF
June 2003 Page 3-9
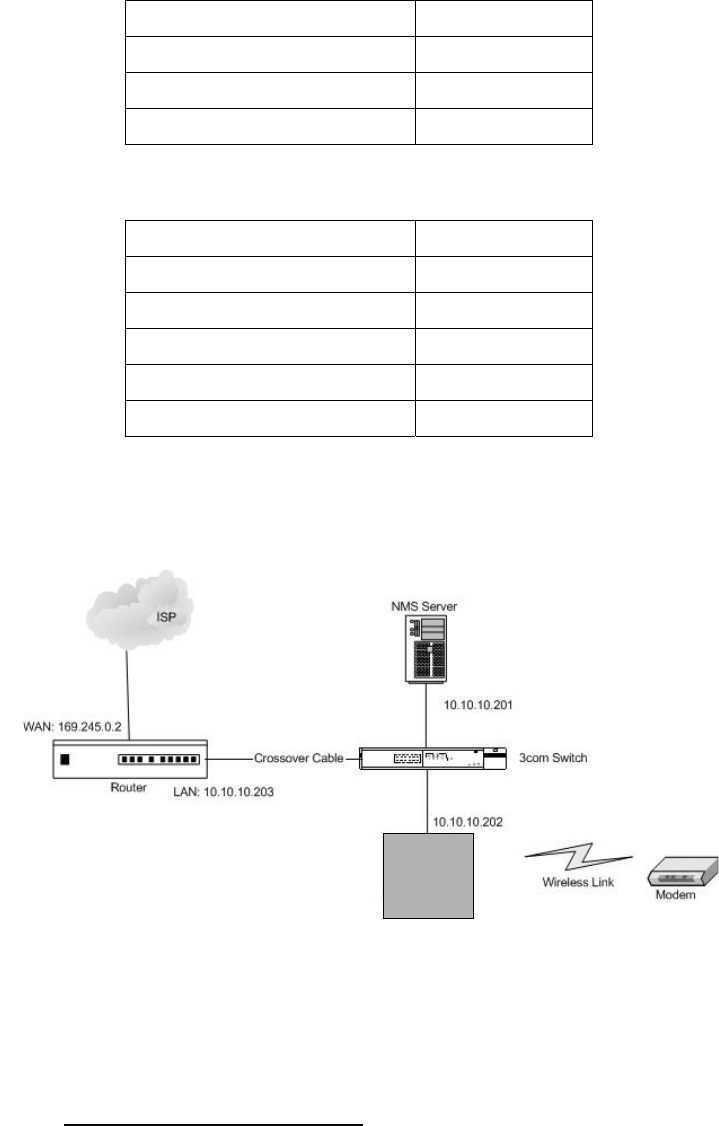
ARCell Default Addresses for Vyyo
NMS (Windows) Server 10.10.10.201
WMTS 10.10.10.202
LAN Subnet mask 255.255.255.0
Available DHCP Addresses 10.10.10.x
ARCell Default Addresses for BSR1000W
NMS (Windows) Server 10.10.10.201
BSR1000W #1 10.10.10.203
BSR1000W #n 10.10.10.20(n+2)
LAN Subnet mask 255.255.255.0
BSR cable IP address 192.168.2.1
Available DHCP Addresses (Internal to BSR)
W-CMTS
Figure 3-9: Network Diagram
3.5.1 NMS Server Configuration
In order to allow the wireless modem to have access to the Internet, it must know the
address of the router. The wireless modem gets this address from the DHCP server, which is a
component of the Windows 2000 Server operating system running the NMS Server.
Open the DHCP server in Windows 2000 Server (Start Menu -> Settings -> Control Panel ->
Administrative Tools)
June 2003 Page 3-10
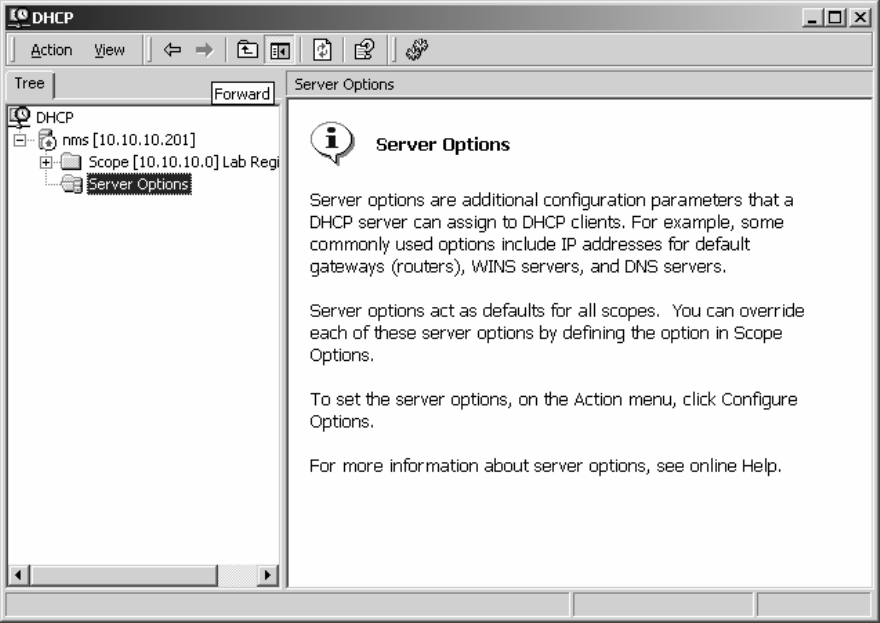
1. Highlight “Server Options” and Click “Action” > “Configure Options”.
2. In the “General Tab”, check the following and enter the specified value
a. 002 Time Offset – Input: 0
b. 003 Router – Input: Enter router’s IP address or NMS’ IP address (Require by Vyyo
Modem)
c. 004 Time Server – Input: NMS’ IP address (e.g. 10.10.10.201)
d. 006 DNS Server –Enter the IP address of the DNS server (e.g. router or NMS)
e. 007 Log Server – Input: NMS’ IP address (e.g. 10.10.10.201)
f. 066 Boot Server Host Name - Input: NMS’ IP Address (e.g. 10.10.10.201)
g. 067 Bootfile Name - Input: configuration file the modem loads (e.g. mic1.cfg)
3. When finished Click “Apply” then “OK”. Your window should now look similar to this:
June 2003 Page 3-11
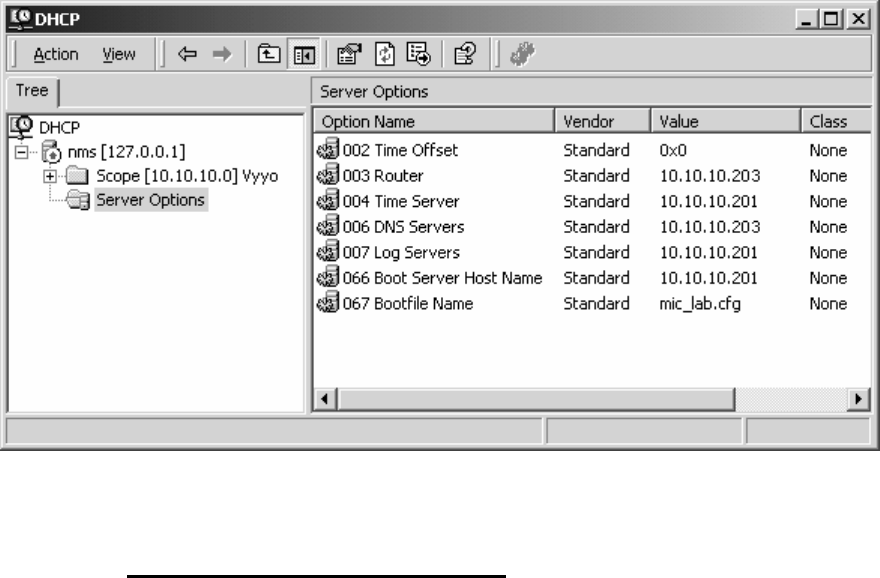
Be sure the “003 Router” and “006 DNS Server” options are set correctly with the
Internet router’s IP address. In this example both Router and DNS server options are set to
10.10.10.203.
3.5.2 Network Testing for Vyyo system
The easiest way to test whether your NMS Server’s DHCP server options are configured
correctly is to connect a computer (MAC, PC, or Laptop) to the Ethernet switch.
Be sure that the user’s PC is set to obtain its networking settings using DHCP. This is done by
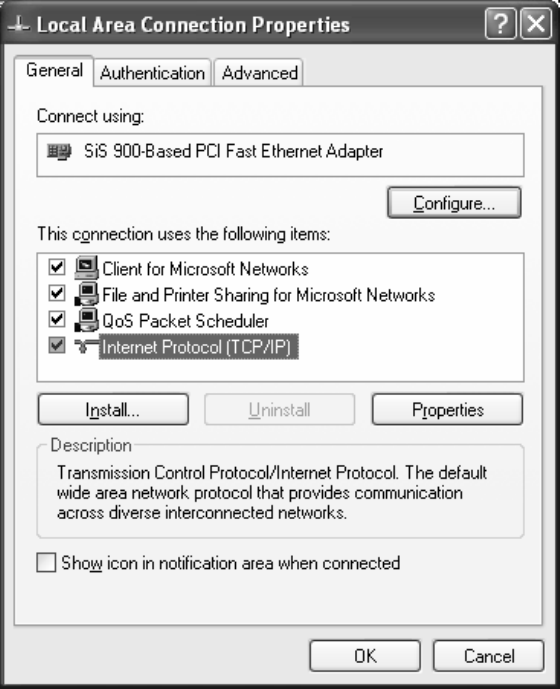
going to Start Menu -> Settings -> Control Panel ->, Network Connection -> Local Area
Connection. Click on “Internet Protocol (TCP/IP)” and then “Properties” in order to verify that
DHCP is enabled.
June 2003 Page 3-12
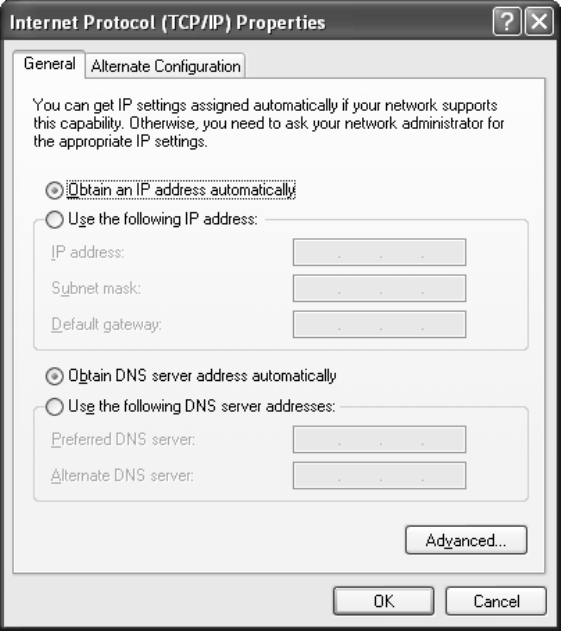
“Obtain an IP address automatically” and “Obtain DNS server address automatically” must be
checked as shown below.
June 2003 Page 3-13
If you are using Windows 95/98 you may need to reset the computer after making any
network changes. If you are using Windows 2000/XP, you can check to see if the system
obtained an IP address by opening a DOS prompt and typing ”ipconfig /all” [NOTE: the space
after “ipconfig” is necessary]. The system should have IP address in the range specified by the
DHCP server, something in the range of 10.10.10.x for this example. If the operating system is
not able to pull a proper IP address, unplug the network cable from the computer system for 30
seconds, and the plug it back in. Wait about 30 seconds to a minute and check again to see if
the system pulls an IP Address.
Once the computer is set for automatic DHCP, automatic DNS, and gets an IP address
from the NMS Server, open a web browser and attempt to connect to a web page. If the web
page loads, then your active DHCP server in the NMS Server machine is configured properly.
Any computer behind a wireless modem and on the local network should be able to go out to
the Internet if it is set to obtain IP addressing information through a DHCP server.
*Note: This portion of document that outlines how to check for DHCP setting was written for the Windows
XP operating systems. Getting to the “Local Area Connection Properties” will vary slightly depending on
which version of Windows you are using
3.6 Wireless Network System Testing
After installing the Hub equipment, take a subscriber unit into each of the Hub sectors and verify
that Internet service is available and that it has the planned range.
June 2003 Page 3-14

4 Antenna and Frequency Planning
This Section describes some of the issues involved in planning a wireless network deployment.
The ARCell wireless system uses different frequencies for Downstream (Hub to subscriber) and
Upstream (subscriber to Hub) communications, which is referred to as a Frequency Division
Duplex system.
The Downstream uses a channel within the UNII “high” band, 5.725-5.825 GHz. Upstream uses
a channel within the UNII “low” band, 5.250-5.350 GHz.
4.1 Antenna Patterns
Each Hub Transceiver has a specific antenna built in. They are labeled according to their
horizontal pattern:
• Omnidirectional (360 degrees)
• 90-degrees directional
• 60-degree directional
Each antenna is directional in the vertical plane as well, with the strongest power straight out
from the antenna’s axis. This means that elevations above straight out from the front of the
antenna (up in the sky) receive less power, as do elevations below straight out. Therefore, the
antenna is normally pointed at the furthest subscriber to be served, with the lower elevations
providing appropriately less power to closer subscribers. This pointing is usually referred to as
“downtilt” because the typical directional transceiver is pointed downward by less than 1 degree.
Omnidirectional antennas need to be mounted vertically, i.e., no mechanical downtilt. The
ARCell omni antenna has an electrical downtilt of about 1 degree.
4.2 Frequency Planning – Downstream
4.2.1 Available Channels
There are 16 available downstream channels in the ARCell standard 5.725-5.825 GHz UNII
band. The frequencies (Table 4-1) were chosen such that the resulting signal as received by
the wireless cable modem (WCM) corresponds to a standard EIA CATV channel.
June 2003 Page 4-1

Table 4-1: Downstream Frequency Plan
WCMTS Down or
Upconverter Output
Transceiver
Radiated Modem IF Input Modem
Center freq.
(MHz)
Center freq.
(MHz)
Center freq.
(MHz) EIA TV Channel
Fd Ftx=Fd+5248 Fif=Fd-52
481 5729 429 58
487 5735 435 59
493 5741 441 60
499 5747 447 61
505 5753 453 62
511 5759 459 63
517 5765 465 64
523 5771 471 65
529 5777 477 66
535 5783 483 67
541 5789 489 68
547 5795 495 69
553 5801 501 70
559 5807 507 71
565 5813 513 72
571 5819 519 73
June 2003 Page 4-2
6.4 <> 48.0 12.8
U/S IF
481 <> 571 529
D/S IF
ARCe ll
Subscriber
Transceiver
5729 <> 5819 5777
D/S AIR
5306.4 <> 5348.0 & 5293.6 <> 5252.0
5312.8 & 52 87 .2
U/S AIR
Modem
429 <> 519 477
D/ S I F
6.4 <> 48.0 12.8
U/S IF
Laptop computer
LAN Data
Al l Frequencies are channel center i n MHz
Upstream 1 (rcv)
Dow nst ream (Tx)
W-CM TS
Up co nv ert er
44 44
Figure 4-1: Frequency Plan.
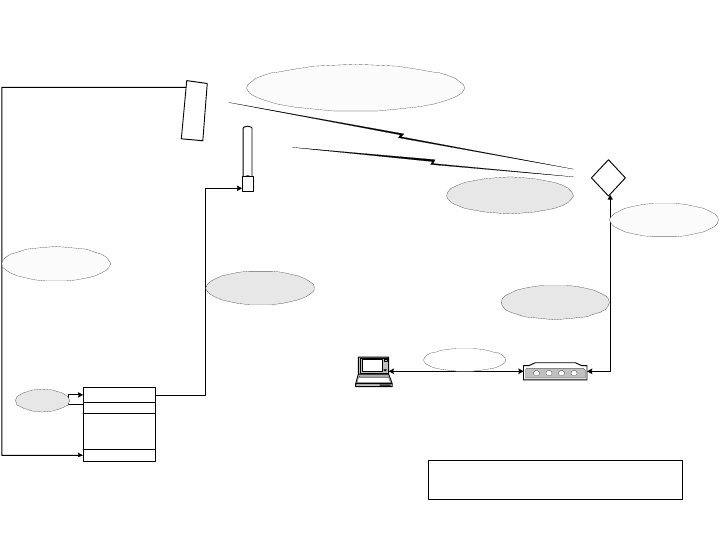
Figure 4-1 illustrates the range of frequencies and an example of one configuration of up and
down conversions. The example is:
a) The 44 MHz Downstream IF signal at the W-CMTS is upconverted to 529 MHz.
In the BSR1000W this is done internally, in the V3000W this is done externally by
the Cadco Upconverter unit.
b) The Figure shows that this upconversion could be any frequency in the range
481 to 571 MHz.
c) The Hub Transmitter modulates this new IF to the 5 GHz band. In this example,
the 529 MHz is upconverted to 5777 MHz.
d) The Subscriber Receiver downconverts example’s 5777 MHz to 477 MHz IF,
which is a standard CATV channel the modem can detect.
e) Going in the Upstream, the modem output (transmit) upstream is 12.8 MHz in
this example.
f) The Subscriber Transmitter (inside the Transceiver) up-converts this to 5312.8
MHz and to 5287.2 MHz, which goes over the air to the Hub Receiver. The
transmission is scheduled by the DOCSIS protocol, so that it does not interfere
with other modem transmission on this channel.
g) The Hub Receiver tuned to 5312.8 MHz, down-converts this to 12.8 MHz.
h) The W-CMTS Upstream port detects the 12.8 MHz upstream signal.
The Figure also shows what a spectrum analyzer would see, namely that the subscriber unit is
also transmitting at 5287.2 MHz, but to receive this, the Hub would need the Receiver tuned to
5287.2 MHz.
June 2003 Page 4-3
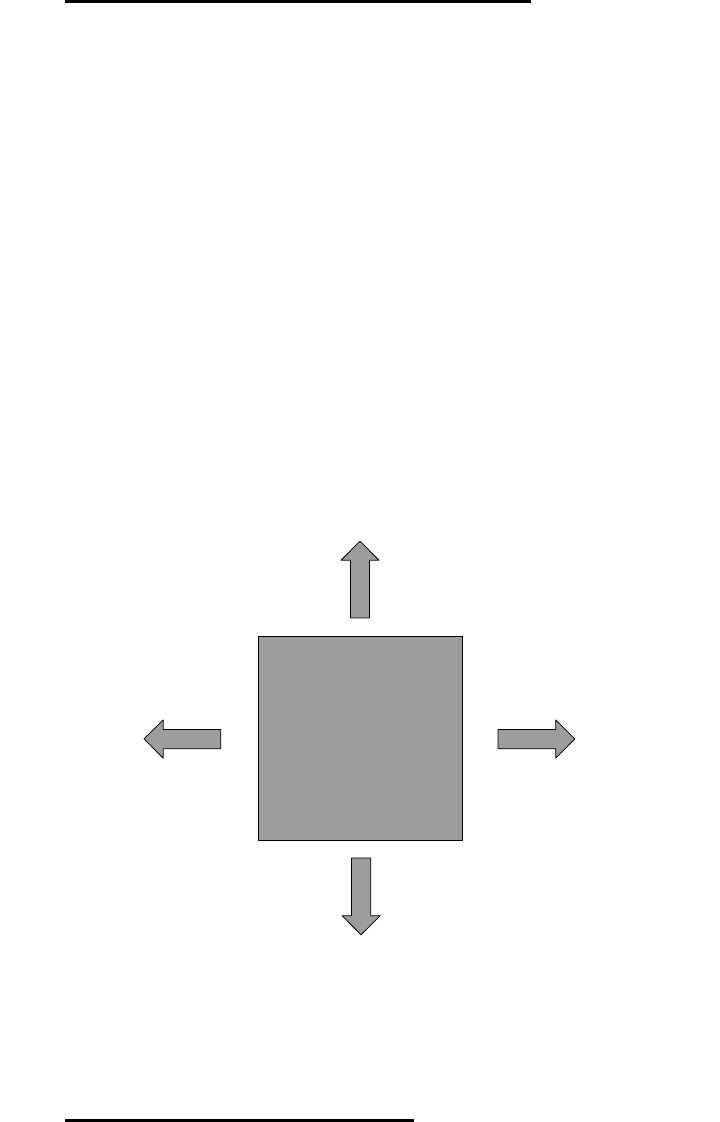
4.2.2 Downstream Adjacent 90-degree Sectors
The 90-degree-Sector Transceiver has a half-power horizontal beam width of 90 degrees, i.e.,
45 degrees each side of center. But, the energy of the antenna does not simply cut off at 45
degrees in horizontal pattern from the centerline of the antenna. Rather, the energy falls off as
the angle from the centerline increases. This means that a subscriber in the vicinity of 45
degrees clockwise from antenna A will also be in the vicinity of 45 degrees counterclockwise
from adjacent antenna B. Subscribers in the overlap zone – especially if they are relatively
close to the base station – will receive downstream signals from both adjacent Hub
Transceivers. This will cause unacceptable interference if both Hub Transceivers are
transmitting on the same frequency, even though the subscriber is receiving nominally the same
signal from both Hub Transceivers.
The solution for this is to ensure that adjacent Hub Transceivers are never transmitting on the
same frequency. Two downstream frequencies (A & B) are required for an omnidirectional
system employing 4x90-degree Hub Transceivers. Figure 4-2 shows the recommended ABAB
pattern.
AA
B
B
Omnidirectional
Hub
4x90-sectors
Figure 4-2: Downstream Channel Example of ABAB.
4.2.3 Downstream Logical Channels
It is important to note the distinction between “downstream frequencies” and “downstream
logical channels”. The “downstream frequencies” (A & B) discussed above refer to the actual
RF carrier frequencies transmitted over the air. “Downstream logical channel” refers to the
downstream data stream at the output of a base station W-CMTS downstream module. In the
examples here, the frequencies employed may be driven from one to two downstream logical
channels. The difference lies in the traffic capacity of the Hub. For example, Figure 4-3, below,
June 2003 Page 4-4
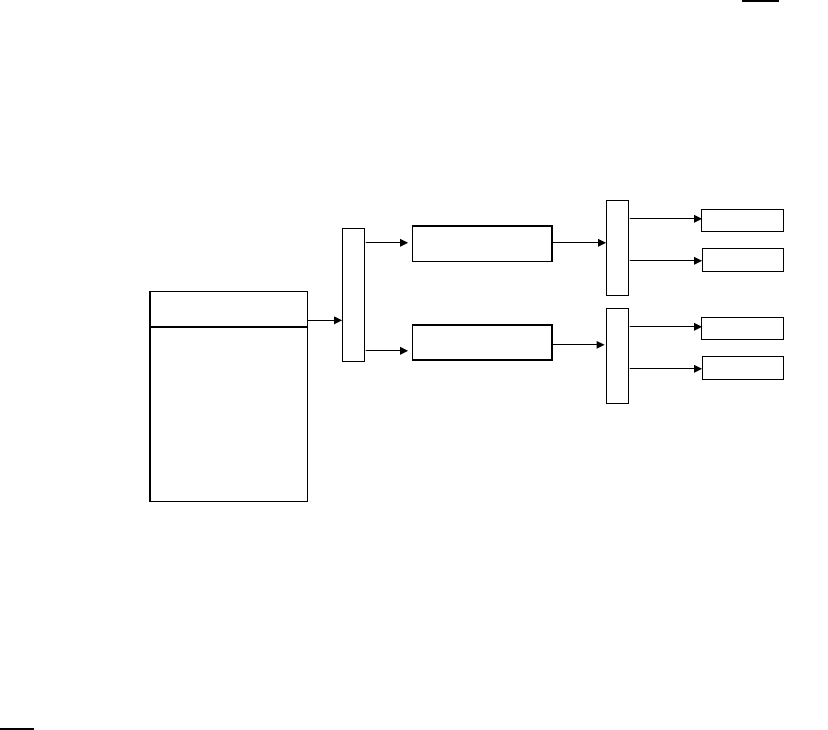
illustrates a four-sector system that utilizes the ABAB frequency pattern and one downstream
logical channel, which is split ultimately to all four sectors. This system has an aggregate raw
downstream capacity of 10 Mbps, when utilizing QPSK modulation, and 20 Mbps when using
16-QAM modulation.
W-CMTS
Downstream 1
Upconverter freq-A
Upconverter freq-B
2-way splitter
Trans/Ant 1
Trans/Ant 3
2-way splitter
Trans/Ant 2
Trans/Ant 4
2-way splitter
Figure 4-3: Four-Sector ABAB System with 1 downstream data stream, total 10 Mbps.
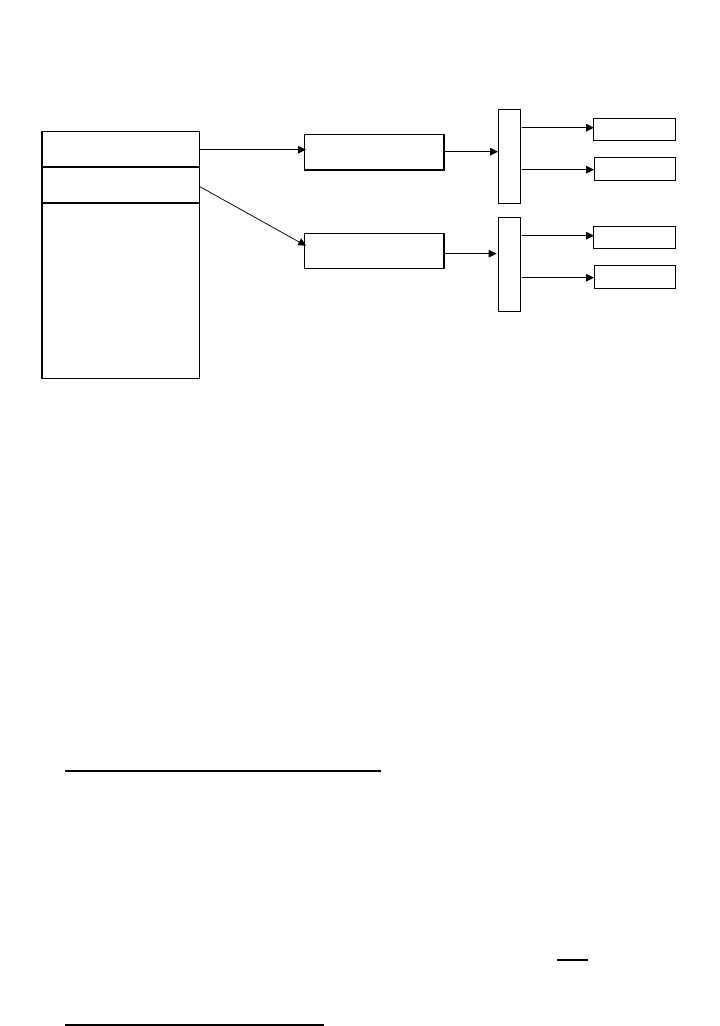
Figure 4-4, below, illustrates a four-sector system that utilizes the ABAB frequency pattern and
two downstream logical channels that are split ultimately to all four sectors. This system has an
aggregate raw downstream capacity of 20 Mbps, when utilizing QPSK modulation, and 40 Mbps
when using 16-QAM modulation.
June 2003 Page 4-5
W-CMTS
Upconverter freq-A
Upconverter freq-B
2-way splitter
Trans/Ant 1
Trans/Ant 3
2-way splitter
Trans/Ant 2
Trans/Ant 4
Downstream 2
10 Mbps
Downstream 1
10 Mbps
Figure 4-4: Four-sector ABAB system with dual downstream data stream, total 20 Mbps.
4.3 Frequency Planning – Upstream
This Section discusses several issues related to planning the use of the frequency band for
Upstream communications.
4.3.1 Upstream Logical Channels
It is important to recall that any given downstream logical channel may have a large number of
upstream logical channels associated with it, and that any given upstream is always associated
with one and only one downstream. Thus, for example, the system in Figure 4-3 has only one
logical downstream (split to all sectors) and four logical upstreams (one from each sector)
connected to 4 upstream input ports on the W-CMTS. The association of one or more upstream
logical channel with a downstream logical channel is made in the W-CMTS configuration.
Upstream logical channels from one or more Hub Transceivers may not be combined into a
single upstream input to the W-CMTS.
4.3.2 Upstream Frequencies
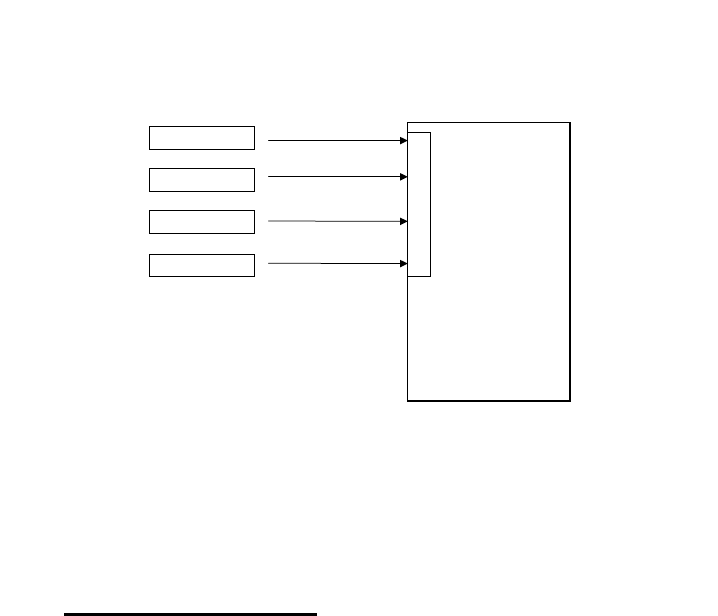
Figure 4-5, below, illustrates the 4 upstream signals from 4 Hub Transceivers arranged in a
standard omnidirectional receive configuration. Note that this upstream configuration applies to
all of the downstream configurations illustrated in the Figures above.
June 2003 Page 4-6
W-CMTS
upstream inputs
Hub Rcv/Ant #1
Hub Rcv/Ant #2
Hub Rcv/Ant #3
Hub Rcv/Ant #4
Freq X
Freq X
Freq Y
Freq Y
Figure 4-5: Four Hub Transceivers as input to W-CMTS.
4.3.3 Available Frequencies
All wireless modems in the same Hub sector must transmit upstream on the same frequency,
and each wireless modem can operate on only one upstream channel.
There are 3 upstream frequencies. The Upstream data rate is 5.12 Mbps with Channel
Bandwidth of 3.2 MHz. See Table 4-2.
The receiver within each Hub Transceiver is factory-tuned to its Receive Carrier Frequency and
Receive Output Frequency to the W-CMTS. Hence the frequency planning must be done prior
to ordering equipment and the frequency must be specified in the purchase order.
The W-CMTS commands the wireless modem to its Upstream Transmit Carrier frequency
during the wireless modem registration process. These are configuration parameters that are
set in the W-CMTS network management system. See the software installation guide for that
product.
June 2003 Page 4-7

Table 4-2: ARCell Upstream Frequency Plan7
Modem Tx &
W-CMTS Rx
Input
RF Upstream Model #
(90 deg Rcv)
Product
Status
center (MHz) center (MHz)
6.4 5306.4 AR1205-064H
9.6 5309.6 AR1205-096H
12.8 5312.8 AR1205-128H
6.4 5293.6 AR1205-064L
9.6 5290.4 AR1205-096L Standard
12.8 5287.2 AR1205-128L Standard
NOTE: the 9.6 & 12.8MHz frequencies are supported by both the V3000W and the BSR1000W
Wireless CMTS Hub controllers. The other frequency (6.4MHz) is not supported by the
BSR1000W.
7 A spectrum analyzer looking at the subscriber’s transmitted RF will see two frequencies. The two
carriers are 5300 MHz +- the upstream IF frequency.
June 2003 Page 4-8

5 Hub Installation Detail – 6x60
This Section will describe a six-sector Hub using 60-degree AR1255 Hub Transceivers. These
Transceivers contain the transmitter, receiver and both Tx & Rx antennas in a single integrated
outdoor unit.
This Section also describes a system using the V3000 W-CMTS, which is a chassis-based
CMTS. This chassis has six card slots for upstream & downstream cards. The Downstream
card is a single port. The upstream card provides 6 upstream ports. Thus the system scales
from a single Downstream and single Upstream (2 cards) to a larger system. For example, the
six-sector system described earlier can have 3 Downstream cards and one Hex-Upstream card.
The maximum traffic capability possible with the V3000W is 100 Mbps in each direction.
This system is ideal for large metropolitan area networks with multiple Hub sites.
NOTE: The ARCell Hub must be professionally installed. The installer must be familiar with
local electrical, building, and other codes, as well as national codes and microwave regulations.
This is for regulatory as well as safety reasons.
5.1 Installation Detail – AR1255 60-degree Hub Transceiver
The Hub Transceiver is almost 4 feet long but weighs less than 12 lbs. It is normally mounted
on a vertical pipe.
Note: The Base Station Installation Checklist is included in the manual as a summary.
5.1.1 Cable connections
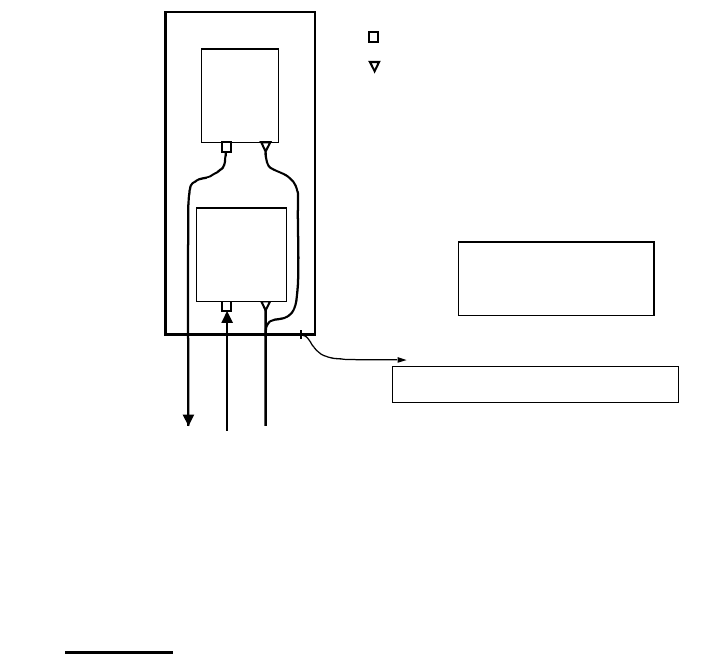
It will be more convenient to connect the transceiver cables and close the transceiver rear
weather cap prior to attaching the transceiver to its mounting pipe. Refer to the Connection
Diagram – Hub Transceiver on the following page.
Remove the sixteen screws securing the rear weather cap to the anodized aluminum back plate
of the transceiver, taking care not to damage the gasket around the weather cap. This will
reveal two aluminum modules containing the ARCell outdoor electronics8. The upper module
contains the receiver and the lower the transmitter. Note the F-female and power9 connectors
on the bottom of each.
Attach the receive (upstream) RG-6 to the F connector on the upper electronics module and the
transmit (downstream) RG-6 to the F connector on the lower electronics module. Arcwave
recommends the use of premium quad-shielded RG-6 coaxial cable (such as Belden 1189A) for
base station installations.
Attach the ARCell-provided power “Y” cable to the connectors on both electronics modules
(connectors are interchangeable). Note that the power connector is keyed and must be rotated
into the correct position prior to seating. The locking ring is quite stiff and must be turned
approximately ¼ turn clockwise for proper connection. Be sure that the upstream and
downstream RG-6 and the power cables clear the mounting screw holes for the rear weather
cap. Refer to the photograph in Figure 5-1. Dress the cables as shown in the photograph and
8 Complete replacement of one or both of the aluminum modules containing the electronic assemblies is the only user
service possible for the ARCell Hub Transceiver.
9 The pin connection information is detailed on the last page of this chapter – it is not normally needed as
ARCell supplies the power cable.
June 2003 Page 5-1
secure with a tie-wrap below the lower electronics module. Although the power connectors are
interchangeable, the method illustrated in the photograph will produce best results.
It is not necessary to disturb the SMA coaxial connector on the top of each electronics module.
This is the connection to the actual antenna panel.
Replace the transceiver rear weather cap taking care that the gasket is seated smoothly around
the edge of the weather cap and that the three cables pass through the cable access on the
bottom end of the weather cap. Replace the sixteen screws securing the weather cap snugly
but not tightly enough to distort the gasket. See Figure 5-2.
Receiver
Module
Receive
Transmit
DC Power
Ground Transceiver to Supporting Structure or
Building Steel per NEC or Local Code
Note: Rear weather cap must
be in place and all screws
secured for outdoor
installation.
F-type Male Connector
DC Connector
Transmitter
Module
Figure 5-1: Hub Transceiver Connection diagram.
The photos in Figures 5-2 and 5-3 show how this is implemented.
5.1.2 Mounting
Mount the Hub Transceiver on a vertical pipe with at least 44 vertical inches clear of unrelated
hardware or other impediments. The transceiver mounting brackets will accommodate pipe
from 1.5 to 2.25 inches in outside diameter. Up-tilt or down-tilt is accomplished by means of
adjusting the nuts on the 5/16 inch threaded bolts captive to the mounting assembly. See
Figure 5-4 for mounting details.
Ground the transceiver to the metallic mounting structure (tower or monopole) or suitable
rooftop ground point per local codes and installation practices. Normally #6 AWG or larger wire
is utilized for this purpose. A ¼-20 ground bolt is provided on the bottom flange of the Hub
Transceiver to attach the ground wire. This is illustrated in Figure 5-4 as well.
June 2003 Page 5-2
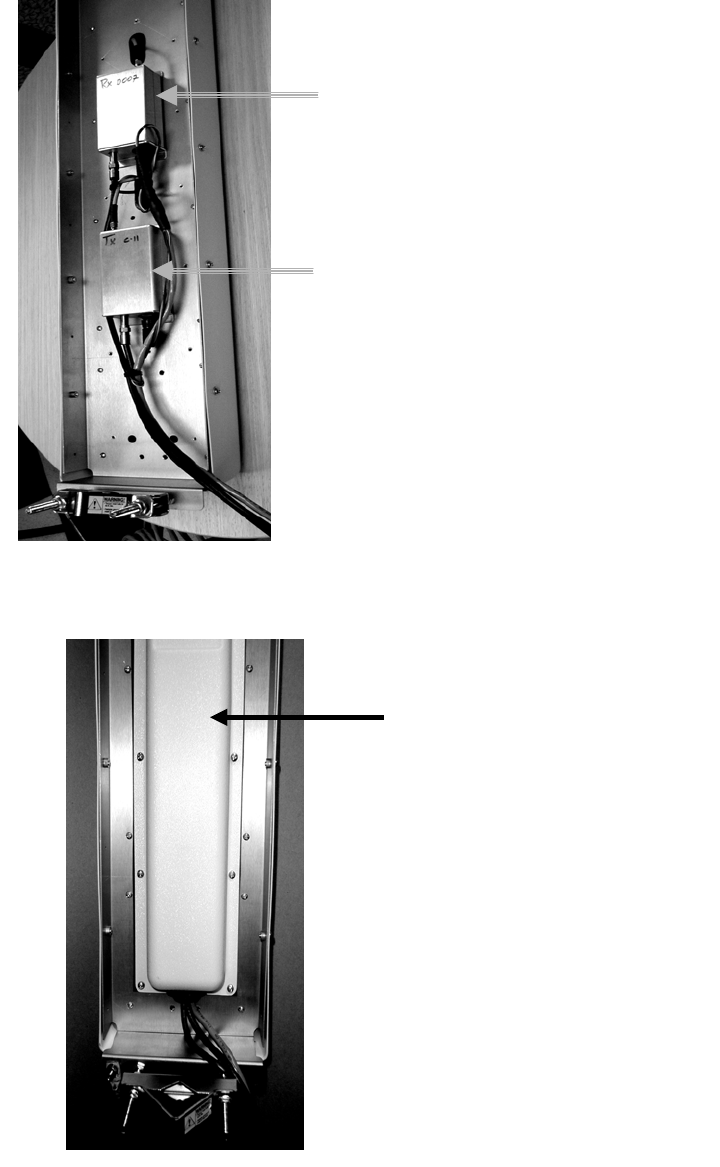
Upstream Receiver module (AR1255RXSP)
Downstream Transmit module (AR1255TXSP-2)
Figure 5-2: Cable Installation and Dressing.
Rear weather cover
Figure 5-3: Weather cap installed.
June 2003 Page 5-3
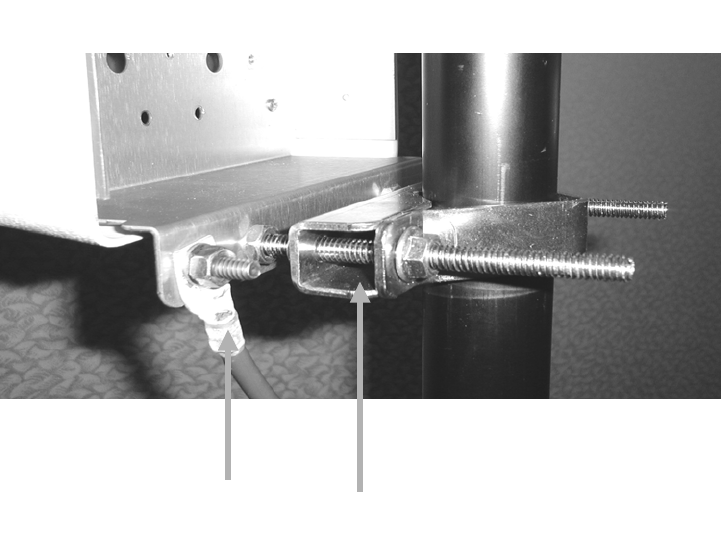
Ground lead lug installed Pipe clamps installed
Figure 5-4: Hub Transceiver Bracket Detail
Bundle the three cables (2 x RG-6, power) with suitable (UV rated) tie wraps and secure to the
mounting structure in a manner to prevent rainwater from flowing down the cable and into the
cable access opening in the rear weather cap. Figure 5-5 illustrates a typical installation. Be
certain to provide a drip loop if the cable bundle is routed upward.
In the case of a single sector, single Hub Transceiver installation, route the bundle of three
cables to the base station indoor equipment room. Take care to leave suitable drip loops and
bond the shields of the RG-6 and power cables to ground per local codes and installation
practices.
If the base station site is multi-sector (two or more collocated Hub Transceivers), route the
bundles of three cables to the equipment room as above. If an Outdoor Junction Box (OJB) is
to be employed in the installation, route the cables to the OJB.
June 2003 Page 5-4
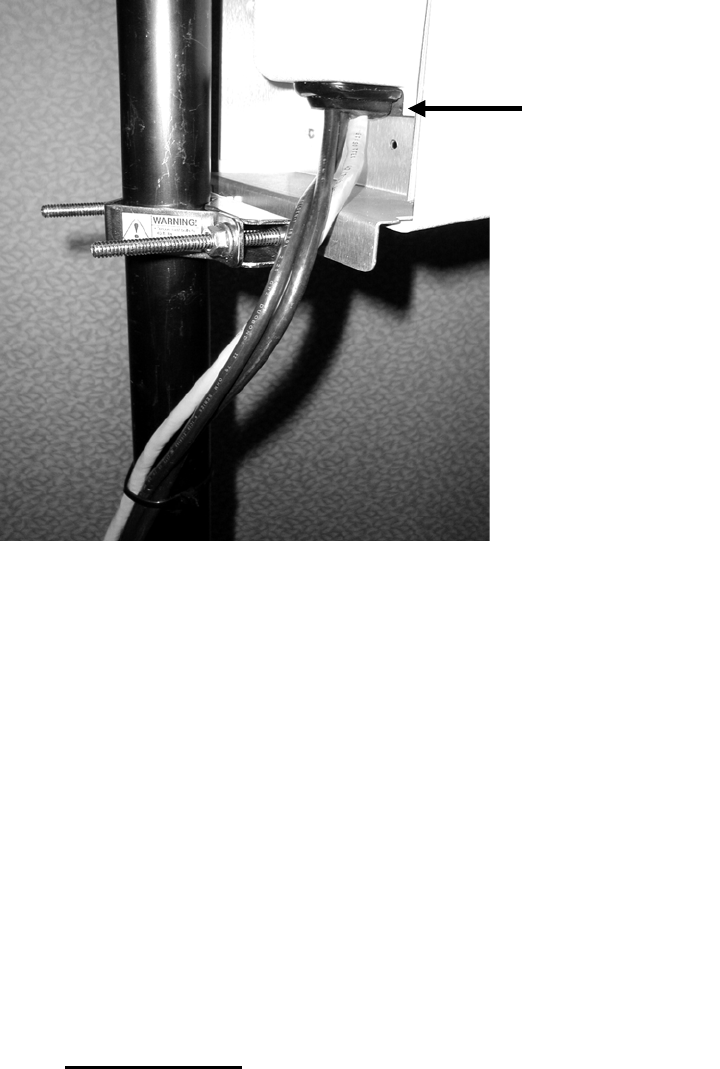
Cable entry
Figure 5-5: Hub Transceiver Cable Installation
5.2 Installation Detail – Outdoor Junction Box (OJB)
A multi-sector configuration consists of two or more Hub Transceivers mounted on a common
building roof or tower/monopole structure served by a single Wireless CMTS (W-CMTS) located
in an adjacent equipment room.
Each Hub Transceiver requires a separate upstream and downstream IF cable, so a six sector
(six Hub Transceiver) installation would require 12 IF coaxial cables. The DC power cables are
simply paralleled. This can be accomplished by running separate power cables from each Hub
Transceiver to the equipment room, or by installing an Outdoor Junction Box (OJB) on the
mounting structure adjacent to the Hub Transceivers and paralleling the DC power in the OJB.
An OJB may be used as a junction point for DC power as described here. It may also house
lightning protection, IF signal splitters and power supplies.
It is the installer’s responsibility to furnish, assemble and install the OJB.
5.2.1 Implementation
Arcwave’s implementation of an OJB as its test site is described and pictured below (Figures 5-
6 – 5-8).
June 2003 Page 5-5
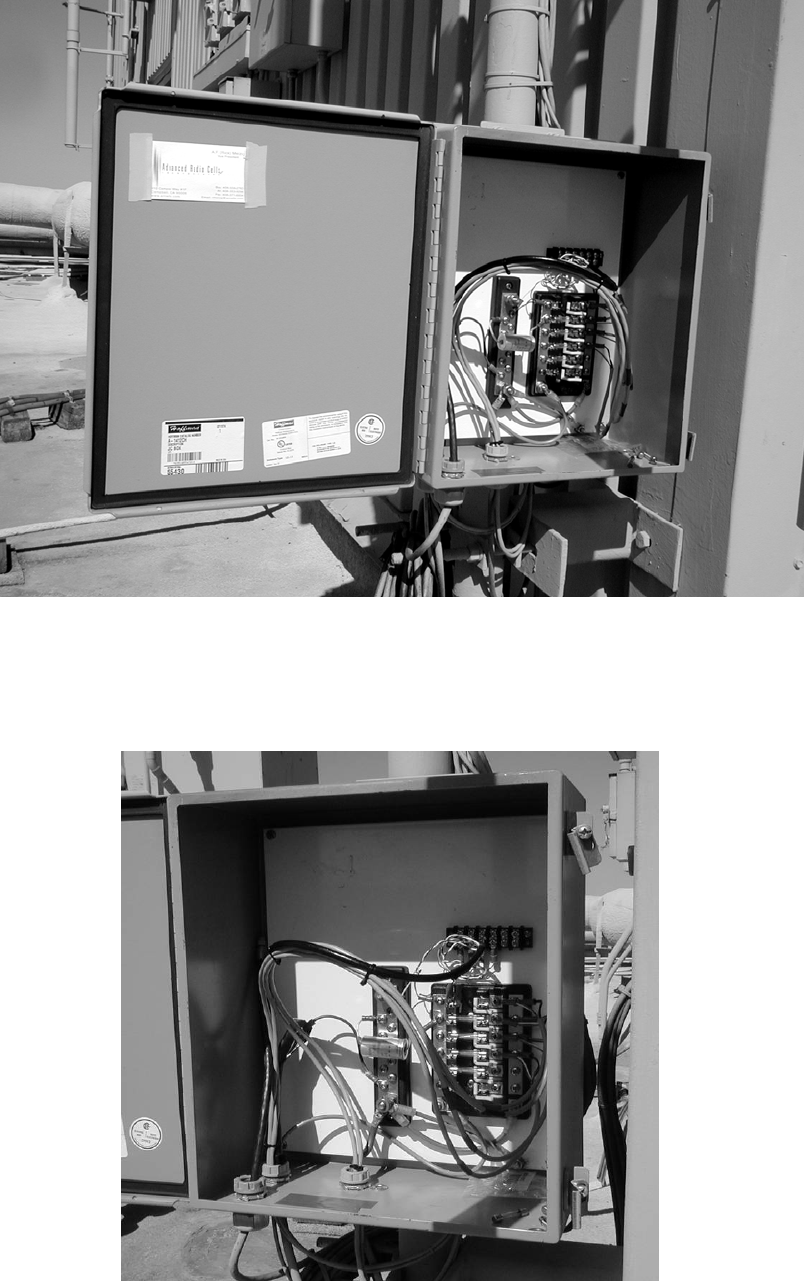
Figure 5-6: Photo of open OJB.
The upper barrier strip terminates the shielded/outdoor CAT 5 cable (black jacket). This is
reserved for the future applications.
Figure 5-7: OJB
June 2003 Page 5-6