Argus Technologies Co AGS-EW2104 Wireless Router User Manual WA601 WE2104
Argus Technologies Co Ltd Wireless Router WA601 WE2104
Manual

1
Web Edition
Nov. 2001

2
Contents
INTRODUCTION.......................................................................................................................................................................................... 4
PACKAGE CONTENTS................................................................................................................... 5
PRE - INSTALLATION.....................................................................................................................5
SYSTEM REQIUREMENTS.............................................................................................................5
FEATURES BENEFITS....................................................................................................................6
ONE - PORT WIRELESS INTERNET GATEWAY ADSL/ CABLE ROUTER .....................................................................8
THE WIRELESS INTERNET GATEWAY FRONT VIEW..............................................................................8
THE WIRELESS INTERNET GATEWAY REAR VIEW ...............................................................................9
4 - PORTS WIRELESS INTERNET GATEWAY ADSL/CABLE ROUTER.........................................................................10
THE WIRELESS INTERNET GATEWAY FRONT VIEW ...........................................................................10
THE WIRELESS INTERNET GATEWAY REAR VIEW .............................................................................11
CONNECTING WIRELESS INTERNET GATEWAY TO THE NETWORK........................................................................12
CONFIGURING YOUR WIRELESS ROUTER...............................................................................................................................14
SETUP WIZARD.............................................................................................................................15
TIME SETTNGS..............................................................................................................................15
DEVICE IP SETTINGS...................................................................................................................16
ADSL/CABLE ISP SETTINGS ........................................................................................................17
ISP ADDITIONAL SETTINGS(PPPOE SETTINGS)....................................................................18
WIRELESS SETTINGS..................................................................................................................19
MODEM SETTINGS.......................................................................................................................20
SAVE & RESTART.........................................................................................................................21
DEVICE INFORMATION.........................................................................................................................................................................22
DHCP SERVER SETTINGS ..........................................................................................................24
IP Adrress Pool Rage.................................................................................................................24
IP Address Reservation .............................................................................................................24
VIRTUAL SERVER SETTINTGS ..................................................................................................25
ACCESS CONTROL SETTINGS..................................................................................................26
STATIC ROUTING SETTINGS......................................................................................................28
DYNAMIC ROUTING SETTINGS..................................................................................................29
FILTER SETTINGS - LAN FILTER SETTINGS...........................................................................30
FILTER SETTINGS - WAN FILTER SETTINGS .........................................................................31
MODE STRING SETTINGS...........................................................................................................32
ADMINISTRATION SETTINGS.....................................................................................................33
SAVE & RESTART.........................................................................................................................35
SYSTEM TOOLS .......................................................................................................................................................................................36
INTRUDER DETECTION LOG......................................................................................................36
DISPLAY ROUTING TABLE.........................................................................................................36
SYSTEM DIAGNOSTICS...............................................................................................................37
SAVE & RESTART.........................................................................................................................38
LOAD SETTINGS - LOAD DEFAULT SETTINGS......................................................................39
LOAD SETTINGS - LOAD SETTINGS FROM FILE ...................................................................39
UPGRADE FIRMWARE.................................................................................................................40
RESET DEVICE..............................................................................................................................40
HOW USING TELNET TO CONFIGURE YOUR WIRELESS INTERNET GATEWAY..................................................41
HOW CONFIGURING YOUR PCS CONNECT TO THE WIRELESS ROUTR .................................................................44
FCC RF Radiation Exposure Statement:
This equipment complies with FCC RF radiation exposure limits set forth for an
uncontrolled environment. This equipment should be installed and operated with a
minimum distance of 20 centimeters between the radiator and your body.
This transmitter must not be co-located or operating in conjunction with any other
antenna or transmitter.
CE Approved
The Digital device has CE Approval

4
Introduction
This manual details instructions of set-up and functions of the wireless Internet
gateway.
This is a breakthrough for SOHO users who need to share a high speed
broadband Internet connection to the Internet. The high-powered antenna design
assures its wireless connection even in large building.
The wireless Internet gateway enables your network to connect through any
ADSL/Cable modem onto the Internet--providing a simple network solution for
SMB and SOHO users.
The one port Wireless Internet gateway is equipped with:
• A WAN Ethernet port (to connect to ADSL/Cable modem)
• An Ethernet port (10/100Mpbs)
• One asynchronous port
The 4 ports Wireless Internet gateway is equipped with:
• A WAN Ethernet port (to connect to ADSL/Cable modem)
• 4 Ethernet ports (10/100Mbps) include one port to select uplink
• An uplink port (to extend to an external hub)
• One asynchronous port.
Once the WAN Ethernet is connected to an ADSL/Cable modem, your ISP will
automatically activate your account. In this way, the entire LAN can share one
high-speed line to the Internet.
The asynchronous port may connect to a 56K modem or to an ISDN TA (to be
used as a dialup backup to the ADSL/Cable connection should the ADSL/Cable
connection fail). If there is no ADSL/Cable service in your area, the dialup backup
can also serve as your Internet access solution.

5
PACKAGE CONTENTS
Please inspect your package. The following items should be included:
1). Wireless internet gateway (the Device)
2). Power adapter
3). Quick Installation Guide
If any of the above items are damaged or missing, please contact your dealer
immediately.
PRE-INSTALLATION CHECKLIST
Before installing the wireless internet gateway, you should:
l Have carefully read the entire manual.
l Be familiar with the terminology and concepts of browsers. (This guide
works under the assumption that you are proficient with the browsers you
are using).
l Have met all the hardware and software requirements.
SYSTEM REQUIREMENTS
l Microsoft I.E 4.0 or later version or Netscape Navigator 4.0 or later
version
l One computer with an installed 10Mbps, 100Mbps or 10/100Mbps
Ethernet card
l One Modem or ISDN TA (if a dialup backup connection is needed)
l One RJ-45 ADSL/Cable Internet connection
l TCP/IP protocol installed
l UTP network Cable with a RJ-45 connection

6
FEATURES AND BENEFITS
High speed for wireless LAN connection
Support up to 11 Mbps data rate by incorporating Direct Sequence Spread
Spectrum (DSSS) technology.
IEEE 802.11b compatible
Fully compatible with the IEEE 802.11b standard
Wireless AP features
Provides Roaming, Best Access Point Selection
Wireless Encryption Protocol
Capable of up to 128 Bit WEP encryption
IP sharing
Shared Internet Access for up to 253 users
ADSL/Cable Backup
Supports dialup backup in case ADSL/Cable connection fails
PPPoE Client
Supports PPPoE client function to connect to the remote PPPoE server
Idle Timer
Let you set a specified idle-time before automatically disconnecting
Routing Protocol
Supports static route, RIP 1/2
Built-in NAT function
Allows multiple PCs and devices to share one Internet connection
Virtual Server
Allows internal workstations (servers) to be accessible from Internet
New feature Upgradeable
New features are upgradeable in the future
Web-Based Configuration
Web based configuration
7
Firewall Protection
Built-in NAT firewall guarantees network security
DHCP Server
Automatically assigns IP information to network users
DHCP Client
Automatically acquires IP information for ADSL/Cable from your ISP
Dial-on Demand
Eliminates the need for Dial-up and automatically logs in to your ISP
Hacker Attack Logging
Supports general hacker attack pattern monitoring and logging
VPN Support
Support PPTP, L2TP and IPSec pass through function
DMZ (demilitarized Zone)
It prevents outside users from getting direct access to server that has company
data, and un-permitted access Internet from inside LAN
8
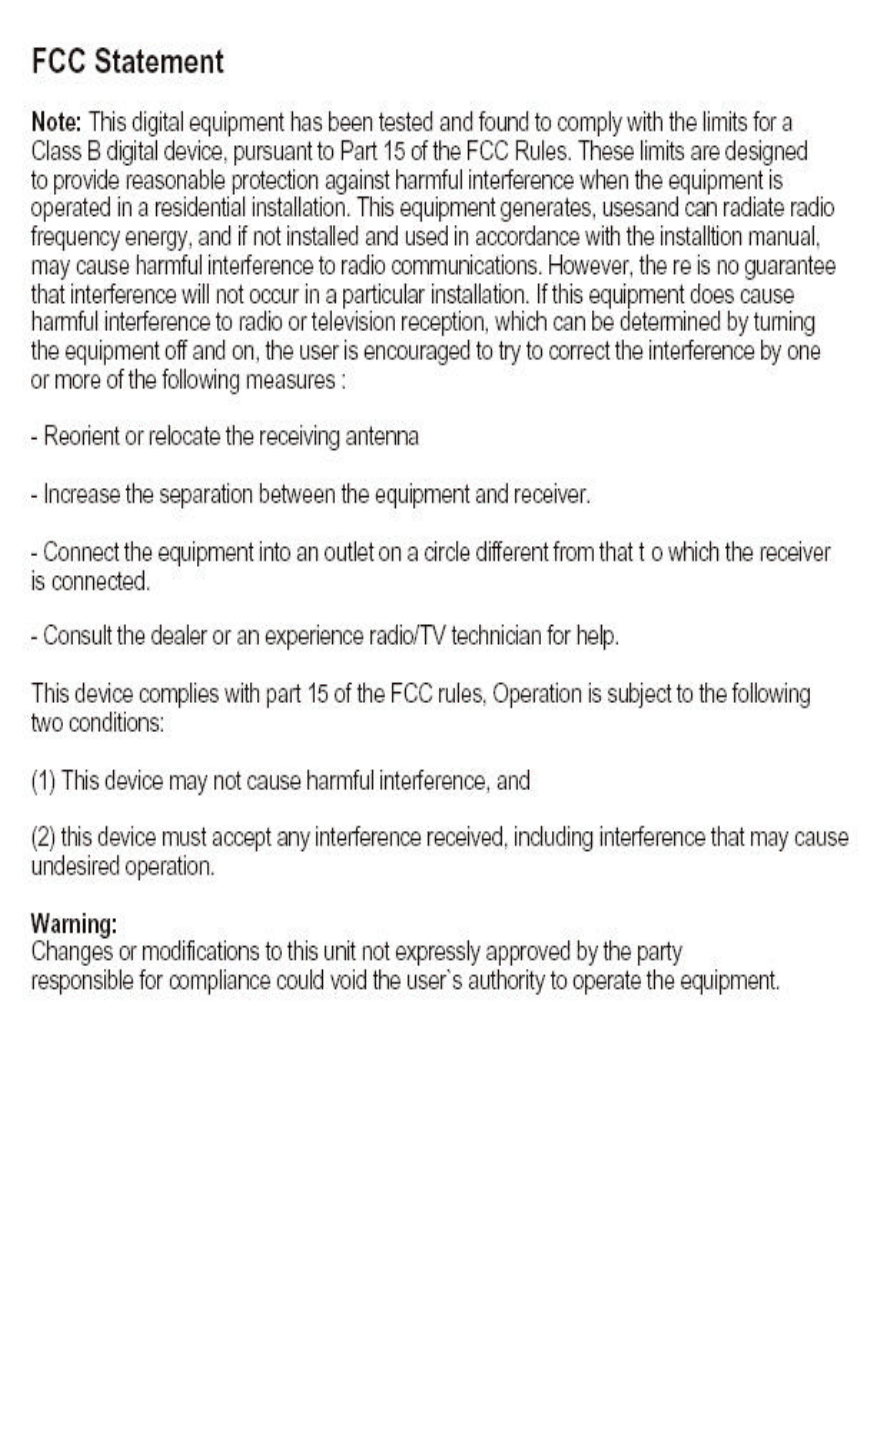
One Port Wireless Internet Gateway
ADSL/Cable Router
The Wireless Internet Gateway Front View
LED indicators
ACT (Green)
LAN LNK (Green)
ACT (Green)
WLS LNK (Green)
ACT (Green)
Serial LNK (Green)
ACT (Green)
WAN
LNK (Green)
STATUS (Yellow) Orange LED will BLINK when device boot and
upgrade firmware.
POWER (Red) Red LED will LIGHT if the gateway is receiving power.
Green LED will
BLINK
when data is transmitting or receiving.
Green LED will LIGHT when Wireless LAN is ready.
Green LED will
BLINK
when data is transmitting or receiving.
Green LED will LIGHT when remote carrier has been
detected.
Green LED will
BLINK
if packet is transmitting or receiving.
Green LED will LIGHT when a good link is established.
Green LED will
BLINK
if packet is transmitting or receiving.
Green LED will LIGHT when a good link is established.
9
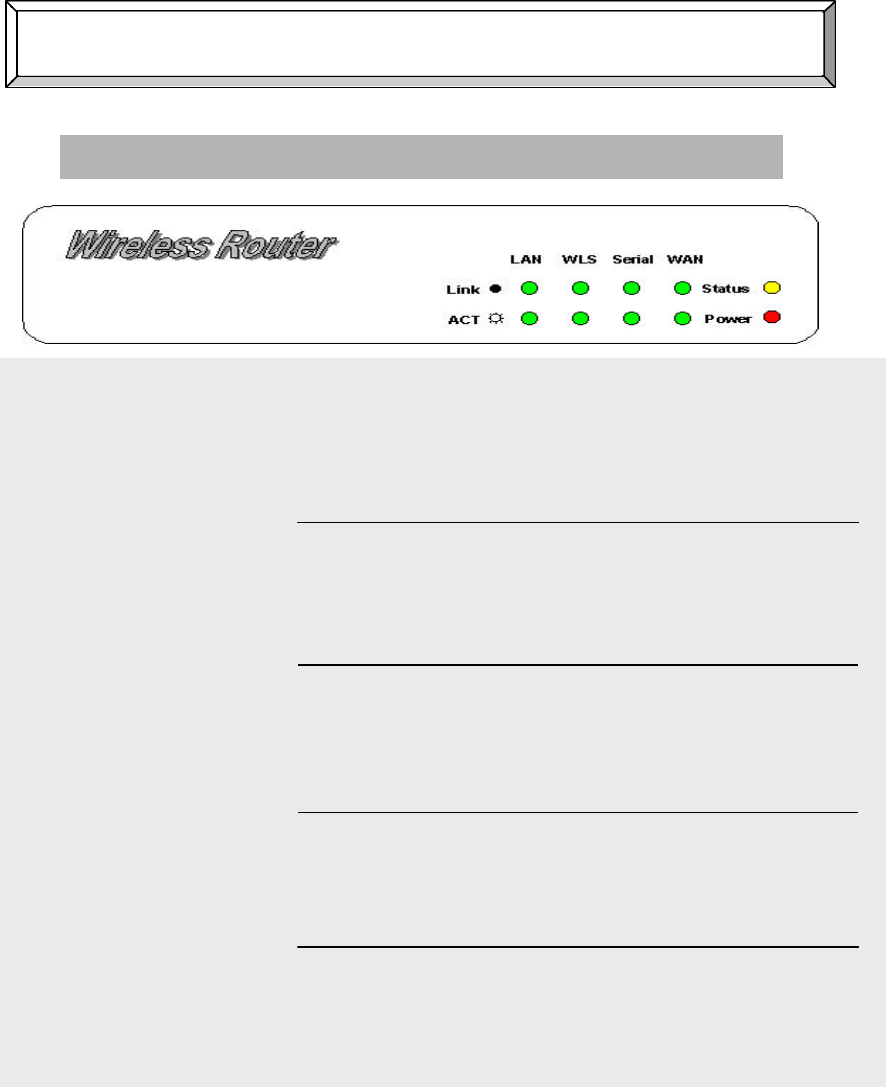
The Wireless Internet Gateway Rear View
The rear panel of the wireless Internet gateway is where all connections are
made.
POWER (5 VDC)
WAN
Async
LAN
The power port is where you will connect the AC to
DC switching power adapter
The WAN 10M Ethernet port is where you will
connect your ASDL/Cable modem
The Async port is where you will connect the 56K
modem or ISDN TA
The LAN port on the rear panel. This is where you
will connect networked devices, such as PCs, ftp
servers or anything else you want to put on your
network.
The Reset Button
If you would like to load default settings, press the reset button and hold it
for 5 ~ 6seconds. It will load the factory default settings for the device.
Please be careful. Do not press the reset button unless you want to clear
the current data.
NOTE
¡I
10
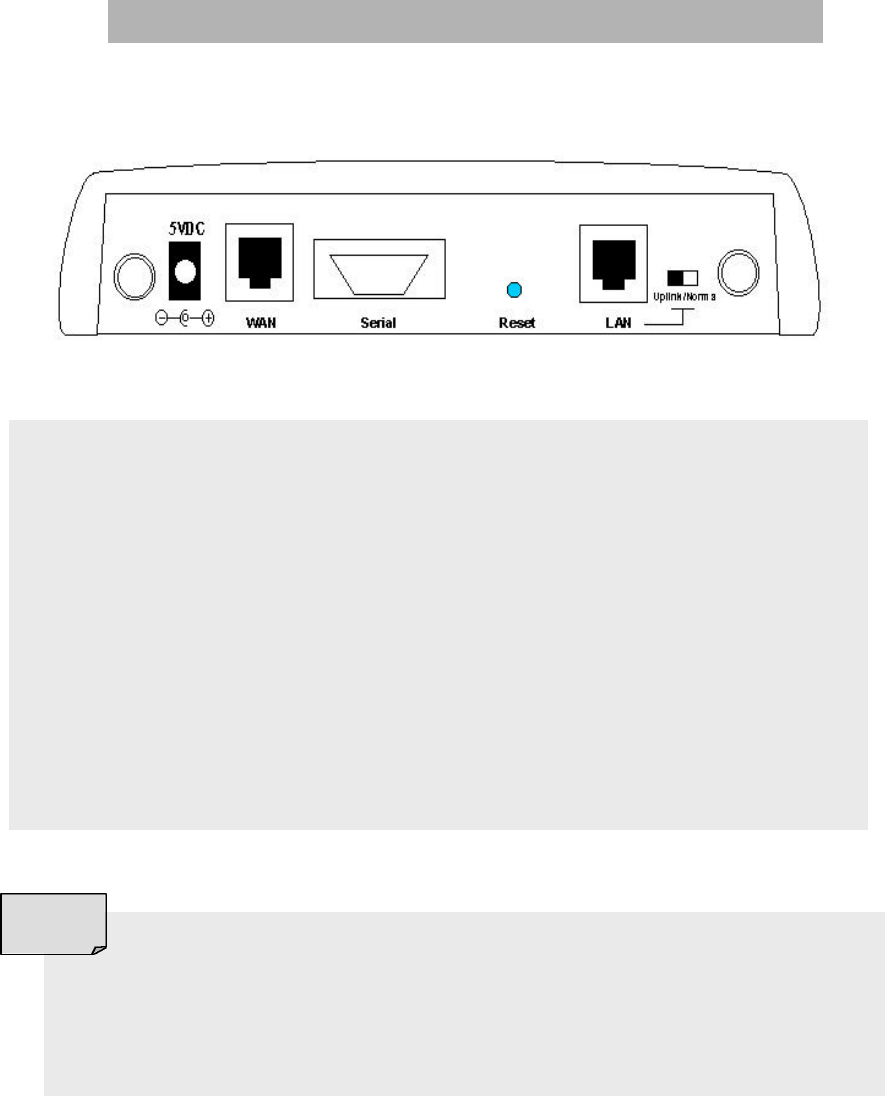
4 - Ports Wireless Internet Gateway
ADSL/Cable Router
The Wireless Internet Gateway Front View
LED indicators
LINK (Green)
LAN [1:4]
Link/Act
ACT (Green)
Wireless (Green) Green LED will BLINK if packet is transmitting or
receiving.
Serial (Green) Green LED will LIGHT when a good link is
established.
WAN (Green) Green LED will LIGHT when a good link is
established.
STATUS (Yellow) Yellow LED will BLINK when device boot and
upgrade firmware.
POWER (Red) Red LED will LIGHT if the gateway is receiving
power.
Green LED will LIGHT when a good link is established.
Green LED will BLINK if packet is transmitting or
receiving.
11
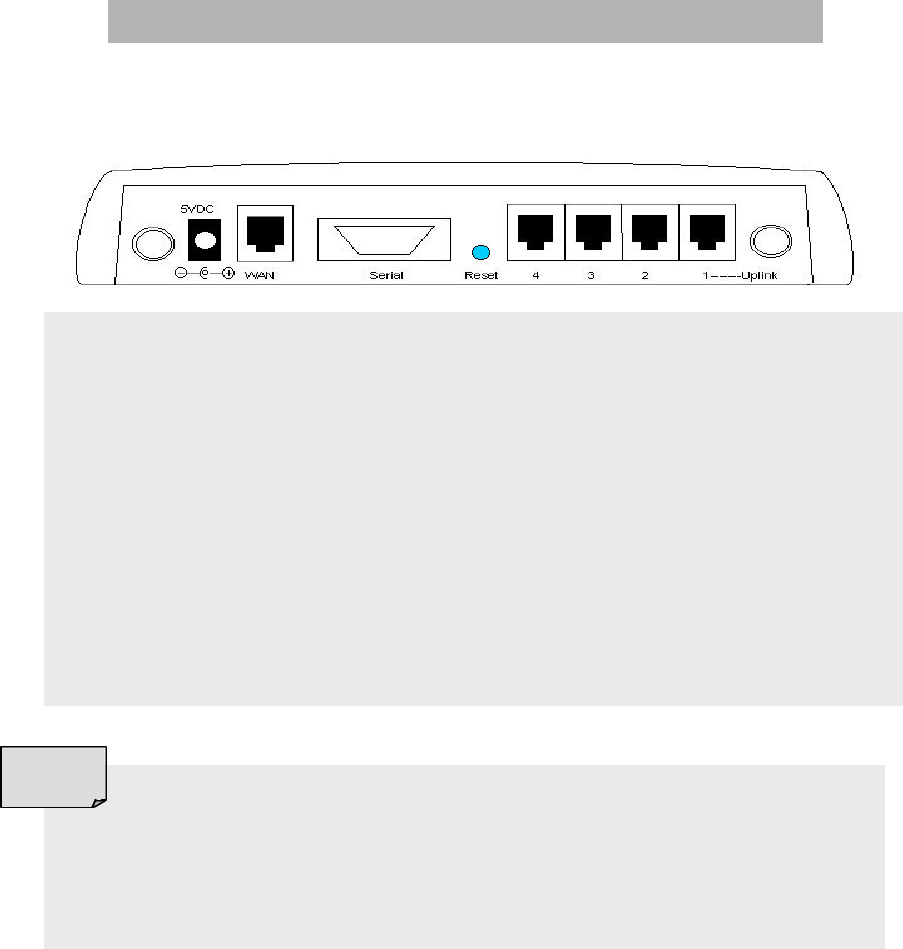
The Wireless Internet Gateway Rear View
The rear panel of the wireless Internet gateway is where all connections are
made.
POWER (5 VDC) The power port is where you will connect the AC to DC
switching power adapter.
WAN The WAN 10M Ethernet port is where you will connect
your ASDL/Cable modem.
Serial The Serial port is where you will connect the 56K modem
or ISDN TA.
LAN[1:4] The LAN port on the rear panel. This is where you will
connect networked devices, such as PCs, ftp servers or
anything else you want to put on your network.
The Reset Button
If you would like to load default settings, press the reset button and hold it
for 5 ~ 6 seconds. It will load the factory default settings for the device.
Please be careful. Do not press the reset button unless you want to clear
the current data.
NOTE
¡I

12
Connecting Wireless Internet Gateway
To The Network
Preface
In order to install the wireless Internet gateway: you will need to check your PC’s
settings and the values from your ISP before connecting your gateway to the
network.
The information offered by your ISP
l Dynamic IP settings
l Your fixed IP address for the gateway
l Your subnet mask for the gateway
l Your default gateway IP address
l Your DNS IP address
The static IP settings for the PC
l Your PC’s fixed IP address
l Your PC’s subnet mask
l Your PC’s default gateway
l Your PC’s primary DNS IP address
The router’s default IP
address settings is 192.168.2.1
NOTE !
If you would like to use PPPoE, you will need the following
values from your ISP in order to install your router:
l Username
l Password
NOTE !

13
The dynamic IP settings for the PC
We recommend that you leave your IP settings as automatically assigned. By
default, the gateway is a DHCP server, and it will give your PC the necessary IP
settings.
Confirm Hardware Installation
After you have the previous values on hand, you can begin to configure your
wireless Internet gateway.
1. Confirm power of the equipments, on your PCs, your ADSL/Cable modem
and the wireless Internet gateway.
2. Connect the power-supply cable to the power port at the rear of the
wireless Internet gateway. Plug the supplied power cable into a power
outlet. Plug the other end into the back of the power adapter.
3. Connect a network cable from one of your PCs’ Ethernet ports to one of
the LAN ports on the back of the wireless Internet gateway. Do the same
with all the PCs you wish to connect to the wireless Internet gateway.
(If your PCs install with the station cards, you can connect to the device
without cabling)
4. Connect the network cable from your ADSL/Cable modem to the WAN
Ethernet port on the rear of the wireless Internet gateway.
If everything is done, please continue to configure the
wireless Internet gateway’s settings on next page…….
If the gateway assigns your PC’s IP address, you have to
enable the function that obtains the IP address automatically for your
PC. (please See Page 41)
NOTE !

14
Configuring Your Wireless Router
Launch your web browser and type the device IP address (http:// 192.168.2.1) in
the browser’s address box. This IP address is the default value of your gateway.
Press Enter
The main menu will appear. It displays all the functions that you can browse, as
well as setup for the wireless internet gateway.
Please make sure your PC’s IP address is in the same network as
the router’s. In the windows 95/98 you can type WINIPCFG
, in the windows
2000/NT you can type IPCONFIG (please see page 43 )
NOTE !
15
SETUP WIZARD
Setup wizard is a step-by-step process that will let you input all the basic
settings.
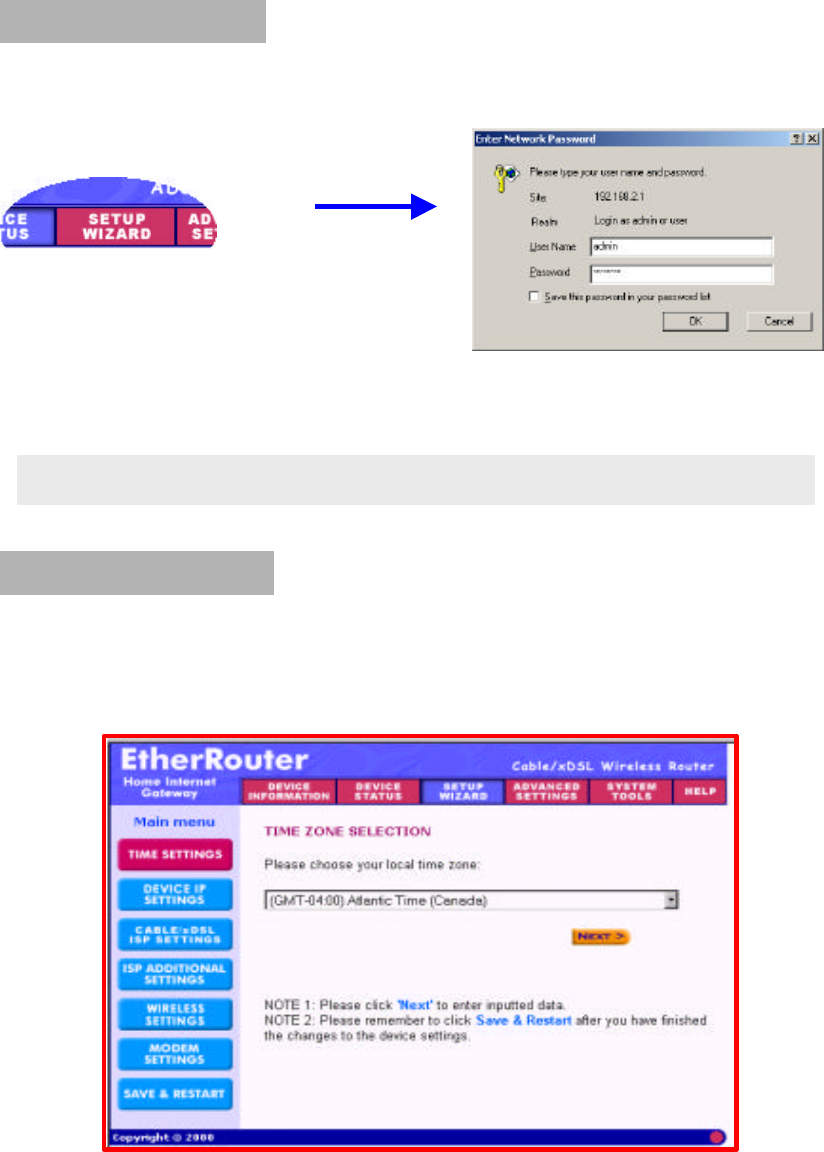
Click the SETUP WIZARD
A username and password will appear. Leave the password box empty and type
admin (the default username) in the username box. Click OK
The setup wizard’s page will appear.
TIME SETTINGS
Please choose the local time zone. After selecting please click Next button to
continue to the next step. You can also click the buttons on the left to set up the
configuration.
If you would like to change the password please See Page 31
NOTE !

16
DEVICE IP SETTINGS
You have to give your internet gateway an IP address on your network. This is
not the IP address from your ISP but the local internal LAN IP address. The IP
address “192.168.2.1” is the default value of your gateway.
Device IP Address
The internal LAN IP address of your internet gateway
Device IP Subnet Mask
The subnet mask can usually be left as its default entry “255.255.255.0”
17
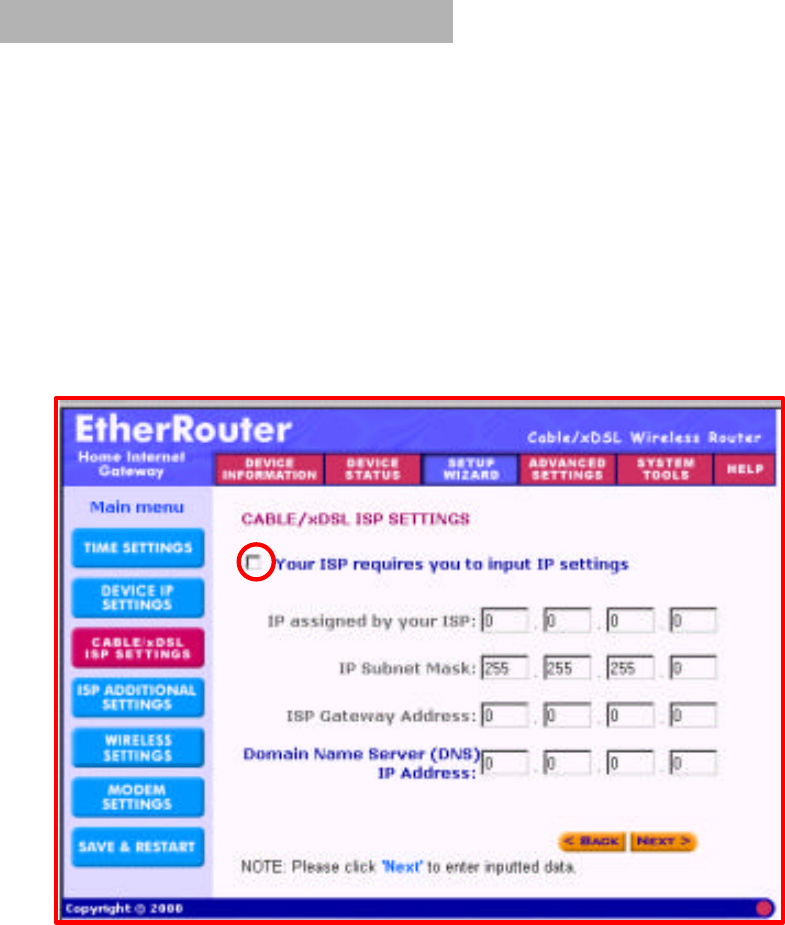
ADSL/Cable ISP SETTINGS
If you would like to use ADSL/Cable ISP settings, you have to enable this
function by configuring this page. Some ISPs may give you Static IP settings. If
this is the case for your ISP, then you need to:
Enter the IP address that is provided by your ISP
Enter the IP subnet mask
Enter the ISP gateway address
Enter the DNS IP address
18
Some ISP may recognize your LAN card Mac address as a legal
user; In this case, you have to copy the LAN card Mac address in the Mac
address field.
For WIN 95/98 you can run winipcfg to see the LAN card Mac address
For WIN 2000/NT you can run ipconfig/all to see the LAN card Mac address
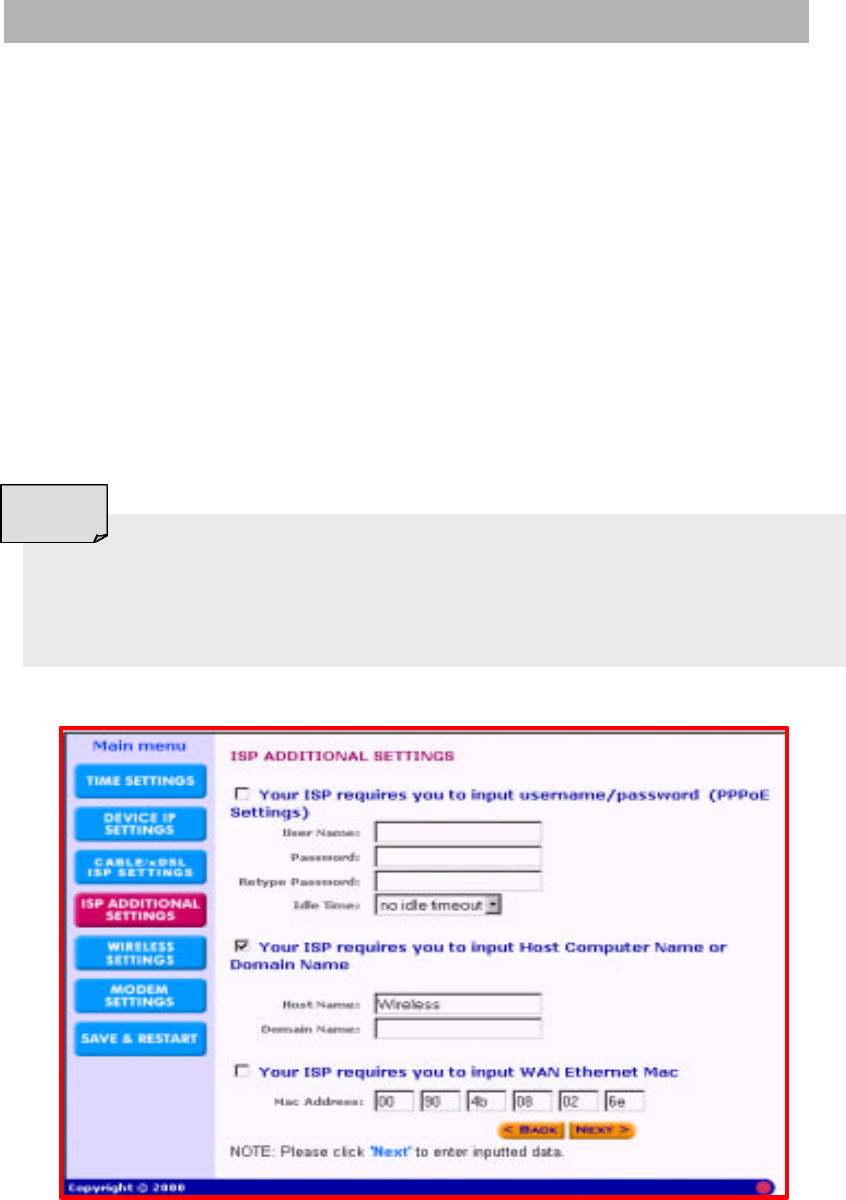
ISP ADDITIONAL SETTINGS (PPPoE SETTINGS)
If you would like to use ISP additional settings, you have to enable this function
and configure this page. Some ISP use this protocol for authentication purposes;
if this is the case, you need to enter:
User name: Enter the user name of your ISP account.
Password: Enter the password of your ISP account.
Retype password: Enter the password of your ISP account again to re-confirm.
Some ISPs use Host Name to authenticate the user; if this is the case, you
need to enter:
Host Name: Enter the name of the gateway.
Domain Name: Enter the domain name provided by your ISP.
Some ISP require you input the LAN card Mac address; if this is the case,
you need to enter:
Mac Address: Enter this LAN card Mac address.
NOTE !
19
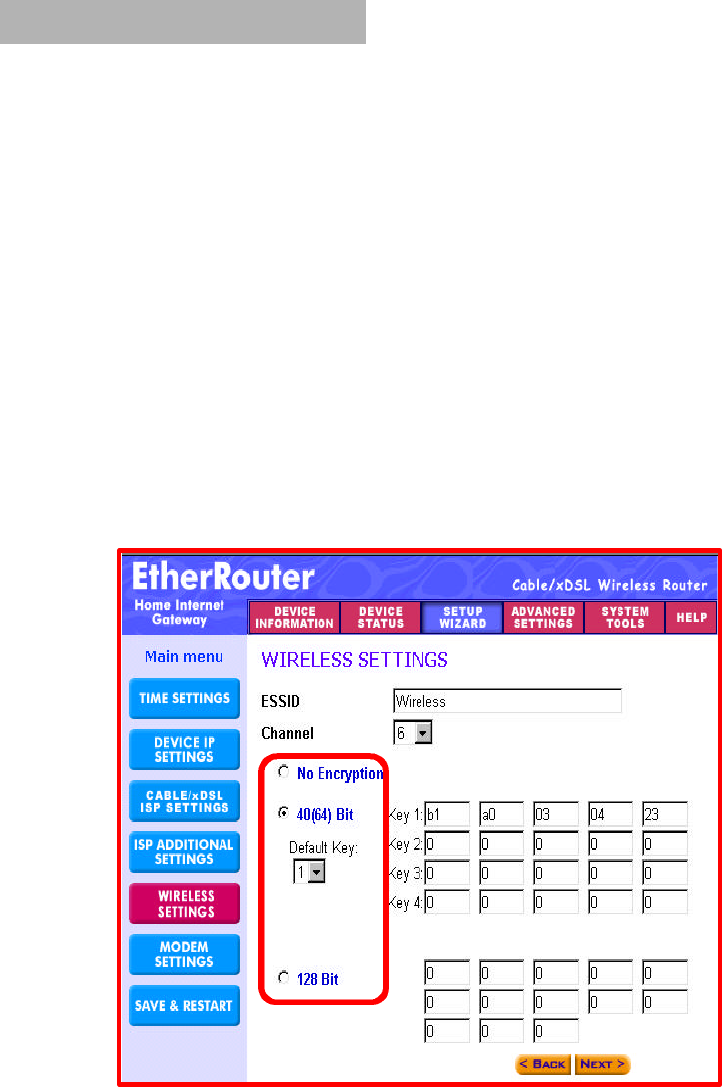
WIRELESS SETTINGS
Here allows user to configure ESSID, Channel, WEP Encryption and the level of
WEP Encryption.
ESSID
ESSID is a unique name shared among all points in a wireless network.
CHANNEL
To avoid interference, user should choose a proper Channel in wireless network.
WEP
WEP (Wired Equivalent Privacy) is method of encrypting data that is transmitted
over your wireless network to ensure data security. If you would like to use this
function, you can select the method of encryption (40 Bit or 128 Bit).
If Encryption (40 Bit or 128 Bit) option is Checked, User has to enter
encryption key manually.
20
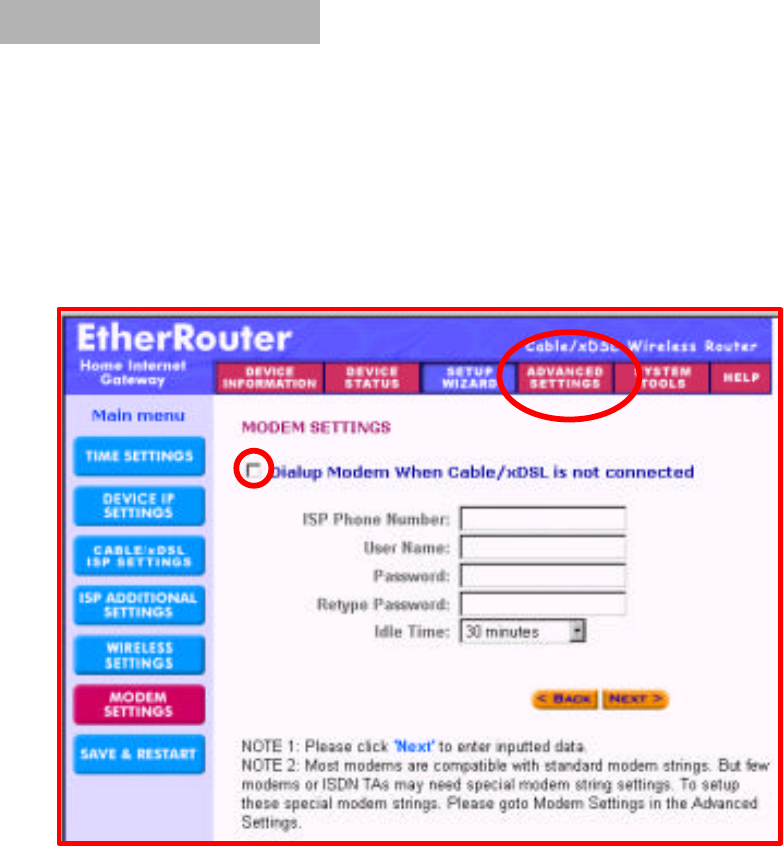
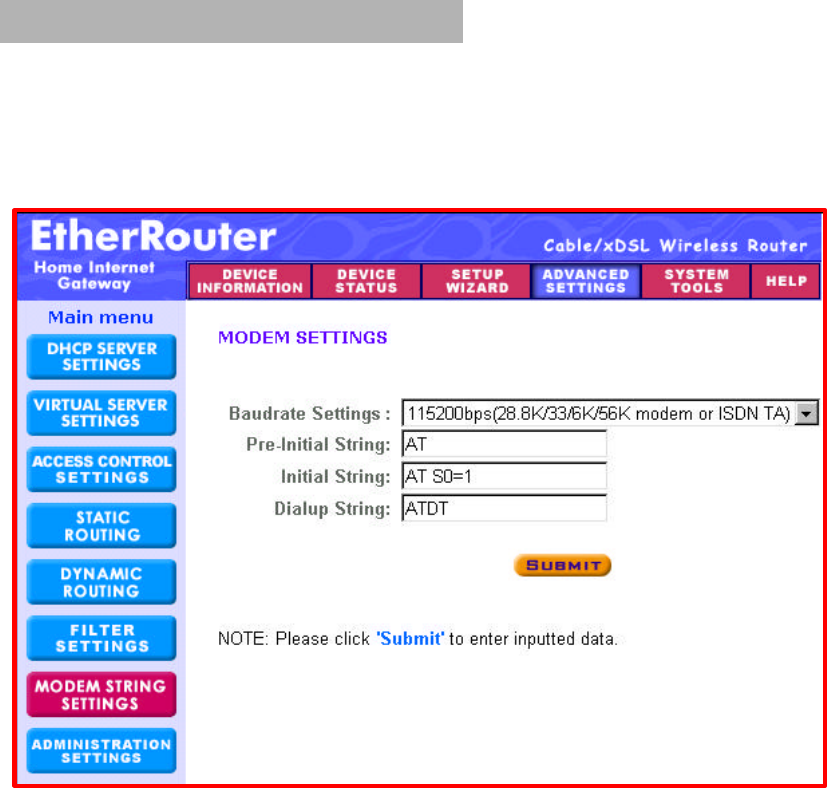
MODEM SETTINGS
The modem dialup can be used as a backup for the ADSL/Cable connection. If
you would like to use modem backup you need to enable the modem settings
function; click on the square shown below and input the ISP account information.
Note: If you want to change the baudrate settings, please click on the
“ADVANCED SETTINGS”. Then click on the MODEM SETTINGS button.
21
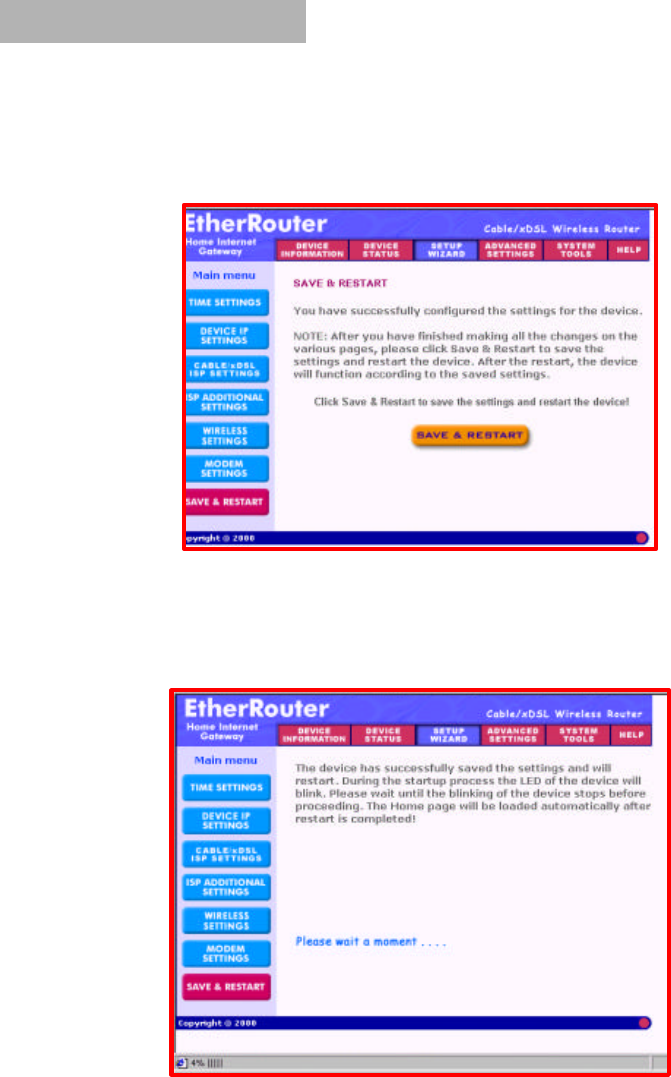
SAVE & RESTART
After you have finished making all the changes on the various pages, please
click Save & Restart to save the settings and restart the device. After the
restart, the device will function according to the saved settings.
During the startup process the LED of the device will blink. Please wait until the
blinking of the device stops before proceeding.
22
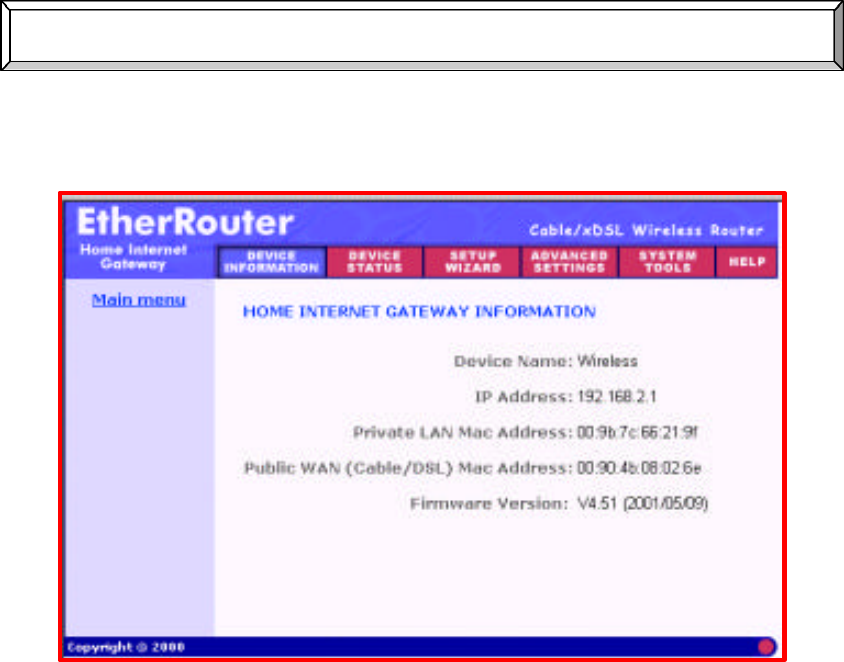
Device Information
Device information displays the current settings of the wireless internet gateway.
Device Name
The host name of the wireless internet gateway
IP Address
The IP address of the wireless internet gateway
Private LAN Mac Address
The Mac address of the wireless internet gateway LAN port
Public WAN (ADSL/Cable) Mac Address
The Mac Address of the wireless internet gateway WAN Ethernet port
Firmware version
Displays the Firmware Version and its release date

23
Device Status
Device status displays the current connection status of the internet gateway.
Modem Backup
The modem can be used as a dialup backup for the ADSL/Cable connection. If
the current connection is via modem, it will show “ Modem: Active,” otherwise it
will show “ Not Active”.
Device IP
Shows the Device IP address, private LAN Mac address and public WAN Mac
address of the wireless internet gateway.
Release and Renew
Click Release button, the wireless internet gateway will disconnect with the
ADSL/Cable modem.
Click Renew button, the wireless internet gateway will connect with the
ADSL/Cable modem again.
DHCP Log
Click DHCP Log button, the screen will display the current DHCP client
information.
24
Advanced Settings
Advanced settings include DHCP server, virtual server and password settings.
A username and password dialog will appear. Type
“admin” in the user name box, and type the password
that you have set for the device (the default is no
password) Click OK.
The Advanced Settings page will appear.
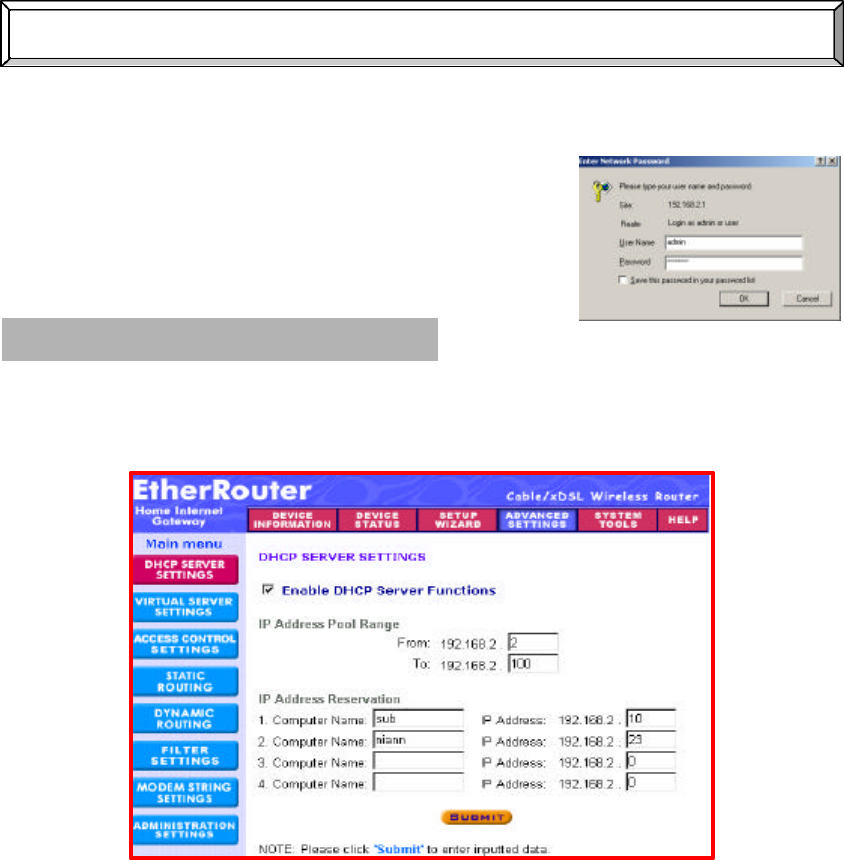
DHCP SERVER SETTINGS
The wireless internet gateway’s DHCP server is enabled by default. If you would
like to disable the DHCP server, uncheck on the square circled below.
IP Address Pool Range
The IP address pool contains the range of the IP address that will automatically
be assigned to the clients of your network.
Default setting is from 192.168.2.2 to 192.168.2.100
IP Address Reservation
You can use IP address reservation option to give particular computers on your
network the same static IP address every time the computer is turned on.
25
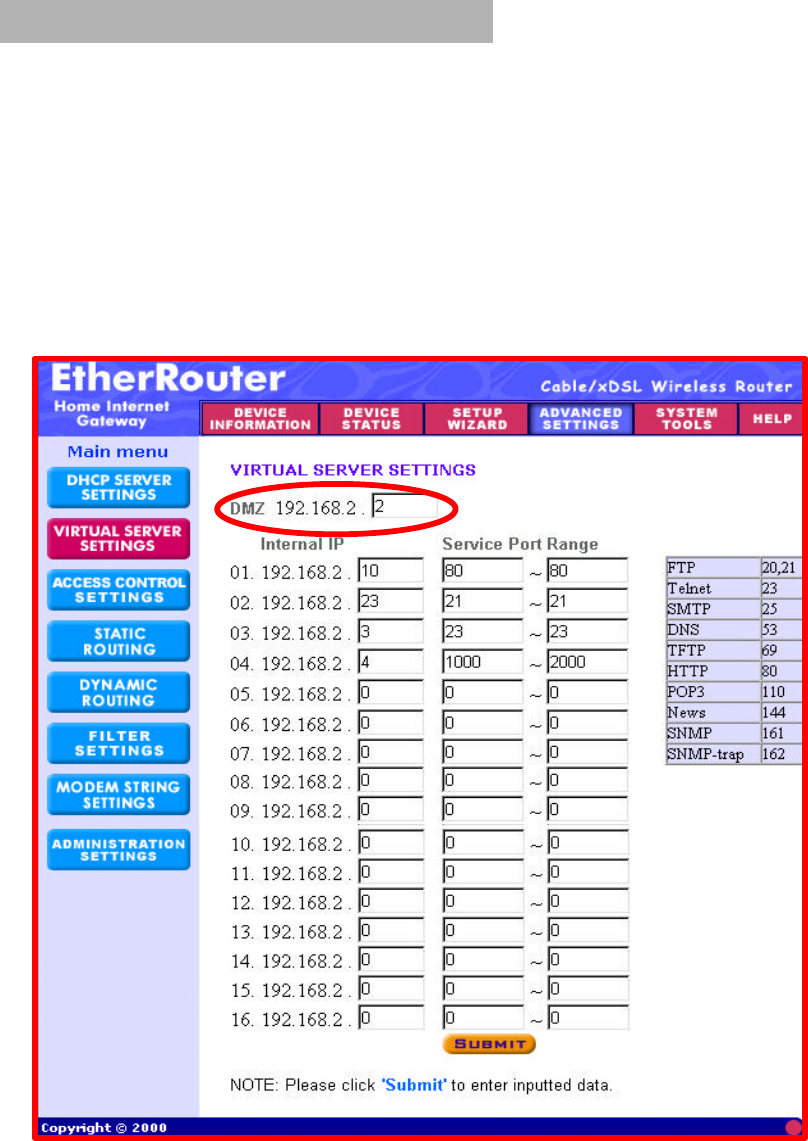
VIRTUAL SERVER SETTINGS
Virtual server settings allow clients on the Internet to access your LAN via the
Internet. You can use the IP mapping function to access an FTP server or Telnet
server etc. remotely through Internet.
DMZ function can be applied to a single client behind the VPN gateway to
expose it to the Internet and ensure complete Internet application compatibility
even if specific ports are not known. If you would like to enable DMZ function,
enter an IP address into the DMZ IP field. The value of ‘0’ means that the DMZ
function is disabled.
26
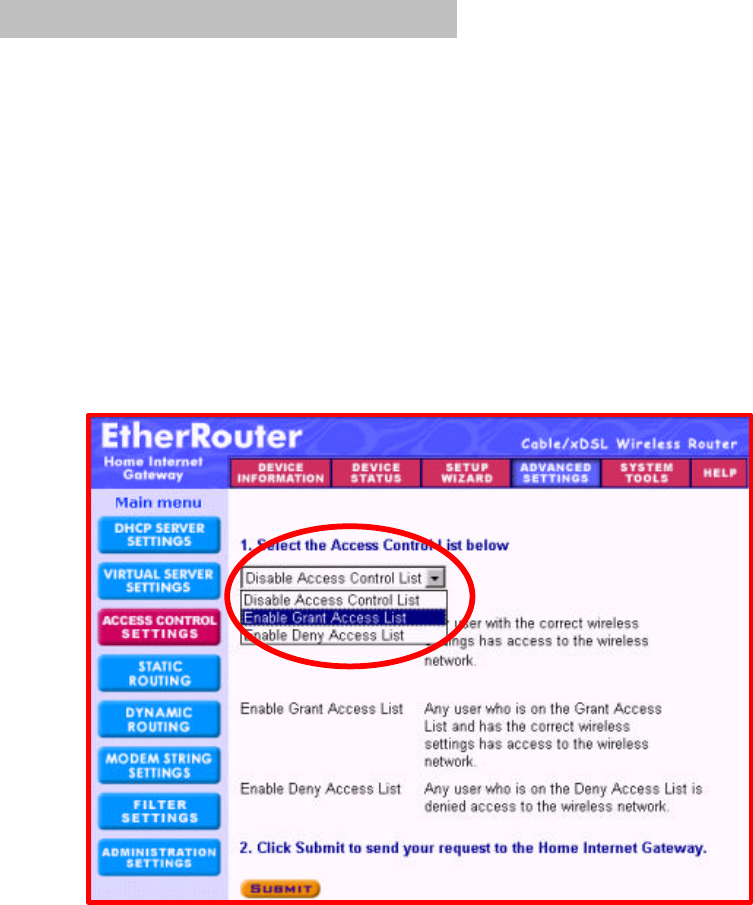
ACCESS CONTROL SETTINGS
Access control settings allow you to define the list of Access Control.
First option is ” Disable Access Control List” , which disable this function.
Second option is ”Enable Grant Access List”, which allows user to define a list
of MAC address. Only packets with these MAC address can pass through router.
Third option is ”Enable Deny Access List”, which allows user to define a list of
MAC address. Packets with these MAC address cannot pass through router.
For second and third options, user can type in the MAC address, and click ‘ Add’
to add to the list. The list will be shown, and can be deleted by clicking the ‘ Del’
button.

27
l Disable Access Control List
l Enable Deny Access List
28
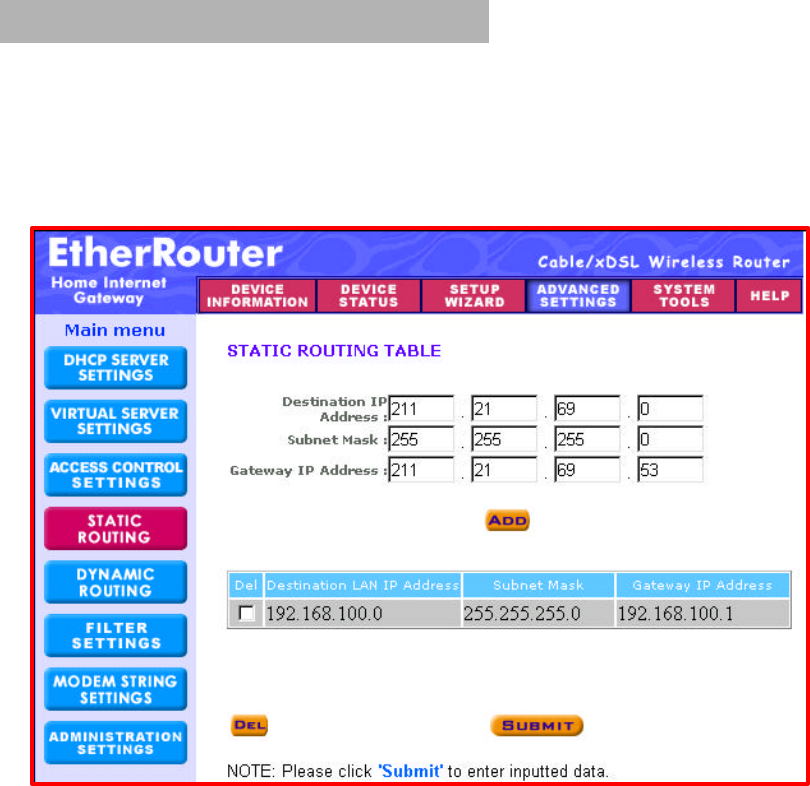
STATIC ROUTING SETTINGS
Static routing settings allow the wireless internet gateway to route IP packets
to another network. The routing table stores the routing information so that your
network device knows where to redirect the IP packets to the proper network.
Destination IP Address
The destination IP is the address of the remote network to which you want to
assign a static route.
Subnet Mask
Enter the subnet mask of your network IP address.
Gateway IP Address
The IP address of the interface used to link to the remote network.

29
DYNAMIC ROUTING SETTINGS
Dynamic routing settings allow the home internet gateway to route IP packets
from one network to others automatically. The RIP protocol is applied, and
broadcasts the routing information to other routers on the network regularly.
For the SEND option choosing the proper protocol by which you transmit the
data on the network.
For the RECEIVE option choosing the proper protocol by which the home
internet gateway receive the data on the network.
30
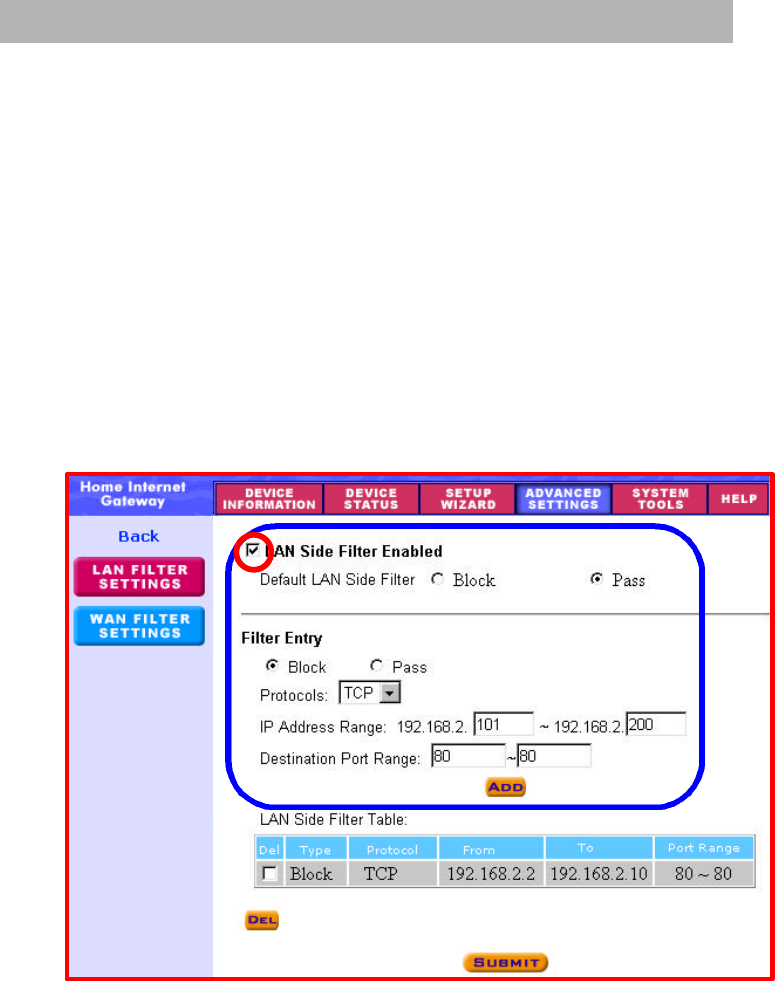
FILTER SETTINGS - LAN FILTER SETTINGS
LAN Filter Settings allow administrator to define whether local user has the
permission to access internet. To active this feature, check LAN Side Filter
Enabled. Then, you can define the filtering policy by entering an IP address
range, network port number and select the protocol(s).
For example, to prevent the local user of IP addresses range (from 101 to 200) to
access port 80 (HTTP), the settings are as follow,
LAN Side Filter Enabled: Enabled
Default LAN Side Filter: Pass
Filter: Block
Protocol: TCP
IP Address Range: 101 ~ 200
Destination Port Range: 80 ~ 80 (HTTP)
31
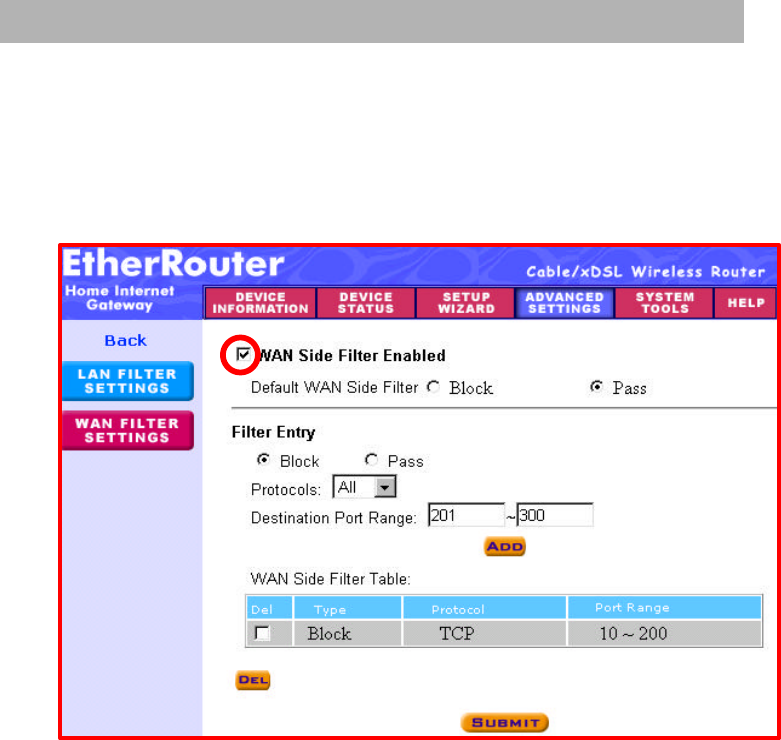
FILTER SETTINGS - WAN FILTER SETTINGS
WAN Filter Settings allow administrator to define whether remote/outside user
has the permission to access the local network. To active this feature, check
WAN Side Filter Enabled. Then, you can define the filtering policy by entering a
port range and select the protocol(s).
32
MODEM STRING SETTINGS
Modem string settings allow user to detail settings for the modem. If you want
to change the baudrate settings, please check the initial string. (You can refer to
your manual of the modem or TA.)
33
It is important to remember your password. If for any reason
you lose or forget your password, press the small reset button
located on the back of the device for 5~6 seconds. Reset action will re-
initialize the settings. All configurations, including password, will be
reset, and requires re-entering.
NOTE !
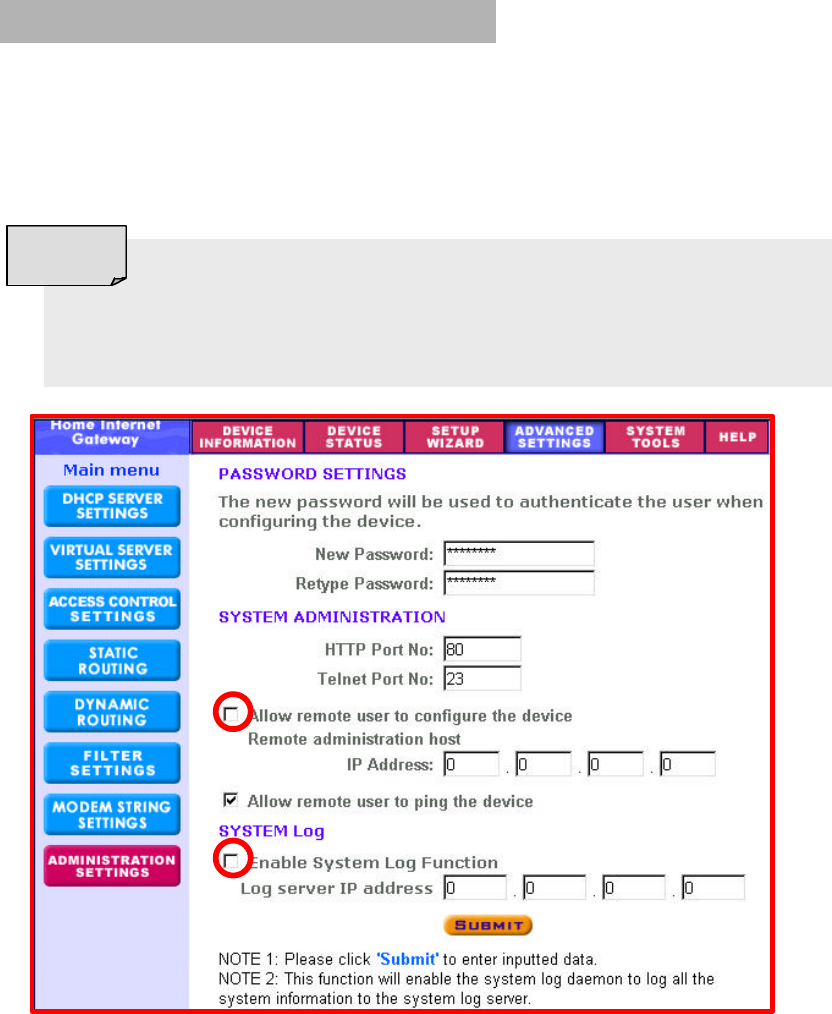
ADMINISTRATION SETTINGS
PASSWORD SETTINGS
You can give your internet gateway a new password. This password is required
the next time you configure your internet gateway. To enter a password, type
your password in the new password field and type it again in the retype password
field.
34
http://<WAN IP Address>: <Port No>
NOTE !
SYSTEM ADMINISTRATION
Here allows remote user to configure and administrate the wireless internet
gateway through Internet.
The default port no for HTTP and TELNET are 80 and 23 respectively.
The default IP address of remote administration host is: 0.0.0.0. (IP address
0.0.0.0 means that any PC on the network can remote access and manage the
wireless internet gateway)
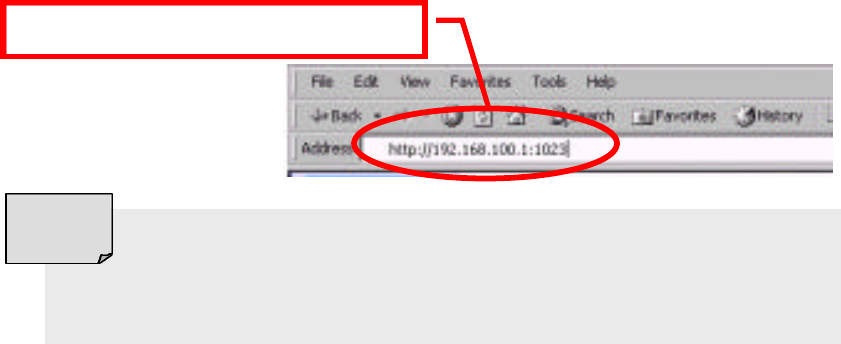
If you use this function you have to enable the feature “Allow remote user to
configure the device” first. Once you have enabled this function, type the
wireless internet gateway WAN IP address (http://192.168.100.1:1023) into the
browser of any or specific PC on the network.
Once HTTP port no (NOT PORT 80) have be changed and the
users of LAN terminal want to configure the wireless internet gateway,
the users have to type the wireless internet gateway LAN IP address with
port no (http://192.168.2.1:1023)
SYSTEM LOG
System Log function allows the administrator to assign the IP address of a server,
on which, a log server is running. When a particular event happens, the router
sends a notification to the log server. The log server can then present the log to
the users. [Free log server can be download from internet, such as Kiwis SysLog
Daemon]
If you finished all the settings, please click Submit button to go to the next
page…
35
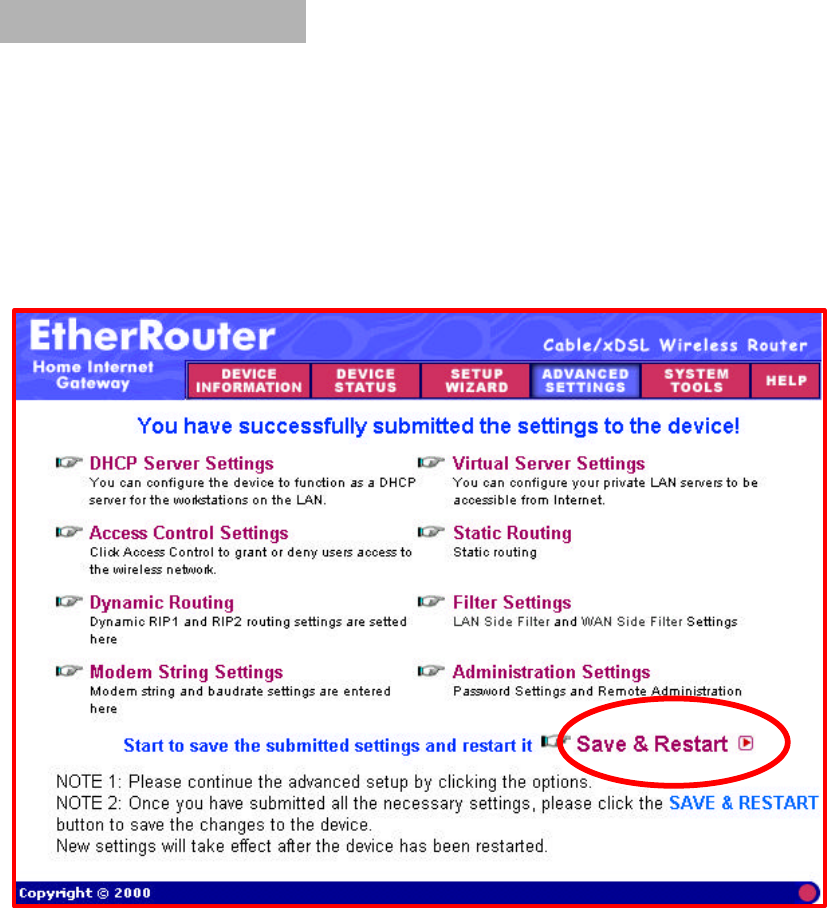
SAVE & RESTART
Here show all the functions of the ADVANCED SETTINGS. If you have finished
making all the changes on the various pages, please click Save & Restart to
save the settings and restart the device. If you want to configure the setting again,
you can browse those functions then click them. After the restart, the device will
function according to the saved settings.
Save & Restart lets you save the input settings to the wireless internet gateway
(so as to be retrieved at a later time) and then restart it.
36
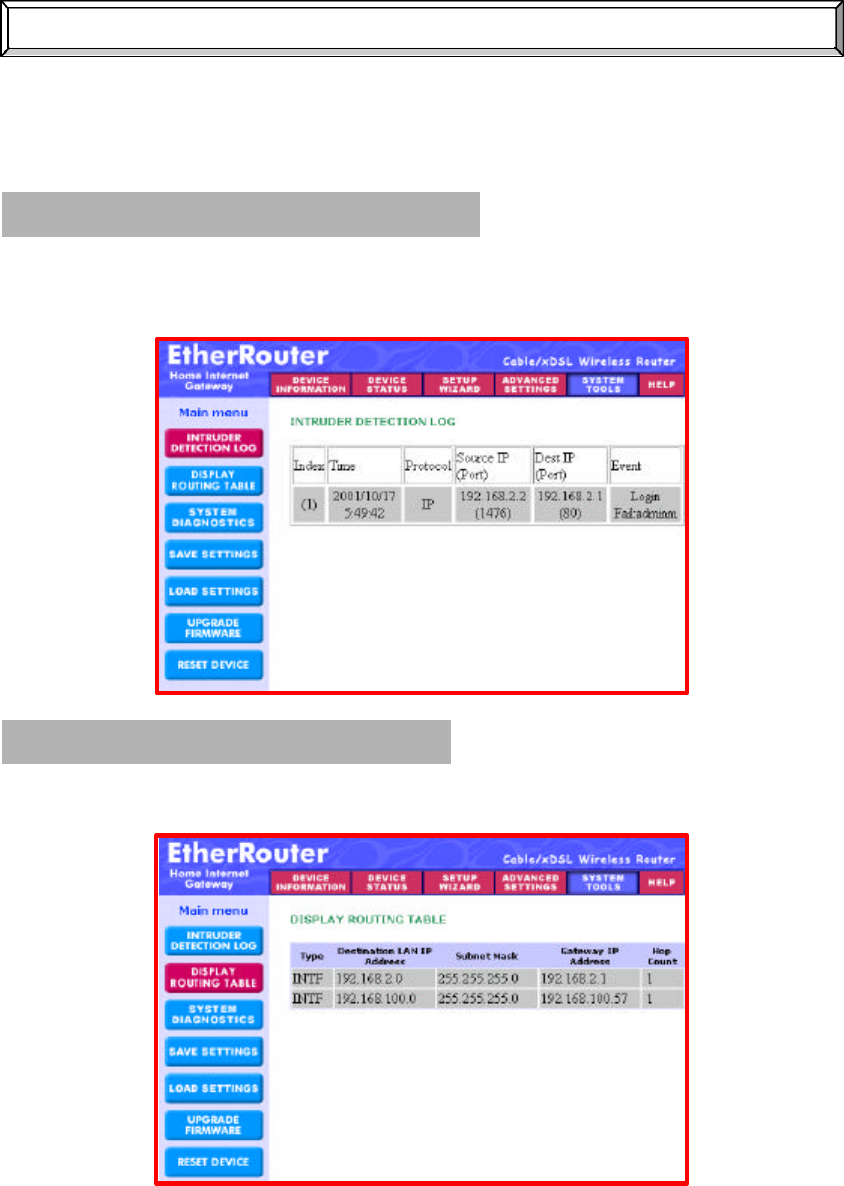
System Tools
System tools
Detects the status of the wireless internet gateway.
INTRUDER DETECTION LOG
The event messages show the possible hacker attacks that have occurred on
your internet gateway. Up to 32 hacker attacks may be logged in this manner.
DISPLAY ROUTING TABLE
Here show the current static routing configuration.
37
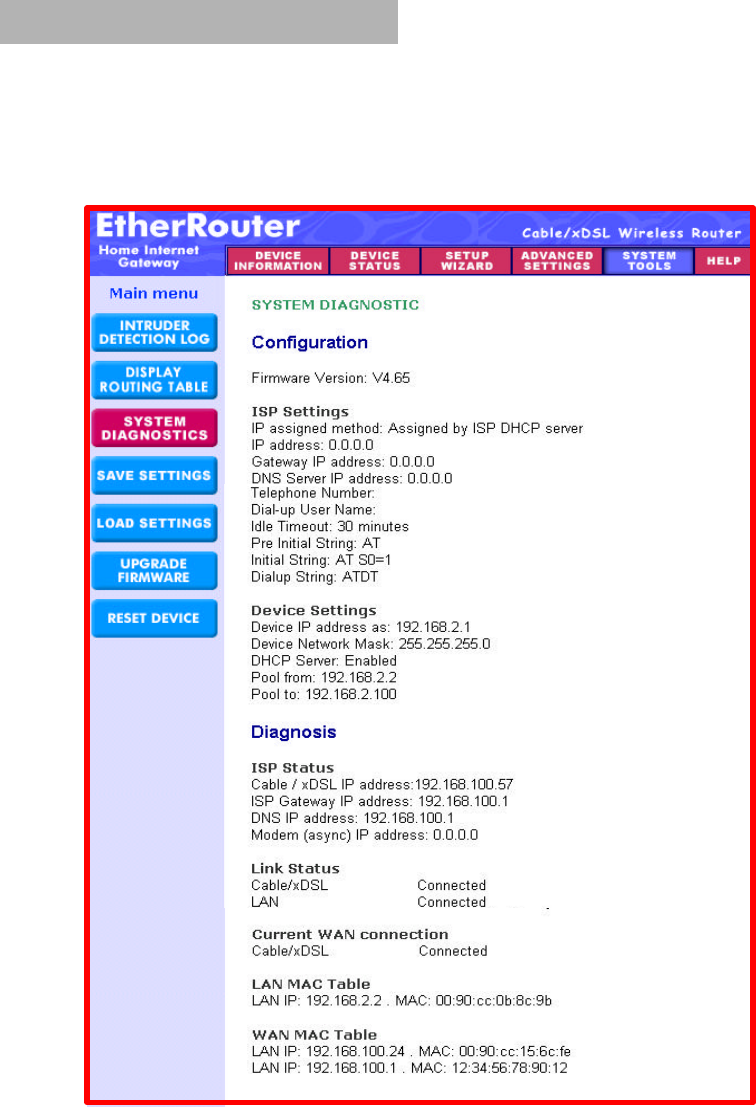
SYSTEM DIAGNOSTICS
System diagnostics shows your internet gateway’s information. It will perform a
check-up on your internet gateway to make sure that everything is functioning
properly.
38
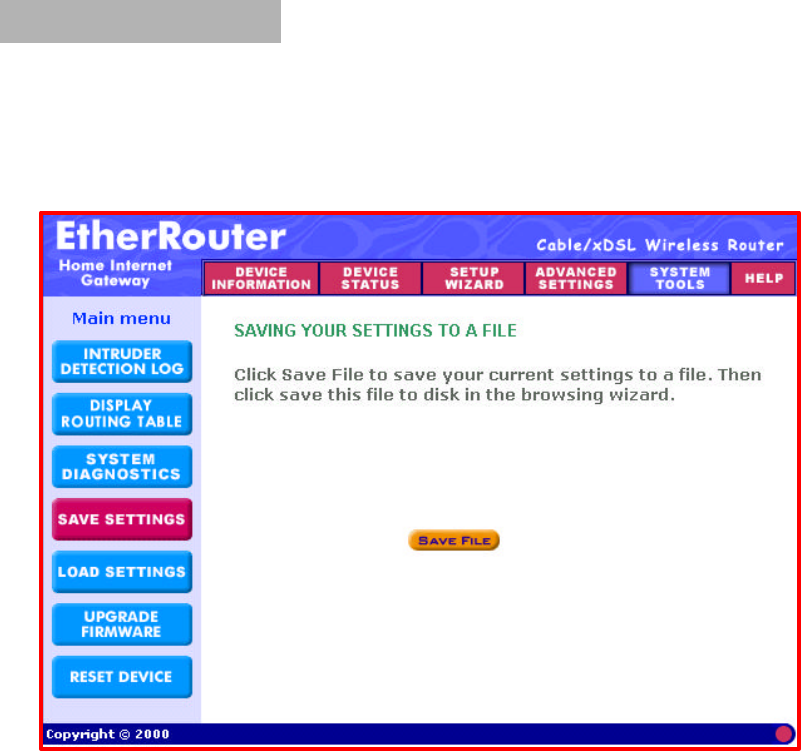
SAVE SETTINGS
Here allow you to save the configuration to a file. If you would like to do this, click
Save File to save your current settings to a file. Then click save this file to disk in
the browsing wizard.
39
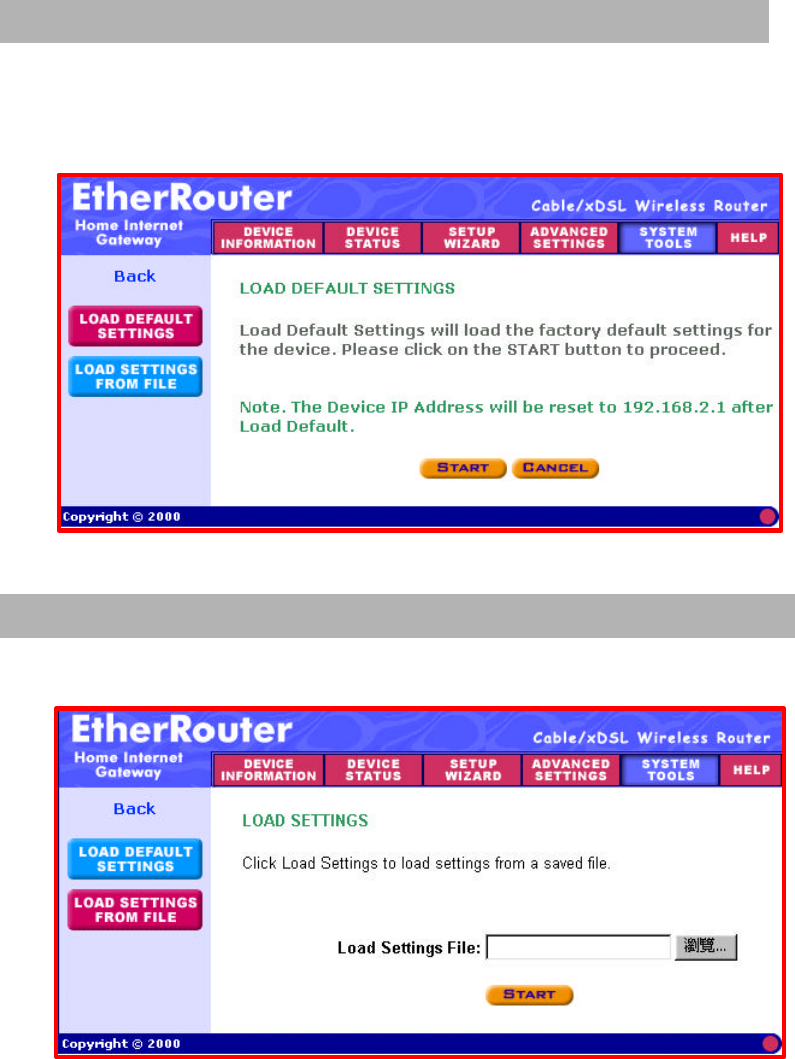
LOAD SETTINGS - LOAD DEFAULT SETTINGS
Here allow you to load the original default settings of your wireless broadband
router.
LOAD SETTINGS - LOAD SETTINGS FROM FILE
Here allow you to load the settings from a file.
40
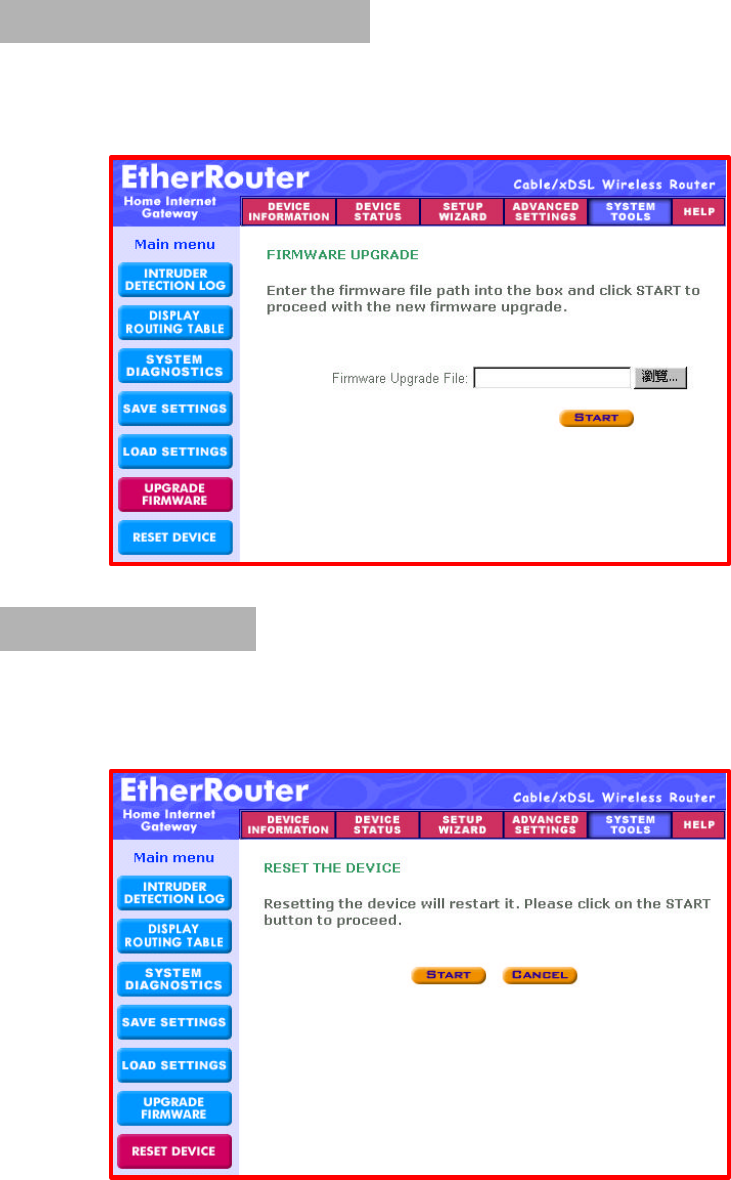
UPGRADE FIRMWARE
The upgrade firmware option allows you to upgrade the latest firmware to your
wireless internet gateway.
RESET DEVICE
Resetting the device will restart it. Click on the START button to restart.
41
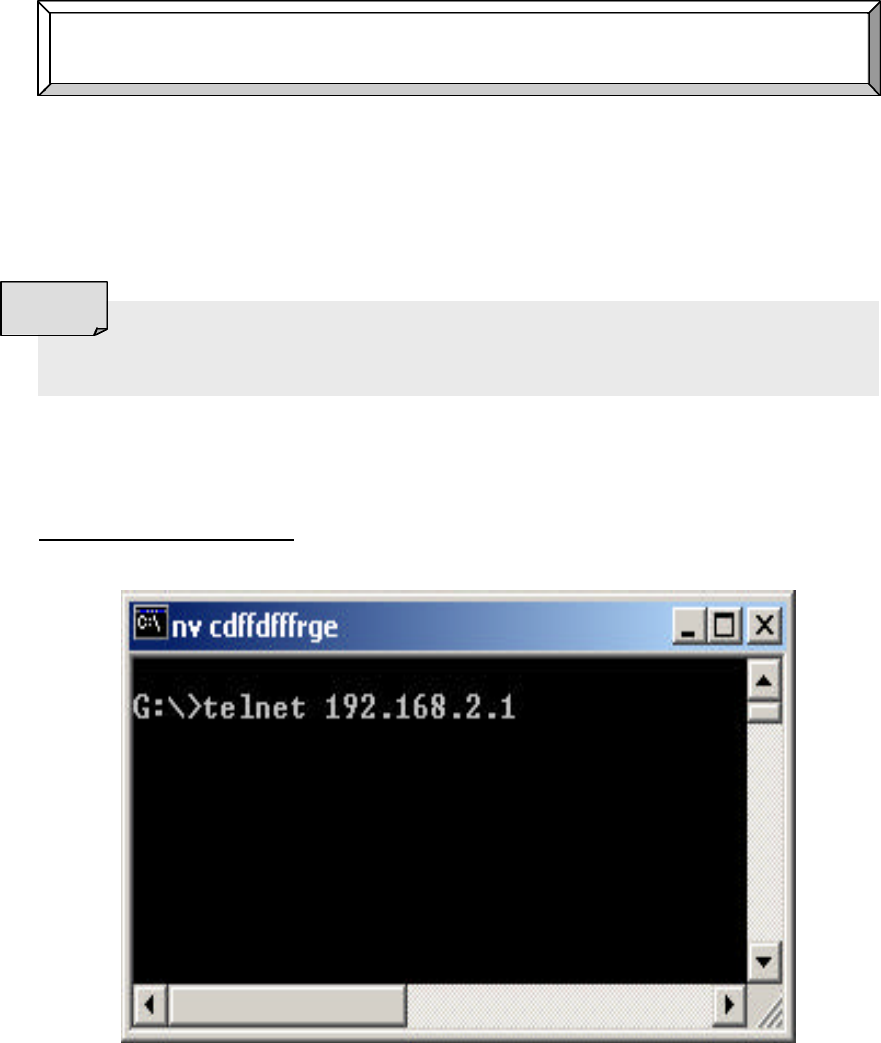
How Using Telnet To Configure Your
Wireless Internet Gateway
Telnet is a telecommunications software utility, which allows you to access a
remote device. The internet gateway has a built-in telnet server that enables a
telnet client to remotely configure the gateway using a menu system.
Launch DOS commend prompt and type Telnet, followed by router‘s IP address
(default IP address is 192.168.2.1) then press Enter.
NOTE: If you change Telnet port no (NOT PORT 23), you should type:
192.168.2.1 <Port No>.
To successfully configure your internet gateway using telnet, TCP/IP
have to be
correctly configured on your PCs and router. And your PCs have to
be located on the same subnet.
NOTE !

42
When prompted to input the router password, press Enter. The wireless internet
gateway telnet server menu will be shown as below.
Define the Router IP Address, Router Subnet Mask, Router Name and
Password by selecting menu letter corresponding to each item. (item a~d)
WAN Ethernet Mac Address
Displays the hardware address of the board. You may change the Mac address if
required by your ISP.
WAN Ethernet Settings
Selects the function of the WAN Ethernet port as Internet Access. Complete the
External IP Port Address, External IP Port Netmask, Gateway IP Address
and DNS IP Address fields using the IP address provided by your ISP.
Async Port Settings
Selects the function of the async port as IP Routing if you have an analog
modem or ISDN TA connected to the async port. Complete the Telephone
number, User name and Password needed to make the connection to your ISP.
Use the menu options to provide specific information about your modem’s Serial
baudrate (speed), Modem Pre-initial, initial, dial-up and hangup strings. You
may also use the menu options to create or edit Login Scripts.
43
Router DNS IP Address
Enter the IP address of your ISP system’s DNS as provided by your ISP.
LAN DHCP Server
You can enable or disable the DHCP function on the internet gateway. If you
select enable, you will be prompted to enter the address range from which the
router will issue IP address.
Virtual Server (IP Mapping)
Define the list of mapped internal and external IP address. For example, you may
want to use IP mapping to access an FTP server on your LAN via the internet.
Load default Settings
Sets the router back to its original factory settings.
Apply and Save Changes
Saves the current configurations into the internet gateway‘s memory.
NOTE: you must select Apply and Save Changes before leaving the menu or
your configuration changes will be lost when the gateway is powered off.
Diagnostic
Select Diagnostic to perform basic hardware checking and display the gateway’s
firmware version. You may also use this option to assign WAN and LAN Mac
address if required by your ISP.
When all options have been configured and after you have selected Apply and
Save Changes, select q.) Quit.
44
How Configuring Your PCs Connect To
The Wireless Router
If you do not wish to set a static IP address on your PC, you will need to
configure your PC to accept the IP address that your gateway will provide.
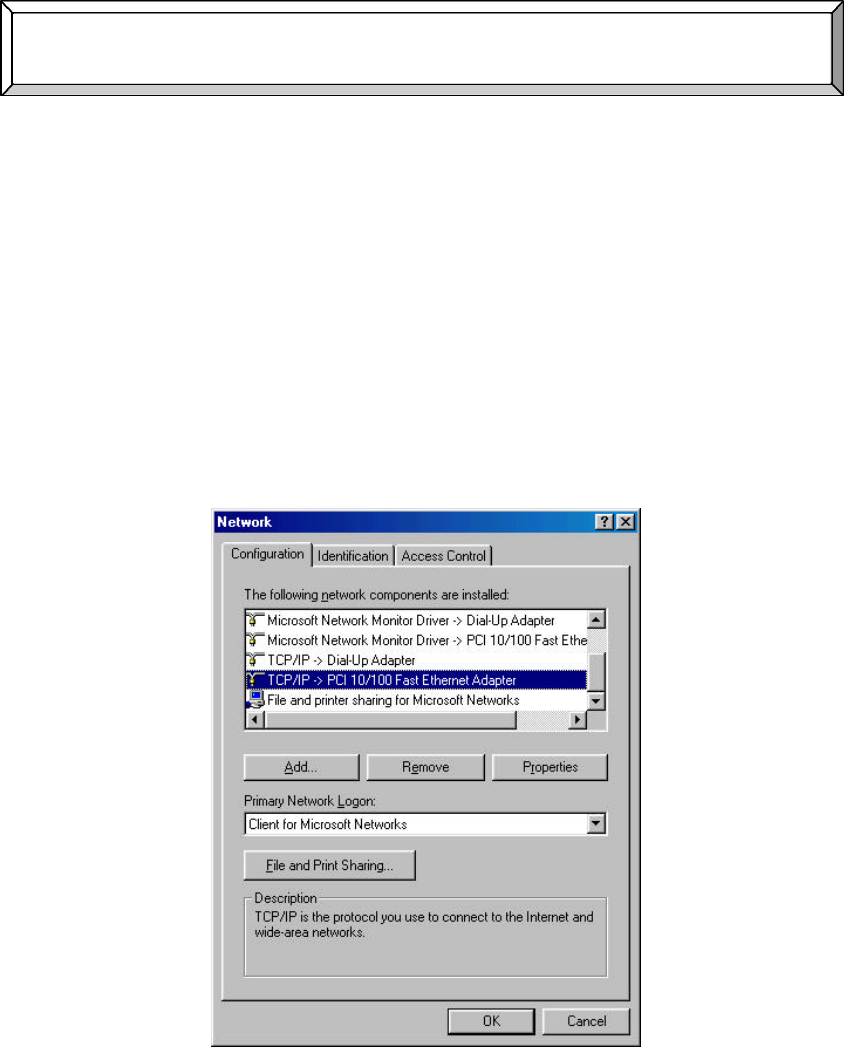
1. Click Start button, select Settings, then Control Panel
2. Double-click the Network Icon
3. In the configuration windows, select the TCP/IP protocol line that has been
associated with your network card/adapter. If there is no TCP/IP line listed,
you will need to install the TCP/IP now.
45
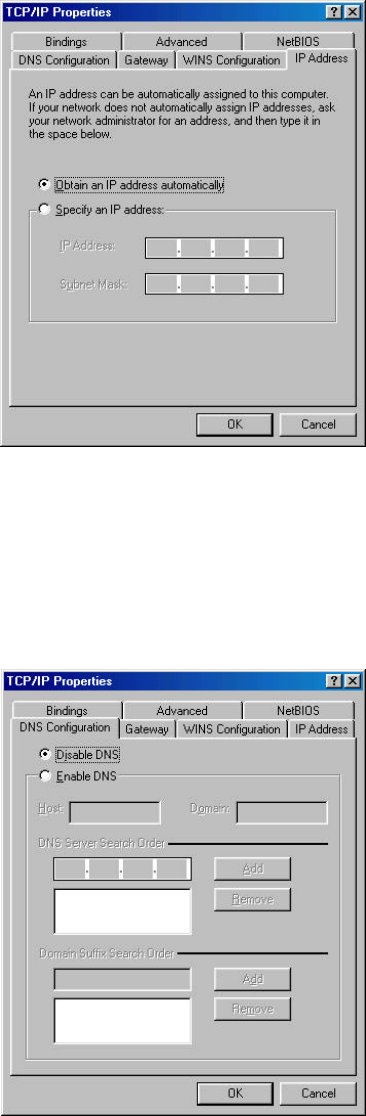
4. Click the Properties button, then choose the IP ADDRESS tab. Select
Obtain an IP address automatically.
5. Then select DNS configuration tab to add DNS IP address. If you do not
wish to add DNS you can Disable DNS function. Press OK. You have
completed the client settings.
6. After clicking OK, windows will ask you to restart the PC. Click Yes.

46
CONFIRM YOUR PC’s IP CONFIGURATION
There are two tools which are great for finding out a computer’s IP configuration:
MAC address and default gateway.
l WINIPCFG (for windows 95/98)
Inside the windows 95/98 Start button, select Run and type winipcfg. In the
example below this computer has a IP address of 192.168.2.100 and the
default gateway is 192.168.2.1. The default gateway should be the network
device IP address. The MAC address in windows 95/98 is called the Adapter
Address.
You can also type winipcfg in the DOS command.
NOTE !
47
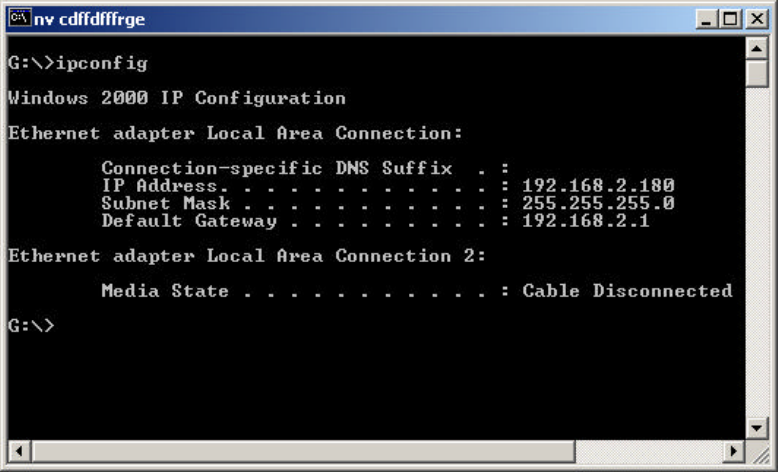
l IPCONFIG (for windows 2000/NT)
In the DOS command type IPCONFIG and press Enter. Your PC IP information
will be displayed as shown below.
This concludes the user manual.
Should you require further assistance or have other inquires please contact your
distributor.