Arima Communication 9001 3.5G PDA Bluetooth User Manual 9001 Usre Manual
Arima Communication Corporation 3.5G PDA Bluetooth 9001 Usre Manual
Contents
- 1. Users Manual 1
- 2. Users Manual 2
Users Manual 1
Chapter 1
1.1 Views of the Device
1.2 Get Started
1.3 Status Indicators
1.4 Enter Information
Chapter 2
2.1 Today Screen
2.2 Start Menu
2.3 Ring tones and Notifications
2.4 General Settings
2.5 Security
Chapter 3
3.1 Make a Call
3.2 Receive a Call
3.3 Video Telephony
3.4 In-Call Options
3.5 Special Dialing Requirements
3.6 Additional Settings
Chapter 4
4.1 Automatic Setup of Your Data Connections
4.2 Manual Setup of Your Data Connections
4.3 Bluetooth
4.4 Beams
4.5 Connect to a Wireless LAN
Chapter 5
5.1 Text Messaging
5.2 MMS
5.3 E-mail
5.4 Windows Live Messenger
Chapter 6
6.1 Introduction to ActiveSync
6.2 Install and Configure ActiveSync
Chapter 7
7.1 Contacts
7.2 Calendar
7.3 Tasks
7.4 Camera and Video Recorder
7.5 Pictures and Videos
7.6 Windows Media Player
7.7 Internet Explorer Mobile
7.8 Java
7.9 Wireless Manager
7.10 Notes
7.11 Office Mobile
7.12 Internet Sharing
7.13 File Explorer
7.14 Windows Live
7.15 Remote Desktop Mobile
7.16 Remote Control
7.17 ClearVue PDF
7.18 Voice Speed Dial
7.19 FM Radio
7.20 Add More Programs to your device
Chapter 8
8.1 Maintain Your Phone
8.2 Reset Your Phone
8.3 Manage Your Program Memory
Appendix
A.1 Regulatory Notices
Chapter 1
1.5 Views of the Device
1.6 Get Started
1.7 Status Indicators
1.8 Enter Information
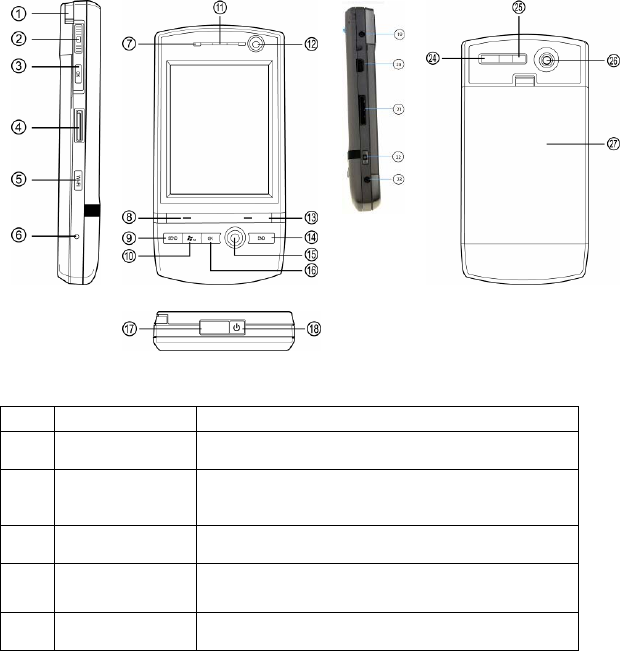
1.1 Views of the Device
No. Item Function
1 Stylus Use the stylus to write, draw or select items on the
touch screen.
2 Jog Wheel Scroll up or down to move through menus and
program instructions. Press for 3 seconds then
scroll up or down to adjust the volume.
3 OK Button Press to confirm your data entries or to exit the
program in use.
4 Micro SD Card
Slot
Insert micro SD memory card with metal contacts
facing downwards.
5 Wi-Fi Button Press to access the Wireless Manager
application.

6 Reset Use the stylus to soft reset the device.
7 LED Displays the status of the phone.
8 Left Soft Key Opens the Calendar from the Today screen and
performs the command shown in the label above
the button.
9 SEND Key Press this key to answer an incoming phone call or
dial a number.
10 Windows Start
Menu Button
Press to bring up the Start menu.
11 Earpiece For use during phone calls.
12 Video Camera For making video telephone calls with another
party who has a 3G phone with this feature.
13 Right Soft Key Opens the Contacts list from the Today screen
and performs the command shown in the label
above the button.
14 END Key Press to end a phone call.
15 Action Button/
Navigation
Controller
Action button - confirm the selection from the
Navigation controller by pressing the centre button.
Navigation controller - press this multi-directional
control up, down, left, or right to move through
menus or programs.
16 OK Button Short Press – Backspace when typing.
Long Press – Confirm your data entries or exit the
program in use.
17 Infrared Port Enables you to exchange files or data with other
devices without cables or wires or use the device
as a remote control.
18 Power Button Press and hold for 2 seconds and then release to
put the device in Standby mode. Press and hold
for 5 seconds to shut down and turn off the device.
19 Wi-Fi Plug External Wi-Fi antenna plug.

20 Mini-USB
Connector
Connect the USB data cable to a PC for
synchronization of information, data transmission
and battery charging or use the device as an
earphone jack or use the hands-free kit.
21 TV/VGA Out
Connector
To send images to a TV, projector or monitor.
22. Camera & Video
Button
Press to launch the camera function and take a
picture or record high quality video.
23 GSM/UMTS
Plug
External GSM/UMTS antenna plug.
24 Video
Microphone
Microphone for recording sound whilst recording a
video.
25 Flash White LED strobe flash.
26 Camera Lens The CMOS camera supports a 2 mega-pixel
resolution with auto-focus function for high quality
colour photos or high quality video recording.
27 Battery Cover To remove or replace the battery, push and slide
out the battery cover.
1.2 Get Started
Install the SIM/USIM Card
Follow these steps to install the SIM/USIM card provided by your local network
service provider. The SIM/USIM card contains your phone number, service
details and phonebook/message memory.
Your device supports both 3V and 1.8V SIM/USIM cards. Some legacy
SIM/USIM cards will not function within this device. Consult with your service
provider for a replacement SIM card. There might be a fee for this service.
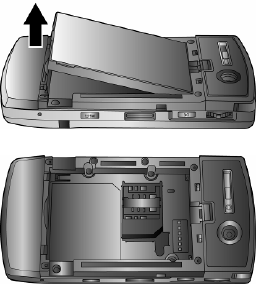
1. Make sure your device is turned off.
2. Pull the battery cover catch up (away from the battery cover) and lift the
battery cover up to remove it.
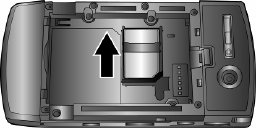
3. Lift the battery to remove it. Then, insert the SIM/USIM card into the SIM card
slot with its gold contacts facing down (the cut-off corner of the SIM/USIM
card should match the cut-off corner in the slot).
4. Replace the battery and gently push down to fit it into place.
5. Replace the battery cover.
Turn on the device
To turn ON the device, press and hold the Power button for 4 seconds. When
you turn on the device for the first time, you will be asked to complete the
screen calibration process. Calibrating the device screen involves tapping the
centre of a cross with the stylus as the cross moves around the screen. This
process ensures that when you tap the screen with your stylus, the tapped item
is activated.
The Today screen displays important information, such as upcoming
appointments and status indicators. You can tap a section on the screen to open
the associated program. If at any point you need to access the Today screen,
just tap Start > Today.
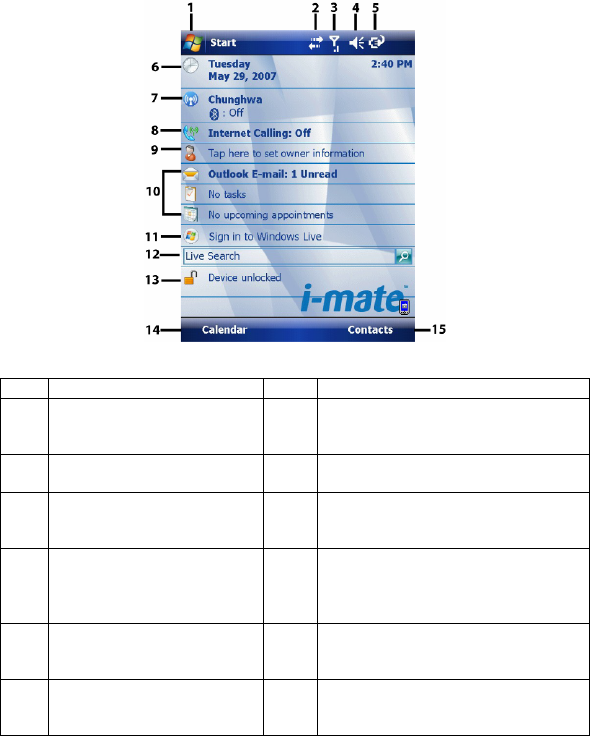
No. Description No. Description
1 Tap to open the Start
menu. 9 Displays the current owner
information. Tap to change the
details.
2 Tap to view the
connectivity status. 10 Tap to open the related messages,
tasks and appointments.
3 Indicates the radio signal
strength. Tap to configure
the phone settings.
11 Tap to sign into Windows Live.*
4 Tap to control device/ringer
volume level. 12 Enter the word to search for and
your device will connect to the
internet and search using Microsoft
Live Search.
5 Indicates the battery
status. Tap to open the
Power Settings screen.
13 Tap to lock or unlock the device.
6 Displays the current date
and time. Tap to set up
date, time, alarm, etc.
14 Shows the current function of the
left soft key. Tap to open the
Calendar screen.

7 Tap to open the Wireless
Manager. If the Wi-Fi
(left) and Bluetooth
(right) icons are displayed,
they are available.
15 Shows the current function of the
right soft key. Tap to open the
Contacts screen.
8 Indicates the status of
internet calling. Tap to
change the status.
Note: Not supported on all language versions of Windows Mobile Operating System.*
To power OFF the device completely, press and hold the POWER button for 2
seconds and the system will prompt you to power off the device. In this state,
the device cannot receive calls or text messages. To save battery power, your
device will automatically go into standby mode if not used for a period of time.
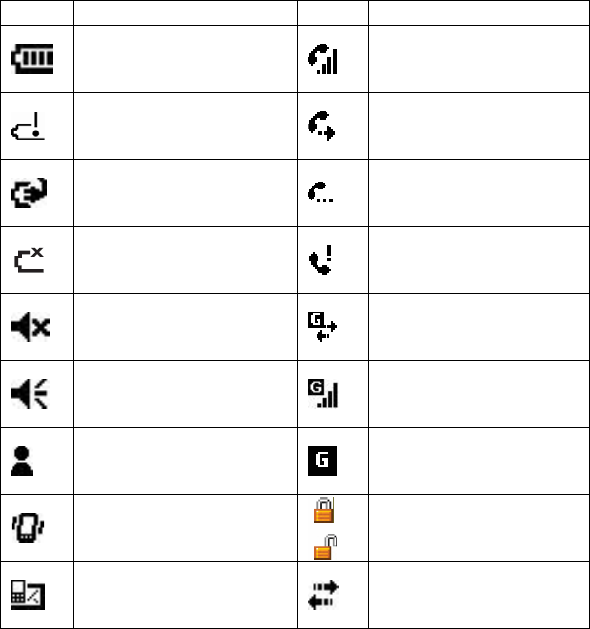
1.3 Status Indicators
Status indicators appear at the top of the screen and on the Today screen.
The following table lists common status indicators and their meanings.
Icon Description Icon Description
Battery level. Voice call in progress.
Battery is very low / Charge
battery soon. Calls are forwarded.
Battery charging. Call on hold.
Battery fault. Missed call.
Ringer off. GPRS Connection in
progress.
Ringer on. GPRS Connected.
New instant message. GPRS available.
Ringer in vibration mode.
Indicates if the device is
locked / unlocked.
New e-mail or text
message. Connected to the PC.
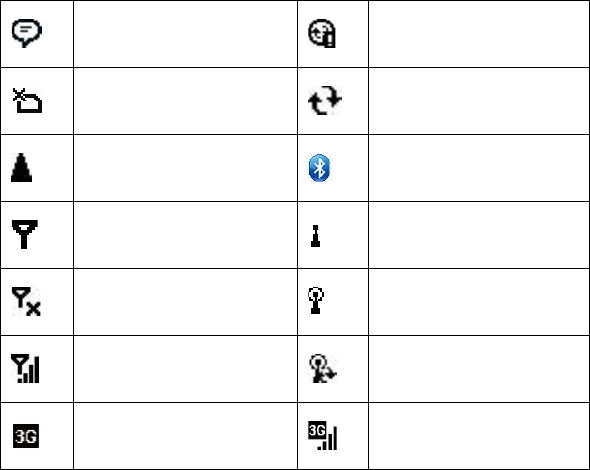
There are more
notifications. Tap the icon to
view all. Connected to the PC.
Synchronization error.
No SIM card installed. Synchronization in progress
Roaming. Bluetooth
No signal Indicates Wi-Fi is turned on.
Reception is turned off. Wi-Fi network in range
GSM signal strength. The
number of bars indicates the
signal strength. Wi-Fi is connected
3G in range 3G connected
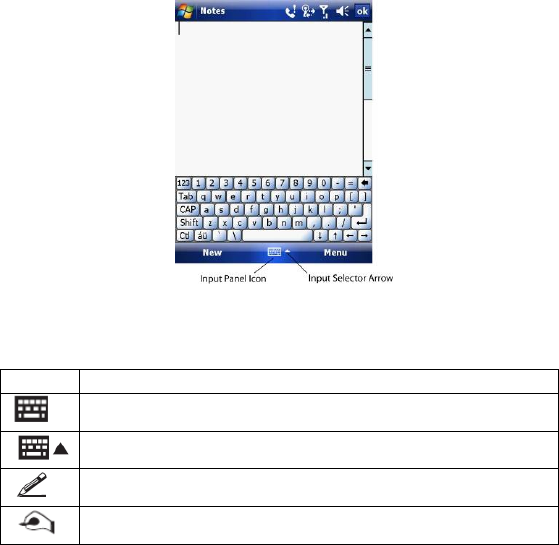
1.4 Enter Information
Input Panel
Input Panel provides access to the various available input methods for your
device, including Block Recognizer, Keyboard, Letter Recognizer and
Transcriber. By default, the Input Panel icon appears on the menu bar to
indicate which input method is currently selected. The Input Selector arrow
(shown at the right side of the Input Panel icon) opens a list of available input
methods.
Note: Not supported on all language versions of Windows Mobile Operating System.
The following input methods are available when text entry is possible.
Icon Input Method
Press to switch the keyboard input on or off.
Input Panel Icon / Press the Input Selector Arrow to change
input methods.
Letter Recognizer or Block Recognizer.
Transcriber.
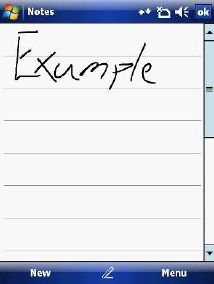
Draw and Write on the Screen
With your device, you can draw directly on the screen or write on the screen
and save notes (Start > Programs > Notes) in your own handwriting. If you
prefer to use handwriting or frequently add drawings to your notes, you may find
it helpful to set Writing as the default input mode. If you prefer typed text, set
Typing as the default input mode.
To change the default input mode in Notes, tap Menu > Options in the notes
list and then, in the Default mode box, tap either Writing or Typing, depending
on your personal preferences. Tap OK.

Voice Recording
You can create a standalone voice recording or you can add a recording to a
note.
Create a voice note
1. Tap Start > Programs > Notes.
2. If you do not see the Recording Toolbar, tap Menu > View Recording
Toolbar.
3. Tap the record icon to begin recording.
4. Hold your device’s microphone near your mouth or other audio source.
5. Tap the stop icon when finished recording.
Change recording formats
1. Tap Start > Settings > Personal tab > Input.
2. Tap the Options tab and in the voice recording format list, tap the format you
want.
3. Tap OK.
Chapter 2
2.1 Today Screen
2.2 Start Menu
2.3 Ring tones and Notifications
2.4 General Settings
2.5 Security
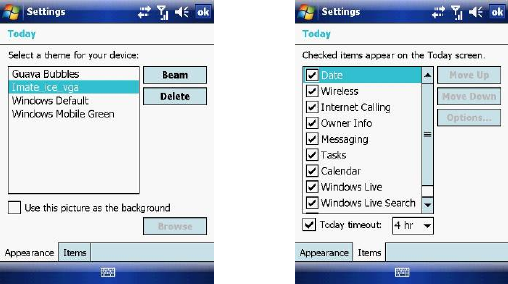
2.1 Today Screen
The Today screen shows your upcoming appointments, active tasks, and
information about e-mail messages.
Customise background items on the Today Screen
1. Tap Start > Settings > Personal tab > Today.
2. On the Appearance tab, select the desired theme for the background of the
Today screen. You can use one of your own pictures as the background
image on the Today screen by selecting the Use this picture as the
background check box and tap Browse to view a list of your picture files.
3. On the Items tab, select the items you want to appear on the Today screen.
To change the order of items displayed on the Today screen, tap the item
and then tap Move Up or Move Down.
4. Tap OK.
Enter Owner Information
Entering and displaying Owner Information on the Today Screen is
recommended and allows someone to return the device if lost.
1. Tap Start > Settings > Personal tab > Owner Information.
2. In the Identification tab, enter your personal information.
If owner information is displayed on the Today screen, you can open and edit
the information directly from it. Just tap that section of the screen.
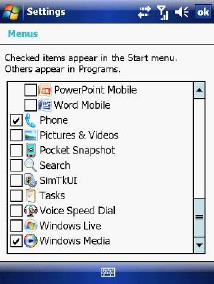
2.2 Start Menu
The Start menu, located at the top left corner of the Today screen, displays a
list of programs. It lets you close a screen and switch from one program to
another. You can start a program by scrolling through the programs list and
then pressing Enter or by tapping a program with the stylus.
You can choose which items appear in the Start menu:
1. Tap Start > Settings > Personal tab > Menus.
2. Select the check boxes of the items you want to appear in the Start menu.
You can select up to seven items.
Create folders and shortcuts
You can also create folders and shortcuts that appear on the Start menu.
Open ActiveSync on your PC, click Explore. In the Mobile Device window,
double click Mobile Device > Windows > Start Menu, then create the folders
and shortcuts that you want. You will see the added items after you synchronize.
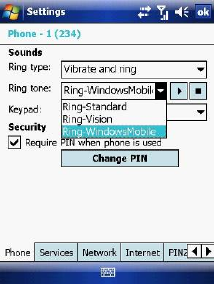
2.3 Ring tones and Notifications
Change ring tones
1. From the Phone screen, tap Menu > Options > Phone tab.
2. In the Ring tone list, tap the sound you want to use.
Note: To use custom *.wav, *.mid, *.mp3, or *.wma files as ring tones, use ActiveSync on
your PC to copy the file to the Windows/Rings folder on your device. Then, select the
sound from the ring tone list. For more information about copying files to your device, see
ActiveSync Help on your PC.
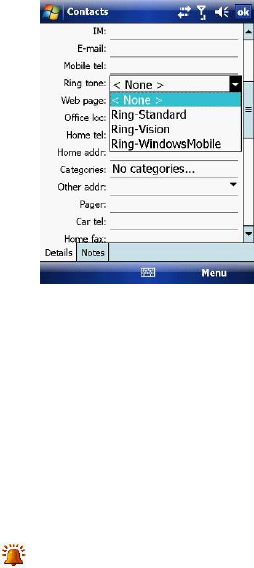
Assign ring tones to Contacts
It is also possible to assign a specific ring tone to a Contact:
1. Go to Start > Contacts and tap on the desired Contact.
2. Select Menu > Edit.
3. In the Ring tone field, select your desired ring tone.
Change the ring type
You can change the way that you are notified of incoming calls. For example,
you can choose to be notified by a ring, vibration or a combination of both.
1. From the Phone keypad, tap Menu > Options > Phone tab.
2. In the Ring type list, tap the desired option.
Set an alarm
1. Tap Start > Settings > System tab > Clock & Alarms > Alarms tab.
2. Tap <Description> and enter a name for the alarm.
3. Tap the day of the week for the alarm. You can select multiple days by
tapping each desired day.
4. Tap the time to open a clock and set the time for the alarm.
5. Tap the alarm icon to specify the type of alarm you want. You can
choose a flashing light, a single sound, a repeating sound or vibration.
6. If you choose to play a sound, tap the list next to the Play sound check box
and tap the sound you want.

Choose how to be notified about events or actions
1. Tap Start > Settings > Personal tab > Sounds & Notifications.
2. On the Sounds tab, choose how you want to be notified by selecting the
appropriate check boxes.
3. On the Notifications tab, tap an event name and choose how you want to be
notified by selecting the appropriate check boxes. You can choose from
several options, such as a special sound, a message, or a flashing light.
2.4 General Settings
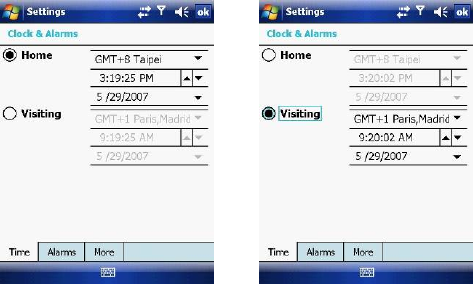
Set the time and date:
1. Tap Start > Settings > System tab > Clock & Alarms.
2. Select the correct time zone and change the date or time.
Set the time and date for a different location
If you visit or communicate with someone in a particular time zone often, you
can select it as your visiting time zone.
1. Tap Start > Settings > System tab > Clock & Alarms.
2. Tap Visiting.
3. Select the correct time zone and change the time or date.
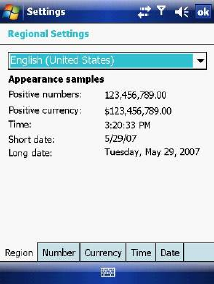
Change language and regional settings
The style in which numbers, currency, dates, and times are displayed is
specified in regional settings.
1. Tap Start > Settings > System tab > Regional Settings.
2. On the Region tab, select your region and language.
3. The region you select determines which options will be available on the other
tabs.
4. To customise settings further, tap the appropriate tabs and select desired
options.
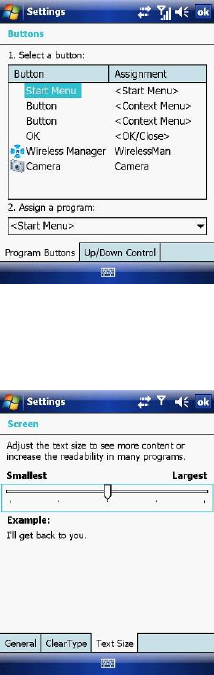
Reassign programs or shortcuts to program buttons
1. Tap Start > Settings > Personal tab > Buttons.
2. A list of buttons and their current assignments is displayed on the Program
Buttons tab.
3. Tap the button you want to reassign. To help you identify the buttons, there
are numbers and icons representing their original functions.
4. In the Assign a program box, tap the program or shortcut to assign.
5. Tap OK.
Increase or decrease screen text size
1. Tap Start > Settings > System tab > Screen > Text Size tab.
2. Move the slider to increase or decrease the text size.
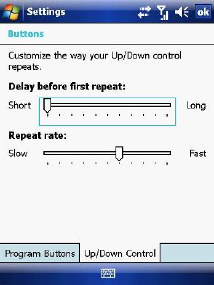
Adjust the speed for scrolling
1. Tap Start > Settings > Personal tab > Buttons > Up/Down Control tab.
2. Do one of the following:
z Under Delay before first repeat, move the slider to shorten or lengthen
the time that elapses before scrolling begins.
z To change the time it takes to scroll from one item to the next, under
Repeat rate, move the slider to adjust the speed.
Change the device name
1. Tap Start > Settings > System tab > About.
2. Tap the Device ID tab.
3. Enter a name.
The device name is used to identify the device in the following situations:
z Synchronizing with a PC.
z Connecting to a network.
z Restoring information from a backup.
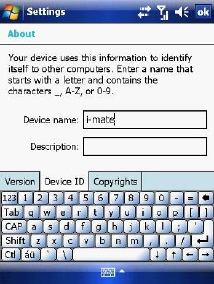
Note: The device name must begin with a letter, consisting of letters from A to Z, numbers
from 0 to 9, and cannot contain spaces. Use the underscore character to separate words. If
you synchronize multiple devices with the same PC, each device must have a unique name.
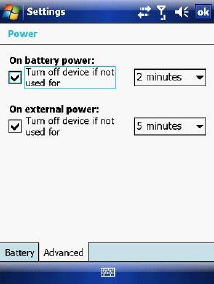
Make the battery last longer
1. Tap Start > Settings > System tab > Power. On the Advanced tab, you can
specify when your device turns off, to conserve battery power. For optimum
conservation, specify 3 minutes or less.
2. Use the AC adapter to plug your device into external power whenever
possible, especially when using a microSD card, a modem or other peripheral.
3. Adjust the backlight settings.
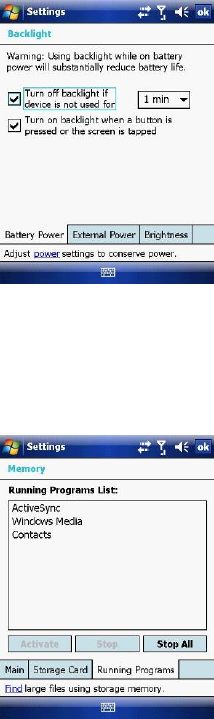
Adjust backlight brightness
1. Tap Start > Settings > System tab > Backlight > Brightness tab.
2. Move the sliders right to increase the brightness or left to decrease it.
Set the backlight to dim after a time delay
1. Tap Start > Settings > System tab > Backlight.
2. Tap the Battery power tab or the External power tab.
3. Select the Turn off backlight if device is not used for check box and
specify the time delay.
Close a program
In most cases, programs automatically close to free needed memory. However,
you can close programs manually.
1. Tap Start > Settings > System > Memory tab > Running Programs.
2. In the Running Programs list, tap the program you want to close and tap
Stop.
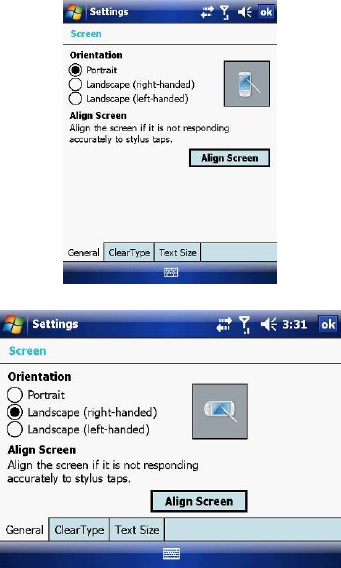
Change the orientation of the screen
You can use your Pocket PC in landscape or portrait modes, depending on how
you wish to use the device.
1. Tap Start > Settings > System tab > Screen > General tab.
2. Choose whether you wish to use the device in Portrait or Landscape modes.
Landscape can be right or left-handed. Tap OK to make the changes.
2.5 Security
SIM Security
To protect your phone with a PIN:
1. From the Phone screen, tap Menu > Options > Phone tab.
2. Tap Require PIN when the phone is used.
3. To change the PIN at any time, tap Change PIN.
Note: Emergency calls can be placed at any time, without a PIN.
Protect your device with a password
You can help keep your data more secure by requiring a password every time
the device is turned on.
1. Tap Start > Settings > Personal tab > Lock.
2. Select the Prompt if device unused for check box. In the box to the right,
select how long your device must be turned off before a password is needed.
In the Password type box, select the type of password you want to use.
Enter the password and, if necessary, confirm it. If the device is configured
for network connection, use a strong password for better network security.
3. On the Hint tab, enter a phrase that will help you remember your password
but does not allow others to guess it. The hint will be displayed after the
wrong password is entered four times.
4. Tap OK. The next time the device is turned on you will be prompted to enter
your password.
Note: Each time a wrong password is entered, the time the device takes to respond will get
longer and longer until the device appears to be not responding. If you forget your
password, you must follow the instructions in your owner’s manual to clear memory before
you can access your device.
Change your password
1. Tap Start > Settings > Personal tab > Lock. You will be prompted to enter
your current password.
2. In the Password box, enter your new password.
3. On the Hint tab, enter a phrase that will help you remember your new
password but does not allow others to guess your password. The hint will be
displayed after the wrong password is entered four times.
4. Tap OK.
Encrypt your files
1. Tap Start > Settings > System tab > Encryption.
2. Select Encrypt files placed on storage cards to encrypt files as they are
placed on a storage card.
Chapter 3
3.1 Make a Call
3.2 Receive a Call
3.3 Video Telephony
3.4 In-Call Options
3.5 Special Dialing Requirements
3.6 Additional Settings
3.1 Make a Call
Like a standard mobile phone, you can use your i-mate™ Windows Mobile®
Pocket PC Phone to make, receive and keep track of calls. You can also take
notes while talking, dial directly from Contacts and easily copy SIM/USIM
contacts to Contacts on the device.
In order to make calls, you will need to insert your SIM/USIM card into the
device as described in Chapter 1. Most SIM/USIM cards are preset with a PIN
(personal identification number), provided by your wireless service provider. If
this option is enabled in your SIM/USIM card, you will be prompted to enter the
PIN when the unit is switched on.
Note: If your PIN is entered incorrectly three times, the SIM/USIM card will be blocked. If
this happens, you can unblock it with the PUK (PIN Unblocking Key) obtained from your
wireless service provider.
You can make a call from Phone, Contacts, Speed Dial, Call History and
SIM/USIM Manager.
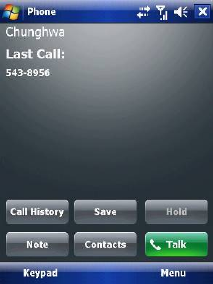
Make a call from the Phone screen
On the Phone screen:
1. Tap the desired phone number and then tap the SEND button.
2. To open the Phone screen, either use the stylus to tap Start > Phone or
press the SEND button.
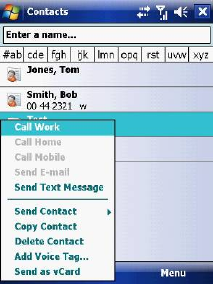
Make a call from the Contacts screen
1. Tap Start > Contacts.
2. To search for a contact, enter the desired name and number in the search
field, or tap the letter corresponding to the name in the alphabet bar.
3. Tap the desired contact and tap Call or press the SEND button.
You can also tap the desired contact in the Contacts list and tap the phone
number that you want to call. Or, tap and hold the desired contact. On the
shortcut menu, tap Call Work, Call Home, or Call Mobile.
By default, the mobile telephone number (m) of a contact is dialled when you
make a call from Contacts. However, you can specify that a different phone
number is used instead.
1. Tap Start > Contacts.
2. Press the Navigation Controller up or down to select the contact.
3. Press the Navigation Controller left or right. The letters representing the
number will change as you scroll through them.
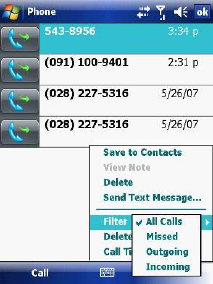
Make a call from Call History
1. On the Phone screen, tap Call History.
2. Tap Menu > Filter and tap a category.
3. Scroll to the desired contact or phone number and tap Call or press the
SEND button.
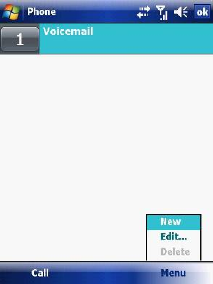
Make a call from Speed Dial
Use Speed Dial to call frequently-used numbers with a single tap. For example,
if you assign a contact to Location 2 in Speed Dial, you can tap and hold it on
the Phone screen to dial the contact’s number. Before you can create a Speed
Dial entry, the number must be in Contacts. To create a Speed Dial entry:
1. On the Phone screen, tap Speed Dial.
2. Tap Menu > New.
3. Tap a contact. Tap the phone number for which you want to create a Speed
Dial entry.
4. In the Location box, select an available location for the new Speed Dial
entry.
Note: To create a Speed Dial entry from Contacts, tap and hold the contact name, tap
Menu > Add to Speed Dial and select an available location for the new Speed Dial
entry. To delete a Speed Dial entry, in the Speed Dial list, tap and hold the desired
entry and tap Delete.
Make an emergency call
To make an emergency call, just enter the emergency phone number for your
location and press SEND.
Note: You can make calls to emergency services under any circumstances, even if you
have enabled the SIM PIN or locked the device. The ability to make emergency calls
depends on network availability.
3.2 Receive a Call
When you receive a phone call, a message will appear, giving you the option to
either answer or ignore the incoming call.
1. To answer the call, tap Answer or press the SEND button.
2. To reject the call, tap Ignore or press the END button.
End a call
Once an incoming or outgoing call is in progress, you can tap End or press
END on the device to hang up.
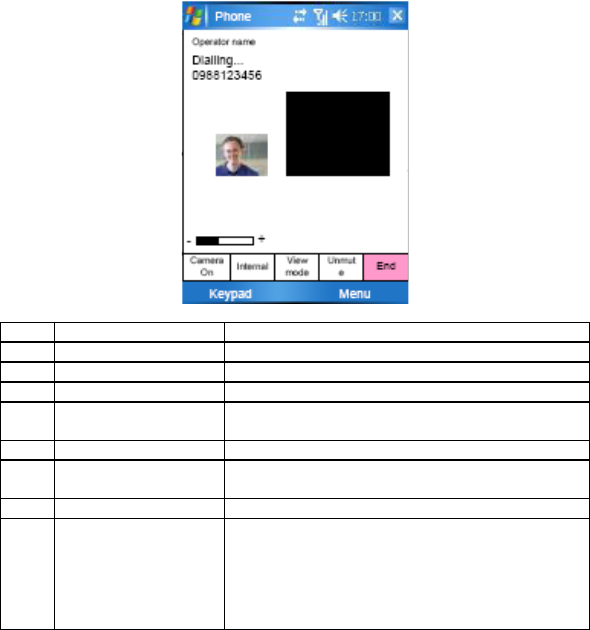
3.3 Video Telephony
Tapping the Video Call button allows you to make a VT (video telephone) call.
Image from VT UI flow
No Item Description
1 Call Duration Displays the length of the video call.
2 Caller Image Displays the caller image.
3 Keypad Tap to return to the keypad.
4 Brightness Use + and - to increase or decrease the screen
brightness.
5 Camera Turns on or off the caller image.
6 Internal / External
Camera Switches between the camera facing you and
the camera pointing away from you.
7 Speaker Turns the speaker on/off.
8 View Mode There are 4 view modes available, tap this
button to switch between them:
Only Receiver - Displays only the person you
are calling.
Only Sender - Displays your image only.
Standard Mode - Displays both the caller and

the receiver (the sender is smaller).
Sender is large - The sender image is large
and the receiver image is small.
9 Menu Contains:
Hold - Places the current call on hold
Mute - Mutes the speaker
Turn Speakerphone On – Turns the speaker
phone on or off.
Turn Handsfree On - Turns handsfree on or off.
Conference
Paste
Save to contacts
Create note
Call history
Speed dial
Options
Video call options
10 End Ends the call.
11 Receiver Image See the person who receives your call.
The above table needs to be applied when the video telephony module is
installed.

3.4 In-Call Options
Put a call on hold
If this option is enabled, your device notifies you when you have another
incoming call and gives you the choice of rejecting or accepting the call.
If you are already on a call and accept the new call, you can choose to switch
between the two callers or set up a conference call between all three parties.
• Tap Answer to take the second call, which will put the first call on hold.
• To end the second call and return to the first call, tap End or press the END
button on your device.
To switch between calls, tap Swap or press the SEND button.
Set up a conference call
1. Either put a call on hold and dial a second number or accept a second
incoming call when you already have one in progress.
2. Tap Conference.
Note: Not all service providers support conference calling. Contact your service provider for
details.
Turn on and off the speakerphone
The built-in speakerphone on your device allows handsfree operation or lets
other people listen to the conversation. To activate the speakerphone mode,
press and hold the SEND button or tap Speaker On on the screen. The
speakerphone icon will appear in the title bar. To turn off the speakerphone,
tap Speaker Off.
Mute a call
You can turn off the microphone during a call so that you can hear the caller but
the caller cannot hear you. During a call, tap Mute.
• When the microphone is turned off, the mute icon will appear on the screen.
• Tap Unmute to turn on the microphone again.
3.5 Special Dialling Requirements
Insert a pause in a dialling sequence
Calls to certain networks may require a pause in between the dialled digits:
1. Tap Start > Contacts.
2. Click the contact whose phone you want to insert a pause.
3. Select the phone number and add a ‘p’ character where you want to insert a
3 second pause.
4. Select the phone number and add a ‘w’ character where you want to insert a
manual pause.
5. To resume dialling after reaching a manual pause, press SEND.
Insert an International Country Code
To make an international call, you must insert a country code at the beginning
of the dialling sequence for the phone number. Tap and Hold ‘0’ on the Phone
screen until a (+) sign appears and then insert the rest of the number.
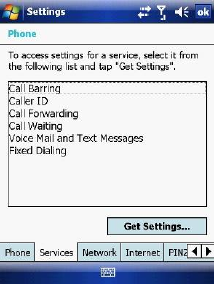
3.6 Additional Settings
Phone services
Phone Services, such as Call Waiting, enable you to choose how to handle all
incoming calls on your device.
Choose services
1. Tap Start > Settings > Personal tab > Phone > Services tab.
2. Tap the service you want to use and tap Get Settings.
Networks
You can view available wireless networks, determine the order in which your
device accesses another network if the current one is unavailable, and specify
whether you want to change networks manually or automatically.
Change phone network settings
1. Tap Start > Settings > Phone > Network tab.
2. By default, your device displays the current network as offered by your
service provider. You can customise this to your preferred network.
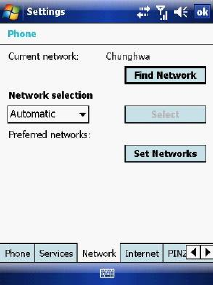
Set preferred networks
1. Tap Start > Settings > Phone > Network tab. By default, network selection
field is set to Automatic. However, you can set it to Manual to choose your
own network at any point of time.
2. Tap Set Networks.
3. Select the networks in Preferred networks and sort them according to your
preference.
4. Tap OK.
Change the keypad tone
You can change the tone you hear when entering a phone number on the
keypad. If set to Long tones, the tone is heard continuously for as long as the
number on the keypad is tapped. Use this setting if you are having trouble
accomplishing tasks that rely on tones from your phone such as accessing
messages from an answering machine. If set to Short tones, the tone is heard
only for one or two seconds. If set to Off, no tone will be heard.
1. From the Phone screen, tap Menu > Options > Phone tab.
2. In the Keypad list, tap the option you want.
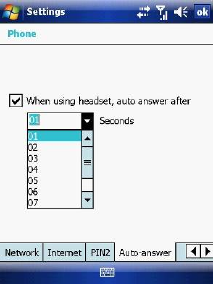
Automatic answering
You can set the phone to automatically answer calls when using the headset. To
do this:
1. From the Today screen, tap Start > Settings > Personal tab > Phone >
Auto-answer tab.
2. Tap the When using headset, auto answer after check box.
3. Select the number of seconds from the drop down menu.
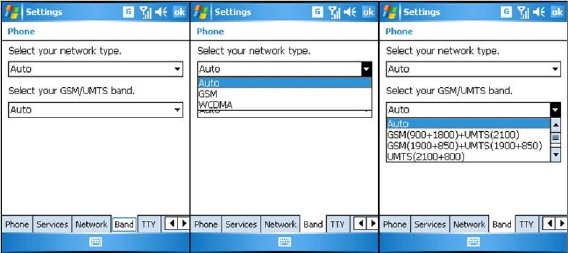
Band settings
The default network type and GSM/UMTS band is set to Auto. However, this
can be changed by the following:
1. From the Today screen, tap Start > Settings > Personal tab > Phone >
Band tab.
2. Tap Select your network type.
3. Select your preferred network type.
4. Tap Select your GSM/UMTS band.
5. Select your preferred GSM/UMTS band type.
Chapter 4
4.1 Automatic Setup of Your Data Connections
4.2 Manual Setup of Your Data Connections
4.3 Bluetooth
4.4 Beams
4.5 Connect to a Wireless LAN
4.1 Automatic Setup of Your Data Connections
Your device is equipped with powerful networking functions that enable you to
connect to the Internet through a General Packet Radio Service (GPRS)
network.
GPRS is a service that allows information to be sent and received across a
mobile telephone network.
Your device is able to configure itself for data services from many of the major
GSM/GPRS operators across the world. Simply insert your SIM/USIM card and
switch on your device. When the device powers on it will prompt for the
configuration steps and configure itself for Web, MMS, and WAP services. If the
settings are not known for your operator, the device will notify you and you will
need to enter them manually.
Note: The use of Web, WAP and Multimedia Messaging Services is subject to your Mobile
Service Provider. You must ensure that your subscription has Web, WAP and MMS before
using those services.
4.2 Manual Setup of Your Data Connections
You can set up connections to the Internet or to a corporate network and
exchange e-mail or instant messages.
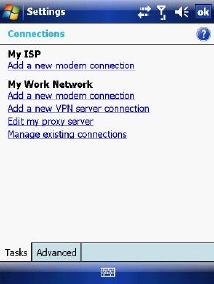
Your device has two connection setting categories: My ISP (Internet Service
Provider) and My Work Network. The My ISP settings are used to connect to
the Internet, and the My Work Network settings can be used to connect to any
private corporate network.
To ensure that both My ISP and My Work Network connections are displayed:
• Tap Start > Settings > Connections tab > Connections > Advanced tab >
tap the Select Networks button.
• From Programs that automatically connect to the Internet, select My ISP.
• From Programs that automatically connect to a private network, select
My Work Network.
Connect to the Internet via ISP
Obtain the following information from your ISP:
• Access point name or server phone number.
• User name (if required).
• Password (if required).
• Domain (if provided by an ISP or a network administrator).
• Proxy settings (if required).
1. Tap Start > Settings > Connections tab > Connections.
2. Tap Add a new modem connection.
3. Enter a name for the connection.
4. Select a modem from the list. For example, if you want to use the mobile
phone network, select Cellular Line or Cellular Line (GPRS).
5. Tap Next.
6. Complete the Connection Wizard by entering the required information and
tapping Finish.
Connect to a private network
Obtain the following information from your ISP:
• Access Point name or server phone number.
• User name (if required).
• Password (if required).
• Domain (If provided by an ISP or a network administrator).
• Proxy settings (if required).
1. Tap Start > Settings > Connections tab > Connections.
2. In My Work Network, follow the instructions for each type of connection.
3. Once finished, tap Edit my proxy server and enter the Proxy Information,
including any WAP Proxy required by the operator if you are setting up a
connection to their WAP site.
4. Complete the Connection Wizard and tap Finish.
Connect to a VPN using the Internet
Please ensure that you have setup a successful GPRS / Wi-Fi connection. The
VPN connection uses existing Internet connections to connect to your work
network. Refer to the next section, Connect to an Intranet URL, for more
information.

1. If the Work Connection is not being used for any other connection, tap on
Add a new VPN server connection and skip to step 4.
2. Tap Start > Settings > Connections > Connections > Advanced tab > tap
Select Networks.
3. Create a new connection to a private network by tapping New… under the
Programs that automatically connect to a private network list. This new
network connection must be selected from this menu when necessary to
connect to a VPN. Assign a name for your choice and tap the VPN tab > New.
4. Complete the VPN setup wizard using the settings provided by your network
administrator, which should include Host Name/IP, VPN Type, User Name,
Password and Domain.
5. If you selected IPSec VPN type, tap Next to select the type of authentication
required. If Pre-Shared key is selected, enter the key.
6. Check the advanced settings and complete the settings according to the
instructions from your network administrator.
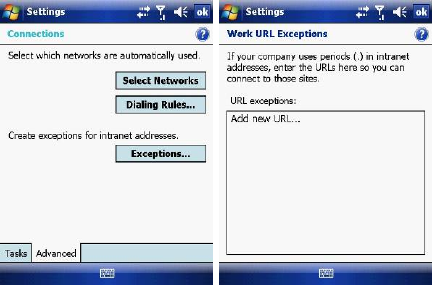
Connect to an Intranet URL
A work URL exception tells Internet Explorer Mobile and/or ActiveSync to look
on the work network to find that URL instead of searching the Internet. This also
has to be setup if you wish to browse intranet websites through your VPN
connection:
1. On the Today screen, tap Start > Settings > Connections > Advanced >
Exceptions.
2. In Work URL Exceptions, tap Add new URL and enter the URL. Tap OK.
Note: Separate multiple URLs with a semicolon.
You should not create URL exceptions for URLs on the Internet. An Intranet URL
can be either an IP address or FQDN (Fully Qualified Domain Name).
4.3 Bluetooth
Bluetooth is a short-range wireless communications technology. Devices with
Bluetooth capabilities can exchange information over a distance of about 10
meters without a physical connection. You can even beam information to a
device in a different room as long as it is within the Bluetooth signal coverage
range.
The software included with your device allows you to use Bluetooth in the
following ways:
1. Beam information such as files, appointments, tasks and contact cards
between devices that have Bluetooth capabilities.
2. Use a Bluetooth headset.
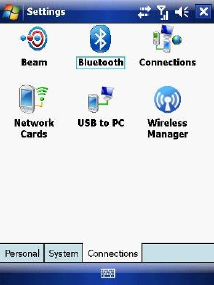
Turn Bluetooth on or off
1. On your device, tap Start > Settings > Connections tab > Wireless
Manager.
2. Select Turn on Bluetooth.
3. Tap Bluetooth Settings > Mode tab. Check the Make this device visible to
other devices box if you want your device to be visible to other Bluetooth
users within a range of approximately 10 meters.
4. Tap OK.
Create a Bluetooth partnership
A Bluetooth partnership is a relationship that you create between your device
and another Bluetooth enabled device in order to exchange information in a
secure manner. Creating a partnership between two devices involves entering
the same personal identification number (PIN) or Passkey on both devices.
Creating a partnership between two devices is a one-time process. Once a
partnership is created, the devices can recognize the partnership and exchange
information without requiring a PIN. Make sure the two devices are within a
range of 10 meters from one another and that Bluetooth is on and discoverable.
1. On the Today screen, tap Start > Settings > Connections tab > Bluetooth.
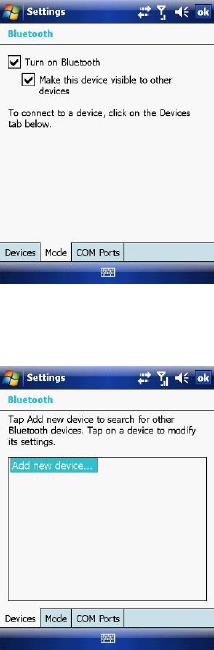
2. On the Devices tab, tap Add new device. Your device searches for other
Bluetooth devices and displays them in the box.
3. Tap the desired device name in the box and tap Next.
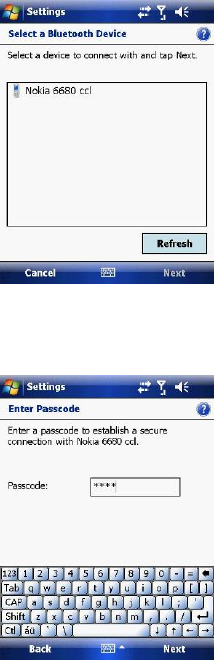
4. Enter a passkey to establish a secure connection. The passkey must be
between 1 and 16 characters.
5. Tap Next.
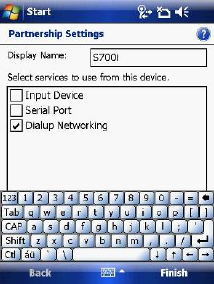
6. Enter the same passkey that is entered on the other device. You can,
however, edit and enter a new name for the other device.
7. Tap Finish after checking the services offered by the other Bluetooth device.
Accept a Bluetooth partnership
1. Ensure that Bluetooth is turned on and discoverable.
2. Tap Yes when prompted to establish a partnership with the other device.
3. Enter a passkey (the same passkey that is entered on the device requesting
the partnership) to establish a secure connection. The passkey must be
between 1 and 16 characters.
4. Tap Next.
5. Tap Finish. You can now exchange information with the other device.
Rename a Bluetooth partnership
1. On the Today screen, tap Start > Settings > Connections tab > Bluetooth.
2. Tap and hold the partnership on the Devices tab.
3. On the shortcut menu, tap Edit.
4. Enter a new name for the partnership.
5. Tap Save.
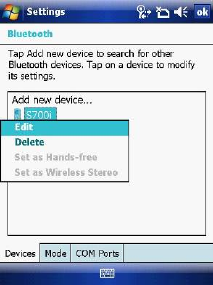
Delete a Bluetooth partnership
1. On the Today screen, tap Start > Settings > Connections tab > Bluetooth.
2. Tap and hold the partnership on the Devices tab.
3. Tap Delete from the shortcut menu.
4.4 Beams
The term Beam is used to describe the short range transferring of information
between two units via Bluetooth. An example of beaming could be sending the
details of a contact to another Windows Mobile device.
By default, the option to receive incoming beams is disabled for security and
battery conservation. Make sure that Receive All Incoming beams is enabled
in Start > Settings > Connections > Beam.
Beam an item
In the Calendar, Contacts, Notes, Tasks and Pictures programs, you can
beam files and information to other devices using Bluetooth.
1. From the program, select the item you want to beam, such as an
appointment in Calendar, a task in Tasks, a contact card in Contacts, or a
picture in Pictures. In Calendar, first open the appointment in Agenda view.
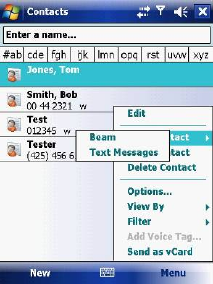
2. Different applications have different ways of beaming:
z In Calendar, tap Menu > Beam.
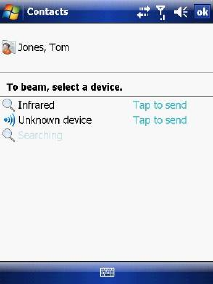
z In Contacts, tap Menu > Send Contact > Beam.
3. Via Bluetooth, select the device to which you want to send the item.
4. Tap on Tap to Send.
4.5 Connect to a Wireless LAN
Connect to a Wi-Fi network
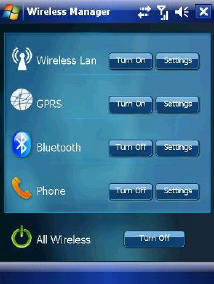
1. On the Today screen, tap Start > Settings > Connections tab > Wireless
Manager. You may also access Wireless Manager from the Today screen
or by pressing the Wi-Fi button on the left side of the device.
2. Press the Wi-Fi button to turn the wireless function on and off.
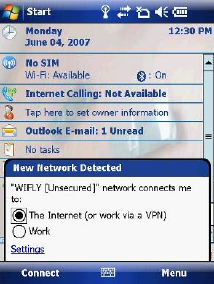
3. When the Wi-Fi function is turned on, the device will start scanning for
available networks and will prompt the user to select one. Select whether this
network is used to connect to The Internet or as a Work connection and
enter the password for this access point, if requested.
4. To configure the required settings on the Wireless Manager screen, tap
Settings next to each of the wireless functions. When the configuration is
completed, you can connect to a Wi-Fi network using your device.
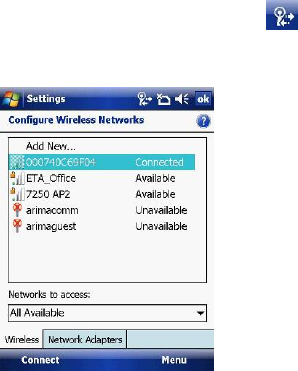
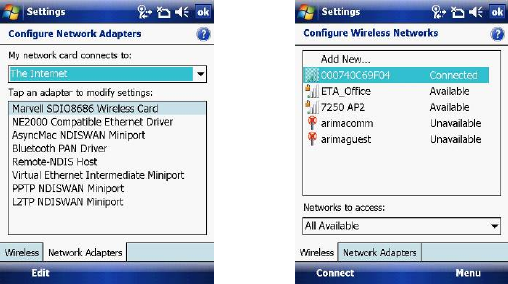
Check Wireless LAN status
You can check the current wireless connection status from the following the
screens of your device:
z Tap Start > Settings > Connections > Wi-Fi or tapping the icon on the
title bar provides information about the connection status and signal quality
for the current connection.
z To manually configure your connection, tap Start > Settings > Connections
tab > Network Cards. This screen displays the wireless networks currently
available and allows you to change the connection settings and create new
connections to other access points not broadcasting their SSIDs.
On http://www.clubimate.com you can find step-by-step guidelines for
connecting your device to public and private Wi-Fi access points. Those
guidelines are also available in the CD that came with your device.
Chapter 5
5.1 Text Messaging
5.2 MMS
5.3 E-mail
5.4 Windows Live Messenger
This chapter describes how you can create or delete, send or receive, and
organise or store your messages in the phone. The following types of messages
are all stored under the Messaging Application:
z Text message (SMS - Short Message Service)
z E-mail messages
z Multimedia messages (MMS)
Real-time messaging is also possible on your device by signing into the MSN
Messenger application, as explained in this chapter.
5.1 Text Messaging
Text Messaging is a popular way of sending short messages to other mobile
phone users and, in some countries, to land lines as well. Each text message is
a maximum of 160 characters long. In some countries the maximum size is 70
characters if accents or other special characters are used. Your device will
automatically join multiple texts together.
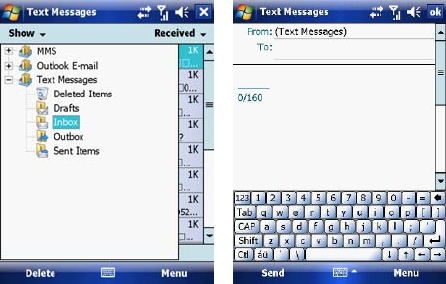
Create a text message
1. On the Today screen, tap Start > Messaging.
2. Select an account from the list. You are automatically taken to the Inbox of
the chosen account.
3. From the bottom of the screen, press Menu > New.
4. In the To: field, enter the mobile phone number of the recipient. Insert a
semicolon (;) between multiple recipients. You may also choose a contact by
pressing Menu > Add Recipient.
5. Tap Send. Text messages are sent immediately.
Note: In the To: field, you can enter phone numbers from your contact cards quickly. Press
the Action button when the cursor is in this field. A new screen displays the contact list for
your selection. Press the Action button again for the selection and the phone returns to the
SMS text message screen. Repeat this for all contacts you wish to send the SMS to.
Cancel a text message
To cancel a message, tap Menu > Cancel Message. If you require Delivery
notification, in the message creation screen tap Menu > Message Options…
and check the Request message delivery notification box.
Insert predefined text into a message
To save time when entering text, you can insert predefined text into messages.
1. Tap Menu > My Text.
2. Select the text you want to insert by tapping the phrase you wish to insert.
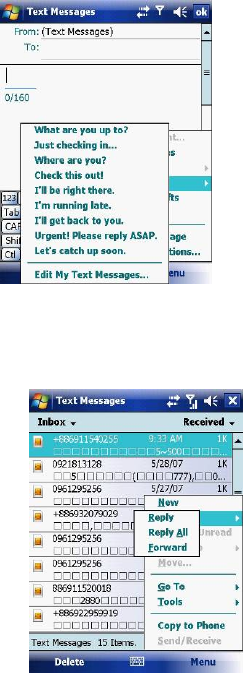
Reply to and Forward a message
1. From the text message inbox tap Menu > Reply > Reply All or from an open
message, tap Reply (bottom left corner).
2. Enter a message in the message area.
3. Tap Send.
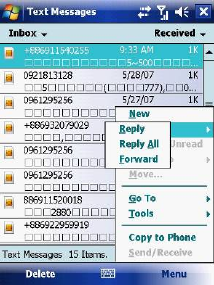
Forward a message
1. From an open message, tap Menu > Reply > Forward.
2. Enter a message in the message area.
3. Choose a recipient to send the message to. Type in the name or tap Menu >
Add recipient.
4. Tap Send.
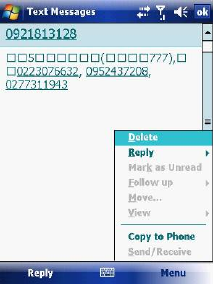
Delete a message
1. On the Today screen, tap Start > Messaging and select an account.
2. Select the message to delete.
3. Tap Delete or press the Left Soft Key.
5.2 MMS
Creating and sharing MMS messages with your friends and family is easy with
your device. You can even use the device’s camera to capture photos while
composing a new MMS message, and send them along it.
Set up an MMS account
Before you can use MMS, you have to configure the required settings on your
device. If your mobile operator settings are recognised by the device when it
first boots-up, MMS settings should be set up automatically.
Manually set up an MMS account
To set up your default MMS Messaging account, tap Start > Messaging >
MMS.
1. Tap Menu > Options > Accounts tab > MMS.
2. Tap the Servers tab > New.
3. Enter the details of your mobile operator’s MMSC.
Manage MMS messages
After configuring the required settings, you can start to compose and manage
your MMS messages.
Compose MMS messages
You can compose MMS messages in a combination of various slides, where
each slide can consist of a photo, audio or video clip and/or text.
1. Tap Start > Messaging > MMS.
2. Tap Menu > New. Select either a custom message from your collection or a
predefined message.
3. In the To: field, enter the recipient’s phone number or e-mail address directly,
or tap To, Cc, or Bcc to choose a phone number or e-mail address from
Contacts.
4. Enter a subject for your message.
5. Tap the Insert icon to select and send a photo or video clip. By default, it will
open the My Pictures folder. To navigate to any other folder containing
pictures or videos, tap Show.
6. Tap the image to insert it. Once selected you may remove the image by
pressing and holding the image.
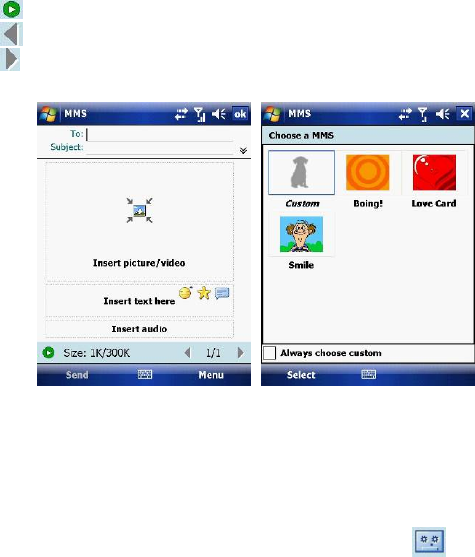
7. Enter text and insert audio clips by tapping the respective areas.
8. Tap Send to send the message.
The following icons act as shortcuts to some of the operations on the MMS
message screen:
Tap to preview your message.
Tap to go to the previous slide.
Tap to go to the next slide.
Add an audio clip to an MMS message
You can add audio clips to your MMS message. However, you can add only
one audio clip per slide.
1. Tap Insert audio. By default, it will open the My Sounds folder. To navigate
to any other folder containing pictures or videos, tap Show.
2. Select an audio file.
Note: To record a new audio clip and add it to your MMS message, tap . This
activates the recording control mode for a new audio clip. Tap Record to start recording
and Stop to stop recording. The new audio clip is automatically inserted into your MMS
message.

Reply to an MMS message
Tap Menu > Reply > Reply or Reply All to reply to the sender of the message,
or to all persons listed in To, Cc, and Bcc of the message.
View an MMS message
You can view MMS messages in several ways.
• Use the playback controls , and .
• Tap Objects to see a list of files included in the message. To save a file,
select it and tap Tools > Save.
• View the slides manually by scrolling through the message using the
Navigation control.
Set advanced options for an MMS message
From the selected message you can change the following:
• Tap Menu > Options > Background to choose a background colour from
the list.
• Tap Menu > Options > Text Layout to align the included text to appear
above, below, left or right of the message.
• Tap Menu > Options > Text Size to choose the size of the text.
• Tap Menu > Options > Text Color to choose the text colour from the list.
• Tap Menu > Options > Text background to choose the text background
colour from the list.
• Tap Menu > Options > Send Options to set the Delivery Time (1-72 hours
or Now), Expiration (1-72 hours or Maximum) and Priority (Low, Normal
or High). Check the Delivery report and Read report check boxes to
activate them.
Change MMS settings
You can set options to keep track of your messages, retrieve messages
immediately, accept or reject messages, and request a delivery or read receipt.
You can also specify resolution for the images you send and message delivery
attempts, and set up a server to access messages.
Configure MMS settings
1. Tap Start > Messaging.
2. Tap Menu > Options > MMS.
3. Select any of the following:
• Retrieve messages immediately: Select this check box to download new
messages automatically without being notified. (Typically, when you are
connected to a network, you receive a notification whenever you receive a
new message.) You can also choose to download messages when you are
on your home network only.
• Confirm to receive messages while roaming: Receive messages when
moving between wireless network sites.
• Save sent messages: Select this check box to save a copy of messages
that you send.
• Allow read report: Select this check box to send and receive read reports.
• Disconnect network connection after MMS: Once an MMS message
has been sent, disconnect from the network.
• Attempts before giving up: Select a value from this list to limit the
number of times the program attempts to send your message.
• Photo resolution: Select a value from this list to choose the resolution for
images that you send. Decreasing the original resolution helps speed up
the sending and receiving of messages.
• Servers: On this tab, you can create a new server or select an existing
one from the list to store and manage your messages. You can also set a
server as default by tapping Set As Default.
5.3 E-mail
Before you can send or receive e-mails, you will need to setup an e-mail
account. There are different types of e-mail accounts supported by the device.
This is described in the next few pages.
• Internet e-mail account (POP3/IMAP4).
• Microsoft Exchange Server (Microsoft Outlook).
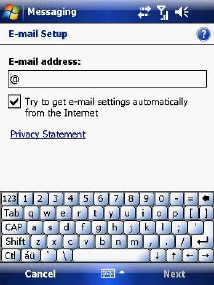
Set up an Internet e-mail account automatically
1. On the Today screen, tap Start > Messaging > New E-mail Account.
2. Enter the e-mail address.
3. Check the Try to get e-mail settings… checkbox.
4. Tap Next to begin searching.
5. If the e-mail address cannot be found, you will be asked to set up the account
manually.
Note: If the account is set up successfully, you will be prompted to send and receive e-mail.
If not, you must tap Next and set up the account manually, which is described in the
following pages. You will need to enter your user name and password for your e-mail
account.
View the Inbox message list
On the Today screen, tap Start > Messaging, and select an account. The
Inbox message list displays your received messages.
Note: To view new messages when they arrive, tap the notification on the Today screen.
Create an e-mail message
1. On the Today screen, tap Start > Messaging.
2. Select an e-mail account from the list.
3. Tap Menu > New.
4. In To, Cc, and/or Bcc, enter the recipient’s e-mail address. Insert a
semicolon (;) between multiple addresses.
5. In Subject, enter a subject for the message.
6. Enter a message.
7. Tap Send. E-mail messages are stored in the Outbox and are sent to
recipients the next time you synchronize or connect to your e-mail server and
send and receive mail.
Note: You can quickly enter e-mail addresses from your contact cards. In the To: field,
press ENTER and select a recipient from the list. Then, select the recipient’s e-mail
address. The semicolon separator is automatically inserted if you enter multiple recipients.
• To set the priority of the message (i.e. to make it appear as Low, Normal or
High priority in the recipient’s inbox), tap Menu > Message Options.
• To cancel a message, tap Menu > Cancel Message.
Insert predefined text into a message
Please refer to Section 5.1 Text Messaging for details on how to use this
feature. You can use it when creating a new message or replying to an e-mail.
When the message screen appears, tap Menu > My Text.

Create and add a signature to message
For each account in Messaging, you can specify a signature to be
automatically inserted into messages that you send.
1. On the Today screen, tap Start > Messaging.
2. Select an e-mail account from the list.
3. Tap Menu > Options > Signatures….
4. Scroll to the account for which you are creating the signature.
5. Select Use Signature with this account.
6. To insert a signature into every message you send, select Include when
replying and forwarding. Otherwise, a signature is inserted only into new
messages.
7. Tap OK.
Reply to a message
1. From an open message, tap either the soft-key Reply or tap Menu > Reply >
Reply or Reply All.
2. Enter a message in the message area.
3. Tap Send.

If you are replying to an e-mail in the Outlook E-mail account, you will send less
data if you do not edit the original message. This may reduce data transfer
costs, depending on your rate plan.
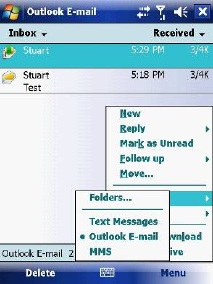
Send and receive Internet e-mail messages
1. On the Today screen, tap Start > Messaging
2. Select an e-mail account from the list.
3. Tap Menu > Send/Receive. The phone should then connect to your e-mail
server via the Internet and send/receive your messages.
4. To manage your folders for ActiveSync, tap on Menu > Tools > Manage
Folders.
Note: To stop this process, tap Menu > Stop Send/Receive.
Download a complete e-mail message
1. On the Today screen, tap Start > Messaging
2. Select an e-mail account from the list.
3. Select the message to download.
4. Tap Menu > Download Message. The complete message is retrieved the
next time you synchronize or connect to your e-mail server to send and
receive e-mail.
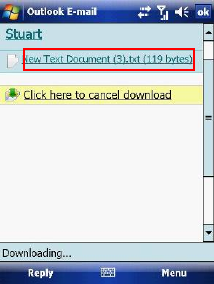
Note: Alternatively, you can scroll down to the bottom of the message and tap Get the rest
of this message. The message will be downloaded the next time your phone connects to
the e-mail server to send/receive e-mail. The frequency of this is determined by the
schedule setup in your ActiveSync configuration, described in Chapter 6.
After you scroll down to the file name shown, tap it and the attached file will be
downloaded when your phone connects to your e-mail server to send/ receive
e-mails again.
View an attachment
In an open message containing a downloaded attachment, tap the attachment.
Note: You can view attachments only for file formats supported by the device.
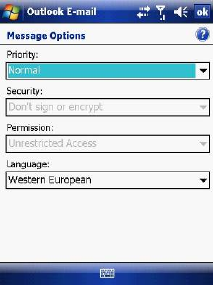
Digitally sign a message
Digitally signing a message applies your public-key certificate to the message.
This proves to the recipient that the message is from you and not from an
impostor, and that the message has not been altered.
1. On the Today screen, tap Start > Messaging.
2. Select an e-mail account from the list.
3. Click Menu > New.
4. Click Menu > Message Options.
5. From the Security list, choose from the drop down menu.
6. Tap OK.
Note: S/MIME encryption and digital signatures for Windows Mobile®-based devices are
available only with Exchange Server 2003 Service Pack 2 or later versions that support
S/MIME. If you are not using one of these products, or have not yet synchronized, these
options are unavailable.
Change e-mail folders and accounts
1. On the Today screen, tap Start > Messaging
2. Select an e-mail account from the list.
3. Tap Go To > Folders.
4. You can select the new folder you wish to view.
5. To manage your folders for ActiveSync, tap Menu > Tools > Manage
Folders.

5.4 Windows Live Messenger
Before you can use Windows Live Messenger you must be
connected to the Internet.
Pocket MSN Messenger overview
With MSN Messenger you can send instant messages to your contacts’ mobile
devices or computers. For instructions, select a task below.
Get started with MSN Messenger
To use MSN Messenger, you need Microsoft Passport Network credentials.
After obtaining credentials, complete the following tasks:
1. Setup a connection with your phone: refer to Chapter 4 Getting Connected.
This enables you to connect to the Internet.
2. Setup an MSN Messenger account. For more information, see Set Up an
Account.
3. Sign in to MSN Messenger. For more information, see Sign In and Out.
To obtain a Passport, go to http://www.passport.com.
To create a Hotmail account, go to http://www.hotmail.com.
Setup an account
Before you can use MSN Messenger, you must set up an instant messaging
account. For MSN Messenger service, you must have Microsoft Passport
Network credentials or a Hotmail account. To use MSN Messenger, you need to
create a connection to the Internet.
1. On the Today screen, tap Start > Messaging > New E-mail Account.
2. Enter the e-mail address.
3. Check the Try to get e-mail settings automatically from the Internet
check box.
4. Tap Next to begin searching.
5. Once found, you will be taken to Windows Live.
Sign In and Out
1. On the Today screen, tap Start > Programs > Messenger or go to Windows
Live, tap Start > Programs > Windows Live.
2. Tap Sign in.
3. Enter the e-mail address and password for your Microsoft® Passport Network
credentials or Hotmail account, and tap Sign in.
Note: The phone will only prompt for your Sign in account and password the first time you
sign in for that account. After successful sign in, you will not be prompted for your Sign in
details the next time. To switch to a different account, tap Menu > Switch User.
Signing in to an account may take several minutes, depending on your
connection speed and how busy your mobile network is.
Add and delete Contacts
After you have signed into Messenger, you will be able to perform the functions
below.
• To add a contact, tap Menu > Add New Contact and then follow the
directions on the screen.
1. To delete a contact, select the contact and tap Menu > Contact options >
Remove contact. Check the boxes to Block this contact and/or Remove
this contact from my Windows Live contact list.
2. Tap OK to permanently delete the contact.
Manage Contacts
• To block a contact from viewing your status and sending you messages,
select the contact and tap Menu > Contact options > Block contact.
• To unblock a contact, select the blocked contact from the list and tap Menu >
Contact options > Unblock Contact.
Change your display name and personal message
1. In MSN Messenger, tap Menu > Change Appearance.
2. In My display name and Personal message, enter the name and phrase
that you want to display in MSN Messenger. Tap Done.
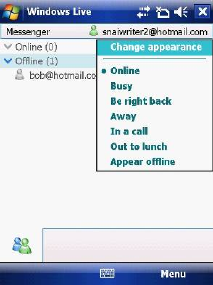
Check your Messenger Status
• Tap the messenger title bar. Your current status is indicated in the list by a
bullet point. You can change your status by selecting another description.
Let Contacts know you are not available
Select your own name at the top of the page and then tap the desired status
description. For example, tap Away.
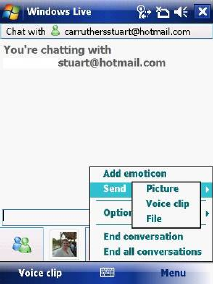
Send a message
1. Tap the contact you want to send a message to.
2. Enter your message in the text entry area at the bottom of the screen and tap
Send.
3. Emoticons, Pictures, Voice Clips and Files can also be sent to the contact.
Tap Menu > Add emoticon or Menu > Send > Picture, Voice Clip or File.
Add Participants
Extra participants can be added to the current conversation.
1. Tap Menu > Options > Add participant.
2. Select the contact.
3. Tap Add.
End a conversation
• Tap Menu > End Conversation.
Chapter 6
6.1 Introduction to ActiveSync
6.2 Install and Configure ActiveSync
6.1 Introduction to ActiveSync
Your device contains ActiveSync software that allows you to create a
synchronisation relationship between your mobile device and your PC. This
means that when your device is connected to your PC, data is shared between
them, according to your preferences. If you make a change in one place, the
next time you connect your PC and device, the change is automatically made to
the other machine.
You may connect to your PC using a cable or a Bluetooth connection.
Accessing files from your PC remotely on your device is also possible using the
1-View component of the i-mate™ Suite. Go to http://www.imatesuite.com for
more information.
To allow the connection to be made, the ActiveSync software provided on the
getting started CD must also be installed on your PC.
Note that upon connecting the device, Windows Vista™ users will be prompted
to download Windows Mobile Device Center software and do not require
ActiveSync on their PC.
To access e-mails or other Outlook information whilst away from your PC, you
may also connect your device to your Microsoft Exchange E-mail server.
This connection may be performed over GPRS, 3G, Wi-Fi or through your PC’s
connection to the Internet. If your Exchange Server is running Exchange 2003
SP2 or later, you may also be able to receive Push e-mails. Any new e-mails
will be sent directly to your device.
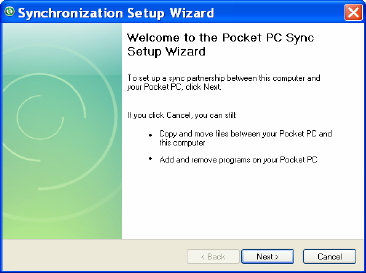
6.2 Install and Configure ActiveSync
You can either install ActiveSync from your Windows Mobile Getting started CD
or download it from http://www.microsoft.com. After the software has been
installed and the USB cable is connected between your PC and phone, the
ActiveSync setup wizard starts up. Click Next to continue.
If you only intend to synchronize directly with your Microsoft Exchange Server
and not your PC, select the option below. The alternative is to synchronize your
phone with your PC. Note that you cannot do both at the same time while
connected to your PC.
Synchronize with Exchange Server
The next few steps explain how to synchronize directly with Exchange Server. If
you plan to synchronize with your PC, go to the Synchronize with your PC
section below.
If you have a PC which is already fully synchronized with your Exchange
Server, then synchronize your device to your PC the very first time instead of
synchronising to the Exchange Server. This will allow faster synchronisation.
First, check the box Synchronize directly with a server running Microsoft
Exchange Server and click Next.
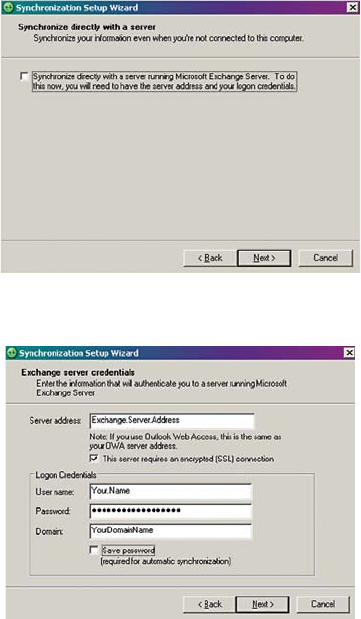
Complete the details below. Contact your network administrator if you do not
know this information.
Ensure that your PC has a connection which is accessible to the Server as the
setup will check the connection and your User name and Password setting
validity.
To synchronize directly through to your Exchange Server instead of your PC,
click the box above and enter the Exchange Server details, as shown below:
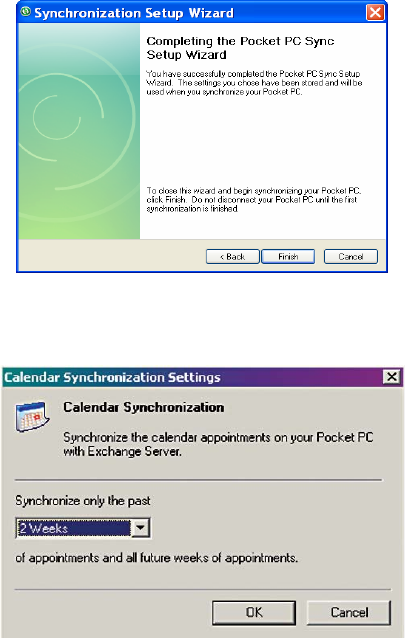
You can view additional setting information by selecting an item and clicking
Settings below. For example, you may choose to synchronize details of your
Calendar for the past two weeks only.
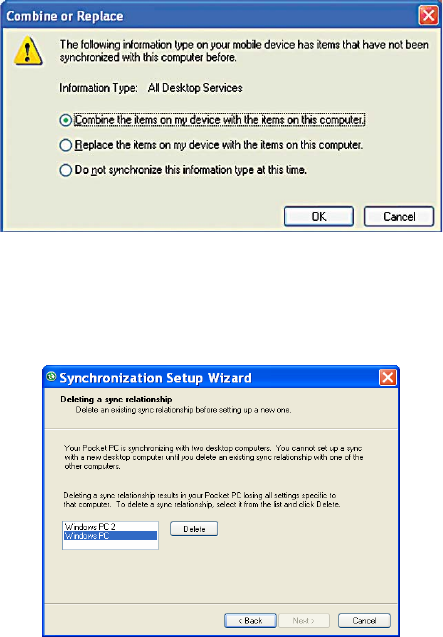
After you click Finish, you should get a screen prompt as below. This needs to
be selected as appropriate to your own requirements, depending on the state of
your PC. The time required for synchronisation depends on how much data is to
be transferred.
Note: Files can only be synchronized with Microsoft Exchange SP 2 or later.
Synchronize with your PC
First you must choose a name for your PC. If you have more than two
synchronisations already established, one must be erased in order to proceed.

After choosing a name, click Next.
This window allows you to choose which information to synchronize and which
will remain private.
Check the box to maintain wireless connection while the device is plugged into
your PC.
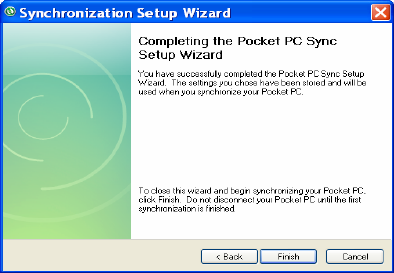
To begin the PC Sync, click Finish but leave the device plugged in.
Change ActiveSync settings
After setting up synchronisation using the Sync Setup wizard on the PC, the
synchronisation settings can subsequently be changed:
• If you want to change ActiveSync settings when synchronising with your PC,
use the Changing the amount of information synchronized section in the
Help files on your PC.
• If you want to change ActiveSync settings for synchronising through to your
Exchange Server, use the ActiveSync settings on your device, as described
in Change settings for an information type below.
Change settings for an information type
Before changing synchronisation settings on the device, first disconnect it from
your PC.
1. On the Today screen, tap Start > Programs > ActiveSync > Menu >
Options.
2. Select one of the information types.
• To view or change settings for an information type (when available), tap
Settings.
• To view or change settings for a computer or Exchange Server, tap Menu
> Settings.

3. Change the amount of information to be synchronized or other settings.
4. Click Done (or Finish in the Exchange Server settings wizard).
Connect to a PC using Bluetooth
1. Follow the instructions in ActiveSync Help on the PC for configuring
Bluetooth on your PC to support ActiveSync. Make sure that your PC’s
Bluetooth is set to Visible (Discoverable) and that ActiveSync on the PC
has the Bluetooth COM port enabled – see below.
2. From the device’s Today screen, tap Start > Programs > ActiveSync.
3. Tap Menu > Connect via Bluetooth. Ensure that the phone and PC are
within close range.
4. If this is the first time you have connected to this PC via Bluetooth, you must
complete the Bluetooth wizard on the phone and setup a Bluetooth
partnership with the PC before synchronising.
5. Tap Sync.
6. When finished, tap Menu > Disconnect Bluetooth.
7. To preserve battery power, turn off Bluetooth.
Ensure that the PC ActiveSync Serial port corresponds to the PC’s Bluetooth
Serial port configuration. In the example below, the Bluetooth Serial Port has
already been set up as COM4 by the computer. Because COM4 is allocated to
Bluetooth, the Allow connections to one of the following field has been set
to COM4 to match this.
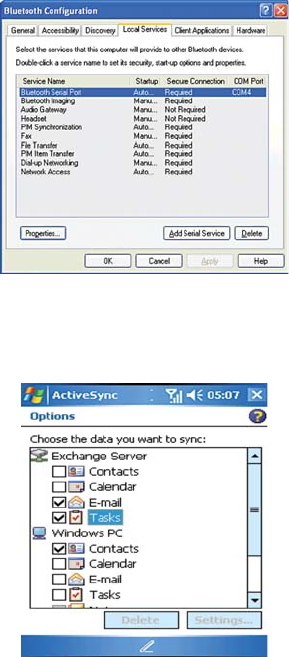
In the sample screenshot below, the PC Bluetooth Manager indicates that the
Bluetooth Serial Port is set to COM4.
If, for example, you wish to synchronize your phone to the Exchange Server for
E-mail and Tasks, and to your PC for Contacts and Calendar, tap Start >
Programs > ActiveSync > Menu > Options from your device and select from
the list as shown.
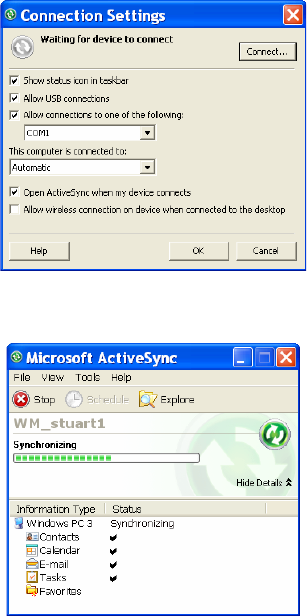
Before connecting your device to your PC, you may first need to check your
ActiveSync Connection Settings by double clicking on the ActiveSync icons at
the bottom right of your PC screen.
When complete, connect your device and synchronisation should take place as
below.
Set up an Exchange Server connection
You can synchronize your E-mail, Calendar Appointments and Contacts
directly with your Exchange server. Tasks may also be synchronized if your
company is running Exchange Server 2003 SP 2 or later.
To complete this configuration, you will need to get the name of the server and
the server domain name from your service provider or system administrator.
You must also know your Exchange user name and password.
Note: Before changing synchronisation settings on the phone, disconnect it from your PC.
You can also refer to some of the screenshots in the previous section of Install and Setup
ActiveSync (with Exchange Server).
1. On the Today Screen, tap Start > Programs > ActiveSync> Menu >
Configure Server. If you have not yet set up ActiveSync with Exchange
Server, it will say Add Server Source.
2. In Server Address, enter the name of the server running Exchange Server
and click Next.
3. Enter your user name, password and domain name and click Next. If you
want the phone to save your password so that you will not need to enter it
again when connecting, select the Save password checkbox.
4. Select the check boxes for the types of information items that you want to
synchronize with Exchange Server.
5. To change available synchronisation settings, select the type of information
and tap Menu > Settings.
6. To change the rules for resolving synchronisation conflicts, tap Menu>
Advanced.
7. Tap Finish.
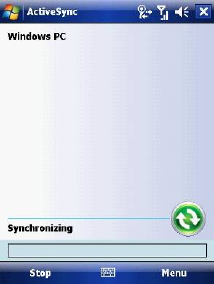
Start and stop synchronisation
1. On the Today screen, tap Start > Programs > ActiveSync.
2. To start synchronisation, tap Sync.
3. To stop synchronising, tap Stop.
Note: This menu only appears during synchronisation.
Synchronize your Music and Video files
Your device is able to synchronize music and video files from your PC. This is
described in detail in Chapter 7.