Arista Networks SS300AT 802.11 a/b/g/n Access Point User Manual
AirTight Networks, Inc. 802.11 a/b/g/n Access Point
User Manual

ȱ
Installation Guide
ȱ
SpectraGuard ® Enterprise
An AirTight® Product
ȱ
Wireless Vulnerability Management and Intrusion Prevention
Version 5.7
ȱ
ȱ
AirTight
®
Networks, Inc., 339 N. Bernardo Avenue, # 200, Mountain View, CA 94043
https://www.airtightnetworks.com
Product documentation is being enhanced continuously based on customer feedback. To obtain a latest copy of this document, visit
www.airtightnetworks.com/home/support.html
ȱ
ȱ
Thisȱpageȱhasȱbeenȱintentionallyȱleftȱblank.

ȱ
SpectraGuard® Enterprise
InstallationȱGuideȱ

Disclaimerȱ
SpectraGuard®ȱEnterpriseȱInstallationȱGuideȱ
iiȱ
THEȱINFORMATIONȱINȱTHISȱGUIDEȱISȱSUBJECTȱTOȱCHANGEȱWITHOUTȱANYȱPRIORȱNOTICE.ȱ
AIRTIGHT®ȱNETWORKS,ȱINC.ȱISȱNOTȱLIABLEȱFORȱANYȱSPECIAL,ȱINCIDENTAL,ȱINDIRECT,ȱORȱCONSEQUENTIALȱ
DAMAGESȱWHATSOEVERȱ(INCLUDING,ȱWITHOUTȱLIMITATION,ȱDAMAGESȱFORȱLOSSȱOFȱBUSINESSȱPROFITS,ȱ
BUSINESSȱINTERRUPTION,ȱLOSSȱOFȱBUSINESSȱINFORMATION,ȱORȱANYȱOTHERȱPECUNIARYȱLOSS)ȱARISINGȱOUTȱOFȱ
THEȱUSEȱOFȱORȱINABILITYȱTOȱUSEȱTHISȱPRODUCT.ȱ
THISȱPRODUCTȱHASȱTHEȱCAPABILITYȱTOȱBLOCKȱWIRELESSȱTRANSMISSIONSȱFORȱTHEȱPURPOSEȱOFȱPROTECTINGȱ
YOURȱNETWORKȱFROMȱMALICIOUSȱWIRELESSȱACTIVITY.ȱBASEDȱONȱTHEȱPOLICYȱSETTINGS,ȱYOUȱHAVEȱTHEȱ
ABILITYȱTOȱSELECTȱWHICHȱWIRELESSȱTRANSMISSIONSȱAREȱBLOCKEDȱAND,ȱTHEREFORE,ȱTHEȱCAPABILITYȱTOȱ
BLOCKȱANȱEXTERNALȱWIRELESSȱTRANSMISSION.ȱIFȱIMPROPERLYȱUSED,ȱYOURȱUSAGEȱOFȱTHISȱPRODUCTȱMAYȱ
VIOLATEȱUSȱFCCȱPARTȱ15ȱANDȱOTHERȱLAWS.ȱBUYERȱACKNOWLEDGESȱTHEȱLEGALȱRESTRICTIONSȱONȱUSAGEȱANDȱ
UNDERSTANDSȱANDȱWILLȱCOMPLYȱWITHȱUSȱFCCȱRESTRICTIONSȱASȱWELLȱASȱOTHERȱGOVERNMENTȱ
REGULATIONS.ȱAIRTIGHTȱISȱNOTȱRESPONSIBLEȱFORȱANYȱWIRELESSȱINTERFERENCEȱCAUSEDȱBYȱYOURȱUSEȱOFȱ
THEȱPRODUCT.ȱAIRTIGHTȱANDȱITSȱAUTHORIZEDȱRESELLERSȱORȱDISTRIBUTORSȱWILLȱASSUMEȱNOȱLIABILITYȱFORȱ
ANYȱDAMAGEȱORȱVIOLATIONȱOFȱGOVERNMENTȱREGULATIONSȱARISINGȱFROMȱYOURȱUSAGEȱOFȱTHEȱPRODUCT,ȱ
EXPECTȱASȱEXPRESSLYȱDEFINEDȱINȱTHEȱINDEMNITYȱSECTIONȱOFȱTHISȱDOCUMENT.ȱ
LIMITATIONȱOFȱLIABILITYȱ
AirTightȱwillȱnotȱbeȱliableȱtoȱcustomerȱorȱanyȱotherȱpartyȱforȱanyȱindirect,ȱincidental,ȱspecial,ȱconsequential,ȱexemplary,ȱorȱ
relianceȱdamagesȱarisingȱoutȱofȱorȱrelatedȱtoȱtheȱuseȱofȱSpectraGuard®ȱEnterpriseȱunderȱanyȱlegalȱtheory,ȱincludingȱbutȱnotȱ
limitedȱtoȱlostȱprofits,ȱlostȱdata,ȱorȱbusinessȱinterruption,ȱevenȱifȱAirTightȱknowsȱofȱorȱshouldȱhaveȱknownȱofȱtheȱpossibilityȱofȱ
suchȱdamages.ȱRegardlessȱofȱtheȱcauseȱofȱactionȱorȱtheȱformȱofȱaction,ȱAirTight’sȱtotalȱcumulativeȱliabilityȱforȱactualȱdamagesȱ
arisingȱoutȱofȱorȱrelatedȱtoȱtheȱuseȱofȱSpectraGuard®ȱEnterpriseȱwillȱnotȱexceedȱtheȱpriceȱpaidȱforȱSpectraGuard®ȱEnterprise.ȱ
Copyrightȱ©ȱ2003–2008ȱAirTight®ȱNetworks,ȱInc.ȱAllȱRightsȱReserved.ȱ
AirTight®ȱNetworks,ȱTheȱAirTightȱlogo,ȱandȱSpectraGuard®ȱareȱregisteredȱtrademarksȱofȱAirTight®ȱNetworks.ȱAllȱotherȱ
productsȱandȱservicesȱareȱtrademarks,ȱregisteredȱtrademarks,ȱandȱserviceȱmarksȱorȱregisteredȱserviceȱmarksȱofȱtheirȱrespectiveȱ
owners.ȱ
ThisȱproductȱcontainsȱcomponentsȱfromȱOpenȱSourceȱsoftware.ȱTheseȱcomponentsȱareȱgovernedȱbyȱtheȱtermsȱandȱconditionsȱ
ofȱtheȱGNUȱPublicȱLicense.ȱToȱreadȱtheseȱtermsȱandȱconditionsȱvisitȱhttp://www.gnu.org/copyleft/gpl.html.ȱ
ThisȱproductȱisȱprotectedȱbyȱoneȱorȱmoreȱofȱU.S.ȱpatentȱNos.ȱ7,002,943,ȱ7,154,874,ȱ7,216,365,ȱ7,333,800,ȱ7,333,481,ȱ7,339,914,ȱ
7,406,320,ȱAustralianȱpatentȱNo.ȱ200429804ȱandȱanyȱothersȱlistedȱatȱwww.airtightnetworks.com/patents.ȱMoreȱpatentsȱpending.ȱ
ȱ
FederalȱCommunicationȱCommissionȱInterferenceȱStatementȱ
ThisȱequipmentȱhasȱbeenȱtestedȱandȱfoundȱtoȱcomplyȱwithȱtheȱlimitsȱforȱaȱClassȱBȱdigitalȱdevice,ȱpursuantȱtoȱPartȱ15ȱofȱtheȱ
FCCȱRules.ȱTheseȱlimitsȱareȱdesignedȱtoȱprovideȱreasonableȱprotectionȱagainstȱharmfulȱinterferenceȱinȱaȱresidentialȱ
installation.ȱThisȱequipmentȱgeneratesȱusesȱandȱcanȱradiateȱradioȱfrequencyȱenergyȱand,ȱifȱnotȱinstalledȱandȱusedȱinȱ
accordanceȱwithȱtheȱinstructions,ȱmayȱcauseȱharmfulȱinterferenceȱtoȱradioȱcommunications.ȱ
However,ȱthereȱisȱnoȱguaranteeȱthatȱinterferenceȱwillȱnotȱoccurȱinȱaȱparticularȱinstallation.ȱIfȱthisȱequipmentȱdoesȱcauseȱ
harmfulȱinterferenceȱtoȱradioȱorȱtelevisionȱreception,ȱwhichȱcanȱbeȱdeterminedȱbyȱturningȱtheȱequipmentȱoffȱandȱon,ȱtheȱuserȱ
isȱencouragedȱtoȱtryȱtoȱcorrectȱtheȱinterferenceȱbyȱoneȱofȱtheȱfollowingȱmeasures:ȱ
xReorientȱorȱrelocateȱtheȱreceivingȱantenna.ȱ
xIncreaseȱtheȱseparationȱbetweenȱtheȱequipmentȱandȱreceiver.ȱ
xConnectȱtheȱequipmentȱintoȱanȱoutletȱonȱaȱcircuitȱdifferentȱfromȱthatȱtoȱwhichȱtheȱreceiverȱisȱconnected.ȱ
xConsultȱtheȱdealerȱorȱanȱexperiencedȱradio/TVȱtechnicianȱforȱhelp.ȱ
ThisȱdeviceȱcompliesȱwithȱPartȱ15ȱofȱtheȱFCCȱRules.ȱOperationȱisȱsubjectȱtoȱtheȱfollowingȱtwoȱconditions:ȱ(1)ȱThisȱdeviceȱmayȱ
notȱcauseȱharmfulȱinterference,ȱandȱ(2)ȱthisȱdeviceȱmustȱacceptȱanyȱinterferenceȱreceived,ȱincludingȱinterferenceȱthatȱmayȱ
causeȱundesiredȱoperation.ȱ
FCCȱCaution:ȱAnyȱchangesȱorȱmodificationsȱnotȱexpresslyȱapprovedȱbyȱtheȱpartyȱresponsibleȱforȱcomplianceȱcouldȱvoidȱtheȱ
userȇsȱauthorityȱtoȱoperateȱthisȱequipment.ȱ
IMPORTANTȱNOTE:ȱ

Disclaimerȱ
SpectraGuard®ȱEnterpriseȱInstallationȱGuideȱ
iii
FCCȱRadiationȱExposureȱStatement:ȱ
ThisȱequipmentȱcompliesȱwithȱFCCȱradiationȱexposureȱlimitsȱsetȱforthȱforȱanȱuncontrolledȱenvironment.ȱThisȱequipmentȱ
shouldȱbeȱinstalledȱandȱoperatedȱwithȱminimumȱdistanceȱ20ȱcmȱbetweenȱtheȱradiatorȱ&ȱyourȱbody.ȱ
Ifȱthisȱdeviceȱisȱgoingȱtoȱbeȱoperatedȱinȱ5.15ȱ~ȱ5.25ȱGHzȱfrequencyȱrange,ȱthenȱitȱisȱrestrictedȱinȱindoorȱenvironmentȱonly.ȱ
ThisȱtransmitterȱmustȱnotȱbeȱcoȬlocatedȱorȱoperatingȱinȱconjunctionȱwithȱanyȱotherȱantennaȱorȱtransmitter.ȱ
This product must be installed by a professional technician/installer.

EndȱUserȱLicenseȱAgreementȱ
SpectraGuard®ȱEnterpriseȱInstallationȱGuideȱ
ivȱ
EndȱUserȱLicenseȱAgreementȱ
BEFOREȱYOUȱCLICKȱ“IȱHAVEȱREADȱANDȱAGREEȱTOȱTHEȱLICENSINGȱAGREEMENTȱABOVE”ȱORȱOTHERWISEȱUSEȱORȱ
ACTIVATEȱTHEȱAIRTIGHTȱPRODUCTS,ȱREADȱTHISȱAGREEMENTȱCAREFULLY.ȱȱITȱISȱAȱLEGALLYȱBINDINGȱ
AGREEMENTȱANDȱCONTROLSȱYOURȱANDȱYOURȱCOMPANY’SȱUSEȱOFȱTHEȱAIRTIGHTȱPRODUCTS.ȱ
WHENȱYOUȱCLICKȱȈIȱHAVEȱREADȱANDȱAGREEȱTOȱTHEȱLICENSINGȱAGREEMENTȱABOVEȈȱORȱOTHERWISEȱ
DOWNLOAD,ȱUSEȱORȱACTIVATEȱTHEȱAIRTIGHTȱPRODUCTS,ȱTHISȱAGREEMENTȱGOVERNSȱYOURȱUSE.ȱȱTHISȱ
AGREEMENTȱISȱENFORCEABLEȱAGAINSTȱYOUȱANDȱANYȱENTITYȱTHATȱOBTAINSȱORȱUSESȱTHEȱAIRTIGHTȱ
PRODUCTSȱTHROUGHȱYOUȱONȱTHEIRȱBEHALF.ȱȱIFȱYOUȱORȱANYȱENTITYȱTHATȱYOUȱREPRESENTȱDOESȱNOTȱAGREEȱ
TOȱALLȱOFȱTHEȱTERMSȱOFȱTHISȱAGREEMENT,ȱCLICKȱTHEȱBOXȱTHATȱSAYSȱ“IȱDOȱNOTȱAGREEȱTOȱTHEȱLICENSINGȱ
AGREEMENTȱABOVE”ȱANDȱDOȱNOTȱOTHERWISEȱDOWNLOAD,ȱINSTALLȱORȱACTIVATEȱTHEȱAIRTIGHTȱPRODUCTS.ȱȱ
IFȱYOUȱPAIDȱFORȱTHEȱAIRTIGHTȱPRODUCT(S)ȱANDȱDIDȱNOTȱHAVEȱANȱOPPORTUNITYȱTOȱREVIEWȱTHISȱ
AGREEMENTȱPRIORȱTOȱPURCHASINGȱITȱANDȱDOȱNOTȱAGREEȱTOȱTHISȱAGREEMENT,ȱCONTACTȱYOURȱPLACEȱOFȱ
PURCHASEȱTOȱRETURNȱTHEȱPRODUCTȱFORȱAȱREFUNDȱINȱACCORDANCEȱWITHȱITSȱREFUNDȱPOLICIES.ȱ
SEEȱSECTIONȱ11ȱREGARDINGȱYOURȱCONSENTȱTOȱAIRTIGHT’SȱUSEȱOFȱCERTAINȱCOLLECTEDȱDATA.ȱ
1. DEFINITIONSȱ
1.1ȱ“You”ȱorȱ“Your”ȱshallȱmeanȱanyȱperson,ȱentityȱorȱorganizationȱthatȱusesȱAirTightȱproducts.ȱ
1.2ȱ“AirTight,”ȱshallȱmeanȱAirTightȱNetworks,ȱInc.ȱ
1.3ȱ“AirTightȱCompetitor”ȱaȱpersonȱorȱentityȱinȱtheȱbusinessȱofȱwirelessȱsecurityȱproductsȱorȱservicesȱsubstantiallyȱ
similarȱtoȱAirTight’sȱproductsȱorȱservices.ȱ
1.4ȱ“YourȱCustomers”ȱmeansȱyourȱcurrentȱorȱpotentialȱcustomersȱexcludingȱanyȱAirTightȱCompetitor.ȱ
1.5ȱ“Documentation”ȱshallȱmeanȱtheȱendȬuserȱtechnicalȱdocumentationȱthatȱAirTightȱsuppliesȱwithȱtheȱHardwareȱ(ifȱ
any)ȱandȱSoftware.ȱȱAdvertisingȱandȱmarketingȱmaterialsȱareȱnotȱDocumentation.ȱ
1.6ȱ“Error”ȱshallȱmeanȱaȱreproducibleȱfailureȱofȱtheȱSoftwareȱorȱHardwareȱtoȱperformȱinȱsubstantialȱconformityȱwithȱitsȱ
Documentation.ȱ
1.7ȱ“Hardware”ȱshallȱmeanȱtheȱhardwareȱcontainingȱAirTightȱsoftware.ȱNotȱallȱAirTightȱProductsȱcomeȱwithȱhardware.ȱ
1.8ȱ“IntellectualȱPropertyȱRights”ȱshallȱmeanȱcopyrights,ȱtrademarks,ȱserviceȱmarks,ȱtradeȱsecrets,ȱpatents,ȱpatentȱ
applications,ȱmoralȱrights,ȱcontractualȱrightsȱofȱnonȬdisclosureȱorȱanyȱotherȱintellectualȱpropertyȱorȱproprietaryȱrights,ȱ
howeverȱarising,ȱthroughoutȱtheȱworld.ȱȱ
1.9ȱ“Release”ȱshallȱmeanȱanyȱUpdateȱorȱUpgradeȱifȱandȱwhenȱtheseȱareȱmadeȱavailableȱbyȱAirTight.ȱȱInȱtheȱeventȱofȱaȱ
disputeȱasȱtoȱwhetherȱaȱparticularȱReleaseȱisȱanȱUpdateȱorȱanȱUpgrade,ȱAirTightȇsȱpublishedȱdesignationȱwillȱbeȱfinal.ȱ
1.10ȱ“Software”ȱshallȱmeanȱtheȱsoftwareȱ(inȱobjectȱcodeȱformat)ȱcreatedȱorȱlicensedȱbyȱAirTightȱandȱlicensedȱtoȱyouȱeitherȱ
asȱaȱstandȱaloneȱproductȱorȱloadedȱonȱAirTightȱHardware,ȱandȱanyȱReleaseȱthereto.ȱ
1.11ȱ“Update”ȱshallȱmean,ȱifȱandȱwhenȱavailable,ȱanyȱerrorȱcorrections,ȱfixes,ȱworkaroundsȱorȱotherȱmaintenanceȱreleasesȱ
withȱrespectȱtoȱtheȱSoftwareȱprovidedȱbyȱAirTightȱthatȱdoȱnotȱaddȱfunctionalityȱtoȱtheȱSoftware.ȱ
1.12ȱ“Upgrade”ȱshallȱmean,ȱifȱandȱwhenȱavailable,ȱnewȱreleasesȱorȱversionsȱofȱtheȱSoftwareȱthatȱmateriallyȱimproveȱtheȱ
functionalityȱof,ȱorȱaddȱmaterialȱfunctionalȱcapabilitiesȱto,ȱtheȱSoftware.ȱAirTightȱmayȱchargeȱadditionalȱlicenseȱfeesȱforȱ
Upgrades.ȱ

EndȱUserȱLicenseȱAgreementȱ
SpectraGuard®ȱEnterpriseȱInstallationȱGuideȱ
v
2. CONTROLLINGȱAGREEMENT:ȱThisȱelectronicȱAgreementȱisȱtheȱentireȱagreementȱbetweenȱyouȱandȱAirTightȱandȱ
supersedesȱallȱpriorȱorȱcontemporaneousȱagreements,ȱunderstandings,ȱandȱcommunications,ȱwhetherȱwrittenȱorȱoralȱ
unlessȱsuchȱagreementȱisȱexecutedȱbyȱanȱofficerȱofȱAirTight.ȱȱInȱsuchȱevent,ȱthatȱagreementȱshallȱonlyȱsupersedeȱthisȱ
AgreementȱtoȱtheȱextentȱsuchȱagreementȱconflictsȱwithȱthisȱAgreement.ȱȱAnyȱtermsȱandȱconditionsȱinȱyourȱpaperȱorȱ
electronicȱpurchaseȱorder,ȱrequestȱforȱproposalȱorȱquotation,ȱorȱaȱresponseȱtoȱthoseȱdocumentsȱareȱsupersededȱbyȱthisȱ
electronicȱAgreement.ȱȱIfȱaȱthirdȱpartyȱresellerȱacceptsȱyourȱpurchaseȱorderȱandȱanȱofficerȱofȱAirTightȱdoesȱnotȱsignȱitȱandȱ
returnȱitȱtoȱyou,ȱAirTightȱisȱnotȱacceptingȱitsȱtermsȱandȱconditions.ȱȱAirTightȱisȱnotȱobligatedȱunderȱanyȱreseller’sȱ
agreementȱwithȱyouȱunlessȱanȱofficerȱofȱAirTightȱsignsȱtheȱagreement.ȱCertainȱthirdȱpartyȱsoftwareȱmayȱbeȱnecessaryȱtoȱ
operateȱorȱrunȱtheȱSoftware,ȱyouȱareȱresponsibleȱforȱobtainingȱandȱlicensingȱsuchȱthirdȱpartyȱsoftware.ȱThirdȱpartyȱ
softwareȱisȱgovernedȱbyȱtheȱlicenseȱagreementȱprovidedȱbyȱthatȱthirdȱparty.ȱ
3. LICENSEȱGRANTȱ
3.1ȱLimitedȱLicense.ȱAllȱSoftwareȱisȱlicensed,ȱnotȱsoldȱandȱsubjectȱtoȱthisȱAgreement.ȱȱAllȱHardwareȱisȱsoldȱsubjectȱtoȱtheȱ
licenseȱgrantedȱinȱthisȱAgreement.ȱȱForȱeachȱunitȱofȱHardwareȱand/orȱSoftwareȱthatȱyouȱpurchase,ȱAirTightȱgrantsȱyouȱaȱnonȬ
exclusive,ȱnonȬtransferableȱ(exceptȱasȱprovidedȱinȱtheȱSectionȱentitledȱAssignment),ȱnonȬsublicensableȱlicenseȱduringȱtheȱtermȱ
ofȱthisȱAgreement,ȱtoȱinstallȱandȱexecuteȱsuchȱSoftwareȱandȱHardware.ȱTheȱSoftwareȱandȱHardwareȱareȱlicensedȱforȱyourȱownȱ
internalȱbusinessȱpurposesȱunlessȱyouȱhaveȱpurchasedȱorȱbeenȱgivenȱaȱdemonstrationȱversionȱorȱauditȱversionȱofȱtheȱSoftware.ȱ
IfȱyouȱhaveȱaȱdemonstrationȱversionȱofȱtheȱSoftware,ȱyouȱmayȱuseȱtheȱSoftwareȱsolelyȱtoȱprovideȱdemonstrationsȱtoȱYourȱ
Customers.ȱIfȱyouȱhaveȱanȱauditȱversionȱofȱtheȱSoftware,ȱyouȱmayȱuseȱitȱtoȱprovideȱservicesȱtoȱYourȱCustomers.ȱYouȱmayȱ
makeȱandȱretainȱoneȱcopyȱofȱtheȱSoftwareȱforȱbackȬupȱandȱdisasterȱrecoveryȱpurposesȱsoȱlongȱasȱyouȱclearlyȱmarkȱitȱasȱaȱ
“backȬup”ȱorȱsimilarȱlanguage.ȱ
3.2ȱRestrictionsȱonȱUse.ȱExceptȱasȱexpresslyȱprovidedȱforȱinȱthisȱAgreement,ȱyouȱshallȱnot:ȱ(a)ȱadapt,ȱalter,ȱpubliclyȱ
display,ȱpubliclyȱperform,ȱtranslate,ȱcreateȱderivativeȱworksȱofȱorȱotherwiseȱmodifyȱtheȱSoftware;ȱ(b)ȱsublicense,ȱlease,ȱrent,ȱ
loan,ȱdistributeȱorȱotherwiseȱtransferȱtheȱSoftwareȱtoȱanyȱthirdȱpartyȱ(exceptȱasȱprovidedȱinȱtheȱSectionȱentitledȱAssignment);ȱ(c)ȱ
allowȱthirdȱpartiesȱtoȱaccessȱorȱuseȱtheȱSoftwareȱorȱHardware,ȱincludingȱbutȱnotȱlimitedȱtoȱASP,ȱOEM,ȱorȱtimeȬsharingȱ
arrangements.ȱYouȱshallȱnotȱreverseȱengineer,ȱdecompile,ȱdisassembleȱorȱotherwiseȱattemptȱtoȱderiveȱtheȱsourceȱcodeȱforȱtheȱ
SoftwareȱexceptȱtoȱtheȱextentȱexpresslyȱpermittedȱbyȱapplicableȱlawȱtoȱobtainȱinformationȱnecessaryȱtoȱrenderȱtheȱSoftwareȱ
interoperableȱwithȱotherȱsoftware;ȱprovided,ȱhowever,ȱthatȱyouȱmustȱfirstȱrequestȱsuchȱinformationȱfromȱAirTightȱandȱ
AirTightȱmay,ȱinȱitsȱdiscretion,ȱeitherȱprovideȱsuchȱinformationȱtoȱyouȱorȱimposeȱreasonableȱconditions,ȱincludingȱaȱ
reasonableȱfee,ȱonȱsuchȱuseȱofȱtheȱsourceȱcodeȱforȱtheȱSoftwareȱtoȱensureȱthatȱAirTightȇsȱandȱitsȱsuppliersȇȱproprietaryȱrightsȱinȱ
theȱsourceȱcodeȱforȱtheȱSoftwareȱareȱprotected;ȱYouȱshallȱnotȱremove,ȱalterȱorȱobscureȱanyȱproprietaryȱnoticesȱonȱtheȱSoftwareȱ
orȱDocumentation.ȱUnderȱnoȱcircumstancesȱmayȱyouȱinstallȱorȱexecuteȱtheȱSoftwareȱonȱmoreȱthanȱoneȱcomputerȱatȱtheȱsameȱ
time.ȱExceptȱtoȱtheȱextentȱnecessaryȱtoȱprovideȱaȱdemonstrationȱorȱservicesȱtoȱYourȱCustomerȱwhenȱyouȱhaveȱpurchasedȱorȱ
beenȱgivenȱtheȱdemonstrationȱversionȱorȱauditȱversionȱofȱtheȱSoftware,ȱrespectively,ȱyouȱshallȱnotȱcaptureȱscreenshotsȱofȱtheȱ
SoftwareȱandȱshareȱitȱwithȱotherȱpeopleȱwithoutȱAirTight’sȱwrittenȱconsent.ȱ
3.3ȱInstallation.ȱYouȱareȱresponsibleȱforȱinstallingȱtheȱSoftwareȱandȱHardwareȱ(ifȱany)ȱunlessȱyouȱpurchaseȱinstallationȱ
servicesȱfromȱAirTightȱorȱaȱthirdȱpartyȱpursuantȱtoȱaȱseparateȱagreement.ȱ
4. PROPRIETARYȱRIGHTS.ȱYouȱacknowledgeȱandȱagreeȱthatȱtheȱSoftwareȱandȱHardware,ȱincludingȱbutȱnotȱlimitedȱtoȱtheirȱ
sequence,ȱstructure,ȱorganizationȱandȱsourceȱcode,ȱcontainsȱIntellectualȱPropertyȱRightsȱofȱAirTightȱandȱitsȱsuppliers.ȱȱTheȱ
Softwareȱisȱlicensedȱandȱnotȱsoldȱtoȱyou,ȱandȱnoȱtitleȱorȱownershipȱtoȱsuchȱSoftwareȱorȱtheȱIntellectualȱPropertyȱRightsȱ
embodiedȱthereinȱpassesȱasȱaȱresultȱofȱthisȱAgreementȱorȱanyȱactȱpursuantȱtoȱthisȱAgreement.ȱȱTheȱSoftwareȱ(andȱallȱ
IntellectualȱPropertyȱRightsȱtherein)ȱisȱtheȱexclusiveȱpropertyȱofȱAirTightȱandȱitsȱsuppliers,ȱandȱallȱrightsȱinȱandȱtoȱtheȱ
SoftwareȱnotȱexpresslyȱgrantedȱtoȱyouȱinȱthisȱAgreement,ȱareȱreserved.ȱȱAirTightȱownsȱallȱcopiesȱofȱtheȱSoftware,ȱhoweverȱ
made.ȱTheȱSoftware,ȱHardwareȱandȱrelatedȱmaterialsȱcontainȱtradeȱsecretsȱofȱAirTightȱandȱyouȱshallȱnotȱprovideȱtheȱ
Software,ȱHardware,ȱDocumentation,ȱorȱdetailsȱregardingȱtheȱoperationȱofȱtheȱSoftwareȱand/orȱHardware,ȱorȱanyȱotherȱ
AirTightȱconfidentialȱand/orȱproprietaryȱinformationȱtoȱanyȱthirdȱparty.ȱ
5. LIMITEDȱWARRANTYȱ
5.1ȱWarranty.ȱForȱaȱperiodȱofȱoneȱyearȱfromȱyourȱreceiptȱofȱtheȱHardwareȱand/orȱSoftwareȱ(theȱ“WarrantyȱPeriod”),ȱ
AirTightȱwarrantsȱtoȱyouȱandȱforȱyourȱsoleȱbenefitȱthat,ȱsubjectȱtoȱtheȱSectionȱentitledȱExclusions,ȱtheȱSoftwareȱandȱHardwareȱ
whenȱusedȱasȱpermittedȱunderȱthisȱAgreementȱandȱinȱaccordanceȱwithȱtheȱinstructionsȱinȱtheȱDocumentation,ȱwillȱoperateȱ
substantiallyȱwithoutȱError.ȱ

EndȱUserȱLicenseȱAgreementȱ
SpectraGuard®ȱEnterpriseȱInstallationȱGuideȱ
viȱ
5.2ȱExclusions.ȱAirTightȱwillȱhaveȱnoȱobligationȱtoȱcorrect,ȱandȱAirTightȱmakesȱnoȱwarrantyȱwithȱrespectȱto,ȱErrorsȱ
causedȱby:ȱ(a)ȱimproperȱinstallationȱofȱtheȱSoftwareȱorȱHardware;ȱ(b)ȱchangesȱthatȱyouȱhaveȱmadeȱtoȱtheȱSoftwareȱorȱ
Hardware;ȱ(c)ȱuseȱofȱtheȱSoftwareȱorȱHardwareȱinȱaȱmannerȱinconsistentȱwithȱtheȱDocumentation;ȱ(d)ȱtheȱcombinationȱofȱtheȱ
SoftwareȱorȱHardwareȱwithȱhardwareȱorȱsoftwareȱnotȱprovidedȱbyȱAirTight;ȱ(e)ȱmalfunction,ȱmodificationȱorȱrelocationȱofȱ
yourȱservers;ȱorȱ(f)ȱyourȱfailureȱtoȱmakeȱreasonableȱbackups.ȱ
5.3ȱRemedyȱforȱErrors.ȱForȱErrorsȱreportedȱtoȱAirTightȱduringȱtheȱWarrantyȱPeriod,ȱyourȱexclusiveȱremedyȱandȱ
AirTightȇsȱsoleȱliabilityȱforȱbreachȱofȱthisȱwarrantyȱisȱthatȱAirTightȱshall,ȱatȱitsȱownȱexpense,ȱ(a)ȱuseȱcommerciallyȱreasonableȱ
effortsȱtoȱmakeȱavailableȱtoȱyou,ȱbyȱInternetȱdownload,ȱUpdatesȱthatȱareȱintendedȱtoȱcorrectȱsuchȱErrorsȱandȱthatȱAirTightȱ
makesȱgenerallyȱavailable;ȱ(b)ȱatȱitsȱelection,ȱrepairȱorȱreplaceȱanyȱdefectiveȱHardwareȱreturnedȱtoȱAirTightȱwithinȱtheȱ
WarrantyȱPeriod.ȱȱAnyȱremedyȱprovidedȱunderȱthisȱSectionȱ5.3ȱwillȱnotȱextendȱtheȱoriginalȱWarrantyȱPeriod.ȱȱAirTightȱshallȱ
haveȱnoȱobligationȱregardingȱErrorsȱreported,ȱorȱreturnsȱmade,ȱafterȱtheȱWarrantyȱPeriod.ȱȱ
5.4ȱDisclaimer.ȱEXCEPTȱFORȱTHEȱEXPRESSȱWARRANTYȱINȱSECTIONȱ5.1,ȱAIRTIGHTȱANDȱITSȱAFFILIATESȱ
DISCLAIMȱALLȱOTHERȱWARRANTIES,ȱWHETHERȱEXPRESS,ȱIMPLIEDȱORȱSTATUTORY,ȱINCLUDINGȱBUTȱNOTȱ
LIMITEDȱTOȱTHEȱIMPLIEDȱWARRANTIESȱOFȱMERCHANTABILITY,ȱFITNESSȱFORȱAȱPARTICULARȱPURPOSE,ȱ
ACCURACY,ȱRESULT,ȱEFFORT,ȱTITLEȱANDȱNONȬINFRINGEMENT.ȱȱTHEREȱISȱNOȱWARRANTYȱTHATȱTHEȱSOFTWAREȱ
WILLȱBEȱERRORȱFREE,ȱORȱTHATȱTHEȱSOFTWAREȱORȱHARDWAREȱWILLȱOPERATEȱWITHOUTȱINTERRUPTIONȱORȱ
WILLȱFULFILLȱANYȱOFȱYOURȱPARTICULARȱPURPOSESȱORȱNEEDS.ȱAIRTIGHTȱPROVIDESȱNOȱWARRANTYȱFORȱANYȱ
THIRDȱPARTYȱSOFTWARE.ȱ
6. LIMITATIONȱOFȱLIABILITY.ȱTOȱTHEȱMAXIMUMȱEXTENTȱPERMITTEDȱBYȱAPPLICABLEȱLAW:ȱȱAIRTIGHT,ȱITSȱ
AFFILIATES,ȱSUPPLIERSȱANDȱMANUFACTURERSȱSHALLȱNOTȱBEȱLIABLEȱTOȱYOUȱORȱANYȱOTHERȱPARTYȱFORȱ
ANYȱINDIRECT,ȱINCIDENTAL,ȱSPECIAL,ȱCONSEQUENTIAL,ȱEXEMPLARYȱORȱRELIANCEȱDAMAGESȱARISINGȱ
OUTȱOFȱORȱRELATEDȱTOȱTHISȱAGREEMENT,ȱTHEȱHARDWAREȱORȱTHEȱSOFTWARE,ȱUNDERȱANYȱLEGALȱ
THEORY,ȱINCLUDINGȱBUTȱNOTȱLIMITEDȱTOȱLOSTȱPROFITS,ȱLOSTȱDATA,ȱBUSINESSȱINTERRUPTION,ȱPERSONALȱ
INJURY,ȱFORȱLOSSȱOFȱPRIVACY,ȱNEGLIGENCE,ȱANDȱFORȱANYȱOTHERȱPECUNIARYȱORȱOTHERȱLOSSȱ
WHATSOEVER,ȱEVENȱIFȱAIRTIGHTȱKNOWSȱOFȱORȱSHOULDȱHAVEȱKNOWNȱOFȱTHEȱPOSSIBILITYȱOFȱSUCHȱ
DAMAGES.ȱȱ
EXCEPTȱFORȱAIRTIGHTȇSȱOBLIGATIONSȱUNDERȱTHEȱSECTIONȱENTITLEDȱINDEMNIFICATION,ȱAIRTIGHTȇS,ȱITSȱ
AFFILIATES’,ȱSUPPLIERS’ȱANDȱMANUFACTURERS’ȱTOTALȱCUMULATIVEȱLIABILITYȱFORȱACTUALȱDAMAGESȱ
ARISINGȱOUTȱOFȱORȱRELATEDȱTOȱTHISȱAGREEMENT,ȱTHEȱHARDWARE,ȱORȱTHEȱSOFTWARE,ȱSHALLȱNOTȱEXCEEDȱ
THEȱPRICEȱAIRTIGHTȱRECEIVEDȱFORȱSUCHȱHARDWAREȱORȱSOFTWARE,ȱREGARDLESSȱOFȱTHEȱCAUSEȱORȱFORMȱ
OFȱACTION.ȱTHISȱSECTIONȱSHALLȱAPPLYȱEVENȱIFȱYOURȱEXCLUSIVEȱREMEDYȱHASȱFAILEDȱOFȱITSȱESSENTIALȱ
PURPOSE.ȱYOUȱACKNOWLEDGEȱANDȱAGREEȱTHATȱTHEȱPRICESȱANDȱFEESȱREFLECTȱTHEȱALLOCATIONȱOFȱRISKȱ
SETȱFORTHȱINȱTHISȱAGREEMENTȱANDȱTHATȱAIRTIGHTȱWOULDȱNOTȱENTERȱINTOȱTHISȱAGREEMENTȱWITHOUTȱ
THESEȱLIMITATIONSȱONȱITSȱLIABILITY.ȱ
7. INFRINGEMENTȱINDEMNIFICATIONȱ
7.1ȱAirTight’sȱObligation.ȱSubjectȱtoȱtheȱSectionsȱentitledȱConditionsȱandȱExclusions,ȱifȱaȱthirdȱpartyȱmakesȱaȱclaimȱagainstȱ
youȱallegingȱthatȱtheȱHardwareȱorȱSoftwareȱinfringesȱanyȱU.S.ȱpatentȱorȱcopyrightȱregisteredȱorȱissuedȱasȱofȱtheȱStartȱDate,ȱ
AirTightȱshall:ȱ(a)ȱpayȱallȱreasonableȱcostsȱtoȱdefendȱyou;ȱandȱ(b)ȱpayȱanyȱdamagesȱassessedȱagainstȱyouȱinȱaȱfinalȱjudgmentȱbyȱ
aȱcourtȱofȱcompetentȱjurisdictionȱorȱanyȱsettlementȱthatȱAirTightȱhasȱagreedȱuponȱwithȱsuchȱthirdȱparty.ȱ
7.2ȱConditions.ȱAirTightȱshallȱbeȱobligatedȱtoȱpayȱtheseȱcostsȱonlyȱifȱyou:ȱ(a)ȱnotifyȱAirTightȱpromptlyȱinȱwritingȱofȱanyȱ
suchȱclaim;ȱ(b)ȱgiveȱAirTightȱfullȱinformationȱandȱassistanceȱinȱsettlingȱand/orȱdefendingȱtheȱclaim;ȱandȱ(c)ȱgiveȱAirTightȱfullȱ
authorityȱandȱcontrolȱofȱtheȱdefenseȱandȱsettlementȱofȱanyȱsuchȱclaim.ȱYouȱmayȱalsoȱparticipateȱinȱtheȱdefenseȱatȱyourȱownȱ
expense.ȱ
7.3ȱExclusions.ȱAirTightȱshallȱnotȱbeȱliableȱfor:ȱ(a)ȱanyȱcostsȱorȱexpensesȱincurredȱbyȱyouȱwithoutȱAirTight’sȱpriorȱwrittenȱ
authorization;ȱ(b)ȱanyȱuseȱofȱtheȱHardwareȱorȱSoftwareȱnotȱinȱaccordanceȱwithȱthisȱAgreementȱorȱtheȱDocumentation;ȱ(c)ȱforȱ
anyȱclaimȱbasedȱonȱtheȱuseȱorȱaȱcombinationȱofȱtheȱHardwareȱorȱSoftwareȱwithȱanyȱotherȱsoftware,ȱfirmware,ȱhardwareȱorȱ
dataȱnotȱprovidedȱorȱapprovedȱbyȱAirTight;ȱ(d)ȱuseȱofȱanyȱReleaseȱofȱtheȱSoftwareȱotherȱthanȱtheȱmostȱcurrentȱReleaseȱmadeȱ
availableȱtoȱyou;ȱorȱ(e)ȱanyȱalterationsȱorȱmodificationȱofȱtheȱHardwareȱorȱSoftwareȱbyȱanyȱpersonȱotherȱthanȱAirTightȱorȱitsȱ
authorizedȱagents.ȱ
7.4.ȱCure.ȱInȱtheȱeventȱAirTightȱisȱrequired,ȱorȱinȱAirTight’sȱsoleȱopinionȱisȱlikelyȱtoȱbeȱrequired,ȱtoȱindemnifyȱyouȱunderȱ

EndȱUserȱLicenseȱAgreementȱ
SpectraGuard®ȱEnterpriseȱInstallationȱGuideȱ
vii
theȱSectionȱentitledȱAirTight’sȱObligation,ȱAirTightȱshallȱdoȱoneȱofȱtheȱfollowing:ȱ(a)ȱobtainȱtheȱrightȱforȱyouȱtoȱcontinueȱusingȱ
theȱHardwareȱorȱSoftware;ȱ(b)ȱreplaceȱorȱmodifyȱtheȱHardwareȱorȱSoftwareȱwithȱaȱfunctionalȱequivalentȱthatȱisȱnonȬinfringing;ȱ
orȱ(c)ȱterminateȱthisȱAgreementȱandȱrefundȱanyȱfeeȱAirTightȱreceived,ȱproratedȱoverȱ3ȱyears,ȱorȱtheȱperiodȱofȱyourȱlicenseȱifȱ
shorterȱthanȱ3ȱyears.ȱ
8. RISKSȱANDȱYOURȱOBLIGATIONS.ȱAirTightȱproductsȱmayȱbeȱcapableȱofȱoperatingȱatȱfrequenciesȱbeyondȱthoseȱallowedȱ
inȱyourȱregionȱandȱlocatingȱandȱdisablingȱtargetedȱwirelessȱdevicesȱandȱcomputers.ȱYOUȱUSEȱAIRTIGHTȱPRODUCTSȱATȱ
YOURȱOWNȱRISK.ȱIfȱaȱthirdȱpartyȱmakesȱaȱclaimȱagainstȱAirTightȱarisingȱoutȱofȱyourȱuseȱofȱtheȱAirTightȱproductsȱorȱyourȱ
breachȱofȱthisȱAgreement,ȱyouȱshall:ȱ(a)ȱpayȱallȱcostsȱtoȱdefendȱAirTight;ȱandȱ(b)ȱpayȱanyȱdamagesȱassessedȱagainstȱ
AirTightȱinȱaȱfinalȱjudgmentȱbyȱaȱcourtȱofȱcompetentȱjurisdictionȱorȱanyȱsettlementȱthatȱyouȱagreedȱuponȱwithȱsuchȱthirdȱ
party.ȱIfȱyouȱfailȱtoȱmeetȱyourȱobligationsȱunderȱthisȱSection,ȱAirTightȱshallȱhaveȱfullȱauthorityȱandȱcontrolȱofȱtheȱdefenseȱ
and/orȱsettlementȱofȱanyȱsuchȱclaimȱatȱyourȱexpense.ȱȱ
9. EXPORTȱRESTRICTIONS.ȱYouȱacknowledgeȱthatȱtheȱSoftwareȱisȱsubjectȱtoȱU.S.ȱexportȱjurisdiction.ȱYouȱagreeȱtoȱcomplyȱ
withȱallȱapplicableȱinternationalȱandȱnationalȱlawsȱthatȱapplyȱtoȱtheȱSoftware,ȱincludingȱtheȱU.S.ȱExportȱAdministrationȱ
Regulations,ȱasȱwellȱasȱendȬuser,ȱendȬuse,ȱandȱdestinationȱrestrictionsȱissuedȱbyȱU.S.ȱandȱotherȱgovernments.ȱYouȱassumeȱ
soleȱresponsibilityȱforȱanyȱrequiredȱexportȱapprovalȱand/orȱlicensesȱandȱallȱrelatedȱcosts.ȱYouȱshallȱnotȱacquire,ȱship,ȱ
transferȱorȱreȬexport,ȱdirectlyȱorȱindirectly,ȱtheȱHardwareȱand/orȱSoftwareȱtoȱproscribed,ȱembargoed,ȱorȱprohibitedȱ
countriesȱorȱtheirȱnationals,ȱdeniedȱdestinations,ȱnorȱuseȱitȱforȱnuclearȱactivities,ȱchemicalȱbiologicalȱweaponsȱorȱmissileȱ
projects.ȱProscribedȱcountries,ȱdestinations,ȱandȱpeopleȱareȱsetȱforthȱinȱtheȱUnitedȱStatesȱExportȱAdministrationȱ
Regulations,ȱandȱtheȱOfficeȱofȱForeignȱAssetȱControl’sȱSpeciallyȱDesignatedȱNationalsȱlist,ȱandȱareȱsubjectȱtoȱchangeȱ
withoutȱfurtherȱnoticeȱfromȱAirTight.ȱ
10. U.S.ȱGOVERNMENTȱENDȱUSERS.ȱTheȱSoftwareȱcoveredȱunderȱthisȱAgreement,ȱisȱaȱ“commercialȱitem”ȱasȱthatȱtermȱisȱ
definedȱatȱ48ȱC.F.R.ȱ2.101,ȱconsistingȱofȱ“commercialȱcomputerȱsoftware”ȱandȱ“commercialȱcomputerȱsoftwareȱ
documentation”ȱasȱsuchȱtermsȱareȱusedȱinȱ48ȱC.F.R.ȱ12.212.ȱConsistentȱwithȱ48ȱC.F.R.ȱ12.212ȱandȱ48ȱC.F.R.ȱ227.7202Ȭ1ȱ
throughȱ227.7202Ȭ4,ȱallȱU.S.ȱGovernmentȱendȱusersȱacquireȱtheȱSoftwareȱandȱanyȱotherȱsoftwareȱandȱdocumentationȱ
coveredȱunderȱthisȱAgreementȱwithȱonlyȱthoseȱrightsȱsetȱforthȱtherein.ȱȱ
11. CONSENTȱTOȱUSEȱOFȱDATA.ȱYouȱagreeȱthatȱAirTightȱandȱitsȱaffiliatesȱmayȱcollectȱandȱuseȱinformationȱthatȱisȱpersonallyȱ
identifiableȱtoȱyou.ȱWeȱcollectȱtwoȱtypesȱofȱinformation.ȱȱ
xTechnicalȱInformationȱregardingȱtheȱAirTightȱproductsȱandȱyourȱhardwareȱorȱsoftware,ȱincluding,ȱbutȱnotȱlimitedȱto,ȱ
serverȱinstallationȱandȱactivationȱinformation,ȱlicenseȱkeyȱexpiration,ȱserverȱlogs,ȱMediaȱAccessȱControlȱ(MAC)ȱ
addresses,ȱInternetȱProtocolȱ(IP)ȱaddresses,ȱwirelessȱnetworkȱ(WLAN)ȱinformationȱandȱsensorȱdetails.ȱTheȱproductȱ
featuresȱallowingȱusȱtoȱcollectȱTechnicalȱInformationȱareȱenabledȱbyȱdefaultȱtoȱconnectȱviaȱtheȱInternetȱtoȱAirTight’sȱ
and/orȱitsȱaffiliates’ȱcomputerȱsystemsȱautomatically,ȱandȱmayȱoccurȱwithoutȱseparateȱnoticeȱtoȱyou.ȱYouȱconsentȱtoȱ
theȱoperationȱofȱtheseȱfeatures.ȱYouȱmayȱchooseȱnotȱtoȱgiveȱusȱthisȱinformationȱbyȱnotȱactivatingȱorȱinstallingȱtheȱ
product.ȱ
ȱ
xPersonalȱInformationȱ(name,ȱaddress,ȱtelephoneȱnumber,ȱcompanyȱnameȱandȱemailȱaddress),ȱcollected,ȱforȱexample,ȱ
asȱpartȱofȱshipping,ȱservicingȱorȱregisteringȱaȱproduct.ȱIfȱweȱcollectȱPersonalȱInformationȱweȱwillȱexpresslyȱaskȱyouȱ
forȱit.ȱYouȱmayȱchooseȱnotȱtoȱgiveȱusȱthisȱinformationȱatȱtheȱtimeȱweȱrequestȱit,ȱbutȱitȱmayȱpreventȱusȱfromȱshippingȱ
orȱservicingȱtheȱproduct.ȱ
ȱ
AirTightȱandȱitsȱaffiliatesȱmayȱuseȱTechnicalȱandȱPersonalȱInformationȱsolelyȱtoȱimproveȱourȱproductsȱorȱtoȱprovideȱ
customizedȱservicesȱorȱtechnologiesȱtoȱyou.ȱAirTightȱwillȱnotȱdiscloseȱthisȱinformationȱinȱaȱformȱthatȱpersonallyȱidentifiesȱyouȱ
exceptȱtoȱthirdȱpartyȱprovidersȱthatȱweȱutilizeȱtoȱserviceȱorȱshipȱtheȱproducts.ȱWeȱmayȱdiscloseȱtheȱcollectedȱinformationȱifȱ
requiredȱtoȱbyȱlawȱorȱcourtȱorder.ȱInformationȱthatȱisȱcollectedȱbyȱorȱsentȱtoȱAirTightȱmayȱbeȱstoredȱandȱprocessedȱinȱtheȱ
UnitedȱStates,ȱIndiaȱorȱanyȱotherȱcountryȱinȱwhichȱAirTight,ȱitsȱaffiliates,ȱsubsidiariesȱorȱagentsȱmaintainȱfacilities.ȱYouȱmayȱ
contactȱusȱregardingȱtheȱcollectionȱandȱuseȱofȱTechnicalȱandȱPersonalȱInformationȱorȱthisȱprovisionȱatȱ
support@airtightnetworks.comȱorȱbyȱwritingȱusȱatȱ339ȱNo.ȱBernardoȱAvenue,ȱSuiteȱ200,ȱMountainȱView,ȱCAȱ94043ȱUSA.ȱ
12. GENERALȱ
12.1ȱTerm.ȱThisȱAgreementȱshallȱstartȱonȱtheȱdateȱyouȱclickȱ“Iȱhaveȱreadȱandȱagreeȱtoȱtheȱlicensingȱtermsȱabove,”ȱ“Iȱ
Agree”ȱorȱotherwiseȱinstallȱorȱactivateȱtheȱSoftwareȱorȱHardwareȱ(theȱ“StartȱDate”)ȱandȱshallȱcontinueȱinȱfullȱforceȱandȱeffectȱ
untilȱitȱexpiresȱpursuantȱtoȱtheȱperiodȱofȱuseȱthatȱyouȱpurchasedȱorȱunlessȱearlierȱterminatedȱasȱdescribedȱinȱtheȱSectionȱ

EndȱUserȱLicenseȱAgreementȱ
SpectraGuard®ȱEnterpriseȱInstallationȱGuideȱ
viiiȱ
entitledȱTermination.ȱ
12.2ȱTermination.ȱWithoutȱprejudiceȱtoȱanyȱotherȱrights,ȱAirTightȱmayȱterminateȱthisȱAgreementȱifȱyouȱdoȱnotȱcomplyȱ
withȱit.ȱYouȱmayȱterminateȱthisȱAgreementȱatȱanytime.ȱUponȱterminationȱofȱthisȱAgreementȱforȱanyȱreason:ȱ(a)ȱallȱlicenseȱ
rightsȱgrantedȱinȱthisȱAgreementȱwillȱimmediatelyȱterminateȱandȱyouȱmustȱpromptlyȱstopȱallȱuseȱofȱtheȱSoftware;ȱ(b)ȱ
AirTightȇsȱobligationȱtoȱprovideȱservicesȱunderȱanyȱserviceȱagreementȱterminates;ȱ(c)ȱyouȱmustȱeraseȱallȱcopiesȱofȱtheȱSoftwareȱ
fromȱyourȱcomputers,ȱandȱdestroyȱallȱcopiesȱofȱtheȱSoftwareȱandȱDocumentationȱonȱtangibleȱmediaȱinȱyourȱpossessionȱorȱ
control.ȱTerminationȱofȱthisȱAgreementȱwillȱnotȱaffectȱyourȱrightȱtoȱotherwiseȱuseȱorȱtransferȱtheȱHardwareȱpurchasedȱfromȱ
AirTightȱonceȱtheȱSoftwareȱisȱremoved.ȱ
12.3ȱSurvival.ȱTheȱSectionsȱentitledȱControllingȱAgreement,ȱProprietaryȱRights,ȱLimitedȱWarranty,ȱLimitationȱofȱLiability,ȱRisksȱ
andȱYourȱObligations,ȱExportȱRestrictions,ȱTermination,ȱGoverningȱLawȱandȱVenueȱandȱSeverabilityȱshallȱsurviveȱtheȱexpirationȱorȱ
terminationȱofȱthisȱAgreement.ȱAirTight’sȱobligationsȱunderȱtheȱSectionȱentitledȱInfringementȱIndemnificationȱshallȱsurviveȱonlyȱ
forȱclaimsȱbasedȱonȱuseȱofȱtheȱHardwareȱorȱSoftwareȱduringȱtheȱlicensedȱterm.ȱȱ
12.4ȱAssignment.ȱYouȱmayȱnotȱassignȱorȱtransfer,ȱbyȱoperationȱofȱlaw,ȱmergerȱorȱotherwise,ȱanyȱofȱyourȱrightsȱorȱdelegateȱ
anyȱofȱyourȱdutiesȱunderȱthisȱAgreementȱ(includingȱwithoutȱlimitation,ȱtheȱlicensesȱwithȱrespectȱtoȱtheȱSoftware)ȱtoȱanyȱthirdȱ
partyȱwithoutȱAirTight’sȱpriorȱwrittenȱconsent.ȱAnyȱattemptedȱassignmentȱorȱtransferȱinȱviolationȱofȱtheȱforegoingȱwillȱbeȱ
void.ȱAirTightȱmayȱassignȱitsȱrightsȱorȱdelegateȱitsȱobligationsȱunderȱthisȱAgreement.ȱ
12.5ȱGoverningȱLawȱandȱVenue.ȱThisȱAgreementȱwillȱbeȱgovernedȱbyȱtheȱlawsȱofȱtheȱStateȱofȱCalifornia.ȱTheȱUnitedȱ
NationsȱConventionȱonȱContractsȱforȱtheȱInternationalȱSaleȱofȱGoodsȱdoesȱnotȱapplyȱtoȱthisȱAgreement.ȱAnyȱactionȱorȱ
proceedingȱarisingȱfromȱorȱrelatingȱtoȱthisȱAgreementȱmustȱbeȱbroughtȱexclusivelyȱinȱaȱfederalȱorȱstateȱcourtȱseatedȱinȱSantaȱ
Clara,ȱCalifornia,ȱandȱinȱnoȱotherȱvenue.ȱEachȱpartyȱirrevocablyȱconsentsȱtoȱtheȱpersonalȱjurisdictionȱandȱvenueȱin,ȱandȱagreesȱ
toȱserviceȱofȱprocessȱissuedȱby,ȱanyȱsuchȱcourt.ȱNotwithstandingȱtheȱforegoing,ȱAirTightȱreservesȱtheȱrightȱtoȱfileȱaȱsuitȱorȱ
actionȱinȱanyȱcourtȱofȱcompetentȱjurisdictionȱasȱAirTightȱdeemsȱnecessaryȱtoȱprotectȱitsȱintellectualȱpropertyȱandȱproprietaryȱ
rights.ȱ
12.6ȱEquitableȱRelief.ȱYouȱagreeȱthatȱtheȱSoftwareȱandȱHardwareȱcontainsȱAirTight’sȱvaluableȱtradeȱsecretsȱandȱ
proprietaryȱinformationȱandȱthatȱanyȱactualȱorȱthreatenedȱdisclosureȱorȱmisappropriationȱofȱsuchȱinformationȱwouldȱ
constituteȱimmediate,ȱirreparableȱharmȱtoȱAirTightȱforȱwhichȱmonetaryȱdamagesȱwouldȱbeȱanȱinadequateȱremedy.ȱTherefore,ȱ
inȱadditionȱtoȱanyȱotherȱrightsȱandȱremediesȱwhichȱmayȱbeȱavailableȱtoȱAirTightȱatȱlawȱorȱinȱequity,ȱanyȱsuchȱactualȱorȱ
threatenedȱdisclosureȱmayȱbeȱstoppedȱthroughȱinjunctiveȱproceedingsȱwithoutȱtheȱpostingȱofȱaȱbond.ȱ
12.7ȱWaiversȱandȱAmendments.ȱAllȱwaiversȱmustȱbeȱinȱwriting.ȱAnyȱwaiverȱorȱfailureȱtoȱenforceȱanyȱprovisionȱofȱthisȱ
Agreementȱonȱoneȱoccasionȱwillȱnotȱbeȱdeemedȱaȱwaiverȱofȱanyȱotherȱprovisionȱorȱofȱsuchȱprovisionȱonȱanyȱotherȱoccasion.ȱ
ThisȱAgreementȱmayȱbeȱamendedȱonlyȱbyȱaȱwrittenȱdocumentȱsignedȱbyȱyouȱandȱAirTight.ȱ
12.8ȱSeverability.ȱIfȱanyȱprovisionȱofȱthisȱAgreementȱisȱheldȱtoȱbeȱvoid,ȱinvalid,ȱunenforceableȱorȱillegal,ȱtheȱotherȱ
provisionsȱshallȱcontinueȱinȱfullȱforceȱandȱeffect.ȱ
ȱ

TableȱofȱContentsȱ
SpectraGuard®ȱEnterpriseȱInstallationȱGuideȱ
ix
TableȱofȱContentsȱ
CHAPTER 1 GETTING STARTED...................................................................................................................................1
1.1 BEFORE YOU BEGIN .......................................................................................................................................................1
1.2 HOW TO GET MORE INFORMATION ..................................................................................................................................1
1.3 CONTACT INFORMATION.................................................................................................................................................1
CHAPTER 2 PACKAGE CONTENTS ..............................................................................................................................2
CHAPTER 3 SERVER AND SENSOR OVERVIEW .......................................................................................................4
3.1 FRONT PANEL OF THE SERVER ........................................................................................................................................4
3.2 REAR PANEL OF THE SERVER ..........................................................................................................................................5
3.3 FRONT PANEL OF SENSOR...............................................................................................................................................6
3.3.1 Sensor SS-200-AT...................................................................................................................................................6
3.3.2 Sensor SS-300-AT...................................................................................................................................................7
3.4 REAR PANEL OF SENSOR SS-200-AT..............................................................................................................................8
3.5 REAR AND SIDE PANELS OF SENSOR SS-300-AT ............................................................................................................9
CHAPTER 4 INSTALLING THE SERVER......................................................................................................................9
4.1 CONNECTING THE SERVER..............................................................................................................................................9
4.1.1 Mount the Server Appliance ...................................................................................................................................9
4.1.2 Power up the Server ...............................................................................................................................................9
4.1.3 Connect the Server to the Network.......................................................................................................................10
4.2 ACCESSING THE SERVER...............................................................................................................................................10
4.2.1 Accessing the Server using SSH (Recommended) ................................................................................................ 11
4.2.2 Accessing the Server using a Serial Cable ........................................................................................................... 11
4.3 ACCESSING THE SERVER INITIALIZATION AND SETUP WIZARD .....................................................................................14
4.3.1 Configure the Backspace Key...............................................................................................................................14
4.3.2 Step 1: Change Config Shell Password ................................................................................................................14
4.3.3 Step 2: Change Network Settings .........................................................................................................................15
4.3.4 Step 3: Set Server Time Zone, Date and Time Settings .........................................................................................16
4.3.5 Step 4: Set Server ID Settings...............................................................................................................................19
4.3.6 Set up the Server DNS Entry ................................................................................................................................21
4.4 LAUNCHING THE SYSTEM CONSOLE (GUI) ..................................................................................................................21
4.4.1 System Requirements............................................................................................................................................21
4.5 ACTIVATING THE LICENSE ............................................................................................................................................24
CHAPTER 5 INSTALLING THE SENSOR....................................................................................................................25
5.1 ZERO CONFIGURATION OF SENSORS .............................................................................................................................25
5.2 CONNECTING THE SENSOR ...........................................................................................................................................25
5.2.1 Mount the SS-200-AT Sensor................................................................................................................................25
5.2.1.1 Ceiling Mounting ............................................................................................................................................................ 25
5.2.1.2 Flat Surface Installation .................................................................................................................................................. 27
5.2.2 Mount the SS-300-AT Sensor................................................................................................................................28
5.2.2.1 Ceiling/Wall Mounting.................................................................................................................................................... 28
5.2.2.2 Flat Surface Installation .................................................................................................................................................. 28
5.2.3 Power up the Sensor.............................................................................................................................................29
5.2.4 Connect the Sensor to the Network ......................................................................................................................30
CHAPTER 6 MANUALLY CONFIGURING THE SENSOR........................................................................................30
6.1 INTRODUCTION.............................................................................................................................................................30
6.2 CONFIGURING SENSOR THROUGH CONFIG SHELL ........................................................................................................30
6.2.1 Invoke HyperTerminal (or minicom) ....................................................................................................................30
6.2.1.1 Launching HyperTerminal .............................................................................................................................................. 30
6.2.1.2 Defining a New HyperTerminal Connection................................................................................................................... 31
6.2.1.3 Specifying HyperTerminal Connection Details............................................................................................................... 32

TableȱofȱContentsȱ
SpectraGuard®ȱEnterpriseȱInstallationȱGuideȱ
xȱ
6.2.1.4 Editing Serial Port Settings ............................................................................................................................................. 32
6.2.2 Log in and Change the Default Password............................................................................................................33
6.2.3 Set Server Discovery ............................................................................................................................................33
6.2.4 Set Sensor Mode...................................................................................................................................................33
6.2.5 Configure Network Settings..................................................................................................................................34
CHAPTER 7 SETTING UP THE SERVER CONSOLE ................................................................................................35
7.1 LOGGING INTO THE CONSOLE.......................................................................................................................................35
7.1.1 Step 1: Starting the Setup Wizard .........................................................................................................................35
7.1.2 Step 2: Changing your Account Password ...........................................................................................................36
7.1.3 Step 3: Preparing your System for Configuration ................................................................................................37
7.1.4 Step 4: Configuring Notification Settings.............................................................................................................40
7.1.5 Step 5: Setting up Locations and Sensors.............................................................................................................45
7.1.5.1 Adding a New Location .................................................................................................................................................. 46
7.1.5.2 Attaching an image ......................................................................................................................................................... 59
7.1.5.3 Placing Locations on a Location Folder with an Attached Image ................................................................................... 59
7.1.5.4 Importing a Planner file into a Location Node ................................................................................................................ 60
7.1.6 Step 6: Classifying APs ........................................................................................................................................60
7.1.6.1 Specify Authorized SSIDs............................................................................................................................................... 61
7.1.6.2 Select Wi-Fi Networks .................................................................................................................................................... 64
7.1.6.3 RSSI based Classification ............................................................................................................................................... 64
7.1.7 Step 7: Classifying Clients....................................................................................................................................69
7.1.8 Step 8: Configuring Intrusion Prevention Policy .................................................................................................72
7.1.8.1 Intrusion Prevention Policy............................................................................................................................................. 72
7.1.8.2 Intrusion Prevention Level.............................................................................................................................................. 74
7.1.9 Step 9: Configuring Events and Reports ..............................................................................................................75
7.1.9.1 Security ........................................................................................................................................................................... 75
7.1.9.2 Monitoring ...................................................................................................................................................................... 75
7.1.9.3 Adding a Report.............................................................................................................................................................. 78
7.1.9.4 Adding a Section to a Report .......................................................................................................................................... 81
7.1.9.5 Creating a Report Schedule............................................................................................................................................. 83
7.1.10 Step 10: Calibrating Location Tracking ...........................................................................................................85
7.1.11 Step 11: Locking the System Configuration ......................................................................................................87
7.1.12 Step 12: Completion of Setup Wizard................................................................................................................89
CHAPTER 8 CONFIG SHELL COMMANDS................................................................................................................91
8.1 SERVER CONFIG SHELL COMMANDS ............................................................................................................................91
8.2 SENSOR CONFIG SHELL COMMANDS ............................................................................................................................95
CHAPTER 9 TROUBLESHOOTING .............................................................................................................................97
9.1 SERVER TROUBLESHOOTING ........................................................................................................................................97
9.2 SENSOR TROUBLESHOOTING ........................................................................................................................................99
ȱ
ȱ

TableȱofȱFiguresȱ
SpectraGuard®ȱEnterpriseȱInstallationȱGuideȱ
xi
TableȱofȱFiguresȱ
FIGURE 1. SERVER PACKAGE CONTENTS ..................................................................................................................................................... 2
FIGURE 2. SENSOR SS-200-AT PACKAGE CONTENTS................................................................................................................................... 3
FIGURE 3. FRONT PANEL OF THE SERVER ..................................................................................................................................................... 4
FIGURE 4. REAR PANEL OF THE SERVER....................................................................................................................................................... 5
FIGURE 5. FRONT PANEL OF SENSOR SS-200-AT......................................................................................................................................... 6
FIGURE 6. FRONT VIEW OF SENSOR SS-300-AT .......................................................................................................................................... 7
FIGURE 7. REAR PANEL OF SENSOR ............................................................................................................................................................. 8
FIGURE 8. REAR PANEL OF SENSOR SS-300-AT .......................................................................................................................................... 9
FIGURE 9. SIDE PANEL OF SENSOR SS-300-AT.......................................................................................................................................... 10
FIGURE 10. MOUNT THE SERVER................................................................................................................................................................... 9
FIGURE 11. POWER UP THE SERVER ............................................................................................................................................................. 10
FIGURE 12. CONNECT THE SERVER TO THE NETWORK ................................................................................................................................. 10
FIGURE 13. OPEN SSH ............................................................................................................................................................................... 11
FIGURE 14. CONNECT THE SERVER TO YOUR COMPUTER USING A SERIAL CABLE ......................................................................................... 11
FIGURE 15. LAUNCH HYPERTERMINAL APPLICATION .................................................................................................................................. 12
FIGURE 16. DEFINE A NEW HYPERTERMINAL CONNECTION FOR THE SYSTEM .............................................................................................. 12
FIGURE 17. SPECIFY HYPERTERMINAL CONNECTION DETAILS..................................................................................................................... 13
FIGURE 18. EDIT SERIAL PORT SETTINGS .................................................................................................................................................... 13
FIGURE 19. MAP THE BACKSPACE KEY ........................................................................................................................................................ 14
FIGURE 20. SERVER INITIALIZATION AND SETUP WIZARD SCREEN ............................................................................................................... 14
FIGURE 21. CHANGE CONFIG SHELL PASSWORD.......................................................................................................................................... 15
FIGURE 22. CHANGE NETWORK SETTINGS .................................................................................................................................................. 16
FIGURE 23. CONFIRM NETWORK SETTINGS CHANGES ................................................................................................................................. 16
FIGURE 24. SPECIFY CONTINENT AND COUNTRY FOR TIME ZONE SETTINGS................................................................................................. 17
FIGURE 25. SELECT TIME ZONE REGION ..................................................................................................................................................... 18
FIGURE 26. SPECIFY IP ADDRESS OF NTP SERVER FOR SYNCHRONIZATION.................................................................................................. 18
FIGURE 27. SPECIFY TIME ZONE USING POSIX TZ FORMAT .......................................................................................................................... 19
FIGURE 28. SPECIFY DATE AND TIME .......................................................................................................................................................... 19
FIGURE 29. SET SERVER ID......................................................................................................................................................................... 20
FIGURE 30. SERVER SETUP COMPLETION SCREEN ....................................................................................................................................... 20
FIGURE 31. GENERATING CERTIFICATE FOR WEB SERVER ............................................................................................................................ 21
FIGURE 32. WEB SITE CERTIFICATE VERIFICATION ...................................................................................................................................... 22
FIGURE 33. INSTALLING JRE....................................................................................................................................................................... 22
FIGURE 34. POP-UP BLOCKER MESSAGE ..................................................................................................................................................... 22
FIGURE 35. DETECTING JAVA RUNTIME ENVIRONMENT (JRE) ..................................................................................................................... 23
FIGURE 36. WEB SITE CERTIFICATE WARNING ............................................................................................................................................ 23
FIGURE 37. HOSTNAME MISMATCH WARNING ............................................................................................................................................. 23
FIGURE 38. DIGITAL SIGNATURE VERIFIED.................................................................................................................................................. 24
FIGURE 39. ACTIVATE LICENSE ................................................................................................................................................................... 24
FIGURE 40. ALIGNING THE SENSOR AND MOUNT SLOTS .............................................................................................................................. 26
FIGURE 41. FIXING THE MOUNTING BRACKET TO THE SENSOR .................................................................................................................... 26
FIGURE 42. TAB ORIENTATIONS FOR US INSTALLATIONS .............................................................................................................................. 26
FIGURE 43. PRESSING THE MOUNT AGAINST THE T- BAR .............................................................................................................................. 27
FIGURE 44. INITIAL TWISTING OF THE MOUNT ............................................................................................................................................ 27
FIGURE 45. FINAL TWISTING OF THE MOUNT WITH THE US TAB SUPPORTING THE MOUNT............................................................................ 27
FIGURE 46. FLAT SURFACE INSTALLATION................................................................................................................................................... 28
FIGURE 47. HOLES FOR INSERTING SCREWS ................................................................................................................................................. 28
FIGURE 48. INSERTING TABS ON THE TABLE STAND....................................................................................................................................... 29
FIGURE 49. LOCKING THE STAND TO THE SENSOR ....................................................................................................................................... 29
FIGURE 50. SENSOR MOUNT ON A TABLE .................................................................................................................................................... 29
FIGURE 51. POWER UP THE SENSOR............................................................................................................................................................. 30
FIGURE 52. CONNECT THE SENSOR TO THE NETWORK ................................................................................................................................. 30
FIGURE 53. CONNECTING THE SENSOR TO YOUR COMPUTER USING A SERIAL CABLE .................................................................................... 30
FIGURE 54. OPENING HYPERTERMINAL ...................................................................................................................................................... 31
FIGURE 55. DEFINE A NEW HYPERTERMINAL CONNECTION FOR SENSOR ..................................................................................................... 31
FIGURE 56. SPECIFY HYPERTERMINAL CONNECTION DETAILS..................................................................................................................... 32
FIGURE 57. EDIT SERIAL PORT SETTINGS .................................................................................................................................................... 32
FIGURE 58. SET SERVER DISCOVERY COMMAND ........................................................................................................................................... 33
FIGURE 59. SET SENSOR MODE COMMAND ................................................................................................................................................... 34

TableȱofȱFiguresȱ
SpectraGuard®ȱEnterpriseȱInstallationȱGuideȱ
xiiȱ
FIGURE 60. CONSOLE LOGIN SCREEN.......................................................................................................................................................... 35
FIGURE 61. END USER LICENSE AGREEMENT SCREEN ................................................................................................................................. 35
FIGURE 62. SYSTEM SETUP WIZARD WELCOME SCREEN ............................................................................................................................. 36
FIGURE 63. CHANGE PASSWORD ................................................................................................................................................................. 37
FIGURE 64. EVENT DE-ACTIVATION............................................................................................................................................................. 38
FIGURE 65. INTRUSION PREVENTION DE-ACTIVATION.................................................................................................................................. 39
FIGURE 66. DEVICE LIST UNLOCKING ......................................................................................................................................................... 40
FIGURE 67. SMTP CONFIGURATION............................................................................................................................................................ 41
FIGURE 68. SYSLOG CONFIGURATION ......................................................................................................................................................... 42
FIGURE 69. SYSLOG CONFIGURATION DIALOG ............................................................................................................................................ 43
FIGURE 70. SNMP CONFIGURATION ........................................................................................................................................................... 44
FIGURE 71. SNMP CONFIGURATION DIALOG .............................................................................................................................................. 45
FIGURE 72. LOCATIONS SCREEN.................................................................................................................................................................. 46
FIGURE 73. ADDING A NEW LOCATION........................................................................................................................................................ 47
FIGURE 74. SPECIFYING LOCATION PROPERTIES .......................................................................................................................................... 47
FIGURE 75. SENSOR CONFIGURATION.......................................................................................................................................................... 48
FIGURE 76. CHANNEL SETTINGS TAB .......................................................................................................................................................... 49
FIGURE 77. CHANNEL FREQUENCY TABLE................................................................................................................................................... 50
FIGURE 78. ANTENNA PORT ASSIGNMENT TAB ............................................................................................................................................ 51
FIGURE 79. SENSOR PASSWORD CONFIGURATION TAB ................................................................................................................................. 52
FIGURE 80. OFFLINE SENSOR CONFIGURATION TAB..................................................................................................................................... 53
FIGURE 81. OFFLINE SENSOR CONFIGURATION:DEVICE CLASSIFICATION POLICY TAB................................................................................. 54
FIGURE 82. OFFLINE SENSOR CONFIGURATION:INTRUSION PREVENTION POLICY TAB ................................................................................. 55
FIGURE 83. IMPORT DEVICES -SENSORS ..................................................................................................................................................... 56
FIGURE 84. IMPORT SENSOR LIST................................................................................................................................................................ 57
FIGURE 85. DEVICES SCREEN –SENSORS .................................................................................................................................................... 58
FIGURE 86. LOCATIONS SCREEN.................................................................................................................................................................. 59
FIGURE 87. PLACING SENSORS ON THE FLOORMAP...................................................................................................................................... 60
FIGURE 88. AUTHORIZED WLAN SETUP..................................................................................................................................................... 61
FIGURE 89. CREATING A CONFIGURATION TEMPLATE FOR AN AUTHORIZED SSID ........................................................................................ 62
FIGURE 90. NO-WI-FINETWORKS .............................................................................................................................................................. 64
FIGURE 91. RSSI BASED CLASSIFICATION ................................................................................................................................................... 65
FIGURE 92. APAUTO-CLASSIFICATION POLICY........................................................................................................................................... 66
FIGURE 93. IMPORT DEVICES –APS............................................................................................................................................................ 67
FIGURE 94. IMPORT AUTHORIZED AP LIST .................................................................................................................................................. 68
FIGURE 95. DEVICES SCREEN –APS........................................................................................................................................................... 68
FIGURE 96. LOCATIONS SCREEN.................................................................................................................................................................. 69
FIGURE 97. CLIENT AUTO-CLASSIFICATION POLICY .................................................................................................................................... 70
FIGURE 98. IMPORT DEVICES –CLIENTS ..................................................................................................................................................... 71
FIGURE 99. DEVICES SCREEN –CLIENTS..................................................................................................................................................... 72
FIGURE 100. INTRUSION PREVENTION POLICY .......................................................................................................................................... 73
FIGURE 101. INTRUSION PREVENTION LEVEL ............................................................................................................................................ 74
FIGURE 102. EVENT CONFIGURATION –SECURITY .................................................................................................................................... 75
FIGURE 103. EVENT CONFIGURATION –MONITORING ............................................................................................................................... 76
FIGURE 104. EVENT ADVANCED SETTINGS ................................................................................................................................................ 77
FIGURE 105. EMAIL NOTIFICATION ........................................................................................................................................................... 77
FIGURE 106. EMAIL CONFIGURATION DIALOG........................................................................................................................................... 78
FIGURE 107. REPORTS SCREEN ................................................................................................................................................................. 78
FIGURE 108. REPORT DETAILS SCREEN ..................................................................................................................................................... 79
FIGURE 109. REPORT DETAILS SCREEN SHOWING REPORT SUMMARY TAB ................................................................................................. 80
FIGURE 110. REPORT DETAILS SCREEN SHOWING REPORT SECTIONS TAB .................................................................................................. 81
FIGURE 111. ADDING A SECTION TO A REPORT .......................................................................................................................................... 82
FIGURE 112. SCHEDULING A REPORT FOR ONE TIME DELIVERY................................................................................................................. 83
FIGURE 113. SCHEDULING A REPORT FOR RECURRING GENERATION .......................................................................................................... 84
FIGURE 114. SPECIFYING ADDITIONAL EMAIL ADDRESSES FOR REPORT DELIVERY .................................................................................... 85
FIGURE 115. LOCATIONS SCREEN –CALIBRATION ..................................................................................................................................... 85
FIGURE 116. RF CALIBRATION DIALOG .................................................................................................................................................... 86
FIGURE 117. EVENT ACTIVATION .............................................................................................................................................................. 87
FIGURE 118. INTRUSION PREVENTION ACTIVATION ................................................................................................................................... 88
FIGURE 119. DEVICE LIST LOCKING ......................................................................................................................................................... 89
FIGURE 120. DASHBOARD SCREEN ........................................................................................................................................................... 90
ȱ

GettingȱStartedȱ
SpectraGuard®ȱEnterpriseȱInstallationȱGuideȱ
1
Chapterȱ1 GettingȱStartedȱ
1.1 BeforeȱYouȱBeginȱ
ThankȱyouȱforȱpurchasingȱSpectraGuardȱEnterpriseȱ(referredȱtoȱasȱ‘system’ȱhereafterȱinȱthisȱdocument)ȱfromȱAirTight®ȱ
Networks,ȱInc.ȱTheȱsystemȱassistsȱyouȱtoȱeffectivelyȱmonitor,ȱtroubleshoot,ȱadminister,ȱandȱprotectȱyourȱwirelessȱnetwork.ȱ
PleaseȱreadȱtheȱEULAȱbeforeȱinstallingȱtheȱServer.ȱInstallingȱtheȱServerȱconstitutesȱyourȱacceptanceȱofȱtheȱtermsȱandȱ
conditionsȱofȱtheȱEULAȱmentionedȱaboveȱinȱthisȱdocument.ȱThisȱproductȱcannotȱbeȱrentedȱorȱleased–youȱareȱtheȱsoleȱownerȱofȱ
theȱproduct.ȱ
ThisȱinstallationȱguideȱgivesȱanȱoverviewȱofȱtheȱpowerȱconnectorȱandȱportsȱonȱtheȱServerȱandȱexplainsȱhowȱtoȱconfigureȱit.ȱ
Thisȱguideȱcontainsȱtheȱfollowingȱchapters:ȱ
xPackageȱContents:ȱListsȱtheȱcomponentsȱincludedȱinȱtheȱsystemȱpackage.ȱ
xServerȱandȱSensorȱ(Sensor)ȱOverview:ȱProvidesȱanȱoverviewȱofȱtheȱServerȱandȱSensor.ȱ
xConfiguringȱtheȱServer:ȱDescribesȱhowȱtoȱpowerȱtheȱServer,ȱconnectȱtheȱServerȱtoȱtheȱnetworkȱandȱyourȱcomputer,ȱ
andȱconfigureȱtheȱServer.ȱ
xInstallingȱtheȱSensor:ȱDescribesȱhowȱtoȱconnectȱandȱinstallȱtheȱSensor.ȱ
xManualȱConfigurationȱofȱSensor:ȱDescribesȱhowȱtoȱconfigureȱtheȱSensorȱthroughȱtheȱConfigȱShell.ȱ
xSettingȱupȱtheȱSystem:ȱDescribesȱhowȱtheȱsystemȱConsoleȱisȱlaunchedȱandȱsetup.ȱ
xConfigȱShellȱCommands:ȱListsȱaȱpreȬdefinedȱsetȱofȱcommandsȱthatȱallowȱyouȱtoȱconfigureȱandȱviewȱtheȱstatusȱofȱtheȱ
ServerȱandȱSensors.ȱ
xTroubleshooting:ȱProvidesȱtroubleshootingȱtipsȱwhileȱinstallingȱtheȱServerȱandȱSensor.ȱ
1.2 Howȱtoȱgetȱmoreȱinformationȱ
Toȱreceiveȱimportantȱnewsȱonȱproductȱupdates,ȱpleaseȱvisitȱourȱwebsiteȱatȱsupport@airtightnetworks.com.ȱ
1.3 ContactȱInformationȱ
AirTight®ȱNetworks,ȱInc.ȱ
339ȱN,ȱBernardoȱAvenue,ȱSuiteȱ#200,ȱ
MountainȱView,ȱCAȱ94043ȱ
Tel:ȱ(650)ȱ961Ȭ1111ȱ
Fax:ȱ(650)ȱ963Ȭ3388ȱ
Forȱtechnicalȱsupportȱsendȱanȱemailȱtoȱsupport@airtightnetworks.com.ȱ
PackageȱContentsȱ
SpectraGuard®ȱEnterpriseȱInstallationȱGuideȱ
2ȱ
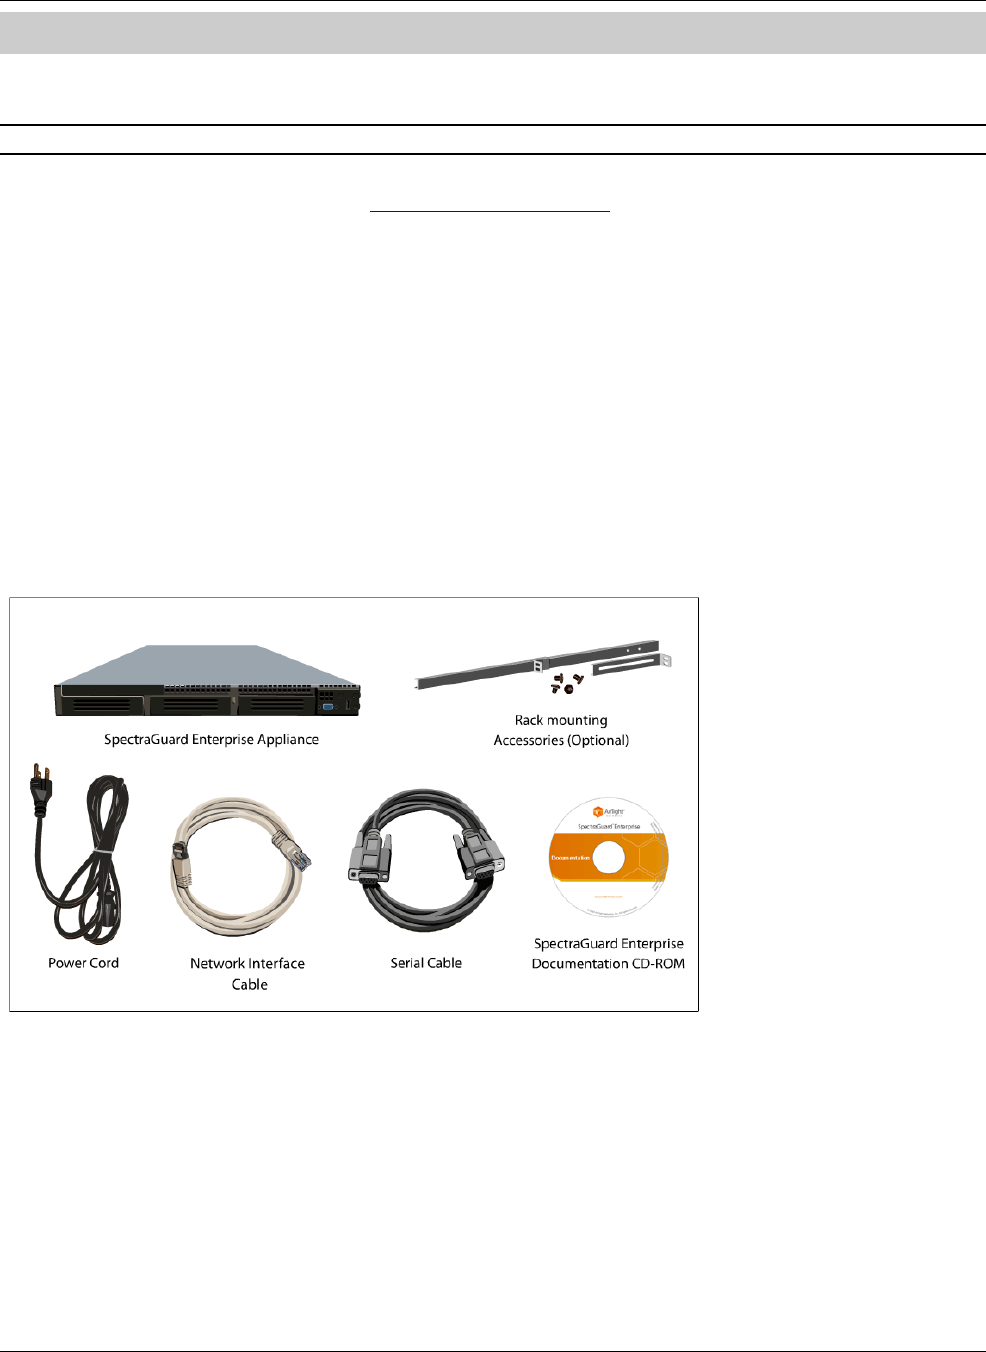
Chapterȱ2 PackageȱContentsȱ
ThisȱchapterȱlistsȱtheȱcomponentsȱincludedȱinȱtheȱServerȱandȱSensorȱ(bothȱ802.11ȱa/b/gȱorȱ802.11ȱa/b/g/n)ȱpackages.ȱ
Note:ȱTheȱconventionsȱtoȱbeȱfollowedȱinȱtheȱGuideȱare:ȱ1>ȱ802.11ȱa/b/g:ȱSSȬ200ȬATandȱ2>ȱ802.11ȱa/b/g/n:ȱSSȬ300ȬAT.ȱ
PleaseȱensureȱthatȱtheȱfollowingȱitemsȱareȱincludedȱinȱtheȱServerȱpackage.ȱIfȱtheȱpackageȱisȱnotȱcomplete,ȱpleaseȱcontactȱ
AirTight®ȱNetworks,ȱInc.ȱTechnicalȱSupportȱatȱsupport@airtightnetworks.com,ȱorȱreturnȱtheȱpackageȱtoȱtheȱvendorȱorȱdealerȱ
whereȱyouȱpurchasedȱtheȱproduct.ȱ
xServerȱwithȱSoftwareȱ
xSystemȱDocumentationȱCDȬROMȱcontaining:ȱ
¾SpectraGuardȱEnterpriseȱUserȱGuideȱ
¾SpectraGuardȱEnterpriseȱInstallationȱGuideȱ
¾SpectraGuardȱEnterpriseȱQuickȱSetupȱGuideȱ
¾SpectraGuardȱEnterpriseȱReportsȱ
¾SpectraGuardȱEnterpriseȱReleaseȱNotesȱ
¾UpgradeȱInstructionsȱforȱSpectraGuardȱEnterpriseȱ
¾HighȱAvailabilityȱConfigurationȱforȱSpectraGuardȱEnterpriseȱ
¾NetworkȱDetectorȱConfigurationȱforȱSpectraGuardȱEnterpriseȱ
xPowerȱCordȱ
xNetworkȱInterfaceȱ(Ethernet)ȱCableȱ
xSerialȱCableȱ
xRackȱMountingȱAccessoriesȱ
ȱ
Figure 1. Server Package Contents
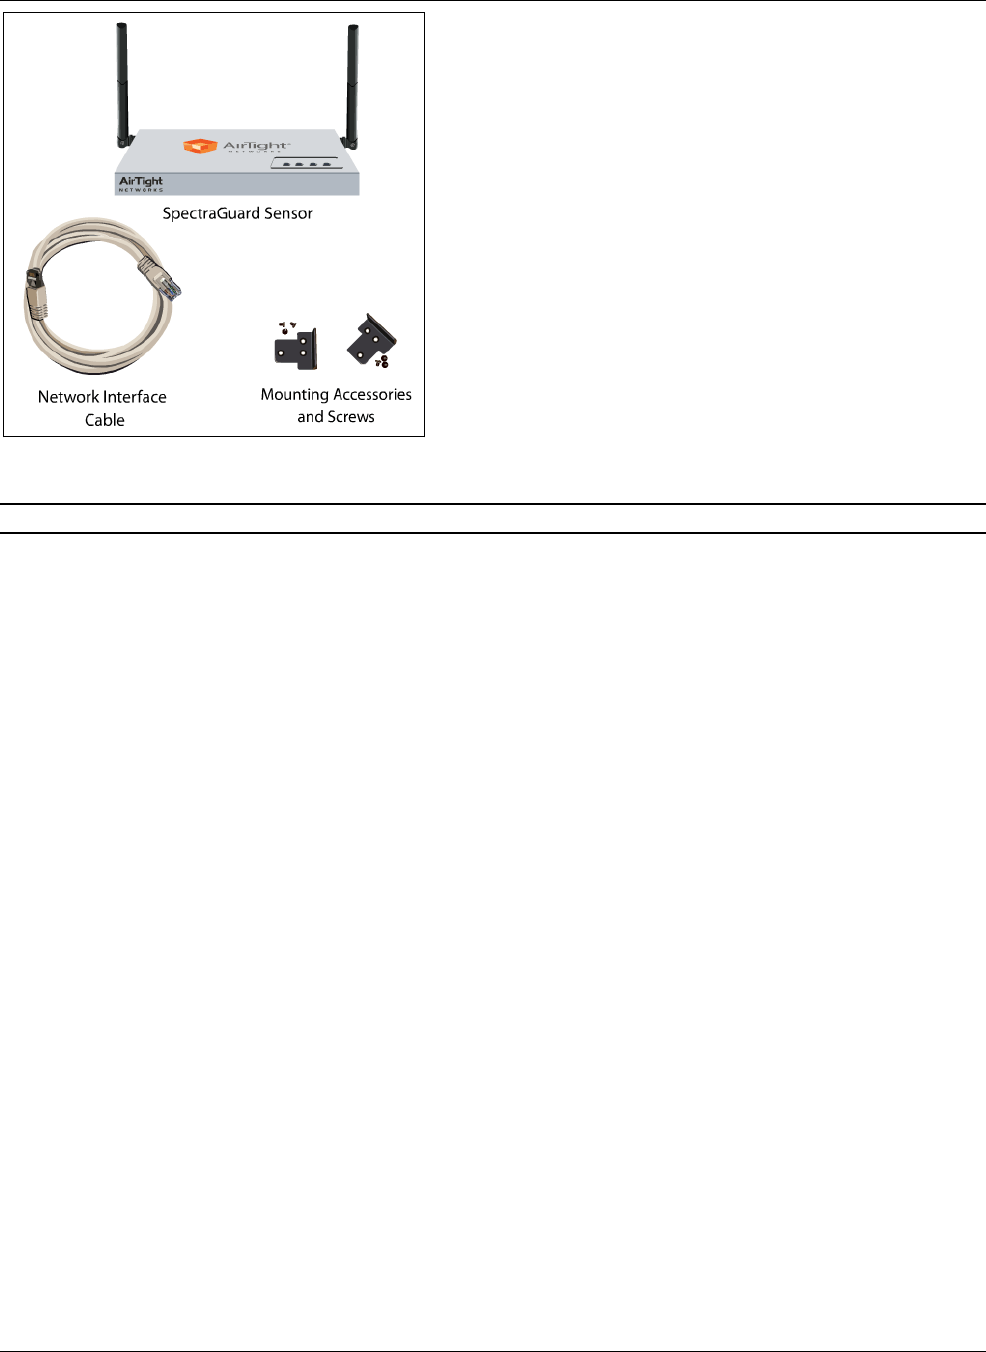
Theȱcontentsȱofȱtheȱa/b/gȱSensorȱpackageȱareȱasȱfollows:ȱ
xSensorȱ
xEthernetȱCableȱ
xWallȱMountingȱAccessoriesȱ
PackageȱContentsȱ
SpectraGuard®ȱEnterpriseȱInstallationȱGuideȱ
3ȱ
ȱ
Figure 2. Sensor SS-200-AT Package Contents
Note:ȱTheȱMACȱaddressȱofȱtheȱSensorȱisȱshownȱonȱaȱlabelȱatȱtheȱbottomȱofȱtheȱproductȱandȱtheȱpackagingȱboxȱ
ServerȱandȱSensorȱOverviewȱ
SpectraGuard®ȱEnterpriseȱInstallationȱGuideȱ
4ȱ
Chapterȱ3 ServerȱandȱSensorȱOverviewȱ
ThisȱchapterȱprovidesȱanȱoverviewȱofȱtheȱServerȱandȱSensorȱandȱdescribesȱinȱdetailȱaboutȱtheȱfollowing.ȱ
xFrontȱPanelȱofȱtheȱServerȱandȱSensorȱ
xRearȱPanelȱofȱtheȱServerȱandȱSensorȱ
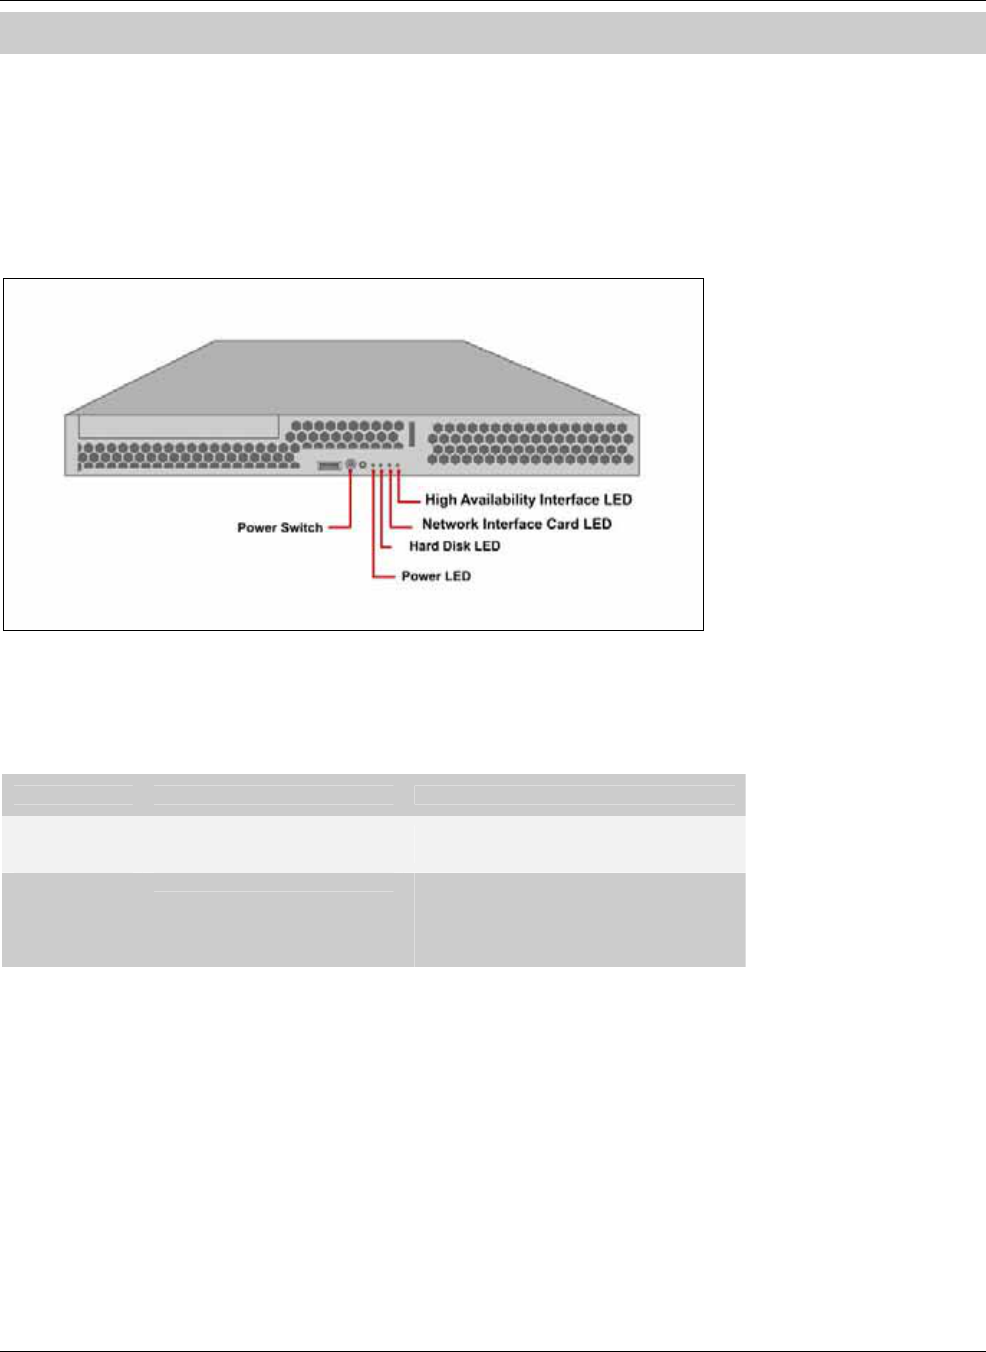
3.1 FrontȱPanelȱofȱtheȱServerȱ
TheȱfrontȱpanelȱofȱtheȱServerȱhasȱaȱPowerȱswitchȱandȱLEDsȱthatȱindicateȱitsȱstate.ȱTheȱfollowingȱfigureȱshowsȱtheȱlocationȱofȱ
theȱPowerȱswitchȱandȱLEDsȱonȱtheȱfrontȱpanelȱofȱtheȱServer.ȱ
ȱ
Figure 3. Front Panel of the Server
TheȱfollowingȱtableȱdescribesȱtheȱbehaviorȱofȱtheȱPowerȱswitch.ȱ
Table 1. Behavior of Power Switch
Action System Behavior Recommended User Action
Push Power
switch for two
seconds
Graceful shutdown of the
Server (similar to restarting
the Server)
No action is required as the Server
restarts automatically.
Push Power
switch for
more than
three seconds
Hard shutdown of the Server
(similar to disconnecting the
power cable)
Press the Power switch again to power
on the Server. Do not press the Power
switch for a longer time as this may
cause damage to the hard disk and
thereby cause severe data loss.
ȱ
TheȱfollowingȱtableȱdescribesȱtheȱstatusȱLEDsȱonȱtheȱfrontȱpanelȱofȱtheȱServer.ȱ
ServerȱandȱSensorȱOverviewȱ
SpectraGuard®ȱEnterpriseȱInstallationȱGuideȱ
5ȱ
Table 2. Front Panel LEDs
LED LED Color Meaning of LED
Solid Green Indicates that the Server is powered on and working
normally
Power
Off Indicates that the Server is not powered on or not
receiving power
Blinking
Green Indicates that the hard disk drive is being accessed
Hard Disk
Off Indicates that the hard disk drive is not being accessed
Blinking
Green Indicates that the Server is connected to the network
Network Interface
Card Off Indicates that the Server is not connected to the
network
Blinking
Green
Indicates that the Server is a part of a high availability
cluster High Availability
Interface Off Indicates that the Server is not a part of a high
availability cluster
ȱ
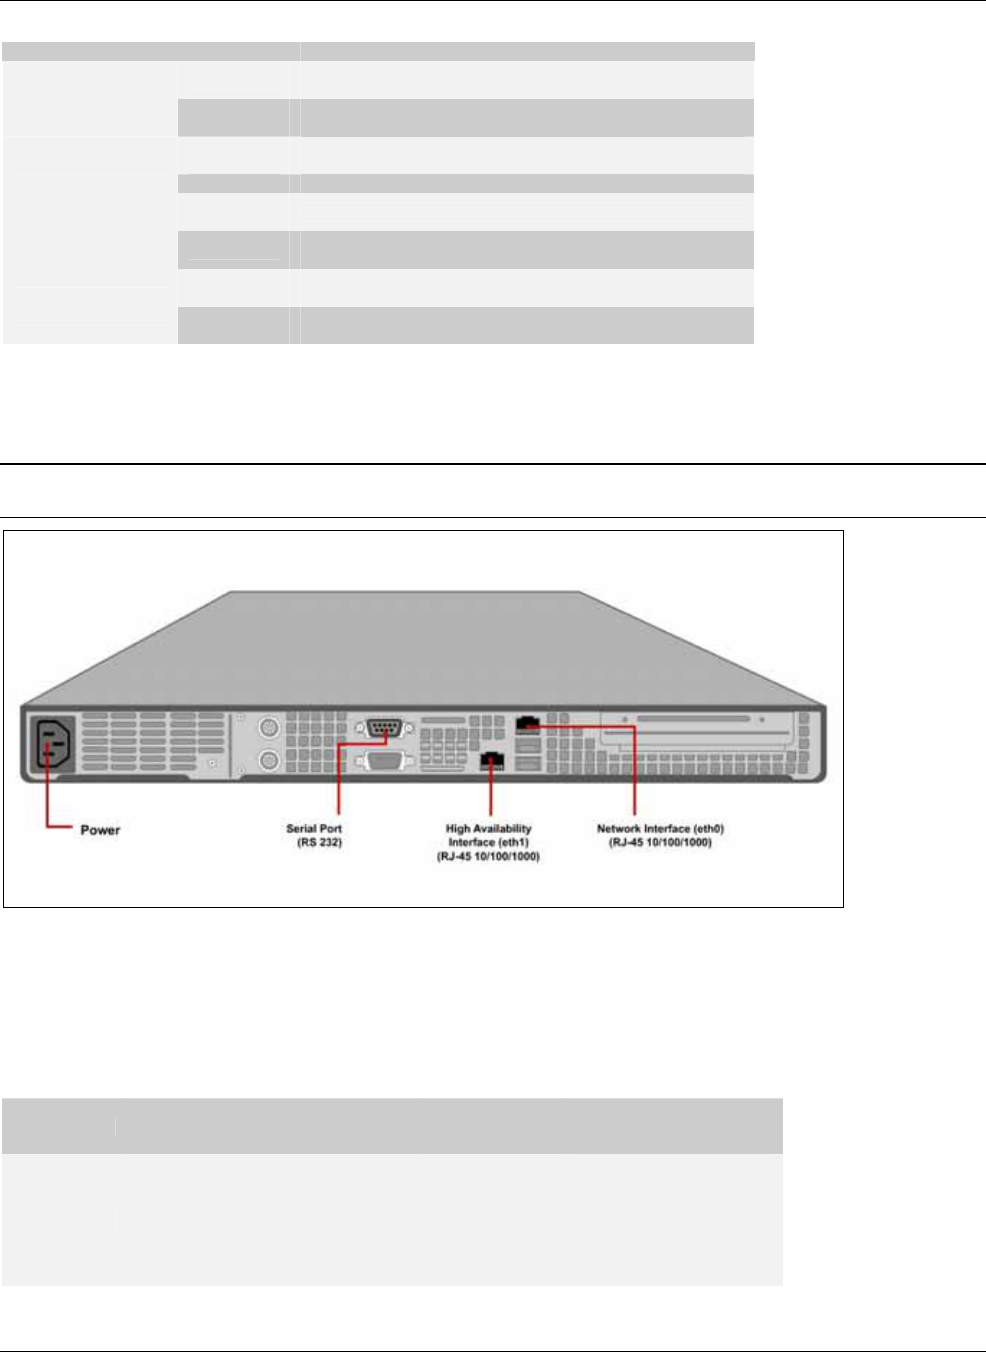
3.2 RearȱPanelȱofȱtheȱServerȱ
TheȱrearȱpanelȱofȱtheȱServerȱhasȱaȱpowerȱconnectorȱandȱportsȱthatȱenableȱyouȱtoȱpowerȱupȱtheȱServerȱandȱconnectȱitȱtoȱtheȱ
networkȱandȱaȱcomputer.ȱ
Note:ȱOtherȱconnectorsȱsuchȱasȱparallelȱport,ȱ25ȬȱpinȱSerialȱport,ȱkeyboardȱconnector,ȱsoundȱcard,ȱandȱsoȱonȱareȱshownȱinȱtheȱfollowingȱ
figure.ȱHowever,ȱtheseȱconnectorsȱareȱdisabledȱandȱcannotȱbeȱused.ȱ
ȱ
Figure 4. Rear Panel of the Server
TheȱrearȱpanelȱofȱtheȱServerȱhasȱaȱSerialȱ(RSȱ232ȱFȬF)ȱport,ȱaȱNetworkȱInterfaceȱportȱ(RJȬ45ȱ10/100/1000ȱEthernet),ȱaȱHighȱ
Availabilityȱ(HA)ȱportȱ(RJȬ45ȱ10/100/1000ȱEthernet),ȱandȱaȱPowerȱconnector.ȱTheȱPowerȱconnectorȱisȱusedȱtoȱpowerȱtheȱServerȱ
usingȱ110Ȭ240Vȱ50/60ȱHzȱACȱinput.ȱTheȱfollowingȱtableȱdescribesȱtheȱSerial,ȱNetworkȱInterface,ȱandȱHighȱAvailabilityȱports.ȱ
Table 3. Rear Panel Ports
Port Description Connector
Type Settings/Protocol
Serial
Enables a serial (RS-232)
connection to establish terminal
sessions using terminal emulation
programs such as HyperTerminal
for Windows or minicom for Linux
DB-9
Settings:
Bits per second: 9600
Data Bits: 8
Parity: None
Stop Bits: 1
Flow Control: None
Protocol: RS-232
ServerȱandȱSensorȱOverviewȱ
SpectraGuard®ȱEnterpriseȱInstallationȱGuideȱ
6ȱ
High
Availability
Interface
Used to connect the Server to a
high availability cluster RJ-45
Settings: 10/100/1000
Mbps
Protocol: Ethernet
Network
Interface
Used to connect the Server to the
wired LAN through a hub or a
switch
Allows the Server to talk to
Sensors
RJ-45
Settings: 10/100/1000
Mbps
Protocol: Ethernet
ȱ
3.3 FrontȱPanelȱofȱSensorȱ
3.3.1 SensorȱSSȬ200ȬATȱ
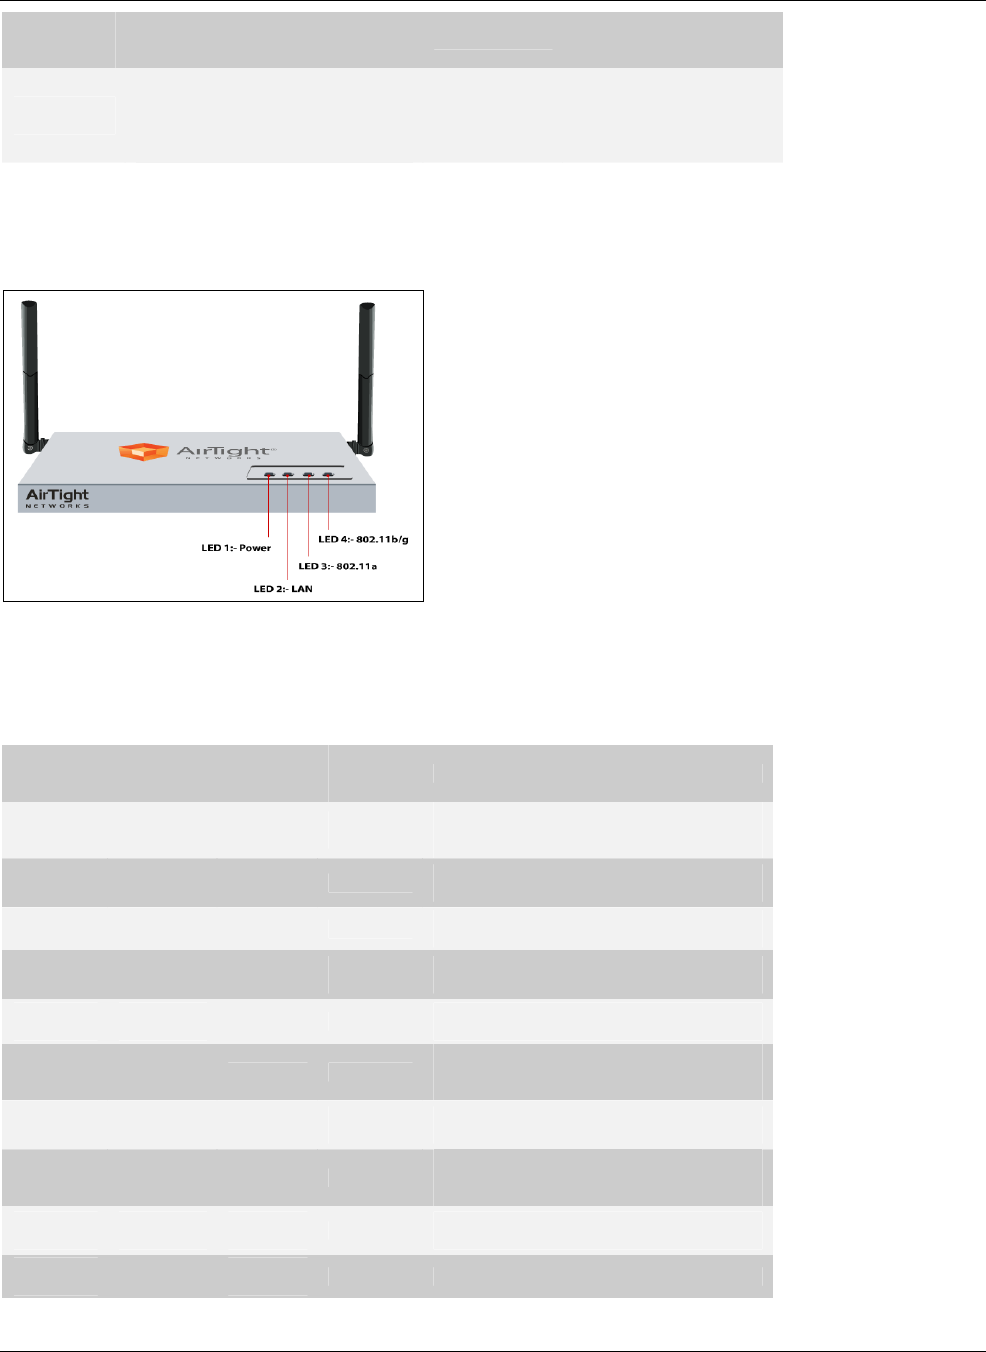
TheȱfrontȱpanelȱofȱtheȱSensorȱhasȱLEDsȱthatȱindicateȱtheȱworkingȱofȱtheȱSensor.ȱ
ȱ
Figure 5. Front Panel of Sensor SS-200-AT
TheseȱLEDsȱareȱdescribedȱinȱtheȱfollowingȱtable.ȱ
Table 4. LED details for Sensor SS-200-AT and SS-300-AT
LED1 or
Power
LED2 or
LAN
LED3 or
802.11a
LED4 or
802.11
b/g
Description
Solid
Green
Solid
Green
Solid
Green
Solid
Green
The Sensor is receiving power and is
working normally. The Sensor is
connected to the Server.
Solid
Green
Solid
Green
Solid
Green Fast Blink The Sensor is performing Troubleshooting
on 802.11b/g.
Solid
Green
Solid
Green
Solid
Green Slow Blink The Sensor is performing Intrusion
Prevention on 802.11b/g.
Solid
Green
Solid
Green Fast Blink Solid
Green
The Sensor is performing Troubleshooting
on 802.11a.
Solid
Green
Solid
Green Fast Blink Fast Blink The Sensor is performing Troubleshooting
on 802.11a and 802.11b/g.
Solid
Green
Solid
Green Fast Blink Slow Blink
The Sensor is performing Troubleshooting
on 802.11a and Intrusion Prevention on
802.11b/g.
Solid
Green
Solid
Green
Slow
Blink
Solid
Green
The Sensor is performing Intrusion
Prevention on 802.11a.
Solid
Green
Solid
Green
Slow
Blink Fast Blink
The Sensor is performing Intrusion
Prevention on 802.11a and
Troubleshooting on 802.11b/g.
Solid
Green
Solid
Green
Slow
Blink Slow Blink The Sensor is performing Intrusion
Prevention on 802.11a and 802.11b/g.
Solid
Green Slow Blink Slow
Blink Slow Blink The Sensor upgrade is in progress.
ServerȱandȱSensorȱOverviewȱ
SpectraGuard®ȱEnterpriseȱInstallationȱGuideȱ
7ȱ
Solid
Orange
Solid
Green Any Any The Sensor is unable to get Ethernet link.
Solid
Orange Fast Blink Any Any The Sensor did not receive a valid IP
address via the DHCP.
Solid
Orange Slow Blink Any Any The Sensor is unable to connect to the
Server.
Solid
Orange Any Solid
Green Any There is an error on 802.11a/b/g
interfaces.
Solid
Orange Any Any Solid
Green
The Sensor is experiencing a software
error.
Off Off Off Off The Sensor is not powered on or it is in
the process of starting up.
ȱ
3.3.2 SensorȱSSȬ300ȬATȱ
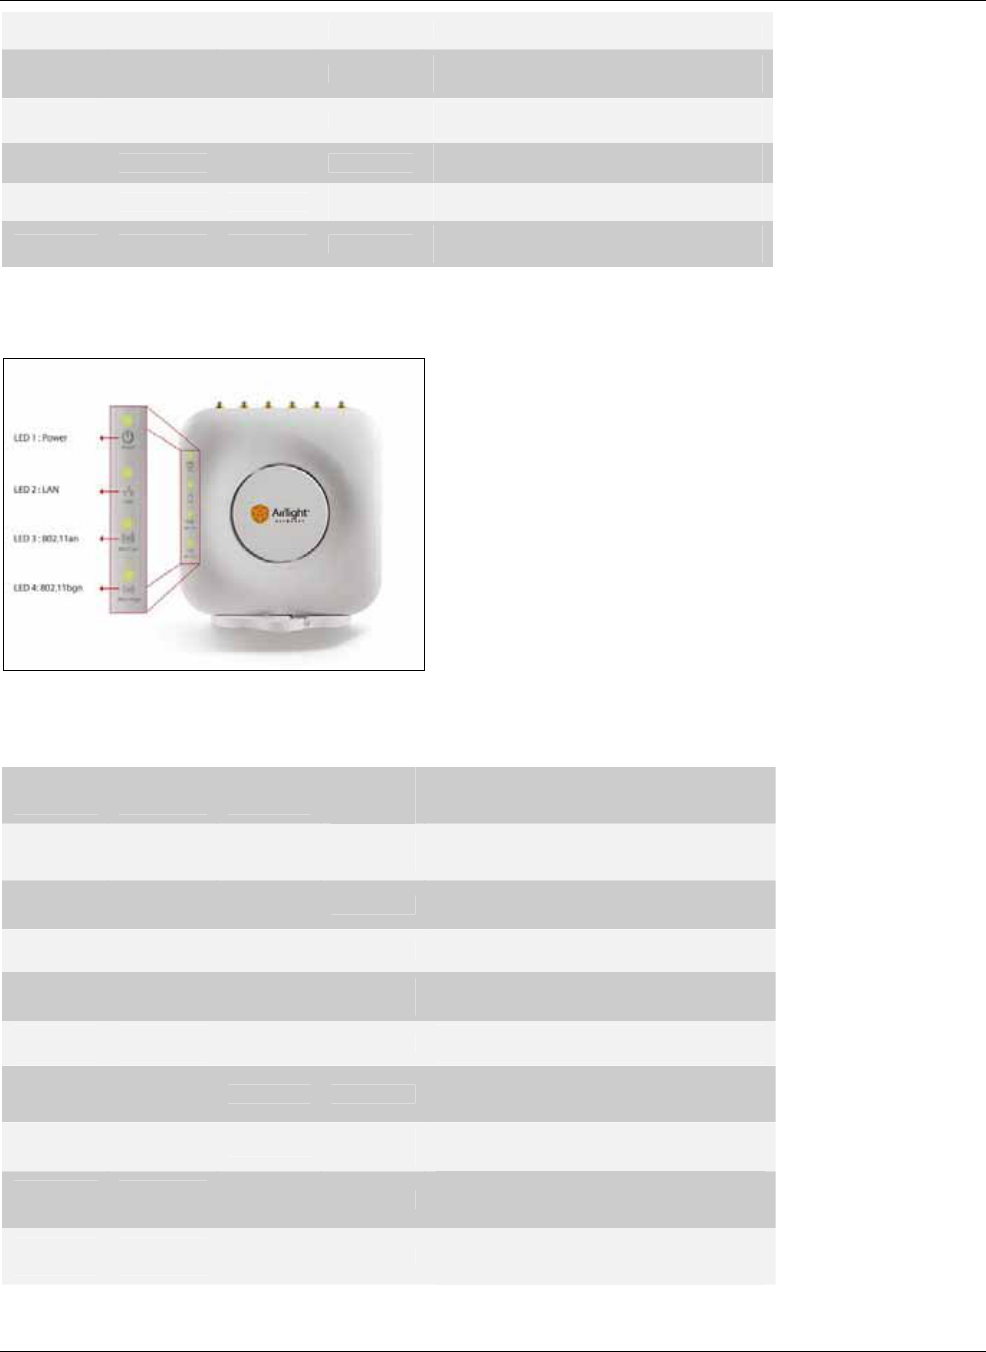
TheȱfrontȱpanelȱofȱtheȱSensorȱhasȱLEDsȱthatȱindicateȱtheȱworkingȱofȱtheȱSensorȱ
ȱ
Figure 6. Front View of Sensor SS-300-AT
Table 5. LED Details for Sensor SS-300-AT
LED1 or
Power
LED2 or
LAN
LED3 or
802.11an
LED4 or
802.11
b/gn
Description
Solid
Green
Solid
Green
Solid
Green
Solid
Green
The Sensor is receiving power and is
working normally. The Sensor is
connected to the Server.
Solid
Green
Solid
Green
Solid
Green Fast Blink The Sensor is performing Troubleshooting
on 802.11b/g/n.
Solid
Green
Solid
Green
Solid
Green Slow Blink The Sensor is performing Intrusion
Prevention on 802.11b/g/n.
Solid
Green
Solid
Green Fast Blink Solid
Green
The Sensor is performing Troubleshooting
on 802.11a/n.
Solid
Green
Solid
Green Fast Blink Fast Blink The Sensor is performing Troubleshooting
on 802.11a/n and 802.11b/g/n.
Solid
Green
Solid
Green Fast Blink Slow Blink
The Sensor is performing Troubleshooting
on 802.11a/n and Intrusion Prevention
on 802.11b/g/n.
Solid
Green
Solid
Green Slow Blink Solid
Green
The Sensor is performing Intrusion
Prevention on 802.11a/n.
Solid
Green
Solid
Green Slow Blink Fast Blink
The Sensor is performing Intrusion
Prevention on 802.11a/n and
Troubleshooting on 802.11b/g/n.
Solid
Green
Solid
Green Slow Blink Slow Blink
The Sensor is performing Intrusion
Prevention on 802.11a/n and
802.11b/g/n.
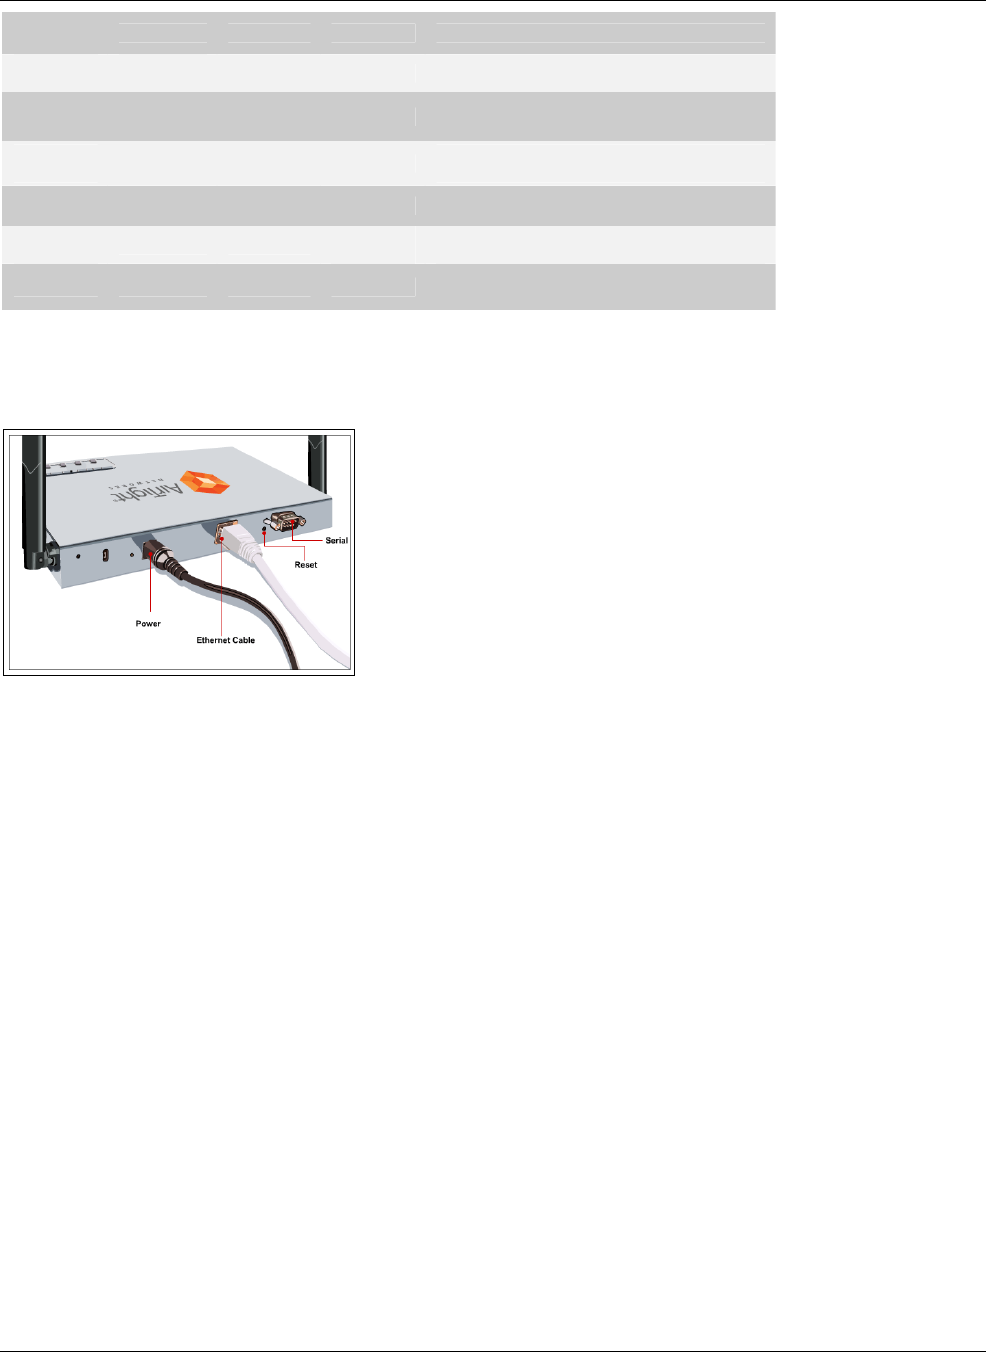
ServerȱandȱSensorȱOverviewȱ
SpectraGuard®ȱEnterpriseȱInstallationȱGuideȱ
8ȱ
Solid
Green Slow Blink Slow Blink Slow Blink The Sensor upgrade is in progress.
Solid
Orange
Solid
Green Any Any The Sensor is unable to get Ethernet link.
Solid
Orange Fast Blink Any Any The Sensor did not receive a valid IP
address via the DHCP.
Solid
Orange Slow Blink Any Any The Sensor is unable to connect to the
Server.
Solid
Orange Any Solid
Green Any There is an error on 802.11a/b/g/n
interfaces.
Solid
Orange Any Any Solid
Green
The Sensor is experiencing a software
error.
Off Off Off Off The Sensor is not powered on or it is in
the process of starting up.
ȱ
3.4 RearȱPanelȱofȱSensorȱSSȬ200ȬATȱ
TheȱrearȱpanelȱofȱtheȱSensorȱSSȬ200ȬATȱhasȱaȱpowerȱconnectorȱandȱportsȱthatȱenableȱyouȱtoȱpowerȱupȱtheȱdeviceȱandȱconnectȱitȱ
toȱtheȱnetworkȱorȱaȱcomputer.ȱ
ȱ
Figure 7. Rear Panel of Sensor
TheȱSensorȱhasȱtheȱfollowingȱports:ȱ
xSerialȱport:ȱConnectsȱtheȱSensorȱtoȱserialȱterminalȱemulationȱprogramsȱsuchȱasȱHyperȱTerminalȱforȱWindowsȱorȱ
minicomȱforȱLinux.ȱ
xEthernetȱport:ȱConnectsȱtheȱSensorȱtoȱtheȱnetwork.ȱ
xResetȱswitch:ȱResetsȱtheȱSensorȱtoȱfactoryȱdefaults.ȱToȱresetȱtheȱSensor,ȱpressȱtheȱResetȱswitchȱandȱpowerȱcycleȱ
(removeȱtheȱpowerȱcableȱonceȱandȱconnectȱitȱbackȱagain)ȱtheȱSensorȱtillȱallȱLEDsȱblinkȱgreen.ȱPressingȱ<Reset>ȱwhileȱ
theȱSensorȱisȱrunningȱwillȱnotȱhaveȱanyȱeffect.ȱTheȱfollowingȱsettingsȱareȱreset:ȱ
¾ConfigȱShellȱPasswordȱisȱresetȱtoȱconfig.ȱ
¾ServerȱDiscoveryȱvalueȱisȱerasedȱandȱchangedȱtoȱtheȱdefault,ȱwifiȬsecurityȬserver.ȱ
¾AllȱtheȱVLANȱconfigurationsȱareȱlost.ȱ
¾SensorȱmodeȱisȱchangedȱtoȱSensorȱOnly.ȱ
¾IfȱstaticȱIPȱwasȱconfiguredȱonȱtheȱSensor,ȱtheȱIPȱisȱerasedȱandȱDHCPȱmodeȱisȱset.ȱ
Afterȱreset,ȱallȱtheȱLEDsȱwillȱblinkȱonce,ȱimplyingȱthatȱtheȱresetȱisȱsuccessful.ȱ
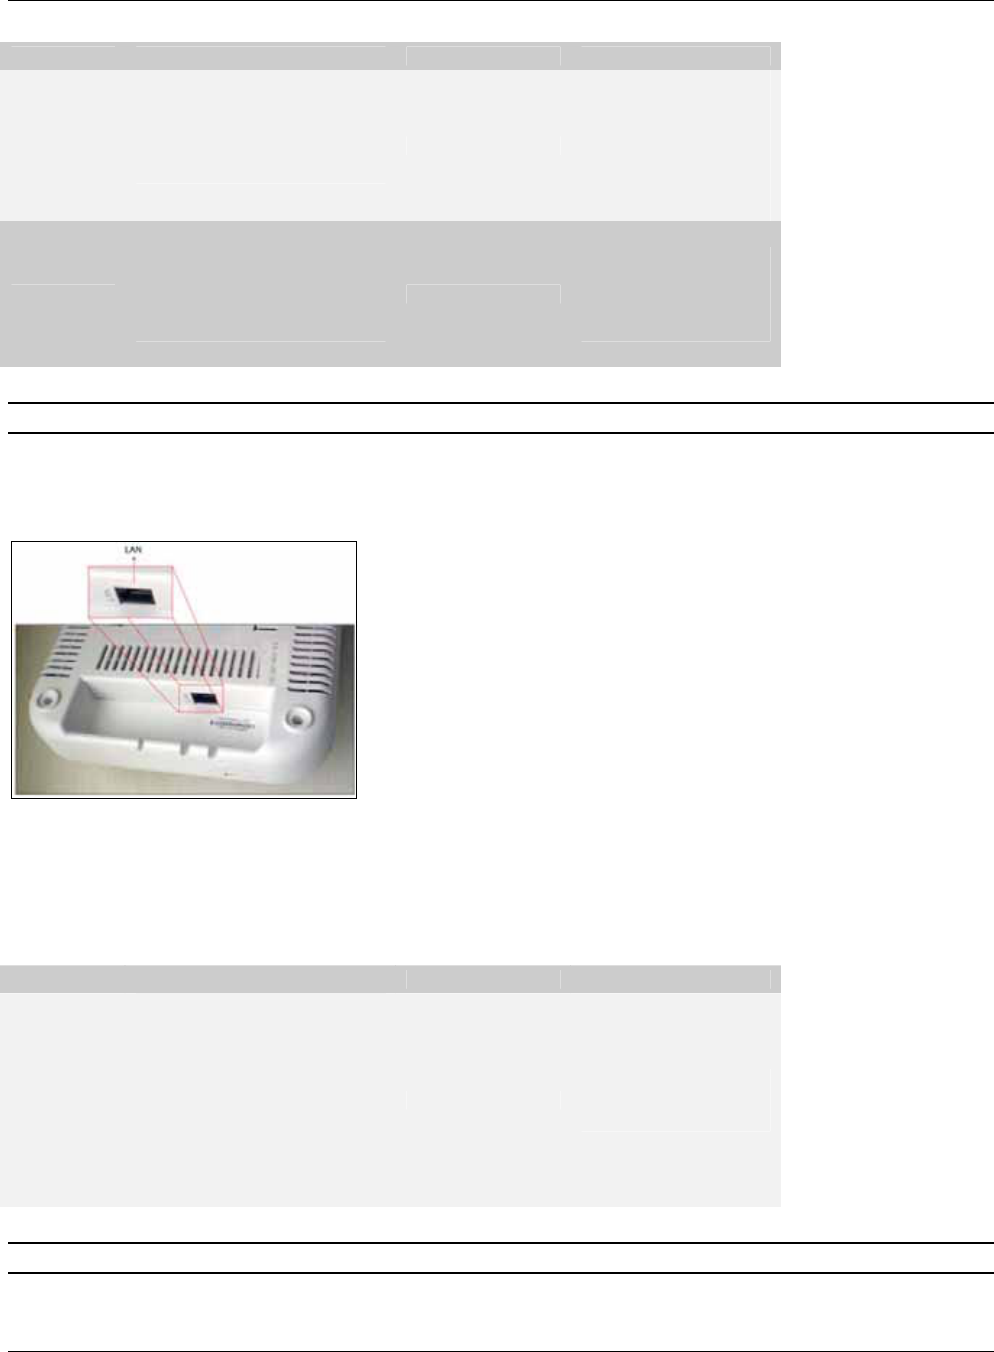
ServerȱandȱSensorȱOverviewȱ
SpectraGuard®ȱEnterpriseȱInstallationȱGuideȱ
9ȱ
Table 6. Rear Panel Port Settings for SS-200-AT
Port Description Connector Type Speed/Protocol
Serial
Enables a serial connection to
establish terminal sessions;
used for launching Config Shell
sessions
DB-9
Settings:
Bits per second: 9600
Data Bits: 8
Parity: None
Stop Bits: 1
Flow Control: None
Protocol: RS-232
Ethernet
Enables the device to be
connected to the wired LAN
through a switch or a hub. This
connection allows the Sensor to
communicate with the Server
RJ-45
Settings:
10/100 Mbps
Protocol:
Ethernet
ȱ
Note:ȱTheȱSpeed/ProtocolȱsettingsȱmentionedȱinȱtheȱaboveȱtableȱareȱtheȱsameȱforȱHypeȱTerminalȱandȱminicom.ȱ
3.5 RearȱandȱSideȱPanelsȱofȱSensorȱSSȬ300ȬATȱ
TheȱrearȱpanelȱofȱtheȱSensorȱSSȬ300ȬATȱhasȱanȱEthernetȱportȱthatȱenablesȱtheȱdeviceȱtoȱbeȱconnectedȱtoȱtheȱwiredȱLANȱthroughȱ
aȱswitchȱorȱaȱhubȱandȱalsoȱprovidesȱtheȱpowerȱforȱtheȱdeviceȱusingȱ802.3afȱstandard.ȱȱ
ȱ
Figure 8. Rear Panel of Sensor SS-300-AT
TheȱSensorȱhasȱtheȱfollowingȱports:ȱ
xEthernetȱport:ȱConnectsȱtheȱSensorȱtoȱtheȱnetworkȱandȱalsoȱprovidesȱtheȱpower.ȱ
Table 7. Rear Panel Port Settings for SS-300-AT
Port Description Connector Type Speed/Protocol
Ethernet
This enables the device to be
connected to the wired LAN
through a switch or a hub. This
connection allows the
SpectraGuard Sensor to
communicate with the
SpectraGuard Enterprise®
Server.
This port also provides the
power for the device using
802.3af standard
RJ-45
10/100/1000 Mbps
Ethernet
Power over Ethernet
ȱ
Note:ȱTheȱSpeed/ProtocolȱsettingsȱmentionedȱinȱtheȱaboveȱtableȱareȱtheȱsameȱforȱHypeȱTerminalȱandȱminicom.ȱ
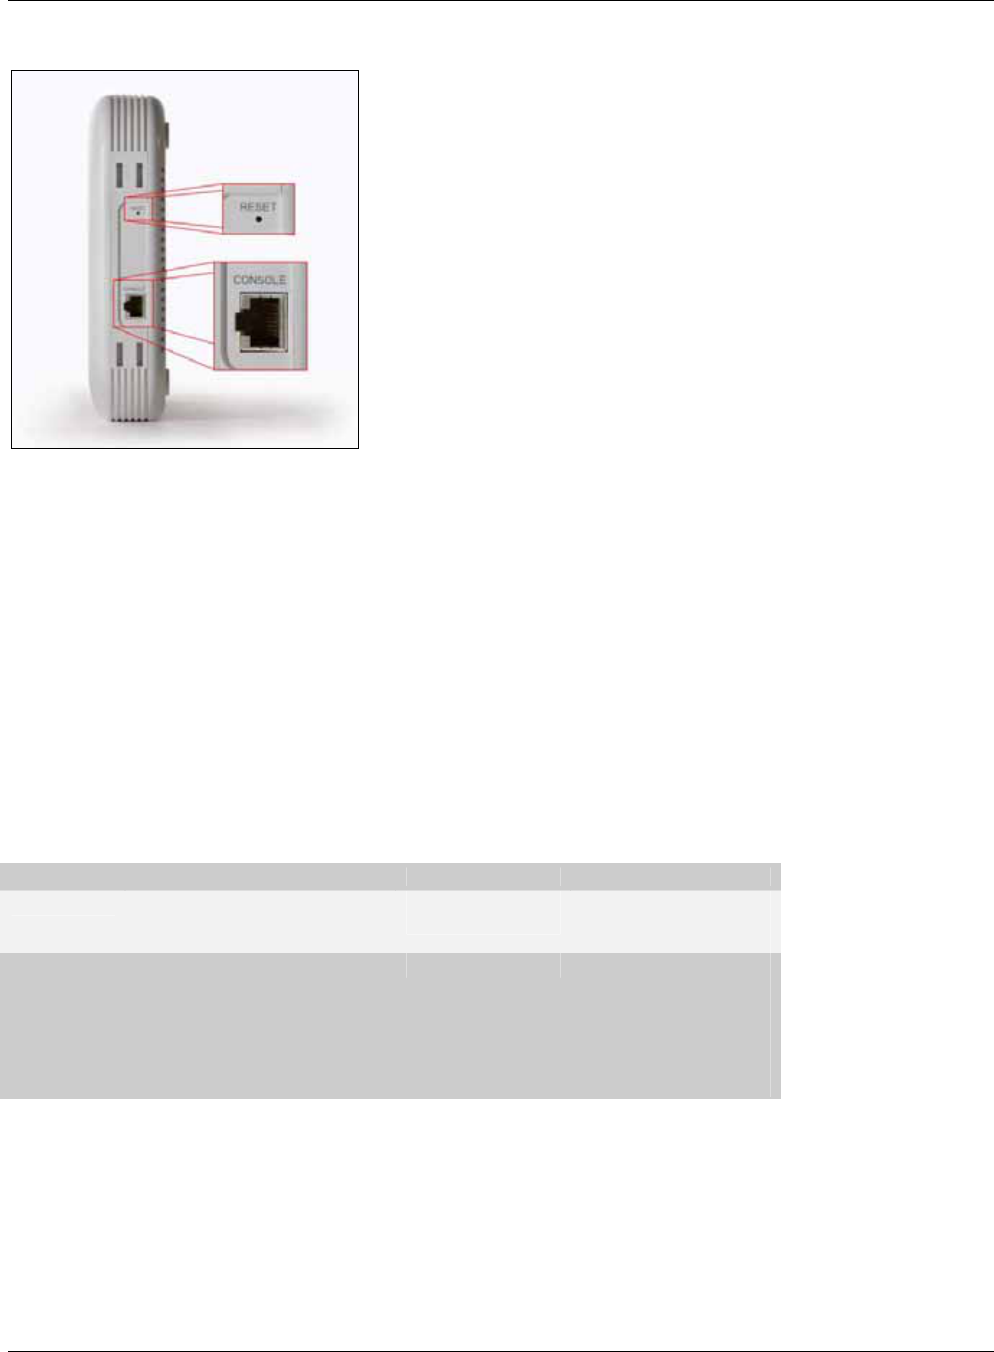
ServerȱandȱSensorȱOverviewȱ
SpectraGuard®ȱEnterpriseȱInstallationȱGuideȱ
10ȱ
ȱ
TheȱsideȱpanelȱofȱtheȱSensorȱSSȬ300ȬATȱhasȱaȱResetȱSwitchȱandȱaȱSerialȱPort.ȱȱ
ȱ
Figure 9. Side Panel of Sensor SS-300-AT
Theȱsideȱpanelȱhasȱtheȱfollowingȱports:ȱ
xSerialȱport:ȱConnectsȱtheȱSensorȱtoȱserialȱterminalȱemulationȱprogramsȱsuchȱasȱHyperȱTerminalȱforȱWindowsȱorȱ
minicomȱforȱLinuxȱ
xResetȱswitch:ȱResetsȱtheȱSensorȱtoȱfactoryȱdefaults.ȱToȱresetȱtheȱSensor,ȱpressȱtheȱResetȱswitchȱandȱpowerȱcycleȱ
(removeȱtheȱpowerȱcableȱonceȱandȱconnectȱitȱbackȱagain)ȱtheȱSensorȱtillȱallȱLEDsȱblinkȱgreen.ȱPressingȱ<Reset>ȱwhileȱ
theȱSensorȱisȱrunningȱwillȱnotȱhaveȱanyȱeffect.ȱTheȱfollowingȱsettingsȱareȱreset:ȱ
¾ConfigȱShellȱPasswordȱisȱresetȱtoȱconfig.ȱ
¾ServerȱDiscoveryȱvalueȱisȱerasedȱandȱchangedȱtoȱtheȱdefault,ȱwifiȬsecurityȬserver.ȱ
¾AllȱtheȱVLANȱconfigurationsȱareȱlost.ȱ
¾SensorȱmodeȱisȱchangedȱtoȱSensorȱOnly.ȱ
¾IfȱstaticȱIPȱwasȱconfiguredȱonȱtheȱSensor,ȱtheȱIPȱisȱerasedȱandȱDHCPȱmodeȱisȱset.ȱ
Afterȱreset,ȱallȱtheȱLEDsȱwillȱblinkȱonce,ȱimplyingȱthatȱtheȱresetȱisȱsuccessful.ȱ
Table 8. Side Panel Port Settings for SS-300-AT
Port Description Connector Type Speed/Protocol
Reset Allows resetting of
SpectraGuard Sensor™ to
factory settings.
Pin-hole
push-button
Hold down and power
cycle the Sensor to
reset
Console Enables a serial connection to
establish terminal sessions.
Used for launching Config Shell
sessions.
RJ-45 RS 232 Serial
Bits per second:
115200
Data Bits: 8
Parity: None
Stop Bits: 1
Flow Control: None
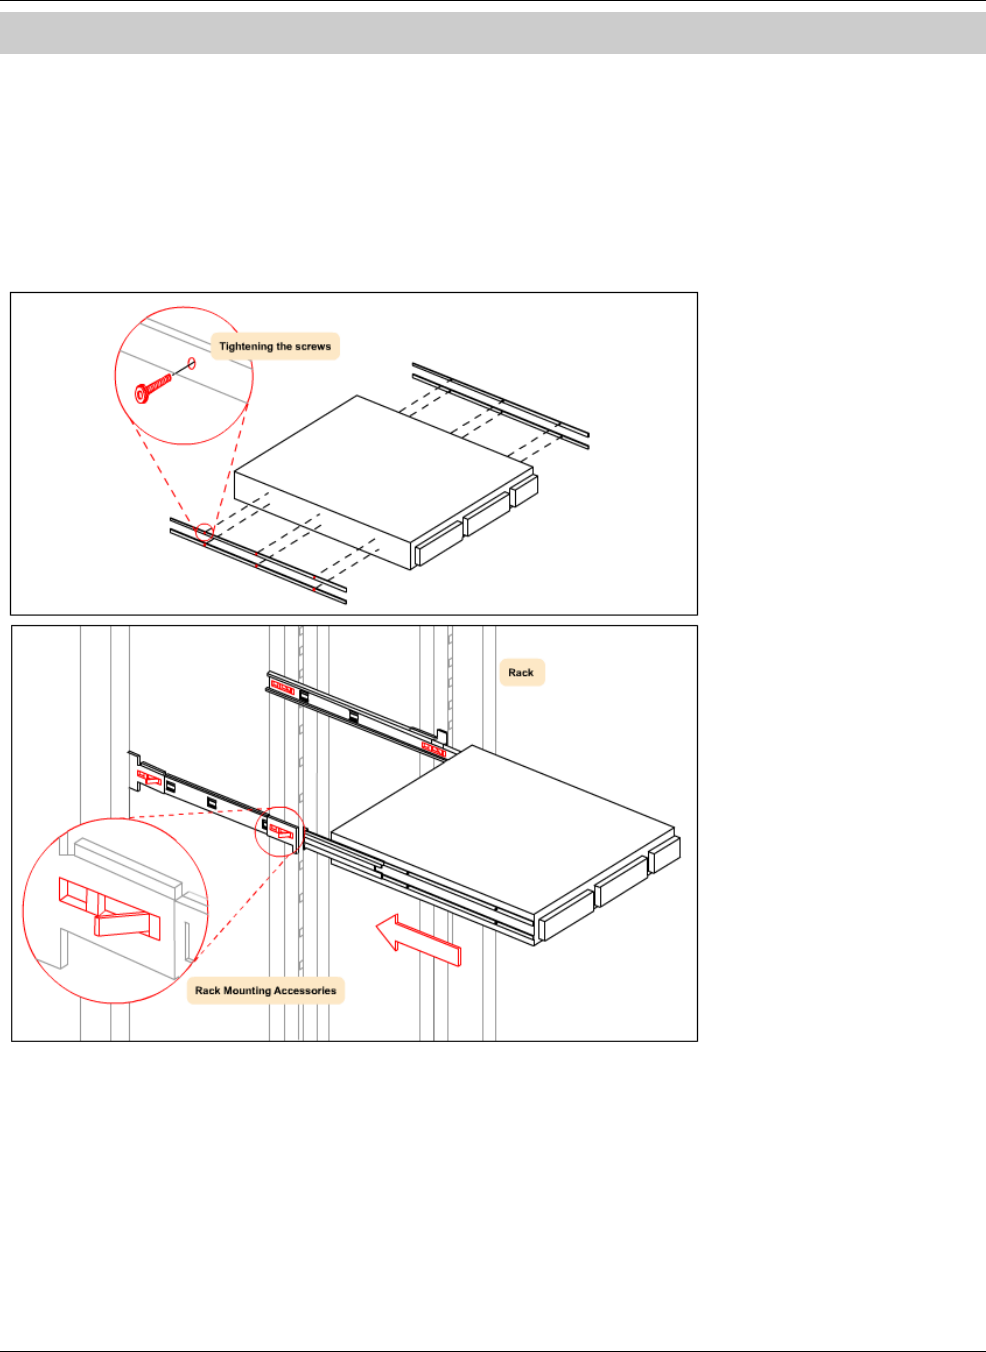
InstallingȱtheȱServerȱ
SpectraGuard®ȱEnterpriseȱInstallationȱGuideȱ
9
Chapterȱ4 InstallingȱtheȱServerȱ
YouȱneedȱtoȱsetȱupȱtheȱServerȱbeforeȱusingȱitȱtoȱmonitorȱandȱprotectȱyourȱnetwork.ȱThisȱchapterȱexplainsȱhowȱtoȱconnectȱandȱ
configureȱtheȱServer.ȱ
4.1 ConnectingȱtheȱServerȱ
ThisȱinvolvesȱmountingȱtheȱServerȱappliance,ȱpoweringȱitȱup,ȱandȱconnectingȱitȱtoȱtheȱnetwork.ȱ
4.1.1 MountȱtheȱServerȱApplianceȱ
PlaceȱtheȱServerȱonȱtheȱrackȱandȱmountȱitȱusingȱtheȱrackȱmountingȱaccessories.ȱ
ȱ
Figure 10. Mount the Server
4.1.2 PowerȱupȱtheȱServerȱ
TheȱServerȱapplianceȱrunsȱatȱ110Ȭ240V,ȱ3Ȭ5A,ȱ50Ȭ60ȱHzȱACȱpower.ȱAirTight®ȱNetworksȱrecommendsȱthatȱyouȱprovideȱsurgeȬ
freeȱstableȱpowerȱtoȱtheȱServer.ȱ
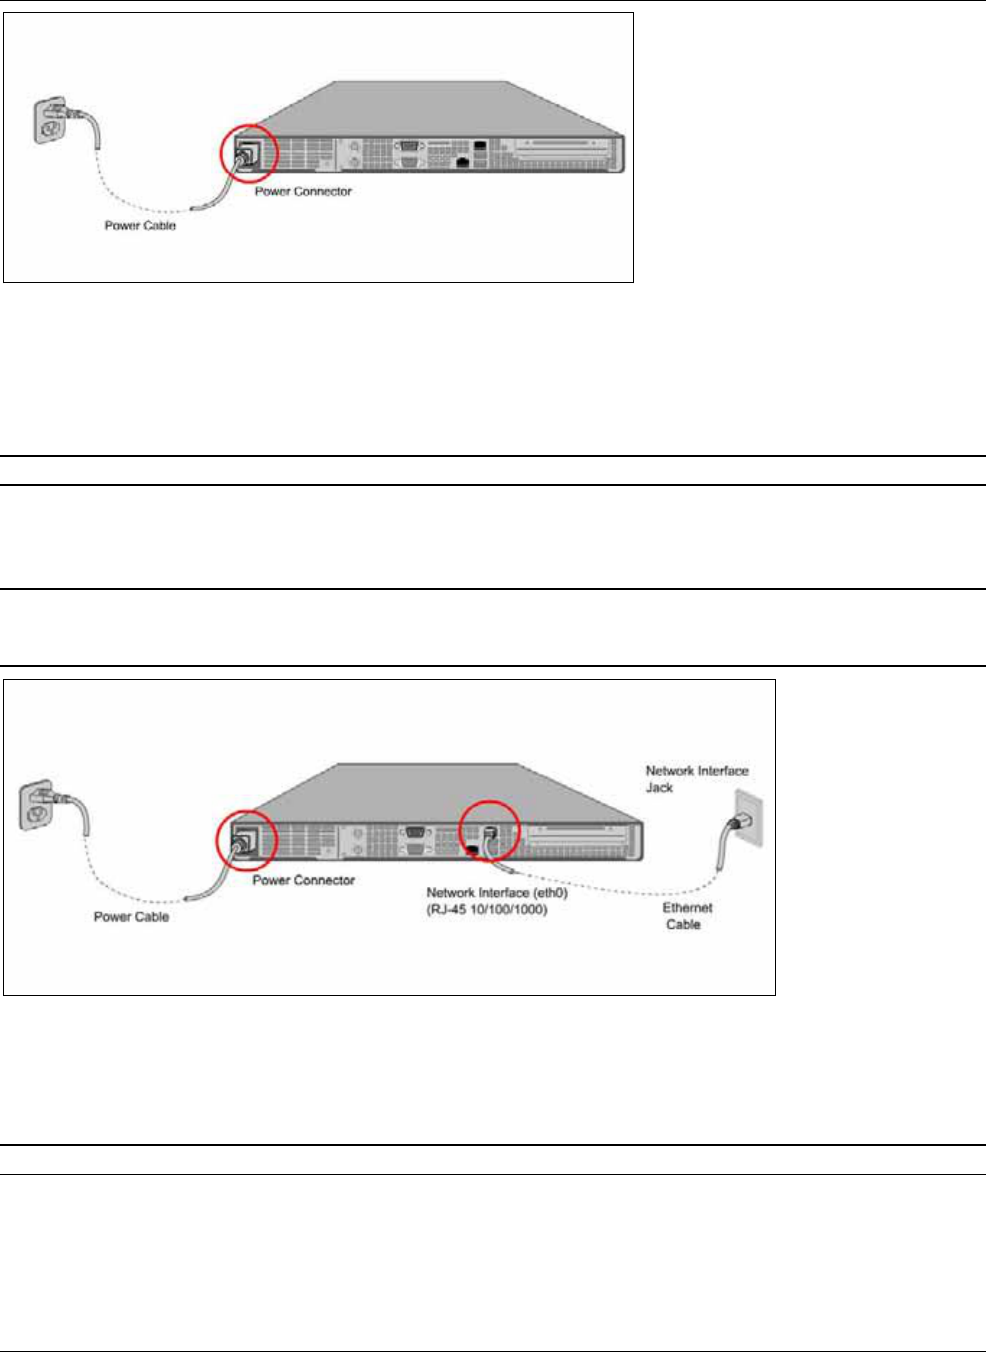
InstallingȱtheȱServerȱ
SpectraGuard®ȱEnterpriseȱInstallationȱGuideȱ
10ȱ
ȱ
Figure 11. Power up the Server
ToȱpowerȱupȱtheȱServer,ȱperformȱtheȱfollowingȱsteps:ȱ
1. ConnectȱoneȱendȱofȱtheȱPowerȱcableȱtoȱtheȱPowerȱsocketȱonȱtheȱrearȱpanelȱofȱtheȱServer.ȱ
2. ConnectȱtheȱotherȱendȱofȱtheȱPowerȱcableȱtoȱaȱ110Ȭ240V,ȱ50/60ȱHzȱACȱpowerȱsource.ȱ
3. PressȱtheȱPowerȱswitchȱonȱtheȱfrontȱpanelȱofȱtheȱServer.ȱ
Note:ȱOnȱconnectingȱtheȱPowerȱcable,ȱtheȱPowerȱLEDȱshouldȱturnȱsolidȱgreen.ȱ
4.1.3 ConnectȱtheȱServerȱtoȱtheȱNetworkȱ
ConnectȱtheȱServerȱtoȱtheȱdesiredȱnetworkȱsegmentȱ(subnet).ȱTheȱServerȱshouldȱbeȱableȱtoȱcommunicateȱwithȱallȱtheȱnetworkȱ
segmentsȱthatȱitȱtriesȱtoȱprotect.ȱ
Warning!ȱTheȱdefaultȱIPȱaddressȱofȱtheȱServerȱisȱ192.168.1.246.ȱPleaseȱensureȱthatȱnoȱotherȱdeviceȱonȱyourȱnetworkȱusesȱtheȱsameȱIPȱ
addressȱasȱtheȱServer.ȱConnectȱtheȱNetworkȱInterfaceȱPortȱonȱtheȱServerȱtoȱtheȱdesiredȱsubnetȱusingȱtheȱEthernetȱcableȱprovidedȱtoȱyouȱasȱ
shownȱinȱtheȱfollowing.ȱDoȱnotȱconnectȱtheȱHighȱAvailabilityȱ(HA)ȱInterfaceȱPortȱtoȱtheȱsubnet.ȱ
ȱ
Figure 12. Connect the Server to the Network
ToȱconnectȱtheȱServerȱtoȱtheȱnetwork,ȱperformȱtheȱfollowingȱsteps:ȱ
1. ConnectȱoneȱendȱofȱtheȱNetworkȱInterfaceȱcableȱtoȱtheȱNetworkȱInterfaceȱportȱonȱtheȱrearȱpanelȱofȱtheȱServer.ȱ
2. ConnectȱtheȱotherȱendȱofȱtheȱNetworkȱInterfaceȱcableȱtoȱtheȱNetworkȱInterfaceȱjackȱlocatedȱonȱtheȱwall.ȱ
Note:ȱOnȱconnectingȱtheȱNetworkȱInterfaceȱcable,ȱtheȱNetworkȱInterfaceȱCardȱLEDȱshouldȱturnȱsolidȱgreen.ȱ
4.2 AccessingȱtheȱServerȱ
YouȱcanȱaccessȱtheȱServerȱinȱtwoȱways:ȱ
xUsingȱSSHȱSecureȱShellȱ(SSH)ȱClientȱtoȱaccessȱtheȱServerȱ(Recommended)ȱ
xUsingȱaȱSerialȱRSȬ232ȱcableȱ
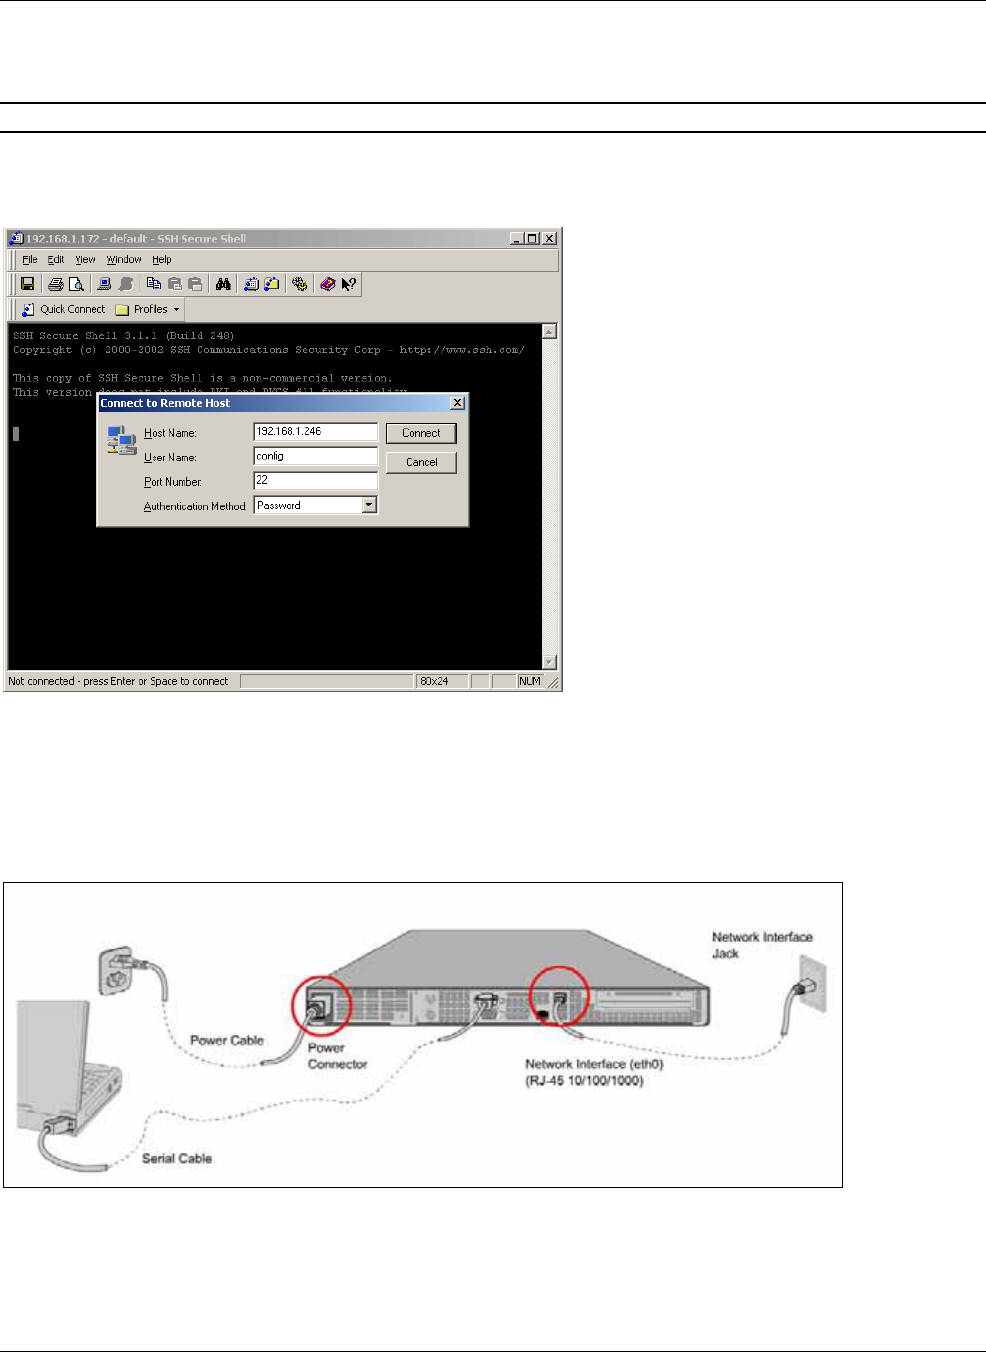
InstallingȱtheȱServerȱ
SpectraGuard®ȱEnterpriseȱInstallationȱGuideȱ
11
4.2.1 AccessingȱtheȱServerȱusingȱSSHȱ(Recommended)ȱ
ToȱaccessȱtheȱServerȱusingȱSSH,ȱperformȱtheȱfollowingȱsteps:ȱ
1. ConnectȱyourȱcomputerȱtoȱtheȱsameȱsubnetȱwhereȱtheȱServerȱisȱconnected.ȱ
Note:ȱTheȱdefaultȱIPȱaddressȱofȱtheȱServerȱisȱ192.168.1.246.ȱ
2. Changeȱyourȱcomputer’sȱIPȱaddressȱtoȱ192.168.1.XXX,ȱforȱexample,ȱ192.168.1.244.ȱ
3. OpenȱSSHȱonȱyourȱcomputerȱandȱpressȱ<Enter>ȱorȱ<Space>ȱonȱtheȱSSHȱSecureȱShellȱdialog.ȱ
4. AccessȱtheȱdefaultȱServerȱIPȱaddress,ȱ192.168.1.246ȱasȱshownȱinȱtheȱfollowingȱfigure.ȱ
ȱ
Figure 13. Open SSH
5. LoginȱusingȱtheȱUsername:ȱconfigȱandȱPassword:ȱconfig.ȱ
4.2.2 AccessingȱtheȱServerȱusingȱaȱSerialȱCableȱ
Alternatively,ȱyouȱcanȱaccessȱtheȱServerȱusingȱaȱSerialȱRSȬ232ȱcableȱasȱshownȱinȱtheȱfollowingȱfigureȱandȱthenȱfollowingȱtheȱ
stepsȱlistedȱbelowȱtheȱfigure.ȱ
ȱ
Figure 14. Connect the Server to your Computer using a Serial Cable
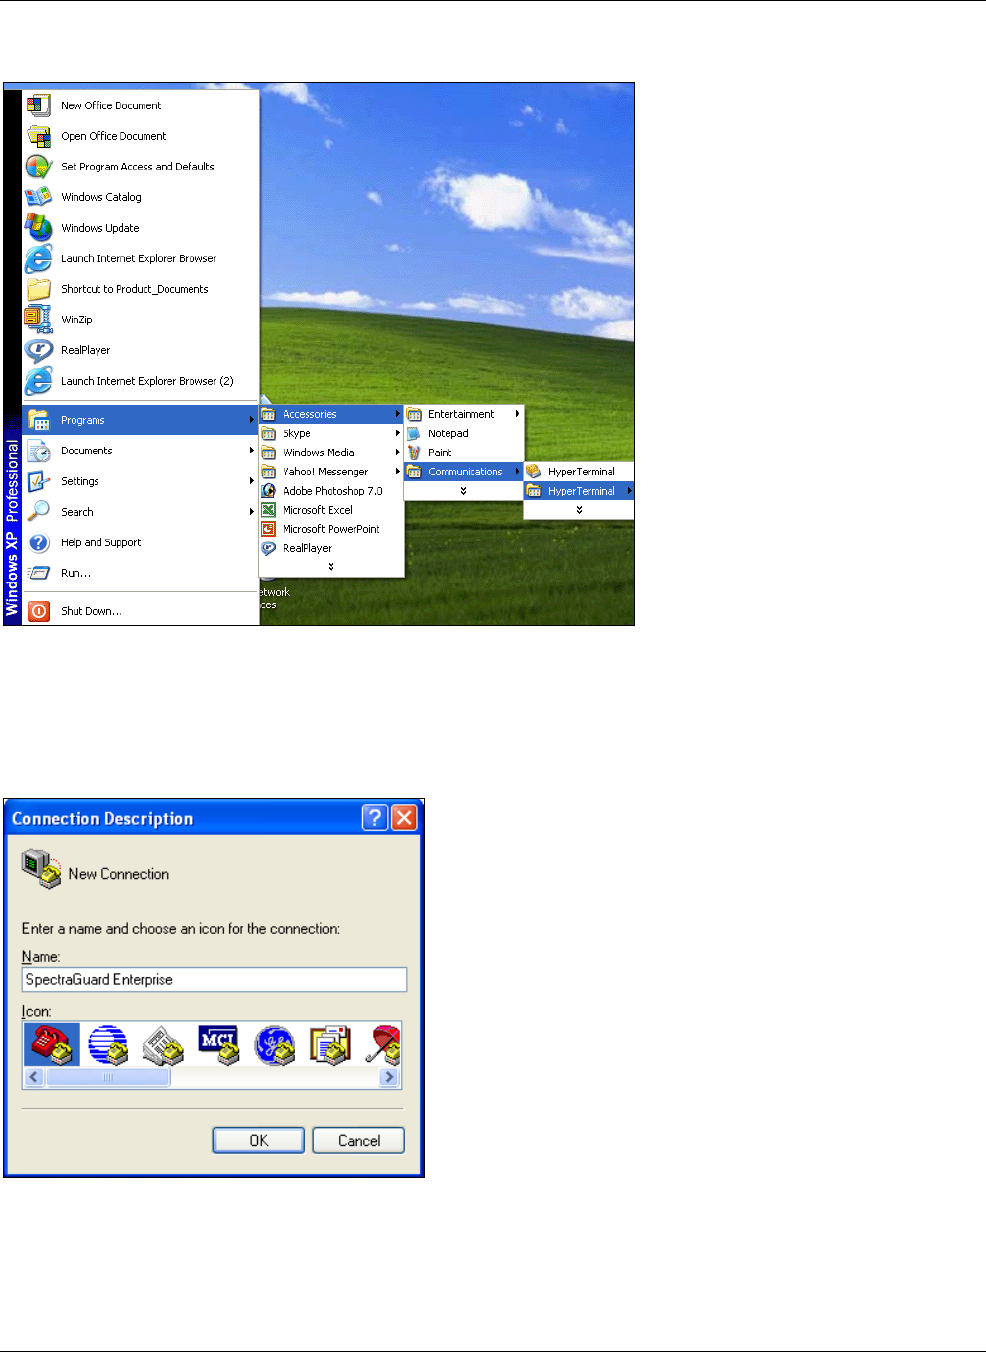
InstallingȱtheȱServerȱ
SpectraGuard®ȱEnterpriseȱInstallationȱGuideȱ
12ȱ
1. ForȱWindowsȱXP,ȱlaunchȱtheȱHyperTerminalȱapplicationȱbyȱclickingȱStartÆȱProgramsÆȱAccessoriesÆȱ
CommunicationsÆȱHyperTerminalȱonȱyourȱdesktop.ȱ
ȱ
ȱ
Figure 15. Launch HyperTerminal Application
2. DefineȱaȱnewȱHyperTerminalȱconnection.ȱ
xSelectȱanȱiconȱtoȱidentifyȱtheȱnewȱconnection.ȱ
xTypeȱtheȱuserȱdefinedȱnameȱforȱtheȱHyperTerminalȱconnectionȱinȱtheȱNameȱfieldȱ
xClickȱ<OK>ȱonȱtheȱConnectionȱDescriptionȱdialog.ȱ
ȱ
Figure 16. Define a New HyperTerminal Connection for the system
3. SpecifyȱtheȱHyperTerminalȱconnectionȱdetailsȱbyȱselectingȱorȱenteringȱtheȱappropriateȱconnectionȱdetailsȱandȱclickingȱ
<OK>ȱonȱtheȱConnectȱToȱdialog.ȱ
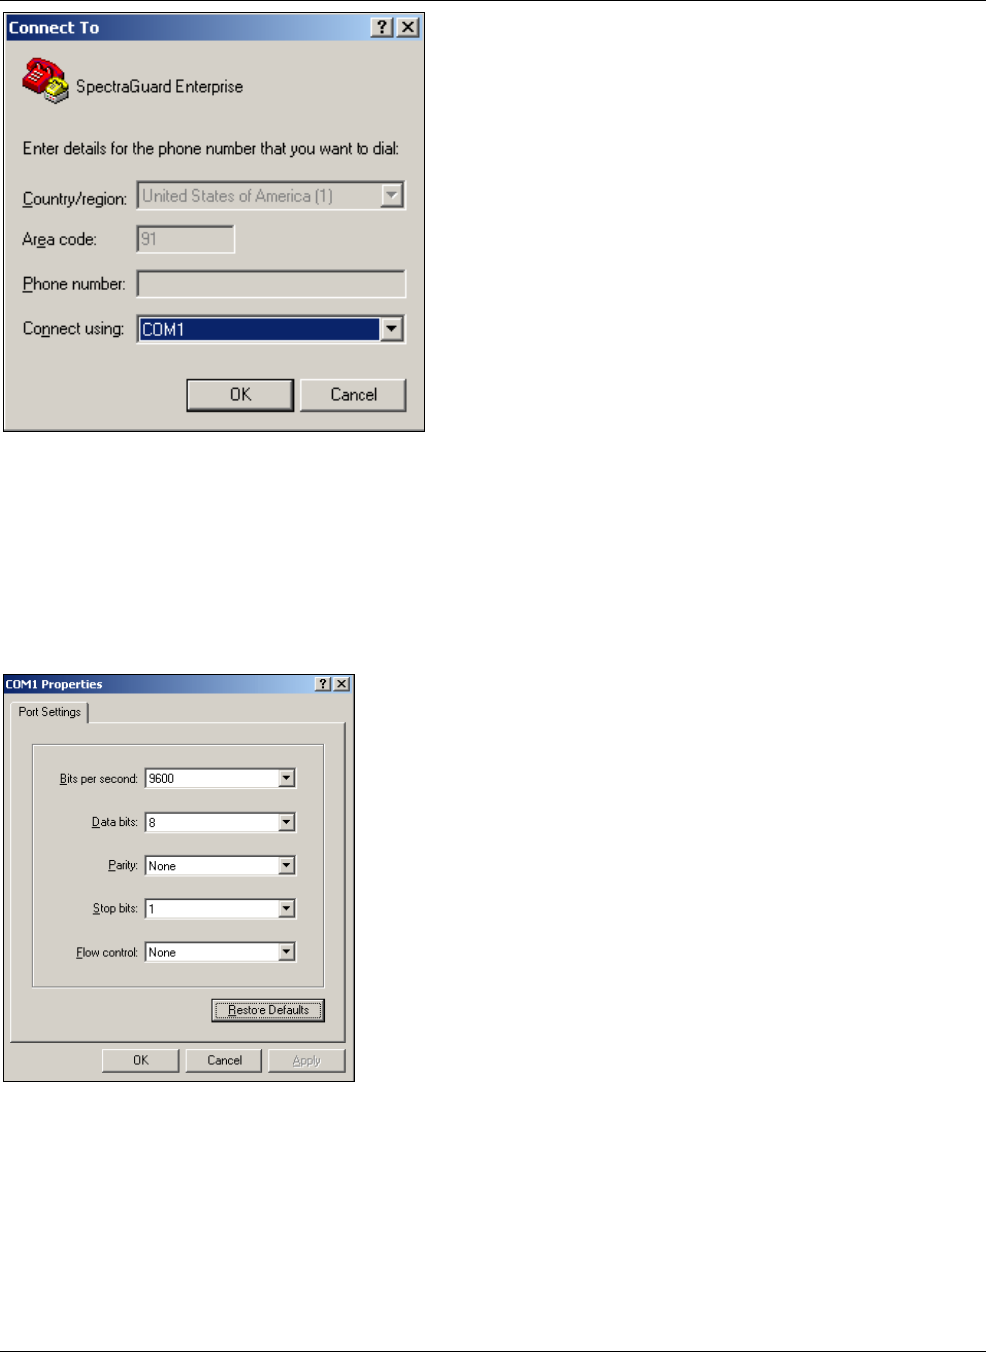
InstallingȱtheȱServerȱ
SpectraGuard®ȱEnterpriseȱInstallationȱGuideȱ
13
ȱ
Figure 17. Specify HyperTerminal Connection Details
4. Editȱtheȱserialȱportȱsettingsȱasȱfollowsȱorȱclickȱ<RestoreȱDefaults>ȱtoȱensureȱproperȱcommunicationȱbetweenȱtheȱServerȱ
andȱyourȱcomputer.ȱ
xBitsȱperȱsecond:ȱ9600ȱ
xDataȱbits:ȱ8ȱ
xParity:ȱNoneȱ
xStopȱbits:ȱ1ȱ
xFlowȱcontrol:ȱNoneȱ
ȱ
Figure 18. Edit Serial Port Settings
5. Clickȱ<OK>ȱonȱtheȱCOMȱPropertiesȱdialog.ȱ
6. Pressȱ<Enter>ȱorȱ<Space>ȱonȱtheȱHyperTerminalȱscreen.ȱTheȱloginȱpromptȱappears.ȱ
7. LoginȱusingȱtheȱUsername:ȱconfigȱandȱPassword:ȱconfig.ȱ

InstallingȱtheȱServerȱ
SpectraGuard®ȱEnterpriseȱInstallationȱGuideȱ
14ȱ
Important:ȱIfȱyouȱareȱconfiguringȱtheȱServerȱforȱHAȱmode,ȱyouȱcanȱskipȱtheȱServerȱInitializationȱandȱSetupȱwizardȱandȱgoȱtoȱtheȱconfigȱ
prompt.ȱChangeȱtheȱconfigȱshellȱpassword,ȱsetȱtheȱtimeȱzone,ȱdateȱandȱtime,ȱsetȱtheȱServerȱID,ȱandȱthenȱuseȱtheȱsetȱhaȱcommandȱtoȱ
configureȱtheȱServerȱinȱHAȱmode.ȱ
4.3 AccessingȱtheȱServerȱInitializationȱandȱSetupȱWizardȱ
TheȱsimpleȱandȱintuitiveȱServerȱInitializationȱandȱSetupȱWizardȱallowsȱyouȱtoȱmapȱtheȱBackspaceȱkey,ȱchangeȱtheȱ
configurationȱpassword,ȱsetȱtheȱdateȱandȱtimeȱandȱtheȱtimeȱzone,ȱchangeȱtheȱnetworkȱsettings,ȱandȱsetȱtheȱServerȱIDȱofȱtheȱ
Server.ȱYouȱcanȱretainȱtheȱdefaultȱvaluesȱatȱeachȱstepȱbyȱpressingȱ<Enter>.ȱJustȱfollowȱtheȱinstructionsȱinȱtheȱInitializationȱandȱ
SetupȱWizardȱtoȱconfigureȱtheȱServer.ȱTheȱwizardȱguidesȱyouȱthroughȱtheȱrestȱofȱtheȱsetupȱofȱtheȱServer.ȱ
4.3.1 ConfigureȱtheȱBackspaceȱKeyȱ
MapȱtheȱBackspaceȱkeyȱtoȱworkȱproperlyȱusingȱtheȱsetȱeraseȱcommandȱasȱshownȱinȱtheȱfollowingȱfigure.ȱ
ȱ
Figure 19. Map the Backspace key
TheȱServerȱInitializationȱandȱSetupȱWizardȱappearsȱasȱshownȱinȱtheȱfollowingȱfigure.ȱ
ȱ
Figure 20. Server Initialization and Setup Wizard Screen
4.3.2 Stepȱ1:ȱChangeȱConfigȱShellȱPasswordȱ
Forȱsecurityȱreasons,ȱAirTightȱrecommendsȱthatȱyouȱchangeȱtheȱconfigȱshellȱpassword.ȱTheȱServerȱdeliberatelyȱavoidsȱstrongȱ
passwordȱcheckingȱbecauseȱitȱdoesȱnotȱwantȱtoȱforceȱpasswordsȱthatȱareȱdifficultȱtoȱremember.ȱ
Theȱfollowingȱfigureȱshowsȱhowȱtoȱchangeȱtheȱconfigȱshellȱpassword.ȱ
ȱ

InstallingȱtheȱServerȱ
SpectraGuard®ȱEnterpriseȱInstallationȱGuideȱ
15
Figure 21. Change Config Shell Password
4.3.3 Stepȱ2:ȱChangeȱNetworkȱSettingsȱ
TheȱnetworkȱsettingsȱofȱtheȱServerȱspecifyȱitsȱuniqueȱIPȱaddressȱonȱtheȱnetwork.ȱSensorsȱuseȱthisȱIPȱaddressȱtoȱidentifyȱtheȱ
Server.ȱTheȱdefaultȱIPȱaddressȱassignedȱtoȱtheȱServerȱisȱ192.168.1.246.ȱ
Important:ȱNoteȱtheȱnetworkȱsettingsȱonȱpaper.ȱIfȱyouȱforgetȱtheȱnetworkȱsettings,ȱyouȱcanȱnoȱlongerȱaccessȱtheȱServerȱoverȱtheȱnetworkȱ
afterȱitȱisȱrebooted.ȱUseȱtheȱSerialȱcableȱtoȱaccessȱtheȱServerȱandȱchangeȱitsȱnetworkȱsettings.ȱ
Toȱchangeȱtheȱnetworkȱsettings,ȱprovideȱtheȱfollowingȱinput.ȱ
xIPȱAddress:ȱChooseȱanȱIPȱaddressȱthatȱisȱcompatibleȱwithȱtheȱnetworkȱsegmentȱonȱwhichȱtheȱServerȱisȱtoȱbeȱ
connected.ȱTheȱServerȱshouldȱbelongȱtoȱtheȱsameȱsubnet.ȱ
xSubnetȱMask:ȱEnterȱtheȱmaskȱofȱtheȱnetworkȱsegmentȱtoȱwhichȱtheȱServerȱisȱtoȱbeȱconnected.ȱ
xGatewayȱIPȱAddress:ȱEnterȱtheȱIPȱaddressȱofȱtheȱgateway,ȱforȱtheȱsubnetȱonȱwhichȱthisȱServerȱisȱtoȱbeȱconnected.ȱ
Ethernetȱtrafficȱfromȱtheȱsubnetȱisȱforwardedȱtoȱanotherȱnetworkȱthroughȱtheȱgateway.ȱ
xPrimaryȱDNSȱIPȱAddress:ȱSpecifyȱtheȱIPȱaddressȱofȱtheȱprimaryȱDNSȱServerȱusedȱbyȱtheȱenterpriseȱserverȱtoȱresolveȱ
DNSȱentries.ȱ
xSecondaryȱDNSȱIPȱAddress:ȱSpecifyȱtheȱIPȱaddressȱofȱtheȱsecondaryȱ(alternate)ȱDNSȱServerȱusedȱbyȱtheȱenterpriseȱ
serverȱtoȱresolveȱDNSȱentries.ȱ
xTertiaryȱDNSȱIPȱAddress:ȱSpecifyȱtheȱIPȱaddressȱofȱtheȱtertiaryȱ(alternate)ȱDNSȱServerȱusedȱbyȱtheȱenterpriseȱserverȱ
toȱresolveȱDNSȱentries.ȱ
xDNSȱSuffix:ȱAppendȱthisȱsuffixȱtoȱtheȱunqualifiedȱdomainȱnameȱtoȱgenerateȱaȱfullyȱqualifiedȱdomainȱname.ȱ
Theȱfollowingȱfiguresȱshowȱhowȱtoȱchangeȱtheȱnetworkȱsettings.ȱ
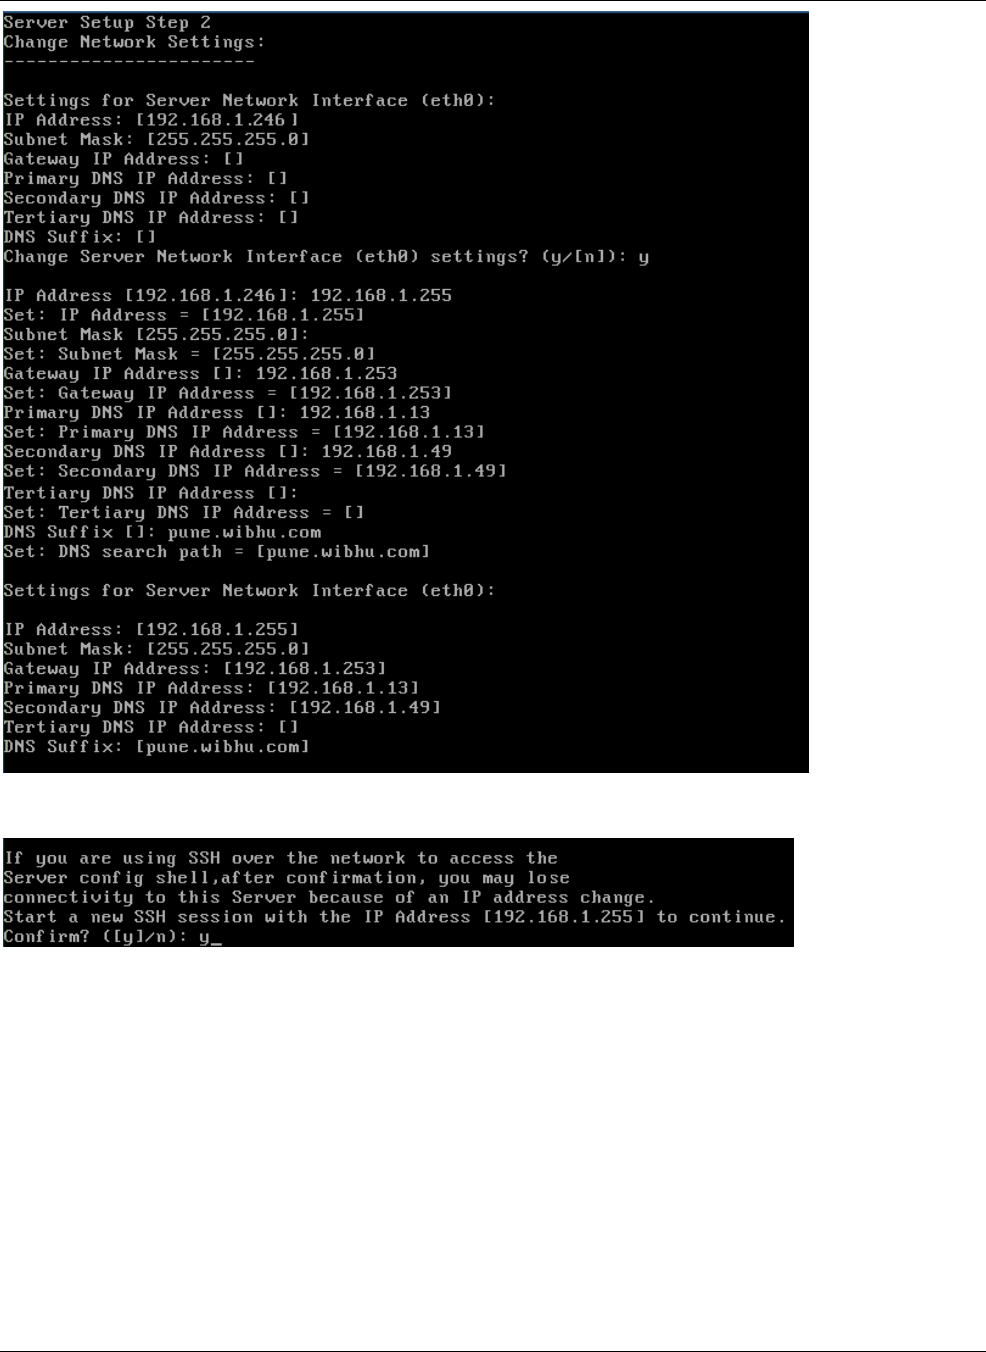
InstallingȱtheȱServerȱ
SpectraGuard®ȱEnterpriseȱInstallationȱGuideȱ
16ȱ
ȱ
Figure 22. Change Network Settings
ȱ
Figure 23. Confirm Network Settings Changes
4.3.4 Stepȱ3:ȱSetȱServerȱTimeȱZone,ȱDateȱandȱTimeȱSettingsȱ
ToȱsetȱtheȱTimeȱZoneȱ(TZ)ȱcorrectly,ȱselectȱaȱcontinent,ȱaȱcountry,ȱandȱthenȱaȱtimeȱzoneȱregion.ȱYouȱcanȱuseȱtheȱNetworkȱTimeȱ
ProtocolȱNTPȱ(NTP)ȱtoȱsynchronizeȱtheȱServerȱclockȱwithȱanotherȱServerȱorȱreferenceȱtimeȱsourceȱbyȱspecifyingȱtheȱIPȱaddressȱ
orȱtheȱURLȱofȱtheȱNTPȱServer.ȱ
Theȱfollowingȱfiveȱfiguresȱshowȱhowȱtoȱchangeȱtheȱtimeȱzoneȱsettingsȱandȱtheȱdateȱandȱtimeȱsettings.ȱ

InstallingȱtheȱServerȱ
SpectraGuard®ȱEnterpriseȱInstallationȱGuideȱ
17
ȱ
Figure 24. Specify Continent and Country for Time Zone Settings
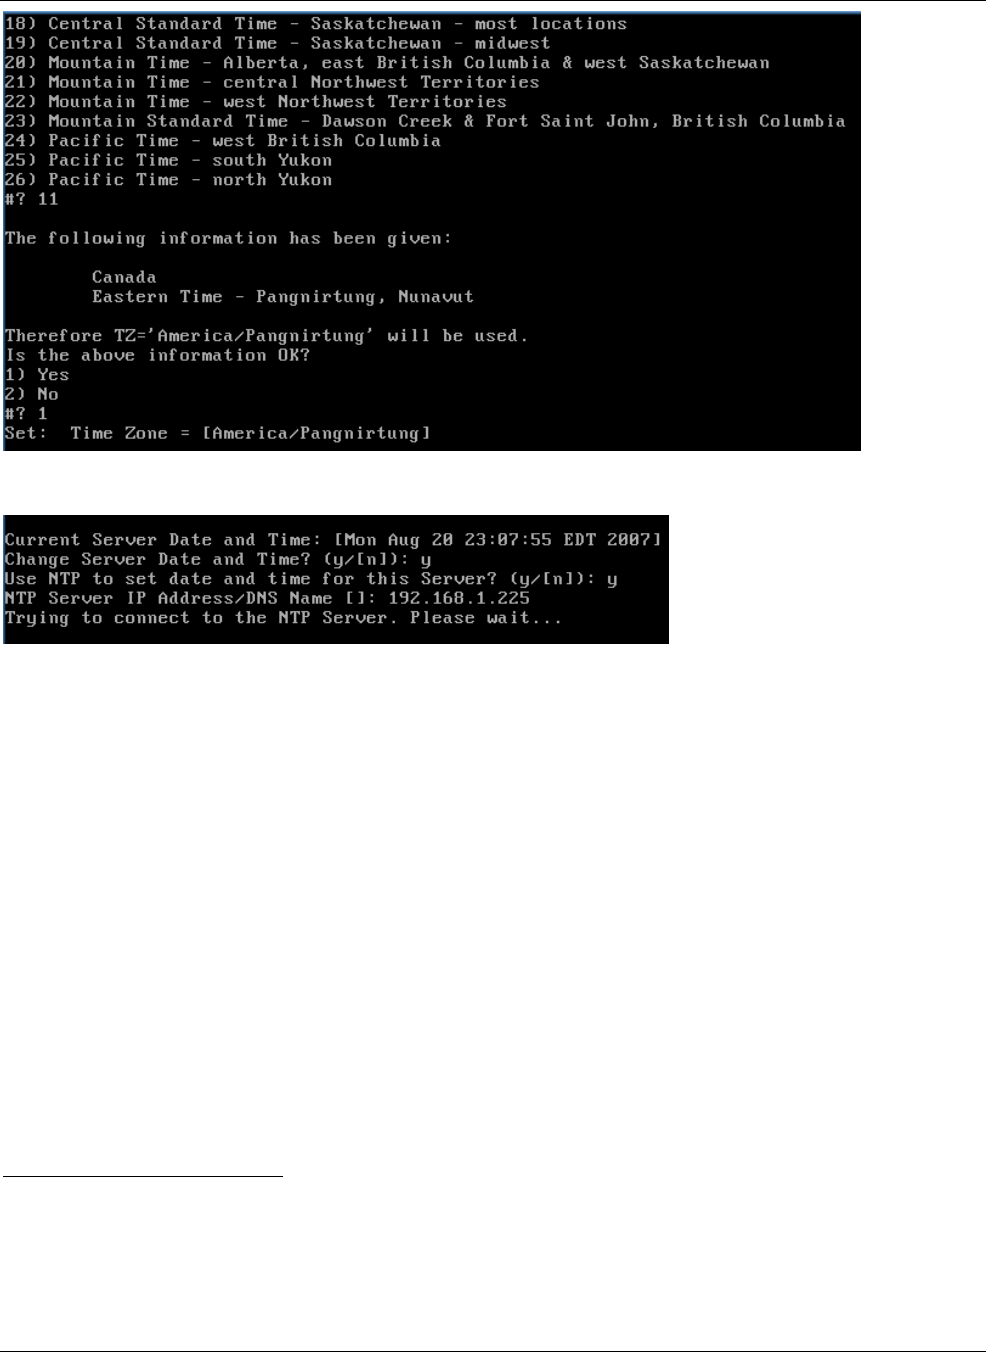
InstallingȱtheȱServerȱ
SpectraGuard®ȱEnterpriseȱInstallationȱGuideȱ
18ȱ
ȱ
Figure 25. Select Time Zone Region
ȱ
Figure 26. Specify IP Address of NTP Server for Synchronization
YouȱcanȱalsoȱspecifyȱtheȱtimeȱzoneȱusingȱtheȱPosixȱTZȱ1formatȱasȱshownȱinȱtheȱfollowingȱfigure.ȱ
ȱȱȱȱȱȱȱȱȱȱȱȱȱȱȱȱȱȱȱȱȱȱȱȱȱȱȱȱȱȱȱȱȱȱȱȱȱȱȱȱ ȱȱȱȱȱȱȱȱȱȱȱȱȱȱȱȱȱȱȱȱȱȱȱȱ
ȱ
1ȱInȱPosixȱTZȱsystems,ȱaȱuserȱcanȱspecifyȱtheȱtimeȱzoneȱbyȱmeansȱofȱtheȱTZȱenvironmentȱvariable.ȱTheȱformatȱusedȱwhenȱthereȱ
isȱnoȱDaylightȱSavingȱTimeȱ(orȱsummerȱtime)ȱinȱtheȱlocalȱtimeȱzoneȱisȱstdȱoffset,ȱwhereȱ‘std’ȱspecifiesȱtheȱnameȱofȱtheȱtimeȱ
zoneȱandȱ‘offset’ȱspecifiesȱtheȱtimeȱvalueȱoneȱmustȱaddȱtoȱtheȱlocalȱtimeȱtoȱgetȱaȱCoordinatedȱUniversalȱTimeȱvalue.ȱItȱhasȱaȱ
syntaxȱ[+ȱ|Ȭ]ȱhhȱ[:ȱmmȱ[:ȱss]].ȱThisȱisȱpositiveȱifȱtheȱlocalȱtimeȱzoneȱisȱwestȱofȱtheȱPrimeȱMeridianȱandȱnegativeȱifȱitȱisȱeast.ȱTheȱ
hourȱmustȱbeȱbetweenȱ0ȱandȱ24,ȱandȱtheȱminuteȱandȱsecondsȱbetweenȱ0ȱandȱ59.ȱ
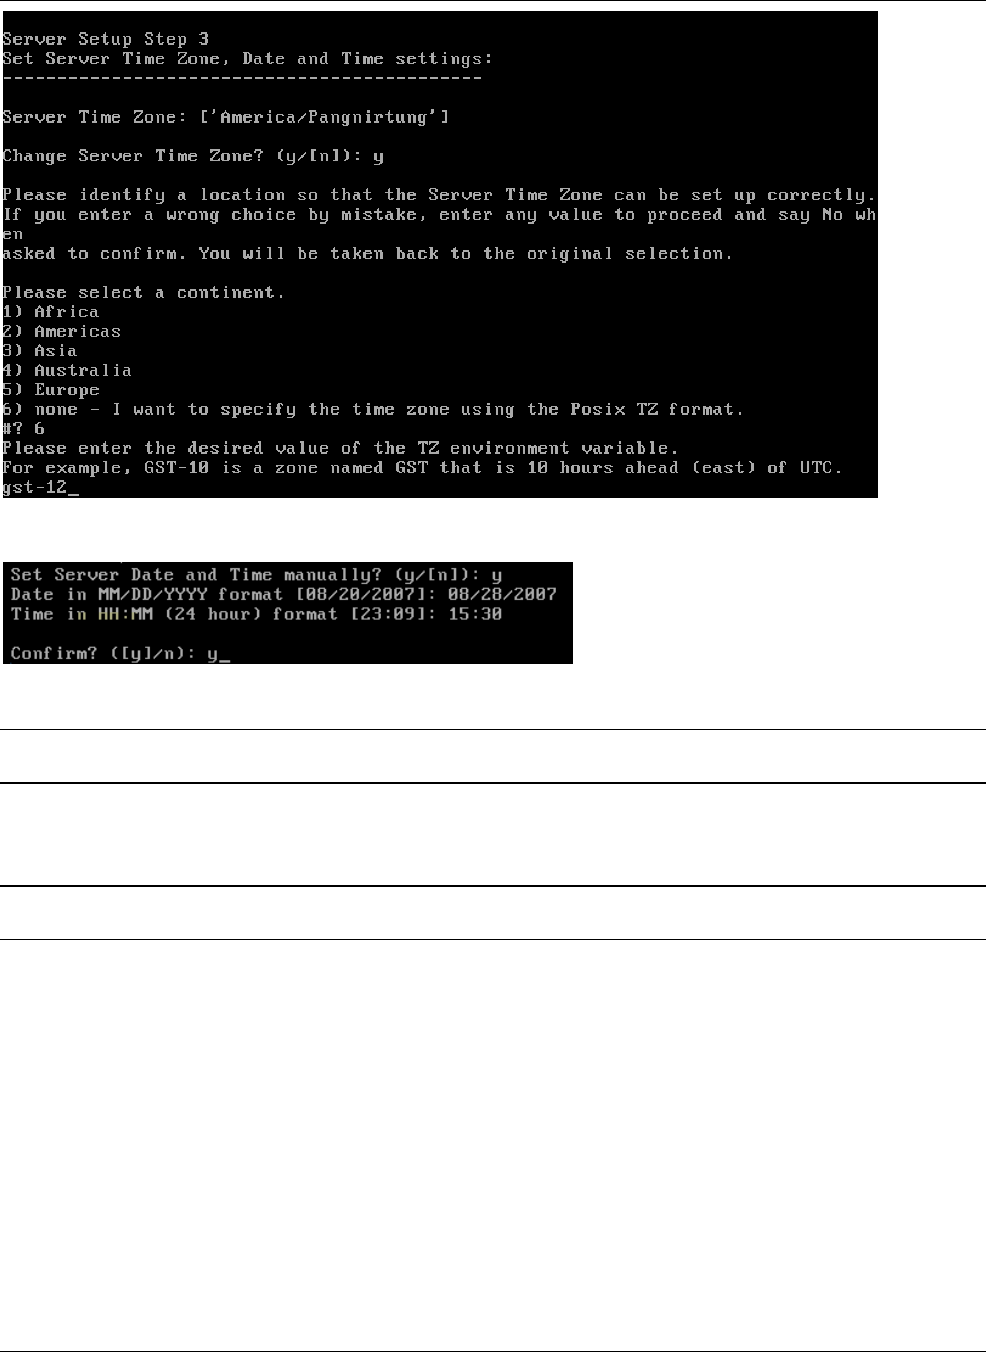
InstallingȱtheȱServerȱ
SpectraGuard®ȱEnterpriseȱInstallationȱGuideȱ
19
ȱ
Figure 27. Specify Time Zone using Posix TZ format
ȱ
Figure 28. Specify Date and Time
Important:ȱOnȱtheȱDateȱandȱTimeȱsettingsȱscreen,ȱifȱtheȱdayȱexceedsȱ31ȱandȱtheȱmonthȱexceedsȱ12,ȱtheȱsystemȱautomaticallyȱsetsȱtheȱdayȱ
toȱ31ȱandȱmonthȱtoȱ12.ȱ
4.3.5 Stepȱ4:ȱSetȱServerȱIDȱSettingsȱ
TheȱServerȱIDȱisȱidentifiesȱaȱuniqueȱServerȱinstanceȱwhenȱthereȱareȱmultipleȱServerȱinstancesȱonȱtheȱnetwork.ȱSensorsȱcanȱbeȱ
configuredȱtoȱcommunicateȱwithȱaȱspecificȱServerȱinstance.ȱTheȱdefaultȱServerȱIDȱisȱ1.ȱ
Recommended:ȱServerȱIDȱsettingȱisȱimportantȱonlyȱifȱyouȱhaveȱaȱmultiȱServerȱinstallation.ȱIfȱyouȱhaveȱonlyȱoneȱServer,ȱtheȱServerȱIDȱ
shouldȱbeȱleftȱatȱtheȱdefaultȱvalueȱ1.ȱ
TheȱfollowingȱfigureȱshowsȱhowȱtoȱsetȱtheȱServerȱID.ȱ
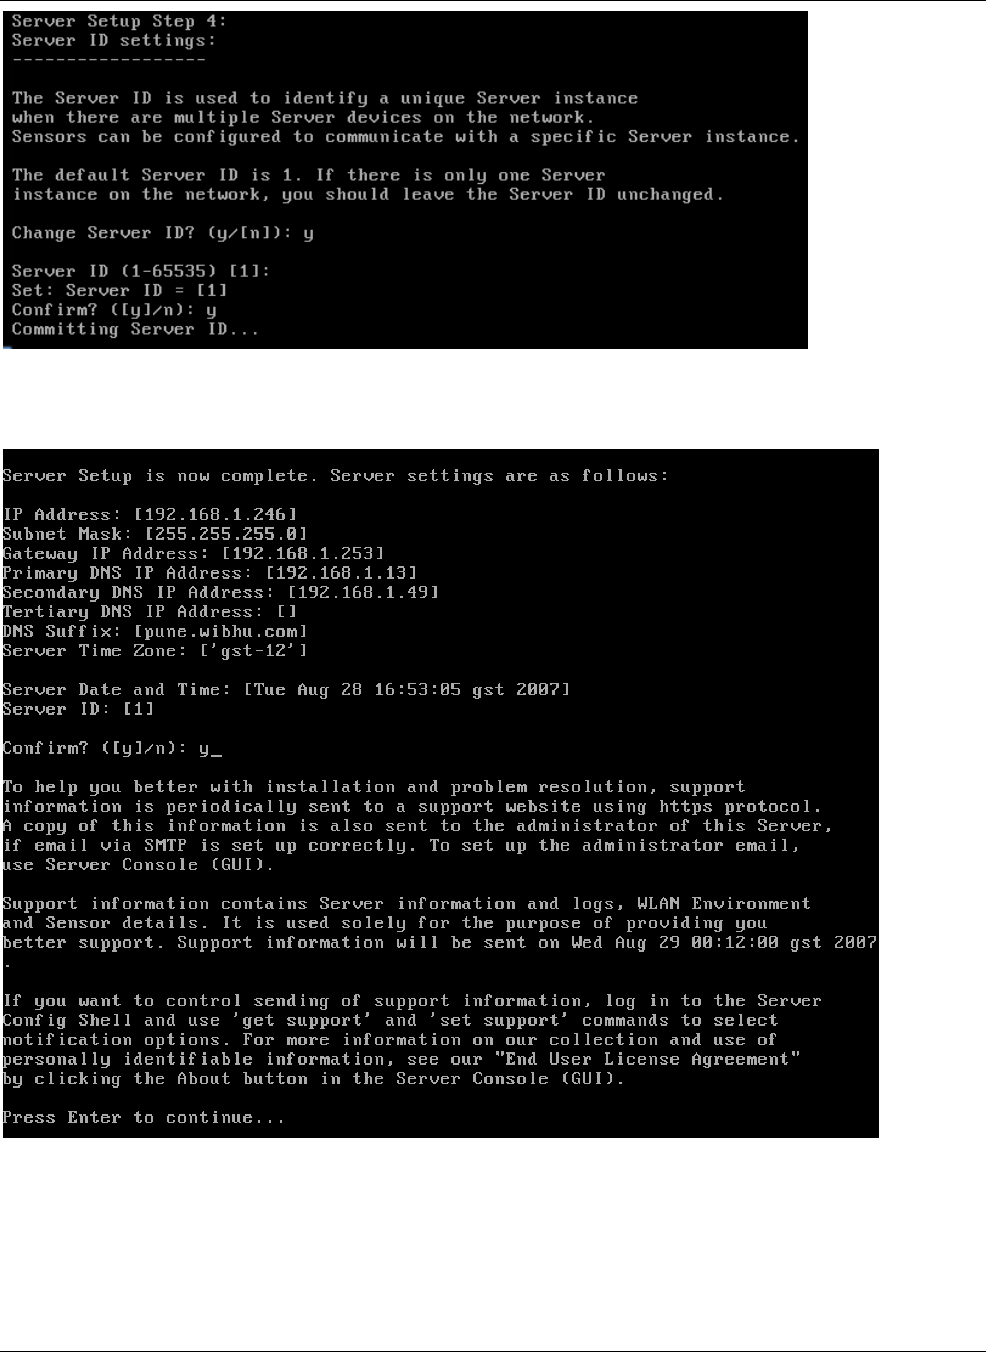
InstallingȱtheȱServerȱ
SpectraGuard®ȱEnterpriseȱInstallationȱGuideȱ
20ȱ
ȱ
Figure 29. Set Server ID
TheȱServerȱinitializationȱcompletionȱmessageȱscreenȱappearsȱasȱshownȱinȱtheȱfollowingȱfigure.ȱ
ȱ
Figure 30. Server Setup Completion Screen
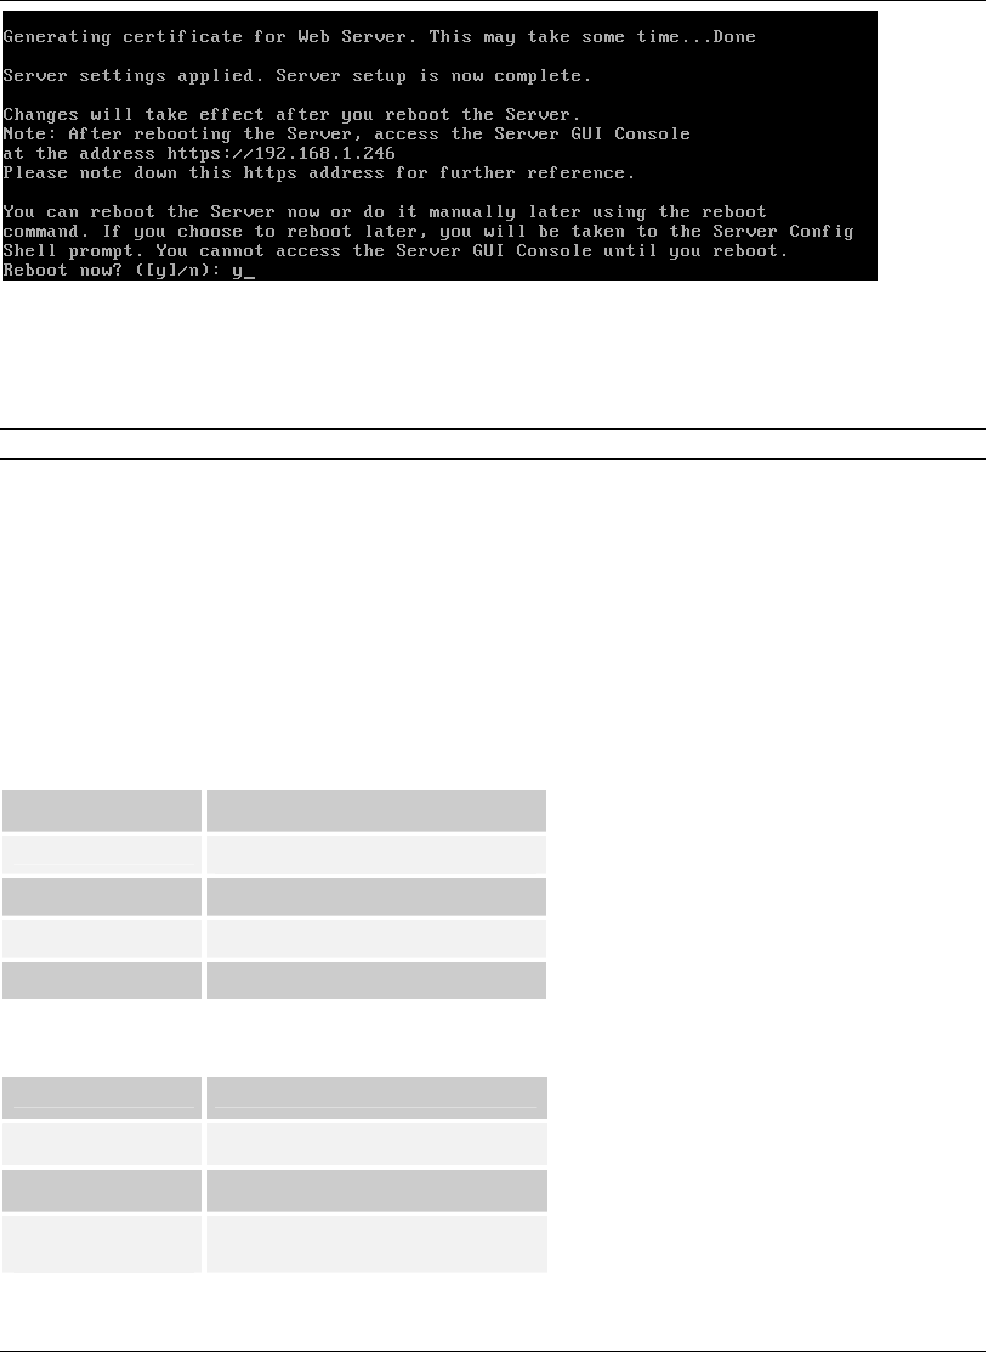
InstallingȱtheȱServerȱ
SpectraGuard®ȱEnterpriseȱInstallationȱGuideȱ
21
ȱ
Figure 31. Generating Certificate for Web Server
PressȱyȱtoȱrebootȱtheȱServerȱforȱtheȱchangesȱtoȱtakeȱeffect.ȱIfȱyouȱchooseȱtoȱrebootȱlaterȱpressȱn.ȱTheȱServerȱConfigȱShell.promptȱ
appears.ȱYouȱneedȱtoȱrebootȱtheȱServerȱonȱcompletionȱofȱtheȱInitializationȱandȱSetupȱWizardȱbeforeȱyouȱaccessȱtheȱServerȱ
Consoleȱ(“GUI”).ȱ
Note:ȱOnȱtheȱServerȱConfigȱShellȱprompt,ȱtypeȱtheȱcommandȱhelpȱtoȱviewȱtheȱlistȱofȱavailableȱcommands.ȱ
4.3.6 SetȱupȱtheȱServerȱDNSȱEntryȱ
AddȱaȱDNSȱentryȱ‘wifiȬsecurityȬserver’ȱinȱyourȱorganization’s/enterpriseȱDNSȱServer.ȱThisȱentryȱshouldȱpointȱtoȱtheȱNetworkȱ
InterfaceȱIPȱAddressȱofȱtheȱServerȱconfiguredȱinȱStepȱ2:ȱChangeȱNetworkȱSettings.ȱ
Addingȱthisȱentryȱservesȱtwoȱpurposes:ȱ
xSensorsȱcanȱconnectȱtoȱtheȱServerȱwithȱzeroȱconfigurationȱifȱtheyȱareȱconnectedȱtoȱaȱDHCPȱenabledȱsubnet.ȱ
xYouȱcanȱaccessȱtheȱServerȱusingȱtheȱaddressȱ‘https://wifiȬsecurityȬserver’.ȱ
4.4 LaunchingȱtheȱSystemȱConsoleȱ(GUI)ȱ
4.4.1 SystemȱRequirementsȱ
Ensureȱthatȱtheȱfollowingȱhardwareȱandȱsoftwareȱisȱavailableȱonȱyourȱcomputerȱbeforeȱlaunchingȱtheȱsystem.ȱ
Table 9. Hardware Requirements
Hardware Requirements
Processor Intel P4 X86 architecture platform (or
equivalent)
Processor Speed 1.4 GHz (minimum)
Memory 512 MB (minimum)
Screen Resolution 1024X768 (recommended)
ȱ
Table 10. Software Requirements
Software Requirements
Operating System
(OS) Windows 2000 or XP
Browser Internet Explorer (IE) 5.5 or higher
Java Runtime
Environment (JRE)
version
JRE 1.6.0 or above
ȱ
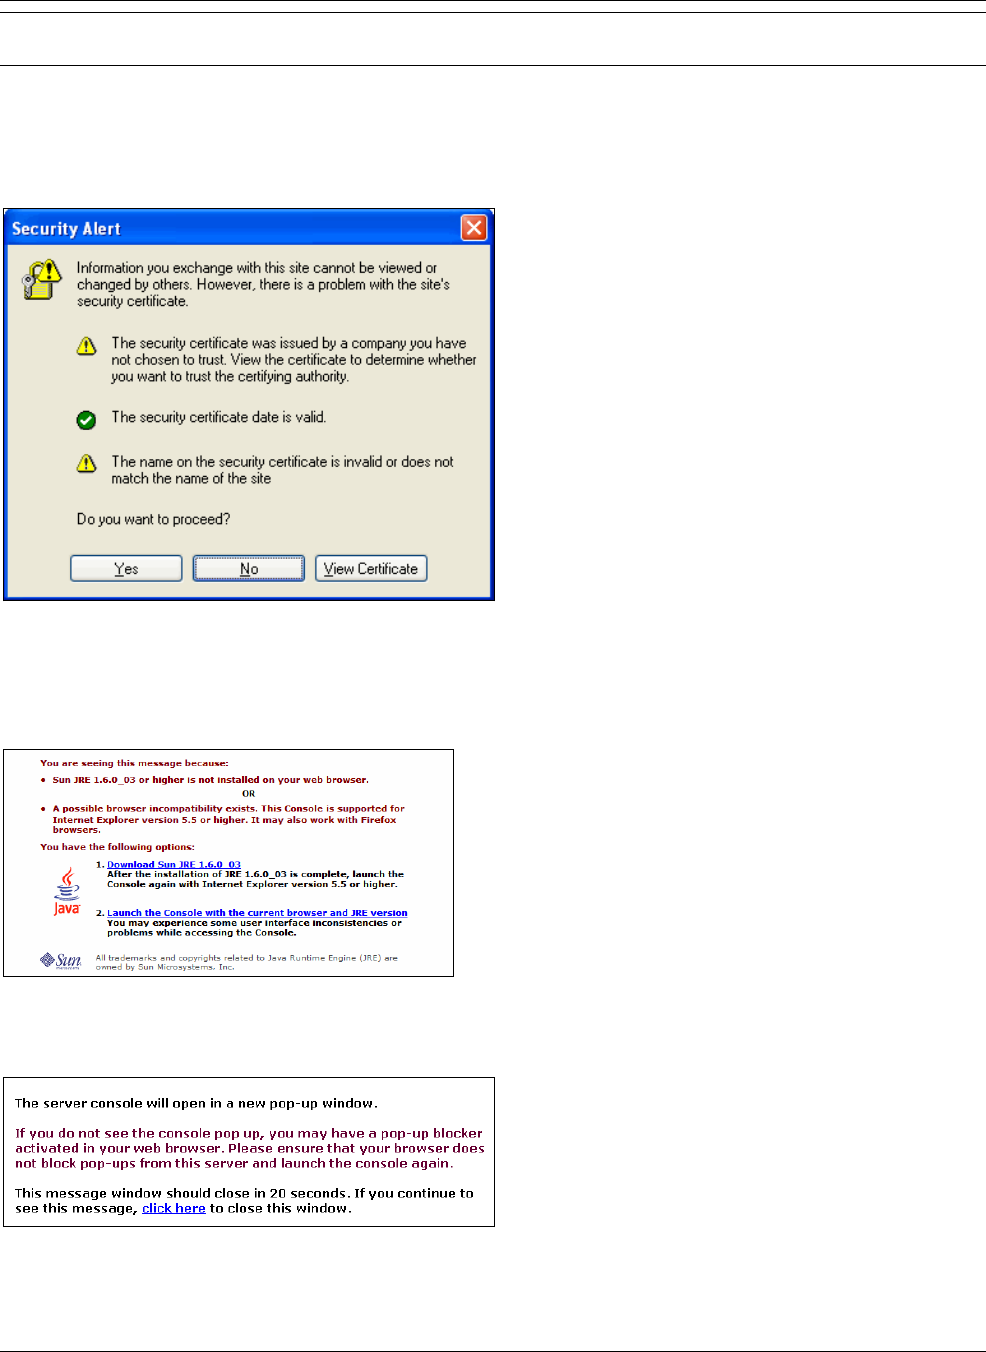
InstallingȱtheȱServerȱ
SpectraGuard®ȱEnterpriseȱInstallationȱGuideȱ
22ȱ
Recommended:ȱInȱIE,ȱunderȱTools
Æ
InternetȱOptions
Æ
ȱAdvanced,ȱdeselectȱtheȱoption,ȱReuseȱwindowsȱforȱlaunchingȱshortcuts.ȱ
Additionally,ȱunderȱTools
Æ
PopȬupȱBlocker,ȱselectȱTurnȱOffȱPopȬupȱBlocker.ȱ
ToȱlaunchȱtheȱConsole,ȱperformȱtheȱfollowingȱsteps:ȱ
1. LaunchȱaȱWebȱbrowserȱsuchȱasȱIEȱ5.5ȱorȱhigherȱonȱaȱclientȱcomputerȱonȱtheȱnetworkȱthatȱhasȱWindowsȱ2000ȱorȱXPȱ
OperatingȱSystemȱ(OS).ȱ
2. EnterȱtheȱdefaultȱIPȱAddressȱforȱtheȱServer,ȱthatȱis,ȱ192.168.1.246.ȱ
3. Clickȱ<Yes>ȱonȱeachȱofȱtheȱsecurityȱmessageȱpopȬupȱdialogsȱtoȱproceed.ȱ
ȱ
Figure 32. Web Site Certificate Verification
Theȱdialogȱshownȱbelowȱappearsȱunderȱtheȱfollowingȱconditions:ȱ
xIfȱtheȱcorrectȱversion,ȱthatȱis,ȱSunȱJREȱ1.6.0ȱisȱnotȱdetectedȱonȱyourȱcomputerȱ
xIfȱtheȱversionȱinstalledȱhasȱnotȱbeenȱactivatedȱforȱusageȱ
ȱ
Figure 33. Installing JRE
4. DisableȱallȱpopȬupȱblockersȱactiveȱonȱyourȱWebȱbrowserȱtoȱeliminateȱtheȱwarningȱmessageȱshownȱinȱtheȱfollowingȱfigure.ȱ
ȱ
Figure 34. Pop-up Blocker Message
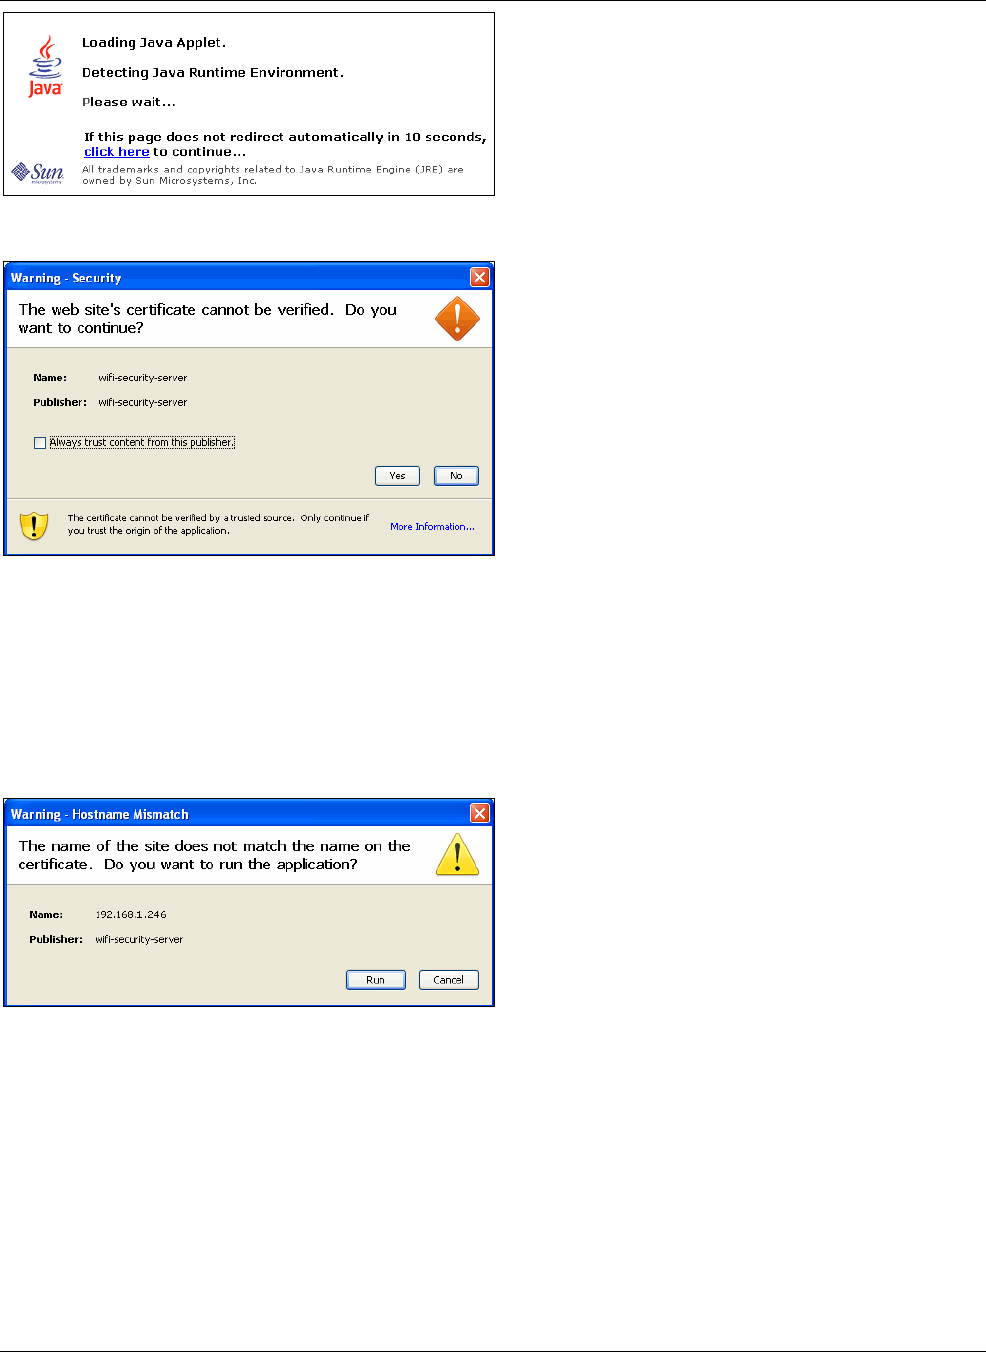
InstallingȱtheȱServerȱ
SpectraGuard®ȱEnterpriseȱInstallationȱGuideȱ
23
ȱ
Figure 35. Detecting Java Runtime Environment (JRE)
ȱ
Figure 36. Web Site Certificate Warning
5. AddȱaȱDNSȱentryȱforȱtheȱhostnameȱwifiȬsecurityȬserverȱandȱtheȱIPȱaddressȱofȱtheȱServerȱinȱtheȱhostsȱfileȱofȱtheȱclientȱ
computerȱtoȱeliminateȱtheȱwarningȱshownȱinȱtheȱfollowingȱfigure.ȱ
Theȱhostsȱfileȱisȱlocatedȱatȱtheȱfollowingȱpath:ȱ
xC:\WINNT\system32\drivers\etc\hosts,ȱforȱWindowsȱ2000ȱ
xC:\windows\system32\drivers\etc\hosts,ȱforȱWindowsȱXPȱ
6. SaveȱtheȱhostsȱfileȱandȱrestartȱtheȱbrowserȱtoȱinvokeȱtheȱConsole.ȱ
ȱ
Figure 37. Hostname Mismatch Warning
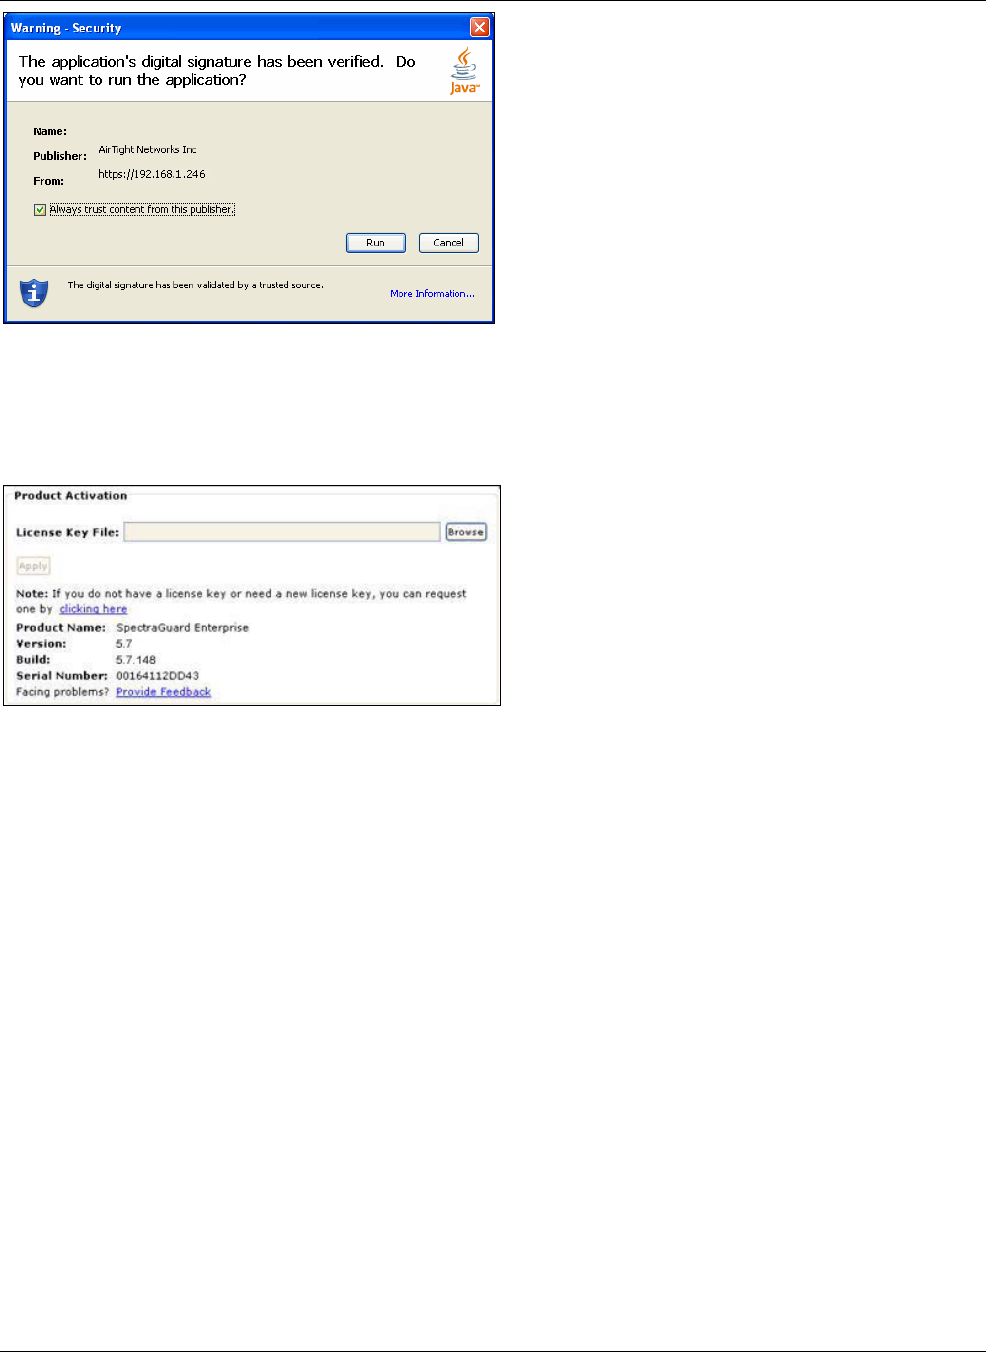
InstallingȱtheȱServerȱ
SpectraGuard®ȱEnterpriseȱInstallationȱGuideȱ
24ȱ
ȱ
Figure 38. Digital Signature Verified
4.5 ActivatingȱtheȱLicenseȱ
1. SaveȱtheȱlicenseȱkeyȱfileȱshippedȱwithȱtheȱServerȱonȱyourȱdesktop.ȱ
2. Browseȱtoȱtheȱlicenseȱkeyȱfileȱandȱselectȱit.ȱClickȱ<Apply>.ȱ
ȱ
Figure 39. Activate License
Ifȱtheȱlicenseȱkeyȱisȱvalid,ȱyouȱwillȱseeȱtheȱLoginȱscreen.ȱOtherwise,ȱyouȱwillȱseeȱanȱerrorȱmessage.ȱ

InstallingȱtheȱSensorȱ
SpectraGuard®ȱEnterpriseȱInstallationȱGuideȱ
25
Chapterȱ5 InstallingȱtheȱSensorȱȱ
SensorȱisȱtheȱprobeȱthatȱmonitorsȱyourȱnetworkȱandȱcommunicatesȱwithȱtheȱServerȱtoȱguardȱyourȱcorporateȱnetworkȱagainstȱ
overȬtheȬairȱattacks.ȱTheȱSensorȱmustȱbeȱpluggedȱtoȱyourȱcorporateȱnetworkȱtoȱperformȱtheȱaboveȱoperations.ȱ
Sensorȱcanȱbeȱconfiguredȱinȱoneȱofȱtheȱfollowingȱthreeȱmodes:ȱ
xSensorȱOnlyȱ(SO)ȱMode:ȱThisȱisȱtheȱdefaultȱmode.ȱInȱthisȱmode,ȱtheȱSensorȱshouldȱbeȱconnectedȱintoȱanȱaccessȱportȱ
onȱaȱswitch.ȱItȱthenȱmonitorsȱaȱsingleȱVLANȱthatȱisȱconfiguredȱonȱthatȱaccessȱport.ȱTheȱwirelessȱinterfaceȱofȱtheȱ
Sensorȱisȱenabled.ȱ
xNetworkȱDetectorȱ(ND)ȱMode:ȱThisȱmodeȱneedsȱtoȱbeȱexplicitlyȱconfigured.ȱInȱthisȱmode,ȱtheȱNDȱshouldȱbeȱ
connectedȱintoȱaȱtrunkȱportȱ(802.1Qȱcapable)ȱonȱaȱswitch.ȱItȱthenȱmonitorsȱmultipleȱVLANsȱthatȱareȱconfiguredȱonȱ
thatȱtrunkȱportȱandȱareȱchosenȱbyȱtheȱuserȱusingȱtheȱNDȱCLI.ȱTheȱwirelessȱinterfaceȱofȱtheȱNDȱisȱdisabled.ȱAnȱSSȬ200Ȭ
ATȱSensorȱinȱNDȱmodeȱcanȱmonitorȱupȱtoȱ32ȱVLANs.ȱSimilarly,ȱanȱSSȬ300ȬATȱcanȱmonitorȱuptoȱ100ȱVLANs.ȱ
xSensor/NDȱComboȱ(SNDC)ȱMode:ȱThisȱmodeȱneedsȱtoȱbeȱexplicitlyȱconfigured.ȱInȱthisȱmode,ȱtheȱSensorȱshouldȱbeȱ
connectedȱintoȱaȱtrunkȱportȱ(802.1Qȱcapable)ȱonȱaȱswitch.ȱItȱthenȱmonitorsȱmultipleȱVLANsȱthatȱareȱconfiguredȱonȱ
thatȱtrunkȱportȱandȱareȱchosenȱbyȱtheȱuserȱusingȱtheȱNDȱCLI.ȱTheȱwirelessȱinterfaceȱofȱtheȱSensorȱisȱenabled.ȱAȱSSȬ
200ȬATȱSensorȱinȱSNDCȱmodeȱcanȱmonitorȱupȱtoȱ4ȱVLAN.ȱSimilarly,ȱanȱSSȬ300ȬATȱcanȱmonitorȱuptoȱ16ȱVLANs.ȱ
Important:ȱToȱpreventȱabuseȱandȱintrusionȱbyȱunauthorizedȱpersonnel,ȱitȱisȱextremelyȱimportantȱtoȱinstallȱtheȱSensorȱsuchȱthatȱitȱisȱ
difficultȱtoȱunplugȱtheȱdeviceȱfromȱtheȱnetworkȱorȱfromȱtheȱpowerȱoutlet.ȱ
5.1 ZeroȱConfigurationȱofȱSensorsȱ
Zeroȱconfigurationȱisȱrequiredȱifȱtheȱfollowingȱconditionsȱareȱsatisfied:ȱ
xTheȱSensorȱisȱinȱSOȱmode.ȱ
xAȱDNSȱentryȱ‘wifiȬsecurityȬserver’ȱisȱsetȱupȱonȱallȱDNSȱServers.ȱThisȱentryȱshouldȱpointȱtoȱtheȱIPȱaddressȱofȱtheȱ
Server.ȱByȱdefaultȱtheȱSensorȱlooksȱforȱtheȱServerȱDNSȱentryȱ‘wifiȬsecurityȬserver’.ȱ
xSensorȱisȱplacedȱonȱaȱsubnetȱthatȱisȱDHCPȱenabled.ȱ
Important:ȱIfȱaȱSensorȱisȱplacedȱonȱaȱnetworkȱsegmentȱthatȱisȱseparatedȱfromȱtheȱServerȱbyȱaȱfirewall,ȱyouȱmustȱfirstȱopenȱportȱ3851ȱforȱ
UserȱDatagramȱProtocolȱ(UDP)ȱandȱTransportȱControlȱProtocolȱ(TCP)ȱbidirectionalȱtrafficȱonȱthatȱfirewall.ȱThisȱportȱnumberȱisȱassignedȱ
toȱAirTight®ȱNetworks.ȱIfȱmultipleȱSensorsȱareȱsetȱupȱtoȱconnectȱtoȱmultipleȱServers,ȱzeroȱconfigurationȱisȱnotȱpossible.ȱInȱthisȱcaseȱ
manualȱconfigurationȱofȱSensorsȱisȱneeded.ȱReferȱtoȱManuallyȱConfiguringȱtheȱSensorȱforȱdetails.ȱ
TheȱstepsȱtoȱinstallȱtheȱSensorȱwithȱnoȱconfigurationȱ(zeroȱconfiguration)ȱareȱasȱfollows.ȱ
xMountȱtheȱSensorȱ
xPowerȱupȱtheȱSensorȱ
xConnectȱtheȱSensorȱtoȱtheȱnetworkȱ
5.2 ConnectingȱtheȱSensorȱ
ThisȱinvolvesȱmountingȱtheȱSensor,ȱpoweringȱitȱup,ȱandȱconnectingȱitȱtoȱtheȱnetwork.ȱ
5.2.1 MountȱtheȱSSȬ200ȬATȱSensorȱ
TakeȱaȱconfiguredȱSensor,ȱthatȱis,ȱmakeȱsureȱthatȱtheȱSensorȱisȱgivenȱaȱstaticȱIPȱorȱtheȱsettingsȱhaveȱbeenȱchangedȱforȱDHCP.ȱ
NoteȱtheȱMACȱaddressȱandȱtheȱIPȱaddressȱofȱtheȱSensorȱinȱaȱsafeȱplaceȱbeforeȱitȱisȱinstalledȱinȱaȱhardȬtoȬreachȱlocation.ȱTheȱ
MACȱaddressȱofȱtheȱSensorȱisȱprintedȱonȱaȱlabelȱatȱtheȱbottomȱofȱtheȱproductȱandȱtheȱpackagingȱbox.ȱ
Recommended:ȱYouȱshouldȱlabelȱtheȱSensorsȱusingȱMACȱaddressesȱorȱatȱleastȱyourȱownȱconvention.ȱForȱexample,ȱuseȱserialȱnumbers,ȱsoȱ
thatȱyouȱcanȱeasilyȱidentifyȱtheȱSensors.ȱ
5.2.1.1 CeilingȱMountingȱ
ToȱmountȱtheȱSensorȱtoȱaȱceiling,ȱperformȱtheȱfollowingȱsteps:ȱ
1. Placeȱtheȱmountingȱbracket/mountȱonȱtheȱSensorȱandȱalignȱtheȱbracketȱslotsȱwithȱthoseȱonȱtheȱSensorȱasȱshownȱinȱtheȱ
followingȱfigure.ȱ
ȱ
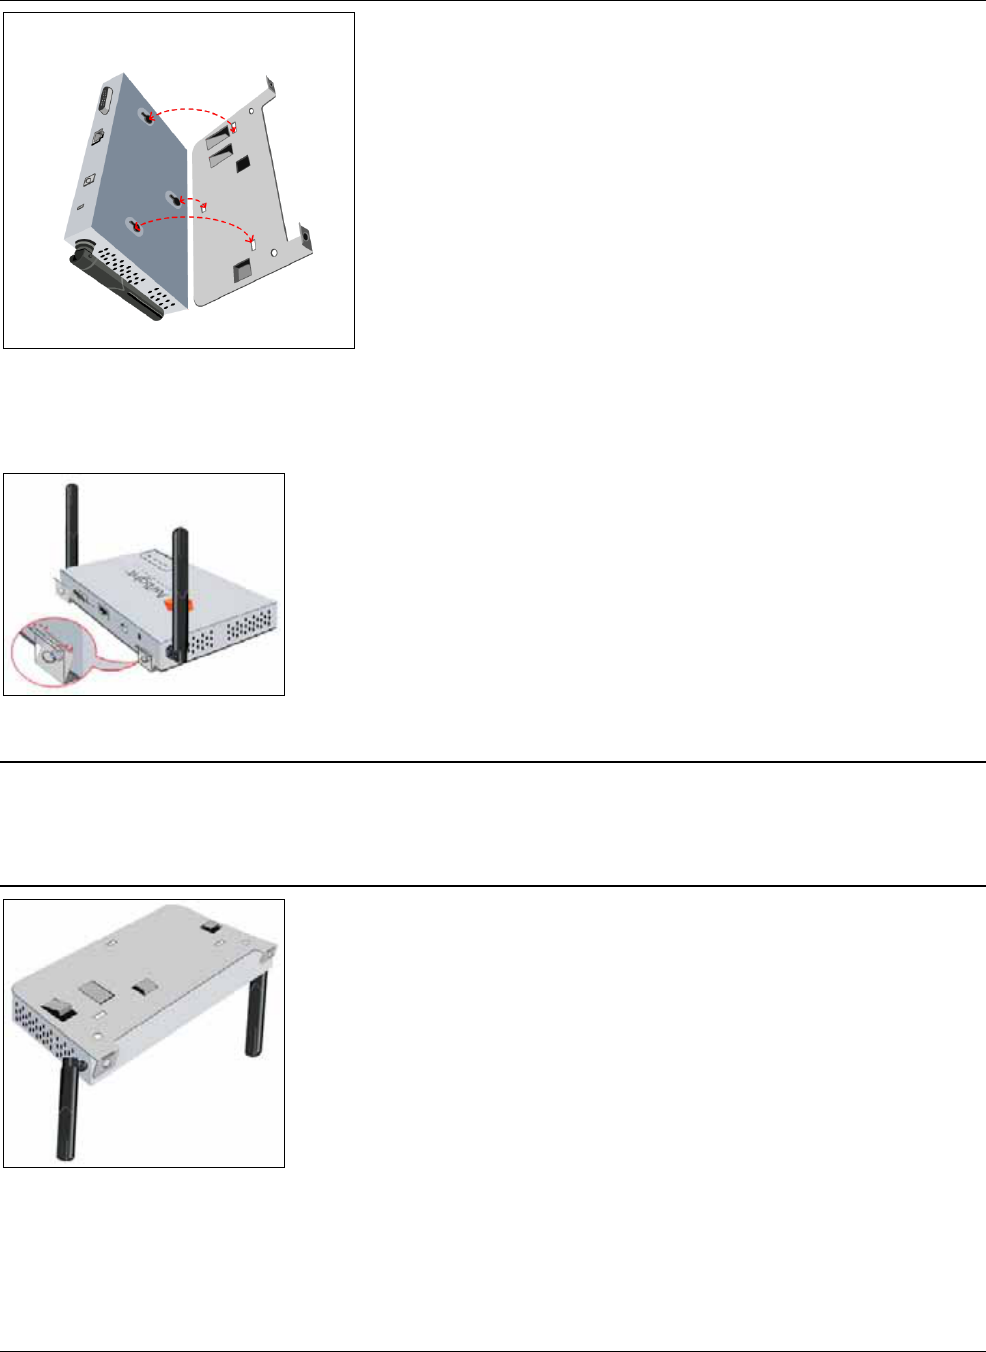
InstallingȱtheȱSensorȱ
SpectraGuard®ȱEnterpriseȱInstallationȱGuideȱ
26ȱ
ȱ
Figure 40. Aligning the Sensor and Mount Slots
2. SlideȱtheȱmountȱandȱbendȱtheȱtwoȱretainingȱplatesȱforwardȱtoȱpreventȱtheȱSensorȱfromȱslidingȱasȱshownȱinȱtheȱfollowingȱ
figure.ȱ
ȱ
Figure 41. Fixing the Mounting Bracket to the Sensor
Note:ȱYouȱneedȱtoȱuseȱonlyȱoneȱofȱtheȱtwoȱtabsȱonȱtheȱmountȱatȱaȱtime.ȱForȱU.SȱInstallations,ȱuseȱtheȱtabȱnearestȱtheȱedgeȱforȱdropȱ
ceiling/tȬbarsȱthatȱareȱapproximatelyȱ1ȱinchȱwide.ȱYouȱneedȱtoȱbendȱtheȱinnerȱtabȱforȱtheȱsmallerȱEuropeanȱdropȱceilingsȱsoȱitȱisȱ
flush/flatȱwithȱtheȱbottomȱofȱtheȱmount.ȱTherefore,ȱtheȱinnerȱtabȱdoesȱnotȱprotrudeȱatȱall.ȱYouȱneedȱtoȱbendȱdownȱtheȱtabȱforȱUSȱdropȱ
ceilingsȱsoȱthatȱitȱprotrudesȱapproximatelyȱ¼ȱinchȱfromȱtheȱbottom.ȱForȱEuropeanȱInstallations,ȱuseȱtheȱinnerȱtabȱforȱdropȱceilings/tȬ
barsȱthatȱareȱapproximatelyȱ½ȱinchȱwide.ȱ
ȱ
Figure 42. Tab orientations for US Installations
3. PressȱtheȱSensor/bracketȱmountȱagainstȱtheȱtȬbarȱatȱanȱangleȱwithȱtheȱtȬbarȱrunningȱbetweenȱtheȱtwoȱtabsȱthatȱwillȱ
eventuallyȱgrabȱtheȱdropȱceilingȱtȬbarȱasȱshownȱinȱtheȱfollowingȱfigure.ȱ
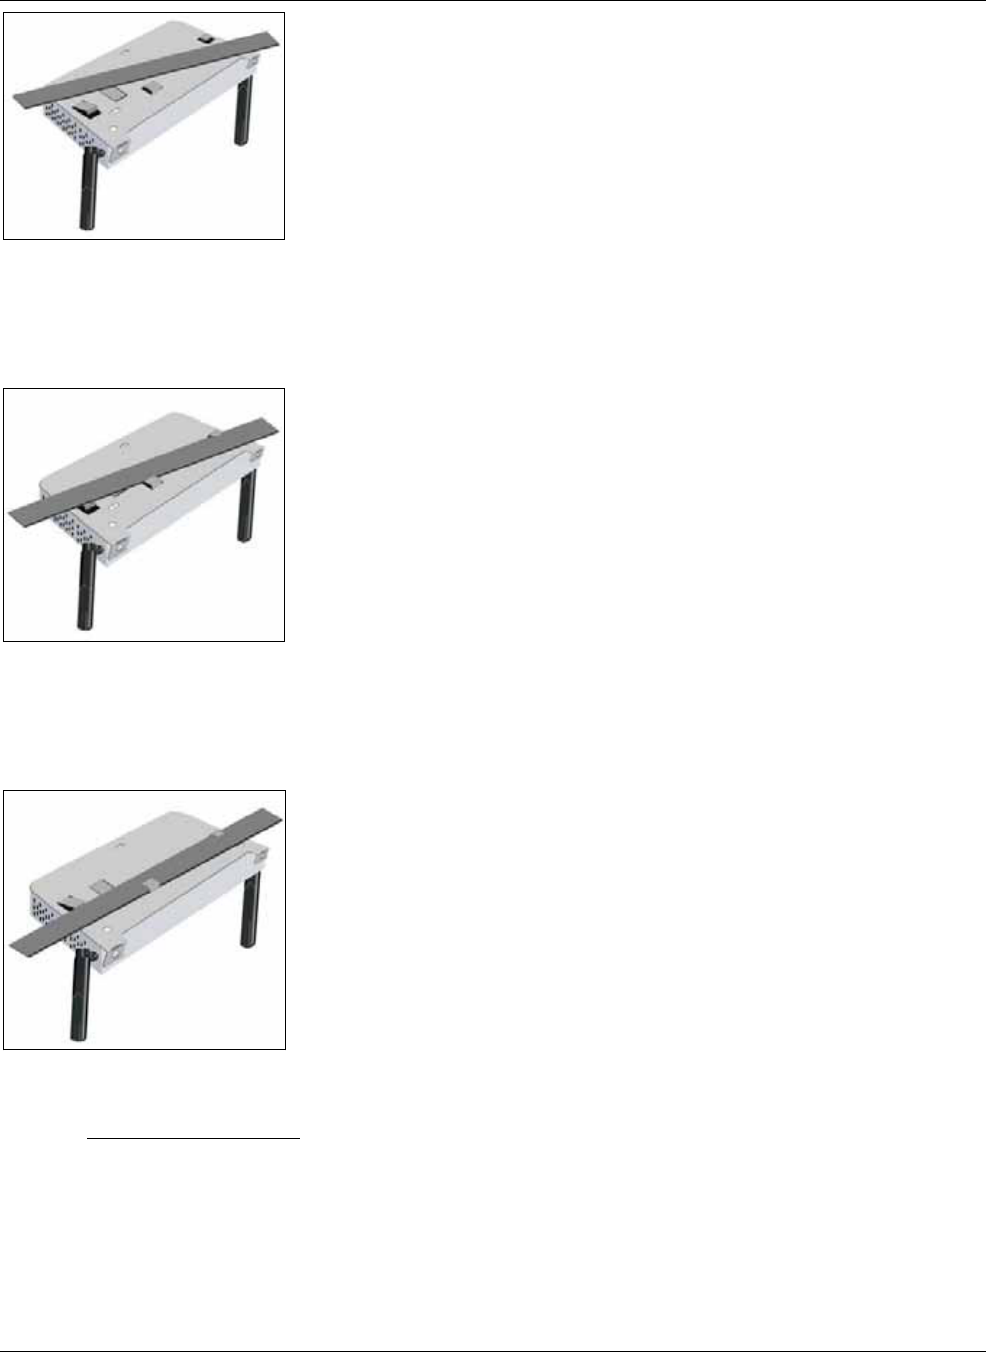
InstallingȱtheȱSensorȱ
SpectraGuard®ȱEnterpriseȱInstallationȱGuideȱ
27
ȱ
Figure 43. Pressing the Mount against the T-Bar
4. Turn/twistȱtheȱmountȱsoȱthatȱtheȱtwoȱtabsȱbeginȱtoȱengageȱtheȱtȬbarȱandȱtheȱtȬbarȱpassesȱoverȱtheȱEuropeanȱtab,ȱwhichȱwasȱ
pushedȱdownȱflush.ȱTheȱtȬbarȱshouldȱalsoȱpushȱagainstȱtheȱUSȱtab,ȱwhichȱwasȱbentȱupȱapproximatelyȱ¼ȱinchȱasȱshownȱinȱ
theȱfollowingȱfigure.ȱ
ȱ
Figure 44. Initial Twisting of the Mount
5. Turn/twistȱtheȱmountȱallȱtheȱway,ȱsoȱthatȱtheȱtwoȱtabsȱcompletelyȱengageȱtheȱtȬbar.ȱTheȱUSȱtabȱbendsȱupȱapproximatelyȱ¼ȱ
inchȱandȱpushesȱagainstȱtheȱsideȱofȱtheȱtȬbarȱpreventingȱtheȱmountȱfromȱtwistingȱbackwardȱandȱdisengagingȱformȱtheȱtȬ
barȱasȱshownȱinȱtheȱfollowingȱfigures.ȱ
ȱ
Figure 45. Final Twisting of the Mount with the US tab supporting the Mount
5.2.1.2 FlatȱSurfaceȱInstallationȱ
YouȱcanȱplaceȱtheȱSensorȱonȱaȱflatȱsurfaceȱsuchȱasȱaȱtable,ȱdesktop,ȱorȱfilingȱcabinet.ȱDoȱnotȱinstallȱtheȱSensorȱonȱanyȱtypeȱofȱ
metalȱsurface.ȱIfȱyouȱchooseȱaȱflatȱsurfaceȱmount,ȱselectȱaȱlocationȱthatȱisȱclearȱofȱobstructionsȱandȱprovidesȱgoodȱreception.ȱ
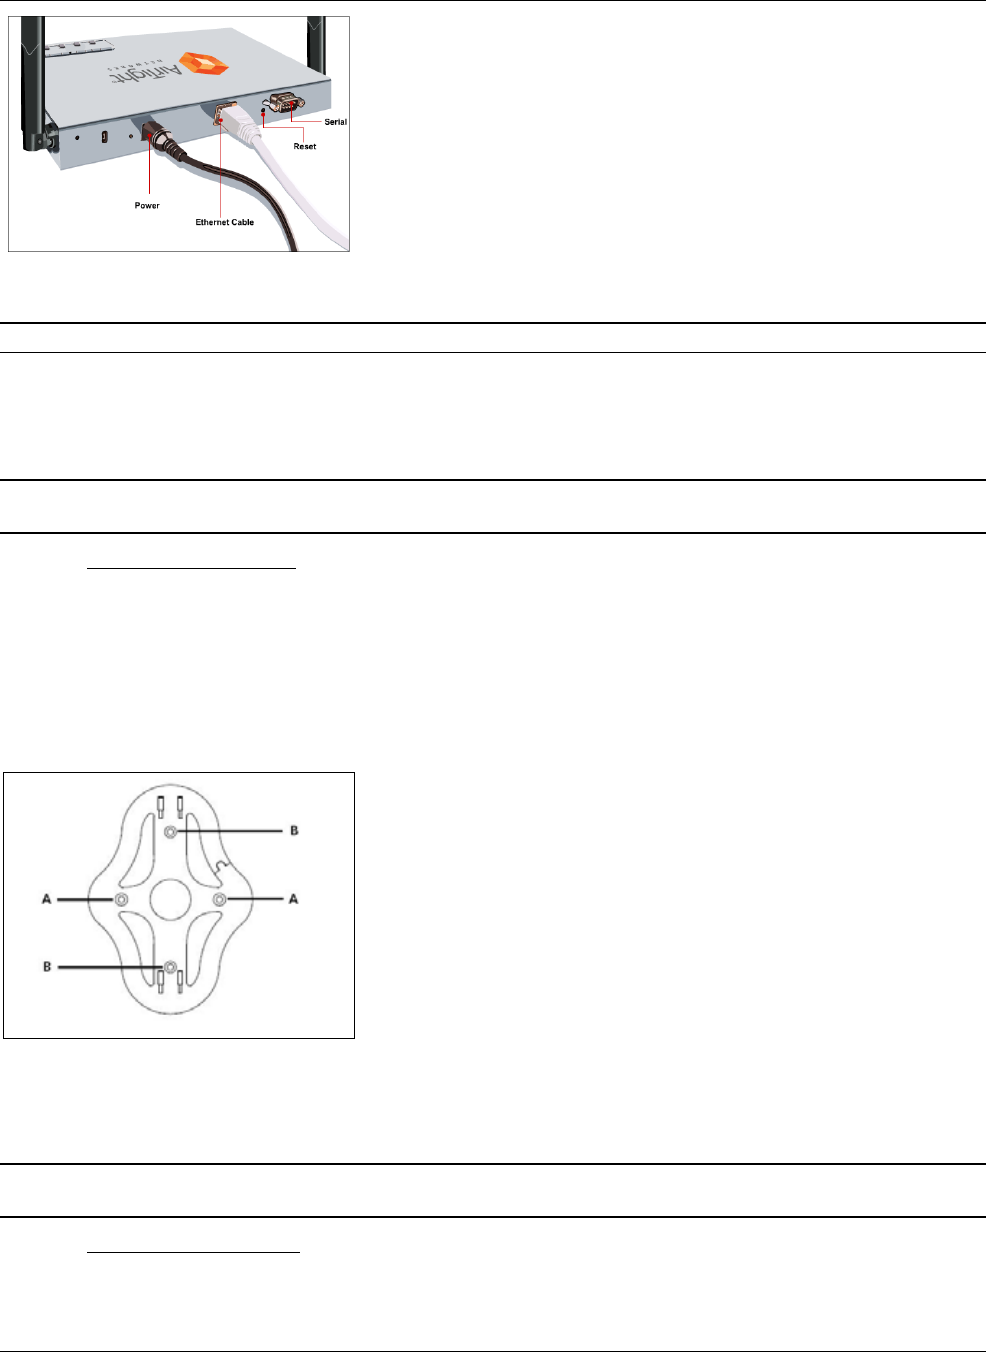
InstallingȱtheȱSensorȱ
SpectraGuard®ȱEnterpriseȱInstallationȱGuideȱ
28ȱ
ȱ
Figure 46. Flat Surface Installation
Recommended:ȱAirTightȱdoesȱnotȱrecommendȱwallȱmountingȱofȱtheȱSensorȱasȱitȱusesȱomniȱdirectionalȱantennas.ȱ
5.2.2 MountȱtheȱSSȬ300ȬATȱSensorȱ
TakeȱaȱconfiguredȱSensor,ȱthatȱis,ȱmakeȱsureȱthatȱtheȱSensorȱisȱgivenȱaȱstaticȱIPȱorȱtheȱsettingsȱhaveȱbeenȱchangedȱforȱDHCP.ȱ
NoteȱtheȱMACȱaddressȱandȱtheȱIPȱaddressȱofȱtheȱSensorȱinȱaȱsafeȱplaceȱbeforeȱitȱisȱinstalledȱinȱaȱhardȬtoȬreachȱlocation.ȱTheȱ
MACȱaddressȱofȱtheȱSensorȱisȱprintedȱonȱaȱlabelȱatȱtheȱbottomȱofȱtheȱproduct.ȱ
Recommended:ȱYouȱshouldȱlabelȱtheȱSensorsȱusingȱMACȱaddressesȱorȱatȱleastȱyourȱownȱconvention.ȱForȱexample,ȱuseȱserialȱnumbers,ȱsoȱ
thatȱyouȱcanȱeasilyȱidentifyȱtheȱSensors.ȱ
5.2.2.1 Ceiling/WallȱMountingȱ
ToȱinstallȱtheȱSensorȱonȱaȱwallȱorȱceiling,ȱuseȱtheȱmountingȱbracketȱthatȱcomesȱwithȱtheȱdevice.ȱFollowȱtheseȱsteps:ȱ
1. ȱFollowingȱtheseȱguidelines,ȱscrewȱtheȱmountingȱbracketȱtoȱaȱwallȱorȱceiling:ȱ
xTheȱmountingȱbracketȱtabsȱshouldȱbeȱpointingȱupward.ȱ
xIfȱmountingȱtoȱdrywall,ȱuseȱtheȱ4ȱscrewsȱandȱ4ȱwallȱanchors.ȱ
xIfȱmountingȱtoȱanȱEUȱelectricalȱboxȱ(60.3mm),ȱuseȱ2ȱthreadedȱscrewsȱandȱinsertȱintoȱtheȱholesȱmarkedȱ“A ” ȱinȱtheȱ
diagramȱshownȱbelow.ȱ
xIfȱmountingȱtoȱaȱUSȱelectricalȱboxȱ(83.3mm),ȱuseȱ2ȱthreadedȱscrewsȱandȱinsertȱintoȱtheȱholesȱmarkedȱ“B”ȱinȱtheȱ
diagramȱshownȱbelow.ȱ
ȱ
Figure 47. Holes for inserting screws
2. ConnectȱtheȱEthernetȱcableȱ(forȱpowerȱandȱnetworkȱconnection)ȱtoȱtheȱLANȱportȱonȱtheȱbackȱofȱtheȱSensor.ȱ
3. ToȱmountȱtheȱSensorȱontoȱtheȱmountingȱbracket,ȱinsertȱtheȱmountingȬbracketȱtabsȱintoȱtheȱslotsȱonȱtheȱbackȱofȱtheȱAP.ȱ
IMPORTANT:ȱIfȱyouȱareȱmountingȱtheȱSensorȱonȱaȱwall,ȱyouȱcannotȱuseȱtheȱslotsȱonȱtheȱbottomȱnarrowȱedgeȱofȱtheȱdevice.ȱInstead,ȱtheȱ
slotsȱonȱtheȱbackȱofȱtheȱSensorȱmustȱbeȱused.ȱ
5.2.2.2 FlatȱSurfaceȱInstallationȱ
ToȱinstallȱtheȱSensorȱonȱaȱflatȱsurfaceȱsuchȱasȱaȱtableȱorȱdesktop,ȱfollowȱtheseȱsteps:ȱ
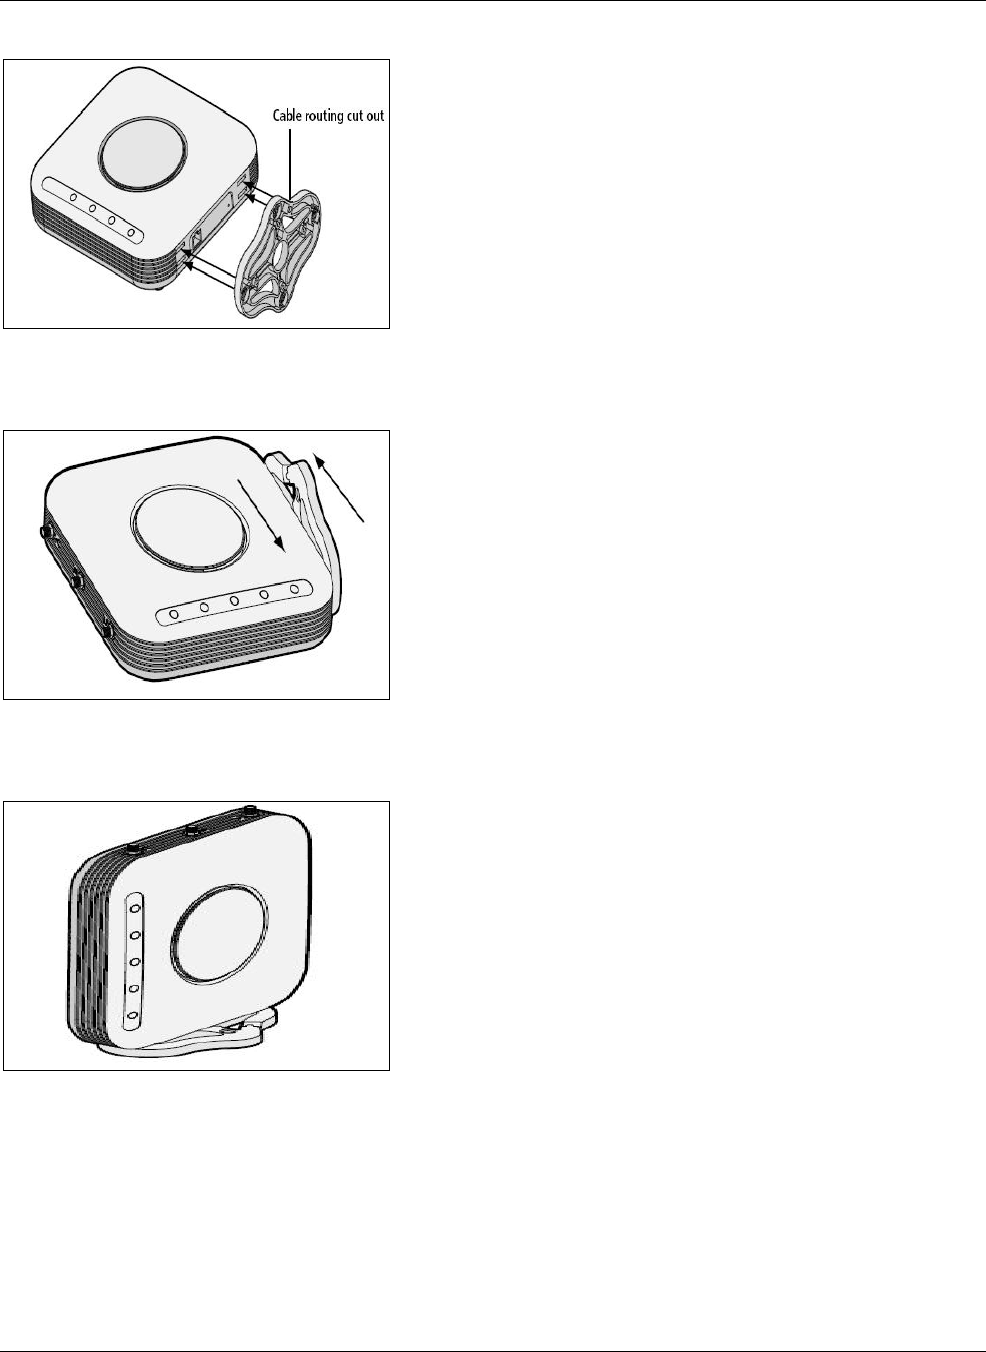
InstallingȱtheȱSensorȱ
SpectraGuard®ȱEnterpriseȱInstallationȱGuideȱ
29
1. InsertȱtheȱtabsȱonȱtheȱtableȱstandȱintoȱtheȱslotsȱonȱtheȱsideȱofȱtheȱSensor,ȱasȱshownȱinȱtheȱillustration.ȱAlignȱtheȱcableȱ
routingȱcutȱoutȱtowardȱtheȱupperȱpartȱofȱtheȱstand.ȱ
ȱ
Figure 48. Inserting tabs on the table stand
2. ToȱlockȱtheȱstandȱtoȱtheȱSensor,ȱslideȱtheȱstandȱbackȱandȱtheȱSensorȱforward,ȱasȱshownȱhere:ȱ
ȱ
Figure 49. Locking the Stand to the Sensor
3. PlaceȱtheȱSensorȱandȱtableȱstandȱonȱtheȱtable.ȱ
ȱ
Figure 50. Sensor Mount on a Table
4. ConnectȱtheȱEthernetȱcableȱforȱpowerȱandȱnetworkȱconnectionȱtoȱtheȱLANȱportȱonȱtheȱbackȱofȱtheȱAP.ȱ
5.2.3 PowerȱupȱtheȱSensorȱ
AnȱSSȬ200ȬATȱSensorȱrunsȱonȱaȱ5VȱDCȱconnection.ȱUseȱtheȱpowerȱadapterȱprovidedȱtoȱpowerȱtheȱSensorȱfromȱanȱ110V~240Vȱ
50/60ȱHzȱACȱpowerȱconnection.ȱ
ToȱpowerȱupȱtheȱSensor,ȱperformȱtheȱfollowingȱsteps:ȱ
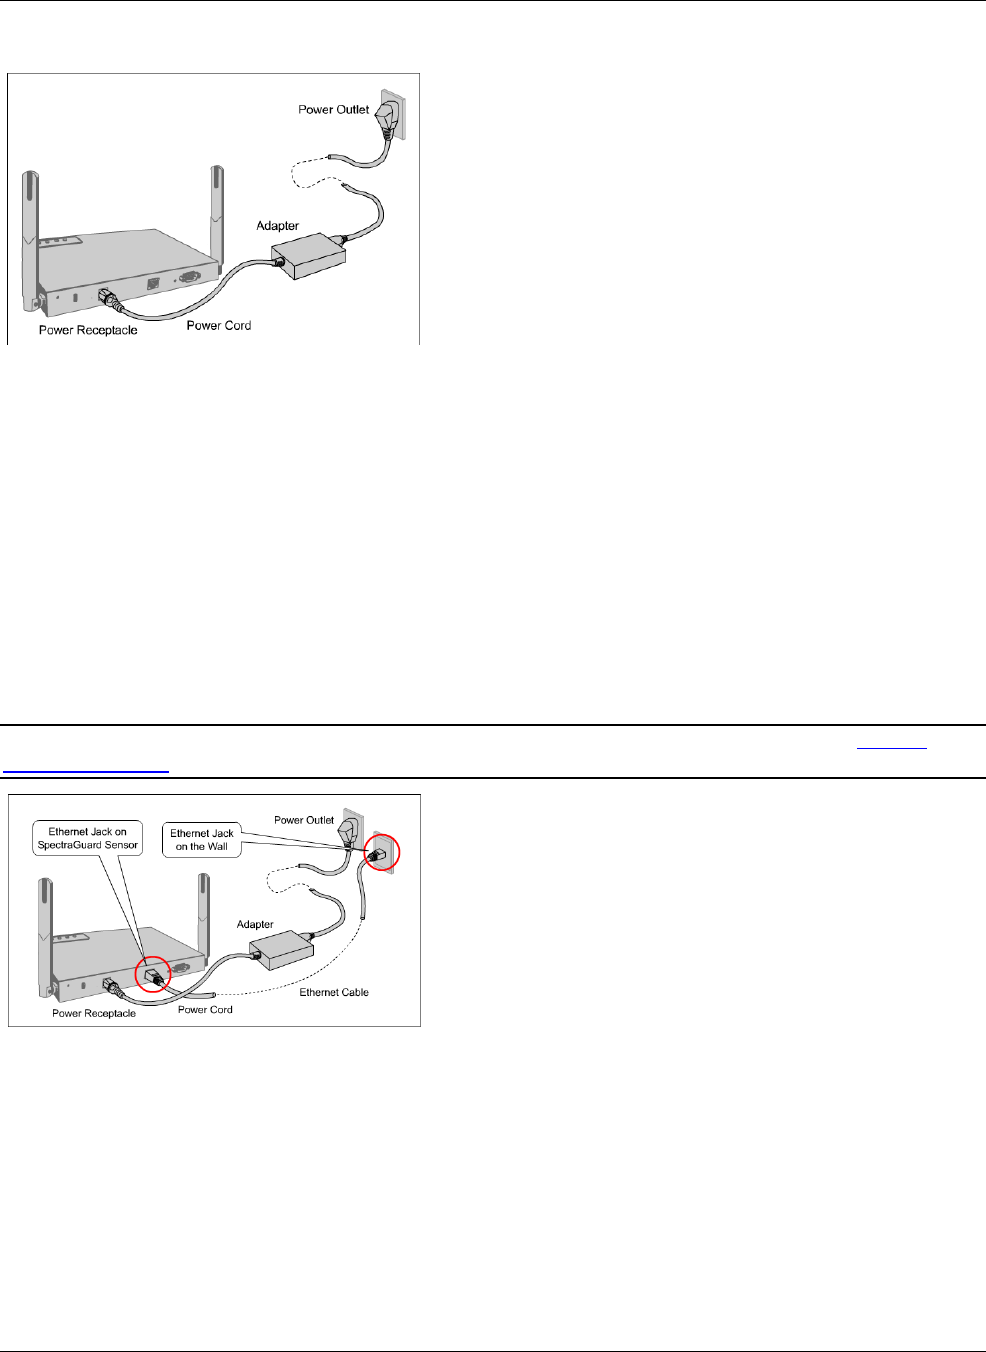
InstallingȱtheȱSensorȱ
SpectraGuard®ȱEnterpriseȱInstallationȱGuideȱ
30ȱ
1. PlugȱtheȱpowerȱcableȱintoȱtheȱDCȱpowerȱreceptacleȱatȱtheȱrearȱofȱtheȱSensor.ȱ
2. Plugȱtheȱotherȱendȱofȱtheȱpowerȱcableȱintoȱanȱ110V~240Vȱ50/60ȱHzȱACȱpowerȱsource.ȱ
ȱ
Figure 51. Power up the Sensor
Waitȱforȱtwoȱminutes!ȱ
3. CheckȱtheȱStatusȱLEDs.ȱYouȱwillȱseeȱLED1ȱturnȱOrangeȱandȱLED2ȱturnȱgreen,ȱindicatingȱthatȱtheȱSensorȱisȱpoweredȱonȱ
correctlyȱandȱwaitingȱtoȱbeȱconnectedȱtoȱtheȱnetwork.ȱ
AnȱSSȬ300ȬATȱSensorȱcanȱbeȱPoweredȱonȱbyȱ802.3afȱClassȱ0ȱPowerȱOverȱEthernetȱofȱNominalȱinputȱvoltageȱ48VȱDC.ȱ
5.2.4 ConnectȱtheȱSensorȱtoȱtheȱNetworkȱ
EnsureȱthatȱtheȱServerȱisȱalreadyȱrunningȱonȱyourȱnetwork.ȱAddȱtheȱDNSȱentryȱ‘wifiȬsecurityȬserver’ȱonȱallȱDNSȱServers.ȱThisȱ
entryȱshouldȱpointȱtoȱtheȱIPȱaddressȱofȱtheȱServer.ȱ
ToȱconnectȱtheȱSensorȱtoȱtheȱnetwork,ȱperformȱtheȱfollowingȱsteps:ȱ
1. EnsureȱthatȱDHCPȱisȱrunningȱonȱtheȱsubnetȱtoȱwhichȱtheȱSensorȱwillȱbeȱconnected.ȱ
2. ConnectȱoneȱendȱofȱtheȱNetworkȱInterfaceȱcableȱtoȱtheȱEthernetȱportȱatȱtheȱrearȱofȱtheȱSensor.ȱ
3. ConnectȱtheȱotherȱendȱofȱtheȱNetworkȱInterfaceȱcableȱtoȱanȱEthernetȱjackȱthatȱisȱconnectedȱtoȱtheȱdesiredȱsubnet.ȱ
Important:ȱIfȱDHCPȱisȱnotȱenabledȱonȱaȱsubnet,ȱSensorsȱcannotȱconnectȱtoȱthatȱsubnetȱwithȱzeroȱconfiguration.ȱReferȱtoȱManuallyȱ
ConfiguringȱtheȱSensorȱforȱdetailsȱonȱmanualȱconfigurationȱofȱSensor.ȱ
ȱ
Figure 52. Connect the Sensor to the Network
Waitȱforȱtwoȱminutes!ȱ
CheckȱtheȱStatusȱLEDsȱonȱtheȱSensor.ȱIfȱallȱLEDsȱglowȱgreen,ȱthenȱtheȱSensorȱisȱoperationalȱandȱconnectedȱtoȱtheȱServer.ȱ
LogȱonȱtoȱtheȱServerȱthroughȱSSH.ȱRunȱtheȱ‘getȱsensorȱlist’ȱcommand.ȱYouȱwillȱseeȱaȱlistȱofȱallȱSensorsȱthatȱareȱrecognizedȱbyȱ
theȱServer.ȱ
TheȱSensorȱisȱconfiguredȱandȱreadyȱtoȱgo.ȱCheckȱtheȱConsoleȱtoȱensureȱthatȱthisȱSensorȱhasȱbeenȱdetected.ȱ
IfȱallȱtheȱSensorsȱhaveȱconnectedȱwithȱzeroȱconfiguration,ȱyouȱneedȱnotȱreadȱthisȱinstallationȱguideȱfurther.ȱ

InstallingȱtheȱSensorȱ
SpectraGuard®ȱEnterpriseȱInstallationȱGuideȱ
31
Note:ȱIfȱLED1ȱturnsȱOrange,ȱitȱmeansȱthatȱtheȱzeroȱconfigurationȱwasȱnotȱsuccessfulȱandȱtheȱSensorȱmustȱbeȱconfiguredȱmanually.ȱReferȱ
toȱManuallyȱConfiguringȱtheȱSensorȱforȱdetails

ManuallyȱConfiguringȱtheȱSensorȱ
SpectraGuard®ȱEnterpriseȱInstallationȱGuideȱ
30ȱ
Chapterȱ6 ManuallyȱConfiguringȱtheȱSensorȱ
Important:ȱIfȱtheȱinstallationȱinȱInstallingȱtheȱSensorȱwasȱsuccessful,ȱstop!ȱYouȱdoȱnotȱneedȱtoȱconfigureȱtheȱSensorȱmanually.ȱ
6.1 Introductionȱ
ManualȱconfigurationȱofȱaȱSensorȱisȱtypicallyȱrequiredȱinȱtheȱfollowingȱcases:ȱ
xSensorȱneedsȱtoȱbeȱconfiguredȱinȱNDȱorȱSNDCȱmode.ȱ
xSensorȱOnlyȱ(SO)ȱdevicesȱcannotȱconnectȱtoȱtheȱServerȱthroughȱzeroȱconfiguration.ȱTheȱDNSȱentryȱforȱtheȱServerȱhasȱ
beenȱchangedȱtoȱanȱentryȱotherȱthanȱȈwifiȬsecurityȬserverȈȱorȱthereȱisȱnoȱDNSȱServerȱpresentȱinȱtheȱnetwork.ȱThisȱisȱ
applicableȱforȱmultiȬserverȱinstallations.ȱ
xSensorȱisȱplacedȱonȱaȱsubnetȱthatȱisȱnotȱDHCPȱenabled.ȱ
6.2 ConfiguringȱSensorȱthroughȱConfigȱShellȱ
ToȱuseȱtheȱConfigȱShell,ȱconnectȱaȱSerialȱ(RSȬ232)ȱcableȱbetweenȱyourȱcomputerȱandȱtheȱSensor.ȱTheȱConfigȱShellȱsupportsȱaȱ
preȬdefinedȱsetȱofȱcommandsȱusedȱtoȱconfigureȱtheȱSensor.ȱ
ȱ
Figure 53. Connecting the Sensor to your computer using a Serial Cable
TheȱstepsȱtoȱconfigureȱtheȱSensorȱmanuallyȱareȱasȱfollows:ȱ
1. InvokeȱHyperȱTerminalȱ(orȱminicom)ȱ
2. Logȱinȱandȱchangeȱtheȱdefaultȱpasswordȱ
3. SetȱServerȱDiscoveryȱ
4. SetȱSensorȱModeȱ
5. SetȱNetworkȱSettingsȱforȱthatȱSensorȱModeȱ
Theȱaboveȱstepsȱareȱexplainedȱinȱdetailȱbelow.ȱ
6.2.1 InvokeȱHyperTerminalȱ(orȱminicom)ȱ
ToȱconfigureȱtheȱSensor,ȱfollowȱtheȱstepsȱdescribedȱbelowȱtoȱinvokeȱtheȱConfigȱShell.ȱ
6.2.1.1 LaunchingȱHyperTerminalȱ
ToȱstartȱHyperTerminal,ȱclickȱStartÆProgramsÆAccessoriesÆCommunicationsÆHyperTerminalȱasȱshownȱinȱtheȱfollowingȱ
figure.ȱ
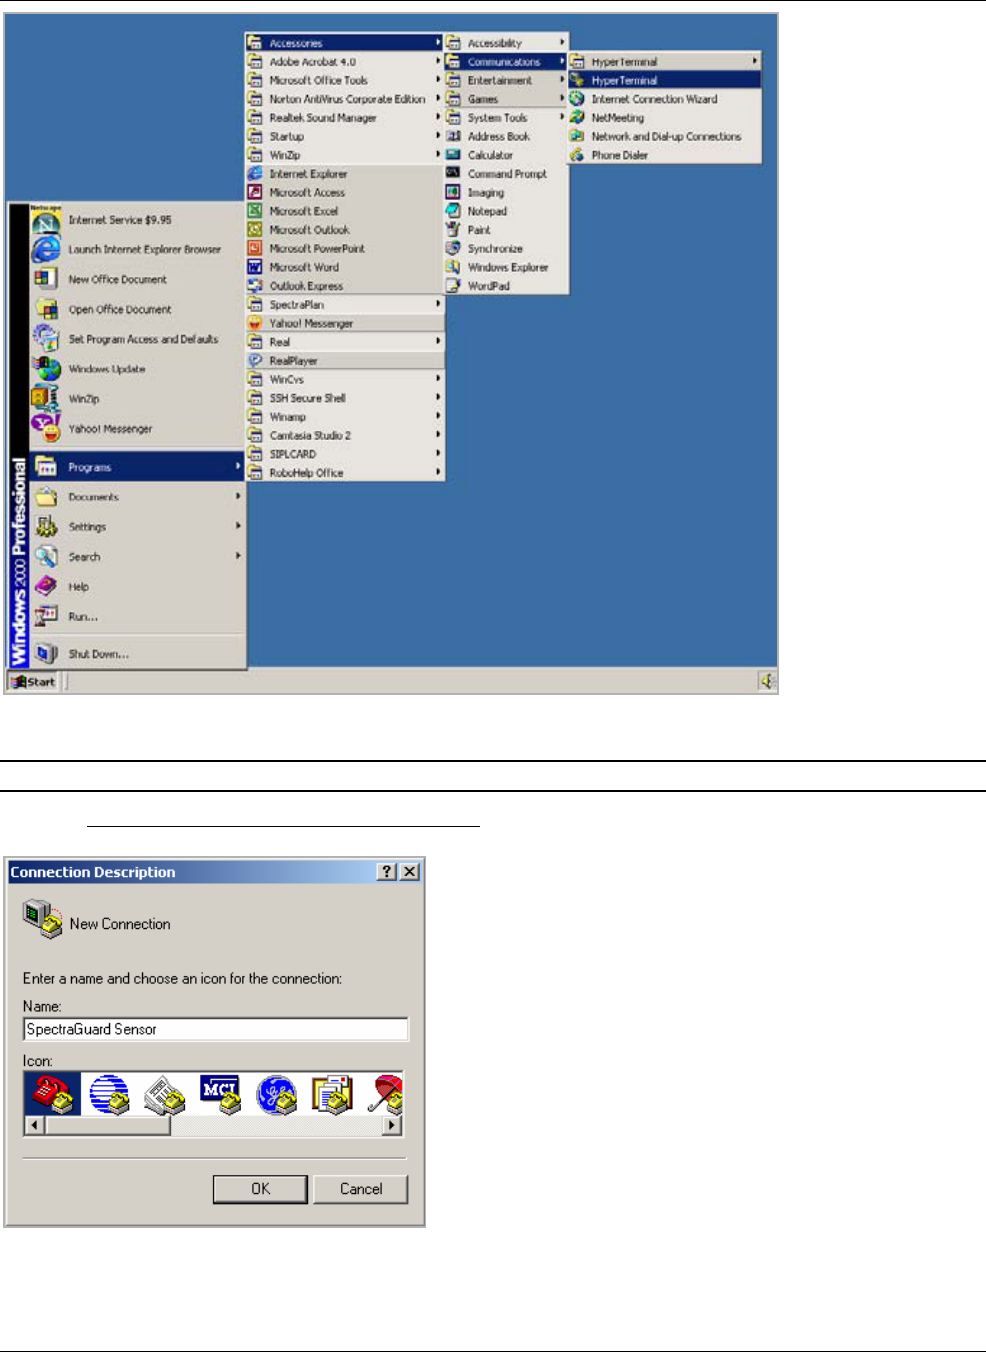
ManuallyȱConfiguringȱtheȱSensorȱ
SpectraGuard®ȱEnterpriseȱInstallationȱGuideȱ
31
ȱ
Figure 54. Opening HyperTerminal
Note:ȱIfȱyouȱareȱusingȱaȱLinuxȱlaptop,ȱyouȱcanȱuseȱminicomȱtoȱconnectȱtoȱtheȱConfigȱShell.ȱ
6.2.1.2 DefiningȱaȱNewȱHyperTerminalȱConnectionȱ
ȱ
ȱ
Figure 55. Define a New HyperTerminal Connection for Sensor
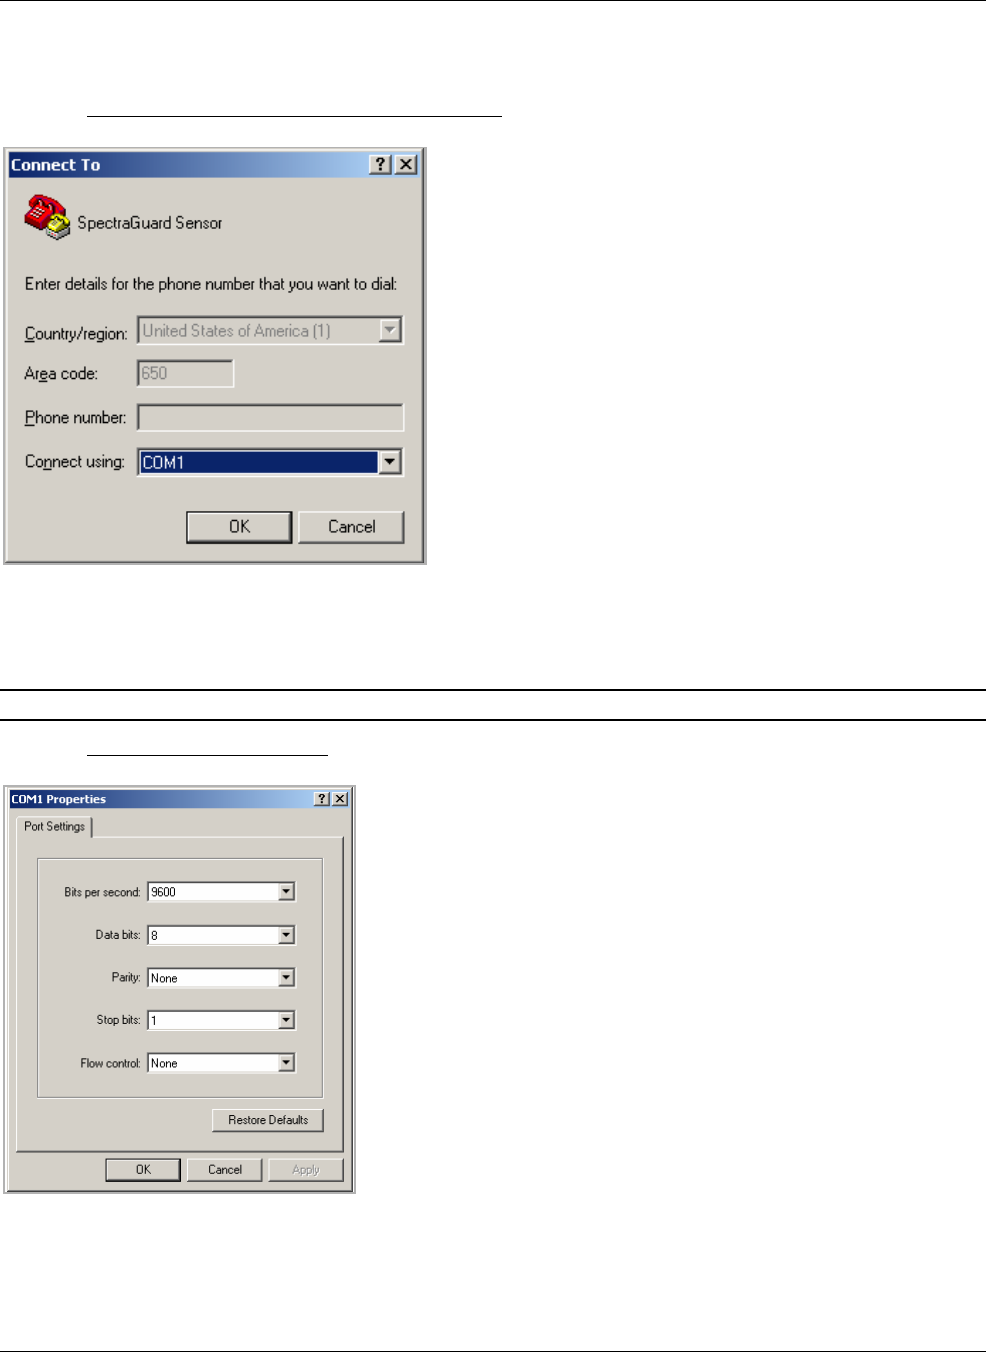
ManuallyȱConfiguringȱtheȱSensorȱ
SpectraGuard®ȱEnterpriseȱInstallationȱGuideȱ
32ȱ
xSelectȱanȱiconȱtoȱidentifyȱtheȱnewȱconnection.ȱ
xTypeȱtheȱrequiredȱnameȱforȱtheȱHyperTerminalȱconnectionȱinȱtheȱNameȱfieldȱ
xClickȱ<OK>ȱonȱtheȱConnectionȱDescriptionȱdialog.ȱ
6.2.1.3 SpecifyingȱHyperTerminalȱConnectionȱDetailsȱ
ȱ
ȱ
Figure 56. Specify HyperTerminal Connection Details
xSelectȱorȱenterȱtheȱappropriateȱconnectionȱdetails.ȱ
xClickȱ<OK>ȱonȱtheȱConnectȱToȱdialog.ȱ
Note:ȱTheȱnameȱofȱtheȱserialȱportȱwillȱchangeȱasȱperȱtheȱsettingsȱofȱyourȱcomputer.ȱ
6.2.1.4 EditingȱSerialȱPortȱSettingsȱ
ȱ
ȱ
Figure 57. Edit Serial Port Settings
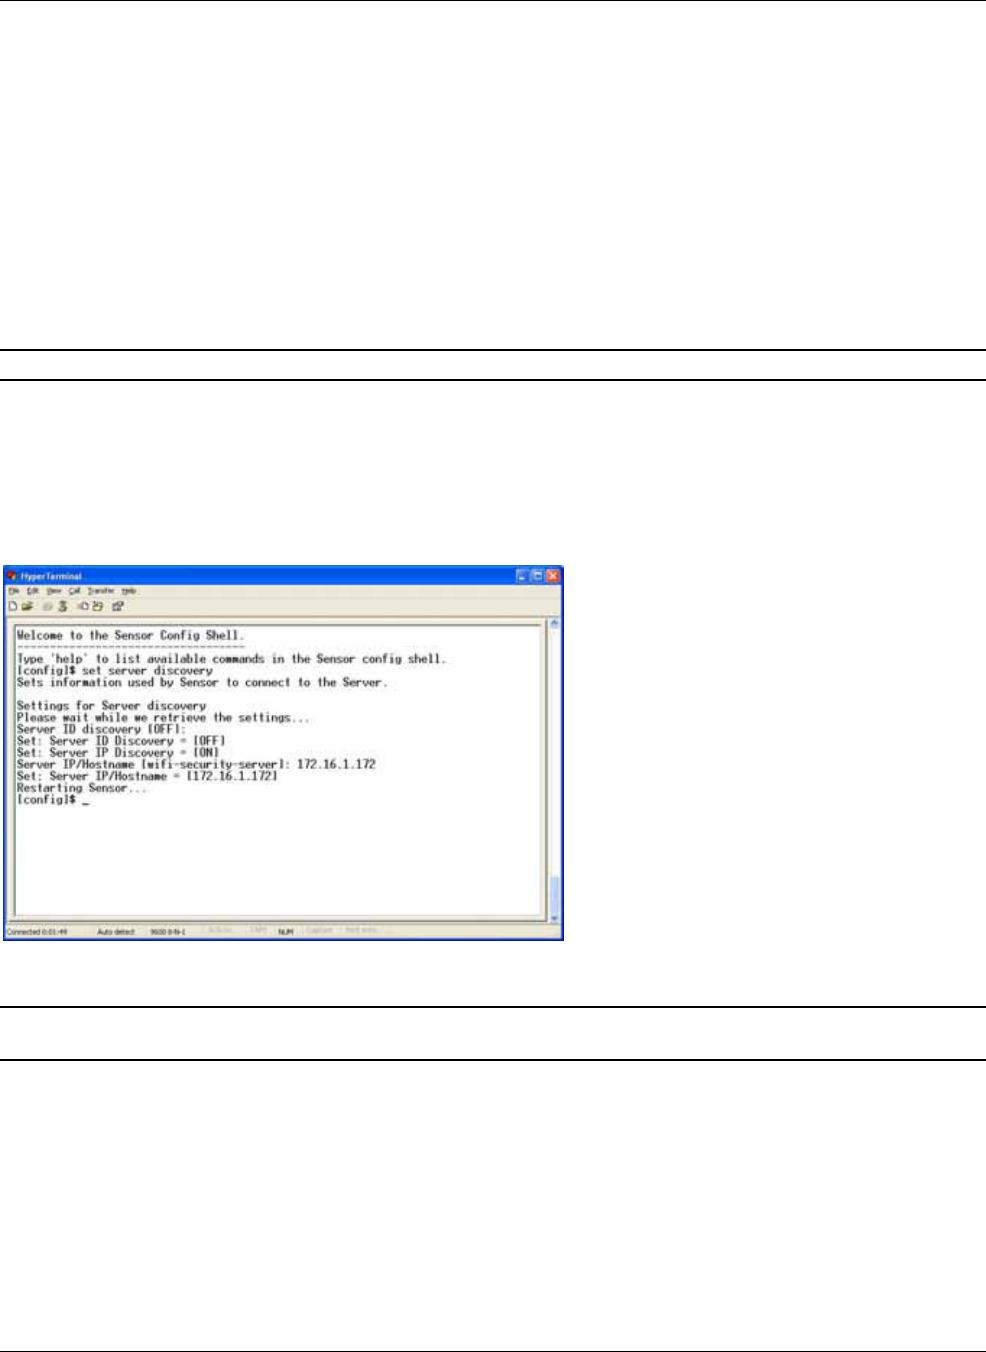
ManuallyȱConfiguringȱtheȱSensorȱ
SpectraGuard®ȱEnterpriseȱInstallationȱGuideȱ
33
xEditȱtheȱserialȱportȱsettingsȱasȱfollowsȱorȱclickȱ<RestoreȱDefaults>ȱtoȱensureȱproperȱcommunicationȱbetweenȱtheȱ
Sensorȱandȱyourȱcomputer.ȱ
¾Bitsȱperȱsecond:ȱ9600ȱ
¾Dataȱbits:ȱ8ȱ
¾Parity:ȱNoneȱ
¾Stopȱbits:ȱ1ȱ
¾Flowȱcontrol:ȱNoneȱ
xClickȱ<OK>ȱonȱtheȱCOMȱPropertiesȱdialog.ȱ
xPressȱ<Enter>ȱorȱ<Space>ȱonȱtheȱHyperTerminalȱscreen.ȱ
6.2.2 LogȱinȱandȱChangeȱtheȱDefaultȱPasswordȱ
LogȱinȱtoȱtheȱConfigȱShellȱusingȱtheȱuserȱnameȱconfigȱandȱpasswordȱconfig.ȱChangeȱtheȱdefaultȱpasswordȱusingȱtheȱcommandȱ
passwd.ȱYouȱcanȱchangeȱtheȱSensorȱpasswordȱusingȱSensorȱtemplates.ȱReferȱtoȱsectionȱ8.4.4:ȱSensorȱConfigurationȱinȱtheȱ
SpectraguardȱEnterpriseȱUserȱGuideȱforȱmoreȱdetails.ȱ
Recommended;ȱAirTightȱrecommendsȱthatȱyouȱchangeȱtheȱdefaultȱpasswordȱforȱsecurityȱreasons,ȱalthoughȱitȱisȱnotȱmandatory.ȱ
6.2.3 SetȱServerȱDiscoveryȱ
TheȱnextȱstepȱisȱtoȱsetȱtheȱServerȱDiscoveryȱinformation.ȱThereȱareȱtwoȱtypesȱofȱServerȱDiscovery.ȱ
xServerȱIPȱbasedȱdiscoveryȱ(preferred)ȱ
xServerȱIDȱbasedȱdiscoveryȱ(deprecated)ȱ
xServiceȱLocationȱProtocolȱ(SLP)ȱbasedȱdiscoveryȱ(ifȱwifiȬsecurityȬserverȱserviceȱhasȱbeenȱconfigured)ȱ
UseȱtheȱcommandȱsetȱserverȱdiscoveryȱtoȱpointȱtheȱSensorȱtoȱtheȱcorrectȱServer.ȱ
ȱ
Figure 58. set server discovery command
Note:ȱIfȱIP/HostnameȱbasedȱdiscoveryȱisȱbeingȱusedȱandȱthereȱisȱmoreȱthanȱoneȱServerȱonȱtheȱnetwork,ȱthenȱyouȱmustȱenterȱtheȱIPȱaddressȱ
ofȱtheȱappropriateȱServer.ȱ
6.2.4 SetȱSensorȱModeȱ
TheȱnextȱstepȱisȱtoȱsetȱtheȱmodeȱofȱtheȱSensor.ȱThereȱareȱthreeȱpossibleȱmodes:ȱ
xSOȱMode:ȱThisȱisȱtheȱdefaultȱmode.ȱInȱthisȱmode,ȱtheȱSensorȱshouldȱbeȱconnectedȱintoȱanȱaccessȱportȱonȱaȱswitch.ȱItȱ
thenȱmonitorsȱaȱsingleȱVLANȱthatȱisȱconfiguredȱonȱthatȱaccessȱport.ȱTheȱwirelessȱinterfaceȱofȱtheȱSensorȱisȱenabled.ȱ
xNDȱMode:ȱThisȱmodeȱneedsȱtoȱbeȱexplicitlyȱconfigured.ȱInȱthisȱmode,ȱtheȱNDȱshouldȱbeȱconnectedȱintoȱaȱtrunkȱportȱ
(802.1Qȱcapable)ȱonȱaȱswitch.ȱItȱthenȱmonitorsȱmultipleȱVLANsȱthatȱareȱconfiguredȱonȱthatȱtrunkȱportȱandȱareȱchosenȱ
byȱtheȱuserȱusingȱtheȱNDȱCLI.ȱTheȱwirelessȱinterfaceȱofȱtheȱNDȱisȱdisabled.ȱAȱSensorȱinȱNDȱmodeȱcanȱmonitorȱupȱtoȱ
32ȱVLANsȱandȱdetectȱupȱtoȱ32ȱVLANs.ȱ
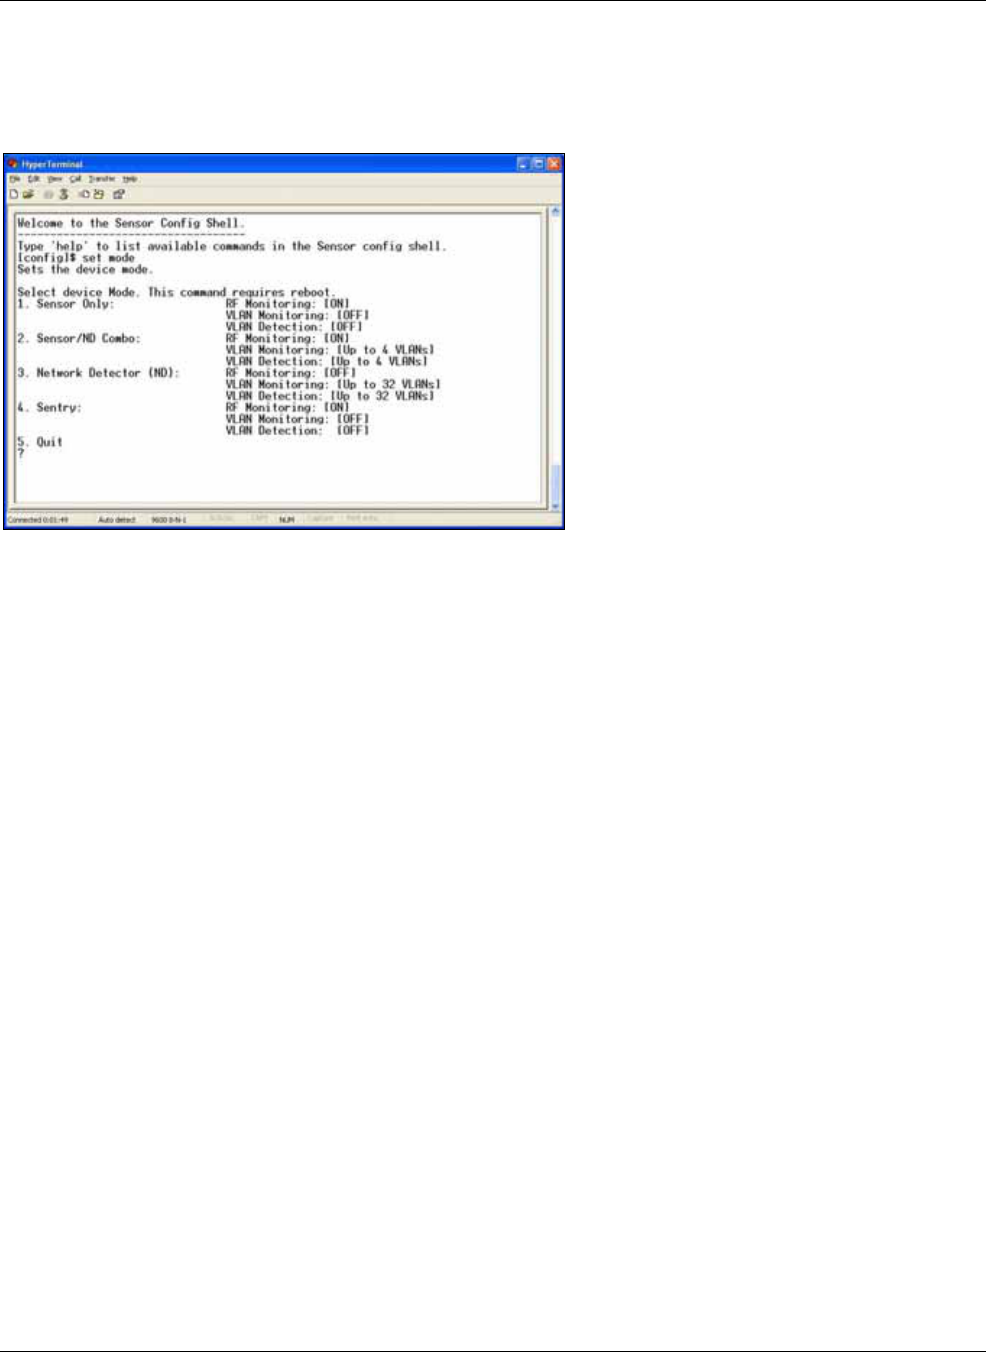
ManuallyȱConfiguringȱtheȱSensorȱ
SpectraGuard®ȱEnterpriseȱInstallationȱGuideȱ
34ȱ
xSNDCȱMode:ȱThisȱmodeȱneedsȱtoȱbeȱexplicitlyȱconfigured.ȱInȱthisȱmode,ȱtheȱSensorȱshouldȱbeȱconnectedȱintoȱaȱ
trunkȱportȱ(802.1Qȱcapable)ȱonȱaȱswitch.ȱItȱthenȱmonitorsȱmultipleȱVLANsȱthatȱareȱconfiguredȱonȱthatȱtrunkȱportȱandȱ
areȱchosenȱbyȱtheȱuserȱusingȱtheȱNDȱCLI.ȱTheȱwirelessȱinterfaceȱofȱtheȱSensorȱisȱenabled.ȱAȱSensorȱinȱSNDCȱmodeȱ
canȱmonitorȱupȱtoȱ4ȱVLANsȱandȱdetectȱupȱtoȱ4ȱVLANs.ȱ
UseȱtheȱsetȱmodeȱcommandȱtoȱsetȱtheȱSensorȱmode.ȱ
ȱ
Figure 59. set sensor mode command
6.2.5 ConfigureȱNetworkȱSettingsȱ
Onceȱtheȱmodeȱisȱset,ȱyouȱhaveȱtoȱenableȱtheȱNetworkȱSettings.ȱ
xSensorȱOnlyȱMode:ȱForȱthisȱmode,ȱuseȱtheȱcommandȱsetȱipȱconfig.ȱThisȱcommandȱrunsȱthroughȱtheȱcurrentȱVLANȱ
andȱtheȱIPȱconfigȱwizard.ȱ
xNetworkȱDetector/Sensor/NDȱComboȱMode:ȱForȱthisȱmode,ȱuseȱtheȱcommandȱsetȱvlanȱconfig.ȱThisȱcommandȱ
configuresȱtheȱIPȱaddressesȱonȱtheȱND.ȱ
ReferȱtoȱChapterȱ3:ȱGuidelinesȱforȱConfiguringȱandȱInstallingȱNDȱandȱSNDCȱinȱtheȱdocumentȱ‘NetworkȱDetectorȱ
ConfigurationȱforȱSpectraGuardȱEnterprise_5.7’ȱforȱfurtherȱdetails.
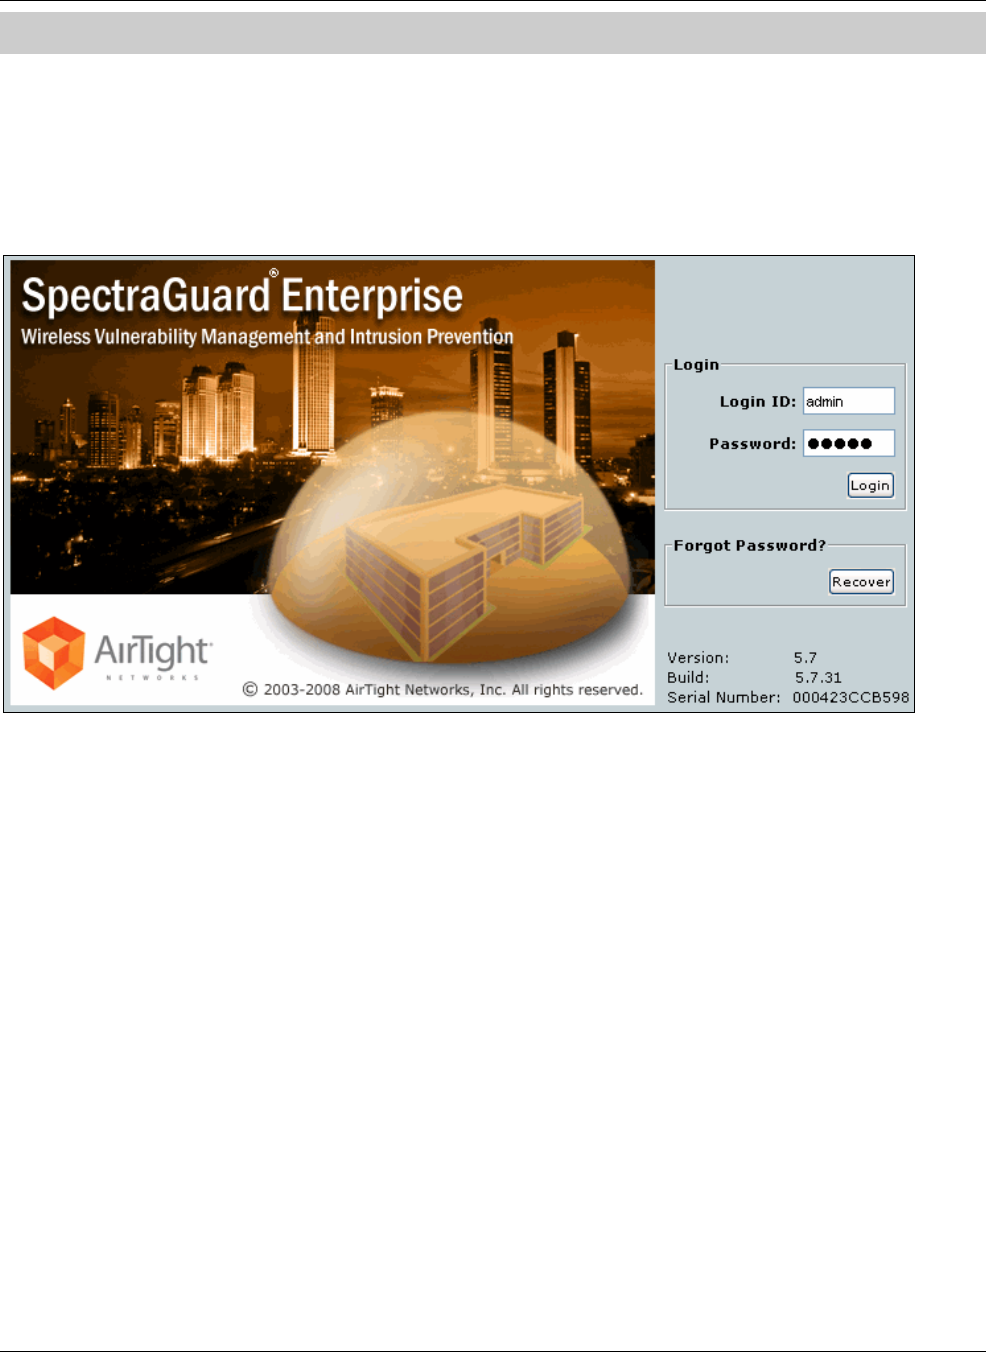
SettingȱupȱtheȱServerȱConsoleȱ
SpectraGuard®ȱEnterpriseȱInstallationȱGuideȱ
35
Chapterȱ7 SettingȱupȱtheȱServerȱConsoleȱ
TheȱConfigurationȱWizardȱguidesȱyouȱthroughȱtheȱstepsȱrequiredȱtoȱsetȱupȱtheȱsystem.ȱTheȱsystemȱisȱmanagedȱthroughȱaȱJavaȱ
appletȱthatȱisȱlaunchedȱinȱtheȱInternetȱExplorerȱ5.5+ȱWebȱbrowser.ȱThisȱHTMLȱinterfaceȱisȱknownȱasȱtheȱ‘ConsoleȱorȱGraphicalȱ
UserȱInterfaceȱ(GUI)’.ȱThisȱchapterȱdescribesȱhowȱtheȱConsoleȱisȱlaunchedȱandȱsetup.ȱ
7.1 LoggingȱintoȱtheȱConsoleȱ
1. OnȱtheȱLoginȱscreen,ȱtypeȱtheȱLoginȱID:ȱadminȱandȱtheȱPassword:ȱadminȱandȱclickȱ<Login>ȱorȱpressȱ<Enter>.ȱ
ȱ
ȱ
Figure 60. Console Login Screen
2. TheȱEndȱUserȱLicenseȱAgreementȱscreenȱappearsȱasȱshownȱinȱtheȱfollowingȱfigure.ȱReadȱtheȱagreementȱcarefullyȱandȱ
selectȱ‘IȱhaveȱreadȱandȱagreeȱtoȱtheȱLicensingȱAgreementȱabove’.ȱClickȱ<Next>.ȱ
ȱ
Figure 61. End User License Agreement Screen
7.1.1 Stepȱ1:ȱStartingȱtheȱSetupȱWizardȱ
3. TheȱWelcomeȱscreenȱappearsȱasȱshownȱinȱtheȱfollowingȱfigure.ȱThisȱwizardȱtakesȱyouȱthroughȱtheȱstepsȱtoȱhelpȱyouȱ
initializeȱtheȱsystem.ȱClickȱ<Next>ȱonȱeachȱscreenȱtoȱproceedȱtoȱtheȱnextȱstep.ȱToȱgoȱbackȱtoȱaȱpreviousȱstep,ȱclickȱ
<Previous>.ȱToȱexitȱtheȱsetupȱwizardȱatȱanyȱpoint,ȱclickȱ<Exit>.ȱYouȱcanȱtakeȱaȱtourȱofȱthisȱwizardȱlaterȱthroughȱtheȱ
ConsoleȱfromȱAdministrationÆGlobalȱTabÆSystemȱSettingsÆWizardsȱandȱconfigureȱtheȱappropriateȱsettings.ȱClickȱ
<Start>.ȱ
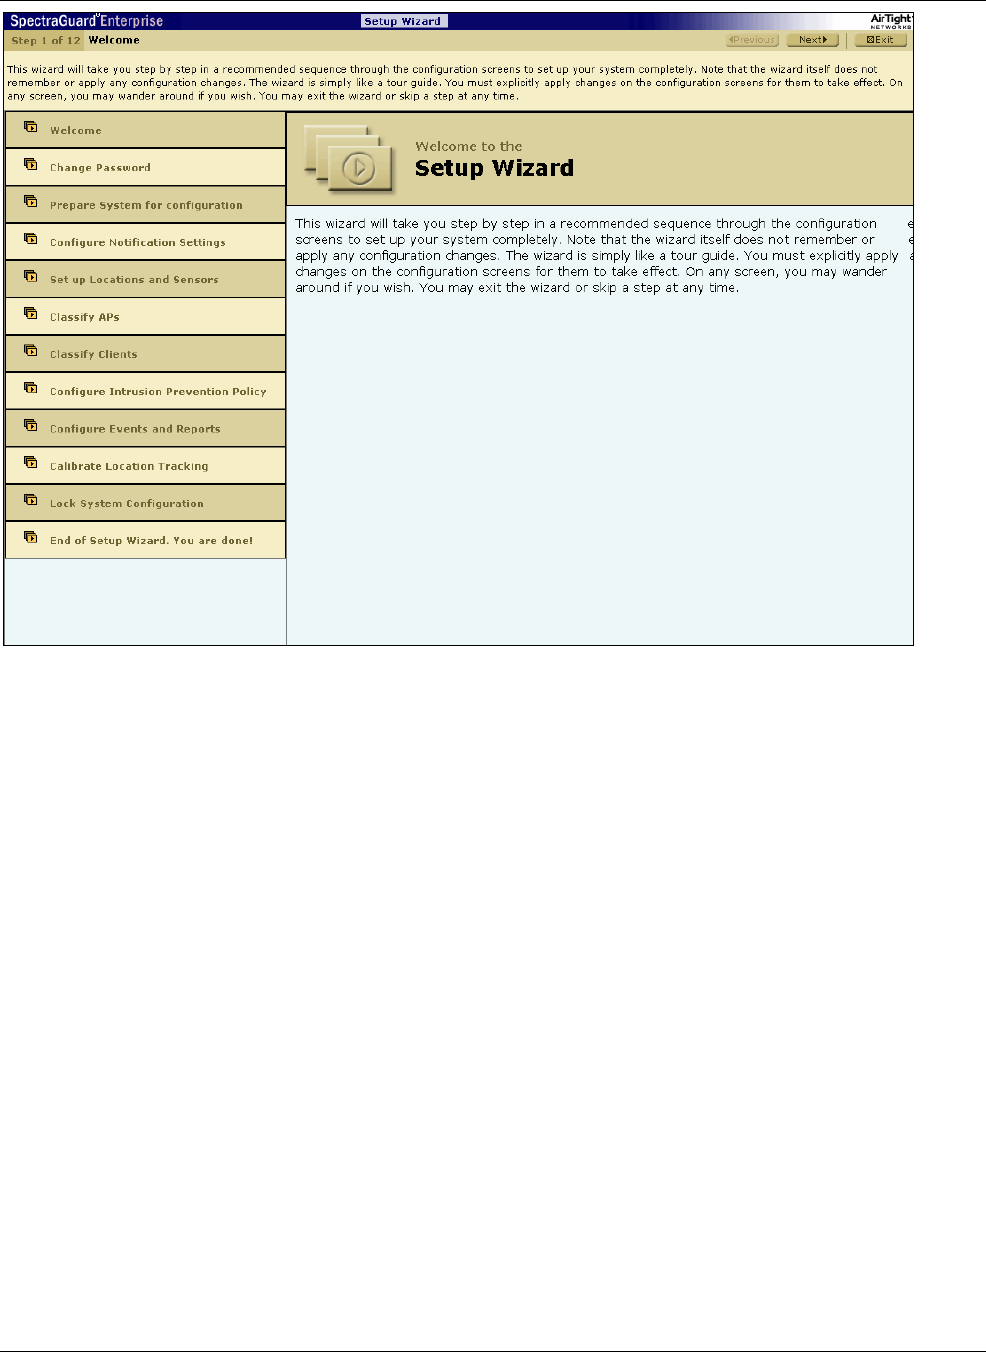
SettingȱupȱtheȱServerȱConsoleȱ
SpectraGuard®ȱEnterpriseȱInstallationȱGuideȱ
36ȱ
ȱ
Figure 62. System Setup Wizard Welcome Screen
7.1.2 Stepȱ2:ȱChangingȱyourȱAccountȱPasswordȱ
4. TheȱChangeȱPasswordȱscreenȱappearsȱasȱshownȱinȱtheȱfollowingȱfigure.ȱChangeȱyourȱaccountȱloginȱpassword.ȱSpecifyȱanȱ
emailȱaddressȱforȱtheȱuserȱadminȱtoȱbeȱusedȱlaterȱtoȱtestȱSMTPȱServerȱsettingsȱandȱotherȱemailȱnotifications.ȱ
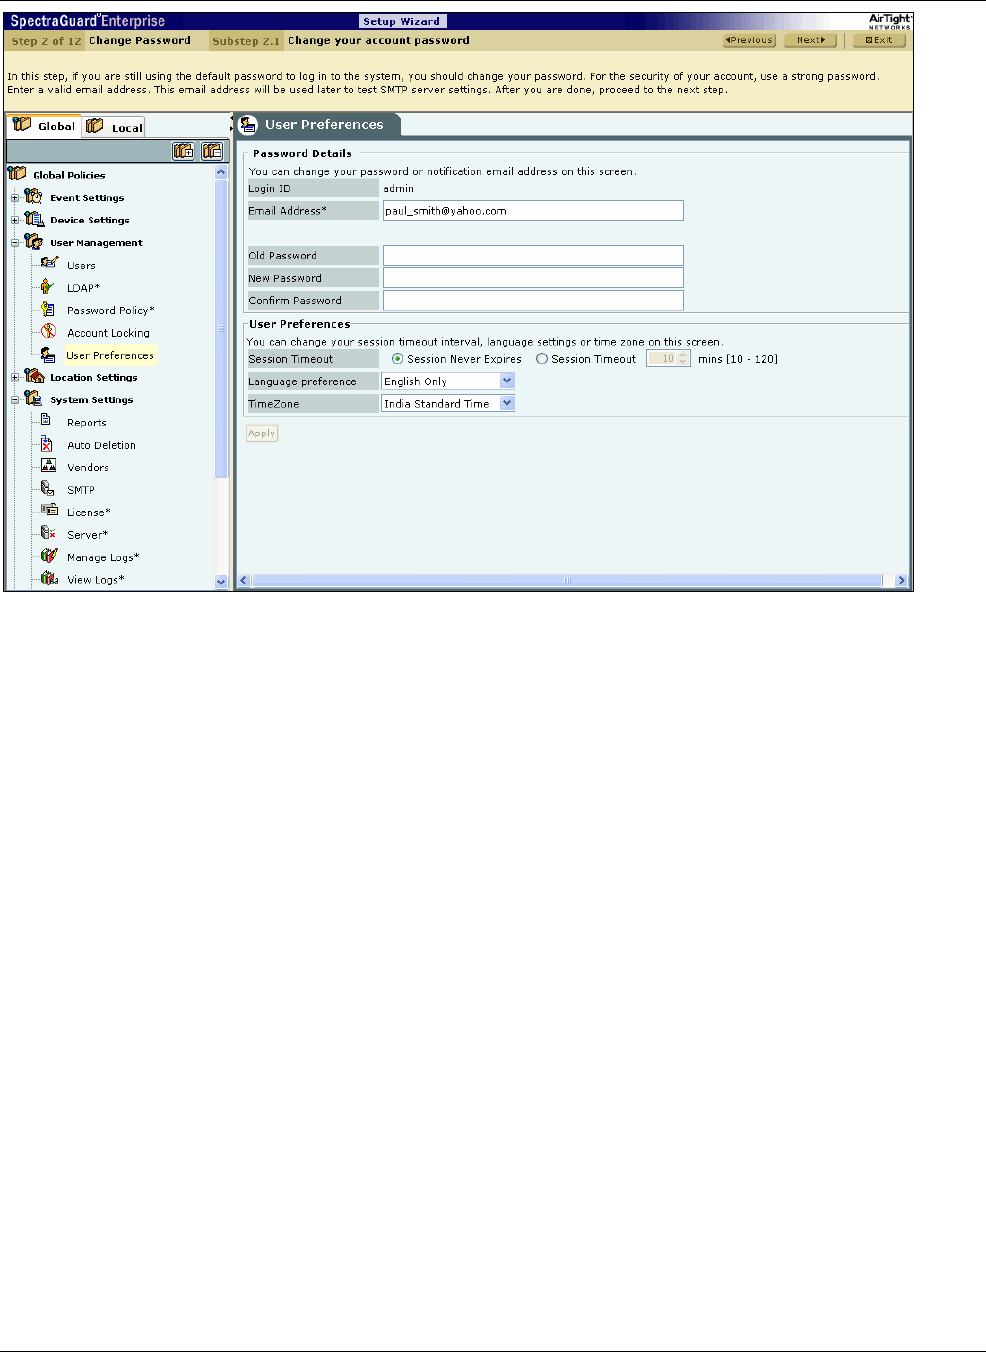
SettingȱupȱtheȱServerȱConsoleȱ
SpectraGuard®ȱEnterpriseȱInstallationȱGuideȱ
37
ȱ
Figure 63. Change Password
UnderȱPasswordȱDetails,ȱyouȱcanȱspecifyȱtheȱfollowing:ȱ
xEmailȱAddressȱ
xOldȱPasswordȱ
xNewȱPasswordȱ
xConfirmȱPasswordȱ
UnderȱUserȱPreferences,ȱyouȱcanȱchangeȱyourȱsessionȱtimeoutȱinterval,ȱlanguageȱsettings,ȱorȱtimeȱzone.ȱ
xSessionȱTimeout:ȱEnablesȱyouȱtoȱspecifyȱtheȱtimeȱafterȱwhichȱtheȱuserȱisȱloggedȱoutȱautomaticallyȱifȱtheȱsystemȱdoesȱ
notȱdetectȱanyȱactivityȱ
¾SessionȱNeverȱExpires:ȱSelectȱthisȱcheckboxȱifȱyouȱdoȱnotȱwantȱtheȱsessionȱtoȱexpireȱ
¾SessionȱTimeout:ȱEnablesȱyouȱtoȱspecifyȱtheȱnumberȱofȱminutesȱafterȱwhichȱtheȱsystemȱautomaticallyȱlogsȱoutȱ
theȱcurrentlyȱloggedȱinȱuserȱwhenȱthereȱisȱnoȱactivityȱonȱtheȱConsoleȱforȱtheȱSessionȱTimeoutȱperiodȱ
(Minimum:ȱ10ȱminutes;ȱMaximum:ȱ120ȱminutes)ȱ
xLanguageȱpreference:ȱSelectȱEnglishȱorȱMultilingualȱsupportȱfromȱtheȱdropȬdownȱlistȱ
xTimeȱZone:ȱSelectȱtheȱappropriateȱtimeȱzoneȱforȱtheȱuserȱ
Toȱsaveȱtheȱnewȱpasswordȱandȱuserȱpreferences,ȱclickȱ<Apply>.ȱ
7.1.3 Stepȱ3:ȱPreparingȱyourȱSystemȱforȱConfigurationȱ
5. TheȱEventȱActivationȱscreenȱappearsȱasȱshownȱinȱtheȱfollowingȱfigure.ȱToȱavoidȱtransientȱeventsȱduringȱtheȱsetupȱprocess,ȱ
deȬactivateȱthisȱfeatureȱforȱallȱlocationsȱwhereȱchangesȱareȱtoȱbeȱmade.ȱTheȱsystemȱpromptsȱyouȱtoȱturnȱthisȱfeatureȱbackȱ
onȱatȱtheȱendȱofȱtheȱSetupȱWizard.ȱIfȱyouȱexitȱtheȱSetupȱWizardȱprematurely,ȱyouȱmustȱmanuallyȱreȬactivateȱthisȱfeature.ȱ
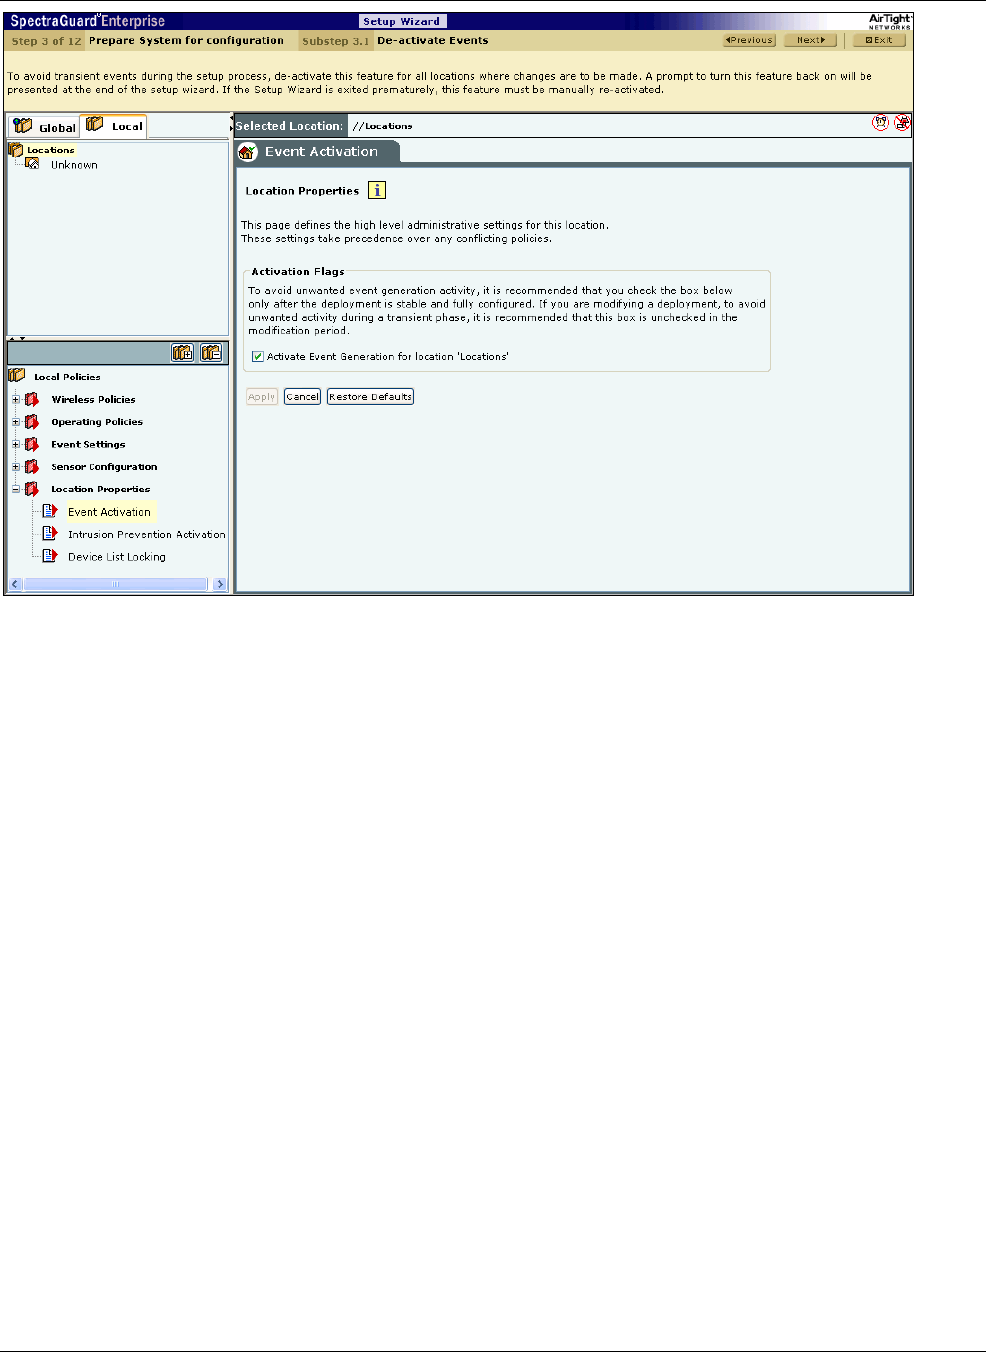
SettingȱupȱtheȱServerȱConsoleȱ
SpectraGuard®ȱEnterpriseȱInstallationȱGuideȱ
38ȱ
ȱ
Figure 64. Event De-activation
6. TheȱIntrusionȱPreventionȱActivationȱscreenȱappearsȱasȱshownȱinȱtheȱfollowingȱfigure.ȱToȱavoidȱunwantedȱintrusionȱ
preventionȱactivityȱduringȱtheȱsetupȱprocess,ȱdeȬactivateȱthisȱfeatureȱforȱallȱlocationsȱwhereȱchangesȱareȱtoȱbeȱmade.ȱTheȱ
systemȱpromptsȱyouȱtoȱturnȱthisȱfeatureȱbackȱonȱatȱtheȱendȱofȱtheȱSetupȱWizard.ȱIfȱyouȱexitȱtheȱSetupȱWizardȱprematurely,ȱ
youȱmustȱmanuallyȱreȬactivateȱthisȱfeature.ȱAuthorizedȱAPsȱshouldȱbeȱinȱtheȱAuthorizedȱfolderȱbeforeȱactivatingȱintrusionȱ
prevention.ȱTheirȱnetworkȱconnectivityȱiconȱmayȱshowȱtheȱstatusȱasȱWired,ȱUnwired,ȱorȱIndeterminate.ȱ
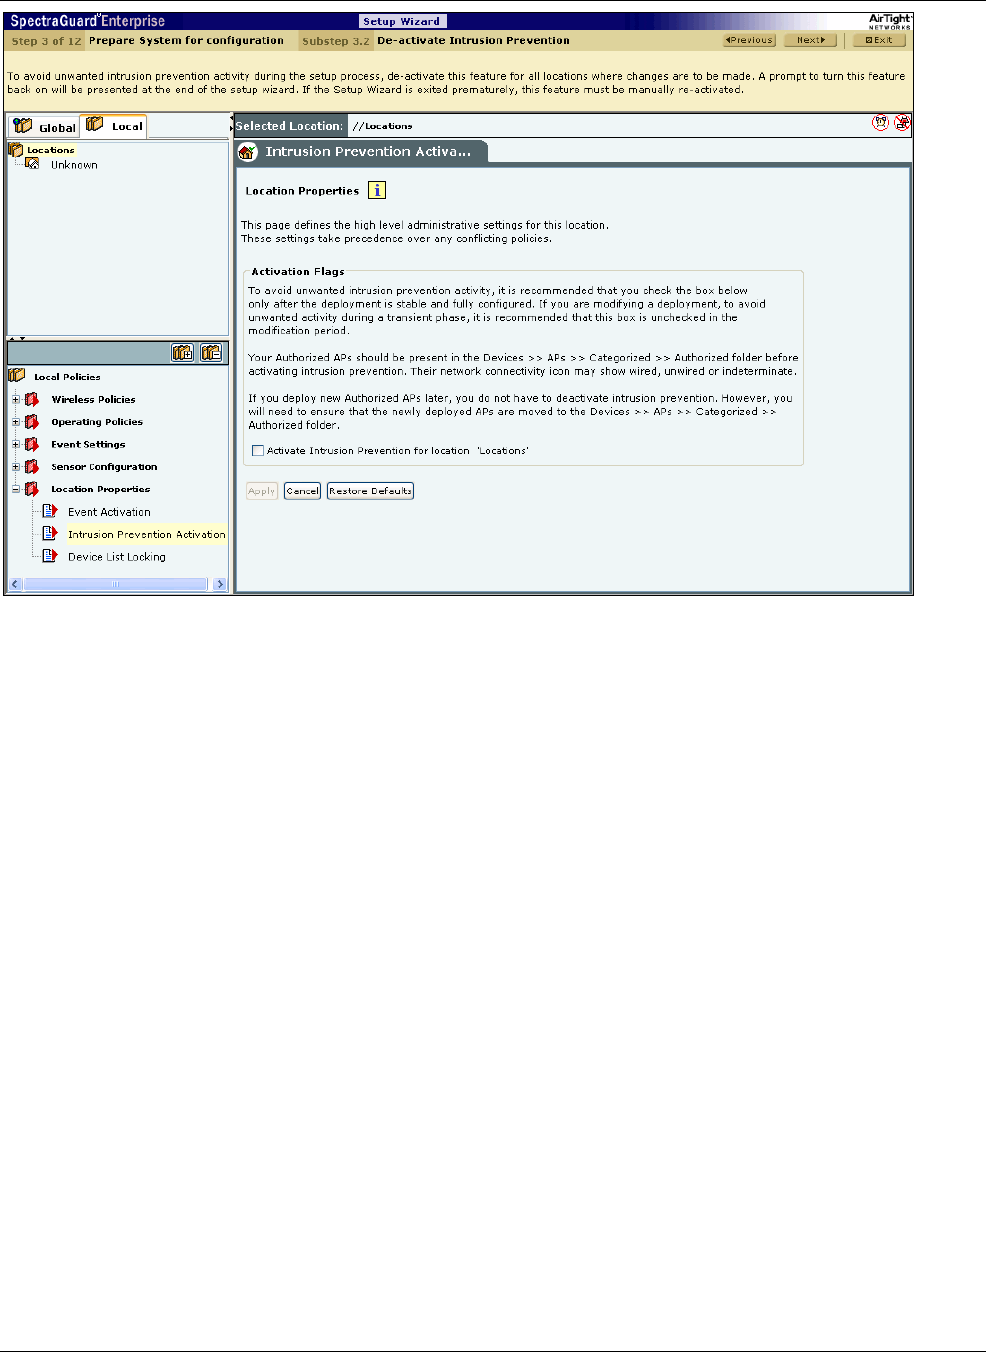
SettingȱupȱtheȱServerȱConsoleȱ
SpectraGuard®ȱEnterpriseȱInstallationȱGuideȱ
39
ȱ
Figure 65. Intrusion Prevention De-activation
7. TheȱDeviceȱListȱLockingȱscreenȱappearsȱasȱshownȱinȱtheȱfollowingȱfigure.ȱIfȱyouȱhadȱpreviouslyȱlockedȱtheȱlistȱofȱ
AuthorizedȱAPsȱandȱClientsȱatȱaȱlocationȱbyȱcheckingȱtheȱtwoȱcheckboxesȱLockȱAPȱListȱforȱlocationȱ‘<selectedȱlocation’>ȱ
andȱLockȱClientȱListȱforȱlocationȱ‘<selectedȱlocation’>,ȱyouȱmustȱunlockȱtheȱlistsȱforȱallȱtheȱlocationsȱwhereȱyouȱexpectȱtoȱ
addȱAuthorizedȱAPsȱorȱClientsȱduringȱtheȱsetupȱwizard.ȱIfȱyouȱlockȱaȱparticularȱdeviceȱlist,ȱnoȱmoreȱdevicesȱofȱthatȱtypeȱ
canȱbeȱsubsequentlyȱautomaticallyȱAuthorizedȱforȱthatȱlocation.ȱAsȱAPsȱareȱnotȱautomaticallyȱmovedȱtoȱtheȱAuthorizedȱ
folder,ȱlockingȱtheȱAuthorizedȱAPȱlistȱmeansȱthatȱnoȱwiredȱAPsȱwillȱbeȱtaggedȱasȱPotentiallyȱAuthorizedȱatȱthisȱlocation;ȱ
theyȱwillȱbecomeȱPotentiallyȱRogueȱandȱmayȱbeȱautomaticallyȱmovedȱtoȱtheȱRogueȱfolderȱbasedȱonȱtheȱAPȱAutoȬ
Classificationȱpolicy.ȱ
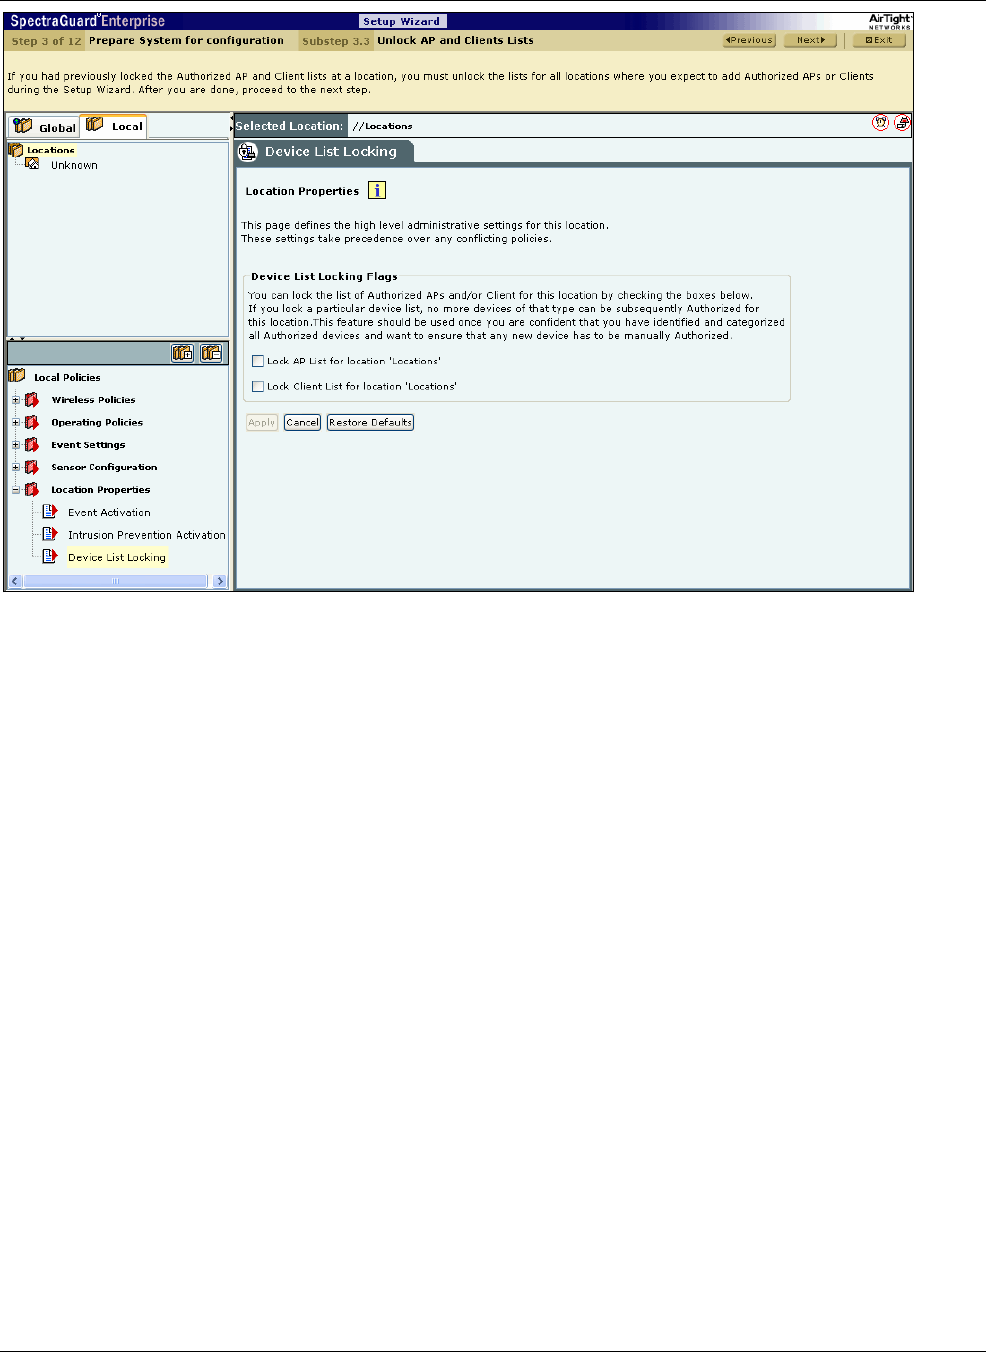
SettingȱupȱtheȱServerȱConsoleȱ
SpectraGuard®ȱEnterpriseȱInstallationȱGuideȱ
40ȱ
ȱ
Figure 66. Device List Unlocking
7.1.4 Stepȱ4:ȱConfiguringȱNotificationȱSettingsȱ
8. TheȱSMTPȱConfigurationȱscreenȱappearsȱasȱshownȱinȱtheȱfollowingȱfigure.ȱYouȱmustȱsetȱSimpleȱMailȱTransferȱProtocolȱ
(SMTP)ȱServerȱsettingsȱtoȱsendȱnotificationȱofȱeventsȱviaȱemail.ȱAirTightȱrecommendsȱthatȱyouȱtestȱtheȱSMTPȱsettingsȱ
beforeȱapplyingȱtheȱchanges.ȱYouȱmustȱhaveȱadministratorȱprivilegesȱtoȱsetȱtheseȱvalues.ȱ
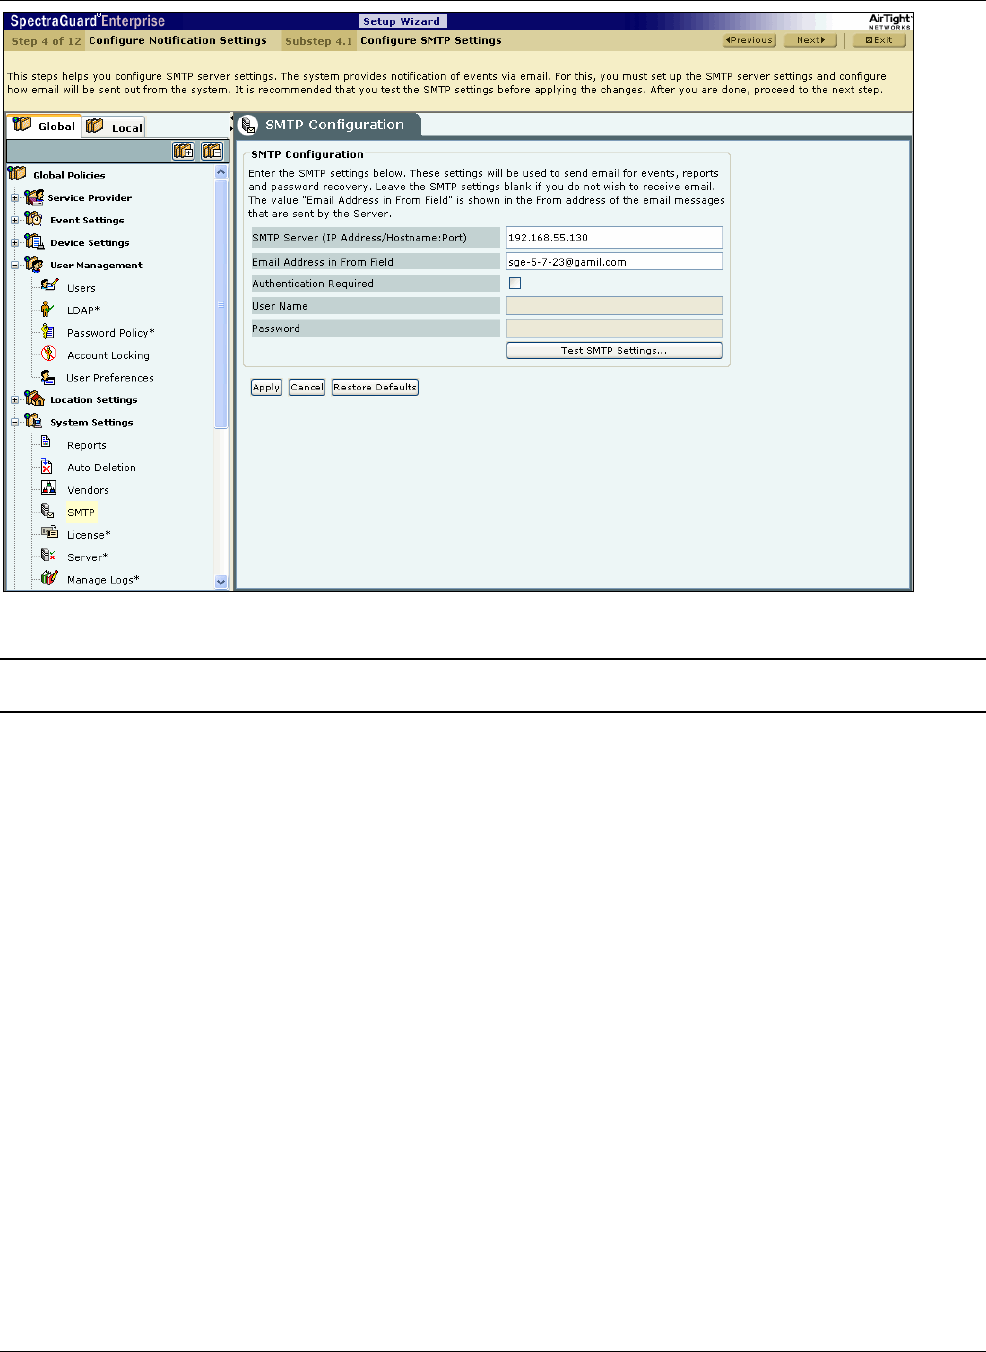
SettingȱupȱtheȱServerȱConsoleȱ
SpectraGuard®ȱEnterpriseȱInstallationȱGuideȱ
41
ȱ
Figure 67. SMTP Configuration
Note:ȱIfȱyouȱwantȱtheȱsystemȱtoȱnotifyȱyouȱbyȱanȱeventsȱemail,ȱyouȱneedȱtoȱspecifyȱSMTPȱServerȱdetails.ȱTheȱsystemȱdoesȱnotȱemailȱeventsȱ
byȱdefault.ȱIfȱyouȱdoȱnotȱwantȱtoȱreceiveȱemailȱforȱtheȱevents,ȱselectȱ<RestoreȱDefaults>ȱandȱ<Apply>.ȱ
SMTPȱConfigurationȱcontainsȱtheȱfollowingȱoptions:ȱ
xSMTPȱServerȱ(IPȱaddress/Hostname:ȱPort):ȱSpecifiesȱtheȱIPȱaddressȱorȱtheȱhostnameȱandȱtheȱportȱnumberȱofȱtheȱ
SMTPȱServerȱtoȱbeȱusedȱbyȱtheȱsystemȱforȱsendingȱemailȱalerts.ȱ
(Default:ȱ127.0.0.1:25)ȱ
TheȱfollowingȱareȱtheȱauthenticationȱprotocolsȱforȱSMTPȱServer:ȱ
¾PLAINȱ(Forȱsendmailȱ8.10ȱandȱabove)ȱ
¾LOGINȱ(Forȱsendmailȱ8.10ȱandȱabove)ȱ
¾NTLMȱ(Windowsȱproprietaryȱauthenticationȱmethod)ȱ
xEmailȱAddressȱinȱFromȱfield:ȱSpecifiesȱtheȱsourceȱaddressȱfromȱwhichȱemailȱalertsȱareȱsent.ȱ
xAuthenticationȱRequired:ȱIfȱenabled,ȱspecifiesȱwhetherȱtheȱSMTPȱServerȱrequiresȱauthentication.ȱ
¾Username:ȱSpecifiesȱtheȱuserȱnameȱforȱSMTPȱServerȱauthentication.ȱ
¾Password:ȱSpecifiesȱtheȱpasswordȱforȱSMTPȱServerȱauthentication.ȱ
Toȱsendȱaȱtestȱemail,ȱclickȱ<TestȱSMTPȱSettings>.ȱThisȱtestȱemailȱwillȱbeȱsentȱtoȱtheȱemailȱaddressȱofȱtheȱloggedȱinȱuser,ȱinȱthisȱ
caseȱuserȱadmin.ȱ
9. TheȱSyslogȱConfigurationȱscreenȱappearsȱasȱshownȱinȱtheȱfollowingȱfigure.ȱSyslogȱConfigurationȱallowsȱtheȱsystemȱtoȱ
sendȱeventsȱtoȱdesignatedȱSyslogȱreceivers.ȱ
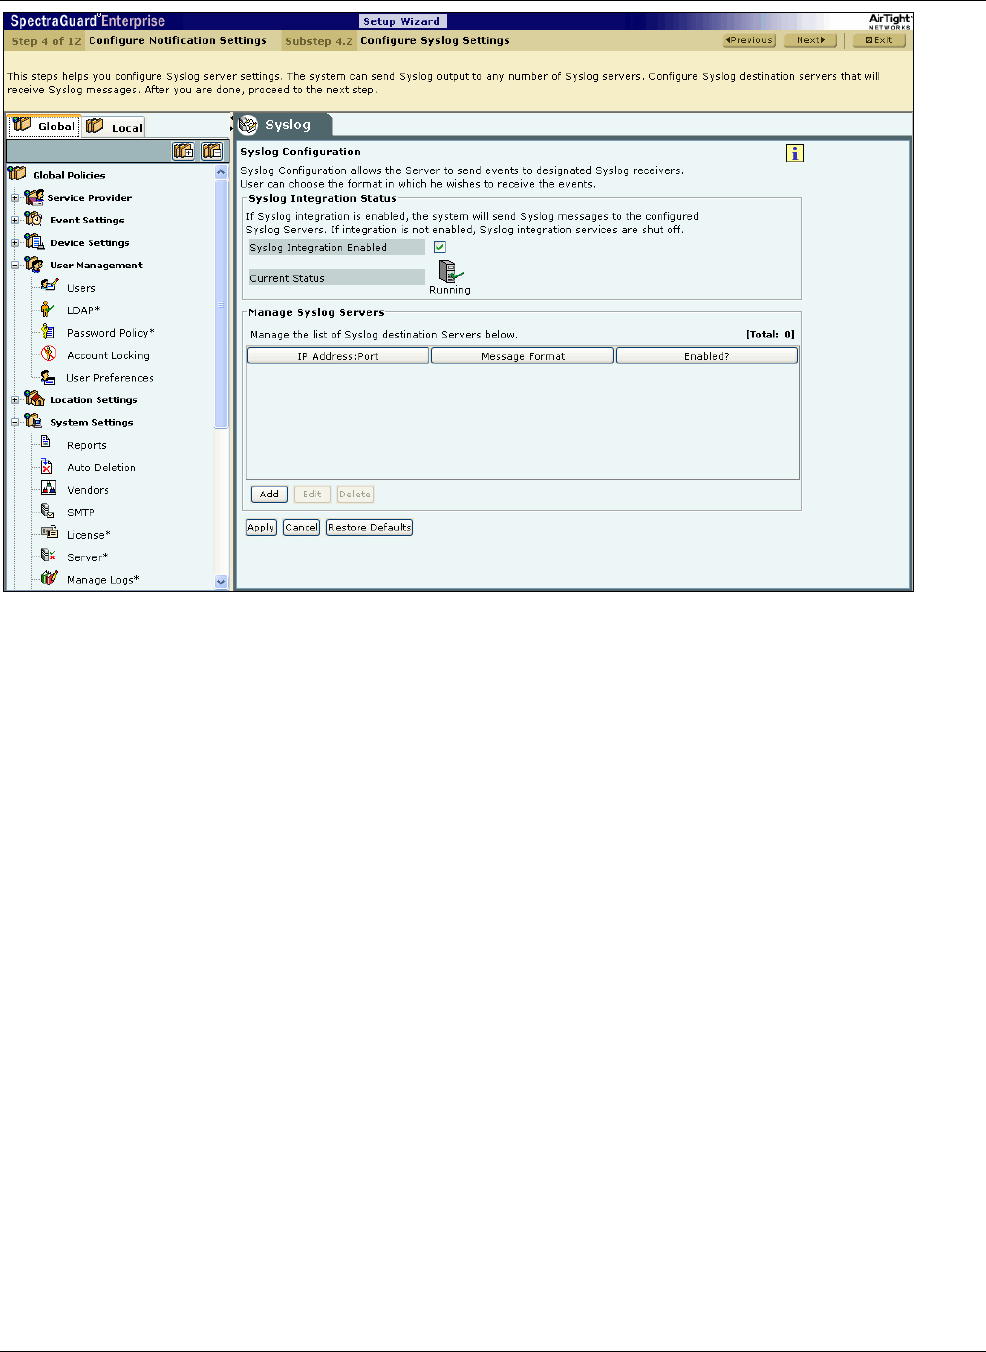
SettingȱupȱtheȱServerȱConsoleȱ
SpectraGuard®ȱEnterpriseȱInstallationȱGuideȱ
42ȱ
ȱ
Figure 68. Syslog Configuration
xSyslogȱIntegrationȱStatus:ȱIfȱSyslogȱintegrationȱisȱenabled,ȱtheȱsystemȱsendsȱmessagesȱtoȱtheȱconfiguredȱSyslogȱ
Servers.ȱElse,ȱSyslogȱintegrationȱservicesȱareȱshutȱoff.ȱ
¾IfȱyouȱselectȱSyslogȱIntegrationȱEnabled,ȱyouȱcanȱmanageȱSyslogȱServers.ȱTheȱsystemȱenablesȱSyslogȱbyȱdefault.ȱ
¾CurrentȱStatus:ȱDisplaysȱtheȱCurrentȱStatusȱofȱtheȱSyslogȱServer:ȱRunningȱorȱStopped.ȱAnȱErrorȱstatusȱisȱshownȱ
inȱoneȱofȱtheȱfollowingȱcases:ȱ
OneȱofȱtheȱconfiguredȱandȱenabledȱSyslogȱServersȱhasȱaȱhostname,ȱwhichȱcannotȱbeȱresolvedȱ
SystemȱServerȱisȱstoppedȱ
Internalȱerror,ȱinȱwhichȱcaseȱyouȱneedȱtoȱcontactȱTechnicalȱSupportȱ
xUnderȱManageȱSyslogȱSevers,ȱclickȱ<Add>ȱtoȱopenȱSyslogȱConfigurationȱdialogȱwhereȱyouȱcanȱaddȱSyslogȱServerȱ
details.ȱ
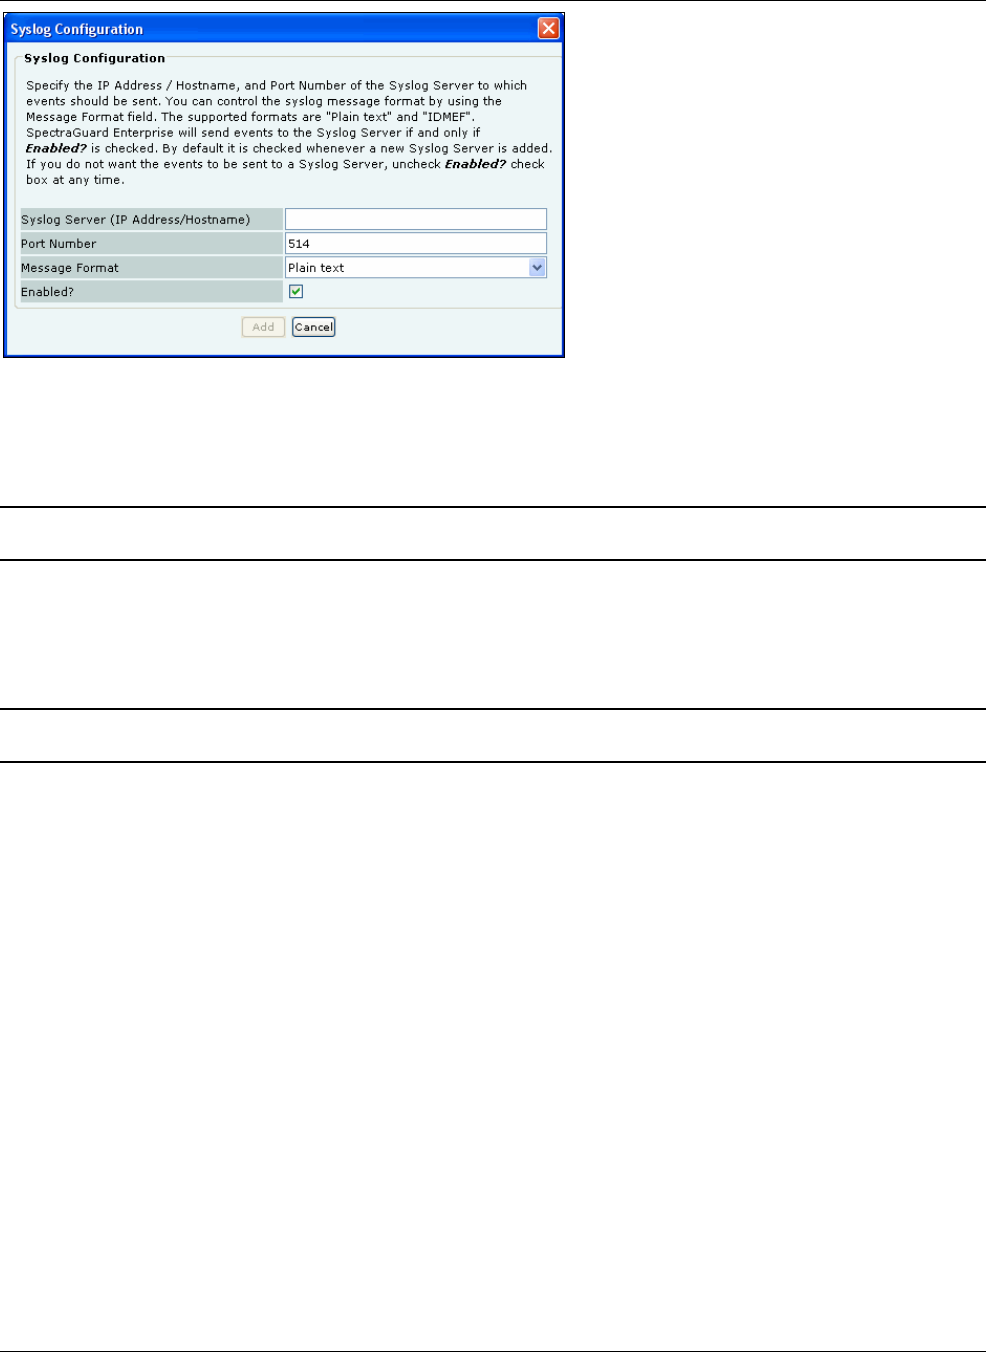
SettingȱupȱtheȱServerȱConsoleȱ
SpectraGuard®ȱEnterpriseȱInstallationȱGuideȱ
43
ȱ
Figure 69. Syslog Configuration Dialog
SyslogȱConfigurationȱcontainsȱtheȱfollowingȱfields:ȱ
xSyslogȱServerȱ(IPȱAddress/Hostname):ȱSpecifiesȱtheȱIPȱaddressȱorȱtheȱhostnameȱofȱtheȱSyslogȱServerȱtoȱwhichȱeventsȱ
shouldȱbeȱsent.ȱ
Note:ȱConfiguredȱSyslogȱServersȱwillȱuseȱtheȱDNSȱnamesȱandȱDNSȱsuffixesȱconfiguredȱbyȱtheȱuserȱinȱtheȱServerȱInitializationȱandȱSetupȱ
WizardȱonȱtheȱServerȱConfigȱShell.ȱ
xPortȱNumber:ȱSpecifiesȱtheȱportȱnumberȱofȱtheȱSyslogȱServerȱtoȱwhichȱtheȱsystemȱsendsȱevents.ȱ
(Default:ȱ514)ȱ
xMessageȱFormat:ȱSpecifiesȱtheȱformatȱinȱwhichȱtheȱeventȱisȱsent:ȱIntrusionȱDetectionȱMessageȱExchangeȱFormatȱ
(IDMEF)ȱorȱPlainȱtext.ȱ
(Default:ȱPlainȱtext)ȱ
Note:ȱIfȱyouȱupgradeȱaȱServer,ȱpreȬ5.6ȱtoȱ5.6,ȱallȱpreviouslyȱconfiguredȱSyslogȱServersȱwouldȱsendȱeventsȱinȱPlainȱtextȱMessageȱFormatȱbyȱ
default.ȱYouȱcanȱselectȱtheȱIDMEFȱformatȱbyȱeditingȱtheȱSyslogȱServerȱsettings.ȱ
xEnabled?:ȱSpecifiesȱifȱtheȱeventsȱareȱtoȱbeȱsentȱtoȱthisȱSyslogȱServer.ȱ
(Default:ȱEnabled)ȱ
Clickȱ<Add>ȱtoȱaddȱtheȱdetailsȱforȱaȱnewȱSyslogȱServer.ȱClickȱ<Cancel>ȱtoȱcloseȱtheȱwindowȱandȱdiscardȱallȱchangesȱthatȱwereȱ
made.ȱ
DoubleȬclickȱaȱrowȱorȱclickȱ<Edit>ȱtoȱopenȱSyslogȱConfigurationȱdialogȱsimilarȱtoȱtheȱoneȱshownȱabove.ȱClickȱ<Save>ȱtoȱsaveȱ
allȱsettings.ȱClickȱ<Cancel>ȱtoȱcloseȱtheȱwindowȱandȱdiscardȱallȱchangesȱthatȱwereȱmade.ȱ
Clickȱ<Delete>ȱtoȱdiscardȱtheȱdetailsȱofȱanȱexistingȱSyslogȱServer.ȱ
10. TheȱSNMPȱConfigurationȱscreenȱappearsȱasȱshownȱinȱtheȱfollowingȱfigure.ȱSNMPȱConfigurationȱallowsȱtheȱsystemȱtoȱ
sendȱeventsȱasȱSNMPȱtrapsȱtoȱdesignatedȱSNMPȱtrapȱreceivers.ȱItȱalsoȱallowsȱSNMPȱmanagersȱtoȱqueryȱServerȱoperatingȱ
parametersȱusingȱIFȬMIB,ȱMIBȬII,ȱandȱHostȱResourcesȱMIB.ȱ
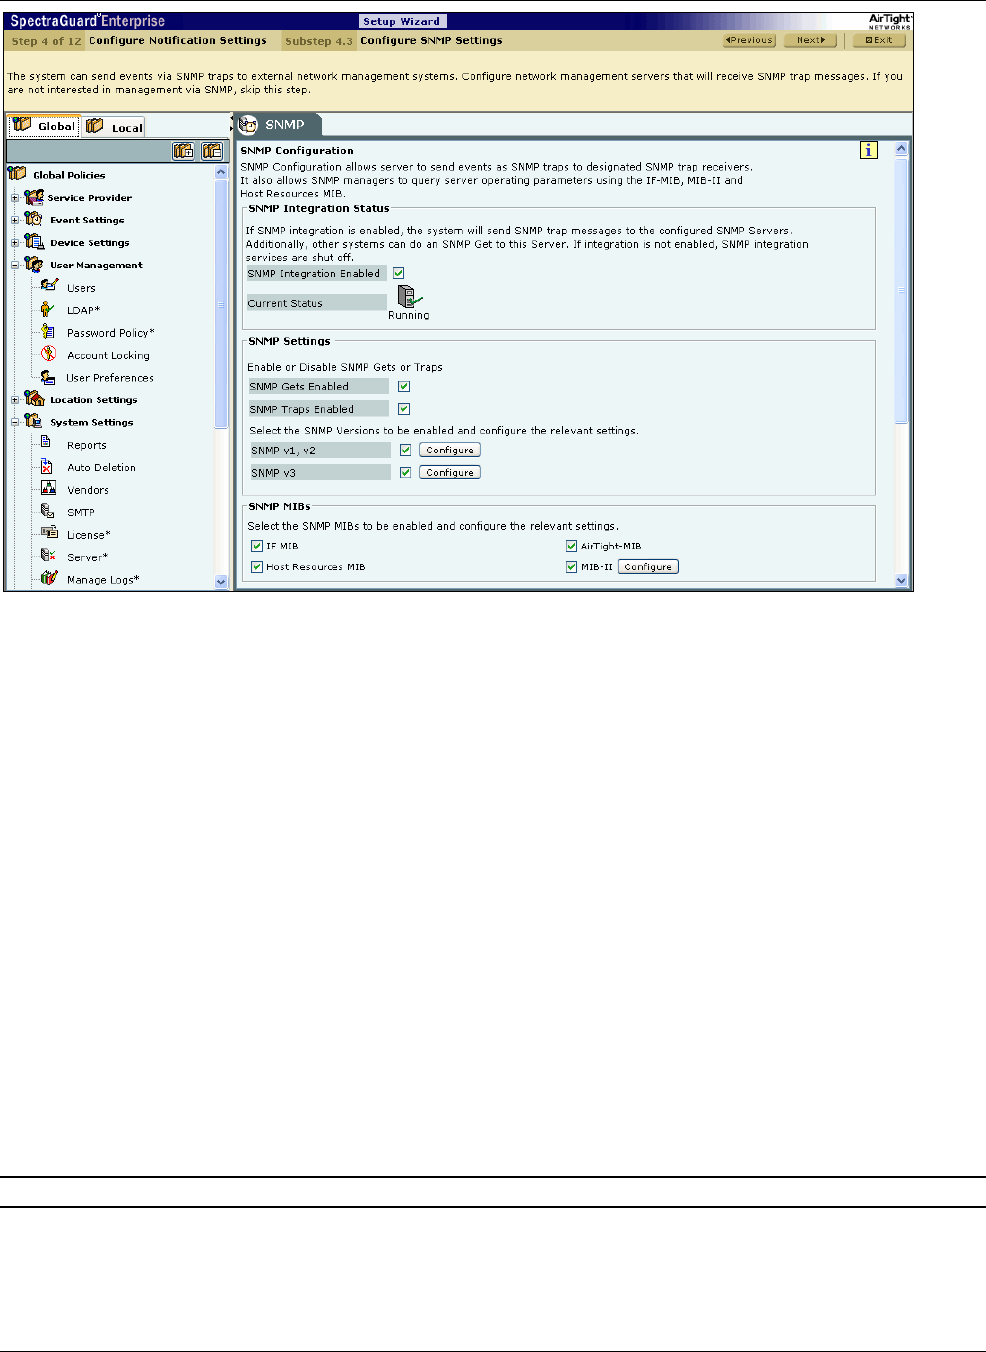
SettingȱupȱtheȱServerȱConsoleȱ
SpectraGuard®ȱEnterpriseȱInstallationȱGuideȱ
44ȱ
ȱ
Figure 70. SNMP Configuration
xSNMPȱIntegrationȱStatus:ȱIfȱSNMPȱintegrationȱisȱenabled,ȱtheȱsystemȱsendsȱSNMPȱtrapsȱtoȱtheȱconfiguredȱSNMPȱ
Servers.ȱOtherȱsystemsȱcanȱdoȱanȱSNMPȱGetȱtoȱthisȱServer.ȱElse,ȱSNMPȱintegrationȱservicesȱareȱshutȱoff.ȱ
¾IfȱyouȱselectȱSNMPȱIntegrationȱEnabled,ȱyouȱcanȱeditȱandȱmanageȱSNMPȱServerȱdetails.ȱTheȱsystemȱenablesȱ
SNMPȱbyȱdefault.ȱ
¾CurrentȱStatus:ȱDisplaysȱtheȱCurrentȱStatusȱofȱtheȱSNMPȱServer:ȱRunning,ȱError,ȱorȱStopped.ȱ
xUnderȱSNMPȱSettings,ȱconfigureȱSNMPȱGetsȱorȱTraps.ȱ
¾SNMPȱGetsȱEnabled:ȱAllowsȱSNMPȱmanagersȱtoȱqueryȱServerȬoperatingȱparametersȱusingȱIFȬMIB,ȱMIBȬII,ȱandȱ
HostȱResourcesȱMIB.ȱ
¾SNMPȱTrapsȱEnabled:ȱAllowsȱSNMPȱtrapsȱtoȱbeȱsentȱtoȱconfiguredȱSNMPȱServers.ȱ
Additionally,ȱselectȱtheȱSNMPȱversionsȱtoȱbeȱenabledȱandȱconfigureȱtheȱrelevantȱsettings.ȱ
¾SNMPȱv1,ȱv2:ȱIfȱselected,ȱspecifyȱtheȱCommunityȱStringȱforȱtheȱSNMPȱagent.ȱ
(Default:ȱpublic)ȱ
¾SNMPȱv3:ȱIfȱselected,ȱspecifyȱtheȱEngineȱID,ȱUsername,ȱandȱPassword.ȱ
(DefaultȱUsername:ȱadmin;ȱDefaultȱPassword:ȱpassword)ȱ
xUnderȱSNMPȱMIBs,ȱselectȱtheȱfollowingȱSNMPȱMIBsȱtoȱbeȱenabledȱandȱconfigureȱtheȱrelevantȱsettings.ȱ
¾IFȱMIBȱ
¾HostȱResourcesȱMIBȱ
¾AirTightȬMIB:ȱEnablesȱtheȱexternalȱSNMPȱagentȱtoȱreceiveȱtrapsȱ
¾MIBȬII:ȱIfȱselected,ȱconfigureȱtheȱSystemȱContact,ȱSystemȱName,ȱandȱSystemȱLocation.ȱ
(DefaultȱSystemȱName:ȱWifiȱSecurityȱSever)ȱ
Note:ȱTheȱInternetȱAssignedȱNumbersȱAuthorityȱ(IANA)ȱassignedȱPrivateȱEnterpriseȱNumberȱforȱAirTight®ȱNetworks,ȱInc.ȱisȱ16901.ȱ
xUnderȱSNMPȱTrapȱDestinationȱServers,ȱclickȱ<Add>toȱopenȱSNMPȱConfigurationȱdialogȱwhereȱyouȱcanȱaddȱSNMPȱ
Serverȱdetails.ȱ
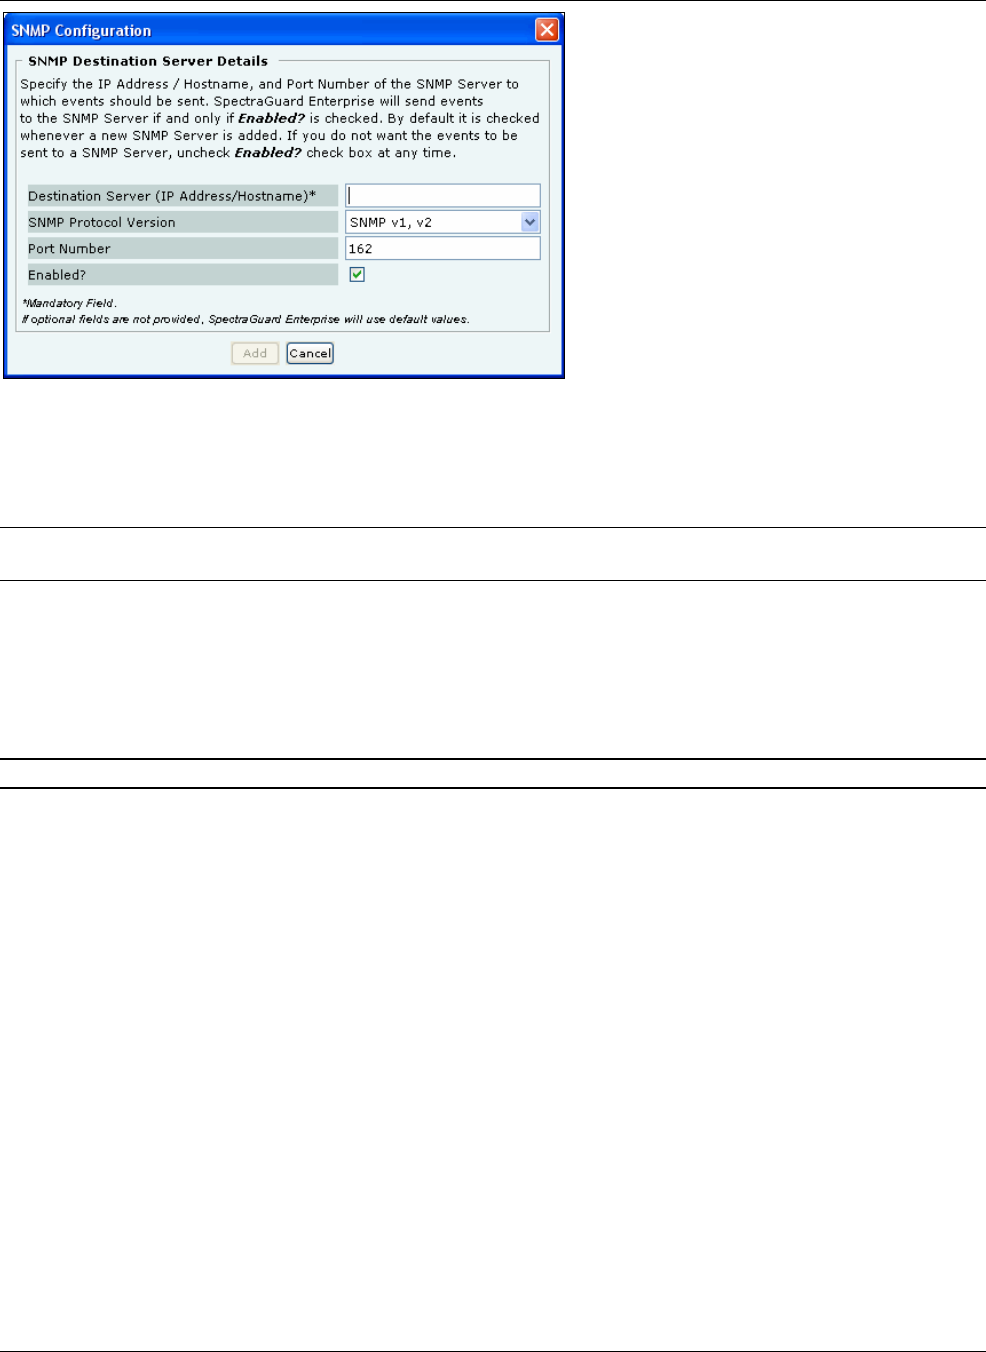
SettingȱupȱtheȱServerȱConsoleȱ
SpectraGuard®ȱEnterpriseȱInstallationȱGuideȱ
45
ȱ
Figure 71. SNMP Configuration Dialog
SNMPȱDestinationȱServerȱDetailsȱcontainsȱtheȱfollowingȱfields:ȱ
xDestinationȱServerȱ(IPȱAddress/Hostname)*:ȱSpecifiesȱtheȱIPȱaddressȱorȱtheȱhostnameȱofȱtheȱSNMPȱServerȱtoȱwhichȱ
eventsȱshouldȱbeȱsent.ȱ
Note:ȱConfiguredȱSNMPȱServersȱwillȱuseȱtheȱDNSȱnamesȱandȱDNSȱsuffixesȱconfiguredȱbyȱtheȱuserȱinȱtheȱServerȱInitializationȱandȱSetupȱ
WizardȱonȱtheȱServerȱConfigȱShell.ȱ
xSNMPȱProtocolȱVe r s ion : ȱSpecifiesȱtheȱSNMPȱprotocolȱversionȱforȱtheȱSNMPȱagent.ȱ
(Default:ȱSNMPȱv1,ȱv2)ȱ
xPortȱNumber:ȱSpecifiesȱtheȱportȱnumberȱonȱtheȱreceivingȱsystemȱtoȱwhichȱtheȱSNMPȱtrapȱisȱsent.ȱ
(Default:ȱ162)ȱ
xEnabled?:ȱSpecifiesȱifȱtheȱSNMPȱServerȱisȱenabledȱtoȱreceiveȱSNMPȱtraps.ȱ
(Default:ȱEnabled)ȱ
Note:ȱYouȱmustȱspecifyȱaȱdifferentȱportȱnumberȱifȱanotherȱapplicationȱusesȱtheȱdefaultȱport.ȱ
Clickȱ<Add>ȱtoȱaddȱtheȱdetailsȱforȱaȱnewȱSNMPȱServer.ȱ
DoubleȬclickȱaȱrowȱorȱselectȱaȱrowȱandȱclickȱ<Edit>ȱtoȱopenȱSNMPȱConfigurationȱdialogȱsimilarȱtoȱtheȱoneȱshownȱabove..ȱ
Clickȱ<Save>ȱtoȱsaveȱallȱsettings.ȱ
Selectȱaȱrowȱandȱclickȱ<Delete>ȱtoȱdiscardȱtheȱdetailsȱofȱanȱexistingȱSNMPȱServer.ȱ
7.1.5 Stepȱ5:ȱSettingȱupȱLocationsȱandȱSensorsȱ
11. TheȱLocationsȱscreenȱappearsȱasȱshownȱinȱtheȱfollowingȱfigure.ȱCreateȱaȱhierarchyȱofȱallȱtheȱlocationsȱthatȱtheȱsystemȱwillȱ
monitorȱandȱsecureȱbyȱaddingȱlocationȱfoldersȱandȱnodes.ȱ
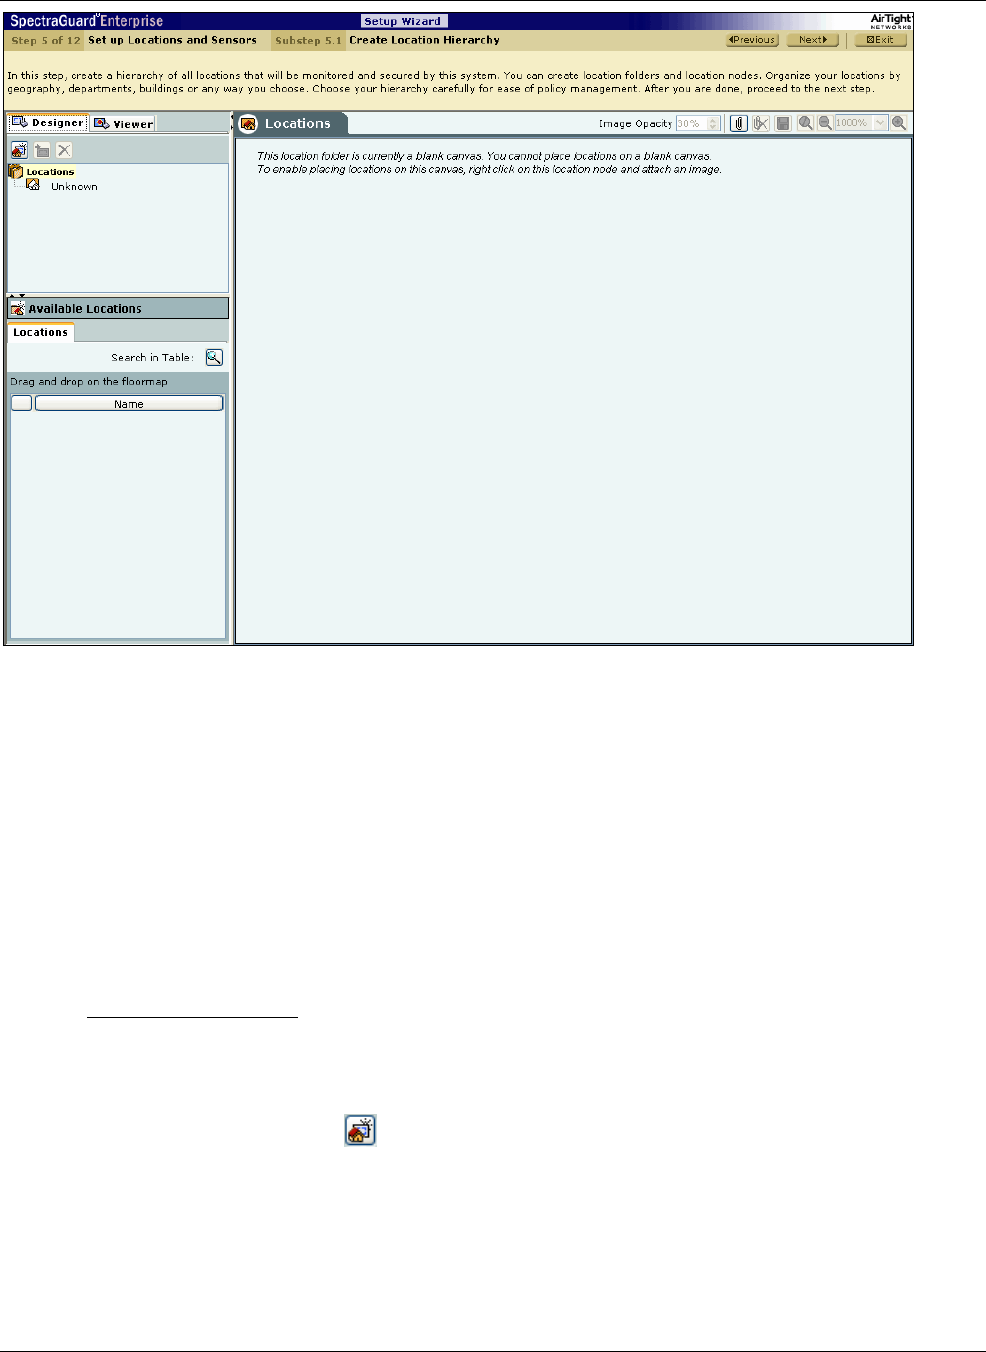
SettingȱupȱtheȱServerȱConsoleȱ
SpectraGuard®ȱEnterpriseȱInstallationȱGuideȱ
46ȱ
ȱ
Figure 72. Locations Screen
TheȱLocationsȱscreenȱoperatesȱinȱtwoȱmodes:ȱDesignerȱmodeȱandȱViewerȱmode.ȱTheȱDesignerȱmodeȱisȱactiveȱbyȱdefault.ȱ
Aȱlocationȱhierarchyȱofȱyourȱsetupȱmayȱcompriseȱlocationȱfoldersȱandȱlocationȱnodes.ȱ
xLocationȱfoldersȱrepresentȱorganizationalȱcomponentsȱsuchȱasȱbuildings,ȱcities,ȱorȱcountries.ȱ
¾Root:ȱThisȱisȱtheȱrootȱlocation.ȱTheȱfactoryȱdefaultȱnameȱforȱthisȱlocationȱisȱLocations.ȱYouȱcanȱrenameȱthisȱ
location.ȱHowever,ȱyouȱcannotȱdeleteȱorȱmoveȱthisȱlocation.ȱ
¾Unknown:ȱThisȱisȱtheȱdefaultȱlocationȱfolderȱofȱtheȱrootȱlocation.ȱYouȱcannotȱcreate,ȱdelete,ȱrename,ȱmove,ȱorȱaddȱ
aȱlocationȱtoȱtheȱUnknownȱfolder.ȱWhenȱtheȱsystemȱdetectsȱaȱnewȱuntaggedȱSensor,ȱitȱtagsȱthisȱSensorȱtoȱtheȱ
Unknownȱlocationȱfolder.ȱInȱotherȱwords,ȱwhenȱtheȱlocationȱtagȱofȱaȱlocationȬawareȱentityȱisȱnotȱknownȱorȱ
cannotȱbeȱdetermined,ȱitȱisȱtaggedȱtoȱtheȱUnknownȱfolder.ȱ
xLocationȱnodesȱrepresentȱcomponentȱdetailsȱsuchȱasȱaȱfloorȱinȱaȱbuilding.ȱForȱexample,ȱHawaiiȱConferenceȱRoom,ȱ
Bldgȱ15–CubicleȱG2,ȱorȱExecutiveȱArea.ȱ
7.1.5.1 AddingȱaȱNewȱLocationȱ
Useȱtheȱfollowingȱstepsȱtoȱaddȱaȱlocation:ȱ
a. InȱtheȱLocationȱtree,ȱselectȱtheȱlocationȱunderȱwhichȱyouȱwishȱtoȱaddȱaȱnewȱlocation.ȱ
b. Doȱoneȱofȱtheȱfollowing:ȱ
xRightȬclickȱandȱfromȱtheȱresultingȱcontextȬsensitiveȱmenu,ȱselectȱAddȱNewȱLocation.ȱ
xClickȱtheȱAddȱNewȱLocationȱiconȱ( )ȱbelowȱtheȱDesignerȱmodeȱtab.ȱ
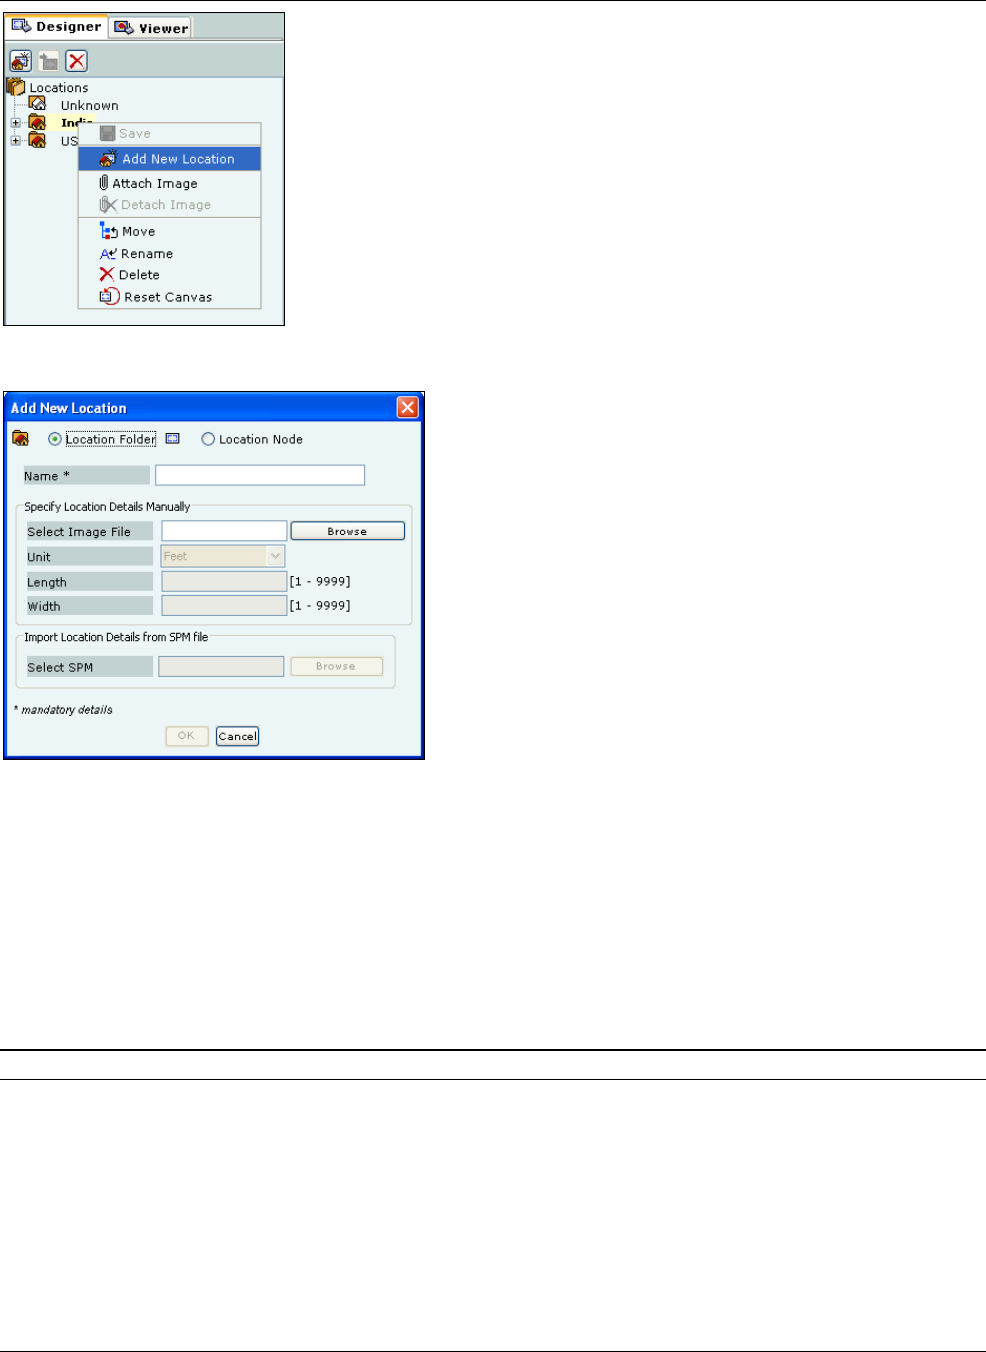
SettingȱupȱtheȱServerȱConsoleȱ
SpectraGuard®ȱEnterpriseȱInstallationȱGuideȱ
47
ȱ
Figure 73. Adding a New Location
ȱ
Figure 74. Specifying Location Properties
c. InȱtheȱAddȱNewȱLocationȱdialog,ȱselectȱtheȱtypeȱofȱlocation,ȱthatȱis,ȱLocationȱFolderȱorȱLocationȱNode.ȱ
d. Enterȱaȱnameȱforȱtheȱnewȱlocationȱandȱoptionallyȱenterȱtheȱfollowingȱdetails.ȱ
xSelectȱImageȱFile:ȱClickȱ<Browse>ȱtoȱnavigateȱtoȱtheȱpathȱofȱtheȱimageȱthatȱyouȱwishȱtoȱattachȱtoȱtheȱlocationȱfolderȱ
orȱnode.ȱ
xUnit:ȱSpecifyȱtheȱunitȱofȱmeasurementȱ(feetȱorȱmeters)ȱforȱtheȱlocationȱnode.ȱ
xLength:ȱSpecifyȱtheȱlengthȱofȱtheȱlocationȱnode.ȱ
xWidth:ȱSpecifyȱtheȱwidthȱofȱtheȱlocationȱnode.ȱ
xSelectȱSPM:ȱClickȱ<Browse>ȱtoȱnavigateȱtoȱtheȱpathȱofȱtheȱ.SPMȱfileȱthatȱyouȱwishȱtoȱimportȱfromȱSpectraGuardȱ
Plannerȱ(Planner)ȱintoȱtheȱnewȱlocationȱnode.ȱ
Note:ȱUnit,ȱLength,ȱWidth,ȱandȱSelectȱSPMȱoptionsȱareȱavailableȱonlyȱforȱaȱlocationȱnode.ȱTheyȱareȱgrayedȱoutȱforȱaȱlocationȱfolder.ȱ
e. Clickȱ<OK>ȱtoȱcreateȱaȱnewȱlocation.ȱAlternatively,ȱclickȱ<Cancel>ȱtoȱavoidȱcreatingȱaȱnewȱlocation.ȱ
12. TheȱSensorȱConfigurationȱscreenȱappearsȱasȱshownȱinȱtheȱfollowingȱfigure.ȱThisȱenablesȱyouȱtoȱcreateȱdifferentȱSensorȱ
configurationȱtemplates.ȱThisȱallowsȱtheȱuserȱtoȱapplyȱdifferentȱsettingsȱtoȱdifferentȱSensorsȱbyȱapplyingȱdifferentȱ
templates.ȱEachȱconfigurationȱtemplateȱallowsȱsettingsȱforȱoperatingȱregion,ȱchannelsȱtoȱmonitor,ȱchannelsȱtoȱdefend,ȱ
antennaȱconfiguration,ȱSensorȱpassword,ȱandȱofflineȱSensorȱoperation.ȱ
Atȱanyȱlocation,ȱyouȱcanȱchooseȱaȱtemplateȱasȱaȱdefaultȱtemplate.ȱThisȱtemplateȱwillȱbeȱappliedȱtoȱanyȱnewȱSensorȱtaggedȱtoȱ
thatȱlocation.ȱ
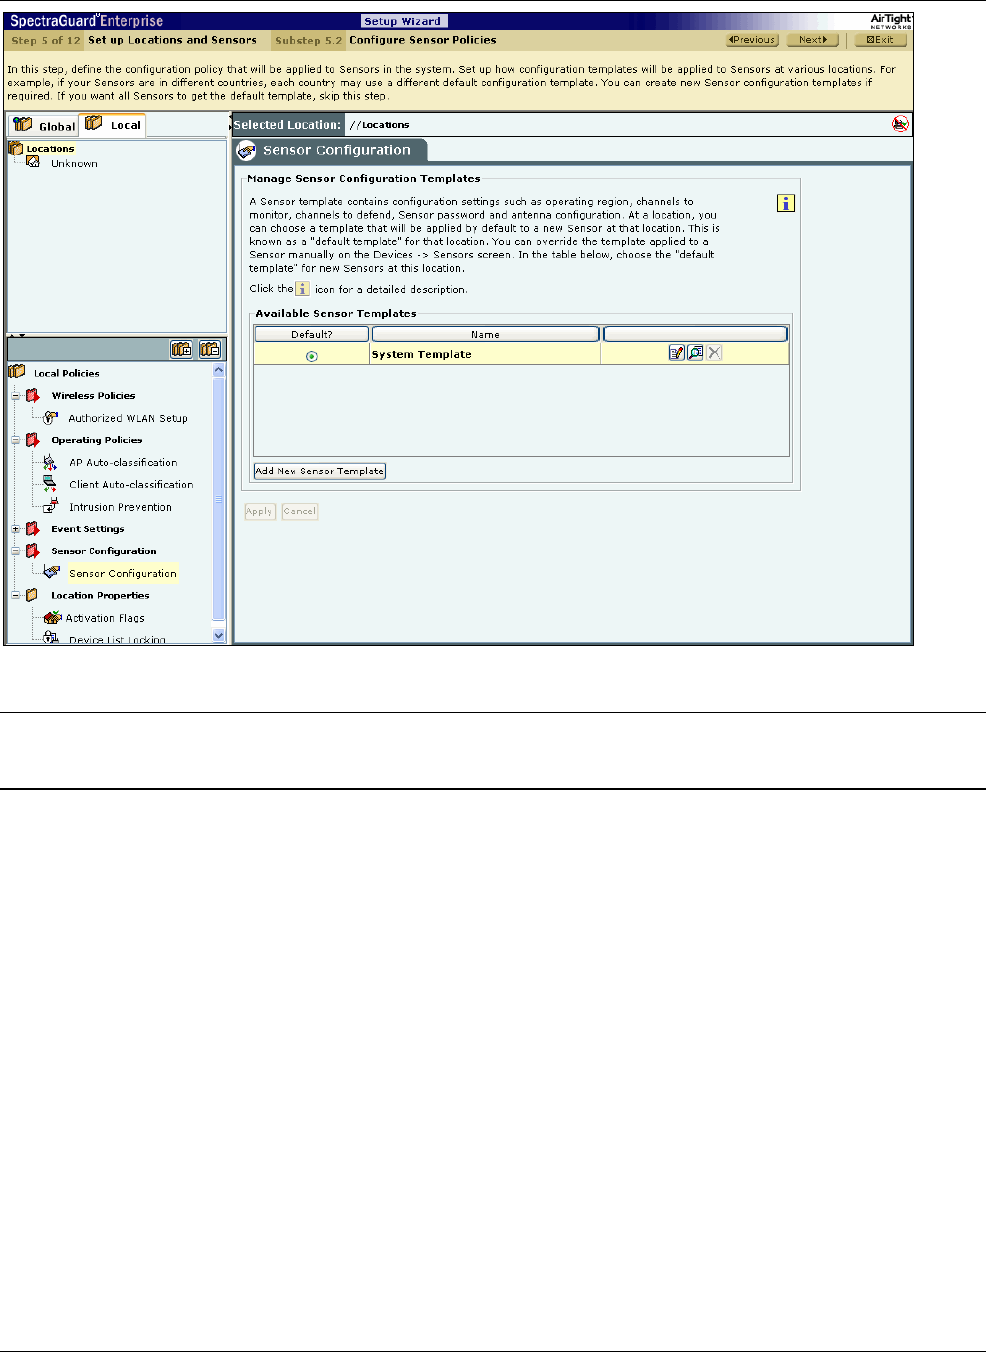
SettingȱupȱtheȱServerȱConsoleȱ
SpectraGuard®ȱEnterpriseȱInstallationȱGuideȱ
48ȱ
ȱ
Figure 75. Sensor Configuration
Note:ȱSensorsȱpriorȱtoȱVersionȱ5.2ȱdoȱnotȱsupportȱadditionalȱchannelsȱ(802.11jȱ&ȱTurboȱchannels),ȱAntennaȱPortȱAssignment,ȱandȱSensorȱ
PasswordȱConfigurationȱfeatures.ȱIfȱyouȱapplyȱtemplatesȱcontainingȱtheseȱsettingsȱtoȱolderȱSensors,ȱolderȱSensorsȱwillȱignoreȱtheȱadditionalȱ
settings.ȱ
Clickȱ<AddȱNewȱSensorȱTemplate>ȱtoȱopenȱtheȱSensorȱConfigurationȱTemplateȱdialog.ȱ
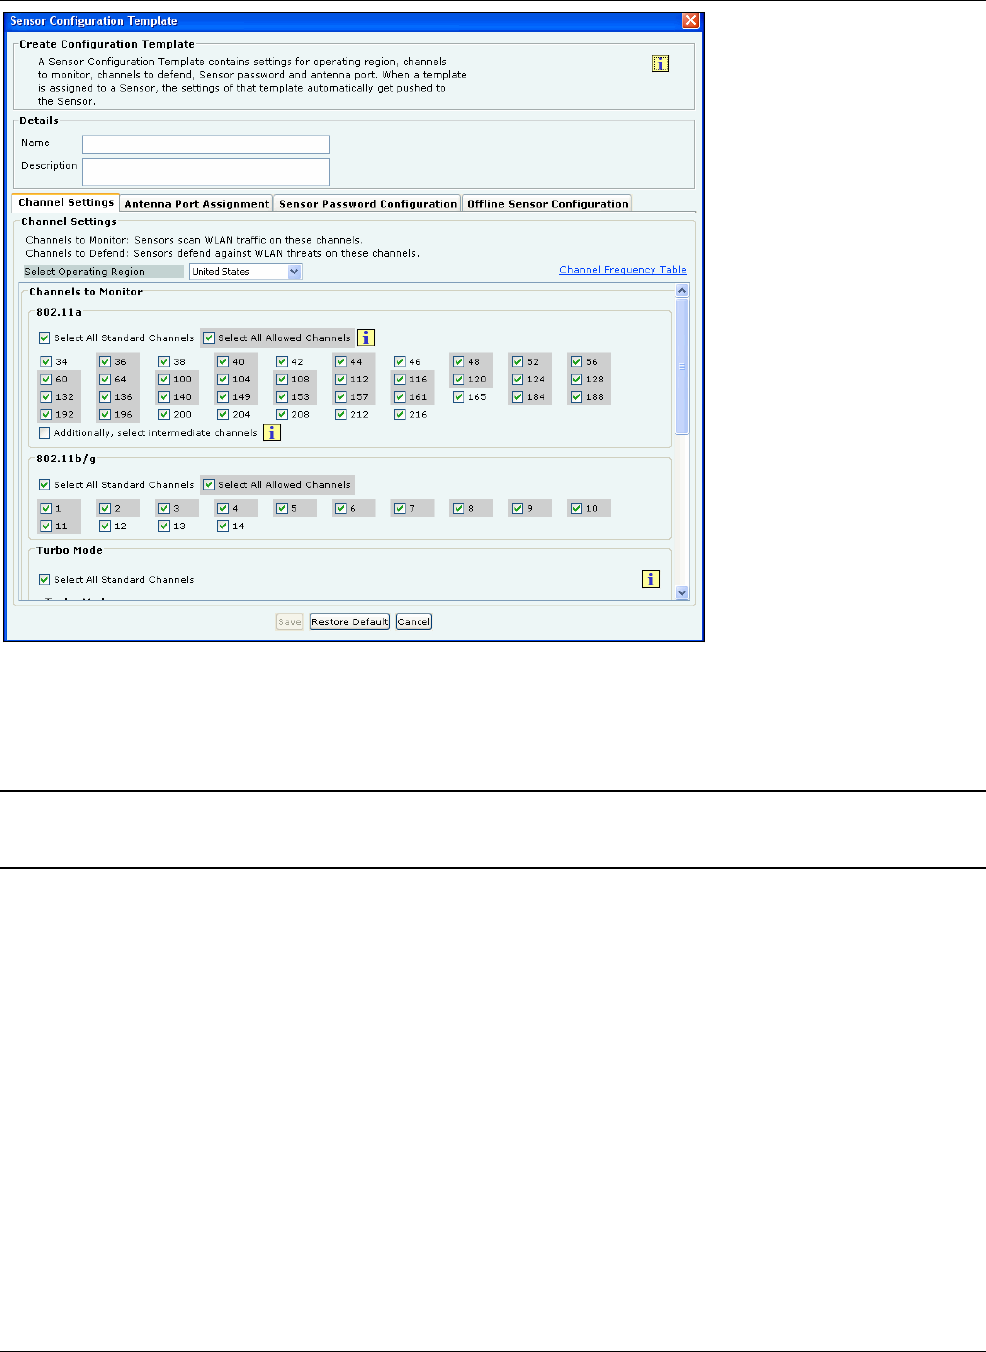
SettingȱupȱtheȱServerȱConsoleȱ
SpectraGuard®ȱEnterpriseȱInstallationȱGuideȱ
49
ȱ
Figure 76. Channel Settings Tab
UnderȱCreateȱConfigurationȱTemplate,ȱspecifyȱtheȱfollowing:ȱ
xName:ȱUniqueȱnameȱofȱtheȱSensorȱConfigurationȱtemplateȱ(lessȱthanȱ40ȱcharacters)ȱ
xDescription:ȱBriefȱdescriptionȱofȱtheȱSensorȱConfigurationȱtemplateȱ(lessȱthanȱ500ȱcharacters)ȱ
Note:ȱTheȱsystemȱstoresȱtheȱdefaultȱSensorȱconfigurationȱinȱaȱpredefinedȱtemplateȱSystemȱTemplate.ȱYouȱcannotȱdeleteȱtheȱSystemȱ
Templateȱnorȱeditȱitsȱname;ȱitȱisȱunique.ȱWhenȱaȱSensorȱisȱaddedȱorȱdiscovered,ȱitȱisȱautomaticallyȱassignedȱtheȱconfigurationȱsettingsȱinȱ
thisȱtemplate.ȱYouȱareȱallowedȱtoȱeditȱtheȱconfigurationȱsettingsȱinȱtheȱSystemȱTemplateȱtoȱeffectȱdefaultȱconfigurationȱofȱtheirȱchoice.ȱ
WheneverȱyouȱdeleteȱaȱuserȬdefinedȱSensorȱconfigurationȱtemplate,ȱallȱtheȱSensorsȱassociatedȱwithȱthatȱtemplateȱareȱassignedȱ
theȱSystemȱTemplate.ȱYouȱcanȱoverrideȱtheȱtemplateȱappliedȱtoȱaȱSensorȱmanuallyȱfromȱtheȱDevicesȱSensorsȱtab.ȱIfȱyouȱ
modifyȱtheȱsettingsȱinȱaȱtemplate,ȱtheȱnewȱsettingsȱareȱappliedȱtoȱtheȱSensorsȱtoȱwhichȱthisȱtemplateȱisȱapplied.ȱ
ChannelȱSettingsȱ
ChannelȱSettingsȱdisplaysȱtheȱ802.11a/802.11b/gȱandȱTurboȱchannelsȱonȱwhichȱscanningȱandȱdefendingȱisȱenabled/disabled.ȱ
SensorsȱscanȱWLANȱtrafficȱonȱchannelsȱspecifiedȱunderȱChannelsȱtoȱMonitorȱandȱdefendȱtheȱnetworkȱagainstȱvariousȱWLANȱ
threatsȱonȱchannelsȱspecifiedȱunderȱChannelsȱtoȱDefend.ȱ
xUnderȱChannelȱSettingsȱtab,ȱspecifyȱtheȱfollowing:ȱ
¾SelectȱOperatingȱRegion:ȱSpecifiesȱtheȱregion:ȱcountry:ȱofȱoperation.ȱEachȱregionȱhasȱitsȱownȱlawsȱgoverningȱtheȱ
useȱofȱtheȱunlicensedȱfrequencyȱspectrumȱforȱ802.11ȱcommunicationsȱandȱTurboȱmode.ȱTheȱsystemȱautomaticallyȱ
selectsȱtheȱchannelsȱthatȱareȱallowedȱbyȱtheȱregulatoryȱdomainȱinȱselectedȱregion.ȱ
(DefaultȱOperatingȱRegion:ȱUnitedȱStates)ȱ
¾ClickȱtheȱlinkȱChannelȱFrequencyȱTableȱtoȱviewȱaȱlistȱofȱchannels,ȱprotocols,ȱfrequencies,ȱandȱcapabilities.ȱ
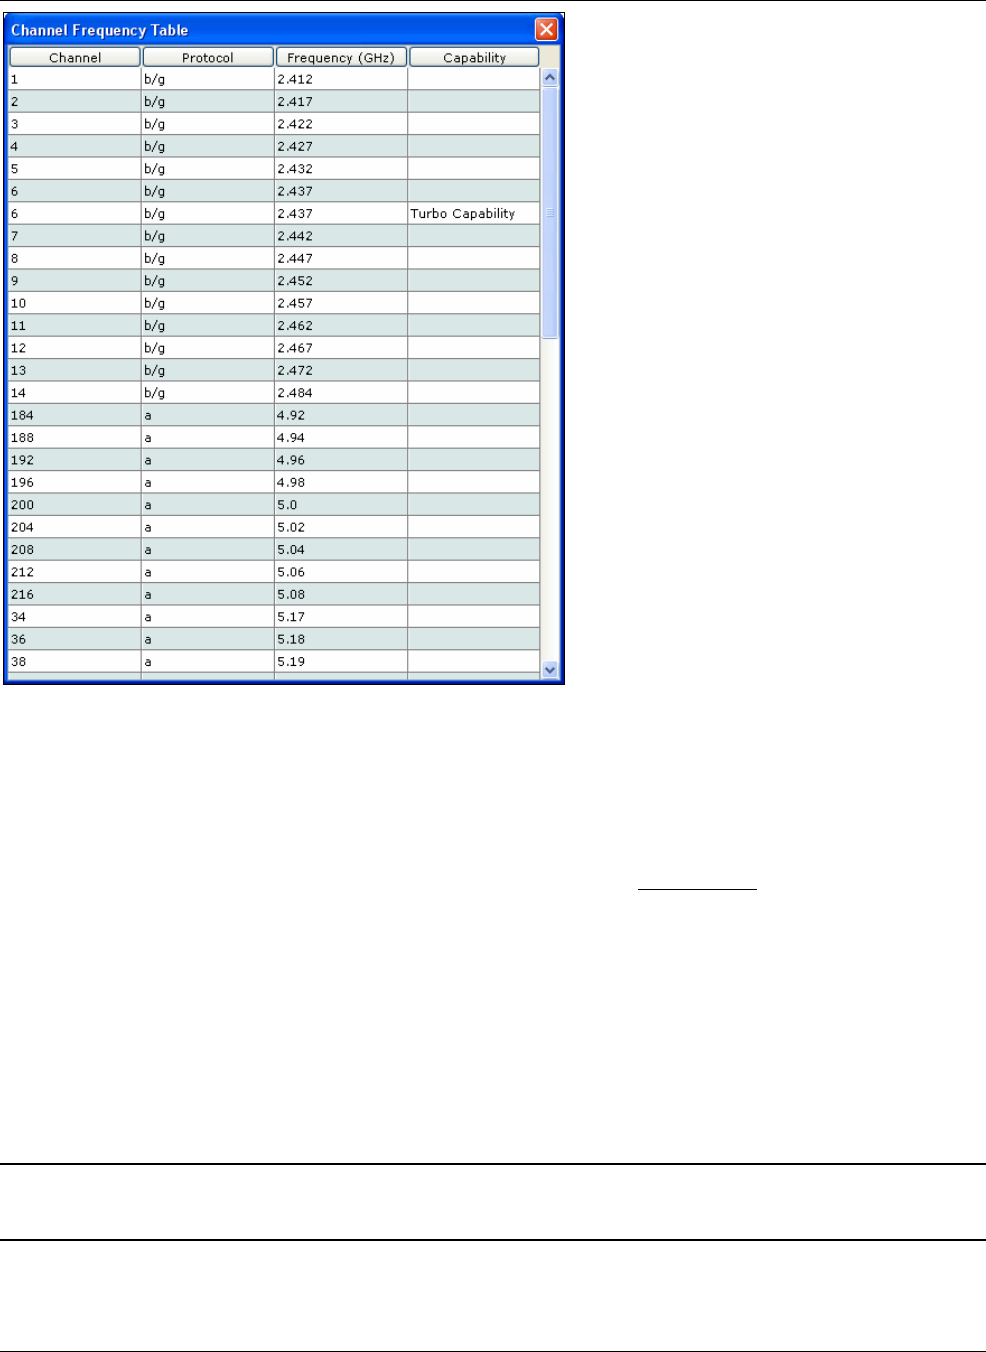
SettingȱupȱtheȱServerȱConsoleȱ
SpectraGuard®ȱEnterpriseȱInstallationȱGuideȱ
50ȱ
ȱ
Figure 77. Channel Frequency Table
¾ChannelsȱtoȱMonitor:ȱSpecifiesȱtheȱchannelsȱtoȱbeȱusedȱbyȱSensorsȱtoȱmonitorȱWLANȱtraffic.ȱ
SelectȱtheȱcheckboxȱSelectȱAllȱStandardȱChannelsȱtoȱselectȱaȱsupersetȱofȱallȱtheȱchannels.ȱForȱ802.11a,ȱtheȱ
standardȱsetsȱofȱchannelsȱareȱ184ȱ–ȱ216ȱandȱ34ȱȬȱ165.ȱByȱdefault,ȱthisȱcheckboxȱisȱselected.ȱ
SelectȱtheȱcheckboxȱSelectȱAllȱAllowedȱChannelsȱtoȱselectȱallȱtheȱallowedȱchannelsȱinȱtheȱselectedȱoperatingȱ
region.ȱByȱdefault,ȱthisȱcheckboxȱisȱselected.ȱ
SelectȱtheȱcheckboxȱAdditionally,ȱselectȱintermediateȱchannelsȱforȱ802.11ȱaȱonlyȱtoȱselectȱtheȱchannelsȱ
betweenȱtheȱallowedȱchannelsȱthatȱareȱnonȬallowedȱinȱtheȱselectedȱoperatingȱregion.ȱSelectingȱtheȱoptionȱ
helpsȱtheȱsystemȱdetectȱdevicesȱoperatingȱonȱillegalȱchannels.ȱForȱ802.11a,ȱtheȱintermediateȱchannelsȱareȱ185,ȱ
186,ȱ187,ȱ35,ȱ37,ȱandȱsoȱon.ȱByȱdefault,ȱthisȱcheckboxȱisȱdeselected.ȱ
¾TurboȱMode:ȱCertainȱAtherosȱChipsetȱbasedȱdevicesȱuseȱwiderȱfrequencyȱbandsȱonȱcertainȱchannelsȱinȱ802.11ȱ
b/gȱandȱ802.11aȱbandȱofȱchannels.ȱTheȱsystemȱisȱcapableȱofȱmonitoringȱchannelsȱthatȱsupportȱTurboȱModeȱofȱ
operationȱandȱdetectingȱanyȱunauthorizedȱcommunicationȱonȱtheseȱchannels.ȱYouȱcanȱselectȱspecificȱorȱallȱ
channelsȱtoȱmonitorȱwirelessȱactivityȱonȱTurboȱchannels.ȱThereȱareȱtenȱTurboȱchannelsȱinȱaȬmode.ȱTheseȱchannelsȱ
areȱ40,ȱ42,ȱ48,ȱ50,ȱ56,ȱ58,ȱ152,ȱ153,ȱ160,ȱandȱ161.ȱThereȱisȱonlyȱoneȱTurboȱchannelȱinȱb/gȬmodeȱi.e.ȱ6.ȱ
¾ChannelsȱtoȱDefend:ȱSpecifiesȱtheȱchannelsȱtoȱbeȱusedȱbyȱSensorsȱtoȱdefendȱWLANȱtrafficȱtoȱprotectȱyourȱ
networkȱagainstȱvariousȱWLANȱthreats.ȱ
Note:ȱItȱisȱmandatoryȱthatȱchannelsȱselectedȱforȱdefendingȱbeȱselectedȱforȱscanning.ȱIfȱaȱchannelȱisȱselectedȱforȱdefendingȱandȱisȱnotȱalreadyȱ
selectedȱforȱscanning,ȱtheȱsystemȱautomaticallyȱselectsȱthatȱchannelȱforȱscanningȱasȱwell.ȱIfȱyouȱdeselectȱaȱchannelȱfromȱChannelsȱtoȱ
Monitor,ȱthenȱthisȱchannelȱisȱalsoȱdeselectedȱfromȱChannelsȱtoȱDefendȱsection.ȱ
AntennaȱPortȱAssignmentȱ
Antennaȱconnectivityȱsettingȱisȱanȱadvancedȱsettingȱandȱshouldȱbeȱusedȱwithȱutmostȱcare.ȱThisȱsettingȱallowsȱyouȱtoȱprovideȱ
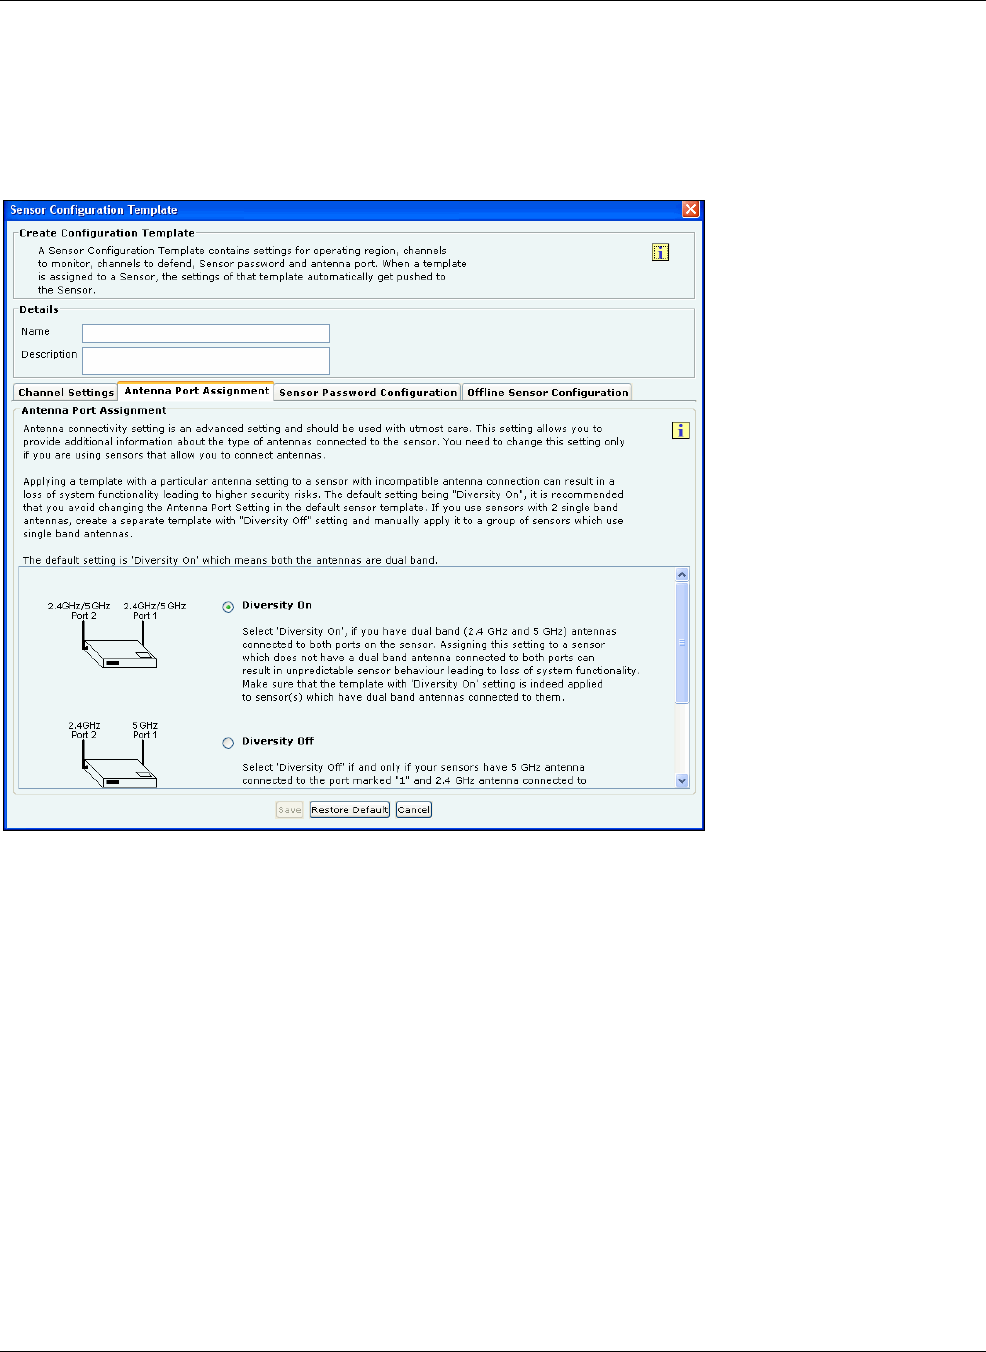
SettingȱupȱtheȱServerȱConsoleȱ
SpectraGuard®ȱEnterpriseȱInstallationȱGuideȱ
51
additionalȱinformationȱaboutȱtheȱtypeȱofȱantennasȱconnectedȱtoȱtheȱSensor.ȱYouȱneedȱtoȱchangeȱthisȱsettingȱonlyȱifȱyouȱuseȱ
Sensorsȱthatȱallowȱyouȱtoȱconnectȱantennas.ȱ
ApplyingȱaȱtemplateȱwithȱaȱparticularȱantennaȱsettingȱtoȱaȱSensorȱwithȱincompatibleȱantennaȱconnectionȱcanȱresultȱinȱaȱlossȱofȱ
systemȱfunctionalityȱleadingȱtoȱhigherȱsecurityȱrisks.ȱYouȱshouldȱnotȱchangeȱtheȱAntennaȱConnectivityȱSettingsȱforȱaȱtemplateȱ
thatȱisȱalreadyȱappliedȱtoȱaȱgroupȱofȱSensorsȱorȱisȱaȱDefaultȱSensorȱtemplate.ȱIfȱyouȱneedȱtoȱchangeȱtheseȱsettings,ȱyouȱshouldȱ
saveȱtheȱchangesȱasȱaȱnewȱtemplateȱfirst,ȱthenȱchangeȱtheȱantennasȱsettingsȱasȱrequired,ȱsaveȱtheȱtemplateȱandȱapplyȱitȱtoȱaȱ
groupȱofȱSensorsȱwhichȱhaveȱtheȱsameȱantennaȱsettingsȱasȱspecifiedȱinȱtheȱtemplate.ȱ
ȱ
Figure 78. Antenna Port Assignment Tab
xUnderȱAntennaȱPortȱAssignmentȱtabȱ
¾SelectȱDiversityȱOnȱorȱDiversityȱOffȱ
DiversityȱOn:ȱThisȱisȱtheȱdefaultȱsetting,ȱwhichȱmeansȱbothȱtheȱantennasȱareȱdualȱband.ȱSelectȱthisȱoptionȱifȱ
youȱhaveȱaȱdualȱbandȱ(2.4ȱGHzȱandȱ5ȱGHz)ȱantennaȱconnectedȱtoȱbothȱtheȱportsȱonȱtheȱSensor.ȱAssigningȱ
thisȱsettingȱtoȱaȱSensorȱwhichȱdoesȱnotȱhaveȱaȱdualȱbandȱantennaȱconnectedȱtoȱbothȱports,ȱcanȱresultȱinȱ
unpredictableȱSensorȱbehaviorȱleadingȱtoȱlossȱofȱsystemȱfunctionality.ȱMakeȱsureȱthatȱtheȱtemplateȱwithȱ
“DiversityȱOn”ȱsettingȱisȱindeedȱappliedȱtoȱSensor(s),ȱwhichȱhaveȱdualȱbandȱantennaȱconnectedȱtoȱthem.ȱ
DiversityȱOff:ȱSelectȱthisȱoptionȱifȱandȱonlyȱifȱyourȱSensorsȱhaveȱaȱ5ȱGHzȱantennaȱconnectedȱtoȱPortȱ1ȱandȱaȱ
2.4ȱGHzȱantennaȱconnectedȱtoȱPortȱ2.ȱTheȱfigureȱinȱtheȱAntennaȱPortȱAssignmentȱtabȱshowsȱhowȱtoȱlocateȱ
theȱportsȱtoȱensureȱthatȱtheȱsingleȱbandȱantennasȱareȱcorrectlyȱconnected.ȱAssigningȱthisȱsettingȱtoȱaȱSensorȱ
thatȱdoesȱnotȱhaveȱsingleȱbandȱantennasȱconnectedȱasȱmentionedȱaboveȱcanȱresultȱinȱunpredictableȱSensorȱ
behaviorȱleadingȱtoȱlossȱofȱsystemȱfunctionality.ȱMakeȱsureȱthatȱtheȱtemplateȱwithȱDiversityȱOffȱsettingȱisȱ
indeedȱappliedȱtoȱSensor(s)ȱthatȱhaveȱtwoȱdifferentȱsingleȱbandȱantennasȱsupportingȱ2.4ȱGHzȱandȱ5ȱGHzȱ
frequencyȱbandsȱandȱconnectedȱasȱmentionedȱabove.ȱ
SensorȱPasswordȱConfigurationȱ
SensorȱPasswordȱsettingȱallowsȱyouȱtoȱmanageȱtheȱpasswordȱforȱuserȱconfigȱonȱtheȱSensorȱCommandȱLineȱInterfaceȱ(CLI).ȱByȱ
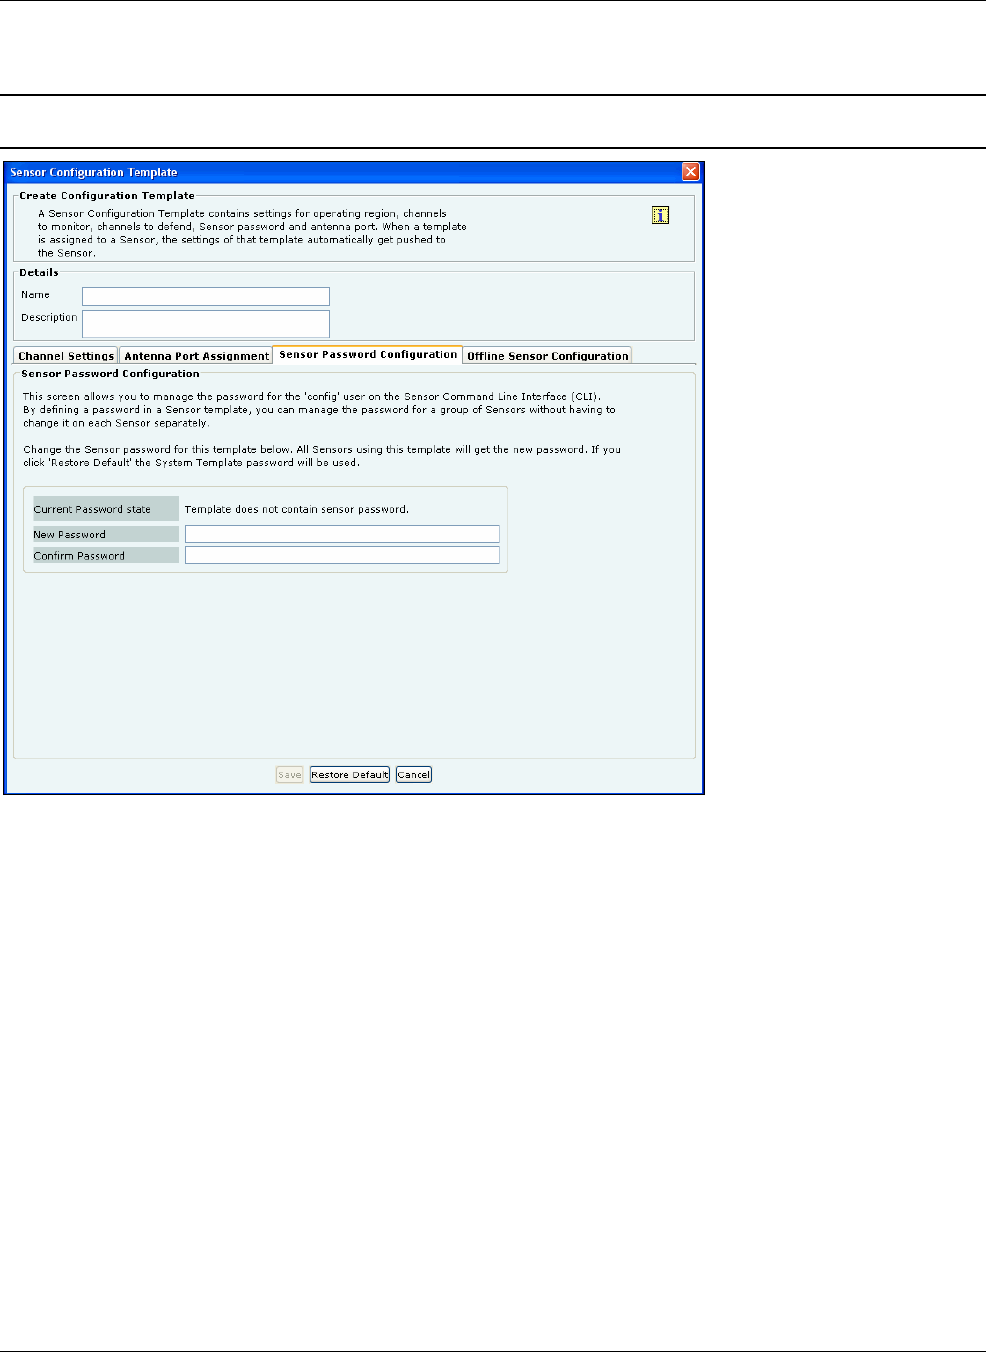
SettingȱupȱtheȱServerȱConsoleȱ
SpectraGuard®ȱEnterpriseȱInstallationȱGuideȱ
52ȱ
definingȱaȱpasswordȱinȱtheȱSensorȱtemplate,ȱyouȱcanȱmanageȱtheȱpasswordȱforȱaȱgroupȱofȱSensorsȱwithoutȱhavingȱtoȱchangeȱitȱ
onȱeachȱSensorȱseparately.ȱTypeȱaȱnewȱpasswordȱorȱclickȱ<RestoreȱDefault>ȱtoȱchangeȱtheȱcurrentȱpasswordȱsettings.ȱIfȱyouȱ
chooseȱ<RestoreȱDefault>,ȱthenȱtheȱpasswordȱsettingȱwillȱbeȱtheȱsameȱasȱthatȱinȱtheȱSystemȱTemplate.ȱ
Note:ȱIfȱaȱSensorȱtemplateȱcontainsȱaȱblankȱpassword,ȱthenȱtheȱSensors,ȱtoȱwhichȱthisȱtemplateȱisȱassigned,ȱretainȱtheirȱexistingȱpassword.ȱ
FactoryȱsettingȱofȱtheȱSystemȱTemplateȱcontainsȱaȱblankȱpassword.ȱ
ȱ
Figure 79. Sensor Password Configuration Tab
xUnderȱSensorȱPasswordȱConfigurationȱtabȱspecifyȱtheȱfollowingȱ
¾CurrentȱPasswordȱstate:ȱSpecifiesȱthatȱtheȱnewȱpasswordȱmustȱbeȱtheȱsameȱasȱtheȱoneȱspecifiedȱinȱtheȱSystemȱ
Template.ȱ
¾NewȱPassword:ȱEnterȱtheȱnewȱpasswordȱtoȱbeȱassignedȱasȱuserȱ‘config’ȱpasswordȱforȱallȱSensorsȱassociatedȱwithȱ
theȱSensorȱtemplateȱbeingȱedited.ȱ
¾ConfirmȱPassword:ȱReenterȱtheȱpasswordȱtoȱhelpȱconfirmȱtheȱnewȱpasswordȱbeforeȱsaving.ȱ
OfflineȱSensorȱConfigurationȱ
ThisȱfeatureȱprovidesȱsomeȱsecurityȱcoverageȱevenȱwhenȱthereȱisȱnoȱconnectivityȱbetweenȱaȱSensorȱandȱtheȱServer.ȱTheȱSensorȱ
providesȱsomeȱclassificationȱandȱpreventionȱcapabilitiesȱwhenȱitȱisȱdisconnectedȱfromȱtheȱServer.ȱTheȱSensorȱalsoȱraisesȱevents,ȱ
storesȱthem,ȱandȱsendsȱthemȱbackȱtoȱtheȱServerȱonȱreconnection.ȱ
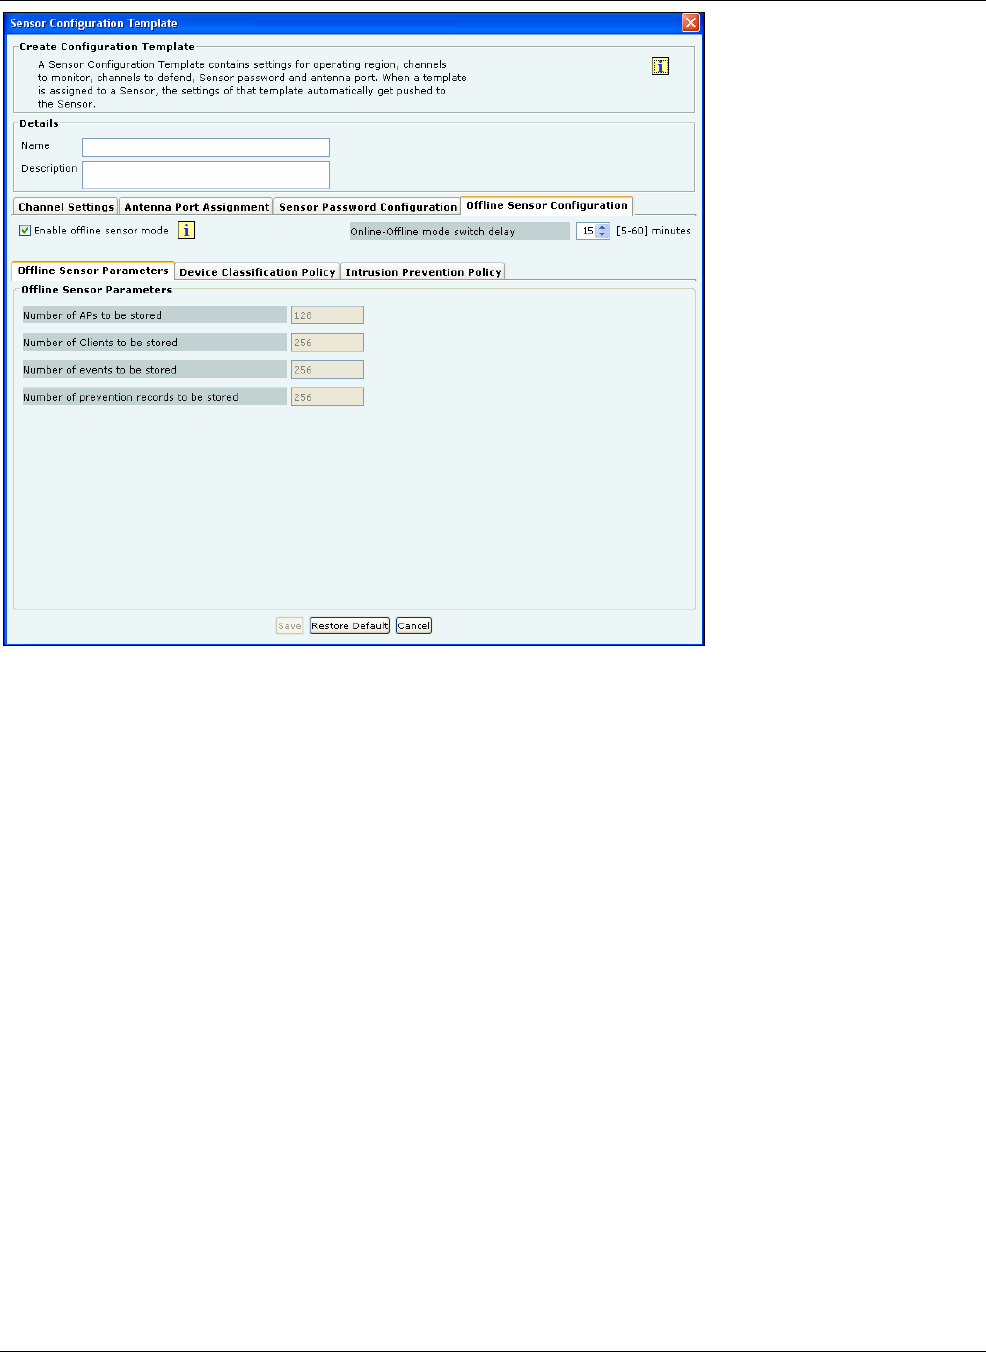
SettingȱupȱtheȱServerȱConsoleȱ
SpectraGuard®ȱEnterpriseȱInstallationȱGuideȱ
53
ȱ
Figure 80. Offline Sensor Configuration Tab
xEnableȱofflineȱSensorȱmode:ȱSelectȱthisȱcheckboxȱtoȱenableȱtheȱofflineȱSensorȱmode.ȱWhenȱthisȱmodeȱisȱenabled,ȱtheȱ
Sensorȱcontinuesȱtoȱdetectȱandȱclassifyȱdevices,ȱraiseȱeventȱalerts,ȱandȱpreventȱongoingȱthreats.ȱ(Default:ȱSelected)ȱ
xOnlineȬOfflineȱmodeȱswitchȱdelay:ȱSpecifyȱtheȱtimeȱafterȱwhich,ȱifȱtheȱSensorȱdoesȱnotȱreceiveȱanyȱcommunicationȱ
fromȱtheȱServerȱandȱEnableȱofflineȱSensorȱmodeȱisȱenabled,ȱtheȱSensorȱswitchesȱtoȱtheȱofflineȱmode.ȱ
(Minimum:ȱ5ȱminutes;ȱMaximum:ȱ60ȱminutes;ȱDefault:ȱ5ȱminutes)ȱ
xUnderȱOfflineȱSensorȱParametersȱtab,ȱyouȱcanȱviewȱtheȱfollowing:ȱ
¾NumberȱofȱAPsȱtoȱbeȱstored:ȱNumberȱofȱAPsȱthatȱtheȱSensorȱwillȱcontinueȱtoȱdetectȱinȱOfflineȱmodeȱ(Default:ȱ
128)ȱ
¾NumberȱofȱClientsȱtoȱbeȱstored:ȱNumberȱofȱClientsȱthatȱtheȱSensorȱwillȱcontinueȱtoȱdetectȱinȱOfflineȱmodeȱ
(Default:ȱ256)ȱ
¾Numberȱofȱeventsȱtoȱbeȱstored:ȱNumberȱofȱeventsȱthatȱtheȱSensorȱwillȱcontinueȱtoȱraiseȱinȱOfflineȱmodeȱ(Default:ȱ
256)ȱ
¾Numberȱofȱpreventionȱrecordsȱtoȱbeȱstored:ȱNumberȱofȱpreventionȱrecordsȱthatȱtheȱSensorȱwillȱcontinueȱtoȱstoreȱ
inȱOfflineȱmodeȱtoȱpreventȱongoingȱthreatsȱ(Default:ȱ256)ȱ
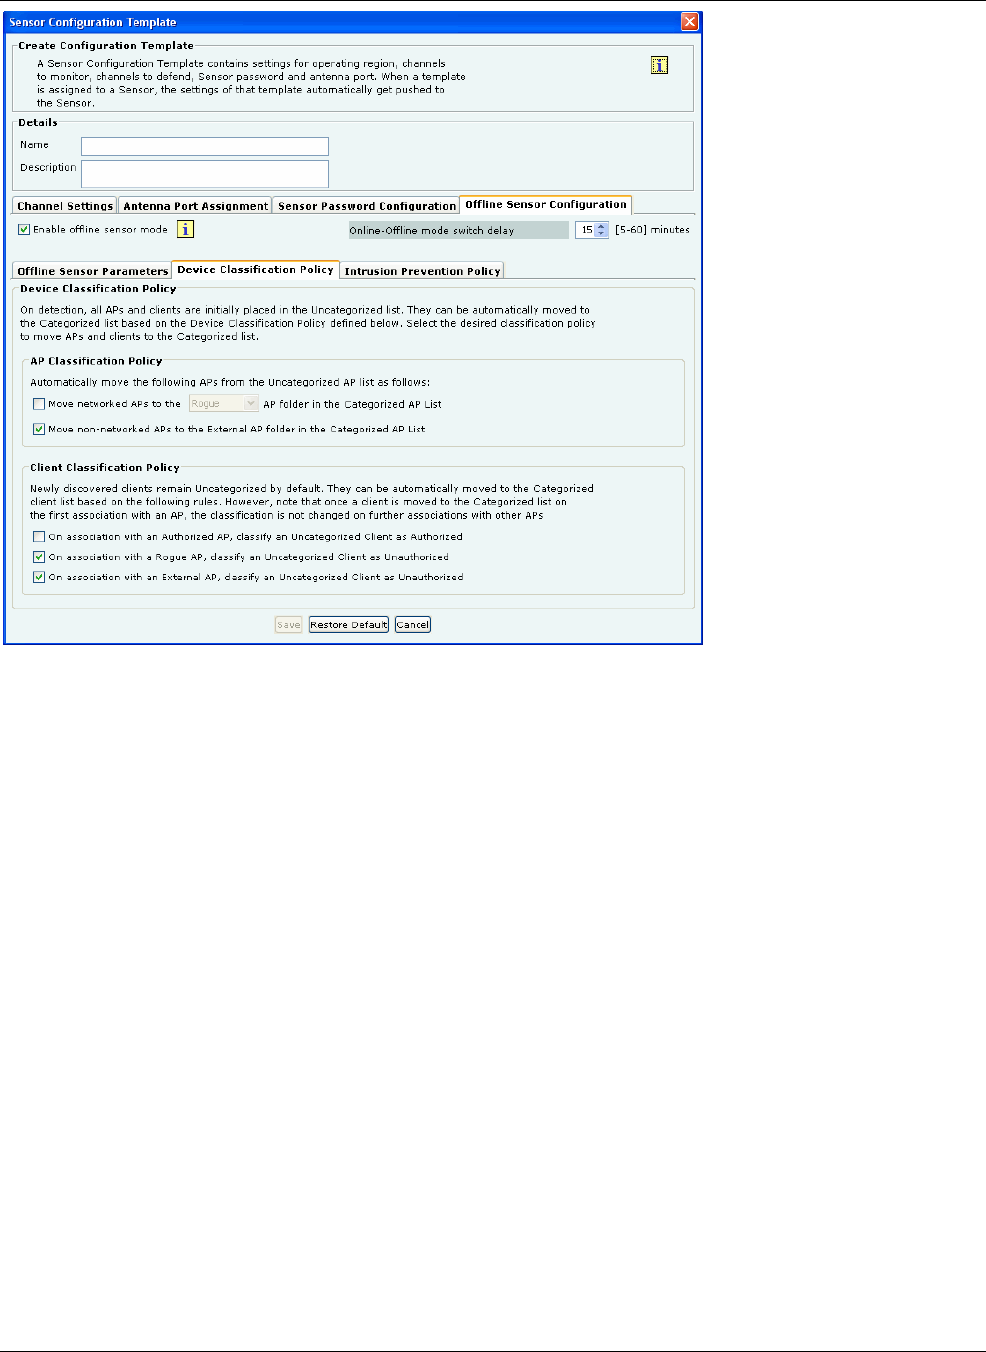
SettingȱupȱtheȱServerȱConsoleȱ
SpectraGuard®ȱEnterpriseȱInstallationȱGuideȱ
54ȱ
sueȱ
Figure 81. Offline Sensor Configuration: Device Classification Policy Tab
xUnderȱDeviceȱClassificationȱPolicyȱtabȱspecifyȱtheȱdesiredȱclassificationȱpoliciesȱtoȱmoveȱAPsȱandȱClientsȱfromȱtheȱ
UncategorizedȱlistȱtoȱtheȱCategorizedȱlist:ȱ
¾UnderȱAPȱClassificationȱPolicy,ȱselectȱoneȱorȱmoreȱoptionsȱtoȱenableȱtheȱsystemȱautomaticallyȱmoveȱAPsȱfromȱ
theȱUncategorizedȱAPȱlistȱtoȱtheȱCategorizedȱAPȱlist:ȱ
MoveȱnetworkedȱAPsȱtoȱtheȱRogueȱorȱAuthorizedȱAPȱfolderȱinȱtheȱCategorizedȱAPȱListȱ
MoveȱnonȬnetworkedȱAPsȱtoȱtheȱExternalȱAPȱfolderȱinȱtheȱCategorizedȱAPȱListȱ
¾UnderȱClientȱClassificationȱPolicy,ȱselectȱoneȱorȱmoreȱoptionsȱtoȱenableȱtheȱsystemȱautomaticallyȱclassifyȱ
ClientsȱbasedȱonȱtheirȱassociationsȱwithȱAPs:ȱ
OnȱassociationȱwithȱanȱAuthorizedȱAP,ȱclassifyȱanȱUncategorizedȱClientȱasȱAuthorizedȱ
OnȱassociationȱwithȱaȱRogueȱAP,ȱclassifyȱanȱUncategorizedȱClientȱasȱUnauthorizedȱ
OnȱassociationȱwithȱanȱExternalȱAP,ȱclassifyȱanȱUncategorizedȱClientȱasȱUnauthorizedȱ
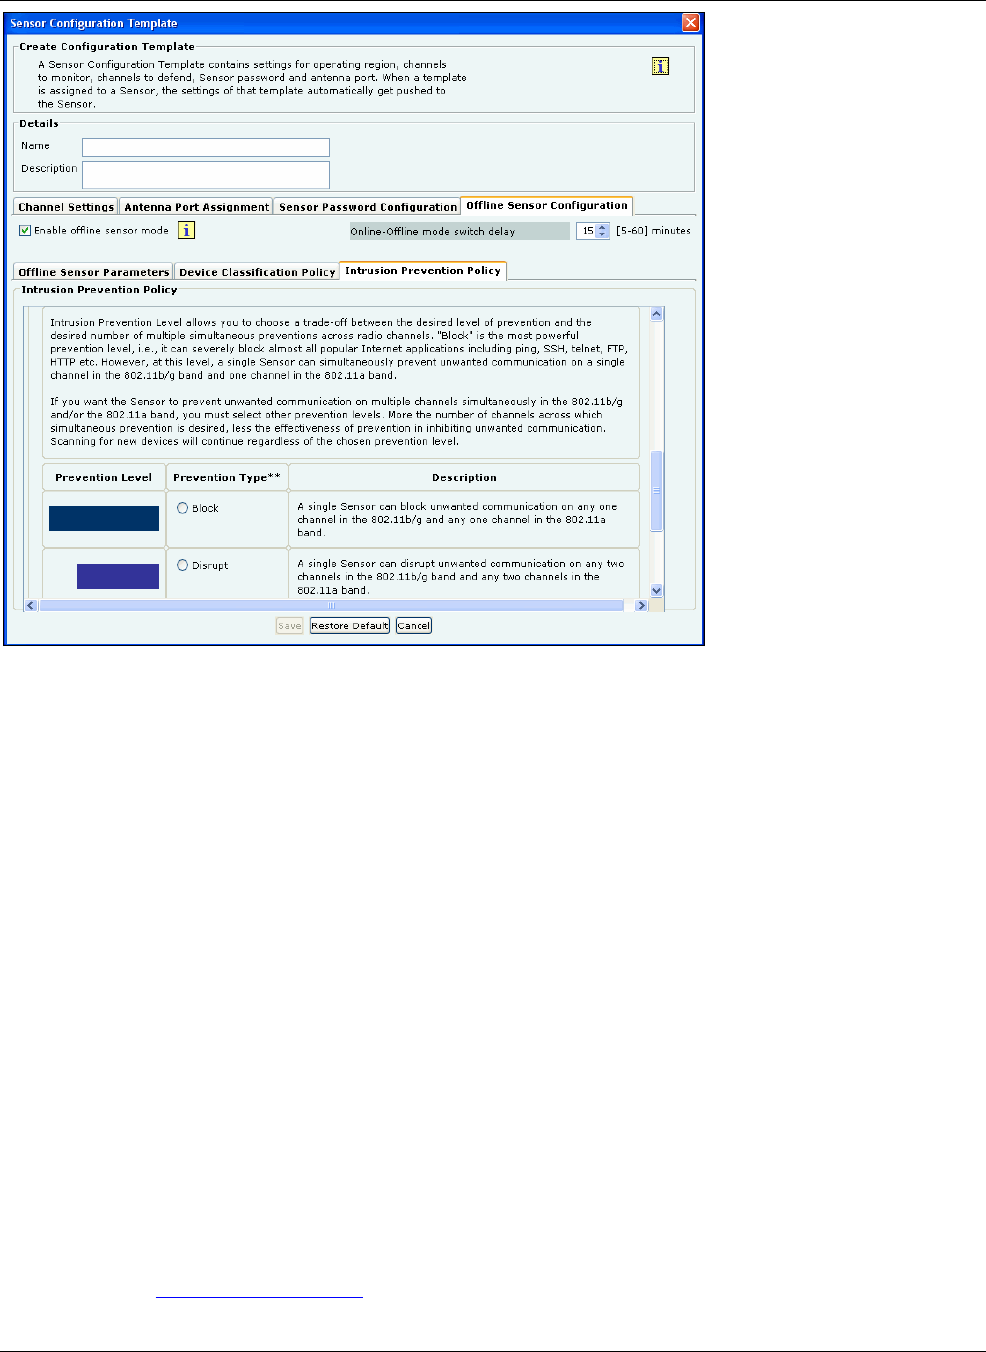
SettingȱupȱtheȱServerȱConsoleȱ
SpectraGuard®ȱEnterpriseȱInstallationȱGuideȱ
55
ȱ
Figure 82. Offline Sensor Configuration: Intrusion Prevention Policy Tab
xUnderȱIntrusionȱPreventionȱPolicyȱtabȱenableȱintrusionȱpreventionȱagainstȱtheȱfollowingȱthreats:ȱ
¾RogueȱAPsȱ
APsȱcategorizedȱasȱRogueȱ
UncategorizedȱAPsȱthatȱareȱconnectedȱtoȱtheȱnetworkȱ
¾MisconfiguredȱAPsȱ
APsȱcategorizedȱasȱAuthorizedȱbutȱusingȱnoȱsecurityȱmechanismȱ(Open)ȱ
APsȱcategorizedȱasȱAuthorizedȱbutȱusingȱweakȱsecurityȱmechanismȱ(WEP)ȱ
¾ClientȱMisȬassociationsȱ
AuthorizedȱClientȱconnectionsȱtoȱAPsȱcategorizedȱasȱExternalȱ
¾UnauthorizedȱAssociationsȱ
UnauthorizedȱClientȱconnectionsȱtoȱAPsȱcategorizedȱasȱAuthorizedȱ
¾AdhocȱConnectionsȱ
AuthorizedȱClientsȱparticipatingȱinȱanyȱadhocȱnetworkȱ
¾Honeypot/EvilȱTwinȱAPsȱ
AuthorizedȱClientȱconnectionȱtoȱHoneypot/EvilȱTwinȱAPsȱ
Additionally,ȱspecifyȱtheȱintrusionȱpreventionȱlevelȱthatȱallowsȱyouȱtoȱchooseȱaȱtradeȬoffȱbetweenȱtheȱdesiredȱlevelȱofȱ
preventionȱandȱtheȱdesiredȱnumberȱofȱmultipleȱsimultaneousȱpreventionsȱacrossȱradioȱchannels.ȱYouȱcanȱchooseȱeitherȱofȱtheȱ
followingȱpreventionȱlevels:ȱ
xBlockȱ
xDisruptȱ
xInterruptȱ
xDegradeȱ
ReferȱtoȱtheȱsectionȱIntrusionȱPreventionȱLevelȱforȱmoreȱdetails.ȱ
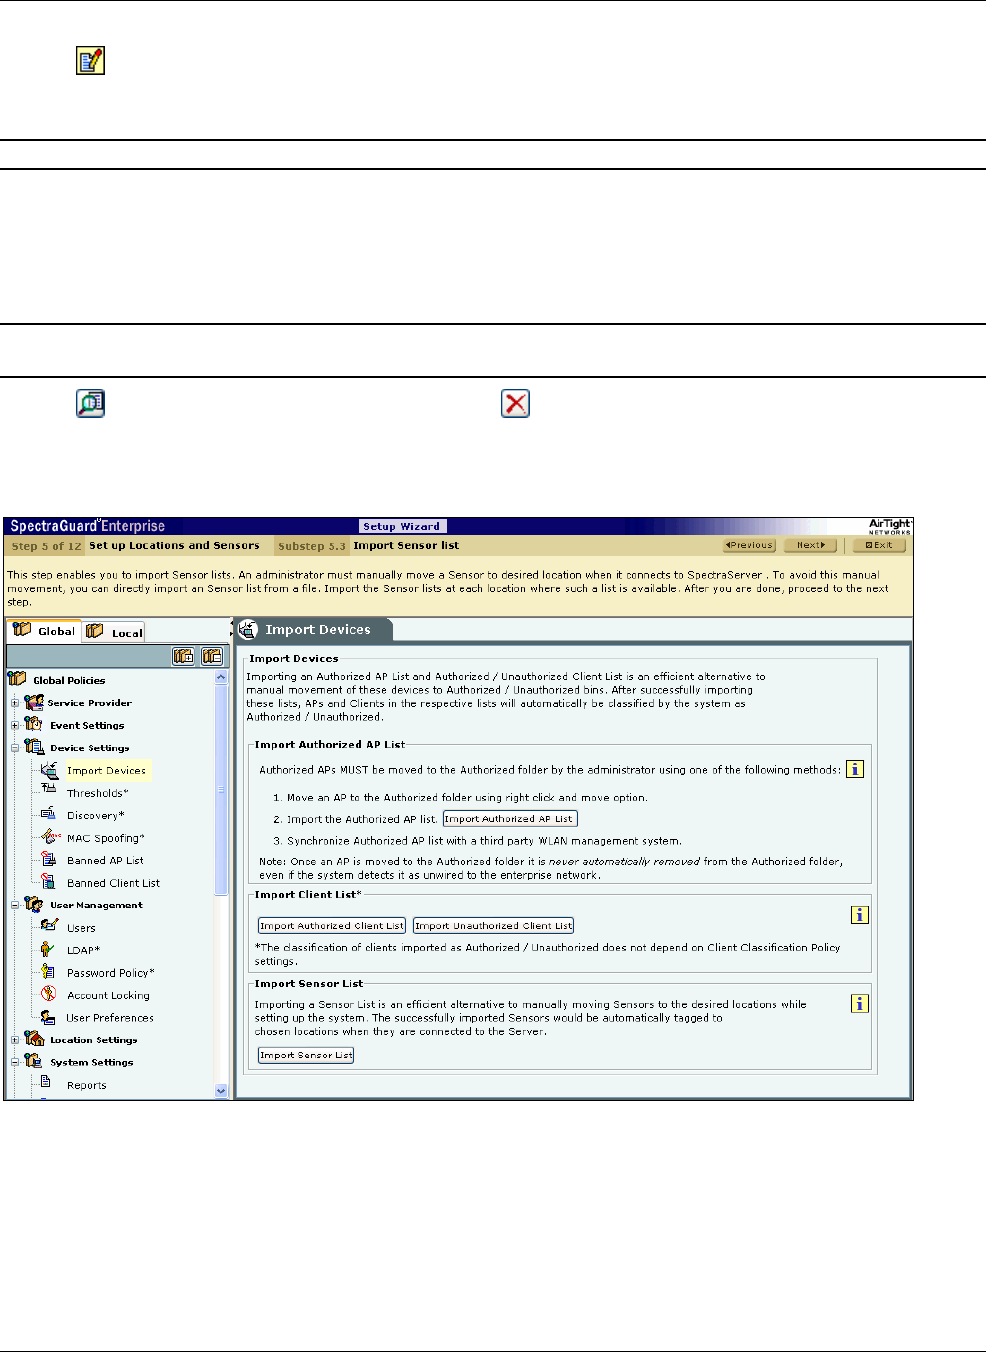
SettingȱupȱtheȱServerȱConsoleȱ
SpectraGuard®ȱEnterpriseȱInstallationȱGuideȱ
56ȱ
Clickȱ<Save>ȱtoȱsaveȱallȱsettings.ȱ
ClickȱtheȱȱiconȱtoȱeditȱanȱexistingȱSensorȱtemplate.ȱWhenȱanȱexistingȱSensorȱtemplateȱisȱeditedȱaȱConfirmationȱ–ȱSaveȱ
dialogȱappearsȱindicatingȱtheȱmodifications,ȱbyȱselectingȱtheȱtabsȱthatȱwereȱmodified.ȱYouȱareȱallowedȱtoȱuncheckȱaȱtabȱifȱyouȱ
wishȱtoȱcancelȱthoseȱmodifications.ȱClickȱ<OK>ȱtoȱsaveȱtheȱchangesȱforȱtheȱselectedȱtab.ȱ
Note:ȱNameȱandȱDescriptionȱofȱtheȱSensorȱtemplateȱareȱautomaticallyȱsaved.ȱ
Clickȱ<SaveȱAs>ȱtoȱsaveȱtheȱSensorȱtemplateȱwithȱaȱdifferentȱnameȱwithoutȱmodifyingȱtheȱoriginalȱtemplate.ȱ
Clickȱ<RestoreȱDefault>ȱtoȱrevertȱtoȱtheȱSystemȱTemplate.ȱTheȱsystemȱenablesȱyouȱtoȱselectȱtabsȱtoȱcontrolȱtheȱsettingsȱthatȱwillȱ
beȱrestoredȱtoȱtheȱdefaultȱvalues.ȱIfȱyouȱclickȱ<RestoreȱDefault>ȱonȱtheȱSystemȱTemplate,ȱparametersȱunderȱtheȱselectedȱtabsȱ
areȱrestoredȱtoȱtheirȱfactoryȱdefaultȱsettings.ȱAȱConfirmationȱ–ȱRestoreȱDefaultȱdialogȱappearsȱwithȱaȱlistȱofȱtabsȱselected,ȱforȱ
whichȱdefaultȱsettingsȱwillȱbeȱapplied.ȱ
Important:ȱTheȱsystemȱhasȱtheȱabilityȱtoȱscanȱandȱdefendȱonȱ4.920Ȭ4.980ȱGHzȱandȱ5.470Ȭ5.725ȱGHzȱchannelsȱinȱUS/CanadaȱandȱIEEEȱ
802.11jȱchannelsȱ4.920Ȭ4.980ȱGHzȱandȱ5.040Ȭ5.080GHzȱchannelsȱinȱJapan.ȱ
Clickȱtheȱ ȱiconȱtoȱviewȱanȱexistingȱSensorȱtemplate.ȱClickȱtheȱ ȱiconȱtoȱdeleteȱanȱexistingȱSensorȱtemplate.ȱ
13. TheȱImportȱSensorȱListȱscreenȱappearsȱasȱshownȱinȱtheȱfollowingȱfigure.ȱImportingȱaȱSensorȱlistȱisȱanȱefficientȱalternativeȱ
toȱmanuallyȱmovingȱSensorsȱtoȱtheȱdesiredȱlocationsȱwhileȱsettingȱupȱtheȱsystem.ȱTheȱsuccessfullyȱimportedȱSensorsȱareȱ
automaticallyȱtaggedȱtoȱtheȱchosenȱlocationsȱwhenȱtheyȱconnectȱtoȱtheȱServer.ȱ
ȱ
Figure 83. Import Devices - Sensors
UnderȱImportȱSensorȱList,ȱclickȱ<ImportȱSensorȱList>ȱtoȱopenȱImportȱSensorȱListȱdialog.ȱ
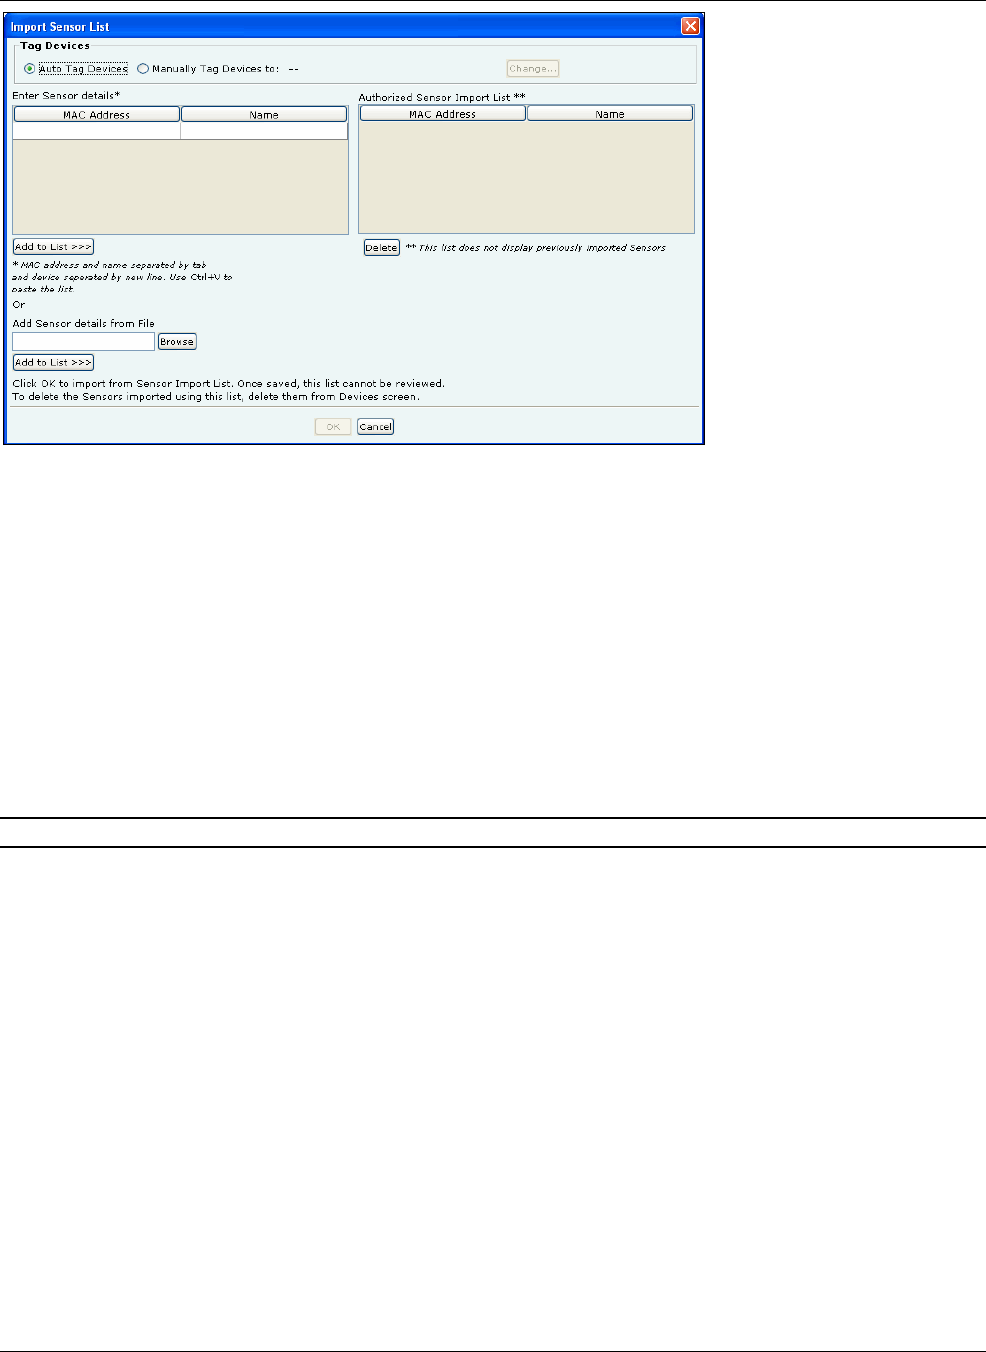
SettingȱupȱtheȱServerȱConsoleȱ
SpectraGuard®ȱEnterpriseȱInstallationȱGuideȱ
57
ȱ
Figure 84. Import Sensor List
InȱtheȱImportȱSensorȱListȱdialog:ȱ
UnderȱTagȱDevices,ȱselectȱoneȱofȱtheȱfollowing:ȱ
xAutoȱTagȱDevices:ȱToȱautomaticallyȱtagȱtheȱSensorȱtoȱtheȱcorrespondingȱlocation.ȱ
xManuallyȱTagȱDevicesȱto::ȱClickȱ<Change>ȱtoȱmanuallyȱtagȱtheȱSensorȱtoȱtheȱdesiredȱlocation.ȱ
UnderȱEnterȱSensorȱdetailsȱ
xToȱaddȱaȱSensor’sȱdetails,ȱtypeȱtheȱSensor’sȱMACȱaddressȱandȱNameȱandȱclickȱ<AddȱtoȱList>>>>.ȱ
xToȱaddȱaȱSensor’sȱdetailsȱfromȱaȱfile,ȱclickȱ<Browse>.ȱOnȱtheȱSelectȱSensor_Device_List_Fileȱdialog,ȱselectȱtheȱ.txtȱfileȱ
fromȱtheȱdesiredȱlocationȱandȱclickȱ<Open>.ȱThenȱclickȱ<AddȱtoȱList>>>>.ȱ
UnderȱAuthorizedȱSensorȱImportȱListȱ
xToȱdeleteȱaȱSensor’sȱdetails,ȱselectȱtheȱcorrespondingȱrowȱandȱclickȱ<Delete>.ȱ
ToȱimportȱSensorsȱfromȱtheȱSensorȱImportȱList,ȱclickȱ<OK>.ȱ
Note:ȱWhenȱyouȱimportȱSensorsȱfromȱaȱlist,ȱyouȱcanȱdeleteȱtheseȱSensorsȱonlyȱfromȱtheȱDevicesȱscreen.ȱ
14. TheȱDevicesÆSensorsȱscreenȱappearsȱasȱshownȱinȱtheȱfollowingȱfigure.ȱSensorsȱproactivelyȱscanȱtheȱnetworkȱandȱ
generateȱevents.ȱSensorsȱcommunicateȱeventȱinformationȱtoȱtheȱsystem.ȱThisȱscreenȱguidesȱyouȱtoȱmoveȱallȱtheȱSensorsȱ
fromȱtheȱUnknownȱlocationȱtoȱtheirȱcorrectȱlocations.ȱ
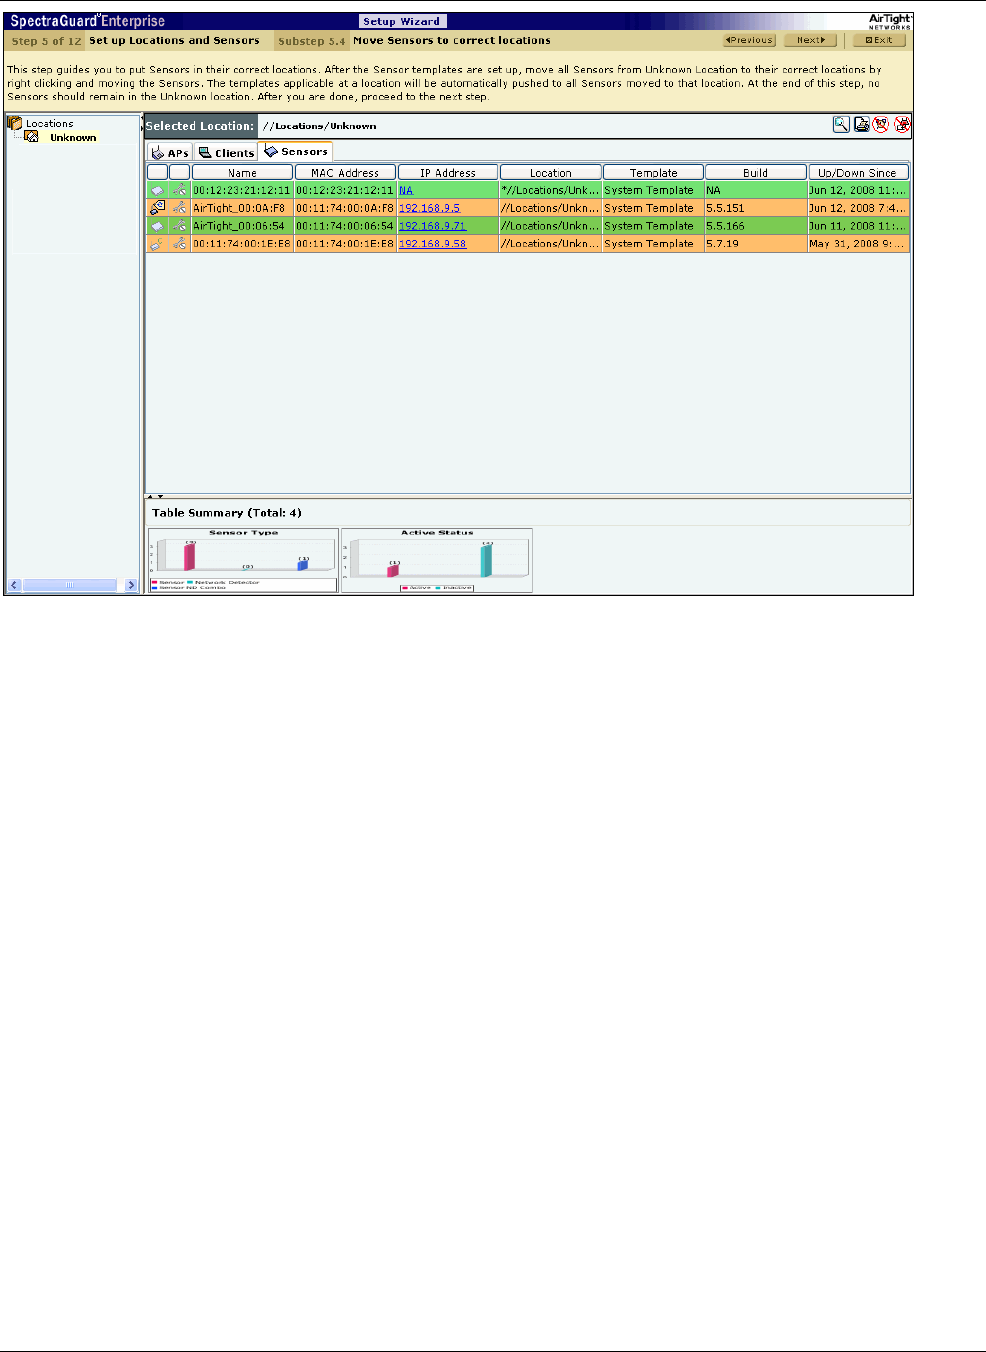
SettingȱupȱtheȱServerȱConsoleȱ
SpectraGuard®ȱEnterpriseȱInstallationȱGuideȱ
58ȱ
ȱ
Figure 85. Devices Screen – Sensors
RightȬclickȱaȱSensorȱrowȱtoȱmoveȱaȱSensor.ȱSelectȱChangeȱLocationȱfromȱtheȱresultantȱcontextȬsensitiveȱmenuȱtoȱmanuallyȱtagȱ
theȱSensorȱtoȱtheȱdesiredȱlocation.ȱ
15. TheȱLocationsȱscreenȱappearsȱasȱshownȱinȱtheȱfollowingȱfigure.ȱCreateȱaȱvisualȱviewȱofȱyourȱdeploymentȱbyȱattachingȱ
picturesȱandȱfloormapsȱtoȱlocations.ȱ
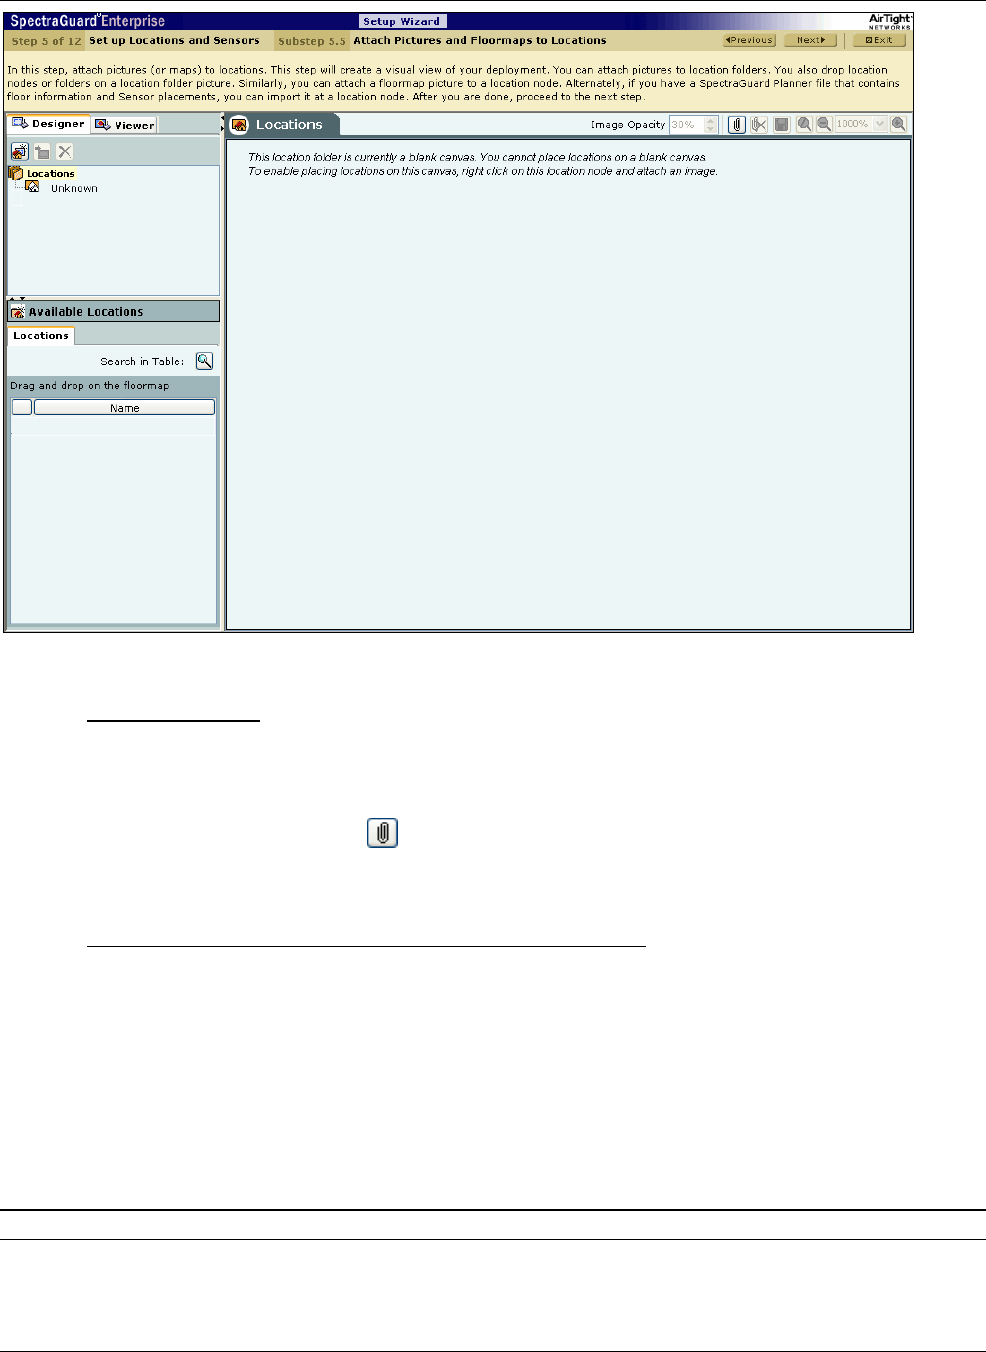
SettingȱupȱtheȱServerȱConsoleȱ
SpectraGuard®ȱEnterpriseȱInstallationȱGuideȱ
59
ȱ
Figure 86. Locations Screen
7.1.5.2 Attachingȱanȱimageȱ
Useȱtheȱfollowingȱstepsȱtoȱattachȱanȱimage:ȱ
a. InȱtheȱLocationȱtree,ȱselectȱtheȱlocationȱtoȱwhichȱyouȱwishȱtoȱattachȱanȱimage.ȱ
b. Doȱoneȱofȱtheȱfollowing:ȱ
xRightȬclickȱandȱfromȱtheȱresultingȱcontextȬsensitiveȱmenu,ȱselectȱAttachȱImage.ȱ
xClickȱtheȱAttachȱImageȱonȱfloorȱiconȱ()ȱinȱtheȱrightȱcorner.ȱ
c. OnȱtheȱSelectȱanȱimageȱfileȱtoȱattachȱtoȱattachȱoverȱaȱplannedȱlocationȱdialog,ȱbrowseȱtoȱtheȱappropriateȱimageȱandȱthenȱ
clickȱ<Open>.ȱ
7.1.5.3 PlacingȱLocationsȱonȱaȱLocationȱFolderȱwithȱanȱAttachedȱImageȱ
Theȱsystemȱenablesȱyouȱtoȱplaceȱlocationsȱonȱaȱlocationȱfolderȱthatȱhasȱanȱattachedȱimage.ȱThisȱhelpsȱyouȱidentifyȱtheȱphysicalȱ
positionȱofȱeachȱofȱtheȱlocations.ȱTheȱlocationsȱplacedȱonȱtheȱattachedȱimageȱareȱindicatedȱbyȱcoloredȱcircles.ȱAȱgreenȱcircleȱ
indicatesȱthatȱtheȱlocationȱisȱSecure,ȱwhileȱaȱredȱcircleȱindicatesȱthatȱtheȱlocationȱisȱVulnerable.ȱ
Useȱtheȱfollowingȱstepsȱtoȱplaceȱlocationsȱonȱtheȱattachedȱimageȱandȱviewȱtheirȱdetails:ȱ
a. InȱtheȱLocationȱtree,ȱselectȱaȱlocationȱfolder.ȱ
b. UnderȱAvailableȱLocations,ȱdragȱandȱdropȱtheȱrequiredȱlocationsȱonȱtheȱattachedȱimage.ȱ
c. Toȱviewȱdetailsȱaboutȱtheȱlocationȱholdȱtheȱmouseȱcursorȱoverȱtheȱcoloredȱcircle.ȱ
d. Toȱgoȱtoȱaȱparticularȱlocationȱplacedȱonȱtheȱimage,ȱdoȱoneȱofȱtheȱfollowing:ȱ
xClickȱtheȱcoloredȱcircleȱrepresentingȱtheȱlocation.ȱ
xPointȱtoȱcoloredȱcircleȱrepresentingȱtheȱlocation,ȱrightȬclickȱandȱselectȱJumpȱtoȱthisȱlocation.ȱ
Note:ȱYouȱcanȱtraverseȱtoȱaȱparticularȱlocationȱnodeȱbyȱfollowingȱstepȱdȱuntilȱyouȱreachȱtheȱdesiredȱlocationȱnode.ȱ
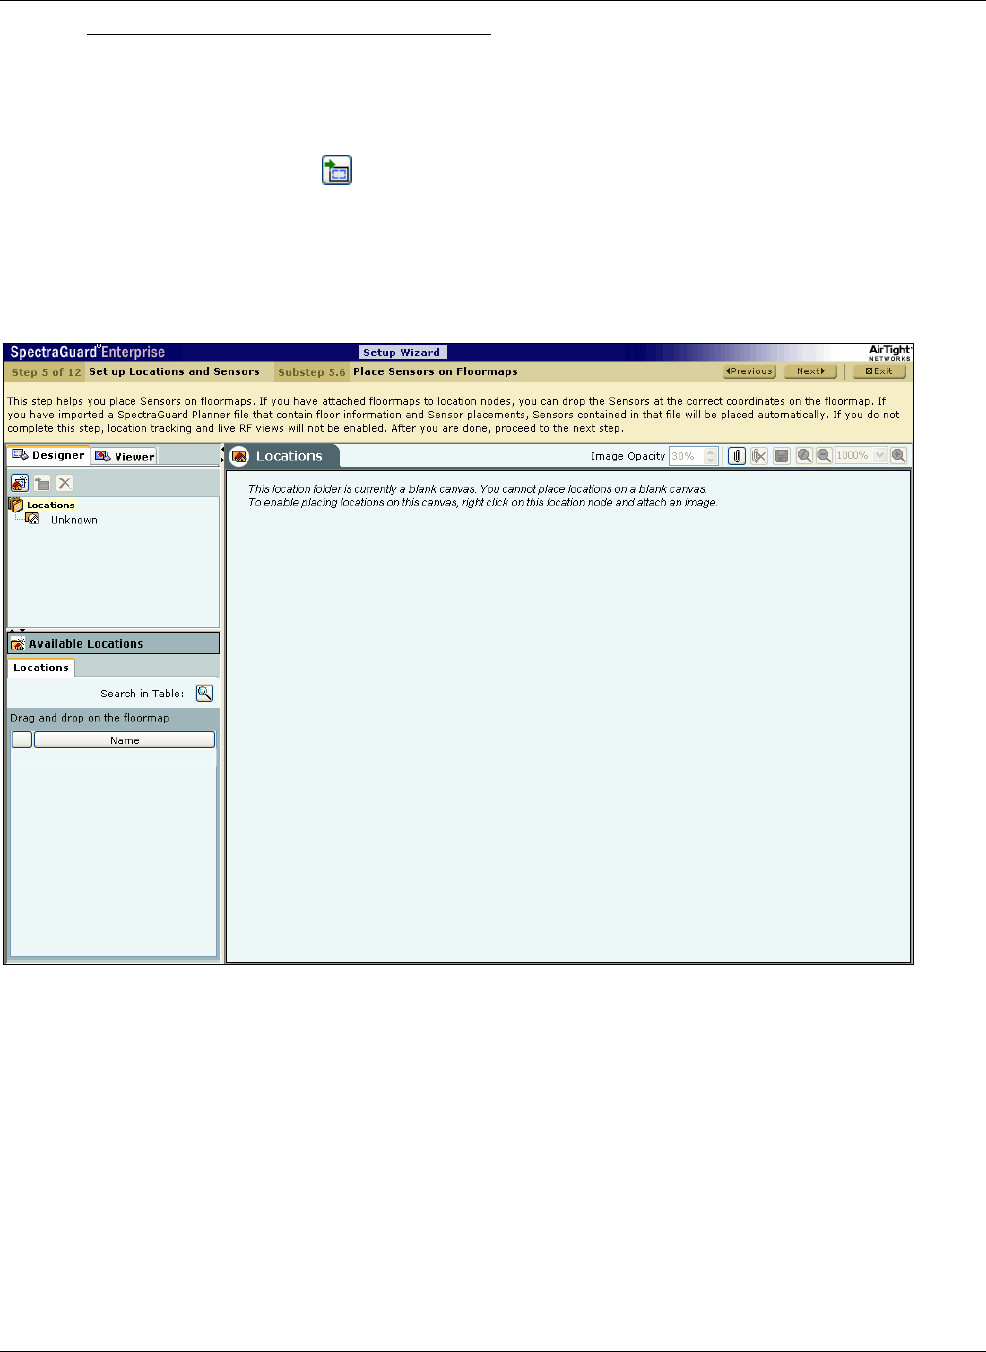
SettingȱupȱtheȱServerȱConsoleȱ
SpectraGuard®ȱEnterpriseȱInstallationȱGuideȱ
60ȱ
7.1.5.4 ImportingȱaȱPlannerȱfileȱintoȱaȱLocationȱNodeȱ
Theȱsystemȱenablesȱyouȱtoȱspecifyȱaȱlayoutȱforȱeachȱlocationȱnodeȱusingȱaȱblankȱcanvas,ȱaȱlayoutȱimage,ȱorȱaȱ.SPMȱfileȱexportedȱ
fromȱPlanner.ȱUseȱtheȱfollowingȱstepsȱtoȱimportȱaȱPlannerȱfile:ȱ
a. InȱtheȱLocationȱtree,ȱselectȱtheȱlocationȱnodeȱintoȱwhichȱyouȱwishȱtoȱimportȱtheȱ.SPMȱfileȱandȱthenȱrightȬclick.ȱ
b. Doȱoneȱofȱtheȱfollowing:ȱ
xFromȱtheȱresultingȱcontextȬsensitiveȱmenu,ȱselectȱImportȱLocation.ȱ
xClickȱtheȱImportȱLocationȱiconȱ()ȱbelowȱtheȱViewerȱmodeȱtab.ȱ
c. InȱtheȱSelectȱSpectraGuardȱPlannerȱ(.spm)ȱFileȱdialog,ȱbrowseȱtoȱtheȱappropriateȱPlannerȱexportedȱ.SPMȱfileȱandȱthenȱ
clickȱ<Open>.ȱ
16. TheȱLocationsȱscreenȱappearsȱasȱshownȱinȱtheȱfollowingȱfigure.ȱYouȱcanȱplaceȱSensorsȱonȱtheȱfloormapsȱbyȱdraggingȱandȱ
droppingȱthem.ȱIfȱyouȱhaveȱimportedȱanȱSPMȱfileȱfromȱPlannerȱthatȱcontainsȱfloorȱinformationȱandȱSensorȱplacements,ȱ
Sensorsȱcontainedȱinȱthatȱfileȱwillȱbeȱplacedȱautomatically.ȱ
ȱ
Figure 87. Placing Sensors on the Floormap
YouȱmustȱcompleteȱthisȱstepȱtoȱviewȱliveȱRFȱcoverageȱmapsȱforȱaȱlocationȱnodeȱandȱperformȱonȬfloorȱlocationȱtrackingȱofȱ
visibleȱ802.11ȱdevices.ȱUseȱtheȱfollowingȱstepsȱtoȱplaceȱSensorsȱonȱtheȱfloormap:ȱ
a. InȱtheȱLocationȱtree,ȱselectȱaȱlocationȱnode.ȱ
b. UnderȱAvailableȱDevices,ȱselectȱtheȱSensorsȱtab,ȱthenȱdragȱandȱdropȱtheȱSensorsȱonȱyourȱfloormap.ȱ
7.1.6 Stepȱ6:ȱClassifyingȱAPsȱ
17. TheȱAuthorizedȱWLANȱSetupȱscreenȱappearsȱasȱshownȱinȱtheȱfollowingȱfigure.ȱOnȱthisȱscreen,ȱspecifyȱAuthorizedȱAPȱ
detailsȱusingȱSSIDȱtemplatesȱtoȱsuitȱdifferentȱlocations.ȱ
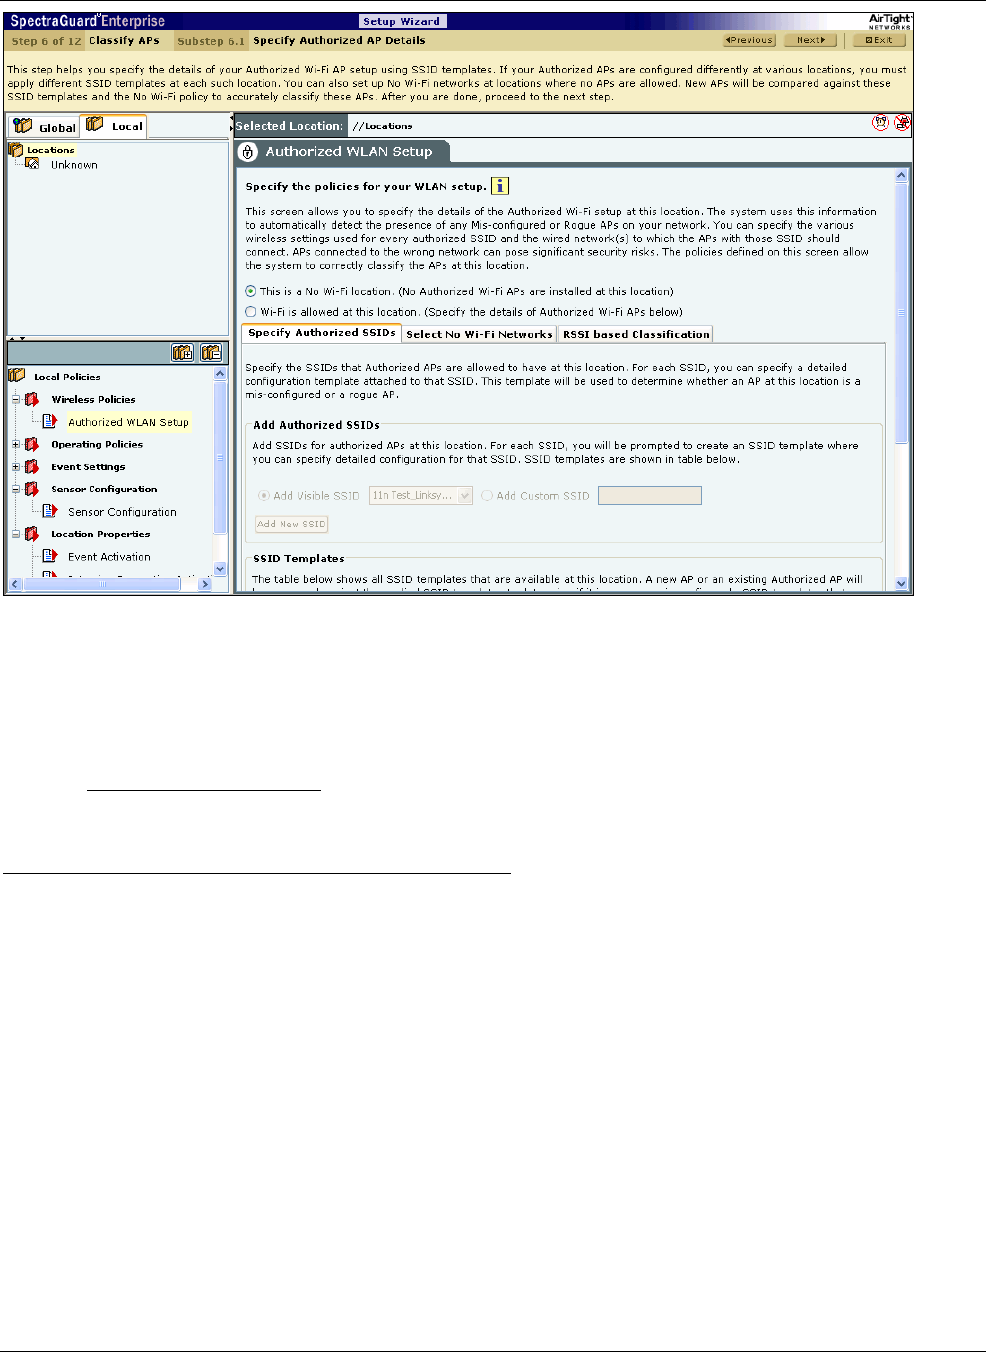
SettingȱupȱtheȱServerȱConsoleȱ
SpectraGuard®ȱEnterpriseȱInstallationȱGuideȱ
61
ȱ
Figure 88. Authorized WLAN Setup
Selectȱoneȱofȱtheȱfollowingȱtoȱcharacterizeȱaȱparticularȱlocation:ȱ
xThisȱisȱaȱNoȱWiȬFiȱlocation:ȱIfȱnoȱAuthorizedȱWiȬFiȱAPsȱareȱinstalledȱatȱthisȱlocation.ȱIfȱyouȱconfigureȱaȱlocationȱasȱaȱ
noȱWiȬFiȱlocation,ȱtheȱSpecifyȱAuthorizedȱSSIDȱsectionȱisȱgrayedȱout.ȱ
xWiȬFiȱisȱallowedȱatȱthisȱlocation:ȱToȱspecifyȱtheȱdetailsȱofȱtheȱAuthorizedȱWiȬFiȱAPsȱinȱthisȱlocation.ȱ
7.1.6.1 SpecifyȱAuthorizedȱSSIDsȱ
Underȱthisȱtab,ȱspecifyȱtheȱAuthorizedȱSSIDsȱatȱthisȱlocation.ȱForȱeachȱSSID,ȱyouȱcanȱspecifyȱtheȱdetailedȱconfiguration.ȱThisȱ
perȱSSIDȱconfigurationȱisȱcalledȱanȱSSIDȱtemplate.ȱ
CreatingȱaȱConfigurationȱTemplateȱforȱanȱAuthorizedȱ802.11ȱSSIDȱ
AddȱAuthorizedȱSSIDsȱallowsȱyouȱtoȱcreateȱanȱSSIDȱtemplateȱinȱoneȱofȱtheȱfollowingȱways:ȱ
xAddȱVisibleȱSSID:ȱToȱcreateȱanȱSSIDȱtemplateȱfromȱaȱlistȱofȱvisibleȱSSIDs.ȱTheȱvisibleȱSSIDȱlistȱisȱbuiltȱusingȱtheȱdataȱ
receivedȱfromȱSensors.ȱ
xAddȱCustomȱSSID:ȱToȱcreateȱaȱtemplateȱusingȱaȱuserȬdefinedȱSSID.ȱ
Clickȱ<AddȱNew>ȱtoȱcreateȱaȱnewȱSSIDȱtemplate.ȱTheȱTemplateȱforȱanȱAuthorizedȱ802.11ȱSSIDȱdialogȱappearsȱwhereȱyouȱcanȱ
selectȱmultipleȱitemsȱinȱsomeȱfields.ȱ
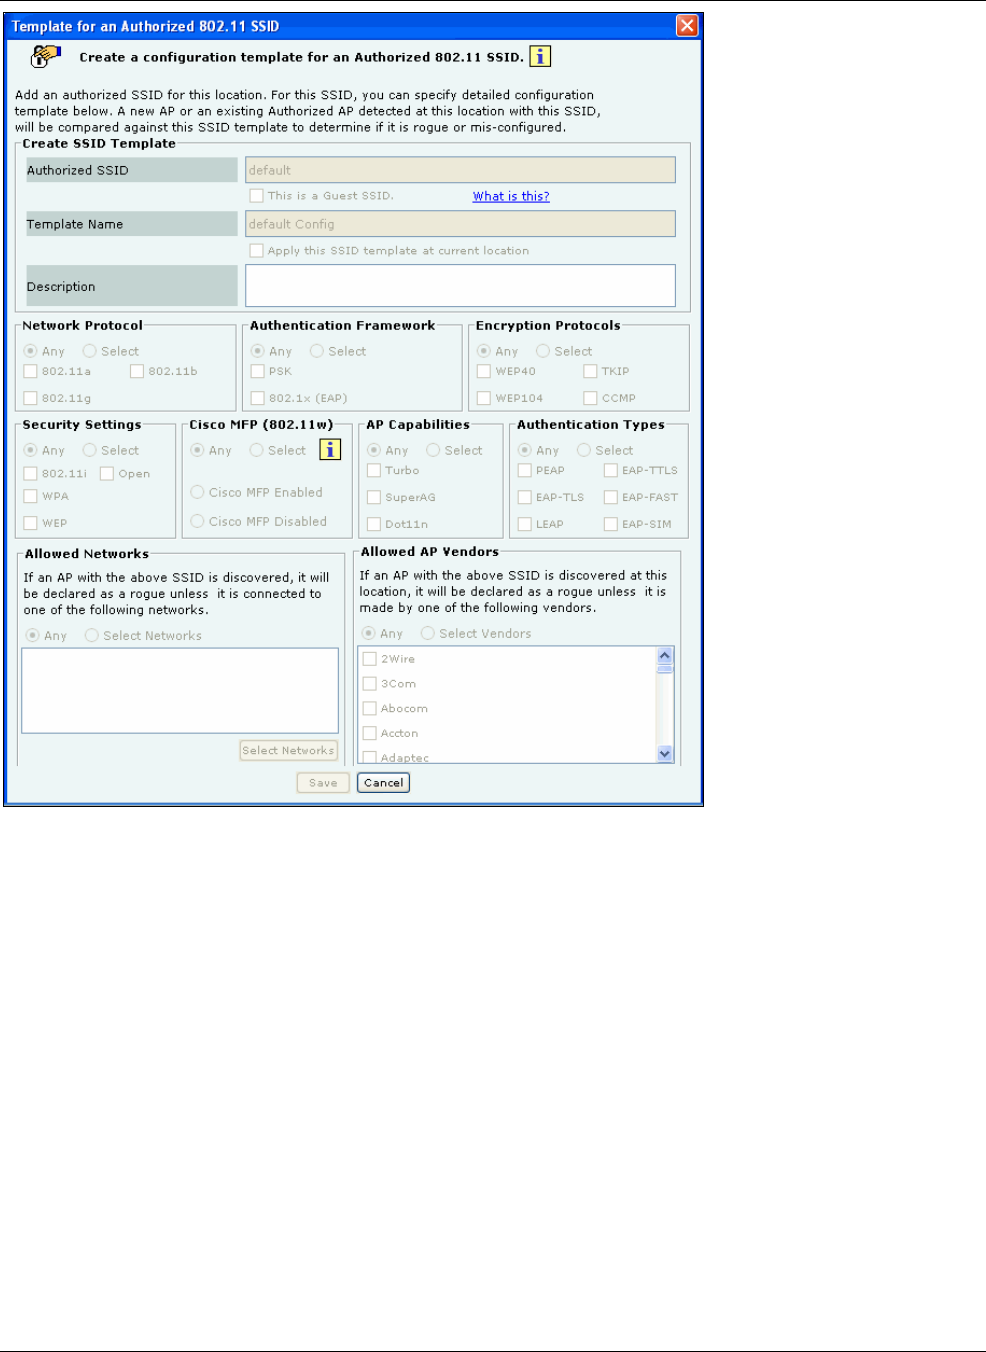
SettingȱupȱtheȱServerȱConsoleȱ
SpectraGuard®ȱEnterpriseȱInstallationȱGuideȱ
62ȱ
ȱ
Figure 89. Creating a Configuration Template for an Authorized SSID
xCreateȱSSIDȱTemplateȱallowsȱyouȱtoȱspecifyȱtheȱdetailsȱforȱcreatingȱaȱnewȱSSIDȱasȱfollows:ȱ
¾AuthorizedȱSSID:ȱDisplaysȱtheȱnameȱofȱtheȱSSIDȱthatȱyouȱhaveȱaddedȱearlierȱ
¾ThisȱisȱaȱGuestȱSSID:ȱSelectȱthisȱoptionȱifȱthisȱSSIDȱisȱaȱGuestȱSSIDȱusedȱtoȱprovideȱWiȬFiȱconnectivityȱtoȱvisitorsȱ
andȱguests.ȱThoughȱAPsȱwithȱGuestȱSSIDȱareȱAuthorized,ȱtheyȱmayȱbeȱtreatedȱdifferentlyȱthanȱAPsȱthatȱareȱusedȱ
byȱemployeesȱforȱcorporateȱaccess.ȱMakingȱanȱSSIDȱasȱGuestȱallowsȱyouȱtoȱspecifyȱadditionalȱclassificationȱandȱ
preventionȱpoliciesȱrelatedȱtoȱGuestȱSSIDs.ȱReferȱtoȱtheȱsectionsȱClientȱAutoȬClassificationȱandȱIntrusionȱ
PreventionȱPolicyȱinȱtheȱSpectraGuardȱEnterpriseȱUserȱGuideȱforȱmoreȱdetailsȱonȱclassifyingȱGuestȱSSIDsȱ
¾TemplateȱName:ȱNameȱofȱtheȱSSIDȱtemplateȱ
¾ApplyȱthisȱSSIDȱtemplateȱatȱcurrentȱlocation:ȱSelectȱthisȱoptionȱtoȱapplyȱthisȱSSIDȱtemplateȱtoȱtheȱcurrentȱ
location.ȱTheȱWLANȱpolicyȱatȱaȱlocationȱconsistsȱofȱSSIDȱtemplatesȱappliedȱatȱthatȱlocation.ȱIfȱtheȱtemplateȱisȱnotȱ
appliedȱatȱthisȱlocation,ȱitȱwillȱnotȱbeȱaȱpartȱofȱtheȱWLANȱpolicyȱ
¾Description:ȱWriteȱaȱshortȱdescriptionȱtoȱhelpȱidentifyȱtheȱSSIDȱtemplateȱ
xNetworkȱProtocolȱallowsȱyouȱtoȱselectȱtheȱallowedȱ802.11ȱprotocolsȱforȱtheȱSSID:ȱ
¾Any:ȱAllowȱAPsȱwithȱanyȱnetworkȱprotocolȱforȱthisȱSSIDȱ
¾Select:ȱSpecifyȱtheȱ802.11ȱprotocolȱonȱwhichȱtheȱsystemȱallowsȱtheȱAPsȱconnectedȱtoȱtheȱnetworkȱtoȱoperate–
802.11ȱa,ȱ802.11ȱb,ȱandȱ802.11gȱ
xAuthenticationȱFrameworkȱallowsȱyouȱtoȱselectȱtheȱsecurityȱframeworkȱforȱtheȱSSID:ȱ

SettingȱupȱtheȱServerȱConsoleȱ
SpectraGuard®ȱEnterpriseȱInstallationȱGuideȱ
63
¾Any:ȱAllowȱAPsȱwithȱanyȱauthenticationȱframeworkȱtoȱconnectȱtoȱtheȱsystemȱ
¾Select:ȱSpecifyȱtheȱauthenticationȱframework–PSKȱandȱ802.1xȱ(EAP).ȱTheȱauthenticationȱframeworkȱisȱonlyȱ
applicableȱifȱtheȱtemplateȱsupportsȱWPA/WPA2ȱandȱ802.11iȱprivacyȱ
xEncryptionȱProtocolsȱallowsȱyouȱtoȱselectȱtheȱallowedȱencryptionȱprotocolsȱforȱtheȱSSID:ȱ
¾Any:ȱAllowȱAPsȱwithȱanyȱencryptionȱprotocolȱforȱthisȱSSIDȱ
¾Select:ȱSpecifyȱtheȱencryptionȱprotocols–WEP40,ȱWEP108,ȱTKIP,ȱandȱCCMP.ȱTKIPȱandȱCCMPȱareȱavailableȱonlyȱ
ifȱtheȱtemplateȱsupportsȱWPA/WPA2ȱandȱ802.11iȱprivacyȱ
xSecurityȱSettingsȱallowsȱyouȱtoȱselectȱtheȱsecurityȱprotocol(s)ȱforȱtheȱSSID:ȱ
¾Any:ȱAllowȱAPsȱwithȱanyȱsecurityȱsettingsȱtoȱconnectȱ
¾Select:ȱSpecifyȱtheȱprivacyȱmechanism–Open,ȱWEP,ȱWPA,ȱandȱ802.11iȱforȱtheȱAPsȱconnectedȱtoȱtheȱSSIDȱ
xCiscoȱMFPȱallowsȱyouȱtoȱmakeȱclassificationȱdecisionsȱonȱCiscoȱManagementȱFrameȱProtection(MFP)ȱcapabilityȱifȱ
802.11iȱcheckboxȱisȱselectedȱunderȱSecurityȱSettings:ȱ
¾Any:ȱPolicyȱdoesȱnotȱcheckȱforȱMFP;ȱbothȱCiscoȱMFPȱenabledȱandȱdisabledȱAPsȱareȱclassifiedȱasȱAuthorizedȱ
¾Select:ȱPolicyȱchecksȱforȱMFPȱ
CiscoȱMFPȱEnabled:ȱSelectȱtoȱclassifyȱonlyȱCiscoȱMFPȱsupportingȱAPsȱasȱAuthorizedȱAPsȱ
CiscoȱMFPȱDisabled:ȱSelectȱtoȱclassifyȱnonȬCiscoȱMFPȱsupportingȱAPsȱasȱAuthorizedȱAPsȱ
xAPȱCapabilitiesȱallowsȱyouȱtoȱselectȱtheȱadditionalȱcapabilitiesȱthatȱAuthorizedȱAPsȱmayȱhave.ȱIfȱyouȱselectȱanyȱofȱ
theseȱadvancedȱcapabilities,ȱtheȱclassificationȱlogicȱallowsȱAPsȱwithȱandȱwithoutȱtheseȱcapabilities.ȱSelectȱoneȱofȱtheȱ
following:ȱ
¾Any:ȱAllowȱAPsȱwithȱanyȱspecialȱcapabilityȱforȱthisȱSSIDȱ
¾Select:ȱSpecifyȱifȱtheȱAPȱusesȱanyȱTurbo/SuperȱtechniquesȱusedȱbyȱAtherosȱtoȱgetȱhigherȱthroughputs–Turbo,ȱ
SuperAG,ȱandȱDot11nȱ(802.11n)ȱ
xAuthenticationȱTypesȱallowsȱyouȱtoȱselectȱtheȱallowedȱauthenticationȱtypesȱthatȱClientsȱcanȱuse.ȱAuthenticationȱ
typesȱdoȱnotȱdetermineȱtheȱclassificationȱofȱAPs,ȱbutȱareȱusedȱtoȱraiseȱanȱeventȱifȱaȱClientȱisȱauthenticatedȱviaȱaȱnonȬ
allowedȱauthenticationȱtype.ȱTheȱsystemȱraisesȱthisȱeventȱonlyȱifȱtheȱsystemȱseesȱauthenticationȱprotocolȱhandshakeȱ
frames.ȱ
¾Any:ȱAllowȱClientsȱwithȱanyȱauthenticationȱtypeȱforȱthisȱSSIDȱ
¾Select:ȱSpecifyȱtheȱauthenticationȱtypesȱthatȱClientsȱcanȱuseȱ(onlyȱifȱ802.1xȱisȱselected)–PEAP,ȱEAPȬTLS,ȱLEAP,ȱ
EAPȬTTLS,ȱEAPȬFAST,ȱandȱEAPȬSIMȱSelectionȱisȱallowedȱ
xAllowedȱNetworksȱallowsȱyouȱtoȱselectȱtheȱnetworksȱwhereȱAuthorizedȱAPsȱwithȱthisȱSSIDȱareȱconnected:ȱ
¾Any:ȱAllowȱAPsȱwithȱthisȱSSIDȱtoȱconnectȱtoȱanyȱnetworkȱ
¾SelectȱNetworks:ȱSpecifyȱtheȱnetworksȱwhereȱAuthorizedȱAPsȱwithȱthisȱSSIDȱareȱconnected.ȱYouȱcanȱeitherȱ
chooseȱfromȱnetworksȱthatȱareȱdiscoveredȱautomaticallyȱbyȱtheȱsystemȱorȱaddȱnewȱnetworksȱthatȱareȱnotȱyetȱ
discoveredȱbyȱtheȱsystemȱ
Clickȱ<SelectȱNetworks>ȱtoȱopenȱAllowedȱNetworksȱforȱSSIDȱdialogȱwhereȱyouȱcanȱmoveȱaȱnetworkȱfromȱ
NetworksȱMonitoredȱbyȱtheȱSystemȱtoȱAllowedȱNetworksȱforȱthisȱSSIDȱandȱaddȱorȱdeleteȱnetworks.ȱ
xUnderȱAllowedȱAPȱVendo r s ,ȱselectȱoneȱofȱtheȱfollowing:ȱ
¾Any:ȱAllowȱAPsȱmanufacturedȱbyȱanyȱvendorȱtoȱconnectȱtoȱtheȱsystemȱ
¾SelectȱVendors:ȱSelectȱtheȱmanufacturerȱofȱtheȱAPȱwithȱtheȱspecifiedȱSSID.ȱIfȱanȱAPȱwithȱtheȱspecifiedȱSSIDȱisȱ
discoveredȱatȱthisȱlocation,ȱtheȱsystemȱdeclaresȱitȱasȱaȱRogue,ȱunlessȱoneȱofȱtheȱmanufacturersȱlistedȱ
manufacturesȱit.ȱ
SSIDȱTemplatesȱ
AȱpolicyȱisȱcollectionȱofȱSSIDȱtemplatesȱattachedȱtoȱthatȱlocation.ȱYouȱcanȱapplyȱanȱSSIDȱtemplateȱfromȱtheȱparentȱorȱcreateȱitȱ
locally;ȱifȱyouȱwishȱtoȱcustomizeȱtheȱWLANȱpolicyȱforȱthatȱlocation.ȱOtherȱtemplatesȱmayȱbeȱavailableȱtoȱbeȱattachedȱbutȱareȱ
notȱpartȱofȱtheȱWLANȱpolicyȱandȱwillȱnotȱbeȱusedȱforȱAPȱclassification.ȱ
TheȱSSIDȱTemplatesȱsectionȱlistsȱtheȱSSIDȱtemplatesȱthatȱareȱavailableȱatȱaȱparticularȱlocation.ȱYouȱmustȱapplyȱtheȱtemplatesȱ
fromȱtheȱavailableȱlistȱtoȱcreateȱtheȱWLANȱpolicyȱatȱthatȱlocation.ȱAȱnewȱAPȱorȱanȱexistingȱAuthorizedȱAPȱisȱcomparedȱagainstȱ
theȱappliedȱSSIDȱtemplatesȱtoȱdetermineȱifȱitȱisȱaȱRogueȱorȱMisȬconfiguredȱAP.ȱTheȱSSIDȱtemplatesȱcreatedȱatȱotherȱlocationsȱ
canȱbeȱappliedȱtoȱaȱselectedȱlocationȱbutȱcannotȱbeȱeditedȱorȱdeleted.ȱTheȱeditȱandȱdeleteȱoperationsȱareȱpossibleȱonlyȱatȱtheȱ
locationȱwhereȱtheȱtemplateȱisȱcreated.ȱTheȱtableȱshowsȱtheȱfollowingȱdetails:ȱ
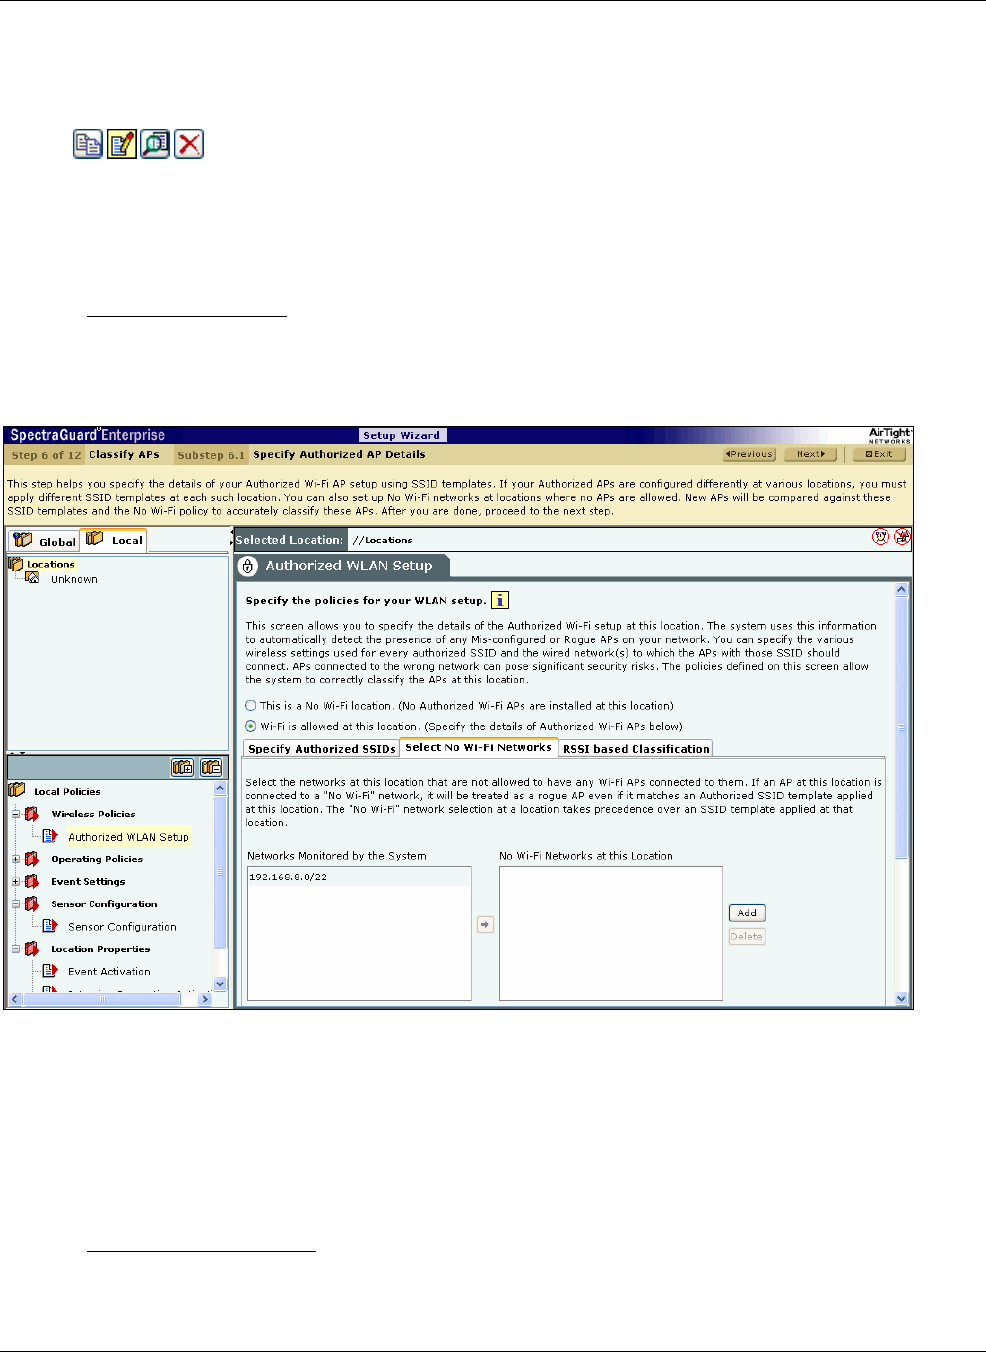
SettingȱupȱtheȱServerȱConsoleȱ
SpectraGuard®ȱEnterpriseȱInstallationȱGuideȱ
64ȱ
xSSID:ȱNameȱofȱtheȱSSIDȱ
xGuestȱSSID?:ȱIndicatesȱifȱitȱisȱaȱGuestȱSSIDȱ
xTemplateȱName:ȱNameȱofȱtheȱSSIDȱtemplateȱ
xApplyȱHere?:ȱEnablesȱyouȱtoȱapplyȱtheȱSSIDȱtemplateȱtoȱtheȱselectedȱlocation.ȱNewȱandȱexistingȱAuthorizedȱAPsȱareȱ
evaluatedȱagainstȱallȱappliedȱSSIDȱtemplatesȱtoȱdetermineȱifȱtheyȱareȱRogueȱorȱMisȬconfigured.ȱ
xȱȱȱ:ȱClickȱtheseȱiconsȱtoȱperformȱtheȱfollowing:ȱ
¾CopyȱtheȱselectedȱSSIDȱtemplateȱtoȱanotherȱlocation.ȱ
¾EditȱtheȱSSIDȱtemplate.ȱThisȱoptionȱisȱenabledȱonlyȱatȱtheȱlocationȱwhereȱtheȱtemplateȱwasȱcreated.ȱ
¾ViewȱtheȱSSIDȱtemplate.ȱ
¾Deleteȱtheȱtemplate.ȱThisȱoptionȱisȱenabledȱonlyȱatȱtheȱlocationȱwhereȱtheȱtemplateȱwasȱcreatedȱandȱonlyȱifȱtheȱ
templateȱisȱnotȱappliedȱatȱanyȱotherȱchildȱlocationsȱofȱtheȱlocationȱwhereȱitȱwasȱcreated.ȱ
7.1.6.2 SelectȱWiȬFiȱNetworksȱ
ThisȱsectionȱallowsȱyouȱtoȱspecifyȱtheȱlistȱofȱnetworksȱatȱtheȱselectedȱlocationȱwhereȱnoȱWiȬFiȱAPsȱareȱallowedȱtoȱbeȱconnected.ȱ
TheȱNoȱWiȬFiȱNetworksȱlistȱatȱaȱlocationȱtakesȱprecedenceȱoverȱtheȱlistȱofȱnetworksȱinȱSSIDȱtemplatesȱappliedȱatȱthatȱlocation.ȱ
Inȱotherȱwords,ȱifȱaȱnetworkȱisȱincludedȱinȱaȱlocation’sȱnoȱWiȬFiȱlistȱandȱhappensȱtoȱbeȱinȱtheȱlistȱofȱnetworksȱinȱoneȱorȱmoreȱ
appliedȱSSIDsȱatȱthatȱlocation,ȱtheȱnetworkȱwillȱbeȱstillȱtreatedȱasȱaȱnoȱWiȬFiȱnetwork.ȱ
ȱ
Figure 90. No-Wi-Fi Networks
xNetworksȱMonitoredȱbyȱtheȱSystem:ȱSpecifiesȱtheȱnetworksȱmonitoredȱbyȱtheȱsystem.ȱ
xNoȱWiȬFiȱNetworksȱatȱthisȱLocation:ȱSpecifiesȱtheȱnetworksȱtoȱwhichȱnoȱWiȬFiȱAPȱshouldȱbeȱconnectedȱatȱtheȱ
selectedȱlocation.ȱ
YouȱcanȱmoveȱaȱnetworkȱfromȱNetworksȱMonitoredȱbyȱtheȱSystemȱtoȱNoȱWiȬFiȱNetworksȱatȱthisȱLocation.ȱ
Clickȱ<Add>ȱtoȱenterȱaȱnewȱnetworkȱaddressȱtoȱaddȱaȱNoȱWiȬFiȱnetworkȱatȱtheȱselectedȱlocation.ȱ
7.1.6.3 RSSIȱbasedȱClassificationȱ
APsȱareȱfurtherȱclassifiedȱbasedȱonȱtheȱRSSIȱvalueȱthatȱtheȱSensorsȱreceive.ȱIfȱtheȱsignalȱstrenthȱexceedsȱaȱmaximmumȱ
threshold,ȱtheȱSensorȱappropriatelyȱclssifiesȱtheȱAP.ȱAirtightȱhiglyȱrecommendsȱthatȱyouȱturnȱonȱnetworkȱconnectivityȱbasedȱ
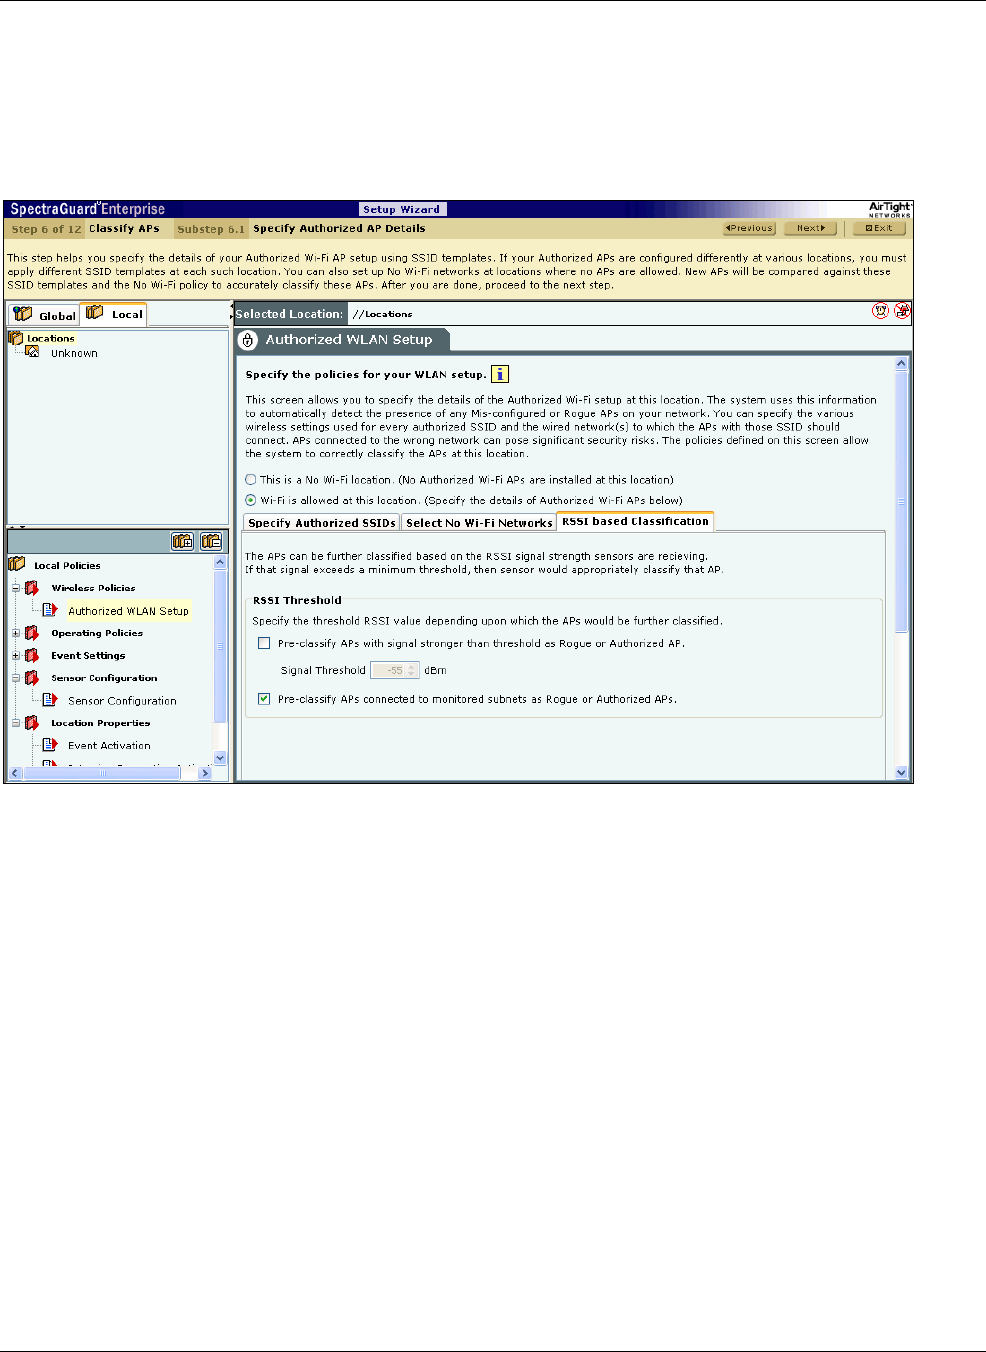
SettingȱupȱtheȱServerȱConsoleȱ
SpectraGuard®ȱEnterpriseȱInstallationȱGuideȱ
65
classificationȱasȱitȱisȱtheȱmostȱreliableȱmechanismȱtoȱclassifyȱwirelessȱdevicesȱwhenȱmostȱofȱyourȱnetworkȱisȱmonitoredȱusingȱ
SensorsȱandȱNDs.ȱ
UnderȱRSSIȱThreshold,ȱselectȱoneȱorȱbothȱ(recommend)ȱofȱtheȱfollowingȱcheckboxes:ȱ
xPreȬclassifyȱAPsȱwithȱsignalȱstrengthȱstrongerȱthanȱthresholdȱasȱRogueȱorȱAuthorizedȱAPsȱtoȱspecifyȱtheȱthresholdȱ
RSSIȱvalueȱbasedȱonȱwhichȱtheȱsystemȱfurtherȱclassifiesȱAPs.ȱ
xPreȬclassifyȱAPsȱconnectedȱtoȱmonitoredȱsubnetȱasȱRogueȱorȱAuthorizedȱAPsȱtoȱclassifyȱAPsȱbasedȱonȱtheirȱ
networkȱconnectivity.ȱ
ȱ
Figure 91. RSSI based Classification
18. TheȱAPȱAutoȬclassificationȱscreenȱappearsȱasȱshownȱinȱtheȱfollowingȱfigure.ȱItȱenablesȱyouȱtoȱspecifyȱtheȱAPȱclassificationȱ
policyȱforȱdifferentȱAPȱcategories.ȱ
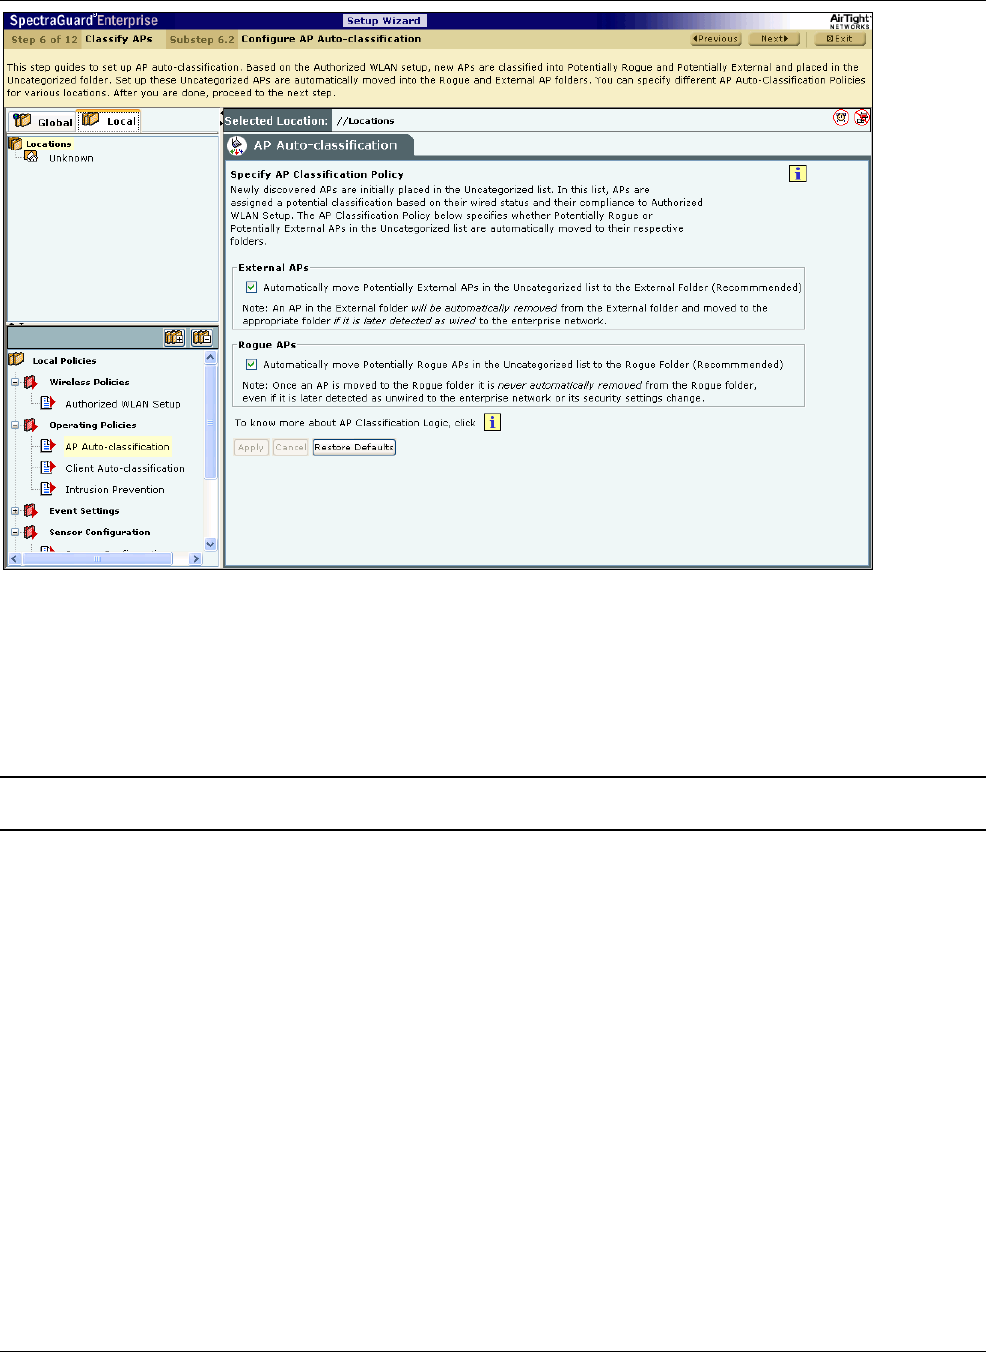
SettingȱupȱtheȱServerȱConsoleȱ
SpectraGuard®ȱEnterpriseȱInstallationȱGuideȱ
66ȱ
ȱ
Figure 92. AP Auto-Classification Policy
UnderȱExternalȱAPs,ȱAirTightȱrecommendsȱthatȱyouȱselectȱAutomaticallyȱmoveȱPotentiallyȱExternalȱAPsȱinȱtheȱ
UncategorizedȱlistȱtoȱtheȱExternalȱFolder.ȱTheȱsystemȱautomaticallyȱremovesȱanȱAPȱfromȱtheȱExternalȱfolderȱandȱmovesȱitȱtoȱ
anȱappropriateȱAPȱfolderȱifȱitȱlaterȱdetectsȱthatȱtheȱAPȱisȱwiredȱtoȱtheȱenterpriseȱnetwork.ȱ
UnderȱRogueȱAPs,ȱAirTightȱrecommendsȱthatȱyouȱselectȱAutomaticallyȱmoveȱPotentiallyȱExternalȱAPsȱinȱtheȱUncategorizedȱ
listȱtoȱtheȱRogueȱFolder.ȱ
Note:ȱOnceȱyouȱmoveȱanȱAPȱtoȱtheȱRogueȱfolder,ȱtheȱsystemȱneverȱautomaticallyȱremovesȱitȱfromȱtheȱRogueȱfolder,ȱevenȱifȱitȱlaterȱdetectsȱ
thatȱtheȱAPȱisȱunwiredȱfromȱtheȱenterpriseȱnetworkȱorȱitsȱsecurityȱsettingsȱhaveȱchanged.ȱ
19. TheȱImportȱDevicesȱscreenȱappearsȱasȱshownȱinȱtheȱfollowingȱfigure.ȱImportingȱanȱAuthorizedȱAPȱListȱisȱanȱefficientȱ
alternativeȱtoȱmanualȱmovementȱofȱtheseȱAPsȱintoȱtheȱAuthorizedȱbin.ȱAfterȱsuccessfullyȱimportingȱtheseȱlists,ȱtheȱsystemȱ
automaticallyȱclassifiesȱtheȱAPsȱinȱtheȱrespectiveȱlistsȱasȱAuthorized.ȱ
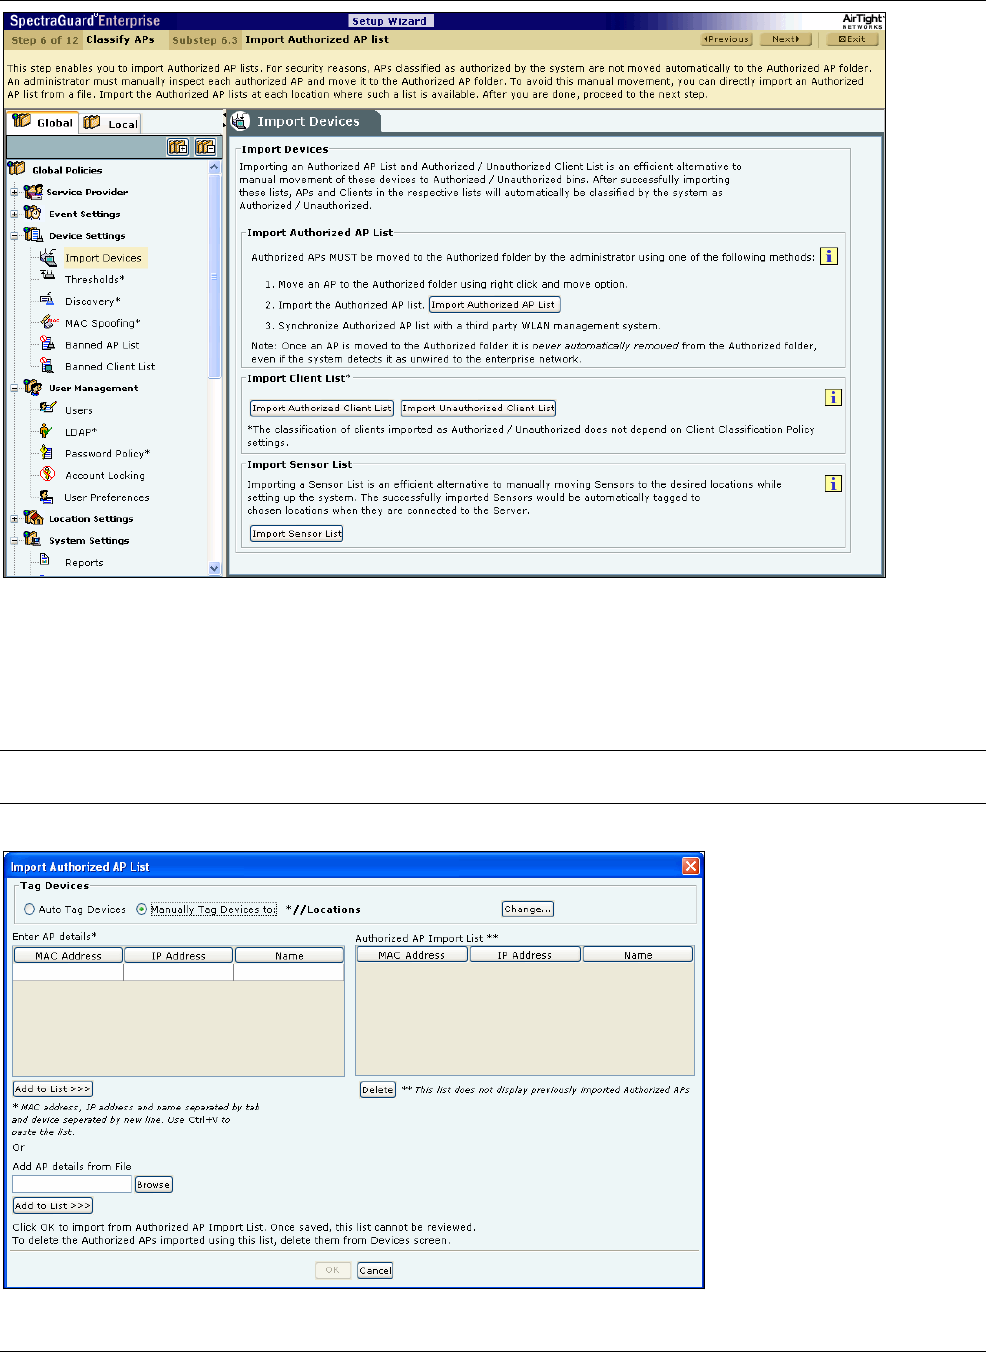
SettingȱupȱtheȱServerȱConsoleȱ
SpectraGuard®ȱEnterpriseȱInstallationȱGuideȱ
67
ȱ
Figure 93. Import Devices – APs
YouȱcanȱmoveȱAuthorizedȱAPsȱtoȱtheȱAuthorizedȱfolderȱusingȱoneȱofȱtheȱfollowingȱmethods:ȱ
xMoveȱanȱAPȱtoȱtheȱAuthorizedȱfolderȱusingȱrightȱclickȱandȱMoveȱoptionȱ
xImportȱtheȱAuthorizedȱAPȱlistȱ
xSynchronizeȱwithȱanȱAPȱManagementȱServerȱ
Note:ȱOnceȱyouȱmoveȱanȱAPȱtoȱtheȱAuthorizedȱfolder,ȱtheȱsystemȱneverȱautomaticallyȱremovesȱitȱfromȱtheȱAuthorizedȱfolder,ȱevenȱifȱitȱ
laterȱdetectsȱthatȱtheȱAPȱisȱunwiredȱfromȱtheȱenterpriseȱnetwork.ȱ
UnderȱImportȱAPȱList,ȱclickȱ<ImportȱAuthorizedȱAPȱList>ȱtoȱopenȱImportȱAuthorizedȱAPȱListȱdialog.ȱ
ȱ
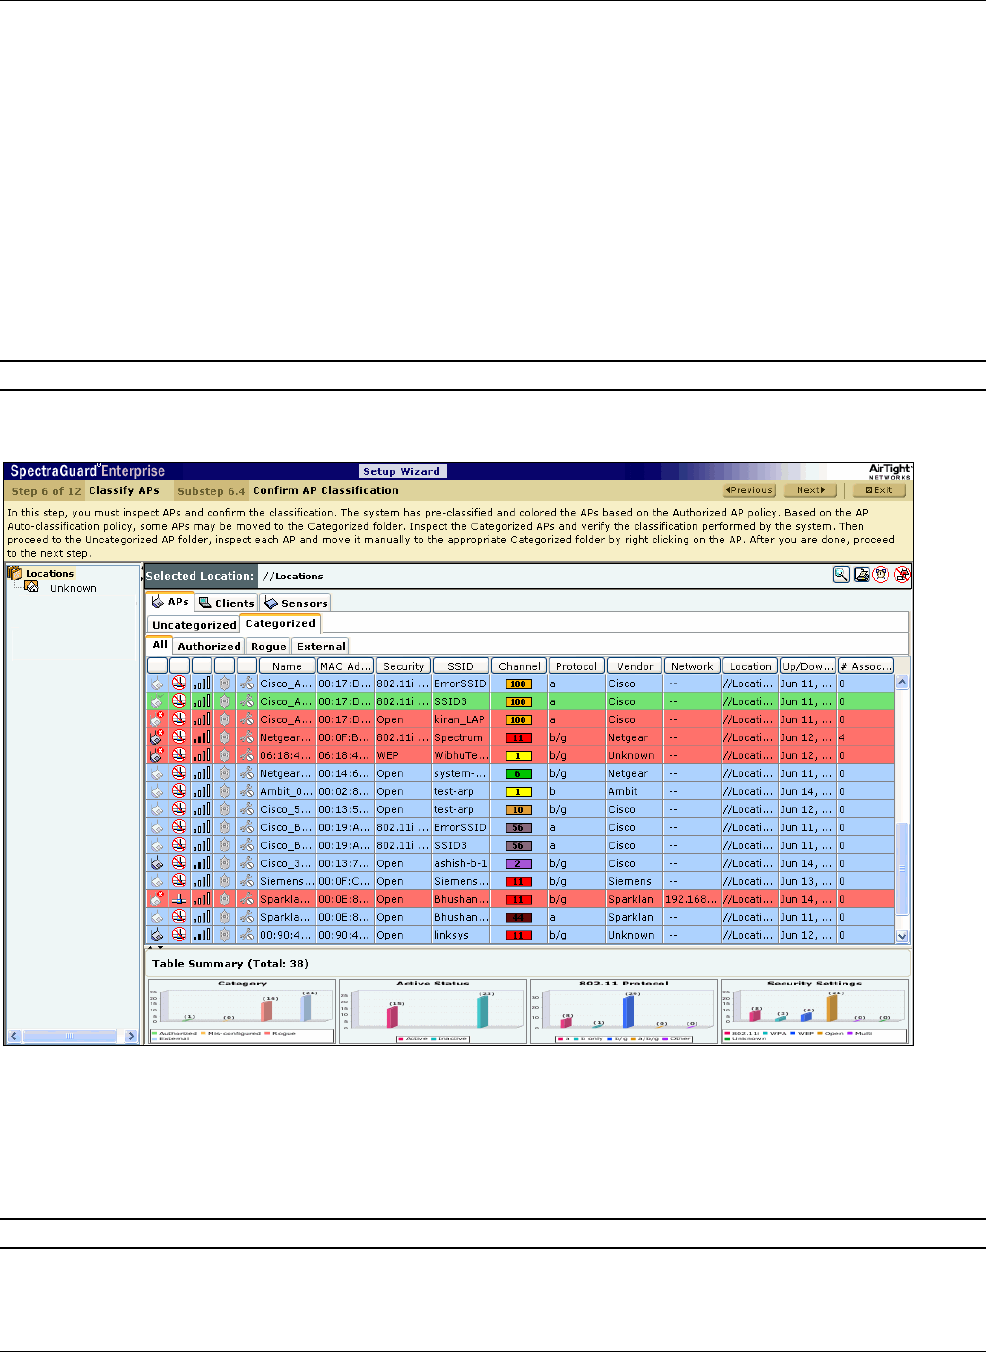
SettingȱupȱtheȱServerȱConsoleȱ
SpectraGuard®ȱEnterpriseȱInstallationȱGuideȱ
68ȱ
Figure 94. Import Authorized AP List
InȱtheȱImportȱAuthorizedȱAPȱListȱdialog:ȱ
UnderȱTagȱDevices,ȱselectȱoneȱofȱtheȱfollowing:ȱ
xAutoȱTagȱDevices:ȱToȱautomaticallyȱtagȱtheȱAPȱtoȱtheȱcorrespondingȱlocation.ȱ
xManuallyȱTagȱDevicesȱto::ȱClickȱ<Change>ȱtoȱmanuallyȱtagȱtheȱAPȱtoȱtheȱdesiredȱlocation.ȱ
UnderȱEnterȱAPȱdetailsȱ
xToȱaddȱanȱAP’sȱdetails,ȱtypeȱtheȱAP’sȱMACȱaddress,ȱIPȱAddress,ȱandȱNameȱandȱclickȱ<AddȱtoȱList>>>>.ȱ
xToȱaddȱanȱAP’sȱdetailsȱfromȱaȱfile,ȱclickȱ<Browse>.ȱOnȱtheȱSelectȱAuthorizedȱAP_Device_List_Fileȱdialog,ȱselectȱtheȱ
.txtȱfileȱfromȱtheȱdesiredȱlocationȱandȱclickȱ<Open>.ȱThenȱclickȱ<AddȱtoȱList>>>>.ȱ
UnderȱAuthorizedȱAPȱImportȱListȱ
xToȱdeleteȱanȱAP’sȱdetails,ȱselectȱtheȱcorrespondingȱrowȱandȱclickȱ<Delete>.ȱ
ToȱimportȱAuthorizedȱAPsȱfromȱtheȱAuthorizedȱAPȱImportȱList,ȱclickȱ<OK>.ȱ
Note:ȱWhenȱyouȱimportȱAPsȱfromȱaȱlist,ȱpolicyȱsettingsȱinȱtheȱSetupȱWizardȱdoȱnotȱaffectȱtheseȱAPs.ȱ
20. TheȱDevicesÆAPsȱscreenȱappearsȱasȱshownȱinȱtheȱfollowingȱfigure.ȱTheȱsystemȱenablesȱyouȱtoȱinspect,ȱconfirm,ȱandȱreȬ
classifyȱaȱdevice,ȱwhichȱis,ȱmoveȱaȱdeviceȱtoȱaȱdifferentȱfolderȱbasedȱonȱfreshȱinformation.ȱ
ȱ
Figure 95. Devices Screen – APs
UseȱtheȱfollowingȱstepsȱtoȱmoveȱanȱAPȱtoȱaȱspecificȱfolder:ȱ
a. InȱtheȱAPȱlist,ȱrightȱclickȱtheȱdesiredȱAPȱrow.ȱ
b. Fromȱtheȱresultingȱcontextȱsensitiveȱmenu,ȱselectȱMoveȱto….ȱ
c. ClickȱtheȱdesiredȱcategoryȱtoȱwhichȱyouȱwantȱtoȱmoveȱtheȱAP.ȱ
Note:ȱIfȱyouȱmoveȱanȱAPȱplacedȱonȱaȱfloormap,ȱanȱErrorȱdialogȱappears.ȱ
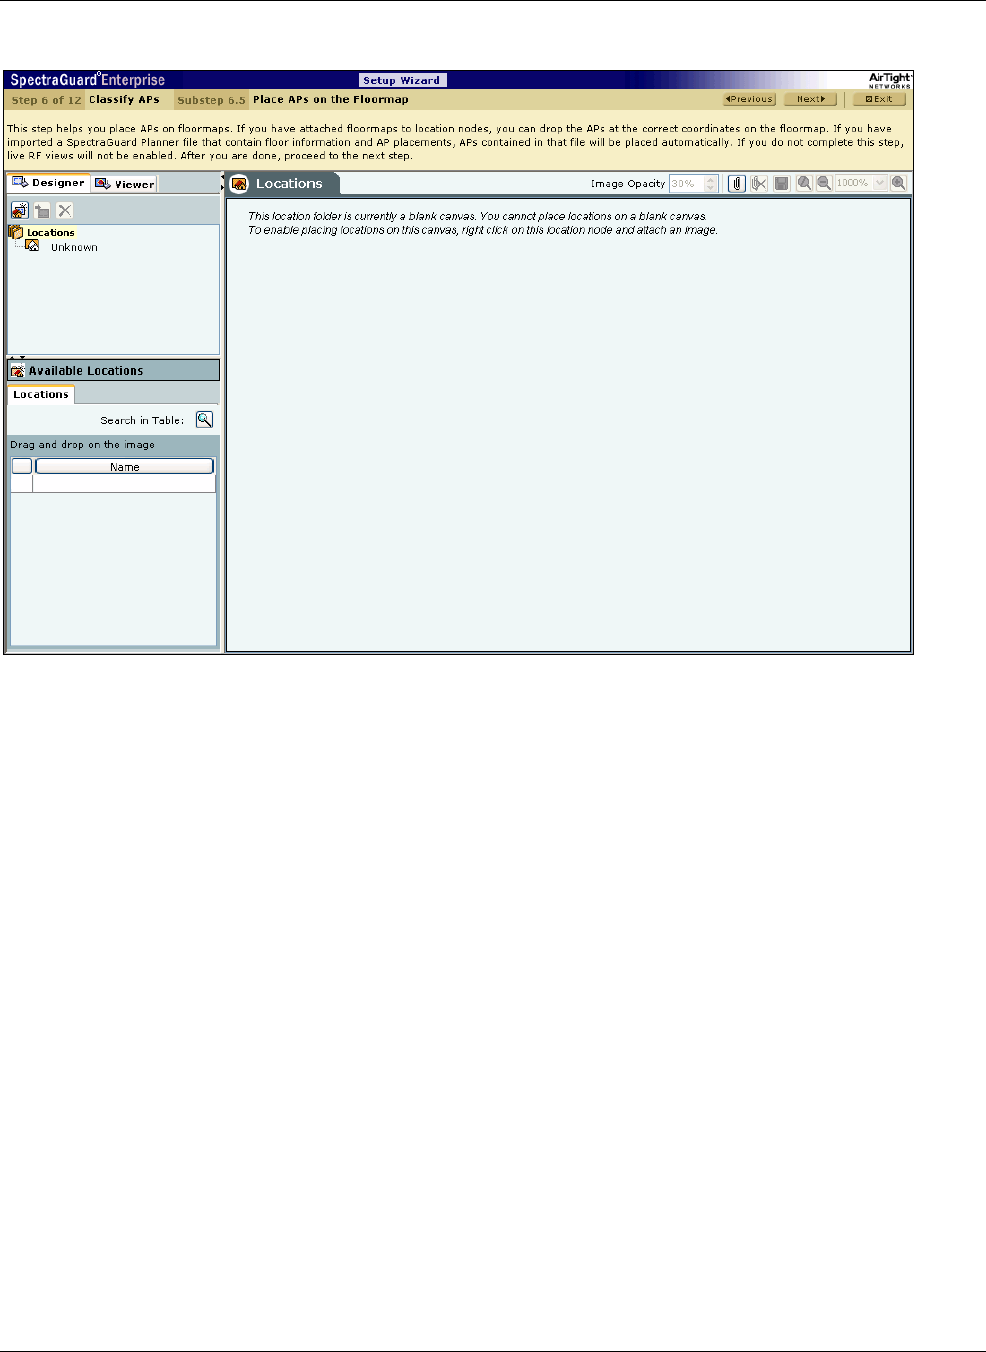
SettingȱupȱtheȱServerȱConsoleȱ
SpectraGuard®ȱEnterpriseȱInstallationȱGuideȱ
69
21. TheȱLocationsȱscreenȱappearsȱasȱshownȱinȱtheȱfollowingȱfigure.ȱTheȱsystemȱenablesȱyouȱtoȱplaceȱAPsȱonȱtheȱfloormapȱtoȱ
viewȱliveȱRFȱcoverageȱmapsȱforȱaȱlocationȱnodeȱandȱperformȱonȬfloorȱlocationȱtrackingȱofȱvisibleȱ802.11ȱdevices.ȱ
ȱ
Figure 96. Locations Screen
UseȱtheȱfollowingȱstepsȱtoȱplaceȱAPsȱonȱtheȱfloormap:ȱ
a. InȱtheȱLocationȱtree,ȱselectȱaȱlocationȱnode.ȱ
b. UnderȱAvailableȱDevices,ȱselectȱtheȱAPsȱtab,ȱthenȱdragȱandȱdropȱtheȱAPsȱonȱyourȱfloormap.ȱ
7.1.7 Stepȱ7:ȱClassifyingȱClientsȱ
22. TheȱClientȱAutoȬclassificationȱscreenȱappearsȱasȱshownȱinȱtheȱfollowingȱfigure.ȱItȱdeterminesȱhowȱClientsȱareȱclassifiedȱ
uponȱinitialȱdiscoveryȱandȱsubsequentȱassociationsȱwithȱAPs.ȱ
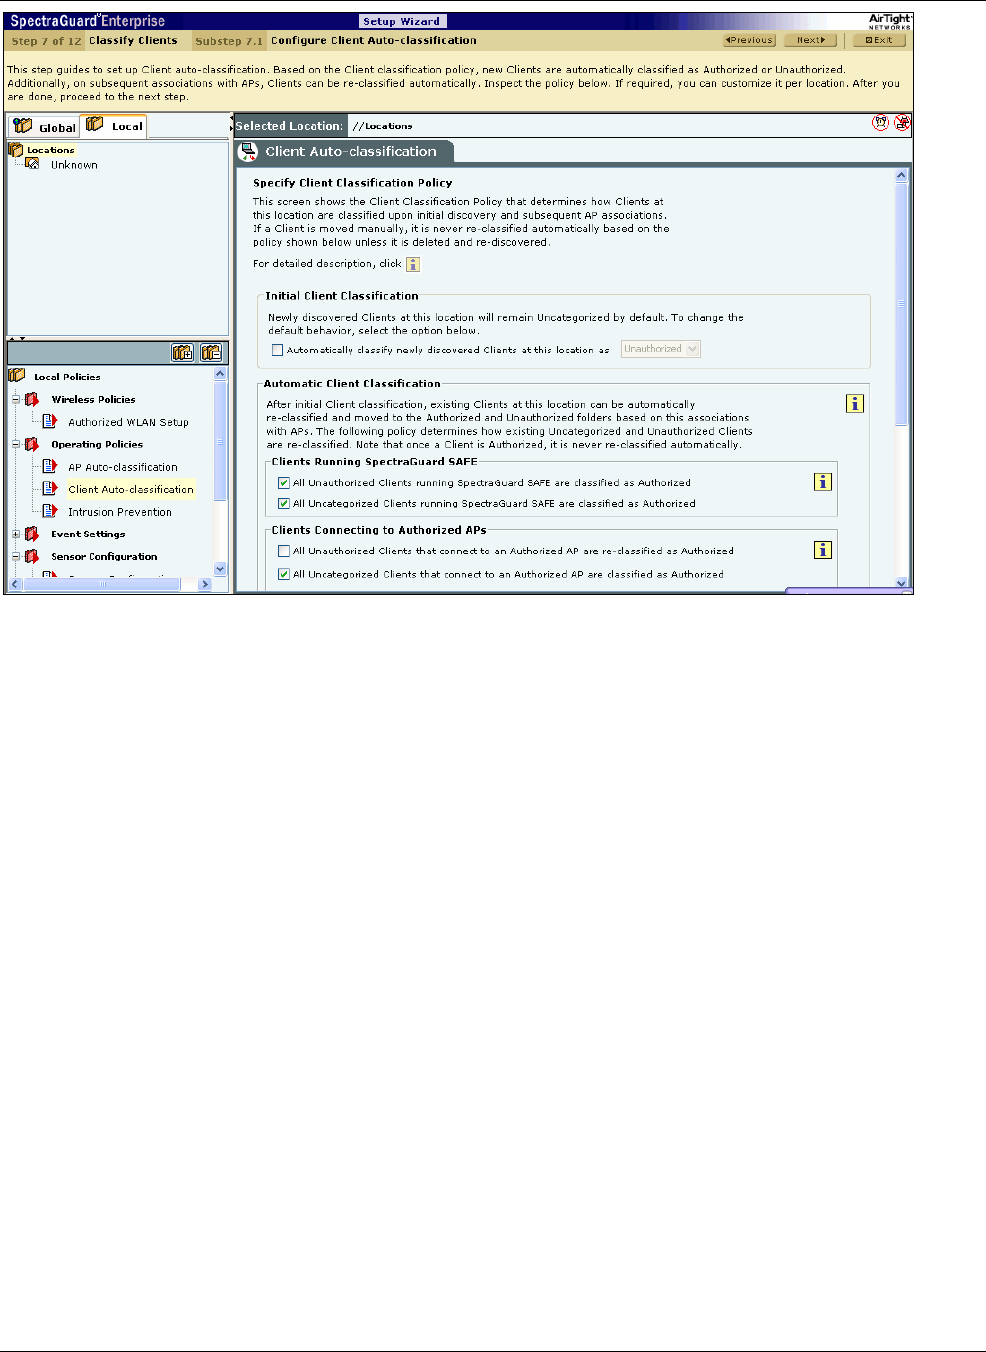
SettingȱupȱtheȱServerȱConsoleȱ
SpectraGuard®ȱEnterpriseȱInstallationȱGuideȱ
70ȱ
ȱ
Figure 97. Client Auto-Classification Policy
UnderȱInitialȱClientȱClassification,ȱspecifyȱifȱnewlyȱdiscoveredȱClientsȱatȱaȱparticularȱlocation,ȱwhichȱareȱUncategorizedȱbyȱ
defaultȱshouldȱbeȱclassifiedȱasȱAuthorizedȱorȱUnauthorized.ȱ
UnderȱAutomaticȱClientȱClassification,ȱselectȱoneȱorȱmoreȱoptionsȱtoȱenableȱTheȱsystemȱautomaticallyȱreȬclassifyȱ
UncategorizedȱandȱUnauthorizedȱClientsȱbasedȱonȱtheirȱassociationsȱwithȱAPs.ȱYouȱcanȱcategorizeȱtheȱfollowingȱtypesȱofȱ
Clients.ȱ
xClientsȱrunningȱSAFEȱ
¾AllȱUnauthorizedȱClientsȱrunningȱSpectraGuardȱSAFEȱareȱclassifiedȱasȱAuthorizedȱ
¾AllȱUncategorizedȱClientsȱrunningȱSpectraGuardȱSAFEȱareȱclassifiedȱasȱAuthorizedȱ
xClientsȱconnectingȱtoȱAuthorizedȱAPsȱ
¾AllȱUnauthorizedȱClientsȱthatȱconnectȱtoȱanȱAuthorizedȱAPȱareȱreȬclassifiedȱasȱAuthorizedȱ
¾AllȱUncategorizedȱClientsȱthatȱconnectȱtoȱanȱAuthorizedȱAPȱareȱclassifiedȱasȱAuthorizedȱ
YouȱcanȱselectȱtheȱfollowingȱExceptionsȱ
¾DoȱnotȱreȬclassifyȱaȱClientȱconnectingȱtoȱaȱGuestȱAPȱasȱAuthorizedȱ
¾DoȱnotȱreȬclassifyȱaȱClientȱconnectingȱtoȱaȱMisȬconfiguredȱAPȱasȱAuthorizedȱ
¾DoȱnotȱreȬclassifyȱaȱClientȱasȱAuthorizedȱifȱitsȱwirelessȱdataȱpacketsȱareȱnotȱdetectedȱonȱtheȱwiredȱnetworkȱ
xClientsȱconnectingȱtoȱExternalȱorȱRogueȱAPsȱ
¾AllȱUncategorizedȱClientsȱthatȱconnectȱtoȱanȱExternalȱAPȱareȱclassifiedȱasȱUnauthorizedȱ
¾AllȱUncategorizedȱClientsȱthatȱconnectȱtoȱaȱRogueȱAPȱareȱclassifiedȱasȱUnauthorizedȱ
¾AllȱUncategorizedȱClientsȱthatȱconnectȱtoȱaȱPotentiallyȱExternalȱAPȱareȱclassifiedȱasȱUnauthorizedȱ
¾AllȱUncategorizedȱClientsȱthatȱconnectȱtoȱaȱPotentiallyȱRogueȱAPȱareȱclassifiedȱasȱUnauthorizedȱ
23. TheȱImportȱDevicesȱscreenȱappearsȱasȱshownȱinȱtheȱfollowingȱfigure.ȱImportingȱanȱAuthorizedȱorȱUnauthorizedȱClientsȱ
ListȱisȱanȱefficientȱalternativeȱtoȱmanualȱmovementȱofȱtheseȱdevicesȱintoȱtheȱAuthorized/Unauthorizedȱbins.ȱAfterȱ
successfullyȱimportingȱtheseȱlists,ȱtheȱsystemȱautomaticallyȱclassifiesȱtheȱClientsȱinȱtheȱrespectiveȱlistsȱasȱ
Authorized/Unauthorized.ȱ
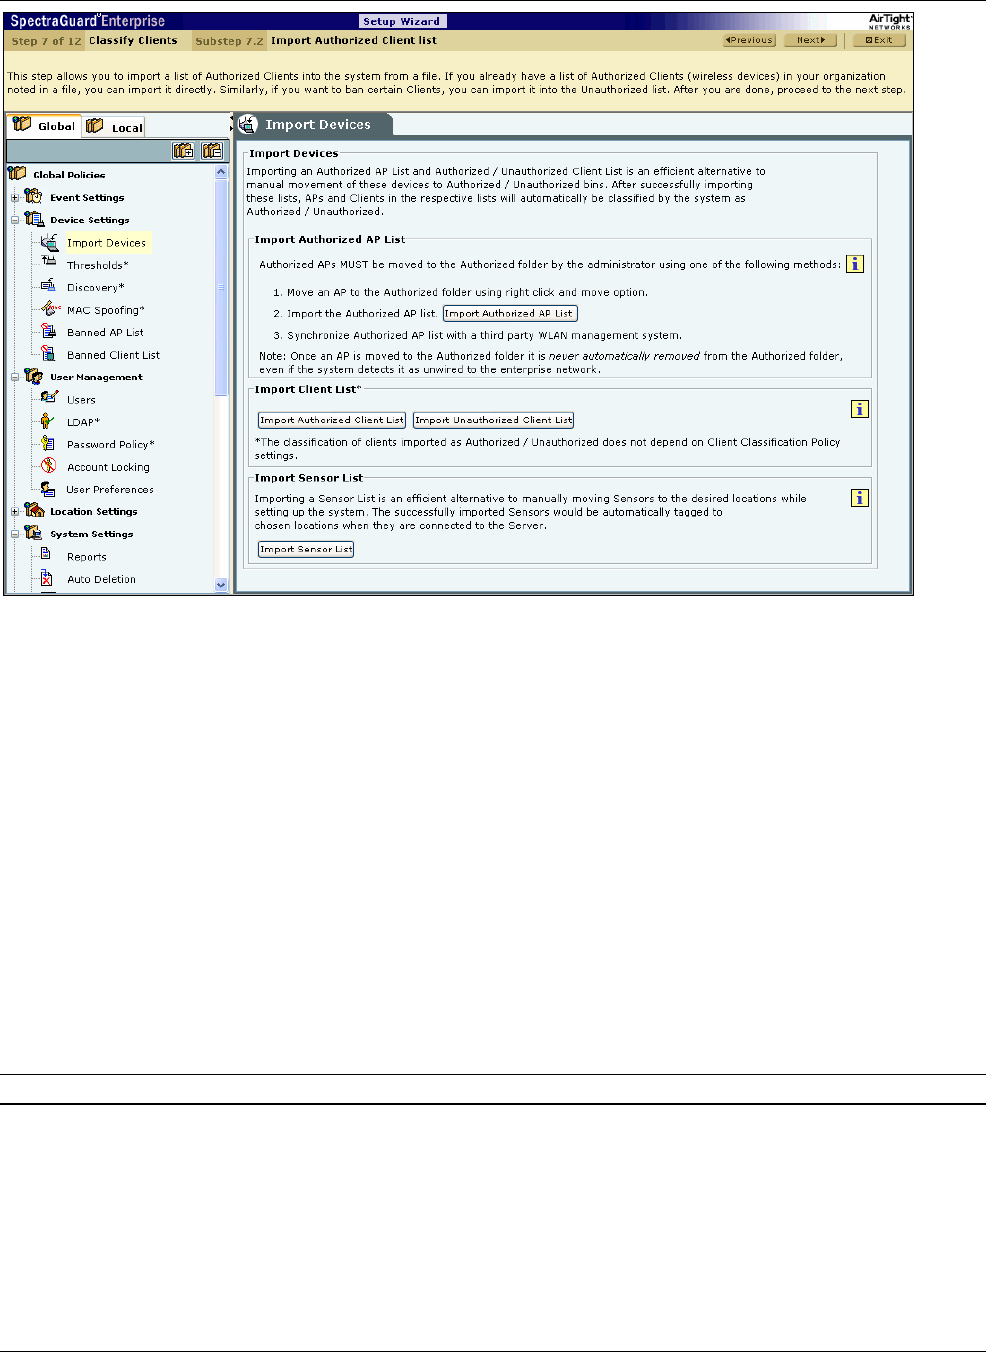
SettingȱupȱtheȱServerȱConsoleȱ
SpectraGuard®ȱEnterpriseȱInstallationȱGuideȱ
71
ȱ
Figure 98. Import Devices – Clients
InȱtheȱImportȱDevicesȱdialog,ȱunderȱImportȱClientȱList,ȱclickȱ<ImportȱAuthorizedȱClientȱList>ȱtoȱopenȱImportȱAuthorizedȱ
ClientȱListȱdialogȱand/orȱclickȱ<ImportȱUnauthorizedȱClientȱList>ȱtoȱopenȱImportȱUnauthorizedȱClientȱListȱdialog.ȱ
InȱtheȱImportȱAuthorized/UnauthorizedȱClientȱListȱdialog:ȱ
UnderȱTagȱDevices,ȱselectȱoneȱofȱtheȱfollowing:ȱ
xAutoȱTagȱDevices:ȱToȱautomaticallyȱtagȱtheȱAPȱtoȱtheȱcorrespondingȱlocation.ȱ
xManuallyȱTagȱDevicesȱto::ȱClickȱ<Change>ȱtoȱmanuallyȱtagȱtheȱAPȱtoȱtheȱdesiredȱlocation.ȱ
UnderȱEnterȱClientȱdetailsȱ
xToȱaddȱaȱClient’sȱdetails,ȱunderȱEnterȱClientȱdetails,ȱtypeȱtheȱClient’sȱMACȱAddress,ȱIPȱAddress,ȱandȱNameȱandȱclickȱ
<AddȱtoȱList>>>>.ȱ
xToȱaddȱaȱClient’sȱdetailsȱfromȱaȱfile,ȱclickȱ<Browse>.ȱOnȱtheȱSelectȱAuthorized/Unauthorizedȱ
Client_Device_List_Fileȱdialog,ȱselectȱtheȱ.txtȱfileȱfromȱtheȱdesiredȱlocationȱandȱclickȱ<Open>.ȱThenȱclickȱ<Addȱtoȱ
List>>>>.ȱ
UnderȱAuthorized/UnauthorizedȱClientȱImportȱListȱ
xToȱdeleteȱaȱClient’sȱdetails,ȱselectȱtheȱcorrespondingȱrowȱandȱclickȱ<Delete>.ȱ
ToȱimportȱAuthorized/UnauthorizedȱClientsȱfromȱtheȱAuthorized/UnauthorizedȱClientȱImportȱList,ȱclickȱ<OK>.ȱ
Note:ȱWhenȱyouȱimportȱClientsȱfromȱaȱlist,ȱpolicyȱsettingsȱinȱtheȱSetupȱWizardȱdoȱnotȱaffectȱtheseȱClients.ȱ
24. TheȱDevicesÆClientsȱscreenȱappearsȱasȱshownȱinȱtheȱfollowingȱfigure.ȱTheȱsystemȱenablesȱyouȱtoȱinspect,ȱconfirm,ȱandȱ
reȬclassifyȱaȱdevice,ȱwhichȱis,ȱmoveȱaȱdeviceȱtoȱaȱdifferentȱfolderȱbasedȱonȱfreshȱinformation.ȱ
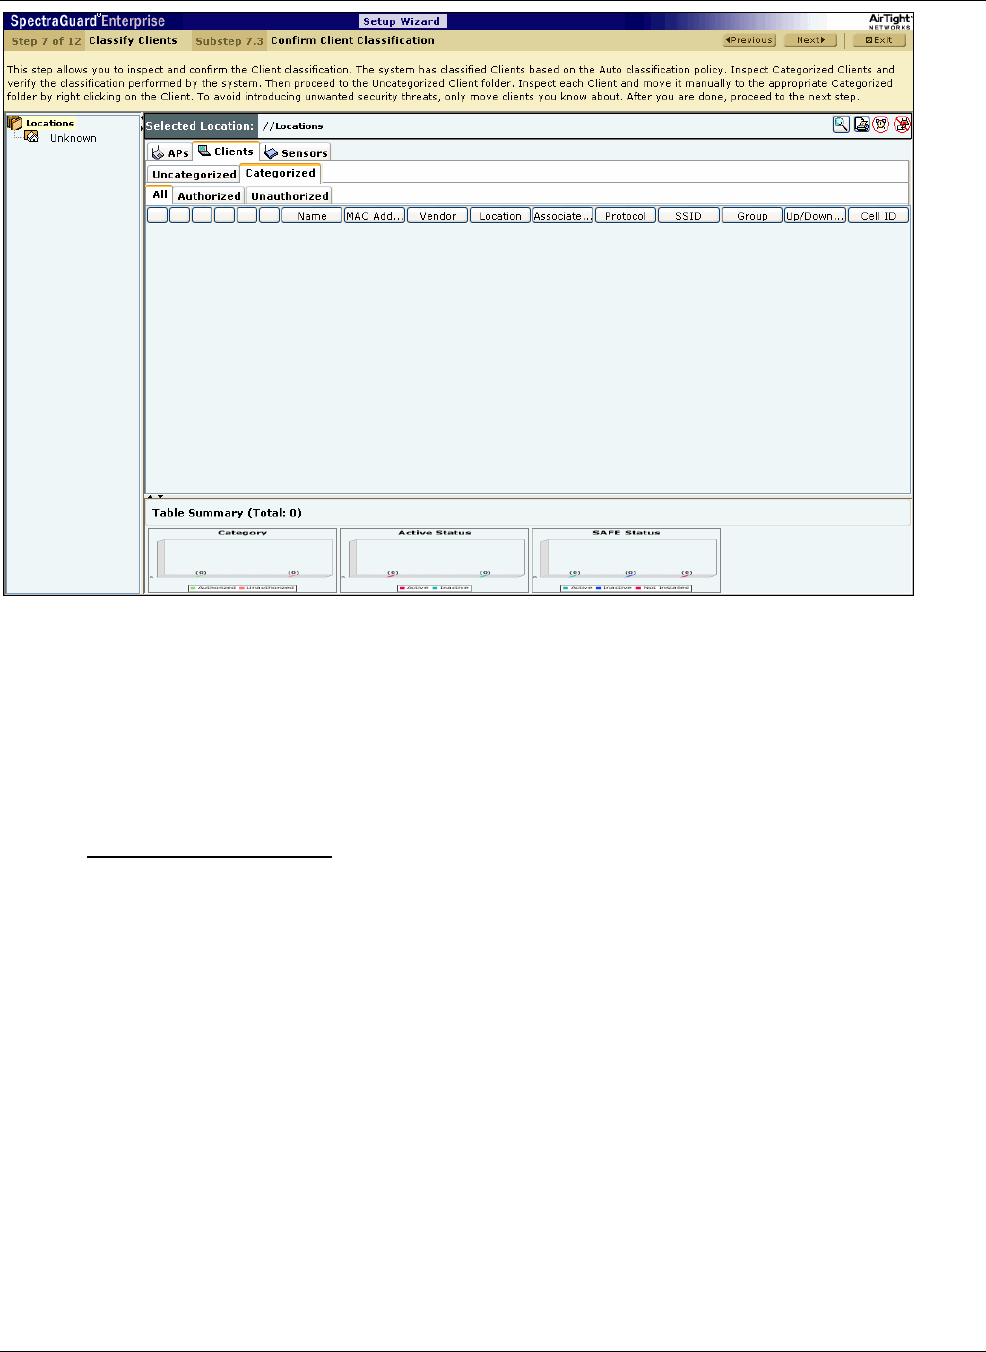
SettingȱupȱtheȱServerȱConsoleȱ
SpectraGuard®ȱEnterpriseȱInstallationȱGuideȱ
72ȱ
ȱ
Figure 99. Devices Screen – Clients
UseȱtheȱfollowingȱstepsȱtoȱmoveȱaȱClientȱtoȱaȱspecificȱfolder:ȱ
a. InȱtheȱClientȱlist,ȱrightȱclickȱtheȱdesiredȱClientȱrow.ȱ
b. Fromȱtheȱresultingȱcontextȱsensitiveȱmenu,ȱselectȱMoveȱto….ȱ
c. ClickȱtheȱdesiredȱcategoryȱtoȱwhichȱyouȱwantȱtoȱmoveȱtheȱClient.ȱ
7.1.8 Stepȱ8:ȱConfiguringȱIntrusionȱPreventionȱPolicyȱ
25. TheȱIntrusionȱPreventionȱscreenȱappearsȱasȱshownȱinȱtheȱfollowingȱfigure.ȱ
7.1.8.1 IntrusionȱPreventionȱPolicyȱ
TheȱIntrusionȱPreventionȱpolicyȱdeterminesȱtheȱwirelessȱthreatsȱagainstȱwhichȱtheȱsystemȱprotectsȱtheȱnetworkȱautomatically.ȱ
TheȱsystemȱautomaticallyȱmovesȱsuchȱthreatȬposingȱAPsȱandȱClientsȱtoȱquarantine.ȱTheȱsystemȱcanȱprotectȱagainstȱmultipleȱ
threatsȱsimultaneouslyȱbasedȱonȱtheȱselectedȱIntrusionȱPreventionȱLevel.ȱ
IfȱtheȱServerȱquarantinesȱanȱAPȱorȱClientȱbasedȱonȱtheȱIntrusionȱPreventionȱpolicy,ȱtheȱDisableȱAutoȬquarantineȱoptionȱ
ensuresȱthatȱtheȱsystemȱwillȱnotȱautomaticallyȱquarantineȱthisȱAPȱorȱClientȱ(regardlessȱofȱtheȱspecifiedȱIntrusionȱPreventionȱ
policies).ȱ
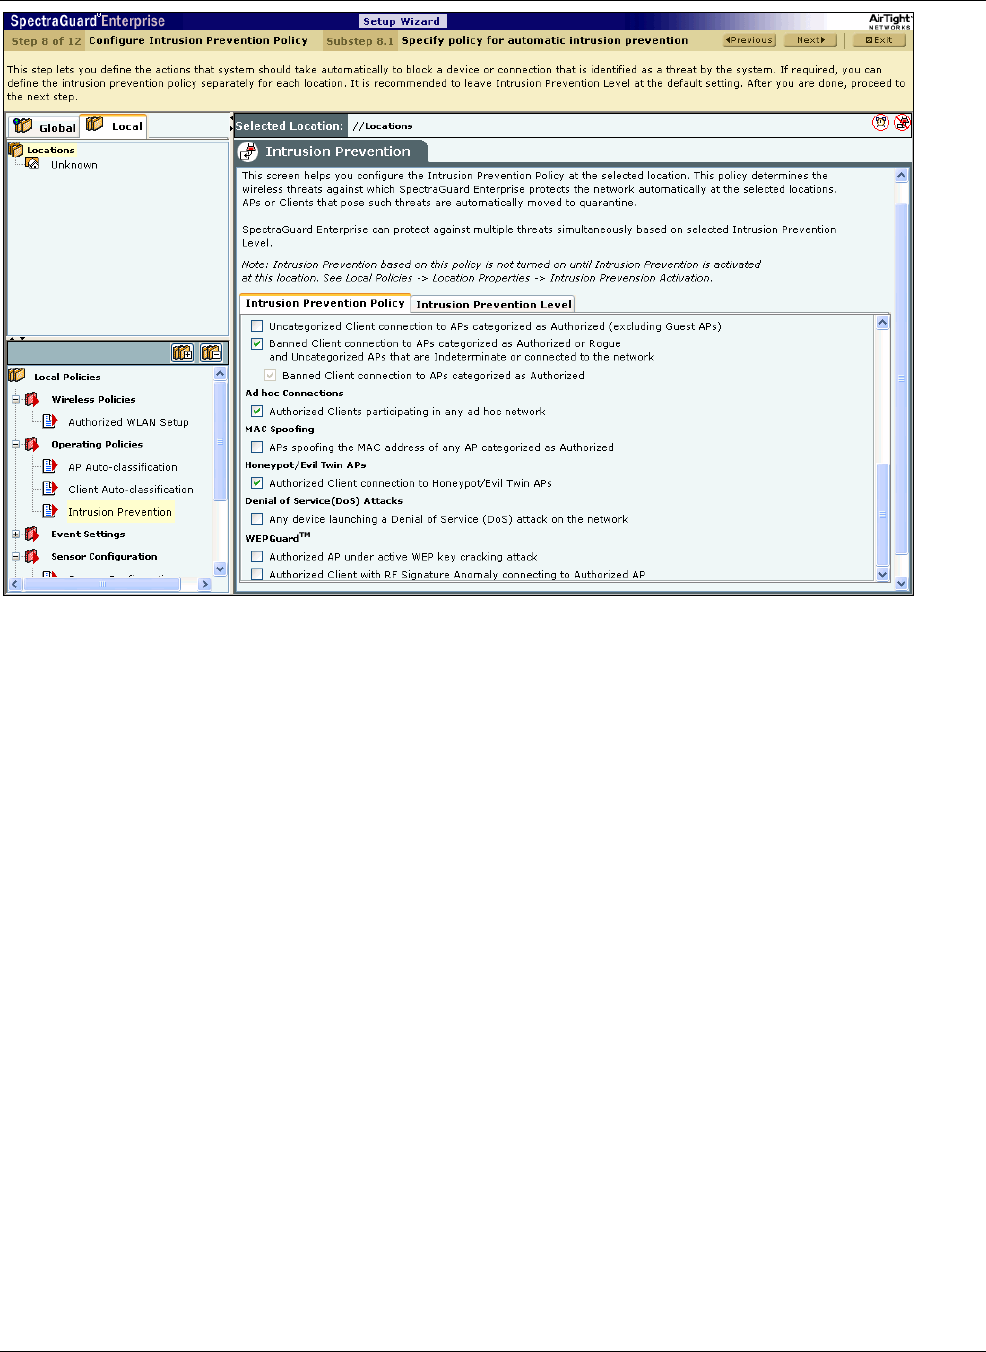
SettingȱupȱtheȱServerȱConsoleȱ
SpectraGuard®ȱEnterpriseȱInstallationȱGuideȱ
73
ȱ
Figure 100. Intrusion Prevention Policy
Youȱcanȱenableȱintrusionȱpreventionȱagainstȱtheȱfollowingȱthreats:ȱ
xRogueȱAPs:ȱAPsȱthatȱareȱconnectedȱtoȱyourȱnetworkȱbutȱnotȱauthorizedȱbyȱtheȱadministrator;ȱanȱattackerȱcanȱgainȱ
accessȱtoȱyourȱnetworkȱthroughȱtheȱRogueȱAPs.ȱYouȱcanȱalsoȱautomaticallyȱquarantineȱUncategorizedȱIndeterminateȱ
andȱBannedȱAPsȱconnectedȱtoȱtheȱnetwork.ȱ
xMisȬconfiguredȱAPs:ȱAPsȱthatȱareȱauthorizedȱbyȱtheȱadministratorȱbutȱdoȱnotȱconformȱtoȱtheȱsecurityȱpolicy;ȱanȱ
attackerȱcanȱgainȱaccessȱtoȱyourȱnetworkȱthroughȱmisconfiguredȱAPs.ȱThisȱcouldȱhappenȱifȱtheȱAPsȱareȱreset,ȱ
tamperedȱwith,ȱorȱifȱthereȱisȱaȱchangeȱinȱtheȱsecurityȱpolicy.ȱ
xClientȱMisȬassociation:ȱAuthorizedȱClientsȱthatȱconnectȱtoȱRogueȱorȱExternalȱ(neighboring)ȱAPs;ȱcorporateȱdataȱonȱ
theȱAuthorizedȱClientȱisȱunderȱthreatȱdueȱtoȱsuchȱconnections.ȱAirTightȱrecommendsȱthatȱyouȱprovideȱautomaticȱ
intrusionȱpreventionȱagainstȱAuthorizedȱClientsȱthatȱconnectȱtoȱExternalȱAPs.ȱ
xUnauthorizedȱAssociations:ȱUnauthorizedȱandȱBannedȱClientsȱthatȱconnectȱtoȱAuthorizedȱAPs;ȱanȱattackerȱcanȱgainȱ
accessȱtoȱyourȱnetworkȱthroughȱAuthorizedȱAPsȱifȱtheȱsecurityȱmechanismsȱareȱweak.ȱUnauthorizedȱorȱ
UncategorizedȱClientȱconnectionsȱtoȱanȱAuthorizedȱAPȱusingȱaȱGuestȱSSIDȱareȱnotȱtreatedȱasȱunauthorizedȱ
associations.ȱ
xAdȱhocȱConnections:ȱPeerȬtoȬpeerȱconnectionsȱbetweenȱClients;ȱcorporateȱdataȱonȱtheȱAuthorizedȱClientȱisȱunderȱ
threatȱifȱitȱisȱinvolvedȱinȱanȱadȱhocȱconnection.ȱ
xMACȱSpoofing:ȱAnȱAPȱthatȱspoofsȱtheȱwirelessȱMACȱaddressȱofȱanȱAuthorizedȱAP;ȱanȱattackerȱcanȱlaunchȱanȱattackȱ
throughȱaȱMACȱspoofingȱAP.ȱ
xHoneypot/EvilȱTwinȱAPs:ȱNeighboringȱAPsȱthatȱhaveȱtheȱsameȱSSIDȱasȱanȱAuthorizedȱAP;ȱAuthorizedȱClientsȱcanȱ
connectȱtoȱHoneypot/EvilȱTwinȱAPs.ȱCorporateȱdataȱonȱtheseȱAuthorizedȱClientsȱisȱunderȱthreatȱdueȱtoȱsuchȱ
connections.ȱ
xDenialȱofȱServiceȱ(DoS)ȱAttacks:ȱDoSȱattacksȱdegradeȱtheȱperformanceȱofȱanȱofficialȱWLAN.ȱ
xWEPGuardȱTM:ȱActiveȱWEPȱcrackingȱtoolsȱallowȱattackersȱtoȱcrackȱtheȱWEPȱkeyȱandȱgainȱaccessȱtoȱconfidentialȱdataȱ
inȱaȱmatterȱofȱminutesȱorȱevenȱseconds.ȱCompromisedȱWEPȱkeysȱareȱusedȱtoȱgainȱentryȱintoȱtheȱauthorizedȱWLANȱ
byȱspoofingȱtheȱMACȱaddressȱofȱanȱinactiveȱAuthorizedȱClient.ȱ
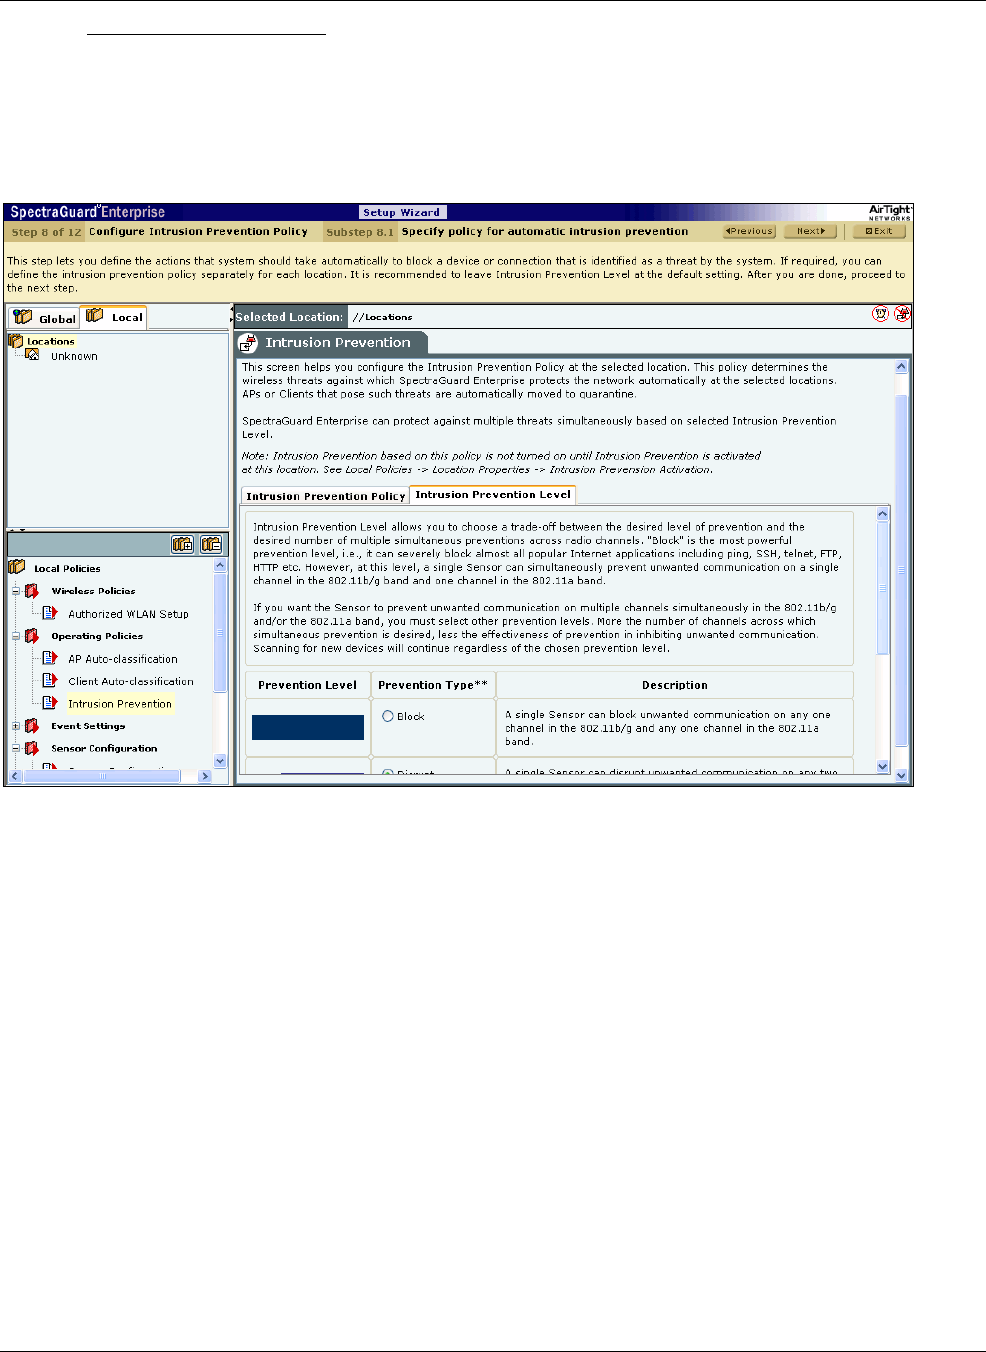
SettingȱupȱtheȱServerȱConsoleȱ
SpectraGuard®ȱEnterpriseȱInstallationȱGuideȱ
74ȱ
7.1.8.2 IntrusionȱPreventionȱLevelȱ
Theȱsystemȱcanȱpreventȱanyȱunwantedȱcommunicationȱinȱyourȱ802.11ȱnetwork.ȱItȱprovidesȱyouȱvariousȱlevelsȱofȱpreventionȬ
blockingȱmechanismsȱofȱvaryingȱeffectiveness.ȱIntrusionȱPreventionȱLevelȱenablesȱyouȱtoȱspecifyȱaȱtradeȬoffȱbetweenȱtheȱ
desiredȱlevelȱofȱpreventionȱandȱtheȱdesiredȱnumberȱofȱmultipleȱsimultaneousȱpreventionsȱacrossȱradioȱchannels.ȱ
Theȱgreaterȱtheȱnumberȱofȱchannelsȱacrossȱwhichȱsimultaneousȱpreventionȱisȱdesired,ȱtheȱlesserȱisȱtheȱeffectivenessȱofȱ
preventionȱinȱinhibitingȱunwantedȱcommunication.ȱScanningȱforȱnewȱdevicesȱcontinuesȱregardlessȱofȱtheȱchosenȱpreventionȱ
level.ȱ
ȱ
Figure 101. Intrusion Prevention Level
Youȱcanȱselectȱtheȱfollowingȱpreventionȱlevels:ȱ
xBlock:ȱAȱsingleȱSensorȱcanȱblockȱunwantedȱcommunicationȱonȱanyȱoneȱchannelȱinȱtheȱ802.11b/gȱbandȱandȱanyȱoneȱ
channelȱinȱtheȱ802.11aȱband.ȱ
xDisrupt:ȱAȱsingleȱSensorȱcanȱdisruptȱunwantedȱcommunicationȱonȱanyȱtwoȱchannelsȱinȱtheȱ802.11b/gȱbandȱandȱanyȱ
twoȱchannelsȱinȱtheȱ802.11aȱband.ȱ
xInterrupt:ȱAȱsingleȱSensorȱcanȱinterruptȱunwantedȱcommunicationȱonȱanyȱthreeȱchannelsȱinȱtheȱ802.11b/gȱbandȱandȱ
anyȱthreeȱchannelsȱinȱtheȱ802.11aȱband.ȱ
xDegrade:ȱAȱsingleȱSensorȱcanȱdegradeȱtheȱperformanceȱofȱunwantedȱcommunicationȱonȱanyȱfourȱchannelsȱinȱ
802.11b/gȱbandȱandȱanyȱfourȱchannelsȱinȱtheȱ802.11aȱband.ȱ
Blockȱisȱtheȱmostȱpowerfulȱpreventionȱlevel,ȱthatȱis,ȱitȱcanȱseverelyȱblockȱalmostȱallȱpopularȱInternetȱapplicationsȱincludingȱ
ping,ȱSSH,ȱtelnet,ȱFTP,ȱHTTP,ȱandȱtheȱlike.ȱHowever,ȱatȱthisȱlevel,ȱaȱsingleȱSensorȱcanȱsimultaneouslyȱpreventȱunwantedȱ
communicationȱonȱonlyȱoneȱchannelȱinȱtheȱ802.11b/gȱbandȱandȱoneȱchannelȱinȱtheȱ802.11aȱband.ȱIfȱyouȱwantȱtheȱSensorȱtoȱ
preventȱunwantedȱcommunicationȱonȱmultipleȱchannelsȱsimultaneouslyȱinȱtheȱ802.11ȱb/gȱand/orȱtheȱ802.11aȱband,ȱyouȱmustȱ
selectȱotherȱpreventionȱlevels.ȱ
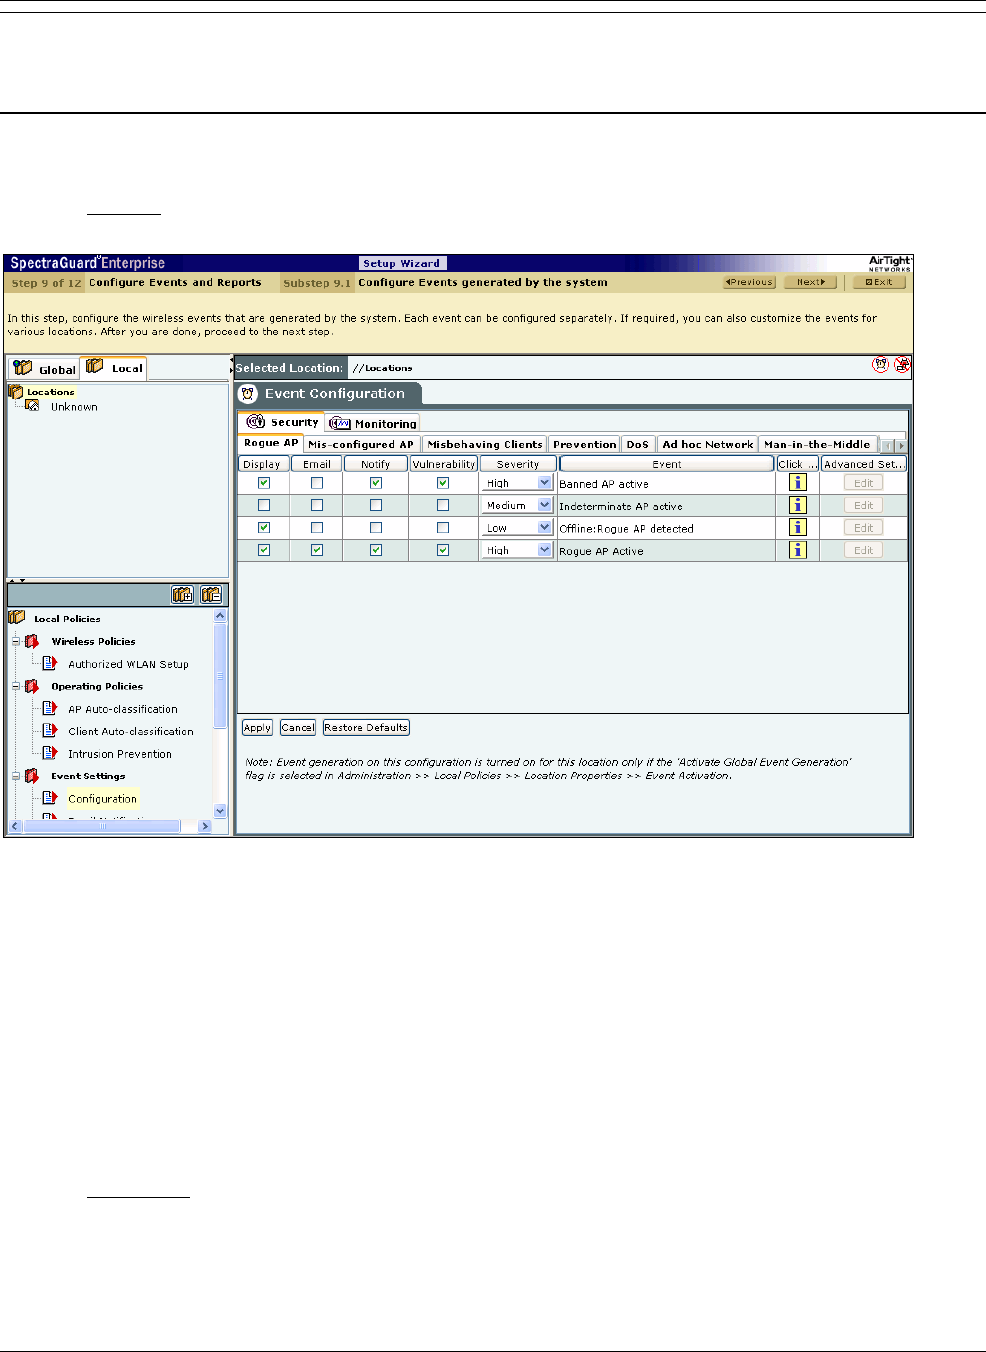
SettingȱupȱtheȱServerȱConsoleȱ
SpectraGuard®ȱEnterpriseȱInstallationȱGuideȱ
75
Note:ȱPreventionȱTypeȱdeterminesȱtheȱblockingȱstrengthȱtoȱpreventȱcommunicationȱfromȱunwantedȱAPsȱandȱClients.ȱTheȱsystemȱcanȱ
preventȱmultipleȱAPsȱandȱClientsȱonȱeachȱchannel.ȱPreventionȱTypeȱisȱnotȱapplicableȱforȱDenialȱofȱServiceȱ(DoS)ȱattacksȱorȱadȱhocȱ
networks.ȱYouȱmustȱselectȱaȱlowerȱblockingȱlevelȱtoȱpreventȱdevicesȱonȱmoreȱchannels.ȱChoosingȱaȱlowerȱblockingȱlevelȱmeansȱthatȱsomeȱ
packetsȱfromȱtheȱblockedȱdeviceȱmayȱgoȱthrough.ȱ
7.1.9 Stepȱ9:ȱConfiguringȱEventsȱandȱReportsȱ
26. TheȱEventȱConfigurationȱfunctionȱscreenȱofȱtheȱEventȱSettingsȱappearsȱasȱshownȱinȱtheȱfollowingȱfigure.ȱ
7.1.9.1 Securityȱ
Securityȱenablesȱyouȱtoȱviewȱeventsȱrelatedȱtoȱsecurityȱandȱthatȱposeȱaȱthreatȱtoȱyourȱnetwork.ȱ
ȱ
Figure 102. Event Configuration – Security
Securityȱisȱfurtherȱdividedȱintoȱtheȱfollowing:ȱ
xRogueȱAPȱ
xMisȬConfiguredȱAPȱ
xMisbehavingȱClientsȱ
xPreventionȱ
xDoSȱ
xAdȱhocȱNetworkȱ
xManȬinȬtheȬMiddleȱ
xMACȱSpoofingȱ
xReconnaissanceȱ
xSystemȱ
7.1.9.2 Monitoringȱ
Monitoringȱenablesȱyouȱtoȱviewȱeventsȱrelatedȱtoȱtheȱmonitoringȱofȱyourȱnetworkȱandȱthatȱareȱinformationalȱinȱnature.ȱ
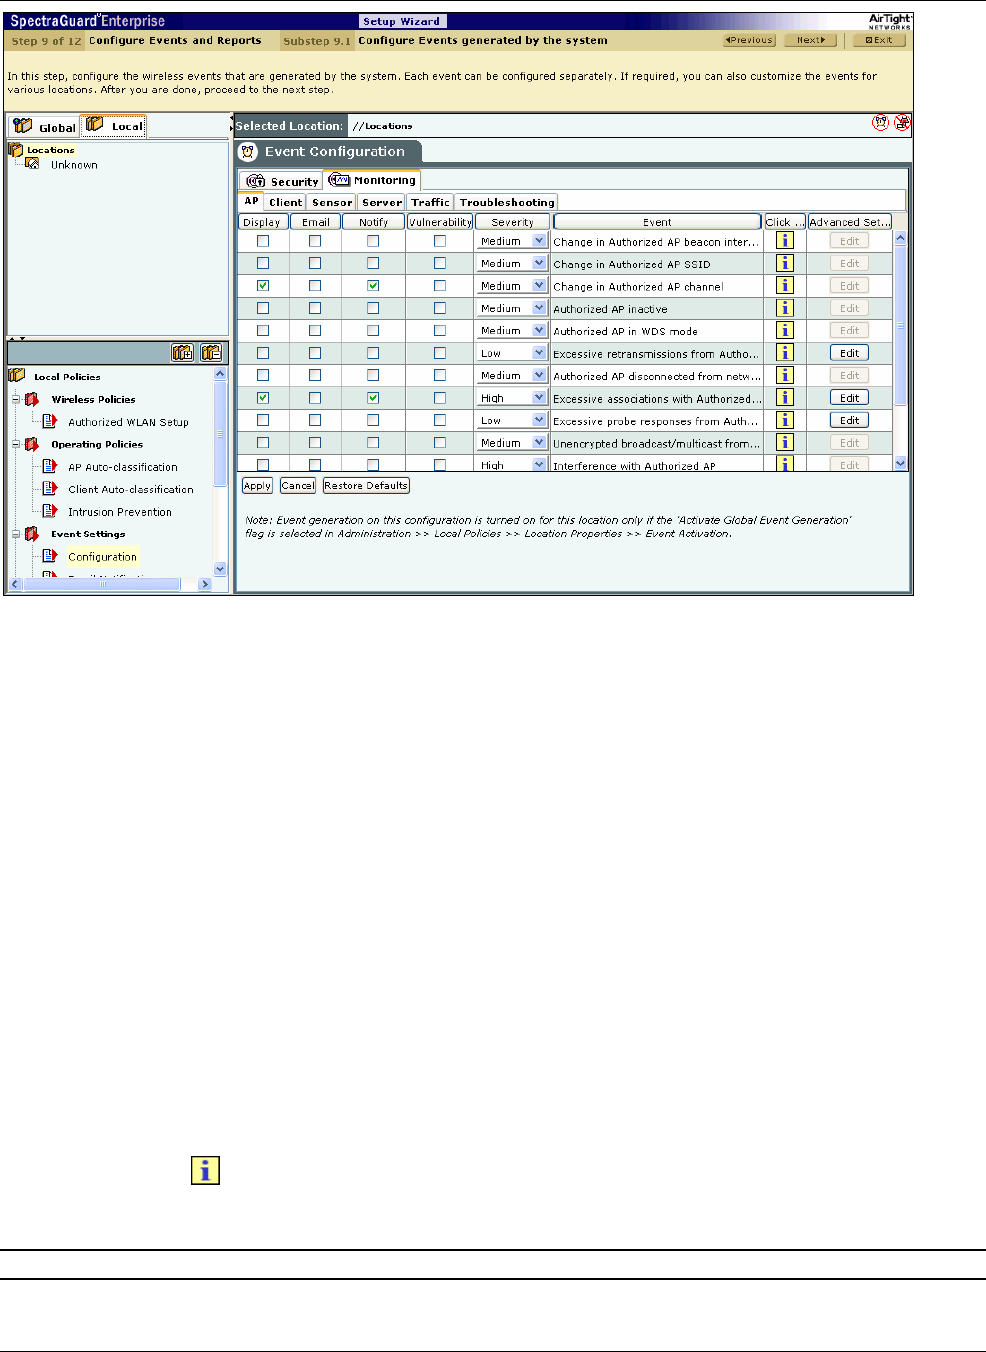
SettingȱupȱtheȱServerȱConsoleȱ
SpectraGuard®ȱEnterpriseȱInstallationȱGuideȱ
76ȱ
ȱ
Figure 103. Event Configuration – Monitoring
Monitoringȱisȱfurtherȱdividedȱintoȱtheȱfollowing:ȱ
xAPȱ
xClientȱ
xSensorȱ
xServerȱ
xTrafficȱ
xTroubleshootingȱ
OnceȱyouȱselectȱanyȱofȱtheȱaboveȱcategoriesȱandȱsubȬcategories,ȱaȱlistȱofȱrelatedȱeventsȱappears.ȱ
Theȱeventsȱlistȱdisplaysȱtheȱfollowingȱcolumns:ȱ
xDisplay:ȱSelectȱtheȱcheckboxesȱthatȱcorrespondȱtoȱtheȱtypesȱofȱeventsȱthatȱyouȱwantȱtoȱappearȱinȱtheȱmainȱEventsȱ
screen.ȱ
xEȬmail:ȱSelectȱtheȱcheckboxesȱthatȱcorrespondȱtoȱtheȱtypesȱofȱeventsȱforȱwhichȱyouȱwantȱemailsȱnotificationsȱsentȱtoȱ
allȱusersȱwhoseȱemailȱaddressesȱyouȱhaveȱconfiguredȱinȱtheȱAdministration
Æ
EventȱSettings
Æ
EmailȱNotification.ȱ
xNotify:ȱSelectȱtheȱcheckboxesȱthatȱcorrespondȱtoȱtheȱtypesȱofȱeventsȱforȱwhichȱyouȱwantȱnotificationsȱsentȱtoȱexternalȱ
agentsȱsuchȱasȱSNMP,ȱSyslog,ȱArcSight,ȱandȱOPSEC.ȱ
xVulnerability:ȱSelectȱcheckboxesȱtoȱindicateȱwhichȱeventsȱmakeȱtheȱsystemȱVulnerable.ȱTheȱSecurityȱScorecardȱ
showsȱVulnerableȱstatusȱifȱanyȱeventsȱofȱtheȱselectedȱtypeȱoccur.ȱ
xSeverity:ȱSelectȱtheȱseverityȱofȱeachȱeventȱasȱHigh,ȱMedium,ȱorȱLow.ȱThisȱfunctionȱhelpsȱyouȱtoȱorganizeȱeventsȱinȱ
theȱmostȱusefulȱway.ȱ
xEvent:ȱProvidesȱaȱshortȱdescriptionȱofȱeachȱevent.ȱ
xClick…:ȱȱClickȱȱtoȱviewȱaȱdetailedȱdescriptionȱofȱtheȱcorrespondingȱeventȱcategory.ȱ
xAdvancedȱSettings:ȱClickȱ<Edit>ȱtoȱopenȱtheȱEventȱAdvancedȱSettingsȱdialogȱandȱchangeȱtheȱconfigurationȱ
parametersȱofȱtheȱcorrespondingȱeventȱcategory.ȱ<Edit>ȱisȱdisabledȱwhenȱtheȱeventȱhasȱnoȱconfigurationȱparameters.ȱ
Note:ȱTheȱparametersȱinȱtheȱEventȱAdvancedȱSettingsȱdialogȱchangesȱaccordingȱtoȱtheȱsettingsȱforȱtheȱselectedȱevent.ȱ
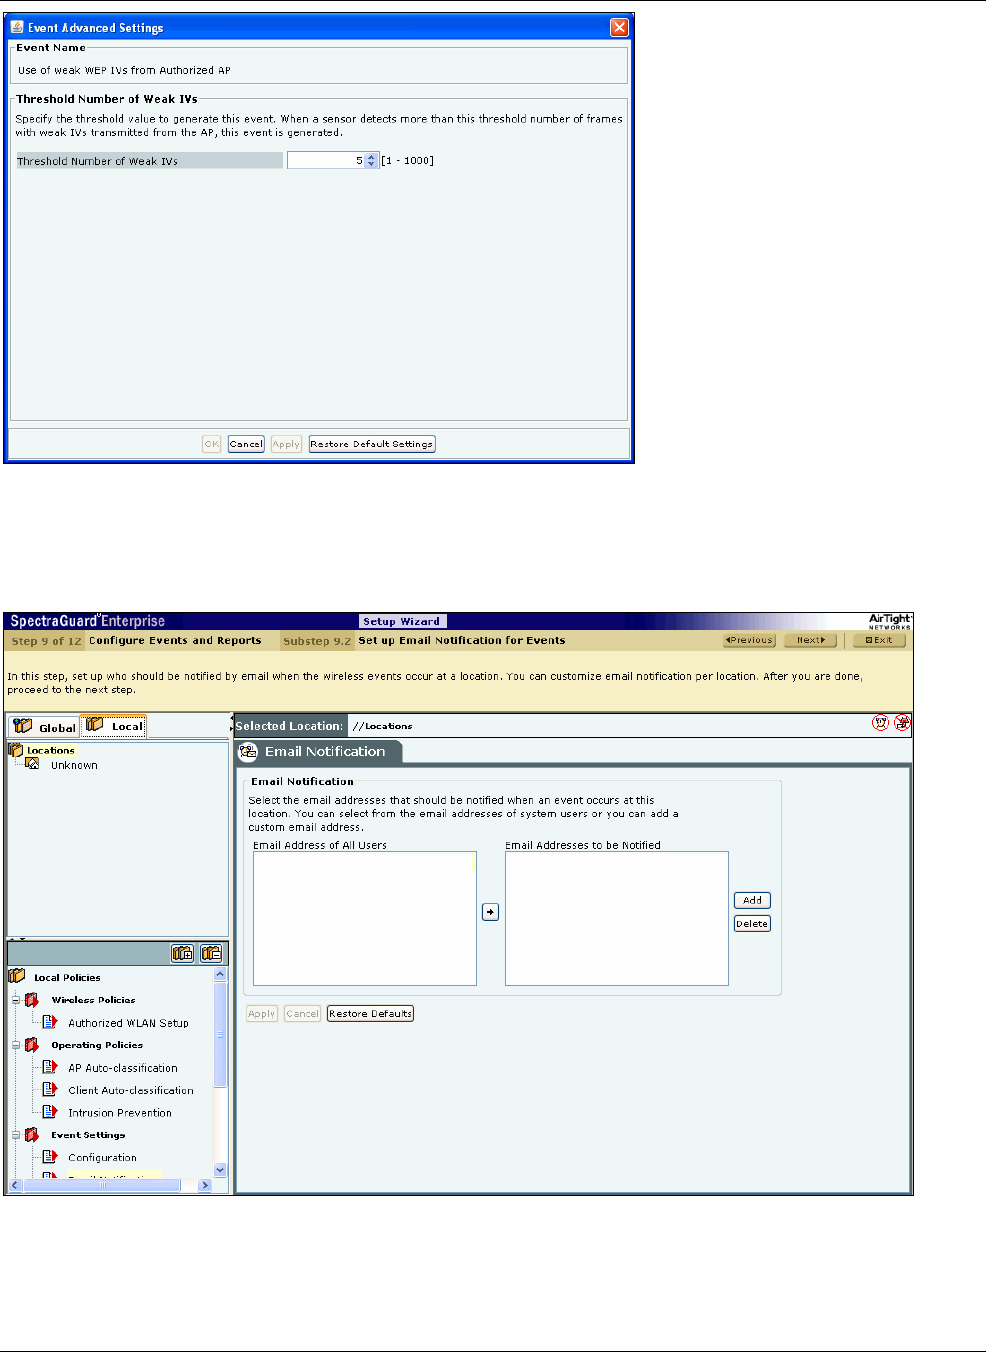
SettingȱupȱtheȱServerȱConsoleȱ
SpectraGuard®ȱEnterpriseȱInstallationȱGuideȱ
77
ȱ
Figure 104. Event Advanced Settings
27. TheȱEmailȱNotificationȱscreenȱappearsȱasȱshownȱinȱtheȱfollowingȱfigure.ȱTheȱEmailȱNotificationȱnodeȱenablesȱyouȱtoȱ
selectȱtheȱemailȱaddressesȱthatȱshouldȱbeȱnotifiedȱwhenȱanȱeventȱoccursȱatȱaȱparticularȱlocation.ȱYouȱcanȱselectȱfromȱtheȱ
emailȱaddressesȱofȱsystemȱusersȱorȱaddȱaȱcustomȱemailȱaddress.ȱ
ȱ
Figure 105. Email Notification
Clickȱ<Add>toȱopenȱCustomȱEmailȱAddressȱforȱNotificationȱdialogȱwhereȱyouȱcanȱaddȱaȱnewȱemailȱaddress.ȱ
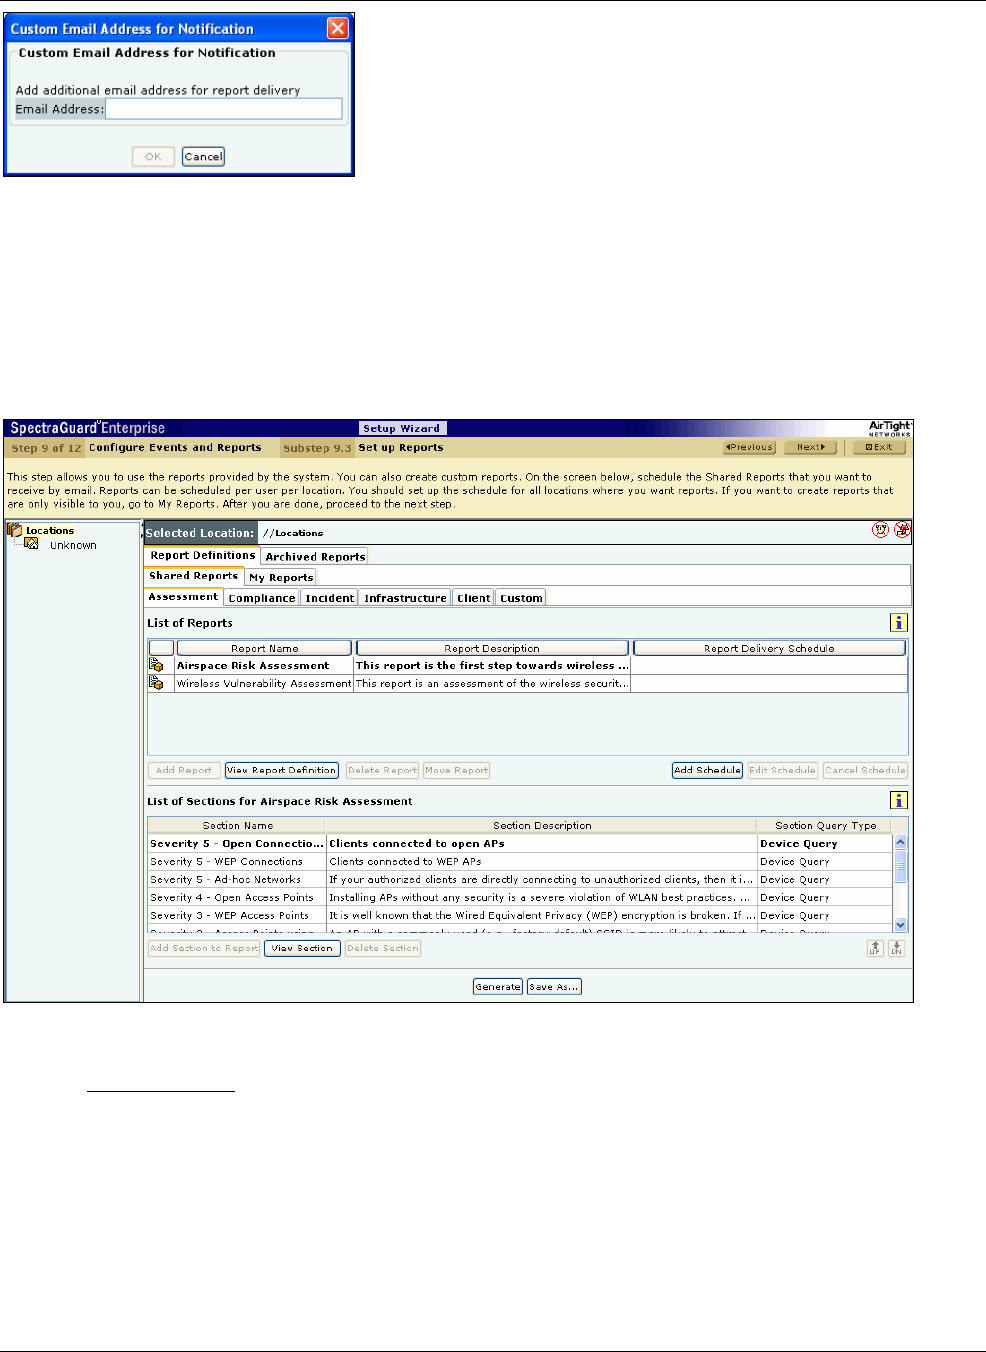
SettingȱupȱtheȱServerȱConsoleȱ
SpectraGuard®ȱEnterpriseȱInstallationȱGuideȱ
78ȱ
ȱ
Figure 106. Email Configuration Dialog
Clickȱ<OK>ȱtoȱaddȱtheȱnewȱemailȱaddress.ȱ
Selectȱanȱemailȱaddressȱandȱclickȱ<Delete>ȱtoȱdeleteȱanȱexistingȱemailȱaddress.ȱYouȱcanȱdeleteȱmultipleȱemailȱaddressesȱusingȱ
clickȬandȬdragȱorȱusingȱtheȱ<Shift>ȱ+ȱ<DownȱArrow>ȱkeysȱandȱthenȱclickingȱ<Delete>.ȱ
28. TheȱReportsȱscreenȱappearsȱasȱshownȱinȱtheȱfollowingȱfigure.ȱTheȱsystemȱenablesȱyouȱtoȱuseȱreportsȱgeneratedȱbyȱtheȱ
systemȱandȱcreateȱcustomȱreports.ȱYouȱcanȱscheduleȱemailȱdeliveryȱofȱaȱSharedȱreport.ȱYouȱcanȱselectȱoneȱtimeȱdeliveryȱorȱ
recurringȱdelivery.ȱ
ȱ
Figure 107. Reports Screen
7.1.9.3 AddingȱaȱReportȱ
Theȱsystemȱenablesȱyouȱtoȱdefineȱcustomizedȱreportsȱsoȱthatȱyouȱcanȱviewȱpreciseȱdetailsȱthatȱyouȱrequire.ȱUseȱtheȱfollowingȱ
stepsȱtoȱaddȱaȱreport:ȱ
a. SelectȱtheȱtabȱMyȱReports.ȱ
b. UnderȱListȱofȱReports,ȱclickȱ<AddȱReport>.ȱ
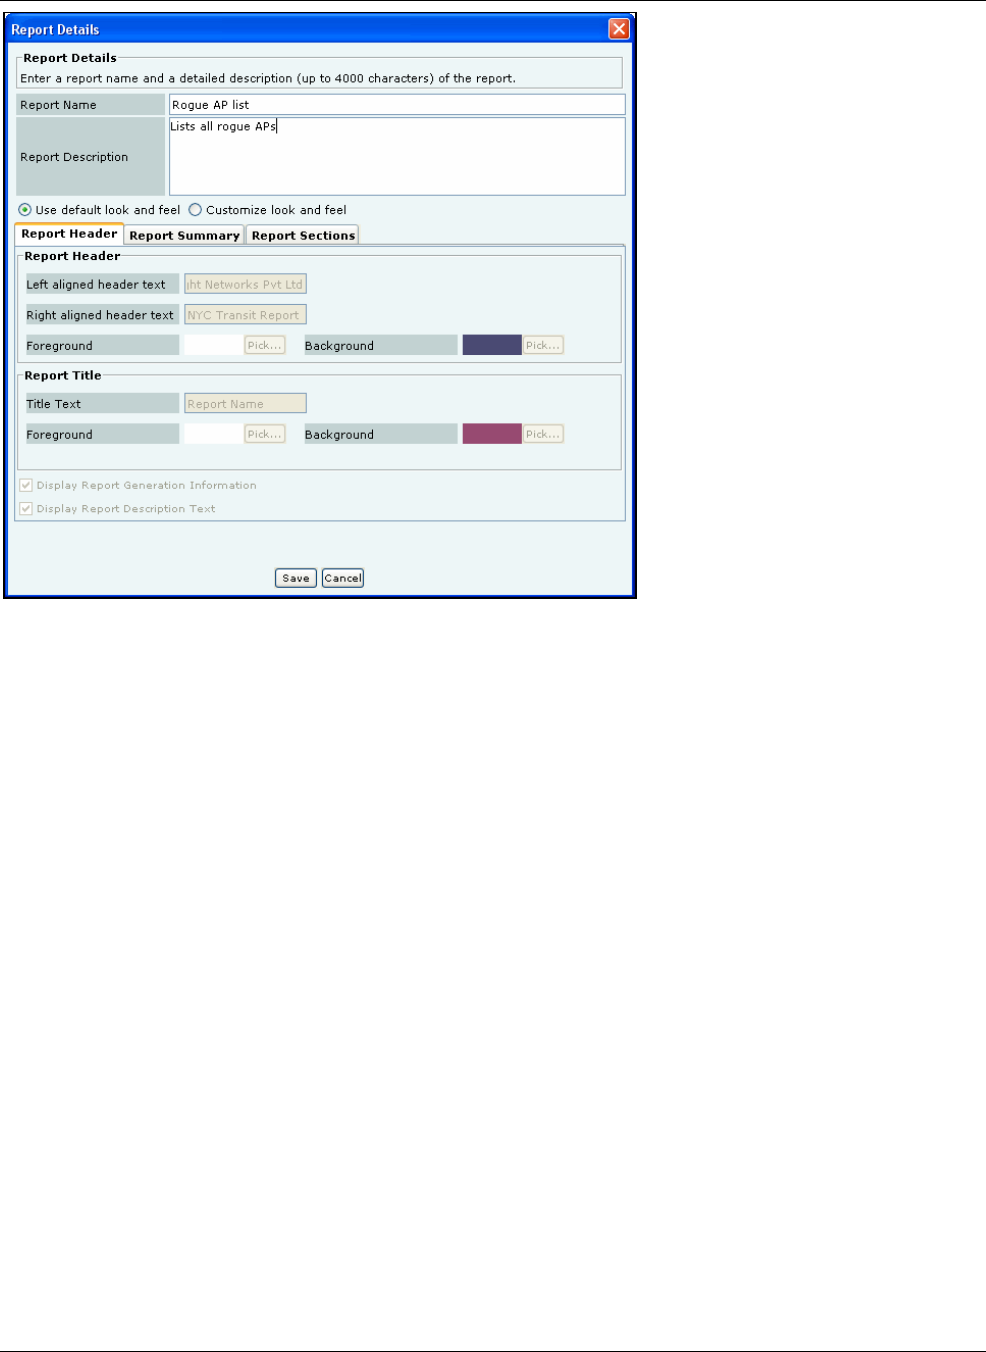
SettingȱupȱtheȱServerȱConsoleȱ
SpectraGuard®ȱEnterpriseȱInstallationȱGuideȱ
79
ȱ
Figure 108. Report Details Screen
c. OnȱtheȱReportȱDetailsȱdialog,ȱunderȱReportȱName,ȱenterȱaȱunique,ȱuserȬfriendlyȱnameȱforȱtheȱreport.ȱ
d. UnderȱReportȱDescription,ȱenterȱbriefȱnotesȱtoȱhelpȱidentifyȱtheȱreport.ȱ
e. ClickȱUseȱdefaultȱlookȱandȱfeel,ȱtoȱretainȱtheȱdefaultȱtext,ȱtitle,ȱandȱcolorsȱforȱtheȱreports.ȱ
f. Alternatively,ȱclickȱCustomizeȱlookȱandȱfeel,ȱtoȱcustomizeȱtheȱappearanceȱofȱtheȱreport.ȱ
g. SelectȱtheȱReportȱHeaderȱtab.ȱ
xUnderȱReportȱHeader,ȱspecifyȱtheȱfollowingȱparametersȱtoȱbeȱcustomizedȱinȱtheȱgeneratedȱreport:ȱ
¾TitleȱText:ȱSpecifyȱtheȱtextȱthatȱshouldȱappearȱinȱtheȱheaderȱonȱtheȱleftȱside.ȱ
¾TextȱonȱRight:ȱSpecifyȱtheȱtextȱthatȱshouldȱappearȱinȱtheȱheaderȱonȱtheȱrightȱside.ȱ
¾Clickȱ<Pick…>ȱandȱselectȱtheȱForegroundȱandȱBackgroundȱcolorsȱforȱtheȱReportȱHeader.ȱ
xUnderȱReportȱTitle,ȱspecifyȱtheȱfollowingȱparametersȱtoȱbeȱcustomizedȱinȱtheȱgeneratedȱreport:ȱ
¾TitleȱText:ȱSpecifyȱaȱtitleȱthatȱappearsȱbelowȱtheȱheaderȱonȱtheȱleftȱside.ȱTheȱReportȱDescriptionȱfollowsȱthisȱtitle.ȱ
¾Clickȱ<Pick…>ȱandȱselectȱtheȱForegroundȱandȱBackgroundȱcolorsȱforȱtheȱReportȱTitle.ȱ
xSelectȱtheȱcheckbox,ȱDisplayȱReportȱGenerationȱInformationȱtoȱviewȱtheȱfollowingȱinformationȱbelowȱtheȱReportȱ
Titleȱ
¾Durationȱforȱwhichȱtheȱreportȱisȱgeneratedȱ
¾Locationȱforȱwhichȱtheȱreportȱisȱgeneratedȱ
¾Userȱwhoȱgeneratedȱtheȱreportȱ
¾Dateȱandȱtimeȱwhenȱtheȱreportȱisȱgeneratedȱ
xSelectȱtheȱcheckbox,ȱDisplayȱReportȱDescriptionȱTextȱtoȱviewȱaȱdetailedȱdescriptionȱofȱtheȱreport.ȱ
h. SelectȱtheȱReportȱSummaryȱtab.ȱ
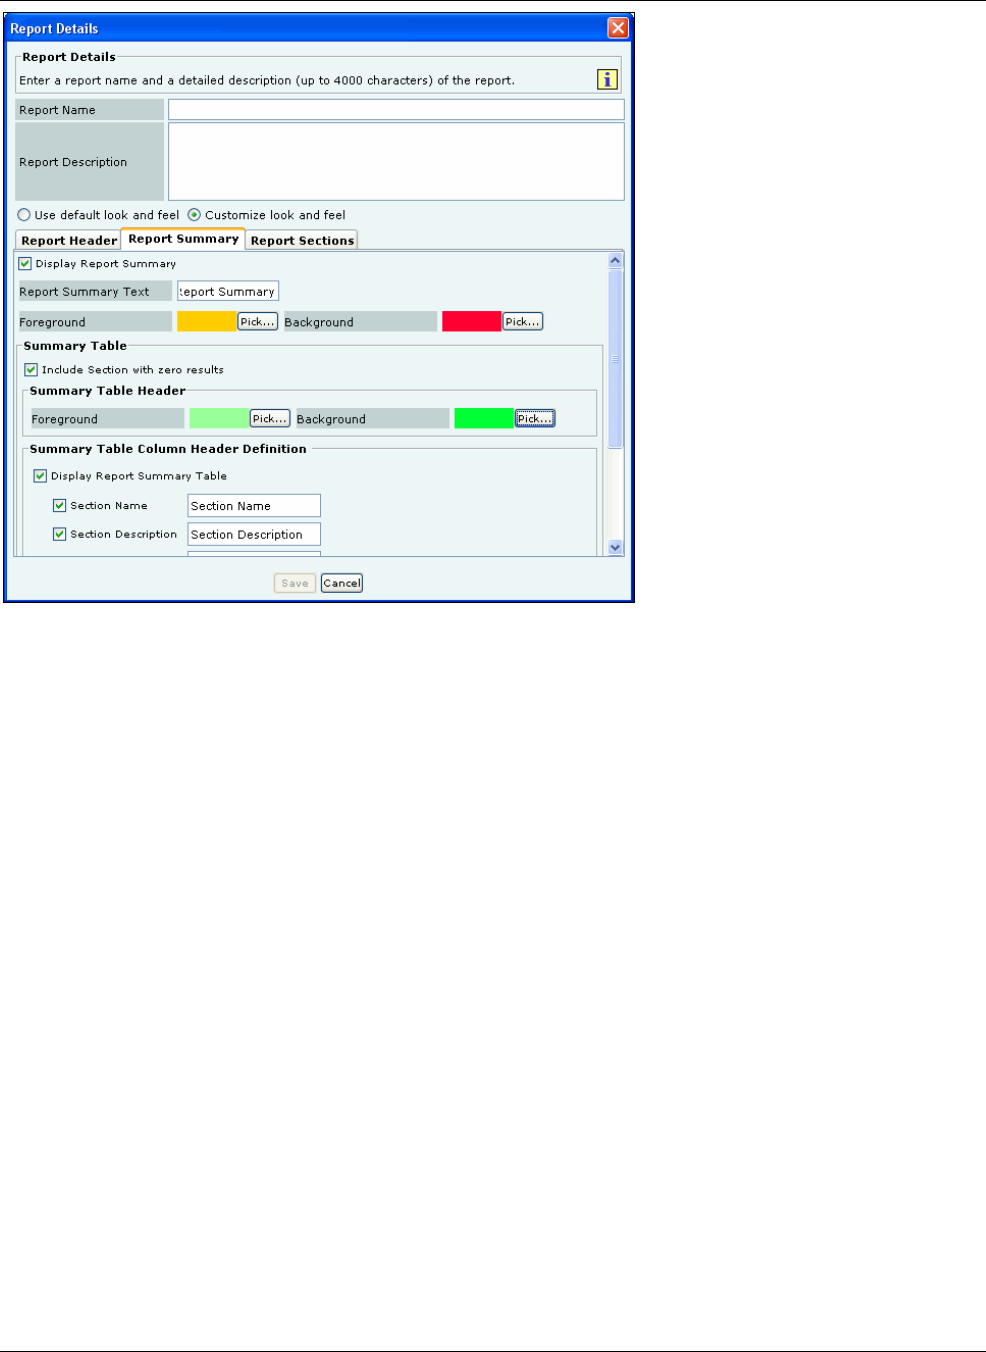
SettingȱupȱtheȱServerȱConsoleȱ
SpectraGuard®ȱEnterpriseȱInstallationȱGuideȱ
80ȱ
ȱ
Figure 109. Report Details Screen showing Report Summary Tab
xDeȬselectȱtheȱcheckbox,ȱDisplayȱReportȱSummaryȱifȱyouȱdoȱnotȱwishȱtoȱviewȱtheȱReportȱSummaryȱinȱaȱtabularȱform.ȱ
xAlternatively,ȱselectȱtheȱcheckbox,ȱDisplayȱReportȱSummaryȱtoȱcustomizeȱparametersȱinȱtheȱReportȱSummaryȱtableȱ
inȱtheȱgeneratedȱreport.ȱ
¾SpecifyȱtheȱReportȱSummaryȱTextȱthatȱshouldȱappearȱasȱtheȱReportȱSummaryȱtableȱheading.ȱ
¾Clickȱ<Pick…>ȱandȱselectȱtheȱForegroundȱandȱBackgroundȱcolorsȱforȱtheȱReportȱSummaryȱtableȱheading.ȱ
xUnderȱSummaryȱTable,ȱselectȱtheȱcheckbox,ȱIncludeȱSectionȱwithȱzeroȱresultsȱtoȱviewȱsectionsȱinȱwhichȱtheȱresultȱ
countȱisȱzero.ȱ
xUnderȱSummaryȱTableȱHeader,ȱclickȱ<Pick…>,ȱselectȱtheȱForeground,ȱandȱBackgroundȱcolorsȱforȱtheȱReportȱ
Summaryȱtableȱrowȱheader.ȱ
xUnderȱSummaryȱTableȱColumnȱHeaderȱDefinition,ȱselectȱtheȱcheckbox,ȱDisplayȱReportȱSummaryȱTableȱtoȱ
customizeȱtheȱfollowingȱcolumnȱnamesȱinȱtheȱReportȱSummaryȱtableȱinȱtheȱgeneratedȱreport.ȱ
¾SectionȱNameȱ
¾SectionȱDescriptionȱ
¾QueryȱTypeȱ
¾ResultȱCountȱ
¾Jumpȱtoȱ
xUnderȱSummaryȱCharts,ȱselectȱaȱradioȱbuttonȱtoȱviewȱtheȱchartsȱinȱtheȱdesiredȱformat.ȱ
i. SelectȱtheȱReportȱSectionsȱtab.ȱ
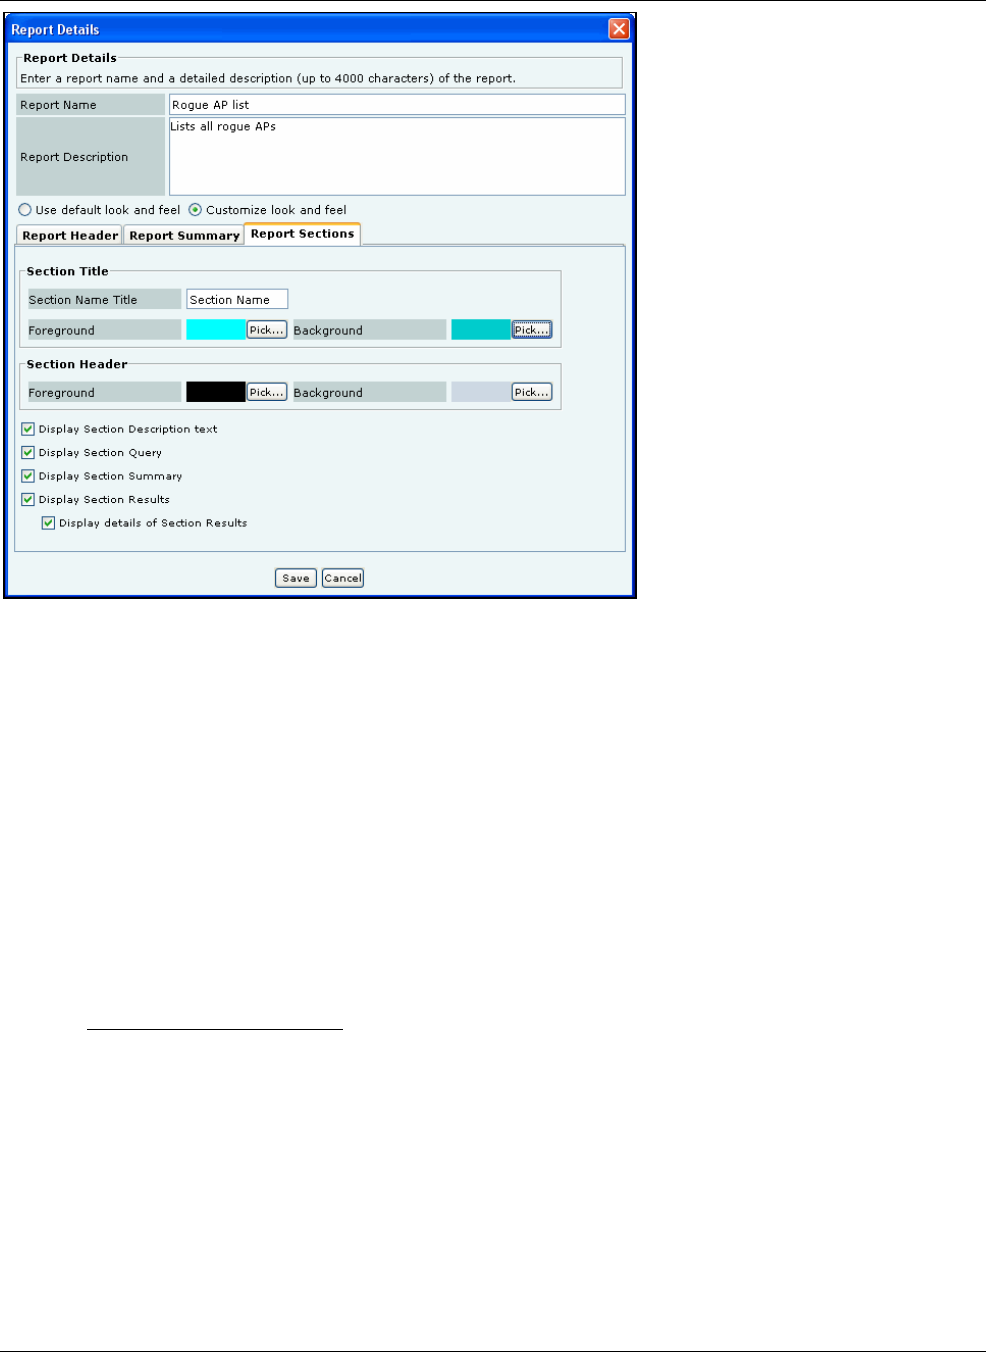
SettingȱupȱtheȱServerȱConsoleȱ
SpectraGuard®ȱEnterpriseȱInstallationȱGuideȱ
81
ȱ
Figure 110. Report Details Screen showing Report Sections Tab
xUnderȱSectionȱTitle,ȱspecifyȱtheȱfollowingȱparametersȱtoȱbeȱcustomizedȱinȱtheȱgeneratedȱreport:ȱ
¾SectionȱNameȱTitle:ȱSpecifyȱtheȱtextȱthatȱshouldȱappearȱasȱaȱcommonȱheadingȱforȱallȱtheȱSectionȱNames.ȱ
¾Clickȱ<Pick…>ȱandȱselectȱtheȱForegroundȱandȱBackgroundȱcolorsȱforȱtheȱSectionȱNameȱTitle.ȱ
xUnderȱSectionȱHeader,ȱspecifyȱtheȱfollowingȱparametersȱtoȱbeȱcustomizedȱinȱtheȱgeneratedȱreport:ȱ
¾Clickȱ<Pick…>,ȱselectȱtheȱForeground,ȱandȱBackgroundȱcolorsȱforȱtheȱtableȱrowȱheadersȱinȱtheȱSectionȱSummaryȱ
andȱSectionȱResultsȱsections.ȱ
¾SelectȱDisplayȱSectionȱDescriptionȱtextȱtoȱviewȱaȱbriefȱdescriptionȱforȱeachȱsectionȱofȱtheȱreport.ȱ
¾SelectȱDisplayȱSectionȱQueryȱtoȱviewȱallȱtheȱconstraintsȱspecifiedȱinȱtheȱdatabaseȱqueryȱforȱthatȱsection.ȱ
¾SelectȱDisplayȱSectionȱSummaryȱtoȱviewȱaȱgraphicalȱandȱtabularȱatȬaȬglanceȱviewȱofȱtheȱresultsȱofȱtheȱsection.ȱ
¾SelectȱDisplayȱSectionȱResultsȱtoȱviewȱallȱtheȱentriesȱinȱtheȱdatabaseȱthatȱsatisfyȱtheȱconstraintsȱspecifiedȱbyȱtheȱ
sectionȱquery.ȱ
SelectȱDisplayȱdetailsȱofȱSectionȱResultsȱtoȱviewȱadditionalȱdetailsȱforȱeachȱentryȱinȱtheȱSectionȱResultsȱ
table.ȱ
j. ToȱaddȱtheȱreportȱtoȱtheȱListȱofȱReports,ȱclickȱ<Save>.ȱTheȱnewȱreportȱappearsȱunderȱtheȱListȱofȱReportsȱtable.ȱ
7.1.9.4 AddingȱaȱSectionȱtoȱaȱReportȱ
Aȱreportȱconsistsȱofȱoneȱorȱmoreȱsections.ȱEachȱsectionȱisȱaȱqueryȱtoȱtheȱdatabase.ȱTheȱsystemȱthenȱsearchesȱitsȱdatabaseȱforȱ
thoseȱrecordsȱthatȱsatisfyȱtheȱconditionsȱthatȱyouȱimpose.ȱUseȱtheȱfollowingȱstepsȱtoȱaddȱaȱsectionȱtoȱaȱreport:ȱ
a. FromȱtheȱListȱofȱReportsȱtable,ȱselectȱtheȱreportȱtoȱwhichȱyouȱneedȱtoȱaddȱaȱsection.ȱ
b. Clickȱ<AddȱSectionȱtoȱReport>.ȱ
ȱ
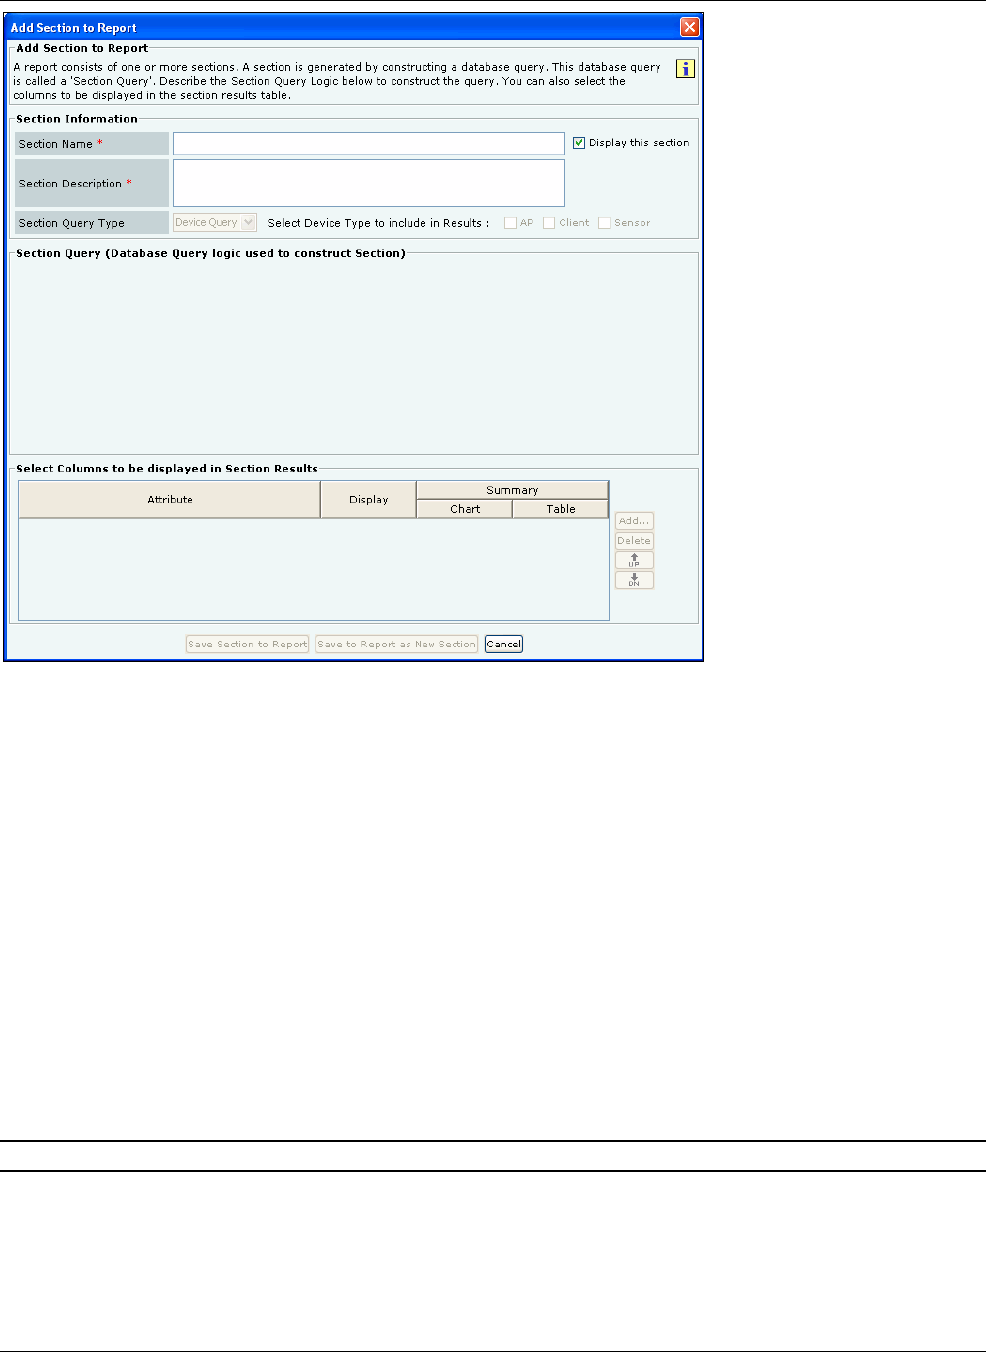
SettingȱupȱtheȱServerȱConsoleȱ
SpectraGuard®ȱEnterpriseȱInstallationȱGuideȱ
82ȱ
ȱ
Figure 111. Adding a Section to a Report
c. OnȱtheȱAddȱSectionȱtoȱReportȱdialog,ȱenterȱaȱSectionȱNameȱandȱaȱSectionȱDescriptionȱforȱtheȱnewlyȱaddedȱsection.ȱ
d. SelectȱtheȱcheckboxȱDisplayȱthisȱsectionȱtoȱviewȱthisȱsectionȱinȱtheȱgeneratedȱreport.ȱ
e. UnderȱSectionȱQueryȱType,ȱselectȱDevice,ȱEvent,ȱorȱSAFEȱasȱtheȱqueryȱtype.ȱ
f. SelectȱanyȱcombinationȱofȱtheȱAP,ȱClient,ȱandȱSensorȱcheckboxesȱtoȱincludeȱtheseȱdeviceȱtypesȱinȱtheȱreport.ȱTheseȱ
checkboxesȱareȱnotȱavailableȱforȱaȱSAFEȱquery.ȱ
g. DescribeȱtheȱSectionȱQueryȱconstructionȱlogicȱbyȱselectingȱtheȱfollowing:ȱ
xAȱcolumnȱfromȱSelectȱColumnȱ
xAȱconditionȱfromȱSelectȱConditionȱ
xAnȱobjectȱforȱtheȱquery,ȱwhichȱyouȱcanȱselectȱorȱenterȱ
h. Optionally,ȱselectȱoneȱorȱmoreȱBooleanȱconnectorsȱ(ORȱorȱAND)ȱtoȱjoinȱtwoȱorȱmoreȱqueries.ȱClickȱ<Delete>ȱtoȱdeleteȱaȱ
query.ȱ
i. UnderȱSelectȱColumnsȱtoȱbeȱdisplayedȱinȱSectionȱResults,ȱdoȱtheȱfollowing.ȱ
xClickȱ<Add>ȱtoȱviewȱaȱlistȱofȱattributesȱandȱselectȱanȱattribute.ȱ
xSelectȱtheȱcheckboxȱDisplayȱtoȱviewȱtheȱselectedȱattributeȱinȱtheȱgeneratedȱreport.ȱ
xUnderȱSummary,ȱyouȱcanȱchooseȱtoȱdoȱtheȱfollowing:ȱ
¾SelectȱtheȱtypeȱofȱchartȱfromȱtheȱdropȬdownȱlistȱtoȱviewȱaȱgraphȱforȱtheȱselectedȱattribute.ȱ
¾SelectȱtheȱcheckboxȱTableȱtoȱviewȱaȱtabulatedȱcountȱforȱtheȱselectedȱattribute.ȱ
Note:ȱPieȱchartsȱareȱnotȱvisibleȱinȱanȱHTMLȱreport.ȱYouȱcanȱviewȱpieȱchartsȱonlyȱinȱaȱPDFȱreport.ȱ
xSelectȱanȱattributeȱandȱclickȱ<Delete>ȱtoȱdeleteȱthatȱattribute.ȱ
xSelectȱanȱattributeȱandȱclickȱ<Up>ȱorȱ<Down>ȱtoȱorganizeȱtheȱattributesȱthatȱappearȱasȱcolumnsȱinȱtheȱSectionȱResultsȱ
tableȱofȱtheȱgeneratedȱreport.ȱ
j. Toȱsaveȱtheȱsectionȱtoȱanȱexistingȱreport,ȱclickȱ<SaveȱSectionȱtoȱReport>.ȱToȱsaveȱtheȱsectionȱwithȱaȱnewȱname,ȱclickȱ<Saveȱ
toȱReportȱasȱNewȱSection>.ȱ
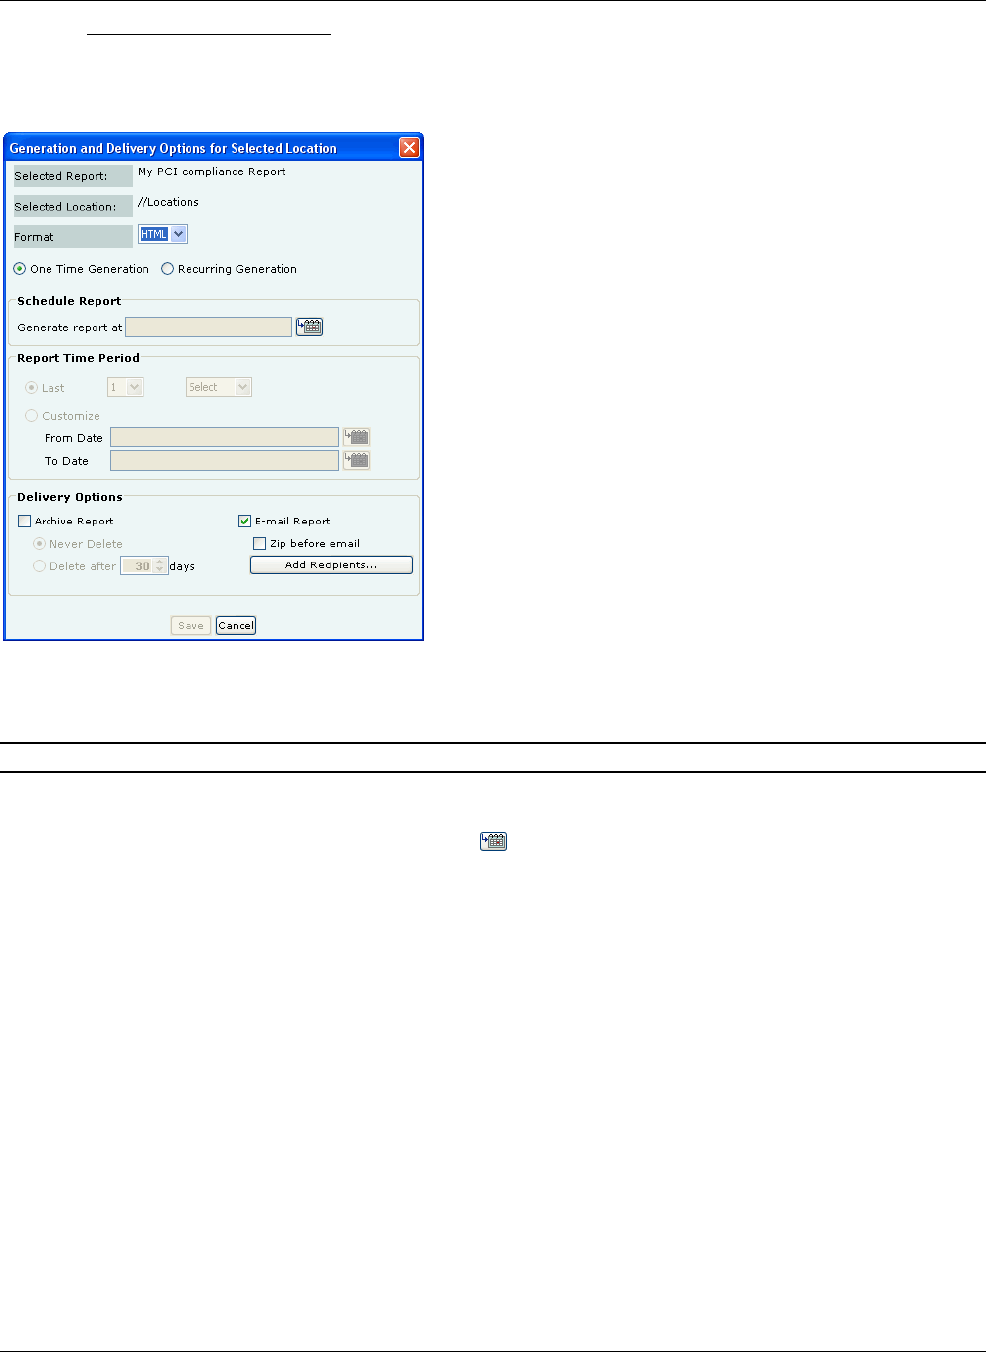
SettingȱupȱtheȱServerȱConsoleȱ
SpectraGuard®ȱEnterpriseȱInstallationȱGuideȱ
83
7.1.9.5 CreatingȱaȱReportȱScheduleȱ
Useȱtheȱfollowingȱstepsȱtoȱscheduleȱemailȱdeliveryȱofȱaȱreport:ȱ
a. FromȱtheȱListȱofȱReportsȱtable,ȱselectȱtheȱreportȱthatȱyouȱwantȱtoȱschedule.ȱ
b. Clickȱ<AddȱSchedule>.ȱTheȱGenerationȱandȱDeliveryȱOptionsȱforȱSelectedȱLocationȱdialogȱappears.ȱ
ȱ
ȱ
Figure 112. Scheduling a Report for One Time Delivery
c. FromȱtheȱFormatȱdropȬdownȱlist,ȱselectȱtheȱoutputȱtypeȱforȱtheȱreport,ȱthatȱis,ȱHTML,ȱXML,ȱorȱPDF.ȱ
Note:ȱTheȱsystemȱdoesȱnotȱsupportȱPDFȱreportȱgenerationȱonȱolderȱversionsȱofȱIEȱ(versionsȱlowerȱthanȱ7.0).ȱ
d. SelectȱeitherȱOneȱTimeȱGenerationȱorȱRecurringȱGeneration.ȱ
xToȱscheduleȱaȱreportȱforȱOneȱTimeȱGeneration,ȱperformȱtheȱfollowing:ȱ
¾UnderȱScheduleȱReport,ȱclickȱtheȱcalendarȱiconȱȱtoȱspecifyȱtheȱdateȱandȱtheȱtimeȱonȱwhichȱtoȱgenerateȱtheȱ
report.ȱ
¾UnderȱReportȱTimeȱPeriod,ȱcustomizeȱtheȱdurationȱforȱwhichȱtheȱreportȱshouldȱbeȱgeneratedȱbyȱdoingȱeitherȱofȱ
theȱfollowing:ȱ
SelectȱLastȱandȱthenȱtheȱnumberȱofȱhours,ȱdays,ȱorȱmonthsȱbeforeȱtheȱreportȱdeliveryȱtime.ȱ
SelectȱCustomizeȱandȱthenȱtheȱexactȱdateȱandȱtimeȱinȱFromȱDateȱandȱToȱDateȱfields.ȱ

SettingȱupȱtheȱServerȱConsoleȱ
SpectraGuard®ȱEnterpriseȱInstallationȱGuideȱ
84ȱ
ȱ
Figure 113. Scheduling a Report for Recurring Generation
xToȱscheduleȱaȱreportȱforȱRecurringȱGeneration,ȱperformȱtheȱfollowing:ȱ
¾UnderȱScheduleȱReport,ȱfromȱtheȱGenerateȱReportȱEveryȱdropȬdownȱlist,ȱselectȱtheȱnumberȱofȱhours,ȱdays,ȱorȱ
monthsȱoverȱwhichȱtoȱdeliverȱtheȱreport.ȱ
¾ClickȱtheȱcalendarȱiconȱnextȱtoȱStartȱDateȱtoȱselectȱtheȱstartȱdateȱandȱtimeȱforȱtheȱreport.ȱ
¾ClickȱtheȱcalendarȱiconȱnextȱtoȱEndȱDateȱtoȱselectȱtheȱendȱdateȱandȱtimeȱforȱtheȱreport.ȱTheȱEndȱDateȱmustȱbeȱ
greaterȱthanȱtheȱStartȱDate.ȱTheȱsystemȱautomaticallyȱselectsȱtheȱEndȱDateȱandȱTimeȱfromȱtheȱStartȱDate.ȱ
¾UnderȱReportȱTimeȱPeriod,ȱcustomizeȱtheȱdurationȱforȱwhichȱtheȱreportȱshouldȱbeȱgeneratedȱbyȱselectingȱLastȱ
andȱthenȱtheȱnumberȱofȱhours,ȱdays,ȱorȱmonthsȱbeforeȱtheȱreportȱdeliveryȱtime.ȱ
e. UnderȱDeliveryȱOptions,ȱperformȱtheȱfollowing:ȱ
xSelectȱArchiveȱReportȱandȱthenȱchooseȱtheȱfollowing:ȱ
¾NeverȱDeleteȱtoȱretainȱtheȱreportȱforeverȱ
¾Deleteȱafterȱ‘n’ȱdaysȱtoȱdeleteȱtheȱreportȱafterȱtheȱspecifiedȱnumberȱofȱdaysȱ
xSelectȱEmailȱReportȱtoȱemailȱaȱcopyȱofȱtheȱreportȱtoȱtheȱselectedȱuser(s).ȱ
¾SelectȱZipȱbeforeȱemailȱtoȱcompressȱtheȱreportȱbeforeȱemailingȱit.ȱ
f. Clickȱ<AddȱRecipients>ȱtoȱopenȱReportȱDeliveryȱdialog.ȱHere,ȱyouȱcanȱdoȱtheȱfollowing:ȱ
xSelectȱoneȱorȱmoreȱemailȱaddressesȱunderȱSystemȱUsersȱandȱthenȱclick
Æ
ȱtoȱmoveȱtheȱchosenȱemailȱaddress(s)ȱtoȱ
Recipients.ȱTheȱsystemȱdeliversȱscheduledȱreportsȱtoȱtheȱusersȱunderȱRecipients.ȱ
xClickȱ<Add>ȱtoȱopenȱAdditionalȱEmailȱAddressesȱdialogȱwhereȱyouȱcanȱspecifyȱaȱcustomȱemailȱaddressȱforȱaȱnonȬ
systemȱuserȱwhoȱwillȱreceiveȱaȱscheduledȱreport.ȱInȱthisȱdialog,ȱyouȱcanȱaddȱmultipleȱemailȱaddressesȱoneȱatȱaȱtime.ȱ
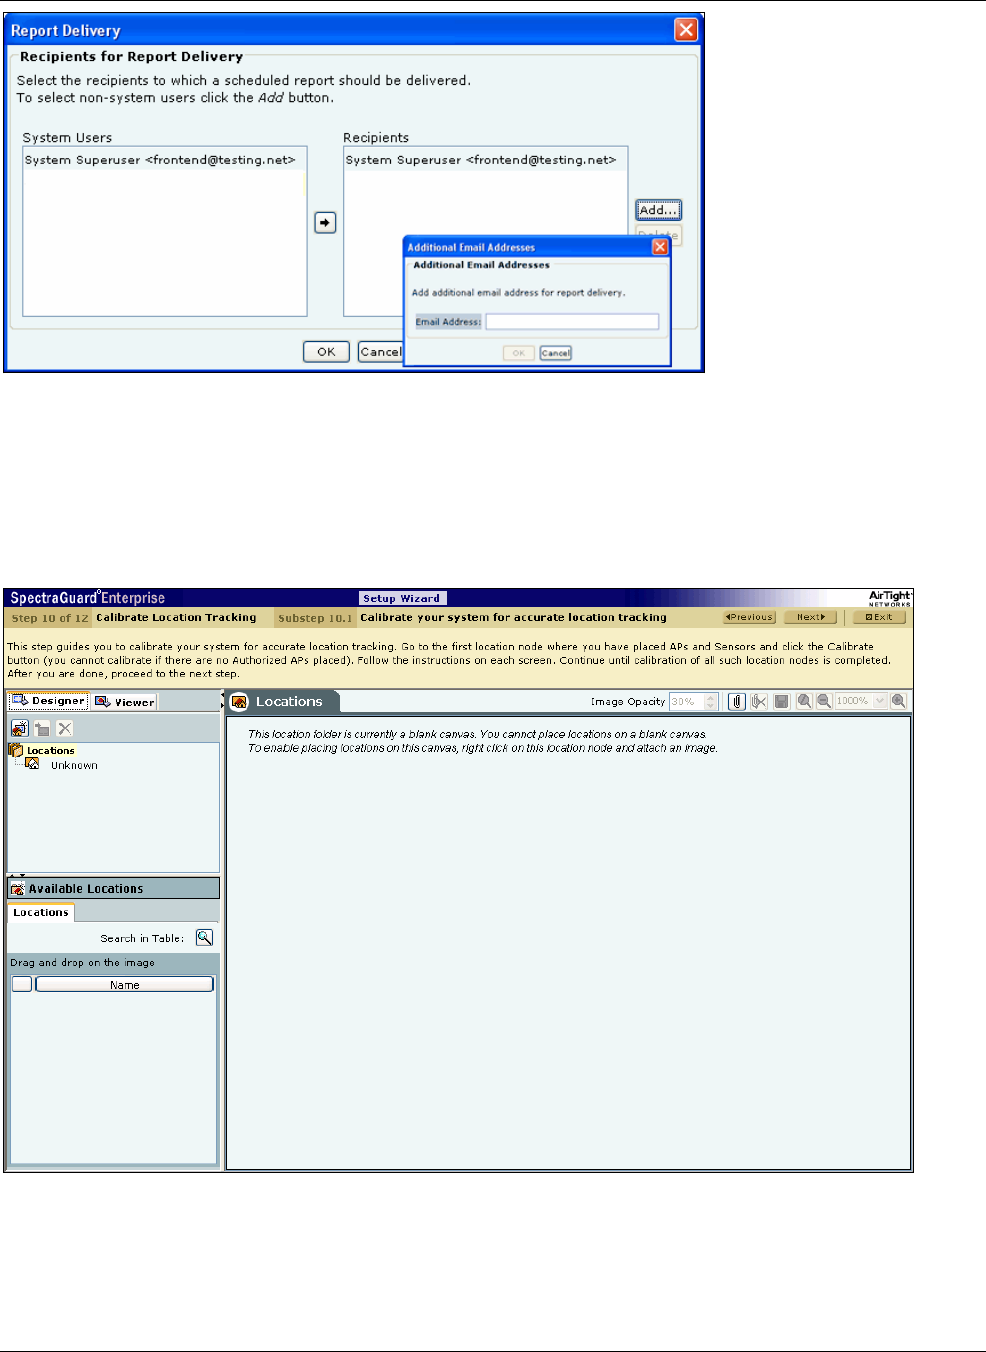
SettingȱupȱtheȱServerȱConsoleȱ
SpectraGuard®ȱEnterpriseȱInstallationȱGuideȱ
85
ȱ
Figure 114. Specifying Additional Email Addresses for Report Delivery
g. Clickȱ<OK>ȱtoȱcloseȱtheȱAdditionalȱEmailȱAddressesȱdialog.ȱ
h. Clickȱ<OK>ȱtoȱcloseȱtheȱReportȱDeliveryȱdialog.ȱ
i. Toȱscheduleȱtheȱreport,ȱclickȱ<Save>.ȱ
7.1.10 Stepȱ10:ȱCalibratingȱLocationȱTrackingȱ
29. TheȱLocationsȱscreenȱappearsȱasȱshownȱinȱtheȱfollowingȱfigure.ȱCalibrateȱyourȱsystemȱforȱaccurateȱlocationȱtracking.ȱ
ȱ
Figure 115. Locations Screen – Calibration
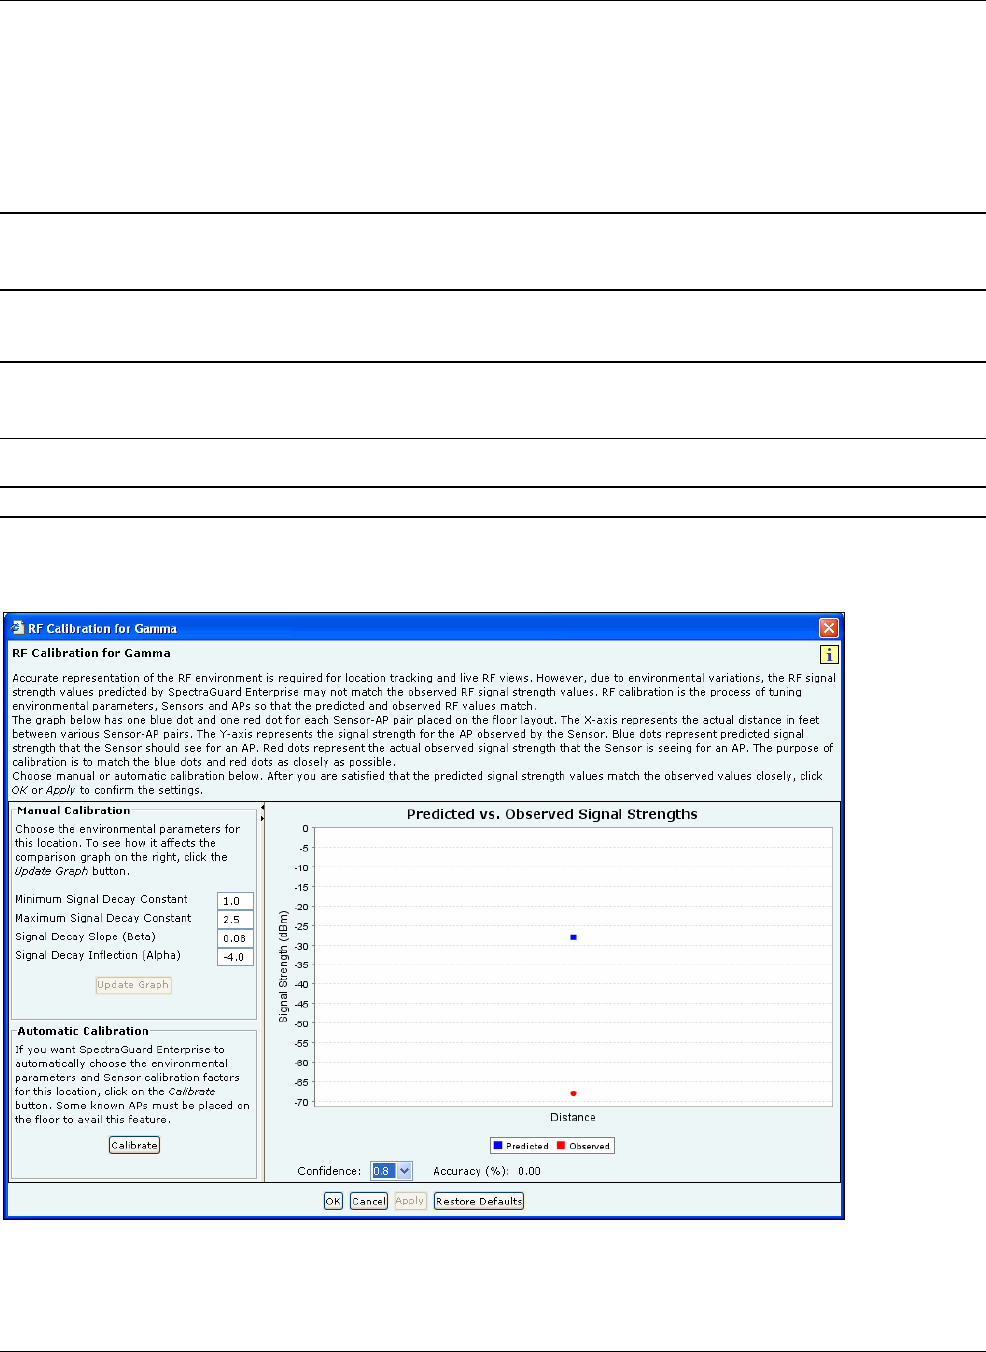
SettingȱupȱtheȱServerȱConsoleȱ
SpectraGuard®ȱEnterpriseȱInstallationȱGuideȱ
86ȱ
CalibrationȱhelpsȱinȱtuningȱRFȱparametersȱusedȱbyȱtheȱsystemȱtoȱcompareȱtheȱAPȱandȱSensorȱpredictionsȱtoȱactualȱ
observations.ȱTheȱsystemȱhasȱaȱrobustȱcalibrationȱtechniqueȱthatȱalsoȱallowsȱmanualȱinterventionȱinȱcaseȱofȱdiscrepancy.ȱUseȱ
theȱfollowingȱstepsȱtoȱcalibrateȱRFȱviews:ȱ
a. Placeȱdevicesȱonȱtheȱfloormap.ȱ
b. SelectȱtheȱViewerȱtab.ȱ
c. SelectȱoneȱofȱtheȱAPȱorȱSensorȱviews.ȱ
d. GenerateȱtheȱdesiredȱRFȱCoverageȱmapȱbyȱclickingȱ<Calibration>.ȱ
e. Toȱimproveȱpredictions,ȱfineȬtuneȱtheȱMin.ȱSignalȱDecayȱConstantȱandȱtheȱMax.ȱSignalȱDecayȱConstant.ȱ
Note:ȱMin.ȱSignalȱDecayȱConstantȱspecifiesȱtheȱamountȱofȱsignalȱlossȱthatȱisȱacceptableȱforȱregionsȱcloseȱtoȱtheȱtransmitterȱ(Sensor).ȱ
Max.ȱSignalȱDecayȱConstantȱspecifiesȱtheȱamountȱofȱsignalȱlossȱthatȱisȱacceptableȱforȱregionsȱawayȱfromȱtheȱtransmitter.ȱSignalȱlossȱisȱ
directlyȱproportionalȱtoȱtheȱsignalȱdecayȱconstants.ȱ
f. ChangeȱtheȱvaluesȱofȱtheȱSignalȱDecayȱSlopeȱ(Beta)ȱandȱtheȱSignalȱDecayȱInflectionȱ(Alpha).ȱTheȱsystemȱusesȱtheseȱ
parametersȱwhenȱcomputingȱtheȱRFȱandȱdefinesȱtheȱregionȱaroundȱtheȱtransmitterȱthatȱisȱunobstructed.ȱ
Note:ȱWhenȱyouȱchangeȱtheȱvaluesȱofȱMin.ȱSignalȱDecayȱConstant,ȱMax.ȱSignalȱDecayȱConstant,ȱSignalȱDecayȱSlopeȱ(Beta),ȱandȱ
SignalȱDecayȱInflectionȱ(Alpha)ȱtheȱRFȱviewȱandȱLocationȱTrackingȱforȱunobstructedȱregionsȱisȱaffected.ȱInȱtheȱobstructedȱregions,ȱonlyȱ
LocationȱTrackingȱisȱaffected,ȱRFȱviewȱisȱnotȱaffected.ȱ
g. Clickȱ<UpdateȱGraph>ȱtoȱviewȱyourȱselectionȱagainstȱtheȱpredictedȱvalues.ȱ
Important:ȱTheȱPredictedȱvalueȱcurveȱshouldȱoverlapȱtheȱObservedȱvalueȱcurveȱasȱmuchȱasȱpossible.ȱ
h. Clickȱ<Calibrate>ȱtoȱcompleteȱcalibrationȱifȱyouȱhaveȱadjustedȱtheȱparametersȱmanuallyȱsuchȱthatȱtheȱtwoȱcurvesȱareȱ
parallelȱ(butȱnotȱcoinciding).ȱ
i. Clickȱ<Apply>ȱtoȱcommitȱyourȱchanges.ȱ
ȱ
Figure 116. RF Calibration Dialog

SettingȱupȱtheȱServerȱConsoleȱ
SpectraGuard®ȱEnterpriseȱInstallationȱGuideȱ
87
7.1.11 Stepȱ11:ȱLockingȱtheȱSystemȱConfigurationȱ
30. TheȱEventȱActivationȱscreenȱappearsȱasȱshownȱinȱtheȱfollowingȱfigure.ȱIfȱtheȱsystemȱconfigurationȱisȱnotȱconfirmed,ȱyouȱ
needȱtoȱgoȱbackȱtoȱtheȱpreviousȱstepsȱandȱcompleteȱanyȱadditionalȱconfiguration.ȱOtherwise,ȱinȱthisȱstep,ȱyouȱcanȱturnȱonȱ
events.ȱTheȱsystemȱwillȱbecomeȱcompletelyȱoperationalȱafterȱactivatingȱintrusionȱprevention.ȱ
ȱ
Figure 117. Event Activation
31. TheȱIntrusionȱPreventionȱActivationȱscreenȱappearsȱasȱshownȱinȱtheȱfollowingȱfigure.ȱIfȱtheȱsystemȱconfigurationȱisȱnotȱ
confirmed,ȱyouȱneedȱtoȱgoȱbackȱtoȱtheȱpreviousȱstepsȱandȱcompleteȱanyȱadditionalȱconfiguration.ȱOtherwise,ȱinȱthisȱstep,ȱ
youȱcanȱturnȱonȱintrusionȱprevention.ȱThisȱmakesȱtheȱsystemȱoperational.ȱ
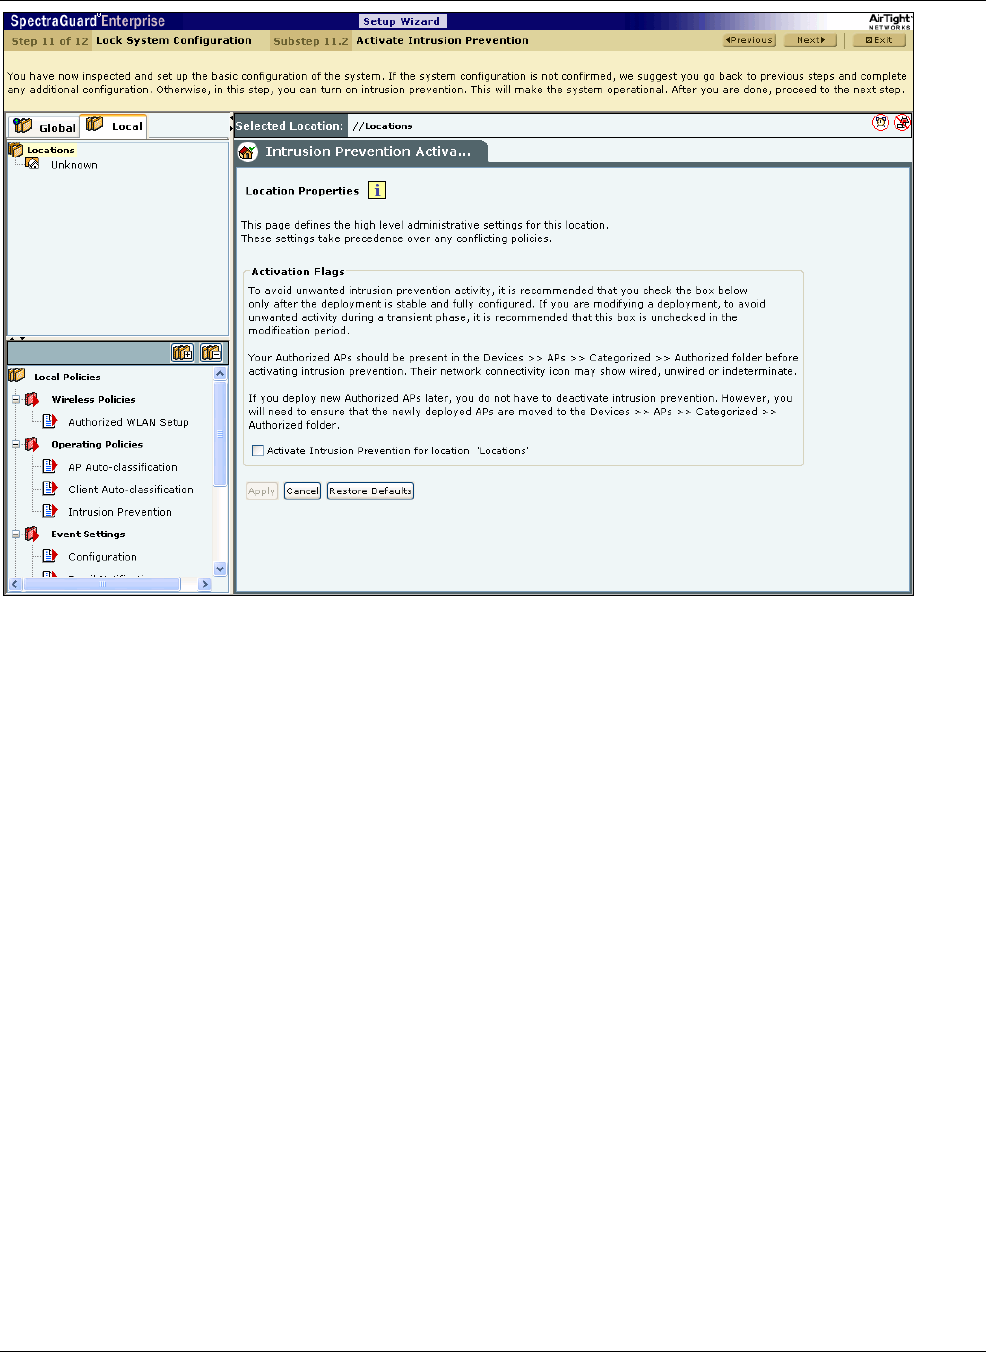
SettingȱupȱtheȱServerȱConsoleȱ
SpectraGuard®ȱEnterpriseȱInstallationȱGuideȱ
88ȱ
ȱ
Figure 118. Intrusion Prevention Activation
32. TheȱDeviceȱListȱLockingȱscreenȱappearsȱasȱshownȱinȱtheȱfollowingȱfigure.ȱIfȱyouȱhadȱpreviouslyȱunlockedȱtheȱlistȱofȱ
AuthorizedȱAPsȱandȱClientsȱatȱaȱlocationȱbyȱdeȬcheckingȱtheȱtwoȱcheckboxesȱLockȱAPȱListȱforȱlocationȱ‘<selectedȱ
location’>ȱandȱLockȱClientȱListȱforȱlocationȱ‘<selectedȱlocation’>,ȱyouȱmayȱlockȱtheȱlistsȱforȱallȱlocationsȱwhereȱyouȱdoȱ
notȱexpectȱmoreȱauthorizedȱAPsȱorȱClientsȱtoȱbeȱadded.ȱAirTightȱrecommendsȱthatȱyouȱlockȱtheȱAPȱlist.ȱIfȱyourȱClientsȱareȱ
authorizedȱautomatically,ȱdoȱnotȱlockȱtheȱClientȱlists.ȱAnyȱnewȱdeviceȱaddedȱafterȱtheȱlistȱisȱlockedȱhasȱtoȱbeȱmanuallyȱ
movedȱtoȱtheȱAuthorizedȱcategory.ȱ
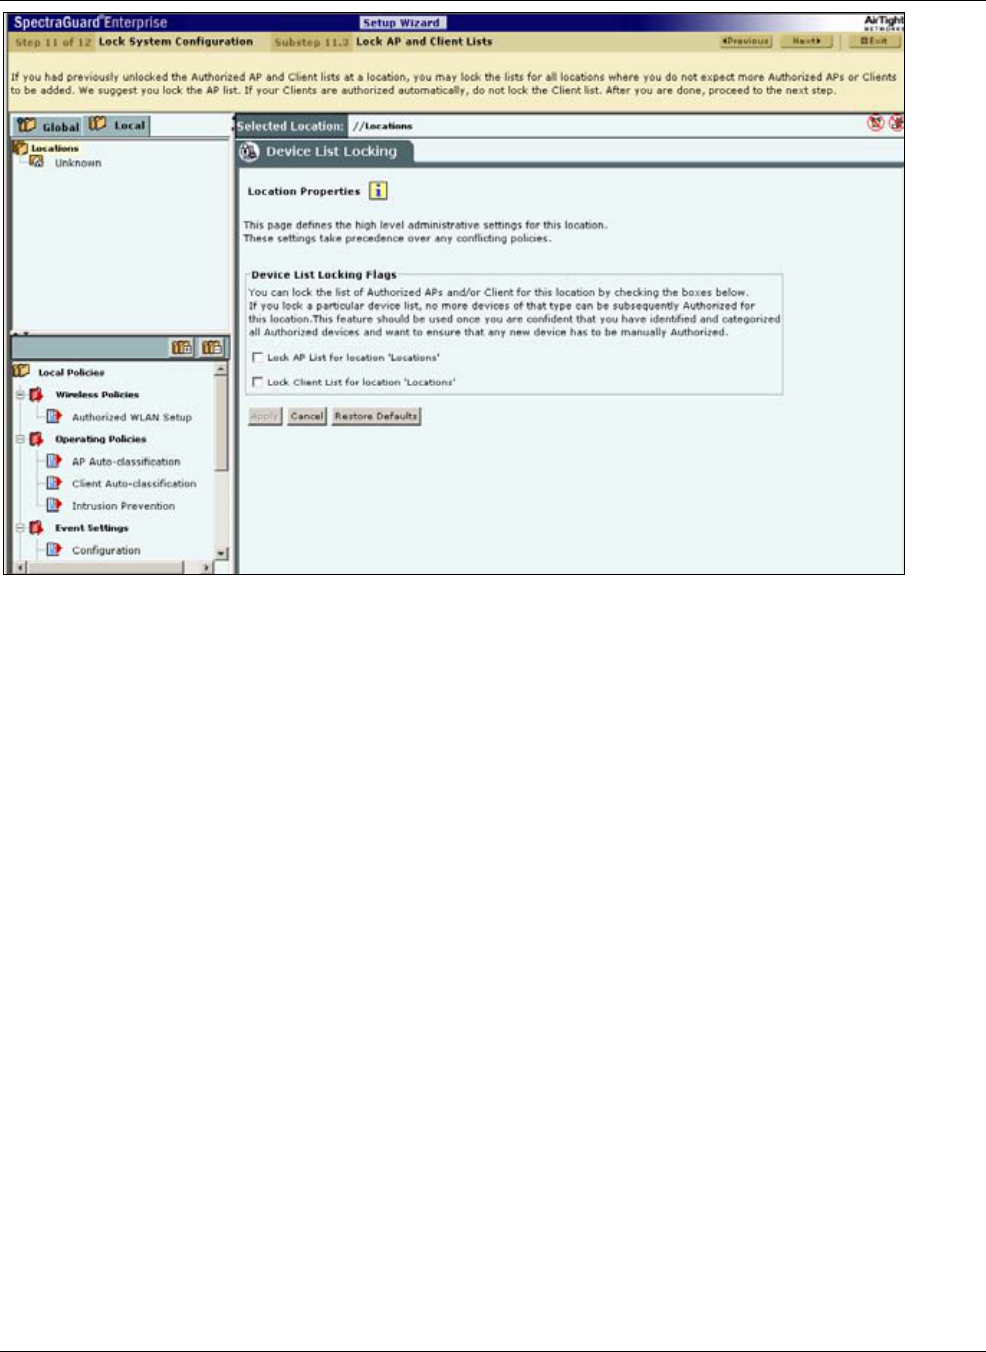
SettingȱupȱtheȱServerȱConsoleȱ
SpectraGuard®ȱEnterpriseȱInstallationȱGuideȱ
89
ȱ
Figure 119. Device List Locking
7.1.12 Stepȱ12:ȱCompletionȱofȱSetupȱWizardȱ
33. Thisȱmarksȱtheȱcompletionȱofȱtheȱsetupȱwizard.ȱTheȱDashboardȱscreenȱappearsȱasȱshownȱinȱtheȱfollowingȱfigure.ȱTheȱ
Serverȱisȱconfiguredȱtoȱprotectȱyourȱnetworkȱagainstȱwirelessȱthreats.ȱ
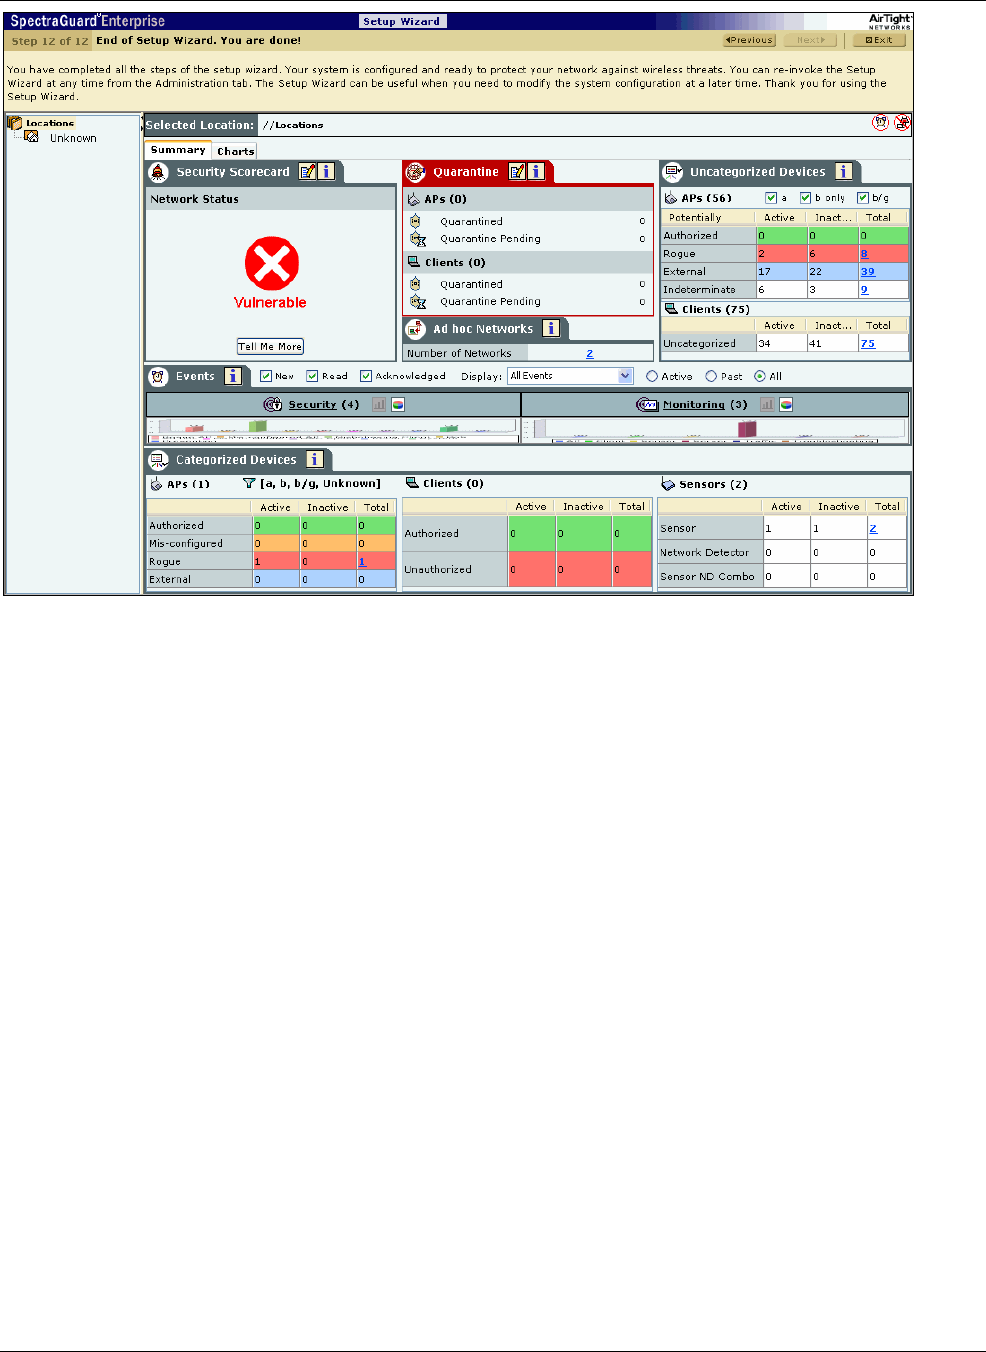
SettingȱupȱtheȱServerȱConsoleȱ
SpectraGuard®ȱEnterpriseȱInstallationȱGuideȱ
90ȱ
ȱ
Figure 120. Dashboard Screen

ConfigȱShellȱCommandsȱ
SpectraGuard®ȱEnterpriseȱInstallationȱGuideȱ
91
Chapterȱ8 ConfigȱShellȱCommandsȱ
8.1 ServerȱConfigȱShellȱCommandsȱ
ThisȱchapterȱdescribesȱtheȱcommandsȱinȱtheȱServerȱConfigȱShellȱusedȱtoȱreconfigureȱorȱmaintainȱtheȱServerȱafterȱrunningȱtheȱ
ServerȱConfigurationȱWizard.ȱSomeȱcommandsȱdisplayȱtheȱstatusȱofȱtheȱServer.ȱ
Database Commands
Command Description
db backup Backs up the database to the Remote Server specified by
you
db clean Resource clean-up without disruption of services
db maintain Resource clean-up after temporary shutting down of services
db reset Resets the database to factory defaults but maintains
network settings
db restore Restores the database from a previous backup on a Remote
Server
ȱ
get Commands
Command Description
get allowed ip Displays the list of IP addresses or subnets that are allowed
to access this device
get cert Generates a self-signed certificate
get certreq Generates a Certificate Signing Request (CSR)
get date Displays the current time zone, date, and time on the Server
get debug Creates a debug information ‘tarball’ file; this file can be
used for debugging purposes
get ha Displays High Availability (HA) Cluster configuration and
service status
get ha help Displays detailed High Availability (HA) setup help
get interface Displays the Network and HA Interface speed and mode
get locationinfo Extracts information about location hierarchy, imported
images, and signal strength for all devices seen by Sensor
get log config Displays the configuration of the logger
get monitoring Displays the number of days that the system should keep
the data for all performance monitoring charts
get network
Displays the Network Interface (eth0) configuration including
the IP Address, Subnet mask, Gateway, DNS Address, and
DNS Prefix
get opsec log Displays the log messages generated by OPSEC API
get route Displays the routing table

ConfigȱShellȱCommandsȱ
SpectraGuard®ȱEnterpriseȱInstallationȱGuideȱ
92ȱ
get sensor list Displays a list of Sensors and NDs
get server config
Displays the complete Server configuration which includes
the Server ID, Server Version, Server Build, MAC address of
the Network and HA Interface, Server Mode, Server Time
Zone, Date and Time Settings, WLSE Integration Settings,
Settings of Network Interfaces, and Server Processes
get server check Runs a Server consistency check and display the results. If
any fatal item fails, a failure result is recorded
get serverid Displays the Server ID
get ssh Displays the status of the SSH Server
get status Displays the status of Server processes
get support Displays settings that control how, when, where, and what
support information is to be sent
get version Displays the version and build information of all the Server
components
ȱ

ConfigȱShellȱCommandsȱ
SpectraGuard®ȱEnterpriseȱInstallationȱGuideȱ
93
set Commands
Command Description
set allowed ip Sets the list of IP addresses or subnets that are allowed to
access this device
set cert Installs a signed SSL certificate issued for the request
generated using 'get certreq'
set date
Sets the current time zone, date, and time information on
the Server; the Server needs to be rebooted for the
date/time information to take effect
set dbserver Starts/Stops the Database Server
set erase Configures the backspace key
set ha Enables or disables High Availability (HA) service
set interface Sets the Network and HA Interface speed and mode
set log config Sets the configuration of the logger
set monitoring Sets the number of days that the system should keep the
data for all performance monitoring charts
set network
Sets the Network Interface (eth0) configuration including the
IP Address, Subnet mask, Gateway, DNS Address, and DNS
Prefix
set route Allows addition/deletion of routing table entries
set server Starts/Stops the Application Server
set serverid Sets the Server ID
set ssh Starts/Stops the SSH access to the Server
set support Sets up how, when, where, and what support information is
to be sent
set webserver Starts/Stops the Web Server
ȱ

ConfigȱShellȱCommandsȱ
SpectraGuard®ȱEnterpriseȱInstallationȱGuideȱ
94ȱ
Other Commands
Command Description
exit Exits the config shell session
help Displays help for all the commands
passwd Allows the admin to change the config shell password
ping<Hostname/IP
Address> Pings a host
reboot Reboots the Server
reset factory Resets the Server to the factory defaults/out of the box
status
reset password gui Sets the Graphical User Interface (GUI) password for the user
‘admin’ to the factory default ‘admin’
shutdown Shuts down the Server gracefully
traceroute Shows the route to a host
upgrade Upgrades the Server using the specified upgrade bundle from
an HTTP location
ȱ

ConfigȱShellȱCommandsȱ
SpectraGuard®ȱEnterpriseȱInstallationȱGuideȱ
95
ȱ
8.2 SensorȱConfigȱShellȱCommandsȱ
get Commands
Command Description
get ap Displays all the currently visible APs
get interface Displays Network Interface speed and mode
get ip config Displays the IP information
get log Displays the log information as it is created
get log config Displays the configuration of the logger
get mode Displays the mode in which the Sensor is currently configured
get rf Displays if RF monitoring for a Sensor is ‘ON’ or ‘OFF’
get serial num Displays the Board Number
get server discovery Displays the Server discovery/setting information
get status Displays the current running status of all the components
get version Displays the version and build information of all the
components
get vlan config Displays the VLAN information (set info and dynamic info)
get vlan id Displays the VLAN IDs seen by the ND
get vlan status Displays the VLAN status information
get model Displays the Sensor Model
ȱ
set Commands
Command Description
set erase Sets the erase character to ^H
set interface Sets Network Interface speed and mode
set ip config Runs through the current VLAN and IP config wizard
set server discovery Sets the Server discovery information
set vlan config Sets multiple VLAN monitoring to ‘ON’ or ‘OFF’
set mode Sets the mode to Sensor, Sensor/ Network Detector Combo,
Network Detector, or Sentry
ȱ

ConfigȱShellȱCommandsȱ
SpectraGuard®ȱEnterpriseȱInstallationȱGuideȱ
96ȱ
Other Commands
Command Description
exit Exists the Sensor config Shell session
help Displays help for all commands
help set Displays help for ‘set’ commands
help get Displays help for ‘get’ commands
help other Displays help for ‘other’ commands
passwd Changes the config Shell password
ping
Pings a host.
Usage: ping <IP_address/host_name> e.g. ping
192.168.1.246
reboot Reboots the Sensor
restart Restarts the Sensor application
reset factory Resets the Sensor to ‘out of the box’ status
upgrade Upgrades the Sensor manually from a given IP address
ȱ
ȱ
Troubleshootingȱ
SpectraGuard®ȱEnterpriseȱInstallationȱGuideȱ
9
7
Chapterȱ9 Troubleshootingȱ
9.1 ServerȱTroubleshootingȱ
ȱ
Problem Solution
After changing the IP
address of the Server,
the computer used to
configure the Server
gets disconnected.
The subnet mask of the computer used to configure the
Server may not be the same as that of the Server. Change
the subnet mask of the computer so that it is in the same
subnet as the Server.
On typing ‘https:// wifi-
security-server’ in the
IE 5.5 browser, the
‘Login’ screen does not
appear even after
adding a DNS entry
‘wifi-security-server’ for
the Server.
The Default gateway and Preferred DNS Server settings of
the computer used to access the Server Console may be
incorrect. Ensure that the Default gateway and Preferred
DNS Server settings of the computer used to access the
Server Console match the Server settings.
On rebooting the
Server, the get network
command does not
show an IP address.
The IP address that you have assigned to the Server
conflicts with some other IP address on the network.
Change the IP address of the Server using the set network
command.
No Sensors connect to
the Server after setting
the Server ID.
The Server ID used by the Server may be used by another
Server on the network. Verify that no other Server with the
Server ID set for the Server is running on the network.
Change the Server ID using the set serverid command.
No connection to the
Server
Check if the Server is powered on.
If the Server is not powered on, switch it on.
Else, check the IP Address or the DNS Name on the Server
Config Shell.
Important: Please ensure that you have used the correct IP
Address or the DNS name to connect to the Server.
If the IP Address or the DNS name is correct, try pinging
other computers on the network from the Server Config
Shell interface.
If the problem still exits, reset the Server and attempt to
reconnect to the Server.
The Console reports
“Java Runtime
Environment Detection”
not installed message.
Follow the instructions provided on the Console to install
the Java Runtime Environment.
Unable to log into the
Console.
If you are logging in for the first time, refer to the
Initializing section for the default Login Name and
Password.
Try recovering the password using the Recover option in the
Forgot Password? section of the Login Screen.
The Console has frozen
(Clicks do not work).
Close the browser and try connecting to the Server in
another window.
If you cannot connect to the Server, follow the steps listed
in Problem 1 of this table.
Troubleshootingȱ
SpectraGuard®ȱEnterpriseȱInstallationȱGuideȱ
98ȱ
No events are being
reported or the device
status is stale (not
updated).
Check the status of the Server on the Administration
screen.
If the Current Status field shows or , click the
Start Server button in the Server Status section.
No Sensor is connected
to the Server.
Check the status of the Server on the Administration
screen.
If the Current Status field shows or , click the
Start Sever button in the Server Status section.
If the Current Status field shows , refer to the
Sensors Troubleshooting section for the solution.
Server response time is
high.
Restart the Console. If the problem persists, run the db
clean command from the Server Config Shell.
ȱ
Troubleshootingȱ
SpectraGuard®ȱEnterpriseȱInstallationȱGuideȱ
99
ȱ
9.2 SensorȱTroubleshootingȱ
ȱ
ȱ
Symptoms Diagnosis Solution
LED1: Solid
Orange
LED2: Fast
Blink
The Sensor did not
receive a valid IP
address via the DHCP.
The DHCP Server is unreachable. Restore the
connectivity to the DHCP Server or set a static IP
address via the HTTP interface or the Config Shell
CLI.
LED1: Solid
Orange
LED2: Slow
Blink
Unable to connect to
the Server.
Ensure that the Server is running and is reachable
from the network to which the Sensor is attached. If
there is a firewall or a router with ACLs enabled
between the Sensor and the Server, ensure that the
traffic is allowed on UDP port 3851.
If utilizing the Server ID based discovery, ensure
that multicast is enabled on the network.
Alternatively, if utilizing the Server IP based
discovery, ensure that the DNS name ‘wifi-security-
server’ has been correctly entered on the DNS
Server. Also ensure that the DNS Server IP
addresses are either correctly configured on the
Sensor, or are provided by the DHCP Server.
LED1: Solid
Orange
LED2: Solid
Green
The Ethernet cable is
loose. It is probably
disconnected from the
network.
Ensure that the Ethernet cable is connected.
LED1: Solid
Orange
LED3: Solid
Green
An error on the
802.11 interface has
occurred.
Contact support@airtightnetworks.com for more
details.
LED1: Solid
Orange
LED4: Solid
Green
A fatal Software error
has occurred.
Contact support@airtightnetworks.com for more
details.